
User's Manual - EMS SQL Manager
1023
© 1999-2022 EMS Software Development SQL Manager for SQL Server User's Manual
-
Upload
khangminh22 -
Category
Documents
-
view
1 -
download
0
Transcript of User's Manual - EMS SQL Manager
© 1999-2022 EMS Software Development
SQL Manager for SQLServerUser's Manual
All rights reserved.
This manual documents EMS SQL Manager for SQL Server
No parts of this work may be reproduced in any form or by any means - graphic, electronic, or mechanical, includingphotocopying, recording, taping, or information storage and retrieval systems - without the written permission of thepublisher.
Products that are referred to in this document may be either trademarks and/or registered trademarks of therespective owners. The publisher and the author make no claim to these trademarks.
While every precaution has been taken in the preparation of this document, the publisher and the author assume noresponsibility for errors or omissions, or for damages resulting from the use of information contained in thisdocument or from the use of programs and source code that may accompany it. In no event shall the publisher andthe author be liable for any loss of profit or any other commercial damage caused or alleged to have been causeddirectly or indirectly by this document.
Use of this documentation is subject to the following terms: you may create a printed copy of this documentationsolely for your own personal use. Conversion to other formats is allowed as long as the actual content is not alteredor edited in any way.
Document generated on: 18/01/2022
SQL Manager for SQL ServerUser's Manual
© 1999-2022 EMS Software Development

SQL Manager for SQL Server - User's Manual3
© 1999-2022 EMS Software Development
Table of Contents
Part I Welcome to SQL Manager for SQL Server! 20
...........................................................................................................................................21What's new
...........................................................................................................................................22System requirements
...........................................................................................................................................23Feature Matrix
...........................................................................................................................................24Installation
...........................................................................................................................................25Registration
...........................................................................................................................................27How to register SQL Manager
...........................................................................................................................................29Version history
...........................................................................................................................................64EMS SQL Manager FAQ
...........................................................................................................................................69Other EMS Products
Part II Getting Started 76
...........................................................................................................................................78Selecting style and language
...........................................................................................................................................80First time started
...........................................................................................................................................82Using Desktop Panel
...........................................................................................................................................84Database navigation
...........................................................................................................................................86Working with database objects
...........................................................................................................................................88Using context menus
.................................................................................................................................................................. 88Host context menu
.................................................................................................................................................................. 89Database context menu
.................................................................................................................................................................. 91Object context menu
...........................................................................................................................................93Working with windows
Part III Database Explorer 99
...........................................................................................................................................102Managing database registration info
...........................................................................................................................................104Connecting to databases
...........................................................................................................................................107Operations with database and server objects
...........................................................................................................................................110Selecting multiple objects
...........................................................................................................................................112Using tabs for database navigation
...........................................................................................................................................115Recently opened objects
...........................................................................................................................................116Managing favorite objects
...........................................................................................................................................118Searching within the tree
...........................................................................................................................................121SQL Assistant
...........................................................................................................................................123Configuring Database Explorer
...........................................................................................................................................126Managing Favorite queries
...........................................................................................................................................127Managing scripts
SQL Manager for SQL Server - User's Manual4
© 1999-2022 EMS Software Development
Part IV Database Management 130
...........................................................................................................................................133Create Database wizard
.................................................................................................................................................................. 133Setting database name
.................................................................................................................................................................. 134Setting connection properties
.................................................................................................................................................................. 135SQL Server Database
.......................................................................................................................................................................... 135Defining database f iles
.......................................................................................................................................................................... 137Defining transaction log f iles
.......................................................................................................................................................................... 139Defining f ilestream files and f ilegroups
.......................................................................................................................................................................... 140Defining f iles for memory-optimized data
.......................................................................................................................................................................... 142Setting recovery model and collation
.................................................................................................................................................................. 143SQL Azure Database
.......................................................................................................................................................................... 143Setting SQL Azure Database options
.......................................................................................................................................................................... 144Setting database collation
.................................................................................................................................................................. 145Viewing result SQL statement
...........................................................................................................................................147Register Database wizard
.................................................................................................................................................................. 147Setting connection parameters
.................................................................................................................................................................. 149Selecting databases
.................................................................................................................................................................. 149Setting specific options
...........................................................................................................................................152Database Registration Info
.................................................................................................................................................................. 152Connection
.................................................................................................................................................................. 154Options
.................................................................................................................................................................. 156Display options
.................................................................................................................................................................. 157Default directories
.................................................................................................................................................................. 158Logs
.................................................................................................................................................................. 160Data options
.................................................................................................................................................................. 162DDL to Files
.......................................................................................................................................................................... 164Options for storing object definitions
.......................................................................................................................................................................... 166Object f ile names
.................................................................................................................................................................. 167Find Option
...........................................................................................................................................169Database Properties
.................................................................................................................................................................. 170Information
.................................................................................................................................................................. 171Options
.......................................................................................................................................................................... 174Recovery options
.......................................................................................................................................................................... 175ANSI options
.......................................................................................................................................................................... 177SQL options
.......................................................................................................................................................................... 178Automation options
.......................................................................................................................................................................... 180Cursor options
.......................................................................................................................................................................... 181FileTable options
.......................................................................................................................................................................... 181Advanced
.................................................................................................................................................................. 183Resource usage
.................................................................................................................................................................. 184Data files
.................................................................................................................................................................. 186Log files
.................................................................................................................................................................. 187Memory-optimized data files
.................................................................................................................................................................. 189Filegroups
.................................................................................................................................................................. 190Filestream files and filegroups
.................................................................................................................................................................. 192Find Option
...........................................................................................................................................194Database Registration Manager
.................................................................................................................................................................. 195Using Navigation bar and Toolbar
...........................................................................................................................................197Server Properties
.................................................................................................................................................................. 198General options

SQL Manager for SQL Server - User's Manual5
© 1999-2022 EMS Software Development
.................................................................................................................................................................. 199Memory options
.................................................................................................................................................................. 200Processor options
.................................................................................................................................................................. 202Security options
.................................................................................................................................................................. 204Active Directory
.................................................................................................................................................................. 205Connection settings
.................................................................................................................................................................. 207Database Settings
.................................................................................................................................................................. 209Misc Server Settings
.................................................................................................................................................................. 210Advanced settings
.................................................................................................................................................................. 212Find Option
Part V Database and Server Objects Management 214
...........................................................................................................................................216New Object
...........................................................................................................................................218Duplicate Object Wizard
.................................................................................................................................................................. 218Selecting the source database
.................................................................................................................................................................. 219Selecting object to duplicate
.................................................................................................................................................................. 220Selecting destination database or server
.................................................................................................................................................................. 221Modifying the new object's definition
...........................................................................................................................................223Database objects
.................................................................................................................................................................. 225Schemas
.......................................................................................................................................................................... 226Schema Editor
......................................................................................................................................... 226Using Navigation bar and Toolbar
......................................................................................................................................... 227Creating/editing schema
.................................................................................................................................................................. 228Schema Objects
.......................................................................................................................................................................... 228Tables
......................................................................................................................................... 229New table
................................................................................................................................... 229Using Navigation bar and Toolbar
................................................................................................................................... 231Setting table properties
................................................................................................................................... 232Specifying f ields
................................................................................................................................... 233Specifying FileTable options
................................................................................................................................... 234Specifying memory-optimized table indices
......................................................................................................................................... 236Table Editor
................................................................................................................................... 237Using Navigation bar and Toolbar
................................................................................................................................... 240Managing f ields
................................................................................................................................... 241Changing f ields order
................................................................................................................................... 242Managing foreign keys
................................................................................................................................... 243Managing checks
................................................................................................................................... 244Managing indices
................................................................................................................................... 245Managing triggers
................................................................................................................................... 246Working w ith table data
................................................................................................................................... 247Table properties
......................................................................................................................................... 249Fields
................................................................................................................................... 250Field Editor
................................................................................................................................... 250Setting f ield name and type
................................................................................................................................... 253Setting f ield identity
................................................................................................................................... 254Setting XML properties
................................................................................................................................... 255Setting f ield defaults
................................................................................................................................... 256Setting f ield description
......................................................................................................................................... 257Foreign Keys
................................................................................................................................... 258Foreign Key Editor
................................................................................................................................... 258Using Navigation bar and Toolbar
................................................................................................................................... 259Creating/editing foreign key
......................................................................................................................................... 261Checks

SQL Manager for SQL Server - User's Manual6
© 1999-2022 EMS Software Development
................................................................................................................................... 262Check Editor
................................................................................................................................... 262Using Navigation bar and Toolbar
................................................................................................................................... 263Creating/editing check
......................................................................................................................................... 264Indices
................................................................................................................................... 265Index Editor
................................................................................................................................... 265Using Navigation bar and Toolbar
................................................................................................................................... 266Creating/editing index
................................................................................................................................... 269Defining index storage
................................................................................................................................... 270Setting spatial index options
................................................................................................................................... 272View ing index info
......................................................................................................................................... 272Triggers
................................................................................................................................... 273Trigger Editor
................................................................................................................................... 273Using Navigation bar and Toolbar
................................................................................................................................... 275Creating/editing trigger
......................................................................................................................................... 276Creating procedures from table
................................................................................................................................... 277Options
................................................................................................................................... 278SELECT Procedure
................................................................................................................................... 279INSERT Procedure
................................................................................................................................... 280UPDATE procedure
................................................................................................................................... 281DELETE Procedure
.......................................................................................................................................................................... 282View s
......................................................................................................................................... 282Using Navigation bar and Toolbar
......................................................................................................................................... 284Creating/editing view
......................................................................................................................................... 285Managing f ields
......................................................................................................................................... 286Managing indexes
......................................................................................................................................... 287Managing triggers
......................................................................................................................................... 288Working w ith data
.......................................................................................................................................................................... 289Procedures
......................................................................................................................................... 290Using Navigation bar and Toolbar
......................................................................................................................................... 291Creating/editing procedure
......................................................................................................................................... 292Brow sing procedure parameters
......................................................................................................................................... 293Specifying input parameters
......................................................................................................................................... 294Executing procedure/function
.......................................................................................................................................................................... 295UDFs
......................................................................................................................................... 296Using Navigation bar and Toolbar
......................................................................................................................................... 297Creating/editing UDF
......................................................................................................................................... 298Brow sing UDF parameters
.......................................................................................................................................................................... 299UDTs
......................................................................................................................................... 300Using Navigation bar and Toolbar
......................................................................................................................................... 301Creating/editing UDT
......................................................................................................................................... 304Managing UDT checks
................................................................................................................................... 305Table Type Check Constraint dialog
......................................................................................................................................... 306Managing UDT Primary/Unique Keys
................................................................................................................................... 306Table Type Constraint dialog
.......................................................................................................................................................................... 308Sequences
......................................................................................................................................... 308Using Navigation bar and Toolbar
......................................................................................................................................... 309Creating/editing sequence
.......................................................................................................................................................................... 311Synonyms
......................................................................................................................................... 311Using Navigation bar and Toolbar
......................................................................................................................................... 313Creating/editing synonym
.......................................................................................................................................................................... 314Aggregates
......................................................................................................................................... 315Using Navigation bar and Toolbar
......................................................................................................................................... 316Creating/editing aggregate
.......................................................................................................................................................................... 317XML Schema Collections
SQL Manager for SQL Server - User's Manual7
© 1999-2022 EMS Software Development
......................................................................................................................................... 318Using Navigation bar and Toolbar
......................................................................................................................................... 319Creating/editing XML Schema Collection
.......................................................................................................................................................................... 320Defaults
......................................................................................................................................... 320Using Navigation bar and Toolbar
......................................................................................................................................... 322Creating/editing default
.......................................................................................................................................................................... 323Rules
......................................................................................................................................... 323Using Navigation bar and Toolbar
......................................................................................................................................... 324Creating/editing rule
.......................................................................................................................................................................... 325Queues
......................................................................................................................................... 326Using Navigation bar and Toolbar
......................................................................................................................................... 327Creating/editing queue
......................................................................................................................................... 328View ing queue messages
.......................................................................................................................................................................... 329External Tables
......................................................................................................................................... 329Creating/editing external tables
.................................................................................................................................................................. 330Non-schema Objects
.......................................................................................................................................................................... 331Users
......................................................................................................................................... 331Using Navigation bar and Toolbar
......................................................................................................................................... 333Creating/editing user
......................................................................................................................................... 334Defining user membership
......................................................................................................................................... 335Specifying permissions
.......................................................................................................................................................................... 335Roles
......................................................................................................................................... 336Using Navigation bar and Toolbar
......................................................................................................................................... 337Creating/editing role
......................................................................................................................................... 338Defining role membership
.......................................................................................................................................................................... 339Assemblies
......................................................................................................................................... 339Using Navigation bar and Toolbar
......................................................................................................................................... 341Creating/editing assembly
.......................................................................................................................................................................... 342DDL Triggers
......................................................................................................................................... 342Using Navigation bar and Toolbar
......................................................................................................................................... 344Creating/editing DDL trigger
.......................................................................................................................................................................... 345Partition Functions
......................................................................................................................................... 345Using Navigation bar and Toolbar
......................................................................................................................................... 347Creating/editing partition function
.......................................................................................................................................................................... 349Partition Schemes
......................................................................................................................................... 349Using Navigation bar and Toolbar
......................................................................................................................................... 351Creating/editing partition scheme
.......................................................................................................................................................................... 352Full-Text Catalogs
......................................................................................................................................... 352Using Navigation bar and Toolbar
......................................................................................................................................... 354Creating/editing full-text catalog
......................................................................................................................................... 355Managing full-text indexes
.......................................................................................................................................................................... 357Symmetric Keys
......................................................................................................................................... 357Using Navigation bar and Toolbar
......................................................................................................................................... 359Creating/editing symmetric key
.......................................................................................................................................................................... 360Asymmetric Keys
......................................................................................................................................... 361Using Navigation bar and Toolbar
......................................................................................................................................... 362Creating/editing asymmetric key
.......................................................................................................................................................................... 364Certif icates
......................................................................................................................................... 365Using Navigation bar and Toolbar
......................................................................................................................................... 366Creating/editing certif icate
......................................................................................................................................... 370Backup Certif icate dialog
.......................................................................................................................................................................... 370Message Types
......................................................................................................................................... 371Using Navigation bar and Toolbar
......................................................................................................................................... 372Creating/editing message type
.......................................................................................................................................................................... 373Contracts
SQL Manager for SQL Server - User's Manual8
© 1999-2022 EMS Software Development
......................................................................................................................................... 373Using Navigation bar and Toolbar
......................................................................................................................................... 375Creating/editing contract
.......................................................................................................................................................................... 376Services
......................................................................................................................................... 376Using Navigation bar and Toolbar
......................................................................................................................................... 378Creating/editing service
......................................................................................................................................... 379View ing service dialogs
.......................................................................................................................................................................... 379Routes
......................................................................................................................................... 380Using Navigation bar and Toolbar
......................................................................................................................................... 381Creating/editing route
.......................................................................................................................................................................... 382Remote Service Bindings
......................................................................................................................................... 382Using Navigation bar and Toolbar
......................................................................................................................................... 384Creating/editing remote service binding
.......................................................................................................................................................................... 385DB Scoped Credentials
......................................................................................................................................... 385Creating/editing db scoped credential
.......................................................................................................................................................................... 386External Data Sources
......................................................................................................................................... 386Creating/editing external data source
.......................................................................................................................................................................... 387External File Formats
......................................................................................................................................... 387Creating/editing external f ile format
...........................................................................................................................................389Server Objects
.................................................................................................................................................................. 390Logins
.......................................................................................................................................................................... 391Setting login parameters
.......................................................................................................................................................................... 395Allocating members
.......................................................................................................................................................................... 396Defining server permissions
.......................................................................................................................................................................... 397Defining server role permissions
.......................................................................................................................................................................... 398Defining login permissions
.......................................................................................................................................................................... 399Defining endpoint permissions
.......................................................................................................................................................................... 400Defining database permissions
.......................................................................................................................................................................... 402User mapping
.................................................................................................................................................................. 402Backup Devices
.......................................................................................................................................................................... 403New backup device
.................................................................................................................................................................. 404Jobs
.......................................................................................................................................................................... 405Setting job properties
.......................................................................................................................................................................... 406Managing job steps
.......................................................................................................................................................................... 409Managing job schedules
.......................................................................................................................................................................... 410Managing notif ications
.......................................................................................................................................................................... 412Managing target servers
.................................................................................................................................................................. 412Schedules
.......................................................................................................................................................................... 413Using Navigation bar and Toolbar
.......................................................................................................................................................................... 414Setting schedule properties
.......................................................................................................................................................................... 415View ing scheduled jobs
.................................................................................................................................................................. 416Alerts
.......................................................................................................................................................................... 417Using Navigation bar and Toolbar
.......................................................................................................................................................................... 418Setting alert properties
.......................................................................................................................................................................... 421Setting additional properties
.......................................................................................................................................................................... 422Managing notif ications
.................................................................................................................................................................. 422Operators
.......................................................................................................................................................................... 423Using Navigation bar and Toolbar
.......................................................................................................................................................................... 424Setting operator properties
.......................................................................................................................................................................... 425Setting additional properties
.......................................................................................................................................................................... 425Managing alert notif ications
.......................................................................................................................................................................... 426Managing job notif ications
.................................................................................................................................................................. 427Proxies
.......................................................................................................................................................................... 427Using Navigation bar and Toolbar
SQL Manager for SQL Server - User's Manual9
© 1999-2022 EMS Software Development
.......................................................................................................................................................................... 428Setting proxy properties
.......................................................................................................................................................................... 431View ing proxy jobs
.................................................................................................................................................................. 431Credentials
.......................................................................................................................................................................... 432Using Navigation bar and Toolbar
.......................................................................................................................................................................... 433Setting credential properties
.................................................................................................................................................................. 434Linked Servers
.......................................................................................................................................................................... 434Configuring Linked server
.......................................................................................................................................................................... 435Security settings
.......................................................................................................................................................................... 437Setting server options
.......................................................................................................................................................................... 438Linked Server content
.................................................................................................................................................................. 438Endpoints
.......................................................................................................................................................................... 439Using Navigation bar and Toolbar
.......................................................................................................................................................................... 440Setting endpoint properties
.......................................................................................................................................................................... 441Setting protocol options
.......................................................................................................................................................................... 443Setting payload options
.................................................................................................................................................................. 448DDL Triggers
.......................................................................................................................................................................... 449Using Navigation bar and Toolbar
.......................................................................................................................................................................... 450Setting DDL trigger properties
.................................................................................................................................................................. 451Server roles
.......................................................................................................................................................................... 452Setting server role parameters
.......................................................................................................................................................................... 453Defining server permissions
.......................................................................................................................................................................... 454Defining server role permissions
.......................................................................................................................................................................... 455Defining login permissions
.......................................................................................................................................................................... 456Defining endpoint permissions
.................................................................................................................................................................. 457DTS Packages
.......................................................................................................................................................................... 457DTS Package properties
Part VI Query Management Tools 460
...........................................................................................................................................462SQL Editor
.................................................................................................................................................................. 462Using Navigation bar and Toolbar
.................................................................................................................................................................. 465Using the context menu
.................................................................................................................................................................. 467Viewing query plan
.................................................................................................................................................................. 468Using object links
.................................................................................................................................................................. 469Executing queries
.................................................................................................................................................................. 470Viewing query logs
.................................................................................................................................................................. 472Debugging T-SQL
.................................................................................................................................................................. 474Favorites editor
.................................................................................................................................................................. 475Merging queries
.................................................................................................................................................................. 476Working with SQL Editor area
...........................................................................................................................................479Visual Query Builder
.................................................................................................................................................................. 479Using Navigation bar and Toolbar
.................................................................................................................................................................. 481Working with diagram area
.................................................................................................................................................................. 483Joining two objects
.................................................................................................................................................................. 485Setting criteria
.................................................................................................................................................................. 487Setting output fields
.................................................................................................................................................................. 489Setting grouping criteria
.................................................................................................................................................................. 489Setting sorting parameters
.................................................................................................................................................................. 490Working with the editor area
.................................................................................................................................................................. 491Query execution
.................................................................................................................................................................. 493Viewing query plan
...........................................................................................................................................495Query parameters
.................................................................................................................................................................. 495Input parameters dialog
SQL Manager for SQL Server - User's Manual10
© 1999-2022 EMS Software Development
Part VII Data Management 498
...........................................................................................................................................499Data View
.................................................................................................................................................................. 499Using Navigation bar and Toolbars
.................................................................................................................................................................. 501Grid View
.......................................................................................................................................................................... 503Customizing columns
.......................................................................................................................................................................... 503Grouping and sorting data
.......................................................................................................................................................................... 505Filtering records
.......................................................................................................................................................................... 508Using the context menu
.......................................................................................................................................................................... 509Working in multi-level mode
......................................................................................................................................... 510Create Grid Level w izard
................................................................................................................................... 511Specifying master level
................................................................................................................................... 512Defining source for detail level
................................................................................................................................... 514Binding master and detail levels
................................................................................................................................... 515Query parameterization
................................................................................................................................... 516Setting additional parameters
.......................................................................................................................................................................... 517Working in card view mode
.......................................................................................................................................................................... 518Column Summary
.......................................................................................................................................................................... 519Copying records
.................................................................................................................................................................. 520Form View
.................................................................................................................................................................. 521Print Data
.......................................................................................................................................................................... 522Page Setup
......................................................................................................................................... 523Page
......................................................................................................................................... 524Margins
......................................................................................................................................... 525Header/Footer
......................................................................................................................................... 527Scaling
.......................................................................................................................................................................... 527Report Formatter
......................................................................................................................................... 528View
......................................................................................................................................... 529Behaviors
......................................................................................................................................... 530Formatting
......................................................................................................................................... 532Styles
......................................................................................................................................... 533Preview
......................................................................................................................................... 534Cards
......................................................................................................................................... 535Charts
.......................................................................................................................................................................... 535Setting report options
.......................................................................................................................................................................... 540Print dialog
.................................................................................................................................................................. 541BLOB View
.......................................................................................................................................................................... 543Navigation w ithin BLOB Editor
.......................................................................................................................................................................... 543Editing as Hexadecimal
.......................................................................................................................................................................... 544Editing as Text
.......................................................................................................................................................................... 545Editing as Rich Text
.......................................................................................................................................................................... 546Editing as Image
.......................................................................................................................................................................... 547Editing as HTML
.......................................................................................................................................................................... 548Editing as XML
.......................................................................................................................................................................... 550Editing as PDF
.................................................................................................................................................................. 551Applying changes
...........................................................................................................................................553Custom Filter
...........................................................................................................................................555Filter Builder dialog
.................................................................................................................................................................. 555Invoking the Filter Builder dialog
.................................................................................................................................................................. 556Adding a new condition
.................................................................................................................................................................. 557Setting filter criteria
.................................................................................................................................................................. 558Setting filter operator
SQL Manager for SQL Server - User's Manual11
© 1999-2022 EMS Software Development
.................................................................................................................................................................. 559Setting filter criteria values
.................................................................................................................................................................. 560Adding a new group
.................................................................................................................................................................. 561Setting group operator
.................................................................................................................................................................. 562Applying filter conditions
...........................................................................................................................................564Data Truncating
Part VIII Import/Export Tools 566
...........................................................................................................................................567Export Data Wizard
.................................................................................................................................................................. 568Setting destination file name and format
.................................................................................................................................................................. 569Selecting fields for export
.................................................................................................................................................................. 570Adjusting data formats
.................................................................................................................................................................. 571Setting header and footer
.................................................................................................................................................................. 572Setting format-specific options
.......................................................................................................................................................................... 572Excel options
......................................................................................................................................... 573Data format
................................................................................................................................... 574Fields
................................................................................................................................... 576Options
................................................................................................................................... 577Styles
......................................................................................................................................... 577Extensions
................................................................................................................................... 578Hyperlinks
................................................................................................................................... 578Notes
................................................................................................................................... 581Charts
................................................................................................................................... 584Cells
................................................................................................................................... 585Merged Cells
......................................................................................................................................... 586Advanced
.......................................................................................................................................................................... 587Access options
.......................................................................................................................................................................... 588Word / RTF options
......................................................................................................................................... 589Base Styles
......................................................................................................................................... 590Strip Styles
.......................................................................................................................................................................... 591HTML options
......................................................................................................................................... 592Preview
......................................................................................................................................... 593Basic
......................................................................................................................................... 594Multi-f ile
......................................................................................................................................... 595Advanced
.......................................................................................................................................................................... 596PDF options
.......................................................................................................................................................................... 598TXT options
.......................................................................................................................................................................... 598CSV options
.......................................................................................................................................................................... 599XML options
.......................................................................................................................................................................... 600MS Excel 2007 / ODS options
.......................................................................................................................................................................... 603MS Word 2007 / ODT options
.................................................................................................................................................................. 605Setting common export options
.................................................................................................................................................................. 607Exporting data
...........................................................................................................................................608Import Data Wizard
.................................................................................................................................................................. 609Selecting source file name and format
.................................................................................................................................................................. 610Selecting data source
.................................................................................................................................................................. 611Setting fields correspondence
.......................................................................................................................................................................... 612Excel
.......................................................................................................................................................................... 614Access
.......................................................................................................................................................................... 615DBF
.......................................................................................................................................................................... 616XML Datapacket
.......................................................................................................................................................................... 617TXT
.......................................................................................................................................................................... 618CSV

SQL Manager for SQL Server - User's Manual12
© 1999-2022 EMS Software Development
.......................................................................................................................................................................... 619HTML
.......................................................................................................................................................................... 621XML Generic
.......................................................................................................................................................................... 622MS Excel/Word 2007, ODF
.................................................................................................................................................................. 623Adjusting data formats
.................................................................................................................................................................. 624Setting advanced field formats
.................................................................................................................................................................. 626Setting import mode
.................................................................................................................................................................. 628Customizing bulk insert options
.................................................................................................................................................................. 630Customizing common options
.................................................................................................................................................................. 631Importing data
...........................................................................................................................................633Export as SQL Script
.................................................................................................................................................................. 634Selecting destination DBMS
.................................................................................................................................................................. 635Setting destination file name
.................................................................................................................................................................. 636Setting BLOB options
.................................................................................................................................................................. 637Selecting fields to export
.................................................................................................................................................................. 638Editing table definition
.................................................................................................................................................................. 639Setting export options
.................................................................................................................................................................. 640Exporting as SQL Script
...........................................................................................................................................642Bulk Insert Wizard
.................................................................................................................................................................. 643Selecting a table or view and the data file
.................................................................................................................................................................. 644Setting bulk insert options
.................................................................................................................................................................. 646Customizing data file format
.................................................................................................................................................................. 648Viewing the result SQL statement
.................................................................................................................................................................. 648Running bulk insert
Part IX Tools 651
...........................................................................................................................................652Dependency Tree
.................................................................................................................................................................. 653Using Navigation bar and Toolbar
.................................................................................................................................................................. 654Viewing dependency tree
...........................................................................................................................................656SQL Monitor
.................................................................................................................................................................. 656Using Navigation bar and Toolbar
.................................................................................................................................................................. 657Working with SQL Monitor
...........................................................................................................................................659SQL Script Editor
.................................................................................................................................................................. 659Using Navigation bar and Toolbar
.................................................................................................................................................................. 661Working with SQL Script editor area
.................................................................................................................................................................. 663Using Script Explorer
.................................................................................................................................................................. 664Script execution
...........................................................................................................................................666Extract Database Wizard
.................................................................................................................................................................. 666Selecting source database
.................................................................................................................................................................. 667Specifying destination file name
.................................................................................................................................................................. 668Setting extraction mode
.................................................................................................................................................................. 669Setting BLOB options
.................................................................................................................................................................. 670Selecting objects for structure extraction
.................................................................................................................................................................. 671Selecting server objects for extraction
.................................................................................................................................................................. 672Selecting objects for data extraction
.................................................................................................................................................................. 673Customizing script options
.................................................................................................................................................................. 675Start of extraction process
...........................................................................................................................................677Database Comparer Wizard
.................................................................................................................................................................. 677Selecting source database
.................................................................................................................................................................. 678Selecting target database
.................................................................................................................................................................. 679Selecting type of synchronization script
.................................................................................................................................................................. 680Defining options for destination script
SQL Manager for SQL Server - User's Manual13
© 1999-2022 EMS Software Development
.................................................................................................................................................................. 681Performing operation
...........................................................................................................................................683Print Metadata
.................................................................................................................................................................. 684Using Navigation bar and Toolbar
.................................................................................................................................................................. 685Printing options
.................................................................................................................................................................. 686Print Preview
...........................................................................................................................................688Search in Metadata
.................................................................................................................................................................. 688Using navigation bar and toolbar
.................................................................................................................................................................. 690Setting search condition
.................................................................................................................................................................. 691Viewing search result
...........................................................................................................................................692HTML Report Wizard
.................................................................................................................................................................. 693Selecting database and directory
.................................................................................................................................................................. 694Selecting object types
.................................................................................................................................................................. 695Specifying CSS
.................................................................................................................................................................. 697Setting additional report options
.................................................................................................................................................................. 698Creating HTML report
...........................................................................................................................................700Reports management
.................................................................................................................................................................. 700Create Report Wizard
.......................................................................................................................................................................... 701Specifying database name and report options
.......................................................................................................................................................................... 702Selecting report bands
.......................................................................................................................................................................... 703Selecting report style
.......................................................................................................................................................................... 704Specifying page settings
......................................................................................................................................... 704Specifying paper settings
......................................................................................................................................... 704Specifying margins
......................................................................................................................................... 705Specifying other page settings
.................................................................................................................................................................. 706Report Designer
.......................................................................................................................................................................... 708Basic elements
......................................................................................................................................... 710Toolbars
.......................................................................................................................................................................... 712Adding database and query components
.......................................................................................................................................................................... 714Adding report components
.......................................................................................................................................................................... 716View ing the report
.......................................................................................................................................................................... 717Saving the report
.......................................................................................................................................................................... 718Adding dialog form
.................................................................................................................................................................. 719Report Viewer
.......................................................................................................................................................................... 720Using Navigation bar and Toolbar
...........................................................................................................................................722Server-level principals
.................................................................................................................................................................. 723Logins
.......................................................................................................................................................................... 723Login Manager
.................................................................................................................................................................. 724Grant Manager
.......................................................................................................................................................................... 726Using Navigation bar, Toolbar and context menu
.......................................................................................................................................................................... 728Managing database-specif ic privileges
......................................................................................................................................... 728Object permissions
......................................................................................................................................... 730Managing column permissions
......................................................................................................................................... 731Filtering objects in list
......................................................................................................................................... 732Database permissions
.......................................................................................................................................................................... 734View ing effective permissions
.................................................................................................................................................................. 735Server Roles
...........................................................................................................................................737Visual Database Designer
.................................................................................................................................................................. 738Using Navigation bar and Toolbars
.................................................................................................................................................................. 742Using Diagram Navigator and DB Objects pane
.................................................................................................................................................................. 743Using context menus
.................................................................................................................................................................. 745Working with diagram objects

SQL Manager for SQL Server - User's Manual14
© 1999-2022 EMS Software Development
.......................................................................................................................................................................... 745Adding/removing objects to/from diagram
.......................................................................................................................................................................... 746Incremental search
.......................................................................................................................................................................... 746Creating objects
.......................................................................................................................................................................... 747Creating relations
.................................................................................................................................................................. 748Working with diagram pages
.................................................................................................................................................................. 749Reverse engineering
.................................................................................................................................................................. 750Printing diagram
.......................................................................................................................................................................... 750Print Preview
.......................................................................................................................................................................... 751Print Setup dialog
.................................................................................................................................................................. 753Saving/loading diagram
.................................................................................................................................................................. 754Setting diagram options
Part X Services 757
...........................................................................................................................................760Backup Database
.................................................................................................................................................................. 760Selecting database to backup
.................................................................................................................................................................. 761Setting backup type and options
.................................................................................................................................................................. 763Selecting database files to backup
.................................................................................................................................................................. 763Selecting backup devices
.................................................................................................................................................................. 765Setting media options
.................................................................................................................................................................. 768Setting advanced media options
.................................................................................................................................................................. 769Setting data transfer and/or transaction log backup options
.................................................................................................................................................................. 771Setting schedule options
.................................................................................................................................................................. 772Running database backup
...........................................................................................................................................774Restore Database
.................................................................................................................................................................. 774Selecting destination database
.................................................................................................................................................................. 776Setting restore type and recovery options
.................................................................................................................................................................. 778Selecting backup set to restore
.................................................................................................................................................................. 781Selecting files to restore
.................................................................................................................................................................. 782Setting advanced restore options
.................................................................................................................................................................. 783Running database restore
...........................................................................................................................................785Backup Devices
.................................................................................................................................................................. 785Backup devices manager
.................................................................................................................................................................. 787Backup Device properties
...........................................................................................................................................789Attach Database
.................................................................................................................................................................. 789Setting connection properties
.................................................................................................................................................................. 790Defining database files and general options
.................................................................................................................................................................. 791Attaching database
...........................................................................................................................................793Detach Database
.................................................................................................................................................................. 793Setting connection properties
.................................................................................................................................................................. 794Selecting the database
.................................................................................................................................................................. 795Detaching database
...........................................................................................................................................797Shrink Database
.................................................................................................................................................................. 797Selecting database and setting shrink mode
.................................................................................................................................................................. 798Defining shrink action for database
.................................................................................................................................................................. 799Defining shrink action for files
.................................................................................................................................................................. 800Shrinking database
...........................................................................................................................................802Indices Management
.................................................................................................................................................................. 803Selecting database for indices management
.................................................................................................................................................................. 803Selecting tables
.................................................................................................................................................................. 804Specifying actions and setting options
.................................................................................................................................................................. 806Editing and executing the result script
SQL Manager for SQL Server - User's Manual15
© 1999-2022 EMS Software Development
...........................................................................................................................................808Update Statistics
.................................................................................................................................................................. 809Selecting database for statistics update
.................................................................................................................................................................. 809Selecting tables and views
.................................................................................................................................................................. 810Specifying update statistics options
.................................................................................................................................................................. 812Browsing indices
.................................................................................................................................................................. 812Browsing statistics
.................................................................................................................................................................. 813Editing and executing the result script
...........................................................................................................................................815Check Database
.................................................................................................................................................................. 816Selecting database to check
.................................................................................................................................................................. 816Specifying arguments and options
.................................................................................................................................................................. 818Editing and executing the result script
...........................................................................................................................................820Instance Manager
.................................................................................................................................................................. 820Using Navigation bar and Toolbar
.................................................................................................................................................................. 821Start/Stop Service
.................................................................................................................................................................. 822Configure Service
...........................................................................................................................................824SQL Server Agent services
.................................................................................................................................................................. 824Jobs
.......................................................................................................................................................................... 826Jobs manager
.................................................................................................................................................................. 827Job History
.......................................................................................................................................................................... 828View ing job history
.......................................................................................................................................................................... 829Filtering job history list
.................................................................................................................................................................. 830Alerts
.......................................................................................................................................................................... 832Alerts manager
.................................................................................................................................................................. 833Operators
.......................................................................................................................................................................... 835Operators manager
.................................................................................................................................................................. 836Schedules
.......................................................................................................................................................................... 838Shared schedules manager
.................................................................................................................................................................. 839Proxies
.......................................................................................................................................................................... 842Proxies manager
.................................................................................................................................................................. 843Target Servers
.......................................................................................................................................................................... 844Target Servers manager
...........................................................................................................................................846Database Snapshots
.................................................................................................................................................................. 846Managing database snapshots
.................................................................................................................................................................. 847Database snapshot properties
...........................................................................................................................................849Linked Servers
.................................................................................................................................................................. 850Linked servers manager
...........................................................................................................................................852DTS Packages
.................................................................................................................................................................. 853DTS Packages manager
...........................................................................................................................................855Resource Governor
.................................................................................................................................................................. 856Using Navigation bar and Toolbar
.................................................................................................................................................................. 856Working with Resource Governor
...........................................................................................................................................859Server Log Viewer
.................................................................................................................................................................. 860Using Navigation bar and Toolbar
.................................................................................................................................................................. 860Working with Server Log Viewer
...........................................................................................................................................862Activity Monitor
.................................................................................................................................................................. 863Using Navigation bar and Toolbar
.................................................................................................................................................................. 863Working with Activity Monitor
Part XI Options 866
SQL Manager for SQL Server - User's Manual16
© 1999-2022 EMS Software Development
...........................................................................................................................................867Environment Options
.................................................................................................................................................................. 868Preferences
.......................................................................................................................................................................... 869Full mode activation
.................................................................................................................................................................. 869Confirmations
.................................................................................................................................................................. 871Appearance
.................................................................................................................................................................. 872Tools
.......................................................................................................................................................................... 873Timeouts
.......................................................................................................................................................................... 874DB Explorer
......................................................................................................................................... 876Search
.......................................................................................................................................................................... 877Object Editors
.......................................................................................................................................................................... 878SQL Editor
.......................................................................................................................................................................... 880SQL Monitor
.......................................................................................................................................................................... 881SQL Script
.......................................................................................................................................................................... 883Query Builder
......................................................................................................................................... 884Style & Color Palette
.......................................................................................................................................................................... 888Default Data Options
.......................................................................................................................................................................... 889Visual Database Designer
.......................................................................................................................................................................... 893Print Metadata
.......................................................................................................................................................................... 894Data Export
.......................................................................................................................................................................... 895SQL Server Reference
.................................................................................................................................................................. 896Fonts
.................................................................................................................................................................. 898Grid
.......................................................................................................................................................................... 900Data Options
.......................................................................................................................................................................... 902Print Data
.......................................................................................................................................................................... 903Color & Formats
.......................................................................................................................................................................... 905Advanced
.......................................................................................................................................................................... 907Column Options
.................................................................................................................................................................. 908Localization
.................................................................................................................................................................. 909Global Shortcuts
.................................................................................................................................................................. 910Find Option
...........................................................................................................................................912Editor Options
.................................................................................................................................................................. 912General
.................................................................................................................................................................. 916Display
.......................................................................................................................................................................... 918Color Scheme
.......................................................................................................................................................................... 919Code Completion
.................................................................................................................................................................. 921SQL Formatter
.......................................................................................................................................................................... 921SQL Words
.................................................................................................................................................................. 923Key Mapping
.................................................................................................................................................................. 925Spell Checking
.................................................................................................................................................................. 926Find Option
...........................................................................................................................................928Save Settings
.................................................................................................................................................................. 928Specifying destination file
.................................................................................................................................................................. 929Selecting settings
.................................................................................................................................................................. 930Selecting databases
.................................................................................................................................................................. 931Saving settings
...........................................................................................................................................933Localization
.................................................................................................................................................................. 933Localization Editor
.................................................................................................................................................................. 935Select Program Language
...........................................................................................................................................937Keyboard Templates
...........................................................................................................................................940Object Templates
.................................................................................................................................................................. 941Views/Functions/Procedures templates
SQL Manager for SQL Server - User's Manual17
© 1999-2022 EMS Software Development
.................................................................................................................................................................. 942SIUD Procedures templates
.................................................................................................................................................................. 943Database Object Names
.......................................................................................................................................................................... 943Field Names
.......................................................................................................................................................................... 944Foreign Key Names
.......................................................................................................................................................................... 945Check Names
.......................................................................................................................................................................... 946Index Names
.......................................................................................................................................................................... 948Trigger Names
.................................................................................................................................................................. 949Server Object Names
...........................................................................................................................................950Find Option dialog
Part XII External Tools 952
...........................................................................................................................................954External Tools dialog
...........................................................................................................................................956External Tool Info editor
Part XIII Appendix 958
...........................................................................................................................................958Program interface
...........................................................................................................................................962Viewing object DDL structure
...........................................................................................................................................963Editing object description
...........................................................................................................................................964Browsing object dependencies
...........................................................................................................................................965Setting object permissions
...........................................................................................................................................966Changing Metadata window
...........................................................................................................................................968Tip of the Day
...........................................................................................................................................969Find Text dialog
...........................................................................................................................................971Replace Text dialog
...........................................................................................................................................974Format specifiers
...........................................................................................................................................977Language Info Editor
...........................................................................................................................................978Using templates
...........................................................................................................................................979Supported file formats
...........................................................................................................................................981To-Do List
...........................................................................................................................................983Windows List
...........................................................................................................................................984Customize toolbars and menus
...........................................................................................................................................988SQL Manager Direct
...........................................................................................................................................991Database Login dialog
...........................................................................................................................................992Overwriting existing output file
...........................................................................................................................................993Script conversion
...........................................................................................................................................994SQL Server Folders
...........................................................................................................................................995Select Object dialog
...........................................................................................................................................996SQL Manager shortcuts
Part XIV How To... 1001
...........................................................................................................................................1003Work with Databases
.................................................................................................................................................................. 1003Connect to a database
.................................................................................................................................................................. 1003Create a database
SQL Manager for SQL Server - User's Manual18
© 1999-2022 EMS Software Development
.................................................................................................................................................................. 1003Edit database connection parameters
.................................................................................................................................................................. 1004Make work w ith a database faster
.................................................................................................................................................................. 1004Design a visual database structure
.................................................................................................................................................................. 1004View an ER diagram
.................................................................................................................................................................. 1004Backup a database
.................................................................................................................................................................. 1005Restore a database from a backup
.................................................................................................................................................................. 1005Create a database copy
.................................................................................................................................................................. 1005Document a database
.................................................................................................................................................................. 1005Save metadata reports to file
.................................................................................................................................................................. 1005Log database changes
.................................................................................................................................................................. 1006Get an SQL dump
.................................................................................................................................................................. 1006Reduce database size
.................................................................................................................................................................. 1006Transfer database from one server to another
...........................................................................................................................................1008Work with Database Objects
.................................................................................................................................................................. 1008Group objects
.................................................................................................................................................................. 1008Find objects
.................................................................................................................................................................. 1008View dependecies
.................................................................................................................................................................. 1008Get an object DDL
.................................................................................................................................................................. 1009Store objects definitions in VCS
...........................................................................................................................................1010Work with Data
.................................................................................................................................................................. 1010View tables w ith many records
.................................................................................................................................................................. 1010Set data filter
.................................................................................................................................................................. 1011Sort and group data
.................................................................................................................................................................. 1011Export/import data
.................................................................................................................................................................. 1012Export data as SQL Script
.................................................................................................................................................................. 1012Edit data of master-detail tables
.................................................................................................................................................................. 1012Add image to table
.................................................................................................................................................................. 1013Set data display format
...........................................................................................................................................1014Work with Queries and Scripts
.................................................................................................................................................................. 1014Create SQL statements rapidly
.................................................................................................................................................................. 1014Control a query productivity
.................................................................................................................................................................. 1014Work w ith several queries at once
.................................................................................................................................................................. 1015Save most frequently used queries
.................................................................................................................................................................. 1015Execute queries w ith parameters
.................................................................................................................................................................. 1015Export query results into file
.................................................................................................................................................................. 1015Execute scripts
.................................................................................................................................................................. 1016Execute a large SQL script
.................................................................................................................................................................. 1016Make SQL script work faster
.................................................................................................................................................................. 1016Customize work w ith Query/Script text
.................................................................................................................................................................. 1017View executed queries and scripts
...........................................................................................................................................1018Create a simple report in Report Designer
...........................................................................................................................................1019Create a scheduled job
...........................................................................................................................................1020Transfer program settings
...........................................................................................................................................1021Update SQL Manager
...........................................................................................................................................1022Report bugs and suggestions

Part
I

SQL Manager for SQL Server - User's Manual20
© 1999-2022 EMS Software Development
1 Welcome to SQL Manager for SQL Server!
EMS SQL Manager for SQL Server is a powerful tool for SQL Server administration anddevelopment. SQL Manager for SQL Server works with all SQL Server versions from 2000to the newest one and supports all the latest SQL Server features including memory-optimized tables, backup encryption, FileTables, columnstore indices and other. It offersplenty of powerful SQL tools such as Visual Database Designer that allows designing SQLServer database in few clicks, Visual Query Builder and advanced SQL editor to buildcomplicated SQL Server queries and many more useful features for efficient SQL Serverdevelopment and administration. SQL Manager has a new state-of-the-art graphical userinterface with well-described wizard system, so clear in use that even a newbie will notbe confused with it.
Visit our web-site for details: http://www.sqlmanager.net/
Key featuresSupport of SQL Server versions up to 2019 and Azure SQL DatabaseEasy management of all SQL Server objectsExcellent visual and text tools for query buildingVisual Database Designer to handle database structure in a few clicksPowerful Transact-SQL debugger to trace procedures, functions, SQL scriptsComparison and synchronization of database structureSimple getting your database under source controlRapid database management and navigationImpressive data export and import capabilitiesAdvanced data manipulation toolsEffective security management Easy-to-use wizards performing SQL Server administrative tasksReport designer with clear in use report construction wizard
Product information
Homepage: http://www.sqlmanager.net/en/products/mssql/manager
Support Ticket System: http://www.sqlmanager.net/support
Register on-line at: http://www.sqlmanager.net/en/products/mssql/manager/buy
SQL Manager for SQL Server - User's Manual21
© 1999-2022 EMS Software Development
1.1 What's new
Version Release date
SQL Manager for SQL Server 5.0.5 January 18, 2022
What's new in SQL Manager for SQL Server 5.0.5?
1. Editor tabs can be now highlighted with the specific DB color.2. Improved processing of dependencies in large databases.3. Incorrect copying of Null cells from tables grid fixed.4. Field name was modified in Duplicate table wizard if it was the same as table name.Fixed now.5. Seed property for identity fields was set to 0 instead of 1. Fixed now.6. BIGINT data types are now exported correctly into XLS and XLSX fils.7. Other minor fixes and improvements.
See also:
Version history 29
SQL Manager for SQL Server - User's Manual22
© 1999-2022 EMS Software Development
1.2 System requirements
System requirements for SQL Manager for SQL Server
Microsoft Windows XP, Microsoft Windows Server 2003, Microsoft Windows Server2008, Microsoft Windows Server 2008 R2, Microsoft Windows Server 2012, MicrosoftWindows Server 2012 R2, Microsoft Windows Server 2016, Microsoft Windows Vista,Microsoft Windows 7, Microsoft Windows 8/8.1, Microsoft Windows 10, MicrosoftWindows 11512MB RAM or more; 1024MB or more recommended100MB of available HD space for program installationMicrosoft® Data Access Components (MDAC) or SQL Server Native ClientPossibility to connect to any local or remote Microsoft® SQL Server™Supported Microsoft SQL Server versions: from 2000 up to 2019 (We do not supportSQL Server Compact Edition), Azure SQL Databases and Amazon RDS for MicrosoftSQL Server
SQL Manager for SQL Server - User's Manual23
© 1999-2022 EMS Software Development
1.3 Feature Matrix
The FREE Lit e version of SQL Manager for SQL Server does not include all features of theFull version and has some limitations concerning the number of the databases that can beregistered and the set of data manipulation and server maintenance tools. The detailedfeature matrix is given below.
Note that when using the FREE Lit e version of SQL Manager for SQL Server you canactivate a 30-day period of fully-functional usage. After the period expires, you will beable to continue using the Lite version.
For more information on activating the Full version features see Full Mode activation .
869
869
SQL Manager for SQL Server - User's Manual24
© 1999-2022 EMS Software Development
1.4 Installation
If you are installing SQL Manager for SQL Server for the first time on your PC:
download the SQL Manager for SQL Server distribution package from the downloadpage available at our site;unzip the downloaded file to any local directory, e.g. C:\unzipped;run MSManagerFull.m si (Full version) or MSManagerLite.m si (Lite version) from thelocal directory and follow the instructions of the installation wizard;after the installation process is complete, find the SQL Manager shortcut in thecorresponding group of Windows Start menu.
If you want to upgrade an installed copy of SQL Manager for SQL Server to the latestversion:
download the SQL Manager for SQL Server distribution package from the downloadpage available at our site;unzip the downloaded file to any local directory, e.g. C:\unzipped;close SQL Manager application if it is running;run MSManagerFull.m si (Full version) or MSManagerLite.m si (Lite version) from thelocal directory and follow the instructions of the installation wizard.
See also:
SQL Manager FAQ 64
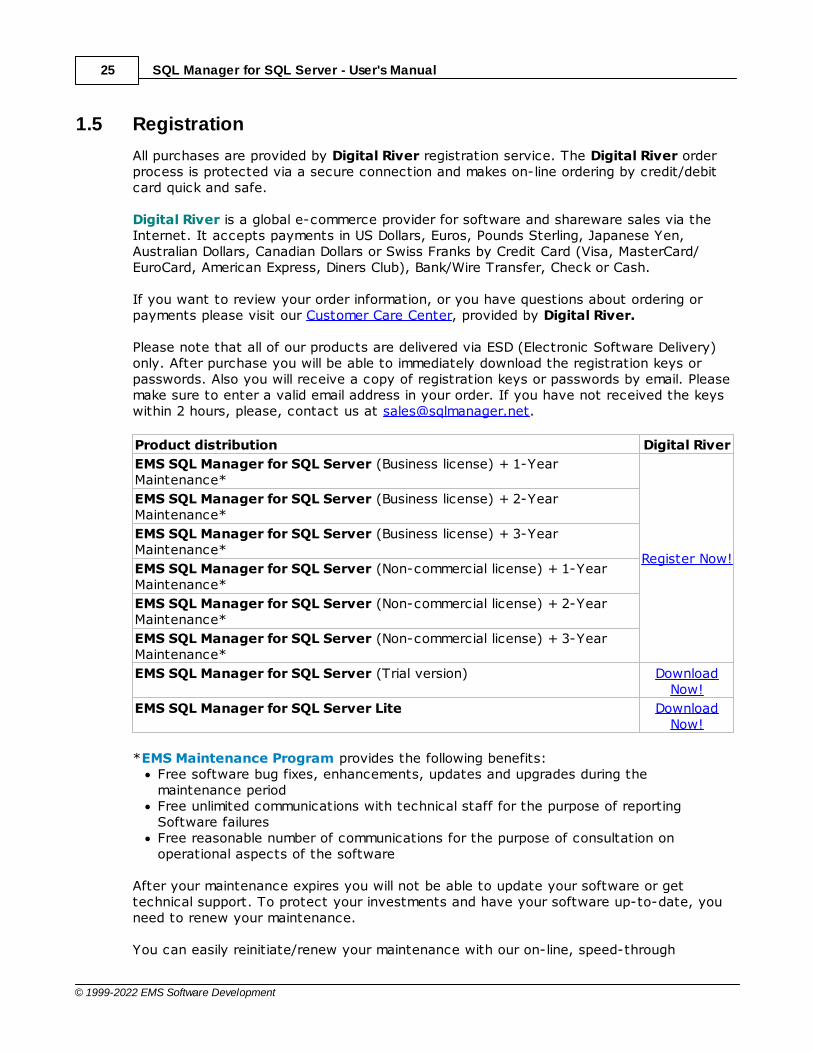
SQL Manager for SQL Server - User's Manual25
© 1999-2022 EMS Software Development
1.5 Registration
All purchases are provided by Digital River registration service. The Digital River orderprocess is protected via a secure connection and makes on-line ordering by credit/debitcard quick and safe.
Digital River is a global e-commerce provider for software and shareware sales via theInternet. It accepts payments in US Dollars, Euros, Pounds Sterling, Japanese Yen,Australian Dollars, Canadian Dollars or Swiss Franks by Credit Card (Visa, MasterCard/EuroCard, American Express, Diners Club), Bank/Wire Transfer, Check or Cash.
If you want to review your order information, or you have questions about ordering orpayments please visit our Customer Care Center, provided by Digital River.
Please note that all of our products are delivered via ESD (Electronic Software Delivery)only. After purchase you will be able to immediately download the registration keys orpasswords. Also you will receive a copy of registration keys or passwords by email. Pleasemake sure to enter a valid email address in your order. If you have not received the keyswithin 2 hours, please, contact us at [email protected].
Product distribution Digital River
EMS SQL Manager for SQL Server (Business license) + 1-YearMaintenance*
Register Now!
EMS SQL Manager for SQL Server (Business license) + 2-YearMaintenance*
EMS SQL Manager for SQL Server (Business license) + 3-YearMaintenance*
EMS SQL Manager for SQL Server (Non-commercial license) + 1-YearMaintenance*
EMS SQL Manager for SQL Server (Non-commercial license) + 2-YearMaintenance*
EMS SQL Manager for SQL Server (Non-commercial license) + 3-YearMaintenance*
EMS SQL Manager for SQL Server (Trial version) DownloadNow!
EMS SQL Manager for SQL Server Lite DownloadNow!
*EMS Maintenance Program provides the following benefits:Free software bug fixes, enhancements, updates and upgrades during themaintenance periodFree unlimited communications with technical staff for the purpose of reportingSoftware failuresFree reasonable number of communications for the purpose of consultation onoperational aspects of the software
After your maintenance expires you will not be able to update your software or gettechnical support. To protect your investments and have your software up-to-date, youneed to renew your maintenance.
You can easily reinitiate/renew your maintenance with our on-line, speed-through

SQL Manager for SQL Server - User's Manual26
© 1999-2022 EMS Software Development
Maintenance Reinstatement/Renewal Interface. After reinitiating/renewal you will receivea confirmation e-mail with all the necessary information.
See also:
How to register SQL Manager 27
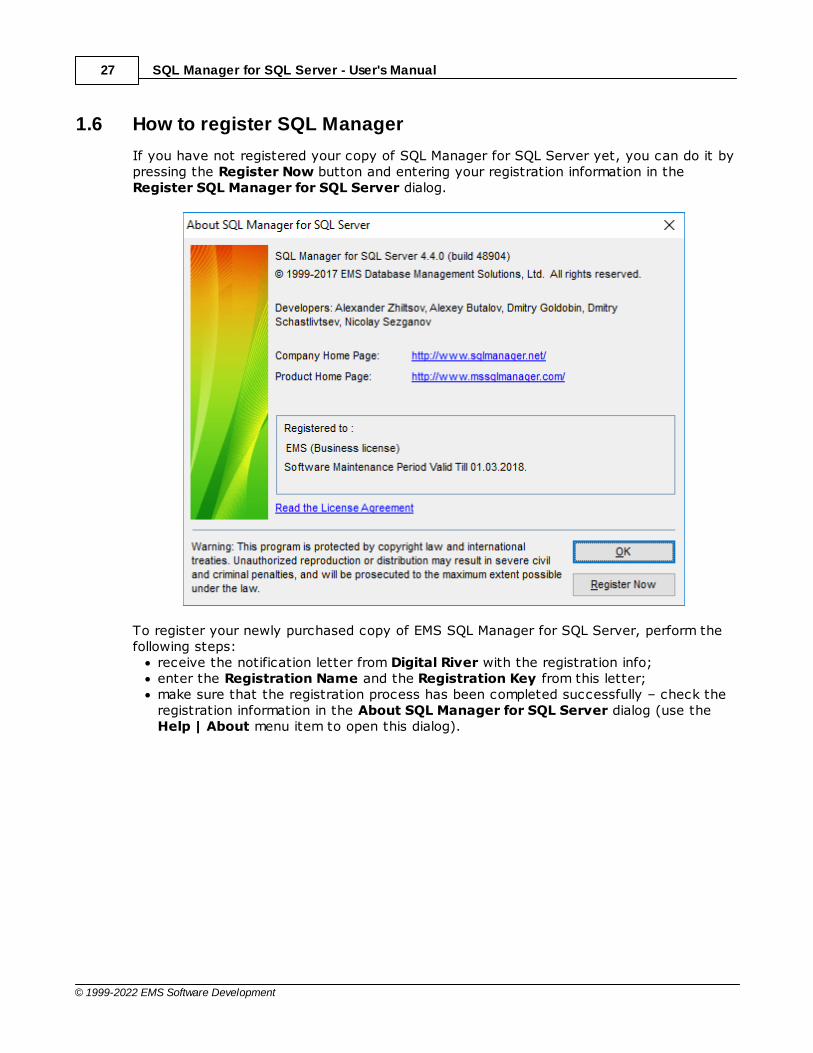
SQL Manager for SQL Server - User's Manual27
© 1999-2022 EMS Software Development
1.6 How to register SQL Manager
If you have not registered your copy of SQL Manager for SQL Server yet, you can do it bypressing the Register Now button and entering your registration information in theRegister SQL Manager for SQL Server dialog.
To register your newly purchased copy of EMS SQL Manager for SQL Server, perform thefollowing steps:
receive the notification letter from Digital River with the registration info;enter the Registration Name and the Registration Key from this letter;make sure that the registration process has been completed successfully – check theregistration information in the About SQL Manager for SQL Server dialog (use theHelp | About menu item to open this dialog).
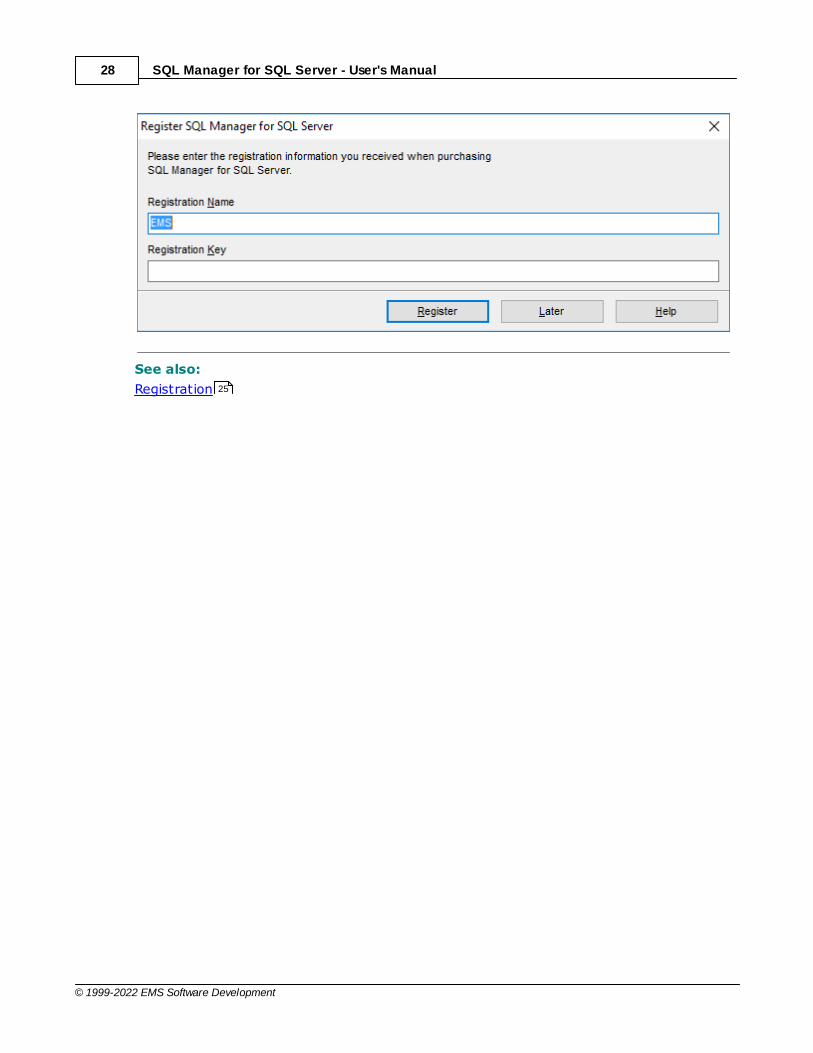
SQL Manager for SQL Server - User's Manual28
© 1999-2022 EMS Software Development
See also:
Registration 25

SQL Manager for SQL Server - User's Manual29
© 1999-2022 EMS Software Development
1.7 Version history
Product name Version Release date
SQL Manager for SQL Server Version 5.0.4 December 18, 2020
SQL Manager for SQL Server Version 5.0.3 December 6, 2019
SQL Manager for SQL Server Version 5.0.2 September 13, 2019
SQL Manager for SQL Server Version 5.0.1 October 4, 2018
SQL Manager for SQL Server Version 5.0 September 6, 2018
SQL Manager for SQL Server Version 4.4.1 July 5, 2017
SQL Manager for SQL Server Version 4.4 March 7, 2017
SQL Manager for SQL Server Versio n4.3
September 7, 2016
SQL Manager for SQL Server Versio n4.2.2
June 28, 2016
SQL Manager for SQL Server Version 4.2 May 26, 2016
SQL Manager for SQL Server Version 4.1.1 November 23, 2015
SQL Manager for SQL Server Version 4.1 March 23, 2015
SQL Manager for SQL Server Version 4.0 July 15, 2014
SQL Manager for SQL Server Version 3.9.0.1 August 27, 2013
SQL Manager for SQL Server Version 3.8.0.1 April 16, 2012
SQL Manager 2011 for SQL Server Version 3.7.0.1 July 11, 2011
SQL Manager 2010 for SQL Server Version 3.6.0.1 June 22, 2010
SQL Manager 2010 for SQL Server Version 3.5.0.1 November 09, 2009
SQL Manager 2008 for SQL Server Version 3.4.0.1 May 20, 2009
SQL Manager 2008 for SQL Server Version 3.3.0.1 September 29, 2008
SQL Manager 2008 for SQL Server Version 3.2.0.1 April 10, 2008
SQL Manager 2008 for SQL Server Version 3.1.0.1 January 18, 2008
SQL Manager 2008 for SQL Server Version 3.0.0.1 November 28, 2007
SQL Manager 2005 for SQL Server Version 2.7.0.1 June 13, 2007
SQL Manager 2005 for SQL Server Version 2.6.0.1 January 23, 2007
SQL Manager 2005 for SQL Server Version 2.5.0.1 September 29, 2006
SQL Manager 2005 for SQL Server Version 2.4.0.1 June 13, 2006
SQL Manager 2005 for SQL Server Version 2.3.0.1 April 24, 2006
SQL Manager 2005 for SQL Server Version 2.2.0.1 February 14, 2006
SQL Manager 2005 for SQL Server Version 2.1.0.1 November 17, 2005
SQL Manager 2005 for SQL Server Version 2.0.5.1 October 31, 2005
SQL Manager 2005 for SQL Server Version 2.0.0.1 October 14, 2005
30
30
30
31
31
32
32
29 33
33
29 33
29
33
34
34
35
37
37
39
40
41
42
44
45
46
47
48
49
50
51
52
54
55
56
SQL Manager for SQL Server - User's Manual30
© 1999-2022 EMS Software Development
MS SQL Manager Version 1.8.5.1 June 28, 2005
MS SQL Manager Version 1.8.0.1 December 16, 2004
MS SQL Manager Version 1.7.0.1 September 15, 2004
MS SQL Manager Version 1.6.0.1 May 31, 2004
MS SQL Manager Version 1.5.0.1 April 14, 2004
MS SQL Manager Version 1.4.0.1 February 24, 2004
MS SQL Manager Version 1.3.0.1 January 14, 2004
MS SQL Manager Version 1.2.0.1 November 17, 2003
MS SQL Manager Version 1.1.0.1 October 14, 2003
MS SQL Manager Version 1.0.0.1 October 1, 2003
Full version history is available at http://www.sqlmanager.net/products/mssql/manager/news
Version 5.0.4
1. Support for compatibility level 15 added.2. Custom toolbars are no longer removed.3. Query plan resulted in error on second execution in Query Builder. Fixed now.4. Memory-optimized table parameters are displayed correctly now.5. Minor fixes and interface improvements.
Version 5.0.3
1. Desktop was not restored correctly if server name contained non-Latin characters.Fixed now.2. 'List index out of bounds' error occured on filtration if connection was lost. Fixed now.3. The main menu disappeared with some specific localizations used. Fixed now.4. Default values are now set correctly on client side.5. Deafult names for tables didn't apply current schema. Fixed now.6. Confirmation was added for closing all editors.7. 'Invalid variant type' error on editing datetime2 data in SQL Azure fixed.8. Now the number of fetched records is displayed right in Load visible rows mode.9. Other minor fixes.
Version 5.0.2
1. The error occured on editing data in Hungarian locale. Fixed now.2. DATA_COMPRESSION option was not generated correctly. Fixed now. 3. Path to the recent file is now saved in Restore database wizard.4. Notifications are now displayed if Debugger cannot be started due to privilegiesrestriction.5. Key mapping didn't work correctly for displaying some objects. Fixed now.
56
57
58
59
59
60
61
61
62
62
63
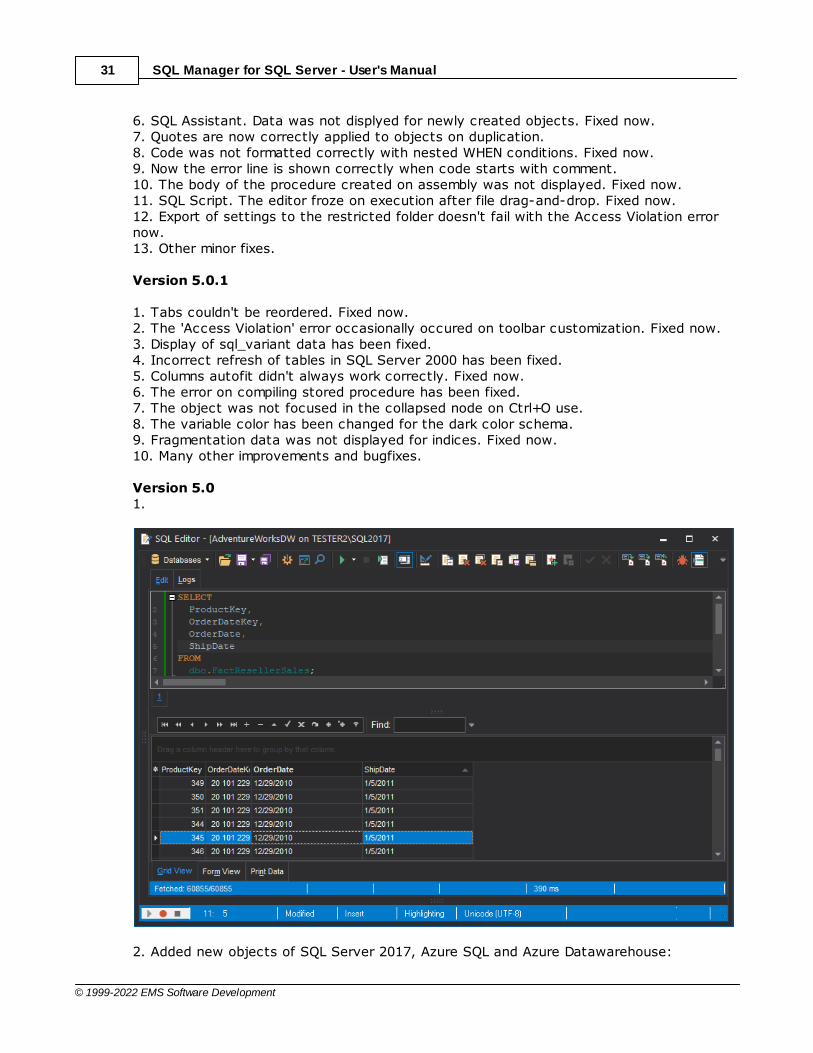
SQL Manager for SQL Server - User's Manual31
© 1999-2022 EMS Software Development
6. SQL Assistant. Data was not displyed for newly created objects. Fixed now.7. Quotes are now correctly applied to objects on duplication.8. Code was not formatted correctly with nested WHEN conditions. Fixed now.9. Now the error line is shown correctly when code starts with comment.10. The body of the procedure created on assembly was not displayed. Fixed now.11. SQL Script. The editor froze on execution after file drag-and-drop. Fixed now.12. Export of settings to the restricted folder doesn't fail with the Access Violation errornow.13. Other minor fixes.
Version 5.0.1
1. Tabs couldn't be reordered. Fixed now. 2. The 'Access Violation' error occasionally occured on toolbar customization. Fixed now.3. Display of sql_variant data has been fixed.4. Incorrect refresh of tables in SQL Server 2000 has been fixed. 5. Columns autofit didn't always work correctly. Fixed now.6. The error on compiling stored procedure has been fixed.7. The object was not focused in the collapsed node on Ctrl+O use. 8. The variable color has been changed for the dark color schema.9. Fragmentation data was not displayed for indices. Fixed now. 10. Many other improvements and bugfixes.
Version 5.01.
2. Added new objects of SQL Server 2017, Azure SQL and Azure Datawarehouse:

SQL Manager for SQL Server - User's Manual32
© 1999-2022 EMS Software Development
External tableDB Scoped CredentialExternal file formatGraph table
3. Support for Amazon RDS for SQL Server implemented.4. MS OLE DB provider for connecting to SQL Server has been updated.5. Unicode object names are supported now. 6. Improved support of high-DPI monitors and large-scale fonts added. 7. Objects can be now added to the Favorites node from the popup menu.8. Encryption algorithms for symmetric and asymmetric keys have been updated. 9. Now it's possible to view object creation and modification date. 10. Code completion has been improved.11. Format set in Color & Formats was not applied. Fixed now.12. Many other improvements and bug-fixes.
Version 4.4.1
1. Data frame . Implemented the ability to add values to the current filter instead ofreplacing them by using the Shift button.
2. TSQL Debugger . Debugging large procedures has been improved and optimized.3. Data frame . When adding a new row empty strings were displayed instead of default
values. Fixed now.4. SQL Editor . Query execution failed when NULL-value was set as a string-parameter.
Fixed now.5. Objects at the Dependencies tab sometimes were added as new nodes instead of
adding inside the right nodes. Fixed now.6. Query Builder . Arrow direction was incorrect for the LEFT OUTER JOIN relationship.
Fixed now.7. Query Builder . The field moved outside list visible area and there was no possibility
to scroll the list. Fixed now.8. An object was not focused using Ctrl+O shortcut when it was out of visible range.
Fixed now.9. The ‘Online’ field option was incorrectly set by default. Now it is available for the
Enterprise edition of SQL Server only.10. Now it is possible to sort and filter data rows returned by a stored procedure.11. The error occurred when launching the program on OS with Breton locale.12. Confirmation window appeared twice on exit the program. Fixed now.13. Table name disappeared in its sub-objects editors in some cases. Fixed now.14. Data frame . If data was shorter than column header column width was set
incorrectly. Fixed now.15. Fixed errors of highlighting and execution code with nested comments.16. There was an error opening table indices after changing this table fields order. Fixed
now.17. Many other improvements and bugfixes.
Version 4.4
1. Support of Azure SQL Database v12 new features.2. Added the ability to browse binary data in Debugger as text or hexadecimal value.3. The ability to encrypt objects with context menu.4. It is possible to change field order in index more efficiently now.5. It is possible to select several table fields for reordering now.6. It was not possible to distinguish NULL-values from empty strings in Debugger
499
472
499
462
479
479
499
472
264
241
472
SQL Manager for SQL Server - User's Manual33
© 1999-2022 EMS Software Development
watches list. Fixed now.7. The cursor moved to the end of SQL-text on formatting. Fixed now.8. 'T he sty le 121 is not supported for c onversions from varbinary to nvarc har' error
occurred on opening partition function based on binary types. Fixed now.9. The field list of alias was displayed incorrectly when the same alias was used in several
queries. Fixed now.10. The script was not generated on reordering index fields. Fixed now.11. The charset was always reset to default on each saving of the object DDL. Fixed
now.
Version 4.3
1. Support for new features of SQL Server 2016 has been added. - Truncate table partition has been added. - Added support for altering columns with ONLINE option ON. - ‘Maximum degree of parallelism’ option has been added in Check database wizard . - Support for DROP IF EXISTS statement in Extract database wizard .2. The possibility to browse PDF has been implemented in BLOB Editor. 3. The algorithm for Code Completion list has been improved. 4. Now information messages and errors in the dialogs can be copied with Ctrl+C.5. Applying of Schema-organized database tree option is performed without reconnectnow.6. SQL Editor. The results of the query without key fields couldn’t be edited. Fixed now.7. Now you can drag-and-drop triggers to set breakpoints in Debugger. 8. ‘Out of memory’ error has been fixed in Extract database wizard . 9. The query executing couldn’t be cancelled in ‘Open server cursor’ and ‘Asynchronousquery’ execution modes. Fixed now.10. The error on loading VARBINARY data has been fixed.11. The tables containing ‘Space’ symbol were processed incorrectly in Query Builder .Fixed now.12. Drop\Create statements were generated in Index Editor even if no changes weremade. Fixed now.13. Code Completion list didn’t appear for functions and procedures with database nameadded. Fixed now.14. Many other fixes and improvements.
Version 4.2.2
1. Some performance issues have been resolved: slow connection and services launch onsome specific client configurations.2. Data Frame . Cells were filled with empty strings instead of default values when anew row was added. Fixed now.3. Defaults and computed fields definitions were truncated in table DDL. Fixed now.4. Data Frame . Incorrect sorting and filtering has been fixed for the case when datawas loaded partially.5. Favourite Queries were not shown when ODBC connection was used. Fixed now.6. The procedures were executed twice in Procedure Editor . Fixed now.7. Many other improvements and bug-fixes.
Version 4.2
345
264
564
250
816
666
550
666
479
265
498
498
474
289
SQL Manager for SQL Server - User's Manual34
© 1999-2022 EMS Software Development
1. ODBC driver support has been implemented to ensure best compatibility with all serverversions. 2. Support of privileges for Routes, Message Types, Services, Service Bindings andQueues has been added.3. Support of new Full-text Indices properties has been added.4. Corresponding Registry settings are cleaned up on unregistering the database.5. The error on applying Quick Filter for Decimal fields has been fixed. 6. Ctrl+O hot key added for focusing the currently edited object in the DB Explorer tree.7. Object editors can be opened from Grant Manager by double-clicking now. 8. Other improvements and bug-fixes.
Version 4.1.1
1. The 'DROP' statements were not generated while synchronizing databases. Fixed now.2. The 'Code Completion' windows did not appear for the INSERTED and DELETED
keywords. Fixed now.3. Sometimes the values of BIGINT type were displayed incorrectly. Fixed now.4. The 'Floating point: division by zero' error occurred when the FLOAT-typed values were
edited. Fixed now.5. Some fixes of synchronization of views.6. Lots of other improvements and bug-fixes.
Version 4.1
1.Support of Azure SQL Database.2.Now when modifying an object, a window is marked with an asterisk (*) in the Windows
Bar . The same is for files opened in SQL Script form, Visual Database Designerdiagrams, etc.
3.DB Explorer . Type of field and nullability are now displayed in DB Explorer tree. Favourite queries and scripts may be added into Favourite Objects folders.
4.Data Grid . Now it has become possible to select several cells and copy them toclipboard. To do this it is necessary to switch on the 'Cell selection' and 'Row/cell multi-selection' options on Grid tab of the Environment Options dialog.
5.Dependency Tree , Dependency tab in object editors. Now dependencies onexternal and dropped objects are shown (for SQL Server 2008 and higher).
6. Export Data as SQL Script , Extract Database . Now in the field 'Script destination |File charset' the last charset saved is chosen.
7. Restore Database wizard . Now the name of the restoring database is displayed in theform header.
8.DDL Trigger Editor , Server Trigger Editor . Events are sorted in alphabetic order. 9. SQL Monitor . Now parameter values, used at query/procedure run, are also displayed
in the log.10.Data Grid .
If the fractional seconds precision of the time value in the field datetime2 exceededthree signs after decimal point, there used to arise an error at data opening. It isfixed now.Default values for datetime types were displayed wrong when adding a new entry. Itis fixed now.Big values of bigint type used to be displayed in scientific notation. It is fixed now.Data of the tinyint field was not sorted in the 'Load Visible Rows' grid mode. Fixed
93 659 737
99
126 116
498
898 867
652 964
633 666
774
342 448
656
499
SQL Manager for SQL Server - User's Manual35
© 1999-2022 EMS Software Development
now.11.Login Editor . Refresh didn’t work in the User Mapping tab. Fixed now.12.SQL Editor . If you execute the query, and then disable the 'Show Actual Execution
Plan' option, odd record set would display in the results for subsequent queries. Fixednow.
13.Attach Database , Detach Database wizards. Some passwords were encodedwrong on saving the template. Fixed now.
14.DB Explorer . If you enable the 'Sort by aliases' option table fields were sorted aswell. Fixed now.
15.At opening the Database Properties dialog for the disconnected database, the valueof the database owner was not displayed. Fixed now.
16.SQL Script . At saving the script was scrolled up to the beginning. Fixed now.17.A lot of other small improvements and bug fixes.
Version 4.0
1. The ability to debug Transact-SQL code is now implemented in SQL Editor . Thedebugger makes it possible to find errors in SQL scripts, stored procedures, user-defined functions by observing their run-time behaviour. It is possible to trace intobodies of stored procedures and functions, see the value of local and global variables,set the breakpoints, etc.
2. Added the Database Comparer tool which allows getting a script to synchronize thedatabase structure.
3. Added support of new SQL Server 2014 features:Support of memory-optimized tables .Support of backup encryption .Support of backup to Windows Azure .
4. The Search in Metadata tool is implemented for performing the quick search withinthe scope of database metadata. The tool allows you to set various search conditionsand view the results.
5. Added the ability to create SELECT/INSERT/UPDATE/DELETE procedures from tablesand views easily.
6. Visual Database Designer .Added the Undo and Redo commands.Added tools for visual formatting diagram objects: setting fonts, colors, etc.Now views, procedures and functions can be added to a diagram.Added the possibility to display attribute properties (optionality, keys, etc.) inparentheses after the attribute name and type.Diagram print options are now saved in the diagram file.Added the possibility to display printing page borders on a diagram.Added the possibility to drag and drop schemas to a diagram.
7.DB Explorer . The database tree now contains Scripts branch for fast access to SQL files from aspecified folder (set in Database Registration Info dialog) and its subfolders.Added the ability to duplicate objects to other databases by using drag-and-drop.Restore of previously opened object editors when connecting to database is carriedout more quickly as far as majority of repeated requests to server are excluded.
8.HTML Report . Now it is possible to define report visual style.Triggers, indices, foreign keys, check constrains are now displayed in a separategeneral list.Now it is not necessary to connect to database to create a report for server objects
390
462
789 793
99
169
659
462
472
677
231
768
763
688
276
737
99
127
152
218
692

SQL Manager for SQL Server - User's Manual36
© 1999-2022 EMS Software Development
only.9. Added the Instance Manager tool which allows checking statuses of SQL Server
services and starting/stopping them.10.Added the Database Registration Manager which allows adding and deleting
database registrations quickly.11.New Object Templates window allows you to preset property values for newly
created objects: fields, indices, triggers, views, procedures, functions. Also it ispossible to define name template for new database and server objects.
12.Environment Options .Added the possibility to define shortcuts for some commands in DB Explorer, SQLEditor, SQL Script and other tools (Global Shortcuts).Now it is possible to specify the display style of object names as sc hem a.nam e ornam e (schema).It is possible to set the font for data grid separately.Added the possibility to specify which database should be selected for a newlyopened editor or tool: the database selected in DB Explorer or the one from thecurrently focused editor.
13.Dependency Tree .Added the possibility to move the tree within the display area by holding the leftmouse button.Changed the drawing of selected object and recursive objects for better distinction.Added different display modes of dependency tree: to show all objects, to showobjects depending on selected object, or only objects selected object depends on.Selected object is placed to the display area automatically now when thedependency tree is too large.
14.Windows panel .Switch between windows is now possible with Ct r l+T ab shortcut.Added the ability to move tabs of open windows with a mouse.Now it is possible to close the windows with the scroll button.
15.Table Editor . Data tab . Added the possibility to create automatically the detail data levels for tablesconnected with the given one by means of foreign keys.Values of geometry and geography types are now displayed as a text. Now it ispossible to edit them.
16.Object names in DDL are not quoted now, if it is not necessary.17.Export/Import Data . Now in most cases exported data is not re-requested from
server.18.Procedure and Function Editors. It is possible to set use of default parameter
values when executing procedures/functions. 19.SQL Formatter now allows formatting DDL statements. 20.SQL Editor . Now the query execution time is displayed more accurately with no
additional cost in the program itself.21.Indices Management , Update Statistics , Shrink Database and Check Database
wizards are non-modal now; operation is executed in a thread.22.Visual Options. Added the possibility to set Slants Kind property value for page
controls.23.SQL Editor , Procedure Editor . The query execution process is completely revised:
repeated query executions to display forward-only cursor results or to get infomessages are excluded.
24.Some of the forms were not scaled in Control Panel\Display | Size of All Items -Medium mode. Fixed now.
25.Lots of other improvements and bug-fixes.
820
194
940
867
909
896
652
93
236 501
509
566
289 295
921
462
802 808 797
815
462 289
SQL Manager for SQL Server - User's Manual37
© 1999-2022 EMS Software Development
Version 3.9.0.1
The possibility to record object definitions to files for further use with version controlsystems (menu Tools | DDL to Files ).SQL Editor . Quick Code .
The list of table fields of current SELECT query is now shown at 'Code Completion'even without indicating table alias.Context sensitive elements: table aliases of the current SQL query, local variables,query table fields now are arranged at 'Code Completion' at the top of the list.The support of table-valued user-defined functions to get the field list in 'CodeCompletion' was added.It is possible to choose the value in 'Code Completion' with the spacebar (option in Options | Editor Options | Display | Quick Code ).Code Parameters did not work if the user-defined function name was quoted. Fixednow.
Duplicate Object wizard . When duplicating the table to database at the same server,the copying is made with SQL statement INSERT FROM … SELECT. But when duplicatingto the other server the data copy statements are not recorded to the main script, andare fulfilled separately that requires less memory.Check Constraint Editor . Now the property setting "Check existing data" is taken fromthe system catalogue, and is included to constraint definitions.SQL Editor . For convenience the query execution timing information is drawn at thesame status bar as the number of returned records is.Activity Monitor . The filter is not reset with clicking Refresh.Job History . The time values are now formatted for more convenient comparison.Jobs . When opening the form the data were not refreshed: at times only the namesof jobs were shown, and all the rest information was blank. Fixed now.New Table form. The right-click menu was not opened for field list. Fixed now.DDL Trigger Editor . After compiling the disabled trigger was enabled. Fixed now.UDT Editor . When saving changes of table type constraints the incorrect script wasat times generated. Fixed now.Save Settings wizard . The database projects for servers with the named instanceswere not saved. Fixed now.Environment Options . Naming Rules. The value of index type tag for XML indexes wasnot saved. Fixed now.Select Object dialog . At Users section the roles were shown, and at Roles - theusers. Fixed now.Credential Editor . If fields 'Password' and 'Confirm password' contained distinctvalues, two error messages appeared when compiling. Fixed now.Environment Options dialog. For Tools | Object Editors tab the wrong Help pagewas opened. Fixed now.Lots of other improvements and bug-fixes.
Version 3.8.0.1
Added support of new SQL Server 2012 features:Support of sequences.Support of custom server roles.Support of columnstore indices.Support of FileTables.Support of contained databases.
162
462 919
919
218
262
462
862
827
824
229
448
299
928
867
995
431
867 877
SQL Manager for SQL Server - User's Manual38
© 1999-2022 EMS Software Development
Added support of spatial indices (SQL Server 2008 and higher).Login Editor . Added the possibility to set up permissions on logins and server roles.Role Editor .
Added the possibility to rename the role and define its description (SQL Server2005 and higher).Now when editing the application role, the following fields are available: "ConfirmPassword" and "Default Schema".The definition is now displayed as CREATE ROLE statement and the modificationscript as ALTER ROLE (SQL Server 2005 and higher).
DB Explorer . Now when pressing "Left", first the subnodes of the current node arecollapsed, after pressing again the parent node is focused.Database Registration Info . OLE DB Provider. Added ability to select SQL Native Client2008 to connect to the server. Also added the "Default" option, which allows connectingby the client corresponding to the Server version.BLOB view . Added the support of PNG images.Table DDL. Added the "Show collation in table DDL only if it is different from databasecollation" option (Tools tab of the Environment Options dialog)Database Properties . Added the ability to modify the following database options:Non-transactional access to FILESTREAM data, Directory name for FileTable data,Containment (all up to SQL Server 2012).Server Properties . Added the ability to modify the following server options: Filestreamaccess level (SQL Server 2008 and higher), Database containment (SQL Server 2012),Compressed backups by default (SQL Server 2008 and higher), Max number of locks,Query wait.Editor Options . Quick Code . Now when pressing the space bar, the CodeCompletion list can be closed with the selected item input.Dependencies tab . Before displaying the dependencies of procedures, functions, andviews, the dependencies on the server are refreshed by the sp_refreshsqlmoduleprocedure.Table Editor .
Now it is possible to set FileTable options when creating and deleting tables.Data tab . After refreshing the corresponding button in the DB Navigator, thecurrent record is not changed.
Added the "Download User's Manuals and Languages" item to the Help menu.Now the Help file is opened in the selected language of the program.Query Builder .
Queries, having a statement in the parsing join condition, gave an error.When calling the "Create View" option, the changes made in the Edit tab were notdisplayed in the view definition. Fixed now.
View Editor . When changing an indexed view which contained multiple indices, theindex creation order in the generated script could be incorrect. Fixed now.When creating an SQL login, the "Enforce password policy" option value was not saved.Fixed now.If the directory name required quoting while rebuilding the full-text directory, an erroroccurred. Fixed now.Foreign Key Editor . If the foreign key name was automatically created by the server,saving the changes caused the "The foreign key is not found in the database" error.Fixed now.SQL Editor . When executing the SELECT query using the SQL Native Client, if therewas a single-line comment before the WHERE clause, the empty data set was returned.Fixed now.UDT Editor . The negative and very large positive values were allowed to be input inthe "Size/precision" and "Scale" fields. Fixed now.
390
335
99
152
541
872 867
169
197
912 919
964
236
246
479
282
258
462
299
SQL Manager for SQL Server - User's Manual39
© 1999-2022 EMS Software Development
Some other improvements and bugfixes.
Version 3.7.0.1
Added the support of ANSI_NULLS and QUOTED_IDENTIFIER options for procedures,functions, views, table triggers, database triggers и server triggers. Aggregate Editor . Added the possibility to create/edit aggregates with severalparameters (SQL Server 2008). Full-Text Catalog Editor . Added the possibility to create full-text indexes for theindexed views.DB Explorer .
Now searching with the toolbar "Search" is possible by both expanded and collapsedtree nodes.
In the script generated by the 'Script to ...' command, the declarations of variablesfor the return value and output parameters are added to the stored procedure.
Editor Options . The maximum value for the "Right margin position" field is increased.SQL Editor .
Some national characters could not be displayed. Fixed now.
After making a replacement using the "Replace Text" dialog, in some cases it wasnot possible to close the end of operation message. Fixed now.
In SQL Server 2000 when opening the "Code Completion" option for the text'<database name>.<schema name>.', the "Invalid object name 'sys.schemas'" erroroccurred. Fixed now.
Data View .
In some cases the presence of sublevels caused the "The component with name ...already exists." error. Fixed now.
Some national characters were not displayed in the "Find" field. Fixed now.
If there was a national character in the column header, the data in this columnwere displayed as null. Fixed now.
If the active view is a sublevel, changing the "Record Limit" value caused AV error.Fixed now.
Server Roles . Opening the form greatly increased CPU usage of the program. Fixednow.Export /Import Data . In some cases when importing/ exporting data to/from thexlsx and docx files in Windows 7, an error occurred. Fixed now. Export Data as SQL Script . Now when creating an SQL script for SQL Server, theconstraint definitions of the table are added to the result script in table DDL.UDF Editor .
The table type parameters were not displayed on the Parameters tab. Fixed now.
The size of the function return value was not displayed in DDL. Fixed now.Procedure Editor . The parameter default values were not displayed for SQLprocedures on the Parameters tab. Fixed now.If the default object was assigned to the table field, the table scheme was not specifiedin the EXEC sp_bindefault command in table DDL. Fixed now.Server Properties . If opening the form caused an error, AV error occurred instead ofthe error message. Fixed now.Queue Editor . When editing/deleting a queue, generated in the non-current scheme,the scheme name was not added to the script and an error occurred. Fixed now.Field Editor . It was not possible to set "precision 0" for the TIME type (SQL Server2008). Fixed now.
314
352
99
912
462
499
735
567 608
633
295
289
197
325
250

SQL Manager for SQL Server - User's Manual40
© 1999-2022 EMS Software Development
Duplicate Object Wizard . When duplicating a value to another scheme, in some casesthe scheme name was not substituted in the script. Fixed now.Aggregate Editor . If a parameter or a return type of the aggregate was UDT, whenopening this aggregate, the corresponding field in the editor was empty. Fixed now.If during the disconnection from the database the request to save data in any openform of the program is occurred, clicking the Cancel button caused the AV error. Fixednow.;If the current Windows locale uses a multi byte encoding (e.g. Chinese), when usingnational characters in the object names, the name was truncated on saving the object.Fixed now.Some other improvements and bugfixes.
Version 3.6.0.1
SQL Editor .
Now the number of affected records is displayed for each batch statement.
If a query returns multiple recordsets, the number of records is now displayed forevery recordset.
Data of FOR XML queries were displayed incorrectly if the data were presented aselements. Fixed now.
Labels in the procedures were considered as parameters during execution. Fixednow.
For certain types of queries returning multiple recordsets, the export of the secondand subsequent recordsets worked incorrectly. Fixed now.
The varchar and text fields data that contained national alphabet characters weresorted incorrectly. Fixed now.
Info messages were sometimes not displayed during repeated execution on SQLServer 2000. Fixed now.
Sometimes the run-time timer did not stop after the execution. Fixed now.Table and View editors, Data tab . Now the editing of the new datetime types valuesis possible with the input mask and the drop-down calendar. Table Editor , Data tab .
The width of the uniqueidentifier fields has been enlarged in the Form View .
On Windows 7 the grid was resized incorrectly after resizing of the form. Fixed now.
The grid level disappeared if the grid level was added and then the Refreshcommand was executed. Fixed now.
The “Set to Empty String” command did not work for varchar (max) fields. Fixednow.
When pressing Fetch All in tables with large number of records, the records wereloaded slowly. Fixed now.
Extract Database .
When extracting a table with the filestream field, the incorrect script wasgenerated: the data were inserted before the creation of the unique key, whichcaused an error. Fixed now.
In some cases the commands of indexes creation were duplicated in the resultscript. Fixed now.
Activity Monitor . The text is highlighted now in the SQL Text dialogue.During the text input some national characters were replaced by question marks in the grid and SQL editor . Fixed now.Query Builder . The query containing a clause or a value in brackets in the TOP was
218
314
462
499
236 246
520
509
666
862
499 462
479
SQL Manager for SQL Server - User's Manual41
© 1999-2022 EMS Software Development
not parsed. Fixed now.Windows toolbar . The switching between windows worked incorrectly if a largenumber of windows were opened. Fixed now.When renaming the procedure without recompiling its body, the old name wasdisplayed in the DDL . Fixed now.In some cases, the extra brackets in field default values were cut off incorrectly. Fixednow.In some cases constraint names autogenerated by the Server were displayed in table DDL . Fixed now.Procedure Editor . If the data export was launched after executing a procedure whichreturned the recordset, the Missing SQL property error occurred. Fixed now.Now it is possible to change the columns width on the Permissions tab of the objectseditors. Table Editor . If on the DDL tab the filestream option and a constrained were setfor the field, the erroneous SQL was created. Fixed now.Indices Management . When working with SQL Server 2000, empty strings couldappear in the index list if the selected table contained the statistics objects. Fixed now.Table Editor . The statistics objects were displayed in the index list in SQL Server2000. Fixed now.Other small improvements and bug fixes.
Version 3.5.0.1
Database Properties : the 'Transparent data encryption' option is now availablewhen working with SQL Server 2008The Jobs form now opens fasterSQL editors:
Added the possibility to load the file contents into SQL Editor by dragging the filefrom the Windows Explorer onto the editor area
The file encoding selected in the Open/Save file dialog is saved and then used whenopening/saving files next time
When using comments like /** ... **/, the text after the block was highlighted likecomments. Fixed nowSQL Editor :
If a file name and path were too long for the window caption, the application used tocut the filename. Now it cuts the path
XML field values were not displayed when connecting through the Native Client.Fixed now
If the last line of the executed query contained comments, the query did not return arecord set. Fixed now
The Ctrl+D shortcut is added for the “Show Results on Edit Tab” command
With a certain option combination set, all queries resulted in “0 records fetched”.Fixed nowSQL Script : if a file name and path were too long for the window caption, theapplication used to cut the filename. Now it cuts the pathNow it is possible to connect to a database if the user does not have thenecessary rights to obtain the collation listDuplicate Object Wizard : now it is possible to change the form sizeKey mapping : the confirmation dialog is now displayed on deleting a scheme andkey combinations
93
289
962
962
289
965
236 962
244
236
169
826
462
476
462
254
996
659
331
218
923
SQL Manager for SQL Server - User's Manual42
© 1999-2022 EMS Software Development
Extract Database :
Added the possibility to extract system objects
The certificate dependency on users by the Authorization property is taken intoaccount when a script is generatedCertificate Editor : the Start Date and End Date parameters now include the drop-down calendar to choose the dateActivity Monitor : sometimes the “Overflow while converting variant of type (Int64)into type (Integer)” error occurred when opening a form for SQL Server 2008. FixednowData View : due to an error in Windows Vista, the grid size did not change whenenlarging the form size. Fixed nowQuery Builder : an error occurred during the reverse engineering of a query whereobject names were quoted. Fixed nowProcedure Editor : after executing a procedure which returned a record set, theCtrl+Ins and Shift+Ins shortcuts stopped working on the procedure text editor’stab. Fixed nowUDF Editor : when launching a UDF, its name was not quoted – an error occurred ifthe name included invalid characters. Fixed nowExport Data , Export as SQL Script : when working with queries returning severalrecord sets, it is now possible to export the second and the following record setsLogin Editor :
An error occurred when revoking permissions for a database. Fixed now
Now it is possible to create a login with a blank passwordIt was not possible to open the editor for an object if its name looked like ‘text (text)’.Fixed nowTable Editor : if non-English localization was used in the program, the “Floatingpoint division by zero” error occurred when switching to the Dependencies tabField Editor : if the default object was bound to the field, an error occurred onsaving – a wrong script was generated. Fixed nowIndex Editor : the Partitioning column list was not filled after choosing the partitionscheme as an index data space. Fixed nowExport as SQL Script : the values of numeric fields with a large precision weredisplayed as nvarchar values. Fixed nowIt was not possible to open Job Editor if connection to a database with a casesensitive collation was established. Fixed nowOther minor improvements and bug-fixes
Version 3.4.0.1
The following SQL Server 2008 feature is now supported:
Resource GovernorSupport of 'FOR XML' clause in queries used to return results as XML instead ofstandard rowsetsUsing macro is now possible in SQL Editor and SQL ScriptData View | Blob View : added the XML tab allowing you to view XML data asa treeThe Unicode support is implemented in procedure /function bodies, views ,triggers , check constraints , object description , field default values and ina number of other object propertiesGrant Manager :
added support of database permissions for SQL Server 2005 and higher
666
364
364
862
499
479
289
996
295
567 633
390
400
236 933
964
250
265
349
633
404
855
548
462 659
499 541 548
289 295 282
272 261 963 255
724
732
SQL Manager for SQL Server - User's Manual43
© 1999-2022 EMS Software Development
users and roles are now separated in the 'Privileges for' list
column permissions were not always displayed correctly: the higher-level objectpermissions were not considered. Fixed nowDatabase Registration Info :
most of the options from the Grid | Data Options section of the EnvironmentOptions dialog can now be specified individually for each of the registereddatabases in the Database Registration Info dialog. The values specified on the Grid| Data Options page will be applied as default settings for newly registereddatabases
added a possibility to select the OLE DB Provider: OLE DB Provider for SQL Server orSQL Native Client
metadata and SQL Editor logs can now be saved in UNICODE or ANSISQL Editor :
after the USE Transact-SQL statement execution the name of the current databaseis displayed in the status bar area of the editor
fixed several errors concerning syntax highlight
fixed several bugs concerning incorrect parsing of table aliases in queries
the Ctrl+Alt+C shortcut did not work for showing the list of fields of the table whosename is copied to clipboard. Fixed now
the displayed number of affected records was not always correct. Fixed nowDB Explorer :
the Find Object dialog has been improved
added a possibility to execute procedures and user-defined functionsdirectly from DB Explorer (through the context menu )
the program saves the information about the last opened database before shutdown.When the application is started next time, this database will be automatically selectedin the DB Explorer tree
the button for switching search mode is added to the Search Panel toolbar
double-clicking an object group node folds and unfolds its branch
when adding a server object , if the branch had not been refreshed yet, only thisnew object was displayed in the tree. Fixed nowExtract Database :
now the script is directly generated in the selected charset, which reduces the scriptgeneration time
with the 'Generate DROP statements' option enabled, odd statements for deletingtable subobjects were generated. Fixed nowExport as SQL Script : now the script is directly generated in the selected charset
, which reduces the script generation timeVisual Database Designer :
tables are arranged more compactly in the reverse engineering mode
alignment options did not work when a diagram was loaded from a fileOptions : the ability to apply default settings (to all or just to a separate categoryof options) is implemented for all option dialogsWindows List : the 'Close All Database Windows' command is implementedData Grid : the method of work in asynchronous mode is changed - the usage of aseparate connection for each Data Grid makes it possible to perform simultaneousfetching without losing the ability to use other functions of the programData Grid : the selected data record highlight changes when the focus is switchedfrom the gridJob Step Editor : added support of the 'Write log to table' option, and newsubsystems of SQL Server 2008Changes that take place upon table recreation are now written to the log of
331 335
730
152
900
867
160
900
158
462
918
99
118
294 289 295
91
118
389
666
633
635
737
749
740 753
866
983
501
501
406
228
SQL Manager for SQL Server - User's Manual44
© 1999-2022 EMS Software Development
metadata changes : changing column identity, reordering columnsSave Settings wizard: now, when saving settings to an existing file, the programsuggests that you overwrite the file or make the new file unique by adding thecurrent date and time to the file nameEnvironment Options | Tools | SQL Server Reference : added an option forSQL Server 2008 Books OnlineFull-Text Catalog Editor :
the data type value of a full-text index was not applied on saving the object
when saving changes, pressing Cancel in the Changing Metadata window resultedin losing changes in the editorThe DDL of user-defined functions did not contain comments to fields of thereturned table. Fixed nowLinked Servers : the content of the linked server was not displayed by theapplication if the provider did not support the information in the catalog. Fixed nowPartition Function Editor : milliseconds in threshold values of datetime type were notdisplayed. Fixed nowExport Data : when exporting data of type decimal with precision less than 15digits, the numbers were rounded to the 4th decimal digit. Fixed nowQuery Builder : the width of the Link Properties dialog was set incorrectly whenrunning in Windows Vista. Fixed nowIt was impossible to change object description if the object's description was anempty string. Fixed nowRole Editor : the 'Refresh' command did not work within the Member of tab. FixednowField Editor : the 'Sparse' option could not be disabled for NOT NULL fields (in SQLServer 2008)It was impossible to turn off the database compatibility level warning on connection- the 'Do not ask me again' option value was not saved after closing the programOther minor improvements and bug-fixes
Version 3.3.0.1
The following SQL Server 2008 features are now supported:
compressed Tables and Indexes ;
Field and file group filestream
filtered indexes
sparse columnsQuery Builder :
when a table is added to a query, its foreign key links to other tables participating inthis query are reflected by JOIN statements
in some cases renaming a table and moving to the SQL tab resulted in the “Cannotbind JOIN expression” error. Fixed nowDB Explorer :
the possibility to reorder hosts using drag-and-drop is implemented
the User role and Application role objects now have different icons
pressing the Edit Object button or selecting the corresponding context menu itemwith multiple selection of server objects resulted in opening a single editor. Fixednow
it is now possible to disable the warning that the database compatibility level is notset to its maximum valueSQL Assistant : the Edit objects command did not work with server objects .Fixed now
158
928
992
867 872 895
352
966
962 295
849
345
567
479 483
963
335 338
250
130
228 264
249 190
264
479
99
335 335
91
110 389
121 389

SQL Manager for SQL Server - User's Manual45
© 1999-2022 EMS Software Development
Database Registration Info : the 'Schema-organized database tree' option is added.With this option disabled, the object tree is built without grouping by schemasDatabase Properties : database owner information is now availableThe ability to edit the result of a query containing JOIN statements is implementedThe seed and increment parameters of the IDENTITY field can now be negativeRestore Database wizard : it is now possible to disconnect all users while restoringan existing databaseHTML Report : added a possibility to change the font size for the DDL section (thecorresponding option is added to the Setting additional report options step of thewizard)The Changing Metadata window can now be closed by pressing the ESC keyThe Access Violation error appeared sometimes when deleting a User-defined datatype . Fixed nowQueue Editor : if the Rollback operation was made in the Changing Metadatawindow while editing a queue , all changes made in the Queue Editor disappeared.Fixed nowDatabase object comments containing national symbols were displayed improperly iftheir collation differed from the client machine default language. Fixed nowExtract Database : bugs concerning wrong statements order and incomplete objectdefinition, and a number of others are fixed nowCode Completion window: some system functions used to be duplicated in the list.Fixed nowCode Parameters: the list of parameters did not appear if the object name was putinto square brackets. Fixed nowVisual Database Designer : some printers could not print field and table icons. FixednowTable Editor : the Property tab could not be refreshed. Fixed nowAn attempt to connect to a SQL Server 2005 database with compatibility level 8 ledto an error; contracts and routes were not refreshed in that case. Fixed nowIf different languages that use different decimal separators were set at the first andthe last tabs of the Regional and Language options dialog (Start->Control panel), anerror occurred when viewing tables with numeric data. Fixed nowData Grid : an error occurred when editing data of the date format with month astext (e.g. dd-MMM-yyyy). Fixed nowWrong shortcuts were displayed for a number of commands from the Quick Codecontext menu group. Fixed nowOther minor improvements and bug-fixes
Scroll to top
Version 3.2.0.1
Service Broker support is implemented; now all Service Broker objects are supported: message types , contracts , queues , services , routes , remote servicebindingsSQL Server 2008 support:
new data types support: date, datetime2, datetimeoffset, time, hierarchyid,geometry, geography;
table types support implemented: table types are displayed within the UDTsbranch in the DB Explorer tree;
Backup Database wizard now supports new backup parameters such ascompression , buffer count , max transfer size ;
logon triggers support implemented: logon triggers are created in the server DDLTrigger Editor . New DDL trigger events are currently supported as well
152
169
249
774
692
697
966
299
325 966
325
963
666
737
236
373 379
501
29
370 373 325 376 379
382
303 299
99
760
768 769 769
342
342
SQL Manager for SQL Server - User's Manual46
© 1999-2022 EMS Software Development
The Same queries for all databases option is added for the SQL Editor . With thisoption enabled SQL Editor stores all queries in a shared repository so that switchingto another database does not cause loading that database queries (applying thatoption does not affect the currently opened copies of the SQL Editor ). The valuesof the option can be changed freely without any risk to lose the query repositorycontentSQL editors:
some functions work faster now
now you can change the size of the Code Completion list
the 'Search next' feature now works even if the ‘Find dialog’ was opened for anotherSQL EditorJob History tool : jobs can now be edited, stopped, run and deleted directly withinthe Job History formServer Log Viewer : time in the date field is now displayed with millisecondsNow on attempt to connect to database the compatibility level is checked with theprompt for changing it, if neededThe ‘Invalid date’ error occurred when entering a date with different languages set atthe first and last tabs of the Control Panel | Regional and Language Options dialog.Fixed nowIn some rare cases the ‘Multiple-step operation generated errors’ error used to occurwhen executing a query containing XML fields. Fixed nowActivity Monitor : after refreshing the content, filtering options used to be resetted.Fixed nowDependency tab : the dependencies used to be displayed improperly for some typesand procedures. Fixed nowLocation of toolbars within the program main window used to be resetted. Fixed nowPrint Metadata : the table field comments were not displayed. Fixed nowVisual Database Designer : the default settings for the diagram were not applied toits first tab. Fixed nowExport Data Wizard : now you can export all results of the multi-recordset queryBLOB Editor used to allow editing data even in read-only levels. Fixed nowFixed the error that occurred on attempt to connect to a database using apassword containing punctuation marksMany other minor improvements and bug-fixes
Scroll to top
Version 3.1.0.1
Implemented support for server objects in Extract Database , Print Metadata ,Duplicate Object , New Object , SQL Script Explorer toolsGrant Manager : it is now possible to view effective permissions on objectsSQL Editor : a number of functions now work fasterSQL Editor : fixed several bugs concerning incorrect work of code folding, 'List indexout of bounds' and 'Access Violation' errors, cases of incorrect recognition of tablealiases in queries, non-applicability of background colorSQL Editor : keyboard templates do not trigger in comments any moreDatabase Registration Info : added the 'Always use client cursor to get data'option; this option should be enabled for remote server connections, e.g. uponconnection via InternetPrint Metadata : added the possibility to interrupt report generationData Grid : sub-levels based on a SQL query can now be edited in the Load All Rowsmode as well, if the query is built by one table and contains key fieldsData Grid : upon insertion of text into a grid cell, Shift-Ins resulted in the
878 462
462
462
476
462
827
827
859
862
964
683
737
567
541
104
29
666 683
218 216 663
724 734
462
462
462 937
152
683
501
501
SQL Manager for SQL Server - User's Manual47
© 1999-2022 EMS Software Development
duplicating field dialog. Fixed nowView Editor : added a capability for editing queries in Query BuilderJob Editor : added commands for running tasks, stopping task execution, viewingtask execution resultsIndices Management : now it is possible to select several indexes and setparameters for all of them simultaneouslySQL Editor : Unicode was not supported upon inputting parameters for queriescontaining parameters' declaration. Fixed nowSQL Editor : when working with several instances of SQL Editor, Favorite querieswere not always saved correctly. Fixed nowSQL Editor : in some cases, after server connection was lost, no attempt toreconnect was made. Fixed nowUpon duplicating full-text catalogs an error message appeared stating that thequery could not be executed inside a transaction. Fixed nowSQL Script : the 'Cannot create file' error used to occur on attempt to save theeditor content to a file. Fixed nowExtract Database : the generated CREATE DATABASE statement did not containoperators for creating files and file groups. Fixed nowServer Log Viewer : in some cases the 'Field Date is not found' error occurred whileopening a log. Fixed nowRestore Database wizard : when saving master options to a template , in somecases database file names were not written into the template. Fixed nowKeyboard Templates : when using the Paste command in a template body, applyingthe template resulted in insertion of the first word only, instead of the entire text fromthe clipboard. Fixed nowDependency Tree : if the tree building was interrupted, rebuilding was not initiatedupon subsequent selection of an object. Fixed nowOther minor improvements and bug-fixes
Scroll to top
Version 3.0.0.1
Added several new tools for working with the server: Server Log Viewer , ActivityMonitor , Shrink Database wizard, Check Database wizard, Indicesmanagement and Update statistics wizards, server roles managementImplemented support for a number of additional SQL Server capabilities: support of Symmetric keys , Asymmetric keys , Certificates ; support of Full-text catalogs
and Full-text indices ; support of server DDL triggers ; support of Endpoints; support of Database Snapshots ; support of Shared Schedules , Proxies andTarget Servers in Jobs ; support of new login properties, such as passwordpolicy, enable/disable; creating Certificate-mapped and Asymmetric key-mapped logins
; capability of mapping logins to database users in Login Editor ; assigningcredentials to SQL Server LoginsSupport of Unicode in SQL Editor , Query Builder , Grid View , Import /Export
Data wizardsAll wizards, including Import /Export Data wizards, Extract Database wizard,Backup /Restore Database wizards run in background mode now, allowing one tocontinue working with the programNew advanced SQL Editor of the Visual Studio 2005 kind with Code Folding,UNICODE support, code completion, syntax highlight and other useful featuresEnhanced Import Data Wizard - now data can be imported up to 10 times faster;also added support of the following source file formats: HTML, XML Document, OpenDocument Format (ODF), Open XML Format (MS Word 2007, MS Excel 2007)
282 479
404
802
462 495
462 474
462
218 352
659
666
859
774 978
937
652
29
859
862 797 815
802 808 735
357 360 364
352 355 448 438
846 409 839
412 824 723
723 402 390
431
462 479 501 608
567
608 567 666
760 774
462
608
SQL Manager for SQL Server - User's Manual48
© 1999-2022 EMS Software Development
Added the Permissions tab to object editors, making it possible to grant privilegeson objects to users and rolesImproved DB Explorer in several respects: added a menu for generation of commonSQL statements for database objects (Script to SQL Editor, Script to Clipboard) - it isnow possible to get CREATE, ALTER, DROP, SELECT statements for each databaseobject; DB Explorer displays server objects (objects of the server level) as well;object status (e.g. enabled/disabled) is indicated by corresponding icons; addedTasks submenu to the context menu , items of the submenu provide access to basicoperations that can be performed over the selected object/database/server; addedthe Search PanelNow it is possible to save frequently used queries within the Favorite Queries nodeof DB Explorer; Favorite Queries can be stored either locally in Windows Registry (inthis case they are only available for local users), or in a special table of the database(therefore, the queries can be accessed by all database users)Enhanced Visual Database Designer : added a new diagram object (Comment);possibility to select the specification level for displaying objects (only object names,only fields); upon Reverse Engineering one can select schemas to add their tablesto the diagramImproved Export Data Wizard : now works faster; added several output file formats:XML Document, Open Document Format (ODF), Open XML Format (MS Word 2007, MSExcel 2007)Advanced Table Editor : added a possibility to view and edit table propertieswithin a separate tabAdded the Find Option tool which allows one to find the required option in thescope of all program settings, by a word or an expression from the option titleEnhanced reports management systemIt is now possible to execute functions directly in Function Editor windowExtract Database wizard : object dependencies are now handled correctlyBackup /Restore Database wizards: implemented support of several additionalbackup/restore parameters applied to SQL Server 2005 (copy-only backup, verifybackup when finished, checksum support)
Scroll to top
Version 2.7.0.1
Database properties : information about the database is now displayed: the size ofthe entire database, data, indexes, transaction log, etc.; the date of the recentlyperformed full, differential, transaction log backupDatabase properties : possibility to rename the database addedDatabase properties : it is now possible to open this dialog for disconnecteddatabases and for databases in the offline modeDatabase properties : it has become possible to change the name and location ofdatabase files (the latter is applied to SQL Server 2005 only)DB Explorer : it is now possible to view brief table information in SQL AssistantIt is now possible to modify the schema/owner in object editorsIncremental search has been added to a number of object listsData View : for string fields of 80 and more characters in length an editor similar tothat used for editing TEXT fields is implemented in the Form View ; also, the "Wordwrap in string editor" option is addedTable Editor , Fields tab: the Data Type column now contains the basic type onwhich the current data type is basedSQL Editor : when several copies of SQL Editor are used and the content of one ofthem is being saved, the changes in the content of the other ones are also considered
965
331 335
99
389
84
89
118
126
737
749
567
236 247
950
700
666
760 774
29
169
169
169
169
99 121
499
520
236 240
462
SQL Manager for SQL Server - User's Manual49
© 1999-2022 EMS Software Development
Export as SQL Script : you are now prompted to confirm the result filereplacement if the file already existsHTML Report : an error used to occur when building a report for SQL Server 2000users ("Invalid object name sys.schemas"). Fixed nowFixed the "List index out of bounds" error that occurred on Step 2 of Export DataWizard with German localization appliedAn error used to occur upon attempt to add the IDENTITY field to an existing table.Fixed nowWhen working on Windows Vista, with Native Client installed and SQL authenticationused, it was impossible to connect to the server. Corrected nowTrigger Editor : it was impossible to change the 'Enabled' property for encryptedtriggers when using the editorIn SQL Editor the name of the object was not displayed as a link when the defaultschema was not [dbo] for the current user and the name of the object of this schemadid not contain the [dbo] schema nameRestore Database : there was an error when specifying the backup file on selectingbackup set to restore from (in the "Backup of database" mode). Fixed nowExtract Database : dependencies between Views and User-Defined Functions werenot considered in the generated script. Corrected nowGrid : in the Load Visible Rows mode the Blank and the Non Blank filters did notwork. Fixed nowAfter aligning windows, e.g. by title vertical, another object selection in the objecteditor caused changing the position and the size of the form. Fixed nowVisual Database Designer : the Primary keys that were created for several fieldswere not displayed. Fixed nowOther minor improvements and bug-fixes
Scroll to top
Version 2.6.0.1
SQL Script : ability to execute selected statements and statements under cursoraddedThe identity field property can now be editedReorder Fields : field order can now be changed no matter if the table has otherdependent objects or notTable Editor : if Object Explorer is turned off, Table Editor opens quicker. ObjectExplorer can be disabled within the Object Editors section of the EnvironmentOptions dialogTable Editor , Fields tab: the Identity column addedExtract Database : view triggers used to be extracted with empty bodies. Fixed nowSQL Editor , Query Builder , Procedure Editor : when executing a queryasynchronously, CPU load could reach 100%. Fixed nowThe DDL of assemblies is now represented as binary codeDependency Tree : with the 'Show subobjects' option enabled, the dependencieswere displayed not quite correctly. Fixed nowDependency Tree : object icons were not printed. Fixed nowSQL Script : the SQL Script window does not close upon disconnect from thedatabaseSQL Script : the error list was not cleared when loading a file. Fixed nowEditor Options : the ability to set default colors addedIndex Editor : when creating an index, you need not specify the data space; thedata space of the table is used by defaultSQL Editor : when switching between queries, the cursor and the scrolling bar
633 992
692
567 933
273
462
774
666
501
737
29
659
241
236
877
867
236 240
666
462 479 289
962 339
652
652
659
659
912
265
462
SQL Manager for SQL Server - User's Manual50
© 1999-2022 EMS Software Development
position were not saved. Fixed nowDDL Trigger Editor : wrong script used to be generated when disabling/enabling anexisting trigger. Fixed nowData View : mouse-wheel scrolling for the Form View is implementedVisual Options: the 'Menus show recently used commands first' option addedEnvironment Options | DB Explorer : the 'Refresh object on showing in SQLAssistant' option is addedAdd Grid Level : with the ‘Show tables related by foreign keys only’ mode enabled,loading tables used to take much time on SQL Server 2005. Fixed nowIt was impossible to create a TIMESTAMP field with a NOT NULL restriction. Fixed nowTo-Do List : on selecting a disconnected database in the list the ‘Invalidauthorization specification’ error message used to appear. Fixed nowIn some rare cases when executing several queries simultaneously in asynchronousmode, the 'Access Violation' error used to appear. Fixed nowDB Explorer : a newly created object was not listed in the 'Recent Objects' drop-down menuView Editor , Triggers tab: if a view had more than one trigger, the type for thesecond and the succeeding triggers used to be displayed incorrectly. Fixed nowVisual Database Designer : in some rare cases when opening a chart the ‘Could notconvert variant of type (OleStr) into (Double)’ error occurred. Fixed nowExport as SQL Script : the values of DATETIME and binary types used to bereturned incorrectly for the sql_variant fields. Fixed nowImport Data Wizard : when importing from DBF format, the default values for theBoolean type were 'False' and 'True' (instead of the required 'F' and 'T'), so it wasnecessary to change them into the appropriate ones while processing the data. FixednowThe Changing Metadata window can now be closed with the Esc button applying nochangesEnvironment Options | Windows : the 'Number of open editors is restricted'option did not function. Fixed now
Scroll to top
Version 2.5.0.1
Database Registration Info : an option that allows one to skip refreshing objects onconnection to database is added SQL Editor , SQL Script , Procedure Editor : information messages are displayedcorrectly now; to enable the messages, switch on the corresponding options withinthe Tools and the SQL Script sections of the Environment Options dialog)French localization addedGrid : items that allow switching between grid tabs are added to the context menu
Grid : in some cases for the master-detail views related by decimal or money typefield in the "Load all rows" mode the records were not displayed. Fixed nowGrid : filtering of DATETIME type data used to work incorrectly in SQL Filtermode. Fixed nowGrid : the "Word wrap in memo editor" option added (Environment Options | Grid
| Advanced )Grid : formats set in Grid | Color & Formats were not applied to detail levels.Fixed nowLinked Servers : Now this feature works fine with SQL Server version 7.0Export as SQL Script : 'COMPUTED BY' fields were not excluded from the INSERTstatements. Fixed now
342
499 520
867 874
510
981
99
282 287
737
633
608
966
867 871
29
154
462 659 289
872 881 867
933
501
505
501
501 505
501 867
898 905
501 903
849
633

SQL Manager for SQL Server - User's Manual51
© 1999-2022 EMS Software Development
Export as SQL Script : sql_variant type data were always represented as strings inthe result script. Fixed nowCLR User-defined data types were not shown in the DB Explorer tree. Fixed nowWhen duplicating a table with data into another database, the TEXT and NTEXTtype data were not copied. Fixed nowWhen duplicating a procedure, its name remained. Fixed nowDB Explorer : after adding an object into the project it did not appear within theProjects node. Fixed nowTrigger Editor : the comments preceding the CREATE TRIGGER statement were notdisplayed in trigger DDL . Fixed nowSQL Editor : for queries returning more than one dataset the value of Fetchedrecords is changed now in the status bar on switching between the grid tabsOn executing a procedure with parameters, those of DATETIME type containing thetime part were not saved between execution sessions. Fixed nowVisual Database Designer : after resetting all toolbars and opening Visual DatabaseDesigner, the toolbar used to disappear from the form. Fixed nowThe 'Reset all Toolbars and menus' command did not work properly for DB Explorertoolbar . Fixed nowNow it is possible to resize the To-Do Item Editor windowDependency Tree : the 'Save as image' button is now available on the NavigationbarWhen creating a table without the NOT NULL flag for the Primary key, theconstraint was not applied automatically, which caused wrong script generation andresulted in error upon its execution. Fixed now
Scroll to top
Version 2.4.0.1
Export as SQL Script : now you can specify the DBMS for which the script should begeneratedBLOB Editor now supports BINARY and VARBINARY field typesLinked Servers : now you can see the tables and views contained by a linked serverExtract Database : now views and procedures are arranged in accordance with theobject dependencies in the target scriptDB Explorer : the 'Add to Projects' command implemented; now objects can beadded by specifying them in the corresponding dialog, and not only by dragging intothe Projects folderWhen duplicating an object into another schema, for some objects its definitionused to change incorrectly in DDL generated. Fixed nowGrid : the 'Expand All' and 'Collapse All' context menu items addedGrid : the 'Save column sorting' option is added for the 'Save and restore layout'modeGrant Manager : now User Editor and Role Editor can be called directly from thiswindowNaming Rules : XML index support implementedCPU usage significantly decreasedFor the fields allowing NULL value the 'Null' sign is indicated in table definition nowSQL Editor : for the queries which allow data insert the ability to import data intothe table implementedSQL Editor : the Code Completion tool did not start automatically. Fixed nowSQL Editor : in some cases the Results tab was not displayed. Fixed nowSQL Editor : in some rare cases the 'Range Check Error' message appeared duringquery execution
633
99
218
218
99
116
273
962
462
737
123
981
652
229
29
633
541
849
666
99
116
218
501 505
501
724
876
962
462
462
462 469
462
469

SQL Manager for SQL Server - User's Manual52
© 1999-2022 EMS Software Development
SQL Editor : upon opening object editor with the Ctrl+Enter shortcut used, thescheme was ignored. Fixed now SQL Editor : the Ctrl+Shift+Enter shortcut for pointing out the correspondingitem in the DB Explorer tree worked incorrectly. Fixed nowSQL Editor : the Code Completion tool used to work incorrectly with the "[" and the"]" symbols. Fixed nowSQL Editor : after dragging objects from DB Explorer to SQL Editor the Undocommand worked improperly in some rare casesSQL Editor : the 'Select All' command did not work correctly on text with long lines(more than 4096 symbols)Restore Database : it was impossible to use logical backup device containing thespace character(s) in its name. Fixed nowJob schedule, daily frequency: fixed the bug with improper handling of Dailyfrequency control (minutes used to be interpreted as hours and vice versa)The size and Scale for input parameter type could not be set when creating new partition functions . Fixed nowTable Editor , Data tab: fixed the bug with incorrect displaying of the bit-typedfields in the 'SQL filter' modeThe dependencies were not displayed for XML schema collections . Fixed nowTo avoid script errors, the name of XML schema collection is always quoted nowwhen creating an XML-typed fieldImport Data Wizard : when setting column correspondence for import from Excel,selecting a new column caused the cursor to move to the first column in the grid.Fixed nowDatabase Registration Info : when applying changes, the originality of databasealiases used not to be checked. Fixed nowVisual Database Designer : switching to another visual scheme did not take anyeffect in context menu style. Fixed now
Scroll to top
Version 2.3.0.1
Editor Options : added the Key Mapping section that allows you to set shortcutsfor SQL editorsXML Schema collections support is implementedQuery Builder : query execution plan is now displayed as a graphical diagramQuery Builder : queries containing user-defined functions are now supportedDependency Tree : the diagram can now be printedSQL Editor : now it is possible to rename and move query tabsSQL Editor : ability to execute statement under cursor addedSQL Editor : query execution time is now displayed in the hh:mm:ss formatSQL Editor : the timer in status bar area used to stay running on after abortingquery execution. Fixed nowSQL editors: now you can set a source code fragment as a comment with a singleclickSQL editors: next Bookmark, Previous Bookmark context menu items addedSQL editors: with 'Trim trailing spaces' option on, an attempt to use Code Completeused to clear the whole line. Fixed nowSQL editors: dragging the field names from SQL Assistant works perfectly nowWhen opening Grant Manager window, it was impossible to edit statementpermissions without forced refresh. Fixed nowHTML Report : now you can include user and role information into reportsHTML Report : ability to change header/footer of the report added
462 996
462 996
99
462
462 99 476
462
774
824
345
236 246
317
317
608
152
737
29
912 923
317
479
479 295
652
462
462
462
462
465
724
692
692 697
SQL Manager for SQL Server - User's Manual53
© 1999-2022 EMS Software Development
Extract Database : now provides an option adding the CREATE DATABASEstatement to the scriptExtract Database : server version is included into comments for the script nowEnvironment Options : now it is possible to set refreshing objects timeout. Refreshof the objects can be terminated after timeout expired if there is an activetransaction that made any changes to metadataThe open/save backup file dialogs now look more like standard ones in behaviourImport Data Wizard : with the 'Use transactions...' option disabled, in the 'Commitchanges manually' mode you are now prompted for an action on transactionImport Data Wizard : ability to resize the wizard window addedImport Data Wizard : the 'Division by zero' error used to appear after importing datawith the 'Commit changes manually' option switched on. Fixed nowImport Data Wizard : having specified user-defined fields to import, the rest of themwere filled with empty strings; so that the default values defined for the fields werenot applied. Fixed nowTrigger Editor : when altering a trigger, the schema/owner name was not added tothe trigger name in the generated script, that in some cases raised errors. Fixed nowForeign key /check constraint editors: the 'Not for replication' option addedVisual Database Designer : it was impossible to drop table via the correspondingcontext menu item when just a field, not the table itself, was selected. Fixed nowVisual Database Designer : when dragging a table of a non-default schema (SQLServer 2005) from DB Explorer to the working area , an error used to appear andthe table was not added. Fixed nowGrid : the 'Paste Cell' context menu item did not work in the Lite version. FixednowGrid : in some rare cases the data of of BIGINT fields were displayed improperly.Fixed nowGrid : with the 'Column auto-width' option enabled, BLOB field columns used tobecome too wide. Fixed nowSQL Script : confirmation of abort script execution addedRestore Database : it was impossible to type in backup file name in thecorresponding window. Fixed nowRestore Database : prompt for database registration used to appear even ifrestoration was unsuccessful. Fixed nowJob Editor : fixed the bug with wrong script generation when you saved the job inwhich the created schedule was deletedDB Explorer : it was unable to open index or trigger via the Recent Objects menu.Fixed nowDB Explorer : the context menu used to stay on top when switching betweenapplications. Fixed nowDB Explorer : after table duplication the indices and triggers of the new tablewere not displayed in the tree. Fixed nowExport Data Wizard : with the 'Export empty tables' option disabled, on attempt toexport an empty table there appeared an error containing no text. Fixed nowExport Data Wizard : in some cases, when exporting data to MS Excel, the 'Dataformat \ Styles' options used to work incorrectly. Fixed nowExport Data Wizard : when exporting data to MS Excel, the user-adjusted BooleanTrue format used to be ignored. Fixed nowDetach Database : having used the 'Clear connections' function, the database wasstill displayed in the DB Explorer tree and further attempts to access its objectsreturned errors. Fixed nowMany other small improvements and bug-fixes
Scroll to top
666
666
867
608
608
608
608
273
258 262
737
737
99 745
501 505
501
501
659
774
774
405
99 115
99
99 218
567
567
567
793
99
29

SQL Manager for SQL Server - User's Manual54
© 1999-2022 EMS Software Development
Version 2.2.0.1
SQL Editor : query execution plan is now displayed as a graphical diagramSQL Formatter: formats SELECT, INSERT, UPDATE, DELETE queries (available from SQLEditor context menu )Grid : when pasting records from the clipboard, you can now set correspondencesbetween clipboard columns and query columnsForm View : Memo-fields editor is extended (can be customized within the Grid |Advanced section of the Environment Options dialog)Blob View : 'Word Wrap' option for text addedGrid : 'Set to Empty String' and other similar operations do not result in postingrecords in the table any moreSQL Script : the progress of script execution is now displayed and the executionprocess can be stoppedSQL Script : several windows can now be opened simultaneouslySQL Script : SQL Script used to hang when a large (>10Mb) script was edited andEnable Parsing was on. Fixed nowSQL Script : now some additional statement types can be parsedSQL Editor : query execution plan can now work with SQL Server 2005SQL Editor : now there are no limitations for the size of edited scriptsField Editor : default constraints now can be renamedDTS Packages : now you can remove imported packagesTable Data : not all the records added with the following COMMIT in "Usetransactions in Data tab of object editors, SQL Editor and Query Builder" mode (Environment Options | Tools ) were displayed. Fixed nowExtract Database : with the "Insert COMMIT after each block" option on, COMMITwas added without corresponding BEGIN TRANSACTION. Fixed nowExtract Database : empty NOT NULL image fields used to be displayed incorrectly.Now fixedExtract Database : dbo name was missing when generating INSERT INTO [dbo].[table_name]Export as SQL Script : with the "Insert COMMIT after each block" option on,COMMIT was added without corresponding BEGIN TRANSACTION. Fixed nowDependency Tree : wrong dependency order was shown for Assemblies ,Aggregates , Partition Functions and Partition Schemas : the parent objectused to be displayed after the dependent one. Fixed nowVisual Database Designer : changing the table name and editing the fields did notaffect the currently opened graphical diagram. Fixed nowReorder Columns , Duplicate Table , Extract Metadata : tables with timestamp/rowversion fields are processed correctly nowSwitching program interface language took a long time if there were any databasesconnected. Fixed nowDatabase Properties : if the "auto file growth" option was off for a DB file, it couldnot be turned on. Fixed nowAttach Database : it was impossible to set login and password using SQLAuthentication. Fixed nowAttach Database : the 'File name' field did not have the Explorer button to call the"Open File" dialog. Fixed nowUDF Editor : options of the 'For new columns only' group are processed properly nowDB Explorer : it was impossible to duplicate triggers and indices . Fixed nowDB Explorer : after dropping a trigger or index it was still displayed in the treeQuery Builder stores queries between sessions now
462 467
465
501
520
905 867
541
501
659
659
659
659
462 467
462
250
852
246
872
666
666
666
633
652 339
314 345 349
737
241 218 666
935
169
789
789
295
99 272 264
99 272 264
479

SQL Manager for SQL Server - User's Manual55
© 1999-2022 EMS Software Development
The 'Don't fill server lists in connection forms' option is added; the option disablesretrieving information about all SQL servers available on the local network because insome rare cases it might take a long timeThe border of the SQL Editor window is now painted according to the current visualschemeProcedure Editor : if the FLOAT type was specified for a procedure parameter andhad a value equal to 0, it used to be processed as NULL. Fixed nowRestore Database : sometimes due to the improper size of the dialog the directorytree at the Select Backup Set step was not seen. Fixed nowThe corresponding documentation page did not open for some forms when pressing F1.Fixed nowSynonym Editor , Aggregate Editor : it was impossible to create an object whenthe <Default> scheme was selected because of wrong script generation. Fixed nowCreate Database wizard : if log and data files had the same names when creating adatabase, the log file was not created. Fixed nowAggregate Editor : if a parameter does not contain the at ("@") sign, it is addedautomatically nowAggregate Editor : turning on the Max Size option disables the Size field nowFixed the bug with the Code Completion drop-down list which could be partiallycovered with Windows TaskbarOn continuous holding F5 button to refresh the objects in DB Explorer they used todouble. Fixed nowTable /Field Editor : identity seed is now displayed properly for values greaterthan 65536Check Editor : the "Check existing data" option is not cleared anymore aftercompiling the current checkAfter renaming the object its name was not refreshed in DB Explorer context menu .Fixed nowFor some forms the Refresh operation could not be performed with F5 key used. Fixednow
Scroll to top
Version 2.1.0.1
Partition functions and partition schemes are now supportedAdded the ability to work with linked serversGerman localization is implemented (Michael Albrecht)Export /Import wizards: added the "Save Current Settings as Default" drop-downmenu and the "Reset Saved Settings" option in TemplatesNew editor options added: trim trailing spaces, Drag and drop text, Group undo,Keep caret horizontal positionGrid : large queries were opened very slowly because the switch to Grid Mode LoadAll Rows was executed after the grid was filled. Fixed nowExport Data Wizard : added the 'Finish' button that runs the Wizard at any momentExport as SQL Script and Extract Database wizards gave values of datetimetype in the formats predefined in Windows settings, which sometimes causedexecution errors. Fixed nowWhen creating a CLR user-defined data type, correct script is generated nowUnicode data are now displayed correctly for the system language for non-UnicodeprogramsObject editors : when pressing F5 in the subobjects lists, the 'Access Violation' erroroccurred. Fixed nowWindow List : added the 'Close window' item to the context menu
462
289
774
778
311 314
133
314
314
99
236 250
262
91
29
345 349
849
933
567 608
912
501
567
633 666
214
983
SQL Manager for SQL Server - User's Manual56
© 1999-2022 EMS Software Development
The "Don't save query text" option available back in version 1.x of the program is nowrestored in SQL EditorGrid : adding level bound by several fields caused “Invalid column name” error.Fixed nowSave Settings : multi-line keyboard templates were blank when imported from a file.Fixed nowKeyboard templates : the #Date tag gave the wrong date. Fixed nowPrinting now works correctly in Aggregate , DDL Trigger and Synonym editorsIndex editor : clicking the header of selected fields list returned the 'Accessviolation' error if the list was empty. Fixed nowSQL Script is now saved with any content of the editorAllow parameters in SQL (Environment Options | Tools ) for currently opened QueryBuilder and SQL Editor windows can now be activated; also, when runningqueries asynchronously, the values of parameters were not taken. Fixed nowOther small improvements and bug-fixes
Scroll to top
Version 2.0.5.1
When closing the program it gave a number of errors if no other programs wererunning. Now fixedField default values are now displayed correctly now when working with SQL Server2005SQL Editor : text search did not work when called from the context menu .Fixed nowSQL Editor : sometimes the Limit bar was displayed for grid. Fixed nowSQL Editor : code completion across databases did not work by table alias withowner (schema) not specified. Fixed nowSQL Editor : code completion by table aliases did not work after 10-15 table linesdown the text. Fixed nowSQL Editor : when adding a new tab and trying to delete a row, the "AccessViolation" error emerged. Fixed nowDatabase Registration Info : Display Options were not saved after closing/restarting the program. Fixed nowNow the size of stored procedure and UDF parameters is shown correctlySQL Script : the "Access Violation" error arose upon calling Code Completion if therewere no connected databases. Fixed nowDB Explorer : now the parameter information of some stored procedure types isdisplayed correctly in SQL AssistantGrid : filtering by value that had an apostrophe (‘) character did not function.Fixed now
Scroll to top
Version 2.0.0.1
Basic features:
Latest SQL Server versions supportFull compatibility with all SQL Server versions from 7 to 2005Full support of SQL Server 2005 permission systemDDL Triggers , Synonyms and Aggregates supportTyped XML columns
Significantly improved user interface
462
501 510
928
937
314 342 311
265
659
872
479 462
29
249
462 969 465
462
462
462
462
152 156
289 295
659
104
99 289
121
501 505
29
722
342 311 314
SQL Manager for SQL Server - User's Manual57
© 1999-2022 EMS Software Development
New well-described Wizard System to perform complex tasks easilyFast access to most essential actions using Navigation bars in most of the windowsNew Windows Toolbar to switch windows easily, like in Windows Task BarOffice 11 and Windows XP visual schemes support
Improved Database ExplorerCreating tabs for any tree node to access it in one-clickWork with multiple selected objects at a timeMuch more convenient toolbar and context menu
New powerful tools to perform SQL Server administrative tasksServer Properties and Database Properties windowsDTS Packages management tool
Visual Database Designer to handle database structure in a few clicksCreating diagram of existing database using Reverse engineering toolDividing diagram into different subject areas located on separate pagesNavigating through diagram using preview navigation toolCreating/editing/dropping tables and table fields visually setting links between themSaving as image or printing database diagramTwo diagram notations (IDEF1x and IE)A lot of visual customization options
New powerful data management toolsPlenty of useful tools such as data grouping, summarizing, fast searching andfilteringMaster-Detail View to work with two linked tables at the same timeTable and Card Views to see data the way you likeAbility to copy and paste selected recordsAdvanced printing systemFully customizable interface
Improved report managementThe new Create Report Wizard allows you to create a simple report in a few clicksManaging reports in the same way as if they were database objects: accessingreports directly through DB Explorer tree
and more...Scroll to top
Version 1.8.5.1
Support of Microsoft® SQL Server 2005When an error arises in SQL Editor or in the Changing Metadata window, thecursor is placed to the proper place nowCreating table : enhanced editing abilities in the Fields gridEditor Options : added the 'Convert Tab character to spaces' optionSQL Editor : implemented the 'Don't save query text' optionSQL Editor : added an ability to reset current execution point - the correspondingitem is added to the context menuTable Editor : confirmation request was not displayed upon deletion of tablesubobjects even if the corresponding option was on. Now fixedQuery Builder : the WHERE part was parsed incorrectly if there were several INoperators - the list was duplicatedTimeouts did not work in SQL ScriptSometimes when disconnecting from a database, its objects were refreshed if viewingtable subobjects was offGrid : the time values were not shown on attempt to enter the edit mode fordatetime fields
93
123 107
197 169
852
749
748
743
753
754
498
508
517
521
700
700
99
29
462 966
229
912
462
462
465
236
479
659
501
SQL Manager for SQL Server - User's Manual58
© 1999-2022 EMS Software Development
When trying to open a procedure with number (e.g. proc;1), there occurred anerror saying that the procedure was not found in the databaseThe program hanged when using keyboard templates if Windows clipboard had thehash (#) signTo-Do List : upon editing an item a second copy of the item used to appear in thelist. Fixed now Table Editor , the Dependency tab: tables with foreign keys referring to acurrently opened table were not shown in the dependent objects listIf the Clustered checkbox was off when creating an index , keyword NONCLUSTEREDwas not added to the script, which led to creating a clustered primary keyShortcuts for tabs did not work. Now fixedResolved the issue when the state of the main form window was not restored whenrunning the applicationIt was impossible to edit fields having a dot (.) character or the 'on' word in theirname. Now fixedCode Completion did not work with table aliases which had the dollar ($) sign intheir name, e.g. "TableName$". Now fixedEditor Options : decreased the minimum possible value for Quick Code delayOther small improvements and bug-fixes
Scroll to top
Version 1.8.0.1
Implemented the ability to generate names for the table subobjects on their creatingautomatically; you can customize the name templates or disable this option using the Naming Rules section of the Environment Options dialogExtract Metadata : changed the sequence of some operator types to registerpossible dependencies between objects; included support for identity and calculatedfields; added an ability to generate the IF EXISTS... DROP statementsSQL Editor : now it is possible to view the query results under the same tab withthe query textThere is a new possibility to disable the Changing Metadata window using thecorresponding option within the Confirmations section of the Environment Options
dialogQuery Builder : the "Access Violation" error emerged on attempt to add a criterion
and close the form. Fixed nowTable Data : the 'DataD: Cannot perform this operation on a closed dataset' errordoes not appear anymoreOn creating a unique index you can now select whether to create an index or aconstraintGrid : added the possibility to set format for the money fields within the Grid tabof the Environment Options dialogTable Data : fixed the bug when the Grid layout was not savedThe 'Make hidden Table Explorer visible on new table window' option is substituted for'Hide Table Explorer'; a new button is added to the toolbar of Table Editor to show/hide the explorerIf a field was indexed, you could not change its type or the NOT NULL constraint -the script error arose. Fixed nowExtract Metadata & Export as Insert : when extracting BLOB data, the final byteswith 0x00 value were cut. Fixed nowExport Data Wizard : when the 'Current record only' option was selected the cursorjumped to the first record and the first record was exported. Fixed nowWhen running the program, it was impossible to shut down Windows. Fixed now
289
937
981
236 964 257
264
112
250
476
912
29
876 867
666
462 469
966
869
867
479
485
246
264
501 898
867
246
236
249
666 633
567
SQL Manager for SQL Server - User's Manual59
© 1999-2022 EMS Software Development
Print Metadata : fixed the bug when the Primary Key and Unique columns of tablefields were not filled outNow the 'Help | Send bug report to' main menu item allows you to access ourSupport Ticket SystemThe 'Class TSynEdit not found' error arose on attempt to open the localizationform. Fixed now
Scroll to top
Version 1.7.0.1
Implemented a new form for creating tables : now it allows you to define all tablefields before table creationImport Data Wizard : added a possibility of defining the error log file nameBackup /Restore : while working with large databases, the operation wascanceled by timeout in 30 seconds. Now the problem is solvedFixed the following bugs concerned with Code Completion : processor loading wasraised after the window "code completion" had been opened with a non-default localization used; the focus bounced back to the top of the list after one startedtyping; the view was not canceled in case a space character was entered or thecursor was moved after typing a letter or a number; there was a problem with re-opening the code completion window after inserting a keywordExport as Insert : in float fields the dot (.) character is used as a fractional partseparator nowThe bug that caused only tree-choice of backup filename in case of using non-logical device is fixed nowWrong script was generated when a Not Null field with a Unique constraint andwithout default value had been added. Fixed nowAfter a field with a unique non-constrained index was changed, wrong script wasgenerated. Fixed nowAvailable permissions were defined incorrectly for UDF . Fixed nowEdit login : the password could not be cleared. Fixed nowConfirmation is requested now on attempt to delete query pagesInteger field changes (if the field was not in edit mode) were saved incorrectly.Fixed nowThe font size changes in Environment Options were not applied to menus andtoolbars. Fixed nowCorrected the "RecordIndex out of range" error that used to appear when editingdatabase file listThe Row Guid flag could not be changed for fields with type "uniqueidentifier". FixednowSometimes after upgrade to a new product version the language settings could not bechanged. Fixed nowExport to XML: if table field names contained spaces, the summary file would notopen. Fixed nowChanging Metadata window: now the editor font is determined by the databaseproperties instead of the defaults used previously
Scroll to top
Version 1.6.0.1
Significantly improved the Export data dialog: now you can add notes, hyperlinksand charts based on exported data to Excel documents; you can also define graphicalstyles for column captions, data, footer, and header for export to RTF documents;
683
958
933
29
229
232
608
760 774
476
933
633
781
249
295
390
249
896 867
184
249
567
966
29
567
SQL Manager for SQL Server - User's Manual60
© 1999-2022 EMS Software Development
ability to define strip styles is also includedSignificantly improved Import Data Wizard to make most of EMS QuickImport 2component suite new abilities available in MS SQL Manager: import from XML format isavailable now; a possibility of importing data from different Excel sheets isimplemented; a possibility of importing formulas from Excel is addedWe have implemented a new service - Backup Devices Manager : you can accessthis tool using the Services menuSQL Editor : now you can use the Shift+Ctrl+Space key combination to viewfunction parameters after you enter a function name in your code; the Shift+Ctrl+Pkey combination can be used to insert names of the function parameters into yourcodeDuplicate Table : in this version you can copy the table metadata and data toanother schema/databaseAdded a new localization - Chinese (Simplified)The Database Metadata log now contains only records that are executedcompletely and not rolled backThe SQL Editor log now contains only statements that are executed successfully.You can disable this feature using the corresponding option within the SQL Editorsection of the Environment Options dialogNow the program correctly displays all objects within the Dependencies tabIf a table contained a calculated field with more than 4000-char length, then the 'Listindex is out of bounds' error appeared. Now fixedForm View : NULL values of date fields were displayed as 30.12.1899. Now fixed
Scroll to top
Version 1.5.0.1
Implemented two new services - Backup Database and Restore Database : youcan access these tools through the Services menuData Grid : now you can filter data in the 'Load Visible Rows' mode; the programexports only the filtered dataImproved the reporting tools (Print Metadata and Print Data tabs of the programwindows): added powerful filters for exporting data to different formats, such as XLS,RTF, HTML, BMP, JPEG and TIFFNow the program compiles large procedures , views , user-defined functionsand triggers without losing spaces in the object bodyNow you can create fields flagged with the Not Null constraint without any problemsSQL Script : fixed a bug that caused the "Control 'tlMessages' has no parentwindow" error after successful script compilationNow the program correctly creates fields with the Collation and the Defaultparameters defined; correct DDL is also built for tables that contain fields withthese parametersSQL Script : now the program correctly saves scripts upon pressing the Ctrl+SshortcutFixed a bug that caused high processor loading when typing text in SQL Editor ifthe selected interface language was different from defaultNow the program correctly displays connection errors that appear when connecting tothe databaseIf the database contained two procedures with names different only in charactercase, then the 'Index is out of bounds' error appeared. Now fixedFixed the 'Index is out of bounds' error that appeared on attempt to create a jobscheduleIf an operation caused many errors on the server, then the program returned only the
608
785
757
462
218
933
656
470
878
867
964
520
29
760 774
757
501
683
289 282 295
272
659
249
228
659
996
462
104
824
SQL Manager for SQL Server - User's Manual61
© 1999-2022 EMS Software Development
last one; now all errors are returnedSQL Script : fixed a bug that caused incorrect word wrapping in the MessageswindowFixed a bug with a button on the Form View tab that shows BLOB contentView Editor : fixed a bug that sometimes caused the 'List index is out of bounds'error when switching between the Description and the Data tabsExtract Metadata : now the program correctly extracts values of BIT fieldsSmall improvements and bug-fixes
Scroll to top
Version 1.4.0.1
Implemented four new services: Jobs , Job History , Alerts , and Operators ;these services are available through the respective items of the Services menuAdded Romanian localization to the installation packageSQL Editor : the grid did not show results of any queries after executing querythat returned empty dataset in asynchronous mode. Now fixedThe 'Class Tcxbutton not found' error appeared when trying to open the KeyboardTemplates dialog. Now fixedSQL Editor : Fixed bug with displaying number of affected rows when executingqueries in asynchronous modeSQL Script : The Rollback on Abort option works correctly nowAdded the vertical scrollbar to the stored procedure parameters dialog ; now youcan define the procedure parameters without any difficultiesFixed the bug giving the 'Insufficient key column information for updating or refreshing'error when refreshing query resultsFixed several bugs in the Code Insight system; now the system correctly works withqueries that contain aliasesExport data : now the Export dialog automatically adds the file extension to the filenameNow you can call the Replace Text dialog using the Ctrl+R keyboard shortcut inSQL Editor and in SQL Script editors
Scroll to top
Version 1.3.0.1
Implemented the threaded query execution : now you can stop query execution atany time. To enable this feature, check the "Asynchronous query execution" optionwithin the Tools tab of the Environment Options dialogSQL Editor : now you can view the query execution plans . You can view theplans by pressing the corresponding button on the SQL Editor toolbar, or bychecking the "Explain Query" option within the SQL Editor section of theEnvironment Options dialogNow grids automatically switch to the "Load Visible Rows" mode on opening querieswith a large amount of result rowsNow the DDL tab and the Extract Metadata Expert show object owners thatdiffer from "dbo"We have fixed a bug with stored procedure executionNow the "Refresh" item of the DB Explorer context menu includes the type of objectto refreshNow the table explorer is correctly refreshed after deleting the table subobjects inthe DB ExplorerSome small improvements and bug-fixes
659
520
282
963 288
666
29
824 827 830 833
757
933
462 469
937
462
659
293
567
971 996
462 659
29
469
872 867
462 467
462
878
867
962 666
294
99
228
99

SQL Manager for SQL Server - User's Manual62
© 1999-2022 EMS Software Development
Scroll to top
Version 1.2.0.1
Added the Services menu which contains two database services - Attach Database and Detach Database
Now you can run stored procedures directly from Procedure EditorNow MS SQL Manager supports operation timeouts. You can setup the timeout valuesusing the Timeouts panel available within the Tools section of the EnvironmentOptions dialogAdded the "Try to open server cursor" option to the SQL Editor section of theEnvironment Options dialogThe "Field 'Name' not found" error appeared on registering database for someservers. Now fixedNow MS SQL Manager correctly opens tables with large NUMERIC and DECIMALfieldsFixed a bug in the Code Completion system. Now it correctly displays view fieldsFixed a bug with comments on altering procedures and functionsThe "Cannot focus a disabled or invisible window" error appeared in some cases. NowfixedSQL Editor : fixed a bug when the "There is no active transaction" messageappeared during query execution , with transactions disabledQuery Builder : fixed a bug with dragging and dropping tables from the explorer panelto the workspaceSQL Script : fixed bug in building the object tree, if the script contains objects,which names differ only by char casesEditor Options : now you can customize colors for SQL functions and SQL datatypesNow SQL Editor saves the cursor position for every script, which is currentlyopenedAdded 'Copy' and 'Paste' items to the grid context menuNow MS SQL Manager does not show the _WA_Sys_xxx indexesA large amount of bug-fixes in Query BuilderSome small bug-fixes and improvements
Scroll to top
Version 1.1.0.1
Implemented an opportunity to view dependencies between database objects: thisfeature is accessible through the Dependencies tab of all Object EditorsConsiderably increased connection speedNow you can set almost all database options using the Database Properties dialogImplemented Default Editor and Rule EditorNow object names containing unavailable symbols are enclosed in square brackets []Now text editors are displayed much faster than in the previous versionFixed a bug with connection to database with SQL Authentication if the 'Password'field was not emptyThe "Cannot sort a row of size XXXX, which is greater than the allowable maximum of8094." message appeared upon connection to databases containing large objects.Now fixedFixed error "Field 'sql2' not found" that used to occur on connection to databasescontaining large triggersFixed the "Invalid column name 'Collation'" error that appeared on connection to the
29
757
789 793
289
872
867
878
867
147
228
289 295
462
469
479
659
912
462
505
479
29
964 214
104
169
320 323
104
104
104
272
SQL Manager for SQL Server - User's Manual63
© 1999-2022 EMS Software Development
database if the 'Collation' property was set to a case-sensitive valueNow you need to confirm record deletion on pressing the Delete key in the gridFixed a bug with displaying object commentsThe 'Login prompt before connection' option available in the Database Info dialogworks properly nowAll windows with text editors are displayed correctly nowNow View Editor generates correct update script if there is a comment before theview definitionSmall bug-fixes and improvements
Scroll to top
Version 1.0.0.1
Basic features:Easy management of all MS SQL objects: creating /dropping databases ; creating/dropping/altering tables , views , procedures , etc.Creating/dropping/altering all the table subobjectsViewing/editing data in tablesSupport of all MS SQL field typesMultiple database connectionsPowerful Login Manager and Grant ManagerSQL Editor with syntax highlightVisual Query BuilderPowerful BLOB Viewer/Editor that provides several ways of viewing BLOB dataExport data to 14 popular formats, including MS Access, Excel, RTF (Word), HTML,etc.Import data from most popular formats, including MS Excel, Access, etc.Customizable program interfaceDetailed Help System and User's Guide
and more...Scroll to top
See also:
What's new
501
963
154
282
29
133 130
228 282 289
236
246
249
104
723 724
462
479
541
567
608
29
21
SQL Manager for SQL Server - User's Manual64
© 1999-2022 EMS Software Development
1.8 EMS SQL Manager FAQ
Please read this page attentively if you have questions about EMS SQL Manager for SQLServer.
Table of contents
1.What is EMS SQL Manager for SQL Server?2.What is the difference between Full and Freeware editions of EMS SQL Manager for SQL
Server?3.What do I need to start working with EMS SQL Manager for SQL Server?4.Why cannot I connect to SQL Server?5.How can I customize data formats in a grid?6.How can I speed up my work with large tables?7. I need to perform some changes in database objects of my test database and then
make the same changes on master database. Are there any tools for this purpose inEMS SQL Manager for SQL Server?
8.How to connect to a named instance of SQL Server 2000 in EMS SQL Manager for SQLServer?
9. I can access my server via an alternative port. I have searched for a setting in EMSSQL Manager for SQL Server to alter the connection port, but have not yet been ableto locate this. How would I go about altering this port?
10.What is the difference between the Export/Import functions in EMS SQL Manager forSQL Server tool and EMS Data Export/Import for SQL Server utilities?
11.What is the difference between the Query Builder module in EMS SQL Manager for SQLServer tool and EMS SQL Query for SQL Server utility?
12.I can‘t modify DDL. Why?13.When I create database objects, their names are always converted to lower case.
How can I prevent it?14.I have a table with ~ 1000 records only and a large number of fields. Opening this
table on Data tab takes too much time.15.What is the difference between the Extract Database and Export As SQL Script
functions?16.I’m trying to export table, but TEXT fields are not exported.17.How do I change the default directory where exported data will be saved?18.I get an error 'Timeout expired' when I try to execute a query in SQL Editor or when I
perform some operations with database objects.19.I get the error "Debugger interface not registered on client" when trying to run the T-
SQL Debugger.
Question/answer listQ:What is EMS SQL Manager for SQL Server?A:EMS SQL Manager for SQL Server is a powerful graphical tool for Microsoft SQL Serverdevelopment and administration. It makes creating and editing MS SQL Server databaseobjects easy and fast, and allows you to run SQL scripts, manage users and theirprivileges, build SQL queries visually, extract, print and search metadata, export data to14 available formats and import them from most popular formats, view and edit BLOBfields, and much more.
Q:
64
64
65
65
65
65
66
66
66
67
67
67
67
67
67
68
68
68
68
SQL Manager for SQL Server - User's Manual65
© 1999-2022 EMS Software Development
What is the difference between Full and Freeware editions of EMS SQL Manager forSQL Server?A:These editions of SQL Manager for SQL Server differ in their functionality. Being a lightedition, SQL Manager Freeware has certain restrictions, for example, it can handle notmore than 5 databases, and some others. You can view the list of all functionaldifferences between full and freeware versions at our Feature Matrix Page.
Q:What do I need to start working with EMS SQL Manager for SQL Server?A:First of all you must have an opportunity to connect to some local or remote SQL Serverfrom 2000 up to 2017 (We do not support SQL Server Compact Edition), Azure SQLDatabases or Amazon RDS for Microsoft SQL Server. Besides you need your computer tosatisfy the system requirements of SQL Manager for SQL Server.
Q:Why cannot I connect to SQL Server?A:1. If your server is installed as named instance, use server name in form . SQL Server2005 Express Editor has by default SQLEXPRESS instance name.2. If you connect to the remote server, make sure that the connection is not blocked byfirewall. Ask your system administrator to correctly open appropriate ports.3. Make sure that SQL Server is started and you have correct login to access it.4. Make sure that client protocols are correctly tuned. User SQL Server ConfigurationManager on connection to SQL Server 2005 (it is installed with Native Client) or SQLServer Client Network Utility (system32 cliconfg.exe) on connection to earlier versions.5. Make sure that remote connection is enabled on server and server protocols arecorrectly tuned. Use SQL Server Surface Area Configuration on SQL Server 2005 and SQLServer Network Utility (Program FilesMicrosoft SQL Server80ToolsBinnsvrnetcn.exe) onearlier server versions.6. If you use named instance of server with dynamic TCP/IP port, make sure that SQLBrowser service is running.7. If you connect remotely, try using server IP address instead of its name to ensure thatDNS works well.
Q:How can I customize data formats in a grid?A:You can customize all display formats: integer, float, date, time and date/time in theEnvironment Options window on the Grid | Color & Formats tab.
Q:How can I speed up my work with large tables?A:For your convenience and to speed up your work Data Grid allows customizing many datadisplay parameters. Here are the most important of them (accessible through DatabaseRegistration Info dialog):
Limit options in table and view editors. The “Select all records of a table” option willenable you to see all table records without extra references to the server, yet in caseof large tables or low speed connection channel the data may be fetched with hugedelays and the incoming traffic might grow considerably.This mode is recommendedwhen working with local databases or in a private network.
SQL Manager for SQL Server - User's Manual66
© 1999-2022 EMS Software Development
The “Select only” mode restricts the maximum number of records returned after thequery. Man can't process a massive amount of information at once. Hence, we came upwith this mode. This mode speeds up table data viewing considerably, prevents hangingand connection timeout. It is recommended to work with large tables, in case of lowspeed connection channels and when the traffic volume is of importance. This is adefault mode.Default Grid Mode. This option defines whether the requested rows will be loaded in theGrid all at once ("Load all rows"), or in parts ("Load visible rows") as the user scrollsdown table data. The first mode increases the query opening time but speeds upscrolling. In the second mode the query opens very fast but there might be delays whennavigating the grid.
We recommend that you set the following option values to achieve maximum efficiencywhen working with large tables:
Select only - OnLoad visible rows - On
Q:I need to perform some changes in database objects of my test database and thenmake the same changes on master database. Are there any tools for this purposein EMS SQL Manager for SQL Server?A:Database Registration Info dialog contains Log tab where you can enable loggingmetadata changes that are performed on a database and SQL statements that areexecuted in SQL Editor.
Q:How to connect to a named instance of SQL Server 2000 in EMS SQL Manager forSQL Server?A:If you have troubles in connection to a named instances of SQL Server 2000 please trythe following: - Run SQL Server Client Network Utility (system32cliconfg.exe) on client computer whereEMS SQL Manager for SQL Server runs.- Go to the second (Alias) tab of the Utility.- Add a new server alias with Server Name in form and TCP/IP as Network library.- Use the server alias name as host name on Database Registration Info dialog of EMSSQL Manager for SQL Server.
Q:I can access my server via an alternative port. I have searched for a setting in EMSSQL Manager for SQL Server to alter the connection port, but have not yet beenable to locate this. How would I go about altering this port?A:To connect to SQL Server 2005 on alternative port, do the following: - Run SQL Server Configuration Manager (it is installed with Native Client) on clientcomputer where SQL Manager runs.- Select SQL Native Client Configuration | Aliases node.- Add a new server alias and set port number, TCP/IP as protocol and server name.- Use the server alias name as host name on Database Registration Info dialog of SQLManager.To connect to SQL Server 2000 or earlier on alternative port, do the following: - Run SQL Server Client Network Utility (system32cliconfg.exe) on client computer whereSQL Manager runs.
SQL Manager for SQL Server - User's Manual67
© 1999-2022 EMS Software Development
- Go to the second (Alias) tab of the Utility.- Add a new server alias and set server name, port number and TCP/IP as Network library.- Use the server alias name as host name on Database Registration Info dialog of SQLManager.
Q:What is the difference between the Export/Import functions in EMS SQL Managerfor SQL Server tool and EMS Data Export/Import for SQL Server utilities?A:EMS Data Export/Import for SQL Server includes some additional features, which are notavailable in SQL Manager for SQL Server such as: export/import data from/to several tables at once; export/import data from/to tables selected from different databases on one host; command line utility to export/import data using the configuration file with all the export/import options.
Q:What is the difference between the Query Builder module in EMS SQL Manager forSQL Server tool and EMS SQL Query for SQL Server utility?A:First of all, EMS SQL Query for SQL Server works faster as it is a much lighter product.Besides it provides additional features for query building, e.g.: keeping query history, which allows you to rollback to any edited query; various interface improvements for more productive and easy work.
Q:I can‘t modify DDL. Why?A:The 'DDL' tabs of the Table Editor, View Editor, etc. are read-only. They display thedefinition of tables. To modify this text you can copy it to the clipboard and modify itusing SQL Editor.
Q:When I create database objects, their names are always converted to lower case.How can I prevent it?A:You need to switch off the “Convert created object's names to lower case” option inEnvironment Options dialog on the Tools | Object Editors tab.
Q:I have a table with ~ 1000 records only and a large number of fields. Opening thistable on Data tab takes too much time.A:You need to set Grid Mode for the table to 'Load Visible Rows'. Please right click on thetable's grid and select Grid Mode | Load Visible Rows.
Q:What is the difference between the Extract Database and Export As SQL Scriptfunctions?A:Export As SQL Script is intended to export table data that will be inserted into a databasesystem other than MS SQL Server. Use Extract Database to copy data to a table on MSSQL Server.
SQL Manager for SQL Server - User's Manual68
© 1999-2022 EMS Software Development
Q:I’m trying to export table, but TEXT fields are not exported.A:Fields of types TEXT, BINARY, IMAGE, etc. are not exported by default. You should selectthese fields manually on the Fields tab.
Q:How do I change the default directory where exported data will be saved?A:Follow the steps below to change directory. - Right click on the database you need in DB Explorer and click on "Database RegistrationInfo..." item in popup menu (you can also find this item in main menu "Database"). TheDatabase Properties form will be opened.- Click on the "Save Options" tab.- In the "Default Directory for Export Data" section you can choose the default directoryfor export file.
Q:I get an error 'Timeout expired' when I try to execute a query in SQL Editor or whenI perform some operations with database objects.A:You need to increase timeout values on Tools | Timeouts tab of Environment Optionsdialog, or set them to 0 - unlimited.
Q:I get the error "Debugger interface not registered on client" when trying to run theT-SQL Debugger.A:In order to debug code on the remote host the client machine must be configured asfollows http://msdn.microsoft.com/en-us/library/cc646024.aspx.
Scroll to top
If you still have any questions, contact us at our Support Center.
64
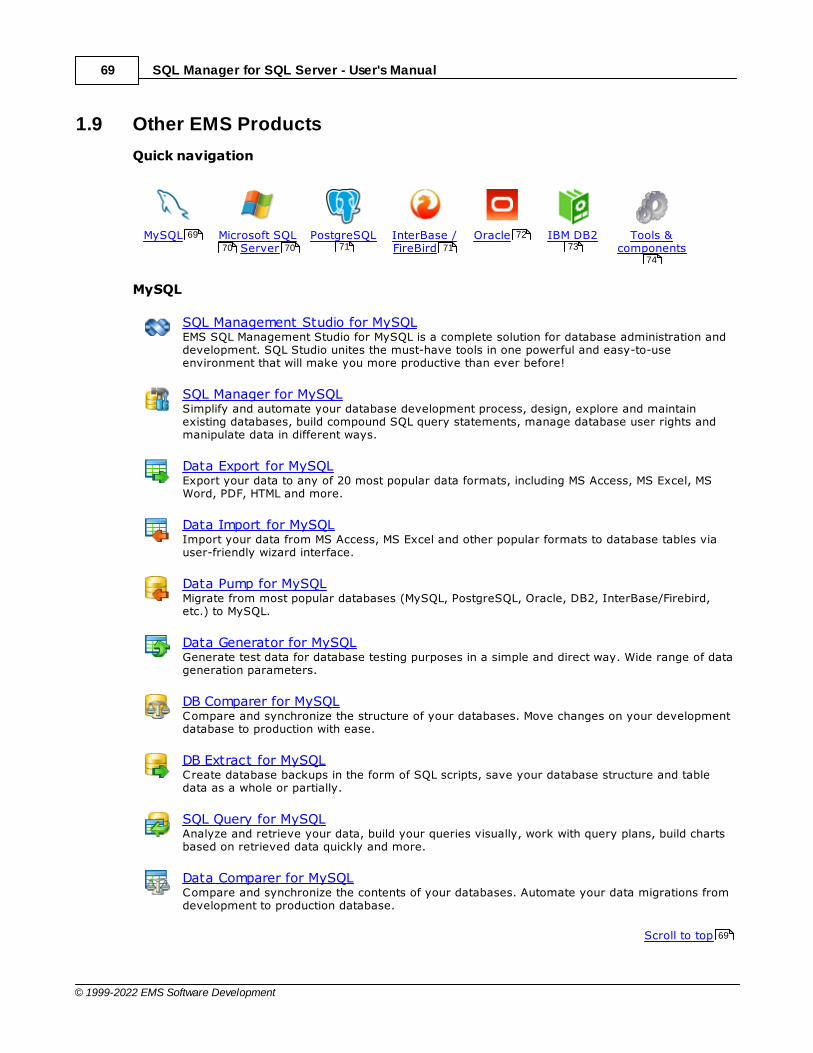
SQL Manager for SQL Server - User's Manual69
© 1999-2022 EMS Software Development
1.9 Other EMS Products
Quick navigation
MySQL Microsoft SQL Server
PostgreSQL InterBase /FireBird
Oracle IBM DB2 Tools &components
MySQL
SQL Management Studio for MySQLEMS SQL Management Studio for MySQL is a complete solution for database administration anddevelopment. SQL Studio unites the must-have tools in one powerful and easy-to-useenvironment that will make you more productive than ever before!
SQL Manager for MySQLSimplify and automate your database development process, design, explore and maintainexisting databases, build compound SQL query statements, manage database user rights andmanipulate data in different ways.
Data Export for MySQLExport your data to any of 20 most popular data formats, including MS Access, MS Excel, MSWord, PDF, HTML and more.
Data Import for MySQLImport your data from MS Access, MS Excel and other popular formats to database tables viauser-friendly wizard interface.
Data Pump for MySQLMigrate from most popular databases (MySQL, PostgreSQL, Oracle, DB2, InterBase/Firebird,etc.) to MySQL.
Data Generator for MySQLGenerate test data for database testing purposes in a simple and direct way. Wide range of datageneration parameters.
DB Comparer for MySQLCompare and synchronize the structure of your databases. Move changes on your developmentdatabase to production with ease.
DB Extract for MySQLCreate database backups in the form of SQL scripts, save your database structure and tabledata as a whole or partially.
SQL Query for MySQLAnalyze and retrieve your data, build your queries visually, work with query plans, build chartsbased on retrieved data quickly and more.
Data Comparer for MySQLCompare and synchronize the contents of your databases. Automate your data migrations fromdevelopment to production database.
Scroll to top
69
70 70 71 71
72
73
74
69
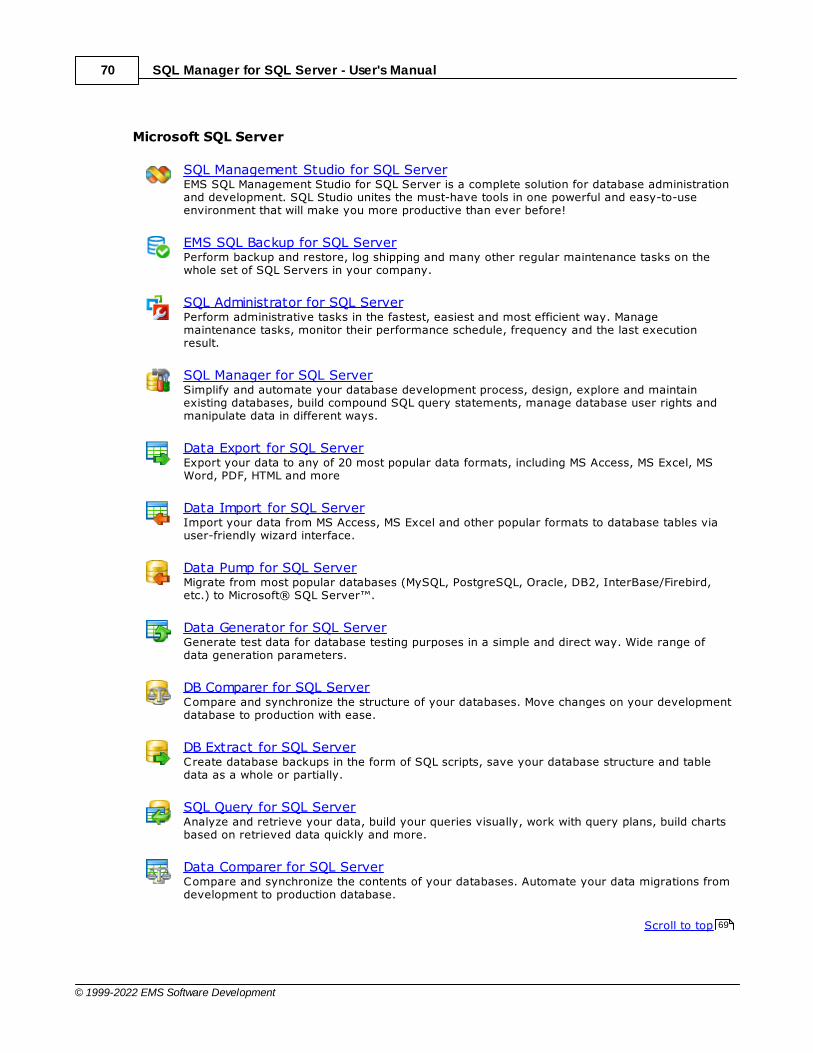
SQL Manager for SQL Server - User's Manual70
© 1999-2022 EMS Software Development
Microsoft SQL Server
SQL Management Studio for SQL ServerEMS SQL Management Studio for SQL Server is a complete solution for database administrationand development. SQL Studio unites the must-have tools in one powerful and easy-to-useenvironment that will make you more productive than ever before!
EMS SQL Backup for SQL ServerPerform backup and restore, log shipping and many other regular maintenance tasks on thewhole set of SQL Servers in your company.
SQL Administrator for SQL ServerPerform administrative tasks in the fastest, easiest and most efficient way. Managemaintenance tasks, monitor their performance schedule, frequency and the last executionresult.
SQL Manager for SQL ServerSimplify and automate your database development process, design, explore and maintainexisting databases, build compound SQL query statements, manage database user rights andmanipulate data in different ways.
Data Export for SQL ServerExport your data to any of 20 most popular data formats, including MS Access, MS Excel, MSWord, PDF, HTML and more
Data Import for SQL ServerImport your data from MS Access, MS Excel and other popular formats to database tables viauser-friendly wizard interface.
Data Pump for SQL ServerMigrate from most popular databases (MySQL, PostgreSQL, Oracle, DB2, InterBase/Firebird,etc.) to Microsoft® SQL Server™.
Data Generator for SQL ServerGenerate test data for database testing purposes in a simple and direct way. Wide range ofdata generation parameters.
DB Comparer for SQL ServerCompare and synchronize the structure of your databases. Move changes on your developmentdatabase to production with ease.
DB Extract for SQL ServerCreate database backups in the form of SQL scripts, save your database structure and tabledata as a whole or partially.
SQL Query for SQL ServerAnalyze and retrieve your data, build your queries visually, work with query plans, build chartsbased on retrieved data quickly and more.
Data Comparer for SQL ServerCompare and synchronize the contents of your databases. Automate your data migrations fromdevelopment to production database.
Scroll to top 69
SQL Manager for SQL Server - User's Manual71
© 1999-2022 EMS Software Development
PostgreSQL
SQL Management Studio for PostgreSQLEMS SQL Management Studio for PostgreSQL is a complete solution for database administrationand development. SQL Studio unites the must-have tools in one powerful and easy-to-useenvironment that will make you more productive than ever before!
EMS SQL Backup for PostgreSQLCreates backups for multiple PostgreSQL servers from a single console. You can use automaticbackup tasks with advanced schedules and store them in local or remote folders or cloudstorages
SQL Manager for PostgreSQLSimplify and automate your database development process, design, explore and maintainexisting databases, build compound SQL query statements, manage database user rights andmanipulate data in different ways.
Data Export for PostgreSQLExport your data to any of 20 most popular data formats, including MS Access, MS Excel, MSWord, PDF, HTML and more
Data Import for PostgreSQLImport your data from MS Access, MS Excel and other popular formats to database tables viauser-friendly wizard interface.
Data Pump for PostgreSQLMigrate from most popular databases (MySQL, SQL Server, Oracle, DB2, InterBase/Firebird,etc.) to PostgreSQL.
Data Generator for PostgreSQLGenerate test data for database testing purposes in a simple and direct way. Wide range ofdata generation parameters.
DB Comparer for PostgreSQLCompare and synchronize the structure of your databases. Move changes on your developmentdatabase to production with ease.
DB Extract for PostgreSQLCreate database backups in the form of SQL scripts, save your database structure and tabledata as a whole or partially.
SQL Query for PostgreSQLAnalyze and retrieve your data, build your queries visually, work with query plans, build chartsbased on retrieved data quickly and more.
Data Comparer for PostgreSQLCompare and synchronize the contents of your databases. Automate your data migrations fromdevelopment to production database.
Scroll to top
InterBase / Firebird
SQL Management Studio for InterBase/FirebirdEMS SQL Management Studio for InterBase and Firebird is a complete solution for databaseadministration and development. SQL Studio unites the must-have tools in one powerful andeasy-to-use environment that will make you more productive than ever before!
69
SQL Manager for SQL Server - User's Manual72
© 1999-2022 EMS Software Development
SQL Manager for InterBase/FirebirdSimplify and automate your database development process, design, explore and maintainexisting databases, build compound SQL query statements, manage database user rights andmanipulate data in different ways.
Data Export for InterBase/FirebirdExport your data to any of 20 most popular data formats, including MS Access, MS Excel, MSWord, PDF, HTML and more
Data Import for InterBase/FirebirdImport your data from MS Access, MS Excel and other popular formats to database tables viauser-friendly wizard interface.
Data Pump for InterBase/FirebirdMigrate from most popular databases (MySQL, SQL Server, Oracle, DB2, PostgreSQL, etc.) toInterBase/Firebird.
Data Generator for InterBase/FirebirdGenerate test data for database testing purposes in a simple and direct way. Wide range ofdata generation parameters.
DB Comparer for InterBase/FirebirdCompare and synchronize the structure of your databases. Move changes on your developmentdatabase to production with ease.
DB Extract for InterBase/FirebirdCreate database backups in the form of SQL scripts, save your database structure and tabledata as a whole or partially.
SQL Query for InterBase/FirebirdAnalyze and retrieve your data, build your queries visually, work with query plans, build chartsbased on retrieved data quickly and more.
Data Comparer for InterBase/FirebirdCompare and synchronize the contents of your databases. Automate your data migrations fromdevelopment to production database.
Scroll to top
Oracle
SQL Management Studio for OracleEMS SQL Management Studio for Oracle is a complete solution for database administration anddevelopment. SQL Studio unites the must-have tools in one powerful and easy-to-useenvironment that will make you more productive than ever before!
SQL Manager for OracleSimplify and automate your database development process, design, explore and maintainexisting databases, build compound SQL query statements, manage database user rights andmanipulate data in different ways.
Data Export for OracleExport your data to any of 20 most popular data formats, including MS Access, MS Excel, MSWord, PDF, HTML and more.
69
SQL Manager for SQL Server - User's Manual73
© 1999-2022 EMS Software Development
Data Import for OracleImport your data from MS Access, MS Excel and other popular formats to database tables viauser-friendly wizard interface.
Data Pump for OracleMigrate from most popular databases (MySQL, PostgreSQL, MySQL, DB2, InterBase/Firebird,etc.) to Oracle
Data Generator for OracleGenerate test data for database testing purposes in a simple and direct way. Wide range of datageneration parameters.
DB Comparer for OracleCompare and synchronize the structure of your databases. Move changes on your developmentdatabase to production with ease.
DB Extract for OracleCreate database backups in the form of SQL scripts, save your database structure and tabledata as a whole or partially.
SQL Query for OracleAnalyze and retrieve your data, build your queries visually, work with query plans, build chartsbased on retrieved data quickly and more.
Data Comparer for OracleCompare and synchronize the contents of your databases. Automate your data migrations fromdevelopment to production database.
Scroll to top
IBM DB2
SQL Manager for DB2Simplify and automate your database development process, design, explore and maintainexisting databases, build compound SQL query statements, manage database user rights andmanipulate data in different ways.
Data Export for DB2Export your data to any of 20 most popular data formats, including MS Access, MS Excel, MSWord, PDF, HTML and more.
Data Import for DB2Import your data from MS Access, MS Excel and other popular formats to database tables viauser-friendly wizard interface.
Data Pump for DB2Migrate from most popular databases (MySQL, PostgreSQL, Oracle, MySQL, InterBase/Firebird,etc.) to DB2
Data Generator for DB2Generate test data for database testing purposes in a simple and direct way. Wide range of datageneration parameters.
DB Extract for DB2Create database backups in the form of SQL scripts, save your database structure and tabledata as a whole or partially.
69

SQL Manager for SQL Server - User's Manual74
© 1999-2022 EMS Software Development
SQL Query for DB2Analyze and retrieve your data, build your queries visually, work with query plans, build chartsbased on retrieved data quickly and more.
Scroll to top
Tools & components
Advanced Data Export for RAD Studio VCLAdvanced Data Export for RAD Studio VCL allows you to save your data in the most popularoffice programs formats.
Advanced Data Export .NETAdvanced Data Export .NET is a component for Microsoft Visual Studio .NET that will allow youto save your data in the most popular data formats for the future viewing, modification, printingor web publication. You can export data into MS Access, MS Excel, MS Word (RTF), PDF, TXT,DBF, CSV and more! There will be no need to waste your time on tiresome data conversion -Advanced Data Export will do the task quickly and will give the result in the desired format.
Advanced Data Import for RAD Studio VCLAdvanced Data Import for RAD Studio VCL will allow you to import your data to the databasefrom files in the most popular data formats.
Advanced PDF Generator for RAD StudioAdvanced PDF Generator for RAD Studio gives you an opportunity to create PDF documentswith your applications written on Delphi or C++ Builder.
Advanced Query Builder for RAD Studio VCLAdvanced Query Builder for RAD Studio VCL is a powerful component for Delphi and C++Builder intended for visual building SQL statements for the SELECT, INSERT, UPDATE andDELETE clauses.
Advanced Excel Report for RAD StudioAdvanced Excel Report for RAD Studio is a powerful band-oriented generator of template-basedreports in MS Excel.
Advanced Localizer for RAD Studio VCLAdvanced Localizer for RAD Studio VCL is an indispensable component for Delphi for addingmultilingual support to your applications.
Scroll to top
69
69

Part
II
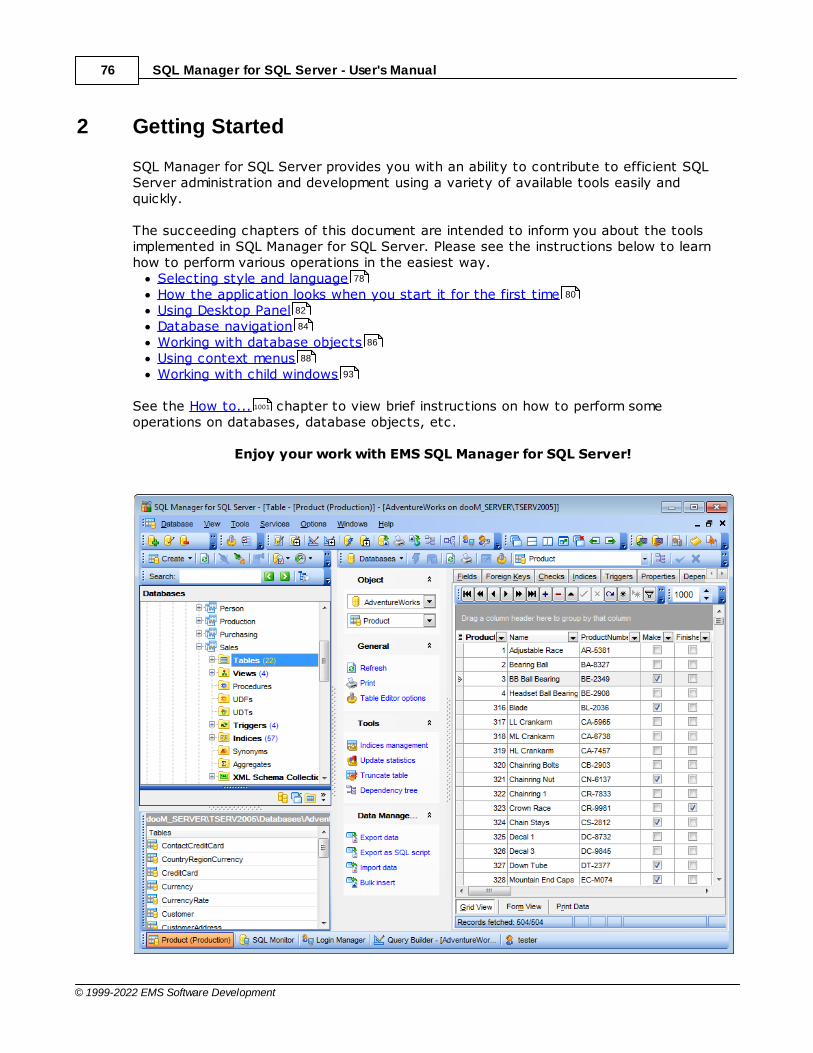
SQL Manager for SQL Server - User's Manual76
© 1999-2022 EMS Software Development
2 Getting Started
SQL Manager for SQL Server provides you with an ability to contribute to efficient SQLServer administration and development using a variety of available tools easily andquickly.
The succeeding chapters of this document are intended to inform you about the toolsimplemented in SQL Manager for SQL Server. Please see the instructions below to learnhow to perform various operations in the easiest way.
Selecting style and languageHow the application looks when you start it for the first timeUsing Desktop PanelDatabase navigationWorking with database objectsUsing context menusWorking with child windows
See the How to... chapter to view brief instructions on how to perform someoperations on databases, database objects, etc.
Enjoy your work with EMS SQL Manager for SQL Server!
78
80
82
84
86
88
93
1001
SQL Manager for SQL Server - User's Manual77
© 1999-2022 EMS Software Development
See also:
Database Explorer
Database Management
Database Objects Management
Query Management Tools
Data Management
Import/Export Tools
Database Tools
Server Tools
Personalization
External Tools
How To...
99
130
214
460
498
566
651
757
866
952
1001
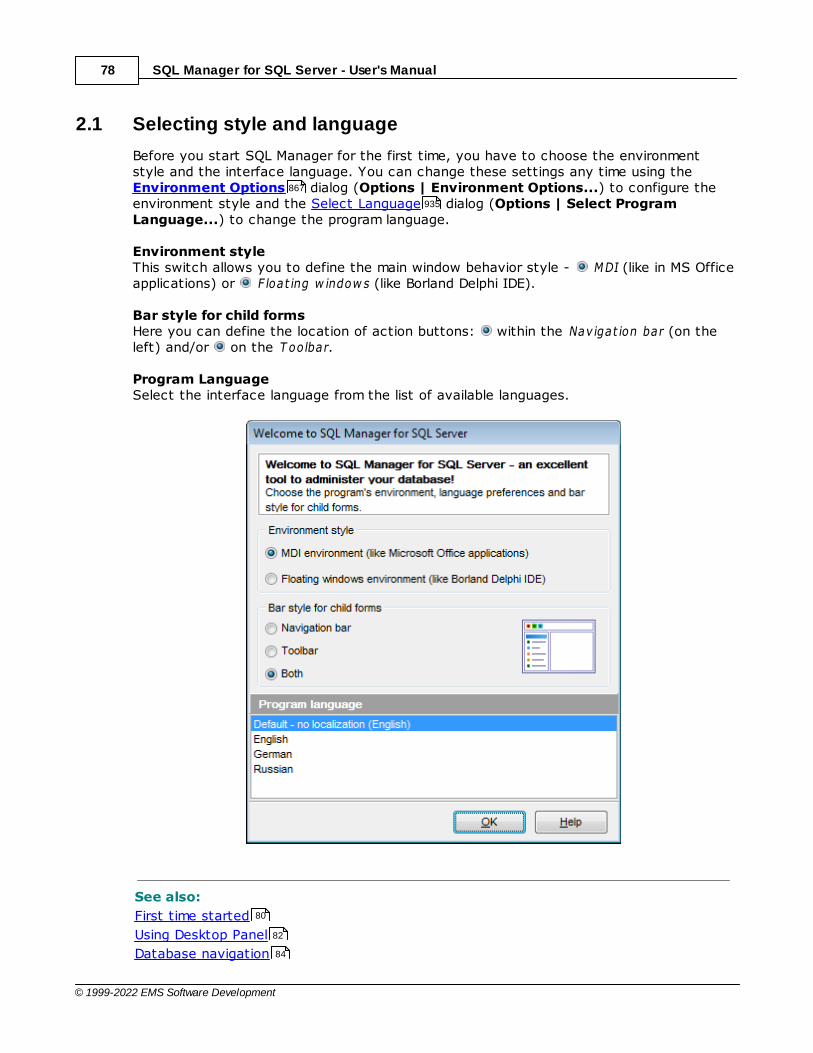
SQL Manager for SQL Server - User's Manual78
© 1999-2022 EMS Software Development
2.1 Selecting style and language
Before you start SQL Manager for the first time, you have to choose the environmentstyle and the interface language. You can change these settings any time using the Environment Options dialog (Options | Environment Options...) to configure theenvironment style and the Select Language dialog (Options | Select ProgramLanguage...) to change the program language.
Environment styleThis switch allows you to define the main window behavior style - MDI (like in MS Officeapplications) or F loat ing w indow s (like Borland Delphi IDE).
Bar style for child formsHere you can define the location of action buttons: within the Navigat ion bar (on theleft) and/or on the T oolbar.
Program LanguageSelect the interface language from the list of available languages.
See also:
First time started
Using Desktop Panel
Database navigation
867
935
80
82
84

SQL Manager for SQL Server - User's Manual79
© 1999-2022 EMS Software Development
Working with database objects
Using context menus
Working with windows
86
88
93

SQL Manager for SQL Server - User's Manual80
© 1999-2022 EMS Software Development
2.2 First time started
This is how SQL Manager for SQL Server looks when you start it for the first time. Usethe Desktop panel to fulfill any of common tasks: Create a new database , Manageexisting database(s) , and several tasks that do not require database registration, i.e.Execute SQL script , accessing the reference system or using available Internetresources.
The main menu allows you to perform various Database operations, open To-Do List and activate/deactivate Database Explorer , SQL Assistant and various toolbars within the View menu, manage your databases using items of the Tools and Services
menus, customize the application using the Options menu, manage SQL ManagerWindows using Window List and other tools, view the Tip of the Day and accessRegistration information and product documentation, update the product to thelatest version using the corresponding items available within the Help menu.
To start working with your SQL Server, you should first register one or several databasesusing Register Database Wizard .
By default the corresponding Register Host, Register Database buttons areavailable on the toolbar and within the Database menu.
When the database connection settings are specified, you can set connection to yourdatabase and proceed to Database navigation , Database Objects management ,working with SQL queries and other tools of SQL Manager.
82 133
147
659
958
981 99 121
960
866
983 968
25 988
147
960
84 214
460
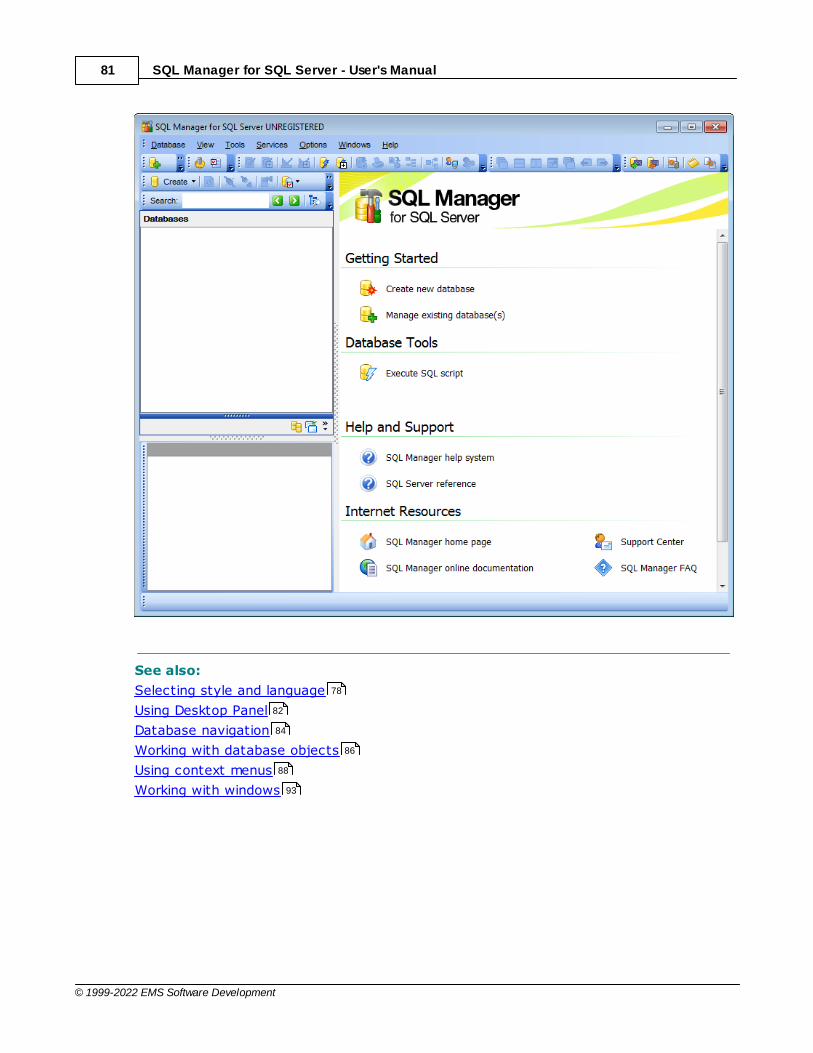
SQL Manager for SQL Server - User's Manual81
© 1999-2022 EMS Software Development
See also:
Selecting style and language
Using Desktop Panel
Database navigation
Working with database objects
Using context menus
Working with windows
78
82
84
86
88
93
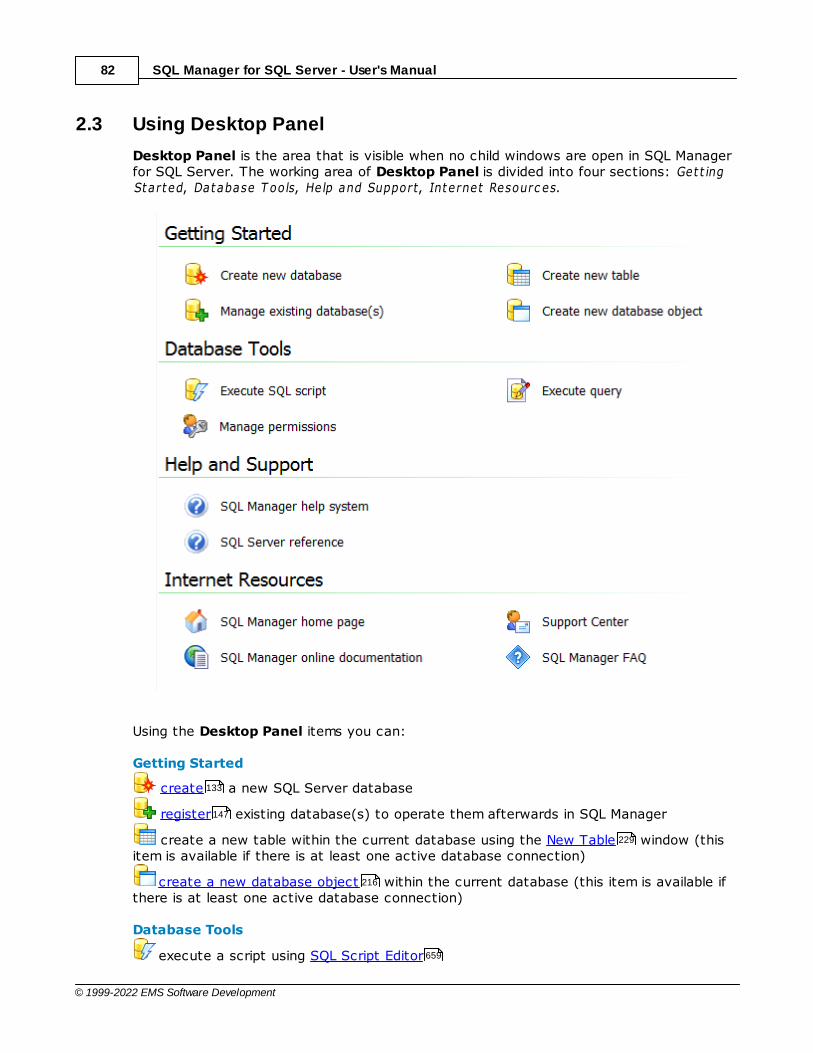
SQL Manager for SQL Server - User's Manual82
© 1999-2022 EMS Software Development
2.3 Using Desktop Panel
Desktop Panel is the area that is visible when no child windows are open in SQL Managerfor SQL Server. The working area of Desktop Panel is divided into four sections: Get t ingStarted, Database T ools, Help and Support, Internet Resourc es.
Using the Desktop Panel items you can:
Getting Started
create a new SQL Server database
register existing database(s) to operate them afterwards in SQL Manager
create a new table within the current database using the New Table window (thisitem is available if there is at least one active database connection)
create a new database object within the current database (this item is available ifthere is at least one active database connection)
Database Tools
execute a script using SQL Script Editor
133
147
229
216
659

SQL Manager for SQL Server - User's Manual83
© 1999-2022 EMS Software Development
execute a SQL query (this item is available if there is at least one active databaseconnection)
grant permissions on database objects to SQL Server users using Grant Manager(this item is available if there is at least one active database connection)
Help and Support
show this help file
use SQL Server reference
Internet Resources
visit SQL Manager Home Page
browse SQL Manager on-line documentation
go to Technical Support Center
look through the Frequently Asked Questions page
See also:
Selecting style and language
First time started
Database navigation
Working with database objects
Using context menus
Working with windows
462
724
64
78
80
84
86
88
93
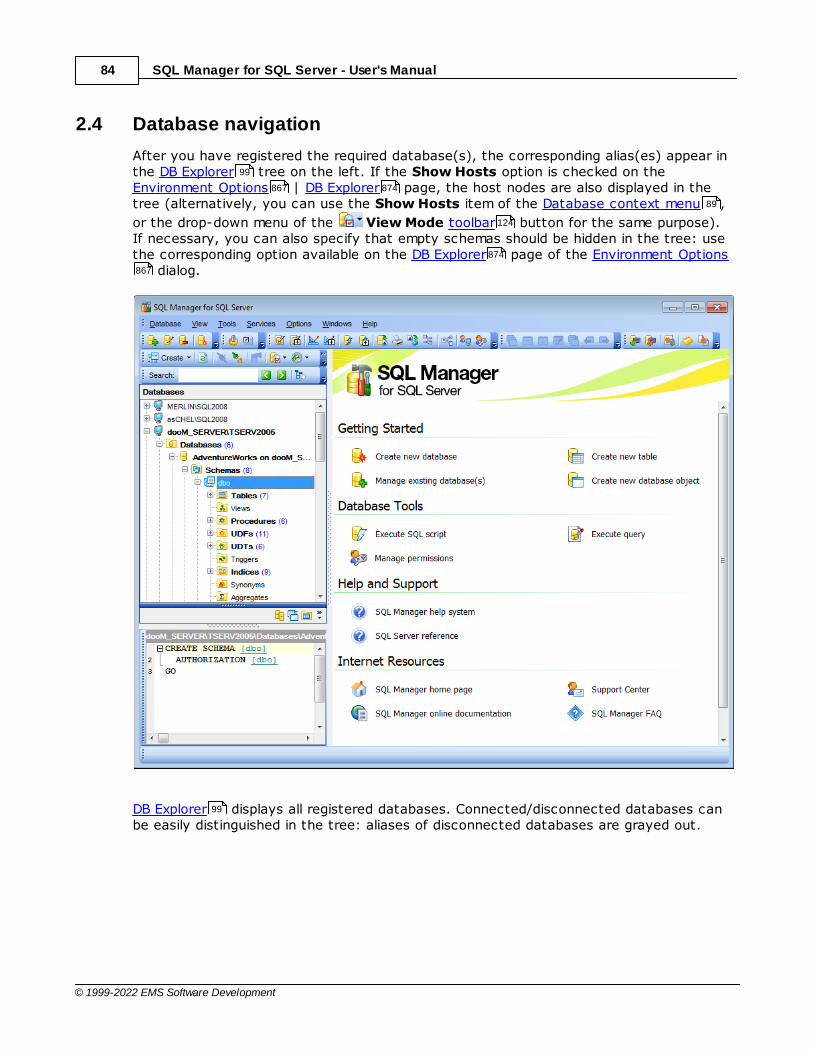
SQL Manager for SQL Server - User's Manual84
© 1999-2022 EMS Software Development
2.4 Database navigation
After you have registered the required database(s), the corresponding alias(es) appear inthe DB Explorer tree on the left. If the Show Hosts option is checked on theEnvironment Options | DB Explorer page, the host nodes are also displayed in thetree (alternatively, you can use the Show Hosts item of the Database context menu ,
or the drop-down menu of the View Mode toolbar button for the same purpose).If necessary, you can also specify that empty schemas should be hidden in the tree: usethe corresponding option available on the DB Explorer page of the Environment Options
dialog.
DB Explorer displays all registered databases. Connected/disconnected databases canbe easily distinguished in the tree: aliases of disconnected databases are grayed out.
99
867 874
89
124
874
867
99
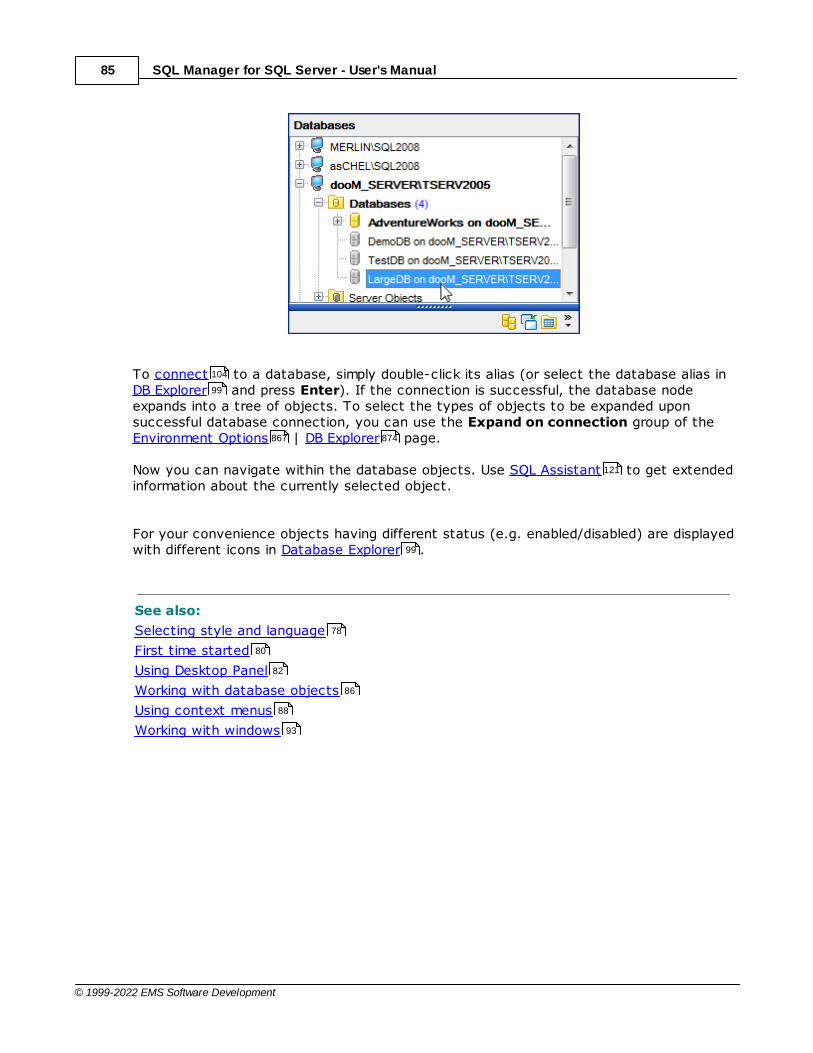
SQL Manager for SQL Server - User's Manual85
© 1999-2022 EMS Software Development
To connect to a database, simply double-click its alias (or select the database alias inDB Explorer and press Enter). If the connection is successful, the database nodeexpands into a tree of objects. To select the types of objects to be expanded uponsuccessful database connection, you can use the Expand on connection group of theEnvironment Options | DB Explorer page.
Now you can navigate within the database objects. Use SQL Assistant to get extendedinformation about the currently selected object.
For your convenience objects having different status (e.g. enabled/disabled) are displayedwith different icons in Database Explorer .
See also:
Selecting style and language
First time started
Using Desktop Panel
Working with database objects
Using context menus
Working with windows
104
99
867 874
121
99
78
80
82
86
88
93
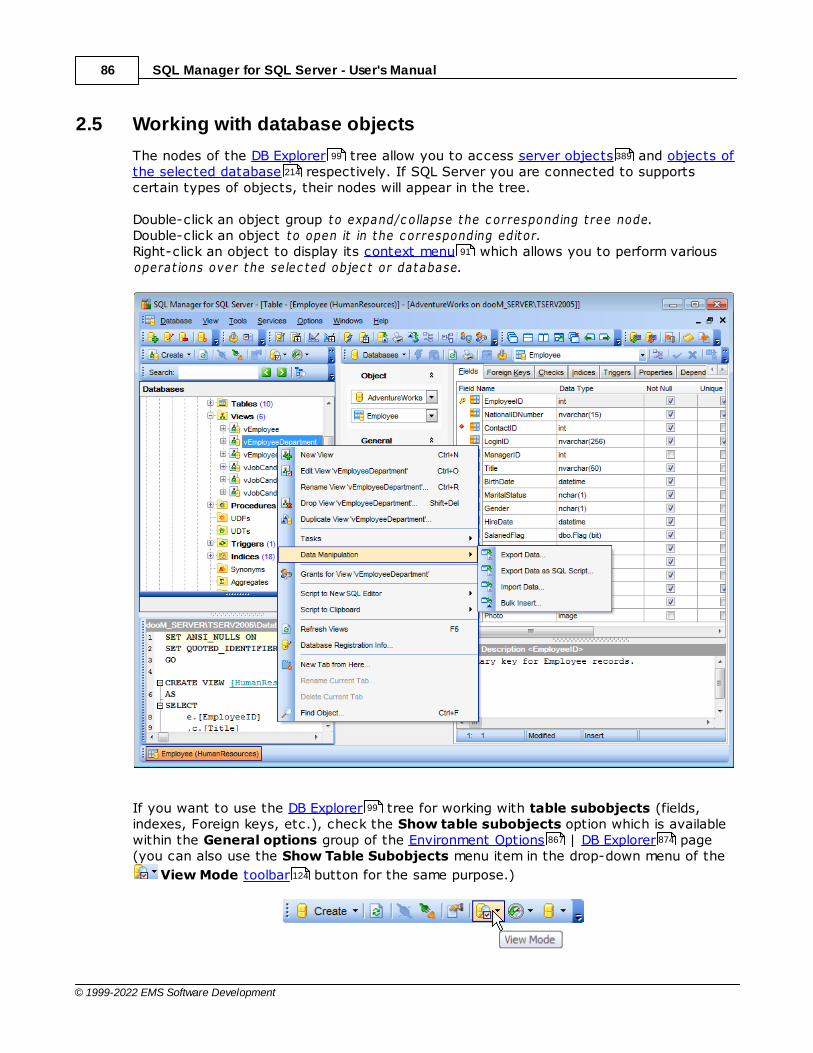
SQL Manager for SQL Server - User's Manual86
© 1999-2022 EMS Software Development
2.5 Working with database objects
The nodes of the DB Explorer tree allow you to access server objects and objects ofthe selected database respectively. If SQL Server you are connected to supportscertain types of objects, their nodes will appear in the tree.
Double-click an object group to expand/c ollapse the c orresponding t ree node.Double-click an object to open it in the c orresponding editor.Right-click an object to display its context menu which allows you to perform variousoperat ions over the se lec ted objec t or database.
If you want to use the DB Explorer tree for working with table subobjects (fields,indexes, Foreign keys, etc.), check the Show table subobjects option which is availablewithin the General options group of the Environment Options | DB Explorer page(you can also use the Show Table Subobjects menu item in the drop-down menu of the
View Mode toolbar button for the same purpose.)
99 389
214
91
99
867 874
124
SQL Manager for SQL Server - User's Manual87
© 1999-2022 EMS Software Development
See also:
Selecting style and language
First time started
Using Desktop Panel
Database navigation
Using context menus
Working with windows
78
80
82
84
88
93
SQL Manager for SQL Server - User's Manual88
© 1999-2022 EMS Software Development
2.6 Using context menus
The context menus are aimed at facilitating your work with SQL Manager for SQLServer: you can perform a variety of operations using context menu items.
Select an object in DB Explorer and right-click its alias to open the context menu.Host context menuDatabase context menuObject context menu
See also:
Selecting style and language
First time started
Using Desktop Panel
Database navigation
Working with database objects
Working with windows
2.6.1 Host context menu
The context menu of a host in the DB Explorer tree allows you to: access server objects and some common services available in the Taskssubmenu;view/edit the selected host properties within the Server Properties dialog;
create a new database on the selected host;
register a new database using Register Database Wizard ;
unregister the selected host;configure representation of hosts and databases in Database Explorer ;create a new tab for the selected host to access it through this tab quickly and/ormanage the existing tab;
search for an object within the tree.
99
88
89
91
78
80
82
84
86
93
99
389 757
197
133
147
130
99
112
118
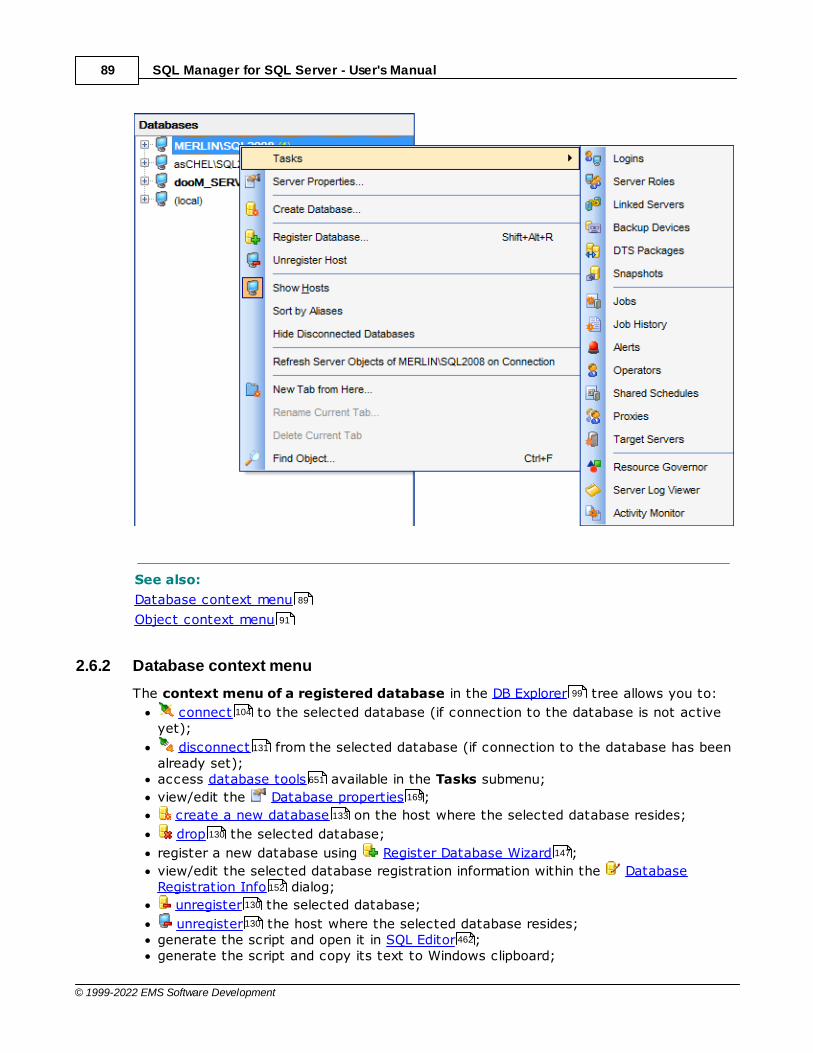
SQL Manager for SQL Server - User's Manual89
© 1999-2022 EMS Software Development
See also:
Database context menu
Object context menu
2.6.2 Database context menu
The context menu of a registered database in the DB Explorer tree allows you to:
connect to the selected database (if connection to the database is not activeyet);
disconnect from the selected database (if connection to the database has beenalready set);access database tools available in the Tasks submenu;
view/edit the Database properties ;
create a new database on the host where the selected database resides;
drop the selected database;
register a new database using Register Database Wizard ;
view/edit the selected database registration information within the DatabaseRegistration Info dialog;
unregister the selected database;
unregister the host where the selected database resides;generate the script and open it in SQL Editor ;generate the script and copy its text to Windows clipboard;
89
91
99
104
131
651
169
133
130
147
152
130
130
462
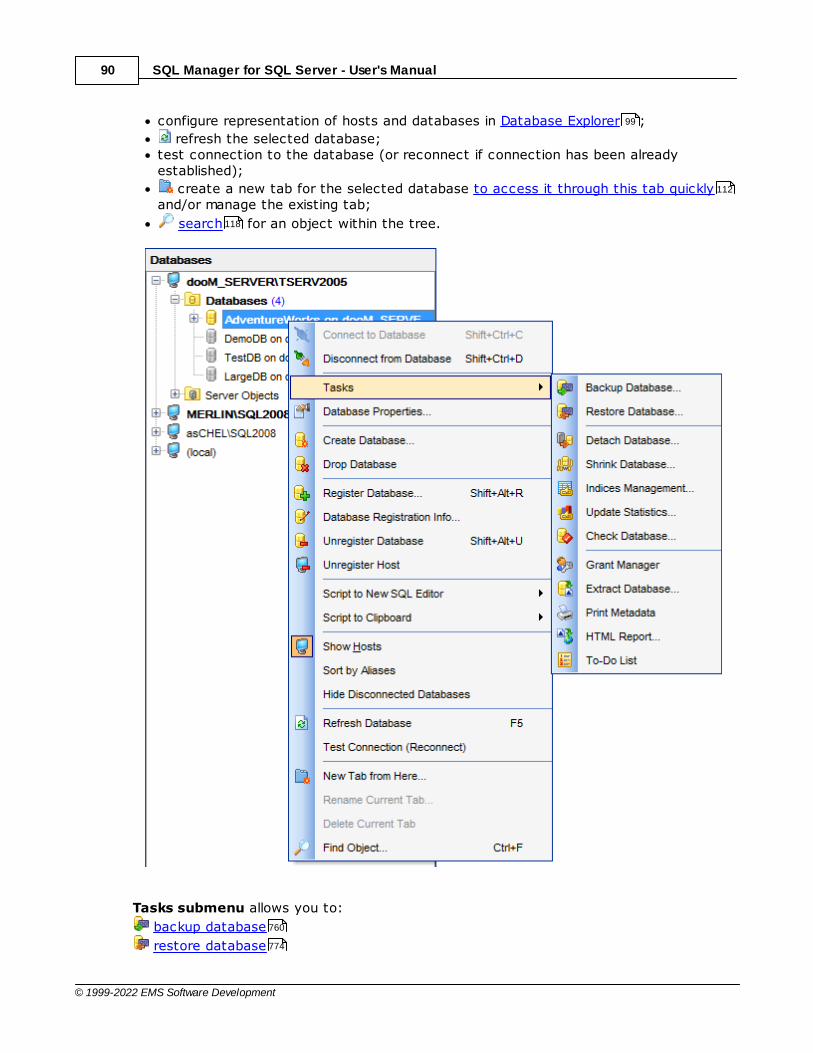
SQL Manager for SQL Server - User's Manual90
© 1999-2022 EMS Software Development
configure representation of hosts and databases in Database Explorer ;
refresh the selected database;test connection to the database (or reconnect if connection has been alreadyestablished);
create a new tab for the selected database to access it through this tab quicklyand/or manage the existing tab;
search for an object within the tree.
Tasks submenu allows you to:
backup database
restore database
99
112
118
760
774
SQL Manager for SQL Server - User's Manual91
© 1999-2022 EMS Software Development
detach database
shrink database
manage indices
update statistics
check database
manage privileges
extract database objects and/or data to an SQL script
print metadata
generate html report of the selected objects
create to-do list
See also:
Host context menu
Object context menu
2.6.3 Object context menu
The context menu of an object (e.g. table or v iew) in the DB Explorer tree allows youto:
create a new database object of the same type;edit the selected object in its editor;rename the selected object;drop the selected object from the database;
duplicate the selected object (create a new object with the same DDLstructure and properties as the selected object has);access common Tasks applied to this object;perform data manipulation operations (for tables and views );
view properties (for tables );
define grants for the selected object;generate the object script and open it in SQL Editor ;generate the object script and copy its text to Windows clipboard;
refresh all objects of the selected object type;
view/edit the database registration information within the Database RegistrationInfo dialog (for database objects );
create a new tab for the selected object to access it through this tab quicklyand/or manage the existing tab;
search for an object within the tree.
793
797
802
808
815
724
666
683
692
981
88
91
99
216
214
214
214
218 962
566 228 282
247 228
724
462
152 214
112
118
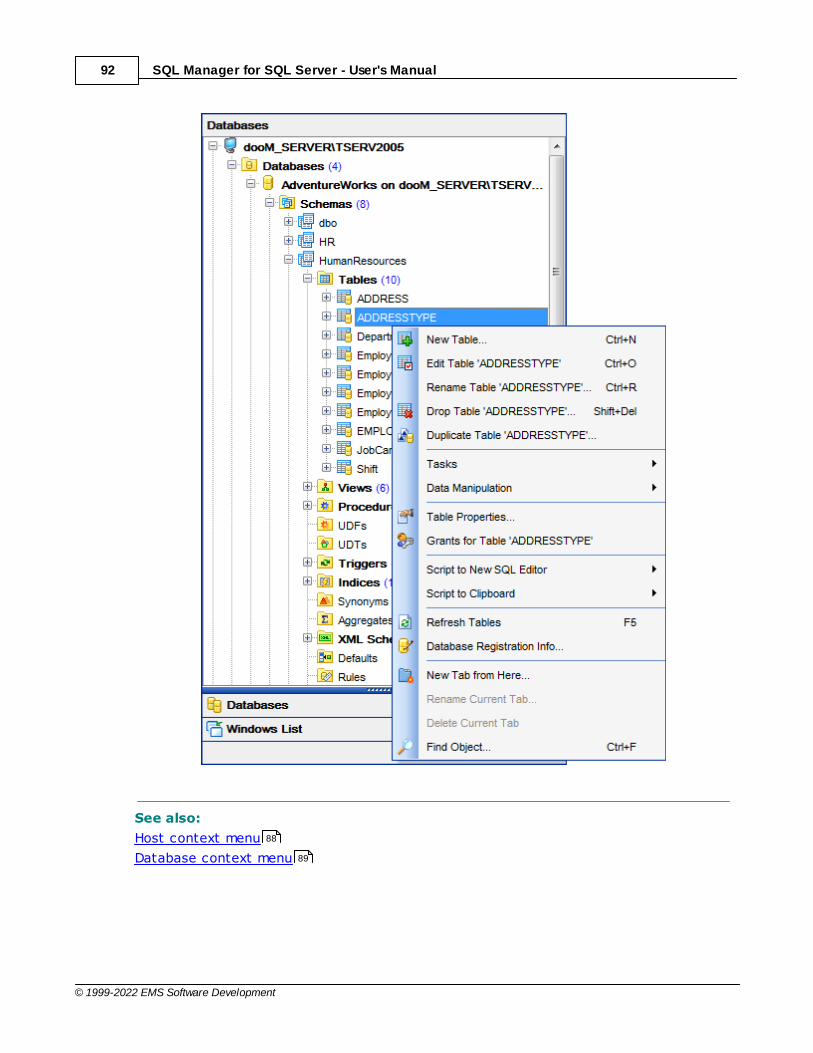
SQL Manager for SQL Server - User's Manual92
© 1999-2022 EMS Software Development
See also:
Host context menu
Database context menu
88
89
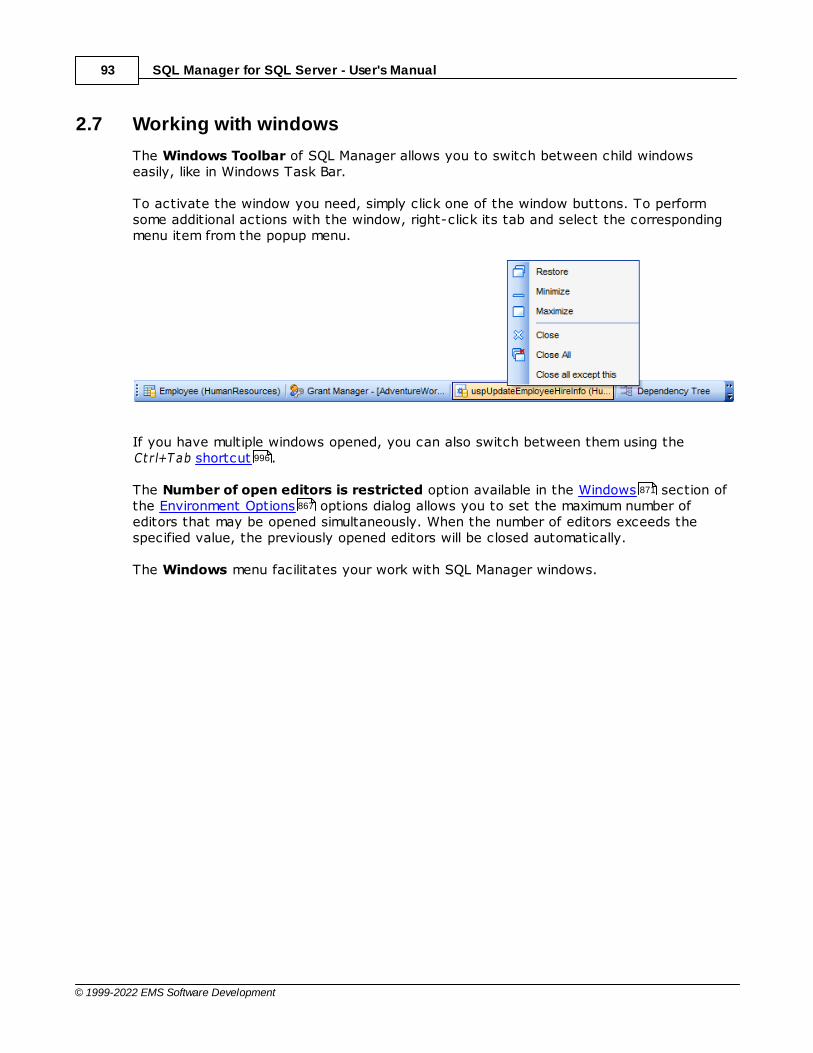
SQL Manager for SQL Server - User's Manual93
© 1999-2022 EMS Software Development
2.7 Working with windows
The Windows Toolbar of SQL Manager allows you to switch between child windowseasily, like in Windows Task Bar.
To activate the window you need, simply click one of the window buttons. To performsome additional actions with the window, right-click its tab and select the correspondingmenu item from the popup menu.
If you have multiple windows opened, you can also switch between them using the Ct r l+T ab shortcut .
The Number of open editors is restricted option available in the Windows section ofthe Environment Options options dialog allows you to set the maximum number ofeditors that may be opened simultaneously. When the number of editors exceeds thespecified value, the previously opened editors will be closed automatically.
The Windows menu facilitates your work with SQL Manager windows.
996
871
867

SQL Manager for SQL Server - User's Manual94
© 1999-2022 EMS Software Development
The Windows menu allows you to: view the Windows List within the corresponding tab of DB Explorer;set all current windows c asc ade:
983 112
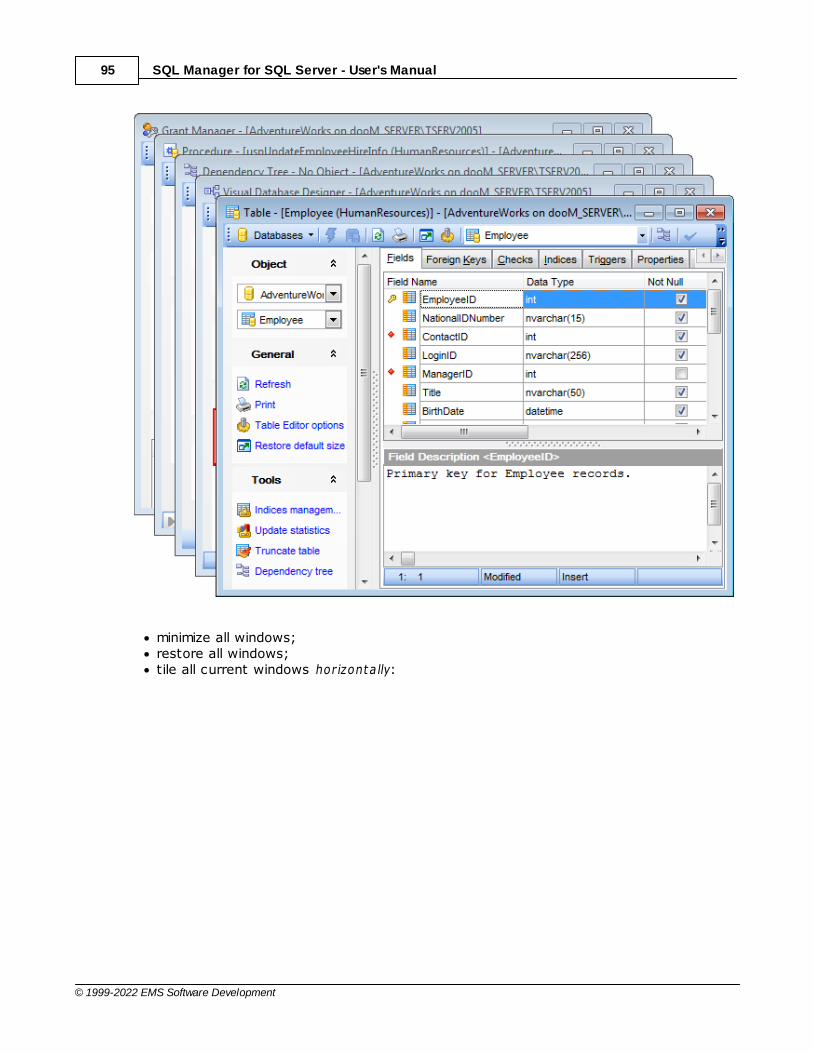
SQL Manager for SQL Server - User's Manual95
© 1999-2022 EMS Software Development
minimize all windows;restore all windows;tile all current windows horizonta lly:
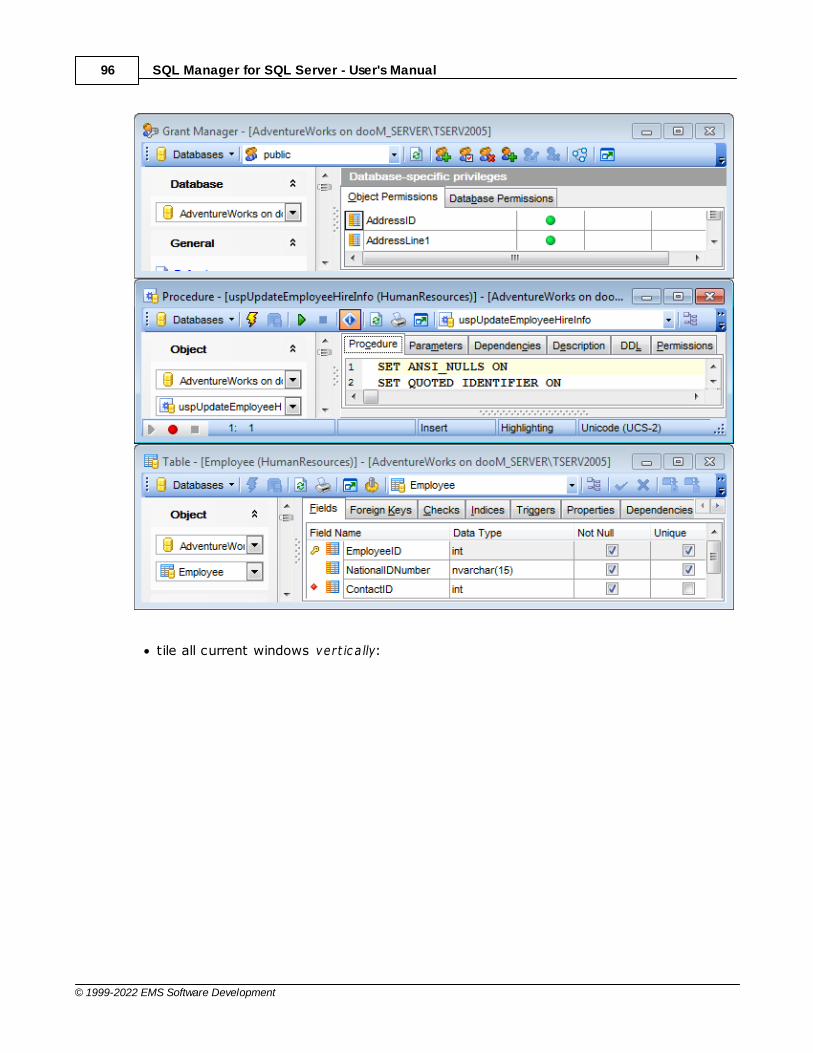
SQL Manager for SQL Server - User's Manual96
© 1999-2022 EMS Software Development
tile all current windows vert ic a lly:
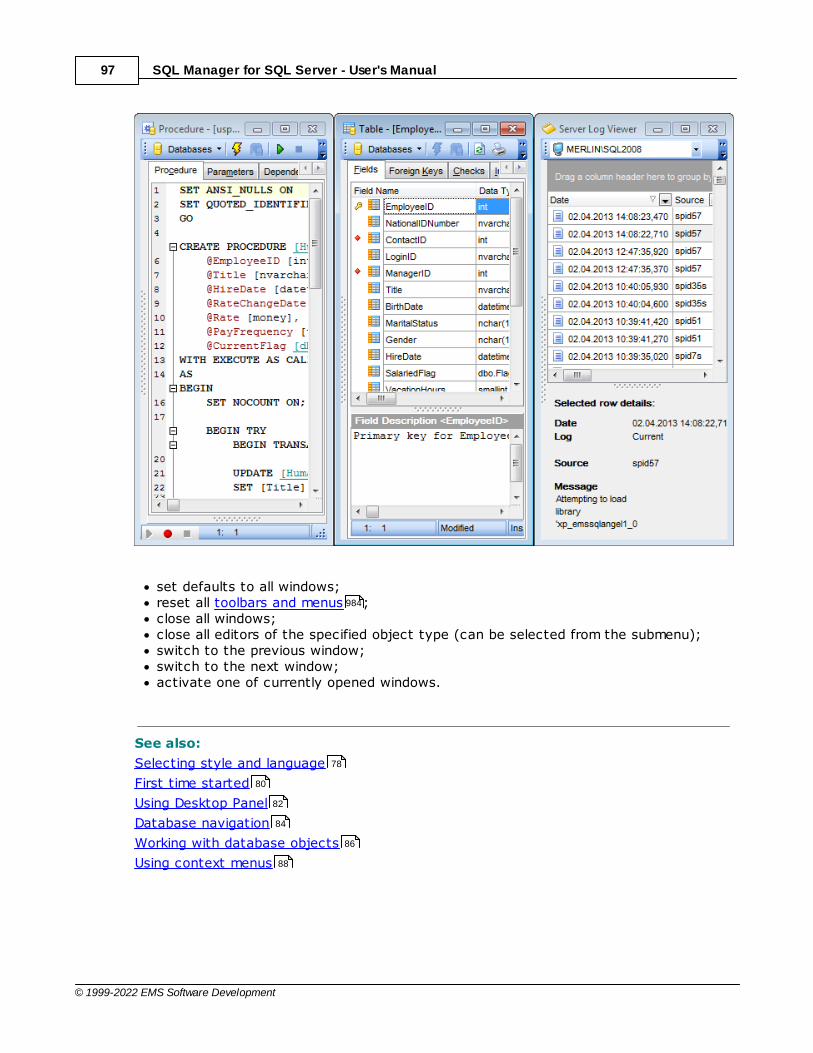
SQL Manager for SQL Server - User's Manual97
© 1999-2022 EMS Software Development
set defaults to all windows;reset all toolbars and menus ;close all windows;close all editors of the specified object type (can be selected from the submenu);switch to the previous window;switch to the next window;activate one of currently opened windows.
See also:
Selecting style and language
First time started
Using Desktop Panel
Database navigation
Working with database objects
Using context menus
984
78
80
82
84
86
88

Part
III
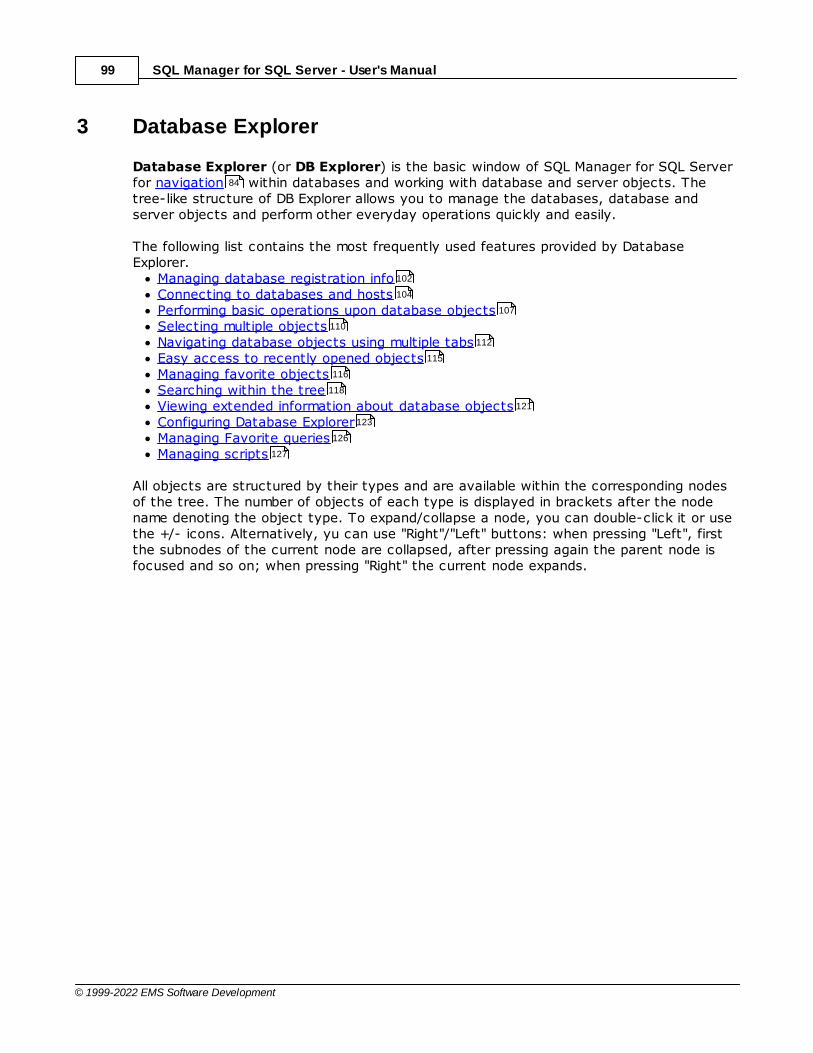
SQL Manager for SQL Server - User's Manual99
© 1999-2022 EMS Software Development
3 Database Explorer
Database Explorer (or DB Explorer) is the basic window of SQL Manager for SQL Serverfor navigation within databases and working with database and server objects. Thetree-like structure of DB Explorer allows you to manage the databases, database andserver objects and perform other everyday operations quickly and easily.
The following list contains the most frequently used features provided by DatabaseExplorer.
Managing database registration infoConnecting to databases and hostsPerforming basic operations upon database objectsSelecting multiple objectsNavigating database objects using multiple tabsEasy access to recently opened objectsManaging favorite objectsSearching within the treeViewing extended information about database objectsConfiguring Database ExplorerManaging Favorite queriesManaging scripts
All objects are structured by their types and are available within the corresponding nodesof the tree. The number of objects of each type is displayed in brackets after the nodename denoting the object type. To expand/collapse a node, you can double-click it or usethe +/- icons. Alternatively, yu can use "Right"/"Left" buttons: when pressing "Left", firstthe subnodes of the current node are collapsed, after pressing again the parent node isfocused and so on; when pressing "Right" the current node expands.
84
102
104
107
110
112
115
116
118
121
123
126
127
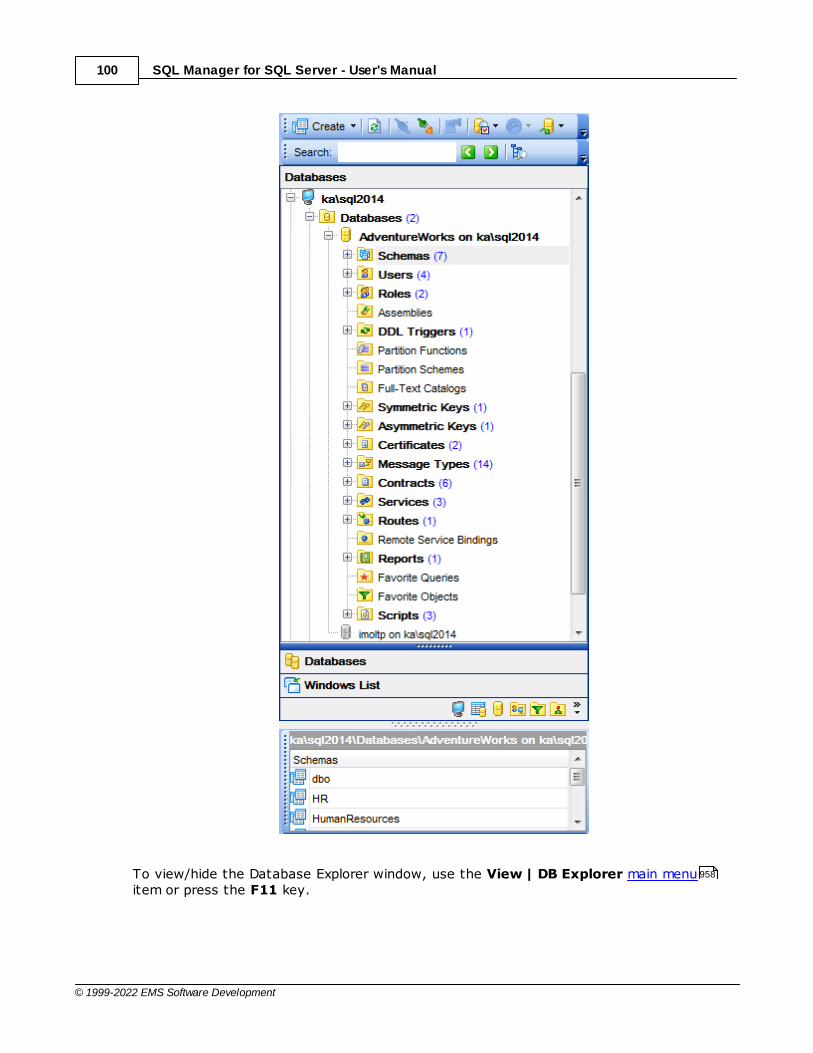
SQL Manager for SQL Server - User's Manual100
© 1999-2022 EMS Software Development
To view/hide the Database Explorer window, use the View | DB Explorer main menuitem or press the F11 key.
958

SQL Manager for SQL Server - User's Manual101
© 1999-2022 EMS Software Development
Use the Ct r l+Shift+C shortcut to collapse current DB Explorer tree branch and switchto the parent node.
Note that you can change host and database aliases order by dragging them within the DB Explorer tree.
See also:
Getting Started
Database Management
Database Objects Management
Query Management Tools
Data Management
Import/Export Tools
Database Tools
Server Tools
Personalization
External Tools
How To...
996
76
130
214
460
498
566
651
757
866
952
1001
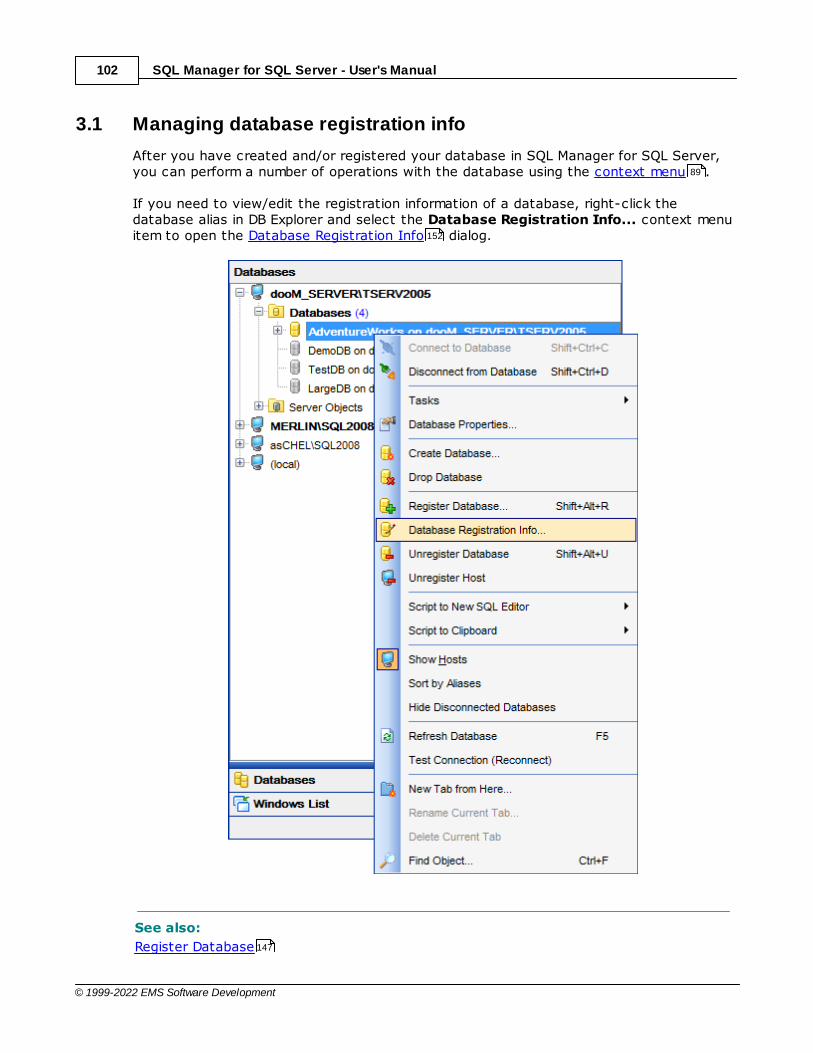
SQL Manager for SQL Server - User's Manual102
© 1999-2022 EMS Software Development
3.1 Managing database registration info
After you have created and/or registered your database in SQL Manager for SQL Server,you can perform a number of operations with the database using the context menu .
If you need to view/edit the registration information of a database, right-click thedatabase alias in DB Explorer and select the Database Registration Info... context menuitem to open the Database Registration Info dialog.
See also:
Register Database
89
152
147

SQL Manager for SQL Server - User's Manual103
© 1999-2022 EMS Software Development
Database Registration Info
Database Properties
152
169
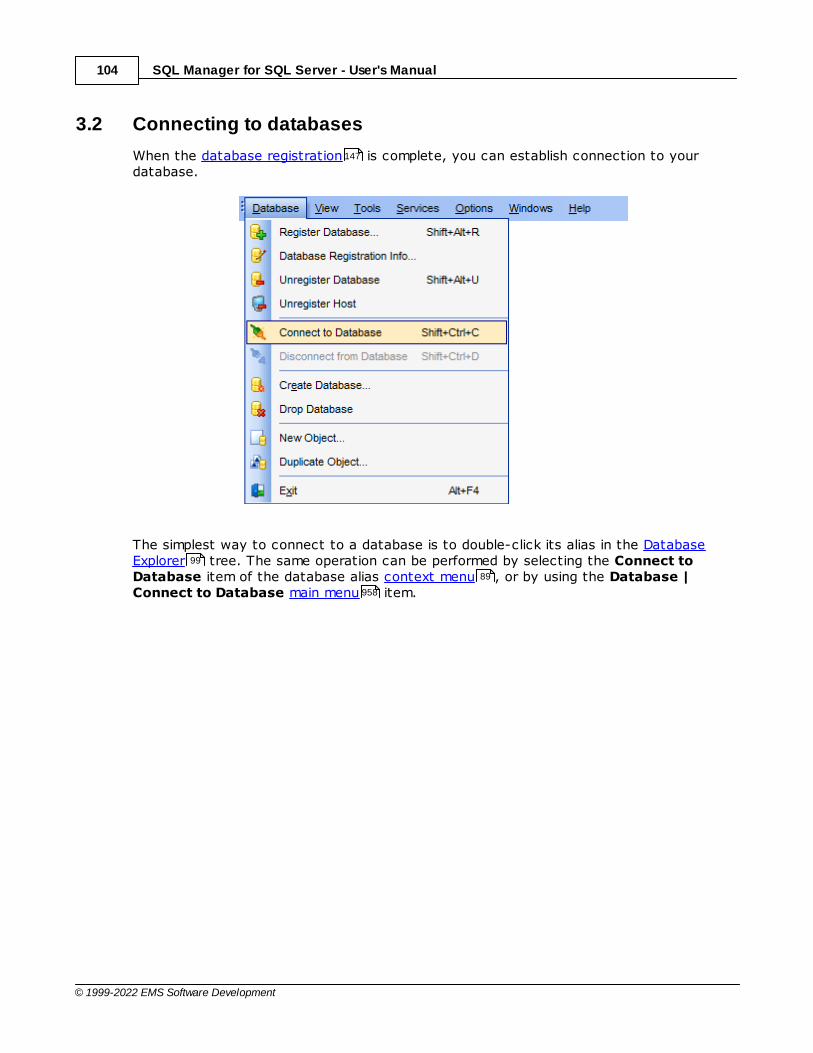
SQL Manager for SQL Server - User's Manual104
© 1999-2022 EMS Software Development
3.2 Connecting to databases
When the database registration is complete, you can establish connection to yourdatabase.
The simplest way to connect to a database is to double-click its alias in the DatabaseExplorer tree. The same operation can be performed by selecting the Connect toDatabase item of the database alias context menu , or by using the Database |Connect to Database main menu item.
147
99
89
958
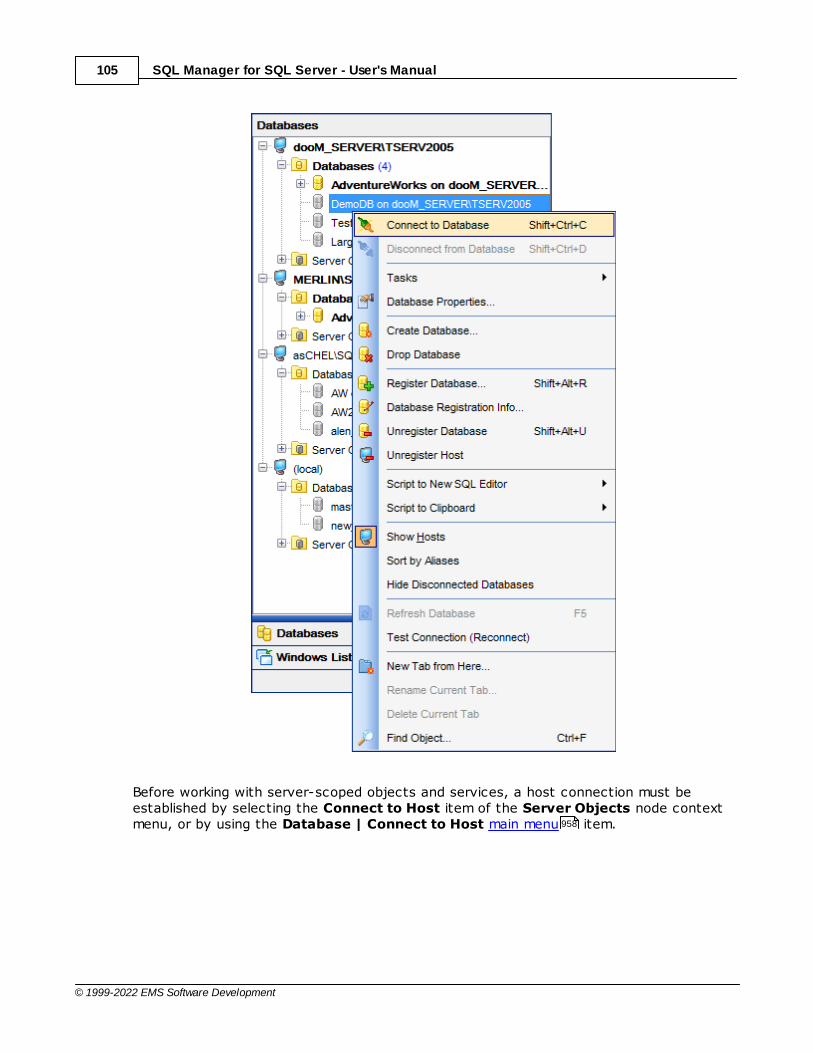
SQL Manager for SQL Server - User's Manual105
© 1999-2022 EMS Software Development
Before working with server-scoped objects and services, a host connection must beestablished by selecting the Connect to Host item of the Server Objects node contextmenu, or by using the Database | Connect to Host main menu item. 958
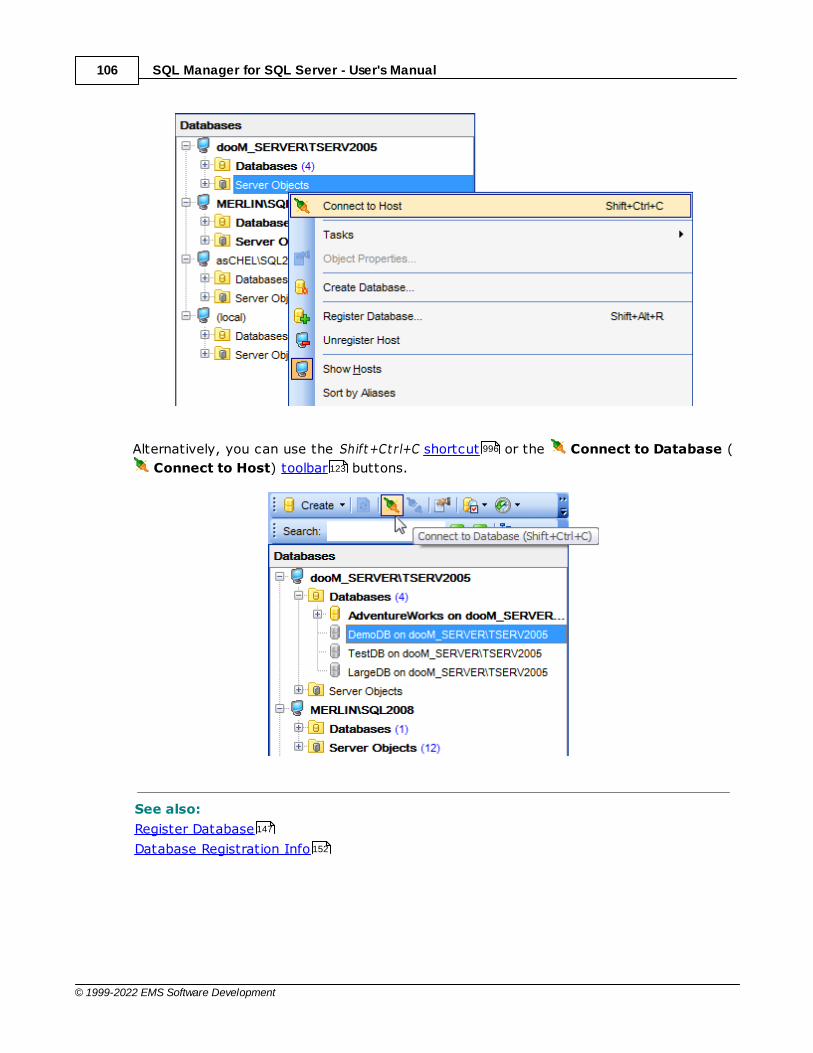
SQL Manager for SQL Server - User's Manual106
© 1999-2022 EMS Software Development
Alternatively, you can use the Shift+Ct r l+C shortcut or the Connect to Database (
Connect to Host) toolbar buttons.
See also:
Register Database
Database Registration Info
996
123
147
152
SQL Manager for SQL Server - User's Manual107
© 1999-2022 EMS Software Development
3.3 Operations with database and server objects
Database Explorer allows you to perform various operations with database objectsand server objects .
To open an object in its editor, you can double-click the object in the DB Explorer tree.
You can also right-click an object within the DB Explorer tree and use its context menu to perform a number of operations:create a new object (the New <object>... item);edit currently selected object (the Edit <object_name>... item);rename currently selected object (the Rename <object_name>... item);drop the selected object from the database (the Drop <object_name>... item);duplicate the selected object (the Duplicate <object_name>... item);define grants for the selected object (the Grants for <object_name>... item).
Note that the context menu contains object-specific items only when the object iscurrently selected in DB Explorer.
214
389
91
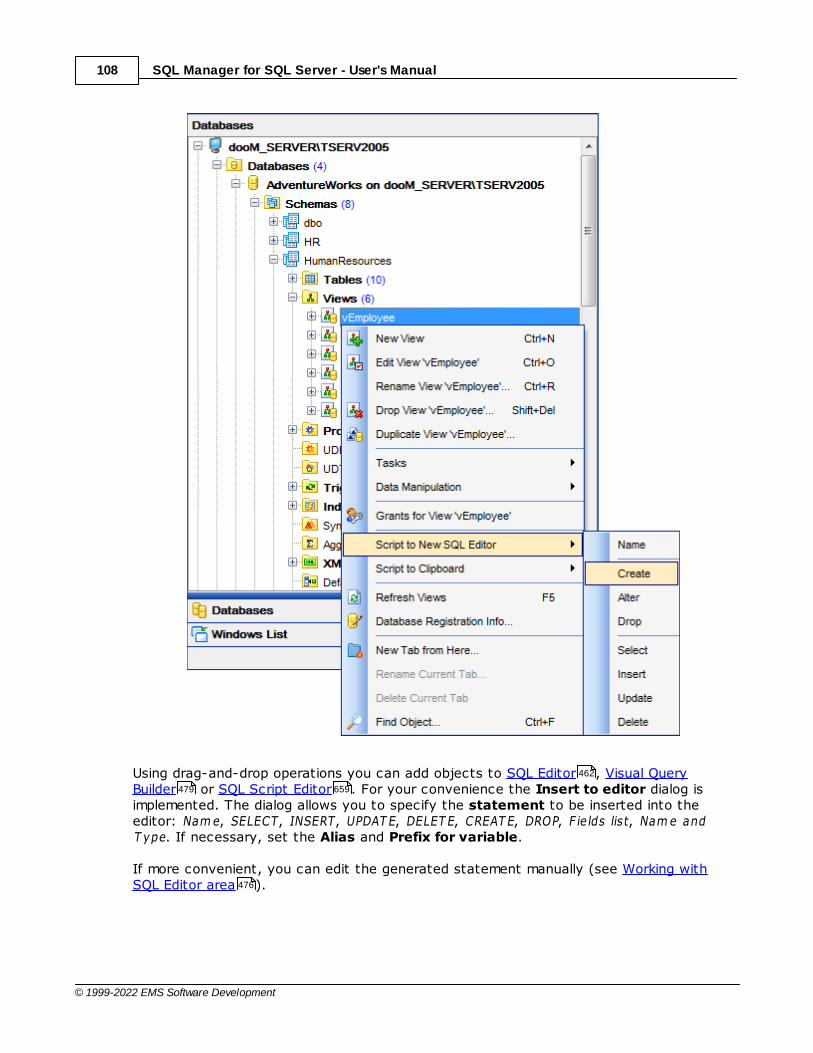
SQL Manager for SQL Server - User's Manual108
© 1999-2022 EMS Software Development
Using drag-and-drop operations you can add objects to SQL Editor , Visual QueryBuilder or SQL Script Editor . For your convenience the Insert to editor dialog isimplemented. The dialog allows you to specify the statement to be inserted into theeditor: Nam e, SELECT, INSERT, UPDAT E, DELET E, CREAT E, DROP, F ie lds list, Nam e andT ype. If necessary, set the Alias and Prefix for variable.
If more convenient, you can edit the generated statement manually (see Working withSQL Editor area ).
462
479 659
476
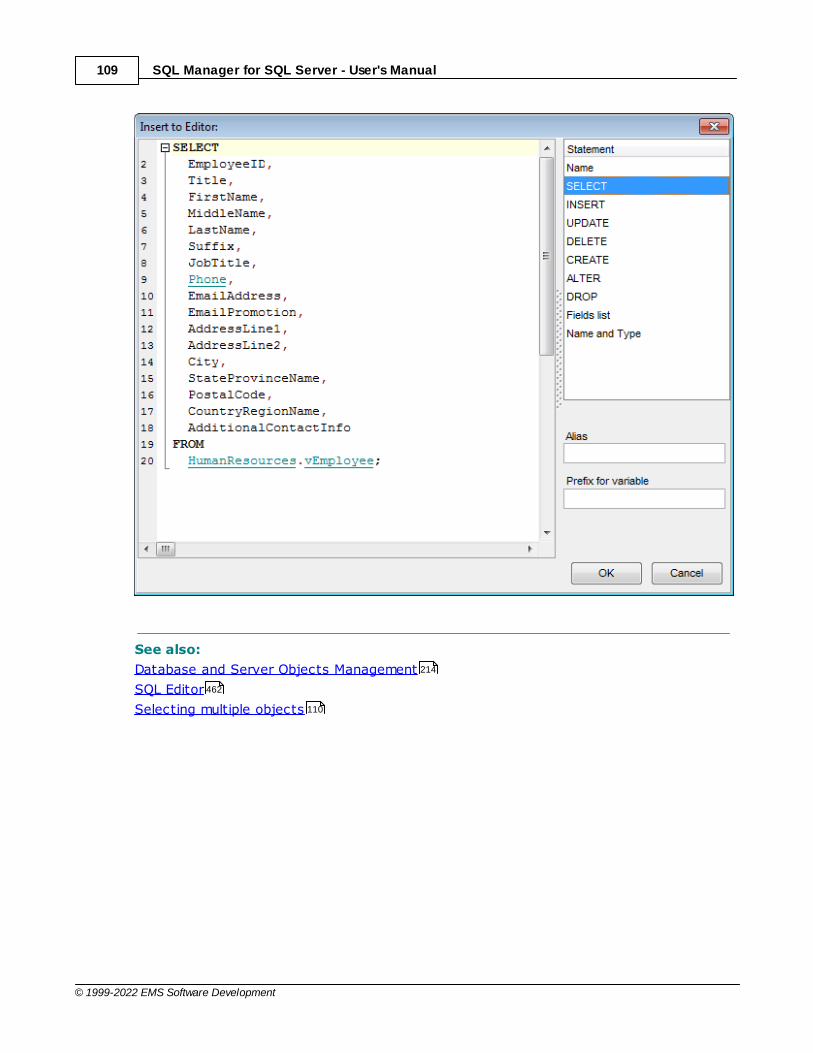
SQL Manager for SQL Server - User's Manual109
© 1999-2022 EMS Software Development
See also:
Database and Server Objects Management
SQL Editor
Selecting multiple objects
214
462
110
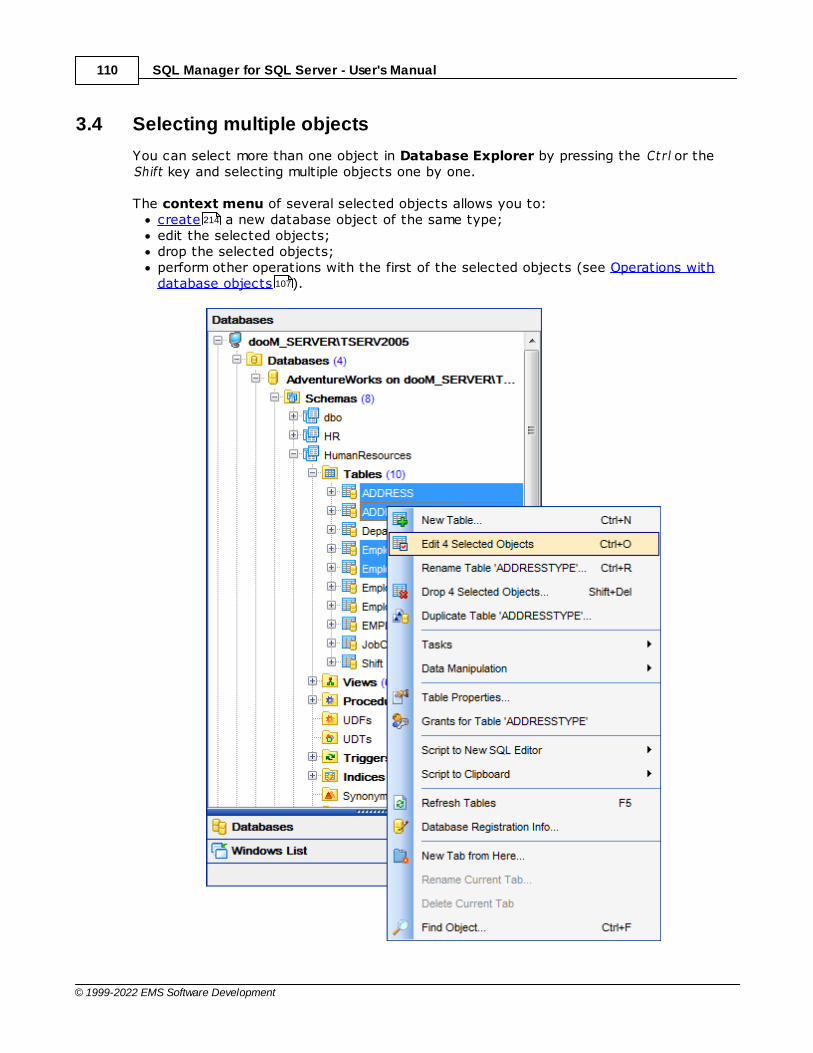
SQL Manager for SQL Server - User's Manual110
© 1999-2022 EMS Software Development
3.4 Selecting multiple objects
You can select more than one object in Database Explorer by pressing the Ct r l or theShift key and selecting multiple objects one by one.
The context menu of several selected objects allows you to: create a new database object of the same type;edit the selected objects;drop the selected objects;perform other operations with the first of the selected objects (see Operations withdatabase objects ).
214
107

SQL Manager for SQL Server - User's Manual111
© 1999-2022 EMS Software Development
Hint: You can move several objects to your projects : just drag and drop the selectedobjects to the previously created subfolder within the Projects node of DB Explorer.
See also:
Operations with database and server objects
Database and Server Objects Management
Managing favorite objects
116
107
214
116
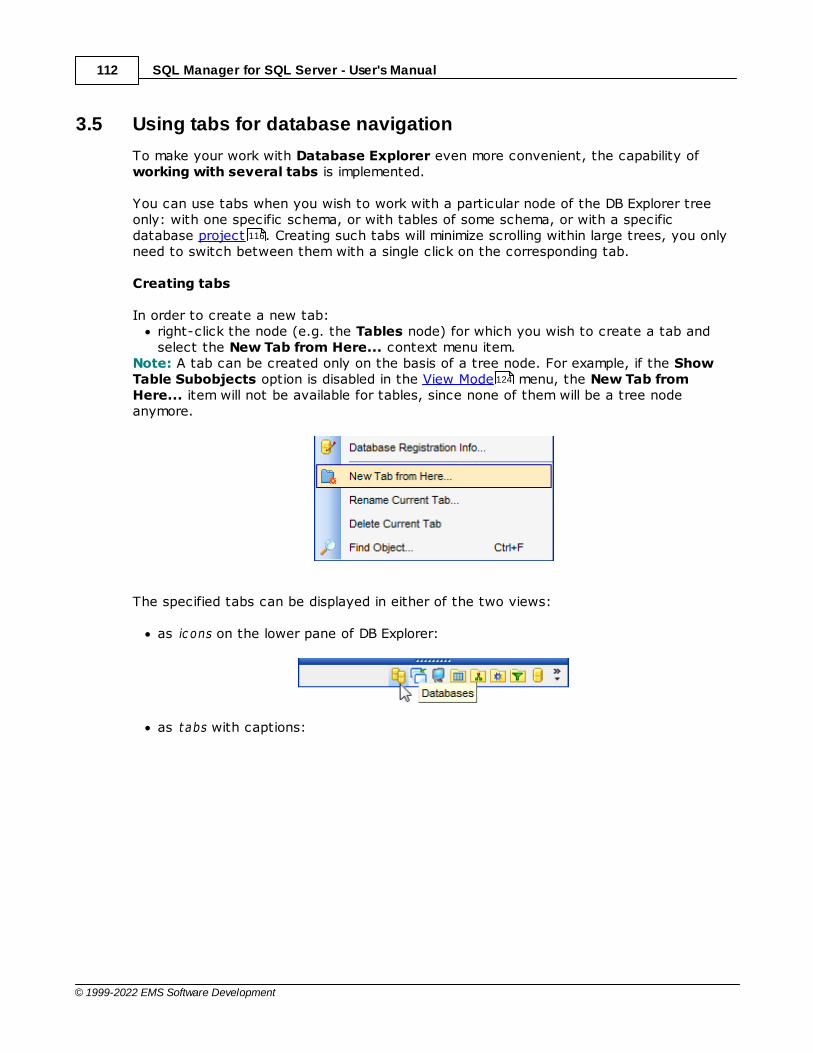
SQL Manager for SQL Server - User's Manual112
© 1999-2022 EMS Software Development
3.5 Using tabs for database navigation
To make your work with Database Explorer even more convenient, the capability ofworking with several tabs is implemented.
You can use tabs when you wish to work with a particular node of the DB Explorer treeonly: with one specific schema, or with tables of some schema, or with a specificdatabase project . Creating such tabs will minimize scrolling within large trees, you onlyneed to switch between them with a single click on the corresponding tab.
Creating tabs
In order to create a new tab:right-click the node (e.g. the Tables node) for which you wish to create a tab andselect the New Tab from Here... context menu item.
Note: A tab can be created only on the basis of a tree node. For example, if the ShowTable Subobjects option is disabled in the View Mode menu, the New Tab fromHere... item will not be available for tables, since none of them will be a tree nodeanymore.
The specified tabs can be displayed in either of the two views:
as ic ons on the lower pane of DB Explorer:
as tabs with captions:
116
124

SQL Manager for SQL Server - User's Manual113
© 1999-2022 EMS Software Development
Hint: You can reorder items in the tabs view by dragging their captions up and down.
To add/remove items to/from the tabs view, you can drag the horizontal splitter up/down:
or click the Configure buttons icon available in the bottom right corner of the DBExplorer window, and select Show More Buttons / Show Fewer Buttons / Add orRemove Buttons items from the popup menu.
Note: Navigation through the tabs is also possible with the help of the following shortcuts:Ct r l+Shift+N - move to the next tab;Ct r l+Shift+P - move to the previous tab.
Renaming tabs
In order to rename a tab:switch to the tab by clicking its caption or icon (there can be only one active tab,and it is highlighted with a different color);right-click within the DB Explorer area and select the Rename Current Tab... contextmenu item.
960
999

SQL Manager for SQL Server - User's Manual114
© 1999-2022 EMS Software Development
Removing tabs
In order to remove a tab:switch to the tab by clicking its caption or icon (there can be only one active tab,and it is highlighted with a different color);right-click within the DB Explorer area and select the Delete Current Tab contextmenu item.
See also:
Managing favorite objects
Windows List
Database and Server Objects Management
116
983
214
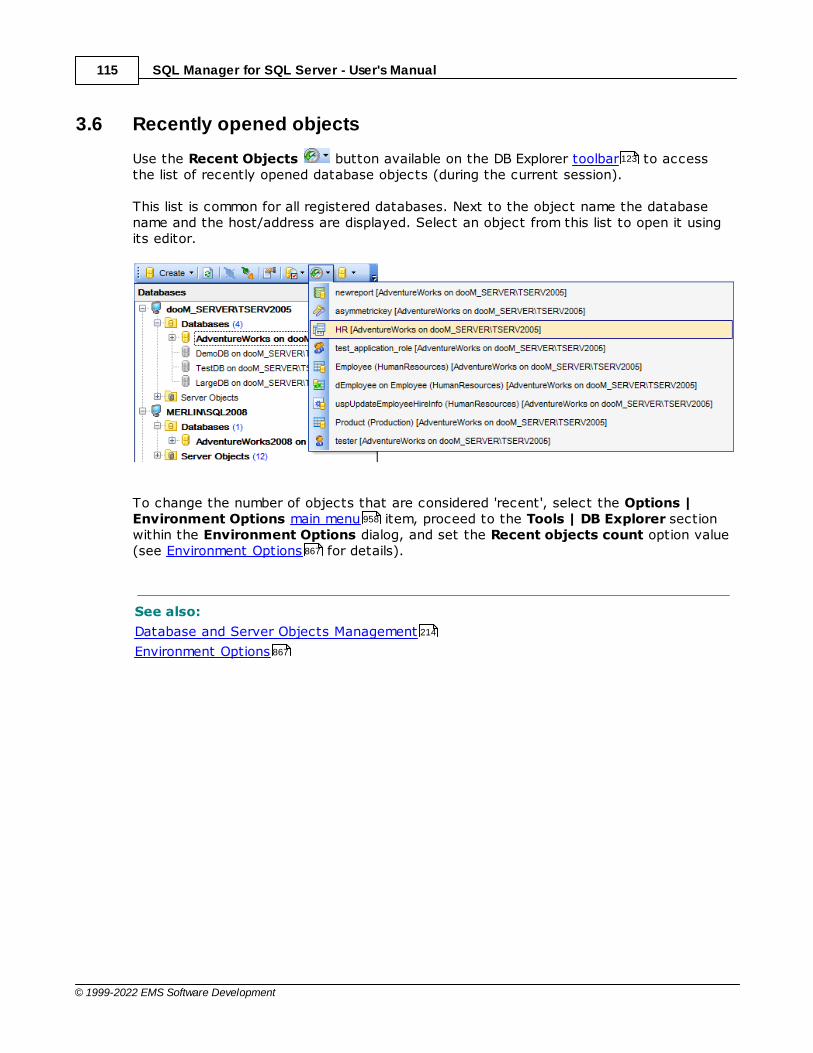
SQL Manager for SQL Server - User's Manual115
© 1999-2022 EMS Software Development
3.6 Recently opened objects
Use the Recent Objects button available on the DB Explorer toolbar to accessthe list of recently opened database objects (during the current session).
This list is common for all registered databases. Next to the object name the databasename and the host/address are displayed. Select an object from this list to open it usingits editor.
To change the number of objects that are considered 'recent', select the Options |Environment Options main menu item, proceed to the Tools | DB Explorer sectionwithin the Environment Options dialog, and set the Recent objects count option value(see Environment Options for details).
See also:
Database and Server Objects Management
Environment Options
123
958
867
214
867
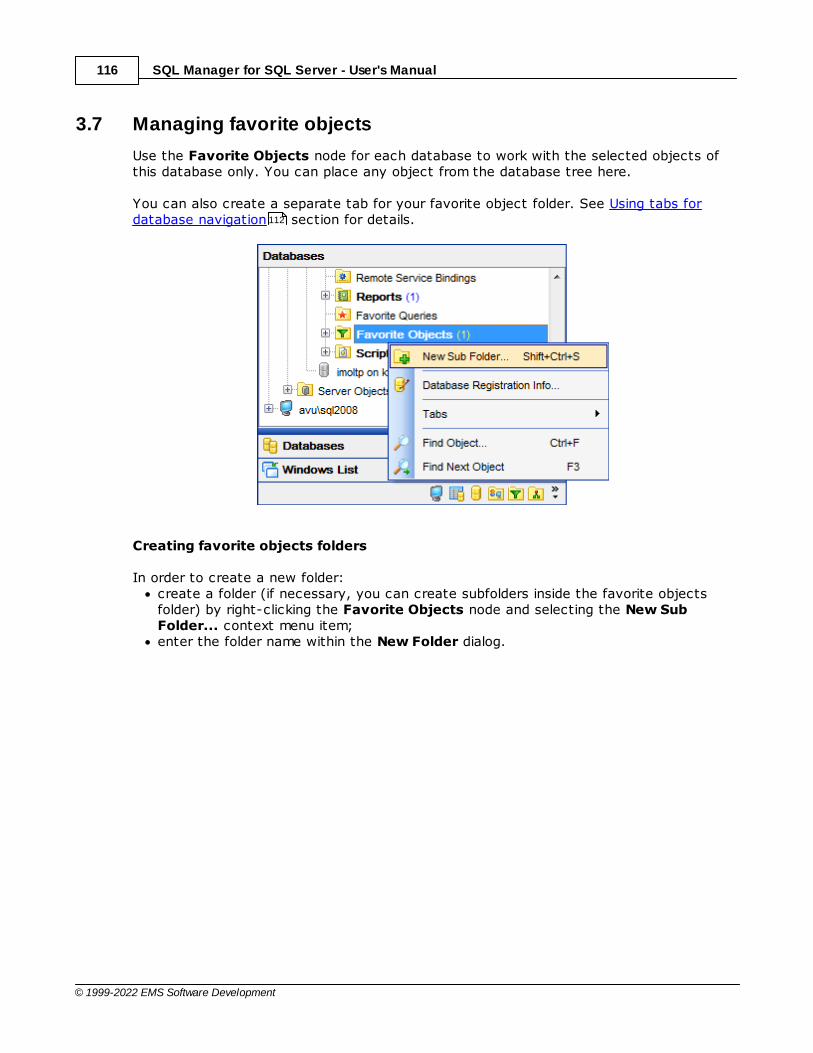
SQL Manager for SQL Server - User's Manual116
© 1999-2022 EMS Software Development
3.7 Managing favorite objects
Use the Favorite Objects node for each database to work with the selected objects ofthis database only. You can place any object from the database tree here.
You can also create a separate tab for your favorite object folder. See Using tabs fordatabase navigation section for details.
Creating favorite objects folders
In order to create a new folder:create a folder (if necessary, you can create subfolders inside the favorite objectsfolder) by right-clicking the Favorite Objects node and selecting the New SubFolder... context menu item;enter the folder name within the New Folder dialog.
112

SQL Manager for SQL Server - User's Manual117
© 1999-2022 EMS Software Development
Adding objects
In order to add a new object to the favorite objects folder:extent the Favorite Objects node in DB Explorer;drag an object (or multiple objects) from the database tree to the favorite objectsfolder
orright-click the favorite objects folder and select the Add Object... context menuitem, or use the Ins key; use the Select Object dialog to specify objects to be added to the favorite objectsfolder.
Removing objects from the favorite objects
In order to remove an object from the favorite objects:right-click the object and select the Remove <object_name> from FavoriteObjects context menu item, or use the Shift+Ct r l+Del shortcut ;confirm removing in the dialog window.
Note: This operation does not drop the object from the database, but only removes itsalias from the favorite objects tree.
See also:
Using tabs for database navigation
Select Object dialog
Database and Server Objects Management
995
996
112
995
214

SQL Manager for SQL Server - User's Manual118
© 1999-2022 EMS Software Development
3.8 Searching within the tree
SQL Manager for SQL Server provides an ability to search for items within the DBExplorer tree. Searching for items may be useful if you have a lot of database objects,and it may be sometimes hard to find the one you need.
There are two search facilities implemented in SQL Manager for your convenience. Youcan search for objects within the DB Explorer tree in either of the following ways:
using the Find Object dialogTo call the Find Object dialog, right-click the Database alias, any database object groupnodes or objects in the DB Explorer tree and select the Find Object... context menuitem, or use the Ct r l+F shortcut .
Available search options are similar to those provided by the Find Text dialog. Fordetailed description of the search options refer to the Find Text dialog page.
Note: You can specify whether the search will be performed within the entire tree or
within the currently selected node only: toggle search mode using the Search bycategories button on the Search Panel , or use the corresponding option available inthe Tools | DB Explorer section of the Environment Options dialog.
using the Search PanelType in the first letters in the edit-box, and the corresponding object will be highlighted in
the tree, as displayed in the picture below. The buttons allow you to define thesearch direction.
88
996
969
123
874 867
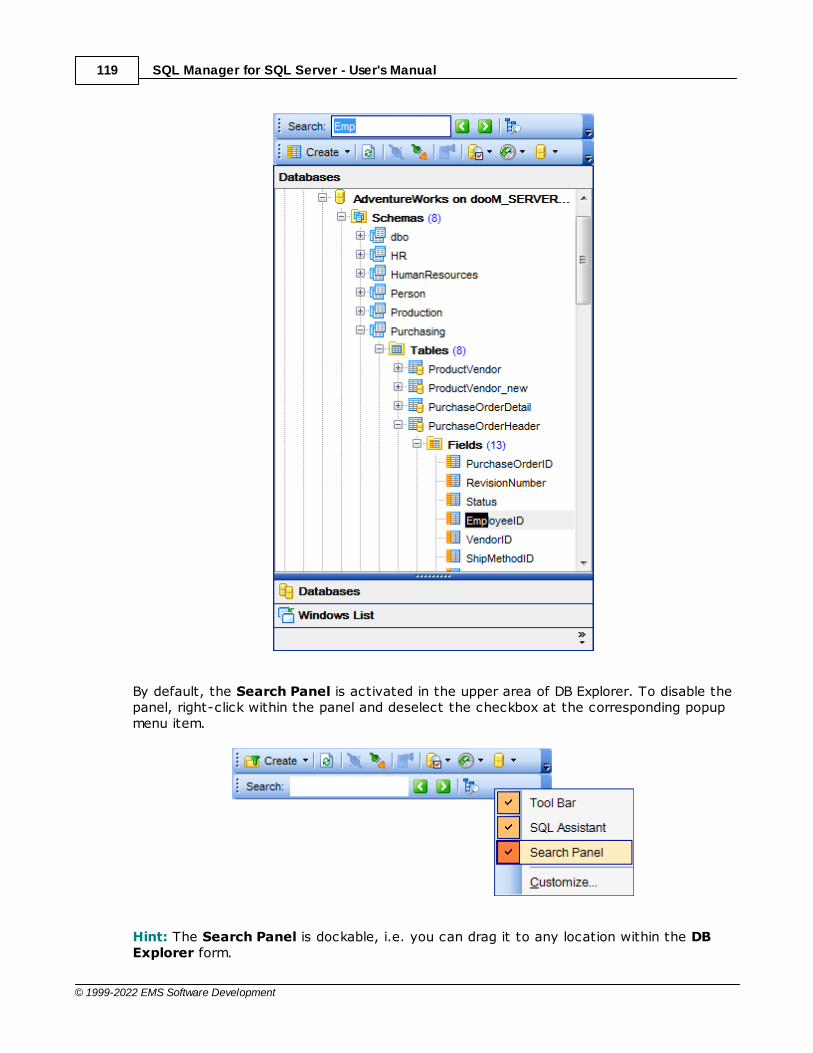
SQL Manager for SQL Server - User's Manual119
© 1999-2022 EMS Software Development
By default, the Search Panel is activated in the upper area of DB Explorer. To disable thepanel, right-click within the panel and deselect the checkbox at the corresponding popupmenu item.
Hint: The Search Panel is dockable, i.e. you can drag it to any location within the DBExplorer form.

SQL Manager for SQL Server - User's Manual120
© 1999-2022 EMS Software Development
See also:
Find Text dialog 969
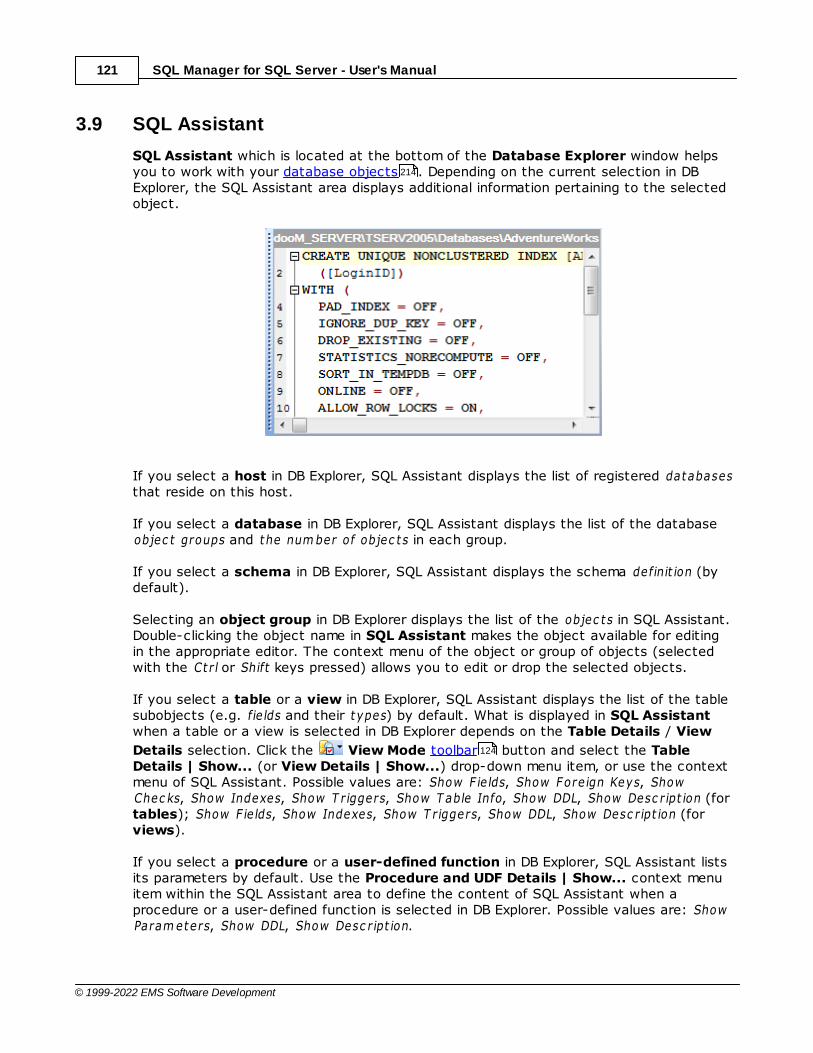
SQL Manager for SQL Server - User's Manual121
© 1999-2022 EMS Software Development
3.9 SQL Assistant
SQL Assistant which is located at the bottom of the Database Explorer window helpsyou to work with your database objects . Depending on the current selection in DBExplorer, the SQL Assistant area displays additional information pertaining to the selectedobject.
If you select a host in DB Explorer, SQL Assistant displays the list of registered databasesthat reside on this host.
If you select a database in DB Explorer, SQL Assistant displays the list of the databaseobjec t groups and the num ber of objec t s in each group.
If you select a schema in DB Explorer, SQL Assistant displays the schema definit ion (bydefault).
Selecting an object group in DB Explorer displays the list of the objec t s in SQL Assistant.Double-clicking the object name in SQL Assistant makes the object available for editingin the appropriate editor. The context menu of the object or group of objects (selectedwith the Ct r l or Shift keys pressed) allows you to edit or drop the selected objects.
If you select a table or a view in DB Explorer, SQL Assistant displays the list of the tablesubobjects (e.g. fie lds and their types) by default. What is displayed in SQL Assistantwhen a table or a view is selected in DB Explorer depends on the Table Details / View
Details selection. Click the View Mode toolbar button and select the TableDetails | Show... (or View Details | Show...) drop-down menu item, or use the contextmenu of SQL Assistant. Possible values are: Show F ie lds, Show Fore ign Keys, ShowChec ks, Show Indexes, Show T riggers, Show T able Info, Show DDL, Show Desc r ipt ion (fortables); Show F ie lds, Show Indexes, Show T riggers, Show DDL, Show Desc r ipt ion (forviews).
If you select a procedure or a user-defined function in DB Explorer, SQL Assistant listsits parameters by default. Use the Procedure and UDF Details | Show... context menuitem within the SQL Assistant area to define the content of SQL Assistant when aprocedure or a user-defined function is selected in DB Explorer. Possible values are: ShowParam eters, Show DDL, Show Desc r ipt ion.
214
124

SQL Manager for SQL Server - User's Manual122
© 1999-2022 EMS Software Development
Selecting other objects in DB Explorer displays the definition in SQL Assistant bydefault. Use the Other Objects' Details | Show... context menu item within the SQLAssistant area to define the content of SQL Assistant when an object is selected in DBExplorer. Possible values are: Show DDL, Show Desc r ipt ion.
You can also use SQL Assistant to work with your queries quickly. You can drag-and-drop object aliases to the SQL Editor , Visual Query Builder or SQL Script Editorworking area, in the same way as this operation is performed in Database Explorer.
See also:
Database and Server Objects Management
460
462 479 659
107
214
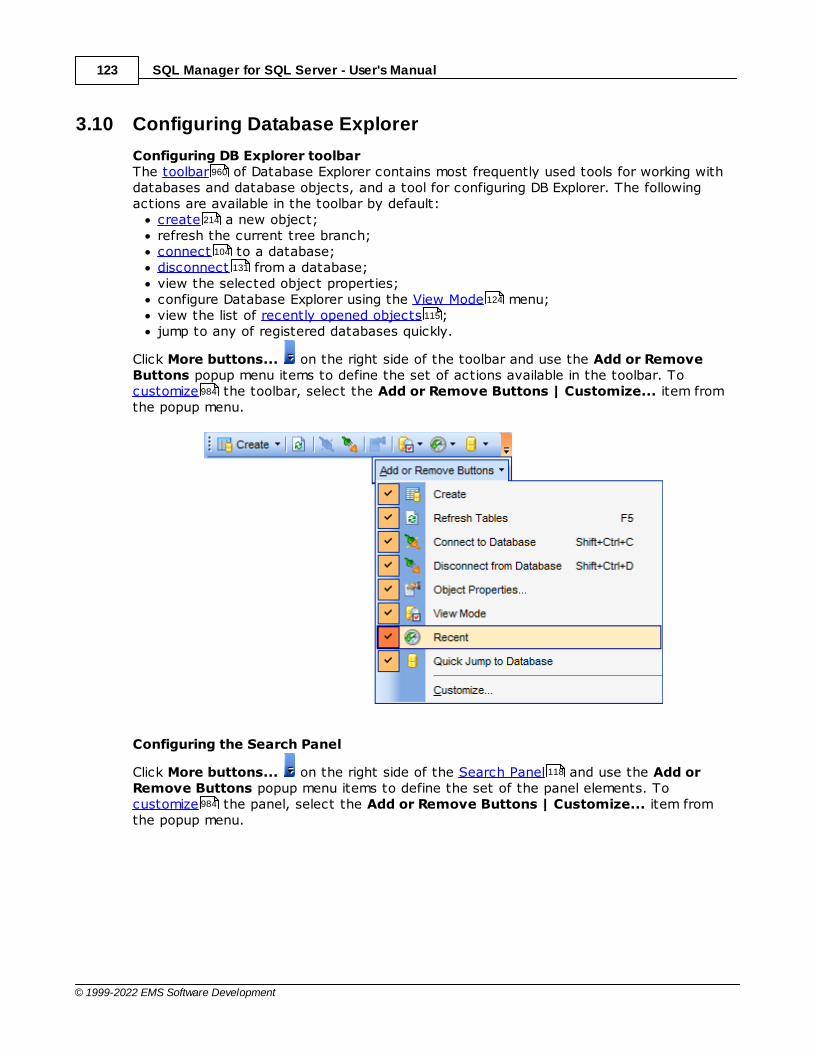
SQL Manager for SQL Server - User's Manual123
© 1999-2022 EMS Software Development
3.10 Configuring Database Explorer
Configuring DB Explorer toolbarThe toolbar of Database Explorer contains most frequently used tools for working withdatabases and database objects, and a tool for configuring DB Explorer. The followingactions are available in the toolbar by default:
create a new object;refresh the current tree branch;connect to a database;disconnect from a database;view the selected object properties;configure Database Explorer using the View Mode menu;view the list of recently opened objects ;jump to any of registered databases quickly.
Click More buttons... on the right side of the toolbar and use the Add or RemoveButtons popup menu items to define the set of actions available in the toolbar. Tocustomize the toolbar, select the Add or Remove Buttons | Customize... item fromthe popup menu.
Configuring the Search Panel
Click More buttons... on the right side of the Search Panel and use the Add orRemove Buttons popup menu items to define the set of the panel elements. Tocustomize the panel, select the Add or Remove Buttons | Customize... item fromthe popup menu.
960
214
104
131
124
115
984
118
984
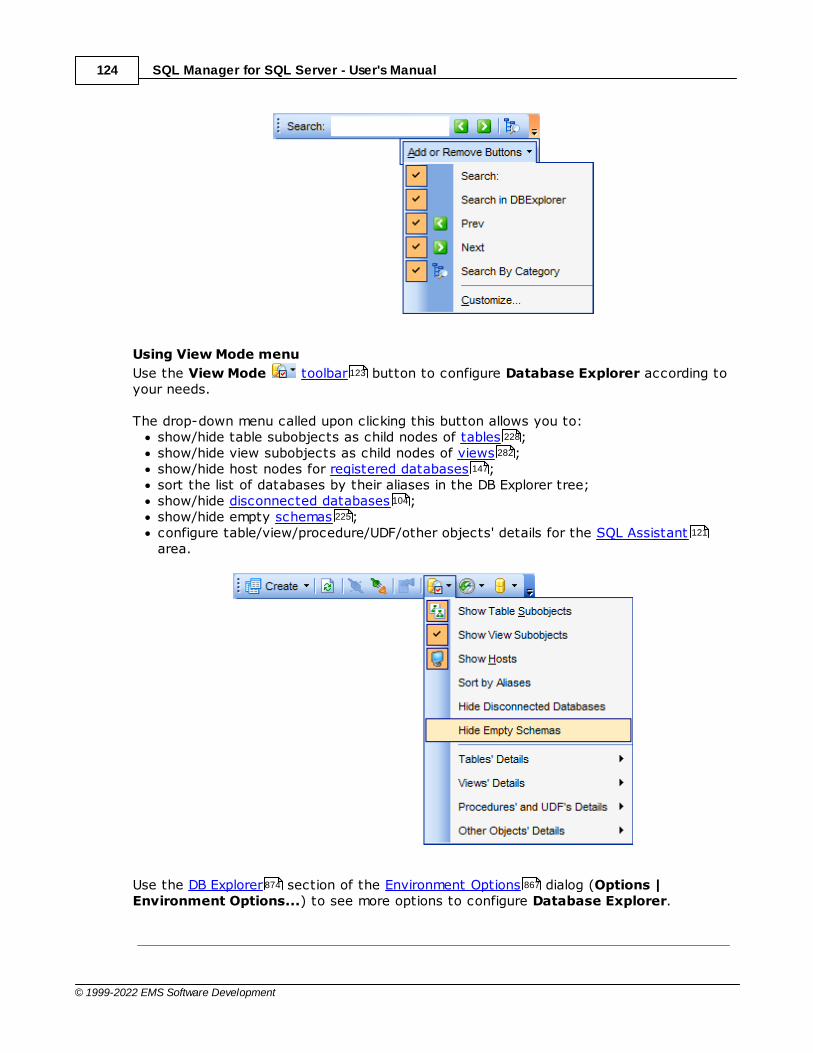
SQL Manager for SQL Server - User's Manual124
© 1999-2022 EMS Software Development
Using View Mode menu
Use the View Mode toolbar button to configure Database Explorer according toyour needs.
The drop-down menu called upon clicking this button allows you to:show/hide table subobjects as child nodes of tables ;show/hide view subobjects as child nodes of views ;show/hide host nodes for registered databases ;sort the list of databases by their aliases in the DB Explorer tree;show/hide disconnected databases ;show/hide empty schemas ;configure table/view/procedure/UDF/other objects' details for the SQL Assistantarea.
Use the DB Explorer section of the Environment Options dialog (Options |Environment Options...) to see more options to configure Database Explorer.
123
228
282
147
104
225
121
874 867

SQL Manager for SQL Server - User's Manual125
© 1999-2022 EMS Software Development
See also:
Customize toolbars and menus
DB Explorer options
984
874
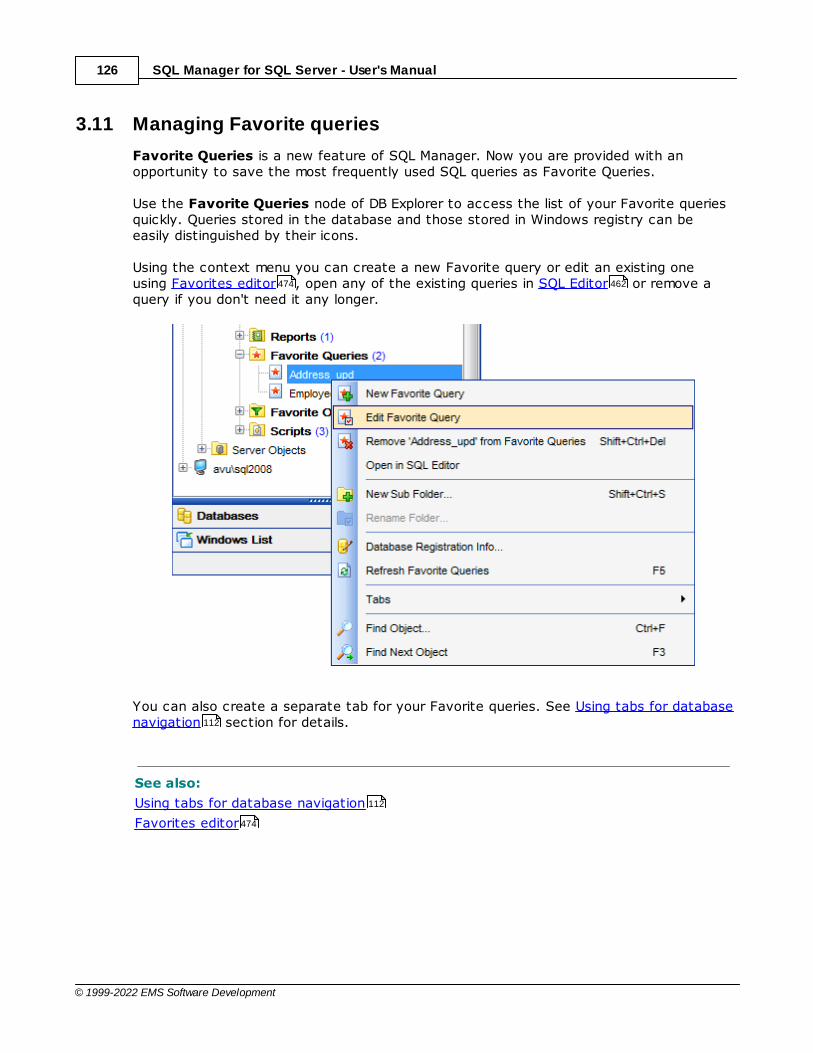
SQL Manager for SQL Server - User's Manual126
© 1999-2022 EMS Software Development
3.11 Managing Favorite queries
Favorite Queries is a new feature of SQL Manager. Now you are provided with anopportunity to save the most frequently used SQL queries as Favorite Queries.
Use the Favorite Queries node of DB Explorer to access the list of your Favorite queriesquickly. Queries stored in the database and those stored in Windows registry can beeasily distinguished by their icons.
Using the context menu you can create a new Favorite query or edit an existing oneusing Favorites editor , open any of the existing queries in SQL Editor or remove aquery if you don't need it any longer.
You can also create a separate tab for your Favorite queries. See Using tabs for databasenavigation section for details.
See also:
Using tabs for database navigation
Favorites editor
474 462
112
112
474
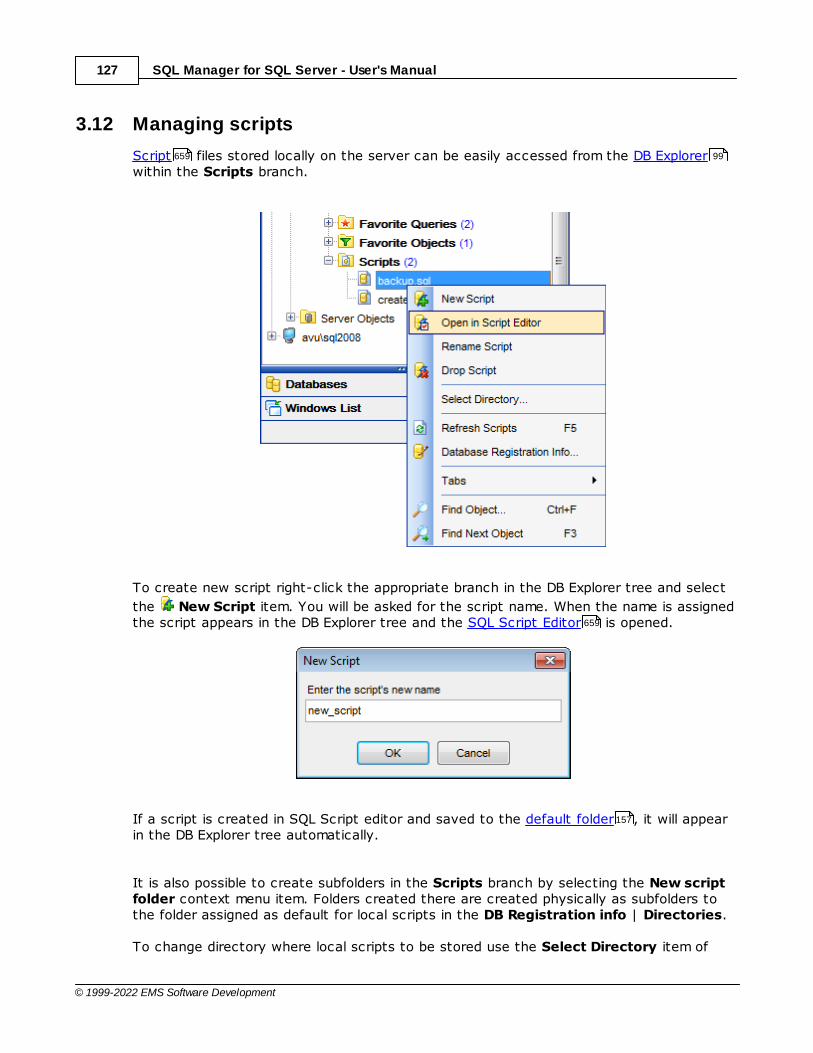
SQL Manager for SQL Server - User's Manual127
© 1999-2022 EMS Software Development
3.12 Managing scripts
Script files stored locally on the server can be easily accessed from the DB Explorerwithin the Scripts branch.
To create new script right-click the appropriate branch in the DB Explorer tree and select
the New Script item. You will be asked for the script name. When the name is assignedthe script appears in the DB Explorer tree and the SQL Script Editor is opened.
If a script is created in SQL Script editor and saved to the default folder , it will appearin the DB Explorer tree automatically.
It is also possible to create subfolders in the Scripts branch by selecting the New scriptfolder context menu item. Folders created there are created physically as subfolders tothe folder assigned as default for local scripts in the DB Registration info | Directories.
To change directory where local scripts to be stored use the Select Directory item of
659 99
659
157
SQL Manager for SQL Server - User's Manual128
© 1999-2022 EMS Software Development
the Scripts context menu, or use the respective field of the DB Registration info |Directories dialog. If specified folder already contains scripts, these scripts will be addedto the DBExplorer tree.
Using the context menu of a script you can:
- open the script in the SQL Script Editor ,rename the script,
- drop the script.
See also:SQL Script EditorDatabase ExplorerDatabase Registration Info
99
659
659
99
152

Part
IV
SQL Manager for SQL Server - User's Manual130
© 1999-2022 EMS Software Development
4 Database Management
SQL Manager for SQL Server provides a number of tools you may need to manage yourSQL Server databases. Find the list of common database management operations for working in SQL Managerbelow.
Unregistering Hosts
In order to unregister a host in SQL Manager for SQL Server:select the host to unregister in the DB Explorer tree;select the Database | Unregister Host main menu item or use the corresponding
Unregister Host toolbar buttonor
right-click the host alias and select the Unregister Host context menu item in theDB Explorer tree;confirm unregistering in the corresponding dialog window.
Creating Databases
In order to create a database in SQL Manager for SQL Server:select the Database | Create Database main menu item or use the
corresponding Create Database toolbar button;set all the necessary options using Create Database wizard which guides youthrough the entire process of creating a new database.
Dropping Databases
In order to drop a database in SQL Manager for SQL Server:select the database to drop in the DB Explorer tree;select the Database | Drop Database main menu item;confirm dropping in the corresponding dialog window.
Registering Databases
In order to register a single database in SQL Manager for SQL Server:select the Database | Register Database... main menu item or use the
corresponding Register Database toolbar buttonor
right-click any database alias and select the Register Database... context menuitem in the DB Explorer tree;set all the necessary options using Register Database wizard which guides youthrough the entire process of database registration.
Unregistering Databases
In order to unregister a database in SQL Manager for SQL Server:select the database to unregister in the DB Explorer tree;select the Database | Unregister Database main menu item or use the
corresponding Unregister Database toolbar button
99
958
960
88
99
958
960
133
99
958
958
960
89
99
147
99
958
960
SQL Manager for SQL Server - User's Manual131
© 1999-2022 EMS Software Development
orright-click the database alias and select the Unregister Database context menuitem in the DB Explorer tree;confirm unregistering in the corresponding dialog window.
Connecting to Databases
In order to connect to a database in SQL Manager for SQL Server:select the database to connect to in the DB Explorer tree;select the Database | Connect to Database main menu item or use the
corresponding Connect to Database toolbar buttonor
right-click the database alias and select the Connect to Database context menuitem in the DB Explorer tree.
Disconnecting from Databases
In order to disconnect from a database in SQL Manager for SQL Server:select the database to disconnect from in the DB Explorer tree;select the Database | Disconnect from Database main menu item or use the
corresponding Disconnect from Database toolbar buttonor
right-click the database alias and select the Disconnect from Database contextmenu item in the DB Explorer tree.
Viewing and Editing Database Registration Info
In order to view/edit database registration info in SQL Manager for SQL Server:select the database or any of its objects in the DB Explorer tree;select the Database | Database Registration Info... main menu item
orright-click the database alias or any of its objects and select the DatabaseRegistration Info... context menu item in the DB Explorer tree.
Viewing and Editing Database Properties
In order to view/edit database properties in SQL Manager for SQL Server:select the database in the DB Explorer tree;right-click the database alias and select the Database Properties... context menu
item or use the corresponding Properties toolbar button.
Viewing and editing Server Properties
In order to view/edit server properties in SQL Manager for SQL Server:select the host or a database that resides on this host in the DB Explorer tree;right-click the host or the database alias and select the Server Properties contextmenu item.
See also:
Getting Started
89
99
99
958
123
89
99
99
958
123
89 99
99
958
89 99
99
89
123
99
88
76

SQL Manager for SQL Server - User's Manual132
© 1999-2022 EMS Software Development
Database Explorer
Database Objects Management
Query Management Tools
Data Management
Import/Export Tools
Database Tools
Server Tools
Personalization
External Tools
How To...
99
214
460
498
566
651
757
866
952
1001
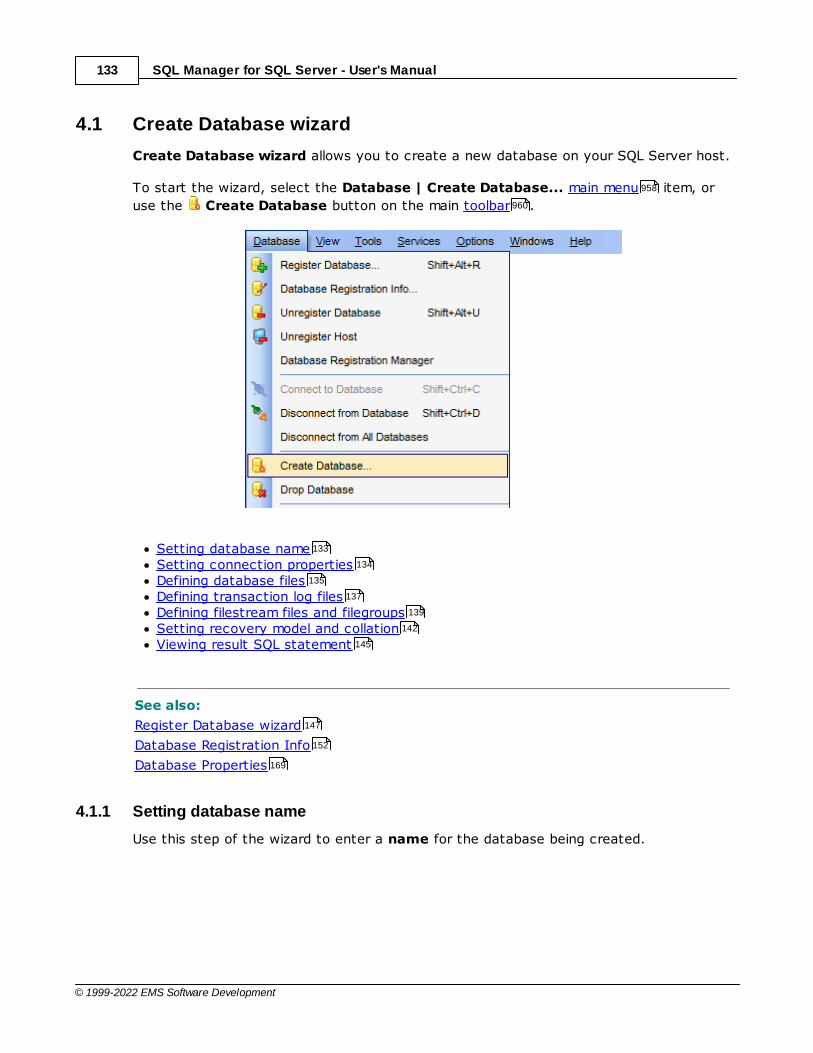
SQL Manager for SQL Server - User's Manual133
© 1999-2022 EMS Software Development
4.1 Create Database wizard
Create Database wizard allows you to create a new database on your SQL Server host.
To start the wizard, select the Database | Create Database... main menu item, or
use the Create Database button on the main toolbar .
Setting database nameSetting connection propertiesDefining database filesDefining transaction log filesDefining filestream files and filegroupsSetting recovery model and collationViewing result SQL statement
See also:
Register Database wizard
Database Registration Info
Database Properties
4.1.1 Setting database name
Use this step of the wizard to enter a name for the database being created.
958
960
133
134
135
137
139
142
145
147
152
169

SQL Manager for SQL Server - User's Manual134
© 1999-2022 EMS Software Development
Register after creatingCheck this option to register the newly created database in SQL Manager (theDatabase Registration Info dialog will be opened after database creation).
Click the Next button to proceed to the Setting connection properties step of thewizard.
4.1.2 Setting connection properties
Use this step of the wizard to set the necessary connection parameters for thedatabase being created. Use the corresponding boxes and options: Server nam e,Authent ic at ion, User nam e and Passw ord.
147
152
134

SQL Manager for SQL Server - User's Manual135
© 1999-2022 EMS Software Development
Specify the host where the database being created will reside: type in the host name inthe Server name field or select one in the drop-down list.Please note that if Microsoft® SQL Server™ is installed as a named instance, you shouldenter the name of your machine and the instance name in the Server name field in thefollowing format: c om puter_nam e\sqlserver_instanc e_nam e (e.g. "MY COMPUT ER\SQLEXPRESS").
Authentication typeSpecify the type of Microsoft® SQL Server™ authentication to be used for theconnection: Window s authentication or SQL Server authentication. It is stronglyrecommended to avoid using SQL Server authentication with "sa" as the login.
If 'SQL Server' has been selected as the authent ic at ion type, you should also provideauthorizat ion settings: User name and Password.
Click the Next button to proceed to the Defining database files step of the wizard.
4.1.3 SQL Server Database
4.1.3.1 Defining database files
This step of the wizard allows you to define database files for the new database.
135
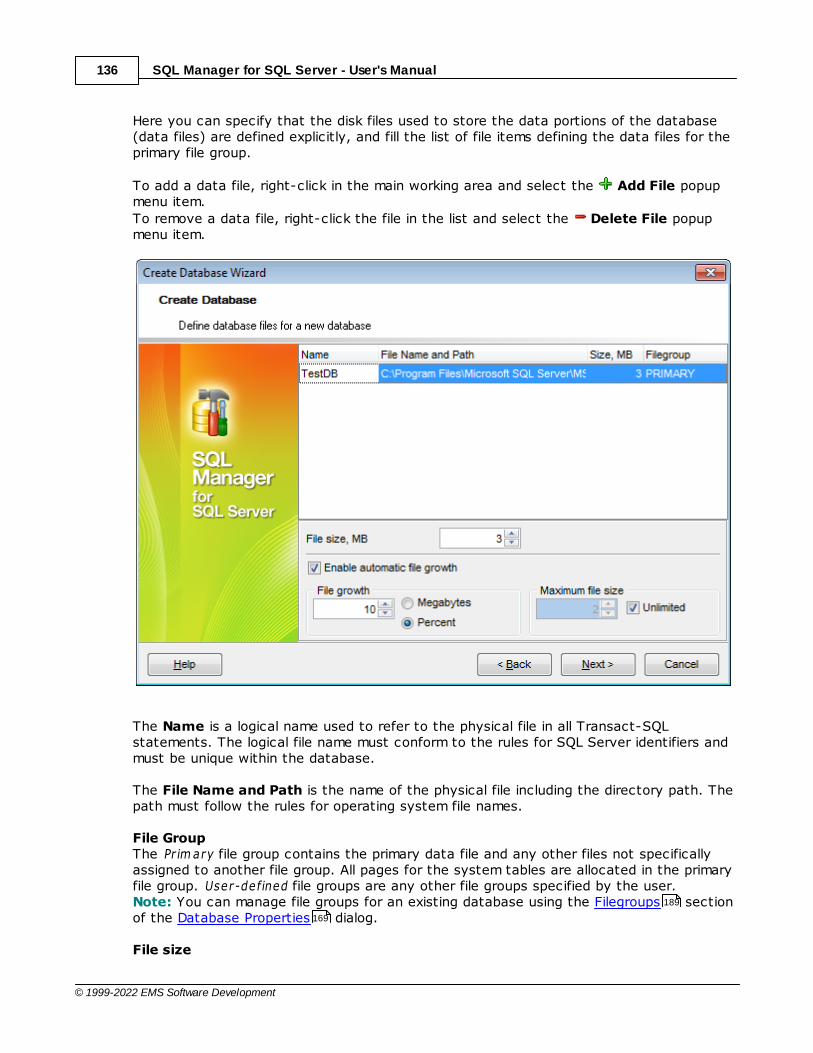
SQL Manager for SQL Server - User's Manual136
© 1999-2022 EMS Software Development
Here you can specify that the disk files used to store the data portions of the database(data files) are defined explicitly, and fill the list of file items defining the data files for theprimary file group.
To add a data file, right-click in the main working area and select the Add File popupmenu item.
To remove a data file, right-click the file in the list and select the Delete File popupmenu item.
The Name is a logical name used to refer to the physical file in all Transact-SQLstatements. The logical file name must conform to the rules for SQL Server identifiers andmust be unique within the database.
The File Name and Path is the name of the physical file including the directory path. Thepath must follow the rules for operating system file names.
File GroupThe Prim ary file group contains the primary data file and any other files not specificallyassigned to another file group. All pages for the system tables are allocated in the primaryfile group. User-defined file groups are any other file groups specified by the user.Note: You can manage file groups for an existing database using the Filegroups sectionof the Database Properties dialog.
File size
189
169

SQL Manager for SQL Server - User's Manual137
© 1999-2022 EMS Software Development
Use the spinner control to specify the original size of the selected database file (inmegabytes).
SQL Server 2005 (and higher) database files can grow automatically from their originallyspecified size. When you define a file, you can specify a file growth increment (inm egabytes or in perc ent). Each time the file fills, it increases its size by the growthincrement. If there are multiple files in a file group, they do not autogrow until all the filesare full. Growth then occurs using a round-robin algorithm.
Each file can also have maximum file size specified. If Unlimited is specified, the filecan continue to grow until it has used all available space on the disk.
Note: After the database is created, you can manage database files using the Data files section of the Database Properties dialog.
Click the Next button to proceed to the Defining transaction log files step of thewizard.
4.1.3.2 Defining transaction log files
This step of the wizard allows you to define transaction log files for the new database.
Log files hold all of the log information used to recover the database. There must be atleast one log file for each database, although there can be more than one. Therecommended file name extension for log files is *.ldf.
To add a log file, right-click in the main working area and select the Add File popupmenu item.
To remove a log file, right-click the file in the list and select the Delete File popupmenu item.
184 169
137
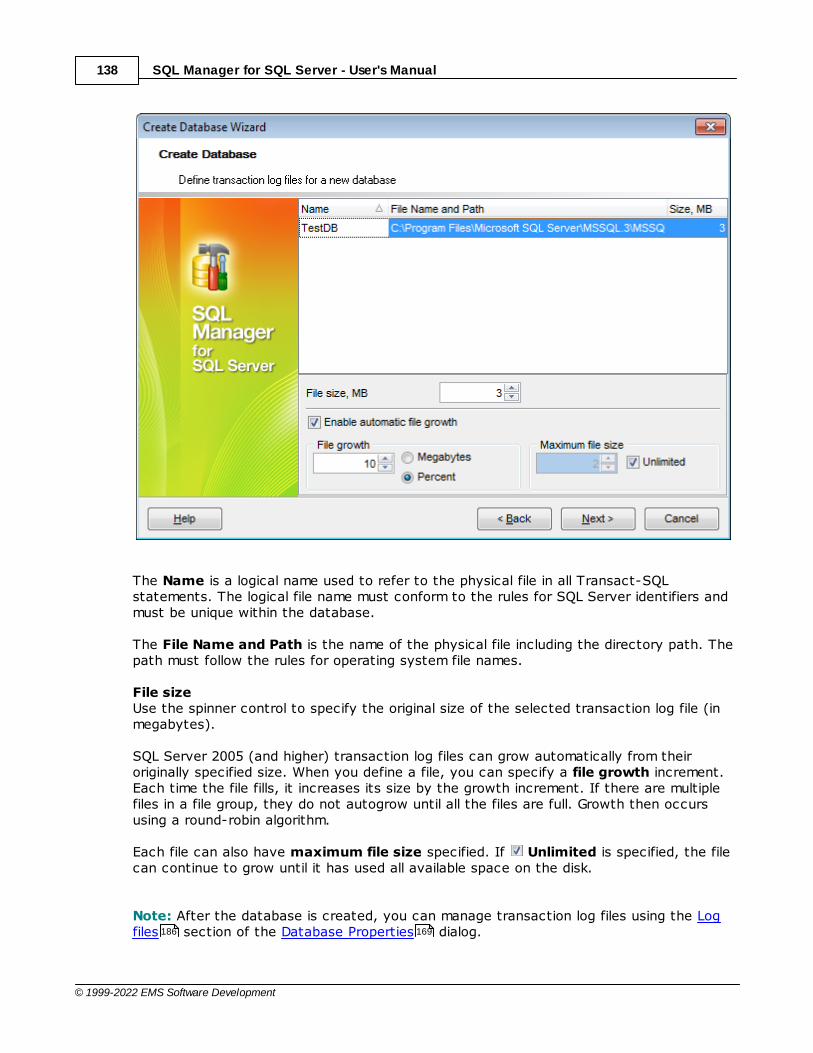
SQL Manager for SQL Server - User's Manual138
© 1999-2022 EMS Software Development
The Name is a logical name used to refer to the physical file in all Transact-SQLstatements. The logical file name must conform to the rules for SQL Server identifiers andmust be unique within the database.
The File Name and Path is the name of the physical file including the directory path. Thepath must follow the rules for operating system file names.
File sizeUse the spinner control to specify the original size of the selected transaction log file (inmegabytes).
SQL Server 2005 (and higher) transaction log files can grow automatically from theiroriginally specified size. When you define a file, you can specify a file growth increment.Each time the file fills, it increases its size by the growth increment. If there are multiplefiles in a file group, they do not autogrow until all the files are full. Growth then occursusing a round-robin algorithm.
Each file can also have maximum file size specified. If Unlimited is specified, the filecan continue to grow until it has used all available space on the disk.
Note: After the database is created, you can manage transaction log files using the Logfiles section of the Database Properties dialog.186 169
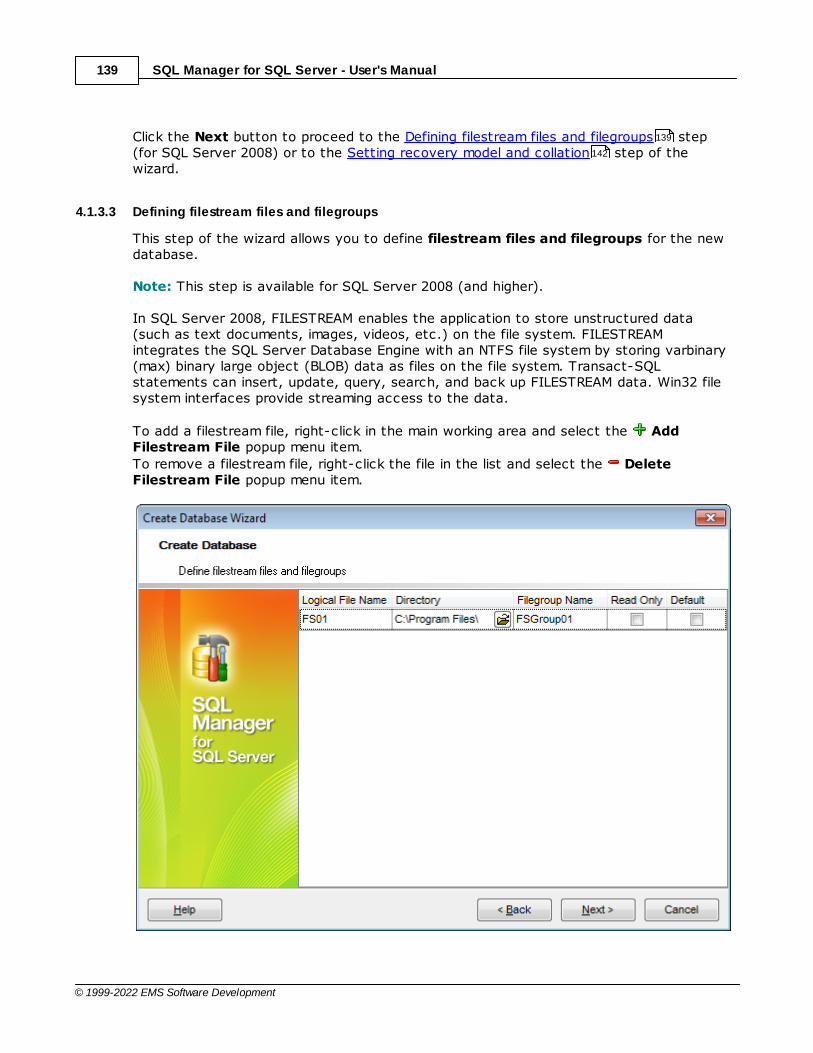
SQL Manager for SQL Server - User's Manual139
© 1999-2022 EMS Software Development
Click the Next button to proceed to the Defining filestream files and filegroups step(for SQL Server 2008) or to the Setting recovery model and collation step of thewizard.
4.1.3.3 Defining filestream files and filegroups
This step of the wizard allows you to define filestream files and filegroups for the newdatabase.
Note: This step is available for SQL Server 2008 (and higher).
In SQL Server 2008, FILESTREAM enables the application to store unstructured data(such as text documents, images, videos, etc.) on the file system. FILESTREAMintegrates the SQL Server Database Engine with an NTFS file system by storing varbinary(max) binary large object (BLOB) data as files on the file system. Transact-SQLstatements can insert, update, query, search, and back up FILESTREAM data. Win32 filesystem interfaces provide streaming access to the data.
To add a filestream file, right-click in the main working area and select the AddFilestream File popup menu item.
To remove a filestream file, right-click the file in the list and select the DeleteFilestream File popup menu item.
139
142
SQL Manager for SQL Server - User's Manual140
© 1999-2022 EMS Software Development
The Logical File Name is the name of the logical file storing the data used to refer to thephysical file in all Transact-SQL statements.
DirectoryThe physical location of the data. The directory must be located on the server where thedatabase resides.
Filegroup NameSpecify the name of the filestream filegroup.
Read Only Specifies that the filestream filegroup is read-only. Updates to objects that reside in thisfilestream filegroup are not allowed. The default fiestream filegroup cannot be read-only.
DefaultThe filestream fields data will be stored in this filestream filegroup if none was specified forthe table.
Note: After the database is created, you can manage filestream files using the Filestreamfiles and filegroups section of the Database Properties dialog.
Click the Next button to proceed to the Setting recovery model and collation step ofthe wizard.
4.1.3.4 Defining files for memory-optimized data
This step of the wizard allows you to define filegroup and files for memory-optimized datatables of the new database.
Note: This step is available for SQL Server 2014.
Creating a memory-optimized filegroup is necessary for creating memory-optimized tables. The memory-optimized filegroup holds one or more containers.Use the Memory-optimized data files grid to add containers to the memory-optimizedfilegroup.
190 169
142
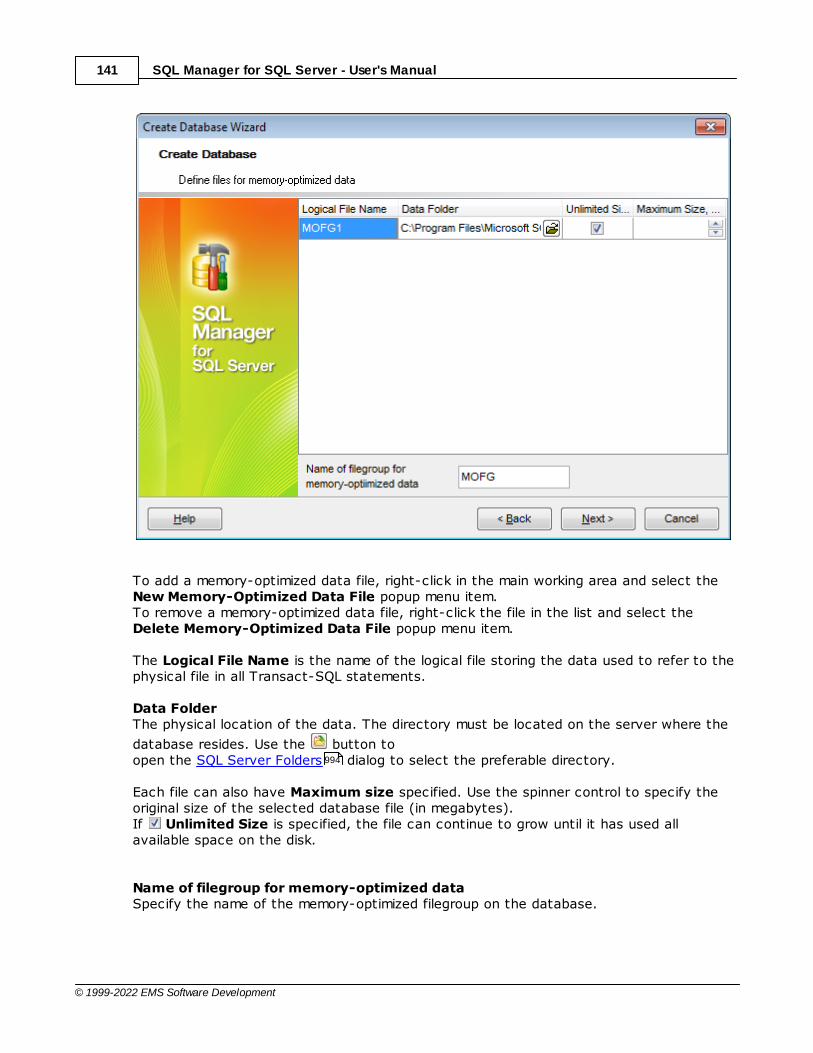
SQL Manager for SQL Server - User's Manual141
© 1999-2022 EMS Software Development
To add a memory-optimized data file, right-click in the main working area and select the New Memory-Optimized Data File popup menu item.To remove a memory-optimized data file, right-click the file in the list and select the Delete Memory-Optimized Data File popup menu item.
The Logical File Name is the name of the logical file storing the data used to refer to thephysical file in all Transact-SQL statements.
Data FolderThe physical location of the data. The directory must be located on the server where the
database resides. Use the button to open the SQL Server Folders dialog to select the preferable directory.
Each file can also have Maximum size specified. Use the spinner control to specify theoriginal size of the selected database file (in megabytes).If Unlimited Size is specified, the file can continue to grow until it has used allavailable space on the disk.
Name of filegroup for memory-optimized dataSpecify the name of the memory-optimized filegroup on the database.
994

SQL Manager for SQL Server - User's Manual142
© 1999-2022 EMS Software Development
4.1.3.5 Setting recovery model and collation
This step of the wizard allows you to set recovery model and collation for the newdatabase.
Recovery model
SQL Server recovery models are used for backup and restore operations. A rec overym odel is a database property that controls the basic behavior of backup and restoreoperations for a database: how transactions are logged, whether the transaction logrequires backup, what kinds of restore operations are available, etc.
FullWhen this recovery model is set, all transactions are fully logged and all the transactionlog records are retained until after they are backed up. In the Enterprise Edition of SQLServer, the full recovery model allows a database to be recovered to the point of failure,assuming that the tail of the log has been backed up after the failure.
Bulk-loggedWhen this recovery model is set, most bulk operations are minimally logged (e.g. indexcreation and bulk loads), and other transactions are fully logged.
Sim pleWhen this recovery model is set, most transactions are minimally logged: only the
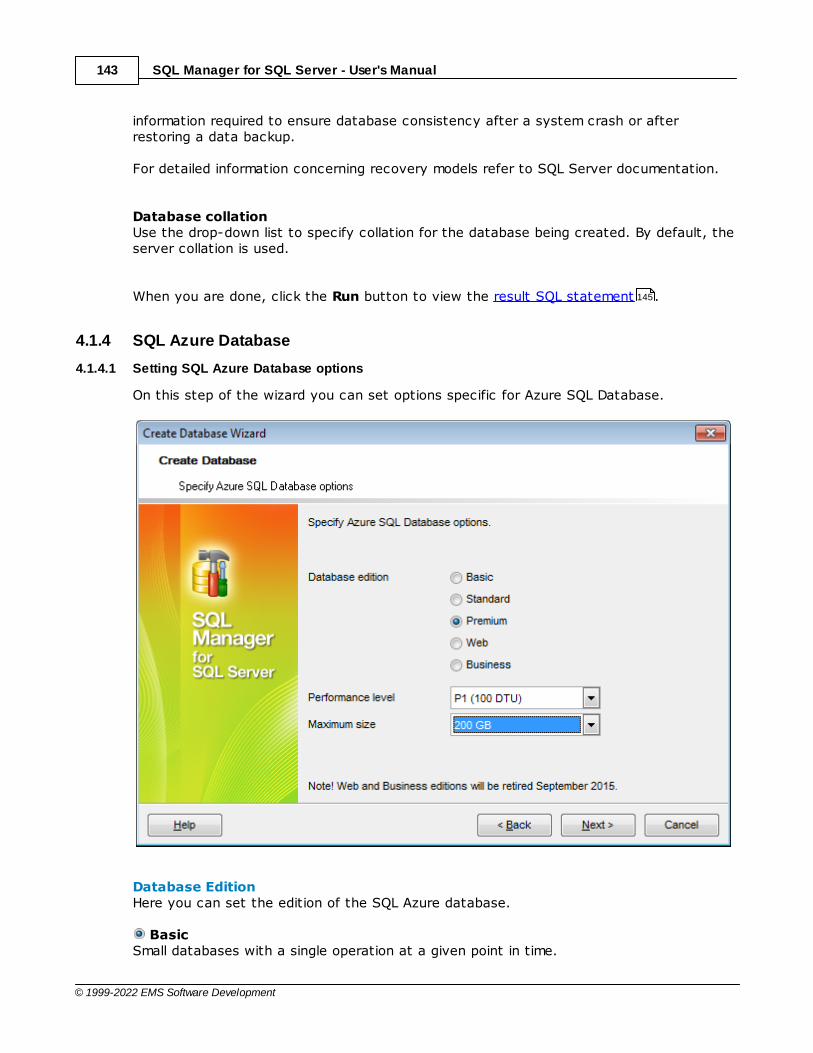
SQL Manager for SQL Server - User's Manual143
© 1999-2022 EMS Software Development
information required to ensure database consistency after a system crash or afterrestoring a data backup.
For detailed information concerning recovery models refer to SQL Server documentation.
Database collationUse the drop-down list to specify collation for the database being created. By default, theserver collation is used.
When you are done, click the Run button to view the result SQL statement .
4.1.4 SQL Azure Database
4.1.4.1 Setting SQL Azure Database options
On this step of the wizard you can set options specific for Azure SQL Database.
Database EditionHere you can set the edition of the SQL Azure database.
BasicSmall databases with a single operation at a given point in time.
145

SQL Manager for SQL Server - User's Manual144
© 1999-2022 EMS Software Development
StandardWorkgroup and cloud applications with multiple concurrent transactions.
PremiumMission-critical, high transactional volume with many concurrent users.
WebWeb apps, workgroup, dept. apps, and other lightweight database workloads.
BusinessLightweight database workloads that require larger sizes than supported with Web.
Note: Web and Businesss editions will be retired September 2015.
Performance LevelUse the drop-down list to select the Performance Level for the database. Performancelevels are specific for the selected database edition.
Maximum sizeSpecifies the maximum size of the database. This value must be valid for the specifiedEdition.
Click the Next button to proceed to the Setting database collation step of the wizard.
4.1.4.2 Setting database collation
This step of the wizard allows you to set the collation for the new database.
144
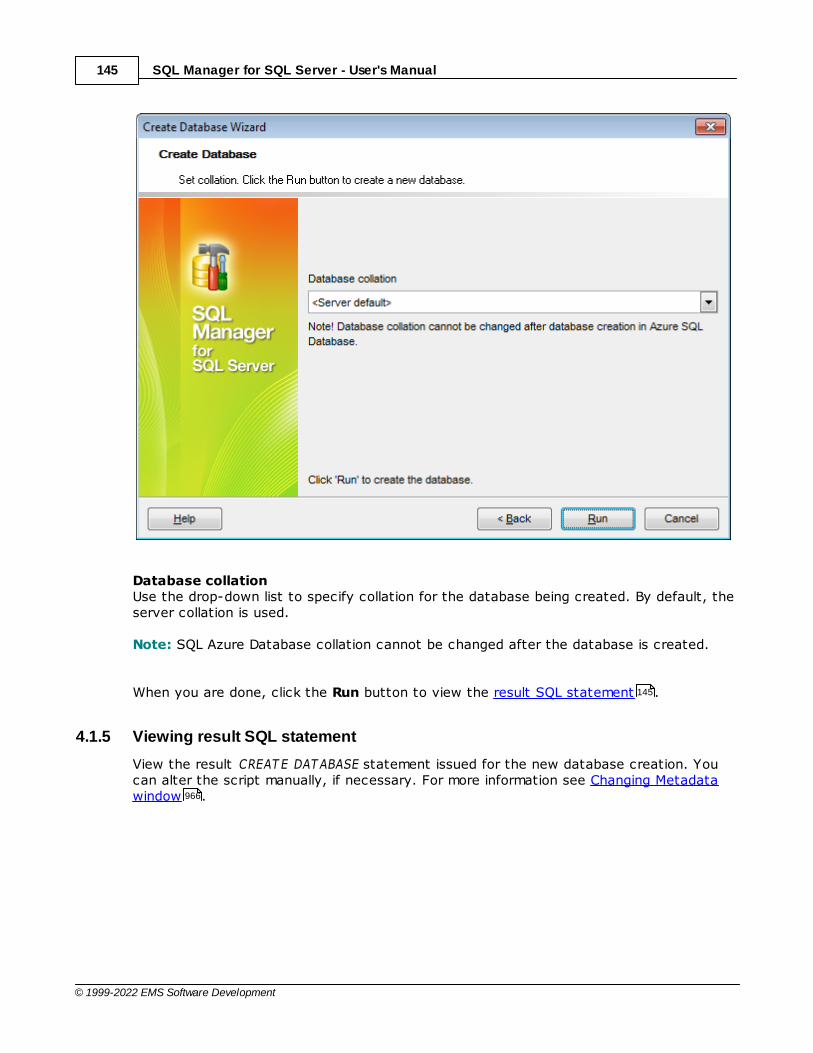
SQL Manager for SQL Server - User's Manual145
© 1999-2022 EMS Software Development
Database collationUse the drop-down list to specify collation for the database being created. By default, theserver collation is used.
Note: SQL Azure Database collation cannot be changed after the database is created.
When you are done, click the Run button to view the result SQL statement .
4.1.5 Viewing result SQL statement
View the result CREAT E DAT ABASE statement issued for the new database creation. Youcan alter the script manually, if necessary. For more information see Changing Metadatawindow .
145
966
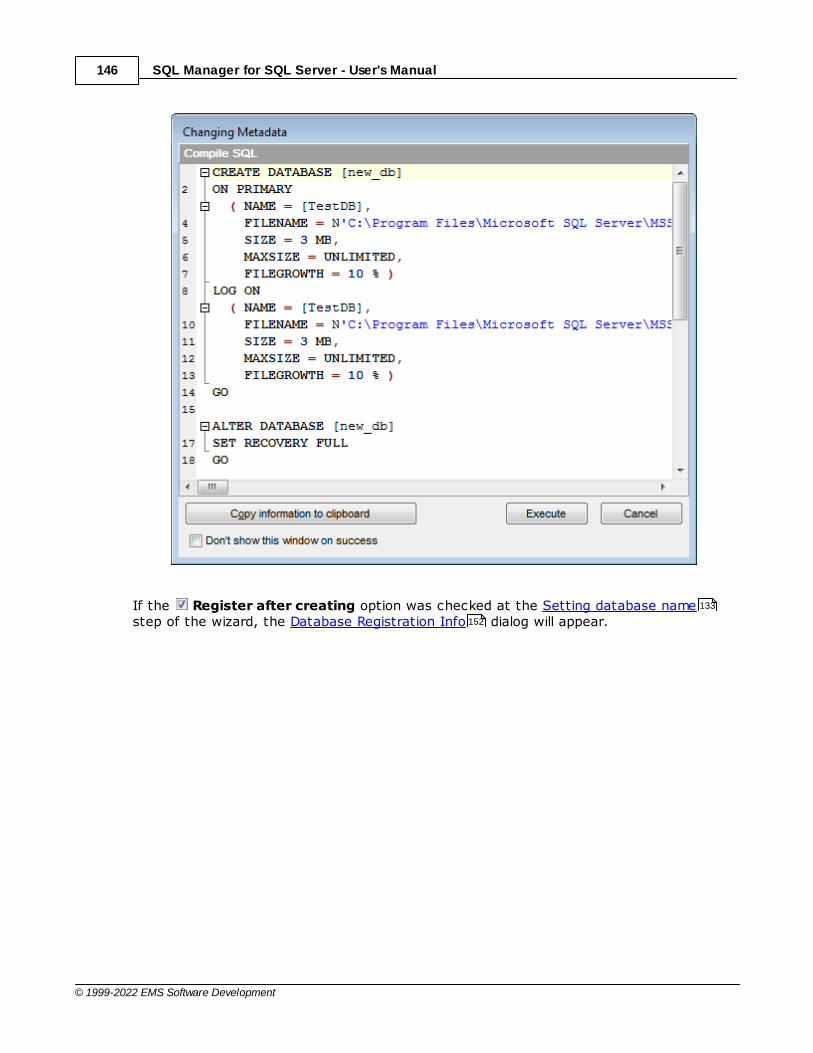
SQL Manager for SQL Server - User's Manual146
© 1999-2022 EMS Software Development
If the Register after creating option was checked at the Setting database namestep of the wizard, the Database Registration Info dialog will appear.
133
152
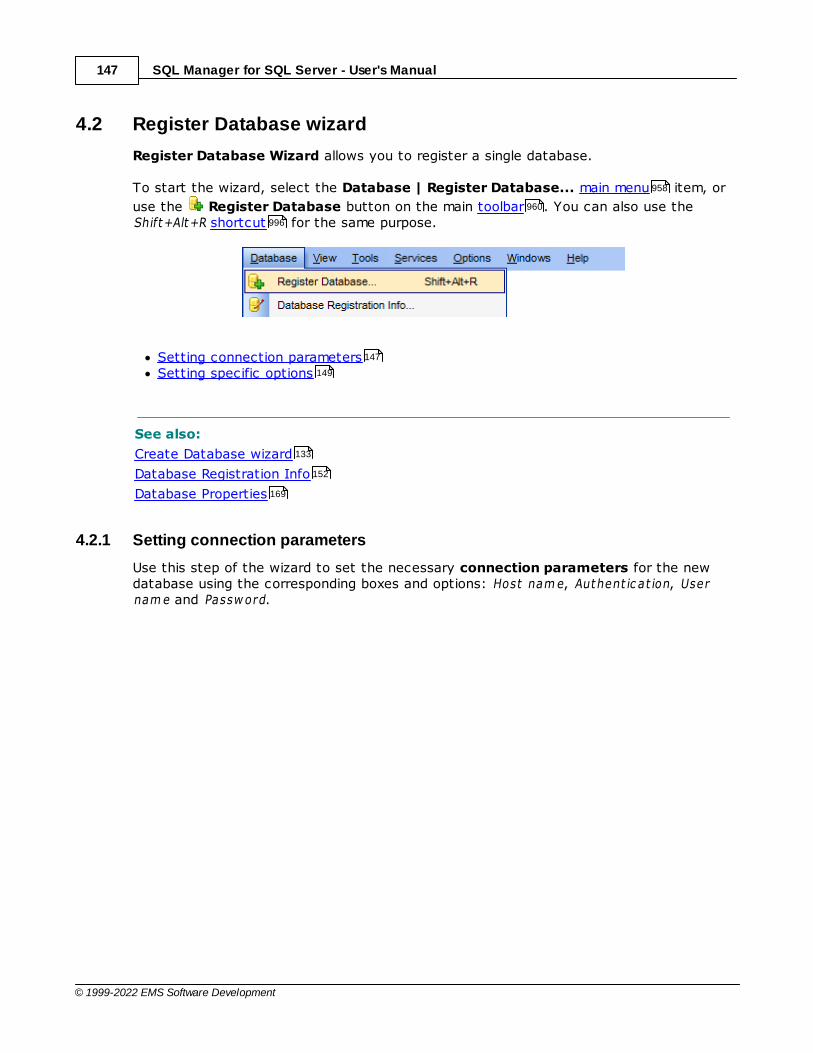
SQL Manager for SQL Server - User's Manual147
© 1999-2022 EMS Software Development
4.2 Register Database wizard
Register Database Wizard allows you to register a single database.
To start the wizard, select the Database | Register Database... main menu item, or
use the Register Database button on the main toolbar . You can also use theShift+Alt+R shortcut for the same purpose.
Setting connection parametersSetting specific options
See also:
Create Database wizard
Database Registration Info
Database Properties
4.2.1 Setting connection parameters
Use this step of the wizard to set the necessary connection parameters for the newdatabase using the corresponding boxes and options: Host nam e, Authent ic at ion, Usernam e and Passw ord.
958
960
996
147
149
133
152
169
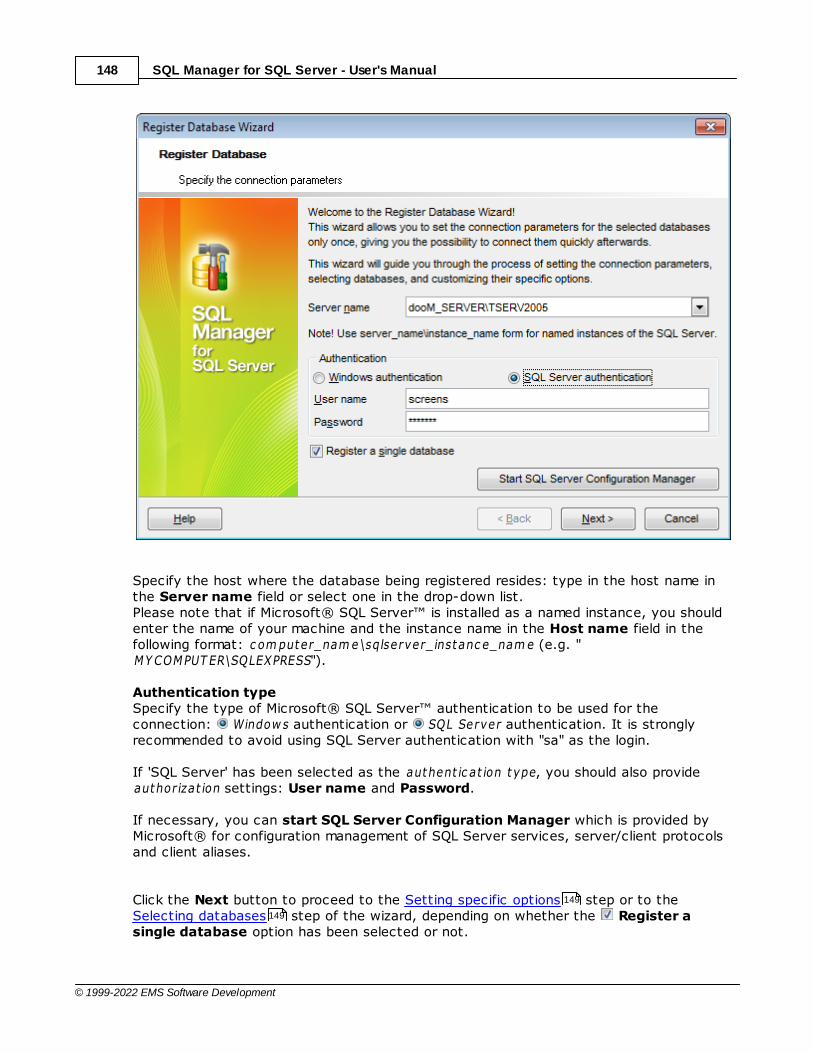
SQL Manager for SQL Server - User's Manual148
© 1999-2022 EMS Software Development
Specify the host where the database being registered resides: type in the host name inthe Server name field or select one in the drop-down list.Please note that if Microsoft® SQL Server™ is installed as a named instance, you shouldenter the name of your machine and the instance name in the Host name field in thefollowing format: c om puter_nam e\sqlserver_instanc e_nam e (e.g. "MY COMPUT ER\SQLEXPRESS").
Authentication typeSpecify the type of Microsoft® SQL Server™ authentication to be used for theconnection: Window s authentication or SQL Server authentication. It is stronglyrecommended to avoid using SQL Server authentication with "sa" as the login.
If 'SQL Server' has been selected as the authent ic at ion type, you should also provideauthorizat ion settings: User name and Password.
If necessary, you can start SQL Server Configuration Manager which is provided byMicrosoft® for configuration management of SQL Server services, server/client protocolsand client aliases.
Click the Next button to proceed to the Setting specific options step or to theSelecting databases step of the wizard, depending on whether the Register asingle database option has been selected or not.
149
149
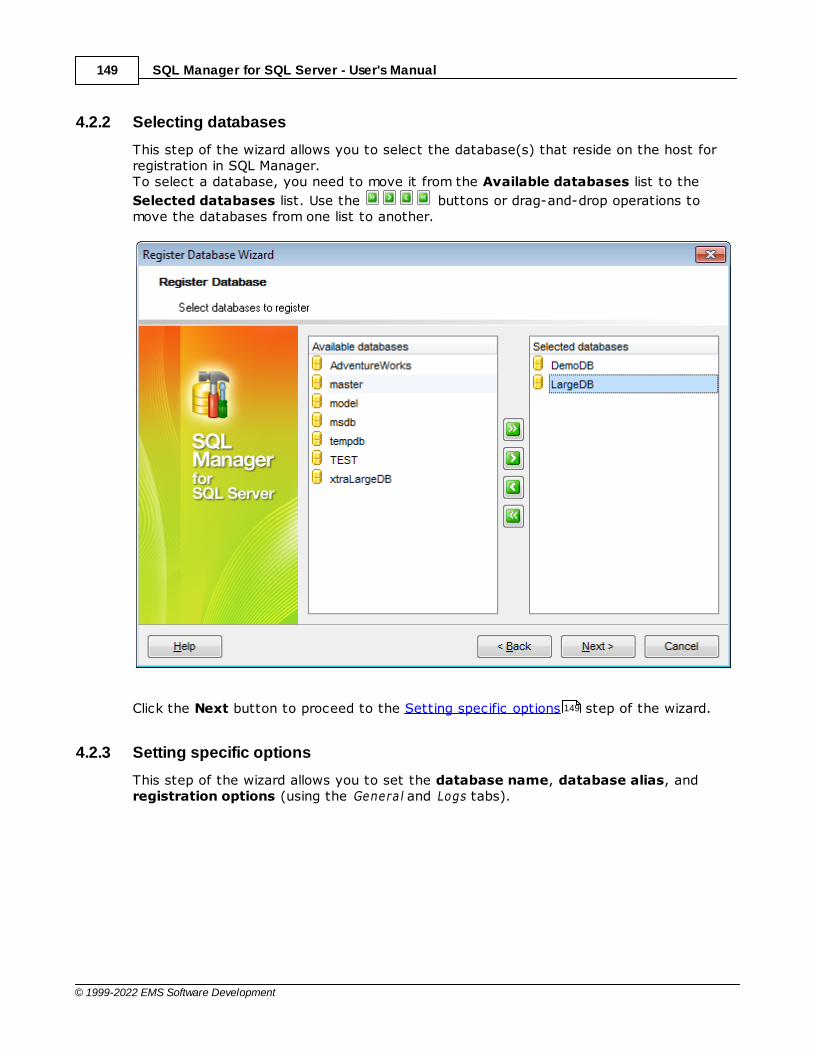
SQL Manager for SQL Server - User's Manual149
© 1999-2022 EMS Software Development
4.2.2 Selecting databases
This step of the wizard allows you to select the database(s) that reside on the host forregistration in SQL Manager.To select a database, you need to move it from the Available databases list to the
Selected databases list. Use the buttons or drag-and-drop operations tomove the databases from one list to another.
Click the Next button to proceed to the Setting specific options step of the wizard.
4.2.3 Setting specific options
This step of the wizard allows you to set the database name, database alias, andregistration options (using the General and Logs tabs).
149
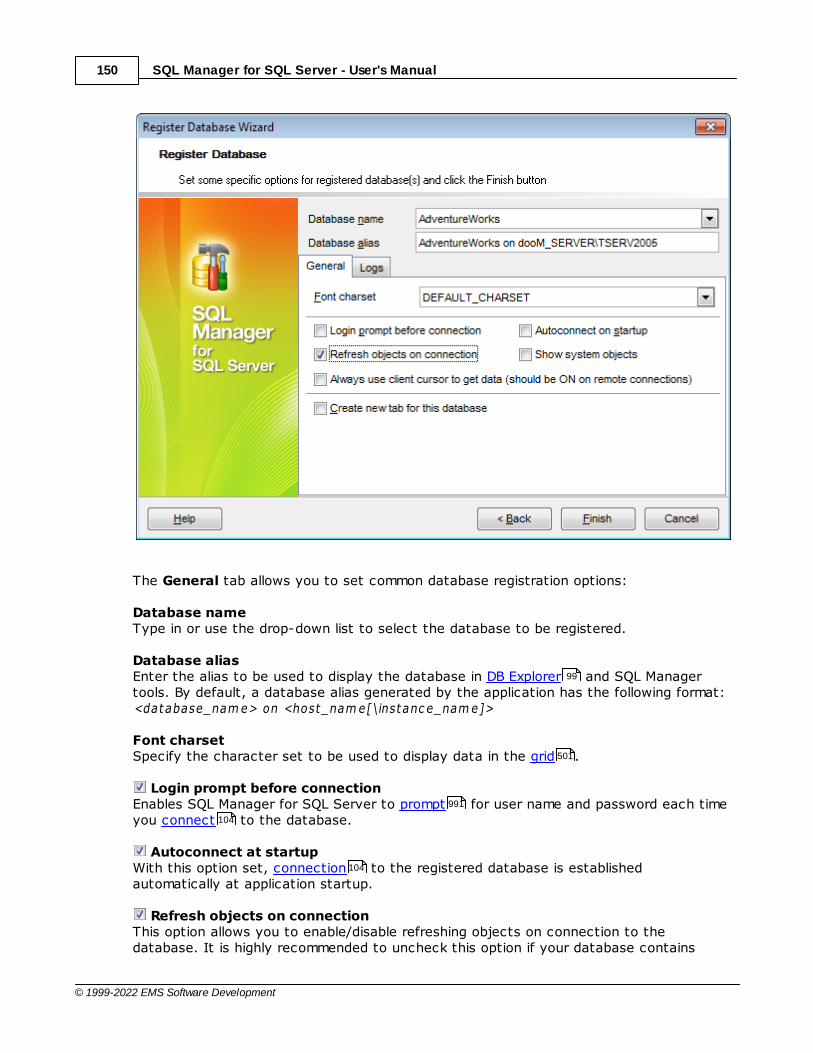
SQL Manager for SQL Server - User's Manual150
© 1999-2022 EMS Software Development
The General tab allows you to set common database registration options:
Database nameType in or use the drop-down list to select the database to be registered.
Database aliasEnter the alias to be used to display the database in DB Explorer and SQL Managertools. By default, a database alias generated by the application has the following format: <database_nam e> on <host_nam e[\instanc e_nam e]>
Font charsetSpecify the character set to be used to display data in the grid .
Login prompt before connection Enables SQL Manager for SQL Server to prompt for user name and password each timeyou connect to the database.
Autoconnect at startup With this option set, connection to the registered database is establishedautomatically at application startup.
Refresh objects on connectionThis option allows you to enable/disable refreshing objects on connection to thedatabase. It is highly recommended to uncheck this option if your database contains
99
501
991
104
104

SQL Manager for SQL Server - User's Manual151
© 1999-2022 EMS Software Development
many objects or if connection to the database is slow.
Show system objectsIf this option is checked, SQL Server system objects will be displayed in DB Explorer .
Create new tab for this databaseIf this option is checked, the database will be displayed within a separate tab in DBExplorer .
The Logs tab allows you to set log options for the database:
Enable log of metadata changesCheck this option if you wish to log metadata changes of your database in a file.
Log fileThis field is enabled if the Enable log of metadata changes option is selected. Type in
or use the Save as button to specify the path to the *.sql file to store the metadatalogs.
Enable log of SQL Editor queriesCheck this option if you wish to log your SQL Editor queries in a file.
Log fileThis field is enabled if the Enable log of SQL Editor queries option is selected. Type in or
use the Save as button to specify the path to the *.sql file to store the logs of SQLqueries.
Is UnicodeEnable this option to save logs in Unicode. If the option is disabled, ANSI will be used.
Click the Finish button when done to start working with the newly registered database inSQL Manager for SQL Server.
99
112
99
462

SQL Manager for SQL Server - User's Manual152
© 1999-2022 EMS Software Development
4.3 Database Registration Info
Use the Database Registration Info dialog to view and edit the registration properties ofthe database.
To open the dialog, select the database or any of its objects in the DB Explorer tree,then select the Database | Database Registration Info... main menu item, or right-click the database alias in DB Explorer and use the Database Registration Info...
context menu item. You can also use the Database Registration Info... button onthe main toolbar .
Editing connection propertiesSetting database optionsSetting display optionsSetting default directoriesSetting log optionsSetting data optionsFind Option
See also:
Register Database wizard
Create Database wizard
Database Properties
4.3.1 Connection
The Connection section of the Database Registration Info dialog allows you to viewand/or edit the connection properties in the corresponding boxes: Host nam e,Authent ic at ion, User nam e, Passw ord, Database nam e, Database a lias, Font c harset, OLEDB Prov ider.
99
958
99
89
960
152
154
156
157
158
160
167
147
133
169
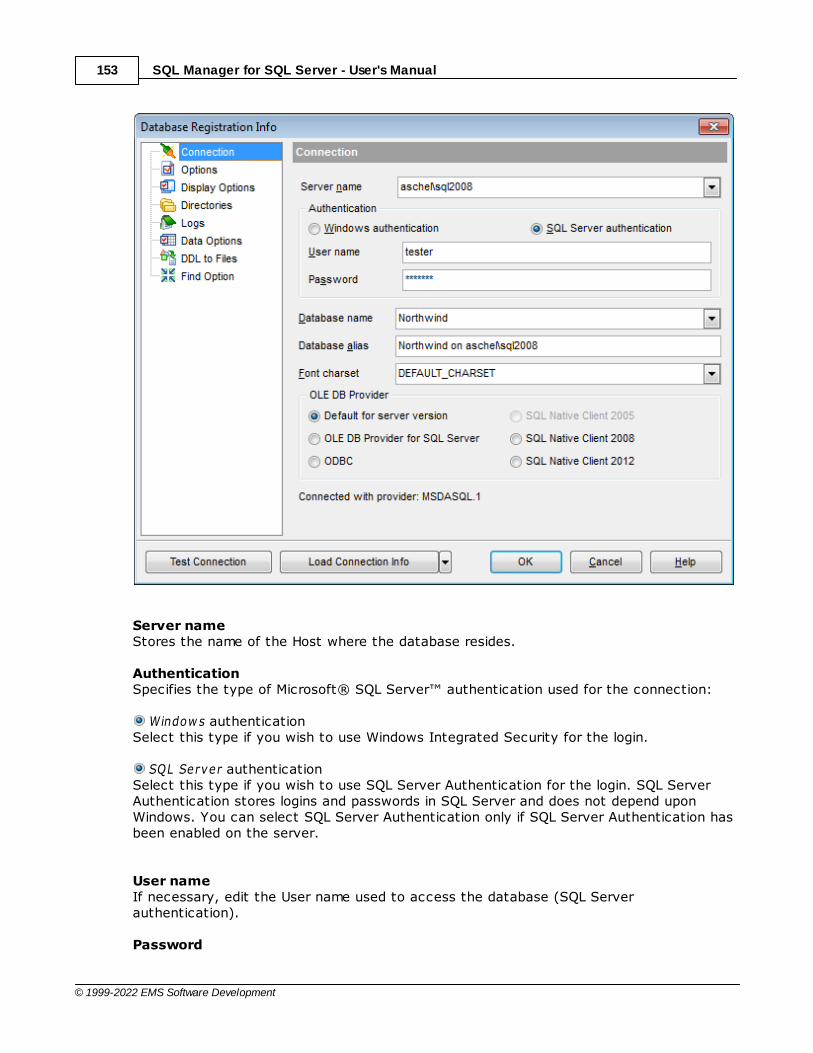
SQL Manager for SQL Server - User's Manual153
© 1999-2022 EMS Software Development
Server nameStores the name of the Host where the database resides.
AuthenticationSpecifies the type of Microsoft® SQL Server™ authentication used for the connection:
Window s authenticationSelect this type if you wish to use Windows Integrated Security for the login.
SQL Server authenticationSelect this type if you wish to use SQL Server Authentication for the login. SQL ServerAuthentication stores logins and passwords in SQL Server and does not depend uponWindows. You can select SQL Server Authentication only if SQL Server Authentication hasbeen enabled on the server.
User nameIf necessary, edit the User name used to access the database (SQL Serverauthentication).
Password
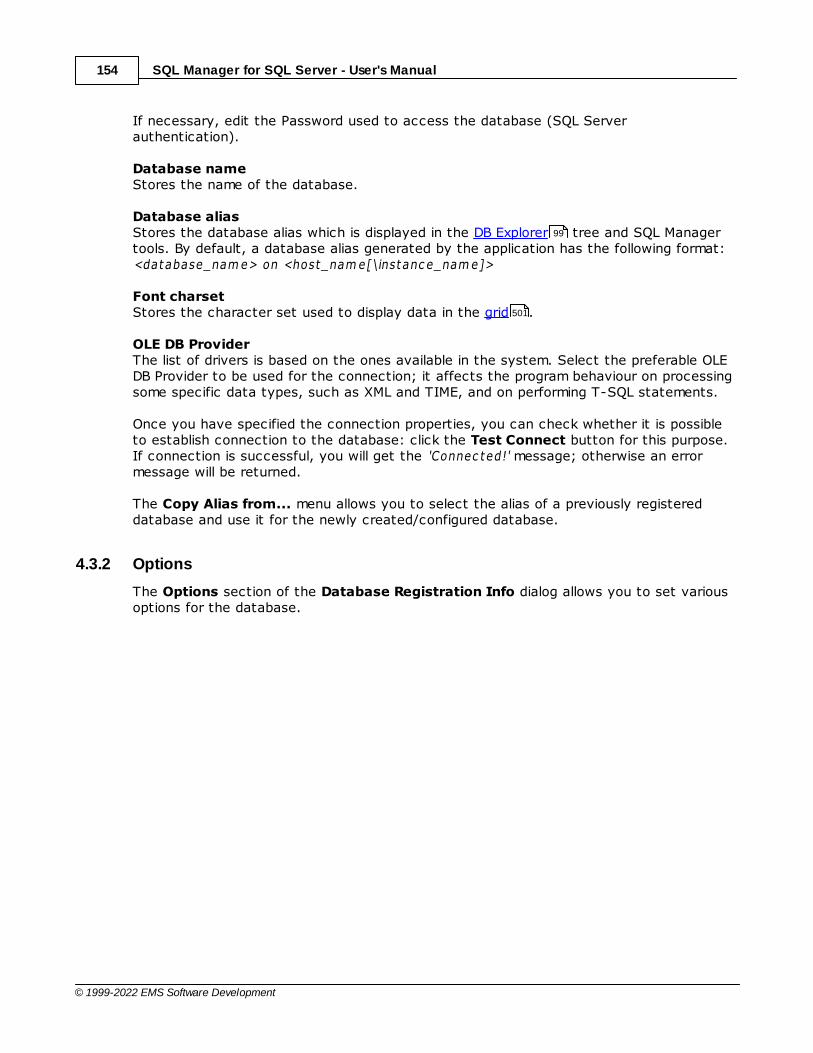
SQL Manager for SQL Server - User's Manual154
© 1999-2022 EMS Software Development
If necessary, edit the Password used to access the database (SQL Serverauthentication).
Database nameStores the name of the database.
Database aliasStores the database alias which is displayed in the DB Explorer tree and SQL Managertools. By default, a database alias generated by the application has the following format: <database_nam e> on <host_nam e[\instanc e_nam e]>
Font charsetStores the character set used to display data in the grid .
OLE DB ProviderThe list of drivers is based on the ones available in the system. Select the preferable OLEDB Provider to be used for the connection; it affects the program behaviour on processingsome specific data types, such as XML and TIME, and on performing T-SQL statements.
Once you have specified the connection properties, you can check whether it is possibleto establish connection to the database: click the Test Connect button for this purpose.If connection is successful, you will get the 'Connec ted!' message; otherwise an errormessage will be returned.
The Copy Alias from... menu allows you to select the alias of a previously registereddatabase and use it for the newly created/configured database.
4.3.2 Options
The Options section of the Database Registration Info dialog allows you to set variousoptions for the database.
99
501
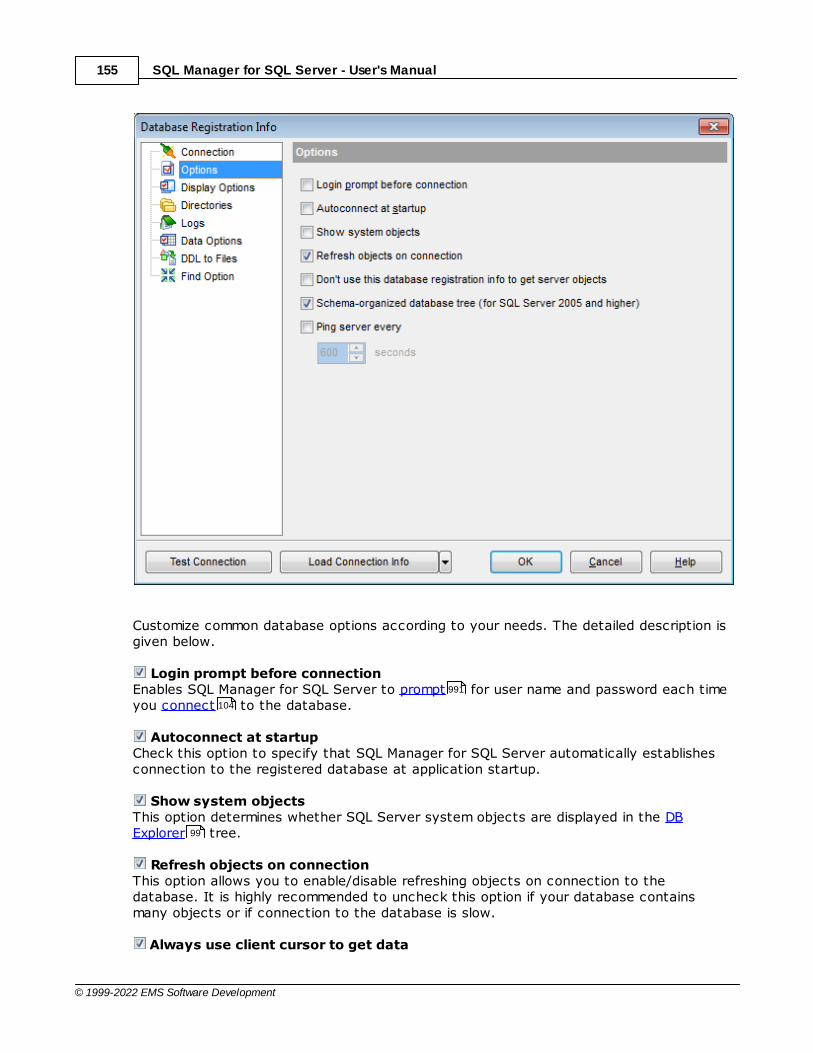
SQL Manager for SQL Server - User's Manual155
© 1999-2022 EMS Software Development
Customize common database options according to your needs. The detailed description isgiven below.
Login prompt before connectionEnables SQL Manager for SQL Server to prompt for user name and password each timeyou connect to the database.
Autoconnect at startup Check this option to specify that SQL Manager for SQL Server automatically establishesconnection to the registered database at application startup.
Show system objectsThis option determines whether SQL Server system objects are displayed in the DBExplorer tree.
Refresh objects on connectionThis option allows you to enable/disable refreshing objects on connection to thedatabase. It is highly recommended to uncheck this option if your database containsmany objects or if connection to the database is slow.
Always use client cursor to get data
991
104
99

SQL Manager for SQL Server - User's Manual156
© 1999-2022 EMS Software Development
This option sets cursor to client. This might be useful for remote server connections, e.g.upon connection via Internet.
Don't use this database registration info to get server objectsIf this option is enabled, the registration info of this database will not be used to establishserver connection and get server objects (when expanding the Server Objects node inDB Explorer ).
Schema-organized database treeIf this option is disabled, the object tree is built without grouping into schemas (forSQL Server 2005 and higher).
Ping server every ... secondsIf this option is ON, the program sends 'SELECT 1' statement every period specified tokeep active connection to the server.
4.3.3 Display options
The Display Options section of the Database Registration Info dialog allows you tospecify which objects will be displayed in the Database Explorer tree.
Use custom color for DB editorsWith this option unchecked the text color for editor tabs is black. To apply user font colorcheck the option and select the color.
99
225
214 99
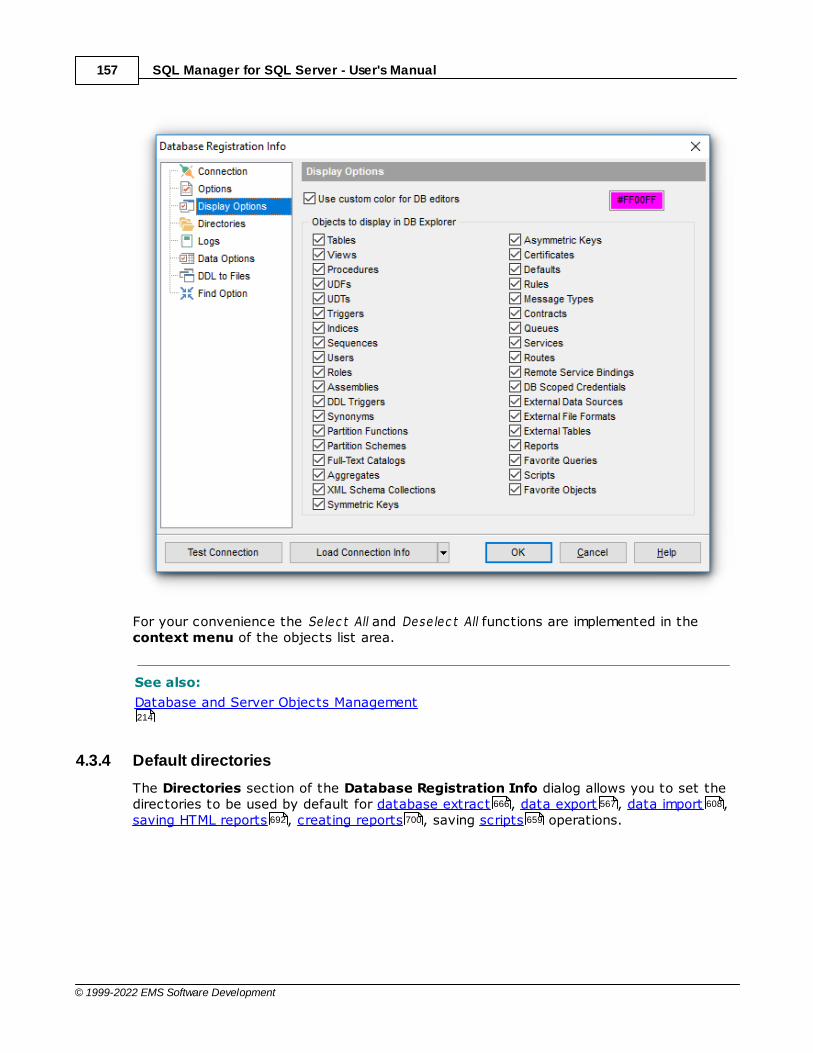
SQL Manager for SQL Server - User's Manual157
© 1999-2022 EMS Software Development
For your convenience the Selec t All and Deselec t All functions are implemented in thecontext menu of the objects list area.
See also:
Database and Server Objects Management
4.3.4 Default directories
The Directories section of the Database Registration Info dialog allows you to set thedirectories to be used by default for database extract , data export , data import ,saving HTML reports , creating reports , saving scripts operations.
214
666 567 608
692 700 659
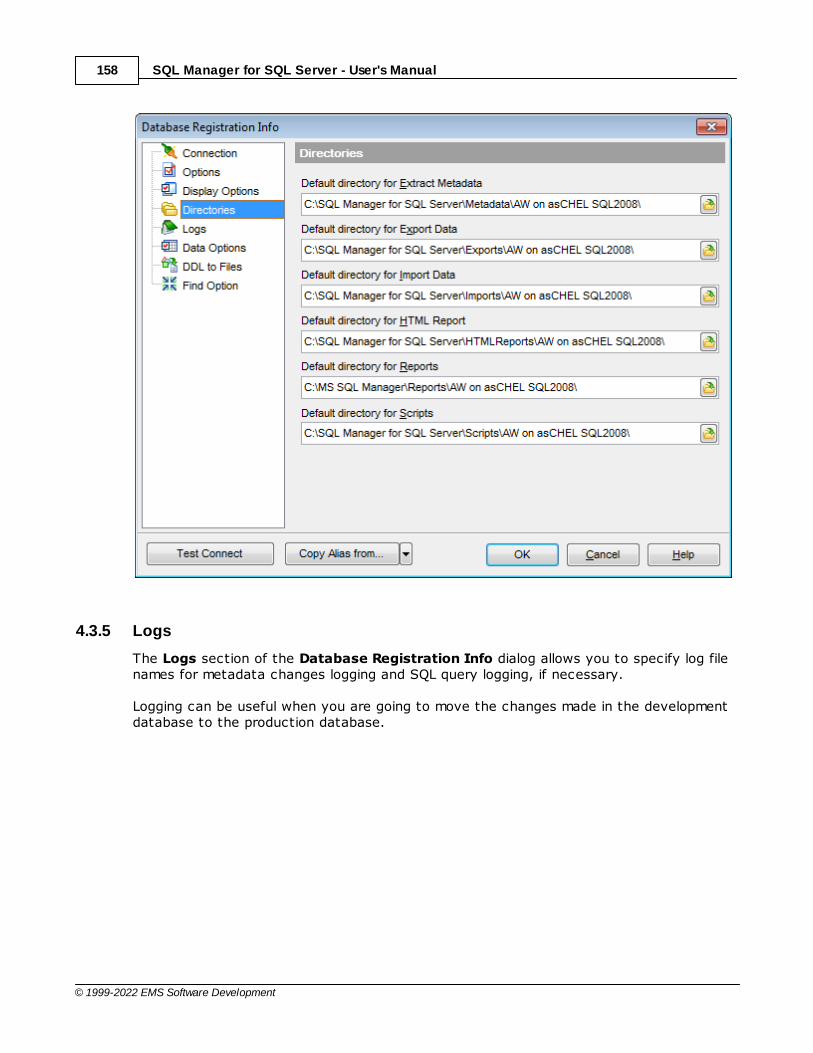
SQL Manager for SQL Server - User's Manual158
© 1999-2022 EMS Software Development
4.3.5 Logs
The Logs section of the Database Registration Info dialog allows you to specify log filenames for metadata changes logging and SQL query logging, if necessary.
Logging can be useful when you are going to move the changes made in the developmentdatabase to the production database.
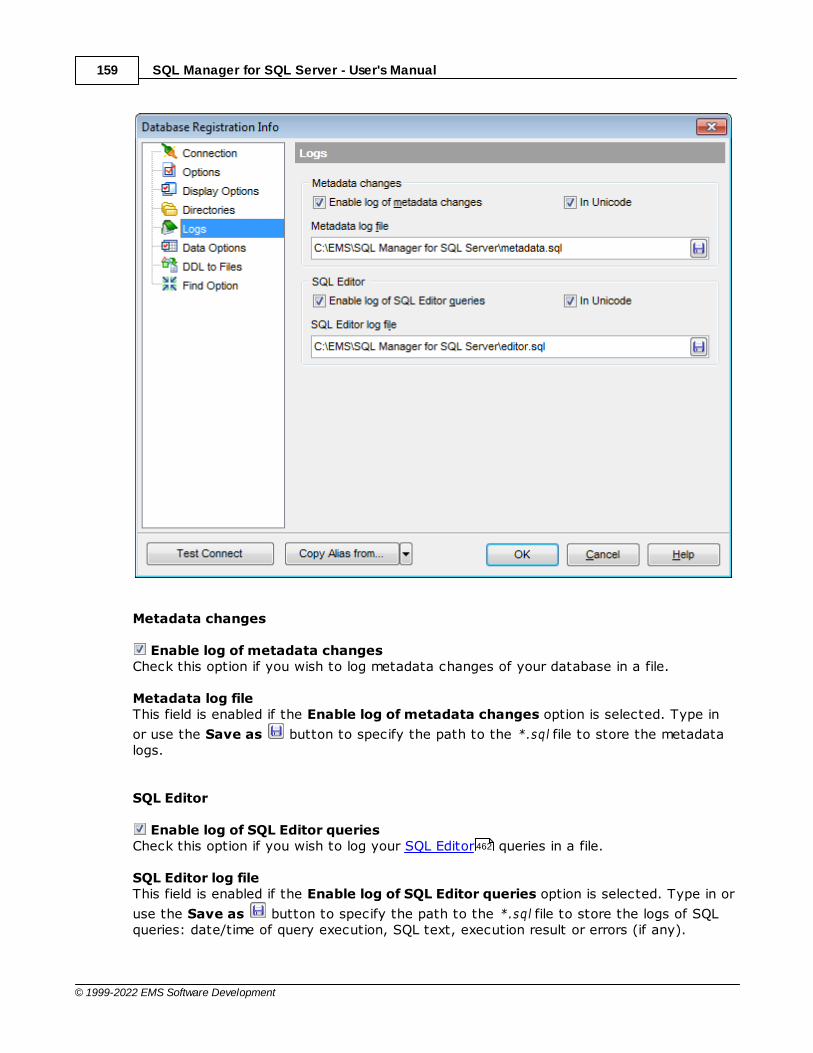
SQL Manager for SQL Server - User's Manual159
© 1999-2022 EMS Software Development
Metadata changes
Enable log of metadata changesCheck this option if you wish to log metadata changes of your database in a file.
Metadata log fileThis field is enabled if the Enable log of metadata changes option is selected. Type in
or use the Save as button to specify the path to the *.sql file to store the metadatalogs.
SQL Editor
Enable log of SQL Editor queriesCheck this option if you wish to log your SQL Editor queries in a file.
SQL Editor log fileThis field is enabled if the Enable log of SQL Editor queries option is selected. Type in or
use the Save as button to specify the path to the *.sql file to store the logs of SQLqueries: date/time of query execution, SQL text, execution result or errors (if any).
462
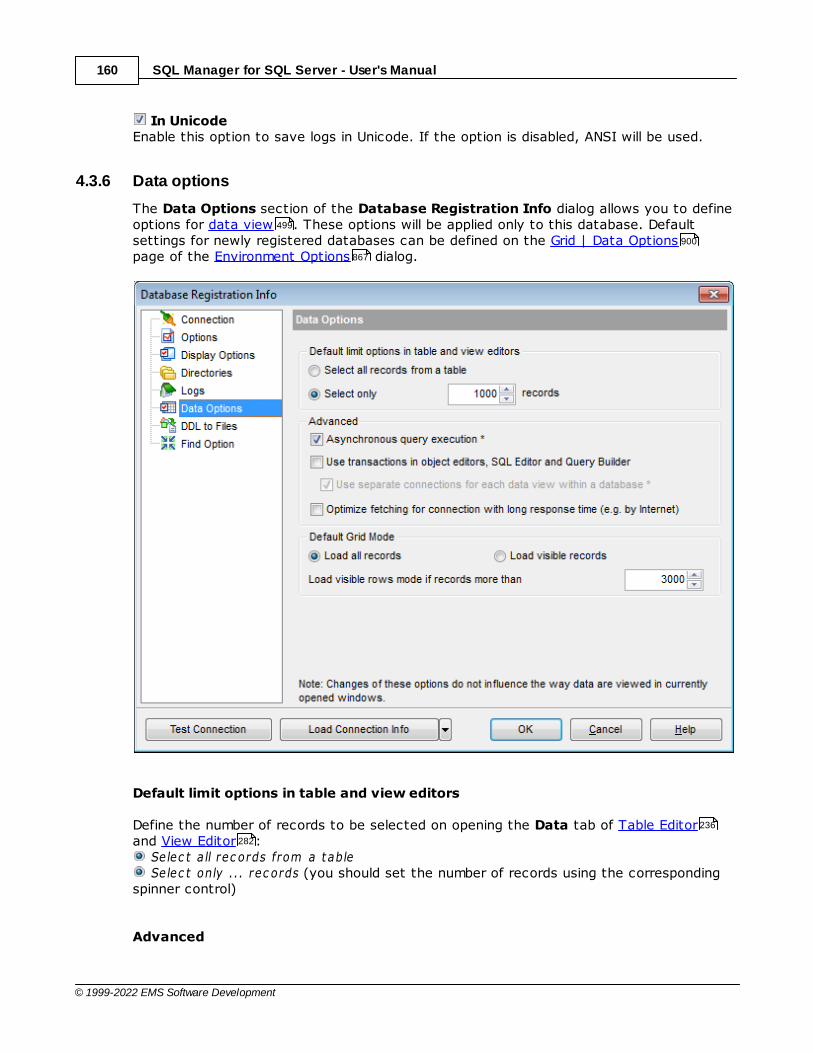
SQL Manager for SQL Server - User's Manual160
© 1999-2022 EMS Software Development
In UnicodeEnable this option to save logs in Unicode. If the option is disabled, ANSI will be used.
4.3.6 Data options
The Data Options section of the Database Registration Info dialog allows you to defineoptions for data view . These options will be applied only to this database. Defaultsettings for newly registered databases can be defined on the Grid | Data Optionspage of the Environment Options dialog.
Default limit options in table and view editors
Define the number of records to be selected on opening the Data tab of Table Editorand View Editor :
Selec t a ll rec ords from a table Selec t only ... rec ords (you should set the number of records using the corresponding
spinner control)
Advanced
499
900
867
236
282
SQL Manager for SQL Server - User's Manual161
© 1999-2022 EMS Software Development
Asynchronous query executionCheck this option to allow executing queries in background mode (asynchronously).
Use transactions in object editors, SQL Editor and Query BuilderIf this option is enabled, a transaction is active until the 'Data' tab is closed or the'Commit' button is pressed; all edited records are blocked until the transaction iscommitted. If this option is disabled, the transaction starts and is immediately committed(autocommit) on saving each record which is blocked only for a short period of time.
Use separate connections for each data view within a databaseSelect this option to use a separate connection for each data view within a database.Disabling this option is recommended if maximum allowed number of connections is toolow. Note that this option is only available when the Use t ransac t ions in Data tab ofobjec t editors, SQL Editor and Query Builder option is enabled.
Optimize fetching for connection with long response timeSelect this option to use optimized methods of fetching data from the database if theresponse time for the connection is long (e.g. the database resides on a server inInternet).
Default Grid Mode
Load visible rowsThe grid loads only a fixed number of dataset records into memory. This option minimizesdataset loading time. The automatic sorting, filtering, summary calculations are notsupported in this mode.
Load all rowsThe grid loads all records from a dataset. This option increases the grid performance byreloading only changed dataset records when updating. In this mode all features(automatic sorting, filtering and summary calculations) are available.
Default Grid Mode defines grid mode which will be used by default.With the Load all rows option enabled, when loading data, all the records are loaded intogrid buffers. In this mode opening the tables with many records may take a very longtime. But in this case you have some advantages: e.g. in the filter drop-down list thecolumn headers are displayed with the values for quick filter; it is possible to open severalsublevels at the same time when viewing data in master-detail view, etc. Because opening and other operations with an object consisting of many records takessufficient time the Load visible rows mode should be used instead. It can be setindividually for each table and is saved between sessions (can be set through the contextmenu of the grid).
Load visible rows mode if records more than...Set this option to switch to the Load visible rows mode when the number of records inthe dataset exceeds the specified value.
See also:
Grid View
Grid options
499
508
501
898

SQL Manager for SQL Server - User's Manual162
© 1999-2022 EMS Software Development
4.3.7 DDL to Files
The DDL to Files section of the Database Registration Info dialog allows you to setoptions for saving database objects definitions to files.Saving objects definitions to files allows using external tools for processing databasescripts or using version control systems for their storage.
To launch the Database Registration Info dialog with DDL to Files tab opened use the
Tools | DDL to Files | Options main menu item, or right-click the database alias in
the DB Explorer tree and select the Tasks | DDL to Files | Options item of thecontext menu .
Write object definition to a file after compilationCheck this option if you want to save objects DDL after changing their definition andsubsequent compilation.
Root folder for storing object definitions
Use the button to select the directory for storing files with objects DDL. In order tomake this data be under version control this directory must be a working copy.
99
89

SQL Manager for SQL Server - User's Manual163
© 1999-2022 EMS Software Development
File to store common options (relative path)Enter the name of *.xm l file that will contain the list of types of objects which definitionsshould be stored in files. This file contains templates of object file names as well.Note: If you do not provide the full path to the file it is stored in the directory defined inthe Root folder for storing object definitions field. To select another location use the
button.Click the Edit File button to select object types and set templates for file names in theOptions for Storing Object Definitions dialog.
File to store object file names (relative path)Enter the name of *.txt file that will contain object names and file names respective tothose objects. Note: If you do not provide the full path to the file it is stored in the directory defined inthe Root folder for storing object definitions field. To select another location use the
button.Click the Edit File button to set file names in the Object File Names dialog.
Confirm file name for new objectIf this option is checked then you will be asked to set a file name for a newly createdobject in the Confirm Object File Names dialog. The file name for a new object isgenerated automatically based on defined templates but you can change it if needed.
The following fields can be used for working with version control systems.
OS command after creating a file
164
166
164

SQL Manager for SQL Server - User's Manual164
© 1999-2022 EMS Software Development
Enter any command that will be executed after a file with object definition is created. If you are using version control system then, for example, the following command can beentered: svn add {file_nam e} (for Subversion revision control system) where {file_nam e}stands for the respective newly created name of a file with object definition.
OS command before updating a fileEnter any command that will be executed before a file with object definition is updated.If you are using version control system then, for example, the following command can beentered: ss c hec kout {file_nam e} -C- (for Visual Source Safe revision control system)where {file_nam e} stands for the respective name of a file with object definition beingupdated.
OS command after deleting a fileEnter any command that will be executed after a file with object definition is deleted.If you are using version control system then, for example, the following command can beentered: svn de l {file_nam e} (for Subversion revision control system) where {file_nam e}stands for the respective name of a file with object definition being deleted.
Click the Write All Objects Now button to save immediately all selected objectsdefinitions to respective files set in the Object file names dialog. The content ofalready existing files will be updated.
Click the Generate Script... button to create an *.sql file containing definitions of allobjects. The order of objects definitions is the same as in the Object file names dialog.
4.3.7.1 Options for storing object definitions
This dialog is used for selecting object types to be saved and setting templates for filenames.For objects of non-selected types definition is saved.
166
166
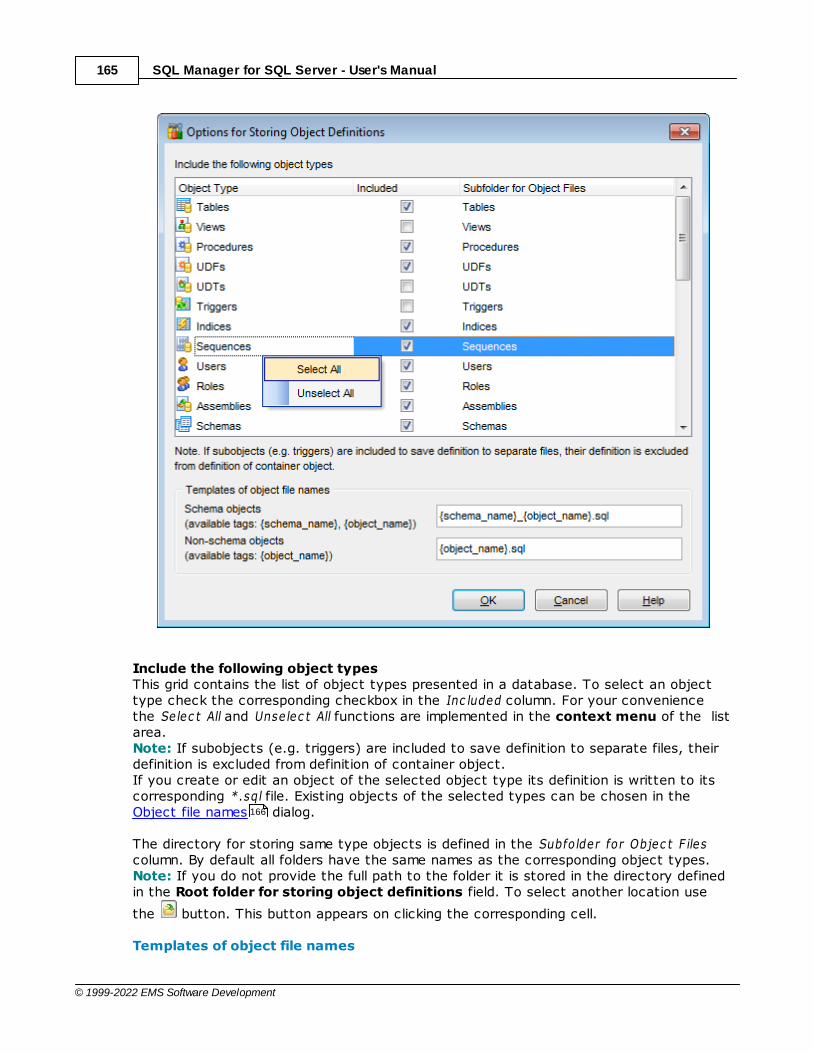
SQL Manager for SQL Server - User's Manual165
© 1999-2022 EMS Software Development
Include the following object typesThis grid contains the list of object types presented in a database. To select an objecttype check the corresponding checkbox in the Inc luded column. For your conveniencethe Selec t All and Unselec t All functions are implemented in the context menu of the listarea.Note: If subobjects (e.g. triggers) are included to save definition to separate files, theirdefinition is excluded from definition of container object.If you create or edit an object of the selected object type its definition is written to itscorresponding *.sql file. Existing objects of the selected types can be chosen in theObject file names dialog.
The directory for storing same type objects is defined in the Subfolder for Objec t F ilescolumn. By default all folders have the same names as the corresponding object types.Note: If you do not provide the full path to the folder it is stored in the directory definedin the Root folder for storing object definitions field. To select another location use
the button. This button appears on clicking the corresponding cell.
Templates of object file names
166

SQL Manager for SQL Server - User's Manual166
© 1999-2022 EMS Software Development
Use this group of options to define templates for file names that are used for storingobjects definitions. For your convenience tags are provided. You can use {objec t_nam e} tag both forschema and non-schema objects files templates. For schema objects a{sc hem a_nam e} tag is available as well.Files extension is optional.
4.3.7.2 Object file names
This dialog is used for managing objects that should be written to files and respective filenames. The order of objects definitions in the general script that is created on clicking the Generate Script... button coincides with the objects order in this list.
If a database object is not added to this list its definition is not saved to file. To managethis list use the grid context menu.
To add all already existing database objects of selected types use the Add AllObjects context menu item.
To add separate objects use the Add Objects... or Insert Objects... context menu item.
164
SQL Manager for SQL Server - User's Manual167
© 1999-2022 EMS Software Development
Pick up needed object(s) in the opened Select Object dialog .
File names are generated automatically according to templates defined in the Options forstoring object definitions dialog. You can change the file name and its path if needed
by pressing the button. For your convenience the Generate File Name option isavailable. If the File Name field is empty due to some reasons you can use this option toset the default file name based on corresponding templates .
You can add any *.sql files to this list that are not associated with objects definitions. Forexample, you can add a file with a script for filling up a table with data. Use the AddFiles... or Insert Files... commands for this purpose. After the file is added to the listselect the SQL as the Objec t T ype for it and define the Objec t Nam e.
To remove files from the list use the Delete... context menu item. The multiple select isavailable.
Use the Select Not Found Objects context menu item to reveal objects that arepresented in the list but do not exist in the database.
Use the Move up and the Move down context menu items to reorder the objects.
4.3.8 Find Option
The Find Option section allows you to search for options available within the DatabaseRegistration Info dialog easily and quickly.
OptionIn this field you can enter the name of the option to search for within the databaseregistration options.
995
164
164

SQL Manager for SQL Server - User's Manual168
© 1999-2022 EMS Software Development
The Available options area lists all options of the Database Registration categoryaccording to the specified name. The Option Kind, Category and Group columns specifyoption type and location.
Select the required option in the list and click Show Option to open the correspondingsection where you can view/edit the value of this option. For your convenience the
required option is marked with an animated icon.

SQL Manager for SQL Server - User's Manual169
© 1999-2022 EMS Software Development
4.4 Database Properties
The Database Properties dialog allows you to view/edit a number of properties whichcan be changed to optimize database performance.
To open the dialog, right-click the database alias in DB Explorer and select the
Database Properties... context menu item, or use the Properties button on theDB Explorer toolbar .
A number of database-level options that determine the characteristics of the databasecan be set for each database. Only the system administrator, database owner, membersof the sysadmin and dbcreator fixed server roles and db_owner fixed database roles
can modify these options. These options are unique to each database and do notaffect other databases.
InformationOptions
99
89
123
735
335
170
171

SQL Manager for SQL Server - User's Manual170
© 1999-2022 EMS Software Development
Recovery options
ANSI options
SQL options
Automation options
Cursor options
Advanced database optionsData filesTransaction log filesFilegroupsFilestream files and filegroupsFind Option
See also:
Register Database wizard
Create Database wizard
Database Registration Info
4.4.1 Information
The Information section of the Database Properties dialog allows you to view thedatabase summary: Database nam e, Database ow ner, T ota l database size, Databaseavailable spac e, T ota l data size (used by data, used by indic es, unused spac e), T ota lt ransac t ion log size (used spac e, unused spac e), Last full/different ia l/t ransac t ion logbac kup dates.
174
175
177
178
180
181
184
186
189
190
192
147
133
152

SQL Manager for SQL Server - User's Manual171
© 1999-2022 EMS Software Development
See also:
Options
Data files
Log files
Filegroups
Filestream files and filegroups
Find Option
4.4.2 Options
The Options section of the Database Properties dialog allows you to view/edit optionspertaining to the SQL Server database in groups: General, Rec overy, ANSI, SQL, Auto,Cursor, F ileT able, Advanc ed.
Recovery optionsANSI optionsSQL optionsAutomation optionsCursor optionsFileTable optionsAdvanced
Options
171
184
186
189
190
192
174
175
177
178
180
181

SQL Manager for SQL Server - User's Manual172
© 1999-2022 EMS Software Development
Read-only mode (READ_ONLY)When this option is enabled, the database is in read-only mode. Users can retrieve datafrom the database, but cannot modify the data, because a read-only database does notallow data modifications:a. Automatic recovery is skipped at system startup.b. Shrinking the database is not possible.c. No locking takes place in read-only databases, which can result in faster queryperformance.
Can be source or target of cross-database ownership chain (DB_CHAINING)When this option is checked, DB_CHAINING is enabled and the database can be thesource or target of a cross-database ownership chain. When the option is unchecked, thedatabase cannot participate in cross-database ownership chaining. You can change thisoption for user databases, but not for system databases.
Database modules can access resources outside of database (TRUSTWORTHY)When this option is on, database modules (for example, views , user-defined functions
, or stored procedures ) that use an impersonation context are allowed to accessresources outside of the database.
State ONLINE
The database is open and available for use (enabled by default). OFFLINE
The database is closed and shutdown, and marked offline. The database cannot bemodified while it is in the offline state.
EMERGENCYThe database is marked READ_ONLY, logging is disabled, and only members of thesysadmin fixed server role can access the database.
Connection mode MULT I_USER
Allows all users with the appropriate permissions to connect to the database (enabled bydefault).
REST RICT ED_USERAllows only members of the db_owner fixed database role and dbcreator and sysadminfixed server roles to connect to the database, but it does not limit their number.
SINGLE_USERAllows one user at a time to connect to the database. All other user connections arebroken.
Transparent data encryption (ENCRYPTION)Enable the option to use encryption. Encryption of the database file is performed at thepage level. The pages in an encrypted database are encrypted before they are written todisk and decrypted when read into memory.Note: This option is available only for SQL Server 2008 databases and higher.
For SQL Azure databases the Options tab looks the following way:
174
797
460
282
295 289

SQL Manager for SQL Server - User's Manual173
© 1999-2022 EMS Software Development
Database EditionHere you can view the current edition of the SQL Azure database and change it, ifnecessary.
BasicSmall databases with a single operation at a given point in time.
StandardWorkgroup and cloud applications with multiple concurrent transactions.
PremiumMission-critical, high transactional volume with many concurrent users.
WebWeb apps, workgroup, dept. apps, and other lightweight database workloads.
BusinessLightweight database workloads that require larger sizes than supported with Web.
Note: Web and Businesss editions will be retired September 2015.
Performance LevelUse the drop-down list to select the Performance Level for the database. Performancelevels are specific for the selected database edition.
Maximum sizeSpecifies the maximum size of the database. This value must be valid for the specifiedEdition.
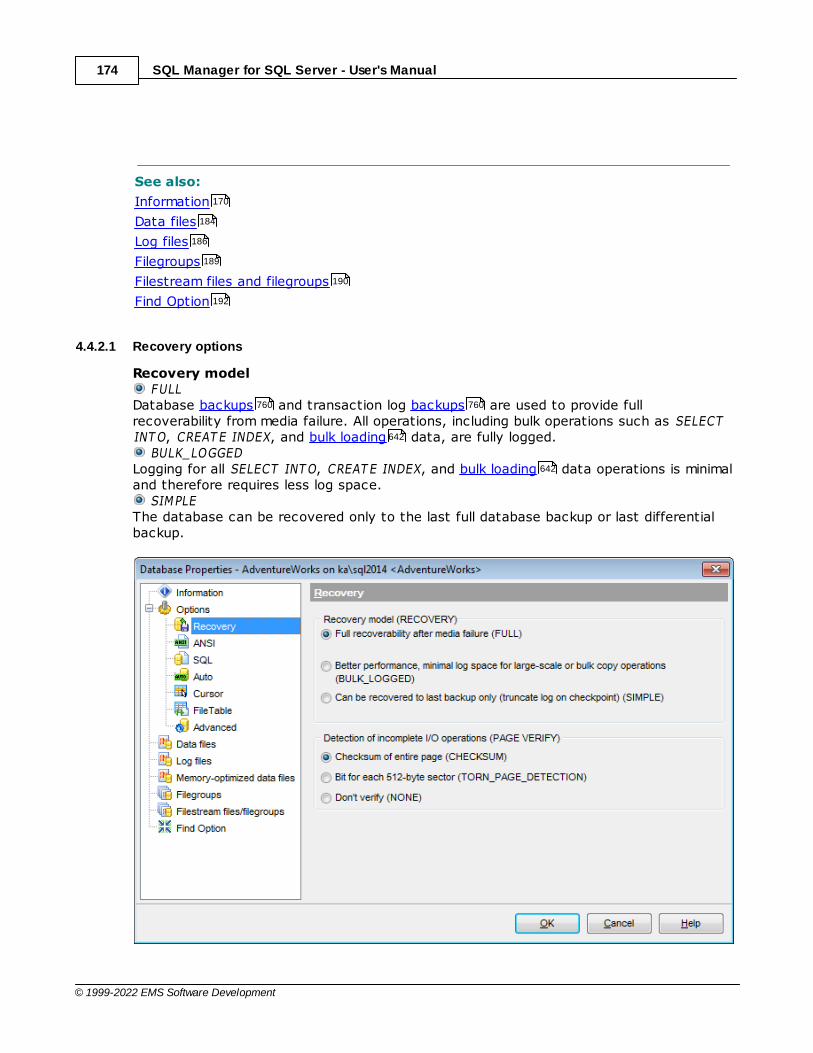
SQL Manager for SQL Server - User's Manual174
© 1999-2022 EMS Software Development
See also:
Information
Data files
Log files
Filegroups
Filestream files and filegroups
Find Option
4.4.2.1 Recovery options
Recovery model FULL
Database backups and transaction log backups are used to provide fullrecoverability from media failure. All operations, including bulk operations such as SELECTINT O, CREAT E INDEX, and bulk loading data, are fully logged.
BULK_LOGGEDLogging for all SELECT INT O, CREAT E INDEX, and bulk loading data operations is minimaland therefore requires less log space.
SIMPLEThe database can be recovered only to the last full database backup or last differentialbackup.
170
184
186
189
190
192
760 760
642
642
SQL Manager for SQL Server - User's Manual175
© 1999-2022 EMS Software Development
Detection of Incomplete I/O OperationsThis group can be used to specify three options to discover incomplete I/O transactionscaused by disk I/O errors:
CHECKSUMA checksum is taken over the contents of the entire page and stored in the page headerwhen a page is written to disk. When a page is read from disk, the checksum isrecomputed and compared to the checksum value stored in the page header.
T ORN_PAGE_DET ECT IONA bit is reversed for each 512-byte sector in the 8-kilobyte (KB) database page when thepage is written to disk. If a bit is in the wrong state when the page is later read, the pagewas written incorrectly; a torn page is detected.
NONEPAGE_VERIFY is set to OFF and future data page writes will not contain a CHECKSUM orT ORN_PAGE_DET ECT ION bit and the page will not be verified at read time.
See also:
ANSI options
SQL options
Automation options
Cursor options
FileTable options
Advanced
4.4.2.2 ANSI options
NULL is default for UDTs and columns (ANSI_NULL_DEFAULT) When this option is enabled, all user-defined data types or columns that are notexplicitly defined as NOT NULL during a CREAT E T ABLE or ALT ER T ABLE statement defaultto allowing null values. Columns that are defined with constraints follow constraint rulesregardless of this option.
Comparisons to null value evaluate to NULL (ANSI_NULLS) When this option is enabled, all comparisons to a null value evaluate to NULL (unknown).When disabled, comparisons of non-Unicode values to a null value evaluate to T RUE ifboth values are NULL.
175
177
178
180
181
299 249
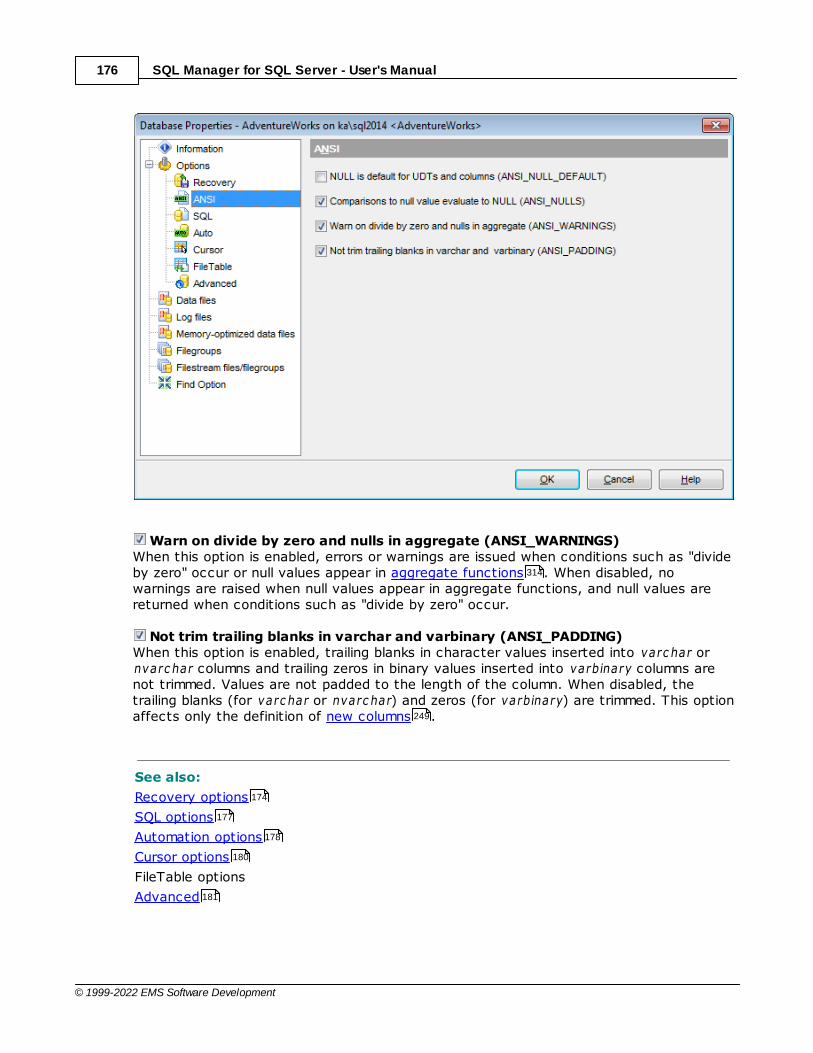
SQL Manager for SQL Server - User's Manual176
© 1999-2022 EMS Software Development
Warn on divide by zero and nulls in aggregate (ANSI_WARNINGS) When this option is enabled, errors or warnings are issued when conditions such as "divideby zero" occur or null values appear in aggregate functions . When disabled, nowarnings are raised when null values appear in aggregate functions, and null values arereturned when conditions such as "divide by zero" occur.
Not trim trailing blanks in varchar and varbinary (ANSI_PADDING) When this option is enabled, trailing blanks in character values inserted into varc har ornvarc har columns and trailing zeros in binary values inserted into varbinary columns arenot trimmed. Values are not padded to the length of the column. When disabled, thetrailing blanks (for varc har or nvarc har) and zeros (for varbinary) are trimmed. This optionaffects only the definition of new columns .
See also:
Recovery options
SQL options
Automation options
Cursor options
FileTable options
Advanced
314
249
174
177
178
180
181
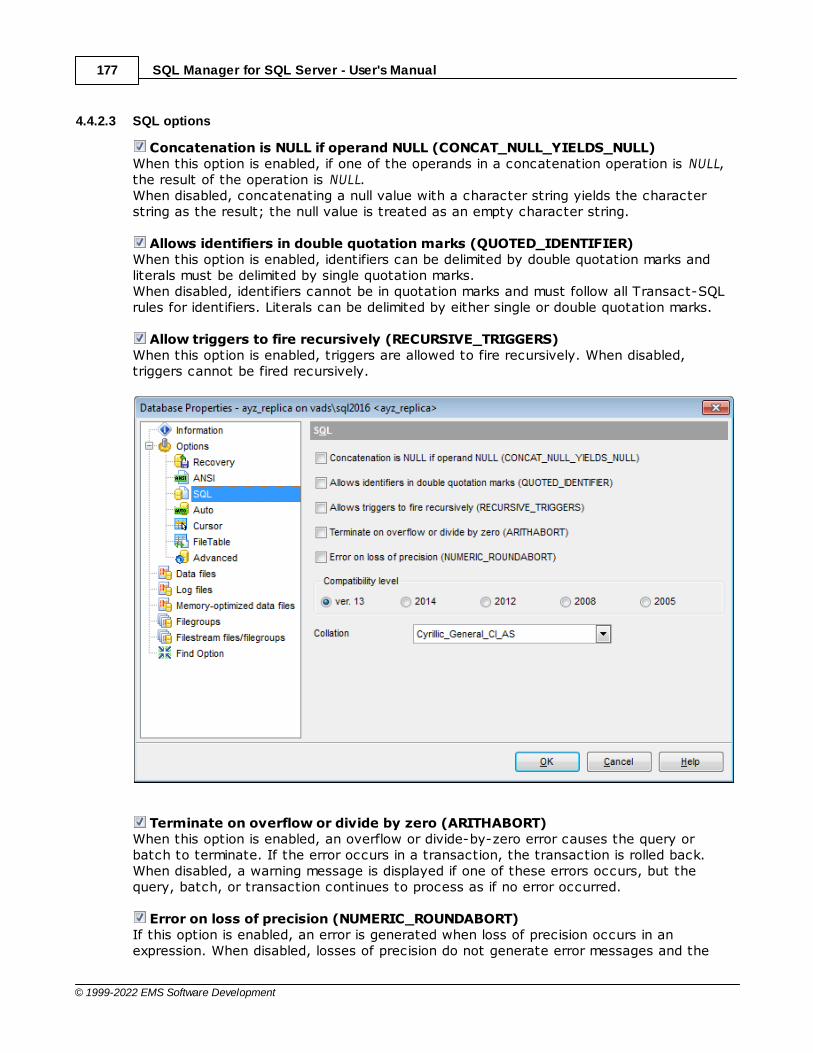
SQL Manager for SQL Server - User's Manual177
© 1999-2022 EMS Software Development
4.4.2.3 SQL options
Concatenation is NULL if operand NULL (CONCAT_NULL_YIELDS_NULL) When this option is enabled, if one of the operands in a concatenation operation is NULL,the result of the operation is NULL.When disabled, concatenating a null value with a character string yields the characterstring as the result; the null value is treated as an empty character string.
Allows identifiers in double quotation marks (QUOTED_IDENTIFIER) When this option is enabled, identifiers can be delimited by double quotation marks andliterals must be delimited by single quotation marks.When disabled, identifiers cannot be in quotation marks and must follow all Transact-SQLrules for identifiers. Literals can be delimited by either single or double quotation marks.
Allow triggers to fire recursively (RECURSIVE_TRIGGERS) When this option is enabled, triggers are allowed to fire recursively. When disabled,triggers cannot be fired recursively.
Terminate on overflow or divide by zero (ARITHABORT) When this option is enabled, an overflow or divide-by-zero error causes the query orbatch to terminate. If the error occurs in a transaction, the transaction is rolled back.When disabled, a warning message is displayed if one of these errors occurs, but thequery, batch, or transaction continues to process as if no error occurred.
Error on loss of precision (NUMERIC_ROUNDABORT) If this option is enabled, an error is generated when loss of precision occurs in anexpression. When disabled, losses of precision do not generate error messages and the
SQL Manager for SQL Server - User's Manual178
© 1999-2022 EMS Software Development
result is rounded to the precision of the column or variable storing the result.
The Compatibility Level option group controls the behavior of an instance of Microsoft®SQL Server™, setting behavior to match a specified version of SQL Server.
Collation can be either a Windows collation name or a SQL collation name. By default,the server collation is used.
See also:
Recovery options
ANSI options
Automation options
Cursor options
FileTable options
Advanced
4.4.2.4 Automation options
Shut down if no connected users (AUTO_CLOSE) When this option is enabled, the database is closed and shut down when the last user ofthe database exits and all processes in the database complete, thereby freeing anyresources. The database reopens automatically when a user tries to use the databaseagain. When disabled, the database remains open even if no users are currently using thedatabase.
Auto create statistics on columns in predicates (AUTO_CREATE_STATISTICS) When this option is enabled, statistics are automatically created on columns used in apredicate. Adding statistics improves query performance because the SQL Server queryoptimizer can better determine how to evaluate a query. If the statistics are not used,SQL Server automatically deletes them. When disabled, statistics are not automaticallycreated; instead, statistics can be manually created.
174
175
178
180
181
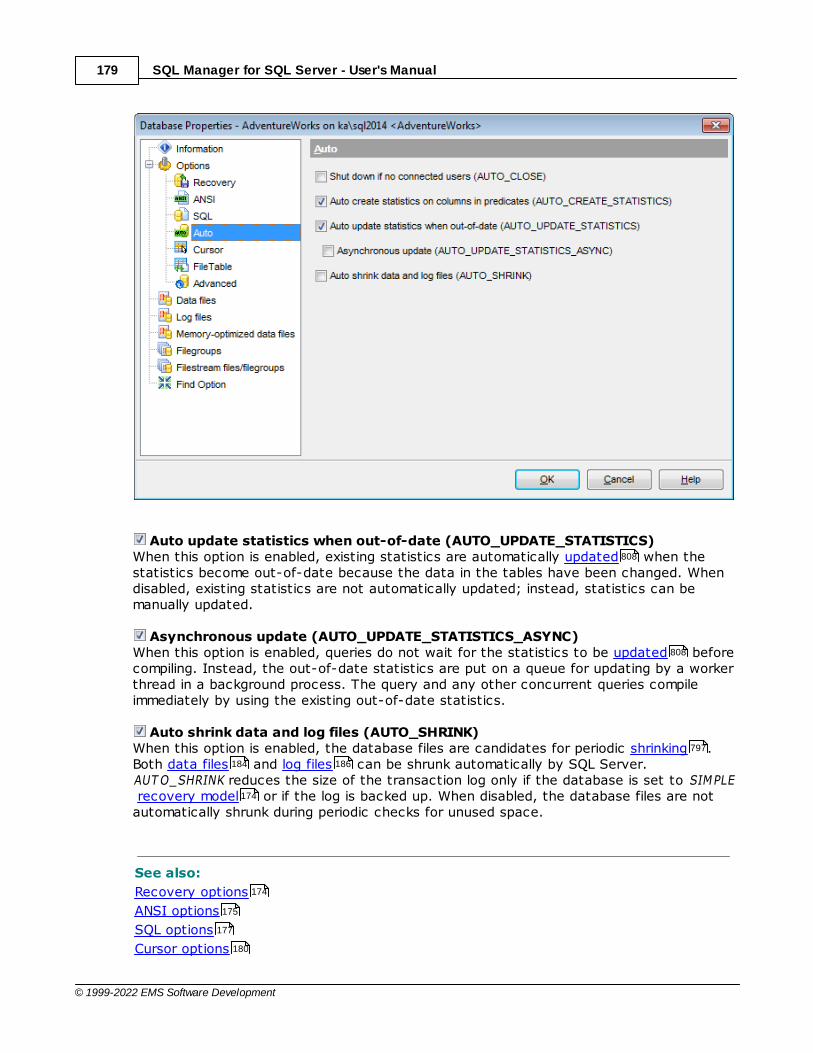
SQL Manager for SQL Server - User's Manual179
© 1999-2022 EMS Software Development
Auto update statistics when out-of-date (AUTO_UPDATE_STATISTICS) When this option is enabled, existing statistics are automatically updated when thestatistics become out-of-date because the data in the tables have been changed. Whendisabled, existing statistics are not automatically updated; instead, statistics can bemanually updated.
Asynchronous update (AUTO_UPDATE_STATISTICS_ASYNC) When this option is enabled, queries do not wait for the statistics to be updated beforecompiling. Instead, the out-of-date statistics are put on a queue for updating by a workerthread in a background process. The query and any other concurrent queries compileimmediately by using the existing out-of-date statistics.
Auto shrink data and log files (AUTO_SHRINK) When this option is enabled, the database files are candidates for periodic shrinking .Both data files and log files can be shrunk automatically by SQL Server.AUT O_SHRINK reduces the size of the transaction log only if the database is set to SIMPLE recovery model or if the log is backed up. When disabled, the database files are notautomatically shrunk during periodic checks for unused space.
See also:
Recovery options
ANSI options
SQL options
Cursor options
808
808
797
184 186
174
174
175
177
180
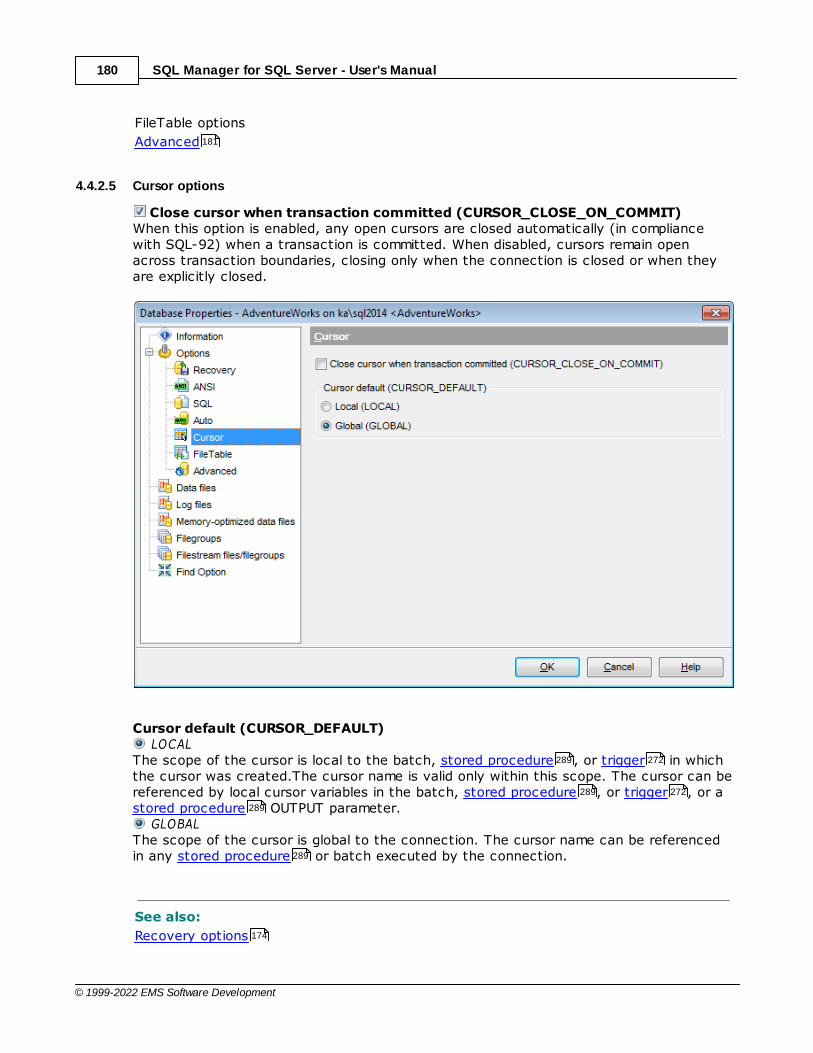
SQL Manager for SQL Server - User's Manual180
© 1999-2022 EMS Software Development
FileTable options
Advanced
4.4.2.5 Cursor options
Close cursor when transaction committed (CURSOR_CLOSE_ON_COMMIT) When this option is enabled, any open cursors are closed automatically (in compliancewith SQL-92) when a transaction is committed. When disabled, cursors remain openacross transaction boundaries, closing only when the connection is closed or when theyare explicitly closed.
Cursor default (CURSOR_DEFAULT) LOCAL
The scope of the cursor is local to the batch, stored procedure , or trigger in whichthe cursor was created.The cursor name is valid only within this scope. The cursor can bereferenced by local cursor variables in the batch, stored procedure , or trigger , or astored procedure OUTPUT parameter.
GLOBALThe scope of the cursor is global to the connection. The cursor name can be referencedin any stored procedure or batch executed by the connection.
See also:
Recovery options
181
289 272
289 272
289
289
174
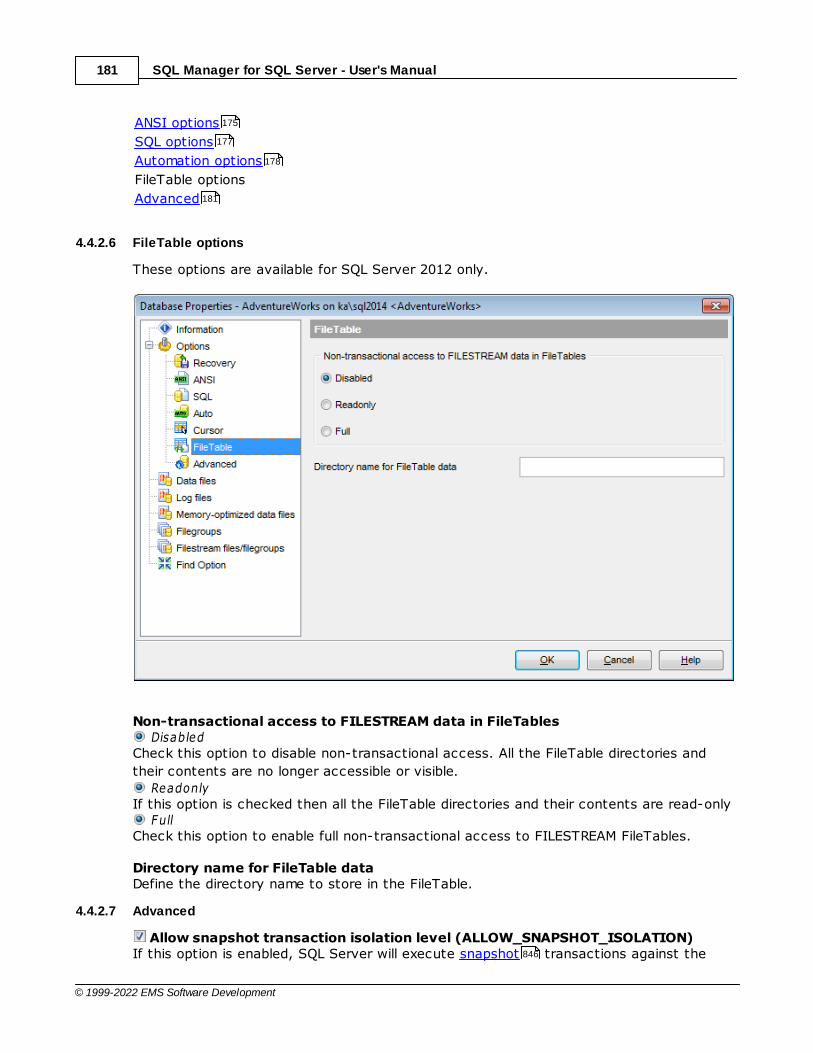
SQL Manager for SQL Server - User's Manual181
© 1999-2022 EMS Software Development
ANSI options
SQL options
Automation options
FileTable options
Advanced
4.4.2.6 FileTable options
These options are available for SQL Server 2012 only.
Non-transactional access to FILESTREAM data in FileTables Disabled
Check this option to disable non-transactional access. All the FileTable directories and
their contents are no longer accessible or visible. Readonly
If this option is checked then all the FileTable directories and their contents are read-only Full
Check this option to enable full non-transactional access to FILESTREAM FileTables.
Directory name for FileTable dataDefine the directory name to store in the FileTable.
4.4.2.7 Advanced
Allow snapshot transaction isolation level (ALLOW_SNAPSHOT_ISOLATION) If this option is enabled, SQL Server will execute snapshot transactions against the
175
177
178
181
846
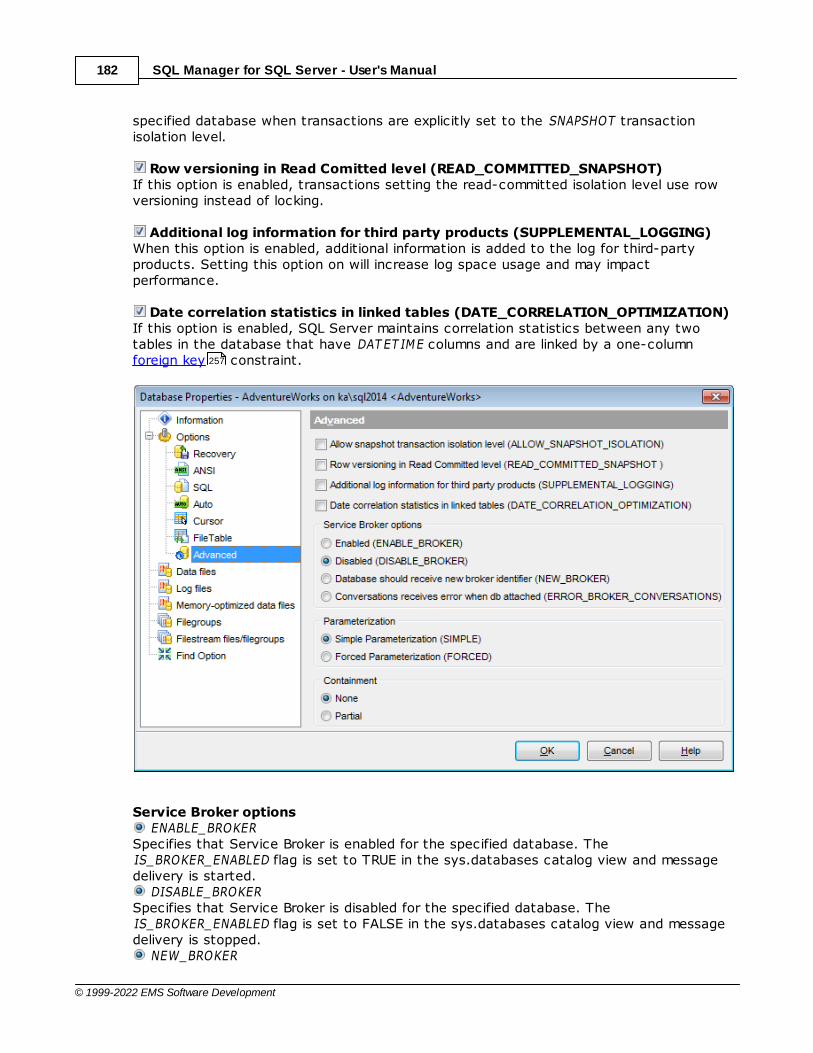
SQL Manager for SQL Server - User's Manual182
© 1999-2022 EMS Software Development
specified database when transactions are explicitly set to the SNAPSHOT transactionisolation level.
Row versioning in Read Comitted level (READ_COMMITTED_SNAPSHOT)If this option is enabled, transactions setting the read-committed isolation level use rowversioning instead of locking.
Additional log information for third party products (SUPPLEMENTAL_LOGGING)When this option is enabled, additional information is added to the log for third-partyproducts. Setting this option on will increase log space usage and may impactperformance.
Date correlation statistics in linked tables (DATE_CORRELATION_OPTIMIZATION)If this option is enabled, SQL Server maintains correlation statistics between any twotables in the database that have DAT ET IME columns and are linked by a one-columnforeign key constraint.
Service Broker options ENABLE_BROKER
Specifies that Service Broker is enabled for the specified database. The IS_BROKER_ENABLED flag is set to TRUE in the sys.databases catalog view and messagedelivery is started.
DISABLE_BROKERSpecifies that Service Broker is disabled for the specified database. The IS_BROKER_ENABLED flag is set to FALSE in the sys.databases catalog view and messagedelivery is stopped.
NEW_BROKER
257

SQL Manager for SQL Server - User's Manual183
© 1999-2022 EMS Software Development
Specifies that the database should receive a new broker identifier. Because the databaseis considered to be a completely new service broker, all existing conversations in thedatabase are immediately removed without producing end dialog messages.
ERROR_BROKER_CONVERSAT IONSSpecifies that conversations in the database should receive an error message when thedatabase is attached. This allows your applications to perform normal clean up for existingconversations.
Parametrization Sim ple Param et r izat ion (SIMPLE)
Queries are parameterized on the basis of the default behavior of the database. Forc ed Param et r izat ion (FORCED)
SQL Server parameterizes all queries in the database.
ContainmentContained Database is independent of the SQL Server Instance. All the databasemetadata and user information is stored inside the database itself.
NoneCheck this option to make a non-contained database.
Part ia lCheck this option to make a database partially contained. A partially contained databaseis a contained database that can allow some features that cross the database boundary(The boundary between a database and the instance of SQL Server or between adatabase and other databases). SQL Server includes the ability to determine when thecontainment boundary is crossed. The partially contained database can store importantinformation in the database so the database still has the information after it is moved.
See also:
Recovery options
ANSI options
SQL options
Automation options
Cursor options
FileTable options
4.4.3 Resource usage
On this tab the results of the sys.resourc e_stat s command are displayed. It returns CPUusage and storage data for an Azure SQL Database.
460
460
174
175
177
178
180
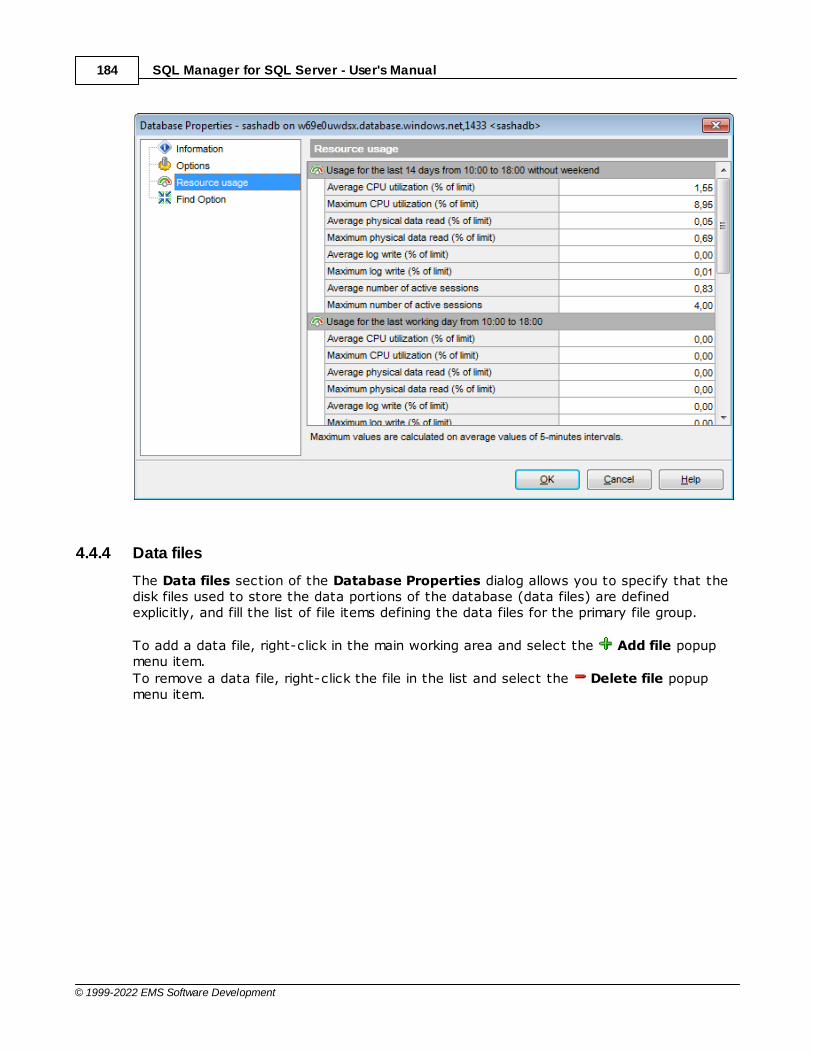
SQL Manager for SQL Server - User's Manual184
© 1999-2022 EMS Software Development
4.4.4 Data files
The Data files section of the Database Properties dialog allows you to specify that thedisk files used to store the data portions of the database (data files) are definedexplicitly, and fill the list of file items defining the data files for the primary file group.
To add a data file, right-click in the main working area and select the Add file popupmenu item.
To remove a data file, right-click the file in the list and select the Delete file popupmenu item.
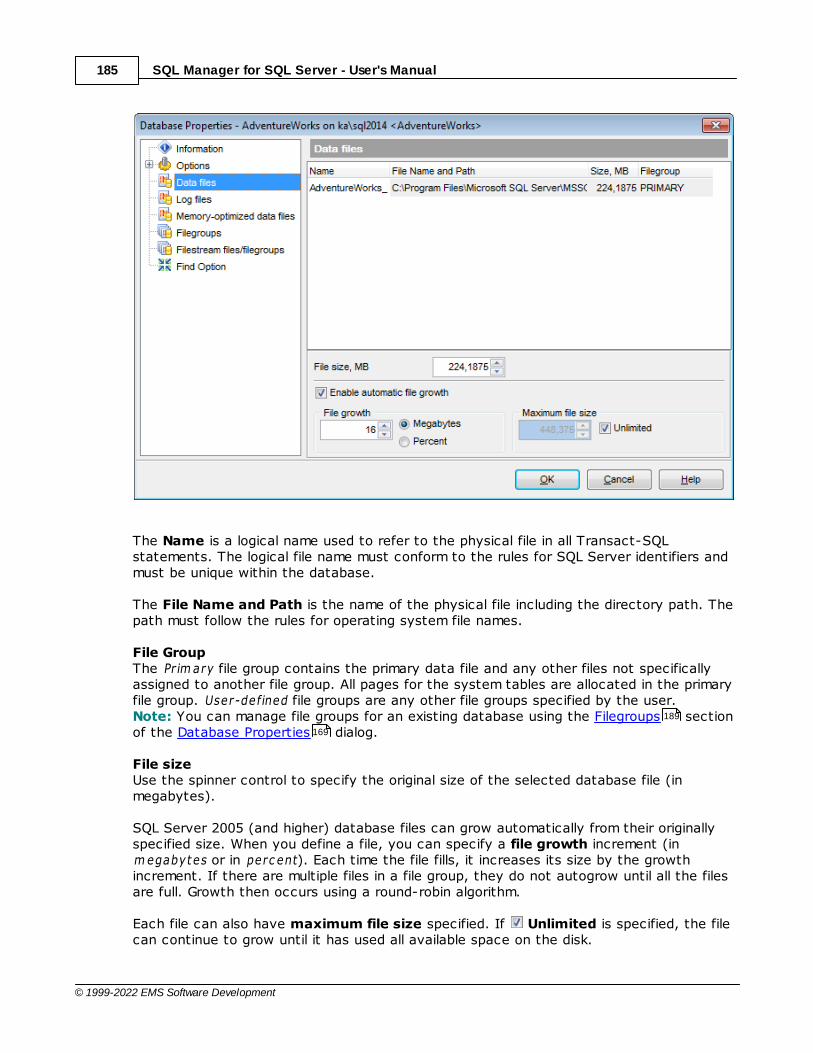
SQL Manager for SQL Server - User's Manual185
© 1999-2022 EMS Software Development
The Name is a logical name used to refer to the physical file in all Transact-SQLstatements. The logical file name must conform to the rules for SQL Server identifiers andmust be unique within the database.
The File Name and Path is the name of the physical file including the directory path. Thepath must follow the rules for operating system file names.
File GroupThe Prim ary file group contains the primary data file and any other files not specificallyassigned to another file group. All pages for the system tables are allocated in the primaryfile group. User-defined file groups are any other file groups specified by the user.Note: You can manage file groups for an existing database using the Filegroups sectionof the Database Properties dialog.
File sizeUse the spinner control to specify the original size of the selected database file (inmegabytes).
SQL Server 2005 (and higher) database files can grow automatically from their originallyspecified size. When you define a file, you can specify a file growth increment (inm egabytes or in perc ent). Each time the file fills, it increases its size by the growthincrement. If there are multiple files in a file group, they do not autogrow until all the filesare full. Growth then occurs using a round-robin algorithm.
Each file can also have maximum file size specified. If Unlimited is specified, the filecan continue to grow until it has used all available space on the disk.
189
169
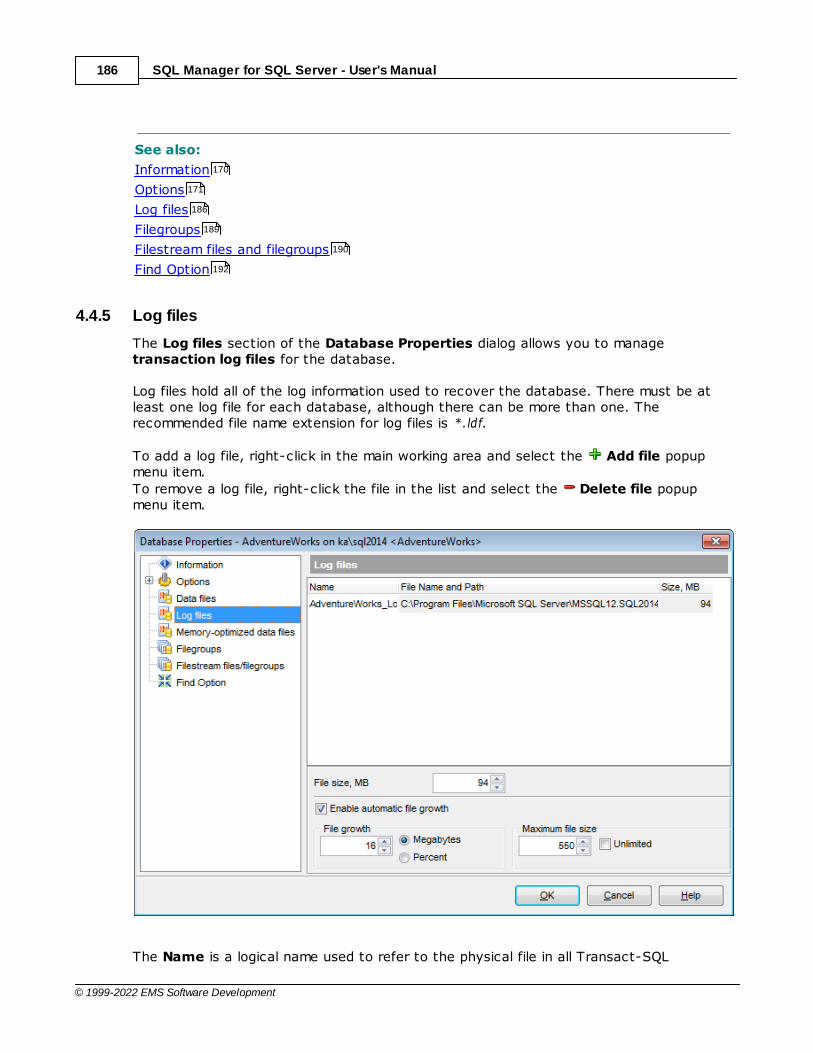
SQL Manager for SQL Server - User's Manual186
© 1999-2022 EMS Software Development
See also:
Information
Options
Log files
Filegroups
Filestream files and filegroups
Find Option
4.4.5 Log files
The Log files section of the Database Properties dialog allows you to managetransaction log files for the database.
Log files hold all of the log information used to recover the database. There must be atleast one log file for each database, although there can be more than one. Therecommended file name extension for log files is *.ldf.
To add a log file, right-click in the main working area and select the Add file popupmenu item.
To remove a log file, right-click the file in the list and select the Delete file popupmenu item.
The Name is a logical name used to refer to the physical file in all Transact-SQL
170
171
186
189
190
192

SQL Manager for SQL Server - User's Manual187
© 1999-2022 EMS Software Development
statements. The logical file name must conform to the rules for SQL Server identifiers andmust be unique within the database.
The File Name and Path is the name of the physical file including the directory path. Thepath must follow the rules for operating system file names.
File sizeUse the spinner control to specify the original size of the selected transaction log file (inmegabytes).
SQL Server 2005 (and higher) transaction log files can grow automatically from theiroriginally specified size. When you define a file, you can specify a file growth increment.Each time the file fills, it increases its size by the growth increment. If there are multiplefiles in a file group, they do not autogrow until all the files are full. Growth then occursusing a round-robin algorithm.
Each file can also have maximum file size specified. If Unlimited is specified, the filecan continue to grow until it has used all available space on the disk.
See also:
Information
Options
Data files
Filegroups
Filestream files and filegroups
Find Option
4.4.6 Memory-optimized data files
The Memory-optimized data files section of the Database Properties dialog allowsyou to manage containers of the memory-optimized filegroup for the database.
Note: This section is only available for SQL Server 2014.
Creating a memory-optimized filegroup is necessary for creating memory-optimized tables. The memory-optimized filegroup holds one or more containers.Use the Memory-optimized data files grid to add containers to the memory-optimizedfilegroup.
170
171
184
189
190
192
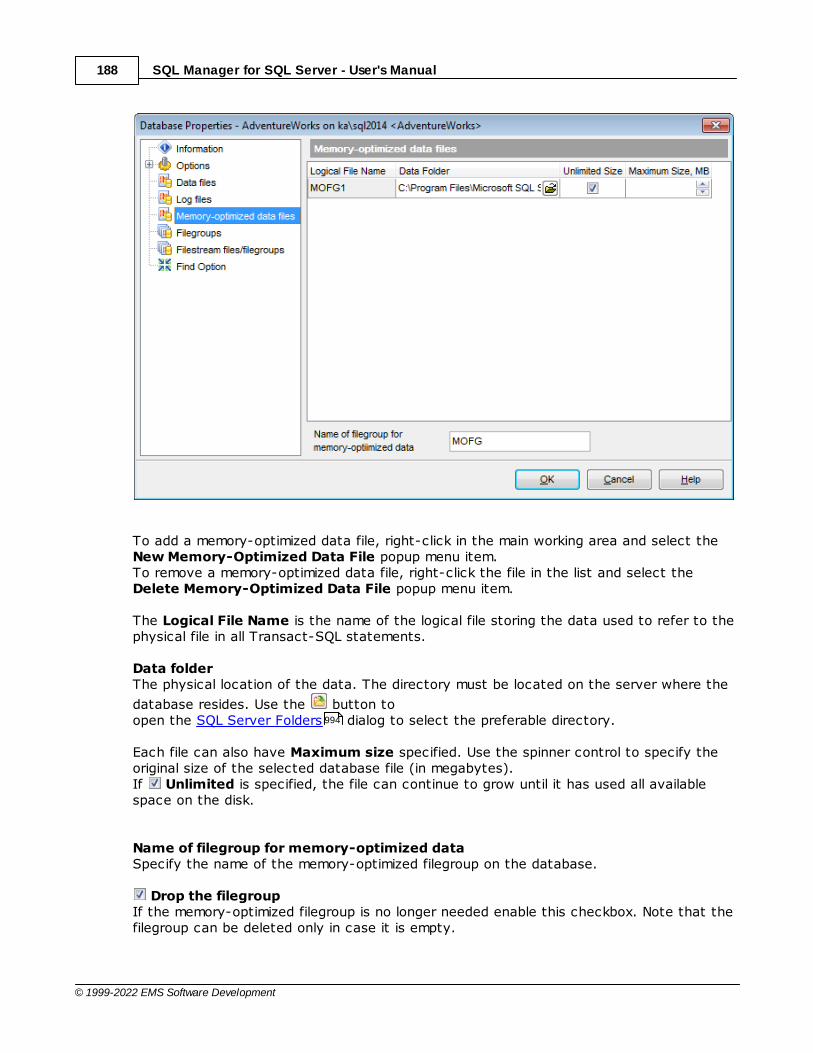
SQL Manager for SQL Server - User's Manual188
© 1999-2022 EMS Software Development
To add a memory-optimized data file, right-click in the main working area and select the New Memory-Optimized Data File popup menu item.To remove a memory-optimized data file, right-click the file in the list and select the Delete Memory-Optimized Data File popup menu item.
The Logical File Name is the name of the logical file storing the data used to refer to thephysical file in all Transact-SQL statements.
Data folderThe physical location of the data. The directory must be located on the server where the
database resides. Use the button to open the SQL Server Folders dialog to select the preferable directory.
Each file can also have Maximum size specified. Use the spinner control to specify theoriginal size of the selected database file (in megabytes).If Unlimited is specified, the file can continue to grow until it has used all availablespace on the disk.
Name of filegroup for memory-optimized dataSpecify the name of the memory-optimized filegroup on the database.
Drop the filegroupIf the memory-optimized filegroup is no longer needed enable this checkbox. Note that thefilegroup can be deleted only in case it is empty.
994
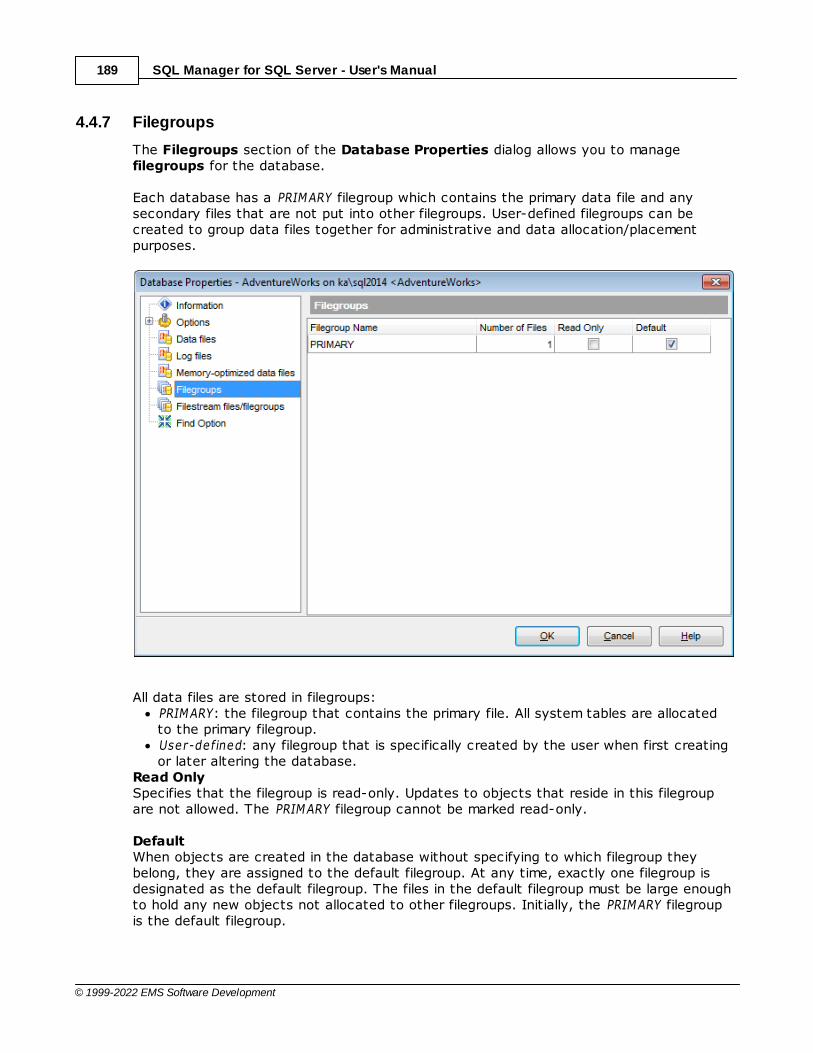
SQL Manager for SQL Server - User's Manual189
© 1999-2022 EMS Software Development
4.4.7 Filegroups
The Filegroups section of the Database Properties dialog allows you to managefilegroups for the database.
Each database has a PRIMARY filegroup which contains the primary data file and anysecondary files that are not put into other filegroups. User-defined filegroups can becreated to group data files together for administrative and data allocation/placementpurposes.
All data files are stored in filegroups:PRIMARY: the filegroup that contains the primary file. All system tables are allocatedto the primary filegroup.User-defined: any filegroup that is specifically created by the user when first creatingor later altering the database.
Read OnlySpecifies that the filegroup is read-only. Updates to objects that reside in this filegroupare not allowed. The PRIMARY filegroup cannot be marked read-only.
DefaultWhen objects are created in the database without specifying to which filegroup theybelong, they are assigned to the default filegroup. At any time, exactly one filegroup isdesignated as the default filegroup. The files in the default filegroup must be large enoughto hold any new objects not allocated to other filegroups. Initially, the PRIMARY filegroupis the default filegroup.
SQL Manager for SQL Server - User's Manual190
© 1999-2022 EMS Software Development
See also:
Information
Options
Data files
Log files
Filestream files and filegroups
Find Option
4.4.8 Filestream files and filegroups
The Filestream files and filegroups section of the Database Properties dialog allowsyou to manage filestream filegroups for the database.
Note: This section is only available for SQL Server 2008 and higher.
In SQL Server 2008, FILESTREAM enables the application to store unstructured data(such as text documents, images, videos, etc.) on the file system. FILESTREAMintegrates the SQL Server Database Engine with an NTFS file system by storing varbinary(max) binary large object (BLOB) data as files on the file system. Transact-SQLstatements can insert, update, query, search, and back up FILESTREAM data. Win32 filesystem interfaces provide streaming access to the data.
To add a filestream file, right-click in the main working area and select the AddFilestream File popup menu item.To remove a filestream file, right-click the file in the list and select the DeleteFilestream File popup menu item.
170
171
184
186
190
192

SQL Manager for SQL Server - User's Manual191
© 1999-2022 EMS Software Development
The Logical File Name is the name of the logical file storing the data used to refer to thephysical file in all Transact-SQL statements.
DirectoryThe physical location of the data. The directory must be located on the server where the
database resides. Use the button to open the SQL Server Folders dialog to select the preferable directory.
Filegroup NameSpecify the name of the filestream filegroup.
Read Only Specifies that the filestream filegroup is read-only. Updates to objects that reside in thisfilestream filegroup are not allowed. The default fiestream filegroup cannot be read-only.
DefaultThe filestream fields data will be stored in this filestream filegroup if none was specified forthe table.
See also:
Information
Options
Data files
Log files
994
170
171
184
186
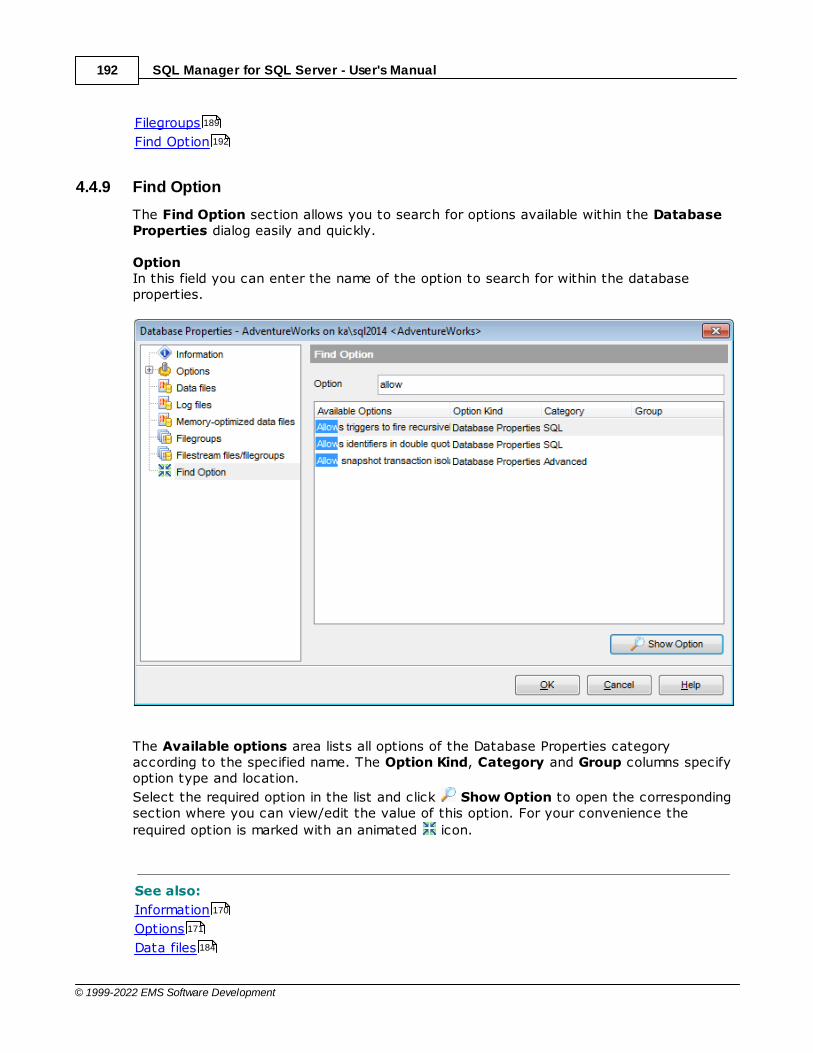
SQL Manager for SQL Server - User's Manual192
© 1999-2022 EMS Software Development
Filegroups
Find Option
4.4.9 Find Option
The Find Option section allows you to search for options available within the DatabaseProperties dialog easily and quickly.
OptionIn this field you can enter the name of the option to search for within the databaseproperties.
The Available options area lists all options of the Database Properties categoryaccording to the specified name. The Option Kind, Category and Group columns specifyoption type and location.
Select the required option in the list and click Show Option to open the correspondingsection where you can view/edit the value of this option. For your convenience the
required option is marked with an animated icon.
See also:
Information
Options
Data files
189
192
170
171
184

SQL Manager for SQL Server - User's Manual193
© 1999-2022 EMS Software Development
Log files
Filegroups
Filestream files and filegroups
186
189
190

SQL Manager for SQL Server - User's Manual194
© 1999-2022 EMS Software Development
4.5 Database Registration Manager
Database Registration Manager allows you to register new databases and delete theregistration of no longer needed databases, including non-existing ones.
To open Database Registration Manager use the corresponding item of the databasecontext menu or the host context menu .
The grid contains all databases located on the selected host. You can change Hostselection using the appropriate drop-down list in the navigation bar .Check databases you want to be registered.
Using the context menu you can:select all databases,uncheck all databases,uncheck deleted databases,refresh the list.
After the selection is made click the Apply changes button to register selecteddatabases.
Availability:
Full version (for Windows) Yes
Lite version (for Windows) No
Note: To compare all features of the Full and the Lite versions of SQL Manager, refer to
89 88
195
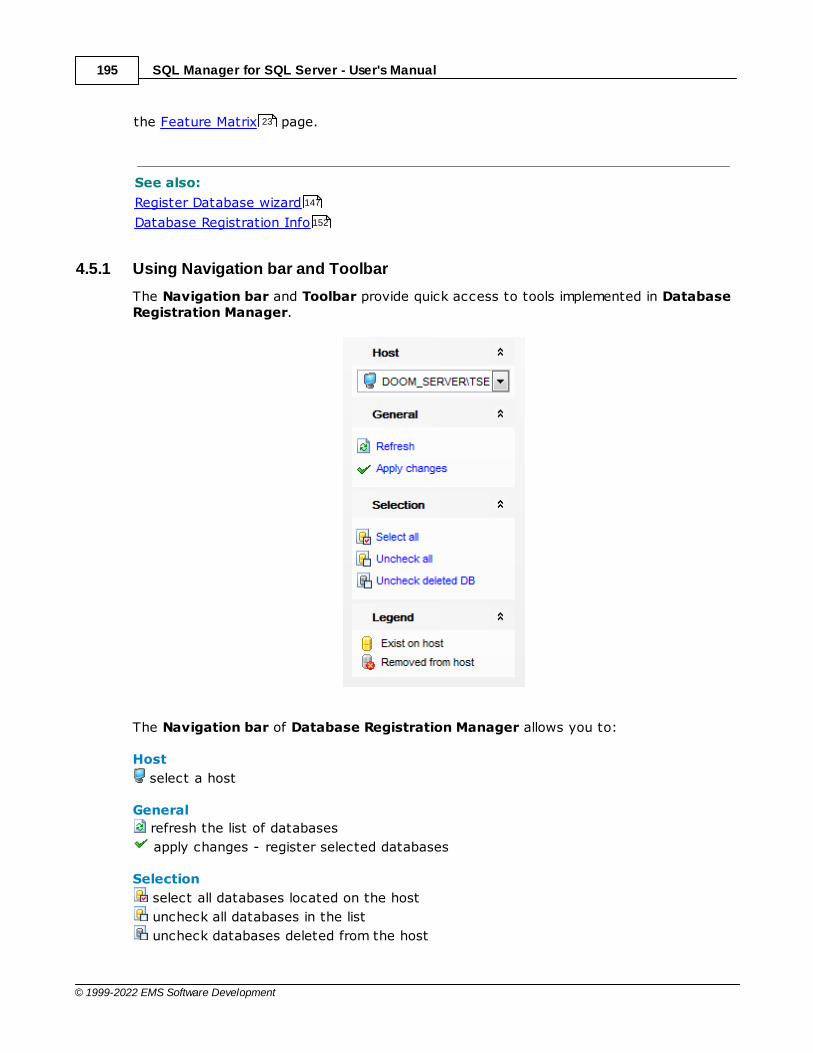
SQL Manager for SQL Server - User's Manual195
© 1999-2022 EMS Software Development
the Feature Matrix page.
See also:
Register Database wizard
Database Registration Info
4.5.1 Using Navigation bar and Toolbar
The Navigation bar and Toolbar provide quick access to tools implemented in DatabaseRegistration Manager.
The Navigation bar of Database Registration Manager allows you to:
Host
select a host
General
refresh the list of databases
apply changes - register selected databases
Selection
select all databases located on the host
uncheck all databases in the list
uncheck databases deleted from the host
23
147
152

SQL Manager for SQL Server - User's Manual196
© 1999-2022 EMS Software Development
Legend
database existing on the host
database removed from the host
Items of the Navigation bar are also available on the ToolBar of Schema Editor. Toenable the toolbar , open the Environment Options dialog, proceed to the Windows
section there and select T oolbar (if you need the toolbar only) or Both (if youneed both the toolbar and the Navigation bar ) in the Bar style for child forms group.
960 867
871
958

SQL Manager for SQL Server - User's Manual197
© 1999-2022 EMS Software Development
4.6 Server Properties
The Server Properties dialog allows you to view/edit a number of server options whichcan be changed to optimize Microsoft® SQL Server performance.
To open the dialog, right-click the database or host alias in DB Explorer and select theServer Properties... context menu item.
General optionsMemory optionsProcessor optionsSecurity optionsActive DirectoryConnection settingsDatabase SettingsMisc Server SettingsAdvanced settingsFind Option
Configured values This option displays the configured values for options on this page. If you change thesevalues, select Running Values to see whether the changes have taken effect. If theyhave not, the instance of SQL Server must be restarted first.
Running values This option displays the currently running values for options on this page. These valuesare read-only.
99
198
199
200
202
204
205
207
209
210
212
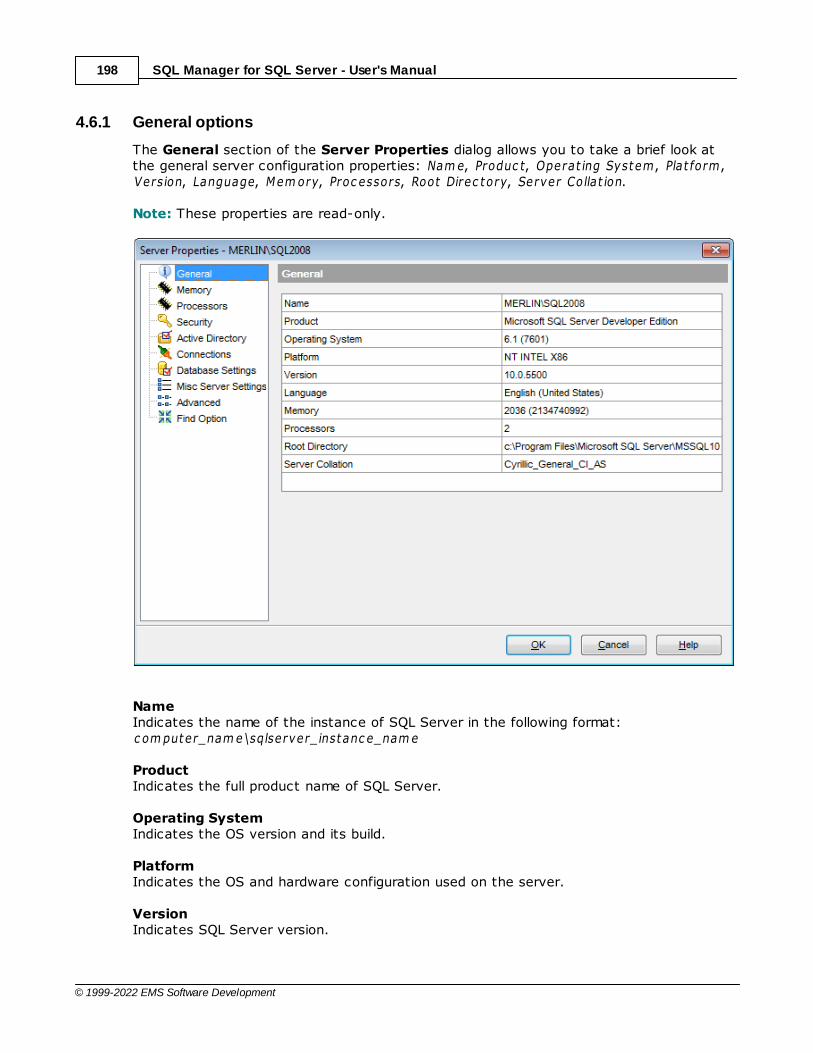
SQL Manager for SQL Server - User's Manual198
© 1999-2022 EMS Software Development
4.6.1 General options
The General section of the Server Properties dialog allows you to take a brief look atthe general server configuration properties: Nam e, Produc t, Operat ing System, Plat form,Version, Language, Mem ory, Proc essors, Root Direc tory, Server Collat ion.
Note: These properties are read-only.
NameIndicates the name of the instance of SQL Server in the following format: c om puter_nam e\sqlserver_instanc e_nam e
ProductIndicates the full product name of SQL Server.
Operating SystemIndicates the OS version and its build.
PlatformIndicates the OS and hardware configuration used on the server.
VersionIndicates SQL Server version.
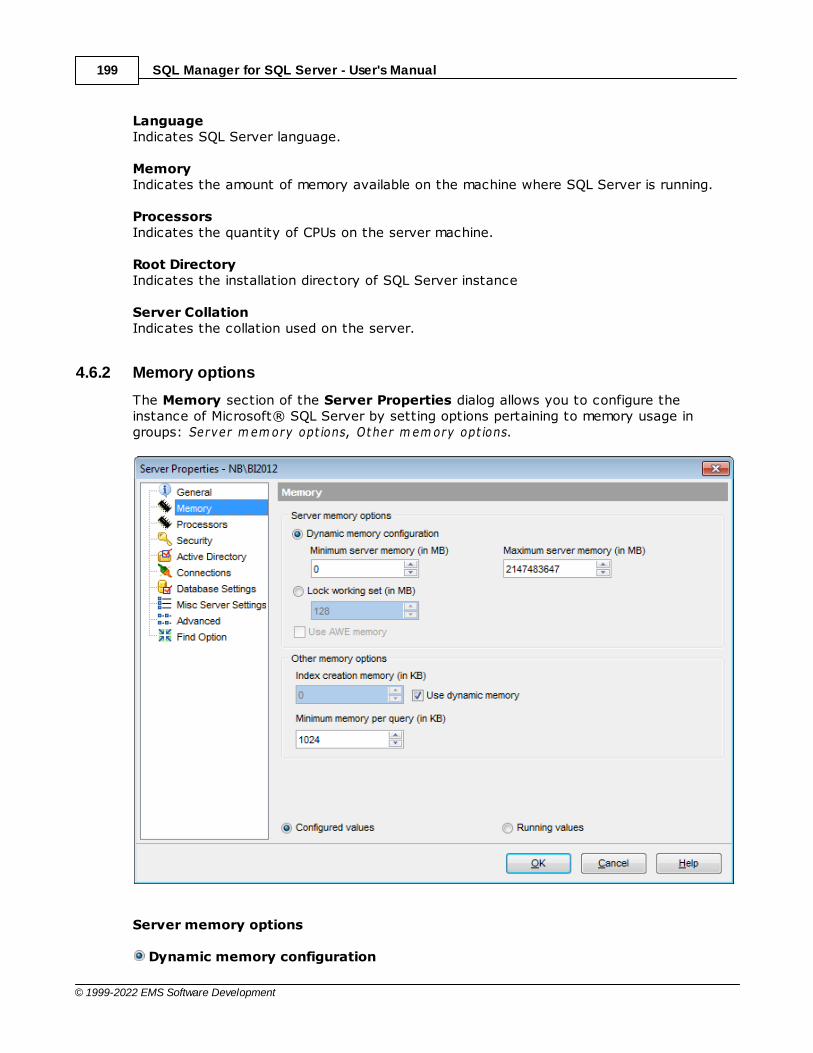
SQL Manager for SQL Server - User's Manual199
© 1999-2022 EMS Software Development
LanguageIndicates SQL Server language.
MemoryIndicates the amount of memory available on the machine where SQL Server is running.
ProcessorsIndicates the quantity of CPUs on the server machine.
Root DirectoryIndicates the installation directory of SQL Server instance
Server CollationIndicates the collation used on the server.
4.6.2 Memory options
The Memory section of the Server Properties dialog allows you to configure theinstance of Microsoft® SQL Server by setting options pertaining to memory usage ingroups: Server m em ory opt ions, Other m em ory opt ions.
Server memory options
Dynamic memory configuration
SQL Manager for SQL Server - User's Manual200
© 1999-2022 EMS Software Development
Use the two server memory options, M inim um server m em ory and Maxim um serverm em ory, to reconfigure the amount of memory (in megabytes) in the buffer pool used bythe instance of SQL Server.By default, SQL Server can change its memory requirements dynamically on the basis ofavailable system resources. The default setting for M inim um server m em ory is 0, and thedefault setting for Maxim um server m em ory is 2147483647. The minimum amount ofmemory that can be specified for Maxim um server m em ory is 16 MB.
Locking working setAllowing SQL Server to use memory dynamically is recommended; however, you can setthe memory options manually and restrict the amount of memory that SQL Server canaccess.
Use AWE memoryUnder Windows Server 2003, SQL Server 2005 (and higher) can use Address WindowingExtensions (AWE) memory to further assist in balancing its own memory requirements withthose of the operating system. This balancing between SQL Server and the operatingsystem is subject to the constraints of the M inim um server m em ory and Maxim umserver m em ory options.
Other memory options
In SQL Server 2000/2005/2008 the Index creation memory option controls the maximuminitial amount of memory allocated for index creation. If additional amount of memory isrequired for index creation operation, and it is available, the server will use additionalmemory thus exceeding the setting of this option. If additional memory is not available,the memory that has been already allocated will be used for index creation.
Use the Minimum memory per query option to specify the minimum amount of memory(in kilobytes) that will be allocated for execution of a query. For example, if Minimummemory per query is set to 2,048 KB, the query is guaranteed to get at least that muchtotal memory. You can set Minimum memory per query to any value from 512 up to2,147,483,647 KB (appr. 2 GB). The default value is 1,024 KB.
4.6.3 Processor options
The Processors section of the Server Properties dialog allows you to configure theinstance of Microsoft® SQL Server by setting options pertaining to processors usage ingroups: Enable proc essors, T hreads, Paralle lism.
Enable processors
To carry out multitasking, it is possible to distribute process threads among differentprocessors. Although efficient from an operating system point of view, this activity canreduce SQL Server performance under heavy system loads, as each processor cache isrepeatedly reloaded with data. Assigning processors to specific threads can improveperformance under these conditions by eliminating processor reloads and reducing threadmigration across processors (thereby reducing context switching); such an associationbetween a thread and a processor is called proc essor aff init y.
You can enable any or both two affinity mask options supported by SQL Server 2005 (andhigher): Automatically set processor affinity mask (also known as CPU affinity
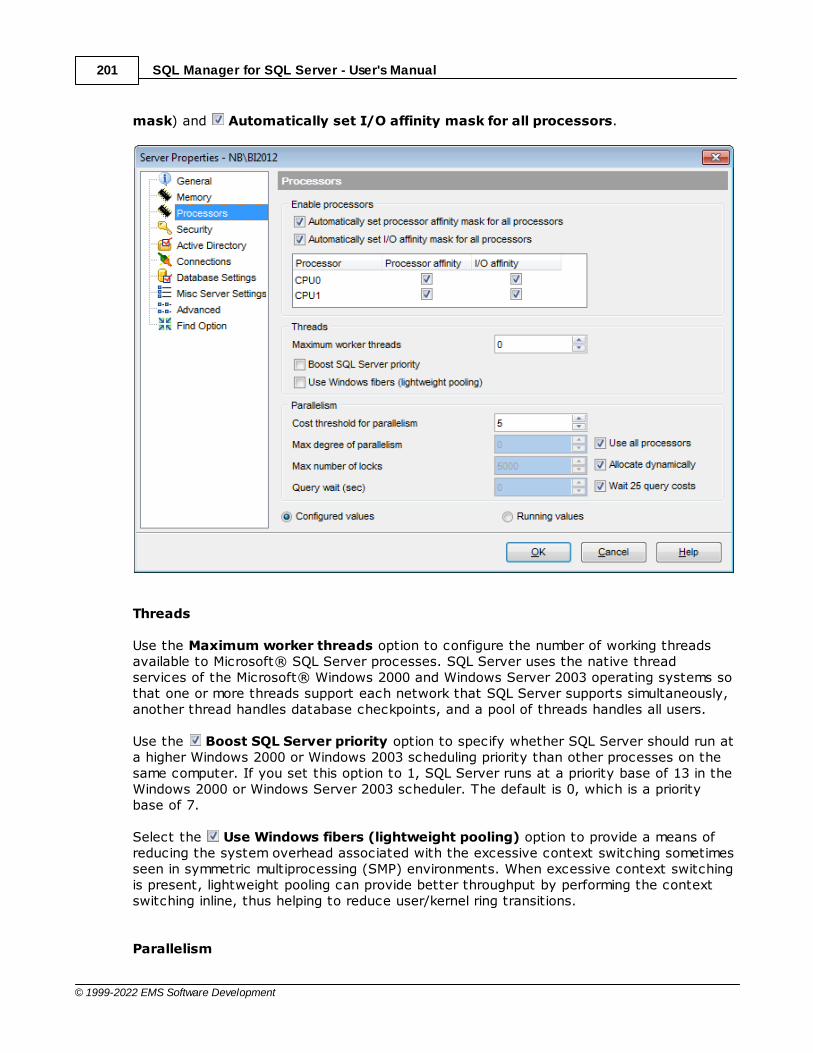
SQL Manager for SQL Server - User's Manual201
© 1999-2022 EMS Software Development
mask) and Automatically set I/O affinity mask for all processors.
Threads
Use the Maximum worker threads option to configure the number of working threadsavailable to Microsoft® SQL Server processes. SQL Server uses the native threadservices of the Microsoft® Windows 2000 and Windows Server 2003 operating systems sothat one or more threads support each network that SQL Server supports simultaneously,another thread handles database checkpoints, and a pool of threads handles all users.
Use the Boost SQL Server priority option to specify whether SQL Server should run ata higher Windows 2000 or Windows 2003 scheduling priority than other processes on thesame computer. If you set this option to 1, SQL Server runs at a priority base of 13 in theWindows 2000 or Windows Server 2003 scheduler. The default is 0, which is a prioritybase of 7.
Select the Use Windows fibers (lightweight pooling) option to provide a means ofreducing the system overhead associated with the excessive context switching sometimesseen in symmetric multiprocessing (SMP) environments. When excessive context switchingis present, lightweight pooling can provide better throughput by performing the contextswitching inline, thus helping to reduce user/kernel ring transitions.
Parallelism
SQL Manager for SQL Server - User's Manual202
© 1999-2022 EMS Software Development
Use the Cost threshold for parallelism option to specify the threshold at which SQLServer creates and runs parallel plans for queries. SQL Server creates and runs a parallelplan for a query only when the estimated cost to run a serial plan for the same query ishigher than the value set in Cost threshold for parallelism. The cost refers to anestimated elapsed time in seconds required to run the serial plan on a specific hardwareconfiguration. Only set Cost threshold for parallelism on symmetric multiprocessors.
Use the Max number of locks option to set the maximum number of available locks,thereby limiting the amount of memory the Database Engine uses for them. The defaultsetting is 0, which allows the Database Engine to allocate and deallocate lock structuresdynamically, based on changing system requirements. When the server is started withlocks set to 0, the lock manager acquires sufficient memory from the Database Engine foran initial pool of 2,500 lock structures. As the lock pool is exhausted, additional memory isacquired for the pool. Allowing SQL Server to use locks dynamically is the recommendedconfiguration.
Use the Query wait option to specify the time in seconds (from 0 through 2147483647)that a query waits for resources before timing out. If the default value of -1 is used, or if–1 is specified, then the time-out is calculated as 25 times of the estimated query cost.In Microsoft SQL Server, memory-intensive queries (such as those involving sorting andhashing) are queued when there is not enough memory available to run the query. Thequery times out after a set time calculated by SQL Server (25 times the estimated cost ofthe query) or the time specified by the nonnegative value of the query wait.
When SQL Server 2005 (and higher) runs on a computer with more than one CPU, itdetects the best degree of parallelism for each instance of a parallel query execution. Youcan use the Max degree of parallelism option to limit the number of processors to usein parallel plan execution. The default value of 0 indicates that all available processors areused. Set Max degree of parallelism to 1 to suppress parallel plan generation. Set thevalue to a number greater than 1 (up to a maximum of 64) to restrict the maximumnumber of processors used by a single query execution. If a value greater than thenumber of available processors is specified, or in case the Use all processors option isselected, the actual number of available processors is used. If the computer has only oneprocessor, the max degree of parallelism value is ignored.
4.6.4 Security options
The Security section of the Server Properties dialog allows you to configure theinstance of Microsoft® SQL Server by setting options pertaining to server security ingroups: Server Authent ic at ion, Login audit ing, Server Proxy Ac c ount, Other sec urit yopt ions.
Server Authentication
Windows Authentication mode When a user connects through a Microsoft® Windows user account, SQL Server validatesthe account name and password using information in the Windows operating system. Thisis the default authentication mode, and is much more secure than the mixed mode.Windows Authentication utilizes Kerberos security protocol, provides password policyenforcement in terms of complexity validation for strong passwords, provides support foraccount lockout, and supports password expiration.
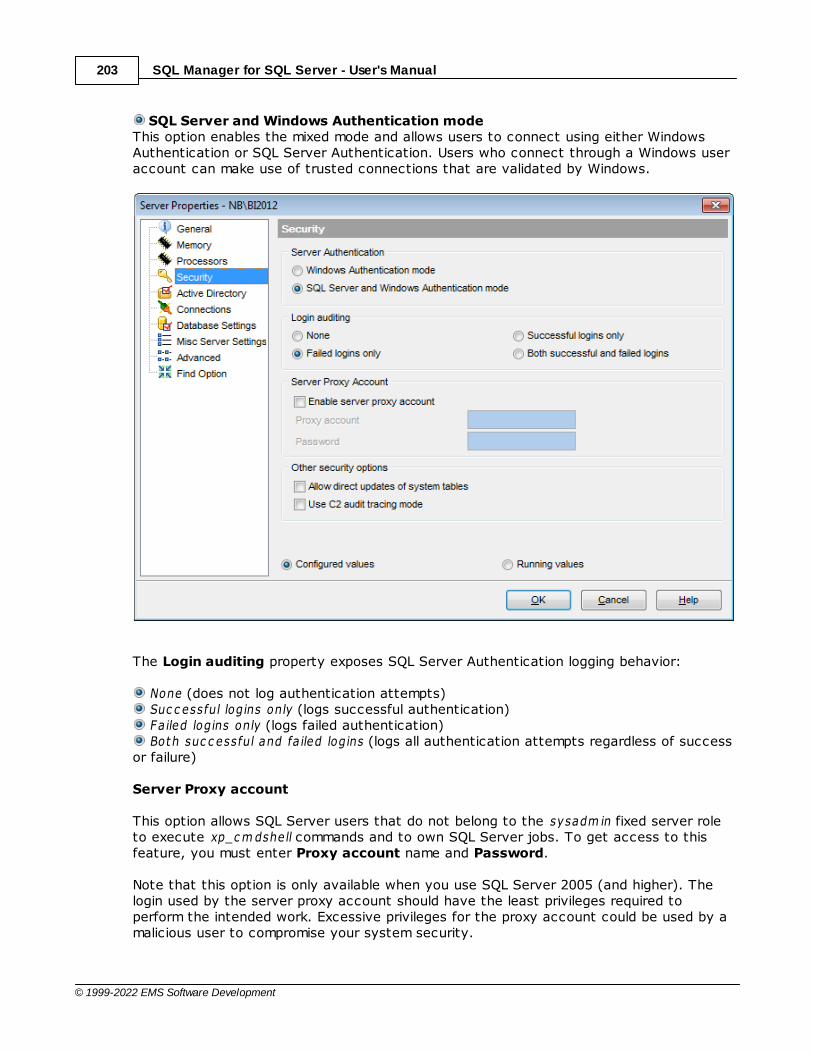
SQL Manager for SQL Server - User's Manual203
© 1999-2022 EMS Software Development
SQL Server and Windows Authentication mode This option enables the mixed mode and allows users to connect using either WindowsAuthentication or SQL Server Authentication. Users who connect through a Windows useraccount can make use of trusted connections that are validated by Windows.
The Login auditing property exposes SQL Server Authentication logging behavior:
None (does not log authentication attempts) Suc c essful logins only (logs successful authentication) Failed logins only (logs failed authentication) Both suc c essful and fa iled logins (logs all authentication attempts regardless of success
or failure)
Server Proxy account
This option allows SQL Server users that do not belong to the sysadm in fixed server roleto execute xp_c m dshell commands and to own SQL Server jobs. To get access to thisfeature, you must enter Proxy account name and Password.
Note that this option is only available when you use SQL Server 2005 (and higher). Thelogin used by the server proxy account should have the least privileges required toperform the intended work. Excessive privileges for the proxy account could be used by amalicious user to compromise your system security.
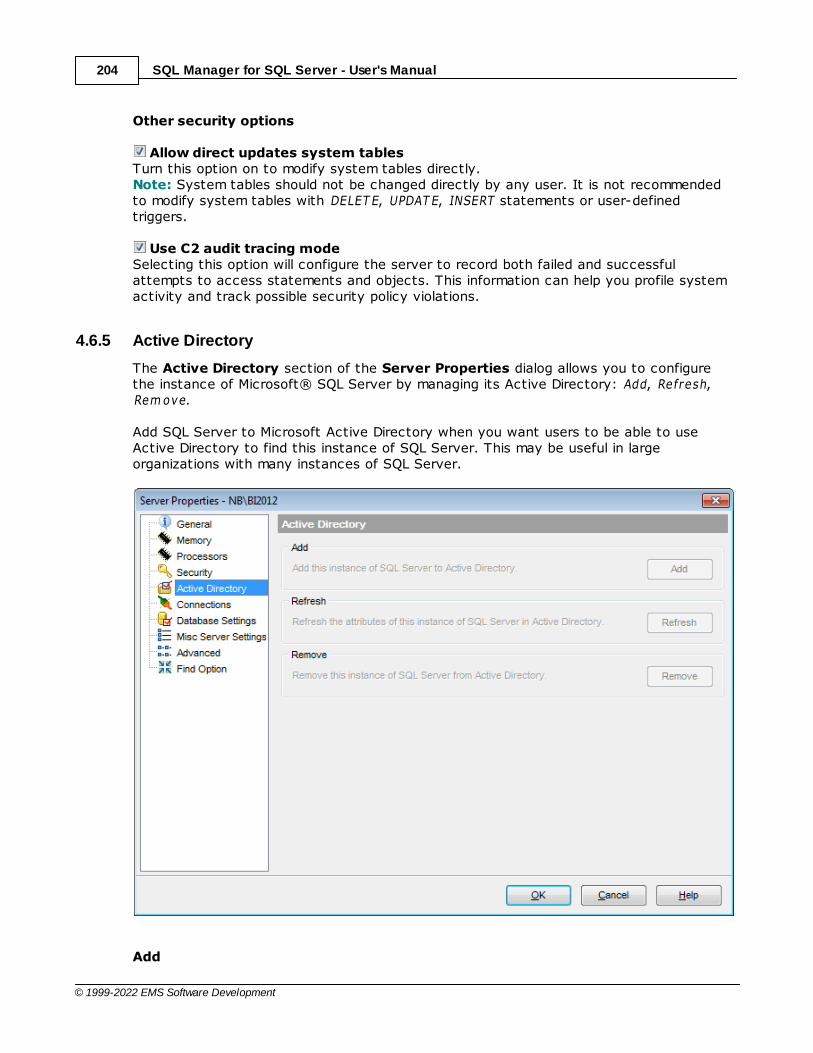
SQL Manager for SQL Server - User's Manual204
© 1999-2022 EMS Software Development
Other security options
Allow direct updates system tablesTurn this option on to modify system tables directly.Note: System tables should not be changed directly by any user. It is not recommendedto modify system tables with DELET E, UPDAT E, INSERT statements or user-definedtriggers.
Use C2 audit tracing modeSelecting this option will configure the server to record both failed and successfulattempts to access statements and objects. This information can help you profile systemactivity and track possible security policy violations.
4.6.5 Active Directory
The Active Directory section of the Server Properties dialog allows you to configurethe instance of Microsoft® SQL Server by managing its Active Directory: Add, Refresh,Rem ove.
Add SQL Server to Microsoft Active Directory when you want users to be able to useActive Directory to find this instance of SQL Server. This may be useful in largeorganizations with many instances of SQL Server.
Add
SQL Manager for SQL Server - User's Manual205
© 1999-2022 EMS Software Development
Add this instance of SQL Server to Active Directory. Connects to Active Directory and registers the instance of Microsoft® SQL Server in theActive directory.
Refresh
Refresh the attributes of this instance in Active Directory. Updates Active Directory with the current Microsoft® SQL Server properties.
Remove
Remove this instance of SQL Server from Active Directory. Unregisters the instance of Microsoft® SQL Server from the Active Directory.
4.6.6 Connection settings
The Connections section of the Server Properties dialog allows you to configure theinstance of Microsoft® SQL Server by setting options pertaining to connection in groups: Connec t ions, Rem ote server c onnec t ions.
Connections
Maximum number of concurrent connections If this option is set to a value other than zero, the number of connections that SQLServer will allow is limited. The default value is 0 (unlimited).
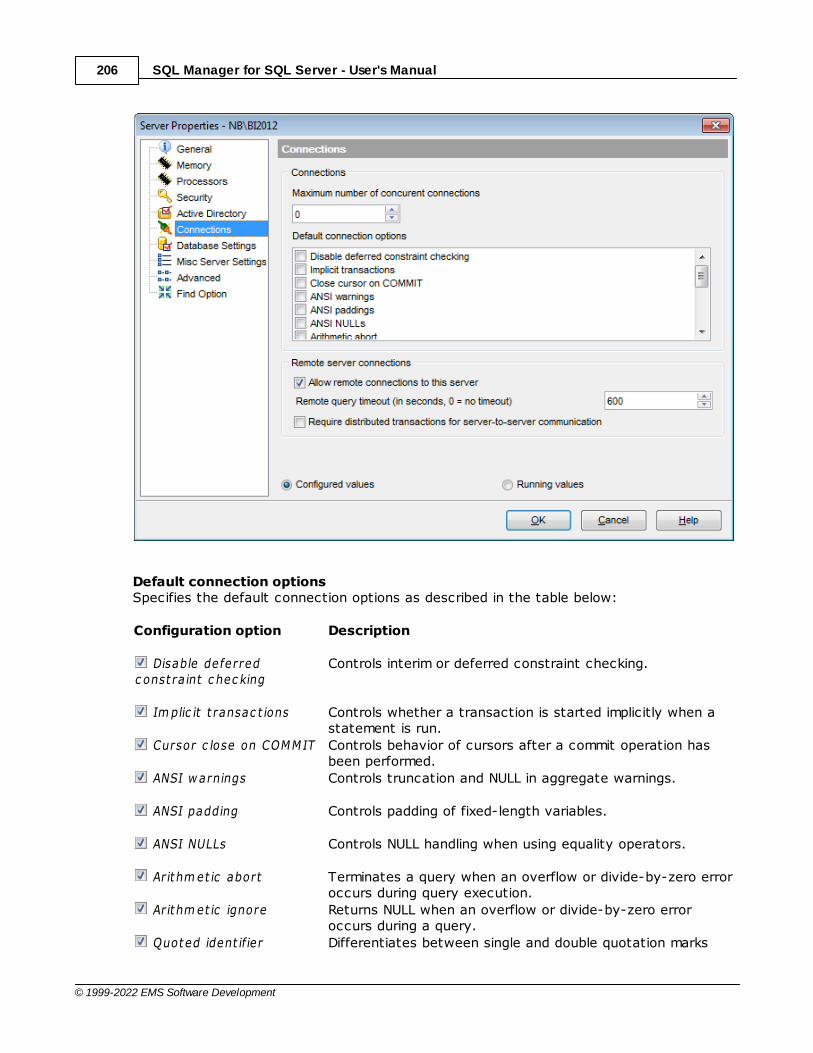
SQL Manager for SQL Server - User's Manual206
© 1999-2022 EMS Software Development
Default connection optionsSpecifies the default connection options as described in the table below:
Configuration option Description
Disable deferredc onst ra int c hec king
Controls interim or deferred constraint checking.
Im plic it t ransac t ions Controls whether a transaction is started implicitly when astatement is run.
Cursor c lose on COMMIT Controls behavior of cursors after a commit operation hasbeen performed.
ANSI w arnings Controls truncation and NULL in aggregate warnings.
ANSI padding Controls padding of fixed-length variables.
ANSI NULLs Controls NULL handling when using equality operators.
Ar ithm et ic abort Terminates a query when an overflow or divide-by-zero erroroccurs during query execution.
Ar ithm et ic ignore Returns NULL when an overflow or divide-by-zero erroroccurs during a query.
Quoted ident if ier Differentiates between single and double quotation marks
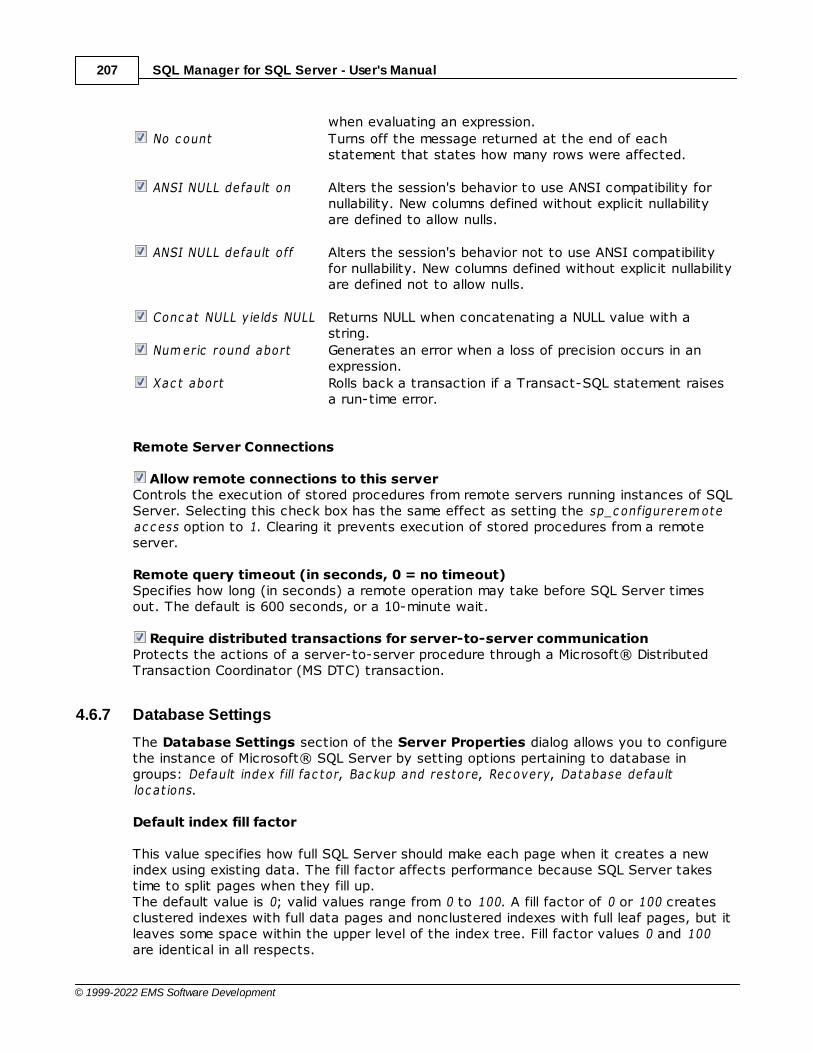
SQL Manager for SQL Server - User's Manual207
© 1999-2022 EMS Software Development
when evaluating an expression.
No c ount Turns off the message returned at the end of eachstatement that states how many rows were affected.
ANSI NULL default on Alters the session's behavior to use ANSI compatibility fornullability. New columns defined without explicit nullabilityare defined to allow nulls.
ANSI NULL default off Alters the session's behavior not to use ANSI compatibilityfor nullability. New columns defined without explicit nullabilityare defined not to allow nulls.
Conc at NULL y ie lds NULL Returns NULL when concatenating a NULL value with astring.
Num eric round abort Generates an error when a loss of precision occurs in anexpression.
Xac t abort Rolls back a transaction if a Transact-SQL statement raisesa run-time error.
Remote Server Connections
Allow remote connections to this server Controls the execution of stored procedures from remote servers running instances of SQLServer. Selecting this check box has the same effect as setting the sp_c onfigurerem oteac c ess option to 1. Clearing it prevents execution of stored procedures from a remoteserver.
Remote query timeout (in seconds, 0 = no timeout) Specifies how long (in seconds) a remote operation may take before SQL Server timesout. The default is 600 seconds, or a 10-minute wait.
Require distributed transactions for server-to-server communication Protects the actions of a server-to-server procedure through a Microsoft® DistributedTransaction Coordinator (MS DTC) transaction.
4.6.7 Database Settings
The Database Settings section of the Server Properties dialog allows you to configurethe instance of Microsoft® SQL Server by setting options pertaining to database ingroups: Default index fill fac tor, Bac kup and restore, Rec overy, Database defaultloc at ions.
Default index fill factor
This value specifies how full SQL Server should make each page when it creates a newindex using existing data. The fill factor affects performance because SQL Server takestime to split pages when they fill up.The default value is 0; valid values range from 0 to 100. A fill factor of 0 or 100 createsclustered indexes with full data pages and nonclustered indexes with full leaf pages, but itleaves some space within the upper level of the index tree. Fill factor values 0 and 100are identical in all respects.

SQL Manager for SQL Server - User's Manual208
© 1999-2022 EMS Software Development
With low fill factor values specified, SQL Server creates indexes with pages that are notfull. Each index takes more storage space, but there is more room for subsequentinsertions without requiring page splits.
Backup and restore
Wait indefinitely Specifies that SQL Server will never time out while waiting for a new backup tape.
Try once Specifies that SQL Server will time out if a backup tape is not available when needed.
Try for ... minute(s) Specifies that SQL Server will time out if a backup tape is not available within the definedperiod of time.
Default backup media retention (in days) Provides a system-wide default for the length of time to retain each backup medium afterit has been used for a database or transaction log backup. This option helps protectbackups from being overwritten until the specified number of days has elapsed.
Compressed backups by defaultCheck this option to enable default compression of backups.

SQL Manager for SQL Server - User's Manual209
© 1999-2022 EMS Software Development
Recovery
Recovery interval (minutes) Sets the maximum period of time to recover a database. The default is 0, it stands forautomatic configuration by SQL Server. In practice, this means a recovery time of lessthan one minute and a checkpoint approximately every one minute for active databases.
Database default locations
Data Specify the default location for data files: type in the path in the Data field or use the
ellipsis button to browse for directory using the SQL Server Folders dialog.
Log Specify the default location for log files: type in the path in the Log field or use the
ellipsis button to browse for directory using the SQL Server Folders dialog.
4.6.8 Misc Server Settings
The Misc Server Settings section of the Server Properties dialog allows you toconfigure the instance of Microsoft® SQL Server by setting miscellaneous server optionsin groups: General set t ings, T w o-digit year support, Netw ork set t ings.
General settings
Use the Default language for user drop-down list to select the default language for allnewly created user logins.
Allow triggers to fire other triggers Use this option to specify whether server-level triggers can be fired recursively.
Use query governor to prevent long-running queries This option allows you to specify a limit on the time period in which a query can run. Thequery governor disallows execution of any query that has an estimated cost exceedingthat value.
994
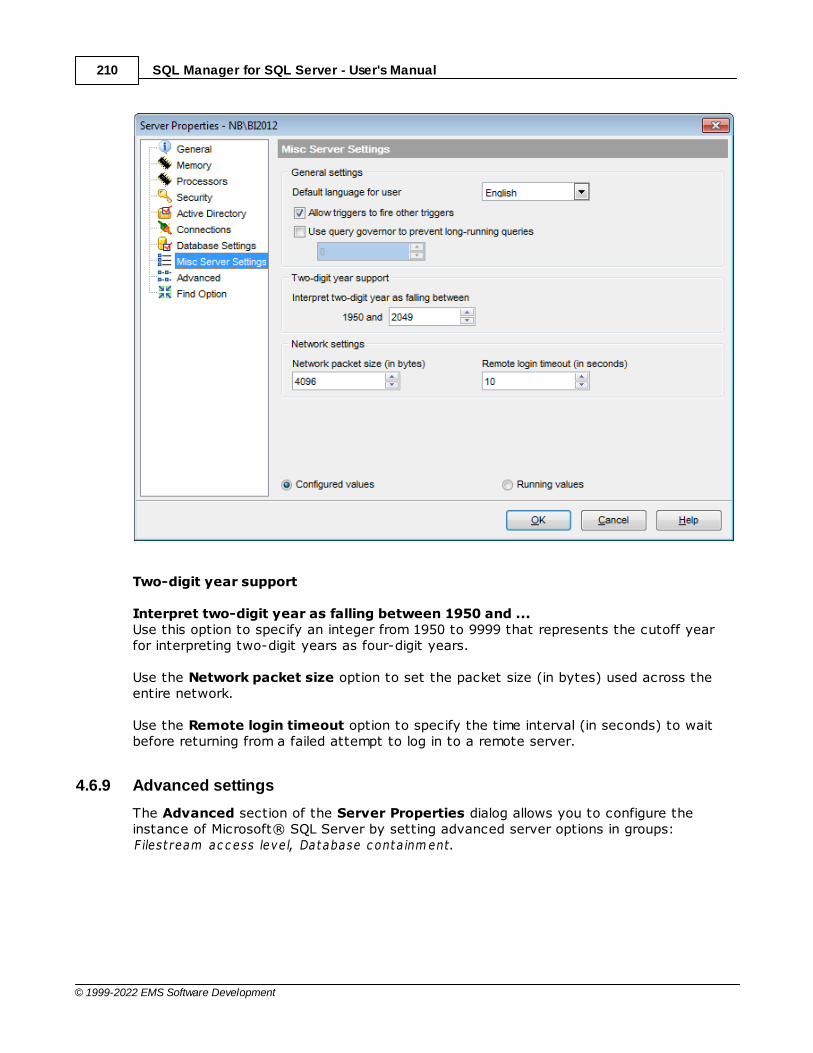
SQL Manager for SQL Server - User's Manual210
© 1999-2022 EMS Software Development
Two-digit year support
Interpret two-digit year as falling between 1950 and ...Use this option to specify an integer from 1950 to 9999 that represents the cutoff yearfor interpreting two-digit years as four-digit years.
Use the Network packet size option to set the packet size (in bytes) used across theentire network.
Use the Remote login timeout option to specify the time interval (in seconds) to waitbefore returning from a failed attempt to log in to a remote server.
4.6.9 Advanced settings
The Advanced section of the Server Properties dialog allows you to configure theinstance of Microsoft® SQL Server by setting advanced server options in groups: F ilest ream ac c ess leve l, Database c ontainm ent.
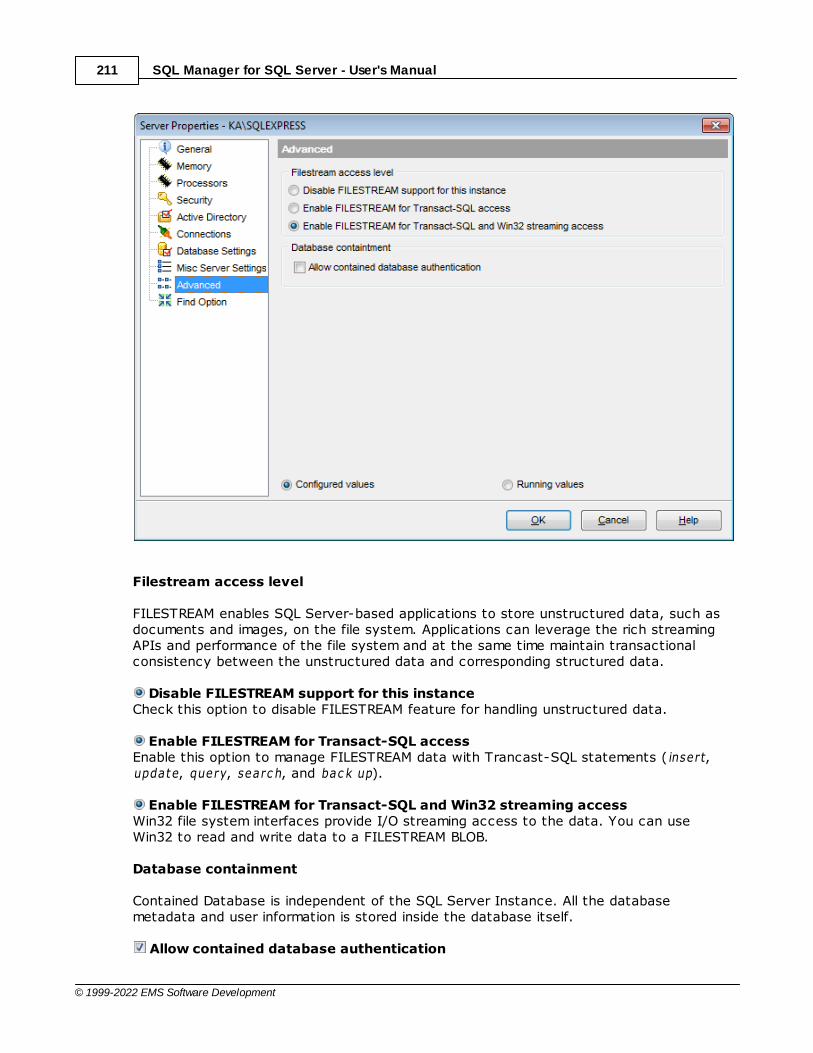
SQL Manager for SQL Server - User's Manual211
© 1999-2022 EMS Software Development
Filestream access level
FILESTREAM enables SQL Server-based applications to store unstructured data, such asdocuments and images, on the file system. Applications can leverage the rich streamingAPIs and performance of the file system and at the same time maintain transactionalconsistency between the unstructured data and corresponding structured data.
Disable FILESTREAM support for this instanceCheck this option to disable FILESTREAM feature for handling unstructured data.
Enable FILESTREAM for Transact-SQL accessEnable this option to manage FILESTREAM data with Trancast-SQL statements (insert,update, query, searc h, and bac k up).
Enable FILESTREAM for Transact-SQL and Win32 streaming accessWin32 file system interfaces provide I/O streaming access to the data. You can useWin32 to read and write data to a FILESTREAM BLOB.
Database containment
Contained Database is independent of the SQL Server Instance. All the databasemetadata and user information is stored inside the database itself.
Allow contained database authentication
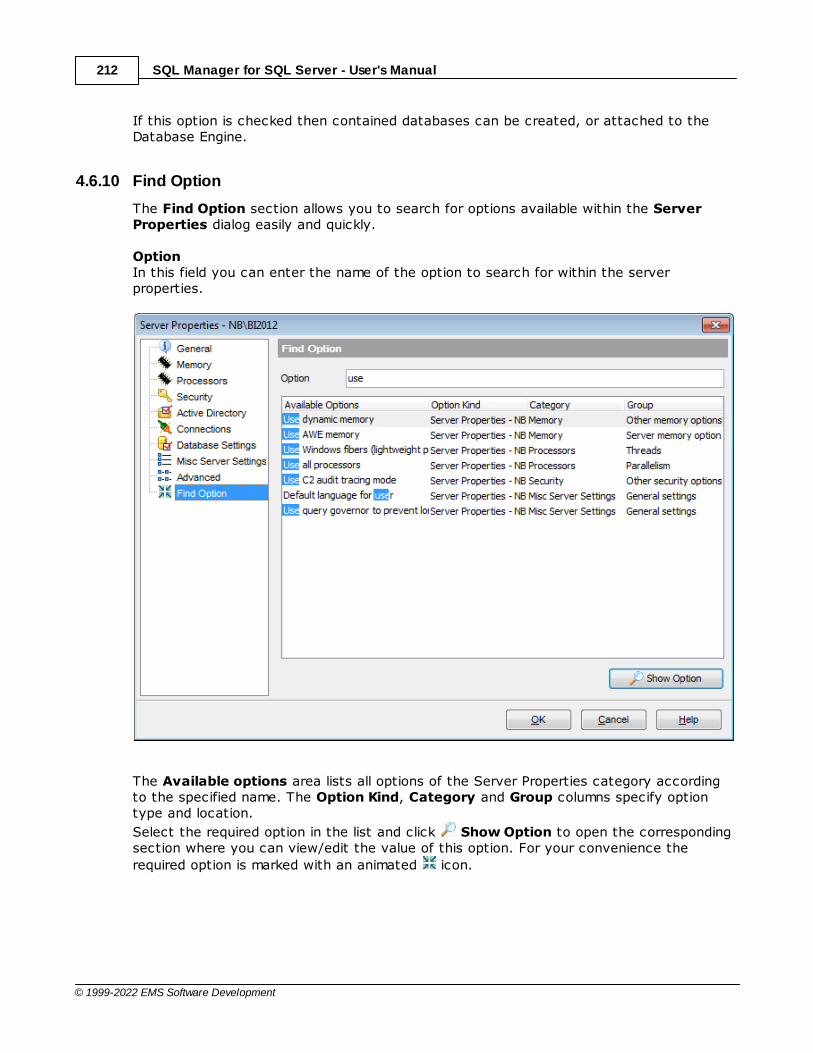
SQL Manager for SQL Server - User's Manual212
© 1999-2022 EMS Software Development
If this option is checked then contained databases can be created, or attached to theDatabase Engine.
4.6.10 Find Option
The Find Option section allows you to search for options available within the ServerProperties dialog easily and quickly.
OptionIn this field you can enter the name of the option to search for within the serverproperties.
The Available options area lists all options of the Server Properties category accordingto the specified name. The Option Kind, Category and Group columns specify optiontype and location.
Select the required option in the list and click Show Option to open the correspondingsection where you can view/edit the value of this option. For your convenience the
required option is marked with an animated icon.

Part
V
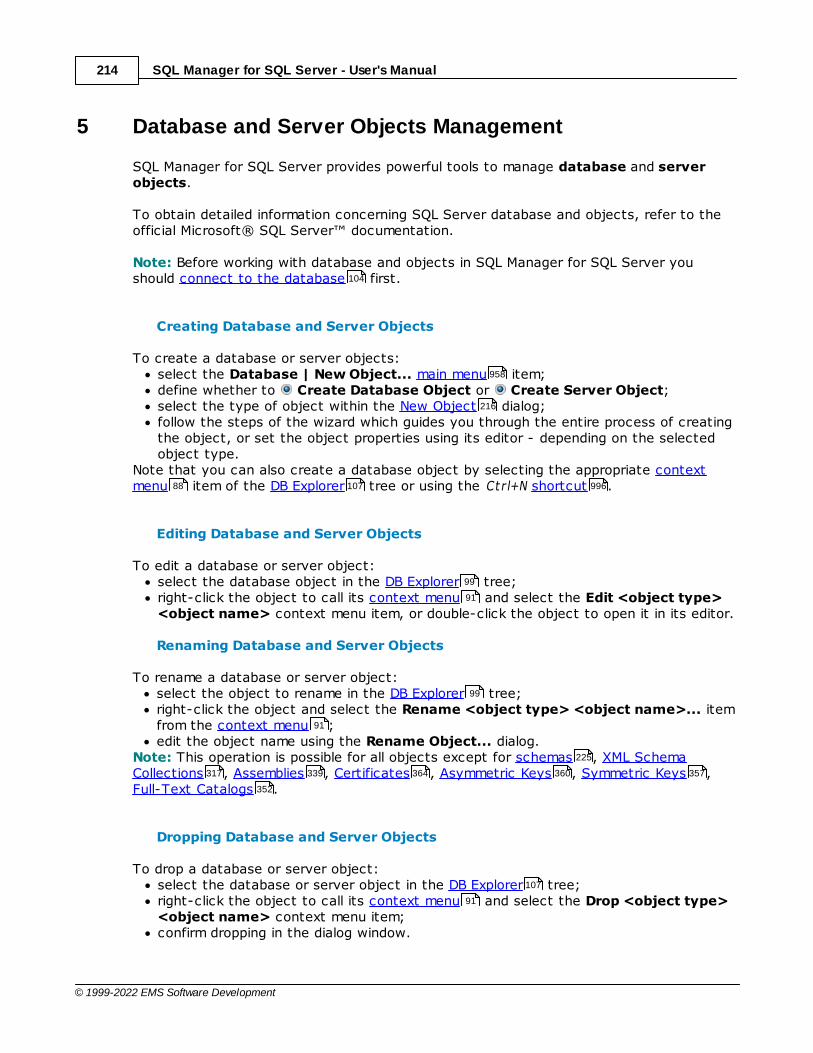
SQL Manager for SQL Server - User's Manual214
© 1999-2022 EMS Software Development
5 Database and Server Objects Management
SQL Manager for SQL Server provides powerful tools to manage database and serverobjects.
To obtain detailed information concerning SQL Server database and objects, refer to theofficial Microsoft® SQL Server™ documentation.
Note: Before working with database and objects in SQL Manager for SQL Server youshould connect to the database first.
Creating Database and Server Objects
To create a database or server objects:select the Database | New Object... main menu item;define whether to Create Database Object or Create Server Object;select the type of object within the New Object dialog;follow the steps of the wizard which guides you through the entire process of creatingthe object, or set the object properties using its editor - depending on the selectedobject type.
Note that you can also create a database object by selecting the appropriate contextmenu item of the DB Explorer tree or using the Ct r l+N shortcut .
Editing Database and Server Objects
To edit a database or server object:select the database object in the DB Explorer tree;right-click the object to call its context menu and select the Edit <object type><object name> context menu item, or double-click the object to open it in its editor.
Renaming Database and Server Objects
To rename a database or server object:select the object to rename in the DB Explorer tree;right-click the object and select the Rename <object type> <object name>... itemfrom the context menu ;edit the object name using the Rename Object... dialog.
Note: This operation is possible for all objects except for schemas , XML SchemaCollections , Assemblies , Certificates , Asymmetric Keys , Symmetric Keys ,Full-Text Catalogs .
Dropping Database and Server Objects
To drop a database or server object:select the database or server object in the DB Explorer tree;right-click the object to call its context menu and select the Drop <object type><object name> context menu item;confirm dropping in the dialog window.
104
958
216
88 107 996
99
91
99
91
225
317 339 364 360 357
352
107
91

SQL Manager for SQL Server - User's Manual215
© 1999-2022 EMS Software Development
When using an object editor, you can benefit from tabs. To switch between tab views,click on their respective tabs at the top of the main editor window. You can do it at anytime, since the tab views are absolutely independent.
To compile a newly created or edited object, you can use the Compile item availablewithin the Navigation bar or Toolbar of the object editor.
See also:
Getting Started
Database Explorer
Database Management
Query Management Tools
Data Management
Import/Export Tools
Database Tools
Server Tools
Personalization
External Tools
How To...
958 960
76
99
130
460
498
566
651
757
866
952
1001
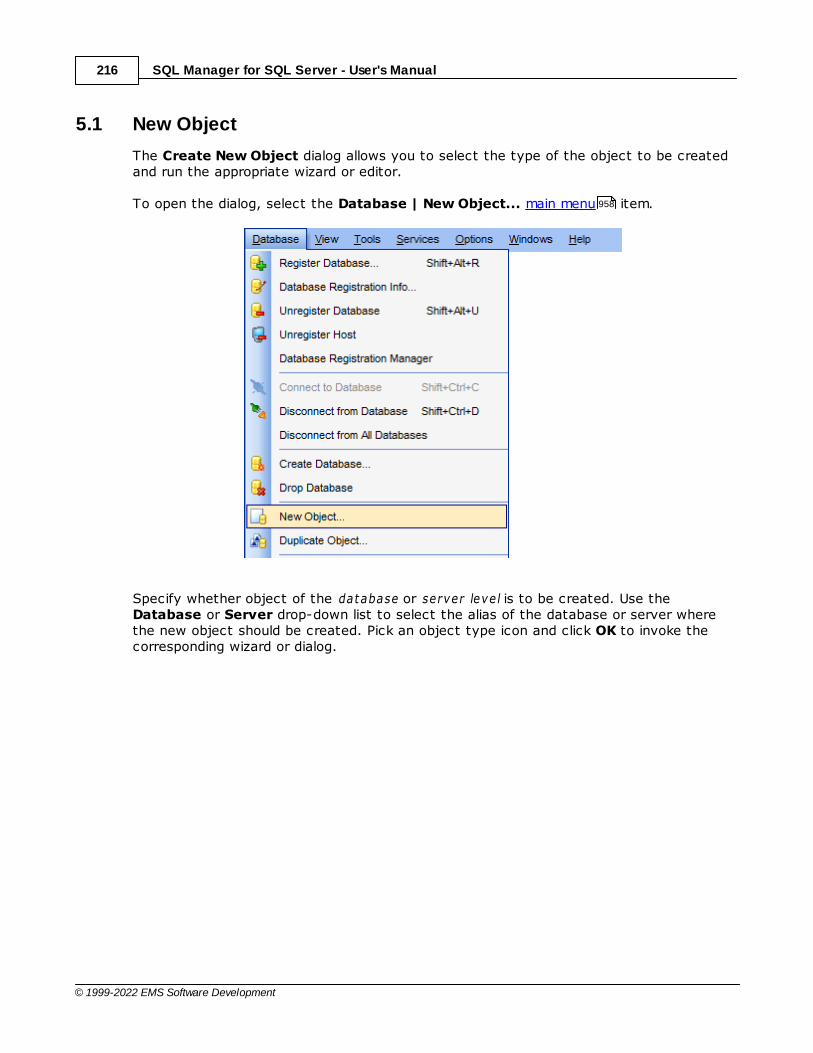
SQL Manager for SQL Server - User's Manual216
© 1999-2022 EMS Software Development
5.1 New Object
The Create New Object dialog allows you to select the type of the object to be createdand run the appropriate wizard or editor.
To open the dialog, select the Database | New Object... main menu item.
Specify whether object of the database or server leve l is to be created. Use theDatabase or Server drop-down list to select the alias of the database or server wherethe new object should be created. Pick an object type icon and click OK to invoke thecorresponding wizard or dialog.
958
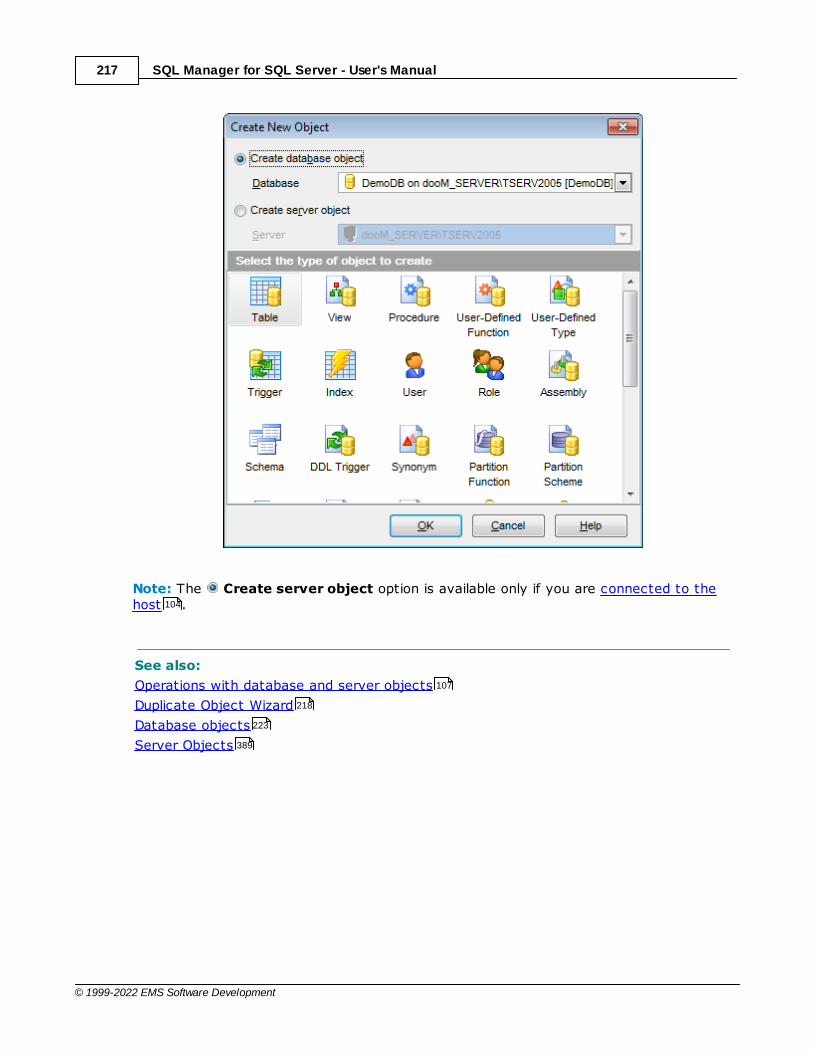
SQL Manager for SQL Server - User's Manual217
© 1999-2022 EMS Software Development
Note: The Create server object option is available only if you are connected to thehost .
See also:
Operations with database and server objects
Duplicate Object Wizard
Database objects
Server Objects
104
107
218
223
389

SQL Manager for SQL Server - User's Manual218
© 1999-2022 EMS Software Development
5.2 Duplicate Object Wizard
Use the Duplicate Object Wizard to create a new database or server object of the sametype and having the same properties as one of the existing ones. To run the wizard, select the Database | Duplicate Object... main menu item, orright-click an object of the desired type in the DB Explorer tree and use the Duplicate<object type> <object name>... context menu item.
Note: Duplicate Object Wizard can be launched on drag-and-drop operation, when youdrag an object from one server in the DB Explorer to another.
Selecting the source databaseSelecting object to duplicateSelecting destination databaseModifying the new object's definition
See also:
New Object dialog
Database objects
Server Objects
5.2.1 Selecting the source database
This step of the wizard allows you to specify whether object of the database or serverlevel is to be duplicated, and to select the source database / server containing thesource object for duplication.
958
99
91
99
218
219
220
221
216
223
389
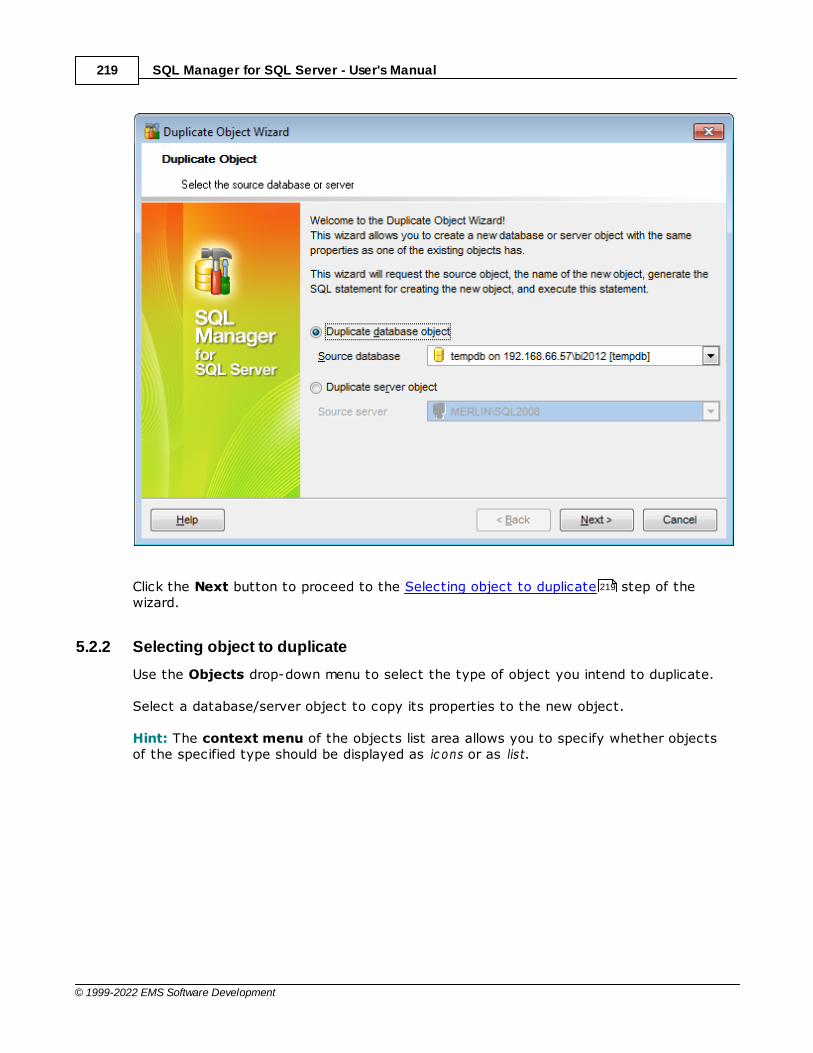
SQL Manager for SQL Server - User's Manual219
© 1999-2022 EMS Software Development
Click the Next button to proceed to the Selecting object to duplicate step of thewizard.
5.2.2 Selecting object to duplicate
Use the Objects drop-down menu to select the type of object you intend to duplicate.
Select a database/server object to copy its properties to the new object.
Hint: The context menu of the objects list area allows you to specify whether objectsof the specified type should be displayed as ic ons or as list.
219
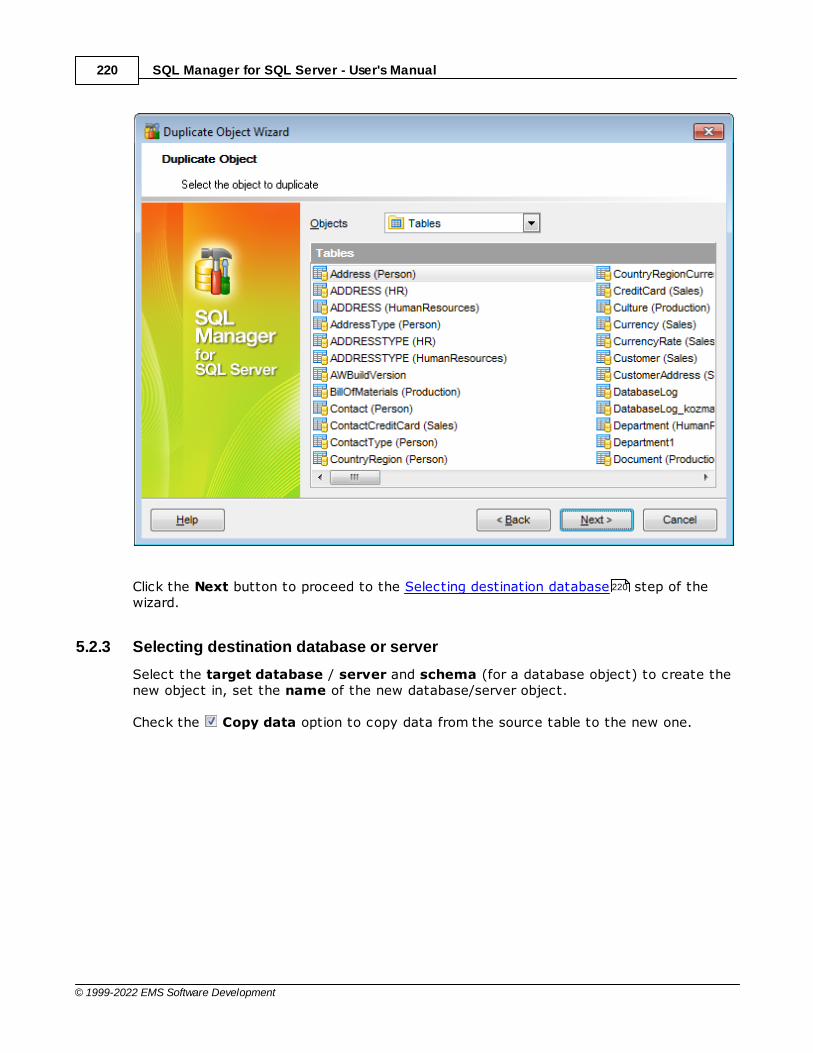
SQL Manager for SQL Server - User's Manual220
© 1999-2022 EMS Software Development
Click the Next button to proceed to the Selecting destination database step of thewizard.
5.2.3 Selecting destination database or server
Select the target database / server and schema (for a database object) to create thenew object in, set the name of the new database/server object.
Check the Copy data option to copy data from the source table to the new one.
220

SQL Manager for SQL Server - User's Manual221
© 1999-2022 EMS Software Development
Click the Next button to proceed to the Modifying the new object's definition step ofthe wizard.
5.2.4 Modifying the new object's definition
This step of the wizard allows you to browse the result SQL statement.
If necessary, you can edit the definition of the new object.
221
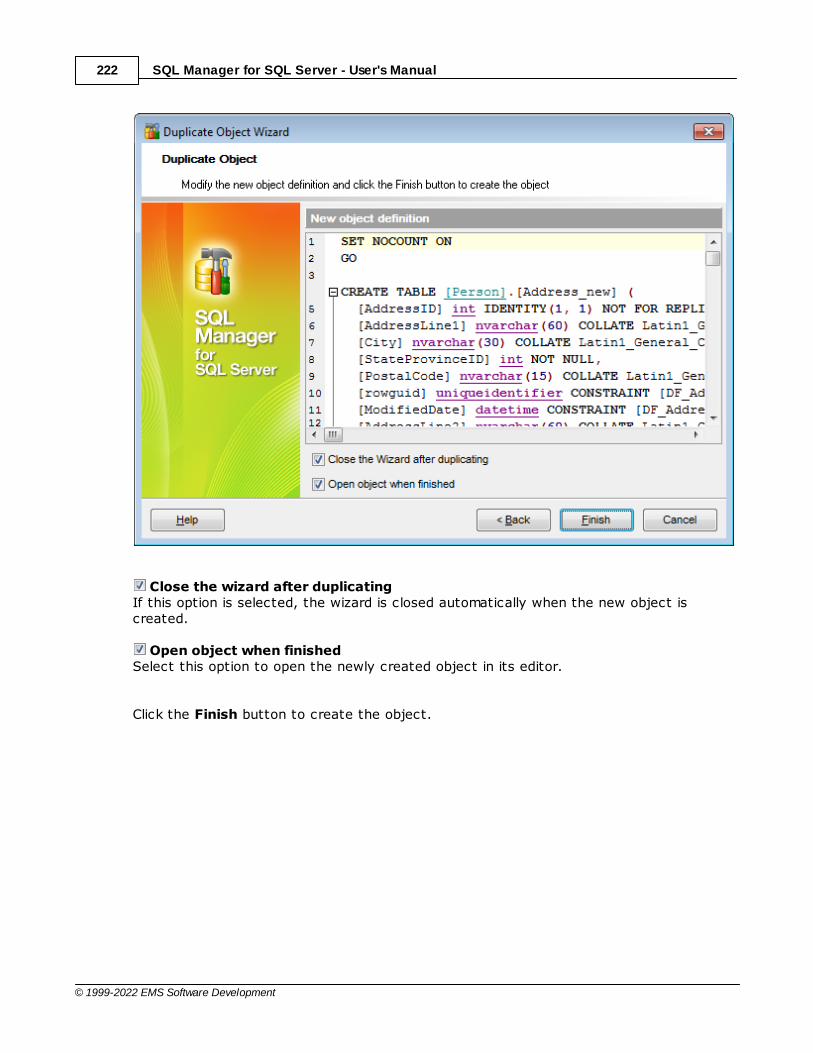
SQL Manager for SQL Server - User's Manual222
© 1999-2022 EMS Software Development
Close the wizard after duplicatingIf this option is selected, the wizard is closed automatically when the new object iscreated.
Open object when finishedSelect this option to open the newly created object in its editor.
Click the Finish button to create the object.

SQL Manager for SQL Server - User's Manual223
© 1999-2022 EMS Software Development
5.3 Database objects
SQL Manager for SQL Server provides all necessary facilities for working with databaseobjects.
Note: To start working with database objects you need to connect to database .
Database Objects:Schemas
Schema Objects:TablesViewsProceduresUDTsUDFsSynonymsAggregatesXML Schema CollectionsDefaultsRulesQueues
Non-schema Objects:AssembliesDDL TriggersPartition FunctionsPartition SchemesFull-Text CatalogsSymmetric KeysAsymmetric KeysCertificatesMessage TypesContractsServicesRoutesRemote Service Bindings
Creating Database Objects
To create a database object:select the Database | New Object... main menu item;select the type of object within the New Object dialog;follow the steps of the wizard which guides you through the entire process of creatingthe object, or set the object properties using its editor - depending on the selectedobject type.
Note that you can also create a database object by selecting the appropriate contextmenu item of the DB Explorer tree or using the Ct r l+N shortcut .
To create a new object with the same properties as one of existing objects has:select the Database | Duplicate Object... main menu item;follow the instructions of Duplicate Object Wizard .
104
225
228
282
289
299
295
311
314
317
320
323
325
339
342
345
349
352
357
360
364
370
373
376
379
382
958
216
88 107 996
958
218
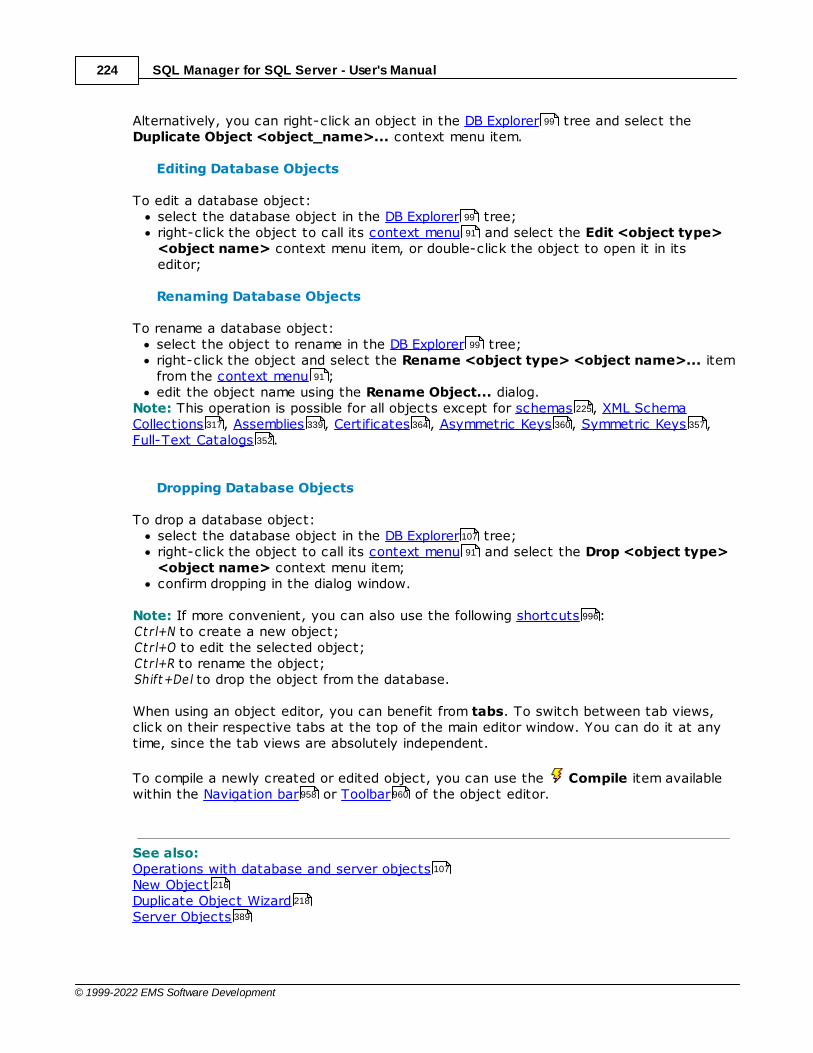
SQL Manager for SQL Server - User's Manual224
© 1999-2022 EMS Software Development
Alternatively, you can right-click an object in the DB Explorer tree and select theDuplicate Object <object_name>... context menu item.
Editing Database Objects
To edit a database object:select the database object in the DB Explorer tree;right-click the object to call its context menu and select the Edit <object type><object name> context menu item, or double-click the object to open it in itseditor;
Renaming Database Objects
To rename a database object:select the object to rename in the DB Explorer tree;right-click the object and select the Rename <object type> <object name>... itemfrom the context menu ;edit the object name using the Rename Object... dialog.
Note: This operation is possible for all objects except for schemas , XML SchemaCollections , Assemblies , Certificates , Asymmetric Keys , Symmetric Keys ,Full-Text Catalogs .
Dropping Database Objects
To drop a database object:select the database object in the DB Explorer tree;right-click the object to call its context menu and select the Drop <object type><object name> context menu item;confirm dropping in the dialog window.
Note: If more convenient, you can also use the following shortcuts :Ct r l+N to create a new object;Ct r l+O to edit the selected object;Ct r l+R to rename the object;Shift+Del to drop the object from the database.
When using an object editor, you can benefit from tabs. To switch between tab views,click on their respective tabs at the top of the main editor window. You can do it at anytime, since the tab views are absolutely independent.
To compile a newly created or edited object, you can use the Compile item availablewithin the Navigation bar or Toolbar of the object editor.
See also:Operations with database and server objectsNew ObjectDuplicate Object WizardServer Objects
99
99
91
99
91
225
317 339 364 360 357
352
107
91
996
958 960
107
216
218
389

SQL Manager for SQL Server - User's Manual225
© 1999-2022 EMS Software Development
5.3.1 Schemas
A Schema is essentially a namespace: it can be defined as a collection of databaseobjects that form a single namespace. A namespace is a set in which each element hasa unique name.
Creating Schemas
To create a new schema:select the Database | New Object... main menu item;select Schema in the Create New Object dialog;define schema properties using the appropriate tabs of Schema Editor .
Hint: To create a new schema, you can also right-click the Schemas node or any objectwithin this node in the DB Explorer tree and select the New Schema item from thecontext menu .
To create a new schema with the same properties as one of existing schemas has:select the Database | Duplicate Object... main menu item;follow the instructions of Duplicate Object Wizard .
Alternatively, you can right-click a schema in the DB Explorer tree and select theDuplicate Schema <schema_name>... context menu item.
Duplicate Object Wizard allows you to select the database to create a new schema in,and to edit the result SQL statement for creating the schema.
Editing Schemas
To edit an existing schema:select the schema for editing in the DB Explorer tree (type the first letters of theschema name for quick search );right-click the object and select the Edit Schema <schema_name>... contextmenu item, or simply double-click the schema;edit schema properties using the appropriate tabs of Schema Editor .
Dropping Schemas
To drop a schema:select the schema to drop in the DB Explorer tree;right-click the object and select the Drop Schema <schema_name>... contextmenu item;confirm dropping in the dialog window.
Note: If more convenient, you can also use the following shortcuts :Ct r l+N to create a new schema;Ct r l+O to edit the selected schema;Shift+Del to drop the object from the database.
See also:
Schema Objects
228
958
216
226
99
91
958
218
99
218
99
118
226
99
996
228
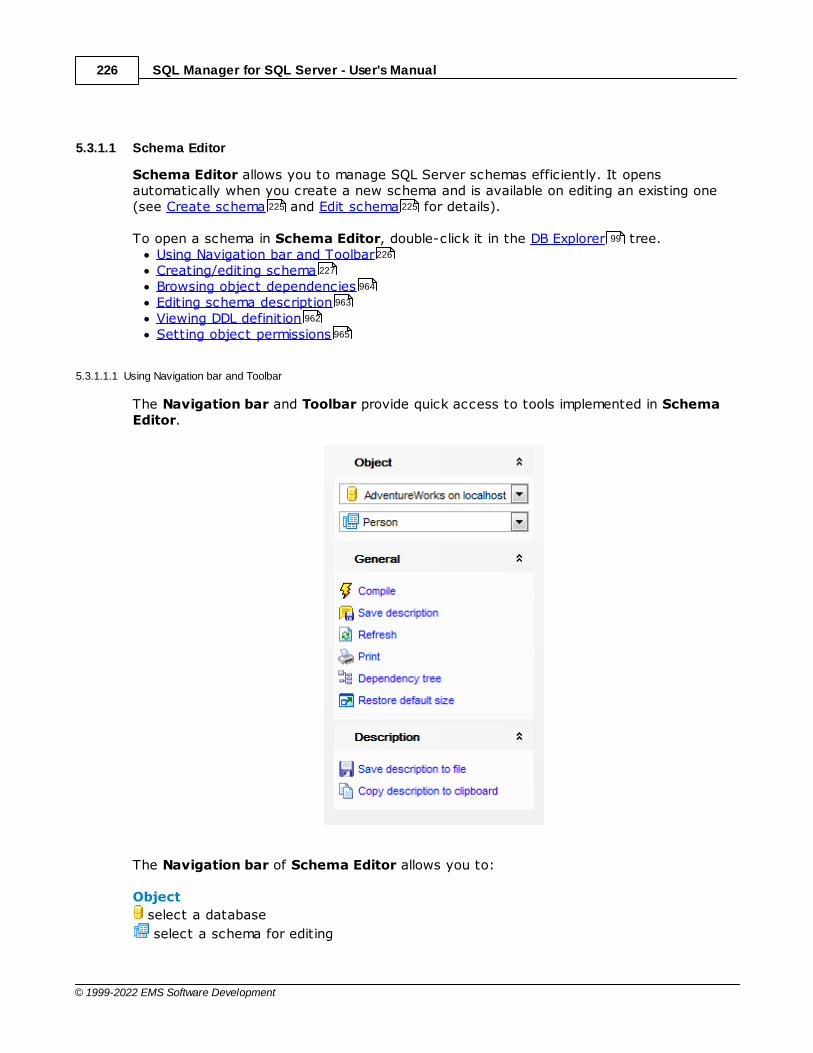
SQL Manager for SQL Server - User's Manual226
© 1999-2022 EMS Software Development
5.3.1.1 Schema Editor
Schema Editor allows you to manage SQL Server schemas efficiently. It opensautomatically when you create a new schema and is available on editing an existing one(see Create schema and Edit schema for details).
To open a schema in Schema Editor, double-click it in the DB Explorer tree.Using Navigation bar and ToolbarCreating/editing schemaBrowsing object dependenciesEditing schema descriptionViewing DDL definitionSetting object permissions
5.3.1.1.1 Using Navigation bar and Toolbar
The Navigation bar and Toolbar provide quick access to tools implemented in SchemaEditor.
The Navigation bar of Schema Editor allows you to:
Object
select a database
select a schema for editing
225 225
99
226
227
964
963
962
965
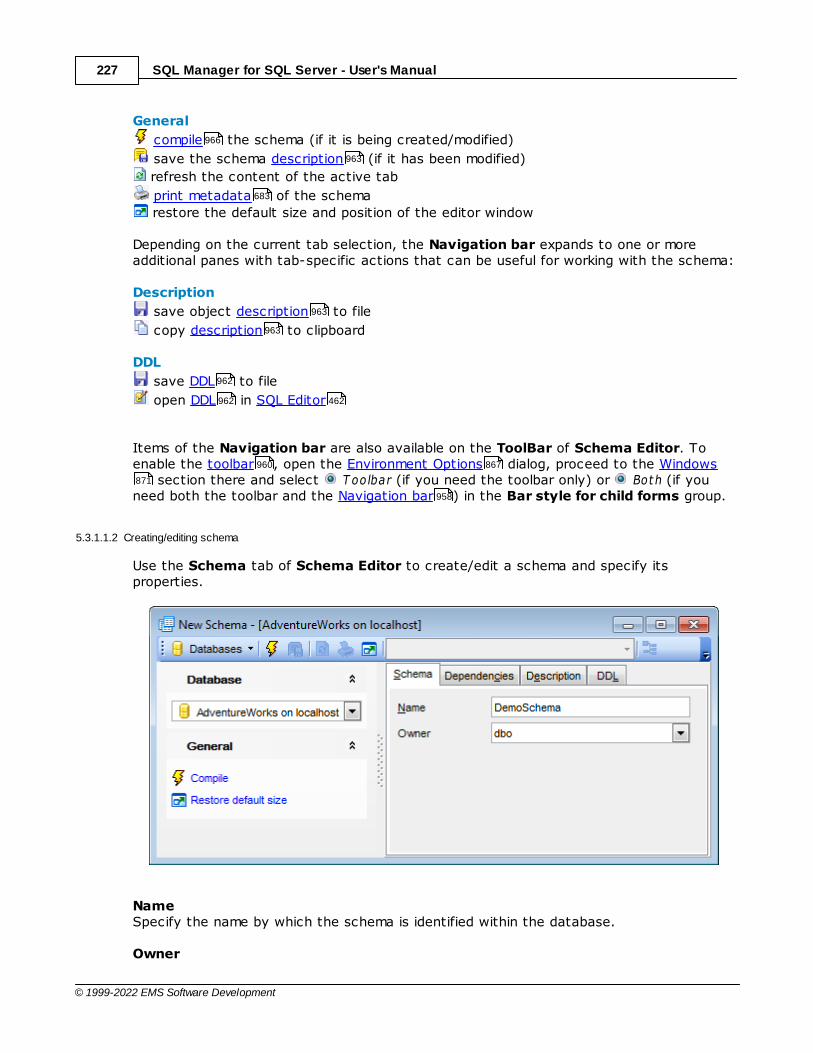
SQL Manager for SQL Server - User's Manual227
© 1999-2022 EMS Software Development
General
compile the schema (if it is being created/modified)
save the schema description (if it has been modified)
refresh the content of the active tab
print metadata of the schema
restore the default size and position of the editor window
Depending on the current tab selection, the Navigation bar expands to one or moreadditional panes with tab-specific actions that can be useful for working with the schema:
Description
save object description to file
copy description to clipboard
DDL
save DDL to file
open DDL in SQL Editor
Items of the Navigation bar are also available on the ToolBar of Schema Editor. Toenable the toolbar , open the Environment Options dialog, proceed to the Windows
section there and select T oolbar (if you need the toolbar only) or Both (if youneed both the toolbar and the Navigation bar ) in the Bar style for child forms group.
5.3.1.1.2 Creating/editing schema
Use the Schema tab of Schema Editor to create/edit a schema and specify itsproperties.
NameSpecify the name by which the schema is identified within the database.
Owner
966
963
683
963
963
962
962 462
960 867
871
958
SQL Manager for SQL Server - User's Manual228
© 1999-2022 EMS Software Development
Specify the name of the database-level principal (user or role ) that will own theschema. This principal may own other schemas, and may not use the current schema asits default schema.
5.3.2 Schema Objects
A schema is a collection of logical structures of data, or schema objects. A schema isowned by a database user. Each user can own a single schema. Schema objects can becreated and manipulated with SQL and include the following types of objects:
TablesViewsProceduresUser-defined typesUser-defined functionsSynonymsAggregatesXML Schema CollectionsDefaultsRulesQueuesExternal Tables
Use the DB Explorer tree to navigate within the existing schemas and their objects.
See also:
New Object dialog
Duplicate Object Wizard
5.3.2.1 Tables
Relational databases store all their data in Tables. A table is a data structure consistingof an unordered set of horizontal rows, each containing the same number of verticalcolumns. The intersection of an individual row and column is a field that contains aspecific piece of information. Much of the power of relational databases comes fromdefining the relations among the tables.
Creating Tables
To create a new table:select the Database | New Object... main menu item;select Table in the Create New Object dialog;define table properties and fields using the appropriate tabs of Table Editor .
Hint: To create a new table, you can also right-click the Tables node or any objectwithin this node in the DB Explorer tree and select the New Table... item from thecontext menu .
To create a new table with the same properties as one of existing tables has:select the Database | Duplicate Object... main menu item;follow the instructions of Duplicate Object Wizard .
331 335
228
282
289
299
295
311
314
317
320
323
325
329
99 84
216
218
958
216
229
99
91
958
218

SQL Manager for SQL Server - User's Manual229
© 1999-2022 EMS Software Development
Alternatively, you can right-click a table in the DB Explorer tree and select theDuplicate Table <table_name>... context menu item.
Duplicate Object Wizard allows you to select the database to create a new table in,and to edit the result SQL statement for creating the table.
Editing Tables
To edit an existing table (manage its fields , indexes , data , etc.):select the table for editing in the DB Explorer tree (type the first letters of thetable name for quick search );right-click the object and select the Edit Table <table_name> context menu item,or simply double-click the table;edit table subobjects and data using the appropriate tabs of Table Editor .
To change the name of a table:select the table to rename in the DB Explorer tree;right-click the table alias and select the Rename Table <table_name>... item fromthe context menu ;edit the table name using the Rename Object... dialog.
Dropping Tables
To drop a table:select the table to drop in the DB Explorer tree;right-click the object and select the Drop Table <table_name>... context menuitem;confirm dropping in the dialog window.
Note: If more convenient, you can also use the following shortcuts :Ct r l+N to create a new table;Ct r l+O to edit the selected table;Ct r l+R to rename the table;Shift+Del to drop the object from the database.
5.3.2.1.1 New table
The New Table window is a mode of Table Editor that opens automatically when youcreate a new table (see Create table for details) and allows you to create a new table,set table properties , specify table fields and edit table description.
To call Table Editor for creating a new table, you can right-click the Tables node or anyobject within this node in the DB Explorer tree and use the Ct r l+N shortcut .
Using Navigation bar and ToolbarSetting table propertiesSpecifying table fields
5.3.2.1.1.1 Using Navigation bar and Toolbar
The Navigation bar and Toolbar provide quick access to tools implemented in TableEditor.
99
218
240 244 246
99
118
236
99
91
99
996
236
228
231 232
99 996
229
231
232

SQL Manager for SQL Server - User's Manual230
© 1999-2022 EMS Software Development
The Navigation bar of Table Editor (in the New table mode) allows you to:
Database
select a database to create a new table in
General
compile the newly created table
restore the default size and position of the editor window
Depending on the current tab selection, the Navigation bar expands to one or moreadditional panes with tab-specific actions that can be useful for working with the table:
Fields
add a new field
edit selected field
drop selected field(s)
Description
save object description to file
copy description to clipboard
DDL
save DDL to file
open DDL in SQL Editor
Items of the Navigation bar are also available on the ToolBar of Table Editor. Toenable the toolbar , open the Environment Options dialog, proceed to the Windows
section there and select T oolbar (if you need the toolbar only) or Both (if youneed both the toolbar and the Navigation bar ) in the Bar style for child forms group.
966
249
249
249
963
963
962
962 462
960 867
871
958
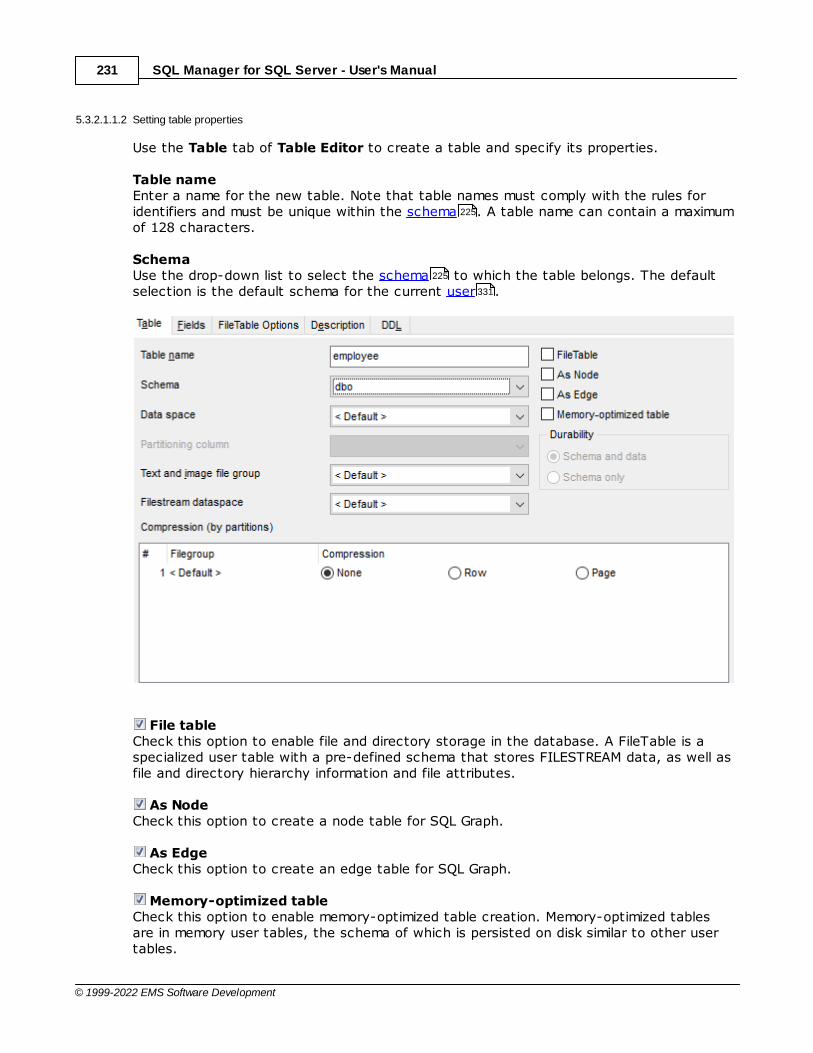
SQL Manager for SQL Server - User's Manual231
© 1999-2022 EMS Software Development
5.3.2.1.1.2 Setting table properties
Use the Table tab of Table Editor to create a table and specify its properties.
Table nameEnter a name for the new table. Note that table names must comply with the rules foridentifiers and must be unique within the schema . A table name can contain a maximumof 128 characters.
Schema Use the drop-down list to select the schema to which the table belongs. The defaultselection is the default schema for the current user .
File tableCheck this option to enable file and directory storage in the database. A FileTable is aspecialized user table with a pre-defined schema that stores FILESTREAM data, as well asfile and directory hierarchy information and file attributes.
As NodeCheck this option to create a node table for SQL Graph.
As EdgeCheck this option to create an edge table for SQL Graph.
Memory-optimized tableCheck this option to enable memory-optimized table creation. Memory-optimized tablesare in memory user tables, the schema of which is persisted on disk similar to other usertables.
225
225
331
SQL Manager for SQL Server - User's Manual232
© 1999-2022 EMS Software Development
If you have selected to create a memory-optimized table, you must specify memory-optimized table indices .
Durability Schema and data
This value indicates that the table is a durable memory-optimized table. This optionprovides durability of both schema and data.
Schema onlyThis value indicates that the table is non-durable. This option ensures durability of thetable schema, including indexes.Such tables are not logged and their data is not persisted on disk.
Data spaceUse the drop-down list to specify the new table data storage (a file group or a partitionscheme ).
Partitioning columnThis drop-down list is only available if a partition scheme is specified for Data space.Select a field that will be used as the partitioning column for the table.
Text and image file groupUse the drop-down list to select the file group where data of the text and im age typeswill be stored.
If necessary, you can also use the Description area to supply a desc r ipt ion for the tablebeing created.
For SQL Server 2008 and higher, Table Editor provides some additional table properties todefine:
Filestream dataspaceSelect the needed Filestream filegroup from the drop-down list.
Compression (by partitions)Use this area to set compression options for the table. Compression type can be differentfor each table partition. Set the partition compression to Row or Page. Set None to leavea partition uncompressed.
To compile the table, use the Compile item available within the Navigation bar .
5.3.2.1.1.3 Specifying f ields
The Fields tab is intended for setting up table fields . Double-click a field to open FieldEditor for editing the field.
Right-click within the Table Fields area to display the context menu allowing you to add,insert, edit or de lete fields.
Fields management tools are also available through the Navigation bar of Table Editor.
234
349
349
232
190
229
249
250
229

SQL Manager for SQL Server - User's Manual233
© 1999-2022 EMS Software Development
The Table Fields list provides the following attributes of each field of the new table:Prim ary KeyColum n Nam eData T ypeSizeMax SizePrec is ionNot NullUniqueIdent it yDefault ValueDefault Objec tCom m ent
For details see Fields .
To compile the table, use the Compile item available within the Navigation bar .
5.3.2.1.1.4 Specifying FileTable options
Use the FileTable Options tab to configure settings for the FileTable being created.This tab is available only for SQL Server 2012.The fields on this tab are enabled only if the File table option is checked on the Table
tab.
249
229
231
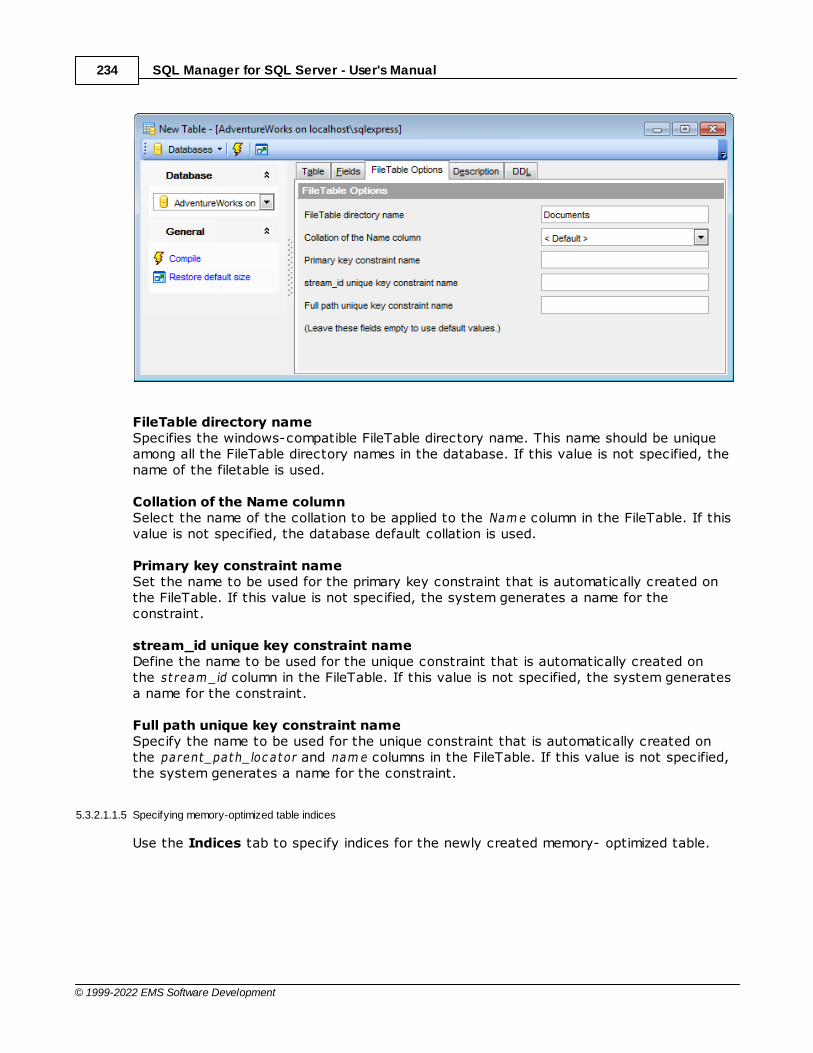
SQL Manager for SQL Server - User's Manual234
© 1999-2022 EMS Software Development
FileTable directory nameSpecifies the windows-compatible FileTable directory name. This name should be uniqueamong all the FileTable directory names in the database. If this value is not specified, thename of the filetable is used.
Collation of the Name columnSelect the name of the collation to be applied to the Nam e column in the FileTable. If thisvalue is not specified, the database default collation is used.
Primary key constraint nameSet the name to be used for the primary key constraint that is automatically created onthe FileTable. If this value is not specified, the system generates a name for theconstraint.
stream_id unique key constraint nameDefine the name to be used for the unique constraint that is automatically created onthe st ream _id column in the FileTable. If this value is not specified, the system generatesa name for the constraint.
Full path unique key constraint nameSpecify the name to be used for the unique constraint that is automatically created onthe parent_path_loc ator and nam e columns in the FileTable. If this value is not specified,the system generates a name for the constraint.
5.3.2.1.1.5 Specifying memory-optimized table indices
Use the Indices tab to specify indices for the newly created memory- optimized table.

SQL Manager for SQL Server - User's Manual235
© 1999-2022 EMS Software Development
The Indexes list provides the following attributes of each index of the table:Nam ePrim ary KeyColum nsHash indexNum ber of Hash Buc ket
Right-click an index to display the context menu allowing you to c reate new, edit or dropan index. Double-click an index or use the New /Edit Index context menu item to open Memory-optimized table index editor for editing the index.
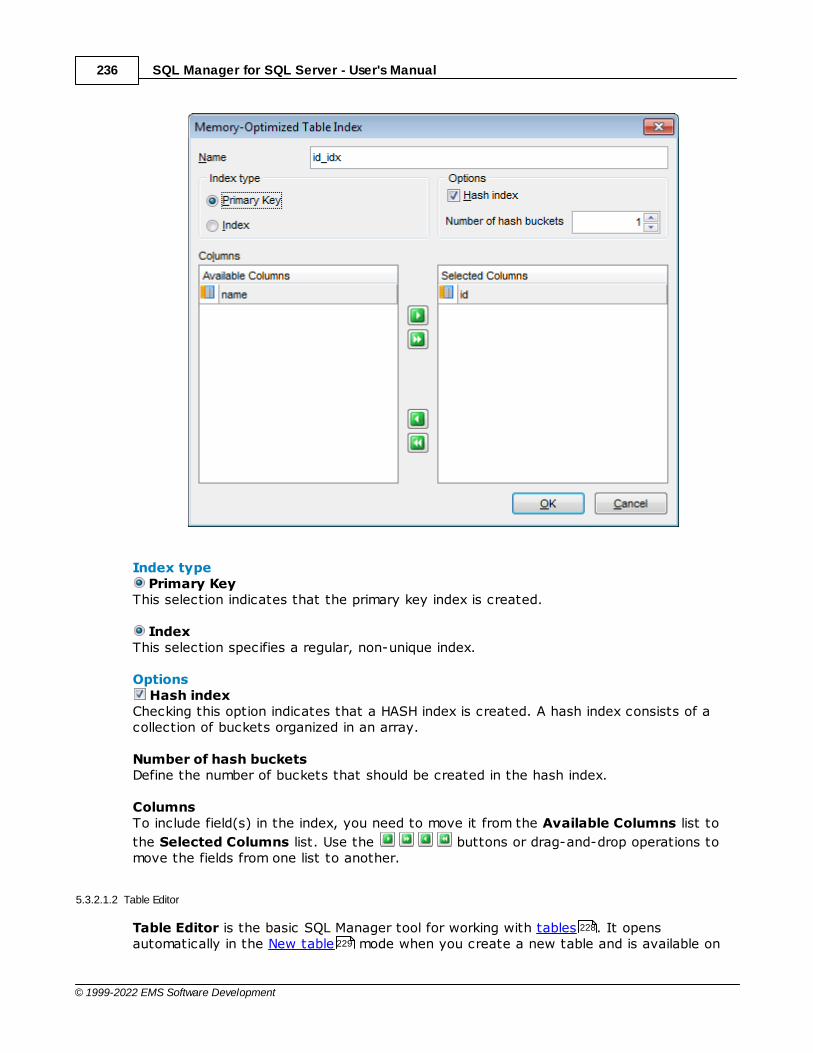
SQL Manager for SQL Server - User's Manual236
© 1999-2022 EMS Software Development
Index type Primary Key
This selection indicates that the primary key index is created.
IndexThis selection specifies a regular, non-unique index.
Options Hash index
Checking this option indicates that a HASH index is created. A hash index consists of acollection of buckets organized in an array.
Number of hash bucketsDefine the number of buckets that should be created in the hash index.
ColumnsTo include field(s) in the index, you need to move it from the Available Columns list to
the Selected Columns list. Use the buttons or drag-and-drop operations tomove the fields from one list to another.
5.3.2.1.2 Table Editor
Table Editor is the basic SQL Manager tool for working with tables . It opensautomatically in the New table mode when you create a new table and is available on
228
229
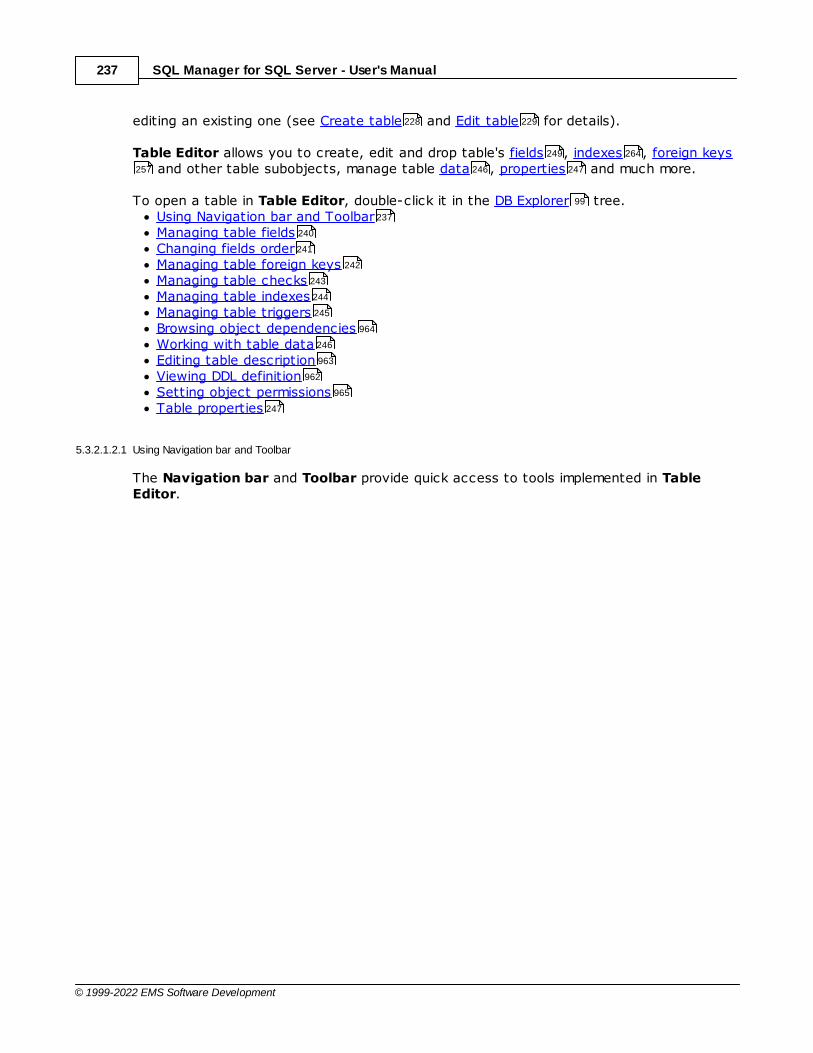
SQL Manager for SQL Server - User's Manual237
© 1999-2022 EMS Software Development
editing an existing one (see Create table and Edit table for details).
Table Editor allows you to create, edit and drop table's fields , indexes , foreign keys and other table subobjects, manage table data , properties and much more.
To open a table in Table Editor, double-click it in the DB Explorer tree.Using Navigation bar and ToolbarManaging table fieldsChanging fields orderManaging table foreign keysManaging table checksManaging table indexesManaging table triggersBrowsing object dependenciesWorking with table dataEditing table descriptionViewing DDL definitionSetting object permissionsTable properties
5.3.2.1.2.1 Using Navigation bar and Toolbar
The Navigation bar and Toolbar provide quick access to tools implemented in TableEditor.
228 229
249 264
257 246 247
99
237
240
241
242
243
244
245
964
246
963
962
965
247

SQL Manager for SQL Server - User's Manual238
© 1999-2022 EMS Software Development
The Navigation bar of Table Editor (in the Edit t able mode) allows you to:

SQL Manager for SQL Server - User's Manual239
© 1999-2022 EMS Software Development
Object
select a database
select a table for editing
General
compile the table (if it is being modified)
save the table description (if it has been modified)
refresh the content of the active tab
print metadata of the table
adjust Table Editor options
restore the default size and position of the editor window
Tools
manage table indexes using Indices Management Wizard
update table statistics using Statistics Update Wizard
truncate data of the table (with the T RUNCAT E T ABLE statement used)
view the dependency tree for the table
create a procedure based on the table
Explorer
browse the table subobjects using the Explorer tree
Depending on the current tab selection, the Navigation bar expands to one or moreadditional panes with tab-specific actions that can be useful for working with the table:
Fields
add a new field
edit selected field
drop selected field(s)
Foreign keys
add a new foreign key
edit selected foreign key
drop selected foreign key(s)
Checks
add a new check
edit selected check
drop selected check(s)
Indices
add a new index
edit selected index
drop selected index(-es)
Triggers
add a new trigger
edit selected trigger
966
963
683
877
802
808
652
276 289
249
249
249
257
257
258
261
261
262
264
264
264
273
273
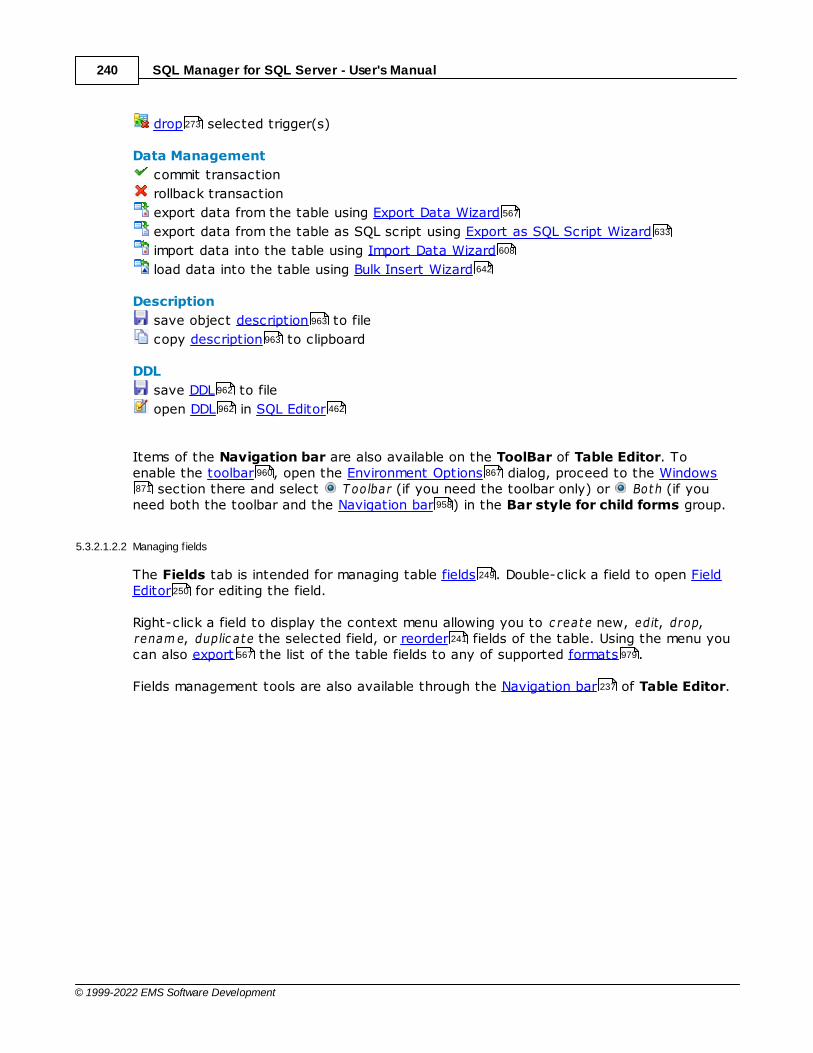
SQL Manager for SQL Server - User's Manual240
© 1999-2022 EMS Software Development
drop selected trigger(s)
Data Management
commit transaction
rollback transaction
export data from the table using Export Data Wizard
export data from the table as SQL script using Export as SQL Script Wizard
import data into the table using Import Data Wizard
load data into the table using Bulk Insert Wizard
Description
save object description to file
copy description to clipboard
DDL
save DDL to file
open DDL in SQL Editor
Items of the Navigation bar are also available on the ToolBar of Table Editor. Toenable the toolbar , open the Environment Options dialog, proceed to the Windows
section there and select T oolbar (if you need the toolbar only) or Both (if youneed both the toolbar and the Navigation bar ) in the Bar style for child forms group.
5.3.2.1.2.2 Managing f ields
The Fields tab is intended for managing table fields . Double-click a field to open FieldEditor for editing the field.
Right-click a field to display the context menu allowing you to c reate new, edit, drop,renam e, duplic ate the selected field, or reorder fields of the table. Using the menu youcan also export the list of the table fields to any of supported formats .
Fields management tools are also available through the Navigation bar of Table Editor.
273
567
633
608
642
963
963
962
962 462
960 867
871
958
249
250
241
567 979
237

SQL Manager for SQL Server - User's Manual241
© 1999-2022 EMS Software Development
The Fields list provides the following attributes of each field of the table:F ie ld Nam eData T ypeNot NullUniqueIdent it yDefault Value
For details see Fields .
If necessary, you can also use the Field Description area to supply a desc r ipt ion foreach field.
5.3.2.1.2.3 Changing f ields order
The Reorder Fields dialog allows you to change the fields order in the table.
To open this dialog, open the table in Table Editor, proceed to the Fields tab there,right-click within the Fields list and select the Reorder Fields item from the contextmenu.
249
240
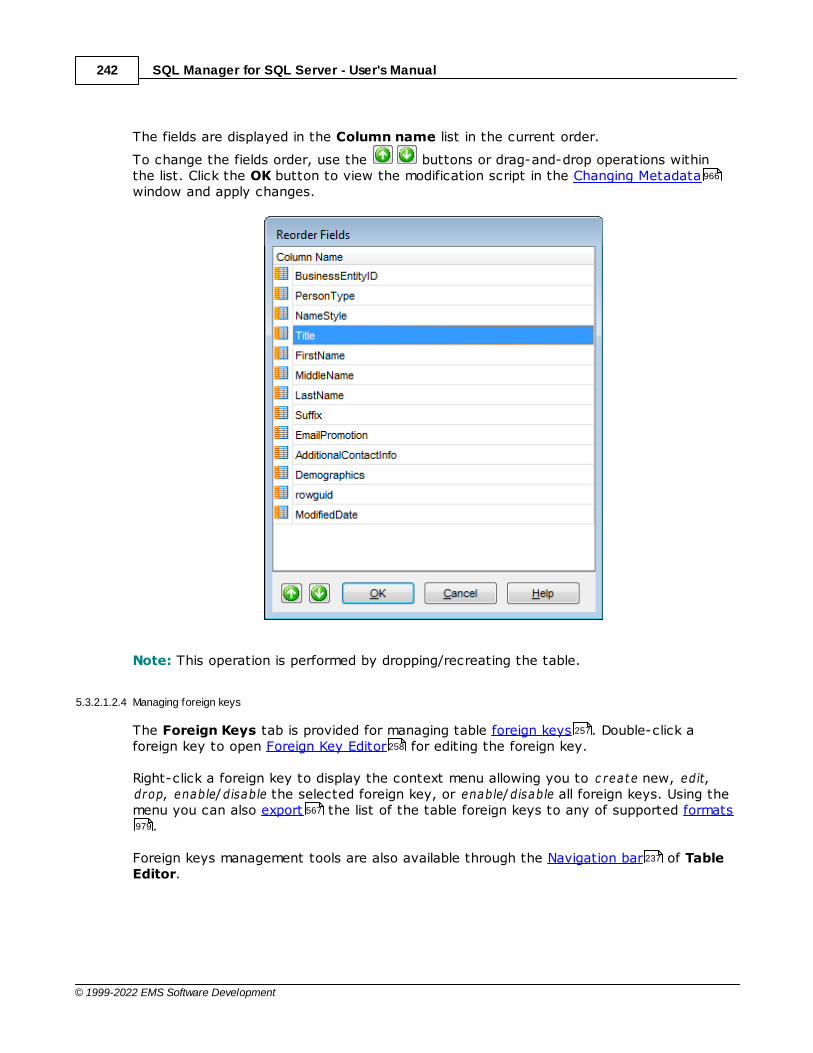
SQL Manager for SQL Server - User's Manual242
© 1999-2022 EMS Software Development
The fields are displayed in the Column name list in the current order.
To change the fields order, use the buttons or drag-and-drop operations withinthe list. Click the OK button to view the modification script in the Changing Metadatawindow and apply changes.
Note: This operation is performed by dropping/recreating the table.
5.3.2.1.2.4 Managing foreign keys
The Foreign Keys tab is provided for managing table foreign keys . Double-click aforeign key to open Foreign Key Editor for editing the foreign key.
Right-click a foreign key to display the context menu allowing you to c reate new, edit,drop, enable/disable the selected foreign key, or enable/disable all foreign keys. Using themenu you can also export the list of the table foreign keys to any of supported formats
.
Foreign keys management tools are also available through the Navigation bar of TableEditor.
966
257
258
567
979
237
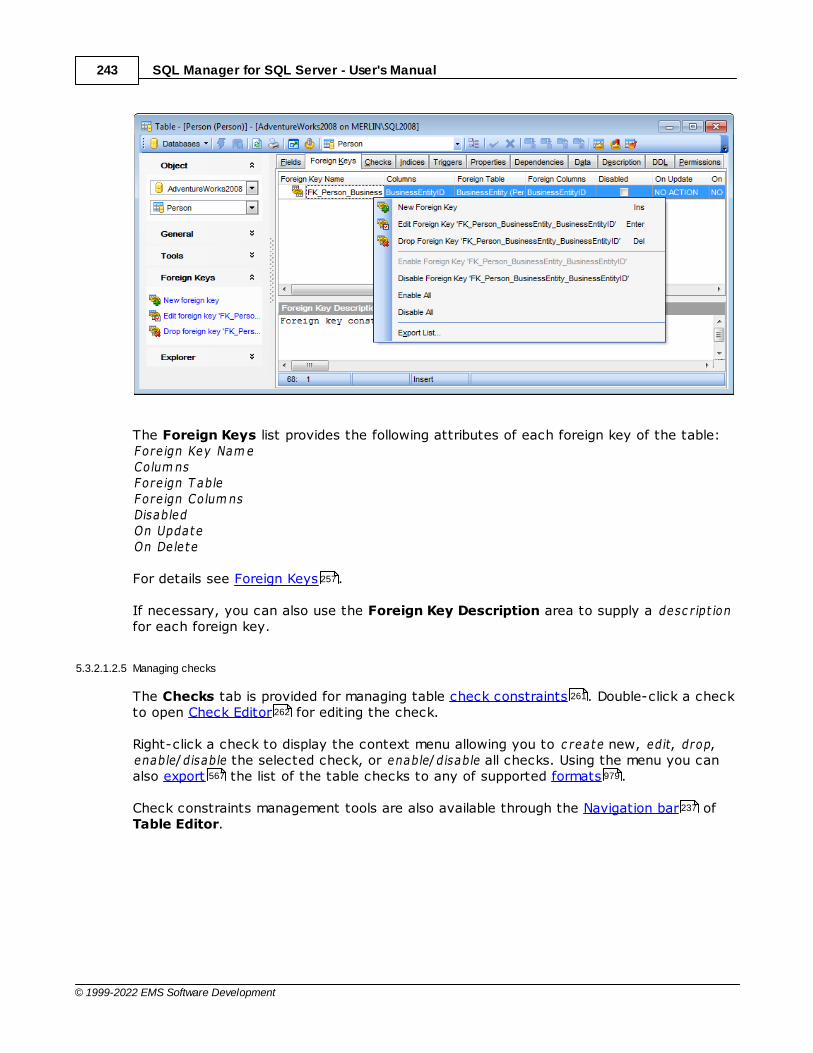
SQL Manager for SQL Server - User's Manual243
© 1999-2022 EMS Software Development
The Foreign Keys list provides the following attributes of each foreign key of the table:Fore ign Key Nam eColum nsFore ign T ableFore ign Colum nsDisabledOn UpdateOn Delete
For details see Foreign Keys .
If necessary, you can also use the Foreign Key Description area to supply a desc r ipt ionfor each foreign key.
5.3.2.1.2.5 Managing checks
The Checks tab is provided for managing table check constraints . Double-click a checkto open Check Editor for editing the check.
Right-click a check to display the context menu allowing you to c reate new, edit, drop,enable/disable the selected check, or enable/disable all checks. Using the menu you canalso export the list of the table checks to any of supported formats .
Check constraints management tools are also available through the Navigation bar ofTable Editor.
257
261
262
567 979
237
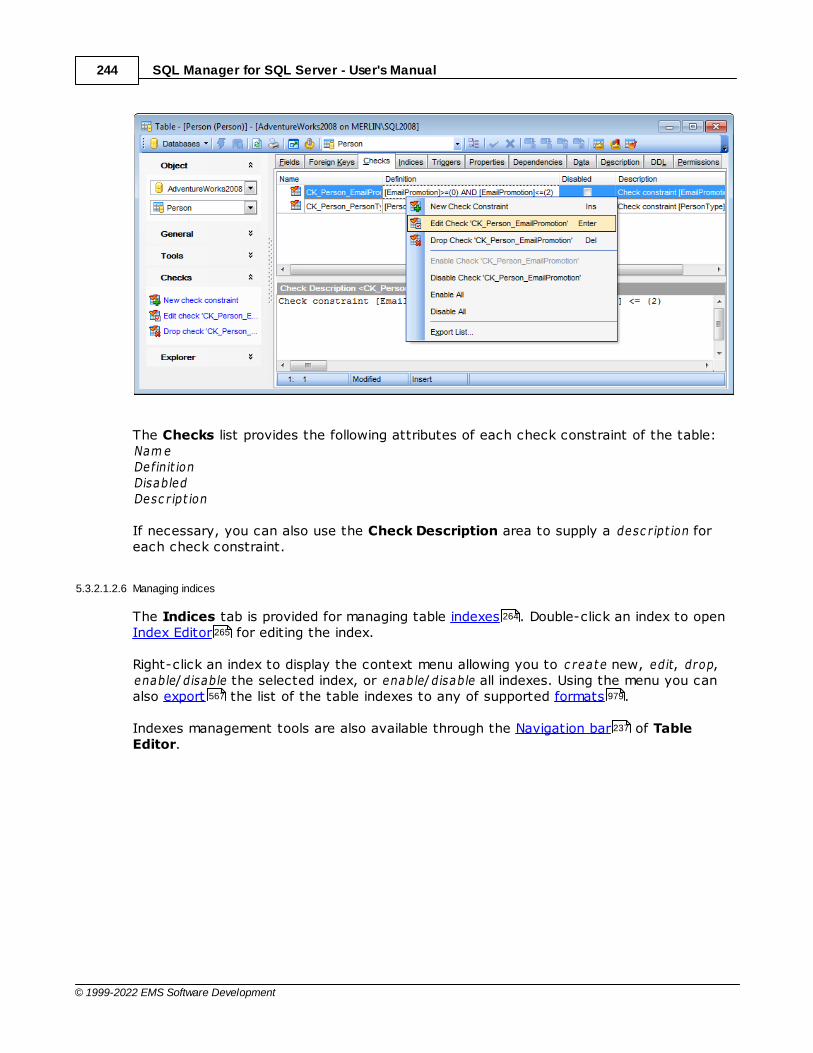
SQL Manager for SQL Server - User's Manual244
© 1999-2022 EMS Software Development
The Checks list provides the following attributes of each check constraint of the table:Nam eDefinit ionDisabledDesc r ipt ion
If necessary, you can also use the Check Description area to supply a desc r ipt ion foreach check constraint.
5.3.2.1.2.6 Managing indices
The Indices tab is provided for managing table indexes . Double-click an index to openIndex Editor for editing the index.
Right-click an index to display the context menu allowing you to c reate new, edit, drop,enable/disable the selected index, or enable/disable all indexes. Using the menu you canalso export the list of the table indexes to any of supported formats .
Indexes management tools are also available through the Navigation bar of TableEditor.
264
265
567 979
237
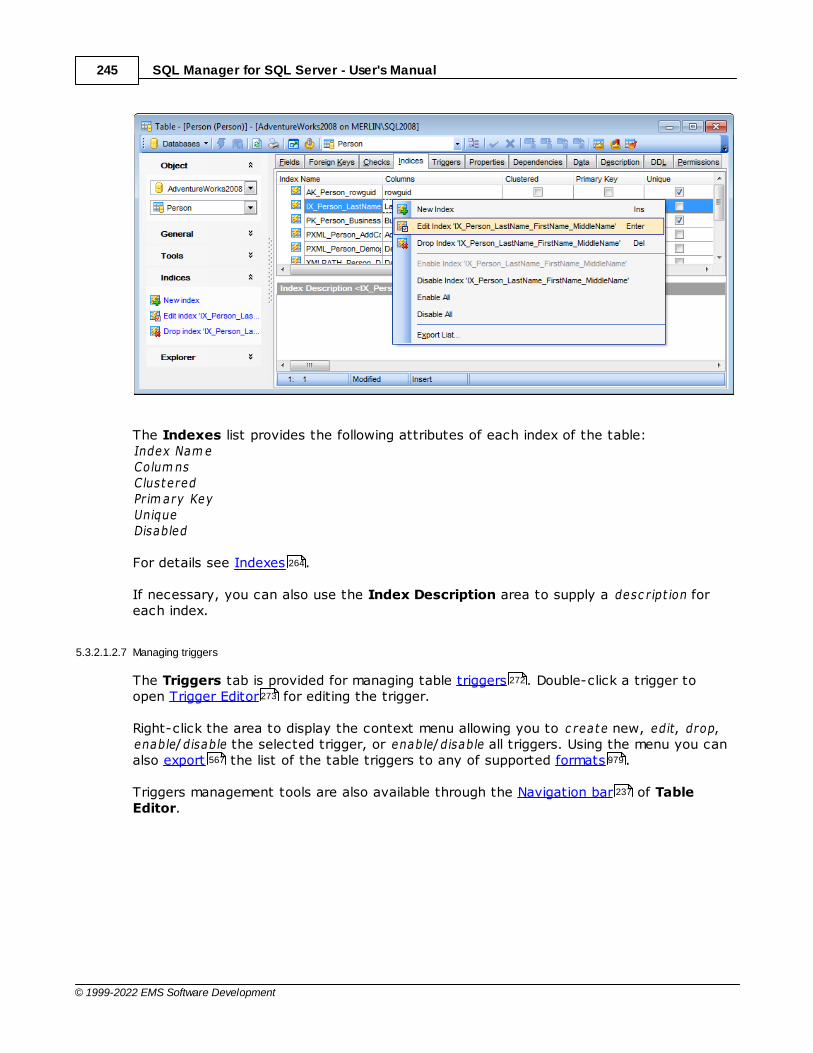
SQL Manager for SQL Server - User's Manual245
© 1999-2022 EMS Software Development
The Indexes list provides the following attributes of each index of the table:Index Nam eColum nsClusteredPrim ary KeyUniqueDisabled
For details see Indexes .
If necessary, you can also use the Index Description area to supply a desc r ipt ion foreach index.
5.3.2.1.2.7 Managing triggers
The Triggers tab is provided for managing table triggers . Double-click a trigger toopen Trigger Editor for editing the trigger.
Right-click the area to display the context menu allowing you to c reate new, edit, drop,enable/disable the selected trigger, or enable/disable all triggers. Using the menu you canalso export the list of the table triggers to any of supported formats .
Triggers management tools are also available through the Navigation bar of TableEditor.
264
272
273
567 979
237
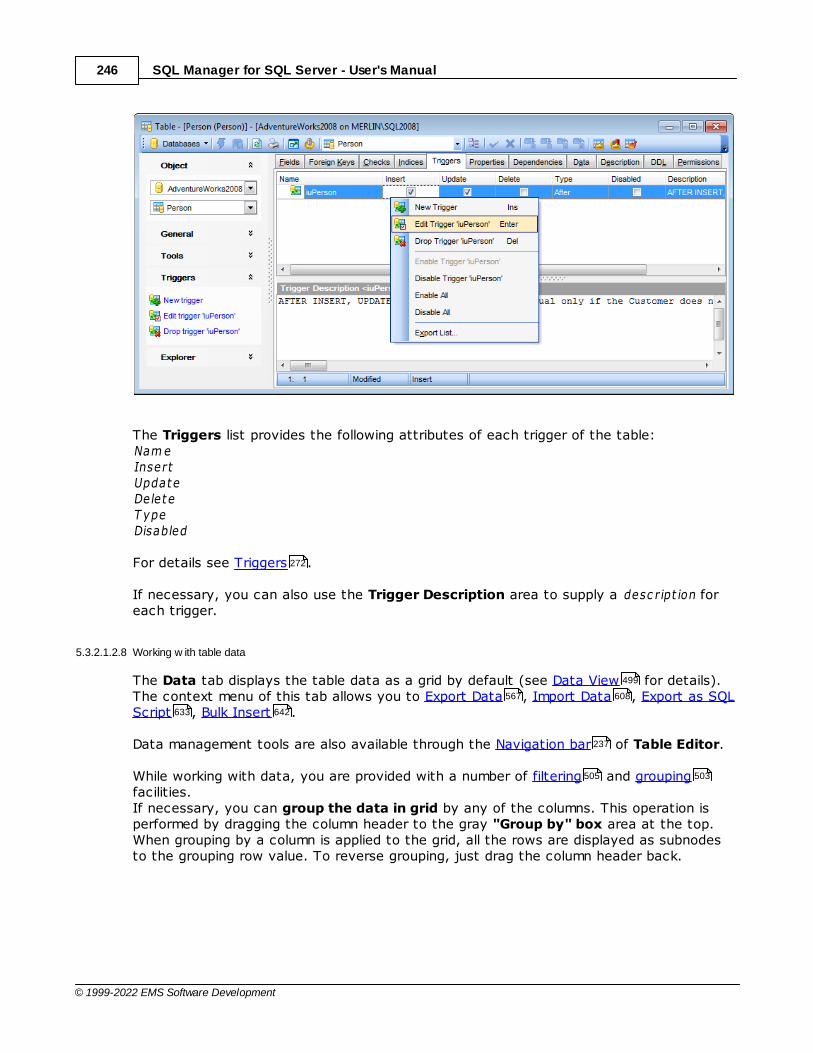
SQL Manager for SQL Server - User's Manual246
© 1999-2022 EMS Software Development
The Triggers list provides the following attributes of each trigger of the table:Nam eInsertUpdateDeleteT ypeDisabled
For details see Triggers .
If necessary, you can also use the Trigger Description area to supply a desc r ipt ion foreach trigger.
5.3.2.1.2.8 Working w ith table data
The Data tab displays the table data as a grid by default (see Data View for details).The context menu of this tab allows you to Export Data , Import Data , Export as SQLScript , Bulk Insert .
Data management tools are also available through the Navigation bar of Table Editor.
While working with data, you are provided with a number of filtering and groupingfacilities.If necessary, you can group the data in grid by any of the columns. This operation isperformed by dragging the column header to the gray "Group by" box area at the top.When grouping by a column is applied to the grid, all the rows are displayed as subnodesto the grouping row value. To reverse grouping, just drag the column header back.
272
499
567 608
633 642
237
505 503

SQL Manager for SQL Server - User's Manual247
© 1999-2022 EMS Software Development
See also:
Data View
5.3.2.1.2.9 Table properties
The Properties tab allows you to view/edit common properties of the table: T able nam e,Sc hem a nam e, T able opt ions (Storage at t r ibutes, T able loc k usage, etc.), T ableinform at ion.
Hint: These properties are also available within a modal dialog which is called through theTable Properties... context menu item of the table alias in DB Explorer .
499
99
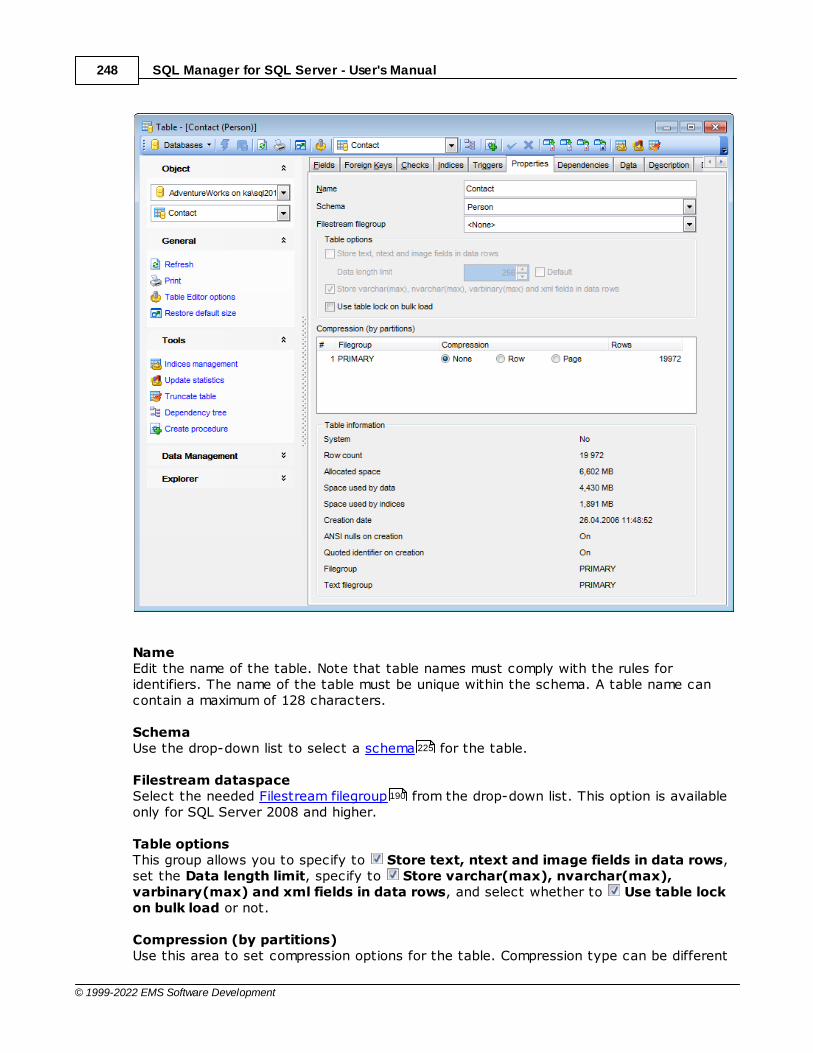
SQL Manager for SQL Server - User's Manual248
© 1999-2022 EMS Software Development
NameEdit the name of the table. Note that table names must comply with the rules foridentifiers. The name of the table must be unique within the schema. A table name cancontain a maximum of 128 characters.
SchemaUse the drop-down list to select a schema for the table.
Filestream dataspaceSelect the needed Filestream filegroup from the drop-down list. This option is availableonly for SQL Server 2008 and higher.
Table optionsThis group allows you to specify to Store text, ntext and image fields in data rows,set the Data length limit, specify to Store varchar(max), nvarchar(max),varbinary(max) and xml fields in data rows, and select whether to Use table lockon bulk load or not.
Compression (by partitions)Use this area to set compression options for the table. Compression type can be different
225
190

SQL Manager for SQL Server - User's Manual249
© 1999-2022 EMS Software Development
for each table partition. Set the partition compression to Row or Page. Set None to leavea partition uncompressed.
The Table information group allows you to view the table summary: System (Y es/No),Row c ount, Spac e used by data, Spac e used by indic es, Creat ion date, ANSI nulls onc reat ion (On/Off), Quoted ident if ier on c reat ion (On/Off), F ile group, T ext f ile group.
DurabilityThis group of options is available for memory-optimized tables only.
Schema and dataThis value indicates that the table is a durable memory-optimized table. This optionprovides durability of both schema and data.
Schema onlyThis value indicates that the table is non-durable. This option ensures durability of thetable schema, including indexes.Such tables are not logged and their data is not persisted on disk.
5.3.2.1.3 Fields
Table fields are managed within the Fields tab of Table Editor .
Creating Fields
To create a new table field:open the table in Table Editor ;proceed to the Fields tab there;right-click the tab area and select the New Field context menu item, or press the Inskey;define the field properties using the Field Editor dialog.
Editing Fields
To edit an existing table field:open the table in Table Editor ;proceed to the Fields tab there;right-click the field and select the Edit Field <field_name> context menu item, orsimply double-click the field;edit the field properties using the Field Editor dialog.
To change the order of table fields:open the table in Table Editor ;proceed to the Fields tab there;right-click a field and select the Reorder Fields <field_name> context menu item;edit fields' order using the Reorder Fields dialog.
Dropping Fields
To drop a table field:open the table in Table Editor ;proceed to the Fields tab there;
236
236
250
236
250
236
241
236

SQL Manager for SQL Server - User's Manual250
© 1999-2022 EMS Software Development
right-click the field and select the Drop Field <field_name> context menu item;confirm dropping in the dialog window.
5.3.2.1.3.1 Field Editor
Field Editor allows you to specify field definition and set field properties. It opensautomatically when you create a new field and is available on editing an existing one (see Create field and Edit field for details).
To open a field in Field Editor, double-click it in the DB Explorer tree, or use the EditField... item of the context menu within the Fields tab of Table Editor .
Setting field name and typeSetting field identitySetting field defaultsSetting field description
Column nameEnter a name for the new field, or modify the name of the field being edited. Note thatthe name of a field must be unique among all the field names in the table.
The Data type tab defines the type of the field data.
Column type kindThis group allows you to select whether the field being created/edited is based on astandard data type, a user-defined type , or is a computed column.
Standard data typeSpecifies that the field is based upon a built-in SQL Server data type.
249 249
99
240 236
250
253
255
256
299
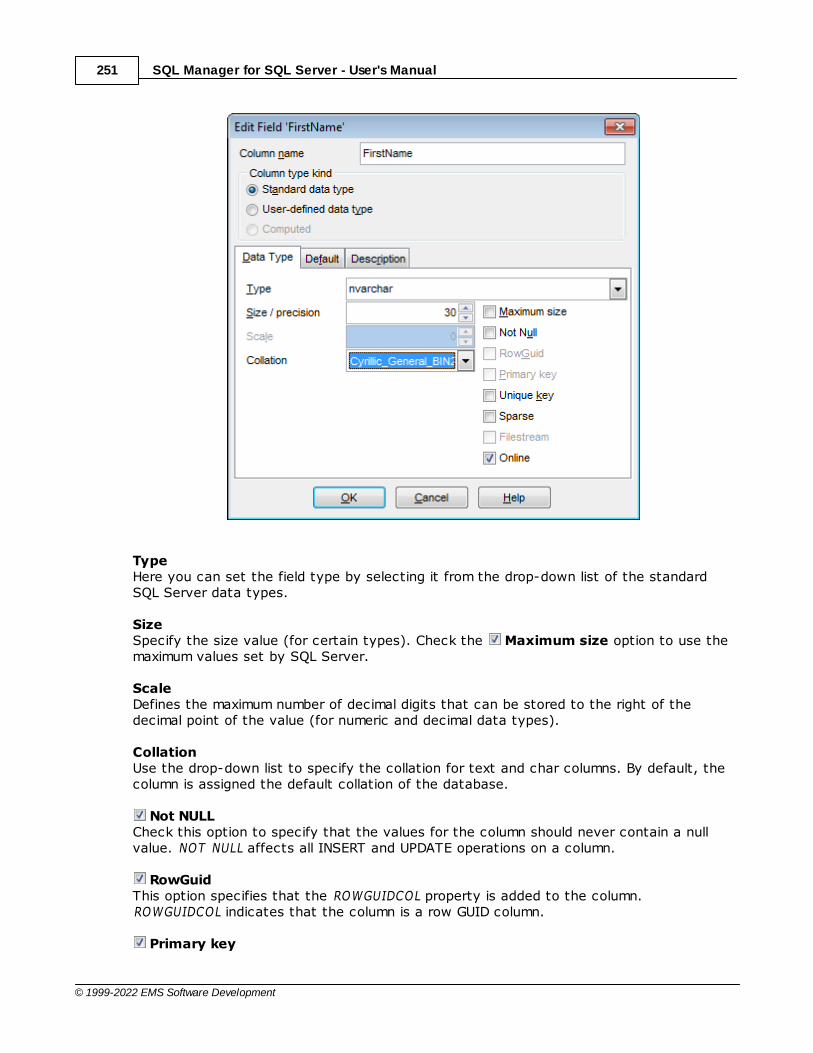
SQL Manager for SQL Server - User's Manual251
© 1999-2022 EMS Software Development
TypeHere you can set the field type by selecting it from the drop-down list of the standardSQL Server data types.
SizeSpecify the size value (for certain types). Check the Maximum size option to use themaximum values set by SQL Server.
ScaleDefines the maximum number of decimal digits that can be stored to the right of thedecimal point of the value (for numeric and decimal data types).
CollationUse the drop-down list to specify the collation for text and char columns. By default, thecolumn is assigned the default collation of the database.
Not NULLCheck this option to specify that the values for the column should never contain a nullvalue. NOT NULL affects all INSERT and UPDATE operations on a column.
RowGuidThis option specifies that the ROWGUIDCOL property is added to the column.ROWGUIDCOL indicates that the column is a row GUID column.
Primary key
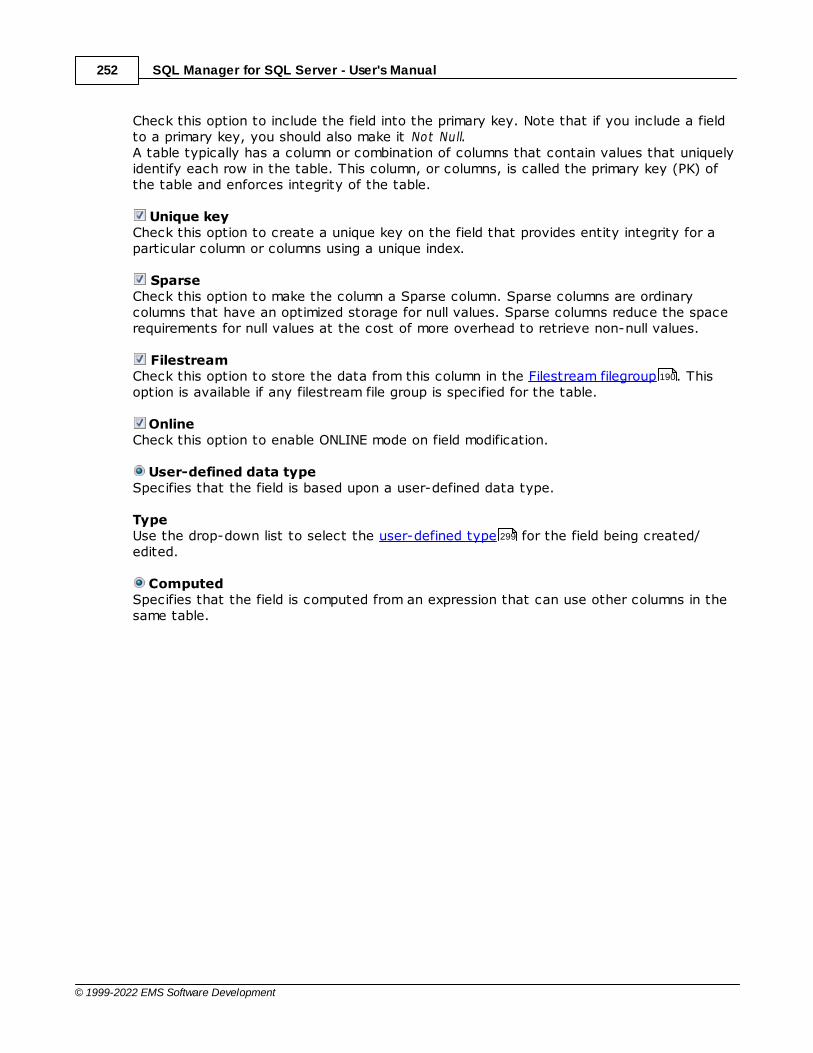
SQL Manager for SQL Server - User's Manual252
© 1999-2022 EMS Software Development
Check this option to include the field into the primary key. Note that if you include a fieldto a primary key, you should also make it Not Null.A table typically has a column or combination of columns that contain values that uniquelyidentify each row in the table. This column, or columns, is called the primary key (PK) ofthe table and enforces integrity of the table.
Unique keyCheck this option to create a unique key on the field that provides entity integrity for aparticular column or columns using a unique index.
SparseCheck this option to make the column a Sparse column. Sparse columns are ordinarycolumns that have an optimized storage for null values. Sparse columns reduce the spacerequirements for null values at the cost of more overhead to retrieve non-null values.
FilestreamCheck this option to store the data from this column in the Filestream filegroup . Thisoption is available if any filestream file group is specified for the table.
OnlineCheck this option to enable ONLINE mode on field modification.
User-defined data typeSpecifies that the field is based upon a user-defined data type.
TypeUse the drop-down list to select the user-defined type for the field being created/edited.
ComputedSpecifies that the field is computed from an expression that can use other columns in thesame table.
190
299
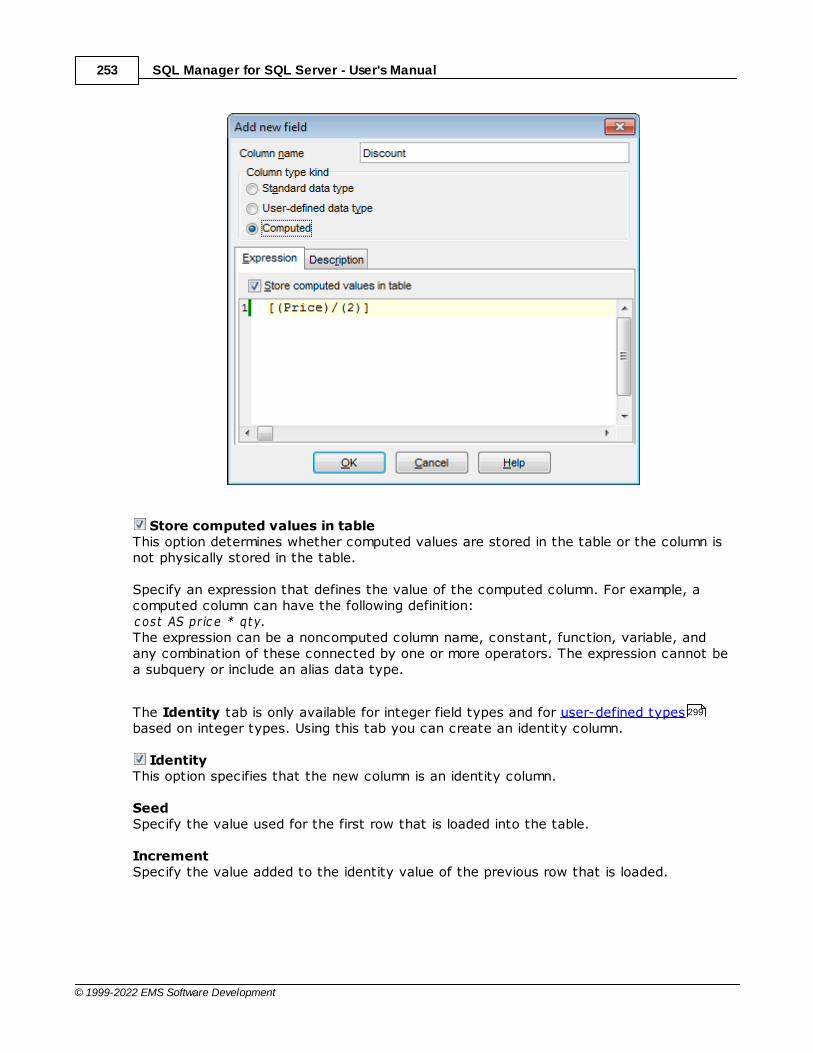
SQL Manager for SQL Server - User's Manual253
© 1999-2022 EMS Software Development
Store computed values in tableThis option determines whether computed values are stored in the table or the column isnot physically stored in the table.
Specify an expression that defines the value of the computed column. For example, acomputed column can have the following definition:c ost AS pr ic e * qty. The expression can be a noncomputed column name, constant, function, variable, andany combination of these connected by one or more operators. The expression cannot bea subquery or include an alias data type.
The Identity tab is only available for integer field types and for user-defined typesbased on integer types. Using this tab you can create an identity column.
IdentityThis option specifies that the new column is an identity column.
SeedSpecify the value used for the first row that is loaded into the table.
IncrementSpecify the value added to the identity value of the previous row that is loaded.
299
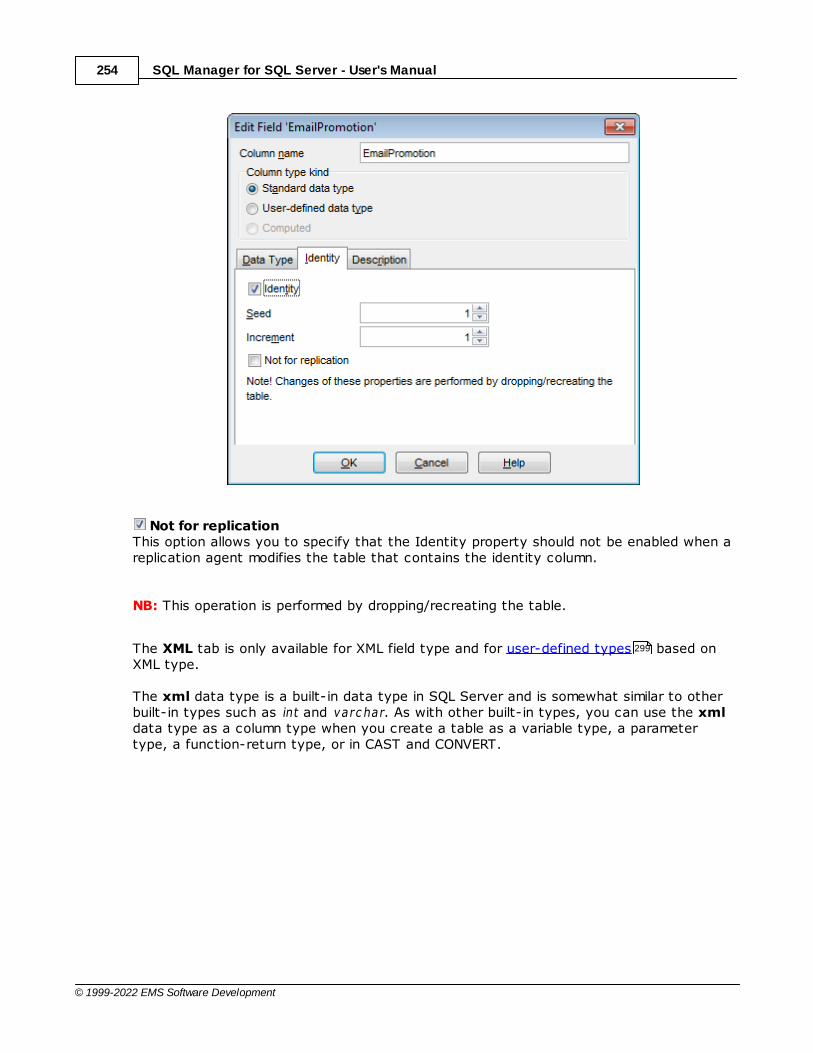
SQL Manager for SQL Server - User's Manual254
© 1999-2022 EMS Software Development
Not for replicationThis option allows you to specify that the Identity property should not be enabled when areplication agent modifies the table that contains the identity column.
NB: This operation is performed by dropping/recreating the table.
The XML tab is only available for XML field type and for user-defined types based onXML type.
The xml data type is a built-in data type in SQL Server and is somewhat similar to otherbuilt-in types such as int and varc har. As with other built-in types, you can use the xmldata type as a column type when you create a table as a variable type, a parametertype, a function-return type, or in CAST and CONVERT.
299
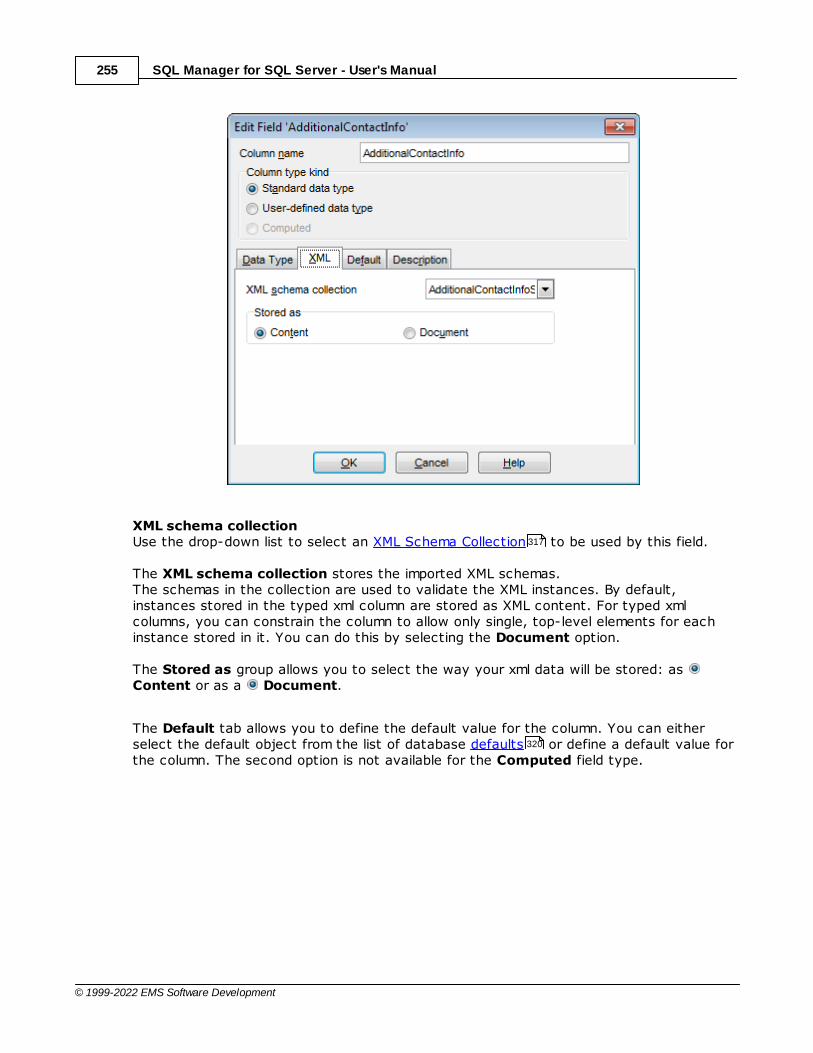
SQL Manager for SQL Server - User's Manual255
© 1999-2022 EMS Software Development
XML schema collectionUse the drop-down list to select an XML Schema Collection to be used by this field.
The XML schema collection stores the imported XML schemas.The schemas in the collection are used to validate the XML instances. By default,instances stored in the typed xml column are stored as XML content. For typed xmlcolumns, you can constrain the column to allow only single, top-level elements for eachinstance stored in it. You can do this by selecting the Document option.
The Stored as group allows you to select the way your xml data will be stored: as Content or as a Document.
The Default tab allows you to define the default value for the column. You can eitherselect the default object from the list of database defaults or define a default value forthe column. The second option is not available for the Computed field type.
317
320
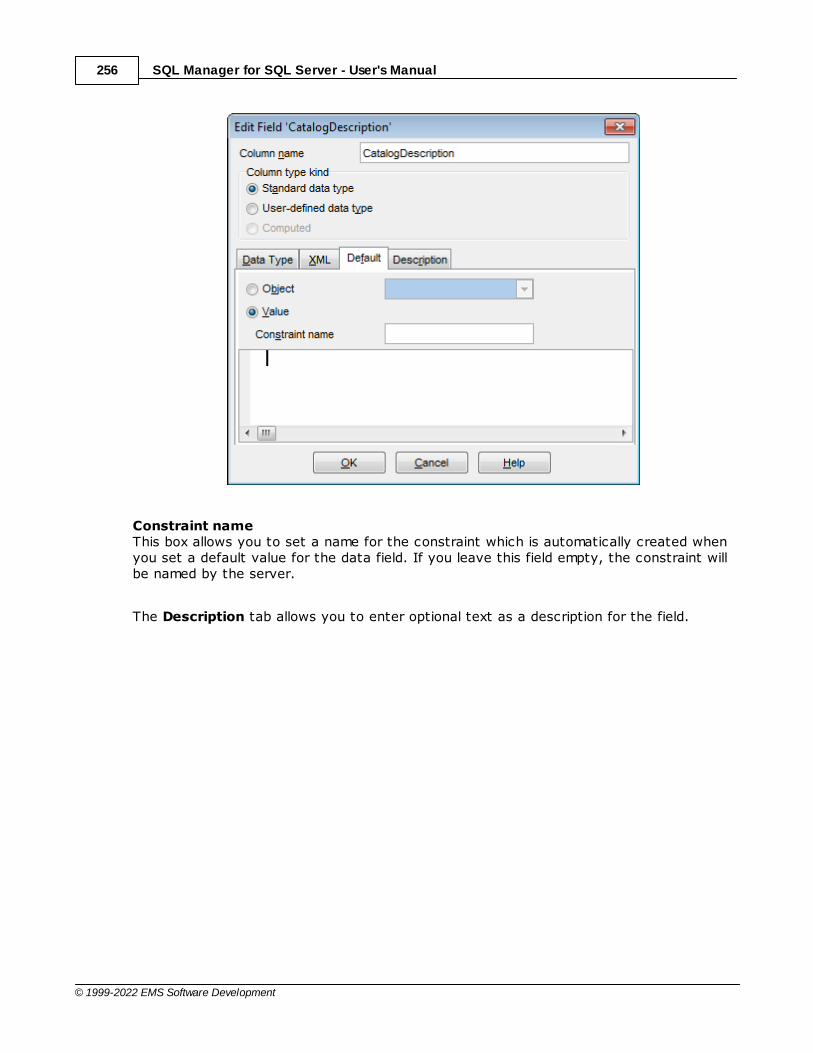
SQL Manager for SQL Server - User's Manual256
© 1999-2022 EMS Software Development
Constraint nameThis box allows you to set a name for the constraint which is automatically created whenyou set a default value for the data field. If you leave this field empty, the constraint willbe named by the server.
The Description tab allows you to enter optional text as a description for the field.
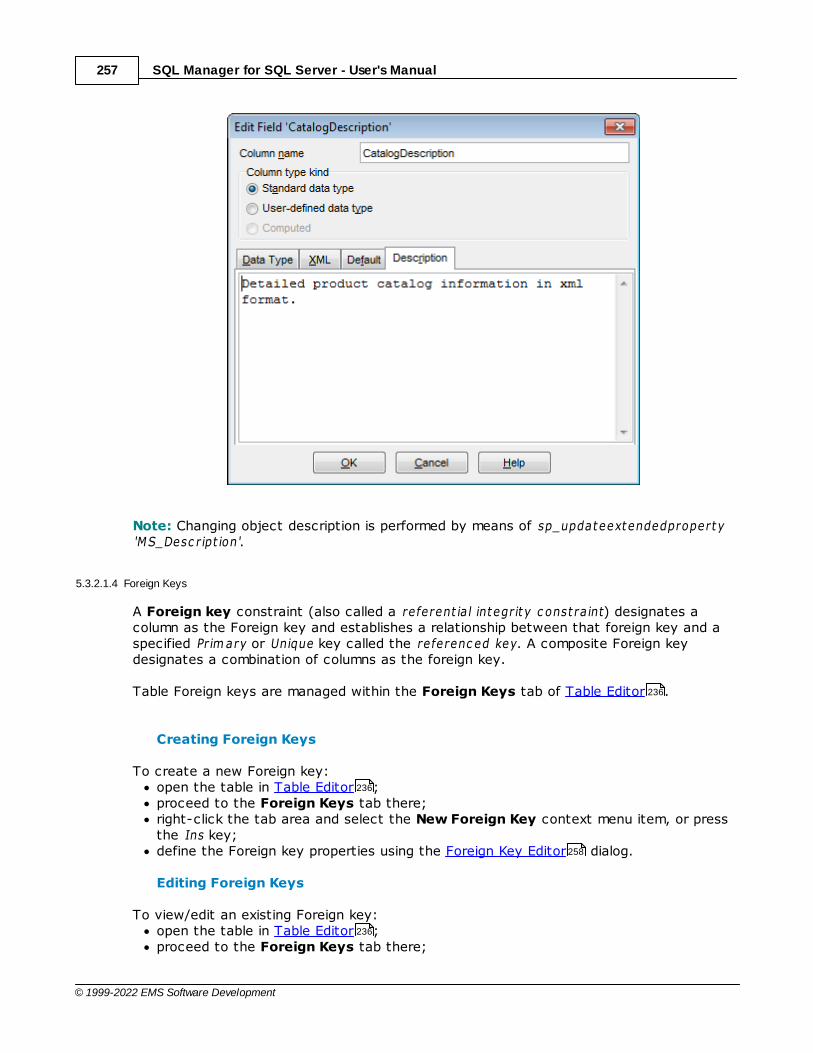
SQL Manager for SQL Server - User's Manual257
© 1999-2022 EMS Software Development
Note: Changing object description is performed by means of sp_updateextendedproperty'MS_Desc r ipt ion'.
5.3.2.1.4 Foreign Keys
A Foreign key constraint (also called a referent ia l integr it y c onst ra int) designates acolumn as the Foreign key and establishes a relationship between that foreign key and aspecified Pr im ary or Unique key called the referenc ed key. A composite Foreign keydesignates a combination of columns as the foreign key.
Table Foreign keys are managed within the Foreign Keys tab of Table Editor .
Creating Foreign Keys
To create a new Foreign key:open the table in Table Editor ;proceed to the Foreign Keys tab there;right-click the tab area and select the New Foreign Key context menu item, or pressthe Ins key;define the Foreign key properties using the Foreign Key Editor dialog.
Editing Foreign Keys
To view/edit an existing Foreign key:open the table in Table Editor ;proceed to the Foreign Keys tab there;
236
236
258
236
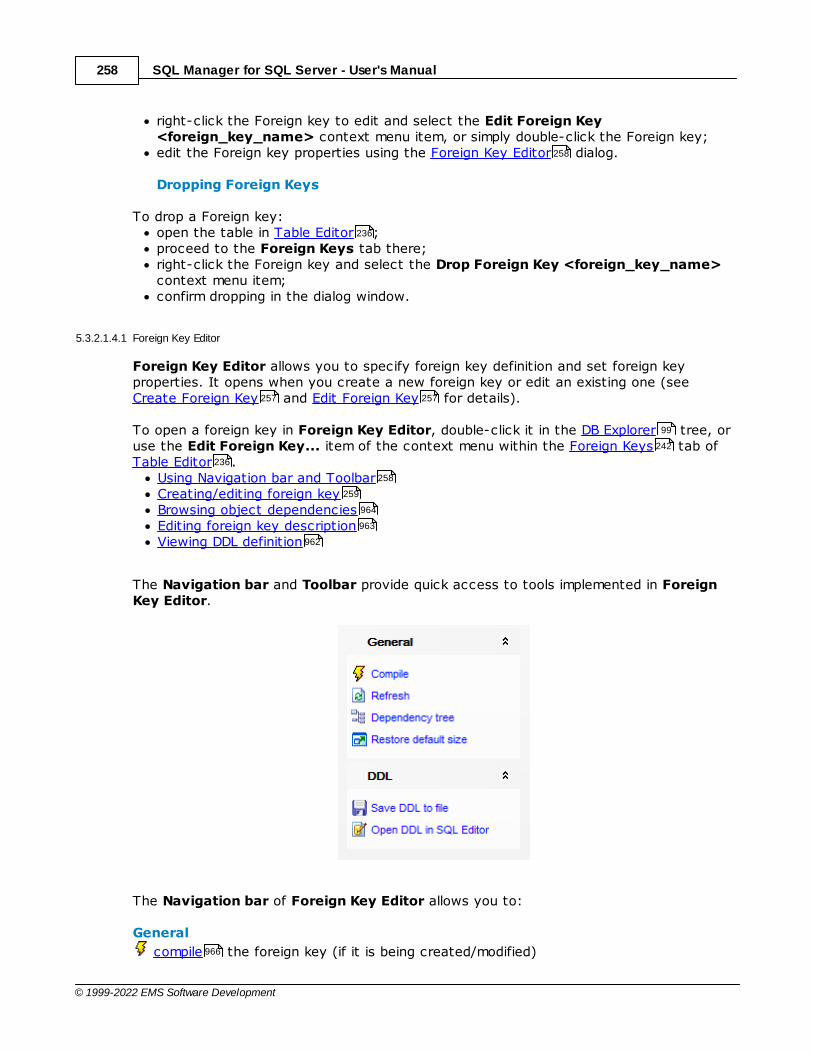
SQL Manager for SQL Server - User's Manual258
© 1999-2022 EMS Software Development
right-click the Foreign key to edit and select the Edit Foreign Key<foreign_key_name> context menu item, or simply double-click the Foreign key;edit the Foreign key properties using the Foreign Key Editor dialog.
Dropping Foreign Keys
To drop a Foreign key:open the table in Table Editor ;proceed to the Foreign Keys tab there;right-click the Foreign key and select the Drop Foreign Key <foreign_key_name>context menu item;confirm dropping in the dialog window.
5.3.2.1.4.1 Foreign Key Editor
Foreign Key Editor allows you to specify foreign key definition and set foreign keyproperties. It opens when you create a new foreign key or edit an existing one (see Create Foreign Key and Edit Foreign Key for details).
To open a foreign key in Foreign Key Editor, double-click it in the DB Explorer tree, oruse the Edit Foreign Key... item of the context menu within the Foreign Keys tab ofTable Editor .
Using Navigation bar and ToolbarCreating/editing foreign keyBrowsing object dependenciesEditing foreign key descriptionViewing DDL definition
The Navigation bar and Toolbar provide quick access to tools implemented in ForeignKey Editor.
The Navigation bar of Foreign Key Editor allows you to:
General
compile the foreign key (if it is being created/modified)
258
236
257 257
99
242
236
258
259
964
963
962
966
SQL Manager for SQL Server - User's Manual259
© 1999-2022 EMS Software Development
save the foreign key description (if it has been modified)
refresh the content of the active tab
view the dependency tree for the foreign key
restore the default size and position of the editor window
Depending on the current tab selection, the Navigation bar expands to one or moreadditional panes with tab-specific actions that can be useful for working with the foreignkey:
Description
save object description to file
copy description to clipboard
DDL
save DDL to file
open DDL in SQL Editor
Items of the Navigation bar are also available on the ToolBar of Foreign Key Editor. Toenable the toolbar , open the Environment Options dialog, proceed to the Windows
section there and select T oolbar (if you need the toolbar only) or Both (if youneed both the toolbar and the Navigation bar ) in the Bar style for child forms group.
Use the Foreign Key tab of Foreign Key Editor to create/edit a foreign key constraintand specify its properties.
NameEnter a name for the new foreign key, or modify the name of the foreign key being edited.
TableThe drop-down list of tables allows you to select the table for which the foreign key iscreated.
963
652
963
963
962
962 462
960 867
871
958
228
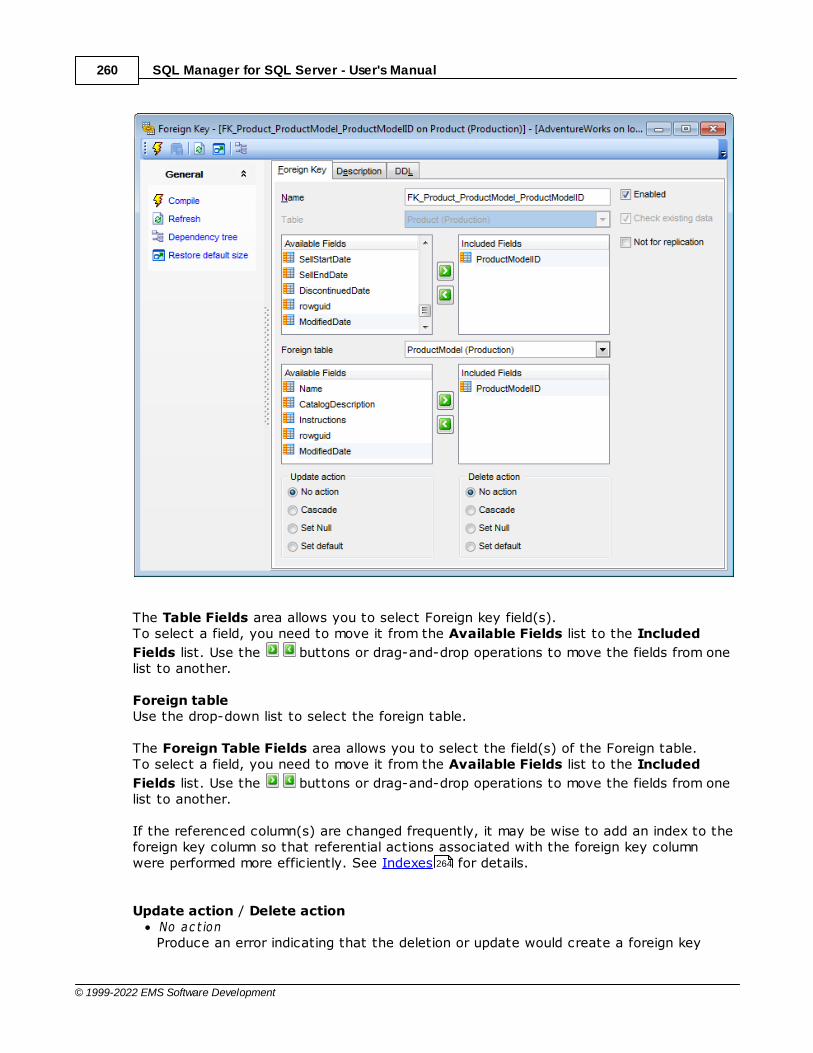
SQL Manager for SQL Server - User's Manual260
© 1999-2022 EMS Software Development
The Table Fields area allows you to select Foreign key field(s).To select a field, you need to move it from the Available Fields list to the Included
Fields list. Use the buttons or drag-and-drop operations to move the fields from onelist to another.
Foreign tableUse the drop-down list to select the foreign table.
The Foreign Table Fields area allows you to select the field(s) of the Foreign table.To select a field, you need to move it from the Available Fields list to the Included
Fields list. Use the buttons or drag-and-drop operations to move the fields from onelist to another.
If the referenced column(s) are changed frequently, it may be wise to add an index to theforeign key column so that referential actions associated with the foreign key columnwere performed more efficiently. See Indexes for details.
Update action / Delete actionNo ac t ion Produce an error indicating that the deletion or update would create a foreign key
264
SQL Manager for SQL Server - User's Manual261
© 1999-2022 EMS Software Development
constraint violation. If the constraint is deferred, this error will be produced atconstraint check time if there still exist any referencing rows. This is the defaultaction.Casc adeDelete any rows referencing the deleted row, or update the value of the referencingcolumn to the new value of the referenced column, respectively.Set NULLSet the referencing column(s) to null.Set defaultSet the referencing column(s) to their default values.
EnabledEnables/disables the foreign key immediately after it is created.
Check existing dataThis option specifies whether the data in the table is or is not validated against a newlyadded or re-enabled foreign key.
Not for replicationThis option allows you to specify that the foreign key should not be enabled when areplication agent modifies the table that is involved in the foreign key.
5.3.2.1.5 Checks
A Check specifies an expression producing a Boolean result which new or updated rowsmust satisfy for an insert or update operation to succeed. Expressions evaluating to TRUEor UNKNOWN succeed. Should any row of an insert or update operation produce a FALSEresult an error exception is raised and the insert or update does not alter the database. Acheck constraint specified as a column constraint should reference that column's valueonly, while an expression appearing in a table constraint may reference multiple columns.
Table checks are managed within the Checks tab of Table Editor .
Creating Checks
To create a new check:open the table in Table Editor ;proceed to the Checks tab there;right-click the tab area and select the New Check Constraint context menu item, orpress the Ins key;define the check properties using the Check Editor dialog.
Editing Checks
To view an existing check:open the table in Table Editor ;proceed to the Checks tab there;right-click the check and select the Edit Check <check_name> context menu item,or simply double-click the check;edit the check properties using the Check Editor dialog.
236
236
262
236
262
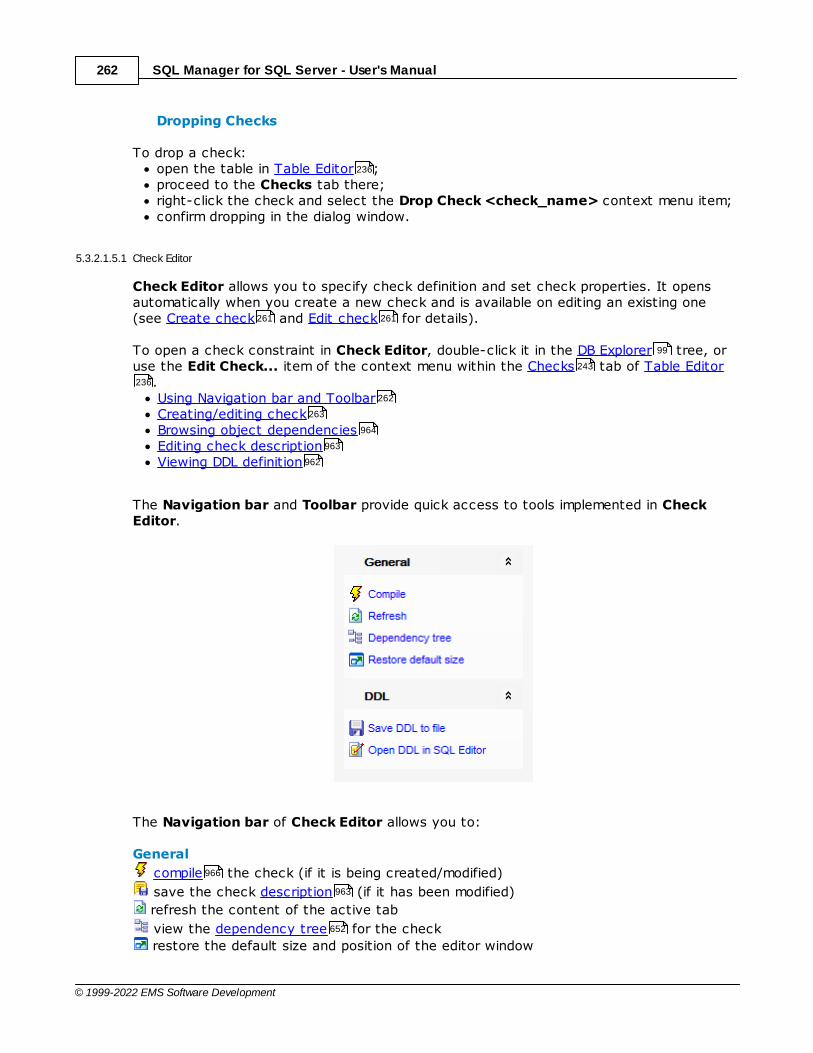
SQL Manager for SQL Server - User's Manual262
© 1999-2022 EMS Software Development
Dropping Checks
To drop a check:open the table in Table Editor ;proceed to the Checks tab there;right-click the check and select the Drop Check <check_name> context menu item;confirm dropping in the dialog window.
5.3.2.1.5.1 Check Editor
Check Editor allows you to specify check definition and set check properties. It opensautomatically when you create a new check and is available on editing an existing one(see Create check and Edit check for details).
To open a check constraint in Check Editor, double-click it in the DB Explorer tree, oruse the Edit Check... item of the context menu within the Checks tab of Table Editor
.Using Navigation bar and ToolbarCreating/editing checkBrowsing object dependenciesEditing check descriptionViewing DDL definition
The Navigation bar and Toolbar provide quick access to tools implemented in CheckEditor.
The Navigation bar of Check Editor allows you to:
General
compile the check (if it is being created/modified)
save the check description (if it has been modified)
refresh the content of the active tab
view the dependency tree for the check
restore the default size and position of the editor window
236
261 261
99
243
236
262
263
964
963
962
966
963
652

SQL Manager for SQL Server - User's Manual263
© 1999-2022 EMS Software Development
Depending on the current tab selection, the Navigation bar expands to one or moreadditional panes with tab-specific actions that can be useful for working with the check:
Description
save object description to file
copy description to clipboard
DDL
save DDL to file
open DDL in SQL Editor
Items of the Navigation bar are also available on the ToolBar of Check Editor. Toenable the toolbar , open the Environment Options dialog, proceed to the Windows
section there and select T oolbar (if you need the toolbar only) or Both (if youneed both the toolbar and the Navigation bar ) in the Bar style for child forms group.
Use the Check tab of Check Editor to create/edit a check constraint and specify itsproperties.
NameEnter a name for the new check, or modify the name of the check being edited.
TableThe drop-down list of tables allows you to select the table for which the check iscreated.
EnabledEnables/disables the check immediately after it is created.
963
963
962
962 462
960 867
871
958
228
SQL Manager for SQL Server - User's Manual264
© 1999-2022 EMS Software Development
Check existing dataThis option specifies whether the data in the table is or is not validated against a newlyadded or re-enabled check.
Not for replicationThis option allows you to specify that the check should not be enabled when a replicationagent modifies the table that is involved in the check.
Definition This area represents the condition implied by the check constraint.You can specify any logical (Boolean) expression that returns T RUE or FALSE based on thelogical operators. For example, salary >= 15000 AND salary <= 100000.
For your convenience the syntax highlight, code completion and a number of otherfeatures for efficient SQL editing are implemented. For details see Working with SQL Editorarea and Using the context menu .
5.3.2.1.6 Indices
Table indexes are managed within the Indices tab of Table Editor .
Creating Indices
To create a new table index:open the table in Table Editor ;proceed to the Indices tab there;right-click the tab area and select the New Index context menu item, or press theIns key;define the index properties using the Index Editor dialog.
Editing Indices
To edit an existing table index:open the table in Table Editor ;proceed to the Indices tab there;right-click the index and select the Edit Index context menu item, or simply double-click the index;edit the index properties using the Index Editor dialog.
Dropping Indices
To drop a table index:open the table in Table Editor ;proceed to the Indices tab there;right-click the index and select the Drop Index context menu item;confirm dropping in the dialog window.
476 465
236
236
265
236
265
236
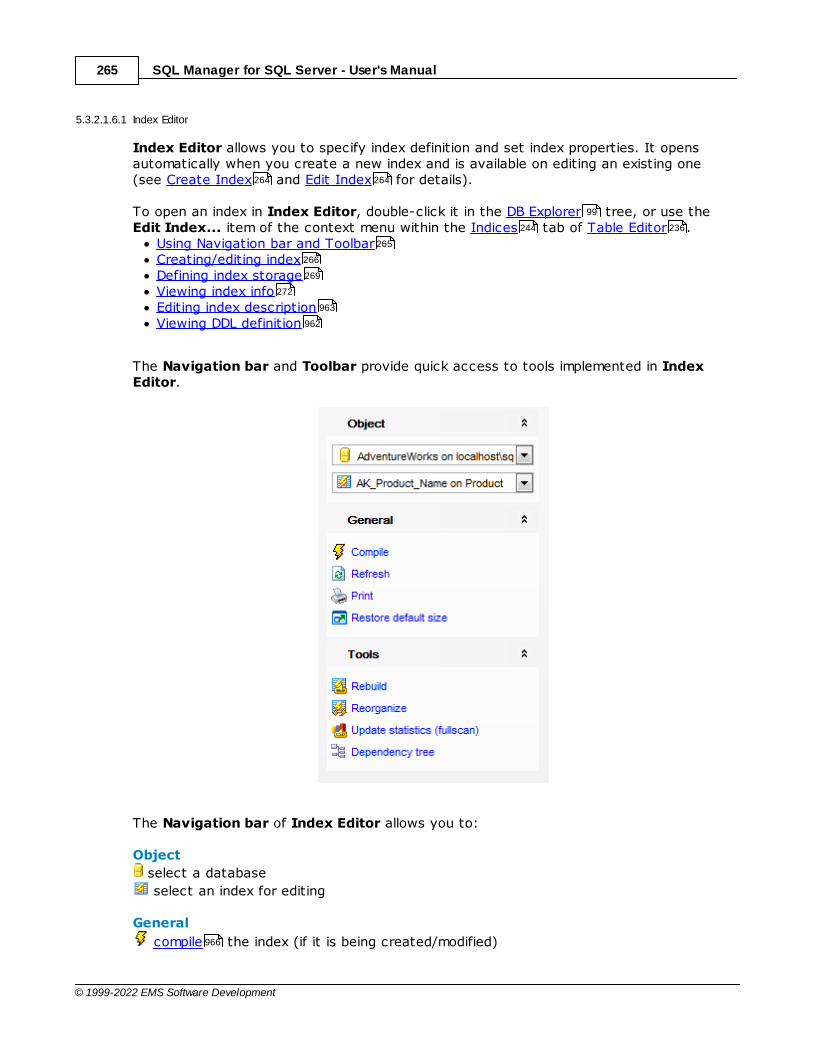
SQL Manager for SQL Server - User's Manual265
© 1999-2022 EMS Software Development
5.3.2.1.6.1 Index Editor
Index Editor allows you to specify index definition and set index properties. It opensautomatically when you create a new index and is available on editing an existing one(see Create Index and Edit Index for details).
To open an index in Index Editor, double-click it in the DB Explorer tree, or use theEdit Index... item of the context menu within the Indices tab of Table Editor .
Using Navigation bar and ToolbarCreating/editing indexDefining index storageViewing index infoEditing index descriptionViewing DDL definition
The Navigation bar and Toolbar provide quick access to tools implemented in IndexEditor.
The Navigation bar of Index Editor allows you to:
Object
select a database
select an index for editing
General
compile the index (if it is being created/modified)
264 264
99
244 236
265
266
269
272
963
962
966

SQL Manager for SQL Server - User's Manual266
© 1999-2022 EMS Software Development
save the index description (if it has been modified)
refresh the content of the active tab
print metadata of the index
restore the default size and position of the editor window
Tools
rebuild the index using the ALT ER INDEX ... REBUILD statement
reorganize the index using the ALT ER INDEX ... REORGANIZE statement
update statistics using the UPDAT E ST AT IST ICS statement
view the dependency tree for the index
Depending on the current tab selection, the Navigation bar expands to one or moreadditional panes with tab-specific actions that can be useful for working with the index:
Description
save object description to file
copy description to clipboard
DDL
save DDL to file
open DDL in SQL Editor
Items of the Navigation bar are also available on the ToolBar of Index Editor. Toenable the toolbar , open the Environment Options dialog, proceed to the Windows
section there and select T oolbar (if you need the toolbar only) or Both (if youneed both the toolbar and the Navigation bar ) in the Bar style for child forms group.
Use the Index tab of Index Editor to create/edit an index on a specified table or view, or an XML index on a specified table , and specify index properties.
NameEnter a name for the new index, or modify the name of the index being edited.
Table or viewThe drop-down list of tables and views allows you to select the table or view to beindexed.
Fill factorSpecify a percentage that indicates how full the Database Engine should make the leaflevel of each index page during index creation or rebuild.
963
683
652
963
963
962
962 462
960 867
871
958
228
282 228
228 282
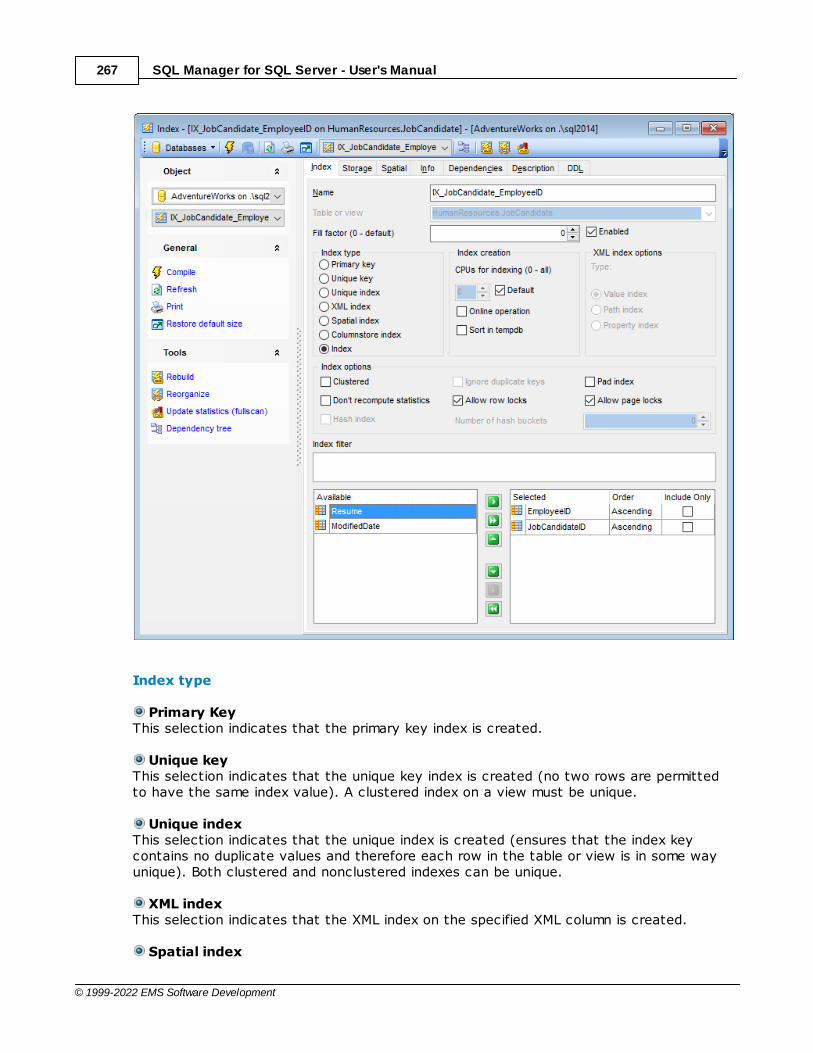
SQL Manager for SQL Server - User's Manual267
© 1999-2022 EMS Software Development
Index type
Primary KeyThis selection indicates that the primary key index is created.
Unique keyThis selection indicates that the unique key index is created (no two rows are permittedto have the same index value). A clustered index on a view must be unique.
Unique indexThis selection indicates that the unique index is created (ensures that the index keycontains no duplicate values and therefore each row in the table or view is in some wayunique). Both clustered and nonclustered indexes can be unique.
XML indexThis selection indicates that the XML index on the specified XML column is created.
Spatial index
SQL Manager for SQL Server - User's Manual268
© 1999-2022 EMS Software Development
This selection indicates that the spatial index is created. These indexes are used byspatial databases (databases which store information related to objects in space).
Columnstore indexThis selection indicates that the columnstore index is created. These indices group andstore data for each column and then join all the columns to complete the whole index.
IndexThis selection specifies a regular, non-unique index.
Index creation
CPUs for indexingThis option allows you to limit the number of processors used in a parallel plan execution.Set a value to restrict the maximum number of processors used in a parallel indexoperation to the specified number or fewer based on the current system workload. If 0 isspecified, the actual number of processors is used.
DefaultIf this option is checked, the default setting for the number of processors is applied.
Online operationThis option specifies whether underlying tables and associated indexes are available forqueries and data modification during the index operation.
Sort in tempdbThis option specifies whether temporary sort results should be stored in tempdb.
XML Index optionsSelect the XML index type:
Value indexThis selection indicates creation of a secondary XML index on columns where key columnsare (node value and path) of the primary XML index. If your workload involves querying forvalues from XML instances without knowing the element or attribute names that containthe values, VALUE index may be useful.
Path indexThis selection indicates creation of a secondary XML index on columns built on pathvalues and node values in the primary XML index. If your queries generally specify pathexpressions on xml type columns, a PATH secondary index may be able to speed up thesearch.
Property indexThis selection indicates creation of a secondary XML index on columns (PK, path and nodevalue) of the primary XML index where PK is the primary key of the base table. Queriesthat retrieve one or more values from individual XML instances may benefit from aPROPERTY index.
Index options
ClusteredUse this option to create an index in which the logical order of the key values determinesthe physical order of the corresponding rows in a table. The bottom, or leaf, level of theclustered index contains the actual data rows of the table. A table or view is228 282
SQL Manager for SQL Server - User's Manual269
© 1999-2022 EMS Software Development
allowed one clustered index at a time.
Ignore duplicate keysThis option is available if the Unique option is checked. This option specifies the errorresponse to duplicate key values in a multiple-row insert operation on a unique clusteredor unique nonclustered index.
Pad indexThis option determines whether the percentage of free space that is specified by fillfactoris applied to the intermediate-level pages of the index.
Do not recompute statisticsThis option specifies that out-of-date index statistics are not automatically recomputed.
In cases when access patterns are well understood and consistent, limiting the lockinglevels available for an index can be beneficial. Disallowing a locking level can affect theconcurrency for a table or index.
Allow row locksThis option specifies whether row locks are allowed when accessing the index.
Allow page locksThis option specifies whether page locks are allowed when accessing the index.
Hash index (for memory-optimized tables)Checking this option indicates that a HASH index is created. A hash index consists of acollection of buckets organized in an array.
Number of hash buckets (for memory-optimized tables)Define the number of buckets that should be created in the hash index.
Index filterUse this field to set the filter for the data from the field(s) included in this index. Availablefor SQL Server 2008 and higher.
Fields for indexTo include field(s) in the index, you need to move it from the Available list to the
Selected list. Use the buttons or drag-and-drop operations to move the fieldsfrom one list to another.
To change the sorting order for a field, select the field in the Selected list and changethe Order value (asc ending/desc ending).Set the Include Only flag to specify that the non-key column is added to the leaf levelof the nonclustered index.
At the Storage tab of the Index Editor you need to define the storage for the index.
228
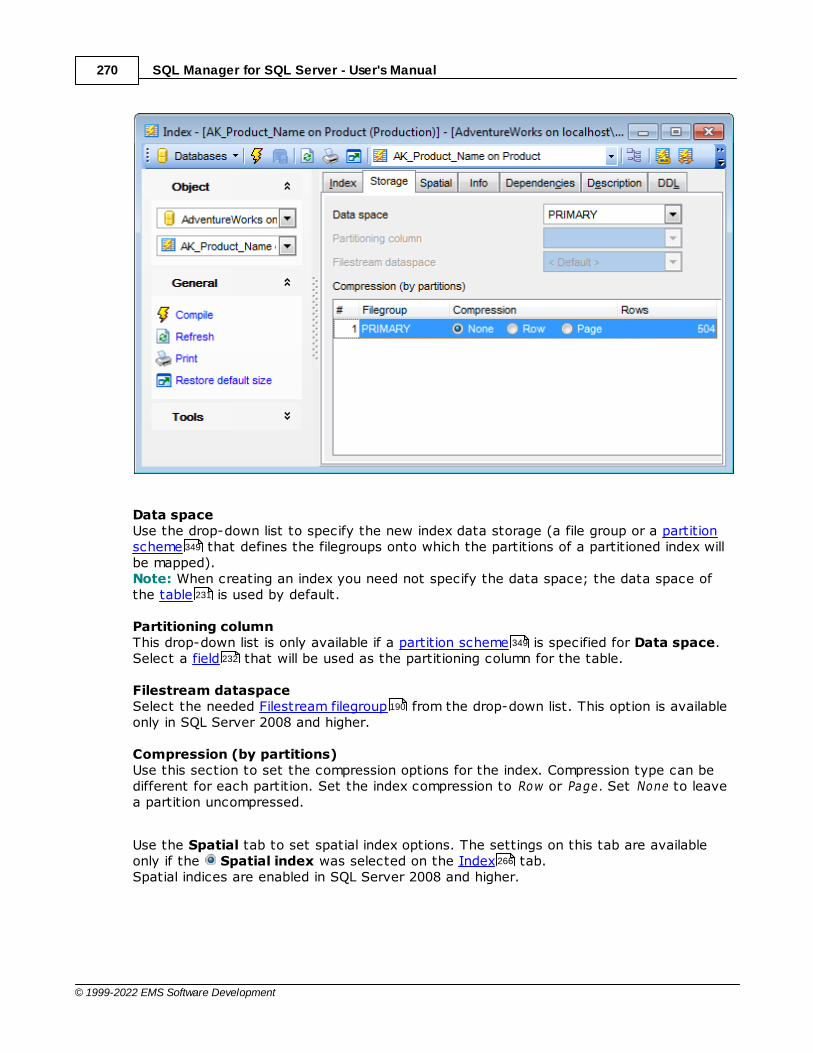
SQL Manager for SQL Server - User's Manual270
© 1999-2022 EMS Software Development
Data spaceUse the drop-down list to specify the new index data storage (a file group or a partitionscheme that defines the filegroups onto which the partitions of a partitioned index willbe mapped).Note: When creating an index you need not specify the data space; the data space ofthe table is used by default.
Partitioning columnThis drop-down list is only available if a partition scheme is specified for Data space.Select a field that will be used as the partitioning column for the table.
Filestream dataspaceSelect the needed Filestream filegroup from the drop-down list. This option is availableonly in SQL Server 2008 and higher.
Compression (by partitions)Use this section to set the compression options for the index. Compression type can bedifferent for each partition. Set the index compression to Row or Page. Set None to leavea partition uncompressed.
Use the Spatial tab to set spatial index options. The settings on this tab are availableonly if the Spatial index was selected on the Index tab.Spatial indices are enabled in SQL Server 2008 and higher.
349
231
349
232
190
266
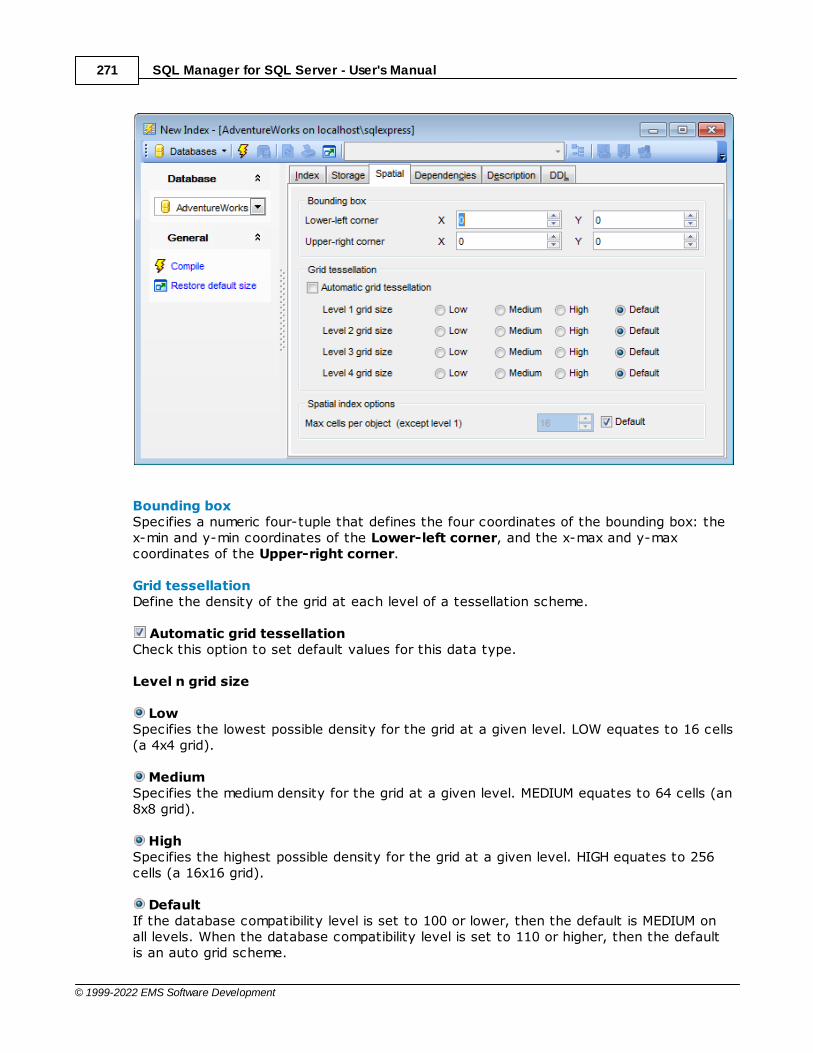
SQL Manager for SQL Server - User's Manual271
© 1999-2022 EMS Software Development
Bounding boxSpecifies a numeric four-tuple that defines the four coordinates of the bounding box: thex-min and y-min coordinates of the Lower-left corner, and the x-max and y-maxcoordinates of the Upper-right corner.
Grid tessellationDefine the density of the grid at each level of a tessellation scheme.
Automatic grid tessellationCheck this option to set default values for this data type.
Level n grid size
LowSpecifies the lowest possible density for the grid at a given level. LOW equates to 16 cells(a 4x4 grid).
MediumSpecifies the medium density for the grid at a given level. MEDIUM equates to 64 cells (an8x8 grid).
HighSpecifies the highest possible density for the grid at a given level. HIGH equates to 256cells (a 16x16 grid).
DefaultIf the database compatibility level is set to 100 or lower, then the default is MEDIUM onall levels. When the database compatibility level is set to 110 or higher, then the defaultis an auto grid scheme.
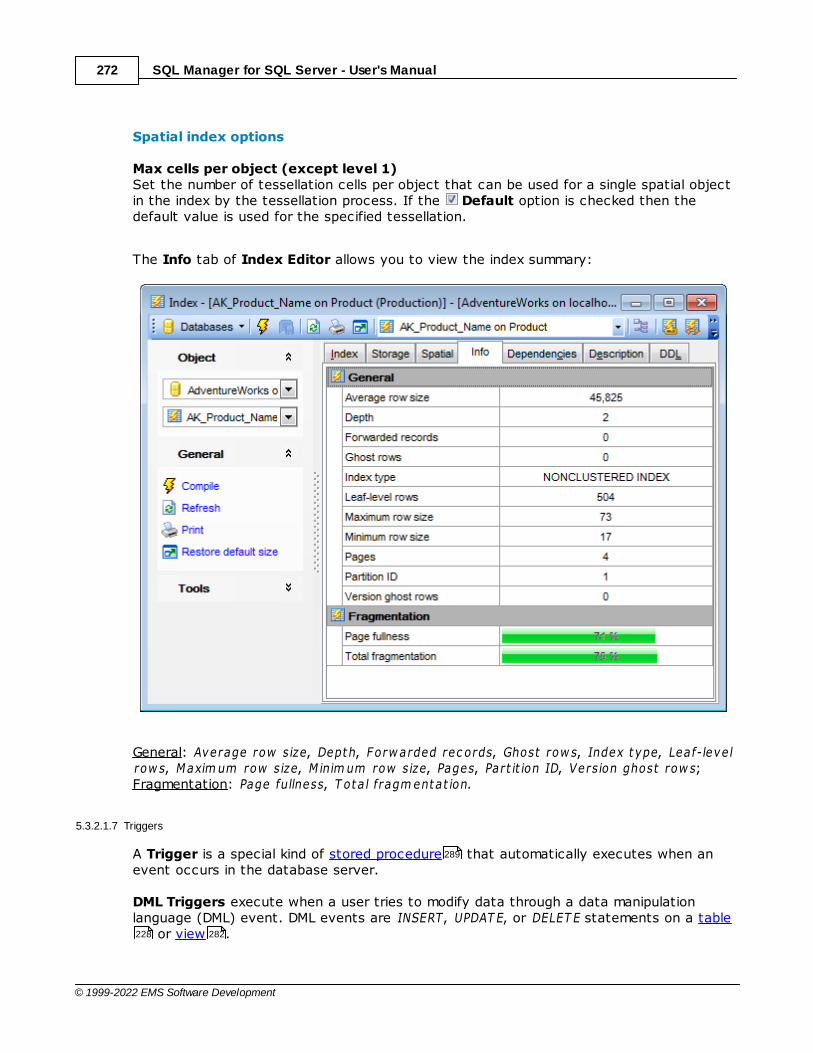
SQL Manager for SQL Server - User's Manual272
© 1999-2022 EMS Software Development
Spatial index options
Max cells per object (except level 1)Set the number of tessellation cells per object that can be used for a single spatial objectin the index by the tessellation process. If the Default option is checked then thedefault value is used for the specified tessellation.
The Info tab of Index Editor allows you to view the index summary:
General: Average row size, Depth, Forw arded rec ords, Ghost row s, Index type, Leaf-leve lrow s, Maxim um row size, M inim um row size, Pages, Part it ion ID, Version ghost row s;Fragmentation: Page fullness, T ota l fragm entat ion.
5.3.2.1.7 Triggers
A Trigger is a special kind of stored procedure that automatically executes when anevent occurs in the database server.
DML Triggers execute when a user tries to modify data through a data manipulationlanguage (DML) event. DML events are INSERT, UPDAT E, or DELET E statements on a table
or view .
289
228 282

SQL Manager for SQL Server - User's Manual273
© 1999-2022 EMS Software Development
Table triggers are managed within the Triggers tab of Table Editor .
Creating Triggers
To create a new trigger:open the table in Table Editor ;proceed to the Triggers tab there;right-click the tab area and select the New Trigger context menu item, or press theIns key;define the trigger properties using the Trigger Editor dialog.
Editing Triggers
To edit an existing trigger:open the table in Table Editor ;proceed to the Triggers tab there;right-click the trigger and select the Edit Trigger <trigger_name> context menuitem, or simply double-click the trigger;edit the trigger properties using the Trigger Editor dialog.
Dropping Triggers
To drop a trigger:open the table in Table Editor ;proceed to the Triggers tab there;right-click the trigger and select the Drop Trigger <trigger_name> context menuitem;confirm dropping in the dialog window.
5.3.2.1.7.1 Trigger Editor
Trigger Editor allows you to specify trigger definition and set trigger properties. It opensautomatically when you create a new trigger and is available on editing an existing one(see Create Trigger and Edit Trigger for details).
To open a trigger in Trigger Editor, double-click it in the DB Explorer tree, or use theEdit Trigger... item of the context menu within the Triggers tab of Table Editor .
Using Navigation bar and ToolbarCreating/editing triggerBrowsing object dependenciesEditing trigger descriptionViewing DDL definition
The Navigation bar and Toolbar provide quick access to tools implemented in TriggerEditor.
236
236
273
236
273
236
273 273
99
245 236
273
275
964
963
962

SQL Manager for SQL Server - User's Manual274
© 1999-2022 EMS Software Development
The Navigation bar of Trigger Editor allows you to:
Object
select a database
select a trigger for editing
General
compile the trigger (if it is being created/modified)
save the trigger description (if it has been modified)
refresh the content of the active tab
print metadata of the trigger
view the dependency tree for the trigger
restore the default size and position of the editor window
Depending on the current tab selection, the Navigation bar expands to one or moreadditional panes with tab-specific actions that can be useful for working with the trigger:
Description
save object description to file
copy description to clipboard
DDL
save DDL to file
open DDL in SQL Editor
Items of the Navigation bar are also available on the ToolBar of Trigger Editor. To
966
963
683
652
963
963
962
962 462
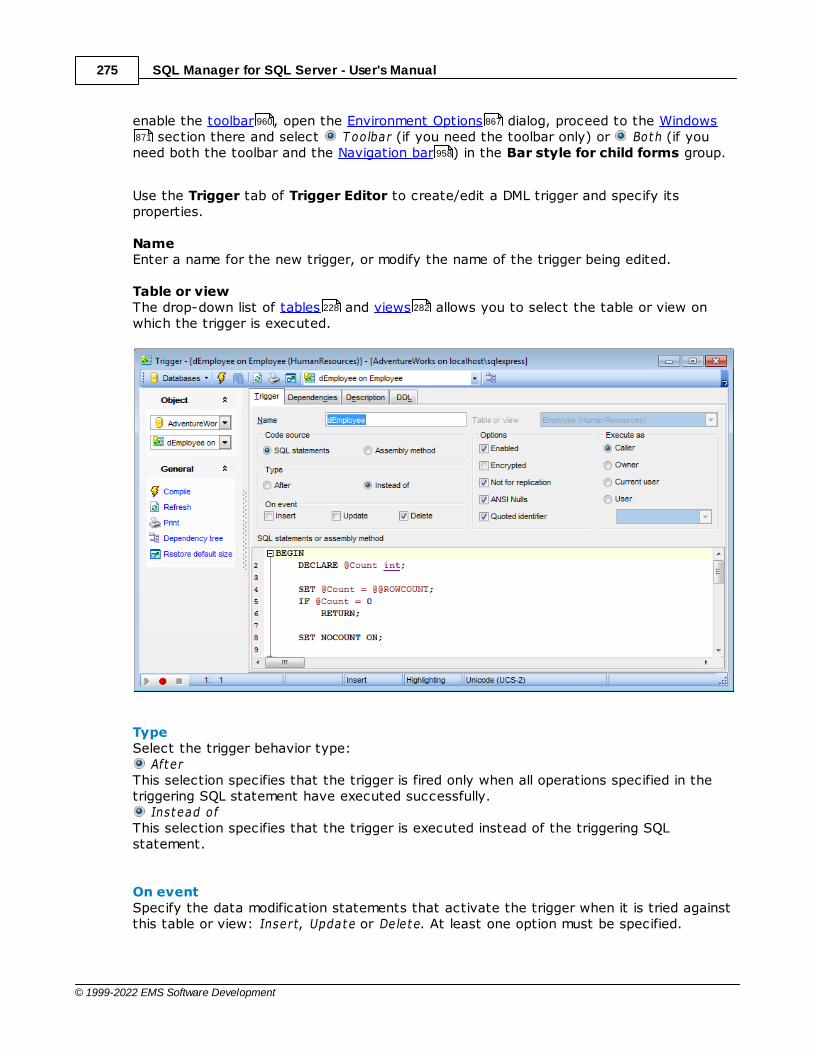
SQL Manager for SQL Server - User's Manual275
© 1999-2022 EMS Software Development
enable the toolbar , open the Environment Options dialog, proceed to the Windows section there and select T oolbar (if you need the toolbar only) or Both (if you
need both the toolbar and the Navigation bar ) in the Bar style for child forms group.
Use the Trigger tab of Trigger Editor to create/edit a DML trigger and specify itsproperties.
NameEnter a name for the new trigger, or modify the name of the trigger being edited.
Table or viewThe drop-down list of tables and views allows you to select the table or view onwhich the trigger is executed.
TypeSelect the trigger behavior type:
AfterThis selection specifies that the trigger is fired only when all operations specified in thetriggering SQL statement have executed successfully.
Instead ofThis selection specifies that the trigger is executed instead of the triggering SQLstatement.
On eventSpecify the data modification statements that activate the trigger when it is tried againstthis table or view: Insert, Update or Delete. At least one option must be specified.
960 867
871
958
228 282
SQL Manager for SQL Server - User's Manual276
© 1999-2022 EMS Software Development
Options
EnabledEnables/disables the trigger immediately after it is created. Enabling a trigger causes it tofire when any Transact-SQL statements on which it was originally programmed areexecuted. A disabled trigger still exists as an object in the current database, but does notfire.
Not for replicationThis option allows you to specify that the trigger should not be executed when areplication agent modifies the table that is involved in the trigger.
EncryptedYou can check this option to encrypt the text of the CREAT E T RIGGER statement if youwant to ensure that other users cannot view the trigger definition.
ANSI NullsThis option specifies ISO compliant behavior of the Equals (=) and Not Equal To (<>)comparison operators when they are used with null values. When this option is switchedon, a SELECT statement that uses WHERE c olum n_nam e = NULL returns zero rows even ifthere are null values in c olum n_nam e. A SELECT statement that uses WHEREc olum n_nam e <> NULL returns zero rows even if there are nonnull values in c olum n_nam e.
Quoted identifierThis option causes SQL Server to follow the ISO rules regarding quotation mark delimitingidentifiers and literal strings. When this option is switched on, identifiers can be delimitedby double quotation marks, and literals must be delimited by single quotation marks. Whenit is switched off, identifiers cannot be quoted and must follow all Transact-SQL rules foridentifiers.
Execute asSpecify the security context under which the trigger is to be executed: Caller, Ow ner, Current user or User (select which user account should be used tovalidate permissions on the objects that are referenced by the trigger).
Code SourceSelect the trigger code source: it can be a direct set of SQL statements or an externalprocedure call from a .NET assembly or DLL.
SQL statements or assembly methodThis area allows you to set the trigger conditions and actions. Trigger conditions specifyadditional criteria that determine whether the tried DML statements cause the triggeractions to be performed.The trigger actions take effect when the DML operation is performed.
5.3.2.1.8 Creating procedures from table
SQL Manager for SQL Server provides you with an ability to create SELECT/INSERT/UPDATE/DELETE procedures from a table and set their properties using the CreateProcedures dialog.
331
331
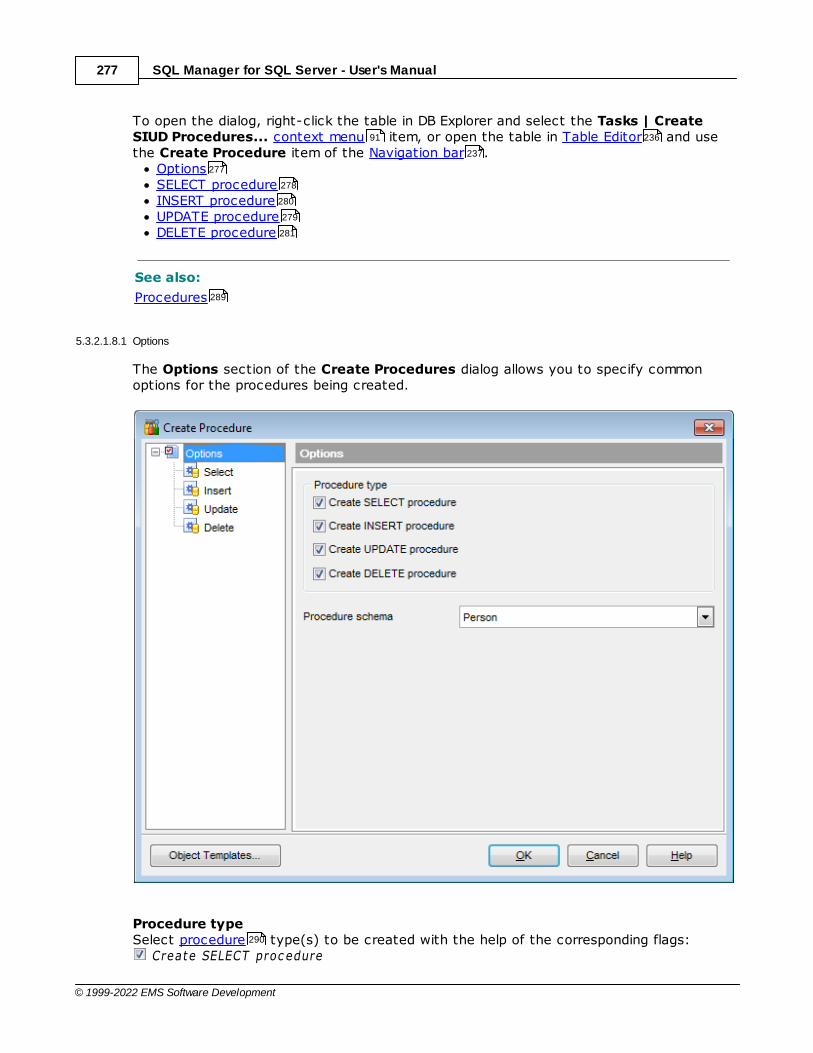
SQL Manager for SQL Server - User's Manual277
© 1999-2022 EMS Software Development
To open the dialog, right-click the table in DB Explorer and select the Tasks | CreateSIUD Procedures... context menu item, or open the table in Table Editor and usethe Create Procedure item of the Navigation bar .
OptionsSELECT procedureINSERT procedureUPDATE procedureDELETE procedure
See also:
Procedures
5.3.2.1.8.1 Options
The Options section of the Create Procedures dialog allows you to specify commonoptions for the procedures being created.
Procedure typeSelect procedure type(s) to be created with the help of the corresponding flags:
Create SELECT proc edure
91 236
237
277
278
280
279
281
289
290
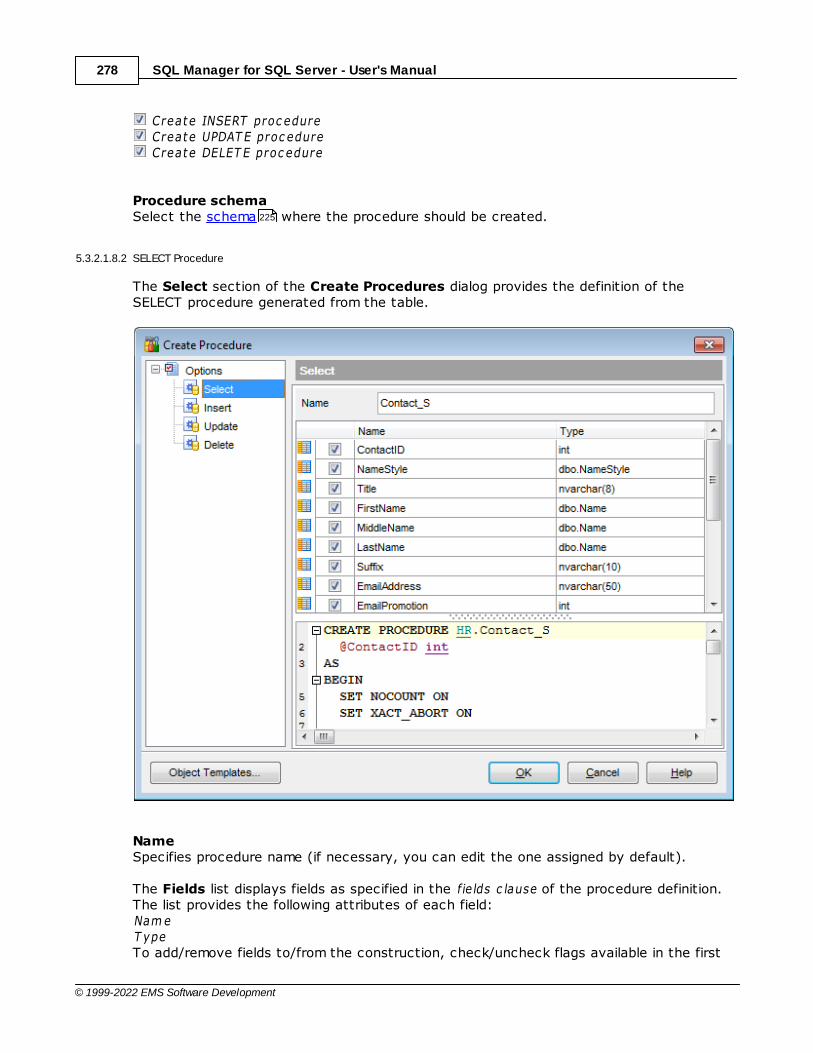
SQL Manager for SQL Server - User's Manual278
© 1999-2022 EMS Software Development
Create INSERT proc edure Create UPDAT E proc edure Create DELET E proc edure
Procedure schemaSelect the schema where the procedure should be created.
5.3.2.1.8.2 SELECT Procedure
The Select section of the Create Procedures dialog provides the definition of theSELECT procedure generated from the table.
NameSpecifies procedure name (if necessary, you can edit the one assigned by default).
The Fields list displays fields as specified in the fie lds c lause of the procedure definition.The list provides the following attributes of each field:Nam eT ypeTo add/remove fields to/from the construction, check/uncheck flags available in the first
225
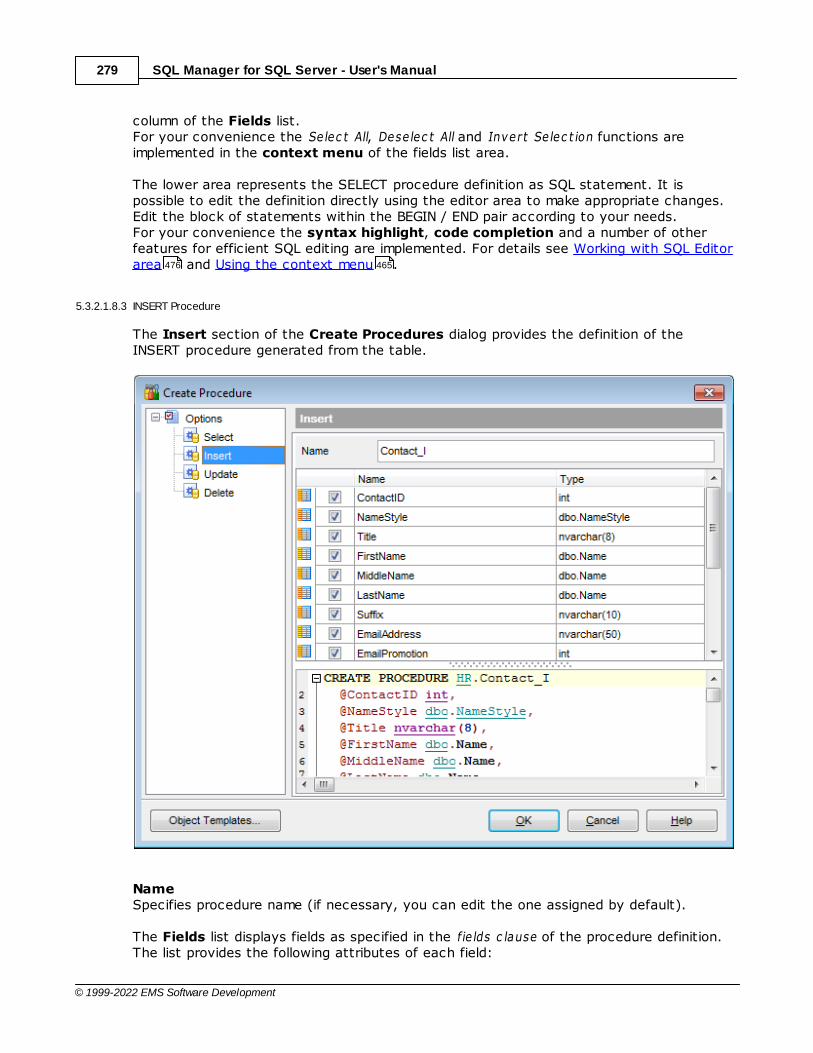
SQL Manager for SQL Server - User's Manual279
© 1999-2022 EMS Software Development
column of the Fields list.For your convenience the Selec t All, Dese lec t All and Invert Se lec t ion functions areimplemented in the context menu of the fields list area.
The lower area represents the SELECT procedure definition as SQL statement. It ispossible to edit the definition directly using the editor area to make appropriate changes.Edit the block of statements within the BEGIN / END pair according to your needs.For your convenience the syntax highlight, code completion and a number of otherfeatures for efficient SQL editing are implemented. For details see Working with SQL Editorarea and Using the context menu .
5.3.2.1.8.3 INSERT Procedure
The Insert section of the Create Procedures dialog provides the definition of theINSERT procedure generated from the table.
NameSpecifies procedure name (if necessary, you can edit the one assigned by default).
The Fields list displays fields as specified in the fie lds c lause of the procedure definition.The list provides the following attributes of each field:
476 465

SQL Manager for SQL Server - User's Manual280
© 1999-2022 EMS Software Development
Nam eT ypeTo add/remove fields to/from the construction, check/uncheck flags available in the firstcolumn of the Fields list.For your convenience the Selec t All, Dese lec t All and Invert Se lec t ion functions areimplemented in the context menu of the fields list area.
The lower area represents the INSERT procedure definition as SQL statement. It ispossible to edit the definition directly using the editor area to make appropriate changes.Edit the block of statements within the BEGIN / END pair according to your needs.For your convenience the syntax highlight, code completion and a number of otherfeatures for efficient SQL editing are implemented. For details see Working with SQL Editorarea and Using the context menu .
5.3.2.1.8.4 UPDATE procedure
The Update section of the Create Procedures dialog provides the definition of theUPDATE procedure generated from the table.
NameSpecifies procedure name (if necessary, you can edit the one assigned by default).
476 465

SQL Manager for SQL Server - User's Manual281
© 1999-2022 EMS Software Development
The Fields list displays fields as specified in the fie lds c lause of the procedure definition.The list provides the following attributes of each field:Nam eT ypeTo add/remove fields to/from the construction, check/uncheck flags available in the firstcolumn of the Fields list.For your convenience the Selec t All, Dese lec t All and Invert Se lec t ion functions areimplemented in the context menu of the fields list area.
The lower area represents the UPDATE procedure definition as SQL statement. It ispossible to edit the definition directly using the editor area to make appropriate changes.Edit the block of statements within the BEGIN / END pair according to your needs.For your convenience the syntax highlight, code completion and a number of otherfeatures for efficient SQL editing are implemented. For details see Working with SQL Editorarea and Using the context menu .
5.3.2.1.8.5 DELETE Procedure
The Delete section of the Create Procedures dialog provides the definition of theDELETE procedure generated from the table.
476 465
SQL Manager for SQL Server - User's Manual282
© 1999-2022 EMS Software Development
NameSpecifies procedure name (if necessary, you can edit the one assigned by default).
The lower area represents the DELETE procedure definition as SQL statement. It ispossible to edit the definition directly using the editor area to make appropriate changes.Edit the block of statements within the BEGIN / END pair according to your needs.For your convenience the syntax highlight, code completion and a number of otherfeatures for efficient SQL editing are implemented. For details see Working with SQL Editorarea and Using the context menu .
5.3.2.2 Views
A View is a logical table based on one or more tables or views. A view contains nodata itself. The tables upon which a view is based are called base tables.
Views are useful for allowing users to access a set of relations (tables ) as if it were asingle table, and limiting their access to just that. Views can also be used to restrictaccess to rows (a subset of a particular table).
View Editor allows you to create new views and define their properties (view name andthe SELECT statement it implements). It opens automatically when you create a new viewand is available on editing an existing one.
To open a view in View Editor, double-click it in the DB Explorer tree.Using Navigation bar and ToolbarCreating/editing viewManaging fieldsManaging indexesManaging triggersBrowsing object dependenciesWorking with dataEditing view descriptionViewing DDL definitionSetting object permissions
5.3.2.2.1 Using Navigation bar and Toolbar
The Navigation bar and Toolbar provide quick access to tools implemented in ViewEditor.
476 465
228
228
99
282
284
285
286
287
964
288
963
962
965

SQL Manager for SQL Server - User's Manual283
© 1999-2022 EMS Software Development
The Navigation bar of View Editor allows you to:
Object
select a database
select a view for editing
General
compile the view (if it is being created/modified)
save the view description (if it has been modified)
edit the view query using Query Builder
refresh the content of the active tab
print metadata of the view
create a procedure based on the view
view the dependency tree for the view
restore the default size and position of the editor window
Depending on the current tab selection, the Navigation bar expands to one or moreadditional panes with tab-specific actions that can be useful for working with the view:
Indices
add a new index
966
963
479
683
276 289
652
264
SQL Manager for SQL Server - User's Manual284
© 1999-2022 EMS Software Development
edit selected index
drop selected index(-es)
Triggers
add a new trigger
edit selected trigger
drop selected trigger(s)
Data Management
commit transaction
rollback transaction
export data from the view using Export Data Wizard
export data from the view as SQL script using Export as SQL Script Wizard
import data
bulk insert
Description
save object description to file
copy description to clipboard
DDL
save DDL to file
open DDL in SQL Editor
Items of the Navigation bar are also available on the ToolBar of View Editor. To enablethe toolbar , open the Environment Options dialog, proceed to the Windowssection there and select T oolbar (if you need the toolbar only) or Both (if you needboth the toolbar and the Navigation bar ) in the Bar style for child forms group.
5.3.2.2.2 Creating/editing view
Use the View tab of View Editor to create/edit a view and specify its definition.
This tab represents the view definition as SQL statement, hence it is enough to simplyedit the whole definition using the editor area to make appropriate changes, and recompilethe view.
For your convenience the syntax highlight, code completion and a number of otherfeatures for efficient SQL editing are implemented. For details see Working with SQL Editorarea and Using the context menu .
264
264
273
273
273
567
633
608
642
963
963
962
962 462
960 867 871
958
476 465
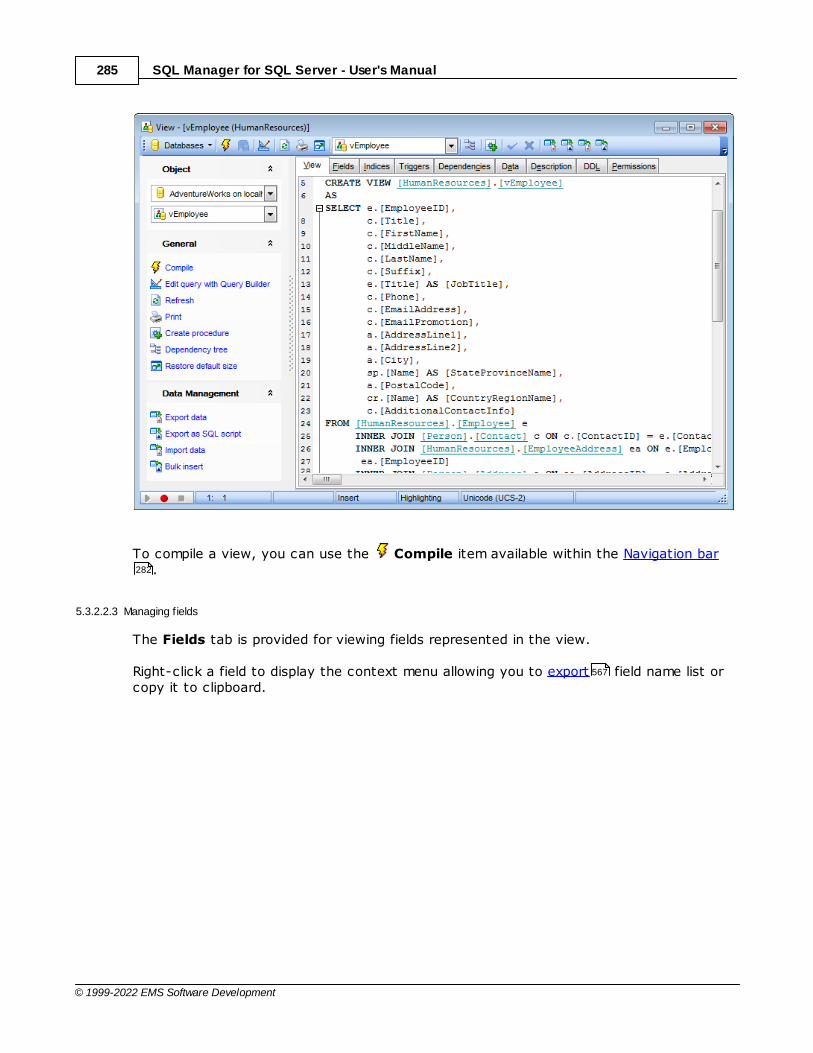
SQL Manager for SQL Server - User's Manual285
© 1999-2022 EMS Software Development
To compile a view, you can use the Compile item available within the Navigation bar.
5.3.2.2.3 Managing f ields
The Fields tab is provided for viewing fields represented in the view.
Right-click a field to display the context menu allowing you to export field name list orcopy it to clipboard.
282
567

SQL Manager for SQL Server - User's Manual286
© 1999-2022 EMS Software Development
The Fields list provides the following attributes of each field of the view:F ie ld Nam eData T ypeNot NullUniqueIdent it yDefault ValueDesc r ipt ion
For details see Fields .
If necessary, you can also use the Field Description area to supply a desc r ipt ion foreach field.
5.3.2.2.4 Managing indexes
The Indices tab is provided for viewing indexes represented in the view. Double-click anindex to open Index Editor for editing the index.
Right-click an index to display the context menu allowing you to c reate new, edit, drop,enable/disable the selected index, or enable/disable all indexes. Using the menu you canalso export the list of the view indexes to any of supported formats .
249
265
567 979
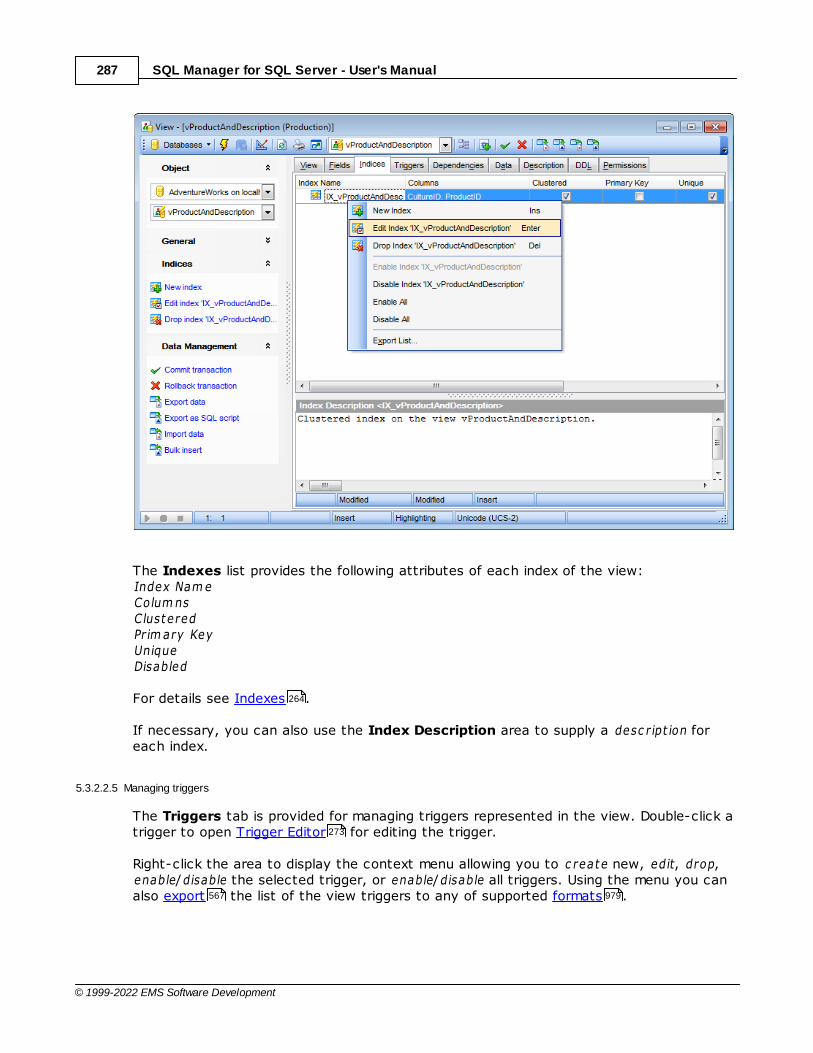
SQL Manager for SQL Server - User's Manual287
© 1999-2022 EMS Software Development
The Indexes list provides the following attributes of each index of the view:Index Nam eColum nsClusteredPrim ary KeyUniqueDisabled
For details see Indexes .
If necessary, you can also use the Index Description area to supply a desc r ipt ion foreach index.
5.3.2.2.5 Managing triggers
The Triggers tab is provided for managing triggers represented in the view. Double-click atrigger to open Trigger Editor for editing the trigger.
Right-click the area to display the context menu allowing you to c reate new, edit, drop,enable/disable the selected trigger, or enable/disable all triggers. Using the menu you canalso export the list of the view triggers to any of supported formats .
264
273
567 979

SQL Manager for SQL Server - User's Manual288
© 1999-2022 EMS Software Development
The Triggers list provides the following attributes of each trigger of the view:Nam eInsertUpdateDeleteT ypeDisabled
For details see Triggers .
If necessary, you can also use the Trigger Description area to supply a desc r ipt ion foreach trigger.
5.3.2.2.6 Working w ith data
The Data tab displays the view data as a grid by default (see Data View for details).The context menu of this tab and the Navigation bar allow you to Export Data ,Import Data , Export as SQL Script , Bulk Insert .
While working with view data, you are provided with a number of filtering and grouping facilities.
If necessary, you can group the data in grid by any of the columns. This operation isperformed by dragging the column header to the gray "Group by" box area at the top.When grouping by a column is applied to the grid, all the rows are displayed as subnodes
272
499
282 567
608 633 642
505
503
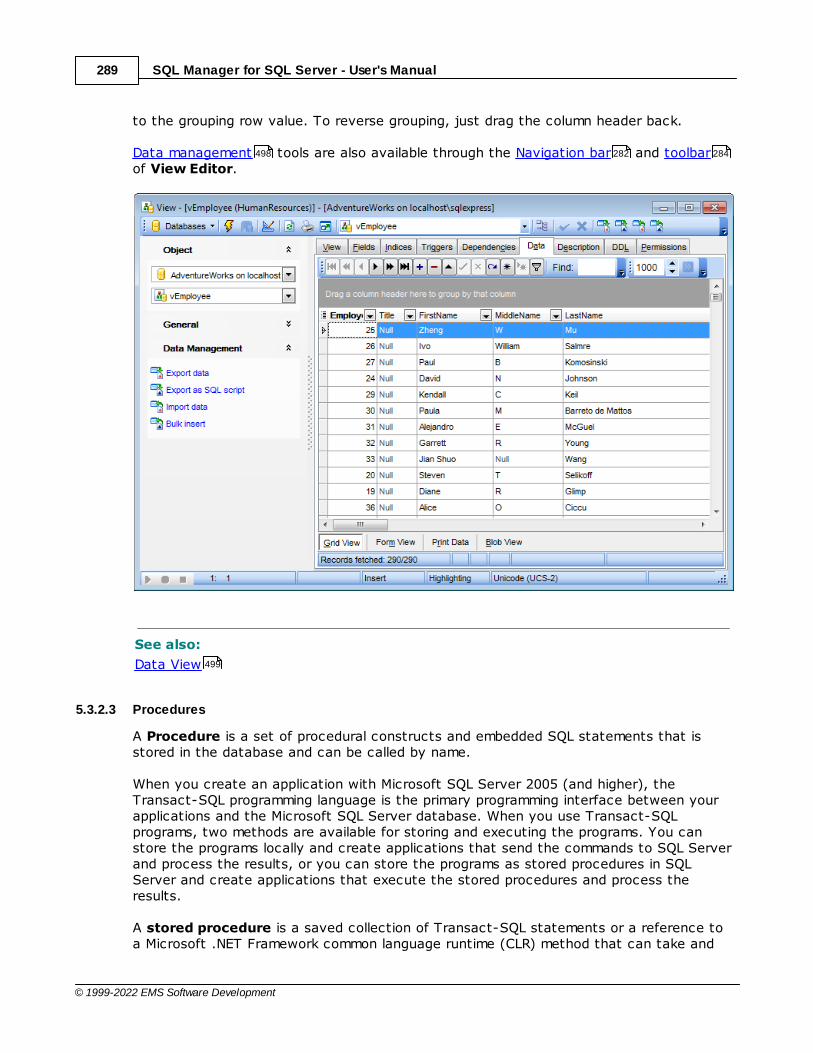
SQL Manager for SQL Server - User's Manual289
© 1999-2022 EMS Software Development
to the grouping row value. To reverse grouping, just drag the column header back.
Data management tools are also available through the Navigation bar and toolbarof View Editor.
See also:
Data View
5.3.2.3 Procedures
A Procedure is a set of procedural constructs and embedded SQL statements that isstored in the database and can be called by name.
When you create an application with Microsoft SQL Server 2005 (and higher), theTransact-SQL programming language is the primary programming interface between yourapplications and the Microsoft SQL Server database. When you use Transact-SQLprograms, two methods are available for storing and executing the programs. You canstore the programs locally and create applications that send the commands to SQL Serverand process the results, or you can store the programs as stored procedures in SQLServer and create applications that execute the stored procedures and process theresults.
A stored procedure is a saved collection of Transact-SQL statements or a reference toa Microsoft .NET Framework common language runtime (CLR) method that can take and
498 282 284
499

SQL Manager for SQL Server - User's Manual290
© 1999-2022 EMS Software Development
return user-supplied parameters. Procedures can be created for permanent use or fortemporary use within a session, local temporary procedure, or for temporary use within allsessions, global temporary procedure.
Procedure Editor allows you to create new procedure, execute the existing procedure oredit its definition. It opens automatically when you create a new procedure and isavailable on editing an existing one.
To open a stored procedure in Procedure Editor, double-click it in the DB Explorertree.
Using Navigation bar and ToolbarCreating/editing procedureBrowsing procedure parametersBrowsing object dependenciesEditing procedure descriptionSpecifying input parametersExecuting procedureViewing DDL definitionSetting object permissions
5.3.2.3.1 Using Navigation bar and Toolbar
The Navigation bar and Toolbar provide quick access to tools implemented inProcedure Editor.
99
290
291
292
964
963
293
294
962
965
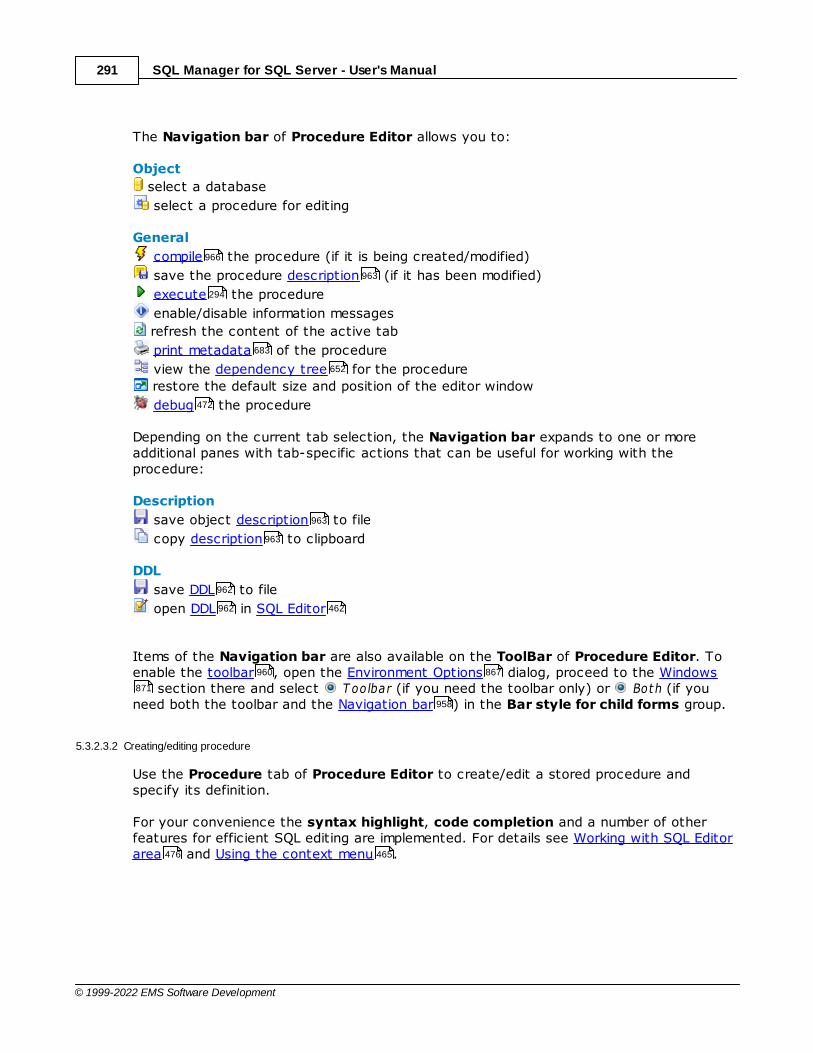
SQL Manager for SQL Server - User's Manual291
© 1999-2022 EMS Software Development
The Navigation bar of Procedure Editor allows you to:
Object
select a database
select a procedure for editing
General
compile the procedure (if it is being created/modified)
save the procedure description (if it has been modified)
execute the procedure
enable/disable information messages
refresh the content of the active tab
print metadata of the procedure
view the dependency tree for the procedure
restore the default size and position of the editor window
debug the procedure
Depending on the current tab selection, the Navigation bar expands to one or moreadditional panes with tab-specific actions that can be useful for working with theprocedure:
Description
save object description to file
copy description to clipboard
DDL
save DDL to file
open DDL in SQL Editor
Items of the Navigation bar are also available on the ToolBar of Procedure Editor. Toenable the toolbar , open the Environment Options dialog, proceed to the Windows
section there and select T oolbar (if you need the toolbar only) or Both (if youneed both the toolbar and the Navigation bar ) in the Bar style for child forms group.
5.3.2.3.2 Creating/editing procedure
Use the Procedure tab of Procedure Editor to create/edit a stored procedure andspecify its definition.
For your convenience the syntax highlight, code completion and a number of otherfeatures for efficient SQL editing are implemented. For details see Working with SQL Editorarea and Using the context menu .
966
963
294
683
652
472
963
963
962
962 462
960 867
871
958
476 465
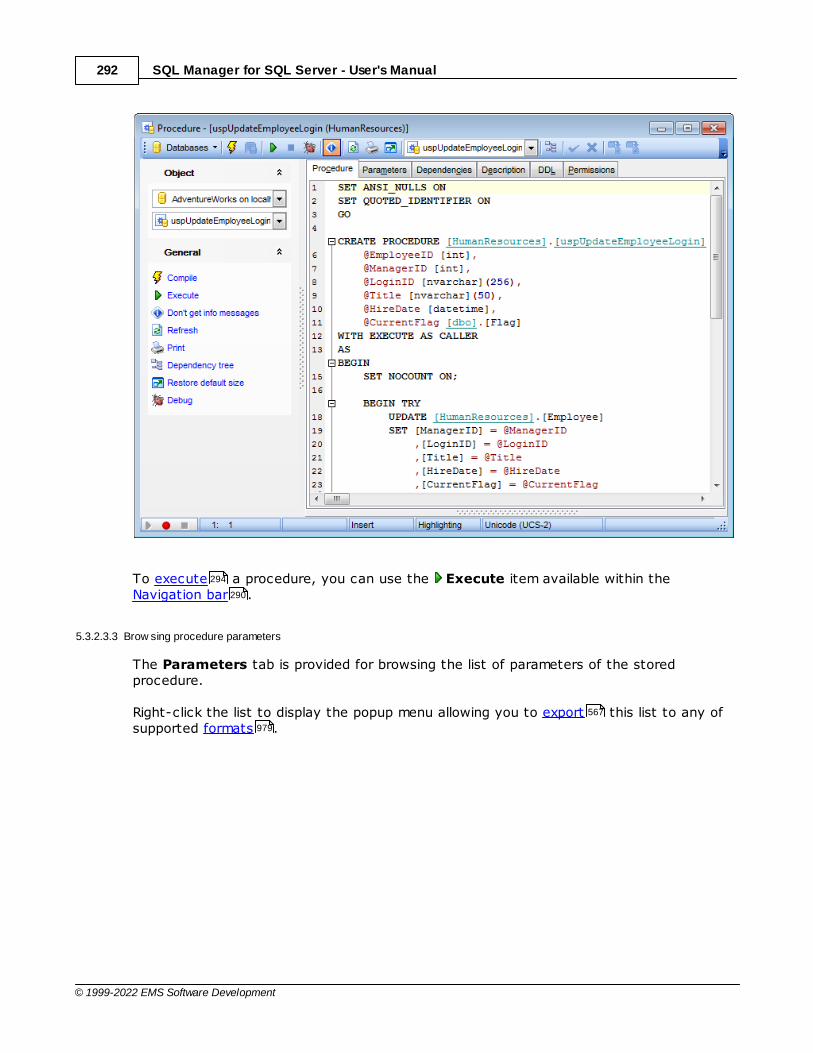
SQL Manager for SQL Server - User's Manual292
© 1999-2022 EMS Software Development
To execute a procedure, you can use the Execute item available within theNavigation bar .
5.3.2.3.3 Brow sing procedure parameters
The Parameters tab is provided for browsing the list of parameters of the storedprocedure.
Right-click the list to display the popup menu allowing you to export this list to any ofsupported formats .
294
290
567
979
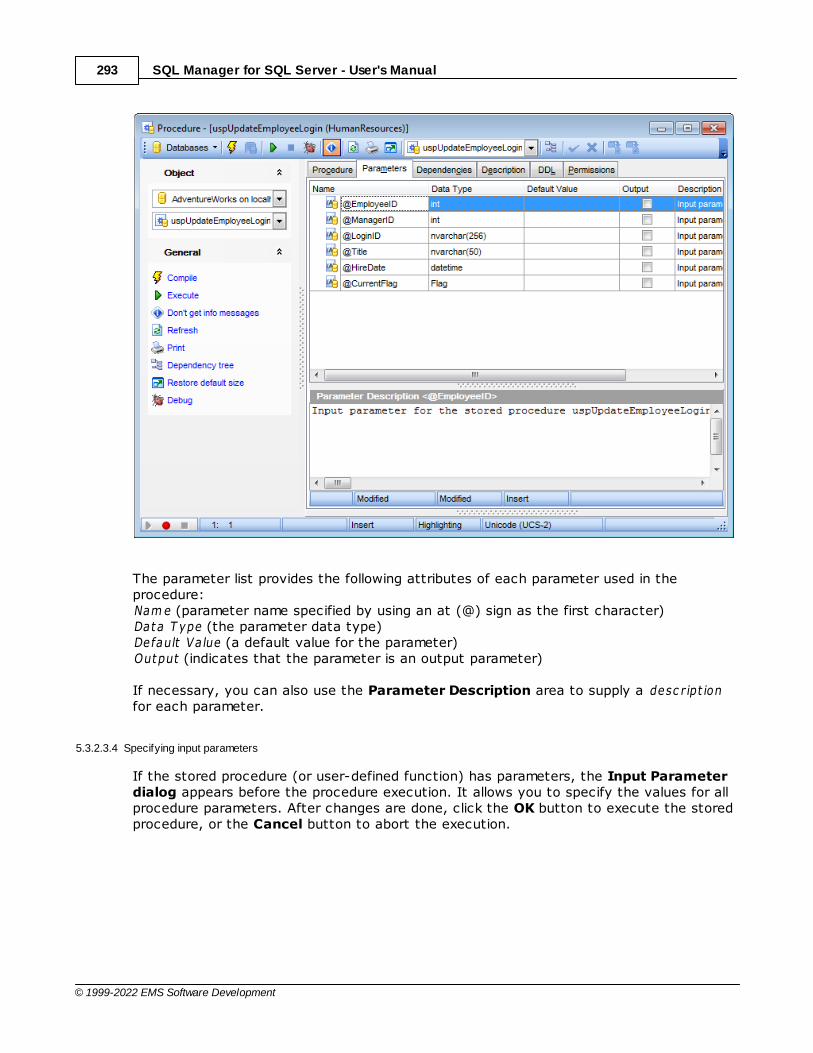
SQL Manager for SQL Server - User's Manual293
© 1999-2022 EMS Software Development
The parameter list provides the following attributes of each parameter used in theprocedure:Nam e (parameter name specified by using an at (@) sign as the first character)Data T ype (the parameter data type)Default Value (a default value for the parameter)Output (indicates that the parameter is an output parameter)
If necessary, you can also use the Parameter Description area to supply a desc r ipt ionfor each parameter.
5.3.2.3.4 Specifying input parameters
If the stored procedure (or user-defined function) has parameters, the Input Parameterdialog appears before the procedure execution. It allows you to specify the values for allprocedure parameters. After changes are done, click the OK button to execute the storedprocedure, or the Cancel button to abort the execution.
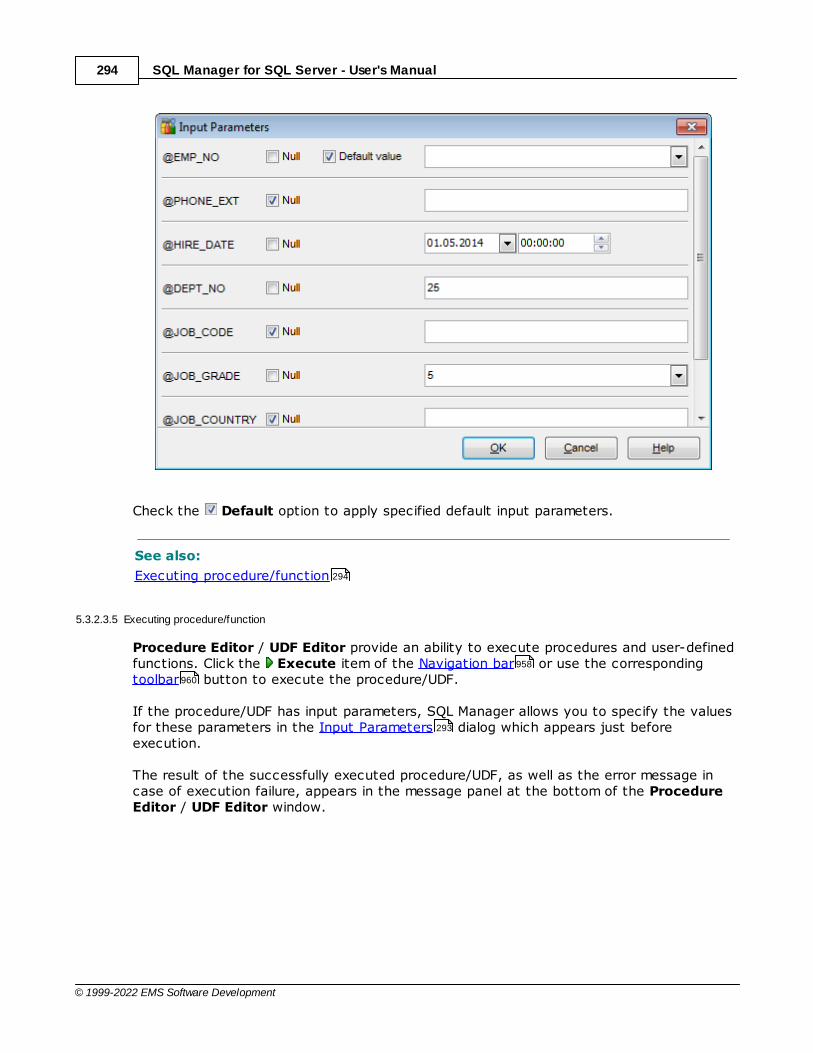
SQL Manager for SQL Server - User's Manual294
© 1999-2022 EMS Software Development
Check the Default option to apply specified default input parameters.
See also:
Executing procedure/function
5.3.2.3.5 Executing procedure/function
Procedure Editor / UDF Editor provide an ability to execute procedures and user-definedfunctions. Click the Execute item of the Navigation bar or use the correspondingtoolbar button to execute the procedure/UDF.
If the procedure/UDF has input parameters, SQL Manager allows you to specify the valuesfor these parameters in the Input Parameters dialog which appears just beforeexecution.
The result of the successfully executed procedure/UDF, as well as the error message incase of execution failure, appears in the message panel at the bottom of the ProcedureEditor / UDF Editor window.
294
958
960
293
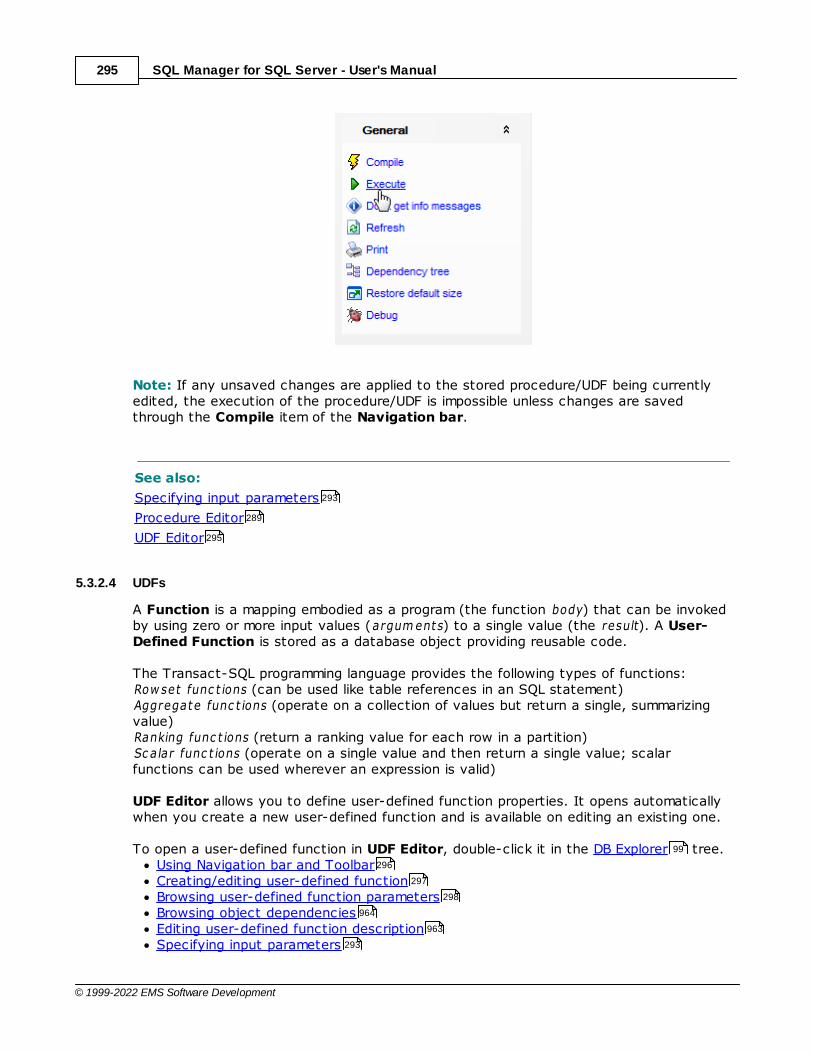
SQL Manager for SQL Server - User's Manual295
© 1999-2022 EMS Software Development
Note: If any unsaved changes are applied to the stored procedure/UDF being currentlyedited, the execution of the procedure/UDF is impossible unless changes are savedthrough the Compile item of the Navigation bar.
See also:
Specifying input parameters
Procedure Editor
UDF Editor
5.3.2.4 UDFs
A Function is a mapping embodied as a program (the function body) that can be invokedby using zero or more input values (argum ents) to a single value (the result). A User-Defined Function is stored as a database object providing reusable code.
The Transact-SQL programming language provides the following types of functions:Row set func t ions (can be used like table references in an SQL statement)Aggregate func t ions (operate on a collection of values but return a single, summarizingvalue)Ranking func t ions (return a ranking value for each row in a partition)Sc alar func t ions (operate on a single value and then return a single value; scalarfunctions can be used wherever an expression is valid)
UDF Editor allows you to define user-defined function properties. It opens automaticallywhen you create a new user-defined function and is available on editing an existing one.
To open a user-defined function in UDF Editor, double-click it in the DB Explorer tree.Using Navigation bar and ToolbarCreating/editing user-defined functionBrowsing user-defined function parametersBrowsing object dependenciesEditing user-defined function descriptionSpecifying input parameters
293
289
295
99
296
297
298
964
963
293
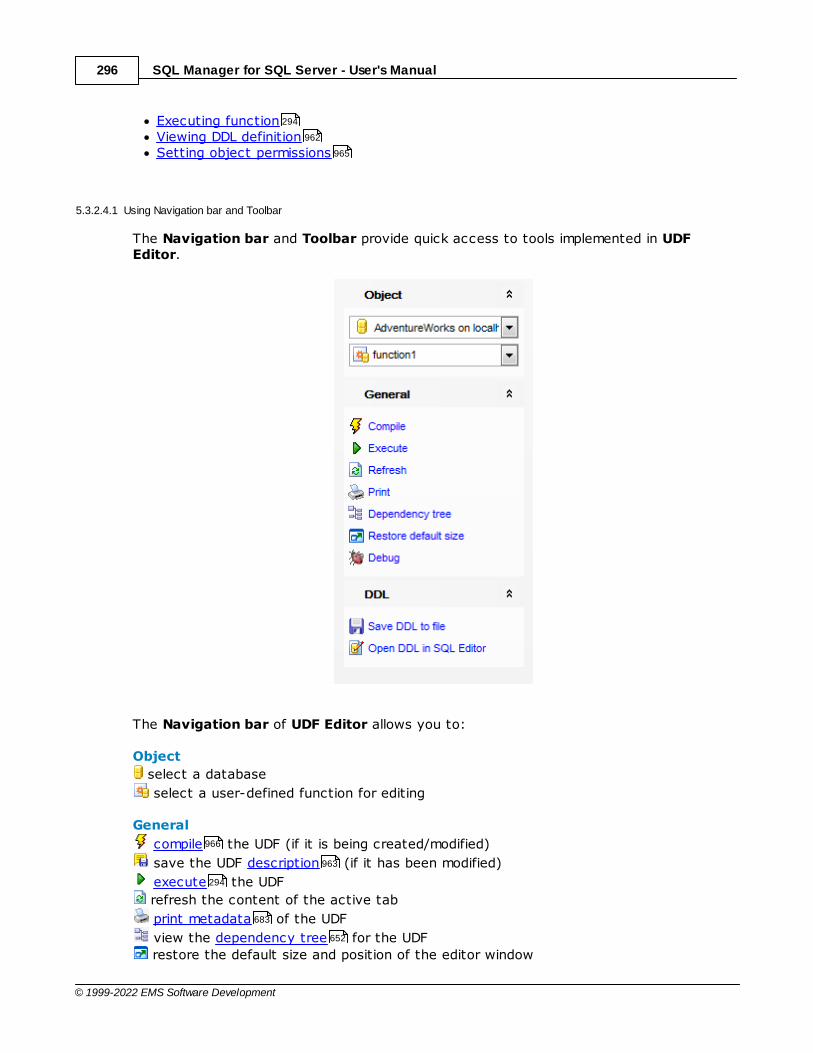
SQL Manager for SQL Server - User's Manual296
© 1999-2022 EMS Software Development
Executing functionViewing DDL definitionSetting object permissions
5.3.2.4.1 Using Navigation bar and Toolbar
The Navigation bar and Toolbar provide quick access to tools implemented in UDFEditor.
The Navigation bar of UDF Editor allows you to:
Object
select a database
select a user-defined function for editing
General
compile the UDF (if it is being created/modified)
save the UDF description (if it has been modified)
execute the UDF
refresh the content of the active tab
print metadata of the UDF
view the dependency tree for the UDF
restore the default size and position of the editor window
294
962
965
966
963
294
683
652
SQL Manager for SQL Server - User's Manual297
© 1999-2022 EMS Software Development
debug the procedure
Depending on the current tab selection, the Navigation bar expands to one or moreadditional panes with tab-specific actions that can be useful for working with the UDF:
Description
save object description to file
copy description to clipboard
DDL
save DDL to file
open DDL in SQL Editor
Items of the Navigation bar are also available on the ToolBar of UDF Editor. To enablethe toolbar , open the Environment Options dialog, proceed to the Windowssection there and select T oolbar (if you need the toolbar only) or Both (if you needboth the toolbar and the Navigation bar ) in the Bar style for child forms group.
5.3.2.4.2 Creating/editing UDF
Use the Function tab of UDF Editor to create/edit a user-defined function and specifyits definition.
For your convenience the syntax highlight, code completion and a number of otherfeatures for efficient SQL editing are implemented. For details see Working with SQL Editorarea and Using the context menu .
472
963
963
962
962 462
960 867 871
958
476 465

SQL Manager for SQL Server - User's Manual298
© 1999-2022 EMS Software Development
Note: A UDF is a Transact-SQL or common language runtime (CLR) routine that returns avalue. User-defined functions, like system functions, can be invoked from a query .Scalar functions can be executed by using an EXECUT E statement like stored procedures
.
To execute a UDF, you can use the Execute item available within the Navigation bar.
5.3.2.4.3 Brow sing UDF parameters
The Parameters tab is provided for browsing the list of parameters of the user-definedfunction.
Right-click the list to display the popup menu allowing you to export this list to any ofsupported formats .
460
289
294
296
567
979
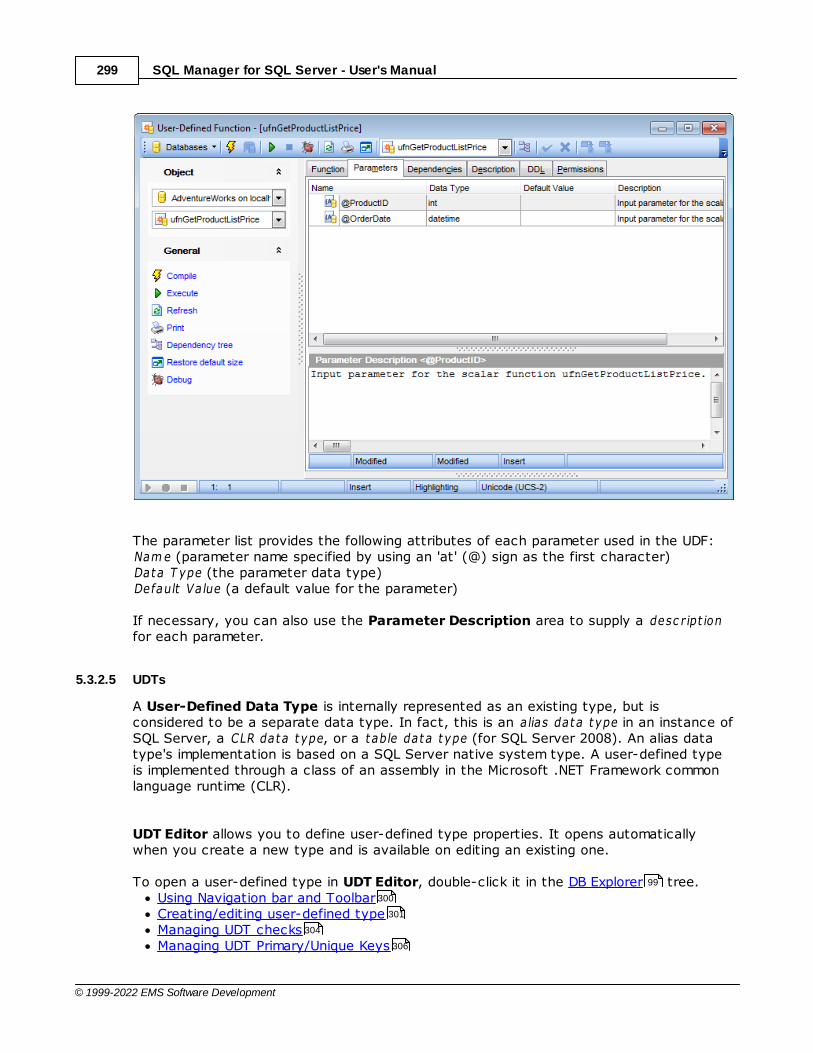
SQL Manager for SQL Server - User's Manual299
© 1999-2022 EMS Software Development
The parameter list provides the following attributes of each parameter used in the UDF:Nam e (parameter name specified by using an 'at' (@) sign as the first character)Data T ype (the parameter data type)Default Value (a default value for the parameter)
If necessary, you can also use the Parameter Description area to supply a desc r ipt ionfor each parameter.
5.3.2.5 UDTs
A User-Defined Data Type is internally represented as an existing type, but isconsidered to be a separate data type. In fact, this is an alias data type in an instance ofSQL Server, a CLR data type, or a table data type (for SQL Server 2008). An alias datatype's implementation is based on a SQL Server native system type. A user-defined typeis implemented through a class of an assembly in the Microsoft .NET Framework commonlanguage runtime (CLR).
UDT Editor allows you to define user-defined type properties. It opens automaticallywhen you create a new type and is available on editing an existing one.
To open a user-defined type in UDT Editor, double-click it in the DB Explorer tree.Using Navigation bar and ToolbarCreating/editing user-defined typeManaging UDT checksManaging UDT Primary/Unique Keys
99
300
301
304
306
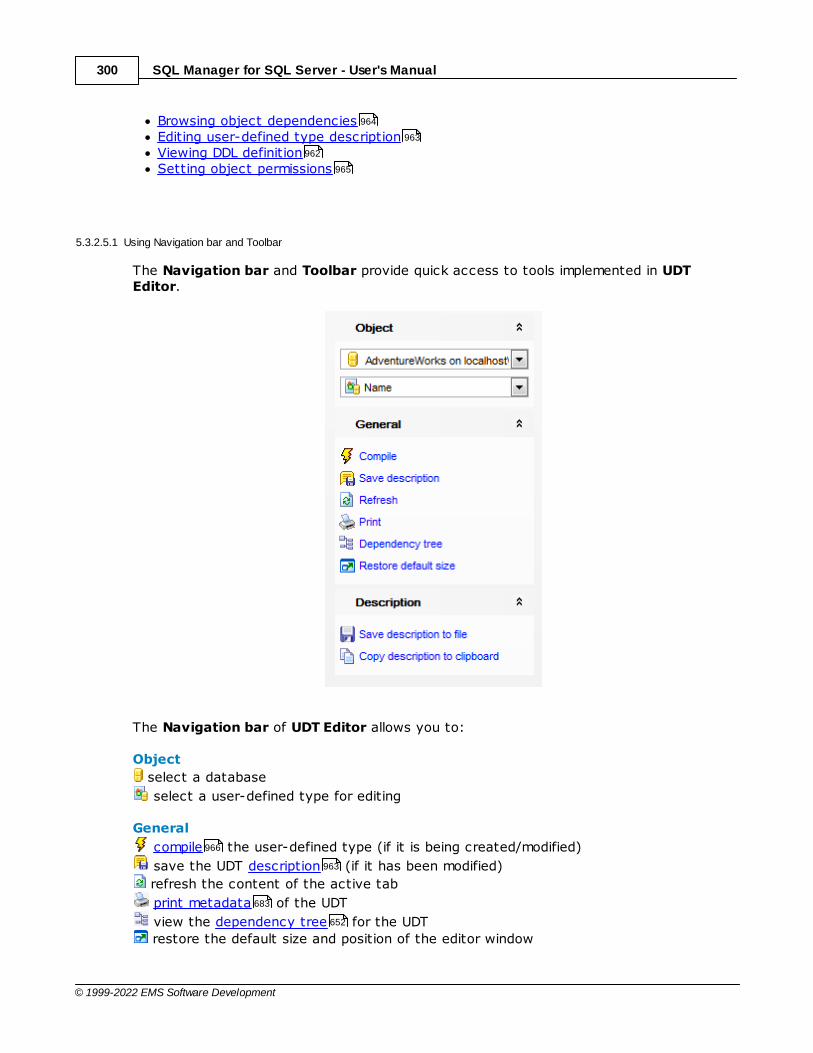
SQL Manager for SQL Server - User's Manual300
© 1999-2022 EMS Software Development
Browsing object dependenciesEditing user-defined type descriptionViewing DDL definitionSetting object permissions
5.3.2.5.1 Using Navigation bar and Toolbar
The Navigation bar and Toolbar provide quick access to tools implemented in UDTEditor.
The Navigation bar of UDT Editor allows you to:
Object
select a database
select a user-defined type for editing
General
compile the user-defined type (if it is being created/modified)
save the UDT description (if it has been modified)
refresh the content of the active tab
print metadata of the UDT
view the dependency tree for the UDT
restore the default size and position of the editor window
964
963
962
965
966
963
683
652
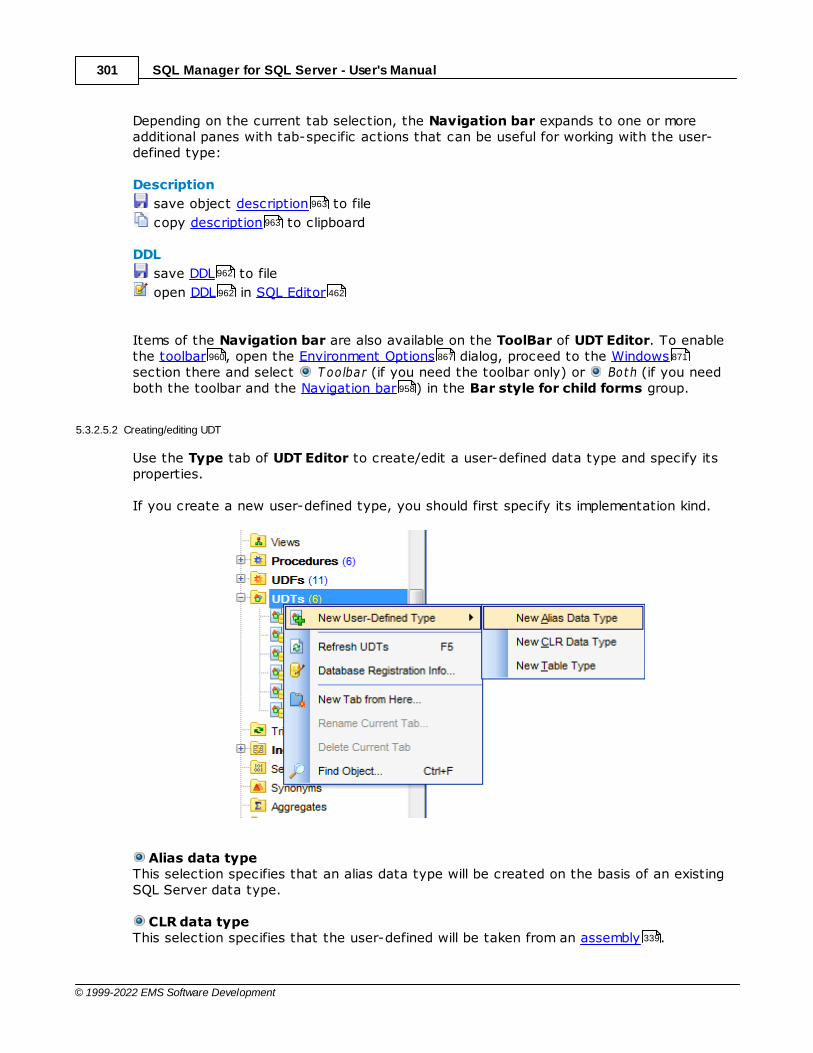
SQL Manager for SQL Server - User's Manual301
© 1999-2022 EMS Software Development
Depending on the current tab selection, the Navigation bar expands to one or moreadditional panes with tab-specific actions that can be useful for working with the user-defined type:
Description
save object description to file
copy description to clipboard
DDL
save DDL to file
open DDL in SQL Editor
Items of the Navigation bar are also available on the ToolBar of UDT Editor. To enablethe toolbar , open the Environment Options dialog, proceed to the Windowssection there and select T oolbar (if you need the toolbar only) or Both (if you needboth the toolbar and the Navigation bar ) in the Bar style for child forms group.
5.3.2.5.2 Creating/editing UDT
Use the Type tab of UDT Editor to create/edit a user-defined data type and specify itsproperties.
If you create a new user-defined type, you should first specify its implementation kind.
Alias data typeThis selection specifies that an alias data type will be created on the basis of an existingSQL Server data type.
CLR data typeThis selection specifies that the user-defined will be taken from an assembly .
963
963
962
962 462
960 867 871
958
339
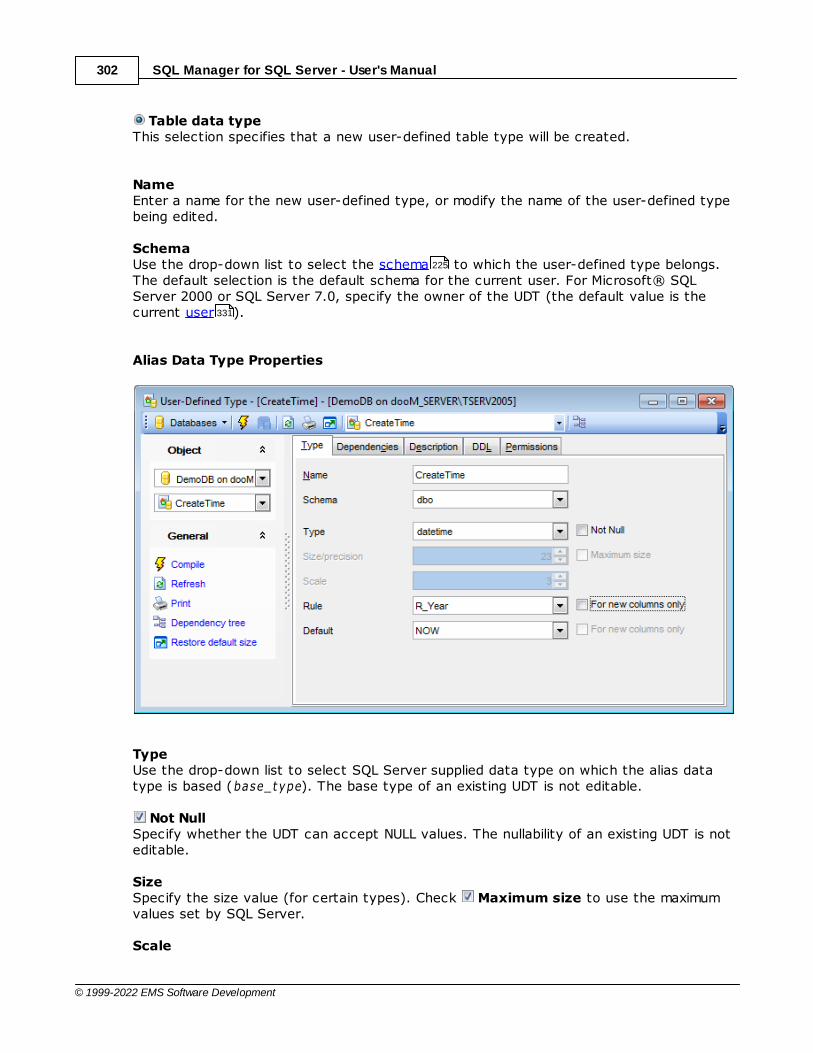
SQL Manager for SQL Server - User's Manual302
© 1999-2022 EMS Software Development
Table data typeThis selection specifies that a new user-defined table type will be created.
NameEnter a name for the new user-defined type, or modify the name of the user-defined typebeing edited.
Schema Use the drop-down list to select the schema to which the user-defined type belongs.The default selection is the default schema for the current user. For Microsoft® SQLServer 2000 or SQL Server 7.0, specify the owner of the UDT (the default value is thecurrent user ).
Alias Data Type Properties
TypeUse the drop-down list to select SQL Server supplied data type on which the alias datatype is based (base_type). The base type of an existing UDT is not editable.
Not Null Specify whether the UDT can accept NULL values. The nullability of an existing UDT is noteditable.
SizeSpecify the size value (for certain types). Check Maximum size to use the maximumvalues set by SQL Server.
Scale
225
331

SQL Manager for SQL Server - User's Manual303
© 1999-2022 EMS Software Development
Defines the maximum number of decimal digits that can be stored to the right of thedecimal point of the value (for numeric and decimal data types).
Rule Use the drop-down list to select a rule to bind to the user-defined data type(optional). Check For new columns only to apply the selected rule only to newlyadded columns.
Default Use the drop-down list to select a default to bind to the user-defined data type(optional). Check For new columns only to apply the selected default only to newlyadded columns.
Note: Some properties cannot be modified because of dependent objects. Open theDependencies tab to browse the list of dependent objects, or view the dependencytree for the user-defined type.
CLR Data Type Properties
AssemblyUse the drop-down list to select the SQL Server assembly that references theimplementation of the user-defined type in the common language runtime (CLR). Theassembly must have been already created in the database.
Class nameSpecifies the class within the assembly that implements the user-defined type. The classname can be a namespace-qualified name (if the programming language that is used towrite the class uses the concept of namespaces, such as C#).
Table Data Type Properties
323
320
964
652
339
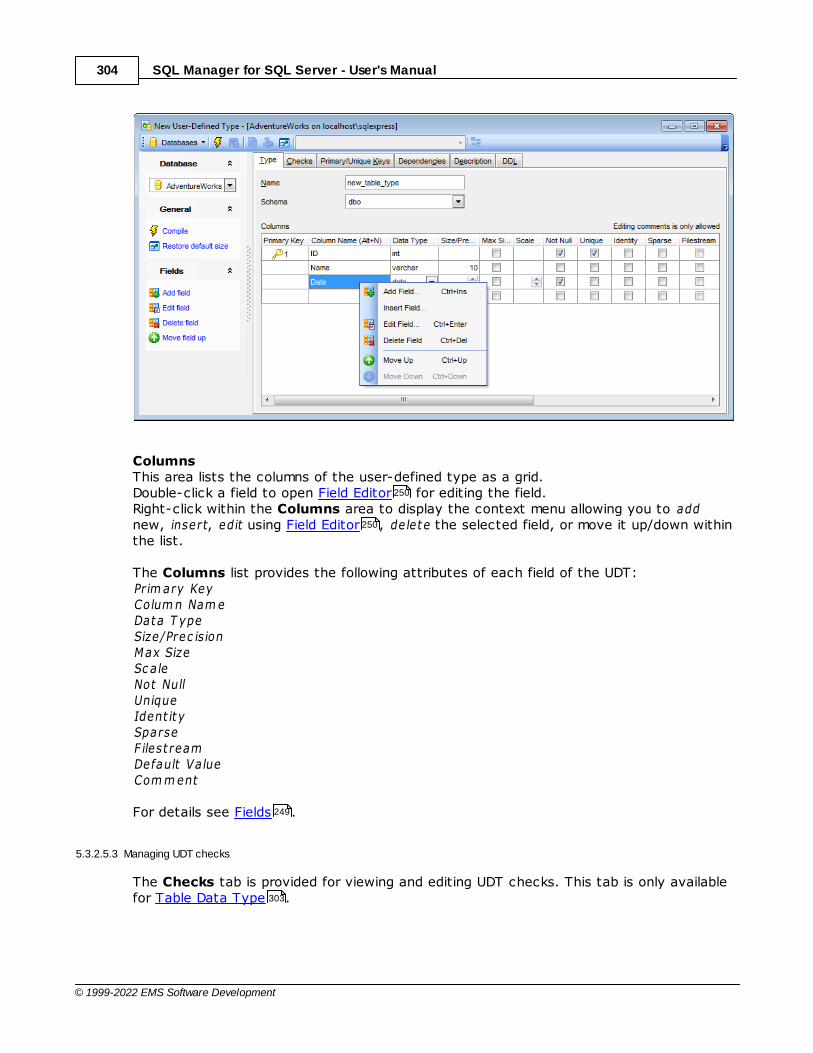
SQL Manager for SQL Server - User's Manual304
© 1999-2022 EMS Software Development
ColumnsThis area lists the columns of the user-defined type as a grid.Double-click a field to open Field Editor for editing the field.Right-click within the Columns area to display the context menu allowing you to addnew, insert, edit using Field Editor , de lete the selected field, or move it up/down withinthe list.
The Columns list provides the following attributes of each field of the UDT:Prim ary KeyColum n Nam eData T ypeSize/Prec is ionMax SizeSc aleNot NullUniqueIdent it ySparseF ilest reamDefault ValueCom m ent
For details see Fields .
5.3.2.5.3 Managing UDT checks
The Checks tab is provided for viewing and editing UDT checks. This tab is only availablefor Table Data Type .
250
250
249
303
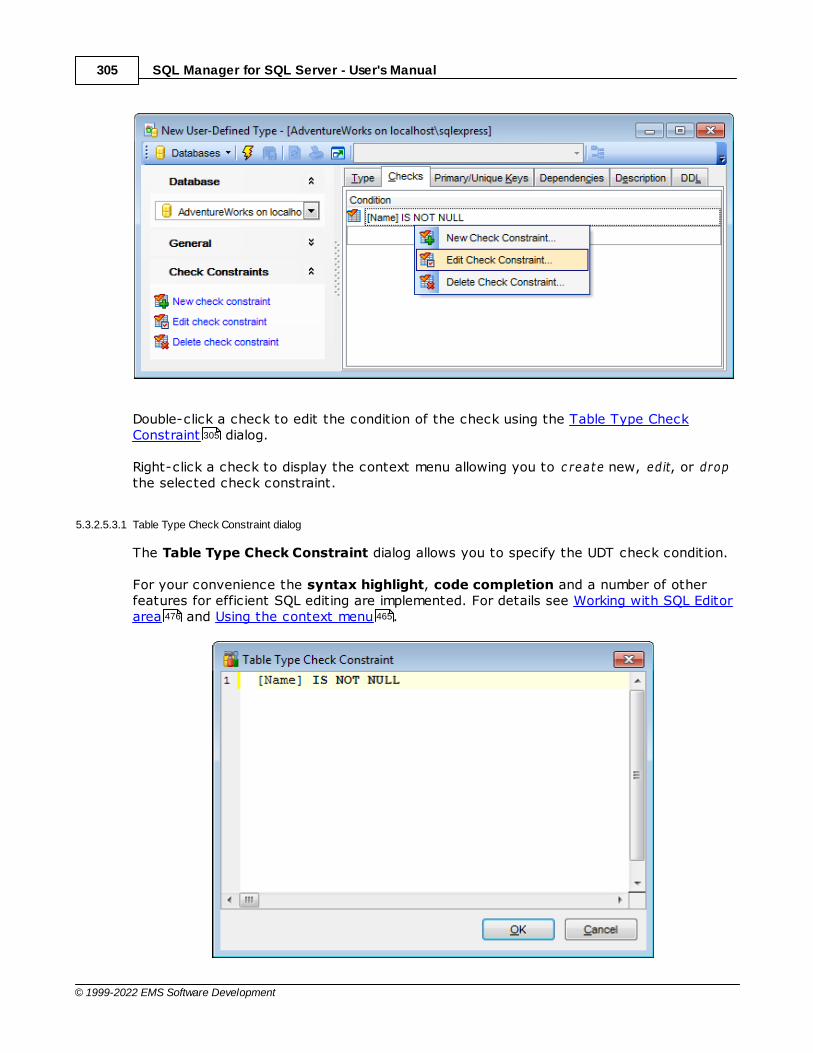
SQL Manager for SQL Server - User's Manual305
© 1999-2022 EMS Software Development
Double-click a check to edit the condition of the check using the Table Type CheckConstraint dialog.
Right-click a check to display the context menu allowing you to c reate new, edit, or dropthe selected check constraint.
5.3.2.5.3.1 Table Type Check Constraint dialog
The Table Type Check Constraint dialog allows you to specify the UDT check condition.
For your convenience the syntax highlight, code completion and a number of otherfeatures for efficient SQL editing are implemented. For details see Working with SQL Editorarea and Using the context menu .
305
476 465

SQL Manager for SQL Server - User's Manual306
© 1999-2022 EMS Software Development
5.3.2.5.4 Managing UDT Primary/Unique Keys
The Primary/Unique Keys tab is provided for viewing and editing UDT primary/uniquekeys. This tab is only available for Table Data Type .
Double-click a constraint to edit it using the Table Type Constraint dialog.
Right-click a constraint to display the context menu allowing you to c reate new, edit, ordrop the selected constraint.
The Columns list provides the following attributes of each constraint of the UDT:Prim ary KeyUnique KeyColum nsClusteredIgnore Duplic ates
5.3.2.5.4.1 Table Type Constraint dialog
The Table Type Constraint dialog allows you to specify the UDT Primary/Unique Keyproperties.
303
306
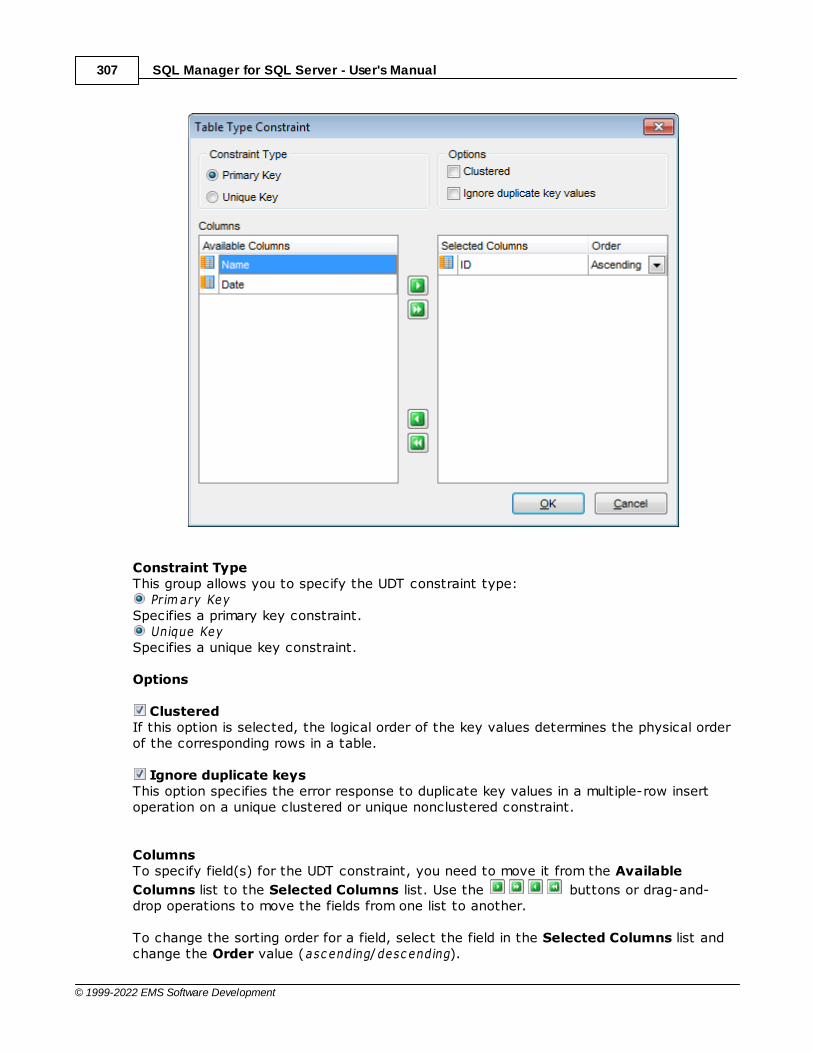
SQL Manager for SQL Server - User's Manual307
© 1999-2022 EMS Software Development
Constraint TypeThis group allows you to specify the UDT constraint type:
Pr im ary KeySpecifies a primary key constraint.
Unique KeySpecifies a unique key constraint.
Options
ClusteredIf this option is selected, the logical order of the key values determines the physical orderof the corresponding rows in a table.
Ignore duplicate keysThis option specifies the error response to duplicate key values in a multiple-row insertoperation on a unique clustered or unique nonclustered constraint.
ColumnsTo specify field(s) for the UDT constraint, you need to move it from the Available
Columns list to the Selected Columns list. Use the buttons or drag-and-drop operations to move the fields from one list to another.
To change the sorting order for a field, select the field in the Selected Columns list andchange the Order value (asc ending/desc ending).
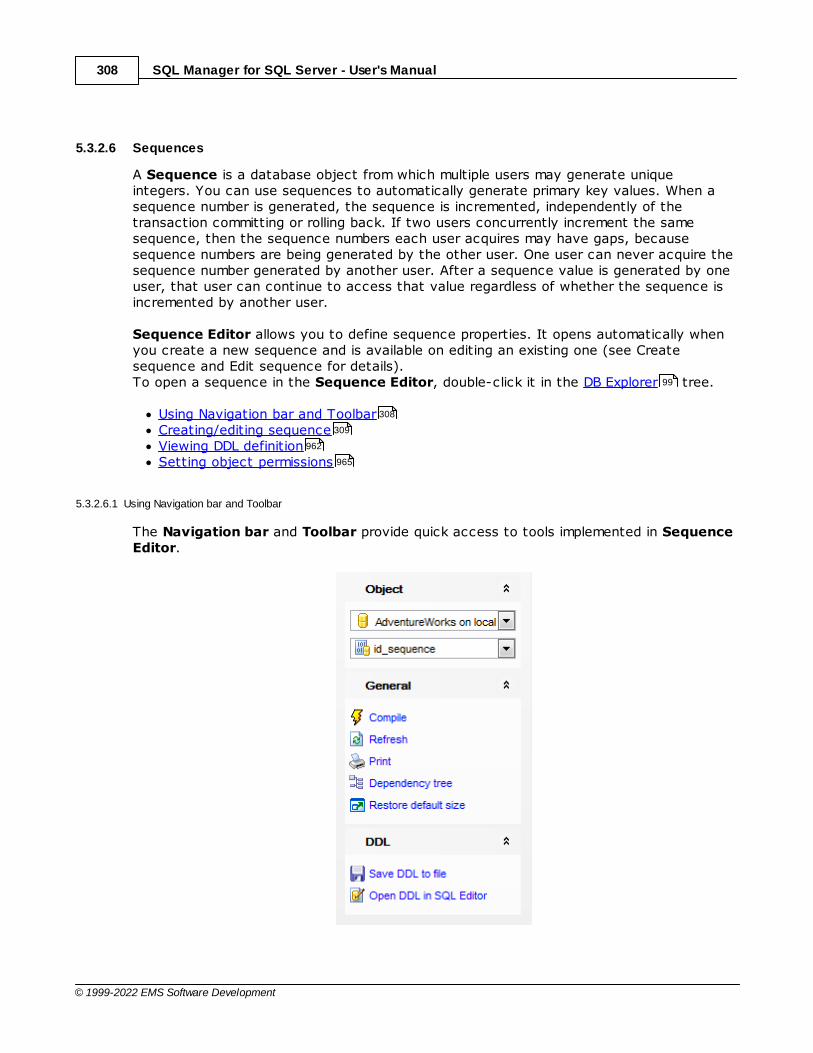
SQL Manager for SQL Server - User's Manual308
© 1999-2022 EMS Software Development
5.3.2.6 Sequences
A Sequence is a database object from which multiple users may generate uniqueintegers. You can use sequences to automatically generate primary key values. When asequence number is generated, the sequence is incremented, independently of thetransaction committing or rolling back. If two users concurrently increment the samesequence, then the sequence numbers each user acquires may have gaps, becausesequence numbers are being generated by the other user. One user can never acquire thesequence number generated by another user. After a sequence value is generated by oneuser, that user can continue to access that value regardless of whether the sequence isincremented by another user.
Sequence Editor allows you to define sequence properties. It opens automatically whenyou create a new sequence and is available on editing an existing one (see Createsequence and Edit sequence for details).To open a sequence in the Sequence Editor, double-click it in the DB Explorer tree.
Using Navigation bar and ToolbarCreating/editing sequenceViewing DDL definitionSetting object permissions
5.3.2.6.1 Using Navigation bar and Toolbar
The Navigation bar and Toolbar provide quick access to tools implemented in SequenceEditor.
99
308
309
962
965

SQL Manager for SQL Server - User's Manual309
© 1999-2022 EMS Software Development
The Navigation bar of Sequence Editor allows you to:
Object
select a database
select a sequence for editing
General
compile the sequence (if it is being created)
set printing options to print metadata of the sequence
view the dependency tree for the sequence
refresh the content of the active tab
restore the default size and position of the editor window
Depending on the current tab selection, the Navigation bar expands to one or moreadditional panes with tab-specific actions that can be useful for working with thesequence:
Description
save object description to file
copy description to clipboard
DDL
save DDL to file
open DDL in SQL Editor
Items of the Navigation bar are also available on the ToolBar of Sequence Editor. Toenable the toolbar , open the Environment Options dialog, proceed to the Windows
section there and select T oolbar (if you need the toolbar only) or Both (if youneed both the toolbar and the Navigation bar ) in the Bar style for child forms group.
5.3.2.6.2 Creating/editing sequence
Use the Sequence tab of Sequence Editor to create/edit a sequence and specify itsproperties.
NameSpecify the name of the sequence to be created, or view the name of the sequence beingedited. Note that the sequence name must be unique within its schema.
CycleThis option indicates that the sequence continues to generate values after reachingeither its maximum or minimum value. After an ascending sequence reaches its maximumvalue, it generates its minimum value. After a descending sequence reaches its minimum,it generates its maximum value.
SchemaUse the drop-down list to specify the schema in which the sequence will be created.
966
685 683
652
963
963
962
962 462
960 867
871
958
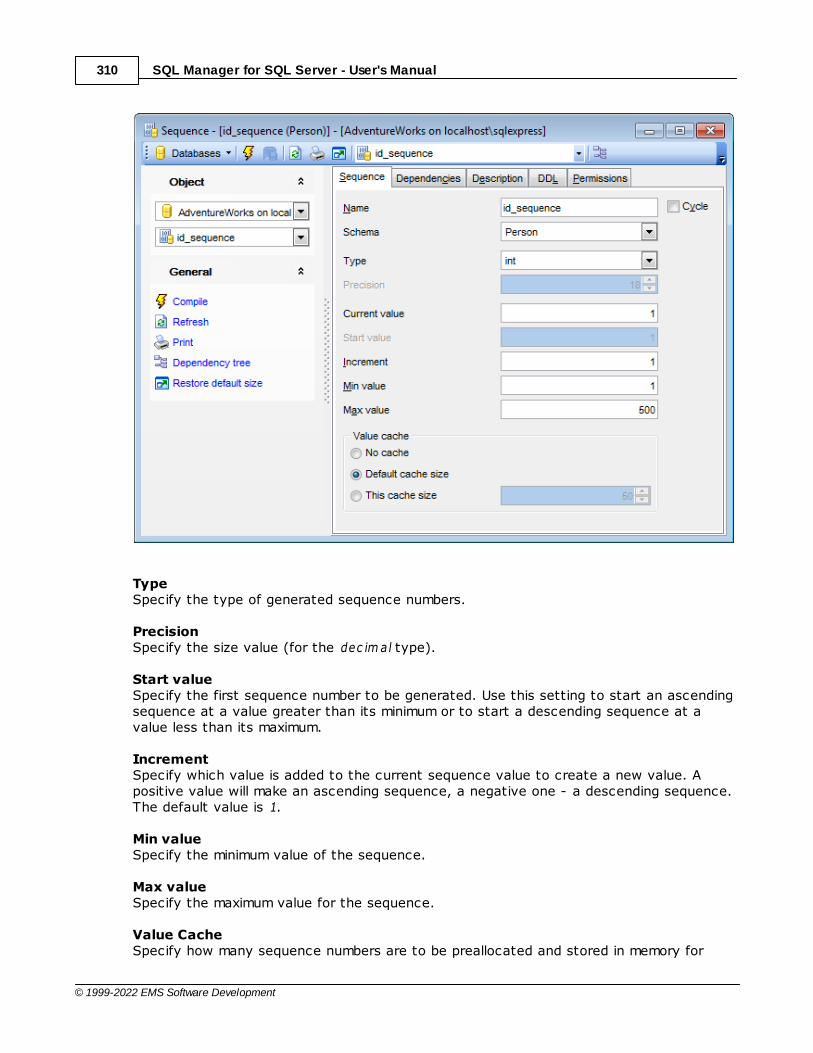
SQL Manager for SQL Server - User's Manual310
© 1999-2022 EMS Software Development
TypeSpecify the type of generated sequence numbers.
PrecisionSpecify the size value (for the dec im al type).
Start valueSpecify the first sequence number to be generated. Use this setting to start an ascendingsequence at a value greater than its minimum or to start a descending sequence at avalue less than its maximum.
IncrementSpecify which value is added to the current sequence value to create a new value. Apositive value will make an ascending sequence, a negative one - a descending sequence.The default value is 1.
Min valueSpecify the minimum value of the sequence.
Max valueSpecify the maximum value for the sequence.
Value CacheSpecify how many sequence numbers are to be preallocated and stored in memory for
SQL Manager for SQL Server - User's Manual311
© 1999-2022 EMS Software Development
faster access in the T his s ize c ac he field or select Default c ac he size or No c ac he.
To compile the object, use the corresponding Compile item of the Navigation bar or toolbar .
5.3.2.7 Synonyms
You can use Synonyms in place of their referenced base object in a number of SQLstatements and expression contexts. When working with synonyms in these contexts, thebase object is affected. For example, if you have a synonym that references a baseobject that is a table , when you insert a row into the synonym, you are actuallyinserting a row into the referenced table.
Synonym Editor allows you to define synonym properties. It opens automatically whenyou create a new synonym and is available on editing an existing one.
To open a synonym in Synonym Editor, double-click it in the DB Explorer tree.Using Navigation bar and ToolbarCreating/editing synonymBrowsing object dependenciesEditing synonym descriptionViewing DDL definitionSetting object permissions
5.3.2.7.1 Using Navigation bar and Toolbar
The Navigation bar and Toolbar provide quick access to tools implemented in SynonymEditor.
966
308 308
228
99
311
313
964
963
962
965
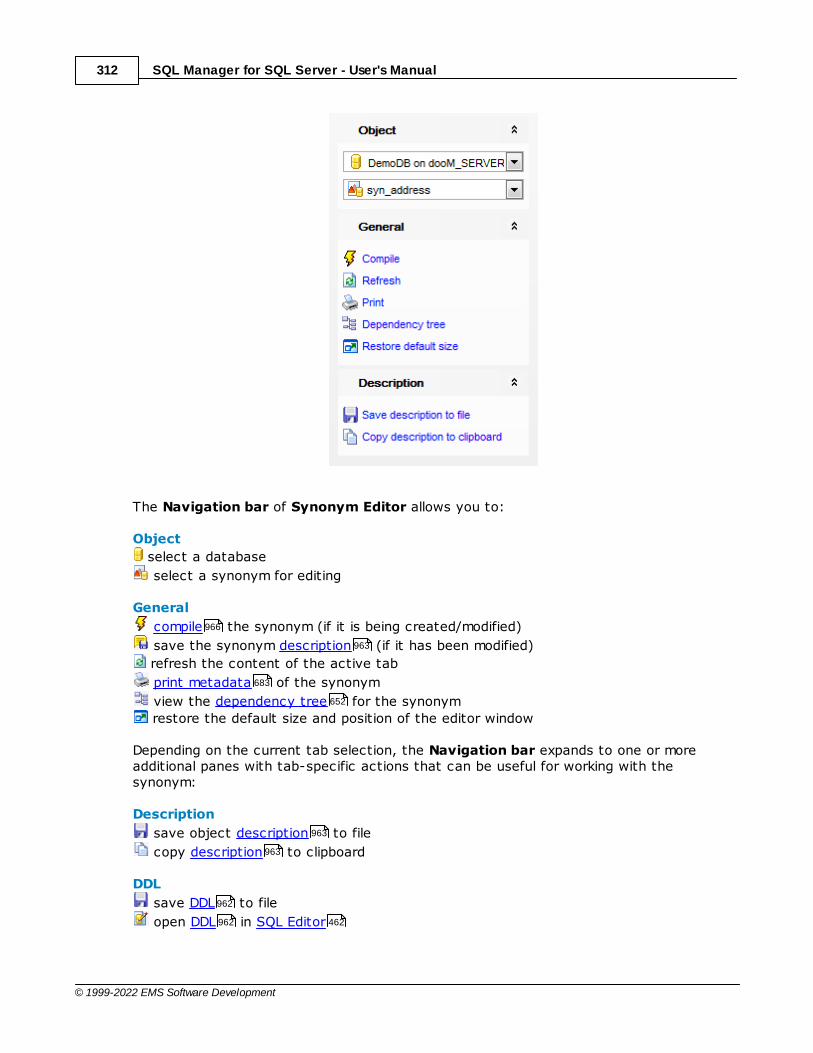
SQL Manager for SQL Server - User's Manual312
© 1999-2022 EMS Software Development
The Navigation bar of Synonym Editor allows you to:
Object
select a database
select a synonym for editing
General
compile the synonym (if it is being created/modified)
save the synonym description (if it has been modified)
refresh the content of the active tab
print metadata of the synonym
view the dependency tree for the synonym
restore the default size and position of the editor window
Depending on the current tab selection, the Navigation bar expands to one or moreadditional panes with tab-specific actions that can be useful for working with thesynonym:
Description
save object description to file
copy description to clipboard
DDL
save DDL to file
open DDL in SQL Editor
966
963
683
652
963
963
962
962 462
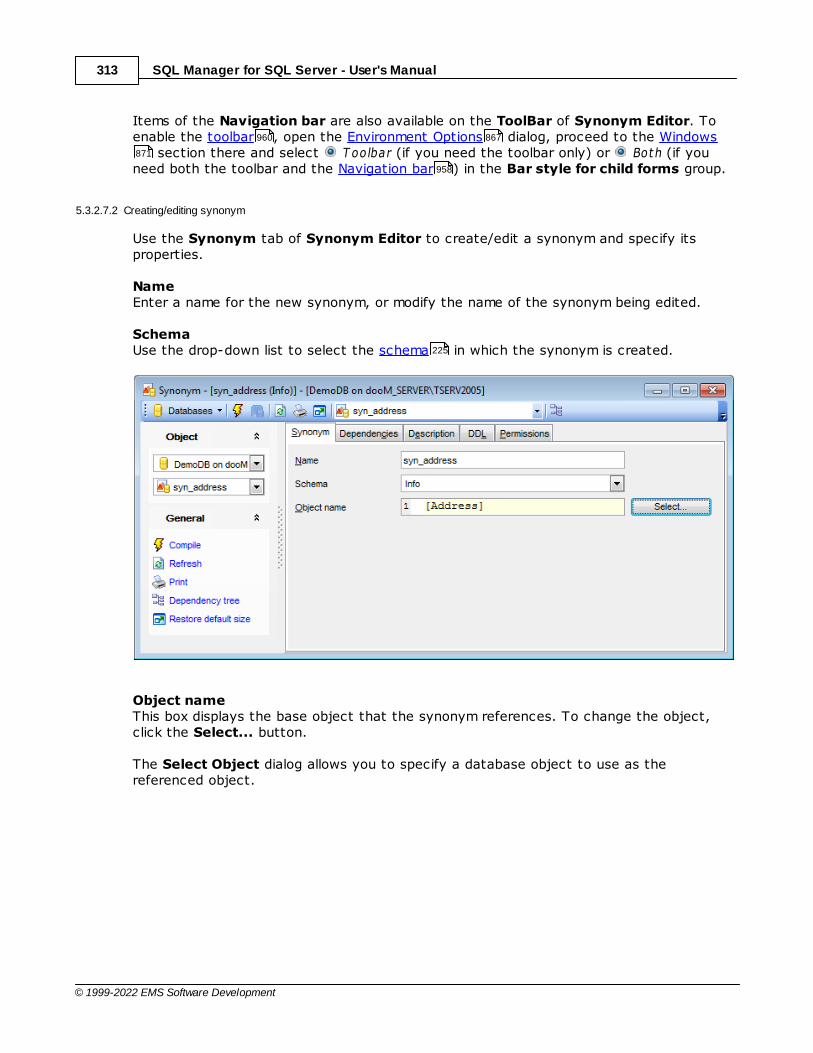
SQL Manager for SQL Server - User's Manual313
© 1999-2022 EMS Software Development
Items of the Navigation bar are also available on the ToolBar of Synonym Editor. Toenable the toolbar , open the Environment Options dialog, proceed to the Windows
section there and select T oolbar (if you need the toolbar only) or Both (if youneed both the toolbar and the Navigation bar ) in the Bar style for child forms group.
5.3.2.7.2 Creating/editing synonym
Use the Synonym tab of Synonym Editor to create/edit a synonym and specify itsproperties.
NameEnter a name for the new synonym, or modify the name of the synonym being edited.
Schema Use the drop-down list to select the schema in which the synonym is created.
Object name This box displays the base object that the synonym references. To change the object,click the Select... button.
The Select Object dialog allows you to specify a database object to use as thereferenced object.
960 867
871
958
225

SQL Manager for SQL Server - User's Manual314
© 1999-2022 EMS Software Development
Hint: The context menu of the Select Object dialog allows you to toggle the Ic ons/Listobject representation mode.
5.3.2.8 Aggregates
Aggregate functions, or Aggregates, perform a calculation on a set of values andreturn a single value. Traditionally Microsoft® SQL Server supported only built-inaggregate functions, such as SUM or MAX, that operate on a set of input scalar valuesand generate a single aggregate value from that set. SQL Server integration with the .NET Framework common language runtime (CLR) now allows developers to create customaggregate functions in managed code and make these functions accessible to Transact-SQL or other managed code.
Aggregate Editor allows you to define aggregate properties. It opens automatically whenyou create a new aggregate and is available on editing an existing one.
To open an aggregate in Aggregate Editor, double-click it in the DB Explorer tree.Using Navigation bar and ToolbarCreating/editing aggregateBrowsing object dependenciesEditing aggregate descriptionViewing DDL definitionSetting object permissions
99
315
316
964
963
962
965
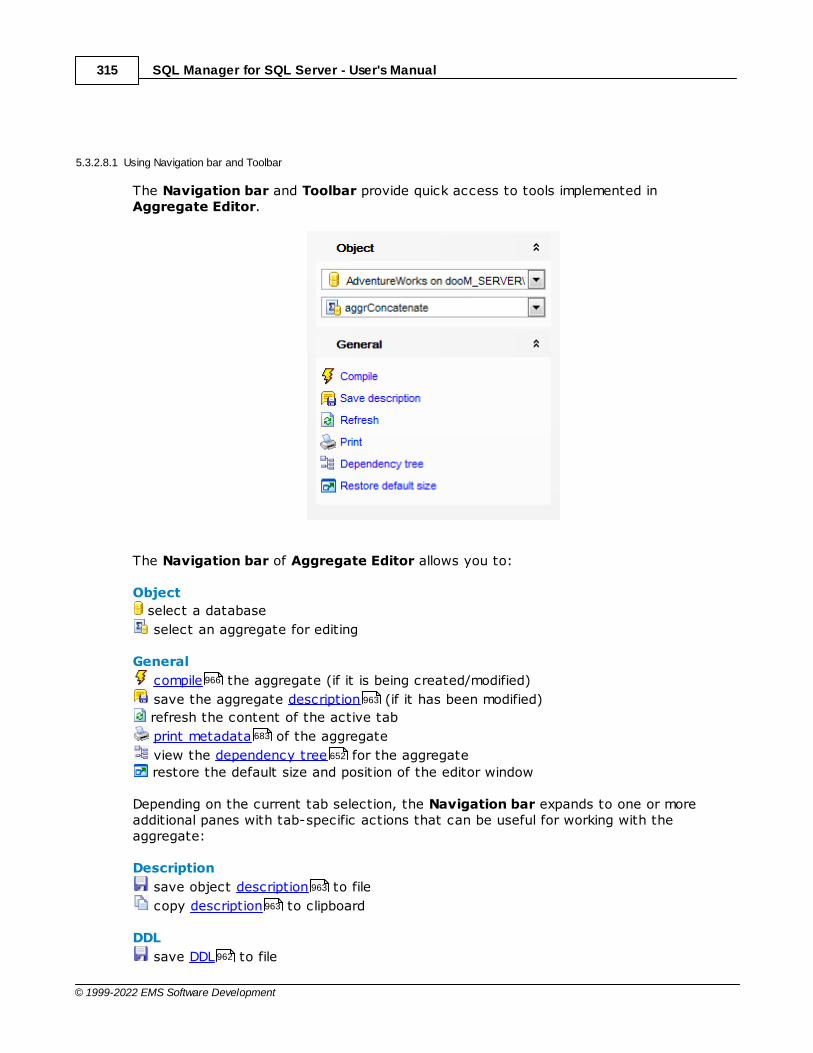
SQL Manager for SQL Server - User's Manual315
© 1999-2022 EMS Software Development
5.3.2.8.1 Using Navigation bar and Toolbar
The Navigation bar and Toolbar provide quick access to tools implemented inAggregate Editor.
The Navigation bar of Aggregate Editor allows you to:
Object
select a database
select an aggregate for editing
General
compile the aggregate (if it is being created/modified)
save the aggregate description (if it has been modified)
refresh the content of the active tab
print metadata of the aggregate
view the dependency tree for the aggregate
restore the default size and position of the editor window
Depending on the current tab selection, the Navigation bar expands to one or moreadditional panes with tab-specific actions that can be useful for working with theaggregate:
Description
save object description to file
copy description to clipboard
DDL
save DDL to file
966
963
683
652
963
963
962
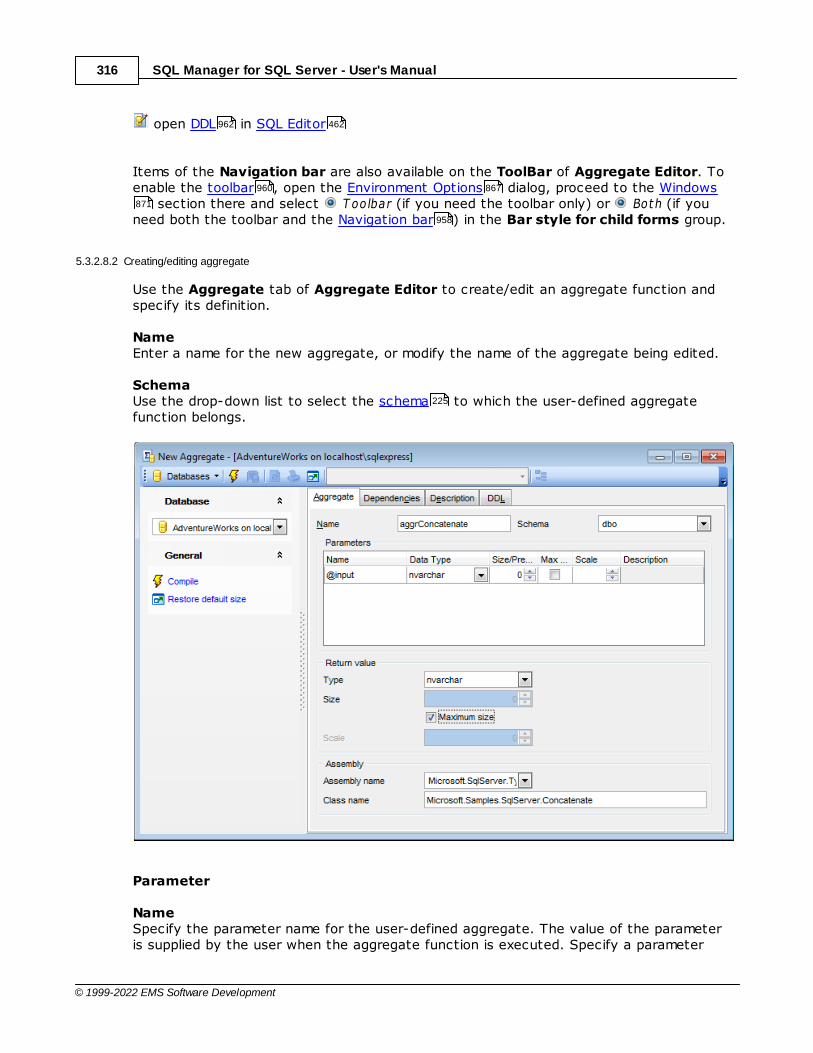
SQL Manager for SQL Server - User's Manual316
© 1999-2022 EMS Software Development
open DDL in SQL Editor
Items of the Navigation bar are also available on the ToolBar of Aggregate Editor. Toenable the toolbar , open the Environment Options dialog, proceed to the Windows
section there and select T oolbar (if you need the toolbar only) or Both (if youneed both the toolbar and the Navigation bar ) in the Bar style for child forms group.
5.3.2.8.2 Creating/editing aggregate
Use the Aggregate tab of Aggregate Editor to create/edit an aggregate function andspecify its definition.
NameEnter a name for the new aggregate, or modify the name of the aggregate being edited.
Schema Use the drop-down list to select the schema to which the user-defined aggregatefunction belongs.
Parameter
NameSpecify the parameter name for the user-defined aggregate. The value of the parameteris supplied by the user when the aggregate function is executed. Specify a parameter
962 462
960 867
871
958
225

SQL Manager for SQL Server - User's Manual317
© 1999-2022 EMS Software Development
name using an at (@) sign as the first character.
TypeUse the drop-down list to select one of the SQL Server system scalar data types to holdthe value of the input parameter or return value.
SizeSpecify the size value (for certain types). Check the Maximum size option to use themaximum values set by SQL Server.
ScaleDefines the maximum number of decimal digits that can be stored to the right of thedecimal point of the value (for float data types).
Return value
Type Use the drop-down list to select the name of an existing data type to be used as thereturn value type.
SizeSpecify the size value (for certain types). Check the Maximum size option to use themaximum values set by SQL Server.
Assembly
Assembly nameUse the drop-down list to select the SQL Server assembly to bind with the user-defined aggregate function. The assembly must already have been created in thedatabase.
Class nameSpecify the name of the class in the assembly that implements the user-definedaggregate. This value must be a valid SQL Server identifier and match the name of a classthat exists in the assembly. This may be a namespace-qualified name if the programminglanguage used to write the class uses namespaces, such as C#.
5.3.2.9 XML Schema Collections
Microsoft® SQL Server™ provides native storage of XML data through the XML data type.The XML Schema Collection stores the imported XML schemas and is then used to dothe following:
Validate XML instancesType the XML data as they are stored in the database
The XML stored in a column or variable that a schema is associated with is referred to astyped XML, because the schema provides the necessary data type information for theinstance data. SQL Server uses this type information to optimize data storage.
Note that XML Schema Collection is a metadata entity like a table in the database, hencethe XML Schema Collection can be created, modified and dropped.
339
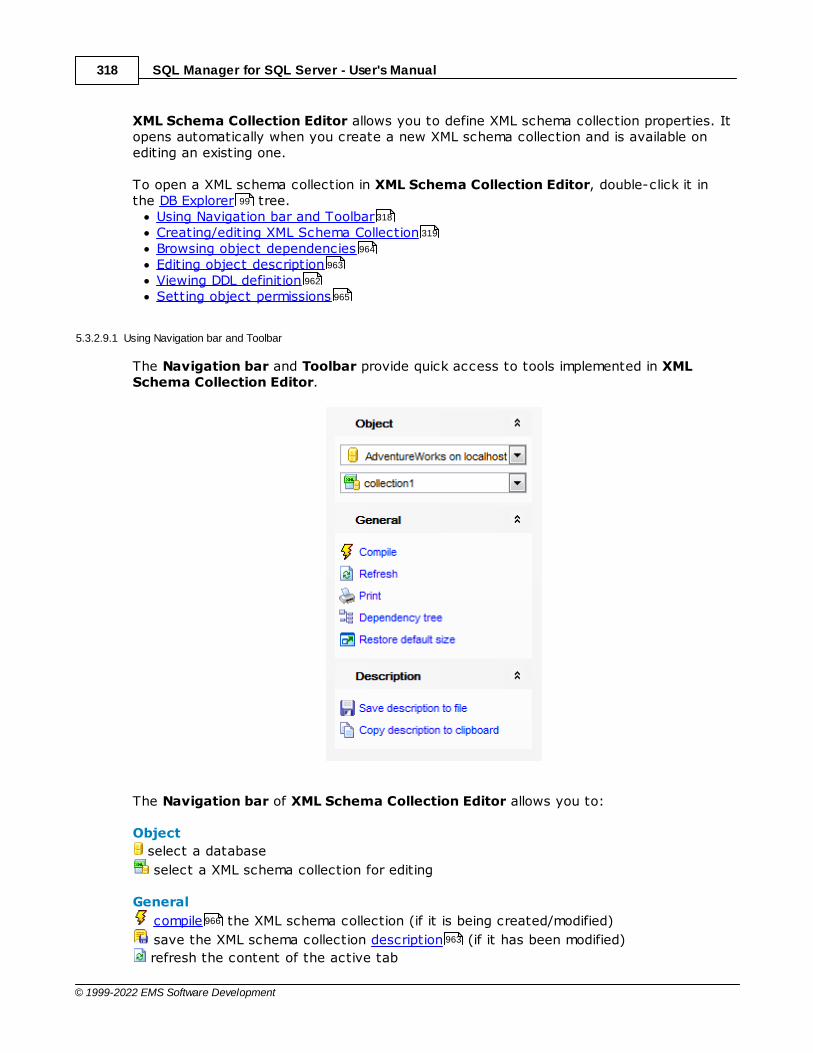
SQL Manager for SQL Server - User's Manual318
© 1999-2022 EMS Software Development
XML Schema Collection Editor allows you to define XML schema collection properties. Itopens automatically when you create a new XML schema collection and is available onediting an existing one.
To open a XML schema collection in XML Schema Collection Editor, double-click it inthe DB Explorer tree.
Using Navigation bar and ToolbarCreating/editing XML Schema CollectionBrowsing object dependenciesEditing object descriptionViewing DDL definitionSetting object permissions
5.3.2.9.1 Using Navigation bar and Toolbar
The Navigation bar and Toolbar provide quick access to tools implemented in XMLSchema Collection Editor.
The Navigation bar of XML Schema Collection Editor allows you to:
Object
select a database
select a XML schema collection for editing
General
compile the XML schema collection (if it is being created/modified)
save the XML schema collection description (if it has been modified)
refresh the content of the active tab
99
318
319
964
963
962
965
966
963

SQL Manager for SQL Server - User's Manual319
© 1999-2022 EMS Software Development
print metadata of the XML schema collection
view the dependency tree for the XML schema collection
restore the default size and position of the editor window
Depending on the current tab selection, the Navigation bar expands to one or moreadditional panes with tab-specific actions that can be useful for working with the XMLschema collection:
Description
save object description to file
copy description to clipboard
DDL
save DDL to file
open DDL in SQL Editor
Items of the Navigation bar are also available on the ToolBar of XML SchemaCollection Editor. To enable the toolbar , open the Environment Options dialog,proceed to the Windows section there and select T oolbar (if you need the toolbaronly) or Both (if you need both the toolbar and the Navigation bar ) in the Bar stylefor child forms group.
5.3.2.9.2 Creating/editing XML Schema Collection
Use the XML Schema Collection tab of XML Schema Collection Editor to create/edit aXML Schema Collection and specify its definition.
NameEnter a name for the new XML Schema Collection, or view the name of the XML SchemaCollection being edited.
Schema Use the drop-down list to select the schema to which the XML Schema Collectionbelongs.
683
652
963
963
962
962 462
960 867
871
958
225
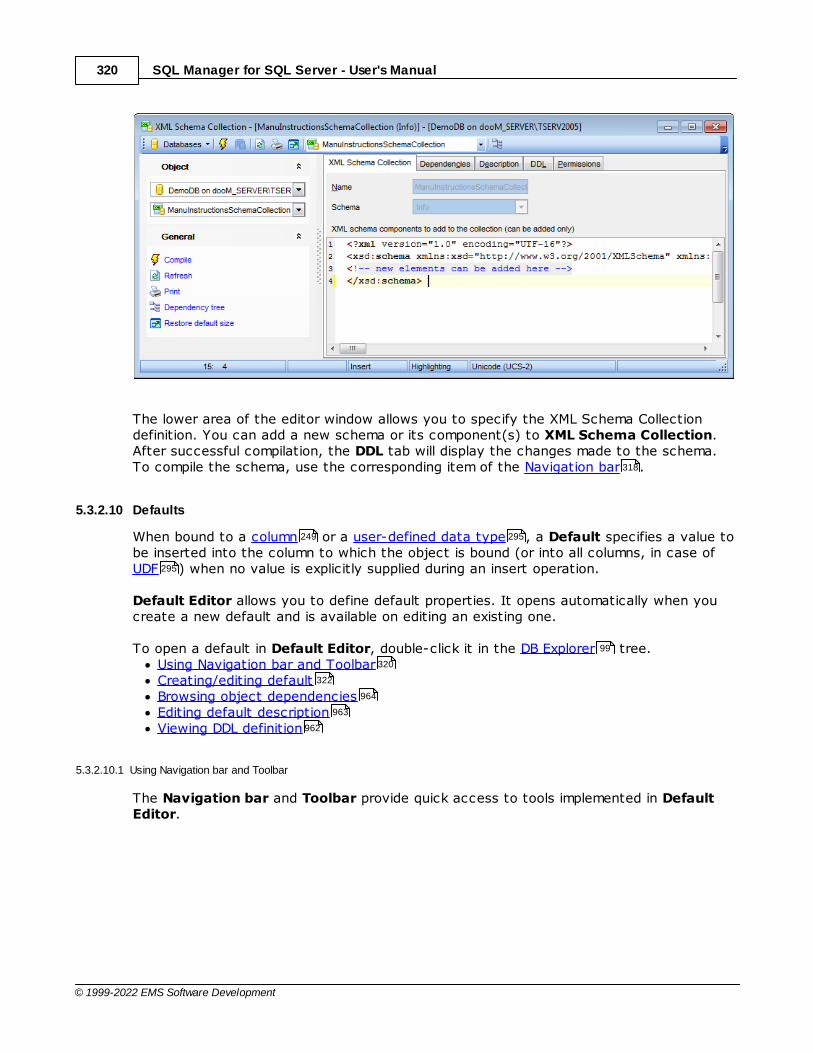
SQL Manager for SQL Server - User's Manual320
© 1999-2022 EMS Software Development
The lower area of the editor window allows you to specify the XML Schema Collectiondefinition. You can add a new schema or its component(s) to XML Schema Collection.After successful compilation, the DDL tab will display the changes made to the schema.To compile the schema, use the corresponding item of the Navigation bar .
5.3.2.10 Defaults
When bound to a column or a user-defined data type , a Default specifies a value tobe inserted into the column to which the object is bound (or into all columns, in case of UDF ) when no value is explicitly supplied during an insert operation.
Default Editor allows you to define default properties. It opens automatically when youcreate a new default and is available on editing an existing one.
To open a default in Default Editor, double-click it in the DB Explorer tree.Using Navigation bar and ToolbarCreating/editing defaultBrowsing object dependenciesEditing default descriptionViewing DDL definition
5.3.2.10.1 Using Navigation bar and Toolbar
The Navigation bar and Toolbar provide quick access to tools implemented in DefaultEditor.
318
249 295
295
99
320
322
964
963
962

SQL Manager for SQL Server - User's Manual321
© 1999-2022 EMS Software Development
The Navigation bar of Default Editor allows you to:
Object
select a database
select a default for editing
General
compile the default (if it is being created/modified)
save the default description (if it has been modified)
refresh the content of the active tab
print metadata of the default
view the dependency tree for the default
restore the default size and position of the editor window
Depending on the current tab selection, the Navigation bar expands to one or moreadditional panes with tab-specific actions that can be useful for working with the default:
Description
save object description to file
copy description to clipboard
DDL
save DDL to file
open DDL in SQL Editor
Items of the Navigation bar are also available on the ToolBar of Default Editor. To
966
963
683
652
963
963
962
962 462
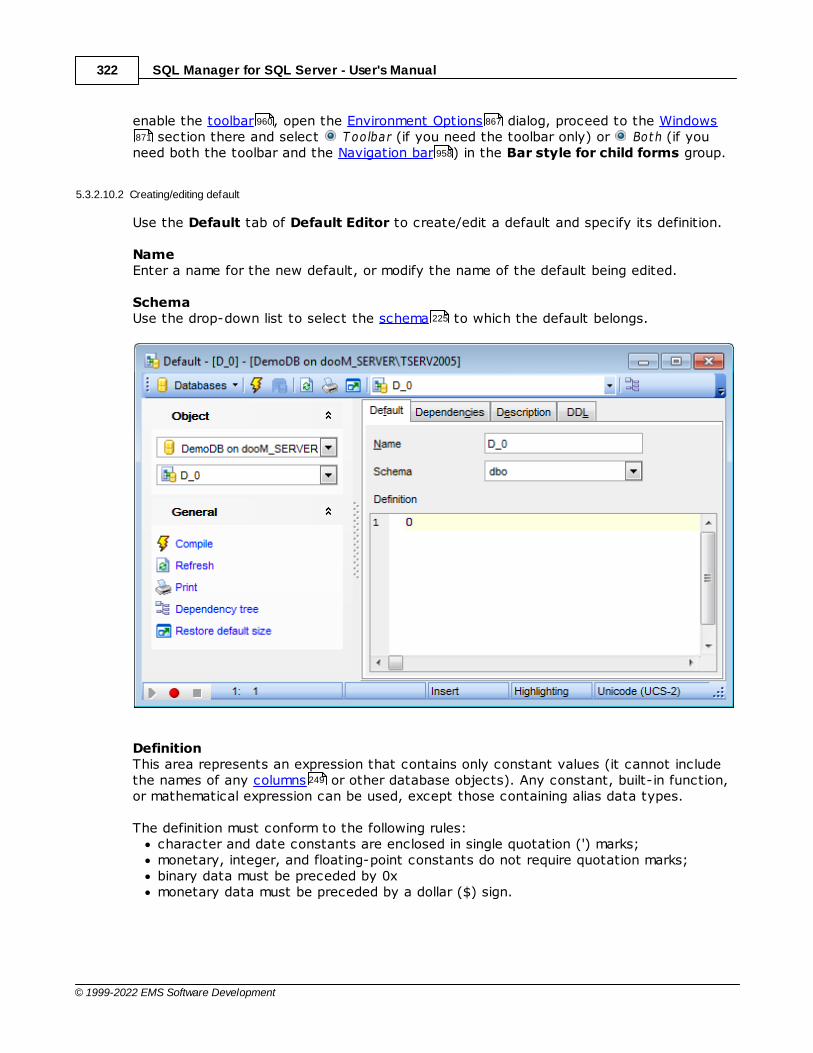
SQL Manager for SQL Server - User's Manual322
© 1999-2022 EMS Software Development
enable the toolbar , open the Environment Options dialog, proceed to the Windows section there and select T oolbar (if you need the toolbar only) or Both (if you
need both the toolbar and the Navigation bar ) in the Bar style for child forms group.
5.3.2.10.2 Creating/editing default
Use the Default tab of Default Editor to create/edit a default and specify its definition.
NameEnter a name for the new default, or modify the name of the default being edited.
Schema Use the drop-down list to select the schema to which the default belongs.
Definition This area represents an expression that contains only constant values (it cannot includethe names of any columns or other database objects). Any constant, built-in function,or mathematical expression can be used, except those containing alias data types.
The definition must conform to the following rules:character and date constants are enclosed in single quotation (') marks;monetary, integer, and floating-point constants do not require quotation marks;binary data must be preceded by 0xmonetary data must be preceded by a dollar ($) sign.
960 867
871
958
225
249
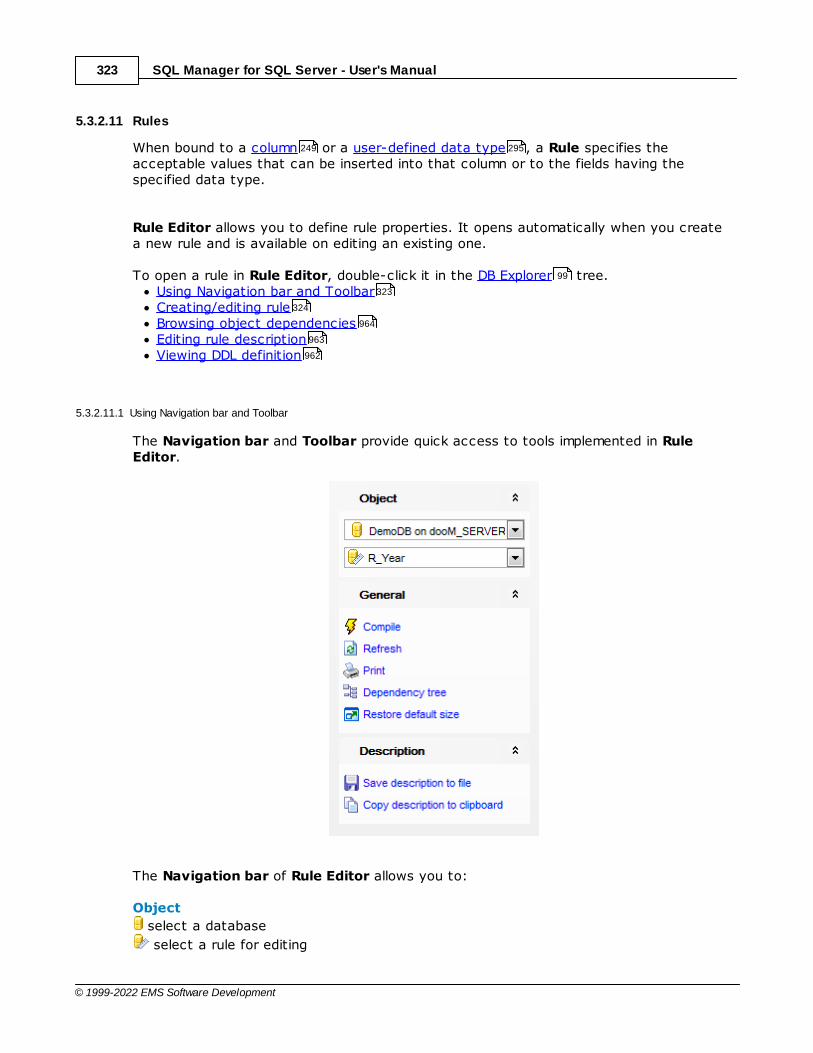
SQL Manager for SQL Server - User's Manual323
© 1999-2022 EMS Software Development
5.3.2.11 Rules
When bound to a column or a user-defined data type , a Rule specifies theacceptable values that can be inserted into that column or to the fields having thespecified data type.
Rule Editor allows you to define rule properties. It opens automatically when you createa new rule and is available on editing an existing one.
To open a rule in Rule Editor, double-click it in the DB Explorer tree.Using Navigation bar and ToolbarCreating/editing ruleBrowsing object dependenciesEditing rule descriptionViewing DDL definition
5.3.2.11.1 Using Navigation bar and Toolbar
The Navigation bar and Toolbar provide quick access to tools implemented in RuleEditor.
The Navigation bar of Rule Editor allows you to:
Object
select a database
select a rule for editing
249 295
99
323
324
964
963
962
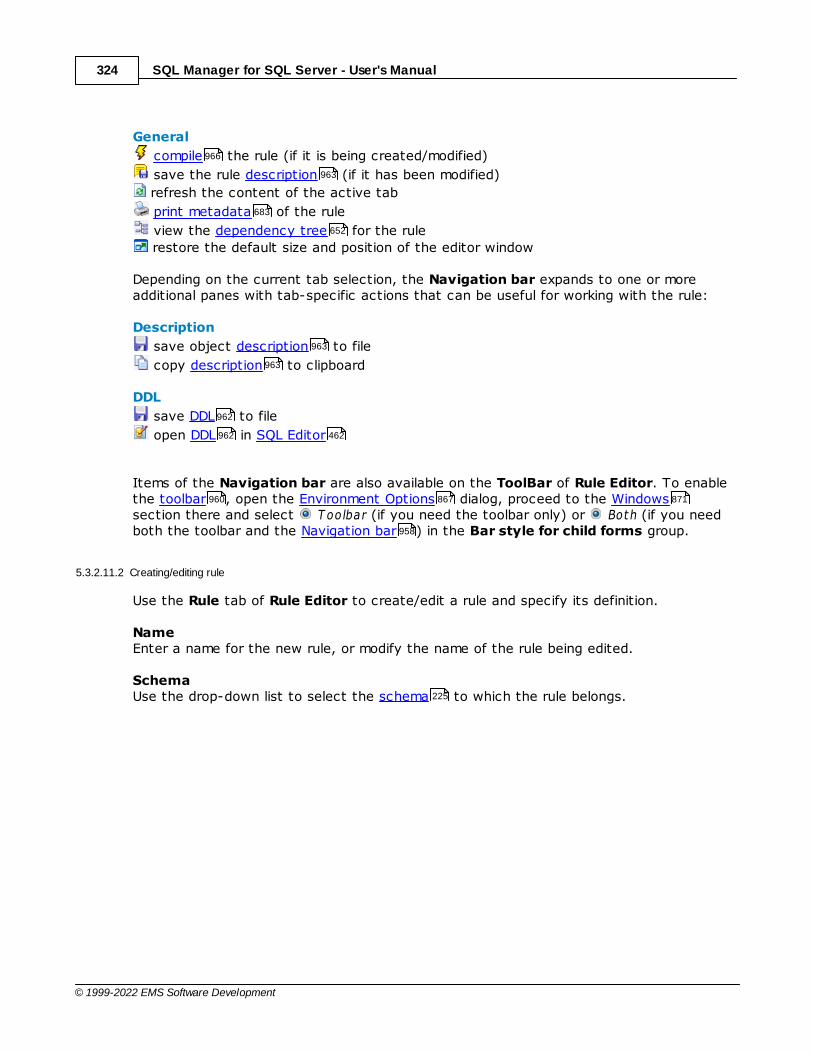
SQL Manager for SQL Server - User's Manual324
© 1999-2022 EMS Software Development
General
compile the rule (if it is being created/modified)
save the rule description (if it has been modified)
refresh the content of the active tab
print metadata of the rule
view the dependency tree for the rule
restore the default size and position of the editor window
Depending on the current tab selection, the Navigation bar expands to one or moreadditional panes with tab-specific actions that can be useful for working with the rule:
Description
save object description to file
copy description to clipboard
DDL
save DDL to file
open DDL in SQL Editor
Items of the Navigation bar are also available on the ToolBar of Rule Editor. To enablethe toolbar , open the Environment Options dialog, proceed to the Windowssection there and select T oolbar (if you need the toolbar only) or Both (if you needboth the toolbar and the Navigation bar ) in the Bar style for child forms group.
5.3.2.11.2 Creating/editing rule
Use the Rule tab of Rule Editor to create/edit a rule and specify its definition.
NameEnter a name for the new rule, or modify the name of the rule being edited.
Schema Use the drop-down list to select the schema to which the rule belongs.
966
963
683
652
963
963
962
962 462
960 867 871
958
225
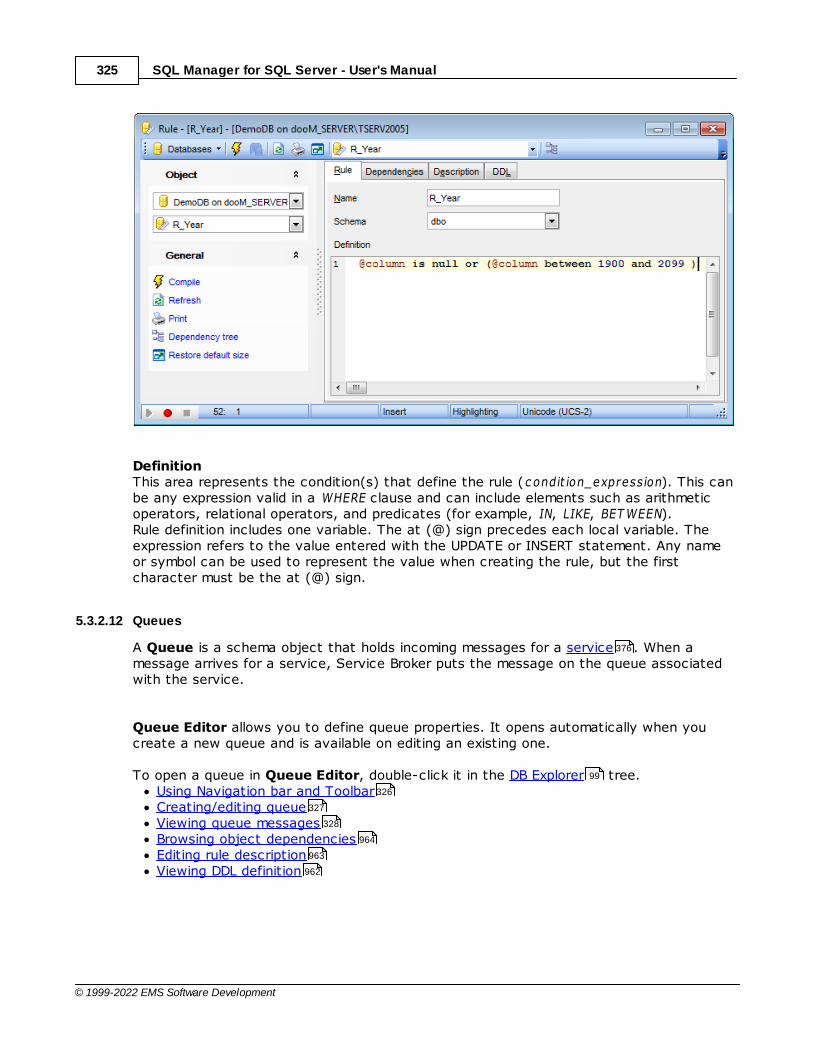
SQL Manager for SQL Server - User's Manual325
© 1999-2022 EMS Software Development
Definition This area represents the condition(s) that define the rule (c ondit ion_expression). This canbe any expression valid in a WHERE clause and can include elements such as arithmeticoperators, relational operators, and predicates (for example, IN, LIKE, BET WEEN). Rule definition includes one variable. The at (@) sign precedes each local variable. Theexpression refers to the value entered with the UPDATE or INSERT statement. Any nameor symbol can be used to represent the value when creating the rule, but the firstcharacter must be the at (@) sign.
5.3.2.12 Queues
A Queue is a schema object that holds incoming messages for a service . When amessage arrives for a service, Service Broker puts the message on the queue associatedwith the service.
Queue Editor allows you to define queue properties. It opens automatically when youcreate a new queue and is available on editing an existing one.
To open a queue in Queue Editor, double-click it in the DB Explorer tree.Using Navigation bar and ToolbarCreating/editing queueViewing queue messagesBrowsing object dependenciesEditing rule descriptionViewing DDL definition
376
99
326
327
328
964
963
962
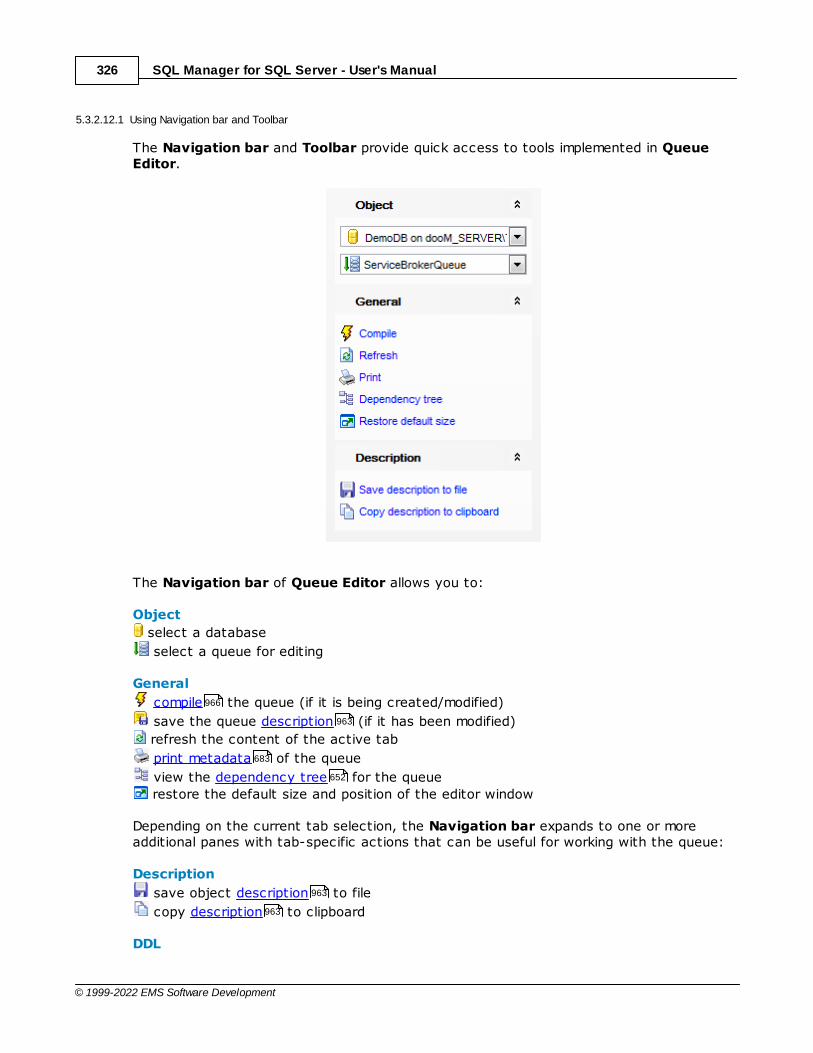
SQL Manager for SQL Server - User's Manual326
© 1999-2022 EMS Software Development
5.3.2.12.1 Using Navigation bar and Toolbar
The Navigation bar and Toolbar provide quick access to tools implemented in QueueEditor.
The Navigation bar of Queue Editor allows you to:
Object
select a database
select a queue for editing
General
compile the queue (if it is being created/modified)
save the queue description (if it has been modified)
refresh the content of the active tab
print metadata of the queue
view the dependency tree for the queue
restore the default size and position of the editor window
Depending on the current tab selection, the Navigation bar expands to one or moreadditional panes with tab-specific actions that can be useful for working with the queue:
Description
save object description to file
copy description to clipboard
DDL
966
963
683
652
963
963
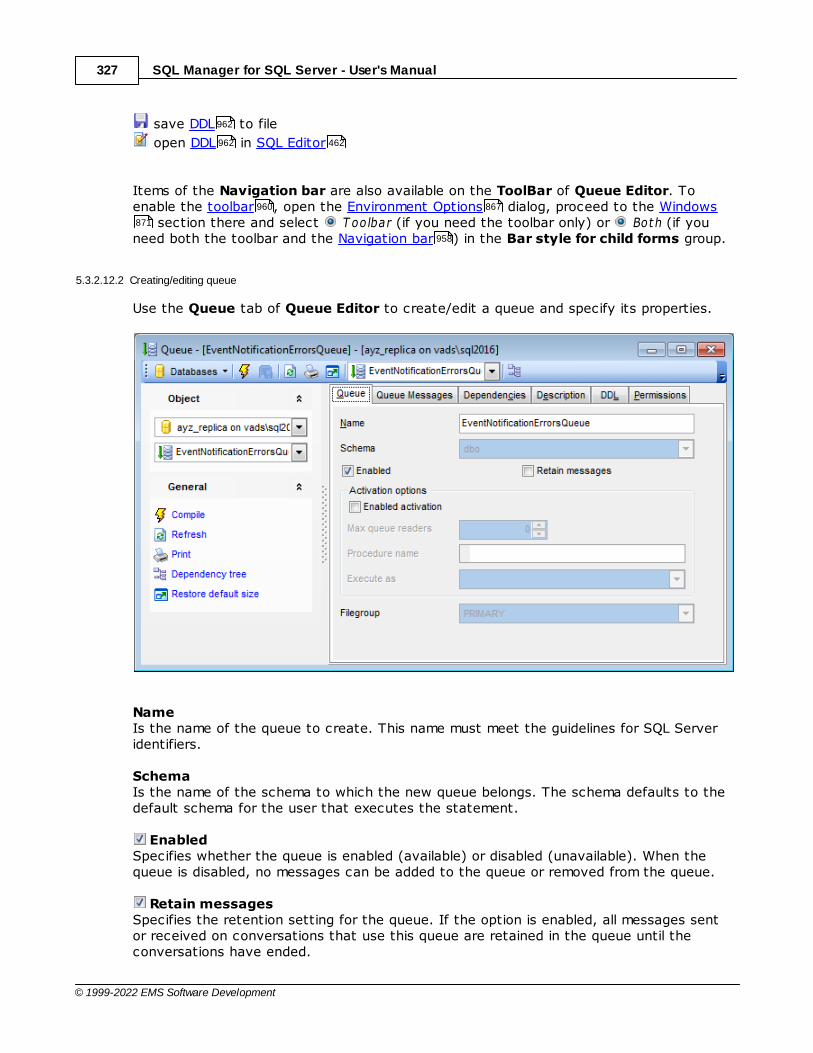
SQL Manager for SQL Server - User's Manual327
© 1999-2022 EMS Software Development
save DDL to file
open DDL in SQL Editor
Items of the Navigation bar are also available on the ToolBar of Queue Editor. Toenable the toolbar , open the Environment Options dialog, proceed to the Windows
section there and select T oolbar (if you need the toolbar only) or Both (if youneed both the toolbar and the Navigation bar ) in the Bar style for child forms group.
5.3.2.12.2 Creating/editing queue
Use the Queue tab of Queue Editor to create/edit a queue and specify its properties.
NameIs the name of the queue to create. This name must meet the guidelines for SQL Serveridentifiers.
SchemaIs the name of the schema to which the new queue belongs. The schema defaults to thedefault schema for the user that executes the statement.
EnabledSpecifies whether the queue is enabled (available) or disabled (unavailable). When thequeue is disabled, no messages can be added to the queue or removed from the queue.
Retain messagesSpecifies the retention setting for the queue. If the option is enabled, all messages sentor received on conversations that use this queue are retained in the queue until theconversations have ended.
962
962 462
960 867
871
958

SQL Manager for SQL Server - User's Manual328
© 1999-2022 EMS Software Development
Activation options
Enabled activationSpecifies whether Service Broker starts the stored procedure to process messages in thisqueue.
Procedure name Enter the name of the activation stored procedure , i.e. the stored procedure that hasto be started to process messages in this queue.
Max queue readersSpecifies the maximum number of instances of the activation stored procedure that thequeue starts at the same time.
Execute asUse the drop-down list to select the SQL Server database user account under which theactivation stored procedure runs.
FilegroupSpecifies the SQL Server filegroup on which the queue is created.
5.3.2.12.3 View ing queue messages
Use the Queue Messages tab of Queue Editor to view queue messages within arequest-reply message cycle.
The Queue Messages List displays the messages as a grid with the following columns:Status, Pr ior it y, Order, Message Sequenc e Num ber, Serv ic e Nam e, Serv ic e Cont rac tNam e, Message T ype Nam e, Validat ion, Message Body. If more convenient, you canchange the order of the columns by dragging their headers horizontally.
Click a column caption to sort items by values of this column in the ascending or thedescending mode.
289
190
503

SQL Manager for SQL Server - User's Manual329
© 1999-2022 EMS Software Development
If necessary, you can group the data in grid by any of the columns. This operation isperformed by dragging the column header to the gray "Group by" box area at the top.When grouping by a column is applied to the grid, all the rows are displayed as subnodesto the grouping row value. To reverse grouping, just drag the column header back.
5.3.2.13 External Tables
External tables are used in SQL Server to access data stored in a Hadoop cluster or Azureblob storage. It can also be used to create an external table for Elastic Database query.
To open an external table double-click it in the DB Explorer tree.
Creating/editing external tablesEditing external table descriptionViewing DDL definition
5.3.2.13.1 Creating/editing external tables
NameSpecify the name for the new external table.
SchemaSelect schema for the external table location.
Data sourceSelect the name of the external data source.
99
329
963
962
SQL Manager for SQL Server - User's Manual330
© 1999-2022 EMS Software Development
File formatSelect the existing external file format object that stores file type and compressionmethod for external data.
Remote schemaSpecify the different schema on the remote database to map the external table definition.
Remote nameSet the remote table name
LocationSpecify the folder or the full path to the file for the actual data in Hadoop or Azure blobstorage. The location starts from the root folder; the root folder is the data locationspecified in the external data source.
DistributionThis option is only required SHARD_MAP_MANAGER databases. Select how the table istreated:
SHARDED table so data from different tables is not overlapped; REPLICATED table so that tables have the same data on every shard; ROUND_ROBIN so that application-specific method is used to distribute the data.
Reject optionsReject parameters are used to determine how PolyBase will handle dirty records.
Select if the values will be specified as literal Value or Percentage.
ValueSpecifies the value or the percentage of rows that can be rejected before the queryfails.
Sample value This attribute is required when you specify Percentage value type. It determines thenumber of rows to attempt to retrieve before the PolyBase recalculates the percentage ofrejected rows.
Row locationInput the directory within the External Data Source to write rejected rows and the errorfile.
5.3.3 Non-schema Objects
Other types of objects are also stored in the database and can be created andmanipulated with SQL, but are not contained in a schema:
AssembliesDDL TriggersPartition FunctionsPartition SchemesFull-Text Catalogs
339
342
345
349
352
SQL Manager for SQL Server - User's Manual331
© 1999-2022 EMS Software Development
Symmetric KeysAsymmetric KeysCertificatesMessage TypesContractsServicesRoutesRemote Service BindingsDB Scoped CredentialsExternal Data SourcesExternal File Formats
Use the DB Explorer tree to navigate within the database(s) and the objects.
See also:
New Object dialog
Duplicate Object Wizard
5.3.3.1 Users
A database User is a database-level security principal enabling object access permissioncontrol at the finest level of granularity. A user represents a single SQL Server login withinthe scope of the database in which the user is defined.
User Editor allows you to define user properties and membership. It opens automaticallywhen you create a new user and is available on editing an existing one.
To open a user in User Editor, double-click it in the DB Explorer tree.Using Navigation bar and ToolbarCreating/editing userDefining user membershipEditing object descriptionViewing DDL definitionSetting object permissions
See also:
Roles
Logins
Grant Manager
5.3.3.1.1 Using Navigation bar and Toolbar
The Navigation bar and Toolbar provide quick access to tools implemented in UserEditor.
357
360
364
370
373
376
379
382
385
386
387
99 84
216
218
99
331
333
334
963
962
965
335
390
724
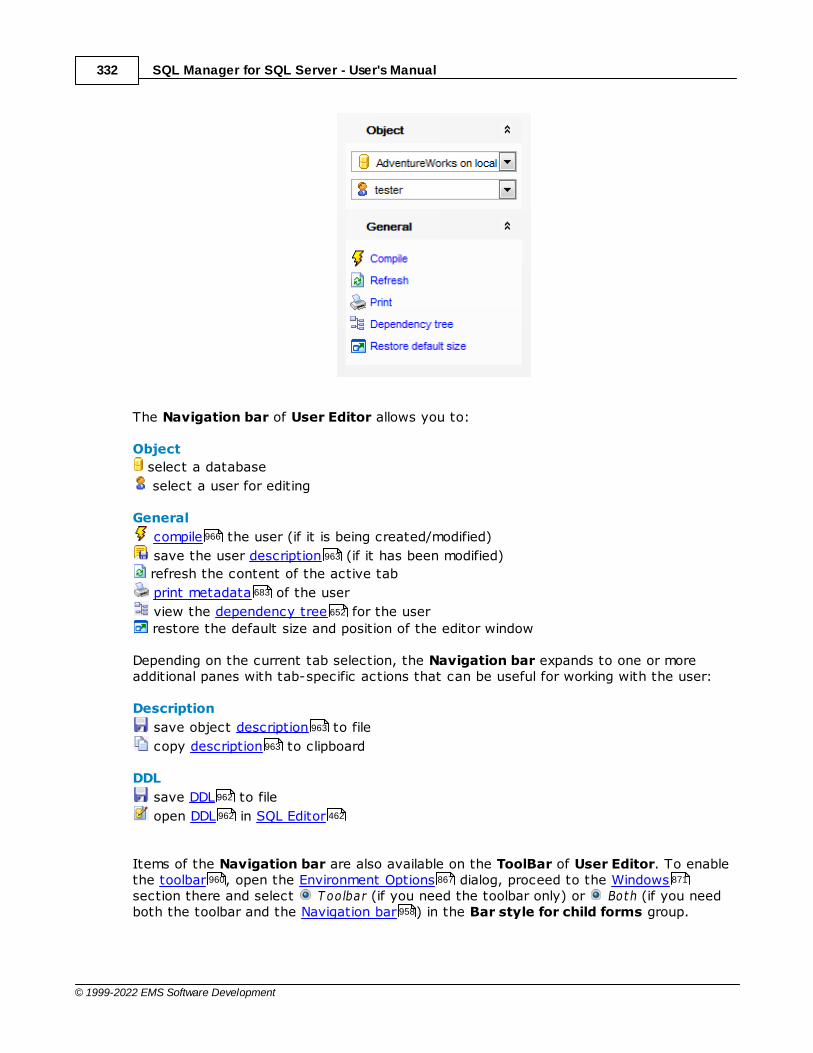
SQL Manager for SQL Server - User's Manual332
© 1999-2022 EMS Software Development
The Navigation bar of User Editor allows you to:
Object
select a database
select a user for editing
General
compile the user (if it is being created/modified)
save the user description (if it has been modified)
refresh the content of the active tab
print metadata of the user
view the dependency tree for the user
restore the default size and position of the editor window
Depending on the current tab selection, the Navigation bar expands to one or moreadditional panes with tab-specific actions that can be useful for working with the user:
Description
save object description to file
copy description to clipboard
DDL
save DDL to file
open DDL in SQL Editor
Items of the Navigation bar are also available on the ToolBar of User Editor. To enablethe toolbar , open the Environment Options dialog, proceed to the Windowssection there and select T oolbar (if you need the toolbar only) or Both (if you needboth the toolbar and the Navigation bar ) in the Bar style for child forms group.
966
963
683
652
963
963
962
962 462
960 867 871
958

SQL Manager for SQL Server - User's Manual333
© 1999-2022 EMS Software Development
5.3.3.1.2 Creating/editing user
Use the User tab of User Editor to create/edit a user and specify its properties.
LoginIf this option is selected, use the drop-down list to specify the SQL Server login forwhich the database user is being created.
Windows principal
Check this option to specify the Windows principal for which the database user is being
created. The Windows principal can be a Windows user, or a Windows group. The user willbe created even if the Windows principal does not have a login. When connecting to SQLServer, if the Windows principal does not have a login, the Windows principal mustauthenticate at the Database Engine through membership in a Windows group that has alogin, or the connection string must specify the contained database as the initial catalog.
Local account on serverSelect this option to specify a built-in server account for the user, or specify theWindows Domain. After that specify User/group name in the corresponding field.You can select whether a new user will be created in a User/custom group or in a Built-in group.
CertificateIf this option is selected, use the drop-down list to specify the certificate for which
723
364

SQL Manager for SQL Server - User's Manual334
© 1999-2022 EMS Software Development
the database user is being created.
Asymmetric keyIf this option is selected, use the drop-down list to specify the asymmetric key forwhich the database user is being created.
Without loginThis option specifies that the user should not be mapped to any of existing logins .
User NameSpecifies the name by which the user is identified inside this database.
Default schemaUse the drop-down list to specify the first schema that will be searched by the serverwhen it resolves the names of objects for this database user.
Default languageSpecify the default language for the new user. If no default language is specified, thedefault language for the user will be the default language of the database.Note: Default language can be specified only for contained database users.
5.3.3.1.3 Defining user membership
The Member of tab of User Editor allows you to define user membership, i.e. to selectthe built-in database role(s) the user will belong to. The selected roles determine thetasks that can be performed through the user.
To select a role, you need to move it from the Available Roles list to the Selected
Roles list. Use the buttons or drag-and-drop operations to move the roles fromone list to another.
360
723
225
335
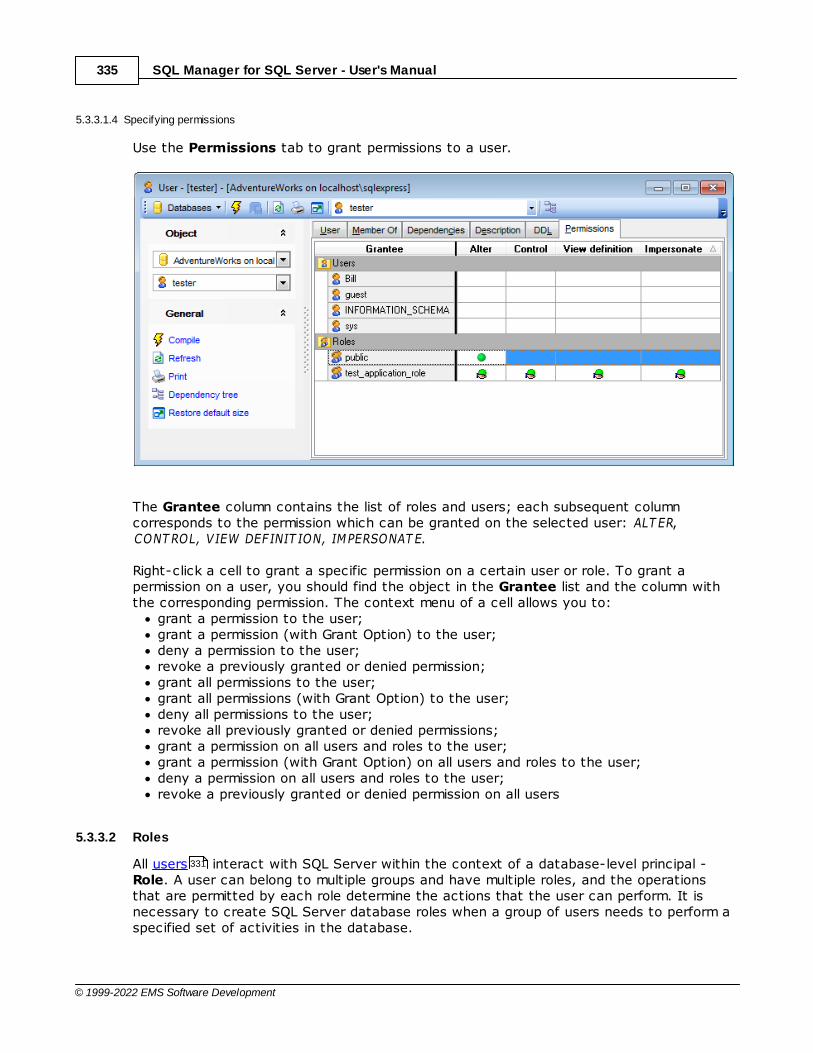
SQL Manager for SQL Server - User's Manual335
© 1999-2022 EMS Software Development
5.3.3.1.4 Specifying permissions
Use the Permissions tab to grant permissions to a user.
The Grantee column contains the list of roles and users; each subsequent columncorresponds to the permission which can be granted on the selected user: ALT ER,CONT ROL, VIEW DEFINIT ION, IMPERSONAT E.
Right-click a cell to grant a specific permission on a certain user or role. To grant apermission on a user, you should find the object in the Grantee list and the column withthe corresponding permission. The context menu of a cell allows you to:
grant a permission to the user;grant a permission (with Grant Option) to the user;deny a permission to the user;revoke a previously granted or denied permission;grant all permissions to the user;grant all permissions (with Grant Option) to the user;deny all permissions to the user;revoke all previously granted or denied permissions;grant a permission on all users and roles to the user;grant a permission (with Grant Option) on all users and roles to the user;deny a permission on all users and roles to the user;revoke a previously granted or denied permission on all users
5.3.3.2 Roles
All users interact with SQL Server within the context of a database-level principal -Role. A user can belong to multiple groups and have multiple roles, and the operationsthat are permitted by each role determine the actions that the user can perform. It isnecessary to create SQL Server database roles when a group of users needs to perform aspecified set of activities in the database.
331
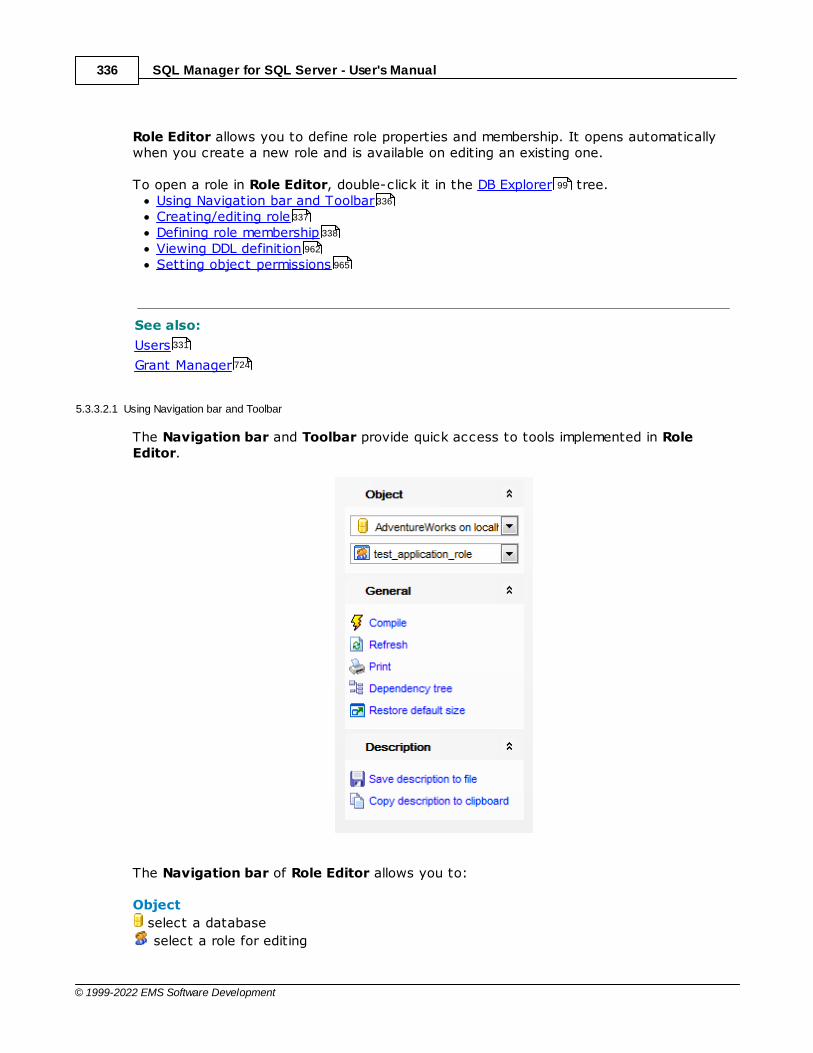
SQL Manager for SQL Server - User's Manual336
© 1999-2022 EMS Software Development
Role Editor allows you to define role properties and membership. It opens automaticallywhen you create a new role and is available on editing an existing one.
To open a role in Role Editor, double-click it in the DB Explorer tree.Using Navigation bar and ToolbarCreating/editing roleDefining role membershipViewing DDL definitionSetting object permissions
See also:
Users
Grant Manager
5.3.3.2.1 Using Navigation bar and Toolbar
The Navigation bar and Toolbar provide quick access to tools implemented in RoleEditor.
The Navigation bar of Role Editor allows you to:
Object
select a database
select a role for editing
99
336
337
338
962
965
331
724
SQL Manager for SQL Server - User's Manual337
© 1999-2022 EMS Software Development
General
compile the role (if it is being created/modified)
refresh the content of the active tab
print metadata of the role
view the dependency tree for the role
restore the default size and position of the editor window
Depending on the current tab selection, the Navigation bar expands to one or moreadditional panes with tab-specific actions that can be useful for working with the role:
DDL
save DDL to file
open DDL in SQL Editor
Items of the Navigation bar are also available on the ToolBar of Role Editor. To enablethe toolbar , open the Environment Options dialog, proceed to the Windowssection there and select T oolbar (if you need the toolbar only) or Both (if you needboth the toolbar and the Navigation bar ) in the Bar style for child forms group.
5.3.3.2.2 Creating/editing role
Use the Role tab of Role Editor to create/edit a role and specify its properties andmembership.
NameEnter a name for the new role, or view the name of the role being edited.
Role typeSelect whether the preferable role type:
Standard (user-defined) role Applic at ion role
966
683
652
962
962 462
960 867 871
958
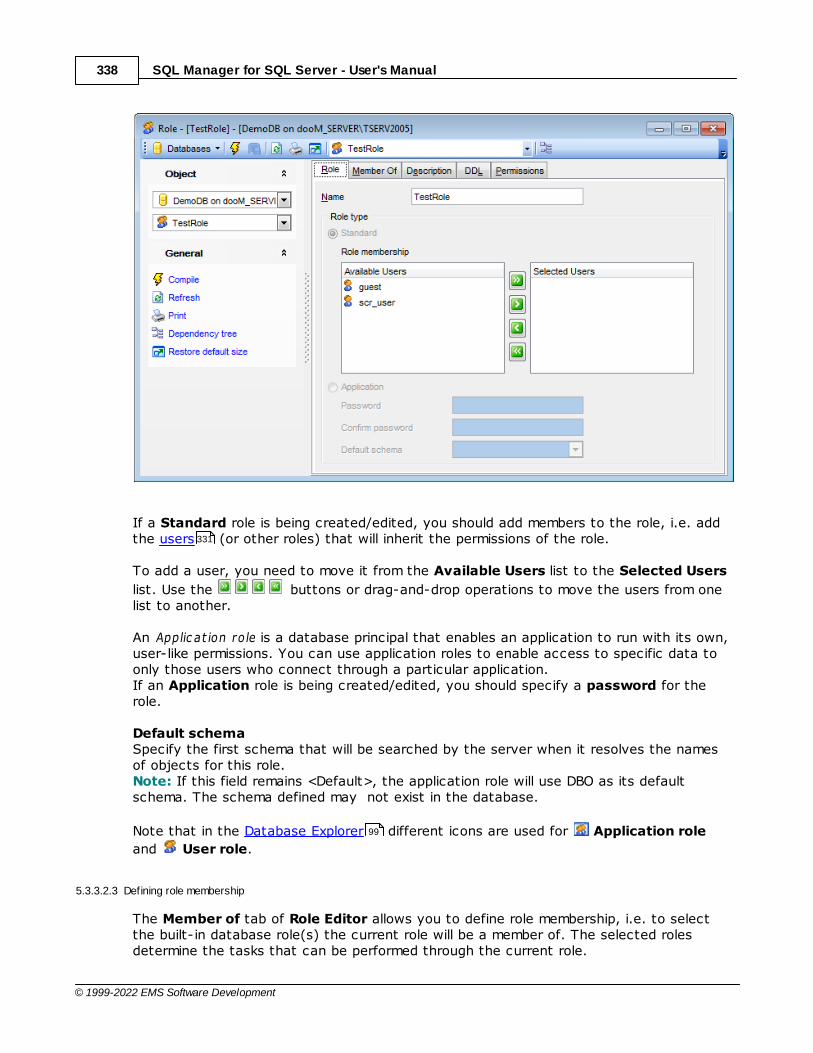
SQL Manager for SQL Server - User's Manual338
© 1999-2022 EMS Software Development
If a Standard role is being created/edited, you should add members to the role, i.e. addthe users (or other roles) that will inherit the permissions of the role.
To add a user, you need to move it from the Available Users list to the Selected Users
list. Use the buttons or drag-and-drop operations to move the users from onelist to another.
An Applic at ion role is a database principal that enables an application to run with its own,user-like permissions. You can use application roles to enable access to specific data toonly those users who connect through a particular application. If an Application role is being created/edited, you should specify a password for therole.
Default schemaSpecify the first schema that will be searched by the server when it resolves the namesof objects for this role.Note: If this field remains <Default>, the application role will use DBO as its defaultschema. The schema defined may not exist in the database.
Note that in the Database Explorer different icons are used for Application role
and User role.
5.3.3.2.3 Defining role membership
The Member of tab of Role Editor allows you to define role membership, i.e. to selectthe built-in database role(s) the current role will be a member of. The selected rolesdetermine the tasks that can be performed through the current role.
331
99
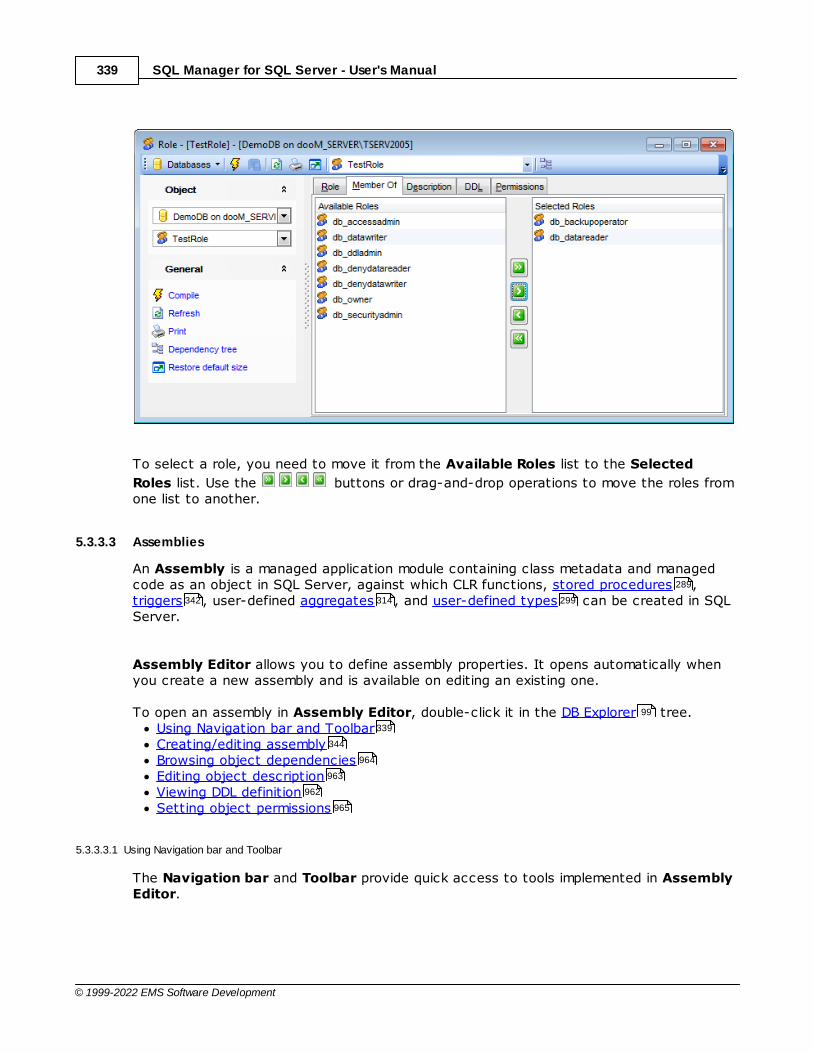
SQL Manager for SQL Server - User's Manual339
© 1999-2022 EMS Software Development
To select a role, you need to move it from the Available Roles list to the Selected
Roles list. Use the buttons or drag-and-drop operations to move the roles fromone list to another.
5.3.3.3 Assemblies
An Assembly is a managed application module containing class metadata and managedcode as an object in SQL Server, against which CLR functions, stored procedures ,triggers , user-defined aggregates , and user-defined types can be created in SQLServer.
Assembly Editor allows you to define assembly properties. It opens automatically whenyou create a new assembly and is available on editing an existing one.
To open an assembly in Assembly Editor, double-click it in the DB Explorer tree.Using Navigation bar and ToolbarCreating/editing assemblyBrowsing object dependenciesEditing object descriptionViewing DDL definitionSetting object permissions
5.3.3.3.1 Using Navigation bar and Toolbar
The Navigation bar and Toolbar provide quick access to tools implemented in AssemblyEditor.
289
342 314 299
99
339
344
964
963
962
965

SQL Manager for SQL Server - User's Manual340
© 1999-2022 EMS Software Development
The Navigation bar of Assembly Editor allows you to:
Object
select a database
select an assembly for editing
General
compile the assembly (if it is being created/modified)
save the assembly description (if it has been modified)
refresh the content of the active tab
print metadata of the assembly
view the dependency tree for the assembly
restore the default size and position of the editor window
Depending on the current tab selection, the Navigation bar expands to one or moreadditional panes with tab-specific actions that can be useful for working with theassembly:
Description
save object description to file
copy description to clipboard
DDL
save DDL to file
open DDL in SQL Editor
966
963
683
652
963
963
962
962 462

SQL Manager for SQL Server - User's Manual341
© 1999-2022 EMS Software Development
Items of the Navigation bar are also available on the ToolBar of Assembly Editor. Toenable the toolbar , open the Environment Options dialog, proceed to the Windows
section there and select T oolbar (if you need the toolbar only) or Both (if youneed both the toolbar and the Navigation bar ) in the Bar style for child forms group.
5.3.3.3.2 Creating/editing assembly
Use the Assembly tab of Assembly Editor to create/edit an assembly and specify itsproperties.
NameEnter a name for the new assembly, or view the name of the assembly being edited.
OwnerUse the drop-down list to select the owner of the assembly (the name of a database user
or role ).
Visible for creating CLR objectsThis option specifies whether the assembly is visible for creating common languageruntime (CLR) functions, stored procedures , triggers , user-defined aggregates ,and user-defined types against it. If disabled, the assembly is intended to be calledonly by other assemblies. If there are existing CLR database objects already createdagainst the assembly, the visibility of the assembly cannot be changed.
Don't check data that depends on assemblyIf this option is unchecked, SQL Server refreshes even those assemblies upon whichpersisted data in the database is dependent.
Code access permissions Specifies a set of code access permissions granted to the assembly when it is accessedby SQL Server.
960 867
871
958
331 335
289 342 314
299

SQL Manager for SQL Server - User's Manual342
© 1999-2022 EMS Software Development
SafeThe most restrictive permission set. Code executed by an assembly cannot accessexternal system resources such as files, the network, environment variables, or theregistry.
External accessAllows assemblies to access certain external system resources such as files, networks,environmental variables, and the registry.
UnsafeAllows assemblies unrestricted access to resources, both within and outside SQL Server.Code executing from within an Unsafe assembly can call unmanaged code.
The Assembly info panel is used to display information about the assembly orapplication, including a description, version information, company name, product name,and more. This information corresponds to the values of global assembly attributes.
The Files list allows you to manage files that correspond to the assembly, and specify thelocal path or network location.
To add a file, right-click within the F iles area and select the Add Row popup menuitem.
To remove a file, right-click the file name within the F iles area and select the DeleteRow popup menu item.
5.3.3.4 DDL Triggers
A Trigger is a special kind of stored procedure that automatically executes when anevent occurs in the database.
DDL Triggers fire in response to a variety of data definition language (DDL) events whichare primarily CREAT E, ALT ER and DROP statements; logon triggers fire in response to theLOGON event that is raised when a user sessions is being established.
DDL Trigger Editor allows you to define DDL trigger properties (the scope of the DDLtriggers is applied to the current database, i.e. the trigger fires whenever event_type orevent_group happens in the current database). It opens automatically when you create anew DDL trigger and is available on editing an existing one.
To open a DDL trigger in DDL Trigger Editor, double-click it in the DB Explorer tree.Using Navigation bar and ToolbarCreating/editing DDL triggerBrowsing object dependenciesEditing object descriptionViewing DDL definition
5.3.3.4.1 Using Navigation bar and Toolbar
The Navigation bar and Toolbar provide quick access to tools implemented in DDLTrigger Editor.
289
99
342
344
964
963
962
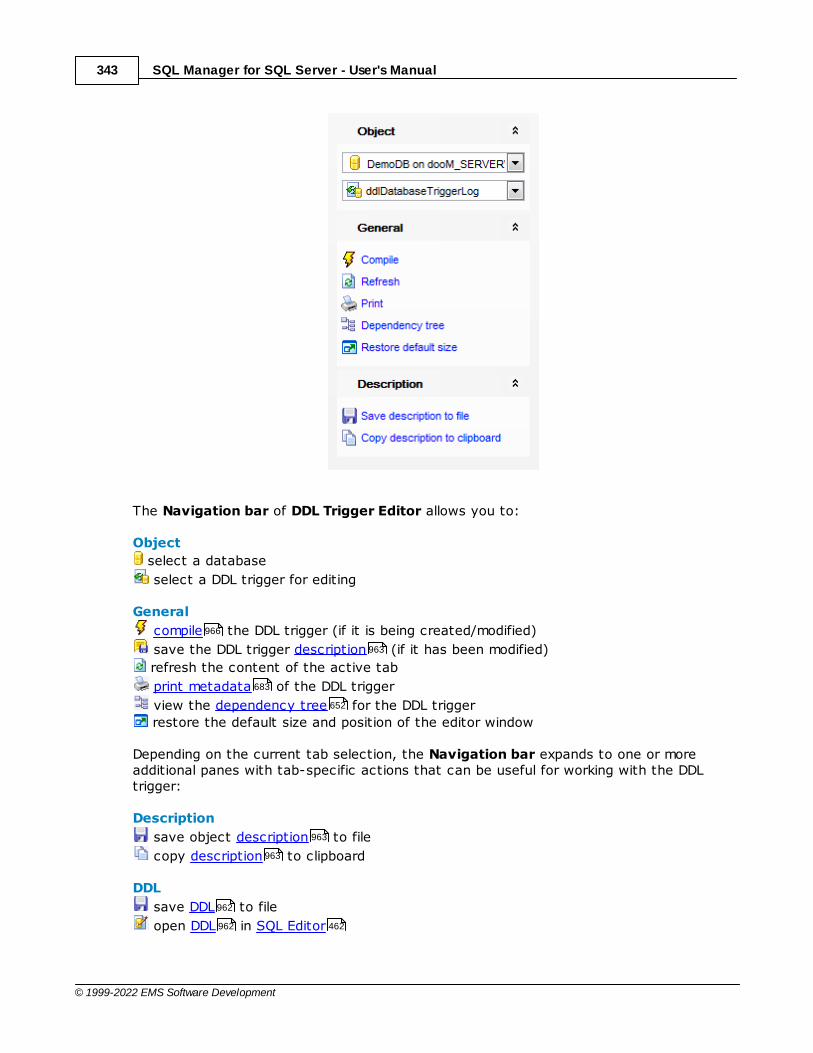
SQL Manager for SQL Server - User's Manual343
© 1999-2022 EMS Software Development
The Navigation bar of DDL Trigger Editor allows you to:
Object
select a database
select a DDL trigger for editing
General
compile the DDL trigger (if it is being created/modified)
save the DDL trigger description (if it has been modified)
refresh the content of the active tab
print metadata of the DDL trigger
view the dependency tree for the DDL trigger
restore the default size and position of the editor window
Depending on the current tab selection, the Navigation bar expands to one or moreadditional panes with tab-specific actions that can be useful for working with the DDLtrigger:
Description
save object description to file
copy description to clipboard
DDL
save DDL to file
open DDL in SQL Editor
966
963
683
652
963
963
962
962 462
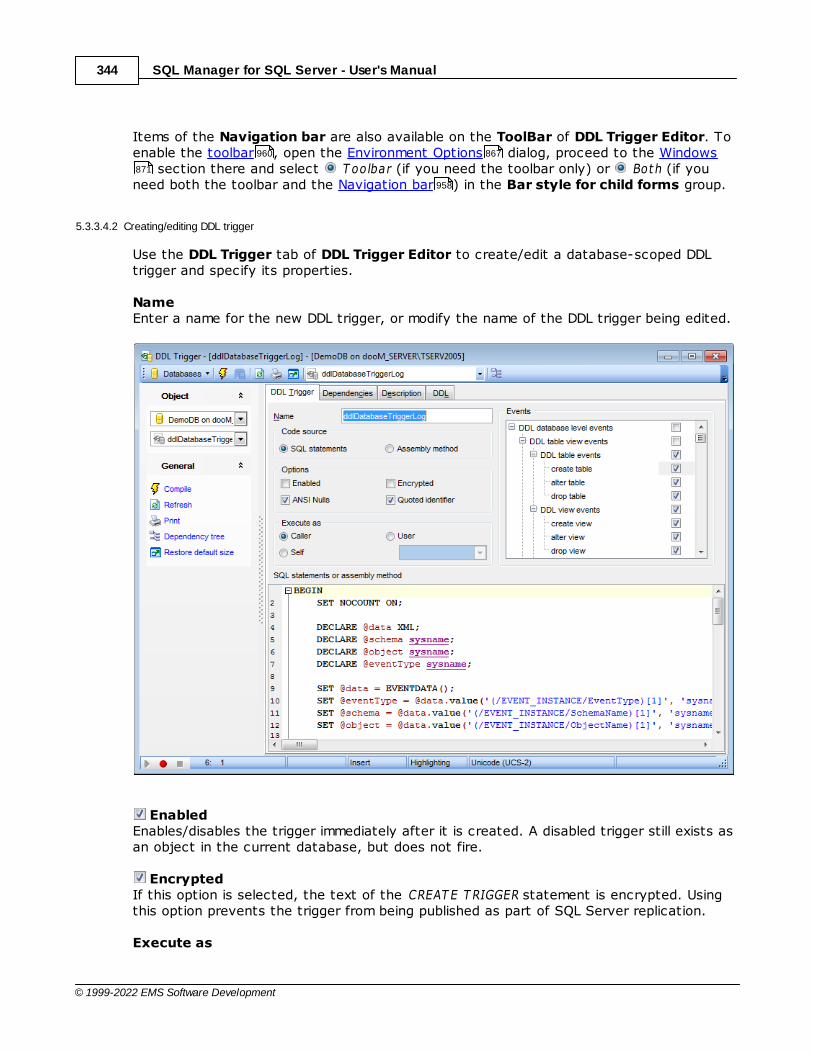
SQL Manager for SQL Server - User's Manual344
© 1999-2022 EMS Software Development
Items of the Navigation bar are also available on the ToolBar of DDL Trigger Editor. Toenable the toolbar , open the Environment Options dialog, proceed to the Windows
section there and select T oolbar (if you need the toolbar only) or Both (if youneed both the toolbar and the Navigation bar ) in the Bar style for child forms group.
5.3.3.4.2 Creating/editing DDL trigger
Use the DDL Trigger tab of DDL Trigger Editor to create/edit a database-scoped DDLtrigger and specify its properties.
NameEnter a name for the new DDL trigger, or modify the name of the DDL trigger being edited.
EnabledEnables/disables the trigger immediately after it is created. A disabled trigger still exists asan object in the current database, but does not fire.
EncryptedIf this option is selected, the text of the CREAT E T RIGGER statement is encrypted. Usingthis option prevents the trigger from being published as part of SQL Server replication.
Execute as
960 867
871
958
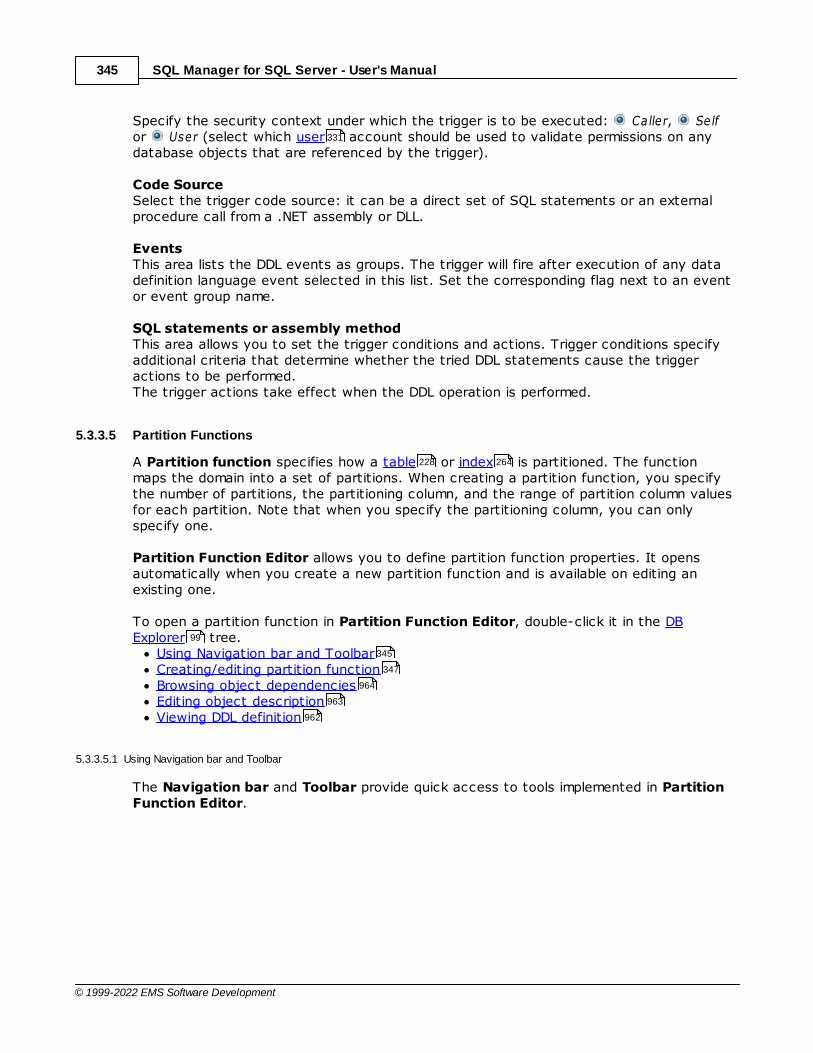
SQL Manager for SQL Server - User's Manual345
© 1999-2022 EMS Software Development
Specify the security context under which the trigger is to be executed: Caller, Se lfor User (select which user account should be used to validate permissions on anydatabase objects that are referenced by the trigger).
Code SourceSelect the trigger code source: it can be a direct set of SQL statements or an externalprocedure call from a .NET assembly or DLL.
EventsThis area lists the DDL events as groups. The trigger will fire after execution of any datadefinition language event selected in this list. Set the corresponding flag next to an eventor event group name.
SQL statements or assembly methodThis area allows you to set the trigger conditions and actions. Trigger conditions specifyadditional criteria that determine whether the tried DDL statements cause the triggeractions to be performed.The trigger actions take effect when the DDL operation is performed.
5.3.3.5 Partition Functions
A Partition function specifies how a table or index is partitioned. The functionmaps the domain into a set of partitions. When creating a partition function, you specifythe number of partitions, the partitioning column, and the range of partition column valuesfor each partition. Note that when you specify the partitioning column, you can onlyspecify one.
Partition Function Editor allows you to define partition function properties. It opensautomatically when you create a new partition function and is available on editing anexisting one.
To open a partition function in Partition Function Editor, double-click it in the DBExplorer tree.
Using Navigation bar and ToolbarCreating/editing partition functionBrowsing object dependenciesEditing object descriptionViewing DDL definition
5.3.3.5.1 Using Navigation bar and Toolbar
The Navigation bar and Toolbar provide quick access to tools implemented in PartitionFunction Editor.
331
228 264
99
345
347
964
963
962

SQL Manager for SQL Server - User's Manual346
© 1999-2022 EMS Software Development
The Navigation bar of Partition Function Editor allows you to:
Object
select a database
select a partition function for editing
General
compile the partition function (if it is being created/modified)
save the partition function description (if it has been modified)
refresh the content of the active tab
print metadata of the partition function
view the dependency tree for the partition function
restore the default size and position of the editor window
Depending on the current tab selection, the Navigation bar expands to one or moreadditional panes with tab-specific actions that can be useful for working with the partitionfunction:
Description
save object description to file
copy description to clipboard
DDL
save DDL to file
open DDL in SQL Editor
966
963
683
652
963
963
962
962 462
SQL Manager for SQL Server - User's Manual347
© 1999-2022 EMS Software Development
Items of the Navigation bar are also available on the ToolBar of Partition FunctionEditor. To enable the toolbar , open the Environment Options dialog, proceed to theWindows section there and select T oolbar (if you need the toolbar only) or Both(if you need both the toolbar and the Navigation bar ) in the Bar style for child formsgroup.
5.3.3.5.2 Creating/editing partition function
Use the Partition Function tab of Partition Function Editor to create/edit a partitionfunction and specify its properties.
NameEnter a name for the new partition function, or view the name of the partition functionbeing edited.
Parameter
TypeSpecifies the data type of the column used for partitioning.
SizeSpecifies the size of the data type. This box is not editable if the size of the selecteddata type is fixed or not applicable.
ScaleSpecifies the maximum number of decimal digits that can be stored to the right of thedecimal point. This box is editable only for num eric and dec im al data types only.
CollationDefines the collation for text, c har, nc har, varc har, nvarc har values.
960 867
871
958

SQL Manager for SQL Server - User's Manual348
© 1999-2022 EMS Software Development
Boundary values belong to left intervalThis option specifies to which side of each boundary value interval, left or right, the boundary value belongs, when interval values are sorted by the Database Engine inascending order from left to right. If checked, LEFT is specified.
Boundary valuesThis area lists the boundary values specified by the partition function.
To add a value, right-click within the Boundary values area and select the Add Value
popup menu item, or press the corresponding Add value button.
To remove a value, right-click the value within the Boundary values area and select the
Delete Value popup menu item, or press the corresponding Delete value button.
Use the Move up and the Move down buttons or popup menu items to reorderthe intervals.
SQL Manager for SQL Server - User's Manual349
© 1999-2022 EMS Software Development
To add a partition scheme which will use the current partition function, right-click withinthe Boundary values area and select the Add Partition Scheme... popup menu item.To drop the partition scheme which uses the current partition function, right-click withinthe Boundary values area and select Drop Partition Scheme<partition_scheme_name> popup menu item.
5.3.3.6 Partition Schemes
A Partition scheme maps the partitions produced by a partition function to a set offilegroups that you define. A partition scheme can use only one partition function.However, a partition function can participate in more than one partition scheme.
Partition Scheme Editor allows you to define partition scheme properties. It opensautomatically when you create a new partition scheme and is available on editing anexisting one.
To open a partition scheme in Partition Scheme Editor, double-click it in the DB Explorer tree.Using Navigation bar and ToolbarCreating/editing partition schemeBrowsing object dependenciesEditing object descriptionViewing DDL definition
5.3.3.6.1 Using Navigation bar and Toolbar
The Navigation bar and Toolbar provide quick access to tools implemented in PartitionScheme Editor.
345
99
349
351
964
963
962

SQL Manager for SQL Server - User's Manual350
© 1999-2022 EMS Software Development
The Navigation bar of Partition Scheme Editor allows you to:
Object
select a database
select a partition scheme for editing
General
compile the partition scheme (if it is being created/modified)
save the partition scheme description (if it has been modified)
refresh the content of the active tab
print metadata of the partition scheme
view the dependency tree for the partition scheme
restore the default size and position of the editor window
Depending on the current tab selection, the Navigation bar expands to one or moreadditional panes with tab-specific actions that can be useful for working with the partitionscheme:
Description
save object description to file
copy description to clipboard
DDL
save DDL to file
open DDL in SQL Editor
966
963
683
652
963
963
962
962 462
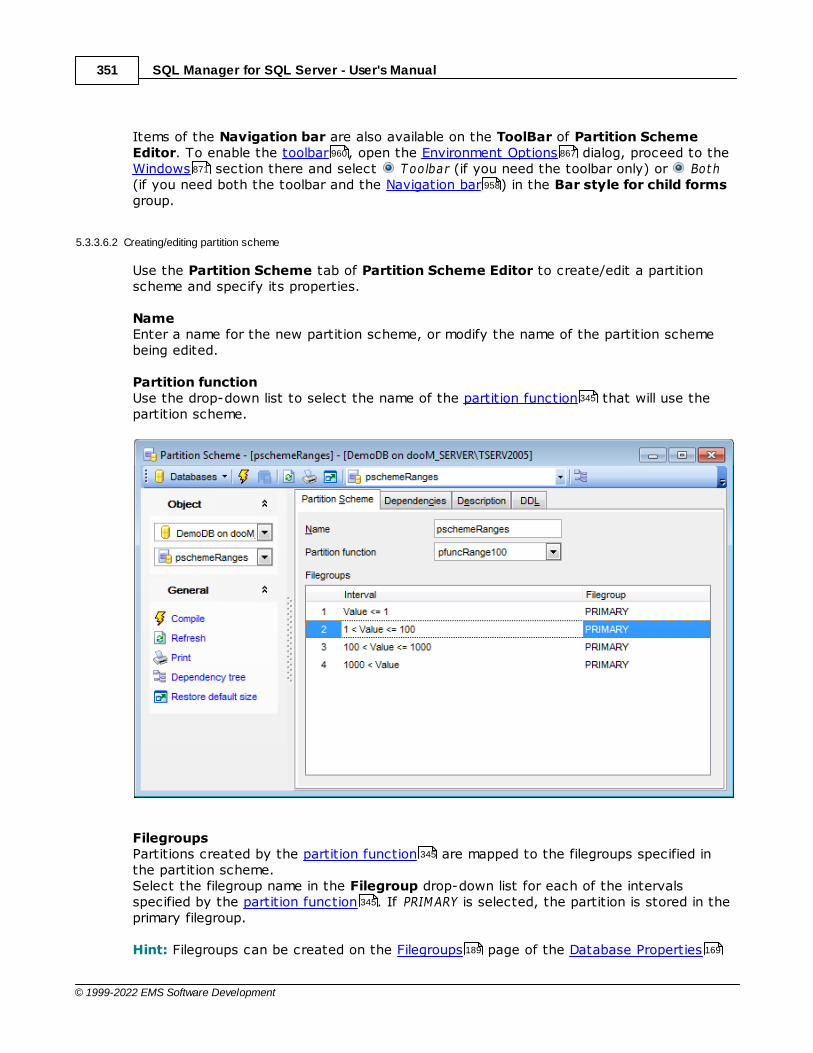
SQL Manager for SQL Server - User's Manual351
© 1999-2022 EMS Software Development
Items of the Navigation bar are also available on the ToolBar of Partition SchemeEditor. To enable the toolbar , open the Environment Options dialog, proceed to theWindows section there and select T oolbar (if you need the toolbar only) or Both(if you need both the toolbar and the Navigation bar ) in the Bar style for child formsgroup.
5.3.3.6.2 Creating/editing partition scheme
Use the Partition Scheme tab of Partition Scheme Editor to create/edit a partitionscheme and specify its properties.
NameEnter a name for the new partition scheme, or modify the name of the partition schemebeing edited.
Partition functionUse the drop-down list to select the name of the partition function that will use thepartition scheme.
FilegroupsPartitions created by the partition function are mapped to the filegroups specified inthe partition scheme.Select the filegroup name in the Filegroup drop-down list for each of the intervalsspecified by the partition function . If PRIMARY is selected, the partition is stored in theprimary filegroup.
Hint: Filegroups can be created on the Filegroups page of the Database Properties
960 867
871
958
345
345
345
189 169

SQL Manager for SQL Server - User's Manual352
© 1999-2022 EMS Software Development
dialog.
5.3.3.7 Full-Text Catalogs
Full-text catalogs and Full-text indexes are the objects that are implemented inMicrosoft® SQL Server for efficient full-text administration which is carried out at theserver, database, table and column levels.
Like regular indexes , Full-text indexes can be automatically updated as data aremodified in the associated tables. Index updating is normally performed as anasynchronous process that runs in the background during periods of low databaseactivity. Tables with the same update characteristics (e.g. small number of changes andlarge number of changes) should be grouped together and assigned to the same Full-textcatalog.
One Full-text catalog can have several full-t ext indexes, but a full-text index can onlybe part of one full-text catalog.
Full-Text Catalog Editor allows you to define full-text catalog properties. It opensautomatically when you create a new full-text catalog and is available on editing anexisting one.
To open a full-text catalog in Full-Text Catalog Editor, double-click it in the DB Explorer tree.Using Navigation bar and ToolbarCreating/editing full-text catalogManaging full-text indexesViewing DDL definitionSetting object permissions
5.3.3.7.1 Using Navigation bar and Toolbar
The Navigation bar and Toolbar provide quick access to tools implemented in Full-TextCatalog Editor.
264
99
352
354
355
962
965
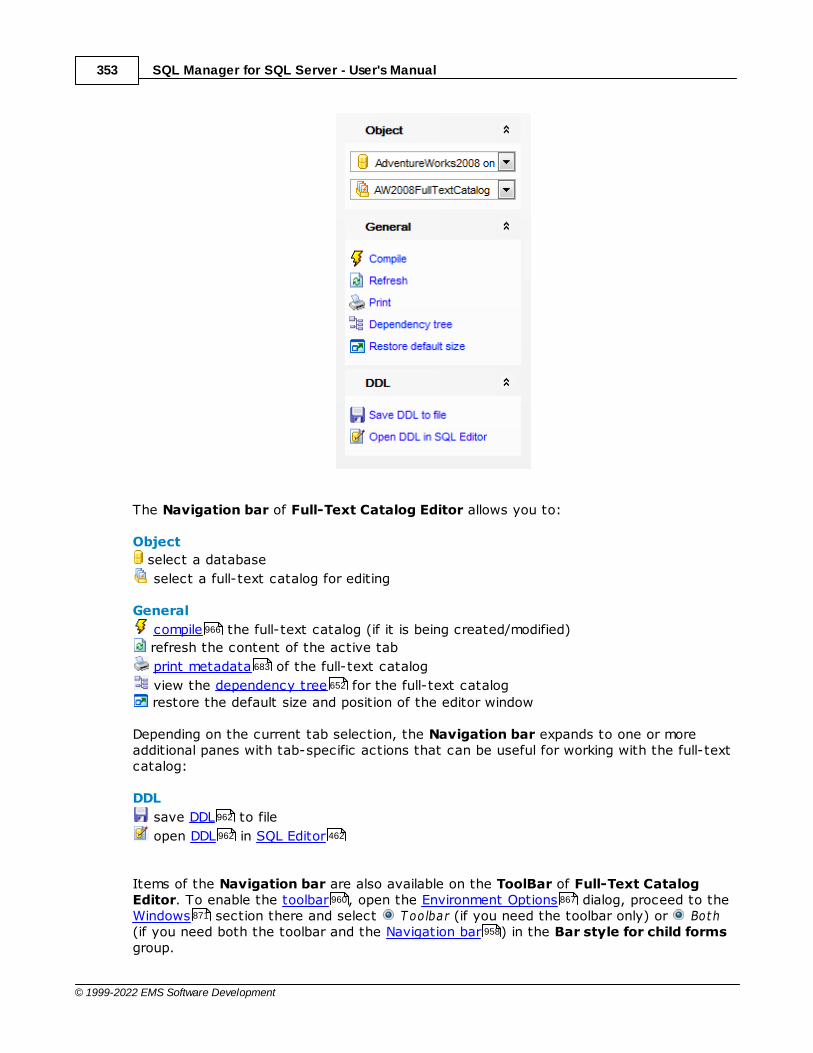
SQL Manager for SQL Server - User's Manual353
© 1999-2022 EMS Software Development
The Navigation bar of Full-Text Catalog Editor allows you to:
Object
select a database
select a full-text catalog for editing
General
compile the full-text catalog (if it is being created/modified)
refresh the content of the active tab
print metadata of the full-text catalog
view the dependency tree for the full-text catalog
restore the default size and position of the editor window
Depending on the current tab selection, the Navigation bar expands to one or moreadditional panes with tab-specific actions that can be useful for working with the full-textcatalog:
DDL
save DDL to file
open DDL in SQL Editor
Items of the Navigation bar are also available on the ToolBar of Full-Text CatalogEditor. To enable the toolbar , open the Environment Options dialog, proceed to theWindows section there and select T oolbar (if you need the toolbar only) or Both(if you need both the toolbar and the Navigation bar ) in the Bar style for child formsgroup.
966
683
652
962
962 462
960 867
871
958

SQL Manager for SQL Server - User's Manual354
© 1999-2022 EMS Software Development
5.3.3.7.2 Creating/editing full-text catalog
Use the Full-Text Catalog tab of Full-Text Catalog Editor to create/edit a full-textcatalog and specify its properties.
NameEnter a name for the new full-text catalog, or view the name of the full-text catalogbeing edited.
OwnerUse the drop-down list to select the owner of the full-text catalog (the name of adatabase user or role ).
File groupUse the drop-down list to select the filegroup which will include the new catalog. Thedefault full-text filegroup is the PRIMARY filegroup for the database.
Path
Use the ellipsis button to specify the root directory for the catalog using the SQL
331 335
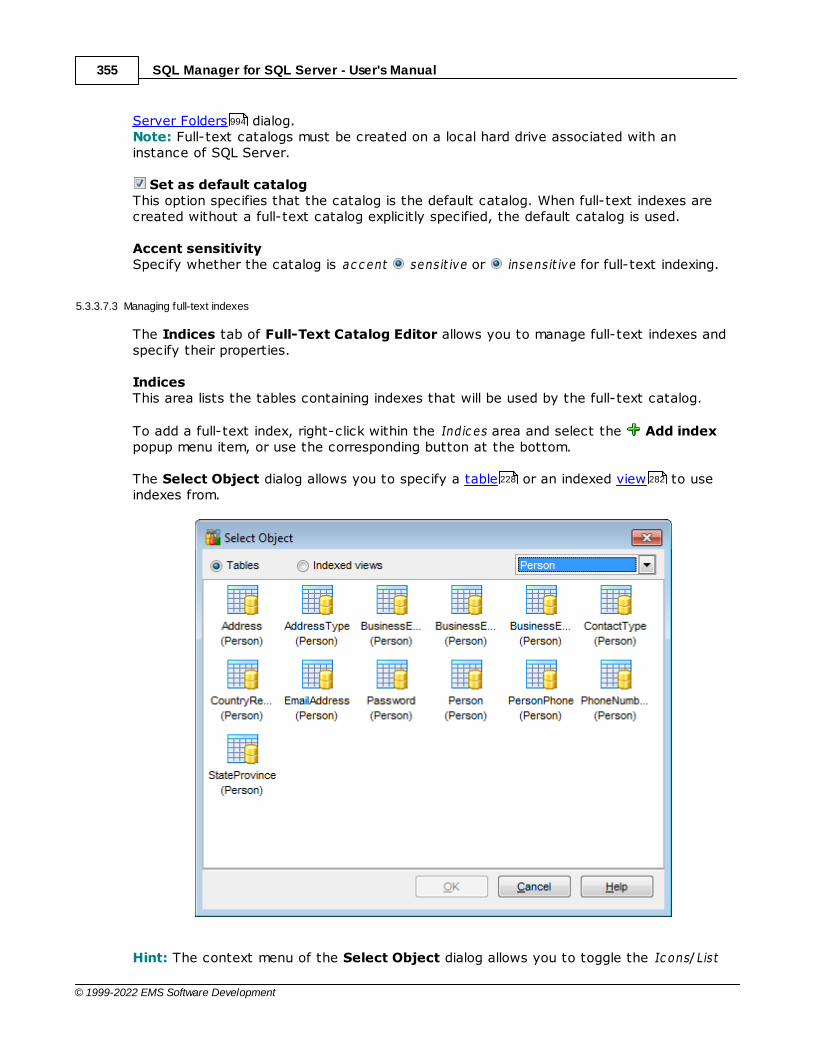
SQL Manager for SQL Server - User's Manual355
© 1999-2022 EMS Software Development
Server Folders dialog. Note: Full-text catalogs must be created on a local hard drive associated with aninstance of SQL Server.
Set as default catalogThis option specifies that the catalog is the default catalog. When full-text indexes arecreated without a full-text catalog explicitly specified, the default catalog is used.
Accent sensitivitySpecify whether the catalog is ac c ent sensit ive or insensit ive for full-text indexing.
5.3.3.7.3 Managing full-text indexes
The Indices tab of Full-Text Catalog Editor allows you to manage full-text indexes andspecify their properties.
IndicesThis area lists the tables containing indexes that will be used by the full-text catalog.
To add a full-text index, right-click within the Indic es area and select the Add indexpopup menu item, or use the corresponding button at the bottom.
The Select Object dialog allows you to specify a table or an indexed view to useindexes from.
Hint: The context menu of the Select Object dialog allows you to toggle the Ic ons/List
994
228 282

SQL Manager for SQL Server - User's Manual356
© 1999-2022 EMS Software Development
object representation mode.
To remove a full-text index, right-click the index within the Indic es area and select the Delete index popup menu item, or use the corresponding button at the bottom.
Options
Select the unique not null key index from Unique index dropdown list, which is requiredfor a full-text index.
Select the Filegroup for creating a full-text index. If 'Default' value is selected the full-text index is placed in the same filegroup as base table or view for a nonpartitioned tableor in the Primary filegroup for a partitioned table.
Select the full-text Stop list for the index. The index is not populated with any tokensthat are part of the specified stoplist.
Use Search property list to associate with the index.
SQL Manager for SQL Server - User's Manual357
© 1999-2022 EMS Software Development
If a table index is enabled (i.e. the Enabled flag is set in the Indices list), you canselect the unique index and set the Track changes property:
AutoSpecifies that SQL Server automatically updates the full-text index as the data aremodified in the associated tables.
ManualSpecifies that the change-tracking log will be propagated either on a schedule using SQLServer Agent, or manually by the user.
OffSpecifies that SQL Server does not keep a list of changes to the indexed data.
ColumnsThis area lists the fields of the selected table. Set the Language of the data stored ineach column. Specifies the Data Type that is used to hold the document type for avarbinary(max) or image document. Tick Statistical Semantics on to create theadditional key phrase and document similarity indexes that are part of statistical semanticindexing.
5.3.3.8 Symmetric Keys
In SQL Server 2005 and higher, data can be encrypted with a hierarchical encryption andkey management infrastructure. Each layer encrypts the layer below it by using acombination of the following mechanisms for encryption: symmetric keys, asymmetrickeys , certificates .
A Symmetric key is a single key that is used for both encryption and decryption.Encryption and decryption by using a symmetric key is fast and suitable for routine usewith sensitive data in the database.
Symmetric Key Editor allows you to define symmetric key properties. It opensautomatically when you create a new symmetric key and is available on editing an existingone.
To open a symmetric key in Symmetric Key Editor, double-click it in the DB Explorertree.
Using Navigation bar and ToolbarCreating/editing symmetric keyBrowsing object dependenciesViewing DDL definitionSetting object permissions
5.3.3.8.1 Using Navigation bar and Toolbar
The Navigation bar and Toolbar provide quick access to tools implemented inSymmetric Key Editor.
360 364
99
357
359
964
962
965
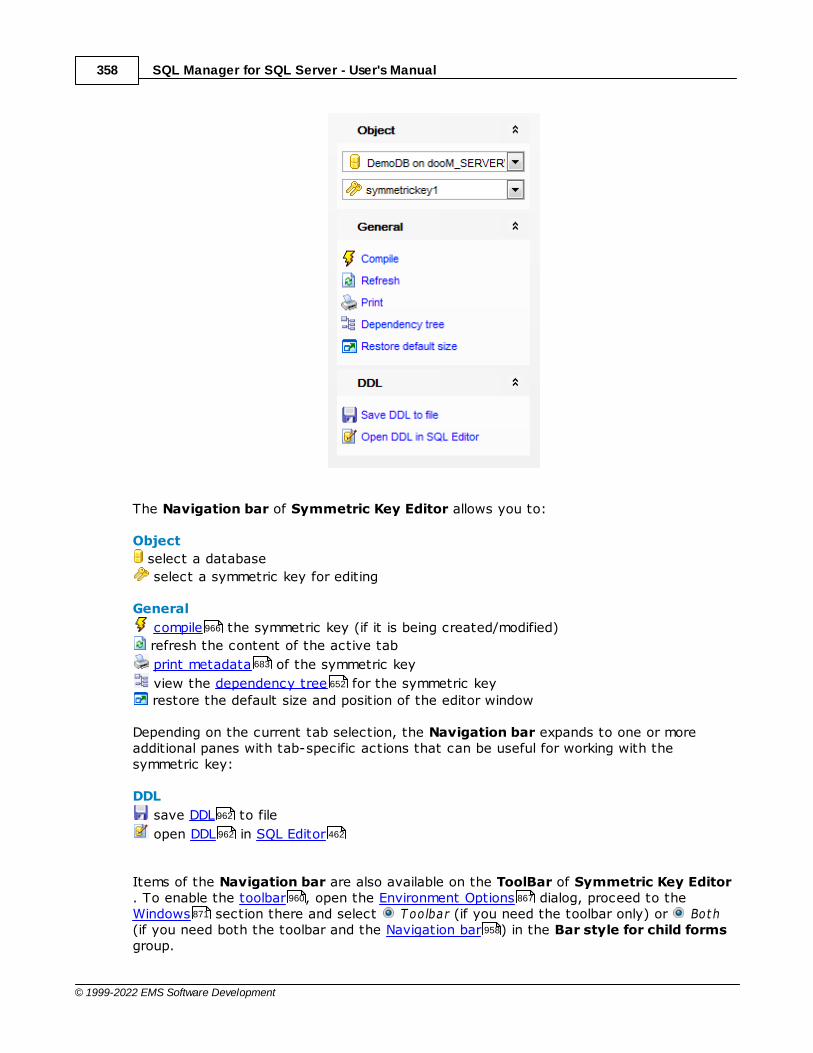
SQL Manager for SQL Server - User's Manual358
© 1999-2022 EMS Software Development
The Navigation bar of Symmetric Key Editor allows you to:
Object
select a database
select a symmetric key for editing
General
compile the symmetric key (if it is being created/modified)
refresh the content of the active tab
print metadata of the symmetric key
view the dependency tree for the symmetric key
restore the default size and position of the editor window
Depending on the current tab selection, the Navigation bar expands to one or moreadditional panes with tab-specific actions that can be useful for working with thesymmetric key:
DDL
save DDL to file
open DDL in SQL Editor
Items of the Navigation bar are also available on the ToolBar of Symmetric Key Editor. To enable the toolbar , open the Environment Options dialog, proceed to theWindows section there and select T oolbar (if you need the toolbar only) or Both(if you need both the toolbar and the Navigation bar ) in the Bar style for child formsgroup.
966
683
652
962
962 462
960 867
871
958
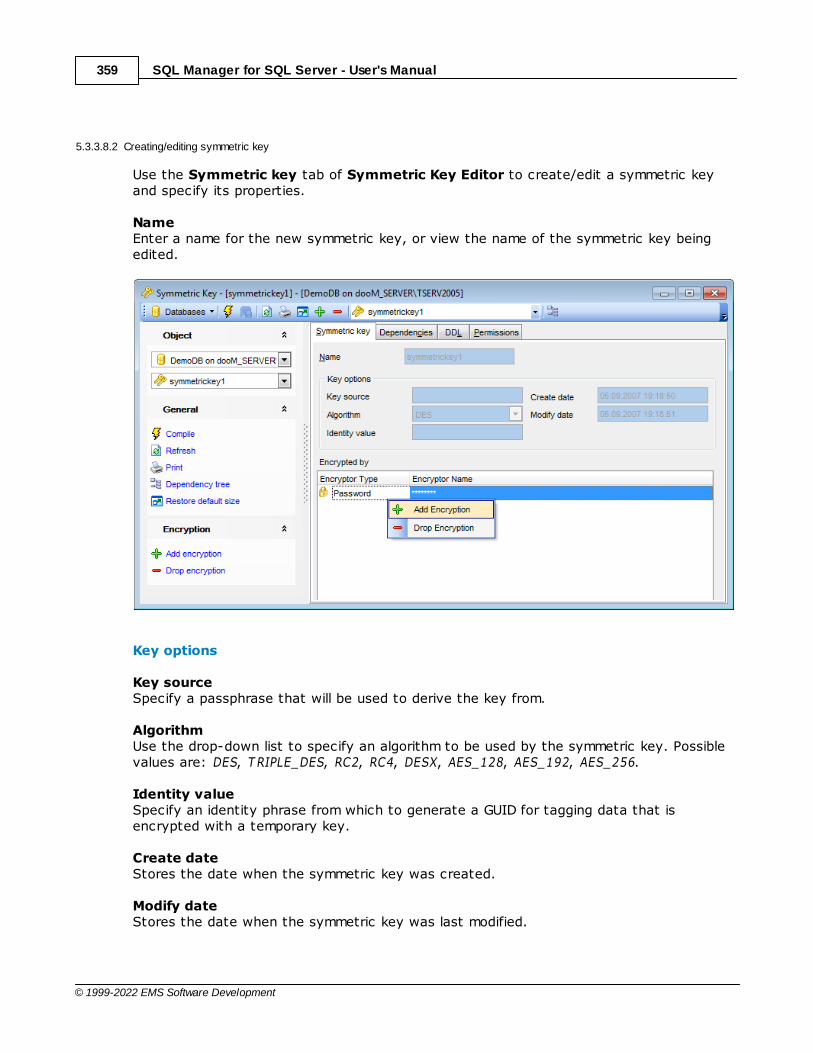
SQL Manager for SQL Server - User's Manual359
© 1999-2022 EMS Software Development
5.3.3.8.2 Creating/editing symmetric key
Use the Symmetric key tab of Symmetric Key Editor to create/edit a symmetric keyand specify its properties.
NameEnter a name for the new symmetric key, or view the name of the symmetric key beingedited.
Key options
Key sourceSpecify a passphrase that will be used to derive the key from.
AlgorithmUse the drop-down list to specify an algorithm to be used by the symmetric key. Possiblevalues are: DES, T RIPLE_DES, RC2, RC4, DESX, AES_128, AES_192, AES_256.
Identity valueSpecify an identity phrase from which to generate a GUID for tagging data that isencrypted with a temporary key.
Create dateStores the date when the symmetric key was created.
Modify dateStores the date when the symmetric key was last modified.
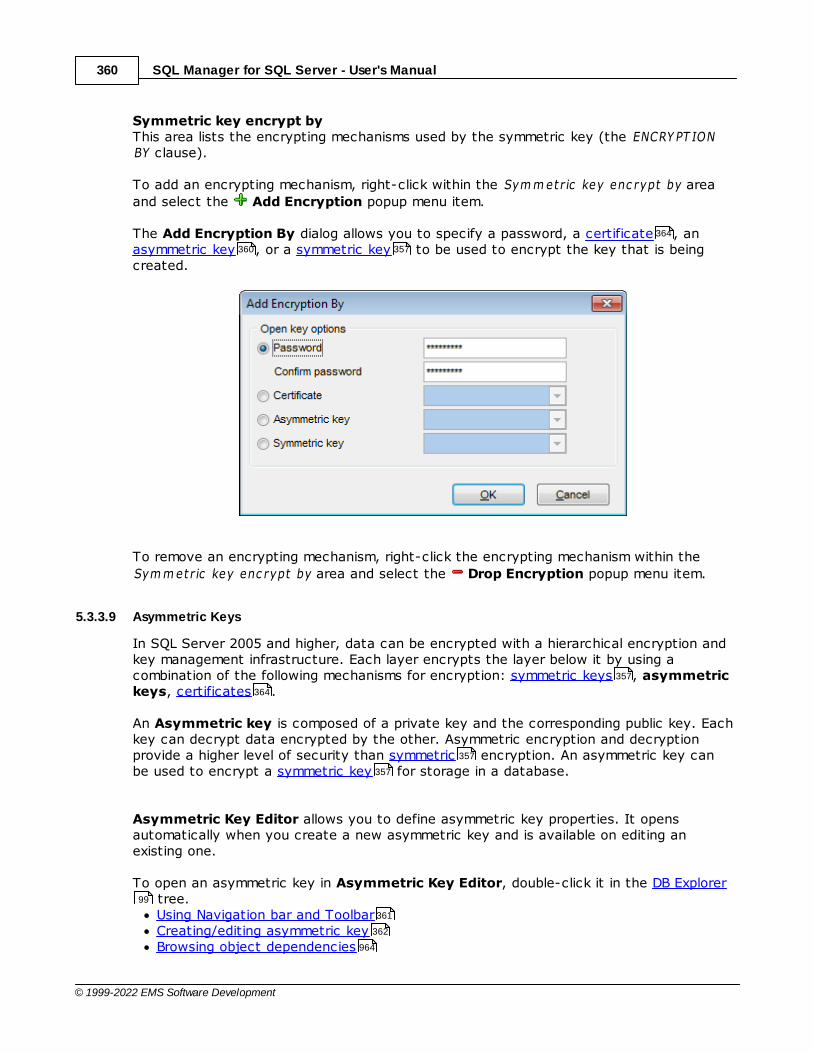
SQL Manager for SQL Server - User's Manual360
© 1999-2022 EMS Software Development
Symmetric key encrypt byThis area lists the encrypting mechanisms used by the symmetric key (the ENCRY PT IONBY clause).
To add an encrypting mechanism, right-click within the Sym m et r ic key enc rypt by area
and select the Add Encryption popup menu item.
The Add Encryption By dialog allows you to specify a password, a certificate , anasymmetric key , or a symmetric key to be used to encrypt the key that is beingcreated.
To remove an encrypting mechanism, right-click the encrypting mechanism within the
Sym m et r ic key enc rypt by area and select the Drop Encryption popup menu item.
5.3.3.9 Asymmetric Keys
In SQL Server 2005 and higher, data can be encrypted with a hierarchical encryption andkey management infrastructure. Each layer encrypts the layer below it by using acombination of the following mechanisms for encryption: symmetric keys , asymmetrickeys, certificates .
An Asymmetric key is composed of a private key and the corresponding public key. Eachkey can decrypt data encrypted by the other. Asymmetric encryption and decryptionprovide a higher level of security than symmetric encryption. An asymmetric key canbe used to encrypt a symmetric key for storage in a database.
Asymmetric Key Editor allows you to define asymmetric key properties. It opensautomatically when you create a new asymmetric key and is available on editing anexisting one.
To open an asymmetric key in Asymmetric Key Editor, double-click it in the DB Explorer tree.Using Navigation bar and ToolbarCreating/editing asymmetric keyBrowsing object dependencies
364
360 357
357
364
357
357
99
361
362
964

SQL Manager for SQL Server - User's Manual361
© 1999-2022 EMS Software Development
Viewing DDL definitionSetting object permissions
5.3.3.9.1 Using Navigation bar and Toolbar
The Navigation bar and Toolbar provide quick access to tools implemented inAsymmetric Key Editor.
The Navigation bar of Asymmetric Key Editor allows you to:
Object
select a database
select an asymmetric key for editing
General
compile the asymmetric key (if it is being created/modified)
refresh the content of the active tab
print metadata of the asymmetric key
view the dependency tree for the asymmetric key
restore the default size and position of the editor window
Depending on the current tab selection, the Navigation bar expands to one or moreadditional panes with tab-specific actions that can be useful for working with theasymmetric key:
DDL
save DDL to file
962
965
966
683
652
962
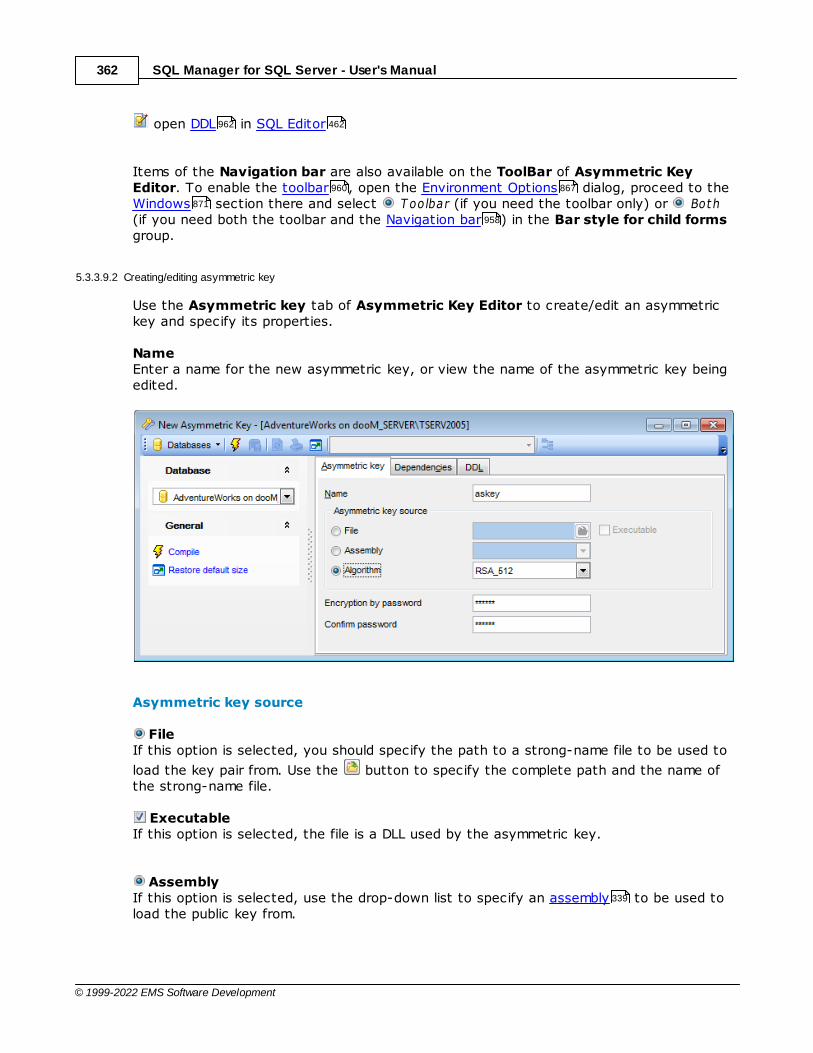
SQL Manager for SQL Server - User's Manual362
© 1999-2022 EMS Software Development
open DDL in SQL Editor
Items of the Navigation bar are also available on the ToolBar of Asymmetric KeyEditor. To enable the toolbar , open the Environment Options dialog, proceed to theWindows section there and select T oolbar (if you need the toolbar only) or Both(if you need both the toolbar and the Navigation bar ) in the Bar style for child formsgroup.
5.3.3.9.2 Creating/editing asymmetric key
Use the Asymmetric key tab of Asymmetric Key Editor to create/edit an asymmetrickey and specify its properties.
NameEnter a name for the new asymmetric key, or view the name of the asymmetric key beingedited.
Asymmetric key source
FileIf this option is selected, you should specify the path to a strong-name file to be used to
load the key pair from. Use the button to specify the complete path and the name ofthe strong-name file.
ExecutableIf this option is selected, the file is a DLL used by the asymmetric key.
AssemblyIf this option is selected, use the drop-down list to specify an assembly to be used toload the public key from.
962 462
960 867
871
958
339

SQL Manager for SQL Server - User's Manual363
© 1999-2022 EMS Software Development
AlgorithmIf this option is selected, use the drop-down list to specify an algorithm to be used by theasymmetric key (the WIT H ALGORIT HM clause). Possible values are: RSA_512, RSA_1024,RSA_2048.
Encryption by password / Confirm passwordSpecify the password that will be used to encrypt the private key, and confirm thepassword in the corresponding boxes.
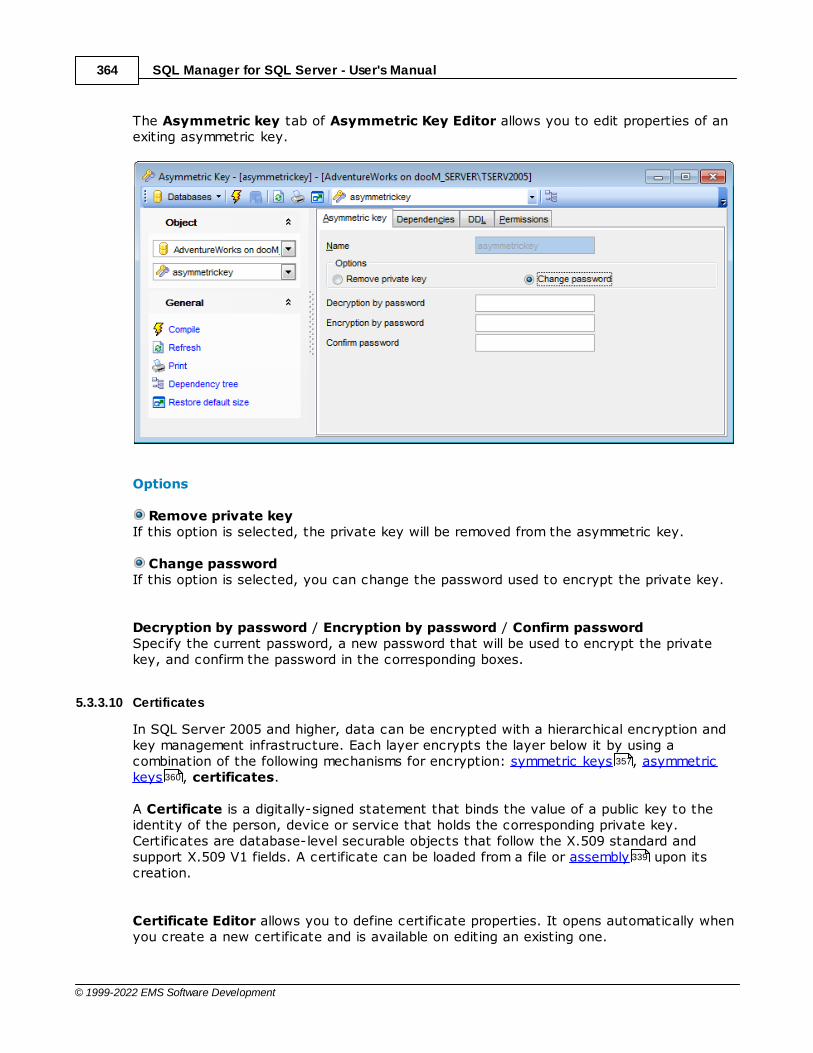
SQL Manager for SQL Server - User's Manual364
© 1999-2022 EMS Software Development
The Asymmetric key tab of Asymmetric Key Editor allows you to edit properties of anexiting asymmetric key.
Options
Remove private keyIf this option is selected, the private key will be removed from the asymmetric key.
Change passwordIf this option is selected, you can change the password used to encrypt the private key.
Decryption by password / Encryption by password / Confirm passwordSpecify the current password, a new password that will be used to encrypt the privatekey, and confirm the password in the corresponding boxes.
5.3.3.10 Certificates
In SQL Server 2005 and higher, data can be encrypted with a hierarchical encryption andkey management infrastructure. Each layer encrypts the layer below it by using acombination of the following mechanisms for encryption: symmetric keys , asymmetrickeys , certificates.
A Certificate is a digitally-signed statement that binds the value of a public key to theidentity of the person, device or service that holds the corresponding private key.Certificates are database-level securable objects that follow the X.509 standard andsupport X.509 V1 fields. A certificate can be loaded from a file or assembly upon itscreation.
Certificate Editor allows you to define certificate properties. It opens automatically whenyou create a new certificate and is available on editing an existing one.
357
360
339
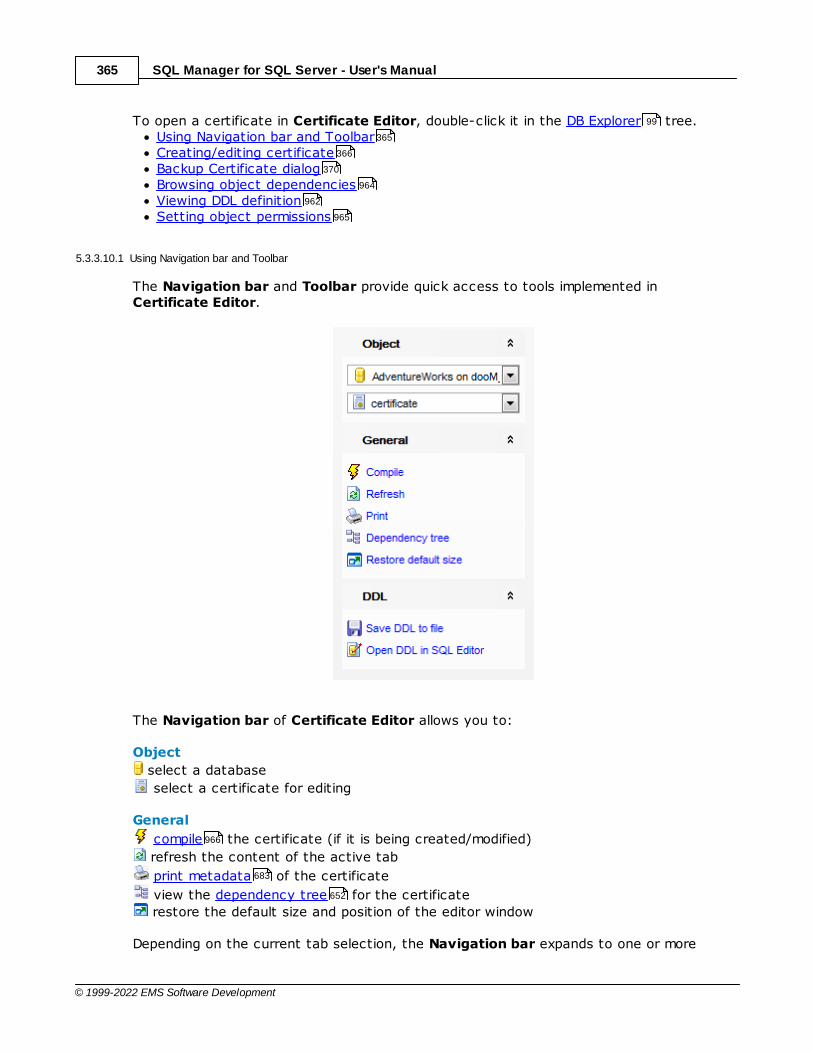
SQL Manager for SQL Server - User's Manual365
© 1999-2022 EMS Software Development
To open a certificate in Certificate Editor, double-click it in the DB Explorer tree.Using Navigation bar and ToolbarCreating/editing certificateBackup Certificate dialogBrowsing object dependenciesViewing DDL definitionSetting object permissions
5.3.3.10.1 Using Navigation bar and Toolbar
The Navigation bar and Toolbar provide quick access to tools implemented inCertificate Editor.
The Navigation bar of Certificate Editor allows you to:
Object
select a database
select a certificate for editing
General
compile the certificate (if it is being created/modified)
refresh the content of the active tab
print metadata of the certificate
view the dependency tree for the certificate
restore the default size and position of the editor window
Depending on the current tab selection, the Navigation bar expands to one or more
99
365
366
370
964
962
965
966
683
652

SQL Manager for SQL Server - User's Manual366
© 1999-2022 EMS Software Development
additional panes with tab-specific actions that can be useful for working with thecertificate:
Actions
save the certificate using the Backup Certificate dialog
DDL
save DDL to file
open DDL in SQL Editor
Items of the Navigation bar are also available on the ToolBar of Certificate Editor. Toenable the toolbar , open the Environment Options dialog, proceed to the Windows
section there and select T oolbar (if you need the toolbar only) or Both (if youneed both the toolbar and the Navigation bar ) in the Bar style for child forms group.
5.3.3.10.2 Creating/editing certif icate
Use the Certificate tab of Certificate Editor to create/edit a certificate and specify itsproperties.
NameEnter a name for the new certificate, or view the name of the certificate being edited.
AuthorizationUse the drop-down list to select the name of the user that will own this certificate, orview the user selected upon the certificate creation.
370
962
962 462
960 867
871
958
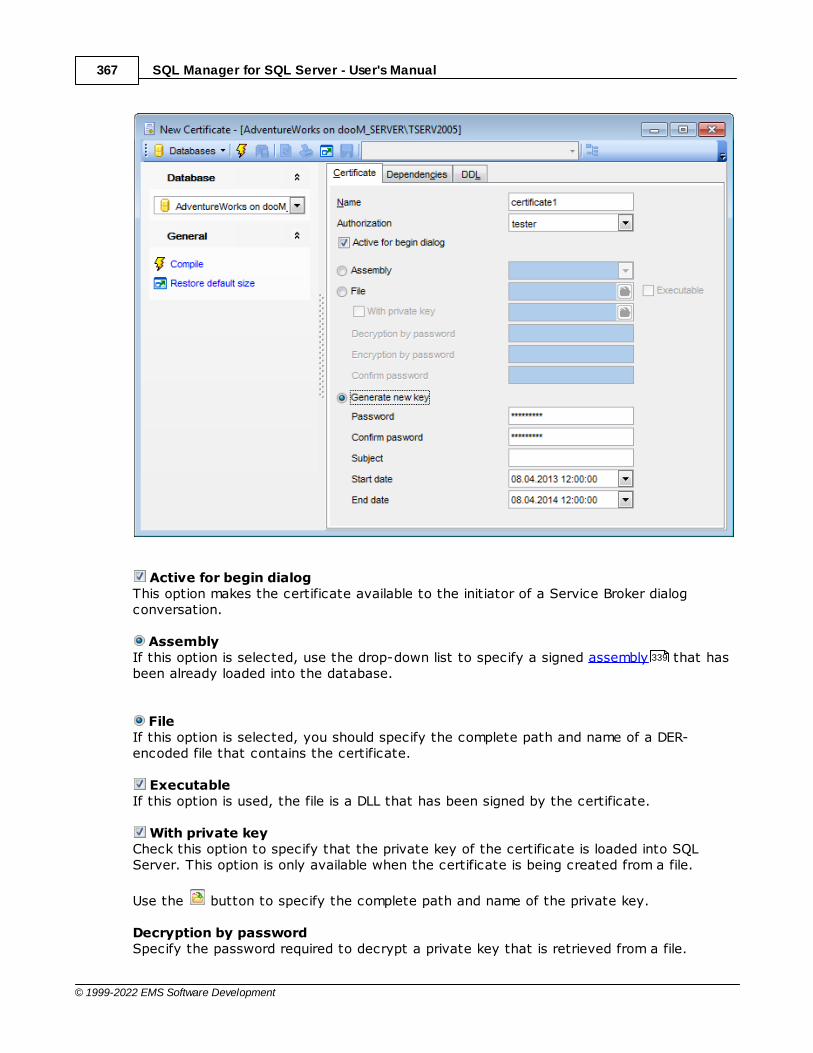
SQL Manager for SQL Server - User's Manual367
© 1999-2022 EMS Software Development
Active for begin dialogThis option makes the certificate available to the initiator of a Service Broker dialogconversation.
AssemblyIf this option is selected, use the drop-down list to specify a signed assembly that hasbeen already loaded into the database.
FileIf this option is selected, you should specify the complete path and name of a DER-encoded file that contains the certificate.
ExecutableIf this option is used, the file is a DLL that has been signed by the certificate.
With private keyCheck this option to specify that the private key of the certificate is loaded into SQLServer. This option is only available when the certificate is being created from a file.
Use the button to specify the complete path and name of the private key.
Decryption by passwordSpecify the password required to decrypt a private key that is retrieved from a file.
339
SQL Manager for SQL Server - User's Manual368
© 1999-2022 EMS Software Development
Encryption by password / Confirm passwordSpecify the password that will be used to encrypt the private key, and confirm thepassword in the corresponding box.
Generate new keyIf this option is selected, a new key will be generated for the certificate. In this case youshould specify the password for the new key, and the subject (a field in the metadataof the certificate as defined in the X.509 standard).
Start dateSet the date when the certificate becomes valid.
Expire dateSet the date when the certificate expires.
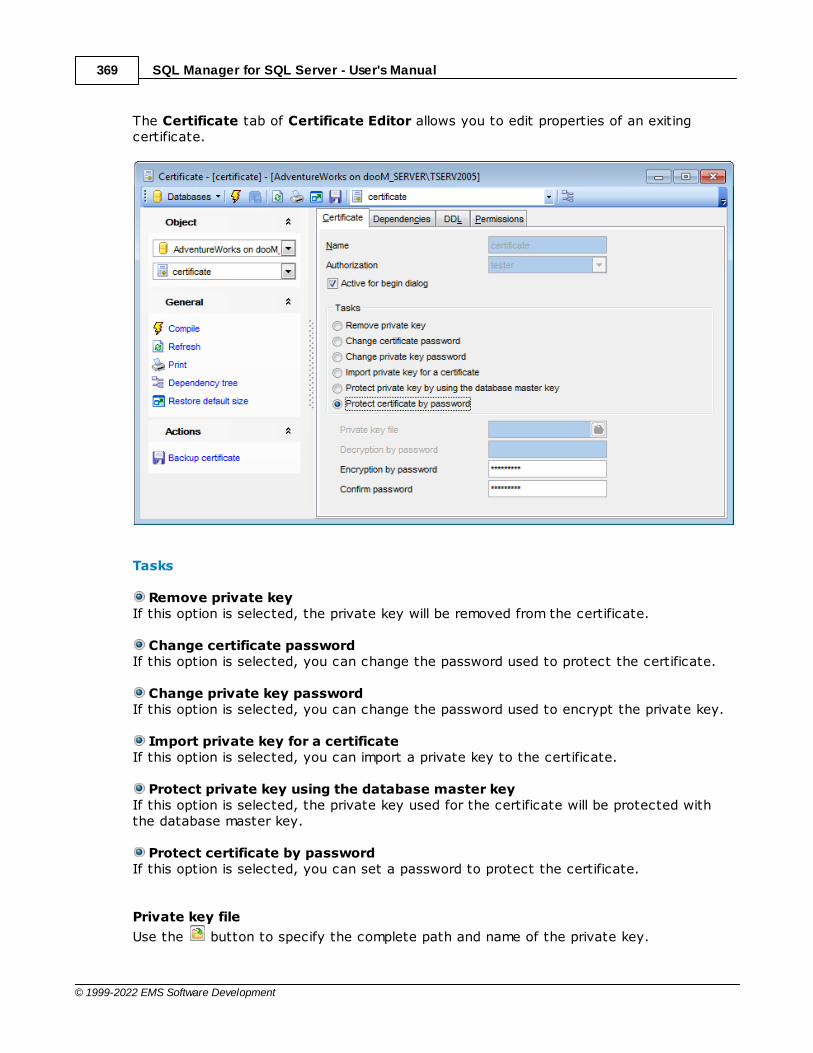
SQL Manager for SQL Server - User's Manual369
© 1999-2022 EMS Software Development
The Certificate tab of Certificate Editor allows you to edit properties of an exitingcertificate.
Tasks
Remove private keyIf this option is selected, the private key will be removed from the certificate.
Change certificate passwordIf this option is selected, you can change the password used to protect the certificate.
Change private key passwordIf this option is selected, you can change the password used to encrypt the private key.
Import private key for a certificateIf this option is selected, you can import a private key to the certificate.
Protect private key using the database master keyIf this option is selected, the private key used for the certificate will be protected withthe database master key.
Protect certificate by passwordIf this option is selected, you can set a password to protect the certificate.
Private key file
Use the button to specify the complete path and name of the private key.
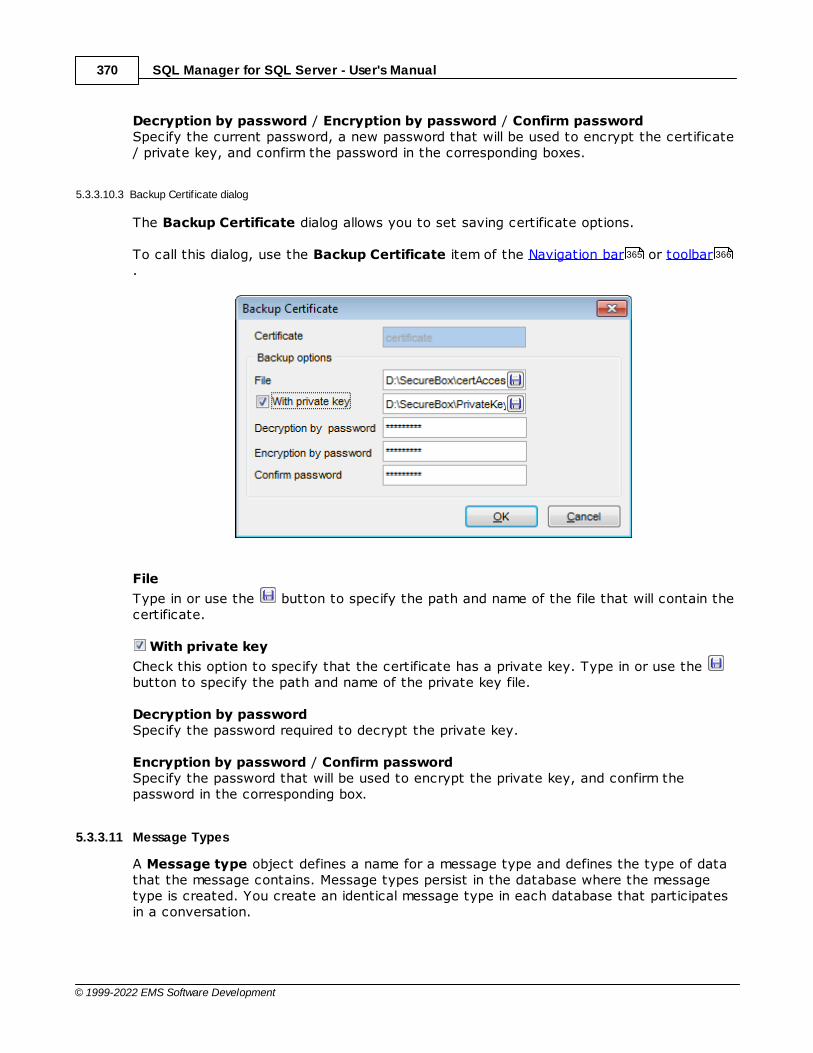
SQL Manager for SQL Server - User's Manual370
© 1999-2022 EMS Software Development
Decryption by password / Encryption by password / Confirm passwordSpecify the current password, a new password that will be used to encrypt the certificate/ private key, and confirm the password in the corresponding boxes.
5.3.3.10.3 Backup Certif icate dialog
The Backup Certificate dialog allows you to set saving certificate options.
To call this dialog, use the Backup Certificate item of the Navigation bar or toolbar.
File
Type in or use the button to specify the path and name of the file that will contain thecertificate.
With private key
Check this option to specify that the certificate has a private key. Type in or use the button to specify the path and name of the private key file.
Decryption by passwordSpecify the password required to decrypt the private key.
Encryption by password / Confirm passwordSpecify the password that will be used to encrypt the private key, and confirm thepassword in the corresponding box.
5.3.3.11 Message Types
A Message type object defines a name for a message type and defines the type of datathat the message contains. Message types persist in the database where the messagetype is created. You create an identical message type in each database that participatesin a conversation.
365 366
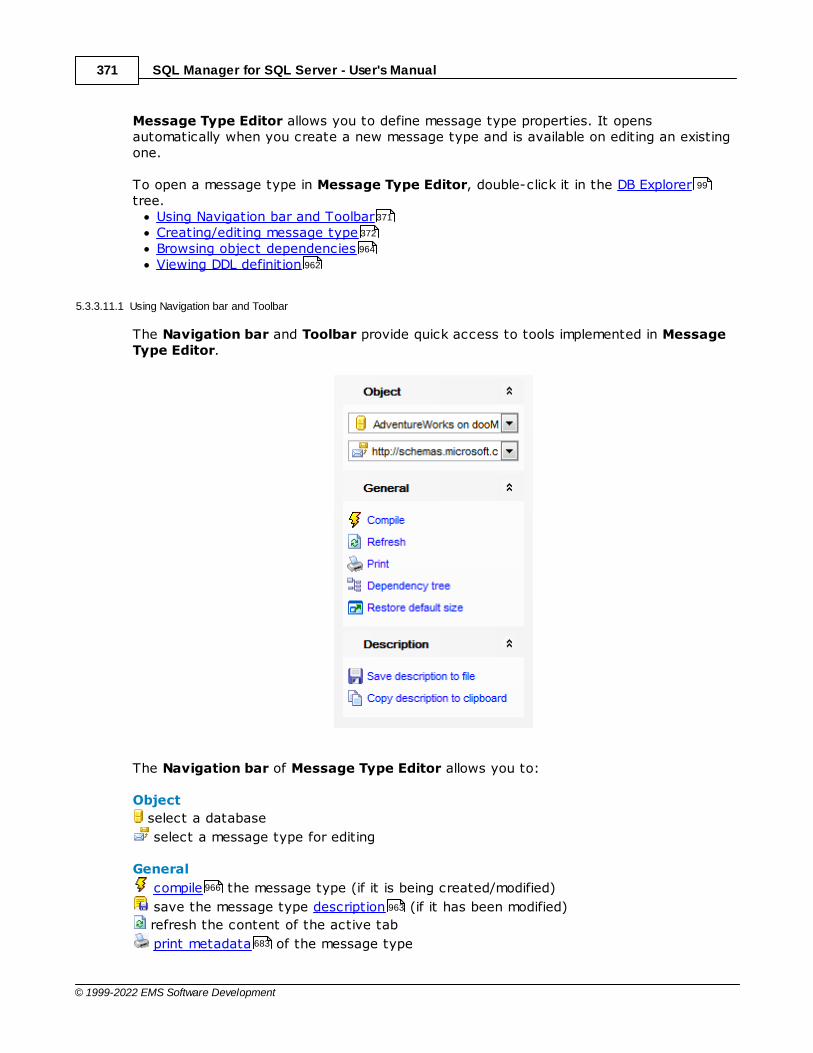
SQL Manager for SQL Server - User's Manual371
© 1999-2022 EMS Software Development
Message Type Editor allows you to define message type properties. It opensautomatically when you create a new message type and is available on editing an existingone.
To open a message type in Message Type Editor, double-click it in the DB Explorertree.
Using Navigation bar and ToolbarCreating/editing message typeBrowsing object dependenciesViewing DDL definition
5.3.3.11.1 Using Navigation bar and Toolbar
The Navigation bar and Toolbar provide quick access to tools implemented in MessageType Editor.
The Navigation bar of Message Type Editor allows you to:
Object
select a database
select a message type for editing
General
compile the message type (if it is being created/modified)
save the message type description (if it has been modified)
refresh the content of the active tab
print metadata of the message type
99
371
372
964
962
966
963
683

SQL Manager for SQL Server - User's Manual372
© 1999-2022 EMS Software Development
view the dependency tree for the message type
restore the default size and position of the editor window
Depending on the current tab selection, the Navigation bar expands to one or moreadditional panes with tab-specific actions that can be useful for working with themessage type:
Description
save object description to file
copy description to clipboard
DDL
save DDL to file
open DDL in SQL Editor
Items of the Navigation bar are also available on the ToolBar of Message Type Editor.To enable the toolbar , open the Environment Options dialog, proceed to theWindows section there and select T oolbar (if you need the toolbar only) or Both(if you need both the toolbar and the Navigation bar ) in the Bar style for child formsgroup.
5.3.3.11.2 Creating/editing message type
Use the Message Type tab of Message Type Editor to create/edit a message type andspecify its properties.
Name
652
963
963
962
962 462
960 867
871
958
SQL Manager for SQL Server - User's Manual373
© 1999-2022 EMS Software Development
Enter a name for the new message type, or view the name of the message type beingedited.
AuthorizationUse the drop-down list to set the owner of the message type to the specified database user or role .
ValidationSpecifies how Service Broker validates the message body for messages of this type.
NoneSpecifies that no validation is performed. The message body can contain data, or it canbe NULL.
EmptySpecifies that the message body must be NULL.
Well-formed XMLSpecifies that the message body must contain well-formed XML.
Valid XML with schemaSpecifies that the message body must contain XML that complies with a schema in thespecified schema collection. Use the drop-down list below to select an existing XMLschema collection .
Note: Some properties cannot be modified because of dependent objects. Open theDependencies tab to browse the list of dependent objects, or view the dependencytree for the message type.
5.3.3.12 Contracts
Contracts define the name of a specific business task and list the message types used inthat task. Service Broker contracts define two different service roles: the initiator and thetarget. The initiator of a conversation begins the conversation by sending a message tothe target. The contract that the conversation uses defines which service role can sendmessages of a given message type .
Contract Editor allows you to define contract properties. It opens automatically whenyou create a new contract and is available on editing an existing one.
To open a contract in Contract Editor, double-click it in the DB Explorer tree.Using Navigation bar and ToolbarCreating/editing contractBrowsing object dependenciesViewing DDL definition
5.3.3.12.1 Using Navigation bar and Toolbar
The Navigation bar and Toolbar provide quick access to tools implemented in ContractEditor.
331 335
317
964
652
370
99
373
375
964
962
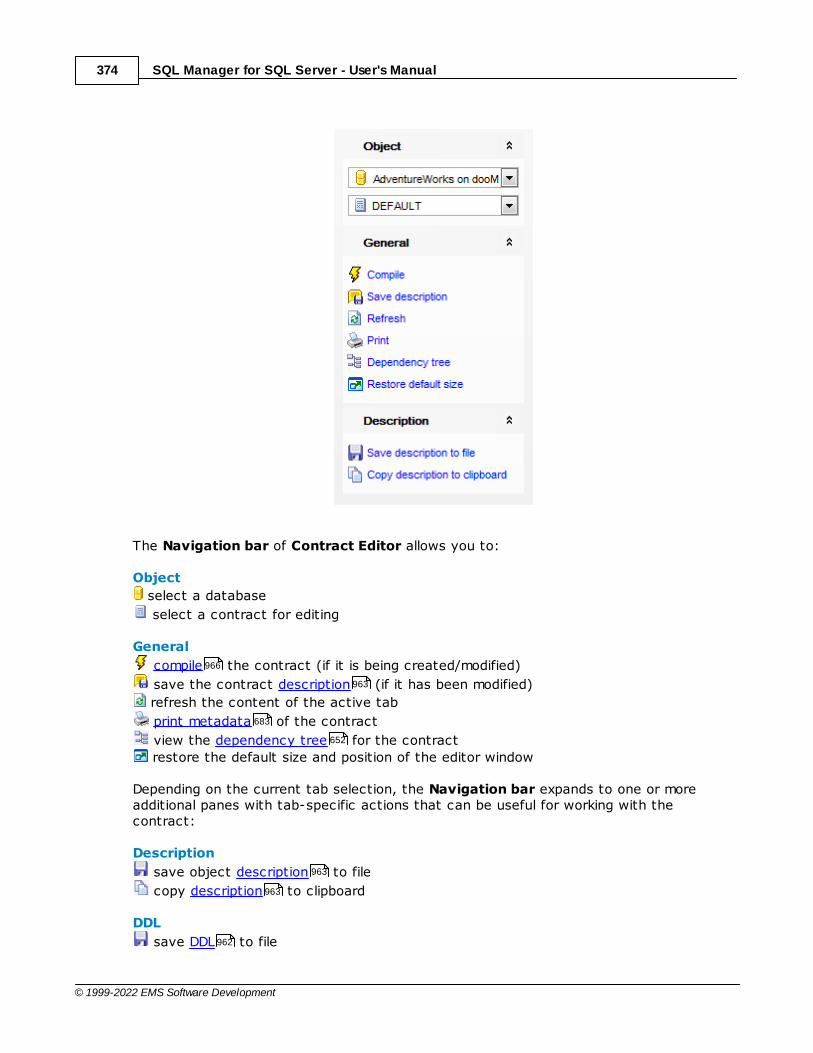
SQL Manager for SQL Server - User's Manual374
© 1999-2022 EMS Software Development
The Navigation bar of Contract Editor allows you to:
Object
select a database
select a contract for editing
General
compile the contract (if it is being created/modified)
save the contract description (if it has been modified)
refresh the content of the active tab
print metadata of the contract
view the dependency tree for the contract
restore the default size and position of the editor window
Depending on the current tab selection, the Navigation bar expands to one or moreadditional panes with tab-specific actions that can be useful for working with thecontract:
Description
save object description to file
copy description to clipboard
DDL
save DDL to file
966
963
683
652
963
963
962

SQL Manager for SQL Server - User's Manual375
© 1999-2022 EMS Software Development
open DDL in SQL Editor
Items of the Navigation bar are also available on the ToolBar of Contract Editor. Toenable the toolbar , open the Environment Options dialog, proceed to the Windows
section there and select T oolbar (if you need the toolbar only) or Both (if youneed both the toolbar and the Navigation bar ) in the Bar style for child forms group.
5.3.3.12.2 Creating/editing contract
Use the Contract tab of Contract Editor to create/edit a contract and specify itsproperties.
NameEnter a name for the new contract, or modify the name of the contract being edited.
AuthorizationUse the drop-down list to set the owner of the contract to the specified database useror role .
Message type listThis area contains the list of message types to be included as part of the contract.
Conversation fieldSpecifies which endpoint can send a message of the indicated message type. Contracts
962 462
960 867
871
958
331
335
370
SQL Manager for SQL Server - User's Manual376
© 1999-2022 EMS Software Development
document the messages that services can use to have specific conversations. Eachconversation has two endpoints: the initiator endpoint, the service that started theconversation, and the target endpoint, the service that the initiator is contacting.
INIT IAT ORIndicates that only the initiator of the conversation can send messages of the specifiedmessage type. A service that starts a conversation is referred to as the initiator of theconversation.
T ARGETIndicates that only the target of the conversation can send messages of the specifiedmessage type. A service that accepts a conversation that was started by another serviceis referred to as the target of the conversation.
ANYIndicates that messages of this type can be sent by both the initiator and the target.
Note: Some properties cannot be modified because of dependent objects. Open theDependencies tab to browse the list of dependent objects, or view the dependencytree for the contract.
5.3.3.13 Services
A Service Broker Service is a name for a specific task or set of tasks. Service Broker usesthe name of the service to route messages, deliver messages to the correct queuewithin a database, and enforce the contract for a conversation.
Service Editor allows you to define service properties. It opens automatically when youcreate a new service and is available on editing an existing one.
To open a service in Service Editor, double-click it in the DB Explorer tree.Using Navigation bar and ToolbarCreating/editing serviceViewing service dialogsBrowsing object dependenciesViewing DDL definition
5.3.3.13.1 Using Navigation bar and Toolbar
The Navigation bar and Toolbar provide quick access to tools implemented in ServiceEditor.
964
652
325
373
99
376
378
379
964
962
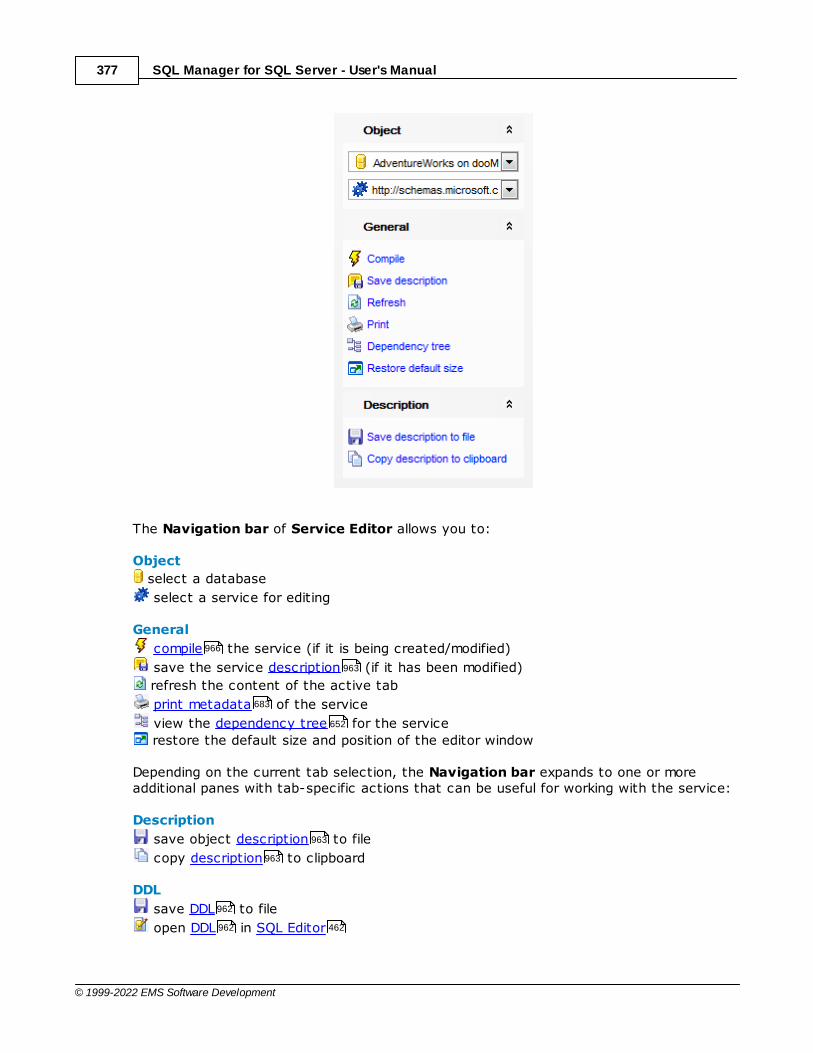
SQL Manager for SQL Server - User's Manual377
© 1999-2022 EMS Software Development
The Navigation bar of Service Editor allows you to:
Object
select a database
select a service for editing
General
compile the service (if it is being created/modified)
save the service description (if it has been modified)
refresh the content of the active tab
print metadata of the service
view the dependency tree for the service
restore the default size and position of the editor window
Depending on the current tab selection, the Navigation bar expands to one or moreadditional panes with tab-specific actions that can be useful for working with the service:
Description
save object description to file
copy description to clipboard
DDL
save DDL to file
open DDL in SQL Editor
966
963
683
652
963
963
962
962 462
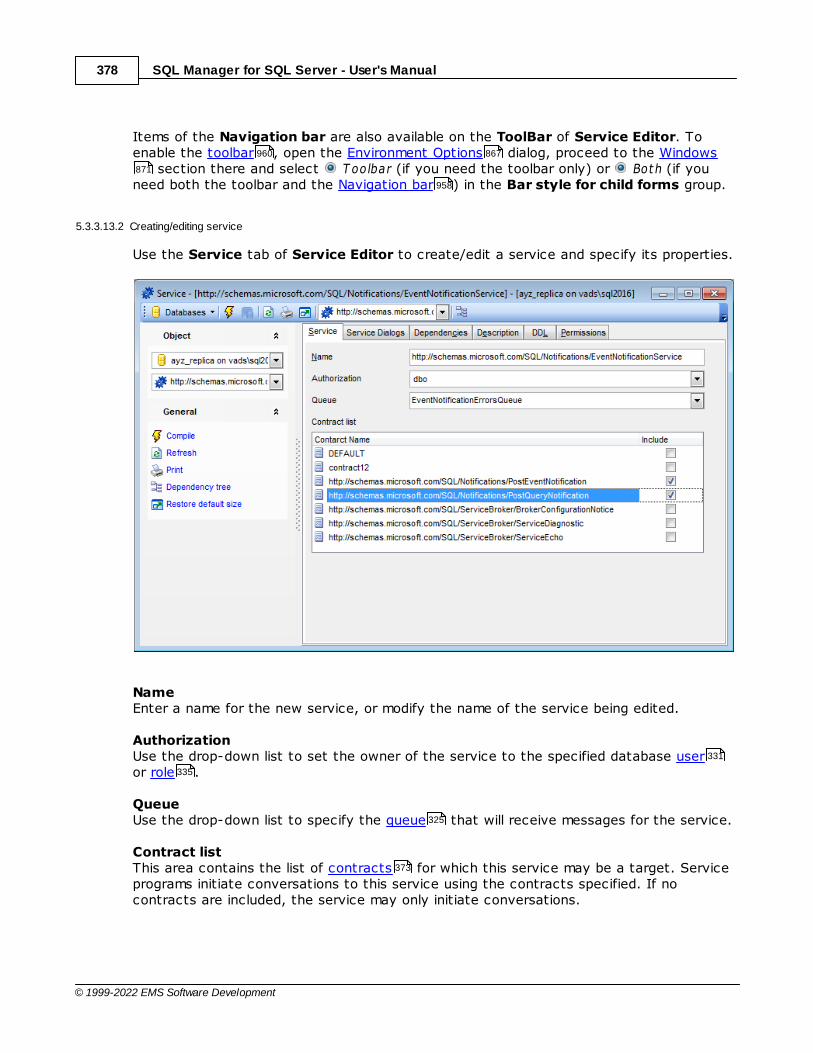
SQL Manager for SQL Server - User's Manual378
© 1999-2022 EMS Software Development
Items of the Navigation bar are also available on the ToolBar of Service Editor. Toenable the toolbar , open the Environment Options dialog, proceed to the Windows
section there and select T oolbar (if you need the toolbar only) or Both (if youneed both the toolbar and the Navigation bar ) in the Bar style for child forms group.
5.3.3.13.2 Creating/editing service
Use the Service tab of Service Editor to create/edit a service and specify its properties.
NameEnter a name for the new service, or modify the name of the service being edited.
AuthorizationUse the drop-down list to set the owner of the service to the specified database useror role .
QueueUse the drop-down list to specify the queue that will receive messages for the service.
Contract listThis area contains the list of contracts for which this service may be a target. Serviceprograms initiate conversations to this service using the contracts specified. If nocontracts are included, the service may only initiate conversations.
960 867
871
958
331
335
325
373
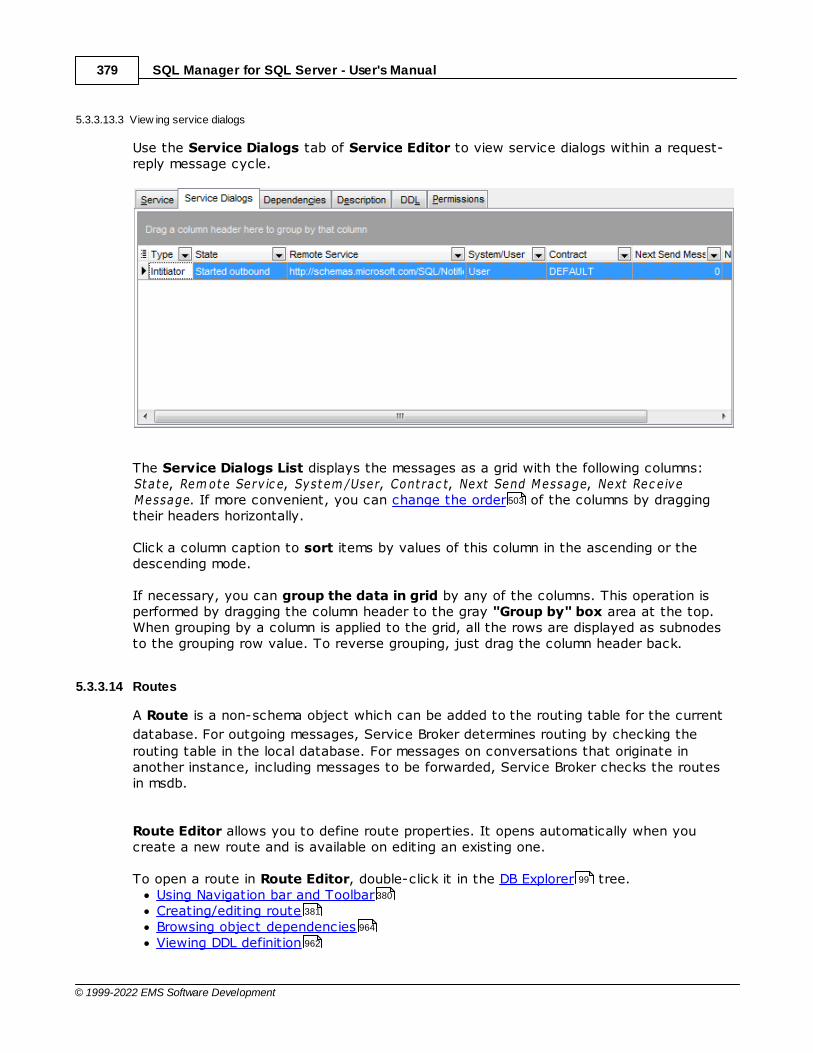
SQL Manager for SQL Server - User's Manual379
© 1999-2022 EMS Software Development
5.3.3.13.3 View ing service dialogs
Use the Service Dialogs tab of Service Editor to view service dialogs within a request-reply message cycle.
The Service Dialogs List displays the messages as a grid with the following columns:State, Rem ote Serv ic e, System /User, Cont rac t, Next Send Message, Next Rec e iveMessage. If more convenient, you can change the order of the columns by draggingtheir headers horizontally.
Click a column caption to sort items by values of this column in the ascending or thedescending mode.
If necessary, you can group the data in grid by any of the columns. This operation isperformed by dragging the column header to the gray "Group by" box area at the top.When grouping by a column is applied to the grid, all the rows are displayed as subnodesto the grouping row value. To reverse grouping, just drag the column header back.
5.3.3.14 Routes
A Route is a non-schema object which can be added to the routing table for the current
database. For outgoing messages, Service Broker determines routing by checking the
routing table in the local database. For messages on conversations that originate inanother instance, including messages to be forwarded, Service Broker checks the routesin msdb.
Route Editor allows you to define route properties. It opens automatically when youcreate a new route and is available on editing an existing one.
To open a route in Route Editor, double-click it in the DB Explorer tree.Using Navigation bar and ToolbarCreating/editing routeBrowsing object dependenciesViewing DDL definition
503
99
380
381
964
962
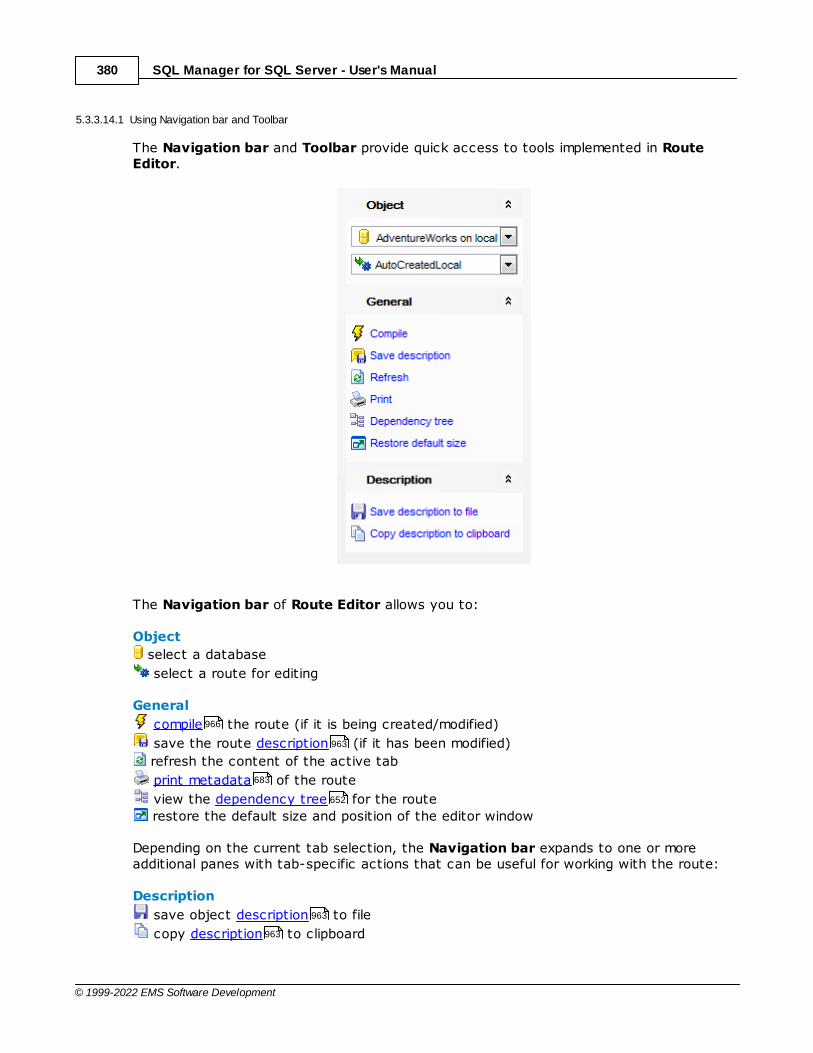
SQL Manager for SQL Server - User's Manual380
© 1999-2022 EMS Software Development
5.3.3.14.1 Using Navigation bar and Toolbar
The Navigation bar and Toolbar provide quick access to tools implemented in RouteEditor.
The Navigation bar of Route Editor allows you to:
Object
select a database
select a route for editing
General
compile the route (if it is being created/modified)
save the route description (if it has been modified)
refresh the content of the active tab
print metadata of the route
view the dependency tree for the route
restore the default size and position of the editor window
Depending on the current tab selection, the Navigation bar expands to one or moreadditional panes with tab-specific actions that can be useful for working with the route:
Description
save object description to file
copy description to clipboard
966
963
683
652
963
963
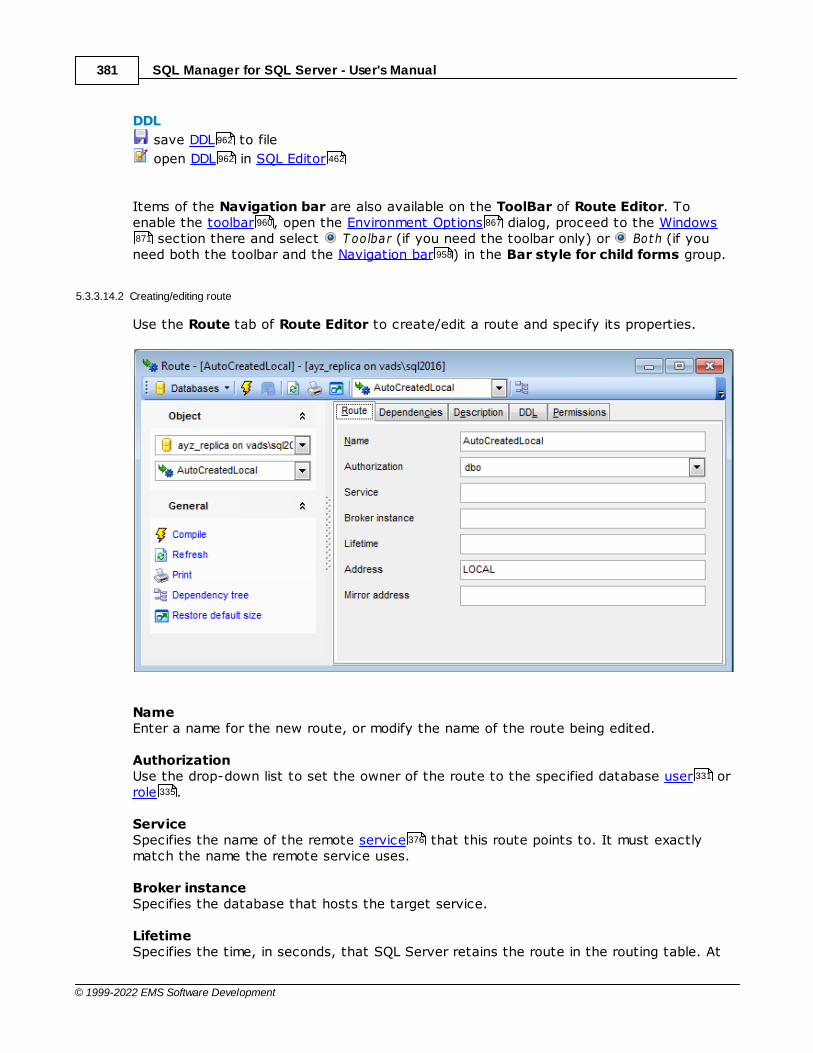
SQL Manager for SQL Server - User's Manual381
© 1999-2022 EMS Software Development
DDL
save DDL to file
open DDL in SQL Editor
Items of the Navigation bar are also available on the ToolBar of Route Editor. Toenable the toolbar , open the Environment Options dialog, proceed to the Windows
section there and select T oolbar (if you need the toolbar only) or Both (if youneed both the toolbar and the Navigation bar ) in the Bar style for child forms group.
5.3.3.14.2 Creating/editing route
Use the Route tab of Route Editor to create/edit a route and specify its properties.
NameEnter a name for the new route, or modify the name of the route being edited.
AuthorizationUse the drop-down list to set the owner of the route to the specified database user orrole .
ServiceSpecifies the name of the remote service that this route points to. It must exactlymatch the name the remote service uses.
Broker instanceSpecifies the database that hosts the target service.
LifetimeSpecifies the time, in seconds, that SQL Server retains the route in the routing table. At
962
962 462
960 867
871
958
331
335
376
SQL Manager for SQL Server - User's Manual382
© 1999-2022 EMS Software Development
the end of the lifetime, the route expires, and SQL Server no longer considers the routewhen choosing a route for a new conversation.
AddressSpecifies the network address for this route.
Mirror addressSpecifies the network address for a mirrored database.
5.3.3.15 Remote Service Bindings
A Remote service binding establishes a relationship between a local database user ,the certificate for the user, and the name of a remote service . Service Broker usesthe remote service binding to provide dialog security for conversations that target theremote service.
Remote Service Binding Editor allows you to define remote service binding properties. Itopens automatically when you create a new remote service binding and is available onediting an existing one.
To open a remote service binding in Remote Service Binding Editor, double-click it inthe DB Explorer tree.
Using Navigation bar and ToolbarCreating/editing remote service bindingBrowsing object dependenciesViewing DDL definition
5.3.3.15.1 Using Navigation bar and Toolbar
The Navigation bar and Toolbar provide quick access to tools implemented in RemoteService Binding Editor.
331
364 376
99
382
384
964
962
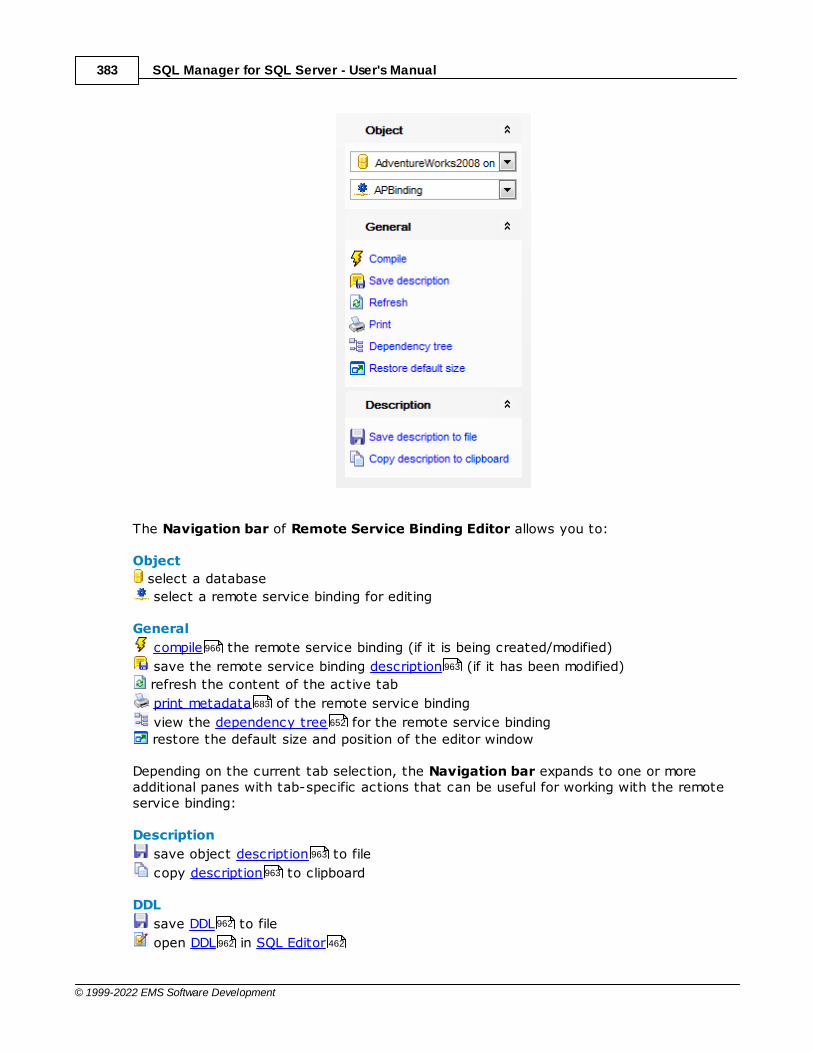
SQL Manager for SQL Server - User's Manual383
© 1999-2022 EMS Software Development
The Navigation bar of Remote Service Binding Editor allows you to:
Object
select a database
select a remote service binding for editing
General
compile the remote service binding (if it is being created/modified)
save the remote service binding description (if it has been modified)
refresh the content of the active tab
print metadata of the remote service binding
view the dependency tree for the remote service binding
restore the default size and position of the editor window
Depending on the current tab selection, the Navigation bar expands to one or moreadditional panes with tab-specific actions that can be useful for working with the remoteservice binding:
Description
save object description to file
copy description to clipboard
DDL
save DDL to file
open DDL in SQL Editor
966
963
683
652
963
963
962
962 462
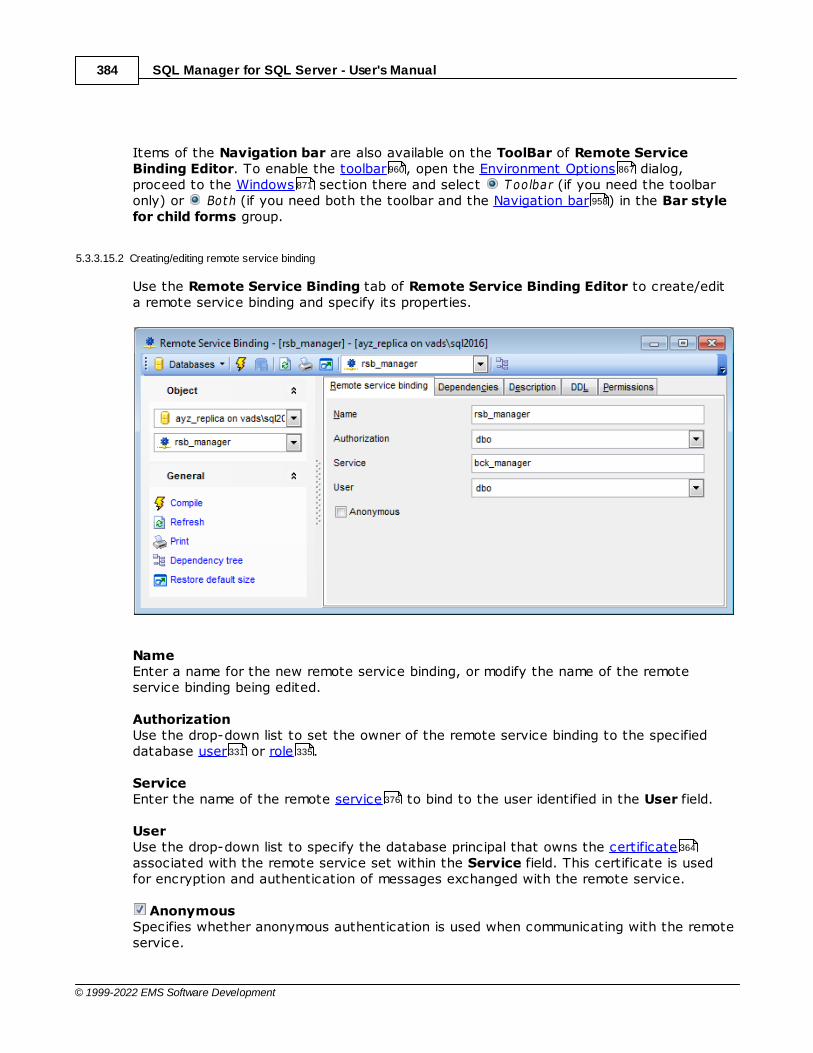
SQL Manager for SQL Server - User's Manual384
© 1999-2022 EMS Software Development
Items of the Navigation bar are also available on the ToolBar of Remote ServiceBinding Editor. To enable the toolbar , open the Environment Options dialog,proceed to the Windows section there and select T oolbar (if you need the toolbaronly) or Both (if you need both the toolbar and the Navigation bar ) in the Bar stylefor child forms group.
5.3.3.15.2 Creating/editing remote service binding
Use the Remote Service Binding tab of Remote Service Binding Editor to create/edita remote service binding and specify its properties.
NameEnter a name for the new remote service binding, or modify the name of the remoteservice binding being edited.
AuthorizationUse the drop-down list to set the owner of the remote service binding to the specifieddatabase user or role .
ServiceEnter the name of the remote service to bind to the user identified in the User field.
UserUse the drop-down list to specify the database principal that owns the certificateassociated with the remote service set within the Service field. This certificate is usedfor encryption and authentication of messages exchanged with the remote service.
AnonymousSpecifies whether anonymous authentication is used when communicating with the remoteservice.
960 867
871
958
331 335
376
364
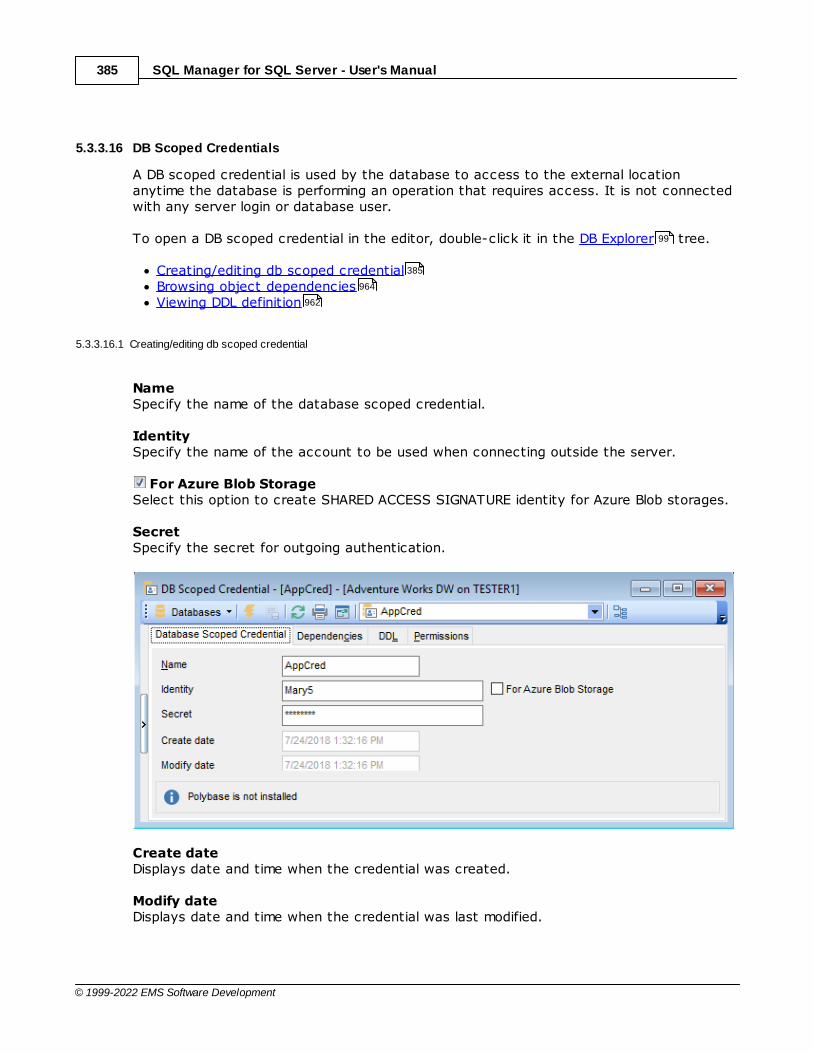
SQL Manager for SQL Server - User's Manual385
© 1999-2022 EMS Software Development
5.3.3.16 DB Scoped Credentials
A DB scoped credential is used by the database to access to the external locationanytime the database is performing an operation that requires access. It is not connectedwith any server login or database user.
To open a DB scoped credential in the editor, double-click it in the DB Explorer tree.
Creating/editing db scoped credentialBrowsing object dependenciesViewing DDL definition
5.3.3.16.1 Creating/editing db scoped credential
NameSpecify the name of the database scoped credential.
IdentitySpecify the name of the account to be used when connecting outside the server.
For Azure Blob StorageSelect this option to create SHARED ACCESS SIGNATURE identity for Azure Blob storages.
SecretSpecify the secret for outgoing authentication.
Create dateDisplays date and time when the credential was created.
Modify dateDisplays date and time when the credential was last modified.
99
385
964
962

SQL Manager for SQL Server - User's Manual386
© 1999-2022 EMS Software Development
5.3.3.17 External Data Sources
An external data source is used for PolyBase or Elastic Database queries.
To open an external data source in the editor, double-click it in the DB Explorer tree.
Creating/editing external data sourceBrowsing object dependenciesViewing DDL definition
5.3.3.17.1 Creating/editing external data source
NameSpecify the unique name for the data source being created.
TypeSelect the type of the data source: HADOOP or BLOB_STORAGE.
LocationSpecify connection string for HADOOP or Azure blob storage in the special format.
CredentialSpecify the database-scoped credential for authenticating to the external datasource.
Resource manager locationSpecify the Hadoop resource manager location to improve query performance.
Database Specify the name of the database that functions as the shard map manager or the remotedatabase.
Shard map managerSet the name of the shard map.
99
386
964
962
385
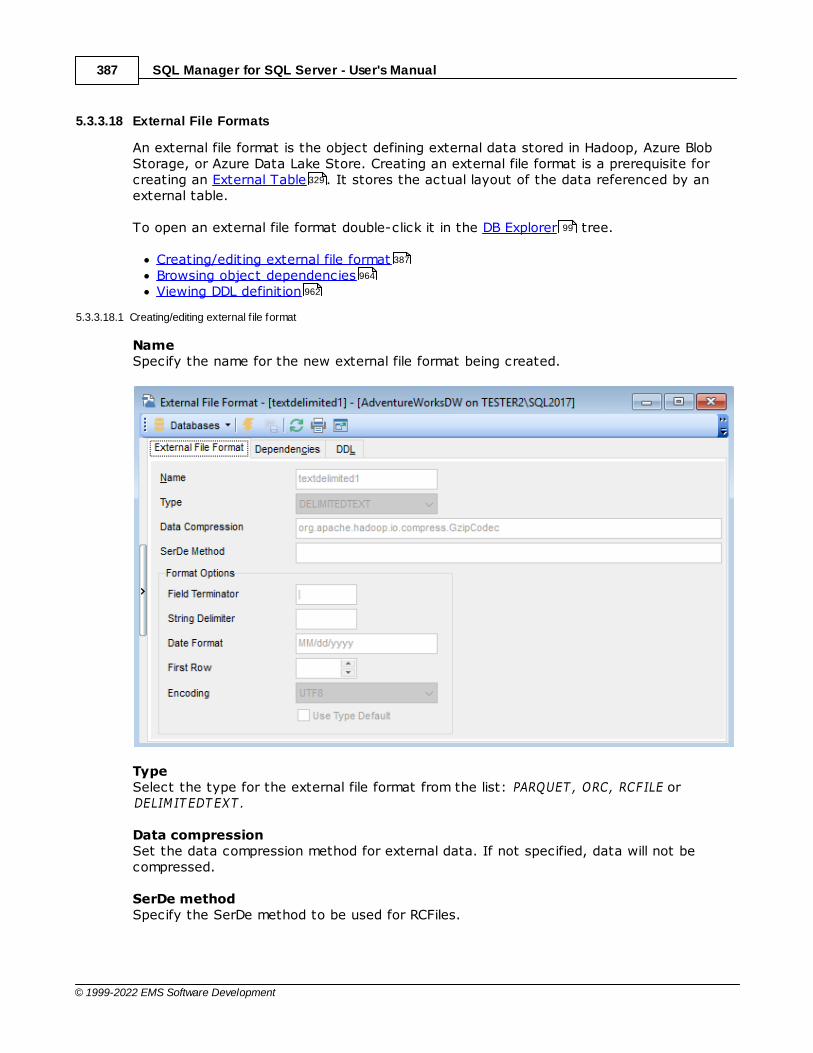
SQL Manager for SQL Server - User's Manual387
© 1999-2022 EMS Software Development
5.3.3.18 External File Formats
An external file format is the object defining external data stored in Hadoop, Azure BlobStorage, or Azure Data Lake Store. Creating an external file format is a prerequisite forcreating an External Table . It stores the actual layout of the data referenced by anexternal table.
To open an external file format double-click it in the DB Explorer tree.
Creating/editing external file formatBrowsing object dependenciesViewing DDL definition
5.3.3.18.1 Creating/editing external f ile format
NameSpecify the name for the new external file format being created.
TypeSelect the type for the external file format from the list: PARQUET , ORC, RCFILE orDELIMIT EDT EXT .
Data compressionSet the data compression method for external data. If not specified, data will not becompressed.
SerDe methodSpecify the SerDe method to be used for RCFiles.
329
99
387
964
962

SQL Manager for SQL Server - User's Manual388
© 1999-2022 EMS Software Development
Format optionsSet the options for the text format with column delimiters (DELIMIT EDT EXT ).
Field terminatorSet one or more characters that mark the end of each field in the text-delimited file. Thedefault terminator is the ?|? character.
String delimiterSpecify the field terminator for string type in the text-delimited file. The default is theempty string "". Date formatSet custom date and time format for the file.
First rowSpecify the row number that is read first in all files during a PolyBase load (1-15).
Encoding Set the UTF8 or UTF16 encoding.
Use type defaultCheck this option to use default values in delimited text files if the value is missing.

SQL Manager for SQL Server - User's Manual389
© 1999-2022 EMS Software Development
5.4 Server Objects
SQL Manager for SQL Server provides all necessary facilities for working with serverobjects.
Note: To start working with server objects you need to connect to server .
Server Objects:LoginsBackup DevicesJobsSchedulesAlertsOperatorsProxiesCredentialsLinked ServersEndpointsDDL TriggersDTS Packages
Creating Server Objects
To create a server object:select the Database | New Object... main menu item;select the type of object within the New Object dialog;follow the steps of the wizard which guides you through the entire process of creatingthe object, or set the object properties using its editor - depending on the selectedobject type.
Note that you can also create a server object by selecting the appropriate context menu item of the DB Explorer tree or using the Ct r l+N shortcut .
To create a new object with the same properties as one of existing objects has:select the Database | Duplicate Object... main menu item;follow the instructions of Duplicate Object Wizard .
Alternatively, you can right-click an object in the DB Explorer tree and select theDuplicate Object <object_name>... context menu item.
Editing Server Objects
To edit a server object:select the server object in the DB Explorer tree;right-click the object to call its context menu and select the Edit <object type><object name> context menu item, or double-click the object to open it in itseditor;
Renaming Server Objects
To rename a server object:select the object to rename in the DB Explorer tree;
104
390
402
404
412
416
422
427
431
434
438
448
457
958
216
88 107 996
958
218
99
99
91
99
SQL Manager for SQL Server - User's Manual390
© 1999-2022 EMS Software Development
right-click the object and select the Rename <object type> <object name>... itemfrom the context menu ;edit the object name using the Rename Object... dialog.
Note: This operation is possible for all objects except for Logins , Credentials , LinkedServers , Endpoints , DTS Packages .
Dropping Server Objects
To drop a server object:select the server object in the DB Explorer tree;right-click the object to call its context menu and select the Drop <object type><object name> context menu item;confirm dropping in the dialog window.
Note: If more convenient, you can also use the following shortcuts :Ct r l+N to create a new object;Ct r l+O to edit the selected object;Ct r l+R to rename the object;Shift+Del to drop the object from the server.
When using an object editor, you can benefit from tabs. To switch between tab views,click on their respective tabs at the top of the main editor window. You can do it at anytime, since the tab views are absolutely independent.
To compile a newly created or edited object, you can use the Compile item availablewithin the Navigation bar or Toolbar of the object editor.
See also:Database objects
5.4.1 Logins
Microsoft® SQL Server™ uses two ways to validate connections to SQL Serverdatabases:Windows Authentication which uses Windows-level principalsandSQL Server Authentication which uses logins to validate the connection.A login is an indivisible principal which is used to connect to the server and use itsresources.
Login Editor allows you to define login properties. It opens automatically when youcreate a new server login and is available on editing an existing one.
To open a login in Login Editor, double-click it in the DB Explorer tree or in the LoginManager . Alternatively, you can right-click the login alias and select the Edit Logincontext menu item.
Setting login parametersAllocating membersDefining server permissions
91
390 431
434 438 457
107
91
996
958 960
223
99
723
391
395
396

SQL Manager for SQL Server - User's Manual391
© 1999-2022 EMS Software Development
Defining server role permissionsDefining endpoint permissionsDefining database permissionsUser mappingViewing DDL definition
See also:
Users
Server roles
Grant Manager
Login Manager
5.4.1.1 Setting login parameters
Use the Login tab of Login Editor to configure login authentication and defaultparameters.
Specify the way used by the login to connect to the instance of SQL Server: Window s authent ic at ion SQL Server authent ic at ion Mapped to c ert if ic ate Mapped to asym m et r ic key
EnabledEnables/disables the login immediately after it is created. A disabled login still exists in theserver, but it cannot be used to connect to the instance of SQL Server.
Login is locked outThis option is used to indicate whether the login is locked out.
Windows authenticationWhen Windows Authentication is used to connect to SQL Server, Microsoft Windows iscompletely responsible for authenticating the client. In this case, the client is identified byits Windows account (Windows-level login).
Built-in account on serverSelect this option to specify a built-in server account for the login (User or Group), orspecify the Windows Domain and User or group name.
397
399
400
402
962
331
451
724
723
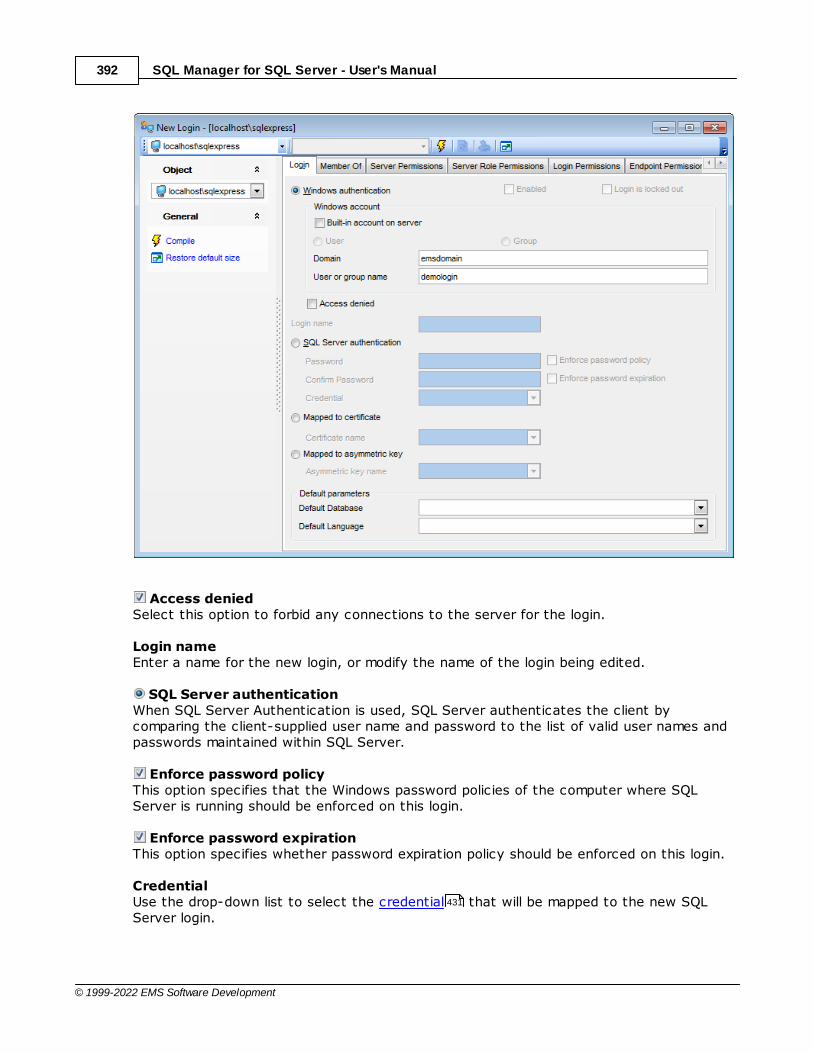
SQL Manager for SQL Server - User's Manual392
© 1999-2022 EMS Software Development
Access deniedSelect this option to forbid any connections to the server for the login.
Login nameEnter a name for the new login, or modify the name of the login being edited.
SQL Server authenticationWhen SQL Server Authentication is used, SQL Server authenticates the client bycomparing the client-supplied user name and password to the list of valid user names andpasswords maintained within SQL Server.
Enforce password policyThis option specifies that the Windows password policies of the computer where SQLServer is running should be enforced on this login.
Enforce password expirationThis option specifies whether password expiration policy should be enforced on this login.
CredentialUse the drop-down list to select the credential that will be mapped to the new SQLServer login.
431

SQL Manager for SQL Server - User's Manual393
© 1999-2022 EMS Software Development
Mapped to certificateSelect this option to specify a certificate-mapped login.
Certificate nameUse the drop-down list to select the certificate that will be associated with this login.364
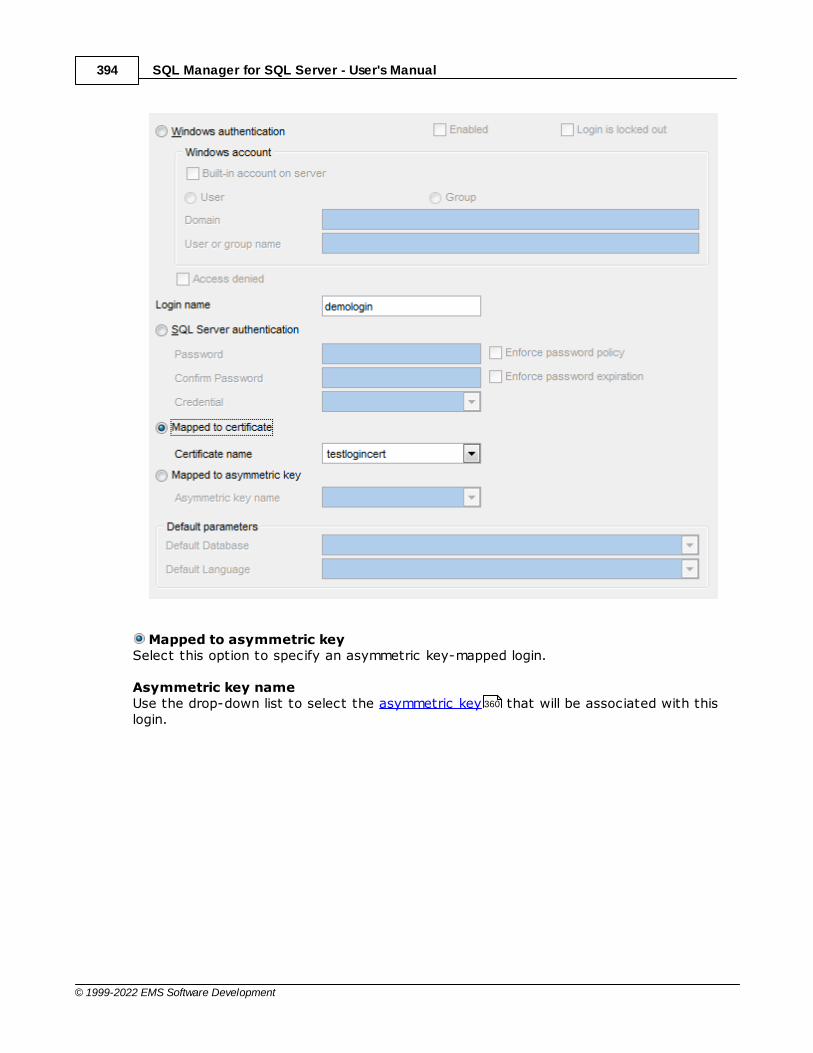
SQL Manager for SQL Server - User's Manual394
© 1999-2022 EMS Software Development
Mapped to asymmetric keySelect this option to specify an asymmetric key-mapped login.
Asymmetric key nameUse the drop-down list to select the asymmetric key that will be associated with thislogin.
360
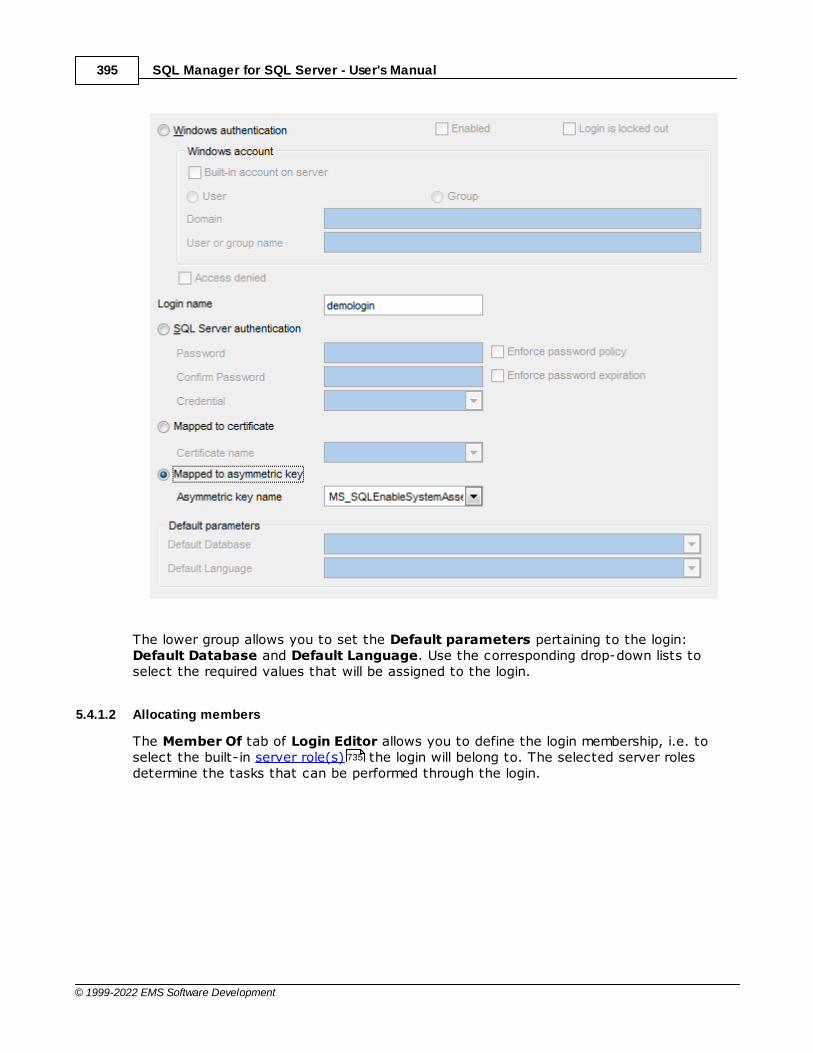
SQL Manager for SQL Server - User's Manual395
© 1999-2022 EMS Software Development
The lower group allows you to set the Default parameters pertaining to the login:Default Database and Default Language. Use the corresponding drop-down lists toselect the required values that will be assigned to the login.
5.4.1.2 Allocating members
The Member Of tab of Login Editor allows you to define the login membership, i.e. toselect the built-in server role(s) the login will belong to. The selected server rolesdetermine the tasks that can be performed through the login.
735
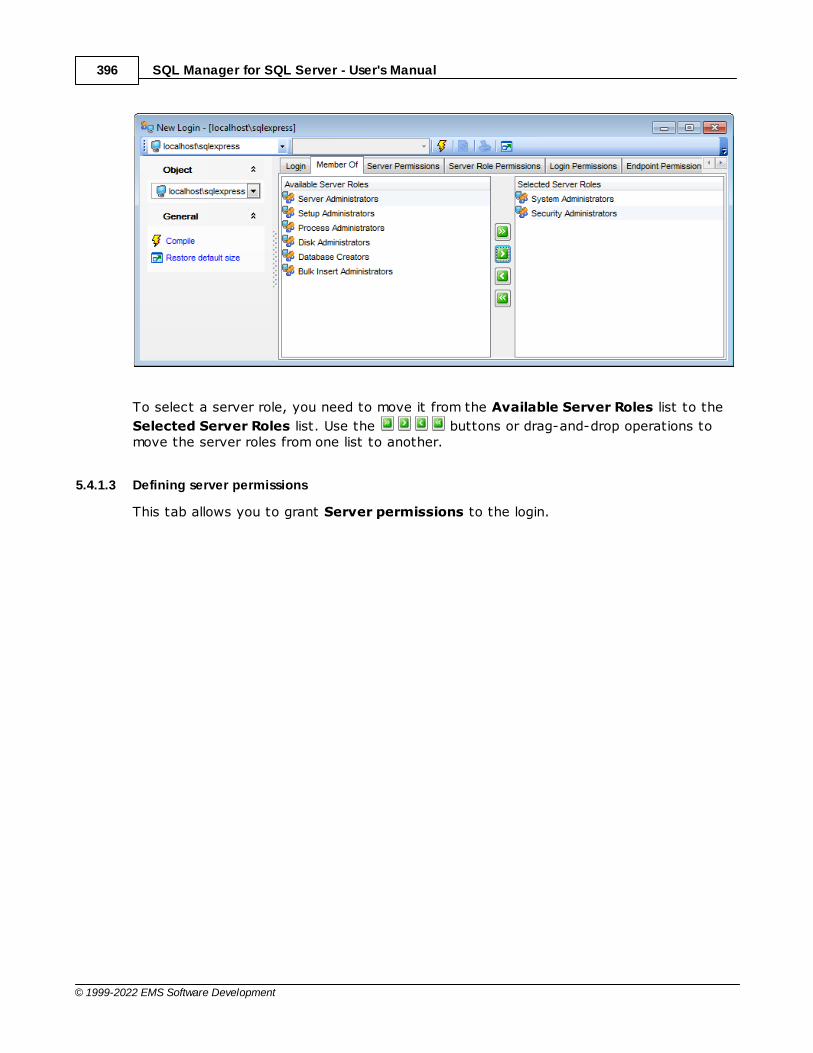
SQL Manager for SQL Server - User's Manual396
© 1999-2022 EMS Software Development
To select a server role, you need to move it from the Available Server Roles list to the
Selected Server Roles list. Use the buttons or drag-and-drop operations tomove the server roles from one list to another.
5.4.1.3 Defining server permissions
This tab allows you to grant Server permissions to the login.
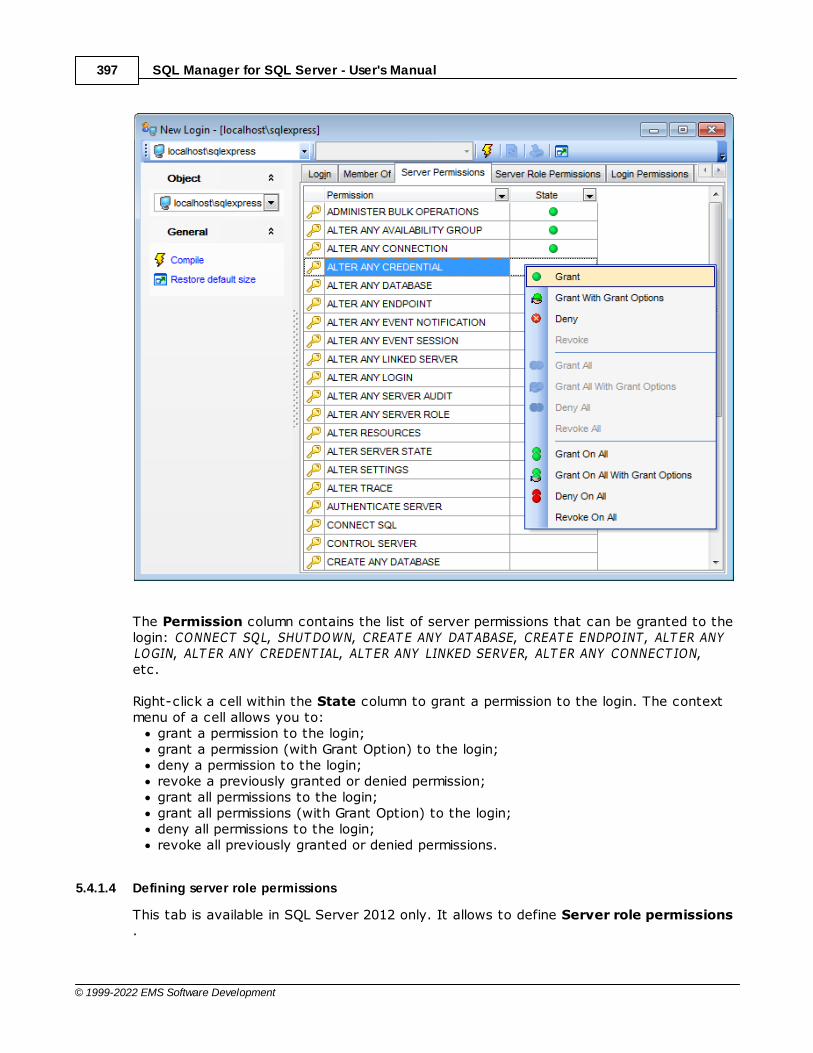
SQL Manager for SQL Server - User's Manual397
© 1999-2022 EMS Software Development
The Permission column contains the list of server permissions that can be granted to thelogin: CONNECT SQL, SHUT DOWN, CREAT E ANY DAT ABASE, CREAT E ENDPOINT, ALT ER ANYLOGIN, ALT ER ANY CREDENT IAL, ALT ER ANY LINKED SERVER, ALT ER ANY CONNECT ION,etc.
Right-click a cell within the State column to grant a permission to the login. The contextmenu of a cell allows you to:
grant a permission to the login;grant a permission (with Grant Option) to the login;deny a permission to the login;revoke a previously granted or denied permission;grant all permissions to the login;grant all permissions (with Grant Option) to the login;deny all permissions to the login;revoke all previously granted or denied permissions.
5.4.1.4 Defining server role permissions
This tab is available in SQL Server 2012 only. It allows to define Server role permissions.
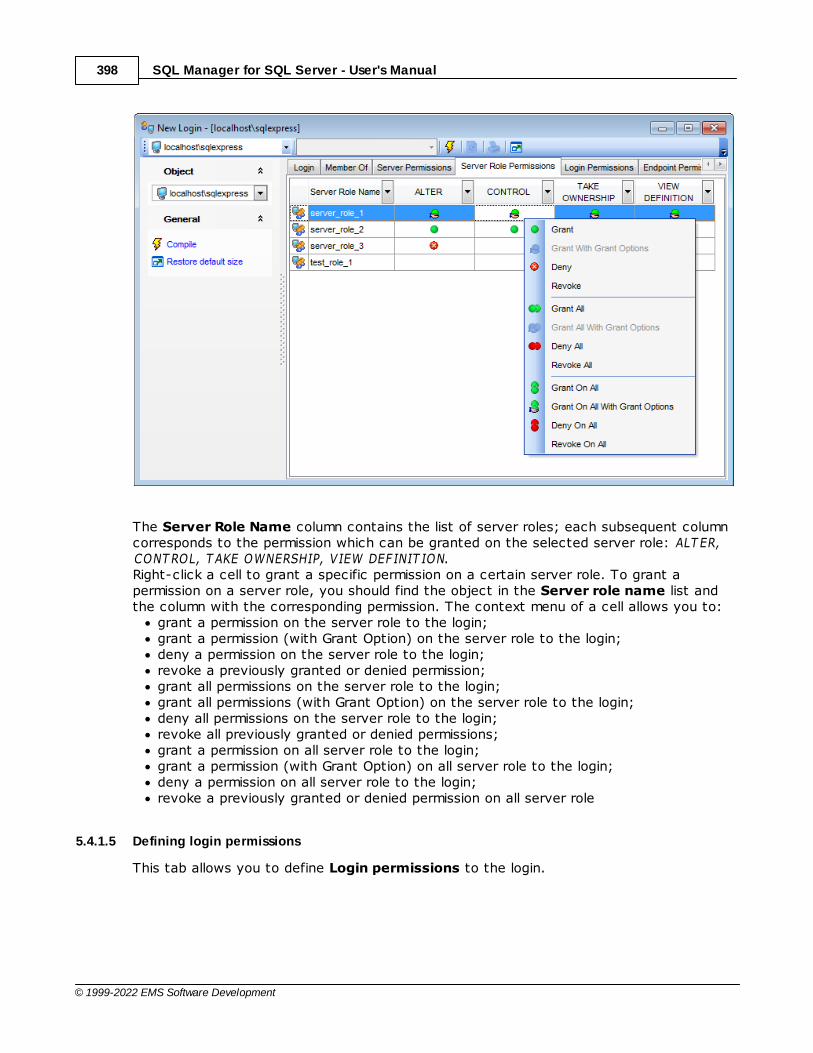
SQL Manager for SQL Server - User's Manual398
© 1999-2022 EMS Software Development
The Server Role Name column contains the list of server roles; each subsequent columncorresponds to the permission which can be granted on the selected server role: ALT ER,CONT ROL, T AKE OWNERSHIP, VIEW DEFINIT ION.Right-click a cell to grant a specific permission on a certain server role. To grant apermission on a server role, you should find the object in the Server role name list andthe column with the corresponding permission. The context menu of a cell allows you to:
grant a permission on the server role to the login;grant a permission (with Grant Option) on the server role to the login;deny a permission on the server role to the login;revoke a previously granted or denied permission;grant all permissions on the server role to the login;grant all permissions (with Grant Option) on the server role to the login;deny all permissions on the server role to the login;revoke all previously granted or denied permissions;grant a permission on all server role to the login;grant a permission (with Grant Option) on all server role to the login;deny a permission on all server role to the login;revoke a previously granted or denied permission on all server role
5.4.1.5 Defining login permissions
This tab allows you to define Login permissions to the login.
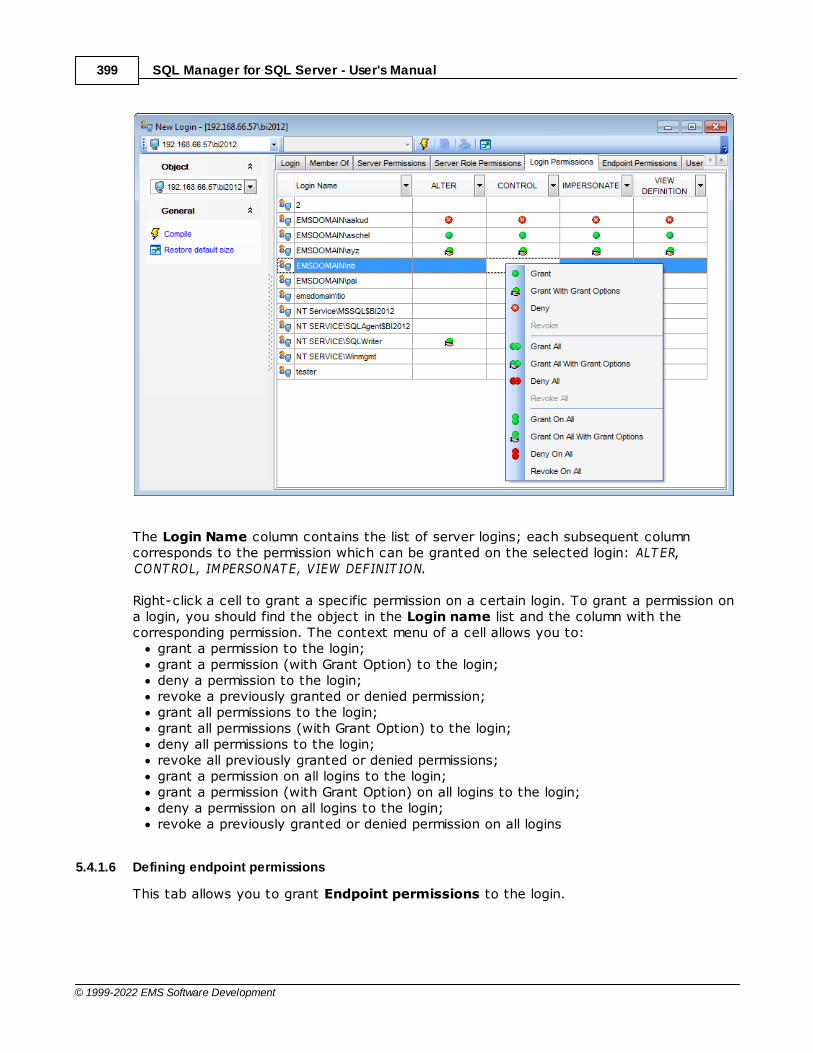
SQL Manager for SQL Server - User's Manual399
© 1999-2022 EMS Software Development
The Login Name column contains the list of server logins; each subsequent columncorresponds to the permission which can be granted on the selected login: ALT ER,CONT ROL, IMPERSONAT E, VIEW DEFINIT ION.
Right-click a cell to grant a specific permission on a certain login. To grant a permission ona login, you should find the object in the Login name list and the column with thecorresponding permission. The context menu of a cell allows you to:
grant a permission to the login;grant a permission (with Grant Option) to the login;deny a permission to the login;revoke a previously granted or denied permission;grant all permissions to the login;grant all permissions (with Grant Option) to the login;deny all permissions to the login;revoke all previously granted or denied permissions;grant a permission on all logins to the login;grant a permission (with Grant Option) on all logins to the login;deny a permission on all logins to the login;revoke a previously granted or denied permission on all logins
5.4.1.6 Defining endpoint permissions
This tab allows you to grant Endpoint permissions to the login.

SQL Manager for SQL Server - User's Manual400
© 1999-2022 EMS Software Development
The Endpoint Name column contains the list of server endpoints ; each subsequentcolumn corresponds to the permission which can be granted on the selected endpoint: ALT ER, CONNECT, VIEW DEFINIT ION, T AKE OWNERSHIP, CONT ROL.
Right-click a cell to grant a specific permission on a certain endpoint. To grant apermission on an endpoint, you should find the object in the Endpoint name list and thecolumn with the corresponding permission. The context menu of a cell allows you to:
grant a permission on the endpoint to the login;grant a permission (with Grant Option) on the endpoint to the login;deny a permission on the endpoint to the login;revoke a previously granted or denied permission;grant all permissions on the endpoint to the login;grant all permissions (with Grant Option) on the endpoint to the login;deny all permissions on the endpoint to the login;revoke all previously granted or denied permissions;grant a permission on all endpoints to the login;grant a permission (with Grant Option) on all endpoints to the login;deny a permission on all endpoints to the login;revoke a previously granted or denied permission on all endpoints
5.4.1.7 Defining database permissions
This tab allows you to grant Database permissions to the user. This tab is onlyavailable on editing an existing server login.
438
722
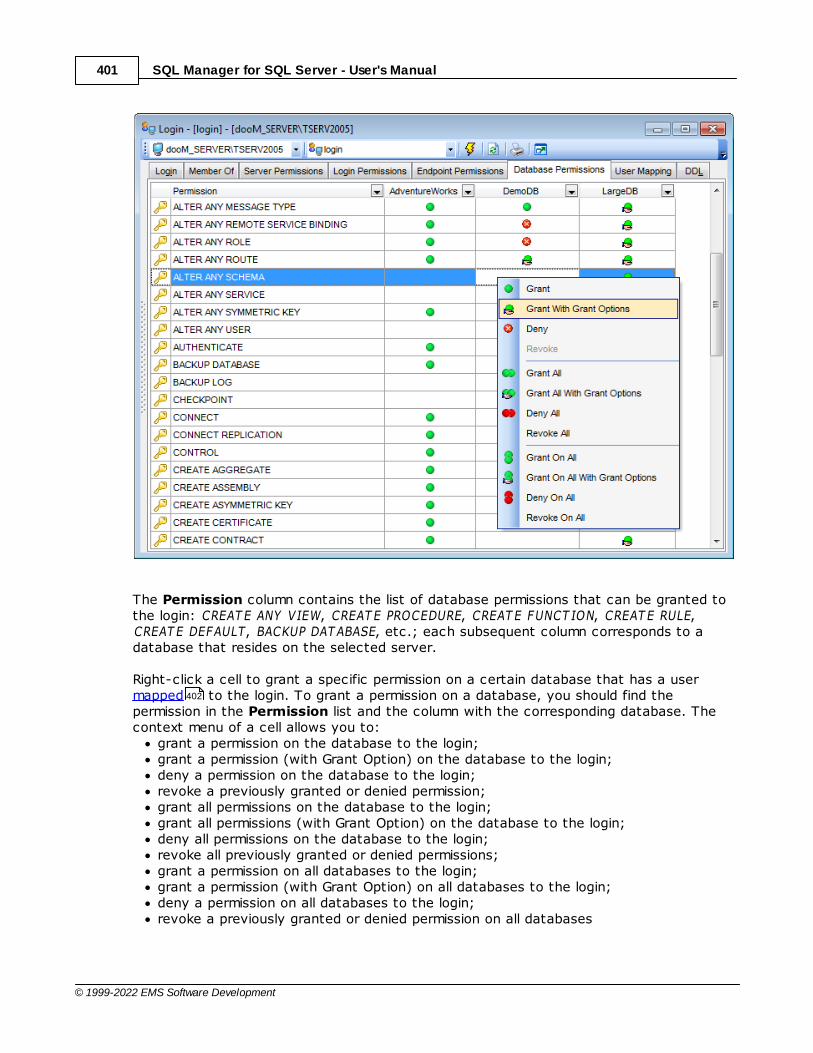
SQL Manager for SQL Server - User's Manual401
© 1999-2022 EMS Software Development
The Permission column contains the list of database permissions that can be granted tothe login: CREAT E ANY VIEW, CREAT E PROCEDURE, CREAT E FUNCT ION, CREAT E RULE,CREAT E DEFAULT, BACKUP DAT ABASE, etc.; each subsequent column corresponds to adatabase that resides on the selected server.
Right-click a cell to grant a specific permission on a certain database that has a user mapped to the login. To grant a permission on a database, you should find thepermission in the Permission list and the column with the corresponding database. Thecontext menu of a cell allows you to:
grant a permission on the database to the login;grant a permission (with Grant Option) on the database to the login;deny a permission on the database to the login;revoke a previously granted or denied permission;grant all permissions on the database to the login;grant all permissions (with Grant Option) on the database to the login;deny all permissions on the database to the login;revoke all previously granted or denied permissions;grant a permission on all databases to the login;grant a permission (with Grant Option) on all databases to the login;deny a permission on all databases to the login;revoke a previously granted or denied permission on all databases
402

SQL Manager for SQL Server - User's Manual402
© 1999-2022 EMS Software Development
5.4.1.8 User mapping
The User Mapping tab allows you to browse the list of databases available on thespecified server, and to map their users to the login.
Set the Map flag next to a database name, and specify the User and the DefaultSchema of the database using the corresponding drop-down lists.
If necessary, use the Database role membership for area at the bottom to definedatabase role(s) for each mapped user.
5.4.2 Backup Devices
A Backup device is a tape drive or a disk drive used in backup and restoreoperations. When creating a backup, you must select a backup device where the datawill be written. Microsoft SQL Server 2005 (and higher) can back up databases,transaction logs, and files to disk and tape devices.
Creating Backup Devices
To create a new backup device:right-click the Backup Devices node (within the Server Objects branch) or anyobject within this node in the DB Explorer tree and select the New Backup Deviceitem from the context menu ;define backup device properties using the appropriate boxes of the New Logical
331
335
760 774
763
99
91

SQL Manager for SQL Server - User's Manual403
© 1999-2022 EMS Software Development
Backup Device dialogor
select the Database | New Object... main menu item;select Backup Device in the Create New Object dialog;define backup device properties using the New Logical Backup Device dialog.
Hint: To create a new backup device, you can also select the Services | BackupDevices main menu item to open the Backup devices manager and select the AddDevice... item from the context menu or on the Navigation bar.
To create a new backup device with the same properties as one of existing backupdevices has:
select the Database | Duplicate Object... menu item;follow the instructions of Duplicate Object Wizard .
Alternatively, you can right-click a backup device in the DB Explorer tree and selectthe Duplicate Backup Device <backup_device_name>... context menu item.
Duplicate Object Wizard allows you to select the server to create a new backup deviceand to edit the result SQL statement for creating the backup device.
To create, rename and drop backup devices, you can also use the context menu andthe Navigation bar of Backup devices manager .
See also:
Backup Database
Backup Devices
5.4.2.1 New backup device
The New Logical Backup Device dialog opens automatically when you create a newbackup device and allows you to define the new backup device parameters.
To call the dialog, you can right-click the Backup Devices node or any object within thisnode in the DB Explorer tree and use the Ct r l+N shortcut .
403
958
216
403
958
218
99
218
785
760
785
99 996

SQL Manager for SQL Server - User's Manual404
© 1999-2022 EMS Software Development
Device Type Select the logical backup device type: F ile , Pipe (for SQL Server versions earlier than2005), or T ape.
Disk backup devices are files on hard disks or other disk storage media are the same asregular operating system files. Tape backup devices are used in the same way as disk devices, but the tape devicemust be connected physically to the computer running an instance of SQL Server, and if atape backup device is filled during the backup operation, but more data still needs to bewritten, SQL Server prompts for a new tape and continues the backup operation.
Logical NameEnter a name for the new backup device.
Physical Device Name and PathDefine the physical location of the device.If Device Type is set to F ile, enter the path and the full name of the file.If Device Type is set to T ape, enter the physical name of the device.
5.4.3 Jobs
A job is a specified set of operations performed sequentially by SQL Server Agent. A jobcan perform a wide range of activities, including running Transact-SQL scripts, command-line applications, Microsoft ActiveX scripts, Integration Services packages, AnalysisServices commands and queries, or Replication tasks. Jobs can run repetitive or scheduled
tasks, and they can automatically notify operators of job status by generatingalerts .
Before using SQL Server jobs, make sure that the SQL Server Agent service is running.
Job Editor allows you to define job properties. It opens automatically when you create anew job and is available on editing an existing one.
To open a job in Job Editor, double-click it in the DB Explorer tree or in the Jobsmanager . Alternatively, you can right-click the job alias and select the Edit Jobcontext menu item.
Setting job propertiesManaging job stepsManaging job schedulesManaging notificationsManaging target serversViewing DDL definition
To create, edit, rename and drop jobs, you can also use the context menu and theNavigation bar of Jobs manager .
See also:
836 833
830
99
826
405
406
409
410
412
962
826

SQL Manager for SQL Server - User's Manual405
© 1999-2022 EMS Software Development
Jobs manager
Schedules
Alerts
Operators
5.4.3.1 Setting job properties
Use the Job tab of the Job Editor to configure/view job properties. If necessary, you canuse items of the Navigation bar to manage the currently opened job (see Jobs manager
).
NameEnter a name for the new job, or modify the name of the job being edited. Enable/disablethe job using the Enabled option.
CategoryUse the drop-down list to select the job category.Job categories help you organize your jobs for easy filtering and grouping. For example,you can organize all your database backup jobs in the Database Maintenanc e category.
OwnerUse the drop-down list to select the job owner.Note: To create a job, a user must be a member of one of the SQL Server Agent fixeddatabase roles or the sysadmin fixed server role. A job can be edited only by its owner ormembers of the sysadmin role.
DescriptionIn this memo field you can supply an optional description for the job.
The lower area displays the following job events and properties:
826
412
416
422
826
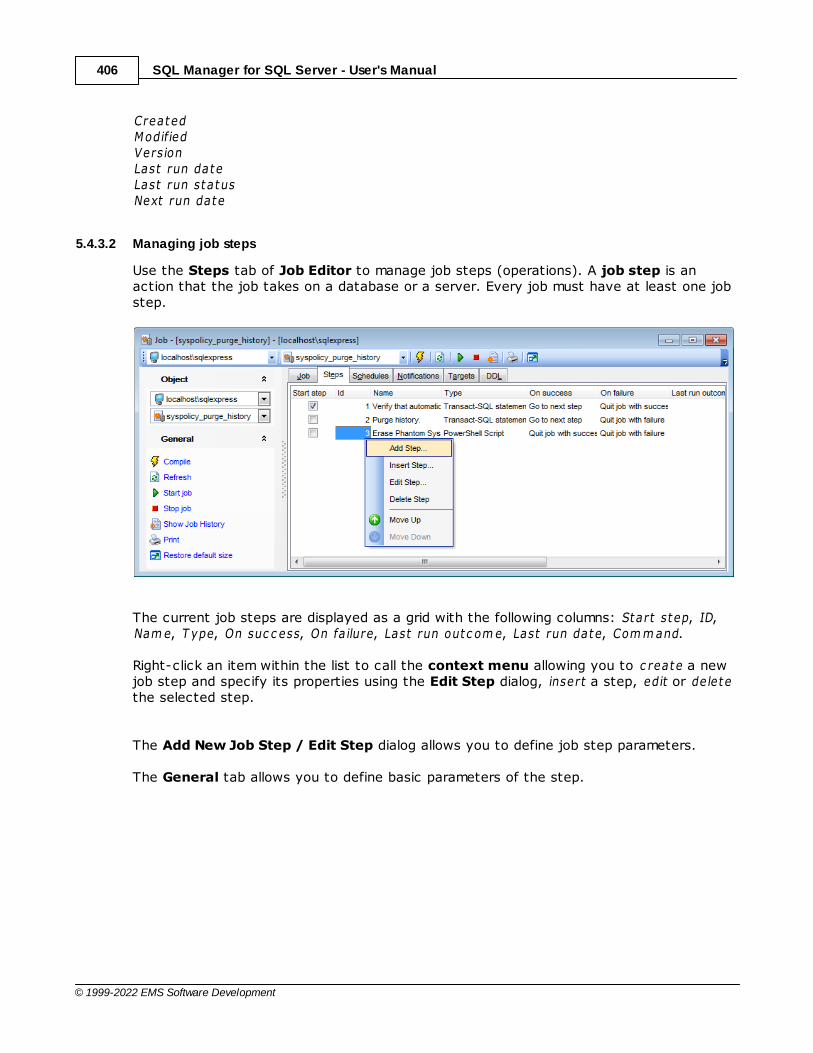
SQL Manager for SQL Server - User's Manual406
© 1999-2022 EMS Software Development
CreatedModifiedVersionLast run dateLast run statusNext run date
5.4.3.2 Managing job steps
Use the Steps tab of Job Editor to manage job steps (operations). A job step is anaction that the job takes on a database or a server. Every job must have at least one jobstep.
The current job steps are displayed as a grid with the following columns: Start step, ID,Nam e, T ype, On suc c ess, On fa ilure, Last run outc om e, Last run date, Com m and.
Right-click an item within the list to call the context menu allowing you to c reate a newjob step and specify its properties using the Edit Step dialog, insert a step, edit or de letethe selected step.
The Add New Job Step / Edit Step dialog allows you to define job step parameters.
The General tab allows you to define basic parameters of the step.
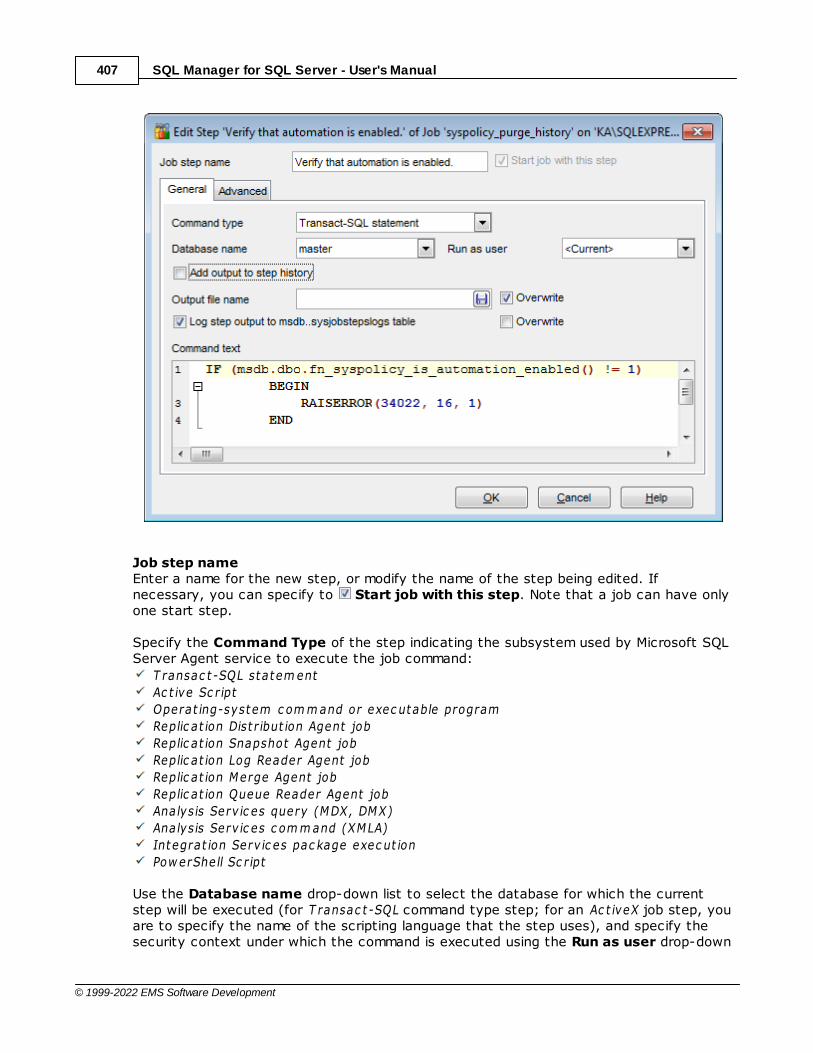
SQL Manager for SQL Server - User's Manual407
© 1999-2022 EMS Software Development
Job step nameEnter a name for the new step, or modify the name of the step being edited. Ifnecessary, you can specify to Start job with this step. Note that a job can have onlyone start step.
Specify the Command Type of the step indicating the subsystem used by Microsoft SQLServer Agent service to execute the job command:
T ransac t -SQL statem ent
Ac t ive Sc r ipt
Operat ing-system c om m and or exec utable program
Replic at ion Dist r ibut ion Agent job
Replic at ion Snapshot Agent job
Replic at ion Log Reader Agent job
Replic at ion Merge Agent job
Replic at ion Queue Reader Agent job
Analysis Serv ic es query (MDX, DMX)
Analysis Serv ic es c om m and (XMLA)
Integrat ion Serv ic es pac kage exec ut ion
Pow erShell Sc r ipt
Use the Database name drop-down list to select the database for which the currentstep will be executed (for T ransac t -SQL command type step; for an Ac t iveX job step, youare to specify the name of the scripting language that the step uses), and specify thesecurity context under which the command is executed using the Run as user drop-down
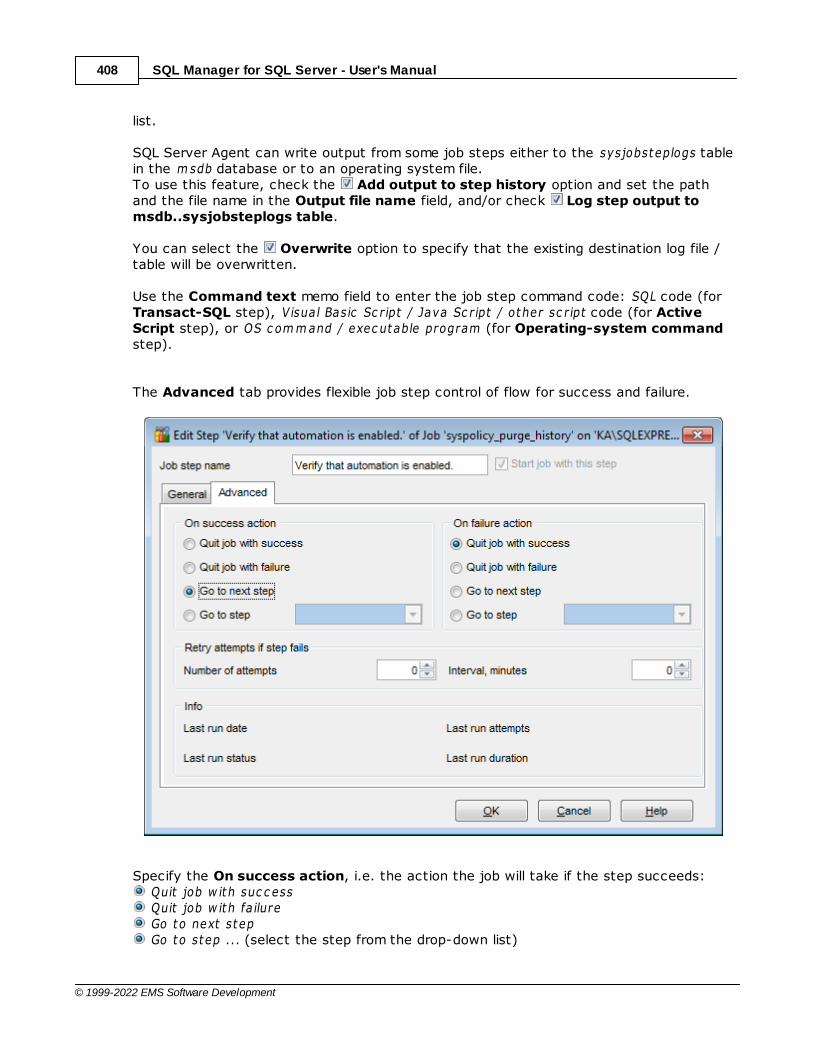
SQL Manager for SQL Server - User's Manual408
© 1999-2022 EMS Software Development
list.
SQL Server Agent can write output from some job steps either to the sysjobsteplogs tablein the m sdb database or to an operating system file.To use this feature, check the Add output to step history option and set the pathand the file name in the Output file name field, and/or check Log step output tomsdb..sysjobsteplogs table.
You can select the Overwrite option to specify that the existing destination log file /table will be overwritten.
Use the Command text memo field to enter the job step command code: SQL code (forTransact-SQL step), V isual Basic Sc r ipt / Java Sc r ipt / other sc r ipt code (for ActiveScript step), or OS c om m and / exec utable program (for Operating-system commandstep).
The Advanced tab provides flexible job step control of flow for success and failure.
Specify the On success action, i.e. the action the job will take if the step succeeds: Quit job w ith suc c ess Quit job w ith fa ilure Go to next step Go to step ... (select the step from the drop-down list)
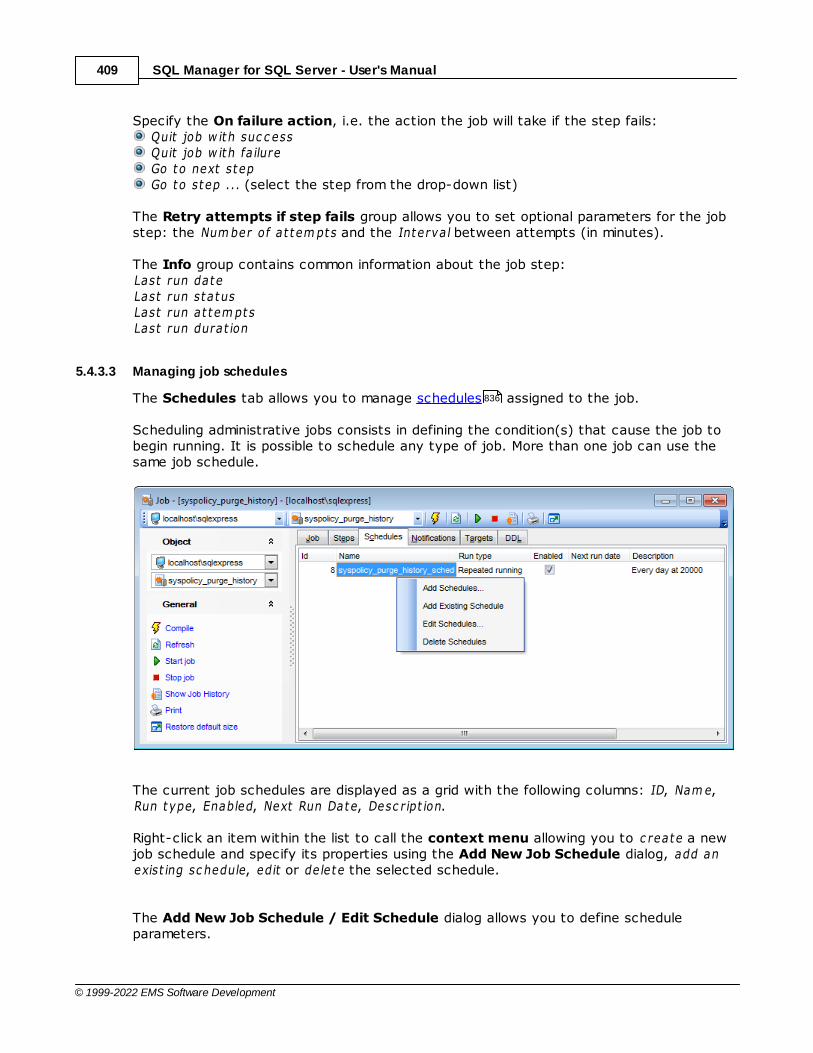
SQL Manager for SQL Server - User's Manual409
© 1999-2022 EMS Software Development
Specify the On failure action, i.e. the action the job will take if the step fails: Quit job w ith suc c ess Quit job w ith fa ilure Go to next step Go to step ... (select the step from the drop-down list)
The Retry attempts if step fails group allows you to set optional parameters for the jobstep: the Num ber of at tem pts and the Interval between attempts (in minutes).
The Info group contains common information about the job step:Last run dateLast run statusLast run at tem ptsLast run durat ion
5.4.3.3 Managing job schedules
The Schedules tab allows you to manage schedules assigned to the job.
Scheduling administrative jobs consists in defining the condition(s) that cause the job tobegin running. It is possible to schedule any type of job. More than one job can use thesame job schedule.
The current job schedules are displayed as a grid with the following columns: ID, Nam e,Run type, Enabled, Next Run Date, Desc r ipt ion.
Right-click an item within the list to call the context menu allowing you to c reate a newjob schedule and specify its properties using the Add New Job Schedule dialog, add anexist ing sc hedule, edit or de lete the selected schedule.
The Add New Job Schedule / Edit Schedule dialog allows you to define scheduleparameters.
836
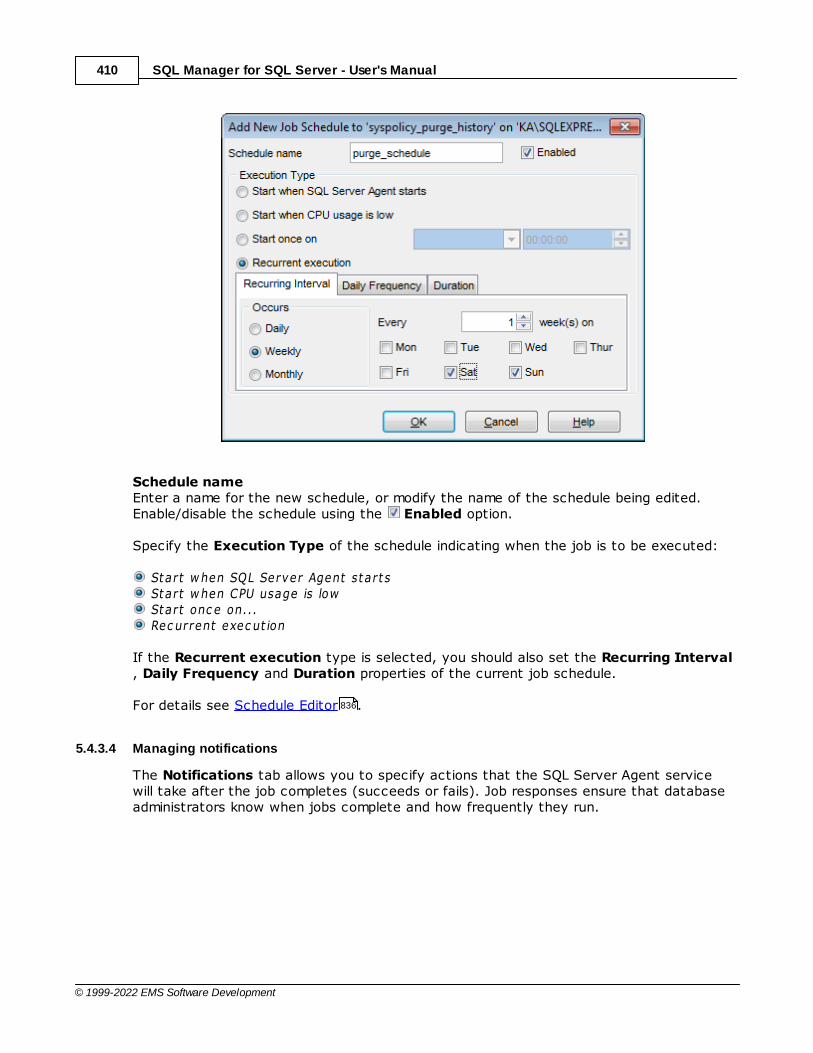
SQL Manager for SQL Server - User's Manual410
© 1999-2022 EMS Software Development
Schedule nameEnter a name for the new schedule, or modify the name of the schedule being edited.Enable/disable the schedule using the Enabled option.
Specify the Execution Type of the schedule indicating when the job is to be executed:
Start w hen SQL Server Agent start s Start w hen CPU usage is low Start onc e on... Rec urrent exec ut ion
If the Recurrent execution type is selected, you should also set the Recurring Interval, Daily Frequency and Duration properties of the current job schedule.
For details see Schedule Editor .
5.4.3.4 Managing notifications
The Notifications tab allows you to specify actions that the SQL Server Agent servicewill take after the job completes (succeeds or fails). Job responses ensure that databaseadministrators know when jobs complete and how frequently they run.
836

SQL Manager for SQL Server - User's Manual411
© 1999-2022 EMS Software Development
Use e-mail operatorUse the drop-down list to select the operator that will be notified via e-m ail, andspecify the job status for the notification to be performed:
When job suc c eeds and/or When job fa ils
Use page operatorUse the drop-down list to select the operator that will be notified using e lec t ronicpaging, and specify the job status for the notification to be performed:
When job suc c eeds and/or When job fa ils
Use net send operatorUse the drop-down list to select the operator that will be notified using a net sendmessage, and specify the job status for the notification to be performed:
When job suc c eeds and/or When job fa ils
Write to Windows Application LogIf necessary, specify the job status for writing to Microsoft Windows Application Log:
When job suc c eeds and/or When job fa ils
Delete jobIf you are certain that you do not need to rerun this job later, you can specify the jobstatus deleting the job:
When job suc c eeds and/or When job fa ils
833
833
833
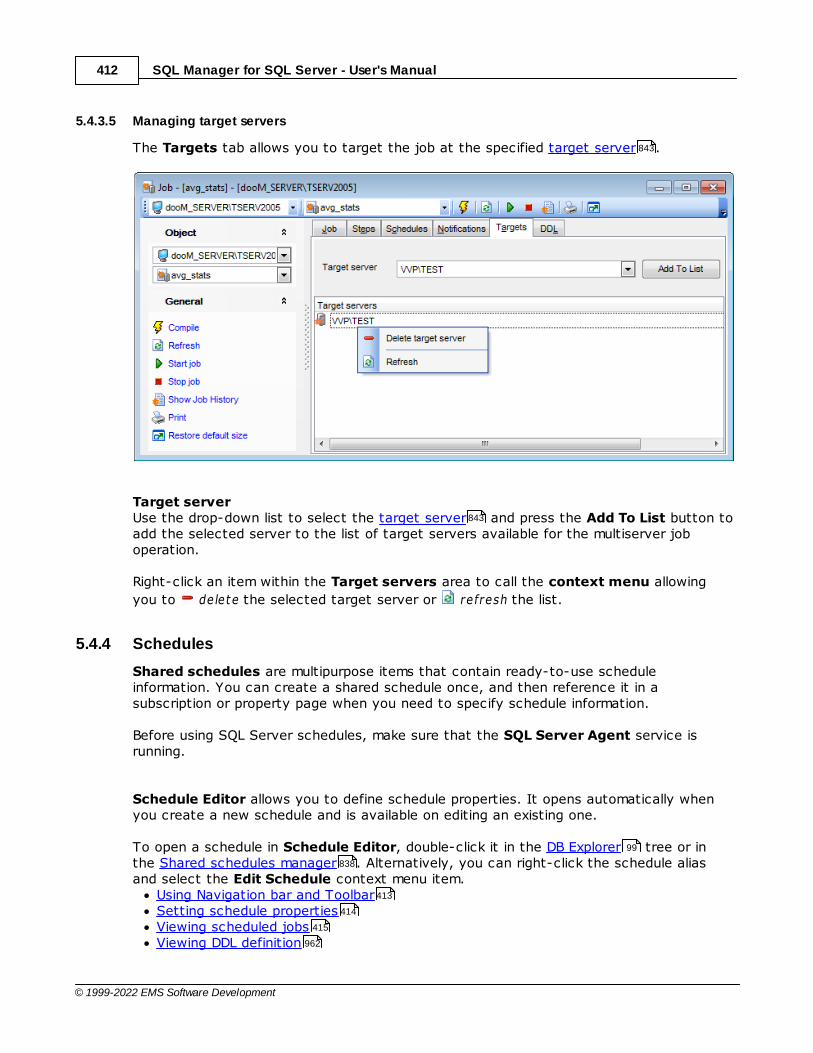
SQL Manager for SQL Server - User's Manual412
© 1999-2022 EMS Software Development
5.4.3.5 Managing target servers
The Targets tab allows you to target the job at the specified target server .
Target serverUse the drop-down list to select the target server and press the Add To List button toadd the selected server to the list of target servers available for the multiserver joboperation.
Right-click an item within the Target servers area to call the context menu allowing
you to de lete the selected target server or refresh the list.
5.4.4 Schedules
Shared schedules are multipurpose items that contain ready-to-use scheduleinformation. You can create a shared schedule once, and then reference it in asubscription or property page when you need to specify schedule information.
Before using SQL Server schedules, make sure that the SQL Server Agent service isrunning.
Schedule Editor allows you to define schedule properties. It opens automatically whenyou create a new schedule and is available on editing an existing one.
To open a schedule in Schedule Editor, double-click it in the DB Explorer tree or inthe Shared schedules manager . Alternatively, you can right-click the schedule aliasand select the Edit Schedule context menu item.
Using Navigation bar and ToolbarSetting schedule propertiesViewing scheduled jobsViewing DDL definition
843
843
99
838
413
414
415
962
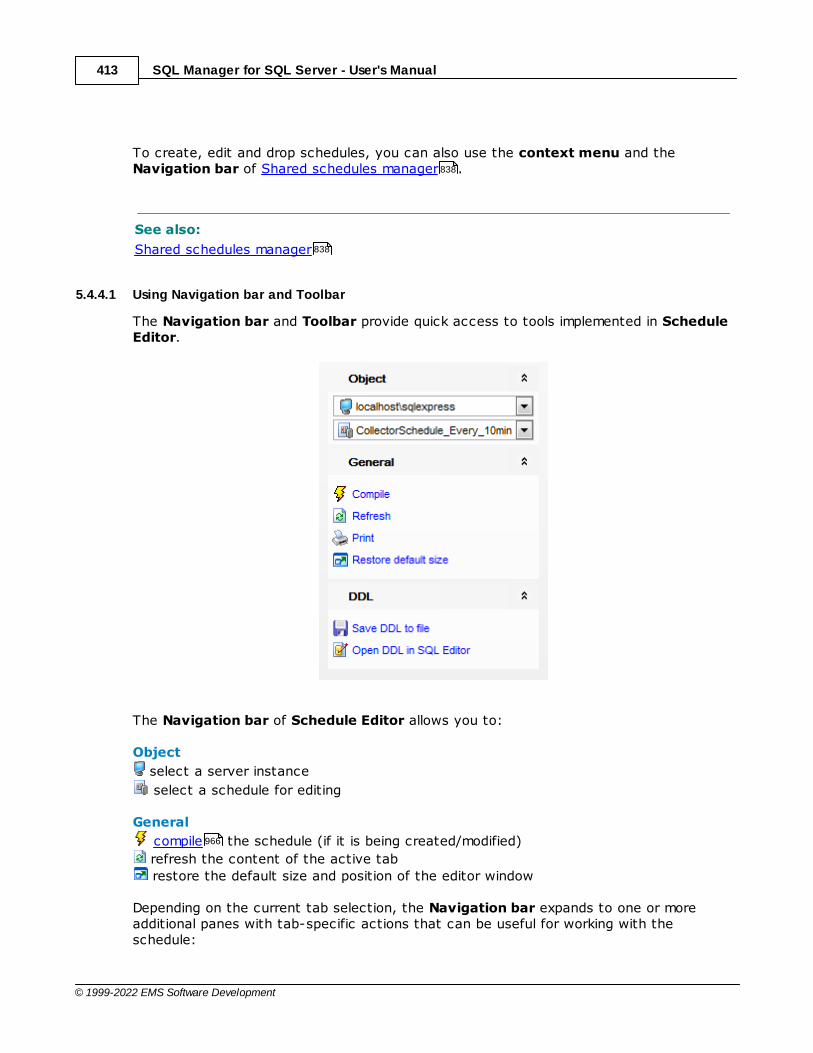
SQL Manager for SQL Server - User's Manual413
© 1999-2022 EMS Software Development
To create, edit and drop schedules, you can also use the context menu and theNavigation bar of Shared schedules manager .
See also:
Shared schedules manager
5.4.4.1 Using Navigation bar and Toolbar
The Navigation bar and Toolbar provide quick access to tools implemented in ScheduleEditor.
The Navigation bar of Schedule Editor allows you to:
Object
select a server instance
select a schedule for editing
General
compile the schedule (if it is being created/modified)
refresh the content of the active tab
restore the default size and position of the editor window
Depending on the current tab selection, the Navigation bar expands to one or moreadditional panes with tab-specific actions that can be useful for working with theschedule:
838
838
966
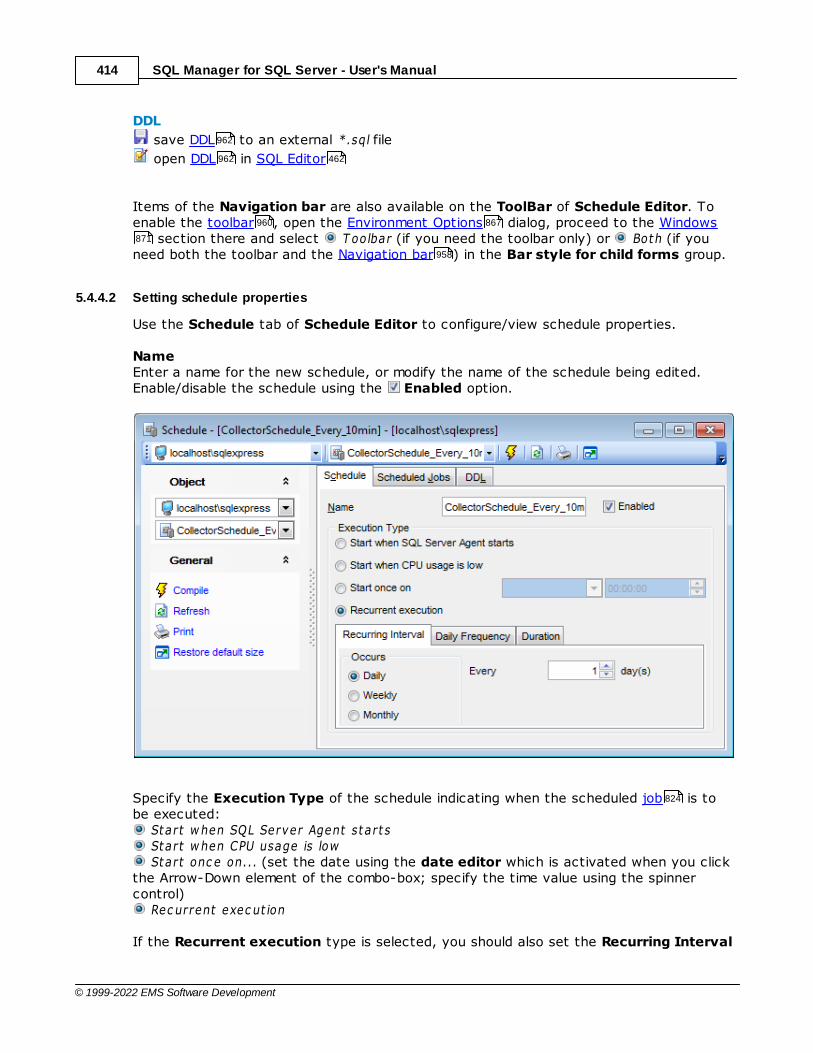
SQL Manager for SQL Server - User's Manual414
© 1999-2022 EMS Software Development
DDL
save DDL to an external *.sql file
open DDL in SQL Editor
Items of the Navigation bar are also available on the ToolBar of Schedule Editor. Toenable the toolbar , open the Environment Options dialog, proceed to the Windows
section there and select T oolbar (if you need the toolbar only) or Both (if youneed both the toolbar and the Navigation bar ) in the Bar style for child forms group.
5.4.4.2 Setting schedule properties
Use the Schedule tab of Schedule Editor to configure/view schedule properties.
NameEnter a name for the new schedule, or modify the name of the schedule being edited.Enable/disable the schedule using the Enabled option.
Specify the Execution Type of the schedule indicating when the scheduled job is tobe executed:
Start w hen SQL Server Agent start s Start w hen CPU usage is low Start onc e on... (set the date using the date editor which is activated when you click
the Arrow-Down element of the combo-box; specify the time value using the spinnercontrol)
Rec urrent exec ut ion
If the Recurrent execution type is selected, you should also set the Recurring Interval
962
962 462
960 867
871
958
824
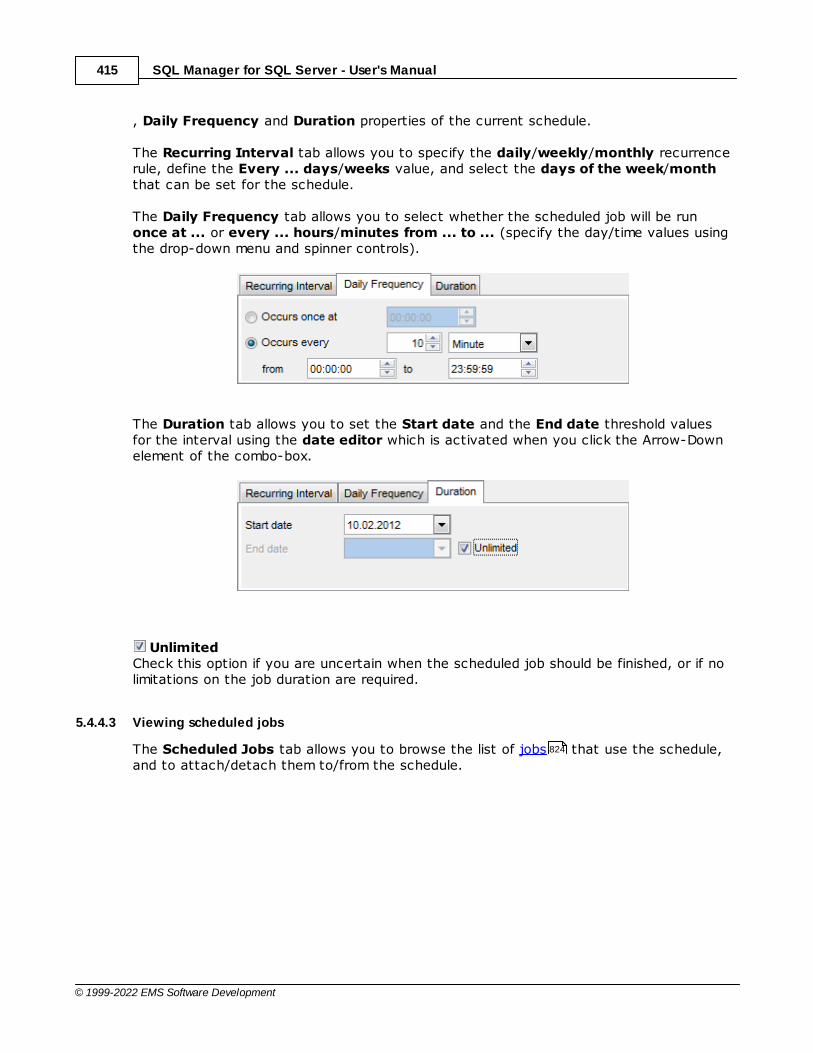
SQL Manager for SQL Server - User's Manual415
© 1999-2022 EMS Software Development
, Daily Frequency and Duration properties of the current schedule.
The Recurring Interval tab allows you to specify the daily/weekly/monthly recurrencerule, define the Every ... days/weeks value, and select the days of the week/monththat can be set for the schedule.
The Daily Frequency tab allows you to select whether the scheduled job will be runonce at ... or every ... hours/minutes from ... to ... (specify the day/time values usingthe drop-down menu and spinner controls).
The Duration tab allows you to set the Start date and the End date threshold valuesfor the interval using the date editor which is activated when you click the Arrow-Downelement of the combo-box.
UnlimitedCheck this option if you are uncertain when the scheduled job should be finished, or if nolimitations on the job duration are required.
5.4.4.3 Viewing scheduled jobs
The Scheduled Jobs tab allows you to browse the list of jobs that use the schedule,and to attach/detach them to/from the schedule.
824
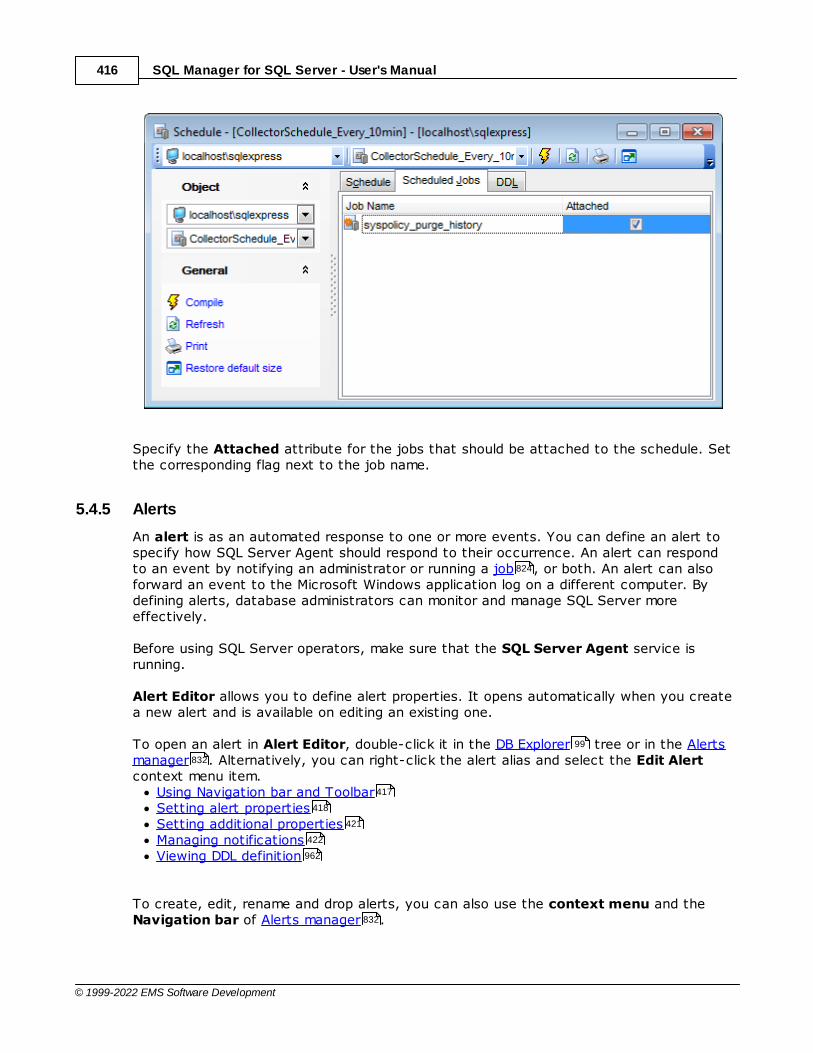
SQL Manager for SQL Server - User's Manual416
© 1999-2022 EMS Software Development
Specify the Attached attribute for the jobs that should be attached to the schedule. Setthe corresponding flag next to the job name.
5.4.5 Alerts
An alert is as an automated response to one or more events. You can define an alert tospecify how SQL Server Agent should respond to their occurrence. An alert can respondto an event by notifying an administrator or running a job , or both. An alert can alsoforward an event to the Microsoft Windows application log on a different computer. Bydefining alerts, database administrators can monitor and manage SQL Server moreeffectively.
Before using SQL Server operators, make sure that the SQL Server Agent service isrunning.
Alert Editor allows you to define alert properties. It opens automatically when you createa new alert and is available on editing an existing one.
To open an alert in Alert Editor, double-click it in the DB Explorer tree or in the Alertsmanager . Alternatively, you can right-click the alert alias and select the Edit Alertcontext menu item.
Using Navigation bar and ToolbarSetting alert propertiesSetting additional propertiesManaging notificationsViewing DDL definition
To create, edit, rename and drop alerts, you can also use the context menu and theNavigation bar of Alerts manager .
824
99
832
417
418
421
422
962
832

SQL Manager for SQL Server - User's Manual417
© 1999-2022 EMS Software Development
See also:
Alerts manager
5.4.5.1 Using Navigation bar and Toolbar
The Navigation bar and Toolbar provide quick access to tools implemented in AlertEditor.
The Navigation bar of Alert Editor allows you to:
Object
select a server instance
select an alert for editing
General
compile the alert (if it is being created/modified)
refresh the content of the active tab
restore the default size and position of the editor window
Depending on the current tab selection, the Navigation bar expands to one or moreadditional panes with tab-specific actions that can be useful for working with the alert:
DDL
save DDL to an external *.sql file
open DDL in SQL Editor
Items of the Navigation bar are also available on the ToolBar of Alert Editor. To enable
832
966
962
962 462
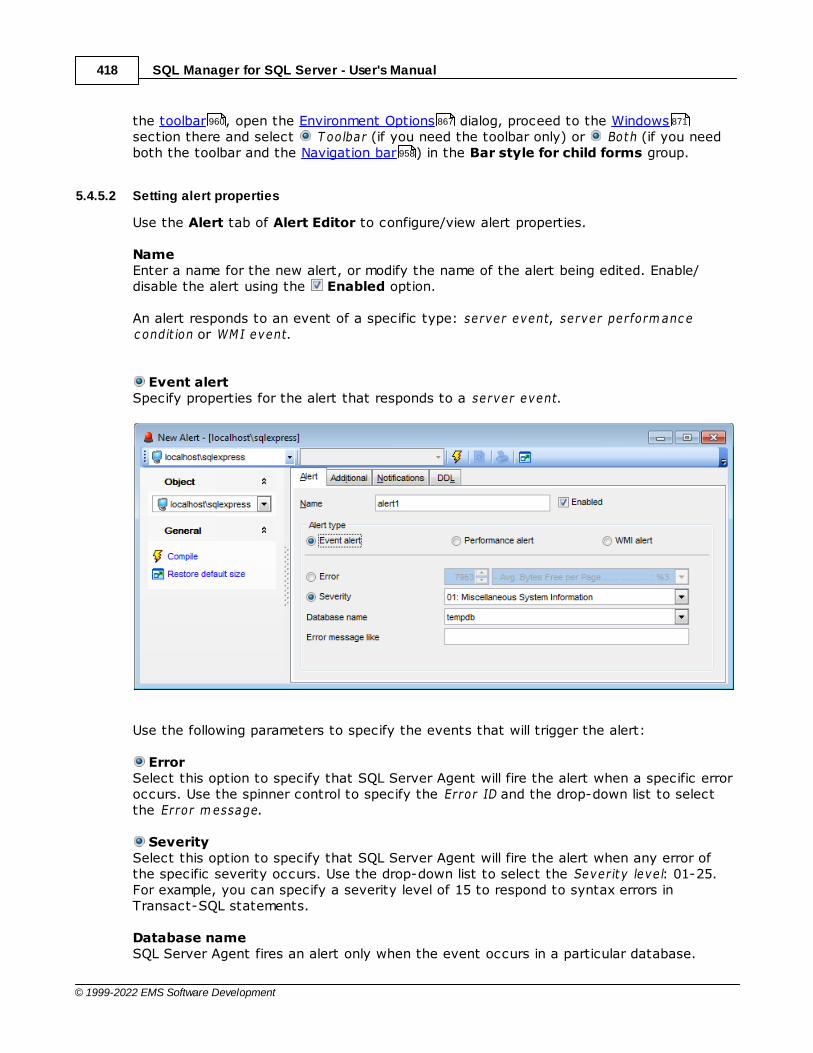
SQL Manager for SQL Server - User's Manual418
© 1999-2022 EMS Software Development
the toolbar , open the Environment Options dialog, proceed to the Windowssection there and select T oolbar (if you need the toolbar only) or Both (if you needboth the toolbar and the Navigation bar ) in the Bar style for child forms group.
5.4.5.2 Setting alert properties
Use the Alert tab of Alert Editor to configure/view alert properties.
NameEnter a name for the new alert, or modify the name of the alert being edited. Enable/disable the alert using the Enabled option.
An alert responds to an event of a specific type: server event, server perform anc ec ondit ion or WMI event.
Event alertSpecify properties for the alert that responds to a server event.
Use the following parameters to specify the events that will trigger the alert:
ErrorSelect this option to specify that SQL Server Agent will fire the alert when a specific erroroccurs. Use the spinner control to specify the Error ID and the drop-down list to selectthe Error m essage.
SeveritySelect this option to specify that SQL Server Agent will fire the alert when any error ofthe specific severity occurs. Use the drop-down list to select the Severit y leve l: 01-25.For example, you can specify a severity level of 15 to respond to syntax errors inTransact-SQL statements.
Database nameSQL Server Agent fires an alert only when the event occurs in a particular database.
960 867 871
958

SQL Manager for SQL Server - User's Manual419
© 1999-2022 EMS Software Development
Select a database from the list of databases that reside on the specified SQL Serverinstance (see Using Navigation bar ).
Error messages likeSQL Server Agent fires an alert when the specified event contains a particular text stringin the event message.
Performance alertSpecify properties for the alert that responds to a server perform anc e c ondit ion.
Use the following parameters to specify the server performance conditions that will triggerthe alert:
ObjectUse the drop-down list to select the area of performance to be monitored.
CounterUse the drop-down list to select the attribute of the area to be monitored.
InstanceUse the drop-down list to define the specific instance (if any) of the attribute to bemonitored.
Alert when counter becomes / ValueUsing these boxes you should specify the threshold for the alert and the behavior thatproduces the alert. Use the drop-down list to select the behavior value: < (falls below), =(becomes equal to), > (rises above). Use the Value edit-box to specify the thresholdnumber that describes the performance condition counter.
WMI alertSpecify properties for the alert that responds to a WMI event.
417
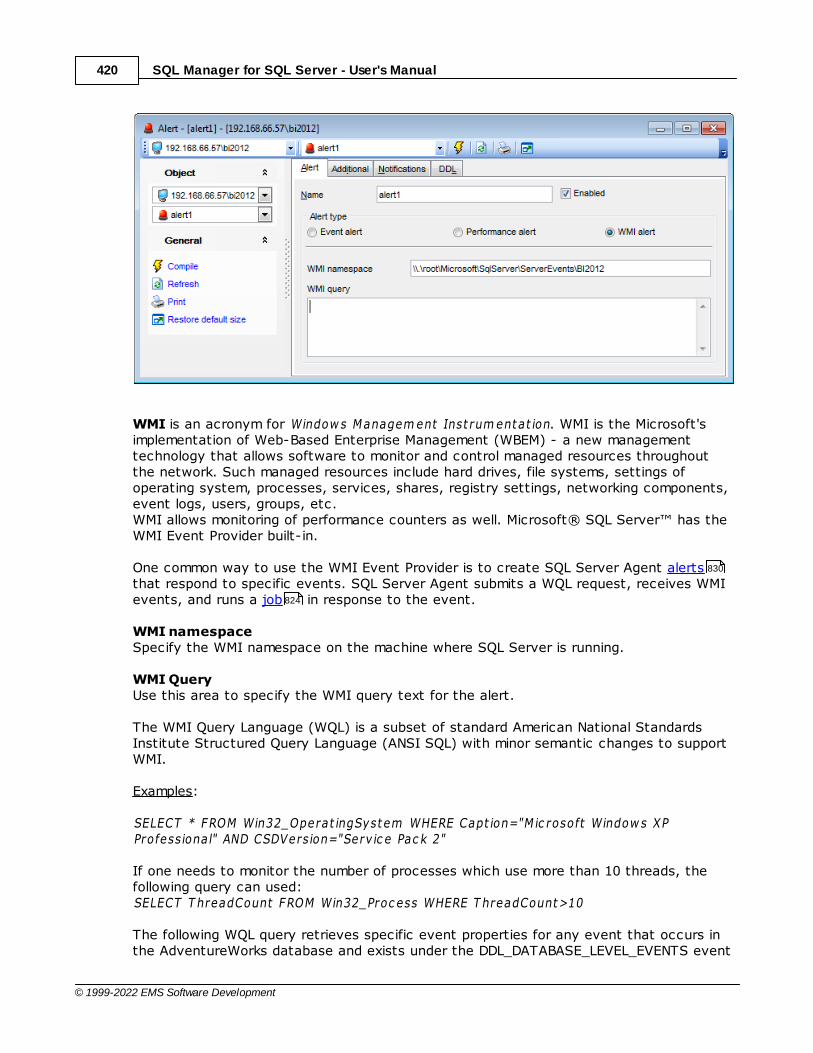
SQL Manager for SQL Server - User's Manual420
© 1999-2022 EMS Software Development
WMI is an acronym for Window s Managem ent Inst rum entat ion. WMI is the Microsoft'simplementation of Web-Based Enterprise Management (WBEM) - a new managementtechnology that allows software to monitor and control managed resources throughoutthe network. Such managed resources include hard drives, file systems, settings ofoperating system, processes, services, shares, registry settings, networking components,event logs, users, groups, etc.WMI allows monitoring of performance counters as well. Microsoft® SQL Server™ has theWMI Event Provider built-in.
One common way to use the WMI Event Provider is to create SQL Server Agent alertsthat respond to specific events. SQL Server Agent submits a WQL request, receives WMIevents, and runs a job in response to the event.
WMI namespaceSpecify the WMI namespace on the machine where SQL Server is running.
WMI QueryUse this area to specify the WMI query text for the alert.
The WMI Query Language (WQL) is a subset of standard American National StandardsInstitute Structured Query Language (ANSI SQL) with minor semantic changes to supportWMI.
Examples:
SELECT * FROM Win32_Operat ingSystem WHERE Capt ion="M ic rosoft Window s XPProfessional" AND CSDVersion="Serv ic e Pac k 2"
If one needs to monitor the number of processes which use more than 10 threads, thefollowing query can used:SELECT T hreadCount FROM Win32_Proc ess WHERE T hreadCount>10
The following WQL query retrieves specific event properties for any event that occurs inthe AdventureWorks database and exists under the DDL_DATABASE_LEVEL_EVENTS event
830
824
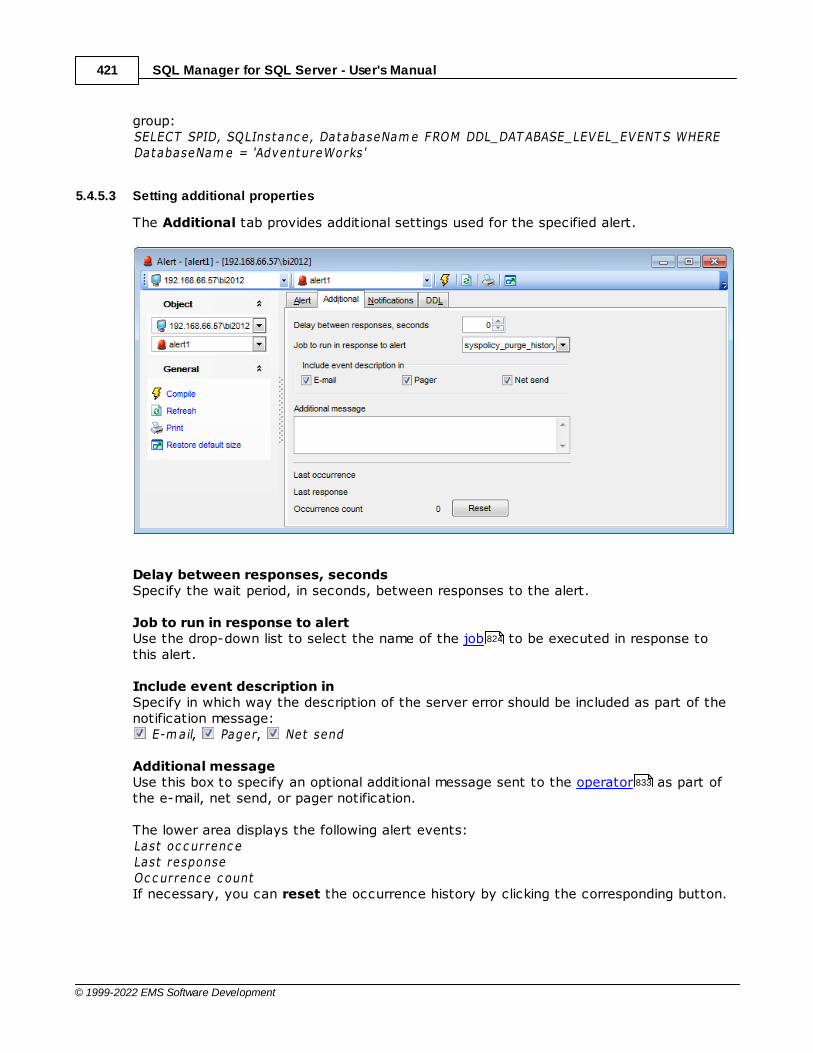
SQL Manager for SQL Server - User's Manual421
© 1999-2022 EMS Software Development
group:SELECT SPID, SQLInstanc e, DatabaseNam e FROM DDL_DAT ABASE_LEVEL_EVENT S WHEREDatabaseNam e = 'AdventureWorks'
5.4.5.3 Setting additional properties
The Additional tab provides additional settings used for the specified alert.
Delay between responses, secondsSpecify the wait period, in seconds, between responses to the alert.
Job to run in response to alertUse the drop-down list to select the name of the job to be executed in response tothis alert.
Include event description inSpecify in which way the description of the server error should be included as part of thenotification message:
E-m ail, Pager, Net send
Additional messageUse this box to specify an optional additional message sent to the operator as part ofthe e-mail, net send, or pager notification.
The lower area displays the following alert events:Last oc c urrenc eLast responseOc c urrenc e c ount If necessary, you can reset the occurrence history by clicking the corresponding button.
824
833
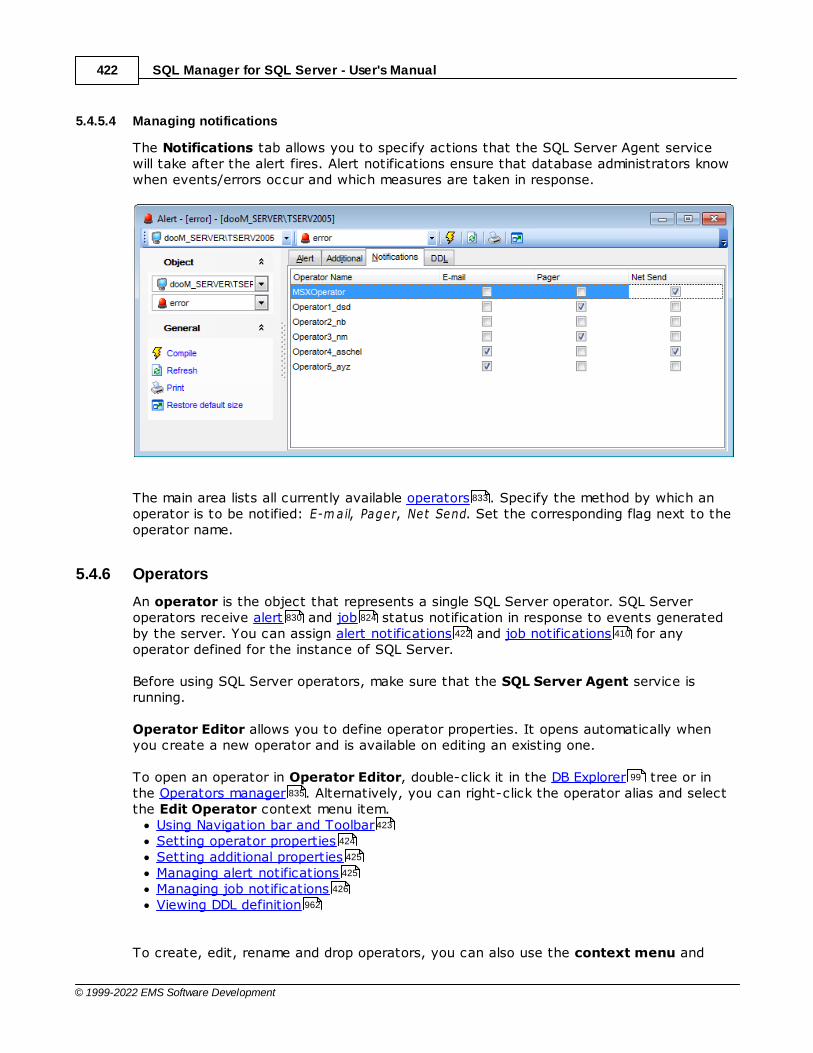
SQL Manager for SQL Server - User's Manual422
© 1999-2022 EMS Software Development
5.4.5.4 Managing notifications
The Notifications tab allows you to specify actions that the SQL Server Agent servicewill take after the alert fires. Alert notifications ensure that database administrators knowwhen events/errors occur and which measures are taken in response.
The main area lists all currently available operators . Specify the method by which anoperator is to be notified: E-m ail, Pager, Net Send. Set the corresponding flag next to theoperator name.
5.4.6 Operators
An operator is the object that represents a single SQL Server operator. SQL Serveroperators receive alert and job status notification in response to events generatedby the server. You can assign alert notifications and job notifications for anyoperator defined for the instance of SQL Server.
Before using SQL Server operators, make sure that the SQL Server Agent service isrunning.
Operator Editor allows you to define operator properties. It opens automatically whenyou create a new operator and is available on editing an existing one.
To open an operator in Operator Editor, double-click it in the DB Explorer tree or inthe Operators manager . Alternatively, you can right-click the operator alias and selectthe Edit Operator context menu item.
Using Navigation bar and ToolbarSetting operator propertiesSetting additional propertiesManaging alert notificationsManaging job notificationsViewing DDL definition
To create, edit, rename and drop operators, you can also use the context menu and
833
830 824
422 410
99
835
423
424
425
425
426
962

SQL Manager for SQL Server - User's Manual423
© 1999-2022 EMS Software Development
the Navigation bar of Operators manager .
See also:
Operators manager
5.4.6.1 Using Navigation bar and Toolbar
The Navigation bar and Toolbar provide quick access to tools implemented in OperatorEditor.
The Navigation bar of Operator Editor allows you to:
Object
select a server instance
select an operator for editing
General
compile the operator (if it is being created/modified)
refresh the content of the active tab
restore the default size and position of the editor window
Depending on the current tab selection, the Navigation bar expands to one or moreadditional panes with tab-specific actions that can be useful for working with theoperator:
DDL
835
835
966
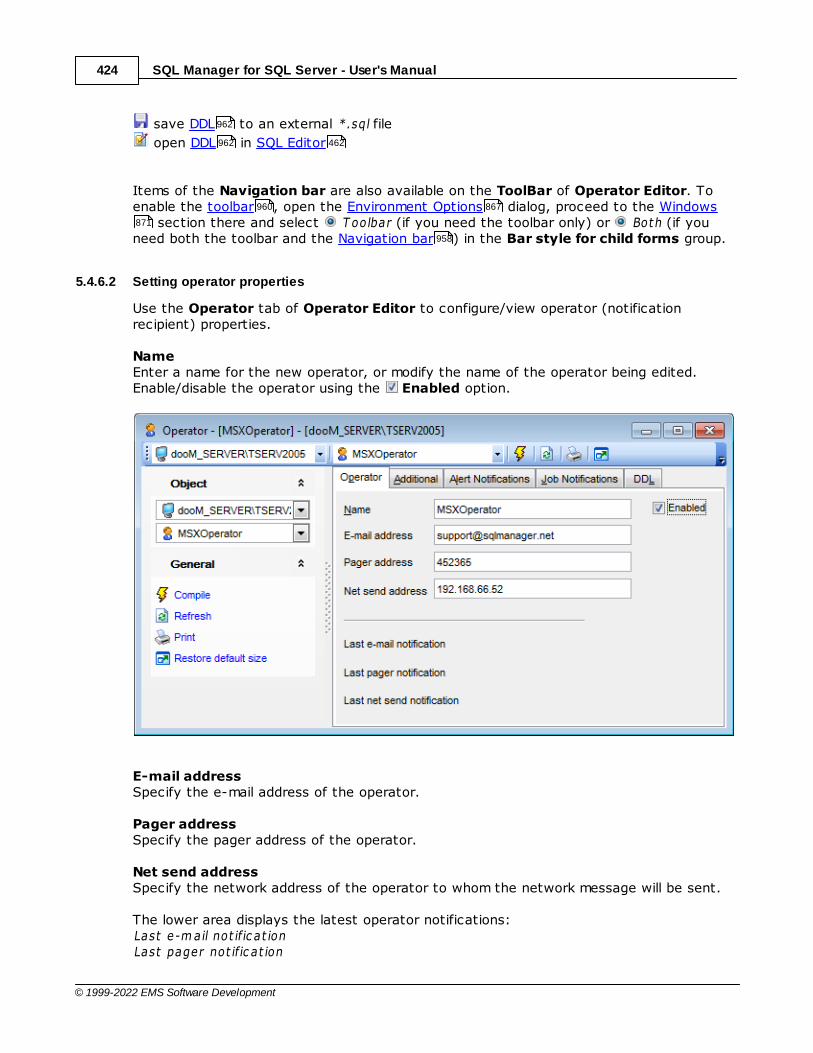
SQL Manager for SQL Server - User's Manual424
© 1999-2022 EMS Software Development
save DDL to an external *.sql file
open DDL in SQL Editor
Items of the Navigation bar are also available on the ToolBar of Operator Editor. Toenable the toolbar , open the Environment Options dialog, proceed to the Windows
section there and select T oolbar (if you need the toolbar only) or Both (if youneed both the toolbar and the Navigation bar ) in the Bar style for child forms group.
5.4.6.2 Setting operator properties
Use the Operator tab of Operator Editor to configure/view operator (notificationrecipient) properties.
NameEnter a name for the new operator, or modify the name of the operator being edited.Enable/disable the operator using the Enabled option.
E-mail addressSpecify the e-mail address of the operator.
Pager addressSpecify the pager address of the operator.
Net send addressSpecify the network address of the operator to whom the network message will be sent.
The lower area displays the latest operator notifications:Last e-m ail not if ic at ionLast pager not if ic at ion
962
962 462
960 867
871
958
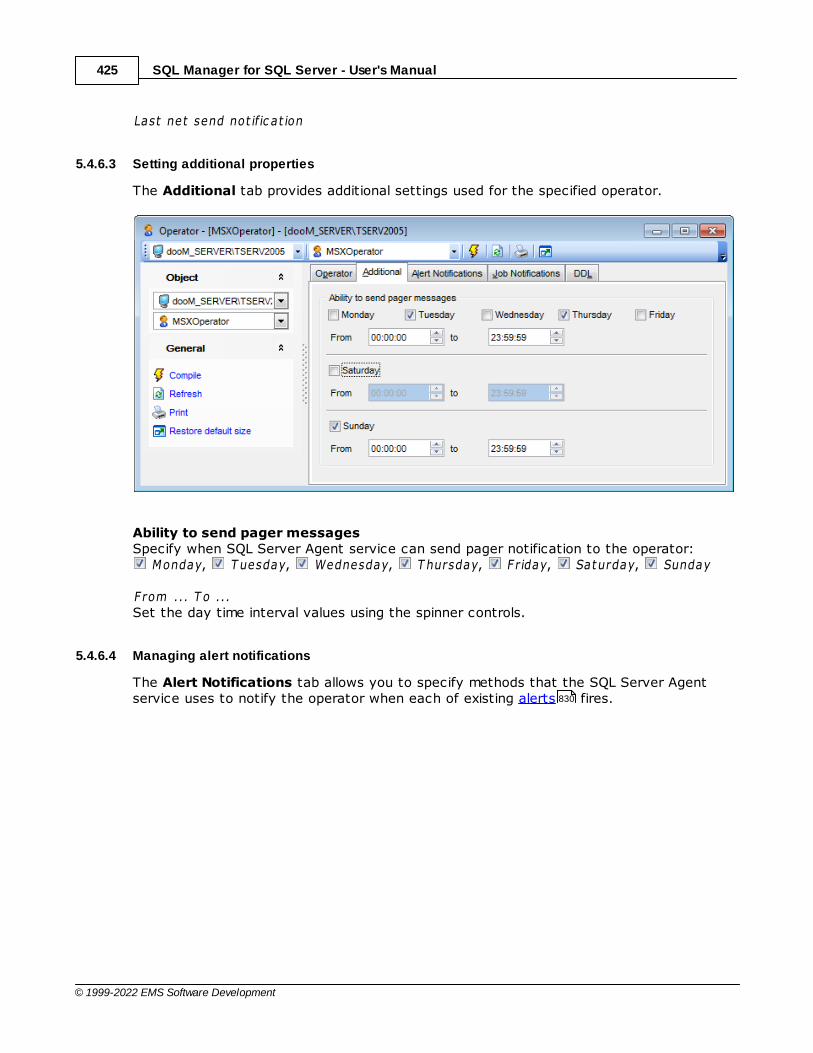
SQL Manager for SQL Server - User's Manual425
© 1999-2022 EMS Software Development
Last net send not if ic at ion
5.4.6.3 Setting additional properties
The Additional tab provides additional settings used for the specified operator.
Ability to send pager messagesSpecify when SQL Server Agent service can send pager notification to the operator:
Monday, T uesday, Wednesday, T hursday, F r iday, Saturday, Sunday
From ... T o ...Set the day time interval values using the spinner controls.
5.4.6.4 Managing alert notifications
The Alert Notifications tab allows you to specify methods that the SQL Server Agentservice uses to notify the operator when each of existing alerts fires.830

SQL Manager for SQL Server - User's Manual426
© 1999-2022 EMS Software Development
The main area lists all currently available alerts . Specify the method by which theoperator is to be notified: E-m ail, Pager, Net Send. Set the corresponding flag next to thealert name.
5.4.6.5 Managing job notifications
The Job Notifications tab allows you to specify methods that the SQL Server Agentservice uses to notify the operator when each of existing jobs is tried (succeeded orfailed).
The main area lists all currently available jobs . Specify the method by which theoperator is to be notified: E-m ail, Pager, Net Send. Set the corresponding flag next to thealert name.
830
824
824
SQL Manager for SQL Server - User's Manual427
© 1999-2022 EMS Software Development
5.4.7 Proxies
A Microsoft® SQL Server Agent proxy defines the security context for a job step. Aproxy provides SQL Server Agent with access to the security credentials for aMicrosoft Windows user. Each proxy can be associated with one or more subsystems. A job step that uses the proxy can access the specified subsystems by using thesecurity context of the Windows user. Before SQL Server Agent runs a job step thatuses a proxy, SQL Server Agent impersonates the credentials defined in the proxy, andthen runs the job step by using that security context.
SQL Server proxies can be used to help database administrators ensure that each jobstep runs with the minimum permissions required to perform its task.
Before using SQL Server proxies, make sure that the SQL Server Agent service isrunning.
Proxy Editor allows you to define proxy properties. It opens automatically when youcreate a new proxy and is available on editing an existing one.
A SQL Server Agent proxy manages security for job steps that involve subsystemsother than the Transact-SQL subsystem. Each proxy corresponds to a security credential
. A proxy may have access to any number of subsystems.
To open a proxy in Proxy Editor, double-click it in the DB Explorer tree or in theProxies manager . Alternatively, you can right-click the proxy alias and select the EditProxy context menu item.
Using Navigation bar and ToolbarSetting proxy propertiesViewing proxy jobsViewing DDL definition
To create, edit and drop proxies, you can also use the context menu and theNavigation bar of Proxies manager .
See also:
Proxies manager
5.4.7.1 Using Navigation bar and Toolbar
The Navigation bar and Toolbar provide quick access to tools implemented in ProxyEditor.
824
431
406
406
431
406
431
99
842
427
428
431
962
842
842
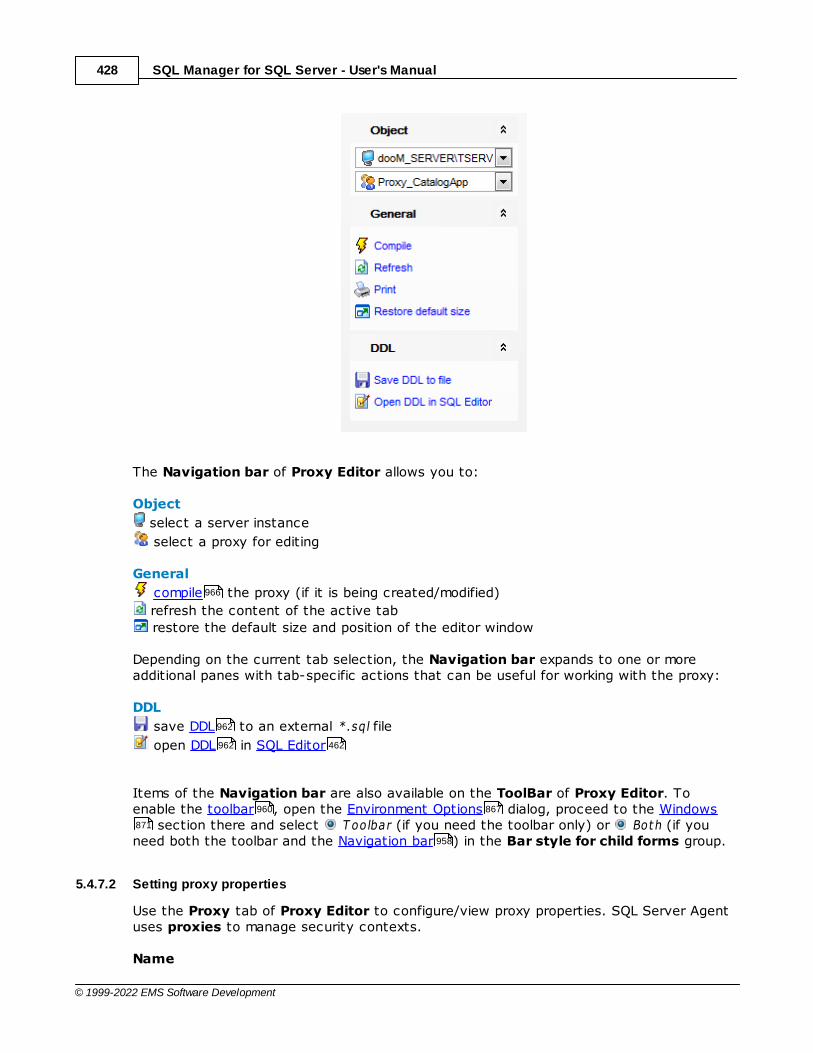
SQL Manager for SQL Server - User's Manual428
© 1999-2022 EMS Software Development
The Navigation bar of Proxy Editor allows you to:
Object
select a server instance
select a proxy for editing
General
compile the proxy (if it is being created/modified)
refresh the content of the active tab
restore the default size and position of the editor window
Depending on the current tab selection, the Navigation bar expands to one or moreadditional panes with tab-specific actions that can be useful for working with the proxy:
DDL
save DDL to an external *.sql file
open DDL in SQL Editor
Items of the Navigation bar are also available on the ToolBar of Proxy Editor. Toenable the toolbar , open the Environment Options dialog, proceed to the Windows
section there and select T oolbar (if you need the toolbar only) or Both (if youneed both the toolbar and the Navigation bar ) in the Bar style for child forms group.
5.4.7.2 Setting proxy properties
Use the Proxy tab of Proxy Editor to configure/view proxy properties. SQL Server Agentuses proxies to manage security contexts.
Name
966
962
962 462
960 867
871
958
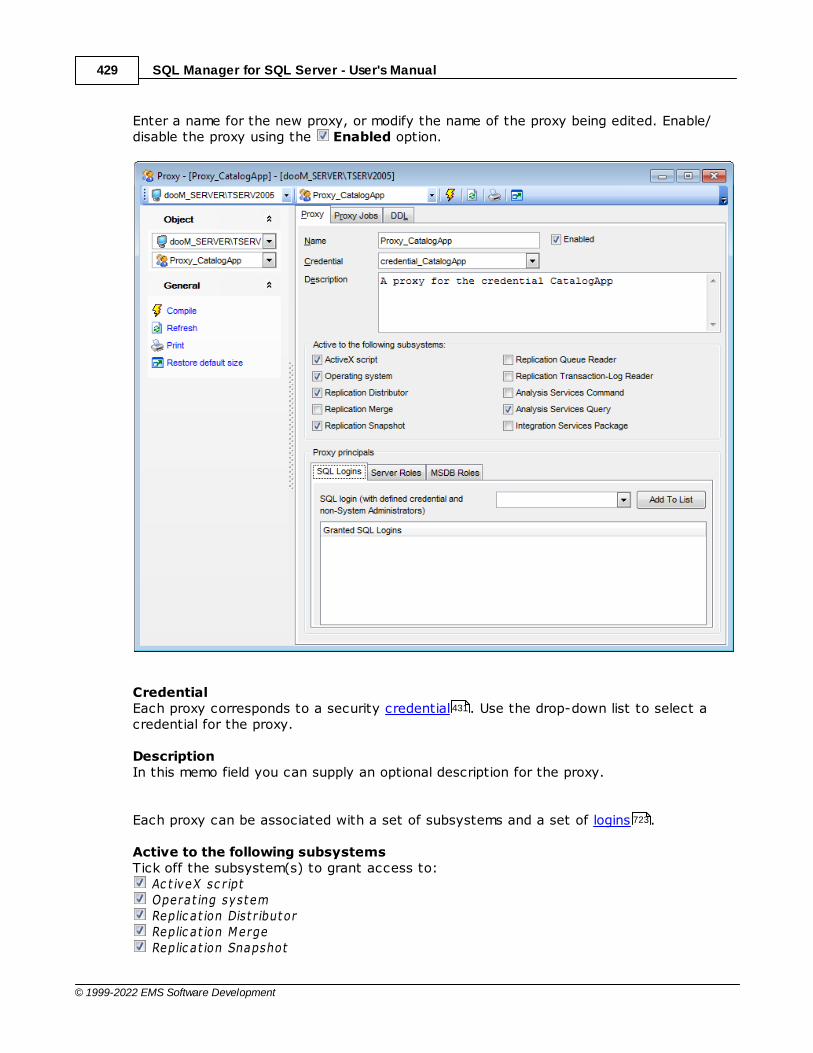
SQL Manager for SQL Server - User's Manual429
© 1999-2022 EMS Software Development
Enter a name for the new proxy, or modify the name of the proxy being edited. Enable/disable the proxy using the Enabled option.
CredentialEach proxy corresponds to a security credential . Use the drop-down list to select acredential for the proxy.
DescriptionIn this memo field you can supply an optional description for the proxy.
Each proxy can be associated with a set of subsystems and a set of logins .
Active to the following subsystemsTick off the subsystem(s) to grant access to:
Ac t iveX sc r ipt Operat ing system Replic at ion Dist r ibutor Replic at ion Merge Replic at ion Snapshot
431
723

SQL Manager for SQL Server - User's Manual430
© 1999-2022 EMS Software Development
Replic at ion Queue Reader Replic at ion T ransac t ion-Log Reader Analysis Serv ic es Com m and Analysis Serv ic es Query Integrat ion Serv ic es Pac kage
The Proxy principals group allows you to grant security principal access to the proxy.
Use the SQL Logins tab to grant access to SQL logins (with defined credentials ).To specify a login, select it in the drop-down list and click the Add to List button.
Use the Server Roles tab to grant access to fixed server roles .To specify a server role, select it in the drop-down list and click the Add to List button.
Use the MSDB Roles tab to grant access to the database roles in the m sdb database.To specify a database role, select it in the drop-down list and click the Add to Listbutton.
722
723 431
735
335

SQL Manager for SQL Server - User's Manual431
© 1999-2022 EMS Software Development
Right-click an item within the Granted SQL Logins / Server Roles / MSDB DatabaseRoles list to call the context menu allowing you to delete a the selected principal and torefresh the list.
5.4.7.3 Viewing proxy jobs
The Proxy Jobs tab allows you to browse the list of job steps that use the proxy.
Note: The proxy can be used only for job steps that use a subsystem associated withthe proxy. To create a job step that uses a specific proxy, the job owner must eitherbelong to a login associated with that proxy or be a member of a role withunrestricted access to proxies.
A proxy can be used in more than one job step . The list displays the job steps as a grid with the following columns: Job Nam e, Job Step,Subsystem.
5.4.8 Credentials
A Credential is a record containing the authentication information required to connect toa resource outside of SQL Server. Most credentials consist of a Windows login andpassword. Credentials allow users that connect to SQL Server using SQL Authentication toconnect to Windows or other resources outside of SQL Server.After creating a credential, you can map it to a login . A single credential can bemapped to multiple SQL Server logins . But a SQL Server login can be mapped to onlyone credential.
Credential Editor allows you to define credential properties. It opens automatically when
406
406
723 735
406
331
723
723 723

SQL Manager for SQL Server - User's Manual432
© 1999-2022 EMS Software Development
you create a new credential and is available on editing an existing one.
To open a credential in Credential Editor, double-click it in the DB Explorer tree.Alternatively, you can right-click the credential alias and select the Edit Credentialcontext menu item.
Using Navigation bar and ToolbarSetting credential propertiesViewing DDL definition
Availability:
Full version (forWindows)
Yes
Lite version (forWindows)
No
Note: To compare all features of the Full and the Lite versions of SQL Manager, refer tothe Feature Matrix page.
See also:
Logins
5.4.8.1 Using Navigation bar and Toolbar
The Navigation bar and Toolbar provide quick access to tools implemented inCredential Editor.
The Navigation bar of Credential Editor allows you to:
99
432
433
962
23
390
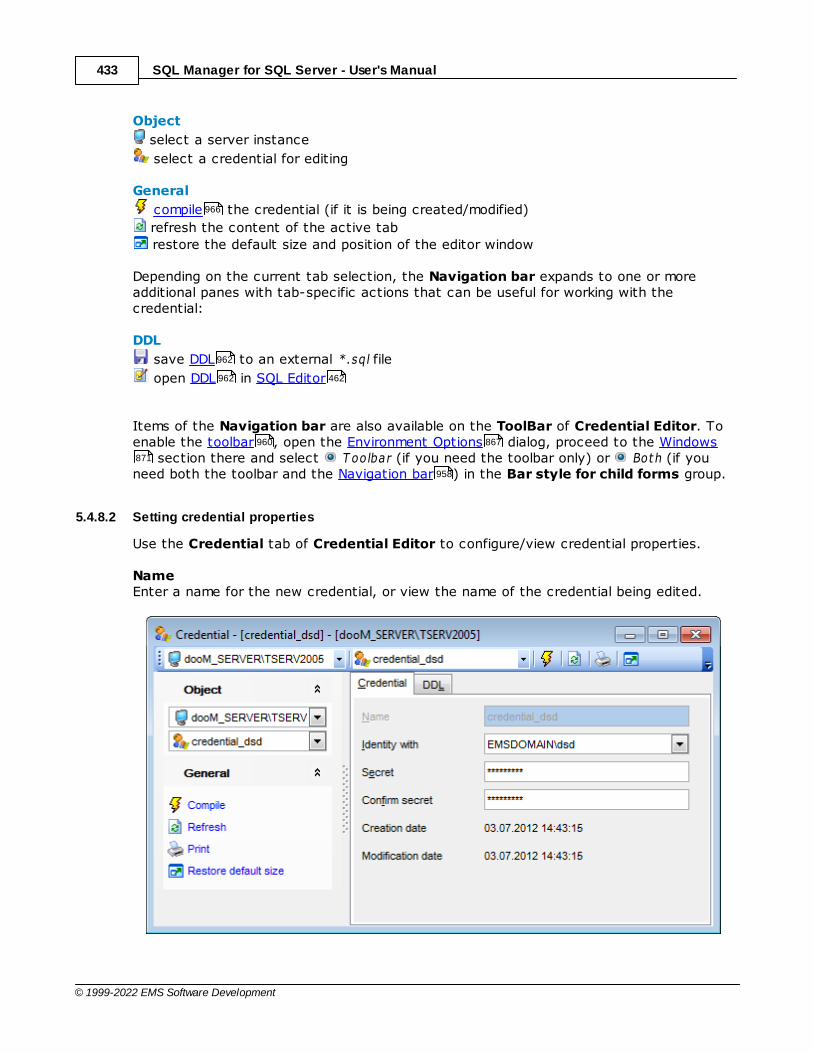
SQL Manager for SQL Server - User's Manual433
© 1999-2022 EMS Software Development
Object
select a server instance
select a credential for editing
General
compile the credential (if it is being created/modified)
refresh the content of the active tab
restore the default size and position of the editor window
Depending on the current tab selection, the Navigation bar expands to one or moreadditional panes with tab-specific actions that can be useful for working with thecredential:
DDL
save DDL to an external *.sql file
open DDL in SQL Editor
Items of the Navigation bar are also available on the ToolBar of Credential Editor. Toenable the toolbar , open the Environment Options dialog, proceed to the Windows
section there and select T oolbar (if you need the toolbar only) or Both (if youneed both the toolbar and the Navigation bar ) in the Bar style for child forms group.
5.4.8.2 Setting credential properties
Use the Credential tab of Credential Editor to configure/view credential properties.
NameEnter a name for the new credential, or view the name of the credential being edited.
966
962
962 462
960 867
871
958
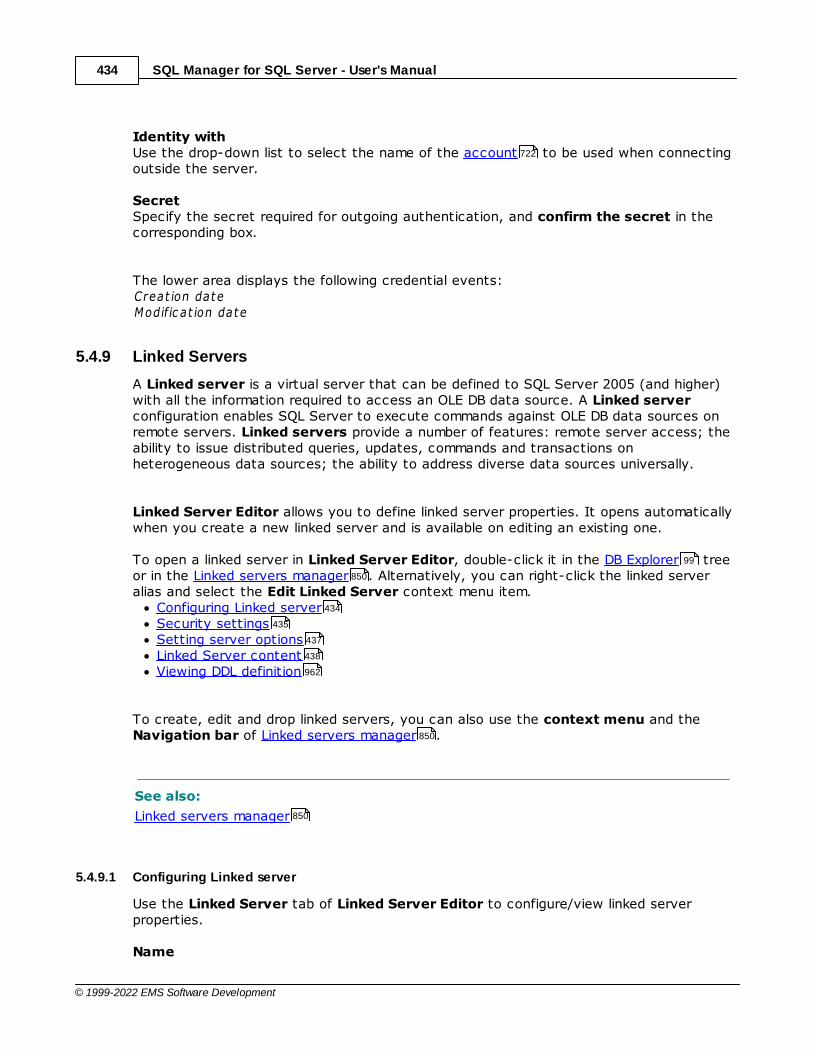
SQL Manager for SQL Server - User's Manual434
© 1999-2022 EMS Software Development
Identity withUse the drop-down list to select the name of the account to be used when connectingoutside the server.
SecretSpecify the secret required for outgoing authentication, and confirm the secret in thecorresponding box.
The lower area displays the following credential events:Creat ion dateModific at ion date
5.4.9 Linked Servers
A Linked server is a virtual server that can be defined to SQL Server 2005 (and higher)with all the information required to access an OLE DB data source. A Linked serverconfiguration enables SQL Server to execute commands against OLE DB data sources onremote servers. Linked servers provide a number of features: remote server access; theability to issue distributed queries, updates, commands and transactions onheterogeneous data sources; the ability to address diverse data sources universally.
Linked Server Editor allows you to define linked server properties. It opens automaticallywhen you create a new linked server and is available on editing an existing one.
To open a linked server in Linked Server Editor, double-click it in the DB Explorer treeor in the Linked servers manager . Alternatively, you can right-click the linked serveralias and select the Edit Linked Server context menu item.
Configuring Linked serverSecurity settingsSetting server optionsLinked Server contentViewing DDL definition
To create, edit and drop linked servers, you can also use the context menu and theNavigation bar of Linked servers manager .
See also:
Linked servers manager
5.4.9.1 Configuring Linked server
Use the Linked Server tab of Linked Server Editor to configure/view linked serverproperties.
Name
722
99
850
434
435
437
438
962
850
850
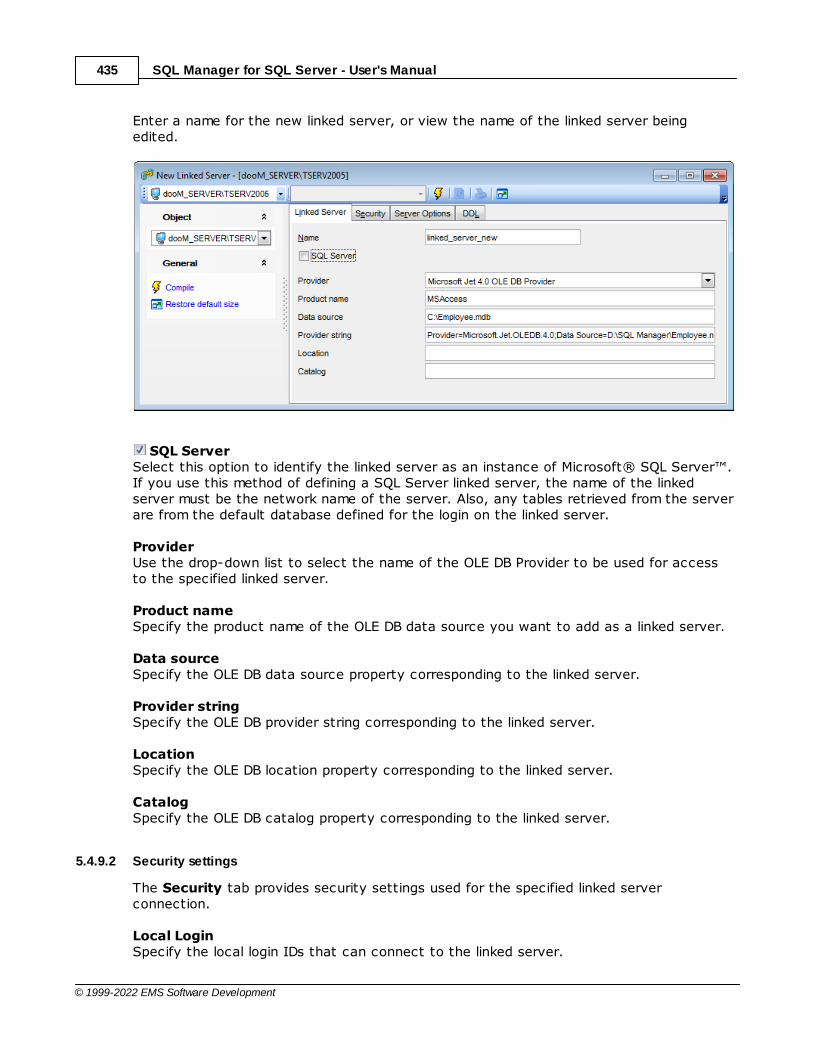
SQL Manager for SQL Server - User's Manual435
© 1999-2022 EMS Software Development
Enter a name for the new linked server, or view the name of the linked server beingedited.
SQL ServerSelect this option to identify the linked server as an instance of Microsoft® SQL Server™.If you use this method of defining a SQL Server linked server, the name of the linkedserver must be the network name of the server. Also, any tables retrieved from the serverare from the default database defined for the login on the linked server.
ProviderUse the drop-down list to select the name of the OLE DB Provider to be used for accessto the specified linked server.
Product name Specify the product name of the OLE DB data source you want to add as a linked server.
Data source Specify the OLE DB data source property corresponding to the linked server.
Provider string Specify the OLE DB provider string corresponding to the linked server.
Location Specify the OLE DB location property corresponding to the linked server.
Catalog Specify the OLE DB catalog property corresponding to the linked server.
5.4.9.2 Security settings
The Security tab provides security settings used for the specified linked serverconnection.
Local LoginSpecify the local login IDs that can connect to the linked server.
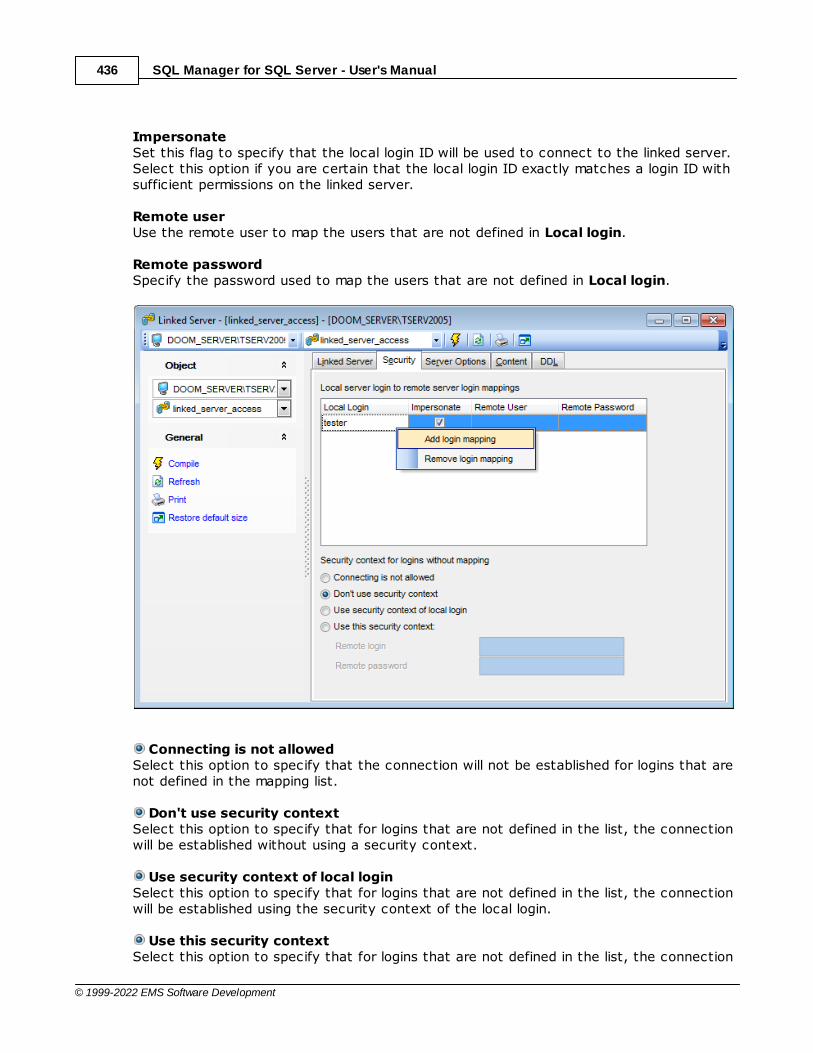
SQL Manager for SQL Server - User's Manual436
© 1999-2022 EMS Software Development
ImpersonateSet this flag to specify that the local login ID will be used to connect to the linked server.Select this option if you are certain that the local login ID exactly matches a login ID withsufficient permissions on the linked server.
Remote userUse the remote user to map the users that are not defined in Local login.
Remote passwordSpecify the password used to map the users that are not defined in Local login.
Connecting is not allowedSelect this option to specify that the connection will not be established for logins that arenot defined in the mapping list.
Don't use security contextSelect this option to specify that for logins that are not defined in the list, the connectionwill be established without using a security context.
Use security context of local loginSelect this option to specify that for logins that are not defined in the list, the connectionwill be established using the security context of the local login.
Use this security contextSelect this option to specify that for logins that are not defined in the list, the connection
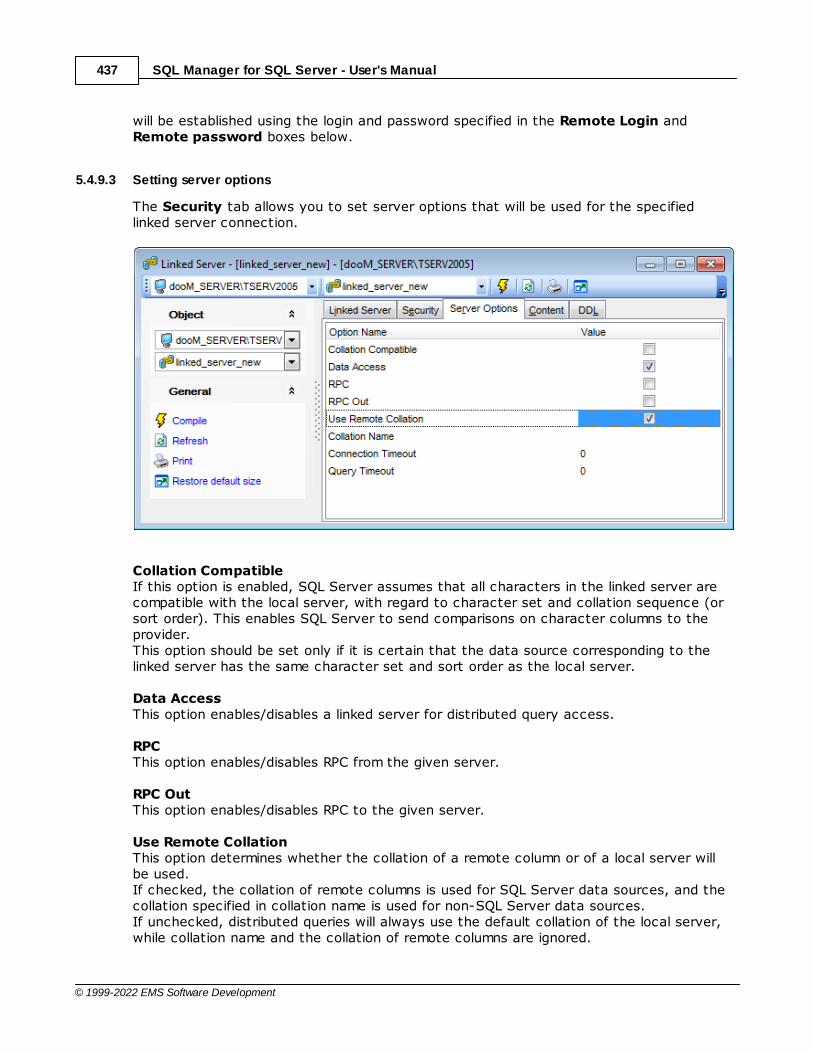
SQL Manager for SQL Server - User's Manual437
© 1999-2022 EMS Software Development
will be established using the login and password specified in the Remote Login andRemote password boxes below.
5.4.9.3 Setting server options
The Security tab allows you to set server options that will be used for the specifiedlinked server connection.
Collation CompatibleIf this option is enabled, SQL Server assumes that all characters in the linked server arecompatible with the local server, with regard to character set and collation sequence (orsort order). This enables SQL Server to send comparisons on character columns to theprovider.This option should be set only if it is certain that the data source corresponding to thelinked server has the same character set and sort order as the local server.
Data AccessThis option enables/disables a linked server for distributed query access.
RPCThis option enables/disables RPC from the given server.
RPC OutThis option enables/disables RPC to the given server.
Use Remote CollationThis option determines whether the collation of a remote column or of a local server willbe used.If checked, the collation of remote columns is used for SQL Server data sources, and thecollation specified in collation name is used for non-SQL Server data sources.If unchecked, distributed queries will always use the default collation of the local server,while collation name and the collation of remote columns are ignored.
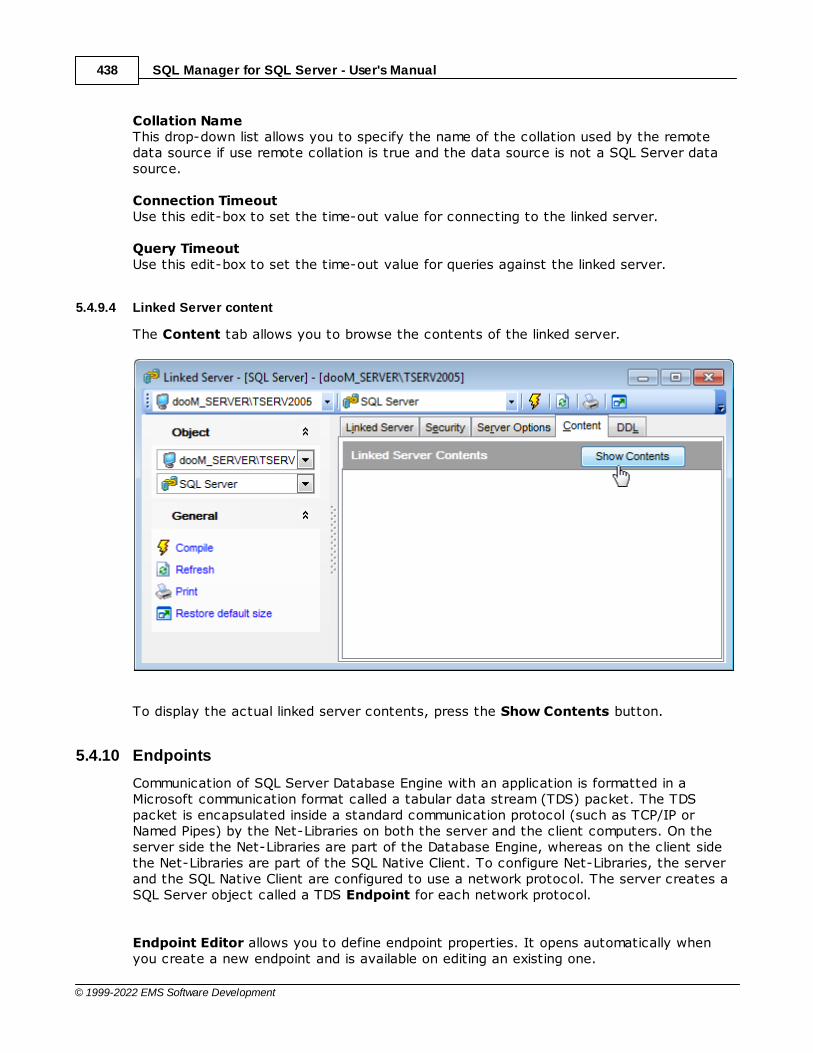
SQL Manager for SQL Server - User's Manual438
© 1999-2022 EMS Software Development
Collation NameThis drop-down list allows you to specify the name of the collation used by the remotedata source if use remote collation is true and the data source is not a SQL Server datasource.
Connection TimeoutUse this edit-box to set the time-out value for connecting to the linked server.
Query TimeoutUse this edit-box to set the time-out value for queries against the linked server.
5.4.9.4 Linked Server content
The Content tab allows you to browse the contents of the linked server.
To display the actual linked server contents, press the Show Contents button.
5.4.10 Endpoints
Communication of SQL Server Database Engine with an application is formatted in aMicrosoft communication format called a tabular data stream (TDS) packet. The TDSpacket is encapsulated inside a standard communication protocol (such as TCP/IP orNamed Pipes) by the Net-Libraries on both the server and the client computers. On theserver side the Net-Libraries are part of the Database Engine, whereas on the client sidethe Net-Libraries are part of the SQL Native Client. To configure Net-Libraries, the serverand the SQL Native Client are configured to use a network protocol. The server creates aSQL Server object called a TDS Endpoint for each network protocol.
Endpoint Editor allows you to define endpoint properties. It opens automatically whenyou create a new endpoint and is available on editing an existing one.
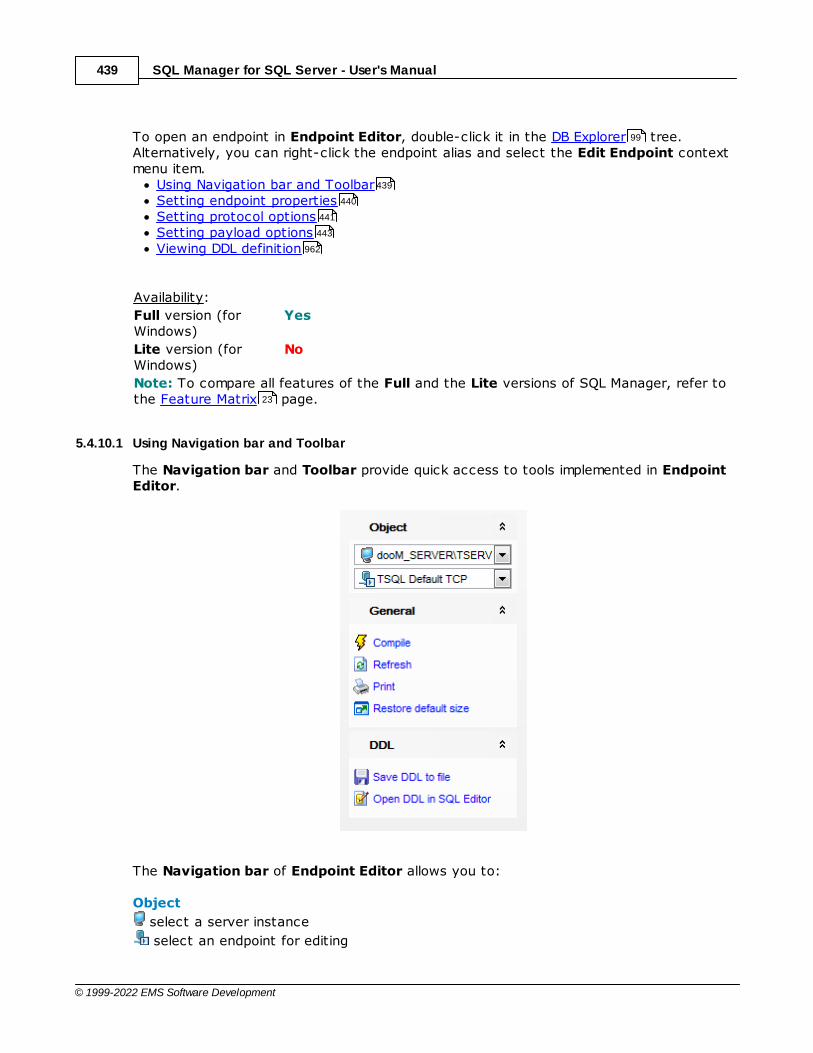
SQL Manager for SQL Server - User's Manual439
© 1999-2022 EMS Software Development
To open an endpoint in Endpoint Editor, double-click it in the DB Explorer tree.Alternatively, you can right-click the endpoint alias and select the Edit Endpoint contextmenu item.
Using Navigation bar and ToolbarSetting endpoint propertiesSetting protocol optionsSetting payload optionsViewing DDL definition
Availability:
Full version (forWindows)
Yes
Lite version (forWindows)
No
Note: To compare all features of the Full and the Lite versions of SQL Manager, refer tothe Feature Matrix page.
5.4.10.1 Using Navigation bar and Toolbar
The Navigation bar and Toolbar provide quick access to tools implemented in EndpointEditor.
The Navigation bar of Endpoint Editor allows you to:
Object
select a server instance
select an endpoint for editing
99
439
440
441
443
962
23

SQL Manager for SQL Server - User's Manual440
© 1999-2022 EMS Software Development
General
compile the endpoint (if it is being created/modified)
refresh the content of the active tab
restore the default size and position of the editor window
Depending on the current tab selection, the Navigation bar expands to one or moreadditional panes with tab-specific actions that can be useful for working with theendpoint:
DDL
save DDL to an external *.sql file
open DDL in SQL Editor
Items of the Navigation bar are also available on the ToolBar of Endpoint Editor. Toenable the toolbar , open the Environment Options dialog, proceed to the Windows
section there and select T oolbar (if you need the toolbar only) or Both (if youneed both the toolbar and the Navigation bar ) in the Bar style for child forms group.
5.4.10.2 Setting endpoint properties
Use the Endpoint tab of Endpoint Editor to configure/view endpoint properties.
NameEnter a name for the new endpoint, or view the name of the endpoint being edited.
Endpoint stateSpecify the state of the endpoint when it is created:
StoppedThis option indicates that the endpoint is stopped. In this state, the server listens to portrequests but returns errors to clients.
StartedThis option indicates that the endpoint is started and is actively listening for connections.
Disabled
966
962
962 462
960 867
871
958
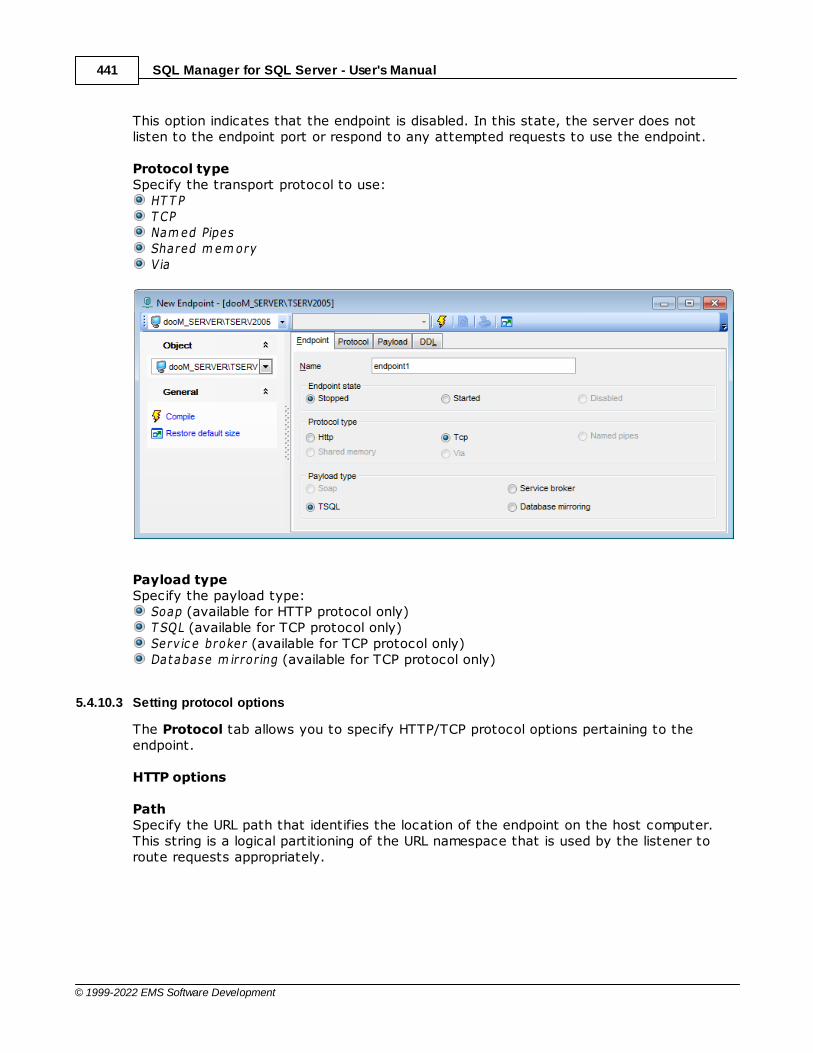
SQL Manager for SQL Server - User's Manual441
© 1999-2022 EMS Software Development
This option indicates that the endpoint is disabled. In this state, the server does notlisten to the endpoint port or respond to any attempted requests to use the endpoint.
Protocol typeSpecify the transport protocol to use:
HT T P T CP Nam ed Pipes Shared m em ory V ia
Payload typeSpecify the payload type:
Soap (available for HTTP protocol only) T SQL (available for TCP protocol only) Serv ic e broker (available for TCP protocol only) Database m irror ing (available for TCP protocol only)
5.4.10.3 Setting protocol options
The Protocol tab allows you to specify HTTP/TCP protocol options pertaining to theendpoint.
HTTP options
PathSpecify the URL path that identifies the location of the endpoint on the host computer.This string is a logical partitioning of the URL namespace that is used by the listener toroute requests appropriately.
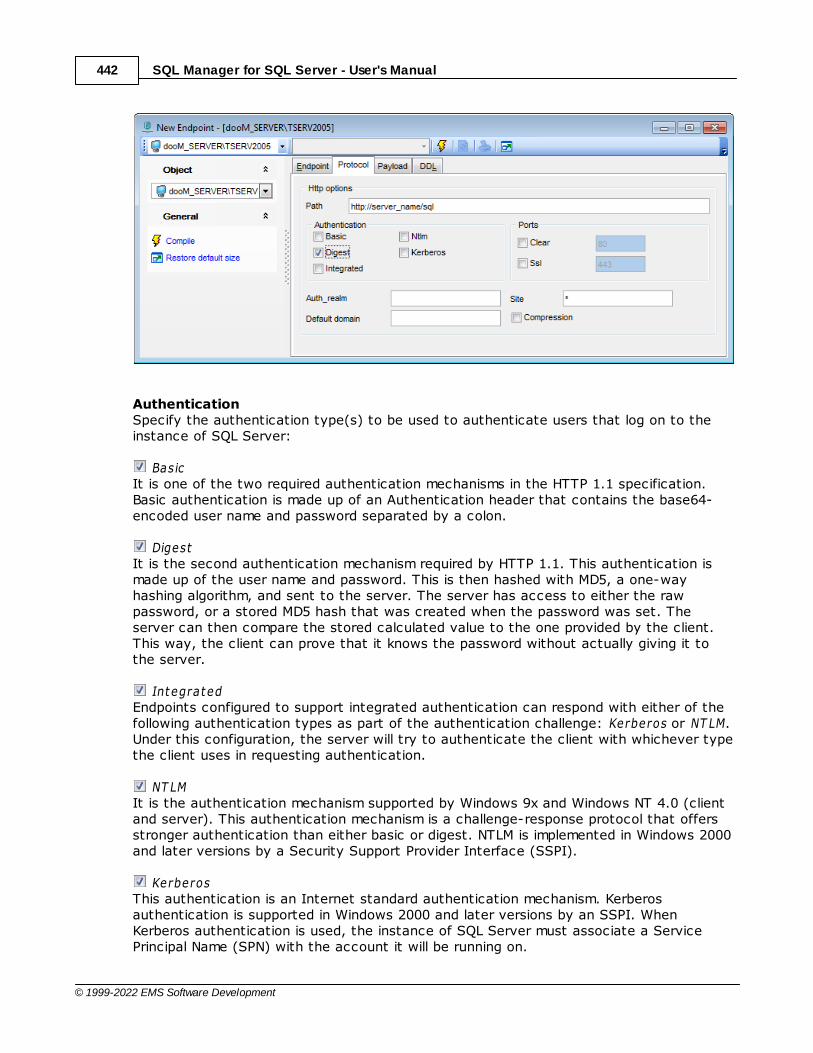
SQL Manager for SQL Server - User's Manual442
© 1999-2022 EMS Software Development
AuthenticationSpecify the authentication type(s) to be used to authenticate users that log on to theinstance of SQL Server:
BasicIt is one of the two required authentication mechanisms in the HTTP 1.1 specification.Basic authentication is made up of an Authentication header that contains the base64-encoded user name and password separated by a colon.
DigestIt is the second authentication mechanism required by HTTP 1.1. This authentication ismade up of the user name and password. This is then hashed with MD5, a one-wayhashing algorithm, and sent to the server. The server has access to either the rawpassword, or a stored MD5 hash that was created when the password was set. Theserver can then compare the stored calculated value to the one provided by the client.This way, the client can prove that it knows the password without actually giving it tothe server.
IntegratedEndpoints configured to support integrated authentication can respond with either of thefollowing authentication types as part of the authentication challenge: Kerberos or NT LM.Under this configuration, the server will try to authenticate the client with whichever typethe client uses in requesting authentication.
NT LMIt is the authentication mechanism supported by Windows 9x and Windows NT 4.0 (clientand server). This authentication mechanism is a challenge-response protocol that offersstronger authentication than either basic or digest. NTLM is implemented in Windows 2000and later versions by a Security Support Provider Interface (SSPI).
KerberosThis authentication is an Internet standard authentication mechanism. Kerberosauthentication is supported in Windows 2000 and later versions by an SSPI. WhenKerberos authentication is used, the instance of SQL Server must associate a ServicePrincipal Name (SPN) with the account it will be running on.
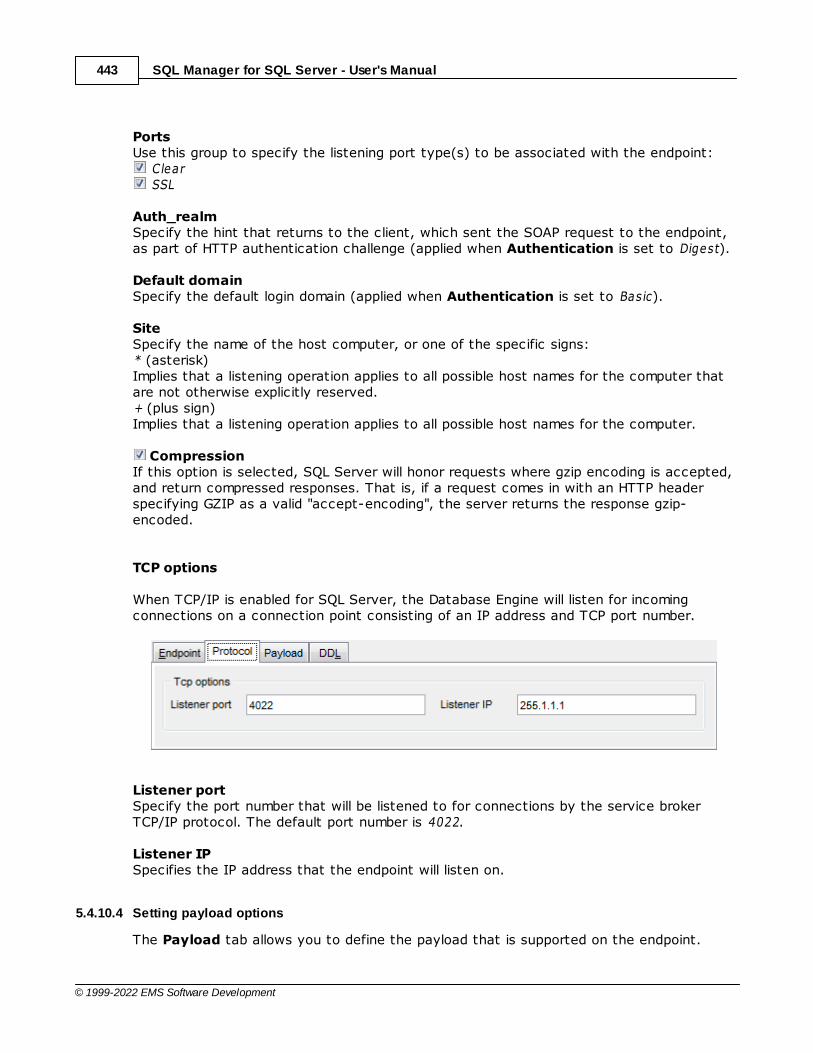
SQL Manager for SQL Server - User's Manual443
© 1999-2022 EMS Software Development
PortsUse this group to specify the listening port type(s) to be associated with the endpoint:
Clear SSL
Auth_realmSpecify the hint that returns to the client, which sent the SOAP request to the endpoint,as part of HTTP authentication challenge (applied when Authentication is set to Digest).
Default domainSpecify the default login domain (applied when Authentication is set to Basic).
SiteSpecify the name of the host computer, or one of the specific signs:* (asterisk) Implies that a listening operation applies to all possible host names for the computer thatare not otherwise explicitly reserved.+ (plus sign) Implies that a listening operation applies to all possible host names for the computer.
CompressionIf this option is selected, SQL Server will honor requests where gzip encoding is accepted,and return compressed responses. That is, if a request comes in with an HTTP headerspecifying GZIP as a valid "accept-encoding", the server returns the response gzip-encoded.
TCP options
When TCP/IP is enabled for SQL Server, the Database Engine will listen for incomingconnections on a connection point consisting of an IP address and TCP port number.
Listener portSpecify the port number that will be listened to for connections by the service brokerTCP/IP protocol. The default port number is 4022.
Listener IPSpecifies the IP address that the endpoint will listen on.
5.4.10.4 Setting payload options
The Payload tab allows you to define the payload that is supported on the endpoint.
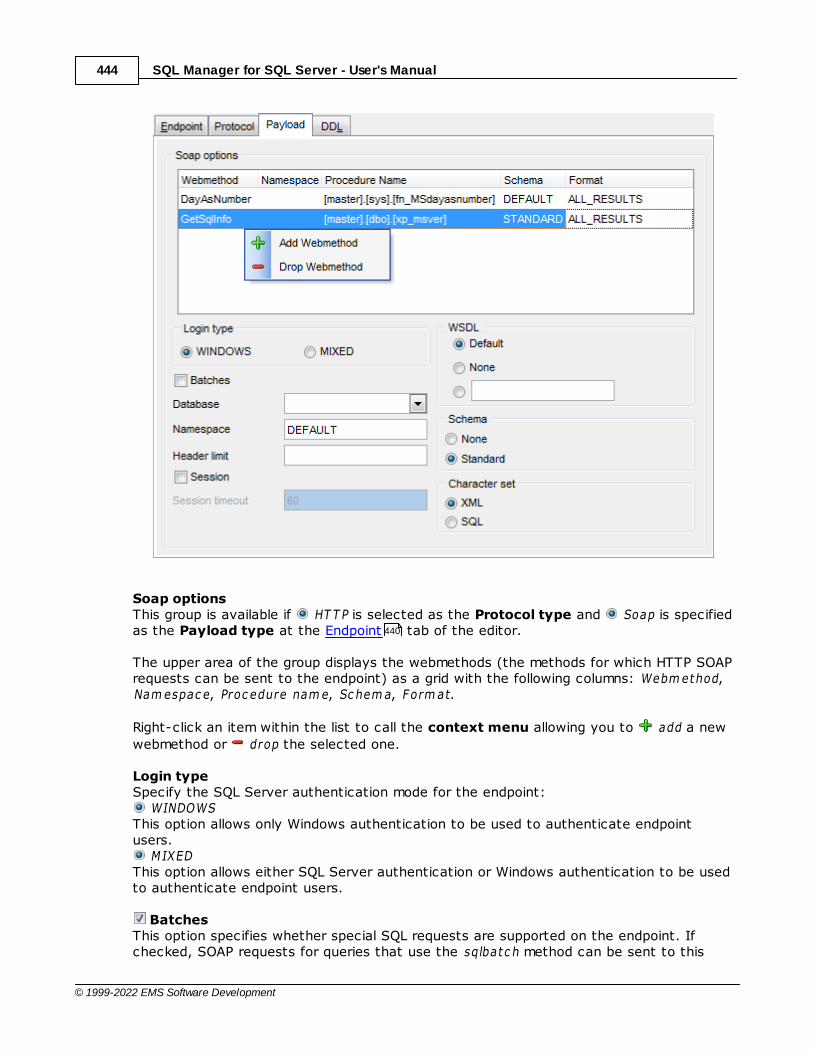
SQL Manager for SQL Server - User's Manual444
© 1999-2022 EMS Software Development
Soap optionsThis group is available if HT T P is selected as the Protocol type and Soap is specifiedas the Payload type at the Endpoint tab of the editor.
The upper area of the group displays the webmethods (the methods for which HTTP SOAPrequests can be sent to the endpoint) as a grid with the following columns: Webm ethod,Nam espac e, Proc edure nam e, Sc hem a, Form at.
Right-click an item within the list to call the context menu allowing you to add a new
webmethod or drop the selected one.
Login typeSpecify the SQL Server authentication mode for the endpoint:
WINDOWSThis option allows only Windows authentication to be used to authenticate endpointusers.
MIXEDThis option allows either SQL Server authentication or Windows authentication to be usedto authenticate endpoint users.
BatchesThis option specifies whether special SQL requests are supported on the endpoint. Ifchecked, SOAP requests for queries that use the sqlbatc h method can be sent to this
440
SQL Manager for SQL Server - User's Manual445
© 1999-2022 EMS Software Development
endpoint.
DatabaseUse the drop-down list to select the database in the context of which the requestedoperation will be executed.
NamespaceSpecify the namespace for the endpoint.
Header limitThis value specifies the maximum size, of the header section in the SOAP envelope (inbytes).
SessionThis option specifies whether the instance of SQL Server allows sessions support. Ifchecked, SQL Server allows sessions support, whereby multiple SOAP request/responsemessage pairs can be identified as part of a single SOAP session.
Session timeoutSpecify time that is available before a SOAP session expires at the server when no furtherrequests are received (in seconds).
WSDLThis group indicates whether WSDL document generation is supported for this endpoint: None, Default (a default WSDL response is generated and returned for WSDL queriessubmitted to the endpoint), or specify stored procedure by name that will return amodified WSDL document.
SchemaThis group specifies whether an XSD schema is returned by the endpoint when SOAPresults are sent.
NONEThis option omits inline schema from SOAP responses.
ST ANDARDThis option includes inline schema in endpoint responses.
Character setThis group defines the character set behavior: XML (by default), or SQL (thecharacters that are not valid as character references are encoded, and then returned inthe result).
289

SQL Manager for SQL Server - User's Manual446
© 1999-2022 EMS Software Development
Service Broker optionsThis group is available if T CP is selected as the Protocol type and Serv ic e broker isspecified as the Payload type at the Endpoint tab of the editor.
Authentication options Window s
Specifies that the endpoint is to connect using Windows Authentication protocol toauthenticate the endpoints. In this case you should also select an authorization method (NT LM or KERBEROS) to be used as the authentication protocol, or NEGOT IAT E that causesthe endpoint to use the Windows negotiation protocol to choose either NTLM orKerberos.
Cert if ic ateSpecifies that the endpoint is to authenticate the connection using a certificate (youshould select one from the drop-down list) to establish identity for authorization.
Window s, Cert if ic ateSpecifies that the endpoint is to try to connect by using Windows Authentication and, ifthat attempt fails, to then try using the specified certificate .
Cert if ic ate, Window sSpecifies that the endpoint is to try to connect by using the specified certificate and,if that attempt fails, to then try using Windows Authentication.
Windows auth typeUse the drop-down list to select an authorization method (NT LM or KERBEROS) to be usedas the authentication protocol, or NEGOT IAT E that causes the endpoint to use theWindows negotiation protocol to choose either NTLM or Kerberos.
Certificate nameUse the drop-down list to select a certificate to be used to authenticate theconnection.
EncryptionThis group specifies whether encryption is used in the process.
440
364
364
364
364

SQL Manager for SQL Server - User's Manual447
© 1999-2022 EMS Software Development
RequiredSpecifies that connections to this endpoint must use encryption. Therefore, to connect tothis endpoint, another endpoint must have ENCRYPTION set to either SUPPORTED orREQUIRED.
SupportedSpecifies that the data is encrypted only if the opposite endpoint specifies eitherSUPPORTED or REQUIRED.
DisabledSpecifies that data sent over a connection is not encrypted.
AlgorithmSpecify the form of encryption used by the endpoint:RC4 (specifies that the endpoint must use the RC4 algorithm)AES (specifies that the endpoint must use the AES algorithm) AES RC4 (specifies that the two endpoints will negotiate for an encryption algorithm withthis endpoint giving preference to the AES algorithm)RC4 AES (specifies that the two endpoints will negotiate for an encryption algorithm withthis endpoint giving preference to the RC4 algorithm)
Message forwardingThis option determines whether messages received by this endpoint that are for serviceslocated elsewhere will be forwarded.
Message buffer size, MbUse the spinner control to specify the maximum amount of storage (in megabytes) toallocate for the endpoint to use when storing messages that are to be forwarded (if Message forwarding is selected).
Database mirroring optionsThis group is available if T CP is selected as the Protocol type and Databasem irror ing is specified as the Payload type at the Endpoint tab of the editor.
Specify the TCP/IP authentication requirements for connections for this endpoint: Window s
Specifies that the endpoint is to connect using Windows Authentication protocol to
440
SQL Manager for SQL Server - User's Manual448
© 1999-2022 EMS Software Development
authenticate the endpoints. In this case you should also select an authorization method (NT LM or KERBEROS) to be used as the authentication protocol, or NEGOT IAT E that causesthe endpoint to use the Windows negotiation protocol to choose either NTLM orKerberos.
Cert if ic ateSpecifies that the endpoint is to authenticate the connection using a certificate (youshould select one from the drop-down list) to establish identity for authorization.
EncryptionThis group specifies whether encryption is used in the process.These options are common for Serv ic e broker and Database m irror ing payload types. Fordetails see Service Broker options.
AlgorithmSpecifies the form of encryption used by the endpoint.This option is common for Serv ic e broker and Database m irror ing payload types. Fordetails see Service Broker options.
RoleThis group specifies the database mirroring role or roles that the endpoint supports.
WitnessEnables the endpoint to perform in the role of a witness in the mirroring process.
PartnerEnables the endpoint to perform in the role of a partner in the mirroring process.
AllEnables the endpoint to perform in the role of both a witness and a partner in themirroring process.
5.4.11 DDL Triggers
A Trigger automatically executes when an event occurs in the database server.
DDL Triggers are a special kind of trigger that fire in response to Data DefinitionLanguage (DDL) statements. They can be used to perform administrative tasks in thedatabase server.
DDL Trigger Editor allows you to define DDL trigger properties (the scope of the DDLtriggers is applied to the current server, i.e. the trigger fires whenever event_type orevent_group happens anywhere in the current server). It opens automatically when youcreate a new DDL trigger and is available on editing an existing one.
To open a DDL trigger in DDL Trigger Editor, double-click it in the DB Explorer tree.Alternatively, you can right-click the DDL trigger alias and select the Edit DDL Triggercontext menu item.
Using Navigation bar and ToolbarSetting DDL trigger propertiesViewing DDL definition
364
99
449
450
962
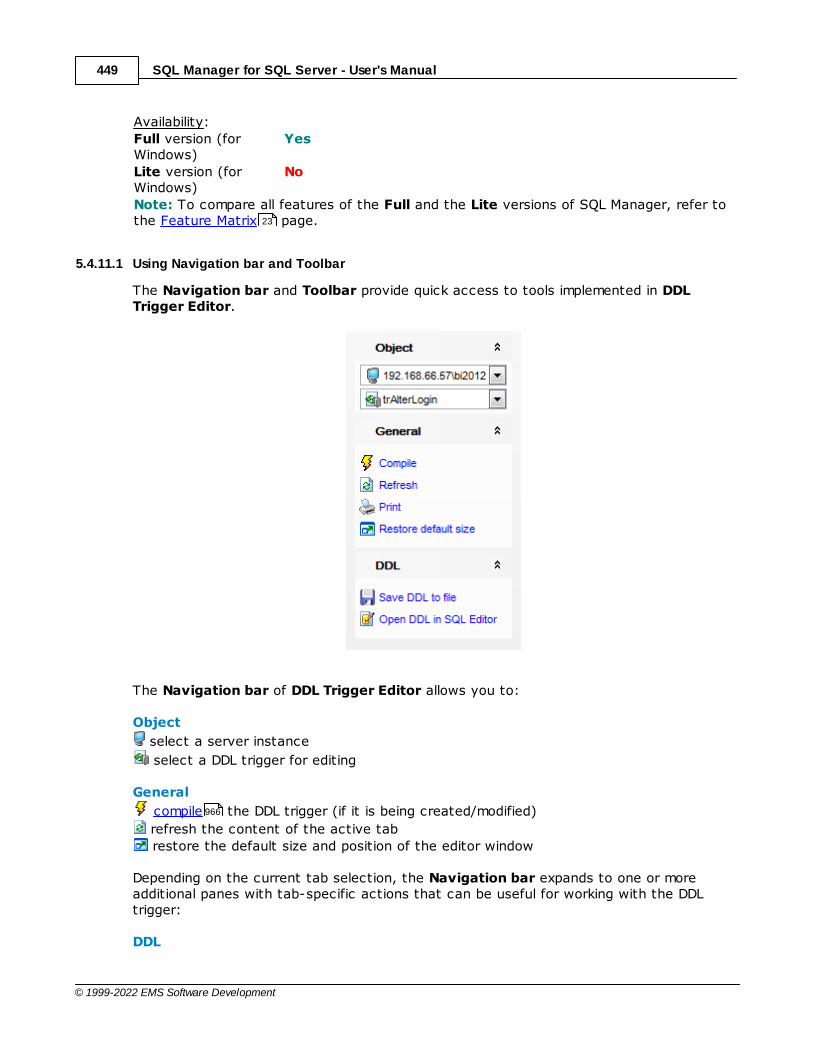
SQL Manager for SQL Server - User's Manual449
© 1999-2022 EMS Software Development
Availability:
Full version (forWindows)
Yes
Lite version (forWindows)
No
Note: To compare all features of the Full and the Lite versions of SQL Manager, refer tothe Feature Matrix page.
5.4.11.1 Using Navigation bar and Toolbar
The Navigation bar and Toolbar provide quick access to tools implemented in DDLTrigger Editor.
The Navigation bar of DDL Trigger Editor allows you to:
Object
select a server instance
select a DDL trigger for editing
General
compile the DDL trigger (if it is being created/modified)
refresh the content of the active tab
restore the default size and position of the editor window
Depending on the current tab selection, the Navigation bar expands to one or moreadditional panes with tab-specific actions that can be useful for working with the DDLtrigger:
DDL
23
966
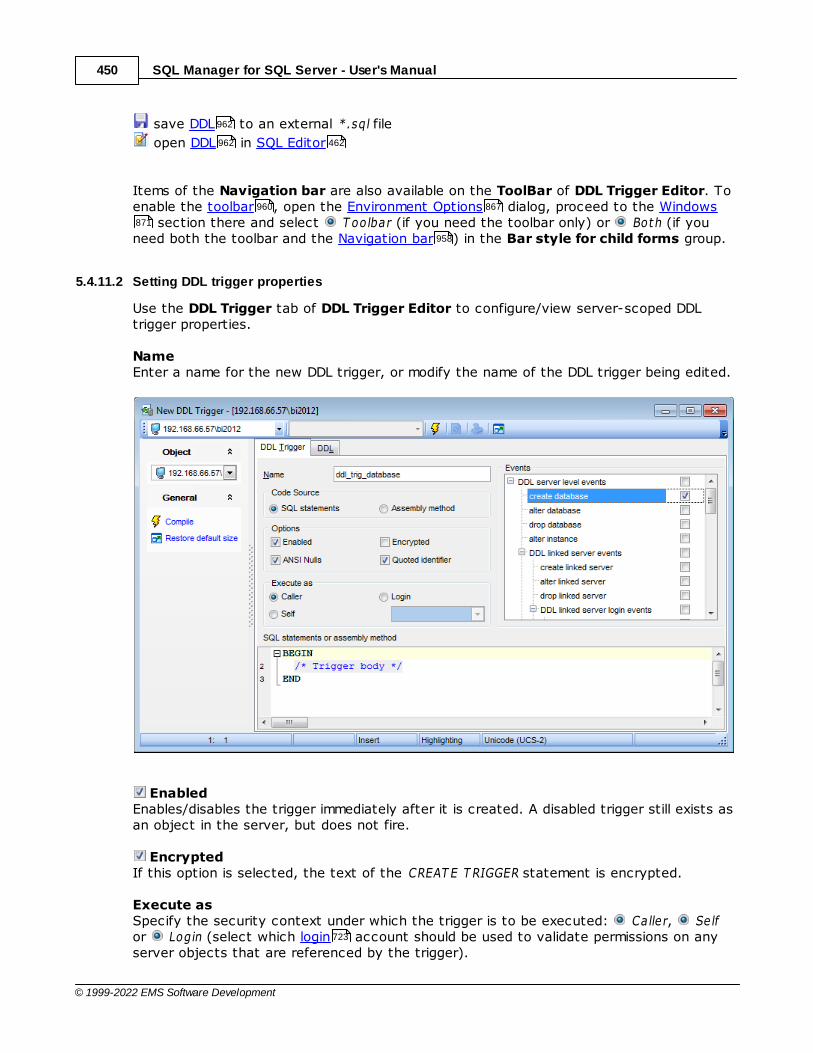
SQL Manager for SQL Server - User's Manual450
© 1999-2022 EMS Software Development
save DDL to an external *.sql file
open DDL in SQL Editor
Items of the Navigation bar are also available on the ToolBar of DDL Trigger Editor. Toenable the toolbar , open the Environment Options dialog, proceed to the Windows
section there and select T oolbar (if you need the toolbar only) or Both (if youneed both the toolbar and the Navigation bar ) in the Bar style for child forms group.
5.4.11.2 Setting DDL trigger properties
Use the DDL Trigger tab of DDL Trigger Editor to configure/view server-scoped DDLtrigger properties.
NameEnter a name for the new DDL trigger, or modify the name of the DDL trigger being edited.
EnabledEnables/disables the trigger immediately after it is created. A disabled trigger still exists asan object in the server, but does not fire.
EncryptedIf this option is selected, the text of the CREAT E T RIGGER statement is encrypted.
Execute asSpecify the security context under which the trigger is to be executed: Caller, Se lfor Login (select which login account should be used to validate permissions on anyserver objects that are referenced by the trigger).
962
962 462
960 867
871
958
723
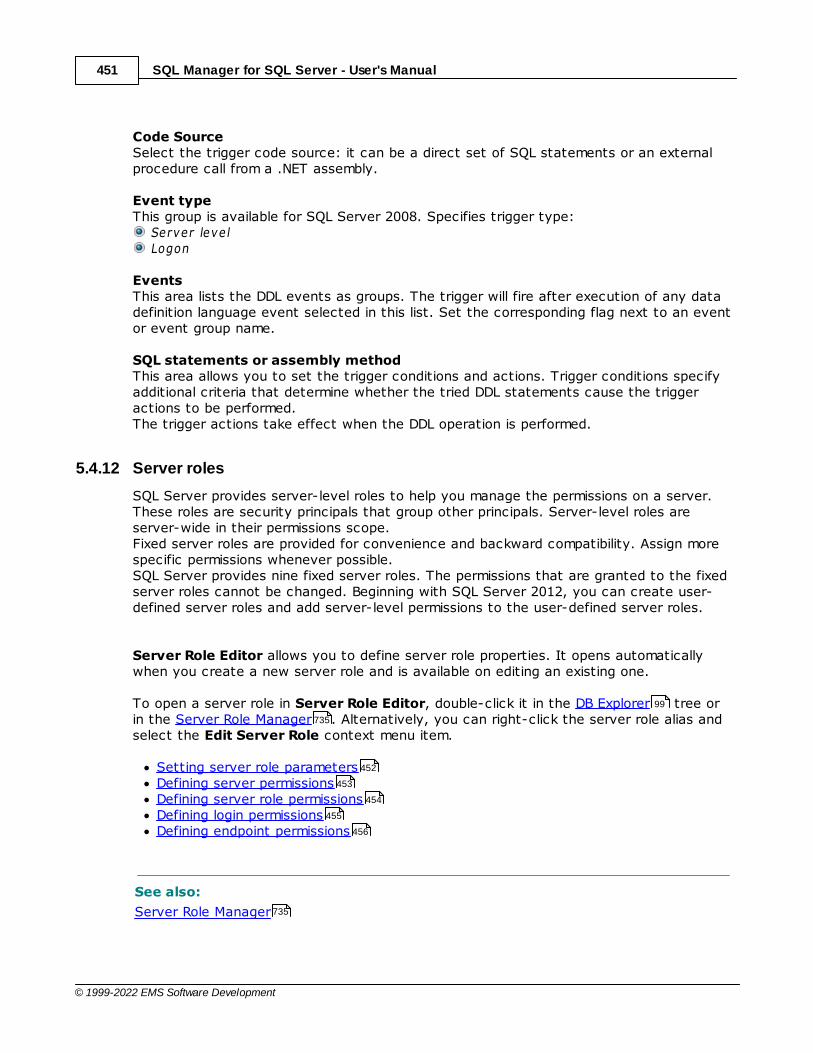
SQL Manager for SQL Server - User's Manual451
© 1999-2022 EMS Software Development
Code SourceSelect the trigger code source: it can be a direct set of SQL statements or an externalprocedure call from a .NET assembly.
Event typeThis group is available for SQL Server 2008. Specifies trigger type:
Server leve l Logon
Events This area lists the DDL events as groups. The trigger will fire after execution of any datadefinition language event selected in this list. Set the corresponding flag next to an eventor event group name.
SQL statements or assembly methodThis area allows you to set the trigger conditions and actions. Trigger conditions specifyadditional criteria that determine whether the tried DDL statements cause the triggeractions to be performed.The trigger actions take effect when the DDL operation is performed.
5.4.12 Server roles
SQL Server provides server-level roles to help you manage the permissions on a server.These roles are security principals that group other principals. Server-level roles areserver-wide in their permissions scope.Fixed server roles are provided for convenience and backward compatibility. Assign morespecific permissions whenever possible.SQL Server provides nine fixed server roles. The permissions that are granted to the fixedserver roles cannot be changed. Beginning with SQL Server 2012, you can create user-defined server roles and add server-level permissions to the user-defined server roles.
Server Role Editor allows you to define server role properties. It opens automaticallywhen you create a new server role and is available on editing an existing one.
To open a server role in Server Role Editor, double-click it in the DB Explorer tree orin the Server Role Manager . Alternatively, you can right-click the server role alias andselect the Edit Server Role context menu item.
Setting server role parametersDefining server permissionsDefining server role permissionsDefining login permissionsDefining endpoint permissions
See also:
Server Role Manager
99
735
452
453
454
455
456
735
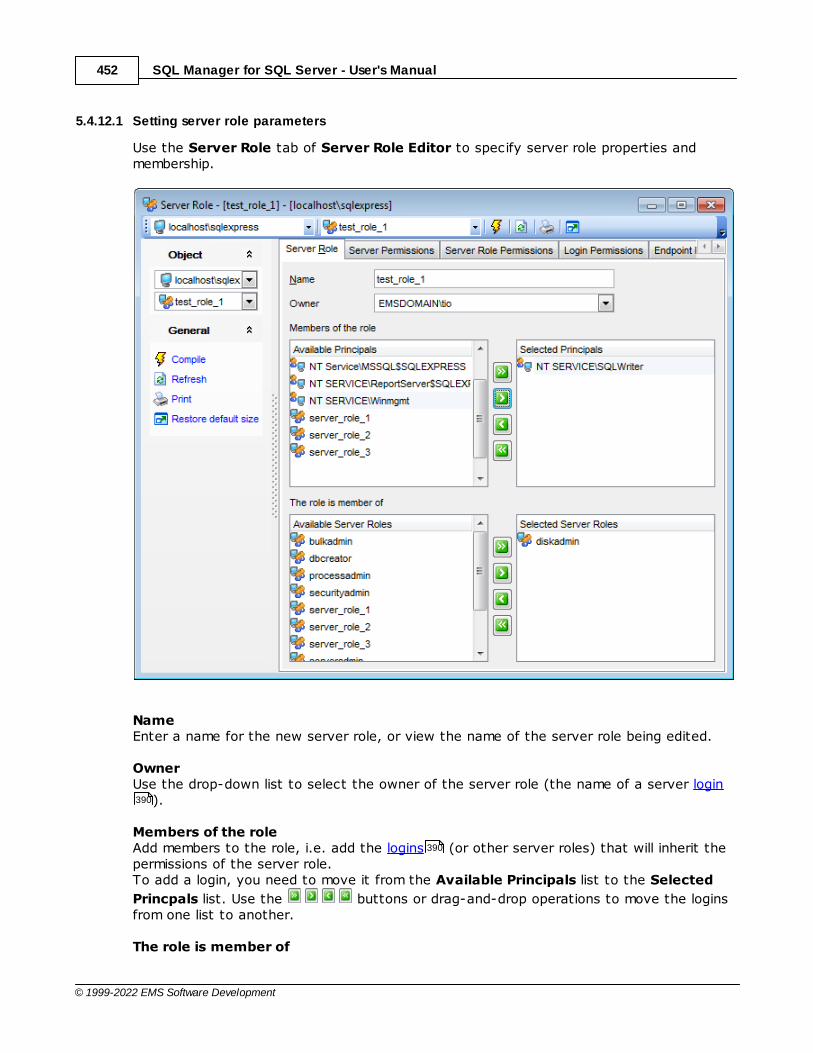
SQL Manager for SQL Server - User's Manual452
© 1999-2022 EMS Software Development
5.4.12.1 Setting server role parameters
Use the Server Role tab of Server Role Editor to specify server role properties andmembership.
NameEnter a name for the new server role, or view the name of the server role being edited.
OwnerUse the drop-down list to select the owner of the server role (the name of a server login
).
Members of the roleAdd members to the role, i.e. add the logins (or other server roles) that will inherit thepermissions of the server role.To add a login, you need to move it from the Available Principals list to the Selected
Princpals list. Use the buttons or drag-and-drop operations to move the loginsfrom one list to another.
The role is member of
390
390

SQL Manager for SQL Server - User's Manual453
© 1999-2022 EMS Software Development
Define role membership, i.e. select the server role(s) the current server role will be amember of. The selected server roles determine the tasks that can be performed throughthe current server role.To select a server role, you need to move it from the Available Server Roles list to the
Selected Server Roles list. Use the buttons or drag-and-drop operations tomove the roles from one list to another.
5.4.12.2 Defining server permissions
This tab allows you to grant Server permissions to the server role.
The Permission column contains the list of server permissions that can be granted to theserver role: CONNECT SQL, SHUT DOWN, CREAT E ANY DAT ABASE, CREAT E ENDPOINT, ALT ERANY LOGIN, ALT ER ANY CREDENT IAL, ALT ER ANY LINKED SERVER, ALT ER ANY CONNECT ION,etc.
Right-click a cell within the State column to grant a permission to the server role. Thecontext menu of a cell allows you to:
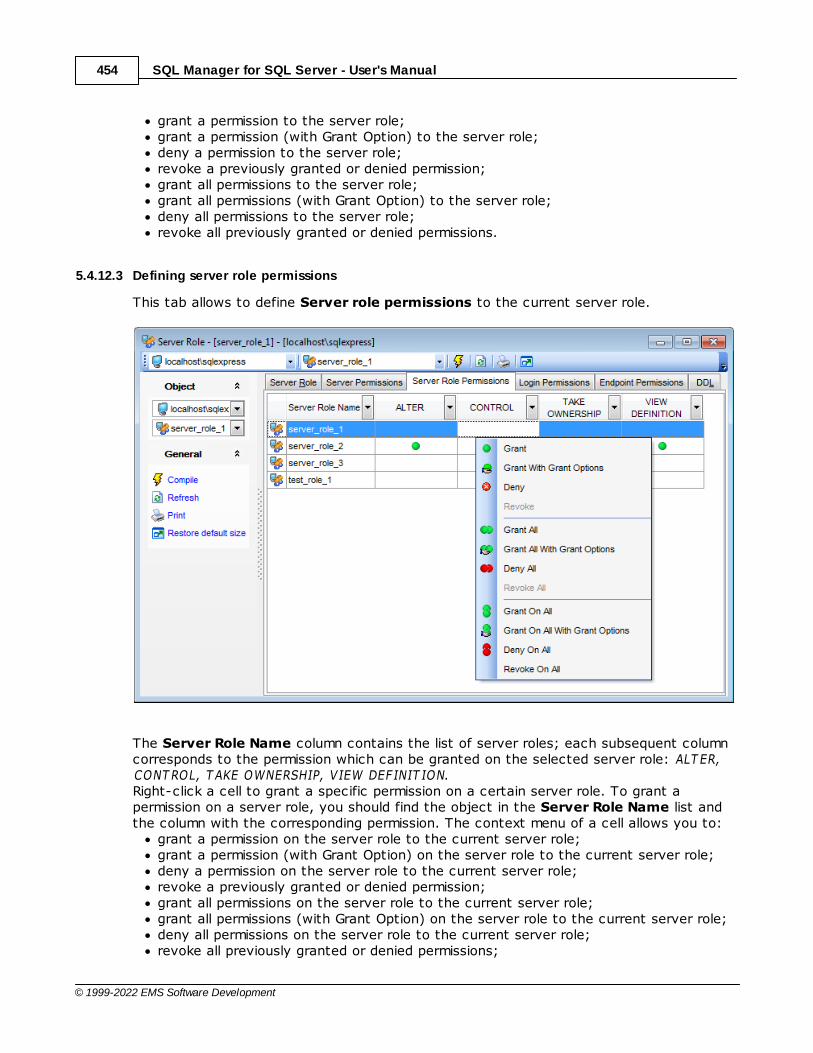
SQL Manager for SQL Server - User's Manual454
© 1999-2022 EMS Software Development
grant a permission to the server role;grant a permission (with Grant Option) to the server role;deny a permission to the server role;revoke a previously granted or denied permission;grant all permissions to the server role;grant all permissions (with Grant Option) to the server role;deny all permissions to the server role;revoke all previously granted or denied permissions.
5.4.12.3 Defining server role permissions
This tab allows to define Server role permissions to the current server role.
The Server Role Name column contains the list of server roles; each subsequent columncorresponds to the permission which can be granted on the selected server role: ALT ER,CONT ROL, T AKE OWNERSHIP, VIEW DEFINIT ION.Right-click a cell to grant a specific permission on a certain server role. To grant apermission on a server role, you should find the object in the Server Role Name list andthe column with the corresponding permission. The context menu of a cell allows you to:
grant a permission on the server role to the current server role;grant a permission (with Grant Option) on the server role to the current server role;deny a permission on the server role to the current server role;revoke a previously granted or denied permission;grant all permissions on the server role to the current server role;grant all permissions (with Grant Option) on the server role to the current server role;deny all permissions on the server role to the current server role;revoke all previously granted or denied permissions;

SQL Manager for SQL Server - User's Manual455
© 1999-2022 EMS Software Development
grant a permission on all server role to the current server role;grant a permission (with Grant Option) on all server role to the current server role;deny a permission on all server role to the current server role;revoke a previously granted or denied permission on all server role.
5.4.12.4 Defining login permissions
This tab allows you to define Login permissions to the server role.
The Login Name column contains the list of server logins ; each subsequent columncorresponds to the permission which can be granted on the selected login: ALT ER,CONT ROL, IMPERSONAT E, VIEW DEFINIT ION.
Right-click a cell to grant a specific permission on a certain login. To grant a permission onan login, you should find the object in the Login Name list and the column with thecorresponding permission. The context menu of a cell allows you to:
grant a permission on the login to the server role;grant a permission (with Grant Option) on the login to the server role;deny a permission on the login to the server role;revoke a previously granted or denied permission;grant all permissions on the login to the server role;grant all permissions (with Grant Option) on the login to the server role;deny all permissions on the login to the server role;revoke all previously granted or denied permissions;grant a permission on all logins to the server role;grant a permission (with Grant Option) on all logins to the server role;deny a permission on all logins to the server role;revoke a previously granted or denied permission on all logins.
390

SQL Manager for SQL Server - User's Manual456
© 1999-2022 EMS Software Development
5.4.12.5 Defining endpoint permissions
This tab allows you to grant Endpoint permissions to the server role.
The Endpoint Name column contains the list of server endpoints ; each subsequentcolumn corresponds to the permission which can be granted on the selected endpoint: ALT ER, CONNECT, CONT ROL, T AKE OWNERSHIP, VIEW DEFINIT ION.
Right-click a cell to grant a specific permission on a certain endpoint. To grant apermission on an endpoint, you should find the object in the Endpoint name list and thecolumn with the corresponding permission. The context menu of a cell allows you to:
grant a permission on the endpoint to the server role;grant a permission (with Grant Option) on the endpoint to the server role;deny a permission on the endpoint to the server role;revoke a previously granted or denied permission;grant all permissions on the endpoint to the server role;grant all permissions (with Grant Option) on the endpoint to the server role;deny all permissions on the endpoint to the server role;revoke all previously granted or denied permissions;grant a permission on all endpoints to the server role;grant a permission (with Grant Option) on all endpoints to the server role;deny a permission on all endpoints to the server role;revoke a previously granted or denied permission on all endpoints
438
SQL Manager for SQL Server - User's Manual457
© 1999-2022 EMS Software Development
5.4.13 DTS Packages
In SQL Server 2000, Data Transformation Services (DTS) is a component built to takedata from one OLE DB data source, perform certain operations and store it in a destinationOLE DB data source. DTS consists of packages which define a particular set of work thatforms a logical work item. DTS Packages contain multiple connections to data sources,tasks to be performed, workflows. Examples of tasks include copying data from source todestination connections, transforming data from a source connection and placing thetransformed data in the destination connection, executing a set of Microsoft ActiveXscripts or Transact-SQL statements against a connection.
In SQL Server 2005 (and higher), Integration Services (SSIS) packages are provided fordata warehousing purposes.
SQL Manager for SQL Server provides running Data Transformation Services (DTS)packages that were developed by using SQL Server 2000 tools. These can be run in SQLServer 2005 and higher, alongside Integration Services (SSIS) packages.
Importing DTS Packages
To import DTS Package:right-click DTS Package node (within the Server Objects branch) or any objectwithin this node in the DB Explorer tree and select the Tasks | Import DTSPackage... item from the context menu .
Exporting DTS Packages
To export DTS Package:right-click DTS Package node (within the Server Objects branch) or any objectwithin this node in the DB Explorer tree and select the Tasks | Export DTSPackage... item from the context menu .
Running DTS Packages
To run DTS Package:right-click any object in the DTS Package node (within the Server Objects branch)in the DB Explorer tree and select the Tasks | Run DTS Package... item from thecontext menu .
To import, export, run DTS Packages you can also use the context menu and theNavigation bar of DTS Packages manager . You can view package properties in theDTS Package properties dialog.
5.4.13.1 DTS Package properties
The DTS Package Properties dialog allows you to browse the DTS package commoninformation.
To open the dialog, right-click the DTS package in DB Explorer and select the DTSPackage Properties... context menu item.
99
91
99
91
99
91
853
457
99
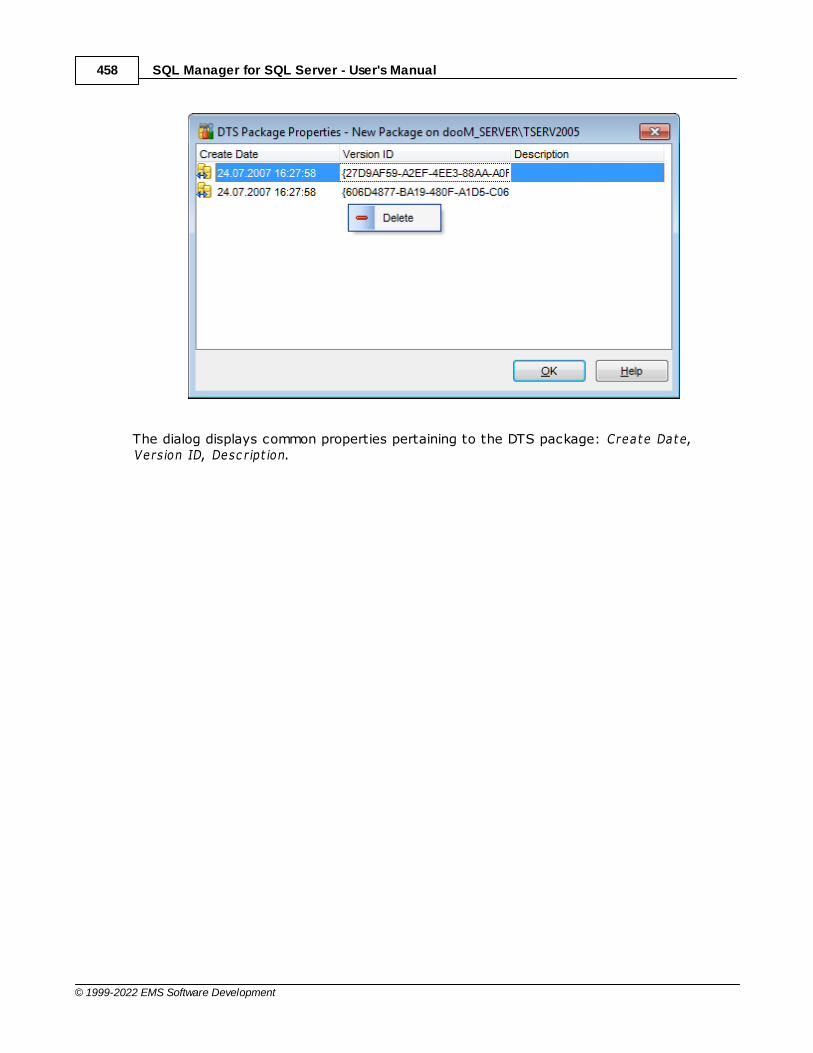
SQL Manager for SQL Server - User's Manual458
© 1999-2022 EMS Software Development
The dialog displays common properties pertaining to the DTS package: Create Date,Version ID, Desc r ipt ion.

Part
VI
SQL Manager for SQL Server - User's Manual460
© 1999-2022 EMS Software Development
6 Query Management Tools
When using SQL Manager for SQL Server, you are provided with two basic tools you mayneed to manage your SQL queries: SQL Editor for editing SQL query text directly andVisual Query Builder for building queries visually. Find the list of common SQL querymanagement operations below.
Creating New Queries
In order to create a new query in SQL Editor:
select the Tools | New SQL Editor main menu item or use the corresponding toolbar button;click the Add new query item of the Navigation bar ;edit the query text within the Edit tab of SQL Editor .
In order to create a new query in Query Builder:select the Tools | New Query Builder main menu item or use the corresponding
toolbar button;build the query visually within the Builder tab of Visual Query Builder .
Editing Queries
In order to open a query in SQL Editor:
select the Tools | Show SQL Editor main menu item or use the corresponding toolbar button;use the numbered tabs at the bottom of the editor window to switch betweenpreviously edited queries. The last edited query is displayed automatically on openingthe editor;edit the query text within the Edit tab of SQL Editor .
In order to open a query in Query Builder:select the Tools | Show Query Builder main menu item or use the corresponding
toolbar button;the last edited query is displayed automatically on opening Query Builder;to load a previously saved diagram, click the Load diagram item of the Navigation bar
;to load a query from an *.sql file, open the Edit tab and click the Load SQL button ofthe Navigation bar;edit the query visually within the Builder and/or the Edit tabs of Visual Query Builder
.
In order to load a query from an *.sql file:
select the Tools | New SQL Editor main menu item or use the corresponding toolbar button;click the Load from file item of the Navigation bar ;browse for the query file using the Open SQL File dialog;edit the query text within the Edit tab of SQL Editor .
Executing Queries
In order to execute a query:
462
479
958
960
462
462
958
960
479
958
960
462
958
960
479
479
958
960
462
462
SQL Manager for SQL Server - User's Manual461
© 1999-2022 EMS Software Development
c reate a new query or open an exist ing one;click the Execute item of the Navigation bar or use the F9 hot-key to executethe query;view/edit the returned data within the Results tab of SQL Editor .
Saving Queries
In order to save a query:c reate a new query or open an exist ing one;click the Save to file Navigation bar item (in SQL Editor) or the Save SQLNavigation bar item (in Query Builder), or use the Ct r l+S shortcut to save thequery using the Save as... dialog;click the Save diagram Navigation bar item in Visual Query Builder to save thedesigned diagram;
oruse the Save all Navigation bar item in SQL Editor if you need to save all thequeries to one file.
See also:
Getting Started
Database Explorer
Database Management
Database Objects Management
Data Management
Import/Export Tools
Database Tools
Server Tools
Personalization
External Tools
How To...
462
462
462
479 996
479 479
462 462
76
99
130
214
498
566
651
757
866
952
1001

SQL Manager for SQL Server - User's Manual462
© 1999-2022 EMS Software Development
6.1 SQL Editor
SQL Editor is the basic tool of SQL Manager for SQL Server for creating and executingqueries. The tool allows you to create and edit the SQL text of a query, prepare andexecute queries and view the results of query execution.
To open SQL Editor, select the Tools | New SQL Editor / Tools | Show SQL Editor main
menu items or use the corresponding / toolbar buttons. You can also use theShift+F12 / F12 shortcuts for the same purpose.
Using Navigation bar and ToolbarWorking with SQL Editor areaUsing the context menuViewing query planUsing object linksExecuting queries and viewing resultsViewing query logsFavorites editorMerging queries
See also:
Visual Query Builder
Query parameters
SQL Script Editor
Editor Options
6.1.1 Using Navigation bar and Toolbar
The Navigation bar and Toolbar provide quick access to tools implemented in SQLEditor.
958 960
996
462
476
465
467
468
469
470
474
475
479
495
659
912
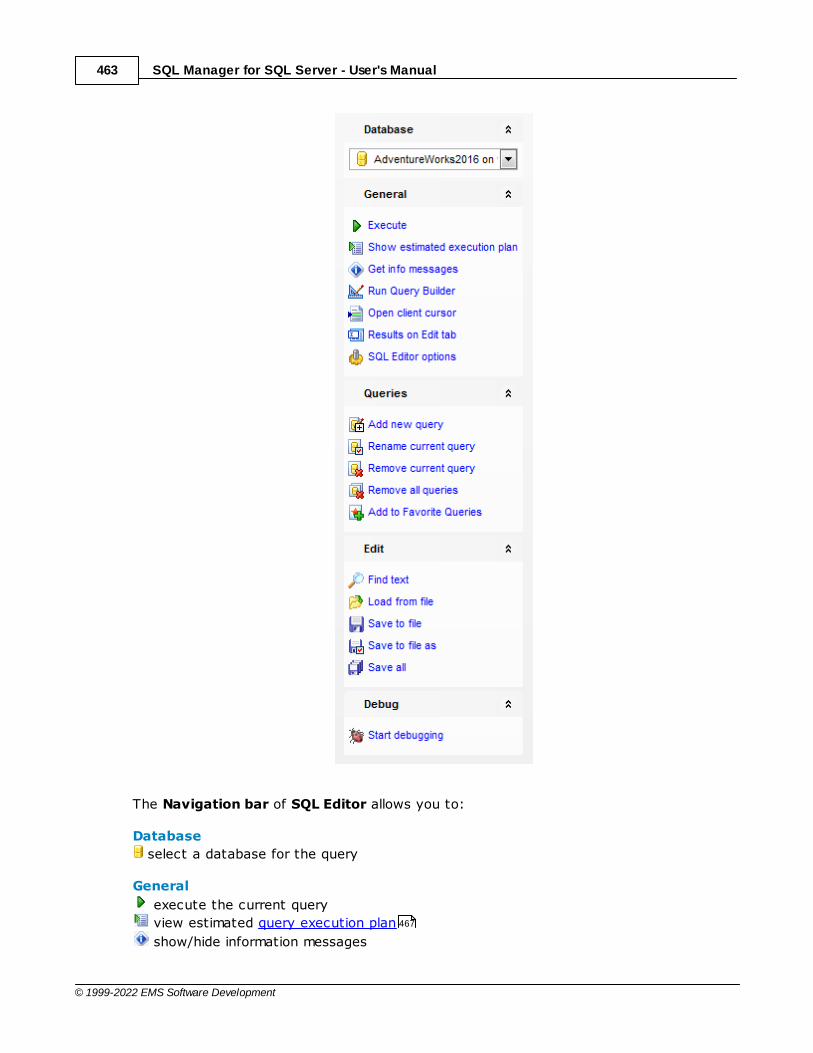
SQL Manager for SQL Server - User's Manual463
© 1999-2022 EMS Software Development
The Navigation bar of SQL Editor allows you to:
Database
select a database for the query
General
execute the current query
view estimated query execution plan
show/hide information messages
467
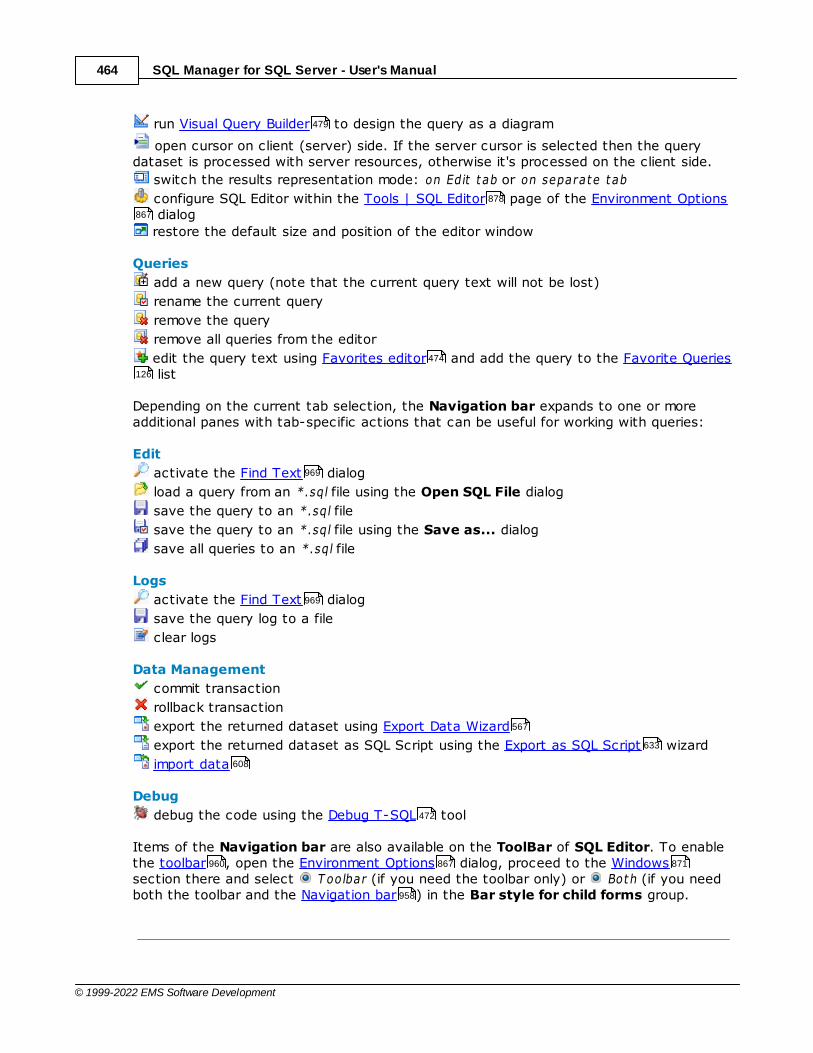
SQL Manager for SQL Server - User's Manual464
© 1999-2022 EMS Software Development
run Visual Query Builder to design the query as a diagram
open cursor on client (server) side. If the server cursor is selected then the querydataset is processed with server resources, otherwise it's processed on the client side.
switch the results representation mode: on Edit t ab or on separate tab
configure SQL Editor within the Tools | SQL Editor page of the Environment Options dialog
restore the default size and position of the editor window
Queries
add a new query (note that the current query text will not be lost)
rename the current query
remove the query
remove all queries from the editor
edit the query text using Favorites editor and add the query to the Favorite Queries list
Depending on the current tab selection, the Navigation bar expands to one or moreadditional panes with tab-specific actions that can be useful for working with queries:
Edit
activate the Find Text dialog
load a query from an *.sql file using the Open SQL File dialog
save the query to an *.sql file
save the query to an *.sql file using the Save as... dialog
save all queries to an *.sql file
Logs
activate the Find Text dialog
save the query log to a file
clear logs
Data Management
commit transaction
rollback transaction
export the returned dataset using Export Data Wizard
export the returned dataset as SQL Script using the Export as SQL Script wizard
import data
Debug
debug the code using the Debug T-SQL tool
Items of the Navigation bar are also available on the ToolBar of SQL Editor. To enablethe toolbar , open the Environment Options dialog, proceed to the Windowssection there and select T oolbar (if you need the toolbar only) or Both (if you needboth the toolbar and the Navigation bar ) in the Bar style for child forms group.
479
878
867
474
126
969
969
567
633
608
472
960 867 871
958
SQL Manager for SQL Server - User's Manual465
© 1999-2022 EMS Software Development
See also:
Working with SQL Editor area
Viewing query plan
Executing queries
Viewing query logs
Favorites editor
6.1.2 Using the context menu
The context menu of SQL Editor area contains execution commands, most of thestandard text-processing functions (Cut, Copy, Paste, Selec t All) and functions forworking with the query as a whole, e.g. you can m ove the c ursor to a part ic ular line,c hange the c ase of selected text, view the query propert ies or pr int the text of thequery. Each of these operations can be also performed with the corresponding hot keysused.
476
467
469
470
474
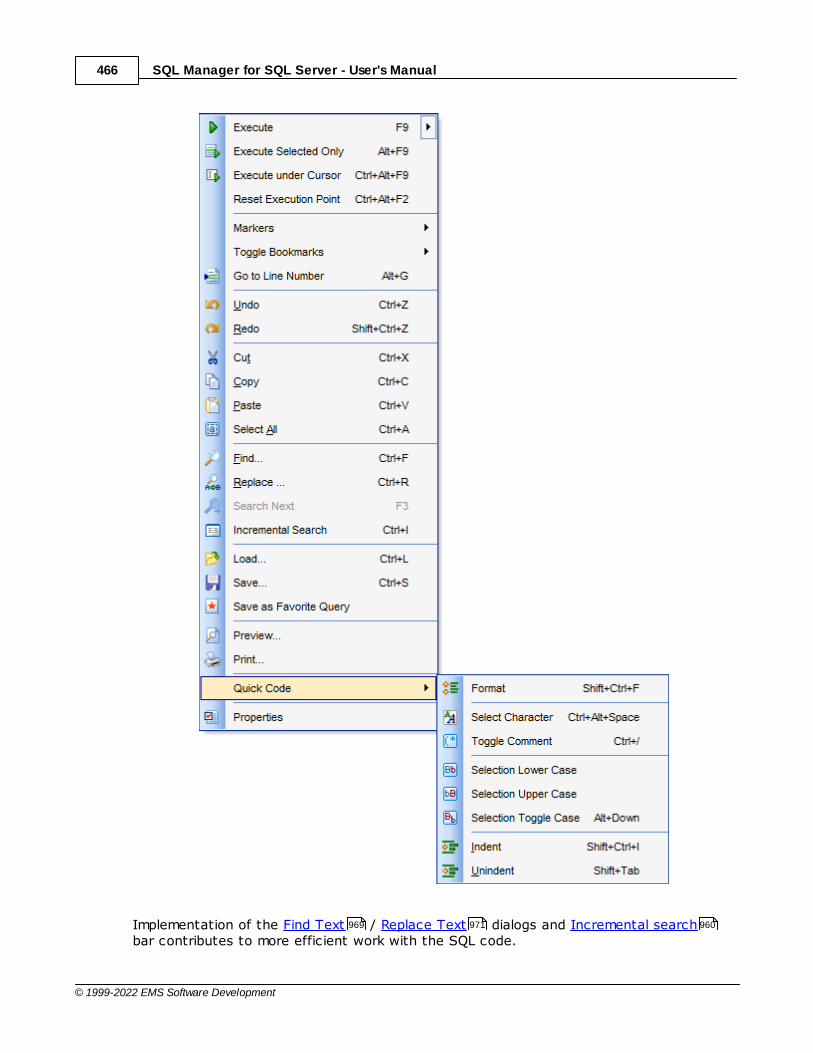
SQL Manager for SQL Server - User's Manual466
© 1999-2022 EMS Software Development
Implementation of the Find Text / Replace Text dialogs and Incremental searchbar contributes to more efficient work with the SQL code.
969 971 960

SQL Manager for SQL Server - User's Manual467
© 1999-2022 EMS Software Development
Find the complete list of SQL Editor context menu items below. The context menu allowsyou to:
add the selected text to dictionary or correct text (see Spell checking for details);execute the query/selected text/text under cursor, and reset execution point (ifnecessary);manage markers: Drop Marker, Collec t Marker, Sw ap Marker;toggle bookmarks allowing you to navigate through the query text and jump to a linewith a particular number;perform editing operations: Undo/Redo, Cut, Copy, Paste, Selec t a ll;perform search and replace operations;save/load a query to/from an external *.sql file;perform preview/print operations;use the Quic k c ode group allowing you to format the selected code using SQLForm at ter to make the code easier to read, toggle comments for code fragments,change case of the selected text, indent/unindent code lines;add the query to the Favorite Queries list;open the Editor Options dialog.
See also:
Working with SQL Editor area
Executing queries
6.1.3 Viewing query plan
Using SQL Manager for SQL Server, you can view the plan for each of the queriescreated and executed in the application. The query plan is available within thecorresponding Plan tab.
To view the Plan of a query, open the query in SQL Editor and use the Showestimated execution plan item of the Navigation bar or toolbar .
The Plan tab allows you to view the sequence of actions performed by the databaseserver in the process of the query execution, and the amount of system resources usedfor the query execution.
925
969 971
728
912
476
469
462 464

SQL Manager for SQL Server - User's Manual468
© 1999-2022 EMS Software Development
The Operation panel below displays the operations as a tree list with the followingcolumns: Operat ion, Logic a l Operat ion, Subt ree Cost, IO Cost, CPU Cost, Est im atedExec ut ions, Est im ated Row s, Ac tual Exec ut ions, Ac tual Row s, Row Size, Paralle l,Statem ent, Argum ent, Defined Values, Output, Warnings.Right-click within the panel to display the context menu allowing you to configure theset of v is ible c olum ns or export the plan to any of supported formats .
If necessary, you can specify that the Plan tab appears automatically upon queryexecution in SQL Editor: select the Show actual execution plan on query executionoption available within the Tools | SQL Editor section of the Environment Optionsdialog.
See also:
SQL Editor options
Executing queries
6.1.4 Using object links
Objects that exist in the database are highlighted in the text as hyperlinks. You can openan object in the appropriate editor by clicking the object name in the text with the Ct r lkey pressed.
567 979
878 867
878
469
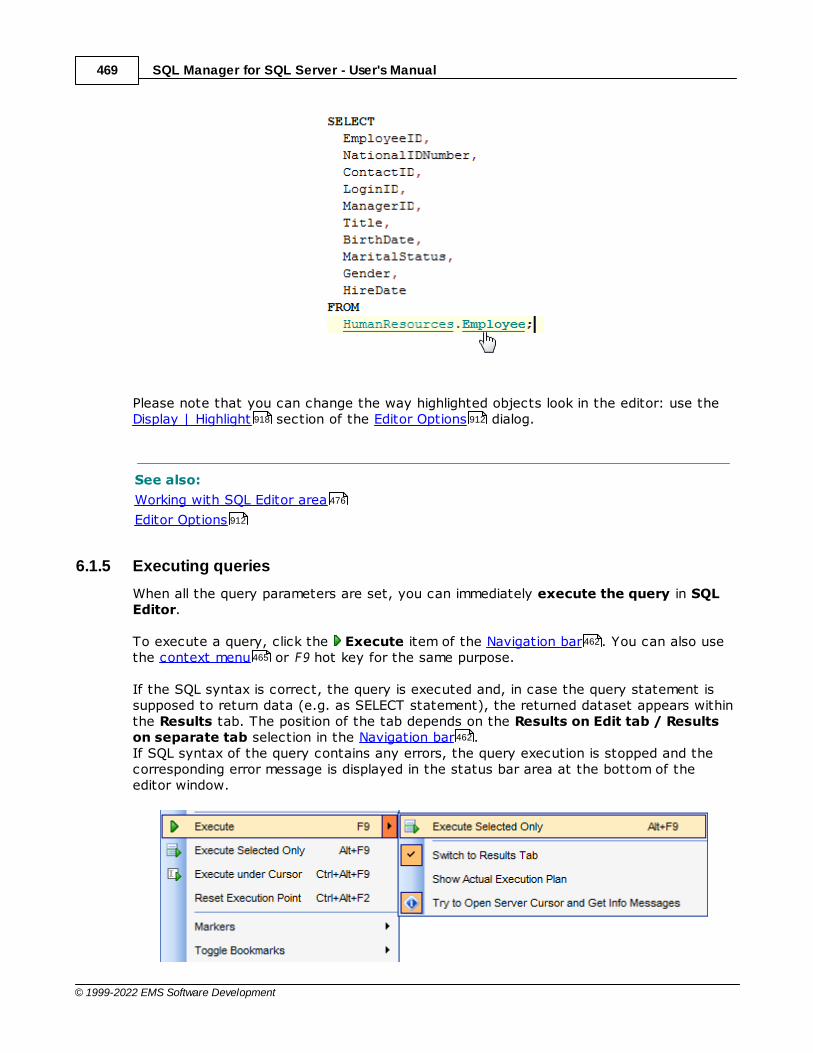
SQL Manager for SQL Server - User's Manual469
© 1999-2022 EMS Software Development
Please note that you can change the way highlighted objects look in the editor: use the Display | Highlight section of the Editor Options dialog.
See also:
Working with SQL Editor area
Editor Options
6.1.5 Executing queries
When all the query parameters are set, you can immediately execute the query in SQLEditor.
To execute a query, click the Execute item of the Navigation bar . You can also usethe context menu or F9 hot key for the same purpose.
If the SQL syntax is correct, the query is executed and, in case the query statement issupposed to return data (e.g. as SELECT statement), the returned dataset appears withinthe Results tab. The position of the tab depends on the Results on Edit tab / Resultson separate tab selection in the Navigation bar . If SQL syntax of the query contains any errors, the query execution is stopped and thecorresponding error message is displayed in the status bar area at the bottom of theeditor window.
918 912
476
912
462
465
462

SQL Manager for SQL Server - User's Manual470
© 1999-2022 EMS Software Development
By default, data returned by a query are displayed as a grid (see Data View fordetails). The context menu of the grid allows you to Export Data , Export as SQLScript .
See also:
Data View
Export Data
Export as SQL Script
6.1.6 Viewing query logs
This tab allows you to view the query log. The log is available within the Logs tab of SQLEditor.
499
505 567
633
499
567
633
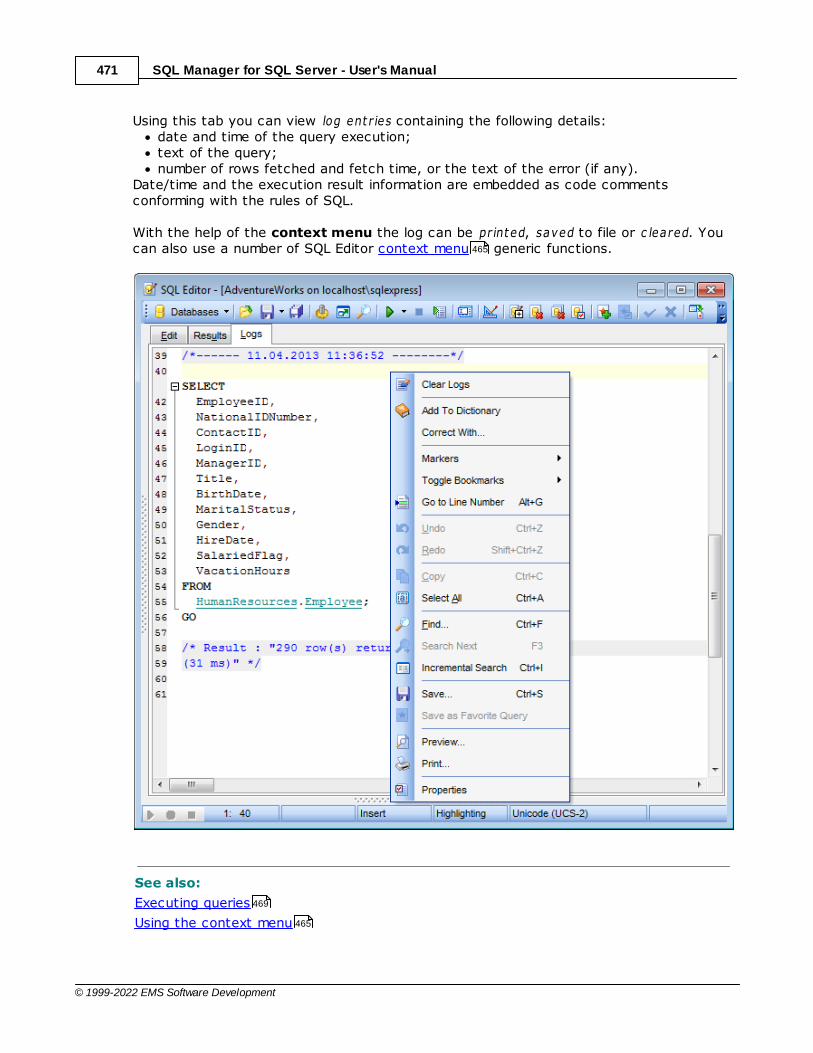
SQL Manager for SQL Server - User's Manual471
© 1999-2022 EMS Software Development
Using this tab you can view log ent r ies containing the following details:date and time of the query execution;text of the query;number of rows fetched and fetch time, or the text of the error (if any).
Date/time and the execution result information are embedded as code commentsconforming with the rules of SQL.
With the help of the context menu the log can be printed, saved to file or c leared. Youcan also use a number of SQL Editor context menu generic functions.
See also:
Executing queries
Using the context menu
465
469
465
SQL Manager for SQL Server - User's Manual472
© 1999-2022 EMS Software Development
6.1.7 Debugging T-SQL
T-SQL Debugger is the cutting edge feature of SQL Manager for SQL Server. This tool isprovided for step-by-step code debugging of SQL scripts, procedures , UDFs . Muchof the power of the debugger comes from toggling breakpoints, getting variables' values,and fetching call stacks.
Note: For debugging on the remote server the host that is running the instance must beconfigured as follows http://msdn.microsoft.com/en-us/library/cc646024.aspx.
The Edit tab of the T-SQL Debugger window contains the following areas:the Debug panel of the Navigation bar ;the Watc hes list;the T -SQL c ode area;the Call stac k box;the Breakpoint s list.
Note: All areas within the Edit tab of the PL/SQL Code Debugger window are dockable,i.e. you can drag an area to any location within the parent form.
The Logs tab of the PL/SQL Code Debugger window displays the debug log.
289 295
462
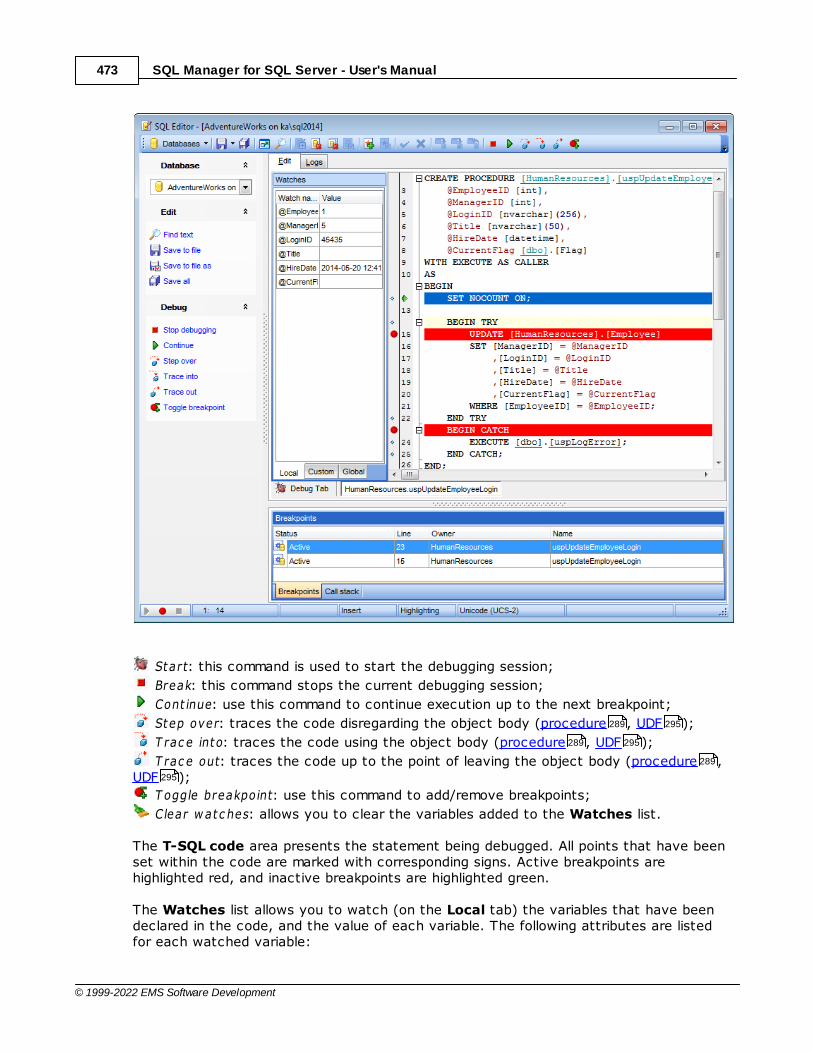
SQL Manager for SQL Server - User's Manual473
© 1999-2022 EMS Software Development
Start: this command is used to start the debugging session;
Break: this command stops the current debugging session;
Cont inue: use this command to continue execution up to the next breakpoint;
Step over: traces the code disregarding the object body (procedure , UDF );
T rac e into: traces the code using the object body (procedure , UDF );
T rac e out: traces the code up to the point of leaving the object body (procedure ,UDF );
T oggle breakpoint: use this command to add/remove breakpoints;
Clear w atc hes: allows you to clear the variables added to the Watches list.
The T-SQL code area presents the statement being debugged. All points that have beenset within the code are marked with corresponding signs. Active breakpoints arehighlighted red, and inactive breakpoints are highlighted green.
The Watches list allows you to watch (on the Local tab) the variables that have beendeclared in the code, and the value of each variable. The following attributes are listedfor each watched variable:
289 295
289 295
289
295
SQL Manager for SQL Server - User's Manual474
© 1999-2022 EMS Software Development
Watc h nam eValueTo add custom watch proceed to the Custom tab and specify the watch name. You candelete the selected watch by using the Ct r l+U shortcut.Use the Global tab to view values of the server global variables.
The Call stack box lists the call stacks, if applicable.
The Breakpoints list displays the currently toggled breakpoints. The following attributesare listed for each breakpoint:StatusLineOw nerNam eUsing the context menu you can enable/disable the selected breakpoint or delete it.
6.1.8 Favorites editor
For your convenience the Favorite Queries list is implemented in SQL Manager for SQL
Server. This list is available within the Favorite Queries node of Database Explorerand allows you to store the most frequently used SQL queries in one location.
To add a query to the Favorite Queries list, use the Add to Favorite QueriesNavigation bar item in SQL Editor. The corresponding item is also available in thecontext menu of SQL Editor working area.
You can edit any of your Favorite Queries using Favorites editor.
126
462
465
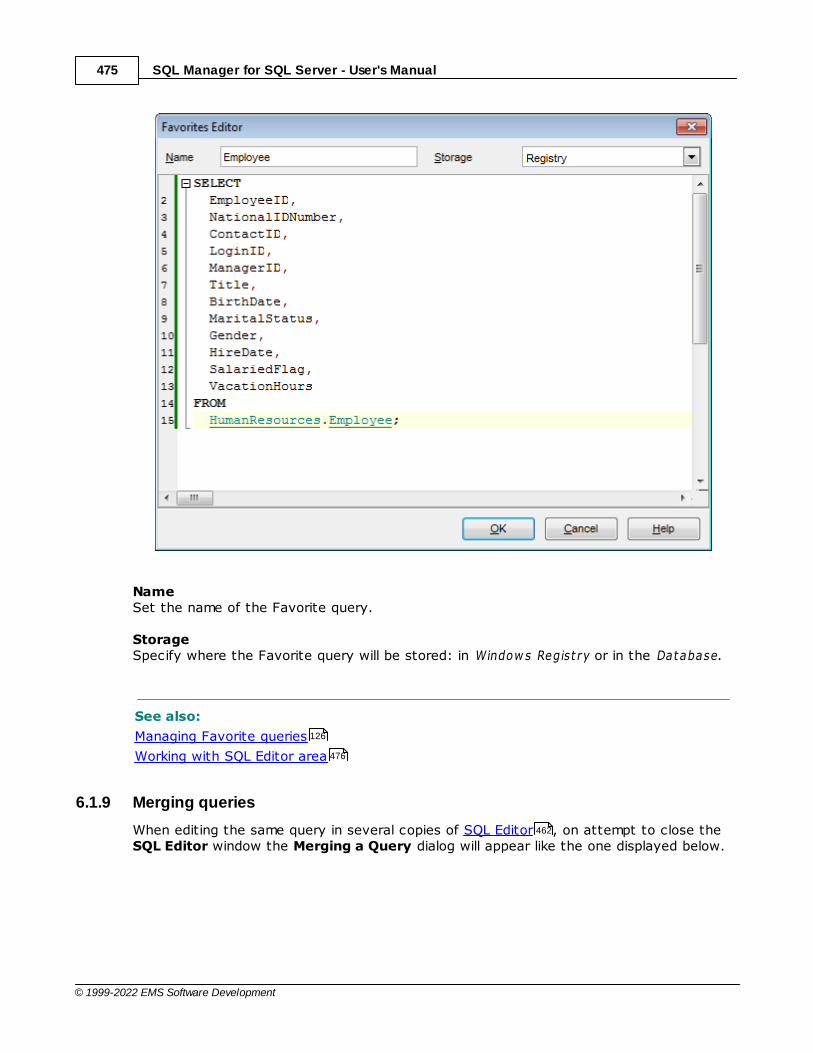
SQL Manager for SQL Server - User's Manual475
© 1999-2022 EMS Software Development
NameSet the name of the Favorite query.
StorageSpecify where the Favorite query will be stored: in Window s Regist ry or in the Database.
See also:
Managing Favorite queries
Working with SQL Editor area
6.1.9 Merging queries
When editing the same query in several copies of SQL Editor , on attempt to close theSQL Editor window the Merging a Query dialog will appear like the one displayed below.
126
476
462

SQL Manager for SQL Server - User's Manual476
© 1999-2022 EMS Software Development
The actions offered are the following:
Save the both changed queriesThe query opened in the first copy of SQL editor will be saved as its original name; thequery in the current copy will be saved under the name with additional postfix (by defaultit is '_1').
Use changes in the current copy of SQL EditorThe query will be saved as the original name; the modifications of SQL made within thecurrent copy of SQL Editor will be applied.
Ignore changes in the current copy of SQL EditorThe query will be saved as its original name; the modifications of SQL made within thecurrent copy of SQL Editor will be ignored.
6.1.10 Working with SQL Editor area
The Editor area of SQL Editor is available within the Edit tab and is provided for workingwith SQL queries in text mode.
For your convenience the syntax highlight, code completion and a number of otherfeatures for efficient SQL editing are implemented:
using object links allowing you to open the object in the associated editor;ability to display line numbers;code folding for statements and clauses;customizable margins and gutters;formatting code for better representation
and more.
If necessary, you can enable/disable or customize most of SQL Editor features using the Editor Options dialog.
The example of code completion is illustrated in the picture below. You can set the delaywithin the Quick code section of the Editor Options dialog or activate thecompletion list manually by pressing the Ct r l+Spac e shortcut .
468
912
919 912
996
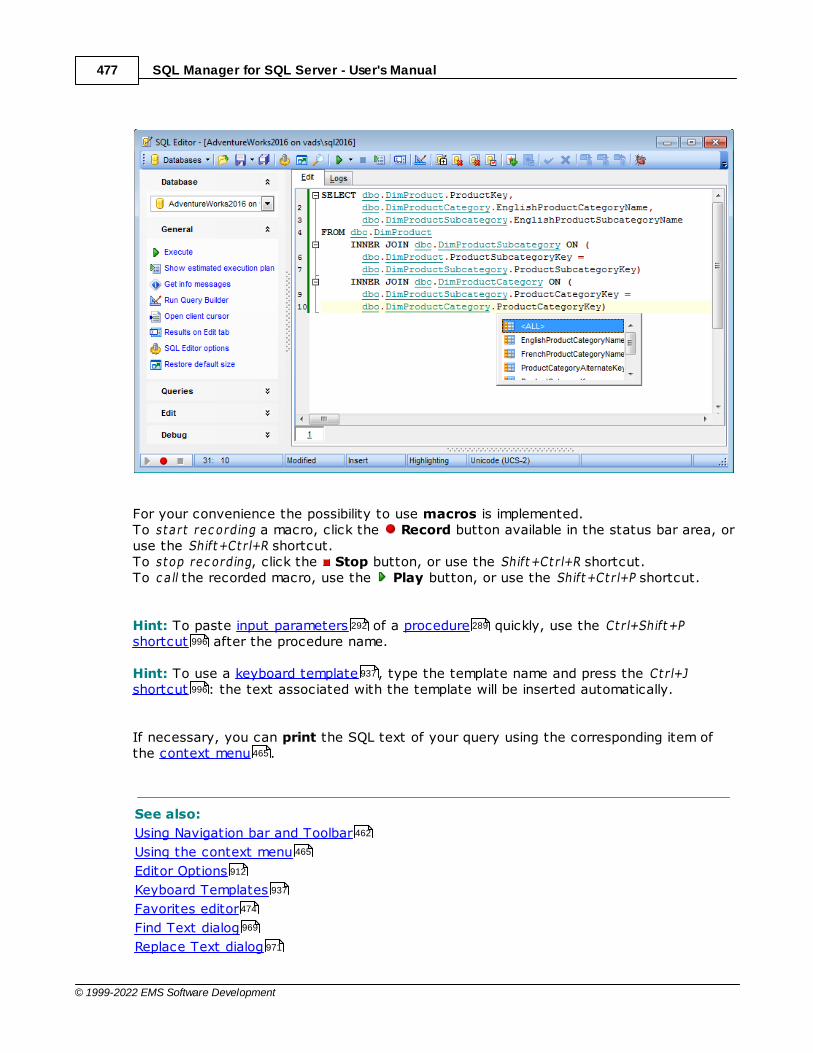
SQL Manager for SQL Server - User's Manual477
© 1999-2022 EMS Software Development
For your convenience the possibility to use macros is implemented.To start rec ording a macro, click the Record button available in the status bar area, oruse the Shift+Ct r l+R shortcut.To stop rec ording, click the Stop button, or use the Shift+Ct r l+R shortcut.To c all the recorded macro, use the Play button, or use the Shift+Ct r l+P shortcut.
Hint: To paste input parameters of a procedure quickly, use the Ct r l+Shift+Pshortcut after the procedure name.
Hint: To use a keyboard template , type the template name and press the Ct r l+Jshortcut : the text associated with the template will be inserted automatically.
If necessary, you can print the SQL text of your query using the corresponding item ofthe context menu .
See also:
Using Navigation bar and Toolbar
Using the context menu
Editor Options
Keyboard Templates
Favorites editor
Find Text dialog
Replace Text dialog
292 289
996
937
996
465
462
465
912
937
474
969
971

SQL Manager for SQL Server - User's Manual478
© 1999-2022 EMS Software Development
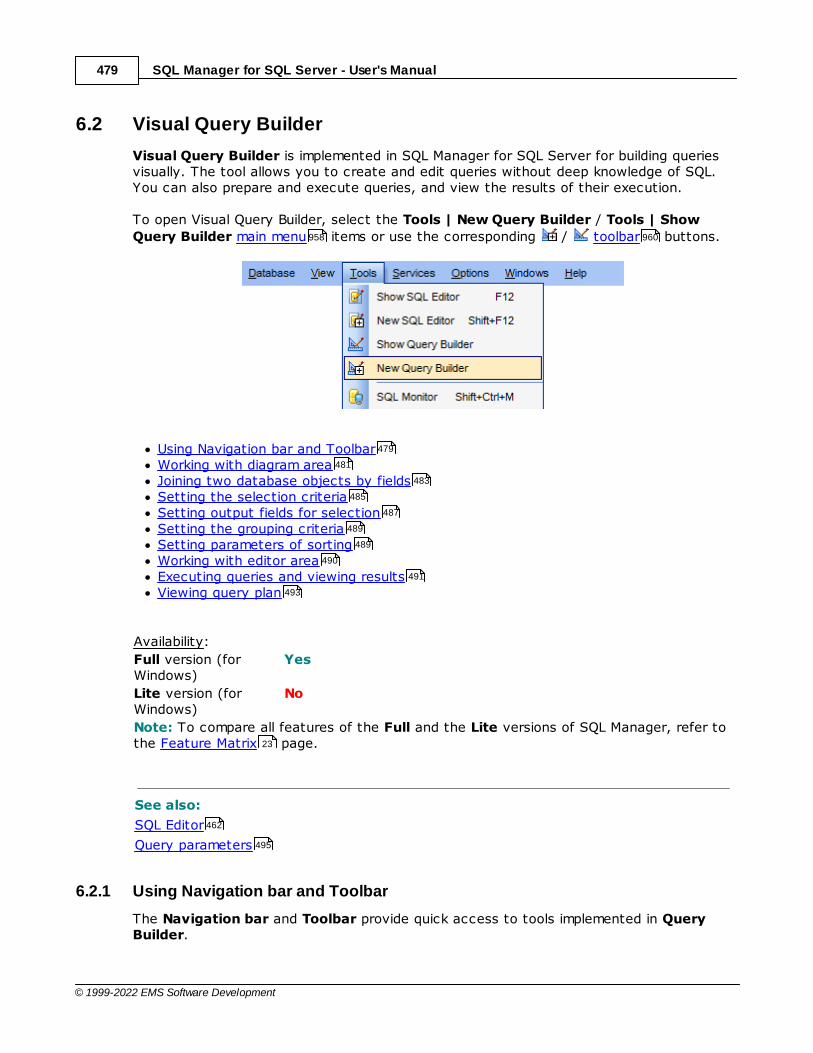
SQL Manager for SQL Server - User's Manual479
© 1999-2022 EMS Software Development
6.2 Visual Query Builder
Visual Query Builder is implemented in SQL Manager for SQL Server for building queriesvisually. The tool allows you to create and edit queries without deep knowledge of SQL.You can also prepare and execute queries, and view the results of their execution.
To open Visual Query Builder, select the Tools | New Query Builder / Tools | Show
Query Builder main menu items or use the corresponding / toolbar buttons.
Using Navigation bar and ToolbarWorking with diagram areaJoining two database objects by fieldsSetting the selection criteriaSetting output fields for selectionSetting the grouping criteriaSetting parameters of sortingWorking with editor areaExecuting queries and viewing resultsViewing query plan
Availability:
Full version (forWindows)
Yes
Lite version (forWindows)
No
Note: To compare all features of the Full and the Lite versions of SQL Manager, refer tothe Feature Matrix page.
See also:
SQL Editor
Query parameters
6.2.1 Using Navigation bar and Toolbar
The Navigation bar and Toolbar provide quick access to tools implemented in QueryBuilder.
958 960
479
481
483
485
487
489
489
490
491
493
23
462
495
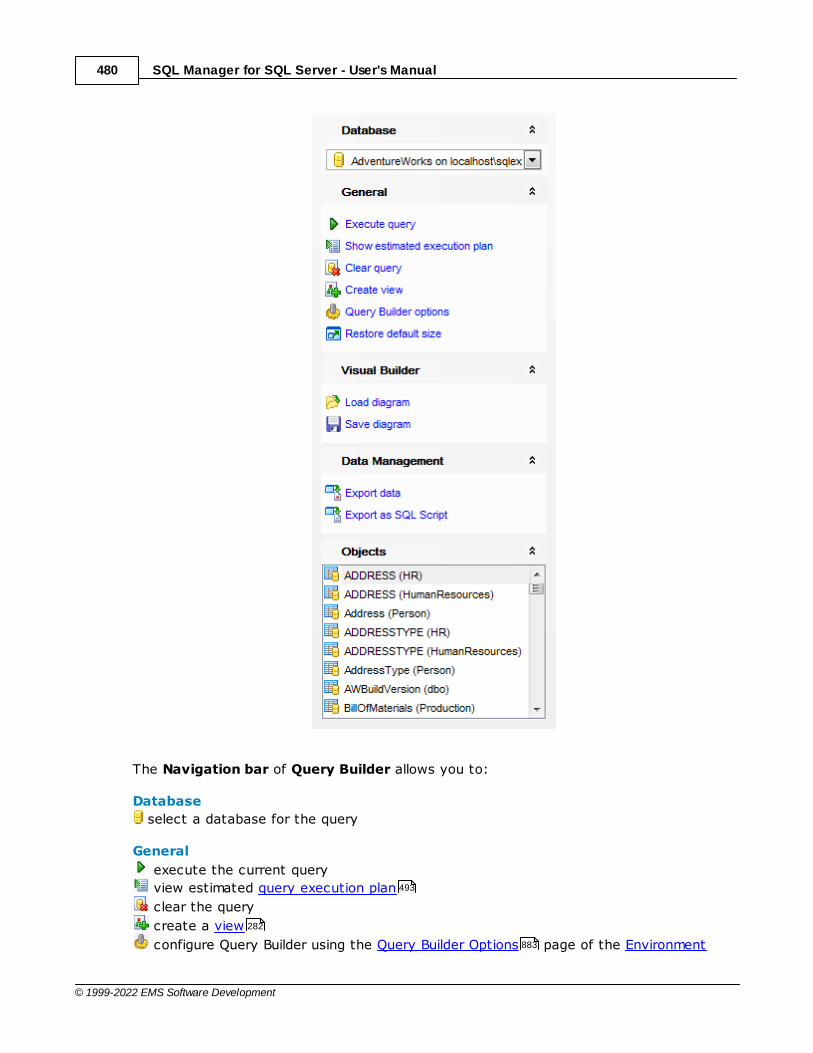
SQL Manager for SQL Server - User's Manual480
© 1999-2022 EMS Software Development
The Navigation bar of Query Builder allows you to:
Database
select a database for the query
General
execute the current query
view estimated query execution plan
clear the query
create a view
configure Query Builder using the Query Builder Options page of the Environment
493
282
883
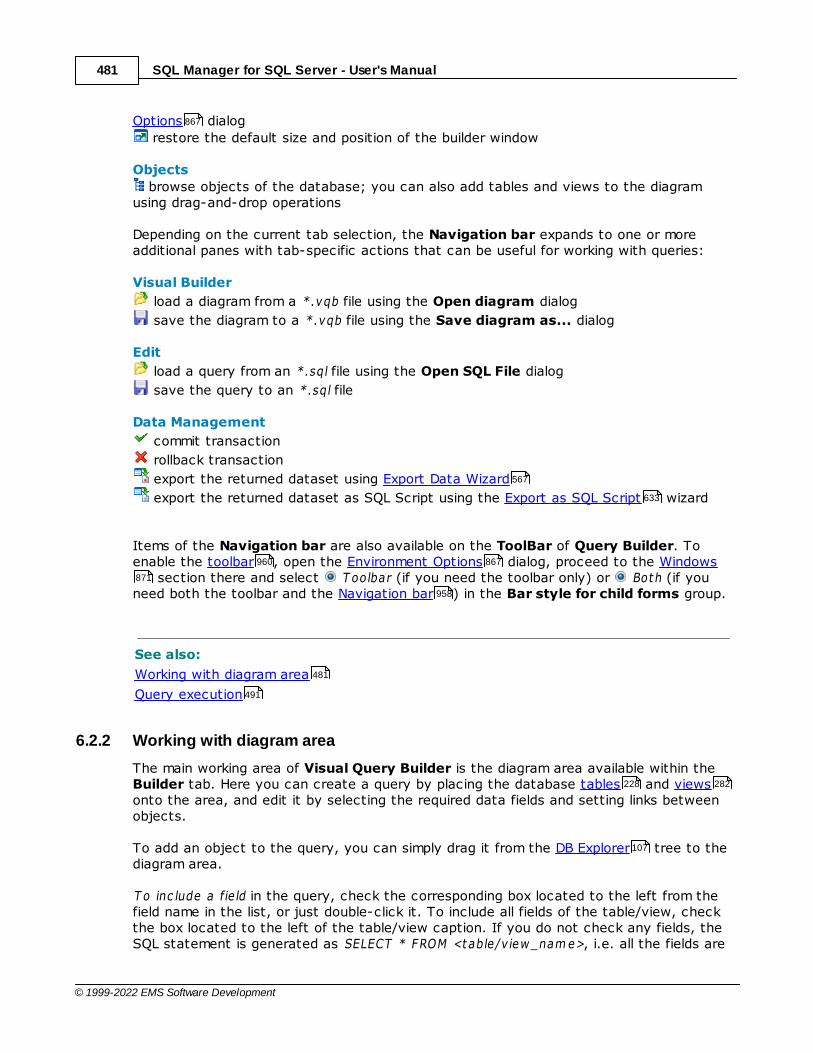
SQL Manager for SQL Server - User's Manual481
© 1999-2022 EMS Software Development
Options dialog
restore the default size and position of the builder window
Objects
browse objects of the database; you can also add tables and views to the diagramusing drag-and-drop operations
Depending on the current tab selection, the Navigation bar expands to one or moreadditional panes with tab-specific actions that can be useful for working with queries:
Visual Builder
load a diagram from a *.vqb file using the Open diagram dialog
save the diagram to a *.vqb file using the Save diagram as... dialog
Edit
load a query from an *.sql file using the Open SQL File dialog
save the query to an *.sql file
Data Management
commit transaction
rollback transaction
export the returned dataset using Export Data Wizard
export the returned dataset as SQL Script using the Export as SQL Script wizard
Items of the Navigation bar are also available on the ToolBar of Query Builder. Toenable the toolbar , open the Environment Options dialog, proceed to the Windows
section there and select T oolbar (if you need the toolbar only) or Both (if youneed both the toolbar and the Navigation bar ) in the Bar style for child forms group.
See also:
Working with diagram area
Query execution
6.2.2 Working with diagram area
The main working area of Visual Query Builder is the diagram area available within theBuilder tab. Here you can create a query by placing the database tables and viewsonto the area, and edit it by selecting the required data fields and setting links betweenobjects.
To add an object to the query, you can simply drag it from the DB Explorer tree to thediagram area.
T o inc lude a fie ld in the query, check the corresponding box located to the left from thefield name in the list, or just double-click it. To include all fields of the table/view, checkthe box located to the left of the table/view caption. If you do not check any fields, theSQL statement is generated as SELECT * FROM <table/v iew _nam e>, i.e. all the fields are
867
567
633
960 867
871
958
481
491
228 282
107
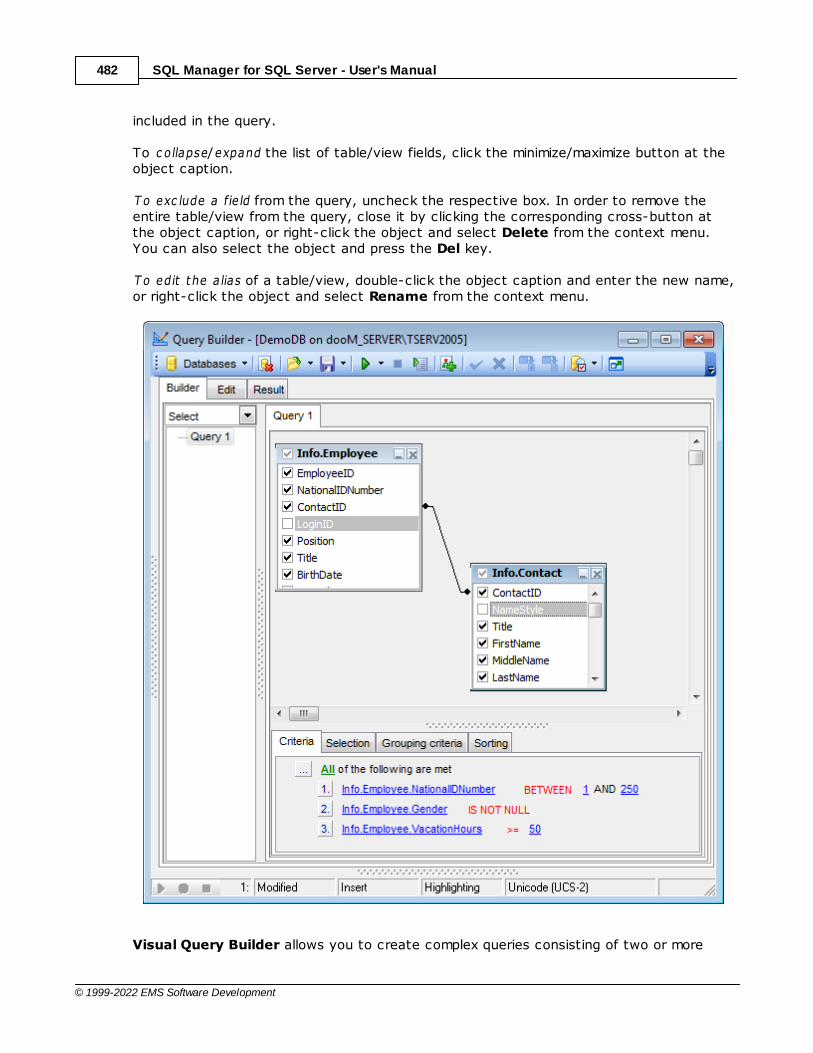
SQL Manager for SQL Server - User's Manual482
© 1999-2022 EMS Software Development
included in the query.
To c ollapse/expand the list of table/view fields, click the minimize/maximize button at theobject caption.
T o exc lude a fie ld from the query, uncheck the respective box. In order to remove theentire table/view from the query, close it by clicking the corresponding cross-button atthe object caption, or right-click the object and select Delete from the context menu.You can also select the object and press the Del key.
T o edit the a lias of a table/view, double-click the object caption and enter the new name,or right-click the object and select Rename from the context menu.
Visual Query Builder allows you to create complex queries consisting of two or more
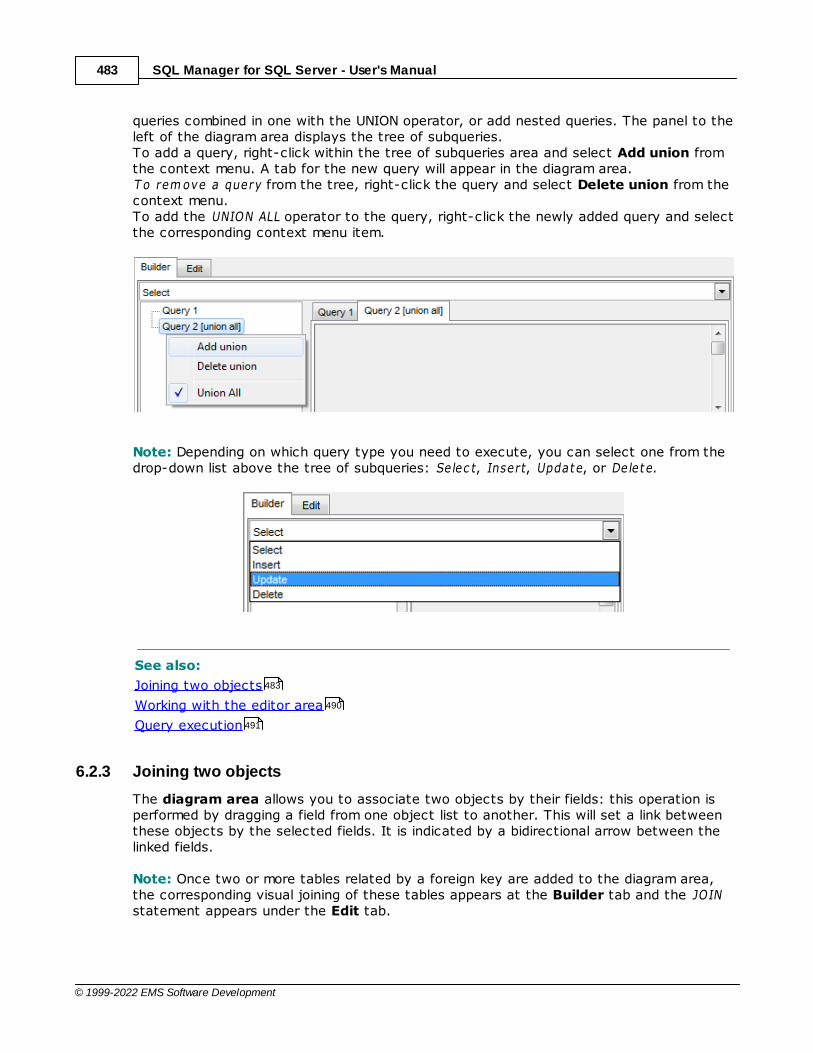
SQL Manager for SQL Server - User's Manual483
© 1999-2022 EMS Software Development
queries combined in one with the UNION operator, or add nested queries. The panel to theleft of the diagram area displays the tree of subqueries.To add a query, right-click within the tree of subqueries area and select Add union fromthe context menu. A tab for the new query will appear in the diagram area.T o rem ove a query from the tree, right-click the query and select Delete union from thecontext menu.To add the UNION ALL operator to the query, right-click the newly added query and selectthe corresponding context menu item.
Note: Depending on which query type you need to execute, you can select one from thedrop-down list above the tree of subqueries: Selec t, Insert, Update, or Delete.
See also:
Joining two objects
Working with the editor area
Query execution
6.2.3 Joining two objects
The diagram area allows you to associate two objects by their fields: this operation isperformed by dragging a field from one object list to another. This will set a link betweenthese objects by the selected fields. It is indicated by a bidirectional arrow between thelinked fields.
Note: Once two or more tables related by a foreign key are added to the diagram area,the corresponding visual joining of these tables appears at the Builder tab and the JOINstatement appears under the Edit tab.
483
490
491
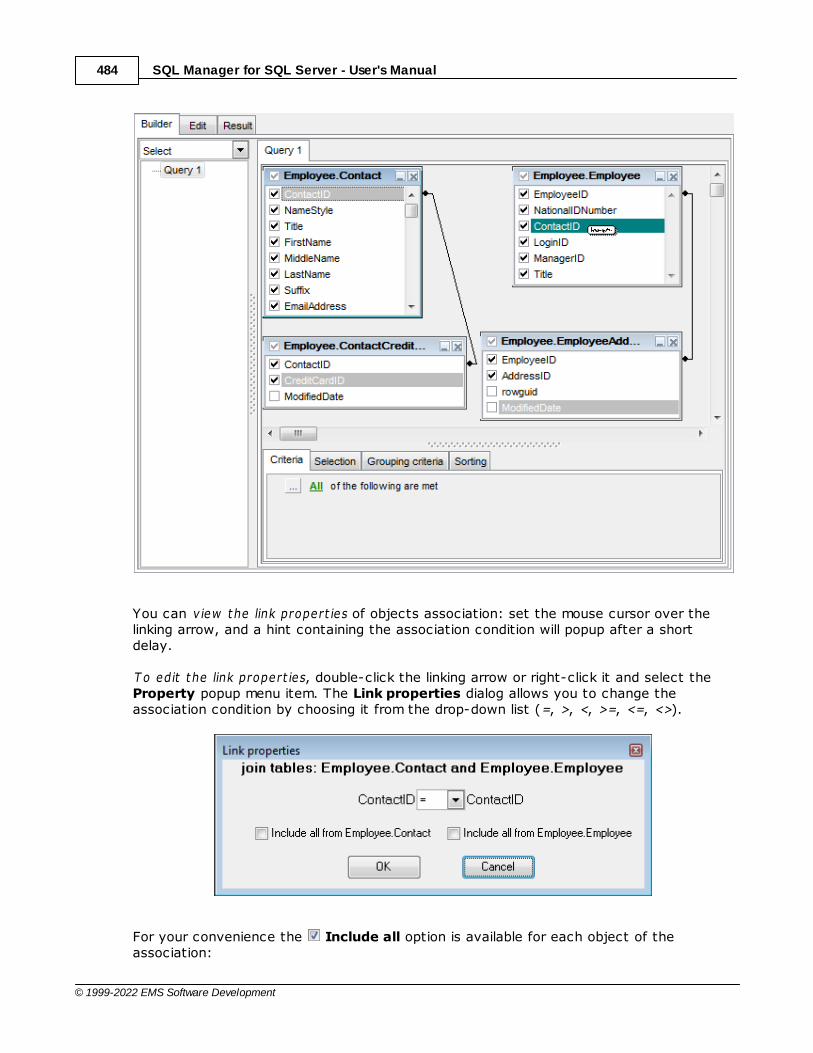
SQL Manager for SQL Server - User's Manual484
© 1999-2022 EMS Software Development
You can v iew the link propert ies of objects association: set the mouse cursor over thelinking arrow, and a hint containing the association condition will popup after a shortdelay.
T o edit the link propert ies, double-click the linking arrow or right-click it and select theProperty popup menu item. The Link properties dialog allows you to change theassociation condition by choosing it from the drop-down list (=, >, <, >=, <=, <>).
For your convenience the Include all option is available for each object of theassociation:
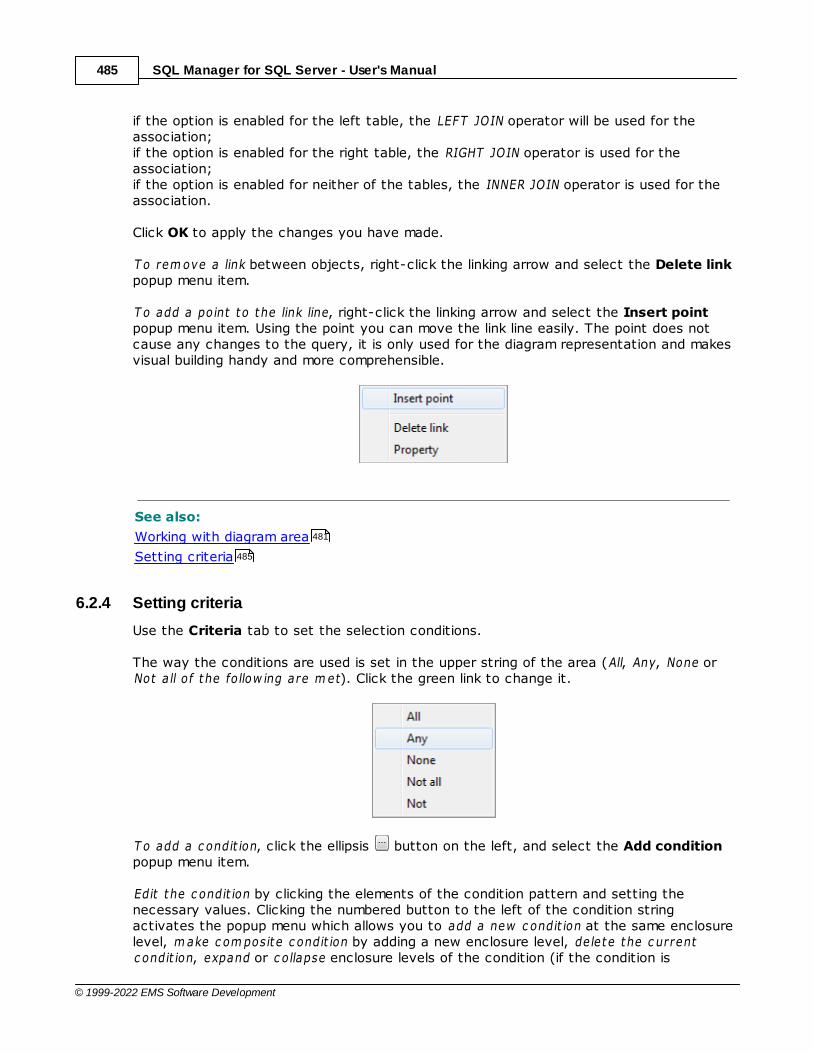
SQL Manager for SQL Server - User's Manual485
© 1999-2022 EMS Software Development
if the option is enabled for the left table, the LEFT JOIN operator will be used for theassociation;if the option is enabled for the right table, the RIGHT JOIN operator is used for theassociation;if the option is enabled for neither of the tables, the INNER JOIN operator is used for theassociation.
Click OK to apply the changes you have made.
T o rem ove a link between objects, right-click the linking arrow and select the Delete linkpopup menu item.
T o add a point to the link line, right-click the linking arrow and select the Insert pointpopup menu item. Using the point you can move the link line easily. The point does notcause any changes to the query, it is only used for the diagram representation and makesvisual building handy and more comprehensible.
See also:
Working with diagram area
Setting criteria
6.2.4 Setting criteria
Use the Criteria tab to set the selection conditions.
The way the conditions are used is set in the upper string of the area (All, Any, None orNot a ll of the fo llow ing are m et). Click the green link to change it.
T o add a c ondit ion, click the ellipsis button on the left, and select the Add conditionpopup menu item.
Edit the c ondit ion by clicking the elements of the condition pattern and setting thenecessary values. Clicking the numbered button to the left of the condition stringactivates the popup menu which allows you to add a new c ondit ion at the same enclosurelevel, m ake c om posite c ondit ion by adding a new enclosure level, de lete the c urrentc ondit ion, expand or c ollapse enclosure levels of the condition (if the condition is
481
485
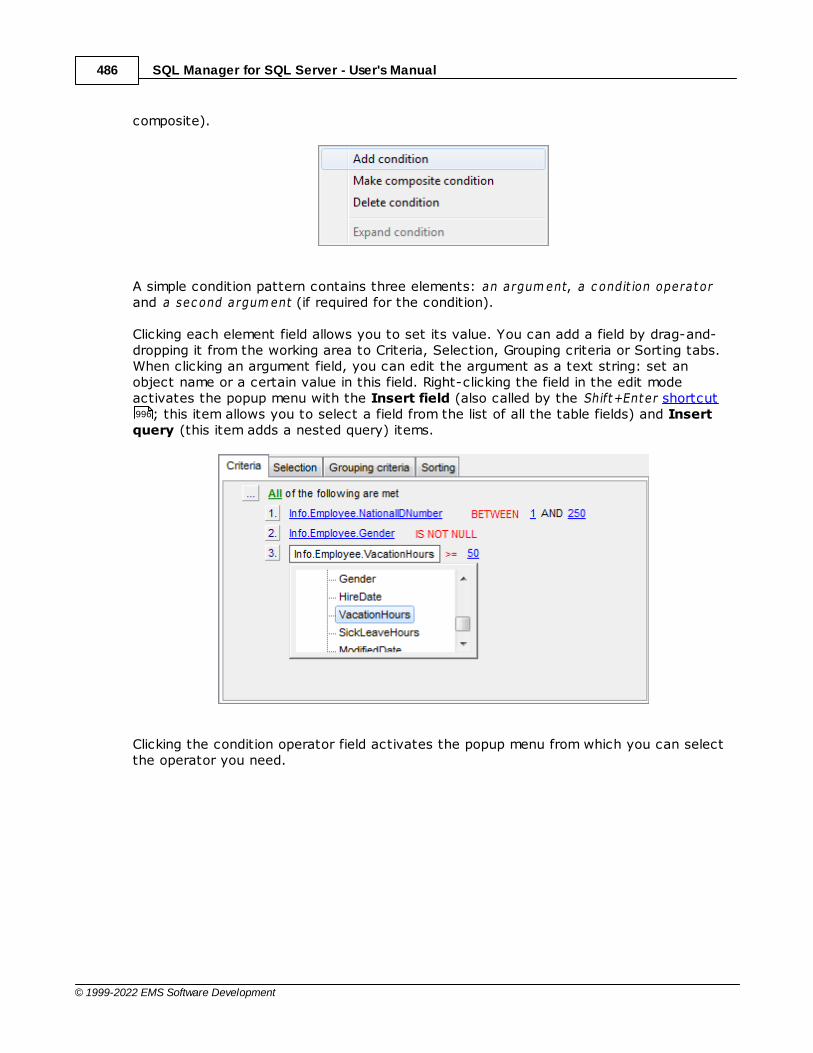
SQL Manager for SQL Server - User's Manual486
© 1999-2022 EMS Software Development
composite).
A simple condition pattern contains three elements: an argum ent, a c ondit ion operatorand a sec ond argum ent (if required for the condition).
Clicking each element field allows you to set its value. You can add a field by drag-and-dropping it from the working area to Criteria, Selection, Grouping criteria or Sorting tabs.When clicking an argument field, you can edit the argument as a text string: set anobject name or a certain value in this field. Right-clicking the field in the edit modeactivates the popup menu with the Insert field (also called by the Shift+Enter shortcut
; this item allows you to select a field from the list of all the table fields) and Insertquery (this item adds a nested query) items.
Clicking the condition operator field activates the popup menu from which you can selectthe operator you need.
996
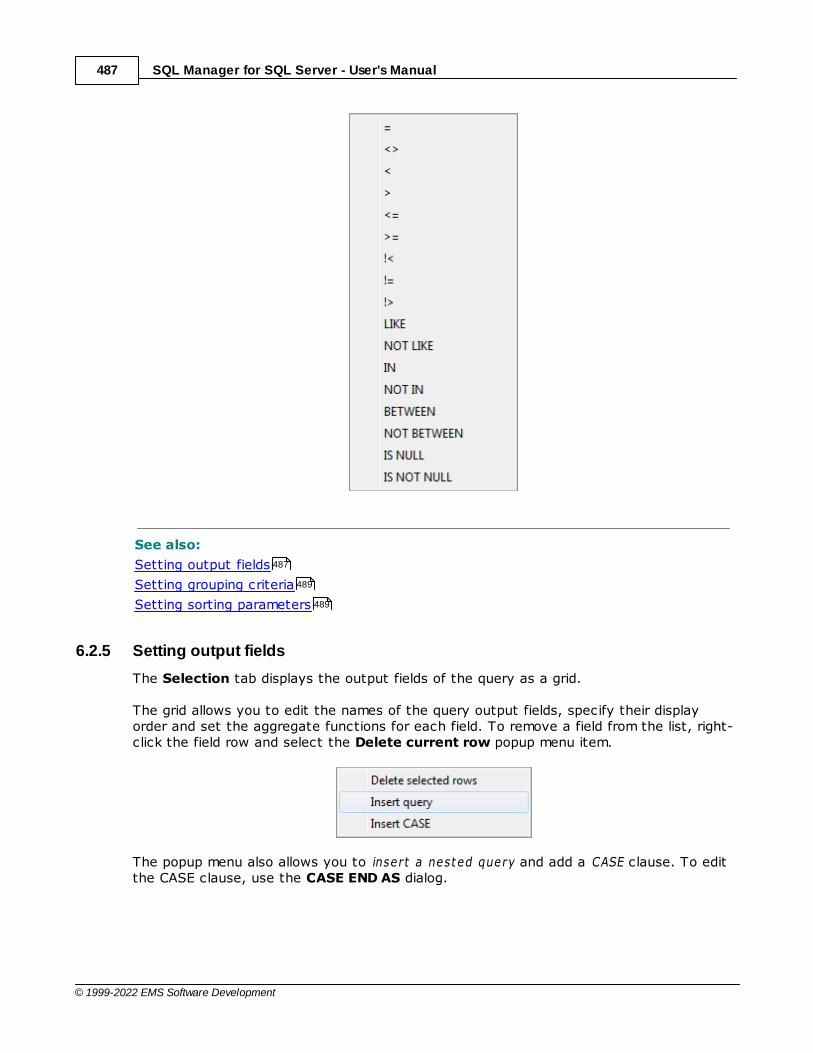
SQL Manager for SQL Server - User's Manual487
© 1999-2022 EMS Software Development
See also:
Setting output fields
Setting grouping criteria
Setting sorting parameters
6.2.5 Setting output fields
The Selection tab displays the output fields of the query as a grid.
The grid allows you to edit the names of the query output fields, specify their displayorder and set the aggregate functions for each field. To remove a field from the list, right-click the field row and select the Delete current row popup menu item.
The popup menu also allows you to insert a nested query and add a CASE clause. To editthe CASE clause, use the CASE END AS dialog.
487
489
489
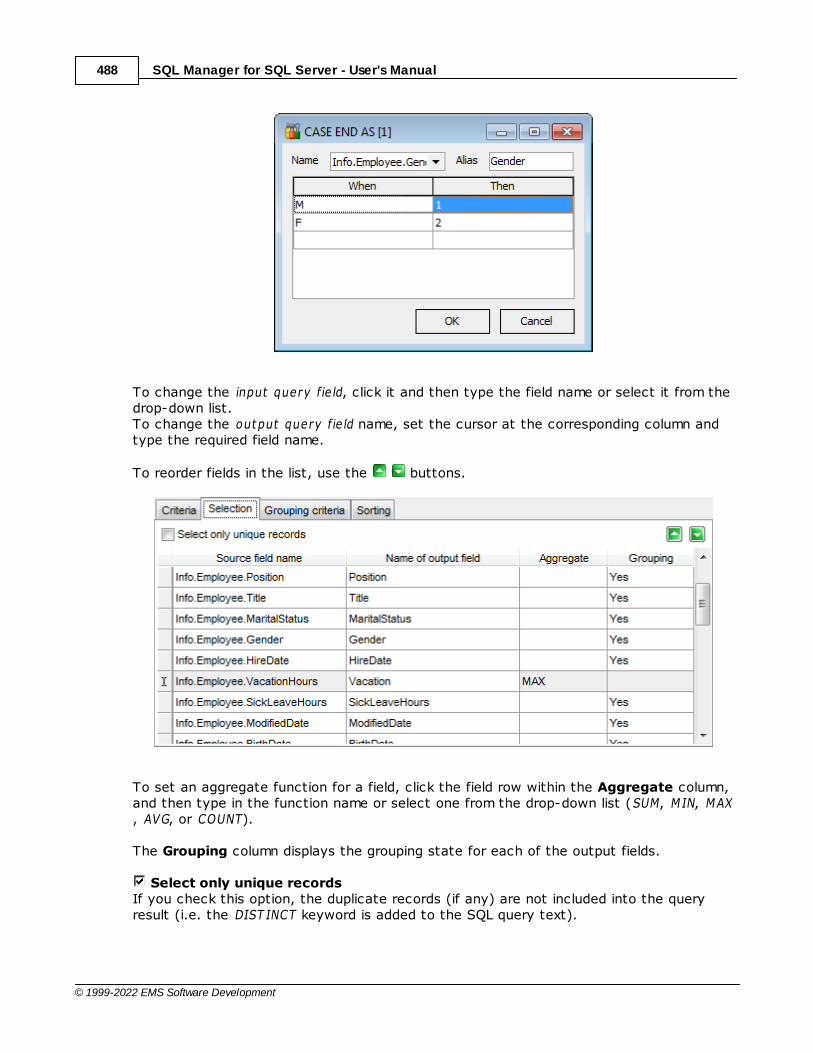
SQL Manager for SQL Server - User's Manual488
© 1999-2022 EMS Software Development
To change the input query fie ld, click it and then type the field name or select it from thedrop-down list. To change the output query fie ld name, set the cursor at the corresponding column andtype the required field name.
To reorder fields in the list, use the buttons.
To set an aggregate function for a field, click the field row within the Aggregate column,and then type in the function name or select one from the drop-down list (SUM, MIN, MAX, AVG, or COUNT).
The Grouping column displays the grouping state for each of the output fields.
Select only unique recordsIf you check this option, the duplicate records (if any) are not included into the queryresult (i.e. the DIST INCT keyword is added to the SQL query text).

SQL Manager for SQL Server - User's Manual489
© 1999-2022 EMS Software Development
See also:
Setting criteria
Setting grouping criteria
Setting sorting parameters
6.2.6 Setting grouping criteria
The Grouping criteria tab allows you to set conditions for grouping query records.
The grouping condition pattern fields are set in the same way as those of the Criteriapattern.
These conditions will be included in the HAVING statement of the generated SQL query.
See also:
Setting criteria
Setting output fields
Setting sorting parameters
6.2.7 Setting sorting parameters
The Sorting tab allows you to set sorting parameters for the records returned by thequery.
The working area contains the Output fields list (at the left) which represents all fields ofthe objects used in the query, and the Sorted fields list (at the right) which contains thefields to sort records by. To move a field from one list to another, drag the selected field or use the Add and
Remove buttons: .
To change the sorting order for a sorted field, select the field in the Sorted fields list andmove it using the Up and Down buttons.
485
489
489
485
485
487
489
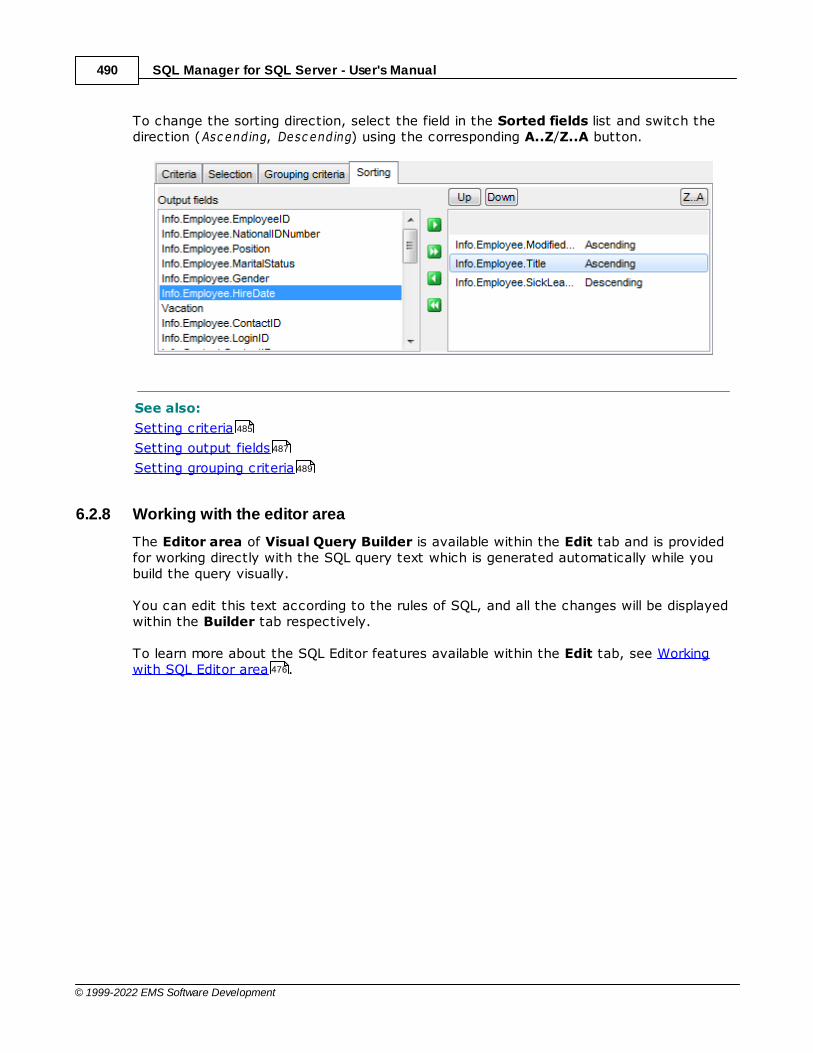
SQL Manager for SQL Server - User's Manual490
© 1999-2022 EMS Software Development
To change the sorting direction, select the field in the Sorted fields list and switch thedirection (Asc ending, Desc ending) using the corresponding A..Z/Z..A button.
See also:
Setting criteria
Setting output fields
Setting grouping criteria
6.2.8 Working with the editor area
The Editor area of Visual Query Builder is available within the Edit tab and is providedfor working directly with the SQL query text which is generated automatically while youbuild the query visually.
You can edit this text according to the rules of SQL, and all the changes will be displayedwithin the Builder tab respectively.
To learn more about the SQL Editor features available within the Edit tab, see Workingwith SQL Editor area .
485
487
489
476

SQL Manager for SQL Server - User's Manual491
© 1999-2022 EMS Software Development
See also:
Working with diagram area
Query execution
SQL Editor
6.2.9 Query execution
When all the query parameters are set, you can immediately execute the query inVisual Query Builder.
To execute a query, click the Execute query item of the Navigation bar . You canalso use the F9 hot key for the same purpose.
If the query parameters are specified correctly, the query is executed and, in case the
481
491
462
479
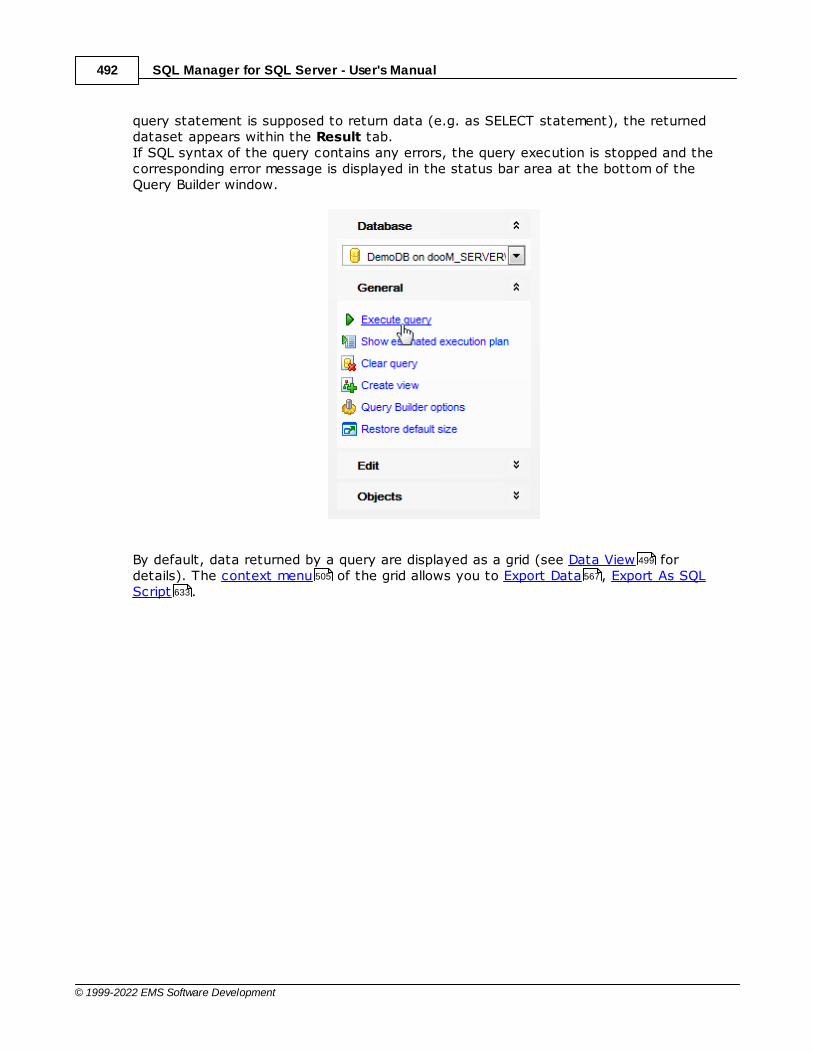
SQL Manager for SQL Server - User's Manual492
© 1999-2022 EMS Software Development
query statement is supposed to return data (e.g. as SELECT statement), the returneddataset appears within the Result tab. If SQL syntax of the query contains any errors, the query execution is stopped and thecorresponding error message is displayed in the status bar area at the bottom of theQuery Builder window.
By default, data returned by a query are displayed as a grid (see Data View fordetails). The context menu of the grid allows you to Export Data , Export As SQLScript .
499
505 567
633
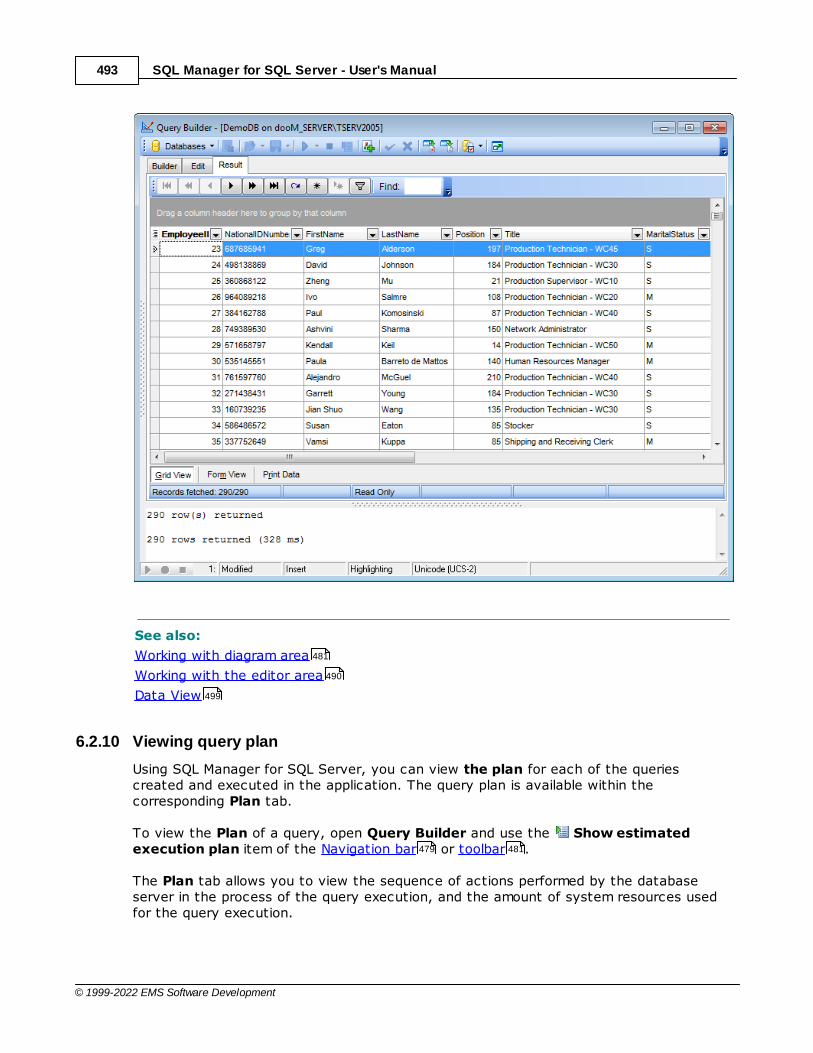
SQL Manager for SQL Server - User's Manual493
© 1999-2022 EMS Software Development
See also:
Working with diagram area
Working with the editor area
Data View
6.2.10 Viewing query plan
Using SQL Manager for SQL Server, you can view the plan for each of the queriescreated and executed in the application. The query plan is available within thecorresponding Plan tab.
To view the Plan of a query, open Query Builder and use the Show estimatedexecution plan item of the Navigation bar or toolbar .
The Plan tab allows you to view the sequence of actions performed by the databaseserver in the process of the query execution, and the amount of system resources usedfor the query execution.
481
490
499
479 481
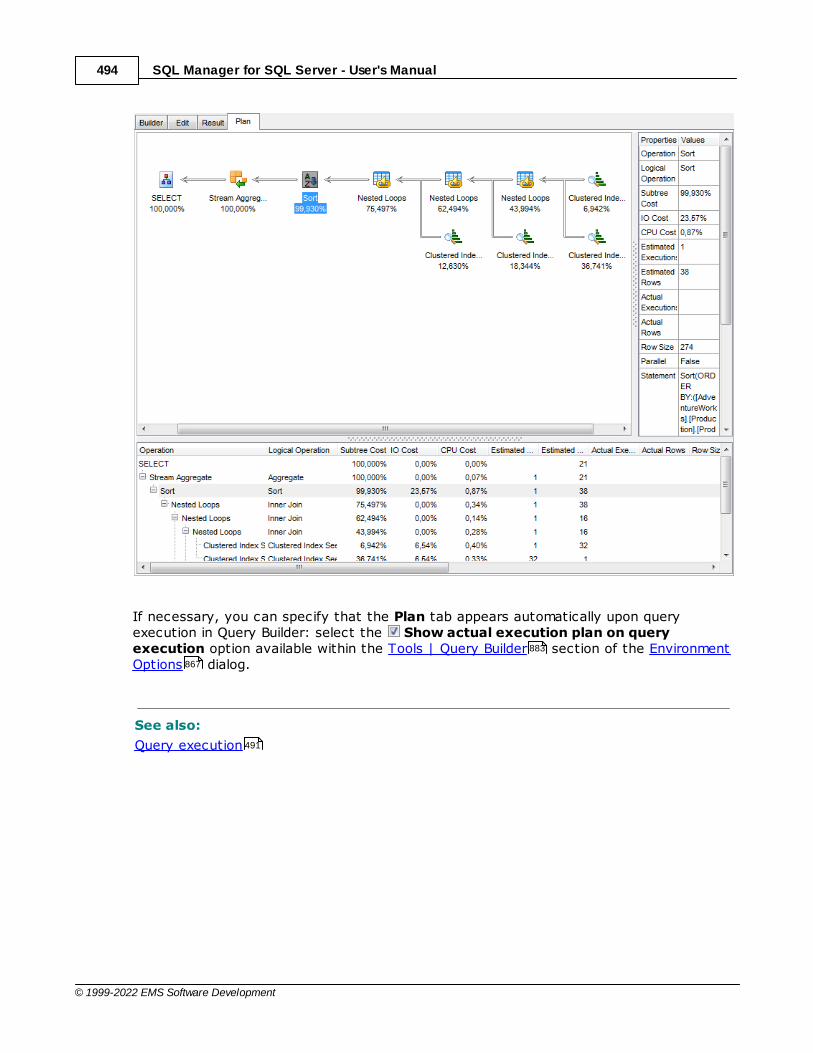
SQL Manager for SQL Server - User's Manual494
© 1999-2022 EMS Software Development
If necessary, you can specify that the Plan tab appears automatically upon queryexecution in Query Builder: select the Show actual execution plan on queryexecution option available within the Tools | Query Builder section of the EnvironmentOptions dialog.
See also:
Query execution
883
867
491

SQL Manager for SQL Server - User's Manual495
© 1999-2022 EMS Software Development
6.3 Query parameters
Both SQL Editor and Visual Query Builder support parameters usage inside the querytext. A parameter is a kind of variable for which a value can be specified just before thequery execution. In the query text the parameter should appear as an identifier with acolon (':') at the beginning, e.g.
SELECT * FROM MY T ABLE WHERE ID = :param 1;
Note: The Allow using of parameters in query text option should be checked on theTools page of the Environment Options dialog for this feature to be enabled.
See also:
SQL Editor
Visual Query Builder
6.3.1 Input parameters dialog
The Input Parameters dialog is used to specify the query parameters as well as valuesof the input parameters of the query before execution.
The edit field for input parameters varies according to the field data type. For yourconvenience the Calc ulator and Date editor are implemented for Num eric and Date andT im e types respectively: click the arrow-down button to call the Calc ulator / Date editorpopup window.
Click OK button to apply the values and execute the query or click Cancel button to
462 479
872 867
462
479

SQL Manager for SQL Server - User's Manual496
© 1999-2022 EMS Software Development
abort execution.

Part
VII

SQL Manager for SQL Server - User's Manual498
© 1999-2022 EMS Software Development
7 Data Management
Table data and query results are displayed on the Data or Results tab of Table Editor ,SQL Editor , Visual Query Builder , etc.
Data can be displayed in one of the following modes: Grid View, Form View, Print Data,BLOB View. See Data View to learn more about these modes. You are also providedwith a number of filtering tools when working with your data.
Data ViewCustom FilterFilter Builder dialog
See also:
Getting Started
Database Explorer
Database Management
Database Objects Management
Query Management Tools
Import/Export Tools
Database Tools
Server Tools
Personalization
External Tools
How To...
236
462 479
499
505
499
553
555
76
99
130
214
460
566
651
757
866
952
1001
SQL Manager for SQL Server - User's Manual499
© 1999-2022 EMS Software Development
7.1 Data View
SQL Manager for SQL Server provides you with powerful tools for viewing, editing andprinting data from tables and queries:
table / view data are available within the Data tab of Table Editor / View Editorcorrespondingly;upon a query execution the returned dataset appears within the Result(s) tab ofSQL Editor / Query Builder (in SQL Editor the position of the tab depends on theResults on Edit tab / Results on separate tab selection in the Navigation bar ).
The data can be displayed in one of four available modes: Grid V iew, Form View, Pr intData and BLOB View. The status bar at the bottom displays the number of records in thecurrent dataset, the time the records were fetched by the application and the status ofthe records (whether the data are read-only or editable).
Please see the succeeding chapters to learn how to work with your data in the simplestand most efficient way.
Using Navigation bar and ToolbarsGrid ViewForm ViewPrint DataBLOB ViewApplying changes
See also:
Custom Filter
Filter Builder dialog
Table Editor
View Editor
7.1.1 Using Navigation bar and Toolbars
When the Data tab (in Table Editor , View Editor ) or the Result(s) tab (in SQLEditor , Query Builder ) is selected, the Navigation bars of these tools contain theData Management group which allows you to:
commit transaction (if the Use t ransac t ions in objec t editors, SQL Editor and QueryBuilder option is selected in the Data Options section of the Database RegistrationInfo dialog)
rollback transaction (if the Use t ransac t ions in objec t editors, SQL Editor and QueryBuilder option is selected in the Data Options section of the Database RegistrationInfo dialog)
export data
export data as SQL script
import data (in T able Editor only)
bulk insert (in T able Editor only)
236 282
469
462 479
462
499
501
520
521
541
551
553
555
236
282
236 282
462 479 958
160
152
160
152
567
633
608
642
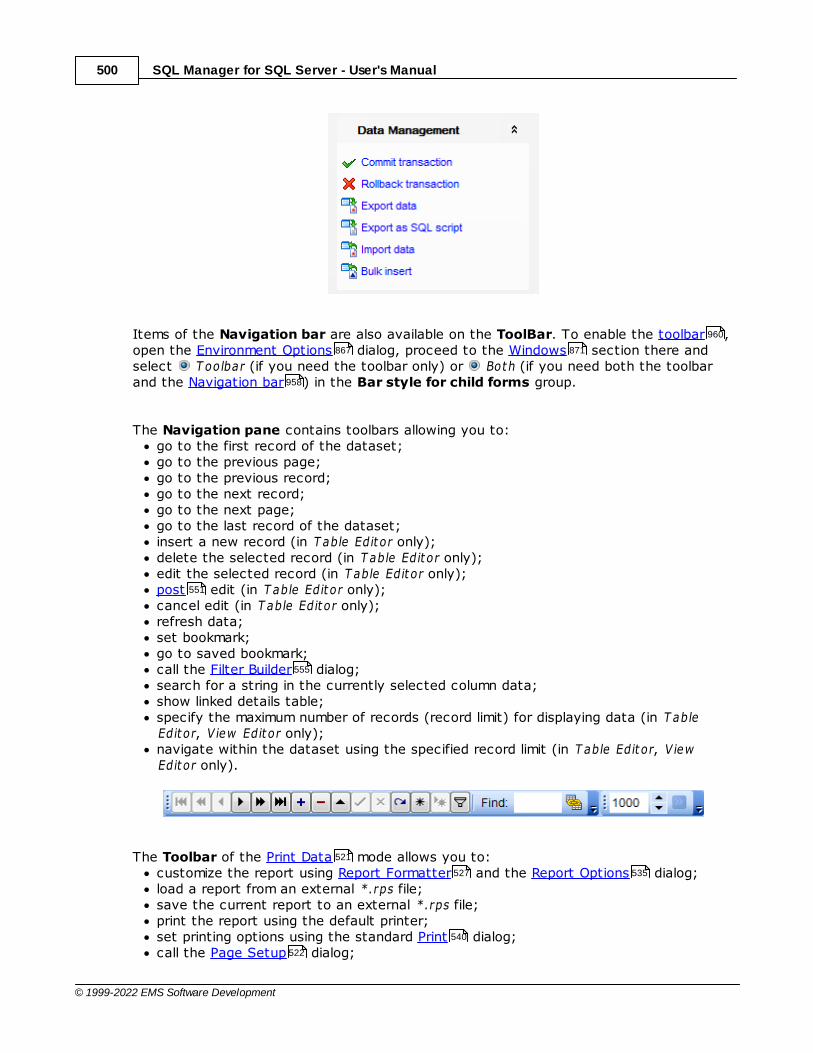
SQL Manager for SQL Server - User's Manual500
© 1999-2022 EMS Software Development
Items of the Navigation bar are also available on the ToolBar. To enable the toolbar ,open the Environment Options dialog, proceed to the Windows section there andselect T oolbar (if you need the toolbar only) or Both (if you need both the toolbarand the Navigation bar ) in the Bar style for child forms group.
The Navigation pane contains toolbars allowing you to:go to the first record of the dataset;go to the previous page;go to the previous record;go to the next record;go to the next page;go to the last record of the dataset;insert a new record (in T able Editor only);delete the selected record (in T able Editor only);edit the selected record (in T able Editor only);post edit (in T able Editor only);cancel edit (in T able Editor only);refresh data;set bookmark;go to saved bookmark;call the Filter Builder dialog;search for a string in the currently selected column data;show linked details table;specify the maximum number of records (record limit) for displaying data (in T ableEditor, V iew Editor only);navigate within the dataset using the specified record limit (in T able Editor, V iewEditor only).
The Toolbar of the Print Data mode allows you to:customize the report using Report Formatter and the Report Options dialog;load a report from an external *.rps file;save the current report to an external *.rps file;print the report using the default printer;set printing options using the standard Print dialog;call the Page Setup dialog;
960
867 871
958
551
555
521
527 535
540
522
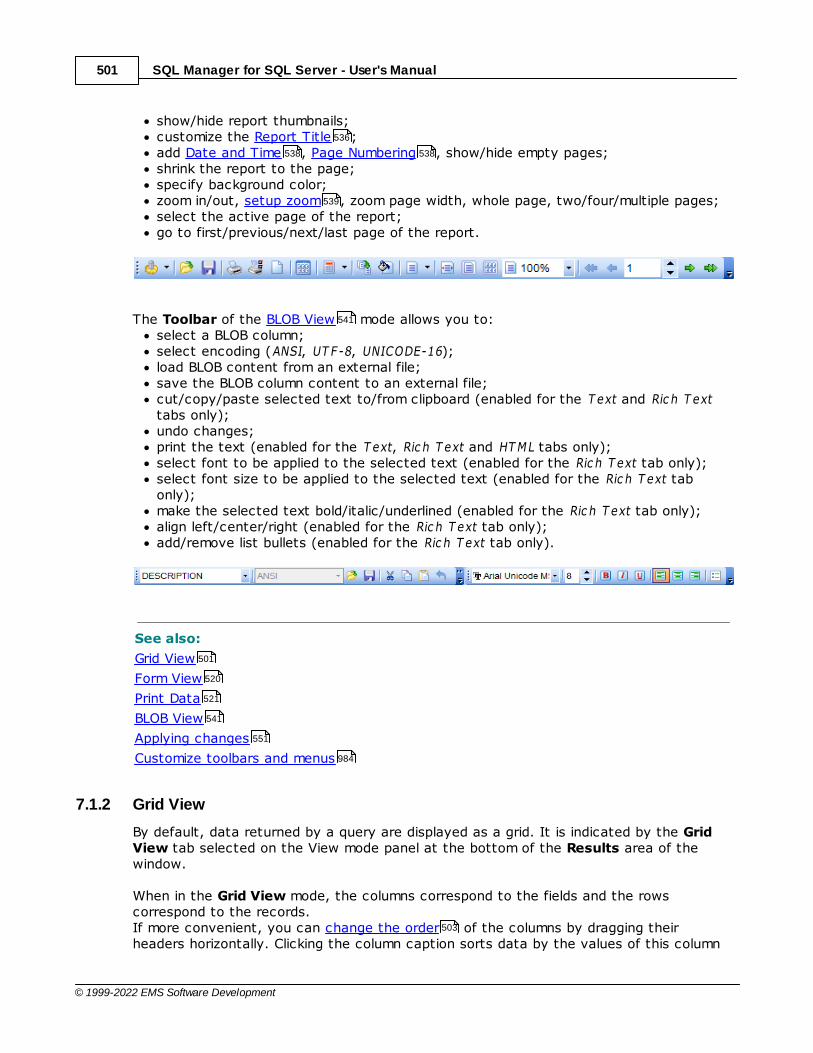
SQL Manager for SQL Server - User's Manual501
© 1999-2022 EMS Software Development
show/hide report thumbnails;customize the Report Title ;add Date and Time , Page Numbering , show/hide empty pages;shrink the report to the page;specify background color;zoom in/out, setup zoom , zoom page width, whole page, two/four/multiple pages;select the active page of the report;go to first/previous/next/last page of the report.
The Toolbar of the BLOB View mode allows you to:select a BLOB column;select encoding (ANSI, UT F-8, UNICODE-16);load BLOB content from an external file;save the BLOB column content to an external file;cut/copy/paste selected text to/from clipboard (enabled for the T ext and Ric h T exttabs only);undo changes;print the text (enabled for the T ext, Ric h T ext and HT ML tabs only);select font to be applied to the selected text (enabled for the Ric h T ext tab only);select font size to be applied to the selected text (enabled for the Ric h T ext tabonly);make the selected text bold/italic/underlined (enabled for the Ric h T ext tab only);align left/center/right (enabled for the Ric h T ext tab only);add/remove list bullets (enabled for the Ric h T ext tab only).
See also:
Grid View
Form View
Print Data
BLOB View
Applying changes
Customize toolbars and menus
7.1.2 Grid View
By default, data returned by a query are displayed as a grid. It is indicated by the GridView tab selected on the View mode panel at the bottom of the Results area of thewindow.
When in the Grid View mode, the columns correspond to the fields and the rowscorrespond to the records. If more convenient, you can change the order of the columns by dragging theirheaders horizontally. Clicking the column caption sorts data by the values of this column
536
538 538
539
541
501
520
521
541
551
984
503
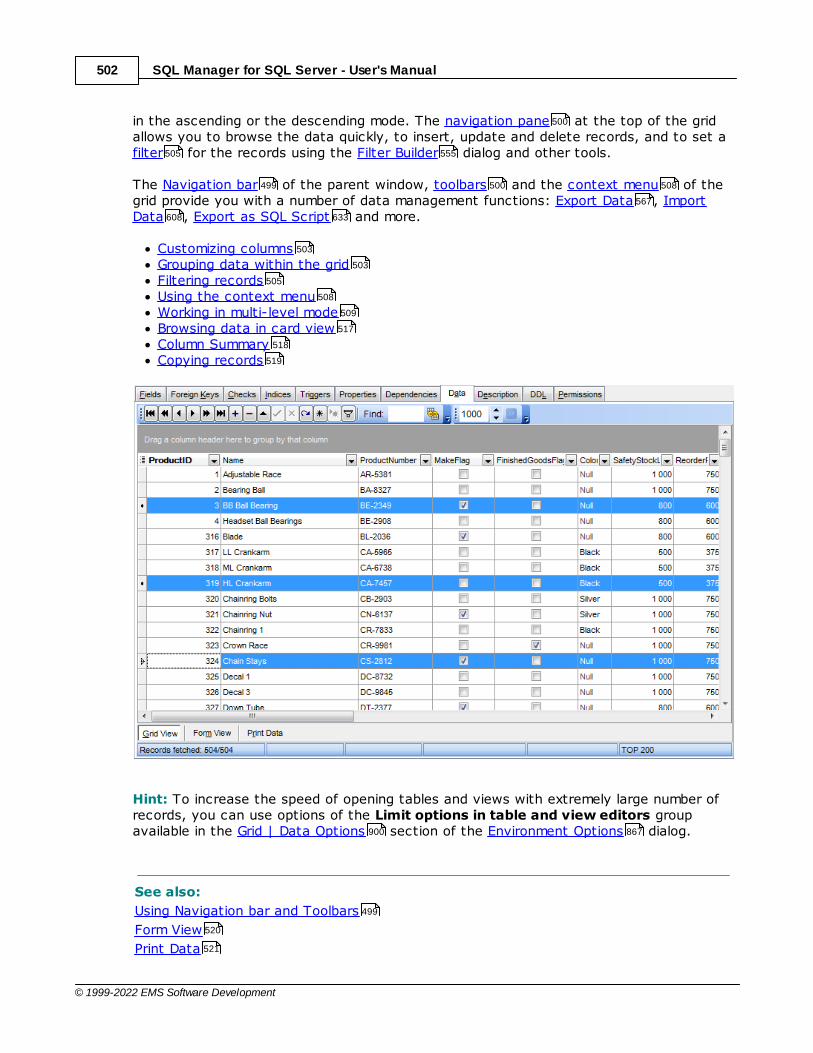
SQL Manager for SQL Server - User's Manual502
© 1999-2022 EMS Software Development
in the ascending or the descending mode. The navigation pane at the top of the gridallows you to browse the data quickly, to insert, update and delete records, and to set a filter for the records using the Filter Builder dialog and other tools.
The Navigation bar of the parent window, toolbars and the context menu of thegrid provide you with a number of data management functions: Export Data , ImportData , Export as SQL Script and more.
Customizing columnsGrouping data within the gridFiltering recordsUsing the context menuWorking in multi-level modeBrowsing data in card viewColumn SummaryCopying records
Hint: To increase the speed of opening tables and views with extremely large number ofrecords, you can use options of the Limit options in table and view editors groupavailable in the Grid | Data Options section of the Environment Options dialog.
See also:
Using Navigation bar and Toolbars
Form View
Print Data
500
505 555
499 500 508
567
608 633
503
503
505
508
509
517
518
519
900 867
499
520
521
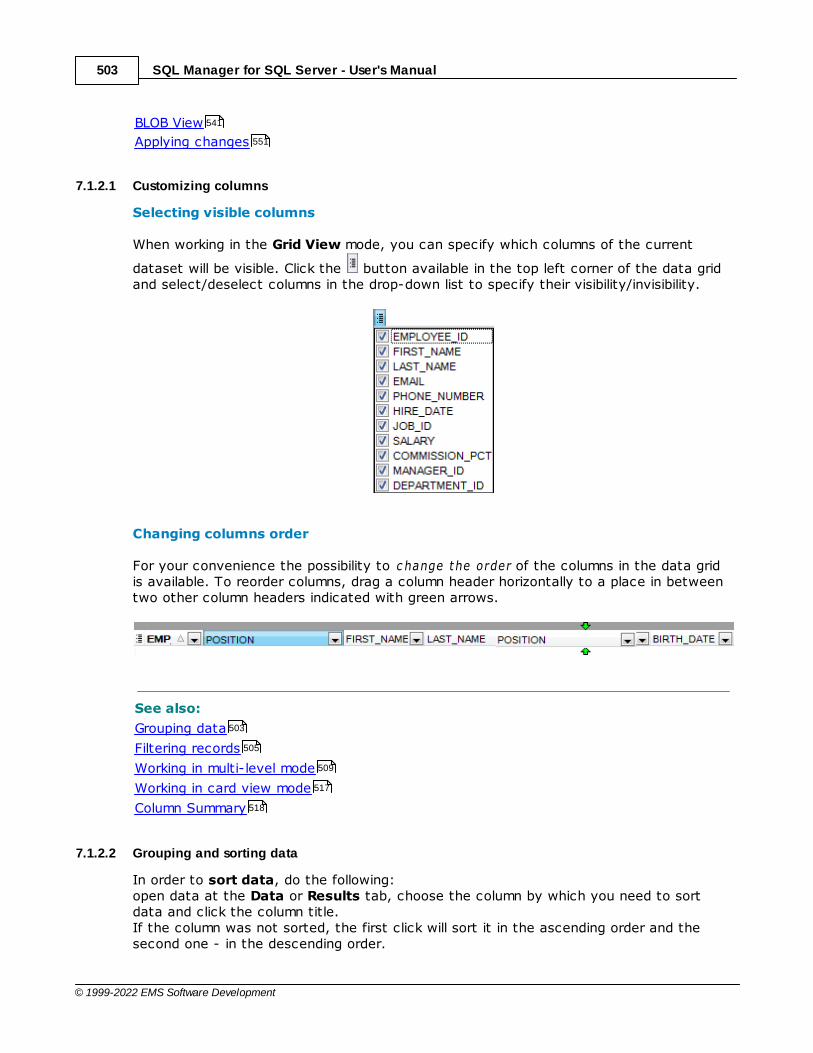
SQL Manager for SQL Server - User's Manual503
© 1999-2022 EMS Software Development
BLOB View
Applying changes
7.1.2.1 Customizing columns
Selecting visible columns
When working in the Grid View mode, you can specify which columns of the current
dataset will be visible. Click the button available in the top left corner of the data gridand select/deselect columns in the drop-down list to specify their visibility/invisibility.
Changing columns order
For your convenience the possibility to c hange the order of the columns in the data gridis available. To reorder columns, drag a column header horizontally to a place in betweentwo other column headers indicated with green arrows.
See also:
Grouping data
Filtering records
Working in multi-level mode
Working in card view mode
Column Summary
7.1.2.2 Grouping and sorting data
In order to sort data, do the following:open data at the Data or Results tab, choose the column by which you need to sortdata and click the column title. If the column was not sorted, the first click will sort it in the ascending order and thesecond one - in the descending order.
541
551
503
505
509
517
518

SQL Manager for SQL Server - User's Manual504
© 1999-2022 EMS Software Development
Clear SortingTo cancel the sorting, open the context menu by right-clicking the necessary column andchoose the Clear Sorting item, or press the Ct r l button and click the column title.
If necessary, you can group the data in grid by any of the columns.
This operation is performed by dragging the column header to the gray "Group by" boxarea at the top. In order to display this area, select the Show "Group by" box optionavailable in the Grid section of the Environment Options dialog.
When grouping by a column is applied to the grid, all the records are displayed assubnodes to the grouping row value as displayed in the screenshot below. The groupingrow can contain the column summary information specified in the Group header group ofthe Column Summary dialog.
To reverse grouping, just drag the column header back.Hint: While dragging the column header back, you can also change the column position.
If necessary, you can group data by two or more columns. In this case column headers
898 867
518
503
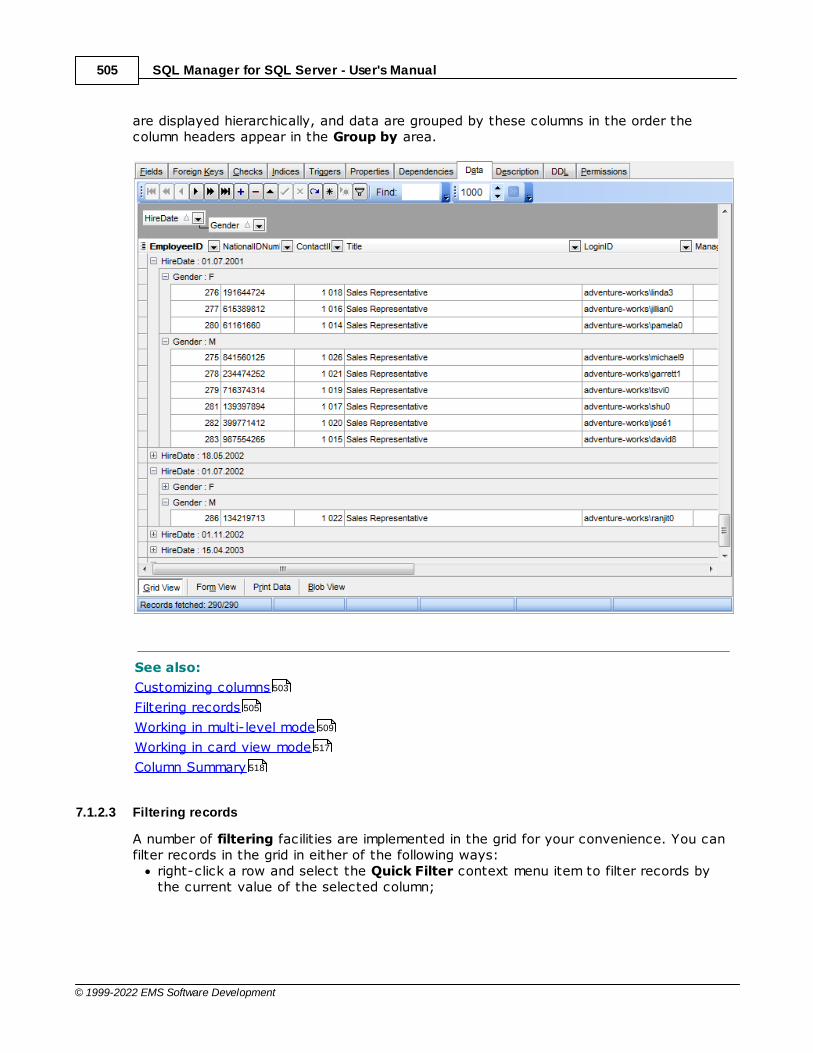
SQL Manager for SQL Server - User's Manual505
© 1999-2022 EMS Software Development
are displayed hierarchically, and data are grouped by these columns in the order thecolumn headers appear in the Group by area.
See also:
Customizing columns
Filtering records
Working in multi-level mode
Working in card view mode
Column Summary
7.1.2.3 Filtering records
A number of filtering facilities are implemented in the grid for your convenience. You canfilter records in the grid in either of the following ways:
right-click a row and select the Quick Filter context menu item to filter records bythe current value of the selected column;
503
505
509
517
518
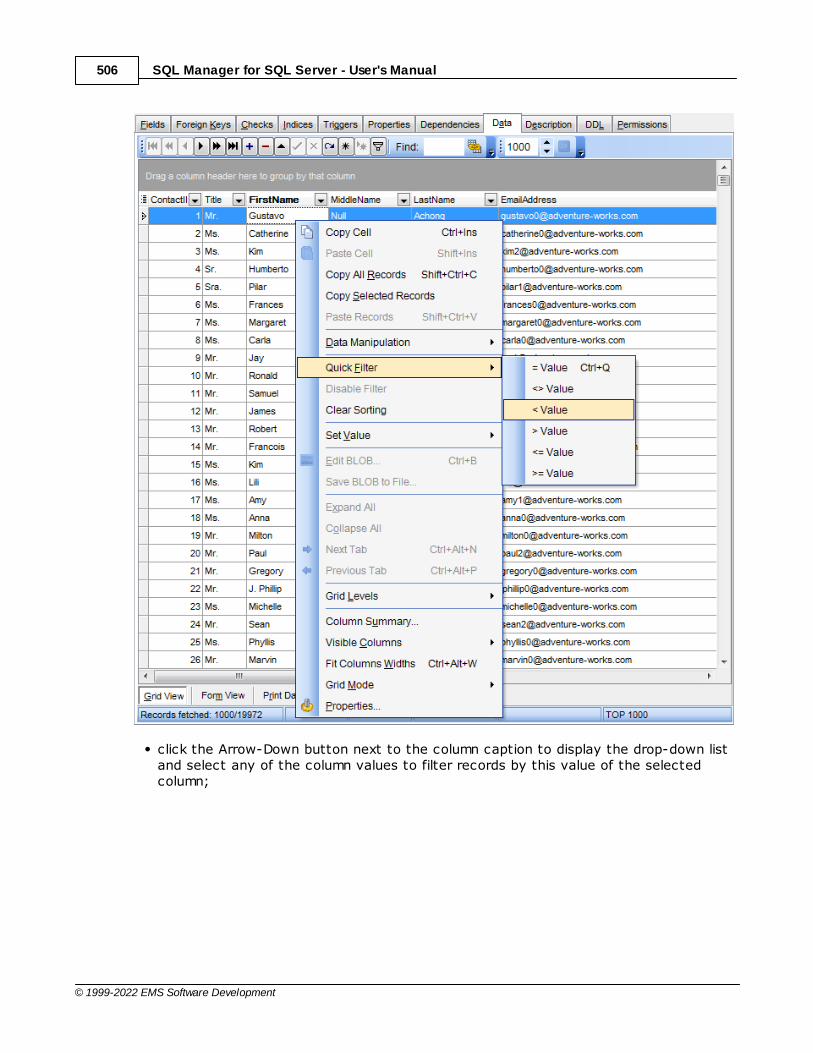
SQL Manager for SQL Server - User's Manual506
© 1999-2022 EMS Software Development
click the Arrow-Down button next to the column caption to display the drop-down listand select any of the column values to filter records by this value of the selectedcolumn;
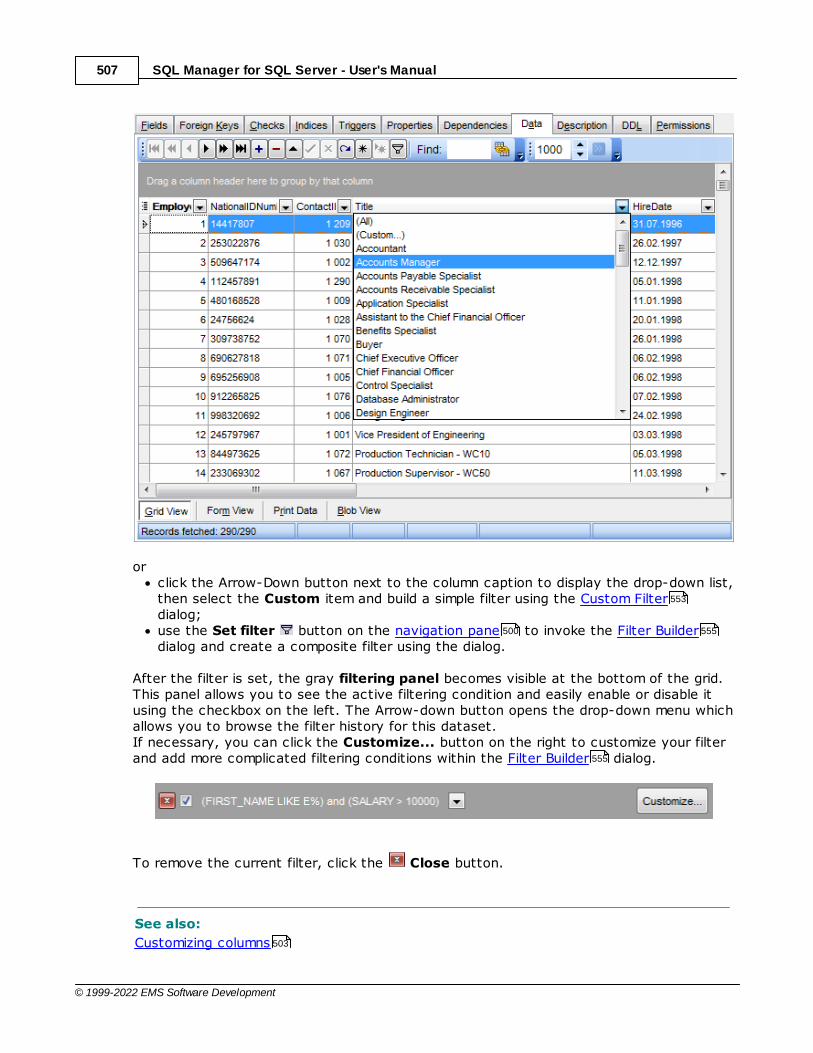
SQL Manager for SQL Server - User's Manual507
© 1999-2022 EMS Software Development
orclick the Arrow-Down button next to the column caption to display the drop-down list,then select the Custom item and build a simple filter using the Custom Filterdialog;use the Set filter button on the navigation pane to invoke the Filter Builderdialog and create a composite filter using the dialog.
After the filter is set, the gray filtering panel becomes visible at the bottom of the grid.This panel allows you to see the active filtering condition and easily enable or disable itusing the checkbox on the left. The Arrow-down button opens the drop-down menu whichallows you to browse the filter history for this dataset.If necessary, you can click the Customize... button on the right to customize your filterand add more complicated filtering conditions within the Filter Builder dialog.
To remove the current filter, click the Close button.
See also:
Customizing columns
553
500 555
555
503
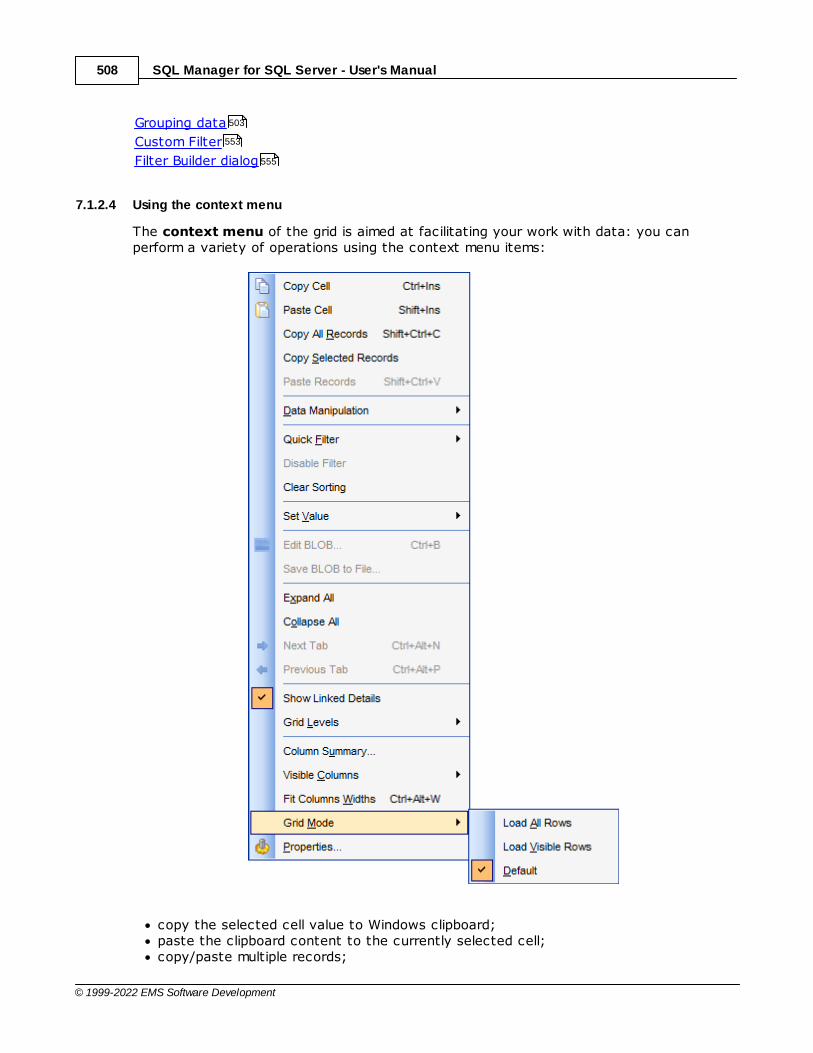
SQL Manager for SQL Server - User's Manual508
© 1999-2022 EMS Software Development
Grouping data
Custom Filter
Filter Builder dialog
7.1.2.4 Using the context menu
The context menu of the grid is aimed at facilitating your work with data: you canperform a variety of operations using the context menu items:
copy the selected cell value to Windows clipboard;paste the clipboard content to the currently selected cell;copy/paste multiple records;
503
553
555
SQL Manager for SQL Server - User's Manual509
© 1999-2022 EMS Software Development
data manipulation: Export Data from the table, Import Data to the table, ExportData as SQL Script , Bulk Insert ;set/disable Quick Filter ;clear sorting;set a value for the selected cell: NULL, Em pty st r ing (for string fields), Now (for TIMEfields), "Zero" (for DATE fields);edit the BLOB value or save the BLOB to file using BLOB viewer/editor ;show linked details (automatically add grid levels on the basis of existing foreignkeys)expand/collapse grid levels and navigate within the tabs;manage grid levels: add a new grid level , delete the current grid level (this item isenabled only when the detail level exists and is currently focused);switch to the Card View mode;view Column Summary ;select visible/invisible columns of the dataset;fit column width for better representation;specify the grid mode: Load All Row s, Load V is ible Row s, Default;view/edit grid properties .
Note: If the Show editor immediately and Always show editor options on theEnvironment options | Grid tab are checked then the context menu of a grid can beevoked by selecting the necessary cell and right-clicking the table header. Otherwise,right-clicking the cell evokes the cell editing menu.
7.1.2.5 Working in multi-level mode
One of unique features of SQL Manager for SQL Server is the ability to work with data inmulti-level mode to view and modify data in several related tables simultaneously.
To manage grid levels, right-click the grid and select the Grid Levels context menugroup. Items of this group allow you to:
add a new grid level using Create Grid Level Wizard ;delete the current grid level;switch between the ordinary T able V iew and the Card View modes.
567 608
633 642
505
541
509
509
510
517
518
898
898
508
510
517
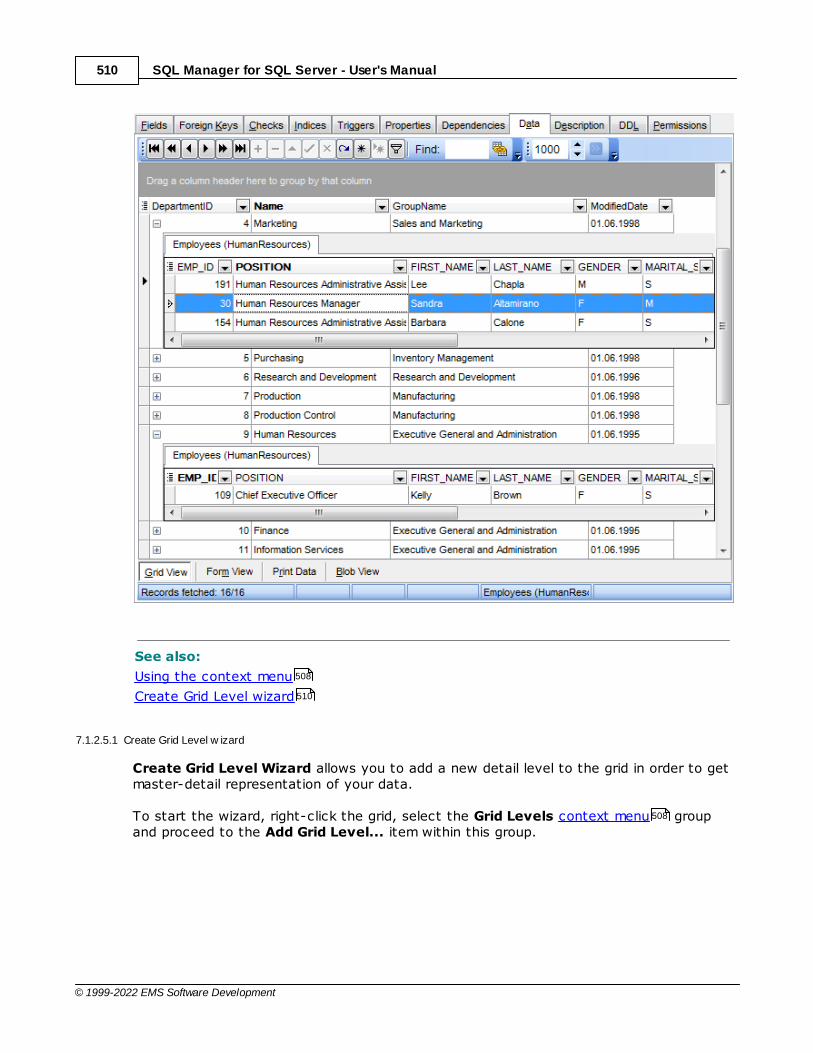
SQL Manager for SQL Server - User's Manual510
© 1999-2022 EMS Software Development
See also:
Using the context menu
Create Grid Level wizard
7.1.2.5.1 Create Grid Level w izard
Create Grid Level Wizard allows you to add a new detail level to the grid in order to getmaster-detail representation of your data.
To start the wizard, right-click the grid, select the Grid Levels context menu groupand proceed to the Add Grid Level... item within this group.
508
510
508
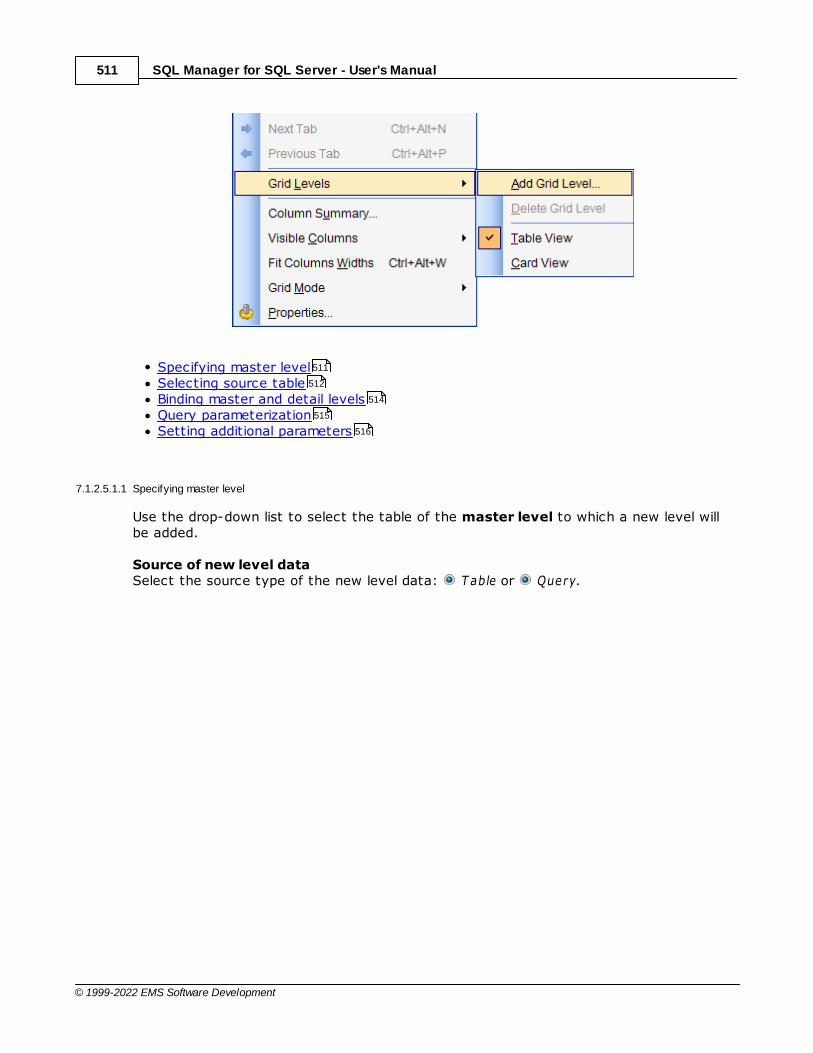
SQL Manager for SQL Server - User's Manual511
© 1999-2022 EMS Software Development
Specifying master levelSelecting source tableBinding master and detail levelsQuery parameterizationSetting additional parameters
7.1.2.5.1.1 Specifying master level
Use the drop-down list to select the table of the master level to which a new level willbe added.
Source of new level dataSelect the source type of the new level data: T able or Query.
511
512
514
515
516
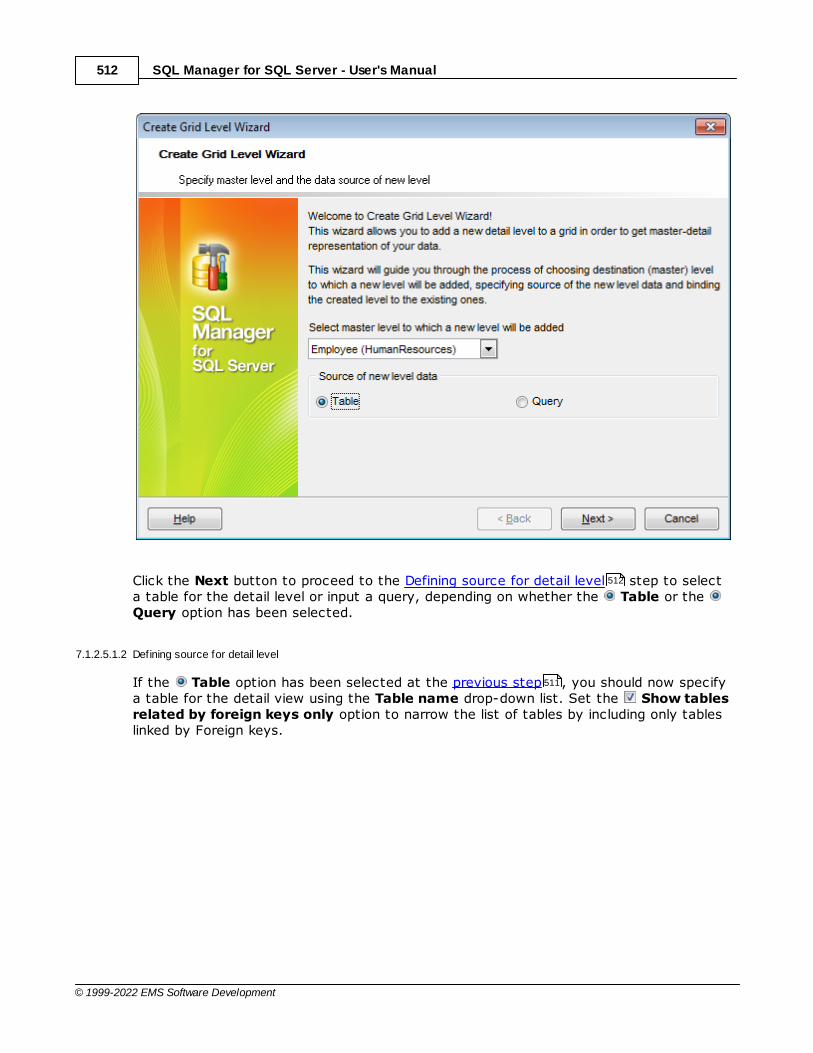
SQL Manager for SQL Server - User's Manual512
© 1999-2022 EMS Software Development
Click the Next button to proceed to the Defining source for detail level step to selecta table for the detail level or input a query, depending on whether the Table or the Query option has been selected.
7.1.2.5.1.2 Defining source for detail level
If the Table option has been selected at the previous step , you should now specifya table for the detail view using the Table name drop-down list. Set the Show tablesrelated by foreign keys only option to narrow the list of tables by including only tableslinked by Foreign keys.
512
511

SQL Manager for SQL Server - User's Manual513
© 1999-2022 EMS Software Development
If the Query option has been selected at the previous step , you should now enter aquery that will be used as the source of the new grid level. If necessary, you can use Query Builder to build the SQL query visually.
511
479
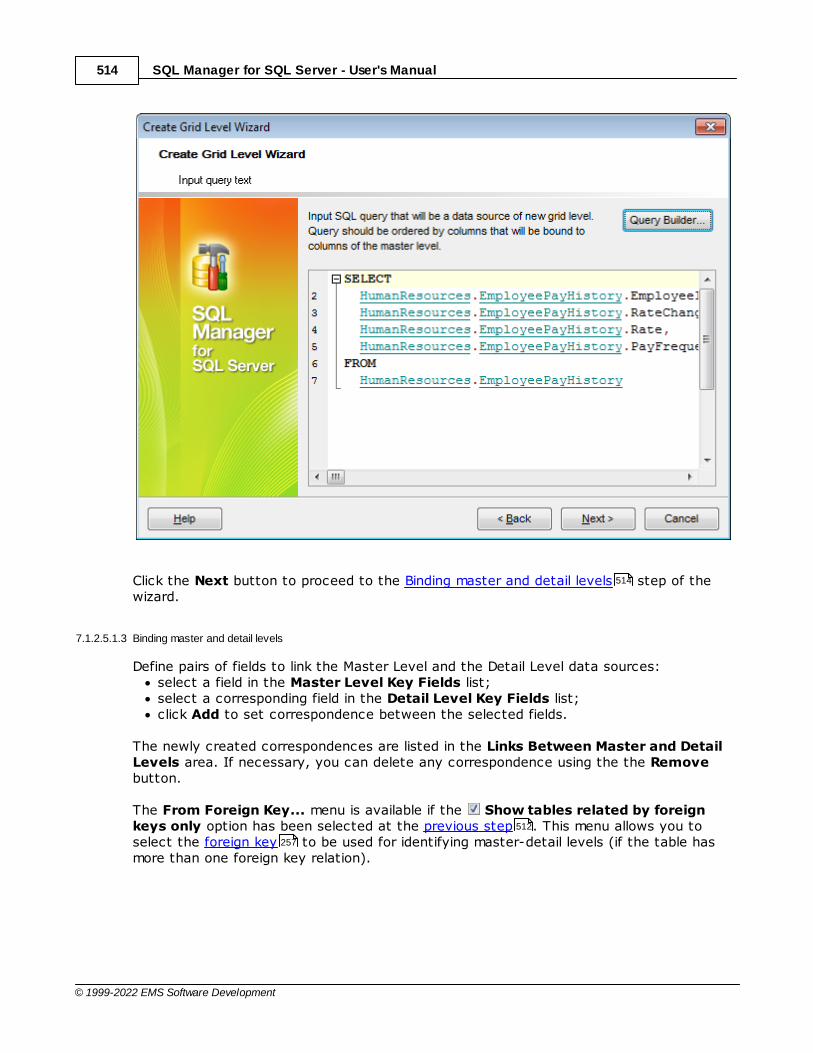
SQL Manager for SQL Server - User's Manual514
© 1999-2022 EMS Software Development
Click the Next button to proceed to the Binding master and detail levels step of thewizard.
7.1.2.5.1.3 Binding master and detail levels
Define pairs of fields to link the Master Level and the Detail Level data sources:select a field in the Master Level Key Fields list;select a corresponding field in the Detail Level Key Fields list;click Add to set correspondence between the selected fields.
The newly created correspondences are listed in the Links Between Master and DetailLevels area. If necessary, you can delete any correspondence using the the Removebutton.
The From Foreign Key... menu is available if the Show tables related by foreignkeys only option has been selected at the previous step . This menu allows you toselect the foreign key to be used for identifying master-detail levels (if the table hasmore than one foreign key relation).
514
512
257

SQL Manager for SQL Server - User's Manual515
© 1999-2022 EMS Software Development
Click the Next button to proceed to the Setting additional parameters step or to theQuery parameterization step of the wizard if Query was selected at the Specifyingmaster level step of the wizard.
7.1.2.5.1.4 Query parameterization
If Query was selected at the Specifying master level step of the wizard, you shouldnow transform the query to a parameterized form that will be used in the 'Load visiblerows' Grid Mode (see the Grid | Data Options section of the Environment Optionsdialog to get more information about grid modes offered by SQL Manager).
516
515
511
511
900 867

SQL Manager for SQL Server - User's Manual516
© 1999-2022 EMS Software Development
Click the Next button to proceed to the Setting additional parameters step of thewizard.
7.1.2.5.1.5 Setting additional parameters
Level captionSet the caption to be used for the new level in the grid.
Level typeSelect the type of view you wish to be applied to the grid level: T able v iew or Cardv iew.
516

SQL Manager for SQL Server - User's Manual517
© 1999-2022 EMS Software Development
When you are done, click the Finish button to complete the operation.
7.1.2.6 Working in card view mode
Depending on your preferences, you can represent data in the Table View or in the CardView modes.
To switch to the Card View mode of data representation, right-click the grid, expandthe Grid Levels context menu group and select the Card View item within this group.508
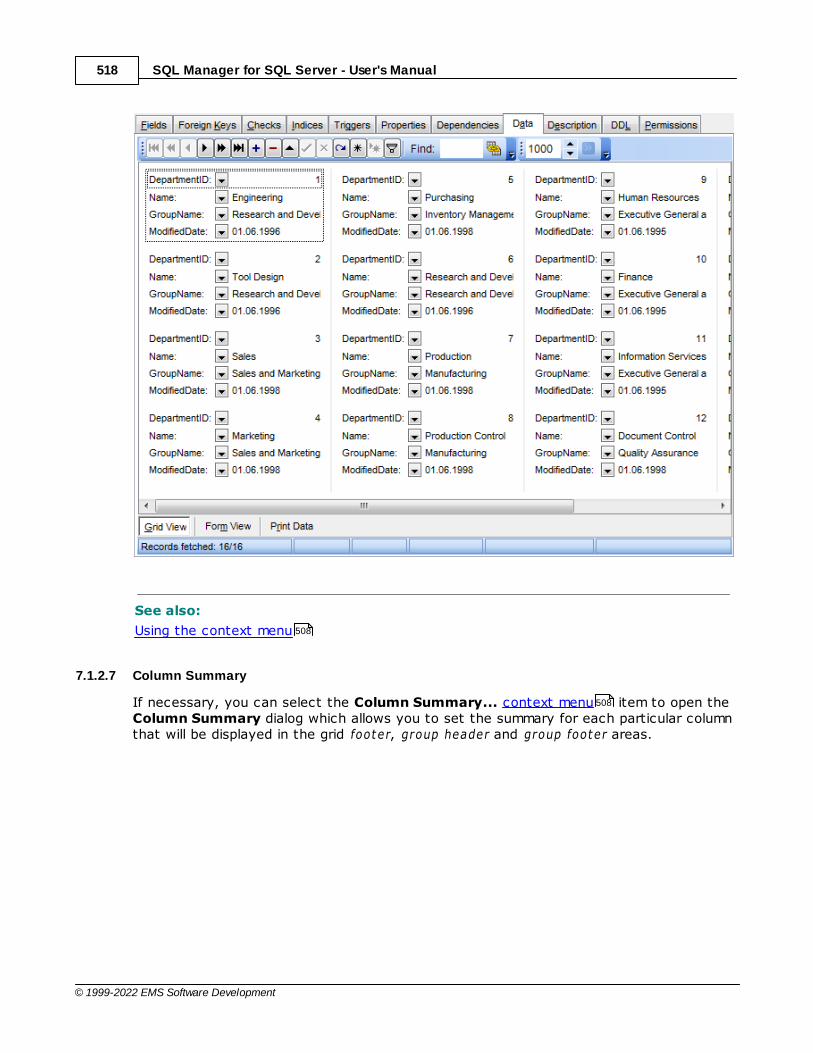
SQL Manager for SQL Server - User's Manual518
© 1999-2022 EMS Software Development
See also:
Using the context menu
7.1.2.7 Column Summary
If necessary, you can select the Column Summary... context menu item to open theColumn Summary dialog which allows you to set the summary for each particular columnthat will be displayed in the grid footer, group header and group footer areas.
508
508
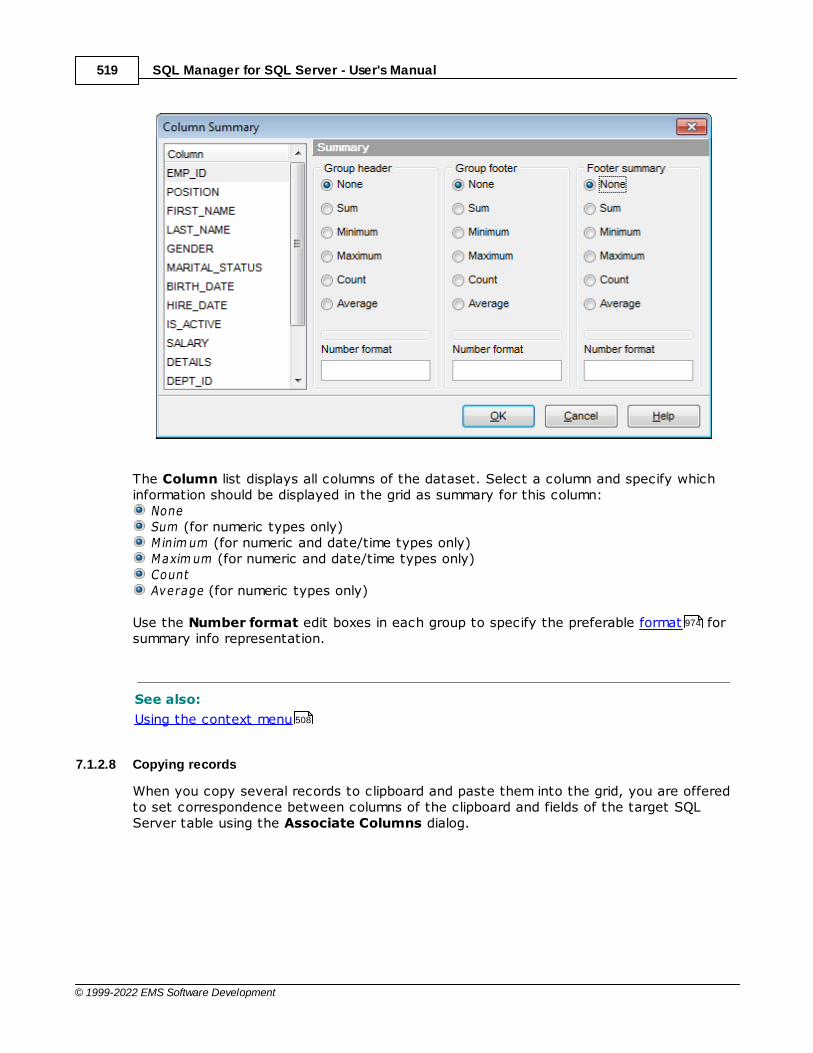
SQL Manager for SQL Server - User's Manual519
© 1999-2022 EMS Software Development
The Column list displays all columns of the dataset. Select a column and specify whichinformation should be displayed in the grid as summary for this column:
None Sum (for numeric types only) M inim um (for numeric and date/time types only) Maxim um (for numeric and date/time types only) Count Average (for numeric types only)
Use the Number format edit boxes in each group to specify the preferable format forsummary info representation.
See also:
Using the context menu
7.1.2.8 Copying records
When you copy several records to clipboard and paste them into the grid, you are offeredto set correspondence between columns of the clipboard and fields of the target SQLServer table using the Associate Columns dialog.
974
508
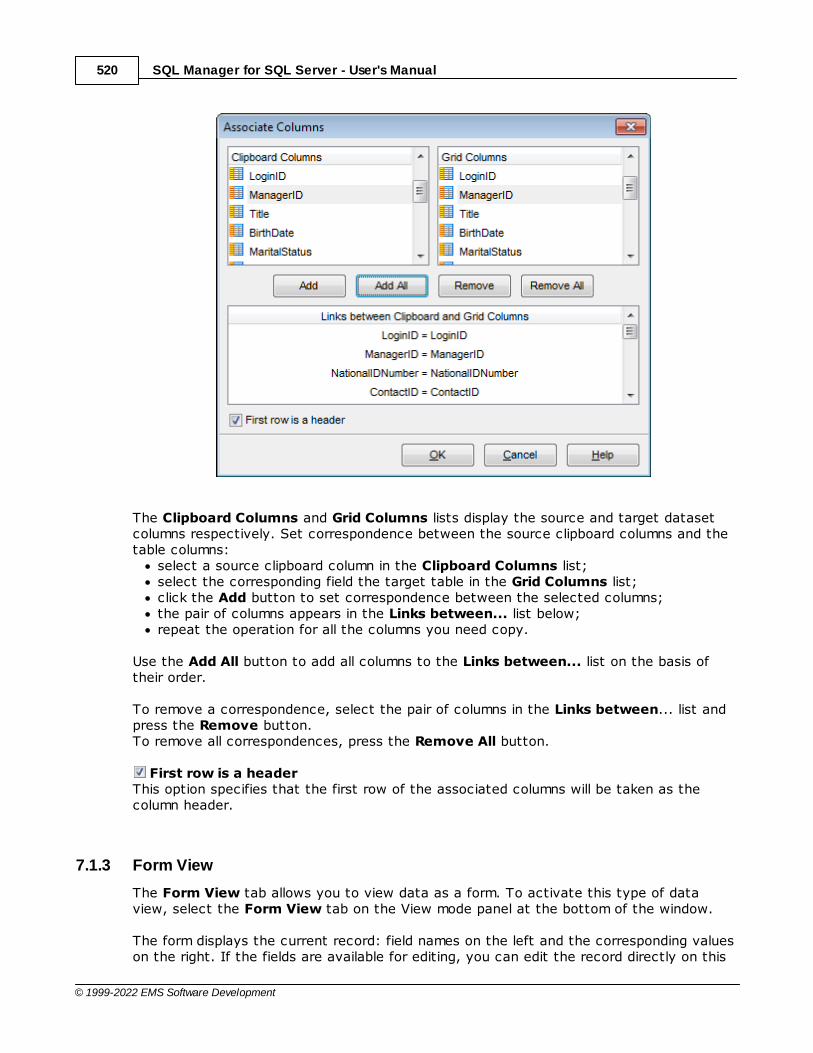
SQL Manager for SQL Server - User's Manual520
© 1999-2022 EMS Software Development
The Clipboard Columns and Grid Columns lists display the source and target datasetcolumns respectively. Set correspondence between the source clipboard columns and thetable columns:
select a source clipboard column in the Clipboard Columns list;select the corresponding field the target table in the Grid Columns list;click the Add button to set correspondence between the selected columns;the pair of columns appears in the Links between... list below;repeat the operation for all the columns you need copy.
Use the Add All button to add all columns to the Links between... list on the basis oftheir order.
To remove a correspondence, select the pair of columns in the Links between... list andpress the Remove button. To remove all correspondences, press the Remove All button.
First row is a headerThis option specifies that the first row of the associated columns will be taken as thecolumn header.
7.1.3 Form View
The Form View tab allows you to view data as a form. To activate this type of dataview, select the Form View tab on the View mode panel at the bottom of the window.
The form displays the current record: field names on the left and the corresponding valueson the right. If the fields are available for editing, you can edit the record directly on this
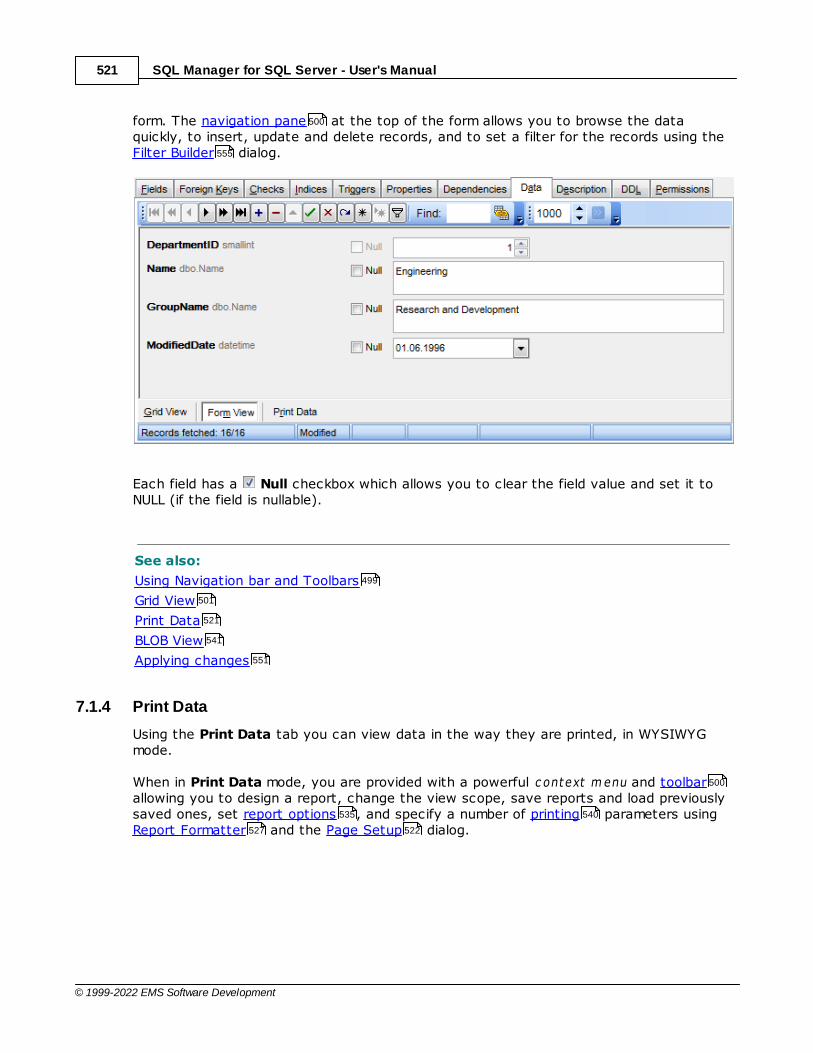
SQL Manager for SQL Server - User's Manual521
© 1999-2022 EMS Software Development
form. The navigation pane at the top of the form allows you to browse the dataquickly, to insert, update and delete records, and to set a filter for the records using the Filter Builder dialog.
Each field has a Null checkbox which allows you to clear the field value and set it toNULL (if the field is nullable).
See also:
Using Navigation bar and Toolbars
Grid View
Print Data
BLOB View
Applying changes
7.1.4 Print Data
Using the Print Data tab you can view data in the way they are printed, in WYSIWYGmode.
When in Print Data mode, you are provided with a powerful c ontext m enu and toolbarallowing you to design a report, change the view scope, save reports and load previouslysaved ones, set report options , and specify a number of printing parameters usingReport Formatter and the Page Setup dialog.
500
555
499
501
521
541
551
500
535 540
527 522
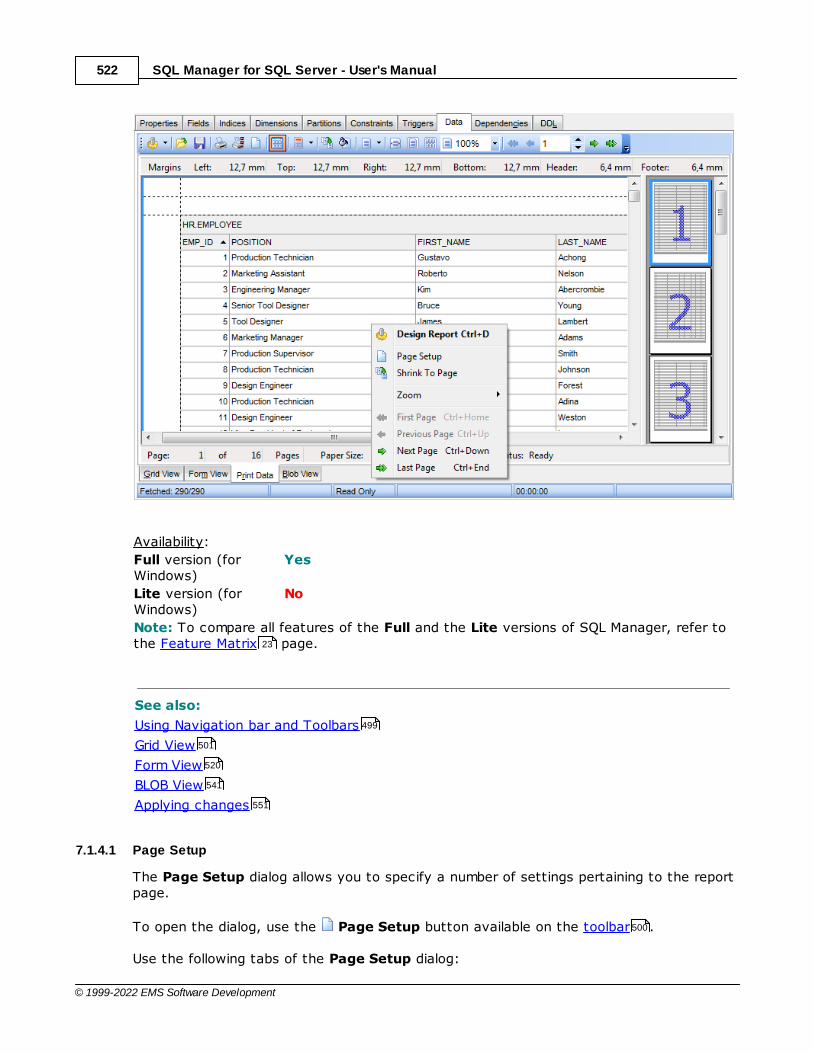
SQL Manager for SQL Server - User's Manual522
© 1999-2022 EMS Software Development
Availability:
Full version (forWindows)
Yes
Lite version (forWindows)
No
Note: To compare all features of the Full and the Lite versions of SQL Manager, refer tothe Feature Matrix page.
See also:
Using Navigation bar and Toolbars
Grid View
Form View
BLOB View
Applying changes
7.1.4.1 Page Setup
The Page Setup dialog allows you to specify a number of settings pertaining to the reportpage.
To open the dialog, use the Page Setup button available on the toolbar .
Use the following tabs of the Page Setup dialog:
23
499
501
520
541
551
500

SQL Manager for SQL Server - User's Manual523
© 1999-2022 EMS Software Development
PageMarginsHeader/FooterScaling
When you are done, you can click the Print... button at the bottom to call the Printdialog.
See also:
Report Formatter
Setting report options
Print dialog
7.1.4.1.1 Page
The Page tab of the Page Setup dialog allows you to specify the paper, page orientat ion, pr int order and shading settings.
Paper
523
524
525
527
540
527
535
540

SQL Manager for SQL Server - User's Manual524
© 1999-2022 EMS Software Development
Select one of the standard paper types in the Type list, or specify custom w idth andheight using the Dimension group (in inches or millimeters, depending on the unit ofm easure specified in the Options dialog).
Use the Paper source drop-down list to select the paper feed type.
Orientation
Select the preferable page orientation (your selection is illustrated in the chart on theleft):
Port ra it Landsc ape
Print Order
Select the preferable order for printing report pages (your selection is illustrated in thechart on the left):
Dow n, then over Over, then dow n
Shading
Print using gray shadingIf this option is selected, gray shading (along with black and white) will be used forprinting the report.
7.1.4.1.2 Margins
The Margins tab of the Page Setup dialog allows you to specify the size of the m arginsand running t it les.
535
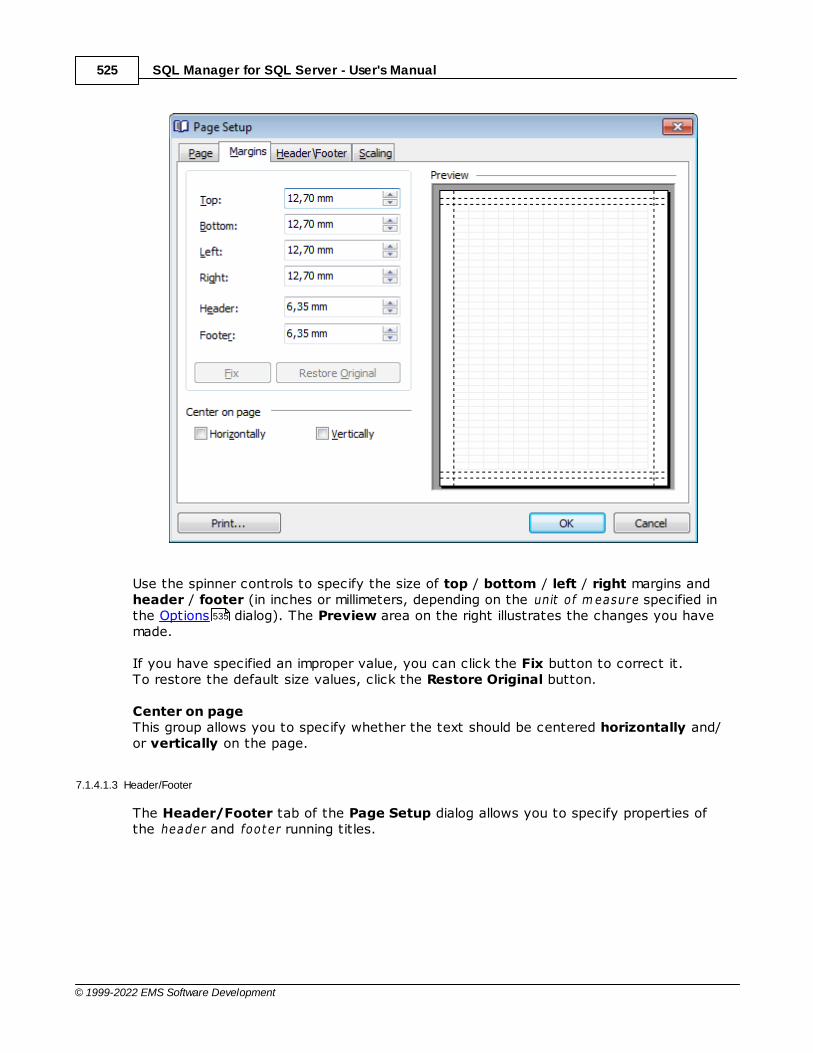
SQL Manager for SQL Server - User's Manual525
© 1999-2022 EMS Software Development
Use the spinner controls to specify the size of top / bottom / left / right margins andheader / footer (in inches or millimeters, depending on the unit of m easure specified inthe Options dialog). The Preview area on the right illustrates the changes you havemade.
If you have specified an improper value, you can click the Fix button to correct it.To restore the default size values, click the Restore Original button.
Center on pageThis group allows you to specify whether the text should be centered horizontally and/or vertically on the page.
7.1.4.1.3 Header/Footer
The Header/Footer tab of the Page Setup dialog allows you to specify properties ofthe header and footer running titles.
535
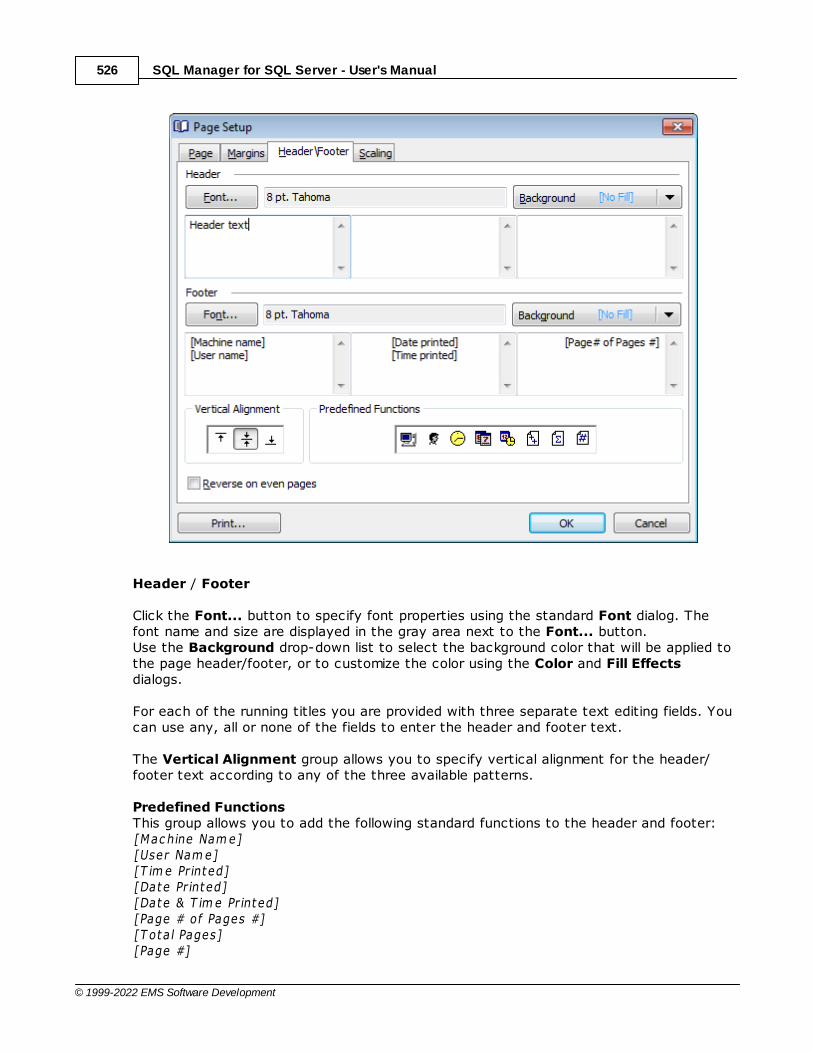
SQL Manager for SQL Server - User's Manual526
© 1999-2022 EMS Software Development
Header / Footer
Click the Font... button to specify font properties using the standard Font dialog. Thefont name and size are displayed in the gray area next to the Font... button.Use the Background drop-down list to select the background color that will be applied tothe page header/footer, or to customize the color using the Color and Fill Effectsdialogs.
For each of the running titles you are provided with three separate text editing fields. Youcan use any, all or none of the fields to enter the header and footer text.
The Vertical Alignment group allows you to specify vertical alignment for the header/footer text according to any of the three available patterns.
Predefined FunctionsThis group allows you to add the following standard functions to the header and footer:[Mac hine Nam e][User Nam e][T im e Pr inted][Date Pr inted][Date & T im e Pr inted][Page # of Pages #][T ota l Pages][Page #]

SQL Manager for SQL Server - User's Manual527
© 1999-2022 EMS Software Development
Reverse on even pagesIf this option is selected, the header and footer text will be reversed on even pages ofthe printing report.
7.1.4.1.4 Scaling
The Scaling tab of the Page Setup dialog allows you to specify the page sc aling options.
Select the preferable scaling mode:
Adjust to ... % norm al s izeUse the spinner control to set the percentage of the regular page size to which the pagesize will be adjusted.
F it t o ... page(s) w ide by ... t a llUse the spinner controls to set the maximum number of pages (by width and by height) onone page to fit its size.
7.1.4.2 Report Formatter
Report Formatter allows you to specify a number of settings pertaining to the printingform of the report.

SQL Manager for SQL Server - User's Manual528
© 1999-2022 EMS Software Development
To open the tool, click the Design Report button available on the toolbar , or usethe Ct r l+D shortcut .
Use the following tabs of the Format Report dialog:ViewBehaviorsFormattingStylesPreviewCardsCharts
The Title Properties... button allows you to customize the report title using the ReportTitle dialog.
See also:
Page Setup
Setting report options
Print dialog
7.1.4.2.1 View
The View tab of the Format Report dialog allows you to specify report elements to showin the report.
500
999
528
529
530
532
533
534
535
536
522
535
540

SQL Manager for SQL Server - User's Manual529
© 1999-2022 EMS Software Development
Tick off the elements to show in the report (c apt ion, bands, headers, footers, groupfooters, expand but tons, filt er bar) and on every page of the report (c apt ion, bands,headers, footers, f ilt er bar).
The Preview area on the right illustrates the changes you have made.
7.1.4.2.2 Behaviors
The Behaviors tab of the Format Report dialog allows you to specify the way(behavior) the report elements will appear on the printing form.
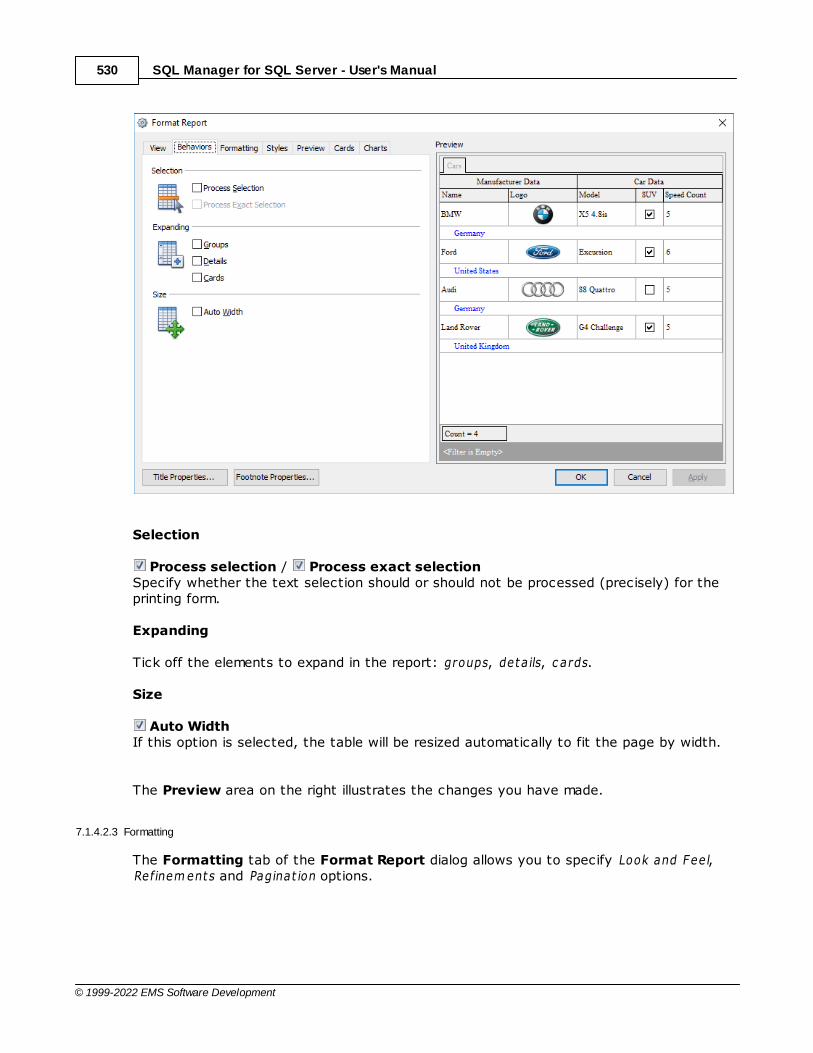
SQL Manager for SQL Server - User's Manual530
© 1999-2022 EMS Software Development
Selection
Process selection / Process exact selectionSpecify whether the text selection should or should not be processed (precisely) for theprinting form.
Expanding
Tick off the elements to expand in the report: groups, deta ils, c ards.
Size
Auto WidthIf this option is selected, the table will be resized automatically to fit the page by width.
The Preview area on the right illustrates the changes you have made.
7.1.4.2.3 Formatting
The Formatting tab of the Format Report dialog allows you to specify Look and Fee l,Refinem ents and Paginat ion options.
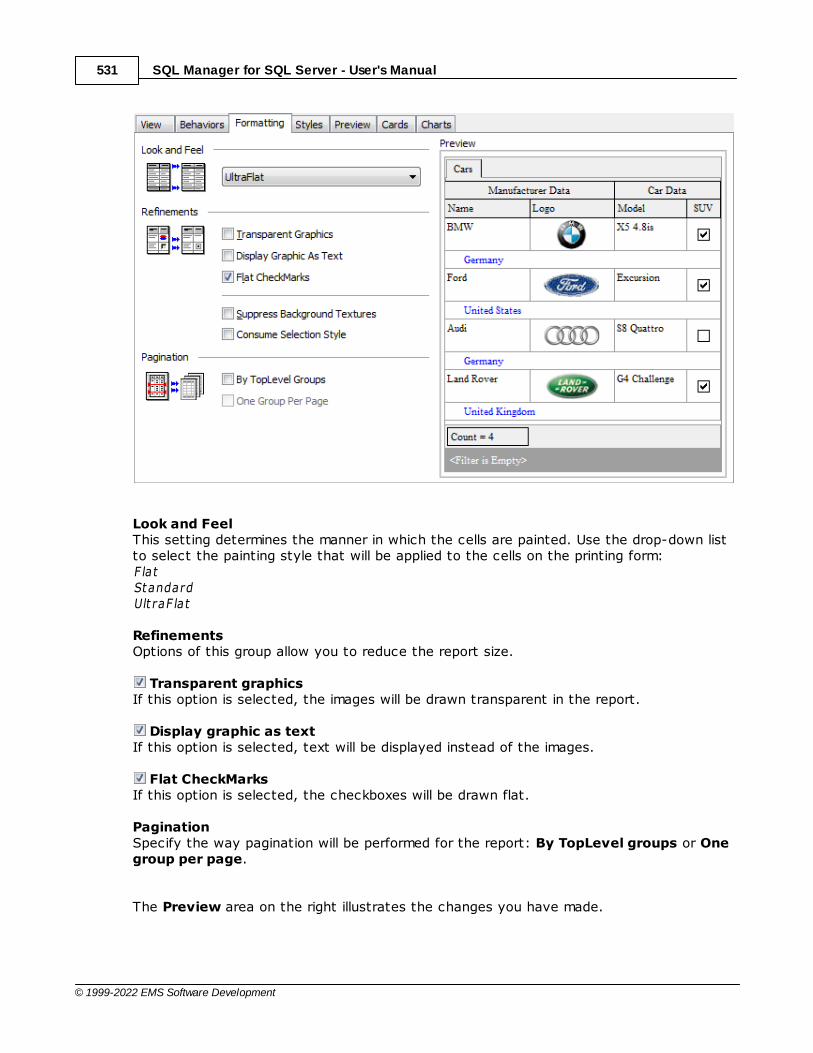
SQL Manager for SQL Server - User's Manual531
© 1999-2022 EMS Software Development
Look and FeelThis setting determines the manner in which the cells are painted. Use the drop-down listto select the painting style that will be applied to the cells on the printing form:F latStandardUlt raF lat
RefinementsOptions of this group allow you to reduce the report size.
Transparent graphicsIf this option is selected, the images will be drawn transparent in the report.
Display graphic as textIf this option is selected, text will be displayed instead of the images.
Flat CheckMarksIf this option is selected, the checkboxes will be drawn flat.
PaginationSpecify the way pagination will be performed for the report: By TopLevel groups or Onegroup per page.
The Preview area on the right illustrates the changes you have made.

SQL Manager for SQL Server - User's Manual532
© 1999-2022 EMS Software Development
7.1.4.2.4 Styles
The Styles tab of the Format Report dialog allows you to specify styles to be applied tothe report elements.
Use native stylesThis option determines whether the native Windows style will be applied to the reportelements.
Note: The Native style option is currently supported for the Windows® XP operatingsystem only.
The elements list displays the names of all report elements, with background color andfont properties specified by default. You can Use native styles for them or customizethem according to your preferences.
To edit an element, select it in the list and use the buttons to the right to edit the stylefor it.Click the Font... button to specify font properties using the standard Font dialog.Click the Color... button to customize the background color using the standard Colordialog.Click the Texture... button to load an image that will be used as the texture for theelement.To rollback the changes, click the Clear button.To restore the default stylesheet properties, click the Restore Defaults button.If you need to save the current style sheet, you can click the Save as... button.
These items are also available through the context menu of the elements list.
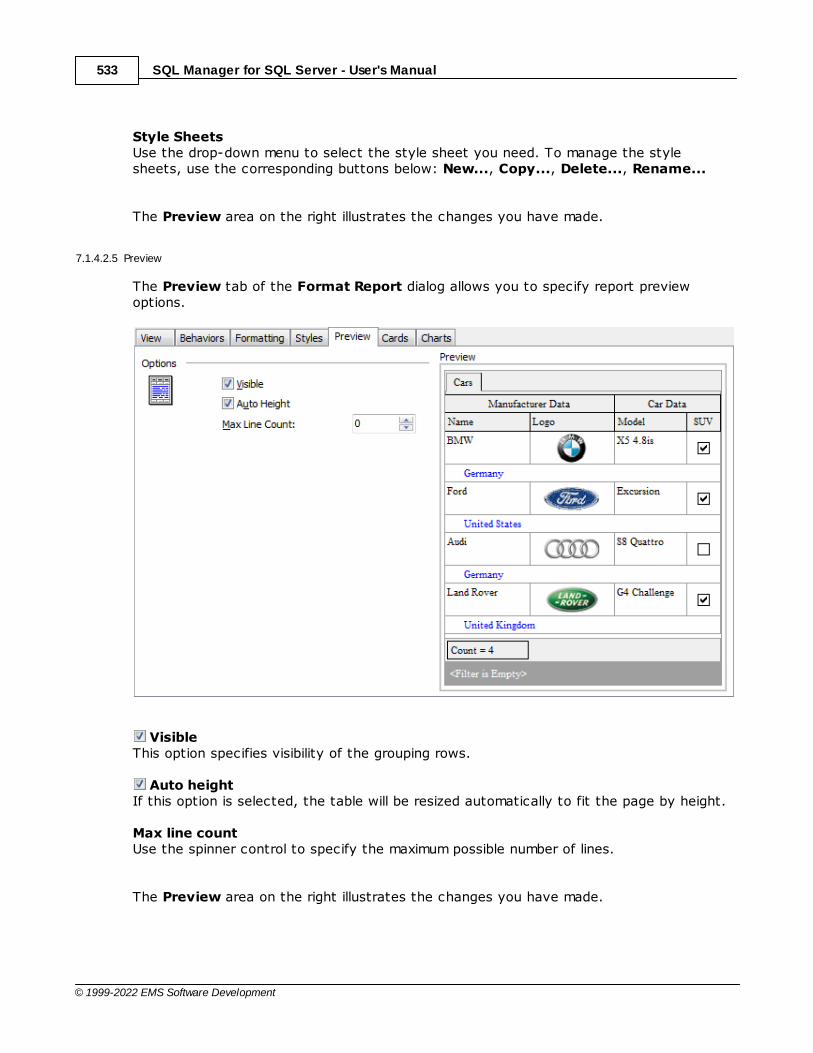
SQL Manager for SQL Server - User's Manual533
© 1999-2022 EMS Software Development
Style SheetsUse the drop-down menu to select the style sheet you need. To manage the stylesheets, use the corresponding buttons below: New..., Copy..., Delete..., Rename...
The Preview area on the right illustrates the changes you have made.
7.1.4.2.5 Preview
The Preview tab of the Format Report dialog allows you to specify report previewoptions.
VisibleThis option specifies visibility of the grouping rows.
Auto heightIf this option is selected, the table will be resized automatically to fit the page by height.
Max line countUse the spinner control to specify the maximum possible number of lines.
The Preview area on the right illustrates the changes you have made.

SQL Manager for SQL Server - User's Manual534
© 1999-2022 EMS Software Development
7.1.4.2.6 Cards
The Cards tab of the Format Report dialog allows you to specify properties for the cardview.
Sizes
Auto WidthIf this option is selected, the cards will be resized automatically to fit the page by width.
Keep same widthSelect this option to keep the card width fixed.
Keep same heightSelect this option to keep the card height fixed.
Spacing
This group allows you to specify horizontal and vertical spacing between cards.
Framing
BorderThis option specifies visibility of the card borders.
Horizontal linesThis option specifies visibility of the horizontal lines (row delimiters) within cards.
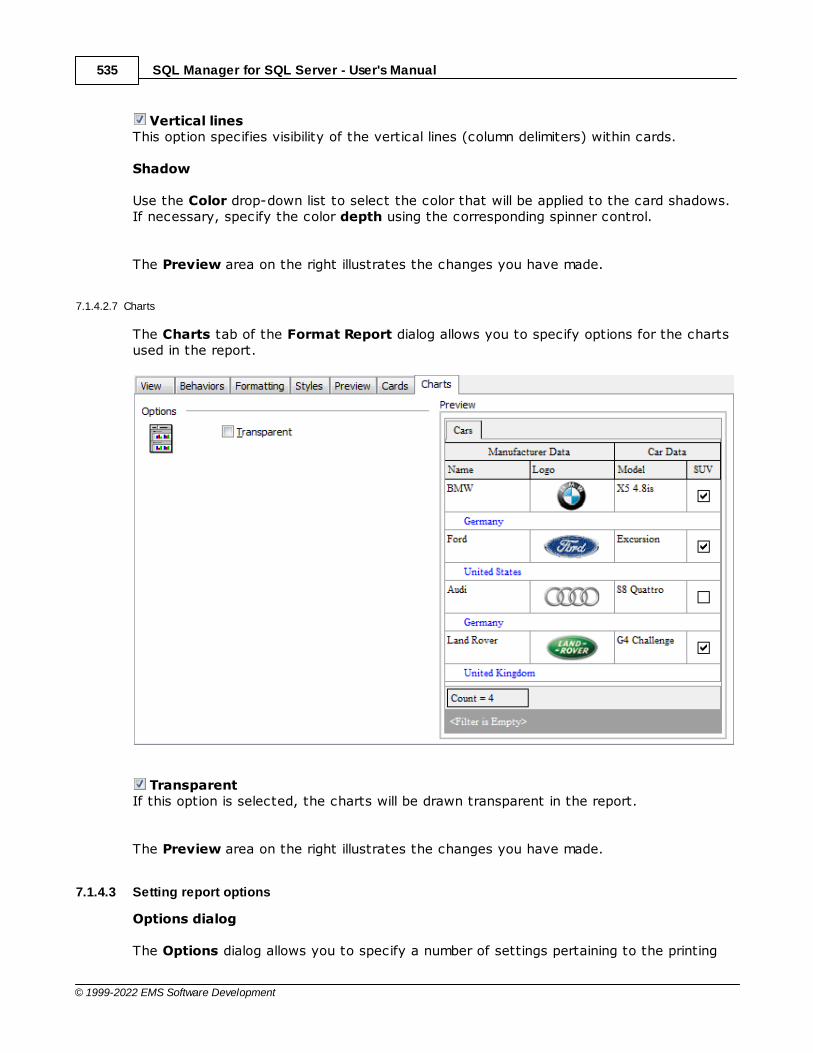
SQL Manager for SQL Server - User's Manual535
© 1999-2022 EMS Software Development
Vertical linesThis option specifies visibility of the vertical lines (column delimiters) within cards.
Shadow
Use the Color drop-down list to select the color that will be applied to the card shadows.If necessary, specify the color depth using the corresponding spinner control.
The Preview area on the right illustrates the changes you have made.
7.1.4.2.7 Charts
The Charts tab of the Format Report dialog allows you to specify options for the chartsused in the report.
TransparentIf this option is selected, the charts will be drawn transparent in the report.
The Preview area on the right illustrates the changes you have made.
7.1.4.3 Setting report options
Options dialog
The Options dialog allows you to specify a number of settings pertaining to the printing
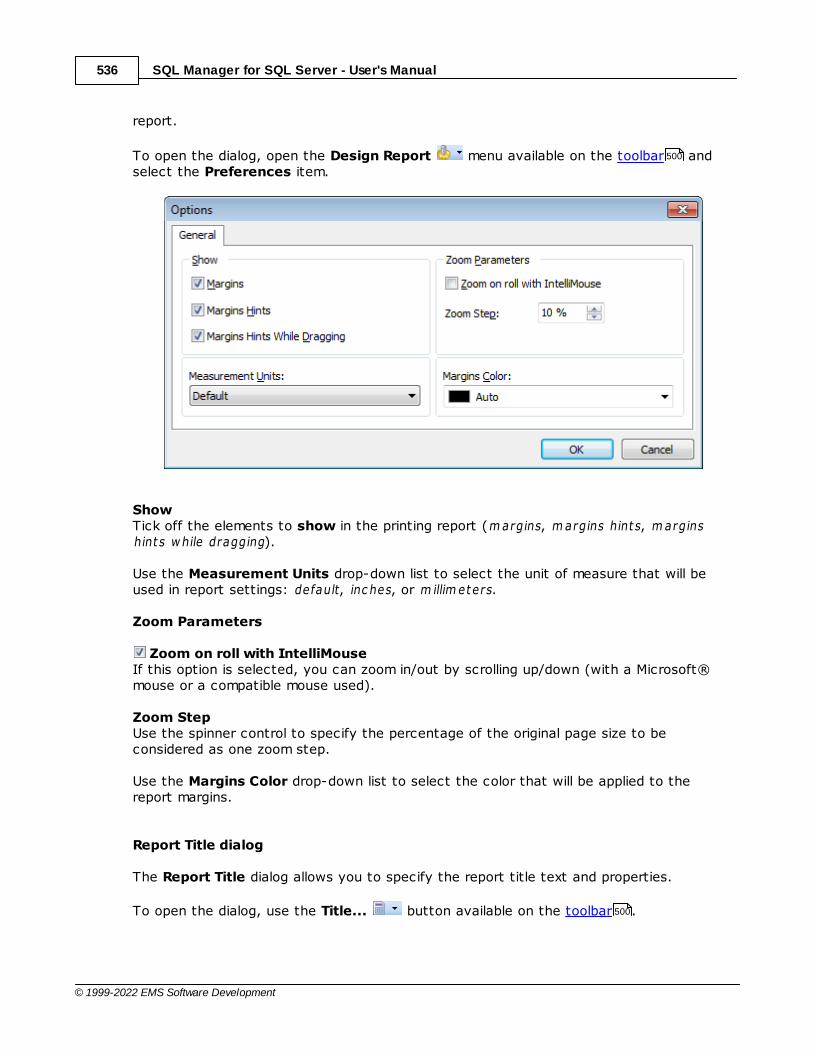
SQL Manager for SQL Server - User's Manual536
© 1999-2022 EMS Software Development
report.
To open the dialog, open the Design Report menu available on the toolbar andselect the Preferences item.
ShowTick off the elements to show in the printing report (m argins, m argins hint s, m arginshint s w hile dragging).
Use the Measurement Units drop-down list to select the unit of measure that will beused in report settings: default, inc hes, or m illim eters.
Zoom Parameters
Zoom on roll with IntelliMouseIf this option is selected, you can zoom in/out by scrolling up/down (with a Microsoft®mouse or a compatible mouse used).
Zoom StepUse the spinner control to specify the percentage of the original page size to beconsidered as one zoom step.
Use the Margins Color drop-down list to select the color that will be applied to thereport margins.
Report Title dialog
The Report Title dialog allows you to specify the report title text and properties.
To open the dialog, use the Title... button available on the toolbar .
500
500
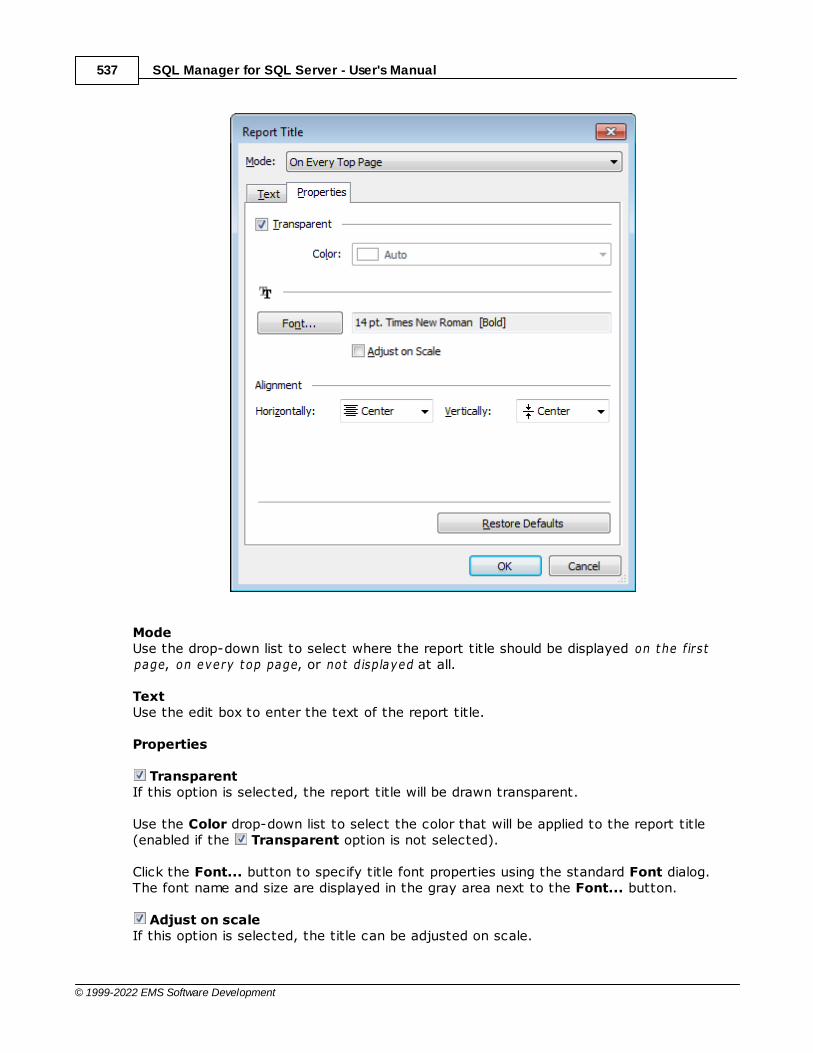
SQL Manager for SQL Server - User's Manual537
© 1999-2022 EMS Software Development
ModeUse the drop-down list to select where the report title should be displayed on the firstpage, on every top page, or not displayed at all.
TextUse the edit box to enter the text of the report title.
Properties
TransparentIf this option is selected, the report title will be drawn transparent.
Use the Color drop-down list to select the color that will be applied to the report title(enabled if the Transparent option is not selected).
Click the Font... button to specify title font properties using the standard Font dialog.The font name and size are displayed in the gray area next to the Font... button.
Adjust on scaleIf this option is selected, the title can be adjusted on scale.
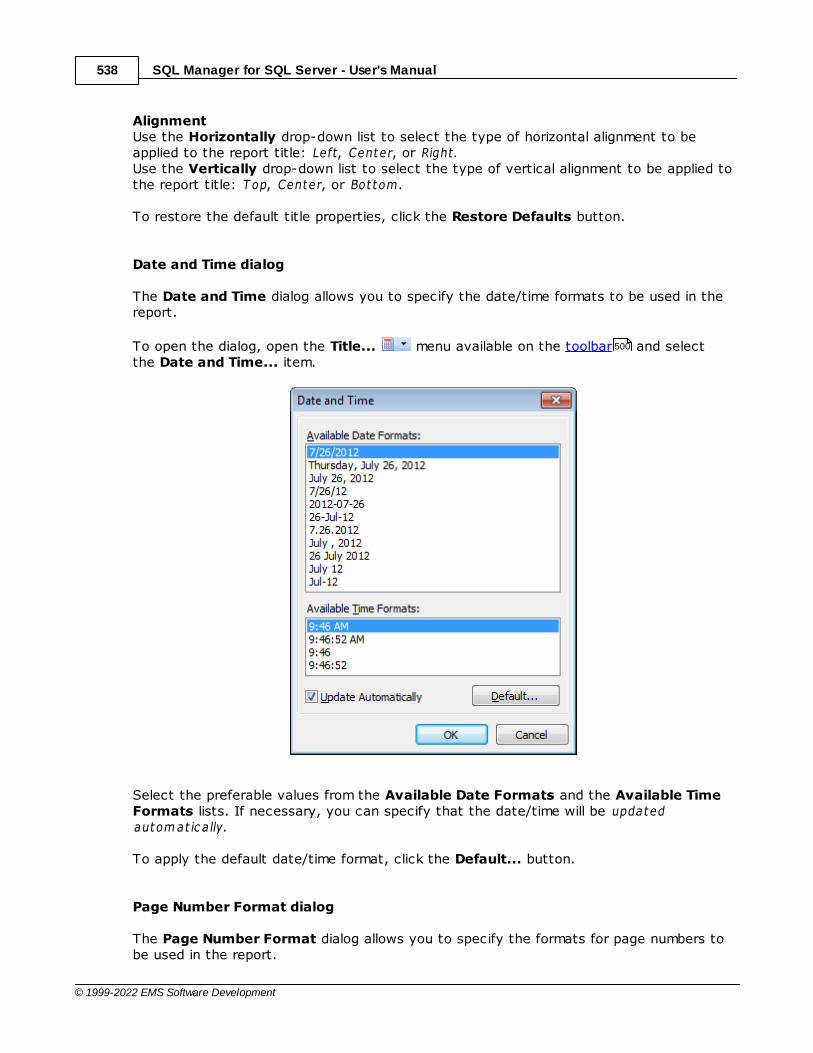
SQL Manager for SQL Server - User's Manual538
© 1999-2022 EMS Software Development
AlignmentUse the Horizontally drop-down list to select the type of horizontal alignment to beapplied to the report title: Left, Center, or Right.Use the Vertically drop-down list to select the type of vertical alignment to be applied tothe report title: T op, Center, or Bot tom.
To restore the default title properties, click the Restore Defaults button.
Date and Time dialog
The Date and Time dialog allows you to specify the date/time formats to be used in thereport.
To open the dialog, open the Title... menu available on the toolbar and selectthe Date and Time... item.
Select the preferable values from the Available Date Formats and the Available TimeFormats lists. If necessary, you can specify that the date/time will be updatedautom at ic a lly.
To apply the default date/time format, click the Default... button.
Page Number Format dialog
The Page Number Format dialog allows you to specify the formats for page numbers tobe used in the report.
500
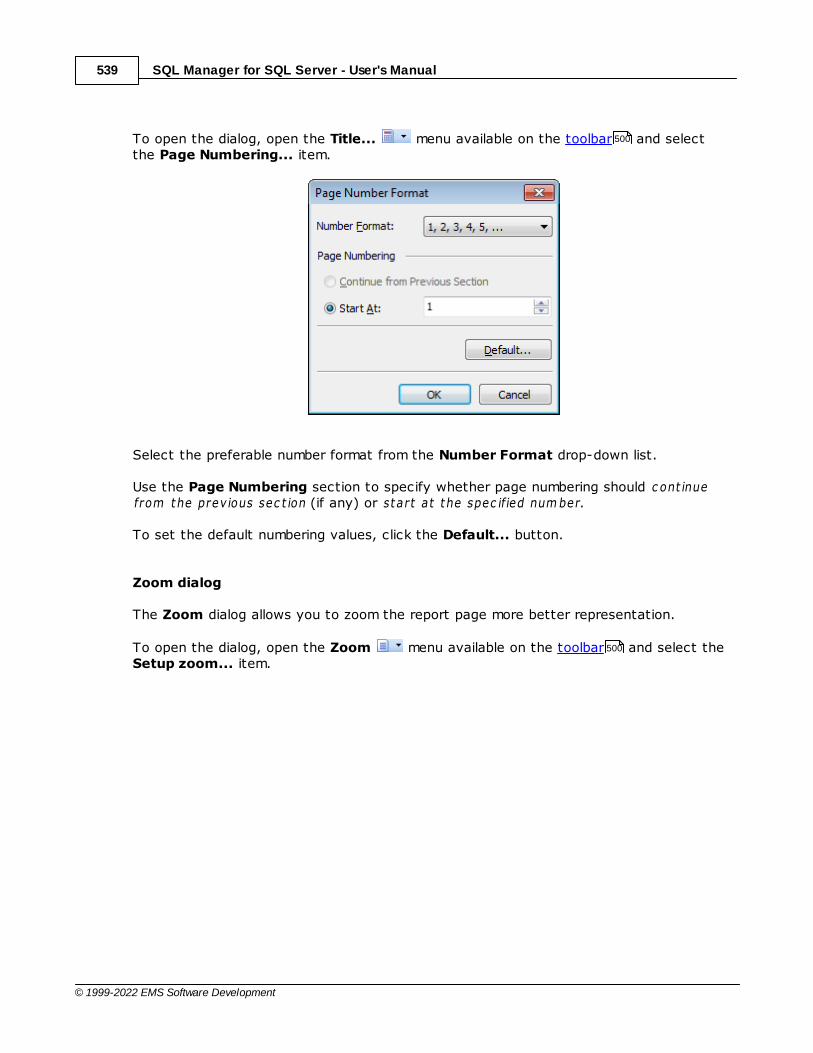
SQL Manager for SQL Server - User's Manual539
© 1999-2022 EMS Software Development
To open the dialog, open the Title... menu available on the toolbar and selectthe Page Numbering... item.
Select the preferable number format from the Number Format drop-down list.
Use the Page Numbering section to specify whether page numbering should c ont inuefrom the prev ious sec t ion (if any) or start at the spec if ied num ber.
To set the default numbering values, click the Default... button.
Zoom dialog
The Zoom dialog allows you to zoom the report page more better representation.
To open the dialog, open the Zoom menu available on the toolbar and select theSetup zoom... item.
500
500
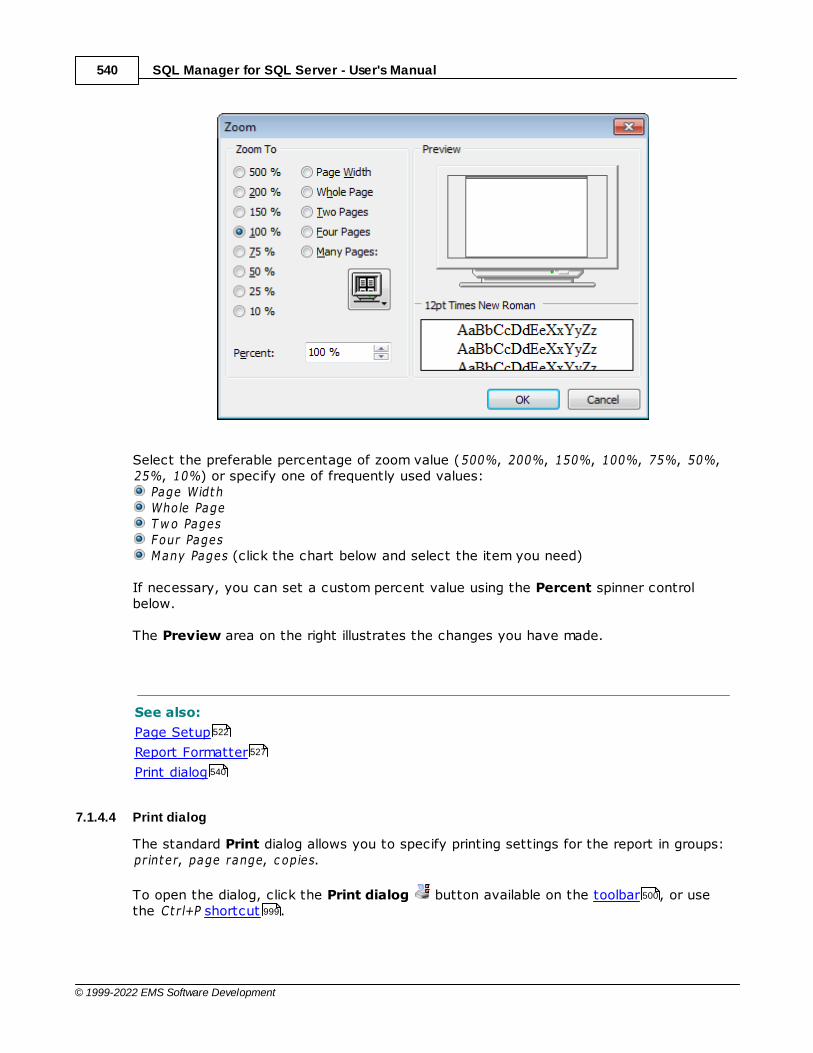
SQL Manager for SQL Server - User's Manual540
© 1999-2022 EMS Software Development
Select the preferable percentage of zoom value (500%, 200%, 150%, 100%, 75%, 50%,25%, 10%) or specify one of frequently used values:
Page Width Whole Page T w o Pages Four Pages Many Pages (click the chart below and select the item you need)
If necessary, you can set a custom percent value using the Percent spinner controlbelow.
The Preview area on the right illustrates the changes you have made.
See also:
Page Setup
Report Formatter
Print dialog
7.1.4.4 Print dialog
The standard Print dialog allows you to specify printing settings for the report in groups:printer, page range, c opies.
To open the dialog, click the Print dialog button available on the toolbar , or usethe Ct r l+P shortcut .
522
527
540
500
999

SQL Manager for SQL Server - User's Manual541
© 1999-2022 EMS Software Development
When you are done, click the Print button to start printing.
If you need to change any page settings before printing, you can click the Page Setup...button at the bottom to call the Page Setup dialog.
See also:
Page Setup
Report Formatter
Setting report options
7.1.5 BLOB View
SQL Manager for SQL Server provides BLOB Viewer/Editor to view and edit BLOB (BinaryLarge Object) fields content. The BLOB Viewer/Editor can be invoked from the data gridwithin Table Editor , SQL Editor , Visual Query Builder , etc.
Navigation within the BLOB Viewer/EditorViewing/Editing BLOB field as Hexadecimal dumpViewing/Editing BLOB field as plain TextViewing/Editing BLOB field as Rich Text (RTF)Viewing/Editing BLOB field as ImageViewing/Editing BLOB field as HTMLViewing/Editing BLOB field as XML
522
522
527
535
236 462 479
543
543
544
545
546
547
548
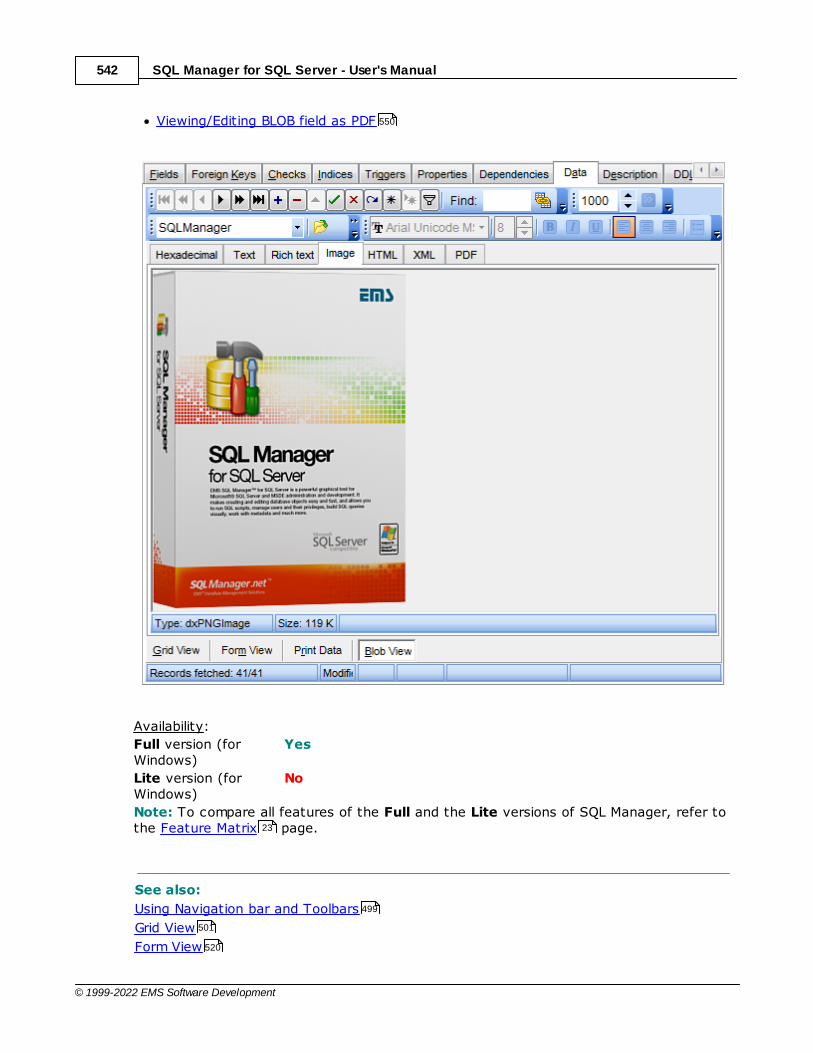
SQL Manager for SQL Server - User's Manual542
© 1999-2022 EMS Software Development
Viewing/Editing BLOB field as PDF
Availability:
Full version (forWindows)
Yes
Lite version (forWindows)
No
Note: To compare all features of the Full and the Lite versions of SQL Manager, refer tothe Feature Matrix page.
See also:
Using Navigation bar and Toolbars
Grid View
Form View
550
23
499
501
520
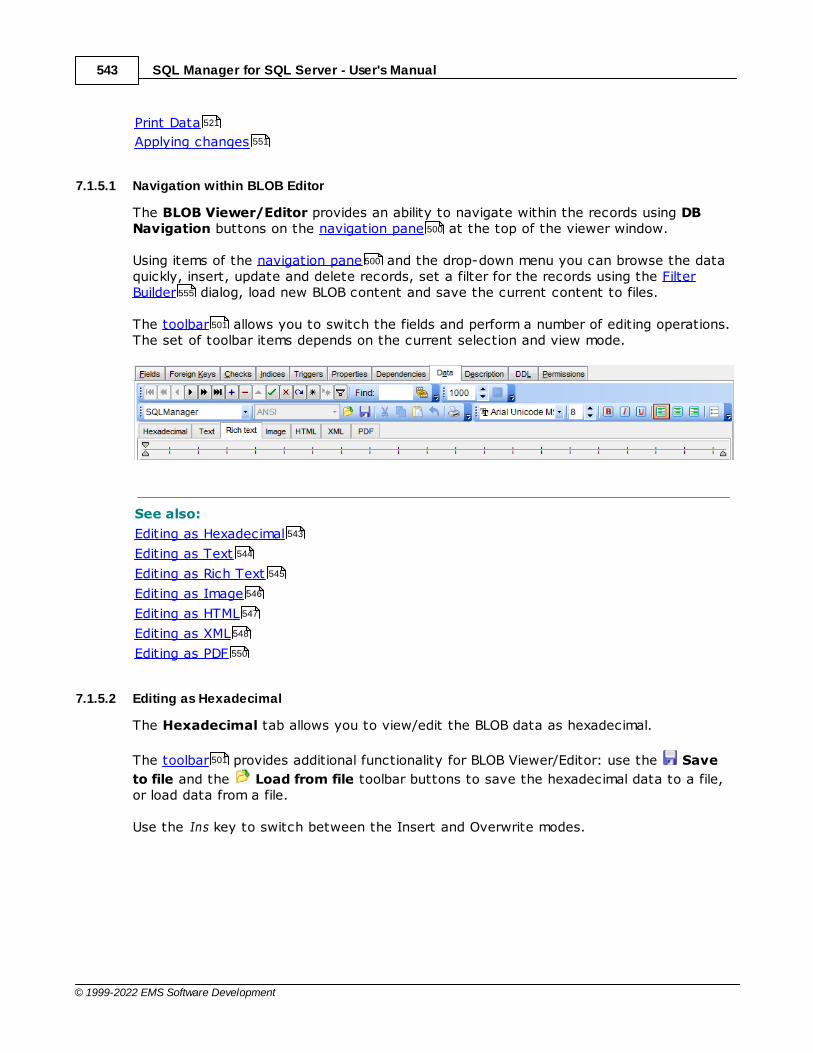
SQL Manager for SQL Server - User's Manual543
© 1999-2022 EMS Software Development
Print Data
Applying changes
7.1.5.1 Navigation within BLOB Editor
The BLOB Viewer/Editor provides an ability to navigate within the records using DBNavigation buttons on the navigation pane at the top of the viewer window.
Using items of the navigation pane and the drop-down menu you can browse the dataquickly, insert, update and delete records, set a filter for the records using the FilterBuilder dialog, load new BLOB content and save the current content to files.
The toolbar allows you to switch the fields and perform a number of editing operations.The set of toolbar items depends on the current selection and view mode.
See also:
Editing as Hexadecimal
Editing as Text
Editing as Rich Text
Editing as Image
Editing as HTML
Editing as XML
Editing as PDF
7.1.5.2 Editing as Hexadecimal
The Hexadecimal tab allows you to view/edit the BLOB data as hexadecimal.
The toolbar provides additional functionality for BLOB Viewer/Editor: use the Save
to file and the Load from file toolbar buttons to save the hexadecimal data to a file,or load data from a file.
Use the Ins key to switch between the Insert and Overwrite modes.
521
551
500
500
555
501
543
544
545
546
547
548
550
501
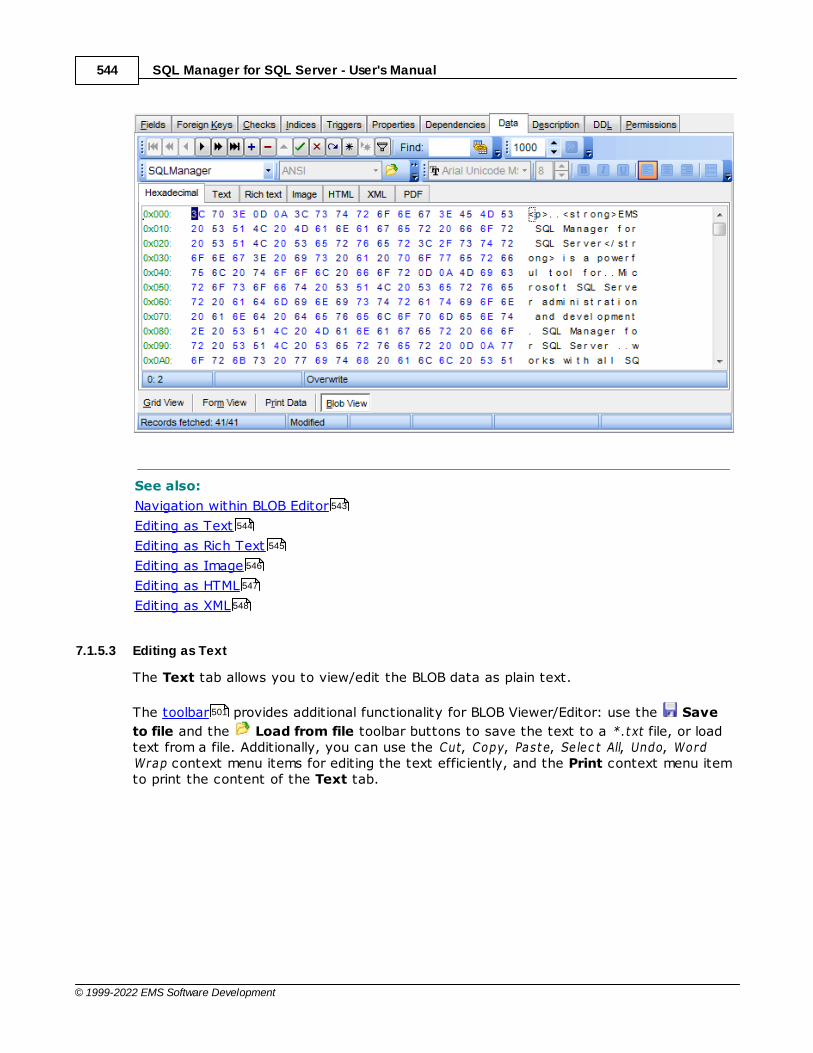
SQL Manager for SQL Server - User's Manual544
© 1999-2022 EMS Software Development
See also:
Navigation within BLOB Editor
Editing as Text
Editing as Rich Text
Editing as Image
Editing as HTML
Editing as XML
7.1.5.3 Editing as Text
The Text tab allows you to view/edit the BLOB data as plain text.
The toolbar provides additional functionality for BLOB Viewer/Editor: use the Save
to file and the Load from file toolbar buttons to save the text to a *.txt file, or loadtext from a file. Additionally, you can use the Cut, Copy, Paste, Selec t All, Undo, WordWrap context menu items for editing the text efficiently, and the Print context menu itemto print the content of the Text tab.
543
544
545
546
547
548
501

SQL Manager for SQL Server - User's Manual545
© 1999-2022 EMS Software Development
See also:
Navigation within BLOB Editor
Editing as Hexadecimal
Editing as Rich Text
Editing as Image
Editing as HTML
Editing as XML
7.1.5.4 Editing as Rich Text
The Rich Text tab allows you to view/edit the BLOB data in Rich Text format (RTF).
The toolbar provides additional functionality for BLOB Viewer/Editor: use the Save
to file and the Load from file toolbar buttons to save the Rich Text to a *.rt f file, orload text from a file. Additionally, you can use the Cut, Copy, Paste, Selec t All, Undocontext menu items for editing the text efficiently, and the Print context menu item toprint the content of the Rich Text tab.
543
543
545
546
547
548
501
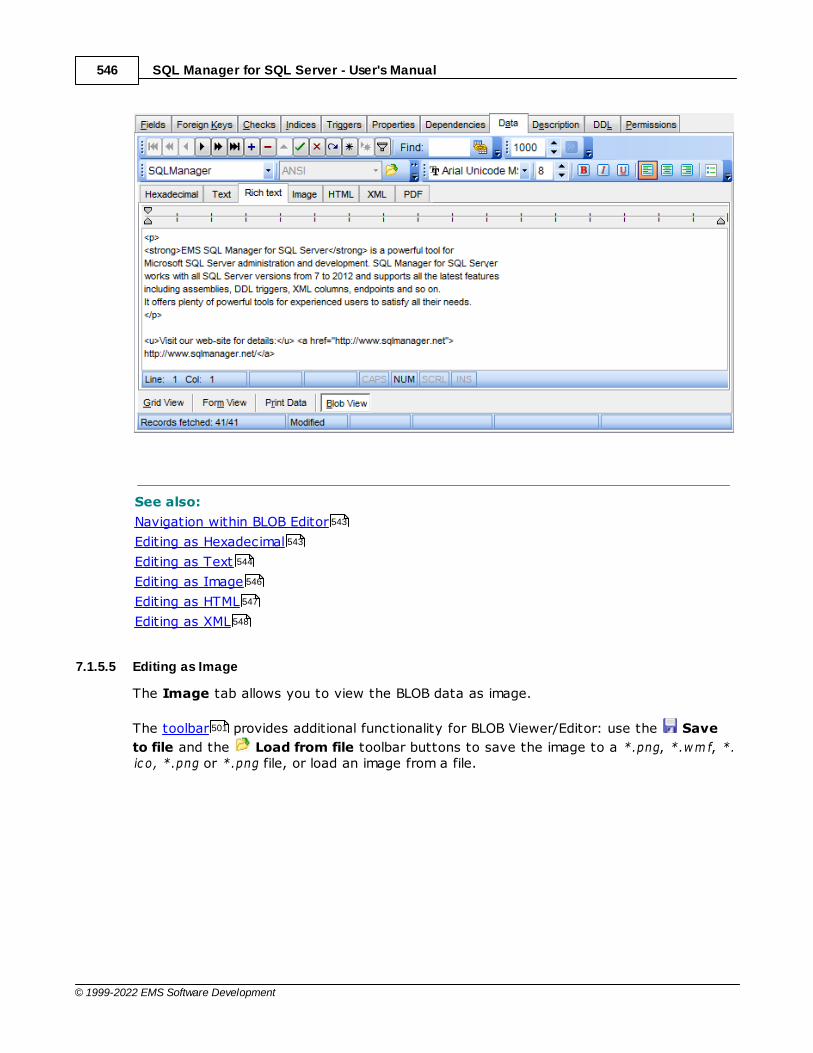
SQL Manager for SQL Server - User's Manual546
© 1999-2022 EMS Software Development
See also:
Navigation within BLOB Editor
Editing as Hexadecimal
Editing as Text
Editing as Image
Editing as HTML
Editing as XML
7.1.5.5 Editing as Image
The Image tab allows you to view the BLOB data as image.
The toolbar provides additional functionality for BLOB Viewer/Editor: use the Save
to file and the Load from file toolbar buttons to save the image to a *.png, *.w m f, *.ic o, *.png or *.png file, or load an image from a file.
543
543
544
546
547
548
501
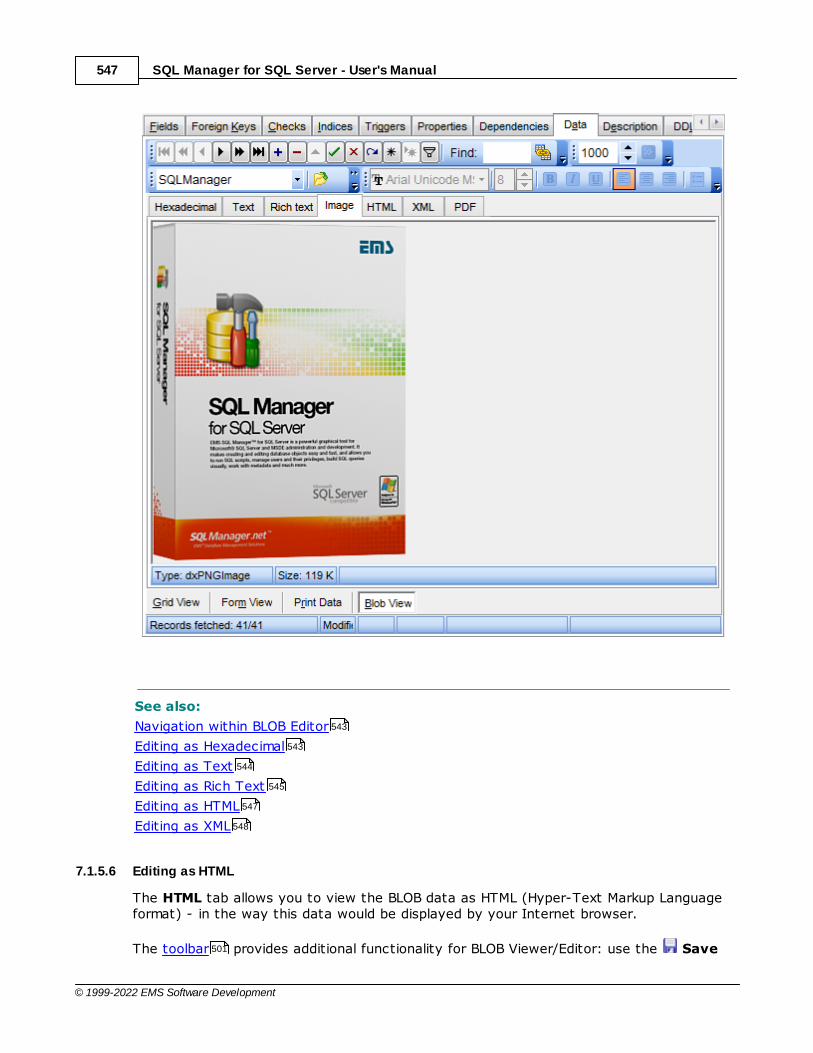
SQL Manager for SQL Server - User's Manual547
© 1999-2022 EMS Software Development
See also:
Navigation within BLOB Editor
Editing as Hexadecimal
Editing as Text
Editing as Rich Text
Editing as HTML
Editing as XML
7.1.5.6 Editing as HTML
The HTML tab allows you to view the BLOB data as HTML (Hyper-Text Markup Languageformat) - in the way this data would be displayed by your Internet browser.
The toolbar provides additional functionality for BLOB Viewer/Editor: use the Save
543
543
544
545
547
548
501
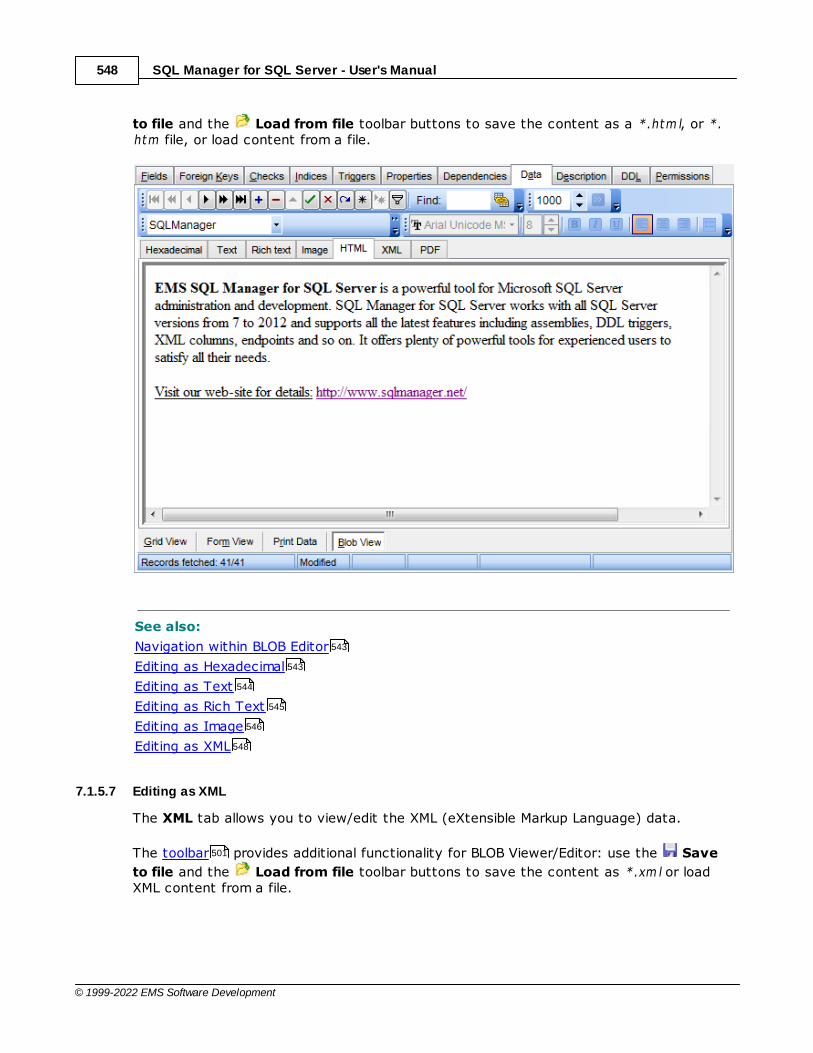
SQL Manager for SQL Server - User's Manual548
© 1999-2022 EMS Software Development
to file and the Load from file toolbar buttons to save the content as a *.htm l, or *.htm file, or load content from a file.
See also:
Navigation within BLOB Editor
Editing as Hexadecimal
Editing as Text
Editing as Rich Text
Editing as Image
Editing as XML
7.1.5.7 Editing as XML
The XML tab allows you to view/edit the XML (eXtensible Markup Language) data.
The toolbar provides additional functionality for BLOB Viewer/Editor: use the Save
to file and the Load from file toolbar buttons to save the content as *.xm l or loadXML content from a file.
543
543
544
545
546
548
501

SQL Manager for SQL Server - User's Manual549
© 1999-2022 EMS Software Development
The XML content is represented as a tree-like structure consisting four editable fields: Name, Unique, Attributes and Value. You can edit data and modify the structure usingdrag-n-drop operations and items of the context menu.
Hint: Hold the Shift key when you drag-and-drop a node to insert it as a child one.
The context menu allows you to:add a node (a child node relatively to the selected one);remove the selected node;copy the selected node source to clipboard;cut the selected node;copy the selected node;paste a node from clipboard.
Press the Item attributes button in the editing mode of an Attribute item to add oredit attributes.

SQL Manager for SQL Server - User's Manual550
© 1999-2022 EMS Software Development
Use the buttons to add or remove an attribute. Click the required attribute nameor value to edit.
See also:
Navigation within BLOB Editor
Editing as Hexadecimal
Editing as Text
Editing as Rich Text
Editing as Image
Editing as HTML
7.1.5.8 Editing as PDF
The PDF tab allows you to view the BLOB data as PDF using Adobe Acrobat Reader. Youneed to have Adobe Acrobat Reader installed to view PDF data.
The toolbar provides additional functionality for PDF Viewer/Editor: use the Save to
file and the Load from file toolbar buttons to save or load the document from the file.
543
543
544
545
546
547
501
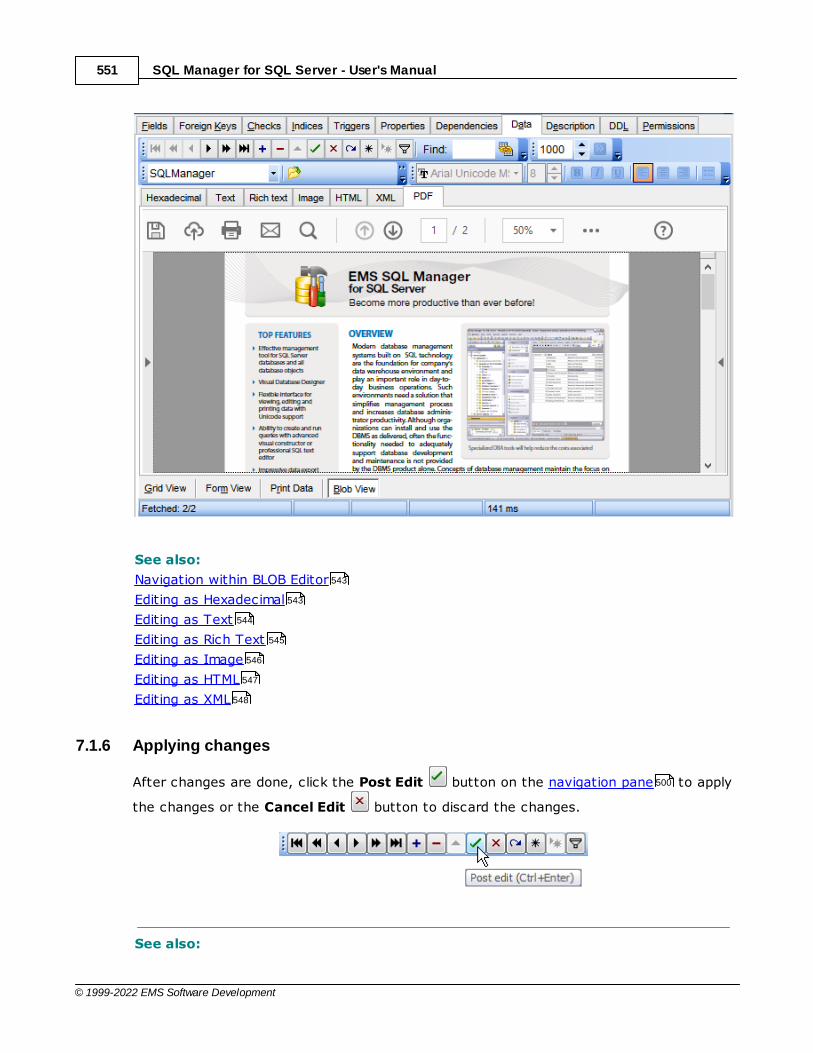
SQL Manager for SQL Server - User's Manual551
© 1999-2022 EMS Software Development
See also:
Navigation within BLOB Editor
Editing as Hexadecimal
Editing as Text
Editing as Rich Text
Editing as Image
Editing as HTML
Editing as XML
7.1.6 Applying changes
After changes are done, click the Post Edit button on the navigation pane to apply
the changes or the Cancel Edit button to discard the changes.
See also:
543
543
544
545
546
547
548
500

SQL Manager for SQL Server - User's Manual552
© 1999-2022 EMS Software Development
Using Navigation bar and Toolbars
Grid View
Form View
Print Data
BLOB View
499
501
520
521
541
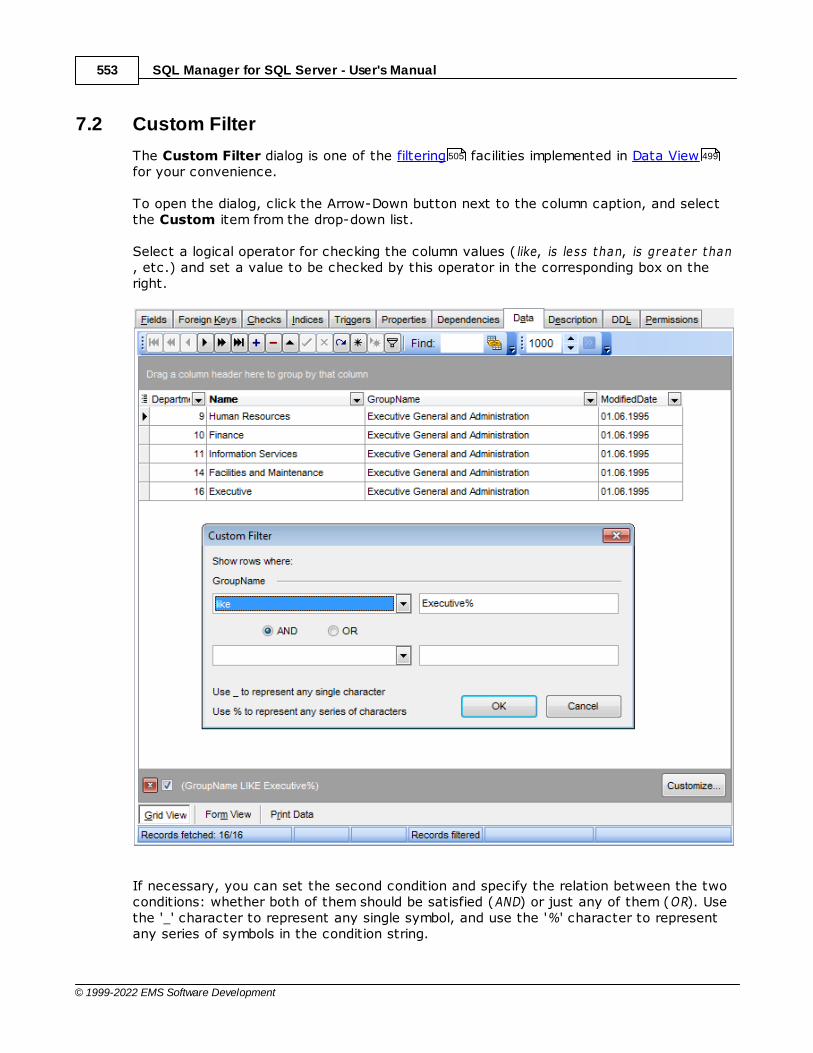
SQL Manager for SQL Server - User's Manual553
© 1999-2022 EMS Software Development
7.2 Custom Filter
The Custom Filter dialog is one of the filtering facilities implemented in Data Viewfor your convenience.
To open the dialog, click the Arrow-Down button next to the column caption, and selectthe Custom item from the drop-down list.
Select a logical operator for checking the column values (like, is less than, is greater than, etc.) and set a value to be checked by this operator in the corresponding box on theright.
If necessary, you can set the second condition and specify the relation between the twoconditions: whether both of them should be satisfied (AND) or just any of them (OR). Usethe '_' character to represent any single symbol, and use the '%' character to representany series of symbols in the condition string.
505 499

SQL Manager for SQL Server - User's Manual554
© 1999-2022 EMS Software Development
See also:
Data View
Filter Builder dialog
499
555
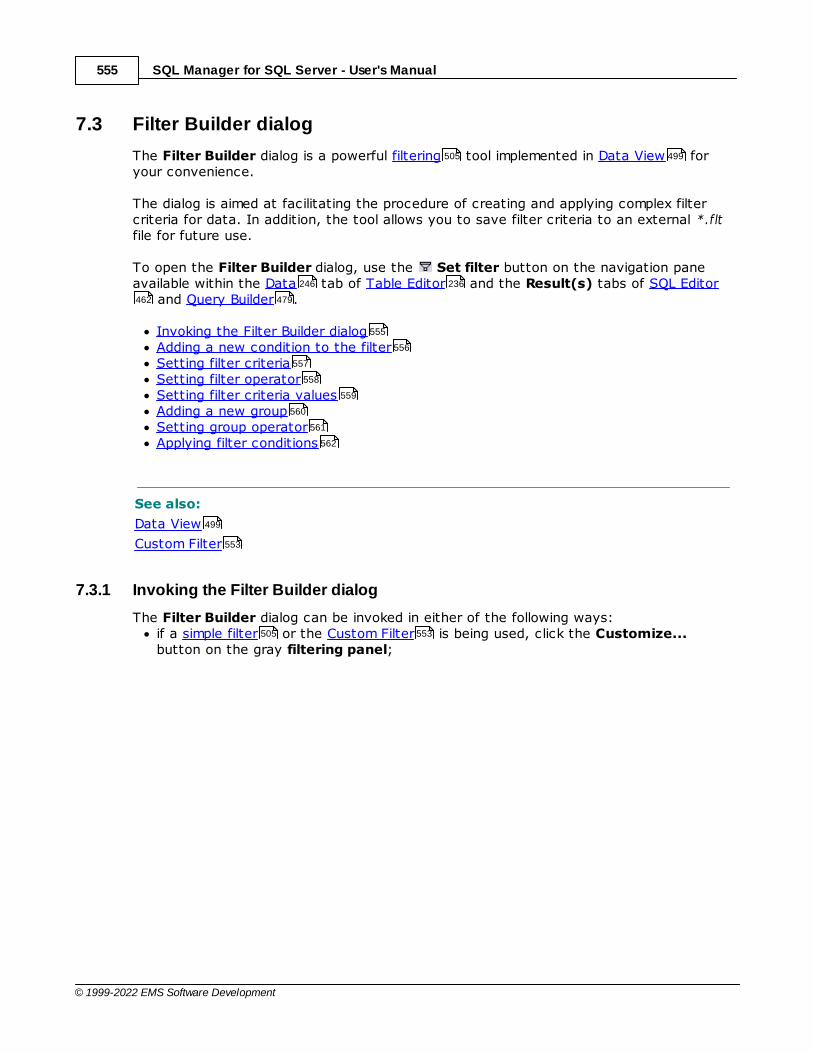
SQL Manager for SQL Server - User's Manual555
© 1999-2022 EMS Software Development
7.3 Filter Builder dialog
The Filter Builder dialog is a powerful filtering tool implemented in Data View foryour convenience.
The dialog is aimed at facilitating the procedure of creating and applying complex filtercriteria for data. In addition, the tool allows you to save filter criteria to an external *.fltfile for future use.
To open the Filter Builder dialog, use the Set filter button on the navigation paneavailable within the Data tab of Table Editor and the Result(s) tabs of SQL Editor
and Query Builder .
Invoking the Filter Builder dialogAdding a new condition to the filterSetting filter criteriaSetting filter operatorSetting filter criteria valuesAdding a new groupSetting group operatorApplying filter conditions
See also:
Data View
Custom Filter
7.3.1 Invoking the Filter Builder dialog
The Filter Builder dialog can be invoked in either of the following ways:if a simple filter or the Custom Filter is being used, click the Customize...button on the gray filtering panel;
505 499
246 236
462 479
555
556
557
558
559
560
561
562
499
553
505 553
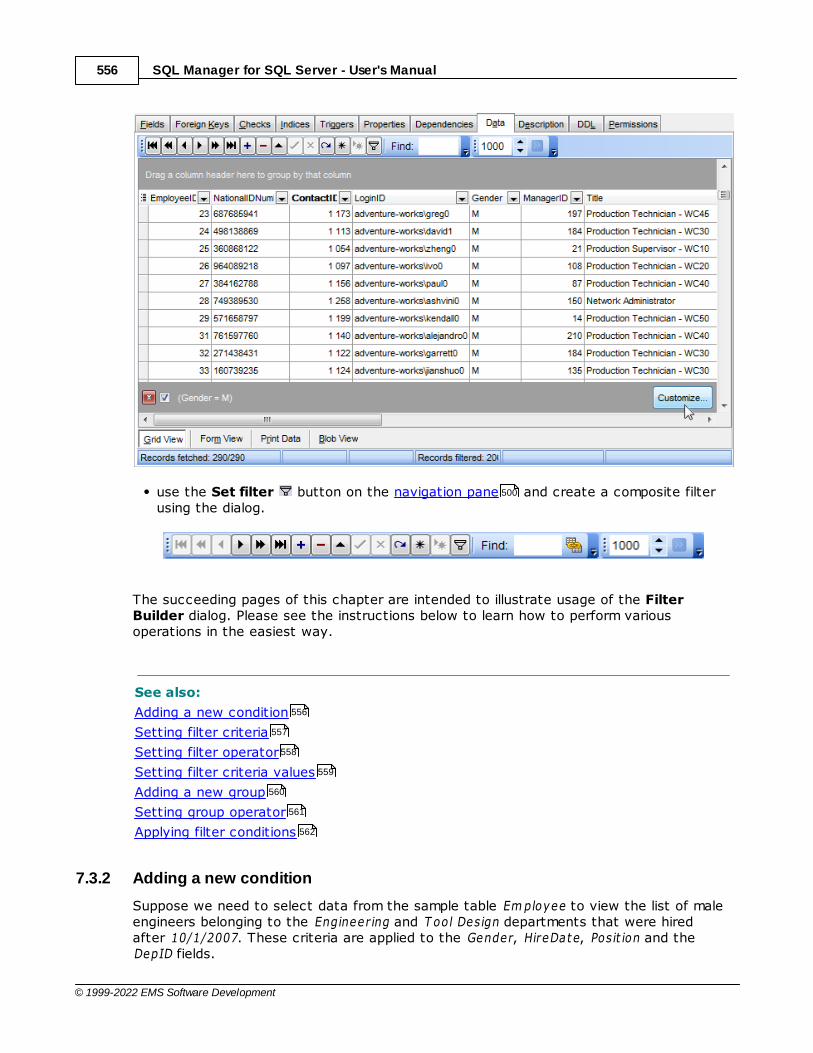
SQL Manager for SQL Server - User's Manual556
© 1999-2022 EMS Software Development
use the Set filter button on the navigation pane and create a composite filterusing the dialog.
The succeeding pages of this chapter are intended to illustrate usage of the FilterBuilder dialog. Please see the instructions below to learn how to perform variousoperations in the easiest way.
See also:
Adding a new condition
Setting filter criteria
Setting filter operator
Setting filter criteria values
Adding a new group
Setting group operator
Applying filter conditions
7.3.2 Adding a new condition
Suppose we need to select data from the sample table Em ployee to view the list of maleengineers belonging to the Engineering and T ool Design departments that were hiredafter 10/1/2007. These criteria are applied to the Gender, HireDate, Posit ion and theDepID fields.
500
556
557
558
559
560
561
562
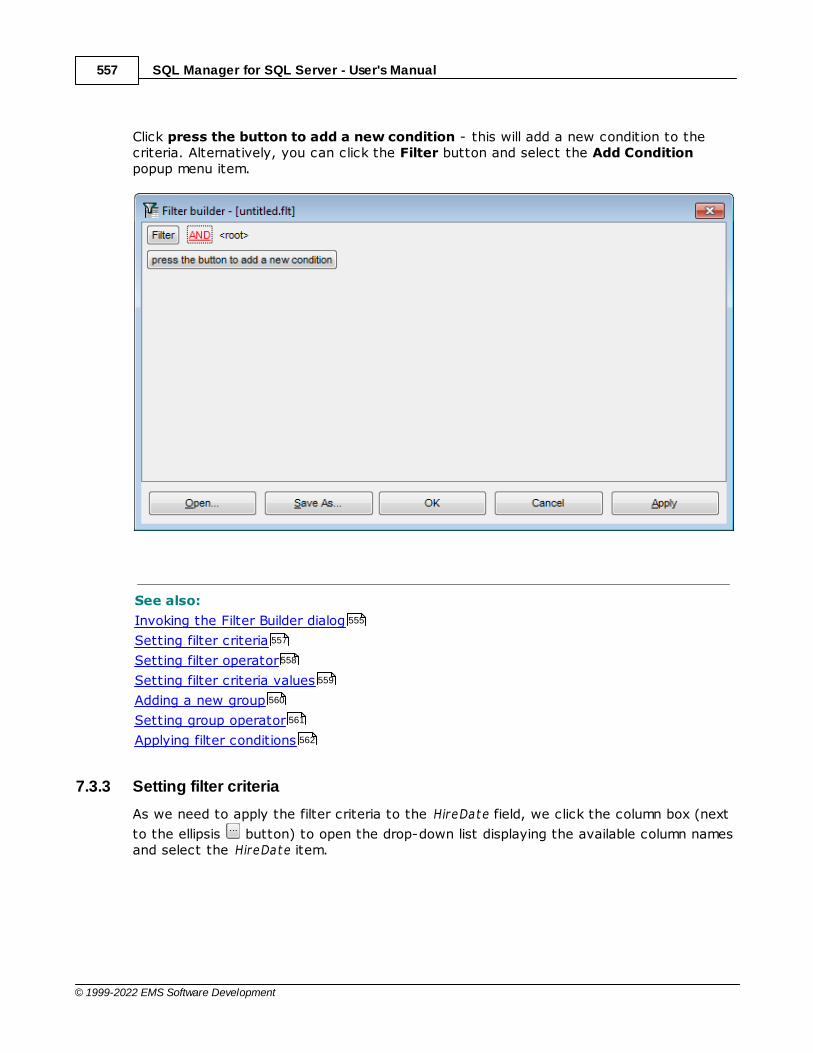
SQL Manager for SQL Server - User's Manual557
© 1999-2022 EMS Software Development
Click press the button to add a new condition - this will add a new condition to thecriteria. Alternatively, you can click the Filter button and select the Add Conditionpopup menu item.
See also:
Invoking the Filter Builder dialog
Setting filter criteria
Setting filter operator
Setting filter criteria values
Adding a new group
Setting group operator
Applying filter conditions
7.3.3 Setting filter criteria
As we need to apply the filter criteria to the HireDate field, we click the column box (next
to the ellipsis button) to open the drop-down list displaying the available column namesand select the HireDate item.
555
557
558
559
560
561
562
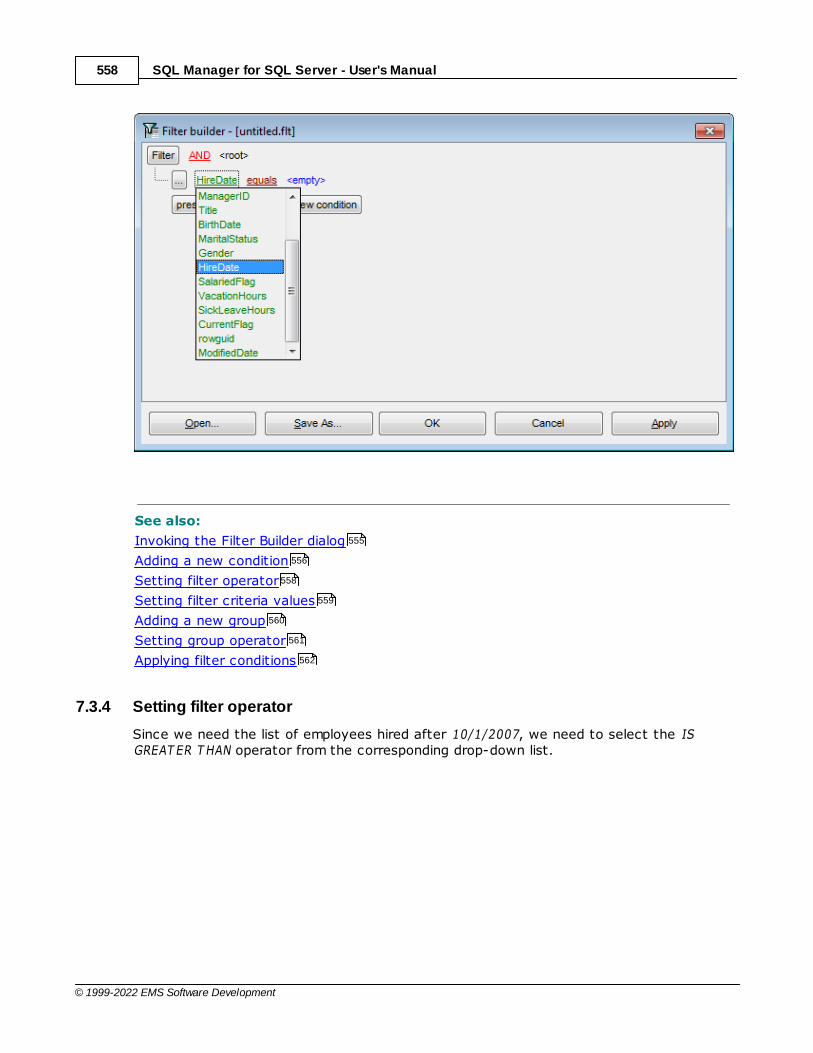
SQL Manager for SQL Server - User's Manual558
© 1999-2022 EMS Software Development
See also:
Invoking the Filter Builder dialog
Adding a new condition
Setting filter operator
Setting filter criteria values
Adding a new group
Setting group operator
Applying filter conditions
7.3.4 Setting filter operator
Since we need the list of employees hired after 10/1/2007, we need to select the ISGREAT ER T HAN operator from the corresponding drop-down list.
555
556
558
559
560
561
562

SQL Manager for SQL Server - User's Manual559
© 1999-2022 EMS Software Development
See also:
Invoking the Filter Builder dialog
Adding a new condition
Setting filter criteria
Setting filter criteria values
Adding a new group
Setting group operator
Applying filter conditions
7.3.5 Setting filter criteria values
Next, we need to specify value '10/1/2007' for the IS GREAT ER T HAN operator.
Similarly, if, for example, we need to get the list of employees hired during the 9/1/2007 -10/1/2007 term, we set the BET WEEN filter operator (this will add two empty valueboxes to specify the inclusive range for the BET WEEN condition) and specify the range forthe operator, i.e. the '9/1/2007' and the '10/1/2007' values in the corresponding valueboxes.
It is possible to set the date value manually by typing it in, or using the date editorwhich is activated when you click the value box.
555
556
557
559
560
561
562
558

SQL Manager for SQL Server - User's Manual560
© 1999-2022 EMS Software Development
Editors used in value boxes are determined by the data type assigned to thecorresponding columns.
See also:
Invoking the Filter Builder dialog
Adding a new condition
Setting filter criteria
Setting filter operator
Adding a new group
Setting group operator
Applying filter conditions
7.3.6 Adding a new group
Since we also need to get the list of male specialists-engineers (i.e. those registered inthe Engineering and T ool Design departments and having an engineering-orientedposition), we can add a complex filter condition combining simple conditions with the ANDoperator. (However, in this particular case we can just add them at the same root levelas for the existing condition).
If you need to add a group of conditions, click the ellipsis button for the HIRE_DAT Econdition and select the Add Group popup menu item.
555
556
557
558
560
561
562

SQL Manager for SQL Server - User's Manual561
© 1999-2022 EMS Software Development
See also:
Invoking the Filter Builder dialog
Adding a new condition
Setting filter criteria
Setting filter operator
Setting filter criteria values
Setting group operator
Applying filter conditions
7.3.7 Setting group operator
Conditions of complex criteria can be combined with any of the four logical operatorsused: AND, OR, NOT AND, NOT OR.
In our case it is enough to click the group operator box and select the AND item fromthe drop-down menu.
555
556
557
558
559
561
562
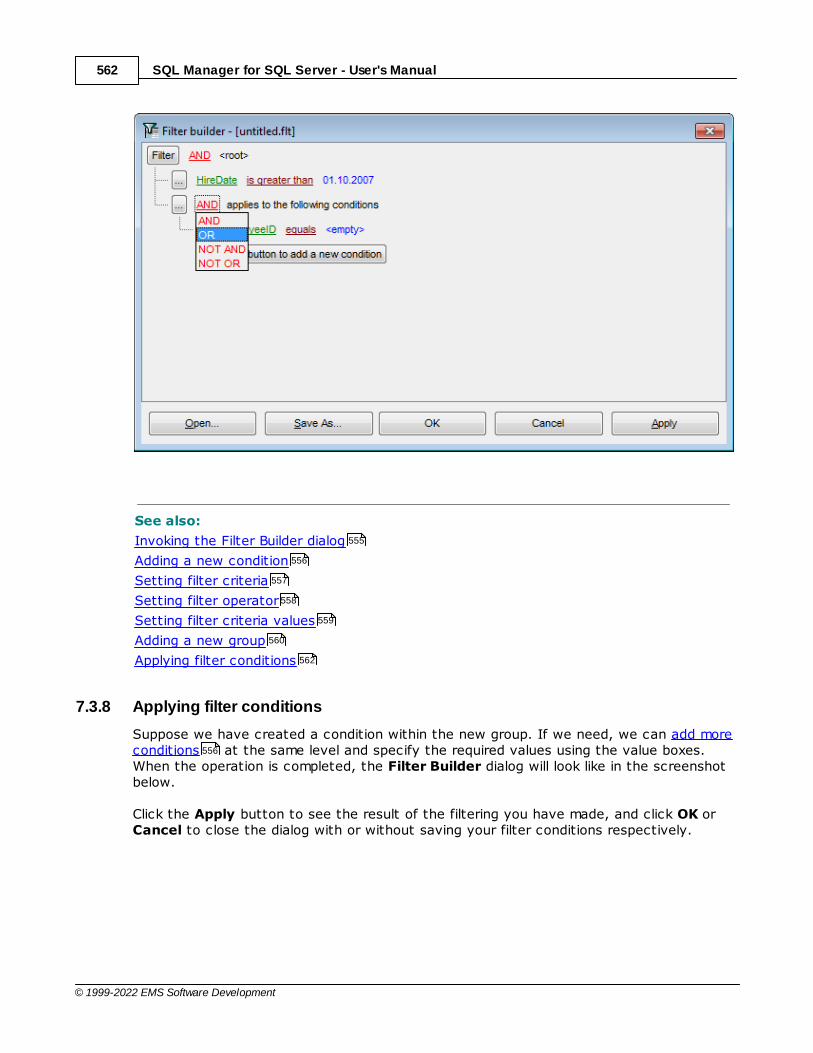
SQL Manager for SQL Server - User's Manual562
© 1999-2022 EMS Software Development
See also:
Invoking the Filter Builder dialog
Adding a new condition
Setting filter criteria
Setting filter operator
Setting filter criteria values
Adding a new group
Applying filter conditions
7.3.8 Applying filter conditions
Suppose we have created a condition within the new group. If we need, we can add moreconditions at the same level and specify the required values using the value boxes.When the operation is completed, the Filter Builder dialog will look like in the screenshotbelow.
Click the Apply button to see the result of the filtering you have made, and click OK orCancel to close the dialog with or without saving your filter conditions respectively.
555
556
557
558
559
560
562
556
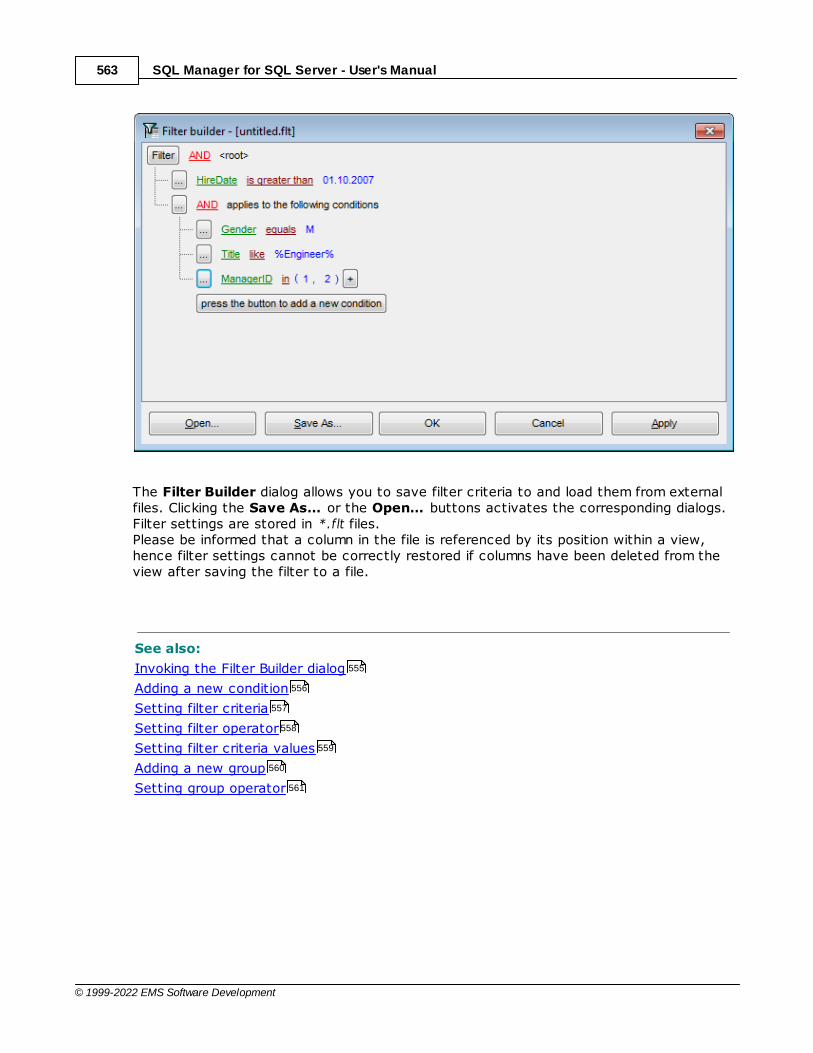
SQL Manager for SQL Server - User's Manual563
© 1999-2022 EMS Software Development
The Filter Builder dialog allows you to save filter criteria to and load them from externalfiles. Clicking the Save As… or the Open… buttons activates the corresponding dialogs.Filter settings are stored in *.flt files.Please be informed that a column in the file is referenced by its position within a view,hence filter settings cannot be correctly restored if columns have been deleted from theview after saving the filter to a file.
See also:
Invoking the Filter Builder dialog
Adding a new condition
Setting filter criteria
Setting filter operator
Setting filter criteria values
Adding a new group
Setting group operator
555
556
557
558
559
560
561
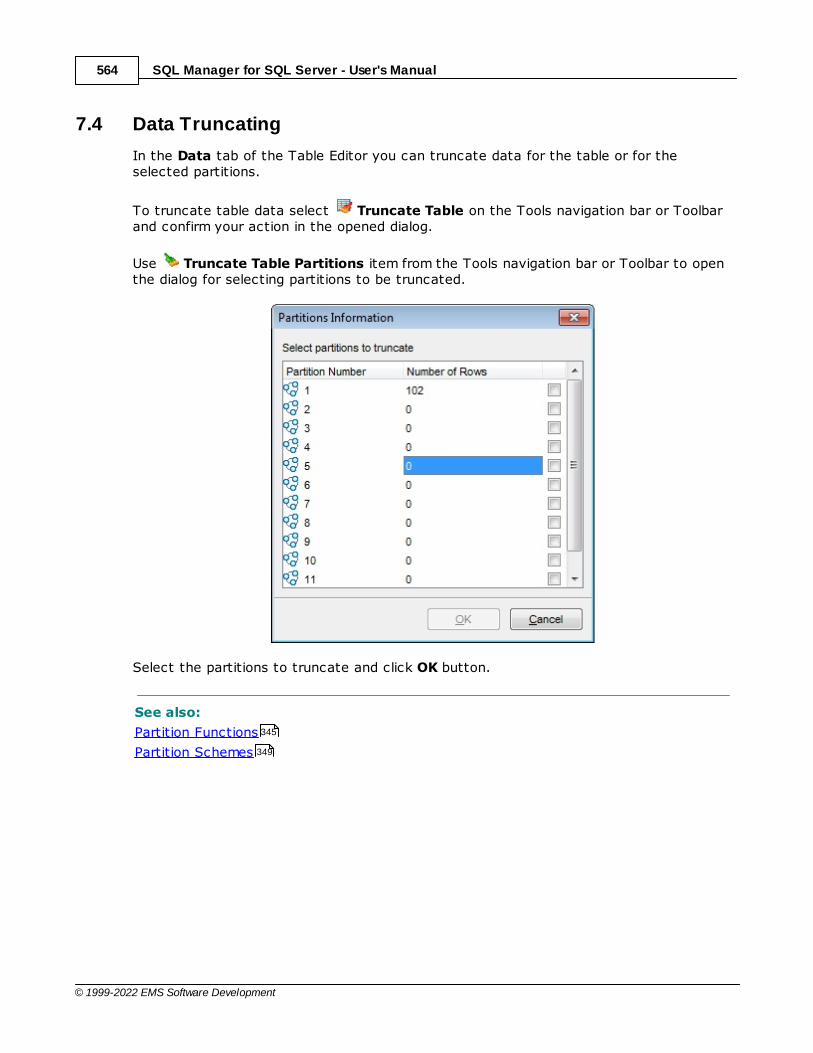
SQL Manager for SQL Server - User's Manual564
© 1999-2022 EMS Software Development
7.4 Data Truncating
In the Data tab of the Table Editor you can truncate data for the table or for theselected partitions.
To truncate table data select Truncate Table on the Tools navigation bar or Toolbarand confirm your action in the opened dialog.
Use Truncate Table Partitions item from the Tools navigation bar or Toolbar to openthe dialog for selecting partitions to be truncated.
Select the partitions to truncate and click OK button.
See also:
Partition Functions
Partition Schemes
345
349

Part
VIII
SQL Manager for SQL Server - User's Manual566
© 1999-2022 EMS Software Development
8 Import/Export Tools
Using SQL Manager for SQL Server you are provided with powerful tools to import andexport data to/from your SQL Server database.
Export Data WizardExports data to various supported formats including MS Exc e l, MS Ac c ess, RT F, HT ML, PDF, CSV, XML, MS Exc e l 2007 and more.
Import Data WizardImports data from any of supported formats: MS Exc e l, MS Ac c ess, DBF, T XT, CSV, XML,MS Exc e l 2007, MS Word 2007 and more.
Export Data as SQL ScriptExports data to an SQL script as a number of INSERT statements.
Bulk Insert WizardImports data with the BULK INSERT statement used.
Using templatesFacilitates using import/export wizards.
See also:
Getting Started
Database Explorer
Database Management
Database Objects Management
Query Management Tools
Data Management
Database Tools
Server Tools
Personalization
External Tools
How To...
567
608
633
633
978
76
99
130
214
460
498
651
757
866
952
1001
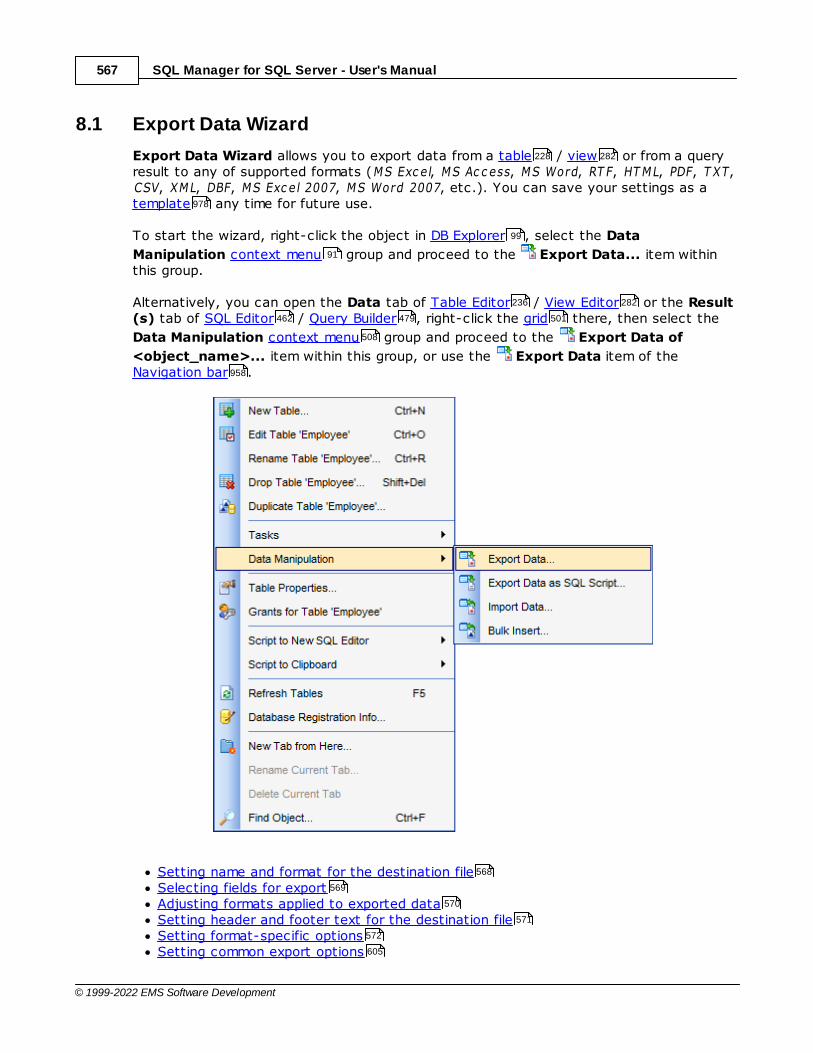
SQL Manager for SQL Server - User's Manual567
© 1999-2022 EMS Software Development
8.1 Export Data Wizard
Export Data Wizard allows you to export data from a table / view or from a queryresult to any of supported formats (MS Exc e l, MS Ac c ess, MS Word, RT F, HT ML, PDF, T XT,CSV, XML, DBF, MS Exc e l 2007, MS Word 2007, etc.). You can save your settings as atemplate any time for future use.
To start the wizard, right-click the object in DB Explorer , select the Data
Manipulation context menu group and proceed to the Export Data... item withinthis group.
Alternatively, you can open the Data tab of Table Editor / View Editor or the Result(s) tab of SQL Editor / Query Builder , right-click the grid there, then select the
Data Manipulation context menu group and proceed to the Export Data of
<object_name>... item within this group, or use the Export Data item of theNavigation bar .
Setting name and format for the destination fileSelecting fields for exportAdjusting formats applied to exported dataSetting header and footer text for the destination fileSetting format-specific optionsSetting common export options
228 282
978
99
91
236 282
462 479 501
508
958
568
569
570
571
572
605

SQL Manager for SQL Server - User's Manual568
© 1999-2022 EMS Software Development
Exporting data
Availability:
Full version (forWindows)
Yes
Lite version (forWindows)
No
Note: To compare all features of the Full and the Lite versions of SQL Manager, refer tothe Feature Matrix page.
See also:
Import Data Wizard
Export as SQL Script
Bulk Insert Wizard
Using templates
8.1.1 Setting destination file name and format
This step of the wizard allows you to select the destination file format you need to exportdata into.
Destination file name
Type in or use the button to specify the path to the file using the Save as... dialog.The file name extension changes automatically according to the selected Destinationformat.
Note: If the target file already exists, the application will show a warning dialog whereyou can choose the action you need.
607
23
608
633
642
978
992
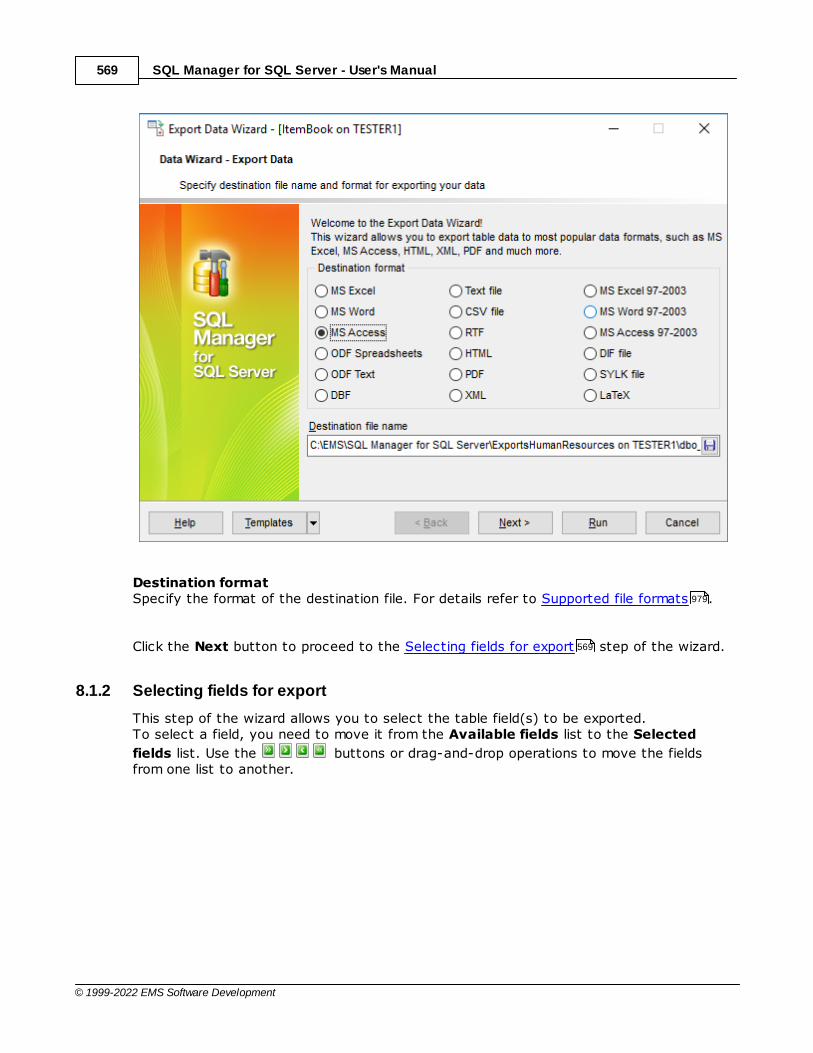
SQL Manager for SQL Server - User's Manual569
© 1999-2022 EMS Software Development
Destination formatSpecify the format of the destination file. For details refer to Supported file formats .
Click the Next button to proceed to the Selecting fields for export step of the wizard.
8.1.2 Selecting fields for export
This step of the wizard allows you to select the table field(s) to be exported.To select a field, you need to move it from the Available fields list to the Selected
fields list. Use the buttons or drag-and-drop operations to move the fieldsfrom one list to another.
979
569
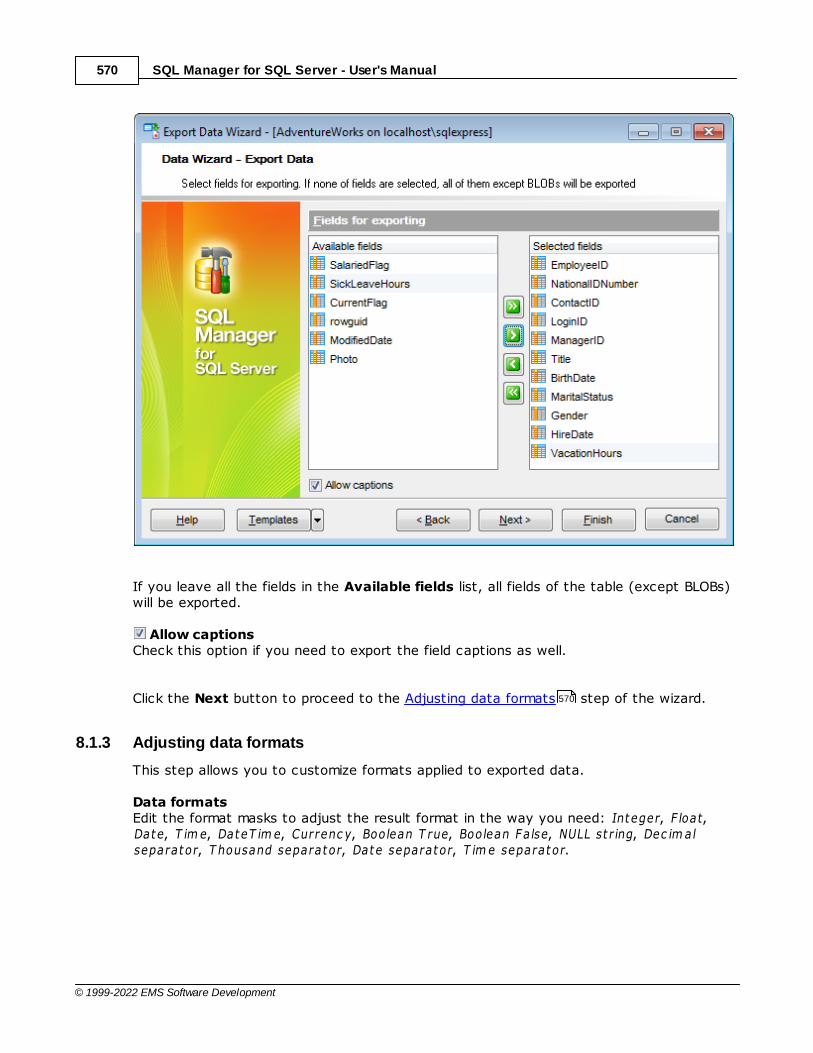
SQL Manager for SQL Server - User's Manual570
© 1999-2022 EMS Software Development
If you leave all the fields in the Available fields list, all fields of the table (except BLOBs)will be exported.
Allow captionsCheck this option if you need to export the field captions as well.
Click the Next button to proceed to the Adjusting data formats step of the wizard.
8.1.3 Adjusting data formats
This step allows you to customize formats applied to exported data.
Data formatsEdit the format masks to adjust the result format in the way you need: Integer, F loat,Date, T im e, DateT im e, Currenc y, Boolean T rue, Boolean False, NULL st r ing, Dec im alseparator, T housand separator, Date separator, T im e separator.
570
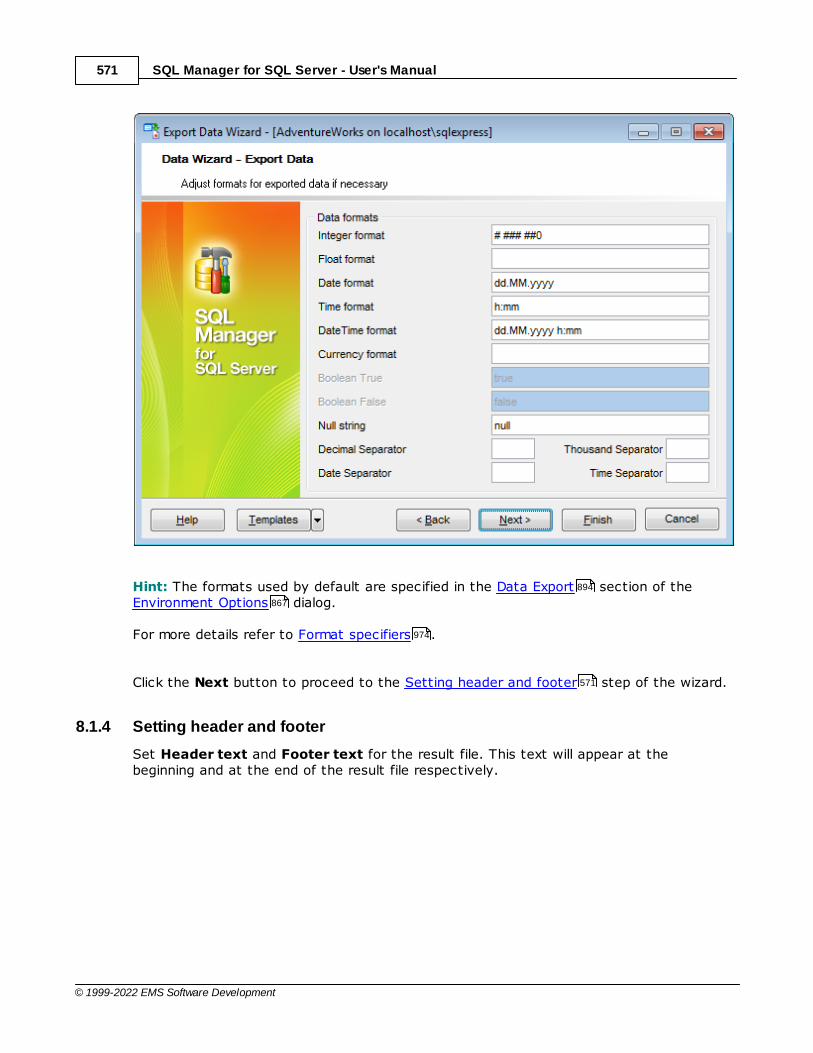
SQL Manager for SQL Server - User's Manual571
© 1999-2022 EMS Software Development
Hint: The formats used by default are specified in the Data Export section of theEnvironment Options dialog.
For more details refer to Format specifiers .
Click the Next button to proceed to the Setting header and footer step of the wizard.
8.1.4 Setting header and footer
Set Header text and Footer text for the result file. This text will appear at thebeginning and at the end of the result file respectively.
894
867
974
571
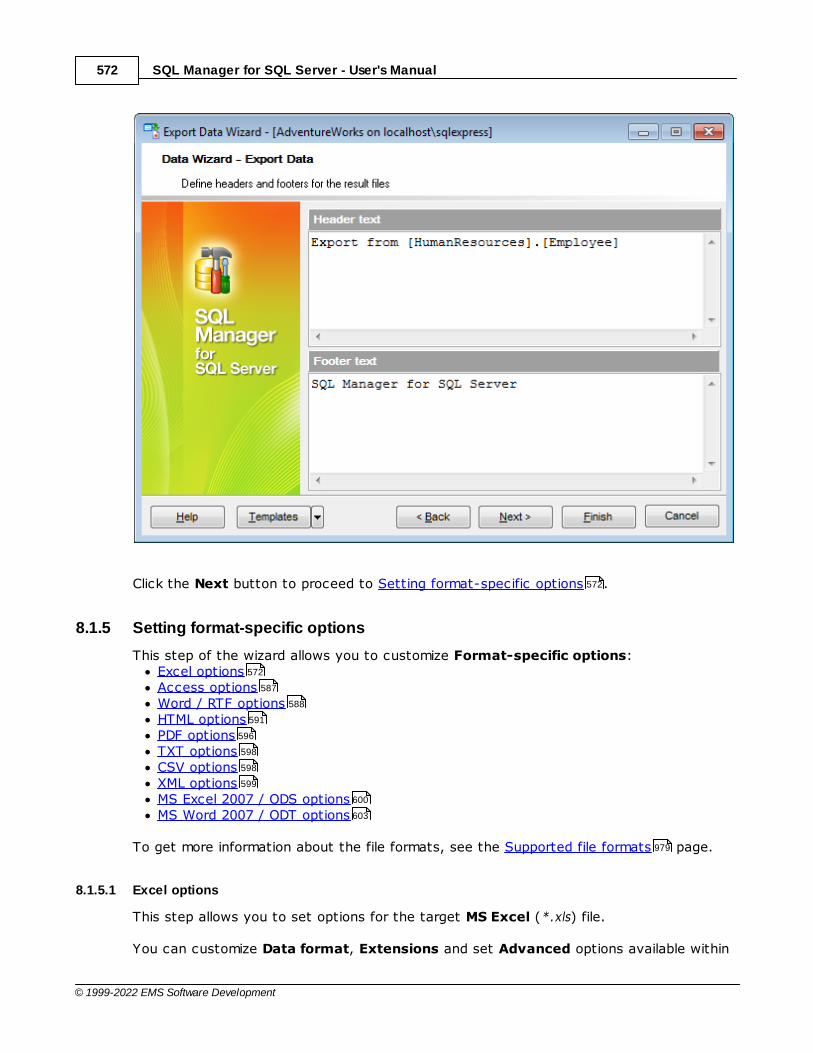
SQL Manager for SQL Server - User's Manual572
© 1999-2022 EMS Software Development
Click the Next button to proceed to Setting format-specific options .
8.1.5 Setting format-specific options
This step of the wizard allows you to customize Format-specific options:Excel optionsAccess optionsWord / RTF optionsHTML optionsPDF optionsTXT optionsCSV optionsXML optionsMS Excel 2007 / ODS optionsMS Word 2007 / ODT options
To get more information about the file formats, see the Supported file formats page.
8.1.5.1 Excel options
This step allows you to set options for the target MS Excel (*.xls) file.
You can customize Data format, Extensions and set Advanced options available within
572
572
587
588
591
596
598
598
599
600
603
979

SQL Manager for SQL Server - User's Manual573
© 1999-2022 EMS Software Development
the corresponding tabs:Data formatExtensionsAdvanced
When you are done, click the Next button to proceed to Setting common export options.
8.1.5.1.1 Data format
The Data Format tab contains general options which allow you to adjust the format foreach kind of Excel cells. This means that you can specify such parameters as font,borders, filling c olor and m ethod, etc. for each entity (such as data fie ld, header, footer,c apt ion, data, hyperlink and so on) separately. Also it is possible to create sty les to makethe target Excel file striped by columns or rows.
FieldsOptionsStyles
For your convenience the previews illustrating the changes are displayed in the SampleGroup area on each page of Data Format tab.
573
577
586
605
574
576
577
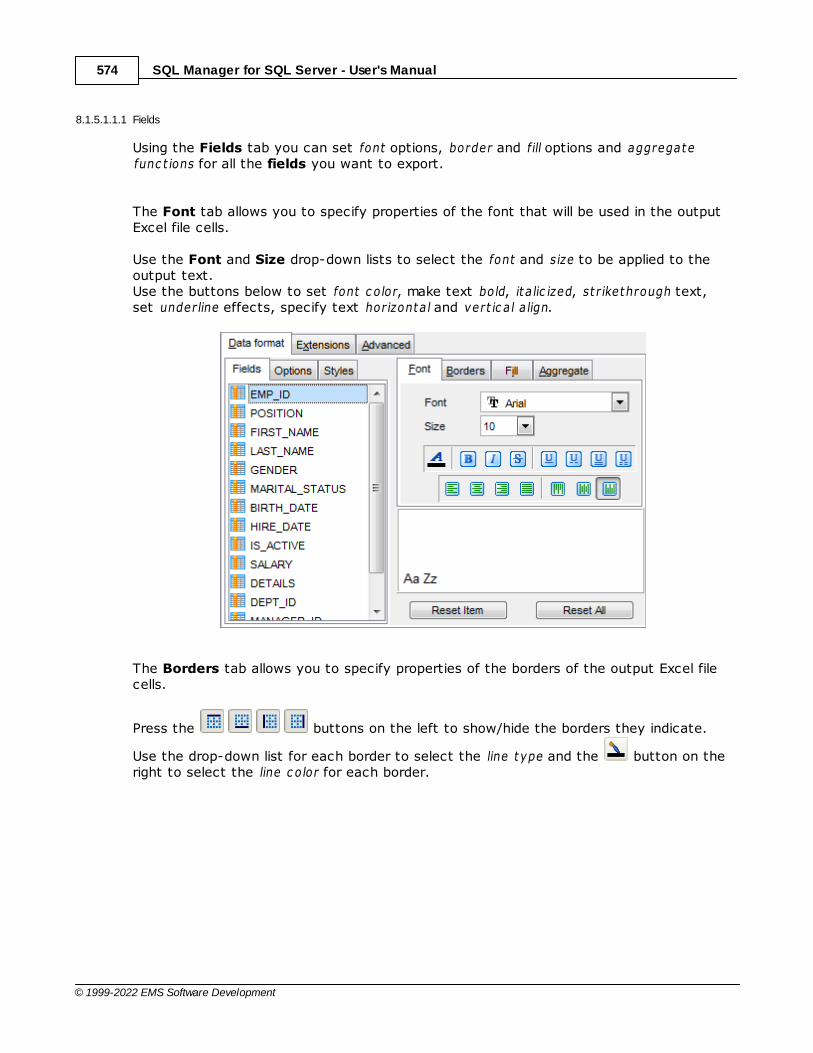
SQL Manager for SQL Server - User's Manual574
© 1999-2022 EMS Software Development
8.1.5.1.1.1 Fields
Using the Fields tab you can set font options, border and fill options and aggregatefunc t ions for all the fields you want to export.
The Font tab allows you to specify properties of the font that will be used in the outputExcel file cells.
Use the Font and Size drop-down lists to select the font and size to be applied to theoutput text.Use the buttons below to set font c olor, make text bold, it a lic ized, st r ikethrough text,set underline effects, specify text horizonta l and vert ic a l a lign.
The Borders tab allows you to specify properties of the borders of the output Excel filecells.
Press the buttons on the left to show/hide the borders they indicate.
Use the drop-down list for each border to select the line type and the button on theright to select the line c olor for each border.
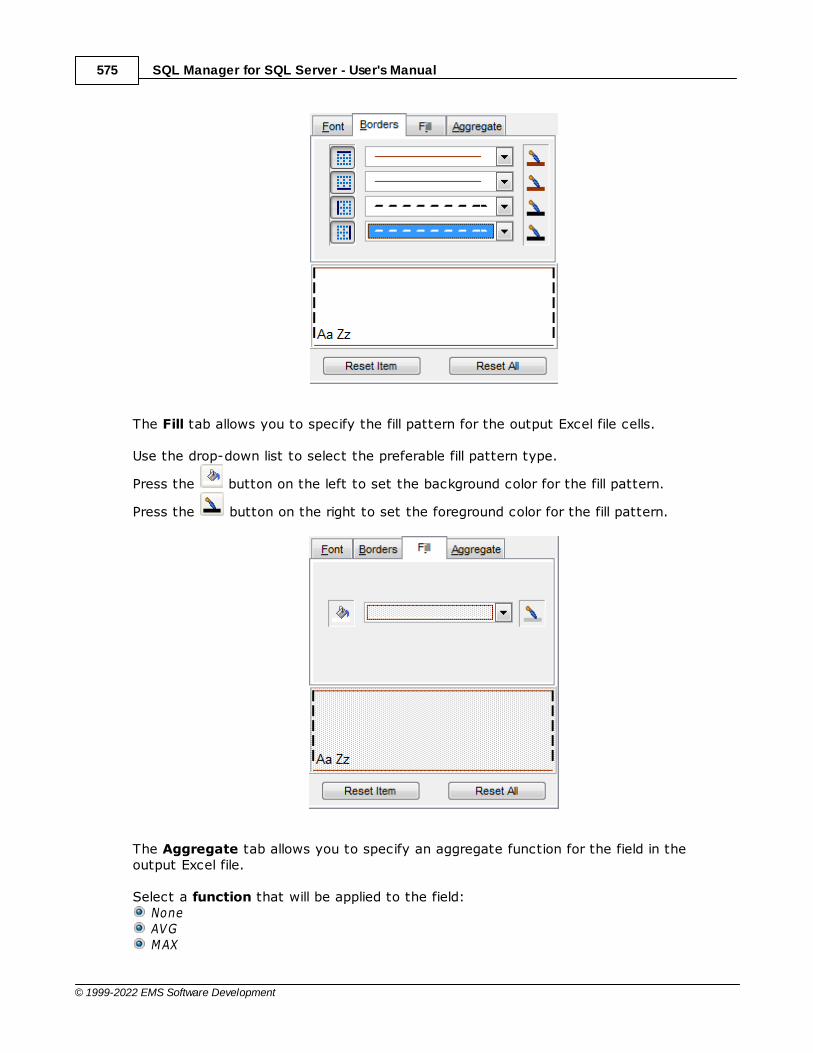
SQL Manager for SQL Server - User's Manual575
© 1999-2022 EMS Software Development
The Fill tab allows you to specify the fill pattern for the output Excel file cells.
Use the drop-down list to select the preferable fill pattern type.
Press the button on the left to set the background color for the fill pattern.
Press the button on the right to set the foreground color for the fill pattern.
The Aggregate tab allows you to specify an aggregate function for the field in theoutput Excel file.
Select a function that will be applied to the field: None AVG MAX
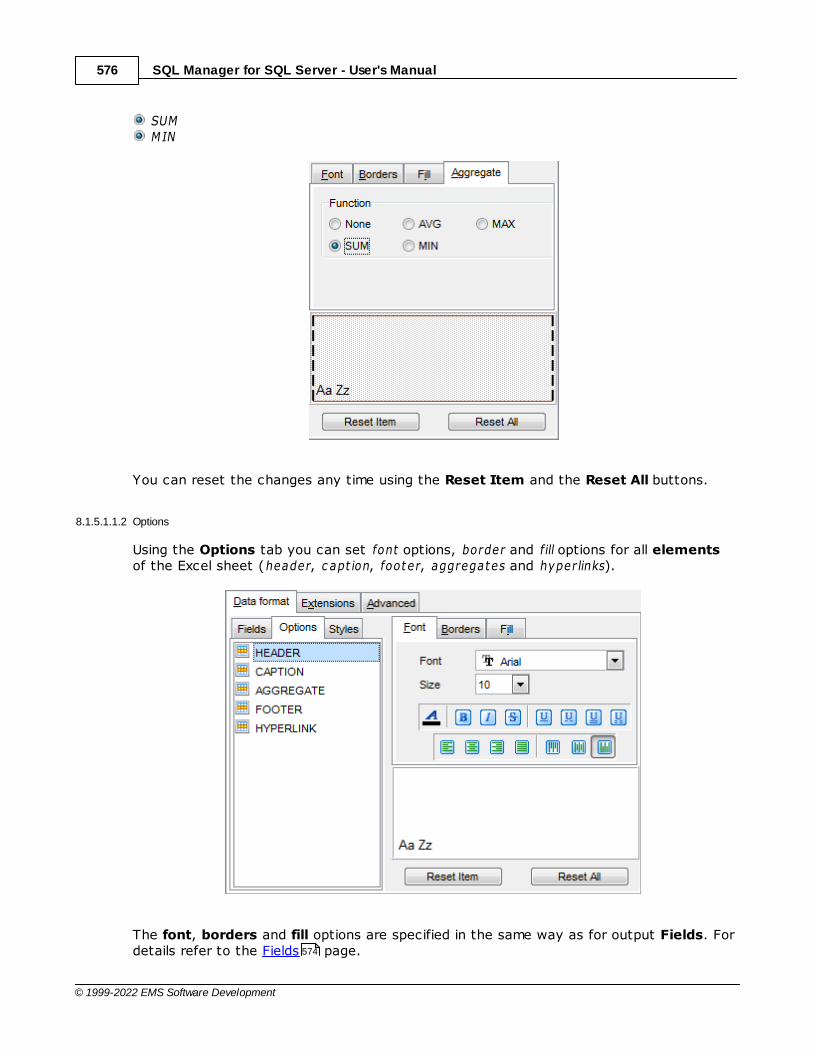
SQL Manager for SQL Server - User's Manual576
© 1999-2022 EMS Software Development
SUM MIN
You can reset the changes any time using the Reset Item and the Reset All buttons.
8.1.5.1.1.2 Options
Using the Options tab you can set font options, border and fill options for all elementsof the Excel sheet (header, c apt ion, footer, aggregates and hyperlinks).
The font, borders and fill options are specified in the same way as for output Fields. Fordetails refer to the Fields page.574
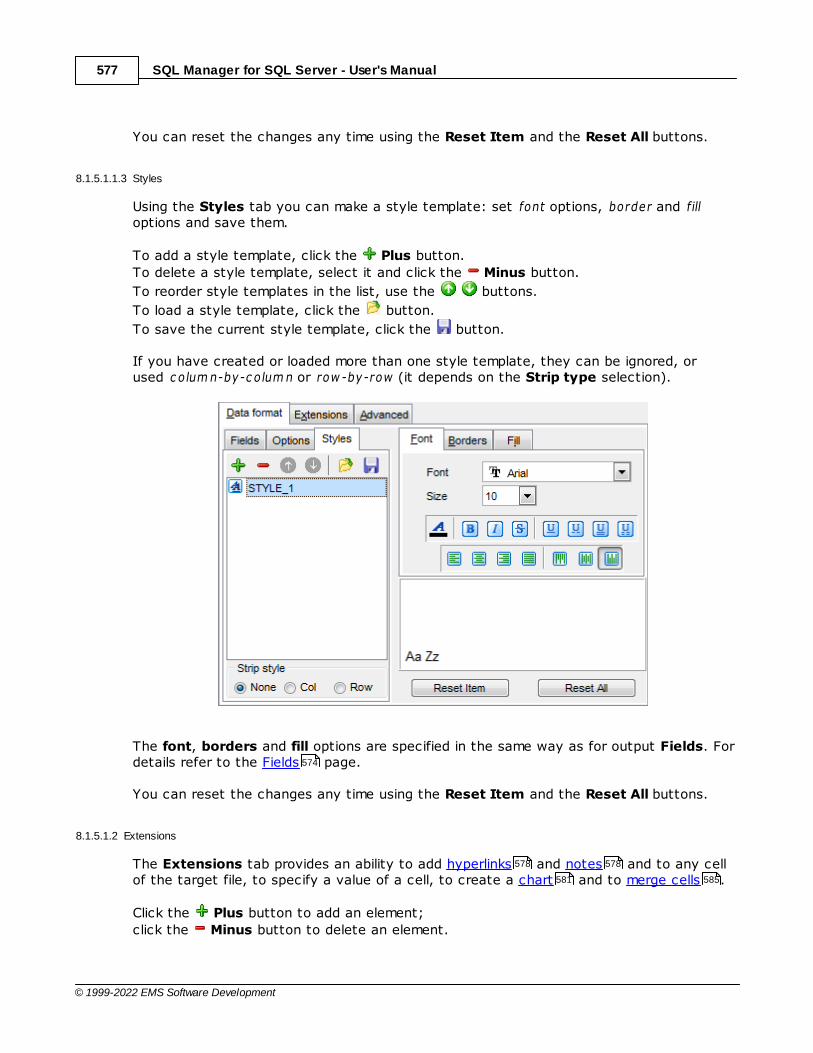
SQL Manager for SQL Server - User's Manual577
© 1999-2022 EMS Software Development
You can reset the changes any time using the Reset Item and the Reset All buttons.
8.1.5.1.1.3 Styles
Using the Styles tab you can make a style template: set font options, border and filloptions and save them.
To add a style template, click the Plus button.
To delete a style template, select it and click the Minus button.
To reorder style templates in the list, use the buttons.
To load a style template, click the button.
To save the current style template, click the button.
If you have created or loaded more than one style template, they can be ignored, orused c olum n-by-c olum n or row -by-row (it depends on the Strip type selection).
The font, borders and fill options are specified in the same way as for output Fields. Fordetails refer to the Fields page.
You can reset the changes any time using the Reset Item and the Reset All buttons.
8.1.5.1.2 Extensions
The Extensions tab provides an ability to add hyperlinks and notes and to any cellof the target file, to specify a value of a cell, to create a chart and to merge cells .
Click the Plus button to add an element;
click the Minus button to delete an element.
574
578 578
581 585

SQL Manager for SQL Server - User's Manual578
© 1999-2022 EMS Software Development
HyperlinksNotesChartsCellsMerged Cells
8.1.5.1.2.1 Hyperlinks
If you need to create a hyperlink:set the cell coordinates (Col and Row);specify whether this is a loc al link or URL;enter the t it le of the hyperlink;specify the target file location or address.
Use the Col and Row spinner controls to specify the column and row for the hyperlink inthe output file.
The Style group allows you to select the preferable hyperlink style: URL Loc al f ile (i.e. the file is located on your local machine or on a machine in the LAN)
Use the Title box to specify the hyperlink name.
The Target box lets you enter the path to the target file or URL. Use the button tocheck whether the specified location is available.
8.1.5.1.2.2 Notes
If you need to create a note:set the cell coordinates (Col and Row);enter text of a note for the cell;
578
578
581
584
585
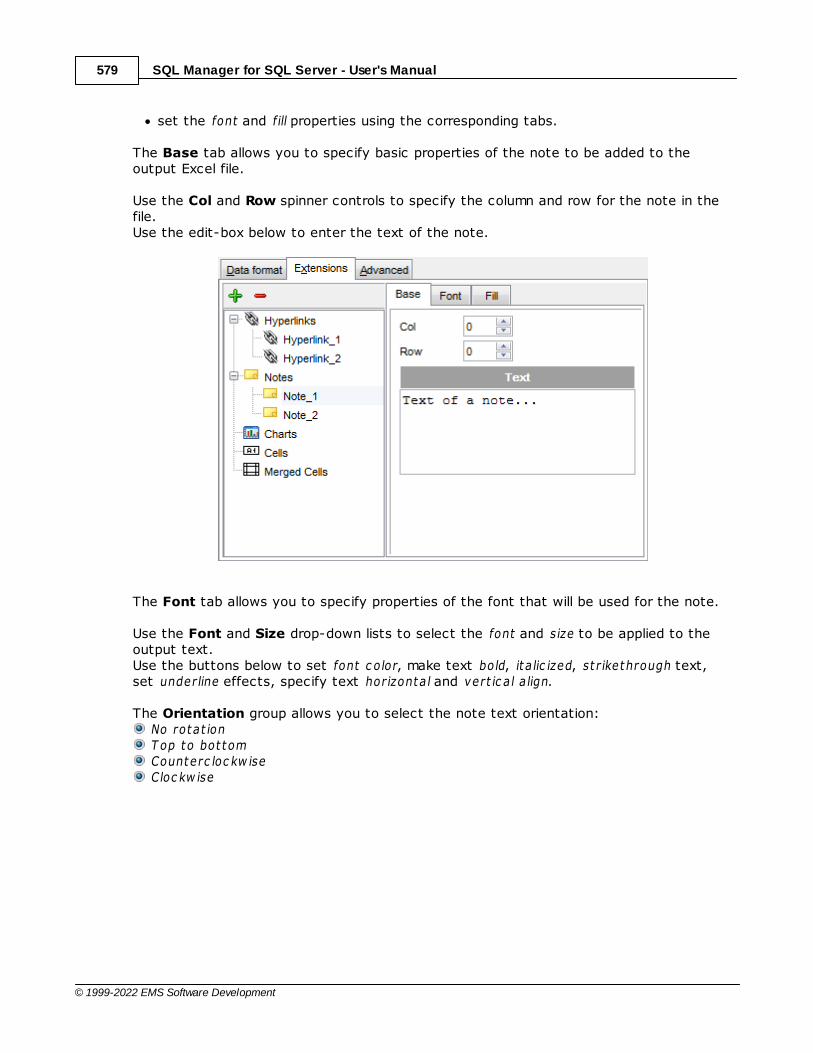
SQL Manager for SQL Server - User's Manual579
© 1999-2022 EMS Software Development
set the font and fill properties using the corresponding tabs.
The Base tab allows you to specify basic properties of the note to be added to theoutput Excel file.
Use the Col and Row spinner controls to specify the column and row for the note in thefile.Use the edit-box below to enter the text of the note.
The Font tab allows you to specify properties of the font that will be used for the note.
Use the Font and Size drop-down lists to select the font and size to be applied to theoutput text.Use the buttons below to set font c olor, make text bold, it a lic ized, st r ikethrough text,set underline effects, specify text horizonta l and vert ic a l a lign.
The Orientation group allows you to select the note text orientation: No rotat ion T op to bot tom Counterc loc kw ise Cloc kw ise
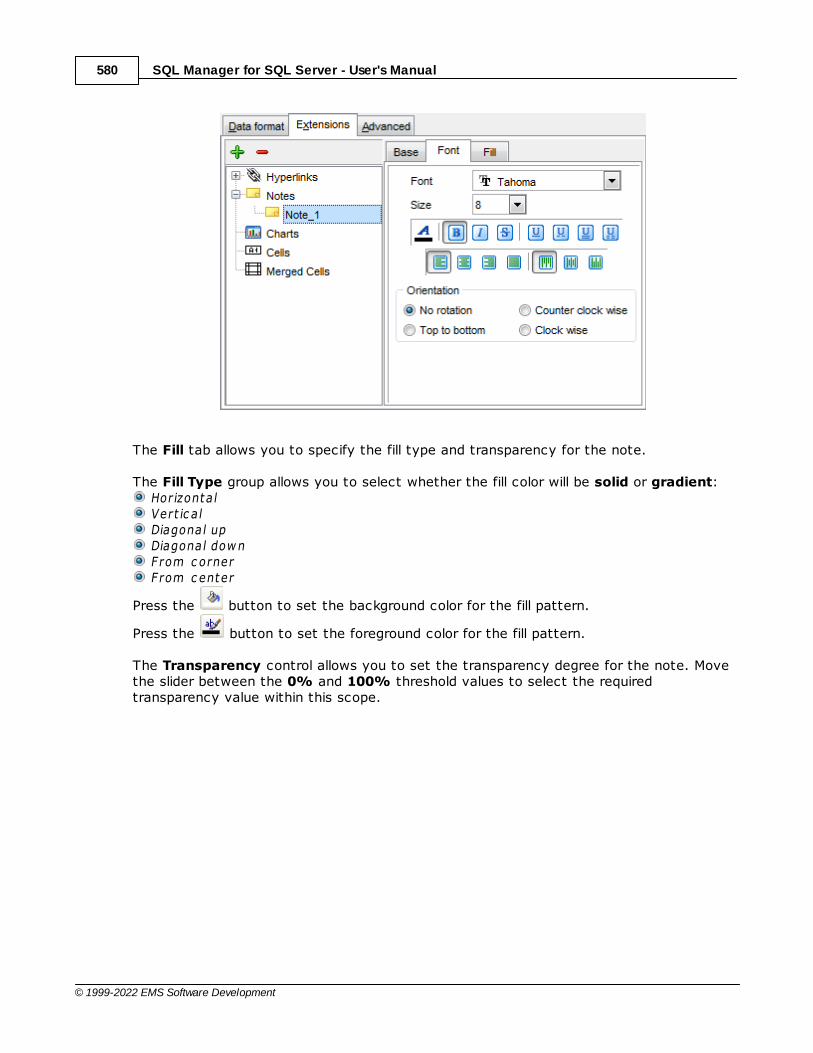
SQL Manager for SQL Server - User's Manual580
© 1999-2022 EMS Software Development
The Fill tab allows you to specify the fill type and transparency for the note.
The Fill Type group allows you to select whether the fill color will be solid or gradient: Horizonta l Vert ic a l Diagonal up Diagonal dow n F rom c orner F rom c enter
Press the button to set the background color for the fill pattern.
Press the button to set the foreground color for the fill pattern.
The Transparency control allows you to set the transparency degree for the note. Movethe slider between the 0% and 100% threshold values to select the requiredtransparency value within this scope.
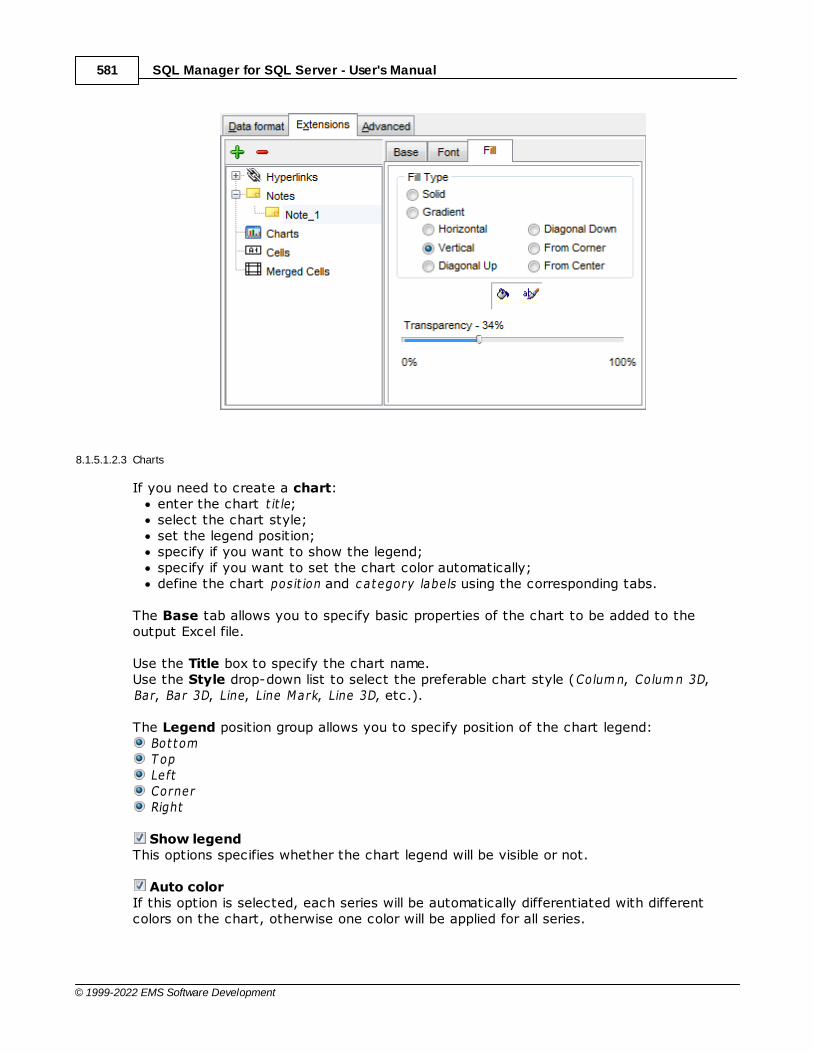
SQL Manager for SQL Server - User's Manual581
© 1999-2022 EMS Software Development
8.1.5.1.2.3 Charts
If you need to create a chart:enter the chart t it le;select the chart style;set the legend position;specify if you want to show the legend;specify if you want to set the chart color automatically;define the chart posit ion and c ategory labe ls using the corresponding tabs.
The Base tab allows you to specify basic properties of the chart to be added to theoutput Excel file.
Use the Title box to specify the chart name.Use the Style drop-down list to select the preferable chart style (Colum n, Colum n 3D,Bar, Bar 3D, Line, Line Mark, Line 3D, etc.).
The Legend position group allows you to specify position of the chart legend: Bot tom T op Left Corner Right
Show legendThis options specifies whether the chart legend will be visible or not.
Auto colorIf this option is selected, each series will be automatically differentiated with differentcolors on the chart, otherwise one color will be applied for all series.
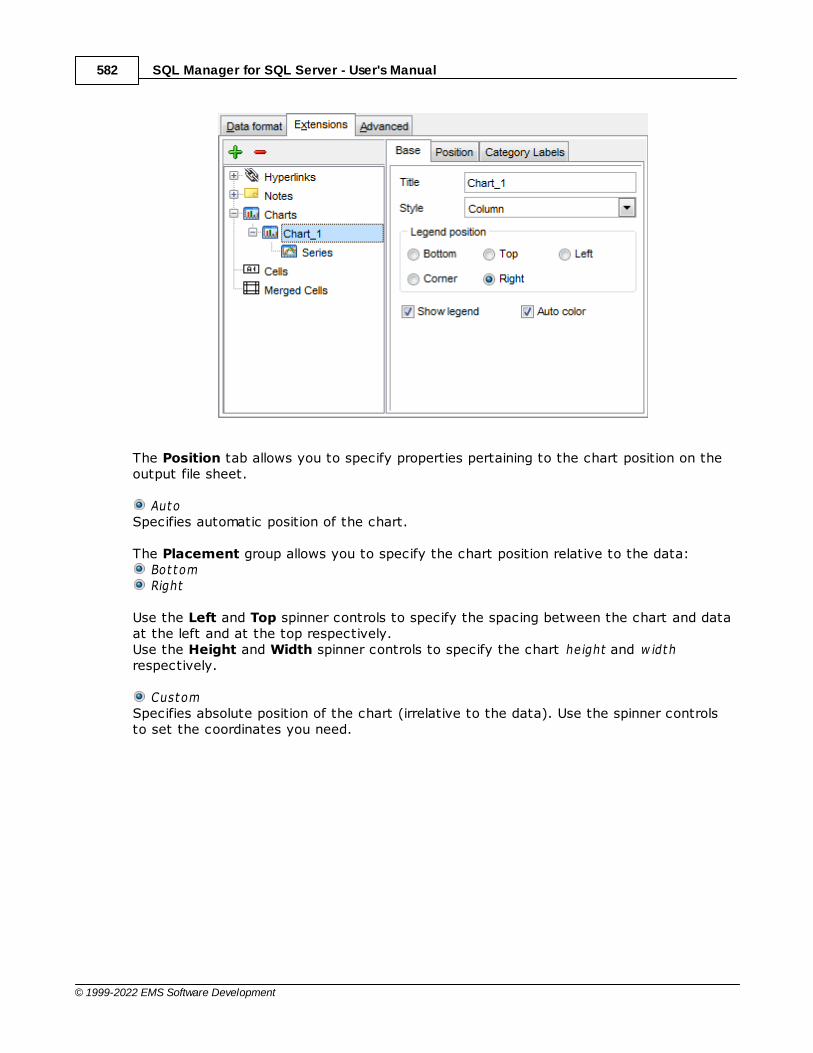
SQL Manager for SQL Server - User's Manual582
© 1999-2022 EMS Software Development
The Position tab allows you to specify properties pertaining to the chart position on theoutput file sheet.
AutoSpecifies automatic position of the chart.
The Placement group allows you to specify the chart position relative to the data: Bot tom Right
Use the Left and Top spinner controls to specify the spacing between the chart and dataat the left and at the top respectively.Use the Height and Width spinner controls to specify the chart he ight and w idthrespectively.
CustomSpecifies absolute position of the chart (irrelative to the data). Use the spinner controlsto set the coordinates you need.
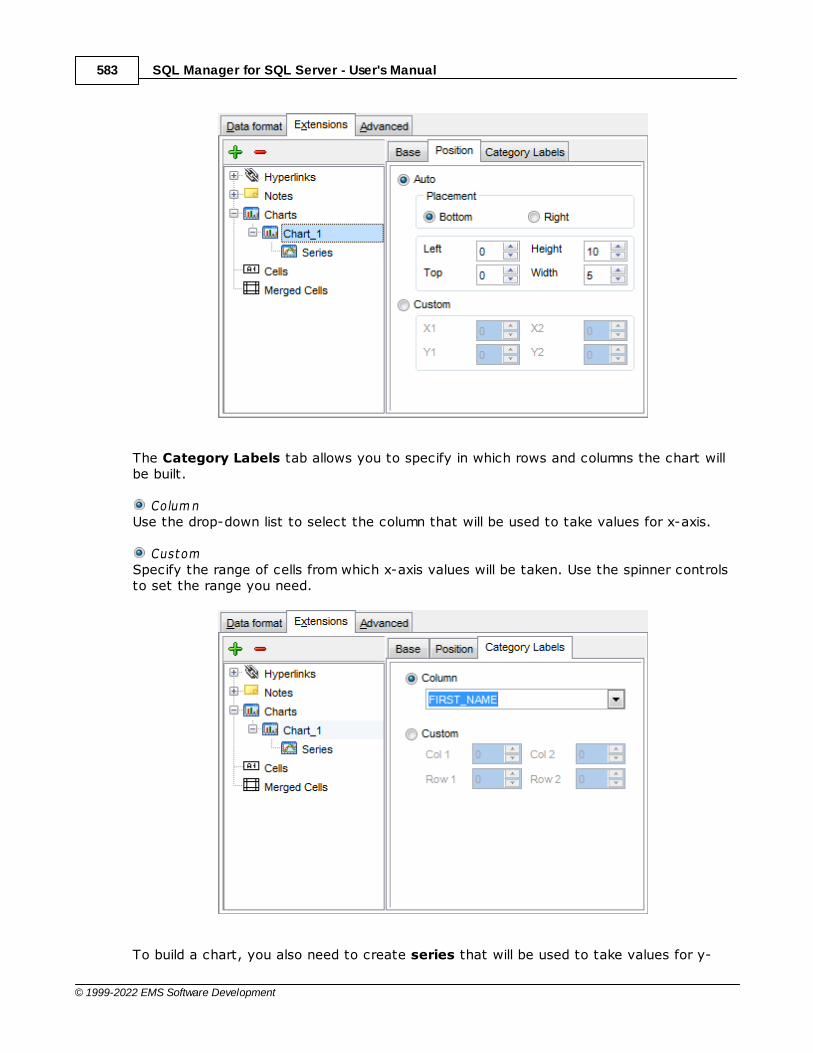
SQL Manager for SQL Server - User's Manual583
© 1999-2022 EMS Software Development
The Category Labels tab allows you to specify in which rows and columns the chart willbe built.
Colum nUse the drop-down list to select the column that will be used to take values for x-axis.
CustomSpecify the range of cells from which x-axis values will be taken. Use the spinner controlsto set the range you need.
To build a chart, you also need to create series that will be used to take values for y-
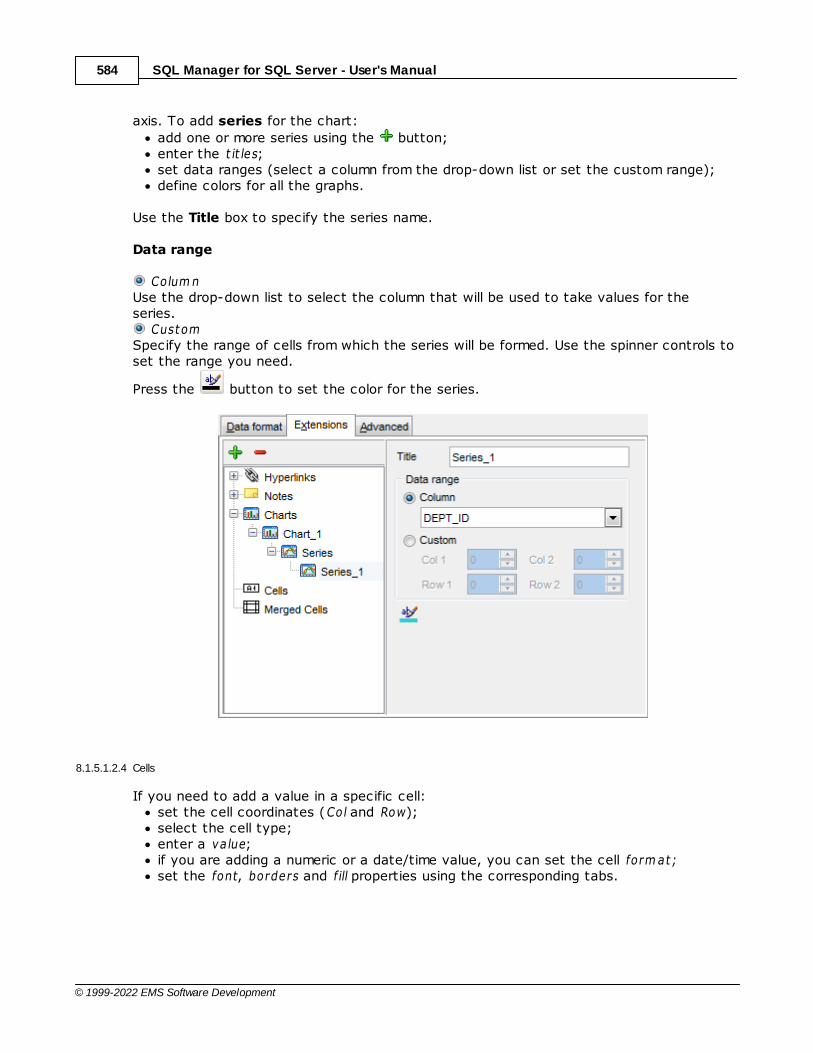
SQL Manager for SQL Server - User's Manual584
© 1999-2022 EMS Software Development
axis. To add series for the chart:
add one or more series using the button;enter the t it les;set data ranges (select a column from the drop-down list or set the custom range);define colors for all the graphs.
Use the Title box to specify the series name.
Data range
Colum nUse the drop-down list to select the column that will be used to take values for theseries.
CustomSpecify the range of cells from which the series will be formed. Use the spinner controls toset the range you need.
Press the button to set the color for the series.
8.1.5.1.2.4 Cells
If you need to add a value in a specific cell:set the cell coordinates (Col and Row);select the cell type;enter a value;if you are adding a numeric or a date/time value, you can set the cell form at ;set the font, borders and fill properties using the corresponding tabs.
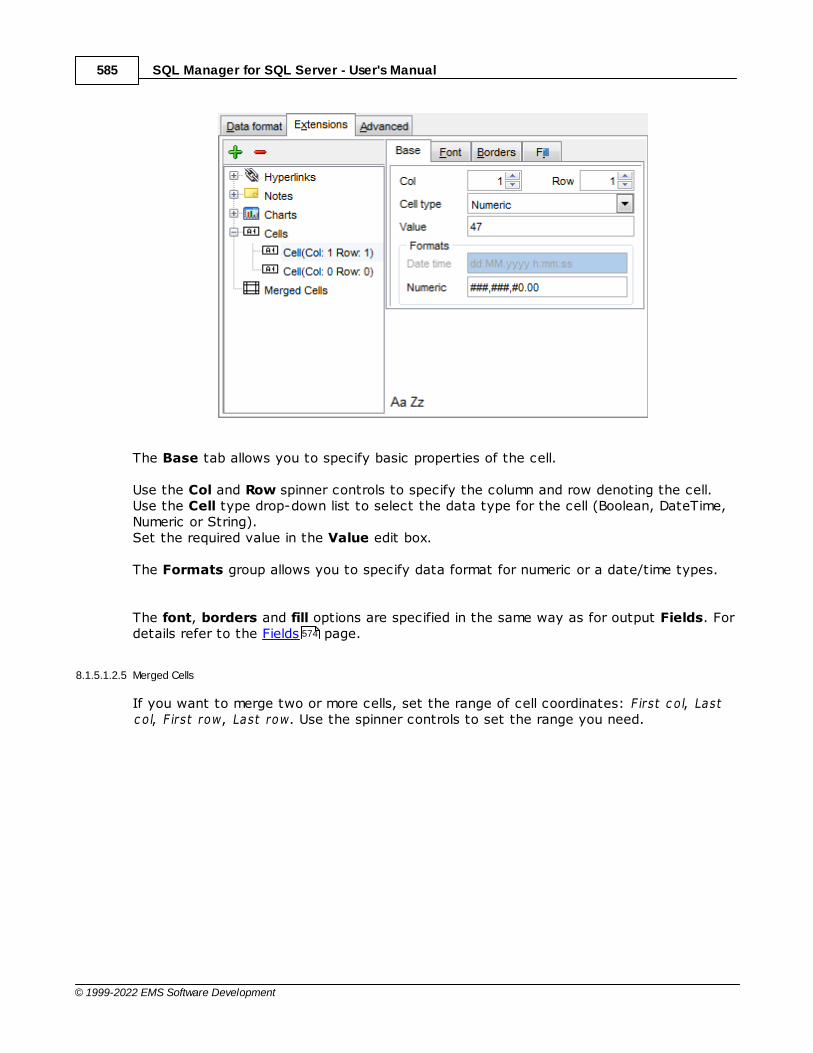
SQL Manager for SQL Server - User's Manual585
© 1999-2022 EMS Software Development
The Base tab allows you to specify basic properties of the cell.
Use the Col and Row spinner controls to specify the column and row denoting the cell.Use the Cell type drop-down list to select the data type for the cell (Boolean, DateTime,Numeric or String).Set the required value in the Value edit box.
The Formats group allows you to specify data format for numeric or a date/time types.
The font, borders and fill options are specified in the same way as for output Fields. Fordetails refer to the Fields page.
8.1.5.1.2.5 Merged Cells
If you want to merge two or more cells, set the range of cell coordinates: F irst c ol, Lastc ol, F irst row, Last row. Use the spinner controls to set the range you need.
574
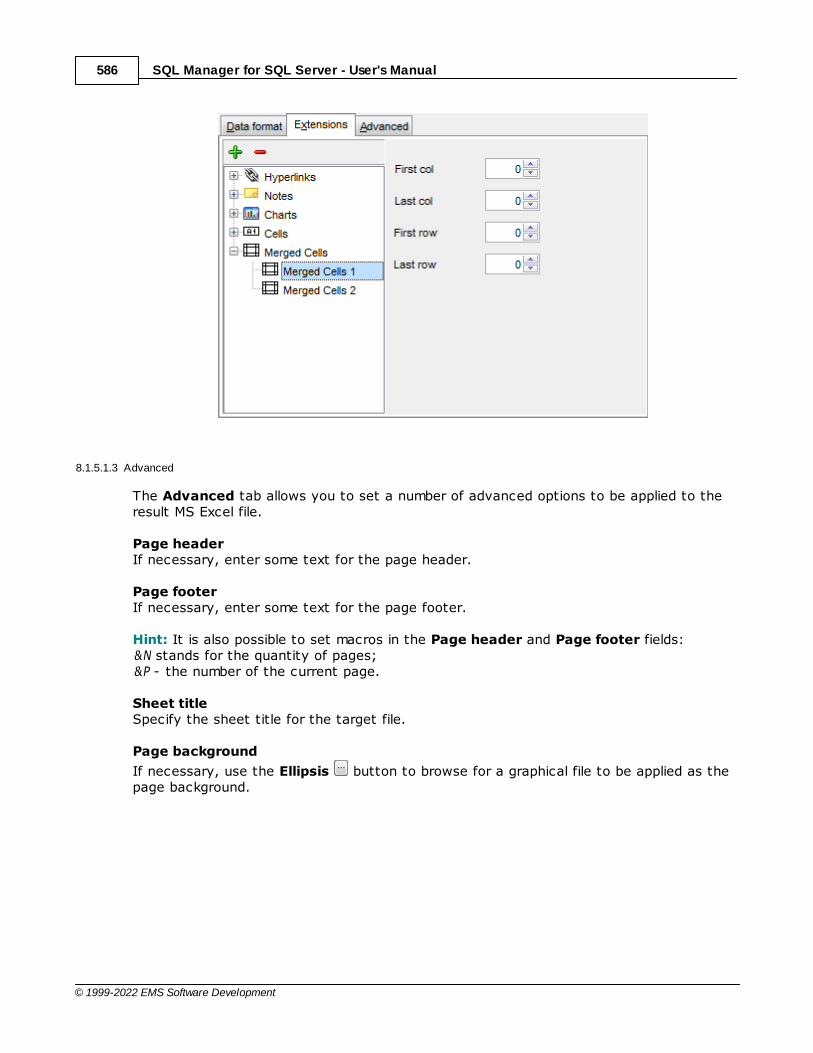
SQL Manager for SQL Server - User's Manual586
© 1999-2022 EMS Software Development
8.1.5.1.3 Advanced
The Advanced tab allows you to set a number of advanced options to be applied to theresult MS Excel file.
Page headerIf necessary, enter some text for the page header.
Page footerIf necessary, enter some text for the page footer.
Hint: It is also possible to set macros in the Page header and Page footer fields:&N stands for the quantity of pages;&P - the number of the current page.
Sheet titleSpecify the sheet title for the target file.
Page background
If necessary, use the Ellipsis button to browse for a graphical file to be applied as thepage background.
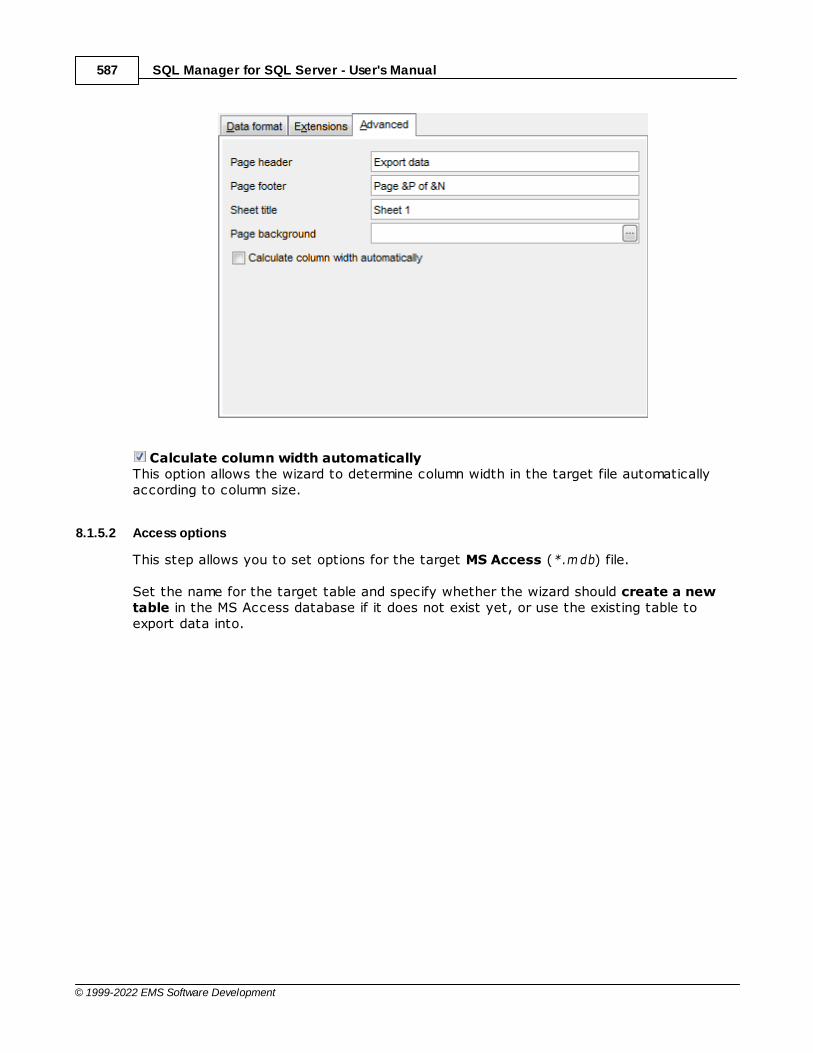
SQL Manager for SQL Server - User's Manual587
© 1999-2022 EMS Software Development
Calculate column width automaticallyThis option allows the wizard to determine column width in the target file automaticallyaccording to column size.
8.1.5.2 Access options
This step allows you to set options for the target MS Access (*.m db) file.
Set the name for the target table and specify whether the wizard should create a newtable in the MS Access database if it does not exist yet, or use the existing table toexport data into.

SQL Manager for SQL Server - User's Manual588
© 1999-2022 EMS Software Development
When you are done, click the Next button to proceed to Setting common export options.
8.1.5.3 Word / RTF options
This step allows you to set options for the target MS Word (*.doc) and Rich TextFormat (*.rt f) files.
Base StylesStrip Styles
For your convenience the previews illustrating the changes are displayed in the SampleGroup area within the Base Sty les and the St r ip Sty les tabs.
605
589
590

SQL Manager for SQL Server - User's Manual589
© 1999-2022 EMS Software Development
When you are done, click the Next button to proceed to Setting common export options.
8.1.5.3.1 Base Styles
The Base Styles tab contains the list of target file entities: HEADER, CAPT ION, DAT A,FOOT ER. You can customize style options, such as font and size, bac kground andforeground c olors, text a lignm ent, etc. for each of them by clicking the correspondingitem in the list and setting the options in the right-side panel. You can also switch pageorientation for the target Word/RTF file using this tab.
605
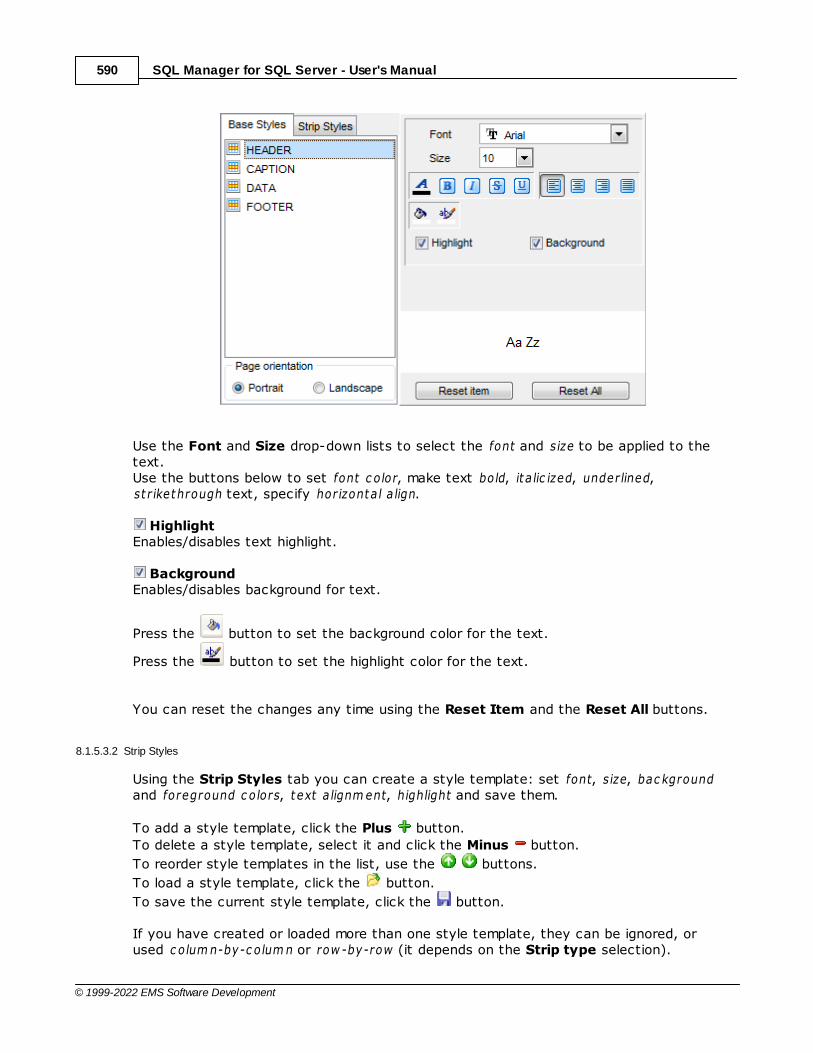
SQL Manager for SQL Server - User's Manual590
© 1999-2022 EMS Software Development
Use the Font and Size drop-down lists to select the font and size to be applied to thetext.Use the buttons below to set font c olor, make text bold, it a lic ized, underlined,st r ikethrough text, specify horizonta l a lign.
HighlightEnables/disables text highlight.
BackgroundEnables/disables background for text.
Press the button to set the background color for the text.
Press the button to set the highlight color for the text.
You can reset the changes any time using the Reset Item and the Reset All buttons.
8.1.5.3.2 Strip Styles
Using the Strip Styles tab you can create a style template: set font, size, bac kgroundand foreground c olors, text a lignm ent, highlight and save them.
To add a style template, click the Plus button.
To delete a style template, select it and click the Minus button.
To reorder style templates in the list, use the buttons.
To load a style template, click the button.
To save the current style template, click the button.
If you have created or loaded more than one style template, they can be ignored, orused c olum n-by-c olum n or row -by-row (it depends on the Strip type selection).
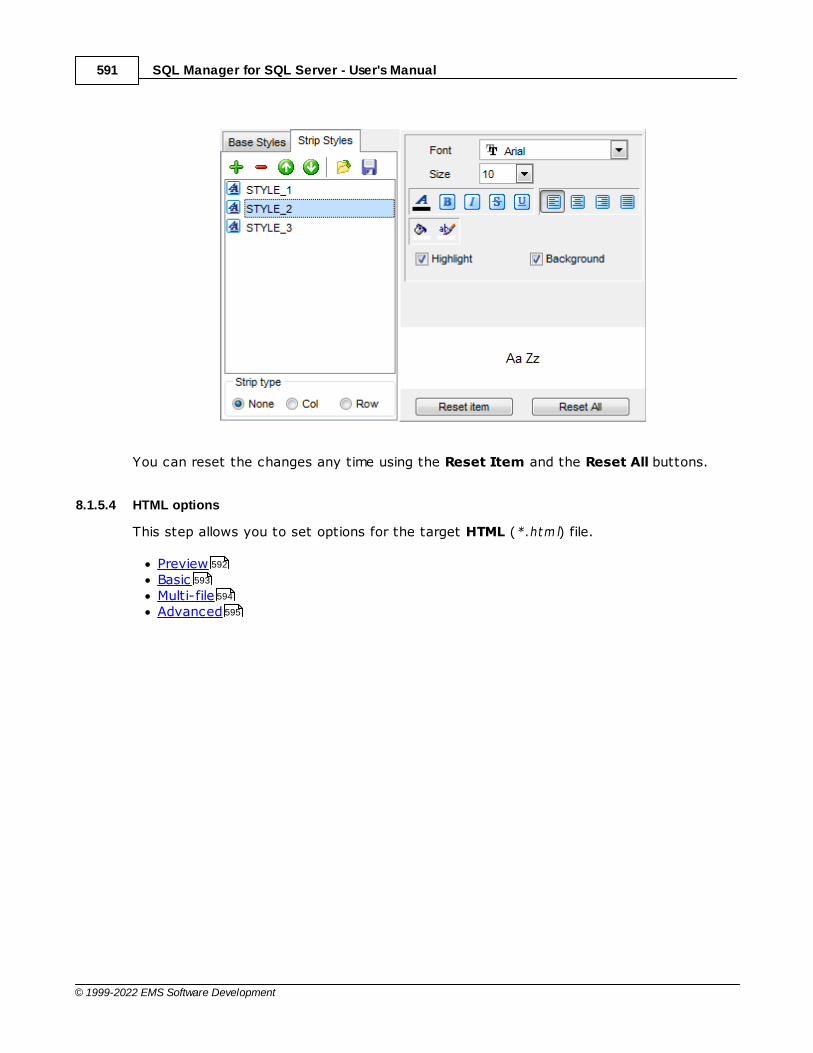
SQL Manager for SQL Server - User's Manual591
© 1999-2022 EMS Software Development
You can reset the changes any time using the Reset Item and the Reset All buttons.
8.1.5.4 HTML options
This step allows you to set options for the target HTML (*.htm l) file.
PreviewBasicMulti-fileAdvanced
592
593
594
595

SQL Manager for SQL Server - User's Manual592
© 1999-2022 EMS Software Development
When you are done, click the Next button to proceed to Setting common export options.
8.1.5.4.1 Preview
The Preview tab allows you to customize the style that will be applied to the targetHTML file using a number of built-in templates provided in the Templates drop-down list.
605
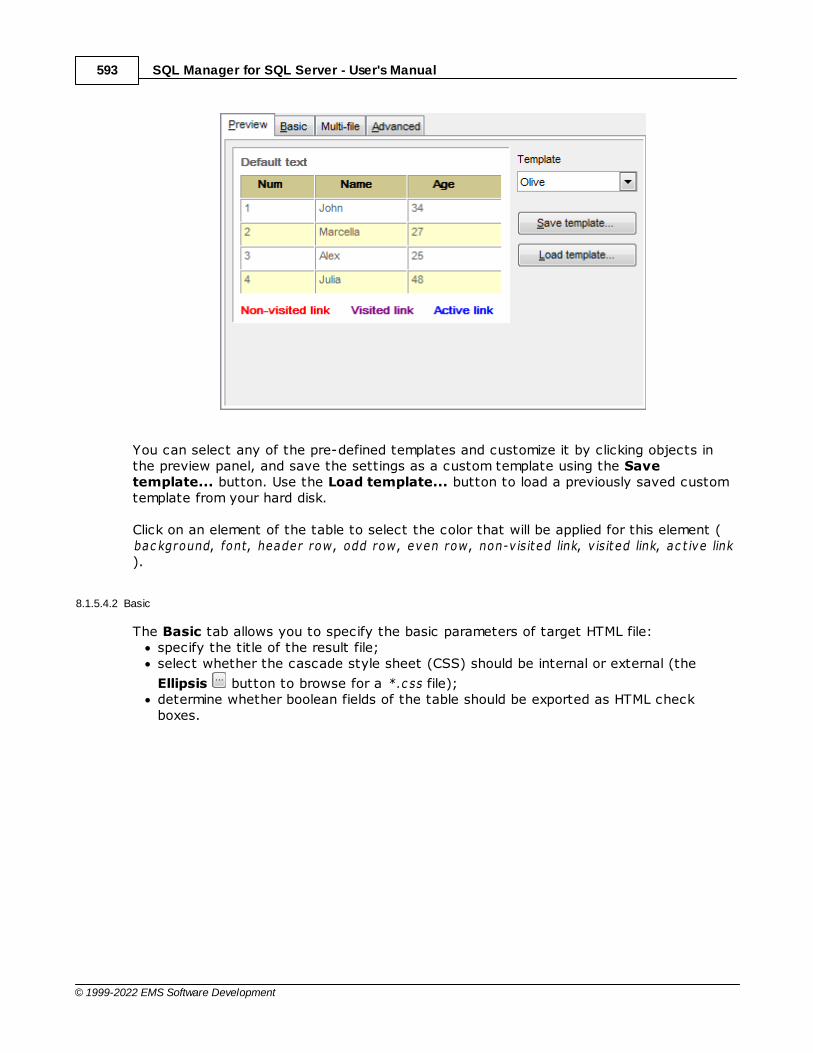
SQL Manager for SQL Server - User's Manual593
© 1999-2022 EMS Software Development
You can select any of the pre-defined templates and customize it by clicking objects inthe preview panel, and save the settings as a custom template using the Savetemplate... button. Use the Load template... button to load a previously saved customtemplate from your hard disk.
Click on an element of the table to select the color that will be applied for this element (bac kground, font, header row, odd row, even row, non-v is it ed link, v is it ed link, ac t ive link).
8.1.5.4.2 Basic
The Basic tab allows you to specify the basic parameters of target HTML file:specify the title of the result file;select whether the cascade style sheet (CSS) should be internal or external (the
Ellipsis button to browse for a *.c ss file);determine whether boolean fields of the table should be exported as HTML checkboxes.
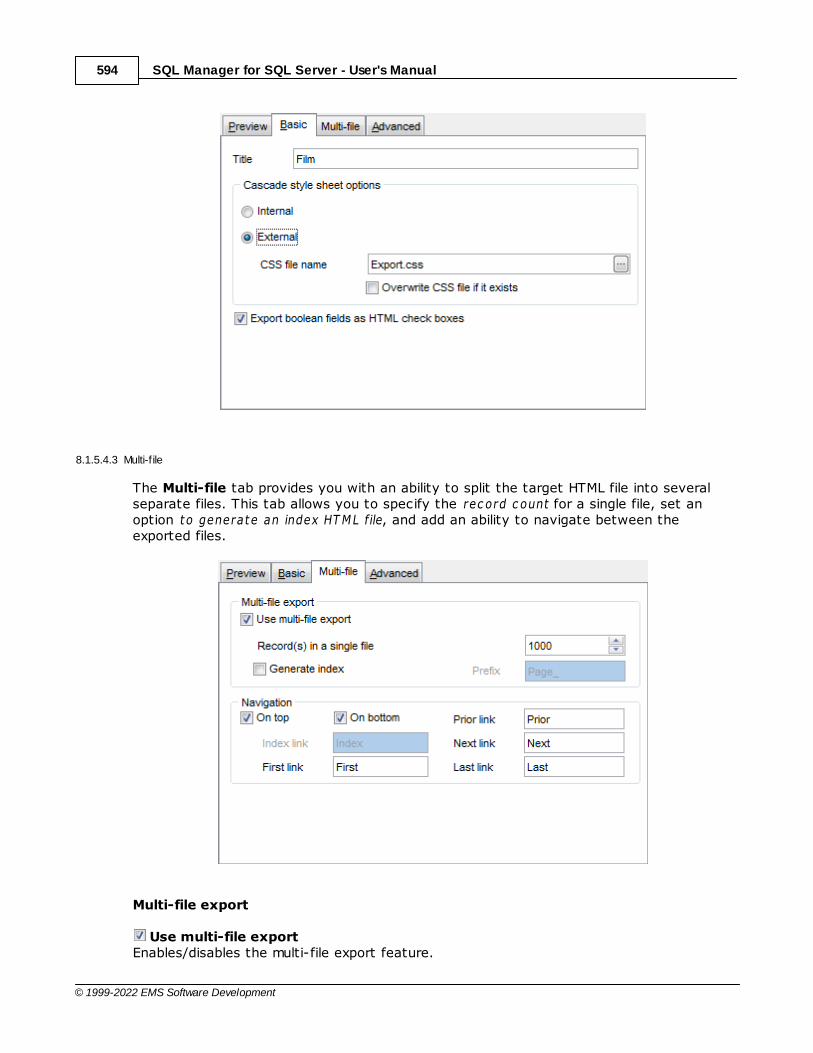
SQL Manager for SQL Server - User's Manual594
© 1999-2022 EMS Software Development
8.1.5.4.3 Multi-f ile
The Multi-file tab provides you with an ability to split the target HTML file into severalseparate files. This tab allows you to specify the rec ord c ount for a single file, set anoption to generate an index HT ML file, and add an ability to navigate between theexported files.
Multi-file export
Use multi-file exportEnables/disables the multi-file export feature.

SQL Manager for SQL Server - User's Manual595
© 1999-2022 EMS Software Development
Record(s) in a single fileUse the spinner control to specify the number of records to be exported into each of thefiles.
Generate indexSpecifies that an index file containing links to all the data files will be generated. Use theedit-box next to the checkbox to set a name for the index file.
NavigationThis group allows you to specify properties for navigation elements, i.e. the elements thatprovide quick access to pages of the multi-file document. Navigation is implemented as aset of hyperlinks.
On topSpecifies that the hyperlinks will be placed at the top of the page.
On bottomSpecifies that the hyperlinks will be placed at the bottom of the page.
Use the Index link, First link, Prior link, Next link and Last link boxes to specifycaptions for the corresponding navigation elements.
8.1.5.4.4 Advanced
The Advanced tab allows you to set a number of advanced options to be applied to theresult HTML file.
Body options
Default font
SQL Manager for SQL Server - User's Manual596
© 1999-2022 EMS Software Development
Use the drop-down list to select the font that will be used in the result file by default.
Background
If necessary, use the Ellipsis button to browse for a graphical file to be applied as thepage background.
Table options
Use the spinner controls to specify common table options: cell padding, cell spacing,border.
Background
If necessary, use the Ellipsis button to browse for a graphical file to be applied as thetable background.
It is also possible to define advanced attributes for both the HTML body and table.
8.1.5.5 PDF options
This step allows you to set options for the target PDF (*.pdf) file.
FontsThis group of options allows you to customize fonts for the header, c apt ion, data, footerof the result file.
Use the Base font name and Font encoding drop-down lists to select the preferablefont (Helvet ic a, Courier, T im es Rom an, etc.) and encoding (Standard, WinANSI,Mac Rom an, PDFDoc) respectively, and the Font size spinner control to specify the fontsize.
Click the Font color... button to select the color to be applied to the font.
For your convenience the preview illustrating the changes is displayed in the Samplearea.

SQL Manager for SQL Server - User's Manual597
© 1999-2022 EMS Software Development
Page options
Use the Page size drop-down list to select one of the standard page formats (Let ter,Legal, A3, A4, etc.).Use the Width and Height spinner controls to specify the page w idth and heightrespectively.Use the Units drop-down list to select the unit of measure that will be used in reportsettings: inc hes, m illim eters, or dots.Use the Orientation drop-down list to select the preferable page orientation: port ra it orlandsc ape.
Margins Use the Left, Right, Top, Bottom spinner controls to specify the corresponding pagemargins for the output PDF file.
Grid optionsUse the Col spacing, Row spacing, Line width spinner controls to specify spacing forgrid columns, rows, and grid line width respectively.
When you are done, click the Next button to proceed to Setting common export options.605

SQL Manager for SQL Server - User's Manual598
© 1999-2022 EMS Software Development
8.1.5.6 TXT options
This step allows you to set options for the target text (*.txt) file.
Set the Calculate column width option on if you want each column of the target file tobe adjusted to the maximum number of characters in it. The Spacing option specifies thenumber of spaces between columns in the target file.
When you are done, click the Next button to proceed to Setting common export options.
8.1.5.7 CSV options
This step allows you to set options for the target CSV (*.c sv) file.
Quote stringsCheck this option to apply quoting for string values in the target file.
Specify the column separator using the Comma drop-down list and the preferable quotecharacter using the Quote drop-down list.
605

SQL Manager for SQL Server - User's Manual599
© 1999-2022 EMS Software Development
When you are done, click the Next button to proceed to Setting common export options.
8.1.5.8 XML options
This step allows you to set options for the target XML (*.xm l) file.
Specify XML document encoding in the Encoding edit box and set the Standalone optionon if you intend to create a standalone XML document (standalone="yes").
XML typeSelect the type of the result XML document: Datapac ket 2.0 or Ac c ess.Conversion between generic XML documents and documents of the XML-Datapac ket(CDS) format can be performed with the help of XML Mapper by Borland®.
605
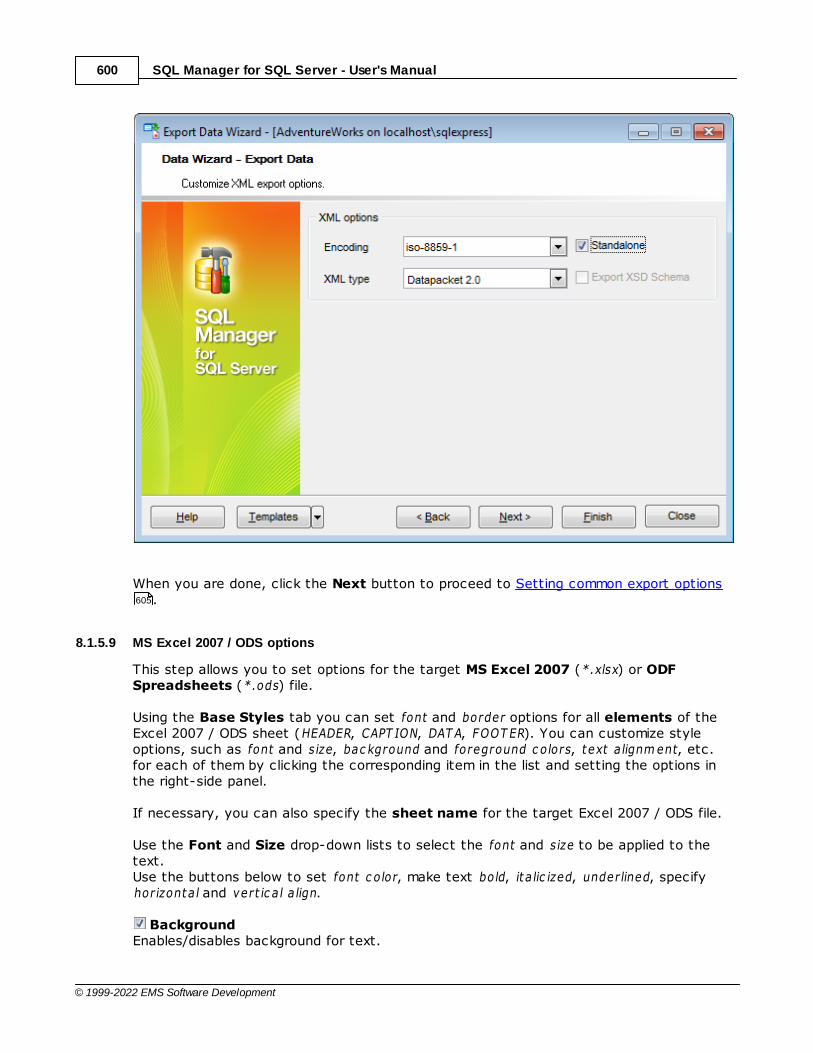
SQL Manager for SQL Server - User's Manual600
© 1999-2022 EMS Software Development
When you are done, click the Next button to proceed to Setting common export options.
8.1.5.9 MS Excel 2007 / ODS options
This step allows you to set options for the target MS Excel 2007 (*.xlsx) or ODFSpreadsheets (*.ods) file.
Using the Base Styles tab you can set font and border options for all elements of theExcel 2007 / ODS sheet (HEADER, CAPT ION, DAT A, FOOT ER). You can customize styleoptions, such as font and size, bac kground and foreground c olors, text a lignm ent, etc.for each of them by clicking the corresponding item in the list and setting the options inthe right-side panel.
If necessary, you can also specify the sheet name for the target Excel 2007 / ODS file.
Use the Font and Size drop-down lists to select the font and size to be applied to thetext.Use the buttons below to set font c olor, make text bold, it a lic ized, underlined, specifyhorizonta l and vert ic a l a lign.
BackgroundEnables/disables background for text.
605
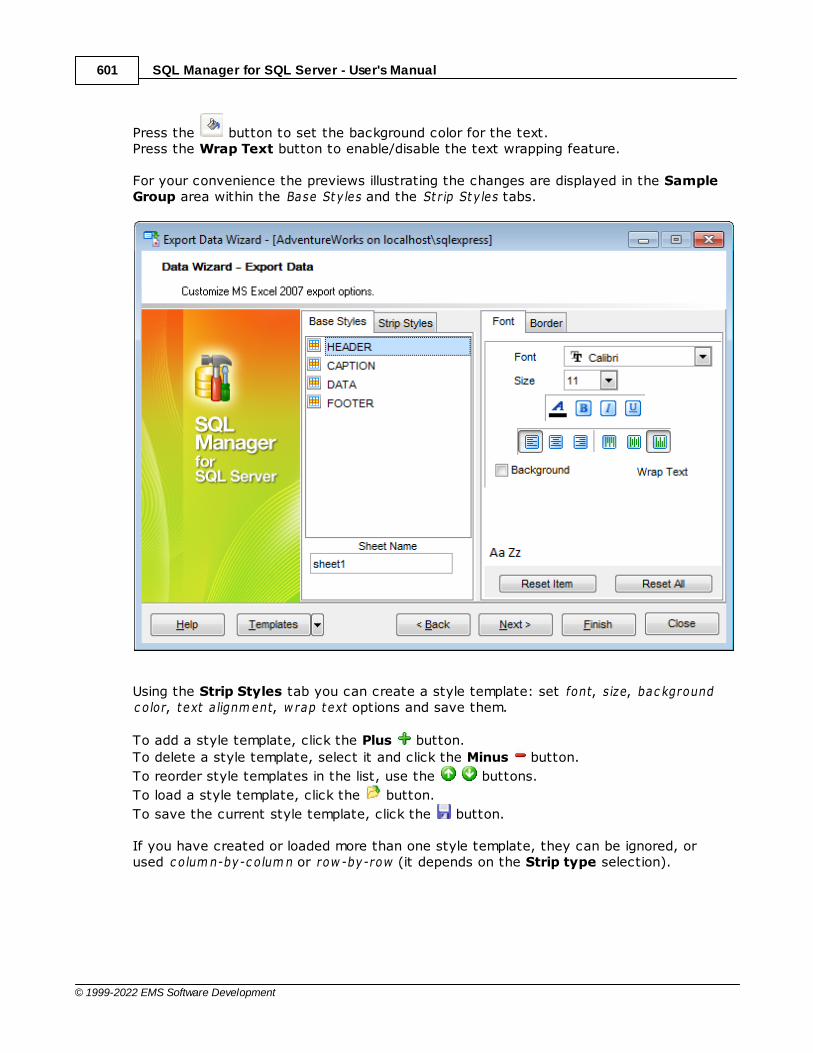
SQL Manager for SQL Server - User's Manual601
© 1999-2022 EMS Software Development
Press the button to set the background color for the text.Press the Wrap Text button to enable/disable the text wrapping feature.
For your convenience the previews illustrating the changes are displayed in the SampleGroup area within the Base Sty les and the St r ip Sty les tabs.
Using the Strip Styles tab you can create a style template: set font, size, bac kgroundc olor, text a lignm ent, w rap text options and save them.
To add a style template, click the Plus button.
To delete a style template, select it and click the Minus button.
To reorder style templates in the list, use the buttons.
To load a style template, click the button.
To save the current style template, click the button.
If you have created or loaded more than one style template, they can be ignored, orused c olum n-by-c olum n or row -by-row (it depends on the Strip type selection).
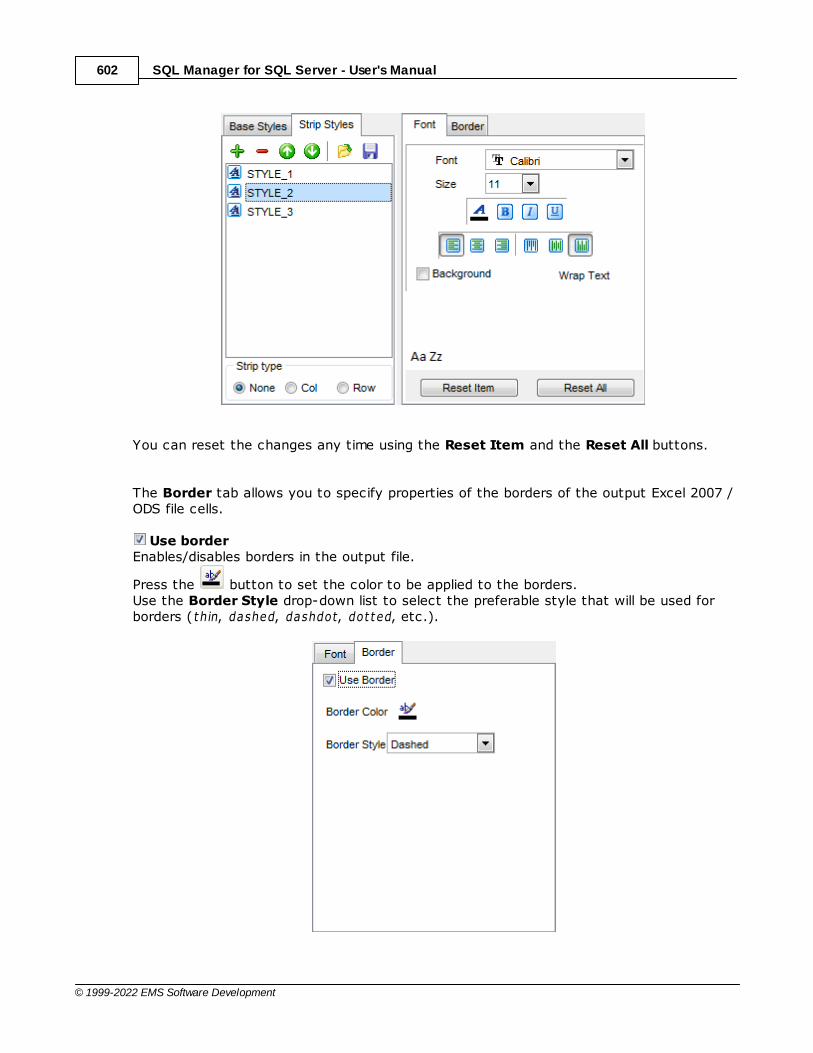
SQL Manager for SQL Server - User's Manual602
© 1999-2022 EMS Software Development
You can reset the changes any time using the Reset Item and the Reset All buttons.
The Border tab allows you to specify properties of the borders of the output Excel 2007 /ODS file cells.
Use borderEnables/disables borders in the output file.
Press the button to set the color to be applied to the borders.Use the Border Style drop-down list to select the preferable style that will be used forborders (thin, dashed, dashdot, dot ted, etc.).
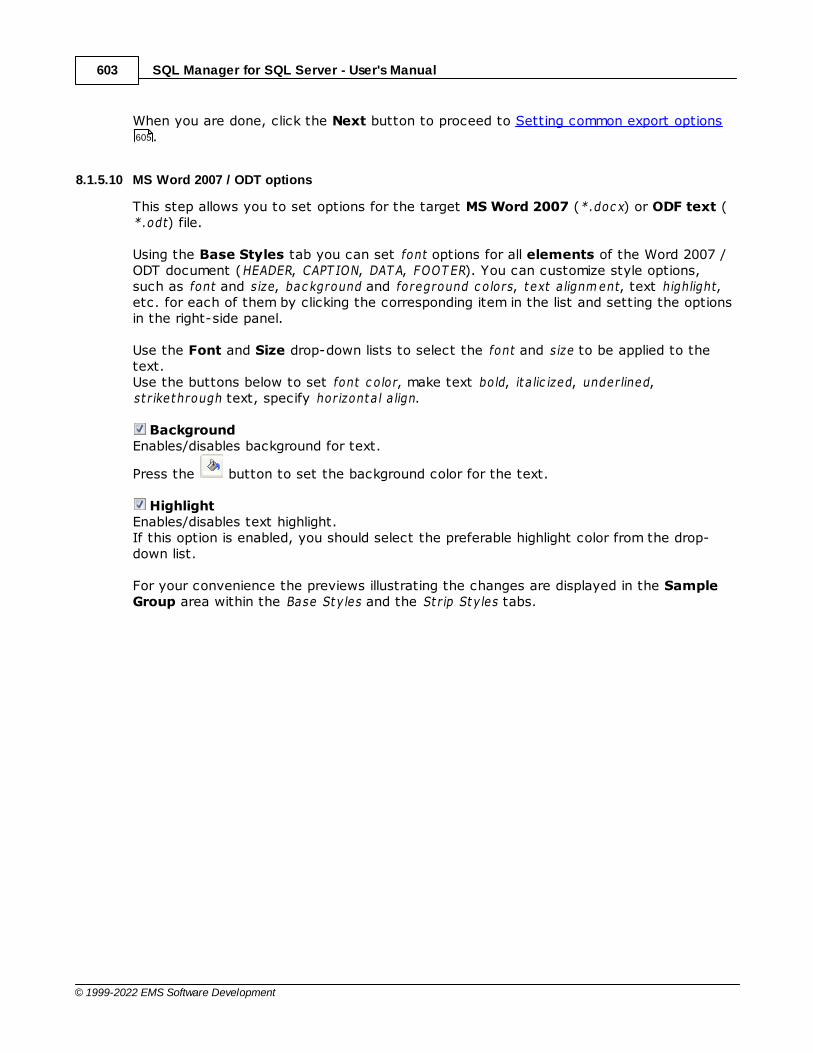
SQL Manager for SQL Server - User's Manual603
© 1999-2022 EMS Software Development
When you are done, click the Next button to proceed to Setting common export options.
8.1.5.10 MS Word 2007 / ODT options
This step allows you to set options for the target MS Word 2007 (*.doc x) or ODF text (*.odt) file.
Using the Base Styles tab you can set font options for all elements of the Word 2007 /ODT document (HEADER, CAPT ION, DAT A, FOOT ER). You can customize style options,such as font and size, bac kground and foreground c olors, text a lignm ent, text highlight,etc. for each of them by clicking the corresponding item in the list and setting the optionsin the right-side panel.
Use the Font and Size drop-down lists to select the font and size to be applied to thetext.Use the buttons below to set font c olor, make text bold, it a lic ized, underlined,st r ikethrough text, specify horizonta l a lign.
BackgroundEnables/disables background for text.
Press the button to set the background color for the text.
HighlightEnables/disables text highlight.If this option is enabled, you should select the preferable highlight color from the drop-down list.
For your convenience the previews illustrating the changes are displayed in the SampleGroup area within the Base Sty les and the St r ip Sty les tabs.
605

SQL Manager for SQL Server - User's Manual604
© 1999-2022 EMS Software Development
Using the Strip Styles tab you can create a style template: set font, size, bac kgroundc olor, text a lignm ent, highlight options and save them.
To add a style template, click the Plus button.
To delete a style template, select it and click the Minus button.
To reorder style templates in the list, use the buttons.
To load a style template, click the button.
To save the current style template, click the button.
If you have created or loaded more than one style template, they can be ignored, orused c olum n-by-c olum n or row -by-row (it depends on the Strip type selection).

SQL Manager for SQL Server - User's Manual605
© 1999-2022 EMS Software Development
You can reset the changes any time using the Reset Item and the Reset All buttons.
Using the Border tab you can enable borders in the result Word 2007 / ODT documentand customize them.
Use borderEnables/disables borders in the output file.
Press the button to set the color to be applied to the borders.Use the Border Style drop-down list to select the preferable style that will be used forborders (single, thic k, double, hair line, etc.).
When you are done, click the Next button to proceed to Setting common export options.
8.1.6 Setting common export options
Use this step of the wizard to set common export options. The detailed description ofthese options is given below.
605

SQL Manager for SQL Server - User's Manual606
© 1999-2022 EMS Software Development
Export empty tablesIf checked, you can export the table even if it does not contain any data.
Skip ... record(s)Specifies the number of records to be skipped before export starts.
Export all recordsSpecifies that all records of the table will be exported.
Export only ... record(s)Specifies the number of records to be exported.
Open files after export If this option is checked, the result file will be opened with the currently associatedprogram after the export operation is completed.
Print files after export If this option is checked, the result file will be sent to the default printer after the exportoperation is completed.
When you are done, click the Next button to proceed to the last step of the wizard.607

SQL Manager for SQL Server - User's Manual607
© 1999-2022 EMS Software Development
8.1.7 Exporting data
This step of the wizard is intended to inform you that all export options have been set,and you can start the export process.
The log area allows you to view the log of operations and errors (if any).
Close the Wizard after successful completionIf this option is selected, the wizard is closed automatically when the export process iscompleted.
If necessary, you can save a template for future use.
Click the Finish button to run the export process.
After the operation is completed, you can view the number of exported records, elapsedt im e, estimated export speed, and the log of operations and errors (if any).
978
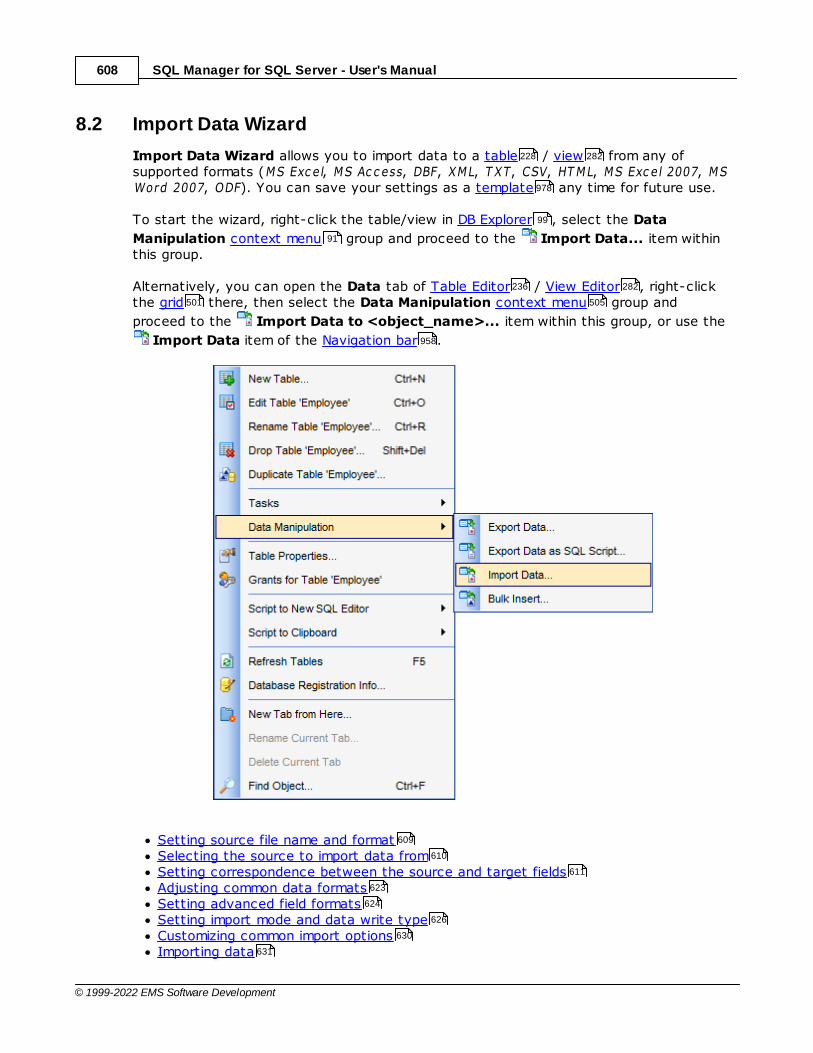
SQL Manager for SQL Server - User's Manual608
© 1999-2022 EMS Software Development
8.2 Import Data Wizard
Import Data Wizard allows you to import data to a table / view from any ofsupported formats (MS Exc e l, MS Ac c ess, DBF, XML, T XT, CSV, HT ML, MS Exc e l 2007, MSWord 2007, ODF). You can save your settings as a template any time for future use.
To start the wizard, right-click the table/view in DB Explorer , select the Data
Manipulation context menu group and proceed to the Import Data... item withinthis group.
Alternatively, you can open the Data tab of Table Editor / View Editor , right-clickthe grid there, then select the Data Manipulation context menu group and
proceed to the Import Data to <object_name>... item within this group, or use the
Import Data item of the Navigation bar .
Setting source file name and formatSelecting the source to import data fromSetting correspondence between the source and target fieldsAdjusting common data formatsSetting advanced field formatsSetting import mode and data write typeCustomizing common import optionsImporting data
228 282
978
99
91
236 282
501 505
958
609
610
611
623
624
626
630
631
SQL Manager for SQL Server - User's Manual609
© 1999-2022 EMS Software Development
Availability:
Full version (forWindows)
Yes
Lite version (forWindows)
No
Note: To compare all features of the Full and the Lite versions of SQL Manager, refer tothe Feature Matrix page.
See also:
Export Data Wizard
Export as SQL Script
Bulk Insert Wizard
Using templates
8.2.1 Selecting source file name and format
This step of the wizard allows you to select the source file format you need to importdata from.
Source file name
Type in or use the button to specify the path to the file using the Open file... dialog.The file name extension changes automatically according to the selected Import Type.
23
567
633
642
978
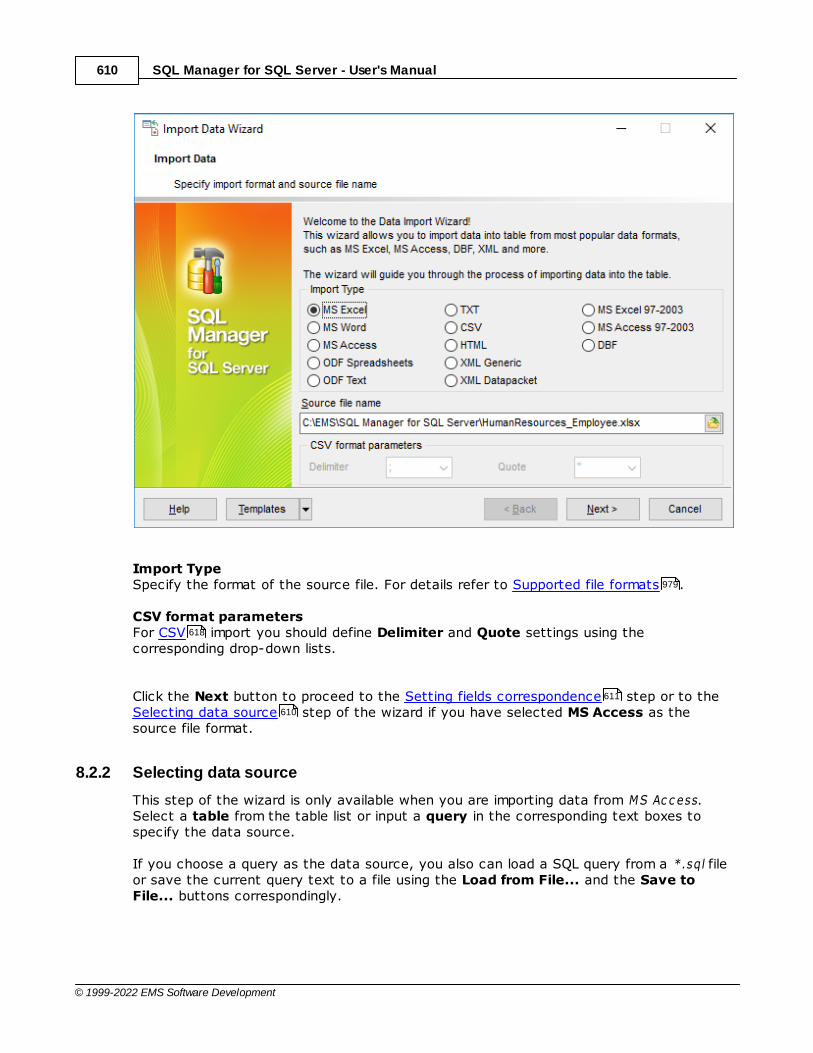
SQL Manager for SQL Server - User's Manual610
© 1999-2022 EMS Software Development
Import TypeSpecify the format of the source file. For details refer to Supported file formats .
CSV format parametersFor CSV import you should define Delimiter and Quote settings using thecorresponding drop-down lists.
Click the Next button to proceed to the Setting fields correspondence step or to theSelecting data source step of the wizard if you have selected MS Access as thesource file format.
8.2.2 Selecting data source
This step of the wizard is only available when you are importing data from MS Ac c ess.Select a table from the table list or input a query in the corresponding text boxes tospecify the data source.
If you choose a query as the data source, you also can load a SQL query from a *.sql fileor save the current query text to a file using the Load from File... and the Save toFile... buttons correspondingly.
979
618
611
610
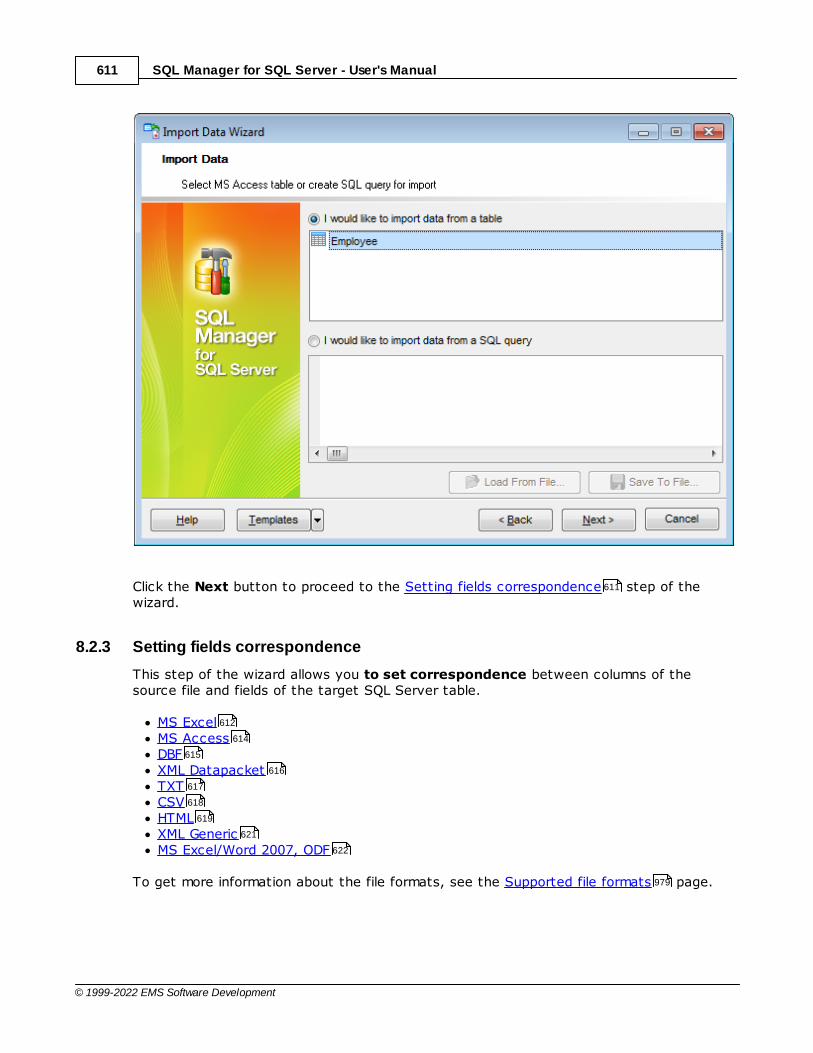
SQL Manager for SQL Server - User's Manual611
© 1999-2022 EMS Software Development
Click the Next button to proceed to the Setting fields correspondence step of thewizard.
8.2.3 Setting fields correspondence
This step of the wizard allows you to set correspondence between columns of thesource file and fields of the target SQL Server table.
MS ExcelMS AccessDBFXML DatapacketTXTCSVHTMLXML GenericMS Excel/Word 2007, ODF
To get more information about the file formats, see the Supported file formats page.
611
612
614
615
616
617
618
619
621
622
979

SQL Manager for SQL Server - User's Manual612
© 1999-2022 EMS Software Development
8.2.3.1 Excel
Specify ranges in the grid for the target and source fields:select a field of the target SQL Server table in the Fields list;proceed to the Sheet grid: click a column caption to select the whole column or clickthe row number to select the whole row;the selected column/row of the source file gets green highlight, and a new rangeindicating the source and target fields correspondence appears in the Ranges list;repeat the operation for all the fields you need to be included in the import process.
If the source Excel file and the destination SQL Server table have the same order of
columns or rows, you can use the Auto Fill Cols or the Auto Fill Rows buttons toset correspondence between them automatically.
If necessary, you can choose to skip a defined number of the source file columns and/orrows using the Col(s) and Row(s) spinner controls of the Skip group (e.g. if you need toexclude column headers from the imported data range).
To clear ranges for a field, select the field in the Fields list and press the Clear Rangesbutton.
To clear all ranges specified for the target table fields, press the Clear All button.
Right-click a range in the Ranges list to call its popup menu. Using the popup menu youcan add or edit ranges manually, rem ove them or change their order.
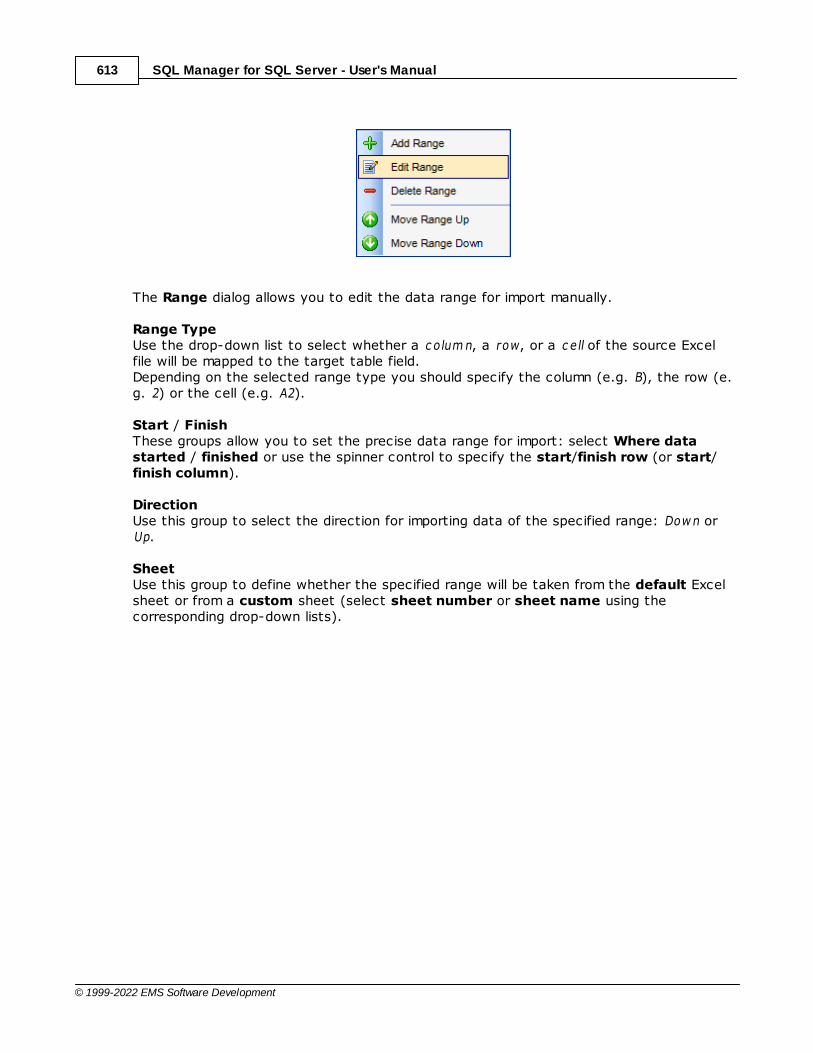
SQL Manager for SQL Server - User's Manual613
© 1999-2022 EMS Software Development
The Range dialog allows you to edit the data range for import manually.
Range TypeUse the drop-down list to select whether a c olum n, a row, or a c e ll of the source Excelfile will be mapped to the target table field.Depending on the selected range type you should specify the column (e.g. B), the row (e.g. 2) or the cell (e.g. A2).
Start / FinishThese groups allow you to set the precise data range for import: select Where datastarted / finished or use the spinner control to specify the start/finish row (or start/finish column).
DirectionUse this group to select the direction for importing data of the specified range: Dow n orUp.
SheetUse this group to define whether the specified range will be taken from the default Excelsheet or from a custom sheet (select sheet number or sheet name using thecorresponding drop-down lists).
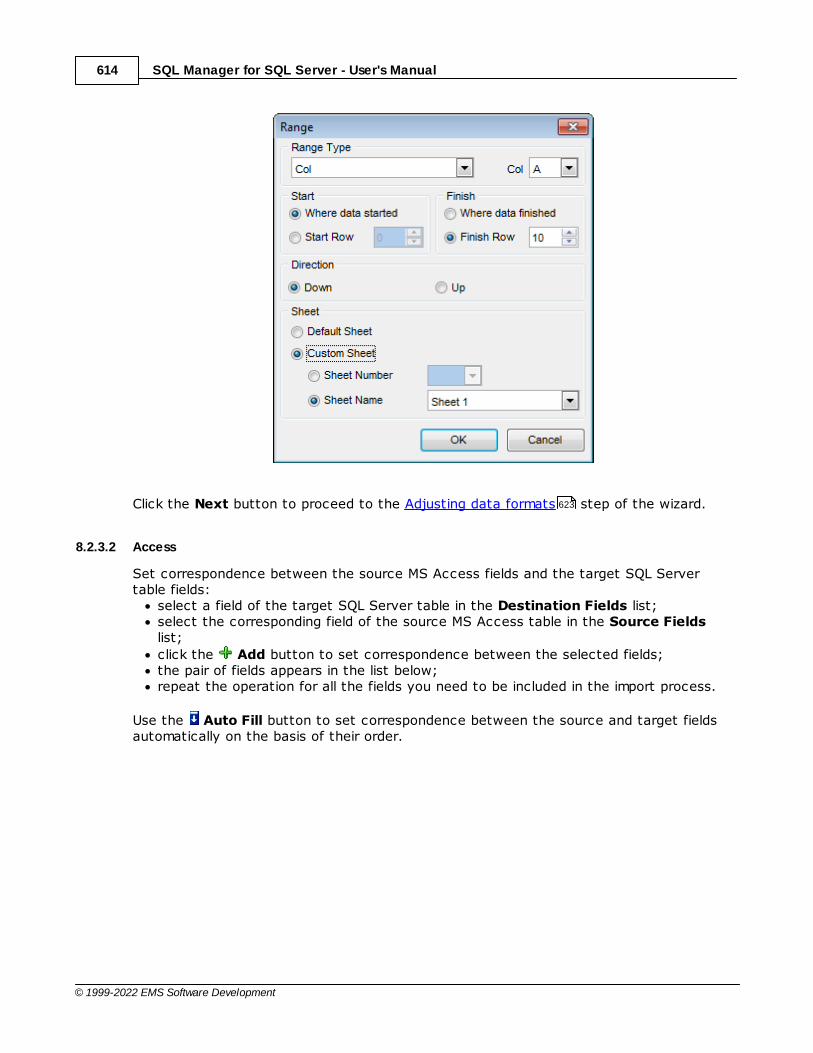
SQL Manager for SQL Server - User's Manual614
© 1999-2022 EMS Software Development
Click the Next button to proceed to the Adjusting data formats step of the wizard.
8.2.3.2 Access
Set correspondence between the source MS Access fields and the target SQL Servertable fields:
select a field of the target SQL Server table in the Destination Fields list;select the corresponding field of the source MS Access table in the Source Fieldslist;
click the Add button to set correspondence between the selected fields;the pair of fields appears in the list below;repeat the operation for all the fields you need to be included in the import process.
Use the Auto Fill button to set correspondence between the source and target fieldsautomatically on the basis of their order.
623
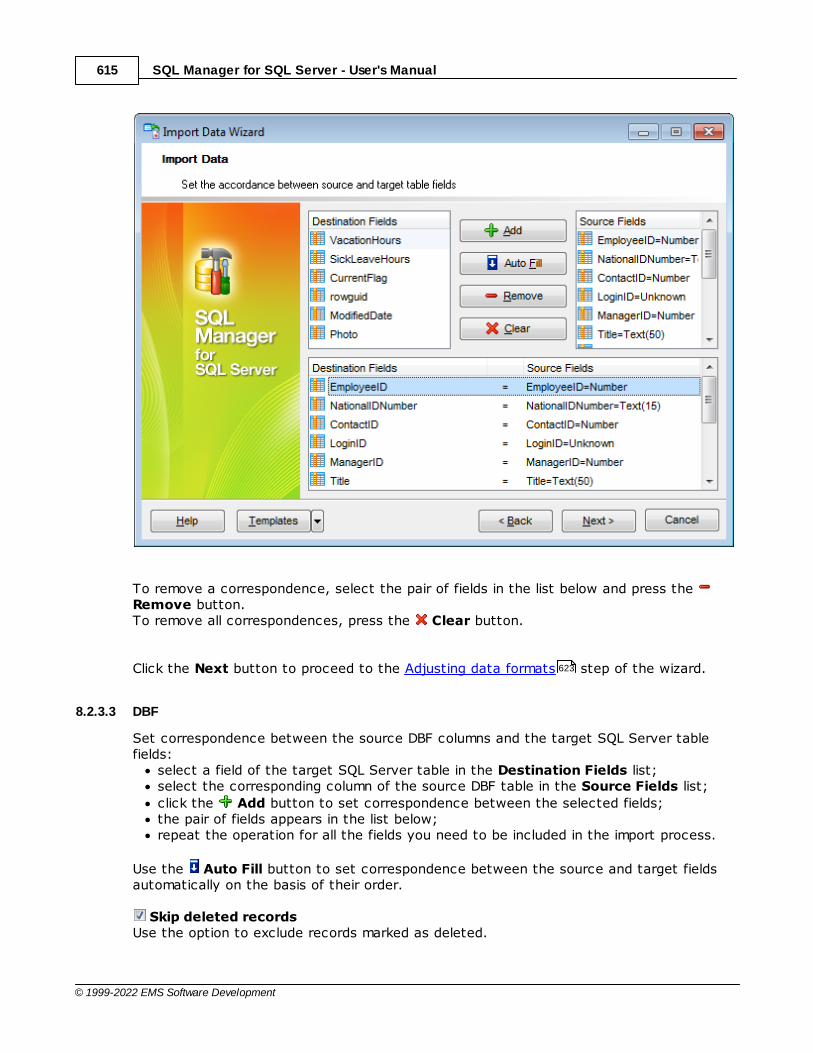
SQL Manager for SQL Server - User's Manual615
© 1999-2022 EMS Software Development
To remove a correspondence, select the pair of fields in the list below and press the Remove button. To remove all correspondences, press the Clear button.
Click the Next button to proceed to the Adjusting data formats step of the wizard.
8.2.3.3 DBF
Set correspondence between the source DBF columns and the target SQL Server tablefields:
select a field of the target SQL Server table in the Destination Fields list;select the corresponding column of the source DBF table in the Source Fields list;
click the Add button to set correspondence between the selected fields;the pair of fields appears in the list below;repeat the operation for all the fields you need to be included in the import process.
Use the Auto Fill button to set correspondence between the source and target fieldsautomatically on the basis of their order.
Skip deleted records Use the option to exclude records marked as deleted.
623
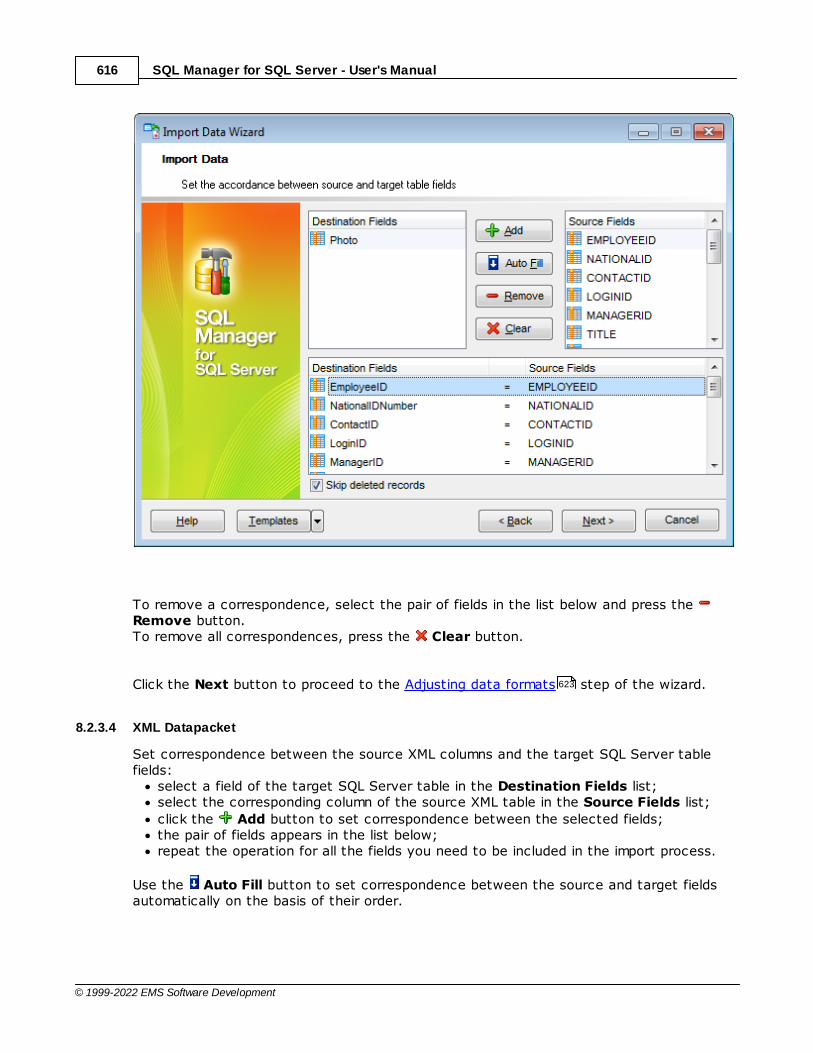
SQL Manager for SQL Server - User's Manual616
© 1999-2022 EMS Software Development
To remove a correspondence, select the pair of fields in the list below and press the Remove button. To remove all correspondences, press the Clear button.
Click the Next button to proceed to the Adjusting data formats step of the wizard.
8.2.3.4 XML Datapacket
Set correspondence between the source XML columns and the target SQL Server tablefields:
select a field of the target SQL Server table in the Destination Fields list;select the corresponding column of the source XML table in the Source Fields list;
click the Add button to set correspondence between the selected fields;the pair of fields appears in the list below;repeat the operation for all the fields you need to be included in the import process.
Use the Auto Fill button to set correspondence between the source and target fieldsautomatically on the basis of their order.
623

SQL Manager for SQL Server - User's Manual617
© 1999-2022 EMS Software Development
To remove a correspondence, select the pair of fields in the list below and press the Remove button. To remove all correspondences, press the Clear button.
Click the Next button to proceed to the Adjusting data formats step of the wizard.
8.2.3.5 TXT
Set correspondence between the source text file columns and the target SQL Servertable fields:
select a field of the target SQL Server table in the Fields list;double-click in the text viewer area to add vertical separators delimiting the sourcecolumn bounds;click the area between the separators to assign the column to the selected targettable field - the selected source column gets black highlight;repeat the operation for all the fields you need to be included in the import process.
If necessary, you can choose to skip a defined number of the source file lines using theSkip Lines spinner control (e.g. if you need to exclude column headers from the importeddata range).
623
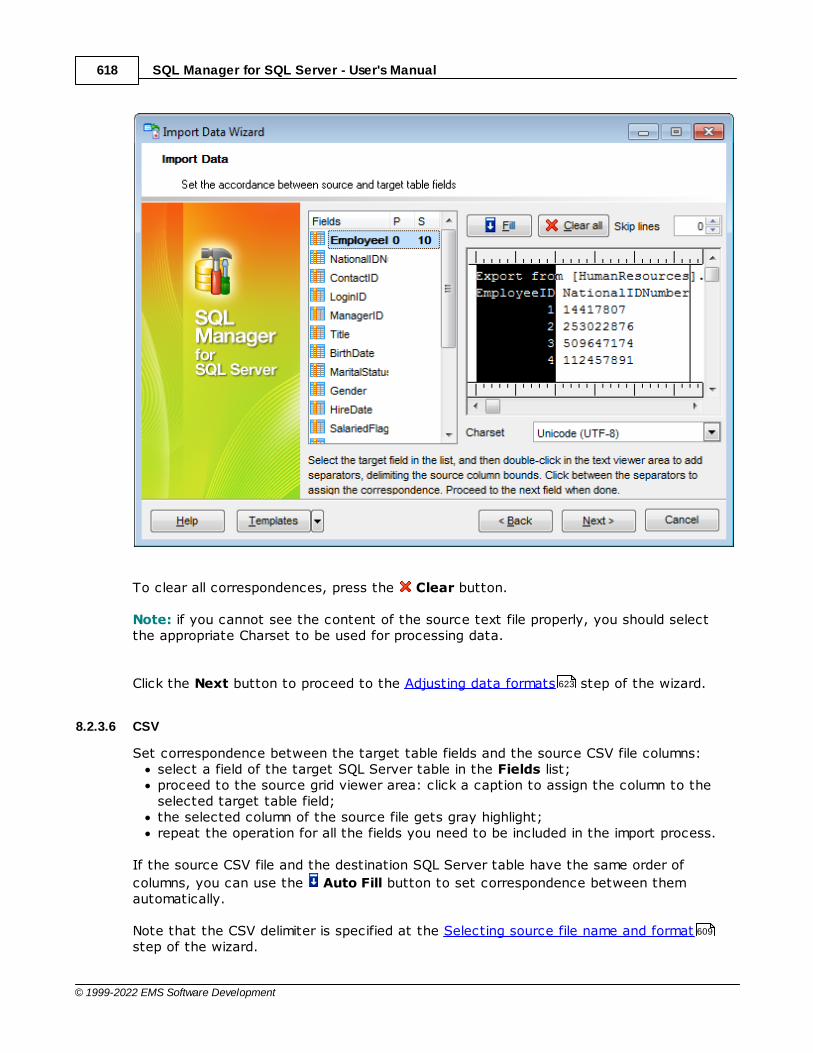
SQL Manager for SQL Server - User's Manual618
© 1999-2022 EMS Software Development
To clear all correspondences, press the Clear button.
Note: if you cannot see the content of the source text file properly, you should selectthe appropriate Charset to be used for processing data.
Click the Next button to proceed to the Adjusting data formats step of the wizard.
8.2.3.6 CSV
Set correspondence between the target table fields and the source CSV file columns:select a field of the target SQL Server table in the Fields list;proceed to the source grid viewer area: click a caption to assign the column to theselected target table field;the selected column of the source file gets gray highlight;repeat the operation for all the fields you need to be included in the import process.
If the source CSV file and the destination SQL Server table have the same order of
columns, you can use the Auto Fill button to set correspondence between themautomatically.
Note that the CSV delimiter is specified at the Selecting source file name and formatstep of the wizard.
623
609
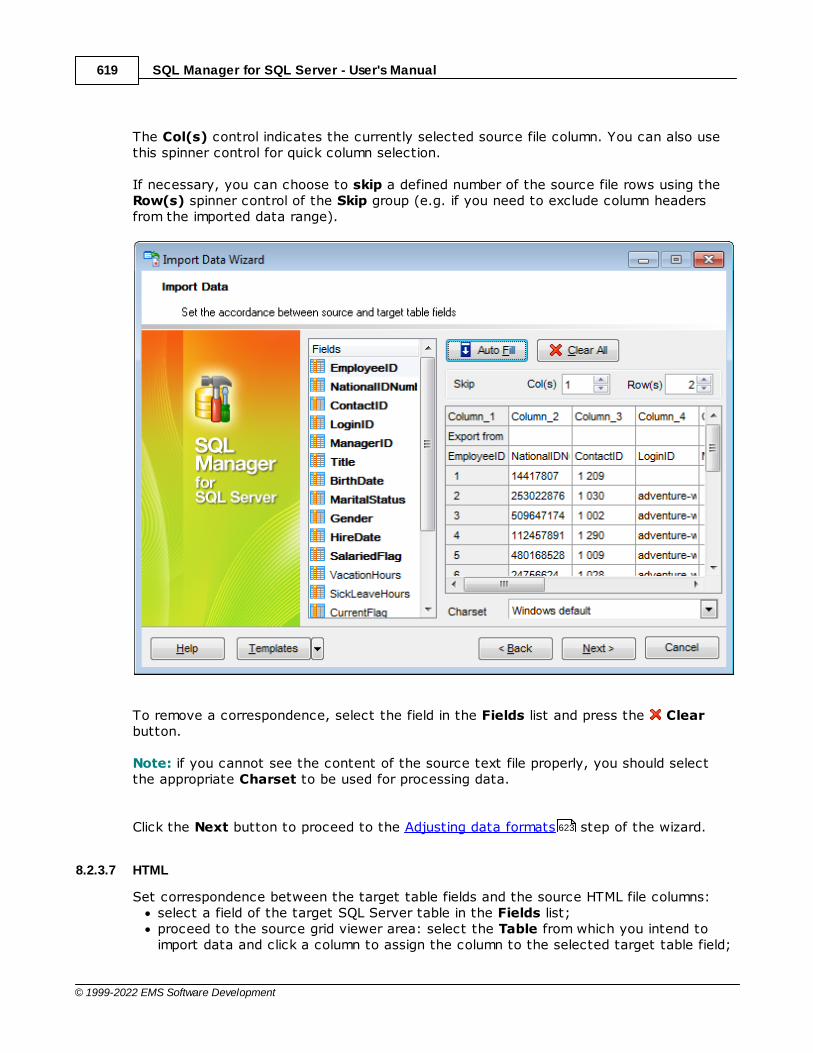
SQL Manager for SQL Server - User's Manual619
© 1999-2022 EMS Software Development
The Col(s) control indicates the currently selected source file column. You can also usethis spinner control for quick column selection.
If necessary, you can choose to skip a defined number of the source file rows using theRow(s) spinner control of the Skip group (e.g. if you need to exclude column headersfrom the imported data range).
To remove a correspondence, select the field in the Fields list and press the Clearbutton.
Note: if you cannot see the content of the source text file properly, you should selectthe appropriate Charset to be used for processing data.
Click the Next button to proceed to the Adjusting data formats step of the wizard.
8.2.3.7 HTML
Set correspondence between the target table fields and the source HTML file columns:select a field of the target SQL Server table in the Fields list;proceed to the source grid viewer area: select the Table from which you intend toimport data and click a column to assign the column to the selected target table field;
623
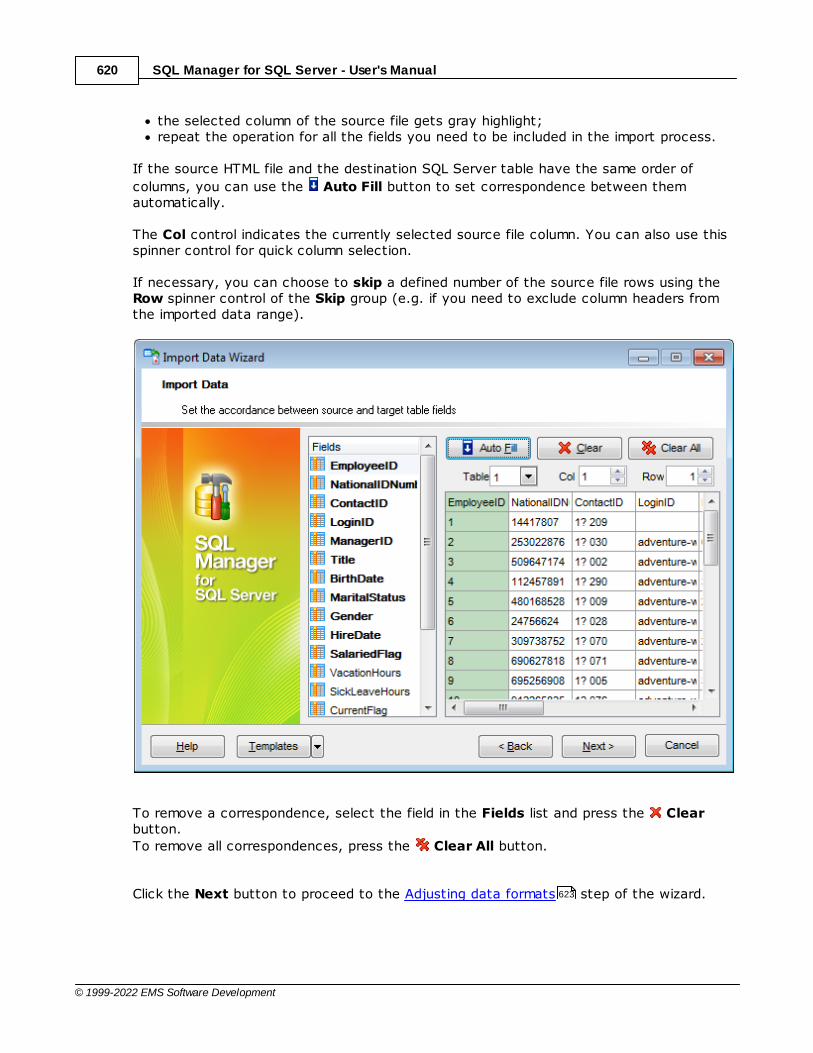
SQL Manager for SQL Server - User's Manual620
© 1999-2022 EMS Software Development
the selected column of the source file gets gray highlight;repeat the operation for all the fields you need to be included in the import process.
If the source HTML file and the destination SQL Server table have the same order of
columns, you can use the Auto Fill button to set correspondence between themautomatically.
The Col control indicates the currently selected source file column. You can also use thisspinner control for quick column selection.
If necessary, you can choose to skip a defined number of the source file rows using theRow spinner control of the Skip group (e.g. if you need to exclude column headers fromthe imported data range).
To remove a correspondence, select the field in the Fields list and press the Clearbutton.
To remove all correspondences, press the Clear All button.
Click the Next button to proceed to the Adjusting data formats step of the wizard.623
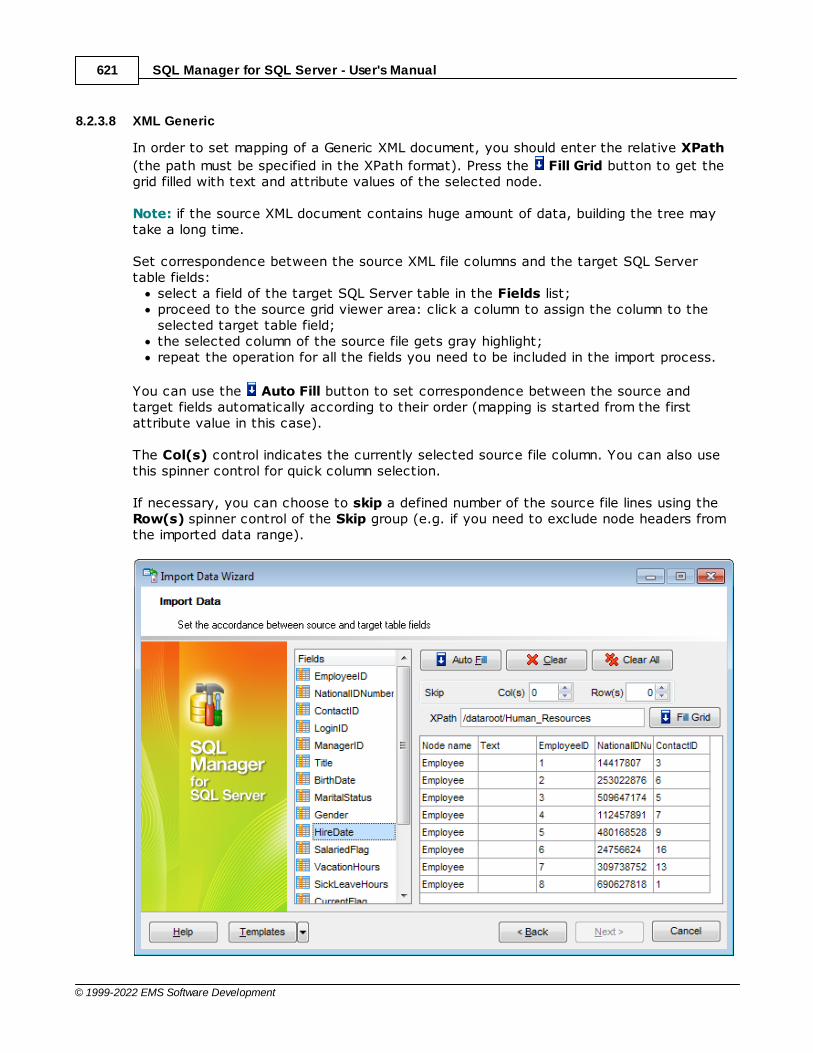
SQL Manager for SQL Server - User's Manual621
© 1999-2022 EMS Software Development
8.2.3.8 XML Generic
In order to set mapping of a Generic XML document, you should enter the relative XPath
(the path must be specified in the XPath format). Press the Fill Grid button to get thegrid filled with text and attribute values of the selected node.
Note: if the source XML document contains huge amount of data, building the tree maytake a long time.
Set correspondence between the source XML file columns and the target SQL Servertable fields:
select a field of the target SQL Server table in the Fields list;proceed to the source grid viewer area: click a column to assign the column to theselected target table field;the selected column of the source file gets gray highlight;repeat the operation for all the fields you need to be included in the import process.
You can use the Auto Fill button to set correspondence between the source andtarget fields automatically according to their order (mapping is started from the firstattribute value in this case).
The Col(s) control indicates the currently selected source file column. You can also usethis spinner control for quick column selection.
If necessary, you can choose to skip a defined number of the source file lines using theRow(s) spinner control of the Skip group (e.g. if you need to exclude node headers fromthe imported data range).

SQL Manager for SQL Server - User's Manual622
© 1999-2022 EMS Software Development
To remove a correspondence, select the field in the Fields list and press the Clearbutton.
To remove all correspondences, press the Clear All button.
Click the Next button to proceed to the Adjusting data formats step of the wizard.
8.2.3.9 MS Excel/Word 2007, ODF
Specify ranges in the grid for the target and source fields:select a field of the target SQL Server table in the Fields list;proceed to the Sheet grid: click a column to assign the column to the selected targettable field;the selected column of the source file gets gray highlight;repeat the operation for all the fields you need to be included in the import process.
If the source file and the tiodestination SQL Server table have the same order of columns,
you can use the Auto Fill button to set correspondence between them automatically.
The Col control indicates the currently selected source file column. You can also use thiscontrol for quick column selection.
If necessary, you can choose to skip a defined number of the source file rows using theSkip spinner control (e.g. if you need to exclude column headers from the imported datarange).
623
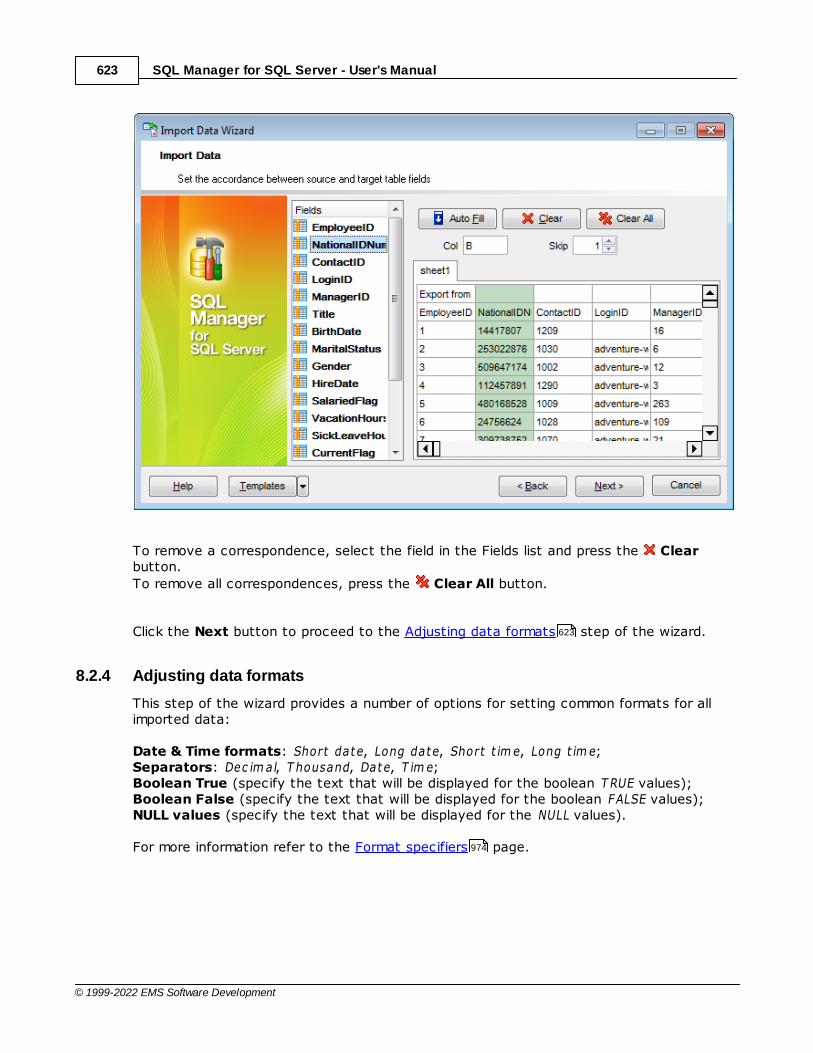
SQL Manager for SQL Server - User's Manual623
© 1999-2022 EMS Software Development
To remove a correspondence, select the field in the Fields list and press the Clearbutton.
To remove all correspondences, press the Clear All button.
Click the Next button to proceed to the Adjusting data formats step of the wizard.
8.2.4 Adjusting data formats
This step of the wizard provides a number of options for setting common formats for allimported data:
Date & Time formats: Short date, Long date, Short t im e, Long t im e;Separators: Dec im al, T housand, Date, T im e;Boolean True (specify the text that will be displayed for the boolean T RUE values);Boolean False (specify the text that will be displayed for the boolean FALSE values);NULL values (specify the text that will be displayed for the NULL values).
For more information refer to the Format specifiers page.
623
974

SQL Manager for SQL Server - User's Manual624
© 1999-2022 EMS Software Development
Click the Next button to proceed to the Setting advanced field formats step of thewizard.
8.2.5 Setting advanced field formats
This step of the wizard allows you to set formats each field separately.
Select a field in the list and adjust format options that will be applied to this field only.
624

SQL Manager for SQL Server - User's Manual625
© 1999-2022 EMS Software Development
Specify Generator value and Generator step for incremental data generation into thespecified field, or enter a Constant value which will be set for all records in the field.
Specify the NULL value which will be used for the records where the value is NULL.
If necessary, specify the default value.
Use the Left / Right quotation edit boxes to specify left/right quotation marks.Use the Quotation action drop-down list to select whether the quotation marks shouldbe added, rem oved, or left 'As is '.
Use the Character case drop-down list to select the case that will be used for stringvalues of the field: Upper, Low er, UpperF irst, UpperF irstWord, or 'As is '.
Use the Character set drop-down list to select which charset will be used for string datain the field: ANSI, OEM, or As is.
The Replacements area allows you to set the text you need to be replaced during data
import into the selected field. Press the Plus button to specify a new replacementoptions using the Add Replacement dialog.

SQL Manager for SQL Server - User's Manual626
© 1999-2022 EMS Software Development
To edit a replacement, click the Edit button.
To remove a replacement, click the Minus button.
When you are done, click the Next button to proceed to the Setting import mode stepof the wizard.
8.2.6 Setting import mode
This step of the wizard allows you to define the records processing mode as Insert All,Insert New, Update, Update or Insert, Delete, Delete or Insert mode:
Insert all: all records from the source file are inserted into the tables irrespective ofwhether any records exist in the destination table or notInsert new: already existing records are skipped, and new records are inserted intothe destination tableUpdate: all existing records are updated from the source fileUpdate or insert: already existing records are updated and new records are insertedinto the destination tableDelete: already existing records are deletedDelete or insert: existing records are deleted and new records are inserted into thedestination table
626
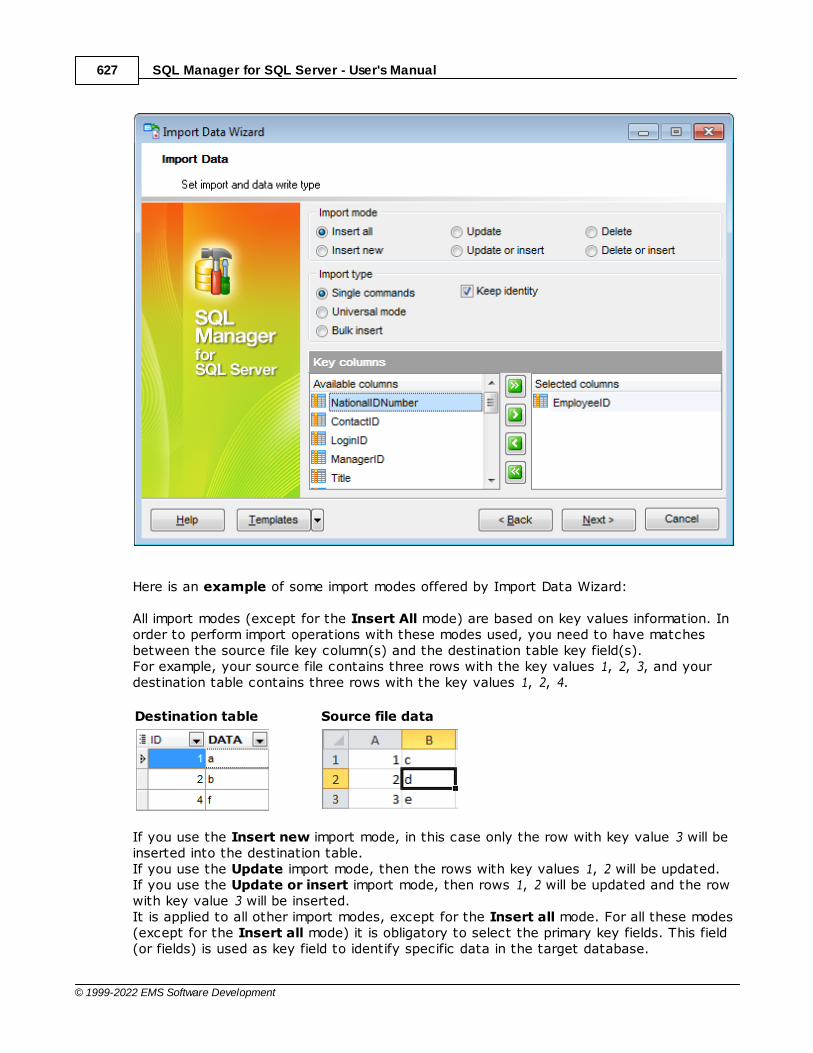
SQL Manager for SQL Server - User's Manual627
© 1999-2022 EMS Software Development
Here is an example of some import modes offered by Import Data Wizard:
All import modes (except for the Insert All mode) are based on key values information. Inorder to perform import operations with these modes used, you need to have matchesbetween the source file key column(s) and the destination table key field(s). For example, your source file contains three rows with the key values 1, 2, 3, and yourdestination table contains three rows with the key values 1, 2, 4.
Destination table Source file data
If you use the Insert new import mode, in this case only the row with key value 3 will beinserted into the destination table.If you use the Update import mode, then the rows with key values 1, 2 will be updated. If you use the Update or insert import mode, then rows 1, 2 will be updated and the rowwith key value 3 will be inserted.It is applied to all other import modes, except for the Insert all mode. For all these modes(except for the Insert all mode) it is obligatory to select the primary key fields. This field(or fields) is used as key field to identify specific data in the target database.
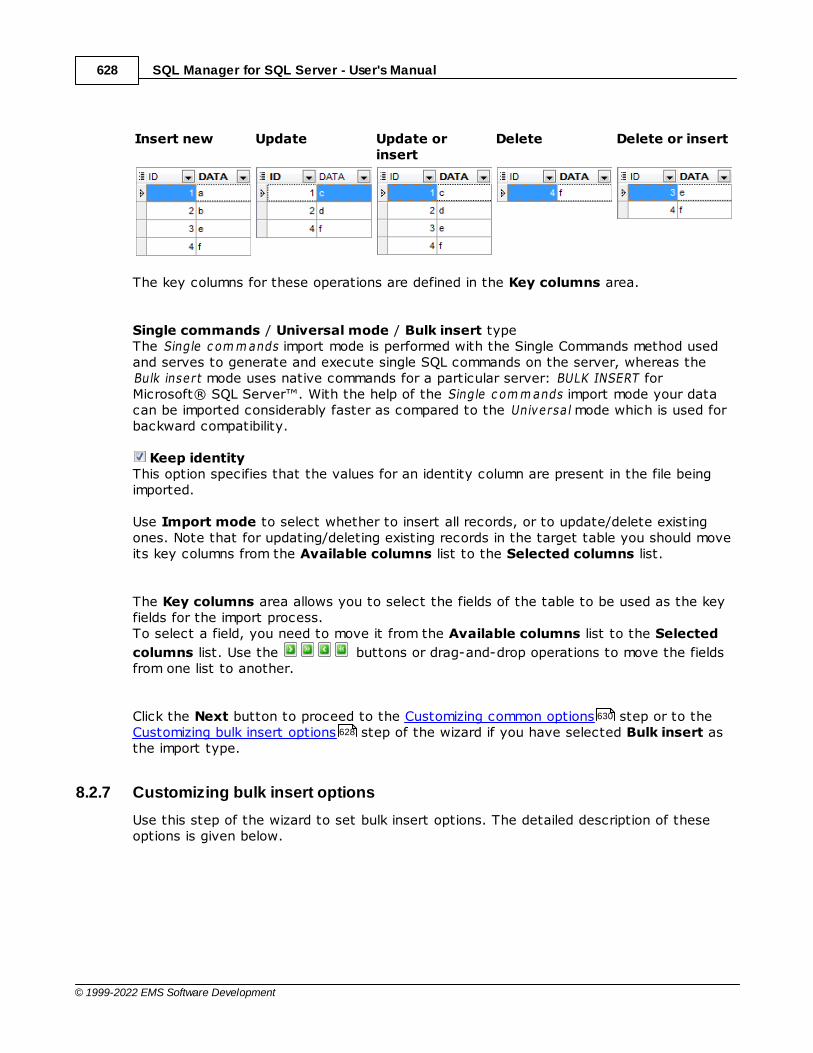
SQL Manager for SQL Server - User's Manual628
© 1999-2022 EMS Software Development
Insert new Update Update orinsert
Delete Delete or insert
The key columns for these operations are defined in the Key columns area.
Single commands / Universal mode / Bulk insert typeThe Single c om m ands import mode is performed with the Single Commands method usedand serves to generate and execute single SQL commands on the server, whereas the Bulk insert mode uses native commands for a particular server: BULK INSERT forMicrosoft® SQL Server™. With the help of the Single c om m ands import mode your datacan be imported considerably faster as compared to the Universal mode which is used forbackward compatibility.
Keep identityThis option specifies that the values for an identity column are present in the file beingimported.
Use Import mode to select whether to insert all records, or to update/delete existingones. Note that for updating/deleting existing records in the target table you should moveits key columns from the Available columns list to the Selected columns list.
The Key columns area allows you to select the fields of the table to be used as the keyfields for the import process.To select a field, you need to move it from the Available columns list to the Selected
columns list. Use the buttons or drag-and-drop operations to move the fieldsfrom one list to another.
Click the Next button to proceed to the Customizing common options step or to theCustomizing bulk insert options step of the wizard if you have selected Bulk insert asthe import type.
8.2.7 Customizing bulk insert options
Use this step of the wizard to set bulk insert options. The detailed description of theseoptions is given below.
630
628

SQL Manager for SQL Server - User's Manual629
© 1999-2022 EMS Software Development
Keep nullsThis option specifies that NULL columns should retain a null value during the bulk copyoperation, rather than have any default values for the columns being inserted.
Fire triggersThis option specifies that any insert triggers defined on the destination table will executeduring the bulk copy operation.
Bulk insert file name
Type in or use the button to specify the name and path to the bulk insert file nameusing the Save As... dialog. If data_file is a remotely stored file, specify the UniversalNaming Convention (UNC) name.
Bulk insert field terminatorSpecify the field terminator to be used for c har and varc har data types.
When you are done, click the Next button to proceed to the Customizing common options step of the wizard.630
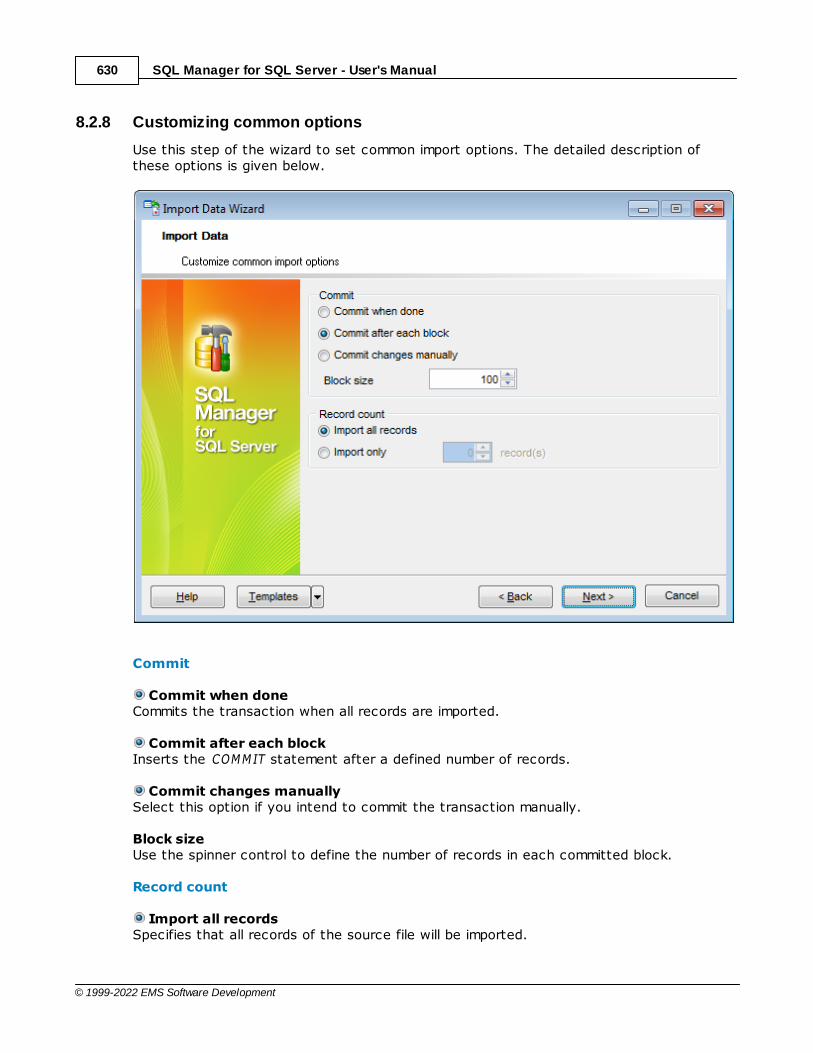
SQL Manager for SQL Server - User's Manual630
© 1999-2022 EMS Software Development
8.2.8 Customizing common options
Use this step of the wizard to set common import options. The detailed description ofthese options is given below.
Commit
Commit when doneCommits the transaction when all records are imported.
Commit after each blockInserts the COMMIT statement after a defined number of records.
Commit changes manuallySelect this option if you intend to commit the transaction manually.
Block sizeUse the spinner control to define the number of records in each committed block.
Record count
Import all recordsSpecifies that all records of the source file will be imported.
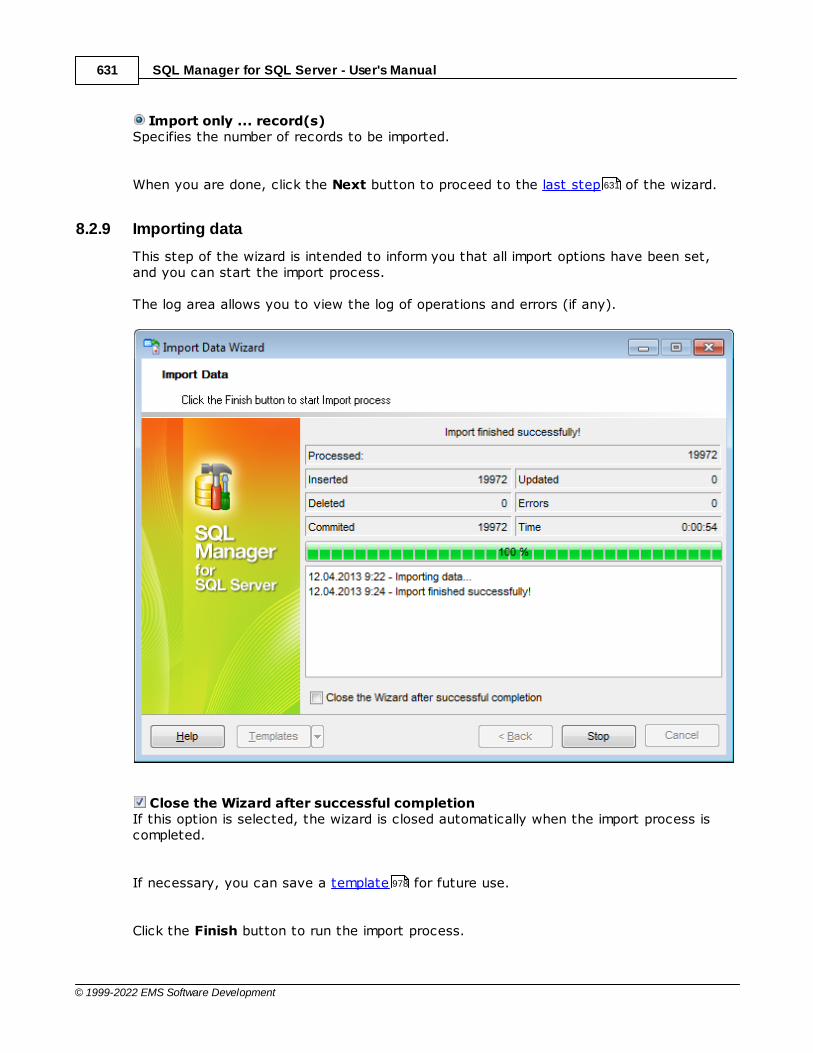
SQL Manager for SQL Server - User's Manual631
© 1999-2022 EMS Software Development
Import only ... record(s)Specifies the number of records to be imported.
When you are done, click the Next button to proceed to the last step of the wizard.
8.2.9 Importing data
This step of the wizard is intended to inform you that all import options have been set,and you can start the import process.
The log area allows you to view the log of operations and errors (if any).
Close the Wizard after successful completionIf this option is selected, the wizard is closed automatically when the import process iscompleted.
If necessary, you can save a template for future use.
Click the Finish button to run the import process.
631
978

SQL Manager for SQL Server - User's Manual632
© 1999-2022 EMS Software Development
After the operation is completed, you can view the total number of proc essed records,the number of inserted/updated/deleted records, the number of c om m it ted records, thenumber of errors, elapsed t im e, and the log of operations and errors (if any).
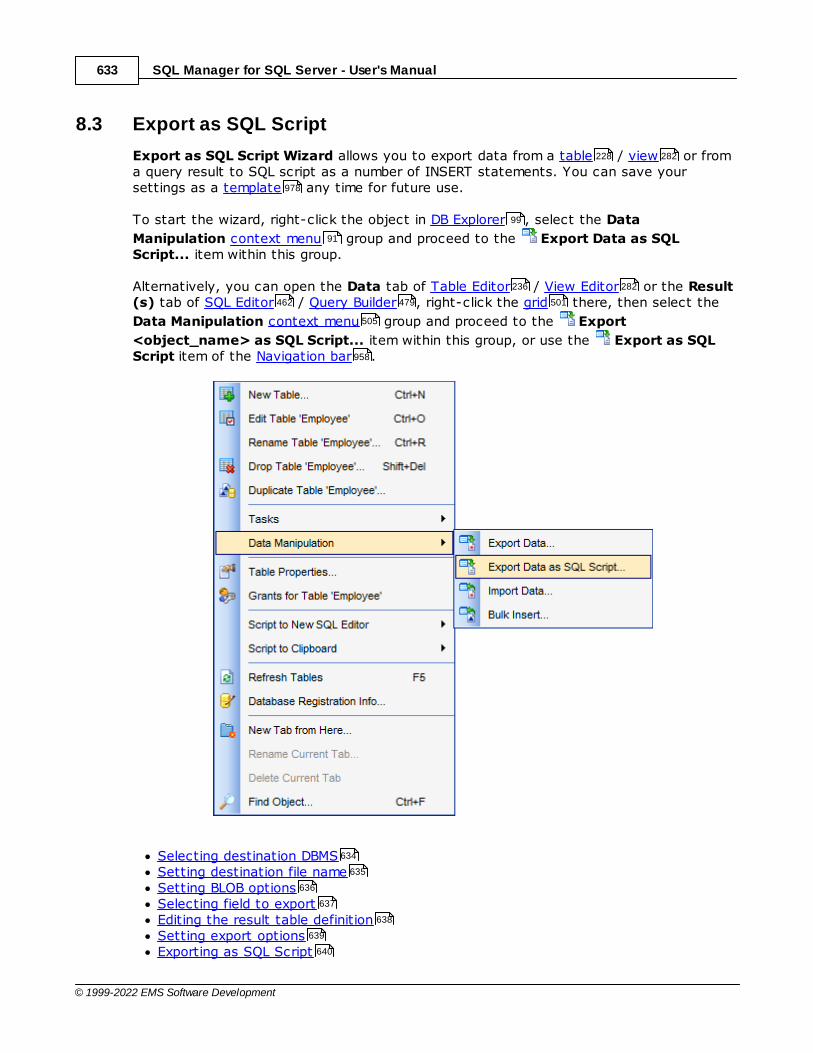
SQL Manager for SQL Server - User's Manual633
© 1999-2022 EMS Software Development
8.3 Export as SQL Script
Export as SQL Script Wizard allows you to export data from a table / view or froma query result to SQL script as a number of INSERT statements. You can save yoursettings as a template any time for future use.
To start the wizard, right-click the object in DB Explorer , select the Data
Manipulation context menu group and proceed to the Export Data as SQLScript... item within this group.
Alternatively, you can open the Data tab of Table Editor / View Editor or the Result(s) tab of SQL Editor / Query Builder , right-click the grid there, then select the
Data Manipulation context menu group and proceed to the Export
<object_name> as SQL Script... item within this group, or use the Export as SQLScript item of the Navigation bar .
Selecting destination DBMSSetting destination file nameSetting BLOB optionsSelecting field to exportEditing the result table definitionSetting export optionsExporting as SQL Script
228 282
978
99
91
236 282
462 479 501
505
958
634
635
636
637
638
639
640
SQL Manager for SQL Server - User's Manual634
© 1999-2022 EMS Software Development
Availability:
Full version (forWindows)
Yes
Lite version (forWindows)
No
Note: To compare all features of the Full and the Lite versions of SQL Manager, refer tothe Feature Matrix page.
See also:
Export Data Wizard
Import Data Wizard
Bulk Insert Wizard
Using templates
8.3.1 Selecting destination DBMS
This step of the wizard allows you to define the destination server you need to exportdata for. The result script will be generated in compliance with the specifications of theselected DBMS:
DB2 InterBase/F irebird M ic rosoft® SQL Server MySQL Orac le PostgreSQL
23
567
608
642
978
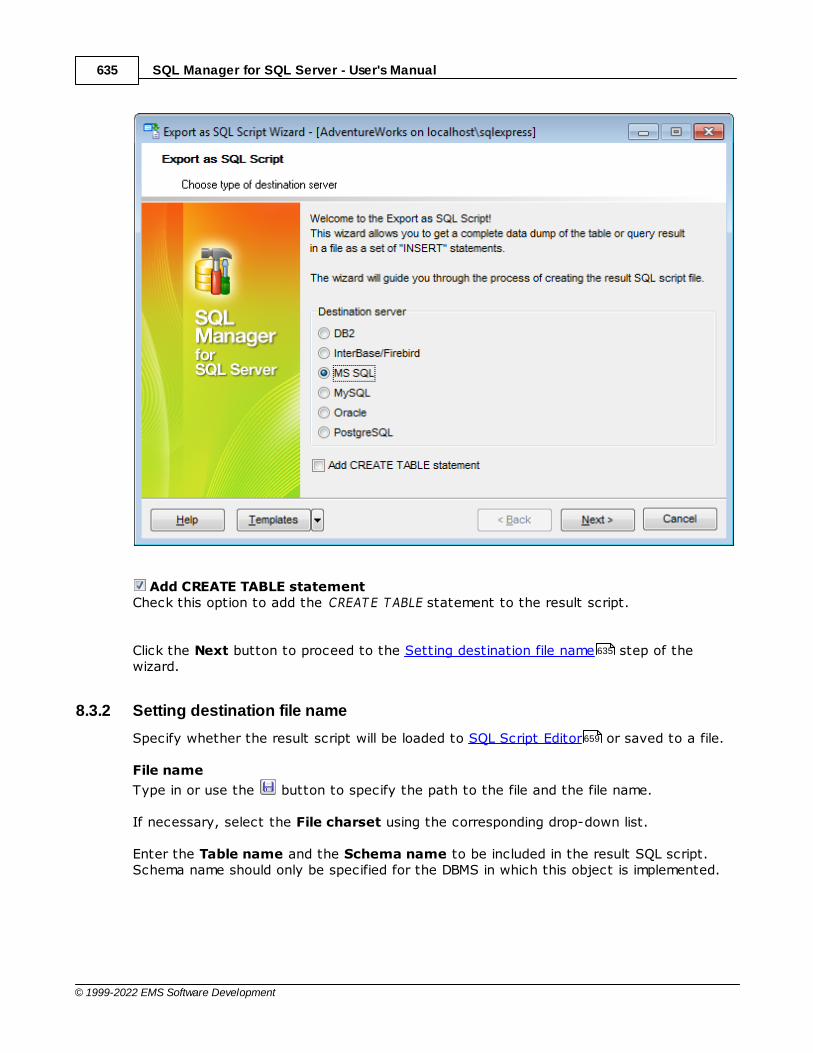
SQL Manager for SQL Server - User's Manual635
© 1999-2022 EMS Software Development
Add CREATE TABLE statementCheck this option to add the CREAT E T ABLE statement to the result script.
Click the Next button to proceed to the Setting destination file name step of thewizard.
8.3.2 Setting destination file name
Specify whether the result script will be loaded to SQL Script Editor or saved to a file.
File name
Type in or use the button to specify the path to the file and the file name.
If necessary, select the File charset using the corresponding drop-down list.
Enter the Table name and the Schema name to be included in the result SQL script.Schema name should only be specified for the DBMS in which this object is implemented.
635
659
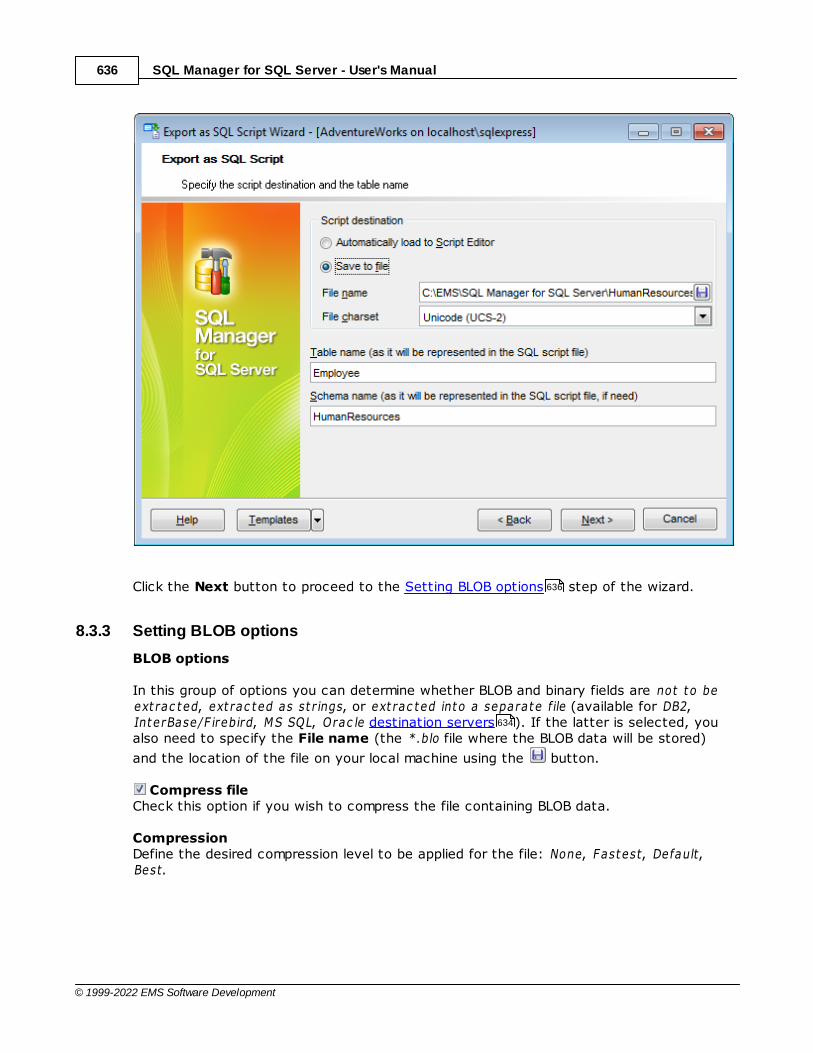
SQL Manager for SQL Server - User's Manual636
© 1999-2022 EMS Software Development
Click the Next button to proceed to the Setting BLOB options step of the wizard.
8.3.3 Setting BLOB options
BLOB options
In this group of options you can determine whether BLOB and binary fields are not to beext rac ted, ext rac ted as st r ings, or ext rac ted into a separate file (available for DB2,InterBase/F irebird, MS SQL, Orac le destination servers ). If the latter is selected, youalso need to specify the File name (the *.blo file where the BLOB data will be stored)
and the location of the file on your local machine using the button.
Compress fileCheck this option if you wish to compress the file containing BLOB data.
CompressionDefine the desired compression level to be applied for the file: None, Fastest, Default,Best.
636
634
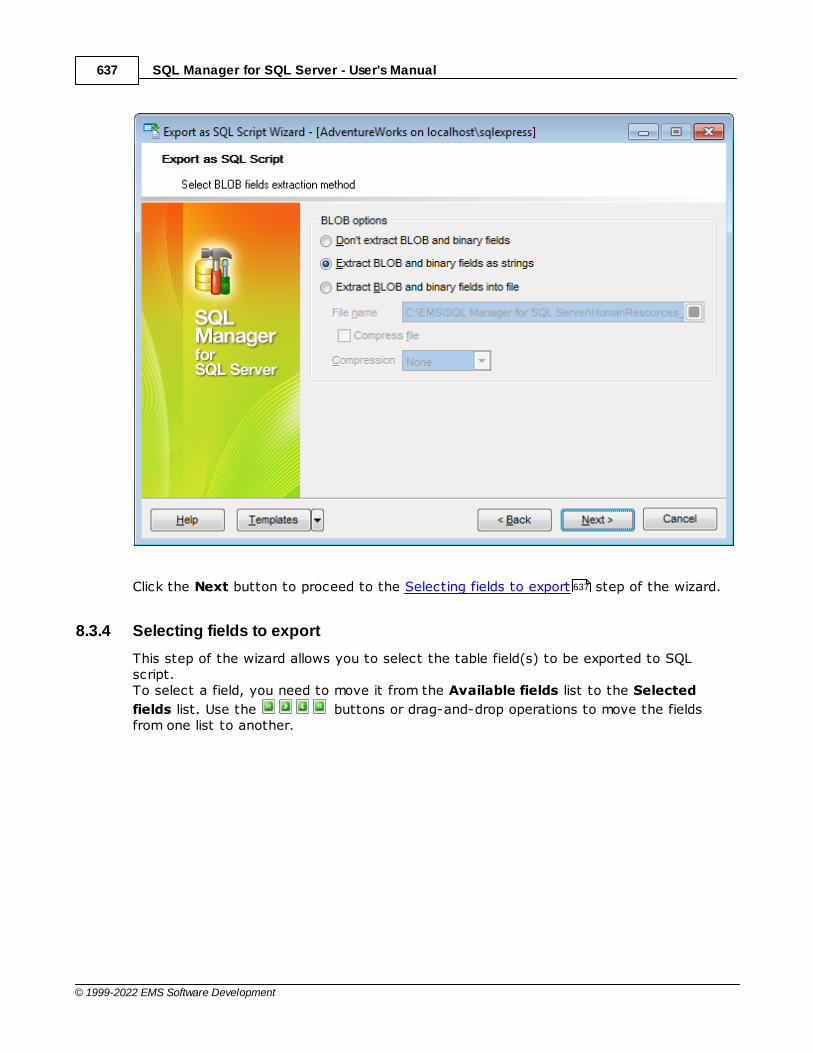
SQL Manager for SQL Server - User's Manual637
© 1999-2022 EMS Software Development
Click the Next button to proceed to the Selecting fields to export step of the wizard.
8.3.4 Selecting fields to export
This step of the wizard allows you to select the table field(s) to be exported to SQLscript.To select a field, you need to move it from the Available fields list to the Selected
fields list. Use the buttons or drag-and-drop operations to move the fieldsfrom one list to another.
637
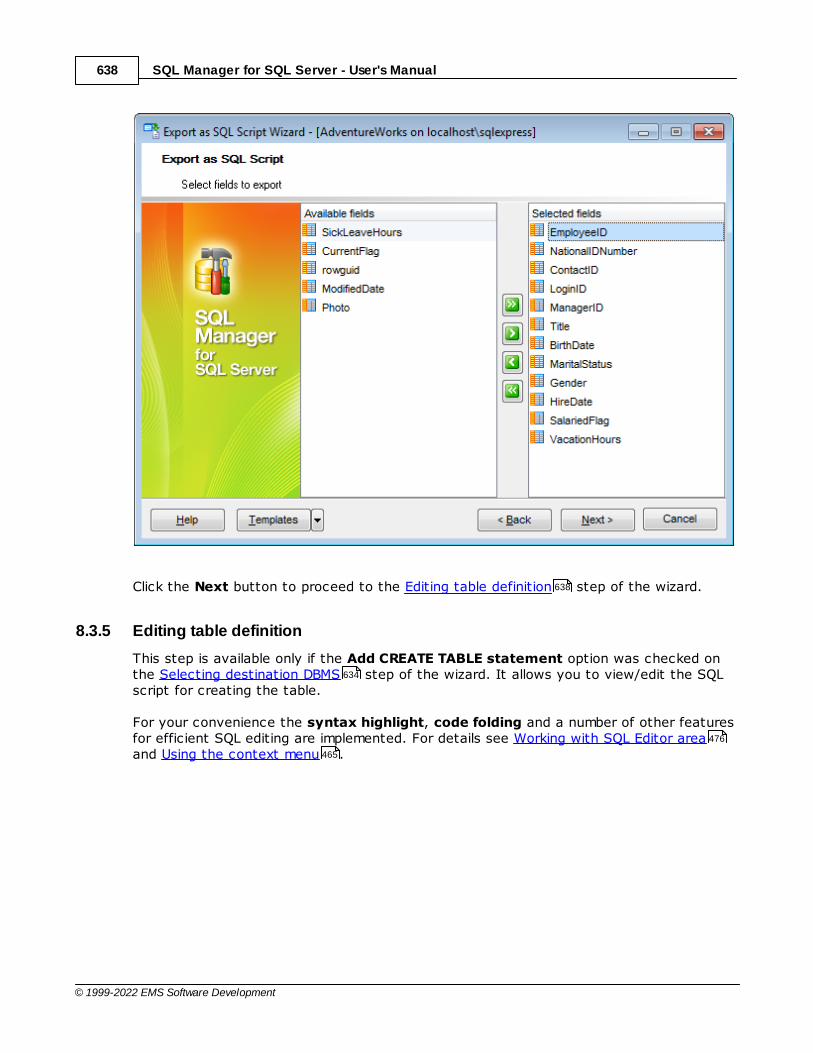
SQL Manager for SQL Server - User's Manual638
© 1999-2022 EMS Software Development
Click the Next button to proceed to the Editing table definition step of the wizard.
8.3.5 Editing table definition
This step is available only if the Add CREATE TABLE statement option was checked onthe Selecting destination DBMS step of the wizard. It allows you to view/edit the SQLscript for creating the table.
For your convenience the syntax highlight, code folding and a number of other featuresfor efficient SQL editing are implemented. For details see Working with SQL Editor areaand Using the context menu .
638
634
476
465

SQL Manager for SQL Server - User's Manual639
© 1999-2022 EMS Software Development
Click the Next button to proceed to the Setting export options step of the wizard.
8.3.6 Setting export options
Specify common export options according to your needs.
If necessary, you can choose to replace non-print characters in strings with spaces.
Records in blockUse the spinner control to define the number of records in each committed block.
Insert COMMIT after each blockCheck this option to add the COMMIT statement after a defined number of records.
639

SQL Manager for SQL Server - User's Manual640
© 1999-2022 EMS Software Development
Click the Next button to proceed to Exporting as SQL Script .
8.3.7 Exporting as SQL Script
This step of the wizard is intended to inform you that all export options have been set,and you can start the export as SQL script process.
The log area allows you to view the log of operations and errors (if any).
640
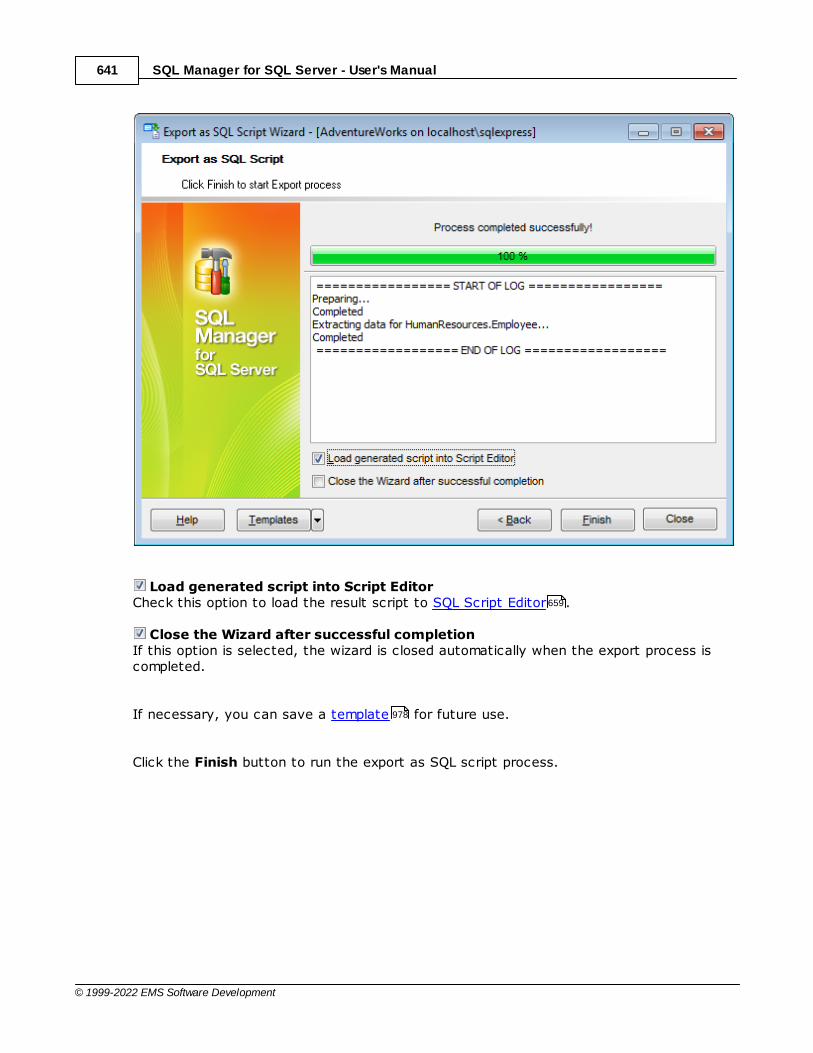
SQL Manager for SQL Server - User's Manual641
© 1999-2022 EMS Software Development
Load generated script into Script EditorCheck this option to load the result script to SQL Script Editor .
Close the Wizard after successful completionIf this option is selected, the wizard is closed automatically when the export process iscompleted.
If necessary, you can save a template for future use.
Click the Finish button to run the export as SQL script process.
659
978
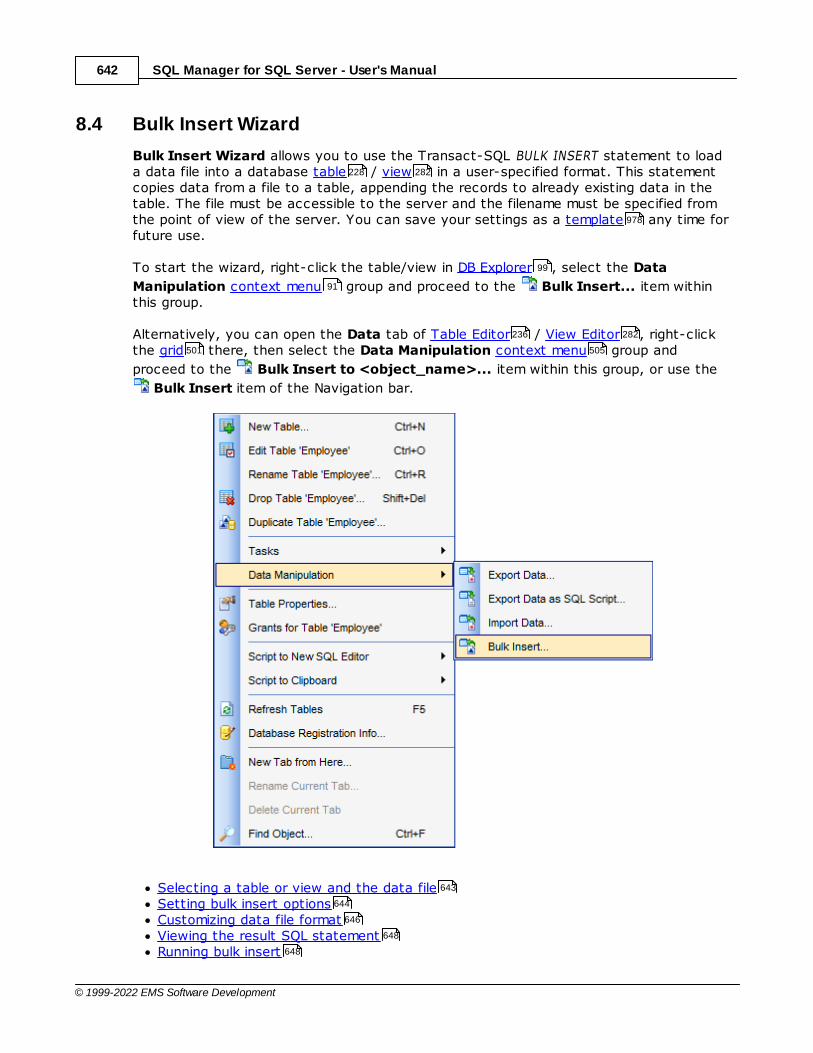
SQL Manager for SQL Server - User's Manual642
© 1999-2022 EMS Software Development
8.4 Bulk Insert Wizard
Bulk Insert Wizard allows you to use the Transact-SQL BULK INSERT statement to loada data file into a database table / view in a user-specified format. This statementcopies data from a file to a table, appending the records to already existing data in thetable. The file must be accessible to the server and the filename must be specified fromthe point of view of the server. You can save your settings as a template any time forfuture use.
To start the wizard, right-click the table/view in DB Explorer , select the Data
Manipulation context menu group and proceed to the Bulk Insert... item withinthis group.
Alternatively, you can open the Data tab of Table Editor / View Editor , right-clickthe grid there, then select the Data Manipulation context menu group and
proceed to the Bulk Insert to <object_name>... item within this group, or use the
Bulk Insert item of the Navigation bar.
Selecting a table or view and the data fileSetting bulk insert optionsCustomizing data file formatViewing the result SQL statementRunning bulk insert
228 282
978
99
91
236 282
501 505
643
644
646
648
648
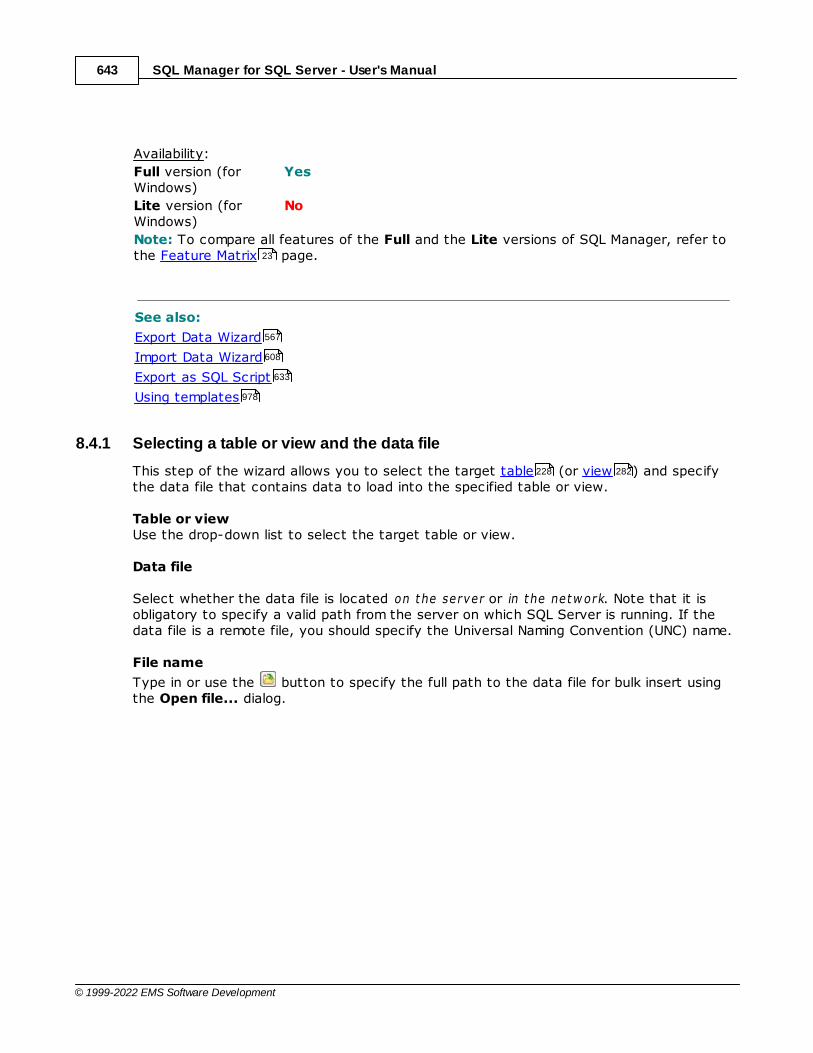
SQL Manager for SQL Server - User's Manual643
© 1999-2022 EMS Software Development
Availability:
Full version (forWindows)
Yes
Lite version (forWindows)
No
Note: To compare all features of the Full and the Lite versions of SQL Manager, refer tothe Feature Matrix page.
See also:
Export Data Wizard
Import Data Wizard
Export as SQL Script
Using templates
8.4.1 Selecting a table or view and the data file
This step of the wizard allows you to select the target table (or view ) and specifythe data file that contains data to load into the specified table or view.
Table or viewUse the drop-down list to select the target table or view.
Data file
Select whether the data file is located on the server or in the netw ork. Note that it isobligatory to specify a valid path from the server on which SQL Server is running. If thedata file is a remote file, you should specify the Universal Naming Convention (UNC) name.
File name
Type in or use the button to specify the full path to the data file for bulk insert usingthe Open file... dialog.
23
567
608
633
978
228 282
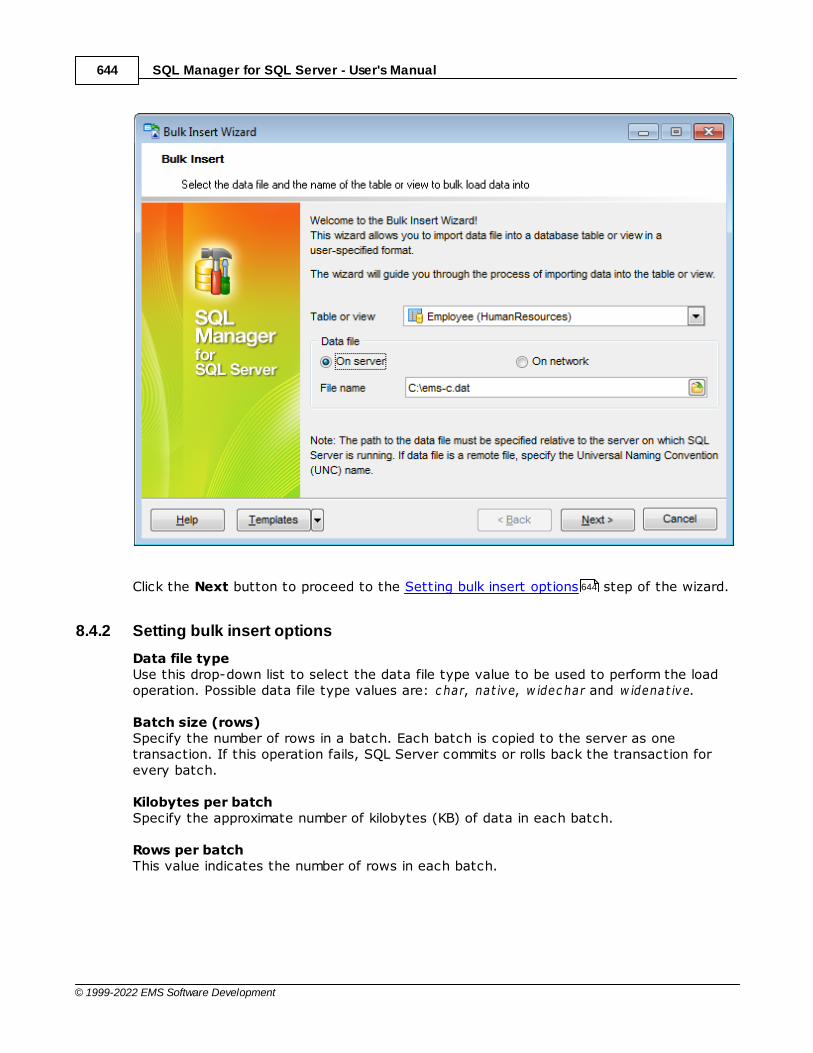
SQL Manager for SQL Server - User's Manual644
© 1999-2022 EMS Software Development
Click the Next button to proceed to the Setting bulk insert options step of the wizard.
8.4.2 Setting bulk insert options
Data file typeUse this drop-down list to select the data file type value to be used to perform the loadoperation. Possible data file type values are: c har, nat ive, w idec har and w idenat ive.
Batch size (rows)Specify the number of rows in a batch. Each batch is copied to the server as onetransaction. If this operation fails, SQL Server commits or rolls back the transaction forevery batch.
Kilobytes per batchSpecify the approximate number of kilobytes (KB) of data in each batch.
Rows per batchThis value indicates the number of rows in each batch.
644

SQL Manager for SQL Server - User's Manual645
© 1999-2022 EMS Software Development
Check constraintsEnable this option to specify that all constraints on the target table or view must bechecked during the bulk insert operation. If disabled, any CHECK constraints are ignored,and after the operation the constraint on the table is marked as not-trusted. This mightbe necessary if the input data contains rows that violate constraints.Note: UNIQUE, PRIMARY KEY, FOREIGN KEY and NOT NULL constraints are alwaysenforced.
Fire triggersUse this option to specify that any insert triggers defined on the destination tableexecute during the bulk load operation. If triggers are defined for INSERT operations onthe target table, they are fired for every completed batch.
Keep identityUse this option to specify that identity value or values in the imported data file are to beused for the identity column. If this option is not checked, the identity values for thiscolumn are verified but not imported, and SQL Server automatically assigns unique valuesbased on the seed and increment values specified during table creation.
Keep nullsUse this option to specify that empty columns should retain a null value during the bulkload operation, instead of having any default values for the columns inserted.
Table lock
SQL Manager for SQL Server - User's Manual646
© 1999-2022 EMS Software Development
Use this option to specify that a table-level lock is acquired for the duration of the bulkload operation. Holding a lock for the duration of the bulk load operation reduces lockcontention on the table and may significantly improve performance.
Max errorsSpecifies the maximum number of syntax errors allowed in the data before the bulk insertoperation is canceled. Each row that cannot be imported by the bulk load operation isignored and counted as one error.Note: This option is not applied to constraint checks and to converting m oney and bigintdata types.
Error fileSpecify the file used to collect rows that have formatting errors and cannot be convertedto an OLEDB rowset. These rows are copied into this error file from the data file "as is".The error file is created when the command is executed.
Click the Next button to proceed to the Customizing data file format step of thewizard.
8.4.3 Customizing data file format
Code pageUse this drop-down list to select the code page of the data in the data file: ACP, OEM orRAW. This option is relevant only if the data contains c har, varc har or text columns withcharacter values greater than 127 or less than 32.
ACP: columns are converted from the ANSI/Microsoft Windows code page (ISO 1252)to the SQL Server code pageOEM: columns are converted from the system OEM code page to the SQL Server codepageRAW: no conversion is performed
Field terminatorUse the drop-down list to specify the field terminator to be used for c har and w idec hardata files: tab c harac ter (\t ), c om m a (,) or sem ic olon (;).
Row terminatorUse the drop-down list to select the row terminator to be used for c har and w idec hardata files: new line c harac ter (\n) or return c harac ter (\r).
646
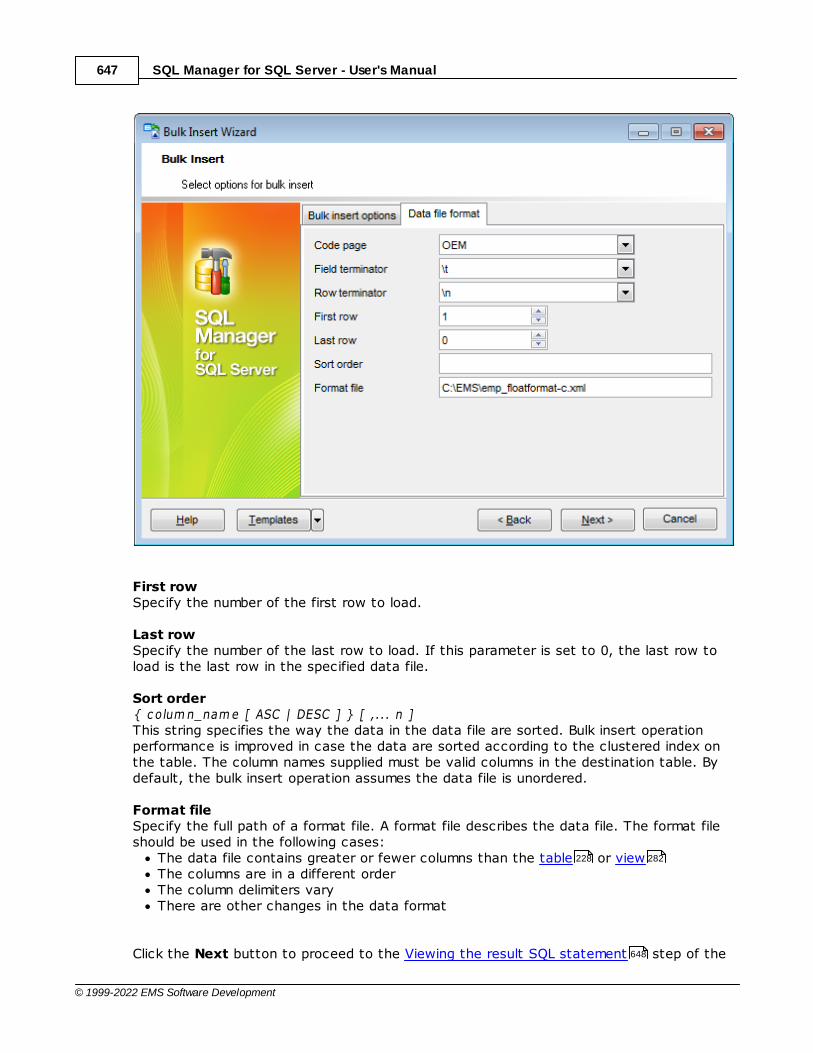
SQL Manager for SQL Server - User's Manual647
© 1999-2022 EMS Software Development
First rowSpecify the number of the first row to load.
Last rowSpecify the number of the last row to load. If this parameter is set to 0, the last row toload is the last row in the specified data file.
Sort order{ c olum n_nam e [ ASC | DESC ] } [ ,... n ]This string specifies the way the data in the data file are sorted. Bulk insert operationperformance is improved in case the data are sorted according to the clustered index onthe table. The column names supplied must be valid columns in the destination table. Bydefault, the bulk insert operation assumes the data file is unordered.
Format fileSpecify the full path of a format file. A format file describes the data file. The format fileshould be used in the following cases:
The data file contains greater or fewer columns than the table or viewThe columns are in a different orderThe column delimiters varyThere are other changes in the data format
Click the Next button to proceed to the Viewing the result SQL statement step of the
228 282
648
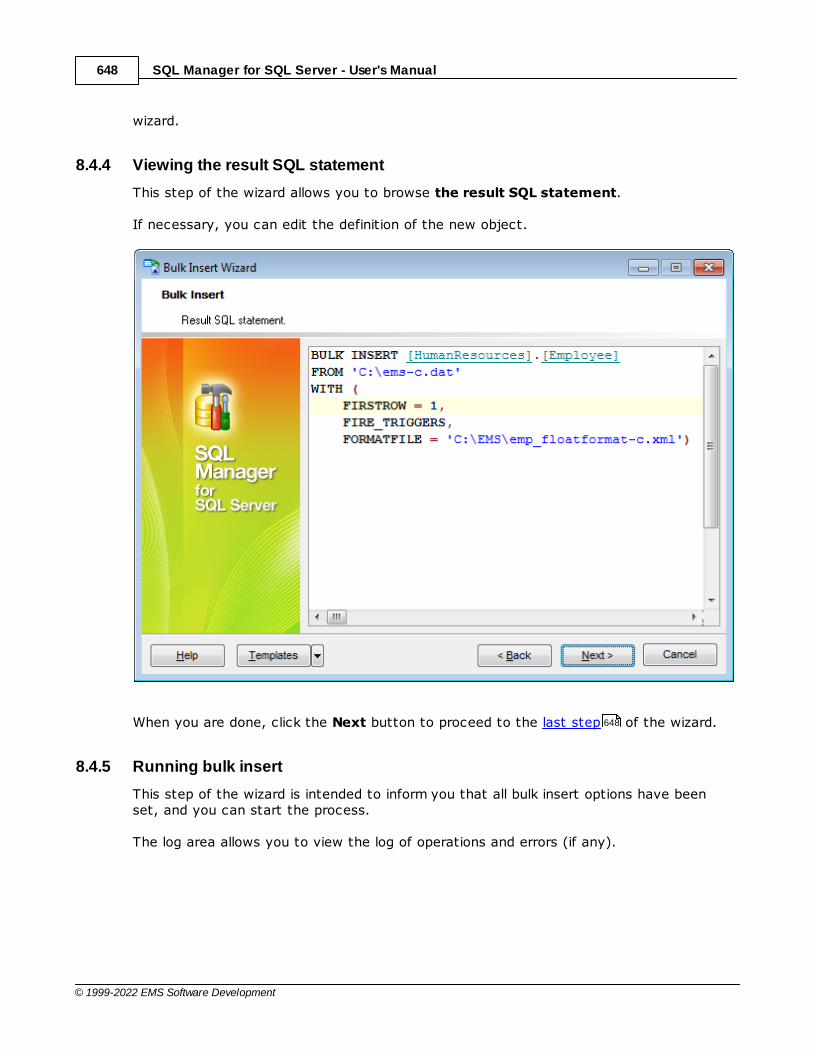
SQL Manager for SQL Server - User's Manual648
© 1999-2022 EMS Software Development
wizard.
8.4.4 Viewing the result SQL statement
This step of the wizard allows you to browse the result SQL statement.
If necessary, you can edit the definition of the new object.
When you are done, click the Next button to proceed to the last step of the wizard.
8.4.5 Running bulk insert
This step of the wizard is intended to inform you that all bulk insert options have beenset, and you can start the process.
The log area allows you to view the log of operations and errors (if any).
648

SQL Manager for SQL Server - User's Manual649
© 1999-2022 EMS Software Development
Close the Wizard after successful completionIf this option is selected, the wizard is closed automatically when the bulk insert processis completed.
If necessary, you can save a template for future use.
Click the Finish button to run the bulk insert process.
978

Part
IX
SQL Manager for SQL Server - User's Manual651
© 1999-2022 EMS Software Development
9 Tools
SQL Manager for SQL Server provides a number of powerful tools that allow you toperform various operations over your databases.The following c om m on database tools are available in SQL Manager for SQL Server:
Dependency TreeAllows you to view all the object dependencies in one diagram.
Visual Database DesignerAllows you to lay out your database schema visually.
SQL Script EditorExecutes SQL scripts in the database.
Extract Database WizardExtracts the table metadata and/or data to an SQL script which can be executed later onanother machine to restore the database structure and/or data.
Print MetadataCreates powerful metadata reports in the WYSIWYG mode ready for printing.
HTML ReportCreates powerful metadata reports in the HTML format.
Reports managementTools for efficient management of reports: creating, editing, viewing, printing.
SQL MonitorDisplays all the SQL statements executed while working in SQL Manager for SQL Server.
Using templatesFacilitates using SQL Manager wizards.
See also:
Getting Started
Database Explorer
Database Management
Database Objects Management
Query Management Tools
Data Management
Import/Export Tools
Server Tools
Personalization
External Tools
How To...
652
737
659
666
683
692
700
656
978
76
99
130
214
460
498
566
757
866
952
1001
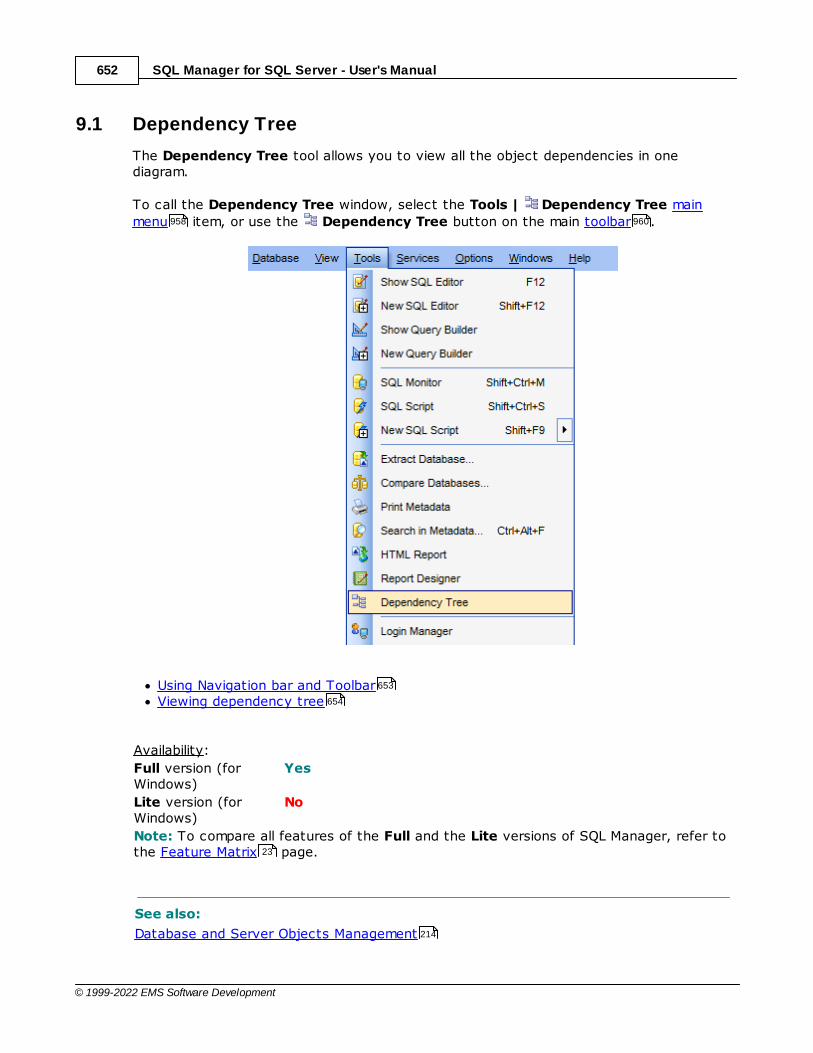
SQL Manager for SQL Server - User's Manual652
© 1999-2022 EMS Software Development
9.1 Dependency Tree
The Dependency Tree tool allows you to view all the object dependencies in onediagram.
To call the Dependency Tree window, select the Tools | Dependency Tree main
menu item, or use the Dependency Tree button on the main toolbar .
Using Navigation bar and ToolbarViewing dependency tree
Availability:
Full version (forWindows)
Yes
Lite version (forWindows)
No
Note: To compare all features of the Full and the Lite versions of SQL Manager, refer tothe Feature Matrix page.
See also:
Database and Server Objects Management
958 960
653
654
23
214
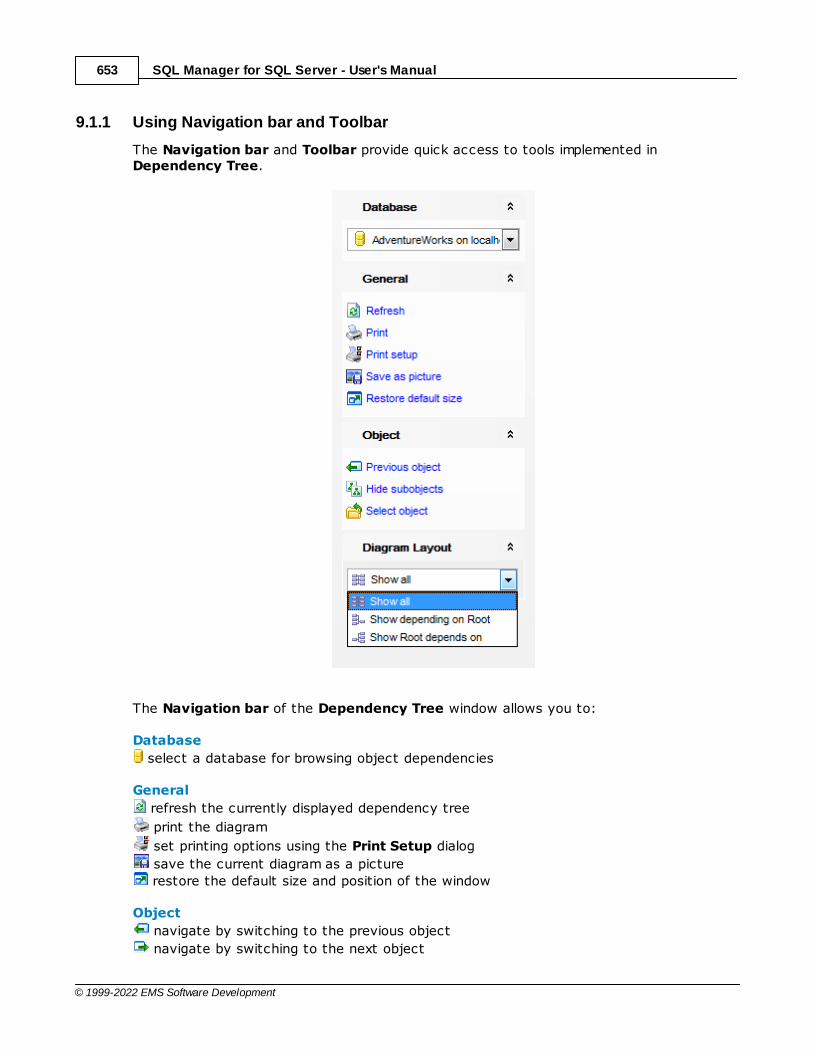
SQL Manager for SQL Server - User's Manual653
© 1999-2022 EMS Software Development
9.1.1 Using Navigation bar and Toolbar
The Navigation bar and Toolbar provide quick access to tools implemented inDependency Tree.
The Navigation bar of the Dependency Tree window allows you to:
Database
select a database for browsing object dependencies
General
refresh the currently displayed dependency tree
print the diagram
set printing options using the Print Setup dialog
save the current diagram as a picture
restore the default size and position of the window
Object
navigate by switching to the previous object
navigate by switching to the next object
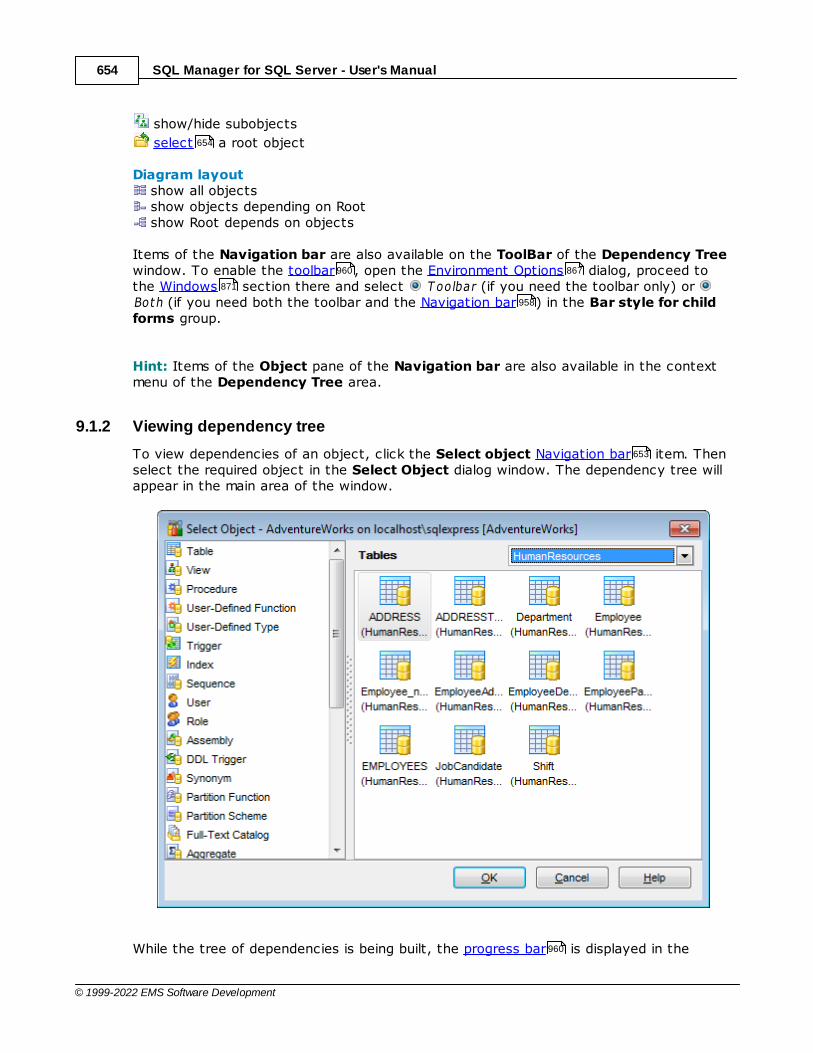
SQL Manager for SQL Server - User's Manual654
© 1999-2022 EMS Software Development
show/hide subobjects
select a root object
Diagram layout show all objects show objects depending on Root show Root depends on objects
Items of the Navigation bar are also available on the ToolBar of the Dependency Treewindow. To enable the toolbar , open the Environment Options dialog, proceed tothe Windows section there and select T oolbar (if you need the toolbar only) or Both (if you need both the toolbar and the Navigation bar ) in the Bar style for childforms group.
Hint: Items of the Object pane of the Navigation bar are also available in the contextmenu of the Dependency Tree area.
9.1.2 Viewing dependency tree
To view dependencies of an object, click the Select object Navigation bar item. Thenselect the required object in the Select Object dialog window. The dependency tree willappear in the main area of the window.
While the tree of dependencies is being built, the progress bar is displayed in the
654
960 867
871
958
653
960
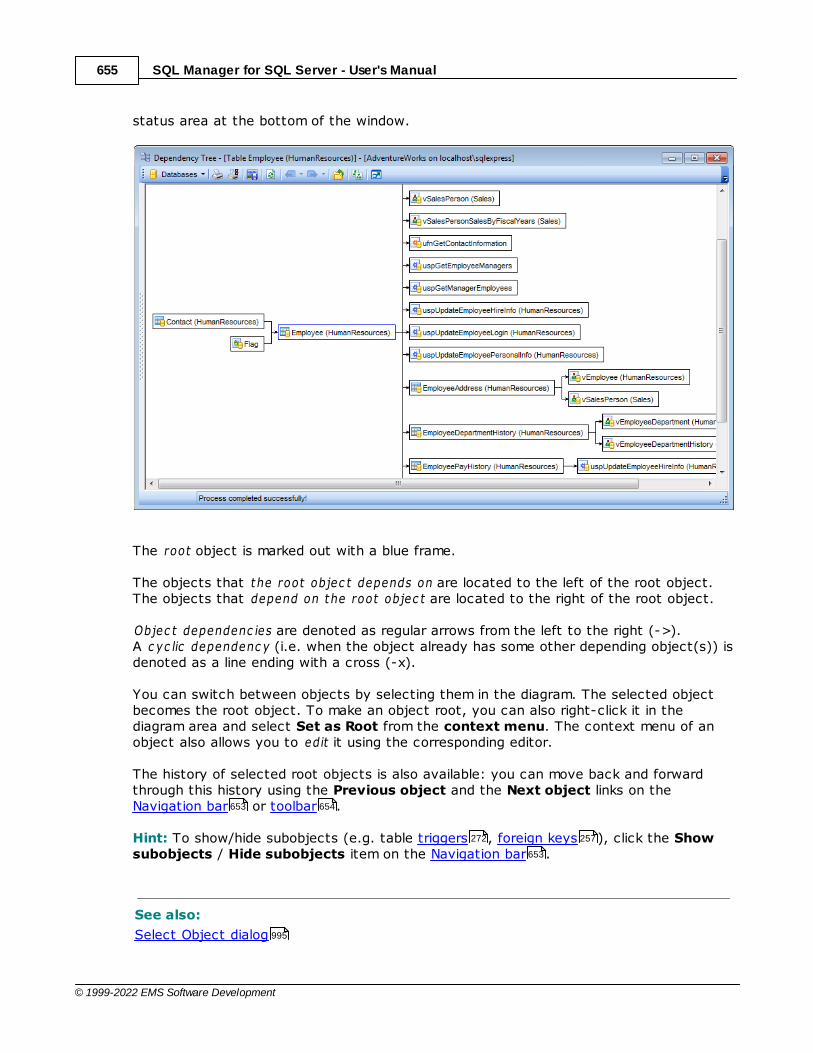
SQL Manager for SQL Server - User's Manual655
© 1999-2022 EMS Software Development
status area at the bottom of the window.
The root object is marked out with a blue frame.
The objects that the root objec t depends on are located to the left of the root object. The objects that depend on the root objec t are located to the right of the root object.
Objec t dependenc ies are denoted as regular arrows from the left to the right (->).A c yc lic dependenc y (i.e. when the object already has some other depending object(s)) isdenoted as a line ending with a cross (-x).
You can switch between objects by selecting them in the diagram. The selected objectbecomes the root object. To make an object root, you can also right-click it in thediagram area and select Set as Root from the context menu. The context menu of anobject also allows you to edit it using the corresponding editor.
The history of selected root objects is also available: you can move back and forwardthrough this history using the Previous object and the Next object links on theNavigation bar or toolbar .
Hint: To show/hide subobjects (e.g. table triggers , foreign keys ), click the Showsubobjects / Hide subobjects item on the Navigation bar .
See also:
Select Object dialog
653 654
272 257
653
995

SQL Manager for SQL Server - User's Manual656
© 1999-2022 EMS Software Development
9.2 SQL Monitor
SQL Monitor allows you to view the log of all operations performed over databases anddatabase objects in SQL Manager for SQL Server. The content of the window is read-only.
To open the SQL Monitor window, select the Tools | SQL Monitor main menu item,or use the Shift+Ct r l+M shortcut .
Using Navigation bar and ToolbarWorking with SQL Monitor
See also:
SQL Monitor options
9.2.1 Using Navigation bar and Toolbar
The Navigation bar and Toolbar provide quick access to tools implemented in SQLMonitor.
The Navigation bar of SQL Monitor allows you to:
General
958
996
656
657
880
SQL Manager for SQL Server - User's Manual657
© 1999-2022 EMS Software Development
clear the content of the window
save the content to a *.txt file using the Save as... dialog
search for a string using the Find Text dialog
search again
configure SQL Monitor using the SQL Monitor section of the Environment Optionsdialog
restore the default size and position of the window
specify that the window is displayed on top of other child windows
Items of the Navigation bar are also available on the ToolBar of SQL Monitor. Toenable the toolbar , open the Environment Options dialog, proceed to the Windows
section there and select T oolbar (if you need the toolbar only) or Both (if youneed both the toolbar and the Navigation bar ) in the Bar style for child forms group.
9.2.2 Working with SQL Monitor
The working area of SQL Monitor lists the log of database operations and SQL queries asitems, each consisting of 3 parts: Exec uted (the date and time of the operation),Operat ion (SQL statement sent to the server), Result (the result of the operation).
Items of the context menu of SQL Monitor area provide access to various functions forworking with the window content. The context menu contains standard text-processingfunctions (Copy, Selec t All), spelling checking and functions for working with thecontent as a whole, e.g. you can set m arkers, m ove the c ursor to a part ic ular line, savethe content to a file or as a favorite query , configure the editor using the propertiesitem or prev iew/print the content. Most of these operations can be also performed withthe corresponding hot keys used.
969
880 867
960 867
871
958
925
126 912
996
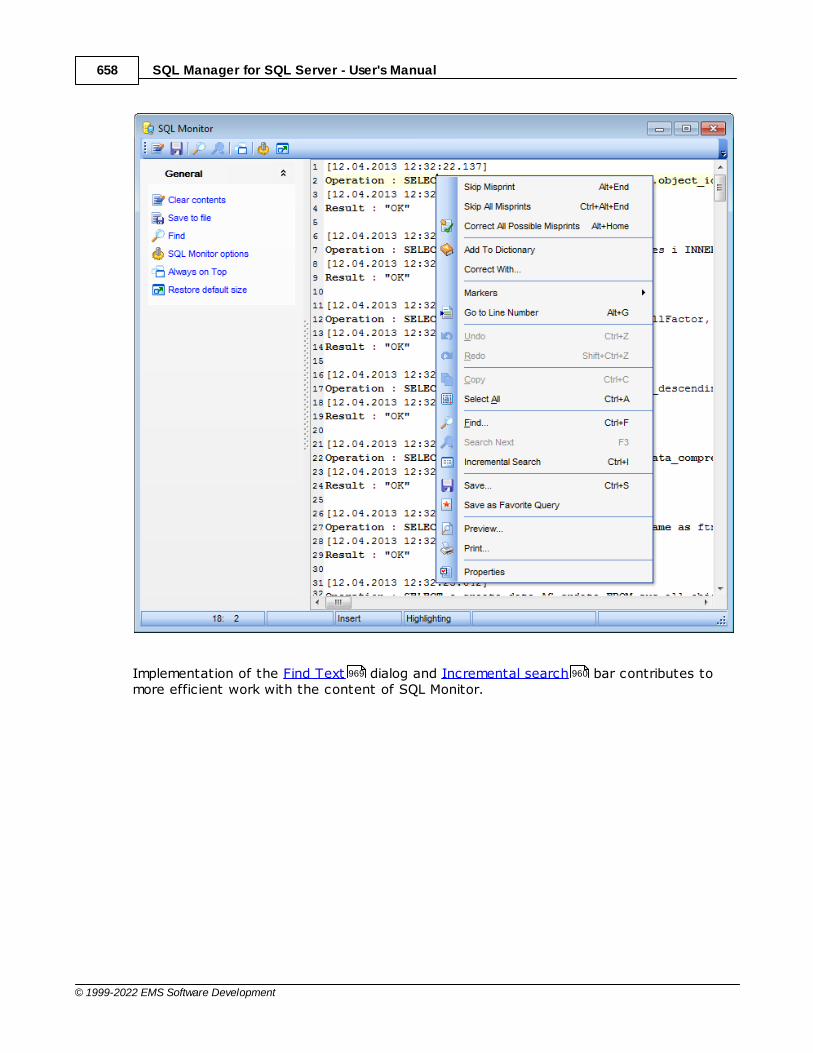
SQL Manager for SQL Server - User's Manual658
© 1999-2022 EMS Software Development
Implementation of the Find Text dialog and Incremental search bar contributes tomore efficient work with the content of SQL Monitor.
969 960
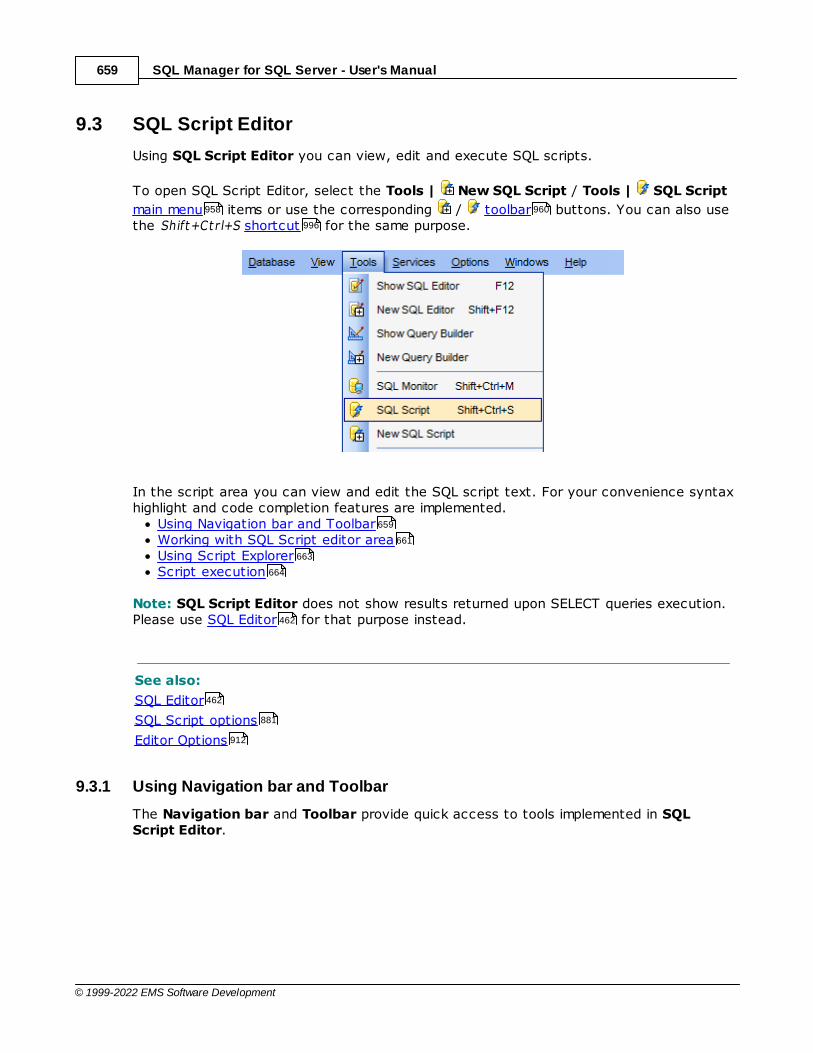
SQL Manager for SQL Server - User's Manual659
© 1999-2022 EMS Software Development
9.3 SQL Script Editor
Using SQL Script Editor you can view, edit and execute SQL scripts.
To open SQL Script Editor, select the Tools | New SQL Script / Tools | SQL Script
main menu items or use the corresponding / toolbar buttons. You can also usethe Shift+Ct r l+S shortcut for the same purpose.
In the script area you can view and edit the SQL script text. For your convenience syntaxhighlight and code completion features are implemented.
Using Navigation bar and ToolbarWorking with SQL Script editor areaUsing Script ExplorerScript execution
Note: SQL Script Editor does not show results returned upon SELECT queries execution.Please use SQL Editor for that purpose instead.
See also:
SQL Editor
SQL Script options
Editor Options
9.3.1 Using Navigation bar and Toolbar
The Navigation bar and Toolbar provide quick access to tools implemented in SQLScript Editor.
958 960
996
659
661
663
664
462
462
881
912
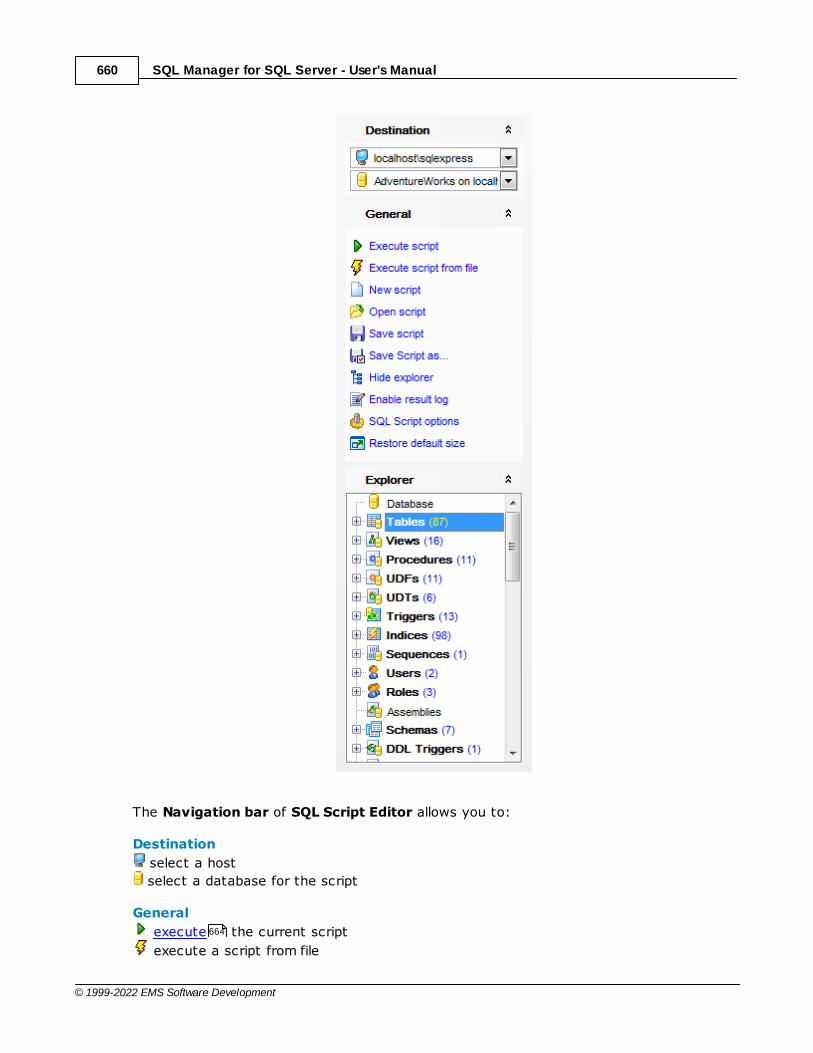
SQL Manager for SQL Server - User's Manual660
© 1999-2022 EMS Software Development
The Navigation bar of SQL Script Editor allows you to:
Destination
select a host
select a database for the script
General
execute the current script
execute a script from file
664
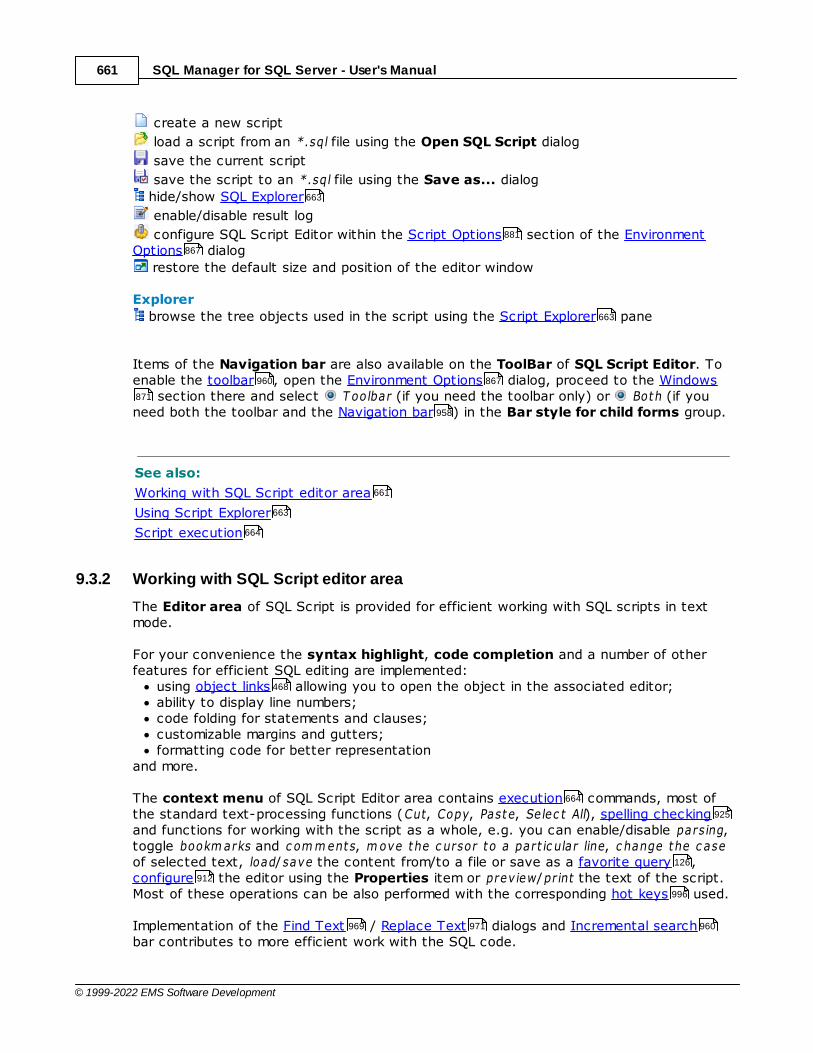
SQL Manager for SQL Server - User's Manual661
© 1999-2022 EMS Software Development
create a new script
load a script from an *.sql file using the Open SQL Script dialog
save the current script
save the script to an *.sql file using the Save as... dialog
hide/show SQL Explorer
enable/disable result log
configure SQL Script Editor within the Script Options section of the EnvironmentOptions dialog
restore the default size and position of the editor window
Explorer
browse the tree objects used in the script using the Script Explorer pane
Items of the Navigation bar are also available on the ToolBar of SQL Script Editor. Toenable the toolbar , open the Environment Options dialog, proceed to the Windows
section there and select T oolbar (if you need the toolbar only) or Both (if youneed both the toolbar and the Navigation bar ) in the Bar style for child forms group.
See also:
Working with SQL Script editor area
Using Script Explorer
Script execution
9.3.2 Working with SQL Script editor area
The Editor area of SQL Script is provided for efficient working with SQL scripts in textmode.
For your convenience the syntax highlight, code completion and a number of otherfeatures for efficient SQL editing are implemented:
using object links allowing you to open the object in the associated editor;ability to display line numbers;code folding for statements and clauses;customizable margins and gutters;formatting code for better representation
and more.
The context menu of SQL Script Editor area contains execution commands, most ofthe standard text-processing functions (Cut, Copy, Paste, Selec t All), spelling checkingand functions for working with the script as a whole, e.g. you can enable/disable parsing,toggle bookm arks and c om m ents, m ove the c ursor to a part ic ular line, c hange the c aseof selected text, load/save the content from/to a file or save as a favorite query ,configure the editor using the Properties item or prev iew/print the text of the script.Most of these operations can be also performed with the corresponding hot keys used.
Implementation of the Find Text / Replace Text dialogs and Incremental searchbar contributes to more efficient work with the SQL code.
663
881
867
663
960 867
871
958
661
663
664
468
664
925
126
912
996
969 971 960
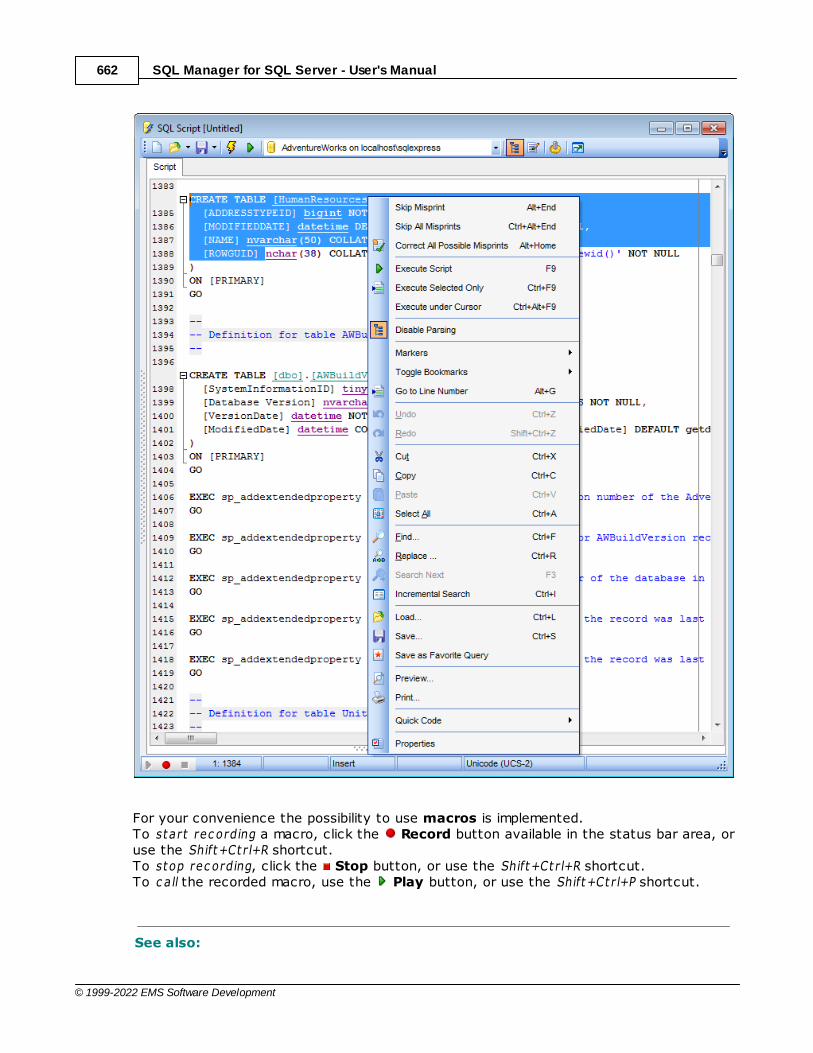
SQL Manager for SQL Server - User's Manual662
© 1999-2022 EMS Software Development
For your convenience the possibility to use macros is implemented.To start rec ording a macro, click the Record button available in the status bar area, oruse the Shift+Ct r l+R shortcut.To stop rec ording, click the Stop button, or use the Shift+Ct r l+R shortcut.To c all the recorded macro, use the Play button, or use the Shift+Ct r l+P shortcut.
See also:
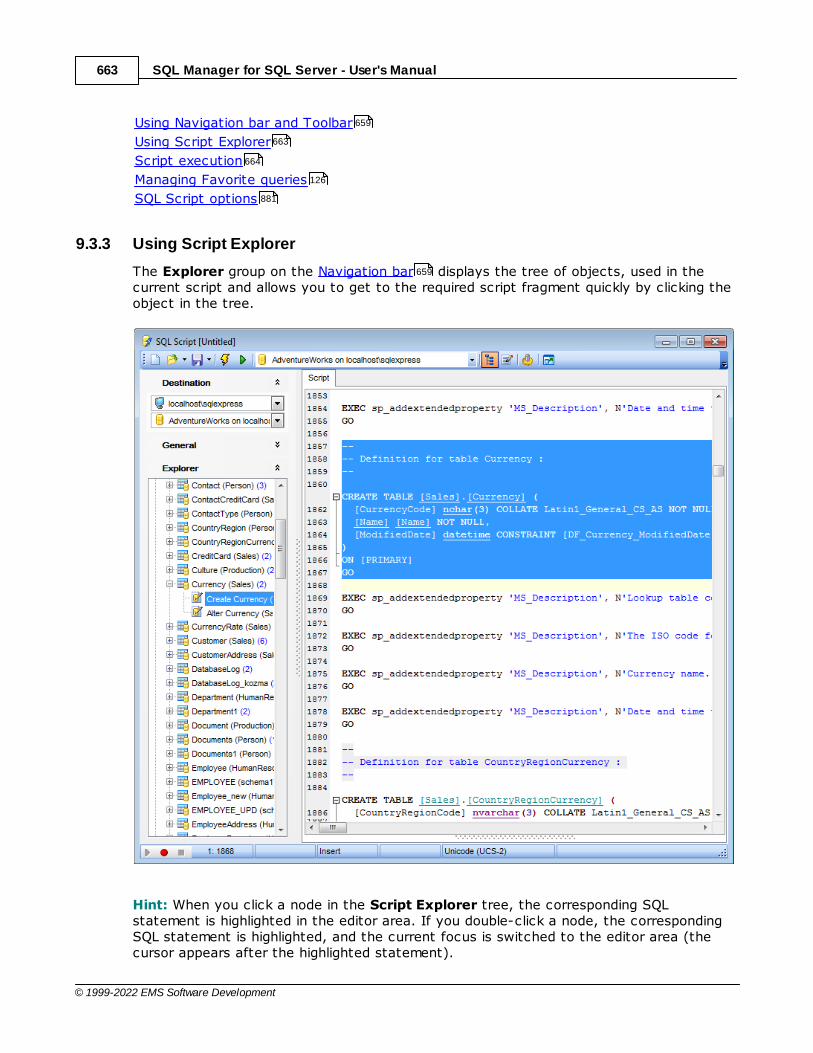
SQL Manager for SQL Server - User's Manual663
© 1999-2022 EMS Software Development
Using Navigation bar and Toolbar
Using Script Explorer
Script execution
Managing Favorite queries
SQL Script options
9.3.3 Using Script Explorer
The Explorer group on the Navigation bar displays the tree of objects, used in thecurrent script and allows you to get to the required script fragment quickly by clicking theobject in the tree.
Hint: When you click a node in the Script Explorer tree, the corresponding SQLstatement is highlighted in the editor area. If you double-click a node, the correspondingSQL statement is highlighted, and the current focus is switched to the editor area (thecursor appears after the highlighted statement).
659
663
664
126
881
659

SQL Manager for SQL Server - User's Manual664
© 1999-2022 EMS Software Development
See also:
Using Navigation bar and Toolbar
Working with SQL Script editor area
Database and Server Objects Management
9.3.4 Script execution
When all the script parameters are set, you can immediately execute the script in SQLScript Editor.
To execute a script, click the Execute script item of the Navigation bar or toolbar. You can also use the context menu or F9 hot key for the same purpose.
Note: If the Execute selected text separately option (see the Tools | SQL Scriptsection of the Environment Options dialog) is enabled (by default) and a text fragmentis currently selected, only this fragment is executed when you click Exec ute sc r ipt on theNavigation bar or press F9. If this option is disabled, the whole script is executed, butyou can still execute the selected fragment using the corresponding Exec ute Selec tedOnly item of the context menu or by pressing Ct r l+F9.
If the SQL syntax is correct, the script is executed and the 'Done!' information messageappears.
If the syntax contains errors or script cannot be executed, the corresponding errormessage is displayed in the status bar area at the bottom of the editor window.
659
661
214
659 661
661
881
867
659
661
SQL Manager for SQL Server - User's Manual665
© 1999-2022 EMS Software Development
Hint: When you select an item from the error list (in the status bar area), thecorresponding SQL statement is highlighted in the editor area. If you double-click an item,the corresponding SQL statement is highlighted, and the current focus is switched to theeditor area (the cursor appears after the highlighted statement).
Note: SQL Script Editor does not show results returned upon SELECT queries execution.Please execute such queries in SQL Editor to see the result dataset.
See also:
Using Navigation bar and Toolbar
Working with SQL Script editor area
Using Script Explorer
469 462
659
661
663

SQL Manager for SQL Server - User's Manual666
© 1999-2022 EMS Software Development
9.4 Extract Database Wizard
Extract Database Wizard allows you to extract database objects and/or data to an SQLscript, e.g. for backup purposes.
To start the wizard, select the Tools | Extract Database... main menu item, or
right-click the database alias in the DB Explorer tree and select the Tasks | ExtractDatabase... item from the context menu .
Selecting a database for extractionSpecifying destination file nameSetting extraction modeSetting BLOB optionsSelecting objects for metadata extractionSelecting objects for data extractionCustomizing script optionsStart of extraction processUsing templates
See also:
SQL Script Editor
Database Objects Management
Using templates
9.4.1 Selecting source database
This step of the wizard allows you to select the source database from which metadataand/or data are to be extracted.
If necessary, check the Extract all metadata and data of the database option tosimplify the wizard.
958
99
89
666
667
668
669
670
672
673
675
978
659
214
978
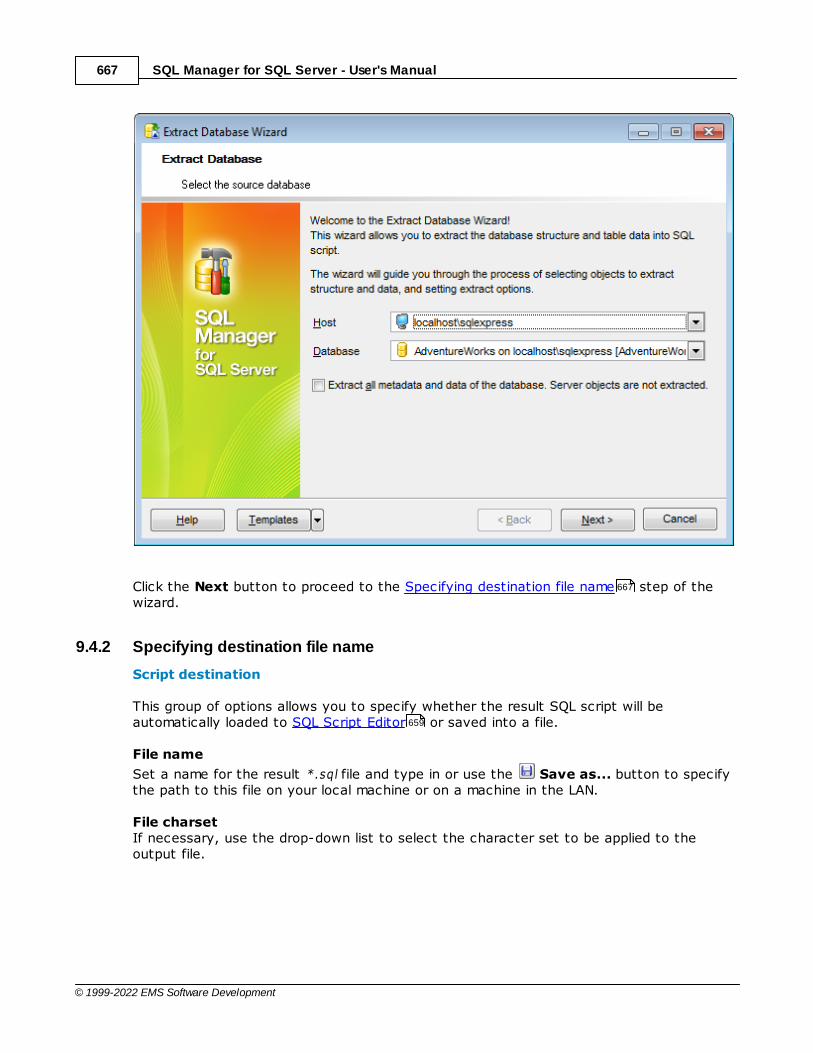
SQL Manager for SQL Server - User's Manual667
© 1999-2022 EMS Software Development
Click the Next button to proceed to the Specifying destination file name step of thewizard.
9.4.2 Specifying destination file name
Script destination
This group of options allows you to specify whether the result SQL script will beautomatically loaded to SQL Script Editor or saved into a file.
File name
Set a name for the result *.sql file and type in or use the Save as... button to specifythe path to this file on your local machine or on a machine in the LAN.
File charsetIf necessary, use the drop-down list to select the character set to be applied to theoutput file.
667
659
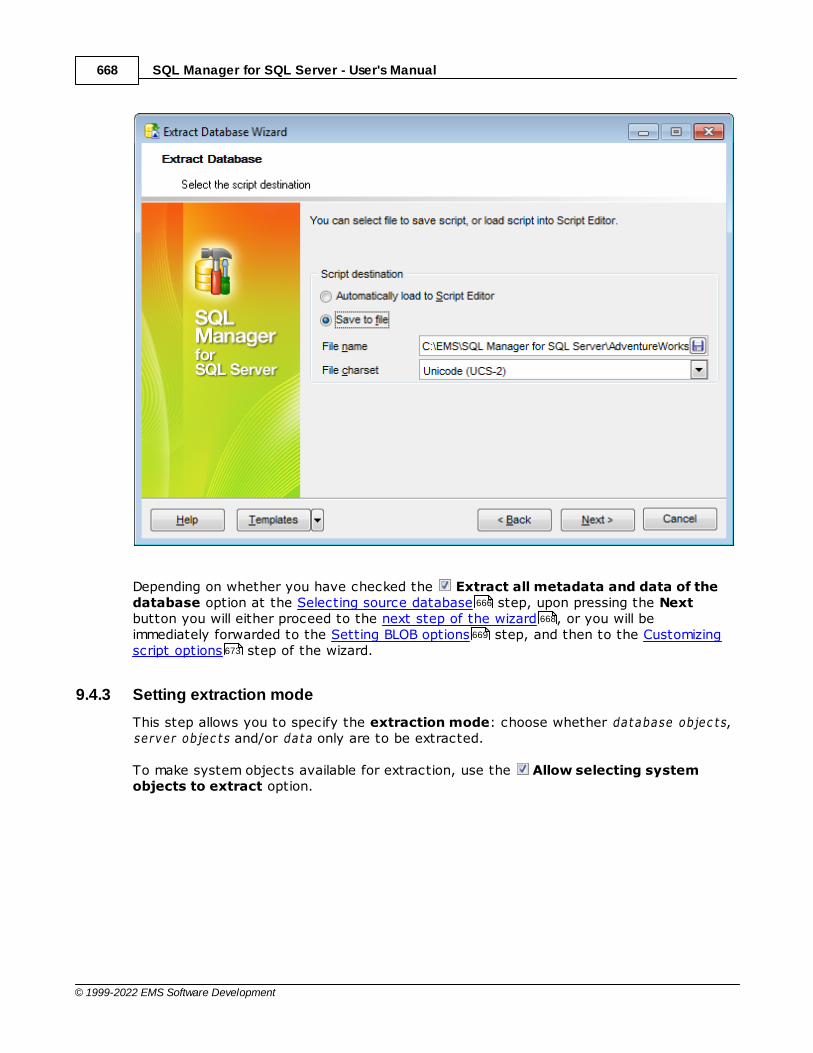
SQL Manager for SQL Server - User's Manual668
© 1999-2022 EMS Software Development
Depending on whether you have checked the Extract all metadata and data of thedatabase option at the Selecting source database step, upon pressing the Nextbutton you will either proceed to the next step of the wizard , or you will beimmediately forwarded to the Setting BLOB options step, and then to the Customizingscript options step of the wizard.
9.4.3 Setting extraction mode
This step allows you to specify the extraction mode: choose whether database objec t s,server objec t s and/or data only are to be extracted.
To make system objects available for extraction, use the Allow selecting systemobjects to extract option.
666
668
669
673
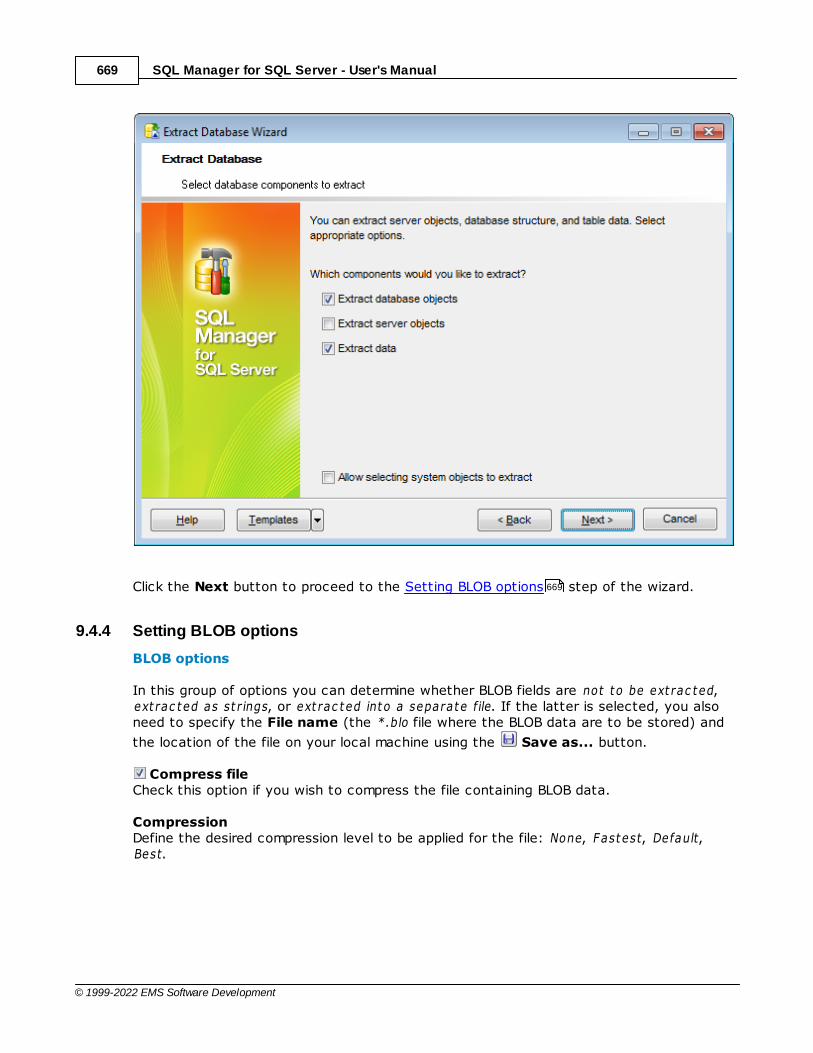
SQL Manager for SQL Server - User's Manual669
© 1999-2022 EMS Software Development
Click the Next button to proceed to the Setting BLOB options step of the wizard.
9.4.4 Setting BLOB options
BLOB options
In this group of options you can determine whether BLOB fields are not to be ext rac ted,ext rac ted as st r ings, or ext rac ted into a separate file. If the latter is selected, you alsoneed to specify the File name (the *.blo file where the BLOB data are to be stored) and
the location of the file on your local machine using the Save as... button.
Compress fileCheck this option if you wish to compress the file containing BLOB data.
CompressionDefine the desired compression level to be applied for the file: None, Fastest, Default,Best.
669
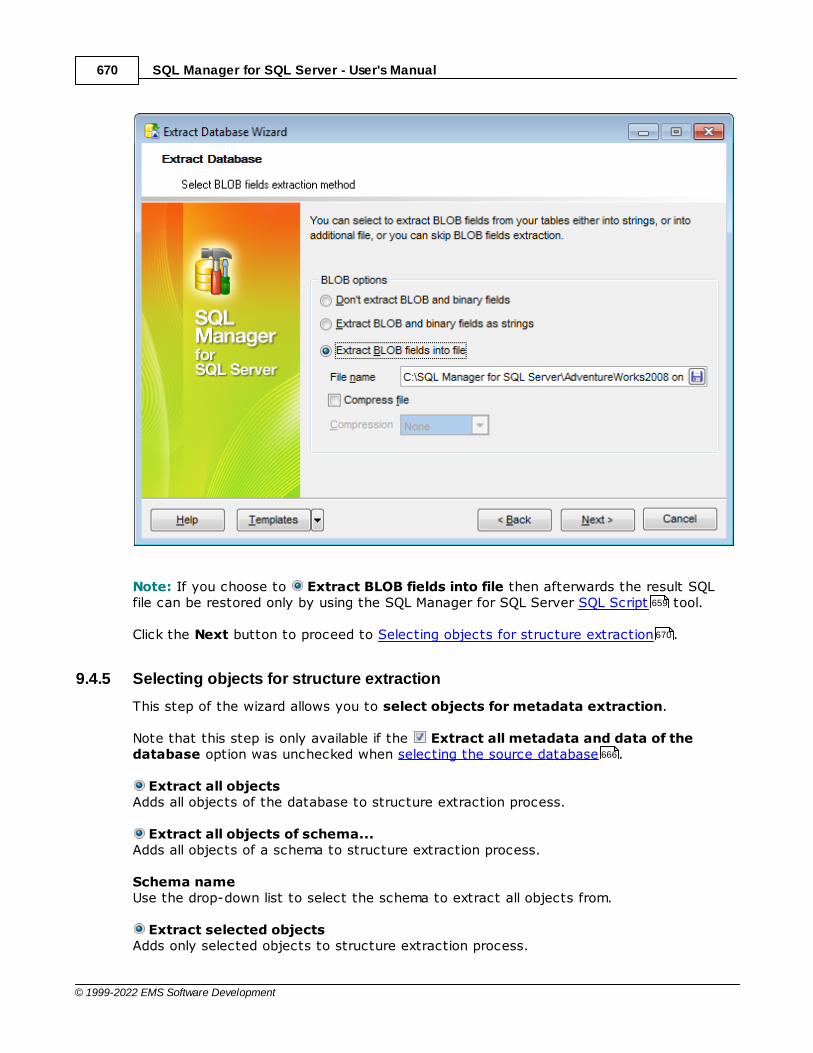
SQL Manager for SQL Server - User's Manual670
© 1999-2022 EMS Software Development
Note: If you choose to Extract BLOB fields into file then afterwards the result SQLfile can be restored only by using the SQL Manager for SQL Server SQL Script tool.
Click the Next button to proceed to Selecting objects for structure extraction .
9.4.5 Selecting objects for structure extraction
This step of the wizard allows you to select objects for metadata extraction.
Note that this step is only available if the Extract all metadata and data of thedatabase option was unchecked when selecting the source database .
Extract all objectsAdds all objects of the database to structure extraction process.
Extract all objects of schema...Adds all objects of a schema to structure extraction process.
Schema nameUse the drop-down list to select the schema to extract all objects from.
Extract selected objectsAdds only selected objects to structure extraction process.
659
670
666
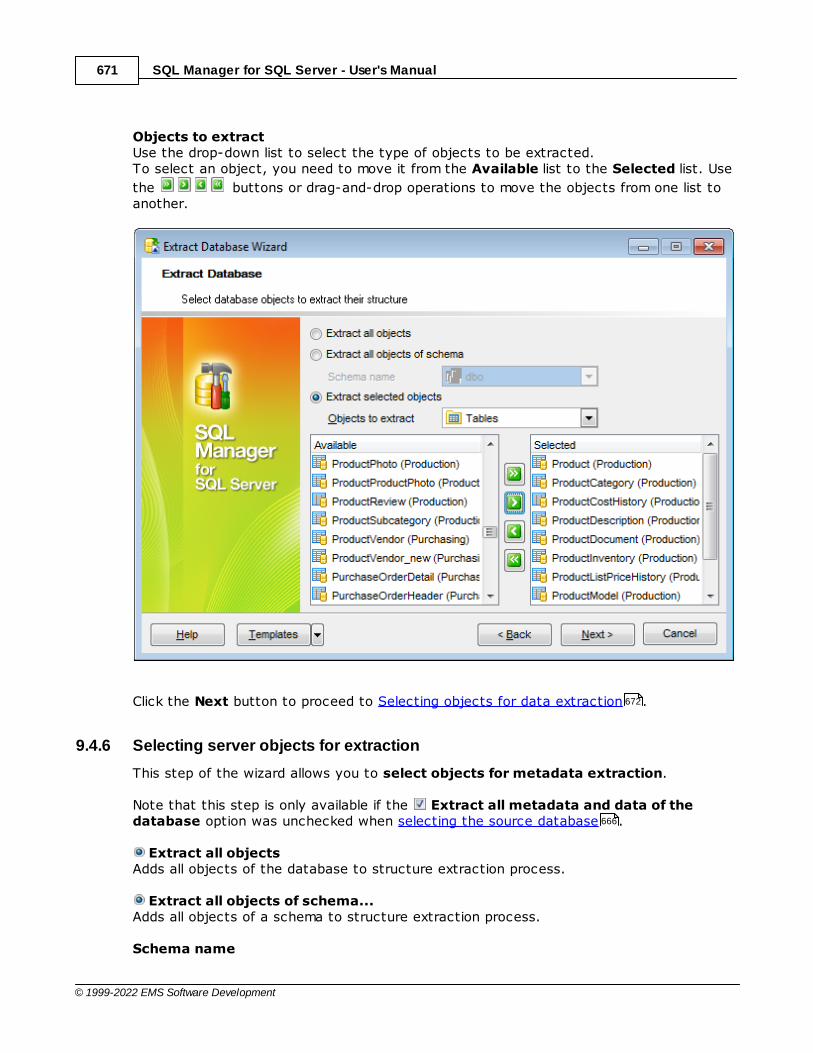
SQL Manager for SQL Server - User's Manual671
© 1999-2022 EMS Software Development
Objects to extractUse the drop-down list to select the type of objects to be extracted.To select an object, you need to move it from the Available list to the Selected list. Use
the buttons or drag-and-drop operations to move the objects from one list toanother.
Click the Next button to proceed to Selecting objects for data extraction .
9.4.6 Selecting server objects for extraction
This step of the wizard allows you to select objects for metadata extraction.
Note that this step is only available if the Extract all metadata and data of thedatabase option was unchecked when selecting the source database .
Extract all objectsAdds all objects of the database to structure extraction process.
Extract all objects of schema...Adds all objects of a schema to structure extraction process.
Schema name
672
666
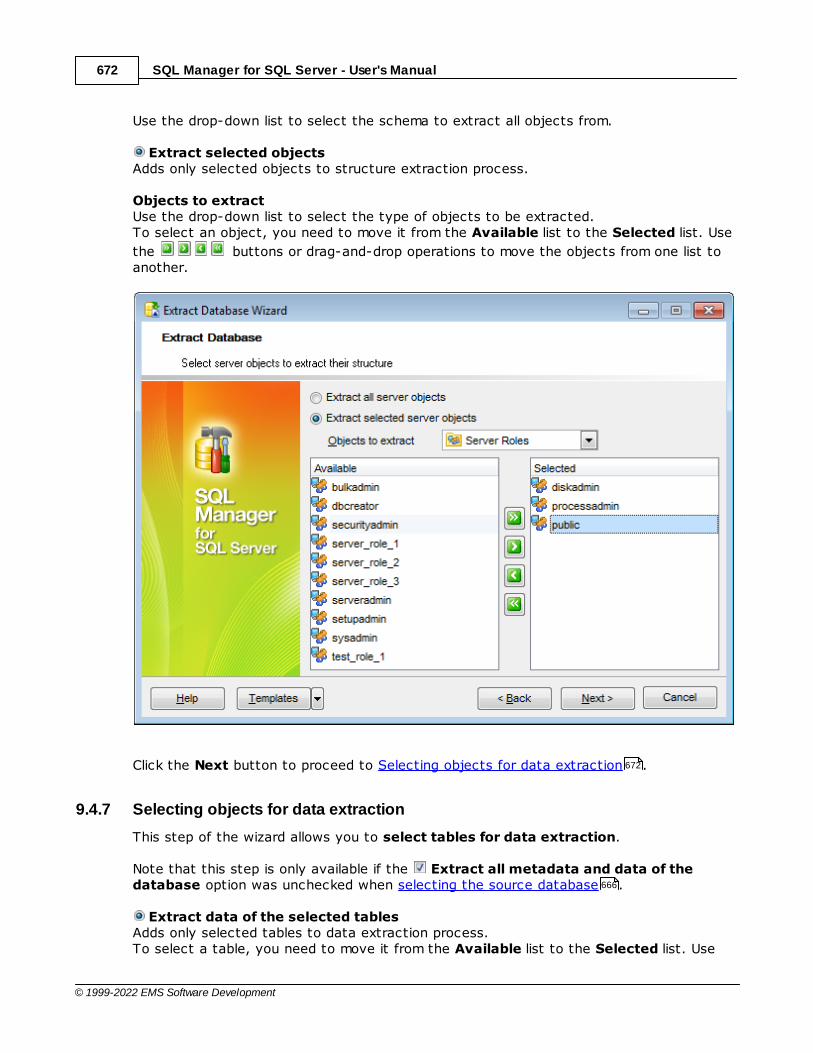
SQL Manager for SQL Server - User's Manual672
© 1999-2022 EMS Software Development
Use the drop-down list to select the schema to extract all objects from.
Extract selected objectsAdds only selected objects to structure extraction process.
Objects to extractUse the drop-down list to select the type of objects to be extracted.To select an object, you need to move it from the Available list to the Selected list. Use
the buttons or drag-and-drop operations to move the objects from one list toanother.
Click the Next button to proceed to Selecting objects for data extraction .
9.4.7 Selecting objects for data extraction
This step of the wizard allows you to select tables for data extraction.
Note that this step is only available if the Extract all metadata and data of thedatabase option was unchecked when selecting the source database .
Extract data of the selected tablesAdds only selected tables to data extraction process.To select a table, you need to move it from the Available list to the Selected list. Use
672
666
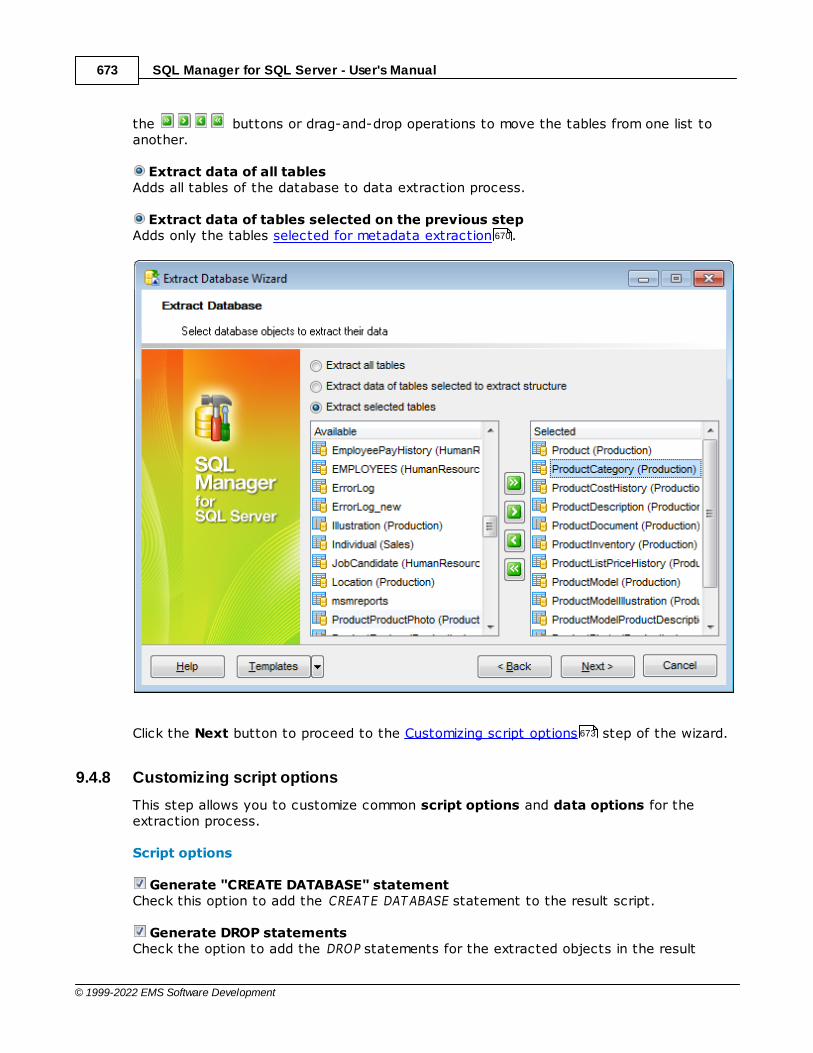
SQL Manager for SQL Server - User's Manual673
© 1999-2022 EMS Software Development
the buttons or drag-and-drop operations to move the tables from one list toanother.
Extract data of all tablesAdds all tables of the database to data extraction process.
Extract data of tables selected on the previous stepAdds only the tables selected for metadata extraction .
Click the Next button to proceed to the Customizing script options step of the wizard.
9.4.8 Customizing script options
This step allows you to customize common script options and data options for theextraction process.
Script options
Generate "CREATE DATABASE" statementCheck this option to add the CREAT E DAT ABASE statement to the result script.
Generate DROP statementsCheck the option to add the DROP statements for the extracted objects in the result
670
673
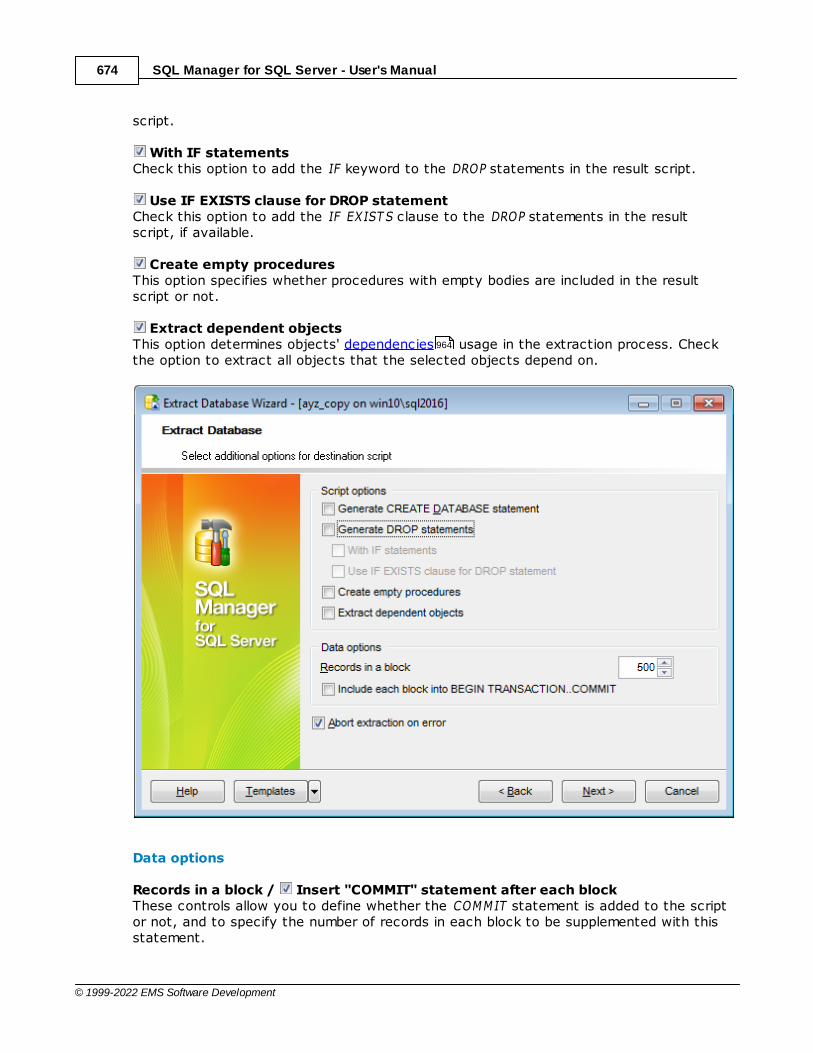
SQL Manager for SQL Server - User's Manual674
© 1999-2022 EMS Software Development
script.
With IF statementsCheck this option to add the IF keyword to the DROP statements in the result script.
Use IF EXISTS clause for DROP statement Check this option to add the IF EXIST S clause to the DROP statements in the resultscript, if available.
Create empty proceduresThis option specifies whether procedures with empty bodies are included in the resultscript or not.
Extract dependent objectsThis option determines objects' dependencies usage in the extraction process. Checkthe option to extract all objects that the selected objects depend on.
Data options
Records in a block / Insert "COMMIT" statement after each blockThese controls allow you to define whether the COMMIT statement is added to the scriptor not, and to specify the number of records in each block to be supplemented with thisstatement.
964
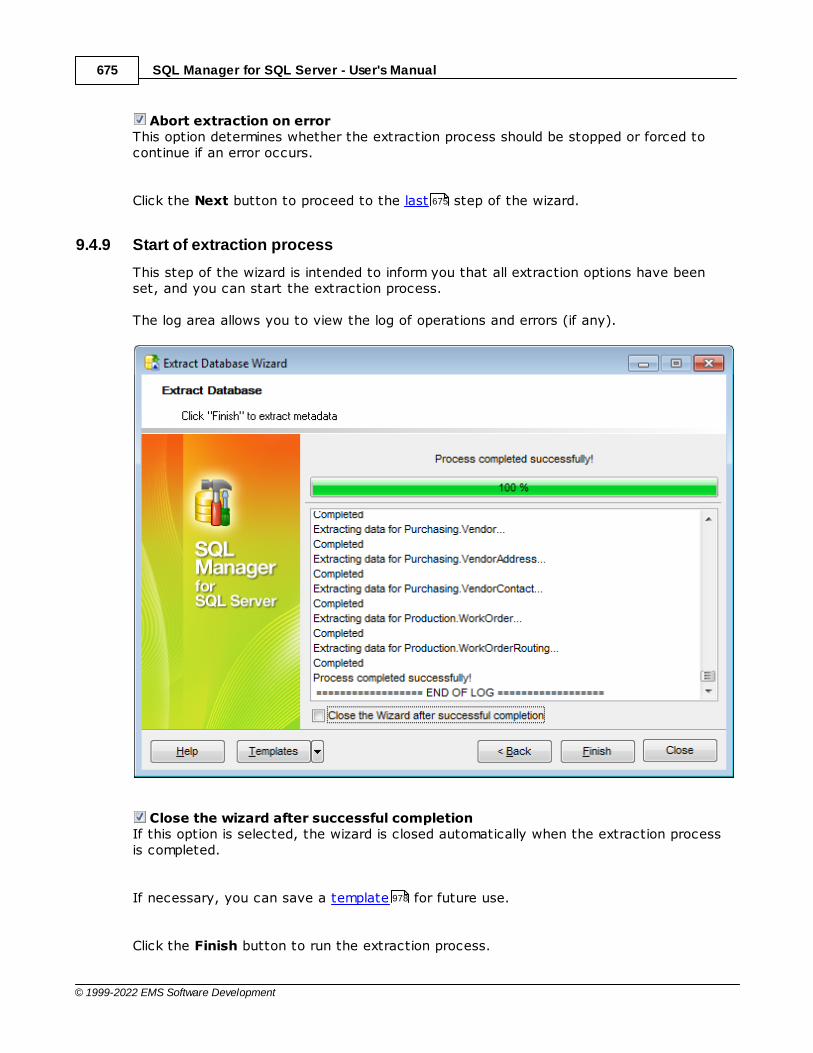
SQL Manager for SQL Server - User's Manual675
© 1999-2022 EMS Software Development
Abort extraction on errorThis option determines whether the extraction process should be stopped or forced tocontinue if an error occurs.
Click the Next button to proceed to the last step of the wizard.
9.4.9 Start of extraction process
This step of the wizard is intended to inform you that all extraction options have beenset, and you can start the extraction process.
The log area allows you to view the log of operations and errors (if any).
Close the wizard after successful completionIf this option is selected, the wizard is closed automatically when the extraction processis completed.
If necessary, you can save a template for future use.
Click the Finish button to run the extraction process.
675
978

SQL Manager for SQL Server - User's Manual676
© 1999-2022 EMS Software Development

SQL Manager for SQL Server - User's Manual677
© 1999-2022 EMS Software Development
9.5 Database Comparer Wizard
Compare Databases Wizard creates an SQL script that provides database structure
synchronization. To launch the wizard use the Tools | Compare Databases... item ofthe main menu .
Selecting source databaseSelecting target databaseSelecting type of the synchronization scriptDefining options for the destination scriptPerforming operation
Availability:
Full version (forWindows)
Yes
Lite version (forWindows)
No
Note: To compare all features of the Full and the Lite versions of SQL Manager, referto the Feature Matrix page.
9.5.1 Selecting source database
Use this step to define source database for comparing.
958
677
678
679
680
681
23
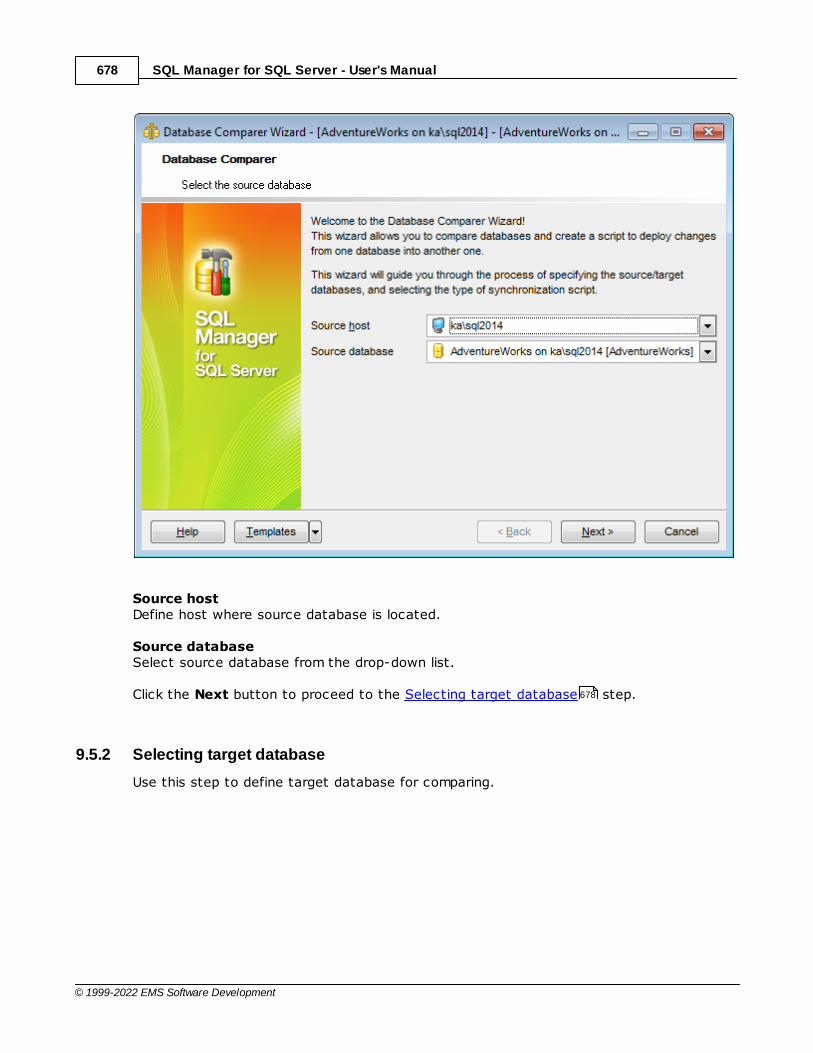
SQL Manager for SQL Server - User's Manual678
© 1999-2022 EMS Software Development
Source hostDefine host where source database is located.
Source databaseSelect source database from the drop-down list.
Click the Next button to proceed to the Selecting target database step.
9.5.2 Selecting target database
Use this step to define target database for comparing.
678
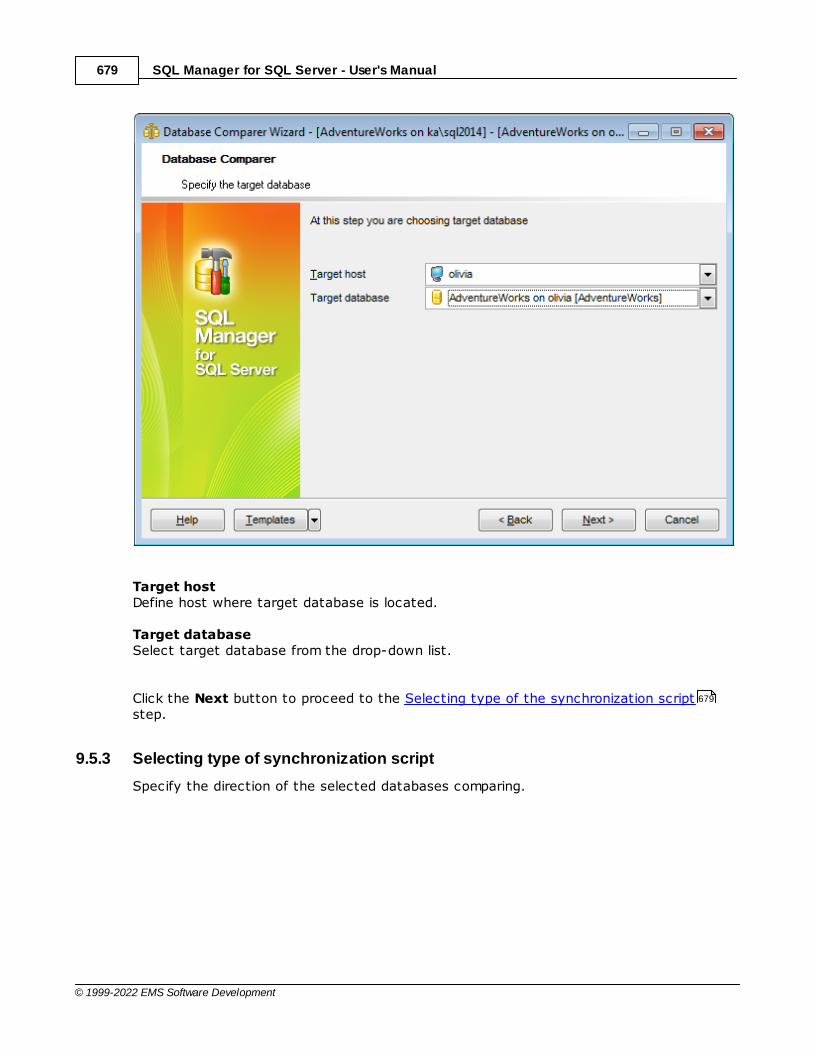
SQL Manager for SQL Server - User's Manual679
© 1999-2022 EMS Software Development
Target hostDefine host where target database is located.
Target databaseSelect target database from the drop-down list.
Click the Next button to proceed to the Selecting type of the synchronization scriptstep.
9.5.3 Selecting type of synchronization script
Specify the direction of the selected databases comparing.
679
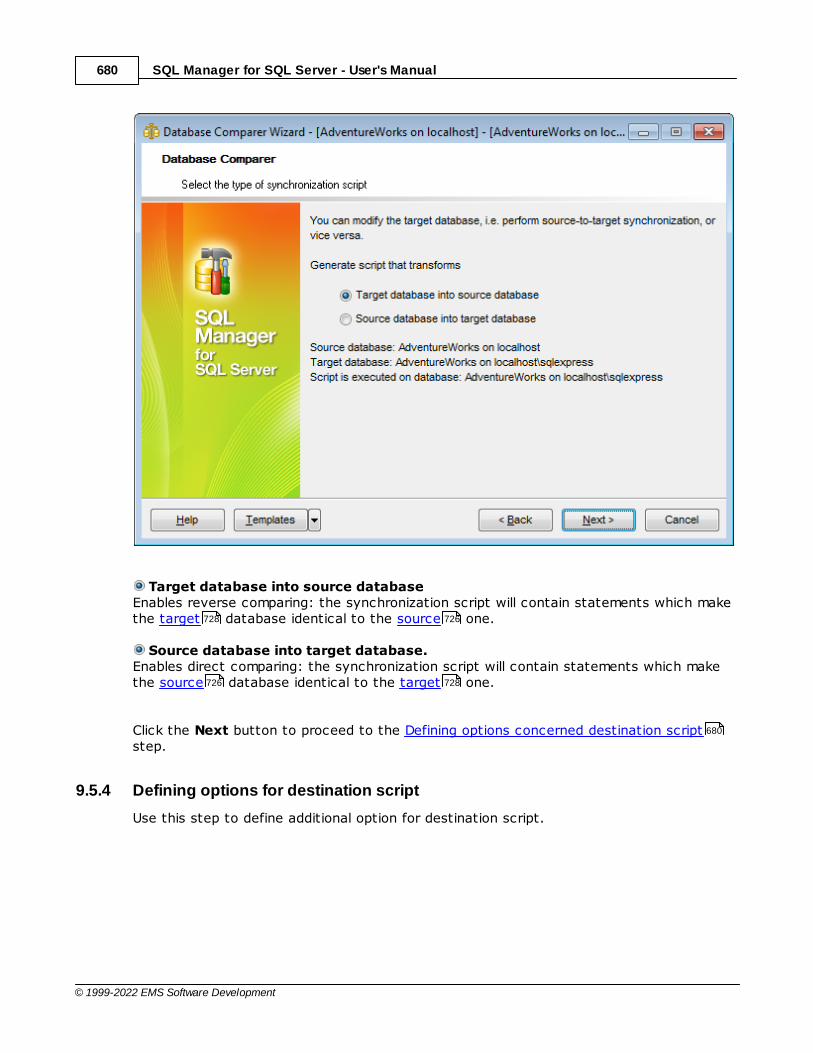
SQL Manager for SQL Server - User's Manual680
© 1999-2022 EMS Software Development
Target database into source databaseEnables reverse comparing: the synchronization script will contain statements which makethe target database identical to the source one.
Source database into target database.Enables direct comparing: the synchronization script will contain statements which makethe source database identical to the target one.
Click the Next button to proceed to the Defining options concerned destination scriptstep.
9.5.4 Defining options for destination script
Use this step to define additional option for destination script.
728 726
726 728
680

SQL Manager for SQL Server - User's Manual681
© 1999-2022 EMS Software Development
Automatically load to Script EditorWith this option is enabled, the synchronization script will not be saved. It will be loadedto Script Editor .
Save to fileUse this option if you need to save the synchronization script to a file.
File name
Defines the name of the file to save the synchronization script to. Click the Savebutton to locate file using the standard dialog or type the file name and it's locationmanually.
File charsetSpecified character set will be used when saving the script to file.
Click the Next button to proceed to the Performing operation step.
9.5.5 Performing operation
This step of the wizard is intended to inform you that all necessary options have beenset, and you can start comparing databases.
659
681
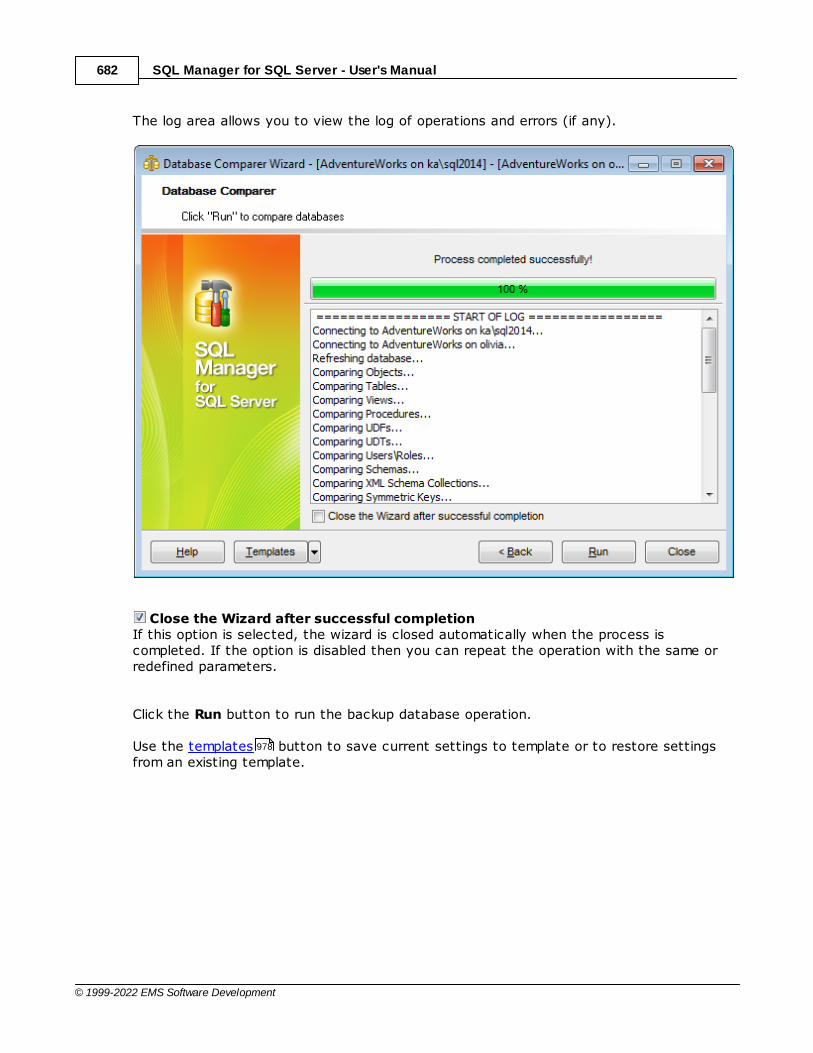
SQL Manager for SQL Server - User's Manual682
© 1999-2022 EMS Software Development
The log area allows you to view the log of operations and errors (if any).
Close the Wizard after successful completionIf this option is selected, the wizard is closed automatically when the process iscompleted. If the option is disabled then you can repeat the operation with the same orredefined parameters.
Click the Run button to run the backup database operation.
Use the templates button to save current settings to template or to restore settingsfrom an existing template.
978
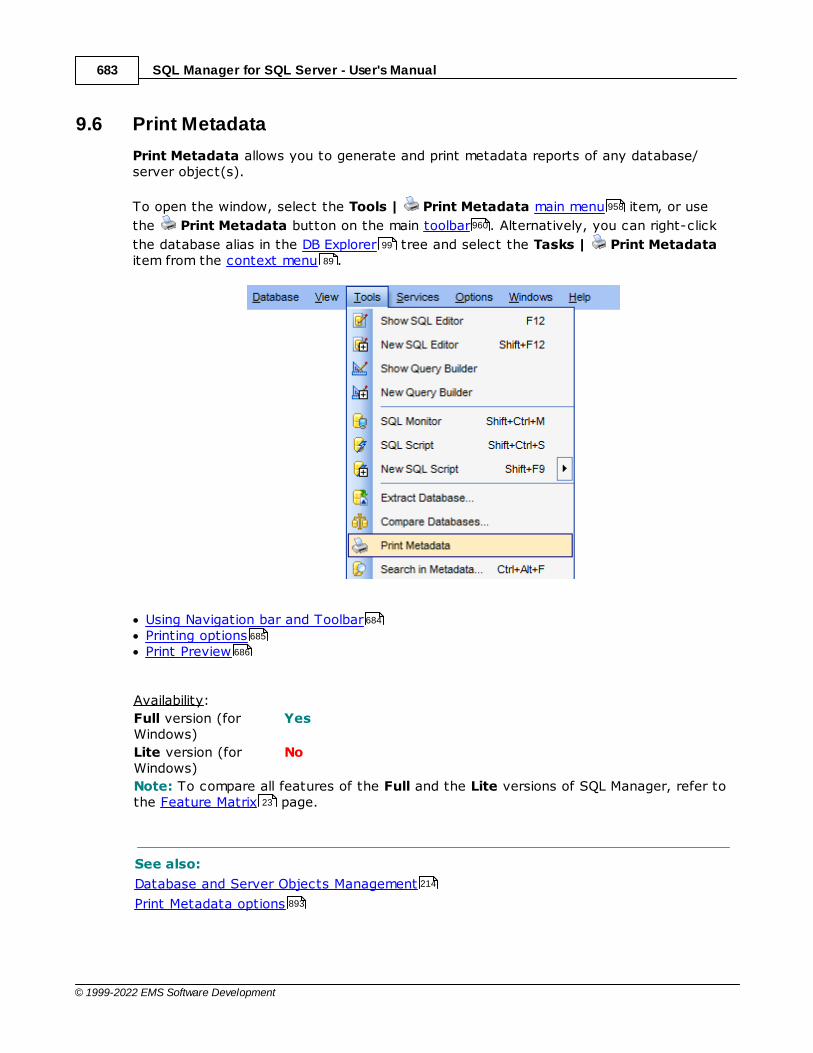
SQL Manager for SQL Server - User's Manual683
© 1999-2022 EMS Software Development
9.6 Print Metadata
Print Metadata allows you to generate and print metadata reports of any database/server object(s).
To open the window, select the Tools | Print Metadata main menu item, or use
the Print Metadata button on the main toolbar . Alternatively, you can right-click
the database alias in the DB Explorer tree and select the Tasks | Print Metadataitem from the context menu .
Using Navigation bar and ToolbarPrinting optionsPrint Preview
Availability:
Full version (forWindows)
Yes
Lite version (forWindows)
No
Note: To compare all features of the Full and the Lite versions of SQL Manager, refer tothe Feature Matrix page.
See also:
Database and Server Objects Management
Print Metadata options
958
960
99
89
684
685
686
23
214
893

SQL Manager for SQL Server - User's Manual684
© 1999-2022 EMS Software Development
9.6.1 Using Navigation bar and Toolbar
The Navigation bar and Toolbar provide quick access to tools implemented in PrintMetadata.
The Navigation bar of the Print Metadata window allows you to:
Servers
select a server instance for the printing report
select a database for the printing report
General
print metadata of the selected object(s)
preview the printing report
restore the default size and position of the window
Database
686
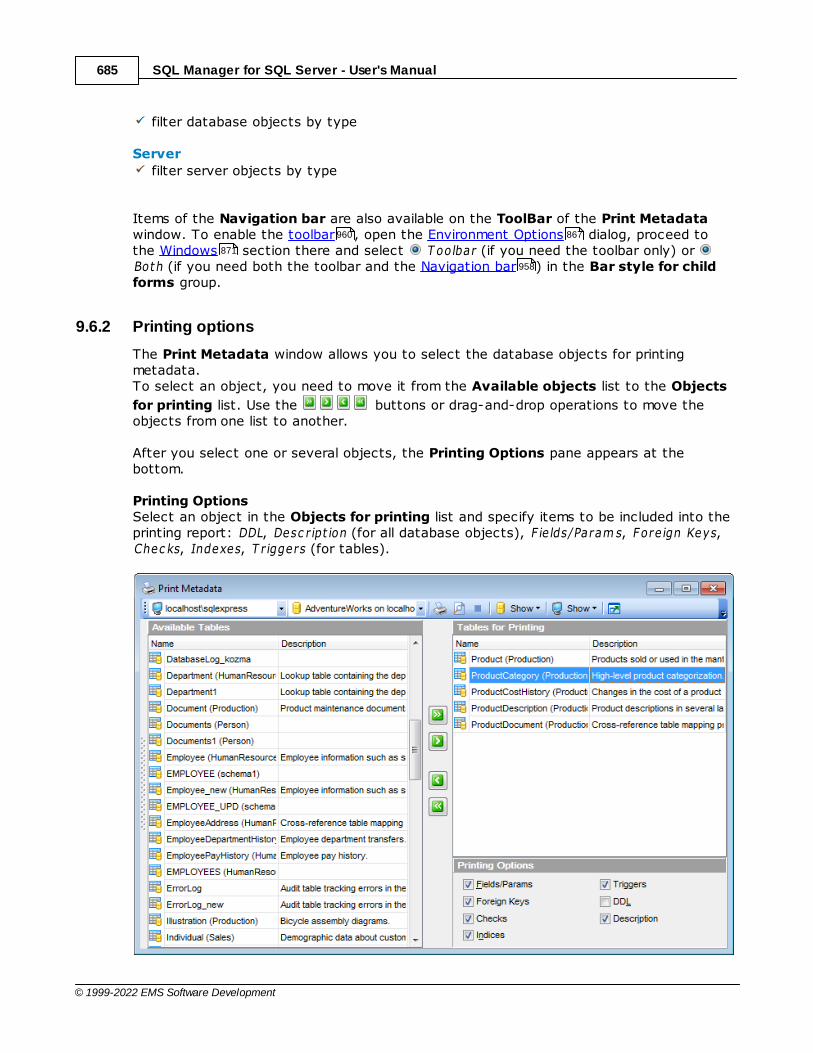
SQL Manager for SQL Server - User's Manual685
© 1999-2022 EMS Software Development
filter database objects by type
Server
filter server objects by type
Items of the Navigation bar are also available on the ToolBar of the Print Metadatawindow. To enable the toolbar , open the Environment Options dialog, proceed tothe Windows section there and select T oolbar (if you need the toolbar only) or Both (if you need both the toolbar and the Navigation bar ) in the Bar style for childforms group.
9.6.2 Printing options
The Print Metadata window allows you to select the database objects for printingmetadata.To select an object, you need to move it from the Available objects list to the Objects
for printing list. Use the buttons or drag-and-drop operations to move theobjects from one list to another.
After you select one or several objects, the Printing Options pane appears at thebottom.
Printing OptionsSelect an object in the Objects for printing list and specify items to be included into theprinting report: DDL, Desc r ipt ion (for all database objects), F ie lds/Param s, Fore ign Keys,Chec ks, Indexes, T r iggers (for tables).
960 867
871
958
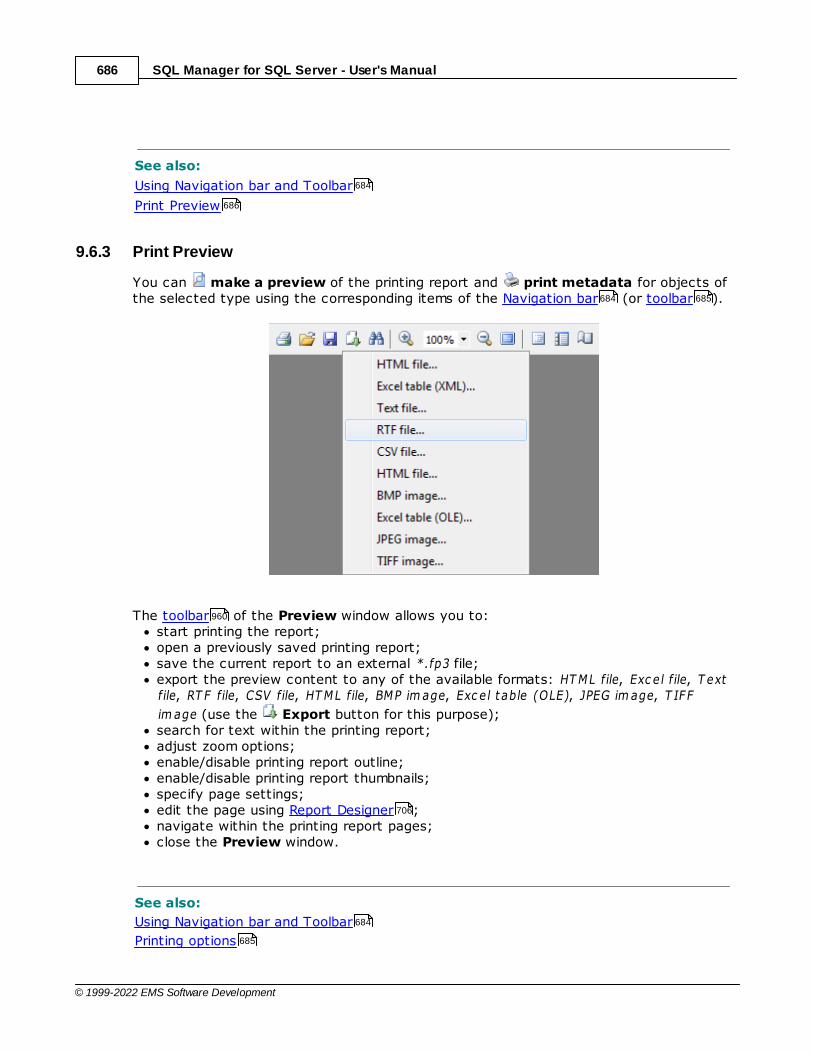
SQL Manager for SQL Server - User's Manual686
© 1999-2022 EMS Software Development
See also:
Using Navigation bar and Toolbar
Print Preview
9.6.3 Print Preview
You can make a preview of the printing report and print metadata for objects ofthe selected type using the corresponding items of the Navigation bar (or toolbar ).
The toolbar of the Preview window allows you to: start printing the report;open a previously saved printing report;save the current report to an external *.fp3 file;export the preview content to any of the available formats: HT ML file, Exc e l f ile, T extfile, RT F file, CSV file, HT ML file, BMP im age, Exc e l t able (OLE), JPEG im age, T IFF
im age (use the Export button for this purpose);search for text within the printing report;adjust zoom options;enable/disable printing report outline;enable/disable printing report thumbnails;specify page settings;edit the page using Report Designer ;navigate within the printing report pages;close the Preview window.
See also:
Using Navigation bar and Toolbar
Printing options
684
686
684 685
960
706
684
685

SQL Manager for SQL Server - User's Manual687
© 1999-2022 EMS Software Development
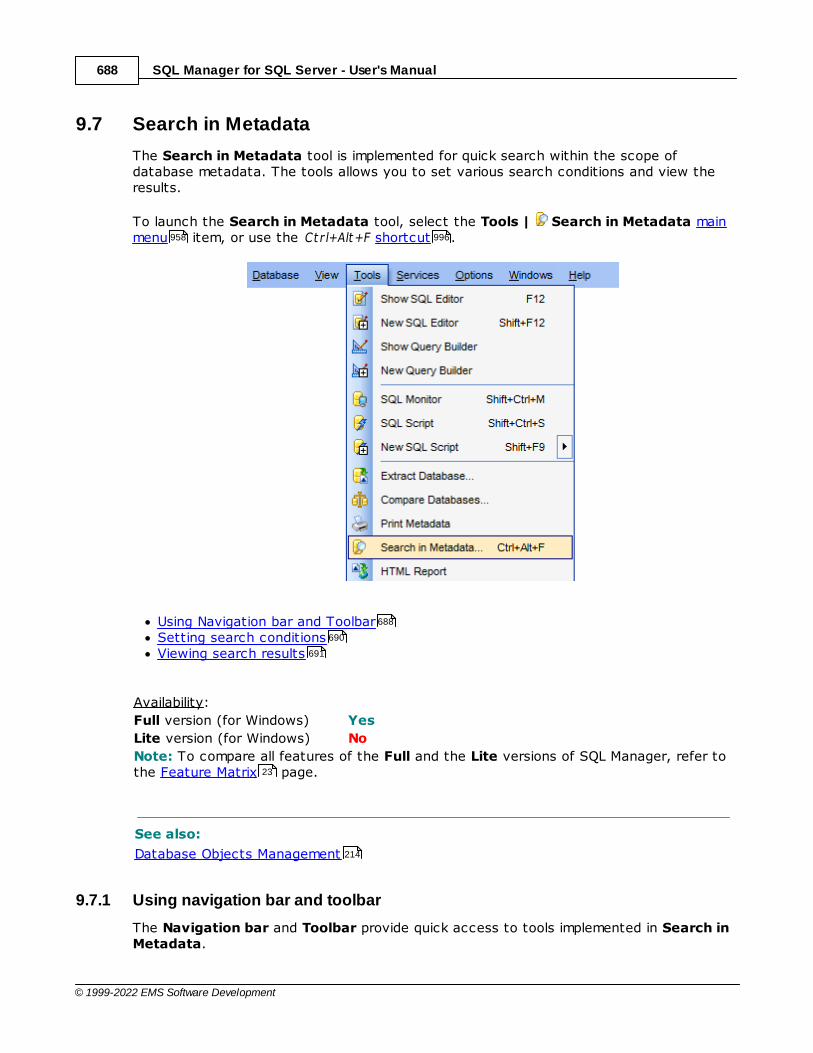
SQL Manager for SQL Server - User's Manual688
© 1999-2022 EMS Software Development
9.7 Search in Metadata
The Search in Metadata tool is implemented for quick search within the scope ofdatabase metadata. The tools allows you to set various search conditions and view theresults.
To launch the Search in Metadata tool, select the Tools | Search in Metadata mainmenu item, or use the Ct r l+Alt+F shortcut .
Using Navigation bar and ToolbarSetting search conditionsViewing search results
Availability:
Full version (for Windows) Yes
Lite version (for Windows) No
Note: To compare all features of the Full and the Lite versions of SQL Manager, refer tothe Feature Matrix page.
See also:
Database Objects Management
9.7.1 Using navigation bar and toolbar
The Navigation bar and Toolbar provide quick access to tools implemented in Search inMetadata.
958 996
688
690
691
23
214
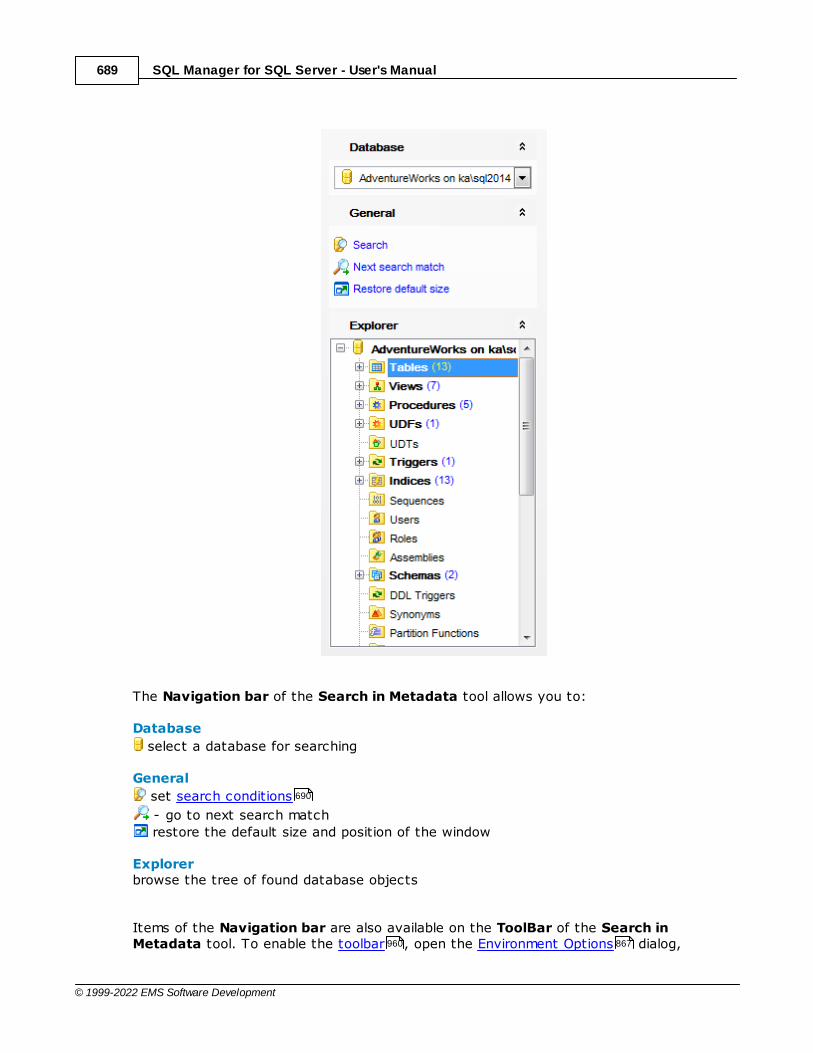
SQL Manager for SQL Server - User's Manual689
© 1999-2022 EMS Software Development
The Navigation bar of the Search in Metadata tool allows you to:
Database
select a database for searching
General
set search conditions
- go to next search match
restore the default size and position of the window
Explorerbrowse the tree of found database objects
Items of the Navigation bar are also available on the ToolBar of the Search inMetadata tool. To enable the toolbar , open the Environment Options dialog,
690
960 867
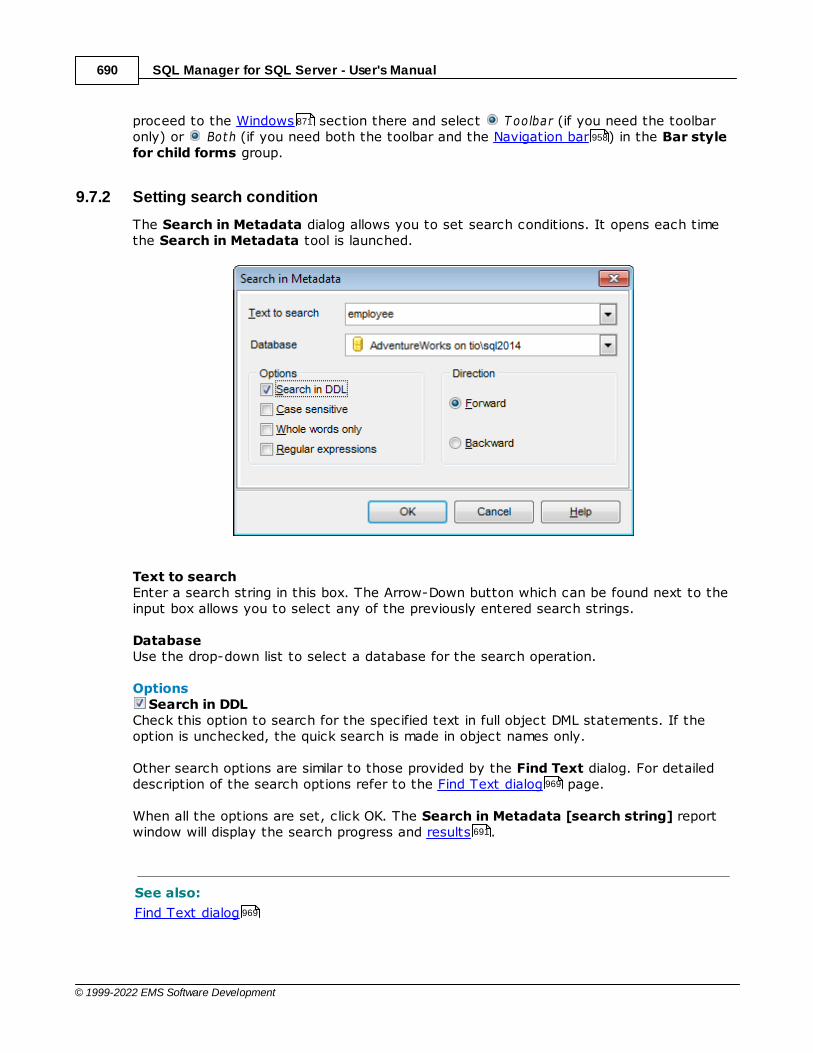
SQL Manager for SQL Server - User's Manual690
© 1999-2022 EMS Software Development
proceed to the Windows section there and select T oolbar (if you need the toolbaronly) or Both (if you need both the toolbar and the Navigation bar ) in the Bar stylefor child forms group.
9.7.2 Setting search condition
The Search in Metadata dialog allows you to set search conditions. It opens each timethe Search in Metadata tool is launched.
Text to search Enter a search string in this box. The Arrow-Down button which can be found next to theinput box allows you to select any of the previously entered search strings.
Database Use the drop-down list to select a database for the search operation.
Options Search in DDL
Check this option to search for the specified text in full object DML statements. If theoption is unchecked, the quick search is made in object names only.
Other search options are similar to those provided by the Find Text dialog. For detaileddescription of the search options refer to the Find Text dialog page.
When all the options are set, click OK. The Search in Metadata [search string] reportwindow will display the search progress and results .
See also:
Find Text dialog
871
958
969
691
969
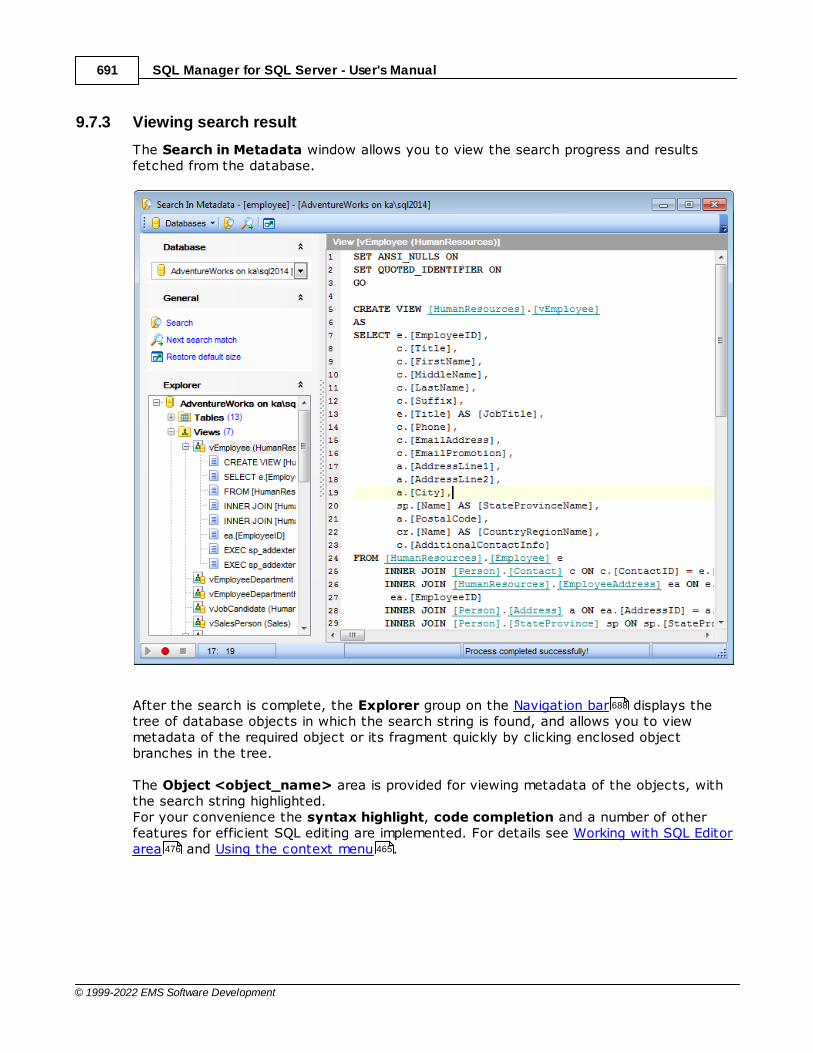
SQL Manager for SQL Server - User's Manual691
© 1999-2022 EMS Software Development
9.7.3 Viewing search result
The Search in Metadata window allows you to view the search progress and resultsfetched from the database.
After the search is complete, the Explorer group on the Navigation bar displays thetree of database objects in which the search string is found, and allows you to viewmetadata of the required object or its fragment quickly by clicking enclosed objectbranches in the tree.
The Object <object_name> area is provided for viewing metadata of the objects, withthe search string highlighted.For your convenience the syntax highlight, code completion and a number of otherfeatures for efficient SQL editing are implemented. For details see Working with SQL Editorarea and Using the context menu .
688
476 465

SQL Manager for SQL Server - User's Manual692
© 1999-2022 EMS Software Development
9.8 HTML Report Wizard
HTML Report wizard allows you to generate a detailed HTML report of the selecteddatabase objects.
To start HTML Report Wizard, select the Tools | HTML Report main menu item, or
use the HTML Report button on the main toolbar . Alternatively, you can right-click
the database alias in the DB Explorer tree and select the Tasks | HTML Report...item from the context menu .
Selecting database and directorySelecting object typesSpecifying CSS for HTML reportSetting additional report optionsCreating HTML reportUsing templates
Availability:
Full version (forWindows)
Yes
Lite version (forWindows)
No
Note: To compare all features of the Full and the Lite versions of SQL Manager, refer tothe Feature Matrix page.
958
960
99
89
693
694
695
697
698
978
23

SQL Manager for SQL Server - User's Manual693
© 1999-2022 EMS Software Development
See also:
Database and Server Objects Management
Using templates
9.8.1 Selecting database and directory
At this step of the wizard you should select the source database and output directoryfor the HTML report.
Source hostDefine host where source database is located.
Source databaseUse the drop-down list of registered and connected databases to select the sourcedatabase for the report.
Output directory
Type in or use the button to specify the path to the output directory for the resultHTML files using the Browse for Folder dialog.
Click the Next button to proceed to the Selecting object types step of the wizard.
214
978
147 104
694
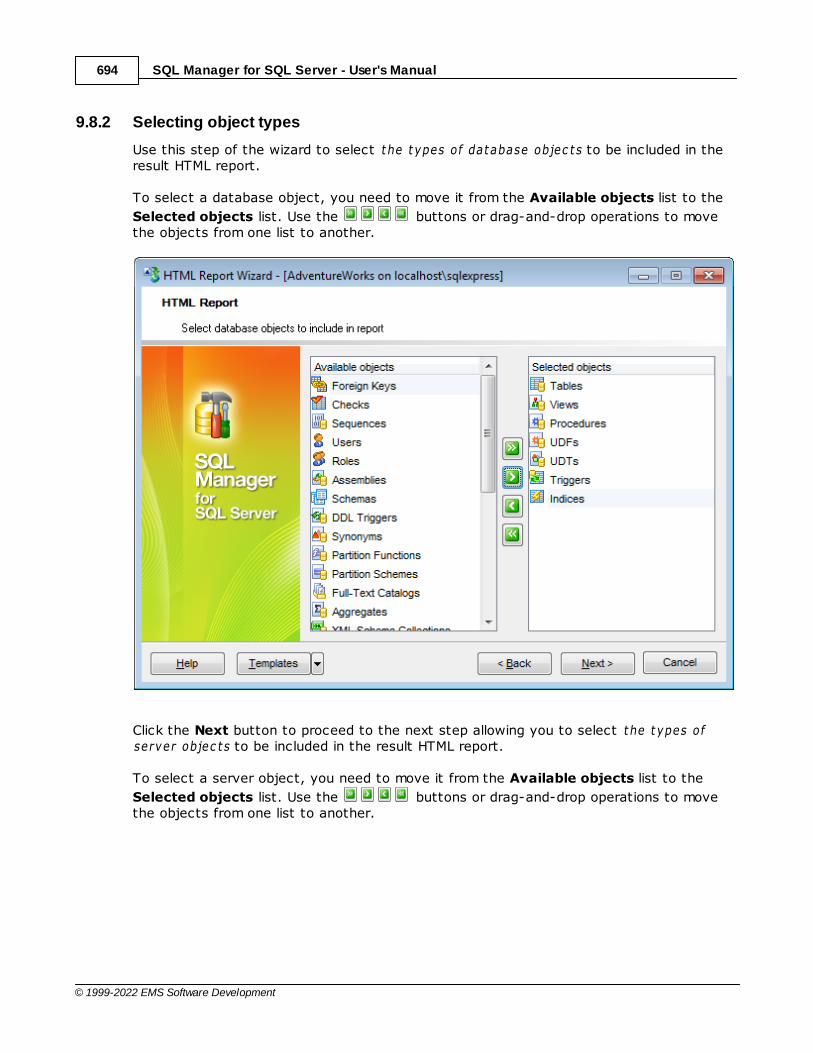
SQL Manager for SQL Server - User's Manual694
© 1999-2022 EMS Software Development
9.8.2 Selecting object types
Use this step of the wizard to select the types of database objec t s to be included in theresult HTML report.
To select a database object, you need to move it from the Available objects list to the
Selected objects list. Use the buttons or drag-and-drop operations to movethe objects from one list to another.
Click the Next button to proceed to the next step allowing you to select the types ofserver objec t s to be included in the result HTML report.
To select a server object, you need to move it from the Available objects list to the
Selected objects list. Use the buttons or drag-and-drop operations to movethe objects from one list to another.

SQL Manager for SQL Server - User's Manual695
© 1999-2022 EMS Software Development
Click the Next button to proceed to the Specifying CSS step of the wizard.
9.8.3 Specifying CSS
This step of the wizard allows you to edit the CSS (Casc ading Sty le Sheet ) f ile that will beused by the result HTML report.
On the CSS T ext Tab you can edit the CSS file.
695

SQL Manager for SQL Server - User's Manual696
© 1999-2022 EMS Software Development
The CSS Prev iew tab allows you to view the HTML report with the defined style. You can select one of the pre-installed templates from the Templates drop-down list orselect the Custom template and edit it on the CSS T ext tab.
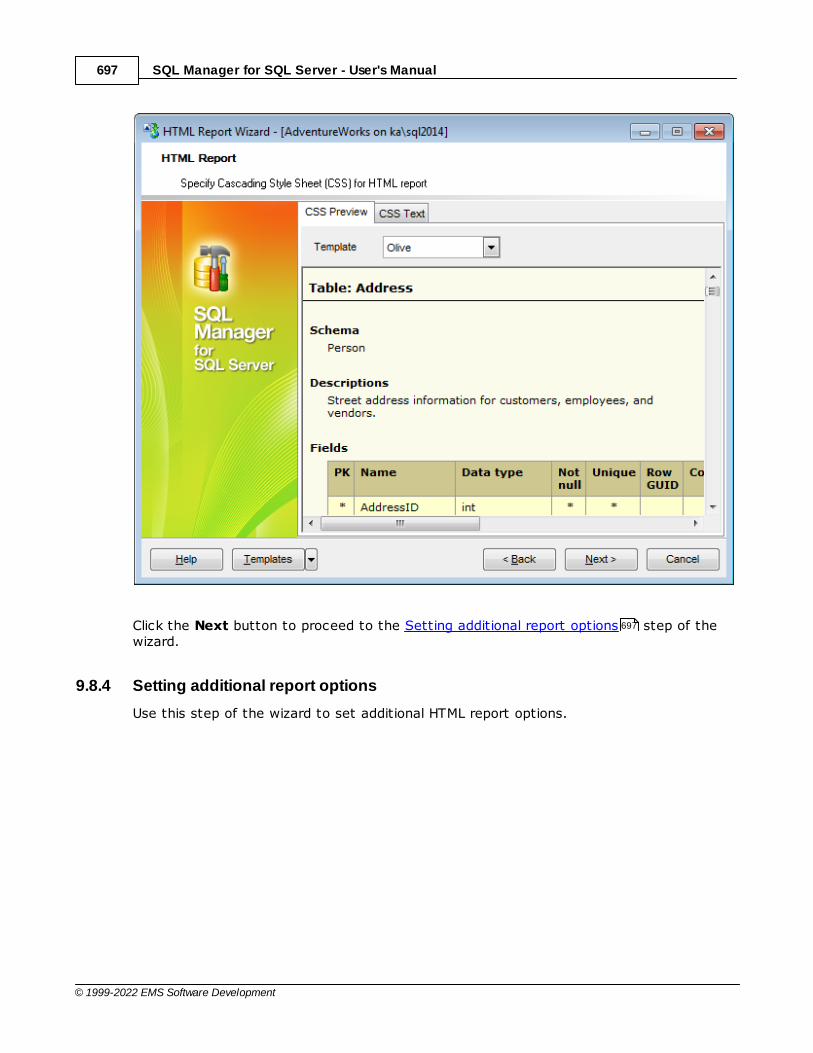
SQL Manager for SQL Server - User's Manual697
© 1999-2022 EMS Software Development
Click the Next button to proceed to the Setting additional report options step of thewizard.
9.8.4 Setting additional report options
Use this step of the wizard to set additional HTML report options.
697
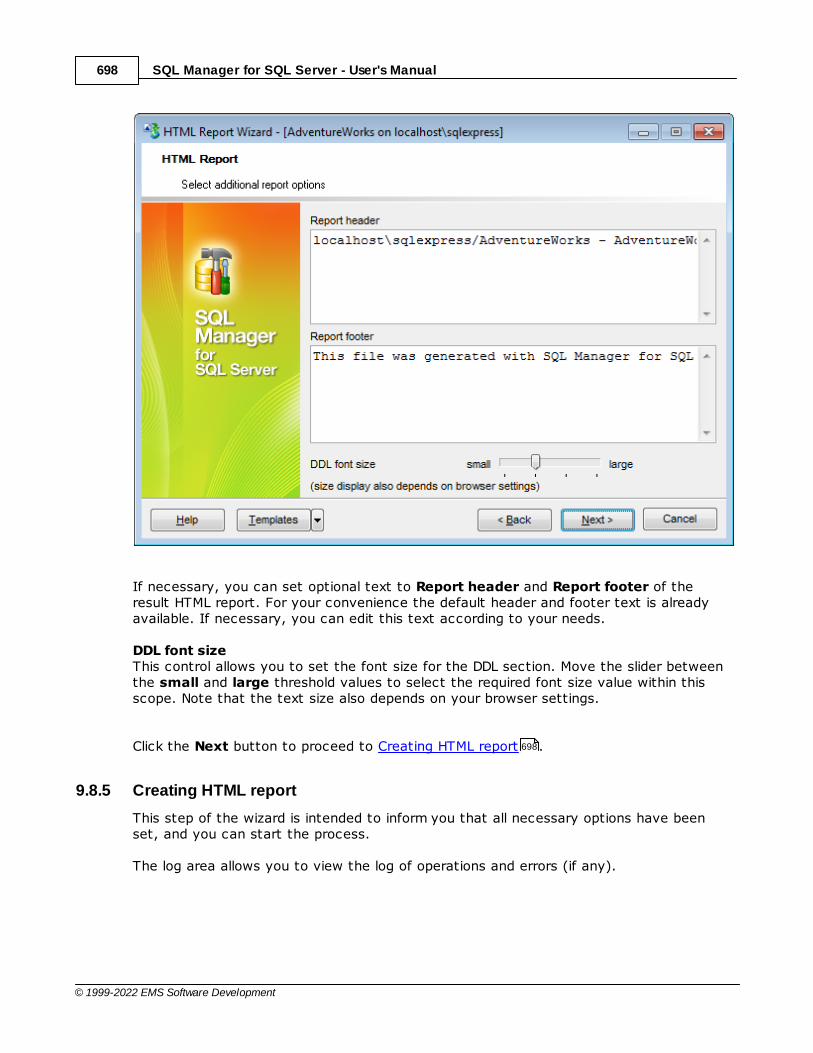
SQL Manager for SQL Server - User's Manual698
© 1999-2022 EMS Software Development
If necessary, you can set optional text to Report header and Report footer of theresult HTML report. For your convenience the default header and footer text is alreadyavailable. If necessary, you can edit this text according to your needs.
DDL font sizeThis control allows you to set the font size for the DDL section. Move the slider betweenthe small and large threshold values to select the required font size value within thisscope. Note that the text size also depends on your browser settings.
Click the Next button to proceed to Creating HTML report .
9.8.5 Creating HTML report
This step of the wizard is intended to inform you that all necessary options have beenset, and you can start the process.
The log area allows you to view the log of operations and errors (if any).
698

SQL Manager for SQL Server - User's Manual699
© 1999-2022 EMS Software Development
Show report after generatingThis option opens the result report in your default browser after generating.
Close the wizard after successful completionIf this option is selected, the wizard is closed automatically when the creating HTMLreport process is completed.
If necessary, you can save a template for future use.
Click the Finish button to run the process.
978
SQL Manager for SQL Server - User's Manual700
© 1999-2022 EMS Software Development
9.9 Reports management
SQL Manager for SQL Server provides several tools for efficient report s m anagem ent:
Create Report WizardThis tool is used to simplify the process of creating reports.
Report DesignerIt is a basic tool for creating powerful reports.
Report ViewerAllows you to view created reports.
Reports can be stored either in the database (table m sm report s will be created to storethem) or in a directory on your hard drive specified on the Directories page of theDatabase Registration Info dialog.
9.9.1 Create Report Wizard
Using Create Report Wizard you can create a report containing required datasets, bandsand fields on them, with a definite report style applied.
To start the wizard, select the Database | New Object... main menu item, thenselect Report in the Create New Object dialog. Alternatively, you can right-click theReports node of the DB Explorer tree and select the New Report... item from thecontext menu .
Specifying report name and optionsSelecting report bandsSelecting report styleSpecifying paper settingsSpecifying marginsSpecifying other page settings
Availability:
Full version (forWindows)
Yes
Lite version (for No
700
706
719
157
152
958
216
99
91
701
702
703
704
704
705

SQL Manager for SQL Server - User's Manual701
© 1999-2022 EMS Software Development
Windows)
Note: To compare all features of the Full and the Lite versions of SQL Manager, refer tothe Feature Matrix page.
See also:
Report Designer
Report Viewer
9.9.1.1 Specifying database name and report options
Select the source database for adding a report and choose the action you need toperform: either c reate a new report or im port an exist ing report from file.
Set the name for the new report and specify the save options for it:
Save to databaseThe report will be created on the server inside the database.
Save to fileIf this option is selected, the report will be saved as a *.fr3 file to the directory specifiedon the Directories page of the Database Registration Info dialog.
23
706
719
157 152

SQL Manager for SQL Server - User's Manual702
© 1999-2022 EMS Software Development
Click the Next button to proceed to the Selecting report bands step of the wizard.
9.9.1.2 Selecting report bands
This step of the wizard allows you to select the bands to be included in the report.To select a band, you need to move it from the Available Bands list to the Report
Bands list. Use the buttons or drag-and-drop operations to move the fieldsfrom one list to another.
Use the Edit button to create datasets for 'data' bands using Query Builder .
Brief information about bands functionality is listed below. See FastReport Help for moreinformation.
Name Functionality
Report title Pr int s onc e at the beginning of report
Report summary Print s onc e at the end of report
Page header Print s at the top of eac h page
Page footer Print s at the bot tom of eac h page
Master header Print s at the beginning of m aster list
Master data Data row s of m aster list
702
479
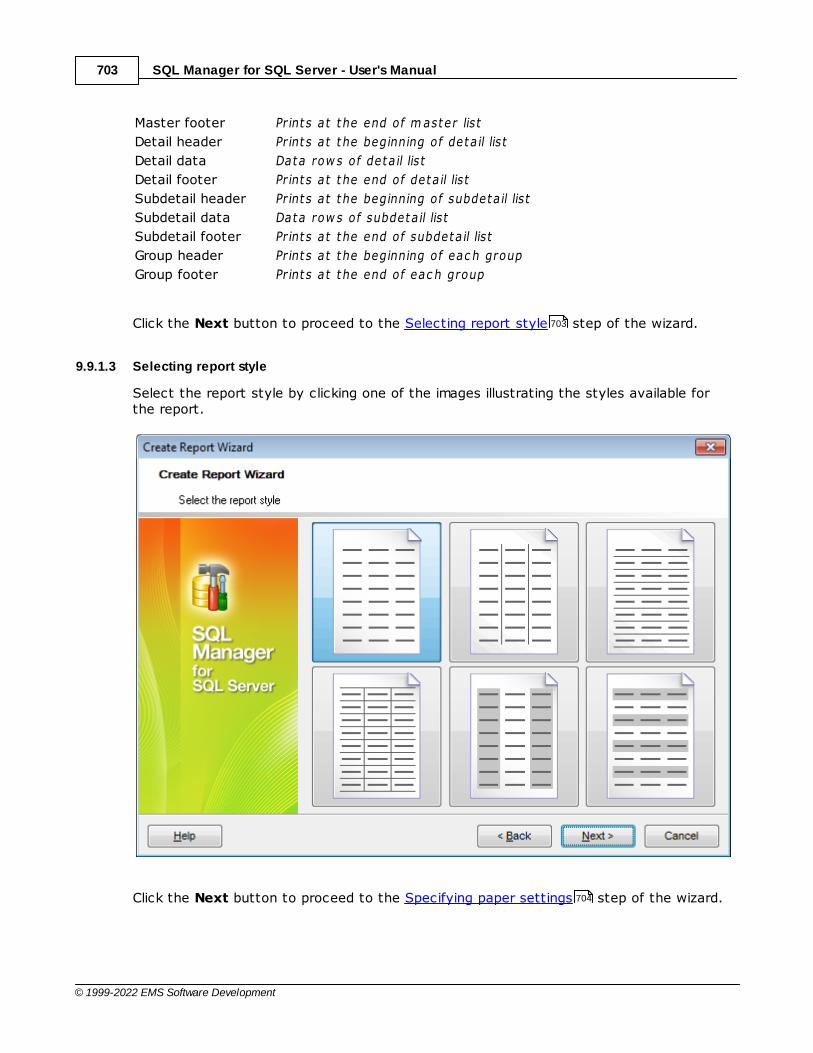
SQL Manager for SQL Server - User's Manual703
© 1999-2022 EMS Software Development
Master footer Print s at the end of m aster list
Detail header Print s at the beginning of deta il list
Detail data Data row s of deta il list
Detail footer Print s at the end of deta il list
Subdetail header Print s at the beginning of subdetail list
Subdetail data Data row s of subdetail list
Subdetail footer Print s at the end of subdetail list
Group header Print s at the beginning of eac h group
Group footer Print s at the end of eac h group
Click the Next button to proceed to the Selecting report style step of the wizard.
9.9.1.3 Selecting report style
Select the report style by clicking one of the images illustrating the styles available forthe report.
Click the Next button to proceed to the Specifying paper settings step of the wizard.
703
704
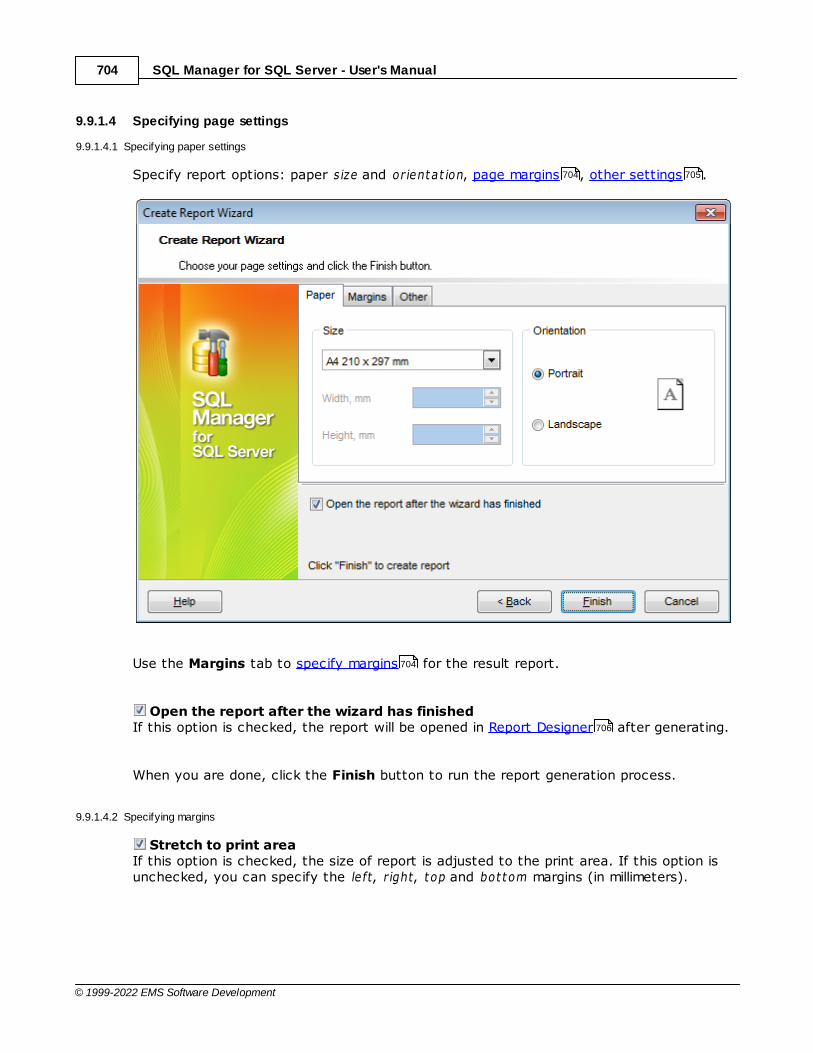
SQL Manager for SQL Server - User's Manual704
© 1999-2022 EMS Software Development
9.9.1.4 Specifying page settings
9.9.1.4.1 Specifying paper settings
Specify report options: paper size and orientat ion, page margins , other settings .
Use the Margins tab to specify margins for the result report.
Open the report after the wizard has finishedIf this option is checked, the report will be opened in Report Designer after generating.
When you are done, click the Finish button to run the report generation process.
9.9.1.4.2 Specifying margins
Stretch to print areaIf this option is checked, the size of report is adjusted to the print area. If this option isunchecked, you can specify the le ft, r ight, top and bot tom margins (in millimeters).
704 705
704
706
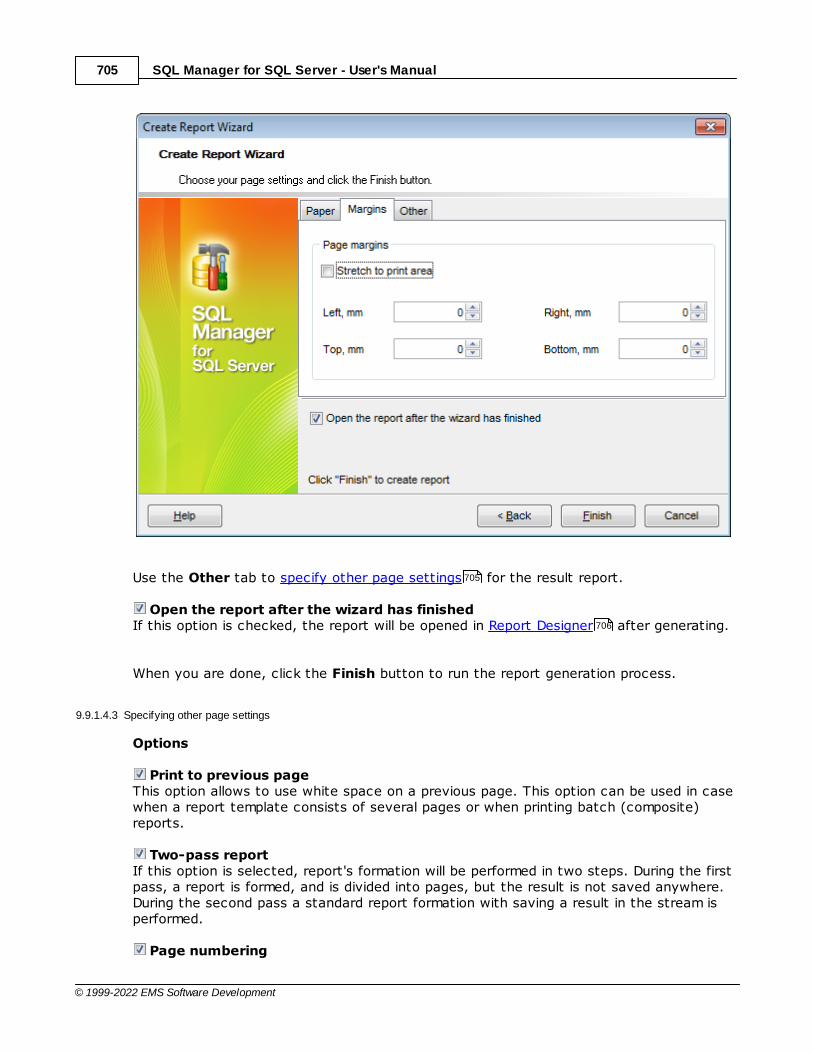
SQL Manager for SQL Server - User's Manual705
© 1999-2022 EMS Software Development
Use the Other tab to specify other page settings for the result report.
Open the report after the wizard has finishedIf this option is checked, the report will be opened in Report Designer after generating.
When you are done, click the Finish button to run the report generation process.
9.9.1.4.3 Specifying other page settings
Options
Print to previous pageThis option allows to use white space on a previous page. This option can be used in casewhen a report template consists of several pages or when printing batch (composite)reports.
Two-pass reportIf this option is selected, report's formation will be performed in two steps. During the firstpass, a report is formed, and is divided into pages, but the result is not saved anywhere.During the second pass a standard report formation with saving a result in the stream isperformed.
Page numbering
705
706
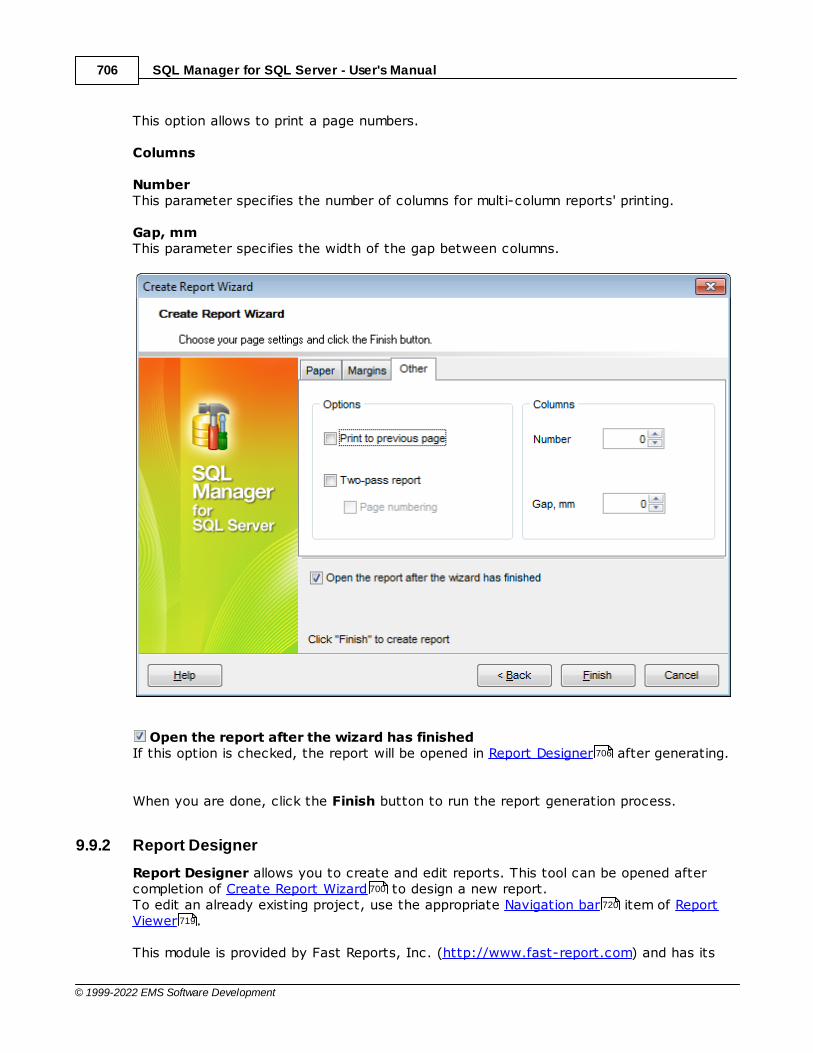
SQL Manager for SQL Server - User's Manual706
© 1999-2022 EMS Software Development
This option allows to print a page numbers.
Columns
NumberThis parameter specifies the number of columns for multi-column reports' printing.
Gap, mmThis parameter specifies the width of the gap between columns.
Open the report after the wizard has finishedIf this option is checked, the report will be opened in Report Designer after generating.
When you are done, click the Finish button to run the report generation process.
9.9.2 Report Designer
Report Designer allows you to create and edit reports. This tool can be opened aftercompletion of Create Report Wizard to design a new report. To edit an already existing project, use the appropriate Navigation bar item of ReportViewer .
This module is provided by Fast Reports, Inc. (http://www.fast-report.com) and has its
706
700
720
719
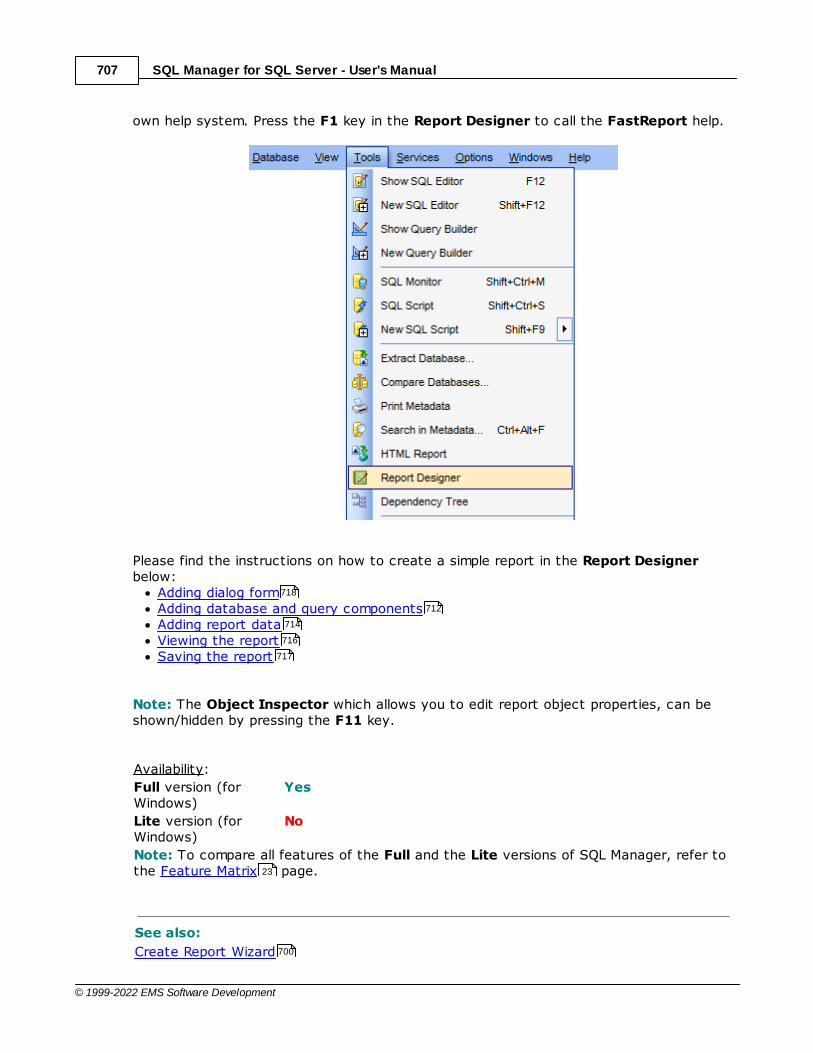
SQL Manager for SQL Server - User's Manual707
© 1999-2022 EMS Software Development
own help system. Press the F1 key in the Report Designer to call the FastReport help.
Please find the instructions on how to create a simple report in the Report Designerbelow:
Adding dialog formAdding database and query componentsAdding report dataViewing the reportSaving the report
Note: The Object Inspector which allows you to edit report object properties, can beshown/hidden by pressing the F11 key.
Availability:
Full version (forWindows)
Yes
Lite version (forWindows)
No
Note: To compare all features of the Full and the Lite versions of SQL Manager, refer tothe Feature Matrix page.
See also:
Create Report Wizard
718
712
714
716
717
23
700
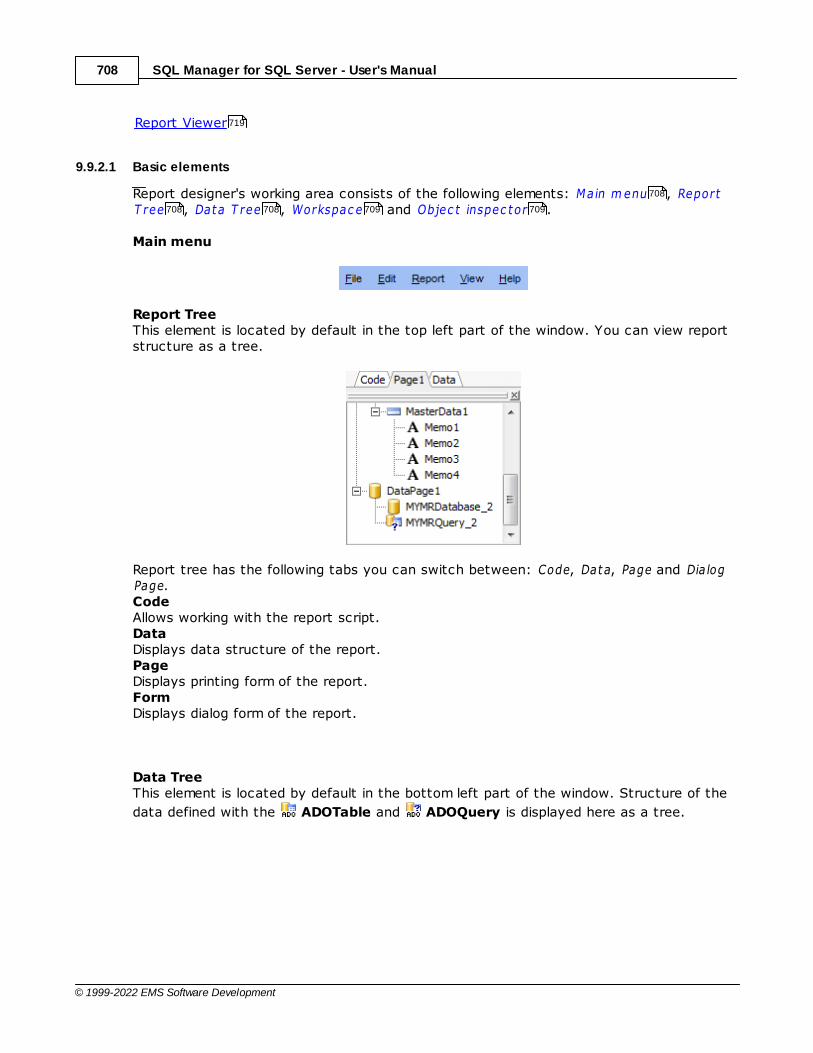
SQL Manager for SQL Server - User's Manual708
© 1999-2022 EMS Software Development
Report Viewer
9.9.2.1 Basic elements
Report designer's working area consists of the following elements: Main m enu , ReportT ree , Data T ree , Workspac e and Objec t inspec tor .
Main menu
Report TreeThis element is located by default in the top left part of the window. You can view reportstructure as a tree.
Report tree has the following tabs you can switch between: Code, Data, Page and Dia logPage.CodeAllows working with the report script.DataDisplays data structure of the report.PageDisplays printing form of the report.FormDisplays dialog form of the report.
Data TreeThis element is located by default in the bottom left part of the window. Structure of the
data defined with the ADOTable and ADOQuery is displayed here as a tree.
719
708
708 708 709 709
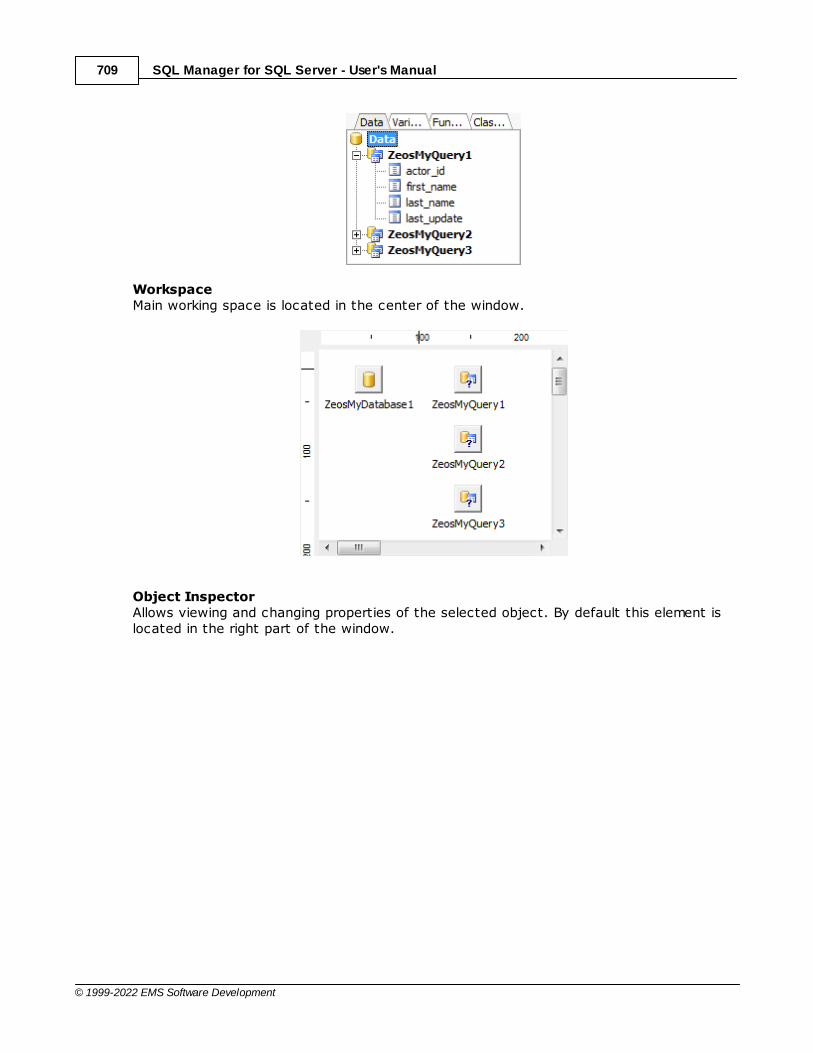
SQL Manager for SQL Server - User's Manual709
© 1999-2022 EMS Software Development
WorkspaceMain working space is located in the center of the window.
Object InspectorAllows viewing and changing properties of the selected object. By default this element islocated in the right part of the window.
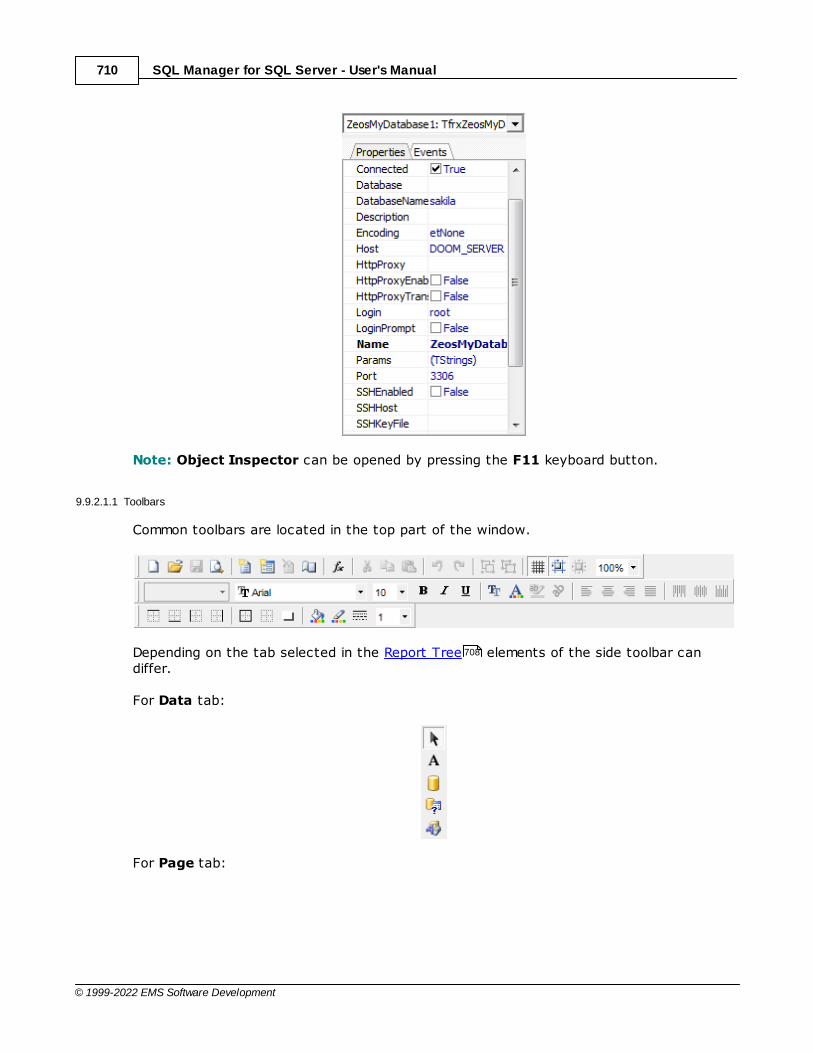
SQL Manager for SQL Server - User's Manual710
© 1999-2022 EMS Software Development
Note: Object Inspector can be opened by pressing the F11 keyboard button.
9.9.2.1.1 Toolbars
Common toolbars are located in the top part of the window.
Depending on the tab selected in the Report Tree elements of the side toolbar candiffer.
For Data tab:
For Page tab:
708
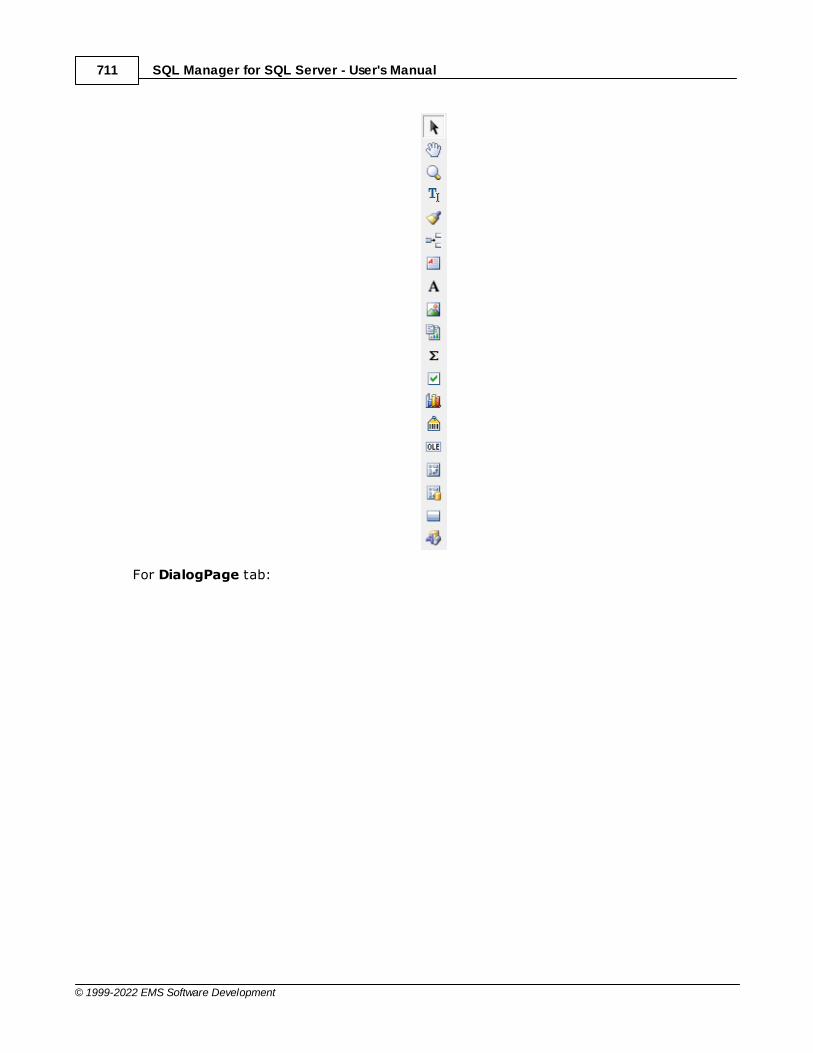
SQL Manager for SQL Server - User's Manual711
© 1999-2022 EMS Software Development
For DialogPage tab:
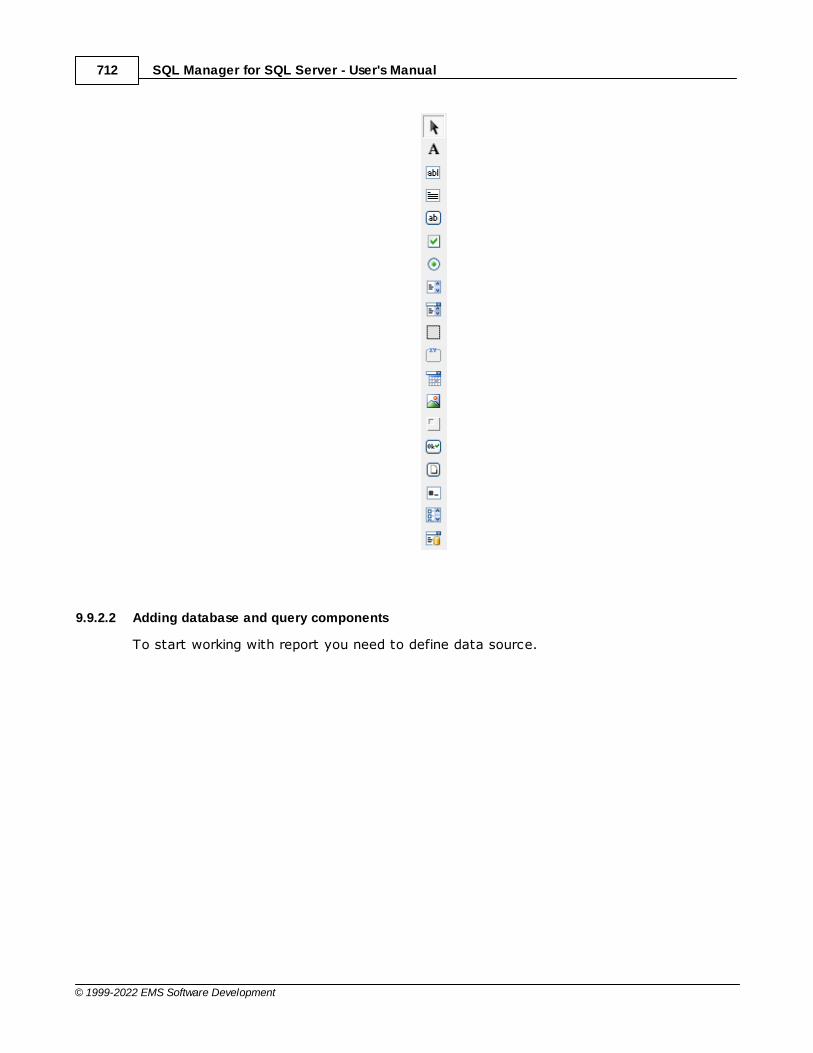
SQL Manager for SQL Server - User's Manual712
© 1999-2022 EMS Software Development
9.9.2.2 Adding database and query components
To start working with report you need to define data source.
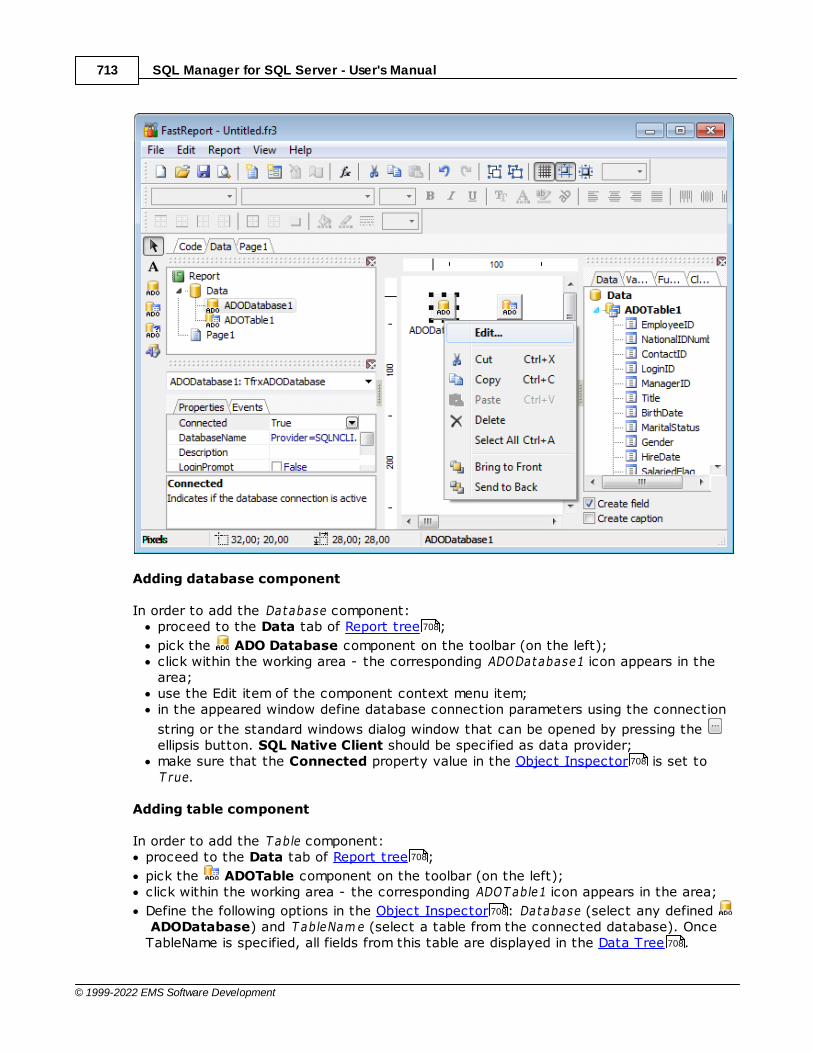
SQL Manager for SQL Server - User's Manual713
© 1999-2022 EMS Software Development
Adding database component
In order to add the Database component:proceed to the Data tab of Report tree ;
pick the ADO Database component on the toolbar (on the left);click within the working area - the corresponding ADODatabase1 icon appears in thearea;use the Edit item of the component context menu item;in the appeared window define database connection parameters using the connection
string or the standard windows dialog window that can be opened by pressing the ellipsis button. SQL Native Client should be specified as data provider;make sure that the Connected property value in the Object Inspector is set toT rue.
Adding table component
In order to add the T able component:proceed to the Data tab of Report tree ;
pick the ADOTable component on the toolbar (on the left);click within the working area - the corresponding ADOT able1 icon appears in the area;
Define the following options in the Object Inspector : Database (select any defined ADODatabase) and T ableNam e (select a table from the connected database). OnceTableName is specified, all fields from this table are displayed in the Data Tree .
708
708
708
708
708
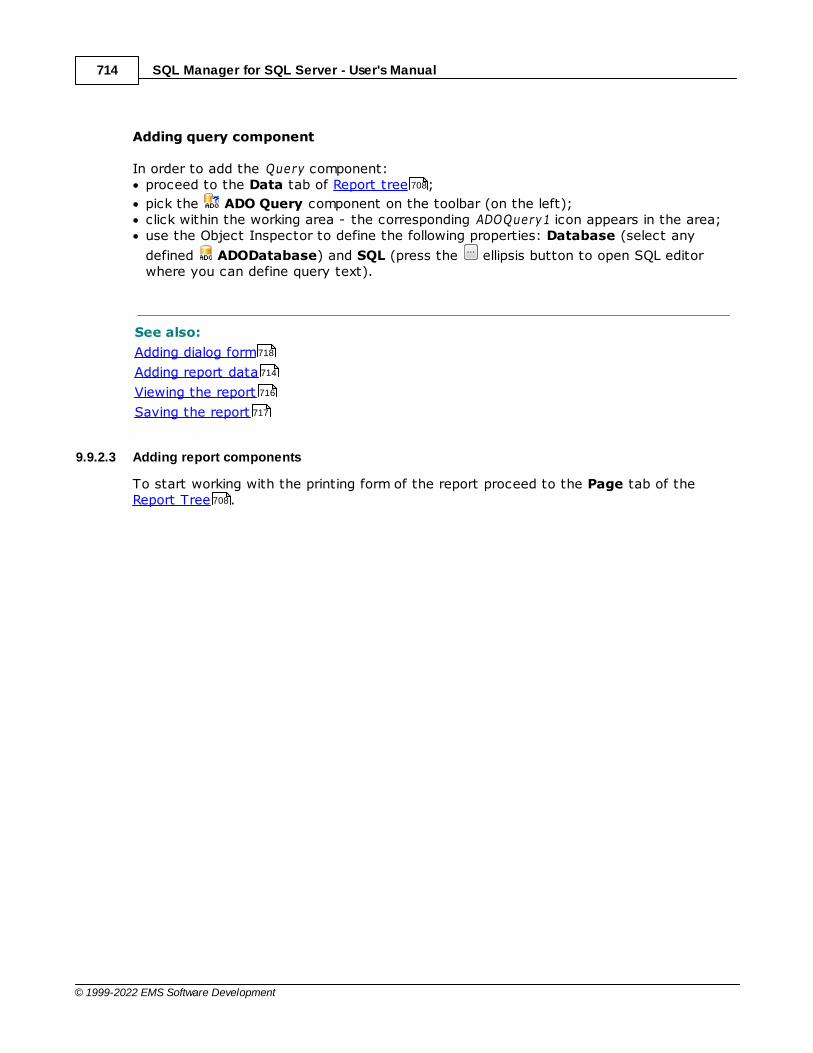
SQL Manager for SQL Server - User's Manual714
© 1999-2022 EMS Software Development
Adding query component
In order to add the Query component:proceed to the Data tab of Report tree ;
pick the ADO Query component on the toolbar (on the left);click within the working area - the corresponding ADOQuery1 icon appears in the area;use the Object Inspector to define the following properties: Database (select any
defined ADODatabase) and SQL (press the ellipsis button to open SQL editorwhere you can define query text).
See also:
Adding dialog form
Adding report data
Viewing the report
Saving the report
9.9.2.3 Adding report components
To start working with the printing form of the report proceed to the Page tab of theReport Tree .
708
718
714
716
717
708
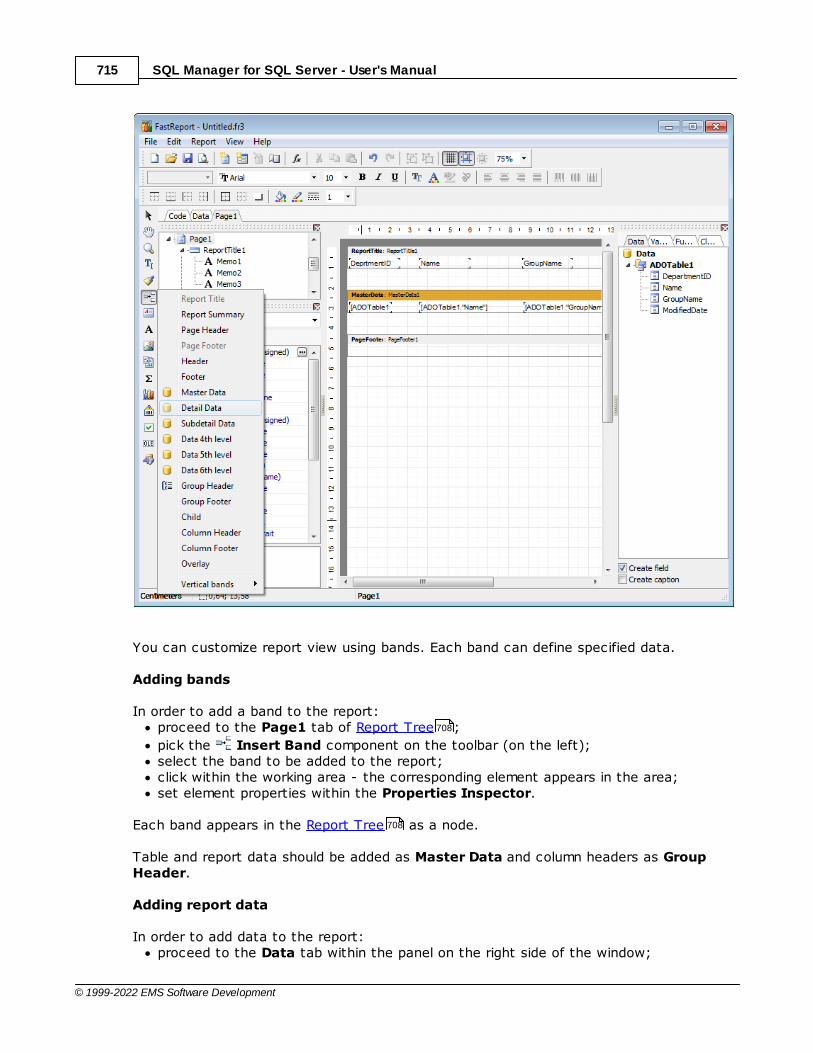
SQL Manager for SQL Server - User's Manual715
© 1999-2022 EMS Software Development
You can customize report view using bands. Each band can define specified data.
Adding bands
In order to add a band to the report:proceed to the Page1 tab of Report Tree ;
pick the Insert Band component on the toolbar (on the left);select the band to be added to the report;click within the working area - the corresponding element appears in the area;set element properties within the Properties Inspector.
Each band appears in the Report Tree as a node.
Table and report data should be added as Master Data and column headers as GroupHeader.
Adding report data
In order to add data to the report:proceed to the Data tab within the panel on the right side of the window;
708
708
SQL Manager for SQL Server - User's Manual716
© 1999-2022 EMS Software Development
pick a field within the Data tree and drag it to the working area;add all necessary elements one by one using drag-and-drop operation for each ofthem.
See also:
Adding dialog form
Adding database and query components
Viewing the report
Saving the report
9.9.2.4 Viewing the report
Viewing the report
To preview the newly created report, select the File | Preview main menu item or use
the corresponding Preview toolbar button. You can also use the Ct r l+P shortcut forthe same purpose. This mode allows you to view, edit and print the result report.
To print the report, use the Print toolbar button or the corresponding context menuitem.
718
712
716
717
996
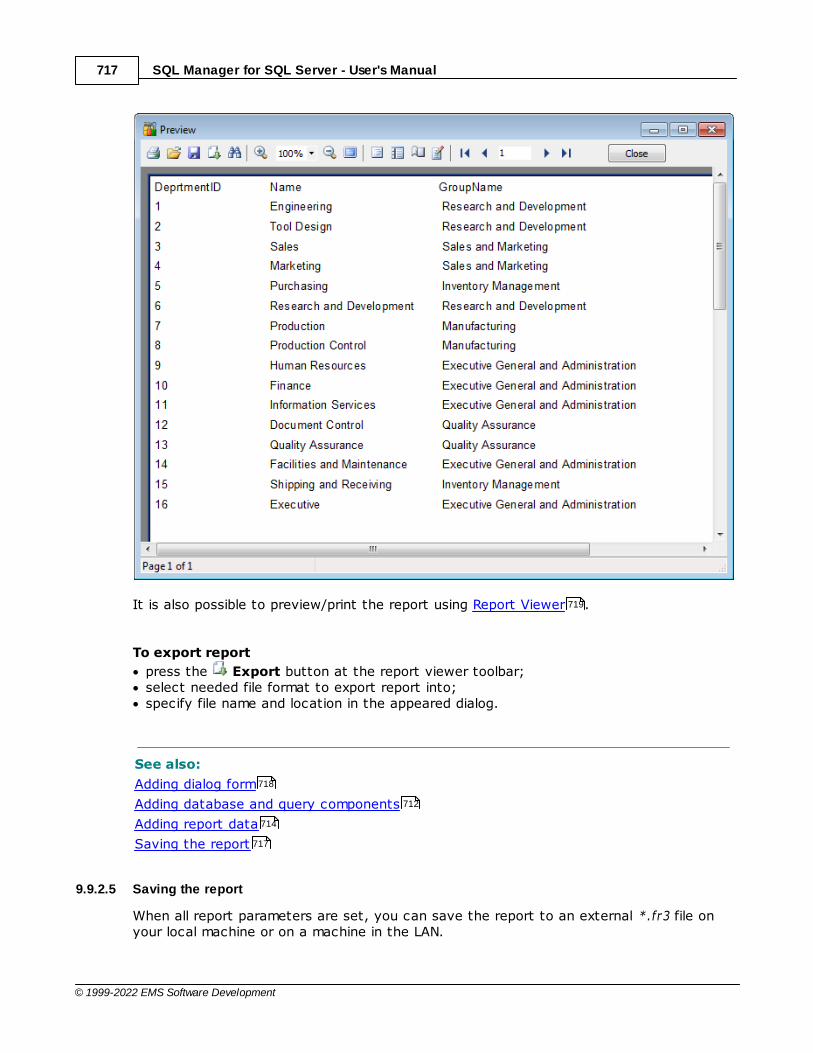
SQL Manager for SQL Server - User's Manual717
© 1999-2022 EMS Software Development
It is also possible to preview/print the report using Report Viewer .
To export report
press the Export button at the report viewer toolbar;select needed file format to export report into;specify file name and location in the appeared dialog.
See also:
Adding dialog form
Adding database and query components
Adding report data
Saving the report
9.9.2.5 Saving the report
When all report parameters are set, you can save the report to an external *.fr3 file onyour local machine or on a machine in the LAN.
719
718
712
714
717

SQL Manager for SQL Server - User's Manual718
© 1999-2022 EMS Software Development
To save the report, select the File | Save main menu item or use the corresponding Save Report toolbar button. You can also use the Ct r l+S shortcut for the samepurpose.
If necessary, you can add the report to the database using Create Report Wizard andperform preview/print operations using Report Viewer .
See also:
Adding dialog form
Adding database and query components
Adding report data
Viewing the report
9.9.2.6 Adding dialog form
To add a dialog form, select the File | New Dialog main menu item in Report Designer.
The new dialog appears within the Dia logPage1 tab of the designer. Use the available RADtools to add necessary interface elements to the dialog.
To call the dialog, proceed to the Code tab and supply the corresponding statement(PascalScript), e.g. beginDia logPage1.Show Modal;
996
700
719
718
712
714
716

SQL Manager for SQL Server - User's Manual719
© 1999-2022 EMS Software Development
end.
Using the Language drop-down list you can select the script language to be used for theevent handler: Pasc alSc r ipt (by default), C++Sc ript, Basic Sc r ipt, JSc r ipt.
For instance, the following C++ Script code can be used as the handler for the OnClic kevent of the 'Show' button to open ADOQuery :{ ADOQuery1.Ac t ive = t rue;}
See also:
Adding database and query components
Adding report data
Viewing the report
Saving the report
9.9.3 Report Viewer
Using Report Viewer you can view, edit, save and print reports.
Possible report operations are described on the Using Navigation bar and Toolbar page.
714
712
714
716
717
720
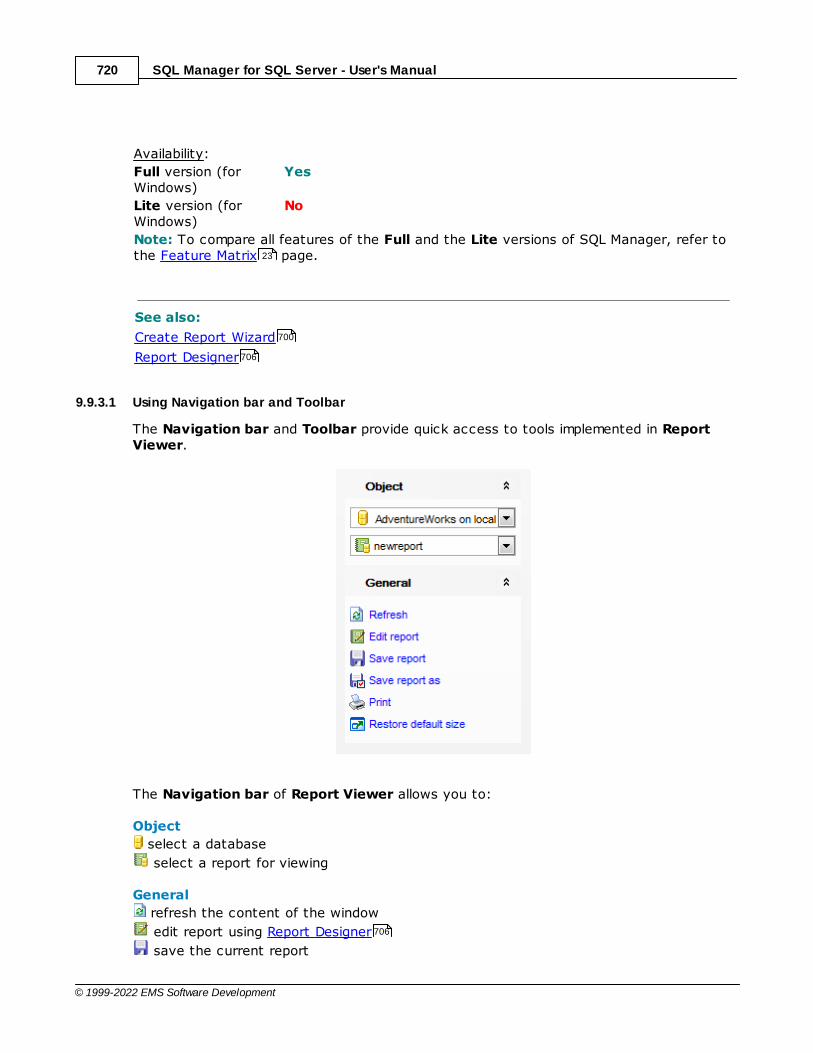
SQL Manager for SQL Server - User's Manual720
© 1999-2022 EMS Software Development
Availability:
Full version (forWindows)
Yes
Lite version (forWindows)
No
Note: To compare all features of the Full and the Lite versions of SQL Manager, refer tothe Feature Matrix page.
See also:
Create Report Wizard
Report Designer
9.9.3.1 Using Navigation bar and Toolbar
The Navigation bar and Toolbar provide quick access to tools implemented in ReportViewer.
The Navigation bar of Report Viewer allows you to:
Object
select a database
select a report for viewing
General
refresh the content of the window
edit report using Report Designer
save the current report
23
700
706
706

SQL Manager for SQL Server - User's Manual721
© 1999-2022 EMS Software Development
save the report to a *.fr3 file using the Save as... dialog
print the report
restore the default size and position of the viewer window
Items of the Navigation bar are also available on the ToolBar of the Report Viewerwindow. To enable the toolbar , open the Environment Options dialog, proceed tothe Windows section there and select T oolbar (if you need the toolbar only) or Both (if you need both the toolbar and the Navigation bar ) in the Bar style for childforms group.
960 867
871
958
SQL Manager for SQL Server - User's Manual722
© 1999-2022 EMS Software Development
9.10 Server-level principals
Principals are individuals, groups, and processes that can request SQL Server resources.
SQL Manager for SQL Server provides management tools for the following server-leve lsec urit y pr inc ipals:
LoginsAllows you to manage SQL Server logins.
Server Roles ManagerAllows you to manage SQL Server roles.
Adding Logins
In order to add a new login:
select the Tools | Login Manager main menu item or use the corresponding toolbar button to open Login Manager ;select the Add login... item of the context menu or within the Navigation bar;define login properties and permissions using Login Editor
orright-click the Logins node (Server Objects) or any object within this node in DBExplorer and select the New Login context menu item, or use the Ct r l+N shortcut
;define login properties and permissions using Login Editor .
Editing Login Properties
In order to edit an existing login:
select the Tools | Login Manager main menu item or use the corresponding toolbar button to open Login Manager ;select the Edit login... item of the context menu or within the Navigation bar;edit the login properties and permissions using Login Editor
orright-click the Logins node (Server Objects) or any object within this node in DBExplorer and select the Edit Login <object_name> context menu item, or usethe Ct r l+O shortcut ;edit the login properties and permissions using Login Editor .
Deleting Logins
In order to delete an existing login:
select the Tools | Login Manager main menu item or use the corresponding toolbar button to open Login Manager ;right-click the login to delete and select the Delete Login item of the context menuor within the Navigation bar;confirm deleting in the dialog window
orright-click the login to delete within the Logins node (Server Objects) in DB Explorer
and select the Drop Login <object_name> context menu item, or use theShift+Del shortcut ;
723
735
958
723
390
99
996
390
958
723
390
99
996
390
958
723
99
996
SQL Manager for SQL Server - User's Manual723
© 1999-2022 EMS Software Development
confirm deleting in the dialog window
Allocating Server Roles
In order to allocate server roles to logins:
select the Tools | Server Roles main menu item or use the corresponding toolbar button;select a server role, and add logins to the Server Role Members list using Server RolesManager .
See also:
Server Log Viewer
Activity Monitor
Resource Governor
9.10.1 Logins
Microsoft® SQL Server™ uses two ways to validate connections to SQL Serverdatabases:Windows Authentication which uses Windows-level principalsandSQL Server Authentication which uses logins to validate the connection.
A login is an indivisible principal which is used to connect to the server and use itsresources.
Login ManagerLogin Editor
See also:
Server Roles
9.10.1.1 Login Manager
The Login Manager allows you to browse the list of existing logins on each of availableinstances of SQL Server, and manage them efficiently.
To launch the tool, select the Tools | Login Manager main menu item, or right-clickthe host alias in the DB Explorer tree and select the Tasks | Logins item from thecontext menu .
958
735
859
862
855
723
390
735
958
99
88
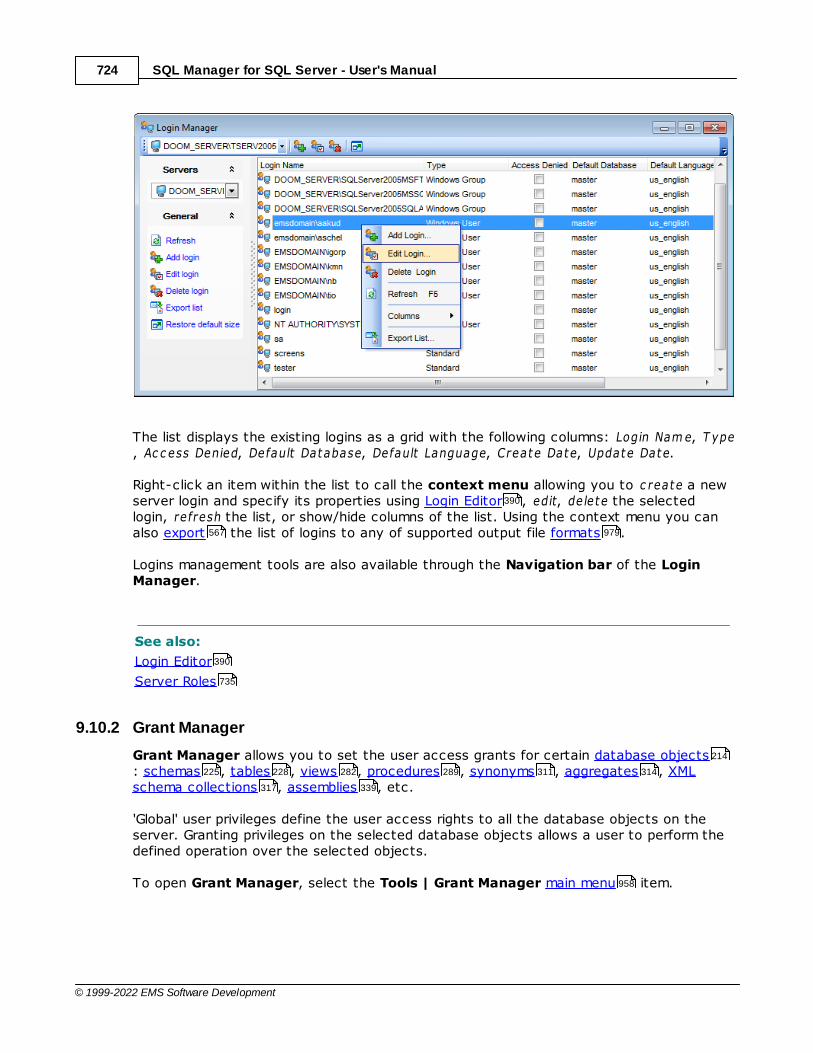
SQL Manager for SQL Server - User's Manual724
© 1999-2022 EMS Software Development
The list displays the existing logins as a grid with the following columns: Login Nam e, T ype, Ac c ess Denied, Default Database, Default Language, Create Date, Update Date.
Right-click an item within the list to call the context menu allowing you to c reate a newserver login and specify its properties using Login Editor , edit, de lete the selectedlogin, refresh the list, or show/hide columns of the list. Using the context menu you canalso export the list of logins to any of supported output file formats .
Logins management tools are also available through the Navigation bar of the LoginManager.
See also:
Login Editor
Server Roles
9.10.2 Grant Manager
Grant Manager allows you to set the user access grants for certain database objects: schemas , tables , views , procedures , synonyms , aggregates , XMLschema collections , assemblies , etc.
'Global' user privileges define the user access rights to all the database objects on theserver. Granting privileges on the selected database objects allows a user to perform thedefined operation over the selected objects.
To open Grant Manager, select the Tools | Grant Manager main menu item.
390
567 979
390
735
214
225 228 282 289 311 314
317 339
958
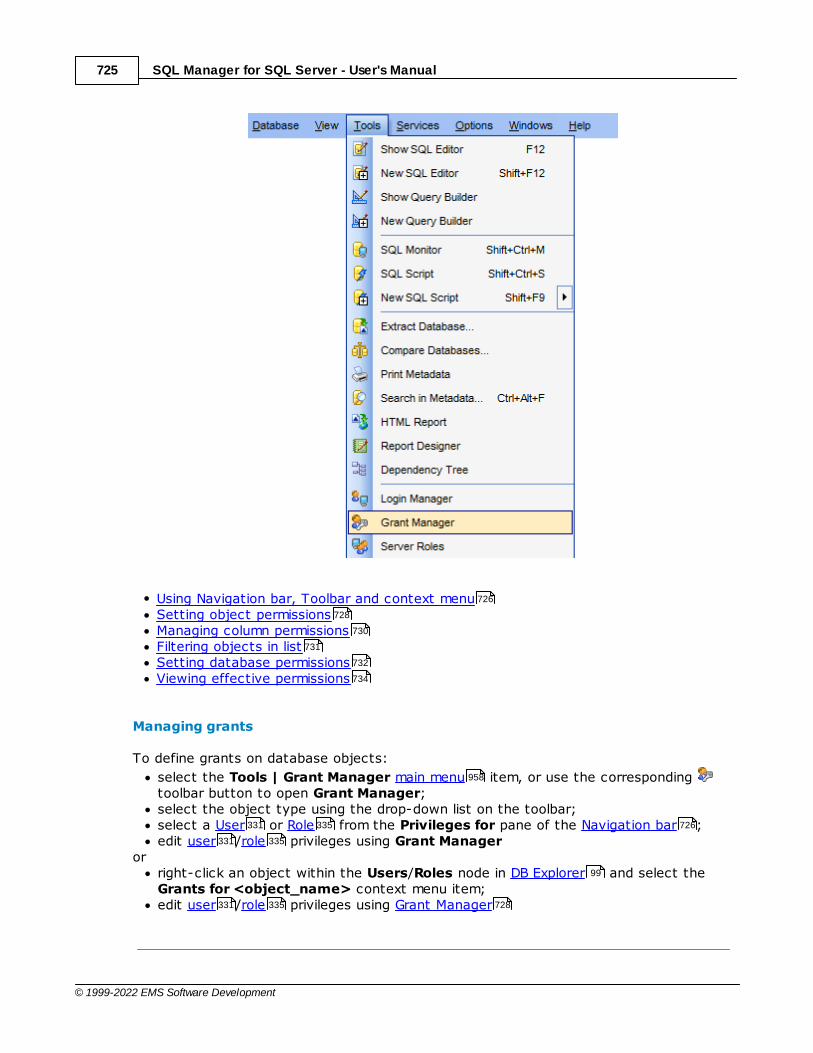
SQL Manager for SQL Server - User's Manual725
© 1999-2022 EMS Software Development
Using Navigation bar, Toolbar and context menuSetting object permissionsManaging column permissionsFiltering objects in listSetting database permissionsViewing effective permissions
Managing grants
To define grants on database objects:
select the Tools | Grant Manager main menu item, or use the corresponding toolbar button to open Grant Manager;select the object type using the drop-down list on the toolbar;select a User or Role from the Privileges for pane of the Navigation bar ;edit user /role privileges using Grant Manager
orright-click an object within the Users/Roles node in DB Explorer and select theGrants for <object_name> context menu item;edit user /role privileges using Grant Manager
726
728
730
731
732
734
958
331 335 726
331 335
99
331 335 728
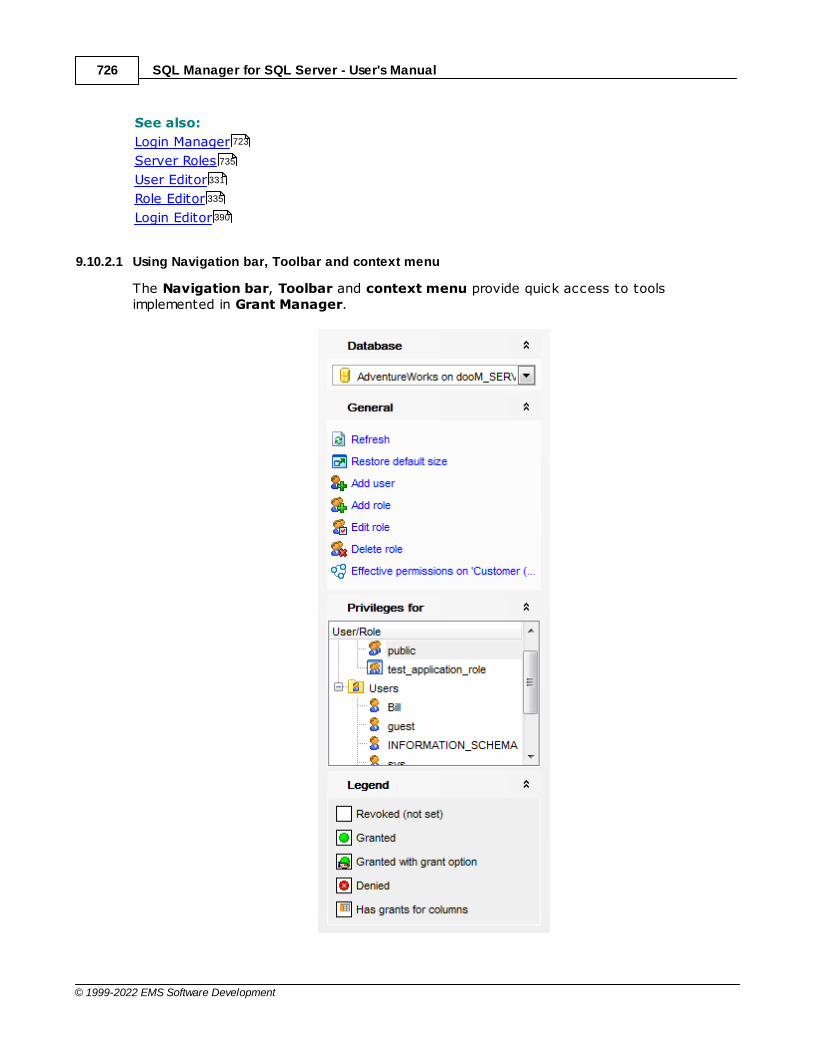
SQL Manager for SQL Server - User's Manual726
© 1999-2022 EMS Software Development
See also:
Login Manager
Server Roles
User Editor
Role Editor
Login Editor
9.10.2.1 Using Navigation bar, Toolbar and context menu
The Navigation bar, Toolbar and context menu provide quick access to toolsimplemented in Grant Manager.
723
735
331
335
390

SQL Manager for SQL Server - User's Manual727
© 1999-2022 EMS Software Development
The Navigation bar of Grant Manager allows you to:
Database
select a database for grants management
General
refresh the content of the window
call User Editor to add a new database user
call User Editor to edit an existing user
delete a database user
call Role Editor to add a database role
call Role Editor to edit an existing database role
delete a database role
view effective permissions on the object
restore the default size and position of the window
Privileges for
select an existing database user /role to grant privileges to
Legend
view the legend
Items of the Navigation bar are also available on the ToolBar of Grant Manager. Toenable the toolbar , open the Environment Options dialog, proceed to the Windows
section there and select T oolbar (if you need the toolbar only) or Both (if youneed both the toolbar and the Navigation bar ) in the Bar style for child forms group.
The context menu is aimed at facilitating your work: you can perform a variety ofoperations using context menu items.
The context menu of Grant Manager allows you to:grant a permission on a securable to the selected principal;grant a permission (with Grant Option) on a securable to the selected principal;deny a permission on a securable to the selected principal;revoke a previously granted or denied permission;grant all permissions on a securable to the selected principal;grant all permissions (with Grant Option) on a securable to the selected principal;deny all permissions on a securable to the selected principal;revoke all previously granted or denied permissions on a securable;grant a permission on all objects to the selected principal;grant a permission (with Grant Option) on all objects to the selected principal;deny a permission on all objects to the selected principal;revoke a previously granted or denied permission on all objects;apply sorting of objects in grid (by type);apply sorting of objects in grid (by name);view effective permissions on the object.
331
331
335
335
734
331 335
960 867
871
958
734

SQL Manager for SQL Server - User's Manual728
© 1999-2022 EMS Software Development
See also:
Setting object permissions
Managing column permissions
Filtering objects in list
Setting database permissions
Viewing effective permissions
9.10.2.2 Managing database-specific privileges
9.10.2.2.1 Object permissions
The Object Permissions tab allows you to define privileges on specified databaseobjects.
To edit the privileges of a user /role on an object of a database, select the databaseusing the Database panel of the Navigation bar , then select a user or role from thePrivileges for list available within the Navigation bar or toolbar . Then select thetype of objects to be displayed in the main working window using the combo-box at thetop.
The Object Name column contains the list of objects of the selected type; eachsubsequent column corresponds to the permission which can be granted on the selectedobject: Selec t, Insert, Update, Delete, Referenc es, Alter, Cont rol, T ake ow nership, V iew definit ion(for tables , views );
728
730
731
732
734
331 335
726
726 727
228 282
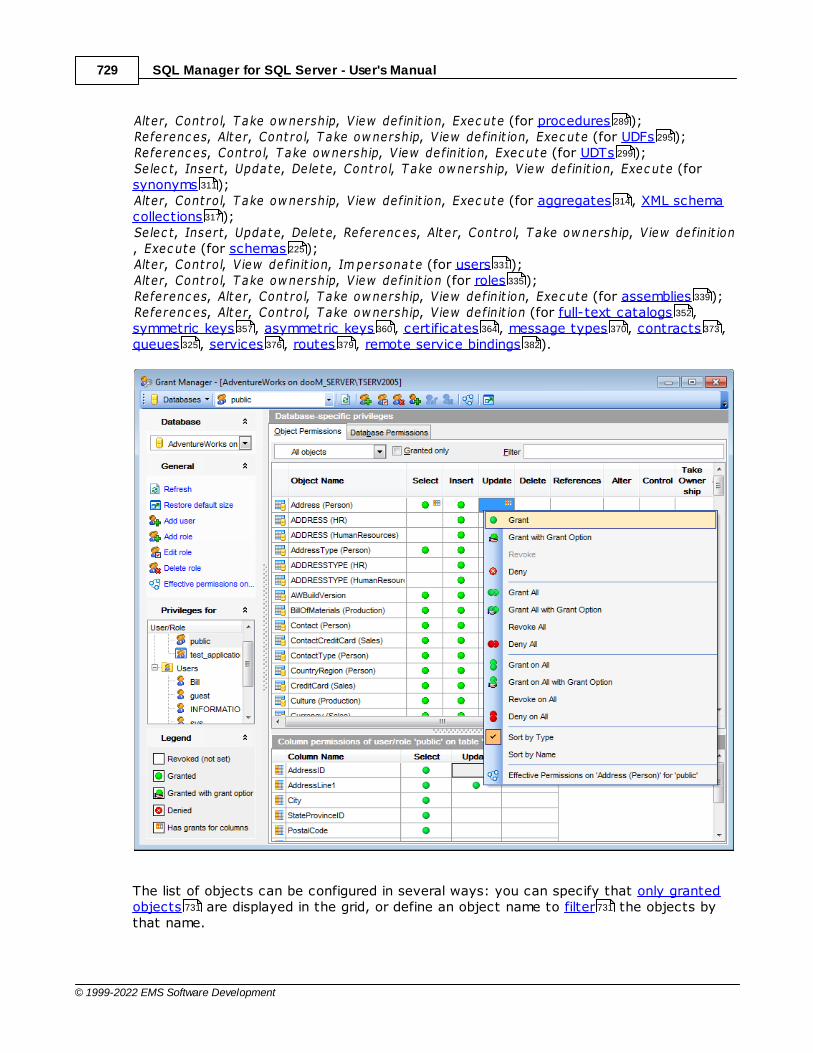
SQL Manager for SQL Server - User's Manual729
© 1999-2022 EMS Software Development
Alter, Cont rol, T ake ow nership, V iew definit ion, Exec ute (for procedures );Referenc es, Alter, Cont rol, T ake ow nership, V iew definit ion, Exec ute (for UDFs );Referenc es, Cont rol, T ake ow nership, V iew definit ion, Exec ute (for UDTs );Selec t, Insert, Update, Delete, Cont rol, T ake ow nership, V iew definit ion, Exec ute (forsynonyms );Alter, Cont rol, T ake ow nership, V iew definit ion, Exec ute (for aggregates , XML schemacollections );Selec t, Insert, Update, Delete, Referenc es, Alter, Cont rol, T ake ow nership, V iew definit ion, Exec ute (for schemas );Alter, Cont rol, V iew definit ion, Im personate (for users );Alter, Cont rol, T ake ow nership, V iew definit ion (for roles );Referenc es, Alter, Cont rol, T ake ow nership, V iew definit ion, Exec ute (for assemblies );Referenc es, Alter, Cont rol, T ake ow nership, V iew definit ion (for full-text catalogs ,symmetric keys , asymmetric keys , certificates , message types , contracts ,queues , services , routes , remote service bindings ).
The list of objects can be configured in several ways: you can specify that only grantedobjects are displayed in the grid, or define an object name to filter the objects bythat name.
289
295
299
311
314
317
225
331
335
339
352
357 360 364 370 373
325 376 379 382
731 731
SQL Manager for SQL Server - User's Manual730
© 1999-2022 EMS Software Development
Right-click a cell to grant a specific permission on a certain object. To grant a permissionon an object, you should find the object in the Object Name list and the column with thecorresponding permission. Note that the cells that are highlighted gray do not admit tosetting grants for an obvious reason (e.g. you cannot execute a table). The contextmenu of a cell contains possible permissions that can be granted:
Grant Grant w ith Grant Opt ion Deny (prevents the principal from inheriting the permission through its group or role
memberships)
Revoke (removes a previously granted or denied permission) Grant All Grant All w ith Grant Opt ion Deny All
Revoke All
Grant on All
Grant on All w ith Grant Opt ion
Deny on All
Revoke on All
Hint: You can also assign privileges by double-clicking the respective cell - in this casethe grant status is changed in the following order: Grant -> Grant w ith Grant Opt ion ->Deny -> Revoke.
See also:
Using Navigation bar, Toolbar and context menu
Managing column permissions
Filtering objects in list
Setting database permissions
Viewing effective permissions
9.10.2.2.2 Managing column permissions
The Column permissions of user/role <principal_name> on <securable_name>area displays the grid with table/view columns and the privileges that can be granted tothe selected user or role .
Use items of the context menu to grant/deny/revoke permissions on columns.
727
726
730
731
732
734
331 335
727
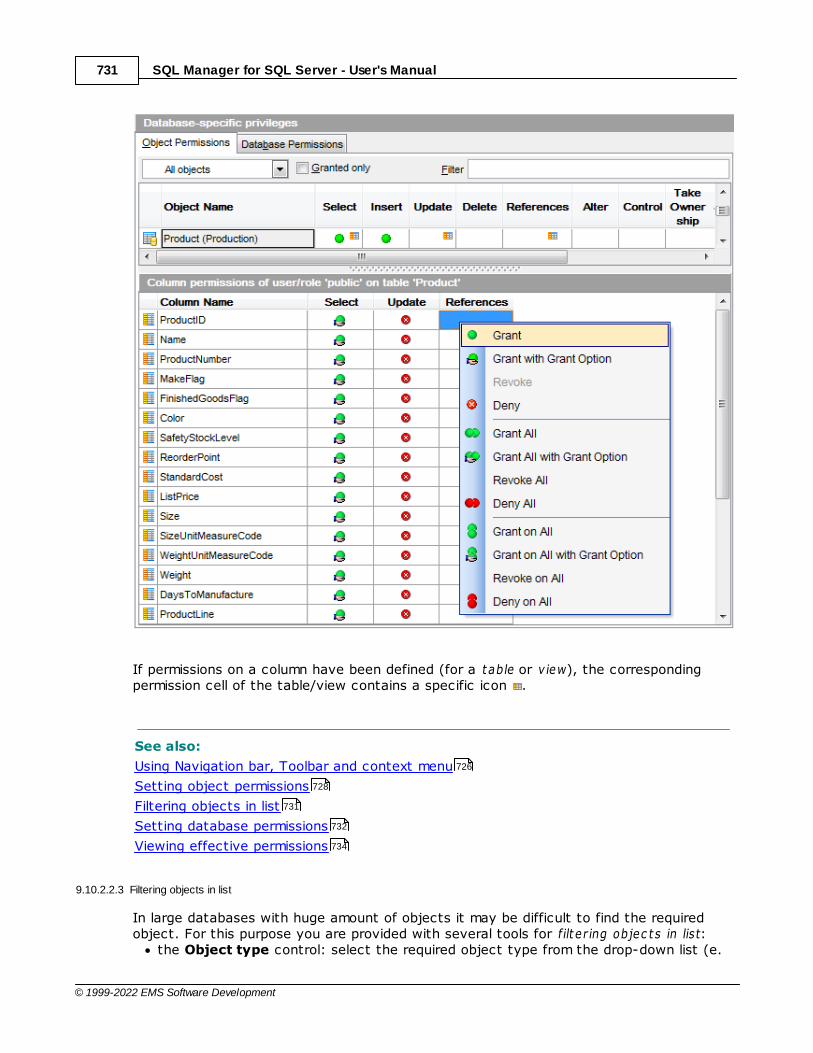
SQL Manager for SQL Server - User's Manual731
© 1999-2022 EMS Software Development
If permissions on a column have been defined (for a table or v iew), the correspondingpermission cell of the table/view contains a specific icon .
See also:
Using Navigation bar, Toolbar and context menu
Setting object permissions
Filtering objects in list
Setting database permissions
Viewing effective permissions
9.10.2.2.3 Filtering objects in list
In large databases with huge amount of objects it may be difficult to find the requiredobject. For this purpose you are provided with several tools for filt er ing objec t s in list:
the Object type control: select the required object type from the drop-down list (e.
726
728
731
732
734
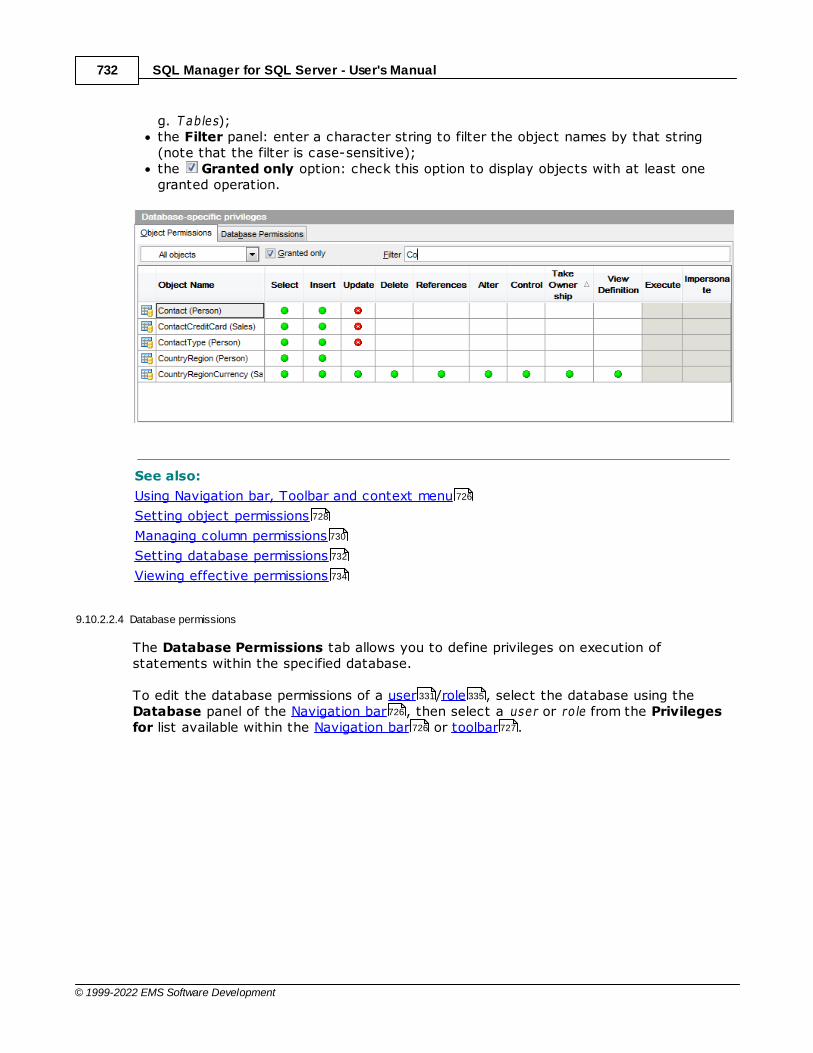
SQL Manager for SQL Server - User's Manual732
© 1999-2022 EMS Software Development
g. T ables);the Filter panel: enter a character string to filter the object names by that string(note that the filter is case-sensitive);the Granted only option: check this option to display objects with at least onegranted operation.
See also:
Using Navigation bar, Toolbar and context menu
Setting object permissions
Managing column permissions
Setting database permissions
Viewing effective permissions
9.10.2.2.4 Database permissions
The Database Permissions tab allows you to define privileges on execution ofstatements within the specified database.
To edit the database permissions of a user /role , select the database using theDatabase panel of the Navigation bar , then select a user or role from the Privilegesfor list available within the Navigation bar or toolbar .
726
728
730
732
734
331 335
726
726 727
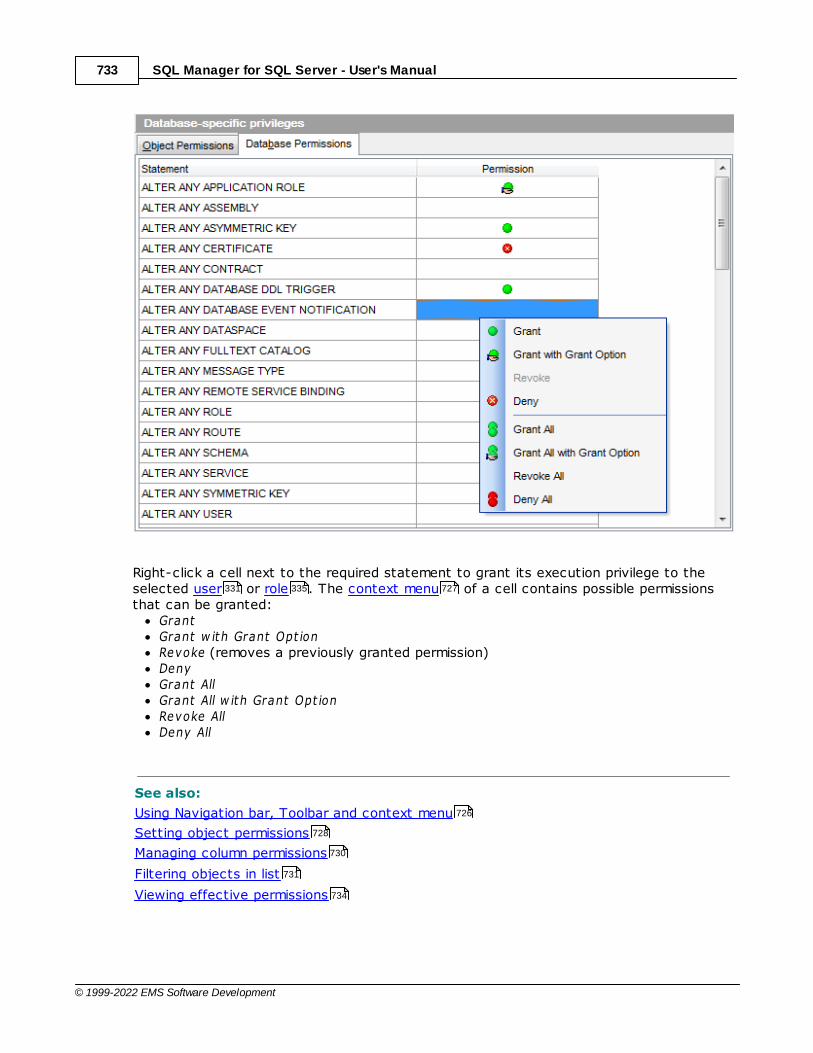
SQL Manager for SQL Server - User's Manual733
© 1999-2022 EMS Software Development
Right-click a cell next to the required statement to grant its execution privilege to theselected user or role . The context menu of a cell contains possible permissionsthat can be granted:
GrantGrant w ith Grant Opt ionRevoke (removes a previously granted permission)DenyGrant AllGrant All w ith Grant Opt ionRevoke AllDeny All
See also:
Using Navigation bar, Toolbar and context menu
Setting object permissions
Managing column permissions
Filtering objects in list
Viewing effective permissions
331 335 727
726
728
730
731
734
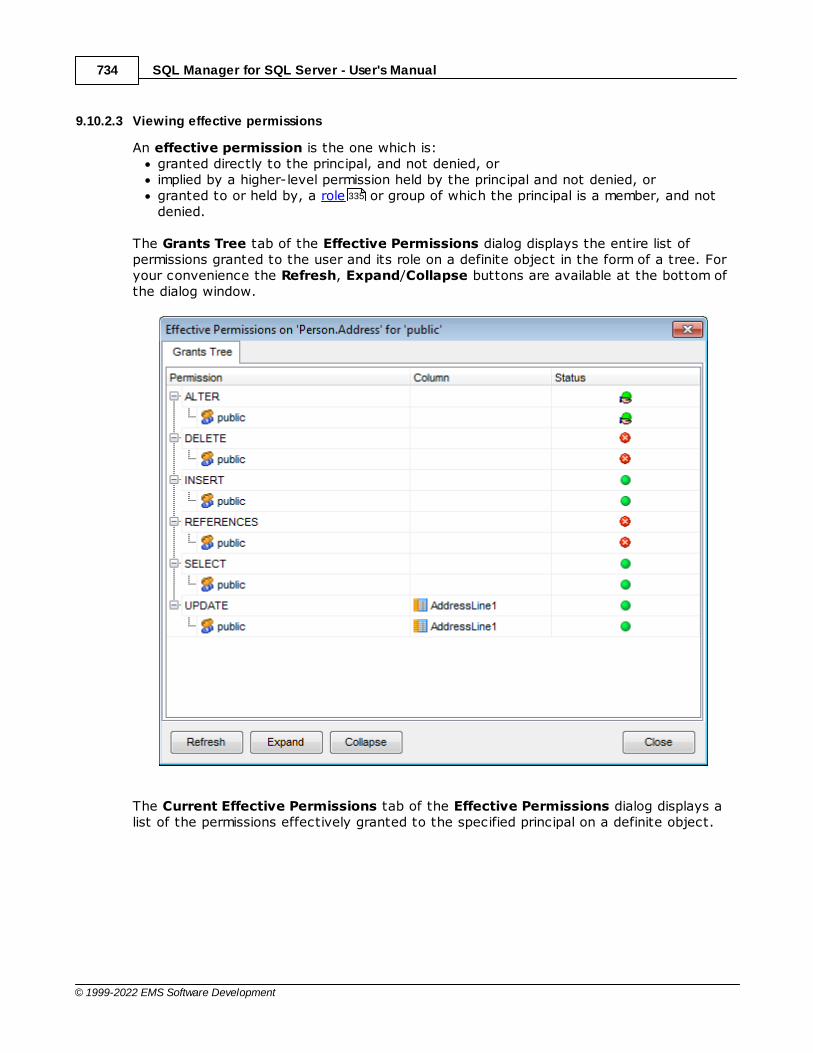
SQL Manager for SQL Server - User's Manual734
© 1999-2022 EMS Software Development
9.10.2.3 Viewing effective permissions
An effective permission is the one which is: granted directly to the principal, and not denied, orimplied by a higher-level permission held by the principal and not denied, orgranted to or held by, a role or group of which the principal is a member, and notdenied.
The Grants Tree tab of the Effective Permissions dialog displays the entire list ofpermissions granted to the user and its role on a definite object in the form of a tree. Foryour convenience the Refresh, Expand/Collapse buttons are available at the bottom ofthe dialog window.
The Current Effective Permissions tab of the Effective Permissions dialog displays alist of the permissions effectively granted to the specified principal on a definite object.
335

SQL Manager for SQL Server - User's Manual735
© 1999-2022 EMS Software Development
See also:
Using Navigation bar, Toolbar and context menu
Setting object permissions
Managing column permissions
Filtering objects in list
Setting database permissions
9.10.3 Server Roles
The Server Roles manager allows you to browse the list of SQL Server roles, and todefine login membership for each of the roles.
To launch the tool, select the Tools | Server Roles main menu item, or right-click thehost alias in the DB Explorer tree and select the Tasks | Server Roles item from thecontext menu .
726
728
730
731
732
395
958
99
88

SQL Manager for SQL Server - User's Manual736
© 1999-2022 EMS Software Development
The upper list displays the server roles as a grid with the following columns: Server RoleNam e, Mem bers Count.
Right-click an item within the list to call the context menu allowing you to refresh thelist, or show/hide columns of the list. Using the context menu you can also export thelist of server roles to any of supported output file formats .
Server roles management tools are also available through the Navigation bar of theServer Roles manager.
The lower area allows you to define login membership, i.e. to select the logins that willbelong to the selected server role. The server roles determine the tasks that can beperformed through the selected login .
To select a login, you need to move it from the Available Logins list to the Server Role
Members list. Use the buttons or drag-and-drop operations to move the loginsfrom one list to another.
See also:
Logins
567
979
723
723
723
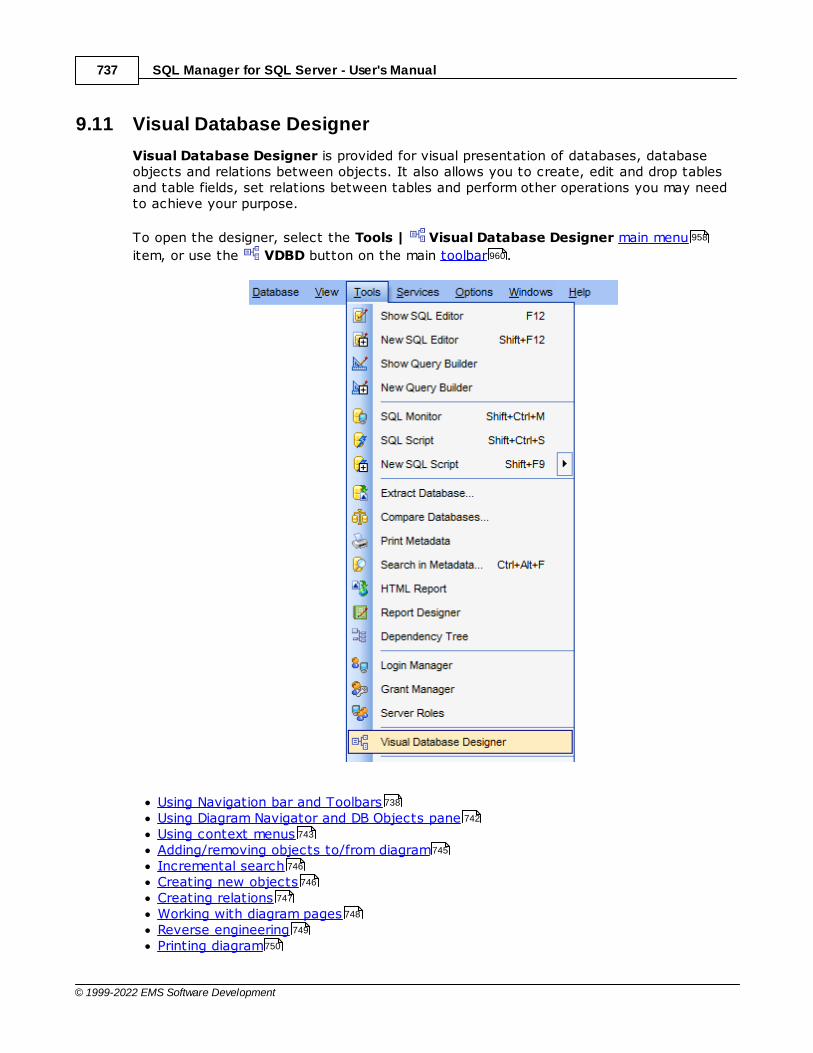
SQL Manager for SQL Server - User's Manual737
© 1999-2022 EMS Software Development
9.11 Visual Database Designer
Visual Database Designer is provided for visual presentation of databases, databaseobjects and relations between objects. It also allows you to create, edit and drop tablesand table fields, set relations between tables and perform other operations you may needto achieve your purpose.
To open the designer, select the Tools | Visual Database Designer main menu
item, or use the VDBD button on the main toolbar .
Using Navigation bar and ToolbarsUsing Diagram Navigator and DB Objects paneUsing context menusAdding/removing objects to/from diagramIncremental searchCreating new objectsCreating relationsWorking with diagram pagesReverse engineeringPrinting diagram
958
960
738
742
743
745
746
746
747
748
749
750
SQL Manager for SQL Server - User's Manual738
© 1999-2022 EMS Software Development
Saving/loading diagramSetting diagram options
Availability:
Full version (forWindows)
Yes
Lite version (forWindows)
No
Note: To compare all features of the Full and the Lite versions of SQL Manager, refer tothe Feature Matrix page.
See also:
Database Objects Management
Visual Database Designer options
9.11.1 Using Navigation bar and Toolbars
The Navigation bar and Toolbars provide quick access to tools implemented in VisualDatabase Designer.
753
754
23
214
889
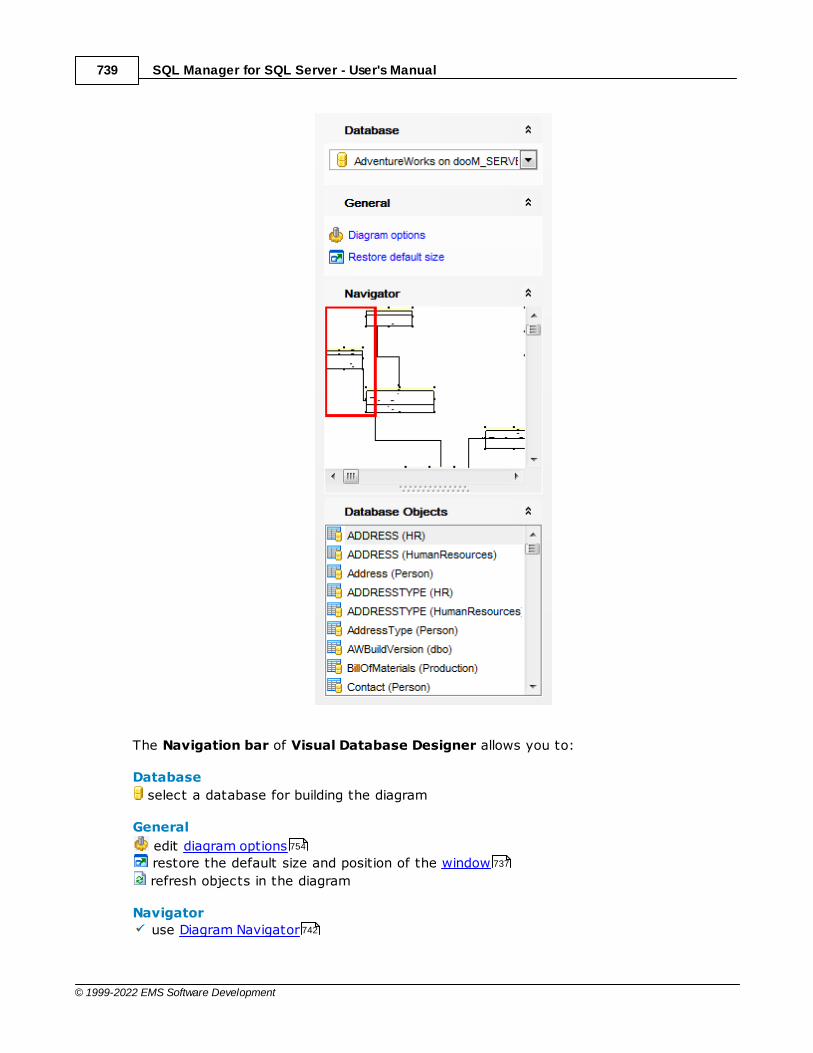
SQL Manager for SQL Server - User's Manual739
© 1999-2022 EMS Software Development
The Navigation bar of Visual Database Designer allows you to:
Database
select a database for building the diagram
General
edit diagram options
restore the default size and position of the window
refresh objects in the diagram
Navigator
use Diagram Navigator
754
737
742
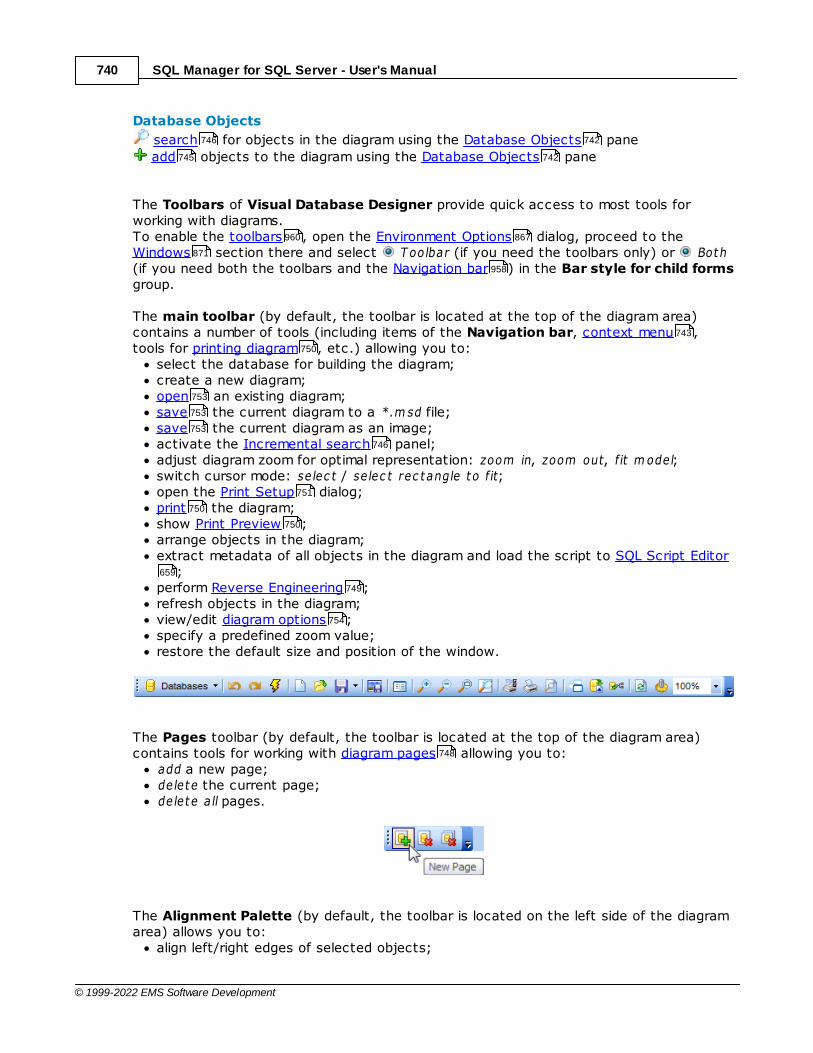
SQL Manager for SQL Server - User's Manual740
© 1999-2022 EMS Software Development
Database Objects
search for objects in the diagram using the Database Objects pane
add objects to the diagram using the Database Objects pane
The Toolbars of Visual Database Designer provide quick access to most tools forworking with diagrams. To enable the toolbars , open the Environment Options dialog, proceed to theWindows section there and select T oolbar (if you need the toolbars only) or Both(if you need both the toolbars and the Navigation bar ) in the Bar style for child formsgroup.
The main toolbar (by default, the toolbar is located at the top of the diagram area)contains a number of tools (including items of the Navigation bar, context menu ,tools for printing diagram , etc.) allowing you to:
select the database for building the diagram;create a new diagram;open an existing diagram;save the current diagram to a *.m sd file;save the current diagram as an image;activate the Incremental search panel;adjust diagram zoom for optimal representation: zoom in, zoom out, f it m odel;switch cursor mode: se lec t / se lec t rec tangle to f it;open the Print Setup dialog;print the diagram;show Print Preview ;arrange objects in the diagram;extract metadata of all objects in the diagram and load the script to SQL Script Editor
;perform Reverse Engineering ;refresh objects in the diagram;view/edit diagram options ;specify a predefined zoom value;restore the default size and position of the window.
The Pages toolbar (by default, the toolbar is located at the top of the diagram area)contains tools for working with diagram pages allowing you to:
add a new page;delete the current page;delete a ll pages.
The Alignment Palette (by default, the toolbar is located on the left side of the diagramarea) allows you to:
align left/right edges of selected objects;
746 742
745 742
960 867
871
958
743
750
753
753
753
746
751
750
750
659
749
754
748
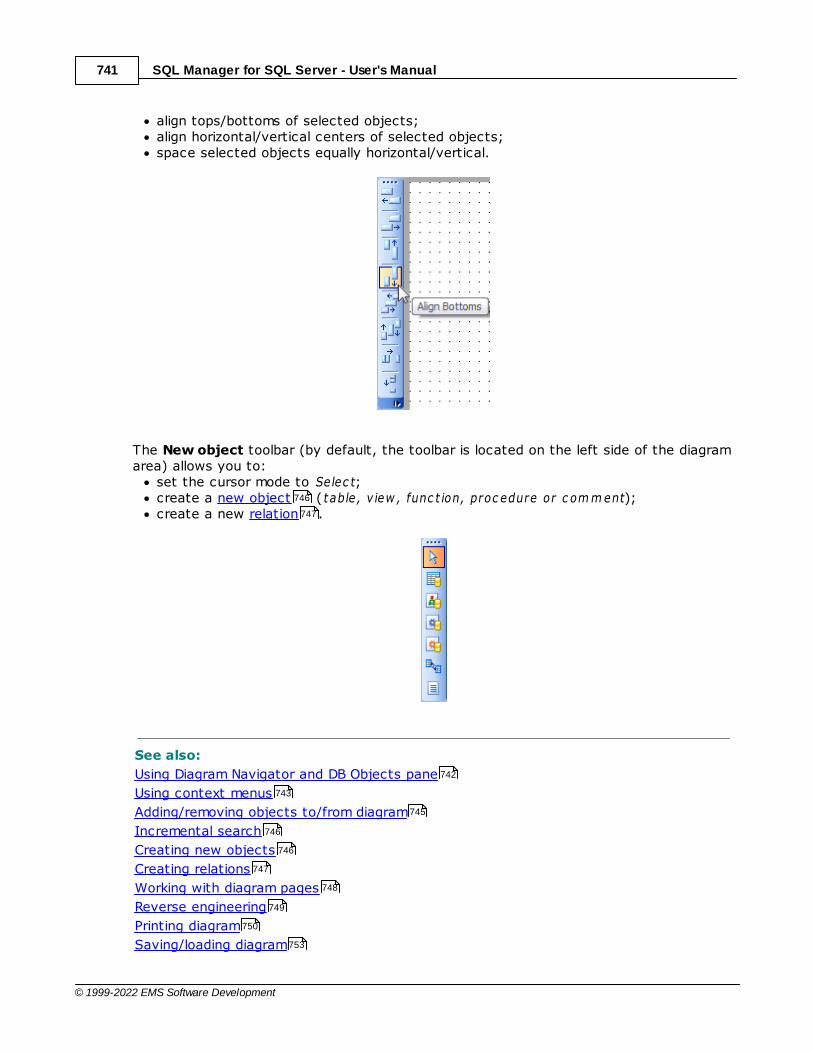
SQL Manager for SQL Server - User's Manual741
© 1999-2022 EMS Software Development
align tops/bottoms of selected objects;align horizontal/vertical centers of selected objects;space selected objects equally horizontal/vertical.
The New object toolbar (by default, the toolbar is located on the left side of the diagramarea) allows you to:
set the cursor mode to Selec t;create a new object (table, v iew , func t ion, proc edure or c om m ent);create a new relation .
See also:
Using Diagram Navigator and DB Objects pane
Using context menus
Adding/removing objects to/from diagram
Incremental search
Creating new objects
Creating relations
Working with diagram pages
Reverse engineering
Printing diagram
Saving/loading diagram
746
747
742
743
745
746
746
747
748
749
750
753
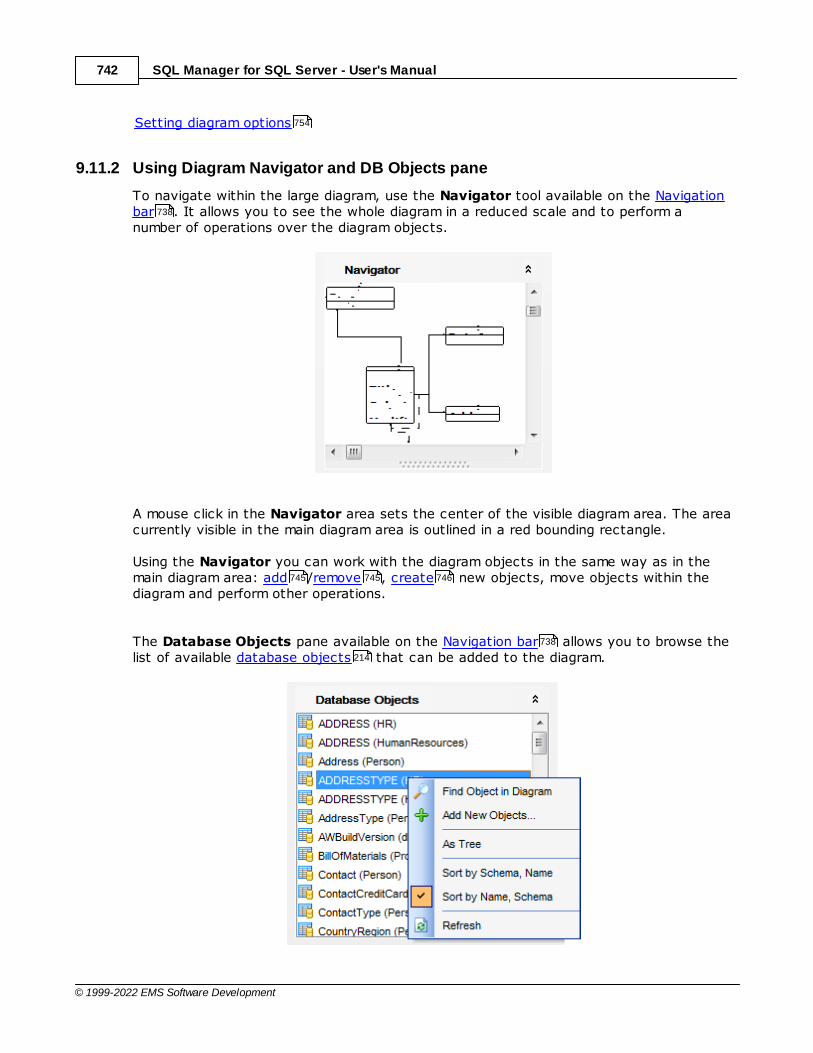
SQL Manager for SQL Server - User's Manual742
© 1999-2022 EMS Software Development
Setting diagram options
9.11.2 Using Diagram Navigator and DB Objects pane
To navigate within the large diagram, use the Navigator tool available on the Navigationbar . It allows you to see the whole diagram in a reduced scale and to perform anumber of operations over the diagram objects.
A mouse click in the Navigator area sets the center of the visible diagram area. The areacurrently visible in the main diagram area is outlined in a red bounding rectangle.
Using the Navigator you can work with the diagram objects in the same way as in themain diagram area: add /remove , create new objects, move objects within thediagram and perform other operations.
The Database Objects pane available on the Navigation bar allows you to browse thelist of available database objects that can be added to the diagram.
754
738
745 745 746
738
214
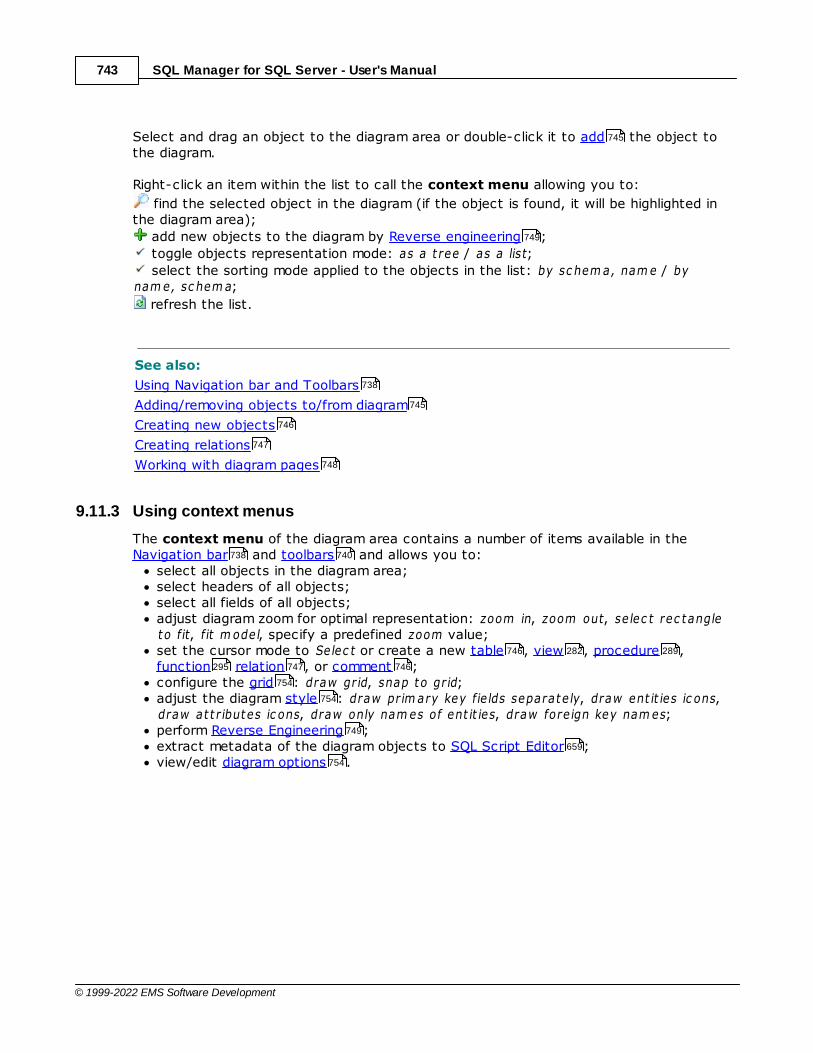
SQL Manager for SQL Server - User's Manual743
© 1999-2022 EMS Software Development
Select and drag an object to the diagram area or double-click it to add the object tothe diagram.
Right-click an item within the list to call the context menu allowing you to:
find the selected object in the diagram (if the object is found, it will be highlighted inthe diagram area);
add new objects to the diagram by Reverse engineering ;
toggle objects representation mode: as a t ree / as a list;
select the sorting mode applied to the objects in the list: by sc hem a, nam e / bynam e, sc hem a;
refresh the list.
See also:
Using Navigation bar and Toolbars
Adding/removing objects to/from diagram
Creating new objects
Creating relations
Working with diagram pages
9.11.3 Using context menus
The context menu of the diagram area contains a number of items available in theNavigation bar and toolbars and allows you to:
select all objects in the diagram area;select headers of all objects;select all fields of all objects;adjust diagram zoom for optimal representation: zoom in, zoom out, se lec t rec tangleto fit, f it m odel, specify a predefined zoom value;set the cursor mode to Selec t or create a new table , view , procedure ,function relation , or comment ;configure the grid : draw gr id, snap to gr id;adjust the diagram style : draw pr im ary key fie lds separate ly, draw ent it ies ic ons,draw at t r ibutes ic ons, draw only nam es of ent it ies, draw fore ign key nam es;perform Reverse Engineering ;extract metadata of the diagram objects to SQL Script Editor ;view/edit diagram options .
745
749
738
745
746
747
748
738 740
746 282 289
295 747 746
754
754
749
659
754
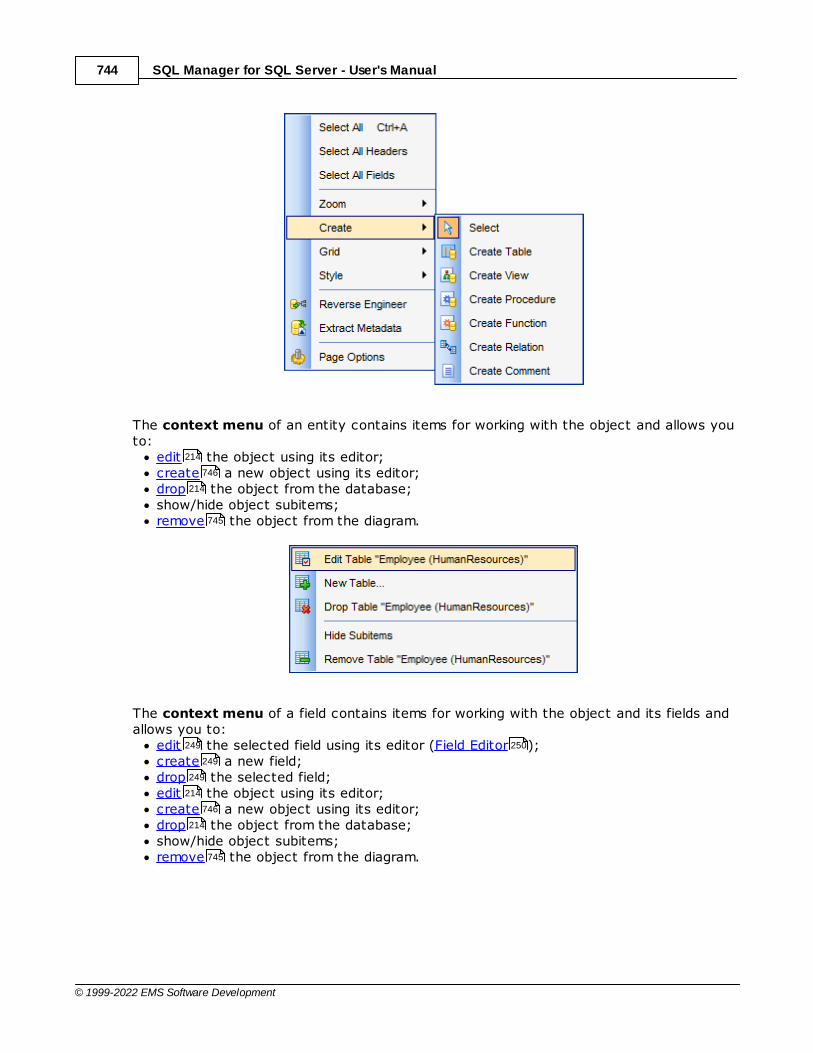
SQL Manager for SQL Server - User's Manual744
© 1999-2022 EMS Software Development
The context menu of an entity contains items for working with the object and allows youto:
edit the object using its editor;create a new object using its editor;drop the object from the database;show/hide object subitems;remove the object from the diagram.
The context menu of a field contains items for working with the object and its fields andallows you to:
edit the selected field using its editor (Field Editor );create a new field;drop the selected field;edit the object using its editor;create a new object using its editor;drop the object from the database;show/hide object subitems;remove the object from the diagram.
214
746
214
745
249 250
249
249
214
746
214
745
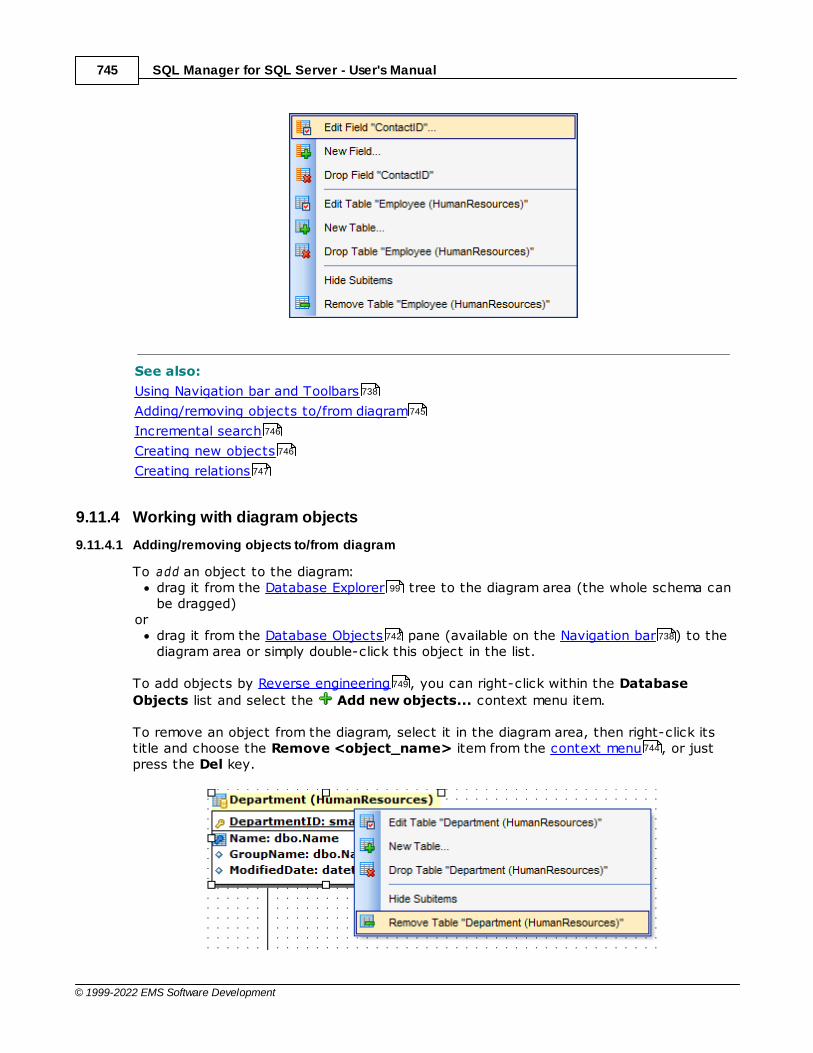
SQL Manager for SQL Server - User's Manual745
© 1999-2022 EMS Software Development
See also:
Using Navigation bar and Toolbars
Adding/removing objects to/from diagram
Incremental search
Creating new objects
Creating relations
9.11.4 Working with diagram objects
9.11.4.1 Adding/removing objects to/from diagram
To add an object to the diagram: drag it from the Database Explorer tree to the diagram area (the whole schema canbe dragged)
ordrag it from the Database Objects pane (available on the Navigation bar ) to thediagram area or simply double-click this object in the list.
To add objects by Reverse engineering , you can right-click within the Database
Objects list and select the Add new objects... context menu item.
To remove an object from the diagram, select it in the diagram area, then right-click itstitle and choose the Remove <object_name> item from the context menu , or justpress the Del key.
738
745
746
746
747
99
742 738
749
744

SQL Manager for SQL Server - User's Manual746
© 1999-2022 EMS Software Development
See also:
Using Navigation bar and Toolbars
Using Diagram Navigator and DB Objects pane
Using context menus
Creating new objects
Creating relations
Reverse engineering
Database Objects Management
9.11.4.2 Incremental search
To search for an object within the diagram:
right-click the required object in the Database Objects pane and select the FindObject in Diagram item from the context menu
orclick the Incremental Search button on the main toolbar or use the Ct r l+Fshortcut to activate the Incremental Search panel in the status bar area of thedesigner window.
Type a string in the edit-box, and the object having the name with the closest match willbe highlighted in the diagram area.
See also:
Using Diagram Navigator and DB Objects pane
9.11.4.3 Creating objects
To create a new object using Visual Database Designer:press on of the Create buttons: Create table, Create view, Create function,Create procedure on the New object toolbar ;click the desired point on the diagram to place the new object at;specify object properties using its editor.
Hint: To create a new object, you can also select the corresponding item from thecontext menu . The context menus also allow you to edit and drop databaseobjects.
738
742
743
746
747
749
214
742
740
996 960
742
214
741
743 214 214

SQL Manager for SQL Server - User's Manual747
© 1999-2022 EMS Software Development
See also:
Using Diagram Navigator and DB Objects pane
Adding/removing objects to/from diagram
Incremental search
Creating relations
9.11.4.4 Creating relations
To establish a new relation (which is the foreign key in terms of databasemanagement):
press the Create relation button on the New object toolbar ;click the entity where the referential constraint should be created;click the referred entity;specify new foreign key properties using Foreign key Editor .
Hint: To create a relation, you can also use the corresponding item of the context menu.
Once the relation is created, it is displayed as a line between two entities in the diagramarea. The style the line is drawn is determined by the diagram notation.The context menu of this line allows you to edit the foreign key using Foreign keyEditor or drop the foreign key from the database.
742
745
746
747
257
741
258
743
257
258 258

SQL Manager for SQL Server - User's Manual748
© 1999-2022 EMS Software Development
See also:
Using Diagram Navigator and DB Objects pane
Adding/removing objects to/from diagram
Incremental search
Creating new objects
9.11.5 Working with diagram pages
You can create several pages in one diagram to split the model into several subjectgroups, e.g. for better comprehension.
To manage diagram pages, right-click on the tabs at the bottom of the diagram area andselect the required popup menu items for adding, de let ing and renam ing pages.
Hint: Page management items are also available on the Pages toolbar of VisualDatabase Designer.
See also:
742
745
746
746
740
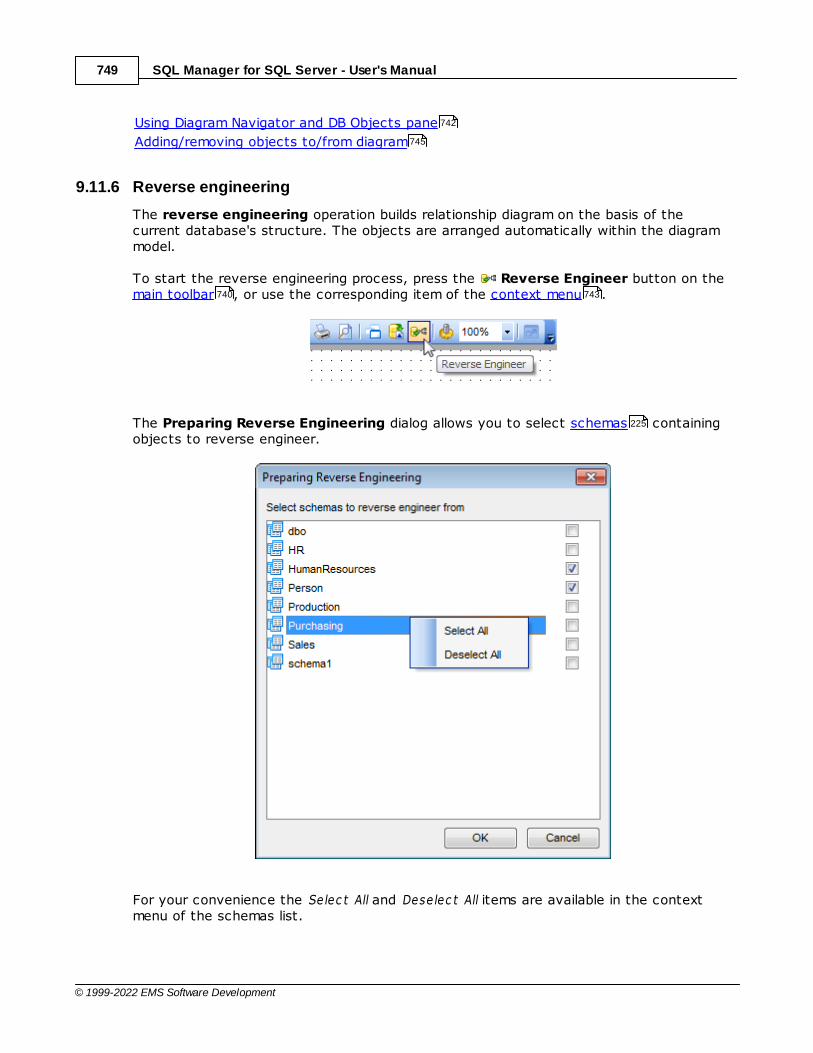
SQL Manager for SQL Server - User's Manual749
© 1999-2022 EMS Software Development
Using Diagram Navigator and DB Objects pane
Adding/removing objects to/from diagram
9.11.6 Reverse engineering
The reverse engineering operation builds relationship diagram on the basis of thecurrent database's structure. The objects are arranged automatically within the diagrammodel.
To start the reverse engineering process, press the Reverse Engineer button on themain toolbar , or use the corresponding item of the context menu .
The Preparing Reverse Engineering dialog allows you to select schemas containingobjects to reverse engineer.
For your convenience the Selec t All and Deselec t All items are available in the contextmenu of the schemas list.
742
745
740 743
225
SQL Manager for SQL Server - User's Manual750
© 1999-2022 EMS Software Development
See also:
Using Navigation bar and Toolbars
Using Diagram Navigator and DB Objects pane
Adding/removing objects to/from diagram
9.11.7 Printing diagram
Visual Database Designer allows you to print and preview the diagram.
T o prev iew the diagram :
press the Print Preview button on the toolbar ;preview the diagram using the Print Preview window.
T o setup pr int opt ions:
press the Print Setup button on the toolbar , or use the corresponding link onthe Navigation bar ; set printing options using the Print Setup dialog and press OK.
T o pr int the diagram :
press the Print button on the toolbar ;set printing options using the Print Setup dialog and press the Print button.
9.11.7.1 Print Preview
The Print Preview dialog allows you to see the diagram layout in WYCIWYG mode beforeit will be printed.
Use the navigation buttons or the spinner control to navigate within the preview pages.Click the Print options... button to call the Print Setup dialog.If necessary, specify the preview zoom according to your preferences.Click the Print all button to start printing.
738
742
745
740
750
740
738
751
740
751
751
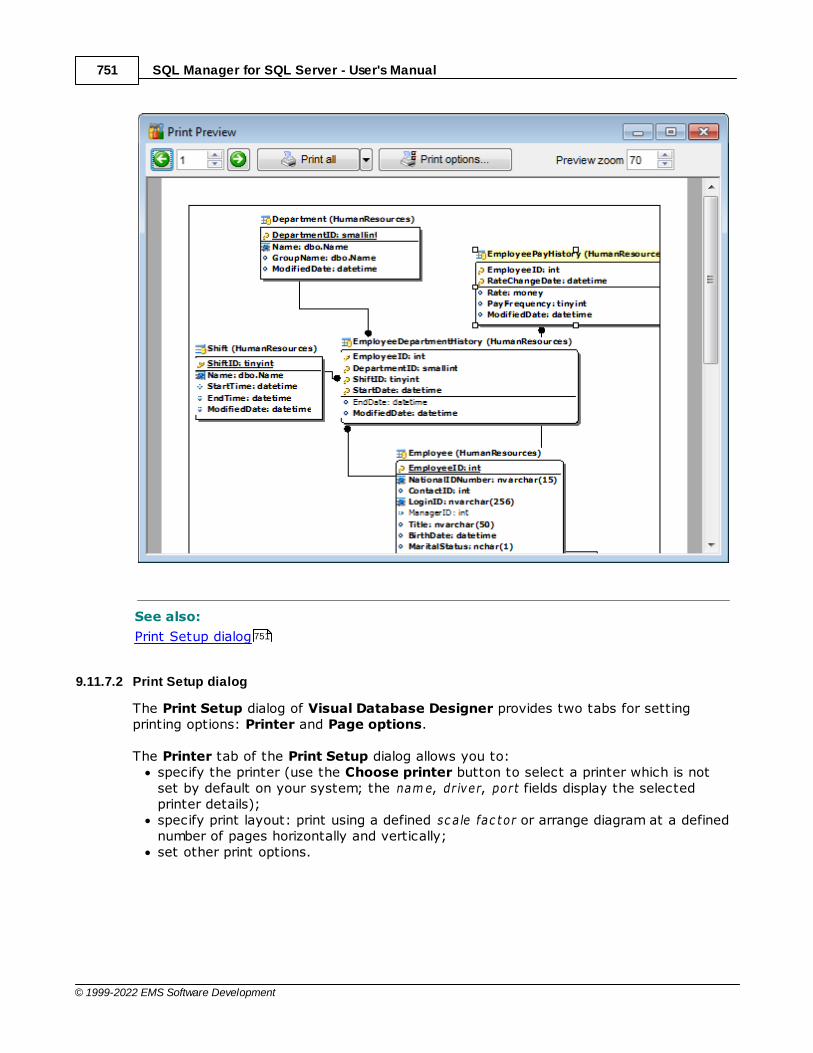
SQL Manager for SQL Server - User's Manual751
© 1999-2022 EMS Software Development
See also:
Print Setup dialog
9.11.7.2 Print Setup dialog
The Print Setup dialog of Visual Database Designer provides two tabs for settingprinting options: Printer and Page options.
The Printer tab of the Print Setup dialog allows you to:specify the printer (use the Choose printer button to select a printer which is notset by default on your system; the nam e, dr iver, port fields display the selectedprinter details);specify print layout: print using a defined sc ale fac tor or arrange diagram at a definednumber of pages horizontally and vertically;set other print options.
751
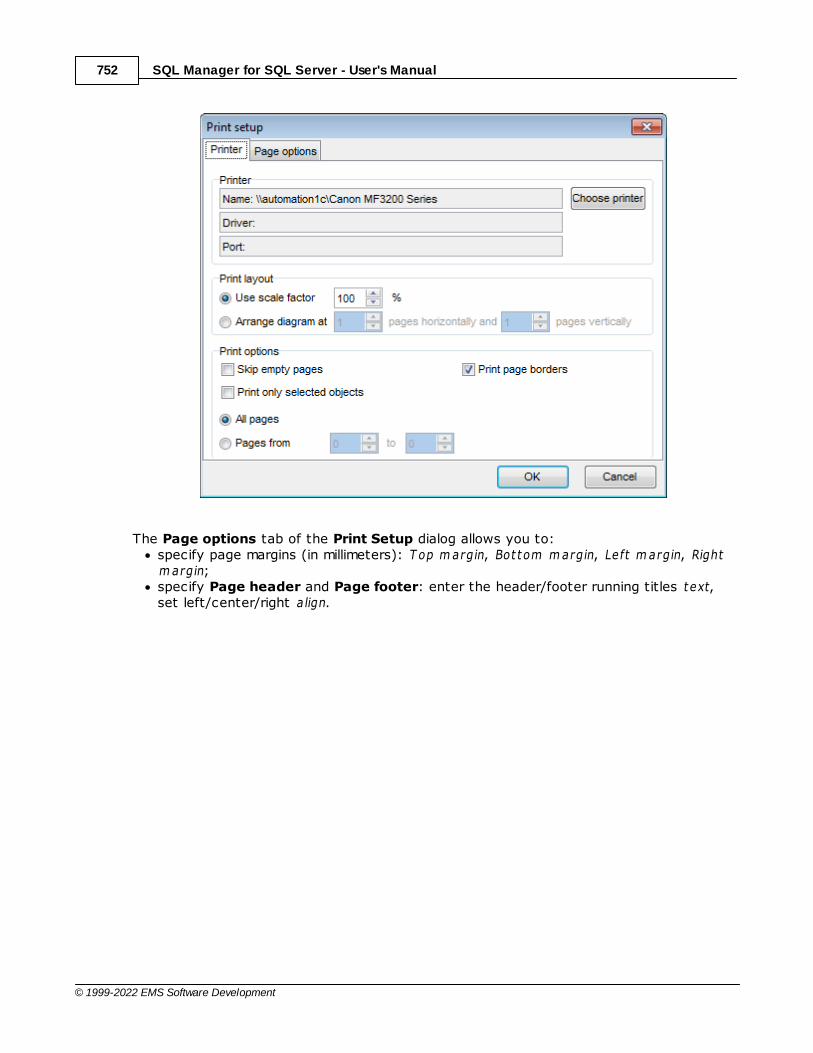
SQL Manager for SQL Server - User's Manual752
© 1999-2022 EMS Software Development
The Page options tab of the Print Setup dialog allows you to:specify page margins (in millimeters): T op m argin, Bot tom m argin, Left m argin, Rightm argin;specify Page header and Page footer: enter the header/footer running titles text,set left/center/right a lign.
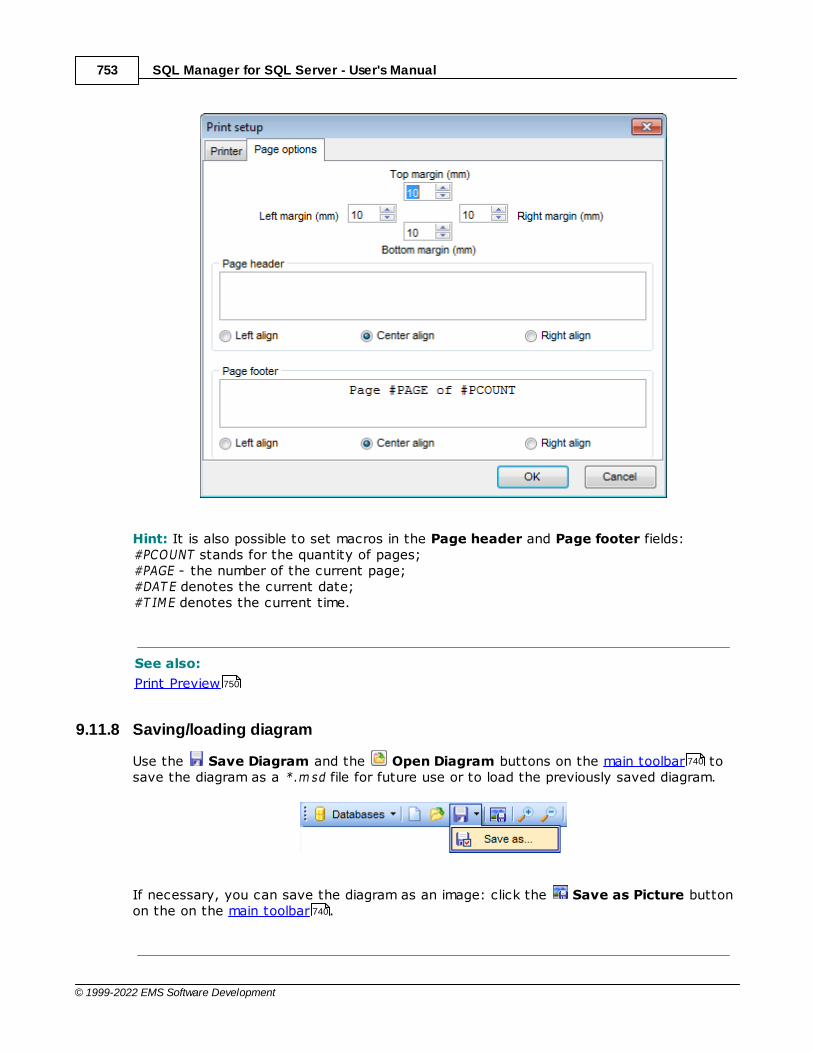
SQL Manager for SQL Server - User's Manual753
© 1999-2022 EMS Software Development
Hint: It is also possible to set macros in the Page header and Page footer fields:#PCOUNT stands for the quantity of pages;#PAGE - the number of the current page;#DAT E denotes the current date;#T IME denotes the current time.
See also:
Print Preview
9.11.8 Saving/loading diagram
Use the Save Diagram and the Open Diagram buttons on the main toolbar tosave the diagram as a *.m sd file for future use or to load the previously saved diagram.
If necessary, you can save the diagram as an image: click the Save as Picture buttonon the on the main toolbar .
750
740
740

SQL Manager for SQL Server - User's Manual754
© 1999-2022 EMS Software Development
See also:
Using Navigation bar and Toolbars
Using Diagram Navigator and DB Objects pane
Using context menus
Adding/removing objects to/from diagram
9.11.9 Setting diagram options
Using the Diagram Options dialog you can setup the behavior and look of each diagrampage.
To open this dialog, use the Page options item of the Navigation bar or on the maintoolbar , or select the corresponding item from the context menu .
See detailed description of each option on the Visual Database Designer page of theEnvironment Options dialog.
Apply changes to all existent objects on the pageIf this option is selected, the current settings will be applied to all objects of the page.
738
742
743
745
738
740 743
889
867

SQL Manager for SQL Server - User's Manual755
© 1999-2022 EMS Software Development
See also:
Using Diagram Navigator and DB Objects pane
Visual Database Designer options
742
889

Part
X
SQL Manager for SQL Server - User's Manual757
© 1999-2022 EMS Software Development
10 Services
SQL Manager for SQL Server provides a number of powerful tools for working with yourdatabase server.
Server-level principalsTools for managing server-level security principals
Server Log ViewerA convenient tool to browse the server logs
Activity MonitorA convenient tool to get information about connections and the locks that they hold
Resource GovernorA tool for managing SQL Server workload and resources
SQL Manager for SQL Server provides graphical user interface for most SQL Server objectsand native services.
The following tools for SQL Server objec t s and serv ic es m anagem ent are available in SQLManager for SQL Server:
Backup DevicesProvides tools for working with backup devices: Backup devices manager , BackupDevice properties .
Database SnapshotsProvides tools for working with database snapshots: Snapshots manager , Snapshotproperties .
Linked ServersProvides tools for working with linked servers: Linked servers manager , Linked ServerEditor .
DTS PackagesProvides tools for working with DTS packages: DTS Packages manager , DTS Packageproperties .
JobsProvides tools for working with jobs: Jobs manager , Job Editor .
Job HistoryProvides a convenient tool to browse the list of recent jobs: Job History .
AlertsProvides tools for working with alerts: Alerts manager , Alert Editor .
OperatorsProvides tools for working with operators: Operators manager , Operator Editor .
Shared Schedules
722
859
862
855
785
785
787
846
846
847
849
850
434
852
853
457
824
826 404
827
828
830
832 416
833
835 422
836
SQL Manager for SQL Server - User's Manual758
© 1999-2022 EMS Software Development
Provides tools for working with schedules: Shared schedules manager , ScheduleEditor .
ProxiesProvides tools for working with proxies: Proxies manager , Proxy Editor .
CredentialsProvides a powerful tool for working with credentials: Credential Editor .
EndpointsProvides a powerful tool for working with endpoints: Endpoint Editor .
DDL TriggersProvides a powerful tool for working with DDL triggers: DDL Trigger Editor .
Target ServersProvides a convenient tool for target servers management: Target Servers manager
SQL Manager for SQL Server provides graphical interface for a number of databasemaintenance operations. The following spec if ic database tools are available in SQLManager:
Attach Database WizardAllows you to attach an existing database to the instance of Microsoft® SQL Server™.
Detach Database WizardAllows you to detach a database from the instance of Microsoft® SQL Server™.
Backup Database WizardCreates backup copies of entire databases, transaction logs and files/filegroups.
Restore Database WizardRestores entire databases, transaction logs and files/filegroups from previously createdbackups.
Shrink Database WizardReduces data and transaction log files.
Indices Management WizardAllows you to reorganize, rebuild, and disable indexes.
Statistics Update WizardUpdates database statistics.
Check Database WizardChecks the allocation, structural, and logical integrity of all database objects.
Grant ManagerAllows you to grant/revoke privileges on database objects.
Using templatesFacilitates using SQL Manager wizards.
838
412
839
842 427
431
431
438
438
448
448
843
844
789
793
760
774
797
802
808
815
724
978
SQL Manager for SQL Server - User's Manual759
© 1999-2022 EMS Software Development
See also:
Getting Started
Database Explorer
Database Management
Database Objects Management
Query Management Tools
Data Management
Import/Export Tools
Database Tools
Personalization
External Tools
How To...
76
99
130
214
460
498
566
651
866
952
1001

SQL Manager for SQL Server - User's Manual760
© 1999-2022 EMS Software Development
10.1 Backup Database
Backup Database Wizard allows you to perform the database backup operation on yourSQL Server system (the BACKUP DAT ABASE Transact-SQL statement is issued).
This operation is used to create a backup copy of an entire database, transaction log orfiles/filegroups.
To run the wizard, select the Services | Backup Database... main menu item, or
right-click the database alias in the DB Explorer tree and select the Tasks | BackupDatabase... item of the context menu .
Selecting database to backupSetting backup type and optionsSelecting database files to backupSelecting backup devicesSetting schedule optionsSetting media optionsSetting advanced backup optionsSetting data transfer and/or transaction log backup optionsRunning database backup
See also:
Restore Database
Using templates
10.1.1 Selecting database to backup
This step of the wizard allows you to specify the host/instance containing the databasefor backup.
958
99
89
760
761
763
763
771
765
768
769
772
774
978
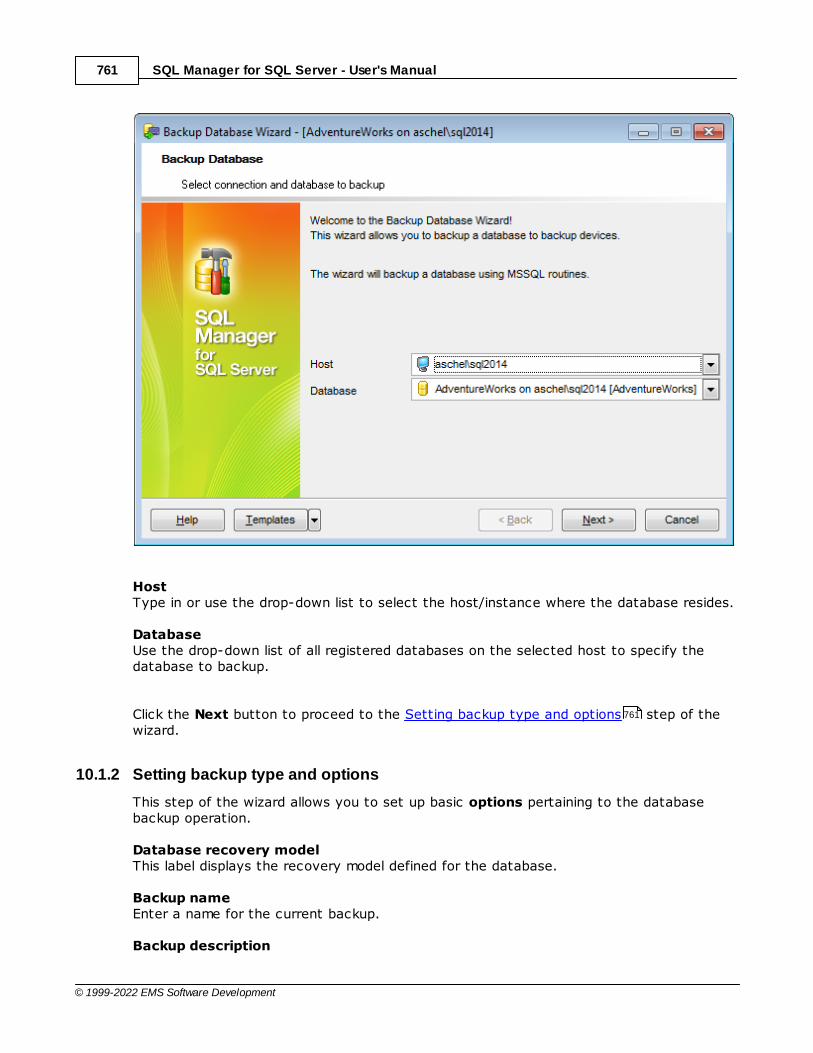
SQL Manager for SQL Server - User's Manual761
© 1999-2022 EMS Software Development
HostType in or use the drop-down list to select the host/instance where the database resides.
DatabaseUse the drop-down list of all registered databases on the selected host to specify thedatabase to backup.
Click the Next button to proceed to the Setting backup type and options step of thewizard.
10.1.2 Setting backup type and options
This step of the wizard allows you to set up basic options pertaining to the databasebackup operation.
Database recovery modelThis label displays the recovery model defined for the database.
Backup nameEnter a name for the current backup.
Backup description
761
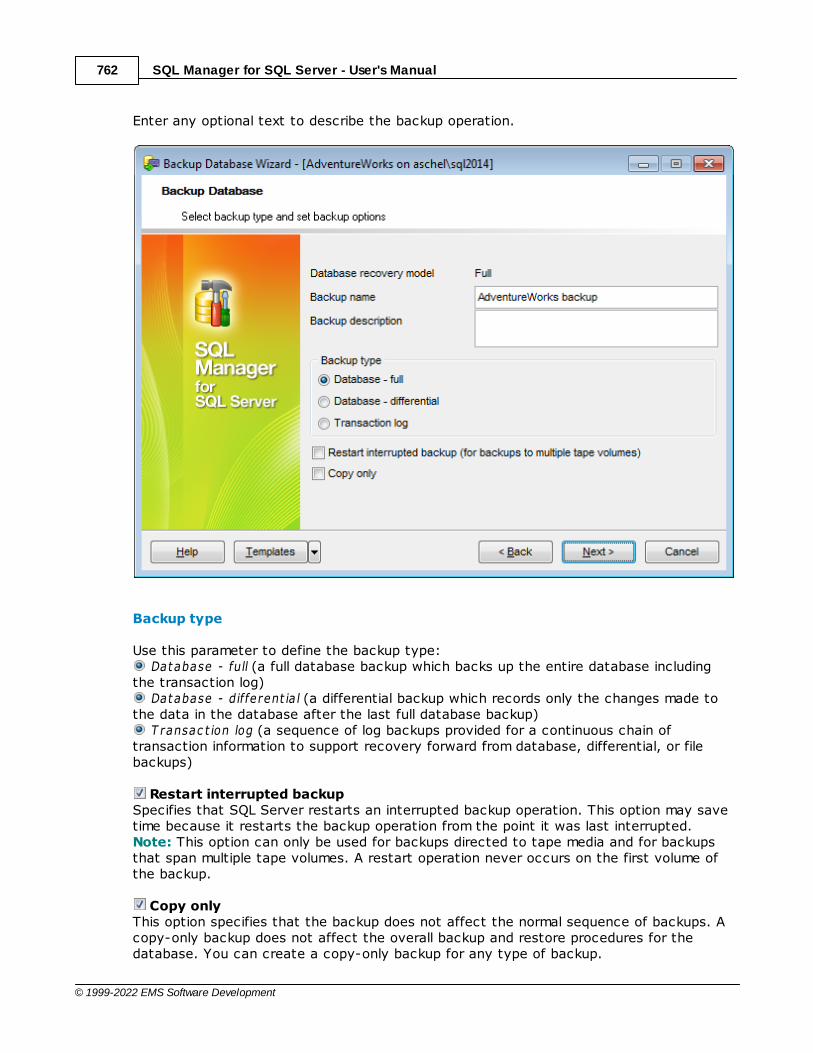
SQL Manager for SQL Server - User's Manual762
© 1999-2022 EMS Software Development
Enter any optional text to describe the backup operation.
Backup type
Use this parameter to define the backup type: Database - full (a full database backup which backs up the entire database including
the transaction log) Database - different ia l (a differential backup which records only the changes made to
the data in the database after the last full database backup) T ransac t ion log (a sequence of log backups provided for a continuous chain of
transaction information to support recovery forward from database, differential, or filebackups)
Restart interrupted backupSpecifies that SQL Server restarts an interrupted backup operation. This option may savetime because it restarts the backup operation from the point it was last interrupted.Note: This option can only be used for backups directed to tape media and for backupsthat span multiple tape volumes. A restart operation never occurs on the first volume ofthe backup.
Copy onlyThis option specifies that the backup does not affect the normal sequence of backups. Acopy-only backup does not affect the overall backup and restore procedures for thedatabase. You can create a copy-only backup for any type of backup.
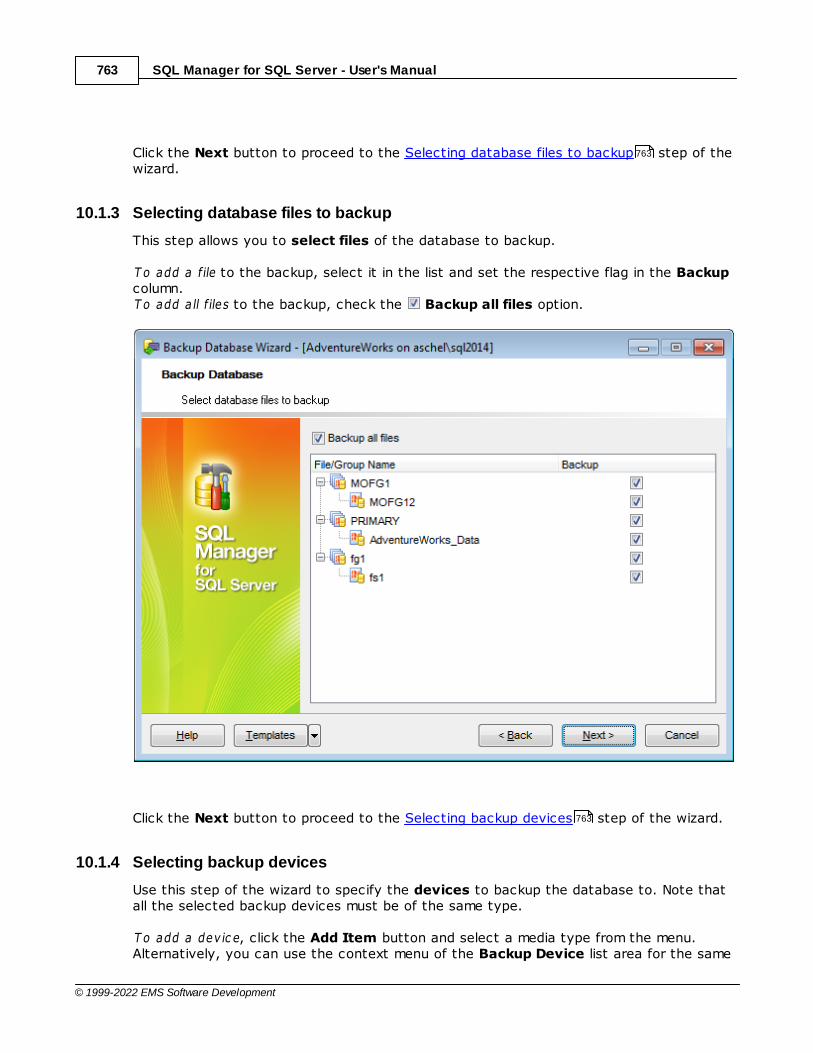
SQL Manager for SQL Server - User's Manual763
© 1999-2022 EMS Software Development
Click the Next button to proceed to the Selecting database files to backup step of thewizard.
10.1.3 Selecting database files to backup
This step allows you to select files of the database to backup.
T o add a file to the backup, select it in the list and set the respective flag in the Backupcolumn. T o add a ll f iles to the backup, check the Backup all files option.
Click the Next button to proceed to the Selecting backup devices step of the wizard.
10.1.4 Selecting backup devices
Use this step of the wizard to specify the devices to backup the database to. Note thatall the selected backup devices must be of the same type.
T o add a dev ic e, click the Add Item button and select a media type from the menu.Alternatively, you can use the context menu of the Backup Device list area for the same
763
763
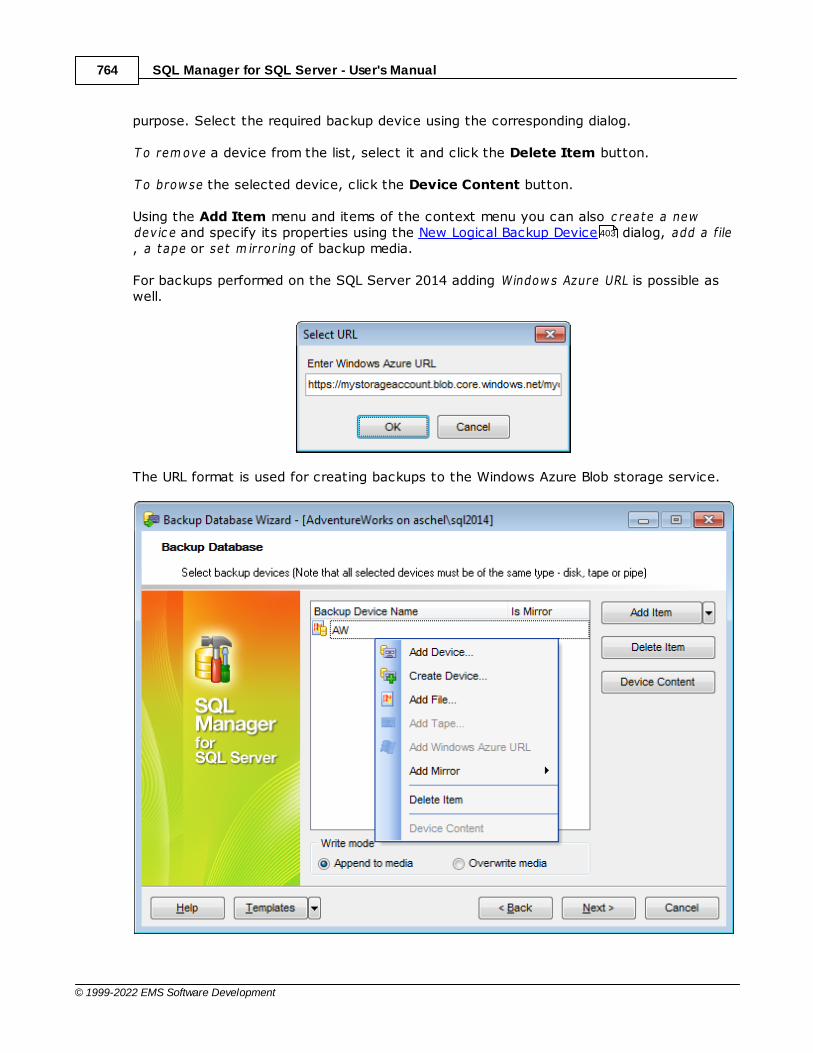
SQL Manager for SQL Server - User's Manual764
© 1999-2022 EMS Software Development
purpose. Select the required backup device using the corresponding dialog.
T o rem ove a device from the list, select it and click the Delete Item button.
T o brow se the selected device, click the Device Content button.
Using the Add Item menu and items of the context menu you can also c reate a newdevic e and specify its properties using the New Logical Backup Device dialog, add a file, a tape or set m irror ing of backup media.
For backups performed on the SQL Server 2014 adding Window s Azure URL is possible aswell.
The URL format is used for creating backups to the Windows Azure Blob storage service.
403
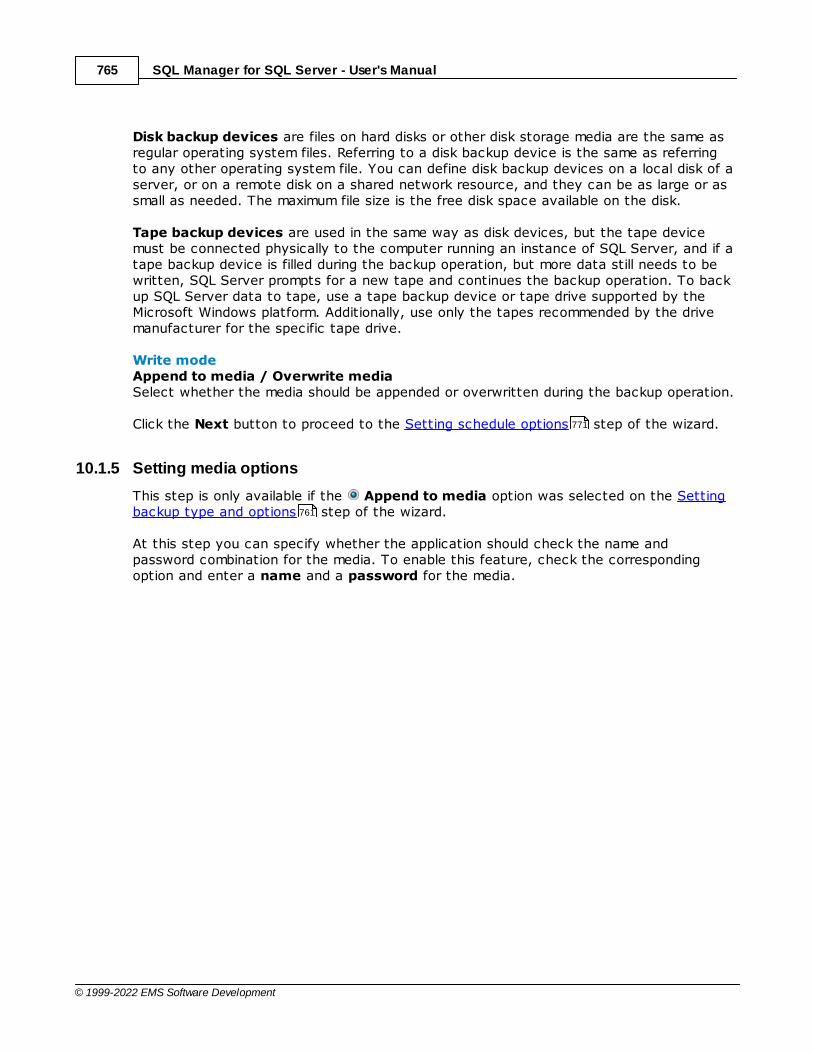
SQL Manager for SQL Server - User's Manual765
© 1999-2022 EMS Software Development
Disk backup devices are files on hard disks or other disk storage media are the same asregular operating system files. Referring to a disk backup device is the same as referringto any other operating system file. You can define disk backup devices on a local disk of aserver, or on a remote disk on a shared network resource, and they can be as large or assmall as needed. The maximum file size is the free disk space available on the disk.
Tape backup devices are used in the same way as disk devices, but the tape devicemust be connected physically to the computer running an instance of SQL Server, and if atape backup device is filled during the backup operation, but more data still needs to bewritten, SQL Server prompts for a new tape and continues the backup operation. To backup SQL Server data to tape, use a tape backup device or tape drive supported by theMicrosoft Windows platform. Additionally, use only the tapes recommended by the drivemanufacturer for the specific tape drive.
Write modeAppend to media / Overwrite mediaSelect whether the media should be appended or overwritten during the backup operation.
Click the Next button to proceed to the Setting schedule options step of the wizard.
10.1.5 Setting media options
This step is only available if the Append to media option was selected on the Settingbackup type and options step of the wizard.
At this step you can specify whether the application should check the name andpassword combination for the media. To enable this feature, check the correspondingoption and enter a name and a password for the media.
771
761
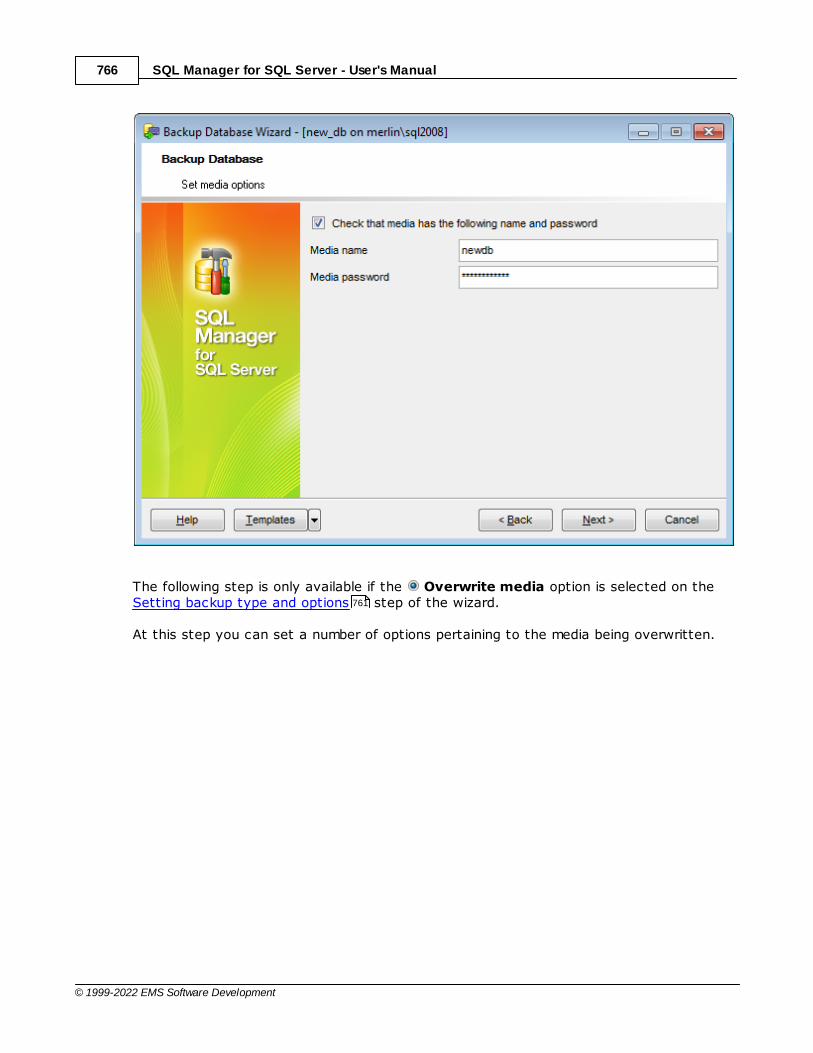
SQL Manager for SQL Server - User's Manual766
© 1999-2022 EMS Software Development
The following step is only available if the Overwrite media option is selected on theSetting backup type and options step of the wizard.
At this step you can set a number of options pertaining to the media being overwritten.
761
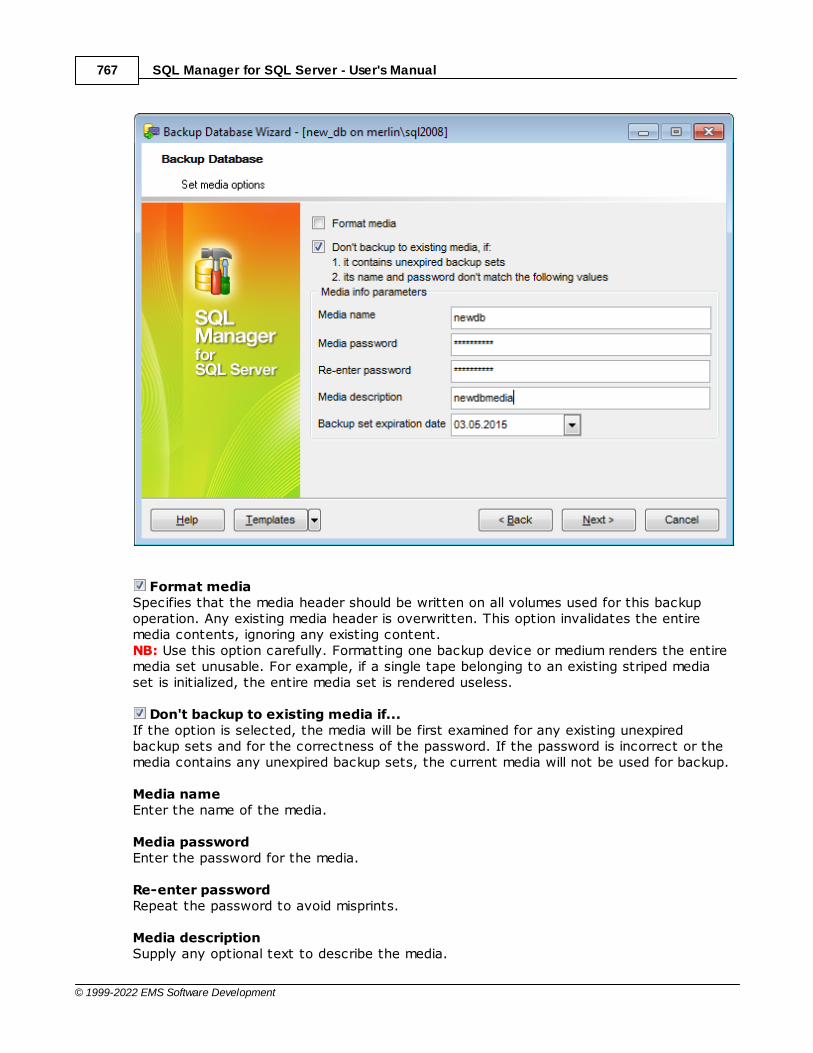
SQL Manager for SQL Server - User's Manual767
© 1999-2022 EMS Software Development
Format mediaSpecifies that the media header should be written on all volumes used for this backupoperation. Any existing media header is overwritten. This option invalidates the entiremedia contents, ignoring any existing content.NB: Use this option carefully. Formatting one backup device or medium renders the entiremedia set unusable. For example, if a single tape belonging to an existing striped mediaset is initialized, the entire media set is rendered useless.
Don't backup to existing media if...If the option is selected, the media will be first examined for any existing unexpiredbackup sets and for the correctness of the password. If the password is incorrect or themedia contains any unexpired backup sets, the current media will not be used for backup.
Media nameEnter the name of the media.
Media passwordEnter the password for the media.
Re-enter passwordRepeat the password to avoid misprints.
Media descriptionSupply any optional text to describe the media.

SQL Manager for SQL Server - User's Manual768
© 1999-2022 EMS Software Development
Backup set expiration dateDefine expiration date for the current backup set.
Click the Next button to proceed to the Setting advanced backup options step of thewizard.
10.1.6 Setting advanced media options
This step offers advanced options that may be useful for the database backupoperation.
Block sizeDefine the size of a data block. Possible values are: Default, T o restore from CD (2048),Other (i.e. you can specify an arbitrary value).
Tape after backupSpecify whether the tape should be rew ound, rew ound and unloaded, or kept open whenthe backup operation is completed.
If necessary, you can set a password for the backup: enter the password twice in therespective edit fields.
768

SQL Manager for SQL Server - User's Manual769
© 1999-2022 EMS Software Development
Verify backup when finishedCheck this option to enable backup verification.
Perform checksum before writing to mediaThis option enables/disables checksum verification before writing to the backup media.
Continue on errorThis option determines whether the backup operation will be stopped or forced tocontinue if an error occurs.
Backup compressionDefines the values that are used to specify the backup compression option.
For backups performed on SQL Server 2014 and higher the following options are availableas well.
Credential for Windows AzureThis field is available only when creating a backup to the Windows Azure Blob storageservice. Use the drop-down list to select the credential for accessing the WindowsAzure storage.
EncryptionUse this drop-down list to specify encryption for a backup. You can specify an encryptionalgorithm to encrypt the backup with or specify <No encryption> to not have the backupencrypted.
Note: Encryption option is allowed only if the Format media option has been set onthe previous step .
EncryptorIf you choose to encrypt you also have to specify the encryptor. Encryptors can be amaster key certificate or an EKM asymmetric key from a master database.
When you are done, click the Next button to proceed to the Setting data transfer and/ortransaction log backup options step of the wizard.
10.1.7 Setting data transfer and/or transaction log backup options
This step offers some additional options that may be useful for setting up databasebackup operation: data t ransfer opt ions and/or t ransac t ion log bac kup opt ions.
Data transfer options(only displayed for SQL Server 2008 and higher)
431
765
364 360
769
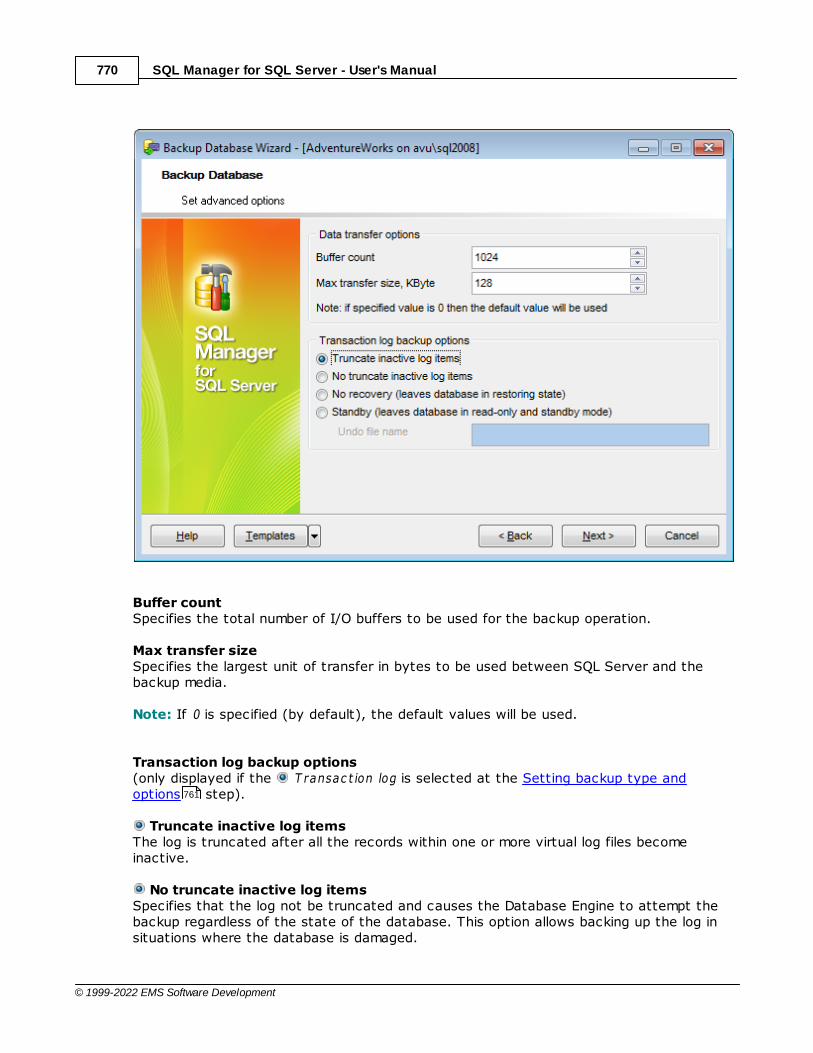
SQL Manager for SQL Server - User's Manual770
© 1999-2022 EMS Software Development
Buffer countSpecifies the total number of I/O buffers to be used for the backup operation.
Max transfer sizeSpecifies the largest unit of transfer in bytes to be used between SQL Server and thebackup media.
Note: If 0 is specified (by default), the default values will be used.
Transaction log backup options(only displayed if the T ransac t ion log is selected at the Setting backup type andoptions step).
Truncate inactive log itemsThe log is truncated after all the records within one or more virtual log files becomeinactive.
No truncate inactive log itemsSpecifies that the log not be truncated and causes the Database Engine to attempt thebackup regardless of the state of the database. This option allows backing up the log insituations where the database is damaged.
761
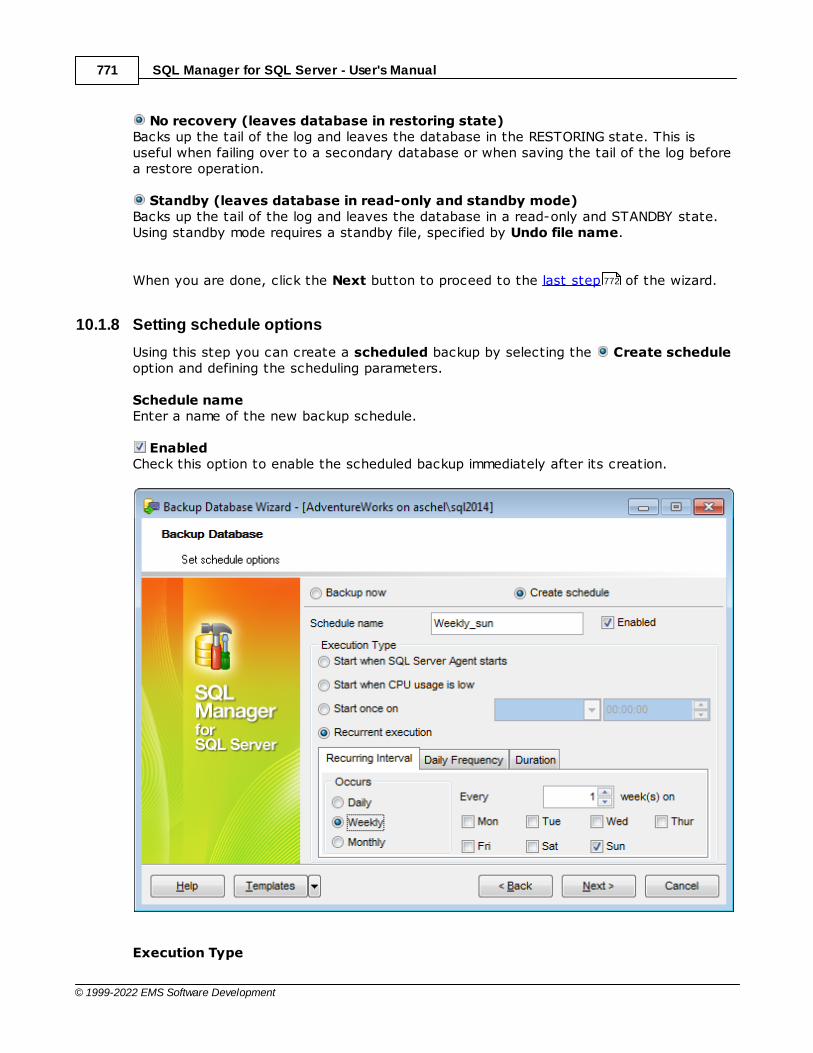
SQL Manager for SQL Server - User's Manual771
© 1999-2022 EMS Software Development
No recovery (leaves database in restoring state)Backs up the tail of the log and leaves the database in the RESTORING state. This isuseful when failing over to a secondary database or when saving the tail of the log beforea restore operation.
Standby (leaves database in read-only and standby mode)Backs up the tail of the log and leaves the database in a read-only and STANDBY state.Using standby mode requires a standby file, specified by Undo file name.
When you are done, click the Next button to proceed to the last step of the wizard.
10.1.8 Setting schedule options
Using this step you can create a scheduled backup by selecting the Create scheduleoption and defining the scheduling parameters.
Schedule nameEnter a name of the new backup schedule.
EnabledCheck this option to enable the scheduled backup immediately after its creation.
Execution Type
772

SQL Manager for SQL Server - User's Manual772
© 1999-2022 EMS Software Development
This panel allows you to define the execution behavior of the schedule:
Start w hen SQL Server Agent start sThe scheduled backup operation will be started each time upon the SQL Server Agentstartup.
Start w hen CPU usage is lowThe scheduled backup operation will be started each time when the CPU usage is low.
Start onc e on...The scheduled backup operation will be started only once on the defined date at thespecified time.
Rec urrent Exec ut ionThe scheduled backup operation will be started recurrently.
The following tabs allow you to setup the schedule routine:
Recurring IntervalThis tab allows you to set the schedule recurrence periodicity in days: you can run yourschedule daily, w eekly, m onthly, every several days, or on a certain day(s) of the week.
Daily FrequencyThis tab allows you to set the schedule recurrence periodicity in hours: you can run yourschedule once at a specified time, or run it every few hours or minutes after the specifiedinterval.
DurationThis tab allows you to set the schedule lifetime: you can set the schedule start date andthe expiration date in the respective edit fields.
Click the Next button to proceed to the Setting media options step of the wizard.
10.1.9 Running database backup
This step of the wizard is intended to inform you that all necessary options have beenset, and you can start the backup database process.
The log area allows you to view the log of operations and errors (if any).
765

SQL Manager for SQL Server - User's Manual773
© 1999-2022 EMS Software Development
Close the Wizard after successful completionIf this option is selected, the wizard is closed automatically when the process iscompleted.
Show SQL This option enables/disables SQL statements displayed within the Operations tab.
If necessary, you can save a template for future use.
Click the Finish button to run the backup database operation.
978
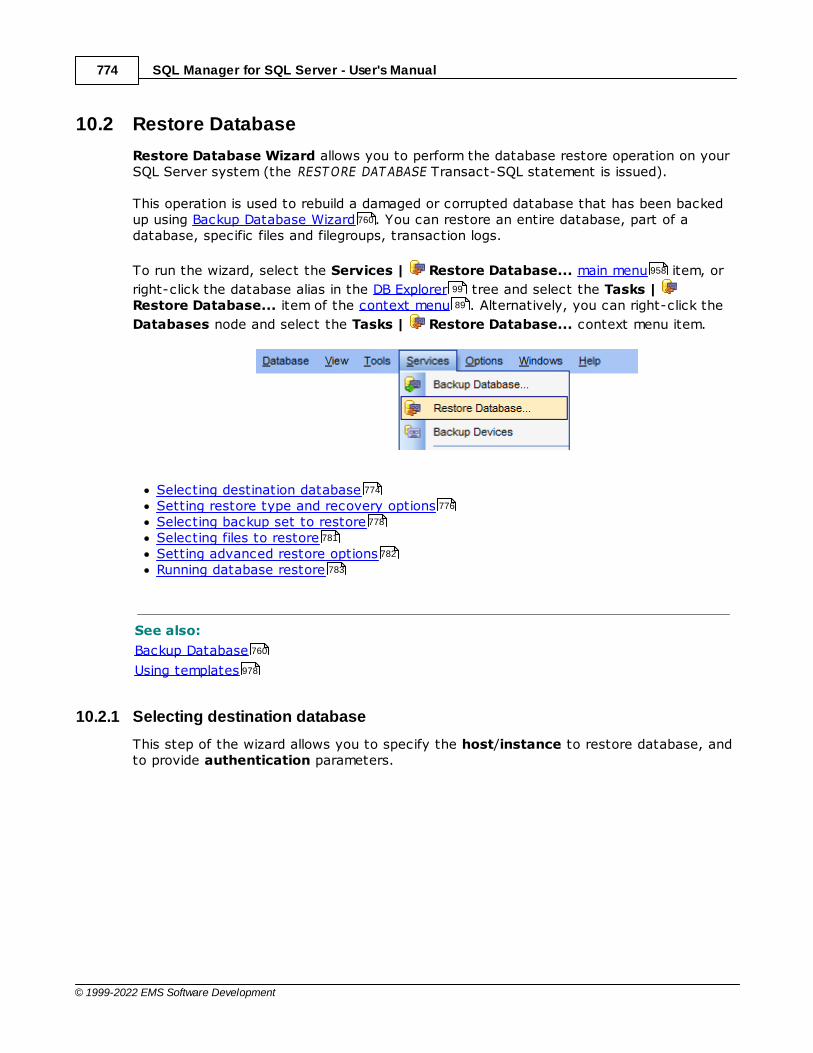
SQL Manager for SQL Server - User's Manual774
© 1999-2022 EMS Software Development
10.2 Restore Database
Restore Database Wizard allows you to perform the database restore operation on yourSQL Server system (the REST ORE DAT ABASE Transact-SQL statement is issued).
This operation is used to rebuild a damaged or corrupted database that has been backedup using Backup Database Wizard . You can restore an entire database, part of adatabase, specific files and filegroups, transaction logs.
To run the wizard, select the Services | Restore Database... main menu item, or
right-click the database alias in the DB Explorer tree and select the Tasks | Restore Database... item of the context menu . Alternatively, you can right-click the
Databases node and select the Tasks | Restore Database... context menu item.
Selecting destination databaseSetting restore type and recovery optionsSelecting backup set to restoreSelecting files to restoreSetting advanced restore optionsRunning database restore
See also:
Backup Database
Using templates
10.2.1 Selecting destination database
This step of the wizard allows you to specify the host/instance to restore database, andto provide authentication parameters.
760
958
99
89
774
776
778
781
782
783
760
978
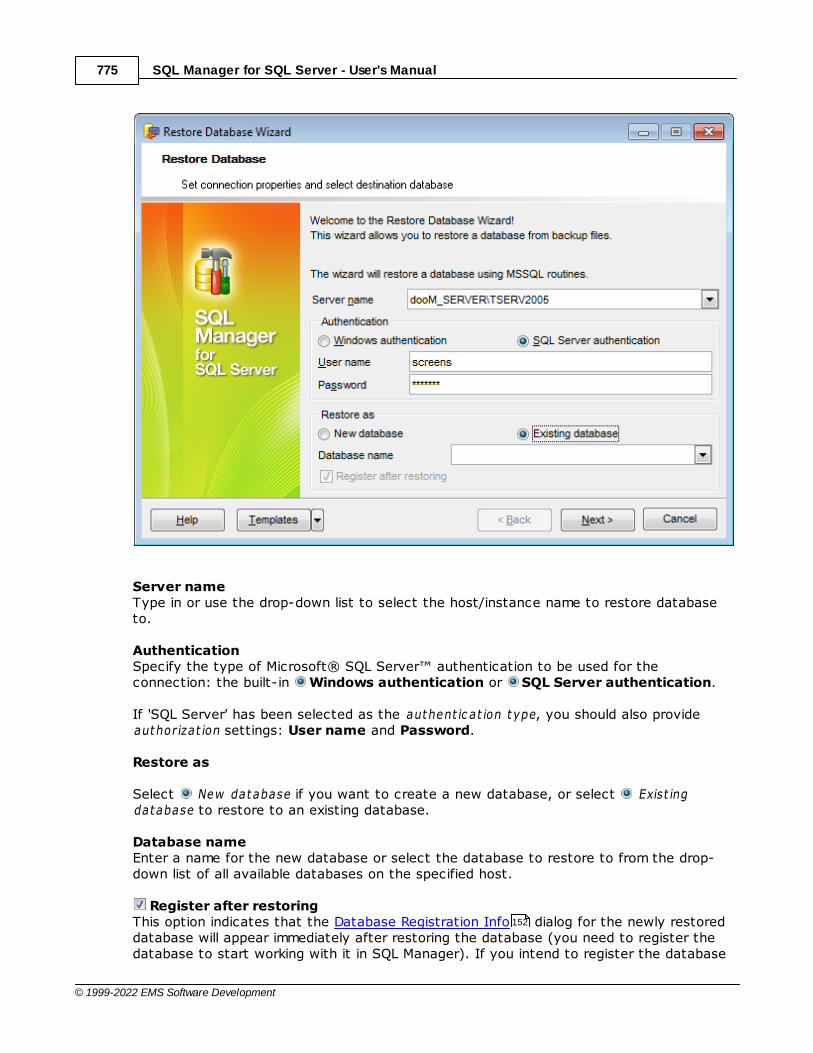
SQL Manager for SQL Server - User's Manual775
© 1999-2022 EMS Software Development
Server nameType in or use the drop-down list to select the host/instance name to restore databaseto.
AuthenticationSpecify the type of Microsoft® SQL Server™ authentication to be used for theconnection: the built-in Windows authentication or SQL Server authentication.
If 'SQL Server' has been selected as the authent ic at ion type, you should also provideauthorizat ion settings: User name and Password.
Restore as
Select New database if you want to create a new database, or select Exist ingdatabase to restore to an existing database.
Database nameEnter a name for the new database or select the database to restore to from the drop-down list of all available databases on the specified host.
Register after restoringThis option indicates that the Database Registration Info dialog for the newly restoreddatabase will appear immediately after restoring the database (you need to register thedatabase to start working with it in SQL Manager). If you intend to register the database
152
SQL Manager for SQL Server - User's Manual776
© 1999-2022 EMS Software Development
later, uncheck this option.
Click the Next button to proceed to the Setting restore type and recovery optionsstep of the wizard.
10.2.2 Setting restore type and recovery options
Use this step of the wizard to define a restore type and set recovery options.
Restore type
This group of options allows you to specify the restore type to be used for the restoreoperation.
DatabaseFull restore or differential restore of entire database or individual files and filegroups. Filesand filegroups can be restored either from a file or filegroup backup operation, or from afull database backup operation.
T ransac t ion logSpecifies that a transaction log backup will be used to restore this database. SQL Serverchecks the backed up transaction log to ensure that the transactions are being loadedinto the correct database and in the appropriate sequence.
Rec overy w ithout restoreSelect this option to execute the database recovery only.
Rec overy from database snapshotSelect this option to restore the database from a previously saved snapshot .
Restart interrupted restoreThis option specifies that SQL Server should restart a restore operation that has beeninterrupted. The restore operation is restarted from the point it was interrupted.
776
846
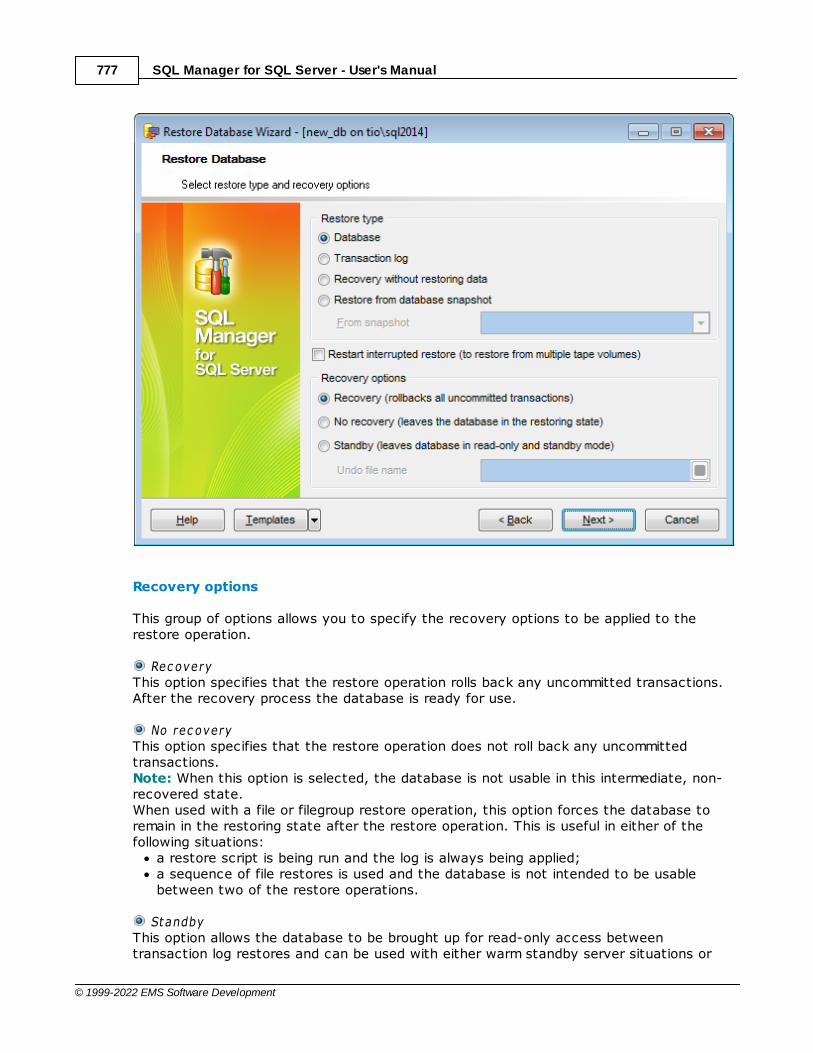
SQL Manager for SQL Server - User's Manual777
© 1999-2022 EMS Software Development
Recovery options
This group of options allows you to specify the recovery options to be applied to therestore operation.
Rec overyThis option specifies that the restore operation rolls back any uncommitted transactions.After the recovery process the database is ready for use.
No rec overyThis option specifies that the restore operation does not roll back any uncommittedtransactions. Note: When this option is selected, the database is not usable in this intermediate, non-recovered state.When used with a file or filegroup restore operation, this option forces the database toremain in the restoring state after the restore operation. This is useful in either of thefollowing situations:
a restore script is being run and the log is always being applied;a sequence of file restores is used and the database is not intended to be usablebetween two of the restore operations.
StandbyThis option allows the database to be brought up for read-only access betweentransaction log restores and can be used with either warm standby server situations or
SQL Manager for SQL Server - User's Manual778
© 1999-2022 EMS Software Development
special recovery situations in which it is useful to inspect the database between logrestores.
Undo file nameSpecify the undo file name, so that the recovery effects can be undone. The size requiredfor the undo file depends on the volume of undo actions resulting from uncommittedtransactions. The same undo file can be used for consecutive restores of the samedatabase. NB: If free disk space is exhausted on the drive containing the specified undo file name,the restore operation stops.
Click the Next button to proceed to the Selecting backup set to restore step of thewizard.
10.2.3 Selecting backup set to restore
At this step of the wizard you need to select a backup media to restore the databasefrom.
You can specify a backup set manually by adding devices to the device list.
T o add a dev ic e, click the Add Item button and select a media type from the menu.Select the required backup device using the corresponding dialog.
T o rem ove a device from the list, select it and click the Delete Item button.
778
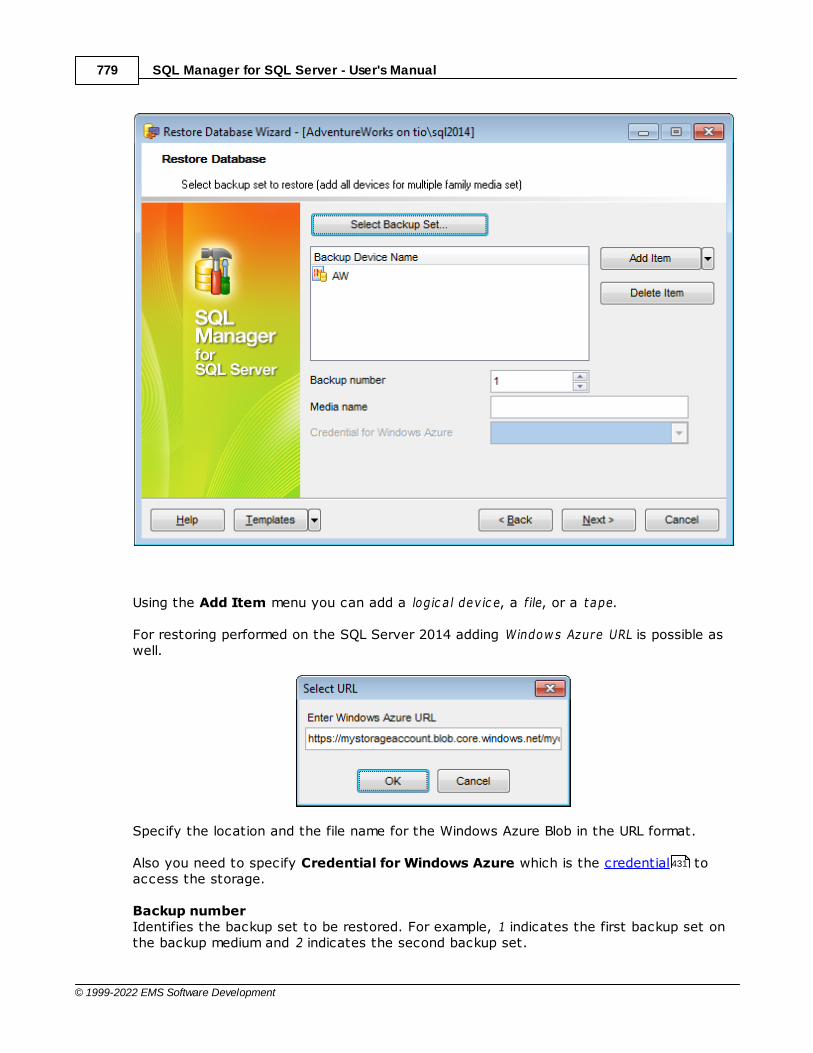
SQL Manager for SQL Server - User's Manual779
© 1999-2022 EMS Software Development
Using the Add Item menu you can add a logic a l dev ic e, a file, or a tape.
For restoring performed on the SQL Server 2014 adding Window s Azure URL is possible aswell.
Specify the location and the file name for the Windows Azure Blob in the URL format.
Also you need to specify Credential for Windows Azure which is the credential toaccess the storage.
Backup numberIdentifies the backup set to be restored. For example, 1 indicates the first backup set onthe backup medium and 2 indicates the second backup set.
431
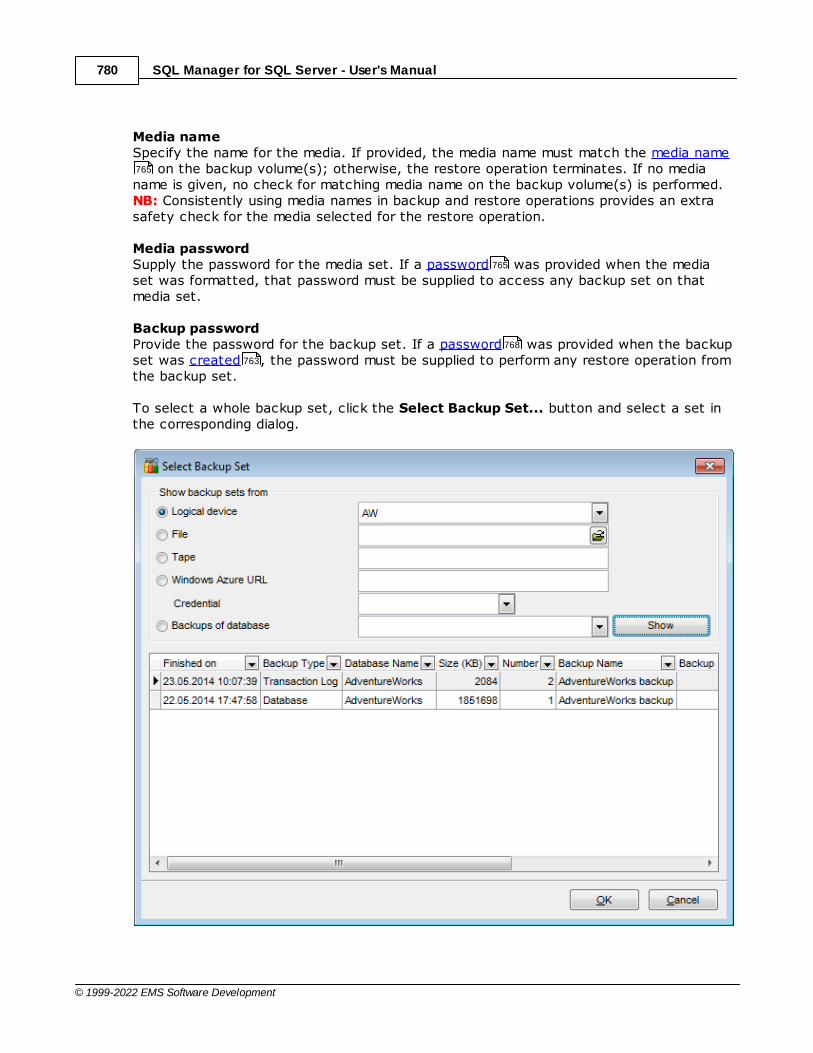
SQL Manager for SQL Server - User's Manual780
© 1999-2022 EMS Software Development
Media nameSpecify the name for the media. If provided, the media name must match the media name
on the backup volume(s); otherwise, the restore operation terminates. If no medianame is given, no check for matching media name on the backup volume(s) is performed.NB: Consistently using media names in backup and restore operations provides an extrasafety check for the media selected for the restore operation.
Media passwordSupply the password for the media set. If a password was provided when the mediaset was formatted, that password must be supplied to access any backup set on thatmedia set.
Backup passwordProvide the password for the backup set. If a password was provided when the backupset was created , the password must be supplied to perform any restore operation fromthe backup set.
To select a whole backup set, click the Select Backup Set... button and select a set inthe corresponding dialog.
765
765
768
763

SQL Manager for SQL Server - User's Manual781
© 1999-2022 EMS Software Development
Click the Next button to proceed to the Selecting files to restore step of the wizard.
10.2.4 Selecting files to restore
This step allows you to select files that will be used to restore the database.
By default the application restores all files. It is indicated by the Restore all filesoption selected. To select files manually, you should uncheck this option.
T o add a file to the restore, select it in the list and set the respective flag in the Restorecolumn. T o add a ll f iles to the restore, check the Restore all files option.
You can also edit file paths by clicking the corresponding rows of the Physical File Nameand Path column.
Partial database restoreThis option specifies a partial restore operation. Application or user errors often affect anisolated portion of the database, such as a table. Examples of this type of error include aninvalid update or a table dropped by mistake. To support recovery from these events, SQLServer provides a mechanism to restore part of the database to another location so thatthe damaged or missing data can be copied back to the original database.
781
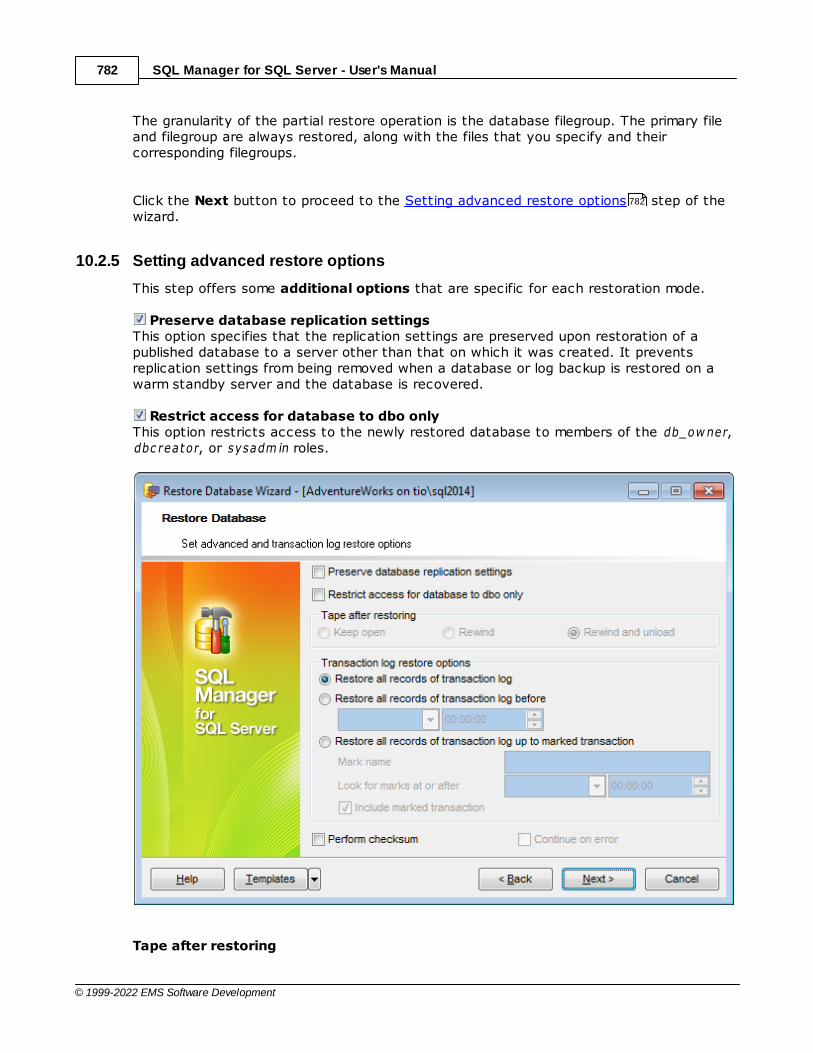
SQL Manager for SQL Server - User's Manual782
© 1999-2022 EMS Software Development
The granularity of the partial restore operation is the database filegroup. The primary fileand filegroup are always restored, along with the files that you specify and theircorresponding filegroups.
Click the Next button to proceed to the Setting advanced restore options step of thewizard.
10.2.5 Setting advanced restore options
This step offers some additional options that are specific for each restoration mode.
Preserve database replication settingsThis option specifies that the replication settings are preserved upon restoration of apublished database to a server other than that on which it was created. It preventsreplication settings from being removed when a database or log backup is restored on awarm standby server and the database is recovered.
Restrict access for database to dbo onlyThis option restricts access to the newly restored database to members of the db_ow ner,dbc reator, or sysadm in roles.
Tape after restoring
782
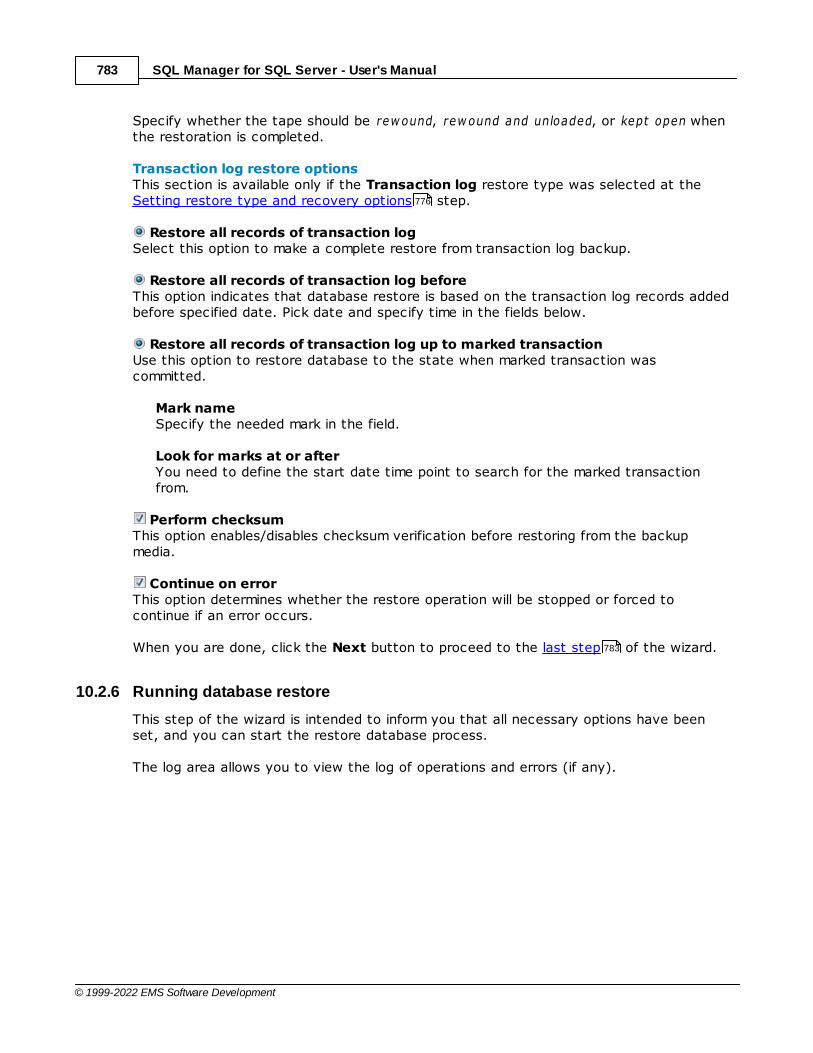
SQL Manager for SQL Server - User's Manual783
© 1999-2022 EMS Software Development
Specify whether the tape should be rew ound, rew ound and unloaded, or kept open whenthe restoration is completed.
Transaction log restore optionsThis section is available only if the Transaction log restore type was selected at theSetting restore type and recovery options step.
Restore all records of transaction logSelect this option to make a complete restore from transaction log backup.
Restore all records of transaction log beforeThis option indicates that database restore is based on the transaction log records addedbefore specified date. Pick date and specify time in the fields below.
Restore all records of transaction log up to marked transactionUse this option to restore database to the state when marked transaction wascommitted.
Mark nameSpecify the needed mark in the field.
Look for marks at or afterYou need to define the start date time point to search for the marked transactionfrom.
Perform checksumThis option enables/disables checksum verification before restoring from the backupmedia.
Continue on errorThis option determines whether the restore operation will be stopped or forced tocontinue if an error occurs.
When you are done, click the Next button to proceed to the last step of the wizard.
10.2.6 Running database restore
This step of the wizard is intended to inform you that all necessary options have beenset, and you can start the restore database process.
The log area allows you to view the log of operations and errors (if any).
776
783
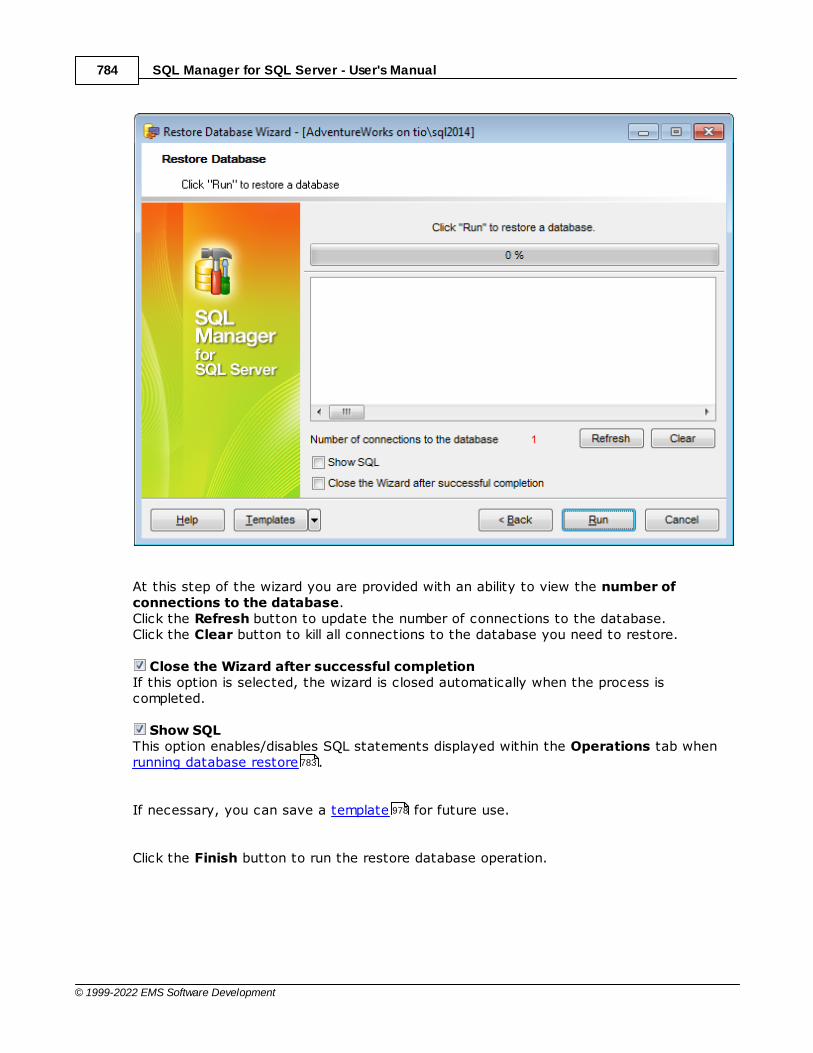
SQL Manager for SQL Server - User's Manual784
© 1999-2022 EMS Software Development
At this step of the wizard you are provided with an ability to view the number ofconnections to the database.Click the Refresh button to update the number of connections to the database.Click the Clear button to kill all connections to the database you need to restore.
Close the Wizard after successful completionIf this option is selected, the wizard is closed automatically when the process iscompleted.
Show SQL This option enables/disables SQL statements displayed within the Operations tab whenrunning database restore .
If necessary, you can save a template for future use.
Click the Finish button to run the restore database operation.
783
978

SQL Manager for SQL Server - User's Manual785
© 1999-2022 EMS Software Development
10.3 Backup Devices
A Backup device is a tape drive or a disk drive used in backup and restoreoperations. When creating a backup, you must select a backup device where the datawill be written. Microsoft SQL Server 2005 (and higher) can back up databases,transaction logs, and files to disk and tape devices.
To open a list of backup devices on a server select the Services | Backup Devices... main menu item
Backup devices managerBackup Device properties
See also:
Backup Database
Restore Database
Backup Devices
10.3.1 Backup devices manager
The Backup devices manager allows you to browse the list of SQL Server backupdevices and manage them efficiently.
To launch the tool, select the Services | Backup Devices main menu item, or right-click the host alias in the DB Explorer tree and select the Tasks | Backup Devicesitem from the context menu .
760 774
763
958
785
787
760
774
402
958
99
88

SQL Manager for SQL Server - User's Manual786
© 1999-2022 EMS Software Development
The list displays the existing backup devices as a grid with the following columns: Devic enam e, T ype, Physic a l nam e.
Right-click an item within the list to call the context menu allowing you to c reate a newbackup device and specify its properties using the New Logical Backup Device dialog,renam e, de lete the selected backup device, refresh the list, or show/hide columns of thelist. Using the context menu you can also export the list of backup devices to any ofsupported output file formats .
Backup devices management tools are also available through the Navigation bar of theBackup devices manager.
The Device contents area allows you to view the contents of the selected backupdevice: Media nam e, Num ber of m edia fam ilies, Fam ily sequenc e num ber, Mediadesc r ipt ion.
To display the actual contents, press the Show button. If necessary, you can check the Auto show option - in this case the contents of each backup device will be retrieved
upon the backup device selection in the list.
The lower list displays the backup operation(s) with the following attributes:F inished onBac kup typeDB Nam eBac kup Nam eSize (KB)Num berExpire on
403
567
979
760
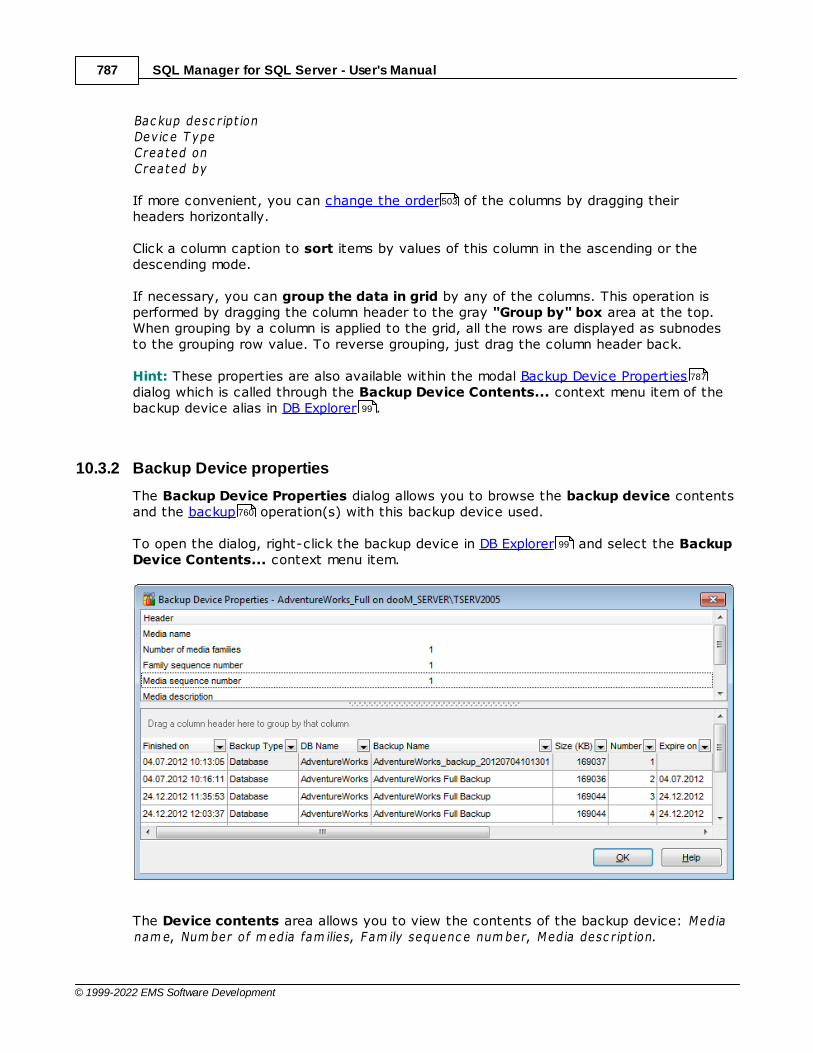
SQL Manager for SQL Server - User's Manual787
© 1999-2022 EMS Software Development
Bac kup desc r ipt ionDevic e T ypeCreated onCreated by
If more convenient, you can change the order of the columns by dragging theirheaders horizontally.
Click a column caption to sort items by values of this column in the ascending or thedescending mode.
If necessary, you can group the data in grid by any of the columns. This operation isperformed by dragging the column header to the gray "Group by" box area at the top.When grouping by a column is applied to the grid, all the rows are displayed as subnodesto the grouping row value. To reverse grouping, just drag the column header back.
Hint: These properties are also available within the modal Backup Device Propertiesdialog which is called through the Backup Device Contents... context menu item of thebackup device alias in DB Explorer .
10.3.2 Backup Device properties
The Backup Device Properties dialog allows you to browse the backup device contentsand the backup operation(s) with this backup device used.
To open the dialog, right-click the backup device in DB Explorer and select the BackupDevice Contents... context menu item.
The Device contents area allows you to view the contents of the backup device: Medianam e, Num ber of m edia fam ilies, Fam ily sequenc e num ber, Media desc r ipt ion.
503
787
99
760
99

SQL Manager for SQL Server - User's Manual788
© 1999-2022 EMS Software Development
The lower list displays the backup operation(s) as a grid with the following columns:F inished on, Bac kup type, DB Nam e, Bac kup Nam e, Size (KB), Num ber, Expire on, Bac kupdesc r ipt ion, Dev ic e T ype, Created on, Created by. If more convenient, you can changethe order of the columns by dragging their headers horizontally.
Click a column caption to sort items by values of this column in the ascending or thedescending mode.
If necessary, you can group the data in grid by any of the columns. This operation isperformed by dragging the column header to the gray "Group by" box area at the top.When grouping by a column is applied to the grid, all the rows are displayed as subnodesto the grouping row value. To reverse grouping, just drag the column header back.
760
503
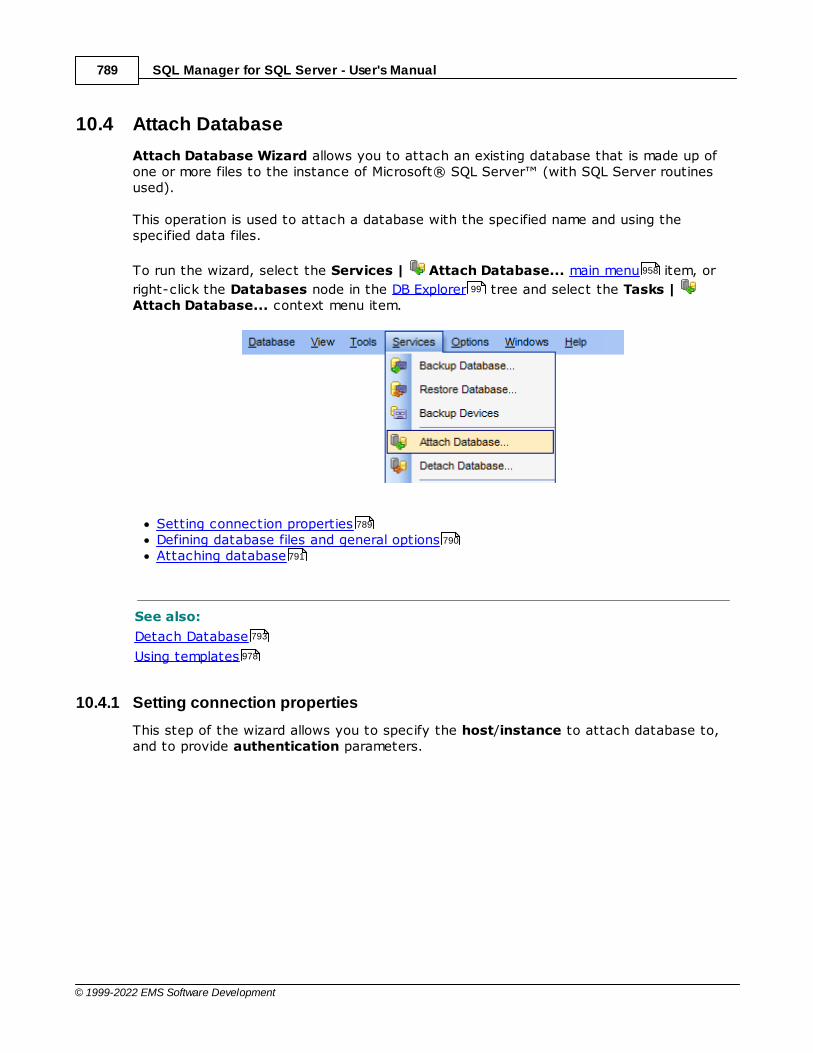
SQL Manager for SQL Server - User's Manual789
© 1999-2022 EMS Software Development
10.4 Attach Database
Attach Database Wizard allows you to attach an existing database that is made up ofone or more files to the instance of Microsoft® SQL Server™ (with SQL Server routinesused).
This operation is used to attach a database with the specified name and using thespecified data files.
To run the wizard, select the Services | Attach Database... main menu item, or
right-click the Databases node in the DB Explorer tree and select the Tasks | Attach Database... context menu item.
Setting connection propertiesDefining database files and general optionsAttaching database
See also:
Detach Database
Using templates
10.4.1 Setting connection properties
This step of the wizard allows you to specify the host/instance to attach database to,and to provide authentication parameters.
958
99
789
790
791
793
978

SQL Manager for SQL Server - User's Manual790
© 1999-2022 EMS Software Development
Server nameType in or use the drop-down list to select the host/instance name to attach databaseto.
AuthenticationSpecify the type of Microsoft® SQL Server™ authentication to be used for theconnection: the built-in Windows authentication or SQL Server authentication.
If 'SQL Server' has been selected as the authent ic at ion type, you should also provideauthorizat ion settings: User name and Password.
Click the Next button to proceed to the Defining database files and general optionsstep of the wizard.
10.4.2 Defining database files and general options
Use this step of the wizard to select the files to attach to the server as a database.
MDF file name with path
Use the button to specify the path and name of the file to attach to the server. Thenpress the Get All Files button to add the database files to the file list.
790
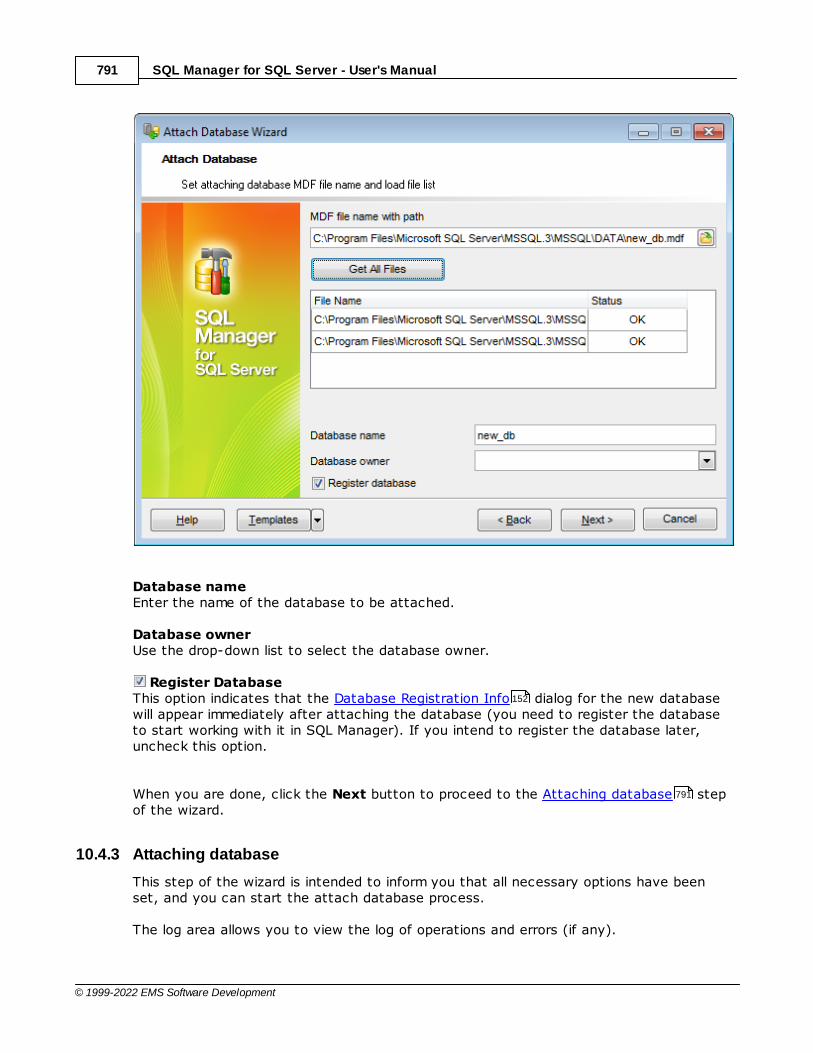
SQL Manager for SQL Server - User's Manual791
© 1999-2022 EMS Software Development
Database nameEnter the name of the database to be attached.
Database ownerUse the drop-down list to select the database owner.
Register DatabaseThis option indicates that the Database Registration Info dialog for the new databasewill appear immediately after attaching the database (you need to register the databaseto start working with it in SQL Manager). If you intend to register the database later,uncheck this option.
When you are done, click the Next button to proceed to the Attaching database stepof the wizard.
10.4.3 Attaching database
This step of the wizard is intended to inform you that all necessary options have beenset, and you can start the attach database process.
The log area allows you to view the log of operations and errors (if any).
152
791

SQL Manager for SQL Server - User's Manual792
© 1999-2022 EMS Software Development
Close the Wizard after successful completionIf this option is selected, the wizard is closed automatically when the process iscompleted.
If necessary, you can save a template for future use.
Click the Finish button to complete the operation.
978
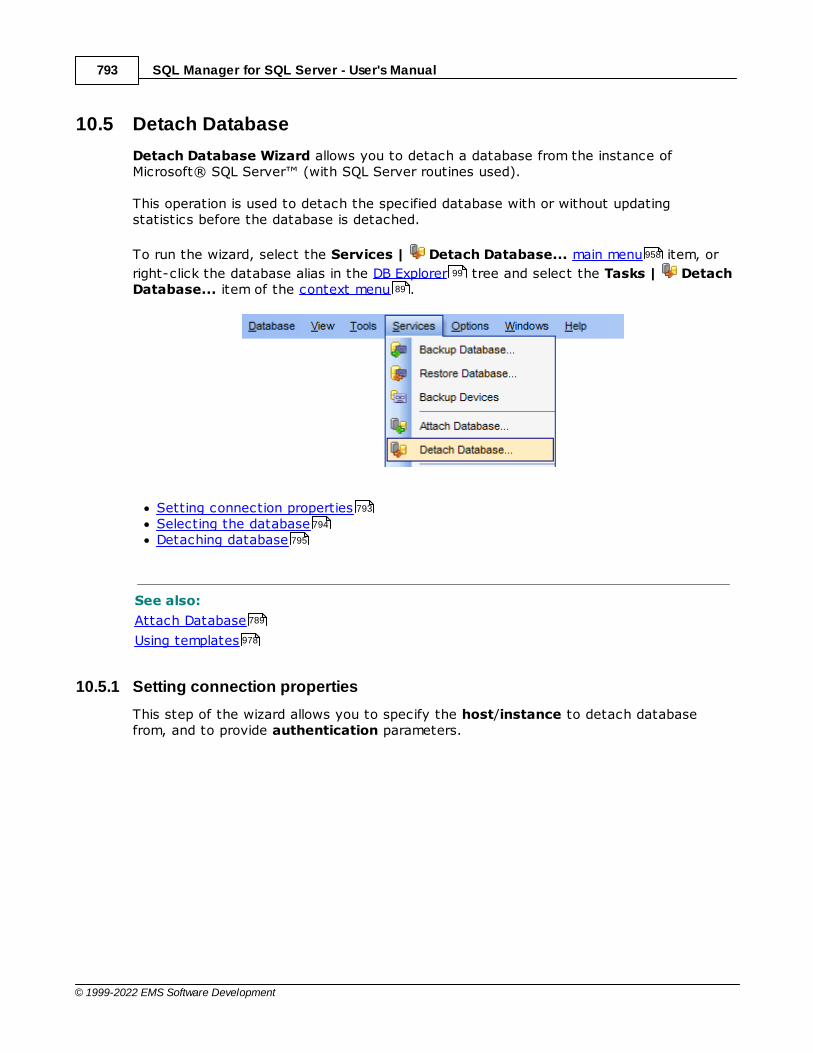
SQL Manager for SQL Server - User's Manual793
© 1999-2022 EMS Software Development
10.5 Detach Database
Detach Database Wizard allows you to detach a database from the instance ofMicrosoft® SQL Server™ (with SQL Server routines used).
This operation is used to detach the specified database with or without updatingstatistics before the database is detached.
To run the wizard, select the Services | Detach Database... main menu item, or
right-click the database alias in the DB Explorer tree and select the Tasks | DetachDatabase... item of the context menu .
Setting connection propertiesSelecting the databaseDetaching database
See also:
Attach Database
Using templates
10.5.1 Setting connection properties
This step of the wizard allows you to specify the host/instance to detach databasefrom, and to provide authentication parameters.
958
99
89
793
794
795
789
978

SQL Manager for SQL Server - User's Manual794
© 1999-2022 EMS Software Development
Server nameType in or use the drop-down list to select the host/instance name to detach databasefrom.
AuthenticationSpecify the type of Microsoft® SQL Server™ authentication to be used for theconnection: the built-in Windows authentication or SQL Server authentication.
If 'SQL Server' has been selected as the authent ic at ion type, you should also provideauthorizat ion settings: User name and Password.
Click the Next button to proceed to the Selecting the database step of the wizard.
10.5.2 Selecting the database
At this step of the wizard you should specify the database to be detached from theinstance of SQL Server.
Use the Database drop-down list to select the database to be detached.Note that you can detach a database only if it has no active connections and it is notenabled for replication. To clear the current connections to the database, use thecorresponding Clear connections button.
794
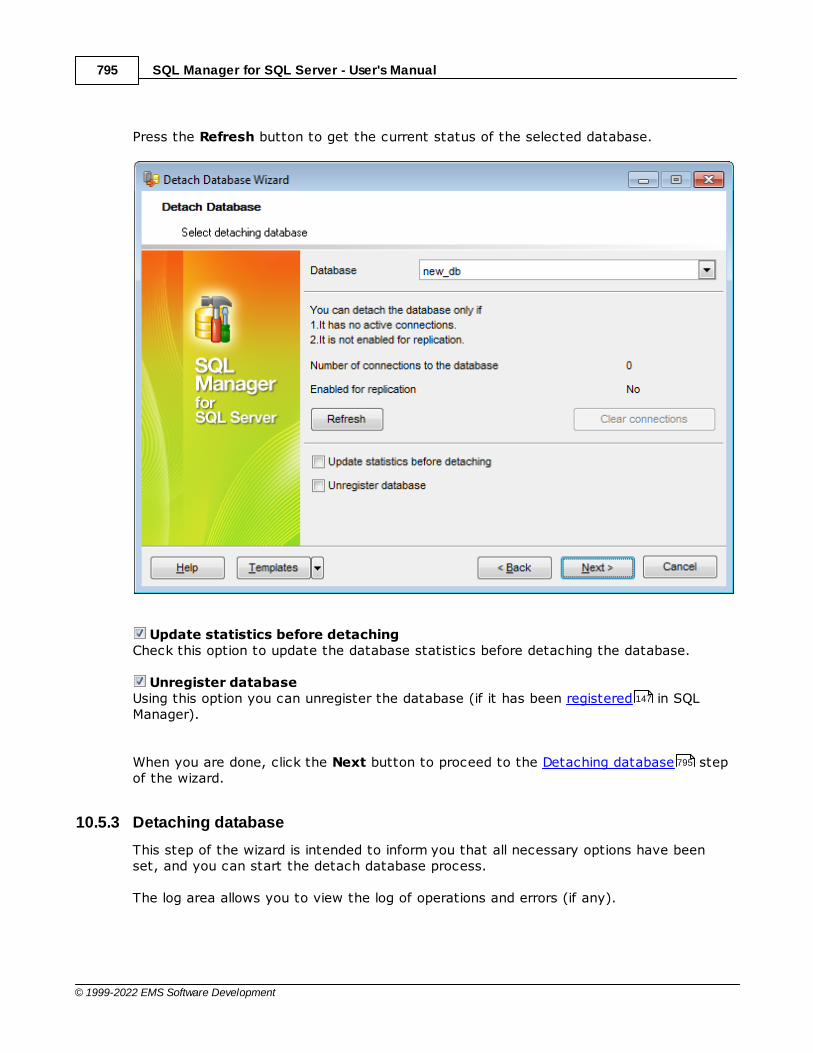
SQL Manager for SQL Server - User's Manual795
© 1999-2022 EMS Software Development
Press the Refresh button to get the current status of the selected database.
Update statistics before detachingCheck this option to update the database statistics before detaching the database.
Unregister databaseUsing this option you can unregister the database (if it has been registered in SQLManager).
When you are done, click the Next button to proceed to the Detaching database stepof the wizard.
10.5.3 Detaching database
This step of the wizard is intended to inform you that all necessary options have beenset, and you can start the detach database process.
The log area allows you to view the log of operations and errors (if any).
147
795
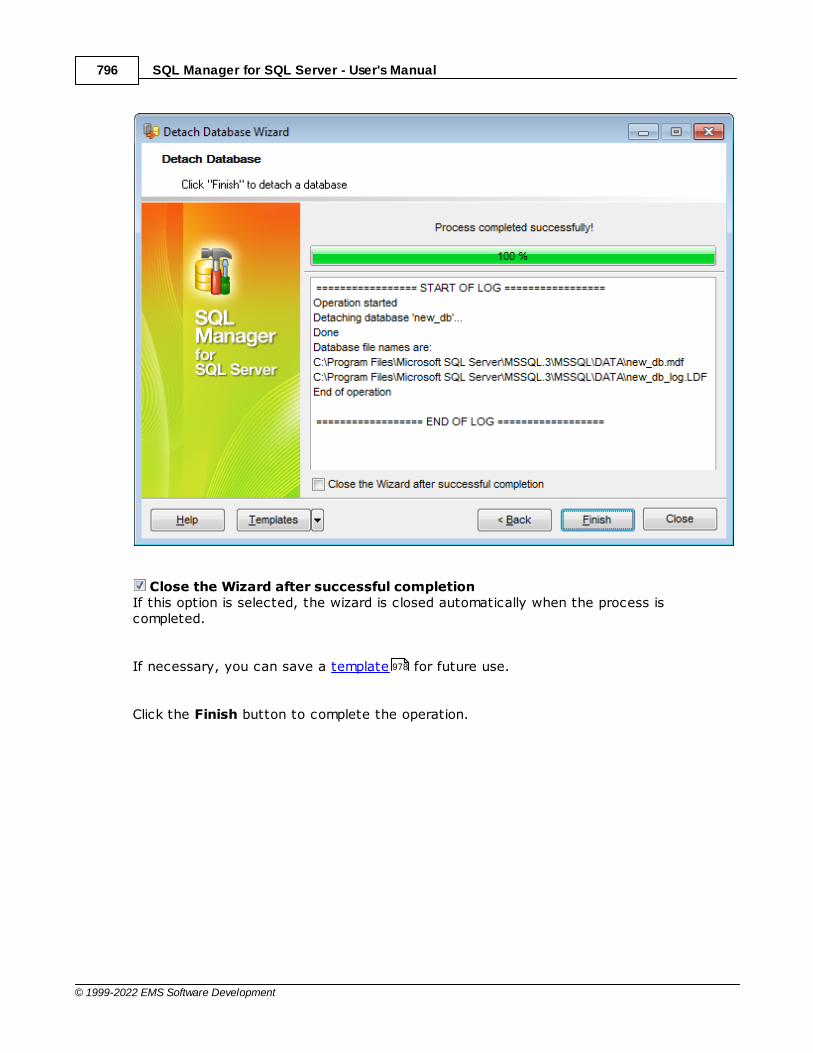
SQL Manager for SQL Server - User's Manual796
© 1999-2022 EMS Software Development
Close the Wizard after successful completionIf this option is selected, the wizard is closed automatically when the process iscompleted.
If necessary, you can save a template for future use.
Click the Finish button to complete the operation.
978
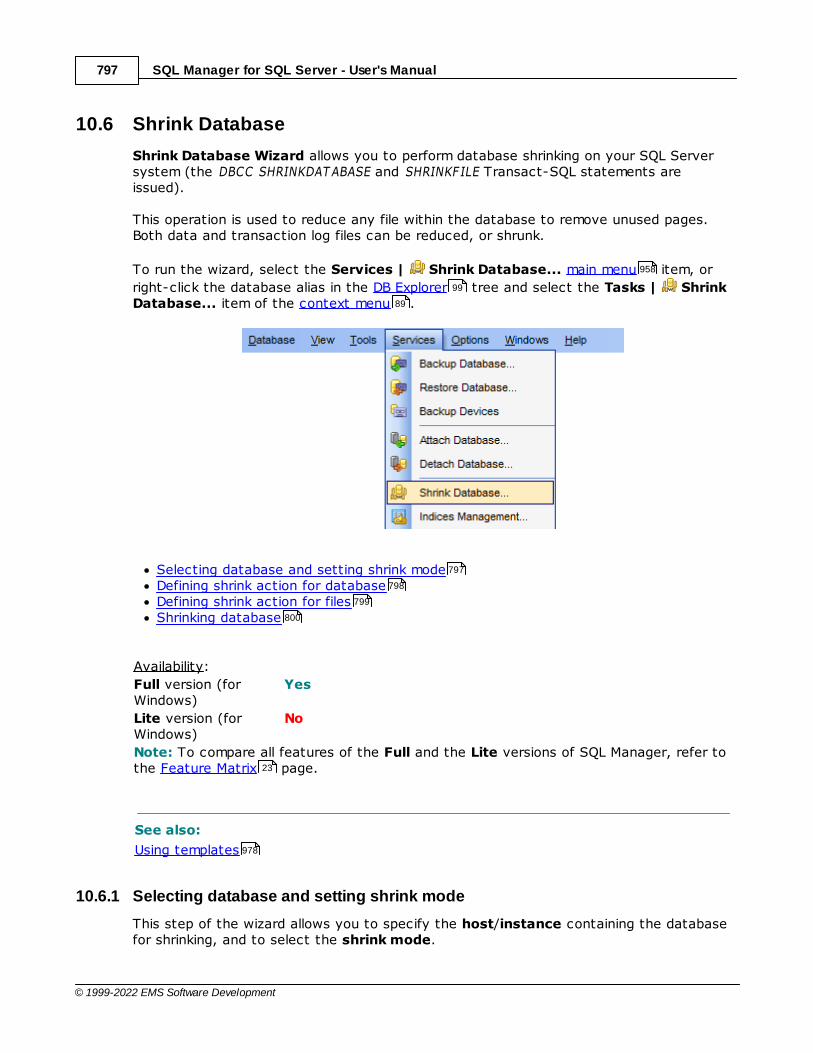
SQL Manager for SQL Server - User's Manual797
© 1999-2022 EMS Software Development
10.6 Shrink Database
Shrink Database Wizard allows you to perform database shrinking on your SQL Serversystem (the DBCC SHRINKDAT ABASE and SHRINKFILE Transact-SQL statements areissued).
This operation is used to reduce any file within the database to remove unused pages.Both data and transaction log files can be reduced, or shrunk.
To run the wizard, select the Services | Shrink Database... main menu item, or
right-click the database alias in the DB Explorer tree and select the Tasks | ShrinkDatabase... item of the context menu .
Selecting database and setting shrink modeDefining shrink action for databaseDefining shrink action for filesShrinking database
Availability:
Full version (forWindows)
Yes
Lite version (forWindows)
No
Note: To compare all features of the Full and the Lite versions of SQL Manager, refer tothe Feature Matrix page.
See also:
Using templates
10.6.1 Selecting database and setting shrink mode
This step of the wizard allows you to specify the host/instance containing the databasefor shrinking, and to select the shrink mode.
958
99
89
797
798
799
800
23
978

SQL Manager for SQL Server - User's Manual798
© 1999-2022 EMS Software Development
HostType in or use the drop-down list to select the host/instance where the database resides.
DatabaseUse the drop-down list of all registered databases on the selected host to specify thedatabase to shrink.
ShrinkSelect the preferable shrink mode: Database (SHRINKDAT ABASE) or Files (SHRINKFILE).
Click the Next button to proceed to the Defining shrink action for database step of thewizard (if you have selected the Database shrink mode), or to the Defining shrink actionfor files step (if you have selected the F iles shrink mode).
10.6.2 Defining shrink action for database
This step of the wizard provides you with information on the allocated and free space,and allows you to specify the shrink action for the database.
798
799

SQL Manager for SQL Server - User's Manual799
© 1999-2022 EMS Software Development
Database info
This group displays the c urrent ly a lloc ated spac e and the available free spac e valuespertaining to the database being shrunk.
Shrink action
Reorganize file before releasing free unused spaceThis action causes the file to be reorganized before free space is released.
Max free space in files after shrinkingSpecify the percentage of free space that will be left in the database file after thedatabase is shrunk.
When you are done, click the Next button to proceed to the Shrinking database stepof the wizard.
10.6.3 Defining shrink action for files
This step of the wizard provides you with information on the allocated and free space,and allows you to specify the shrink action for each of the database files.
800

SQL Manager for SQL Server - User's Manual800
© 1999-2022 EMS Software Development
Shrink action for file
Re lease unused spac eThe free unused space is released explicitly (default).
Reorganize pages before re leasing unused spac eThis action causes the pages to be reorganized before unused space is released.
Em pty file by m igrat ing the data to other f ile in the sam e filegroupThis action migrates all data from the selected file to other files in the same filegroup. Inthis case placing data on the file is not allowed.
If necessary, you can change the default value of the target_size edit-box to enforceshrinking the file to the specified size.
When you are done, click the Next button to proceed to the Shrinking database stepof the wizard.
10.6.4 Shrinking database
This step of the wizard is intended to inform you that all necessary options have beenset, and you can start the shrink database/files process.
800
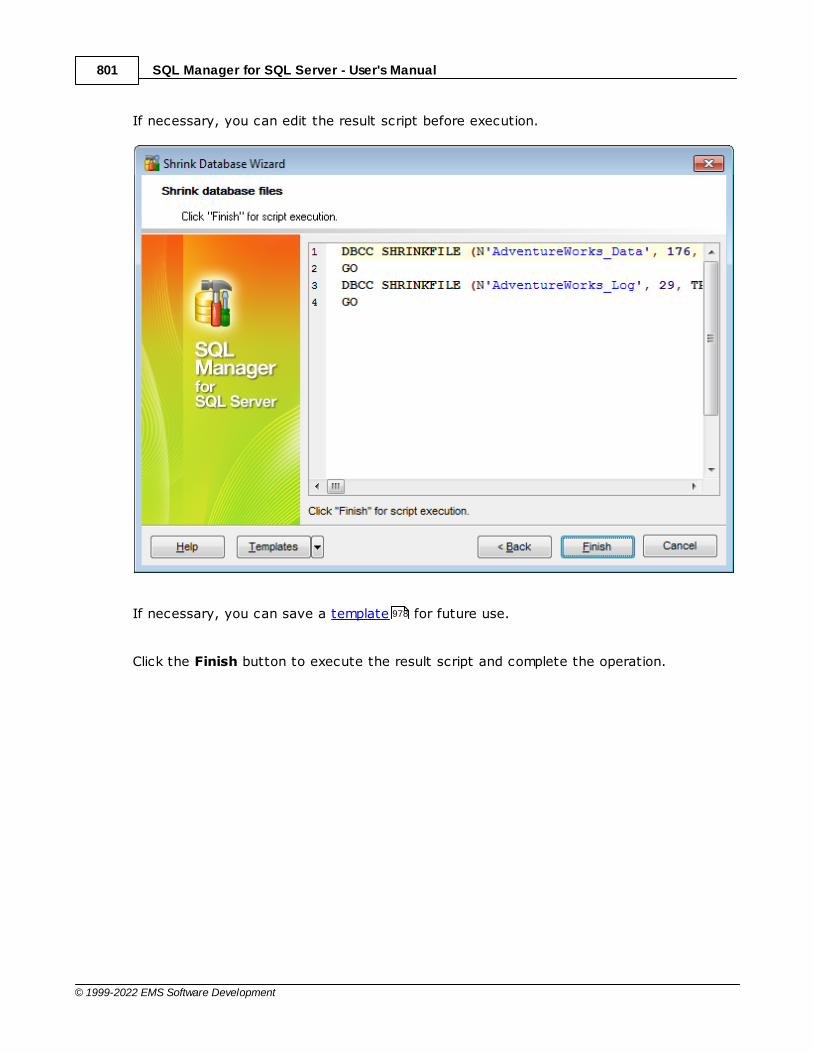
SQL Manager for SQL Server - User's Manual801
© 1999-2022 EMS Software Development
If necessary, you can edit the result script before execution.
If necessary, you can save a template for future use.
Click the Finish button to execute the result script and complete the operation.
978
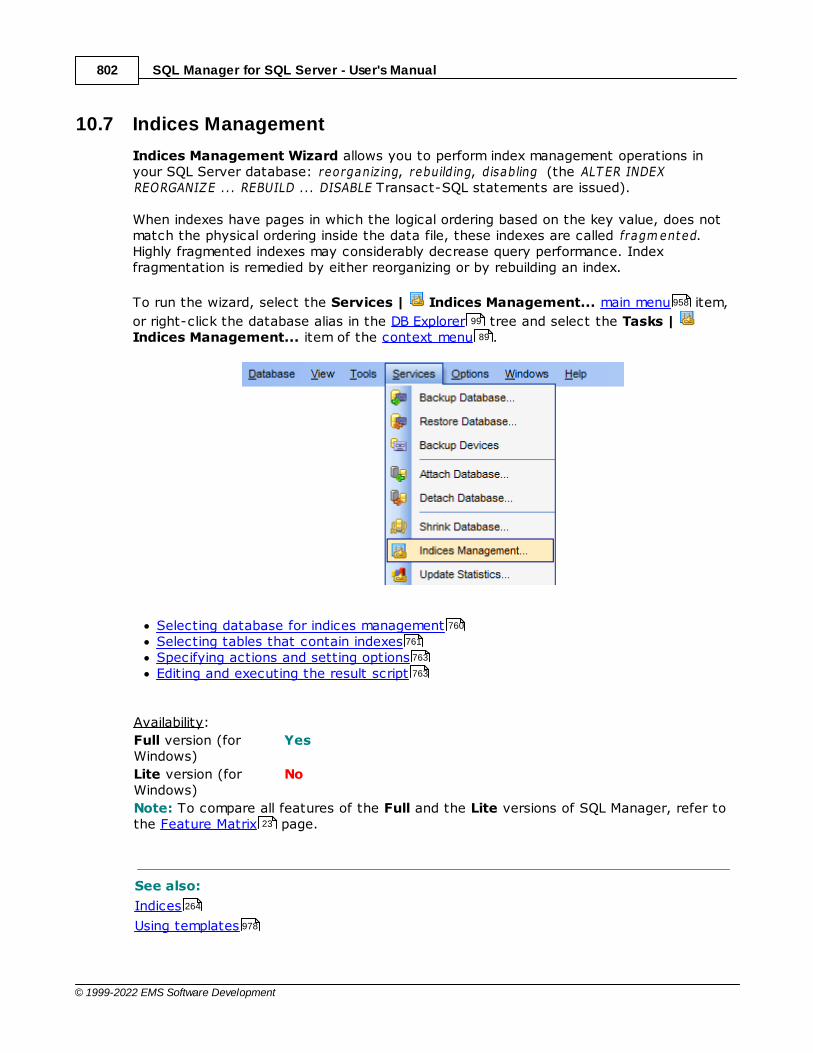
SQL Manager for SQL Server - User's Manual802
© 1999-2022 EMS Software Development
10.7 Indices Management
Indices Management Wizard allows you to perform index management operations inyour SQL Server database: reorganizing, rebuilding, disabling (the ALT ER INDEXREORGANIZE ... REBUILD ... DISABLE Transact-SQL statements are issued).
When indexes have pages in which the logical ordering based on the key value, does notmatch the physical ordering inside the data file, these indexes are called fragm ented.Highly fragmented indexes may considerably decrease query performance. Indexfragmentation is remedied by either reorganizing or by rebuilding an index.
To run the wizard, select the Services | Indices Management... main menu item,
or right-click the database alias in the DB Explorer tree and select the Tasks | Indices Management... item of the context menu .
Selecting database for indices managementSelecting tables that contain indexesSpecifying actions and setting optionsEditing and executing the result script
Availability:
Full version (forWindows)
Yes
Lite version (forWindows)
No
Note: To compare all features of the Full and the Lite versions of SQL Manager, refer tothe Feature Matrix page.
See also:
Indices
Using templates
958
99
89
760
761
763
763
23
264
978

SQL Manager for SQL Server - User's Manual803
© 1999-2022 EMS Software Development
10.7.1 Selecting database for indices management
This step of the wizard allows you to specify the host/instance containing the databasefor indexes management.
HostType in or use the drop-down list to select the host/instance where the database resides.
DatabaseUse the drop-down list of all registered databases on the selected host to specify thedatabase to manage indexes in.
Click the Next button to proceed to the Selecting tables step of the wizard.
10.7.2 Selecting tables
This step of the wizard allows you to select tables containing indexes.
To select a table, you need to move it from the Available Tables list to the Selected
Tables list. Use the buttons or drag-and-drop operations to move the tablesfrom one list to another.
803

SQL Manager for SQL Server - User's Manual804
© 1999-2022 EMS Software Development
Click the Next button to proceed to the Specifying actions and setting options step ofthe wizard.
10.7.3 Specifying actions and setting options
Use this step of the wizard to specify an action for each index and set the respectiveparameters.
The upper area lists all indexes of the tables selected at the previous step .
The Fragmentation column indicates the current fragmentation percentage of eachindex (avg_fragm entat ion_in_perc ent);the Action column allows you to specify one of the available actions to be performed overthe selected index: REBUILD, REORGANIZE, DISABLE.
804
803
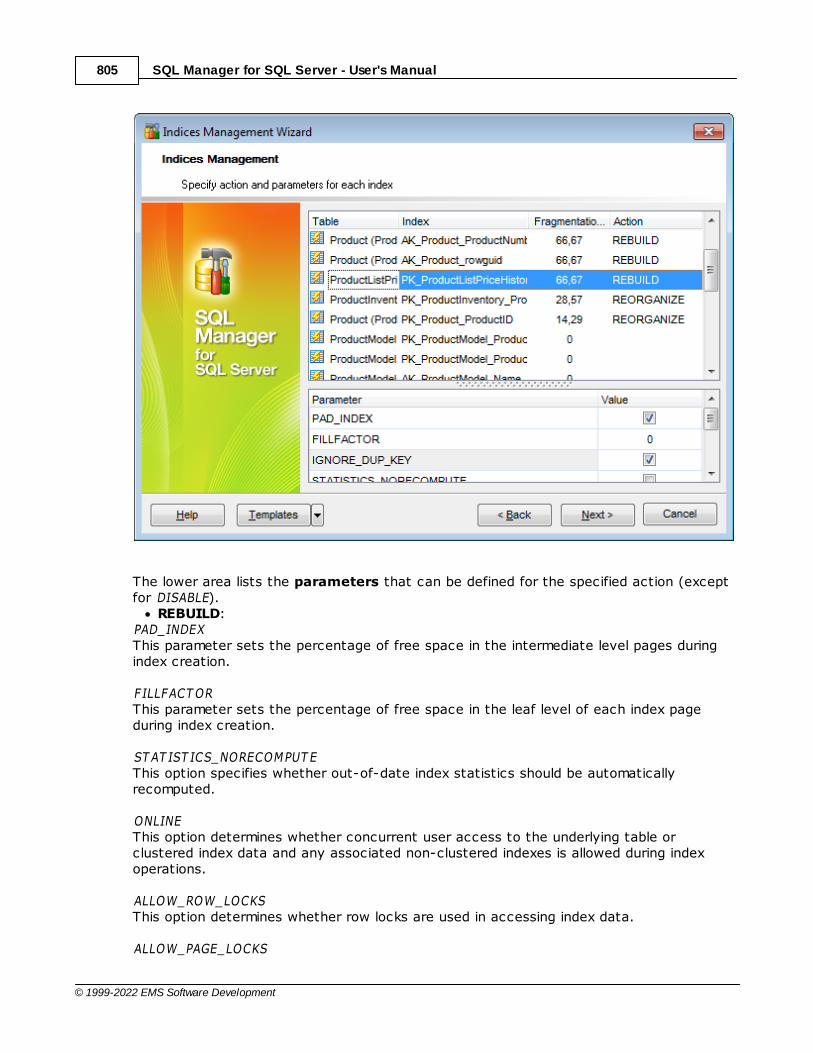
SQL Manager for SQL Server - User's Manual805
© 1999-2022 EMS Software Development
The lower area lists the parameters that can be defined for the specified action (exceptfor DISABLE).
REBUILD:PAD_INDEXThis parameter sets the percentage of free space in the intermediate level pages duringindex creation.
F ILLFACT ORThis parameter sets the percentage of free space in the leaf level of each index pageduring index creation.
ST AT IST ICS_NORECOMPUT EThis option specifies whether out-of-date index statistics should be automaticallyrecomputed.
ONLINEThis option determines whether concurrent user access to the underlying table orclustered index data and any associated non-clustered indexes is allowed during indexoperations.
ALLOW_ROW_LOCKSThis option determines whether row locks are used in accessing index data.
ALLOW_PAGE_LOCKS
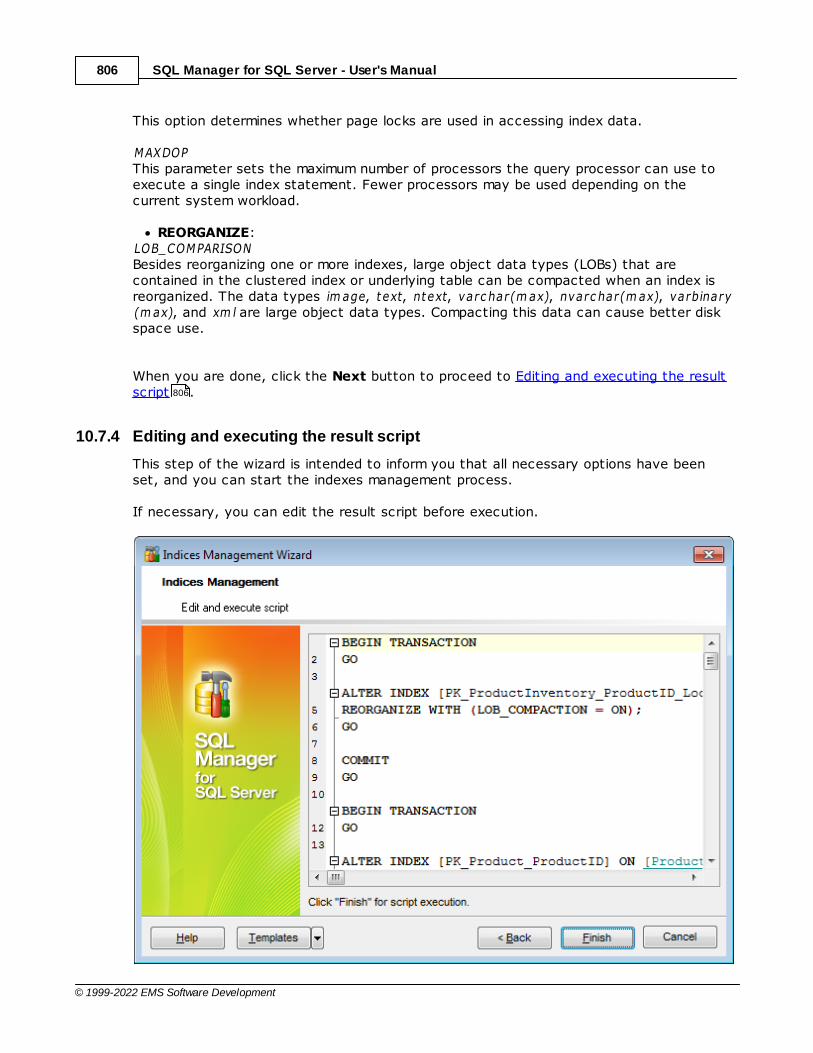
SQL Manager for SQL Server - User's Manual806
© 1999-2022 EMS Software Development
This option determines whether page locks are used in accessing index data.
MAXDOPThis parameter sets the maximum number of processors the query processor can use toexecute a single index statement. Fewer processors may be used depending on thecurrent system workload.
REORGANIZE:LOB_COMPARISONBesides reorganizing one or more indexes, large object data types (LOBs) that arecontained in the clustered index or underlying table can be compacted when an index isreorganized. The data types im age, text, ntext, varc har(m ax), nvarc har(m ax), varbinary(m ax), and xm l are large object data types. Compacting this data can cause better diskspace use.
When you are done, click the Next button to proceed to Editing and executing the resultscript .
10.7.4 Editing and executing the result script
This step of the wizard is intended to inform you that all necessary options have beenset, and you can start the indexes management process.
If necessary, you can edit the result script before execution.
806

SQL Manager for SQL Server - User's Manual807
© 1999-2022 EMS Software Development
If necessary, you can save a template for future use.
Click the Finish button to execute the result script and complete the operation.
978
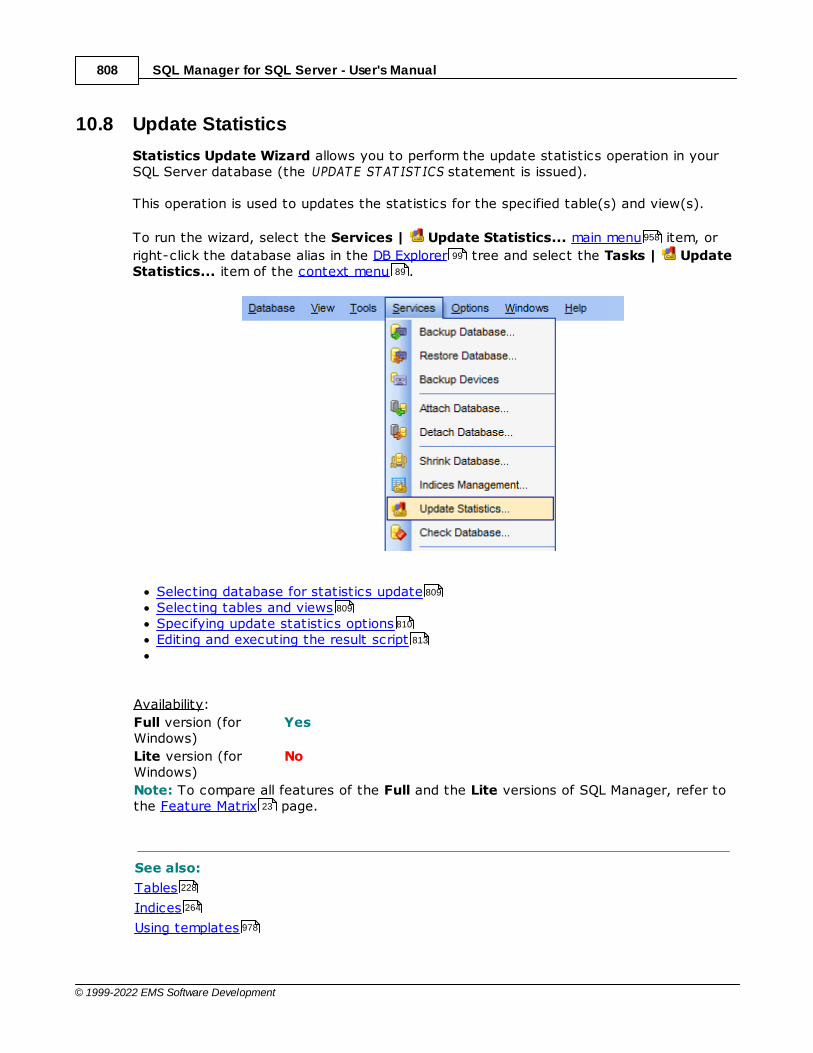
SQL Manager for SQL Server - User's Manual808
© 1999-2022 EMS Software Development
10.8 Update Statistics
Statistics Update Wizard allows you to perform the update statistics operation in yourSQL Server database (the UPDAT E ST AT IST ICS statement is issued).
This operation is used to updates the statistics for the specified table(s) and view(s).
To run the wizard, select the Services | Update Statistics... main menu item, or
right-click the database alias in the DB Explorer tree and select the Tasks | UpdateStatistics... item of the context menu .
Selecting database for statistics updateSelecting tables and viewsSpecifying update statistics optionsEditing and executing the result script
Availability:
Full version (forWindows)
Yes
Lite version (forWindows)
No
Note: To compare all features of the Full and the Lite versions of SQL Manager, refer tothe Feature Matrix page.
See also:
Tables
Indices
Using templates
958
99
89
809
809
810
813
23
228
264
978
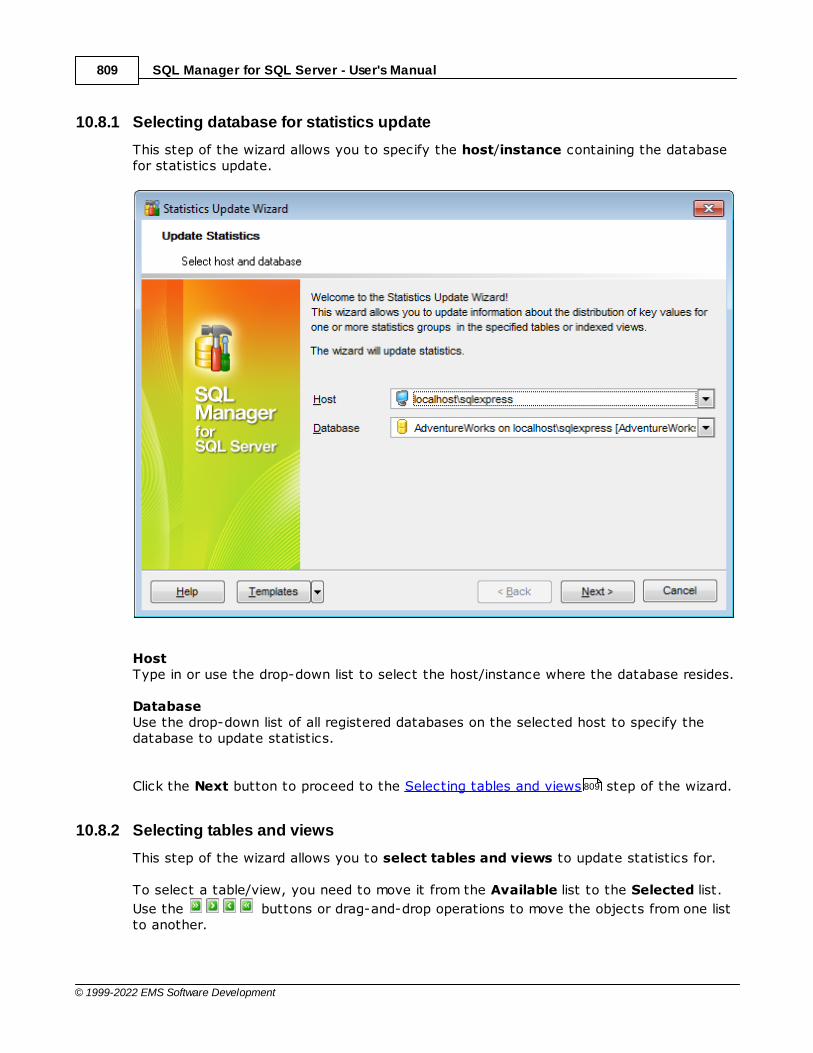
SQL Manager for SQL Server - User's Manual809
© 1999-2022 EMS Software Development
10.8.1 Selecting database for statistics update
This step of the wizard allows you to specify the host/instance containing the databasefor statistics update.
HostType in or use the drop-down list to select the host/instance where the database resides.
DatabaseUse the drop-down list of all registered databases on the selected host to specify thedatabase to update statistics.
Click the Next button to proceed to the Selecting tables and views step of the wizard.
10.8.2 Selecting tables and views
This step of the wizard allows you to select tables and views to update statistics for.
To select a table/view, you need to move it from the Available list to the Selected list.
Use the buttons or drag-and-drop operations to move the objects from one listto another.
809
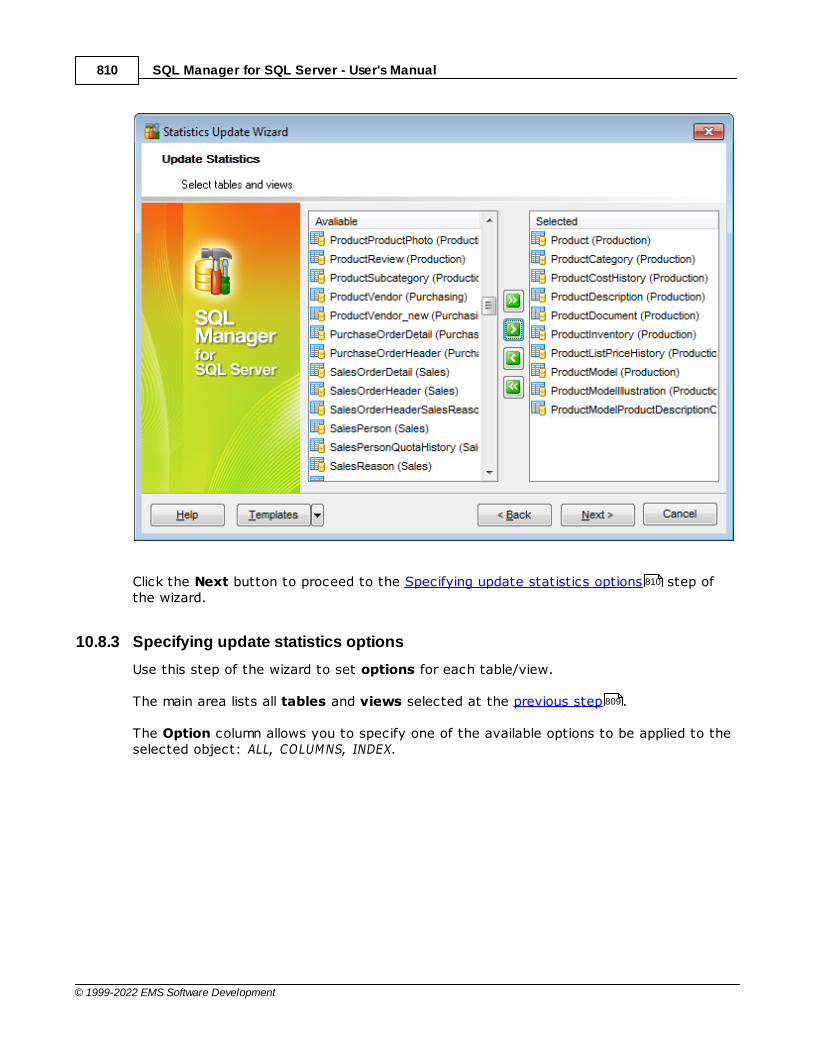
SQL Manager for SQL Server - User's Manual810
© 1999-2022 EMS Software Development
Click the Next button to proceed to the Specifying update statistics options step ofthe wizard.
10.8.3 Specifying update statistics options
Use this step of the wizard to set options for each table/view.
The main area lists all tables and views selected at the previous step .
The Option column allows you to specify one of the available options to be applied to theselected object: ALL, COLUMNS, INDEX.
810
809
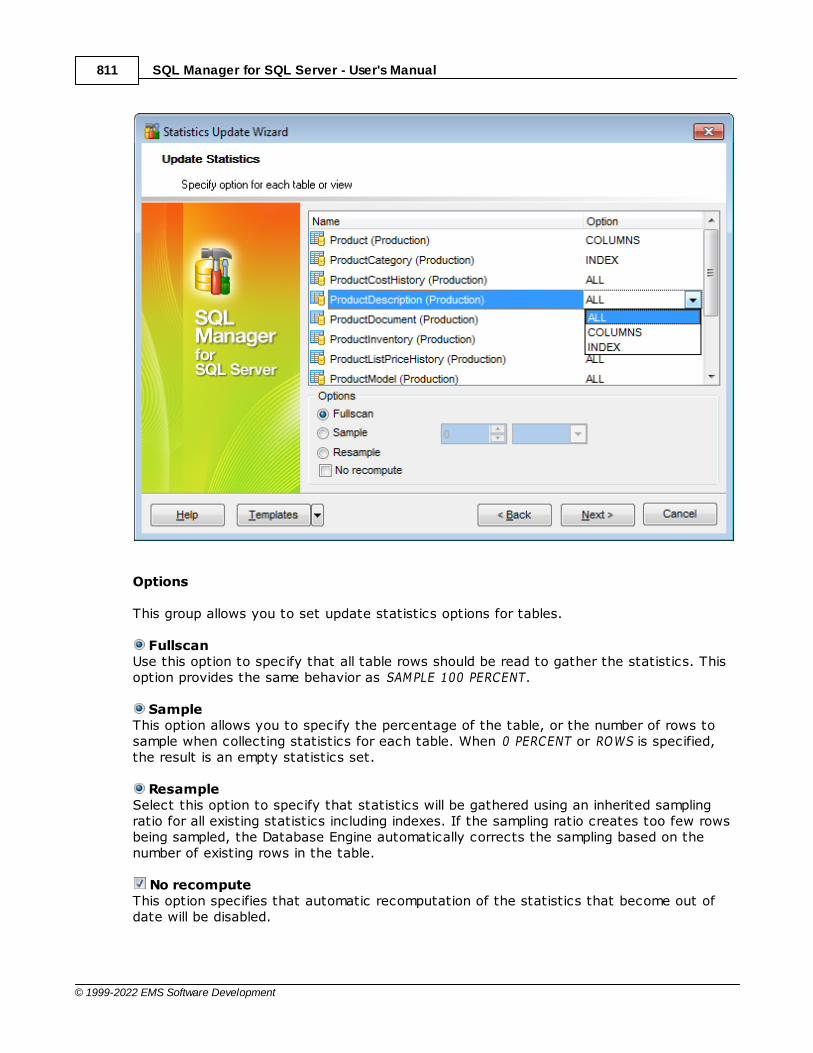
SQL Manager for SQL Server - User's Manual811
© 1999-2022 EMS Software Development
Options
This group allows you to set update statistics options for tables.
FullscanUse this option to specify that all table rows should be read to gather the statistics. Thisoption provides the same behavior as SAMPLE 100 PERCENT.
SampleThis option allows you to specify the percentage of the table, or the number of rows tosample when collecting statistics for each table. When 0 PERCENT or ROWS is specified,the result is an empty statistics set.
ResampleSelect this option to specify that statistics will be gathered using an inherited samplingratio for all existing statistics including indexes. If the sampling ratio creates too few rowsbeing sampled, the Database Engine automatically corrects the sampling based on thenumber of existing rows in the table.
No recomputeThis option specifies that automatic recomputation of the statistics that become out ofdate will be disabled.
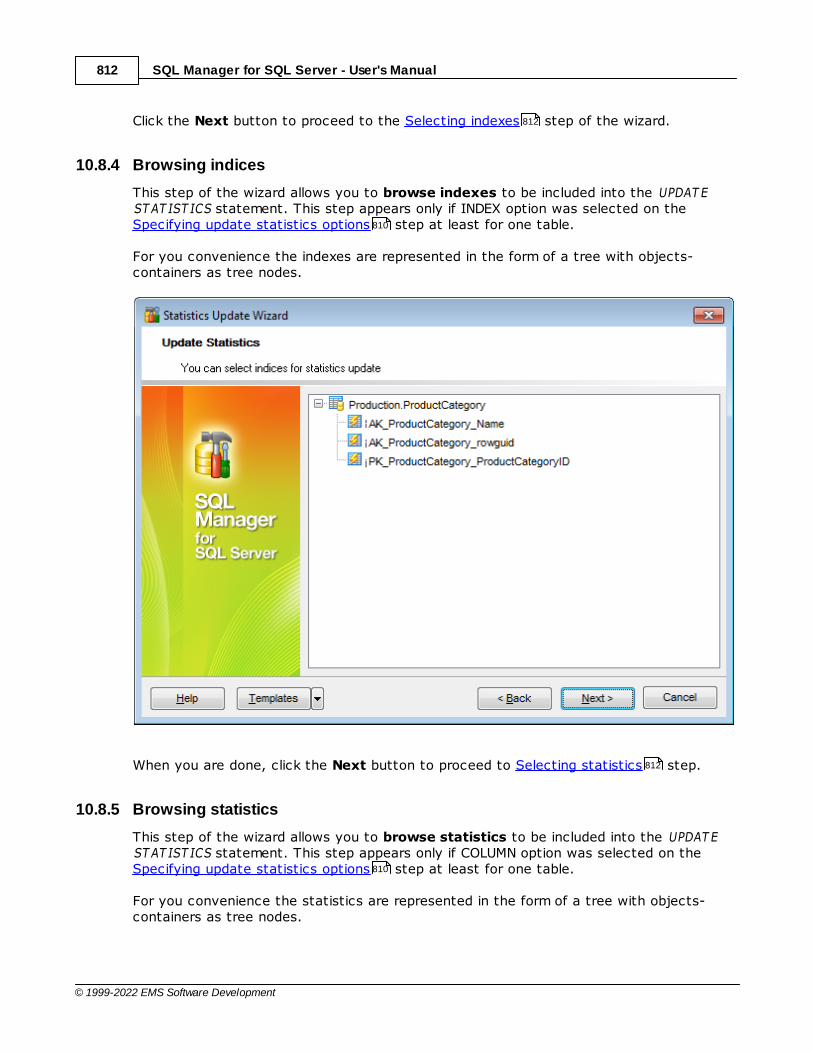
SQL Manager for SQL Server - User's Manual812
© 1999-2022 EMS Software Development
Click the Next button to proceed to the Selecting indexes step of the wizard.
10.8.4 Browsing indices
This step of the wizard allows you to browse indexes to be included into the UPDAT EST AT IST ICS statement. This step appears only if INDEX option was selected on theSpecifying update statistics options step at least for one table.
For you convenience the indexes are represented in the form of a tree with objects-containers as tree nodes.
When you are done, click the Next button to proceed to Selecting statistics step.
10.8.5 Browsing statistics
This step of the wizard allows you to browse statistics to be included into the UPDAT EST AT IST ICS statement. This step appears only if COLUMN option was selected on theSpecifying update statistics options step at least for one table.
For you convenience the statistics are represented in the form of a tree with objects-containers as tree nodes.
812
810
812
810
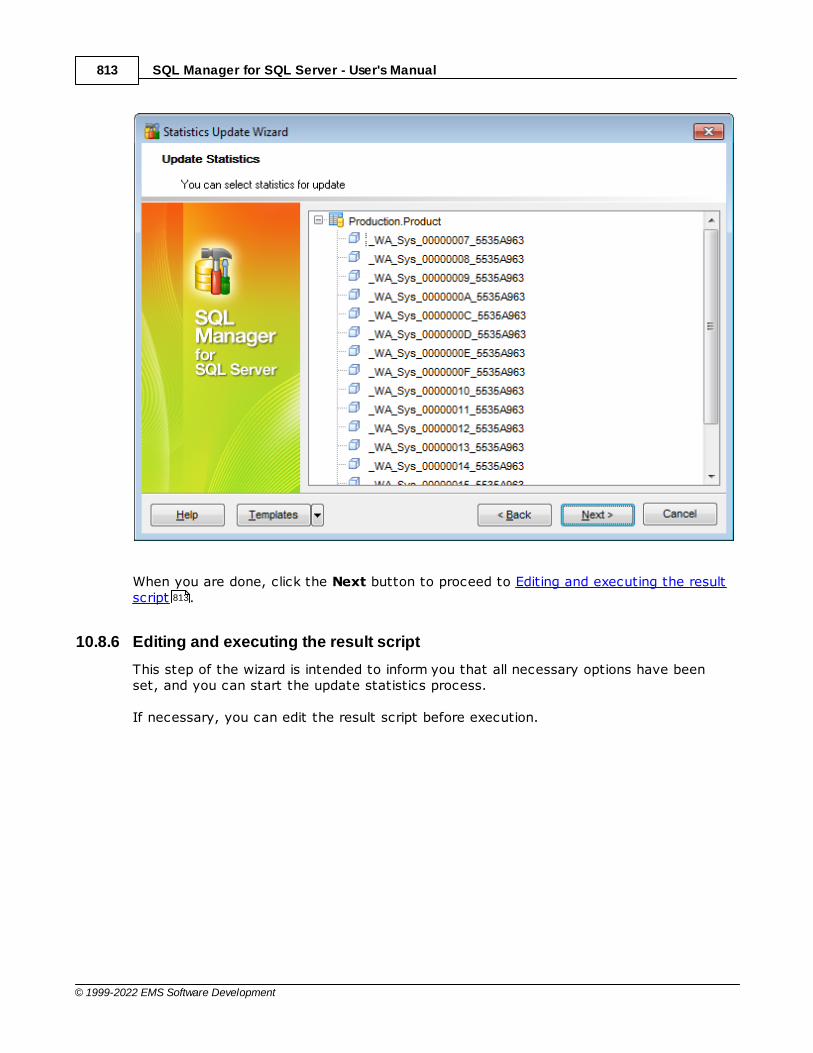
SQL Manager for SQL Server - User's Manual813
© 1999-2022 EMS Software Development
When you are done, click the Next button to proceed to Editing and executing the resultscript .
10.8.6 Editing and executing the result script
This step of the wizard is intended to inform you that all necessary options have beenset, and you can start the update statistics process.
If necessary, you can edit the result script before execution.
813
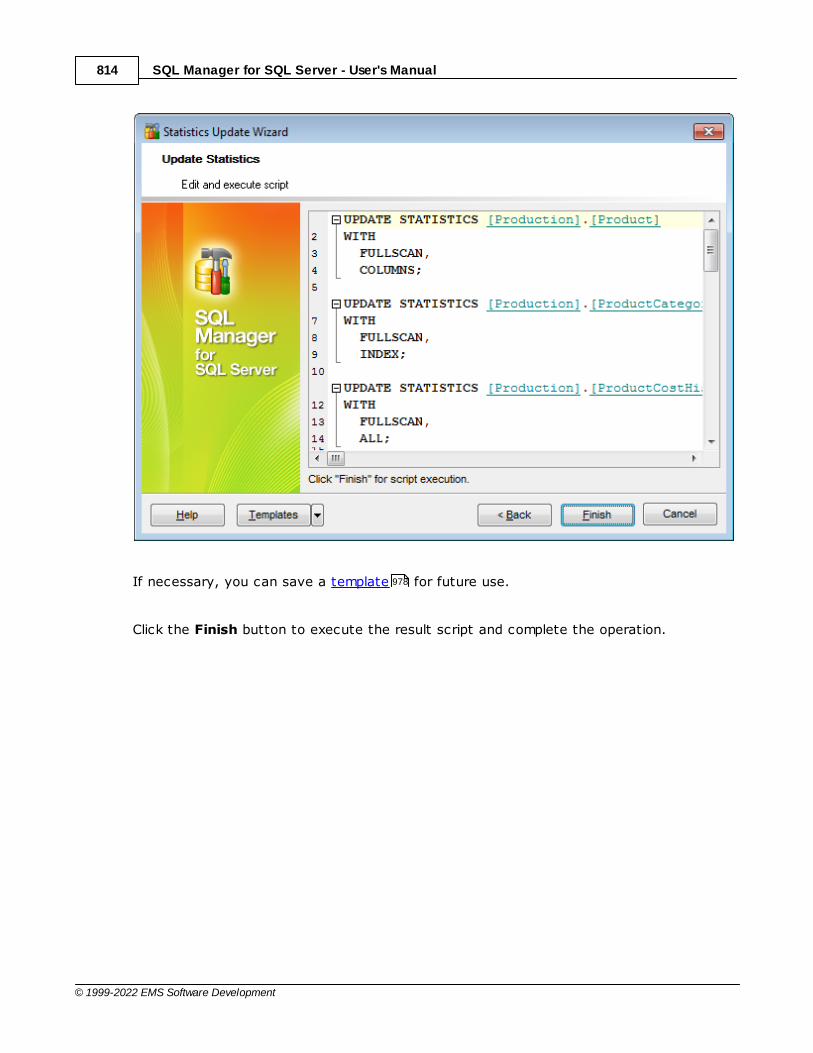
SQL Manager for SQL Server - User's Manual814
© 1999-2022 EMS Software Development
If necessary, you can save a template for future use.
Click the Finish button to execute the result script and complete the operation.
978
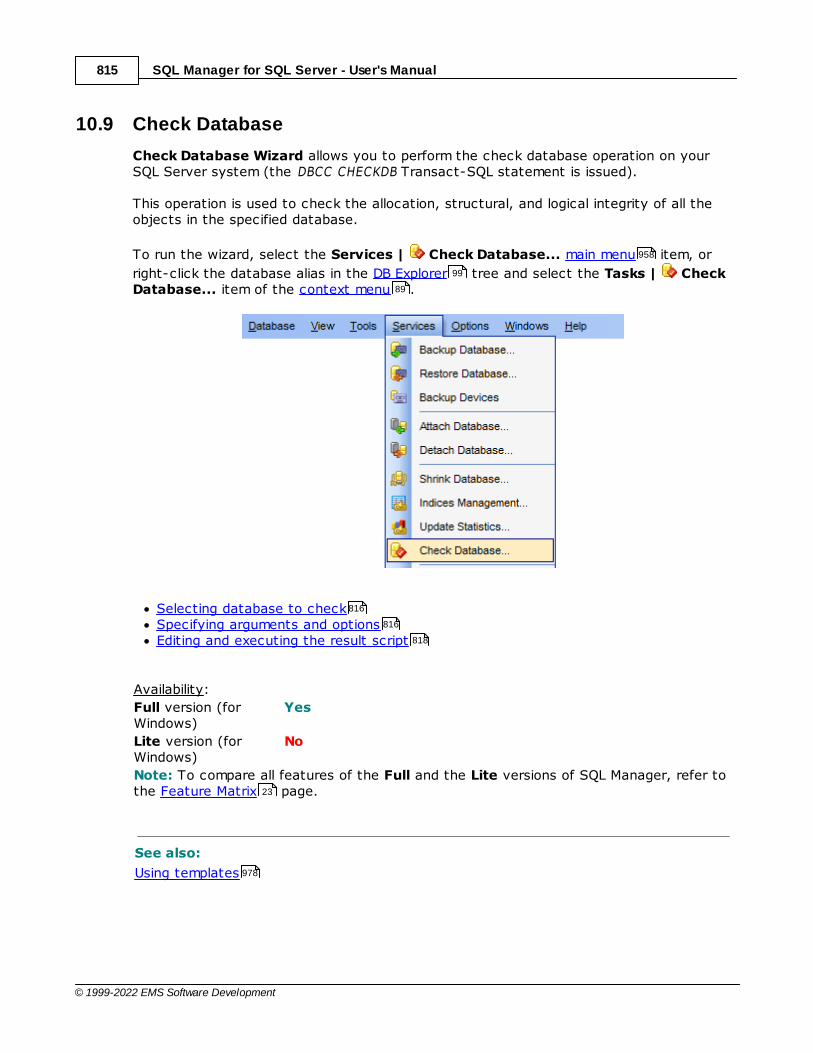
SQL Manager for SQL Server - User's Manual815
© 1999-2022 EMS Software Development
10.9 Check Database
Check Database Wizard allows you to perform the check database operation on yourSQL Server system (the DBCC CHECKDB Transact-SQL statement is issued).
This operation is used to check the allocation, structural, and logical integrity of all theobjects in the specified database.
To run the wizard, select the Services | Check Database... main menu item, or
right-click the database alias in the DB Explorer tree and select the Tasks | CheckDatabase... item of the context menu .
Selecting database to checkSpecifying arguments and optionsEditing and executing the result script
Availability:
Full version (forWindows)
Yes
Lite version (forWindows)
No
Note: To compare all features of the Full and the Lite versions of SQL Manager, refer tothe Feature Matrix page.
See also:
Using templates
958
99
89
816
816
818
23
978

SQL Manager for SQL Server - User's Manual816
© 1999-2022 EMS Software Development
10.9.1 Selecting database to check
This step of the wizard allows you to select the host/instance containing the databasefor checking.
HostType in or use the drop-down list to select the host/instance where the database resides.
DatabaseUse the drop-down list of all registered databases on the selected host to specify thedatabase to run integrity checks for.
Click the Next button to proceed to the Specifying arguments and options step of thewizard.
10.9.2 Specifying arguments and options
Use this step of the wizard to specify arguments and options for the check databaseoperation.
816
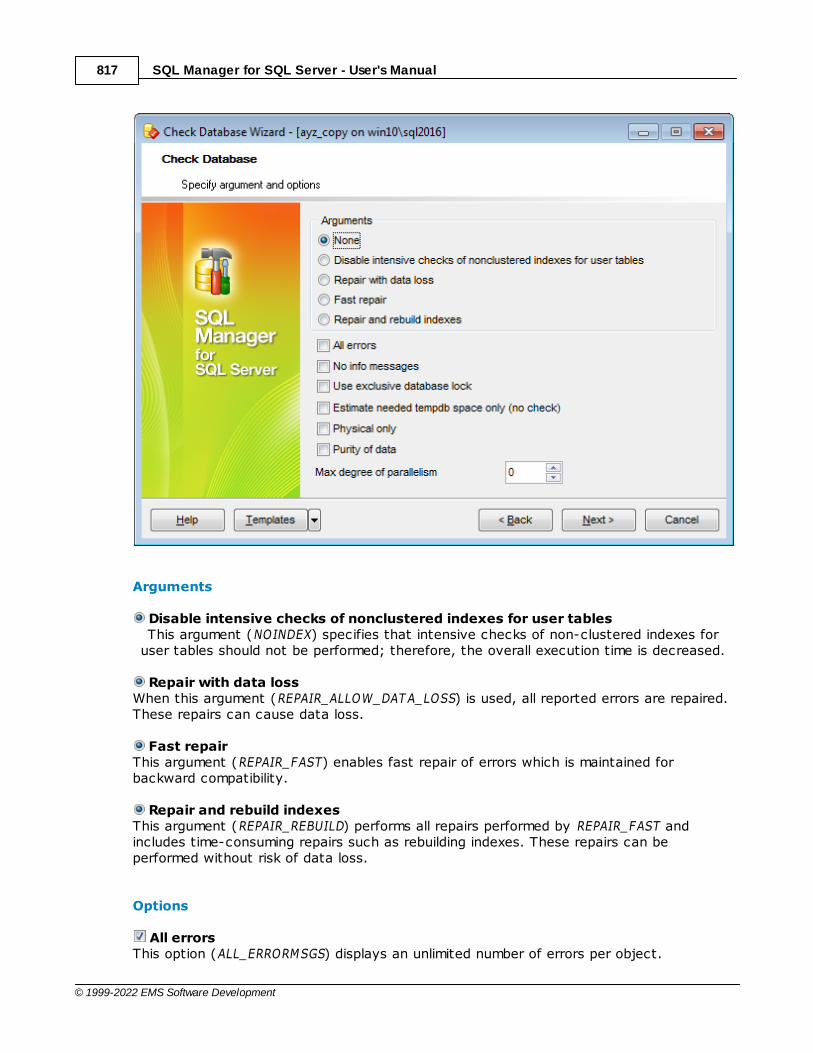
SQL Manager for SQL Server - User's Manual817
© 1999-2022 EMS Software Development
Arguments
Disable intensive checks of nonclustered indexes for user tablesThis argument (NOINDEX) specifies that intensive checks of non-clustered indexes for
user tables should not be performed; therefore, the overall execution time is decreased.
Repair with data lossWhen this argument (REPAIR_ALLOW_DAT A_LOSS) is used, all reported errors are repaired.These repairs can cause data loss.
Fast repairThis argument (REPAIR_FAST) enables fast repair of errors which is maintained forbackward compatibility.
Repair and rebuild indexesThis argument (REPAIR_REBUILD) performs all repairs performed by REPAIR_FAST andincludes time-consuming repairs such as rebuilding indexes. These repairs can beperformed without risk of data loss.
Options
All errorsThis option (ALL_ERRORMSGS) displays an unlimited number of errors per object.
SQL Manager for SQL Server - User's Manual818
© 1999-2022 EMS Software Development
No info messagesThis option (NO_INFOMSGS) suppresses all informational messages.
Use exclusive database lockIf this option (T ABLOCK) is used, the DBCC CHECKDB statement obtains locks instead ofusing an internal database snapshot. This includes a short-term database exclusive lock.
Estimate onlyThis option (EST IMAT EONLY) displays the estimated amount of tem pdb space that isrequired to run DBCC CHECKDB with all the other specified options. The actual databasecheck is not performed in this case.
Physical onlyThis option (PHY SICAL_ONLY) limits the checking operation to the integrity of the physicalstructure of the page and record headers, the physical structure of B-trees and theallocation consistency of the database. Designed to provide a small overhead check ofthe physical consistency of the database, this check can also detect torn pages,checksum failures, and common hardware failures that can compromise a user's data.
Purity of dataIf this option (DAT A_PURIT Y) is enabled, the DBCC CHECKDB statement checks thedatabase for column values that are not valid or out-of-range.
Max degree of parallelismUse this option to set the degree of threads per execution. The default value for Maxdegree of parallelism is set to 0, this means there is no limit to the number of processors.
When you are done, click the Next button to proceed to Editing and executing the resultscript .
10.9.3 Editing and executing the result script
This step of the wizard is intended to inform you that all necessary options have beenset, and you can start the check database process.
If necessary, you can edit the result script before execution.
818
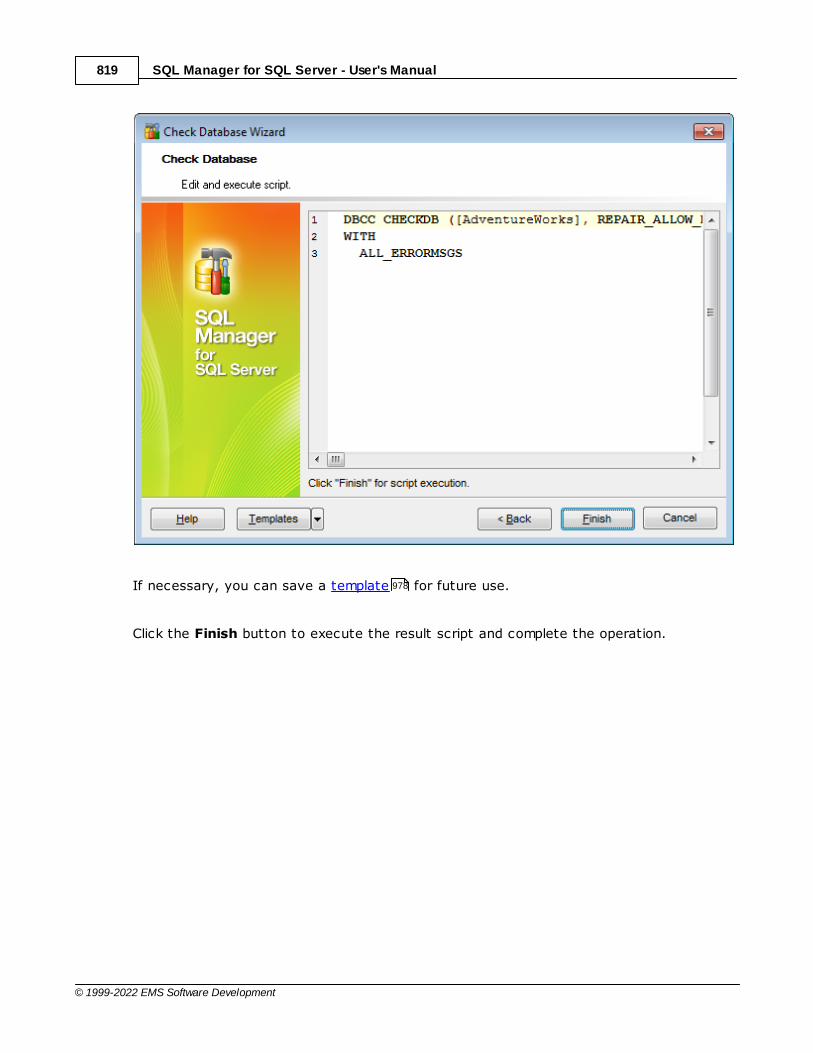
SQL Manager for SQL Server - User's Manual819
© 1999-2022 EMS Software Development
If necessary, you can save a template for future use.
Click the Finish button to execute the result script and complete the operation.
978
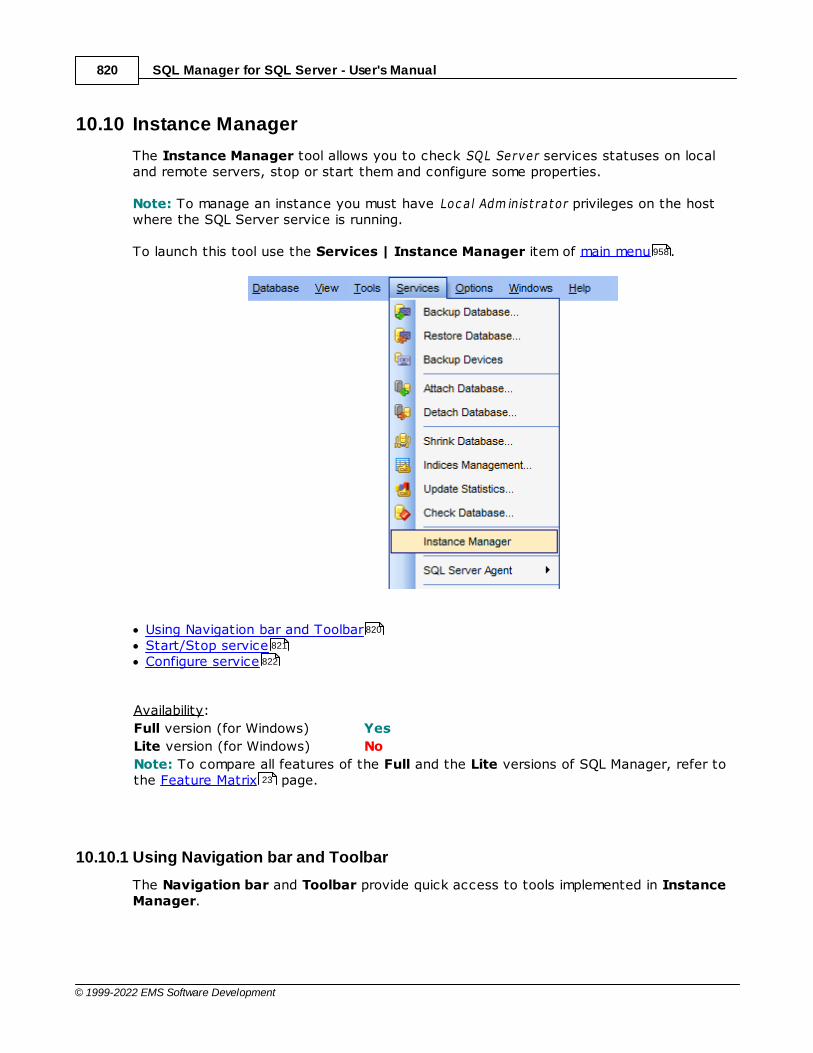
SQL Manager for SQL Server - User's Manual820
© 1999-2022 EMS Software Development
10.10 Instance Manager
The Instance Manager tool allows you to check SQL Server services statuses on localand remote servers, stop or start them and configure some properties.
Note: To manage an instance you must have Loc al Adm inist rator privileges on the hostwhere the SQL Server service is running.
To launch this tool use the Services | Instance Manager item of main menu .
Using Navigation bar and ToolbarStart/Stop serviceConfigure service
Availability:
Full version (for Windows) Yes
Lite version (for Windows) No
Note: To compare all features of the Full and the Lite versions of SQL Manager, refer tothe Feature Matrix page.
10.10.1 Using Navigation bar and Toolbar
The Navigation bar and Toolbar provide quick access to tools implemented in InstanceManager.
958
820
821
822
23
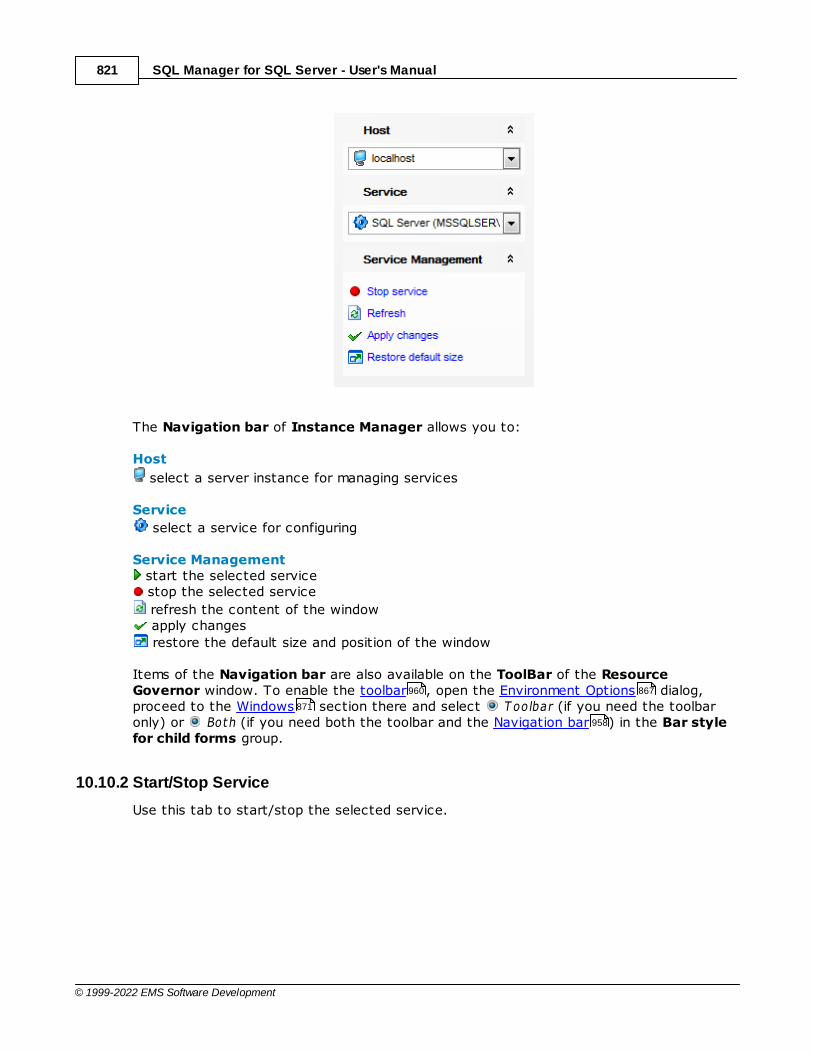
SQL Manager for SQL Server - User's Manual821
© 1999-2022 EMS Software Development
The Navigation bar of Instance Manager allows you to:
Host
select a server instance for managing services
Service
select a service for configuring
Service Management start the selected service stop the selected service
refresh the content of the window apply changes
restore the default size and position of the window
Items of the Navigation bar are also available on the ToolBar of the ResourceGovernor window. To enable the toolbar , open the Environment Options dialog,proceed to the Windows section there and select T oolbar (if you need the toolbaronly) or Both (if you need both the toolbar and the Navigation bar ) in the Bar stylefor child forms group.
10.10.2 Start/Stop Service
Use this tab to start/stop the selected service.
960 867
871
958
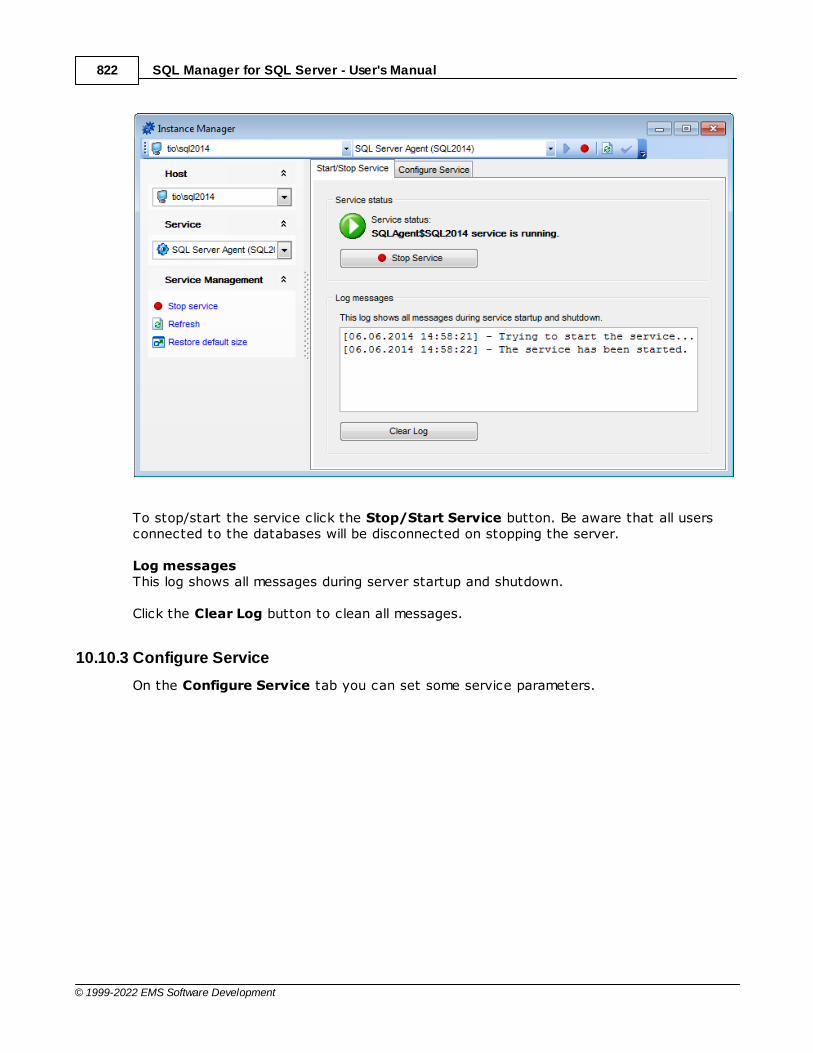
SQL Manager for SQL Server - User's Manual822
© 1999-2022 EMS Software Development
To stop/start the service click the Stop/Start Service button. Be aware that all usersconnected to the databases will be disconnected on stopping the server.
Log messagesThis log shows all messages during server startup and shutdown.
Click the Clear Log button to clean all messages.
10.10.3 Configure Service
On the Configure Service tab you can set some service parameters.
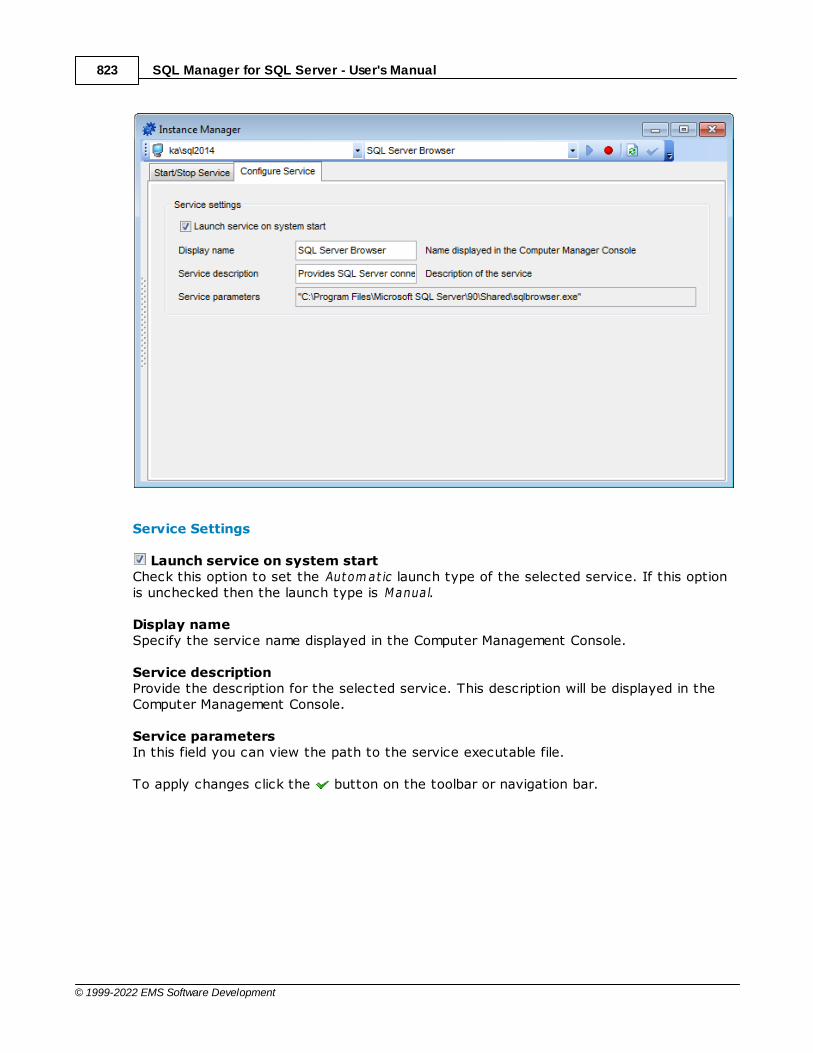
SQL Manager for SQL Server - User's Manual823
© 1999-2022 EMS Software Development
Service Settings
Launch service on system startCheck this option to set the Autom at ic launch type of the selected service. If this optionis unchecked then the launch type is Manual.
Display nameSpecify the service name displayed in the Computer Management Console.
Service descriptionProvide the description for the selected service. This description will be displayed in theComputer Management Console.
Service parametersIn this field you can view the path to the service executable file.
To apply changes click the button on the toolbar or navigation bar.
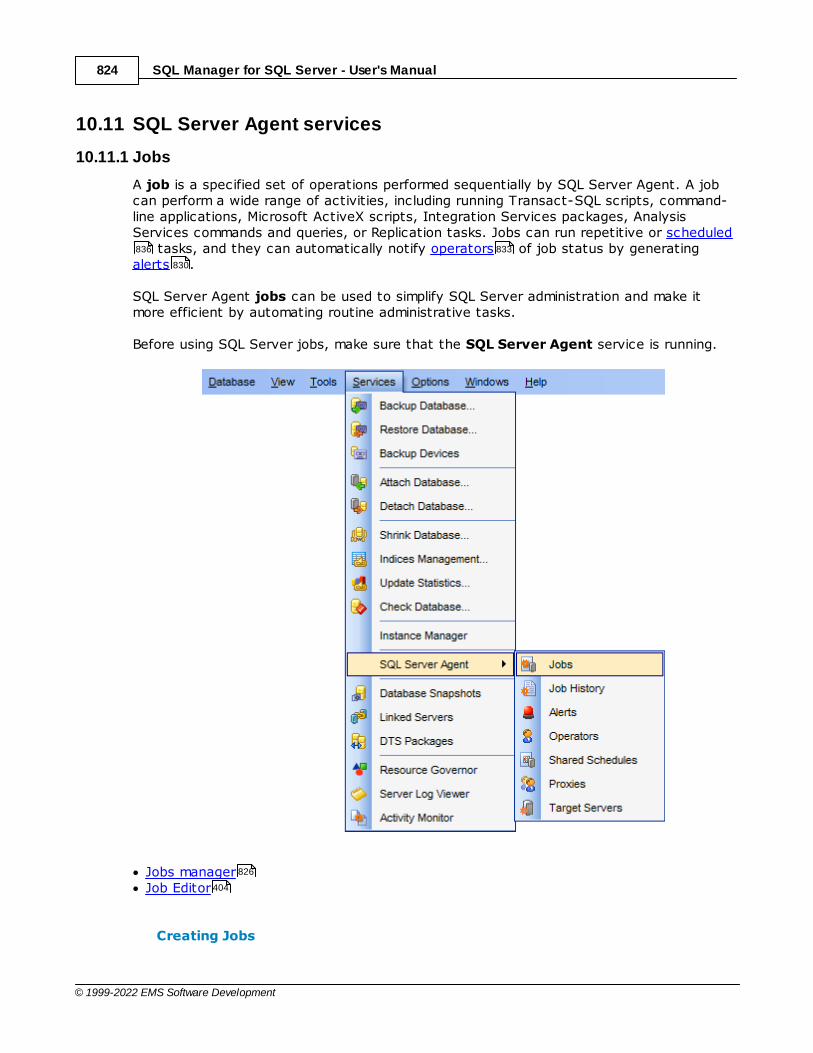
SQL Manager for SQL Server - User's Manual824
© 1999-2022 EMS Software Development
10.11 SQL Server Agent services
10.11.1 Jobs
A job is a specified set of operations performed sequentially by SQL Server Agent. A jobcan perform a wide range of activities, including running Transact-SQL scripts, command-line applications, Microsoft ActiveX scripts, Integration Services packages, AnalysisServices commands and queries, or Replication tasks. Jobs can run repetitive or scheduled
tasks, and they can automatically notify operators of job status by generatingalerts .
SQL Server Agent jobs can be used to simplify SQL Server administration and make itmore efficient by automating routine administrative tasks.
Before using SQL Server jobs, make sure that the SQL Server Agent service is running.
Jobs managerJob Editor
Creating Jobs
836 833
830
826
404
SQL Manager for SQL Server - User's Manual825
© 1999-2022 EMS Software Development
To create a new job:right-click the Jobs node (within the Server Objects branch) or any object withinthis node in the DB Explorer tree and select the New Job item from the contextmenu ;define job properties using the appropriate tabs of Job Editor .
orselect the Database | New Object... main menu item;select Job in the Create New Object dialog;define job properties using Job Editor .
Hint: To create a new job, you can also select the Services | SQL Server Agent | Jobs main menu item to open the Jobs manager and select the Add Job... item from thecontext menu or on the Navigation bar.
To create a new job with the same properties as one of existing jobs has:select the Database | Duplicate Object... menu item;follow the instructions of Duplicate Object Wizard .
Alternatively, you can right-click a job in the DB Explorer tree and select the DuplicateJob <job_name>... context menu item.
Duplicate Object Wizard allows you to select the server to create a new job and toedit the result SQL statement for creating the job.
Editing Jobs
To edit an existing job:select the job for editing in the DB Explorer tree (type the first letters of the jobname for quick search );right-click the object and select the Edit Job <job_name> context menu item, orsimply double-click the job;edit job properties using the appropriate tabs of Job Editor .
To change the name of a job:select the Job to rename in the DB Explorer tree;right-click the job alias and select the Rename Job <job_name>... item from thecontext menu ;edit the job name using the Rename Object... dialog.
Dropping Jobs
To drop a job:select the job to drop in the DB Explorer tree;right-click the object and select the Drop Job <job_name>... context menu item;confirm dropping in the dialog window.
Note: If more convenient, you can also use the following shortcuts :Ct r l+N to create a new job;Ct r l+O to edit the selected job;Ct r l+R to rename the job;Shift+Del to drop the object.
To create, edit, rename and drop jobs, you can also use the context menu and theNavigation bar of Jobs manager .
99
91
404
958
216
404
958
218
99
218
99
118
404
99
91
99
996
826
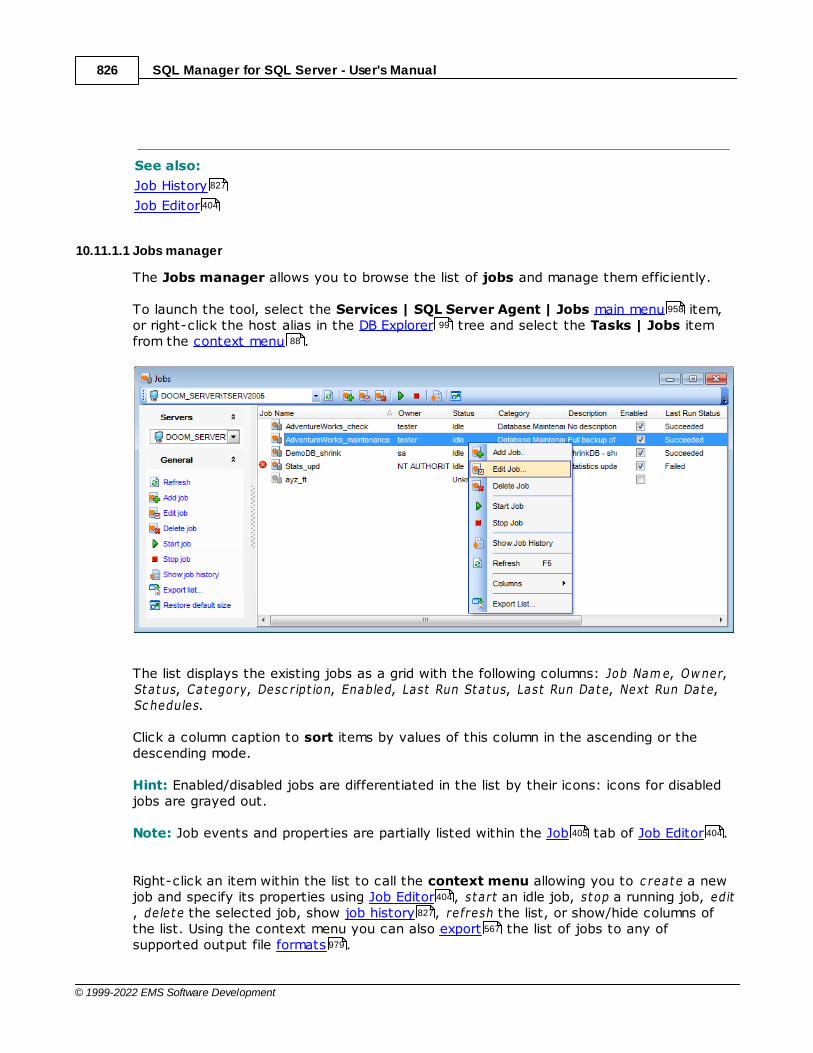
SQL Manager for SQL Server - User's Manual826
© 1999-2022 EMS Software Development
See also:
Job History
Job Editor
10.11.1.1 Jobs manager
The Jobs manager allows you to browse the list of jobs and manage them efficiently.
To launch the tool, select the Services | SQL Server Agent | Jobs main menu item,or right-click the host alias in the DB Explorer tree and select the Tasks | Jobs itemfrom the context menu .
The list displays the existing jobs as a grid with the following columns: Job Nam e, Ow ner,Status, Category, Desc r ipt ion, Enabled, Last Run Status, Last Run Date, Next Run Date,Sc hedules.
Click a column caption to sort items by values of this column in the ascending or thedescending mode.
Hint: Enabled/disabled jobs are differentiated in the list by their icons: icons for disabledjobs are grayed out.
Note: Job events and properties are partially listed within the Job tab of Job Editor .
Right-click an item within the list to call the context menu allowing you to c reate a newjob and specify its properties using Job Editor , start an idle job, stop a running job, edit, de lete the selected job, show job history , refresh the list, or show/hide columns ofthe list. Using the context menu you can also export the list of jobs to any ofsupported output file formats .
827
404
958
99
88
405 404
404
827
567
979
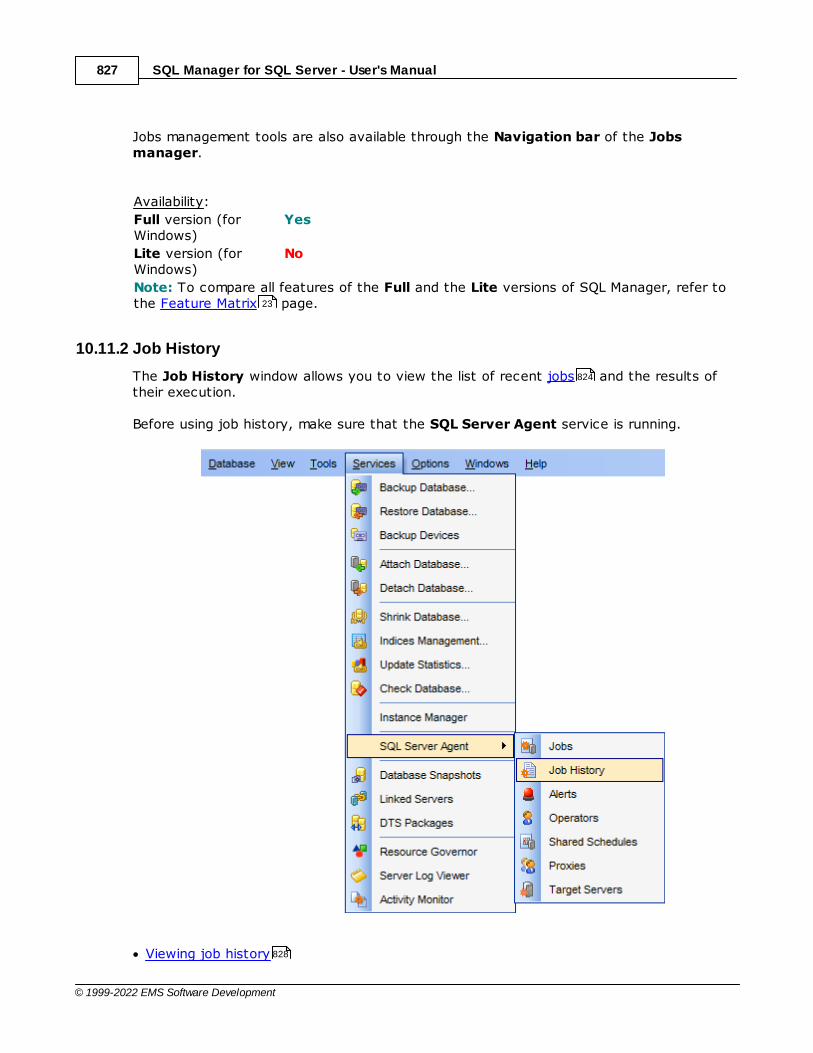
SQL Manager for SQL Server - User's Manual827
© 1999-2022 EMS Software Development
Jobs management tools are also available through the Navigation bar of the Jobsmanager.
Availability:
Full version (forWindows)
Yes
Lite version (forWindows)
No
Note: To compare all features of the Full and the Lite versions of SQL Manager, refer tothe Feature Matrix page.
10.11.2 Job History
The Job History window allows you to view the list of recent jobs and the results oftheir execution.
Before using job history, make sure that the SQL Server Agent service is running.
Viewing job history
23
824
828

SQL Manager for SQL Server - User's Manual828
© 1999-2022 EMS Software Development
Filtering job history list
Availability:
Full version (forWindows)
Yes
Lite version (forWindows)
No
Note: To compare all features of the Full and the Lite versions of SQL Manager, refer tothe Feature Matrix page.
See also:
Jobs manager
Jobs Editor
10.11.2.1 Viewing job history
The Job History window allows you to browse the list of recently tried jobs and managethis list efficiently.
To launch the tool, select the Services | SQL Server Agent | Job History main menuitem, or right-click the host alias in the DB Explorer tree and select the Tasks | JobHistory item from the context menu .
829
23
826
404
958
99
88

SQL Manager for SQL Server - User's Manual829
© 1999-2022 EMS Software Development
The list displays the recent jobs as a grid with the following columns: Run Date, Job Nam e, Run Status, Durat ion, Ret r ies, Sent Em ail, Sent Pager, Net Sent, Server.
Right-click an item within the list to call the context menu allowing you to filter jobsin list, c lear the history of all jobs or of the selected job, refresh the list, or show/hidecolumns of the list. Using the context menu you can also export the job history list toany of supported output file formats , add, edit and delete jobs.
Job history list management tools are also available through the Navigation bar of theJob History window.
The Steps area displays the list of steps defined for the selected job, with the followingattributes pertaining to each step: Step ID, Step Nam e, Run Status, Error ID, Severit y,Run Date, Durat ion, Ret r ies.
At the bottom of the Job History window the Message area is located. It allows you toview the details of the selected step execution.
10.11.2.2 Filtering job history list
The Job History Filter dialog is a filtering facility implemented in Job History list for yourconvenience.
To open the dialog, right-click within the Job History list and select the Filter... contextmenu item, or use the corresponding item of the Navigation bar.
The Job History Filter dialog provides the following options for flexible Job History list
829
567
979
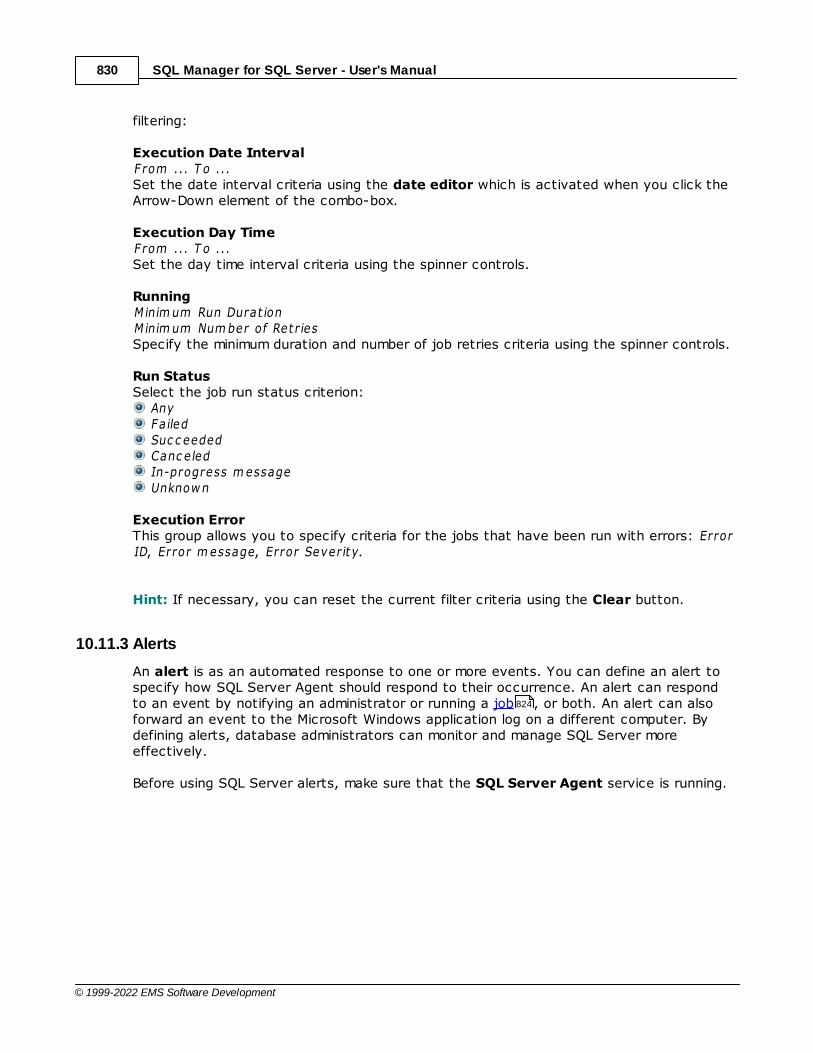
SQL Manager for SQL Server - User's Manual830
© 1999-2022 EMS Software Development
filtering:
Execution Date IntervalFrom ... T o ...Set the date interval criteria using the date editor which is activated when you click theArrow-Down element of the combo-box.
Execution Day TimeFrom ... T o ...Set the day time interval criteria using the spinner controls.
RunningMinim um Run Durat ionM inim um Num ber of Ret r iesSpecify the minimum duration and number of job retries criteria using the spinner controls.
Run StatusSelect the job run status criterion:
Any Failed Suc c eeded Canc eled In-progress m essage Unknow n
Execution ErrorThis group allows you to specify criteria for the jobs that have been run with errors: ErrorID, Error m essage, Error Severit y.
Hint: If necessary, you can reset the current filter criteria using the Clear button.
10.11.3 Alerts
An alert is as an automated response to one or more events. You can define an alert tospecify how SQL Server Agent should respond to their occurrence. An alert can respondto an event by notifying an administrator or running a job , or both. An alert can alsoforward an event to the Microsoft Windows application log on a different computer. Bydefining alerts, database administrators can monitor and manage SQL Server moreeffectively.
Before using SQL Server alerts, make sure that the SQL Server Agent service is running.
824

SQL Manager for SQL Server - User's Manual831
© 1999-2022 EMS Software Development
Alerts managerAlert Editor
Creating Alerts
To create a new alert:right-click the Alerts node (within the Server Objects branch) or any object withinthis node in the DB Explorer tree and select the New Alert item from the contextmenu ;define alert properties using the appropriate tabs of Alert Editor .
orselect the Database | New Object... main menu item;select Alert in the Create New Object dialog;define alert properties using Alert Editor .
Hint: To create a new alert, you can also select the Services | SQL Server Agent |Alerts main menu item to open the Alerts manager and select the Add Alert... itemfrom the context menu or on the Navigation bar.
To create a new alert with the same properties as one of existing alerts has:select the Database | Duplicate Object... menu item;follow the instructions of Duplicate Object Wizard .
Alternatively, you can right-click an alert in the DB Explorer tree and select the
832
416
99
91
416
958
216
416
958
218
99
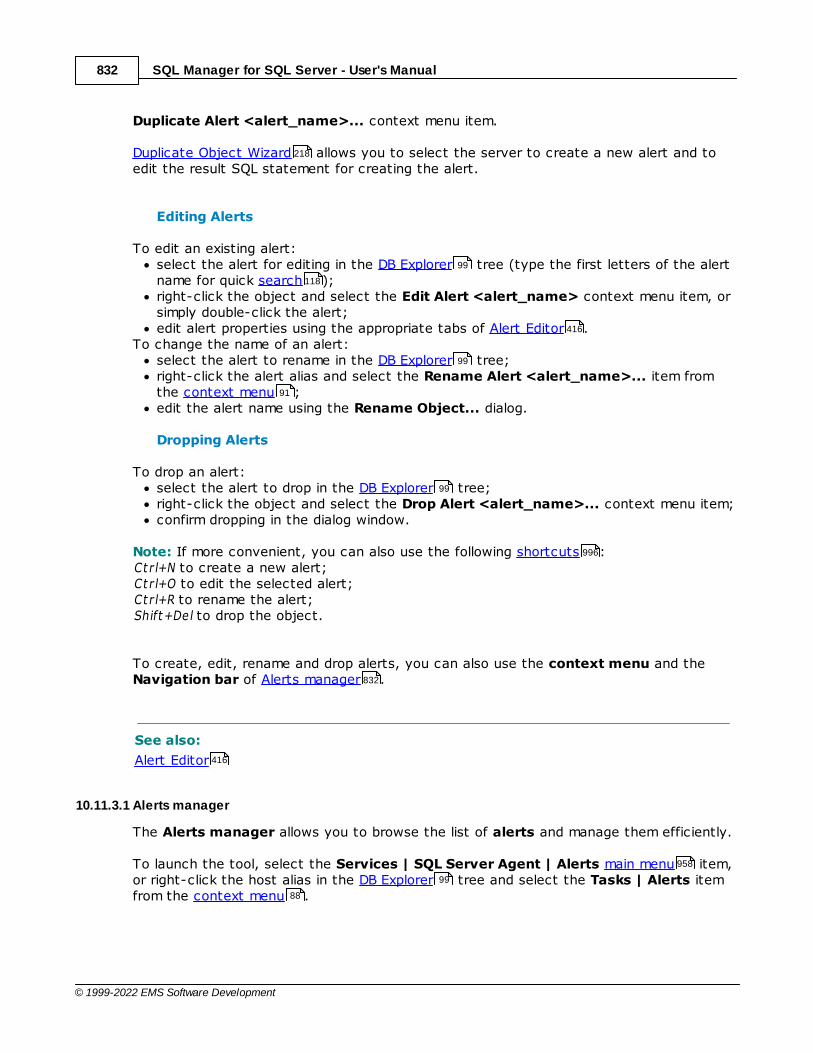
SQL Manager for SQL Server - User's Manual832
© 1999-2022 EMS Software Development
Duplicate Alert <alert_name>... context menu item.
Duplicate Object Wizard allows you to select the server to create a new alert and toedit the result SQL statement for creating the alert.
Editing Alerts
To edit an existing alert:select the alert for editing in the DB Explorer tree (type the first letters of the alertname for quick search );right-click the object and select the Edit Alert <alert_name> context menu item, orsimply double-click the alert;edit alert properties using the appropriate tabs of Alert Editor .
To change the name of an alert:select the alert to rename in the DB Explorer tree;right-click the alert alias and select the Rename Alert <alert_name>... item fromthe context menu ;edit the alert name using the Rename Object... dialog.
Dropping Alerts
To drop an alert:select the alert to drop in the DB Explorer tree;right-click the object and select the Drop Alert <alert_name>... context menu item;confirm dropping in the dialog window.
Note: If more convenient, you can also use the following shortcuts :Ct r l+N to create a new alert;Ct r l+O to edit the selected alert;Ct r l+R to rename the alert;Shift+Del to drop the object.
To create, edit, rename and drop alerts, you can also use the context menu and theNavigation bar of Alerts manager .
See also:
Alert Editor
10.11.3.1 Alerts manager
The Alerts manager allows you to browse the list of alerts and manage them efficiently.
To launch the tool, select the Services | SQL Server Agent | Alerts main menu item,or right-click the host alias in the DB Explorer tree and select the Tasks | Alerts itemfrom the context menu .
218
99
118
416
99
91
99
996
832
416
958
99
88
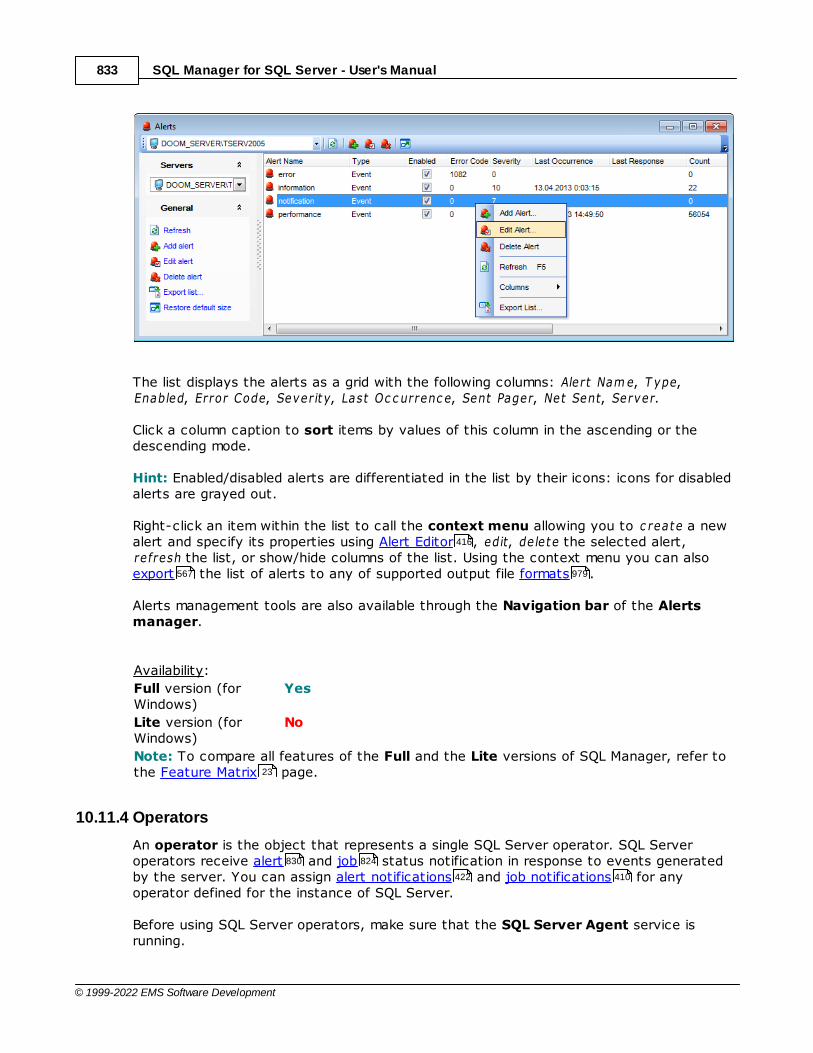
SQL Manager for SQL Server - User's Manual833
© 1999-2022 EMS Software Development
The list displays the alerts as a grid with the following columns: Alert Nam e, T ype,Enabled, Error Code, Severit y, Last Oc c urrenc e, Sent Pager, Net Sent, Server.
Click a column caption to sort items by values of this column in the ascending or thedescending mode.
Hint: Enabled/disabled alerts are differentiated in the list by their icons: icons for disabledalerts are grayed out.
Right-click an item within the list to call the context menu allowing you to c reate a newalert and specify its properties using Alert Editor , edit, de lete the selected alert,refresh the list, or show/hide columns of the list. Using the context menu you can alsoexport the list of alerts to any of supported output file formats .
Alerts management tools are also available through the Navigation bar of the Alertsmanager.
Availability:
Full version (forWindows)
Yes
Lite version (forWindows)
No
Note: To compare all features of the Full and the Lite versions of SQL Manager, refer tothe Feature Matrix page.
10.11.4 Operators
An operator is the object that represents a single SQL Server operator. SQL Serveroperators receive alert and job status notification in response to events generatedby the server. You can assign alert notifications and job notifications for anyoperator defined for the instance of SQL Server.
Before using SQL Server operators, make sure that the SQL Server Agent service isrunning.
416
567 979
23
830 824
422 410

SQL Manager for SQL Server - User's Manual834
© 1999-2022 EMS Software Development
Operators managerOperator Editor
Creating Operators
To create a new operator:right-click the Operators node (within the Server Objects branch) or any objectwithin this node in the DB Explorer tree and select the New Operator item fromthe context menu ;define operator properties using the appropriate tabs of Operator Editor .
orselect the Database | New Object... main menu item;select Operator in the Create New Object dialog;define operator properties using Operator Editor .
Hint: To create a new operator, you can also select the Services | SQL Server Agent |Operators main menu item to open the Operators manager and select the AddOperator... item from the context menu or on the Navigation bar.
To create a new operator with the same properties as one of existing operators has:select the Database | Duplicate Object... menu item;follow the instructions of Duplicate Object Wizard .
Alternatively, you can right-click an operator in the DB Explorer tree and select the
835
422
99
91
422
958
216
422
958
218
99

SQL Manager for SQL Server - User's Manual835
© 1999-2022 EMS Software Development
Duplicate Operator <operator_name>... context menu item.
Duplicate Object Wizard allows you to select the server to create a new operator andto edit the result SQL statement for creating the operator.
Editing Operators
To edit an existing operator:select the operator for editing in the DB Explorer tree (type the first letters of theoperator name for quick search );right-click the object and select the Edit Operator <operator_name> context menuitem, or simply double-click the operator;edit operator properties using the appropriate tabs of Operator Editor .
To change the name of an operator:select the operator to rename in the DB Explorer tree;right-click the operator alias and select the Rename Operator <operator_name>...item from the context menu ;edit the operator name using the Rename Object... dialog.
Dropping Operators
To drop an operator:select the operator to drop in the DB Explorer tree;right-click the object and select the Drop Operator <operator_name>... contextmenu item;confirm dropping in the dialog window.
Note: If more convenient, you can also use the following shortcuts :Ct r l+N to create a new operator;Ct r l+O to edit the selected operator;Ct r l+R to rename the operator;Shift+Del to drop the object.
To create, edit, rename and drop operators, you can also use the context menu andthe Navigation bar of Operators manager .
See also:
Operator Editor
10.11.4.1 Operators manager
The Operators manager allows you to browse the list of operators and manage themefficiently.
To launch the tool, select the Services | SQL Server Agent | Operators main menuitem, or right-click the host alias in the DB Explorer tree and select the Tasks |Operators item from the context menu .
218
99
118
422
99
91
99
996
835
422
958
99
88
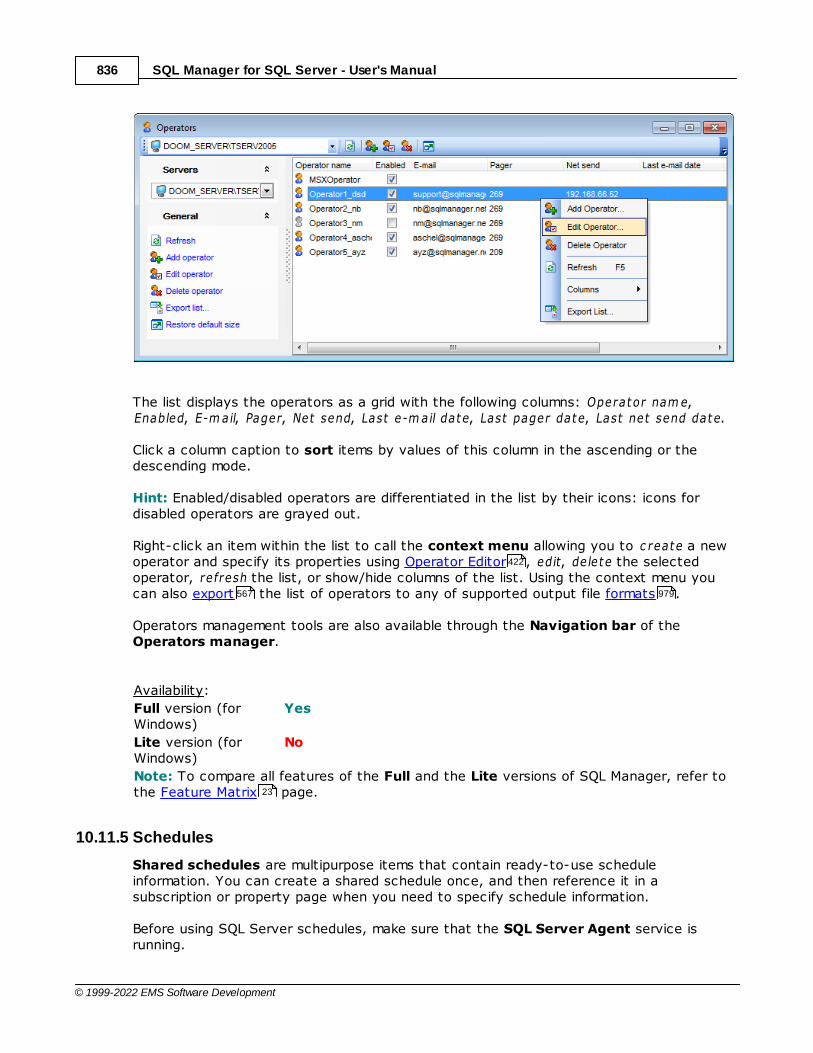
SQL Manager for SQL Server - User's Manual836
© 1999-2022 EMS Software Development
The list displays the operators as a grid with the following columns: Operator nam e,Enabled, E-m ail, Pager, Net send, Last e-m ail date, Last pager date, Last net send date.
Click a column caption to sort items by values of this column in the ascending or thedescending mode.
Hint: Enabled/disabled operators are differentiated in the list by their icons: icons fordisabled operators are grayed out.
Right-click an item within the list to call the context menu allowing you to c reate a newoperator and specify its properties using Operator Editor , edit, de lete the selectedoperator, refresh the list, or show/hide columns of the list. Using the context menu youcan also export the list of operators to any of supported output file formats .
Operators management tools are also available through the Navigation bar of theOperators manager.
Availability:
Full version (forWindows)
Yes
Lite version (forWindows)
No
Note: To compare all features of the Full and the Lite versions of SQL Manager, refer tothe Feature Matrix page.
10.11.5 Schedules
Shared schedules are multipurpose items that contain ready-to-use scheduleinformation. You can create a shared schedule once, and then reference it in asubscription or property page when you need to specify schedule information.
Before using SQL Server schedules, make sure that the SQL Server Agent service isrunning.
422
567 979
23
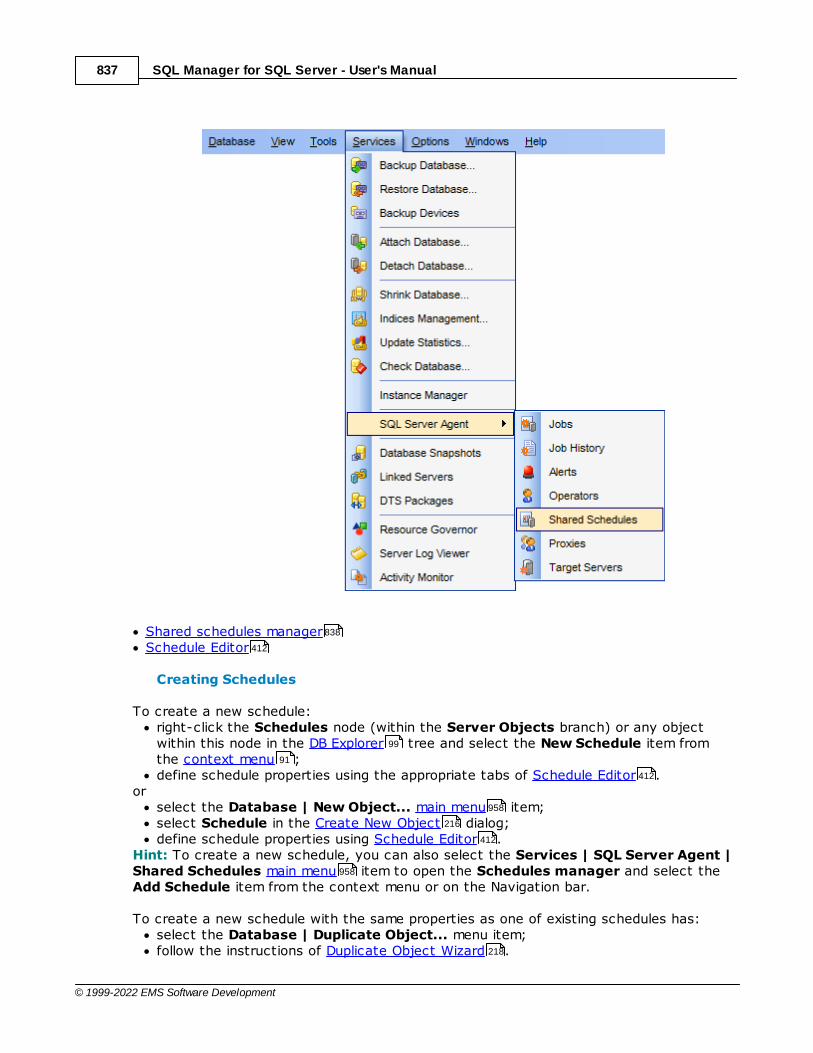
SQL Manager for SQL Server - User's Manual837
© 1999-2022 EMS Software Development
Shared schedules managerSchedule Editor
Creating Schedules
To create a new schedule:right-click the Schedules node (within the Server Objects branch) or any objectwithin this node in the DB Explorer tree and select the New Schedule item fromthe context menu ;define schedule properties using the appropriate tabs of Schedule Editor .
orselect the Database | New Object... main menu item;select Schedule in the Create New Object dialog;define schedule properties using Schedule Editor .
Hint: To create a new schedule, you can also select the Services | SQL Server Agent |Shared Schedules main menu item to open the Schedules manager and select theAdd Schedule item from the context menu or on the Navigation bar.
To create a new schedule with the same properties as one of existing schedules has:select the Database | Duplicate Object... menu item;follow the instructions of Duplicate Object Wizard .
838
412
99
91
412
958
216
412
958
218
SQL Manager for SQL Server - User's Manual838
© 1999-2022 EMS Software Development
Alternatively, you can right-click a schedule in the DB Explorer tree and select theDuplicate Schedule <schedule_name>... context menu item.
Duplicate Object Wizard allows you to select the server to create a new schedule andto edit the result SQL statement for creating the schedule.
Editing Schedules
To edit an existing schedule:select the schedule for editing in the DB Explorer tree (type the first letters of theschedule name for quick search );right-click the object and select the Edit Schedule <schedule_name> contextmenu item, or simply double-click the schedule;edit schedule properties using the appropriate tabs of Schedule Editor .
To change the name of a schedule:select the schedule to rename in the DB Explorer tree;right-click the schedule alias and select the Rename Schedule<schedule_name>... item from the context menu ;edit the schedule name using the Rename Object... dialog.
Dropping Schedules
To drop a schedule:select the schedule to drop in the DB Explorer tree;right-click the object and select the Drop Schedule <schedule_name>... contextmenu item;confirm dropping in the dialog window.
Note: If more convenient, you can also use the following shortcuts :Ct r l+N to create a new schedule;Ct r l+O to edit the selected schedule;Ct r l+R to rename the schedule;Shift+Del to drop the object.
To create, edit and drop schedules, you can also use the context menu and theNavigation bar of Shared schedules manager .
See also:
Schedule Editor
10.11.5.1 Shared schedules manager
The Schedules manager allows you to browse the list of shared schedules andmanage them efficiently.
To launch the tool, select the Services | SQL Server Agent | Shared Schedules mainmenu item, or right-click the host alias in the DB Explorer tree and select the Tasks| Shared Schedules item from the context menu .
99
218
99
118
412
99
91
99
996
838
412
958 99
88

SQL Manager for SQL Server - User's Manual839
© 1999-2022 EMS Software Development
The list displays the shared schedules as a grid with the following columns: ID, Nam e, RunT ype, Enabled, Created.
Click a column caption to sort items by values of this column in the ascending or thedescending mode.
Hint: Enabled/disabled schedules are differentiated in the list by their icons: icons fordisabled schedules are grayed out.
Right-click an item within the list to call the context menu allowing you to c reate a newschedule and specify its properties using Schedule Editor , edit, de lete the selectedschedule, refresh the list, or show/hide columns of the list. Using the context menu youcan also export the list of schedules to any of supported output file formats .
Schedules management tools are also available through the Navigation bar of theSchedules manager.
Availability:
Full version (forWindows)
Yes
Lite version (forWindows)
No
Note: To compare all features of the Full and the Lite versions of SQL Manager, refer tothe Feature Matrix page.
10.11.6 Proxies
A Microsoft® SQL Server Agent proxy defines the security context for a job step. Aproxy provides SQL Server Agent with access to the security credentials for aMicrosoft Windows user. Each proxy can be associated with one or more subsystems. A
412
567 979
23
824
431
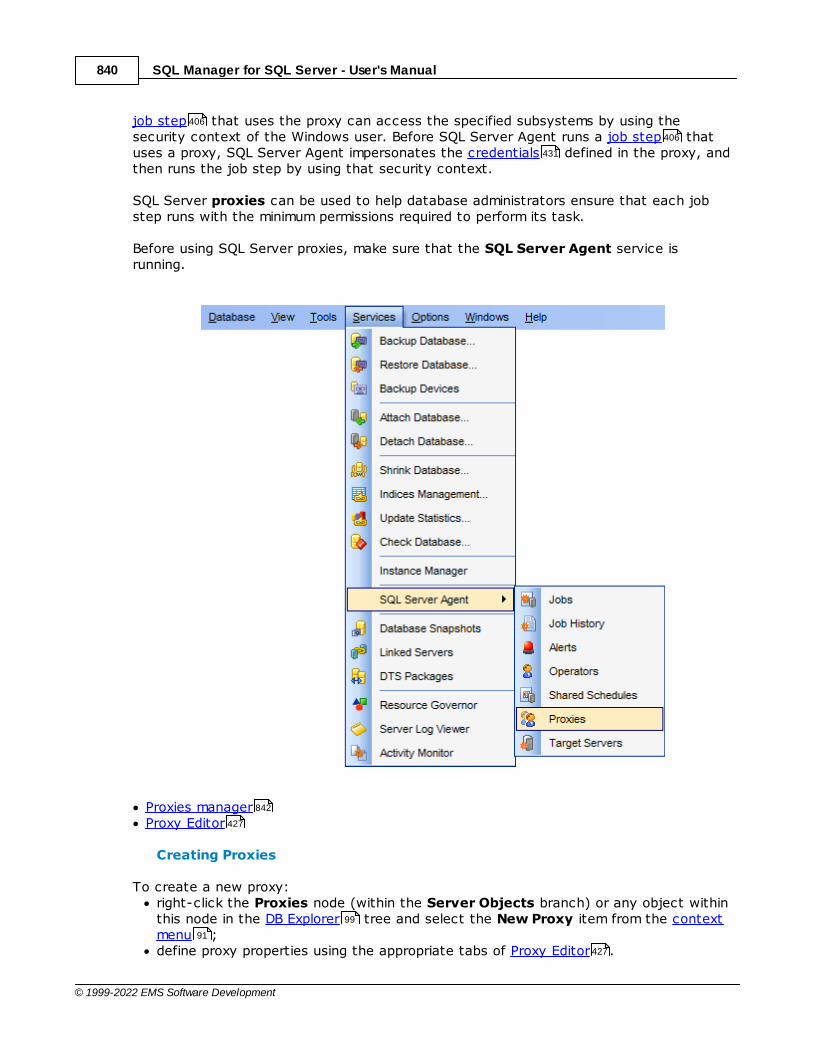
SQL Manager for SQL Server - User's Manual840
© 1999-2022 EMS Software Development
job step that uses the proxy can access the specified subsystems by using thesecurity context of the Windows user. Before SQL Server Agent runs a job step thatuses a proxy, SQL Server Agent impersonates the credentials defined in the proxy, andthen runs the job step by using that security context.
SQL Server proxies can be used to help database administrators ensure that each jobstep runs with the minimum permissions required to perform its task.
Before using SQL Server proxies, make sure that the SQL Server Agent service isrunning.
Proxies managerProxy Editor
Creating Proxies
To create a new proxy:right-click the Proxies node (within the Server Objects branch) or any object withinthis node in the DB Explorer tree and select the New Proxy item from the contextmenu ;define proxy properties using the appropriate tabs of Proxy Editor .
406
406
431
842
427
99
91
427
SQL Manager for SQL Server - User's Manual841
© 1999-2022 EMS Software Development
orselect the Database | New Object... main menu item;select Proxy in the Create New Object dialog;define proxy properties using Proxy Editor .
Hint: To create a new proxy, you can also select the Services | SQL Server Agent |Proxies main menu item to open the Proxies manager and select the Add Proxy...item from the context menu or on the Navigation bar.
To create a new proxy with the same properties as one of existing proxies has:select the Database | Duplicate Object... menu item;follow the instructions of Duplicate Object Wizard .
Alternatively, you can right-click a proxy in the DB Explorer tree and select theDuplicate Proxy <proxy_name>... context menu item.
Duplicate Object Wizard allows you to select the server to create a new proxy and toedit the result SQL statement for creating the proxy.
Editing Proxies
To edit an existing proxy:select the proxy for editing in the DB Explorer tree (type the first letters of theproxy name for quick search );right-click the object and select the Edit Proxy <proxy_name> context menu item,or simply double-click the proxy;edit proxy properties using the appropriate tabs of Proxy Editor .
To change the name of a proxy:select the proxy to rename in the DB Explorer tree;right-click the proxy alias and select the Rename Proxy <proxy_name>... item fromthe context menu ;edit the proxy name using the Rename Object... dialog.
Dropping Proxies
To drop a proxy:select the proxy to drop in the DB Explorer tree;right-click the object and select the Drop Proxy <proxy_name>... context menuitem;confirm dropping in the dialog window.
Note: If more convenient, you can also use the following shortcuts :Ct r l+N to create a new proxy;Ct r l+O to edit the selected proxy;Ct r l+R to rename the proxy;Shift+Del to drop the object.
To create, edit and drop proxies, you can also use the context menu and theNavigation bar of Proxies manager .
See also:
958
216
427
958
218
99
218
99
118
427
99
91
99
996
842

SQL Manager for SQL Server - User's Manual842
© 1999-2022 EMS Software Development
Proxy Editor
10.11.6.1 Proxies manager
The Proxies manager allows you to browse the list of proxies and manage themefficiently.
To launch the tool, select the Services | SQL Server Agent | Proxies main menuitem, or right-click the host alias in the DB Explorer tree and select the Tasks |Proxies item from the context menu .
The list displays the proxies as a grid with the following columns: Proxy Nam e, Enabled,Desc r ipt ion, Credent ia l Ident it y.
Click a column caption to sort items by values of this column in the ascending or thedescending mode.
Hint: Enabled/disabled proxies are differentiated in the list by their icons: icons fordisabled proxies are grayed out.
Right-click an item within the list to call the context menu allowing you to c reate a newproxy and specify its properties using Proxy Editor , edit, de lete the selected proxy,refresh the list, or show/hide columns of the list. Using the context menu you can alsoexport the list of proxies to any of supported output file formats .
Proxies management tools are also available through the Navigation bar of the Proxiesmanager.
Availability:
Full version (forWindows)
Yes
Lite version (for No
427
958
99
88
427
567 979
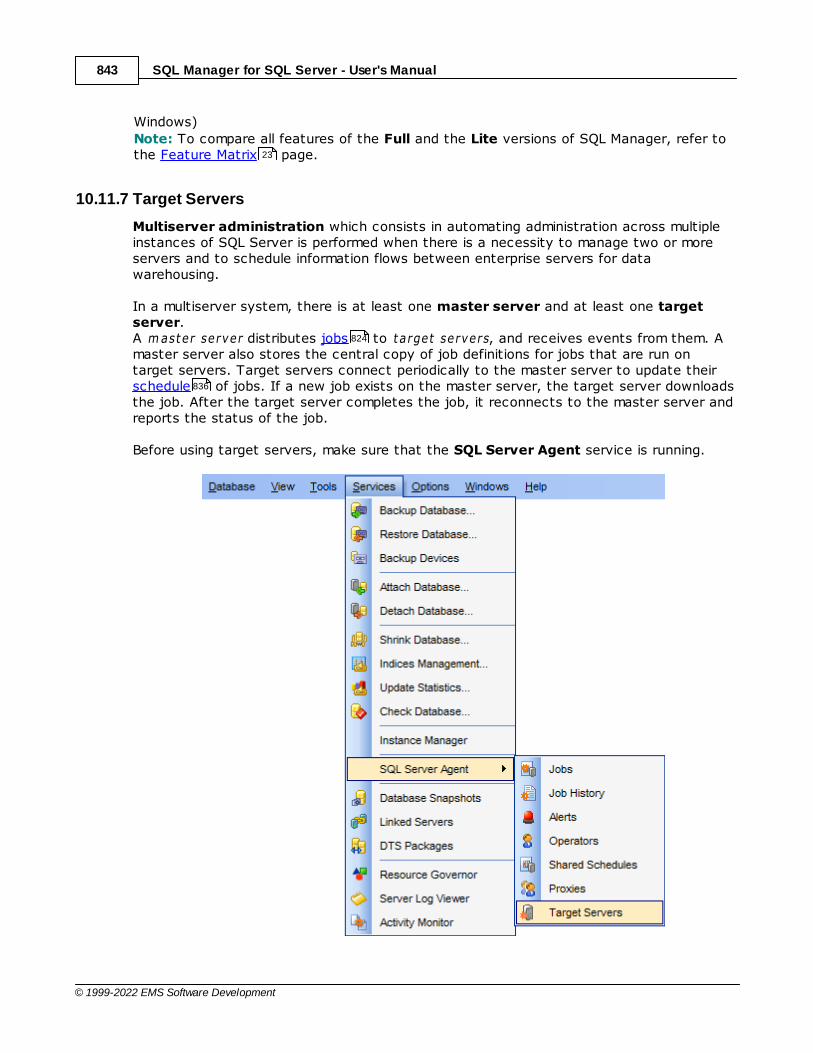
SQL Manager for SQL Server - User's Manual843
© 1999-2022 EMS Software Development
Windows)
Note: To compare all features of the Full and the Lite versions of SQL Manager, refer tothe Feature Matrix page.
10.11.7 Target Servers
Multiserver administration which consists in automating administration across multipleinstances of SQL Server is performed when there is a necessity to manage two or moreservers and to schedule information flows between enterprise servers for datawarehousing.
In a multiserver system, there is at least one master server and at least one targetserver. A m aster server distributes jobs to target servers, and receives events from them. Amaster server also stores the central copy of job definitions for jobs that are run ontarget servers. Target servers connect periodically to the master server to update their schedule of jobs. If a new job exists on the master server, the target server downloadsthe job. After the target server completes the job, it reconnects to the master server andreports the status of the job.
Before using target servers, make sure that the SQL Server Agent service is running.
23
824
836
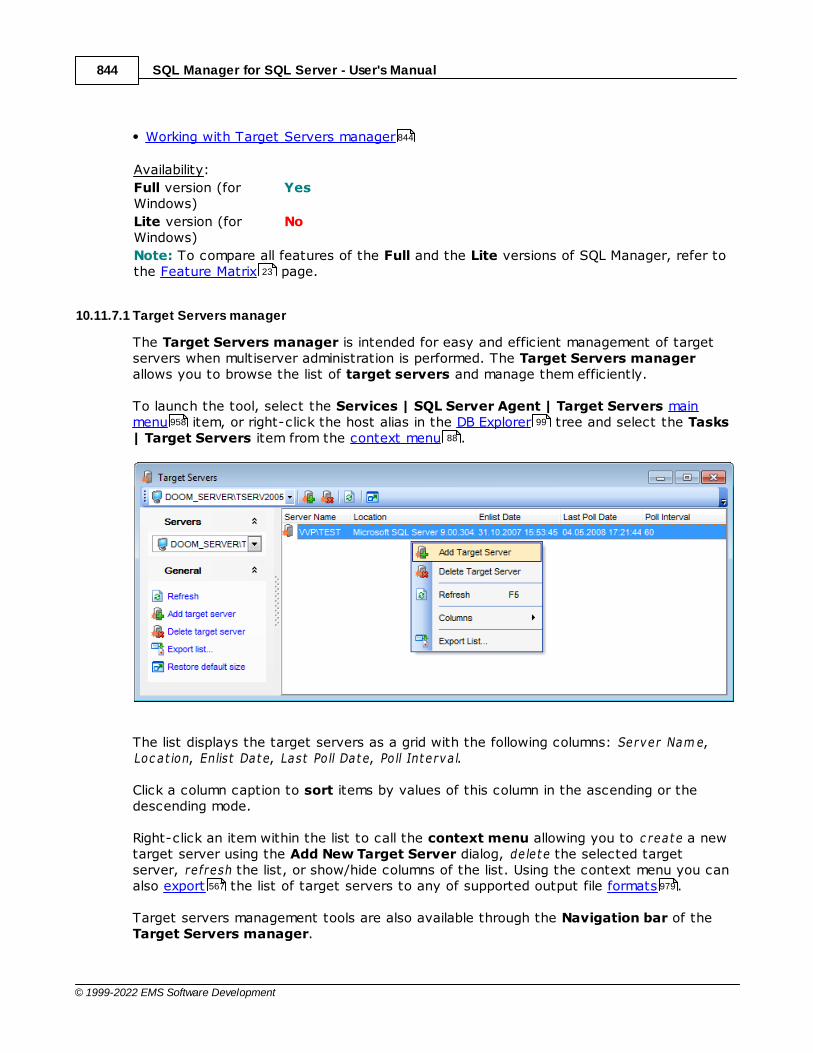
SQL Manager for SQL Server - User's Manual844
© 1999-2022 EMS Software Development
Working with Target Servers manager
Availability:
Full version (forWindows)
Yes
Lite version (forWindows)
No
Note: To compare all features of the Full and the Lite versions of SQL Manager, refer tothe Feature Matrix page.
10.11.7.1 Target Servers manager
The Target Servers manager is intended for easy and efficient management of targetservers when multiserver administration is performed. The Target Servers managerallows you to browse the list of target servers and manage them efficiently.
To launch the tool, select the Services | SQL Server Agent | Target Servers mainmenu item, or right-click the host alias in the DB Explorer tree and select the Tasks| Target Servers item from the context menu .
The list displays the target servers as a grid with the following columns: Server Nam e,Loc at ion, Enlist Date, Last Poll Date, Poll Interval.
Click a column caption to sort items by values of this column in the ascending or thedescending mode.
Right-click an item within the list to call the context menu allowing you to c reate a newtarget server using the Add New Target Server dialog, de lete the selected targetserver, refresh the list, or show/hide columns of the list. Using the context menu you canalso export the list of target servers to any of supported output file formats .
Target servers management tools are also available through the Navigation bar of theTarget Servers manager.
844
23
958 99
88
567 979
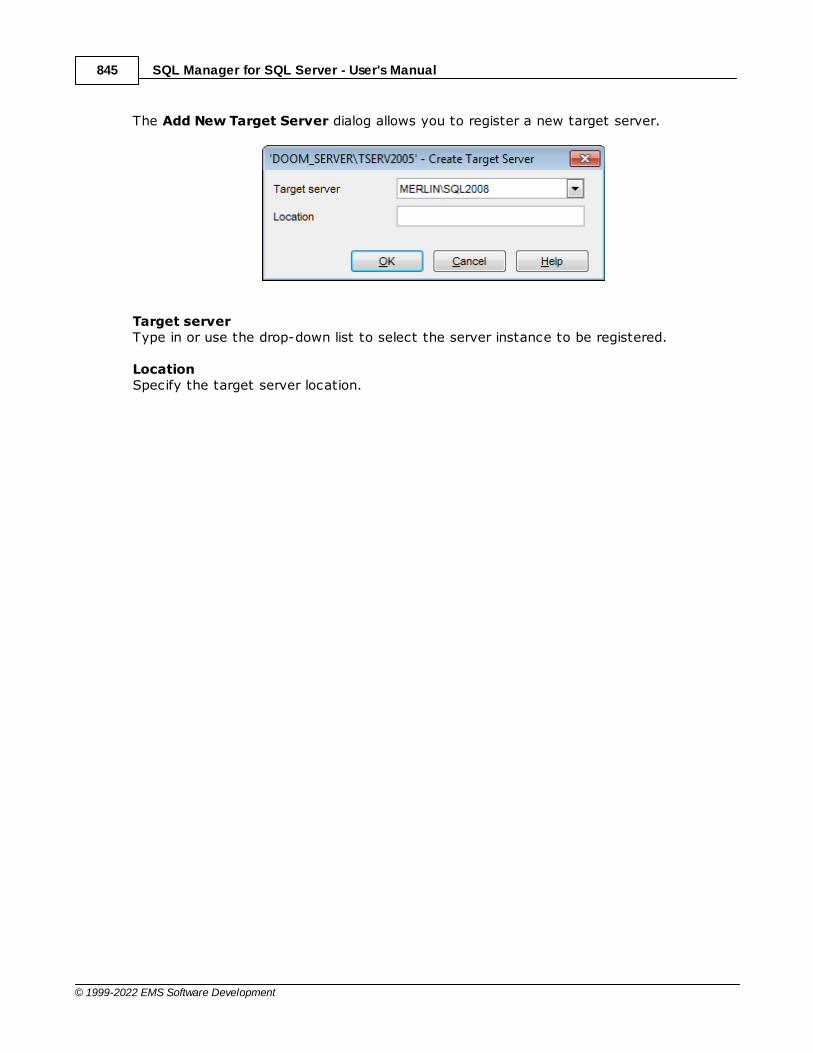
SQL Manager for SQL Server - User's Manual845
© 1999-2022 EMS Software Development
The Add New Target Server dialog allows you to register a new target server.
Target serverType in or use the drop-down list to select the server instance to be registered.
LocationSpecify the target server location.
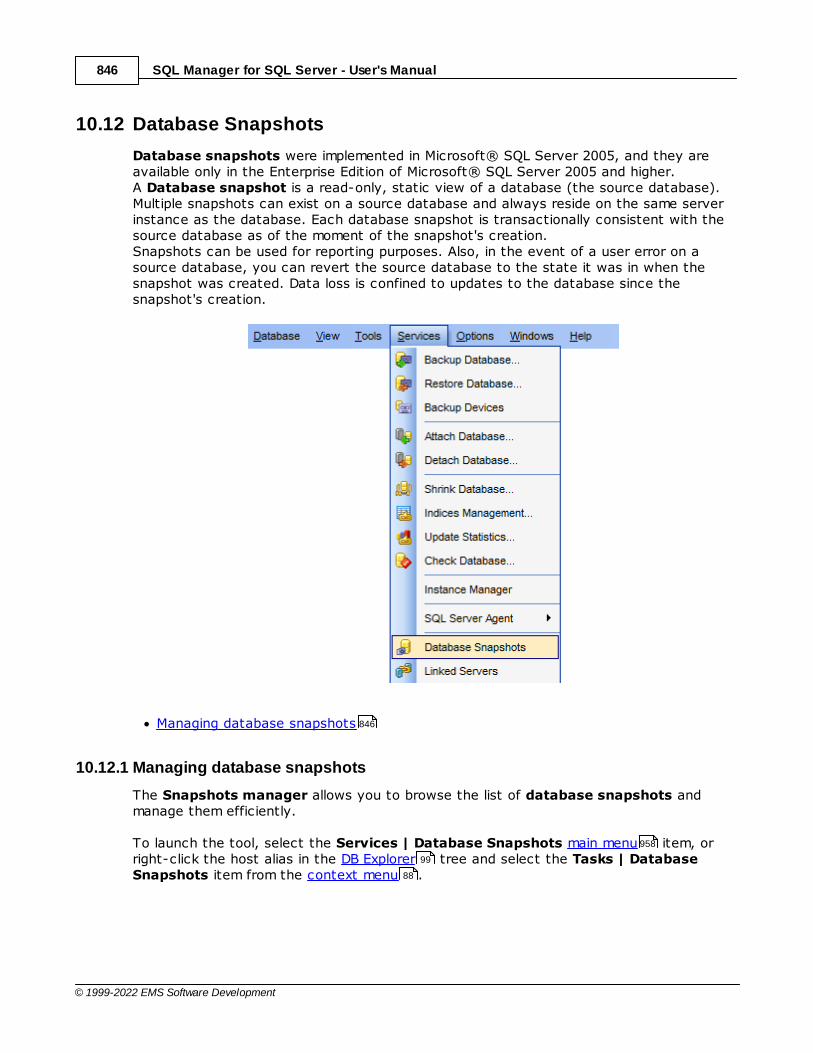
SQL Manager for SQL Server - User's Manual846
© 1999-2022 EMS Software Development
10.12 Database Snapshots
Database snapshots were implemented in Microsoft® SQL Server 2005, and they areavailable only in the Enterprise Edition of Microsoft® SQL Server 2005 and higher.A Database snapshot is a read-only, static view of a database (the source database).Multiple snapshots can exist on a source database and always reside on the same serverinstance as the database. Each database snapshot is transactionally consistent with thesource database as of the moment of the snapshot's creation.Snapshots can be used for reporting purposes. Also, in the event of a user error on asource database, you can revert the source database to the state it was in when thesnapshot was created. Data loss is confined to updates to the database since thesnapshot's creation.
Managing database snapshots
10.12.1 Managing database snapshots
The Snapshots manager allows you to browse the list of database snapshots andmanage them efficiently.
To launch the tool, select the Services | Database Snapshots main menu item, orright-click the host alias in the DB Explorer tree and select the Tasks | DatabaseSnapshots item from the context menu .
846
958
99
88
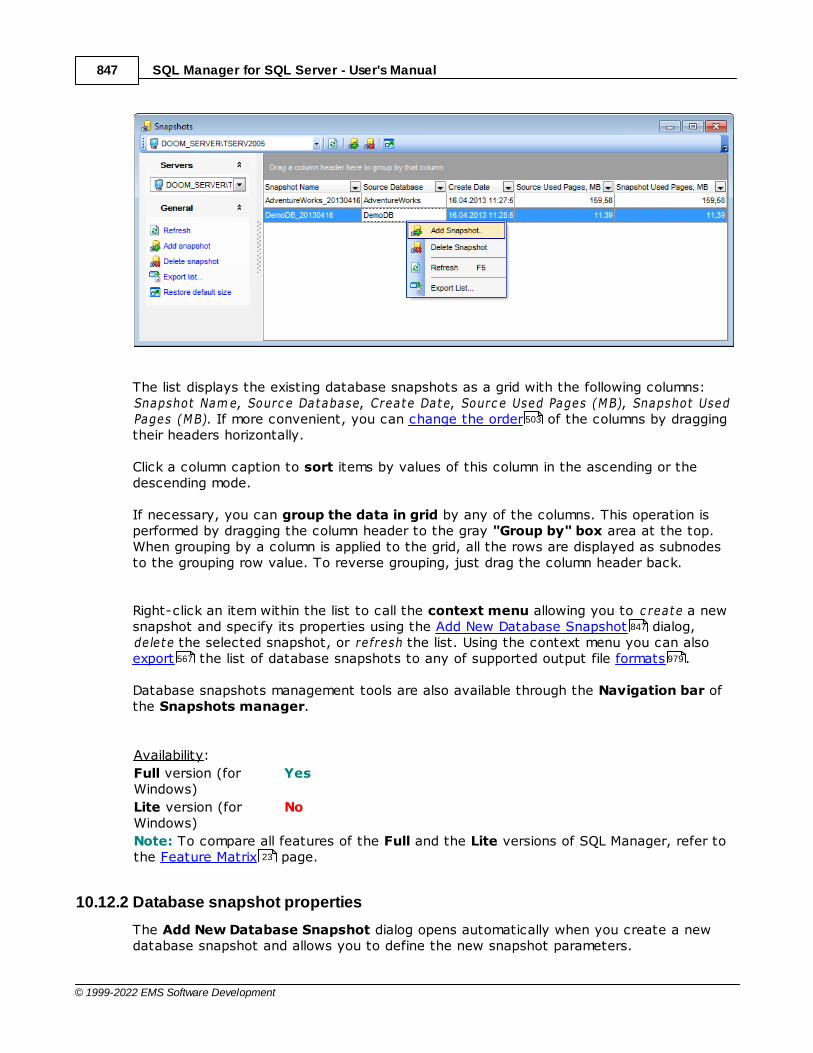
SQL Manager for SQL Server - User's Manual847
© 1999-2022 EMS Software Development
The list displays the existing database snapshots as a grid with the following columns: Snapshot Nam e, Sourc e Database, Create Date, Sourc e Used Pages (MB), Snapshot UsedPages (MB). If more convenient, you can change the order of the columns by draggingtheir headers horizontally.
Click a column caption to sort items by values of this column in the ascending or thedescending mode.
If necessary, you can group the data in grid by any of the columns. This operation isperformed by dragging the column header to the gray "Group by" box area at the top.When grouping by a column is applied to the grid, all the rows are displayed as subnodesto the grouping row value. To reverse grouping, just drag the column header back.
Right-click an item within the list to call the context menu allowing you to c reate a newsnapshot and specify its properties using the Add New Database Snapshot dialog,delete the selected snapshot, or refresh the list. Using the context menu you can alsoexport the list of database snapshots to any of supported output file formats .
Database snapshots management tools are also available through the Navigation bar ofthe Snapshots manager.
Availability:
Full version (forWindows)
Yes
Lite version (forWindows)
No
Note: To compare all features of the Full and the Lite versions of SQL Manager, refer tothe Feature Matrix page.
10.12.2 Database snapshot properties
The Add New Database Snapshot dialog opens automatically when you create a newdatabase snapshot and allows you to define the new snapshot parameters.
503
847
567 979
23
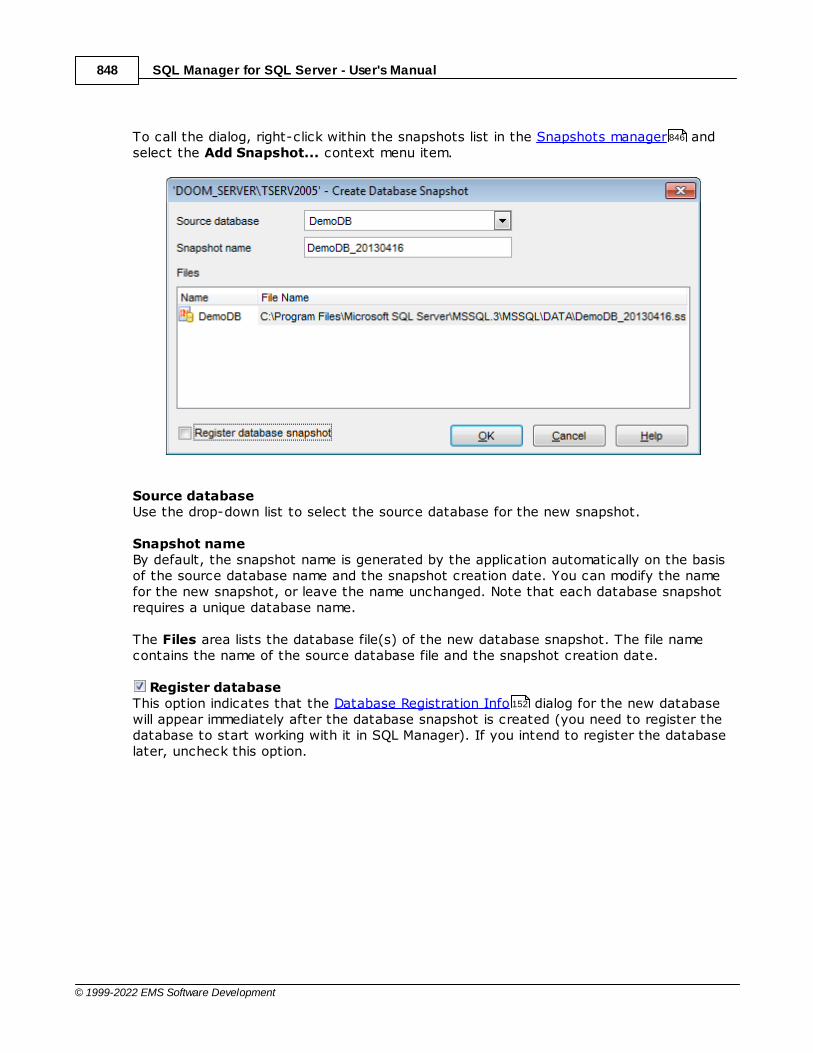
SQL Manager for SQL Server - User's Manual848
© 1999-2022 EMS Software Development
To call the dialog, right-click within the snapshots list in the Snapshots manager andselect the Add Snapshot... context menu item.
Source databaseUse the drop-down list to select the source database for the new snapshot.
Snapshot nameBy default, the snapshot name is generated by the application automatically on the basisof the source database name and the snapshot creation date. You can modify the namefor the new snapshot, or leave the name unchanged. Note that each database snapshotrequires a unique database name.
The Files area lists the database file(s) of the new database snapshot. The file namecontains the name of the source database file and the snapshot creation date.
Register databaseThis option indicates that the Database Registration Info dialog for the new databasewill appear immediately after the database snapshot is created (you need to register thedatabase to start working with it in SQL Manager). If you intend to register the databaselater, uncheck this option.
846
152

SQL Manager for SQL Server - User's Manual849
© 1999-2022 EMS Software Development
10.13 Linked Servers
A Linked server is a virtual server that can be defined to SQL Server 2005 (and higher)with all the information required to access an OLE DB data source. A Linked serverconfiguration enables SQL Server to execute commands against OLE DB data sources onremote servers. Linked servers provide a number of features: remote server access; theability to issue distributed queries, updates, commands and transactions onheterogeneous data sources; the ability to address diverse data sources universally.
Linked servers managerLinked Server Editor
Creating Linked Servers
To create a new linked server:right-click the Linked Servers node (within the Server Objects branch) or anyobject within this node in the DB Explorer tree and select the New Linked Serveritem from the context menu ;define linked server properties using the appropriate tabs of Linked Server Editor .
orselect the Database | New Object... main menu item;select Linked Server in the Create New Object dialog;define linked server properties using Linked Server Editor .
Hint: To create a new linked server, you can also select the Services | Linked Serversmain menu item to open the Linked servers manager and select the Add LinkedServer item from the context menu or on the Navigation bar.
850
434
99
91
434
958
216
434
958
SQL Manager for SQL Server - User's Manual850
© 1999-2022 EMS Software Development
To create a new linked server with the same properties as one of existing linked servershas:
select the Database | Duplicate Object... menu item;follow the instructions of Duplicate Object Wizard .
Alternatively, you can right-click a linked server in the DB Explorer tree and select theDuplicate Linked Server <linked_server_name>... context menu item.
Duplicate Object Wizard allows you to select the server to create a new linked serverand to edit the result SQL statement for creating the linked server.
Editing Linked Servers
To edit an existing linked server:select the linked server for editing in the DB Explorer tree (type the first letters ofthe Linked Server name for quick search );right-click the object and select the Edit Linked Server <linked_server_name>context menu item, or simply double-click the linked server;edit linked server properties using the appropriate tabs of Linked Server Editor .
Dropping Linked Servers
To drop a linked server:select the linked server to drop in the DB Explorer tree;right-click the object and select the Drop Linked Server <linked_server_name>...context menu item;confirm dropping in the dialog window.
Note: If more convenient, you can also use the following shortcuts :Ct r l+N to create a new linked server;Ct r l+O to edit the selected linked server;Shift+Del to drop the object.
To create, edit and drop linked servers, you can also use the context menu and theNavigation bar of Linked servers manager .
See also:
Linked Server Editor
10.13.1 Linked servers manager
The Linked servers manager allows you to browse the list of linked servers andmanage them efficiently.
To launch the tool, select the Services | Linked Servers main menu item, or right-click the host alias in the DB Explorer tree and select the Tasks | Linked Servers itemfrom the context menu .
218
99
218
99
118
434
99
996
850
434
958
99
88
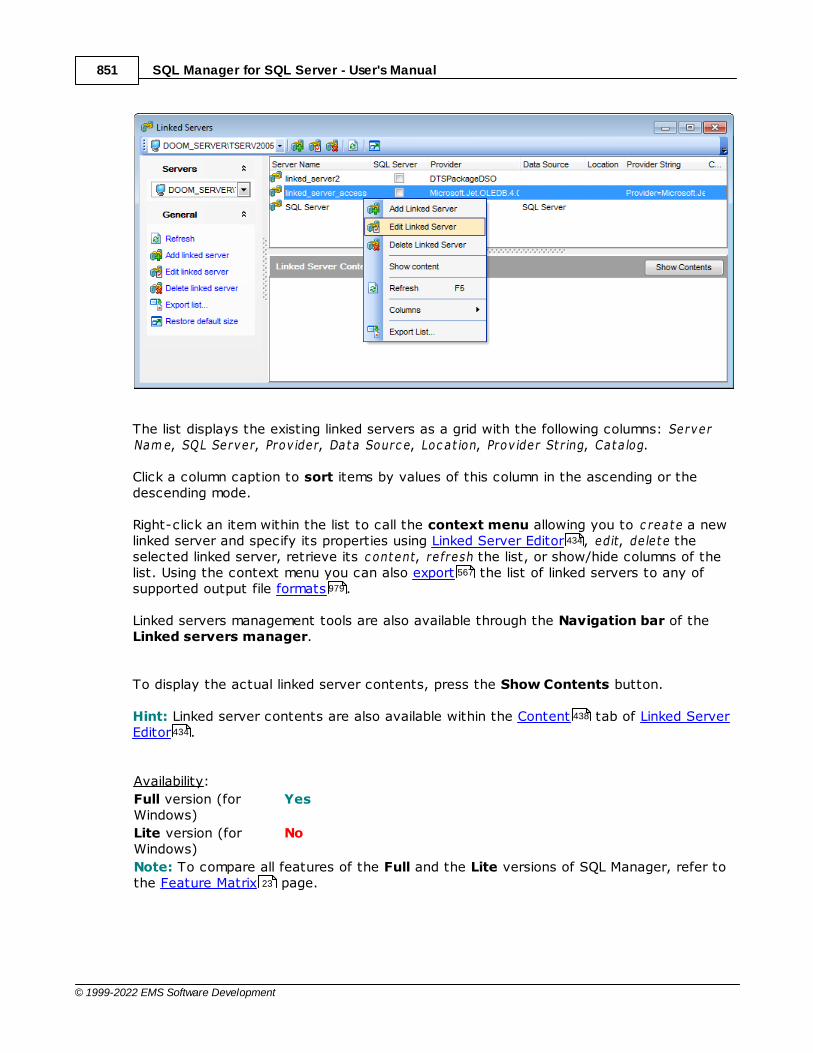
SQL Manager for SQL Server - User's Manual851
© 1999-2022 EMS Software Development
The list displays the existing linked servers as a grid with the following columns: ServerNam e, SQL Server, Prov ider, Data Sourc e, Loc at ion, Prov ider St r ing, Catalog.
Click a column caption to sort items by values of this column in the ascending or thedescending mode.
Right-click an item within the list to call the context menu allowing you to c reate a newlinked server and specify its properties using Linked Server Editor , edit, de lete theselected linked server, retrieve its c ontent, refresh the list, or show/hide columns of thelist. Using the context menu you can also export the list of linked servers to any ofsupported output file formats .
Linked servers management tools are also available through the Navigation bar of theLinked servers manager.
To display the actual linked server contents, press the Show Contents button.
Hint: Linked server contents are also available within the Content tab of Linked ServerEditor .
Availability:
Full version (forWindows)
Yes
Lite version (forWindows)
No
Note: To compare all features of the Full and the Lite versions of SQL Manager, refer tothe Feature Matrix page.
434
567
979
438
434
23

SQL Manager for SQL Server - User's Manual852
© 1999-2022 EMS Software Development
10.14 DTS Packages
In SQL Server 2000, Data Transformation Services (DTS) is a component built to takedata from one OLE DB data source, perform certain operations and store it in a destinationOLE DB data source. DTS consists of packages which define a particular set of work thatforms a logical work item. DTS Packages contain multiple connections to data sources,tasks to be performed, workflows. Examples of tasks include copying data from source todestination connections, transforming data from a source connection and placing thetransformed data in the destination connection, executing a set of Microsoft ActiveXscripts or Transact-SQL statements against a connection.
In SQL Server 2005 (and higher), Integration Services (SSIS) packages are provided fordata warehousing purposes.
SQL Manager for SQL Server provides running Data Transformation Services (DTS)packages that were developed by using SQL Server 2000 tools. These can be run in SQLServer 2005 and higher, alongside Integration Services (SSIS) packages.
DTS packages managerDTS package properties
See also:
DTS Packages Editor
853
457
457
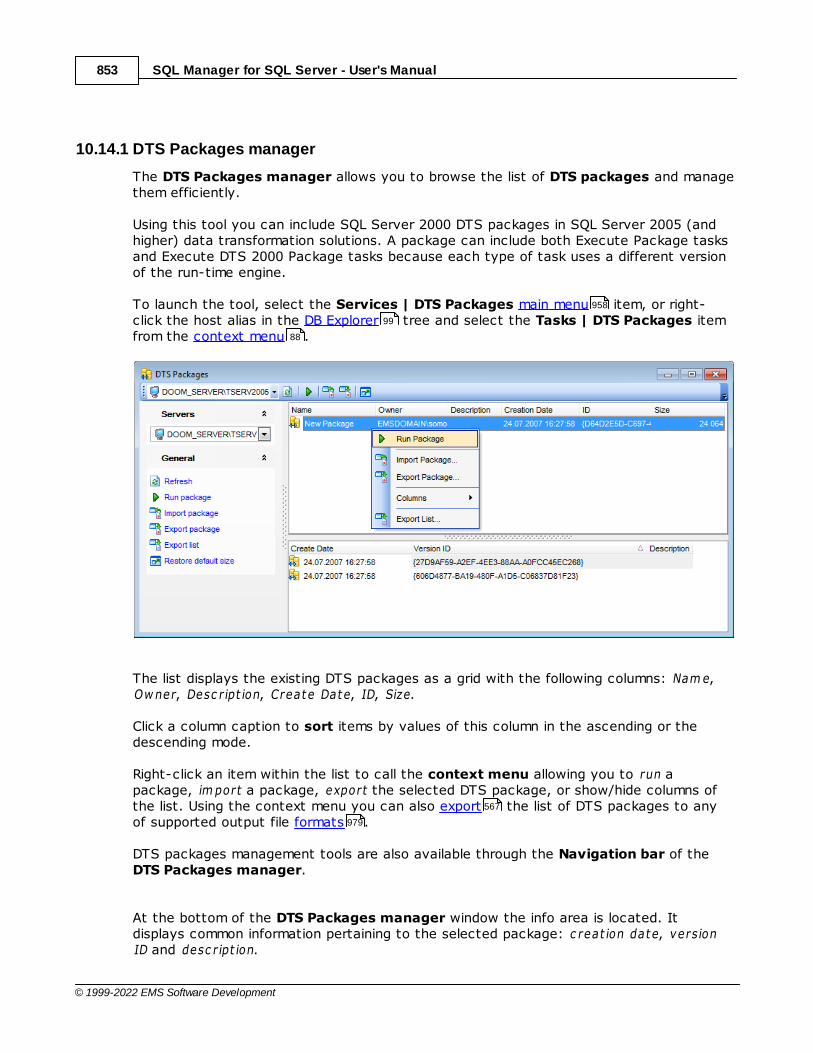
SQL Manager for SQL Server - User's Manual853
© 1999-2022 EMS Software Development
10.14.1 DTS Packages manager
The DTS Packages manager allows you to browse the list of DTS packages and managethem efficiently.
Using this tool you can include SQL Server 2000 DTS packages in SQL Server 2005 (andhigher) data transformation solutions. A package can include both Execute Package tasksand Execute DTS 2000 Package tasks because each type of task uses a different versionof the run-time engine.
To launch the tool, select the Services | DTS Packages main menu item, or right-click the host alias in the DB Explorer tree and select the Tasks | DTS Packages itemfrom the context menu .
The list displays the existing DTS packages as a grid with the following columns: Nam e,Ow ner, Desc r ipt ion, Create Date, ID, Size.
Click a column caption to sort items by values of this column in the ascending or thedescending mode.
Right-click an item within the list to call the context menu allowing you to run apackage, im port a package, export the selected DTS package, or show/hide columns ofthe list. Using the context menu you can also export the list of DTS packages to anyof supported output file formats .
DTS packages management tools are also available through the Navigation bar of theDTS Packages manager.
At the bottom of the DTS Packages manager window the info area is located. Itdisplays common information pertaining to the selected package: c reat ion date, versionID and desc r ipt ion.
958
99
88
567
979
SQL Manager for SQL Server - User's Manual854
© 1999-2022 EMS Software Development
Hint: These properties are also available within the modal DTS Package propertiesdialog which is called through the DTS Package Properties... context menu item of theDTS package alias in DB Explorer .
If you need to remove a package, right-click the package in the information area andselect the Delete popup menu item.
Availability:
Full version (forWindows)
Yes
Lite version (forWindows)
No
Note: To compare all features of the Full and the Lite versions of SQL Manager, refer tothe Feature Matrix page.
457
99
23
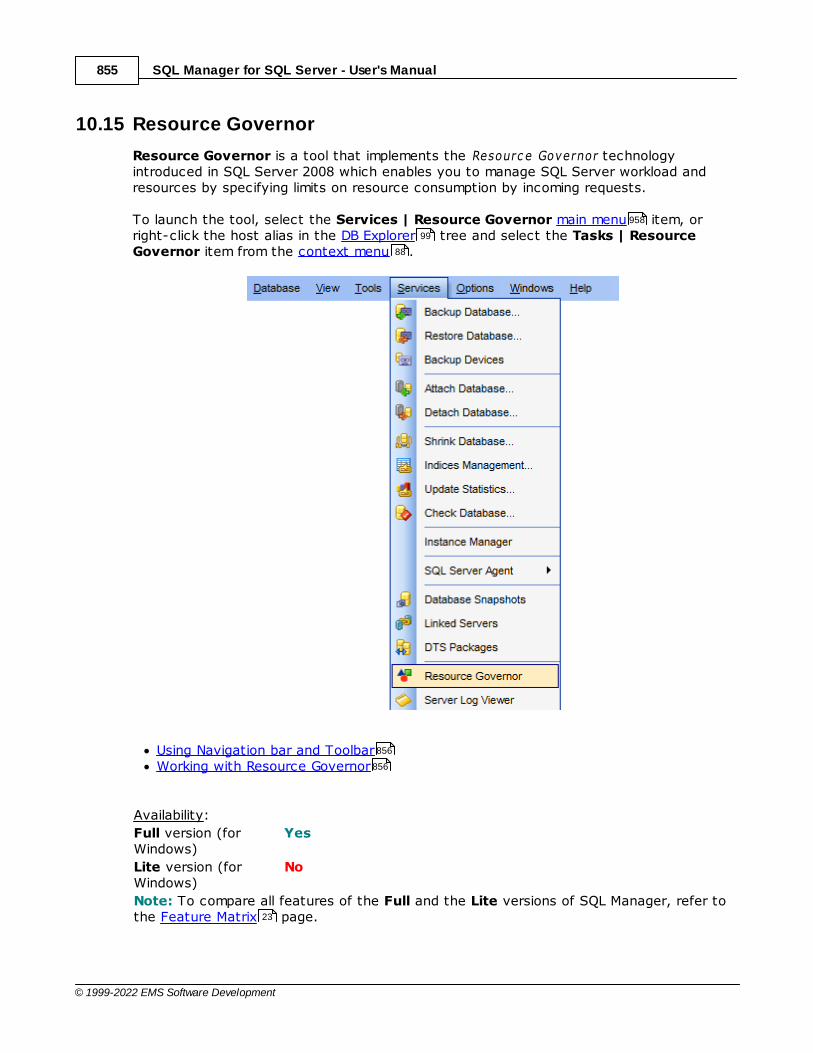
SQL Manager for SQL Server - User's Manual855
© 1999-2022 EMS Software Development
10.15 Resource Governor
Resource Governor is a tool that implements the Resourc e Governor technologyintroduced in SQL Server 2008 which enables you to manage SQL Server workload andresources by specifying limits on resource consumption by incoming requests.
To launch the tool, select the Services | Resource Governor main menu item, orright-click the host alias in the DB Explorer tree and select the Tasks | ResourceGovernor item from the context menu .
Using Navigation bar and ToolbarWorking with Resource Governor
Availability:
Full version (forWindows)
Yes
Lite version (forWindows)
No
Note: To compare all features of the Full and the Lite versions of SQL Manager, refer tothe Feature Matrix page.
958
99
88
856
856
23
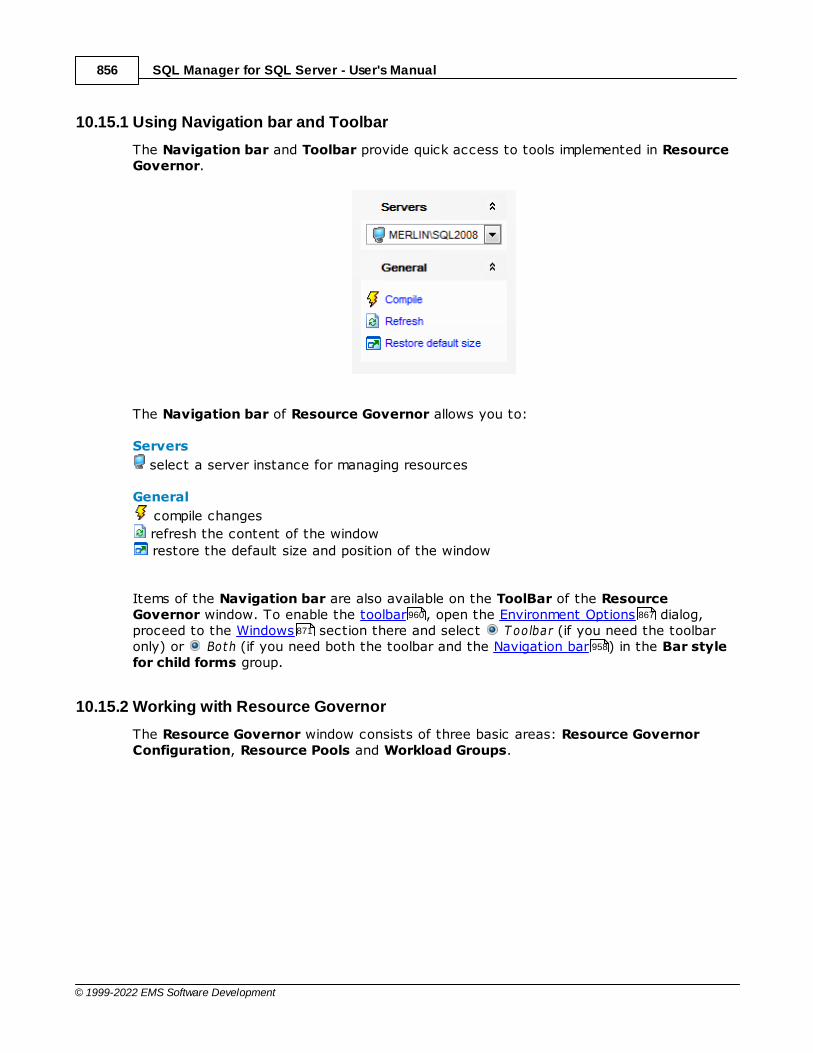
SQL Manager for SQL Server - User's Manual856
© 1999-2022 EMS Software Development
10.15.1 Using Navigation bar and Toolbar
The Navigation bar and Toolbar provide quick access to tools implemented in ResourceGovernor.
The Navigation bar of Resource Governor allows you to:
Servers
select a server instance for managing resources
General
compile changes
refresh the content of the window
restore the default size and position of the window
Items of the Navigation bar are also available on the ToolBar of the ResourceGovernor window. To enable the toolbar , open the Environment Options dialog,proceed to the Windows section there and select T oolbar (if you need the toolbaronly) or Both (if you need both the toolbar and the Navigation bar ) in the Bar stylefor child forms group.
10.15.2 Working with Resource Governor
The Resource Governor window consists of three basic areas: Resource GovernorConfiguration, Resource Pools and Workload Groups.
960 867
871
958

SQL Manager for SQL Server - User's Manual857
© 1999-2022 EMS Software Development
Resource Governor Configuration
Resource Governor enabledThis option enables/disables Resource Governor.
Classifier functionUse the drop-down list to select the user-defined function whose return values will beused for classifying sessions that are then routed to the appropriate workload group.
To create a new function, click the button. To refresh the function list, click the button.
Note: If there are pending changes in Resource Governor configuration, you will need toreconfigure Resource Governor to apply these changes using the corresponding Reconfigure button.
The Resource Pools list displays the resource pools as a grid with the following columns:Resourc e Pool Nam e, M inim um CPU (%), Maxim um CPU (%), M inim um Mem ory (%),Maxim um Mem ory (%). If more convenient, you can change the order of the columnsby dragging their headers horizontally.
Click a column caption to sort items by values of this column in the ascending or thedescending mode.
To set a value, click in the cell you need, and type in the required value, or use thespinner control for this purpose.
295
503
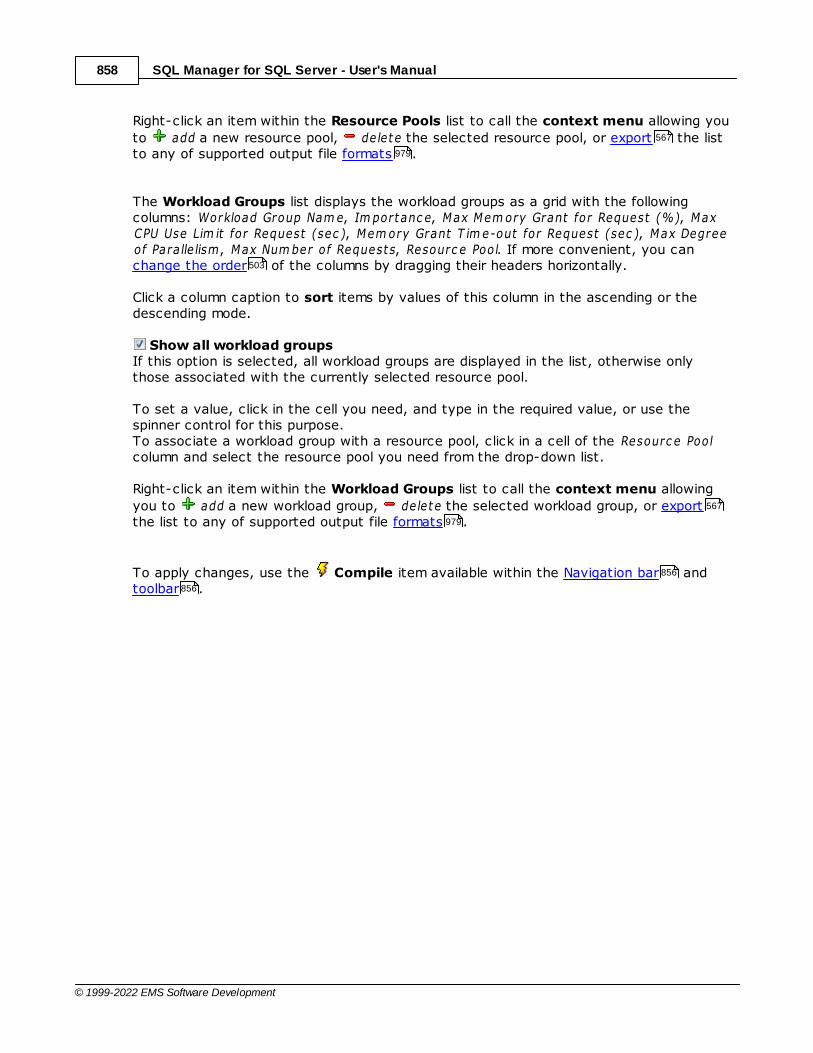
SQL Manager for SQL Server - User's Manual858
© 1999-2022 EMS Software Development
Right-click an item within the Resource Pools list to call the context menu allowing you
to add a new resource pool, de lete the selected resource pool, or export the listto any of supported output file formats .
The Workload Groups list displays the workload groups as a grid with the followingcolumns: Workload Group Nam e, Im portanc e, Max Mem ory Grant for Request (%), MaxCPU Use Lim it for Request (sec ), Mem ory Grant T im e-out for Request (sec ), Max Degreeof Para lle lism, Max Num ber of Requests, Resourc e Pool. If more convenient, you canchange the order of the columns by dragging their headers horizontally.
Click a column caption to sort items by values of this column in the ascending or thedescending mode.
Show all workload groupsIf this option is selected, all workload groups are displayed in the list, otherwise onlythose associated with the currently selected resource pool.
To set a value, click in the cell you need, and type in the required value, or use thespinner control for this purpose.To associate a workload group with a resource pool, click in a cell of the Resourc e Poolcolumn and select the resource pool you need from the drop-down list.
Right-click an item within the Workload Groups list to call the context menu allowing
you to add a new workload group, de lete the selected workload group, or exportthe list to any of supported output file formats .
To apply changes, use the Compile item available within the Navigation bar andtoolbar .
567
979
503
567
979
856
856
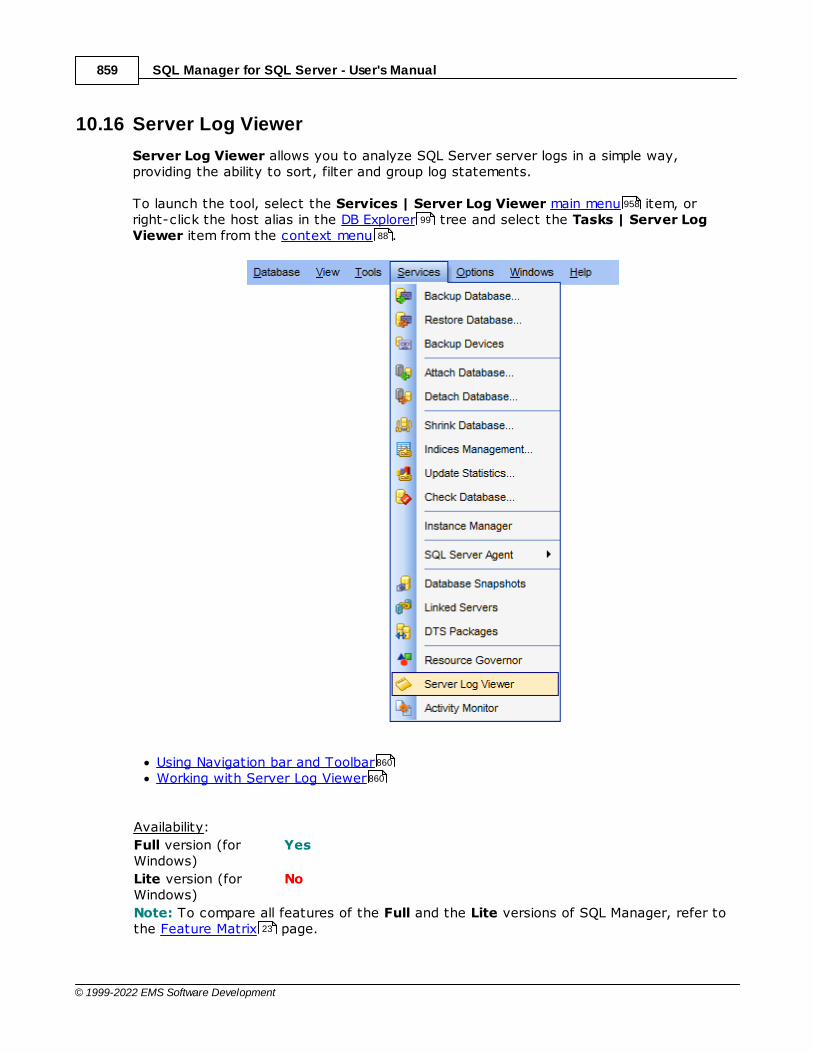
SQL Manager for SQL Server - User's Manual859
© 1999-2022 EMS Software Development
10.16 Server Log Viewer
Server Log Viewer allows you to analyze SQL Server server logs in a simple way,providing the ability to sort, filter and group log statements.
To launch the tool, select the Services | Server Log Viewer main menu item, orright-click the host alias in the DB Explorer tree and select the Tasks | Server LogViewer item from the context menu .
Using Navigation bar and ToolbarWorking with Server Log Viewer
Availability:
Full version (forWindows)
Yes
Lite version (forWindows)
No
Note: To compare all features of the Full and the Lite versions of SQL Manager, refer tothe Feature Matrix page.
958
99
88
860
860
23
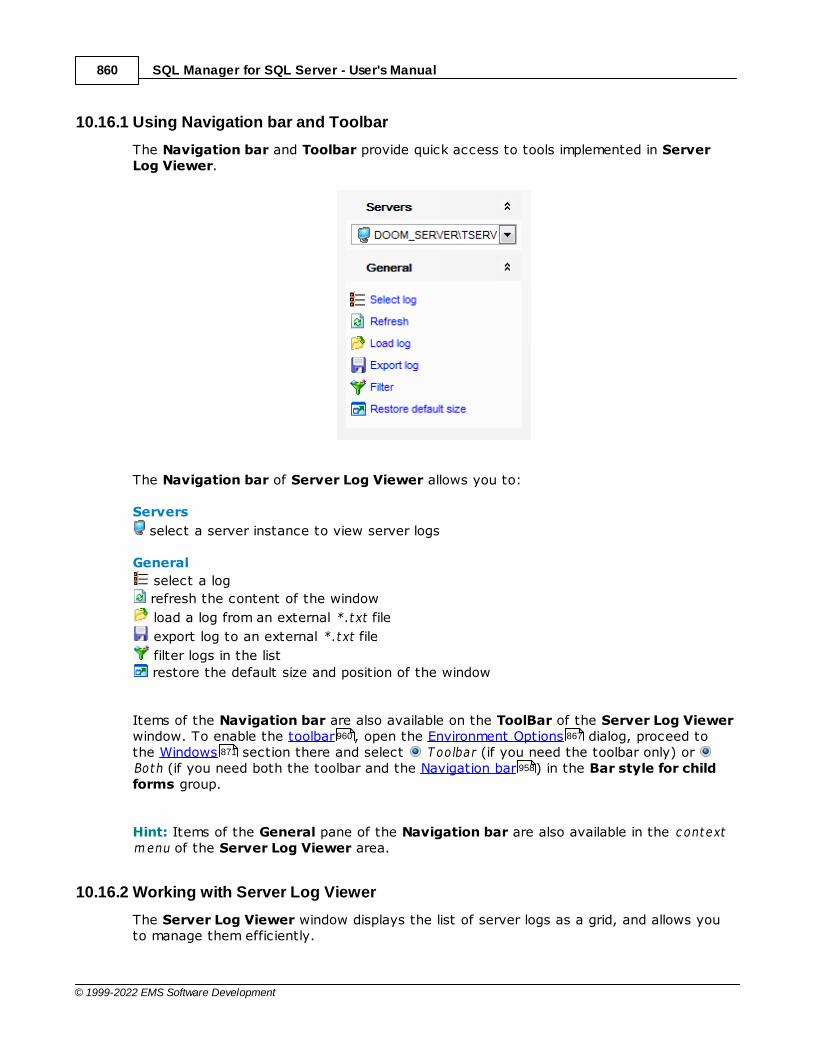
SQL Manager for SQL Server - User's Manual860
© 1999-2022 EMS Software Development
10.16.1 Using Navigation bar and Toolbar
The Navigation bar and Toolbar provide quick access to tools implemented in ServerLog Viewer.
The Navigation bar of Server Log Viewer allows you to:
Servers
select a server instance to view server logs
General
select a log
refresh the content of the window
load a log from an external *.txt file
export log to an external *.txt file
filter logs in the list
restore the default size and position of the window
Items of the Navigation bar are also available on the ToolBar of the Server Log Viewerwindow. To enable the toolbar , open the Environment Options dialog, proceed tothe Windows section there and select T oolbar (if you need the toolbar only) or Both (if you need both the toolbar and the Navigation bar ) in the Bar style for childforms group.
Hint: Items of the General pane of the Navigation bar are also available in the c ontextm enu of the Server Log Viewer area.
10.16.2 Working with Server Log Viewer
The Server Log Viewer window displays the list of server logs as a grid, and allows youto manage them efficiently.
960 867
871
958

SQL Manager for SQL Server - User's Manual861
© 1999-2022 EMS Software Development
The list displays the server logs as a grid with the following columns: Date, Sourc e,Message, Log T ype, Log Sourc e. If more convenient, you can change the order of thecolumns by dragging their headers horizontally.
Click a column caption to sort items by values of this column in the ascending or thedescending mode.
If necessary, you can group the data in grid by any of the columns. This operation isperformed by dragging the column header to the gray "Group by" box area at the top.When grouping by a column is applied to the grid, all the rows are displayed as subnodesto the grouping row value. To reverse grouping, just drag the column header back.
Right-click an item within the list to call the context menu allowing you to se lec t a log,refresh the list, load a log, export log and filter the logs in the grid.
Server logs management tools are also available through the Navigation bar and toolbar of Server Log Viewer.
The lower area displays the following server log details:DateLogSourc eMessage
503
860
860

SQL Manager for SQL Server - User's Manual862
© 1999-2022 EMS Software Development
10.17 Activity Monitor
Activity Monitor allows you to get information about users connections to the DatabaseEngine and the locks that they hold.
Use Activity Monitor when troubleshooting database locking issues, and to terminate adeadlocked or otherwise unresponsive process.
To launch the tool, select the Services | Activity Monitor main menu item, or right-click the host alias in the DB Explorer tree and select the Tasks | Activity Monitoritem from the context menu .
Using Navigation bar and ToolbarWorking with Activity Monitor
Availability:
Full version (forWindows)
Yes
Lite version (forWindows)
No
958
99
88
863
863
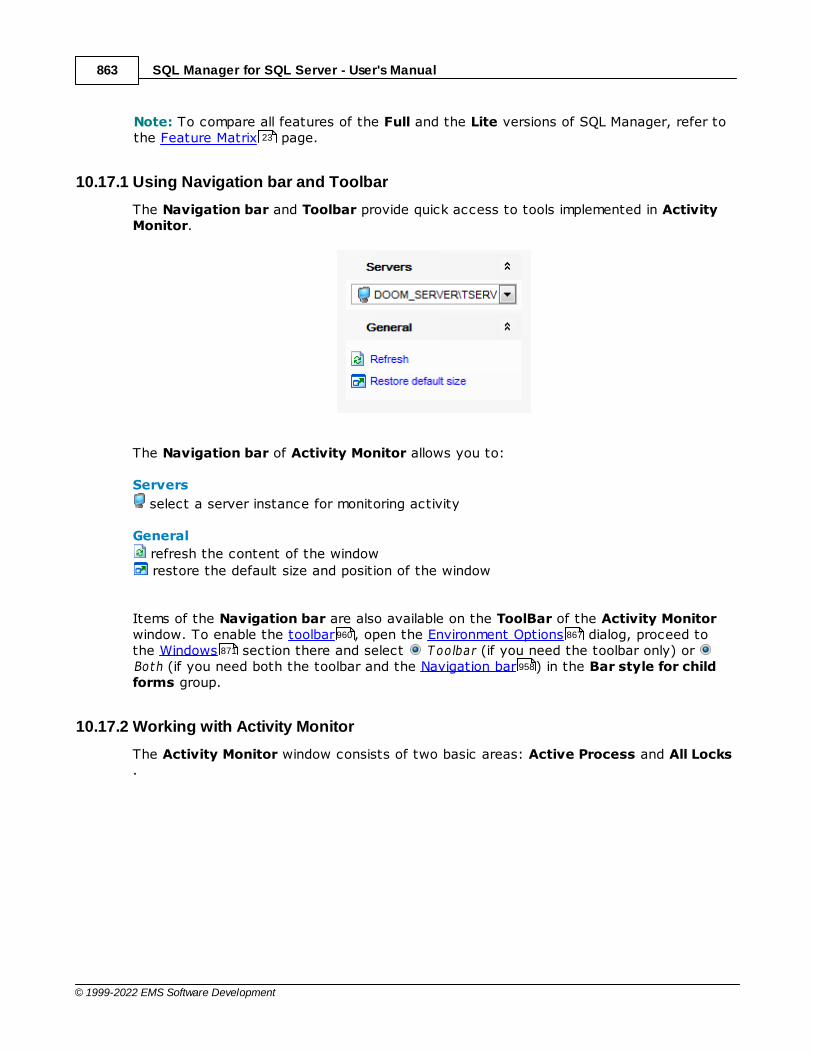
SQL Manager for SQL Server - User's Manual863
© 1999-2022 EMS Software Development
Note: To compare all features of the Full and the Lite versions of SQL Manager, refer tothe Feature Matrix page.
10.17.1 Using Navigation bar and Toolbar
The Navigation bar and Toolbar provide quick access to tools implemented in ActivityMonitor.
The Navigation bar of Activity Monitor allows you to:
Servers
select a server instance for monitoring activity
General
refresh the content of the window
restore the default size and position of the window
Items of the Navigation bar are also available on the ToolBar of the Activity Monitorwindow. To enable the toolbar , open the Environment Options dialog, proceed tothe Windows section there and select T oolbar (if you need the toolbar only) or Both (if you need both the toolbar and the Navigation bar ) in the Bar style for childforms group.
10.17.2 Working with Activity Monitor
The Activity Monitor window consists of two basic areas: Active Process and All Locks.
23
960 867
871
958
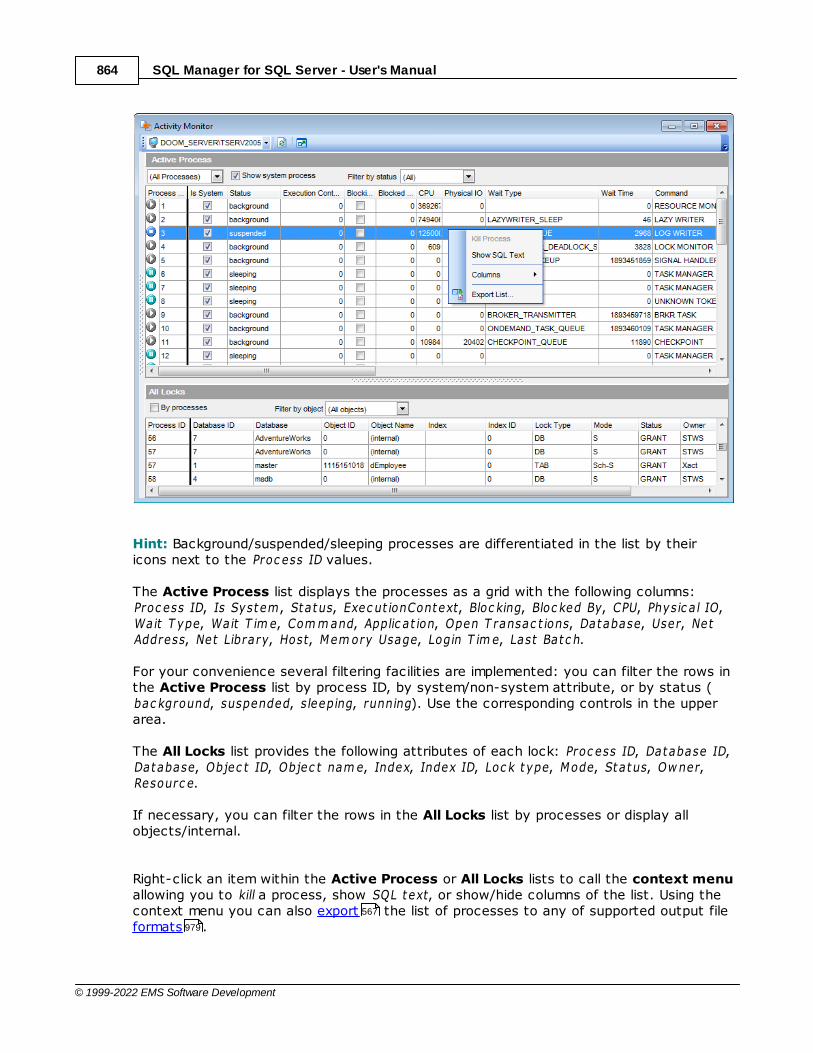
SQL Manager for SQL Server - User's Manual864
© 1999-2022 EMS Software Development
Hint: Background/suspended/sleeping processes are differentiated in the list by theiricons next to the Proc ess ID values.
The Active Process list displays the processes as a grid with the following columns:Proc ess ID, Is System, Status, Exec ut ionContext, Bloc king, Bloc ked By, CPU, Physic a l IO,Wait T ype, Wait T im e, Com m and, Applic at ion, Open T ransac t ions, Database, User, NetAddress, Net Library, Host, Mem ory Usage, Login T im e, Last Batc h.
For your convenience several filtering facilities are implemented: you can filter the rows inthe Active Process list by process ID, by system/non-system attribute, or by status (bac kground, suspended, sleeping, running). Use the corresponding controls in the upperarea.
The All Locks list provides the following attributes of each lock: Proc ess ID, Database ID,Database, Objec t ID, Objec t nam e, Index, Index ID, Loc k type, Mode, Status, Ow ner,Resourc e.
If necessary, you can filter the rows in the All Locks list by processes or display allobjects/internal.
Right-click an item within the Active Process or All Locks lists to call the context menuallowing you to kill a process, show SQL text, or show/hide columns of the list. Using thecontext menu you can also export the list of processes to any of supported output fileformats .
567
979

Part
XI
SQL Manager for SQL Server - User's Manual866
© 1999-2022 EMS Software Development
11 Options
SQL Manager for SQL Server provides you with capabilities for flexible personalization ofthe application.
Please see the chapters below to learn how to use personalization tools effectively.Environment OptionsEditor OptionsSave SettingsLocalizationKeyboard TemplatesFind Option dialog
The Options menu allows you to export all program settings to a *.reg file for future use,e.g. when you need to move the settings to another machine (see Save Settings fordetails).
Hint: Each of the SQL Manager Options dialogs is provided with the Reset to defaultsbutton. You can use it either to Reset current category or to Reset all categories.
See also:
Getting Started
Database Explorer
Database Management
Database Objects Management
Query Management Tools
Data Management
Import/Export Tools
Database Tools
Server Tools
External Tools
How To...
867
912
928
933
937
950
928
76
99
130
214
460
498
566
651
757
952
1001
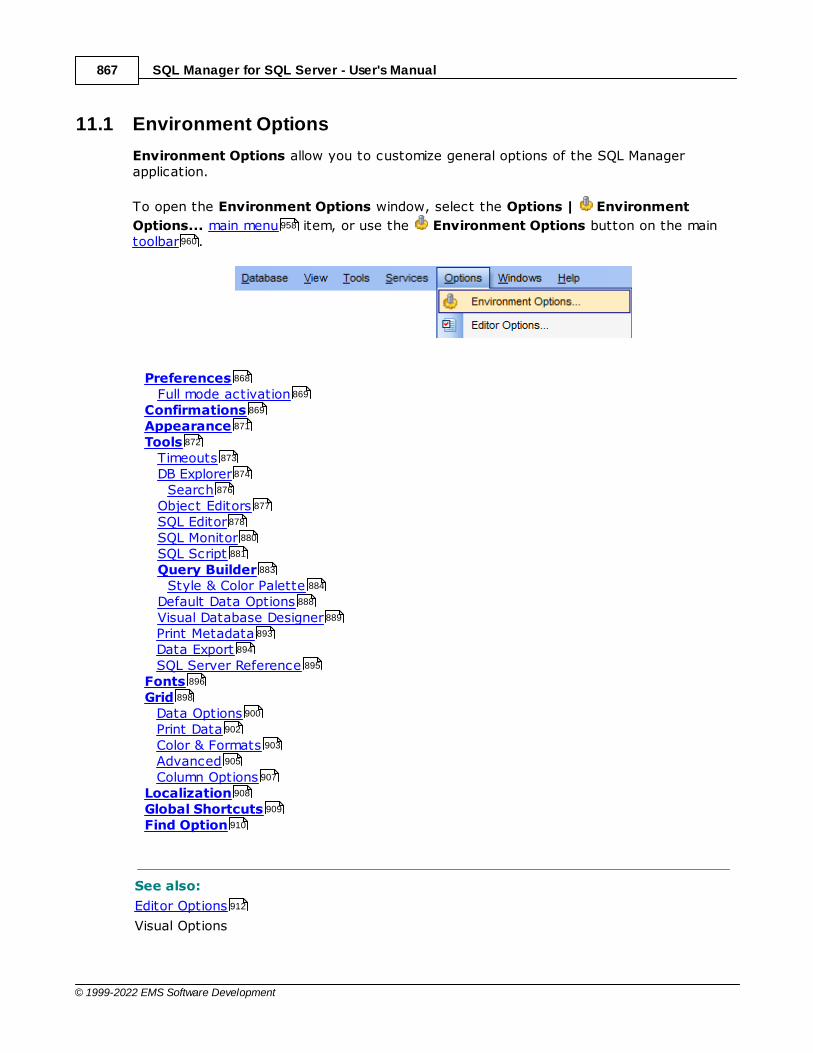
SQL Manager for SQL Server - User's Manual867
© 1999-2022 EMS Software Development
11.1 Environment Options
Environment Options allow you to customize general options of the SQL Managerapplication.
To open the Environment Options window, select the Options | Environment
Options... main menu item, or use the Environment Options button on the maintoolbar .
PreferencesFull mode activation
ConfirmationsAppearanceTools
TimeoutsDB Explorer SearchObject EditorsSQL EditorSQL MonitorSQL ScriptQuery Builder
Style & Color PaletteDefault Data OptionsVisual Database DesignerPrint MetadataData ExportSQL Server Reference
FontsGrid
Data OptionsPrint DataColor & FormatsAdvancedColumn Options
LocalizationGlobal ShortcutsFind Option
See also:
Editor Options
Visual Options
958
960
868
869
869
871
872
873
874
876
877
878
880
881
883
884
888
889
893
894
895
896
898
900
902
903
905
907
908
909
910
912
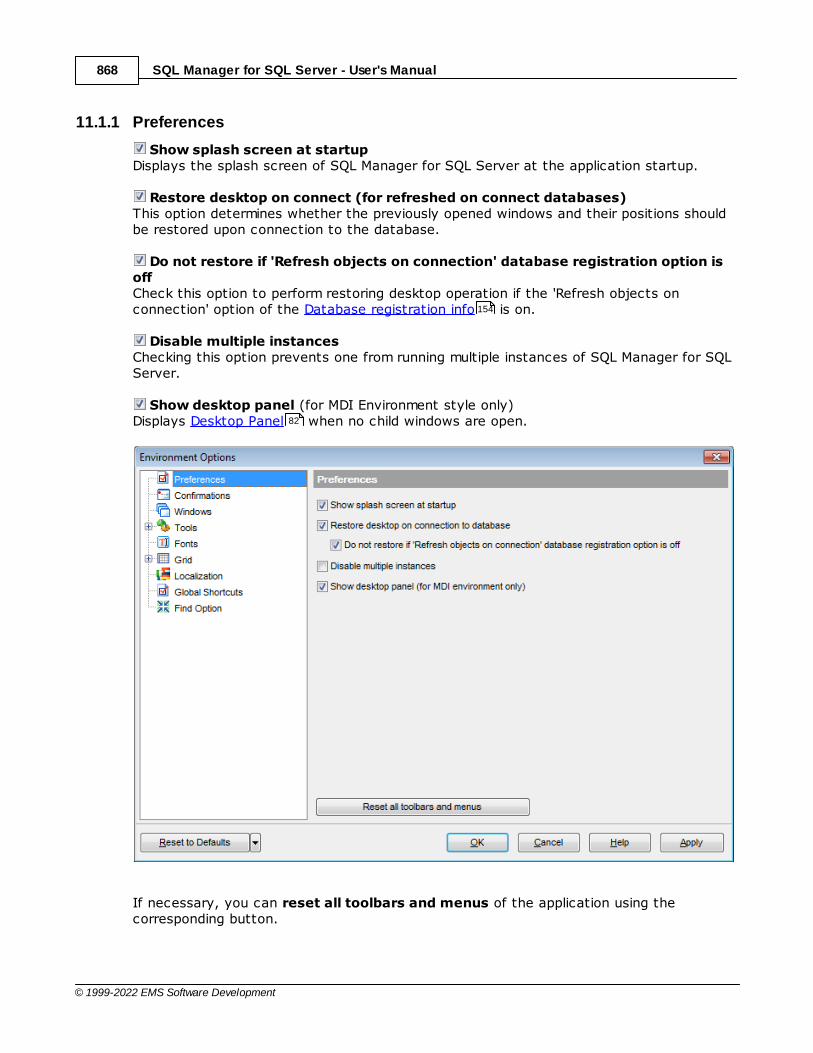
SQL Manager for SQL Server - User's Manual868
© 1999-2022 EMS Software Development
11.1.1 Preferences
Show splash screen at startupDisplays the splash screen of SQL Manager for SQL Server at the application startup.
Restore desktop on connect (for refreshed on connect databases)This option determines whether the previously opened windows and their positions shouldbe restored upon connection to the database.
Do not restore if 'Refresh objects on connection' database registration option isoffCheck this option to perform restoring desktop operation if the 'Refresh objects onconnection' option of the Database registration info is on.
Disable multiple instancesChecking this option prevents one from running multiple instances of SQL Manager for SQLServer.
Show desktop panel (for MDI Environment style only)Displays Desktop Panel when no child windows are open.
If necessary, you can reset all toolbars and menus of the application using thecorresponding button.
154
82
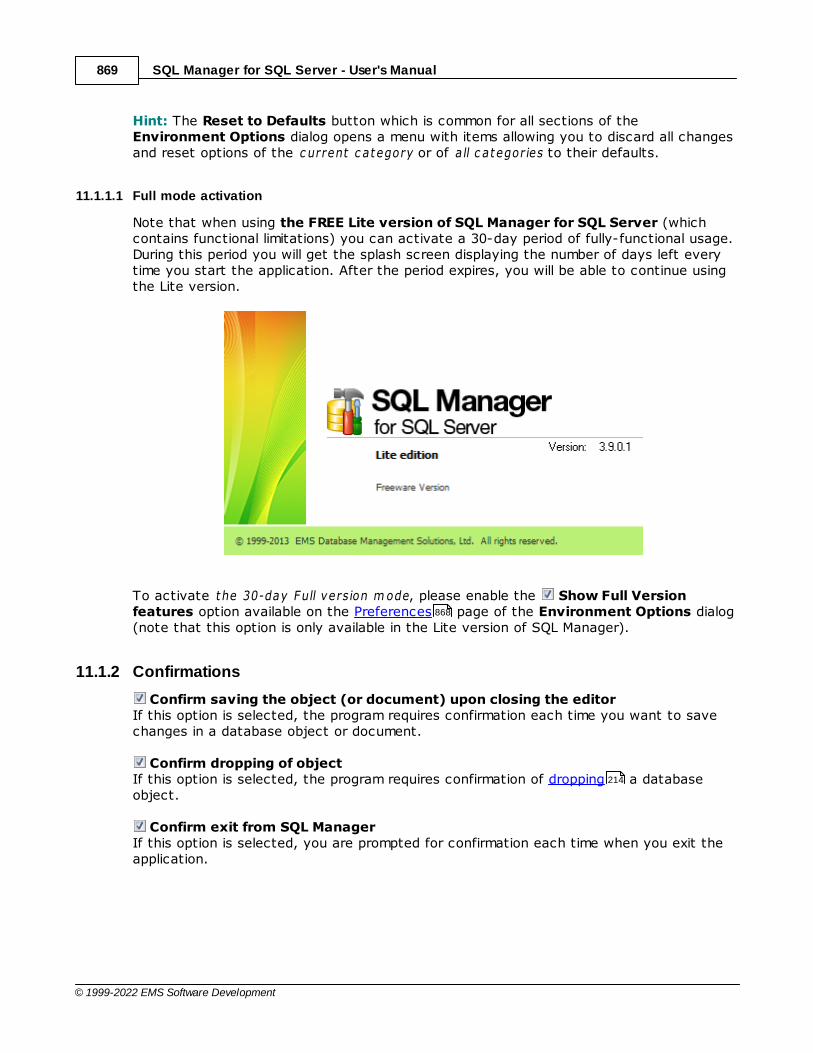
SQL Manager for SQL Server - User's Manual869
© 1999-2022 EMS Software Development
Hint: The Reset to Defaults button which is common for all sections of theEnvironment Options dialog opens a menu with items allowing you to discard all changesand reset options of the c urrent c ategory or of a ll c ategories to their defaults.
11.1.1.1 Full mode activation
Note that when using the FREE Lite version of SQL Manager for SQL Server (whichcontains functional limitations) you can activate a 30-day period of fully-functional usage.During this period you will get the splash screen displaying the number of days left everytime you start the application. After the period expires, you will be able to continue usingthe Lite version.
To activate the 30-day Full version m ode, please enable the Show Full Versionfeatures option available on the Preferences page of the Environment Options dialog(note that this option is only available in the Lite version of SQL Manager).
11.1.2 Confirmations
Confirm saving the object (or document) upon closing the editorIf this option is selected, the program requires confirmation each time you want to savechanges in a database object or document.
Confirm dropping of object If this option is selected, the program requires confirmation of dropping a databaseobject.
Confirm exit from SQL Manager If this option is selected, you are prompted for confirmation each time when you exit theapplication.
868
214

SQL Manager for SQL Server - User's Manual870
© 1999-2022 EMS Software Development
Confirm deleting recordsThis option enables/disables a confirmation dialog for deleting records.
Confirm metadata changing (Changing Metadata Window)This option enables/disables the Changing Metadata window.
Confirm addition into spell checking dictionary Enable this option if you wish to be prompted for adding a word to the dictionary which isused for checking words spelling (see Spell Checking ).
Confirm transformation of misprint into substitution If this option is selected, you need to confirm replacing a misprinted word with acorresponding substitution word (see Spell Checking ).
Confirm transaction commitIf this option is selected, the program requires confirmation on attempt to commit atransaction.
Confirm transaction rollbackIf this option is selected, the program requires confirmation on attempt to rollback atransaction.
Confirm transaction commit on closing data in object editorsIf this option is selected, the program prompts to commit the transaction upon closing the'Data' tab in object editors.
966
925
925
SQL Manager for SQL Server - User's Manual871
© 1999-2022 EMS Software Development
Transaction confirmation in SQL Editor and Query Builder
Disable transaction confirmation on closing the editorIf this option is checked, no transaction confirmation will be required on closing SQL Editor
and Query Builder . Specify the default action (Com m it or Rollbac k) and this actionwill be performed automatically each time when you exit Query Builder or SQL Editor.
11.1.3 Appearance
Theme
Select the main color theme for the application: Light , Blue or Dark.
Environment styleThis group allows you to define the basic window environment - MDI (like Microsoft®Office) or F loat ing w indow s (like Borland® Delphi IDE).
Windows restrictionsThis option allows you to set the number of editors (Table Editor , SQL Editor , etc.)that can be opened simultaneously.
Zoom options This group of options is only available if Environment Style is set to F loat ing w indow senv ironm ent. It allows you to set maximization size for child windows:
Full sc reen Rest r ic ted by Main Form Rest r ic ted by Main Form and DB Explorer Just if ied m y Main Form and DB Explorer
Bar style for child formsHere you can define the location of action buttons: within the Navigat ion bar (on theleft) and/or on the T oolbar.
If necessary, you can also Enable floating toolbars for your application.
462 479
236 462
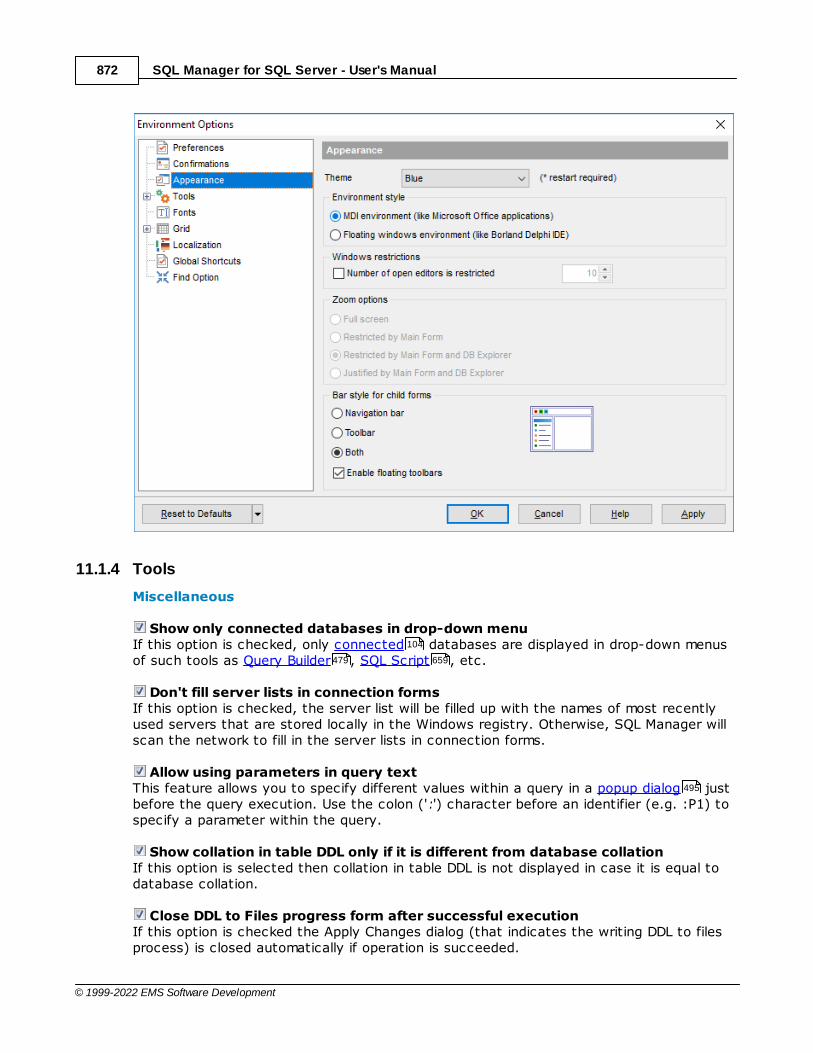
SQL Manager for SQL Server - User's Manual872
© 1999-2022 EMS Software Development
11.1.4 Tools
Miscellaneous
Show only connected databases in drop-down menuIf this option is checked, only connected databases are displayed in drop-down menusof such tools as Query Builder , SQL Script , etc.
Don't fill server lists in connection formsIf this option is checked, the server list will be filled up with the names of most recentlyused servers that are stored locally in the Windows registry. Otherwise, SQL Manager willscan the network to fill in the server lists in connection forms.
Allow using parameters in query textThis feature allows you to specify different values within a query in a popup dialog justbefore the query execution. Use the colon (':') character before an identifier (e.g. :P1) tospecify a parameter within the query.
Show collation in table DDL only if it is different from database collationIf this option is selected then collation in table DDL is not displayed in case it is equal todatabase collation.
Close DDL to Files progress form after successful executionIf this option is checked the Apply Changes dialog (that indicates the writing DDL to filesprocess) is closed automatically if operation is succeeded.
104
479 659
495

SQL Manager for SQL Server - User's Manual873
© 1999-2022 EMS Software Development
Object name display styleHere you can select the format in which object names will be displayed in some objecteditors, headers of object editors, Select Object dialog , Print metadata .
<schema>.<name>Display object name in the "<schema_name>.<object_name>" format.
<name> (<schema>) with hiding the 'dbo' schemaDisplay object name in the "<object_name> (<schema_name>)" format. 'dbo' schemaname is omitted.
New tool form should be opened forThis option defines which database should be selected in the launched tool.
Database currently selected in DB ExplorerTool will be opened with the database focused in the DB Explorer selected.
Database selected in currently focused formTool will be opened with the database which is selected in the current form.
11.1.4.1 Timeouts
This page allows you to set timeouts for some operations performed in SQL Manager.Timeouts are necessary for preventing program hang-up upon execution of a SQLstatement due to transaction interlocking. You can set timeouts for c hanging m etadata,
995 683
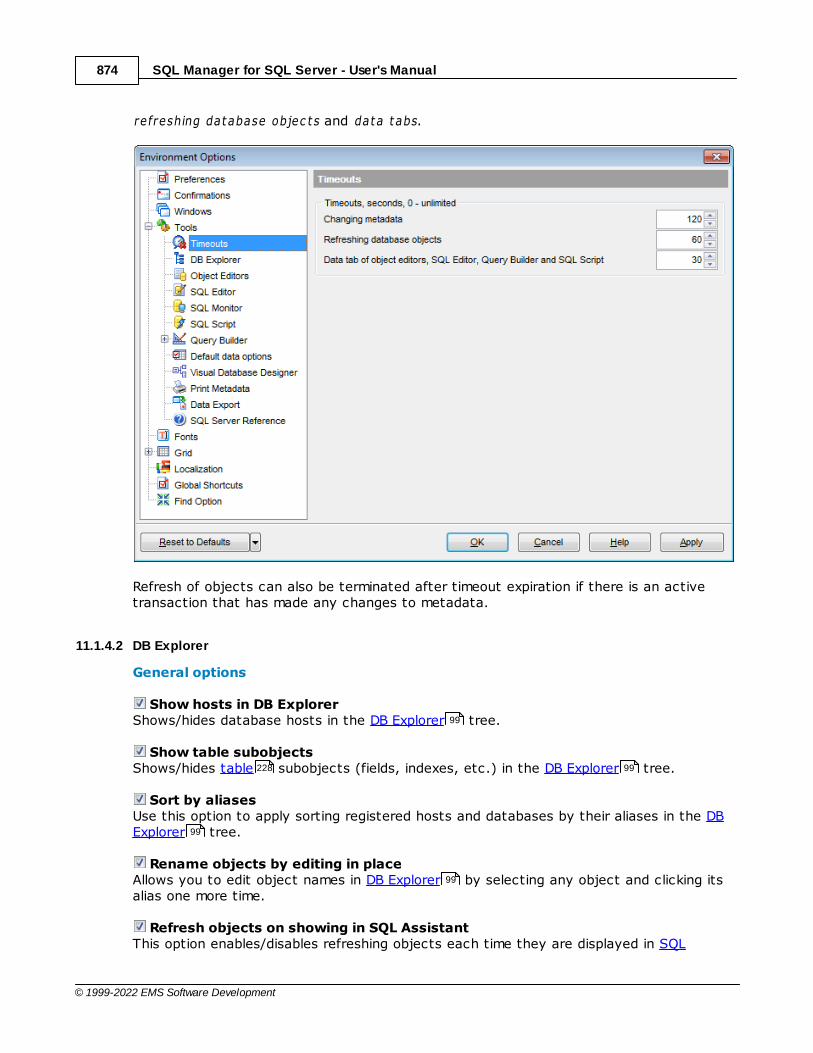
SQL Manager for SQL Server - User's Manual874
© 1999-2022 EMS Software Development
refreshing database objec t s and data tabs.
Refresh of objects can also be terminated after timeout expiration if there is an activetransaction that has made any changes to metadata.
11.1.4.2 DB Explorer
General options
Show hosts in DB ExplorerShows/hides database hosts in the DB Explorer tree.
Show table subobjectsShows/hides table subobjects (fields, indexes, etc.) in the DB Explorer tree.
Sort by aliasesUse this option to apply sorting registered hosts and databases by their aliases in the DBExplorer tree.
Rename objects by editing in placeAllows you to edit object names in DB Explorer by selecting any object and clicking itsalias one more time.
Refresh objects on showing in SQL AssistantThis option enables/disables refreshing objects each time they are displayed in SQL
99
228 99
99
99

SQL Manager for SQL Server - User's Manual875
© 1999-2022 EMS Software Development
Assistant .
Search by categoriesThis option determines the search scope when the Find Item feature is used: if thisoption is selected, the search is performed within the currently selected category (node inthe tree) only.
Don't search in collapsed nodesEnable the option to search within the expanded nodes only.
Auto expand navigation paneIf this option is checked, the list of navigation tabs in DB Explorer is expandedautomatically on program launch.
Show hintCheck this option to enable popup hints with general information for databases in DBExplorer.
Hide empty schemasThis option allows you to specify whether schemas containing no objects will bedisplayed in the DB Explorer tree.
Recent objects countDefines the number of objects displayed within the Recent menu of the DB Explorer .
121
118
112
225
99
115 99

SQL Manager for SQL Server - User's Manual876
© 1999-2022 EMS Software Development
Table details in SQL AssistantThese options switch the SQL Assistant mode for displaying table details (fie lds,Fore ign keys, c hec ks, indexes, t r iggers, table info, definit ion or desc r ipt ion).
Expand on connectionThis group of options allows you to specify the node(s) indicating type(s) of objects thatwill be expanded within DB Explorer upon successful connection to the database.
See also:
Database Explorer
11.1.4.2.1 Search
Here you can set search options for DB Explorer search string:
Search by categories
This option determines the search scope when the Find Item feature is used: if this optionis selected, the search is performed within the currently selected category (node in thetree) only.
Use case sensitive search
If this option is selected, the search string case is considered when using the SearchPanel.
121 228
99
99
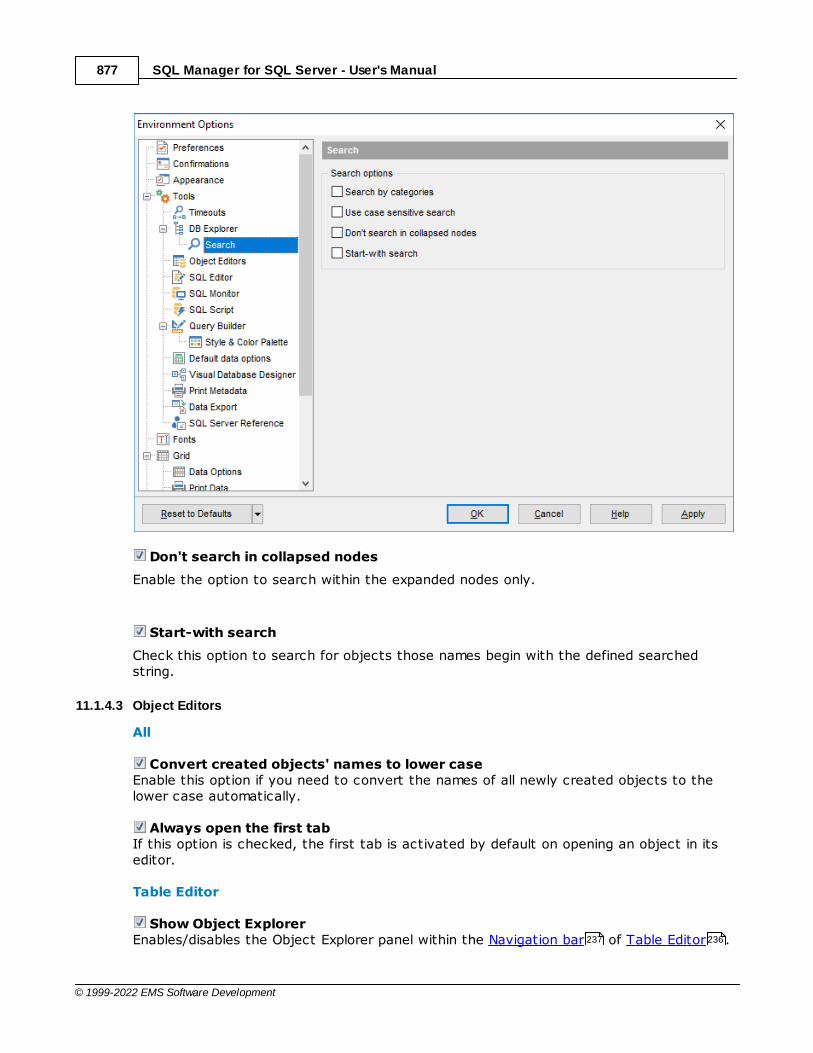
SQL Manager for SQL Server - User's Manual877
© 1999-2022 EMS Software Development
Don't search in collapsed nodes
Enable the option to search within the expanded nodes only.
Start-with search
Check this option to search for objects those names begin with the defined searchedstring.
11.1.4.3 Object Editors
All
Convert created objects' names to lower case Enable this option if you need to convert the names of all newly created objects to thelower case automatically.
Always open the first tabIf this option is checked, the first tab is activated by default on opening an object in itseditor.
Table Editor
Show Object ExplorerEnables/disables the Object Explorer panel within the Navigation bar of Table Editor .237 236
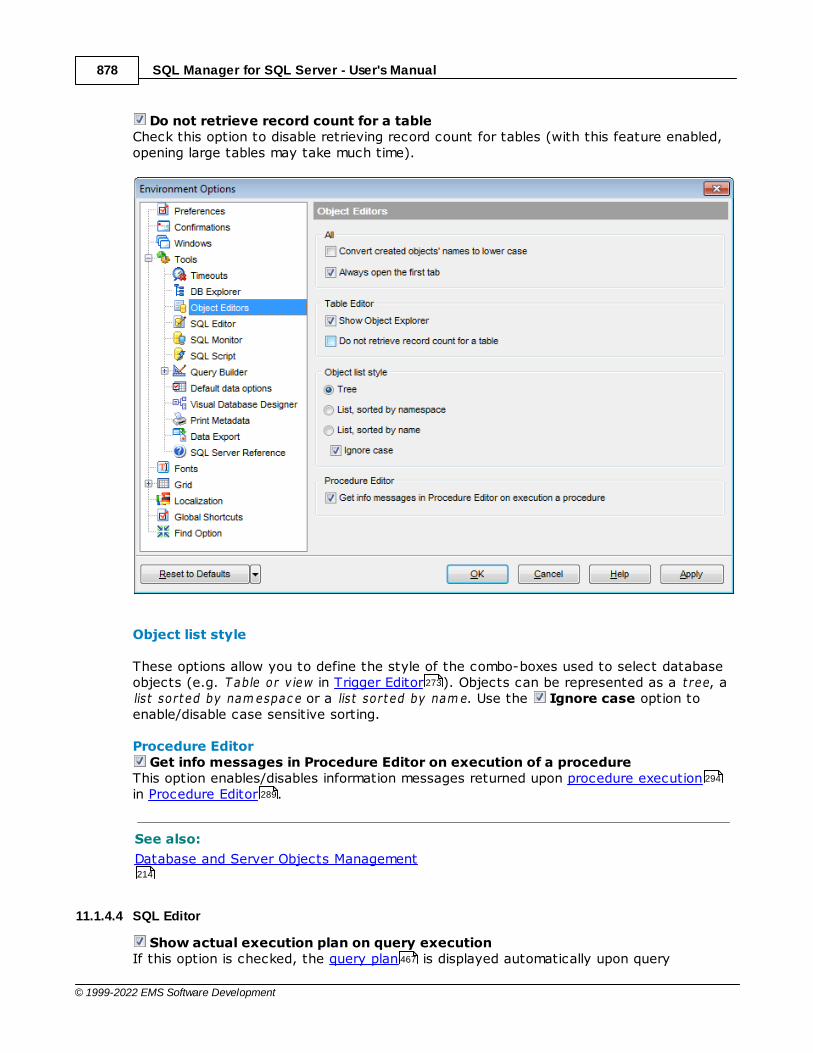
SQL Manager for SQL Server - User's Manual878
© 1999-2022 EMS Software Development
Do not retrieve record count for a tableCheck this option to disable retrieving record count for tables (with this feature enabled,opening large tables may take much time).
Object list style
These options allow you to define the style of the combo-boxes used to select databaseobjects (e.g. T able or v iew in Trigger Editor ). Objects can be represented as a t ree, alist sorted by nam espac e or a list sorted by nam e. Use the Ignore case option toenable/disable case sensitive sorting.
Procedure Editor Get info messages in Procedure Editor on execution of a procedure
This option enables/disables information messages returned upon procedure executionin Procedure Editor .
See also:
Database and Server Objects Management
11.1.4.4 SQL Editor
Show actual execution plan on query executionIf this option is checked, the query plan is displayed automatically upon query
273
294
289
214
467
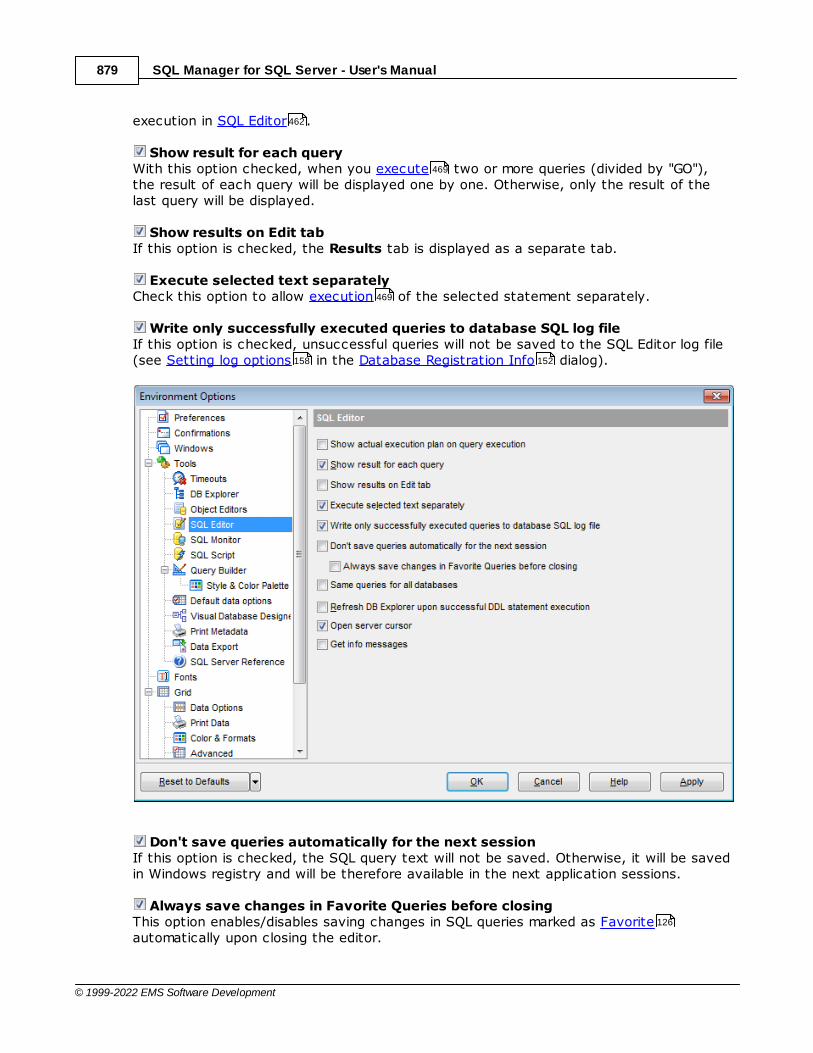
SQL Manager for SQL Server - User's Manual879
© 1999-2022 EMS Software Development
execution in SQL Editor .
Show result for each queryWith this option checked, when you execute two or more queries (divided by "GO"),the result of each query will be displayed one by one. Otherwise, only the result of thelast query will be displayed.
Show results on Edit tabIf this option is checked, the Results tab is displayed as a separate tab.
Execute selected text separatelyCheck this option to allow execution of the selected statement separately.
Write only successfully executed queries to database SQL log fileIf this option is checked, unsuccessful queries will not be saved to the SQL Editor log file(see Setting log options in the Database Registration Info dialog).
Don't save queries automatically for the next sessionIf this option is checked, the SQL query text will not be saved. Otherwise, it will be savedin Windows registry and will be therefore available in the next application sessions.
Always save changes in Favorite Queries before closingThis option enables/disables saving changes in SQL queries marked as Favoriteautomatically upon closing the editor.
462
469
469
158 152
126
SQL Manager for SQL Server - User's Manual880
© 1999-2022 EMS Software Development
Same queries for all databasesWith this option enabled, SQL Editor stores all queries in a shared repository, so thatswitching to another database does not cause loading queries of that database (applyingthis option does not affect currently opened copies of SQL Editor). The value of theoption can be changed freely without any risk to lose the query repository content.
Refresh DB Explorer upon successful DDL statement executionIf this option is selected, the content of DB Explorer is refreshed each time a DDLstatement is executed successfully in SQL Editor .
Open server cursorThis option determines whether the application should attempt to open server cursor. Ifthis option is ON, the result dataset is processed with server resources, otherwise it'sprocessed on the client side.
Get info messagesThis options enables receiving of server messages and PRINT command results.
See also:
SQL Editor
11.1.4.5 SQL Monitor
SQL logThis group of options allows you to enable logging of all SQL Monitor events to a file.Check the Log SQL Monitor events to file option, specify the path to the log file using
the button, and enter a name for the *.sql file. To clear the log file after it reachessome definite size, check the Clear log file when it is greater than... option and set themaximum file size (in Kilobytes).
462
99
469 462
462
656

SQL Manager for SQL Server - User's Manual881
© 1999-2022 EMS Software Development
Show time of operationIf this option is checked, the execution time of logged operations is added.
Always show on topSelect this option if you want to display the SQL Monitor window in the foregroundpermanently.
See also:
SQL Monitor
11.1.4.6 SQL Script
Abort script execution on errorIf this option is checked, script execution is aborted if an error occurs.
Show statements explorerWith this option checked, SQL Script Editor parses the loaded script to enable fastnavigation in the Script Explorer tool.
Show message when doneDisplays a message box on finishing script execution.
656
656
659
663
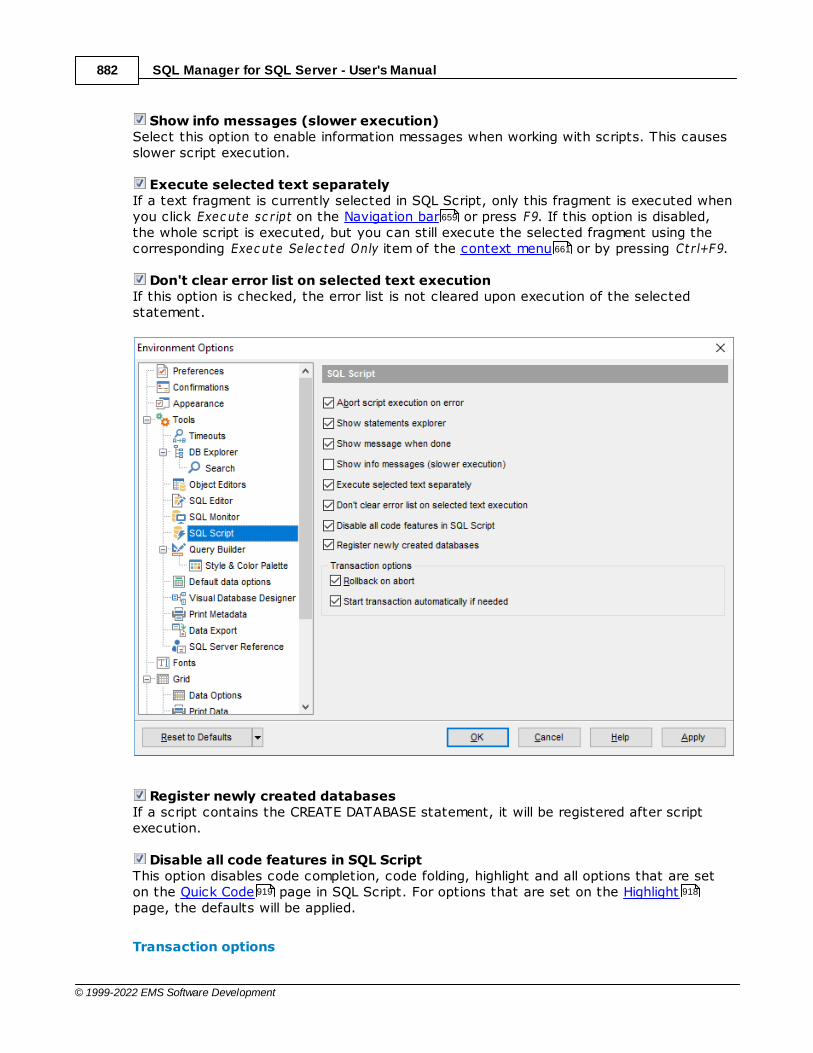
SQL Manager for SQL Server - User's Manual882
© 1999-2022 EMS Software Development
Show info messages (slower execution)Select this option to enable information messages when working with scripts. This causesslower script execution.
Execute selected text separatelyIf a text fragment is currently selected in SQL Script, only this fragment is executed whenyou click Exec ute sc r ipt on the Navigation bar or press F9. If this option is disabled,the whole script is executed, but you can still execute the selected fragment using thecorresponding Exec ute Selec ted Only item of the context menu or by pressing Ct r l+F9.
Don't clear error list on selected text executionIf this option is checked, the error list is not cleared upon execution of the selectedstatement.
Register newly created databasesIf a script contains the CREATE DATABASE statement, it will be registered after scriptexecution.
Disable all code features in SQL ScriptThis option disables code completion, code folding, highlight and all options that are seton the Quick Code page in SQL Script. For options that are set on the Highlightpage, the defaults will be applied.
Transaction options
659
661
919 918
SQL Manager for SQL Server - User's Manual883
© 1999-2022 EMS Software Development
Rollback on abort
This option is only available if the Abort script on error option is checked. This optionevokes automatic rollback when script execution is aborted.
Start transaction automatically if needed
If the option is enabled then transaction starts automatically after statements isexecuted. Otherwise, the BEGIN statement is required for transaction to start.
See also:
SQL Script Editor
11.1.4.7 Query Builder
General options
Allow SELECT queries onlyWhen this option is checked, the INSERT, UPDAT E and DELET E statements are not allowedin Query Builder .
Select condition rowDisplays the selected condition in different rows on the Criteria and Grouping Criteriatabs of Query Builder .
Drag field nameDisplays the dragged field name in the Builder area.
Hide selection when inactiveHides the selection when the Query Builder window is inactive.
Show field typesDisplays the field data type next to the field name in the table box.
Union all by defaultCheck this option to use the UNION ALL expression in Query Builder by default.The UNION keyword allows you to include the results of two SELECT statements in oneresulting table. The ALL parameter incorporates all rows into the results, including duplicates. If notspecified, duplicate rows are removed.
Allow owner prefix for dbo objectsAdds the schema name to the table name in the 'Table' box caption (for [dbo] schemaobjects)
Show actual execution plan on query executionIf this option is checked, the query plan is displayed within the corresponding tab ofthe Query Builder window.
659
479
479
479
479
493
479
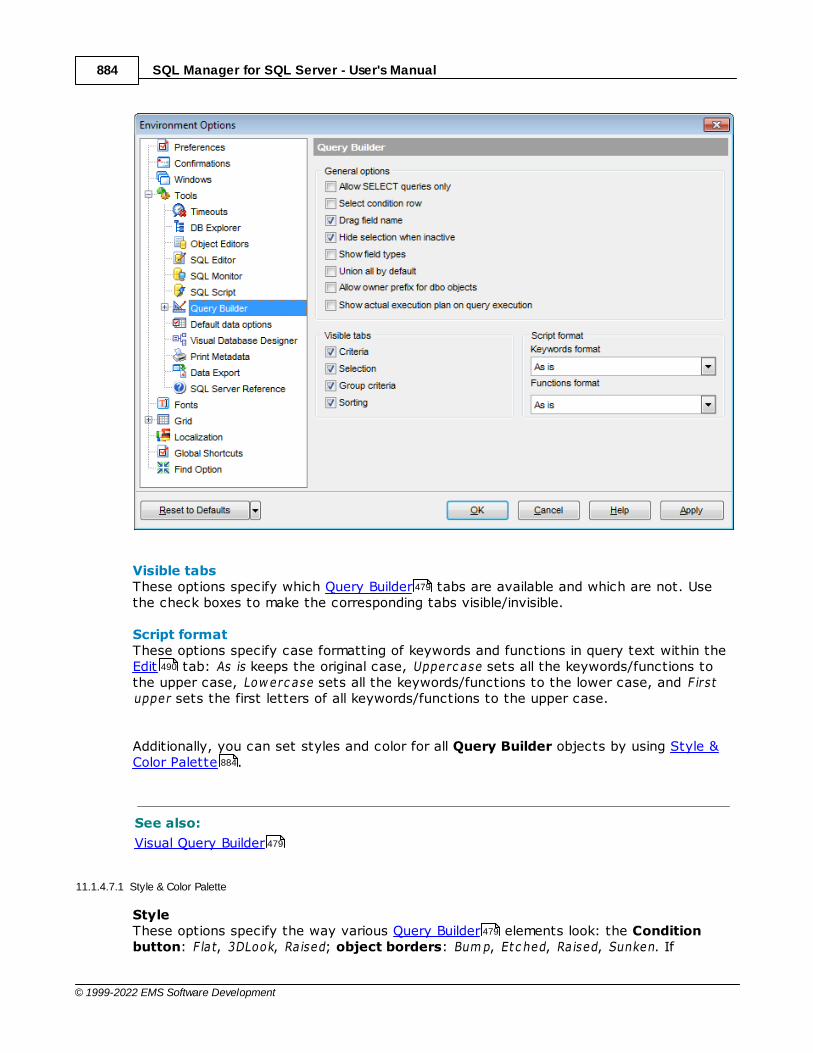
SQL Manager for SQL Server - User's Manual884
© 1999-2022 EMS Software Development
Visible tabsThese options specify which Query Builder tabs are available and which are not. Usethe check boxes to make the corresponding tabs visible/invisible.
Script formatThese options specify case formatting of keywords and functions in query text within the Edit tab: As is keeps the original case, Upperc ase sets all the keywords/functions tothe upper case, Low erc ase sets all the keywords/functions to the lower case, and F irstupper sets the first letters of all keywords/functions to the upper case.
Additionally, you can set styles and color for all Query Builder objects by using Style &Color Palette .
See also:
Visual Query Builder
11.1.4.7.1 Style & Color Palette
Style These options specify the way various Query Builder elements look: the Conditionbutton: F lat, 3DLook, Raised; object borders: Bum p, Etc hed, Raised, Sunken. If
479
490
884
479
479

SQL Manager for SQL Server - User's Manual885
© 1999-2022 EMS Software Development
necessary, you can also specify flatness for objects and buttons using the correspondingoptions.
XP tables style This option determines the appearance of non-client areas of tables in Query Builder .
Show icons on tabsWith this option selected, you can see icons next to the tab names in Query Builder .
Color paletteThese options define the colors of various Query Builder elements.
Ac t ive c ondit ion row (at the Criteria and Grouping criteria tabs):
Condit ion text (at the Criteria and Grouping criteria tabs):
479
479
479
485 489
485 489
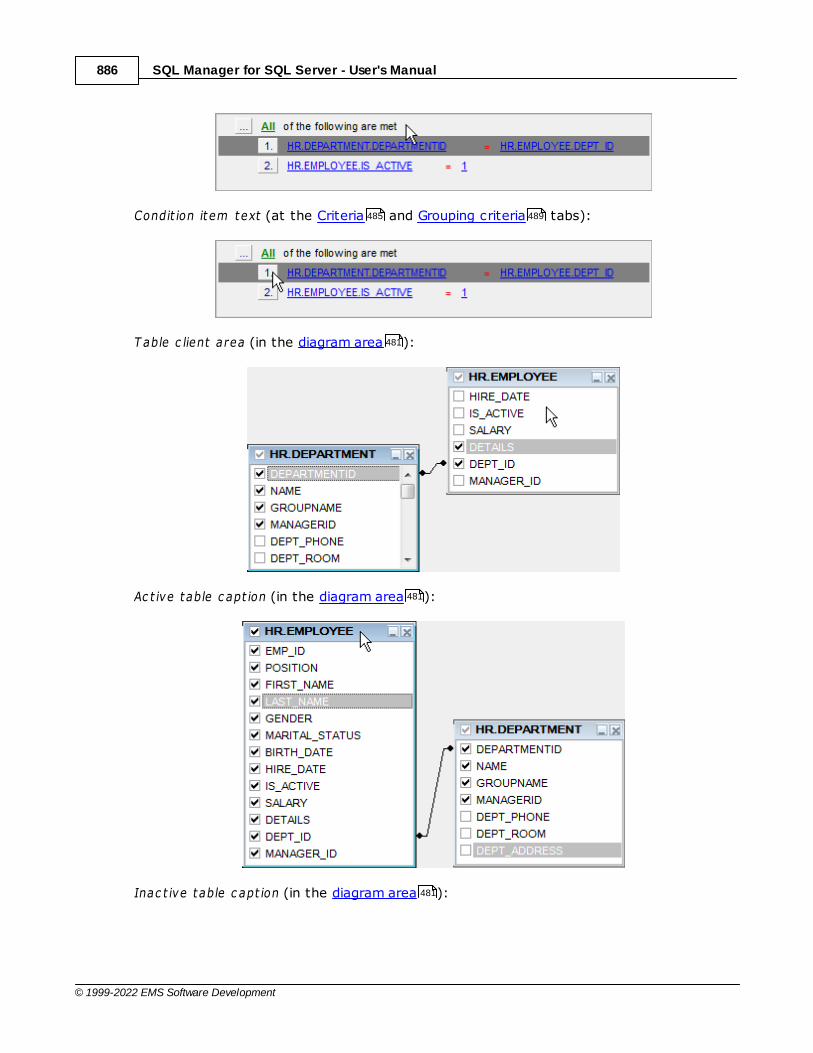
SQL Manager for SQL Server - User's Manual886
© 1999-2022 EMS Software Development
Condit ion it em text (at the Criteria and Grouping criteria tabs):
T able c lient area (in the diagram area ):
Ac t ive table c apt ion (in the diagram area ):
Inac t ive table c apt ion (in the diagram area ):
485 489
481
481
481
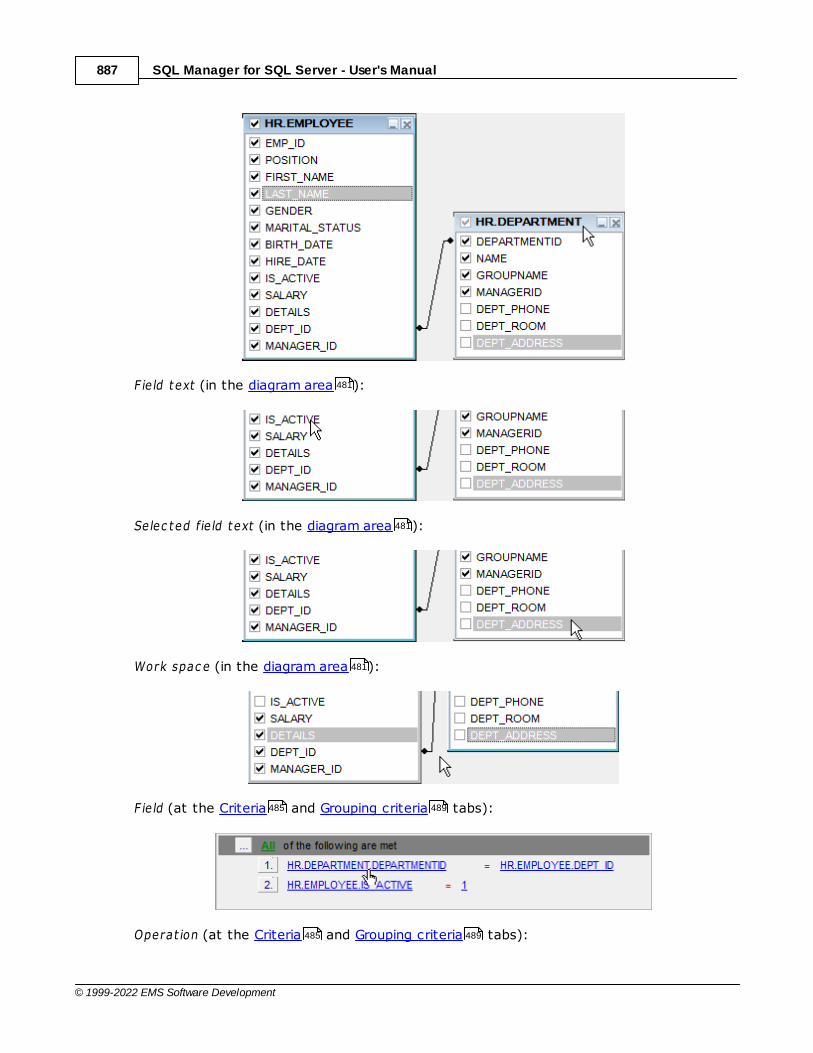
SQL Manager for SQL Server - User's Manual887
© 1999-2022 EMS Software Development
F ie ld text (in the diagram area ):
Selec ted fie ld text (in the diagram area ):
Work spac e (in the diagram area ):
F ie ld (at the Criteria and Grouping criteria tabs):
Operat ion (at the Criteria and Grouping criteria tabs):
481
481
481
485 489
485 489

SQL Manager for SQL Server - User's Manual888
© 1999-2022 EMS Software Development
Group (at the Grouping criteria tab):
Predic ate (at the Criteria and Grouping criteria tabs when a subquery is used):
Subquery (at the Criteria and Grouping criteria tabs when a subquery is used):
Click an item to select a color for the corresponding element using the Color dialog whereyou can specify the required color from the palette.
11.1.4.8 Default Data Options
Default data options for newly registered databases
489
485 489 482
485 489 482

SQL Manager for SQL Server - User's Manual889
© 1999-2022 EMS Software Development
Asynchronous query executionCheck this option to allow executing queries in background mode (asynchronously).
Use transactions in Data tab of object editors, SQL Editor and Query BuilderIf this option is enabled, a transaction is active until the 'Data' tab is closed or the'Commit' button is pressed; all edited records are blocked until the transaction iscommitted. If this option is disabled, the transaction starts and is immediately committed(autocommit) on saving each record which is blocked only for a short period of time.
Use separate connections for each data view within a databaseUncheck this option to use separate connection for each data view within a database.Note that this option is only available when the Use t ransac t ions in Data tab of objec teditors, SQL Editor and Query Builder option is enabled.
11.1.4.9 Visual Database Designer
Visual settings
Model notationWhen you work in Visual Database Designer , you can choose one of the followingmodeling notations:
Integration DEFinition for Information Modeling (IDEF1X);Information Engineering (IE).
737
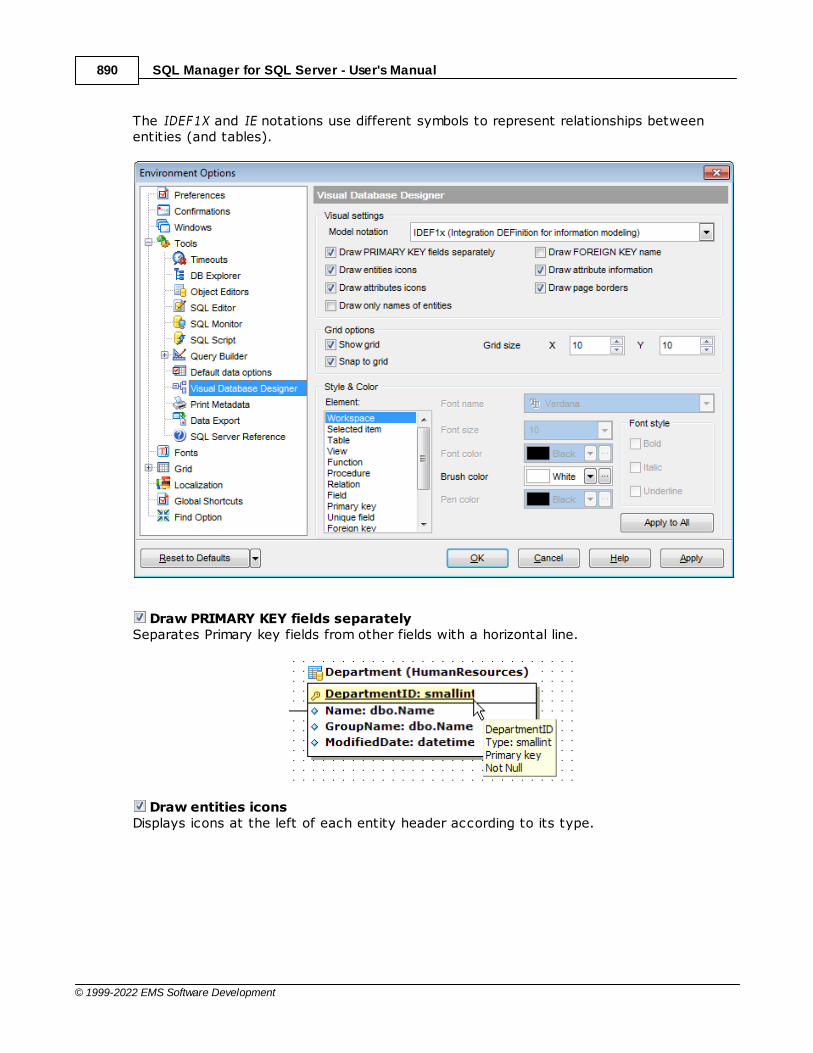
SQL Manager for SQL Server - User's Manual890
© 1999-2022 EMS Software Development
The IDEF1X and IE notations use different symbols to represent relationships betweenentities (and tables).
Draw PRIMARY KEY fields separatelySeparates Primary key fields from other fields with a horizontal line.
Draw entities iconsDisplays icons at the left of each entity header according to its type.
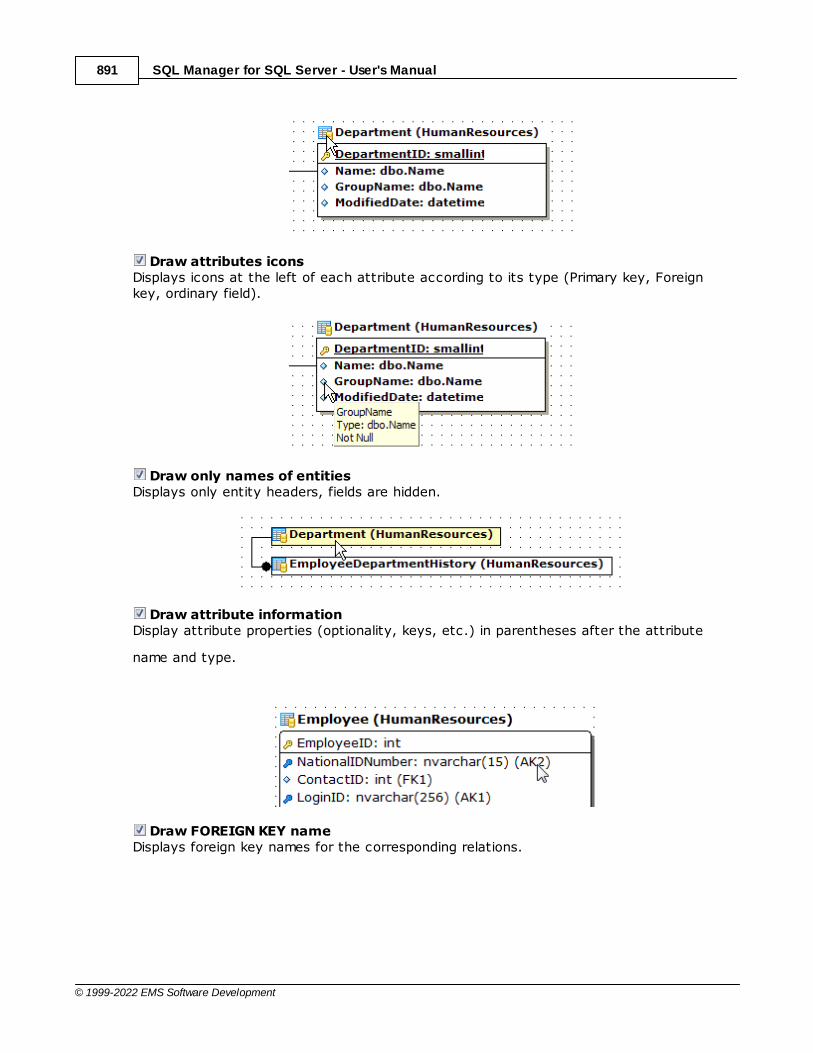
SQL Manager for SQL Server - User's Manual891
© 1999-2022 EMS Software Development
Draw attributes iconsDisplays icons at the left of each attribute according to its type (Primary key, Foreignkey, ordinary field).
Draw only names of entitiesDisplays only entity headers, fields are hidden.
Draw attribute informationDisplay attribute properties (optionality, keys, etc.) in parentheses after the attribute
name and type.
Draw FOREIGN KEY nameDisplays foreign key names for the corresponding relations.
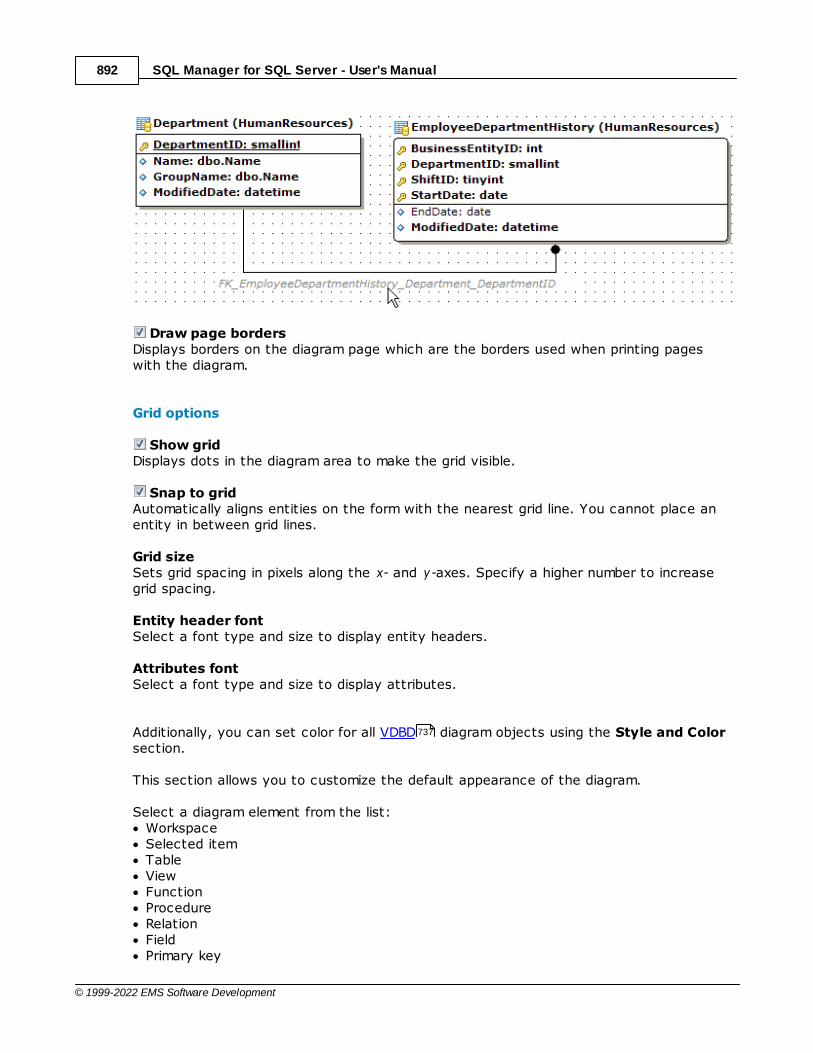
SQL Manager for SQL Server - User's Manual892
© 1999-2022 EMS Software Development
Draw page bordersDisplays borders on the diagram page which are the borders used when printing pageswith the diagram.
Grid options
Show gridDisplays dots in the diagram area to make the grid visible.
Snap to gridAutomatically aligns entities on the form with the nearest grid line. You cannot place anentity in between grid lines.
Grid sizeSets grid spacing in pixels along the x- and y-axes. Specify a higher number to increasegrid spacing.
Entity header fontSelect a font type and size to display entity headers.
Attributes fontSelect a font type and size to display attributes.
Additionally, you can set color for all VDBD diagram objects using the Style and Colorsection.
This section allows you to customize the default appearance of the diagram.
Select a diagram element from the list:WorkspaceSelected itemTableViewFunctionProcedureRelationFieldPrimary key
737
SQL Manager for SQL Server - User's Manual893
© 1999-2022 EMS Software Development
Unique fieldForeign keyAutoincrement fieldNot null fieldComment
Then you can specify the following style settings for each element:Font nam eFont sty leFont s izeFont c olorBrush c olorPen c olor
See also:
Visual Database Designer
11.1.4.10 Print Metadata
Default paper size
Define the default paper size for reports created with the Print Metadata tool used: A4 (210 x 297 mm) Let ter (8 1/2 x 11 ")
737
683

SQL Manager for SQL Server - User's Manual894
© 1999-2022 EMS Software Development
See also:
Print Metadata
11.1.4.11 Data Export
This page allows you to customize formats applied to exported data.
683
567

SQL Manager for SQL Server - User's Manual895
© 1999-2022 EMS Software Development
Data formatsEdit the format masks to adjust the result format in the way you need: Integer form at,F loat form at, Date form at, T im e form at, DateT im e form at, Currenc y form at, BooleanT rue, Boolean False, Null st r ing.
Auto save format stringsSelect this option to save specified format strings automatically.
These settings can also be specified at the Adjusting data formats step of Export DataWizard .Fore more details see Format specifiers .
See also:
Export Data Wizard
11.1.4.12 SQL Server Reference
Using this page you can set which Microsoft® SQL Server™ reference system will befurther used in SQL Manager for SQL Server:
M ic rosoft Doc um ent Explorer (SQL Server 2008 Help) M ic rosoft Doc um ent Explorer (SQL Server 2005 Help)
570
567
974
567
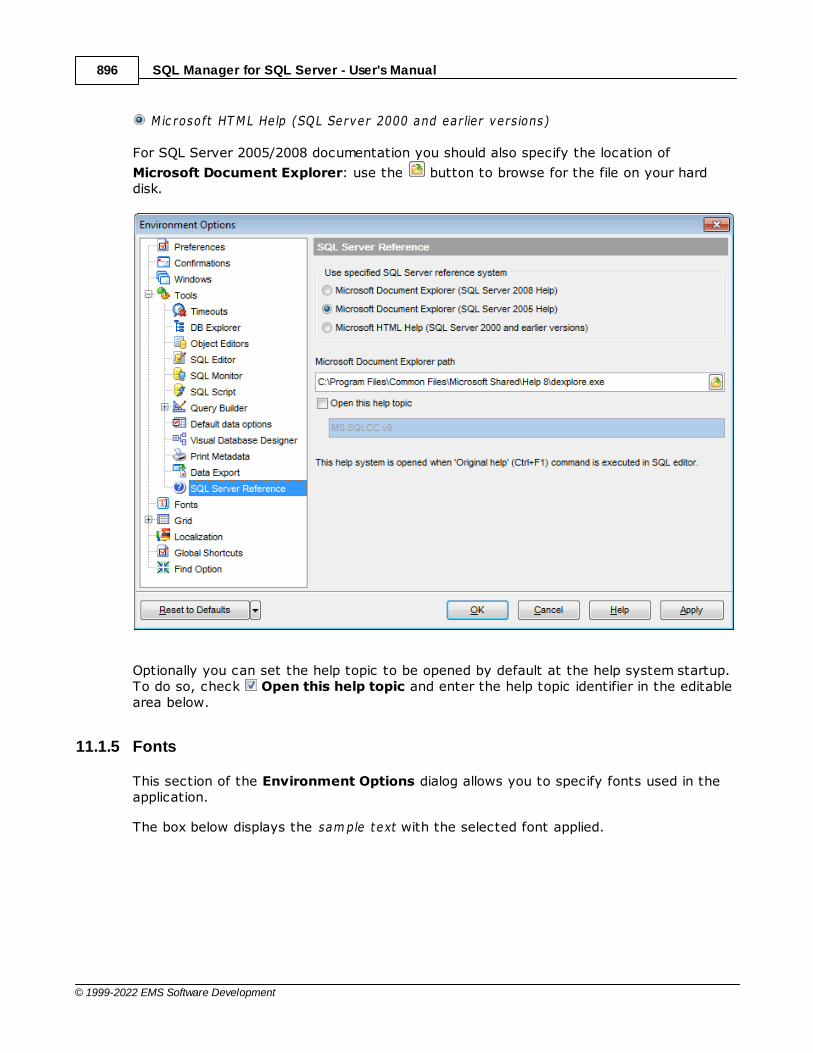
SQL Manager for SQL Server - User's Manual896
© 1999-2022 EMS Software Development
M ic rosoft HT ML Help (SQL Server 2000 and ear lier versions)
For SQL Server 2005/2008 documentation you should also specify the location of
Microsoft Document Explorer: use the button to browse for the file on your harddisk.
Optionally you can set the help topic to be opened by default at the help system startup.To do so, check Open this help topic and enter the help topic identifier in the editablearea below.
11.1.5 Fonts
This section of the Environment Options dialog allows you to specify fonts used in theapplication.
The box below displays the sam ple text with the selected font applied.
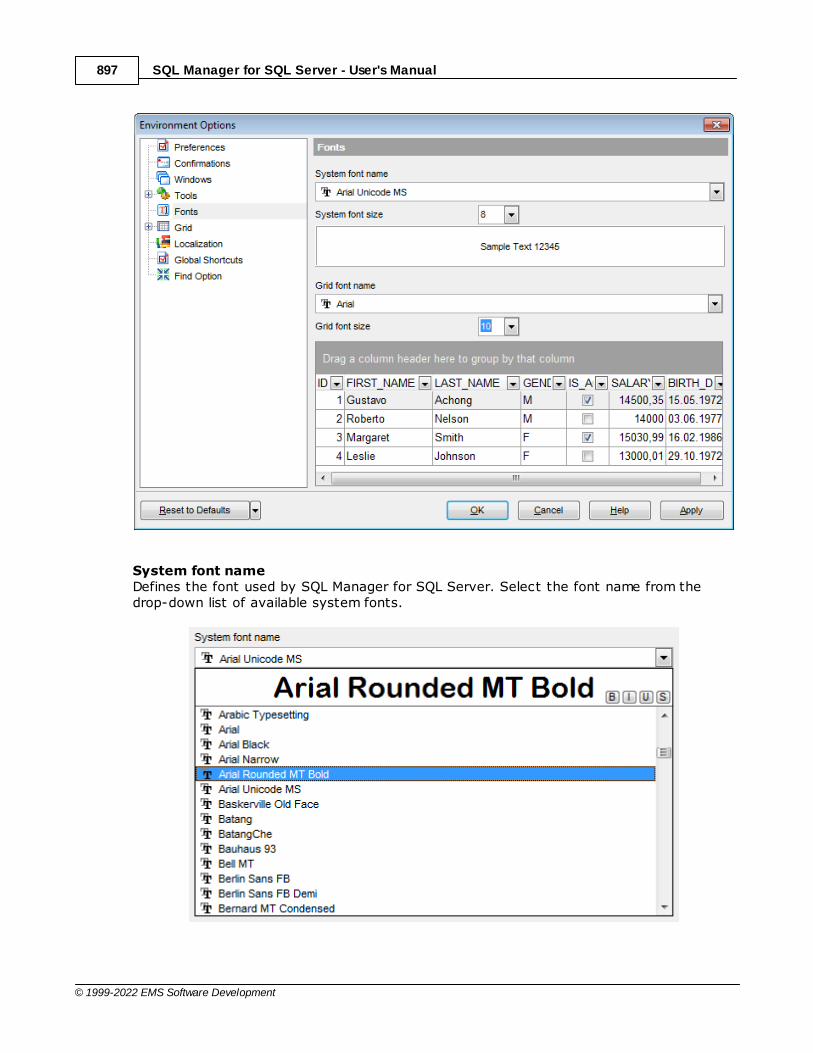
SQL Manager for SQL Server - User's Manual897
© 1999-2022 EMS Software Development
System font nameDefines the font used by SQL Manager for SQL Server. Select the font name from thedrop-down list of available system fonts.
SQL Manager for SQL Server - User's Manual898
© 1999-2022 EMS Software Development
System font size Defines the font size used by SQL Manager for SQL Server. Type in or use the drop-downlist to select the required value.
Grid font nameDefines the font used for displaying data in the Data Grid . Select the font name fromthe drop-down list of available system fonts.
Grid font sizeDefines the font size used for displaying data in the Data Grid . Type in or use the drop-down list to select the required value.
In the sample grid you can view how the data grid will look like with the configured font.
11.1.6 Grid
General options
Striped gridsDisplays the odd grid rows in a different color defined by the Strip option available on theColor & Formats page.
Show editor immediatelyAllows editing the cell value right after the cell is clicked.
Always show editorSet this option to make the cell editors always active.
Enable auto-search in gridIf this option is checked, the cursor is automatically forwarded to the closest match whenyou start typing.
Row multi-selectionWith this option set, multiple rows can be selected in grid .
Invert selectionDetermines whether a single cell within the focused row or the entire row is highlightedwhen focused.
Column auto-widthWith this option set, column widths are changed in order to display all columns withoutusing the horizontal scroll bar. If the content a column is still too large to display withouta need to resize the grid, then the column values are truncated and the hiddencharacters are replaced with an ellipsis at the end.
Cell auto-heightIf the widths of the columns are insufficient to display the full content, then text clippingoccurs. Set this option to prevent this. If this option is set, the cell content is displayedin multiple lines where necessary. You can set the number of lines to display using the Cell max line count option.
501
501
903
501

SQL Manager for SQL Server - User's Manual899
© 1999-2022 EMS Software Development
Grid layout preference
Autofit column widthsUse this option to shrink the grid columns so that the longest visible column value fits.
Save and restore layoutUse this option to keep the original grid width. Check the Restore sorting option to applydefaults to sorting (except for SQL sorting) as well.
Root level options
These options are applied to the main view of the grid. See Grid View for details.
Detail level options
These options are applied to the detail view of the grid. See Grid View for details.
Show "Group by" boxDisplays the gray area above the column caption allowing one to group data in thegrid.
Show indicatorActivates/deactivates the row indicator pane at the left.
509 501
509 501
503

SQL Manager for SQL Server - User's Manual900
© 1999-2022 EMS Software Development
Show navigatorActivates/deactivates the data navigator similar to the navigation pane at the top ofthe grid. The navigator is available at the bottom of detail level view.
Show "New item row"Displays an empty row at the bottom of a view which is a convenient way for adding datato the grid.
Hide tabs for single detailThis option is useful when only one view is present on the detail level. When the option isenabled, the view tab is hidden.
SelectionIf the Row selection is selected then the whole record in the table is selected in thetable on clicking the cell. Otherwise, only the clicked cell is selected ( Cell selectionoption).
Check the Row/cell multi-selection option to enable the selection of multiple cells orrows in the grid with the Shift button.
See also:
Grid View
11.1.6.1 Data Options
Limit options in table and view editors
Define the number of records to be selected on opening the Data tab of Table Editorand View Editor :
Selec t a ll rec ords from a table* Selec t only ... rec ords* (you should set the number of records using the corresponding
spinner control)
500
501
236
282
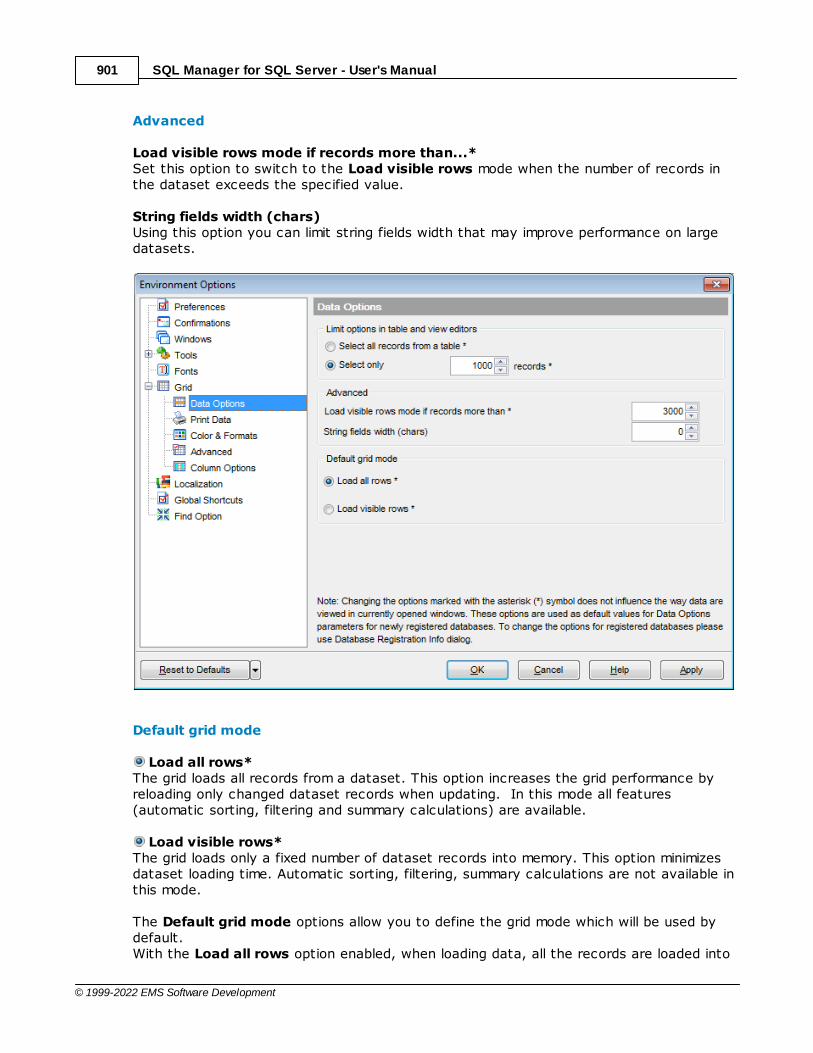
SQL Manager for SQL Server - User's Manual901
© 1999-2022 EMS Software Development
Advanced
Load visible rows mode if records more than...*Set this option to switch to the Load visible rows mode when the number of records inthe dataset exceeds the specified value.
String fields width (chars)Using this option you can limit string fields width that may improve performance on largedatasets.
Default grid mode
Load all rows*The grid loads all records from a dataset. This option increases the grid performance byreloading only changed dataset records when updating. In this mode all features(automatic sorting, filtering and summary calculations) are available.
Load visible rows*The grid loads only a fixed number of dataset records into memory. This option minimizesdataset loading time. Automatic sorting, filtering, summary calculations are not available inthis mode.
The Default grid mode options allow you to define the grid mode which will be used bydefault.With the Load all rows option enabled, when loading data, all the records are loaded into
SQL Manager for SQL Server - User's Manual902
© 1999-2022 EMS Software Development
grid buffers. In this mode opening the tables with many records may take a considerableamount of time. But in this case you can make use of some advantages: in the filter drop-down list the column headers are displayed with the values for quick filtering; it is possibleto open several sub-levels at the same time when viewing data in master-detail view,etc. In case opening and other operations with an object consisting of many records takessufficient time, the Load visible rows mode should be used instead. It can be setindividually for each table and saved between sessions (can be set through the contextmenu of the grid).
Note: Changing the options marked with the asterisk (*) sign does not affect the waydata are viewed in currently opened windows. These options are used as default valuesfor Data Options parameters for newly registered databases. To change the options forregistered databases, please use the Database Registration Info dialog.
See also:
EMS SQL Manager FAQ
11.1.6.2 Print Data
Save/restore following print data properties
These options specify which Print Data properties will be saved between work sessions(e.g. if you tick off the Page set t ings item, those settings will be saved and storedbetween the sessions).
You can save/restore the following Print Data properties: Card v iew representat ion,Detail v iew representat ion, Expanding, Form at t ing, Level opt ions, "On every page"opt ions, Paginat ion, Prev iew opt ions, Im age opt ions, Selec t ion opt ions, Report s izeopt ions, Show ing gr id e lem ents, Page num ber form at, Page set t ings, Report t it le.
508
160
66
521
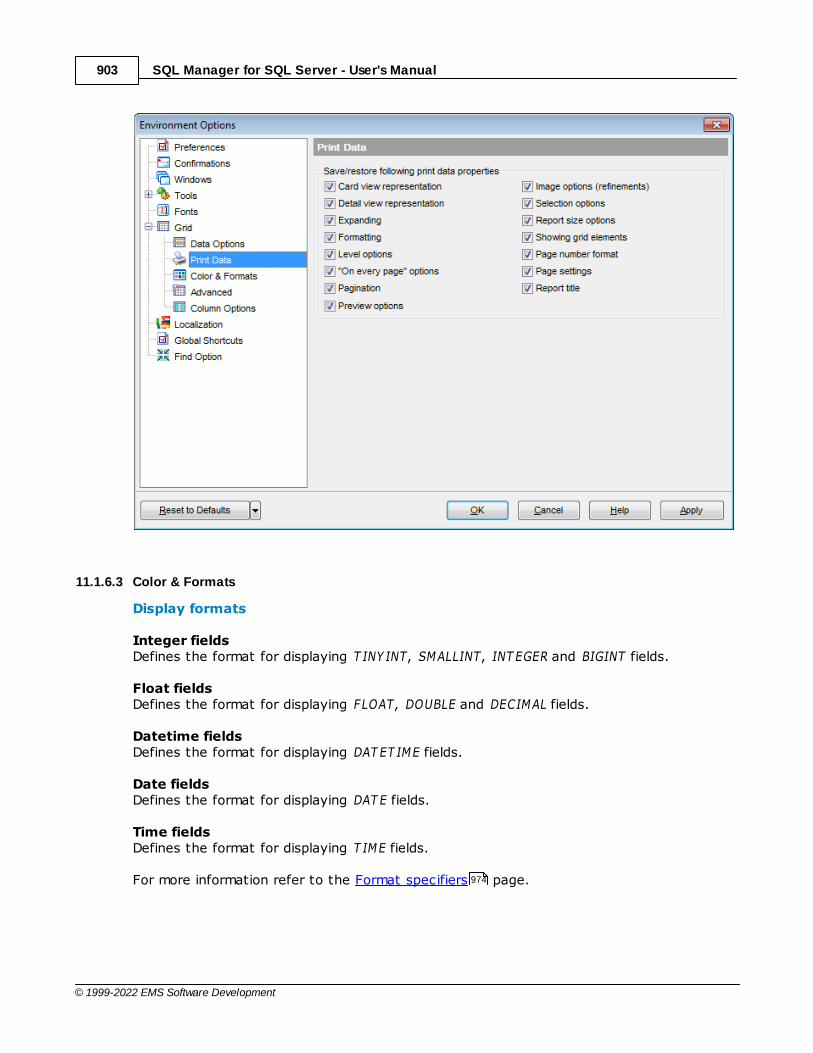
SQL Manager for SQL Server - User's Manual903
© 1999-2022 EMS Software Development
11.1.6.3 Color & Formats
Display formats
Integer fieldsDefines the format for displaying T INY INT, SMALLINT, INT EGER and BIGINT fields.
Float fieldsDefines the format for displaying FLOAT, DOUBLE and DECIMAL fields.
Datetime fieldsDefines the format for displaying DAT ET IME fields.
Date fieldsDefines the format for displaying DAT E fields.
Time fieldsDefines the format for displaying T IME fields.
For more information refer to the Format specifiers page.974
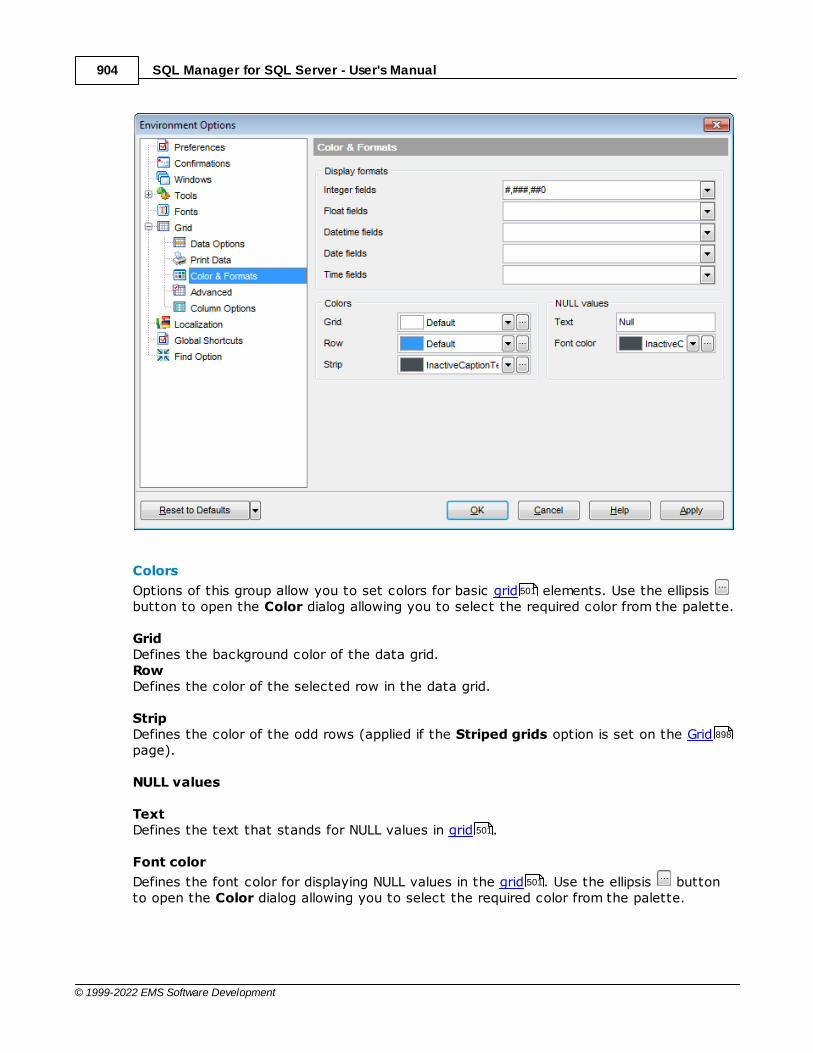
SQL Manager for SQL Server - User's Manual904
© 1999-2022 EMS Software Development
Colors
Options of this group allow you to set colors for basic grid elements. Use the ellipsis button to open the Color dialog allowing you to select the required color from the palette.
GridDefines the background color of the data grid. Row Defines the color of the selected row in the data grid.
StripDefines the color of the odd rows (applied if the Striped grids option is set on the Gridpage).
NULL values
Text Defines the text that stands for NULL values in grid .
Font color
Defines the font color for displaying NULL values in the grid . Use the ellipsis buttonto open the Color dialog allowing you to select the required color from the palette.
501
898
501
501
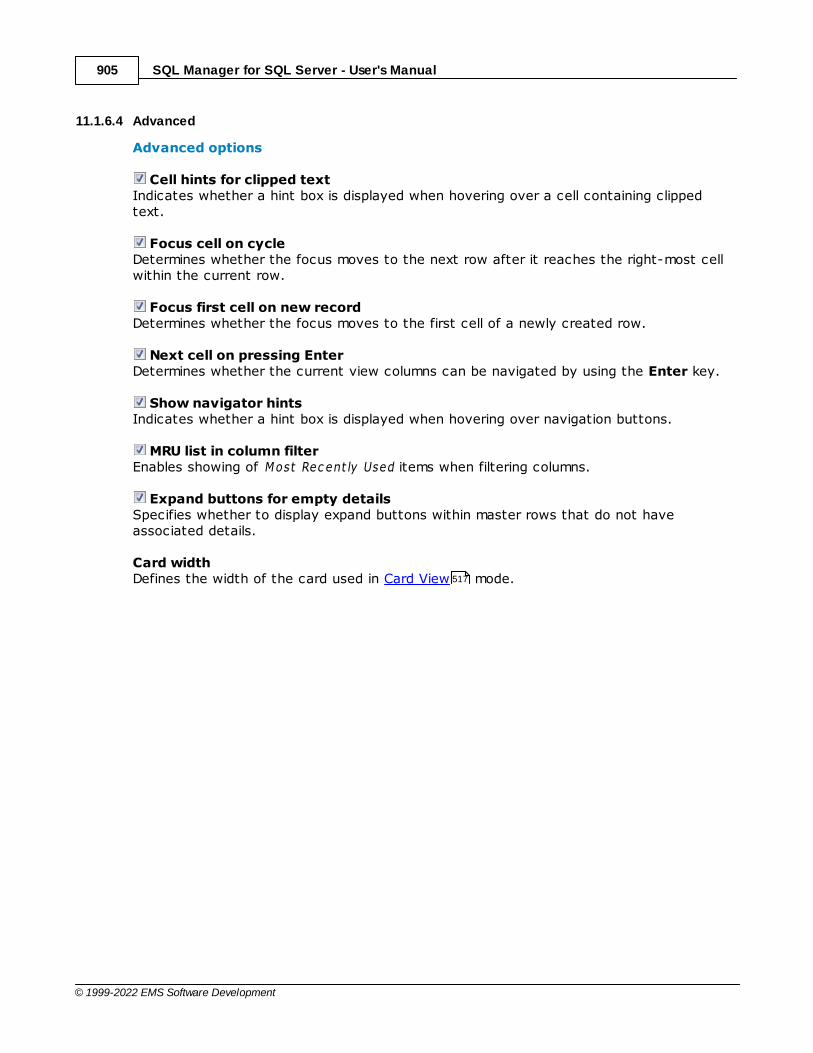
SQL Manager for SQL Server - User's Manual905
© 1999-2022 EMS Software Development
11.1.6.4 Advanced
Advanced options
Cell hints for clipped textIndicates whether a hint box is displayed when hovering over a cell containing clippedtext.
Focus cell on cycleDetermines whether the focus moves to the next row after it reaches the right-most cellwithin the current row.
Focus first cell on new recordDetermines whether the focus moves to the first cell of a newly created row.
Next cell on pressing EnterDetermines whether the current view columns can be navigated by using the Enter key.
Show navigator hintsIndicates whether a hint box is displayed when hovering over navigation buttons.
MRU list in column filterEnables showing of Most Rec ent ly Used items when filtering columns.
Expand buttons for empty detailsSpecifies whether to display expand buttons within master rows that do not haveassociated details.
Card widthDefines the width of the card used in Card View mode.517
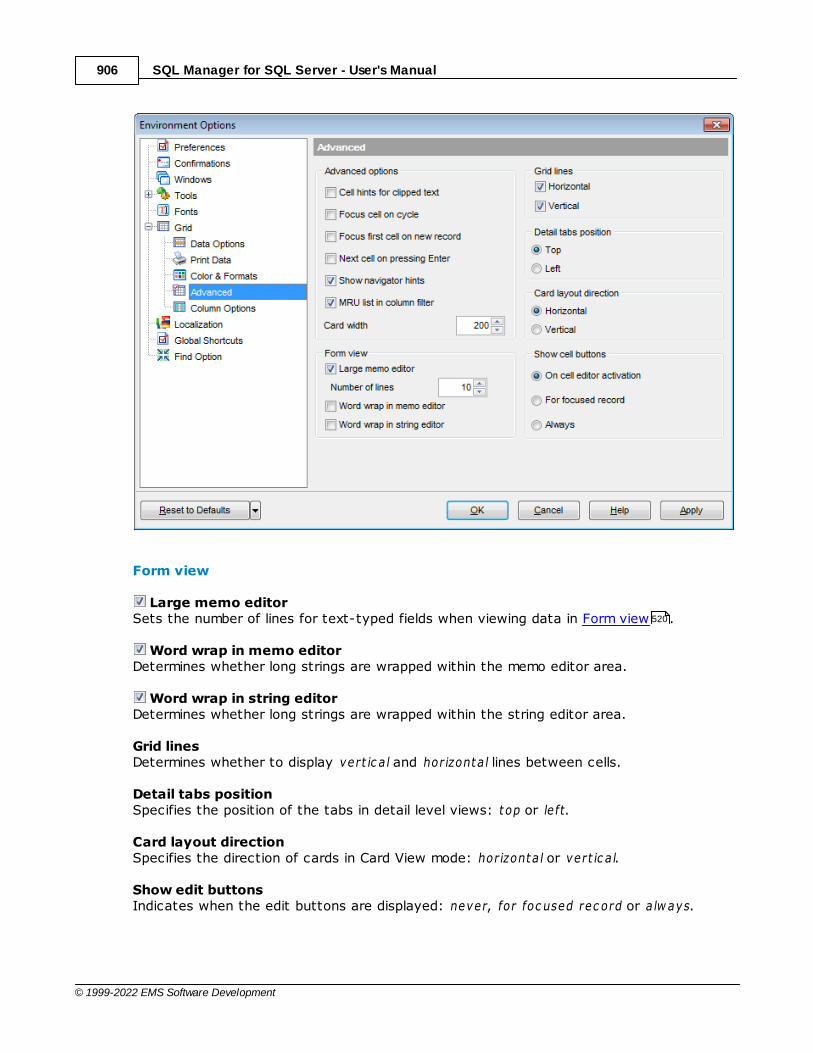
SQL Manager for SQL Server - User's Manual906
© 1999-2022 EMS Software Development
Form view
Large memo editorSets the number of lines for text-typed fields when viewing data in Form view .
Word wrap in memo editorDetermines whether long strings are wrapped within the memo editor area.
Word wrap in string editorDetermines whether long strings are wrapped within the string editor area.
Grid linesDetermines whether to display vert ic a l and horizonta l lines between cells.
Detail tabs positionSpecifies the position of the tabs in detail level views: top or le ft.
Card layout directionSpecifies the direction of cards in Card View mode: horizonta l or vert ic a l.
Show edit buttonsIndicates when the edit buttons are displayed: never, for foc used rec ord or a lw ays.
520

SQL Manager for SQL Server - User's Manual907
© 1999-2022 EMS Software Development
11.1.6.5 Column Options
Common options
Auto-select textDetermines whether all text within an editor is automatically selected when the editorgets focus.
Hide selection on losing focusDetermines whether the visual indication of the selected text remains when the editorloses focus.
Memo editor options
Inserting Return charactersSpecifies whether a user can insert return characters into text.
Inserting Tab charactersSpecifies whether a user can insert tab characters into text.
Word wrap in gridDetermines whether long strings are wrapped in grid.
Popup memo editorsTurns on popup memo editors for text BLOB type fields.
SQL Manager for SQL Server - User's Manual908
© 1999-2022 EMS Software Development
Spin editor options
Use Ctrl+Up instead of Up to increase valueAllows you to use Ct r l+Up and Ct r l+Dow n key combinations for editing spinner values (forINT EGER field values).
Show large increment buttonsDetermines whether fast buttons (for large increment) are visible within the editor.
IncrementSpecifies the increment value for the spin editor (spinner control).
Large incrementSpecifies the large increment value for the spin editor (spinner control).
Spin editor buttons' positionSpecifies the position of spin editor (spinner control) buttons: vert ic a l, hor izonta l / le ftand r ight or horizonta l / r ight.
11.1.7 Localization
The Localization section of the Environment Options dialog is provided for managingthe localization files of SQL Manager for SQL Server.
You can create your own *.lng files similar to those available in the %program _direc tory%\Languages folder, add them to the list of available languages and set the new languageas the program interface language.
Default directory
Use the Explorer button to specify the directory where the *.lng files are to be storedby default.
Choose program languageUse the drop-down list of available languages to select the interface language to beapplied to the application.
Auto scan languages on startupWhen checked, the directory with localization files will be scanned automatically at theapplication startup; all the languages found will be added to the list of availablelanguages.
Available LanguagesLists all the languages available for localization and the corresponding *.lng files. Double-click a language in the list to edit its name or the *.lng file.
Add DefaultsThis button is used to search for *.lng files in the Default directory and add all of themto the Available Languages list.
AddOpens the Add language dialog where you can specify your own localization file and set977
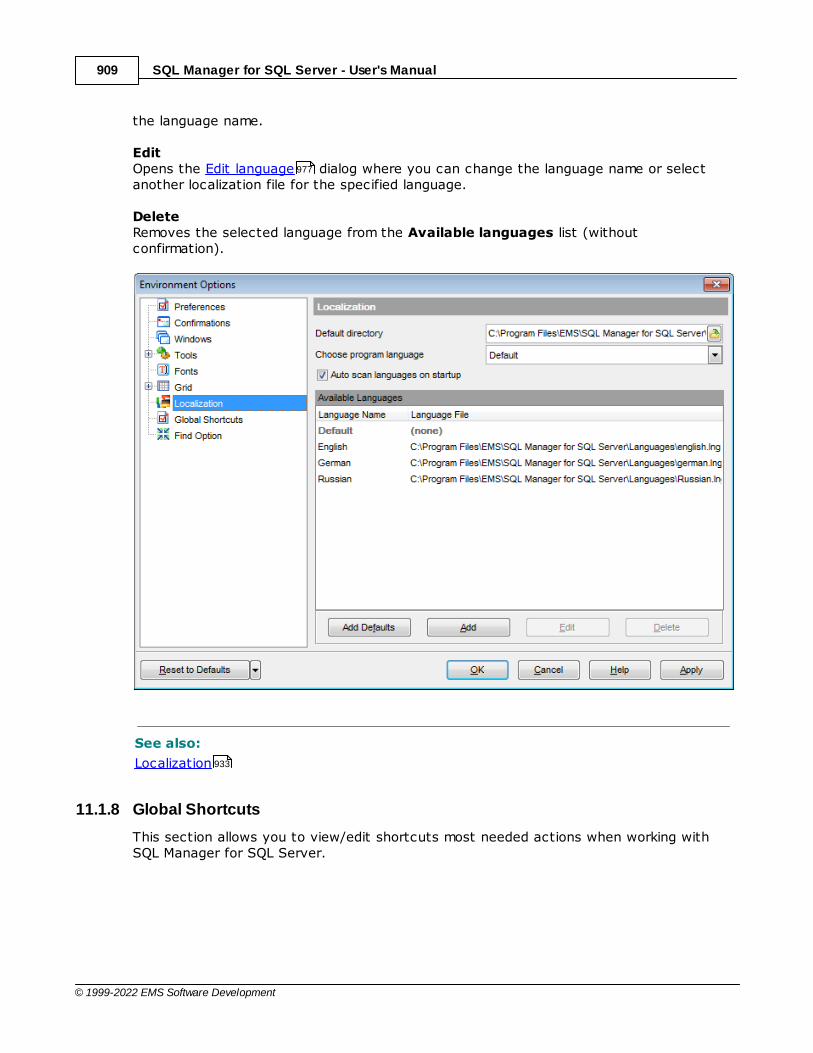
SQL Manager for SQL Server - User's Manual909
© 1999-2022 EMS Software Development
the language name.
EditOpens the Edit language dialog where you can change the language name or selectanother localization file for the specified language.
DeleteRemoves the selected language from the Available languages list (withoutconfirmation).
See also:
Localization
11.1.8 Global Shortcuts
This section allows you to view/edit shortcuts most needed actions when working withSQL Manager for SQL Server.
977
933
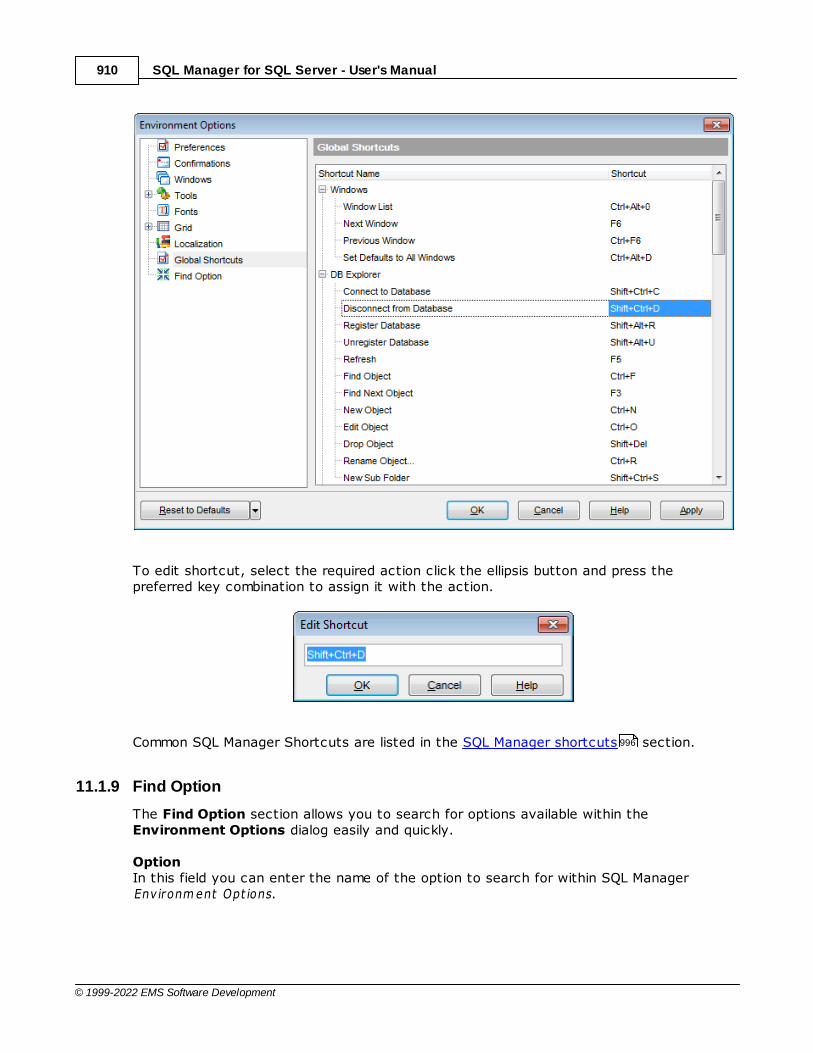
SQL Manager for SQL Server - User's Manual910
© 1999-2022 EMS Software Development
To edit shortcut, select the required action click the ellipsis button and press thepreferred key combination to assign it with the action.
Common SQL Manager Shortcuts are listed in the SQL Manager shortcuts section.
11.1.9 Find Option
The Find Option section allows you to search for options available within theEnvironment Options dialog easily and quickly.
OptionIn this field you can enter the name of the option to search for within SQL Manager Env ironm ent Opt ions.
996
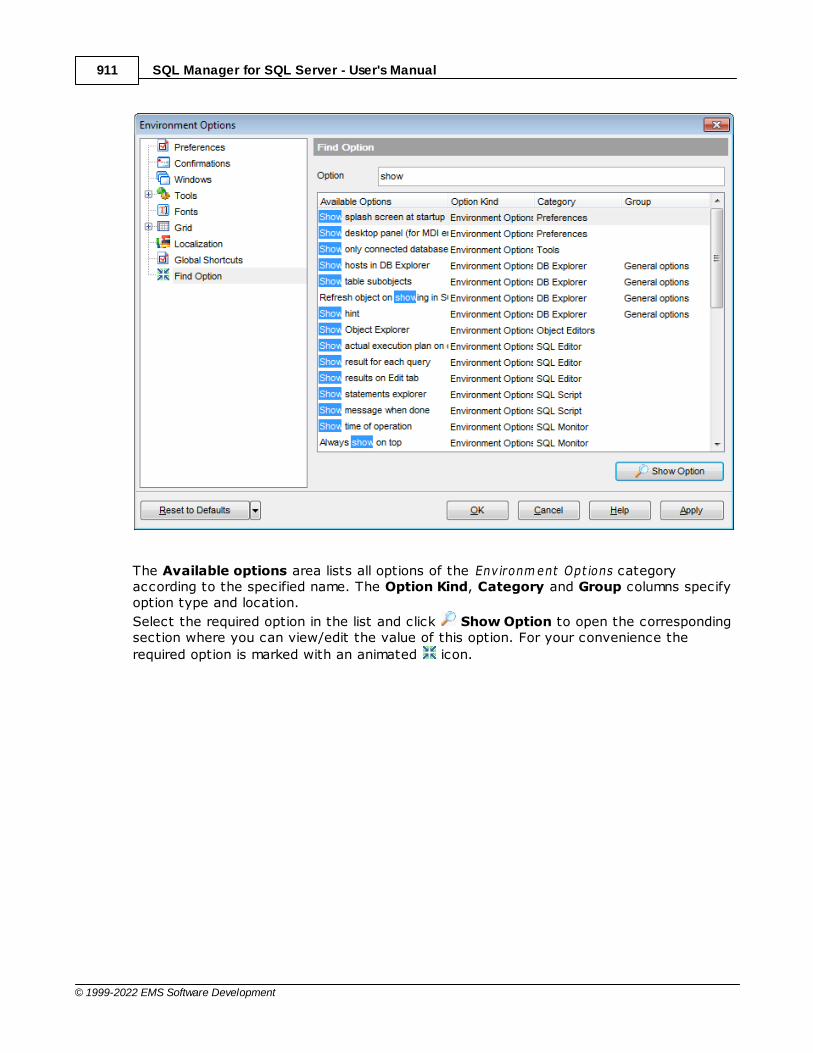
SQL Manager for SQL Server - User's Manual911
© 1999-2022 EMS Software Development
The Available options area lists all options of the Env ironm ent Opt ions categoryaccording to the specified name. The Option Kind, Category and Group columns specifyoption type and location.
Select the required option in the list and click Show Option to open the correspondingsection where you can view/edit the value of this option. For your convenience the
required option is marked with an animated icon.
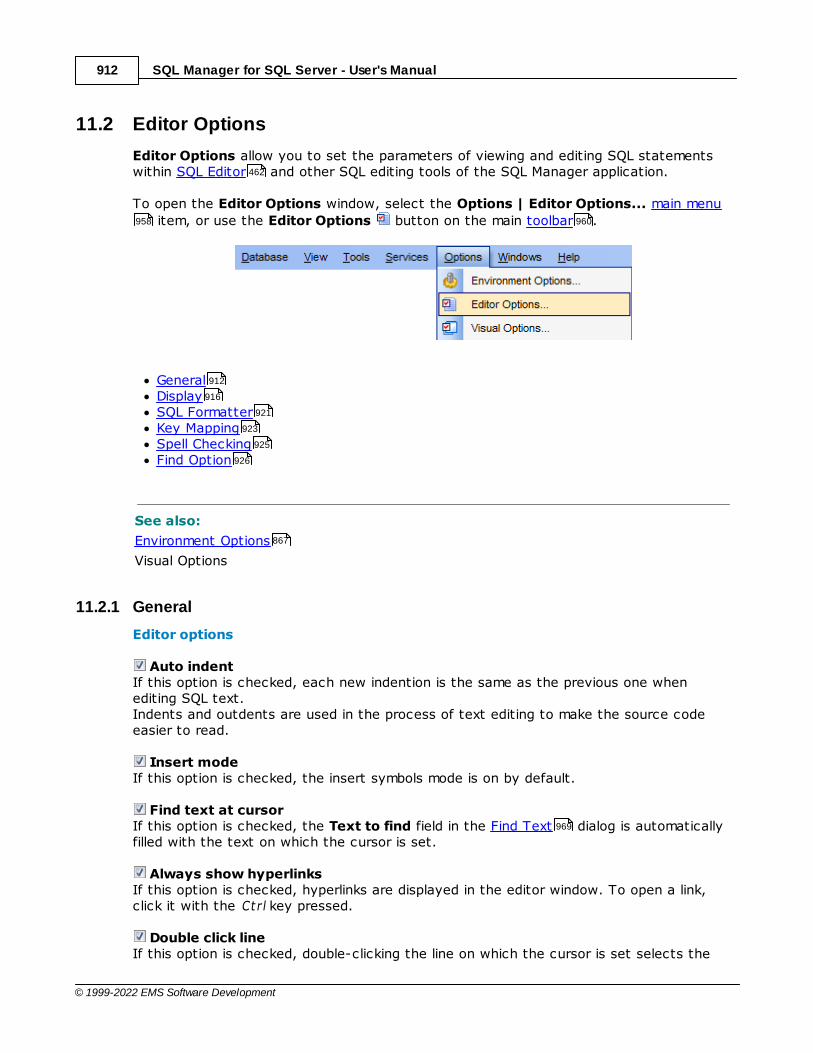
SQL Manager for SQL Server - User's Manual912
© 1999-2022 EMS Software Development
11.2 Editor Options
Editor Options allow you to set the parameters of viewing and editing SQL statementswithin SQL Editor and other SQL editing tools of the SQL Manager application.
To open the Editor Options window, select the Options | Editor Options... main menu
item, or use the Editor Options button on the main toolbar .
GeneralDisplaySQL FormatterKey MappingSpell CheckingFind Option
See also:
Environment Options
Visual Options
11.2.1 General
Editor options
Auto indent If this option is checked, each new indention is the same as the previous one whenediting SQL text.Indents and outdents are used in the process of text editing to make the source codeeasier to read.
Insert mode If this option is checked, the insert symbols mode is on by default.
Find text at cursor If this option is checked, the Text to find field in the Find Text dialog is automaticallyfilled with the text on which the cursor is set.
Always show hyperlinks If this option is checked, hyperlinks are displayed in the editor window. To open a link,click it with the Ct r l key pressed.
Double click lineIf this option is checked, double-clicking the line on which the cursor is set selects the
462
958 960
912
916
921
923
925
926
867
969

SQL Manager for SQL Server - User's Manual913
© 1999-2022 EMS Software Development
whole line.
Trim trailing spacesIf this option is checked, all spaces after the last symbol in line will be trimmed.
Fixed line heightPrevents line height calculation. If this option is checked, the default line height is taken.
Persistent blocksKeeps marked blocks selected even when the cursor is moved with the arrow keys used,unless a new block is selected.
Fixed column moveIf this option is checked, the caret keeps its horizontal position when moved betweenlines.
Optimal fillCheck this option to enable optimal algorithm of filling text content in the working area ofthe editor.
Unindent keep alignKeeps align for the lines that are not indented.
Smart caretThis option determines the caret movement (up, down, line start, line end). The caret ismoved to the nearest position on the screen.
Resolve aliasesEnables/disables the syntax highlight and code completion features for aliases.
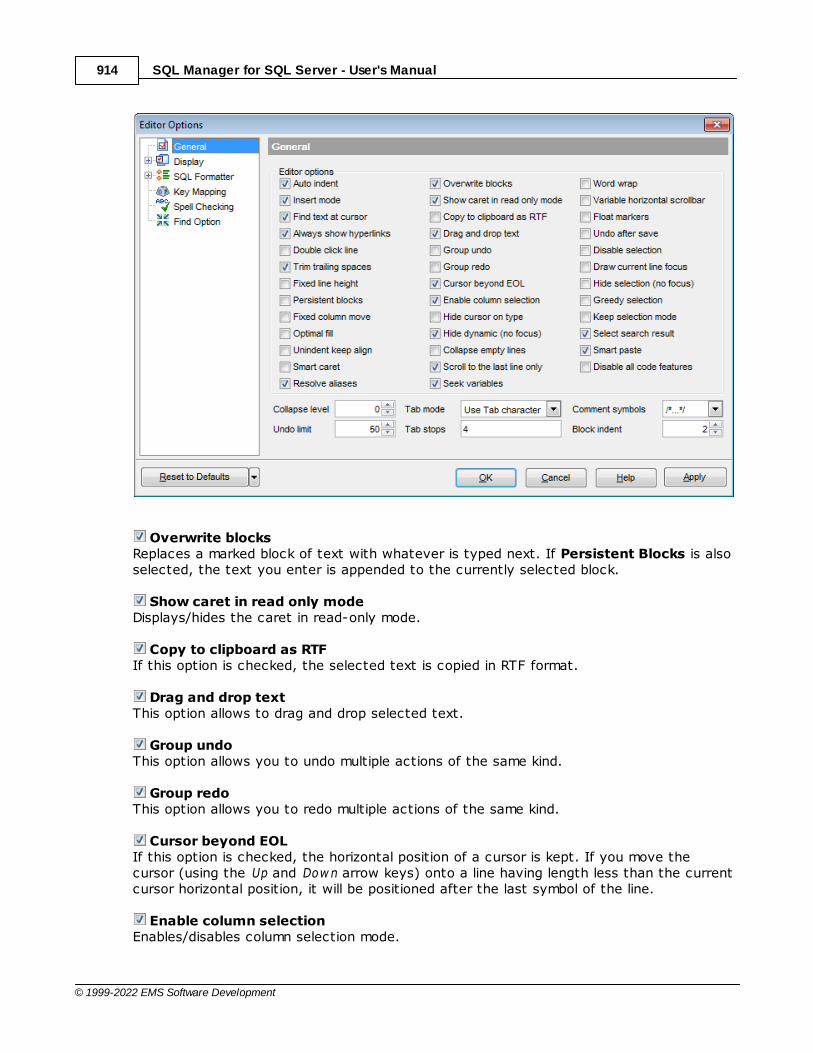
SQL Manager for SQL Server - User's Manual914
© 1999-2022 EMS Software Development
Overwrite blocksReplaces a marked block of text with whatever is typed next. If Persistent Blocks is alsoselected, the text you enter is appended to the currently selected block.
Show caret in read only modeDisplays/hides the caret in read-only mode.
Copy to clipboard as RTFIf this option is checked, the selected text is copied in RTF format.
Drag and drop textThis option allows to drag and drop selected text.
Group undoThis option allows you to undo multiple actions of the same kind.
Group redoThis option allows you to redo multiple actions of the same kind.
Cursor beyond EOLIf this option is checked, the horizontal position of a cursor is kept. If you move thecursor (using the Up and Dow n arrow keys) onto a line having length less than the currentcursor horizontal position, it will be positioned after the last symbol of the line.
Enable column selectionEnables/disables column selection mode.
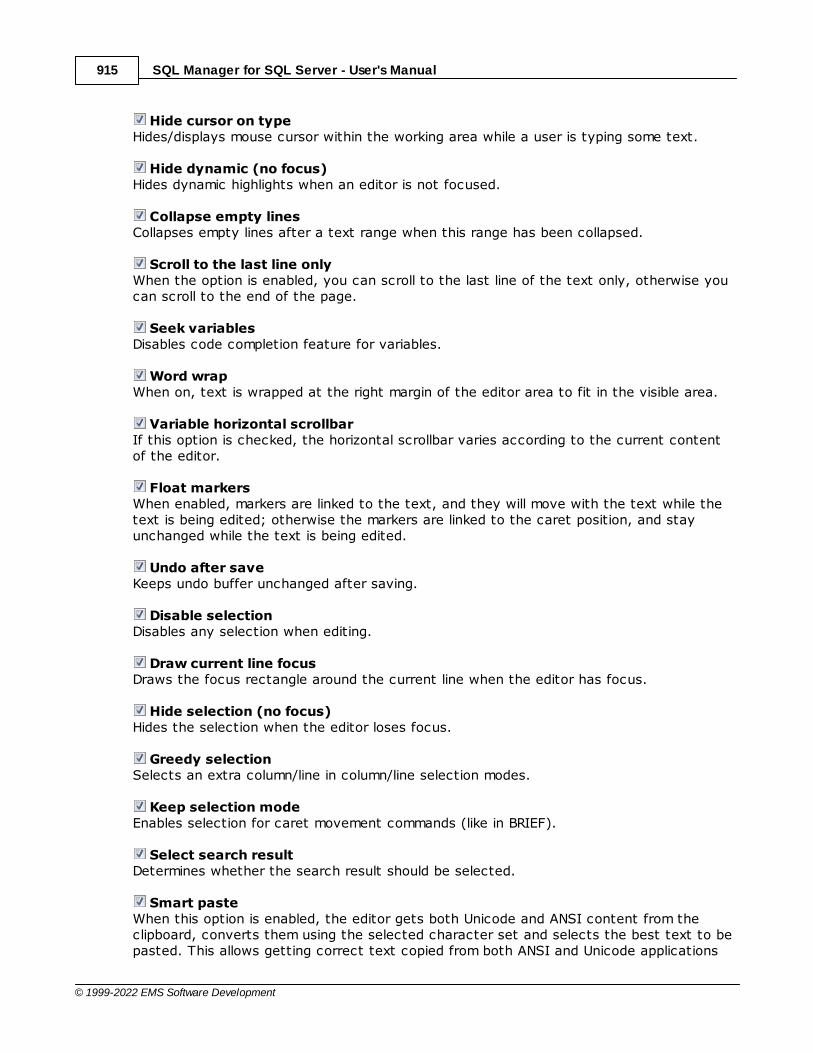
SQL Manager for SQL Server - User's Manual915
© 1999-2022 EMS Software Development
Hide cursor on typeHides/displays mouse cursor within the working area while a user is typing some text.
Hide dynamic (no focus)Hides dynamic highlights when an editor is not focused.
Collapse empty linesCollapses empty lines after a text range when this range has been collapsed.
Scroll to the last line onlyWhen the option is enabled, you can scroll to the last line of the text only, otherwise youcan scroll to the end of the page.
Seek variablesDisables code completion feature for variables.
Word wrapWhen on, text is wrapped at the right margin of the editor area to fit in the visible area.
Variable horizontal scrollbarIf this option is checked, the horizontal scrollbar varies according to the current contentof the editor.
Float markersWhen enabled, markers are linked to the text, and they will move with the text while thetext is being edited; otherwise the markers are linked to the caret position, and stayunchanged while the text is being edited.
Undo after saveKeeps undo buffer unchanged after saving.
Disable selectionDisables any selection when editing.
Draw current line focusDraws the focus rectangle around the current line when the editor has focus.
Hide selection (no focus)Hides the selection when the editor loses focus.
Greedy selectionSelects an extra column/line in column/line selection modes.
Keep selection modeEnables selection for caret movement commands (like in BRIEF).
Select search resultDetermines whether the search result should be selected.
Smart pasteWhen this option is enabled, the editor gets both Unicode and ANSI content from theclipboard, converts them using the selected character set and selects the best text to bepasted. This allows getting correct text copied from both ANSI and Unicode applications

SQL Manager for SQL Server - User's Manual916
© 1999-2022 EMS Software Development
disregarding the currently selected keyboard language.
Disable all code featuresThis option disables code completion, code folding, highlight and all options that are seton the Quick Code page. For options that are set on the Highlight page, thedefaults will be applied.
Collapse levelSpecifies the level of text ranges that will be affected by the "Collapse all" command.
Undo limit Defines the maximum number of changes possible to be undone.
Tab modeSpecifies the way the TAB key is processed. Possible values are: Use tab c harac ter(inserts a tab character); Insert spac es (inserts space characters); Dia log behav iour(when the edit control is in a dialog, the focus is switched to the next control); Sm arttab (tabs to the first non-white space character in the preceding line).
Tab stops Defines the tab length used when editing a text.
Comment symbols Defines the symbols which will be used to comment code fragments.
Block indent Specify the number of spaces to indent a marked block.
Hint: The Reset to Defaults button which is common for all sections of the EditorOptions dialog opens a menu with items allowing you to discard all changes and resetoptions of the c urrent c ategory or of a ll c ategories to their defaults.
11.2.2 Display
Default editor fonts Use these options to set the fonts and size used in the editor. If the Show only fixed-width fonts option is checked, only fonts with fixed width aredisplayed in the Font dialog.
Gutter
Show line numbersIf this option is checked, line numbers are displayed in the SQL text editor window.
Gutter auto widthEnable this option to specify that the gutter width will be adjusted automatically.
Display line stateIf this option is checked, a colored line indicating the state of all altered lines in the textis displayed at the gutter of the editor window.
919 918
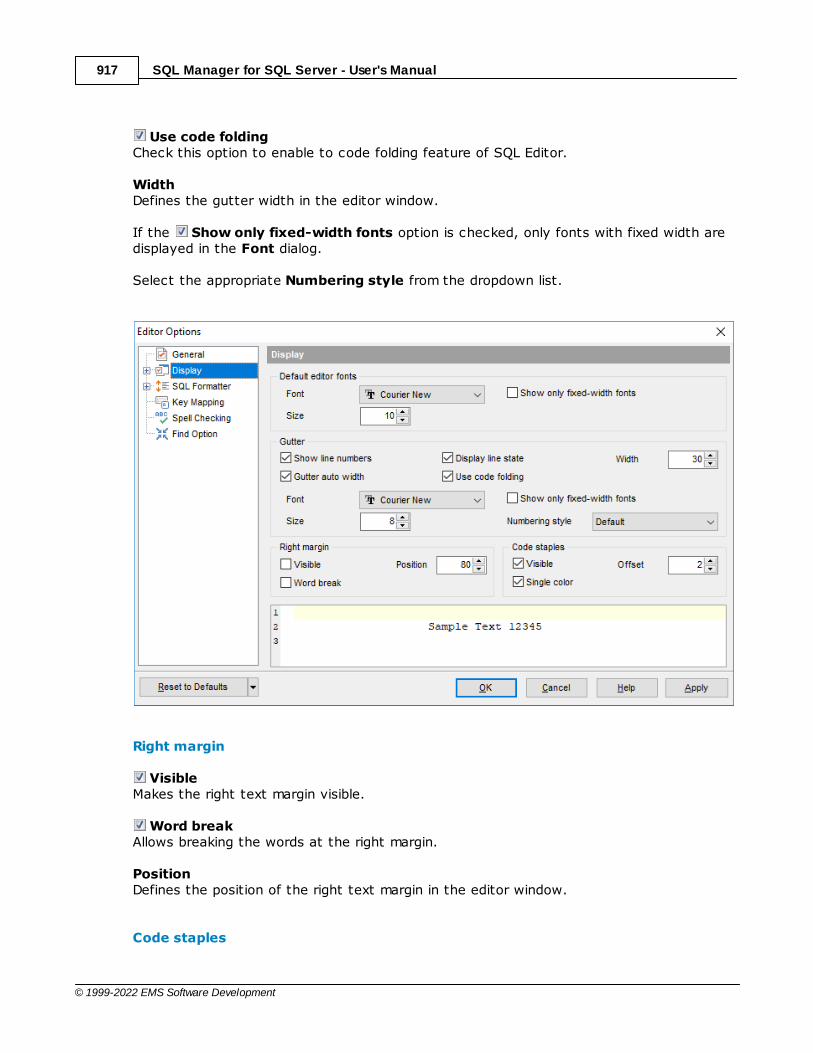
SQL Manager for SQL Server - User's Manual917
© 1999-2022 EMS Software Development
Use code foldingCheck this option to enable to code folding feature of SQL Editor.
WidthDefines the gutter width in the editor window.
If the Show only fixed-width fonts option is checked, only fonts with fixed width aredisplayed in the Font dialog.
Select the appropriate Numbering style from the dropdown list.
Right margin
VisibleMakes the right text margin visible.
Word breakAllows breaking the words at the right margin.
PositionDefines the position of the right text margin in the editor window.
Code staples
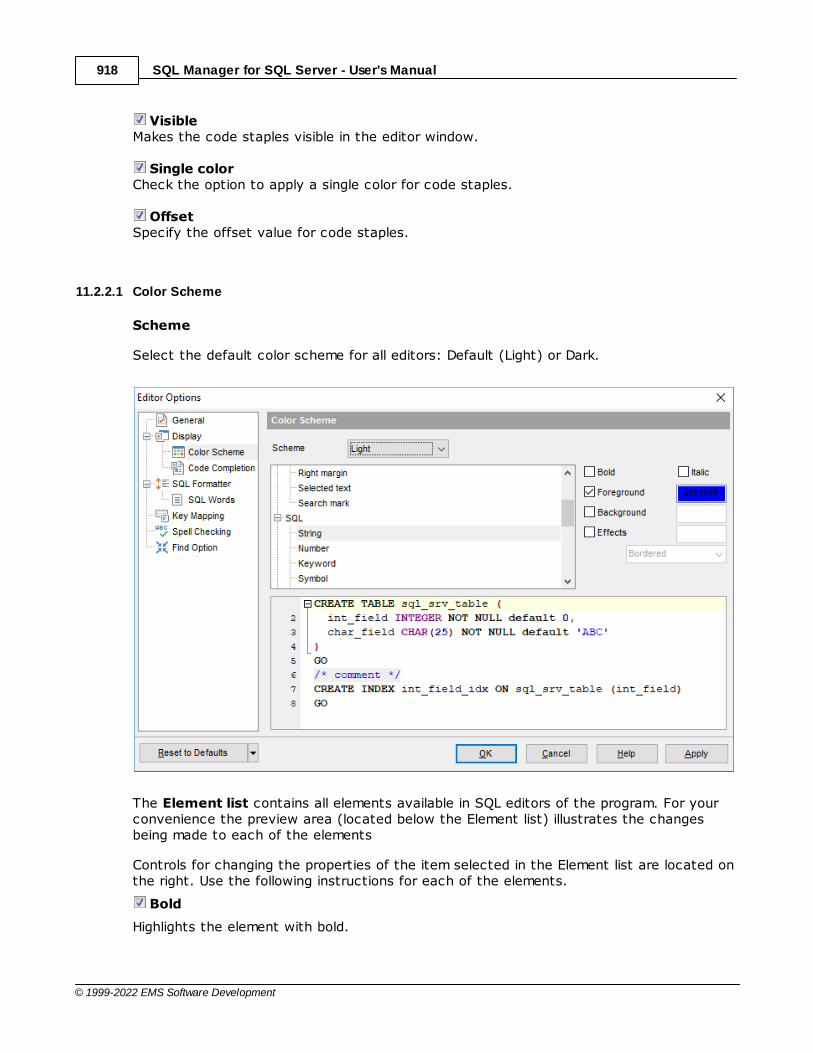
SQL Manager for SQL Server - User's Manual918
© 1999-2022 EMS Software Development
VisibleMakes the code staples visible in the editor window.
Single colorCheck the option to apply a single color for code staples.
OffsetSpecify the offset value for code staples.
11.2.2.1 Color Scheme
Scheme
Select the default color scheme for all editors: Default (Light) or Dark.
The Element list contains all elements available in SQL editors of the program. For yourconvenience the preview area (located below the Element list) illustrates the changesbeing made to each of the elements
Controls for changing the properties of the item selected in the Element list are located onthe right. Use the following instructions for each of the elements.
Bold
Highlights the element with bold.
SQL Manager for SQL Server - User's Manual919
© 1999-2022 EMS Software Development
Italic
Makes the element text cursive.
Foreground
Select the foreground color for the element.
Background
Select the background color for the element.
Effects
Enables additional effects for the element text.
See also:
Code Completion
11.2.2.2 Code Completion
Automatic features
Code completion If this option is checked, then on typing the first word characters in the SQL text editoryou will be offered some variants for the word completion in a popup list (an analogue ofthe Code Insight feature in Delphi IDE).
Sensitivity This option allows you to set the number of characters to be typed before codecompletion is activated.
Delay Using this option you can change the time after which completion variants popup.
Parameters completion
If this option is checked, the Delphi-like hint for key words is enabled.
Group by typeIf enabled, the items in the code completion list are sorted by type, otherwise they aresorted by name.
Show information hintsThis option enables/disables information hints.
919

SQL Manager for SQL Server - User's Manual920
© 1999-2022 EMS Software Development
Accept by Space key tooCheck this option to enable Code Completion list to close with the selected item inputwhen pressing the space bar.
Code parametersIf this option is checked, the Delphi-like hint for key words is enabled.
Auto launch keyboard templates Allows you to use keyboard templates for faster typing frequently used expressions (see Keyboard Templates ).
Completion list object
The list contains all objects for which you can set quick code parameters. For yourconvenience the preview area (located to the right of the Completion list object list)illustrates the changes being made to each of the objects.
If you press the Disable element button, the standard settings will be applied to thisobject; the button text will change to Enable element. If you press this button, you willbe able to change font and color attributes for this object.
Controls for changing the properties of the item selected in the Completion list object listare located on the right.
See also:
937

SQL Manager for SQL Server - User's Manual921
© 1999-2022 EMS Software Development
Color Scheme
11.2.3 SQL Formatter
SQL Formatter is a feature implemented in SQL Manager for SQL Server and is a usefultool for formatting SQL queries and scripts, making SQL statements easy to read. SQLFormatter is introduced in SQL Editor , SQL Script and some object editors.
The Settings tab of the SQL Formatter section allows you to enable this feature andapply SQL formatting to subqueries, if necessary.
Format SQL queryCheck this option to enable SQL formatting.
Format subqueryEnables SQL formatting for subqueries.
See also:
SQL Editor
11.2.3.1 SQL Words
The SQL words page of the SQL Formatter section allows you to select the key wordsfor each action of SQL formatter and to set formatting parameters.
918
462 659
462
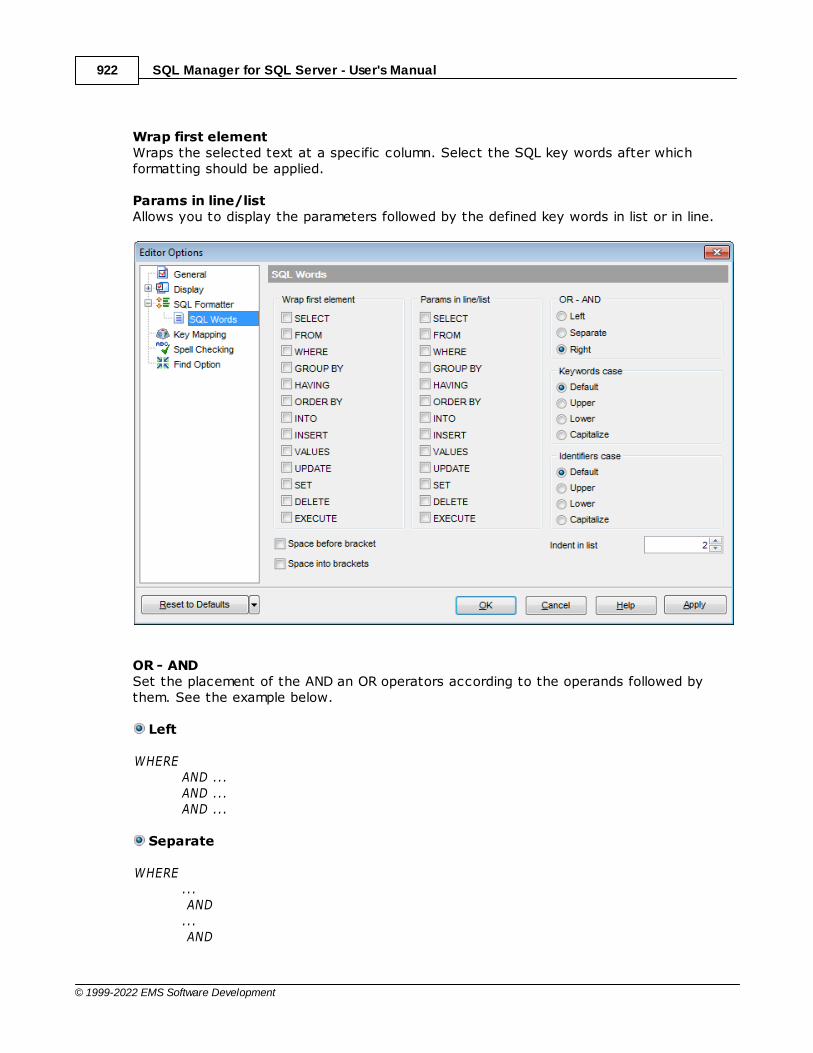
SQL Manager for SQL Server - User's Manual922
© 1999-2022 EMS Software Development
Wrap first elementWraps the selected text at a specific column. Select the SQL key words after whichformatting should be applied.
Params in line/listAllows you to display the parameters followed by the defined key words in list or in line.
OR - ANDSet the placement of the AND an OR operators according to the operands followed bythem. See the example below.
Left
WHEREAND ...AND ...AND ...
Separate
WHERE... AND... AND
SQL Manager for SQL Server - User's Manual923
© 1999-2022 EMS Software Development
Right
WHERE... AND... AND ... AND
The Keywords case / Identifiers case options allow you to define the case of thecorresponding items.You can choose UPPER, low er, Capita lize.Default case means that the name of the identifier/keyword remains "AS IS".
Space before bracketAdds a "space" character before the opening bracket and after the closing one.
Space into bracketsAdds a "space" character after the opening bracket and before the closing one.
Indent in listSets the size of indent relatively to the previous string.
11.2.4 Key Mapping
For your convenience key mapping is provided in SQL Manager for SQL Server. On thispage you can set the shortcuts for various commands/operations according to yourneeds.
Use the Commands list on the right to select the command for which you need to makea shortcut, then place cursor into the Key editor and press the key combination you finduseful (use Ct r l Alt Shift buttons). After setting the shortcut, press the New button toadd it to the list of existing Key combinations. If the specified shortcut is alreadyassigned to another command/operation, an error message with the command/operationwill be returned.
996
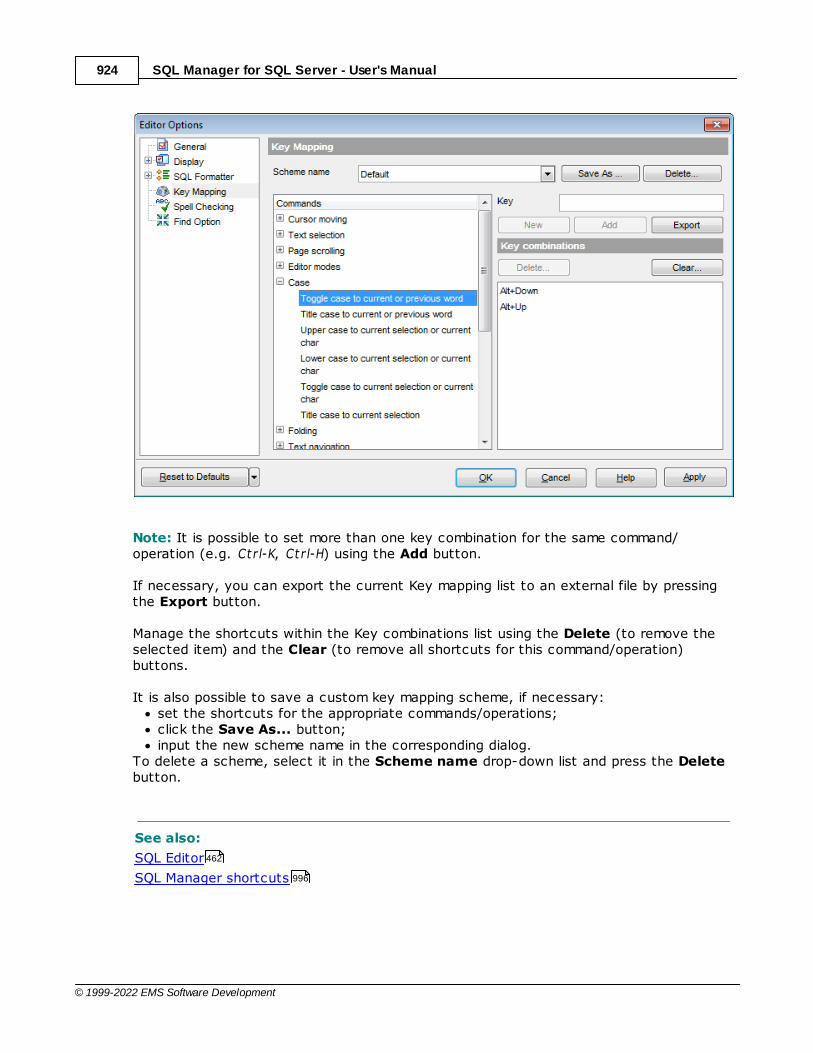
SQL Manager for SQL Server - User's Manual924
© 1999-2022 EMS Software Development
Note: It is possible to set more than one key combination for the same command/operation (e.g. Ct r l-K, Ct r l-H) using the Add button.
If necessary, you can export the current Key mapping list to an external file by pressingthe Export button.
Manage the shortcuts within the Key combinations list using the Delete (to remove theselected item) and the Clear (to remove all shortcuts for this command/operation)buttons.
It is also possible to save a custom key mapping scheme, if necessary:set the shortcuts for the appropriate commands/operations;click the Save As... button;input the new scheme name in the corresponding dialog.
To delete a scheme, select it in the Scheme name drop-down list and press the Deletebutton.
See also:
SQL Editor
SQL Manager shortcuts
462
996
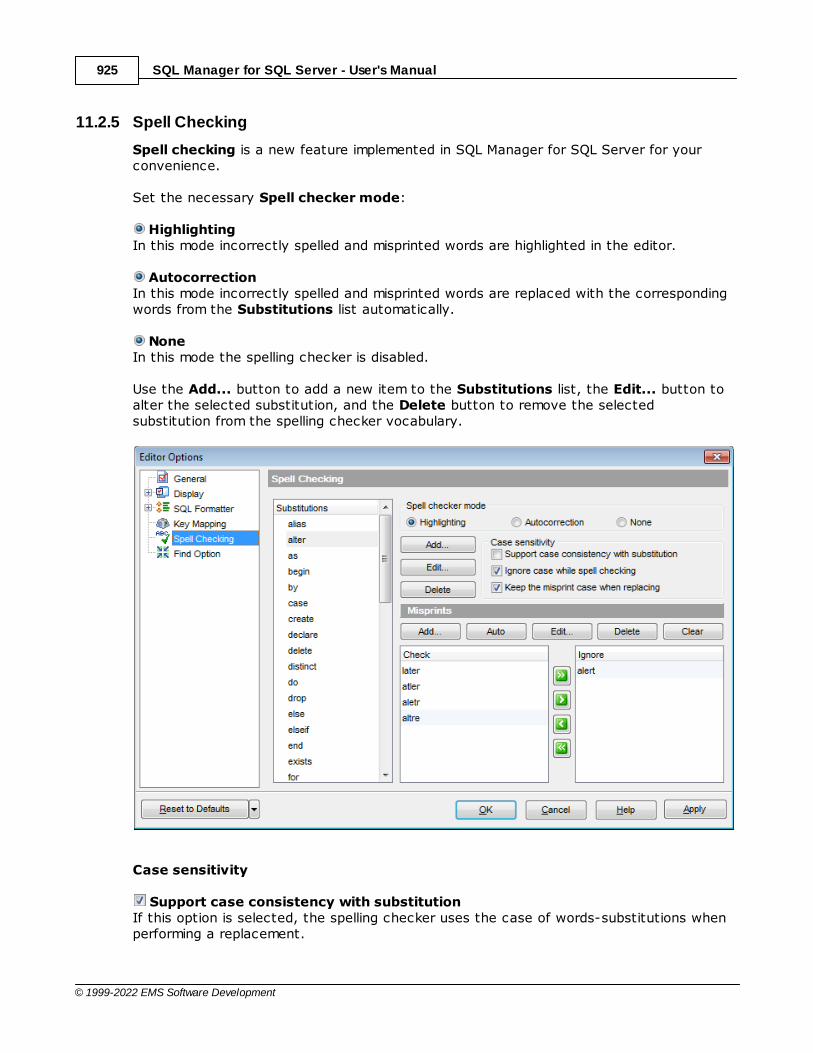
SQL Manager for SQL Server - User's Manual925
© 1999-2022 EMS Software Development
11.2.5 Spell Checking
Spell checking is a new feature implemented in SQL Manager for SQL Server for yourconvenience.
Set the necessary Spell checker mode:
HighlightingIn this mode incorrectly spelled and misprinted words are highlighted in the editor.
AutocorrectionIn this mode incorrectly spelled and misprinted words are replaced with the correspondingwords from the Substitutions list automatically.
NoneIn this mode the spelling checker is disabled.
Use the Add... button to add a new item to the Substitutions list, the Edit... button toalter the selected substitution, and the Delete button to remove the selectedsubstitution from the spelling checker vocabulary.
Case sensitivity
Support case consistency with substitutionIf this option is selected, the spelling checker uses the case of words-substitutions whenperforming a replacement.
SQL Manager for SQL Server - User's Manual926
© 1999-2022 EMS Software Development
Ignore case while spell checkingCheck this option to disable case checking.
Keep the misprint case when replacingCheck this option if you do not wish to change the case of the replaced word.
MisprintsControls of this group allow you to manage the spelling checker vocabulary: use the Add... button to add a new misprint to the vocabulary, the Auto button to use thedefault list of misprints, the Edit... button to change the selected misprint, the Deletebutton to remove the selected misprint from the vocabulary, and the Clear button toempty the list of misprints for the currently selected substitution.
It is also possible to exclude a misprint from spell checking without deleting the misprint.This misprint will therefore remain in the vocabulary, but it will be ignored by the spellingchecker.To mark a misprint as excluded, you need to move it from the Check list to the Ignore
list. Use the buttons or drag-and-drop operations to move the misprints fromone list to another.
11.2.6 Find Option
The Find Option section allows you to search for options available within the EditorOptions dialog easily and quickly.
OptionIn this field you can enter the name of the option to search for within SQL Manager EditorOpt ions.
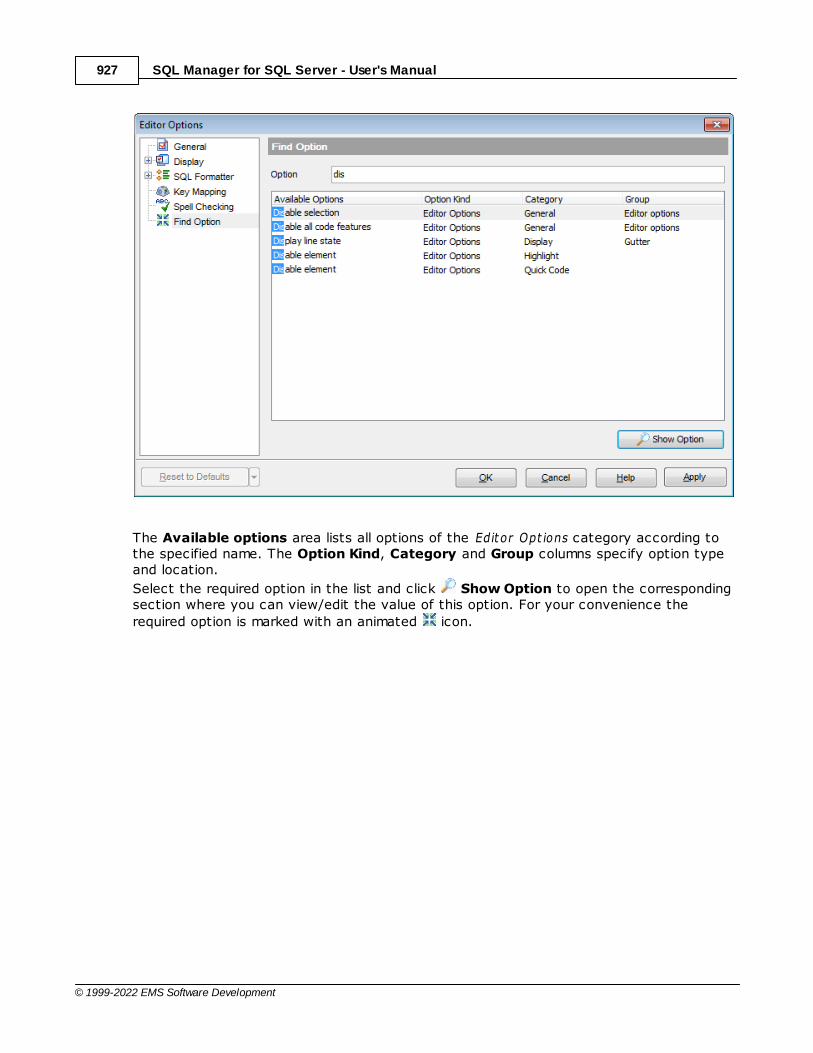
SQL Manager for SQL Server - User's Manual927
© 1999-2022 EMS Software Development
The Available options area lists all options of the Editor Opt ions category according tothe specified name. The Option Kind, Category and Group columns specify option typeand location.
Select the required option in the list and click Show Option to open the correspondingsection where you can view/edit the value of this option. For your convenience the
required option is marked with an animated icon.

SQL Manager for SQL Server - User's Manual928
© 1999-2022 EMS Software Development
11.3 Save Settings
Save Settings Wizard allows you to export the settings of SQL Manager for SQL Server -wholly or partially - to a single *.reg file which can be applied afterwards to SQL Managerfor SQL Server installed on another machine, or it can be used to backup previoussettings.
To start the wizard, select the Options | Save Settings main menu item.
Specifying destination fileSelecting settingsSelecting databasesSaving settings
To apply saved settings you need to open the created *.reg file, then press the OKbutton in the window appeared. All settings will be applied automatically (they will beadded in the Windows Registry).
11.3.1 Specifying destination file
This step of the wizard allows you to specify the location of the destination file.
Filename
Use the button to set the path to the *.reg file where the application settings are tobe saved.
Note: If the target file already exists, the application will show a warning dialog whereyou can choose the action you need.
958
928
929
930
931
992

SQL Manager for SQL Server - User's Manual929
© 1999-2022 EMS Software Development
Press the Next button to proceed to the next step of the wizard.
11.3.2 Selecting settings
This step of the wizard allows you to specify the information you need to be saved to theresult file: Database regist rat ion info, Favorit e objec t s, T abs, Env ironm ent opt ions, Editoropt ions, V isual opt ions, Keyboard tem plates, Objec t tem plates, External tools list, Formplac em ents, MRU list s, Favorit e queries stored in regist ry.
929

SQL Manager for SQL Server - User's Manual930
© 1999-2022 EMS Software Development
Press the Next button to proceed to the next step of the wizard.
11.3.3 Selecting databases
This step of the wizard allows you to select the database(s) to save the registrationsettings.
To select a database, you need to move its alias from the Available Databases list to
the Selected Databases list. Use the buttons or drag-and-drop operations tomove the databases from one list to another.
930
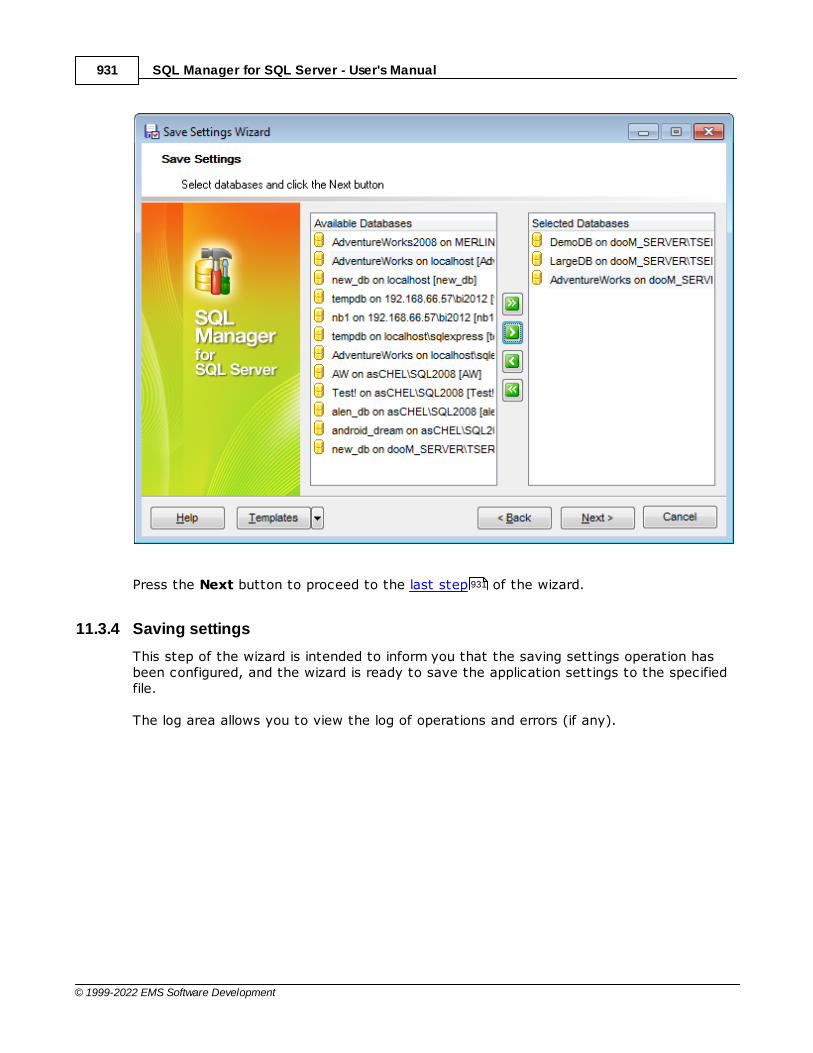
SQL Manager for SQL Server - User's Manual931
© 1999-2022 EMS Software Development
Press the Next button to proceed to the last step of the wizard.
11.3.4 Saving settings
This step of the wizard is intended to inform you that the saving settings operation hasbeen configured, and the wizard is ready to save the application settings to the specifiedfile.
The log area allows you to view the log of operations and errors (if any).
931
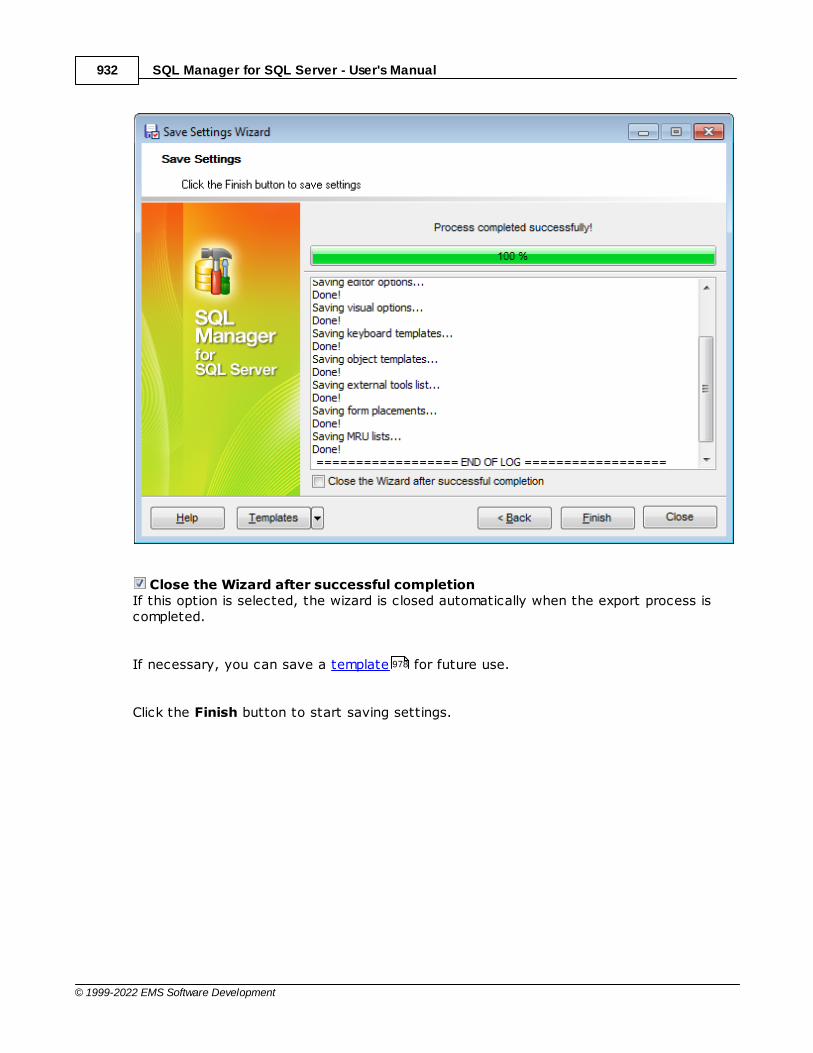
SQL Manager for SQL Server - User's Manual932
© 1999-2022 EMS Software Development
Close the Wizard after successful completionIf this option is selected, the wizard is closed automatically when the export process iscompleted.
If necessary, you can save a template for future use.
Click the Finish button to start saving settings.
978
SQL Manager for SQL Server - User's Manual933
© 1999-2022 EMS Software Development
11.4 Localization
When using SQL Manager for SQL Server, your are provided with multi-language interfacesupport. You can change the program language, specify the directories for yourlocalization files easily, edit existing localizations and create your own localization files.
Changing Program Language
In order to select the program interface language:select the Options | Select Program Language... main menu item;select the interface language in the Select Language dialog;click OK to apply the language and close the dialog.
Editing Program Localization
In order to edit the interface localization:open one of the program windows (e.g. Table Editor , SQL Editor ) where youwish to edit the localization of captions and hints;use the Shift+Ct r l+L keyboard shortcut to open the Localization Editor window;edit window captions and hints as necessary;
click the Save button on the toolbar .Note: The Localization Editor window is only available if the currently selectedlanguage is different from the default.
Creating New Localization Files
In order to create a new localization file:create a new localization file similar to those located in the %program _direc tory%\Languages folder;select the Options | Environment Options main menu item;proceed to the Localization section of the Environment Options dialog;click the Add button;set the language name and the path to the new *.lng file within the Language InfoEditor dialog.
The new language is added to the list of available languages. Now you can set it as theinterface language using the Select Program Language dialog or the Localizationsection of the Environment Options dialog.
See also:
Localization
Language Info Editor
11.4.1 Localization Editor
The Localization Editor window allows you to edit the captions and hints of any SQLManager window, if the selected program language is different from the default one.
To call this window, use the Shift+Ct r l+L shortcut in any child window of SQL Manager
958
935
236 462
996 933
960
933
958
908
977
935 908
867
908
977
996
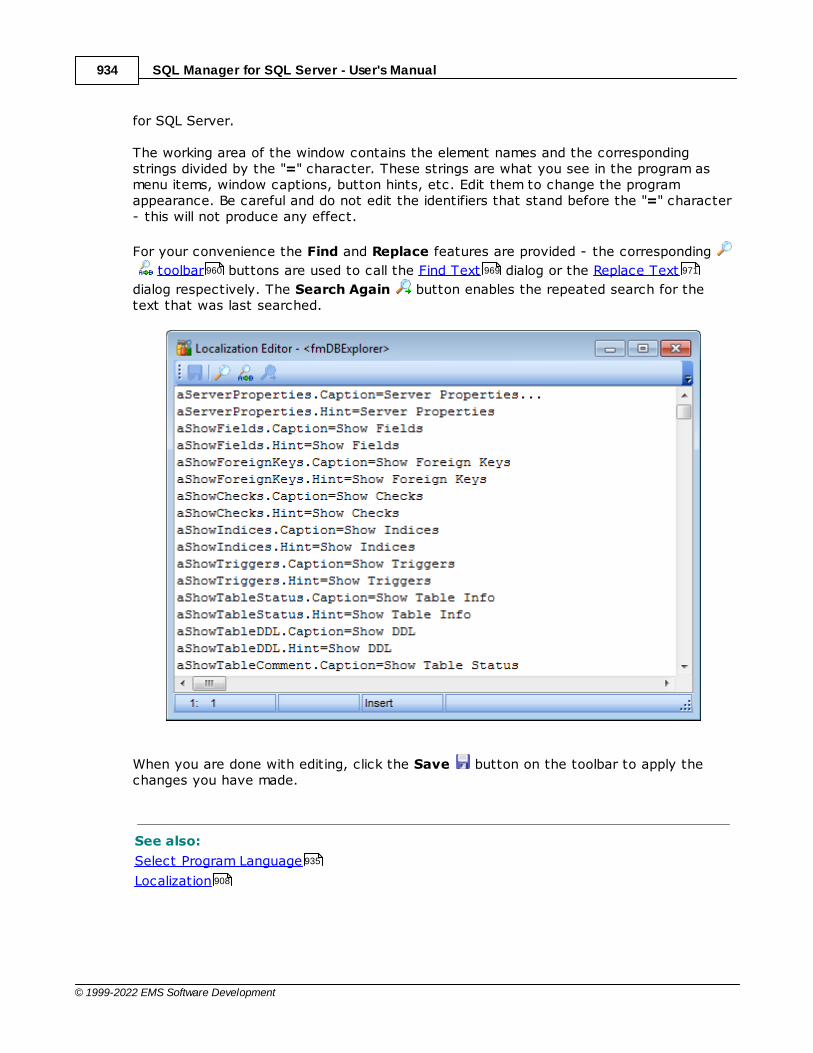
SQL Manager for SQL Server - User's Manual934
© 1999-2022 EMS Software Development
for SQL Server.
The working area of the window contains the element names and the correspondingstrings divided by the "=" character. These strings are what you see in the program asmenu items, window captions, button hints, etc. Edit them to change the programappearance. Be careful and do not edit the identifiers that stand before the "=" character- this will not produce any effect.
For your convenience the Find and Replace features are provided - the corresponding
toolbar buttons are used to call the Find Text dialog or the Replace Text
dialog respectively. The Search Again button enables the repeated search for thetext that was last searched.
When you are done with editing, click the Save button on the toolbar to apply thechanges you have made.
See also:
Select Program Language
Localization
960 969 971
935
908
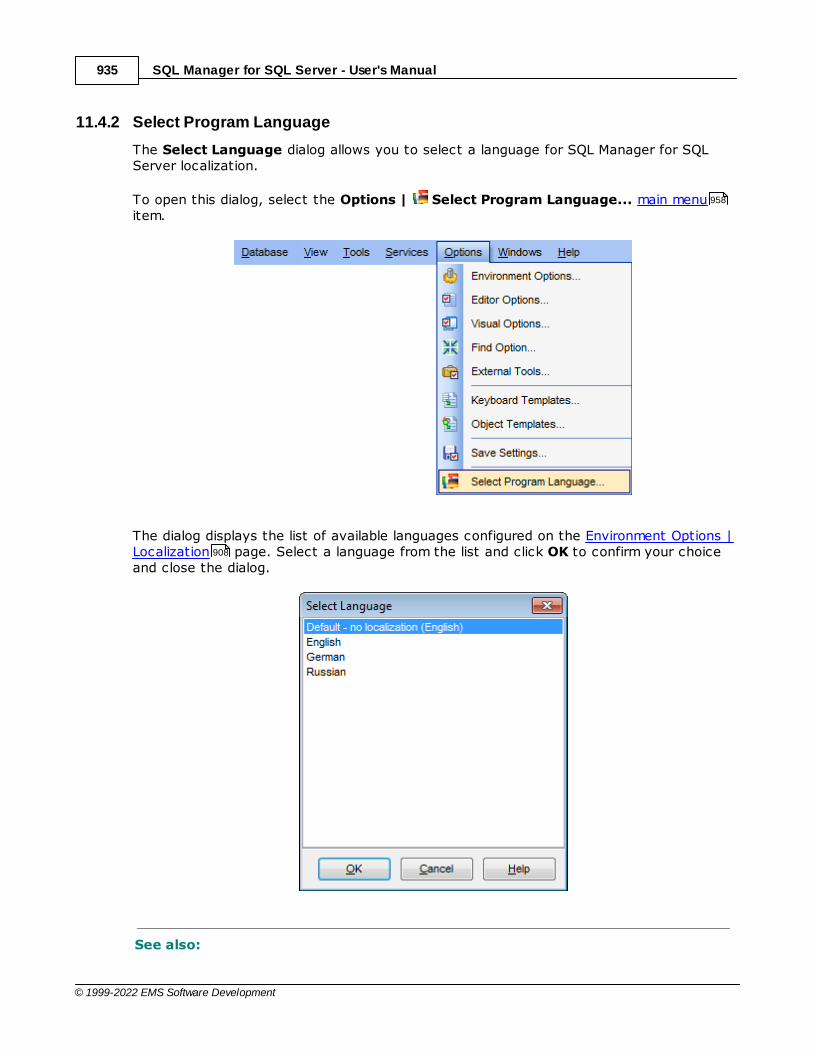
SQL Manager for SQL Server - User's Manual935
© 1999-2022 EMS Software Development
11.4.2 Select Program Language
The Select Language dialog allows you to select a language for SQL Manager for SQLServer localization.
To open this dialog, select the Options | Select Program Language... main menuitem.
The dialog displays the list of available languages configured on the Environment Options |Localization page. Select a language from the list and click OK to confirm your choiceand close the dialog.
See also:
958
908

SQL Manager for SQL Server - User's Manual936
© 1999-2022 EMS Software Development
Localization Editor
Localization
933
908
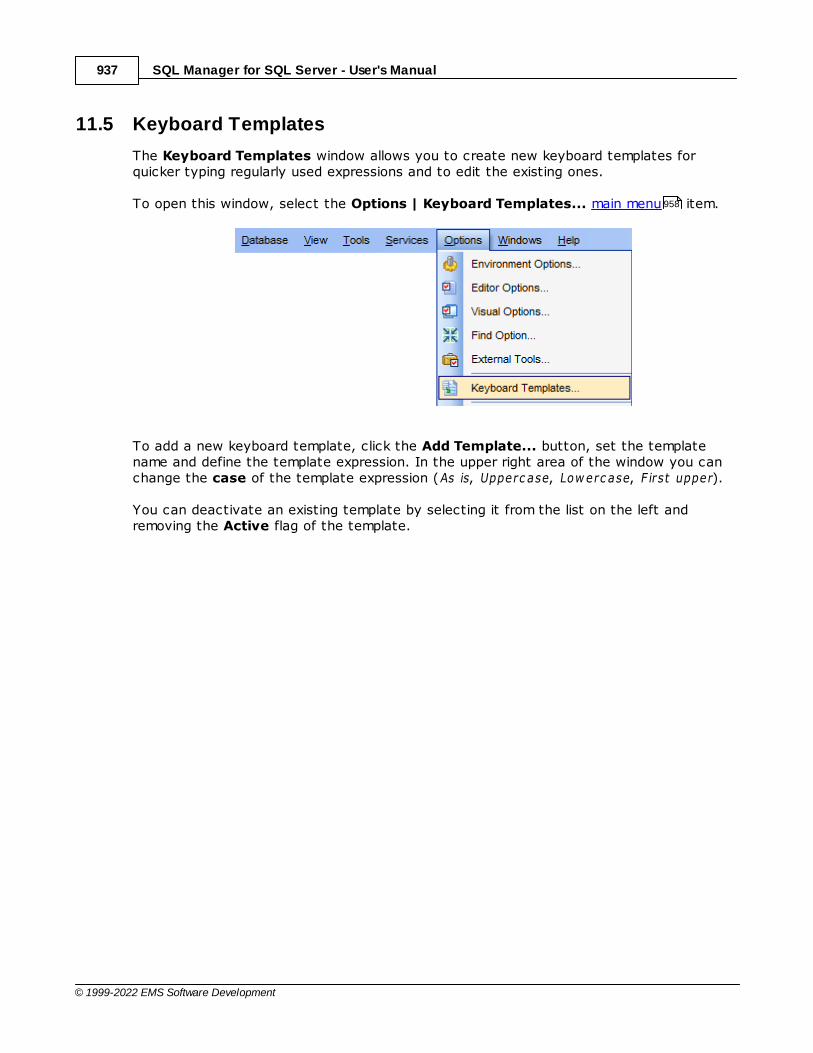
SQL Manager for SQL Server - User's Manual937
© 1999-2022 EMS Software Development
11.5 Keyboard Templates
The Keyboard Templates window allows you to create new keyboard templates forquicker typing regularly used expressions and to edit the existing ones.
To open this window, select the Options | Keyboard Templates... main menu item.
To add a new keyboard template, click the Add Template... button, set the templatename and define the template expression. In the upper right area of the window you canchange the case of the template expression (As is, Upperc ase, Low erc ase, F irst upper).
You can deactivate an existing template by selecting it from the list on the left andremoving the Active flag of the template.
958
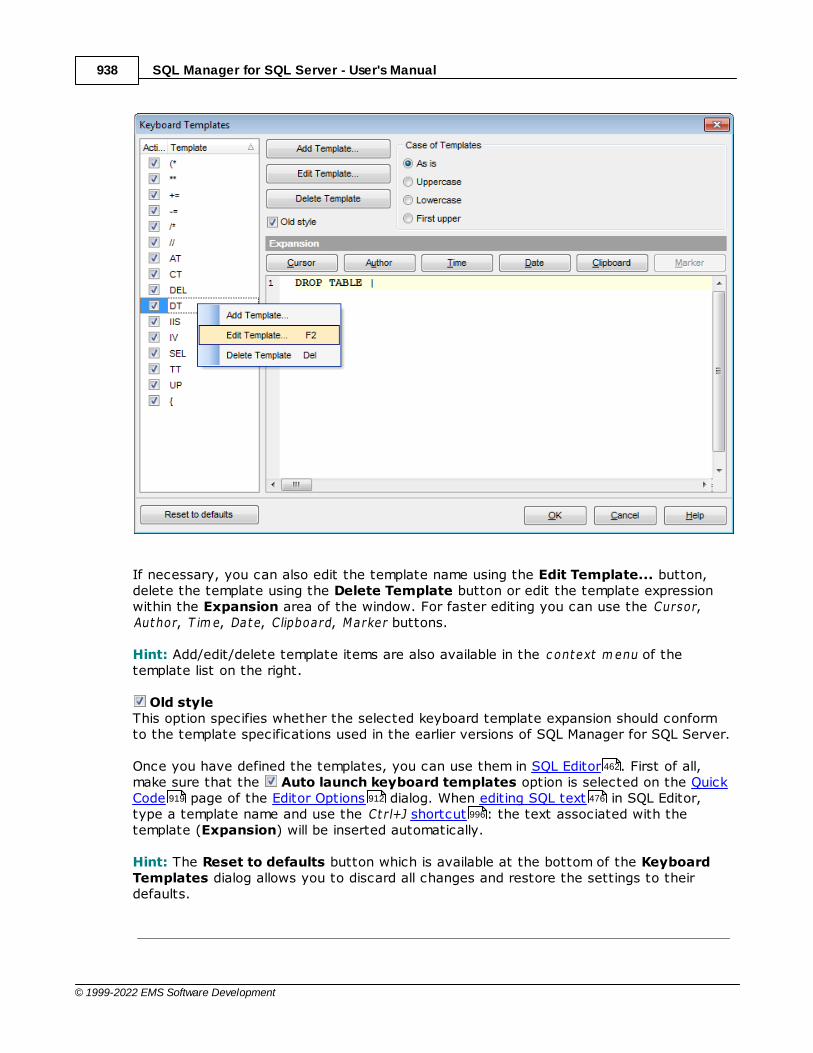
SQL Manager for SQL Server - User's Manual938
© 1999-2022 EMS Software Development
If necessary, you can also edit the template name using the Edit Template... button,delete the template using the Delete Template button or edit the template expressionwithin the Expansion area of the window. For faster editing you can use the Cursor,Author, T im e, Date, Clipboard, Marker buttons.
Hint: Add/edit/delete template items are also available in the c ontext m enu of thetemplate list on the right.
Old styleThis option specifies whether the selected keyboard template expansion should conformto the template specifications used in the earlier versions of SQL Manager for SQL Server.
Once you have defined the templates, you can use them in SQL Editor . First of all,make sure that the Auto launch keyboard templates option is selected on the QuickCode page of the Editor Options dialog. When editing SQL text in SQL Editor,type a template name and use the Ct r l+J shortcut : the text associated with thetemplate (Expansion) will be inserted automatically.
Hint: The Reset to defaults button which is available at the bottom of the KeyboardTemplates dialog allows you to discard all changes and restore the settings to theirdefaults.
462
919 912 476
996

SQL Manager for SQL Server - User's Manual939
© 1999-2022 EMS Software Development
See also:
Quick Code
SQL Manager shortcuts
919
996

SQL Manager for SQL Server - User's Manual940
© 1999-2022 EMS Software Development
11.6 Object Templates
The Object Templates window allows you to preset the definition template for the nameand/or body of an object to be created.
To open this window, select the Options | Object Templates... main menu item.
Select an object in the tree and set its template using the editor area.
958
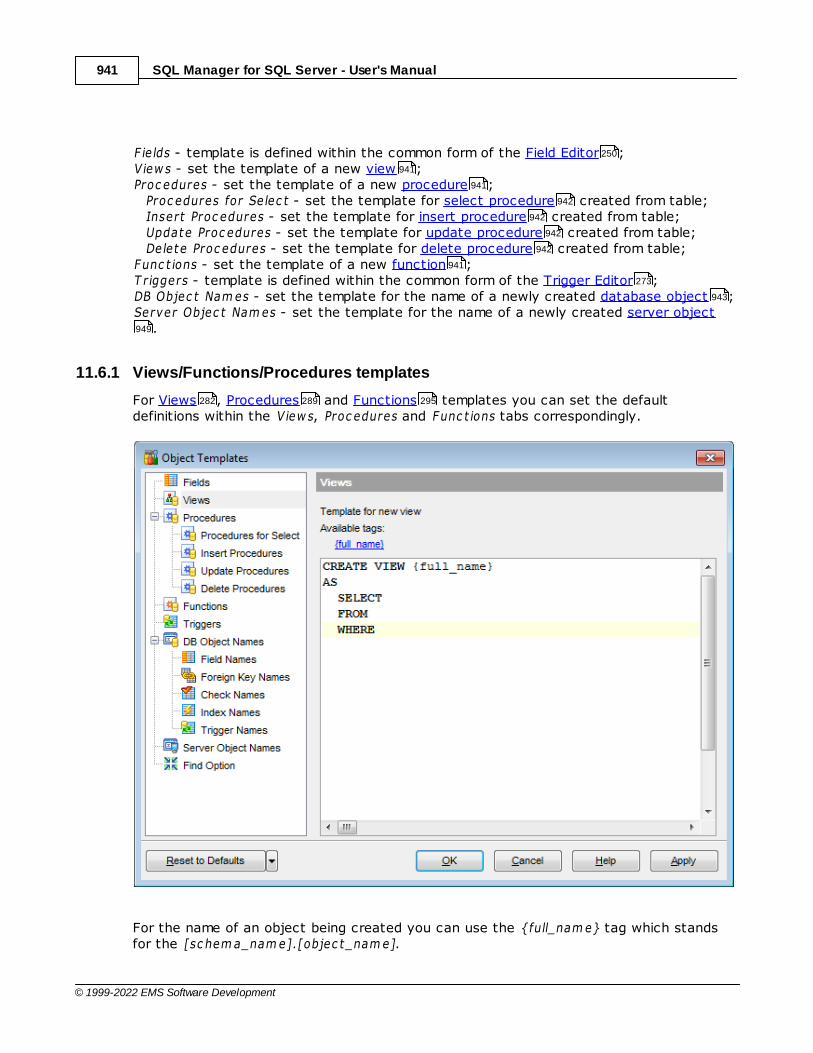
SQL Manager for SQL Server - User's Manual941
© 1999-2022 EMS Software Development
F ie lds - template is defined within the common form of the Field Editor ;View s - set the template of a new view ;Proc edures - set the template of a new procedure ;
Proc edures for Se lec t - set the template for select procedure created from table;Insert Proc edures - set the template for insert procedure created from table;Update Proc edures - set the template for update procedure created from table;Delete Proc edures - set the template for delete procedure created from table;
Func t ions - set the template of a new function ;T riggers - template is defined within the common form of the Trigger Editor ;DB Objec t Nam es - set the template for the name of a newly created database object ;Server Objec t Nam es - set the template for the name of a newly created server object
.
11.6.1 Views/Functions/Procedures templates
For Views , Procedures and Functions templates you can set the defaultdefinitions within the View s, Proc edures and Func t ions tabs correspondingly.
For the name of an object being created you can use the {full_nam e} tag which standsfor the [sc hem a_nam e].[objec t_nam e].
250
941
941
942
942
942
942
941
273
943
949
282 289 295

SQL Manager for SQL Server - User's Manual942
© 1999-2022 EMS Software Development
Click the tag to insert it at the cursor position.Object names templates are defined within the DB Object Names tab.
11.6.2 SIUD Procedures templates
For Select , Insert , Update and Delete procedures created from tabletemplates can be defined within the corresponding tabs of the Object Templates window.
For each procedure type you can define the name template of the generated procedure.The available for naming {table_nam e} tag stands for the name of the table from whichthe procedure is being created.
Within the procedure editor window you are to specify the template for proceduredefinition. The following tags can be used:{full_nam e} - stands for [sc hem a_nam e].[proc edure_nam e];{table_nam e} - name of the table from which the procedure is being created;{table_sc hem a} - schema which contains the table;{in_param s} - input parameters of the procedure;{fie lds} (for select, insert procedures) - list of table fields;{w here_c lause} (for select, update, delete procedures) - where clause of the select/update/delete statement;{values} (for insert procedure) - values to be inserted in the table;
943
278 279 280 281 276
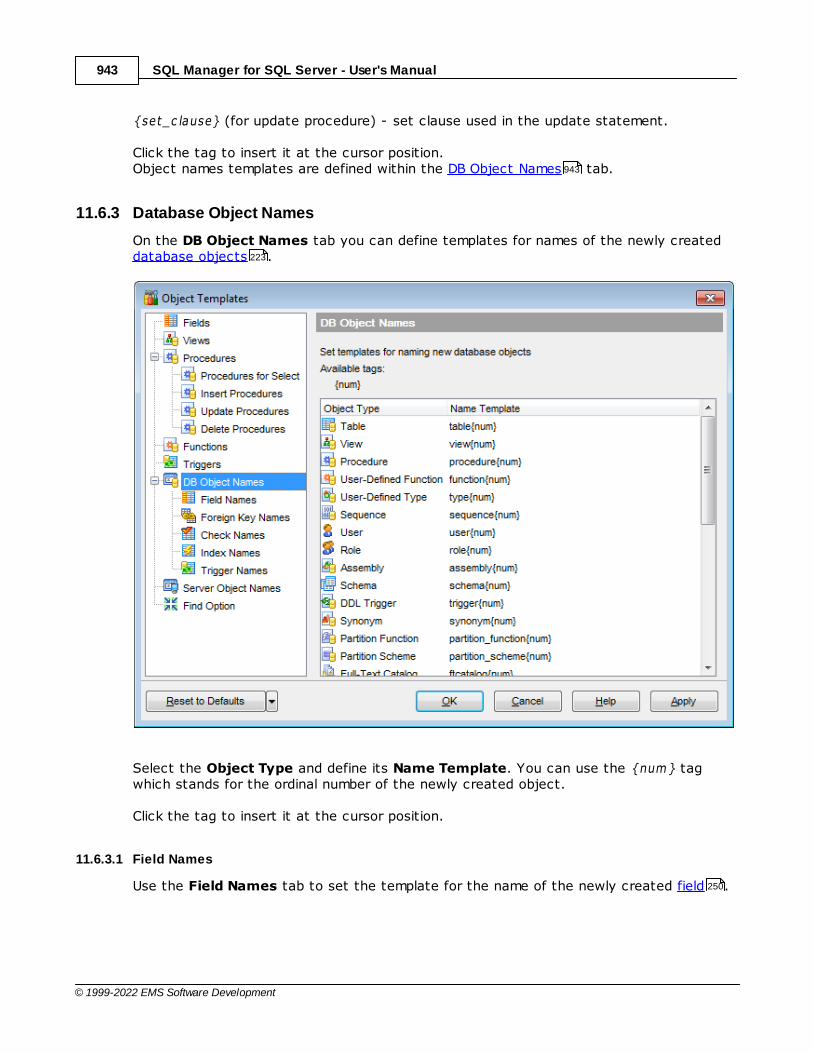
SQL Manager for SQL Server - User's Manual943
© 1999-2022 EMS Software Development
{set_c lause} (for update procedure) - set clause used in the update statement.
Click the tag to insert it at the cursor position.Object names templates are defined within the DB Object Names tab.
11.6.3 Database Object Names
On the DB Object Names tab you can define templates for names of the newly createddatabase objects .
Select the Object Type and define its Name Template. You can use the {num } tagwhich stands for the ordinal number of the newly created object.
Click the tag to insert it at the cursor position.
11.6.3.1 Field Names
Use the Field Names tab to set the template for the name of the newly created field .
943
223
250
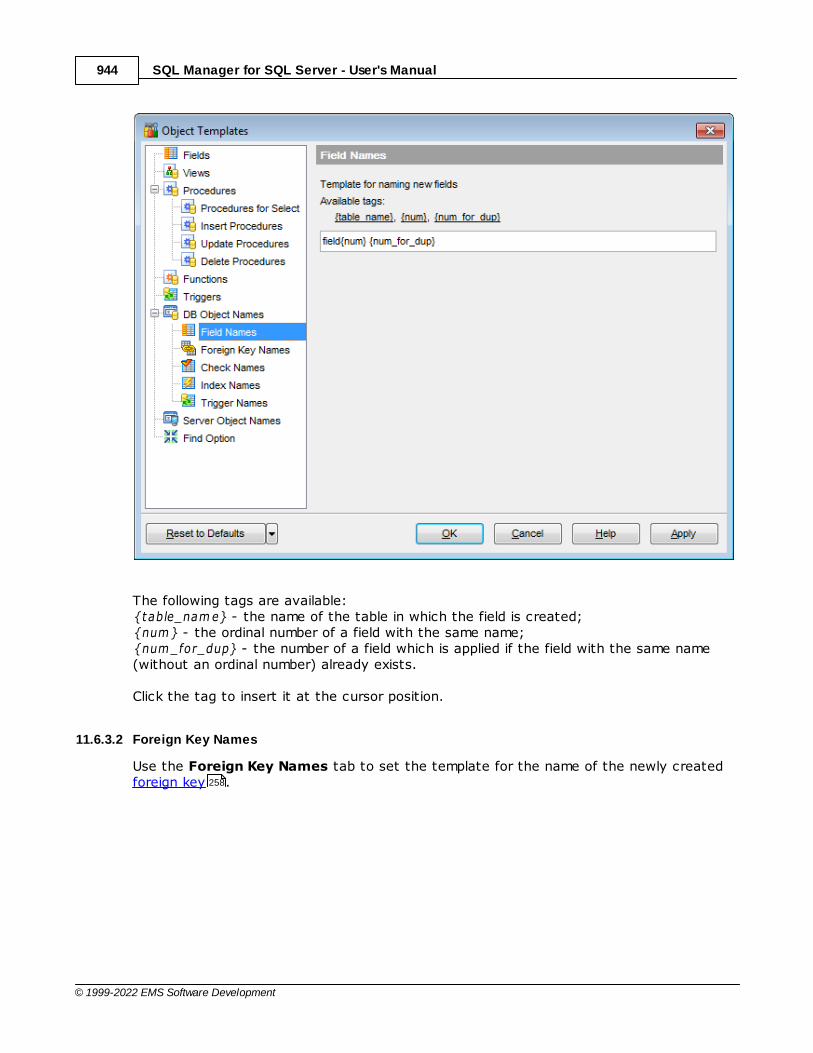
SQL Manager for SQL Server - User's Manual944
© 1999-2022 EMS Software Development
The following tags are available:{table_nam e} - the name of the table in which the field is created;{num } - the ordinal number of a field with the same name;{num _for_dup} - the number of a field which is applied if the field with the same name(without an ordinal number) already exists.
Click the tag to insert it at the cursor position.
11.6.3.2 Foreign Key Names
Use the Foreign Key Names tab to set the template for the name of the newly createdforeign key .258
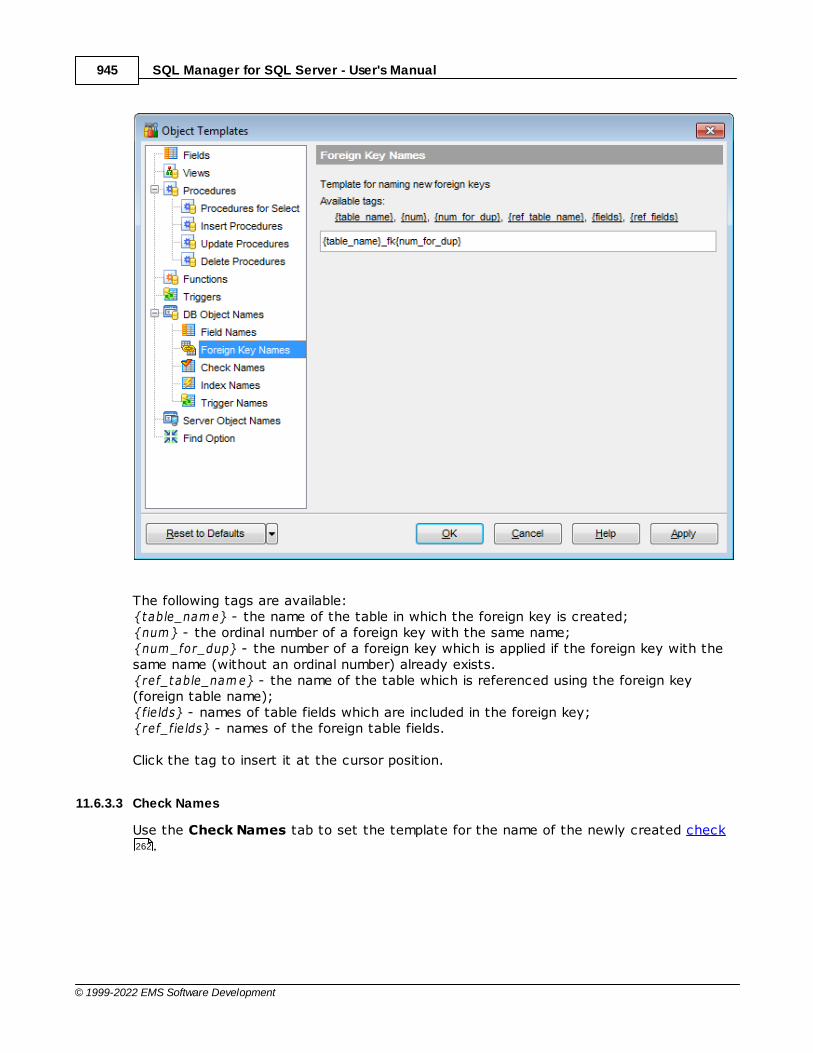
SQL Manager for SQL Server - User's Manual945
© 1999-2022 EMS Software Development
The following tags are available:{table_nam e} - the name of the table in which the foreign key is created;{num } - the ordinal number of a foreign key with the same name;{num _for_dup} - the number of a foreign key which is applied if the foreign key with thesame name (without an ordinal number) already exists.{ref_table_nam e} - the name of the table which is referenced using the foreign key(foreign table name);{fie lds} - names of table fields which are included in the foreign key;{ref_fie lds} - names of the foreign table fields.
Click the tag to insert it at the cursor position.
11.6.3.3 Check Names
Use the Check Names tab to set the template for the name of the newly created check.262
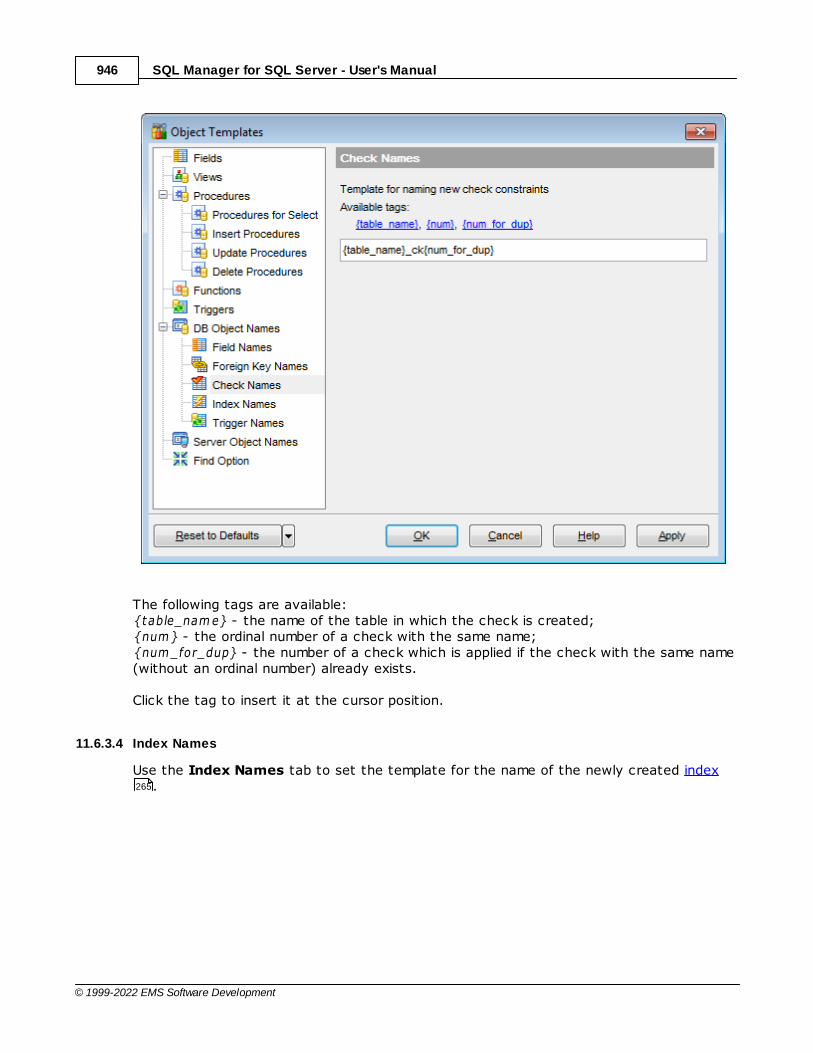
SQL Manager for SQL Server - User's Manual946
© 1999-2022 EMS Software Development
The following tags are available:{table_nam e} - the name of the table in which the check is created;{num } - the ordinal number of a check with the same name;{num _for_dup} - the number of a check which is applied if the check with the same name(without an ordinal number) already exists.
Click the tag to insert it at the cursor position.
11.6.3.4 Index Names
Use the Index Names tab to set the template for the name of the newly created index.265
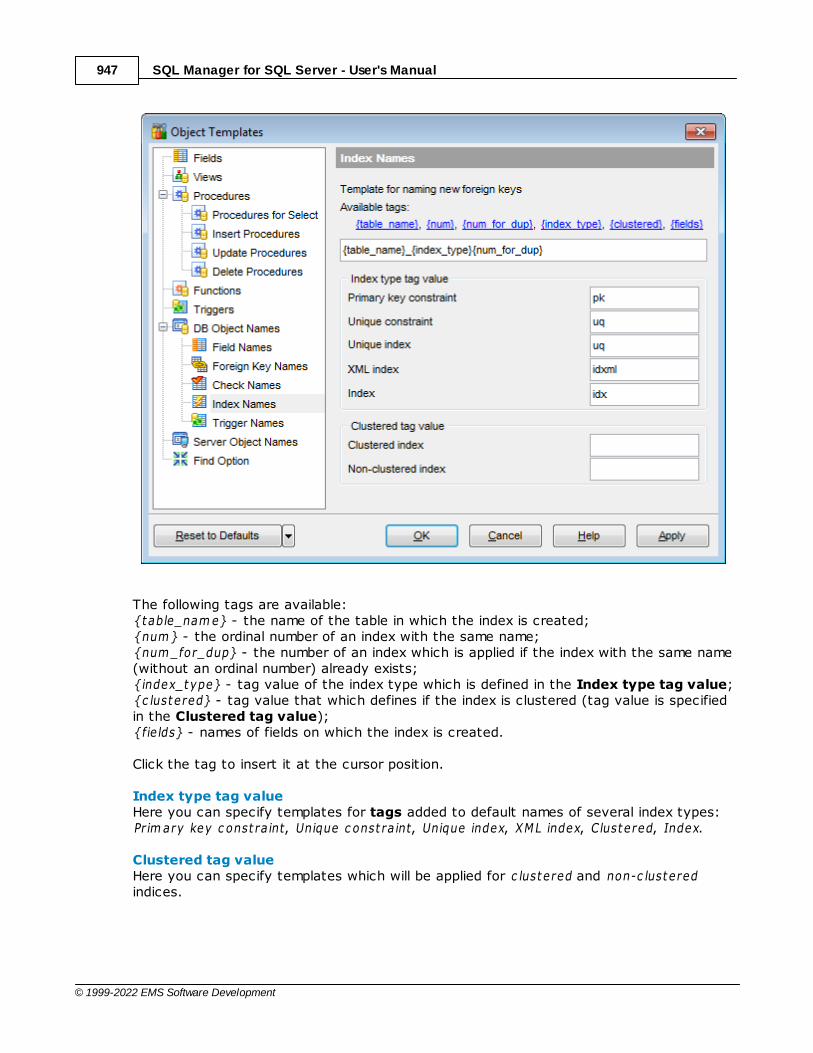
SQL Manager for SQL Server - User's Manual947
© 1999-2022 EMS Software Development
The following tags are available:{table_nam e} - the name of the table in which the index is created;{num } - the ordinal number of an index with the same name;{num _for_dup} - the number of an index which is applied if the index with the same name(without an ordinal number) already exists;{index_type} - tag value of the index type which is defined in the Index type tag value;{c lustered} - tag value that which defines if the index is clustered (tag value is specifiedin the Clustered tag value);{fie lds} - names of fields on which the index is created.
Click the tag to insert it at the cursor position.
Index type tag valueHere you can specify templates for tags added to default names of several index types:Prim ary key c onst ra int, Unique c onst ra int, Unique index, XML index, Clustered, Index.
Clustered tag valueHere you can specify templates which will be applied for c lustered and non-c lusteredindices.
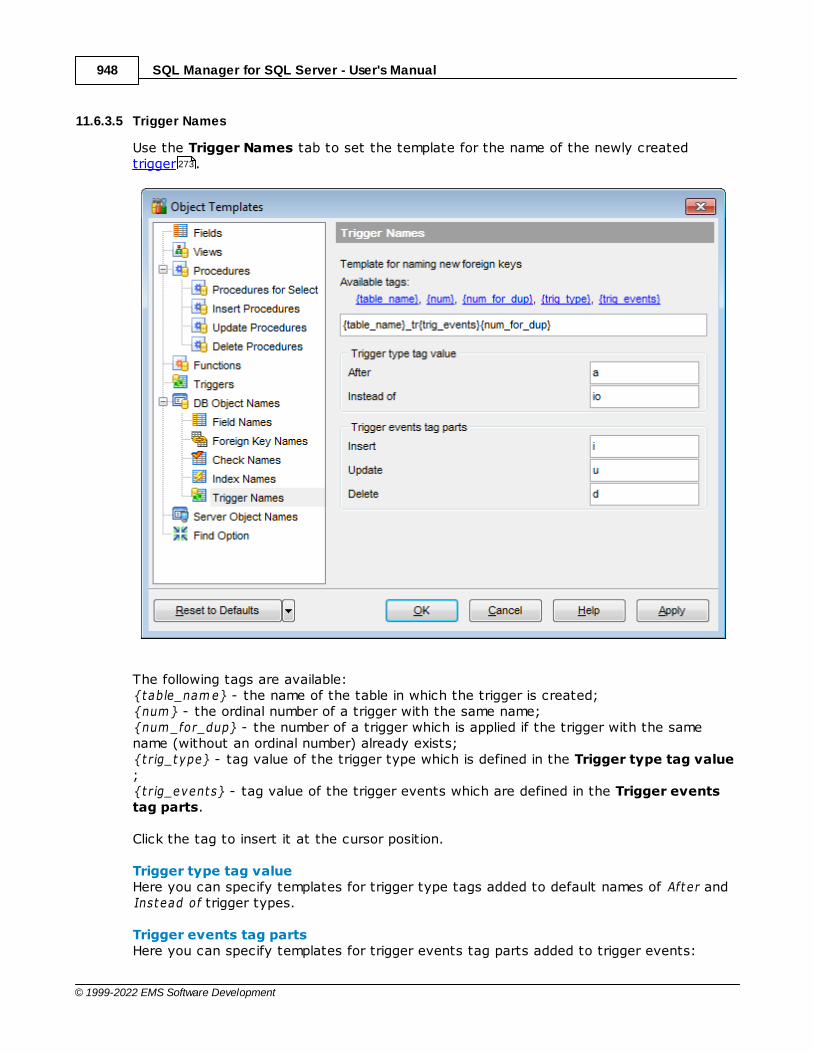
SQL Manager for SQL Server - User's Manual948
© 1999-2022 EMS Software Development
11.6.3.5 Trigger Names
Use the Trigger Names tab to set the template for the name of the newly createdtrigger .
The following tags are available:{table_nam e} - the name of the table in which the trigger is created;{num } - the ordinal number of a trigger with the same name;{num _for_dup} - the number of a trigger which is applied if the trigger with the samename (without an ordinal number) already exists;{t r ig_type} - tag value of the trigger type which is defined in the Trigger type tag value;{t r ig_events} - tag value of the trigger events which are defined in the Trigger eventstag parts.
Click the tag to insert it at the cursor position.
Trigger type tag valueHere you can specify templates for trigger type tags added to default names of After andInstead of trigger types.
Trigger events tag partsHere you can specify templates for trigger events tag parts added to trigger events:
273

SQL Manager for SQL Server - User's Manual949
© 1999-2022 EMS Software Development
Insert, Update, Delete.
11.6.4 Server Object Names
On the Server Object Names tab you can define templates for names of the newlycreated server objects .
Select the Object Type and define its Name Template. You can use the {num } tagwhich stands for the ordinal number of the newly created object.
Click the tag to insert it at the cursor position.
389
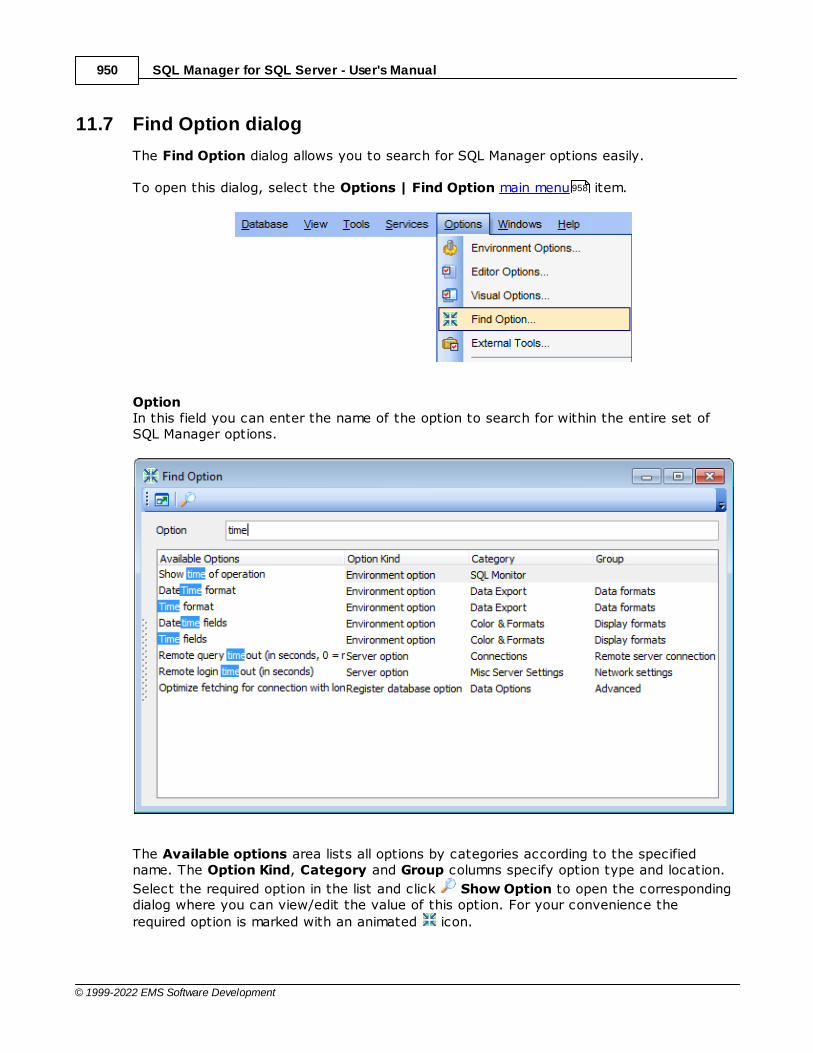
SQL Manager for SQL Server - User's Manual950
© 1999-2022 EMS Software Development
11.7 Find Option dialog
The Find Option dialog allows you to search for SQL Manager options easily.
To open this dialog, select the Options | Find Option main menu item.
OptionIn this field you can enter the name of the option to search for within the entire set ofSQL Manager options.
The Available options area lists all options by categories according to the specifiedname. The Option Kind, Category and Group columns specify option type and location.
Select the required option in the list and click Show Option to open the correspondingdialog where you can view/edit the value of this option. For your convenience the
required option is marked with an animated icon.
958

Part
XII
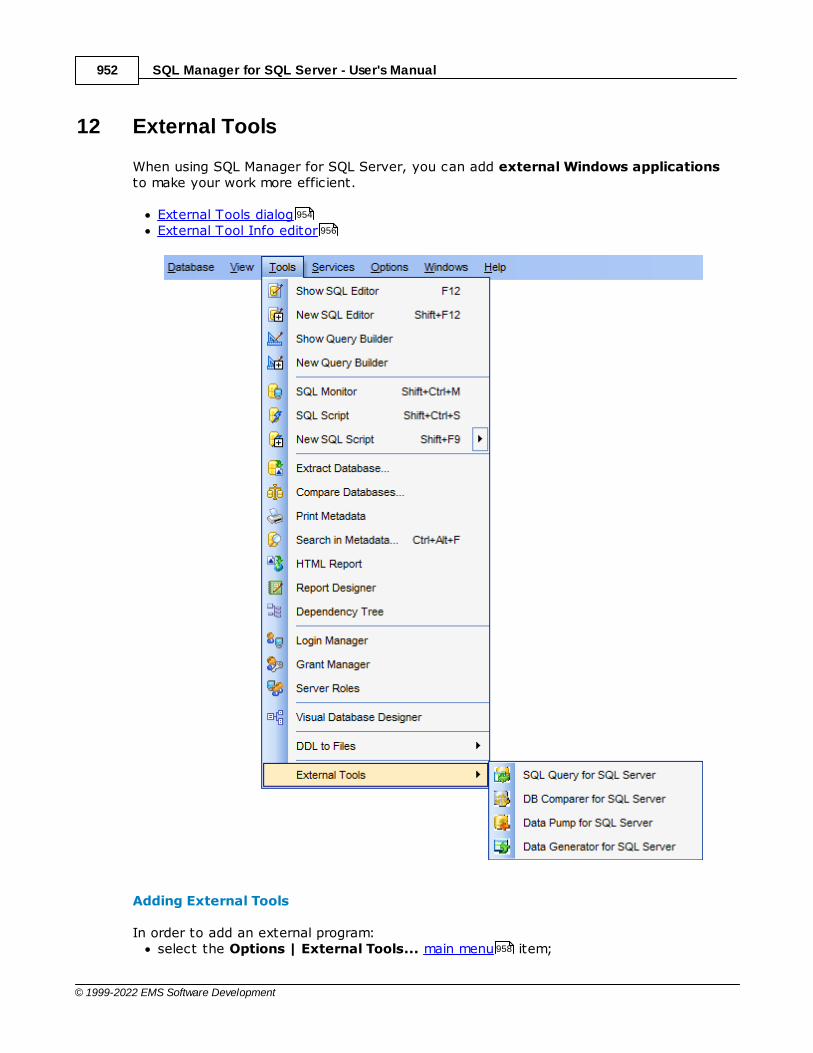
SQL Manager for SQL Server - User's Manual952
© 1999-2022 EMS Software Development
12 External Tools
When using SQL Manager for SQL Server, you can add external Windows applicationsto make your work more efficient.
External Tools dialogExternal Tool Info editor
Adding External Tools
In order to add an external program:select the Options | External Tools... main menu item;
954
956
958
SQL Manager for SQL Server - User's Manual953
© 1999-2022 EMS Software Development
click the Add... button in the External Tools dialog;specify parameters of the new external tool within the External Tool Info editor;confirm adding the new external tool by clicking OK in the External Tool Info editorand the External Tools dialog.
This adds the icon and the title of the application you have selected to the Tools |External Tools submenu. Now you can run this tool quickly without closing SQL Manager.
Removing External Tools
In order to remove an external program: select the Options | External Tools... main menu item;select the tool to be removed in the Tools list of the External Tools dialog;press the Del key or click the Delete button within the dialog;click OK to confirm removing the tool and closing the dialog.
The selected tool has been removed and is no longer accessible from the Tools |External Tools submenu.
See also:
Getting Started
Database Explorer
Database Management
Database Objects Management
Query Management Tools
Data Management
Import/Export Tools
Database Tools
Server Tools
Personalization
How To...
954
956
956
954
958
954
76
99
130
214
460
498
566
651
757
866
1001

SQL Manager for SQL Server - User's Manual954
© 1999-2022 EMS Software Development
12.1 External Tools dialog
The External Tools dialog allows you to manage the list of external applications whichcan be easily run from within SQL Manager environment.
To open this dialog, select the Options | External Tools... main menu item.
Tools Lists all added external applications.
Add...Opens the External Tool Info editor for adding a new tool to the Tools | ExternalTools submenu.
Edit...Opens the External Tool Info editor for editing the title, the hot key, the path to theexecutable file, the working directory and execution parameters of the tool currentlyselected in the Tools list.
DeleteRemoves the selected tool from the list of SQL Manager for SQL Server external tools.
958
956
956
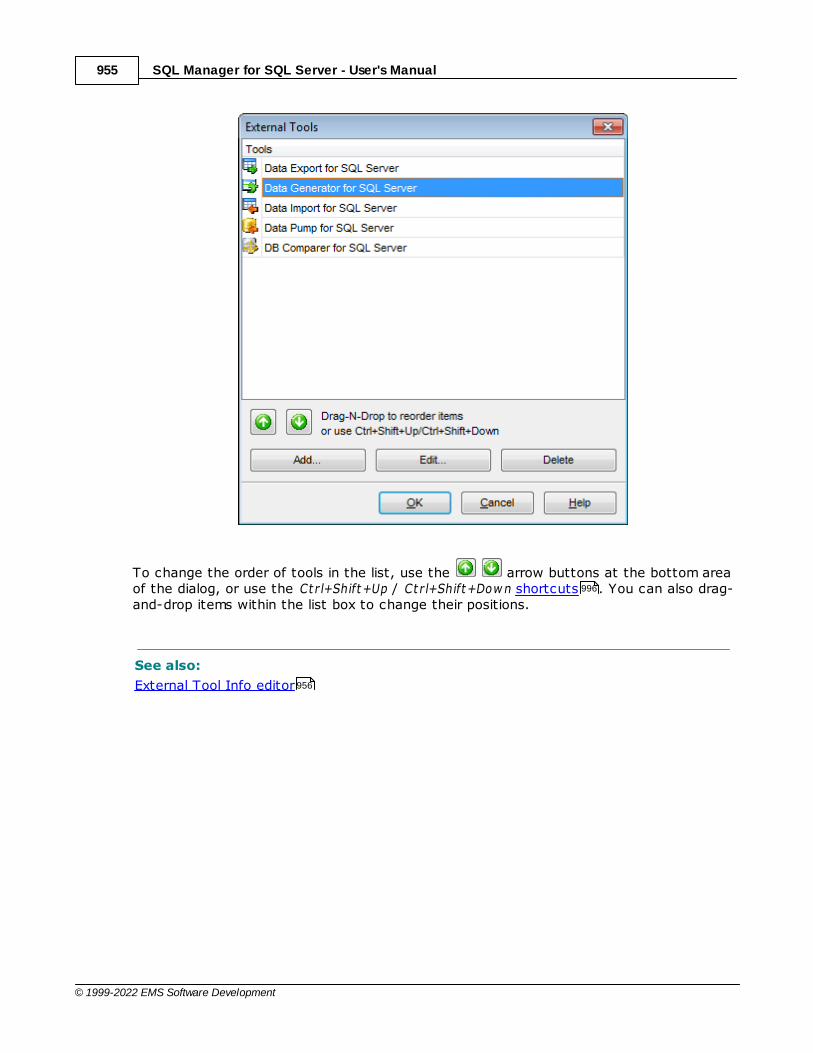
SQL Manager for SQL Server - User's Manual955
© 1999-2022 EMS Software Development
To change the order of tools in the list, use the arrow buttons at the bottom areaof the dialog, or use the Ct r l+Shift+Up / Ct r l+Shift+Dow n shortcuts . You can also drag-and-drop items within the list box to change their positions.
See also:
External Tool Info editor
996
956
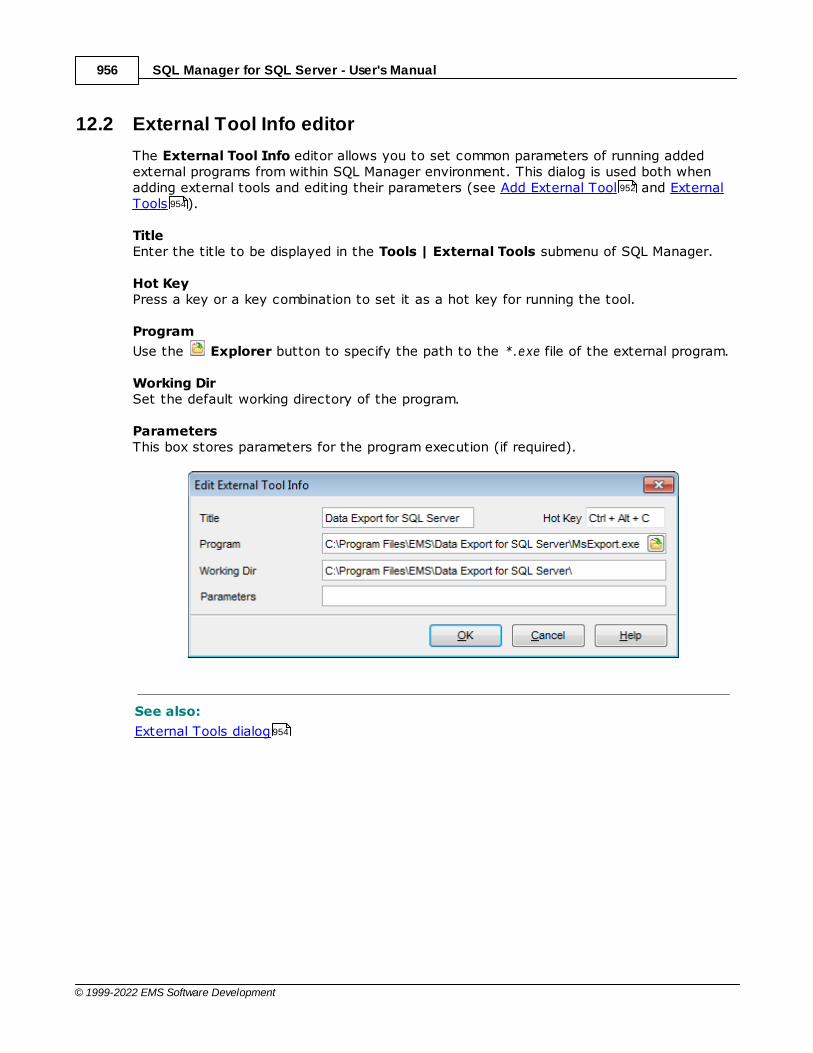
SQL Manager for SQL Server - User's Manual956
© 1999-2022 EMS Software Development
12.2 External Tool Info editor
The External Tool Info editor allows you to set common parameters of running addedexternal programs from within SQL Manager environment. This dialog is used both whenadding external tools and editing their parameters (see Add External Tool and ExternalTools ).
TitleEnter the title to be displayed in the Tools | External Tools submenu of SQL Manager.
Hot KeyPress a key or a key combination to set it as a hot key for running the tool.
Program
Use the Explorer button to specify the path to the *.exe file of the external program.
Working DirSet the default working directory of the program.
ParametersThis box stores parameters for the program execution (if required).
See also:
External Tools dialog
952
954
954

Part
XIII
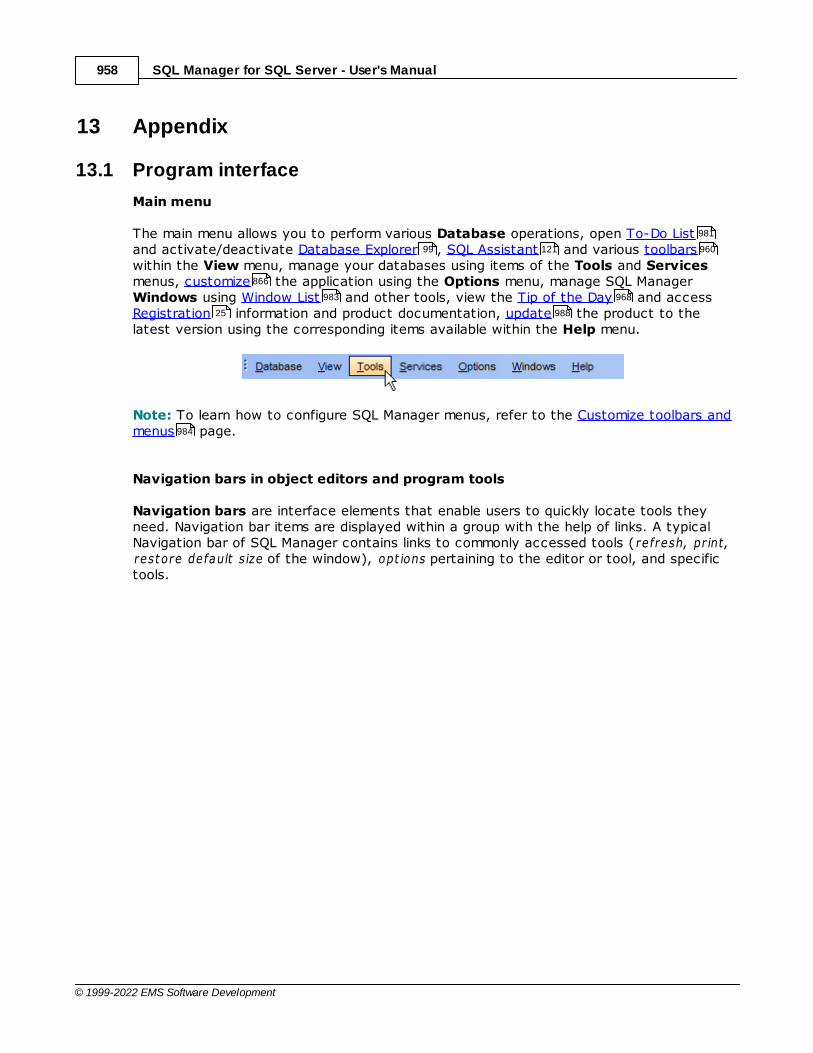
SQL Manager for SQL Server - User's Manual958
© 1999-2022 EMS Software Development
13 Appendix
13.1 Program interface
Main menu
The main menu allows you to perform various Database operations, open To-Do Listand activate/deactivate Database Explorer , SQL Assistant and various toolbarswithin the View menu, manage your databases using items of the Tools and Servicesmenus, customize the application using the Options menu, manage SQL ManagerWindows using Window List and other tools, view the Tip of the Day and accessRegistration information and product documentation, update the product to thelatest version using the corresponding items available within the Help menu.
Note: To learn how to configure SQL Manager menus, refer to the Customize toolbars andmenus page.
Navigation bars in object editors and program tools
Navigation bars are interface elements that enable users to quickly locate tools theyneed. Navigation bar items are displayed within a group with the help of links. A typicalNavigation bar of SQL Manager contains links to commonly accessed tools (refresh, pr int,restore default s ize of the window), opt ions pertaining to the editor or tool, and specifictools.
981
99 121 960
866
983 968
25 988
984
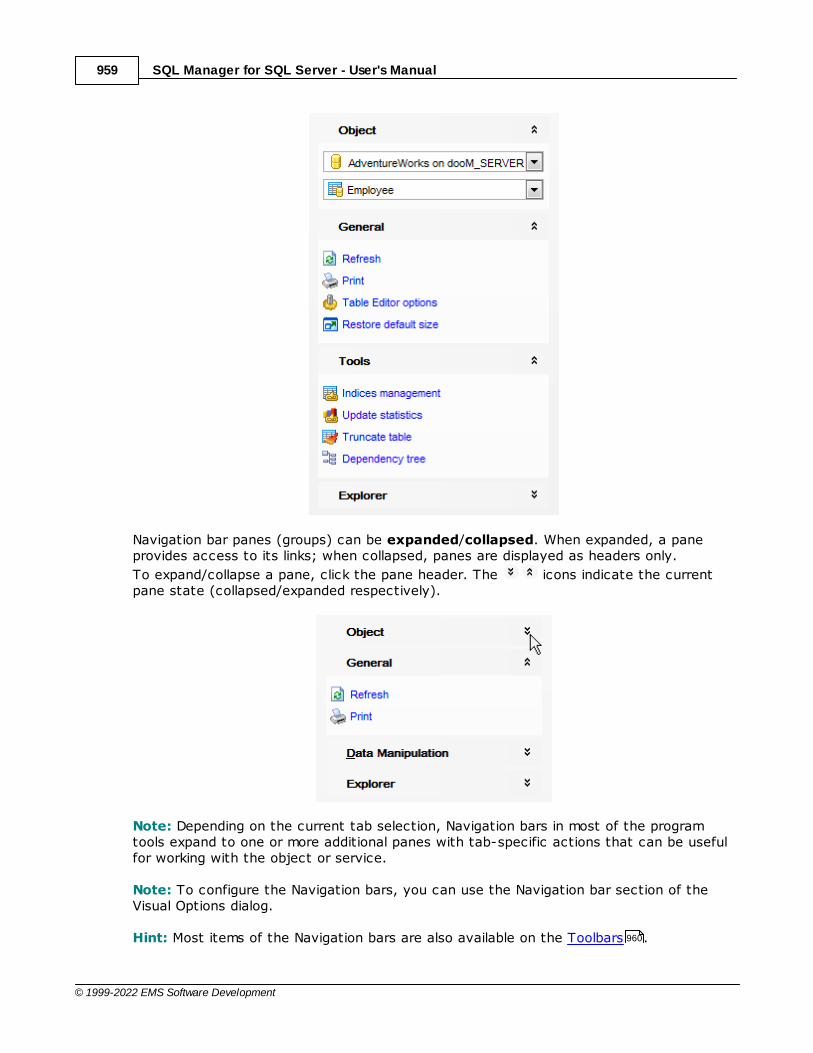
SQL Manager for SQL Server - User's Manual959
© 1999-2022 EMS Software Development
Navigation bar panes (groups) can be expanded/collapsed. When expanded, a paneprovides access to its links; when collapsed, panes are displayed as headers only.
To expand/collapse a pane, click the pane header. The icons indicate the currentpane state (collapsed/expanded respectively).
Note: Depending on the current tab selection, Navigation bars in most of the programtools expand to one or more additional panes with tab-specific actions that can be usefulfor working with the object or service.
Note: To configure the Navigation bars, you can use the Navigation bar section of theVisual Options dialog.
Hint: Most items of the Navigation bars are also available on the Toolbars .960
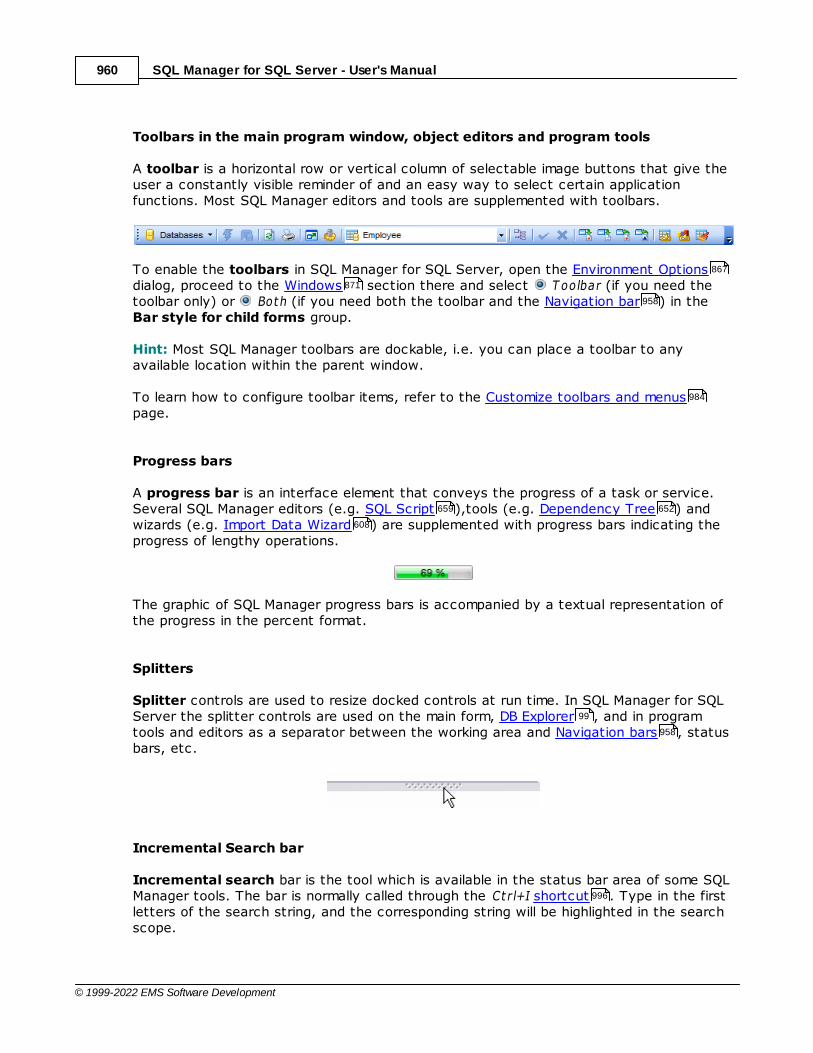
SQL Manager for SQL Server - User's Manual960
© 1999-2022 EMS Software Development
Toolbars in the main program window, object editors and program tools
A toolbar is a horizontal row or vertical column of selectable image buttons that give theuser a constantly visible reminder of and an easy way to select certain applicationfunctions. Most SQL Manager editors and tools are supplemented with toolbars.
To enable the toolbars in SQL Manager for SQL Server, open the Environment Optionsdialog, proceed to the Windows section there and select T oolbar (if you need thetoolbar only) or Both (if you need both the toolbar and the Navigation bar ) in theBar style for child forms group.
Hint: Most SQL Manager toolbars are dockable, i.e. you can place a toolbar to anyavailable location within the parent window.
To learn how to configure toolbar items, refer to the Customize toolbars and menuspage.
Progress bars
A progress bar is an interface element that conveys the progress of a task or service.Several SQL Manager editors (e.g. SQL Script ),tools (e.g. Dependency Tree ) andwizards (e.g. Import Data Wizard ) are supplemented with progress bars indicating theprogress of lengthy operations.
The graphic of SQL Manager progress bars is accompanied by a textual representation ofthe progress in the percent format.
Splitters
Splitter controls are used to resize docked controls at run time. In SQL Manager for SQLServer the splitter controls are used on the main form, DB Explorer , and in programtools and editors as a separator between the working area and Navigation bars , statusbars, etc.
Incremental Search bar
Incremental search bar is the tool which is available in the status bar area of some SQLManager tools. The bar is normally called through the Ct r l+I shortcut . Type in the firstletters of the search string, and the corresponding string will be highlighted in the searchscope.
867
871
958
984
659 652
608
99
958
996

SQL Manager for SQL Server - User's Manual961
© 1999-2022 EMS Software Development
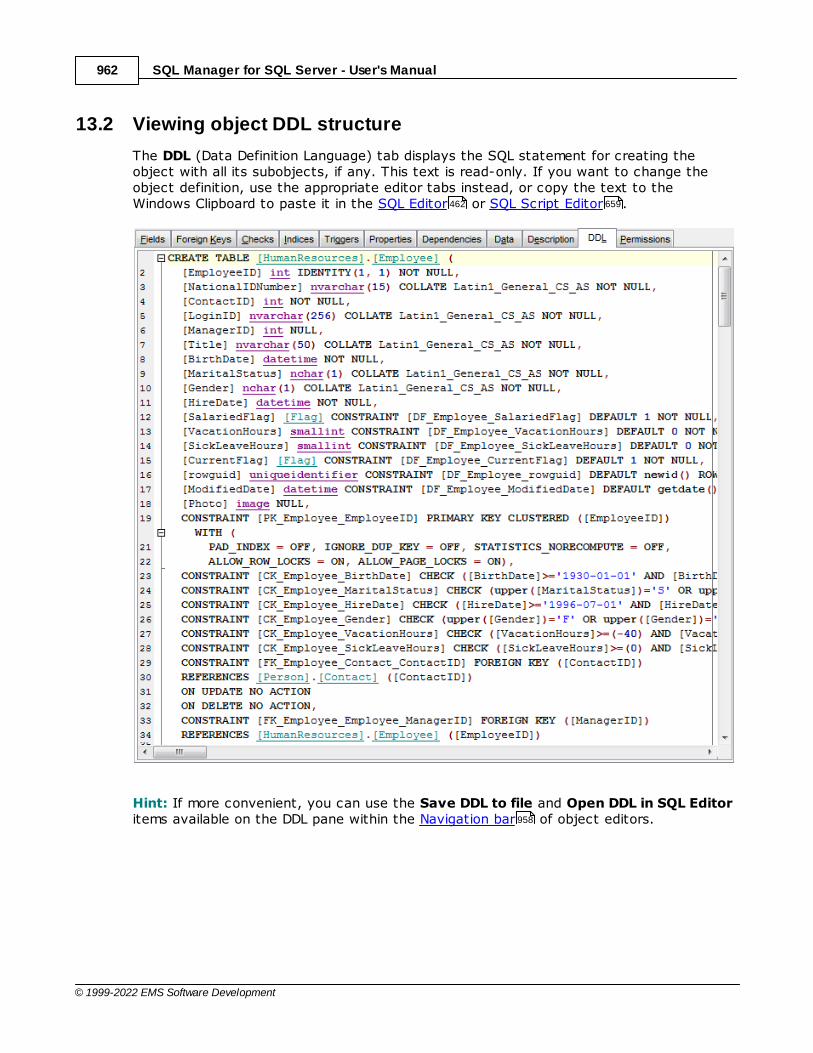
SQL Manager for SQL Server - User's Manual962
© 1999-2022 EMS Software Development
13.2 Viewing object DDL structure
The DDL (Data Definition Language) tab displays the SQL statement for creating theobject with all its subobjects, if any. This text is read-only. If you want to change theobject definition, use the appropriate editor tabs instead, or copy the text to theWindows Clipboard to paste it in the SQL Editor or SQL Script Editor .
Hint: If more convenient, you can use the Save DDL to file and Open DDL in SQL Editoritems available on the DDL pane within the Navigation bar of object editors.
462 659
958
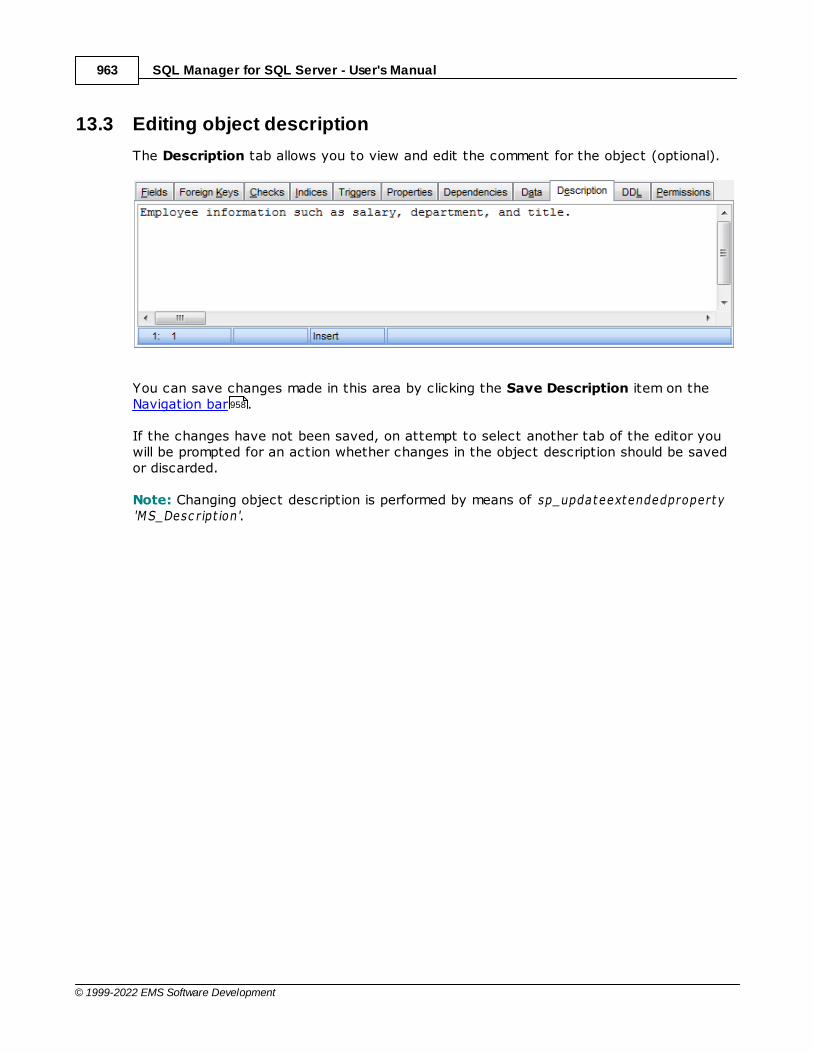
SQL Manager for SQL Server - User's Manual963
© 1999-2022 EMS Software Development
13.3 Editing object description
The Description tab allows you to view and edit the comment for the object (optional).
You can save changes made in this area by clicking the Save Description item on theNavigation bar .
If the changes have not been saved, on attempt to select another tab of the editor youwill be prompted for an action whether changes in the object description should be savedor discarded.
Note: Changing object description is performed by means of sp_updateextendedproperty'MS_Desc r ipt ion'.
958

SQL Manager for SQL Server - User's Manual964
© 1999-2022 EMS Software Development
13.4 Browsing object dependencies
The Dependencies tab allows you to view objects that depend on the object beingedited, and the objects that the edited object depends on.
Hint: To open a dependent object or a depending object in its editor, you can simplydouble-click the object alias in the Objects that <object_name> depends on andObjects that depend on <object_name> lists.
See also:
Dependency Tree 652

SQL Manager for SQL Server - User's Manual965
© 1999-2022 EMS Software Development
13.5 Setting object permissions
The Permissions tab allows you to view the permissions currently allocated for thisobject, and to grant permissions on the object to any of the existing principals.
For details see Grant Manager .
728
724
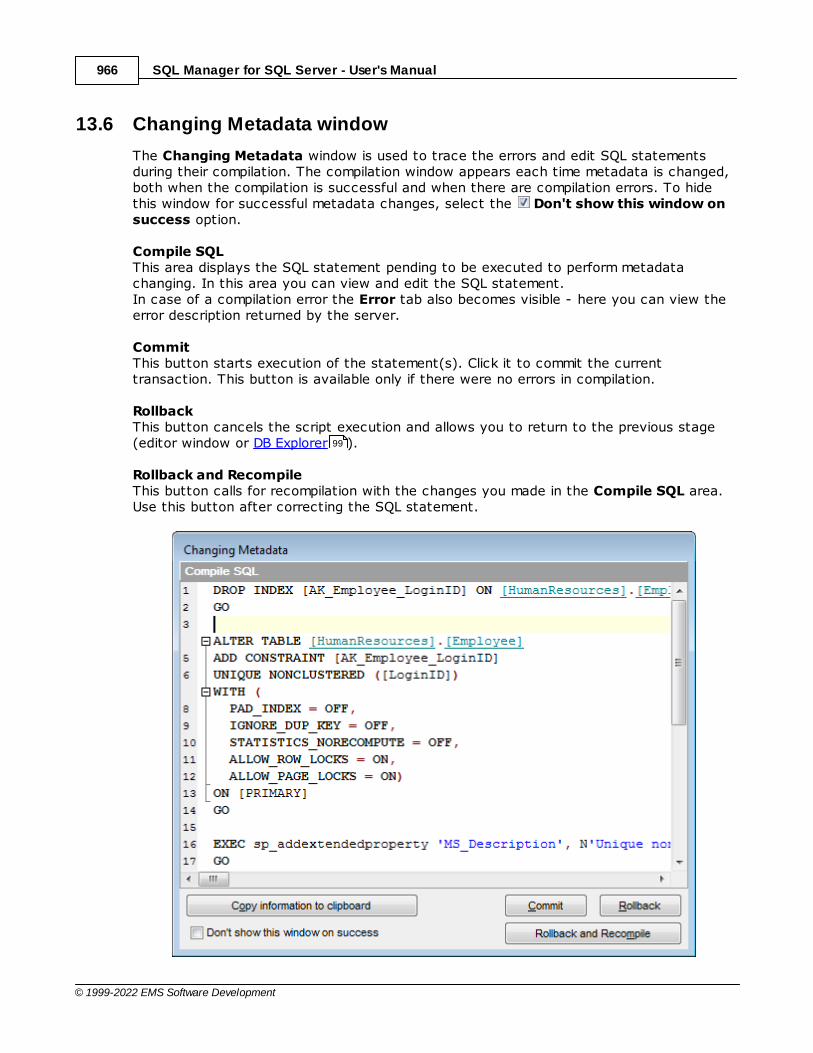
SQL Manager for SQL Server - User's Manual966
© 1999-2022 EMS Software Development
13.6 Changing Metadata window
The Changing Metadata window is used to trace the errors and edit SQL statementsduring their compilation. The compilation window appears each time metadata is changed,both when the compilation is successful and when there are compilation errors. To hidethis window for successful metadata changes, select the Don't show this window onsuccess option.
Compile SQL This area displays the SQL statement pending to be executed to perform metadatachanging. In this area you can view and edit the SQL statement. In case of a compilation error the Error tab also becomes visible - here you can view theerror description returned by the server.
CommitThis button starts execution of the statement(s). Click it to commit the currenttransaction. This button is available only if there were no errors in compilation.
RollbackThis button cancels the script execution and allows you to return to the previous stage(editor window or DB Explorer ).
Rollback and RecompileThis button calls for recompilation with the changes you made in the Compile SQL area.Use this button after correcting the SQL statement.
99

SQL Manager for SQL Server - User's Manual967
© 1999-2022 EMS Software Development
If necessary, you can copy information to clipboard and save it in a text editorafterwards (the button is only enabled when a compilation error occurs).
If you want this window to appear only in case of an error, uncheck the Confirmmetadata changing (Changing Metadata Window) option (checked by default)available within the Confirmations section of the Environment Options dialog.867

SQL Manager for SQL Server - User's Manual968
© 1999-2022 EMS Software Development
13.7 Tip of the Day
This window allows you to see short messages notifying you about interestingparticularities and useful features of SQL Manager for SQL Server.
To open this window, select the Help | Tip of the Day main menu item.
If you check the Show tips at startup option, this window will popup each time youstart SQL Manager for SQL Server.
958
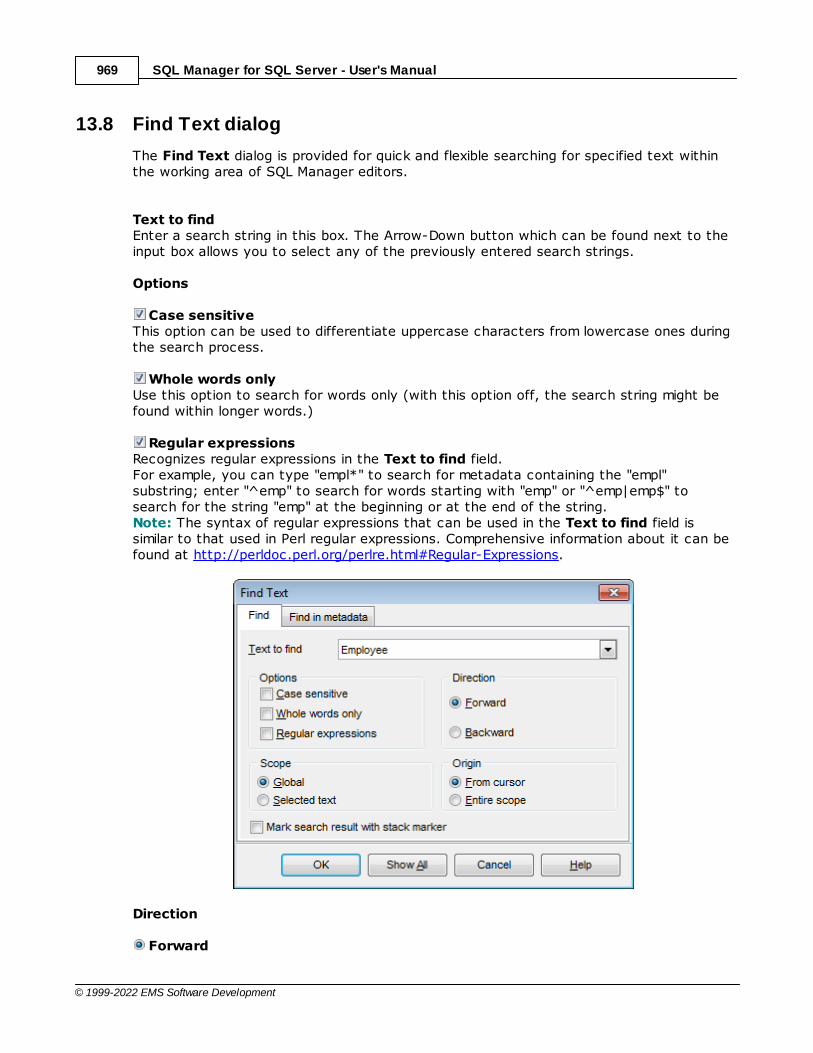
SQL Manager for SQL Server - User's Manual969
© 1999-2022 EMS Software Development
13.8 Find Text dialog
The Find Text dialog is provided for quick and flexible searching for specified text withinthe working area of SQL Manager editors.
Text to findEnter a search string in this box. The Arrow-Down button which can be found next to theinput box allows you to select any of the previously entered search strings.
Options
Case sensitiveThis option can be used to differentiate uppercase characters from lowercase ones duringthe search process.
Whole words onlyUse this option to search for words only (with this option off, the search string might befound within longer words.)
Regular expressionsRecognizes regular expressions in the Text to find field. For example, you can type "empl*" to search for metadata containing the "empl"substring; enter "̂ emp" to search for words starting with "emp" or "̂ emp|emp$" tosearch for the string "emp" at the beginning or at the end of the string.Note: The syntax of regular expressions that can be used in the Text to find field issimilar to that used in Perl regular expressions. Comprehensive information about it can befound at http://perldoc.perl.org/perlre.html#Regular-Expressions.
Direction
Forward
SQL Manager for SQL Server - User's Manual970
© 1999-2022 EMS Software Development
Searches from the current position to the end of the working area.
BackwardSearches from the current position to the beginning of the working area.
Scope
GlobalSearches within the entire working area, in the direction specified by the Direc t ionsetting.
Selected textSearches only within the currently selected text, in the direction specified by the Direc t ion setting. You can use the mouse or block commands to select a block of text.
Origin
From cursorThe search starts at the cursor's current position, and then proceeds either forward tothe end of the scope, or backward to the beginning of the scope depending on the Direc t ion setting.
Entire scopeThe search covers either the entire block of selected text or the entire script (no matterwhere the cursor is in the Editor area) depending upon the Sc ope options.
Mark search result with stack markerThe option toggles marking search results. If this option is selected, stack markers are setat all search positions - this makes it possible to jump from one marker (search result) toanother within the text.
Click the Show All button to highlight every occurrence of the search string.

SQL Manager for SQL Server - User's Manual971
© 1999-2022 EMS Software Development
13.9 Replace Text dialog
The Replace Text dialog is provided for searching and replacing text within the workingarea of SQL Manager editors.
Text to findEnter a search string in this box. The Arrow-Down button which can be found next to theinput box allows you to select any of the previously entered search strings.
Text to replace This box allows you to enter a string to replace the search string. The Arrow-Down buttonwhich can be found next to the input box allows you to select any of the previouslyentered strings. To replace the search string with an empty string, leave this input boxblank.
Options
Case sensitive This option can be used to differentiate uppercase characters from lowercase ones duringthe search process.
Whole words only Use this option to search for words only (with this option off, the search string might befound within longer words.)
Regular expressions Recognizes regular expressions in the Text to find field.
Replace with templateThis option requires the Regular expressions option selection.Enable this option to use regular expressions in the Text to replace field. Expression usedin this field will be applied to each string that matches the Text to find expression.
Note: The syntax of regular expressions that can be used in the Text to find and theText to replace fields is similar to that used in Perl regular expressions. Comprehensiveinformation about it can be found at http://perldoc.perl.org/perlre.html#Regular-Expressions.
Prompt on replace Check this option if you wish to be prompted before replacing upon each occurrence ofthe search string. When this option is off, the search string is replaced automatically.
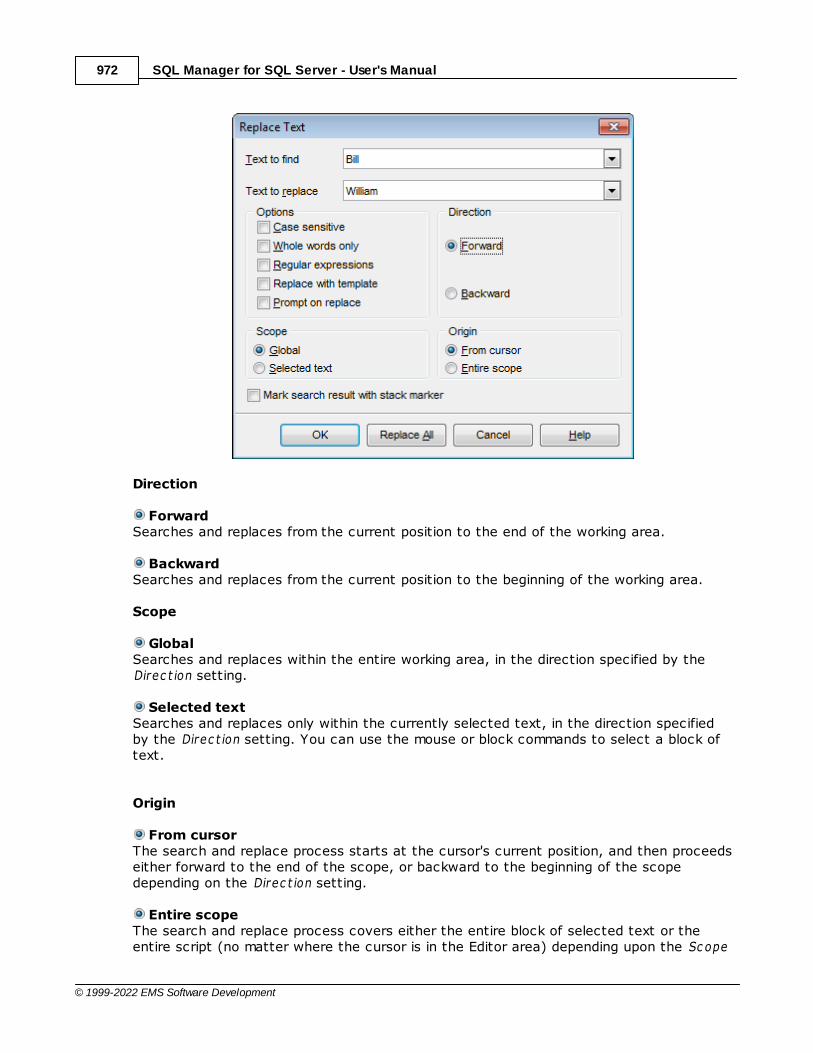
SQL Manager for SQL Server - User's Manual972
© 1999-2022 EMS Software Development
Direction
Forward Searches and replaces from the current position to the end of the working area.
BackwardSearches and replaces from the current position to the beginning of the working area.
Scope
Global Searches and replaces within the entire working area, in the direction specified by the Direc t ion setting.
Selected text Searches and replaces only within the currently selected text, in the direction specifiedby the Direc t ion setting. You can use the mouse or block commands to select a block oftext.
Origin
From cursor The search and replace process starts at the cursor's current position, and then proceedseither forward to the end of the scope, or backward to the beginning of the scopedepending on the Direc t ion setting.
Entire scope The search and replace process covers either the entire block of selected text or theentire script (no matter where the cursor is in the Editor area) depending upon the Sc ope

SQL Manager for SQL Server - User's Manual973
© 1999-2022 EMS Software Development
options.
Mark search result with stack markerThe option toggles marking search results. If this option is selected, stack markers are setat all search positions - this makes it possible to jump from one marker (search result) toanother within the text.
Click the Replace All button to replace every occurrence of the search string. If youhave checked the Prompt on replace option, the confirmation dialog box appears uponeach occurrence of the search string.
SQL Manager for SQL Server - User's Manual974
© 1999-2022 EMS Software Development
13.10 Format specifiers
The following format specifiers are supported in the format string:
Float/Integer format
0Digit place holder. If the value being formatted has a digit in the position where the '0'appears in the format string, then that digit is copied to the output string. Otherwise, a'0' is stored in that position in the output string.
#Digit placeholder. If the value being formatted has a digit in the position where the '#'appears in the format string, then that digit is copied to the output string. Otherwise,nothing is stored in that position in the output string.
.Decimal point. The first '.' character in the format string determines the location of thedecimal separator in the formatted value; any additional '.' characters are ignored.
,Thousand separator. If the format string contains one or more ',' characters, the outputwill have thousand separators inserted between each group of three digits to the left ofthe decimal point. The placement and number of ',' characters in the format string doesnot affect the output, except to indicate that thousand separators are wanted.
E+Scientific notation. If any of the strings 'E+', 'E-', 'e+', or 'e-' are contained in the formatstring, the number is formatted using scientific notation. A group of up to four '0'characters can immediately follow the 'E+', 'E-', 'e+', or 'e-' to determine the minimumnumber of digits in the exponent. The 'E+' and 'e+' formats cause a plus sign to be outputfor positive exponents and a minus sign to be output for negative exponents. The 'E-' and'e-' formats output a sign character only for negative exponents.
Date/Time format
cDisplays the date using the format using the Short Date Format, followed by the timeusing the Long Time Format. The time is not displayed if the date-time value indicatesmidnight precisely.
dDisplays the day as a number without a leading zero (1-31).
ddDisplays the day as a number with a leading zero (01-31).
dddDisplays the day as an abbreviation (Sun-Sat) using the strings of the Short Day Names.
dddd
SQL Manager for SQL Server - User's Manual975
© 1999-2022 EMS Software Development
Displays the day as a full name (Sunday-Saturday) using the strings of the Long DayNames.
dddddDisplays the date using the Short Date Format.
ddddddDisplays the date using the Long Date Format.
eDisplays the year in the current period/era as a number without a leading zero (Japanese,Korean and Taiwanese locales only).
eeDisplays the year in the current period/era as a number with a leading zero (Japanese,Korean and Taiwanese locales only).
gDisplays the period/era as an abbreviation (Japanese and Taiwanese locales only).
ggDisplays the period/era as a full name. (Japanese and Taiwanese locales only).
mDisplays the month as a number without a leading zero (1-12). If the m specifierimmediately follows an h or hh specifier, the minute rather than the month is displayed.
mmDisplays the month as a number with a leading zero (01-12). If the mm specifierimmediately follows an h or hh specifier, the minute rather than the month is displayed.
mmmDisplays the month as an abbreviation (Jan-Dec) using the strings given of the ShortMonth Names.
mmmmDisplays the month as a full name (January-December) using the strings of the LongMonth Names.
yyDisplays the year as a two-digit number (00-99).
yyyyDisplays the year as a four-digit number (0000-9999).
hDisplays the hour without a leading zero (0-23).
hhDisplays the hour with a leading zero (00-23).
nDisplays the minute without a leading zero (0-59).
SQL Manager for SQL Server - User's Manual976
© 1999-2022 EMS Software Development
nnDisplays the minute with a leading zero (00-59).
sDisplays the second without a leading zero (0-59).
ssDisplays the second with a leading zero (00-59).
zDisplays the millisecond without a leading zero (0-999).
zzzDisplays the millisecond with a leading zero (000-999).
tDisplays the time using the Short Time Format.
ttDisplays the time using the Long Time Format.
am/pmUses the 12-hour clock for the preceding h or hh specifier, and displays 'am' for any hourbefore noon, and 'pm' for any hour after noon. The am/pm specifier can use lower, upper,or mixed case, and the result is displayed accordingly.
a/pUses the 12-hour clock for the preceding h or hh specifier, and displays 'a' for any hourbefore noon, and 'p' for any hour after noon. The a/p specifier can use lower, upper, ormixed case, and the result is displayed accordingly.
ampmUses the 12-hour clock for the preceding h or hh specifier, and displays the contents ofthe TimeAMString global variable for any hour before noon, and the contents of theTimePMString global variable for any hour after noon.
/Displays the date separator character using the Date Separator.
:Displays the time separator character using the Time Separator.
'xx'/"xx"Characters enclosed in single or double quotes are displayed as-is, and do not affectformatting.

SQL Manager for SQL Server - User's Manual977
© 1999-2022 EMS Software Development
13.11 Language Info Editor
The Language Info Editor dialog allows you to set the language name and specify thecorresponding *.lng localization file. This dialog is opened when you add or edit a language(see Environment Options | Localization ).
Language NameThe name of the language that is displayed in the Select Program Language dialog andwithin the Available Languages list of the Environment Options | Localization section.
Language FileThe *.lng file containing the translated string resources. See the %program _direc tory%\Languages folder to find already existing localization files.
Adding a languageThe Add language dialog allows you to specify your own localization file and set thelanguage name.
Editing a languageThe Edit language dialog allows you to change the language name or select anotherlocalization file for the specified language.
908
935
908
SQL Manager for SQL Server - User's Manual978
© 1999-2022 EMS Software Development
13.12 Using templates
For your convenience the ability to use templates is provided by SQL Manager for SQLServer. A template is a named collection of wizard options stored in a file.
Instead of performing a long chain of routine steps all the time you can save all theoptions of the wizard for future use as a template file. Select the Templates | SaveTemplate drop-down menu item, specify the template file name and set an optionalcomment for the template file.When starting the wizard next time, you can load the template by selecting the Templates | Load Template drop-down menu item.
Note that saving/loading of templates is possible at any step of the wizard.

SQL Manager for SQL Server - User's Manual979
© 1999-2022 EMS Software Development
13.13 Supported file formats
MS ExcelThe most popular e-table format used by Microsoft® Excel (*.xls). The result files arefully compatible with Microsoft® Excel versions 97-2000, 2003 and XP.
MS AccessFile of Microsoft® Access format (*.m db) with an ADO connection used.
MS WordOne of the most popular text processing formats used by Microsoft® Word (*.doc). Theresult files are fully compatible with Microsoft® Word versions 97-2000, 2003 and XP.
RTFRich Text Format (*.rt f) supported by many text processing programs (e.g. WordPad).
HTMLHyper Text Markup Language file format (*.htm l, *.htm), complete compatibility withHTML 4.0 specification.
PDFA standard format in electronic publishing (*.pdf).
Text filePlain text file format (*.txt).
CSV fileComma-Separated Value file format (*.c sv).
DIF fileData Interchange File (*.dif) format.
SYLKSymbolic Links (*.slk) file format.
Note: all the text formats including T ext f ile, CSV, DIF, SY LK are usually used as workingor interchange formats.
LaTeXA specific file format (*.tex) which is a popular (especially among mathematicians andphysicists) macroextension of T eX pack developed by D.Knut.
XMLA markup language for documents containing structured information (*.xm l).
DBFDatabase file format (*.dbf) used by dBASE and a number of xBASE applications.
MS Excel 2007The contemporary e-table format used by Microsoft® Excel 2007 (*.xlsx). The result filesare fully compatible with Microsoft® Excel 2007.
MS Word 2007
SQL Manager for SQL Server - User's Manual980
© 1999-2022 EMS Software Development
The contemporary text processing format used by Microsoft® Word 2007 (*.doc x). Theresult files are fully compatible with Microsoft® Word 2007.
ODF SpreadsheetsOASIS Open Document Format for Office Applications - open document file format forspreadsheets (*.ods) used by a number of applications including OpenOffice.org andKOffice.
ODF textOASIS Open Document Format for Office Applications - open document file format forword processing (*.odt) documents used by a number of applications includingOpenOffice.org and KOffice.
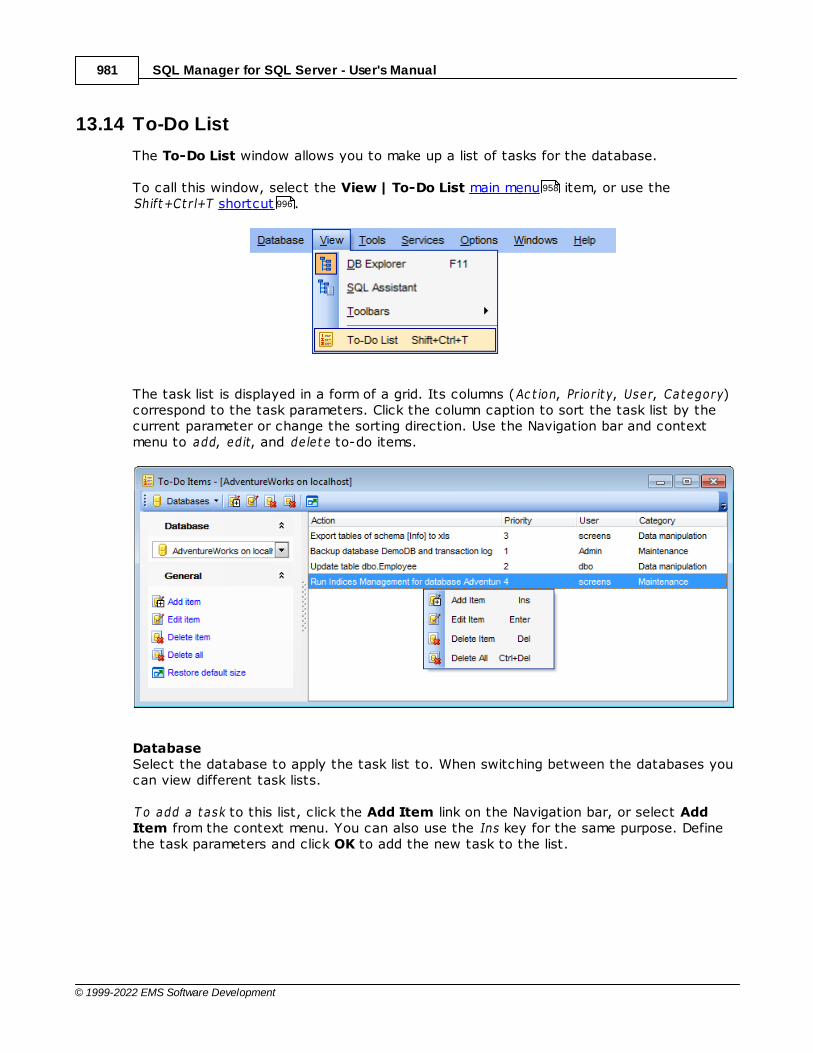
SQL Manager for SQL Server - User's Manual981
© 1999-2022 EMS Software Development
13.14 To-Do List
The To-Do List window allows you to make up a list of tasks for the database.
To call this window, select the View | To-Do List main menu item, or use theShift+Ct r l+T shortcut .
The task list is displayed in a form of a grid. Its columns (Ac t ion, Pr ior it y, User, Category)correspond to the task parameters. Click the column caption to sort the task list by thecurrent parameter or change the sorting direction. Use the Navigation bar and contextmenu to add, edit, and delete to-do items.
DatabaseSelect the database to apply the task list to. When switching between the databases youcan view different task lists.
T o add a task to this list, click the Add Item link on the Navigation bar, or select AddItem from the context menu. You can also use the Ins key for the same purpose. Definethe task parameters and click OK to add the new task to the list.
958
996
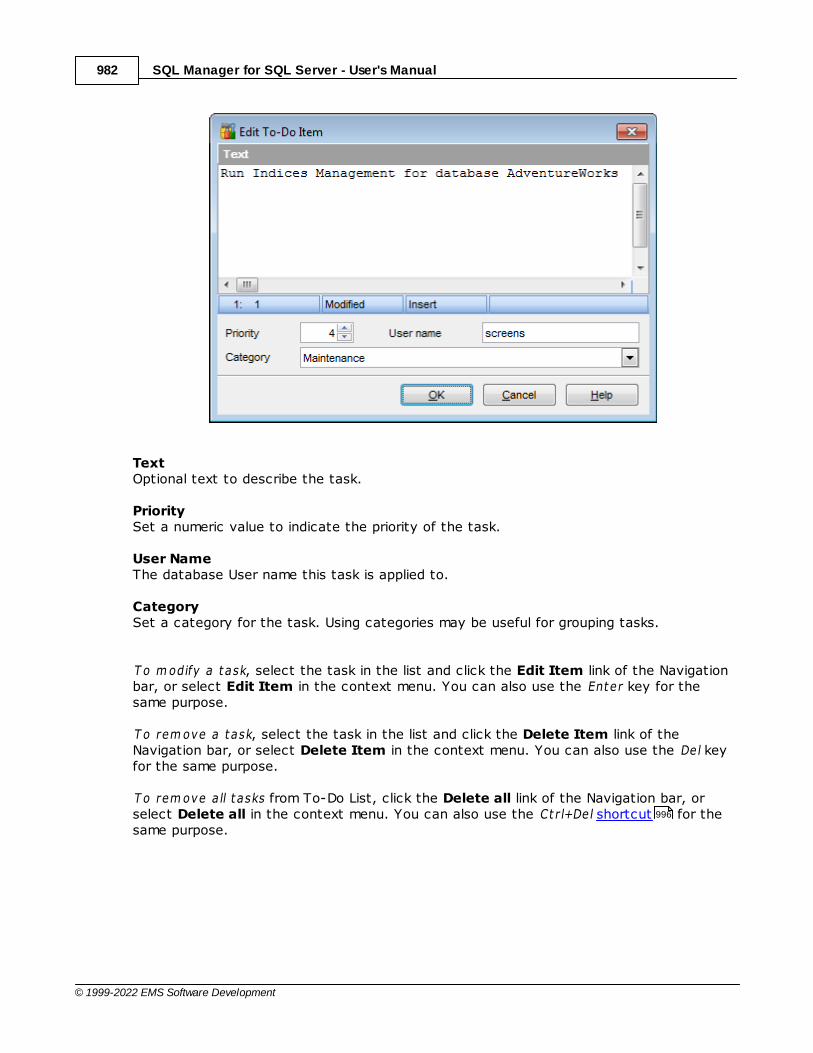
SQL Manager for SQL Server - User's Manual982
© 1999-2022 EMS Software Development
TextOptional text to describe the task.
PrioritySet a numeric value to indicate the priority of the task.
User NameThe database User name this task is applied to.
CategorySet a category for the task. Using categories may be useful for grouping tasks.
T o m odify a task, select the task in the list and click the Edit Item link of the Navigationbar, or select Edit Item in the context menu. You can also use the Enter key for thesame purpose. T o rem ove a task, select the task in the list and click the Delete Item link of theNavigation bar, or select Delete Item in the context menu. You can also use the Del keyfor the same purpose.
T o rem ove a ll t asks from To-Do List, click the Delete all link of the Navigation bar, orselect Delete all in the context menu. You can also use the Ct r l+Del shortcut for thesame purpose.
996
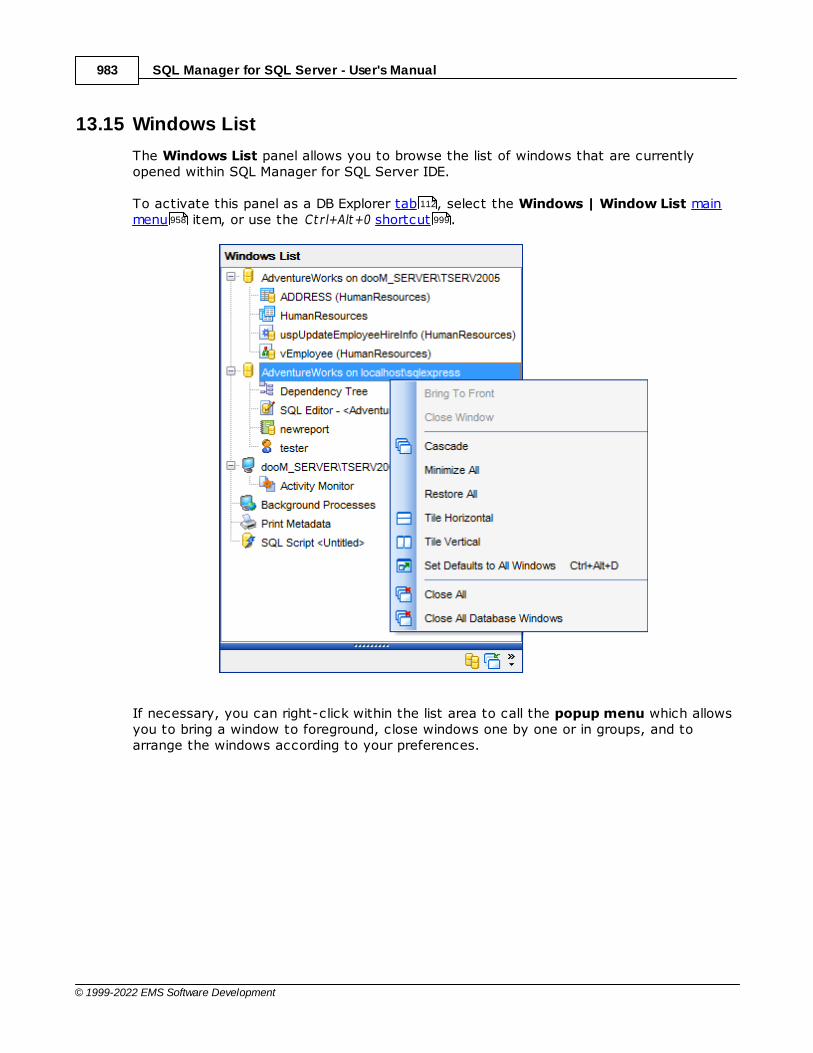
SQL Manager for SQL Server - User's Manual983
© 1999-2022 EMS Software Development
13.15 Windows List
The Windows List panel allows you to browse the list of windows that are currentlyopened within SQL Manager for SQL Server IDE.
To activate this panel as a DB Explorer tab , select the Windows | Window List mainmenu item, or use the Ct r l+Alt+0 shortcut .
If necessary, you can right-click within the list area to call the popup menu which allowsyou to bring a window to foreground, close windows one by one or in groups, and toarrange the windows according to your preferences.
112
958 999
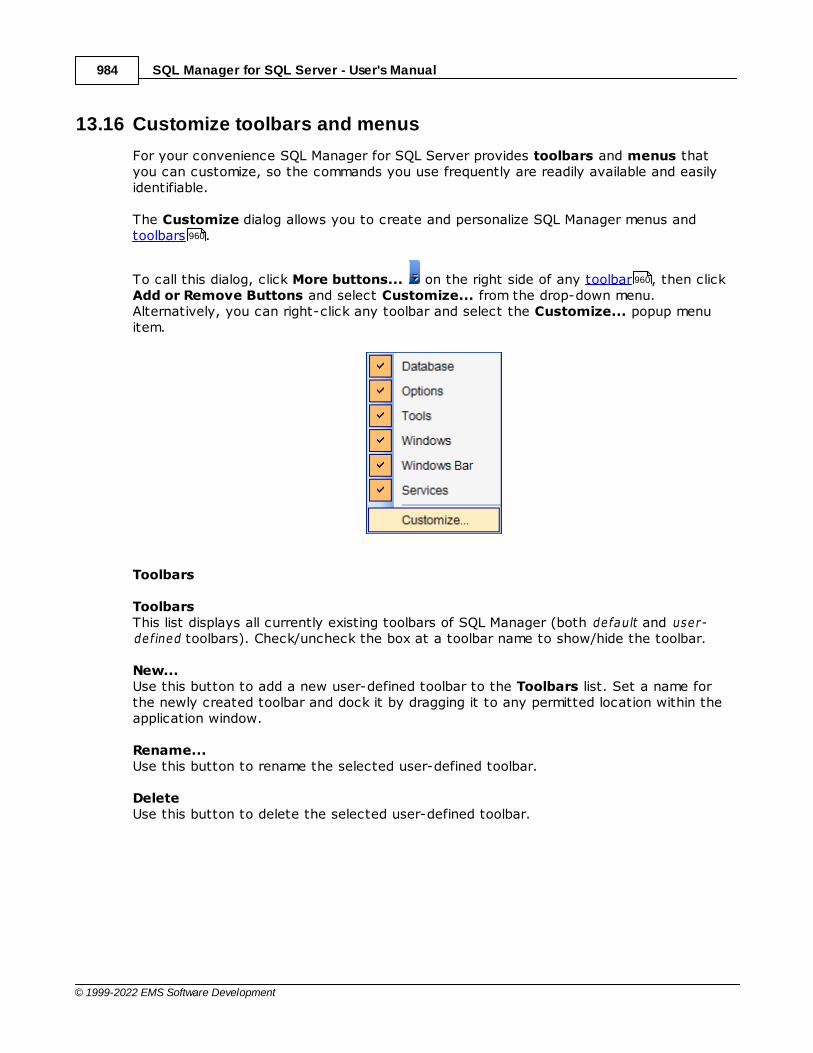
SQL Manager for SQL Server - User's Manual984
© 1999-2022 EMS Software Development
13.16 Customize toolbars and menus
For your convenience SQL Manager for SQL Server provides toolbars and menus thatyou can customize, so the commands you use frequently are readily available and easilyidentifiable.
The Customize dialog allows you to create and personalize SQL Manager menus andtoolbars .
To call this dialog, click More buttons... on the right side of any toolbar , then clickAdd or Remove Buttons and select Customize... from the drop-down menu.Alternatively, you can right-click any toolbar and select the Customize... popup menuitem.
Toolbars
ToolbarsThis list displays all currently existing toolbars of SQL Manager (both default and user-defined toolbars). Check/uncheck the box at a toolbar name to show/hide the toolbar.
New...Use this button to add a new user-defined toolbar to the Toolbars list. Set a name forthe newly created toolbar and dock it by dragging it to any permitted location within theapplication window.
Rename...Use this button to rename the selected user-defined toolbar.
DeleteUse this button to delete the selected user-defined toolbar.
960
960
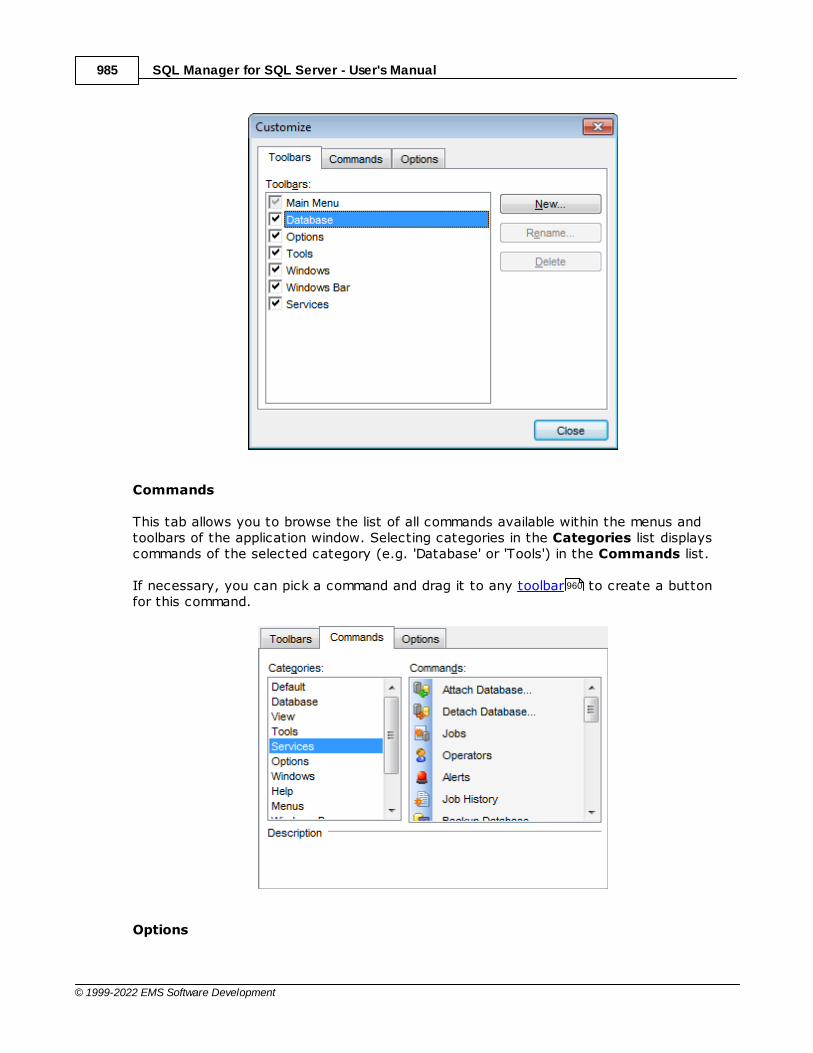
SQL Manager for SQL Server - User's Manual985
© 1999-2022 EMS Software Development
Commands
This tab allows you to browse the list of all commands available within the menus andtoolbars of the application window. Selecting categories in the Categories list displayscommands of the selected category (e.g. 'Database' or 'Tools') in the Commands list.
If necessary, you can pick a command and drag it to any toolbar to create a buttonfor this command.
Options
960
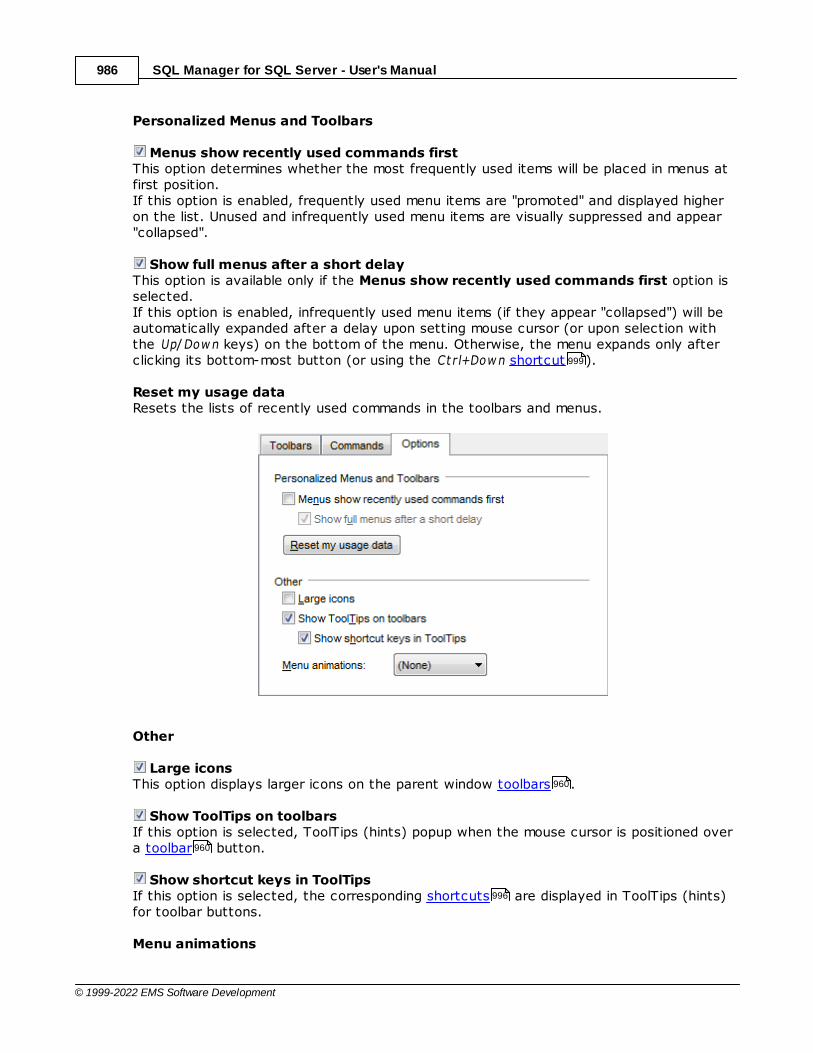
SQL Manager for SQL Server - User's Manual986
© 1999-2022 EMS Software Development
Personalized Menus and Toolbars
Menus show recently used commands firstThis option determines whether the most frequently used items will be placed in menus atfirst position.If this option is enabled, frequently used menu items are "promoted" and displayed higheron the list. Unused and infrequently used menu items are visually suppressed and appear"collapsed".
Show full menus after a short delayThis option is available only if the Menus show recently used commands first option isselected.If this option is enabled, infrequently used menu items (if they appear "collapsed") will beautomatically expanded after a delay upon setting mouse cursor (or upon selection withthe Up/Dow n keys) on the bottom of the menu. Otherwise, the menu expands only afterclicking its bottom-most button (or using the Ct r l+Dow n shortcut ).
Reset my usage dataResets the lists of recently used commands in the toolbars and menus.
Other
Large iconsThis option displays larger icons on the parent window toolbars .
Show ToolTips on toolbarsIf this option is selected, ToolTips (hints) popup when the mouse cursor is positioned overa toolbar button.
Show shortcut keys in ToolTipsIf this option is selected, the corresponding shortcuts are displayed in ToolTips (hints)for toolbar buttons.
Menu animations
999
960
960
996

SQL Manager for SQL Server - User's Manual987
© 1999-2022 EMS Software Development
Use the drop-down list to specify the menu animation effects:None (no animation)Random (random choice: Unfold, Slide, Fade)Unfold (unfolding menus)Slide (sliding menus)Fade (menus fade in when appearing)

SQL Manager for SQL Server - User's Manual988
© 1999-2022 EMS Software Development
13.17 SQL Manager Direct
SQL Manager Direct is a feature of SQL Manager for SQL Server which provides you withquick access to the related Internet resources and allows you to keep your SQL Managerversion up-to-date.
To open the SQL Manager Direct window, select the Help | SQL Manager Direct itemfrom the main menu .
Links to sqlmanager.net resources provided by the SQL Manager Direct window aregrouped into several sections:
SQL Manager for SQL Server New sGeneral Inform at ionDow nloadsRelated Produc ts
Upon a link selection you will be immediately forwarded to the corresponding resource.
SQL Manager for SQL Server NewsThis section takes you directly to the latest EMS news column. Using the links you canget up-to-date news, product information and downloads from sqlmanager.net.
General InformationThis section offers a number of links to product news, features, Feature Matrix , systemrequirements , testimonials and much more.
DownloadsUsing links of this section you can download other product versions from the downloadpage.
958
23
22
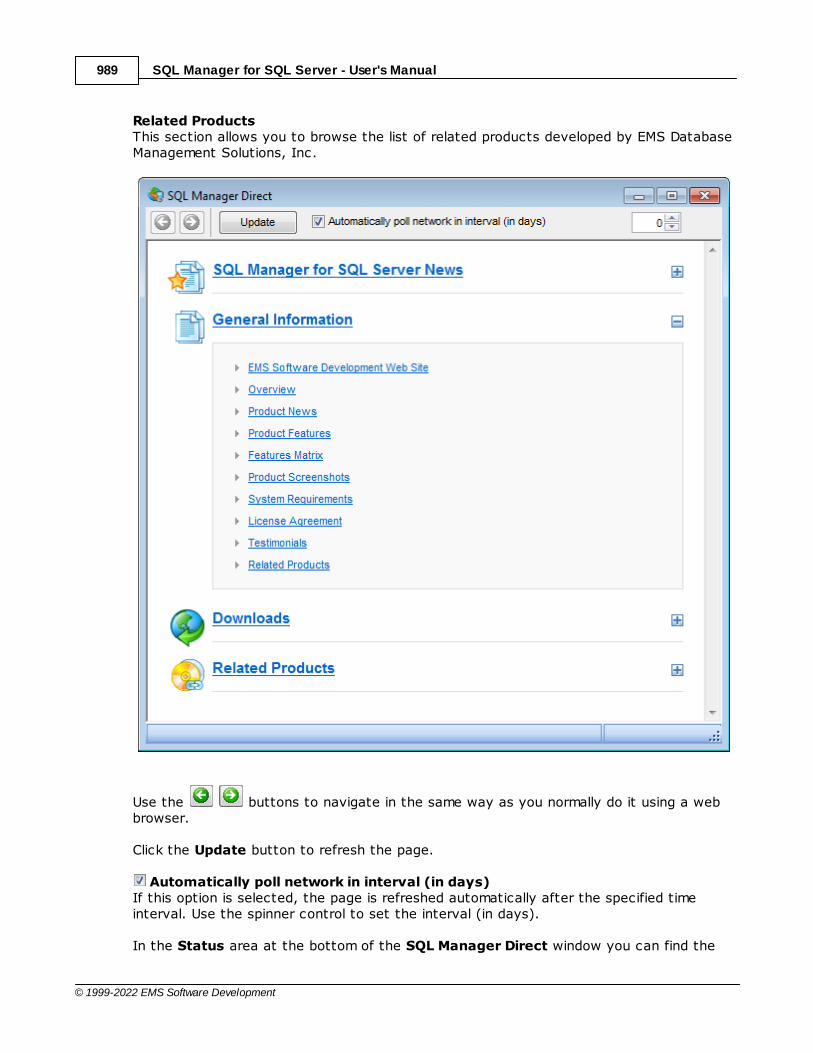
SQL Manager for SQL Server - User's Manual989
© 1999-2022 EMS Software Development
Related ProductsThis section allows you to browse the list of related products developed by EMS DatabaseManagement Solutions, Inc.
Use the buttons to navigate in the same way as you normally do it using a webbrowser.
Click the Update button to refresh the page.
Automatically poll network in interval (in days)If this option is selected, the page is refreshed automatically after the specified timeinterval. Use the spinner control to set the interval (in days).
In the Status area at the bottom of the SQL Manager Direct window you can find the

SQL Manager for SQL Server - User's Manual990
© 1999-2022 EMS Software Development
status of your request to the sqlmanager.net website.

SQL Manager for SQL Server - User's Manual991
© 1999-2022 EMS Software Development
13.18 Database Login dialog
The Log in Database dialog appears on attempt to connect to a database if theLogin prompt before connection option is enabled on the Options page of theDatabase Registration Info dialog.
Specify authent ic at ion type and user nam e / passw ord (if necessary) and click OK tostart working with the database.
131
154
152

SQL Manager for SQL Server - User's Manual992
© 1999-2022 EMS Software Development
13.19 Overwriting existing output file
If a file having the same name as specified for an output file generated by SQL Manageralready exists, a warning dialog is displayed.
You can Overwrite the file, Make it Unique, or Cancel both and change the path or filename manually.
The application makes the file unique by adding the current timestamp to the specified filename if the Add Timestamp to filename option is enabled, or by adding a simplenumeric postfix to the file name if this option is disabled.
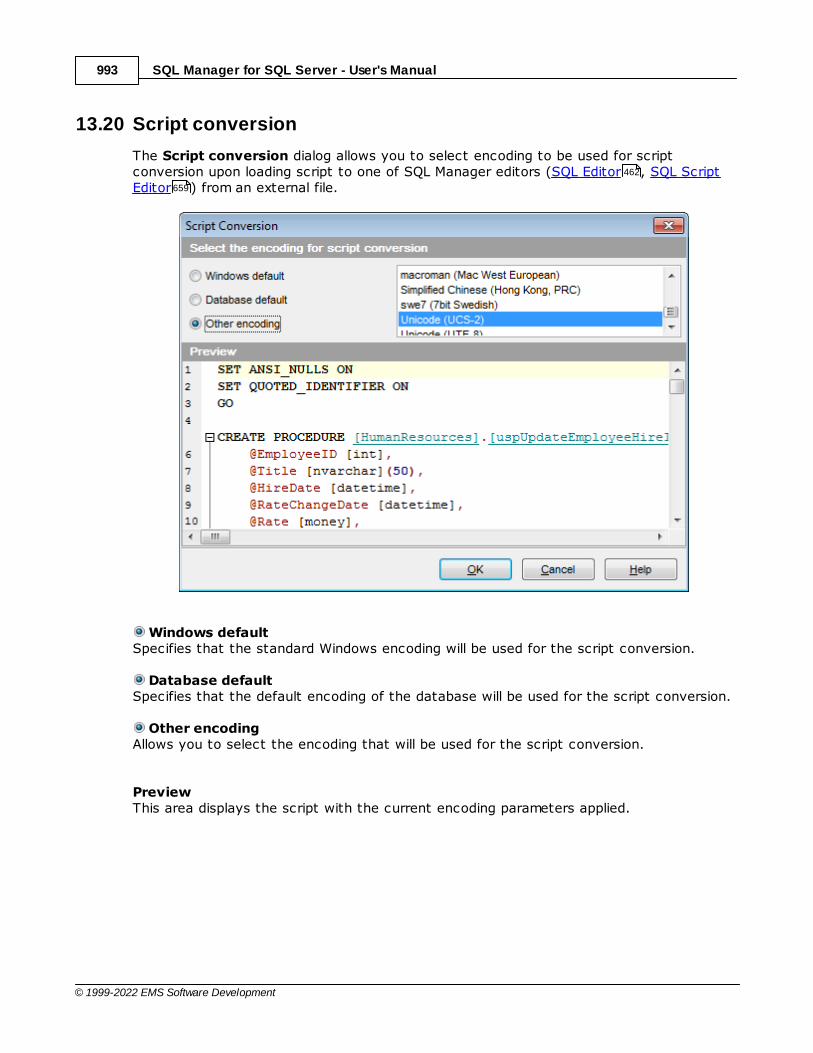
SQL Manager for SQL Server - User's Manual993
© 1999-2022 EMS Software Development
13.20 Script conversion
The Script conversion dialog allows you to select encoding to be used for scriptconversion upon loading script to one of SQL Manager editors (SQL Editor , SQL ScriptEditor ) from an external file.
Windows defaultSpecifies that the standard Windows encoding will be used for the script conversion.
Database defaultSpecifies that the default encoding of the database will be used for the script conversion.
Other encodingAllows you to select the encoding that will be used for the script conversion.
PreviewThis area displays the script with the current encoding parameters applied.
462
659
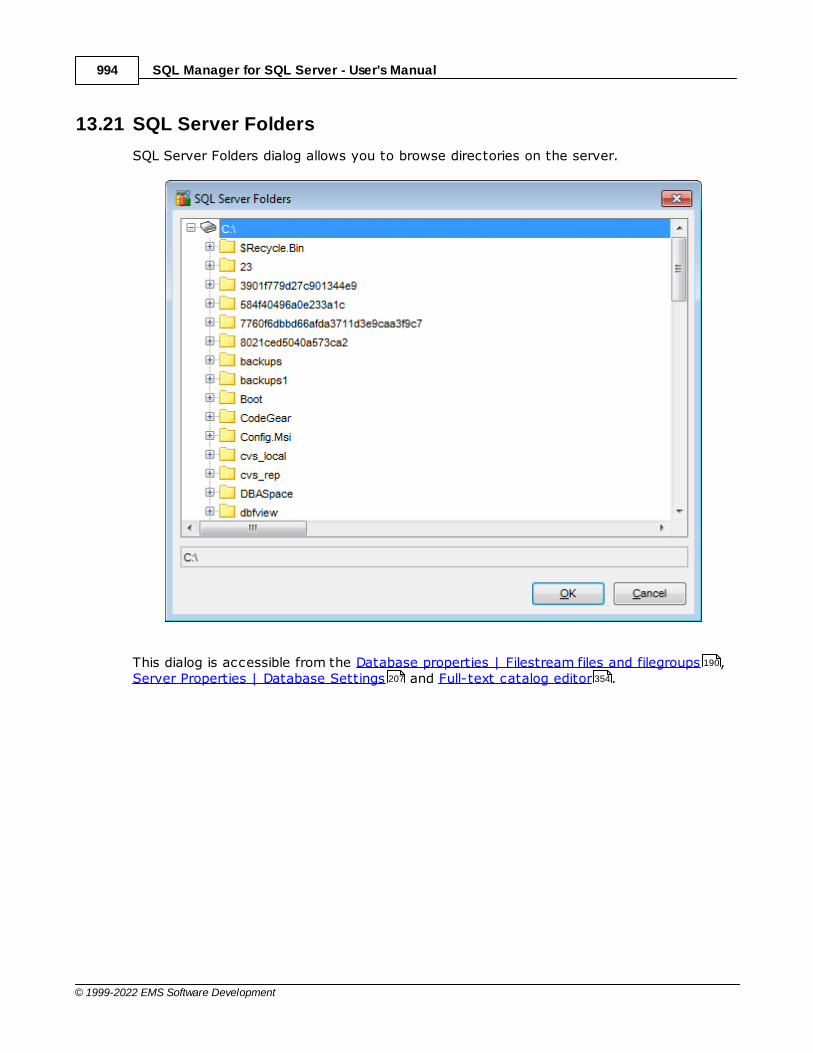
SQL Manager for SQL Server - User's Manual994
© 1999-2022 EMS Software Development
13.21 SQL Server Folders
SQL Server Folders dialog allows you to browse directories on the server.
This dialog is accessible from the Database properties | Filestream files and filegroups ,Server Properties | Database Settings and Full-text catalog editor .
190
207 354

SQL Manager for SQL Server - User's Manual995
© 1999-2022 EMS Software Development
13.22 Select Object dialog
The Select Object dialog appears each time the application requests a database objectselection, e.g. upon a root object selection for the Dependency Tree tool, or whenchoosing an object to be added to a project .
First select the object type in the list on the left-hand side of the window. Pick theobject you need and click OK the apply your selection.
652
116

SQL Manager for SQL Server - User's Manual996
© 1999-2022 EMS Software Development
13.23 SQL Manager shortcuts
Database management:
Shift+Alt+R Register a database using Register Database WizardShift+Alt+U Unregister the selected databaseShift+Ct r l+C Connect to a databaseShift+Ct r l+D Disconnect from a database
Database objects management:
Ct r l+N Create a new object (the object type depends on the current selection)Ct r l+O Edit the selected object in its editorCt r l+R Rename the selected objectShift+Del Drop the selected objectCt r l+Shift+C Collapse the current DB Explorer tree branch and switch selection to the
parent tree node
SQL Manager tools:
F11 View/hide Database ExplorerCt r l+F Search for an item in the DB Explorer treeShift+Ct r l+T Open the To-Do List windowF12 Show SQL EditorShift+F12 Open a new instance of SQL EditorShift+Ct r l+M Open SQL MonitorShift+Ct r l+S Open SQL Script EditorShift+Ct r l+L Open Localization EditorIns Add a new table subobject (the subobject type depends on the current tab
selection)Ct r l+I Start incremental search
SQL Editor and SQL Script (fixed and default):
F9 Execute query/scriptAlt+F9 Execute selected onlyCt r l+Alt+F9 Execute under cursorCt r l+Alt+F2 Reset execution point (SQL Editor only)Shift+Ct r l+<digit>
Toggle bookmark #<digit>
Ct r l+<digit> Go to bookmark #<digit>Ct r l+Q Go to next bookmarkF2 Drop marker to current positionCt r l+Z;Alt+BkSp
Undo
Shift+Ct r l+Z;Shift+Alt+BkSp
Redo
Ct r l+F Search for text using the Find Text dialogCt r l+R Replace text using the Replace Text dialog
147
104
99
99
99
981
462
462
656
659
933
960
969
971

SQL Manager for SQL Server - User's Manual997
© 1999-2022 EMS Software Development
F3 Search nextCt r l+I Start incremental searchAlt+G Go to line number (an input number dialog prompts for the number)Ct r l+L Load a script from an external fileCt r l+S Save the script to an external fileCt r l+F1 Show original help SQL Server Books OnlineShift+Ct r l+F Format the SQL text using SQL FormatterAlt+<sym bol>Switch to the query with <&sym bol> in its name (SQL Editor only)Ct r l+J Insert a keyboard templateСt r l+D Toggle query results display mode (at the Edit tab or at a separate one)Ct r l+Alt+Left Switch to the next tab of SQL EditorCt r l+Alt+Right Switch to the previous tab of SQL EditorCt r l+Alt+PgUp Switch to the last tab of SQL EditorCt r l+Alt+PgDow n
Switch to the first tab of SQL Editor
Shift+Ct r l+Left
Select the previous word
Shift+Ct r l+Right
Select the next word
Shift+Hom e Select text to the beginning of the lineShift+End Select text to the end of the lineShift+PageUp Select one page upShift+PageDow n
Select one page down
Shift+Ct r l+PageUp
Select text to the first line on the page
Shift+Ct r l+PageDow n
Select text to the last line on the page
Shift+Ct r l+Hom e
Select text to the absolute beginning
Shift+Ct r l+End
Select text to the absolute end
Shift+Alt+Left Select column symbol-by-symbol to the leftShift+Alt+Right
Select column symbol-by-symbol to the right
Shift+Alt+Up Select column upwardsShift+Alt+Down
Select column downwards
Shift+Ct r l+Alt+Left
Select column word-by-word to the left
Shift+Ct r l+Alt+Right
Select column word-by-word to the right
Shift+Alt+Hom e
Select column to the first char of line
Shift+Alt+End Select column to the last char of lineShift+Alt+PageUp
Select column to the beginning of the page
Shift+Alt+PageDow n
Select column to the end of the page
Shift+Ct r l+Alt+Hom e
Select column from the current cursor position to the beginning of the firstline
Shift+Ct r l+Alt+End
Select column from the current cursor position to the beginning of the lastline
Ct r l+Up Scroll up one line with cursor position unchangedCt r l+Dow n Scroll down one line with cursor position unchanged
937
462
462
462
462
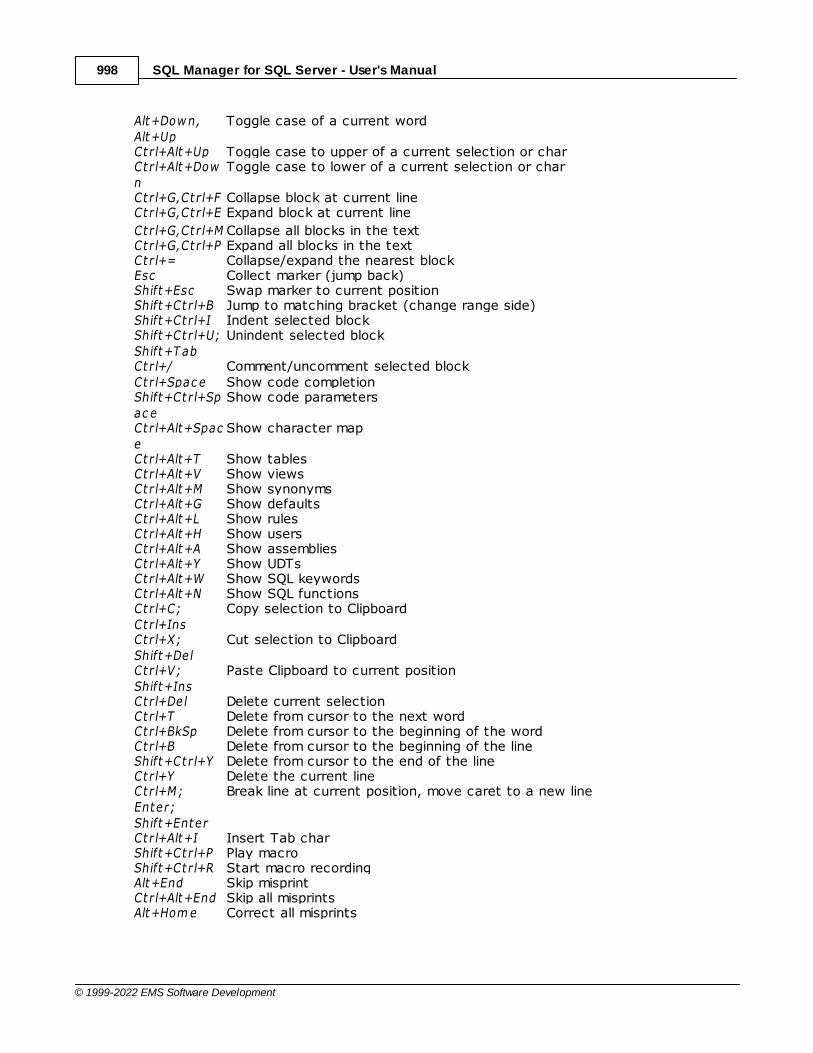
SQL Manager for SQL Server - User's Manual998
© 1999-2022 EMS Software Development
Alt+Dow n,Alt+Up
Toggle case of a current word
Ct r l+Alt+Up Toggle case to upper of a current selection or charCt r l+Alt+Down
Toggle case to lower of a current selection or char
Ct r l+G,Ct r l+F Collapse block at current lineCt r l+G,Ct r l+E Expand block at current line
Ct r l+G,Ct r l+M Collapse all blocks in the textCt r l+G,Ct r l+P Expand all blocks in the textCt r l+= Collapse/expand the nearest blockEsc Collect marker (jump back)Shift+Esc Swap marker to current positionShift+Ct r l+B Jump to matching bracket (change range side)Shift+Ct r l+I Indent selected blockShift+Ct r l+U;Shift+T ab
Unindent selected block
Ct r l+/ Comment/uncomment selected blockCt r l+Spac e Show code completionShift+Ct r l+Spac e
Show code parameters
Ct r l+Alt+Space
Show character map
Ct r l+Alt+T Show tablesCt r l+Alt+V Show viewsCt r l+Alt+M Show synonymsCt r l+Alt+G Show defaultsCt r l+Alt+L Show rulesCt r l+Alt+H Show usersCt r l+Alt+A Show assembliesCt r l+Alt+Y Show UDTsCt r l+Alt+W Show SQL keywordsCt r l+Alt+N Show SQL functionsCt r l+C;Ct r l+Ins
Copy selection to Clipboard
Ct r l+X;Shift+Del
Cut selection to Clipboard
Ct r l+V;Shift+Ins
Paste Clipboard to current position
Ct r l+Del Delete current selectionCt r l+T Delete from cursor to the next wordCt r l+BkSp Delete from cursor to the beginning of the wordCt r l+B Delete from cursor to the beginning of the lineShift+Ct r l+Y Delete from cursor to the end of the lineCt r l+Y Delete the current lineCt r l+M;Enter;Shift+Enter
Break line at current position, move caret to a new line
Ct r l+Alt+I Insert Tab charShift+Ct r l+P Play macroShift+Ct r l+R Start macro recordingAlt+End Skip misprintCt r l+Alt+End Skip all misprintsAlt+Hom e Correct all misprints
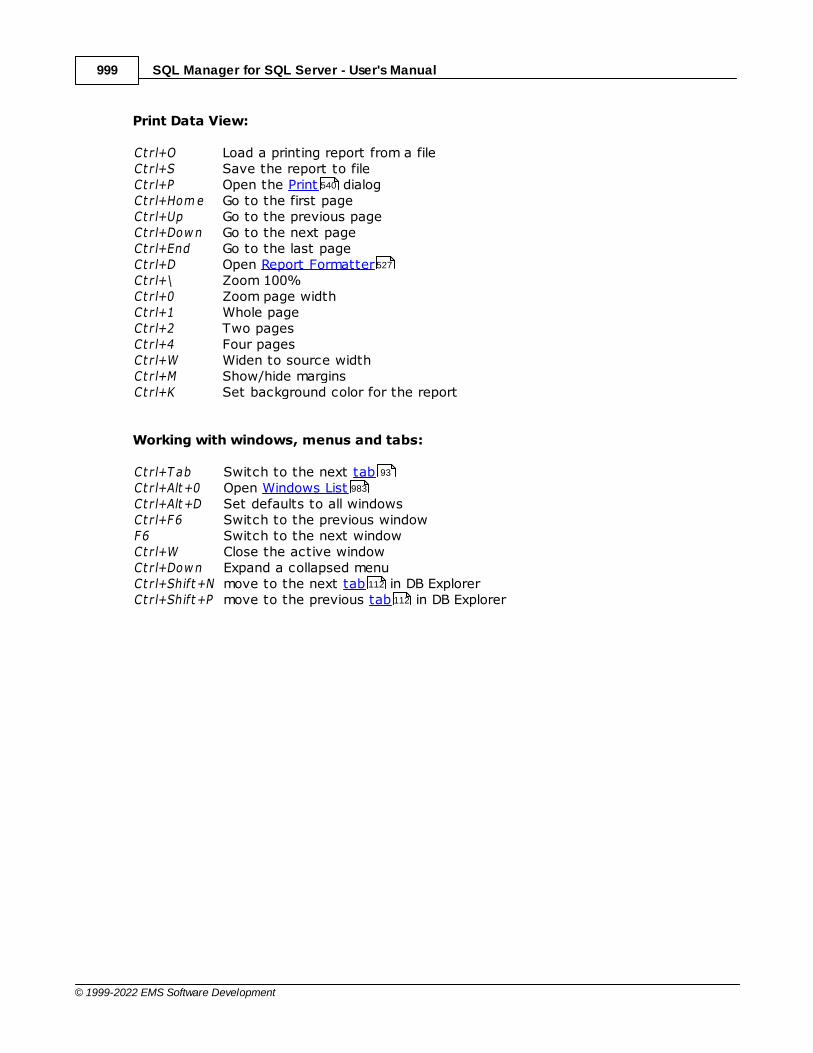
SQL Manager for SQL Server - User's Manual999
© 1999-2022 EMS Software Development
Print Data View:
Ct r l+O Load a printing report from a fileCt r l+S Save the report to fileCt r l+P Open the Print dialogCt r l+Hom e Go to the first pageCt r l+Up Go to the previous pageCt r l+Dow n Go to the next pageCt r l+End Go to the last pageCt r l+D Open Report FormatterCt r l+\ Zoom 100%Ctrl+0 Zoom page widthCt r l+1 Whole pageCt r l+2 Two pagesCt r l+4 Four pagesCt r l+W Widen to source widthCt r l+M Show/hide marginsCt r l+K Set background color for the report
Working with windows, menus and tabs:
Ct r l+T ab Switch to the next tabCt r l+Alt+0 Open Windows ListCt r l+Alt+D Set defaults to all windowsCt r l+F6 Switch to the previous windowF6 Switch to the next windowCtrl+W Close the active windowCtrl+Dow n Expand a collapsed menuCt r l+Shift+N move to the next tab in DB ExplorerCt r l+Shift+P move to the previous tab in DB Explorer
540
527
93
983
112
112

Part
XIV
SQL Manager for SQL Server - User's Manual1001
© 1999-2022 EMS Software Development
14 How To...
The succeeding pages of this chapter are intended to provide you with brief instructionson how to perform this or that operation correctly using SQL Manager for SQL Server.
Work with DatabasesConnect to a databaseCreate a databaseEdit database connection parametersMake work with a database fasterDesign a visual database structureView an ER diagramBackup a databaseRestore a database from a backupCreate a database copyDocument a databaseSave metadata reports to fileLog database changesGet an SQL dumpReduce database sizeTransfer database from one server to another
Work with Database ObjectsGroup objectsFind objectsView dependeciesGet an object DDL
Work with DataView tables with many recordsSet data filterSort and group dataExport/import dataExport data as SQL ScriptEdit data of master-detail tablesAdd image to tableSet data display format
Work with Queries and ScriptsCreate SQL statements rapidlyControl a query productivityWork with several queries at onceSave most frequently used queriesExecute queries with parametersExport query results into fileExecute scriptsExecute a large SQL scriptMake SQL script work fasterCustomize work with Query/Script textView executed queries and scripts
1003
1003
1003
1004
1004
1004
1004
1005
1005
1005
1005
1005
1006
1006
1006
1008
1008
1008
1008
1010
1010
1011
1011
1012
1012
1012
1013
1014
1014
1014
1015
1015
1015
1015
1016
1016
1016
1017
SQL Manager for SQL Server - User's Manual1002
© 1999-2022 EMS Software Development
Create a simple report in Report DesignerCreate a scheduled jobTransfer program settingsUpdate SQL ManagerReport bugs and suggestions
See also:
Getting Started
Database Explorer
Database Management
Database Objects Management
Query Management Tools
Data Management
Import/Export Tools
Database Tools
Server Tools
Personalization
External Tools
1018
1019
1020
1021
1022
76
99
130
214
460
498
566
651
757
866
952
SQL Manager for SQL Server - User's Manual1003
© 1999-2022 EMS Software Development
14.1 Work with Databases
14.1.1 Connect to a database
If you want to connect to a database that has not been registered yet then perform thefollowing operations:
1. Launch the Register Database wizard by selecting the Database | RegisterDatabase... main menu item.
2. If a host where the database is located has not been registered yet then type in itsname in the Server name field on the first step of the wizard. Otherwise, selectthe necessary host from the drop-down list.
Note: To register several databases at once uncheck the Register a singledatabase option. In this case you will proceed to the Selecting databases step ofthe wizard where you are to define databases you want to be registered.3.On the last step of the wizard set database name and specify specific options.4. The registered database(s) is/are now displayed in the DB Explorer . To connect to
the database double-click its alias or select the Connect to Database item of thedatabase context menu .
14.1.2 Create a database
To create a database on the registered server perform the following operations:
1. Launch the Create Database wizard by selecting Database | Create Databasemain menu item.
2.On the first step specify a name for a newly created database.3.On the second step set the necessary connection parameters for the database
being created. Use the corresponding boxes and options: Server nam e, Authent ic at ion, User nam e and Passw ord.
4.Define the data files and transaction log files on the third and the fourth stepscorrespondingly. The primary data file is the starting point of the database and pointsto the other files in the database. The recommended file name extension for primarydata files is *.m df. Log files hold all the log information that is used to recover thedatabase. The recommended file name extension for log files is *.ldf. If you use theSQL Server 2008 (or higher) then define filestream files and filegroups on the next step
. FILESTREAM enables the application to store unstructured data (such as textdocuments, images, videos, etc.) on the file system.
5.On the next step set recovery model and collation. A rec overy m odel is a databaseproperty that controls the basic behavior of backup and restore operations for adatabase. Collation controls the way string values are sorted.
6. Click the Finish button to view the result SQL statement. If you have checked the Register After Creating box on the first step of the wizard then the DatabaseRegistration Info dialog will appear after creating a new database.
14.1.3 Edit database connection parameters
If you have made a mistake when creating and registering a database or theinformation provided is incomplete then it can be edited using the Database RegistrationInfo dialog. You can view this information both for connected or disconnecteddatabase.
To open the dialog, select the database or any of its objects in the DB Explorer tree,
147
958
147
149
149
99
89
133
958
133
134
137 137
139
142
133
152
133 147
152
99
SQL Manager for SQL Server - User's Manual1004
© 1999-2022 EMS Software Development
then select the Database | Database Registration Info... main menu item, or
right-click the database alias in DB Explorer and use the Database RegistrationInfo... context menu item.
The connection parameters can be changed on the Connections tab of the dialog. Hereyou can define or redefine the following properties in the corresponding boxes: Servernam e, User nam e, Passw ord, Database nam e, Database a lias, Font c harset and OLE DBProv ider.
14.1.4 Make work with a database faster
If your database contains too many objects or if a connection to the database is slowyou can increase work speed by uncheking the Refresh objects on connection optionwhen registering database or editing the Database Registration Info .Also you can uncheck the Restore desktop on connect option in the Preferencessection of the Environment Options .
14.1.5 Design a visual database structure
To design your database visually you may use the Visual Database Designer . It allowsyou to create, edit and drop tables and table fields, set relations between tables andperform other operations you may need to achieve your purpose.To create a new object right-click within the diagram area and then choose the Createitem of the context menu. After that a new object will appear on a diagram.After you have finished designing your diagram you can click a Compile button to createthis structure physically.
14.1.6 View an ER diagram
The relationship diagram is built using the reverse engineering operation.To view an ER diagram of a scheme you should follow the steps:1. Run Visual Database Designer ;2. Click the Reverse Engineer button on the main toolbar or use the
corresponding item of the context menu .3.Choose schemas to reverse engineer from.
The created diagram can be saved as a *.m sd file ( Save Diagram button) or as an
image ( Save as Picture button).
14.1.7 Backup a database
A database backup is created by means of the Backup Database Wizard . To launch it
choose Services | Backup Database main menu item.Using this wizard you can define the necessary backup parameters and options, such asthe database for backup, backup type (Full, Different ia l or T ransac t ion log), files of thedatabase to backup, physical or logical devices, media options (append or overw ritemedia), data transfer and/or transaction log options and others.
You can also choose to create a backup now or create a schedule to run a databasebackup automatically.
958
99
89
154
868
867
737
749
737
740
743
760
958

SQL Manager for SQL Server - User's Manual1005
© 1999-2022 EMS Software Development
14.1.8 Restore a database from a backup
Use the Restore Database Wizard to restore a database from a backup. To launch the
wizard and set restore options choose the Services | Restore Database main menu item.
Using this wizard you can define the necessary restore parameters, such as database torestore, restore type (Database, T ransac t ion log, Rec overy w ithout restore or Rec overyfrom database snapshot), recovery options, backup media to restore a database from,database files, and some other options.
14.1.9 Create a database copy
In order to create a copy of the whole database or of separate objects you can:1. Extract DB objects structure and data into SQL script using the Extract Database
Wizard . The result script can be used to copy or restore your database. If the Generate CREATE DATABASE statement option was not checked while customizingscript options then you need to create a database before performing the extractscript. It is better to execute a script from file using the SQL Script Editor .
2. Create a database backup with the help of the Backup Database Wizard . Then runthe Restore Database Wizard and select the New database as a destinationdatabase.
3. Create copies of separate database objects by using the Duplicate Object Wizard .
14.1.10 Document a database
There are several ways to document a database:1. You can generate a detailed HTML report of the selected database objects using
HTML Report Wizard .2. You can generate and print metadata reports of any database object(s). Generated
reports can be exported to any of the available formats: HTML file, Excel file, Text file,RTF file, CSV file, HTML file, BMP image, Excel table (OLE), JPEG image, TIFF image.
3. You can save the Visual Database Designer diagram as a *.msd file for future use.A diagram is saved with the objects XML files. If necessary, you can also save thediagram as an image.
14.1.11 Save metadata reports to file
To save a metadata report in a file of any supported format (*.txt , *.c sv, *.pdf, *.htm l)you should do the following:
1.Open the Print Metadata window by selecting the Tools | Print Metadata itemof the main menu .
2.Mark the needed objects and define printing settings and click the Preview buttonon the navigation bar or toolbar .
3. In the opened Preview window click Export and select from the drop-down list theneeded file format for report saving. When done, specify file name and location.
14.1.12 Log database changes
If you want to perform metadata changes logging and SQL query logging you need to:1. Check the Enable log of metadata changes and specify the path to the *.sql file
to store the metadata logs.2. Check the Enable log of SQL Editor queries and specify the path to the *.sql file
774
958
666
673
659
760
774
218
692
683
737
683
958
684

SQL Manager for SQL Server - User's Manual1006
© 1999-2022 EMS Software Development
to store the logs of SQL queries: date/time of query execution, SQL text, executionresult or errors (if any).
This can be done in the Database Registration Info | Logs window.
14.1.13 Get an SQL dump
To get an SQL dump (an *.sql file) of your database use the Extract Database Wizardthat will extract database objects and/or data to an SQL script, e.g. for backup purposes.
14.1.14 Reduce database size
Database size reducing can be done by means of the Shrink Database Wizard . It allowsreducing the size of data files and log files in the specified database. This operation isused to reduce any file within the database to remove unused pages. Both data andtransaction log files can be reduced.Note: You can shrink a database only if there are no active connections to this databaseand it is now involved in the replication.
14.1.15 Transfer database from one server to another
Source Server is a server where a database is located.Target Server is a server to which the database should be moved.
If versions of the source and target servers are the sameYou can transfer a database in one of the following ways:1.Copy database files from the source server directory to the target server directory.
This can be done without SQL Manager for SQL Server. Then attach to explore thecomplete list of the files for copying use the Data files , Log files and Filestreamfiles and filegroups sections of the Database Properties dialog.
2. Create a full backup of a database using the Backup Database Wizard and save itto the file (this option is set at the step of selecting backup devices ), copy thebackup file to any directory of the target server to which the server has read accessand then restore the database to a new one using the Restore Database Wizard(this option is set at the step of selecting destination database step).
Note: To perform file copying you need to stop the server or perform the detachdatabase operation and then the attach database operation. Both actions will causethe temporary database offline state.
If versions of the source and target servers are differentExtract database objects structure and data into SQL Script using the Extract DatabaseWizard and execute the script for the target server using SQL Script Editor .
Note: If you choose not to use the CREATE DATABASE statement during the scriptexecution, you should create a new database before executing a script at the targetserver.
Note: If versions of the source and target servers are different, in most cases you willhave to edit the script manually for it to be executed successfully.
Note: To transfer databases from other formats or servers to the SQL Server, use our
158
666
797
184 186
190 169
760
763
774
774
793 789
666 659

SQL Manager for SQL Server - User's Manual1007
© 1999-2022 EMS Software Development
EMS Data Pump for SQL Server tool.
SQL Manager for SQL Server - User's Manual1008
© 1999-2022 EMS Software Development
14.2 Work with Database Objects
14.2.1 Group objects
If you want to group objects you can do it in one of the following ways:Using projects (situated in the DB Explorer tree):1.Click create New Sub Folder in the Favorite Objects folder using the corresponding
item of the context menu2.Define its name and drag-and-drop necessary objects there or use the Add Object
item of the created folder context menu. Pick the objects to add to folder from theappeared dialog.
Using DB Explorer tabs:1.Right-click the necessary object in the DB Explorer .
2. Choose the New Tab from Here item of the object context menu and define thename of the tab.
3.Now your objects are stored on the separate tab of a DB Explorer .Note: If object is not a tree node, it cannot be placed on separate tab.
14.2.2 Find objects
In order to search for objects you need you can:1.Call the Find Object dialog by right-clicking the Database alias, any database object
group nodes or objects in the DB Explorer tree and select the Find Object... contextmenu item.
2.Call the Find Object dialog by using the Ct r l+F shortcut .3. Type in the first letters in the edit-box of the Search Panel , and the corresponding
object will be highlighted in the tree, as displayed in the picture below.Note: Objects among which the search is performed should be updated and the objectnode should be expanded.
14.2.3 View dependecies
If you want to view all the object dependencies then:1.Use a dependencies tab in the Table Editor .2.Use the Dependency Tree tool.These tools may be useful when you can't find an object that prevents your fromdropping a table.
14.2.4 Get an object DDL
In order to get an object DDL you can:1.Right-click the object in the DB explorer tree and select the Script to New SQL
Editor | Create context menu item.2.Right-click the object and select the Edit <object> <object_name>... context
menu item or double-click the object and then proceed to the DDL tab in theopened object editor window.
116 99
99
99
91
99
88
996
118
964 236
652
99
962

SQL Manager for SQL Server - User's Manual1009
© 1999-2022 EMS Software Development
14.2.5 Store objects definitions in VCS
If you want your objects to be under version control system, perform the following steps.1. Proceed to the DDL to Files tab of the Database Registration Info dialog and
enable the Write object definition to a file after compilation option.2.Define the directory which will be used for storing object file names in the Root folder
for storing object definitions field. In order to make files be under version control thisdirectory must be a working copy.
3. Choose object types and add files for storing objects definitions using the Options forstoring object definitions and Object file names correspondingly. These files canbe added to version control system.
4.Use the following fields of the DDL to Files tab to define version control systemcommands on actions performed with objects files:
OS command after creating a fileEnter any command that will be executed after a file with object definition iscreated. If you are using version control system then, for example, the following command canbe entered: svn add {file_nam e} (for Subversion revision control system) where{file_nam e} stands for the respective newly created name of a file with objectdefinition.
OS command before updating a fileEnter any command that will be executed before a file with object definition isupdated.If you are using version control system then, for example, the following command canbe entered: ss c hec kout {file_nam e} -C- (for Visual Source Safe revision controlsystem) where {file_nam e} stands for the respective name of a file with objectdefinition being updated.
OS command after deleting a fileEnter any command that will be executed after a file with object definition is deleted.If you are using version control system then, for example, the following command canbe entered: svn de l {file_nam e} (for Subversion revision control system) where{file_nam e} stands for the respective name of a file with object definition beingdeleted.
162 152
164 166
162
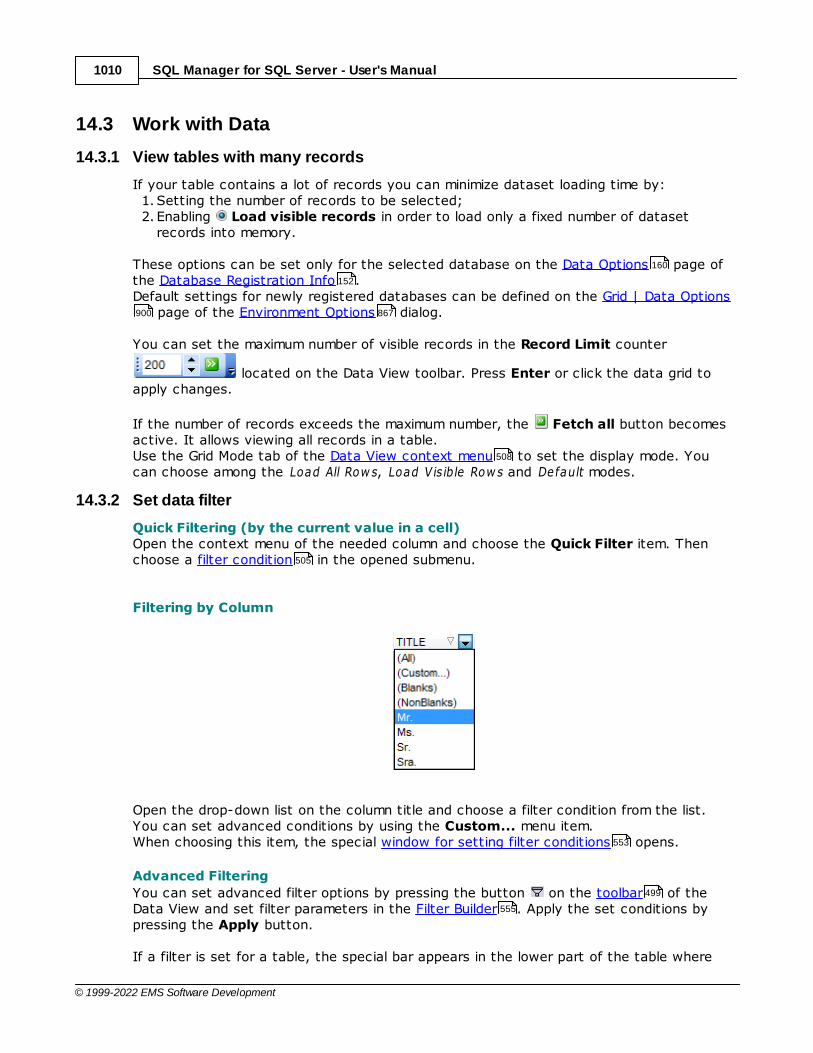
SQL Manager for SQL Server - User's Manual1010
© 1999-2022 EMS Software Development
14.3 Work with Data
14.3.1 View tables with many records
If your table contains a lot of records you can minimize dataset loading time by:1. Setting the number of records to be selected;2. Enabling Load visible records in order to load only a fixed number of dataset
records into memory.
These options can be set only for the selected database on the Data Options page ofthe Database Registration Info .Default settings for newly registered databases can be defined on the Grid | Data Options
page of the Environment Options dialog.
You can set the maximum number of visible records in the Record Limit counter
located on the Data View toolbar. Press Enter or click the data grid toapply changes.
If the number of records exceeds the maximum number, the Fetch all button becomesactive. It allows viewing all records in a table.Use the Grid Mode tab of the Data View context menu to set the display mode. Youcan choose among the Load All Row s, Load V is ible Row s and Default modes.
14.3.2 Set data filter
Quick Filtering (by the current value in a cell) Open the context menu of the needed column and choose the Quick Filter item. Thenchoose a filter condition in the opened submenu.
Filtering by Column
Open the drop-down list on the column title and choose a filter condition from the list.You can set advanced conditions by using the Custom... menu item.When choosing this item, the special window for setting filter conditions opens.
Advanced Filtering You can set advanced filter options by pressing the button on the toolbar of theData View and set filter parameters in the Filter Builder . Apply the set conditions bypressing the Apply button.
If a filter is set for a table, the special bar appears in the lower part of the table where
160
152
900 867
508
505
553
499
555
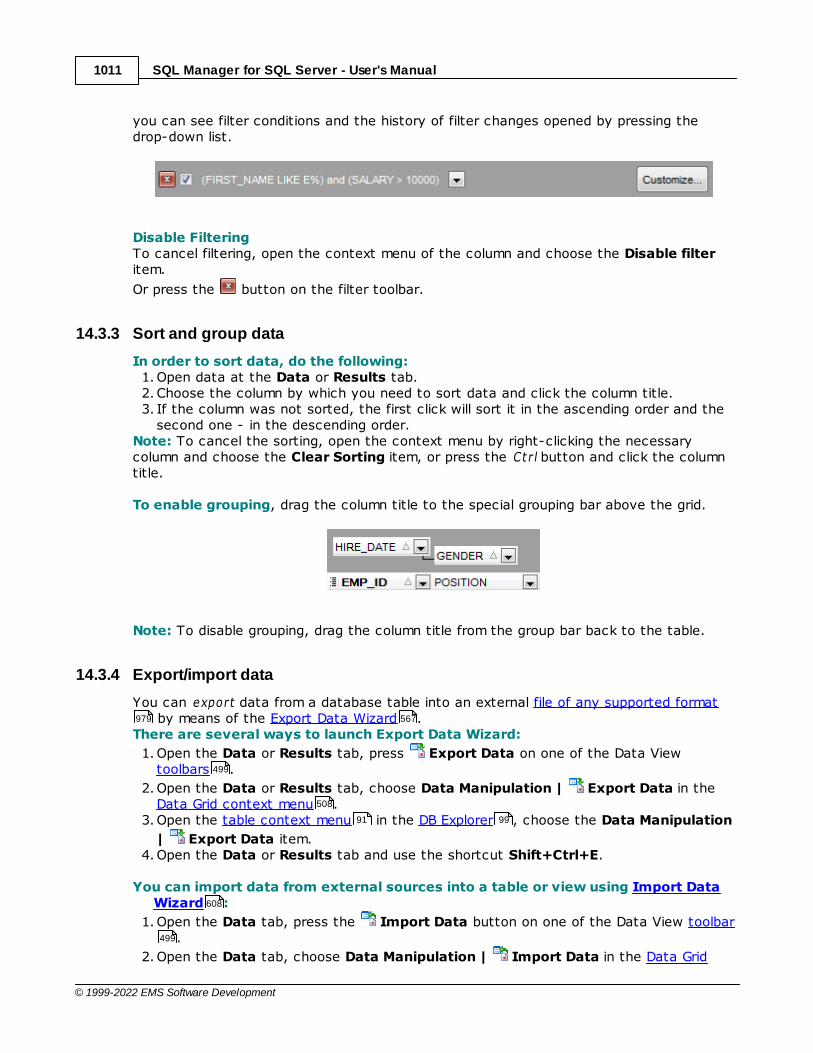
SQL Manager for SQL Server - User's Manual1011
© 1999-2022 EMS Software Development
you can see filter conditions and the history of filter changes opened by pressing thedrop-down list.
Disable FilteringTo cancel filtering, open the context menu of the column and choose the Disable filteritem.
Or press the button on the filter toolbar.
14.3.3 Sort and group data
In order to sort data, do the following:1.Open data at the Data or Results tab.2. Choose the column by which you need to sort data and click the column title.3. If the column was not sorted, the first click will sort it in the ascending order and the
second one - in the descending order.Note: To cancel the sorting, open the context menu by right-clicking the necessarycolumn and choose the Clear Sorting item, or press the Ct r l button and click the columntitle.
To enable grouping, drag the column title to the special grouping bar above the grid.
Note: To disable grouping, drag the column title from the group bar back to the table.
14.3.4 Export/import data
You can export data from a database table into an external file of any supported format by means of the Export Data Wizard .
There are several ways to launch Export Data Wizard:
1.Open the Data or Results tab, press Export Data on one of the Data Viewtoolbars .
2.Open the Data or Results tab, choose Data Manipulation | Export Data in theData Grid context menu .
3.Open the table context menu in the DB Explorer , choose the Data Manipulation
| Export Data item.4.Open the Data or Results tab and use the shortcut Shift+Ctrl+E.
You can import data from external sources into a table or view using Import DataWizard :
1.Open the Data tab, press the Import Data button on one of the Data View toolbar.
2.Open the Data tab, choose Data Manipulation | Import Data in the Data Grid
979 567
499
508
91 99
608
499
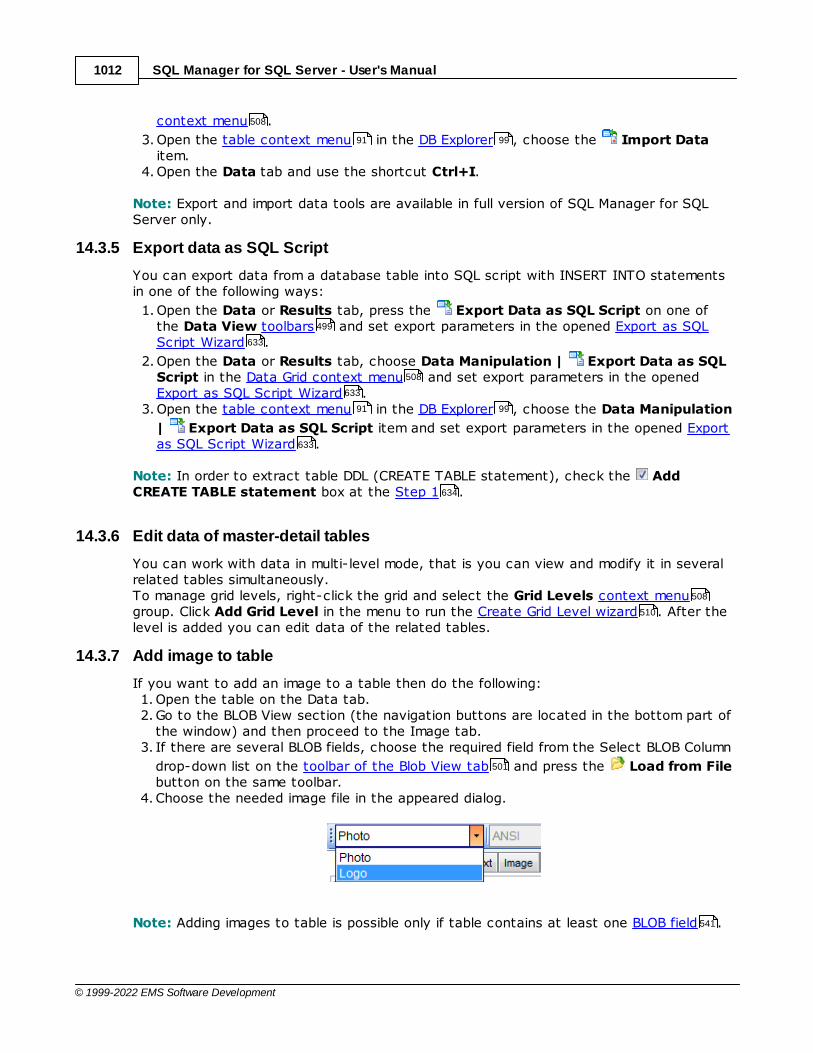
SQL Manager for SQL Server - User's Manual1012
© 1999-2022 EMS Software Development
context menu .
3.Open the table context menu in the DB Explorer , choose the Import Dataitem.
4.Open the Data tab and use the shortcut Ctrl+I.
Note: Export and import data tools are available in full version of SQL Manager for SQLServer only.
14.3.5 Export data as SQL Script
You can export data from a database table into SQL script with INSERT INTO statementsin one of the following ways:
1.Open the Data or Results tab, press the Export Data as SQL Script on one ofthe Data View toolbars and set export parameters in the opened Export as SQLScript Wizard .
2.Open the Data or Results tab, choose Data Manipulation | Export Data as SQLScript in the Data Grid context menu and set export parameters in the openedExport as SQL Script Wizard .
3.Open the table context menu in the DB Explorer , choose the Data Manipulation
| Export Data as SQL Script item and set export parameters in the opened Exportas SQL Script Wizard .
Note: In order to extract table DDL (CREATE TABLE statement), check the AddCREATE TABLE statement box at the Step 1 .
14.3.6 Edit data of master-detail tables
You can work with data in multi-level mode, that is you can view and modify it in severalrelated tables simultaneously.To manage grid levels, right-click the grid and select the Grid Levels context menugroup. Click Add Grid Level in the menu to run the Create Grid Level wizard . After thelevel is added you can edit data of the related tables.
14.3.7 Add image to table
If you want to add an image to a table then do the following:1.Open the table on the Data tab.2.Go to the BLOB View section (the navigation buttons are located in the bottom part of
the window) and then proceed to the Image tab. 3. If there are several BLOB fields, choose the required field from the Select BLOB Column
drop-down list on the toolbar of the Blob View tab and press the Load from Filebutton on the same toolbar.
4. Choose the needed image file in the appeared dialog.
Note: Adding images to table is possible only if table contains at least one BLOB field .
508
91 99
499
633
508
633
91 99
633
634
508
510
501
541

SQL Manager for SQL Server - User's Manual1013
© 1999-2022 EMS Software Development
14.3.8 Set data display format
To set the format for displaying data open the Options | Environment Options dialogfrom the main program menu , proceed to the Color & Formats tab and define orchoose the display format for some data types in the Display formats section.
958 903
SQL Manager for SQL Server - User's Manual1014
© 1999-2022 EMS Software Development
14.4 Work with Queries and Scripts
14.4.1 Create SQL statements rapidly
There are two options for creating SQL queries rapidly:
In the DB Explorer1.Right-click a table in the DB Explorer 2. Choose Script to New SQL Editor context menu item.3. Select the necessary query type.
In the Visual Query Builder1.Open Visual Query Builder .2.On the Builder tab drag an object from the DB Explorer tree to the diagram area.3. Choose necessary fields to include in the query by checking the corresponding box
located to the left from the field name in the list, or just by double-clicking it. Toinclude all fields of the table/view, check the box located to the left of the table/viewcaption.
4. Associate two objects by their fields.Drag a field from one object list to another.This will set a link between these objects by the selected fields. It is indicated by abidirectional arrow between the linked fields.
5. Edit link properties . Double-click the linking arrow or right-click it and select theProperty popup menu item. The Link properties dialog allows you to change theassociation condition by choosing it from the drop-down list.
6. You can view and edit your SQL statement on the Edit tab of the Visual Query Builder.
14.4.2 Control a query productivity
You can view a query productivity on the query plan . It allows you to view thesequence of actions performed by the database server in the process of the queryexecution, and the amount of system resources used for the query execution.To view the Plan of a query, open the query in SQL Editor and use the Showestimated execution plan item of the Navigation bar or toolbar .If necessary, you can specify that the Plan tab appears automatically upon queryexecution in SQL Editor : select the Show actual execution plan on queryexecution option available within the Tools | SQL Editor section of the EnvironmentOptions dialog.
14.4.3 Work with several queries at once
SQL Editor provides a possibility to open and edit several queries. You can create tabsin the lower part of the SQL Editor, each tab may contain a separate query. There areseveral ways for creating tabs:
1.Open SQL Editor and choose Add New Query on one of the toolbars .
2.Open SQL Editor and choose Add New Query in the context menu of the
existing tab.3.Use the shortcut Ctrl + N.
Note: Each tab can be renamed and any query can be added to Favorite Queries .
99
479
107
483
483
479
467
462 464
462
878
867
462
462
465
126
SQL Manager for SQL Server - User's Manual1015
© 1999-2022 EMS Software Development
14.4.4 Save most frequently used queries
Use the Favorite Queries feature to store your most frequently used SQL queries. Toaccess the list of your favorite queries you can use the Favorite Queries node of DBExplorer or create a separate tab for your Favorite queries.
Using the context menu you can create a new Favorite query or edit an existing oneusing Favorites editor , open any of the existing queries in SQL Editor or remove aquery if you don't need it any longer.
14.4.5 Execute queries with parameters
If you want to use queries with parameters then you should check Allow usingparameters in query text option in the Environment Options | Tools .This feature allows you to specify different values within a query in a popup dialog justbefore the query execution. Use the colon (':') character before an identifier (e.g. :P1) tospecify a parameter within the query.
14.4.6 Export query results into file
When executing queries, their results can be displayed on the Edit or Results tab in theData View . You can copy data from database tables into an external file of any supported formatin one of the following ways:
1.Open the Data or Results tab, press Export Data on one of the Data Viewtoolbars and define export parameters in the opened Data Export Wizard .
2.Open the Data or Results tab, choose Data Manipulation | Export Data in theData Grid context menu and define export parameters in the opened Data ExportWizard .
3.Open the table context menu in the DB Explorer , choose the Export Dataitem and define export parameters in the opened Data Export Wizard .
4.Open the Data or Results tab and use the shortcut Ctrl+E.
14.4.7 Execute scripts
SQL Script allows you to create, view, edit and execute SQL scripts. To open SQL
Script Editor select the Tools | SQL Script... main menu item. This tool is intendedfor work with a great number of SQL statements and with scripts that are stored in files.For instance, you can execute a script directly from a file without loading it to the Editorwindow. This reduces memory usage. However SQL Script allows just to estimate whetherthe execution of script statements will be successful, but it does not return query result.
Note: To execute SQL scripts you should use SQL Script , not SQL Editor . The latteris intended for creating, editing and executing SQL statements. It also provides apossibility to view query result, perform various operations with it (data import, dataexport, etc.) and manage transactions.
126
474 462
872
495
499
979
567
508
567
91 99
567
659
958
659 462

SQL Manager for SQL Server - User's Manual1016
© 1999-2022 EMS Software Development
14.4.8 Execute a large SQL script
If you need to execute a large SQL script it's not necessary to load it from file to the SQLScript Editor window as it can take a lot of time. Instead you can execute script
directly from *.sql, *.zsql or *.txt file. In order to do this click the Execute scriptfrom file button of the Navigation bar and Toolbar in SQL Script editor .
14.4.9 Make SQL script work faster
In order to make the SQL script work faster, you can disable some functions.
Parsing
Choose and disable the Disable Parsing item on one of SQL Script Editor toolbars .
Automatic Creation of Hierarchical Text StructureUncheck the Use code folding box in the Display section of the Editor options.
Syntax Highlight and Quick Code for AliasesChoose Options | Editor options in the main program menu , proceed to the General
tab and uncheck the Resolve aliases box - the syntax highlight and quick code for aliases will be disabled.
14.4.10 Customize work with Query/Script text
To customize work with a query/script text you may:
Use Internal LinkThis means that the name of the object existing on a database is highlighted in a query/script text. Such an object can be opened by holding the Ct r l key and clicking the objectwith a mouse.
Add Text TemplateKeyboard templates allow you to type regularly used expressions and edit the existingones quicker. Once you have defined the templates, you can use them in SQL Editor .When editing SQL text in SQL Editor, type a template name and use the Ct r l+Jshortcut : the text associated with the template will be inserted automatically.
Use Automatic Completion (Object List)You can call the autocompletion list by starting entering the first characters of the textand using the shortcut Ct r l + Spac e.
Customize Autocompletion ListChoose Options | Editor options in the main program menu , proceed to the QuickCode tab and define the list and quick code parameters.
Apply Automatic Formatting of Query/ScriptChoose Quick Code | Format in the SQL Editor/SQL Script context menu or theShift+Ct r l+F shortcut to apply automatic formatting.
Set Font and Query/Script Format at the Display tabChoose Options | Editor options in the main program menu , proceed to the Displaytab and define common font and format parameters for SQL Editor/SQL Script.
659
659 659
659
916
958
912 918
919
937
462
476
996
958
919
465
958 916

SQL Manager for SQL Server - User's Manual1017
© 1999-2022 EMS Software Development
Set Font and Query/Script Format at the Highlight tabChoose Options | Editor options in the main program menu , proceed to the Highlight
tab and define font options for each element.Note: If some font parameters are defined on the Highlight tab, they will be applied tothe query/script text and not the ones defined on the Display tab.
14.4.11 View executed queries and scripts
To view all queries and scripts sent to the server you need to launch SQL Monitor . Itwill show you the log of database operations and SQL queries as items, each consisting of3 parts: Exec uted (the date and time of the operation), Operat ion (SQL statement sentto the server), Result (the result of the operation).
Note: SQL Monitor only displays scripts and queries executed in SQL Manager for SQLServer during current session.
958
918
656
SQL Manager for SQL Server - User's Manual1018
© 1999-2022 EMS Software Development
14.5 Create a simple report in Report Designer
To create a report using Report Designer :
1. Select the Tools | Report Designer main menu item.
2. In the opened Report Designer select the File | New Report main menu item, or
click the New Report item of the navigation bar. The following objects will be addedto the newly created report: ReportTitle, MasterData and PageFooter.
3. Connect to data source .4. Add ADOTable or ADOQuery object.5. Link ADOTable or ADOQuery with ADODatabase .6. Place database fields on the Page1. Move the required fields from Data Tree to
Band MasterData.
706
712
712 712
712 712 712
708
SQL Manager for SQL Server - User's Manual1019
© 1999-2022 EMS Software Development
14.6 Create a scheduled job
SQL Server provides a possibility to run jobs automatically without user interaction, i.e.you can define event or date to start the job. A job can be scheduled by creating a new schedule for the job, or by attaching anexisting schedule to the job.There are two ways to create a new schedule
right-click the Schedules node (within the Server Objects branch) in the DB Explorer tree and select the New Schedule item from the context menu and configure
schedule options in the Schedule Editor .right-click the Jobs node (within the Server Objects branch) in the DB Explorer treeand select the New Job item from the context menu . In the Job Editor whenManaging job schedules right-click within the work area to call the context menuand select the Add Schedules... item. Configure parameters of the new schedule inthe New Schedule dialog.
To attach an existing schedule right-click the Jobs node (within the Server Objectsbranch) in the DB Explorer tree and select the New Job item from the context menu. In the Job Editor when Managing job schedules right-click within the work area tocall the context menu and select the Add Existing Schedule item. Then choose thenecessary schedule from the list.
99 91
836
99
91 824
409
99 91
824 409
SQL Manager for SQL Server - User's Manual1020
© 1999-2022 EMS Software Development
14.7 Transfer program settings
If you want to apply current program settings (wholly or partially) to SQL Manager for SQLServer installed on another machine you can save them into a single *.reg file. This canbe done by means of the Save Settings Wizard .
Note: Favorite Queries are not saved in this case. To get access to your queries fromanother machine please store them in the database. To save a favorite query in adatabase select the Database from the drop-down list in the Storage field when creatingor editing a favorite query.
928
126
474
SQL Manager for SQL Server - User's Manual1021
© 1999-2022 EMS Software Development
14.8 Update SQL Manager
SQL Manager for SQL Server can be updated in the following ways:1.Download the SQL Manager for SQL Server distribution package from the download
page, then extract archive to the preferable directory (e.g. c:\unzipped). Close SQLManager for SQL Server if it's opened and run MsManagerFullSetup.exe orMsManagerLiteSetup.exe.
2. Select the Help | SQL Manager Direct , then press the Update button. If new SQLManager for SQL Server version is released it will be offered for downloading. Click Yesin the dialog window to update SQL Manager for SQL Server automatically.
988

SQL Manager for SQL Server - User's Manual1022
© 1999-2022 EMS Software Development
14.9 Report bugs and suggestions
1.Before reporting bugs and suggestions make sure you are using the latest version ofthe SQL Manager for SQL Server.
2. If so then you may contact us via Members Area on http://www.sqlmanager.net/, viaHelp main menu or by sending an email to [email protected].
3. Please, don't forget to mention your OS version, SQL Server version and programversion.
4.Describe the steps to reproduce the bug in detail and illustrate them with screenshots.

SQL Manager for SQL Server - User's Manual1023
© 1999-2022 EMS Software Development
Credits
Technical Writers:
Cover Designer:
Dmitry Doni
Semyon Slobodenyuk
Tatyana Makurova
Team Coordinators:
Roman Tkachenko
Software Developers:
Alexander Zhiltsov
Alexey Butalov
Dmitry Goldobin
Dmitry Schastlivtsev
Olga Ryabova
Translators:
Anna Shulk ina
Sergey Fominykh
Alexander Chelyadin
Alexander Zhiltsov
Nicolay Sezganov