HDFC Life/CA/2021-22/27 Listing Department Listing ... - NSE
Upload
khangminh22Category
view
0download
0
User's GuideCMP0044-01 EN

Copyrights and Trademarks
No part of this publication may be reproduced, stored in a retrieval system, or transmitted in any form or by any means, electronic, mechanical,photocopying, recording, or otherwise, without the prior written permission of Seiko Epson Corporation. The information contained herein is designedonly for use with this Epson printer. Epson is not responsible for any use of this information as applied to other printers.
Neither Seiko Epson Corporation nor its affiliates shall be liable to the purchaser of this product or third parties for damages, losses, costs, or expensesincurred by the purchaser or third parties as a result of accident, misuse, or abuse of this product or unauthorized modifications, repairs, or alterations tothis product, or (excluding the U.S.) failure to strictly comply with Seiko Epson Corporation’s operating and maintenance instructions.
Seiko Epson Corporation shall not be liable for any damages or problems arising from the use of any options or any consumable products other than thosedesignated as Original Epson Products or Epson Approved Products by Seiko Epson Corporation.
Seiko Epson Corporation shall not be held liable for any damage resulting from electromagnetic interference that occurs from the use of any interface cablesother than those designated as Epson Approved Products by Seiko Epson Corporation.
EPSON®, Epson UltraChrome®, EPSON EXCEED YOUR VISION, EXCEED YOUR VISION and their logos are registered trademarks or trademarks ofSeiko Epson Corporation.
Microsoft®, Windows®, Windows Vista® and PowerPoint® are registered trademarks of Microsoft Corporation.
Apple®, Macintosh®, and Mac OS® are registered trademarks of Apple Inc.
Intel® is a registered trademark of Intel Corporation.
PowerPC® is a registered trademark of International Business Machines Corporation.
Adobe®, Photoshop®, Lightroom®, and Adobe® RGB (1998) are either registered trademarks or trademarks of Adobe Systems Incorporated in the UnitedStates and/or other countries.
General Notice: Other product names used herein are for identification purposes only and may be trademarks of their respective owners. Epson disclaims anyand all rights in those marks.
© 2015 Seiko Epson Corporation. All rights reserved.
SC-P9000 Series/SC-P7000 Series/SC-P8000 Series/SC-P6000 Series User's Guide
Copyrights and Trademarks
2

Contents
Copyrights and Trademarks
IntroductionImportant Safety Instructions. . . . . . . . . . . . . . . . . 6
The symbols on the product . . . . . . . . . . . . . . . . 6When choosing a place for this product. . . . . . . . 6When setting up this product. . . . . . . . . . . . . . . 6When using this product. . . . . . . . . . . . . . . . . . . 7When handling the ink cartridges. . . . . . . . . . . . 7
Note on this Guide. . . . . . . . . . . . . . . . . . . . . . . . . 7Meaning of Symbols. . . . . . . . . . . . . . . . . . . . . . 7Illustrations. . . . . . . . . . . . . . . . . . . . . . . . . . . . 7Operating System Versions. . . . . . . . . . . . . . . . . 7
Printer Parts. . . . . . . . . . . . . . . . . . . . . . . . . . . . . . 9Front. . . . . . . . . . . . . . . . . . . . . . . . . . . . . . . . . 9Back. . . . . . . . . . . . . . . . . . . . . . . . . . . . . . . . . 10Roll paper adapter. . . . . . . . . . . . . . . . . . . . . . . 12Control panel. . . . . . . . . . . . . . . . . . . . . . . . . . 12Screen View. . . . . . . . . . . . . . . . . . . . . . . . . . . 14
Features. . . . . . . . . . . . . . . . . . . . . . . . . . . . . . . . 16Realizing High Resolution. . . . . . . . . . . . . . . . . 16Superior Ease of Use. . . . . . . . . . . . . . . . . . . . . 17Various Options. . . . . . . . . . . . . . . . . . . . . . . . 17
Notes on Usage and Storage. . . . . . . . . . . . . . . . . . 18Installation space. . . . . . . . . . . . . . . . . . . . . . . 18Notes when using the printer. . . . . . . . . . . . . . . 18Notes when not using the printer. . . . . . . . . . . . 19Notes on handling ink cartridges. . . . . . . . . . . . 19Notes on handling paper. . . . . . . . . . . . . . . . . . 20
Introducing the Software. . . . . . . . . . . . . . . . . . . . 22Software on the Disc. . . . . . . . . . . . . . . . . . . . . 22Software on the Website. . . . . . . . . . . . . . . . . . 25Remote Manager. . . . . . . . . . . . . . . . . . . . . . . . 26
Starting and Closing Software. . . . . . . . . . . . . . . . 26Starting. . . . . . . . . . . . . . . . . . . . . . . . . . . . . . 26Closing. . . . . . . . . . . . . . . . . . . . . . . . . . . . . . . 26
Uninstalling Software. . . . . . . . . . . . . . . . . . . . . . 27Windows. . . . . . . . . . . . . . . . . . . . . . . . . . . . . 27Mac OS X. . . . . . . . . . . . . . . . . . . . . . . . . . . . . 27
Basic OperationsLoading and Removing the Roll Paper. . . . . . . . . . 28
Loading Roll Paper. . . . . . . . . . . . . . . . . . . . . . 28Cutting the roll paper. . . . . . . . . . . . . . . . . . . . 31
Removing Roll Paper. . . . . . . . . . . . . . . . . . . . . 32Loading and Removing Cut Sheets. . . . . . . . . . . . . 34
Loading Cut Sheets A3 Size or Larger andPoster Board. . . . . . . . . . . . . . . . . . . . . . . . . . . 34Loading Cut Sheets Smaller than A3 Size. . . . . . 36Removing Cut Sheets. . . . . . . . . . . . . . . . . . . . 36
Checking and Setting the Paper Type. . . . . . . . . . . 37Checking the Paper Type. . . . . . . . . . . . . . . . . . 37Paper Type Settings. . . . . . . . . . . . . . . . . . . . . . 38
Using the Paper Basket. . . . . . . . . . . . . . . . . . . . . 39Ejecting Paper to the Rear. . . . . . . . . . . . . . . . . 39Ejecting Paper to the Front. . . . . . . . . . . . . . . . 41Storing. . . . . . . . . . . . . . . . . . . . . . . . . . . . . . . 42
Using the Auto Take-up Reel Unit (SC-P9000Series/SC-P8000 Series Only). . . . . . . . . . . . . . . . . 43
Using the Control Panel. . . . . . . . . . . . . . . . . . 43Attaching the Paper. . . . . . . . . . . . . . . . . . . . . . 44Removing Paper from the Auto Take-up ReelUnit. . . . . . . . . . . . . . . . . . . . . . . . . . . . . . . . . 47
Basic Printing Methods. . . . . . . . . . . . . . . . . . . . . 48Printing (Windows). . . . . . . . . . . . . . . . . . . . . 48Printing (Mac OS X). . . . . . . . . . . . . . . . . . . . . 49Canceling Printing (Windows). . . . . . . . . . . . . 51Canceling Printing (Mac OS X). . . . . . . . . . . . . 52Canceling Printing (from the Printer). . . . . . . . 52
Printable area. . . . . . . . . . . . . . . . . . . . . . . . . . . . 52Roll Paper Printable Area. . . . . . . . . . . . . . . . . 52Cut Sheets Printable Area. . . . . . . . . . . . . . . . . 53
Changing the Type of Black Ink. . . . . . . . . . . . . . . 54Switching Automatically. . . . . . . . . . . . . . . . . . 54Switching Manually. . . . . . . . . . . . . . . . . . . . . . 55
Turning Off the Power Using Power Off Timer. . . . . . . . . . . . . . . . . . . . . . . . . . . . . . . . . . . . . . 56
Using the Optional Hard Disk UnitFunction Summary. . . . . . . . . . . . . . . . . . . . . . . . 57
Extended functions. . . . . . . . . . . . . . . . . . . . . . 57Print Job Management. . . . . . . . . . . . . . . . . . . 57Data on a Hard Disk. . . . . . . . . . . . . . . . . . . . . 58
Saving Print Jobs. . . . . . . . . . . . . . . . . . . . . . . . . . 58Viewing and Printing Saved Print Jobs. . . . . . . . . . 59
Using the Printer Driver(Windows)Displaying the Settings Screen. . . . . . . . . . . . . . . . 61
With the Start button. . . . . . . . . . . . . . . . . . . . 61
SC-P9000 Series/SC-P7000 Series/SC-P8000 Series/SC-P6000 Series User's Guide
Contents
3

Displaying Help. . . . . . . . . . . . . . . . . . . . . . . . . . 62Click the Help Button to Display. . . . . . . . . . . . 62Right-click on the item you want to check anddisplay. . . . . . . . . . . . . . . . . . . . . . . . . . . . . . . 62
Customizing the Printer Driver. . . . . . . . . . . . . . . 63Saving various settings as your Select Settings. . . . . . . . . . . . . . . . . . . . . . . . . . . . . . . . . . . . 63Adding a Paper Type . . . . . . . . . . . . . . . . . . . . 63Rearranging display items. . . . . . . . . . . . . . . . . 65
Summary of the Utility Tab. . . . . . . . . . . . . . . . . . 66
Using the Printer Driver(Mac OS X)Displaying the Settings Screen. . . . . . . . . . . . . . . . 68Displaying Help. . . . . . . . . . . . . . . . . . . . . . . . . . 68Using Presets. . . . . . . . . . . . . . . . . . . . . . . . . . . . 68
Saving to Presets. . . . . . . . . . . . . . . . . . . . . . . . 68Deleting from Presets. . . . . . . . . . . . . . . . . . . . 69
Using Epson Printer Utility 4. . . . . . . . . . . . . . . . . 69Starting Epson Printer Utility 4. . . . . . . . . . . . . 69Epson Printer Utility 4 Functions. . . . . . . . . . . . 69
Printing VarietiesAuto Color Adjustment by PhotoEnhance(Windows Only). . . . . . . . . . . . . . . . . . . . . . . . . . 71Correct color and print. . . . . . . . . . . . . . . . . . . . . 72Printing Black and White Photos. . . . . . . . . . . . . . 75Borderless Printing. . . . . . . . . . . . . . . . . . . . . . . . 78
Types of Borderless Printing Methods. . . . . . . . 78Supported Paper. . . . . . . . . . . . . . . . . . . . . . . . 78About Roll Paper Cutting. . . . . . . . . . . . . . . . . 79Setting Procedures for Printing. . . . . . . . . . . . . 80
Enlarged/Reduced Printing. . . . . . . . . . . . . . . . . . 82Fit to Page/Scale to fit paper size. . . . . . . . . . . . 83Fit to Roll Paper Width(Windows Only). . . . . . 84Custom Scale Setting. . . . . . . . . . . . . . . . . . . . . 84
Multi-Page Printing. . . . . . . . . . . . . . . . . . . . . . . 86Poster Printing (Enlarge to cover several sheetsand print - Windows only). . . . . . . . . . . . . . . . . . 88
Setting Procedures for Printing. . . . . . . . . . . . . 88Joining the output paper together. . . . . . . . . . . 90
Printing at Non-Standard Sizes. . . . . . . . . . . . . . . 93Banner printing (on roll paper). . . . . . . . . . . . . . . 96Layout Manager(Windows Only). . . . . . . . . . . . . . 98
Setting Procedures for Printing. . . . . . . . . . . . . 98Saving and Recalling Settings. . . . . . . . . . . . . . 100
Color Management PrintingAbout Color Management. . . . . . . . . . . . . . . . . . 101Color Management Print Settings. . . . . . . . . . . . 101
Setting profiles. . . . . . . . . . . . . . . . . . . . . . . . 102Setting color management with the applications. . . . . . . . . . . . . . . . . . . . . . . . . . . . . . . . . . . . . 102Setting color management with the printer driver. . . . . . . . . . . . . . . . . . . . . . . . . . . . . . . . . . . . . 104
Color management printing by Host ICM(Windows). . . . . . . . . . . . . . . . . . . . . . . . . . . 104Color management printing by ColorSync(Mac OS X). . . . . . . . . . . . . . . . . . . . . . . . . . . 105Color management printing by DriverICM(Windows Only). . . . . . . . . . . . . . . . . . . 105
Using the Control Panel MenuMenu Operations. . . . . . . . . . . . . . . . . . . . . . . . 108Menu List. . . . . . . . . . . . . . . . . . . . . . . . . . . . . . 109
Maintenance menu. . . . . . . . . . . . . . . . . . . . . 109Print Queues menu. . . . . . . . . . . . . . . . . . . . . 109Paper menu. . . . . . . . . . . . . . . . . . . . . . . . . . 110Printer Setup Menu. . . . . . . . . . . . . . . . . . . . . 111Printer Status Menu. . . . . . . . . . . . . . . . . . . . 111Option Setup Menu. . . . . . . . . . . . . . . . . . . . . 112Network Setup Menu. . . . . . . . . . . . . . . . . . . 112Preferences Menu. . . . . . . . . . . . . . . . . . . . . . 113Administrator Menu. . . . . . . . . . . . . . . . . . . . 113
Menu Descriptions. . . . . . . . . . . . . . . . . . . . . . . 114Maintenance. . . . . . . . . . . . . . . . . . . . . . . . . . 114Print Queues. . . . . . . . . . . . . . . . . . . . . . . . . . 115Paper. . . . . . . . . . . . . . . . . . . . . . . . . . . . . . . 116Printer Setup. . . . . . . . . . . . . . . . . . . . . . . . . . 120Printer Status. . . . . . . . . . . . . . . . . . . . . . . . . 121Option Setup. . . . . . . . . . . . . . . . . . . . . . . . . 122Network Setup. . . . . . . . . . . . . . . . . . . . . . . . 122Preferences. . . . . . . . . . . . . . . . . . . . . . . . . . . 123Administrator Menu. . . . . . . . . . . . . . . . . . . . 123
MaintenancePrint Head Maintenance. . . . . . . . . . . . . . . . . . . 125
Maintenance Operations. . . . . . . . . . . . . . . . . 125Checking for clogged nozzles. . . . . . . . . . . . . . 126Cleaning the print head. . . . . . . . . . . . . . . . . . 127Adjusting print misalignments (HeadAlignment). . . . . . . . . . . . . . . . . . . . . . . . . . . 129
Replacing Consumables. . . . . . . . . . . . . . . . . . . . 133Replacing Ink Cartridges. . . . . . . . . . . . . . . . . 133Replacing Maintenance Boxes. . . . . . . . . . . . . 134
SC-P9000 Series/SC-P7000 Series/SC-P8000 Series/SC-P6000 Series User's Guide
Contents
4

Replacing the Cutter. . . . . . . . . . . . . . . . . . . . 135Cleaning the Printer. . . . . . . . . . . . . . . . . . . . . . 137
Cleaning the outside. . . . . . . . . . . . . . . . . . . . 137Cleaning the inside. . . . . . . . . . . . . . . . . . . . . 137
Problem SolverWhat to do When a Message is Displayed. . . . . . . 139SpectroProofer Error. . . . . . . . . . . . . . . . . . . . . . 142When a Maintenance Call/Service Call Occurs. . . 143Troubleshooting. . . . . . . . . . . . . . . . . . . . . . . . . 145
You cannot print (because the printer does notwork). . . . . . . . . . . . . . . . . . . . . . . . . . . . . . . 145The printer sounds like it is printing, butnothing prints. . . . . . . . . . . . . . . . . . . . . . . . . 147The prints are not what you expected. . . . . . . . 147Feeding or ejecting problems. . . . . . . . . . . . . . 150Others. . . . . . . . . . . . . . . . . . . . . . . . . . . . . . 153
AppendixOptions and Consumable Products. . . . . . . . . . . 156
Epson Special Media. . . . . . . . . . . . . . . . . . . . 156Ink cartridges. . . . . . . . . . . . . . . . . . . . . . . . . 156Others. . . . . . . . . . . . . . . . . . . . . . . . . . . . . . 158
Supported Media. . . . . . . . . . . . . . . . . . . . . . . . . 159Epson Special Media Table. . . . . . . . . . . . . . . 159Supported Commercially Available Paper. . . . . 176Before Printing on Commercially AvailablePaper. . . . . . . . . . . . . . . . . . . . . . . . . . . . . . . 177
Notes When Moving or Transporting the Printer. . . . . . . . . . . . . . . . . . . . . . . . . . . . . . . . . . . . . 180
Notes When Moving the Printer. . . . . . . . . . . 180Notes on Transporting. . . . . . . . . . . . . . . . . . 180Notes when reusing the printer. . . . . . . . . . . . 181
System Requirements. . . . . . . . . . . . . . . . . . . . . 182System Requirements of the Printer Driver. . . . 182
Specifications Table. . . . . . . . . . . . . . . . . . . . . . . 183Standards and Approvals. . . . . . . . . . . . . . . . . 184
Where To Get HelpTechnical Support Web Site. . . . . . . . . . . . . . . . . 186Contacting Epson Support. . . . . . . . . . . . . . . . . . 186
Before Contacting Epson. . . . . . . . . . . . . . . . . 186Help for Users in North America. . . . . . . . . . . 187Help for Users in Europe. . . . . . . . . . . . . . . . . 187Help for Users in Australia. . . . . . . . . . . . . . . 187Help for Users in Singapore. . . . . . . . . . . . . . . 188Help for Users in Thailand. . . . . . . . . . . . . . . . 188
Help for Users in Vietnam. . . . . . . . . . . . . . . . 188Help for Users in Indonesia. . . . . . . . . . . . . . . 188Help for Users in Hong Kong. . . . . . . . . . . . . . 189Help for Users in Malaysia. . . . . . . . . . . . . . . . 189Help for Users in India. . . . . . . . . . . . . . . . . . 189Help for Users in the Philippines. . . . . . . . . . . 190
Software License TermsOPEN SOURCE SOFTWARE LICENSE. . . . . . . 191
Bonjour. . . . . . . . . . . . . . . . . . . . . . . . . . . . . 192Other Software Licenses. . . . . . . . . . . . . . . . . . . 197
Info-ZIP copyright and license. . . . . . . . . . . . . 197
SC-P9000 Series/SC-P7000 Series/SC-P8000 Series/SC-P6000 Series User's Guide
Contents
5

Introduction
Important SafetyInstructions
Read all of these instructions before using the printer.Also be sure to follow all warnings and instructionsmarked on the printer.
The symbols on the product
The symbols on this Epson product are used in order toensure safety and proper use of the product and toprevent danger to customers and other persons, andproperty damage.
The symbols indicate the meaning below. Be sure thatyou completely understand the meaning of symbols onthis product before using it.
Stand-by
When choosing a place for this product
❏ Place this product on a flat, stable surface that islarger than this product. This product will notoperate properly if it is tilted or at an angle.
❏ Avoid places subject to rapid changes intemperature and humidity. Also keep it away fromdirect sunlight, strong light, or heat sources.
❏ Avoid places subject to shocks and vibrations.
❏ Keep this product away from dusty areas.
❏ Place this product near a wall outlet where the plugcan be easily unplugged.
When setting up this product
❏ Do not block or cover the openings in this product’scabinet.
❏ Do not insert objects through the slots. Take carenot to spill liquid on this product.
❏ This product’s power cord is for use with thisproduct only. Use with other equipment may resultin fire or electric shock.
❏ Connect all equipment to properly groundedpower outlets. Avoid using outlets on the samecircuit as copiers or air control systems thatregularly switch on and off.
❏ Avoid electrical outlets controlled by wall switchesor automatic timers.
❏ Keep the entire computer system away frompotential sources of electromagnetic interference,such as loudspeakers or the base units of cordlesstelephones.
❏ Use only the type of power source indicated on theproduct’s label.
❏ Use only the power cord that comes with thisproduct. Use of another cord may result in fire orelectric shock.
❏ Do not use a damaged or frayed power cord.
❏ If you use an extension cord with this product,make sure the total ampere rating of the devicesplugged into the extension cord does not exceed thecord’s ampere rating. Also, make sure the totalampere rating of all devices plugged into the walloutlet does not exceed the wall outlet’s ampererating.
❏ Do not attempt to service this product yourself.
❏ Unplug this product and refer servicing to qualifiedservice personnel under the following conditions:The power cord or plug is damaged; liquid hasentered the product; the product has been droppedor the cabinet damaged; the product does notoperate normally or exhibits a distinct change inperformance.
❏ If you plan to use the printer in Germany, observethe following:To provide adequate short-circuit protection andover-current protection for this printer, thebuilding installation must be protected by a 10 or 16amp circuit breaker.
SC-P9000 Series/SC-P7000 Series/SC-P8000 Series/SC-P6000 Series User's Guide
Introduction
6

❏ If damage occurs to the plug, replace the cord set orconsult a qualified electrician. If there are fuses inthe plug, make sure you replace them with fuses ofthe correct size and rating.
When using this product
❏ Do not put your hand inside this product or touchthe ink cartridges during printing.
❏ Do not move the print heads by hand; otherwiseyou may damage this product.
❏ Always turn the product off using the Power buttonon the control panel. When this button is pressed,the Power light flashes briefly then goes off. Do notunplug the power cord or turn off the product untilthe Power light stops flashing.
When handling the ink cartridges
❏ Keep ink cartridges out of the reach of children anddo not drink.
❏ If ink gets on your skin, wash it off with soap andwater. If it gets in your eyes, flush them immediatelywith water.
❏ Before installing the new ink cartridge in theprinter, shake it back and forth horizontally in fivecentimeter movements about 15 times within fiveseconds.
❏ Use the ink cartridge before the date printed on itspackage.
❏ Use up the ink cartridge within six months ofinstallation for best results.
❏ Do not dismantle the ink cartridges or try to refillthem. This could damage the print head.
❏ Do not touch the IC chip on the side of the cartridge.This may affect normal operation and printing.
❏ The IC chip on this ink cartridge retains a variety ofcartridge-related information, such as the inkcartridge status, so that the cartridge may beremoved and reinserted freely. However, each timethe cartridge is inserted, some ink is consumedbecause the printer automatically performs areliability check.
❏ If you remove an ink cartridge for later use, protectthe ink supply area from dirt and dust, and store it inthe same environment as this product. Note thatthere is a valve in the ink supply port, making coversor plugs unnecessary, but care is needed to preventthe ink from staining items that the cartridgetouches. Do not touch the ink supply port orsurrounding area.
Note on this Guide
Meaning of Symbols
Warning: Warnings must be followed toavoid serious bodily injury.
Caution: Cautions must be followed toavoid damage to this product orbodily injury.
c Important: Important contains importantinformation on the operation ofthis product.
Note: Notes contain useful oradditional information on theoperation of this product.
Illustrations
Unless otherwise noted, the illustrations in thisdocumentation show the SC-P9000 Series.
Unless otherwise noted, the computer screenshots showthe violet inkset being used with the SC-P9000 Series.
Operating System Versions
In this documentation, the following abbreviations areused.
Windows refers to Windows 8.1, 8, 7, Vista and XP.
❏ Windows 8.1 refers to Windows 8.1, Windows 8.1Pro, and Windows 8.1 Enterprise.
SC-P9000 Series/SC-P7000 Series/SC-P8000 Series/SC-P6000 Series User's Guide
Introduction
7

❏ Windows 8 refers to Windows 8, Windows 8 Pro,and Windows 8 Enterprise.
❏ Windows 7 refers to Windows 7 Home Basic,Windows 7 Home Premium, Windows 7Professional, and Windows 7 Ultimate.
❏ Windows Vista refers to Windows Vista HomeBasic Edition, Windows Vista Home PremiumEdition, Windows Vista Business Edition,Windows Vista Enterprise Edition, and WindowsVista Ultimate Edition.
❏ Windows XP refers to Windows XP Home Edition,Windows XP Professional x64 Edition, andWindows XP Professional.
❏ Windows Server 2012 refers to Windows Server2012 Essentials Edition, Server 2012 standardEdition.
❏ Windows Server 2008 refers to Windows Server2008 Standard Edition and Windows Server 2008Enterprise Edition.
❏ Windows Server 2008 x64 refers to Windows Server2008 x64 Standard Edition, Windows Server 2008x64 Enterprise Edition, Windows Server 2008 R2Standard Edition, and Windows Server 2008 R2Enterprise Edition.
❏ Windows Server 2003 refers to Windows Server2003 Standard Edition and Windows Server 2003Enterprise Edition.
❏ Windows Server 2003 x64 refers to Windows Server2003 x64 Standard Edition and Windows Server2003 x64 Enterprise Edition.
Mac OS XIn this manual, "Mac OS X" is used to refer to "OS XYosemite", "OS X Mavericks", "OS X Mountain Lion","OS X Lion", and "Mac OS X v10.6.8".
SC-P9000 Series/SC-P7000 Series/SC-P8000 Series/SC-P6000 Series User's Guide
Introduction
8

Printer Parts
Front
A Front coverOpen this cover when cleaning the printer or clearing jams.
B Ink covers (on the left and right)Open when installing ink cartridges. Press the button on the control panel to open by 5 mm.
U “Replacing Ink Cartridges” on page 133
C Paper basketOutput from the printer collects in this basket, keeping the media clean and free of creases.
U “Using the Paper Basket” on page 39
D CastersThere are two casters on each leg. The casters are normally kept locked once the printer is in place.
E Paper supportUse this to control the paper eject direction for the roll paper.
F Manual boxHolds the manual for the printer. This can be installed on the left or on the right.
G Control panelU “Control panel” on page 12
SC-P9000 Series/SC-P7000 Series/SC-P8000 Series/SC-P6000 Series User's Guide
Introduction
9

H Paper feed slotInsert the paper into this slot.
U “Loading and Removing the Roll Paper” on page 28
U “Loading and Removing Cut Sheets” on page 34
I Roll paper coverOpen to load roll paper.
J Adapter holderThe roll paper adapter is placed in this holder when loading the roll paper.
Back
A Maintenance BoxAbsorbs waste ink. The SC-P9000 Series/SC-P8000 Series has one on the left and one on the right, and theSC-P7000 Series/SC-P6000 Series has one on the right.
U “Replacing Maintenance Boxes” on page 134
B USB portConnects the USB cable.
C Option portConnects the optional SpectroProofer mounter or Auto Take-up Reel Unit (for the SC-P9000 Series/SC-P8000Series only).
D LAN portConnects the LAN cable.
SC-P9000 Series/SC-P7000 Series/SC-P8000 Series/SC-P6000 Series User's Guide
Introduction
10

E Data lightThe network connection status and data reception are indicated by a lit or flashing light.
On : Connected.
Flashing : Receiving data.
F Status lightThe color indicates the network transmission speed.
Off : 10Base-T
Red : 100Base-TX
Green : 1000Base-T
G AC inletConnect the supplied power cable here.
H Option slotConnects the optional hard disk unit.
SC-P9000 Series/SC-P7000 Series/SC-P8000 Series/SC-P6000 Series User's Guide
Introduction
11

Roll paper adapter
Use the supplied roll paper adapter when loading rollpaper onto the printer.
U “Loading and Removing the Roll Paper” onpage 28
A Size lever
Position according to the size of the roll core.
B Adapter lock lever
Lift to unlock, lower to lock. Unlock when attachingroll paper to the adapter, lock once the roll isattached.
Control panel
A Power lightThe printer’s operational status is indicated by a lit orflashing light
On : The power is on.
Flashing : The printer is receiving data or cleaning theprint head or performing other operationsin the course of being shut down.
Off : The power is off.
B Power button PTurns the printer on or off.
C Pause/Cancel button W❏ The printer enters pause status if this is pressed while
printing. To release the pause status, press the Wbutton again, or select Pause Cancel on the screenand then press the Z button. To cancel print jobsbeing processed, select Job Cancel on the screen andthen press the Z button.
❏ Pressing this button while a menu is displayed closesthe menu and returns the printer to ready status.
D Pause lightIndicates whether or not the printer is ready.
On : Cannot print. (The printer is paused, a jobis being canceled, a menu is displayed, anerror has occurred, and so on.)
Off : Ready to print.
E Screen
SC-P9000 Series/SC-P7000 Series/SC-P8000 Series/SC-P6000 Series User's Guide
Introduction
12

Displays the printer's status, menus, error messages,and so on.
U “Screen View” on page 14
U “What to do When a Message is Displayed” onpage 139
F Open ink cover button Press to open the ink cover when replacing the inkcartridges and so on. When you select the ink coveryou want to open, the ink cover opens approximately5 mm when you press the Z button.Button operations are disabled while printing orcleaning.
G Paper source button l❏ If this is pressed before loading paper, the Paper
Source screen is displayed, and you can select rollpaper or cut sheets.
❏ If this is pressed while a menu is displayed, you arereturned to the previous menu.
H Paper feed button u/d❏ When roll paper is loaded, press the d button to feed
the roll paper. Press the u button to rewind. Keep thed button pressed to feed the paper up to 3 m. Keep theu button pressed to rewind the paper up to 20 cm.
❏ If this is pressed while pressure roller is released, youcan adjust the strength of the paper suction for theloading path in three stages.
❏ If you press d when the thickness of the loaded cutsheets is less than 0.5 mm, the paper is fed and theprinter is ready to print.U “Loading and Removing Cut Sheets” onpage 34
❏ Press d to eject paper when cut sheets are loaded.U “Removing Cut Sheets” on page 36
❏ Press to select menu items and parameter when amenu is displayed.
I Menu button r❏ If this is pressed when the printer's menu can be
changed (the printer is ready to print or there is nopaper), the Settings menu is displayed.U “Using the Control Panel Menu” on page 108
❏ If this is pressed while a menu is displayed, you aretaken to the next menu.
J Paper cut button X
It is used to manually cut roll paper using the built-incutter.
U “Manual cut method” on page 32
K Load paper button Y❏ Locks or releases the pressure roller. When you want to
load paper, press once to release the lock, and thenadjust the paper to the loading position. Press again tofeed the paper and the printer is ready to print.
❏ If this is pressed when Remaining Setup is set to On inthe Paper menu, a barcode is printed on the edge ofthe roll paper, and the pressure roller is released.
L Load paper lightThe status of the pressure roller is indicated bywhether the light is on or off.
On : The pressure roller is released. When thelight is on, printing cannot be performed.
Off : The pressure roller is locked.
M OK button❏ If this is pressed while a parameter is selected from the
Menu, the parameter is set or executed.
❏ If this is pressed when no paper is loaded, the PaperLoading Method menu is displayed. When the papertype is selected, you can check the loading method.
❏ If this is pressed while drying ink or a color chart, dryingis canceled.
N Change black ink button ❏ Changes the type of black ink.
U “Changing the Type of Black Ink” on page 54
❏ If this is pressed when the paper setting name or thepassword entry screen is displayed, you can changethe type of letters.
O Ink check light
SC-P9000 Series/SC-P7000 Series/SC-P8000 Series/SC-P6000 Series User's Guide
Introduction
13

The ink status is indicated by a lit or flashing light.
On : Indicates errors such as an installed inkcartridge is expended, an ink cartridgeis not installed, or a wrong ink cartridgeis installed. Check the contents of theerror on the control panel's screen.
Flashing : The ink is low. We recommendreplacing the ink cartridge as soon aspossible because the ink may beexpended while printing.
Off : No error.
P Paper check lightThe paper status is indicated by a lit or flashing light.
On : Indicates an error such as there is nopaper or that the paper differs to thepaper setting. Check the contents of theerror on the control panel's screen.
Flashing : Indicates an error such as a paper jam orthat the paper has skewed. Check thecontents of the error on the controlpanel's screen.
Off : No error.
Screen View
1. MessagesDisplays the printer's status, operations, and errormessages.U “What to do When a Message is Displayed” onpage 139 U “Using the Control Panel Menu” on page 108
2. Paper SourceThe settings for Paper Source (roll paper or cut sheets)and Auto Cut for roll paper are indicated by the icons inthe following table.The paper name selected in Paper Type is displayed onthe right of the icon. When Custom Paper is selected, anumber is displayed on the paper icon.U “Paper” on page 116
Icon Explanation
Prints on roll paper. The paper is cutautomatically after printing one page.
Prints on roll paper. Auto cut is notperformed.
Prints on cut sheets.
3. Platen GapDisplays the Platen Gap settings.U “Custom Paper Setting” on page 117 U “Printer Setup” on page 120
Icon Explanation
Standard is selected
Narrow is selected
Wide is selected
Wider is selected
SC-P9000 Series/SC-P7000 Series/SC-P8000 Series/SC-P6000 Series User's Guide
Introduction
14

Icon Explanation
Widest is selected
4.Roll Paper MarginDisplays the value set for Roll Paper Margin.
❏ Auto: Standard is set
❏ 15mm: Top15mm/Bottom15mm is set
❏ 35/15mm: Top35mm/Bottom15mm is set
❏ 150/15mm: Top150mm/Bottom15mm is set
❏ 3mm: 3mm is set
❏ 15mm: 15mm is set
U “Paper” on page 116
5. Approximate amount of ink remaining for eachcolorDisplays the amount of ink remaining for each color.
Ink codes
SC-P9000 Series/SC-P7000 Series
C Cyan
OR Orange
Y Yellow
LC Light Cyan
MK Matte Black
PK Photo Black
VM Vivid Magenta
LK Light Black
GR Green
LLK/V* Light Light Black/Violet
VLM Vivid Light Magenta
* The display differs depending on the inksets being used.
SC-P8000 Series/SC-P6000 Series
C Cyan
Y Yellow
SC-P8000 Series/SC-P6000 Series
LC Light Cyan
MK Matte Black
PK Photo Black
VM Vivid Magenta
LK Light Black
LLK Light Light Black
VLM Vivid Light Magenta
Ink remaining (using Cyan as an example)
Icon Ink Remaining in Cartridge
No error. The height of the indicatorchanges with the level of ink remaining.
Ink is low. You need to prepare a new inkcartridge.
Ink cartridge is expended; replace with anew ink cartridge.
An error occurred. Check the message onthe screen, and clear the error.
6. Usage status of optional itemDisplays the availability of optional item.
Nothing is displayed when the item is not connected.
Auto take-up reel unit*
* Only SC-P9000 Series/SC-P8000 Series are supported
Icon Status
Available
Not Available
SpectroProofer Mounter 24"/44"
Icon Status
Available
SC-P9000 Series/SC-P7000 Series/SC-P8000 Series/SC-P6000 Series User's Guide
Introduction
15

Icon Status
Not Available
Hard disk unit
Icon Status
Available
Communicating
Not Available
7. Usage status of black inkDisplays the selected black ink.
8. Approximate space in Maintenance BoxDisplays the approximate amount of space in theMaintenance Box.
For the SC-P9000 Series/SC-P8000 Series there are twoicons, and for the SC-P7000 Series/SC-P6000 Seriesthere is one icon.
Icon Space in Maintenance Box
No error. The height of the indicatorcorresponds to the amount of space.
The Maintenance Box is nearing the end ofits service life. You need to prepare a newMaintenance Box.
Maintenance Box is at the end of its servicelife. Replace the Maintenance Box with anew one.
9. Roll paper remainingWhen Remaining Setup is set to On in the Paper menu,the amount of roll paper remaining is displayed. Whenthe length remaining falls below the value set in SetAlert Length, a appears above the icon to warn youthat the printer is nearing the end of the roll.
U “Paper” on page 116
Features
The main features of this printer are described below.
Realizing High Resolution
The newly developed ink technology provides highdefinition for photo, fine art, and proofing paper.
Pigmented inks with superiorresistance
Pigment inks maintain more beautiful and more vibrantprints over a long period of time with their high lightfastness. They are also extremely fade-resistant and canbe safely displayed in direct sunlight. Additionally, thehigh water and ozone resistance is not only ideal forphoto printing, but also allows for store displays andbanners, outdoor displays of posters and so on. Whenyou are printing for outdoor use, use laminationprocessing.
Two types of black ink with maximumblack density (Dmax)
By automatically switching to suit the paper type beingused, the two types of black ink provided are PhotoBlack which realizes a smooth, professional finish onglossy paper, and Matte Black which increases blackoptical density using matte paper. The maximumdensity (Dmax) improves on previous black inks andbrings out delicate tone differences in gradations.
U “Changing the Type of Black Ink” on page 54
Multi-colored ink variation
Chooses between two sets of 10 color inks to suityour use (SC-P9000 Series/SC-P7000 Series)The following shows the two types of ink sets availablefor Epson UltraChrome HDX (SC-P9000 Series/SC-P7000 Series). The ink set cannot be changed once ithas begun to be used.
❏ Light Light Black inkset ideal for gradationsThree types of black ink density, Photo Black, LightBlack and Light Light Black, allows you to bring out
SC-P9000 Series/SC-P7000 Series/SC-P8000 Series/SC-P6000 Series User's Guide
Introduction
16

delicate tone differences in black-and-whiteimages.In addition, the other seven colors, includingOrange and Green, realize superior colorreproduction creating bright and vivid images ingreen to yellow and yellow to red.
❏ Violet inkset providing a wide range of colorreproductionAs well as Orange and Green, this set comes witheight color inks including the newly developedViolet. By realizing superior color reproductioncreating bright and vivid images in green to yellowand yellow to red, as well as deep shades of blue, wehave achieved the industry's best PANTONE coverratio.
Basic eight color inks including three types ofblack (SC-P8000 Series/SC-P6000 Series)The Epson UltraChrome HD (SC-P8000 Series/SC-P6000 Series) ink realizes delicate tone differencesin black-and-white images using three types of black inkdensity, Photo Black, Light Black, and Light Light Black,in addition to five basic color inks for photo andproofing.
Superior Ease of Use
Spindle-free roll paper adaptermakes loading roll paper a snap
The lack of a spindle makes it possible to load andremove roll paper even in environments where space isat a premium. To load roll paper, simply place it on thetop of the printer and attach roll paper adapters to bothends.
U “Loading Roll Paper” on page 28
Improved color adjustment function(Epson Color Calibration Utility)
The Epson Color Calibration Utility software providedon the software disc supplied allows you to easilyperform color calibration using the printer's built-insensors.
Adjust all prints with one calibrationBy saving the calibration data to the printer, you do notneed to perform calibration for every paper type ormode. Also, you do not need to make individualcalibrations when sharing the printer with multipleusers.
Perform color management for multiple printersYou can perform color management for multipleprinters that are the same model and use the sameinkset.
See the Epson Color Calibration Utility manual fordetails.
Improved energy efficiency withsleep mode and Power Off Timer
When no print jobs are being handled, or when nooperation has been performed for some time, the printerenters sleep mode to reduce power consumption.Furthermore, if the Power Off Timer function isenabled, the printer can automatically switch off toavoid wasting electricity. This function works if no printjobs are received and no operations are carried out onthe control panel while the printer is not in an errorstatus for a specified duration of time.
U “Turning Off the Power Using Power Off Timer” onpage 56
Various Options
Optimized printing (Hard disk unit)
When the hard disk unit is installed, print jobs can besaved, queued, and reprinted. Saved print jobs can alsobe printed from the printer's control panel. This reducesthe time from starting your computer and printing froman application, as well as allowing you to reprint quickly.
U “Using the Optional Hard Disk Unit” onpage 57
SC-P9000 Series/SC-P7000 Series/SC-P8000 Series/SC-P6000 Series User's Guide
Introduction
17

Automatic color management(SpectroProofer mounter)
With the SpectroProofer Mounter 24"/44" installed, youcan perform printing, drying, and color measurementoperations in sequence on roll paper. Another optionalcolor measurement device ILS30EP can be used for avariety of color measurement conditions including thenew M1 standard. (Supports M0/M1/M2)
Also, the 44" model is up to two times faster thanconventional models, provides more accurate readingswith the addition of a function to prevent misalignedmeasurement position, and realizes savings by reducingthe amount of paper used to print charts by half of theconventional model ratio.
To use this you need commercially available RIPsoftware.
Efficient continuous printing on rollpaper (Auto take-up reel unit)
When using the optional auto take-up reel unit with theSC-P9000 Series/SC-P8000 Series, roll paper can beautomatically wound up after printing for efficientcontinuous printing.
U “Using the Auto Take-up Reel Unit (SC-P9000Series/SC-P8000 Series Only)” on page 43
Notes on Usage andStorage
Installation space
Make sure that you secure a space of at least 300 mmaround the entire printer, clear of any other objects, sothat paper ejection and consumable replacement are notobstructed.
See the “Specifications Table” for the externaldimensions of the printer.
U “Specifications Table” on page 183
Notes when using the printer
Note the following points when using this printer toavoid breakdowns, malfunctions, and print qualitydecline.
❏ When using the printer, observe the operatingtemperature and humidity range described in the"Specifications Table".U “Specifications Table” on page 183Even when the conditions above are met, you maynot be able to print properly if the environmentalconditions are not suitable for the paper. Be sure touse the printer in an environment where the paper'srequirements are met. For more details, see thedocumentation supplied with the paper.Also, when operating in dry areas, air conditionedenvironment, or under direct sunlight, maintainthe appropriate humidity.
SC-P9000 Series/SC-P7000 Series/SC-P8000 Series/SC-P6000 Series User's Guide
Introduction
18

❏ Do not install the printer next to heat sources ordirectly in the path of air from a ventilator or airconditioner. Failure to observe this precautioncould result in the print head nozzles drying andclogging.
❏ The print head may not be capped (i.e., may notmove to the right-hand side) if an error occurs andthe printer is turned off without first resolving theerror. Capping is a function for automaticallycovering the print head with a cap (lid) to preventthe print head from drying out. In this case, turn onthe power and wait a while until capping isperformed automatically.
❏ When the power is on, do not remove the powerplug or cut the power at the breaker. The print headmay not be capped properly. In this case, turn on thepower and wait a while until capping is performedautomatically.
❏ Even when the printer is not in use, some ink will beconsumed by head cleaning and other maintenanceoperations needed to keep the print head in goodcondition.
Notes when not using the printer
If you are not using it, note the following points whenstoring the printer. If it is not stored correctly, you maynot be able to print properly the next time it is used.
❏ If you do not print for a long time, the print headnozzles may become clogged. We recommend thatyou print once a week to prevent the print headfrom clogging.
❏ The roller may leave an impression on paper that isleft in the printer. This can also cause wavy or curledpaper resulting in paper feeding problems or theprint head could be scratched. Remove any paperwhen storing.
❏ Store the printer after confirming that the printhead has been capped (the print head is positionedat the far right). If the print head is left uncapped fora long time, the print quality may decline.
Note:If the print head is not capped, turn the printer on, andthen turn it off.
❏ To prevent the accumulation of dust and otherforeign matter in the printer, close all covers beforeplacing it in storage.If the printer will be not be used for an extendedperiod, protect it with an anti-static cloth or othercover.The print head nozzles are very small, and they canbecome clogged easily if fine dust gets on the printhead, and you may not be able to print properly.
❏ When turned on after an extended period of disuse,the printer may automatically perform headcleaning to ensure print quality.U “Timer Cleaning” on page 125
Notes on handling ink cartridges
Note the following points when handling ink cartridgesto maintain good print quality.
❏ The supplied ink cartridges and Maintenance Boxare for use during the initial charging. The suppliedink cartridges and Maintenance Box will be requirereplacement relatively quickly.
❏ We recommend that ink cartridges be stored atroom temperature out of direct sunlight and usedbefore the expiry date printed on the packaging.
❏ For optimum print quality, we recommend usingup ink within six months after installing in theprinter.
❏ Ink cartridges that have been stored at lowtemperatures for an extended period should beallowed to return to room temperature over aperiod of four hours.
❏ Do not touch the IC chips on the ink cartridges. Youmay not be able to print properly.
❏ Install all ink cartridges into each slot. You cannotprint if any of the slots are empty.
❏ Do not leave the printer without ink cartridgesinstalled. The ink in the printer may dry, preventingit from printing as expected. Leave ink cartridges inall slots even while you do not use the printer.
❏ The ink level and other data are stored in the ICchip, allowing cartridges to be used after beingremoved and replaced.
SC-P9000 Series/SC-P7000 Series/SC-P8000 Series/SC-P6000 Series User's Guide
Introduction
19

❏ To avoid getting dirt on the ink supply port, storethe removed ink cartridge properly. The ink supplyport has a valve in it so it does not need to be capped.
❏ Removed ink cartridges may have ink around theink supply port, so be careful not to get any ink onthe surrounding area when removing thecartridges.
❏ To maintain the quality of the print head, thisprinter stops printing before ink cartridges arecompletely expended.
❏ Although the ink cartridges may contain recycledmaterials, this does not affect printer function orperformance.
❏ Do not dismantle or remodel ink cartridges. Youmay not be able to print properly.
❏ Do not drop or knock ink cartridges against hardobjects; otherwise, the ink may leak.
Notes on handling paper
Note the following points when handling and storingthe paper. If the paper is not in good condition, printquality may decline.
Check the documentation supplied with each paper.
Notes on Handling
❏ Use Epson special media under normal roomconditions (temperature: 15 to 25˚C, humidity: 40to 60%).
❏ Do not fold the paper or scratch the surface of thepaper.
❏ Avoid touching the printable surface of the paperwith your bare hands. Moisture and oils from yourhands can affect print quality.
❏ Handle paper by the edges. We recommendwearing cotton gloves.
❏ Changes in temperature and humidity may causepaper to become wavy or curled. Check thefollowing points.
❏ Insert the paper just before printing.
❏ Do not use wavy or warped paper.
For roll paper, cut off any parts that are wavy orcurled, and then load the paper again.For cut sheets, use new paper.
❏ Do not wet the paper.
❏ Do not throw away the paper packaging as you canuse it for storing the paper.
❏ Avoid locations that are subject to direct sunlight,excessive heat, or humidity.
❏ Keep cut sheets in their original package afteropening, and keep them in a flat place.
❏ Remove roll paper that is not in use from theprinter. Rewind it correctly and then store it in theoriginal packaging that came with the roll paper. Ifyou leave the roll paper in the printer for a longtime, its quality may decline.
Notes on handling printed paper
To maintain long lasting, high quality print results, notethe following points.
❏ Do not rub or scratch the printed surface. If they arerubbed or scratched, the ink may peel off.
❏ Do not touch the printed surface; Failure to observethis precaution may cause ink to rub off.
❏ Make sure the print outs are completely dry beforefolding of stacking; otherwise, the color may changewhere they touch (leaves a mark). These marks willdisappear if they are separated immediately anddried; however, they will remain if not separated.
❏ If you put the print outs in an album before they arecompletely dry, they may be blurred.
❏ Do not use a dryer to dry the print outs.
❏ Avoid direct sunlight.
❏ Prevent color distortion while displaying or storingthe print outs by following the instructions in thepaper's documentation.
SC-P9000 Series/SC-P7000 Series/SC-P8000 Series/SC-P6000 Series User's Guide
Introduction
20

Note:Typically, print outs and photos fade over time (colordistortion) due to the effects of light and variousconstituents in the air. This also applies to Epson specialmedia. However, with the correct storage method, thedegree of color distortion can be minimized.
❏ See the documentation supplied with Epson specialmedia for detailed information on handling thepaper after printing.
❏ The colors of photos, posters, and other printedmaterials appear different under different lightingconditions (light sources*). The colors of print outsfrom this printer may also appear different underdifferent light sources.* Light sources include sunlight, fluorescent light,incandescent light, and other types.
SC-P9000 Series/SC-P7000 Series/SC-P8000 Series/SC-P6000 Series User's Guide
Introduction
21

Introducing the Software
As well as the printer driver, a variety of software packages are also provided such as Network easy configuration andplug-in software to add functionality to commercially available packages. You can install the software from thesoftware disc supplied, or by downloading from the Epson website.
U “Software on the Disc” on page 22
U “Software on the Website” on page 25
There is also software that can be used over a network through a web browser without having to install it.
U “Remote Manager” on page 26
Software on the Disc
The supplied Software Disc contains the following software. For details on using the software, see the PDF manuals orthe on-line help for the software in question.
Note:You can upgrade the software supplied. Check for the latest versions on the Epson website.
http://www.epson.com
Software Name Explanation
Printer Driver The printer driver is required when using the printer. Follow the steps in the "Setup Guide"to install.
U “Summary of the Printer Driver” on page 23
Epson Network Utilities When a network connection is setup using the "Setup Guide", network related modulesare installed.
See the "Network Guide" (PDF).
EpsonNet Config With this software, you can configure various network settings for the printer from yourcomputer. This is useful as it allows you to enter addresses and names using the keyboard.
Installation U “Installing individually” on page 24
EPSON LFP Remote Panel 2 Software for registering custom paper from a computer.
Installation U “Installing individually” on page 24
Epson Color Calibration Utility Software that performs calibrations using the printer's built-in sensors.
Installation U “Installing individually” on page 24
SC-P9000 Series/SC-P7000 Series/SC-P8000 Series/SC-P6000 Series User's Guide
Introduction
22

Summary of the Printer Driver
The main functions of the printer driver are describedbelow.
❏ Converts print data received from applications intoprintable data and sends it to the printer.
❏ Settings such as document size and print quality canbe adjusted from the settings dialogs.
Windows
You can save these settings and easily import orexport these saved settings.U “Customizing the Printer Driver” onpage 63
Mac OS X
❏ Allows you to execute printer maintenancefunctions to maintain print quality, check theprinter's status, and so on.
Windows
You can easily import or export printer driversettings.U “Summary of the Utility Tab” on page 66
SC-P9000 Series/SC-P7000 Series/SC-P8000 Series/SC-P6000 Series User's Guide
Introduction
23

Mac OS X
Installing individually
Insert the software disc into the disk drive, and thenfollow the on-screen instructions.
The screens displayed differ according to the operatingsystem being used as shown below.
WindowsClick Information for Manuals and Applications.
Check the folder containing the necessary software, andinstall.
Mac OS XSelect the necessary software, and then click Install.
Clear the checkboxes for any software that has alreadybeen installed.
Follow the on-screen instructions to install.
See the following for instructions on starting andclosing the software.
U “Starting and Closing Software” on page 26
SC-P9000 Series/SC-P7000 Series/SC-P8000 Series/SC-P6000 Series User's Guide
Introduction
24

Software on the Website
Aside from the software supplied on the software disc, the latest software versions for this printer can also be found onthe Epson website. Download as required.
http://www.epson.com
Note:Depending on your country or region, you may not be able to download software from the website.
For more details, contact your dealer or Epson Support.
For details on using the software, see the PDF manuals or the on-line help for the software in question.
See the following for instructions on starting and closing the software.
U “Starting and Closing Software” on page 26
Software Name Explanation
LFP Print Plug-In for Office* Plug-in software for Microsoft Office applications (Word, Excel, and PowerPoint).Installing this plug-in displays a ribbon in Office applications that gives quick access tohorizontal and vertical banner printing and enlarged printing.
Before installing the plug-in, check the following.
❏ Office applications are installed.
❏ Office applications are not running.
LFP HDD Utility* The Utility can be used to manage print jobs stored on the optional hard disk unit. Use thiswhen connecting the printer directly to the computer using a USB cable.
Epson Print Layout This is a plug-in for Adobe Photoshop and Adobe Lightroom.
❏ By operating with Adobe Photoshop and Adobe Lightroom, you can easily performcolor management.
❏ You can check the adjusted image for black-and-white photographs on the screen.
❏ You can save your preferred paper type and size and load them easily.
❏ You can easily layout and print photos.
LFP Accounting Tool* This software provides total cost calculations for printed paper, job information, and soon.
CopyFactory* This software allows you to make enlarged copies using an Epson scanner. Check forsupported scanners on the Epson website.
* Windows only
SC-P9000 Series/SC-P7000 Series/SC-P8000 Series/SC-P6000 Series User's Guide
Introduction
25

Remote Manager
This software allows you to operate the printer from acomputer over a network using the printer's built-innetwork interface. You can check the printer's statusand configure network settings, in addition tomanaging the print jobs stored on the optional hard diskunit. You can perform the following operations for printjobs stored on the hard disk unit.
❏ Cancel individual print queue
❏ Cancel individual hold queue
❏ Resume hold queue
StartingEnter the printer's IP address in a computer webbrowser.
For more information, see the online help for RemoteManager.
Starting and ClosingSoftware
Starting
You can start by using any of the following methods.
Double-click the shortcut icon on the desktopDepending on the software being used, a shortcut iconmay not be created during installation.
Starting from the menu
❏ Windows 8.1/Windows 8Enter the software name in the search charm, andthen select the icon displayed.
❏ Other than Windows 8.1/Windows 8Click the Start button, click the installed softwarename from All Programs (or Programs) or in theEPSON folder, and then select the software youwant to start.
❏ Mac OS XClick the installed software name fromApplications or the EPSON folder, and then selectthe software you want to start.
Click the icon on the desktop taskbar (Windows only)Click the icon and select the software you want to startfrom the menu displayed.
Closing
The application can be closed using one of the followingmethods.
❏ Click the button (Exit, Close, , and so on).
❏ Select Exit from the toolbar menu.
SC-P9000 Series/SC-P7000 Series/SC-P8000 Series/SC-P6000 Series User's Guide
Introduction
26

Uninstalling Software
Windows
c Important:
❏ You must log in with an Administrators group.
❏ In Windows 7/Windows Vista, if anAdministrator password or confirmation isrequested, enter the password and thencontinue with the operation.
A Turn off the printer, and unplug the interfacecable.
B Go to the Control Panel and click Uninstall aprogram from the Programs category.
C Select the software you want to remove and thenclick Uninstall/Change (or Change/Remove/Add or remove).
You can remove EPSON Status Monitor 3 andthe printer driver by selecting EPSONSC-XXXXX Printer Uninstall.
Select EPSON LFP Remote Panel 2 to removeEPSON LFP Remote Panel 2.
D Select the target printer icon, and then click OK.
P
E Follow the on-screen instructions to continue.
When the delete confirmation message appears,click Yes.
Restart the computer if you are reinstalling the printerdriver.
Mac OS X
When reinstalling or upgrading the printer driver orother software, follow the steps below to uninstall thetarget software first.
Printer DriverUse the "Uninstaller".
Downloading the UninstallerDownload the Uninstaller from the Epson website.
http://www.epson.com/
Using the UninstallerFollow the instructions on the Epson website.
Other softwareDrag and drop folder with the software name from theApplications folder into Trash to delete.
SC-P9000 Series/SC-P7000 Series/SC-P8000 Series/SC-P6000 Series User's Guide
Introduction
27

Basic Operations
Loading and Removingthe Roll Paper
Loading Roll Paper
Load roll paper after attaching the supplied roll paperadapters.
c Important:
Insert the paper just before printing. The roller mayleave an impression on paper that is left in theprinter.
Note:
❏ The paper that can be used in the printer is detailedin the following section.U “Supported Media” on page 159
❏ When paper has not been loaded in the printer, pressthe Z button to check the loading methods.
Buttons that are used in the following settings
A Turn on the printer by pressing the P button.
B Press the l button, and then select Roll Paperfrom the Paper Source menu.
To automatically cut after printing, select RollPaper / Cut. If you do not want to cut, select RollPaper / No Cut.
C Open the roll paper cover.
D Lower the lock lever for the adapter holder torelease the lock.
E Move the adapter holder to the left.
When moving the adapter holder, make sure youuse the handle.
F Place the roll paper on top of the printer.
SC-P9000 Series/SC-P7000 Series/SC-P8000 Series/SC-P6000 Series User's Guide
Basic Operations
28

G Adjust the size of the roll paper adapters to thesize of the roll core.
Change the size of both of the roll paper adaptersso that they are the same size.
3-inch core 2-inch core
H Raise the adapter lock lever to release the lock oneach of the two roll paper adapters.
I Attach the roll paper adapters to both ends of theroll paper, and then lower the lock levers on theleft and right to lock them in place.
Make sure you insert the adapters fully beforelocking them.
J Push the roll paper to the right until it touches theroll paper loading guide.
K Move the adapter holder so that the u on theadapter holder and the left roll paper adapter arealigned.
SC-P9000 Series/SC-P7000 Series/SC-P8000 Series/SC-P6000 Series User's Guide
Basic Operations
29

L Roll the roll paper slowly into the roll paperholder.
M Grip the handle on the adapter holder and slide tothe right until it is fully inserted to the holdershaft.
Make sure that both ends of the roll paper areseated securely to the adapters.
N Raise the lock levers on the adapter holders tolock them in place.
O Press the Y button on the control panel.
The pressure roller is released.
P Insert the leading edge of the roll paper into thepaper feed slot, and then feed the roll paper byhand until the leading edge comes out frombelow the front cover.
If the leading edge of the roll paper does notappear, use the u or d button to adjust the PaperSuction.
Q With both hands, pull the roll paper until theleading edge of the paper is in the center of thestand (the position of the label shown in theillustration).
Make sure that the roll paper is free of slack andthe end is not folded.
R Close the roll paper cover.
SC-P9000 Series/SC-P7000 Series/SC-P8000 Series/SC-P6000 Series User's Guide
Basic Operations
30

S Press the Y button.
After a few seconds, the paper moves to thestarting print position.
When you press the W button, operations startimmediately.
Note:Pressing the X button within three seconds ofpressing the Y button cuts off the leading edge ofthe roll paper. This is useful if the leading edge is notalready cut straight across or is not clean.
T Check the media type.
U “Checking and Setting the Paper Type” onpage 37
Cutting the roll paper
The printer is equipped with a built-in cutter. You cancut roll paper after printing by using one of the followingmethods.
❏ Auto Cut:The cutter cuts automatically at a determinedposition each time a page is printed in accordancewith the setting of the printer driver or controlpanel menu.
❏ Manual cut:The cutting position is specified on the controlpanel, and then the roll paper is cut. A cutline isprinted for manual cutting and can be used as aguide when cutting paper using the built-in cutter.
c Important:
The commercially available media types, such asthose shown below, may not be cut cleanly by thebuilt-in cutter. Furthermore, cutting the followingmedia types may damage or reduce the lifetime ofthe built-in cutter.
❏ Fine art paper
❏ Canvas
❏ Vinyl
❏ Matte poster board
❏ Adhesive paper
❏ Banner media
Cut these media types with commercially availablescissors or a cutter in the following manner:
With the front cover closed, hold down the d buttonon the control panel while viewing the inside of theprinter until the cutting position emerges frombelow the front cover. Cut the paper using scissors ora third-party cutter.
Setting Auto Cut
You can specify the method either on the control panelor the printer driver. Note, however, that the settingselected with the printer driver takes priority when theprinter driver is used.
Note:
❏ Disable the auto cut settings in the printer and theprinter driver when using the optional auto take-upreel unit.
❏ It may take a while to cut the roll paper.
Setting on the computerSet Auto Cut from the Roll Paper Option in the printerdriver's Properties (or Printing preferences) screen.
Setting from the printer
Press the l button and select auto cut on the PaperSource screen.
U “Control panel” on page 12
SC-P9000 Series/SC-P7000 Series/SC-P8000 Series/SC-P6000 Series User's Guide
Basic Operations
31

Note:You can also select this from Paper - Roll Paper Setup -Auto Cut.
U “Paper menu” on page 110
Manual cut method
When Off is selected in the printer driver or Off isselected for Auto Cut in the control panel, the paper canbe cut in any location after printing as described below.
Buttons that are used in the following settings
A With the front cover closed, hold down the dbutton on the control panel while viewing theinside of the printer until the cutting positionreaches the position of the label.
Note:To cut the paper using the built-in cutter, thedistance from the cutting position to the edge of thepaper needs to be 60 to 127 mm. The necessarylength differs depending on the paper type andcannot be changed. If the necessary length has notbeen reached, paper is fed automatically leaving amargin. Use a commercially available cutter toremove the unnecessary margin.
B Press the X button.
A confirmation screen is displayed. Press the Zbutton to cut using the built-in cutter.
Press the l button to return to the previousmenu.
Removing Roll Paper
This section describes how to remove and store rollpaper after printing. The pressure roller may leaveimpressions on paper that is left in the printer.
Buttons that are used in the following settings
A Make sure the printer is on.
B Open the roll paper cover.
SC-P9000 Series/SC-P7000 Series/SC-P8000 Series/SC-P6000 Series User's Guide
Basic Operations
32

C Press the Y button on the control panel torelease the pressure roller.
The roll paper is automatically rewound if theprinter state is after the paper cut but in theREADY state. When Remaining Setup is set toOn, the paper is rewound after printing the paperinformation. The paper is not rewound whenusing the optional auto take-up reel unit.If the paper is not rewound automatically, youneed to rewind manually.
Note:When removing the roll paper, you can use theoptional roll paper belt to prevent the roll paperfrom unwinding.
D Lower the lock lever for the adapter holder torelease the lock.
E Move the adapter holder to the left.
When moving the adapter holder, make sure youuse the handle.
F Roll over the paper roll to the front side to place iton the top of the printer.
SC-P9000 Series/SC-P7000 Series/SC-P8000 Series/SC-P6000 Series User's Guide
Basic Operations
33

G Raise the adapter lock levers to release the locks,and remove the roll paper adapters from the rollpaper.
After rewinding the roll paper carefully, store itin the original package.
H Close the roll paper cover.
When continuing printing, press the Y buttonon the control panel.
Loading and RemovingCut Sheets
The loading method for cut sheets differs from paperthat is A3 size or larger, poster board (paper that isthicker than 0.5 mm), and other paper.
U “Loading Cut Sheets A3 Size or Larger and PosterBoard” on page 34
U “Loading Cut Sheets Smaller than A3 Size” onpage 36
c Important:
If the paper is wavy or curled, use new paper. If wavyor curled paper is loaded, this printer may not beable to recognize the paper size, feed the paper, orprint correctly.
We recommend that you return the paper to itsoriginal package and store it flat, and take it out ofthe package just before you use it.
Loading Cut Sheets A3 Size or Larger and Poster Board
c Important:
❏ Insert the paper just before printing. The rollermay leave an impression on paper that is left inthe printer.
❏ When roll paper is loaded, rewind the roll paperbefore loading the cut sheets.U “Removing Roll Paper” on page 32
Note:
❏ The paper that can be used in the printer is detailedin the following section.U “Supported Media” on page 159
❏ When paper has not been loaded in the printer, pressthe Z button to check the loading methods.
SC-P9000 Series/SC-P7000 Series/SC-P8000 Series/SC-P6000 Series User's Guide
Basic Operations
34

Buttons that are used in the following settings
A Turn on the printer by pressing the P button.
B Press the l button, and then select Cut Sheetfrom the Paper Source menu.
C Close the roll paper cover.
D Press the Y button.
The pressure roller is released.
E Insert the paper until the trailing edge is belowthe loading mark on the roll paper cover.
Normally, the paper should be loaded vertically.
On the SC-P9000 Series/SC-P8000 Series, posterboard that is over 762 mm long can be insertedhorizontally.
Note:For Epson Color Calibration Utility color charts,insert the page from the top with the printed sidefacing up.
F Position the trailing and right edges of the paperas shown by the loading mark.
If it is hard to position thick paper, use the u or dbuttons to adjust the suction strength.
G Press the Y button.
The paper moves to the starting print position.
H Check the media type.
U “Checking and Setting the Paper Type” onpage 37
SC-P9000 Series/SC-P7000 Series/SC-P8000 Series/SC-P6000 Series User's Guide
Basic Operations
35

Loading Cut Sheets Smaller than A3 Size
c Important:
❏ Insert the paper just before printing. The rollersmay leave impressions on paper that is left inthe printer.
❏ When roll paper is loaded, rewind the roll paperbefore loading the cut sheets.U “Removing Roll Paper” on page 32
Note:
❏ The paper that can be used in the printer is detailedin the following section.U “Supported Media” on page 159
❏ When paper has not been loaded in the printer, pressthe Z button to check the loading methods.
Buttons that are used in the following settings
A Turn on the printer by pressing the P button.
B Press the l button, and then select Cut Sheetfrom the Paper Source menu.
C Close the roll paper cover.
D Insert the paper into the printer, keeping its rightedge aligned with the loading mark on the rollpaper cover.
c Important:
Load cut sheets vertically.
For paper smaller than A4 size, insert by keepingthe right edge aligned with the additional linebelow the paper feed slot.
Press the d button. is displayed on the screen.
E Press the d button.
The paper moves to the starting print position.
F Check the media type.
U “Checking and Setting the Paper Type” onpage 37
Removing Cut Sheets
Buttons that are used in the following settings
SC-P9000 Series/SC-P7000 Series/SC-P8000 Series/SC-P6000 Series User's Guide
Basic Operations
36

A Check the message displayed on the controlpanel's screen.
When Ready is displayedPress the d button, and then feed the paper to theejection position.
Other messagesProceed to Step 2.
c Important:
Do not press the buttons when the power lightor the pause light are flashing.
B Press the d button to take the paper.
c Important:
Ejected paper may drop down. Make sure theleading edge of the paper is not damaged if itdoes drop.
Checking and Setting thePaper Type
Before you start printing, check the paper loaded in theprinter on the control panel's screen, and if it differs,make settings again. If you print using settings that donot match the paper type, you may not obtain optimumprint results for the paper type.
Checking the Paper Type
One of the following screens is displayed.
InformationSelected Paper Type:
Keep Settings Above Change Settings
Proceed
❏ Information screenThis is displayed when loading roll paper that doesnot have a printed barcode, or when loading cutsheets. Follow the steps below and then makesettings.U “Paper Type Settings” on page 38
❏ Ready ScreenThis is displayed when loading roll paper that has aprinted barcode. The barcode is read automatically,and the paper type and amount remaining aredisplayed. You can start printing quickly.
Note:When Roll Paper Remaining - Remaining Setup is set toOn from the Paper menu, a barcode is printedautomatically on the edge of the paper when the rollpaper is removed. The barcode is automatically read andsettings adjusted the next time the paper is used,improving efficiency when multiple rolls of paper areused.
U “Paper” on page 116
SC-P9000 Series/SC-P7000 Series/SC-P8000 Series/SC-P6000 Series User's Guide
Basic Operations
37

Paper Type Settings
Buttons that are used in the following settings
A Check the content displayed on the screen.
InformationSelected Paper Type:
Keep Settings Above Change Settings
Proceed
When changing settings and printingUse the d/u buttons to select Change Settings,and then press the Z button. Next, proceed toStep 2.
When printing using the current settingsWith Keep Settings Above selected, press theZ button, and then proceed to Step 4.
When using commercially available paper forthe first timeYou need to register custom paper information.With Keep Settings Above selected, press theZ button, and then proceed to Step 4.
B Select the Paper Type, and then press the Zbutton.
C Select the media name, and then press the Zbutton.
D When Remaining Setup is set to On, use the d/u buttons to set the roll paper length to 5.0 to 99.5m, and then press the Z button.
You can set in increments of 0.5 m.
E Check that Ready is displayed on the screen.
When printing immediatelySend the print data from the computer.
When using commercially available paper forthe first timeMake custom paper settings.
U “Before Printing on Commercially AvailablePaper” on page 177
Note:When printing using the printer driver and the papersettings on the printer and the printer driver do notmatch, the following occurs.
❏ When genuine Epson media is loaded in the printer:The printer driver settings are used.
❏ When custom paper is loaded in the printer:The printer settings are used.
SC-P9000 Series/SC-P7000 Series/SC-P8000 Series/SC-P6000 Series User's Guide
Basic Operations
38

Using the Paper Basket
Using the paper basket allows you to print smoothly bypreventing the paper from getting dirty or wrinkled.Paper basket usage differs depending on the paperspecifications.
Ejecting paper to the rear (for normal printing)Ejected paper is collected in the paper basket.
This is available for roll paper or cut sheets that meet thefollowing specifications.
SC-P9000 Series/SC-P8000 Series
SC-P7000 Series/SC-P6000 Series
Thickness Less than 0.5 mm Less than 0.5 mm
PaperLength
Less than 1580 mm Less than 914.4 mm
c Important:
Normally the capacity of the paper basket should beone sheet at a time.
When collecting more than one sheet of paper at atime, the gap between the paper support and thepaper basket is reduced, and the paper may not beejected correctly.
See the following for the paper ejection method to therear of the printer.
U “Ejecting Paper to the Rear” on page 39
Ejecting paper to the front of the printer (for bannerprinting and printing on thick paper)When performing banner printing on roll paper orprinting on thick cut sheets, eject paper to the front ofthe printer.
This is available for roll paper or cut sheets that meet thefollowing specifications.
SC-P9000 Series/SC-P8000 Series
SC-P7000 Series/SC-P6000 Series
Thickness 0.5mm or more 0.5mm or more
PaperLength
1580mm or more 914.4mm or more
See the following for the paper ejection method from thefront of the printer.
U “Ejecting Paper to the Front” on page 41
Ejecting Paper to the Rear
This section explains how to switch the paper basketfrom the stored state to the ready state.
SC-P9000 Series/SC-P7000 Series/SC-P8000 Series/SC-P6000 Series User's Guide
Basic Operations
39

A Raise the paper supports to the horizontalposition.
B Lower the paper basket at the front until it is levelwith the floor.
C Lower the paper supports while pressing the leftand the right sides until the supports are verticalas shown in the illustration.
D Carefully raise the basket at the front by one level.
When the cloth touches the floor, secure usingthe hook and loop fastener tape as shown in theillustration.
c Important:
If image quality is smudged in DoubleweightMatte Paper or Enhanced Matte Paper, raiseall paper supports by one level.
SC-P9000 Series/SC-P7000 Series/SC-P8000 Series/SC-P6000 Series User's Guide
Basic Operations
40

Note:For Enhanced Matte Paper, when the front basketis level with the floor the basket can hold multiple,continuous print outs. However, the image qualitymay be smudged, damaged, or soiled.
For the SC-P9000 Series/SC-P8000 Series,proceed to Step 5.
For the SC-P7000 Series/SC-P6000 Series, thiscompletes this section.
E Switch the position of the basket at the rearaccording to the length of the print outs.
When the paper length is 1,189 mm (A1 length)or lessRaise the basket so that it is straight up.
When the paper length is 1,189 mm (A1 length)or moreLay the basket straight out.
Ejecting Paper to the Front
This section explains how to switch the paper basketfrom the stored state to the ready state.
A Raise the paper supports to the horizontalposition.
B Remove the hook and loop fastener tape.
SC-P9000 Series/SC-P7000 Series/SC-P8000 Series/SC-P6000 Series User's Guide
Basic Operations
41

C Raise the front basket so that is vertical.
Make sure the cloth is pulled tight.
D Lower the paper supports while pressing left andright as shown in the illustration until they touchthe cloth.
Storing
Store the paper basket before loading paper or movingthe printer.
When storing, perform each ejection procedure inreverse, and store the front and rear paper basketsvertically as shown in the illustration.
U “Ejecting Paper to the Rear” on page 39
U “Ejecting Paper to the Front” on page 41
FrontPlace the paper supports in the position shown in theillustration to prevent the front paper basket fromfalling to the floor and getting soiled.
Back
SC-P9000 Series/SC-P7000 Series/SC-P8000 Series/SC-P6000 Series User's Guide
Basic Operations
42

Using the Auto Take-upReel Unit (SC-P9000Series/SC-P8000 SeriesOnly)
The optional auto take-up reel unit automatically takesup paper as it is printed. It improves efficiency forbanners or large jobs involving continuous printing onroll paper.
The auto take-up reel unit for this printer can take uppaper in either of the directions shown below. Sometypes of paper may not support one or the other of thesedirections or may place restrictions on the take-updirection.
See the following section for information on take-upsupport and take-up direction.
U “Epson Special Media Table” on page 159
Printed side out Printed side in
Taking-up with printed side out places the printedsurface on the outside of the roll.
Taking-up with printed side in places the printedsurface on the inside of the roll.
Caution:
❏ Fix the roll core for the auto take-up reel unit inplace as described in the documentation.Dropping the roll core could cause injury.
❏ Be careful that your hands, hair, or otherobjects do not get caught in the moving parts ofthe auto take-up reel unit.Failure to observe this precaution could resultin injury.
c Important:
Confirm that the end of the roll is cut straight across.The unit will not function as expected if the end ofthe roll is wavy or curved.
U “Manual cut method” on page 32
Note:For information on installing the auto take-up reel unit,see the documentation supplied with the auto take-upreel unit.
Using the Control Panel
This section describes how to use the control panel forthe auto take-up reel unit.
A Power lampDisplays the status of the auto take-up reel unit.
On : The auto take-up reel unit isready for use.
Flickering : The auto take-up reel unit is inuse.
Blinking : The auto take-up reel unit is inpower-saving mode.
Intermittentblinking
: An error has occurred.
Off : The power is off.
B Auto switchSelects the auto take-up direction.
SC-P9000 Series/SC-P7000 Series/SC-P8000 Series/SC-P6000 Series User's Guide
Basic Operations
43

Backward : The roll is taken up with the printableside in.
Forward : The roll is taken up with the printableside out.
Off : The auto take-up reel unit does nottake up paper.
C Manual switchSelects the manual take-up direction.
The selected option takes effect when the Autoswitch is in the Off position.
Backward : The roll is taken up with the printableside in.
The speed will increase after the buttonis pressed for more than three seconds.
Forward : The roll is taken up with the printableside out.
The speed will increase after the buttonis pressed for more than three seconds.
Attaching the Paper
This section describes how to attach roll paper to theauto take-up reel unit roll core.
The procedure varies with the take-up direction.
c Important:
Before proceeding, select Off for Auto Cut. Using theauto take-up reel unit when On is selected will causeerrors.
U “Cutting the roll paper” on page 31
Taking Up the Paper Printable SideOut
For information on installing the roll core, see the SetupGuide for the optional auto take-up reel unit.
Buttons that are used in the following settings
A Set the auto take-up reel unit Auto switch to Off.Plug the power cord into an outlet and confirmthat the power lamp lights.
B Press the P button to turn on the printer.
C Check that the roll paper is correctly loaded in theprinter.
D Check that the auto take-up reel unit icon isdisplayed on the printer's screen.
If the icon is not displayed, check that the autotake-up reel unit is connected correctly and isturned on.
E Press the l button on the printer, and then selectRoll Paper from the Paper Source menu.
F Keep the d button on the printer pressed untilthe end of the roll reaches the roll core.
SC-P9000 Series/SC-P7000 Series/SC-P8000 Series/SC-P6000 Series User's Guide
Basic Operations
44

G Tape the end to the roll core.
Place tape (available from third-party suppliers)at the center and then at the left and right ends.
H Keep the d button in the printer pressed untilyou have fed enough paper for about three wrapsaround the roll core.
I Keep the Manual switch on the auto take-up reelunit pressed to Forward to wrap the paper threetimes around the core.
After wrapping the paper around the core,ensure that paper around the core is sufficientlyloose.
Note:The tensioner supplied with the auto take-up reelunit is used with some types of paper. Slacken thepaper and insert the tensioner near the center of thepaper as shown. See the following section forinformation on paper that requires the tensioner.
U “Epson Special Media Table” on page 159
J Set the auto take-up reel unit Auto switch toForward.
Taking Up the Paper Printable Side In
For information on installing the roll core, see the SetupGuide for the optional auto take-up reel unit.
Buttons that are used in the following settings
SC-P9000 Series/SC-P7000 Series/SC-P8000 Series/SC-P6000 Series User's Guide
Basic Operations
45

A Set the auto take-up reel unit Auto switch to Off.Plug the power cord into an outlet and confirmthat the power lamp lights.
B Press the P button to turn on the printer.
C Check that the roll paper is correctly loaded in theprinter.
D Check that the auto take-up reel unit icon isdisplayed on the printer's screen.
If the icon is not displayed, check that the autotake-up reel unit is connected correctly and isturned on.
E Press the l button on the printer, and then selectRoll Paper from the Paper Source menu.
F Keep the d button on the printer pressed untilthe end of the roll reaches the roll core.
G Tape the end to the roll core.
Place tape (available from third-party suppliers)at the center and then at the left and right ends.
H Keep the d button in the printer pressed untilyou have fed enough paper for about three wrapsaround the roll core.
I Keep the Manual switch on the auto take-up reelunit pressed to Backward to wrap the paper threetimes around the core.
SC-P9000 Series/SC-P7000 Series/SC-P8000 Series/SC-P6000 Series User's Guide
Basic Operations
46
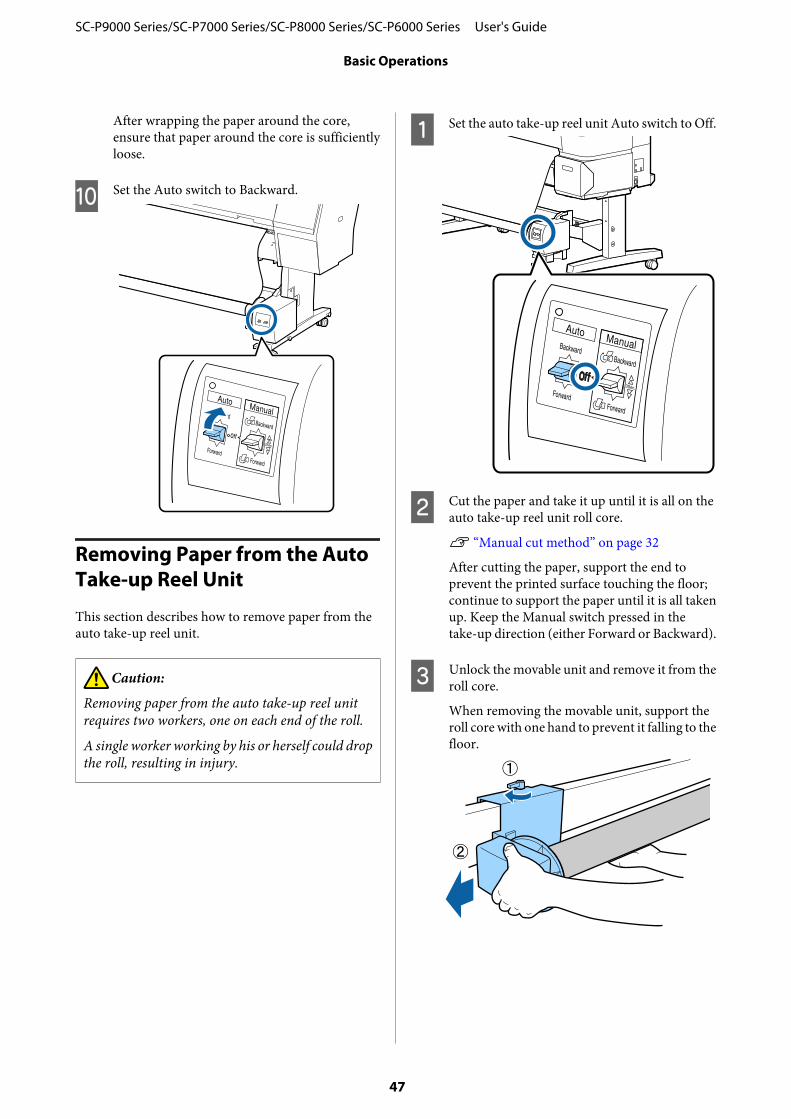
After wrapping the paper around the core,ensure that paper around the core is sufficientlyloose.
J Set the Auto switch to Backward.
Removing Paper from the Auto Take-up Reel Unit
This section describes how to remove paper from theauto take-up reel unit.
Caution:
Removing paper from the auto take-up reel unitrequires two workers, one on each end of the roll.
A single worker working by his or herself could dropthe roll, resulting in injury.
A Set the auto take-up reel unit Auto switch to Off.
B Cut the paper and take it up until it is all on theauto take-up reel unit roll core.
U “Manual cut method” on page 32
After cutting the paper, support the end toprevent the printed surface touching the floor;continue to support the paper until it is all takenup. Keep the Manual switch pressed in thetake-up direction (either Forward or Backward).
C Unlock the movable unit and remove it from theroll core.
When removing the movable unit, support theroll core with one hand to prevent it falling to thefloor.
SC-P9000 Series/SC-P7000 Series/SC-P8000 Series/SC-P6000 Series User's Guide
Basic Operations
47

D Remove the roll core from the auto take-up reelunit. Basic Printing Methods
This section explains how to print and how to cancelprinting.
Printing (Windows)
Make print settings such as paper size and paper sourcefrom the connected computer and then print.
A Turn on the printer, and load the paper.
U “Loading and Removing the Roll Paper” onpage 28
U “Loading and Removing Cut Sheets” onpage 34
B When you have created the data, click Print inthe File menu.
C Make sure your printer is selected, and then clickPreferences or Properties to display the settingsscreen.
XX-XXXXX Series
SC-P9000 Series/SC-P7000 Series/SC-P8000 Series/SC-P6000 Series User's Guide
Basic Operations
48

D Select the Media Type, Color, Print Quality,Mode, and Source according to the paper loadedin the printer.
E Make sure you select the same Size as you set inthe application.
After making the settings, click OK.
F When settings are complete, click Print.
XX-XXXXX Series
The progress bar is displayed, and printing starts.
Screen while printingThe following screen is displayed when you startprinting, and the progress bar (the computer'sprocessing status) is displayed. On this screen you cancheck the remaining ink level, product numbers for theink cartridges, and so on.
An error message is displayed if an error occurs or an inkcartridge needs replacing while printing.
Printing (Mac OS X)
Make print settings such as paper size and paper sourcefrom the connected computer and then print.
A Turn on the printer, and load the paper.
U “Loading and Removing the Roll Paper” onpage 28
U “Loading and Removing Cut Sheets” onpage 34
SC-P9000 Series/SC-P7000 Series/SC-P8000 Series/SC-P6000 Series User's Guide
Basic Operations
49

B When you have created the data, from the Filemenu of the application, click Print and so on.
C Click Show Details at the bottom of the screen.
For Mac OS X v10.6.8, click the arrow ( ) onthe right of the printer name to make settings onthe Page Setup screen.
Note:If page settings are not displayed in the print dialog,click the "page settings" option (e.g., Page Setup) inthe File menu.
D Check that this printer is selected, and then setthe paper size.
Select the paper size, borderless printing options,and paper source in the Paper Size menu.
E Select Print Settings from the list, and then seteach item.
Set the Media Type, Color, Print Quality, andother settings according to the type of paperloaded in the printer. Normally, you can printcorrectly just by setting items in the PrintSettings screen.
F When settings are complete, click Print.
The printer icon is displayed in the Dock while printing.Click the printer icon to display the status. You cancheck the progress of the current print job and theprinter status information. You can also cancel a printjob.
SC-P9000 Series/SC-P7000 Series/SC-P8000 Series/SC-P6000 Series User's Guide
Basic Operations
50

Also, if an error occurs while printing, a notificationmessage is displayed. Canceling Printing (Windows)
When the computer has finished sending data to theprinter, you cannot cancel the print job from thecomputer. Cancel on the printer.
U “Canceling Printing (from the Printer)” onpage 52
When the progress bar is displayedClick Cancel.
When the progress bar is not displayed
A Click the printer icon on the Taskbar.
Whether or not an icon is displayed depends onthe settings selected for Windows.
B Select the job you want to cancel, and then selectCancel from the Document menu.
To cancel all jobs, click Cancel All Documents inthe Printer menu.
P
SC-P9000 Series/SC-P7000 Series/SC-P8000 Series/SC-P6000 Series User's Guide
Basic Operations
51

If the job has been sent to the printer, print data isnot displayed on the above screen.
Canceling Printing (Mac OS X)
When the computer has finished sending data to theprinter, you cannot cancel the print job from thecomputer. Cancel on the printer.
U “Canceling Printing (from the Printer)” onpage 52
A Click the printer icon in the Dock.
B Select the job you want to cancel, and then clickDelete.
If the job has been sent to the printer, print data isnot displayed on the above screen.
Canceling Printing (from the Printer)
Press the W button, select Job Cancel on the screen,and then press the Z button.
The print job is canceled even in the middle of printing.It may take a while before the printer returns to readystatus after canceling a job.
Note:Note: You cannot delete print jobs which are in the printqueue on the computer using the above operation. See"Canceling Printing (Windows)" or "Canceling Printing(Mac OS X)" in the previous section for information ondeleting print jobs from the print queue.
Printable area
This section describes the printable areas for the printer.
If the margin set in an application is larger than thefollowing setting values, sections beyond the specifiedmargins are not printed. For example, if 15 mm isselected for the left and right margins in the printermenus and the document fills the page, the 15 mm at theleft and right sides of the page will not be printed.
Roll Paper Printable Area
The gray area in the illustration below shows theprintable area.
The arrow in the illustration indicates the direction ofthe ejected paper.
*1 SC-P9000 Series/SC-P8000 Series
*2 SC-P7000 Series/SC-P6000 Series
*3 Selecting Roll Paper (Banner) from Source in theprinter driver sets the top and bottom margins ofthe paper to 0 mm.
SC-P9000 Series/SC-P7000 Series/SC-P8000 Series/SC-P6000 Series User's Guide
Basic Operations
52

*4 The printer driver supports the followingmaximum paper lengths.
Windows: 15 m (590.6 inch)
Mac OS X: 15 m 24 cm (600 inch)
When printing on paper longer than this, you needcommercially available banner printing software.In this situation, select Roll Paper (Banner) fromSource in the printer driver.
A to D in the illustration indicates the margins at thetop, bottom, left, and right.
For borderless printing, the following values are set to 0mm.
❏ Left and right borderless printing: B, D
❏ Borderless printing on all sides: A, B, C, D
Margins in other situations depends on the optionselected for Roll Paper Margin in the menus, as shownin the table below.
Roll Paper Margin SettingsU “Paper” on page 116
indicates factory default settings.
Roll Paper MarginParameter
Margin Values
Normal A,C=15 mm*
B,D=3 mm
Top15mm/Bottom15mm A,C=15mm
B,D=3 mm
Top35mm/Bottom15mm A=35 mm
C=15mm
B,D=3 mm
Top150mm/Bottom15mm A=150mm
C=15mm
B,D=3 mm
3mm A,B,C,D=3 mm
Roll Paper MarginParameter
Margin Values
15mm A,B,C,D=15mm
* When Normal is selected, the value for A is 20 mmfor the following paper.
Premium Glossy Photo Paper (250)/PremiumSemigloss Photo Paper (250)/Premium LusterPhoto Paper (260)/Premium Semimatte PhotoPaper (260)
Also, when using Enhanced Adhesive SyntheticPaper, the value for A is 100 mm.
c Important:
❏ Printing is distorted when the trailing edge ofthe roll paper comes off the core. Make sure thetrailing edge does not come inside the printingarea.
❏ The print size does not change even when themargins are changed.
Cut Sheets Printable Area
The gray area in the illustration below shows theprintable area. The arrow in the illustration indicates thedirection of the ejected paper.
When printing borderless on the left and right, the leftand right margins are 0 mm.
*1 SC-P9000 Series/SC-P8000 Series
*2 SC-P7000 Series/SC-P6000 Series
SC-P9000 Series/SC-P7000 Series/SC-P8000 Series/SC-P6000 Series User's Guide
Basic Operations
53

*3 15.5 mm when printing Enhanced Matte PosterBoard Changing the Type of
Black Ink
This printer allows you to set both photo black ink andmatte black ink and switch between them depending onthe paper type.
Photo Black ink reduces the grainy feeling of photopapers giving them a smooth, professional finish. MatteBlack ink significantly increases black optical densitywhen printing on matte type papers.
See the following section to select a suitable black ink forthe media type.
U “Epson Special Media Table” on page 159
Note:If there is not enough ink remaining for the switch, youwill need to replace the cartridge. It may be possible toprint with ink cartridges that could not be used for a blackink switch.
Switching Automatically
You can switch black inks and print from the printerdriver.
Set Auto Black Ink Change to On from the PrinterSetup menu in advance.
U “Printer Setup” on page 120
A Display the printer driver's Main screen.
U “Printing (Windows)” on page 48
U “Printing (Mac OS X)” on page 49
B Select the paper type from the Media Type menu.
Depending on the media type you select, blackink is switched automatically during printing.
SC-P9000 Series/SC-P7000 Series/SC-P8000 Series/SC-P6000 Series User's Guide
Basic Operations
54

Windows
Mac OS XXX-XXXXX
Note:
❏ The black ink type that can be used for printingvaries depending on the media type.
❏ You can select the type of black ink from theprinter driver when the media type selectedsupports both photo black and matte black.U “Supported Media” on page 159
❏ If the printer status cannot be acquired, theblack ink type may change automatically.
C Check other settings, and then start printing.
Switching Manually
Change from the control panel.
Buttons that are used in the following settings
A Turn on the printer by pressing the P button.
B Press the button.
Follow the on-screen instructions.
SC-P9000 Series/SC-P7000 Series/SC-P8000 Series/SC-P6000 Series User's Guide
Basic Operations
55

Turning Off the PowerUsing Power Off Timer
The printer offers the following two power managementoptions.
Sleep modeThe printer enters sleep mode when there are no errors,no print jobs being received, and no control panel orother operations performed. When the printer enterssleep mode, the control panel's screen turns off and theinternal motors and other parts switch off to consumeless power.
Sleep mode is cleared if a print job is received or a buttonon the control panel is pressed.
The delay before the printer enters sleep mode can beselected from values between 5 and 210 minutes. Atdefault settings, the printer enters sleep mode if nooperations are performed for 15 minutes. The delay canbe changed from the Preferences menu.
U “Preferences” on page 123
Note:When the printer enters sleep mode, the control panel'sscreen goes blank as if the power has been turned off, butthe P light remains lit.
Power Off TimerThe printer is equipped with a Power Off Timer optionthat automatically turns the printer off if no errorsoccur, no print jobs are received, and no control panel orother operations are performed for a set period of time.The delay before the printer turns off automatically canbe selected from values between 1 and 24 hours inincrements of 1 hour.
The default setting is 8 hours.
The printer turns off automatically if no errors occur, noprint jobs are received, and no operations on the panelor other operations are performed for eight hours orlonger.
Power Off Timer settings can be adjusted from thePreferences menu.
U “Preferences” on page 123
About Power ManagementYou can adjust the time before Power Management isapplied. Any increase will affect the printer’s energyefficiency. Please consider the environment beforemaking any change.
SC-P9000 Series/SC-P7000 Series/SC-P8000 Series/SC-P6000 Series User's Guide
Basic Operations
56

Using the OptionalHard Disk Unit
Function Summary
When an optional hard disk unit (from now on, harddisk) is installed, you can save print jobs and thenreprint them.
Extended functions
Print jobs can be viewed and managed as describedbelow.
Viewing Print JobsWhen there are multiple print jobs with some in thequeue, the following information can be displayed.
❏ Estimated print start time
❏ Estimated print time
Viewing and Resuming Held Print JobsIf the source or other settings selected with the printerdiffer from the settings specified in the print job, anerror will occur and printing will be suspended.
When an error occurs, printing cannot be restarted untilthe printer has been readied by, for example, replacingthe paper.
However, the following types of print job can be heldtemporarily on the hard disk.
Therefore, after printing all the jobs that can be printedwith the current paper, you can replace the paper withthe media specified in the held print jobs and resumeprinting, making your work more efficient.
❏ Print jobs that specify sources that differ from thatselected with the printer
❏ Print jobs that specify paper types that differ fromthat selected with the printer
❏ Print jobs that specify output paper sizes (widths)that are larger than that selected with the printer
Note:Held print jobs can be saved if On is selected for StoreHeld Job in the control panel Printer Setup menu.
The factory default setting is Off.
U “Printer Setup” on page 120
Viewing and Printing Stored JobsPrint jobs can be stored on the hard disk and printed at alater date.
Print jobs selected for printing at a later date can beprinted directly on the hard disk without increasing theload on your computer.
Print jobs are saved using the printer driver.
U “Saving Print Jobs” on page 58
Note:Jobs printed with the following applications are alwayssaved to the hard disk.
❏ LFP Print Plug-In for Office
❏ EPSON CopyFactory5
❏ Epson Color Calibration Utility
Print Job Management
From the Print Job menu of the Control PanelDetailed procedureU “Viewing and Printing SavedPrint Jobs” on page 59
From Remote ManagerWhen the printer and the computer on which the harddisk is installed are connected over a network, useRemote Manager.
U “Remote Manager” on page 26
From LFP HDD Utility (Windows only)When the printer and the computer on which the harddisk is installed are connected by USB, you can alsoperform operations from the HDD utility. You candownload the software from the Epson home page.
U “Software on the Website” on page 25
SC-P9000 Series/SC-P7000 Series/SC-P8000 Series/SC-P6000 Series User's Guide
Using the Optional Hard Disk Unit
57

Data on a Hard Disk
Data on a hard disk cannot be copied to a computer orother device. Even when print jobs have been stored onthe hard disk, save the original data on a computer.
Data on a hard disk may be lost or corrupted in thefollowing situations.
❏ When the disk is affected by static electricity orelectrical noise
❏ When the disk has been used incorrectly
❏ After a malfunction or repair
❏ When the disk was damaged by a natural disaster
We take no responsibility for any data loss, datacorruption, or other problems due to any cause, evenincluding those listed above and within the warrantyperiod. Be aware that we are also not responsible for therecovery of lost or corrupted data.
Saving Print Jobs
This section describes the printer driver settings used tosave print jobs.
Settings on Windows
A When you have created the data, click Print inthe File menu.
P
B After confirming that the printer is selected, clickPrinter properties or Properties to displayprinter settings.
P
C On the Page Layout screen, click the Settingsbutton from Hard Disk Unit, and then selectPrint Job.
Print operations differ depending on the selectedcontent as shown below.
❏ Print and Save:Saves the job to the hard disk at the same time asprinting. When Print after TransmissionCompleted is selected, printing starts after theprint job has been saved to the hard disk unit.
❏ Print only:Prints the job without saving to the hard disk.
SC-P9000 Series/SC-P7000 Series/SC-P8000 Series/SC-P6000 Series User's Guide
Using the Optional Hard Disk Unit
58

❏ Save only:Saves the job without printing.
Next, print the document normally.
Making Settings for Mac OS X
A When you have created the data, from the Filemenu of the application, click Print and so on.
B Check that the printer is selected, and then selectHDD Settings from the list.
C Select Print Mode.
After clicking Print, the operations differdepending on the selected content as shownbelow.
❏ Print and Save:Saves the job to the hard disk at the same time asprinting. When Print after TransmissionCompleted is selected, printing starts after theprint job has been saved to the hard disk unit.
❏ Print only:Prints the job without saving to the hard disk.
❏ Save only:Saves the job without printing.
Next, print the document normally.
Viewing and PrintingSaved Print Jobs
This section describes how to view and print saved jobsfrom the control panel.
Buttons that are used in the following settings
A Confirm that the printer is ready and press the rbutton.
The settings menu will be displayed.
B Press the d button, and then the r button.
The Print Job menu will be displayed.
C Press the d/u buttons to select Saved Job Queueand press the Z button.
The names of stored print jobs are displayed.
D Press the d/u buttons to select the desired joband press the Z button.
Information on the selected job will be displayed.
SC-P9000 Series/SC-P7000 Series/SC-P8000 Series/SC-P6000 Series User's Guide
Using the Optional Hard Disk Unit
59

To exit without printing the job, press the Wbutton after viewing job data.
To print the job, proceed to Step 5.
E Press the Z button.
The File Options is displayed.
F Press the d/u buttons to select Print File orDelete, and then press the r button.
When Delete is selected, a confirmation screenappears. Press the Z button to delete the job.
When Print File is selected, proceed to Step 7.
G Press the d/u buttons, enter the number ofcopies, and then press the Z button.
Printing starts.
SC-P9000 Series/SC-P7000 Series/SC-P8000 Series/SC-P6000 Series User's Guide
Using the Optional Hard Disk Unit
60

Using the PrinterDriver(Windows)
Displaying the SettingsScreen
You can access the printer driver in the following ways:
❏ From Windows applicationsU “Printing (Windows)” on page 48
❏ With the Start button
With the Start button
Follow the steps below when specifying commonsettings among applications or performing printermaintenance, such as Nozzle Check or Head Cleaning.
A On the Control Panel click Hardware andSound and then View devices and printers.
For Windows 7Click Start and then Devices and Printers.
For Windows VistaClick , Control Panel, Hardware andSound, and then Printer.
For Windows XPClick Start, Control Panel, Printers and OtherHardware, and then Printers and Faxes.
Note:If your Windows XP Control Panel is in ClassicView, click Start, Control Panel, and thenPrinters and Faxes.
B Right-click your printer icon, and click Printingpreferences.
The printer driver setting screen is displayed.
Make the necessary settings. These settings become thedefault settings of the printer driver.
SC-P9000 Series/SC-P7000 Series/SC-P8000 Series/SC-P6000 Series User's Guide
Using the Printer Driver(Windows)
61

Displaying Help
You can access the printer driver help in the followingways:
❏ Click Help
❏ Right-click on the item you want to check anddisplay
Click the Help Button to Display
By displaying help, you can use the contents page orkeyword search to read the help.
Right-click on the item you want to check and display
Right-click the item, and then click Help.
Note:In Windows XP, click on the title bar, and then clickthe help item you want to view.
SC-P9000 Series/SC-P7000 Series/SC-P8000 Series/SC-P6000 Series User's Guide
Using the Printer Driver(Windows)
62
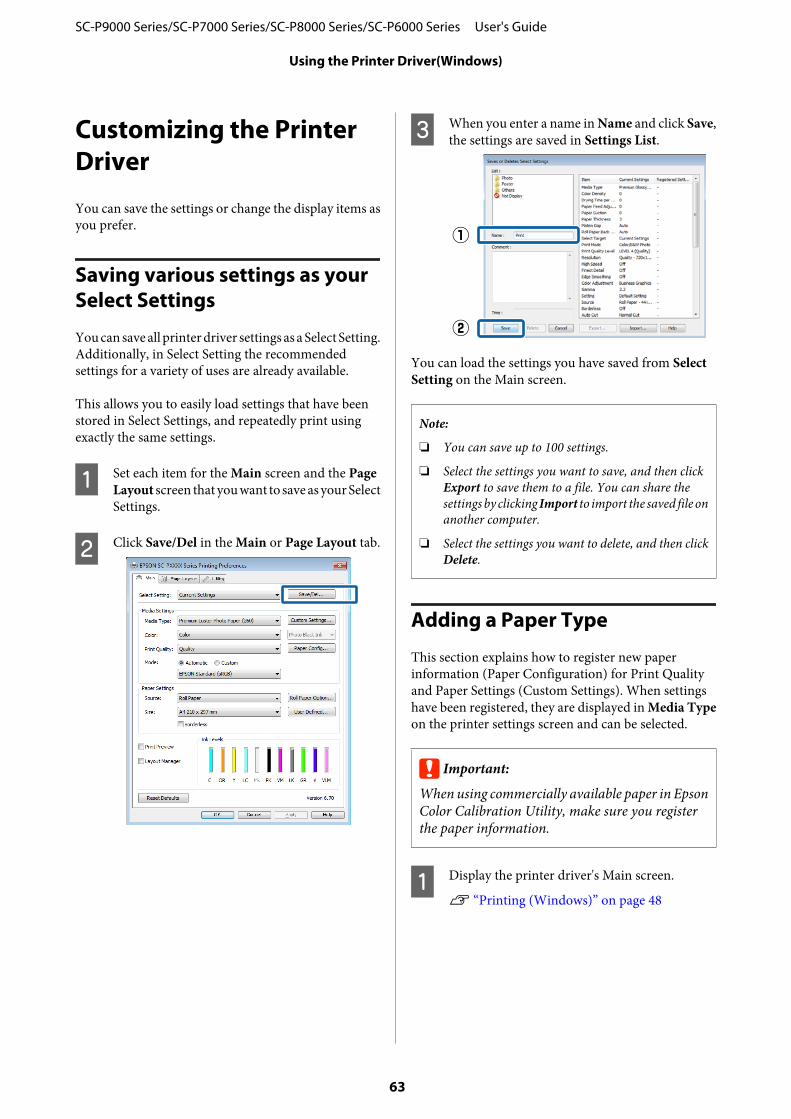
Customizing the PrinterDriver
You can save the settings or change the display items asyou prefer.
Saving various settings as your Select Settings
You can save all printer driver settings as a Select Setting.Additionally, in Select Setting the recommendedsettings for a variety of uses are already available.
This allows you to easily load settings that have beenstored in Select Settings, and repeatedly print usingexactly the same settings.
A Set each item for the Main screen and the PageLayout screen that you want to save as your SelectSettings.
B Click Save/Del in the Main or Page Layout tab.
C When you enter a name in Name and click Save,the settings are saved in Settings List.
You can load the settings you have saved from SelectSetting on the Main screen.
Note:
❏ You can save up to 100 settings.
❏ Select the settings you want to save, and then clickExport to save them to a file. You can share thesettings by clicking Import to import the saved file onanother computer.
❏ Select the settings you want to delete, and then clickDelete.
Adding a Paper Type
This section explains how to register new paperinformation (Paper Configuration) for Print Qualityand Paper Settings (Custom Settings). When settingshave been registered, they are displayed in Media Typeon the printer settings screen and can be selected.
c Important:
When using commercially available paper in EpsonColor Calibration Utility, make sure you registerthe paper information.
A Display the printer driver's Main screen.
U “Printing (Windows)” on page 48
SC-P9000 Series/SC-P7000 Series/SC-P8000 Series/SC-P6000 Series User's Guide
Using the Printer Driver(Windows)
63

B Select Media Type, and then click PaperConfiguration.
When registering commercially available paperas custom paper, select the Epson special mediatype that is closest to the paper you are using.
C Adjust settings for the new custom media andclick OK.
D Click Custom Settings.
E When you enter a name in Name and click Save,the settings are saved in Settings List.
You can select saved settings from Media Type on theMain screen.
Note:
❏ You can save up to 100 settings.
❏ Select the settings you want to save, and then clickExport to save them to a file. You can share thesettings by clicking Import to import the saved file onanother computer.
❏ Select the settings you want to delete, and then clickDelete.
SC-P9000 Series/SC-P7000 Series/SC-P8000 Series/SC-P6000 Series User's Guide
Using the Printer Driver(Windows)
64

Rearranging display items
To display frequently used items right away, you canarrange Select Setting, Media Type, and Paper Size asfollows.
❏ Hide unnecessary items.
❏ Rearrange in an order of most frequent use.
❏ Arrange in groups (folders).
A Go to the Utility tab and click MenuArrangement.
B Select Edit Item.
C Order or group items in the List box.
❏ You can move and order items by dragging anddropping.
❏ To add a new group (folder), click AddGroup.
❏ To delete a group (folder), click DeleteGroup.
❏ Drag and drop unnecessary items to NotDisplay.
Note:When Delete Group is performed, the group(folder) is deleted, however the settings in thedeleted group (folder) remain. You also need todelete individually from Settings List in the savelocation.
D Click Save.
SC-P9000 Series/SC-P7000 Series/SC-P8000 Series/SC-P6000 Series User's Guide
Using the Printer Driver(Windows)
65

Summary of the UtilityTab
You can perform the following maintenance functionsfrom the printer driver's Utility tab.
Nozzle CheckThis function prints a nozzle check pattern to check ifthe print head nozzles are clogged.
If you see banding or gaps in the print outs, performhead cleaning to clear any clogged nozzles.
U “Checking for clogged nozzles” on page 126
Head CleaningIf you see banding or gaps in the print outs, performhead cleaning. Cleans the surface of the print head toimprove the print quality.
U “Cleaning the print head” on page 127
Print Head AlignmentIf the print results appear grainy or out of focus, performPrint Head Alignment. The Print Head Alignmentfunction corrects print head gaps.
U “Adjusting print misalignments (HeadAlignment)” on page 126
EPSON Status Monitor 3You can check the printer's status, such as the remainingink level and error messages, on the computer's screen.
Monitoring PreferencesYou can select the error notifications displayed on theEPSON Status Monitor 3 screen, or register a shortcutfor the Utility icon to the Taskbar.
Note:If you select the Shortcut Icon on the MonitoringPreferences screen, the Utility shortcut icon is displayedon the Windows Taskbar.
By right-clicking the icon, you can display the followingmenu and perform maintenance functions.
EPSON Status Monitor 3 starts when the printer name isclicked from the displayed menu.
Print QueueYou can display the list of all waiting jobs.
On the Print Queue screen, you can view informationon the data waiting to be printed, delete and reprintthese jobs.
Printer and Option Information (SC-P9000 Series/SC-P7000 Series only)Displays the inkset information. These settings shouldnot normally be changed.
If you cannot acquire inkset information automatically,select an inkset according to the ink type that is installedin the printer.
SC-P9000 Series/SC-P7000 Series/SC-P8000 Series/SC-P6000 Series User's Guide
Using the Printer Driver(Windows)
66

Speed and ProgressYou can set various functions for printer driver basicoperations.
Menu ArrangementYou can arrange the display items of Select Setting,Media Type, and Paper Size. For example, you canreorder them by frequency of access.
U “Rearranging display items” on page 65
Export or ImportYou can export or import the printer driver settings.This function is useful when you want to make the sameprinter driver settings on multiple computers.
EPSON LFP Remote Panel 2You can configure custom paper settings and othersettings. For details, see the EPSON LFP Remote Panel 2help.
Epson Color Calibration UtilityStart Epson Color Calibration Utility and performcalibration. See the Epson Color Calibration Utilitymanual for details.
Note:If EPSON LFP Remote Panel 2 and Epson ColorCalibration Utility are grayed out, the applications arenot installed on the computer being used.
You can download the latest applications from the Epsonwebsite.
U “Software on the Website” on page 25
SC-P9000 Series/SC-P7000 Series/SC-P8000 Series/SC-P6000 Series User's Guide
Using the Printer Driver(Windows)
67

Using the PrinterDriver(Mac OS X)
Displaying the SettingsScreen
The display method of the printer driver setting screenmay differ depending on the application or the OSversion.
U “Printing (Mac OS X)” on page 49
Displaying Help
Click in the printer driver setting screen to displayHelp.
Using Presets
You can enter a name in Presets and save the settings forfrequently used setting information (items in Paper Sizeor Print Settings), and setting information forcommercially available paper.
This allows you to easily load settings and repeatedlyprint using exactly the same settings.
Note:Settings saved in Presets can also be selected from EpsonColor Calibration Utility. When using commerciallyavailable paper in Epson Color Calibration Utility, werecommend saving settings in Presets.
Saving to Presets
A Set each item in Paper Size and Print Settings thatyou want to save to the preset.
When registering commercially availablepaper as custom paper(1) Select Print Settings from the list, and then
select the Epson special media type that isclosest to the paper you are using from MediaType.
(2) Select Paper Configuration from the list, andthen make settings according to the paper youwant to register. See the printer driver help formore details on each setting item.
B Click Save Current Settings as Preset... fromPresets.
C Enter a name, and then click OK.
SC-P9000 Series/SC-P7000 Series/SC-P8000 Series/SC-P6000 Series User's Guide
Using the Printer Driver(Mac OS X)
68

Note:When All printers is selected from PresetAvailable For, you can select the saved Preset fromall printer drivers installed on your computer.
The settings are saved to Presets.
You can then select the settings you saved fromPresets.
Deleting from Presets
A On the Print screen, select Show Presets... fromPresets.
B Select the setting you want to delete, click Delete,and then click OK.
Using Epson Printer Utility4
You can perform maintenance tasks such as NozzleCheck or Head Cleaning by using Epson Printer Utility4. This utility is installed automatically when you installthe printer driver.
Starting Epson Printer Utility 4
A Click the Apple menu - System Preferences -Printers & Scanners (or Print & Fax).
B Select the printer and click Options & Supplies >Utility > Open Printer Utility.
Epson Printer Utility 4 Functions
You can perform the following maintenance functionsfrom Epson Printer Utility 4.
SC-P9000 Series/SC-P7000 Series/SC-P8000 Series/SC-P6000 Series User's Guide
Using the Printer Driver(Mac OS X)
69

EPSON Status MonitorYou can check the printer's status, such as the remainingink level and error messages, on the computer's screen.
Nozzle CheckThis function prints a nozzle check pattern to check ifthe print head nozzles are clogged.
If you see banding or gaps in the print outs, performhead cleaning to clear any clogged nozzles.
U “Checking for clogged nozzles” on page 126
Head CleaningIf you see banding or gaps in the print outs, performhead cleaning. Cleans the surface of the print head toimprove the print quality.
U “Cleaning the print head” on page 127
Print Head AlignmentPerform print head alignment if the print results appeargrainy or blurred. The Print Head Alignment functioncorrects print head gaps.
U “Adjusting print misalignments (HeadAlignment)” on page 126
EPSON LFP Remote Panel 2You can configure custom paper settings and othersettings. For details, see the EPSON LFP Remote Panel 2help.
Note:If EPSON LFP Remote Panel 2 is grayed out, theapplication is not installed on the computer being used.
You can download the latest applications from the Epsonwebsite.
U “Software on the Website” on page 25
SC-P9000 Series/SC-P7000 Series/SC-P8000 Series/SC-P6000 Series User's Guide
Using the Printer Driver(Mac OS X)
70

Printing Varieties
Auto Color Adjustment byPhotoEnhance (WindowsOnly)
The printer driver for this printer comes with the Epsonproprietary function PhotoEnhance that makes themost efficient use of the color reproduction area,corrects image data to improve colors before printing.
By using PhotoEnhance, you can correct photo colors tomatch the subject types such as people, scenery, or nightview. You can print color data in sepia or black andwhite. Colors are automatically corrected simply byselecting the print mode.
Note:It is recommended that you use images with a color spaceof sRGB.
A When using applications featuring a colormanagement function, specify how to adjustcolors from these applications.
When using applications without a colormanagement function, start from step 2.
Depending on the type of the application, makethe settings following the table below.
Adobe Photoshop CS3 or laterAdobe Photoshop Elements 6.0 or laterAdobe Photoshop Lightroom 1 or later
OS Color ManagementSettings
Windows 8.1,
Windows 8,
Windows 7,
Windows Vista
Printer Manages Colors
Windows XP(Service Pack 2 orlater and .NET 3.0or later)
Windows XP (otherthan the above)
No Color Management
In other applications, set No ColorManagement.
Note:For information on supported platforms, see thewebsite for the application in question.
Setting example for Adobe Photoshop CS5
Open the Print screen.
Select Color Management and then Document.Select Printer Manages Colors as the ColorHandling setting, and then click Print.
B Display the printer driver's Main screen.
U “Printing (Windows)” on page 48
SC-P9000 Series/SC-P7000 Series/SC-P8000 Series/SC-P6000 Series User's Guide
Printing Varieties
71

C Select Custom Settings from Color Mode, andthen select PhotoEnhance.
To make more detailed adjustments, clickAdvanced, and then proceed to Step 4.
D On the PhotoEnhance screen, you can set effectsto apply to the print data.
See the printer driver help for more details oneach item.
E Check other settings, and then start printing.
Correct color and print
The printer driver automatically and internally correctscolors to match the color space. You can select from thefollowing color correction modes.
❏ EPSON Standard (sRGB)Optimizes the sRGB space and corrects the color.
❏ Adobe RGBAdobe RGB Optimizes the sRGB space and correctsthe color.
Note that if you click Advanced when one of the abovecolor processing options is selected, you can fine-tuneGamma, Brightness, Contrast, Saturation, and colorbalance for the selected option.
Use this option when the application in use does nothave a color correction function.
Making Settings in Windows
A When using applications featuring a colormanagement function, specify how to adjustcolors from these applications.
When using applications without a colormanagement function, start from step 2.
Depending on the type of the application, makethe settings following the table below.
Adobe Photoshop CS3 or laterAdobe Photoshop Elements 6.0 or laterAdobe Photoshop Lightroom 1 or later
OS Color ManagementSettings
Windows 8.1,
Windows 8,
Windows 7,
Windows Vista
Printer Manages Colors
Windows XP(Service Pack 2 orlater and .NET 3.0or later)
Windows XP (otherthan the above)
No Color Management
In other applications, set No ColorManagement.
SC-P9000 Series/SC-P7000 Series/SC-P8000 Series/SC-P6000 Series User's Guide
Printing Varieties
72

Note:For information on supported platforms, see thewebsite for the application in question.
Setting example for Adobe Photoshop CS5
Open the Print screen.
Select Color Management and then Document.Select Printer Manages Colors as the ColorHandling setting, and then click Print.
B Display the printer driver's Main screen.
U “Printing (Windows)” on page 48
C Select Custom Settings from Color Mode, andthen select Color Controls.
To make more detailed adjustments, clickAdvanced, and then proceed to Step 4.
D Make the necessary settings.
See the printer driver help for more details oneach item.
Note:You can adjust the correction value by checking thesample image on the left side of the screen. You canalso use the color circle to fine-tune the colorbalance.
E Check other settings, and then start printing.
Making Settings for Mac OS X
A When using applications featuring a colormanagement function, specify how to adjustcolors from these applications.
When using applications without a colormanagement function, start from step 2.
When using the following applications, select thePrinter Manages Colors color managementoption.
Adobe Photoshop CS3 or laterAdobe Photoshop Elements 6 or laterAdobe Photoshop Lightroom 1 or later
In other applications, set No ColorManagement.
Note:For information on supported platforms, see thewebsite for the application in question.
Setting example for Adobe Photoshop CS5
Open the Print screen.
SC-P9000 Series/SC-P7000 Series/SC-P8000 Series/SC-P6000 Series User's Guide
Printing Varieties
73

Select Color Management and then Document.Select Printer Manages Colors as the ColorHandling setting, and then click Print.
B Display the Print screen.
U “Printing (Mac OS X)” on page 49
C Select Color Matching from the list, and thenclick EPSON Color Controls.
Note:EPSON Color Controls will not be available in thefollowing applications if Step 1 is omitted.
❏ Adobe Photoshop CS3 or later
❏ Adobe Photoshop Lightroom 1 or later
❏ Adobe Photoshop Elements 6 or later
D Select Print Settings from the list, and then selectColor Controls as the Color Settings setting.When adjusting the parameters manually, clickAdvanced Color Settings.
E Make the necessary settings.
See the printer driver help for more details oneach item.
F Check other settings, and then start printing.
SC-P9000 Series/SC-P7000 Series/SC-P8000 Series/SC-P6000 Series User's Guide
Printing Varieties
74

Printing Black and WhitePhotos
You can print black and white photos with richgradation by adjusting the image data color by theprinter driver. You can correct image data whenprinting without processing the data from applications.The original data is not affected.
You cannot select Advanced B&W Photo in thefollowing instances. When printing in black and white,select Black (Windows) or Grayscale (Mac OS X).
❏ When using the Violet inkset for the SC-P9000Series/SC-P7000 Series
❏ When using Singleweight Matte Paper, PhotoQuality Ink Jet Paper, or Plain Paper
Note:It is recommended that you use images with a color spaceof sRGB.
Making Settings in Windows
A When using applications featuring a colormanagement function, specify how to adjustcolors from these applications.
When using applications without a colormanagement function, start from step 2.
Depending on the type of the application, makethe settings following the table below.
Adobe Photoshop CS3 or laterAdobe Photoshop Elements 6.0 or laterAdobe Photoshop Lightroom 1 or later
OS Color ManagementSettings
Windows 8.1,
Windows 8,
Windows 7,
Windows Vista
Printer Manages Colors
Windows XP(Service Pack 2 orlater and .NET 3.0or later)
Windows XP (otherthan the above)
No Color Management
In other applications, set No ColorManagement.
Note:For information on supported platforms, see thewebsite for the application in question.
Setting example for Adobe Photoshop CS5
Open the Print screen.
Select Color Management and then Document.Select Printer Manages Colors or No ColorManagement as the Color Handling setting, andthen click Print.
B Display the printer driver's Main screen.
U “Printing (Windows)” on page 48
C Select Color from Advanced B&W Photo.
SC-P9000 Series/SC-P7000 Series/SC-P8000 Series/SC-P6000 Series User's Guide
Printing Varieties
75

To make detailed adjustments, proceed to Step 4.If you do not want to make adjustments, proceedto Step 6.
D Select Custom Settings from Color Mode, andthen click Advanced.
E Make the necessary settings.
See the printer driver help for more details oneach item.
F Check other settings, and then start printing.
Making Settings for Mac OS X
A When using applications featuring a colormanagement function, specify how to adjustcolors from these applications.
When using the following applications, select thePrinter Manages Colors color managementoption.
Adobe Photoshop CS3 or laterAdobe Photoshop Elements 6 or laterAdobe Photoshop Lightroom 1 or later
In other applications, set No ColorManagement.
Note:For information on supported platforms, see thewebsite for the application in question.
Setting example for Adobe Photoshop CS5
Open the Print screen.
Select Color Management and then Document.Select Printer Manages Colors as the ColorHandling setting, and then click Print.
SC-P9000 Series/SC-P7000 Series/SC-P8000 Series/SC-P6000 Series User's Guide
Printing Varieties
76

B Display the Print screen, select Print Settingsfrom the list, and then select Advanced B&WPhoto as the Color.
U “Printing (Mac OS X)” on page 49
C Click Advanced Color Settings.
D Make the necessary settings.
See the printer driver help for more details oneach item.
E Check other settings, and then start printing.
SC-P9000 Series/SC-P7000 Series/SC-P8000 Series/SC-P6000 Series User's Guide
Printing Varieties
77

Borderless Printing
You can print your data without margins on the paper.
The types of borderless printing you can choose vary asshown below depending on the media type.
Roll Paper: No margins for all edges, no margins for theleft and right
Cut Sheets: No margins for the left and right only
(Borderless printing is not available with poster board.)
When printing borderless for all edges, you can alsoconfigure the cutting operation.
U “About Roll Paper Cutting” on page 79
When performing left and right borderless printing,margins appear on the top and bottom of the paper.
Top and bottom margin values U “Printable area” onpage 52
Types of Borderless Printing Methods
You can perform borderless printing using thefollowing two methods.
❏ Auto ExpandThe printer driver enlarges the print data to a sizeslightly larger than the paper size and prints theenlarged image. The sections which are beyond thepaper edges are not printed; therefore, resulting inborderless printing.Use settings such as Page Setup in the applicationsto set the size of the image data as follows.
- Match the paper size and page setting for the printdata.
- If the application has margin settings, set themargins to 0 mm.
- Make the image data as large as the paper size.
❏ Retain SizeCreate the print data larger than the paper size inthe applications to produce borderless output. Theprinter driver does not enlarge the image data. Usesettings such as Page Setup in the applications to setthe size of the image data as follows.
- Create print data larger than its actual print size by 3mm on the left and right (6 mm in total).
- If the application has margin settings, set themargins to 0 mm.
- Make the image data as large as the paper size.
Select this setting if you want to avoid imageenlargement by the printer driver.
Supported Paper
Depending on the media type or size, the print qualitymay decline or borderless printing cannot be selected.
U “Epson Special Media Table” on page 159
U “Supported Commercially Available Paper” onpage 176
SC-P9000 Series/SC-P7000 Series/SC-P8000 Series/SC-P6000 Series User's Guide
Printing Varieties
78

About Roll Paper Cutting
When performing borderless printing on roll paper, you can specify whether it is left and right borderless printing orall edges borderless printing, and how to cut the paper in the printer driver's Roll Paper Option. The cutting operationfor each value is shown in the following chart.
Printer driversettings
Normal Cut Single Cut Double Cut
Cutting Operation
Explanation
The default printer driver settingis Normal Cut.
❏ The top area may becomeslightly uneven dependingon the image since the printoperation stops whilecutting the top edge of theroll paper.
❏ If the cut position ismisaligned slightly, smallparts of the image may beshown on the top orbottom of the adjacentpages. If this occurs,perform Adjust CutPosition.U “Maintenance” onpage 114
❏ When you print one pageonly or print one pagemultiple times, theoperation is the same asthat for Double Cut. Whencontinuously printingmultiple sheets, the printercuts 1 mm inside on the topedge of the first page andthe bottom edge of thesubsequent pages to avoidshowing margins.
❏ The top area may becomeslightly uneven dependingon the image since the printoperation stops whilecutting the top edge of theroll paper.
❏ The printed paper isapproximately 2 mmshorter than the specifiedsize since the printer cutsthe paper inside the imageto avoid showing top andbottom margins.
❏ After cutting the bottomedge of the previous page,the printer feeds the paper,and then cuts the top edgeof the following page.Although this produces 60to 127 mm cut-off pieces,the cut is more accurate.
SC-P9000 Series/SC-P7000 Series/SC-P8000 Series/SC-P6000 Series User's Guide
Printing Varieties
79

Setting Procedures for Printing
Making Settings in Windows
A When the printer driver's Main screen isdisplayed, you can configure various settingsrequired for printing such as Media Type,Source, Size.
U “Printing (Windows)” on page 48
B Select Borderless, and then click Expansion.
You can not choose the expansion amount whenRoll Paper or Roll Paper (Banner) is selected forSource.
C Select Auto Expand or Retain Size as theMethod of Enlargement.
If you select Auto Expand, set how much of theimage goes beyond the edge of the paper asshown below.
Max : 3 mm for left and 5 mm for right (theimage shifts 1 mm to the right)
Normal : 3 mm for left and right
Min : 1.5mm for left and right
Note:Moving the slider towards Min decreases the imageenlargement ratio. Therefore, some margins mayappear at the edges of the paper depending on thepaper and printing environment.
SC-P9000 Series/SC-P7000 Series/SC-P8000 Series/SC-P6000 Series User's Guide
Printing Varieties
80

D When using roll paper, click Roll Paper Option,and then set Auto Cut option.
U “About Roll Paper Cutting” on page 79
E Check other settings, and then start printing.
Making Settings for Mac OS X
A Open the Print screen and select the paper sizefrom the Paper Size option, and then select aborderless printing method.
U “Printing (Mac OS X)” on page 49
The selections for borderless printing methodsare displayed as shown below.
xxxx (Roll Paper - Borderless, Auto Expand)
xxxx (Roll Paper - Borderless, Retain Size)
xxxx (Sheet - Borderless, Auto Expand)
xxxx (Sheet - Borderless, Retain Size)
Where XXXX is the actual paper size, such as A4.
Note:If page setting options are not available in theapplication's print dialog, display the page settingsdialog.
B Select Page Layout Settings from the list, andthen set Roll Paper Option or Expansion.
See the following for more details on Auto Cutfrom Roll Paper Option.
U “About Roll Paper Cutting” on page 79
Expansion is only available when Auto Expandis selected from Paper Size. The following showsthe values for each item.
Max : 3 mm for left and 5 mm for right (theimage shifts 1 mm to the right)
Normal : 3 mm for left and right
Min : 1.5mm for left and right
SC-P9000 Series/SC-P7000 Series/SC-P8000 Series/SC-P6000 Series User's Guide
Printing Varieties
81

Note:Moving the slider towards Min decreases the imageenlargement ratio. Therefore, some margins mayappear at the edges of the paper depending on thepaper and printing environment.
C Check other settings, and then start printing.
Enlarged/ReducedPrinting
You can enlarge or reduce the size of your data. Thereare three setting methods.
❏ Fit to Page printingAutomatically enlarges or reduces the image size tofit the paper size.
❏ Fit to Roll Paper Width (Windows only)Automatically enlarges or reduces the image size tofit the roll paper width.
❏ CustomYou can specify the enlargement or reduction ratio.Use this method for a non-standard paper size.
SC-P9000 Series/SC-P7000 Series/SC-P8000 Series/SC-P6000 Series User's Guide
Printing Varieties
82

Fit to Page/Scale to fit paper size
Making Settings in Windows
A When the printer driver's Page Layout screen isdisplayed, set the same paper size as the data'spaper size in Page Size or Paper Size.
U “Printing (Windows)” on page 48
B Select the size of the paper loaded in the printerfrom the Output Paper list.
Fit to Page is selected as Reduce/Enlarge.
C Check other settings, and then start printing.
Making Settings for Mac OS X
A Open the Print screen, select Paper Handlingfrom the list, and then check Scale to fit papersize.
U “Printing (Mac OS X)” on page 49
B Select the size of the paper loaded in the printer asthe Destination Paper Size.
Note:When performing enlarged printing, clear theScale down only check box.
C Check other settings, and then start printing.
SC-P9000 Series/SC-P7000 Series/SC-P8000 Series/SC-P6000 Series User's Guide
Printing Varieties
83

Fit to Roll Paper Width(Windows Only)
A Display the printer driver Main tab and selectRoll Paper for Source.
U “Printing (Windows)” on page 48
B Display the Page Layout tab and choose a PageSize that matches the page size used in thedocument size.
C Select the size of the paper loaded in the printerfrom the Output Paper list.
Fit to Page is selected as Reduce/Enlarge.
D Select Fit to Roll Paper Width.
E Select the width of the roll paper loaded in theprinter from the Roll Width list.
F Check other settings, and then start printing.
Custom Scale Setting
Making Settings in Windows
A When the printer driver's Page Layout screen isdisplayed, set the same paper size as the data'spaper size in Page Size or Paper Size.
U “Printing (Windows)” on page 48
SC-P9000 Series/SC-P7000 Series/SC-P8000 Series/SC-P6000 Series User's Guide
Printing Varieties
84

B Select the size of the paper loaded in the printerfrom the Output Paper list.
Fit to Page is selected as Reduce/Enlarge.
C Select Custom, and then set the Scale to value.
Enter a value directly or click the arrows to theright of the scale box to set the value.
Select the scale within a range of 10 to 650 %.
D Check other settings, and then start printing.
Making Settings for Mac OS X
A When the Print screen is displayed, select the sizeof the paper loaded in the printer from the PaperSize list.
U “Printing (Mac OS X)” on page 49
B Click Scale, and then enter the scale.
If the Print screen in the application you are usingdoes not have an input item for the scale that youwant to use, display the Page Setup screen andmake settings.
SC-P9000 Series/SC-P7000 Series/SC-P8000 Series/SC-P6000 Series User's Guide
Printing Varieties
85

U “Printing (Mac OS X)” on page 49 Multi-Page Printing
You can print multiple pages of your document on onesheet of paper.
If you print continuous data prepared at A4 size, it isprinted as shown below.
Note:
❏ In Windows, you cannot use the Multi-Pageprinting function when performing borderlessprinting.
❏ In Windows, you can use the reduce/enlargefunction (Fit to Page) to print the data on differentsizes of paper.U “Enlarged/Reduced Printing” on page 82
SC-P9000 Series/SC-P7000 Series/SC-P8000 Series/SC-P6000 Series User's Guide
Printing Varieties
86

Making Settings in Windows
A When the printer driver's Page Layout screen isdisplayed, select the Multi-Page check box, selectN-up, and then click Settings.
U “Printing (Windows)” on page 48
B In the Print Layout screen, specify the number ofpages per sheet and the page order.
If the Print page frames check box is selected,page frames are printed on each page.
C Check other settings, and then start printing.
Making Settings for Mac OS X
A When the Print screen is displayed, select Layoutfrom the list, and then specify the number ofpages per sheet and so on.
U “Printing (Mac OS X)” on page 49
Note:You can print frames around arranged pages usingthe Border function.
B Check other settings, and then start printing.
SC-P9000 Series/SC-P7000 Series/SC-P8000 Series/SC-P6000 Series User's Guide
Printing Varieties
87

Poster Printing (Enlargeto cover several sheetsand print - Windows only)
The poster printing function automatically enlarges anddivides the print data. You can join the printed sheets tocreate a large poster or calendar. Poster printing isavailable up to 16-fold (four sheets by four sheets) ofnormal printing size. There are two ways to printposters.
❏ Borderless poster printingThis automatically enlarges and divides the printdata and prints without margins. You can make aposter just by joining the output paper together. Toperform borderless printing, the data is expandedso that it extends slightly over the paper size.Enlarged areas that exceed the paper are notprinted. Therefore, the image may misalign at thejoins. To join the pages precisely, perform thefollowing poster printing with margins.
❏ Poster printing with marginsThis automatically enlarges and divides the printdata and prints with margins. You need to cut themargins and then join the output paper together tomake a poster. Although the final size is slightlysmaller since you have to cut off the margins, theimage joins fit precisely.
Setting Procedures for Printing
A Prepare the print data using applications.
The printer driver automatically enlarges theimage data when printing.
B When the printer driver's Page Layout screen isdisplayed, select the Multi-Page check box, selectPoster, and then click Settings.
U “Printing (Windows)” on page 48
C In the Poster Settings screen, select the numberof pages you want in the poster.
SC-P9000 Series/SC-P7000 Series/SC-P8000 Series/SC-P6000 Series User's Guide
Printing Varieties
88

D Select borderless poster printing or posterprinting with margins, and then select any pagesthat you do not want to print.
When borderless is selected:Select Borderless Poster Print.
Note:If Borderless Poster Print is grayed out, theselected paper or the size does not supportborderless printing.
U “Epson Special Media Table” on page 159
U “Supported Commercially Available Paper”on page 176
When with margins is selected:Clear Borderless Poster Print.
Note:Regarding the size after joining together:
When Borderless Poster Print is cleared andprinting with margins is selected, the Print CuttingGuides items are displayed.
The finished size is the same whether or not TrimLines is selected. However, if OverlappingAlignment Marks is selected, the finished size issmaller with an overlap.
E Check other settings, and then start printing.
SC-P9000 Series/SC-P7000 Series/SC-P8000 Series/SC-P6000 Series User's Guide
Printing Varieties
89

Joining the output paper together
The steps for joining the output paper together differbetween borderless poster printing and poster printingwith margins.
Borderless poster printingThis section describes how to join four printed pagestogether. Check and match the printed pages, and jointhem in the order indicated below using an adhesivetape on the back of the sheets.
Poster printing with marginsIf Overlapping Alignment Marks is selected, joinguides (indicated by the lines drawn through andaround the X marks in the illustration below) will beprinted on each sheet.
Note:The alignment marks are black for black-and-whiteprinting.
The following section describes how to join four printedpages together.
A Ready the two top sheets and trim the excessfrom the left sheet by cutting along the linejoining the two join guides (the centers of the Xmarks).
B Lay the upper left sheet on top of upper rightsheet. Lineup the X marks as shown in theillustration below, and temporarily fasten themusing an adhesive tape on the back.
SC-P9000 Series/SC-P7000 Series/SC-P8000 Series/SC-P6000 Series User's Guide
Printing Varieties
90

C With the two sheets overlapping, trim the excessby cutting along the line joining the two cutguides (the lines to the left of the X marks).
D Rejoin the two sheets.
Use an adhesive tape to stick the backs of thesheets together.
E Repeat Steps 1 to 4 for the lower sheets.
F Trim the bottom from the upper sheets bycutting along the line joining the two guides (thelines above the X marks).
G Lay the upper sheet on top of the lower sheet.Lineup the X marks as shown in the illustrationbelow, and temporarily fasten them using anadhesive tape on the back.
SC-P9000 Series/SC-P7000 Series/SC-P8000 Series/SC-P6000 Series User's Guide
Printing Varieties
91

H With the two sheets overlapping, trim the excessby cutting along the line joining the two cutguides (the lines above the X marks).
I Join the upper and lower sheets together.
Use an adhesive tape to stick the backs of thesheets together.
SC-P9000 Series/SC-P7000 Series/SC-P8000 Series/SC-P6000 Series User's Guide
Printing Varieties
92

J After joining all the sheets, trim off the borders bycutting along the cut guides (outside the Xmarks).
Printing at Non-StandardSizes
Before printing at non-standard sizes, including verticalor horizontal banners and documents with equal sides,save the desired paper size in the printer driver. Oncethey have been saved in the printer driver, custom sizescan be selected in the application Page Setup and otherprint dialogs.
Supported paper sizesThe following table shows the paper sizes that can be setin the printer driver. See the following for paper sizessupported by the printer.
U “Printable area” on page 52
PaperWidth
SC-P9000 Series/SC-P8000 Series
89*1 to 1118 mm
SC-P7000 Series/SC-P6000 Series
89*1 to 610 mm
PaperHeight
Windows: 127*1 to 15000 mm
Mac OS X: 127*1 to 15240 mm*2
*1 The smallest size supported by the printer is 182mm wide by 254 mm long. If a smaller size isentered in the printer driver as a Custom PaperSize, the document will print withwider-than-expected margins, which must betrimmed.
*2 For Mac OS X Custom Paper Sizes, although youcan specify a large paper size which cannot beloaded on this printer, it will not be printedproperly.
SC-P9000 Series/SC-P7000 Series/SC-P8000 Series/SC-P6000 Series User's Guide
Printing Varieties
93

c Important:
When using commercially available software, thepossible output sizes are restricted. If you are usingapplications that support banner printing, you canset a longer paper length. See the application'smanual for details.
Making Settings in Windows
A When the printer driver's Main screen isdisplayed, click User Defined.
U “Printing (Windows)” on page 48
B In the User Defined Paper Size screen, set thepaper size you want to use, and then click Save.
❏ You can enter up to 24 single-byte charactersfor the Paper Size Name.
❏ The length and width values for a pre-definedsize close to the desired custom size can bedisplayed by selecting the appropriate optionin the Base Paper Size menu.
❏ If the length and width ratio is the same as adefined paper size, select the defined paper sizefrom Fix Aspect Ratio and select eitherLandscape or Portrait for the Base. In thiscase, you can only adjust either the paper widthor paper height.
Note:
❏ To change the paper size you saved, select thepaper size name from the list on the left.
❏ To delete the user-defined size you saved,select the paper size name from the list on theleft, and then click Delete.
❏ You can save up to 100 paper sizes.
C Click OK.
You can now select the new paper size from theSize menu in the Main tab.
You can now print as normal.
Making Settings for Mac OS X
A When the Print screen is displayed, selectManage Custom Sizes from the Paper Size list.
If page setting options are not available in theapplication's print dialog, display the pagesettings dialog.
SC-P9000 Series/SC-P7000 Series/SC-P8000 Series/SC-P6000 Series User's Guide
Printing Varieties
94

U “Printing (Mac OS X)” on page 49
B Click +, and then enter the paper size name.
C Enter the Width, Height for the Paper Size,enter the margins, and then click OK.
You can set the page size and printer marginsdepending on the printing method.
Note:
❏ To edit a saved custom size, choose its namefrom the list on the left.
❏ To copy a saved custom size, select the size inthe list on the left and click Duplicate.
❏ To delete a saved custom size, select it in the liston the left and click -.
❏ The custom paper size setting differsdepending on the operating system version.See your operating system's documentationfor details.
D Click OK.
You can select the paper size you saved from thePaper Size pop-up menu.
You can now print as normal.
SC-P9000 Series/SC-P7000 Series/SC-P8000 Series/SC-P6000 Series User's Guide
Printing Varieties
95

Banner printing (on rollpaper)
You can print banners and panoramic pictures if youcreate and set print data for banner printing in yourapplication.
There are two ways to print a banner.
Printer Driver Source Supported Applications
Roll Paper Document preparationsoftware, image editingsoftware, and so on*
Roll paper (Banner) Applications that supportbanner printing
* Create print data at a size supported by the givenapplication while maintaining the printing lengthand width ratio.
See the following for available paper sizes.
U “Printing at Non-Standard Sizes” on page 93
Making Settings in Windows
A In the printer driver's Main screen, select MediaType.
U “Printing (Windows)” on page 48
B Select Roll Paper or Roll Paper (Banner) fromthe Source list.
Note:
❏ You can only use Roll Paper (Banner) forapplications that support banner printing.
❏ Selecting Roll Paper (Banner) sets the top andbottom margins of the paper to 0 mm.
SC-P9000 Series/SC-P7000 Series/SC-P8000 Series/SC-P6000 Series User's Guide
Printing Varieties
96

C Click User Defined and match the paper size tothe size of the data if necessary.
Note:If you are using applications that support bannerprinting, you do not need to set User DefinedPaper Size if you select Roll Paper (Banner) as theSource.
D On the Page Layout screen make sure theOptimize Enlargement check box is selected.
E Check other settings, and then start printing.
Making Settings for Mac OS X
A When the Print screen is displayed, select the sizeof the data created with the application in PaperSize.
If page setting options are not available in theapplication's print dialog, display the pagesettings dialog.
U “Printing (Mac OS X)” on page 49
B Check other settings, and then start printing.
SC-P9000 Series/SC-P7000 Series/SC-P8000 Series/SC-P6000 Series User's Guide
Printing Varieties
97
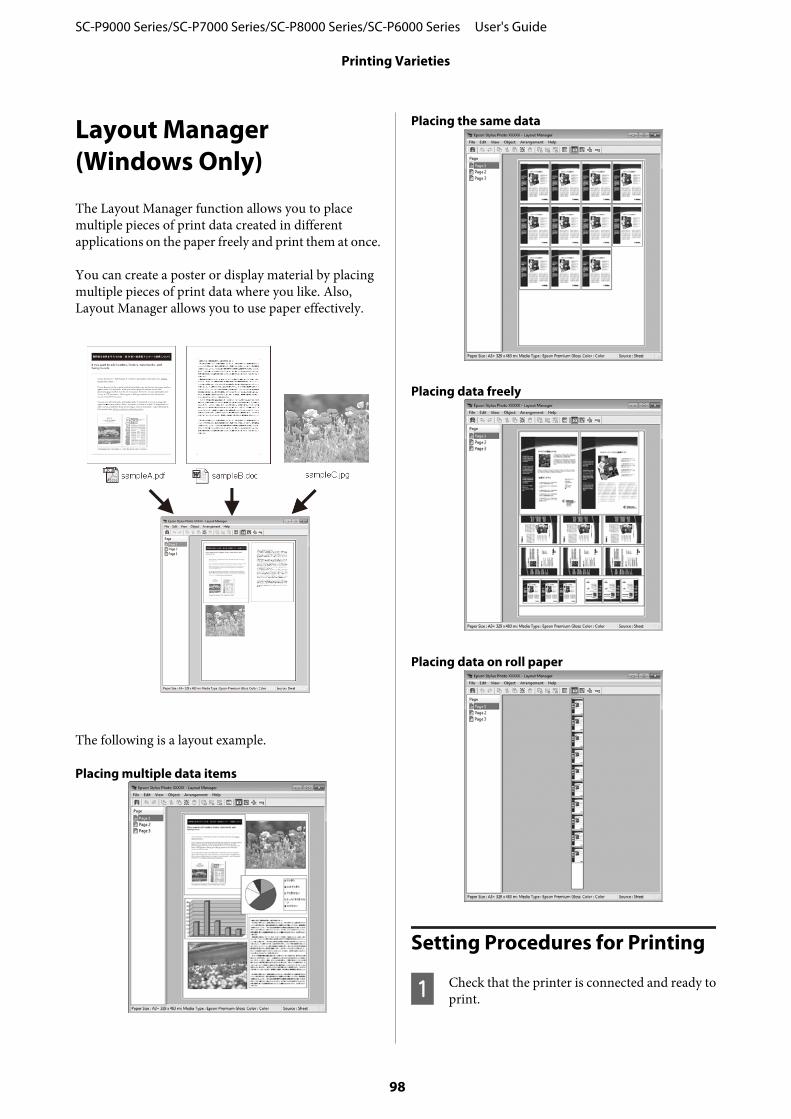
Layout Manager(Windows Only)
The Layout Manager function allows you to placemultiple pieces of print data created in differentapplications on the paper freely and print them at once.
You can create a poster or display material by placingmultiple pieces of print data where you like. Also,Layout Manager allows you to use paper effectively.
The following is a layout example.
Placing multiple data items
Placing the same data
Placing data freely
Placing data on roll paper
Setting Procedures for Printing
A Check that the printer is connected and ready toprint.
SC-P9000 Series/SC-P7000 Series/SC-P8000 Series/SC-P6000 Series User's Guide
Printing Varieties
98

B Open the file you want to print in yourapplication.
C Select Layout Manager in the Main tab of theprinter driver and choose an option for Size thatmatches the size of the document created in theapplication.
U “Printing (Windows)” on page 48
Note:The option selected for Size is the size used in theLayout Manager. The actual printing paper size isset in the screen in Step 7.
D Click OK. When printing with an application,the Layout Manager screen opens.
The print data is not printed, but one page isplaced on the paper of the Layout Managerscreen as one object.
E Leave the Layout Manager screen open andrepeat steps 2 to 4 to arrange the next pieces ofdata.
The objects are added to the Layout Managerscreen.
F Arrange the objects on the Layout Managerscreen.
Objects can be dragged to new positions andresized; in addition, they can be rearranged orrotated using the options in the Object menu.
The overall size and placement of the objects canbe changed using the Preferences andArrangement options in the File menu.
See the Layout Manager screen help for moredetails on each function.
SC-P9000 Series/SC-P7000 Series/SC-P8000 Series/SC-P6000 Series User's Guide
Printing Varieties
99

G Click File - Properties, and make print settingson the printer driver screen.
Set Media Type, Source, Size or Roll Width, andso on.
H Click the File menu on the Layout Managerscreen, and then click Print.
Printing starts.
Saving and Recalling Settings
You can save the Layout Manager screen arrangementand setting contents to a file. If you need to close yourapplication in the middle of a job, you can save it to a fileand then open it later to continue your work.
Saving
A On the Layout Manager screen, click File menuand then Save as.
B Enter the file name, select the location, and thenclick Save.
C Close the Layout Manager screen.
Opening saved files
A Right-click the utility icon ( ) in the Windowstaskbar and select Layout Manager from themenu that appears.
The Layout Manager screen is displayed.
If the Utility shortcut icon is not displayed on theWindows TaskbarU “Summary of the UtilityTab” on page 66
B On the Layout Manager screen, click File menuand then Open.
C Select the location and open the required file.
SC-P9000 Series/SC-P7000 Series/SC-P8000 Series/SC-P6000 Series User's Guide
Printing Varieties
100

Color ManagementPrinting
About Color Management
Even when using the same image data, the originalimage and the displayed image may look different, andthe printed results may look different to the image yousee on the display. This occurs due to the difference incharacteristics when input devices such as scanners anddigital cameras capture colors as electronic data, andwhen output devices such as display screens andprinters reproduce colors from the color data. The colormanagement system is a means to adjust differences incolor conversion characteristics among input andoutput devices. As well as applications for imageprocessing, each operating system is equipped with acolor management system, such as ICM for Windowsand ColorSync for Mac OS X.
In a color management system, a color definition filecalled a "Profile" is used to perform color matchingbetween devices. (This file is also called an ICC profile.)The profile of an input device is called an input profile(or source profile), and the profile of an output device,such as a printer, is called a printer profile (or outputprofile). A profile is prepared for each media type in thisprinter's driver.
The color conversion areas by the input device and thecolor reproduction area by the output device differ. As aresult, there are color areas that do not match even whenperforming color matching using a profile. In additionto specifying profiles, the color management systemalso specifies conversion conditions for areas wherecolor matching failed as "intent". The name and type ofintent vary depending on the color management systemyou are using.
You cannot match the colors on the printed results anddisplay by color management between the input deviceand the printer. To match both colors, you need toperform color management between the input deviceand the display as well.
Color Management PrintSettings
You can perform color management printing using thisprinter's printer driver in the following two ways.
Choose the best method according to the applicationyou are using, the operating system environment, theaim of the print out, and so on.
Setting color management with the applicationsThis method is for printing from applications thatsupport color management. All color managementprocesses are carried out by the application's colormanagement system. This method is useful when youwant to obtain the same color management print resultsusing a common application among different operatingsystem environments.
U “Setting color management with the applications”on page 102
Setting color management with the printer driverThe printer driver uses the operating system's colormanagement system and carries out all colormanagement processes. You can make colormanagement settings in the printer driver using thefollowing two methods.
❏ Host ICM (Windows) / ColorSync (Mac OS X)Set when printing from applications that supportcolor management. This is effective in producingsimilar print results from different applicationsunder the same operating systems.U “Color management printing by Host ICM(Windows)” on page 104U “Color management printing by ColorSync(Mac OS X)” on page 105
❏ Driver ICM (Windows only)This allows you to perform color managementprinting from applications that do not supportcolor management.U “Color management printing by DriverICM(Windows Only)” on page 105
SC-P9000 Series/SC-P7000 Series/SC-P8000 Series/SC-P6000 Series User's Guide
Color Management Printing
101

Setting profiles
Settings for the input profile, printer profile, and intent(matching method) vary between three types of colormanagement printing since their color managementengines are used differently. This is because colormanagement usage differs between the engines. Makesettings in the printer driver or application as describedin the following table.
Inputprofilesettings
Printerprofilesettings
Intentsettings
Driver ICM(Windows)
PrinterDriver
PrinterDriver
PrinterDriver
Host ICM(Windows)
Application PrinterDriver
PrinterDriver
ColorSync(Mac OS X)
Application PrinterDriver
Application
Application Application Application Application
Printer profiles for each paper type that is needed whenperforming color management are installed with theprinter's printer driver. You can select the profile fromthe printer driver's settings screen.
You can select the profile from the printer driver'ssettings screen.
U “Color management printing by DriverICM(Windows Only)” on page 105
U “Color management printing by Host ICM(Windows)” on page 104
U “Color management printing by ColorSync (MacOS X)” on page 105
U “Setting color management with the applications”on page 102
Setting colormanagement with theapplications
Print using applications with a color managementfunction. Make the color management settings in theapplication and disable the printer driver's coloradjustment function.
A Make color management settings in theapplications.
Setting example for Adobe Photoshop CS5
Open the Print screen.
Select Color Management and then Document.Select Photoshop Manages Colors as the ColorHandling setting, select the Printer Profile andthe Rendering Intent, and then click Print.
B Display the printer driver's settings screen(Windows) or Print screen (Mac OS X).
Make printer driver settings.
For WindowsU “Printing (Windows)” on page 48
For Mac OS XU “Printing (Mac OS X)” on page 49
SC-P9000 Series/SC-P7000 Series/SC-P8000 Series/SC-P6000 Series User's Guide
Color Management Printing
102

C Set color management to off.
For WindowsIn the Main screen, select Custom as the Modesetting, and select Off (No Color Adjustment).
Note:In Windows 7, Windows Vista, and Windows XP(Service Pack 2 or later and .NET 3.0) Off (NoColor Adjustment) is selected automatically.
For Mac OS XSelect Print Settings from the list, and then selectOff (No Color Adjustment) as the ColorSettings setting.
D Check other settings, and then start printing.
SC-P9000 Series/SC-P7000 Series/SC-P8000 Series/SC-P6000 Series User's Guide
Color Management Printing
103

Setting colormanagement with theprinter driver
Color management printing by Host ICM (Windows)
Use image data in which an input profile has beenembedded. Also, the application must support ICM.
A Make the settings for color adjustment using theapplication.
Depending on the type of the application, makethe settings following the table below.
Adobe Photoshop CS3 or laterAdobe Photoshop Elements 6.0 or laterAdobe Photoshop Lightroom 1 or later
OS Color ManagementSettings
Windows 8.1,
Windows 8,
Windows 7,
Windows Vista
Printer Manages Colors
Windows XP(Service Pack 2 orlater and .NET 3.0or later)
Windows XP (otherthan the above)
No Color Management
In other applications, set No ColorManagement.
Note:For information on supported platforms, see thewebsite for the application in question.
Setting example for Adobe Photoshop CS5
Open the Print screen.
Select Color Management and then Document.Select Printer Manages Colors as the ColorHandling setting, and then click Print.
When using applications without a colormanagement function, start from step 2.
B In the printer driver's Main screen, selectCustom as the Mode, select ICM, and then clickAdvanced.
U “Printing (Windows)” on page 48
C Select ICM Mode in Printer Color Adjustment.
See the printer driver help for more details.
SC-P9000 Series/SC-P7000 Series/SC-P8000 Series/SC-P6000 Series User's Guide
Color Management Printing
104

When Epson special media is selected for MediaType in the Main screen, the printer profilecorresponding to the media type is automaticallyselected and displayed in the Printer ProfileDescription box.
To change the profile, select Show all profiles atthe bottom.
D Check other settings, and then start printing.
Color management printing by ColorSync (Mac OS X)
Use image data in which an input profile has beenembedded. Also, the application must supportColorSync.
Note:Depending on the application, color managementprinting by ColorSync may not be supported.
A Disable the color management functions in theapplication.
B Display the Print screen.
U “Printing (Mac OS X)” on page 49
C Select Color Matching from the list, and thenclick ColorSync.
D Check other settings, and then start printing.
Color management printing by Driver ICM(Windows Only)
The printer driver uses its own printer profiles toperform color management. You can use the followingtwo color correction methods.
❏ Driver ICM (Basic)Specify one type of profile and intent for processingthe entire image data.
❏ Driver ICM (Advanced)The printer driver distinguishes the image data intothe Image, Graphics, and Text areas. Specify threetypes of profiles and intents for processing eacharea.
When using applications featuring a colormanagement functionMake the settings for color processing using theapplication before making printer driver settings.
Depending on the type of the application, make thesettings following the table below.
Adobe Photoshop CS3 or laterAdobe Photoshop Elements 6.0 or laterAdobe Photoshop Lightroom 1 or later
SC-P9000 Series/SC-P7000 Series/SC-P8000 Series/SC-P6000 Series User's Guide
Color Management Printing
105

OS Color ManagementSettings
Windows 8.1,
Windows 8,
Windows 7,
Windows Vista
Printer Manages Colors
Windows XP (Service Pack2 or later and .NET 3.0 orlater)
Windows XP (other thanthe above)
No Color Management
In other applications, set No Color Management.
Note:For information on supported platforms, see the websitefor the application in question.
Setting example for Adobe Photoshop CS5
Open the Print screen.
Select Color Management and then Document. SelectPrinter Manages Colors as the Color Handling setting,and then click Print.
A In the printer driver's Main screen, selectCustom as the Mode, select ICM, and then clickAdvanced.
U “Printing (Windows)” on page 48
B From ICM Mode in the ICM screen, selectDriver ICM (Basic) or Driver ICM(Advanced).
If you select Driver ICM (Advanced), you canspecify the profiles and intent for each imagesuch as photos, graphics, and text data.
Intent Explanation
Saturation Keeps the current saturationunchanged and converts thedata.
SC-P9000 Series/SC-P7000 Series/SC-P8000 Series/SC-P6000 Series User's Guide
Color Management Printing
106

Intent Explanation
Perceptual Converts the data so that a morevisually natural image isproduced. This feature is usedwhen a wider gamut of color isused for image data.
RelativeColorimetric
Converts the data so that a set ofcolor gamut and white point (orcolor temperature) coordinatesin the original data match theircorresponding print coordinates.This feature is used for manytypes of color matching.
AbsoluteColorimetric
Assigns absolute color gamutcoordinates to the original andprint data and converts the data.Therefore, color tone adjustmentis not performed on any whitepoint (or color temperature) forthe original or print data. Thisfeature is used for specialpurposes such as logo colorprinting.
C Check other settings, and then start printing.
SC-P9000 Series/SC-P7000 Series/SC-P8000 Series/SC-P6000 Series User's Guide
Color Management Printing
107

Using the Control Panel Menu
Menu Operations
Operate the menus as shown below. The explanations use the Maintenance menu as an example.
OK
OKOK OK
OKMenu Maintenance Print Job Paper Printer Setup Printer Status
Nozzle CheckPress to printnozzle check pattern.
Proceed Cancel
Maintenance Nozzle Check Head Cleaning Head Alignment Cutter Maintenance
Proceed BackProceed Back
Paper Loading Method Roll Paper Cut Sheet(Under A3) Cut Sheet(Over A3) Poster Board
Proceed Back
Select Ink Cover to Open Open Right Cover Open Left Cover Open Both Covers
Done Back
Paper Source Roll Paper / Cut Roll Paper / No Cut Cut Sheet
Done Back
Switching Black InkSwitch black ink to ?
Yes No
Done
*1 After pressing the Z button to select the highlighted option, press the l button to return to the previous menu.Press the W button to exit.
*2 Instructions are not displayed when paper is loaded.
SC-P9000 Series/SC-P7000 Series/SC-P8000 Series/SC-P6000 Series User's Guide
Using the Control Panel Menu
108

Menu List
The items and options available in the menu are described below. See the reference pages for more details on eachitem.
Maintenance menu
U “Maintenance” on page 114
Menu item Description
Nozzle Check Press Z to start printing.
Head Cleaning All Nozzles Normal, Heavy Press Z to start cleaning.
XX/XX (where XXindicates the inkcolor code)
Normal, Heavy
Head Alignment Auto Uni-D, Bi-D 2-color,Bi-D All Color, Bi-D #1to #4
Press Z to start printing/alignment.
Manual Uni-D, Bi-D 2-color,Bi-D All Color
Press Z to start printing.
CutterMaintenance
Adjust Cut Position -3 to 3mm
Replace Cutter Press Z to start move.
Print Queues menu
This menu is only available when the optional hard disk unit is installed.
U “Print Queues” on page 115
Menu item Description
Print Queue XXXXXXXXXXX (name of print queue) Lists the Waiting Job Name, User, Estimated Start Time, andEstimated Print Time.
Hold Queue View HoldQueue
XXXXXXXXXXX(name of hold queue)
Lists the Paused Job Name, User, Paper Type, Source, Size,and Reason For Hold.
Resume All Jobs Press Z to start printing.
Saved Job Queue XXXXXXXXXXX (name of saved job queue) Lists the Stored Job Name, User, Paper Length, Pages, PaperType, Copies, Source, Size, and Estimated Print Time.
When the job name is selected and you press the r button,the File Options menu is displayed.
SC-P9000 Series/SC-P7000 Series/SC-P8000 Series/SC-P6000 Series User's Guide
Using the Control Panel Menu
109

Paper menu
Items marked with an asterisk (*) are only available when the optional hard disk unit is installed.
U “Paper” on page 116
Menu item Description
Select Paper Type Photo Paper Lists supported Epson media.
Proofing Paper
Fine Art Paper
Matte Paper
Plain Paper
Others
Custom Paper Lists the names of user-defined custom paper types.
Custom Paper Setting -
XXXXXXXXXXXXXXXXXXXX Lists the names of custom paper types.
Select Reference Paper Photo Paper Lists supported Epson media.
Proofing Paper
Fine Art Paper
Matte Paper
Plain Paper
Others
No Paper Selected -
Platen Gap Narrow, Standard, Wide, Wider, Widest
Detect Paper Thickness Press Z to start printing.
Paper Feed Adjust Pattern Press Z to start printing.
Value -0.70 to +0.70%
Paper Suction -4 to 0
Drying Time Per Pass 0 to 10 sec
Roll Paper Tension Normal, High, Extra High
Remove Skew On, Off
Setting Name 22 characters or less (letters, numbers, and symbols)
Restore Settings Yes, No
Print Paper List Press Z to start printing.
SC-P9000 Series/SC-P7000 Series/SC-P8000 Series/SC-P6000 Series User's Guide
Using the Control Panel Menu
110

Menu item Description
Roll Paper Remaining Remaining Setup On, Off
Set Length 5.0 to 99.5m
Set Alert Length 1 to 15m
Roll Paper Setup Auto Cut On, Off
Page Line On, Off
Roll Paper Margin Normal, Top15mm/Bottom15mm, Top 35 mm/Bottom 15mm, Top 150 mm/Bottom 15 mm, 3mm,15mm
Roll End Option Continue, Stop Printing, Reprint*
Roll Paper Tension Lv1 to 5
Refresh Margin On, Off
Printer Setup Menu
Items marked with an asterisk (*) are only available when the optional hard disk unit is installed.
U “Printer Setup” on page 120
Menu item Description
Platen Gap Narrow, Standard, Wide, Wider, Widest
Paper Size Check On, Off
Paper Skew Check On, Off
Auto Nozzle Check Auto Cleaning Setting Periodically, Every Job, Off
Auto Clean Max Repeat 1 to 3
Timer Cleaning XX hours, Off
Print Nozzle Pattern Every 10 pages, Every Page, Off
Auto Black Ink Change On, Off
BK Ink Change Setting Normal, Quick
Calibration Setting On, Off
Store Held Job* On, Off
Restore Settings Yes, No
Printer Status Menu
U “Printer Status” on page 121
SC-P9000 Series/SC-P7000 Series/SC-P8000 Series/SC-P6000 Series User's Guide
Using the Control Panel Menu
111

Menu item Description
Firmware Version xxxxxxx,xx.xx,xxxx
Option Status Displays the options connected.
Print Status Sheet Press Z to start printing.
Calibration Date MM/DD/YY HH:MM
Option Setup Menu
The following menus are only displayed when the optional SpectroProofer mounter or Auto Take-up Reel Unit areinstalled.
U “Option Setup” on page 122
Menu item Description
SpectroProofer -
SProofer Status Device Version:ILS30 X-Rite ILS30EP vxxxx
Calibration Tile S/N xxxxxx
Device Temperature XX˚C
Firmware Version xxxxxx
Air Temperature XX˚C
Backing Color Displays the installed backing colors.
SProofer Setting Press Z to start printing/alignment.
Auto Take-up Reel Unit xxxxxx
Network Setup Menu
U “Network Setup” on page 122
Menu item Description
IP Address Setting Auto -
Panel IP Address, Subnet Mask, Default Gateway
IPv6 Setting On, Off
IEEE802.1x Setting On, Off
HTTPS Redirect Setting On, Off
Print Status Sheet Press Z to start printing.
Restore Settings Yes, No
SC-P9000 Series/SC-P7000 Series/SC-P8000 Series/SC-P6000 Series User's Guide
Using the Control Panel Menu
112

Preferences Menu
U “Preferences” on page 123
Menu item Description
Language Lists the supported languages.
Unit: Length m, ft/in
Unit: Temperature ˚C, ˚F
Sleep Mode 5 to 210 minutes
Power Off Timer Off, 1 to 24 hours
Administrator Menu
Items marked with an asterisk (*) are only available when the optional hard disk unit is installed.
U “Administrator Menu” on page 123
Menu item Description
Change Password Enter a password.
Operational Control Network Setup Password Required, No Password Required
Powerful Cleaning All Nozzles Yes, No
XX/XX (where XX indicatesthe ink color code)
Yes, No
Date And Time MM/DD/YY HH:MM
Time Zone Enter the time difference between GMT and the current timezone.
Format HDD* Non-Secure (Quick) When you confirm the message displayed, formatting starts.
Secure (Quick)
Secure (Sanitizing)
Reset All Settings Yes, No
SC-P9000 Series/SC-P7000 Series/SC-P8000 Series/SC-P6000 Series User's Guide
Using the Control Panel Menu
113

Menu Descriptions
Maintenance
Item Description
Nozzle Check Press the Z button to print a nozzle check pattern. Inspect the patternvisually and perform head cleaning if you detect faint or missing colors.
U “Checking for clogged nozzles” on page 126
Head Cleaning Select the combination of ink colors for head cleaning, and the strength ofthe cleaning. Only use this menu when nozzles are clogged.
U “Cleaning the print head” on page 126
Combination of ink colors to be cleanedCheck the ink colors with faint or missing segments in the check pattern,and then specify which nozzles to clean. The displayed items differdepending on the printer model and ink sets being used.
❏ If there are faint or missing segments in all colors: Select AllNozzles.
❏ If there are faint or missing segments in only a few colors: Select thespecific ink colors you want to clean. You can select multiple items atthe same time.
Cleaning strengthNormally, select Normal. If nozzles are clogged even after performingNormal head cleaning several times, perform Heavy cleaning.
All Nozzles Normal
Heavy
XX/XX Normal
Heavy
Head Alignment Perform print head alignment when setting up the printer for the firsttime, and after moving or transporting the printer. Perform print headalignment when the print results look grainy or out-of-focus. Normally,select Auto.
U “Adjusting print misalignments (Head Alignment)” on page 129
Auto: The printer reads adjustment patterns using the sensor whileprinting the patterns, and makes adjustments automatically.
Manual: The printer prints a pattern; inspect the pattern visually and enterthe value you think appropriate. Use this if you cannot perform autoadjustment, or if you are not satisfied with the adjustment results whenusing Auto.
Auto Uni-D, Bi-D 2-color,Bi-D All Color, Bi-D#1 to #4
Manual Uni-D, Bi-D 2-color,Bi-D All Color
Cutter Maintenance Make settings for the printer's built-in cutter.
Adjust Cut Position -3 to 3mm You can fine tune the cut position when printing to roll paper with nomargins in all directions. The cut position can be adjusted in increments of0.2 mm.
Replace Cutter Moves the cutter to the replacement position so it can be replaced. Pressthe Z button to move the cutter to the replacement position. The papermust be removed before the cutter can be replaced. Remove the paperbefore proceeding.
U “Replacing the Cutter” on page 135
SC-P9000 Series/SC-P7000 Series/SC-P8000 Series/SC-P6000 Series User's Guide
Using the Control Panel Menu
114

Print Queues
This menu is only available when the optional hard disk unit is installed. When printing without using the printerdriver included with the printer, the job names and estimated times in the following table may not be displayedcorrectly.
Item Description
Print Queue Lists the estimated start time and time needed to print the selected job.
The reason that printing cannot be performed is displayed in RemoteManager or LFP HDD Utility, and you can hold or cancel the job.
U “Function Summary” on page 57
XXXXXXXXXXX
(name of print queue)
Waiting Job Name
User
Estimated StartTime
Estimated PrintTime
Hold Queue Displays the print settings for held jobs and the reason the job is held.
Jobs that are held because the job print settings differ from those currentlyselected for the printer can be printed as described below.
(1) Replace the paper and take whatever other steps may be necessary toready the device for printing.
(2) Select Resume All Jobs.
View Hold Queue
XXXXXXXXXXX
(name of holdqueue)
Paused Job Name
User
Paper Type
Source
Size
Reason For Hold
Resume All Jobs Press the Z button to resume all held jobs currently in the queue.
Saved Job Queue Shows the status of the selected stored job when it was last printed.
If you press the r button after confirmation, the File Options menu isdisplayed.
When Print File is selectedA screen is displayed where you can enter the number of copies. When youhave entered the number of copies using the u/d buttons, the screenswitches to Estimated Print Time. Press the Z button to start printing.
When Delete is selectedA confirmation screen is displayed. Press the Z button to delete the job.
XXXXXXXXXXX
(name of stored job)
Stored Job Name
User
Paper Length
Pages
Paper Type
Copies
Source
Size
Estimated PrintTime
SC-P9000 Series/SC-P7000 Series/SC-P8000 Series/SC-P6000 Series User's Guide
Using the Control Panel Menu
115

Paper
* Default setting
Item Description
Select Paper Type Photo Paper Select the type of paper loaded. When loading commercially availablepaper, or when using customized paper settings, select the Custom Papersettings name.Proofing Paper
Fine Art Paper
Matte Paper
Plain Paper
Others
Custom Paper
Custom Paper Setting Register paper information when using commercially available paper orwhen using customized paper settings for genuine Epson paper. See thefollowing table for details on the setting content.
U “Custom Paper Setting” on page 117
Print Paper List Press the Z button to print a list of custom paper settings.
Roll Paper Remaining You can set the length for the currently loaded roll paper.
Remaining Setup On Select whether to display/record (On) or not to display/record (Off) theamount of remaining roll paper. If On is selected, you will be prompted toenter the length of the roll. When a length has been entered for the loadedroll paper, a barcode will automatically be printed on the roll stating thelength remaining, the value selected for the roll remaining alert, and thepaper type when the roll is removed.
The barcode is automatically read and settings adjusted the next time thepaper is used, improving efficiency when multiple rolls of paper are used.
Off*
Set Length 5.0 to 99.5 Displayed when On is selected for Remaining Setup.
Set the length for the loaded roll paper to 5.0 to 99.5 m. You can set in 0.5mincrements.
Set Alert Length 1 to 15 m (5*) Displayed when On is selected for Remaining Setup.
Set within a range from 1 to 15 m to display a warning when the amount ofremaining roll paper drops below that limit. You can set in 1 m increments.
Roll Paper Setup Only available when printing on roll paper.
SC-P9000 Series/SC-P7000 Series/SC-P8000 Series/SC-P6000 Series User's Guide
Using the Control Panel Menu
116

Item Description
Auto Cut On* Choose On to automatically cut roll paper using the built-in cutter as eachpage is printed or Off to disable auto paper cutting. The setting selectedwith the printer driver takes priority when the printer driver is used.Off
Page Line On* If Auto Cut is Off, you can choose to print (On) or not print (Off) cut lines onroll paper. Cut lines are not printed if Auto Cut is On or when cut sheets orposter board is used.
Note, however, that if the roll width selected with the computer isnarrower than the paper loaded in the printer, cut lines will be printedregardless of the option selected for Auto Cut.
The setting selected with the printer driver takes priority when the printerdriver is used.
Off
Roll Paper Margin Normal* When set to Normal, the top and bottom margins are 15 mm, and the leftand right margins are 3 mm.
Except for 15mm, the left and right margins for all other settings are 3mm.
U “Printable area” on page 52
Top15mm/Bottom15mm
Top35mm/Bottom15mm
Top150mm/Bottom15mm
3mm
15mm
Refresh Margin On* If On is selected during borderless printing, the printer will automaticallytrim the leading edge to remove any ink stains that may have been left bythe previous copy; to disable this feature, choose Off.Off
Roll End Option Continue Select the action to perform for a roll after replacement: print theremaining data (Continue) / do not print (Stop Printing) / print againfrom the beginning (Reprint).
Reprint is only available when the optional hard disk unit is installed.
Stop Printing*
Reprint
Roll Paper Tension 1 to 5 (3*) This setting is used if Extra High is set as one of the following settings:Paper menu - Custom Paper Setting - Roll Paper Tension, or PaperConfiguration - Roll Paper Back Tension in the printer driver.
If wrinkles are formed on the paper during printing when theabovementioned Roll Paper Back Tension is High, set it to Extra High,and then configure the strength of the tension using this setting.
Higher values produce higher tension.
Custom Paper Setting
Set each item in the following table for commercially available paper based on the characteristics of the paper. Whencustomizing paper settings for genuine Epson paper, select the corresponding paper type from Select ReferencePaper, and then enter your settings.
* Default setting
SC-P9000 Series/SC-P7000 Series/SC-P8000 Series/SC-P6000 Series User's Guide
Using the Control Panel Menu
117

Item Description
XXXXXXXXXXX Displays the registered setting name.
Select ReferencePaper
Photo Paper,Proofing Paper, FineArt Paper, MattePaper, Plain Paper,Others, No PaperSelected
You can select the media type that is the closest to the paper you are using.Select No Paper Selected if you do not want to specify a specific papertype.
However, in Epson Color Calibration Utility you cannot use No PaperSelected as the Select Reference Paper setting. Make sure you select oneof the other paper types.
Platen Gap Narrow Select the platen gap, which is the distance between the print head andthe paper. Normally, select Standard. Select a wider setting if print resultsare scratched or smudged. If, upon performing head alignment, you feelthat it is still not completely aligned, select Narrow.
Standard*
Wide
Wider
Widest
Detect Paper Thickness Press the Z button to print a pattern to determine the thickness of thecurrent paper. Select the pattern number with the least misalignmentfrom the print results.
In the following example image, "4" is the best choice.
SC-P9000 Series/SC-P7000 Series/SC-P8000 Series/SC-P6000 Series User's Guide
Using the Control Panel Menu
118

Item Description
Paper Feed Adjust Pattern Use this setting if you are unable to resolve banding issues (horizontalstriped lines or uneven colors) in the standard print area (for cut sheets, thearea excluding the 1 to 2 cm strip at the bottom of the paper) even afterhead cleaning or head alignment.
Pattern selectedPress the Z button to print an adjustment pattern. Look for theadjustment pattern with the lightest colors from rows A to D, and enter thevalue.
In the following example image, "3" is the best choice.
1 2 3 4 5
A
When the adjustment pattern has been printed, a screen where you canenter the number is displayed on the control panel. Use the d/u buttonsto enter the numbers in order, and then press the Z button.
Value selectedChoose an adjustment between -0.70 and +0.70%.
Selecting too small a value causes dark bands; adjust the amount upward.Similarly, choosing too large a value causes white bands; adjust theamount downward.
Value
Paper Suction -4 to 0 (0*) It is important to choose the appropriate amount of suction for the paperused in order to maintain the correct distance between the paper and theprint head. Choosing too high a value for thin or soft paper will increasethe distance between the paper and the print head, causing print qualityto decline or preventing the paper feeding correctly. In such cases, you willneed to lower the paper suction. The suction power is weakened when theparameter is lowered.
Drying Time Per Pass 0 to 10 seconds (0*) Select the time the print head pauses to allow drying after each pass.Choose from values between 0.0 and 10.0 seconds. Depending on thepaper type, the ink may take a while to dry. If the ink blurs on the paper, seta longer time for drying the ink.
Increasing the drying time increases the time needed to print.
Roll Paper Tension Standard* Select High or Extra High if the paper wrinkles while printing on rollpaper.
If Extra High is set, the Roll Paper Tension setting in the Paper menu isenabled.
It is not necessary to set this option for cut sheets.
High
Extra High
Remove Skew On* Select whether to enable (On) or disable (Off) paper skew reduction whileprinting on roll paper.
It is not necessary to set this option for cut sheets.Off
Setting Name Enter a name of up to 22 characters for custom paper settings. Choose aneasy-to-remember name for quick selection.
Restore Settings Yes Restore the selected custom paper settings to default values.
No
SC-P9000 Series/SC-P7000 Series/SC-P8000 Series/SC-P6000 Series User's Guide
Using the Control Panel Menu
119

Printer Setup
* Default setting
Item Description
Platen Gap Narrow Select the Platen Gap, which is the distance between the print head andthe paper. Normally, select Standard. Select a wider setting if print resultsare scratched or smudged. Select Narrow if you feel the print head is notcompletely aligned after performing head alignment.
Standard*
Wide
Wider
Widest
Paper Size Check On* Choose whether the printer automatically detects (On), or does notautomatically detect (Off), the width of the media. We generallyrecommend to operate with this setting set to On. Try choosing Off if apaper setting error is displayed when the paper is correctly loaded. Note,however, that the printer may print outside the paper when Off isselected. If it prints beyond the edges of the paper, the inside of the printerbecomes dirty with ink.
Off
Paper Skew Check On* If On is selected, an error will be displayed in the control panel and printingwill stop if the paper is skewed; select Off to disable this feature. On isrecommended in most circumstances as skewed paper may cause theprinter to jam.
Off
Auto Nozzle Check Set the timing that you want the printer to check the status of the nozzles,and if clogged nozzles are detected, set the number of times to performauto cleaning. If the nozzles are not clogged, cleaning is not performed.
U “Automatically detecting clogged nozzles” on page 125
Auto Cleaning Setting Periodically* Set the timing for performing an Auto Nozzle Check that will run beforeprinting starts.
Periodically: Checks at fixed intervals at a timing determined by theprinter.
Every Job: Checks at each job.
Off: Checks only under specific conditions.
Every Job
Off
Auto Clean Max Repeat 1 to 3 (1*) When clogged nozzles are detected, set the number of times toautomatically repeat cleaning.
Timer Cleaning XX hours When the following operations are performed after the set time haspassed from the time the last print was completed, cleaning is performedautomatically. If the nozzles are not clogged, cleaning is not performed.
❏ The printer is turned on.
❏ The printer returns from sleep mode.
Off*
Print Nozzle Pattern Every 10 pages* Prints a nozzle check pattern at the top of the page after printing everypage or every 10 pages.
You can check by viewing the pattern after printing, and determine if thereare any problems in the print results before and after printing.
Every Page
Off
SC-P9000 Series/SC-P7000 Series/SC-P8000 Series/SC-P6000 Series User's Guide
Using the Control Panel Menu
120
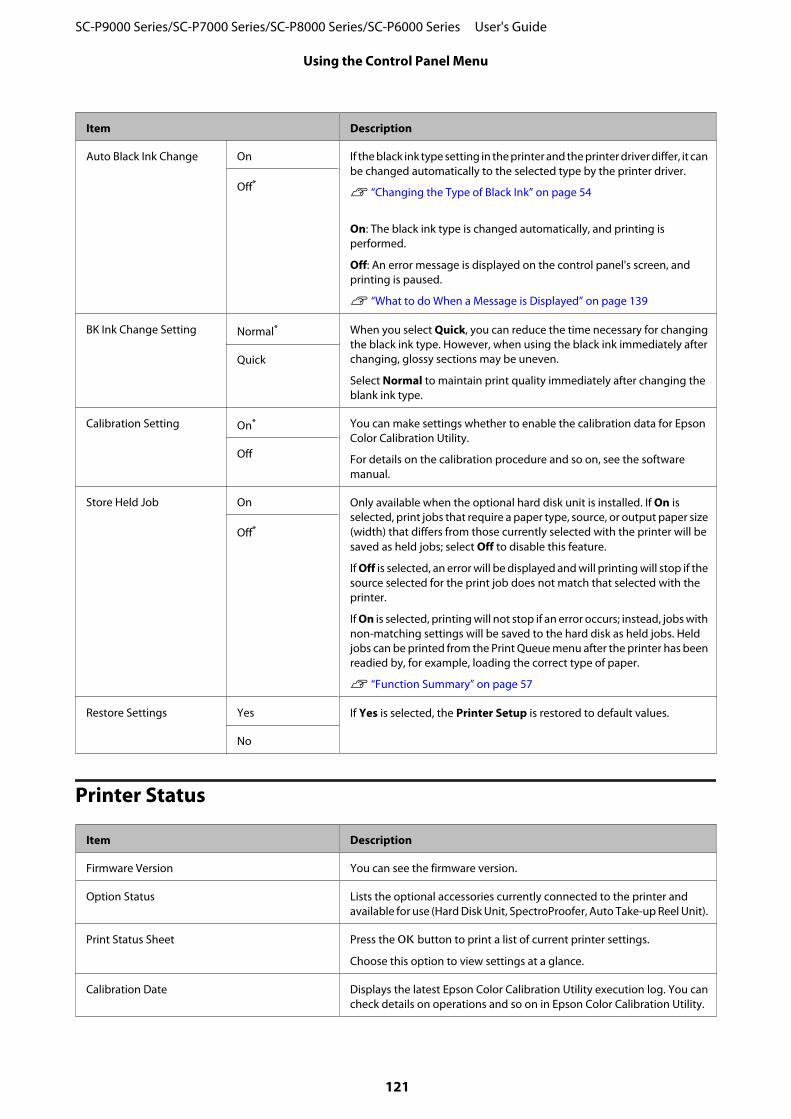
Item Description
Auto Black Ink Change On If the black ink type setting in the printer and the printer driver differ, it canbe changed automatically to the selected type by the printer driver.
U “Changing the Type of Black Ink” on page 54
On: The black ink type is changed automatically, and printing isperformed.
Off: An error message is displayed on the control panel's screen, andprinting is paused.
U “What to do When a Message is Displayed” on page 139
Off*
BK Ink Change Setting Normal* When you select Quick, you can reduce the time necessary for changingthe black ink type. However, when using the black ink immediately afterchanging, glossy sections may be uneven.
Select Normal to maintain print quality immediately after changing theblank ink type.
Quick
Calibration Setting On* You can make settings whether to enable the calibration data for EpsonColor Calibration Utility.
For details on the calibration procedure and so on, see the softwaremanual.
Off
Store Held Job On Only available when the optional hard disk unit is installed. If On isselected, print jobs that require a paper type, source, or output paper size(width) that differs from those currently selected with the printer will besaved as held jobs; select Off to disable this feature.
If Off is selected, an error will be displayed and will printing will stop if thesource selected for the print job does not match that selected with theprinter.
If On is selected, printing will not stop if an error occurs; instead, jobs withnon-matching settings will be saved to the hard disk as held jobs. Heldjobs can be printed from the Print Queue menu after the printer has beenreadied by, for example, loading the correct type of paper.
U “Function Summary” on page 57
Off*
Restore Settings Yes If Yes is selected, the Printer Setup is restored to default values.
No
Printer Status
Item Description
Firmware Version You can see the firmware version.
Option Status Lists the optional accessories currently connected to the printer andavailable for use (Hard Disk Unit, SpectroProofer, Auto Take-up Reel Unit).
Print Status Sheet Press the Z button to print a list of current printer settings.
Choose this option to view settings at a glance.
Calibration Date Displays the latest Epson Color Calibration Utility execution log. You cancheck details on operations and so on in Epson Color Calibration Utility.
SC-P9000 Series/SC-P7000 Series/SC-P8000 Series/SC-P6000 Series User's Guide
Using the Control Panel Menu
121

Option Setup
Item Description
SpectroProofer You can check the current status of the SpectroProofer mounter installedon the printer, and initialize the settings.
SProofer Status You can check the status of the SpectroProofer mounter.
Device Version:ILS30 Displays the version of the ILS30EP installed on the mounter.
Calibration Tile S/N Displays the calibration tile serial number of the ILS30EP installed on themounter.
Device Temperature Displays the temperature of the ILS30EP installed on the mounter.
Firmware Version Displays the version of the mounter.
Air Temperature Displays the air temperature around the mounter.
Backing Color Displays the backing colors installed in the mounter. If the color differsfrom the actual color, check the status of the backing and make sure it isinstalled correctly. For details on installing the SpectroProofer mounter,see the "Setup Guide" (booklet).
SProofer Setting The printer automatically initializes the settings for the SpectroProofermounter. For details on procedures for initializing settings and so on, seethe "User's Guide" (PDF).
Auto Take-up Reel Unit Displays the firmware version of the auto take-up reel unit installed on theprinter.
Network Setup
* Default setting
Item Description
IP Address Setting Auto* Select whether to use DHCP to set the IP address (Auto), or to set theaddress manually (Panel). Select Panel to enter the IP Address, SubnetMask, and Default Gateway. Contact your system administrator fordetailed information.
Panel
IPv6 Setting On Select whether to enable or disable the IPv6 function.
Off*
IEEE802.1x Setting On Select whether to enable or disable the IEEE802.1X function.
Off*
HTTPS Redirect Setting On* Select whether to enable or disable the function to auto-direct HTTP toHTTPS.
Off
Print Status Sheet Press the Z button to print a list of the Network Setup. Use thisinformation for a complete overview of network settings.
SC-P9000 Series/SC-P7000 Series/SC-P8000 Series/SC-P6000 Series User's Guide
Using the Control Panel Menu
122

Item Description
Restore Settings Yes Select Yes to restore all Network Setup content to default values.
No
Preferences
* Default setting
Item Description
Language Japanese, English,French, Italian,German, Portuguese,Spanish, Dutch,Russian, Korean,Chinese
Select the language used on the control panel's screen.
Unit: Length m* Select the unit of length which is displayed on the control panel's screen orprinted on the patterns.
ft/in
Unit: Temperature ˚C* Select the temperature units used in the control panel display.
˚F
Sleep Mode 5 to 210 minutes (15*) The printer will enter sleep mode if no errors have occurred, no print jobshave been received, and no actions are performed on the control panel foran extended period of time. This setting selects the amount of time untilthe printer enters sleep mode.
U “Turning Off the Power Using Power Off Timer” on page 56
Power Off Timer Off The printer turns off automatically when there are no errors, no print jobsbeing received, and no control panel or other operations are performedfor eight hours.
The delay before the printer turns off can be selected from values between1 and 24 hours in increments of 1 hour.
Choose Off to prevent the printer turning off automatically.
1 to 24 hours (8*)
Administrator Menu
Selecting Administrator Menu displays a password prompt. No password is entered at shipment; press the Z buttonto proceed. If the administrator password has been changed, enter the administrator password.
* Default setting
SC-P9000 Series/SC-P7000 Series/SC-P8000 Series/SC-P6000 Series User's Guide
Using the Control Panel Menu
123

Item Description
Change Password Enter an administrator password of up to 20 characters.
Selecting Administrator Menu displays a password prompt. TheAdministrator Menu will only be displayed if the correct password isentered, preventing non-administrators from accidentally changingsettings.
Keep the password in a safe place.
Should you forget the password, contact your dealer or Epson Support.
Operational Control Choose whether the administrator password is required to accessNetwork Setup from the control panel or Remote Manager.
Network Setup Password Required*
No Password Required
Powerful Cleaning All Nozzles Performs more powerful cleaning than Head Cleaning from theMaintenance menu. Check the ink colors with faint or missing segmentsin the check pattern, and then specify which nozzles to clean. Thedisplayed items differ depending on the printer model and ink sets beingused.
❏ If there are faint or missing segments in all colors: Select AllNozzles.
❏ If there are faint or missing segments in only a few colors: Select thespecific ink colors you want to clean. You can select multiple items atthe same time.
XX/XX
Date And Time MM/DD/YY HH:MM Set the printer’s built-in clock. The time provided by the clock is used whenprinting logs and status sheets.
Time Zone Enter the difference between the current time zone and GMT.
The selected time zone is used in e-mail notifications sent by RemoteManager when an error occurs.
Format HDD Non-Secure (Quick) Only available when the optional hard disk unit is installed.
Formatting starts after you select the type of format and confirm themessage displayed.
You can select from the following three types of formatting.
❏ Non-Secure (Quick): Deletes file management information for dataon the hard disk. Use this when you want to use the printer with a harddisk that has been used with other printers.
❏ Secure (Quick): Overwrites the entire hard disk with a randomcharacter pattern. Erases data more securely than Non-Secure(Quick). However, it is possible that data could be recovered by usinga dedicated data recovery tool.
❏ Secure (Sanitizing): Overwrites data with random 00/FF/ data, andthen checks using an algorithm based on the U.S Department ofDefense standard (DoD5220-22m). This option takes longer than theothers to finish formatting, however it does provide the securestmethod of erasing data. Select this when you need to eraseconfidential data.
Secure (Quick)
Secure (Sanitizing)
Reset All Settings Yes Select Yes to restore defaults for all settings except the Date And Time,Language, and Unit: Length options in the Preferences menu.
No
SC-P9000 Series/SC-P7000 Series/SC-P8000 Series/SC-P6000 Series User's Guide
Using the Control Panel Menu
124

Maintenance
Print Head Maintenance
You need to perform print head maintenance if whitelines appear in your print outs or if you notice the printquality has declined.
Maintenance Operations
You can perform the following printer maintenancefunctions for maintaining the print head in goodcondition to ensure the best print quality. Carry outappropriate maintenance depending on the printresults and situation.
Automatically detecting cloggednozzles
The printer has functions that allow it to automaticallydetect the position of clogged nozzles in the print headand perform cleaning without having to print a nozzlecheck pattern.
Note:
❏ This function does not guarantee 100% detection ofclogged nozzles.
❏ A small amount of ink is consumed when detectingclogged nozzles.
❏ Ink is consumed when performing automaticcleaning.
You can set the following two items on the Printer Setupmenu.
U “Printer Setup” on page 120
Auto Nozzle CheckWhen this is set to On, the status of the nozzles ischecked at the following times. When clogged nozzlesare detected, cleaning is performed automatically thenumber of times set on the control panel.
❏ When printing starts (periodically or every job)
❏ Before and after head cleaning
c Important:
Even if Auto Cleaning Setting from Auto NozzleCheck is set to Off, an auto nozzle check is alwaysperformed at the following times.
❏ After initial ink chargingAn auto nozzle check is performed after inkcharging to check the status of the nozzles. Ifclogged nozzles are detected, auto cleaning isperformed once.
❏ Before changing the type of black inkSince black inks cannot be changed correctly ifnozzles are clogged, an auto nozzle check isperformed. If nozzles are clogged, auto cleaningis performed (up to three times) until thenozzles are cleared regardless of the AutoClean Max Repeat setting.
Timer CleaningAfter the set time has passed from the end of theprevious print job, auto cleaning is performed when thefollowing operations are performed. If the nozzles arenot clogged, cleaning is not performed.
❏ The printer is turned on.
❏ The printer returns from sleep mode.
Checking for clogged nozzles usingthe printed check pattern
The following two methods are available.
On-Demand Nozzle Check PatternWe recommend printing a nozzle check pattern andperforming a visual inspection before printing when theprinter has not been used for an extended period orwhen printing important print jobs. Visually inspect theprinted pattern and clean the print head if you noticefaint or missing areas.
U “Checking for clogged nozzles” on page 126
SC-P9000 Series/SC-P7000 Series/SC-P8000 Series/SC-P6000 Series User's Guide
Maintenance
125

Print Nozzle Pattern function (for roll paperonly)A nozzle check pattern is printed at the top of thespecified page (every page or every 10 pages). Whenprinting a large reel of jobs, or when printing importantprint jobs, you can check that there are no cloggednozzles and determine if there are any problems in theprint results before and after printing.
U “Printer Setup” on page 120
Cleaning the print head
This function cleans the surface of the print head andclears clogged nozzles. Use this if faint or missingsegments are detected in the check pattern.
U “Cleaning the print head” on page 127
Adjusting print misalignments (HeadAlignment)
This function adjusts the print misalignment. Use this iflines are misaligned or print results are grainy.
U “Adjusting print misalignments (HeadAlignment)” on page 126
Checking for clogged nozzles
Nozzle checks can be performing from a computer orusing printer's control panel.
From the computer
Explanations in this section use the Windows printerdriver as an example.
Use Epson Printer Utility 4 for Mac OS X.
U “Epson Printer Utility 4 Functions” on page 69
A Make sure that the roll paper or a cut sheet of A4size or larger is loaded in the printer.
U “Loading and Removing the Roll Paper” onpage 28
U “Loading and Removing Cut Sheets” onpage 34
B Choose a paper type that matches the paper in theprinter.
U “Checking and Setting the Paper Type” onpage 37
C Click Nozzle Check from the Utility tab in theprinter driver's Properties (or Printingpreferences) screen.
D Click Print.
The nozzle check pattern is printed.
E Check the nozzle check pattern.
If there is no problem: click Finish.
If there is a problem: click Clean.
After printing a nozzle check pattern, make surethat the nozzle check pattern printing is completebefore printing your data or cleaning the printhead.
From the printer
Buttons that are used in the following settings
SC-P9000 Series/SC-P7000 Series/SC-P8000 Series/SC-P6000 Series User's Guide
Maintenance
126

A Make sure that the roll paper or a cut sheet of A4size or larger is loaded in the printer.
U “Loading and Removing the Roll Paper” onpage 28
U “Loading and Removing Cut Sheets” onpage 34
B Choose a paper type that matches the paper in theprinter.
U “Checking and Setting the Paper Type” onpage 37
C Press the r button to display the setup menu.
D Confirm that Maintenance is highlighted, andthen press the r button twice.
A confirmation dialog will be displayed.
OK
OKNozzle CheckPress to printnozzle check pattern.
Proceed Cancel
E Press the Z button to print a check pattern.
Review the printed check pattern while referringto the following section.
Example of clean nozzles
There are no gaps in the nozzle check pattern.
Example of clogged nozzles
If any segments are missing in the nozzle checkpattern, perform head cleaning.
U “Cleaning the print head” on page 127
Cleaning the print head
Although head cleaning can be performed from thecomputer or the printer, the cleaning procedures differas explained below.
From the computerAll nozzles are cleaned.
U “From the computer” on page 128
From the printerYou can clean all nozzles or select only those nozzles forwhich the printed nozzle check pattern indicates aproblem. You can also select two levels of cleaningstrength.
U “From the printer” on page 128
Notes on Head Cleaning
Ink is consumed during head cleaning.Clean the print head only if print quality declines; forexample, if the printout is blurry or the color is incorrector missing.
When cleaning all nozzles, ink is consumed from allcolors.Even if you are using only black inks for black and whiteprinting, color inks are also consumed.
Prepare a new maintenance box if there is notenough empty space in the box.If you repeat head cleaning several times in a shortperiod, the ink in the maintenance box may become fullsoon as ink does not evaporate quickly from themaintenance box.
Powerful Cleaning consumes much more ink thanHead Cleaning in the Maintenance menu.Check the remaining ink level in advance, and prepare anew ink cartridge before you start cleaning if the ink islow.
If the nozzles are still clogged after performingPowerful Cleaning, turn off the printer and leave itovernight or longer.When left for some time, the clogged ink may dissolve.
If the nozzles are still clogged, contact your dealer orEpson Support.
SC-P9000 Series/SC-P7000 Series/SC-P8000 Series/SC-P6000 Series User's Guide
Maintenance
127

From the computer
Before starting this procedure, be sure to read thefollowing:
U “Notes on Head Cleaning” on page 127
Explanations in this section use the Windows printerdriver as an example.
Use Epson Printer Utility 4 for Mac OS X.
U “Using Epson Printer Utility 4” on page 69
A Click Head Cleaning from the Utility tab in theprinter driver's Properties (or Printingpreferences) screen.
B Click Start.
Head cleaning starts and it takes about fourminutes.
Note:When Auto Nozzle Check is set to On, the nozzlesare checked after head cleaning, and if clogging isdetected, auto cleaning is performed. Depending onthe status of the nozzles and the Auto Clean MaxRepeat setting, this function can take up to 15minutes.
C Click Print Nozzle Check Pattern.
Confirm the nozzle check pattern.
If you see any faint or missing segments in thenozzle check pattern, click Cleaning.
If you cannot clear the clogged nozzles even afterrepeating cleaning several times in succession,select Heavy from Head Cleaning on theprinter's control panel.
U “From the printer” on page 128
From the printer
Before starting this procedure, be sure to read thefollowing:
U “Notes on Head Cleaning” on page 127
Buttons that are used in the following settings
A Press the r button to display the setup menu.
B Confirm that Maintenance is highlighted, andthen press the r button.
The Maintenance menu will be displayed.
C Press the d/u buttons to select Head Cleaning,and then press the r button.
D Select nozzle arrays for cleaning.
Press the u/d buttons and select the color pairswith faint or missing segments in the checkpattern.
If there are faint or missing segments in allcolorsSelect All Nozzles, and then press the r button.
If there are faint or missing segments in part ofthe colorsSelect the colors that need to be confirmed, andthen press the Z button to confirm. You canselect more than one at once. When you havefinished selecting, press the r button.
SC-P9000 Series/SC-P7000 Series/SC-P8000 Series/SC-P6000 Series User's Guide
Maintenance
128

E Select the cleaning strength. To start, selectNormal.
Press the u/d buttons to select the strength, andthen press the Z button to start cleaning.
Head cleaning takes about 3 to 14 minutes.
Note:The more color pairs selected, the longer it takes toperform cleaning. Depending on the status of thenozzles and the Auto Clean Max Repeat setting,this function can take up to 24 minutes.
A confirmation message is displayed whencleaning is complete.
F To print a check pattern and check the status ofthe clogging, select Nozzle Check, and then pressthe Z button.
To exit without performing a nozzle check, selectExit, and then press the Z button.
If the nozzles are still clogged, repeat steps 1 to 5 severaltimes. If the nozzles are still clogged after repeating theprocedure several times in succession, repeat from step1, and select Heavy in step 5.
If the nozzles are still clogged after performing Heavy,see the following section and perform PowerfulCleaning.
Powerful CleaningBefore starting this procedure, be sure to read thefollowing:
U “Notes on Head Cleaning” on page 127
A Press the r button to display the setup menu.
B Press the d/u buttons to select AdministratorMenu, and then press the r button.
C Enter the administrator password, and thenpress the Z button.
D Press the d/u buttons to select PowerfulCleaning, and then press the r button.
E Select the nozzle arrays for Powerful Cleaning.
Press the u/d buttons and select the color pairswith faint or missing segments in the checkpattern.
If there are faint or missing segments in allcolorsSelect All Nozzles, and then press the r button.
If there are faint or missing segments in part ofthe colorsSelect the colors that need to be confirmed, andthen press the Z button to confirm. You canselect more than one at once. When you havefinished selecting, press the r button.
F A confirmation dialog is displayed. Select Yes,and then press the Z button to start PowerfulCleaning.
Powerful Cleaning takes about 4 to 16 minutes.
Note:The more color pairs selected, the longer it takes toperform cleaning. Also, depending on the status ofthe nozzles, it can take up to about 27 minutes.
When Powerful Cleaning is complete, you arereturned to the screen displayed before cleaningwas performed.
G Print a check pattern, and inspect the results todetermine if the problem has been resolved.
U “From the printer” on page 126
Adjusting print misalignments (Head Alignment)
If lines are misaligned or print results are grainy,perform Head Alignment to adjust the printmisalignment.
The print head fires ink when moving to the left and tothe right while printing. Since there is a short distance(gap) between the paper surface and the print head, aprint misalignment may occur due to the paperthickness, changes in temperature or humidity, andinternal inertia while the print head moves.
Although Head Alignment can be performed from thecomputer or the printer, the alignment proceduresdiffer as explained below.
SC-P9000 Series/SC-P7000 Series/SC-P8000 Series/SC-P6000 Series User's Guide
Maintenance
129

From the computerIn auto adjustment (Bi-D 2-color), an adjustmentpattern is printed on the loaded paper, read by thesensors, and the optimum adjustment value is registeredto the printer. It takes about 6 minutes to complete theadjustments.
In most cases, head alignment can be performedsuccessfully with just this operation. We normallyrecommend this method as this is the simplest method.
U “From the computer” on page 130
From the printerYou can perform auto or manual adjustments. You canalso select Uni-D, Bi-D 2-color, and Bi-D All Coloradjustments from each menu.
❏ Auto adjustmentThe sensor reads the adjustment pattern printed onthe paper, and automatically registers the optimumadjustment value to the printer. It takes about 3 to10 minutes to complete the adjustments. The timerequired varies depending on the menu selected.
❏ Manual adjustmentVisually check the adjustment patterns printed onthe paper, and enter the optimal adjustment values.Use this if you cannot perform auto adjustment, orif you are not satisfied with the adjustment resultswhen using Auto.The following three menus are available for manualadjustment.
ItemName
Explanation
Uni-D Adjusts differences in the printposition for uni-directional printingfor each color based on Light Cyan.
Bi-D2-color
Adjusts differences in the printposition for bi-directional printingfor two colors, Light Cyan and VividLight Magenta.
Bi-D AllColor
Adjusts differences in the printposition for bi-directional printingfor all colors.
It takes about 17 minutes to print an adjustmentpattern. The time required varies depending on themenu selected.
U “From the printer” on page 131
Notes on Head Alignment
Adjustments are made depending on the paperloaded in the printer.Make sure that the paper is loaded correctly, and that aSelect Paper Type is selected.
U “Loading and Removing the Roll Paper” onpage 28
U “Loading and Removing Cut Sheets” on page 34
When adjusting using commercially available paper,make sure you register the custom paper in advance.
U “Before Printing on Commercially AvailablePaper” on page 177
Make sure that nozzles are not clogged.If nozzles are clogged, adjustment may not beperformed correctly. Print the check pattern, perform avisual inspection, and perform head cleaning ifnecessary.
U “Checking for clogged nozzles” on page 126
Auto adjustment cannot be performed when usingthe following paper.
❏ Plain Paper
❏ Enhanced Matte Poster Board
❏ Transparent or colored paper
Perform manual adjustment when using these types ofpaper.
U “From the printer” on page 131
When performing auto adjustment, make sure thatno external light (direct sunlight) enters the printer.Otherwise, the printer's sensors may not read theadjustment pattern correctly. If auto adjustment cannotbe performed even after making sure no external light isentering the printer, perform manual adjustment.
U “From the printer” on page 131
From the computer
Before starting this procedure, be sure to read thefollowing:
U “Notes on Head Alignment” on page 130
SC-P9000 Series/SC-P7000 Series/SC-P8000 Series/SC-P6000 Series User's Guide
Maintenance
130

Explanations in this section use the Windows printerdriver as an example.
Use Epson Printer Utility 4 for Mac OS X.
U “Using Epson Printer Utility 4” on page 69
A Make sure that the roll paper or a cut sheet of A4size or larger is loaded in the printer.
U “Loading and Removing the Roll Paper” onpage 28
U “Loading and Removing Cut Sheets” onpage 34
When adjusting using commercially availablepaper, make sure you register the Custom Paperin advance.
U “Before Printing on Commercially AvailablePaper” on page 177
B Choose a paper type that matches the paper in theprinter.
U “Checking and Setting the Paper Type” onpage 37
C Click Print Head Alignment from the Utility tabin the printer driver's Properties (or Printingpreferences) screen.
Follow the on-screen instructions.
The sensor reads the adjustment pattern while itis printing, and automatically registers theoptimum adjustment value to the printer.
Check the adjustment results to confirm ifgraininess or misalignment recurs in the printedimage.
If you are not satisfied with the adjustmentresults, perform manual adjustment from theprinter.
U “From the printer” on page 131
From the printer
Before starting this procedure, be sure to read thefollowing:
U “Notes on Head Alignment” on page 130
Buttons that are used in the following settings
A Make sure that the roll paper or a cut sheet of A4size or larger is loaded in the printer.
U “Loading and Removing the Roll Paper” onpage 28
U “Loading and Removing Cut Sheets” onpage 34
When adjusting using commercially availablepaper, make sure you register the Custom Paperin advance.
U “Before Printing on Commercially AvailablePaper” on page 177
B Choose a paper type that matches the paper in theprinter.
U “Checking and Setting the Paper Type” onpage 37
C Press the r button to display the setup menu.
SC-P9000 Series/SC-P7000 Series/SC-P8000 Series/SC-P6000 Series User's Guide
Maintenance
131

D Confirm that Maintenance is highlighted, andthen press the r button.
The Maintenance menu will be displayed.
E Press the d/u buttons to select HeadAlignment, and then press the r button.
F Select an adjustment item.
When adjusting automaticallyPress the d/u buttons to select Auto, and thenpress the r button. Next, proceed to Step 7.
When adjusting manuallyPress the d/u buttons to select Manual, and thenpress the r button. Next, proceed to Step 8.
G Press the d/u buttons to select Bi-D 2-color, andthen press the Z button.
The sensor reads the adjustment pattern while itis printing, and automatically registers theoptimum adjustment value to the printer.
When adjustment is complete, you are returnedto the screen displayed before head alignmentwas performed. Check the adjustment results toconfirm if graininess or misalignment recurs inthe printed image.
If you are not satisfied with the adjustmentresultsPerform auto adjustment again from step 1, butselect Bi-D All Color in step 7. If you are notsatisfied with the results of Bi-D All Color,perform the same procedure for Uni-D.
If you want to make more detailed adjustments,perform Bi-D #1, Bi-D #2, Bi-D #3, or Bi-D #4.[#1] to [#4] displays the size of the ink dots. Sincethis differs depending on the printer driversettings when printing, perform [#1] to [#4] inorder.
H Press the d/u buttons to select Bi-D 2-color, andthen press the Z button.
The adjustment pattern is printed on the loadedpaper.
Note:Multiple adjustment patterns are printed for cutsheets. Once printing the first sheet is complete,load the next sheet of paper.
I Note the numbers of the patterns with the fewestwhite lines or in which the white lines are mostevenly spaced.
This would be pattern "3" in the example shownin the illustration.
J The screen to enter a numeric value is displayed.Enter the value for each check pattern number(such as #1) and ink color that you checked instep 9, and then press the Z button.
Enter a value for all pattern numbers and inkcolors in order. After entering all values, you arereturned to the screen displayed before headalignment was performed. Check the adjustmentresults to confirm if graininess or misalignmentrecurs in the printed image.
If you are not satisfied with the adjustmentresultsPerform manual adjustment again from step 1,but select Bi-D All Color in step 8. If you are notsatisfied with the results of Bi-D All Color,perform the same procedure for Uni-D.
SC-P9000 Series/SC-P7000 Series/SC-P8000 Series/SC-P6000 Series User's Guide
Maintenance
132

Replacing Consumables
Replacing Ink Cartridges
If one of the installed ink cartridges is expended,printing cannot be performed. If an ink low warning isdisplayed, we recommend replacing the ink cartridge(s)as soon as possible.
If an ink cartridge runs out while printing, you cancontinue printing after replacing the ink cartridge.However, when replacing ink during a print job, youmay see a difference in color depending on the dryingconditions.
Supported ink cartridges U “Options andConsumable Products” on page 156
How to replace
You can use the same procedure to replace all inkcartridges.
Note the following points when replacing ink.Otherwise, printer operations may not be performedcorrectly.
❏ Make sure the printer is turned on when replacingink.
❏ Press the button to open the ink cover.
c Important:
Epson recommends the use of genuine Epson inkcartridges. Epson cannot guarantee the quality orreliability of non-genuine ink. The use ofnon-genuine ink may cause damage that is notcovered by Epson’s warranties, and under certaincircumstances, may cause erratic printer behavior.Information about non-genuine ink levels may notbe displayed, and use of non-genuine ink is recordedfor possible use in service support.
A Make sure the printer is on.
B Press the button on the control panel.
Note:The button is disabled while printing orcleaning.
C Select the cover for the ink cartridge you want toreplace, and then press the Z button.
The ink cover lock is released, and the coveropens by about 5 mm.
D Open the ink cover.
c Important:
Do not force open the ink cartridge cover untilthe lock is released.
E Push back the ink cartridge that you want toreplace.
When you hear a click, the ink cartridge will popout a little.
SC-P9000 Series/SC-P7000 Series/SC-P8000 Series/SC-P6000 Series User's Guide
Maintenance
133

F Pull out the ink cartridge.
c Important:
Removed ink cartridges may have ink aroundthe ink supply port, so be careful not to get anyink on the surrounding area when removingthe cartridges.
G Remove the new ink cartridge from the bag.Shake the ink cartridge for 5 seconds 15 timeshorizontally in approximately 5 cm movementsas shown in the illustration.
c Important:
Do not touch the IC chips on the ink cartridges.You may not be able to print properly.
H With the u mark on the ink cartridge facing up,press it in until you hear it click.
Match the color of the ink cartridge to the color ofthe label on the back of the ink cover.
c Important:
Install all ink cartridges into each slot. Youcannot print if any of the slots are empty.
I Close the ink cover.
Replacing Maintenance Boxes
If the message No Enough Space is displayed, replacethe specified Maintenance Box.
Supported Maintenance Boxes
U “Options and Consumable Products” onpage 156
SC-P9000 Series/SC-P7000 Series/SC-P8000 Series/SC-P6000 Series User's Guide
Maintenance
134

c Important:
Do not reuse maintenance boxes that have beenremoved and left out in the open for a long period oftime. The ink on the inside will be dry and hard andwill be unable to absorb enough ink.
How to replace
The following shows the number of maintenance boxesand the installation positions.
SC-P9000 Series/SC-P8000 Series: 2 (left and right)
SC-P7000 Series/SC-P6000 Series: 1 (right only)
Replace the Maintenance Box on the side with the NoEnough Space message displayed. The replacementprocedure is the same for both sides. When you need toreplace both sides, repeat Steps 2 to 5.
c Important:
Do not replace the Maintenance Box when theprinter is turned on. Waste ink may leak.
A Turn off the printer.
B Remove the new maintenance box from thepackage.
C Remove the maintenance box without tilting it.
D Place the used maintenance box in the clear bagincluded with your new maintenance box, andmake sure that the zipper is closed tight.
E Insert the new maintenance box.
c Important:
Do not touch the IC chip on the maintenance box.Doing so may prevent normal operation andprinting.
Replacing the Cutter
Replace the cutter when it is not cutting paper cleanly.
Supported cutter
U “Options and Consumable Products” onpage 156
Use a cross-head screwdriver to replace the cutter. Makesure you have a cross-head screwdriver with you beforereplacing the cutter.
SC-P9000 Series/SC-P7000 Series/SC-P8000 Series/SC-P6000 Series User's Guide
Maintenance
135

c Important:
Take care not to damage the cutter blade. Droppingit or knocking it against hard objects may chip theblade.
When the SpectroProofer mounter (option) isinstalledYou cannot open the cutter replacement cover when theSpectroProofer mounter is installed. Remove theSpectroProofer mounter before replacing the cutter,and then reinstall it afterwards. When removing, see themanual supplied with the mounter, and then follow theprocedure in reverse to reinstall it.
U "SpectroProofer Mounter 24"/44" Setup Guide"(booklet)
Buttons that are used in the following settings
A Remove any paper from the printer.
U “Removing Roll Paper” on page 32
U “Removing Cut Sheets” on page 36
B Press the r button to display the setup menu.
C Confirm that Maintenance is highlighted, andthen press the r button.
The Maintenance menu will be displayed.
D Press the u/d buttons to select CutterMaintenance, and then press the r button.
E Press the u/d buttons to select Replace Cutterand press the r button.
A confirmation dialog will be displayed.
F Press the Z button to move the cutter to thereplacement position.
G Press down the knob on the cutter replacementcover, and pull it down and towards you toremove.
H Loosen the screw that secures the cutter with across-head screwdriver.
I Remove the old cutter from the printer.
Caution:
Do not store the cutter within the reach ofchildren. The cutter's blade could cause aninjury. Pay careful attention when replacingthe cutter.
SC-P9000 Series/SC-P7000 Series/SC-P8000 Series/SC-P6000 Series User's Guide
Maintenance
136

J Install the new cutter.
Insert a screw into the cutter side of the hole onthe printer.
K Tighten the screw with a cross-head screwdriverto secure the cutter.
c Important:
Screw the cutter firmly, otherwise the cutposition may be slightly shifted or skewed.
L Insert the base of the cutter replacement cover inthe correct place, and push in the top part.
Push until you hear it click into place.
M After replacing the cutter, press the Z button.
The cutter will return to its original position.
Cutter replacement is complete when the screenon the control panel returns to the screendisplayed before you started replacement.
Cleaning the Printer
To keep your printer in optimum operating condition,clean it regularly (about once a month).
Cleaning the outside
A Remove any paper from the printer.
B Make sure the printer is turned off and the screenhas turned off, and then unplug the power cablefrom the outlet.
C Use a soft, clean cloth to carefully remove anydust or dirt.
If the printer is particularly dirty, dampen thecloth with water containing a small amount ofneutral detergent, and then firmly wring thecloth dry before using it to wipe the printer'ssurface. Next, use a dry cloth to wipe away anyremaining moisture.
c Important:
Never use benzene, thinners, or alcohol toclean the printer. They could causediscoloration and deformities.
Cleaning the inside
Clean the pressure rollers if prints are smudged orsoiled.
Ink and particles of paper adhering to the platen shouldbe removed, as they may otherwise soil the paper.
c Important:
Failure to remove dust and particles of paper fromthe platen could result in clogged nozzles or damageto the print head.
Cleaning the roller
Follow the steps below to clean the roller by feedingplain paper.
SC-P9000 Series/SC-P7000 Series/SC-P8000 Series/SC-P6000 Series User's Guide
Maintenance
137

A Turn on the printer, and load it with widestavailable roll paper.
U “Loading and Removing the Roll Paper” onpage 28
B Press the d button.
Paper is fed while the d button is pressed. If thepaper is not soiled, cleaning is complete.
Cut the paper after cleaning is done.
U “Manual cut method” on page 32
Cleaning Inside the Printer
A Make sure the printer is turned off and the screenhas turned off, and then unplug the power cablefrom the outlet.
B Leave the printer for a minute.
C Open the front cover and use a soft, clean cloth tocarefully clean away any dust or dirt inside theprinter.
Carefully wipe the light blue areas (a) shown inthe following illustration. So as not to smear dirt,wipe in the direction indicated by the arrow inthe illustration. If the printer is particularly dirty(when the back of the paper is soiled whileprinting), dampen the cloth with watercontaining a small amount of neutral detergent,and then firmly wring the cloth dry before usingit to wipe the printer's surface. Then, wipe theinside of the printer with a dry, soft cloth.
c Important:
❏ Be sure not to touch the roller or the inkabsorbing areas (b, shown in gray) duringcleaning; otherwise, prints may be soiled.
❏ Be careful not to touch the ink tubes insidethe printer, otherwise, the printer may bedamaged.
D If any paper particles (that looks like whitepowder) accumulates on the platen, usesomething like a cocktail stick to push it in.
E After cleaning, close the front cover.
SC-P9000 Series/SC-P7000 Series/SC-P8000 Series/SC-P6000 Series User's Guide
Maintenance
138

Problem Solver
What to do When a Message is Displayed
If the printer displays one of the messages shown below, refer to the solution listed and take the necessary steps.
Messages What to do
Ink Cartridge ErrorInk cartridge cannot berecognized. Insert again or replaceink cartridge.
❏ Remove and reinsert the ink cartridge. If the message persists, insert a new inkcartridge (do not reinstall the cartridge that caused the error).U “How to replace” on page 133
❏ Condensation may occur in the ink cartridge. Leave it at room temperature for at leastfour hours before installing the ink cartridge.U “Notes on handling ink cartridges” on page 19
Ink Cartridge ErrorInk cartridge cannot be detected.Insert again or replace inkcartridge.
Ink Cartridge ErrorPlease install the correct inkcartridge.
Insert a genuine Epson ink cartridge approved for use in the printer.
U “Options and Consumable Products” on page 156
U “Replacing Ink Cartridges” on page 133
Ink Low The ink is low. Ready a new ink cartridge.
U “Options and Consumable Products” on page 156
Cleaning ErrorAutomatic head cleaning failed.Retry?
Clogged nozzles are not cleared even after performing Auto Cleaning the set number oftimes. To perform Auto Cleaning again, select Yes. To finish, select No.
U “Automatically detecting clogged nozzles” on page 125
Paper Load ErrorNo paper detected.
❏ Roll PaperRemove and then reload the roll paper. Before you reset the paper, cut the edge ofthe roll paper straight horizontally. Cut off any jagged or folded sections. If there is aproblem with the edge, a paper load error occurs again.U “Loading and Removing the Roll Paper” on page 28
❏ Poster BoardRemove and then reload the poster board. Load the paper straight so that it is notskewed.U “Loading Cut Sheets A3 Size or Larger and Poster Board” on page 34
Paper Eject ErrorCould not eject paper.
Press the Z button to clear the error. If any paper remains inside the printer, remove it.
U “Roll paper jam” on page 151
U “Cut sheets jam” on page 152
If you select Cut Sheet from the Paper Source menu even if roll paper is loaded, change thesetting to Roll Paper, and then reload the paper.
U “Loading and Removing the Roll Paper” on page 28
Paper Cut ErrorRemove uncut paper.
After pressing the Z button, pull out the paper and cut along the line of the failed cutusing scissors or a commercially available cutter.
Pull the edge of the paper straight outside the printer.
SC-P9000 Series/SC-P7000 Series/SC-P8000 Series/SC-P6000 Series User's Guide
Problem Solver
139

Messages What to do
Paper Size ErrorLoaded paper is not supportedsize.
The loaded paper width is not supported. Press the Z button and remove the paper.
Paper for use in the printer must be at least 254 mm wide. Use paper that is at least 254 mmwide.
Should this message be displayed with paper of a width that can be used in the printer,you may be able to print if you select Off for Paper Size Check in the Printer Setup menu.
U “Printer Setup” on page 120
Paper Sensor ErrorLoaded paper or print out has aproblem.Refer to manual for details.
Press the W button to clear the error from the control panel.
If this error is displayed when performing automatic head alignment, check the followingitems.
❏ Does the paper support auto head alignment?Head alignment is not available with transparent or colored media, tracing paper,paper not supported by the auto head alignment function, or paper that is 1.0 mm ormore thick.U “Notes on Head Alignment” on page 130
❏ Are outside light sources interfering with the process?If the printer is exposed to direct sunlight or another light source that causes opticalinterference, shade the printer from these sources.
❏ Are the default values selected for Platen Gap?Restore the item to its default value.
❏ Are some print head nozzles clogged?Perform head cleaning.U “Cleaning the print head” on page 126
If this error is displayed in circumstances other than those listed above, check that theprinter supports the current paper.
U “Supported Media” on page 159
F/W Install ErrorFirmware update failed.Restart the printer.
Turn the printer off, wait for a few minutes, and then turn on the printer again.
Update the firmware again.
If this message appears on the LCD panel again, contact your dealer or Epson Support.
Command ErrorCheck driver settings.
Press the W button and select Job Cancel to stop printing. Confirm that the printer driveryou are using supports this printer.
Reel Unit ErrorCheck Auto Take-up Reel Unit andrestart printer.
Turn the printer off, wait for a few minutes, and then turn on the printer again.
If this message appears on the LCD panel again, contact your dealer or Epson Support.
Reel Unit ErrorConnect Auto Take-up Reel Unitcable and restart printer.
After reconnecting the cable connecting the auto take-up reel unit to the printer, turn theprinter off and then on again.
U The Setup Guide supplied with the optional auto take-up reel unit.
Reel Unit DisconnectedAuto Take-up reel unit isdisconnetcted. Do you continue?
The auto take-up reel unit is not connected. After reconnecting the cable connecting theauto take-up reel unit to the printer, select No to turn the printer off. Turn the printer againafter a short pause.
U The Setup Guide supplied with the optional auto take-up reel unit.
To continue printing without using the auto take-up reel unit, select Yes.
SC-P9000 Series/SC-P7000 Series/SC-P8000 Series/SC-P6000 Series User's Guide
Problem Solver
140

Messages What to do
Take-Up ErrorIs anything obstructing thetake-up reel sensor system?
After checking the take-up reel unit sensor and removing any obstructions, press the Zbutton.
If there is loose paper around the take-up reel unit roll core, set the Auto switch to Off andkeep the Manual switch pressed in the take-up direction to remove the slack. Afterconfirming that the paper is correctly attached, return the Auto switch to its originalposition and press the Z button.
U “Using the Auto Take-up Reel Unit (SC-P9000 Series/SC-P8000 Series Only)” onpage 43
HDD ErrorHDD used for another printerneeds to be formatted. Continue?
Optional hard disk units that have been installed on other devices must be formatted afterbeing transferred to this printer. The disk can not be used until it is formatted. To formatthe disk, use the Administrator Menu menu in the control panel.
U “Administrator Menu” on page 123
Storage ErrorCheck if hard disk unit is correctlyinstalled.
Press the W button and select Job Cancel to stop printing. Remove and reinstall the harddisk unit.
If this message appears on the LCD panel again, contact your dealer or Epson Support.
When you are printing via the printer driver included with the printer, you can printregardless of the hard disk status when you select Print only in Hard Disk UnitSettings.
U “Saving Print Jobs” on page 58
Data Size ErrorData size of print job is too large.Check on print job.
The optional hard disk unit can store print jobs up to 100 GB in size. To print larger jobs,select Print only from Hard Disk Unit Settings in printer driver; alternatively, make surethat print jobs are less than 100 GB in size.
U “Saving Print Jobs” on page 58
HDD Store ErrorHard disk does not have enoughspace.See documentation for how todelete stored print jobs.
Unwanted jobs can be deleted from Remote Manager or the LFP HDD Utility.
U “Print Job Management” on page 57
HDD Boot ErrorHard disk error. Hard disk cannotbe used.
Press the Z button to clear the error from the control panel. When you are printing viathe printer driver included with the printer, you can print regardless of the hard disk statuswhen you select Print only in Hard Disk Unit Settings.
U “Saving Print Jobs” on page 58
If this message appears on the LCD panel again, contact your dealer or Epson Support.
Held Jobs LimitHeld job queue full.
The number of held jobs has reached 200.
Press the Z button and select Resume All Jobs.
U “Function Summary” on page 57
Checking hard disk Data saved to the optional hard disk unit is being checked. If the results of the checkindicate that data restoration is necessary, the restoration is carried out next. Restorationmay take up to 20 minutes.
If the restoration ends, the start completes.
If it was not possible to restore the data, the format menu of the hard disk appears. If thehard disk is formatted, the hard disk can be used again. If you exit the menu withoutformatting the hard disk, only printing that does not use the hard disk is possible.
SC-P9000 Series/SC-P7000 Series/SC-P8000 Series/SC-P6000 Series User's Guide
Problem Solver
141

Messages What to do
SP Connection ErrorSee manual and reconnect cablesof SpectroProofer Mounter toprinter.
The optional SpectroProofer mounter (from here on, mounter) is not installed on theprinter correctly. Turn off the printer, and then reconnect the cables of the SpectroProofermounter correctly. Turn on the printer again after a short pause.
See the manual supplied with the mounter for more information on connecting cables.
SProofer DisconnectedSpectroProofer Mounter is notrecognized. Continue?
The mounter is not connected to the printer correctly. Connect the cables of the mountercorrectly, and then select No to turn off the printer. Turn on the printer again after a shortpause.
See the manual supplied with the mounter for more information on connecting cables.
If you do not want to use the mounter, select Yes.
ILS30EP ErrorSee manual and reconnect ILS30EPto SpectroProofer Mounter. Turnprinter off and on again.
The optional color measurement device ILS30EP (from here on, ILS30EP) is not installed onthe mounter correctly. Turn off the printer, and then reconnect the cables of the ILS30EPcorrectly. Turn on the printer again after a short pause.
See the manual supplied with the ILS30EP for more information on connecting cables.
ILS30EP DisconnectedILS30EP is not recognized.Continue?
The ILS30EP is not connected to the printer correctly. Connect the cables of the ILS30EPcorrectly, and then select No to turn off the printer. Turn on the printer again after a shortpause.
See the manual supplied with the ILS30EP for more information on connecting cables.
If you do not want to use the mounter, select Yes.
SpectroProofer ErrorSee documentation for how tosolve the problem.NN (where NN is the error number)
The solution depends on the error number. See the following table.
U “SpectroProofer Error” on page 142
SpectroProofer Error
If SpectroProofer Error is displayed, see the two numbers at the end of the error number for the solution. See themanual supplied with the mounter for more information on removing, cleaning, and installing, the mounter.
If this message appears on the LCD panel again, contact your dealer or Epson Support.
U See “Where To Get Help” on page 186
Error Number What to do
01 The mounter is not installed correctly. Turn off the printer, remove the mounter, and theninstall it again.
SC-P9000 Series/SC-P7000 Series/SC-P8000 Series/SC-P6000 Series User's Guide
Problem Solver
142

Error Number What to do
13, 15 Check the following points.
❏ Is there an error in the backing?Remove the mounter and check the backing condition. If it is not installed correctly,install it again. Remove any packing material or foreign substances between themedia holding plates and the backing.
❏ Are there any errors in the carriage moving area?Remove the mounter and check the base and the interior. Remove any packingmaterial or foreign substances.
❏ Are there any errors in the calibration tile holder?Remove the mounter and check the status of the calibration tile holder. If it is notinstalled correctly, install it again.
❏ Are you using paper that does not meet the required specifications?Do not use paper that is not supported by the mounter.U “Supported Media” on page 159
❏ Is the printer being used in an environment that does not meet the requiredspecifications?Make sure you use the printer, mounter, and paper within the requiredspecifications. See the manual supplied with the accessories for more information onthe recommended environmental conditions for the mounter and paper.Recommended environment for the printer U “Specifications Table” onpage 183
80 Check the following points.
❏ Do the numbers on the ILS30EP and the calibration tile label match?Remove the mounter and check the ILS30EP and the label of the calibration tile. If youhave multiple ILS30EP, make sure you install the one that matches the number on thecalibration tile.
❏ Is the lens of the ILS30EP or the calibration tile soiled?See the manual supplied with the mounter to clean the parts.
For numbers other than the above Make a note of the number displayed and contact customer support services forassistance. If customer support for your area is not listed below, contact the dealer whereyou purchased your product.
U See “Where To Get Help” on page 186
When a Maintenance Call/Service Call Occurs
Error messages What to do
Maintenance RequestReplace Part Soon/Replace Part NowXXXXXXXX
A part used in the printer is nearing the end of its service life.
Contact your dealer or Epson Support and tell them the maintenance requestcode.
You cannot clear the maintenance request until the part is replaced. A service calloccurs if you continue to use the printer.
SC-P9000 Series/SC-P7000 Series/SC-P8000 Series/SC-P6000 Series User's Guide
Problem Solver
143

Error messages What to do
Call For ServiceXXXX Error XXXXPower off and then on. If this doesn’t work,note the code and call for service.
A call for service occurs when:
❏ The power cable is not connected securely
❏ An error that cannot be cleared occurs
When a call for service has occurred, the printer automatically stops printing. Turnoff the printer, disconnect the power cable from the outlet and from the AC inleton the printer, and then reconnect. Turn on the printer again multiple times.
If the same call for service is displayed on the LCD panel, contact your dealer orEpsonSupport for assistance. Tell them the call for service code is "XXXX".
SC-P9000 Series/SC-P7000 Series/SC-P8000 Series/SC-P6000 Series User's Guide
Problem Solver
144

Troubleshooting
You cannot print (because the printer does not work)
The printer does not turn on.
o Is the power cable plugged into the electricaloutlet or the printer?Make sure the power cable is securely plugged intothe printer.
o Is there a problem with the power outlet?Make sure your outlet works by connecting the powercable for another electric product.
The printer turns off automatically.
o Is Power Off Timer enabled?To prevent the printer turning off automatically,select Off.
U “Preferences” on page 123
The printer driver is not installedproperly (Windows).
o Is the icon for this printer displayed in theDevices and Printers/Printer/Printers andFaxes folder?
❏ YesThe printer driver is installed. See "The printer isnot connected correctly to the computer" on thenext page.
❏ NoThe printer driver is not installed. Install theprinter driver.
o Does the printer port setting match theprinter connection port?Check the printer port.
Click the Port tab in the printer Properties dialog andcheck the option selected for Print to followingport(s).
❏ USB:USBxxx (x stands for the port number) forthe USB connection
❏ Network: The correct IP address for the networkconnection
If it is not indicated, the printer driver is not installedcorrectly. Delete and reinstall the printer driver.
U “Uninstalling Software” on page 27
The printer driver is not installedproperly (Mac OS X).
o Is the printer added to the printer list?Click the Apple menu - System Preferences -Printers & Scanners (or Print & Fax).
If the printer name is not displayed, add the printer.
The printer is not communicatingwith the computer.
o Is the cable plugged in properly?Confirm that the interface cable is securely connectedto both the printer port and the computer. Also, makesure the cable is not broken nor bent. If you have aspare cable, try connecting with the spare cable.
o Does the interface cable specification matchthe specifications for the computer?Make sure the interface cable specifications matchthe specifications for the printer and the computer.
U “System Requirements” on page 182
o When using a USB hub, is it being usedcorrectly?In the USB specification, daisy-chains of up to five USBhubs are possible. However, we recommend that youconnect the printer to the first hub connected directlyto the computer. Depending on the hub you areusing, the operation of the printer may becomeunstable. If this should occur, plug the USB cabledirectly into your computer's USB port.
SC-P9000 Series/SC-P7000 Series/SC-P8000 Series/SC-P6000 Series User's Guide
Problem Solver
145

o Is the USB hub recognized correctly?Make sure the USB hub is recognized correctly on thecomputer. If the computer correctly detects the USBhub, disconnect all USB hubs from the computer andconnect the printer directly to the computer USB port.Ask the USB hub manufacturer about USB huboperation.
You cannot print under the networkenvironment.
o Are the network settings correct?Ask your network administrator for the networksettings.
o Connect the printer directly to the computerusing a USB cable, and then try to print.If you are able to print via USB, there is a problem withnetwork settings. Ask your system administrator, orrefer to the manual for your network system. If youcannot print via USB, see the appropriate section inthis User’s Guide.
The printer has an error.
o View the message displayed in the controlpanel.U “Control panel” on page 12
U “What to do When a Message is Displayed” onpage 139
The printer stops printing.
o Is the status of print queue Pause? (Windows)If you stop printing or the printer stops printingbecause of an error, the print queue enters a Pausestatus. You cannot print in this status.
Double-click the printer icon in the Devices andPrinters, Printers, or Printers and Faxes folder; ifprinting is paused, open the Printer menu and clearthe Pause check box.
o Does the current printer status show PrintingPaused (Mac OS X)?Open the status dialog for your printer and checkwhether printing is paused.
(1) Select System Preferences > Printers & Scanners(or Print & Fax) > Open Print Queue> from the Applemenu.
(2) Double-click the icon for any printer that isPaused.
(3) Click Resume Printer.
Your problem is not listed here.
o Decide whether the trouble is caused by theprinter driver or the application. (Windows)Perform a test print from the printer driver so that youcan check that the connection between the printerand computer is correct and the printer driver settingsare correct.
(1) Make sure that the printer is turned on and in readystatus, and load A4 or larger paper.
(2) Open the Devices and Printers, Printers, orPrinters and Faxes folder.
(3) Right-click the target printer icon, and selectProperties.
(4) In the Properties dialog, select the General tab andclick Print Test Page.
After a while the printer starts to print a test page.
❏ If the test page is printed correctly, theconnection between the printer and computer iscorrect. Go to the next section.
❏ If the test page is not printed correctly, check theitems above again.U “You cannot print (because the printer doesnot work)” on page 145
The "Driver Version" shown on the test page is theversion number of the Windows internal driver. Thisdiffers from the Epson printer driver version that youinstalled.
SC-P9000 Series/SC-P7000 Series/SC-P8000 Series/SC-P6000 Series User's Guide
Problem Solver
146

The printer sounds like it is printing, but nothing prints
The print head moves, but nothingprints.
o Confirm the printer operation.Print a nozzle check pattern. Because a nozzle checkpattern can be printed without connecting to acomputer, you can check the operations and printstatus for the printer.
U “Checking for clogged nozzles” on page 126
Check the next section if the nozzle check pattern isnot printed correctly.
o Is the message Motor Self Adjustmentdisplayed on the control panel's screen?The printer adjusts the internal motor. Wait for a whilewithout turning off the printer.
The nozzle check pattern is notprinted correctly.
o Perform head cleaning.The nozzles may be clogged. Print a nozzle checkpattern again after performing head cleaning.
U “Cleaning the print head” on page 127
o Has the printer been left unused for a longtime?If the printer has not been used for a long time, thenozzles may have dried up and have been clogged.
The prints are not what you expected
Print quality is poor, uneven, toolight, or too dark.
o Are the print head nozzles clogged?If the nozzles are clogged, specific nozzles do not fireink and the print quality declines. Print a nozzle checkpattern.
U “Checking for clogged nozzles” on page 126
o Was Head Alignment performed?With bidirectional printing, the print head prints whilemoving left and right. If the print head is misaligned,ruled lines may be misaligned accordingly. If verticalruled lines are misaligned with bidirectional printing,perform Head Alignment.
U “Adjusting print misalignments (HeadAlignment)” on page 126
o Are you using a genuine Epson ink cartridge?This printer is developed for use with Epson inkcartridges. If you use non-Epson ink cartridges,printouts may be faint, or the color of the printedimage may be changed because the remaining inklevel is not correctly detected. Be sure to use thecorrect ink cartridge.
o Are you using an old ink cartridge?The print quality declines when an old ink cartridge isused. Replace the old ink cartridge with a new one. Werecommend using all the ink in the cartridge beforethe expiry date printed on the package (within sixmonths of installation).
o Have the ink cartridges been shaken?The ink cartridges for this printer contain pigmentinks. Shake the cartridges thoroughly beforeinstalling them in the printer.
U “Replacing Ink Cartridges” on page 133
o Are the Media Type settings correct?Print quality is affected if the Media Type you haveselected in the Printer Settings screen (Windows) orPrint screen (Mac OS X) in the printer driver does notmatch with the paper that is loaded in the printer. Besure to match the media type setting with the paperthat is loaded in the printer.
o Did you select a low quality mode (such asSpeed) as the Print Quality?If the options selected for Print Quality > QualityOptions place priority on speed, quality will besacrificed for print speed, potentially causing printquality to decline. To improve print quality, selectResolution options that give priority to quality.
o Is color management enabled?Enable color management.
U “Color Management Printing” on page 101
SC-P9000 Series/SC-P7000 Series/SC-P8000 Series/SC-P6000 Series User's Guide
Problem Solver
147
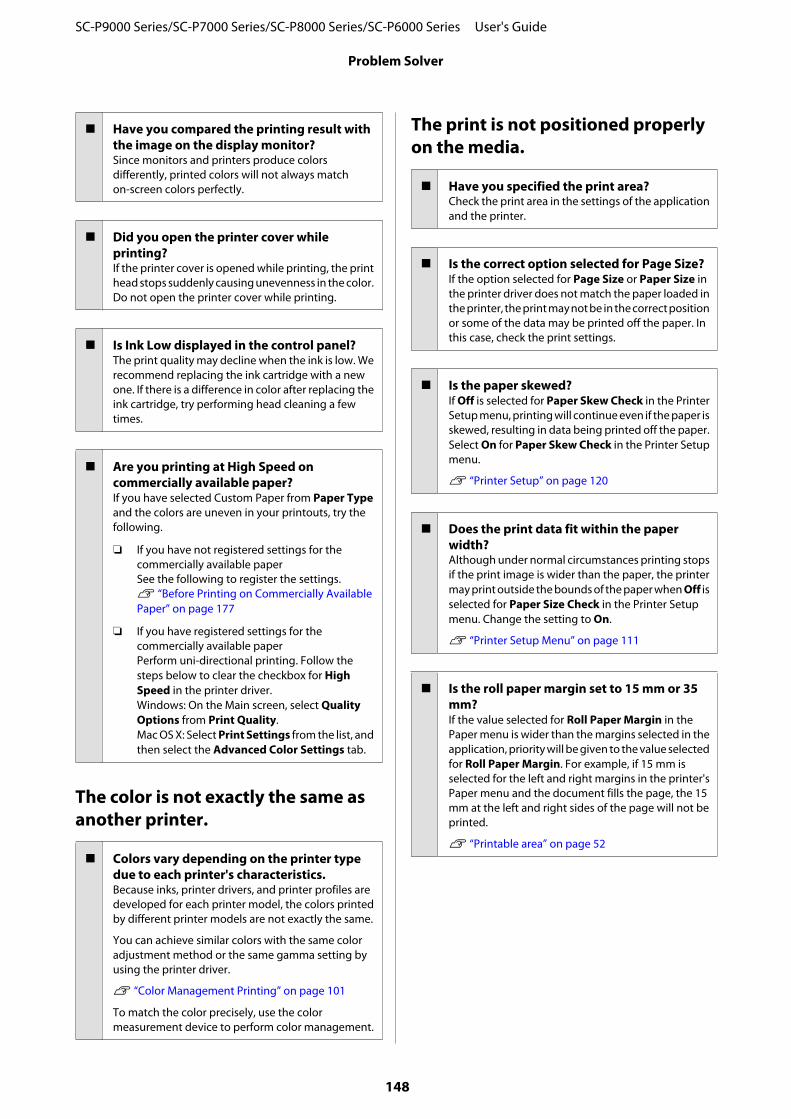
o Have you compared the printing result withthe image on the display monitor?Since monitors and printers produce colorsdifferently, printed colors will not always matchon-screen colors perfectly.
o Did you open the printer cover whileprinting?If the printer cover is opened while printing, the printhead stops suddenly causing unevenness in the color.Do not open the printer cover while printing.
o Is Ink Low displayed in the control panel?The print quality may decline when the ink is low. Werecommend replacing the ink cartridge with a newone. If there is a difference in color after replacing theink cartridge, try performing head cleaning a fewtimes.
o Are you printing at High Speed oncommercially available paper?If you have selected Custom Paper from Paper Typeand the colors are uneven in your printouts, try thefollowing.
❏ If you have not registered settings for thecommercially available paperSee the following to register the settings.U “Before Printing on Commercially AvailablePaper” on page 177
❏ If you have registered settings for thecommercially available paperPerform uni-directional printing. Follow thesteps below to clear the checkbox for HighSpeed in the printer driver.Windows: On the Main screen, select QualityOptions from Print Quality.Mac OS X: Select Print Settings from the list, andthen select the Advanced Color Settings tab.
The color is not exactly the same asanother printer.
o Colors vary depending on the printer typedue to each printer's characteristics.Because inks, printer drivers, and printer profiles aredeveloped for each printer model, the colors printedby different printer models are not exactly the same.
You can achieve similar colors with the same coloradjustment method or the same gamma setting byusing the printer driver.
U “Color Management Printing” on page 101
To match the color precisely, use the colormeasurement device to perform color management.
The print is not positioned properlyon the media.
o Have you specified the print area?Check the print area in the settings of the applicationand the printer.
o Is the correct option selected for Page Size?If the option selected for Page Size or Paper Size inthe printer driver does not match the paper loaded inthe printer, the print may not be in the correct positionor some of the data may be printed off the paper. Inthis case, check the print settings.
o Is the paper skewed?If Off is selected for Paper Skew Check in the PrinterSetup menu, printing will continue even if the paper isskewed, resulting in data being printed off the paper.Select On for Paper Skew Check in the Printer Setupmenu.
U “Printer Setup” on page 120
o Does the print data fit within the paperwidth?Although under normal circumstances printing stopsif the print image is wider than the paper, the printermay print outside the bounds of the paper when Off isselected for Paper Size Check in the Printer Setupmenu. Change the setting to On.
U “Printer Setup Menu” on page 111
o Is the roll paper margin set to 15 mm or 35mm?If the value selected for Roll Paper Margin in thePaper menu is wider than the margins selected in theapplication, priority will be given to the value selectedfor Roll Paper Margin. For example, if 15 mm isselected for the left and right margins in the printer'sPaper menu and the document fills the page, the 15mm at the left and right sides of the page will not beprinted.
U “Printable area” on page 52
SC-P9000 Series/SC-P7000 Series/SC-P8000 Series/SC-P6000 Series User's Guide
Problem Solver
148

Vertical ruled lines are misaligned.
o Is the print head misaligned? (in bidirectionalprinting)With bidirectional printing, the print head prints whilemoving left and right. If the print head is misaligned,ruled lines may be misaligned accordingly. If verticalruled lines are misaligned with bidirectional printing,perform Head Alignment.
U “Adjusting print misalignments (HeadAlignment)” on page 126
The printed surface is scuffed orsoiled.
o Is the paper too thick or too thin?Check that the paper specifications are compatiblewith this printer.
U “Supported Media” on page 159
For information about the media types andappropriate settings for printing on paper from othermanufacturers or when using RIP software, see thedocumentation supplied with the paper, or contactthe dealer of the paper or the manufacturer of the RIP.
o Is the paper creased or folded?Do not use old paper or paper with folds in it. Alwaysuse new paper.
o Is the paper wavy or warped?If the paper becomes wavy or warped due to changesin temperature or humidity, the paper may be scuffed.
Check the following points.
❏ Insert the paper just before printing.
❏ Do not use wavy or warped paper.For roll paper, cut off any parts that are wavy orwarped, and then load the paper again.For cut sheets, use new paper.
o Is the print head scuffing the printed surface?If the surface of the paper is scuffed, select a PlatenGap option between Wide and Widest.
U “Custom Paper Setting” on page 117
U “Printer Setup” on page 120
o Is the print head scuffing the edge of thepaper?In the Paper menu, select Top35mm/Bottom15mmas the Roll Paper Setup - Roll Paper Margin option.
U “Paper” on page 116
o Widen the bottom marginDepending on the paper usage, storage conditions,and the content of the print data, the bottom edgemay be scuffed when printing. In this situation it isbest to create your data with a wider bottom margin.
o Does the interior of the printer needcleaning?The rollers may need cleaning. Clean the rollers byfeeding and ejecting paper.
U “Cleaning the inside” on page 137
The paper is creased.
o Are you using the printer at normal roomtemperature?Epson special media should be used at normal roomtemperature (temperature: 15 to 25˚C, humidity: 40 to60%). For information about paper such as thin paperfrom other manufacturers that requires specialhandling, see the documentation supplied with thepaper.
o When using non-Epson special media, haveyou made the paper configuration?When using non-Epson special media, configure thepaper characteristics (custom paper) before printing.
U “Before Printing on Commercially AvailablePaper” on page 177
The reverse side of the printed paperis soiled.
o Select On for Paper Size Check in the Settingsmenu.Although printing normally stops if the print image iswider than the paper, when Off is selected for PaperSize Check in the Printer Setup menu, the printer mayprint outside the bounds of the paper, getting ink onthe inside of the printer in the process. This can beprevented by changing the setting to On.
U “Printer Setup” on page 120
U “Cleaning the inside” on page 137
SC-P9000 Series/SC-P7000 Series/SC-P8000 Series/SC-P6000 Series User's Guide
Problem Solver
149

o Is ink dry on the printed surface?Depending on the printing density and media type,the ink may take a while to dry. Do not stack the paperuntil the printed surface is dry.
Also, if you set the Drying Time per Head Pass inPaper Configuration from the printer driver, you canstop the operation after printing (ejecting and cuttingpaper) and wait until the ink is dry. See the printerdriver help for more details on the PaperConfiguration dialog box.
Too much ink is fired.
o Are the Media Type settings correct?Make sure that the printer driver's Media Typesettings match the paper that you are using. Theamount of ink to be fired is controlled according to themedia type. If the settings do not match the paperloaded, too much ink may be fired.
o Is the Color Density setting correct?Lower the density of the ink in the PaperConfiguration dialog box from the printer driver. Theprinter may be firing too much ink for some paper. Seethe printer driver help for more details on the PaperConfiguration dialog box.
o Are you printing on tracing paper?If too much ink is used when printing in B&W ontracing paper, you may get better results by choosinga lower print density in the Paper Configurationdialog box.
Margins appear in borderlessprinting.
o Are the settings for the print data in theapplication correct?Make sure that the paper settings in the applicationare correct as well as in the printer driver.
U “Borderless Printing” on page 78
o Are the paper settings correct?Make sure that the paper settings of the printer matchthe paper that you are using.
o Have you changed the amount ofenlargement?Adjust the amount of enlargement for borderlessprinting. Margins may appear if you set the amount ofenlargement to Min.
U “Borderless Printing” on page 78
o Is the paper stored correctly?The paper may expand or contract if it is not storedcorrectly so that margins appear even whenborderless is set. See the documentation suppliedwith the paper for more information on the storagemethod.
o Are you using paper that supports borderlessprinting?Paper that does not support borderless printing mayexpand or contract while printing so that marginsappear even when borderless is set. We recommendusing paper that is designed to support borderlessprinting.
o Try adjusting the cutter.When there are margins on the top and bottom of theroll paper while performing borderless printing, tryperforming Adjust Cut Position. It may reduce themargins.
U “Maintenance” on page 114
Feeding or ejecting problems
Unable to feed or eject paper.
o Is the paper loaded in the correct position?See the following for the correct paper loadingpositions.
U “Loading and Removing the Roll Paper” onpage 28
U “Loading and Removing Cut Sheets” on page 34
If the paper is loaded correctly, check the condition ofthe paper that you are using.
o Is the paper loaded in the correct direction?Load cut sheets vertically. If they are not loaded in thecorrect direction, the paper may not be recognizedand an error may occur.
U “Loading and Removing Cut Sheets” on page 34
SC-P9000 Series/SC-P7000 Series/SC-P8000 Series/SC-P6000 Series User's Guide
Problem Solver
150

o Is the paper creased or folded?Do not use old paper or paper with folds in it. Alwaysuse new paper.
o Is the paper damp?Do not use paper that is damp. Also, Epson specialmedia should be left in the bag until you intend to useit. If it is left out for a long time, the paper curls up andgets damp so that it does not feed properly.
o Is the paper wavy or warped?If the paper becomes wavy or warped due to changesin temperature or humidity, the printer may not beable to recognize the paper size correctly.
Check the following points.
❏ Insert the paper just before printing.
❏ Do not use wavy or warped paper.For roll paper, cut off any parts that are wavy orwarped, and then load the paper again.For cut sheets, use new paper.
o Is the paper too thick or too thin?Check that the paper specifications are compatiblewith this printer. For information about the mediatypes and appropriate settings for printing on paperfrom other manufacturers or when using RIP software,see the documentation supplied with the paper, orcontact the dealer of the paper or the manufacturer ofthe RIP.
o Are you using the printer at normal roomtemperature?Epson special media should be used at normal roomtemperature (temperature: 15 to 25˚C, humidity: 40 to60%).
o Is paper jammed in the printer?Open the printer cover of the printer and check thatthere are no paper jams or foreign objects in theprinter. If paper is jammed, see "Paper jams" belowand clear the jammed paper.
o Is the paper suction too strong?If you continue to have problems with ejected paper,try lowering the Paper Suction (the amount of suctionused to keep the paper on the paper feed path).
U “Custom Paper Setting” on page 117
Paper does not collect in the paperbasket or is creased or folded whenthe paper basket is used.
o Does the print job require a lot of ink, or is thehumidity of the workplace high?Depending on the job and the work environment,paper may not collect in the paper basket. Take thefollowing measures as appropriate.
❏ Paper does not collect in the paper basket: Useyour hands to lightly press the paper into thepaper basket as it is ejected from the printer.
❏ The paper folds after it has been cutautomatically: Select manual cutting and takethe paper in both hands after it is cut.
❏ The paper creases and does not collect well in thepaper basket: Resume printing after closing thepaper basket. Before the paper ejected from theprinter touches the floor, take it in both handsclose to the paper eject guides and continue tolightly support it until printing is complete.
Roll paper jam
To remove jammed paper, follow the steps below:
A Open the roll paper cover, and then cut the paperabove the paper insertion slot using acommercially available cutter.
B Check that the pause light is not flashing, andthen press the Y button to release the pressureroller.
SC-P9000 Series/SC-P7000 Series/SC-P8000 Series/SC-P6000 Series User's Guide
Problem Solver
151

C Rewind the roll paper.
D Open the front cover.
c Important:
Do not touch the cables around the print head.Failure to observe this precaution coulddamage the printer.
E Using your hand, slowly move the print head tothe side that is not jammed with paper.
c Important:
Other than when you are removing paperjams, do not touch the print head. If you touchthe print head with your hand, staticelectricity may cause a malfunction.
F Remove the jammed paper.
Do not touch the rollers, ink absorbing areas, orink tubes.
G Close the front cover.
H Turn the printer off and then back on.
I Reload the paper and resume printing.
U “Loading Roll Paper” on page 28
c Important:
Before you reload the roll paper, cut the edgestraight horizontally. Cut any wavy or creasedsections. If there is a problem at the edge, decreasedprint quality and paper jams may occur.
Cut sheets jam
To remove jammed paper, follow the steps below:
SC-P9000 Series/SC-P7000 Series/SC-P8000 Series/SC-P6000 Series User's Guide
Problem Solver
152

A Open the front cover.
c Important:
Do not touch the cables around the print head.Failure to observe this precaution coulddamage the printer.
B Using your hand, slowly move the print head tothe side that is not jammed with paper.
c Important:
Other than when you are removing paperjams, do not touch the print head. If you touchthe print head with your hand, staticelectricity may cause a malfunction.
C Remove the jammed paper.
Do not touch the rollers, ink absorbing areas, orink tubes.
D Close the front cover.
E Turn the printer off and then back on.
F Reload the paper and resume printing.
U “Loading and Removing Cut Sheets” onpage 34
Others
The control panel display keepsturning off.
o Is the printer in sleep mode?Sleep mode is exited if a print job is received or the Pbutton on the control panel is pressed. The delay canbe changed from the Preferences menu.
U “Preferences” on page 123
SC-P9000 Series/SC-P7000 Series/SC-P8000 Series/SC-P6000 Series User's Guide
Problem Solver
153

Color ink runs out quickly even whenprinting in the Black&White mode orwhen printing black data.
o Color ink is consumed during the headcleaning process.If all nozzles are selected when you perform HeadCleaning or Powerful Cleaning, inks of all colors willbe used. (This is true even if you are currently printingin black and white.)
U “Cleaning the print head” on page 127
The paper is not cut cleanly.
o Replace the cutter.If the paper is not cut cleanly, replace the cutter.
U “Replacing the Cutter” on page 135
A light is visible inside the printer.
o This is not a failure.The light is a light inside the printer.
The administrator password has beenlost
o Should you forget the administrator password,contact your dealer or Epson Support.
Head cleaning is performedautomatically
o The printer may automatically perform head cleaningto ensure print quality.
When an error occurs during colormeasurement (when using theSpectroProofer mounter), the colorsdo not match even after performingcolor calibration
o Are the temperature and humidity within therange specified for the printer (duringoperation) and paper?If the color measurement chart is printed outside therecommended environmental conditions, the correctcolor measurement is not acquired. See the manualssupplied with the printer and paper for therecommended environmental conditions.
Recommended environment for the printer U“Specifications Table” on page 183
o Do the RIP or application print settings differfrom the actual print conditions?Printing cannot be performed correctly if the papertype or black ink type differ from the RIP or applicationsettings. Check the the paper type loaded in theprinter and the black ink type settings are correct.
o Was the color measurement chart printedwith clogged nozzles?Check that there is no visible banding (horizontal linesat regular intervals) in the color measurement chart. Ifa color measurement chart is printed with cloggednozzles, the correct color measurement result cannotbe acquired. If there are clogged nozzles, performhead cleaning, and then print the color measurementchart again.
U “Cleaning the print head” on page 126
o Are there stains or scratches on the colormeasurement chart, or does ink peel off?If there are stains or scratches on the colormeasurement chart, or if ink peels off, the correct colormeasurement result cannot be acquired. Reprint thecolor measurement chart.
SC-P9000 Series/SC-P7000 Series/SC-P8000 Series/SC-P6000 Series User's Guide
Problem Solver
154

o Is the color measurement chart sufficientlydry?If the ink has not dried sufficiently, the correct colormeasurement result cannot be acquired. When usingcommercially available paper, if the drying time is notincreased beyond the standard time, ink will not bedried sufficiently. Set a longer drying time in the RIP orapplication you are using. See the manual suppliedwith the RIP or application for more information insetting the drying time. See the manual supplied withthe paper for more information on the dryingcondition.
o Was custom paper information registered?When performing calibration for commerciallyavailable paper, use one of the following methods toregister custom paper information. If the paper hasnot been registered, you cannot select it from theEpson Color Calibration Utility paper types.
❏ Register the paper in the printer driver.Windows U “Adding a Paper Type ” onpage 63Mac OS X U “Saving to Presets” on page 68
❏ Register the paper in the printer.In Select Reference Paper, select anythingexcept for No Paper Selected. If you select NoPaper Selected, an error is generated in EpsonColor Calibration Utility and calibration cannotbe performed.U “Custom Paper Setting” on page 117
o Is any external light (direct sunlight) enteringthe printer when performing colormeasurement?If any external light enters the printer, the correctcolor measurement result cannot be acquired.Prevent external light from entering the printer.
The printer turned off due to a powercut
o Turn off the printer, and then turn it back on.When the printer is not turned off normally, the printhead may not be capped correctly. If the print head isleft uncapped for a long time, the print quality maydecline.
When you turn on the printer, capping is performedautomatically after a few minutes.
Also, if the printer is turned off during calibration, datatransmission and writing adjustment values may notbe performed correctly. Turn on the printer, and thencheck Calibration Date from the Printer Status menu.When the date is initialized, the adjustment values arealso initialized.
Exit Epson Color Calibration Utility, and then restart.The adjustment values are automatically restored.
U “Printer Status” on page 121
U "Epson Color Calibration UtilityUser's Guide"(PDF)
SC-P9000 Series/SC-P7000 Series/SC-P8000 Series/SC-P6000 Series User's Guide
Problem Solver
155

Appendix
Options and Consumable Products
The following options and consumable products are available for use with your printer. (As of October, 2015)
For the latest information, see the Epson Web site.
Epson Special Media
U “Epson Special Media Table” on page 159
Ink cartridges
Epson recommends the use of genuine Epson ink cartridges. Epson cannot guarantee the quality or reliability ofnon-genuine ink. The use of non-genuine ink may cause damage that is not covered by Epson’s warranties, and undercertain circumstances, may cause erratic printer behavior.
Information about non-genuine ink levels may not be displayed, and use of non-genuine ink is recorded for possibleuse in service support.
U “Replacing Ink Cartridges” on page 133
SC-P9000/SC-P7000, SC-P8000/SC-P6000
Color NamePart number
700 ml 350ml 150ml
Photo Black T8041 T8241 T8341
Cyan T8042 T8242 T8342
Vivid Magenta T8043 T8243 T8343
Yellow T8044 T8244 T8344
Light Cyan T8045 T8245 T8345
Vivid Light Magenta T8046 T8246 T8346
Light Black T8047 T8247 T8347
Matte Black T8048 T8248 T8348
Light Light Black T8049 T8249 T8349
Orange* T804A T824A T834A
Green* T804B T824B T834B
Violet* T804D T824D T834D
SC-P9000 Series/SC-P7000 Series/SC-P8000 Series/SC-P6000 Series User's Guide
Appendix
156

* Only available for the SC-P9000/SC-P7000.
SC-P9070/SC-P7070, SC-P8070/SC-P6070
Color NamePart number
700 ml 350ml 150ml
Photo Black T7681 T7691 T7701
Cyan T7682 T7692 T7702
Vivid Magenta T7683 T7693 T7703
Yellow T7684 T7694 T7704
Light Cyan T7685 T7695 T7705
Vivid Light Magenta T7686 T7696 T7706
Light Black T7687 T7697 T7707
Matte Black T7688 T7698 T7708
Light Light Black T7689 T7699 T7709
Orange* T768A T769A T770A
Green* T768B T769B T770B
Violet* T768D T769D T770D
* Only available for the SC-P9070/SC-P7070.
SC-P9080/SC-P7080, SC-P8080/SC-P6080
Color NamePart number
700 ml 350ml 150ml
Photo Black T8061 T8261 T8361
Cyan T8062 T8262 T8362
Vivid Magenta T8063 T8263 T8363
Yellow T8064 T8264 T8364
Light Cyan T8065 T8265 T8365
Vivid Light Magenta T8066 T8266 T8366
Light Black T8067 T8267 T8367
Matte Black T8068 T8268 T8368
Light Light Black T8069 T8269 T8369
Orange* T806A T826A T836A
SC-P9000 Series/SC-P7000 Series/SC-P8000 Series/SC-P6000 Series User's Guide
Appendix
157

Color NamePart number
700 ml 350ml 150ml
Green* T806B T826B T836B
Violet* T806D T826D T836D
* Only available for the SC-P9080/SC-P7080.
Others
Product Part number Explanation
Maintenance Box T6997 Replacement part for when the current part is at the end ofits service life.
U “Replacing Maintenance Boxes” on page 134
Auto Cutter Spare Blade C12C815331 U “Replacing the Cutter” on page 135
Roll Media Adapter C12C811241 When loading roll paper, these attach to both ends of thepaper core.
U “Loading and Removing the Roll Paper” on page 28
SpectroProofer Mounter 44"*1 C12C890521 When the optional color measurement device ILS30EP isinstalled and attached to the printer, color measurement isautomatically performed for printed material. See themanual supplied with the mounter for more informationon installing.
You need a commercially available software RIP to use themounter.
SpectroProofer Mounter 24"*2 C12C890531
ILS30EP C12C932021 Color measurement device installed on the mounter. Seethe manual supplied with the color measurement devicefor more information on installing on the mounter.
Auto Take-up Reel Unit*1 C12C815323 Automatically winds printed roll paper around the papercore. See the manual supplied with the Auto take-up reelunit for more information on installing.
Use U “Using the Auto Take-up Reel Unit (SC-P9000Series/SC-P8000 Series Only)” on page 43
Hard Disk Unit C12C848031 U “Using the Optional Hard Disk Unit” on page 57
Roll Paper Belt C12C890121 This holder keeps roll paper from unrolling after it isremoved from the printer.
U “Removing Roll Paper” on page 32
*1 Available for the SC-P9000 Series/SC-P8000 Series.
*2 Available for the SC-P7000 Series/SC-P6000 Series.
SC-P9000 Series/SC-P7000 Series/SC-P8000 Series/SC-P6000 Series User's Guide
Appendix
158

Supported Media
We recommend you use the following Epson special media for high-quality printing results.
Note:For information about the media types and appropriate settings for printing on paper other than Epson special media orwhen using raster image processing (RIP) software, see the documentation supplied with the paper, or contact the dealer ofthe paper or the manufacturer of the RIP.
Epson Special Media Table
The following provides the meaning of the table titles for supported paper sizes.
Title Explanation
Size: Describes the size for cut sheet media or the width for roll paper.
Borderless: Describes whether borderless printing is available.
✓: Recommended paper, -: Unavailable paper
Calibration: Describes whether or not Epson Color Calibration Utility is available.
✓: Available, -: Unavailable
Mounter: Describes whether or not the optional SpectroProofer mounter is available.
✓: Available, -: Unavailable
Take-up: Describes whether or not the optional auto take-up reel unit is available for the SC-P9000 Series/SC-P8000 Series. (When it is available, the take-up direction is also stated.)
F: Forward (printed side out), B: Backward (printed side in), -: Unavailable
Roll Paper
Premium Glossy Photo Paper (250)❏ Paper thickness: 0.27 mm ❏ Roll core size: 3 inches
Printer driver settings
Media Type Photo Paper - Premium Glossy Photo Paper (250)
Type of black ink Photo Black (PK)
ICC profile
SC-P9000 Series/SC-P7000Series
LLK ink set: SC-P9000_P7000_Series_LLK PremiumGlossyPhotoPaper250.icc
V ink set: SC-P9000_P7000_Series_V PremiumGlossyPhotoPaper250.icc
SC-P8000 Series/SC-P6000Series
SC-P8000_P6000_Series PremiumGlossyPhotoPaper250.icc
SC-P9000 Series/SC-P7000 Series/SC-P8000 Series/SC-P6000 Series User's Guide
Appendix
159

Supported paper sizes
Size Borderless Calibration Mounter Take-up
406 mm/16 inches
✓ ✓ ✓ F/B610 mm/24 inches
914 mm/36 inches*
1118 mm/44 inches*
* SC-P7000 Series/SC-P6000 Series is not supported.
Premium Semigloss Photo Paper (250)❏ Paper thickness: 0.27 mm ❏ Roll core size: 3 inches
Printer driver settings
Media Type Photo Paper - Premium Semigloss Photo Paper (250)
Type of black ink Photo Black (PK)
ICC profile
SC-P9000 Series/SC-P7000Series
LLK ink set: SC-P9000_P7000_Series_LLK PremiumSemiglossPhotoPaper250.icc
V ink set: SC-P9000_P7000_Series_V PremiumSemiglossPhotoPaper250.icc
SC-P8000 Series/SC-P6000Series
SC-P8000_P6000_Series PremiumSemiglossPhotoPaper250.icc
Supported paper sizes
Size Borderless Calibration Mounter Take-up
406 mm/16 inches
✓ ✓ ✓ F/B610 mm/24 inches
914 mm/36 inches*
1118 mm/44 inches*
* SC-P7000 Series/SC-P6000 Series is not supported.
Premium Luster Photo Paper (260)❏ Paper thickness: 0.27 mm ❏ Roll core size: 3 inches
Printer driver settings
Media Type Photo Paper - Premium Luster Photo Paper (260)
Type of black ink Photo Black (PK)
SC-P9000 Series/SC-P7000 Series/SC-P8000 Series/SC-P6000 Series User's Guide
Appendix
160

ICC profile
SC-P9000 Series/SC-P7000Series
LLK ink set: SC-P9000_P7000_Series_LLK PremiumLusterPhotoPaper260.icc
V ink set: SC-P9000_P7000_Series_V PremiumLusterPhotoPaper260.icc
SC-P8000 Series/SC-P6000Series
SC-P8000_P6000_Series PremiumLusterPhotoPaper260.icc
Supported paper sizes
Size Borderless Calibration Mounter Take-up
254 mm/10 inches
✓
-
✓
-300mm
✓
406 mm/16 inches
F/B
508 mm/20 inches -
610 mm/24 inches
✓914 mm/36 inches*
1118 mm/44 inches*
* SC-P7000 Series/SC-P6000 Series is not supported.
Premium Semimatte Photo Paper (260)❏ Paper thickness: 0.268mm ❏ Roll core size: 3 inches
Printer driver settings
Media Type Photo Paper - Premium Semimatte Photo Paper (260)
Type of black ink Photo Black (PK)
ICC profile
SC-P9000 Series/SC-P7000Series
LLK ink set: SC-P9000_P7000_Series_LLK PremiumSemimattePhotoPaper260.icc
V ink set: SC-P9000_P7000_Series_V PremiumSemimattePhotoPaper260.icc
SC-P8000 Series/SC-P6000Series
SC-P8000_P6000_Series PremiumSemimattePhotoPaper260.icc
Supported paper sizes
Size Borderless Calibration Mounter Take-up
406 mm/16 inches
✓ ✓ ✓ F/B610 mm/24 inches
914 mm/36 inches*
1118 mm/44 inches*
SC-P9000 Series/SC-P7000 Series/SC-P8000 Series/SC-P6000 Series User's Guide
Appendix
161
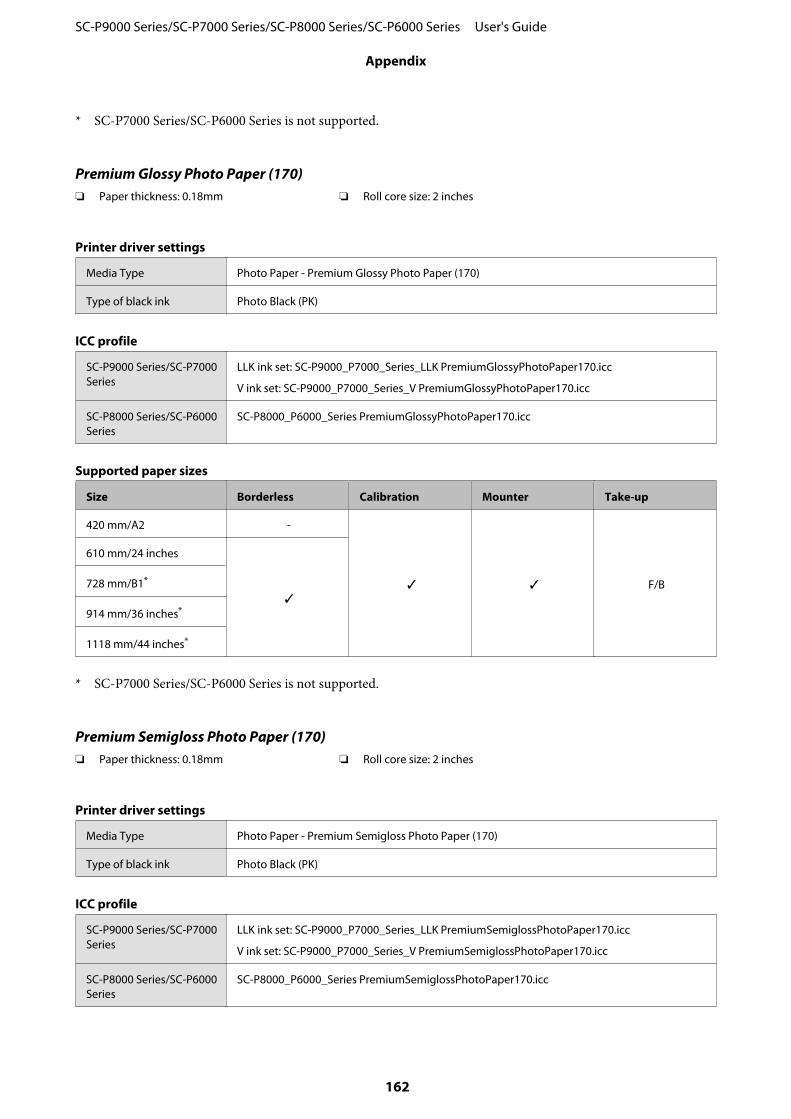
* SC-P7000 Series/SC-P6000 Series is not supported.
Premium Glossy Photo Paper (170)❏ Paper thickness: 0.18mm ❏ Roll core size: 2 inches
Printer driver settings
Media Type Photo Paper - Premium Glossy Photo Paper (170)
Type of black ink Photo Black (PK)
ICC profile
SC-P9000 Series/SC-P7000Series
LLK ink set: SC-P9000_P7000_Series_LLK PremiumGlossyPhotoPaper170.icc
V ink set: SC-P9000_P7000_Series_V PremiumGlossyPhotoPaper170.icc
SC-P8000 Series/SC-P6000Series
SC-P8000_P6000_Series PremiumGlossyPhotoPaper170.icc
Supported paper sizes
Size Borderless Calibration Mounter Take-up
420 mm/A2 -
✓ ✓ F/B
610 mm/24 inches
✓
728 mm/B1*
914 mm/36 inches*
1118 mm/44 inches*
* SC-P7000 Series/SC-P6000 Series is not supported.
Premium Semigloss Photo Paper (170)❏ Paper thickness: 0.18mm ❏ Roll core size: 2 inches
Printer driver settings
Media Type Photo Paper - Premium Semigloss Photo Paper (170)
Type of black ink Photo Black (PK)
ICC profile
SC-P9000 Series/SC-P7000Series
LLK ink set: SC-P9000_P7000_Series_LLK PremiumSemiglossPhotoPaper170.icc
V ink set: SC-P9000_P7000_Series_V PremiumSemiglossPhotoPaper170.icc
SC-P8000 Series/SC-P6000Series
SC-P8000_P6000_Series PremiumSemiglossPhotoPaper170.icc
SC-P9000 Series/SC-P7000 Series/SC-P8000 Series/SC-P6000 Series User's Guide
Appendix
162

Supported paper sizes
Size Borderless Calibration Mounter Take-up
420 mm/A2 -
✓ ✓ F/B610 mm/24 inches
✓914 mm/36 inches*
1118 mm/44 inches*
* SC-P7000 Series/SC-P6000 Series is not supported.
Photo Paper Gloss 250❏ Paper thickness: 0.25mm ❏ Roll core size: 3 inches
Printer driver settings
Media Type Photo Paper - Photo Paper Gloss 250
Type of black ink Photo Black (PK)
ICC profile
SC-P9000 Series/SC-P7000Series
LLK ink set: SC-P9000_P7000_Series_LLK PhotoPaperGloss250.icc
V ink set: SC-P9000_P7000_Series_V PhotoPaperGloss250.icc
SC-P8000 Series/SC-P6000Series
SC-P8000_P6000_Series PhotoPaperGloss250.icc
Supported paper sizes
Size Borderless Calibration Mounter Take-up
432 mm/17 inches
✓ ✓ ✓ F/B610 mm/24 inches
914 mm/36 inches*
1118 mm/44 inches*
* SC-P7000 Series/SC-P6000 Series is not supported.
EPSON Proofing Paper White Semimatte❏ Paper thickness: 0.2mm ❏ Roll core size: 3 inches
Printer driver settings
Media Type Proofing Paper - Epson Proofing Paper White Semimatte
Type of black ink Photo Black (PK)
SC-P9000 Series/SC-P7000 Series/SC-P8000 Series/SC-P6000 Series User's Guide
Appendix
163
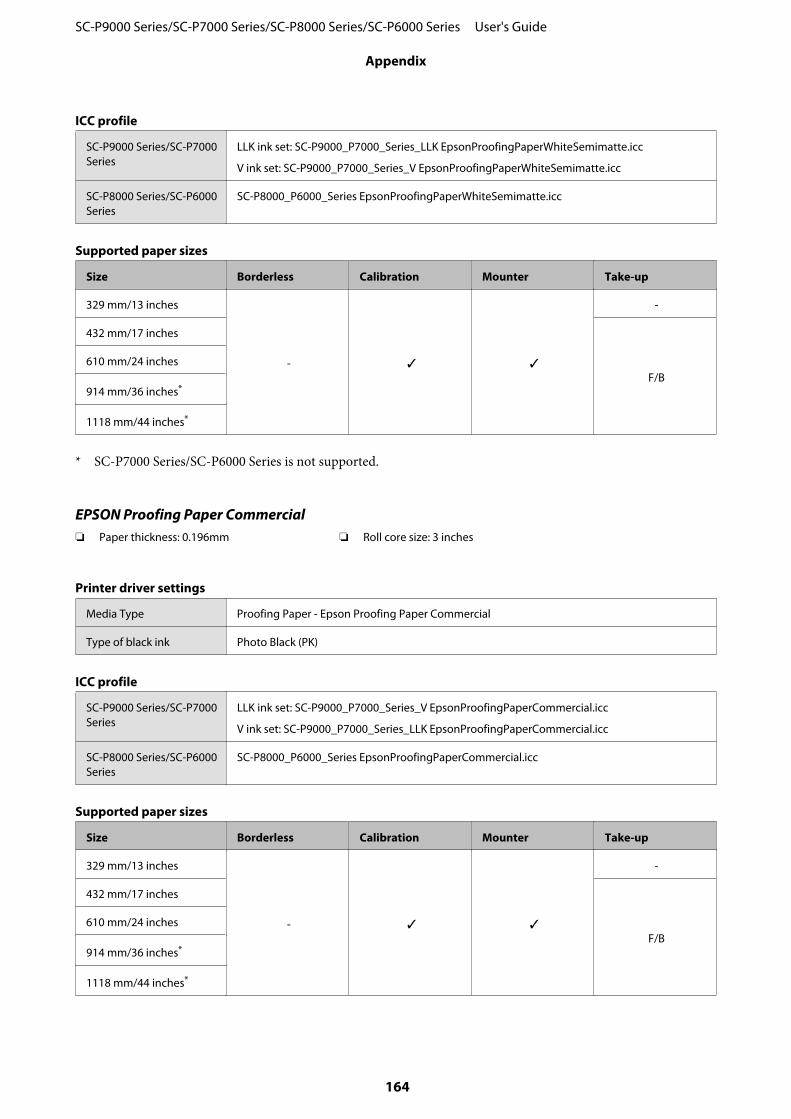
ICC profile
SC-P9000 Series/SC-P7000Series
LLK ink set: SC-P9000_P7000_Series_LLK EpsonProofingPaperWhiteSemimatte.icc
V ink set: SC-P9000_P7000_Series_V EpsonProofingPaperWhiteSemimatte.icc
SC-P8000 Series/SC-P6000Series
SC-P8000_P6000_Series EpsonProofingPaperWhiteSemimatte.icc
Supported paper sizes
Size Borderless Calibration Mounter Take-up
329 mm/13 inches
- ✓ ✓
-
432 mm/17 inches
F/B610 mm/24 inches
914 mm/36 inches*
1118 mm/44 inches*
* SC-P7000 Series/SC-P6000 Series is not supported.
EPSON Proofing Paper Commercial❏ Paper thickness: 0.196mm ❏ Roll core size: 3 inches
Printer driver settings
Media Type Proofing Paper - Epson Proofing Paper Commercial
Type of black ink Photo Black (PK)
ICC profile
SC-P9000 Series/SC-P7000Series
LLK ink set: SC-P9000_P7000_Series_V EpsonProofingPaperCommercial.icc
V ink set: SC-P9000_P7000_Series_LLK EpsonProofingPaperCommercial.icc
SC-P8000 Series/SC-P6000Series
SC-P8000_P6000_Series EpsonProofingPaperCommercial.icc
Supported paper sizes
Size Borderless Calibration Mounter Take-up
329 mm/13 inches
- ✓ ✓
-
432 mm/17 inches
F/B610 mm/24 inches
914 mm/36 inches*
1118 mm/44 inches*
SC-P9000 Series/SC-P7000 Series/SC-P8000 Series/SC-P6000 Series User's Guide
Appendix
164

* SC-P7000 Series/SC-P6000 Series is not supported.
Singleweight Matte Paper❏ Paper thickness: 0.14mm ❏ Roll core size: 2 inches
Printer driver settings
Media Type Matte Paper - Singleweight Matte Paper
Type of black ink Matte Black (MK)
ICC profile
SC-P9000 Series/SC-P7000Series
SC-P9000_P7000_Series Standard.icc
SC-P8000 Series/SC-P6000Series
SC-P8000_P6000_Series Standard.icc
Supported paper sizes
Size Borderless Calibration Mounter Take-up
419 mm/16.5 inches -
✓ -
F432 mm/17 inches
✓
610 mm/24 inches
F*2914 mm/36 inches*1
1118 mm/44 inches*1
*1 SC-P7000 Series/SC-P6000 Series is not supported.
*2 Use the tensioner supplied with the optional auto take-up reel unit.
Doubleweight Matte Paper❏ Paper thickness: 0.21mm ❏ Roll core size: 2 inches
Printer driver settings
Media Type Matte Paper - Doubleweight Matte Paper
Type of black ink Matte Black (MK)
ICC profile
SC-P9000 Series/SC-P7000Series
SC-P9000_P7000_Series Standard.icc
SC-P8000 Series/SC-P6000Series
SC-P8000_P6000_Series Standard.icc
SC-P9000 Series/SC-P7000 Series/SC-P8000 Series/SC-P6000 Series User's Guide
Appendix
165

Supported paper sizes
Size Borderless Calibration Mounter Take-up
610 mm/24 inches
✓ ✓ ✓*2 F914 mm/36 inches*1
1118 mm/44 inches*1
*1 SC-P7000 Series/SC-P6000 Series is not supported.
*2 Only operations guaranteed. (Color measurement not guaranteed.)
Enhanced Matte Paper❏ Paper thickness: 0.2mm ❏ Roll core size: 3 inches
Printer driver settings
Media Type Matte Paper - Enhanced Matte Paper
Type of black ink Photo Black (PK), Matte Black (MK)
ICC profile
SC-P9000 Series/SC-P7000Series
LLK ink set:
❏ PK: SC-P9000_P7000_Series_LLK EnhancedMattePaper_PK.icc
❏ MK: SC-P9000_P7000_Series_LLK EnhancedMattePaper_MK.icc
V ink set:
❏ PK: SC-P9000_P7000_Series_V EnhancedMattePaper_PK.icc
❏ MK: SC-P9000_P7000_Series_V EnhancedMattePaper_MK.icc
SC-P8000 Series/SC-P6000Series
❏ PK: SC-P8000_P6000_Series EnhancedMattePaper_PK.icc
❏ MK: SC-P8000_P6000_Series EnhancedMattePaper_MK.icc
Supported paper sizes
Size Borderless Calibration Mounter Take-up
432 mm/17 inches
- ✓ ✓*2 F610 mm/24 inches
914 mm/36 inches*1
1118 mm/44 inches*1
*1 SC-P7000 Series/SC-P6000 Series is not supported.
*2 Only operations guaranteed. (Color measurement not guaranteed.)
SC-P9000 Series/SC-P7000 Series/SC-P8000 Series/SC-P6000 Series User's Guide
Appendix
166

Watercolor Paper - Radiant White❏ Paper thickness: 0.29mm ❏ Roll core size: 3 inches
Printer driver settings
Media Type Fine Art Paper - Watercolor Paper - Radiant White
Type of black ink Photo Black (PK), Matte Black (MK)
ICC profile
SC-P9000 Series/SC-P7000Series
LLK ink set:
❏ PK: SC-P9000_P7000_Series_LLK WatercolorPaper-RadiantWhite_PK.icc
❏ MK: SC-P9000_P7000_Series_LLK WatercolorPaper-RadiantWhite_MK.icc
V ink set:
❏ PK: SC-P9000_P7000_Series_V WatercolorPaper-RadiantWhite_PK.icc
❏ MK: SC-P9000_P7000_Series_V WatercolorPaper-RadiantWhite_MK.icc
SC-P8000 Series/SC-P6000Series
❏ PK: SC-P8000_P6000_Series WatercolorPaper-RadiantWhite_PK.icc
❏ MK: SC-P8000_P6000_Series WatercolorPaper-RadiantWhite_MK.icc
Supported paper sizes
Size Borderless Calibration Mounter Take-up
610 mm/24 inches
- ✓ ✓*2 F/B914 mm/36 inches*1
1118 mm/44 inches*1
*1 SC-P7000 Series/SC-P6000 Series is not supported.
*2 Only operations guaranteed. (Color measurement not guaranteed.)
UltraSmooth Fine Art Paper❏ Paper thickness: 0.32mm ❏ Roll core size: 3 inches
Printer driver settings
Media Type Fine Art Paper - UltraSmooth Fine Art Paper
Type of black ink Photo Black (PK), Matte Black (MK)
SC-P9000 Series/SC-P7000 Series/SC-P8000 Series/SC-P6000 Series User's Guide
Appendix
167

ICC profile
SC-P9000 Series/SC-P7000Series
LLK ink set:
❏ PK: SC-P9000_P7000_Series_LLK UltraSmoothFineArtPaper_PK.icc
❏ MK: SC-P9000_P7000_Series_LLK UltraSmoothFineArtPaper_MK.icc
V ink set:
❏ PK: SC-P9000_P7000_Series_V UltraSmoothFineArtPaper_PK.icc
❏ MK: SC-P9000_P7000_Series_V UltraSmoothFineArtPaper_MK.icc
SC-P8000 Series/SC-P6000Series
❏ PK: SC-P8000_P6000_Series UltraSmoothFineArtPaper_PK.icc
❏ MK: SC-P8000_P6000_Series UltraSmoothFineArtPaper_MK.icc
Supported paper sizes
Size Borderless Calibration Mounter Take-up
432 mm/17 inches
- ✓ ✓*2 F/B610 mm/24 inches
1118 mm/44 inches*1
*1 SC-P7000 Series/SC-P6000 Series is not supported.
*2 Only operations guaranteed. (Color measurement not guaranteed.)
Enhanced synthetic paper❏ Paper thickness: 0.12mm ❏ Roll core size: 2 inches
Printer driver settings
Media Type Others - Enhanced Synthetic Paper
Type of black ink Matte Black (MK)
ICC profile
SC-P9000 Series/SC-P7000Series
SC-P9000_P7000_Series Standard.icc
SC-P8000 Series/SC-P6000Series
SC-P8000_P6000_Series Standard.icc
Supported paper sizes
Size Borderless Calibration Mounter Take-up
610 mm/24 inches- ✓ - F/B
1118 mm/44 inches*
* SC-P7000 Series/SC-P6000 Series is not supported.
SC-P9000 Series/SC-P7000 Series/SC-P8000 Series/SC-P6000 Series User's Guide
Appendix
168

Enhanced adhesive synthetic paper❏ Paper thickness: 0.17mm ❏ Roll core size: 2 inches
Printer driver settings
Media Type Others - Enhanced Adhesive Synthetic Paper
Type of black ink Matte Black (MK)
ICC profile
SC-P9000 Series/SC-P7000Series
SC-P9000_P7000_Series Standard.icc
SC-P8000 Series/SC-P6000Series
SC-P8000_P6000_Series Standard.icc
Supported paper sizes
Size Borderless Calibration Mounter Take-up
610 mm/24 inches- ✓ - F/B
1118 mm/44 inches*
* SC-P7000 Series/SC-P6000 Series is not supported.
Cut sheet
Premium Glossy Photo Paper❏ Paper thickness: 0.27 mm
Printer driver settings
Media Type Photo Paper - Premium Glossy Photo Paper
Type of black ink Photo Black (PK)
ICC profile
SC-P9000 Series/SC-P7000Series
LLK ink set: SC-P9000_P7000_Series_LLK PremiumGlossyPhotoPaper.icc
V ink set: SC-P9000_P7000_Series_V PremiumGlossyPhotoPaper.icc
SC-P8000 Series/SC-P6000Series
SC-P8000_P6000_Series PremiumGlossyPhotoPaper.icc
SC-P9000 Series/SC-P7000 Series/SC-P8000 Series/SC-P6000 Series User's Guide
Appendix
169

Supported paper sizes
Size Borderless Calibration Mounter
A3
- ✓ -S-B/A3+
A2
Premium Semigloss Photo Paper❏ Paper thickness: 0.27 mm
Printer driver settings
Media Type Photo Paper - Premium Semigloss Photo Paper
Type of black ink Photo Black (PK)
ICC profile
SC-P9000 Series/SC-P7000Series
LLK ink set: SC-P9000_P7000_Series_LLK PremiumSemiglossPhotoPaper.icc
V ink set: SC-P9000_P7000_Series_V PremiumSemiglossPhotoPaper.icc
SC-P8000 Series/SC-P6000Series
SC-P8000_P6000_Series PremiumSemiglossPhotoPaper.icc
Supported paper sizes
Size Borderless Calibration Mounter
A3
- ✓-
S-B/A3+
A2 ✓
Premium Luster Photo Paper❏ Paper thickness: 0.27 mm
Printer driver settings
Media Type Photo Paper - Premium Luster Photo Paper
Type of black ink Photo Black (PK)
ICC profile
SC-P9000 Series/SC-P7000Series
LLK ink set: SC-P9000_P7000_Series_LLK PremiumLusterPhotoPaper.icc
V ink set: SC-P9000_P7000_Series_V PremiumLusterPhotoPaper.iccc
SC-P8000 Series/SC-P6000Series
SC-P8000_P6000_Series PremiumLusterPhotoPaper.icc
SC-P9000 Series/SC-P7000 Series/SC-P8000 Series/SC-P6000 Series User's Guide
Appendix
170

Supported paper sizes
Size Borderless Calibration Mounter
S-B/A3+- ✓
-
A2 ✓
EPSON Proofing Paper White Semimatte❏ Paper thickness: 0.2mm
Printer driver settings
Media Type Proofing Paper - Epson Proofing Paper White Semimatte
Type of black ink Photo Black (PK)
ICC profile
SC-P9000 Series/SC-P7000Series
LLK ink set: SC-P9000_P7000_Series_LLK EpsonProofingPaperWhiteSemimatte.icc
V ink set: SC-P9000_P7000_Series_V EpsonProofingPaperWhiteSemimatte.icc
SC-P8000 Series/SC-P6000Series
SC-P8000_P6000_Series EpsonProofingPaperWhiteSemimatte.icc
Supported paper sizes
Size Borderless Calibration Mounter
S-B/A3+- ✓ -
A3++
Photo Quality Ink Jet Paper❏ Paper thickness: 0.12mm
Printer driver settings
Media Type Matte Paper - Photo Quality Ink Jet Paper
Type of black ink Matte Black (MK)
ICC profile
SC-P9000 Series/SC-P7000Series
SC-P9000_P7000_Series Standard.icc
SC-P8000 Series/SC-P6000Series
SC-P8000_P6000_Series Standard.icc
SC-P9000 Series/SC-P7000 Series/SC-P8000 Series/SC-P6000 Series User's Guide
Appendix
171

Supported paper sizes
Size Borderless Calibration Mounter
A3
- - -S-B/A3+
A2
Archival Matte Paper❏ Paper thickness: 0.2mm
Printer driver settings
Media Type Matte Paper - Archival Matte Paper
Type of black ink Photo Black (PK), Matte Black (MK)
ICC profile
SC-P9000 Series/SC-P7000Series
LLK ink set:
❏ PK: SC-P9000_P7000_Series_LLK ArchivalMattePaper_PK.icc
❏ MK: SC-P9000_P7000_Series_LLK ArchivalMattePaper_MK.icc
V ink set:
❏ PK: SC-P9000_P7000_Series_V ArchivalMattePaper_PK.icc
❏ MK: SC-P9000_P7000_Series_V ArchivalMattePaper_MK.icc
SC-P8000 Series/SC-P6000Series
❏ PK: SC-P8000_P6000_Series ArchivalMattePaper_PK.icc
❏ MK: SC-P8000_P6000_Series ArchivalMattePaper_MK.icc
Supported paper sizes
Size Borderless Calibration Mounter
A3
- ✓
-S-B/A3+
A2✓*2
US-C*1
*1 SC-P7000 Series/SC-P6000 Series is not supported.
*2 Only operations guaranteed. (Color measurement not guaranteed.)
Enhanced Matte Paper❏ Paper thickness: 0.2mm
SC-P9000 Series/SC-P7000 Series/SC-P8000 Series/SC-P6000 Series User's Guide
Appendix
172

Printer driver settings
Media Type Matte Paper - Enhanced Matte Paper
Type of black ink Photo Black (PK), Matte Black (MK)
ICC profile
SC-P9000 Series/SC-P7000Series
LLK ink set:
❏ PK: SC-P9000_P7000_Series_LLK EnhancedMattePaper_PK.icc
❏ MK: SC-P9000_P7000_Series_LLK EnhancedMattePaper_MK.icc
V ink set:
❏ PK: SC-P9000_P7000_Series_V EnhancedMattePaper_PK.icc
❏ MK: SC-P9000_P7000_Series_V EnhancedMattePaper_MK.icc
SC-P8000 Series/SC-P6000Series
❏ PK: SC-P8000_P6000_Series EnhancedMattePaper_PK.icc
❏ MK: SC-P8000_P6000_Series EnhancedMattePaper_MK.icc
Supported paper sizes
Size Borderless Calibration Mounter
A2- ✓ ✓*2
US-C*1
*1 SC-P7000 Series/SC-P6000 Series is not supported.
*2 Only operations guaranteed. (Color measurement not guaranteed.)
Watercolor Paper - Radiant White❏ Paper thickness: 0.29mm
Printer driver settings
Media Type Fine Art Paper - Watercolor Paper - Radiant White
Type of black ink Photo Black (PK), Matte Black (MK)
ICC profile
SC-P9000 Series/SC-P7000Series
LLK ink set:
❏ PK: SC-P9000_P7000_Series_LLK WatercolorPaper-RadiantWhite_PK.icc
❏ MK: SC-P9000_P7000_Series_LLK WatercolorPaper-RadiantWhite_MK.icc
V ink set:
❏ PK: SC-P9000_P7000_Series_V WatercolorPaper-RadiantWhite_PK.icc
❏ MK: SC-P9000_P7000_Series_V WatercolorPaper-RadiantWhite_MK.icc
SC-P8000 Series/SC-P6000Series
❏ PK: SC-P8000_P6000_Series WatercolorPaper-RadiantWhite_PK.icc
❏ MK: SC-P8000_P6000_Series WatercolorPaper-RadiantWhite_MK.icc
SC-P9000 Series/SC-P7000 Series/SC-P8000 Series/SC-P6000 Series User's Guide
Appendix
173
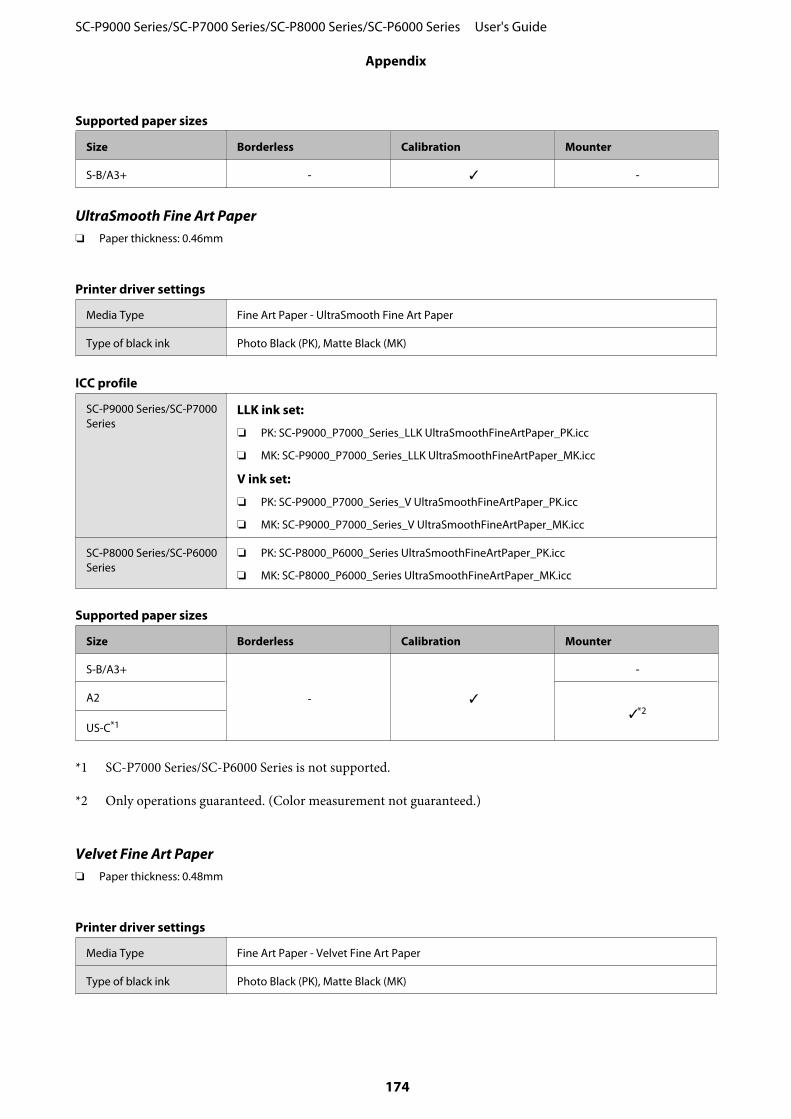
Supported paper sizes
Size Borderless Calibration Mounter
S-B/A3+ - ✓ -
UltraSmooth Fine Art Paper❏ Paper thickness: 0.46mm
Printer driver settings
Media Type Fine Art Paper - UltraSmooth Fine Art Paper
Type of black ink Photo Black (PK), Matte Black (MK)
ICC profile
SC-P9000 Series/SC-P7000Series
LLK ink set:
❏ PK: SC-P9000_P7000_Series_LLK UltraSmoothFineArtPaper_PK.icc
❏ MK: SC-P9000_P7000_Series_LLK UltraSmoothFineArtPaper_MK.icc
V ink set:
❏ PK: SC-P9000_P7000_Series_V UltraSmoothFineArtPaper_PK.icc
❏ MK: SC-P9000_P7000_Series_V UltraSmoothFineArtPaper_MK.icc
SC-P8000 Series/SC-P6000Series
❏ PK: SC-P8000_P6000_Series UltraSmoothFineArtPaper_PK.icc
❏ MK: SC-P8000_P6000_Series UltraSmoothFineArtPaper_MK.icc
Supported paper sizes
Size Borderless Calibration Mounter
S-B/A3+
- ✓
-
A2✓*2
US-C*1
*1 SC-P7000 Series/SC-P6000 Series is not supported.
*2 Only operations guaranteed. (Color measurement not guaranteed.)
Velvet Fine Art Paper❏ Paper thickness: 0.48mm
Printer driver settings
Media Type Fine Art Paper - Velvet Fine Art Paper
Type of black ink Photo Black (PK), Matte Black (MK)
SC-P9000 Series/SC-P7000 Series/SC-P8000 Series/SC-P6000 Series User's Guide
Appendix
174

ICC profile
SC-P9000 Series/SC-P7000Series
LLK ink set:
❏ PK: SC-P9000_P7000_Series_LLK VelvetFineArtPaper_PK.icc
❏ MK: SC-P9000_P7000_Series_LLK VelvetFineArtPaper_MK.icc
V ink set:
❏ PK: SC-P9000_P7000_Series_V VelvetFineArtPaper_PK.icc
❏ MK: SC-P9000_P7000_Series_V VelvetFineArtPaper_MK.icc
SC-P8000 Series/SC-P6000Series
❏ PK: SC-P8000_P6000_Series VelvetFineArtPaper_PK.icc
❏ MK: SC-P8000_P6000_Series VelvetFineArtPaper_MK.icc
Supported paper sizes
Size Borderless Calibration Mounter
S-B/A3+
- ✓
-
A2✓*2
US-C*1
*1 SC-P7000 Series/SC-P6000 Series is not supported.
*2 Only operations guaranteed. (Color measurement not guaranteed.)
Enhanced Matte Poster Board❏ Paper thickness: 1.3mm
Printer driver settings
Media Type Fine Art Paper - Enhanced Matte Poster Board
Type of black ink Photo Black (PK), Matte Black (MK)
ICC profile
SC-P9000 Series/SC-P7000Series
LLK ink set:
❏ PK: SC-P9000_P7000_Series_LLK EnhancedMattePosterBoard_PK.icc
❏ MK: SC-P9000_P7000_Series_LLK EnhancedMattePosterBoard_MK.icc
V ink set:
❏ PK: SC-P9000_P7000_Series_V EnhancedMattePosterBoard_PK.icc
❏ MK: SC-P9000_P7000_Series_V EnhancedMattePosterBoard_MK.icc
SC-P8000 Series/SC-P6000Series
❏ PK: SC-P8000_P6000_Series EnhancedMattePosterBoard_PK.icc
❏ MK: SC-P8000_P6000_Series EnhancedMattePosterBoard_MK.icc
SC-P9000 Series/SC-P7000 Series/SC-P8000 Series/SC-P6000 Series User's Guide
Appendix
175

Supported paper sizes
Size Borderless Calibration Mounter
610 mm (24") × 762 mm(30")
- - -762 mm (30") × 1016 mm(40")*
* SC-P7000 Series/SC-P6000 Series is not supported.
Supported Commercially Available Paper
When using commercially available paper, make sure you register the paper information.
U “Before Printing on Commercially Available Paper” on page 177
This printer supports the following paper specifications for non-Epson media.
c Important:
❏ Do not use paper that is wrinkled, scuffed, torn, or dirty.
❏ Although plain paper and recycled paper manufactured by other companies can be loaded and fed in theprinter as long as they meet the following specifications, Epson cannot guarantee the print quality.
❏ Although other paper types manufactured by other companies can be loaded in the printer as long as theymeet the following specifications, Epson cannot guarantee the paper feeding and print quality.
❏ When using the SpectroProofer mounter, see the documentation supplied with your software RIP.
Roll Paper
Roll core size 2 inch and 3 inch
Roll paper outer diameter 2-inch core: 103 mm or less
3-inch core: 150 mm or less
Paper Width SC-P9000 Series/SC-P8000 Series: 254 mm (10 inches) to 1,118 mm (44 inches)
SC-P7000 Series/SC-P6000 Series: 254 mm (10 inches) to 610 mm (24 inches)
Paper Length 2-inch core: 45 m or less
3-inch core: 202 m or less
Thickness 0.08mm to 0.5mm
Cut sheet
Paper Width SC-P9000 Series/SC-P8000 Series: 182 mm (B5) to 1,118 mm (44 inches)
SC-P7000 Series/SC-P6000 Series: 182 mm (B5) to 620 mm*1
Paper Length*2 SC-P9000 Series/SC-P8000 Series: 297 mm (A4) to 1580 mm (B0+)
SC-P7000 Series/SC-P6000 Series: 297 mm (A4) to 914 mm (A1+)
SC-P9000 Series/SC-P7000 Series/SC-P8000 Series/SC-P6000 Series User's Guide
Appendix
176

Thickness 0.08 mm to 1.5 mm (0.5 mm to 1.5 mm for thick paper)
*1 The printable area is 610 mm (24 inches).
U “Cut Sheets Printable Area” on page 53
*2 762 mm for thick paper.
Supported paper widths for borderless printing (for roll paper and cut sheets)
Available for All models Only for SC-P9000 Series/SC-P8000Series
254mm/10inch
300mm/11.8inch
Super A3/B/329 mm/13inch
406mm/16inch
US C/ 432mm/17inch
B2/515 mm
A1/594mm
Super A1/610mm/24inch
B1/728mm
Super A0/914mm/36inch
Super B0/1118mm/44inch
When using the Epson Color Calibration Utility
Even if the specified conditions are met, you cannot use the following paper types.
❏ Paper that is thin and soft (plain paper and so on)
❏ Paper with an uneven print surface
❏ Paper that is colored or transparent
❏ Paper on which ink blurs or overflows when printing
❏ Paper which bends seriously during loading and printing
When performing color calibration for multiple printers, you can only use cut sheets A3 size or larger.For one printer, you can use A3 size or larger roll paper as well as cut sheets.
Before Printing on Commercially Available Paper
Note:
❏ Be sure to check the paper characteristics (such as if the paper is glossy, the material, and the thickness) in the manualprovided with the paper or contact the dealer of the paper.
❏ Test the print quality with this printer before purchasing a large amount of paper.
When using non-Epson media (Custom Paper), make the paper configuration according to the paper characteristicsbefore printing. Printing without making configuring may cause wrinkles, rubbing, uneven colors, and so on.
Make sure you set the following three items.
SC-P9000 Series/SC-P7000 Series/SC-P8000 Series/SC-P6000 Series User's Guide
Appendix
177

Select ReferencePaper
The optimum settings for using different types of Epson special media have already been registered tothis printer.
Check the following, and then select the Epson special media type that is closest to the paper you areusing.
❏ Glossy paper*: Photo Paper or Proofing Paper
❏ Thick paper that is not glossy: Matte Paper
❏ Thin, soft paper that is not glossy; Plain Paper
❏ Cotton paper with an uneven surface: Fine Art Paper
❏ Special media such as film, cloth, poster board, and tracing paper: Others
Thickness Set the thickness of the paper. If you do not know the exact thickness, set Detect Paper Thickness fromthe control panel's Paper menu.
This allows you to reduce the grainy feeling and scuff marks in print outs, as well as differences in the printposition and color.
Paper Feed Adjust Optimizes the paper feed when printing. Reduces banding (horizontal stripes) or uneven colors.
* Check which to select in the manual provided with the paper or contact the dealer of the paper.
Make settings using one of the following methods.
❏ Set Custom Paper Setting from the control panel's Paper menu.You can make paper settings for all items except for the three mentioned above.U “From the printer” on page 179
❏ Set in EPSON LFP Remote Panel 2 (software supplied)You can make the same settings as the control panel's Paper menu from a computer. For details, see the EPSONLFP Remote Panel 2 help.
❏ Set in the printer driver.Make settings from the printer driver, and save to a computer.When Custom Paper is selected in Select Paper Type from the control panel's Paper menu, the control panel'ssettings are enabled regardless of the printer driver settings.U “From the printer driver” on page 179
When you have finished making settings, print using the saved settings and check the results. If you are not satisifedwith the print results, check the following and set the item according to the problem.
U “The prints are not what you expected” on page 147
c Important:
If you change one item set in the Paper menu, you need to perform Paper Feed Adjust again.
SC-P9000 Series/SC-P7000 Series/SC-P8000 Series/SC-P6000 Series User's Guide
Appendix
178

From the printer
Buttons that are used in the following settings
A Press the r button on the printer's control panelto display the Settings menu.
B Press the d/u buttons to select Paper, and thenpress the r button.
The Paper menu will be displayed.
C Press the d/u buttons to select Custom PaperSetting, and then press the r button.
The Custom Paper Setting menu is displayed.
D Press the d/u buttons to select the custom papernumber (1 to 10) that you want to save thesettings to, and then press the Z button.
A setting items screen is displayed. If you select anumber to which settings have already beensaved, the setting is overwritten.
Make sure you set the following three items.
❏ Select Reference Paper
❏ Detect Paper Thickness
❏ Paper Feed Adjust
See the following for more information on eachsetup item.
U “Custom Paper Setting” on page 117
From the printer driver
❏ WindowsOpen the Main screen, and then save the settings inCustom Settings from Paper Configuration.U “Adding a Paper Type ” on page 63
❏ Mac OS XSelect Paper Configuration from the list, makesettings, and then save the settings in Presets.U “Saving to Presets” on page 68
SC-P9000 Series/SC-P7000 Series/SC-P8000 Series/SC-P6000 Series User's Guide
Appendix
179

Notes When Moving orTransporting the Printer
This section describes precaution when moving andtransporting the product.
Notes When Moving the Printer
This section assumes that the product is being moved toanother location on the same floor without traversingstairs, ramps, or lifts. See the following section forinformation on moving the printer between floors or toanother building.
U “Notes on Transporting” on page 180
Caution:
Do not tilt the product more than 10 degreesforward or back while moving it. Failure to observethis precaution could result in the printer fallingover, causing accidents.
c Important:
Do not remove the ink cartridges. Failure to observethis precaution could cause the print head nozzles todry out.
Getting Ready
A Confirm that the printer is off.
B Disconnect the power cords and all other cables.
C Place the paper basket in its storage position.
U “Storing” on page 42
D Remove the optional auto take-up reel unit orSpectroProofer mounter if they are installed.
U Setup Guide (booklet) supplied withoptional items
E Unlock the casters.
F Move the printer.
c Important:
Use the casters to move the printer indoors ashort distance over a level floor. They can notbe used for transport.
Notes on Transporting
Make the following preparations in advance beforetransporting the printer.
❏ Turn off the printer and remove all cables.
❏ Remove any paper.
❏ Remove any optional components if they areinstalled.To remove the optional components, see the Setupguide included with each of them, and then reversethe attachment procedure.
Furthermore, repack it using the original box andpacking materials to protect it from shock andvibration.
When packing, make sure you install protectivematerial to secure the print head.
See the "Setup Guide" (booklet) supplied with theprinter for the installation method, and install in theoriginal location before the printer was removed.
SC-P9000 Series/SC-P7000 Series/SC-P8000 Series/SC-P6000 Series User's Guide
Appendix
180

Caution:
❏ The printer is heavy. When you pack or movethe printer, use four or more people whencarrying it.
❏ When you lift the printer, maintain a naturalposture.
❏ When you lift the printer, place your hands atthe locations indicated in the followingillustration.If you lift the printer while holding othersections, you may be injured. For example, youmay drop the printer or your fingers may bepinched when lowering the printer.
When you move the printer while packaging it, placeyour hands at the positions in the illustration, and thenlift.
c Important:
❏ Only hold the required area; otherwise, theprinter may be damaged. Failure to observe thisprecaution could damage the printer.
❏ Move and transport the printer with inkcartridges installed. Do not remove the inkcartridges; otherwise, the nozzles may beclogged and make it impossible to print, or inkmay leak.
Notes when reusing the printer
After moving or transporting the printer, follow thesteps below to put it into a ready status.
See the Choosing a Place for the Printer section of the"Setup Guide" (booklet) in advance to make sure thelocation is suitable for installing the printer.
A See the "Setup Guide" to install the printer.
U "Setup Guide" (booklet)
c Important:
Make sure you lock the casters after installingthe printer.
B Print a check pattern and check for cloggednozzles.
U “From the printer” on page 126
C Perform Head Alignment (auto adjustment).
U “From the printer” on page 126
SC-P9000 Series/SC-P7000 Series/SC-P8000 Series/SC-P6000 Series User's Guide
Appendix
181

System Requirements
System Requirements of the Printer Driver
The following chart shows the system requirements toinstall and use the printer driver included with thisprinter. For information on supported operatingsystems, see the Epson website.
Windows
Operating system Windows XP/Windows XP x64
Windows Vista//Windows Vista x64
Windows 7/Windows 7 x64
Windows 8/Windows 8 x64
Windows 8.1/Windows 8.1 x64
Windows Server 2003/WindowsServer 2003 x64/Windows Server2008/Windows Server 2008 x64/Windows Server 2008 R2/WindowsServer 2012
CPU Core 2 Duo 3.05 GHz or better
Memory 1 GB or more available memory
Available hard diskspace
32 GB or more
Interface Hi-Speed USB-Compatible with theUSB 2.0 Specification.*1
Ethernet 10BASE-T, 100BASE-TX/1000BASE-T*2
Display resolution SVGA (800 x 600) or higherresolution
*1 When using a USB hub (a relay device forconnecting multiple USB devices) during a USBconnection, we recommend making a directconnection to the computer with the first tier USBhub. Depending on the USB hub you are using, theoperation of the printer may become unstable. Ifthis should occur, plug the USB cable directly intoyour computer's USB port.
*2 Use a shielded twisted-pair cable (Category 5 orhigher).
Note:When installing, you must log in as a user with ancomputer administrator account (a user belonging to theAdministrators group).
Mac OS X
Operating system Mac OS X v10.6.8 or later
CPU Core 2 Duo 3.05 GHz or better
Memory 1 GB or more available memory
Available hard diskspace
32 GB or more
Display resolution WXGA (1280 x 800) or higherresolution
Interface Hi-Speed USB-Compatible with theUSB 2.0 Specification.*1
Ethernet 10BASE-T, 100BASE-TX/1000BASE-T*2
*1 When using a USB hub (a relay device forconnecting multiple USB devices) during a USBconnection, we recommend making a directconnection to the computer with the first tier USBhub. Depending on the USB hub you are using, theoperation of the printer may become unstable. Ifthis should occur, plug the USB cable directly intoyour computer's USB port.
*2 Use a shielded twisted-pair cable (Category 5 orhigher).
SC-P9000 Series/SC-P7000 Series/SC-P8000 Series/SC-P6000 Series User's Guide
Appendix
182

Specifications Table
Printer Specifications
Printing method On-demand ink jet
Nozzle configura-tion
SC-P9000 Series/SC-P7000Series360 nozzles x 10 colors (Cyan, LightCyan, Vivid Magenta, Vivid LightMagenta, Yellow, Orange, Green,Violet*/Light Light Black*, LightBlack, Photo Black/Matte Black)
* Select one of these colors.
SC-P8000 Series/SC-P6000Series360 nozzles x 8 colors (Cyan, LightCyan, Vivid Magenta, Vivid LightMagenta, Yellow, Light Light Black,Light Black, Photo Black/MatteBlack)
Resolution (maxi-mum)
2880×1440 dpi
Control code ESC/P raster (undisclosedcommand)
Media feed meth-od
Friction feed
Built-in memory 1GB for Main
64MB for Network
Network Functions IPv4, IPv6, WSD, SSLcommunication, IEEE802.1X
Rated voltage AC 100 to 240 V
Rated frequency 50 to 60 Hz
Rated current 2A
Power consumption
In use SC-P9000 Series/SC-P8000SeriesApproximately 75 W
SC-P7000 Series/SC-P6000SeriesApproximately 65 W
Ready mode Approximately 19 W
Sleep mode Approximately 2.0 W
Power off 0.5 W or less
Printer Specifications
Temperature Operating: 10 to 35 ˚C (50 to 95˚F)
Storage (before unpacking):-20 to 60 ̊ C (-4 to 140˚F) (within 120hours at 60 ˚C (140˚F), within amonth at 40 ˚C (104˚F)
Storage (after unpacking):-20 to 40 ˚C (-4 to 104 &F) (within amonth at 40 ˚C (104 ˚F))
Humidity Operating: 20 to 80% (withoutcondensation)
Storage (before unpacking): 5 to85% (without condensation)
Storage (after unpacking): 5 to 85%(without condensation)
Operating temperature/humidity (optional Hard Disk Unitnot installed)
Operating temperature/humidity (optional Hard Disk Unitinstalled)
SC-P9000 Series/SC-P7000 Series/SC-P8000 Series/SC-P6000 Series User's Guide
Appendix
183

Printer Specifications
Dimension SC-P9000 Series/SC-P8000SeriesPaper basket closed:
(W) 1864 x (D) 667 x (H) 1218mm
Using the paper basket (openedfully):
(W) 1864 x (D) 1318 x (H) 1218mm
SC-P7000 Series/SC-P6000SeriesPaper basket closed:
(W) 1356 x (D) 667 x (H) 1218mm
Using the paper basket (openedfully):
(W) 1356 x (D) 903 x (H) 1218mm
Weight* SC-P9000 Series/SC-P8000 Series:Approximately 135kg
SC-P7000 Series/SC-P6000 Series:Approximately 101kg
* Without ink cartridges
Ink Specifications
Type Special ink cartridges
Pigment ink SC-P9000 Series/SC-P7000SeriesBlack: Light Light Black, Light Black,Photo Black, Matte Black
Color: Cyan, Light Cyan, VividMagenta, Vivid Light Magenta,Yellow, Orange, Green, Violet
SC-P8000 Series/SC-P6000SeriesBlack: Light Light Black, Light Black,Photo Black, Matte Black
Color: Cyan, Light Cyan, VividMagenta, Vivid Light Magenta,Yellow
Use by date See the date printed on thepackage (at normal temperature)
Print qualityguarantee expiry
Six months (after installing in theprinter)
Storagetemperature
Uninstalled:-20 to 40˚C (within a month at 40˚C)
Installed in printer:-20 to 40˚C (within a month at 40˚C)
Transporting:-20 to 60˚C (within 1 month at 40˚C,within 72 hours at 60˚C)
Cartridgedimensions
700 ml:(W) 40 x (D) 320 x (H) 107mm
350 ml/150 ml:(W) 40 x (D) 240 x (H) 107mm
c Important:
❏ The ink freezes if left at below -15˚C for a longtime. If it does freeze, leave it at roomtemperature (25˚C) for at least four hours(without condensation).
❏ Do not disassemble or refill the ink cartridges.
Standards and Approvals
Safety UL 60950-1
CAN/CSA C22.2 No.60950-1
SC-P9000 Series/SC-P7000 Series/SC-P8000 Series/SC-P6000 Series User's Guide
Appendix
184

EMC FCC part 15 subpart B Class B
CAN/CSA-CEI/IEC CISPR 22 Class B
AS/NZS CISPR 32 Class B
SC-P9000 Series/SC-P7000 Series/SC-P8000 Series/SC-P6000 Series User's Guide
Appendix
185

Where To Get Help
Technical Support WebSite
Epson’s Technical Support Web Site provides help withproblems that cannot be solved using thetroubleshooting information in your productdocumentation. If you have a Web browser and canconnect to the Internet, access the site at:
http://support.epson.net/
If you need the latest drivers, FAQs, manuals, or otherdownloadables, access the site at:
http://www.epson.com
Then, select the support section of your local EpsonWeb site.
Contacting EpsonSupport
Before Contacting Epson
If your Epson product is not operating properly and youcannot solve the problem using the troubleshootinginformation in your product documentation, contactEpson support services for assistance. If Epson supportfor your area is not listed below, contact the dealer whereyou purchased your product.
Epson support will be able to help you much morequickly if you give them the following information:
❏ Product serial number(The serial number label is usually on the back of theproduct.)
❏ Product model
❏ Product software version(Click About, Version Info, or similar button inthe product software.)
❏ Brand and model of your computer
❏ Your computer operating system name and version
❏ Names and versions of the software applicationsyou normally use with your product
SC-P9000 Series/SC-P7000 Series/SC-P8000 Series/SC-P6000 Series User's Guide
Where To Get Help
186

Help for Users in North America
Epson provides the technical support services listedbelow.
Internet Support
Visit Epson’s support website at http://epson.com/support and select your product for solutions tocommon problems. You can download drivers anddocumentation, get FAQs and troubleshooting advice,or e-mail Epson with your questions.
Speak to a Support Representative
Dial: (562) 276‐1300 (U.S.), or (905) 709-9475(Canada), 6 am to 6 pm, Pacific Time, Monday throughFriday. Days and hours of support are subject to changewithout notice. Toll or long distance charges may apply.
Before you call Epson for support, please have thefollowing information ready:
❏ Product name
❏ Product serial number
❏ Proof of purchase (such as a store receipt) and dateof purchase
❏ Computer configuration
❏ Description of the problem
Note:For help using any other software on your system, see thedocumentation for that software for technical supportinformation.
Purchase Supplies and Accessories
You can purchase genuine Epson ink cartridges, ribboncartridges, paper, and accessories from an Epsonauthorized reseller. To find the nearest reseller, call800-GO-EPSON (800-463-7766). Or you can purchaseonline at http://www.epsonstore.com (U.S. sales) orhttp://www.epson.ca (Canadian sales).
Help for Users in Europe
Check your Pan-European Warranty Document forinformation on how to contact Epson support.
Help for Users in Australia
Epson Australia wishes to provide you with a high levelof customer service. In addition to your productdocumentation, we provide the following sources forobtaining information:
Your Dealer
Don’t forget that your dealer can often help identify andresolve problems. The dealer should always be the firstcall for advise on problems; they can often solveproblems quickly and easily as well as give advise on thenext step to take.
Internet URLhttp://www.epson.com.au
Access the Epson Australia World Wide Web pages.Worth taking your modem here for the occasional surf!The site provides a download area for drivers, Epsoncontact points, new product information and technicalsupport (e-mail).
Epson Helpdesk
Epson Helpdesk is provided as a final backup to makesure our clients have access to advice. Operators on theHelpdesk can aid you in installing, configuring andoperating your Epson product. Our Pre-sales Helpdeskstaff can provide literature on new Epson products andadvise where the nearest dealer or service agent islocated. Many types of queries are answered here.
The Helpdesk numbers are:
Phone: 1300 361 054
Fax: (02) 8899 3789
SC-P9000 Series/SC-P7000 Series/SC-P8000 Series/SC-P6000 Series User's Guide
Where To Get Help
187

We encourage you to have all the relevant informationon hand when you ring. The more information youprepare, the faster we can help solve the problem. Thisinformation includes your Epson productdocumentation, type of computer, operating system,application programs, and any information you feel isrequired.
Help for Users in Singapore
Sources of information, support, and services availablefrom Epson Singapore are:
World Wide Web(http://www.epson.com.sg)
Information on product specifications, drivers fordownload, Frequently Asked Questions (FAQ), SalesEnquiries, and Technical Support via e-mail areavailable.
Epson HelpDesk(Phone: (65) 6586 3111)
Our HelpDesk team can help you with the followingover the phone:
❏ Sales enquiries and product information
❏ Product usage questions or problems
❏ Enquiries on repair service and warranty
Help for Users in Thailand
Contacts for information, support, and services are:
World Wide Web(http://www.epson.co.th)
Information on product specifications, drivers fordownload, Frequently Asked Questions (FAQ), ande-mail are available.
Epson Hotline(Phone: (66) 2685 -9899)
Our Hotline team can help you with the following overthe phone:
❏ Sales enquiries and product information
❏ Product usage questions or problems
❏ Enquiries on repair service and warranty
Help for Users in Vietnam
Contacts for information, support, and services are:
Epson Hotline (Phone): 84-8-823-9239
Service Center: 80 Truong Dinh Street,District 1, Hochiminh CityVietnam
Help for Users in Indonesia
Contacts for information, support, and services are:
World Wide Web(http://www.epson.co.id)
❏ Information on product specifications, drivers fordownload
❏ Frequently Asked Questions (FAQ), SalesEnquiries, questions through e-mail
Epson Hotline
❏ Sales enquiries and product information
❏ Technical supportPhone (62) 21-572 4350
Fax (62) 21-572 4357
Epson Service Center
Jakarta Mangga Dua Mall 3rd floor No 3A/BJl. Arteri Mangga Dua,Jakarta
Phone/Fax: (62) 21-62301104
SC-P9000 Series/SC-P7000 Series/SC-P8000 Series/SC-P6000 Series User's Guide
Where To Get Help
188

Bandung Lippo Center 8th floorJl. Gatot Subroto No.2Bandung
Phone/Fax: (62) 22-7303766
Surabaya Hitech Mall lt IIB No. 12Jl. Kusuma Bangsa 116 – 118Surabaya
Phone: (62) 31-5355035Fax: (62)31-5477837
Yogyakarta Hotel Natour GarudaJl. Malioboro No. 60Yogyakarta
Phone: (62) 274-565478
Medan Wisma HSBC 4th floorJl. Diponegoro No. 11Medan
Phone/Fax: (62) 61-4516173
Makassar MTC Karebosi Lt. Ill Kav. P7-8JI. Ahmad Yani No.49Makassar
Phone: (62)411-350147/411-350148
Help for Users in Hong Kong
To obtain technical support as well as other after-salesservices, users are welcome to contact Epson HongKong Limited.
Internet Home Page
Epson Hong Kong has established a local home page inboth Chinese and English on the Internet to provideusers with the following information:
❏ Product information
❏ Answers to Frequently Asked Questions (FAQs)
❏ Latest versions of Epson product drivers
Users can access our World Wide Web home page at:
http://www.epson.com.hk
Technical Support Hotline
You can also contact our technical staff at the followingtelephone and fax numbers:
Phone: (852) 2827-8911
Fax: (852) 2827-4383
Help for Users in Malaysia
Contacts for information, support, and services are:
World Wide Web(http://www.epson.com.my)
❏ Information on product specifications, drivers fordownload
❏ Frequently Asked Questions (FAQ), SalesEnquiries, questions through e-mail
Epson Trading (M) Sdn. Bhd.
Head Office.
Phone: 603-56288288
Fax: 603-56288388/399
Epson Helpdesk
❏ Sales enquiries and product information (Infoline)Phone: 603-56288222
❏ Enquiries on repair services & warranty, productusage and technical support (Techline)
Phone: 603-56288333
Help for Users in India
Contacts for information, support, and services are:
SC-P9000 Series/SC-P7000 Series/SC-P8000 Series/SC-P6000 Series User's Guide
Where To Get Help
189

World Wide Web(http://www.epson.co.in)
Information on product specifications, drivers fordownload, and products enquiry are available.
Epson India Head Office - Bangalore
Phone: 080-30515000
Fax: 30515005
Epson India Regional Offices:
Location Telephonenumber
Fax number
Mumbai 022-28261515 /16/17
022-28257287
Delhi 011-30615000 011-30615005
Chennai 044-30277500 044-30277575
Kolkata 033-22831589 / 90 033-22831591
Hyderabad 040-66331738/ 39 040-66328633
Cochin 0484-2357950 0484-2357950
Coimbatore 0422-2380002 NA
Pune 020-30286000 /30286001/30286002
020-30286000
Ahmedabad 079-26407176 / 77 079-26407347
Helpline
For Service, Product info or to order a cartridge -18004250011 (9AM - 9PM) - This is a Toll-free number.
For Service (CDMA & Mobile Users) - 3900 1600 (9AM- 6PM) Prefix local STD code
Help for Users in the Philippines
To obtain technical support as well as other after salesservices, users are welcome to contact the EpsonPhilippines Corporation at the telephone and faxnumbers and e-mail address below:
Trunk Line: (63-2) 706 2609
Fax: (63-2) 706 2665
HelpdeskDirect Line:
(63-2) 706 2625
E-mail: [email protected]
World Wide Web (http://www.epson.com.ph)
Information on product specifications, drivers fordownload, Frequently Asked Questions (FAQ), andE-mail Enquiries are available.
Toll-Free No. 1800-1069-EPSON(37766)
Our Hotline team can help you with the following overthe phone:
❏ Sales enquiries and product information
❏ Product usage questions or problems
❏ Enquiries on repair service and warranty
SC-P9000 Series/SC-P7000 Series/SC-P8000 Series/SC-P6000 Series User's Guide
Where To Get Help
190

Software License Terms
OPEN SOURCE SOFTWARE LICENSE
1) This printer product includes open source software programs listed in Section 5) according to the license terms ofeach open source software program.
2) We provide the source code of the GPL Programs, LGPL Programs, Apache License Program and ncftp licenseProgram (each is defined in Section 5) until five (5) years after the discontinuation of same model of this printerproduct. If you desire to receive the source code above, please see the "Contacting Epson Support" in the User's Guide,and contact the customer support of your region. You shall comply with the license terms of each open source softwareprogram.
3) The open source software programs are WITHOUT ANY WARRANTY; without even the implied warranty ofMERCHANTABILITY AND FITNESS FOR A PARTICULAR PURPOSE. See the license agreements of each opensource software program for more details, which are described on \Manual\Data\oss.pdf in the Printer SoftwareDisc.
4) The license terms of each open source software program are described on \Manual\Data\oss.pdf in the PrinterSoftware Disc.
5) The list of open source software programs which this printer product includes are as follows.
GNU GPL
This printer product includes the open source software programs which apply the GNU General Public LicenseVersion 2 or later version (“GPL Programs”).
The list of GPL Programs:linux-2.6.35-arm1-epson12busybox-1.17.4ethtool-2.6.35e2fsprogs-1.41.14scrub-2.4smartmontools-5.40WPA Supplicant 0.7.3Shred(Coreutils v8.23)
GNU Lesser GPL
This printer product includes the open source software programs which apply the GNU Lesser General PublicLicense Version 2 or later version (“Lesser GPL Programs”).
The list of LGPL Programs:uclibc-0.9.32libusb-1.0.8libiConv-1.14
Apache License
This printer product includes the open source software program “Bonjour” which apply the Apache LicenseVersion2.0 (“Apache License Program”).
Bonjour License
SC-P9000 Series/SC-P7000 Series/SC-P8000 Series/SC-P6000 Series User's Guide
Software License Terms
191

This printer product includes the open source software program “Bonjour” which applies the terms andconditions provided by owner of the copyright to the “Bonjour”.
Net-SNMP license
This printer product includes the open source software program “Net-SNMP” which applies the terms andconditions provided by owner of the copyright to the “Net-SNMP”.
BSD License (Berkeley Software Distribution License)
This printer product includes the open source software program which apply the Berkeley SoftwareDistribution License (“BSD Program”).
The list of BSD Licence Programs:
busybox-1.17.4WPA Supplicant 0.7.3
Sun RPC License
This printer product includes the open source software program “busybox-1.17.4” which apply the Sun RPCLicense (“Sun RPC Program”).
ncftp license
This printer product includes the open source software program “ncftp-3.2.4” which applies the terms andconditions provided by owner of the copyright to the “ncftp”.
e2fsprogs license
This printer product includes the open source software program “e2fsprogs-1.41.14” which applies the termsand conditions provided by owner of the copyright to the “e2fsprogs”.
MIT license
This printer product includes the open source software program “jQuery v1.8.2” which apply the MIT License.
Bonjour
This printer product includes the open source software programs which apply the Apple Public Source LicenseVersion1.2 or its latest version ("Bonjour Programs").We provide the source code of the Bonjour Programs pursuant to the Apple Public Source License Version1.2 or itslatest version until five (5) years after the discontinuation of same model of this printer product. If you desire to receivethe source code of the Bonjour Programs, please see the "Contacting Customer Support" in Appendix or PrintingGuide of this User's Guide, and contact the customer support of your region.
You can redistribute Bonjour Programs and/or modify it under the terms of the Apple Public Source LicenseVersion1.2 or its latest version.
These Bonjour Programs are WITHOUT ANY WARRANTY; without even the implied warranty ofMERCHANTABILITY AND FITNESS FOR A PARTICULAR PURPOSE.
The Apple Public Source License Version1.2 is as follows. You also can see the Apple Public Source License Version1.2at http://www.opensource.apple.com/apsl/.APPLE PUBLIC SOURCE LICENSEVersion 2.0 - August 6, 2003
SC-P9000 Series/SC-P7000 Series/SC-P8000 Series/SC-P6000 Series User's Guide
Software License Terms
192

1. General; Definitions. This License applies to any program or other work which Apple Computer, Inc. ("Apple")makes publicly available and which contains a notice placed by Apple identifying such program or work as "OriginalCode" and stating that it is subject to the terms of this Apple Public Source License version 2.0 ("License"). As used inthis License:
1.1 "Applicable Patent Rights" mean: (a) in the case where Apple is the grantor of rights, (i) claims of patents that arenow or hereafter acquired, owned by or assigned to Apple and (ii) that cover subject matter contained in the OriginalCode, but only to the extent necessary to use, reproduce and/or distribute the Original Code without infringement;and (b) in the case where You are the grantor of rights, (i) claims of patents that are now or hereafter acquired, ownedby or assigned to You and (ii) that cover subject matter in Your Modifications, taken alone or in combination withOriginal Code.
1.2 "Contributor" means any person or entity that creates or contributes to the creation of Modifications.
1.3 "Covered Code" means the Original Code, Modifications, the combination of Original Code and anyModifications, and/or any respective portions thereof.
1.4 "Externally Deploy" means: (a) to sublicense, distribute or otherwise make Covered Code available, directly orindirectly, to anyone other than You; and/or (b) to use Covered Code, alone or as part of a Larger Work, in any way toprovide a service, including but not limited to delivery of content, through electronic communication with a clientother than You.
1.5 "Larger Work" means a work which combines Covered Code or portions thereof with code not governed by theterms of this License.
1.6 "Modifications" mean any addition to, deletion from, and/or change to, the substance and/or structure of theOriginal Code, any previous Modifications, the combination of Original Code and any previous Modifications, and/or any respective portions thereof. When code is released as a series of files, a Modification is: (a) any addition to ordeletion from the contents of a file containing Covered Code; and/or (b) any new file or other representation ofcomputer program statements that contains any part of Covered Code.
1.7 "Original Code" means (a) the Source Code of a program or other work as originally made available by Apple underthis License, including the Source Code of any updates or upgrades to such programs or works made available byApple under this License, and that has been expressly identified by Apple as such in the header file(s) of such work; and(b) the object code compiled from such Source Code and originally made available by Apple under this License
1.8 "Source Code" means the human readable form of a program or other work that is suitable for makingmodifications to it, including all modules it contains, plus any associated interface definition files, scripts used tocontrol compilation and installation of an executable (object code).
1.9 "You" or "Your" means an individual or a legal entity exercising rights under this License. For legal entities, "You" or"Your" includes any entity which controls, is controlled by, or is under common control with, You, where "control"means (a) the power, direct or indirect, to cause the direction or management of such entity, whether by contract orotherwise, or (b) ownership of fifty percent (50%) or more of the outstanding shares or beneficial ownership of suchentity.
2. Permitted Uses; Conditions & Restrictions. Subject to the terms and conditions of this License, Apple hereby grantsYou, effective on the date You accept this License and download the Original Code, a world-wide, royalty-free,non-exclusive license, to the extent of Apple's Applicable Patent Rights and copyrights covering the Original Code, todo the following:
2.1 Unmodified Code. You may use, reproduce, display, perform, internally distribute within Your organization, andExternally Deploy verbatim, unmodified copies of the Original Code, for commercial or non-commercial purposes,provided that in each instance:
SC-P9000 Series/SC-P7000 Series/SC-P8000 Series/SC-P6000 Series User's Guide
Software License Terms
193

(a) You must retain and reproduce in all copies of Original Code the copyright and other proprietary notices anddisclaimers of Apple as they appear in the Original Code, and keep intact all notices in the Original Code that refer tothis License; and
(b) You must include a copy of this License with every copy of Source Code of Covered Code and documentation Youdistribute or Externally Deploy, and You may not offer or impose any terms on such Source Code that alter or restrictthis License or the recipients' rights hereunder, except as permitted under Section 6.
2.2 Modified Code. You may modify Covered Code and use, reproduce, display, perform, internally distribute withinYour organization, and Externally Deploy Your Modifications and Covered Code, for commercial ornon-commercial purposes, provided that in each instance You also meet all of these conditions:
(a) You must satisfy all the conditions of Section 2.1 with respect to the Source Code of the Covered Code;
(b) You must duplicate, to the extent it does not already exist, the notice in Exhibit A in each file of the Source Code ofall Your Modifications, and cause the modified files to carry prominent notices stating that You changed the files andthe date of any change; and
(c) If You Externally Deploy Your Modifications, You must make Source Code of all Your Externally DeployedModifications either available to those to whom You have Externally Deployed Your Modifications, or publiclyavailable. Source Code of Your Externally Deployed Modifications must be released under the terms set forth in thisLicense, including the license grants set forth in Section 3 below, for as long as you Externally Deploy the Covered Codeor twelve (12) months from the date of initial External Deployment, whichever is longer. You should preferablydistribute the Source Code of Your Externally Deployed Modifications electronically (e.g. download from a website).
2.3 Distribution of Executable Versions. In addition, if You Externally Deploy Covered Code (Original Code and/orModifications) in object code, executable form only, You must include a prominent notice, in the code itself as well asin related documentation, stating that Source Code of the Covered Code is available under the terms of this Licensewith information on how and where to obtain such Source Code.
2.4 Third Party Rights. You expressly acknowledge and agree that although Apple and each Contributor grants thelicenses to their respective portions of the Covered Code set forth herein, no assurances are provided by Apple or anyContributor that the Covered Code does not infringe the patent or other intellectual property rights of any otherentity. Apple and each Contributor disclaim any liability to You for claims brought by any other entity based oninfringement of intellectual property rights or otherwise. As a condition to exercising the rights and licenses grantedhereunder, You hereby assume sole responsibility to secure any other intellectual property rights needed, if any. Forexample, if a third party patent license is required to allow You to distribute the Covered Code, it is Your responsibilityto acquire that license before distributing the Covered Code.
3. Your Grants. In consideration of, and as a condition to, the licenses granted to You under this License, You herebygrant to any person or entity receiving or distributing Covered Code under this License a non-exclusive, royalty-free,perpetual, irrevocable license, under Your Applicable Patent Rights and other intellectual property rights (other thanpatent) owned or controlled by You, to use, reproduce, display, perform, modify, sublicense, distribute and ExternallyDeploy Your Modifications of the same scope and extent as Apple's licenses under Sections 2.1 and 2.2 above.
4. Larger Works. You may create a Larger Work by combining Covered Code with other code not governed by theterms of this License and distribute the Larger Work as a single product. In each such instance, You must make sure therequirements of this License are fulfilled for the Covered Code or any portion thereof.
5. Limitations on Patent License. Except as expressly stated in Section 2, no other patent rights, express or implied, aregranted by Apple herein. Modifications and/or Larger Works may require additional patent licenses from Applewhich Apple may grant in its sole discretion.
SC-P9000 Series/SC-P7000 Series/SC-P8000 Series/SC-P6000 Series User's Guide
Software License Terms
194

6. Additional Terms. You may choose to offer, and to charge a fee for, warranty, support, indemnity or liabilityobligations and/or other rights consistent with the scope of the license granted herein ("Additional Terms") to one ormore recipients of Covered Code. However, You may do so only on Your own behalf and as Your sole responsibility,and not on behalf of Apple or any Contributor. You must obtain the recipient's agreement that any such AdditionalTerms are offered by You alone, and You hereby agree to indemnify, defend and hold Apple and every Contributorharmless for any liability incurred by or claims asserted against Apple or such Contributor by reason of any suchAdditional Terms.
7. Versions of the License. Apple may publish revised and/or new versions of this License from time to time. Eachversion will be given a distinguishing version number. Once Original Code has been published under a particularversion of this License, You may continue to use it under the terms of that version. You may also choose to use suchOriginal Code under the terms of any subsequent version of this License published by Apple. No one other than Applehas the right to modify the terms applicable to Covered Code created under this License.
8. NO WARRANTY OR SUPPORT. The Covered Code may contain in whole or in part pre-release, untested, or notfully tested works. The Covered Code may contain errors that could cause failures or loss of data, and may beincomplete or contain inaccuracies. You expressly acknowledge and agree that use of the Covered Code, or anyportion thereof, is at Your sole and entire risk. THE COVERED CODE IS PROVIDED "AS IS" AND WITHOUTWARRANTY, UPGRADES OR SUPPORT OF ANY KIND AND APPLE AND APPLE'S LICENSOR(S)(COLLECTIVELY REFERRED TO AS "APPLE" FOR THE PURPOSES OF SECTIONS 8 AND 9) AND ALLCONTRIBUTORS EXPRESSLY DISCLAIM ALL WARRANTIES AND/OR CONDITIONS, EXPRESS ORIMPLIED, INCLUDING, BUT NOT LIMITED TO, THE IMPLIED WARRANTIES AND/OR CONDITIONS OFMERCHANTABILITY, OF SATISFACTORY QUALITY, OF FITNESS FOR A PARTICULAR PURPOSE, OFACCURACY, OF QUIET ENJOYMENT, AND NONINFRINGEMENT OF THIRD PARTY RIGHTS. APPLE ANDEACH CONTRIBUTOR DOES NOT WARRANT AGAINST INTERFERENCE WITH YOUR ENJOYMENT OFTHE COVERED CODE, THAT THE FUNCTIONS CONTAINED IN THE COVERED CODE WILL MEET YOURREQUIREMENTS, THAT THE OPERATION OF THE COVERED CODE WILL BE UNINTERRUPTED ORERROR-FREE, OR THAT DEFECTS IN THE COVERED CODE WILL BE CORRECTED. NO ORAL ORWRITTEN INFORMATION OR ADVICE GIVEN BY APPLE, AN APPLE AUTHORIZED REPRESENTATIVE ORANY CONTRIBUTOR SHALL CREATE A WARRANTY. You acknowledge that the Covered Code is not intendedfor use in the operation of nuclear facilities, aircraft navigation, communication systems, or air traffic controlmachines in which case the failure of the Covered Code could lead to death, personal injury, or severe physical orenvironmental damage.
9. LIMITATION OF LIABILITY. TO THE EXTENT NOT PROHIBITED BY LAW, IN NO EVENT SHALL APPLEOR ANY CONTRIBUTOR BE LIABLE FOR ANY INCIDENTAL, SPECIAL, INDIRECT OR CONSEQUENTIALDAMAGES ARISING OUT OF OR RELATING TO THIS LICENSE OR YOUR USE OR INABILITY TO USE THECOVERED CODE, OR ANY PORTION THEREOF, WHETHER UNDER A THEORY OF CONTRACT,WARRANTY, TORT (INCLUDING NEGLIGENCE), PRODUCTS LIABILITY OR OTHERWISE, EVEN IF APPLEOR SUCH CONTRIBUTOR HAS BEEN ADVISED OF THE POSSIBILITY OF SUCH DAMAGES ANDNOTWITHSTANDING THE FAILURE OF ESSENTIAL PURPOSE OF ANY REMEDY. SOME JURISDICTIONSDO NOT ALLOW THE LIMITATION OF LIABILITY OF INCIDENTAL OR CONSEQUENTIAL DAMAGES, SOTHIS LIMITATION MAY NOT APPLY TO YOU. In no event shall Apple's total liability to You for all damages (otherthan as may be required by applicable law) under this License exceed the amount of fifty dollars ($50.00).
10. Trademarks. This License does not grant any rights to use the trademarks or trade names "Apple", "AppleComputer", "Mac", "Mac OS", "QuickTime", "QuickTime Streaming Server" or any other trademarks, service marks,logos or trade names belonging to Apple (collectively "Apple Marks") or to any trademark, service mark, logo or tradename belonging to any Contributor. You agree not to use any Apple Marks in or as part of the name of productsderived from the Original Code or to endorse or promote products derived from the Original Code other than asexpressly permitted by and in strict compliance at all times with Apple's third party trademark usage guidelines whichare posted at http://www.apple.com/legal/guidelinesfor3rdparties.html.
SC-P9000 Series/SC-P7000 Series/SC-P8000 Series/SC-P6000 Series User's Guide
Software License Terms
195

11. Ownership. Subject to the licenses granted under this License, each Contributor retains all rights, title and interestin and to any Modifications made by such Contributor. Apple retains all rights, title and interest in and to the OriginalCode and any Modifications made by or on behalf of Apple ("Apple Modifications"), and such Apple Modificationswill not be automatically subject to this License. Apple may, at its sole discretion, choose to license such AppleModifications under this License, or on different terms from those contained in this License or may choose not tolicense them at all.
12. Termination.
12.1 Termination. This License and the rights granted hereunder will terminate:
(a) automatically without notice from Apple if You fail to comply with any term(s) of this License and fail to cure suchbreach within 30 days of becoming aware of such breach;
(b) immediately in the event of the circumstances described in Section 13.5(b); or
(c) automatically without notice from Apple if You, at any time during the term of this License, commence an actionfor patent infringement against Apple; provided that Apple did not first commence an action for patent infringementagainst You in that instance.
12.2 Effect of Termination. Upon termination, You agree to immediately stop any further use, reproduction,modification, sublicensing and distribution of the Covered Code. All sublicenses to the Covered Code which havebeen properly granted prior to termination shall survive any termination of this License. Provisions which, by theirnature, should remain in effect beyond the termination of this License shall survive, including but not limited toSections 3, 5, 8, 9, 10, 11, 12.2 and 13. No party will be liable to any other for compensation, indemnity or damages ofany sort solely as a result of terminating this License in accordance with its terms, and termination of this License willbe without prejudice to any other right or remedy of any party.
13. Miscellaneous.
13.1 Government End Users. The Covered Code is a "commercial item" as defined in FAR 2.101. Government softwareand technical data rights in the Covered Code include only those rights customarily provided to the public as definedin this License. This customary commercial license in technical data and software is provided in accordance with FAR12.211 (Technical Data) and 12.212 (Computer Software) and, for Department of Defense purchases, DFAR252.227-7015 (Technical Data -- Commercial Items) and 227.7202-3 (Rights in Commercial Computer Software orComputer Software Documentation). Accordingly, all U.S. Government End Users acquire Covered Code with onlythose rights set forth herein.
13.2 Relationship of Parties. This License will not be construed as creating an agency, partnership, joint venture or anyother form of legal association between or among You, Apple or any Contributor, and You will not represent to thecontrary, whether expressly, by implication, appearance or otherwise.
13.3 Independent Development. Nothing in this License will impair Apple's right to acquire, license, develop, haveothers develop for it, market and/or distribute technology or products that perform the same or similar functions as, orotherwise compete with, Modifications, Larger Works, technology or products that You may develop, produce,market or distribute.
13.4 Waiver; Construction. Failure by Apple or any Contributor to enforce any provision of this License will not bedeemed a waiver of future enforcement of that or any other provision. Any law or regulation which provides that thelanguage of a contract shall be construed against the drafter will not apply to this License.
SC-P9000 Series/SC-P7000 Series/SC-P8000 Series/SC-P6000 Series User's Guide
Software License Terms
196

13.5 Severability. (a) If for any reason a court of competent jurisdiction finds any provision of this License, or portionthereof, to be unenforceable, that provision of the License will be enforced to the maximum extent permissible so as toeffect the economic benefits and intent of the parties, and the remainder of this License will continue in full force andeffect. (b) Notwithstanding the foregoing, if applicable law prohibits or restricts You from fully and/or specificallycomplying with Sections 2 and/or 3 or prevents the enforceability of either of those Sections, this License willimmediately terminate and You must immediately discontinue any use of the Covered Code and destroy all copies of itthat are in your possession or control.
13.6 Dispute Resolution. Any litigation or other dispute resolution between You and Apple relating to this Licenseshall take place in the Northern District of California, and You and Apple hereby consent to the personal jurisdictionof, and venue in, the state and federal courts within that District with respect to this License. The application of theUnited Nations Convention on Contracts for the International Sale of Goods is expressly excluded.
13.7 Entire Agreement; Governing Law. This License constitutes the entire agreement between the parties with respectto the subject matter hereof. This License shall be governed by the laws of the United States and the State of California,except that body of California law concerning conflicts of law.
Where You are located in the province of Quebec, Canada, the following clause applies: The parties hereby confirmthat they have requested that this License and all related documents be drafted in English.
Les parties ont exigé que le présent contrat et tous les documents connexes soient rédigés en anglais.
EXHIBIT A.
"Portions Copyright (c) 1999-2003 Apple Computer, Inc. All Rights Reserved.
This file contains Original Code and/or Modifications of Original Code as defined in and that are subject to the ApplePublic Source License Version 2.0 (the 'License'). You may not use this file except in compliance with the License.Please obtain a copy of the License at http://www.opensource.apple.com/apsl/ and read it before using this file.
The Original Code and all software distributed under the License are distributed on an 'AS IS' basis, WITHOUTWARRANTY OF ANY KIND, EITHER EXPRESS OR IMPLIED, AND APPLE HEREBY DISCLAIMS ALL SUCHWARRANTIES, INCLUDING WITHOUT LIMITATION, ANY WARRANTIES OF MERCHANTABILITY,FITNESS FOR A PARTICULAR PURPOSE, QUIET ENJOYMENT OR NON-INFRINGEMENT. Please see theLicense for the specific language governing rights and limitations under the License."
Other Software Licenses
Info-ZIP copyright and license
This is version 2007-Mar-4 of the Info-ZIP license. The definitive version of this document should be available atftp://ftp.info-zip.org/pub/infozip/license.html indefinitely and a copy at http://www.info-zip.org/pub/infozip/license.html.
Copyright © 1990-2007 Info-ZIP. All rights reserved.
For the purposes of this copyright and license, “Info-ZIP” is defined as the following set of individuals:
Mark Adler, John Bush, Karl Davis, Harald Denker, Jean-Michel Dubois, Jean-loup Gailly, Hunter Goatley, EdGordon, Ian Gorman, Chris Herborth, Dirk Haase, Greg Hartwig, Robert Heath, Jonathan Hudson, Paul Kienitz,David Kirschbaum, Johnny Lee, Onno van der Linden, Igor Mandrichenko, Steve P. Miller, Sergio Monesi, KeithOwens, George Petrov, Greg Roelofs, Kai Uwe Rommel, Steve Salisbury, Dave Smith, Steven M. Schweda, ChristianSpieler, Cosmin Truta, Antoine Verheijen, Paul von Behren, Rich Wales, Mike White.
SC-P9000 Series/SC-P7000 Series/SC-P8000 Series/SC-P6000 Series User's Guide
Software License Terms
197
Permission is granted to anyone to use this software for any purpose, including commercial applications, and to alter itand redistribute it freely, subject to the above disclaimer and the following restrictions:
1. Redistributions of source code (in whole or in part) must retain the above copyright notice, definition,disclaimer, and this list of conditions.
2. Redistributions in binary form (compiled executables and libraries) must reproduce the above copyrightnotice, definition, disclaimer, and this list of conditions in documentation and/or other materials providedwith the distribution. The sole exception to this condition is redistribution of a standard UnZipSFX binary(including SFXWiz) as part of a self-extracting archive; that is permitted without inclusion of this license, aslong as the normal SFX banner has not been removed from the binary or disabled.
3. Altered versions--including, but not limited to, ports to new operating systems, existing ports with newgraphical interfaces, versions with modified or added functionality, and dynamic, shared, or static libraryversions not from Info-ZIP--must be plainly marked as such and must not be misrepresented as being theoriginal source or, if binaries, compiled from the original source. Such altered versions also must not bemisrepresented as being Info-ZIP releases--including, but not limited to, labeling of the altered versions withthe names “Info-ZIP” (or any variation thereof, including, but not limited to, different capitalizations), “PocketUnZip,” “WiZ” or “MacZip” without the explicit permission of Info-ZIP. Such altered versions are furtherprohibited from misrepresentative use of the Zip-Bugs or Info-ZIP e-mail addresses or the Info-ZIP URL(s),such as to imply Info-ZIP will provide support for the altered versions.
4. Info-ZIP retains the right to use the names “Info-ZIP,” “Zip,” “UnZip,” “UnZipSFX,” “WiZ,” “Pocket UnZip,”“Pocket Zip,” and “MacZip” for its own source and binary releases.
SC-P9000 Series/SC-P7000 Series/SC-P8000 Series/SC-P6000 Series User's Guide
Software License Terms
198
Copyright © 2022 FDOKUMEN