User Manual - ZKTeco EU
51
User Manual BioTime Web Version: 1.0.3 Date: July 2019
-
Upload
khangminh22 -
Category
Documents
-
view
0 -
download
0
Transcript of User Manual - ZKTeco EU
Contents I
User Manual BioTime Web
Version 103
Date July 2019
About This Manual This document introduces the installation and uninstallation of BioTime Web and describes the user
interface and menu operations of this software
All design and specification declared are subject to change without notice in advance
Important Statement Unless authorized by our company no group or individual shall take excerpts of or copy all or part of
these instructions nor transmit the contents of these instructions by any means
The products described in this manual may include software that is copyrighted by our company and its
possible licensors No one may copy publish edit take excerpts of decompile decode reverse-engineer
rent transfer sublicense or otherwise infringe upon the softwares copyright unless authorized by the
copyright holder(s) This is subject to relevant laws prohibiting such restrictions
As this product is regularly updated we cannot guarantee exact consistency between the
actual product and the written information in this manual Our company claims no
responsibility for any disputes that arise due to differences between the actual technical
parameters and the descriptions in this document The manual is subject to change without
prior notice
Contents
1 What is BioTime Web 1
2 Web Server Access 2
3 Dashboard Options 4
4 Calendar Management 5
41 Calendar Definition 5
42 Calendar Editing 7
43 Other functions 9
5 Shifts Management 10
51 Add a New Shift 10
52 Edit a Shift 11
53 Delete a Shift 12
6 Attendance Events Management 13
61 Add a New Attendance Event 13
62 Attendance Event Editing 15
63 Delete an Attendance Event 16
7 Departments Management 17
71 Add a New Department 17
72 Edit a Department 17
73 Delete a Department 18
8 Employee Management 19
81 Add a New Employee 19
82 Edit an Employee 20
83 Delete an Employee 21
84 Enrollment Options 22
85 Other Employee Functions 25
9 Real-Time Monitoring 27
10 Messages Management 28
101 Add a New Message 28
102 Delete Messages 29
11 Attendance Log Records 30
111 Search Log Records 30
112 Manual Attendance Registration 33
12 Worked Hours Report 35
121 Generating a Worked Hours Report 35
13 Balanced Report 41
131 Generating the balanced report 41
14 Information Page 44
BioTime Web User Manual 1
1 What is BioTime Web BioTime Web is a Web Server that is embedded in a range of ZKTeco devices This web server
permits setup and management of TampA operations in the device Via the Web Server more advanced functions can be accessed easily Such functions include
bull Employee Management bull Calendar and Shift Management bull Reports Generation bull Attendance Events Management bull Manual Attendance Registration (without the use of the device)
2 BioTime Web User Manual
2 Web Server Access To start operating with the Web Server that is with the TampA device via a connected browser a username and password are needed This username and password should be set in the device in advance Also the user accessing the Web Server should have obtained the permissions needed Please refer to the ZPad+ User Manual for instructions on managing users who have the access right to the web server
1 Access the login page of the Web Server We will consider that the Web Server protocol is set to HTTP The address that needs to be introduced in the address bar of the browser is
httpIP_ADDRESSPORT
IP_ADDRESS The devicersquos IP Address
PORT The web serverrsquos port which is configured in the TampA Settings app
If the network communication to the device is correct and the port configured is accessible the login page will be displayed
2 Insert the username and password of a registered user Next click on ldquoLog Inrdquo If the username and password are correct the Dashboard of BioTime Web will be presented to the user with the Real-Time Monitoring interface already selected
BioTime Web User Manual 3
3 If the username or password is not correct a message will be displayed on the screen as shown below
Once we have provided correct login information and the Dashboard is presented to the user we are ready to start navigating the Web Server
4 BioTime Web User Manual
3 Dashboard Options All operations that can be done with BioTime Web can be accessed from the Dashboard
Below is a list of options available
Option Description
Dashboard Real-Time Monitoring of the device last punches will be shown here You may export such data to Excel
Departments List of departments created New departments can also be created from here
Employees
This is the most important aspect of TampA operation The list of created employees is displayed here New employees can be registered here You may also edit the details of existing employees or delete their accounts here TampA Reports can be accessed from here and enrollment options can be edited
Messages Messages that need to be sent to the punching device either publicly or to a list of employees are managed from here
Events Attendance Events Management
Shifts Shifts management Shifts are defined in order to compare expected to actual work time by the employees
Calendars Calendar management Calendars are defined in order to control Special Days when certain conditions apply
Attendance Attendance registry Data captured by the device is shown Also the modification of the punches details and records is allowed
Reports Reports generated based on time and attendance by the employees
Information Information about the device and the BioTime Web software Also the percentage of the devicersquos used memory and storage is displayed here
Language Language in which BioTime Web is presented to users
(Log Out) Log out from BioTime Web and show the login screen
Next different navigation options will be explained The order shown is the order that a user needs to follow in order to successfully set up a TampA Management solution using BioTime Web
BioTime Web User Manual 5
4 Calendar Management Calendar Management is the first aspect of TampA Management that needs to be set up In BioTime Web the calendar is defined by working non-working and holidays of a given year The difference between the day types is that on non-working days and holidays it is not expected for an employee to go to work accordingly the reports do not count the absence of employees during these days
BioTime Webrsquos calendar is created by default and the user needs to edit it according to the TampA needs of the company to be managed
41 Calendar Definition
1 Access the Calendar by the link in the Dashboard The current month will be displayed
2 Click on the Define Calendar icon in order to define the basic aspects of the calendar being the working and non-working days A page will be presented that lets the user select which days of the week are working and non-working days
3 The difference between Working and Non-Working days is that Non-Working days cannot be added to a shift By default Saturdays and Sundays are defined in BioTime Web as Non-working days Say in our company regular shifts are arranged on Saturdays apart from the weekdays so Saturdays have to be changed to working days After doing the necessary changes click Accept in order to save the changes and for the calendar to be recalculated according to the changes
6 BioTime Web User Manual
4 Once the working and non-working days are set it is time to define the holidays For simplification purposes only the holiday of the 25th of December will be defined In order to do it navigate to the month of December using the selector located over the calendar clicking the right arrow until the month of December is shown on screen
5 Next click on the 25th day and the Add Special Day dialogue will be opened Start and End days are already set which are both the 25th the day is set as a holiday Also there is no need to specify the day of the week It is only needed to select Holiday in the Day Type drop-down selector After click on Accept
6 The day will be set as a holiday Repeat the process for all the Holidays in a year or the needed time period
BioTime Web User Manual 7
42 Calendar Editing
Editing a calendar means changing day types for specific days of the year While in the previous section a holiday was set in the calendar other non-working days or days that are defined as non-working can be set as working days instead Repeat steps 4 to 6 on the previous section for any day of the year to set it as a different day type as it is by default
The operation to set a day back to its default day type is the following In the following example the 25th of December is going to set back as a working day
1 Browse to the month in which the day has been set up as a holiday In this case it is going to be December
2 Click on the day number It is important that the number is clicked NOT the rest of the space of the day
3 The Daily view will be shown Click on the x on the screen in order to delete the special day and set back the day to default
8 BioTime Web User Manual
4 After confirming the deletion the day will be configured back to its default as it was set when the calendar was defined
BioTime Web User Manual 9
43 Other Functions
View type Year Month Week
In the top-left of the screen there is an option to change how the calendar is shown on screen
The yearly view shows how many working non-working and holidays are configured in a week
The monthly view is the normal view of the month which lets the user set holiday easily
The weekly view lets the user know which shifts are defined for each day
10 BioTime Web User Manual
5 Shifts Management Shifts are the specification of the time the employees need to be in their workplace and the time they finish their workday Multiple shifts can be defined Shifts are the next aspect after Calendars that needs to be defined in a proper TampA Management In order to start shifts management the dashboard option Shift will be selected
51 Add a New Shift
1 Click on Add New to start the process of adding a new shift
2 The New Shift dialogue will appear on the screen Fill in all the needed details and click on each weekday that needs to be added to the shift The check Night Shift specifies if the End Time of the shift is after 2359 The field Total Hours needs to be inserted manually
Once completed click on Accept to save the shift
Reminder Only days which are marked as working days can be added to the shiftrsquos workdays
3 The shift will be added to the list of available shifts
BioTime Web User Manual 11
52 Edit a Shift
In order to carry the shifts modification of the TampA managed company Shifts defined in BioTime Web can be edited accordingly
1 Click on the Edit icon of any registered shift
2 The Edit Shift Dialog will be shown on screen Make any necessary changes and click Accept
3 The edited details of the shift will show on the screen
12 BioTime Web User Manual
53 Delete a Shift
Registered shifts can be deleted if they are not needed anymore
1 Click on the Delete icon of a registered shift in order to delete it
2 Click OK on the confirmation window
3 The Shift will effectively be deleted from the shift list Warning If any employees had only the deleted shift assigned to them after deleting no shift will be assigned to them which will make the calculation for some of the reports impossible
BioTime Web User Manual 13
6 Attendance Events Management Attendance Events are a very important aspect of TampA Management Events are the ldquoreasonsrdquo for an employee to enter and leave his workplace In that manner when an employee punches the device will register an IN event or an OUT event on which reports will be based BioTime Web includes a list of basic attendance events that can be expanded according to needs
The events included are
Check IN Check OUT Break IN Break OUT Overtime IN Overtime OUT
Also punching the device without selecting an event will also set a 0 (zero) event which will be assigned to the event ldquoWork INrdquo
These events cannot be changed and will automatically be translated according to the language BioTime Web is set In order to manage Attendance Events select the Events option in the dashboard
61 Add a New Attendance Event
1 On the Events page click Add New to add a new attendance event
2 The New Attendance Event dialogue will appear on the screen Input all the details and click Accept to save the Event The Count as Work check will determine if the time that passes after the event will be counted as worked time for reports The INOUT selector determines if the event marks a time start or a time end of the event
14 BioTime Web User Manual
Attendance Events are configured regarding the Count As Work check and the INOUT selector determines how TampA is going to be managed and the punches that are needed to be registered by the employees in order to register worked time correctly
There are two possible scenarios
a) Only create OUT events and do NOT set them with the check Count as Work activated
In this scenario employees punch when starting work without selecting any event which will punch the zero event (Work IN) To register a break in work time employees will punch the OUT event of the needed activity (Lunch Break Doctor etc) When the break finishes the employee needs to punch again without selecting the event When finishing the workday employees will punch again without selecting the event The total of punches will be always even Calculated work time will be the total of time registered in pairs of punched events
In this example n is the total number of punches registered by an employee in a day t0 will be the first punch in a day and tn be the last
n will always be an even number for calculated time to work properly
Worked time will be calculated in pairs that means time passed from t0 to t1 from t2 to t3 t4 to t5 and t(n-1) to tn
The time between odd pairs will not be counted as work
If there is an odd number of punches the time between t(n-1) and tn will not be counted as work time
b) Create INOUT events for all events and set Count as Work if needed
When starting work the employee will punch event no1 (Check IN) This event has the check Count as Work activated To register a break in work time punch the selected event OUT event (Lunch OUT Doctor OUT Break OUT) which has the check Count as Work not activated When the break finishes the IN punch of the event is needed which has Count as Work activated Total punches within a day will also be even in this scenario If a new break happens the same procedure will be followed When finishing work the employee will punch event no2 (Check OUT) which does not have the check Count as Work activated Calculated work time will be the sum of times passed between punches of events which have the check Count as Work activated and punches
BioTime Web User Manual 15
which do not have the check Count As Work activated
In this example n is the total number of punches registered by an employee in a day t0 will be the first punch in a day and tn the last
n will always be an even number as all events must be ldquoclosedrdquo before the end of the day
Worked time will be calculated taking into account the ldquoCount As Workrdquo check of the event the punch is registering that means
t0 will always have ldquoCount as Workrdquo activated
Time will be counted until a t is registered with ldquoCount As Workrdquo deactivated and start to be counted again when a t with ldquoCount As Workrdquo activated is registered
3 The created event will appear on the list and it will be available to set punches to it
62 Attendance Event Editing
The only field of a registered event that cannot be edited is the Code
The process of event editing is as follows
1 On the events list page click on the event that needs to be edited The Edit Event dialogue will be shown
16 BioTime Web User Manual
2 Make necessary changes and click on Accept The properties of the event will be changed accordingly
Warning Changes in the ldquoCount as workrdquo check can affect the worked hours report
63 Delete an Attendance Event
Like editing you may completely delete an attendance event The process is as follows
1 On the events list page click on the event that needs to be deleted The Edit Event dialogue will be shown
2 Click on the red Delete icon After confirming the event will effectively be deleted
Warning Worked time reports can be affected by how the event was created
BioTime Web User Manual 17
7 Departments Management The registering of the Departments is the final step of the setup of TampA Management before employeesrsquo registration BioTime Web Departments serve as a grouping method of Employees Departments are managed on the Departments page found in the dashboard
71 Add a New Department
To add a new department the process is as follows
1 Click on the Add New button on the departments list page
2 In the dialogue input the Name and click Accept
3 The department is added to the list
72 Edit a Department
The name of a department can be changed
1 Select a department on the list by clicking on it The Edit Department dialogue will be opened
18 BioTime Web User Manual
2 Change the name as desired and click Accept when done The list will be updated with the new name
73 Delete a Department
A department can be deleted as long as it does NOT have any employees assigned to it
1 Select a department on the list by clicking on it The Edit Department dialogue will then be opened
2 Click on the red Delete icon and the confirmation message in order to delete the department If the department has any assigned employees the following message will be displayed
3 If the deletion is correct the deleted department will no longer appear on the list
BioTime Web User Manual 19
8 Employee Management Employees are the core of TampA Management systems The Employee management section of BioTime Web allows the registry modification and deletion of the employees by the managed company
When registering a new employee his department and shift can be provided in order to generate accurate reports about the compliance of the employee to the company in TampA terms
BioTime Web can also communicate with the device in order to enroll fingerprints or cards for punching Also from the employees page it is possible to set a manual punch access the log records and the reports
Employees are managed on the employee page that can be accessed from the Dashboard
81 Add a New Employee
These are the steps needed to register a new employee
1 Click on the Insert Employee icon in order to open the New Employee dialogue
2 Insert the details of the employee and click on Save
Warning It is not possible to select two or more conflicting shifts that is two shifts with coincidence time between them An error will be displayed if this situation happens
3 If the details are correct the employee will be added to the list
20 BioTime Web User Manual
82 Edit an Employee
A created employee can be edited by changing its name department or shifts assigned Also Special Days can be set for an employee when it is NOT expected for the employee to attend to work ie a period of holidays demanded by the employee
1 Click on the View icon on any of the employees in order to edit them
2 The Employee Detail dialogue will be opened and any of the details of the employee can be edited Click on Accept to Save the changes
3 In order to add Special Days click on the Add New icon embedded into the Special Days subsection The Add Special Days dialogue will open where the user can select the period of time set as special After setting the type of day the period will be set click Accept in order to set the special days for the employee
BioTime Web User Manual 21
4 The special Days defined will appear in the subsection As shown in the following screenshot it is possible to edit the special days asked or delete them with the corresponding icons
83 Delete an Employee
As in all the previous aspects it is also possible to delete the existing employees The process is as follows There are two ways to delete existing employees
bull Deleting One Employee at a time 1 Select an employee as if going to edit its details by clicking on the View Icon
2 In the Employee Details dialogue click on the red Delete icon in order to delete the employee A confirmation message will follow and after confirming the employee will be deleted
22 BioTime Web User Manual
bull Deleting more than one employee at a time 1 Click on the delete employee icon which is next to the registered employee
2 A check will appear next to all the employees in order to select the employees that need to be deleted
3 Click on the green icon in order to delete the selected employees Confirm the message that appears next
84 Enrollment Options
From the Employees page it is possible to direct the Android device which has BioTime Web embedded to enroll a Fingerprint or a Card Also it is possible to input the Card RFID number in order to enroll it manually The enrollment options appear next to the employee
BioTime Web User Manual 23
Fingerprint Enrollment
1 In order to enroll a fingerprint click on the hand icon
2 Select the finger to enroll in the following screen
3 In the device a dialogue will be opened asking the user to punch with the same finger three times in order to enroll the fingerprint
4 The employees list will show that the employee has an enrolled fingerprint if it was the first one
24 BioTime Web User Manual
enrolled
Card Enrollment
1 To enroll a card click on the card icon
2 In the device a dialogue will be opened asking the user to punch with a card in order to enroll it
3 If the card can be read and it is not previously enrolled to a different employee the enrollment will be successful and the employee list will show that the employee has an enrolled card
Manual Card Enrollment
1 In order to manually enroll a card without using the device while indicating the RFID of the card click on the screen icon
2 A dialogue will be opened asking for the RFID of the card to be enrolled
BioTime Web User Manual 25
3 After inserting the RFID click on Accept in order to save the details of the card
85 Other Employee Functions
Other functions available include the exporting the employees to excel employee filtering log records and reports
Excel Export
In order to export the employees that are being shown on the screen to an excel file (XLSX) click on the Excel export icon on the top right of the page
Employees Filtering
On occasions when there are many employees registered it is useful to filter the employees in order to reduce the number of employees on screen
Code Filter employees by codes Input one or more charactersnumbers of the code in order to filter by them
Name Filter Employees by names After writing one or more characters of the name the employees shown on the screen will be the ones starting by the written characters
Department Filter employees by departments Select a department in the drop-down menu in order for the employees of the selected department to be displayed
26 BioTime Web User Manual
Log Records
It is possible to access the log records page from here where it is possible to register manual punches
View the Log Records section of this manual for more information
Reports Worked Hours and Balanced
Also it is possible to access the reports from here View the Reports section of this manual for more information
BioTime Web User Manual 27
9 Real-Time Monitoring The Real Time Monitor of the device is the page where last punches registered by the device are shown In order to access it click on Dashboard
The Code Name Attendance Event and DateTime of the punches are shown
Export to Excel
There is an option to export the contents of the Real-Time Monitor to Excel It is done by clicking on the icon on the top right of the screen
28 BioTime Web User Manual
10 Messages Management A Message is a piece of information that will be delivered to the Employees through the device Messages can be sent to one Employee only all the employees in a department or publicly A message directed to an employee or a list of employees will be shown when punching while public or non-directed messages will be shown on the Desktop of the device no punching is needed to see them Messages are managed on the message page that can be accessed from the dashboard
101 Add a New Message
1 To add a new message click on Add New
2 In the Add New Message dialogue fill in the details of the message Note that in the Receiver field it is possible to select a public message an individual receiver or a whole department
3 The message will be added to the message list and will be displayed accordingly
BioTime Web User Manual 29
102 Delete Messages
Unlike other aspects of the TampA editing of messages is NOT allowed However it is possible to delete registered messages even when their validity date has not yet passed
The process is as follows
1 On the messages list click on the Delete icon to the right of the message
2 After confirming the deletion the message will be deleted and removed from the list of messages
30 BioTime Web User Manual
11 Attendance Log Records The attendance log page shows a list of punches made by the employees Also it permits the introduction of manual punches and the editing of the punches made The Attendance Log Records page can be accessed by selecting Log Records in the Attendance drop-down menu in the Dashboard
111 Search Log Records
Log records can be filtered by employees and dates Both filters can be used at the same time in order to search the log records of a specific employee in a specific date period
Employee filter
1 When opened the Log Records page will show the punches done in the current day To search the log records of a specific employee click on the choose employee icon in order to open the employee dialogue
2 On the employee search dialogue input the first character of the code the name or the department of the employee we are looking for The results grid will be updated according to the characters inputted in those fields
Note The Department named Company includes all the registered employees
BioTime Web User Manual 31
3 Click on the employee in the grid that we want the records to be looked for The log records page will show the punches done by the selected employee on the current day 20 lines of punches will be shown on each page
Dates filter
1 In the top right of the page there are two date selectors which work as a start dateend date period In the following example all punches done in February will be looked for Once the two dates have been set click on the Search for logs icon to filter the punches
2 All the punches in the specified dates will be shown
3 Once the punches appear on the screen an employee can be selected in order to view the punches
in the time period with the Choose Employee icon Also employee punches can be filtered by Name or by Code In order to do so insert any characters included in the Name or Code of the
32 BioTime Web User Manual
displayed results The results will be filtered in order to show only the punches of the employees with those characters in the Name or in the Code
In the following example results have been filtered by Name
And next by Code
Export to Excel
Once the wanted punches by the wanted employees are shown on screen it is possible to export them to excel Click on the ldquoexport to excelrdquo icon on the right of the page
BioTime Web User Manual 33
112 Manual Attendance Registration
BioTime Web allows the user to manually add an attendance registry without the use of the device The procedure is as follows
1 On the Log Records screen click on the Insert Attendance icon
2 On the insert attendance dialogue fill in the employee that a manual punch is going to be inserted the attendance event and the date and time Next click on the green icon to insert the manual punch
Warning Insert the time carefully in the expected format
3 The manual punch will be added into the log records of the employee
34 BioTime Web User Manual
BioTime Web User Manual 35
12 Worked Hours Report After having configured all the TampA for the company and having punches already registered in the device it is now possible to generate reports based on the punches
The first of the available reports is the Worked Hours report in which the total of worked hours by the employees are shown To access this report select Worked Hours from the Report drop-down menu of the dashboard
121 Generating a Worked Hours Report
1 After selecting the worked hours report automatically the report of the current day for all the employees will be generated Usually this report will not be completed as not all the punches from today are already registered In the following example no punches have been registered today
2 Next we are going to generate the reports for the day 10012019 of all the registered employees In order to do so we are going to select the day 10012019 in both dates selector In order to generate the report click on the Search for Logs icon next
3 Allow some time for the report to be generated When the calculations are finished the report will be shown on screen
36 BioTime Web User Manual
4 From this point there are a few possible options regarding the results of the report
Employee Filtering
There are several options in order to limit the employees shown in the report Once the report is displayed on the screen results can be filtered by names or by codes inserting characters of the name or of the code in the corresponding fields
In the following example the results have been filtered by Name
And
next filtered by Code
BioTime Web User Manual 37
To view the worked hour report of a single employee only please follow these steps
1 Click on the Choose Employee icon
2 In the employee search dialogue input the first character of the code the name or the department of the employee we are looking for The results grid will be updated according to the characters inputted in those fields
Note The Department named Company includes all the registered employees
38 BioTime Web User Manual
3 We can also click on the Choose employee icon and choose a specific employee The report will be updated to include the employee selected only
Also it is possible to limit the employees shown on the report by showing only the employees of a selected department or by manually selecting the desired employees
In order to only view the employees of one department select the department that needs to be shown on the departments drop-down selector available
BioTime Web User Manual 39
Report Status
Next to the amount of worked hours by the employee on a given date there is a status field that specifies if the TampA Records for that employee in that date are correct Being correct means that the number of events is even (View the Attendance Events section of this manual for more information) There are two possible results in the status field
This is the Ok status means that TampA for the employee and date is correct
This is the Review status means that there are one or more errors in the TampA for the employee and date
In this case click on the eye icon next with the column name View Detail in order to check the punches done by that employee on that date and find what the errors are
As we can see the number of events is odd Noticing the times of the punches made it looks like the employee forgot to punch his exit In order to correct this situation a manual punch needs to be done on the Log Records page In other circumstances the time of punches the event or the deleting of punches can be done on this page
DailyWeeklyMonthly Report
There is an option to group the days in weeks or months in order to make the report more readable The status field in a grouped report is the same that in a daily report marking the weekmonth as OK if an even number of punches are registered
40 BioTime Web User Manual
BioTime Web User Manual 41
13 Balanced Report The balanced report compares the worked hours by an employee on a given date to the hours that the employee should have worked according to its assigned shift
To access the balanced report click on Balanced from the Reports drop-down menu in the Dashboard
131 Generating the Balanced Report
The previous report explained was generated automatically with the current date for all the registered
employees This report on the contrary needs specific steps to be followed in order to generate it
1 First select View Logs if needed If this check is selected the report will include the punches registered if not only the total of worked hours will be shown
2 Select the employees that are going to be included in the report It is possible to select a whole department by selecting from the drop-down menu of Department
There is also a Choose Employee icon available to select specific employees
3 This dialogue is different from the similar one available in the previous report Here more than one employee can be selected After selecting all the needed employees click on Accept to close the dialogue
42 BioTime Web User Manual
4 Next select the starting date and ending date the report needs to be generated the report will include worked time between these two dates against expected working time according to shifts
5 The balanced report will be generated for the employees and dates selected In the example it is shown that two employees worked less time than expected and two employees worked more
BioTime Web User Manual 43
6 By clicking on any of the employees in the report it is possible to view the details of the punches registered to find any mistakes or missing punches
7 This report also offers the feature ldquoexport to excelrdquo
44 BioTime Web User Manual
14 Information Page The information page shows the amount of memory used by the device and the amount of used space The rest of the information is only directed to distributors
This page also allows users to perform a backup of the current TampA data and to restore this data
BioTime Web User Manual 45
wwwzktecoeu
Copyright2019 ZKTECO CO LTD All rights reserved
- 1 What is BioTime Web
- 2 Web Server Access
- 3 Dashboard Options
- 4 Calendar Management
-
- 41 Calendar Definition
- 42 Calendar Editing
- 43 Other Functions
-
- 5 Shifts Management
-
- 51 Add a New Shift
- 52 Edit a Shift
- 53 Delete a Shift
-
- 6 Attendance Events Management
-
- 61 Add a New Attendance Event
- 62 Attendance Event Editing
- 63 Delete an Attendance Event
-
- 7 Departments Management
-
- 71 Add a New Department
- 72 Edit a Department
- 73 Delete a Department
-
- 8 Employee Management
-
- 81 Add a New Employee
- 82 Edit an Employee
- 83 Delete an Employee
- 84 Enrollment Options
- 85 Other Employee Functions
-
- 9 Real-Time Monitoring
- 10 Messages Management
-
- 101 Add a New Message
- 102 Delete Messages
-
- 11 Attendance Log Records
-
- 111 Search Log Records
- 112 Manual Attendance Registration
-
- 12 Worked Hours Report
-
- 121 Generating a Worked Hours Report
-
- 13 Balanced Report
-
- 131 Generating the Balanced Report
-
- 14 Information Page
-
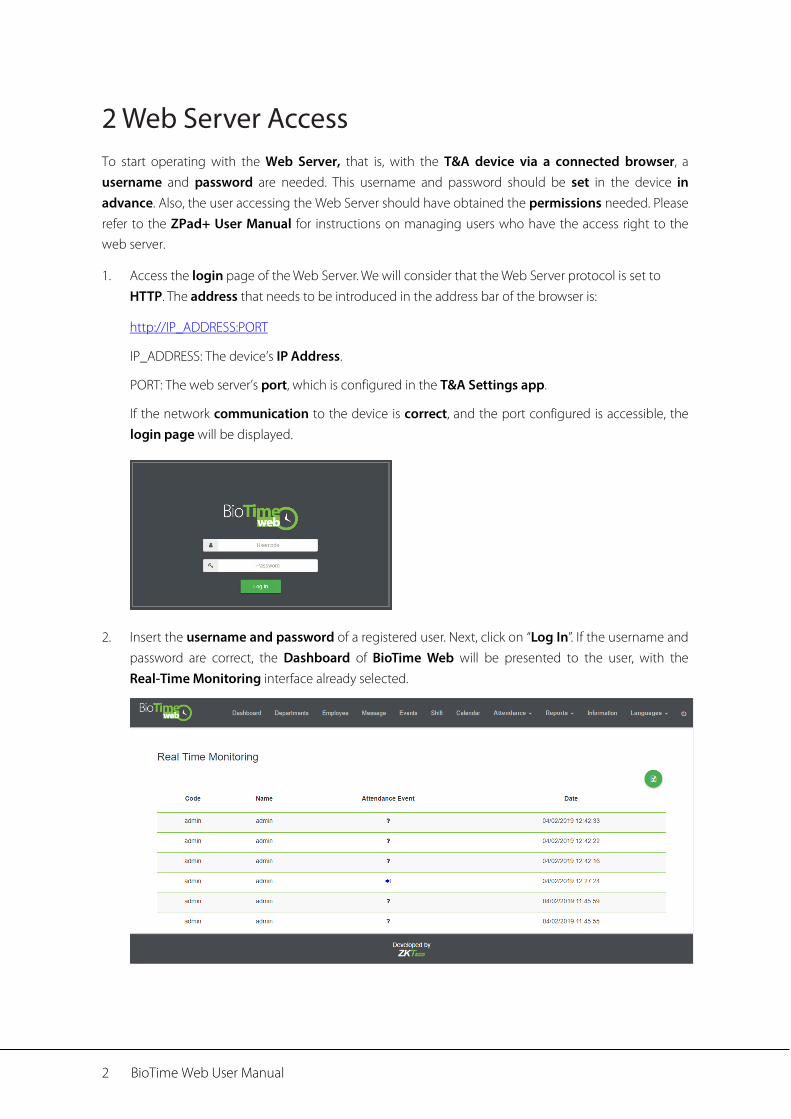
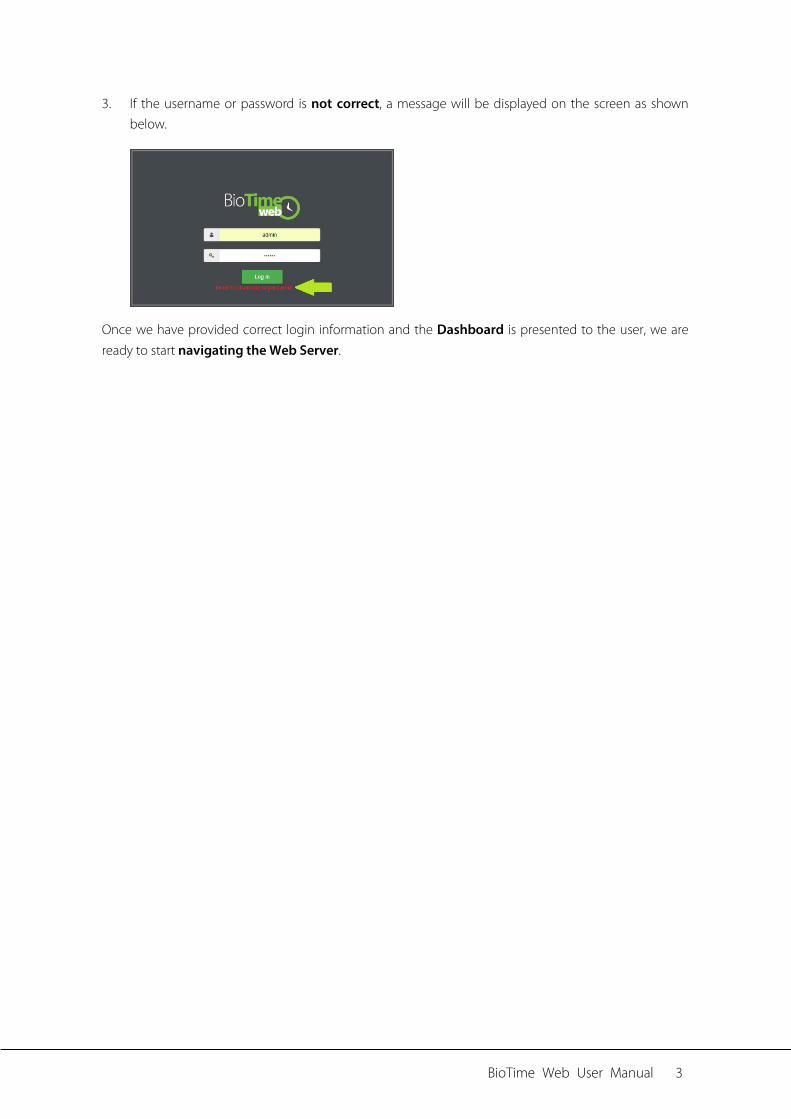
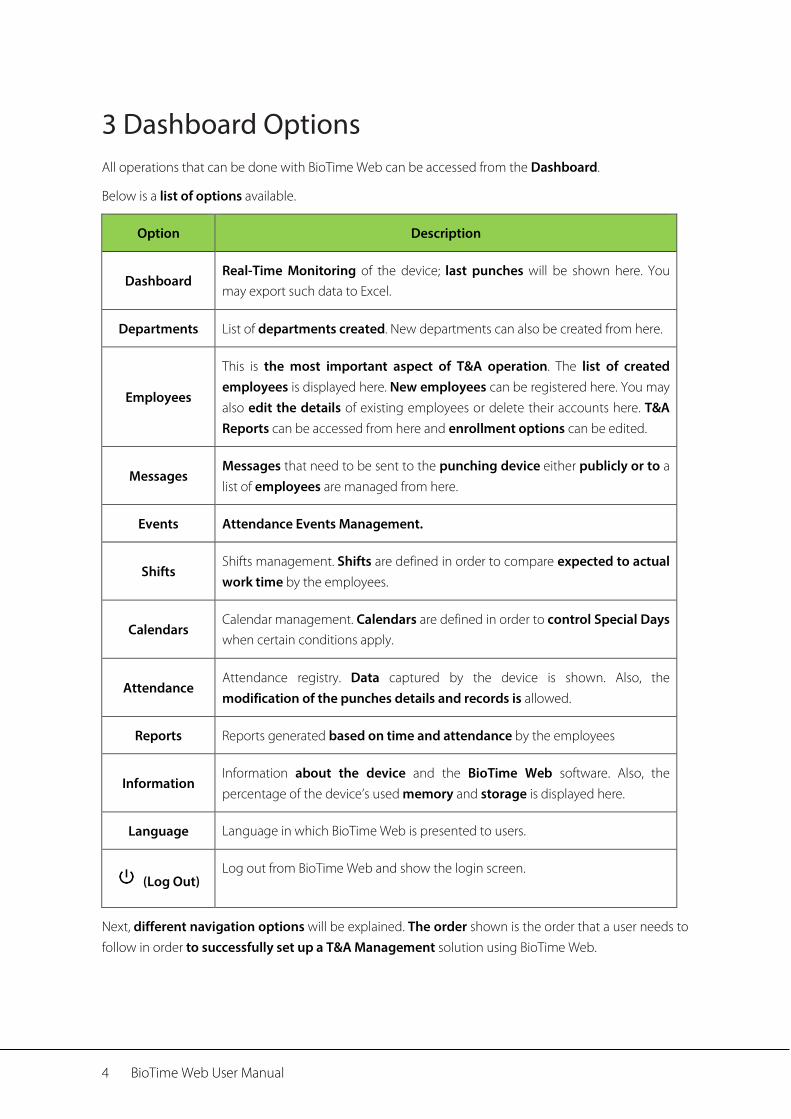
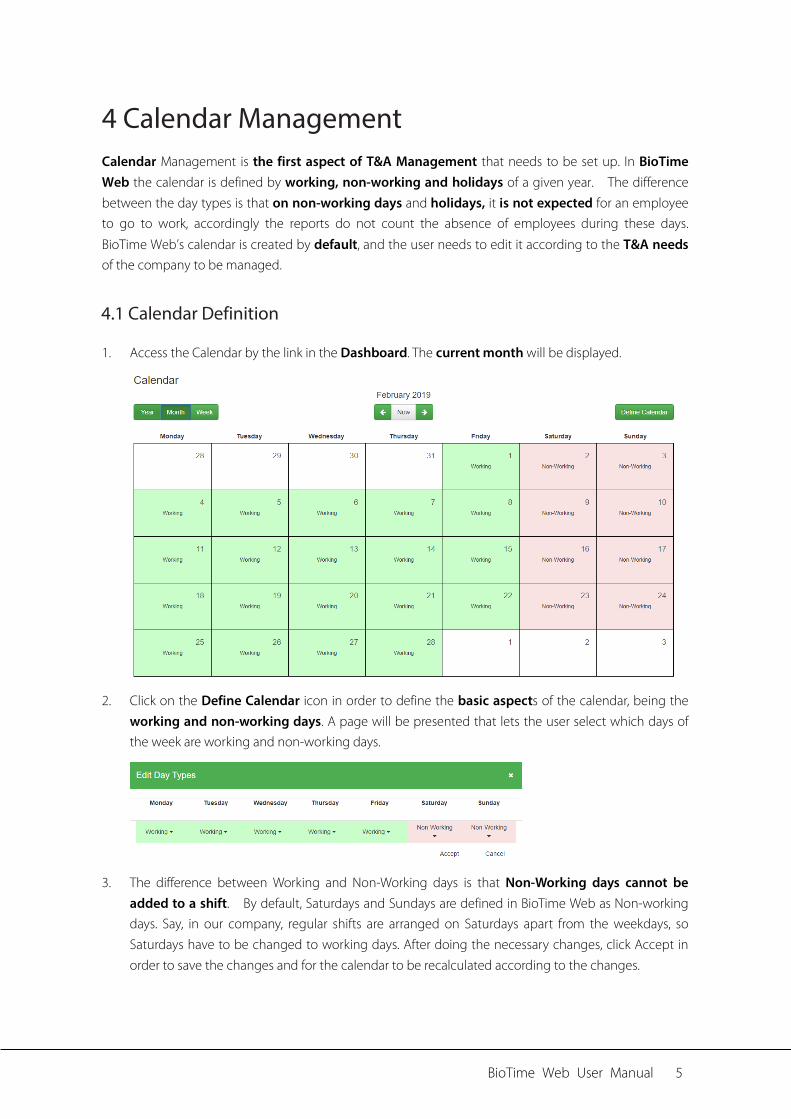
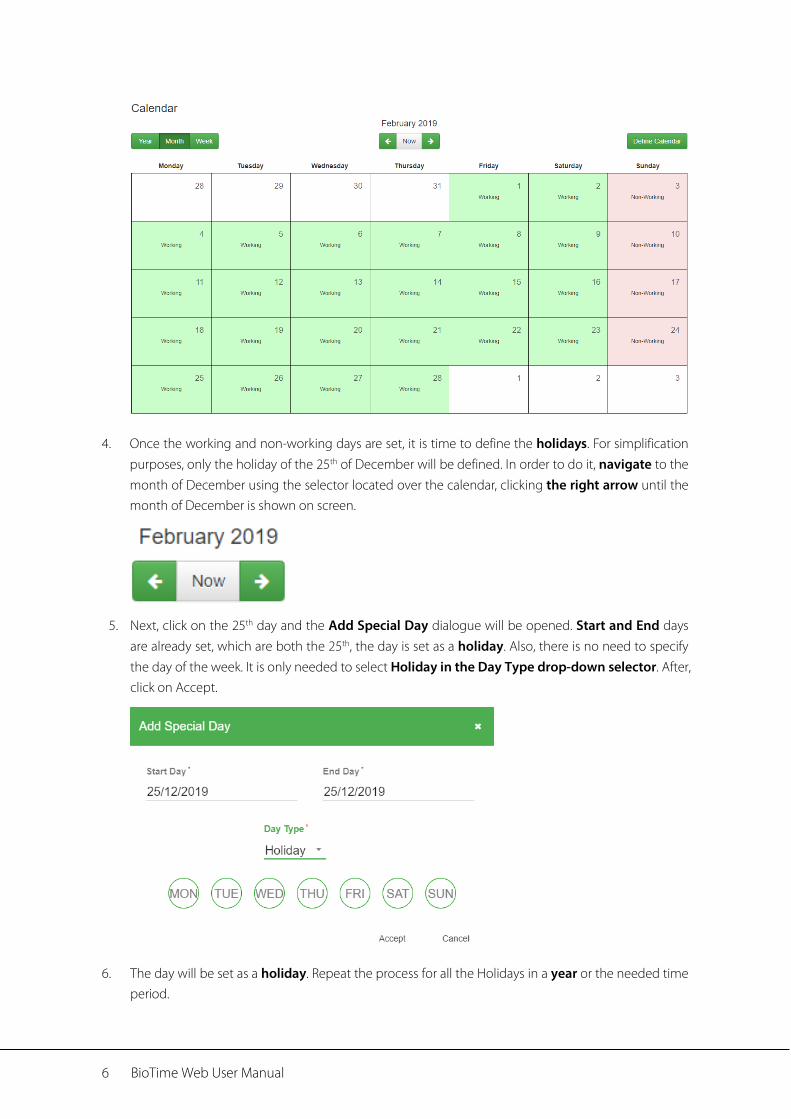
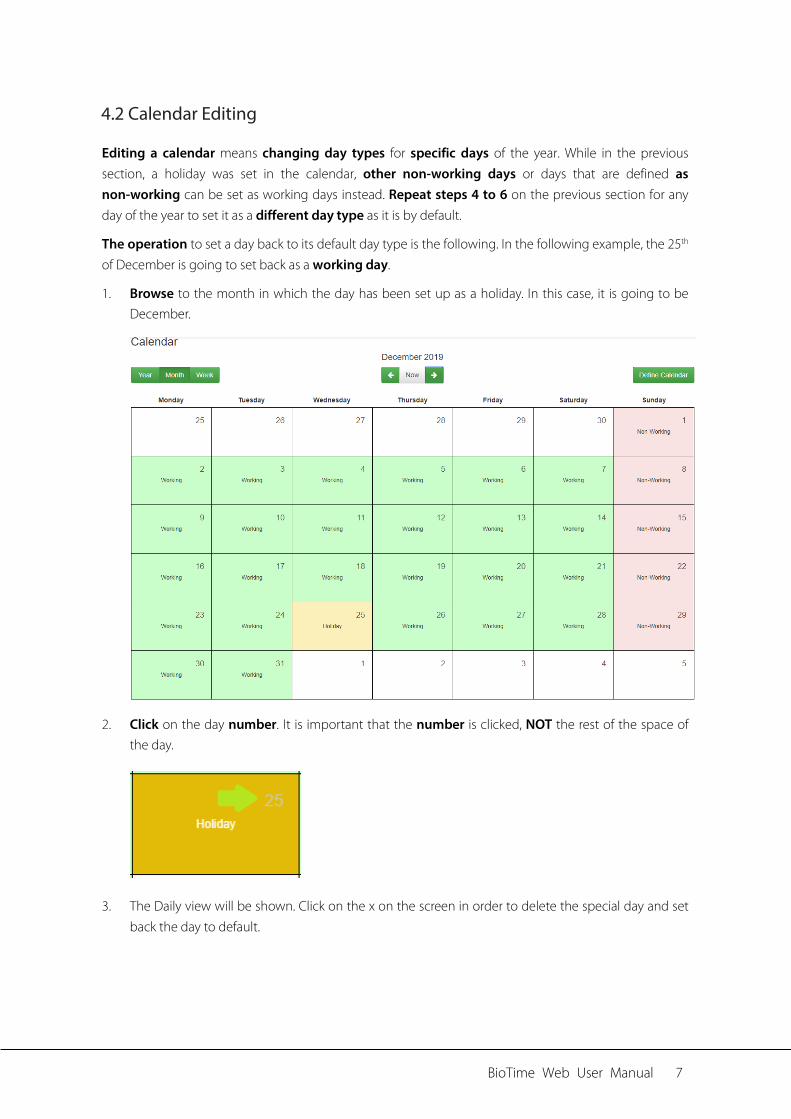
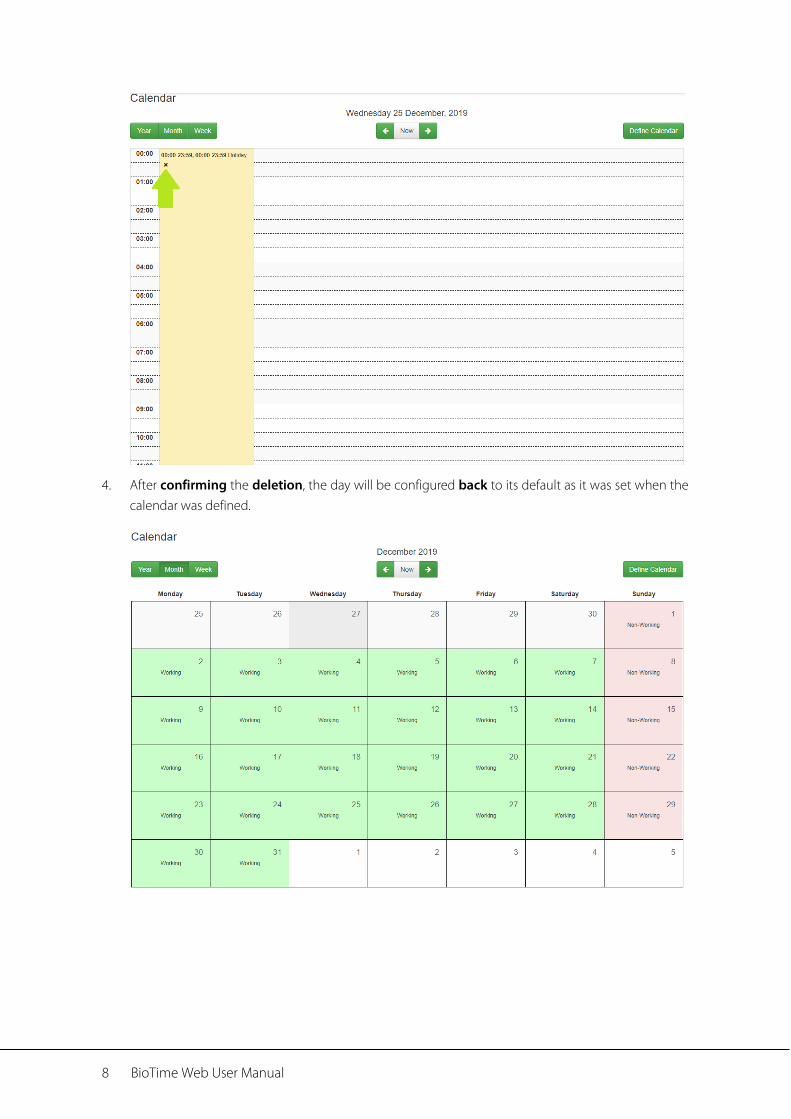
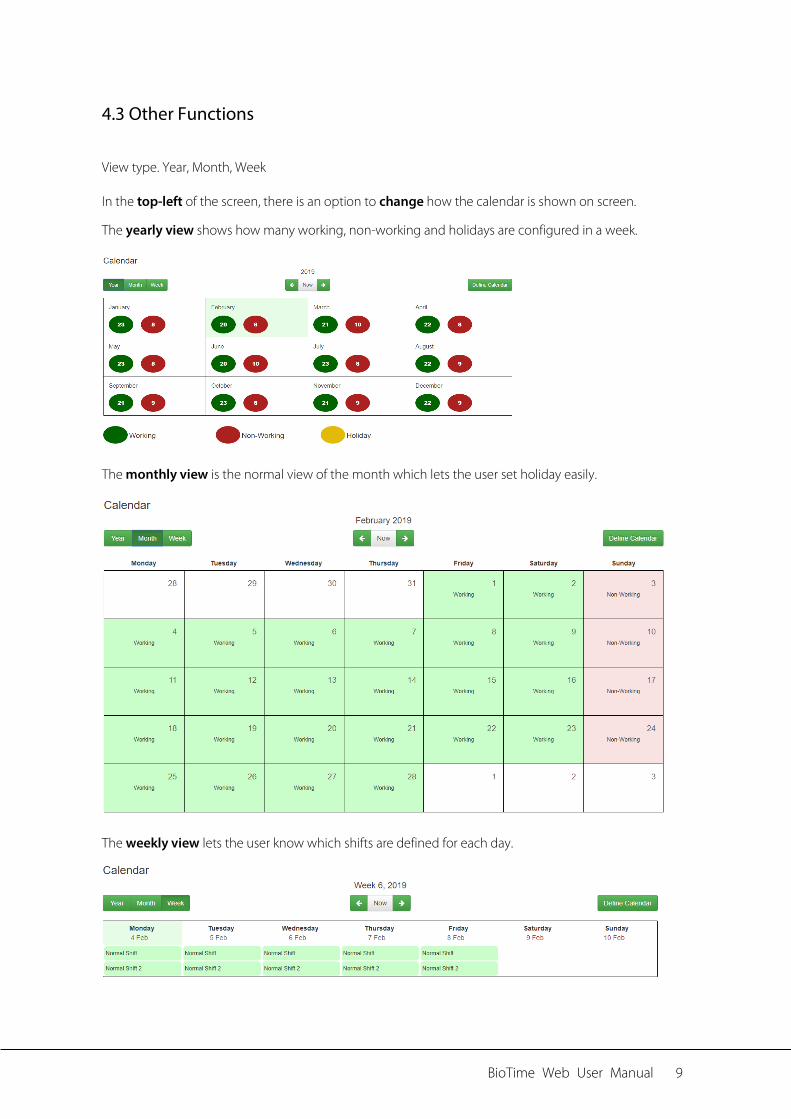
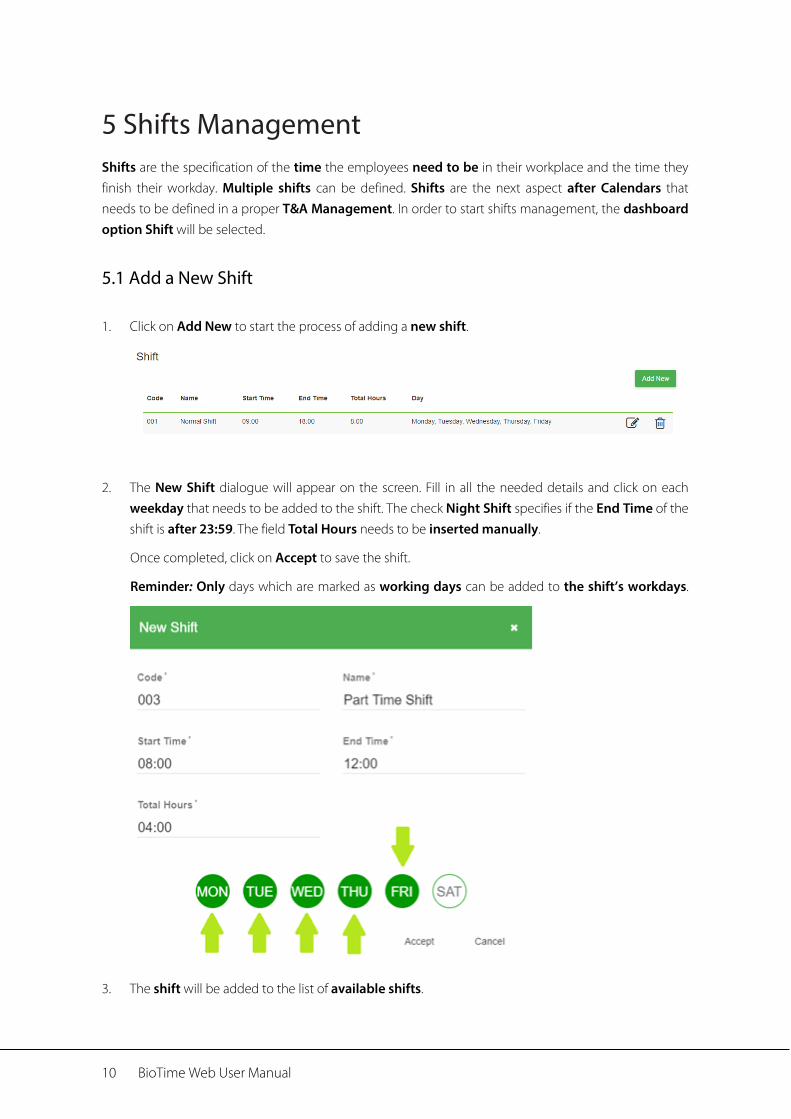
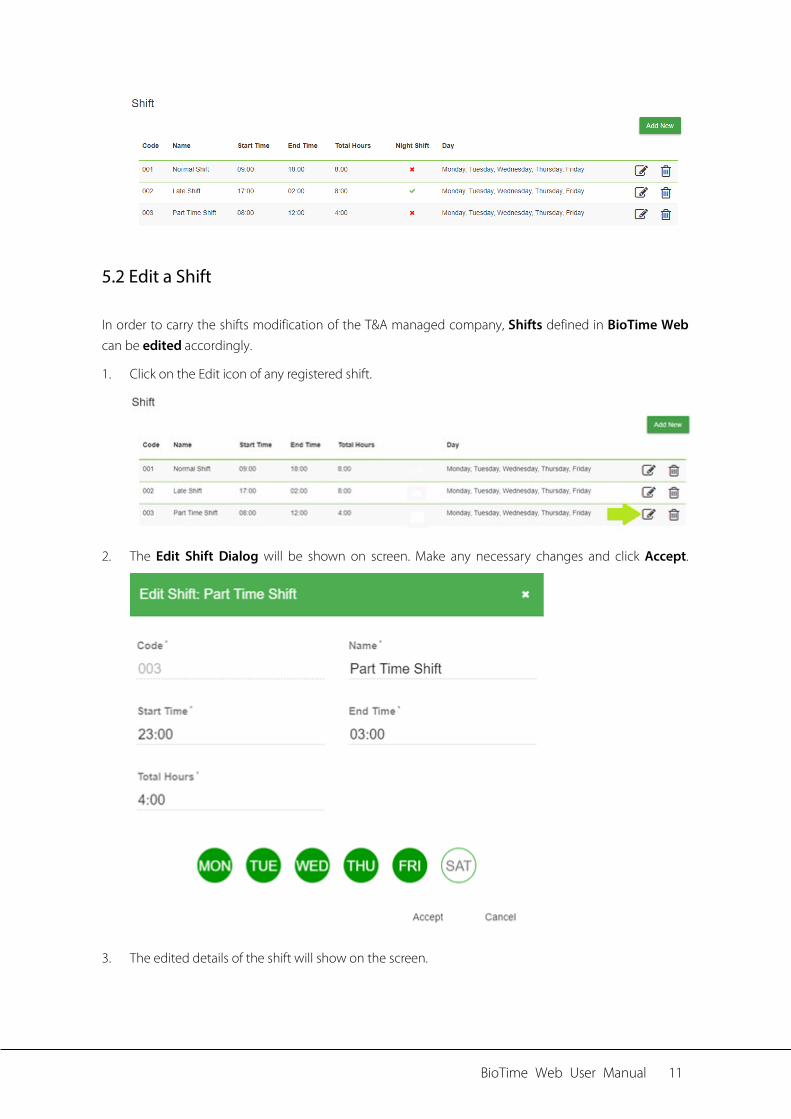
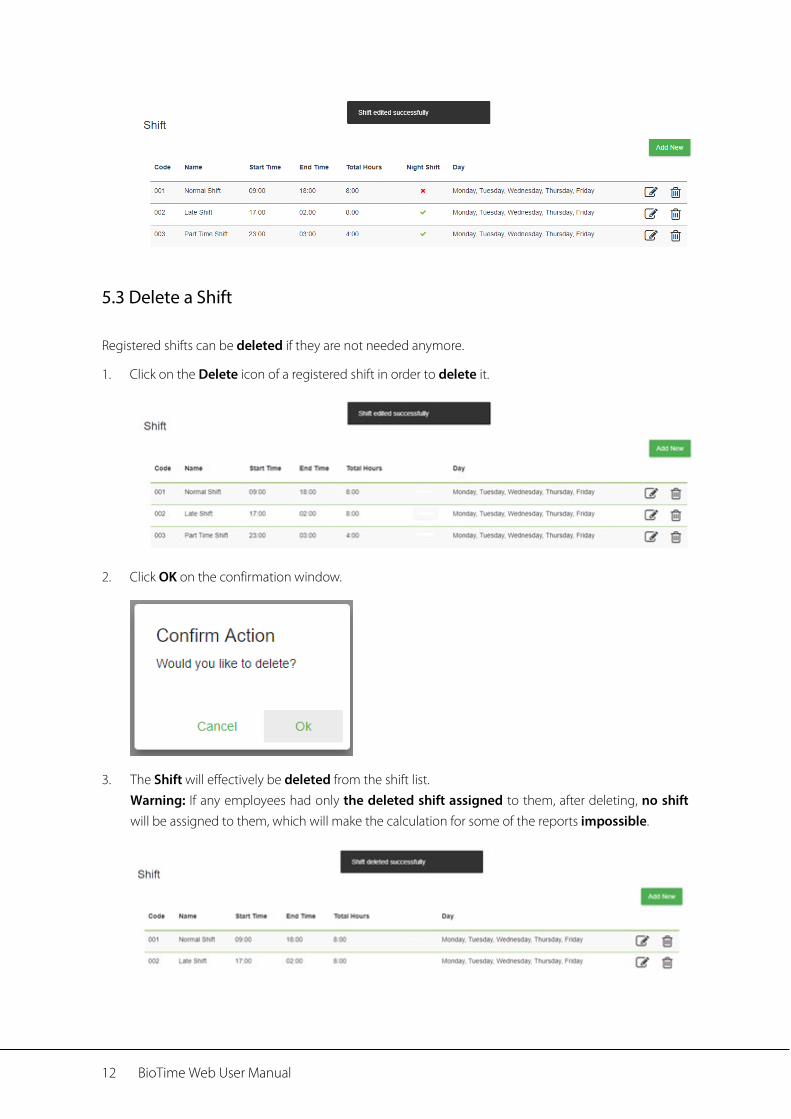
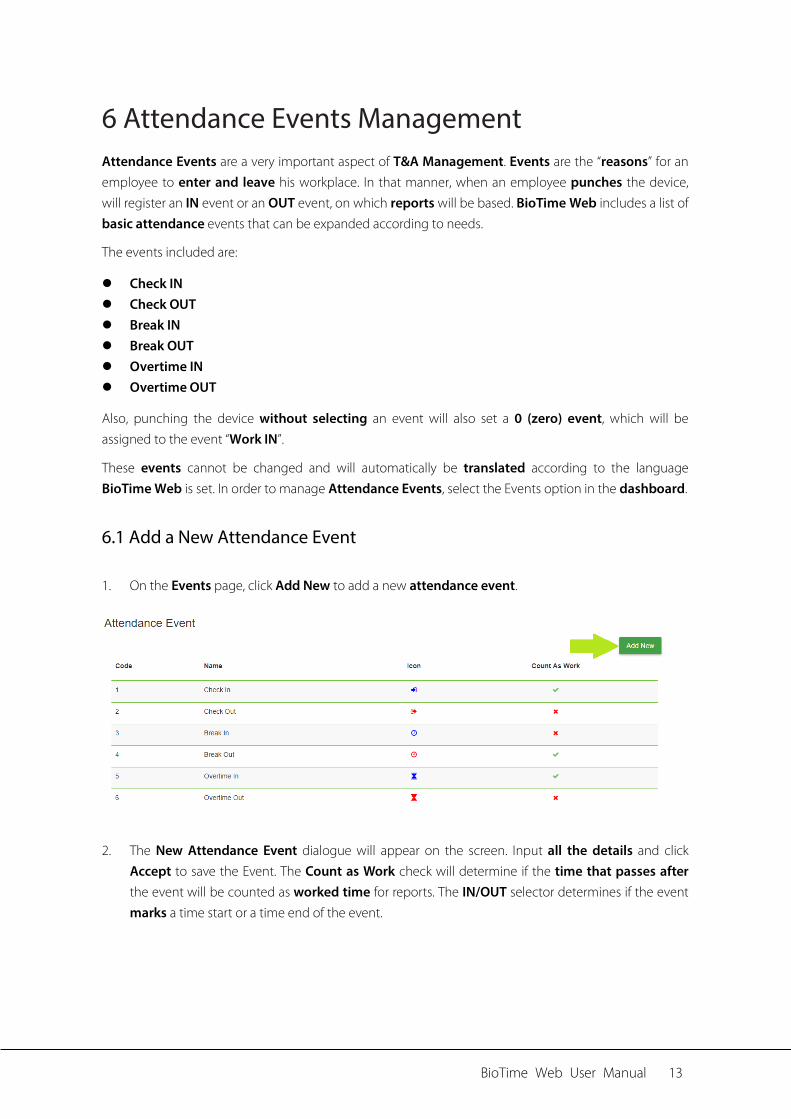
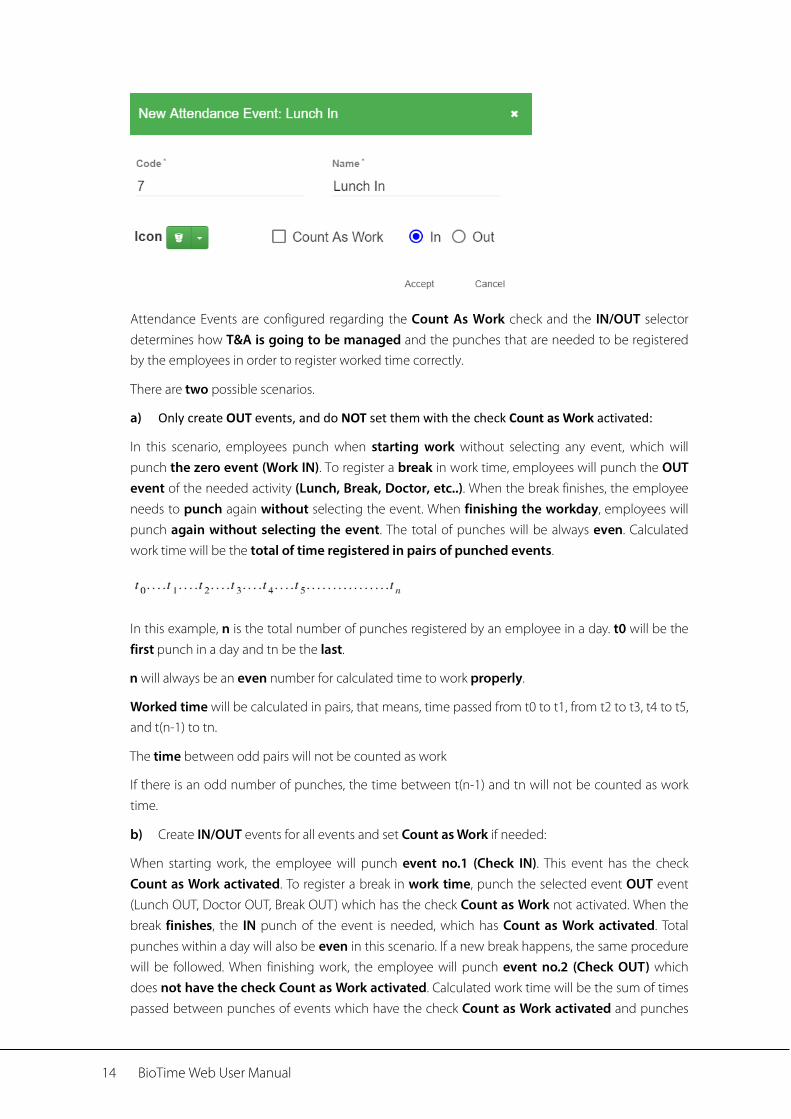
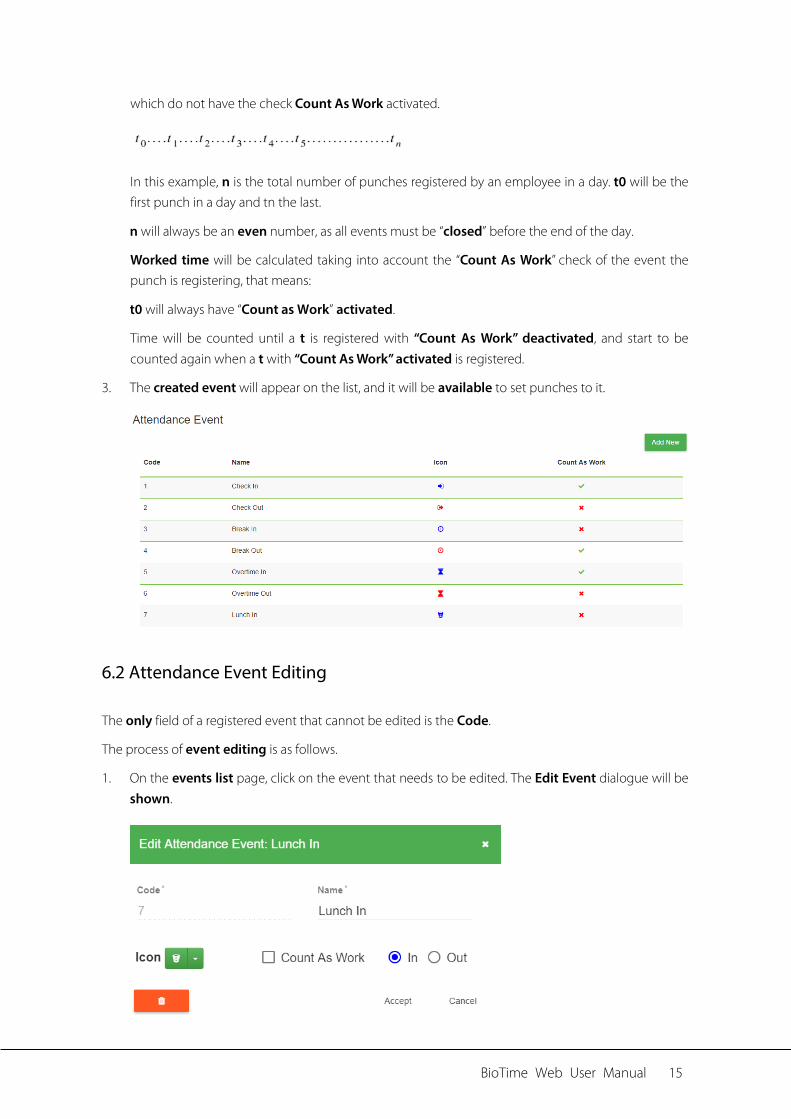
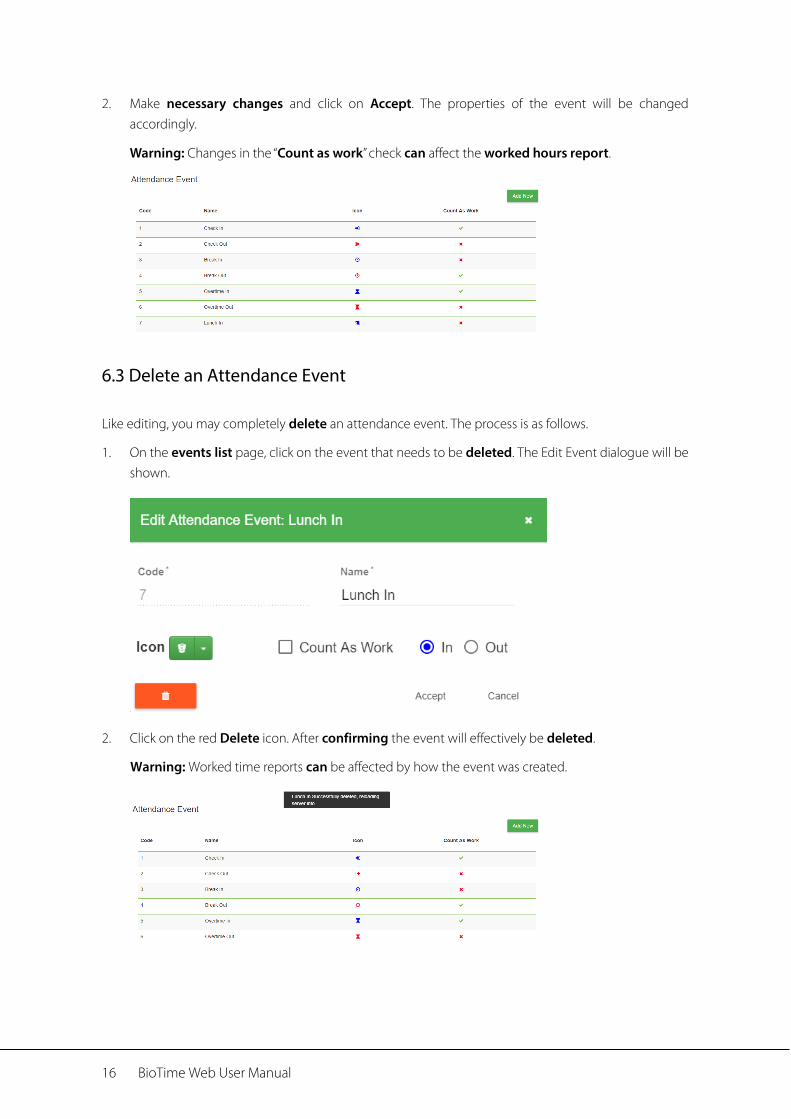
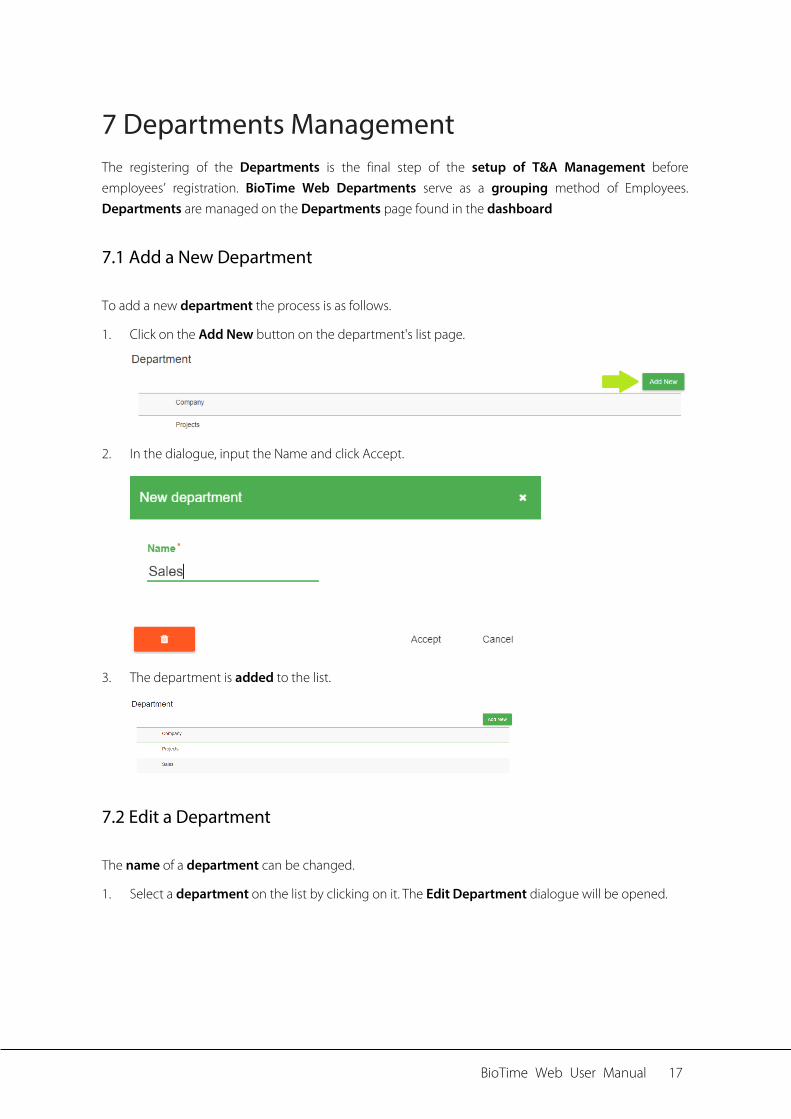
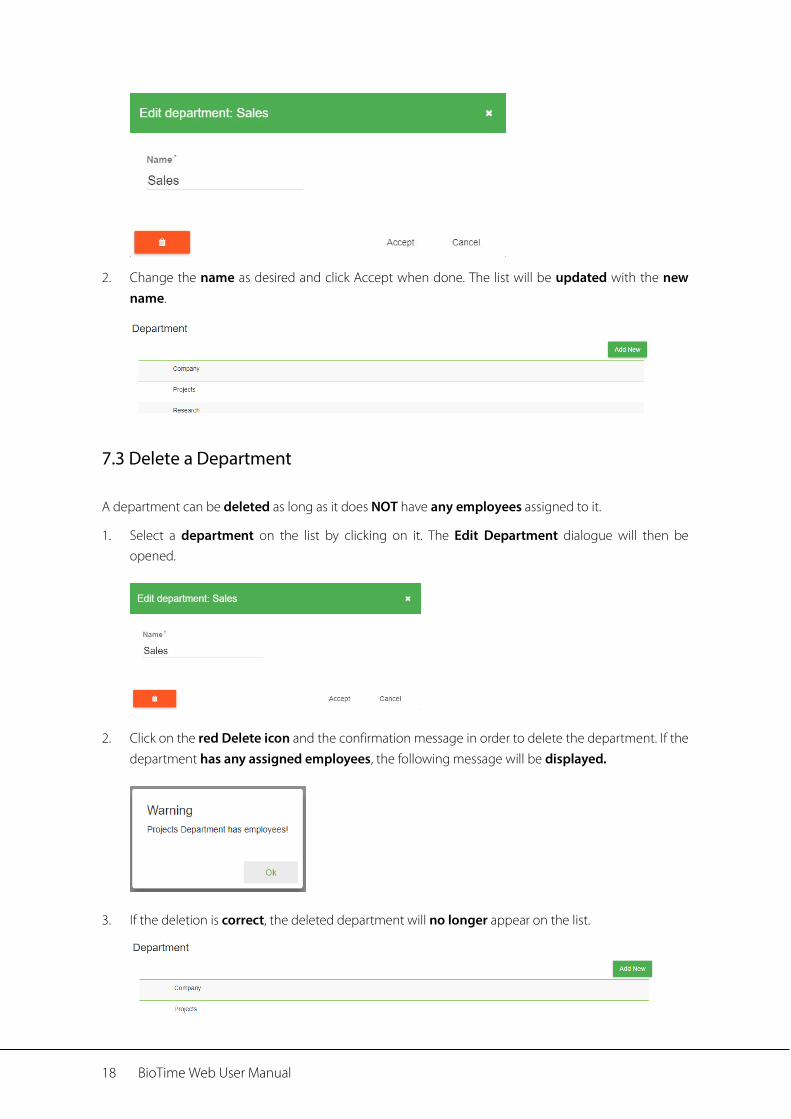
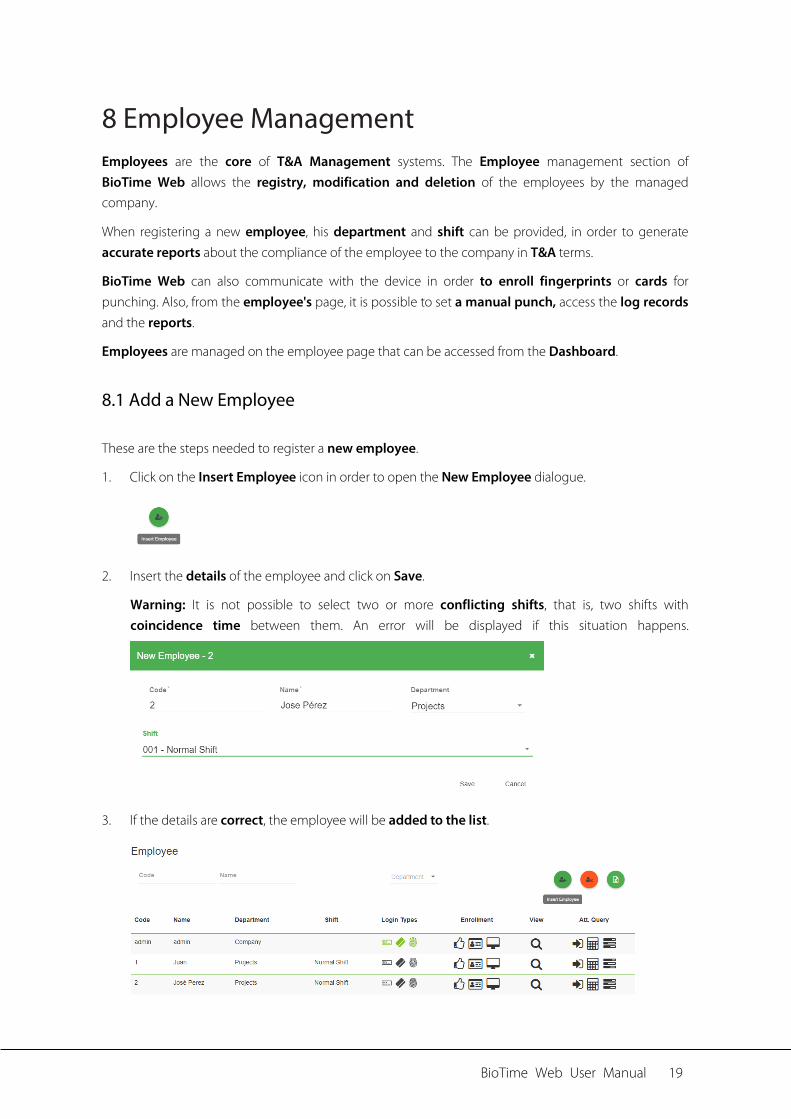
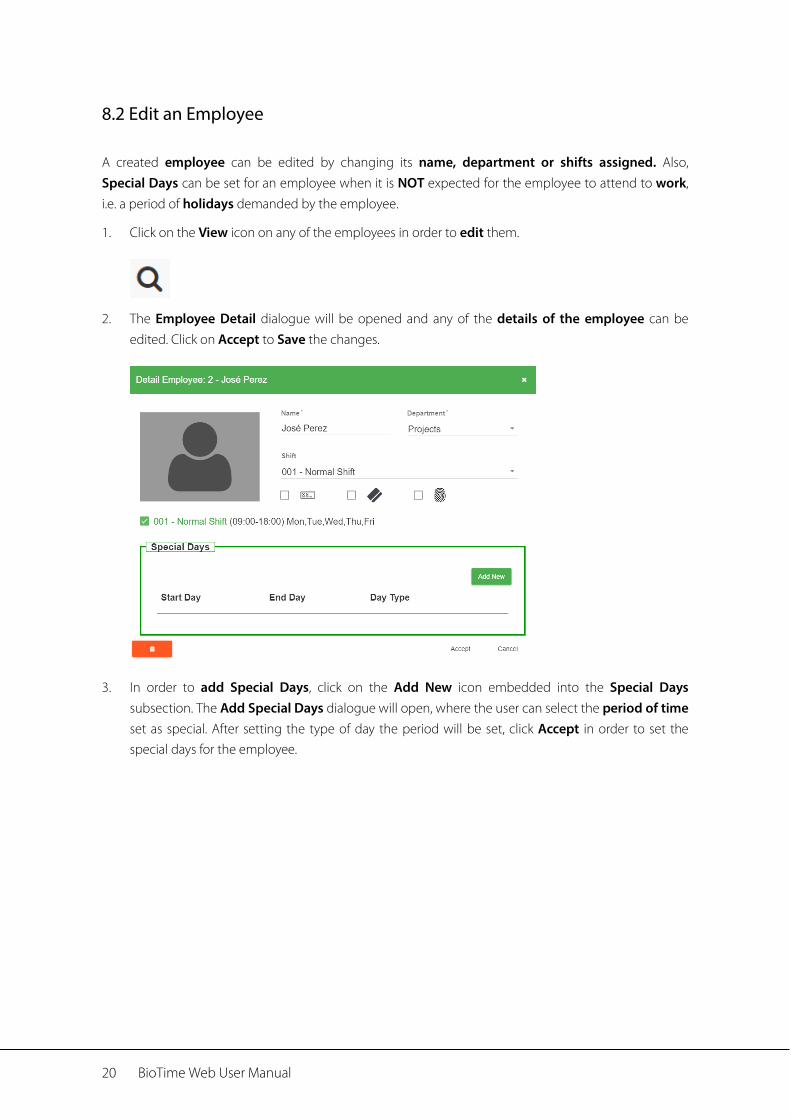
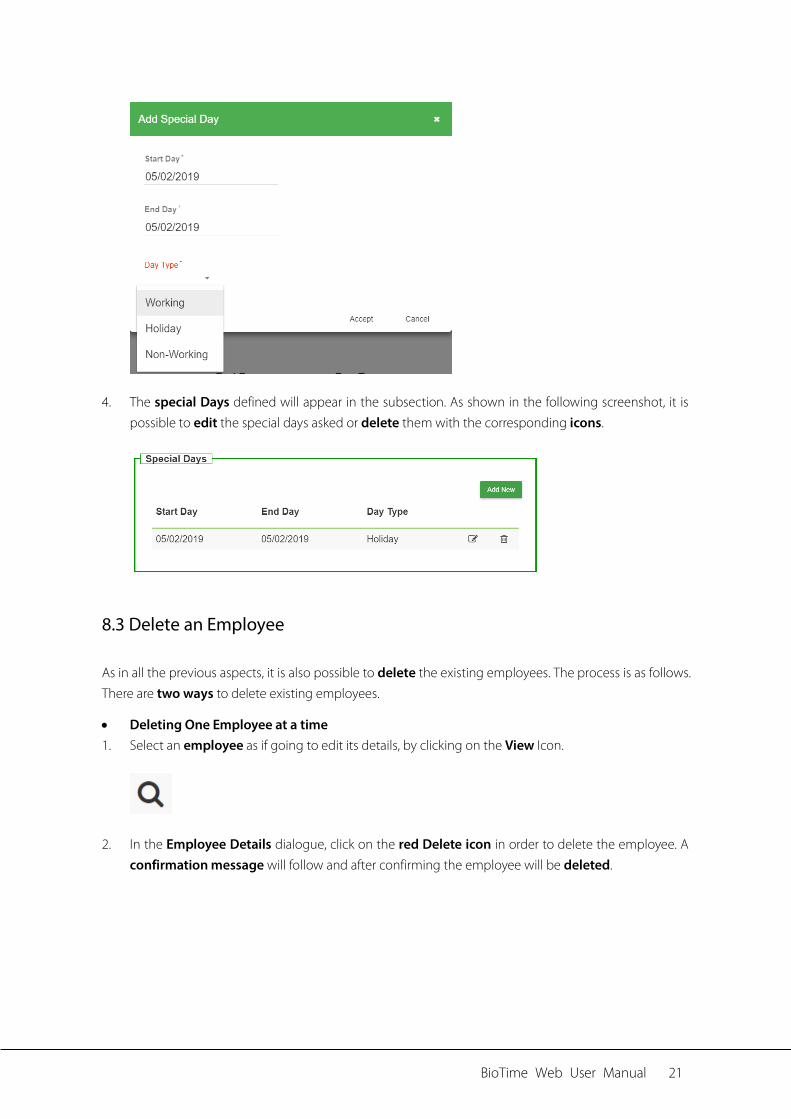
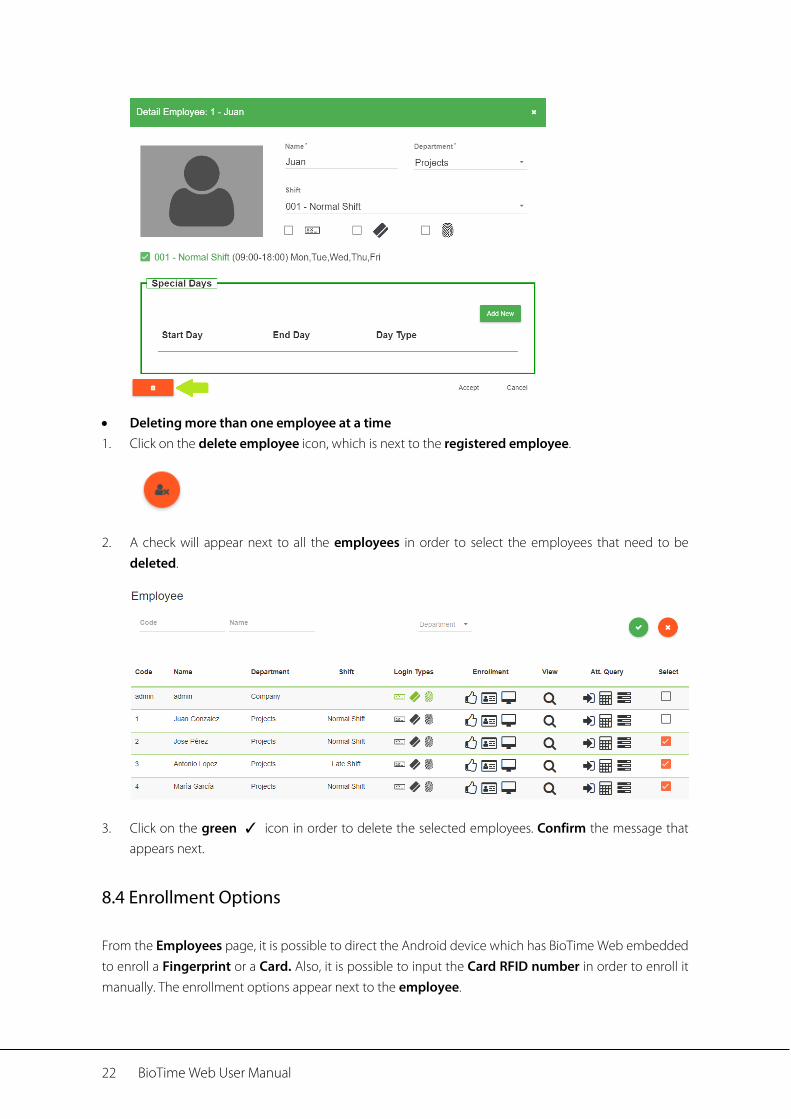
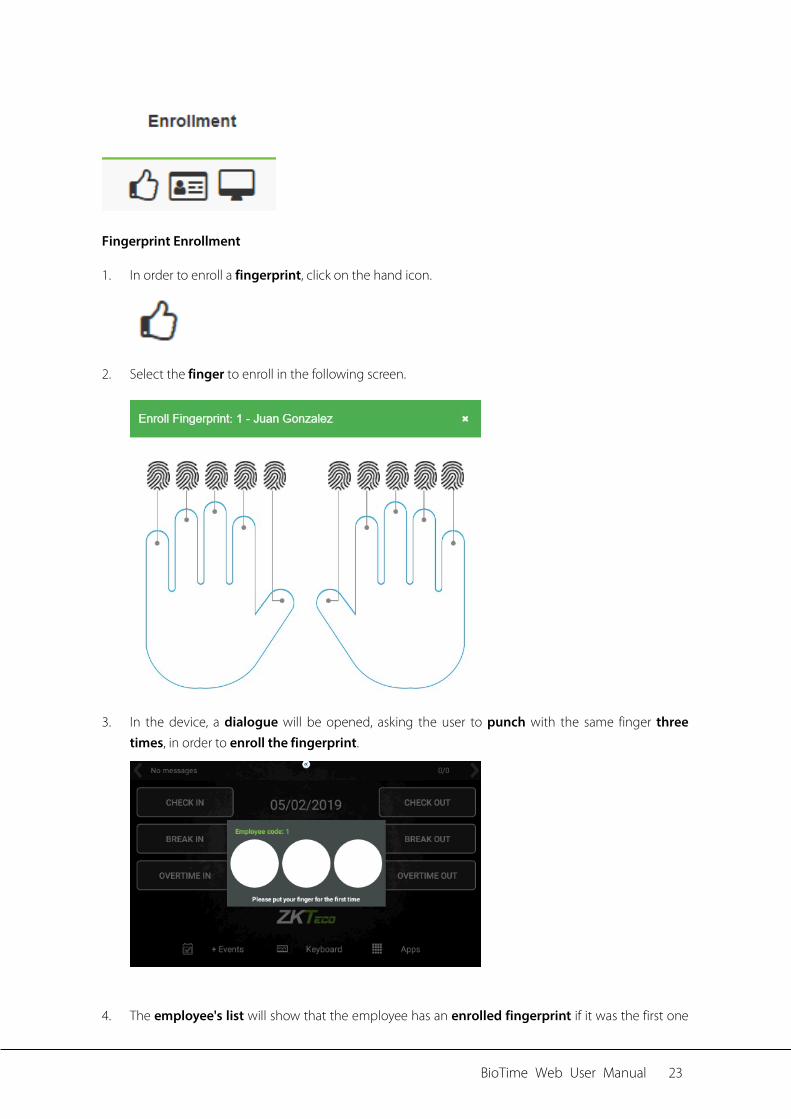
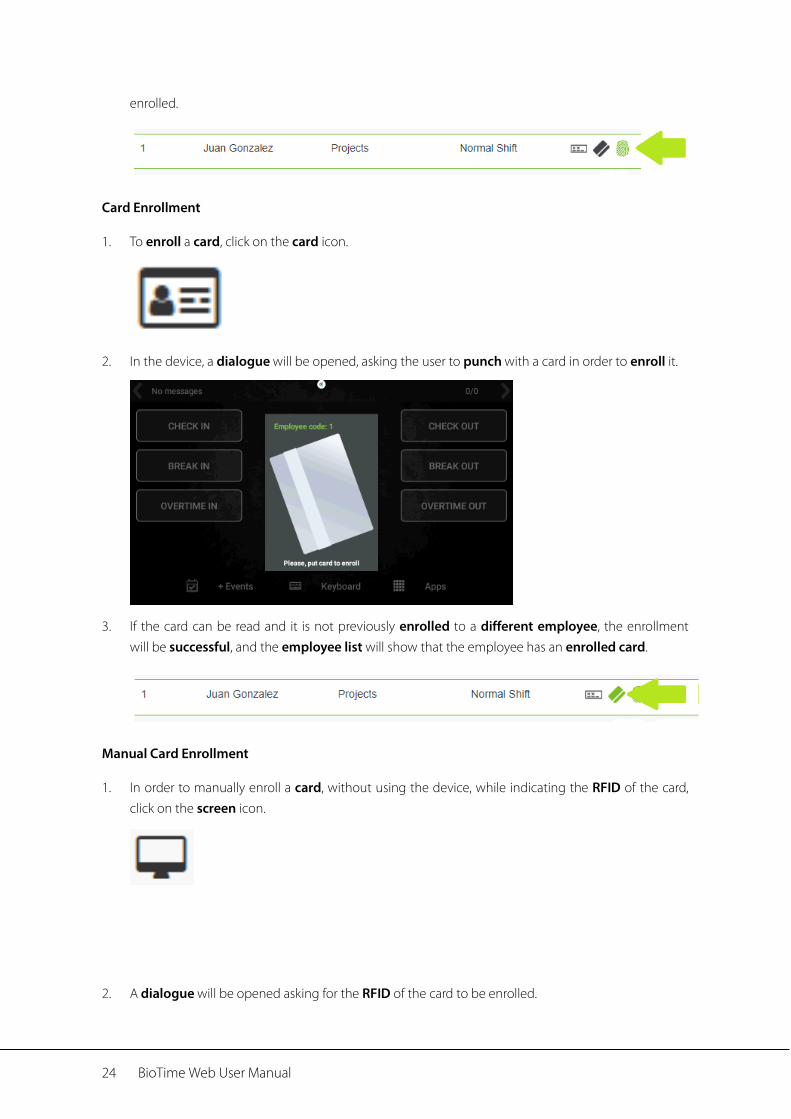
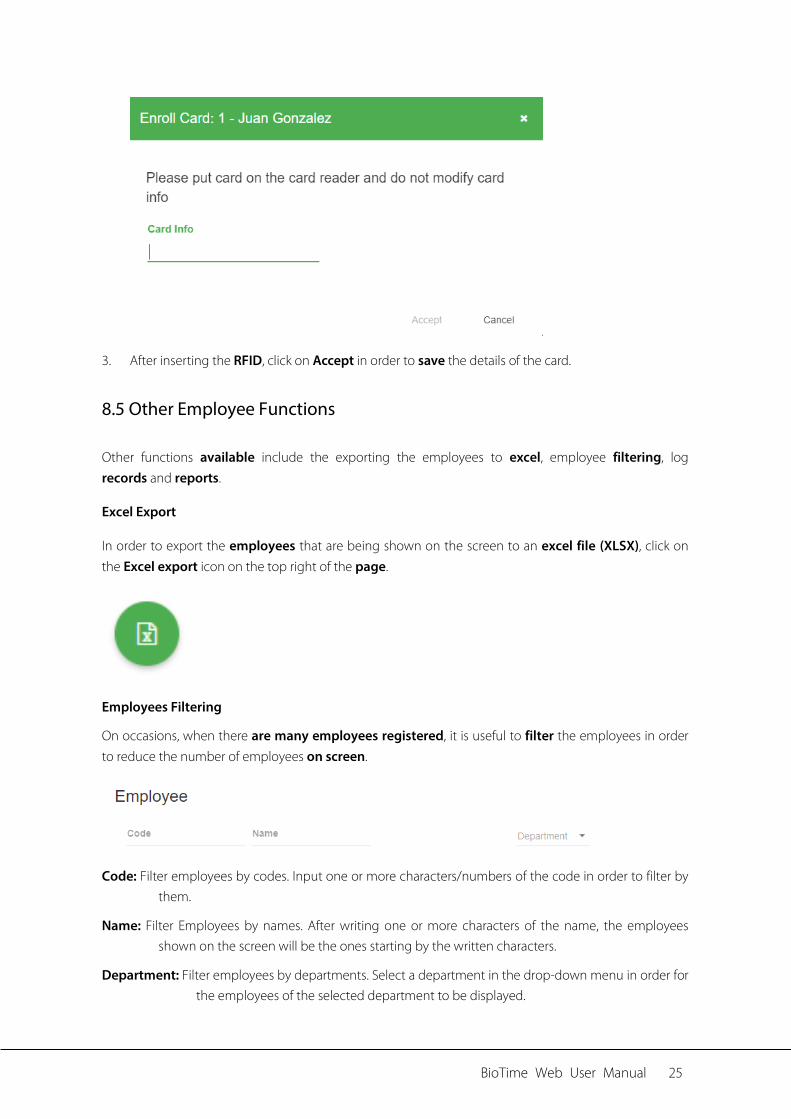
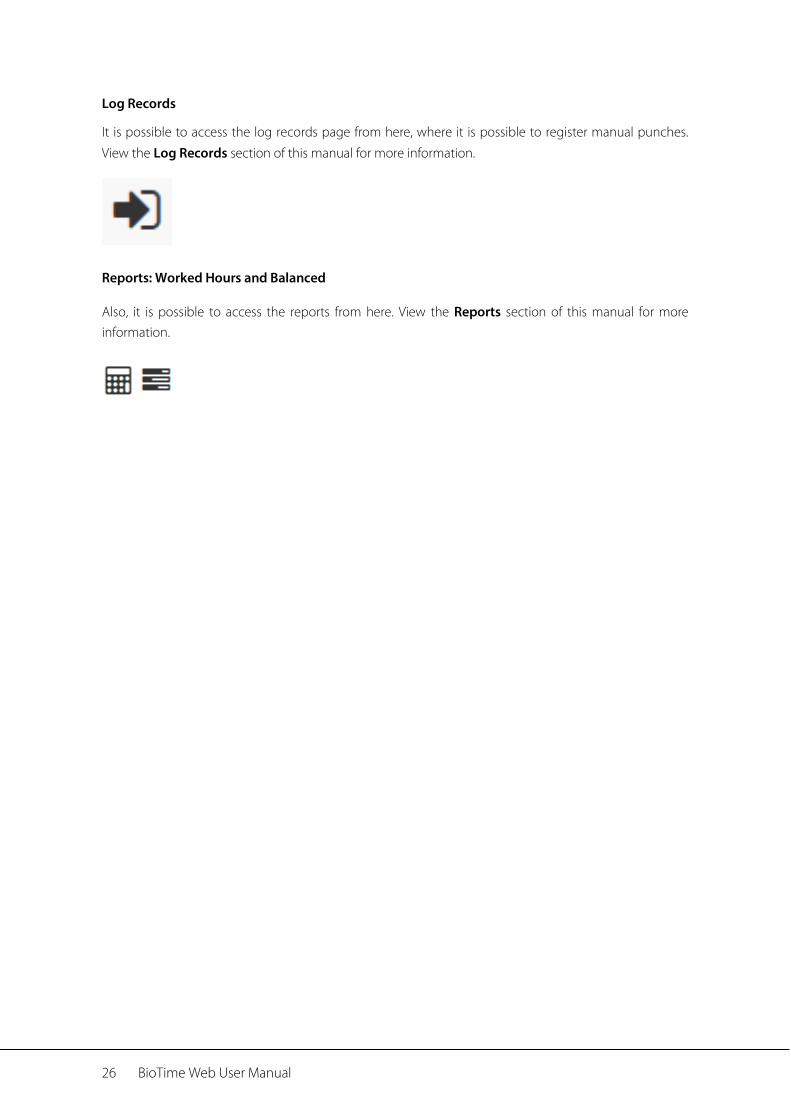
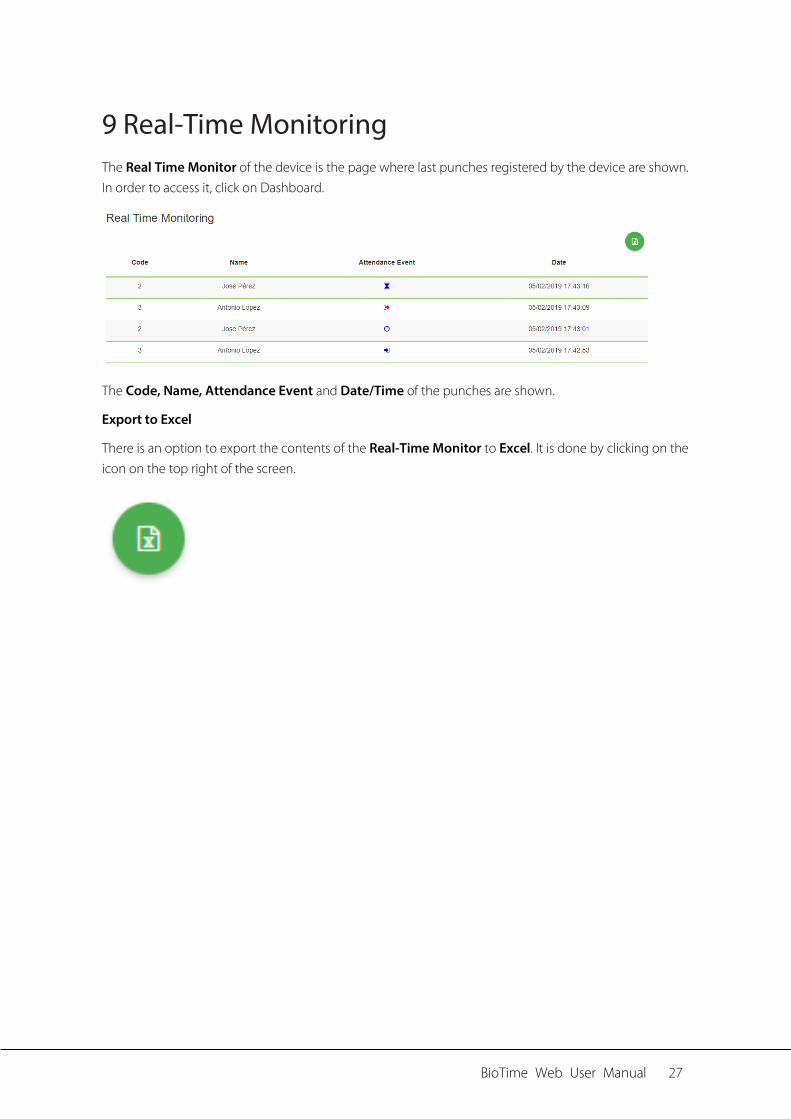
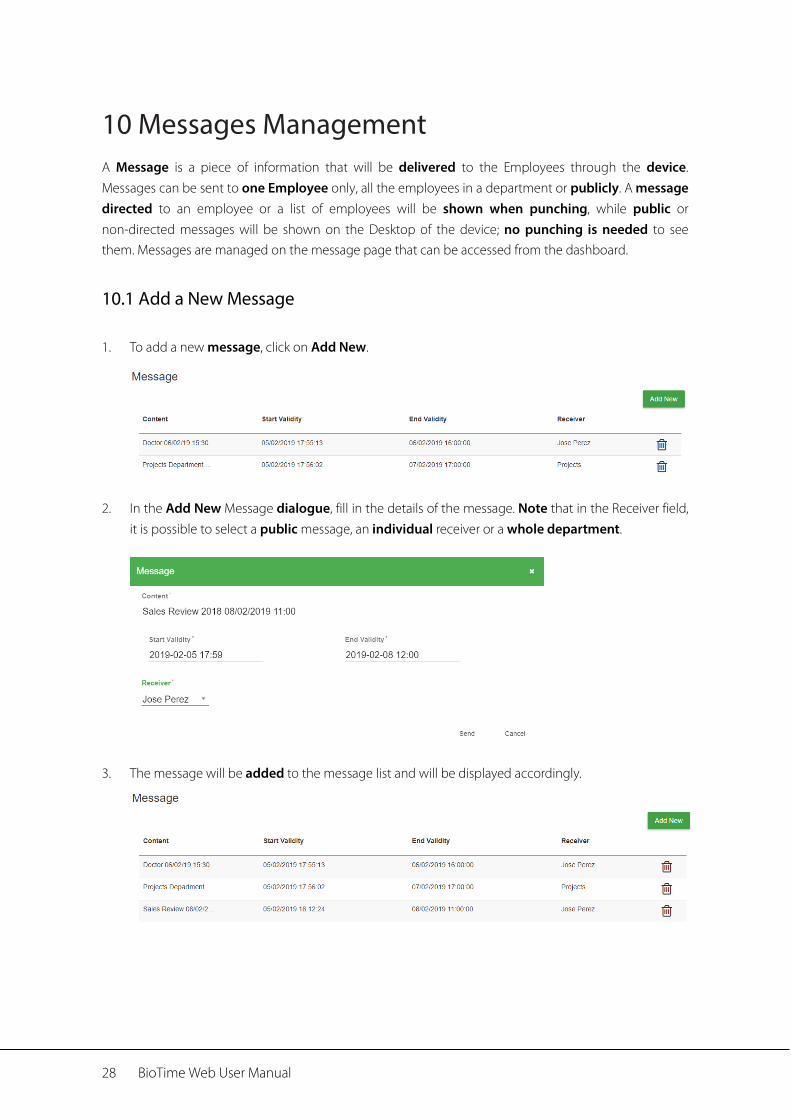
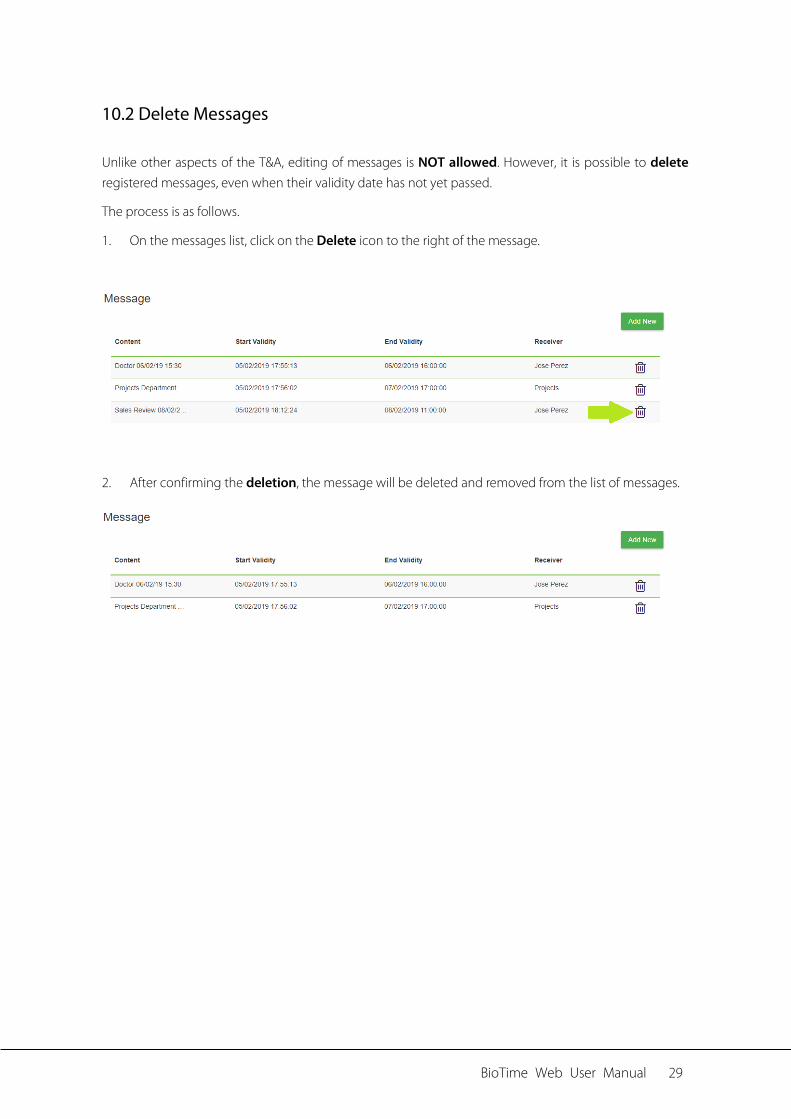
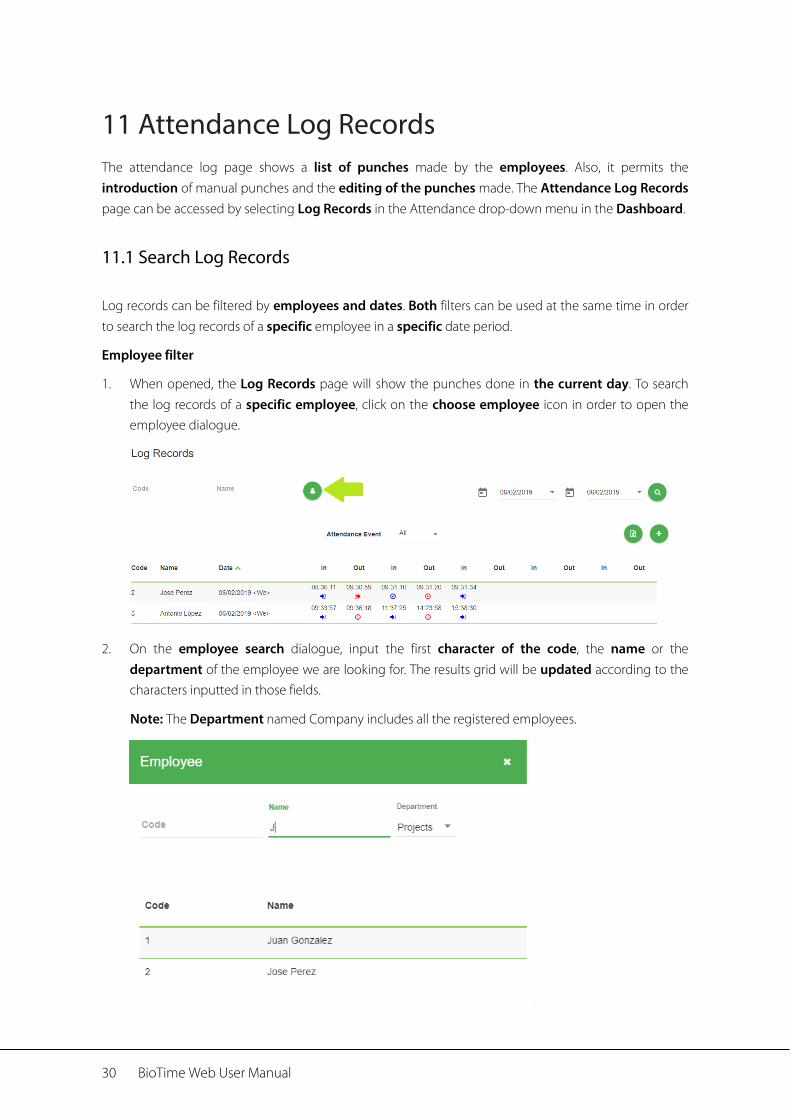
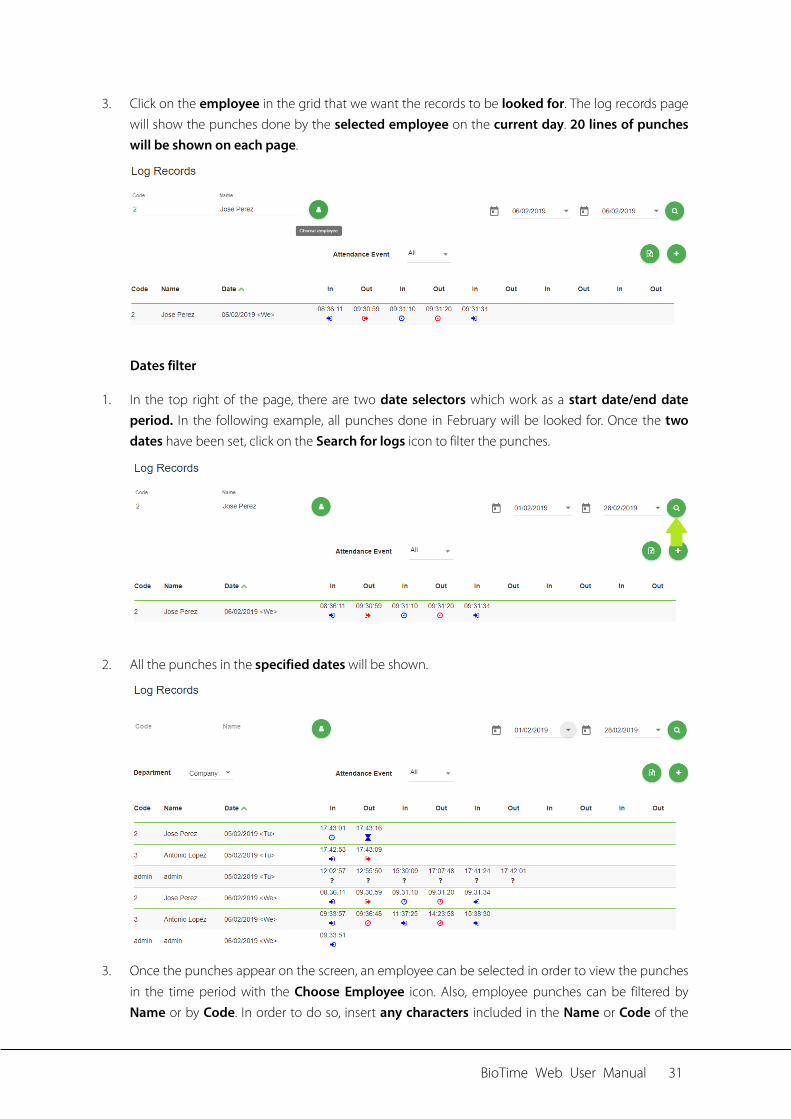
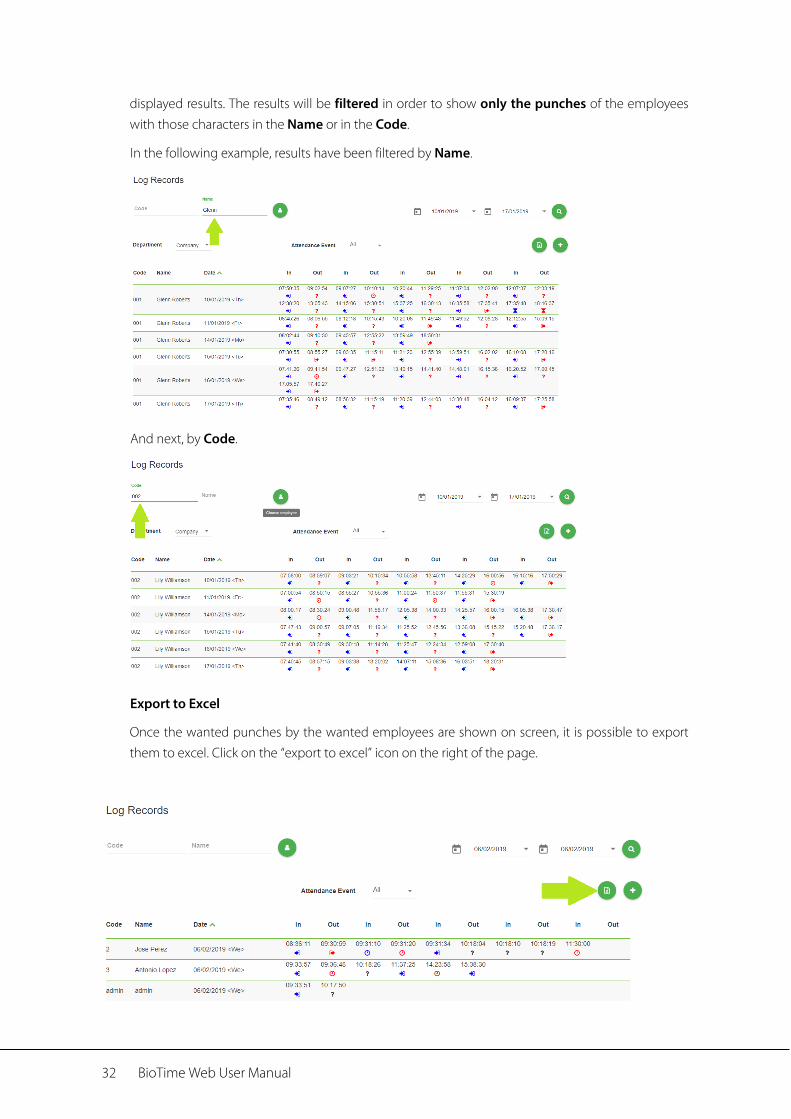
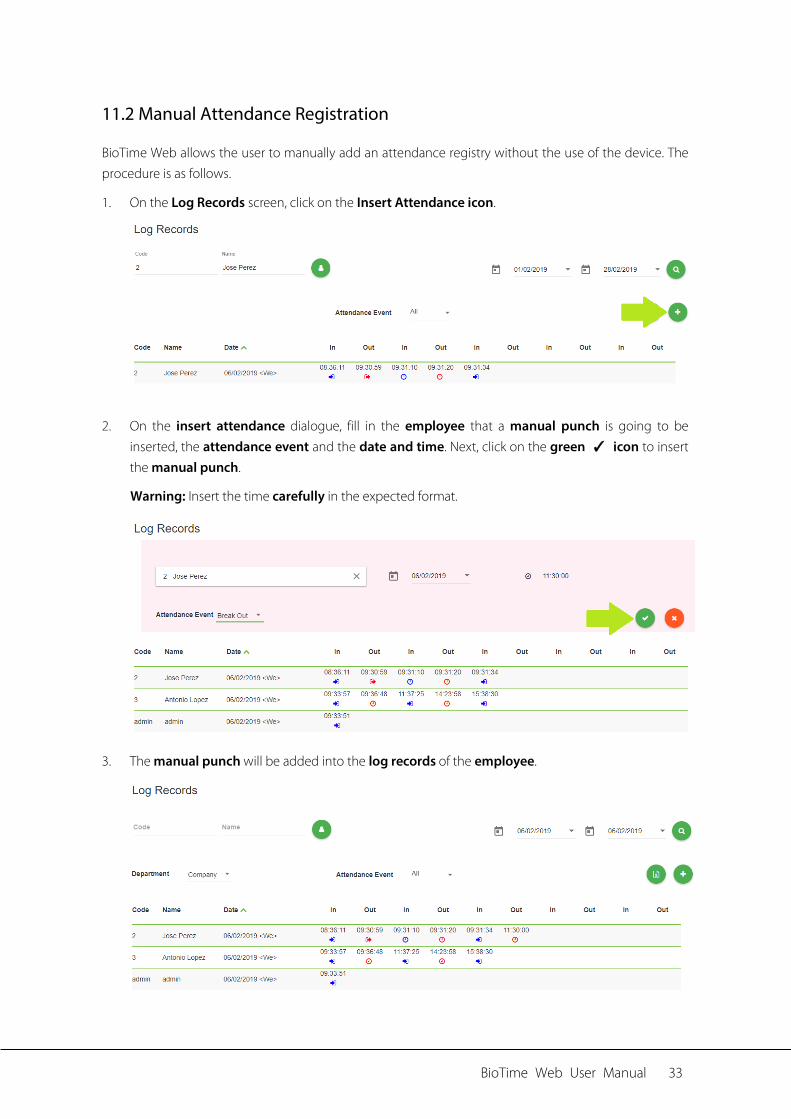
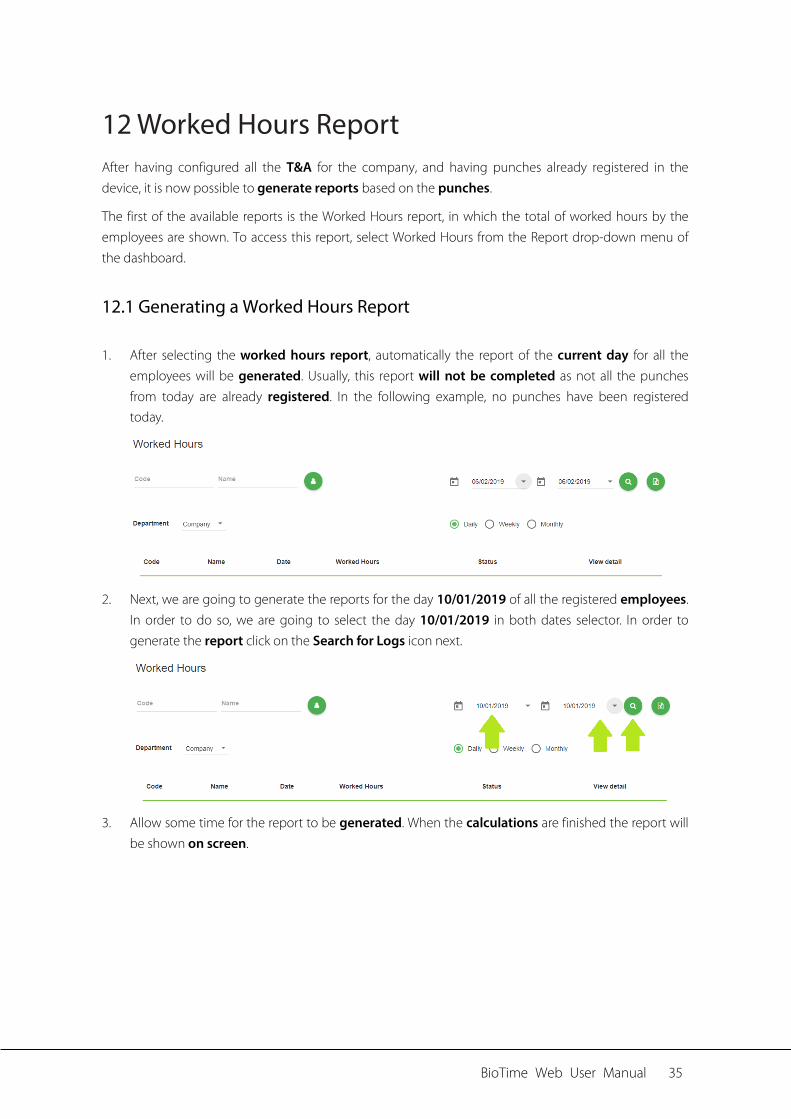
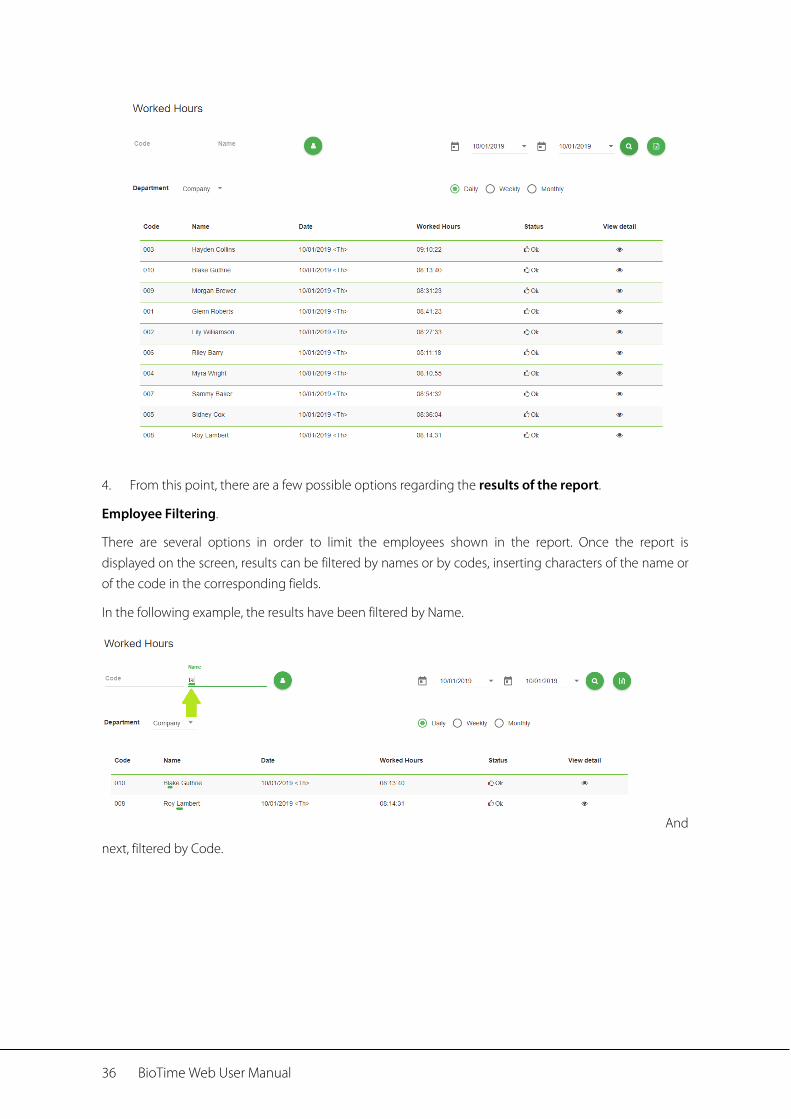
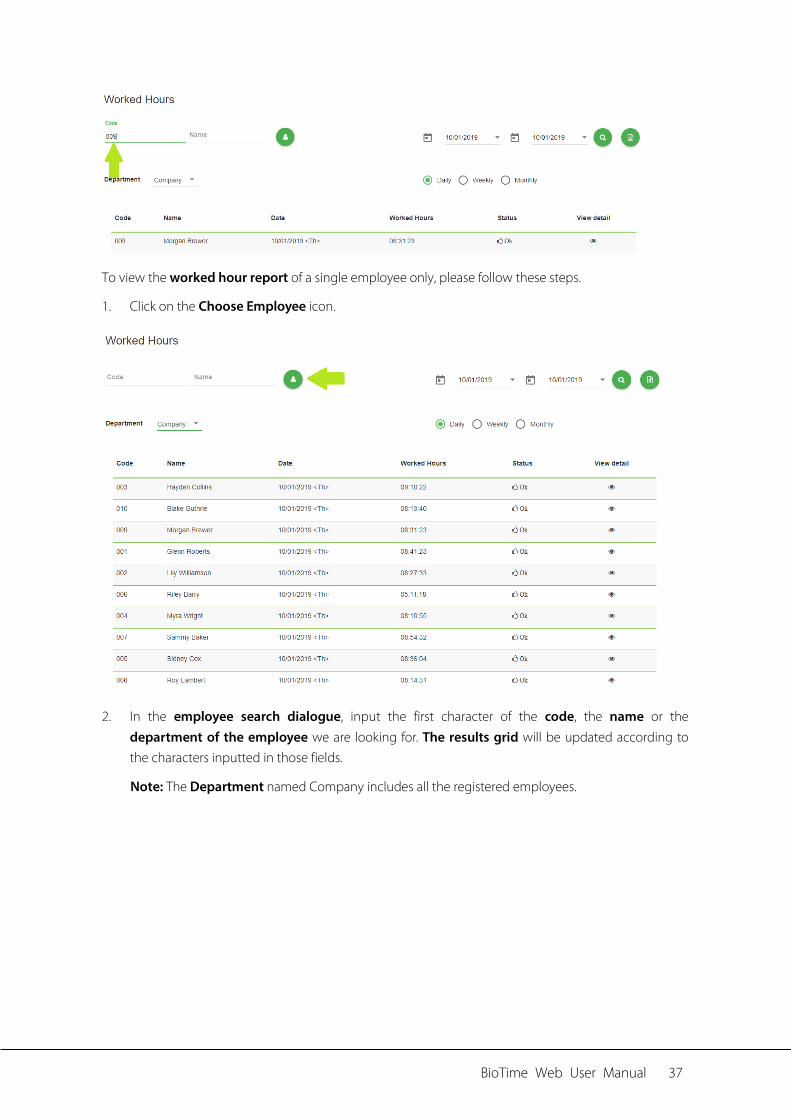
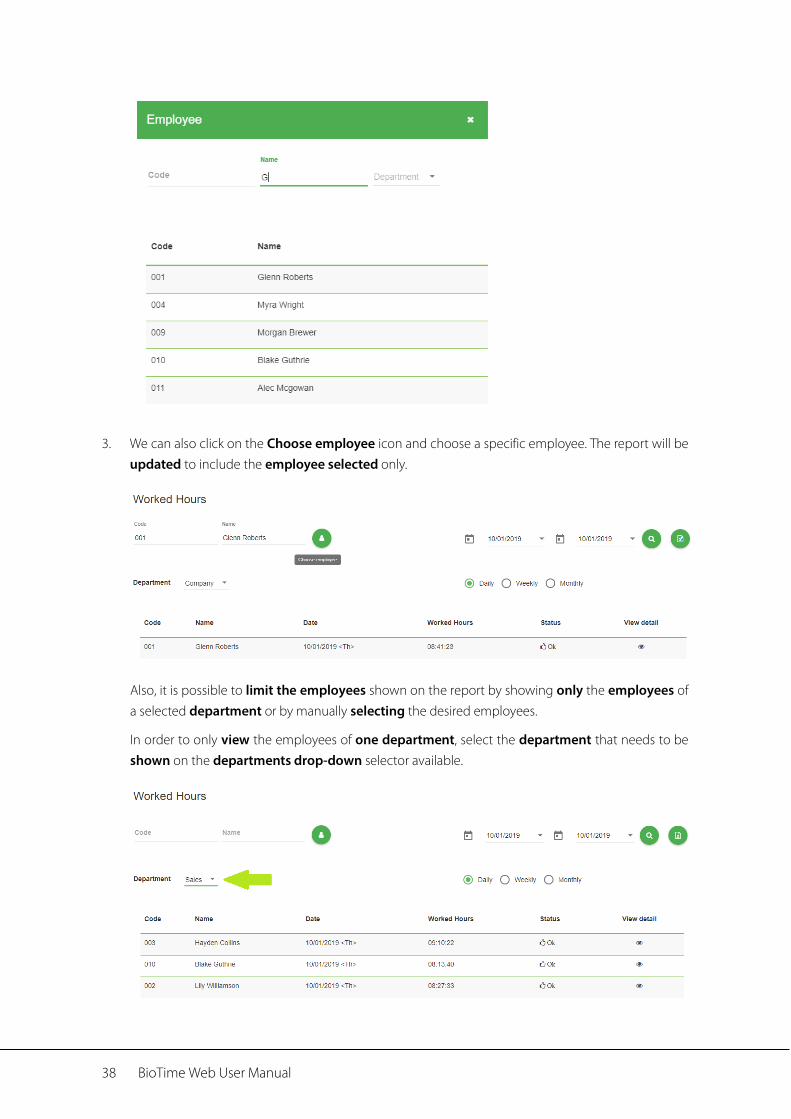
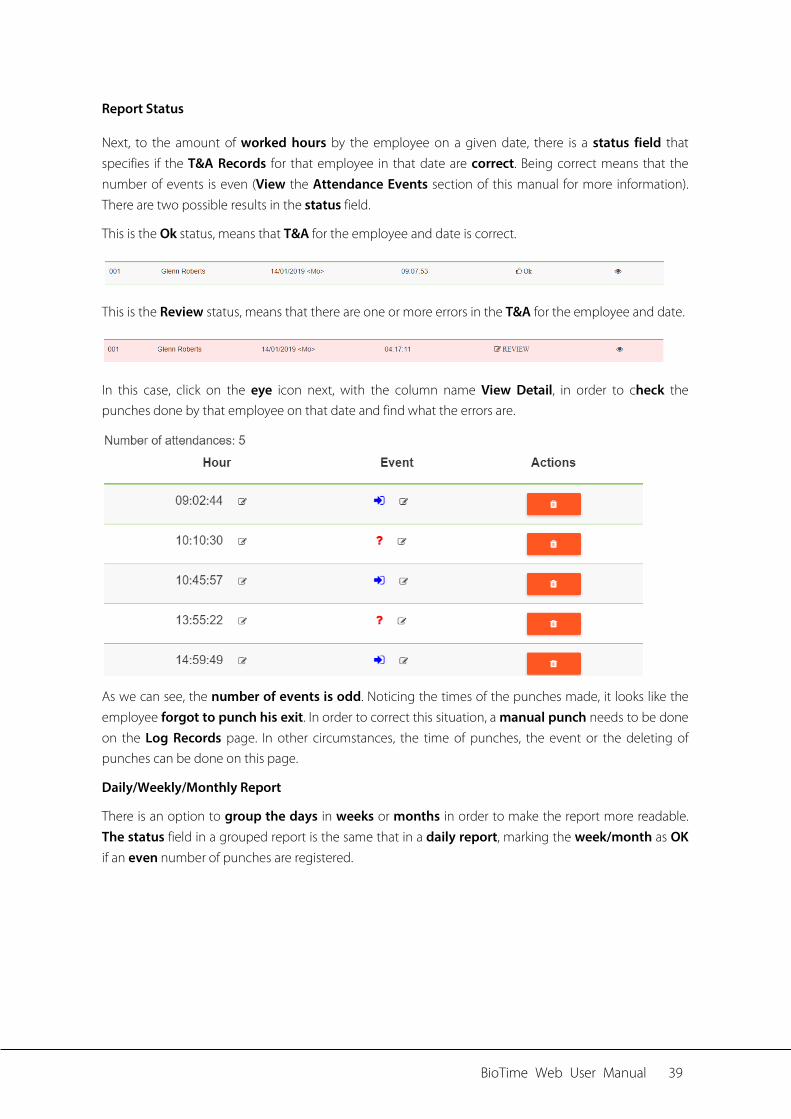
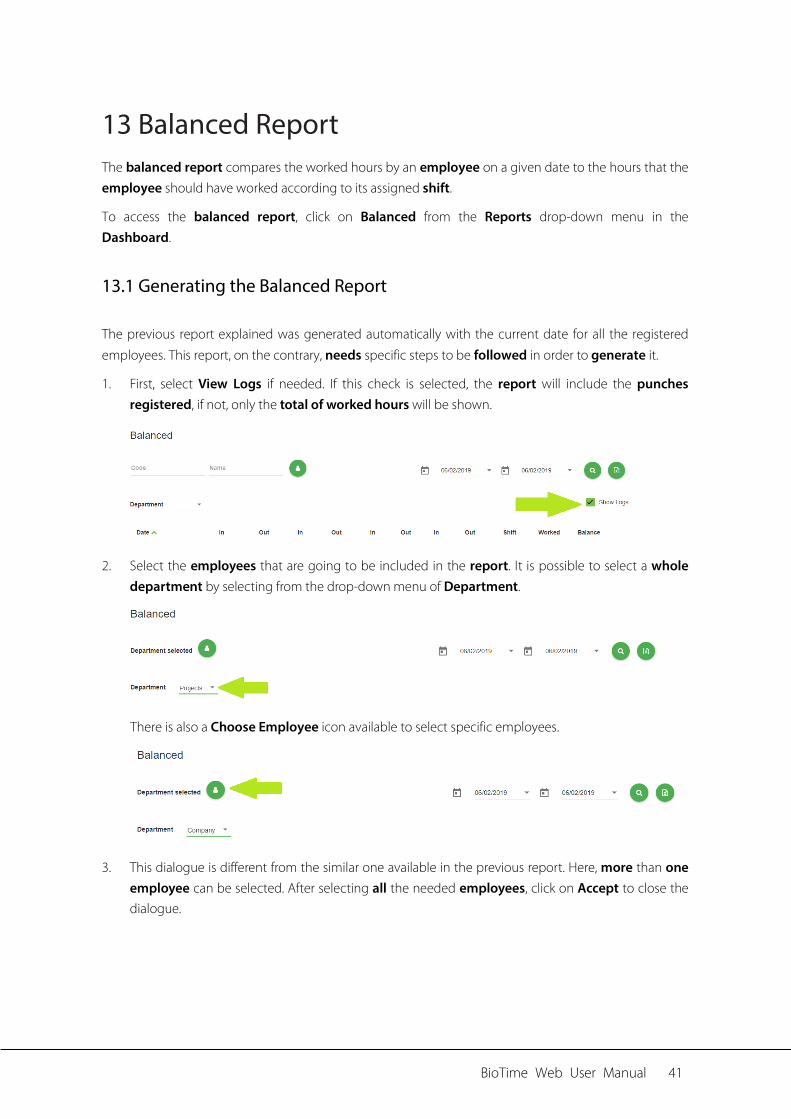
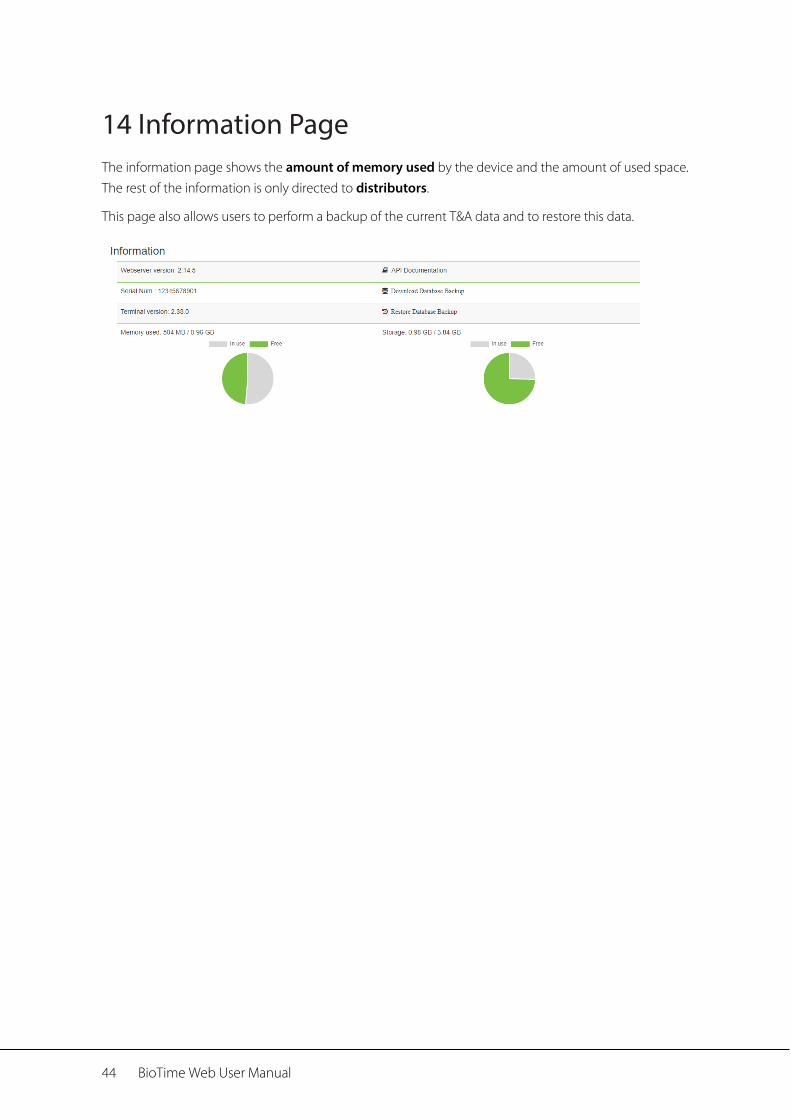