User Manual - SwingLogic Golf
32
User Manual SWING LOGIC VENTURES
-
Upload
khangminh22 -
Category
Documents
-
view
0 -
download
0
Transcript of User Manual - SwingLogic Golf

User Manual
SWING LOGIC VENTURES

INDEX
SLX-HYBIRD X3 USER MANUAL 2
03
04
05
06
07
09
10
11
12
13
14
15
16
17
18
19
20
21
22
28
30
Composition
Quick Start Guide (QSG) Summary
Register Product
Using Bluetooth speaker
Using Launch monitor
Swing detection via multi-sensor
Swing with Nano sensor
Using audible GPS
Using the magnetic mount
Charging and using the power bank
Using the remote button
Nano Button new connecting
LCD Display Guide
Button and LED Guide
Firmware Update
Install SLX-Connect and Using
Calibration at SLX-Connect Setting
Using E6 Connect (STEP 1 ~ 11)
Troubleshooting
Caution and Warning
RULES

Composition
SLX-HYBRID X3 model components.
Main LCD ScreenPower Bank port
Charger port
Charger Cable Registration Card Protective Travel Pouch
Dual Speakers
Magnet mount
Control buttons
Nano Charger port
Nano Sensor / Remote(only pro model)
Nano Glove Mount
SLX-HYBIRD X3 USER MANUAL 3

QSG Summary
INSTANCEDISPLAY
BLUETOOTHSPEAKER
REMOTECONTROL
SWING SENSOR
MAGNETMOUNT
POWERBANK
WATERPROOF
SWING ANAALYSIS
AUDIBLEGPS
E6 CONNECT COMPATIBLE
SLX-Hybrid PRO model only
SLX-Hybrid PRO model only
PC/iOS
NEODIMUNGlove Mount
+36,000 courses
iOS / ANDROID
iOS / ANDROID
10W STEREOTN LCD
6000mAh IP 5X
SLX-Hybrid PRO model only
Hybrid Power ON BLE Button 3sec Press “SLX-SPEAKER” Pairing
BLUETOOTH SPEAKER
Feature List
1 2 3
Button Power ON UP/DN Press (club) Mode Press (display)
ROMOTE CONTROL *speaker : volume/pause
1 2 3
Hybrid Power ON Display Select (mode) Club select (up/down)
INSTACE DISPLAY1 2
Unit select (pause) install 3~4 ft back and swing4 5
3
BLE Speaker paring Connect SLX APP ROUND MENU Select
AUDIBLE GPS1 2
Go to the Tee box Click button and Get TTS remaining distance4 5
3
Nano PW ON Connecting Check Glove mount install
SWING With SENSOR1 2
Club select (up/dn) Setup(vibration) and Swing4 5
3
PC/Phone BLE ON Connect (SLX-HYBIRD) Configure/Setting
SWING With SENSOR1 2
Club control Using Simulator or Swing Analyzer4 5
3
SLX-HYBIRD X3 USER MANUAL 4

Register Product
Welcome to SLX. Register your product right away. After registration, you will receive an E6 Connect license.
You must register your product and serial number on SwingLogic.us and select the license type to receive your E6 License key.
Or navigate to https://register.swinglogic.us
Scan QR with Camera App
1. Scan included QR code (navigate to https://register.swinglogic.us)2. Input required device registration information3. An E6 License Key will be emailed from ([email protected]) - Accessible through the SwingLogic User Portal4. Download E6 Connect app for PC/iOS5. Visit https://portal.e6golf.com - using the same email that was registered in STEP 2.6. REDEEM License Key
Registration STEPS
The Registration Process is REQUIRED to receive your Free E6 License Key.
SLX-HYBIRD X3 USER MANUAL 5

Using Bluetooth speaker
SLX-Hybrid features high-quality, high-power dual stereo speakers. For Bluetooth Connection, find the device name "SLX-SPEAKER" and pair it.
BLE button clickChange to SPEAKER mode
Pairing mode LED (blue color)
Speaker mode LCD
Speaker bluetooth paired ICON
Speaker modeVolumn up/downLaunch Monitor modePause / Play
find the device name "SLX-SPEAKER" and pair it.
SLX-SPEAKER
AB
SLX-HYBIRD X3 USER MANUAL 6
SLX-SPEAKER may not be discoverable if it is connected to another phone. When connecting to a new phone, please disconnect from the previous phone.

Using Launch Monitor
You can quickly check swing results with the LCD Display While using the app, you can audibly hear results through the TTS.
TIP: If you connect the SLX-Conncect app, you can check your selected result through voice TTS using headphones.
Ball SpeedDistance
DistanceHead Speed
Head SpeedSmash Factor
Toggle result
Change Display by using the Mode/Power Button
Hybrid Location
Install 3~4f horizontally behind the ball in line with intended direction.
Club ChangeMode Change
Units Change
3f ~ 4f “The distance is 245 yards.”
SLX-HYBIRD X3 USER MANUAL 7

Using Launch Monitor
You can use it by applying it according to various places of use.
Available clubs: Driver through 9 ironDetection sensor: Radar sensorIt is more convenient to connect the SLX app and use it as an earphone through TTS.
On the Range:
Available clubs: Driver through PutterRadar sensor + Nano Sensor (option)When using as a simulator,utilize with the Nano to get direction and swing tempo results.
Indoor Simulator or Outdoor Net
Ball Location
TIP: Depending on the type of shot, if you adjust the position in the ball detection zone, the recognition rate will increase.
“The distance is 245 yards.”
SLX-HYBIRD X3 USER MANUAL 8
Approach (4 ft)
Normal (3.5 ft)
Putting (3 ft)
HybridBall detecting zone

Swing detection via multi-sensor
Swing analysis is possible with a multi-sensor that combines radar and Micro sensor.(Patent Pending)
It can be used in a variety of ways, from short-distance putting to real ball striking.
Using only Hybrid (Radar Sensor)When practicing without app
We recommend using up to 9 irons when using radar only.(Wedges can easily get out of range of radar due to launch angle. Smash factor approaches 1.0 and distance can be accurately shown when combined with Nano)
Output data:Ball Speed, Head Speed, Distance , Smash Factor
Ball speed, head speed detectionPutting (head speed) detectionDistance, smash factor
Using with nano sensor (Radar + Nano Sensor)
For use as a golf simulator and detailed analysis
Output data:Launch direction / Face, Path Angle / Side Spin / Tempo / Swing Type / Swing Score(Swing Score Related Tempo compared to Pro's)
When the nano power is turned on, it is automatically connected to the hybrid. When connected, the Bluetooth icon is displayed on the LCD.
Practice swing recognition launch direction/tempo detection, head speed verification
SLX-HYBIRD X3 USER MANUAL 9

Swing with Nano sensor
Utilizing the Nano Sensor provides more accurate swing results.Golf gloves are required when swinging using the nano sensor.(Nano Sensor may be clipped to watch band or tape on wrist for putting analysis without a glove)
Mount the sensor as shown in the figure below and install it vertically in the correct position to increase the accuracy.If you use nano sensor, you can get more accurate swing results.For accurate use, install it as shown in the figure below.
NOTE: Swing recognition may be difficult for extremely strong or weak grips. The Nano Sensor can be adjust by turning the clip at an angle to improve setup recognition. See website help documents for more information or reach out to [email protected]
Insert the glove with top of clip facing up (wrist) as shown in the picture.Insert the NANO sensor into the mount, turn it exactly 90 degrees clockwise (USB should be facing towards thumb when properly installed.)Limit waggle at setup to prevent Nano Sensor reset.Swing within 3 seconds after address postureRaise your wrist up with palm facing the ground and Nano Sensor horizontal, to use +/- on the Nano Sensor for club selection
NANO Glove mount and Swing Guide
Left-handed people must wear gloves on their right hand.
SLX-HYBIRD X3 USER MANUAL 10

Using audible GPS
Use the audible GPS function using the SLX-Connect app. You can now easily check the distance from the cart to the pin.
Connect speaker and use the nano button to check the remaining distance.
NOTE: Hybrid device relies on SLX Connect Application and mobile phone location sharing for GPS function.
SLX-Connect Run Course Enter Tee Box > Select GPS menu
Bluetooth Speaker paring SLX-Connect Connect Select round1 2
Go the tee box in course Click mode button and get distance
Max 20m
4 5
3
The remaining distance to the pin is 245 yards.
SLX-HYBIRD X3 USER MANUAL 11

Using the magnetic mount
Use the strong magnet on the Hybrid base bottom to attach to cart, or rely on the non-slip coating to set in cart seat or cup holder area.
Depending on the location of the magnet, it may fall off due to impact. It is the user's responsibility to exercise caution when driving the cart.
You can hear good sound quality without shaking in anywhere
Neodymium Magnet
SLX-HYBIRD X3 USER MANUAL 12

Charging and using Power bank
Charge your phone during a round of golf with power bank function.
USB Wall Adapter not included.
It can be charged with USB-C type using a 5V - 1AmH charging adapter. Hybrid charging time 8 hours, Nano charging time 2 hours
Device Charging
Hybrid5V
Nano5V
Using Power Bank
You can charge your phone and Nano button through the USB port.PwerBank max 6000mAh (3.7v standard)
SLX-HYBIRD X3 USER MANUAL 13

Using the remote button
Utilize the Nano Sensor as a remote control.
Audible GPS mode
NOTE: It is recommended that a speaker be connected for Voice GPS output.You need to connect the SLX-CONNECT and enter the course in Play mode.
Button matching
Launch Monitor mode
Up/Down Button
Mode Button
Up/DownClub Change
Mode ButtonDisplay change
When the nano power is turned on, it is automatically connected to the hybrid. When connected, the Bluetooth icon is displayed on the LCD.
successful nano sensor connection
Connect Check
Up/DownClub Change
Mode ButtonAudio OUT TTS
SLX-HYBIRD X3 USER MANUAL 14

Nano Button new connecting
Nano Sensor comes paired with Hybrid Unit, however if a new connection is needed or replacement Nano Senor required, they can be paired as follows:
New Connection
Press the minus button of Hybrid and Nano together for 5 seconds to try pairing between new devices. The icon blinks for Hybrid, and blinks blue for Nano
Hybrid and Nano are connected and shipped from the factory.
NANO Connect checking
When Hybrid-Nano is connected, the rear swing icon is activated, and the Nano's LED will be green.
Auto Paring
5 Sec press 5 Sec press
Red to Green
SLX-HYBIRD X3 USER MANUAL 15

Nano Connect
APP ConnectionGPS mode
Speaker paired
Battery Charging B : Ball SpeedH : Head Speed (club Speed)D : Distance (carry)S : Smash Factor (Ball/Head)
First Result / Second Result
CLUB
LCD Display Guide
Hybrid provides optimal LCD display in various modes. Optimized for viewing directly behind hitter.
Hybrid LCD
Voice GPS mode
CP : Center PinBP : Back PinFP : Front Pin
Hole Remaining Distance Play / Pause
VolumeThe volume label may not change
depending on the connected phone.
Speaker mode Launch Monitor mode
Radar power
Swing modePutting mode
putting mode icon blinkslong putting mode.
SLX-HYBIRD X3 USER MANUAL 16

Button and LED Guide
Easy to understand LED lights show connection and unit status.
Hybrid Button
Club / Volume Up/Down buttonPower (ON) / Display Mode button / power off: press for 3 seconds
Speaker mode buttonClub / Volume Up/Down buttonPower (ON) / Display Mode button / power off: press for 3 secondsPause / Unit Change button
SpeakerConnected
NANONew Pairing
SpeakerDisconnected
Hybrid Error
Hybrid LED
Nano Sensor
NanoDisconnected
Nanoconnected
NanoSwing Ready
Low Battery
NANO LED
SLX-HYBIRD X3 USER MANUAL 17
Greenblink
Blueblink
Redblink
Reddoubleblink
Redslowblink
Redfastblink

Firmware Update
Connect SLX-CONNECT > Connect menu > Device Select
When the firmware of HW is updated, it is activated with a green button.Initial Firmware Updates will require separate Update App. Integration into SLX Connect underway.
You can temporarily install and use the SLX-FIRMWARE MANGER app. Direct updates from SLX-CONNECT will be updated later.
SLX-HYBIRD X3 USER MANUAL 18

Install SLX-Connect and Using
SLX Connect includes Swing Analysis, on-course GPS, Swing Video capture, and mini simulator game.
Search “SLX-CONNECT” in app store Support OS : IOS/Android/PC compatibleSupport Device : iPad / Tablet / Phone compatible
Shot History 3D Analyzer menu
GPS Menu Camera Menu(auto Trigger)
Important!Calibrate your swing for each club by your shot result through the calibration included in the setting menu (patented technology) Some features may be updated in the future.
Recommended OS : Window 10 / Android 12 / iOS 12It may not work under the recommended OS or lower.
SLX-HYBIRD X3 USER MANUAL 19
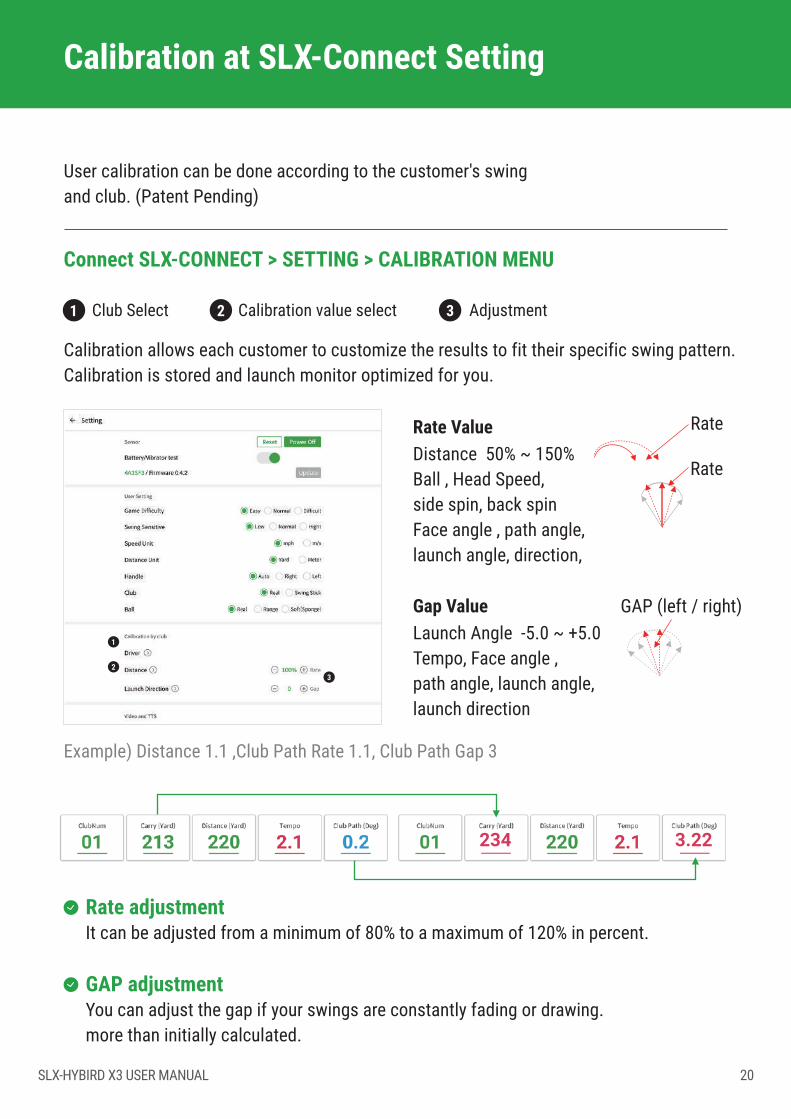
Calibration at SLX-Connect Setting
User calibration can be done according to the customer's swing and club. (Patent Pending)
Connect SLX-CONNECT > SETTING > CALIBRATION MENU
Rate adjustment
Club Select Calibration value select Adjustment1 2 3
Calibration allows each customer to customize the results to fit their specific swing pattern. Calibration is stored and launch monitor optimized for you.
Example) Distance 1.1 ,Club Path Rate 1.1, Club Path Gap 3
1
23
Rate ValueDistance 50% ~ 150%Ball , Head Speed, side spin, back spinFace angle , path angle,launch angle, direction,
Gap ValueLaunch Angle -5.0 ~ +5.0Tempo, Face angle , path angle, launch angle, launch direction
Rate
Rate
GAP (left / right)
It can be adjusted from a minimum of 80% to a maximum of 120% in percent.
GAP adjustmentYou can adjust the gap if your swings are constantly fading or drawing.more than initially calculated.
234 3.22
SLX-HYBIRD X3 USER MANUAL 20

Using E6 Connect
E6 CONNECT software is available. Please install and connect according to each STEP.
Create an account and register with Swing Logic
STEP 1
Create an account and register with us STEP 1 Find the included Card as depicted below: You can either scan the QR code on your phone's camera or go to : https://register.swinglogic.us
Check Email for License Key(Sometimes ends up in junk / spam folder)
Scan QR with Camera AppYou must register your product and serial number on SwingLogic.us to receive your E6 License key
Registration STEPS
SWINGLOGIC REGISTRATIONREQUIRED FOR E6 LICENSE
Use Camera app to scan included QR code or visit swinglogic.us and select REGISTER/CHECK IN Fill out registration information. E6 license key will be assigned after registration Download E6 Connect Redeem license key provided during registration
Configure settings within E6 to calibrate distances and increase sensitivity to match swing type and speed formaximum accuracy
https://register.swinglogic.us
1.
2.3.4.5.
1.
License Recieved After Registration with
Calibration STEPS
LICENSE OPTIONS EXPLAINED (IMPORTANT)
5-Course Option is your FREE License and one version ( iOS or PC) is included with Purchase. UPGRADE to the Expanded Content Subscription @ $10/mo, that is the and Option DETAILS: Expanded Content Subscription now has ~40 Courses, mini games (darts, closest to pin, battleship...) & Online Play + multiple modes ( Regular Stroke Play, captains choice, best ball etc...) Check out our website to learn more about the additional features if this interests you. If you are an avid golfer...$10/mo for infinite rounds on 40 courses is a pretty good deal.
SLX-HYBIRD X3 USER MANUAL 21

Using E6 Connect
Install E6 CONNECT
STEP 2
After download, Run the program to install the software.PC Version: https://portal.e6golf.com/update/e6-connect iOS Version: You will need to download the software from the app store. If you search for “E6 CONNECT” then it will pull up and you will be able to download.
Start the E6 Application & Redeem your License
STEP 3
If you have a License code, press the REDEEM button to enter the code. If you don't have the code, press SKIP to move on. If you press SKIP, the demo version will be applied by default. You will also be required to setup an E6 Connect Account during this process. Please take note and remember your login credentials
PC iOS
SLX-HYBIRD X3 USER MANUAL 22

Using E6 Connect
License Activation
STEP 4
Enter License Key and press the Enter button.
Select Tracking System Device
STEP 5
Select “SwingLogic -SLX ”
SwingLogic - SLX
NOTE: Depending on the license type you are redeeming, the list of available trackers will be different. If you have redeemed any of the license we have provided, the list will be much shorter and contain only small sensor based products.
SLX-HYBIRD X3 USER MANUAL 23

Using E6 Connect
Ensure Bluetooth is on
STEP 6
Go to Settings > Bluetooth and Make sure your Bluetooth is turned on in your PC or iPhone/iPad. For iOS, you need to allow "E6 Connect" in Bluetooth settings.
Connect Device with E6 CONNECT
STEP 7
Device will automatically connect to E6 CONNECT. The CONNECT ICON on LCD turns on and you can hear the voice “Device connected”. If device is not connected, see Troubleshooting Page
E6 Connect Hybrid LCD
※ Bluetooth USB dongle not included and must be purchased seperately
ImportantIf your PC does not have Bluetooth, you will need to purchase a dongle.(not inculded)
SLX-HYBIRD X3 USER MANUAL 24

Using E6 Connect
Calibrate sensor Setting - Maximize Accuracy
STEP 8
When inside the application's Main Menu. Settings→Simulator→Configure
Check the swing data on the screen
STEP 9
When you swing, the ball will fly on the screen and Post-Shot dialog is displayed.
Important!Default Settings Difficulty = Normal, Sensitivity = Normal, Woods/Iron/Putter = Your Choice based on type of clubs you will be installing sensor on. It is best to start with 0% distance "boost" to see what your sensor is displaying initially then adjusting up or down based on simulator output vs expected ball flight. You can also increase the altitude in Enviromental Settings to have your ball fly further.
Important!For more details on E6 Connect, check the “https://e6golf.com/e6-connect/manual”
SLX-HYBIRD X3 USER MANUAL 25

Using E6 Connect
Club selection control
STEP 10
You can change your club selection outside of the E6 Connect Application by click these up and down buttons.
Important!On the green, it automatically changes to the target direction. (Club side does not work on green)
Target Control
STEP 11
In the fairway / driving range, if you click the mode button once, it will change to "Target Control mode". Afterwards, you can change the target with the LEFT / RIGHT buttons. If you click the mode button again, it will change to "Club Control mede".
SLX-HYBIRD X3 USER MANUAL 26

Troubleshooting
Check the latest registered information at swinglogic.us/support. Below is a simple troubleshooting guide.
Connection Troubleshooting
If your sensor does not connect to E6 within 30 seconds of starting application Check to ensure Bluetooth is available on your system & turned on. Charge for to ensure adequate battery power. Ensure E6 software is closed. Go into your systems bluetooth settings and have your device "Forget" or "Remove" the sensor & then "re-pair" the connection.If you do not have this option, toggle your bluetooth OFF for 10 seconds then back on. Start E6 Connect & wait for "connected".
Hybrid does not detect swing.
Hybrid may be too far or too close to the ball.Check that the hybrid position is levelIf the shot is not recognized, the position is correct, and the LED does not show the person indicator. Try a factory reset.If there is a problem even after Reset the power, get AS. When the radar sensor is bad, the L.MONITOR icon flickers or does not appear.
Setting
Bluetooth
ON
SLX-MicroSIMPaired Remove
Important!The most common issue with bluetooth connection happens with PC users. Ensuring you have the most current drivers will alleviate complications. Also, some customers on desktop devices assume their PC has bluetooth and it does not. For those in this category you will have to buy a BT dongle.
Reset the power
SLX-HYBIRD X3 USER MANUAL 27

Troubleshooting
Check the latest registered information at swinglogic.us/support. Below is a simple troubleshooting guide.
Replacing and reconnecting the Nano Sensor
If the Hybrid and Nano are not connected or if you need to replace the Nano, See the "Nano Sensor Replacement" manual. If you press and hold the "-" button on the Hybrid and Nano sensors, they are automatically connected.Power off : press for 3 seconds
Nano Sensor Swing Recognition
If the nano sensor does not recognize the swing well,try adjusting the position of the sensor installed on the glove. Depending on the customer's setup posture, it may not be recognized.
Left-handed people must wear gloves ontheir right hand.
Calibration of swing results
If the swing results are very differenttry adjusting each result in the SLX-Connect app > Settings > Calibration menu.
Factory reset
If everything does not work, you can reset it by pressing the "+" / "-" buttons at the same time for 7 seconds. Read the "Factory Reset" menu.
SLX-HYBIRD X3 USER MANUAL 28

Caution and Warning
You must read and agree to the terms and conditions available on swinglogic.us
Usage & Liabilities
Before first use, check the battery life status. Do not use the product for purposes other than its intended functions. Do not separate and disassemble the product. Do not subject the product to severe impact, such as one caused by a drop. Do not use unauthorized components. We hold no liability for information that may leak from Bluetooth communications. We hold no liability for damage to clubs such as scratches, spots, etc. Do not expose the product to severe temperature or humidity.Ensure there are no nearby obstacles or people when you swing. Remove device from the cradle after use. Do not use on a hard surface such as concrete or asphalt.
Warranty and A/S
6 month warranty from the date of original retail purchase. *No warranty against damages or loss caused by accident, abuse, or natural disasters.
For support, please contact the following email : [email protected] For more details, check the Website : WWW.SWINGLOGIC.USExtended Warranties for 1-year available for purchase from swinglogic.us
SLX-HYBIRD X3 USER MANUAL 29

FCC / IC RULES
SLX-HYBIRD X3 USER MANUAL 30
FCC Compliance StatementThis device complies with part 15 of the FCC Rules. Operation is subject to the following two conditions : (1) This device may not cause harmful interference, and (2) This device must accept any interference received, including interference that may cause undesired operation.
CAUTION: Changes or modifications not expressly approved by the party responsible for compliance could void the user’s authority to operate the equipment
Note: This equipment has been tested and found to comply with the limits for a Class B digital device, pursuant to part 15 of the FCC Rules. These limits are designed to provide reasonable protection against harmful interference in a residential installation. This equipment generates, uses and can radiate radio frequency energy and, if not installed and used in accordance with the instructions, may cause harmful interference to radio communications. However, there is no guarantee that interference will not occur in a particular installation. If this equipment does cause harmful interference to radio or television reception, which can be determined by turning the equipment off and on, the user is encouraged to try to correct the interference by one or more of the following measures:—Reorient or relocate the receiving antenna.—Increase the separation between the equipment and receiver.—Connect the equipment into an outlet on a circuit different from that to which the receiver is connected.—Consult the dealer or an experienced radio/TV technician for help.
This equipment complies with FCC radiation exposure limits set forth for an uncontrolled environment.
Industry Canada StatementThis device complies with Industry Canada license-exempt RSS standard(s). Operation is subject to the following two conditions: (1)this device may not cause interference, and (2)this device must accept any interference, including interference that may cause undesired operation of the device.

FCC / IC RULES
SLX-HYBIRD X3 USER MANUAL 31
Énoncé d'Industrie Canada(IC)
Le present appareil est conforme aux CNR d’Industrie Canada applicables aux appareils radio exempts de licence. L’exploitation est autorisee aux deux conditions suivantes : (1) l’appareil ne doit pas produire de brouillage, et (2) l’utilisateur de l’appareil doit accepter tout brouillage radioelectrique subi, meme si le brouillage est susceptible d’en compromettre le fonctionnement. Tout changement ou modification non expressément approuvé par la partie chargée de la mise en conformité peut annuler le droit de l’utilisateur à utiliser l’équipement.
Cet équipement est conforme aux limites d’exposition aux rayonnements IC établies pour unenvironnement non contrôlé.

[email protected] | SLX / PATENTS
SPECIFICATION
Product NameSize / WeightBluetoothSpeakerPower Source
Sensor
Operating TemperatureWaterProof
SLX – Hybrid X3 (PRO )165 X 75 X 70 mm (530g) / 6.4” X 2.9“ X 2.7” (18.1oz)Bluetooth 4.0 BLE 2.4Ghz, 1 MpbsBluetooth 5.0 / 5W Dual Stereo Battery -Lithium ion 7.4V 3,000mAhPower Bank – 6000mAh(3.7V)Charging time 5 Hours (full charge / 5V 1A)24Ghz Doppler sensor 6-Axis MEM-10 °C ~ 50 °C (14 ° F ~ 122 ° F)IPX 5X
(SLX-Hybrid Pro model only)
SWING LOGIC VENTURES