
r52-11tc golf roller manual | tru-turf
23
R52-11TC GOLF ROLLER MANUAL
-
Upload
khangminh22 -
Category
Documents
-
view
6 -
download
0
Transcript of r52-11tc golf roller manual | tru-turf
R52-11TC GOLF ROLLER MANUAL

TRU-TURF R52-11TC Golf Greens Roller Manual
1. Important
2. Machine Information Record
3. Safety Information
4. Warranty
5. Assembly
List of components 6. Mounting seat to seat base Mounting steering joystick to the steering shaft Attaching trailer arm to machine Attaching dampener strut and trailer arms Attaching draw bar to trailer arms Attaching wheels to trailer arms 7. Correct dampener strut operation Replacing oil Transmission oil tank breather Lubricating smoothing head pivot bearings
8. Operation
Pre-operation checks Standard operation Procedures 9. Park Brake Points to remember
10. Maintenance Transmission (pump, Eaton 11) Storing Service of drive chain system Lubrication Service of smoothing roller bearings 11. Change engine oil Change transmission oil Maintenance Schedule
12. Fault Finding
Roller will not move one or either way Roller will not steer Roller has excessive vibration Smoothing rollers seized Rubber drive roller will not rotate
13. Machine Components
38. Labels
39. Parts List
Separate Engine Owners Manual Included
Contents

TRU-TURF R52-11TC Golf Greens Roller Manual1
TRU-TURF R52-11TC Golf Greens Roller Manual 2
Please read and understand before operating machine.
1. Pre-check all nuts, bolts, grub screws for tightness prior to operating machine.
2. Understand the operating procedures and the controls before operating.
3. Use the machine to roll 18-36 greens then check that all nuts, bolts etc. are tight. If loose and the Loctite seal has been broken, treat item as per Loctite instructions, reseal, then tighten securely.
4. Loose transmission and drive roller sprockets will cause damage to shafts and keyways. Ensure they are correctly tightened at all times.
5. Change the transmission oil after 50 hours of operation, then as per the servicing schedule.
We use and recommend Penrite Synthetic 5 SAE 5W-60. Available through our dealer network.
U.S.A. customers contact your dealer or visit www.truturf.com to find your nearest dealer.
Australian customers call 07 5594 7199.
International customers contact your dealer or visit www.truturf.com to find your nearest dealer.
Important
Machine Information
Model. R52-11TC Golf Green Roller
Serial No.
Engine No.
Transmission No.
Purchase Date No.
Congratulations on your investment in the R52-11TC Golf Green Roller and your move to smoother, faster, more consistent putting Greens. The following operation and maintenance manual has been prepared for use with the R52-11TC Golf Green Roller. It is intended as a guide and supplemental updates to the manual may take place at a future date, without prior notice.
This machine is engineered to be simple to operate and easy to maintain. If you have any questions or concerns that this manual does not address, please feel free to contact your distributor.
Distributor Information
Name:
Address:
Telephone:
Fax:
Email:
Machine Information Record
TRU-TURF R52-11TC Golf Greens Roller Manual3
TRU-TURF R52-11TC Golf Greens Roller Manual 4
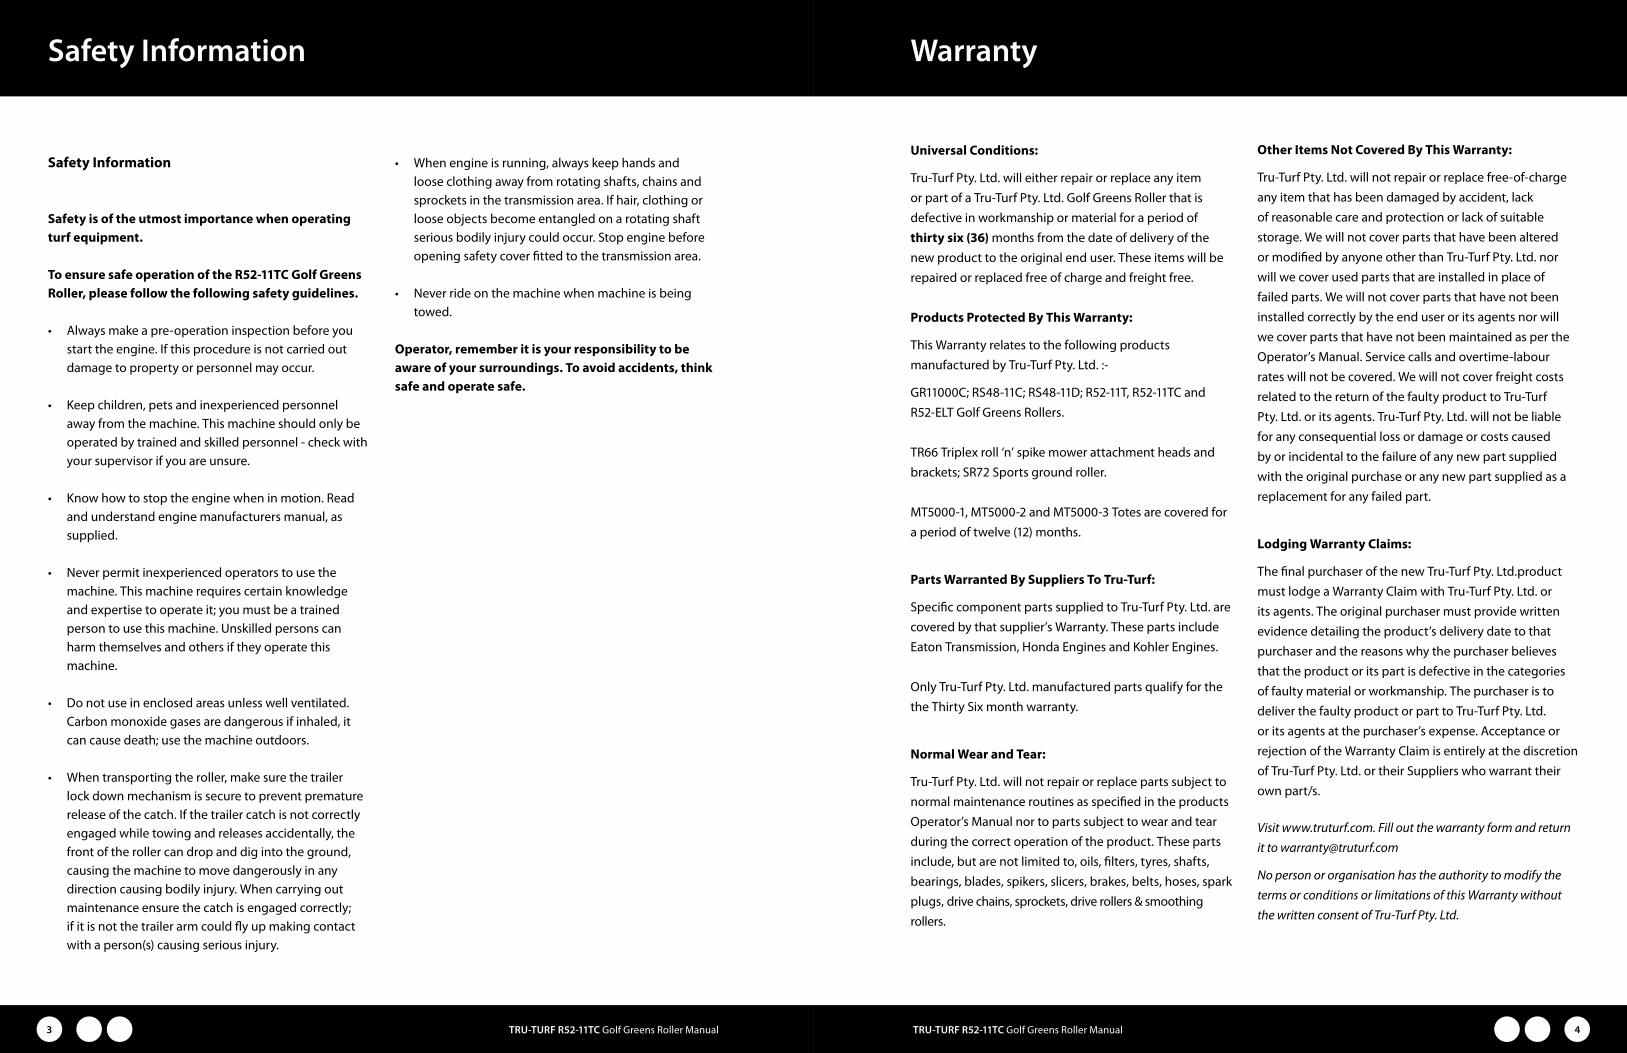
Safety Information
Safety is of the utmost importance when operating turf equipment.
To ensure safe operation of the R52-11TC Golf Greens Roller, please follow the following safety guidelines.
• Always make a pre-operation inspection before you start the engine. If this procedure is not carried out damage to property or personnel may occur.
• Keep children, pets and inexperienced personnel away from the machine. This machine should only be operated by trained and skilled personnel - check with your supervisor if you are unsure.
• Know how to stop the engine when in motion. Read and understand engine manufacturers manual, as supplied.
• Never permit inexperienced operators to use the machine. This machine requires certain knowledge and expertise to operate it; you must be a trained person to use this machine. Unskilled persons can harm themselves and others if they operate this machine.
• Do not use in enclosed areas unless well ventilated. Carbon monoxide gases are dangerous if inhaled, it can cause death; use the machine outdoors.
• When transporting the roller, make sure the trailer lock down mechanism is secure to prevent premature release of the catch. If the trailer catch is not correctly engaged while towing and releases accidentally, the front of the roller can drop and dig into the ground, causing the machine to move dangerously in any direction causing bodily injury. When carrying out maintenance ensure the catch is engaged correctly; if it is not the trailer arm could fly up making contact with a person(s) causing serious injury.
• When engine is running, always keep hands and loose clothing away from rotating shafts, chains and sprockets in the transmission area. If hair, clothing or loose objects become entangled on a rotating shaft serious bodily injury could occur. Stop engine before opening safety cover fitted to the transmission area.
• Never ride on the machine when machine is being towed.
Operator, remember it is your responsibility to be aware of your surroundings. To avoid accidents, think safe and operate safe.
Safety Information Warranty
Universal Conditions:
Tru-Turf Pty. Ltd. will either repair or replace any item or part of a Tru-Turf Pty. Ltd. Golf Greens Roller that is defective in workmanship or material for a period of thirty six (36) months from the date of delivery of the new product to the original end user. These items will be repaired or replaced free of charge and freight free. Products Protected By This Warranty:
This Warranty relates to the following products manufactured by Tru-Turf Pty. Ltd. :-
GR11000C; RS48-11C; RS48-11D; R52-11T, R52-11TC and R52-ELT Golf Greens Rollers. TR66 Triplex roll ‘n’ spike mower attachment heads and brackets; SR72 Sports ground roller. MT5000-1, MT5000-2 and MT5000-3 Totes are covered for a period of twelve (12) months.
Parts Warranted By Suppliers To Tru-Turf:
Specific component parts supplied to Tru-Turf Pty. Ltd. are covered by that supplier’s Warranty. These parts include Eaton Transmission, Honda Engines and Kohler Engines. Only Tru-Turf Pty. Ltd. manufactured parts qualify for the the Thirty Six month warranty.
Normal Wear and Tear:
Tru-Turf Pty. Ltd. will not repair or replace parts subject to normal maintenance routines as specified in the products Operator’s Manual nor to parts subject to wear and tear during the correct operation of the product. These parts include, but are not limited to, oils, filters, tyres, shafts, bearings, blades, spikers, slicers, brakes, belts, hoses, spark plugs, drive chains, sprockets, drive rollers & smoothing rollers.
Other Items Not Covered By This Warranty:
Tru-Turf Pty. Ltd. will not repair or replace free-of-charge any item that has been damaged by accident, lack of reasonable care and protection or lack of suitable storage. We will not cover parts that have been altered or modified by anyone other than Tru-Turf Pty. Ltd. nor will we cover used parts that are installed in place of failed parts. We will not cover parts that have not been installed correctly by the end user or its agents nor will we cover parts that have not been maintained as per the Operator’s Manual. Service calls and overtime-labour rates will not be covered. We will not cover freight costs related to the return of the faulty product to Tru-Turf Pty. Ltd. or its agents. Tru-Turf Pty. Ltd. will not be liable for any consequential loss or damage or costs caused by or incidental to the failure of any new part supplied with the original purchase or any new part supplied as a replacement for any failed part.
Lodging Warranty Claims:
The final purchaser of the new Tru-Turf Pty. Ltd.product must lodge a Warranty Claim with Tru-Turf Pty. Ltd. or its agents. The original purchaser must provide written evidence detailing the product’s delivery date to that purchaser and the reasons why the purchaser believes that the product or its part is defective in the categories of faulty material or workmanship. The purchaser is to deliver the faulty product or part to Tru-Turf Pty. Ltd. or its agents at the purchaser’s expense. Acceptance or rejection of the Warranty Claim is entirely at the discretion of Tru-Turf Pty. Ltd. or their Suppliers who warrant their own part/s.
Visit www.truturf.com. Fill out the warranty form and return it to [email protected]
No person or organisation has the authority to modify the terms or conditions or limitations of this Warranty without the written consent of Tru-Turf Pty. Ltd.

TRU-TURF R52-11TC Golf Greens Roller Manual5
TRU-TURF R52-11TC Golf Greens Roller Manual 6
Initial Assembly
When you receive the crate, the machine will be broken down into components ready for assembly. If you run into any problems during assembly, please feel free to call your local distributor or agent.
List of Components
QTY Description
1 Operation, Maintenance and Parts Manual
1 Machine Frame/Body
1 Drivers Seat
2 Armrests
4 ⁵/₁₆” x ³/₄” UNC Bolts
2 Tires mounted on Wheel Rim
1 Steering Joystick
1 Dampener Strut (attached to main body end)
1 Left-side Trailer Arm
1 Right-side Trailer Arm
2 30mm External Circlips
1 Drawbar Coupling Assembly
2 ³/₈” x 1¹/2” UNF 2P Bolts
2 ³/₈” UNF Nyloc Nuts
Assembly
Assembly Procedure
Step 1: Mounting the seat to the seat base.
• Use the four ⁵/₁₆” x ³/₄” UNC bolts to fasten the seat to the seat base.
• Remove armrest screws from the seat, position left and right side armrest, fasten and tighten.
Step 2: Mount the steering joystick to the steering shaft.
• Select the steering joystick.
• Slide the joystick into the slot on the top of the steering shaft, already installed in the steering column directly in front of the foot pedal controls, insert the ³/₈” bolt into the bottom bolt hole, select a comfortable operating position, joystick forward for extra operating room or back for less, once determined insert the other ³/₈” bolt into the upper hole and tighten both bolts securely.
Step 3: Attaching the left-hand trailer arm to machine body.
• Locate the trailer arm support axle 30mm in diameter (1¼”) which extends out on the left side of the machine, remove the circlip from the support axle. Oil machined portion. Slide the left hand side trailer arm, onto the axle, replace the circlip, ensuring the circlip is located in the groove correctly.
Step 4: Attaching dampener strut and right hand trailer arm.
• Locate the trailer arm support axle 30 mm in diameter (1¼”) which extends out on the right side of the
machine, remove the circlip from the axle. Hold the right side trailer arm in the vertical position and slide it part way onto the axle. Locate dampener strut., remove packing from the unattached end.
• Place strut onto locating pin and push completely on, insert washer and cotter pin in place to prevent strut from coming off the shaft.
• If necessary use a soft headed hammer and tap the trailer arm onto the axle until the circlip groove is revealed, fit the circlip, ensuring it is located in the groove correctly.
Step 5: Attaching draw bar to trailer arms.
• Locate the draw bar assembly.
• Gather the ends of the right and left trailer arms.
• Place the draw bar assembly between the trailer arms and align the holes.
• Place one 2¾” x ³/₈” bolt through each hole, fit ³/₈” Nyloc nut to each bolt and tighten securely.
• Test to ensure the trailer catch is correctly locking the trailer arms in the down position and the catch locking pin fits correctly when transporting the roller, for safety.
Step 6: Attaching wheels to trailer arms.
• Locate the two wheels for the left and right side trailer arms.
• Check tires for the correct air pressure, approximately 18psi. Do not exceed this pressure. The tires act as the suspension, hence the low P.S.I.
Assembly

TRU-TURF R52-11TC Golf Greens Roller Manual7
TRU-TURF R52-11TC Golf Greens Roller Manual 8
• Remove wheel nuts from both hubs, slide wheels onto hub with air valves facing outwards. Replace wheel nuts and tighten securely.
• Ensure the taper on the nuts, mate into the wheel tapers correctly.
Step 7: Correct dampener strut operation
• When the roller is in the trailing position Carefully hold the draw bar assembly, release the locking catch, gently with a firm grip begin to raise the draw bar, when it has travelled sufficiently the dampener strut will take over and prevent the trailer arms rapidly rotating on it’s axle, allowing the roller to lower to the surface gently. This prevents the operator from being injured. When the roller is resting on the ground push the trailer arms back gently, (do not use excessive force) until the trailer arms will travel no further. The dampener strut is designed to hold the trailer arms back behind the operator with the wheels off the ground.
Step 8: Replace engine oil
• A tag is placed on the engine’s On/Off switch indicating you must fill the machine with oil prior to operation. Low oil level will cause the engine to stop on steep hills, the engine cut off safety switch is designed this way to protect the engine from damage if low in oil.
• The oil in the engine upon delivery (if not pre-delivered) is to prevent the inside of the engine from corroding, replace it with the correct engine oil, as per the manufacturers specifications.
Step 9: Transmission oil tank breather.
• Unscrew the plastic plug from the top of the tank and replace it with the anti-splash breather supplied. Seal damage and oil leakage will occur if the breather is not installed. If this is not done damage to the seals in the transmission will occur.
Step 10: Lubricate smoothing head pivot bearings. • There is a grease nipple or zirk located on the three (3)
smoothing head centre ball joint swivels. Apply grease to lubricate fittings.
• Apply grease to the upper main bearing that supports and carries the three smoothing heads.
Assembly
Operation procedures
Pre-operation checks
• Check engine as per Honda manual.
• Ensure steering joystick has no looseness.
• Check that foot pedal depresses under normal foot pressure in both directions and returns to the neutral position. (Similar resistance to a motor vehicle clutch). If this action is not smooth, check the yoke and transmission struts for correct operation.
• Ensure that the draw bar locking catch mechanism is securely locked to the main draw bar and the safety pin is fitted when trailing the roller.
• Check and tighten grub screws fitted to the end bearing lock rings on the rubber coated drive roller bearings on each smoothing head and main support bearing.
• Grease lightly Bearings fitted to Drive Roller and Smoothing Head pivot bearings. Replace plastic caps if fitted.
• Grease rod ends, sparingly.
• Check tire pressure for proper operating pressure (18psi). Do not over inflate.
• Check for oil and fuel leaks - rectify before using machine.
• Lubricate the drive chain with a suitable chain lubricant.
Standard operation procedures
• Inspect and check that the roller is serviceable prior to departing from workshop.
• Use a suitable towing vehicle to move roller from green to green.
• Maximum recommended towing speed would be equal to a motorized golf buggy. Approximately 4mph/7kph. Towing at excess speed or across rough terrain may cause damage to the machine and trailer.
• When approaching the green do not tow the roller onto the green to set up, put the roller on the fringe of the green. Put trailer in the up position, start up the roller and drive it onto the green.
• Greens can be rolled in any direction; take care to ensure there are no crease lines produced on the surface.
• It is recommended that you place the smoothing head rollers on the high side of the green when rolling. This increases the weight on the rubber drive roller and gives better traction, it also reduces slipping or spinning of the drive roller on the green, depending also on the operators ability. Whilst becoming familiar with the roller, set the throttle at about ¹/₂ - ³/₄ speed. Press the left or right foot pedal down gently but not suddenly. Be smooth with your action, hold in this position until nearing the edge of the green, then take your foot gently off the pedal, the roller will come to a stop. Rest your other foot on the opposite pedal and gently apply the pressure to the pedal. It then starts to move the roller in the opposite direction. Once again be gentle with the pedal, but not sudden. By using the left and right pedal in this manner, will ensure there is no damage to the green and less wear and tear on the equipment and operator.
Operation procedures
TRU-TURF R52-11TC Golf Greens Roller Manual9
TRU-TURF R52-11TC Golf Greens Roller Manual 10
Maintenance
• Stop engine before performing any maintenance.
• Service the Honda engine according to the manufacturers maintenance schedule.
Transmission (pump, Eaton 11)
• Initially, change the oil at 50 hours running time, then;
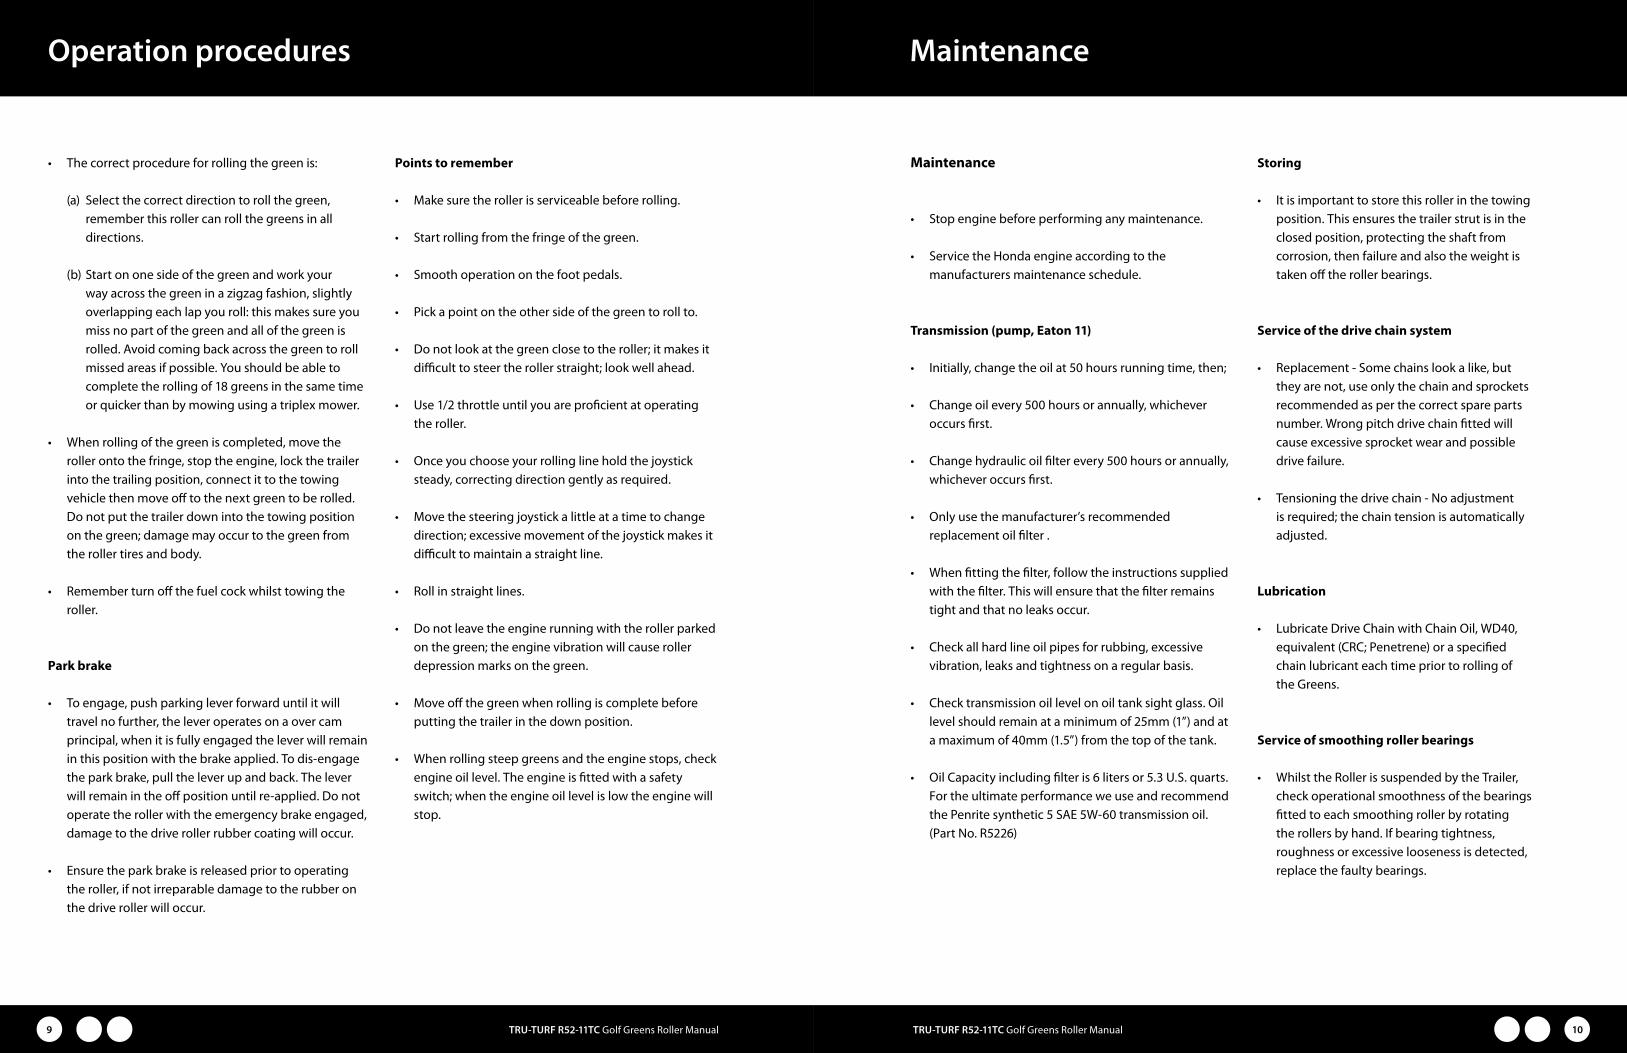
• Change oil every 500 hours or annually, whichever occurs first.
• Change hydraulic oil filter every 500 hours or annually, whichever occurs first.
• Only use the manufacturer’s recommended replacement oil filter .
• When fitting the filter, follow the instructions supplied with the filter. This will ensure that the filter remains tight and that no leaks occur.
• Check all hard line oil pipes for rubbing, excessive vibration, leaks and tightness on a regular basis.
• Check transmission oil level on oil tank sight glass. Oil level should remain at a minimum of 25mm (1”) and at a maximum of 40mm (1.5”) from the top of the tank.
• Oil Capacity including filter is 6 liters or 5.3 U.S. quarts. For the ultimate performance we use and recommend the Penrite synthetic 5 SAE 5W-60 transmission oil. (Part No. R5226)
Storing
• It is important to store this roller in the towing position. This ensures the trailer strut is in the closed position, protecting the shaft from corrosion, then failure and also the weight is taken off the roller bearings.
Service of the drive chain system
• Replacement - Some chains look a like, but they are not, use only the chain and sprockets recommended as per the correct spare parts number. Wrong pitch drive chain fitted will cause excessive sprocket wear and possible drive failure.
• Tensioning the drive chain - No adjustment is required; the chain tension is automatically adjusted.
Lubrication
• Lubricate Drive Chain with Chain Oil, WD40, equivalent (CRC; Penetrene) or a specified chain lubricant each time prior to rolling of the Greens.
Service of smoothing roller bearings
• Whilst the Roller is suspended by the Trailer, check operational smoothness of the bearings fitted to each smoothing roller by rotating the rollers by hand. If bearing tightness, roughness or excessive looseness is detected, replace the faulty bearings.
Maintenance
Points to remember
• Make sure the roller is serviceable before rolling.
• Start rolling from the fringe of the green.
• Smooth operation on the foot pedals.
• Pick a point on the other side of the green to roll to.
• Do not look at the green close to the roller; it makes it difficult to steer the roller straight; look well ahead.
• Use 1/2 throttle until you are proficient at operating the roller.
• Once you choose your rolling line hold the joystick steady, correcting direction gently as required.
• Move the steering joystick a little at a time to change direction; excessive movement of the joystick makes it difficult to maintain a straight line.
• Roll in straight lines.
• Do not leave the engine running with the roller parked on the green; the engine vibration will cause roller depression marks on the green.
• Move off the green when rolling is complete before putting the trailer in the down position.
• When rolling steep greens and the engine stops, check engine oil level. The engine is fitted with a safety switch; when the engine oil level is low the engine will stop.
• The correct procedure for rolling the green is:
(a) Select the correct direction to roll the green, remember this roller can roll the greens in all directions.
(b) Start on one side of the green and work your way across the green in a zigzag fashion, slightly overlapping each lap you roll: this makes sure you miss no part of the green and all of the green is rolled. Avoid coming back across the green to roll missed areas if possible. You should be able to complete the rolling of 18 greens in the same time or quicker than by mowing using a triplex mower.
• When rolling of the green is completed, move the roller onto the fringe, stop the engine, lock the trailer into the trailing position, connect it to the towing vehicle then move off to the next green to be rolled. Do not put the trailer down into the towing position on the green; damage may occur to the green from the roller tires and body.
• Remember turn off the fuel cock whilst towing the roller.
Park brake
• To engage, push parking lever forward until it will travel no further, the lever operates on a over cam principal, when it is fully engaged the lever will remain in this position with the brake applied. To dis-engage the park brake, pull the lever up and back. The lever will remain in the off position until re-applied. Do not operate the roller with the emergency brake engaged, damage to the drive roller rubber coating will occur.
• Ensure the park brake is released prior to operating the roller, if not irreparable damage to the rubber on the drive roller will occur.
Operation procedures

TRU-TURF R52-11TC Golf Greens Roller Manual11
TRU-TURF R52-11TC Golf Greens Roller Manual 12
Fault Finding
Roller will not move one or either way, check
• Chain is okay
• Sprockets are not worn or slipping on the shaft
• Foot control is operating - check all arms are secure
• For Sheared Sprocket Keys
• Rubber coupling broken
Roller will not steer, check
• Woodruff Key is in place and not sheared
• Rod ends are connected to smoothing roller head and the steering arm
• Rod ends are not broken or seized
• Centre swivel bearing on top centre of each smoothing roller head has not seized
• Connecting rod are in place and serviceable
Roller has excessive vibration, check
• Disconnect engine-to- transmission and isolate the drive chain to determine whether the problem is in the engine or in the transmissions
• If engine is at fault contact your nearest engine agent for rectification
• If the transmission is at fault, repair or replace as
necessary, or seek professional advice from a local Eaton Service Center
• Any out of alignment between engine and transmission.
• For damaged engine and transmission couplings
Smoothing rollers seized, check
• Bearings have not seized
• Replace if necessary
• Accumulated dry debris is not locking the smoothing rollers.
Rubber drive roller will not rotate, check
• Roller shaft end bearings have not seized
• Broken chain
• Slipping sprockets
• the Park Brake is not locked on
Fault Finding
• If bearings are faulty
(a) Remove the complete smoothing head from the machine, undo the four swivel mount bolts on upper body and steering rod, wheel the roller away until the total head is exposed to work on.
(b) Remove roller shaft bolts from end plates, remove rollers from the heads.
(c) Fit new bearings, replace rollers into the heads, lubricate shaft bolts with an anti seize compound before installing them. Tighten securely and ensure rollers rotate freely when fully tightened.
or If the rollers are a sealed type remove the roller and
replace with a complete new roller.
(d) If the rods are removed or lengths altered ensure they are correctly adjusted so that the three heads are parallel to each other when in the straight ahead position. Adjust if necessary.
Changing engine oil
• Change oil and service as per the manufacturers Servicing Schedule enclosed as a separate insert to this manual.
Description Pre-Delivery Pre-Operating 12 Monthly
Check Engine oil √ √
Check Transmission Oil Level √ √
Beware of contaminants entering the transmission √ √
Lubricate drive chain with WD40 or equivalent √ √
Check Tires Max 18 P.S.I. √ √
Check Gas √ √
Check Smoothing Roller Bearing √ √
Check Drive Roller Bearings √ √
Check for loose Nuts and Bolts √ √
Renew Engine Oil as per manufacturers Handbook
Renew Transmission Oil - See page 1 for correct oil every 500hrs or... √
Renew Transmission Oil Filter * √
Renew Smoothing Roller Bearings * √
Renew Drive Roller Bearings * √
Renew Chain Tensioner Sprocket Bearings * √
Renew Drive Chain * √
Replace Foot Pedal Struts *
Replace Trailer Strut *
Changing transmission oil
Ongoing Maintenance, Lubricant and Replacement Schedule (below)
Note. Areas indicated with a * need to be changed when defective or as required. This may be before the recommended replacement schedule. Please replace all parts as necessary.
Maintenance
TRU-TURF R52-11TC Golf Greens Roller Manual13
TRU-TURF R52-11TC Golf Greens Roller Manual 14
PR
OD
UC
ED
BY
AN
AU
TO
DE
SK
ED
UC
AT
ION
AL
PR
OD
UC
T
PR
OD
UC
ED
BY
AN
AU
TO
DE
SK
ED
UC
AT
ION
AL
PR
OD
UC
T
PRODUCED BY AN AUTODESK EDUCATIONAL PRODUCT
PRODUCED BY AN AUTODESK EDUCATIONAL PRODUCT
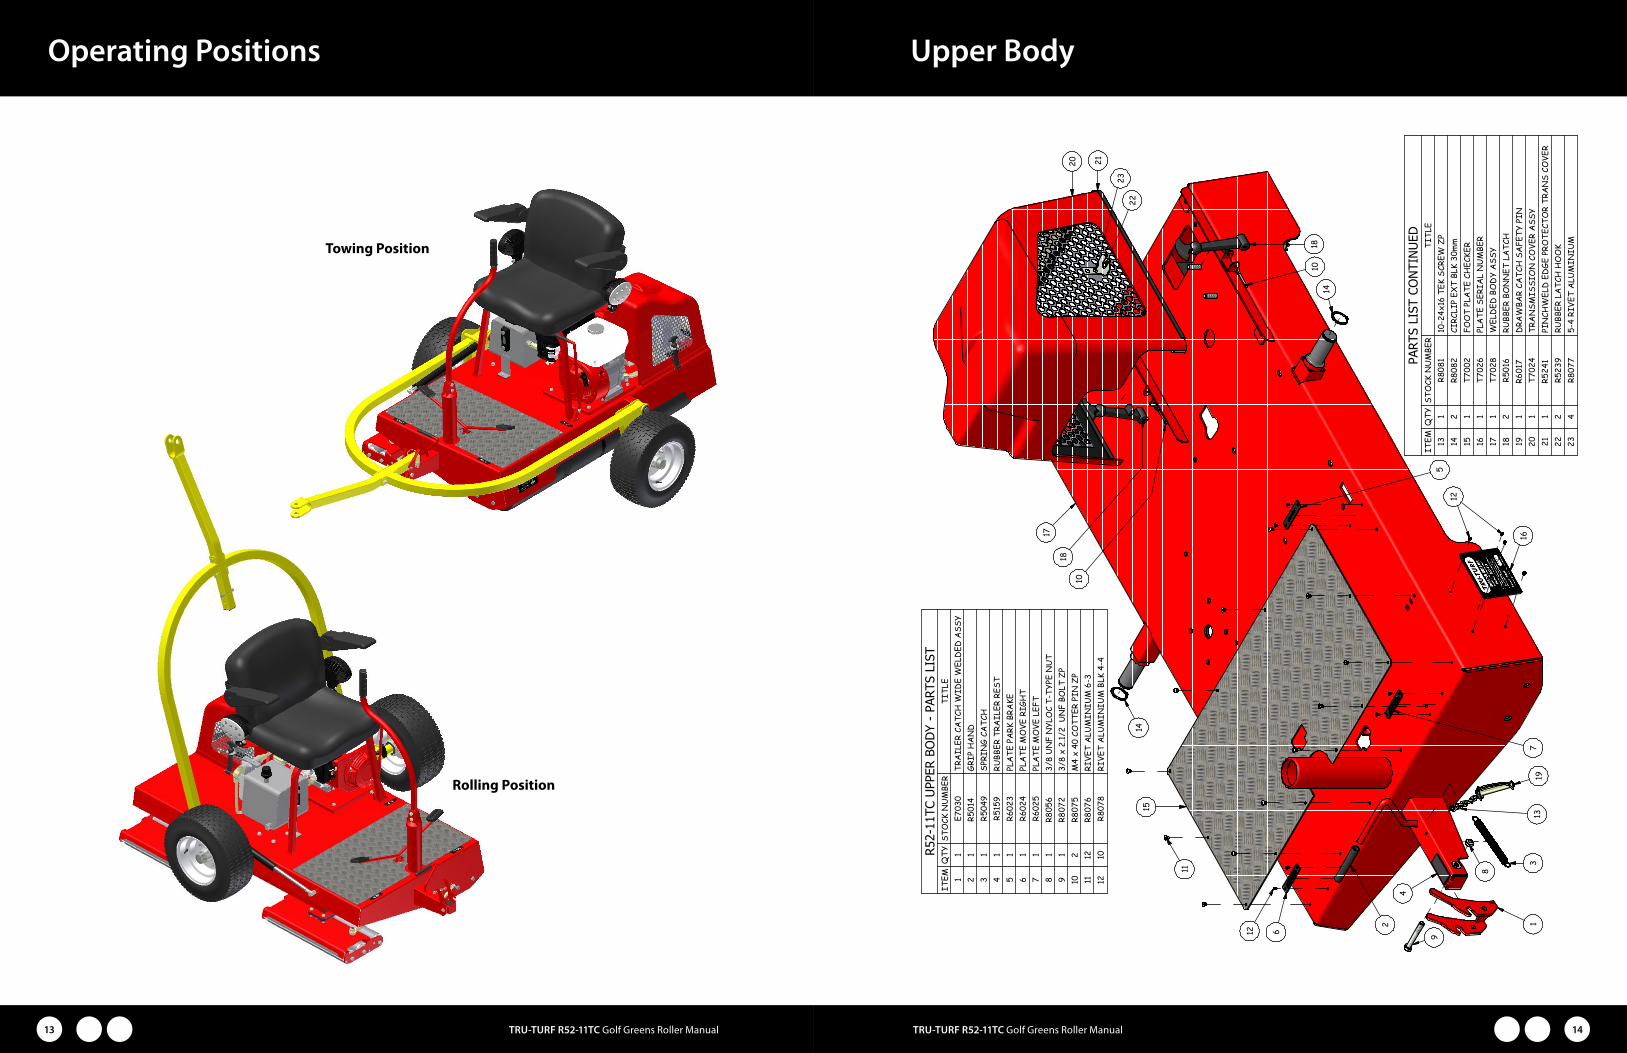
Upper Body
Towing Position
Rolling Position
Operating Positions
TRU-TURF R52-11TC Golf Greens Roller Manual15
TRU-TURF R52-11TC Golf Greens Roller Manual 16
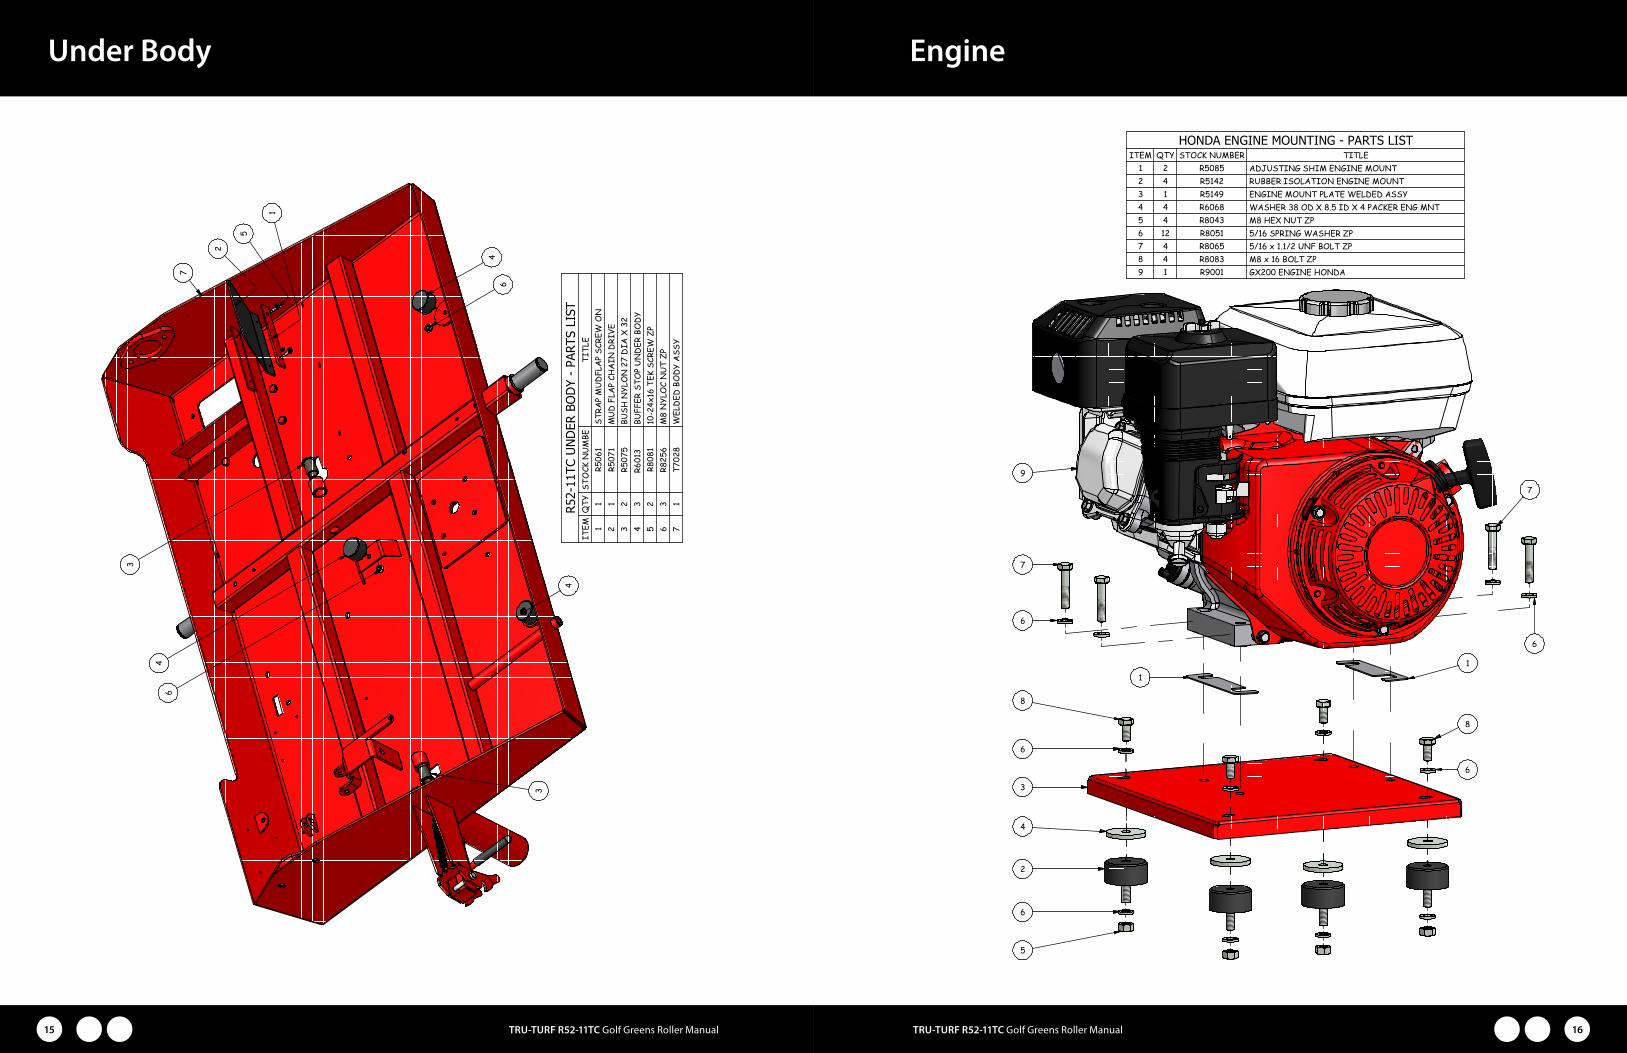
EngineUnder Body
PRODUCED BY AN AUTODESK EDUCATIONAL PRODUCT
PRODUCED BY AN AUTODESK EDUCATIONAL PRODUCT
PR
OD
UC
ED
BY
AN
AU
TO
DE
SK
ED
UC
AT
ION
AL
PR
OD
UC
T
PR
OD
UC
ED
BY
AN
AU
TO
DE
SK
ED
UC
AT
ION
AL
PR
OD
UC
T
PR
OD
UC
ED
BY
AN
AU
TO
DE
SK
ED
UC
AT
ION
AL
PR
OD
UC
T
PR
OD
UC
ED
BY
AN
AU
TO
DE
SK
ED
UC
AT
ION
AL
PR
OD
UC
T
PRODUCED BY AN AUTODESK EDUCATIONAL PRODUCT
PRODUCED BY AN AUTODESK EDUCATIONAL PRODUCT
TRU-TURF R52-11TC Golf Greens Roller Manual17
TRU-TURF R52-11TC Golf Greens Roller Manual 18
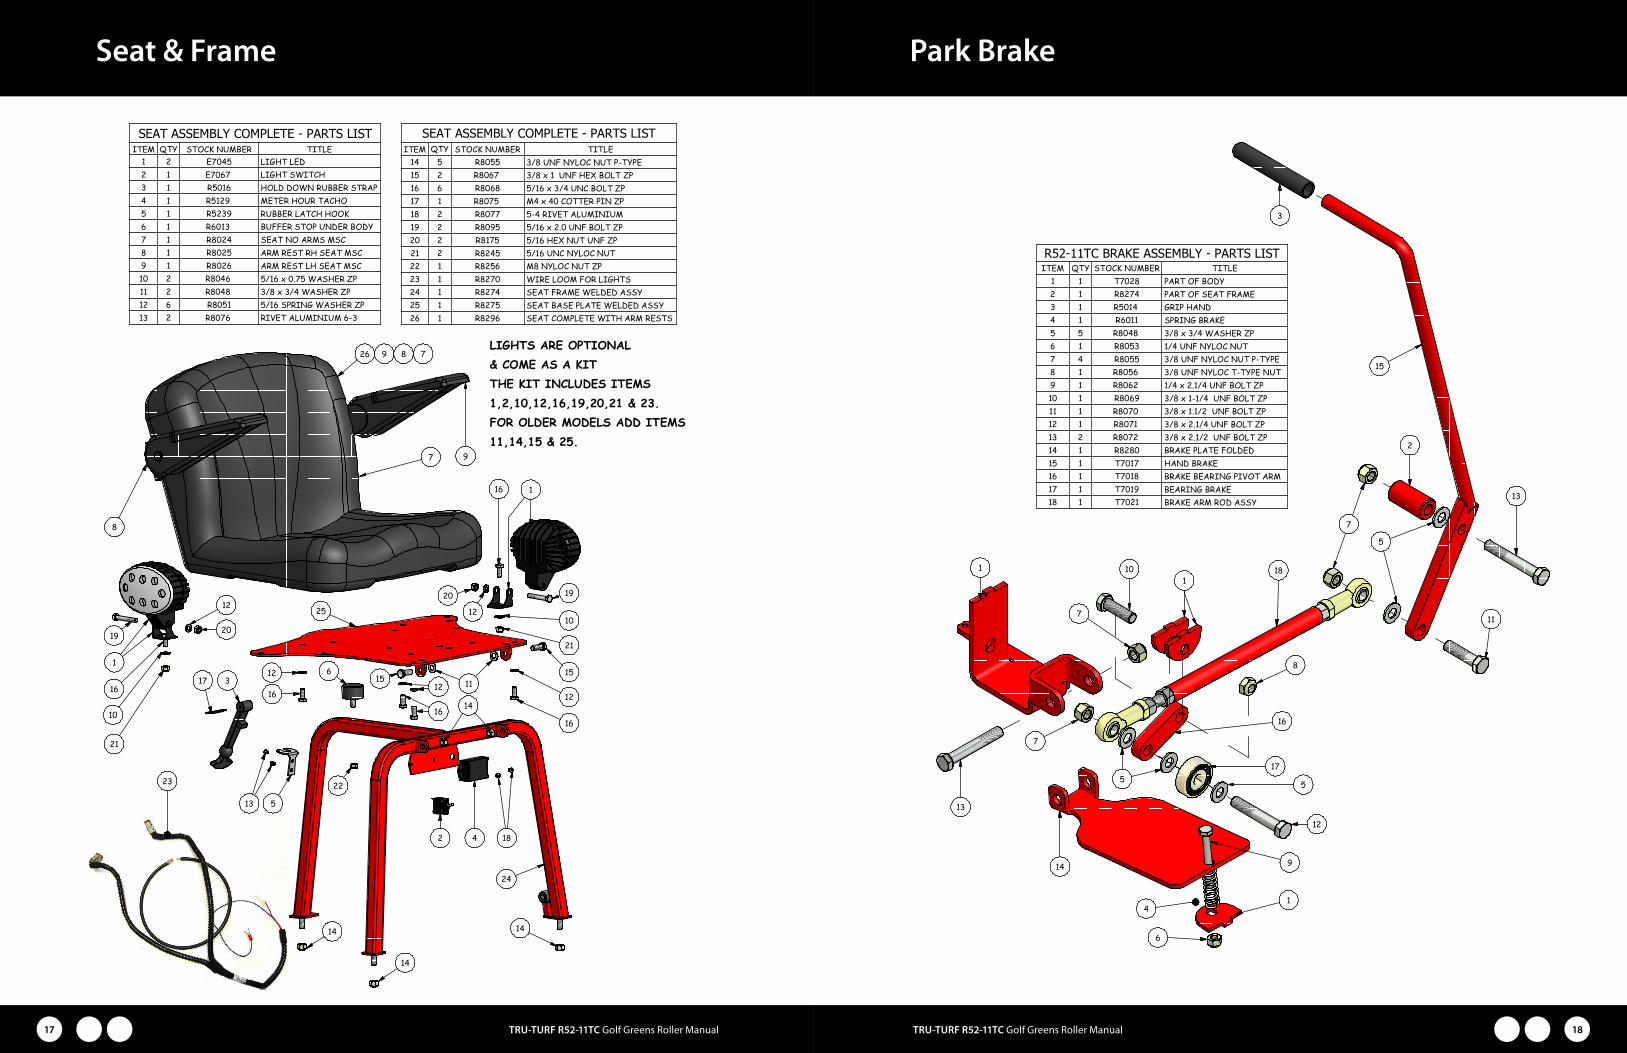
Park BrakeSeat & Frame
PRODUCED BY AN AUTODESK EDUCATIONAL PRODUCT
PRODUCED BY AN AUTODESK EDUCATIONAL PRODUCTP
RO
DU
CE
D B
Y A
N A
UT
OD
ES
K E
DU
CA
TIO
NA
L P
RO
DU
CT
PR
OD
UC
ED
BY
AN
AU
TO
DE
SK
ED
UC
AT
ION
AL
PR
OD
UC
T
PRODUCED BY AN AUTODESK EDUCATIONAL PRODUCT
PRODUCED BY AN AUTODESK EDUCATIONAL PRODUCT
PR
OD
UC
ED
BY
AN
AU
TO
DE
SK
ED
UC
AT
ION
AL
PR
OD
UC
T
PR
OD
UC
ED
BY
AN
AU
TO
DE
SK
ED
UC
AT
ION
AL
PR
OD
UC
T
TRU-TURF R52-11TC Golf Greens Roller Manual19
TRU-TURF R52-11TC Golf Greens Roller Manual 20
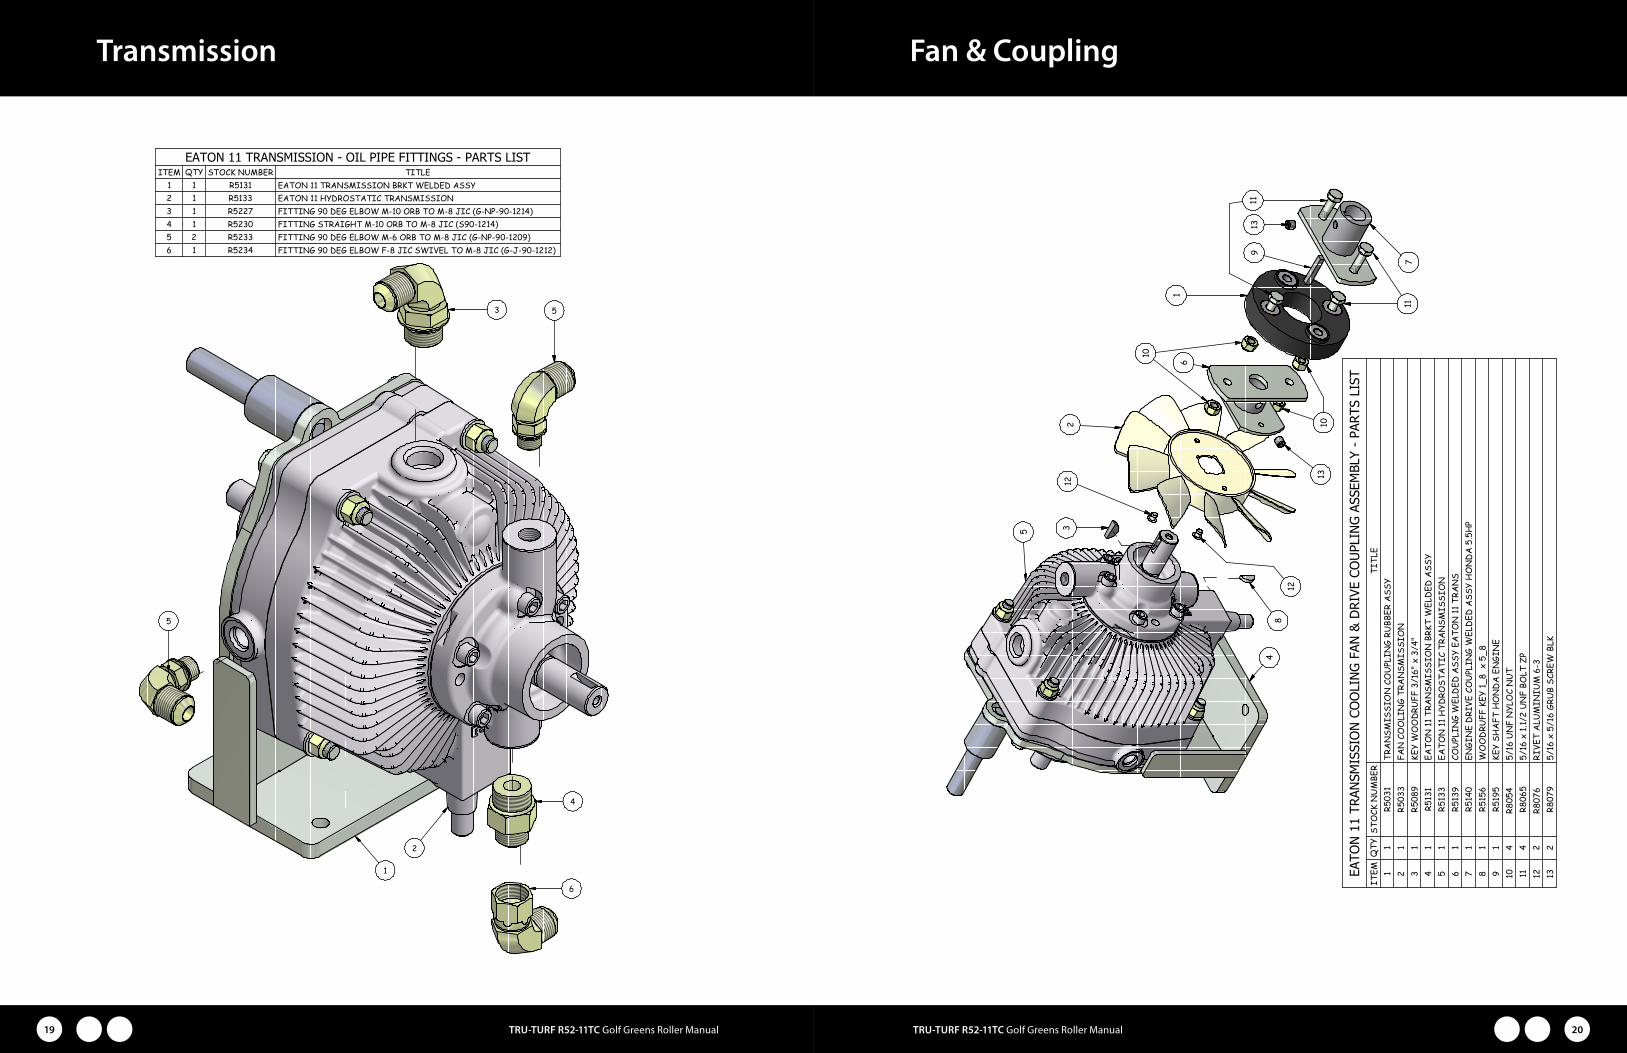
Fan & Coupling
PRODUCED BY AN AUTODESK EDUCATIONAL PRODUCT
PRODUCED BY AN AUTODESK EDUCATIONAL PRODUCT
PR
OD
UC
ED
BY
AN
AU
TO
DE
SK
ED
UC
AT
ION
AL
PR
OD
UC
T
PR
OD
UC
ED
BY
AN
AU
TO
DE
SK
ED
UC
AT
ION
AL
PR
OD
UC
T
Transmission
PR
OD
UC
ED
BY
AN
AU
TO
DE
SK
ED
UC
AT
ION
AL
PR
OD
UC
T
PR
OD
UC
ED
BY
AN
AU
TO
DE
SK
ED
UC
AT
ION
AL
PR
OD
UC
T
PRODUCED BY AN AUTODESK EDUCATIONAL PRODUCT
PRODUCED BY AN AUTODESK EDUCATIONAL PRODUCT
TRU-TURF R52-11TC Golf Greens Roller Manual21
TRU-TURF R52-11TC Golf Greens Roller Manual 22
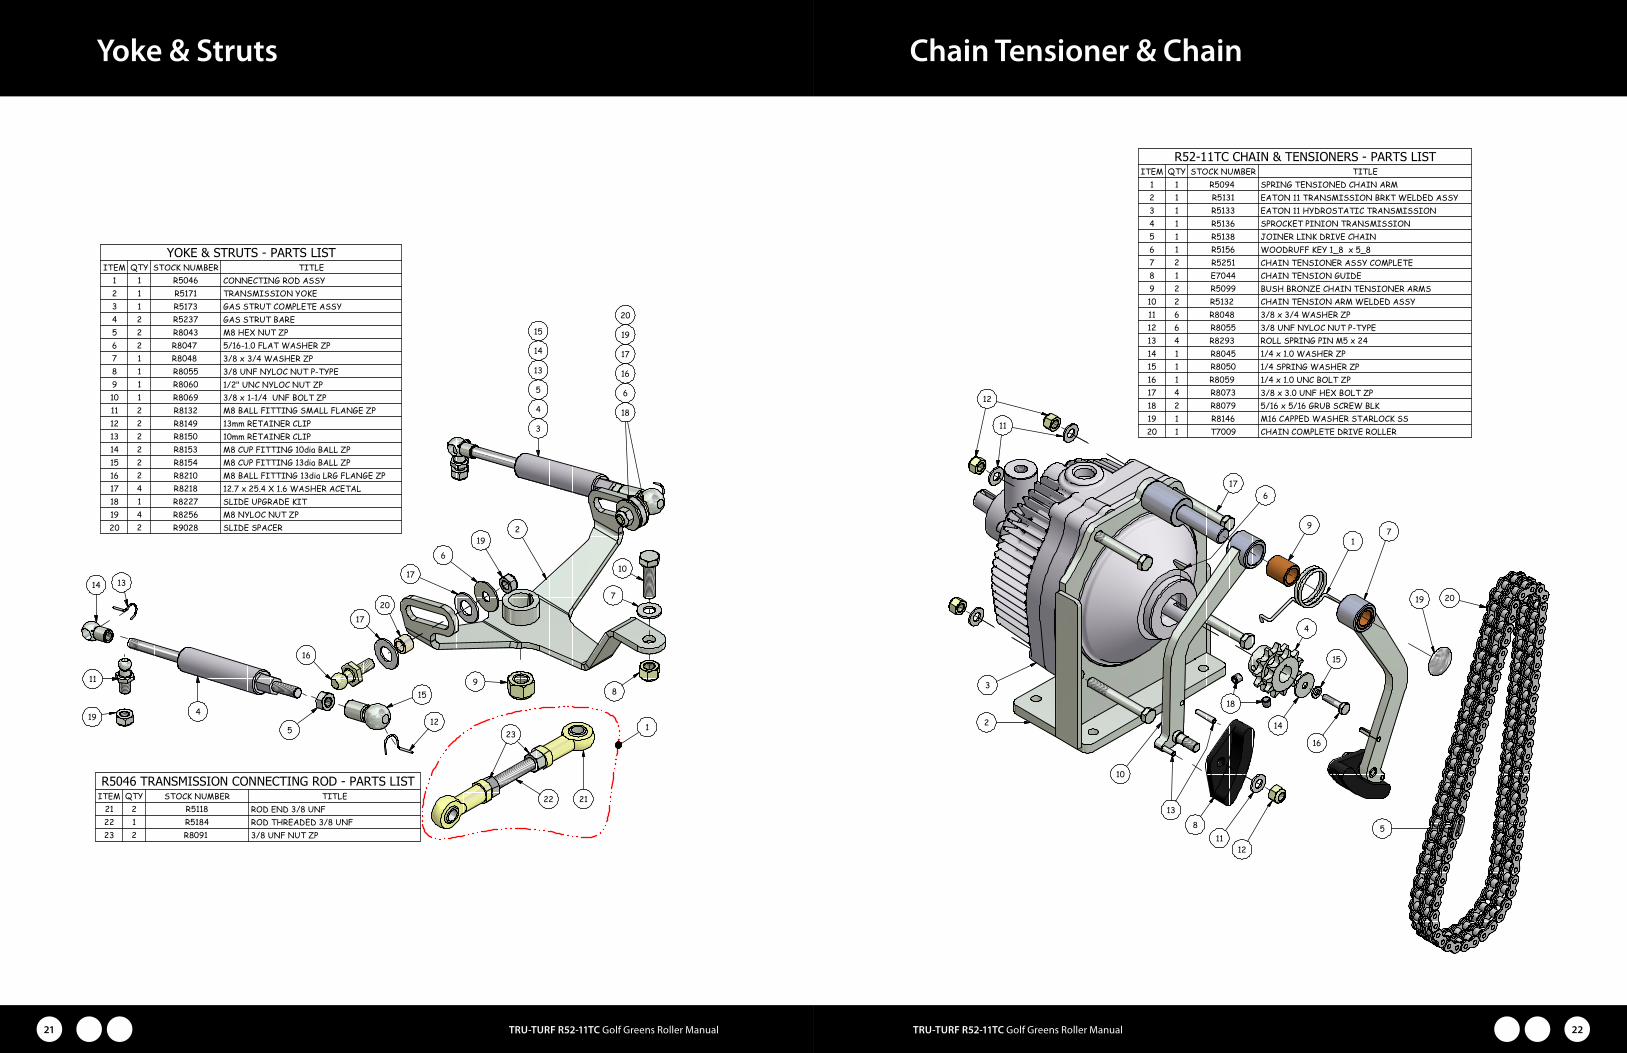
Chain Tensioner & Chain
PRODUCED BY AN AUTODESK EDUCATIONAL PRODUCT
PRODUCED BY AN AUTODESK EDUCATIONAL PRODUCT
PR
OD
UC
ED
BY
AN
AU
TO
DE
SK
ED
UC
AT
ION
AL
PR
OD
UC
T
PR
OD
UC
ED
BY
AN
AU
TO
DE
SK
ED
UC
AT
ION
AL
PR
OD
UC
T
Yoke & Struts
PRODUCED BY AN AUTODESK EDUCATIONAL PRODUCT
PRODUCED BY AN AUTODESK EDUCATIONAL PRODUCT
PR
OD
UC
ED
BY
AN
AU
TO
DE
SK
ED
UC
AT
ION
AL
PR
OD
UC
T
PR
OD
UC
ED
BY
AN
AU
TO
DE
SK
ED
UC
AT
ION
AL
PR
OD
UC
T

TRU-TURF R52-11TC Golf Greens Roller Manual23
TRU-TURF R52-11TC Golf Greens Roller Manual 24
Oil Tank & Fittings
PRODUCED BY AN AUTODESK EDUCATIONAL PRODUCT
PRODUCED BY AN AUTODESK EDUCATIONAL PRODUCTP
RO
DU
CE
D B
Y A
N A
UT
OD
ES
K E
DU
CA
TIO
NA
L P
RO
DU
CT
PR
OD
UC
ED
BY
AN
AU
TO
DE
SK
ED
UC
AT
ION
AL
PR
OD
UC
T
Oil Tank & Pipes
PR
OD
UC
ED
BY
AN
AU
TO
DE
SK
ED
UC
AT
ION
AL
PR
OD
UC
T
PR
OD
UC
ED
BY
AN
AU
TO
DE
SK
ED
UC
AT
ION
AL
PR
OD
UC
T
PRODUCED BY AN AUTODESK EDUCATIONAL PRODUCT
PRODUCED BY AN AUTODESK EDUCATIONAL PRODUCT

TRU-TURF R52-11TC Golf Greens Roller Manual25
TRU-TURF R52-11TC Golf Greens Roller Manual 26
Smoothing Heads
PRODUCED BY AN AUTODESK EDUCATIONAL PRODUCT
PRODUCED BY AN AUTODESK EDUCATIONAL PRODUCTP
RO
DU
CE
D B
Y A
N A
UT
OD
ES
K E
DU
CA
TIO
NA
L P
RO
DU
CT
PR
OD
UC
ED
BY
AN
AU
TO
DE
SK
ED
UC
AT
ION
AL
PR
OD
UC
T
Joystick & Steering Components
PR
OD
UC
ED
BY
AN
AU
TO
DE
SK
ED
UC
AT
ION
AL
PR
OD
UC
T
PR
OD
UC
ED
BY
AN
AU
TO
DE
SK
ED
UC
AT
ION
AL
PR
OD
UC
T
PRODUCED BY AN AUTODESK EDUCATIONAL PRODUCT
PRODUCED BY AN AUTODESK EDUCATIONAL PRODUCT
TRU-TURF R52-11TC Golf Greens Roller Manual27
TRU-TURF R52-11TC Golf Greens Roller Manual 28
Drive Roller Sprocket & Bearings
PR
OD
UC
ED
BY
AN
AU
TO
DE
SK
ED
UC
AT
ION
AL
PR
OD
UC
T
PR
OD
UC
ED
BY
AN
AU
TO
DE
SK
ED
UC
AT
ION
AL
PR
OD
UC
T
PRODUCED BY AN AUTODESK EDUCATIONAL PRODUCT
PRODUCED BY AN AUTODESK EDUCATIONAL PRODUCT
Drive Roller
PR
OD
UC
ED
BY
AN
AU
TO
DE
SK
ED
UC
AT
ION
AL
PR
OD
UC
T
PR
OD
UC
ED
BY
AN
AU
TO
DE
SK
ED
UC
AT
ION
AL
PR
OD
UC
T
PRODUCED BY AN AUTODESK EDUCATIONAL PRODUCT
PRODUCED BY AN AUTODESK EDUCATIONAL PRODUCT
TRU-TURF R52-11TC Golf Greens Roller Manual29
TRU-TURF R52-11TC Golf Greens Roller Manual 30
Pivoting Head
PR
OD
UC
ED
BY
AN
AU
TO
DE
SK
ED
UC
AT
ION
AL
PR
OD
UC
T
PR
OD
UC
ED
BY
AN
AU
TO
DE
SK
ED
UC
AT
ION
AL
PR
OD
UC
T
PRODUCED BY AN AUTODESK EDUCATIONAL PRODUCT
PRODUCED BY AN AUTODESK EDUCATIONAL PRODUCT
Smoothing Head Exploded
PR
OD
UC
ED
BY
AN
AU
TO
DE
SK
ED
UC
AT
ION
AL
PR
OD
UC
T
PR
OD
UC
ED
BY
AN
AU
TO
DE
SK
ED
UC
AT
ION
AL
PR
OD
UC
T
PRODUCED BY AN AUTODESK EDUCATIONAL PRODUCT
PRODUCED BY AN AUTODESK EDUCATIONAL PRODUCT

TRU-TURF R52-11TC Golf Greens Roller Manual31
TRU-TURF R52-11TC Golf Greens Roller Manual 32
Connecting Rods
PRODUCED BY AN AUTODESK EDUCATIONAL PRODUCT
PRODUCED BY AN AUTODESK EDUCATIONAL PRODUCTP
RO
DU
CE
D B
Y A
N A
UT
OD
ES
K E
DU
CA
TIO
NA
L P
RO
DU
CT
PR
OD
UC
ED
BY
AN
AU
TO
DE
SK
ED
UC
AT
ION
AL
PR
OD
UC
T
Foot Pedal Control
PR
OD
UC
ED
BY
AN
AU
TO
DE
SK
ED
UC
AT
ION
AL
PR
OD
UC
T
PR
OD
UC
ED
BY
AN
AU
TO
DE
SK
ED
UC
AT
ION
AL
PR
OD
UC
T
PRODUCED BY AN AUTODESK EDUCATIONAL PRODUCT
PRODUCED BY AN AUTODESK EDUCATIONAL PRODUCT
TRU-TURF R52-11TC Golf Greens Roller Manual33
TRU-TURF R52-11TC Golf Greens Roller Manual 34
Trailer Assembly
PR
OD
UC
ED
BY
AN
AU
TO
DE
SK
ED
UC
AT
ION
AL
PR
OD
UC
T
PR
OD
UC
ED
BY
AN
AU
TO
DE
SK
ED
UC
AT
ION
AL
PR
OD
UC
T
PRODUCED BY AN AUTODESK EDUCATIONAL PRODUCT
PRODUCED BY AN AUTODESK EDUCATIONAL PRODUCT
Trailer Arm
PR
OD
UC
ED
BY
AN
AU
TO
DE
SK
ED
UC
AT
ION
AL
PR
OD
UC
T
PR
OD
UC
ED
BY
AN
AU
TO
DE
SK
ED
UC
AT
ION
AL
PR
OD
UC
T
PRODUCED BY AN AUTODESK EDUCATIONAL PRODUCT
PRODUCED BY AN AUTODESK EDUCATIONAL PRODUCT
TRU-TURF R52-11TC Golf Greens Roller Manual35
TRU-TURF R52-11TC Golf Greens Roller Manual 36
Wheel Hub & Bearings
PR
OD
UC
ED
BY
AN
AU
TO
DE
SK
ED
UC
AT
ION
AL
PR
OD
UC
T
PR
OD
UC
ED
BY
AN
AU
TO
DE
SK
ED
UC
AT
ION
AL
PR
OD
UC
T
PRODUCED BY AN AUTODESK EDUCATIONAL PRODUCT
PRODUCED BY AN AUTODESK EDUCATIONAL PRODUCT
Light Kit without base
PR
OD
UC
ED
BY
AN
AU
TO
DE
SK
ED
UC
AT
ION
AL
PR
OD
UC
T
PR
OD
UC
ED
BY
AN
AU
TO
DE
SK
ED
UC
AT
ION
AL
PR
OD
UC
T
PRODUCED BY AN AUTODESK EDUCATIONAL PRODUCT
PRODUCED BY AN AUTODESK EDUCATIONAL PRODUCT

TRU-TURF R52-11TC Golf Greens Roller Manual37
TRU-TURF R52-11TC Golf Greens Roller Manual 38
Light Kit with base Labels
TO MOVE RIGHT DEPRESS SLOWLY
PARK BRAKE
TO MOVE LEFT DEPRESS SLOWLY
WHEN ROLLING SLOPING GREENS PLACETHESE ROLLERS ON THE HIGH SIDE. DANGER
DO NOT OPERATE MACHINEWITHOUT COVER IN PLACE.
T7026
R6023
R6040 R6041
R6025 R6024
R6059
R6057
R6058Officially Licensed Product
of the PGA TOURTIRE PRESSURE
MAXIMUM 15 P.S.Ior damage to machine may occur
PR
OD
UC
ED
BY
AN
AU
TO
DE
SK
ED
UC
AT
ION
AL
PR
OD
UC
T
PR
OD
UC
ED
BY
AN
AU
TO
DE
SK
ED
UC
AT
ION
AL
PR
OD
UC
T
PRODUCED BY AN AUTODESK EDUCATIONAL PRODUCT
PRODUCED BY AN AUTODESK EDUCATIONAL PRODUCT

TRU-TURF R52-11TC Golf Greens Roller Manual39
TRU-TURF R52-11TC Golf Greens Roller Manual 40
Parts List
Part No. Description Page
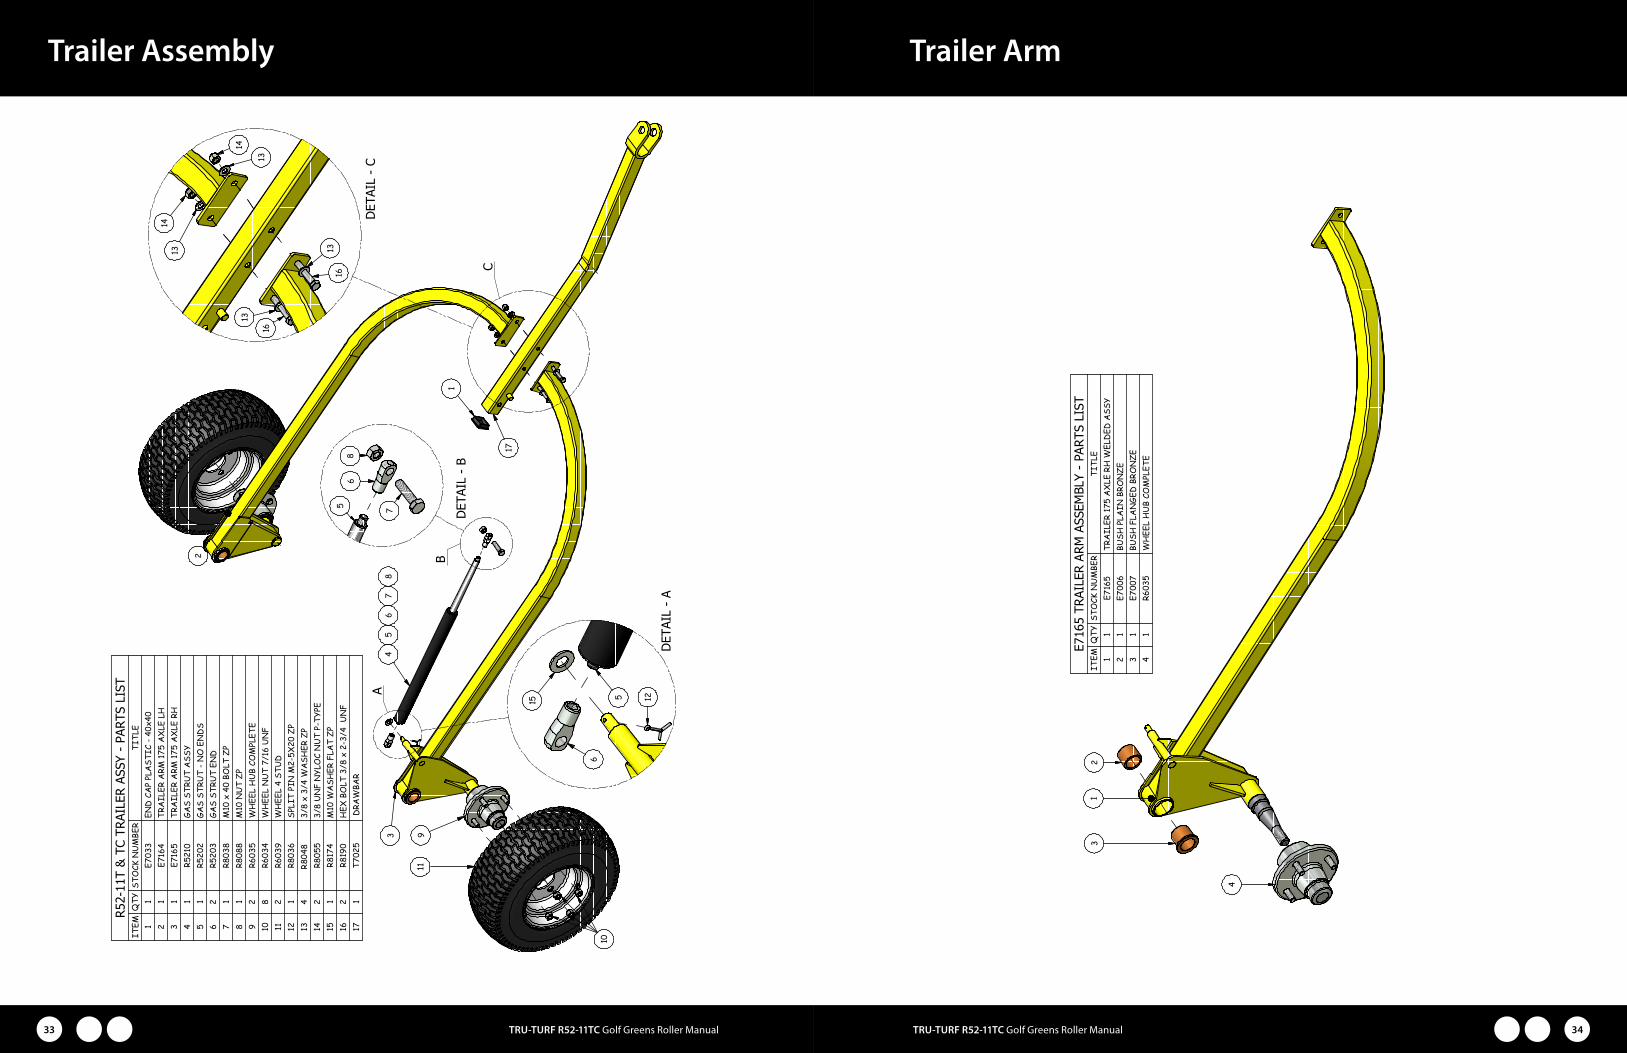
E7006 Bush Plain Bronze 34
E7007 Bush Flanged Bronze 34
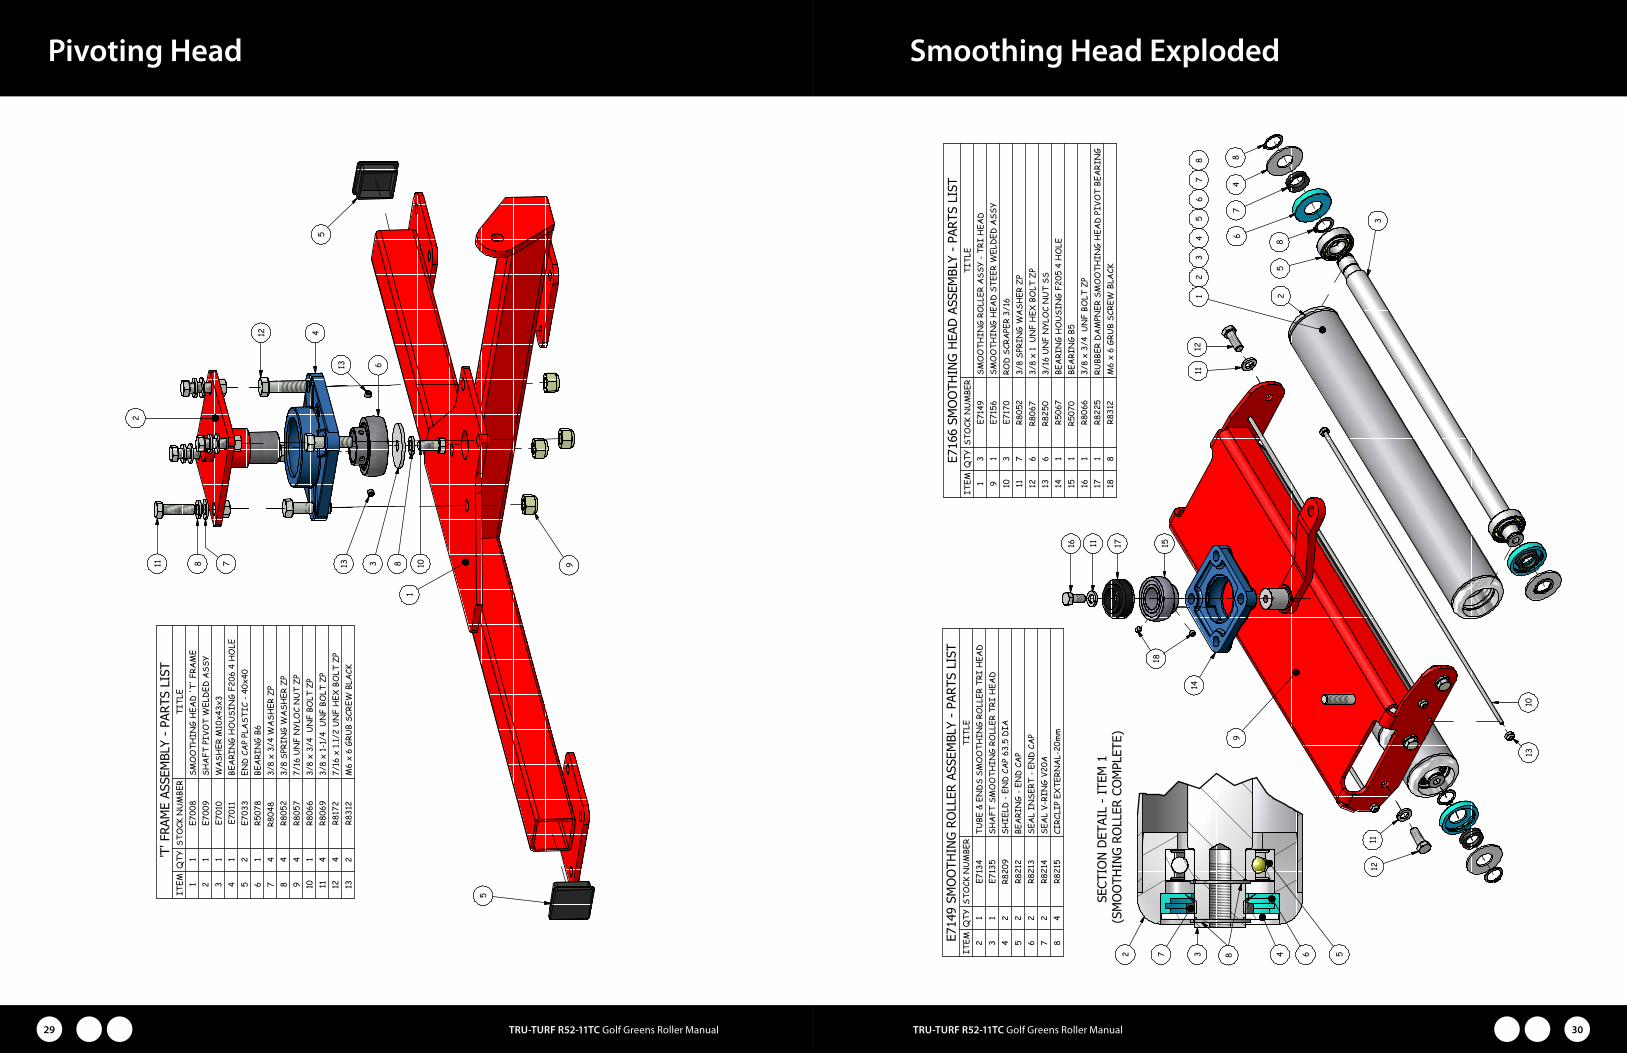
E7008 Smoothing Head ‘T’ Frame 26, 29
E7009 Tri Head Bearing ‘T’ Support 26, 29
E7010 Washer Tri Head Bearing 28, 29
E7011 Housing 26, 29, 31
E7012 M12 Threaded Steer Rod 31
E7015 Rod Threaded Stabiliser 31
E7016 Rod Stabiliser Unit 26, 31
E7017 Rod Connecting Head 26, 31
E7018 Connecting Rod Steering Assy 25
E7019 Rod End Female Studded 31
E7020 Rod End Female 31
E7023 Rod Threaded Heads 31
E7024 Tube Tie Rod Heads 31
E7025 Tube Tie Rod Stabiliser 31
E7028 Tube Spacer 26
E7029 Steering Arm 25
E7030 Catch Trailer 14
E7033 Cap End RHS Plastic 26, 29, 33
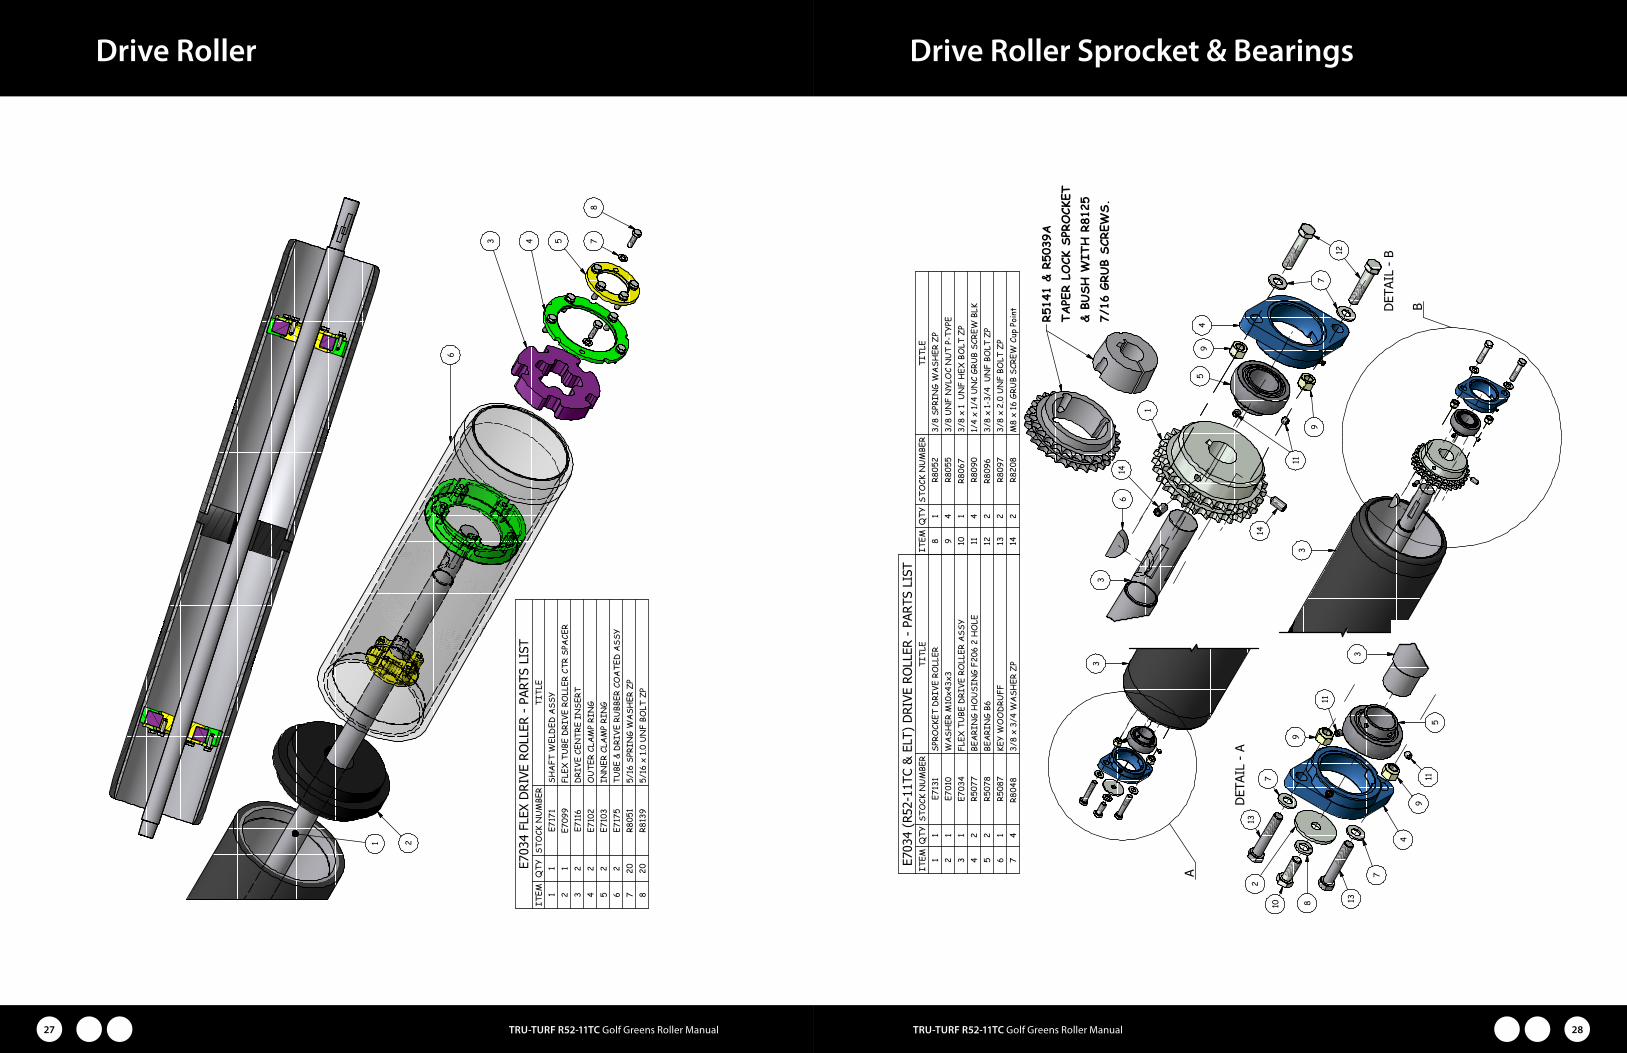
E7034 Flex Tube Roller 28
E7044 Chain Tension Guide 22
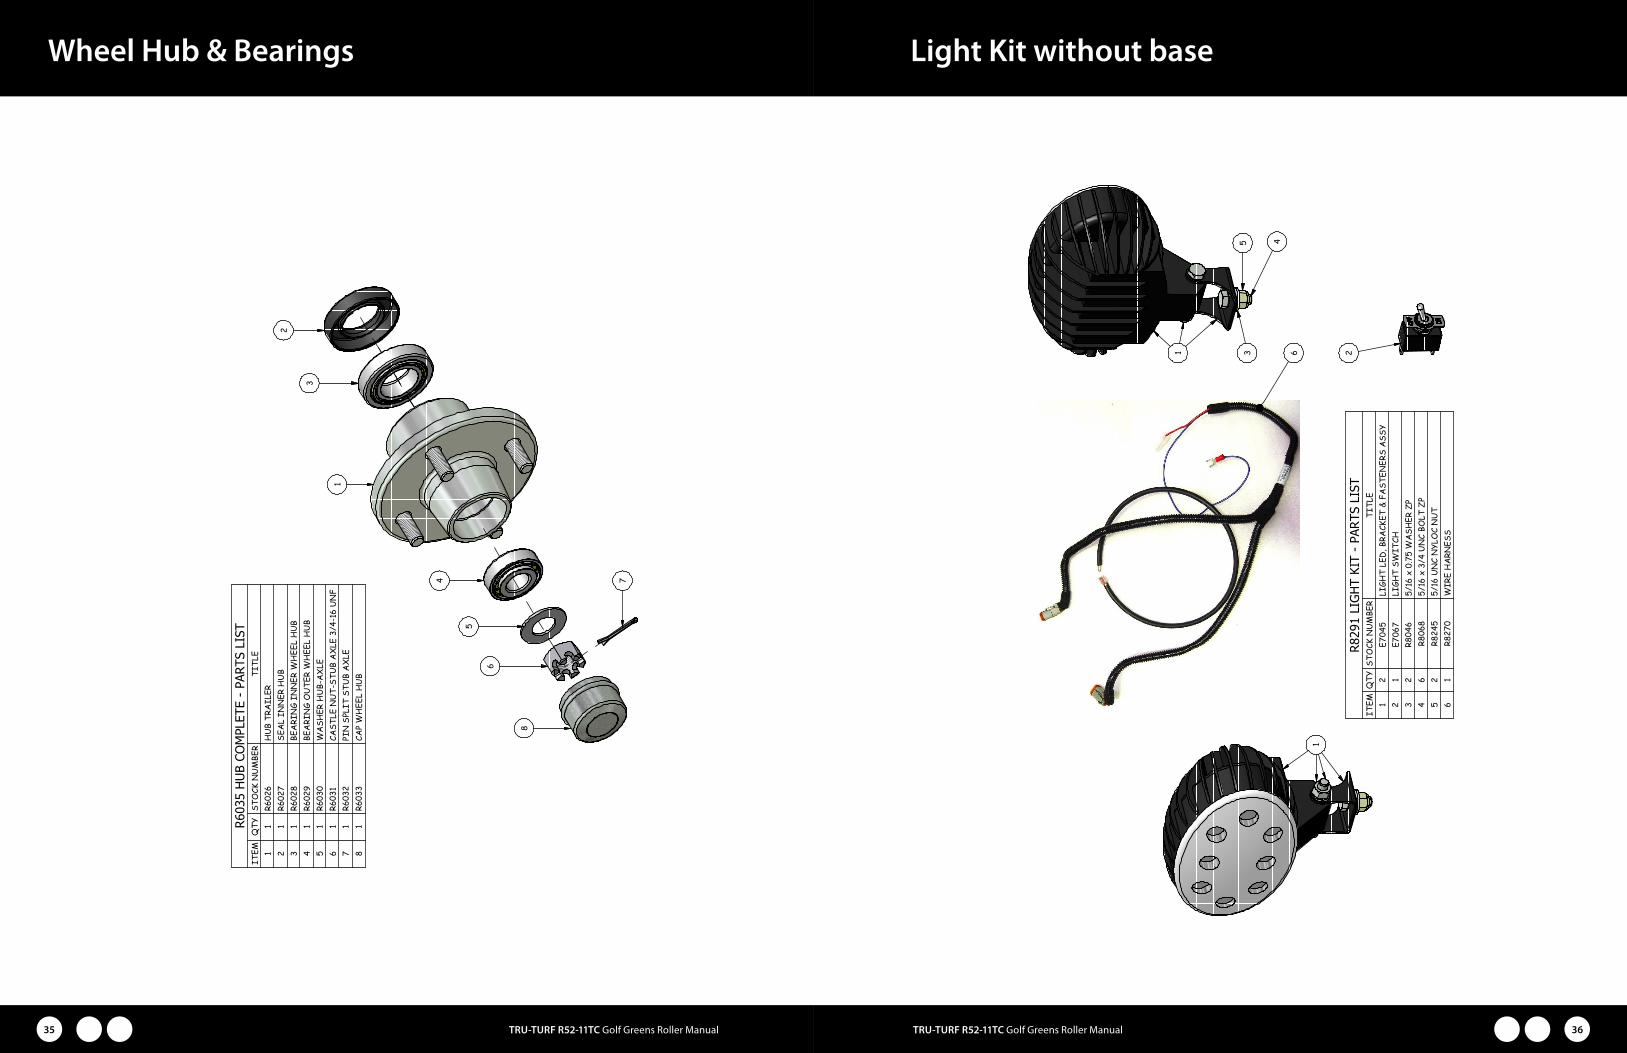
E7045 Light LED 17, 36, 37
E7067 Light Switch 17, 36, 37
E7099 Tube Centre Drive Roller 27
E7102 Clamp Ring 27
E7103 Clamp Ring 27
E7116 Drive Insert 27
E7131 Sprocket Drive Roller 28
E7134 Tube Complete 30
E7135 Shaft 30
E7149 Roller Smoothing 30
E7156 Smoothing Head Steer 30
E7164 Trailer Arm Left Hand 33
E7165 Trailer Arm Right Hand 33, 34
E7166 Head Steering 26, 30
E7167 Head Centre 26
E7168 Head Rear 26
E7170 Rod Scraper 30
E7171 Shaft 27
E7175 Tube Rubber Coated 27
R5009 Grip Joystick 25
Part No. Description Page
R5012 Pad Foot Pedal 32
R5014 Grip 14, 18
R5016 Catch Rubber 14, 17
R5031 Rubber Coupling 20
R5033 Fan Transmission 20
R5039A Bush Taper Lock 28
R5046 Rod Unit Transmission Yoke 21, 32
R5049 Spring 14, 25
R5061 Strap Mudflap Screw On 15
R5067 Housing F205 4 Hole 30
R5070 Bearing B5 30
R5071 Mud Flap 15
R5075 Bush 27 Dia x 32 15, 32
R5077 Housing LFL6J 2 Hole 28
R5078 Bearing B6 26, 28, 29
R5085 Shim Engine 16
R5087 Key Woodruff 28
R5089 Key Woodruff 3/16 x 3/4 20
R5094 Spring Chain Tensioner Arm 22
R5099 Bush Bronze Chain Tensioner Arms 22
R5118 Rod End 18, 21, 32
R5129 Meter Hour Tach 17
R5131 Eaton 11 Transmission Brkt 19, 20, 22, 23
R5132 Chain Tension Arm 22
R5133 Transmission Eaton 11 19, 20, 22, 23
R5136 Sprocket Pinion Transmission 22
R5138 Joiner Chain 22
R5139 Transmission Coupling Eaton 11 20
R5140 Engine Coupling Honda 6.5hp 20
R5141 Sprocket Drive Roller (Suits T-lock) 28
R5142 Cushion Rubber Engine Mount 16
R5143 Tank Transmission Oil 23, 24
R5144 Breather Oil Tank 23, 24
R5145 Plug Tank Drain 23, 24
R5147 Cartridge Filter 23, 24
R5148 Sight Gauge 23, 24
R5152 Pipe Transmission Oil 23
R5153 Pipe Transmission Oil 23
R5154 Pipe Transmission Oil 23
R5156 Key Woodruff 1/8 x 5/8 20, 22, 25, 32
R5159 Rubber Trailer Rest 14
R5171 Yoke Assy 21
Parts List
Part No. Description Page
R5173 Strut Transmission 21
R5178 Pipe Transmission Oil 23
R5184 Rod Transmission Yoke 21, 32
R5195 Key Honda Engine 20
R5197 Rubber Strip Oil Tank 24
R5202 Strut No Ends 33
R5203 Strut End 33
R5210 Strut Kit 33
R5227 Fitting 90 Deg Elbow 19, 23
R5228 Fitting Straight 23, 24
R5229 Fitting 90 Deg Elbow 23, 24
R5230 Fitting Straight 19, 23
R5231 Fitting Straight 23, 24
R5232 Fitting 90 Deg Elbow 23, 24
R5233 Fitting 90 Deg Elbow 19, 23
R5234 Fitting 90 Deg Elbow 19, 23, 24
R5237 Gas Strut 21
R5239 Latch Hook 14, 17
R5251 Chain Tension Arm Kit 22
R6009 Joystick Shaft 25
R6011 Spring Brake 18
R6013 Buffer Stop Under Body/Seat 15, 17
R6017 Pin Drawbar Safety 14
R6023 Plate Emergency & Park Brake 14, 38
R6024 Plate Move Right 14, 38
R6025 Plate Move Left 14, 38
R6026 Hub Trailer 35
R6027 Seal Inner Hub 35
R6028 Bearing Hub Inner 35
R6029 Bearing Hub Outer 35
R6030 Washer Hub 35
R6031 Nut Stub 35
R6032 Pin Cotter Stub Axle 35
R6033 Cap Hub 35
R6034 Wheel Nut 33
R6035 Wheel Hub Complete 33, 34
R6039 Wheel 4 Stud 33
R6040 Decal Rolling Sloping Greens 38
R6041 Decal Danger 38
R6057 Decal Tru-Turf 38
R6058 Decal Tire Pressure 38
R6059 Decal PGA 38
Part No. Description Page
R8005 Foot Pedal Arm 32
R8013 Housing Filter Transmission Oil Tank 23, 24
R8018 Bearing 6304 25
R8024 Seat Pan Msc 17
R8025 Arm Rest RHS 17
R8026 Arm Rest LHS 17
R8036 Split Pin 33
R8037 M8 x 12 Bolt 16
R8038 M10 x 40 Bolt 33
R8039 M12 Nut Nyloc 25, 26
R8043 M8 Nut 21
R8045 1/4 x 1 Washer 22
R8046 5/16 x 3/4 Washer 17, 36, 37
R8047 Washer Flat 21
R8048 3/8 x 3/4 Washer 17, 18, 21, 22, 26, 28, 29, 32, 33
R8050 1/4 Spring Washer 22
R8051 5/16 Spring Washer 16, 17, 21, 24, 27
R8052 3/8 Spring Washer 26, 28, 29, 30
R8053 1/4 UNF Nut Nyloc 18
R8054 5/16 UNF Nut Nyloc 20, 24
R8055 3/8 UNF Nut Nyloc 17, 18, 21, 22, 25, 26, 28, 29, 32, 33
R8056 3/8 UNF Nut Nyloc T Type 14, 18
R8057 7/16 UNF Nut Nyloc P Type 26, 29,
R8059 1/4 x 1 UNC Bolt 22
R8060 1/2 UNC Nut Nyloc 21, 25, 32
R8062 1/4 x 21/4 UNF Bolt 18
R8064 5/16 x 21/2 UNF Bolt 24
R8065 5/16 x 11/2 UNF Bolt 16, 20
R8066 3/8 x 3/4 UNF Bolt 29, 30
R8067 3/8 x 1 UNF Bolt 17, 28, 30
R8068 5/16 x 3/4 UNC Bolt 17, 36, 37
R8069 3/8 x 11/4 UNF Bolt 18, 26, 29, 32
R8070 3/8 x 11/2 UNF Bolt 18, 25
R8071 3/8 x 21/4 UNF Bolt 18
R8072 3/8 x 21/2 UNF Bolt 14, 18
R8073 3/8 x 3 UNF Bolt 22
R8075 M4 x 40 Cotter Pin 14, 17
R8076 6-3 Rivet 14, 17, 20
R8077 5-4 Rivet 14, 17
R8078 4-4 Rivet Black 14
R8079 5/16 x 5/16 Grub Screw 20, 22, 29
R8081 10-24 x 16 Tek Screw 14, 15

TRU-TURF R52-11TC Golf Greens Roller Manual41
Parts List
Part No. Description Page
R8082 Circlip External 30mm 14
R8083 M8 x 16 Bolt 24
R8086 M12 Nut Thin 31
R8087 M12 Nut Std 31
R8088 M10 Nut 33
R8090 1/4 x 1/4 UNC Grub Screw 28
R8091 Nut 3/8 UNF 18, 21, 32
R8095 5/16 X 2 UNF Bolt 17
R8096 Bolt 3/8 x 13/4 UNF 28
R8097 3/8 x 2 BOLT UNF 28
R8125 7/16 Grub Screw 28
R8132 Ball Fitting Small 21
R8138 3/8 x 11/4 UNF Bolt 21
R8139 5/16 x 1 UNF Bolt 27
R8146 Capped Washer 22
R8149 Clip 21
R8150 Clip 21
R8153 Cup Fitting 21
R8154 Cup Fitting 21
R8172 Bolt 26, 29
R8174 Washer M10 33
R8175 5/16 UNF Nut 17
R8189 Bolt 5/16 x UNF Nut 24
R8190 Bolt 33
R8208 Screw 28
R8209 Shield 30
R8210 Ball Fitting Large 21
R8212 Bearing End Cap 30
R8213 Seal Insert 30
R8214 Seal V Ring 30
R8215 Circlip 30
R8218 Washer Teflon 21
R8225 Dampner 30
R8227 Slide Upgrade Kit 21
R8245 5/16 x 21/2 Bolt UNF 17, 36, 37
R8250 Nut Nyloc 3/16 UNF 30
R8256 Nut M8 Nyloc 15, 16, 17, 21
R8270 Loom Light 17, 36, 37
R8274 Seat Frame Welded Assy 17, 18
R8275 Seat Base 17, 37
R8280 Brake Plate 18
R8291 LED Light Kit 36
Part No. Description Page
R8292 LED Light Kit Complete Upgrade 37
R8293 Roll Spring Pin 22
R8296 Seat Including Arm Rests 17
R8312 M6 x 6 Grub Screw 30
R9001 GX200 Engine Honda 16
R9028 Slide Spacer 21
T7002 Plate Checker 14
T7004 Engine Mount Plate 16
T7007 Shaft Foot Pedal 32
T7008 Foot Pedal Selector 32
T7009 Chain Duplex Eaton 11 22
T7010 Joystick 25
T7011 Rod Steering Unit 26
T7012 Rod Threaded Steering 31
T7013 Tube Tie Rod Steering 31
T7015 Drawbar Bent 33
T7017 Hand Brake 18
T7018 Break / Bearing Pivot Arm 18
T7019 Bearing 18
T7021 Brake Arm Connecting Rod 18
T7022 Break Connecting Rod 18
T7023 Tube Break Rod 18
T7024 Transmission Cover 14
T7026 Plate Serial Number 14, 38
T7028 Body Assy 14, 15
E7045 Light LED Bracket & Fastener Assy 17, 36, 37
E7067 Light Switch 17, 36, 37
R8046 5/16 x 3/4 Waher 36, 37
R8068 5/16 x 3/4 UNC Bolt 36, 37
R8245 5/16 UNC Nyloc Nut 36, 37
R8270 Wire Harness 36, 37
R8275 Seat Base Welded Assy 37
Options