User Manual | 3D Repo
53
User Manual Version 2.18
-
Upload
khangminh22 -
Category
Documents
-
view
1 -
download
0
Transcript of User Manual | 3D Repo

User Manual Version 2.18

Welcome This user manual is an introductory guide to the 3D Repo’s easy-to-use online BIM Platform. For more information on how to use 3D repo, consult the Full User Manual. For Best optimal experience please use on of the following 64-bit Web browsers:
www.google.com/chrome/ www.mozilla.org/en-US/firefox/new/
There is a Sample_Project in your account too and it is used as an example in this manual. Where this user manual instructs the user to hold the Ctrl key whilst clicking, this assumes the user is running a Windows Operating System. If the user is instead running a Mac OS, they should hold the CMD key where this manual instructs to hold the Ctrl key.
The following is an introductory contents table for important topics:
Log in p7
Upload a Model p10
Upload a new Revision of a Model p11
Add a Model to an existing Federation p14
Navigate the 3D Viewer p15-17
Measure within a Model p17
Create an Issue p20
Update an Issue’s Status p23
Comment on an Issue p27
Highlight Groups with Colour Override p33
Save a Viewpoint within a Model p35
Use the Clip tool to view 3D cross-sections p36
Compare Revisions of a Model p37
Check for Clashes within a Federation p39
2

Contents Welcome 2
Setting up 6 Sign up 6 Log in 6 Logout 6
Teamspaces 7 Share your Teamspace 7
Projects 8 Create Project 8 Edit Project 9 Delete Project 9
Models 10 Upload Model 10 Add Model Revision 11 Access Model Revisions 11 Edit Model Name 12 Download Model 12 Delete Model 12
Federations 13 Create Federation 13 Edit Federation 14 Delete Federation 14
3D Repo Viewer 15 Switching between 3D Repo Viewer and Teamspaces Panel 15 Navigation Modes 16 Select Objects 16 Selection Box 16 Hide Objects 17 Isolate Objects 17 Show All Objects 17 Zoom to Object 17 Return to Extent View 17 Focus Mode 17
Measure Tool 17
3

BIM Data 18
Issues 19 Show Closed Issues 19 Show Sub-Model Issues 19
Add Issue 20 Information visible from the Issues List 21
Priority 22 Status 22
Update an Issue’s Status 23 Job 23
Assign to Job 23 Filter by Job of Creator 23
Type 24 Due Date 24
Pins 24 Object Visibility and Selection 25 Screenshots 26 Comments 27 Filter Tools 27 Print List 28 Import or Export Issues 29 Hide/Show Additional Information 29
Groups 30 Create Group 30 Edit Group 31 Isolate Group 31 Multi-Select 33 Colour Override 33 Toggle All Colour Overrides / Delete All Groups 34
Views 35 Create View 35 Load View 35 Edit View Name 35 Delete View 35
Tree 36
Clip 36
4

Compare 37 3D DIFF Compare 37 3D CLASH Compare 39
GIS (Geographical Information Systems) 41
Models & Federations 42 Model Settings 42
Model Type / Model Code 43 Issue Types 44 GIS Reference Information 45
Profile 46 Edit User’s Information 46 Update Password 46 Add Profile Picture 46
Billing 47 Licence Purchases 47
Subscription 47 History 47
Quotas 47
Licences & Jobs 47 Manage Licences 47 Manage Jobs 48
Assign Permissions 49
Touchscreen 51
Virtual Reality 51
Lite Mode 51
3drepo.io Infrastructure 51
Workflow 52 Model Management 52
Important Information about Uploading Models 53 Units 53 Coordinates 53 Formats 53 Navis Plugin 53
5

Setting up
Sign up 1. Go to https://www.3drepo.io/signup 2. Within the following display, click SIGN UP.
3. Fill in the required user details and click the SIGN UP! Button. 4. A verification email is sent to the email address you have provided: open this email and
click on the link that says Confirm Email Address. 5. Return to https://www.3drepo.io and log in to 3D Repo.
Log in 1. Go to https://www.3drepo.io 2. Fill in your login details and click the LOG IN button.
(Note that username entry is case-sensitive!) 3. Once logged in, you will see a list of your Projects under the heading Teamspaces.
Logout To end the session, select Logout from the Profile Menu.
6

Teamspaces A Teamspace is a place in the cloud where you can store your Projects and collaborate. Each user has their own Teamspace which can be shared with other users of 3D Repo.
After login, you will see your Teamspace open with the Sample Project. Open it and explore what you can do with 3D Repo, or continue reading this manual.
Sample_Project is provided by Rob Jackson from Bond Bryan. Thanks Rob!
Share your Teamspace Enable another 3D Repo user to view and edit your Projects, Models, and Federations.
1. Click on Licences & Jobs on the left-hand side of the screen. 2. Assign a Licence to the user by entering their username
(remember it is case-sensitive!). 3. Select their Job from the drop-down list.
If their Job title is not in the selection, click on the Jobs tab above to add it to the list.
4. Once the user is assigned a Licence, click on Assign Permissions on the bottom-left of the screen.
5. Their username should appear in the User column, and there will be a checkbox to the right of it, in the Admin column. Tick the box by clicking it to share your Teamspace with the user.
To share not your entire Teamspace but only specific Projects, Models, or Federations, see the section below on how to Assign Permissions.
7

Projects Models and Federations are saved within Project folders.
For example, Sample_Project in your Teamspace contains the Lego House Architecture, Structure and Landscape Models which are federated in the Lego House Federation.
Create Project 1. To create a new Project, click on the green plus button in the bottom right corner of the
Teamspaces Panel and choose ADD PROJECT.
2. Your Teamspace is selected by default, but you can change it if you are an Admin of another Teamspace (see above on sharing a Teamspace).
3. Type in your Project’s name and click SAVE.
8

Access the Project Menu by clicking the three-dots menu icon to the right of the Project name in the Teamspaces Panel.
Options in the Project Menu are Edit Project and Delete Project.
Edit Project Edit Project allows you to edit the Project’s name.
Delete Project Delete Project deletes the Project and all the Models within it. Use with caution.
9

Models
Upload Model 1. Click on the green plus button in the bottom right corner of the Teamspaces Panel and
click on ADD MODEL.
2. Specify Teamspace (your Teamspace is selected by default). (Teamspace names are identical to usernames!)
3. Click the drop-down Project menu and select the Project.
4. Fill in the name of the new Model and specify its Type (e.g. architectural) and Units (e.g. choose a measurement of units such as millimetres from the dropdown list). Note the importance of Model Type. Revision name and Revision description are optional for this first revision of your Model.
5. To upload a Model, click UPLOAD FILE, locate and select the Model to be uploaded, and click the SAVE button.
6. The Model is then uploaded and processed on the cloud. A confirmation message will appear once the Model is ready.
7. Once the Model has been successfully uploaded, locate it in the Teamspaces Panel and click on the Model’s name to open it in the 3D Repo Viewer.
Additional options are available from the Model Menu (depending on the user’s Permissions).
10

Add Model Revision To upload a new revision of the Model:
1. In the Teamspaces Panel, click the three-dots menu icon next to the model you want to revise.
2. Select “Upload file”. 3. A pop-up window will appear, in
which you can specify the name of this revision and its description.
4. Click SELECT FILE to upload IFC or FBX file formats.
Access Model Revisions 3D Repo is a version control system. Each revision within a project can be accessed from the same Model Menu as accessed above:
1. In the Teamspaces Panel, click the three-dots icon next to the Model you want to revise. 2. Select “Revisions” from the menu to reach a list of the Model/Federation’s revisions.
Alternatively, you can switch through the revisions once you have opened a Model or Federation within the 3D Repo Viewer. Just click the Model or Federation name beneath the 3D Repo logo at the top of the screen, and a revision selection menu will pop up, as shown here:
11

Edit Model Name Open Model Settings by clicking the three-dots menu icon to the right of your Model then clicking Settings from the Model options list, and change the Model name in the upper-right of the Model Settings page. Make sure to scroll down and click the red SAVE button before leaving Model Settings.
Download Model Click the three-dots icon to the right of the Model you wish to download, then click the Download option from the menu that pops up. This will download the Model file directly within the web browser and should be available within your Downloads folder. (The shortcut to access the Downloads within both the Google Chrome and the Mozilla Firefox web browsers is Ctrl J.) The downloaded file will be of the same format as the file which was originally uploaded (e.g. if the uploaded file was a .ifc file, the downloaded file will be a .ifc file).
Delete Model Click the three-dots icon to the right of the Model you wish to delete, and click the Delete option. The Model will be deleted permanently from 3D Repo’s database. Use with caution. Note that Models cannot be deleted while they are part of any Federations. To delete a Model that is part of a Federation:
1. In the Teamspaces Panel, find the Federation that the Model is a part of. 2. Click the three-dot icon to the right of that Federation to bring up the Federation Menu. 3. Select the Edit option from the Federation Menu. 4. Click on the green minus button beside the Model to detach it from the Federation. 5. You will then be able to delete the Model when you return to the Model Menu.
12

Federations
Create Federation 1. Click the plus icon in the bottom-right corner of the Teamspaces Panel and click ADD
FEDERATION.
2. Specify the Teamspace (your Teamspace is selected by default).
3. Click the Project drop-down menu and select the relevant Project. 4. Type the Name of the Federation.
5. Specify the units of measurement from the drop-down list.
Note that these must match the units of measurement on the model data you will input.
13

6. Click on the green plus button next to the Model name in the Available list to add it to this new Federation.
7. Click on the green minus button to remove a Model from the Federated list to the Available List.
8. Click the SAVE button when done.
The Federation is then available in that Project’s Federations folder in the Teamspaces Panel. Access the Federation Menu by clicking the three-dots menu icon to the right of the Federation name in the Teamspaces Panel.
Edit Federation Click Edit in the Federation Menu to add or remove Models within the Federation (using the same plus and minus buttons as above).
Delete Federation Click Delete to delete the Federation. Note that the Models within the Federation are not deleted. To delete Models, access the Model Menu options by clicking the menu icon to the right of the Model’s name within the Teamspaces Panel.
14

3D Repo Viewer 3D Repo Viewer runs on WebGL and our technology exploits the capabilities of modern browsers to the limit in order to render the large BIM models common in construction and infrastructure projects. Loading large complex models may take up to several minutes. We recommend 8GB of RAM and the Chrome or Firefox web browsers for the best experience.
Switching between 3D Repo Viewer and Teamspaces Panel To enter the 3D Repo Viewer from the Teamspaces Panel and view your Model in 3D, click directly on a Model or Federation in their respective list in the Teamspaces Panel. To leave the 3D Repo Viewer and return to the Teamspaces Panel, click on the 3D Repo logo at the top-middle of the screen (unless the 3D Repo Viewer is in Focus Mode).
15

Navigation Modes ● Turntable (default) ● Helicopter
Click on the Navigation button in the lower toolbar to change navigation mode.
In Helicopter Mode there are also options to change the helicopter’s speed. These can be found by clicking the navigation mode button whilst in Helicopter Mode.
(Multi-)Select Objects Click on an Object to select it. To select multiple Objects, hold the Ctrl key and click them. To remove Objects from selection, hold Alt and click them.
Selection Box Hold down the Shift key then click and drag to select all items visible within a rectangular area. A Selection Box dragged to the right will select only objects fully within the rectangular area; one dragged to the left will select all objects that are at all within the rectangular area.
16

The following buttons are all in the lower toolbar in the 3D Repo Viewer.
Hide Objects To hide an Object, select it and then click the Hide button in the lower toolbar.
Isolate Objects BIM models are often complex and hard to navigate. You can Isolate single or multiple Objects for easier navigation. Select the Object(s) in the 3D Viewer (hold CTRL to multi-select) or in the Tree Card and click the Isolate button. It is also possible to Isolate Groups.
Show All Objects To reveal all hidden Objects, click Show All.
Zoom to Object Double-click on an Object to zoom to it. This also pivots the Turntable navigation system around the centre of the selected Object.
Return to Extent View To return to a viewpoint from which you see the whole Model, click the Extent button.
Focus Mode To hide all UI elements (buttons etc.), enter Focus Mode by clicking on the Focus button. To exit Focus Mode, click on the cross button in the top-right of the screen.
The Measure Tool is in the top-right of the 3D Repo Viewer.
Measure Tool 1. Click on the green Measure button on the top-right to activate the Measure Tool. 2. Pick the first and second points on the Model (the points between which you wish to
measure). 3. A pop-up will appear displaying the measured values. “L” is the distance between points,
and “X”, “Y”, “Z” are distance along the grid axes (“Z” is the vertical distance).
17

BIM Data BIM Data is any information about the building models (i.e. not direct modelling data). The Object Model as you see it in the 3D Repo Model Viewer is composed of model data; any information stored in the Model that is about e.g. an Object’s manufacturer is BIM Data, and will be displayed when 3D Repo’s BIM Tool is used on that Object. When you use the BIM Tool, this data is displayed in a pop-up Card upon Object selection.
1. Activate the Tool by clicking the BIM button on the upper-right of the screen. 2. Click on the Object you wish to inspect. 3. The BIM Data Card will pop up displaying the BIM data attached to that Object. 4. To deactivate the BIM Tool, click on the BIM button again.
18

Issues Organise and manage Issues for a Model or Federation within the 3D Repo Viewer
When you open a Model or Federation, the Issues Card is open by default. You can display/hide the Card by clicking the blue Issues button on the left edge of the screen. 3D Repo allows users to Comment, draw mark-up, place Pins, and save viewpoints in the Model. All these features can be used (so lots of information can be stored) within each Issue.
Note that Issues created within a Model will be visible in any Federations that the Model is a part of (if a user clicks Show Sub-Model Issues), but the reverse is not true: Issues created within a Federation will not be visible in any of that Federation’s Models.
In the Issues List, the names of the issues are prepended by the “Model Type” of the Model they were created within. This helps to differentiate, within the Issues List of a Federation, between the Issues of the different Models in that Federation. Model Type is set when a Model is created.
Show Closed Issues When the Status of an Issue is set to Closed, the Issue disappears from the Issues List. To view all Issues, including those whose Status has been set to Closed, click Show closed issues in the Issues Menu.
Show Sub-Model Issues Issues created on a specific Model can be seen when viewing any Federation that the Model is a part of. This setting is disabled by default, meaning that a Federation’s Issues List will normally only show Federation-specific Issues (i.e. Issues created on a Federation rather than any of its sub-Models). When viewing a Federation, to view Issues created for any Models within that Federation, open the Issues Menu and click on Show sub model issues. Note that all changes made to an Issue after its creation (including changes of Status, Priority, and Job Assignment) are tracked and are visible within the Comments section of each Issue.
19

Add Issue 1. Create a new Issue by clicking on the plus button at the bottom-right corner of the Issues
Card.
2. Give the Issue a Title.
3. Set the Priority (Low/Medium/High), Status (e.g. Open/Closed), and Type (e.g. Clash).
4. You can also assign (or re-assign) an Issue to a Job in the Assign drop-down menu.
5. Add or change the Due Date for the Issue.
6. Write a Description to provide more information about the Issue.
7. To create a Screenshot, position the viewpoint where you want it, then click on the Screenshot button at the bottom of the Card (it looks like a camera). Once the Screenshot Editor is open, the Draw Tool is active by default and you can sketch immediately.
a. Choose a pen colour from the drop-down menu and adjust the pen size with the slider. Sketch or annotate the Screenshot to highlight important details.
b. Select Eraser to erase any unwanted pen markings from your sketch.
c. If you want to move the camera, exit the Screenshot Creator and move the viewpoint before clicking the Screenshot button again.
d. Click the Save button when finished.
8. To place a Pin, activate the Pin Tool and click to place a Pin on any geometry within your model.
9. Object visibility and selection and the Pin Tool all affect the resulting Screenshot.
10. Click the Submit button to save the new issue to the 3D Repo database. The only detail necessary to create an Issue is its Title. Details, Description, Screenshot, and Pin are all optional features. Note that if you do not create a Screenshot for the Issue, the Viewer’s perspective at the time of the Issue’s creation will be saved as its Screenshot.
20

Information visible from the Issues List As well as basic metadata for each Issue (Title, Description, Creator), information for the Priority, Status, Date Created, and the Job to which the Issue has been assigned is visible at-a-glance from the Issues List. To view an Issue’s details (as well as its Edit History and any Comments made on it), click the Issue in the Issues List and then click the blue bar with the arrow that appears to the right of that Issue’s name.
- The Priority and Status of each Issue are visible via the circular icon in the Issues List, to the left of the username of the person who created the Issue.
- The date on which the Issue was created is visible to the right of the Issue’s creator’s username in the Issues List. If the Issue was created on the day it is being viewed, the time of its creation is shown.
- The bar to the left of each Issue is coloured according to the Job to which that Issue has been assigned. The colour to which each Job corresponds can be changed within Licences & Jobs.
- The Model Type appears at the start of each Issue name. (Model Type can be changed in Model Settings.) This is followed by a number which indicates how many Issues have been created before this Issue. The first Issue on this Model will have started “Architectural.1”.
Note that that first Issue is not visible in the screen-capture below because that Issue’s Status had been set to Closed, and the Issues List was not displaying Closed Issues when the screen-capture was taken. To display them, click Show Closed Issues in the Issues List Menu.
21

Priority The colour of the circle indicates the Issue’s current Priority (eg red for High Priority).
Status The content of the circle indicates the Issue’s current Status (eg empty for Open Status, blue with a tick for Closed Status).
22

Update an Issue’s Status ● A user with a Job to which an Issue has been assigned can enter the Issue Editor and
change the Status of that Issue to In Progress. ● Once the Issue has been resolved the user should change Issue Status to For Approval. ● This assigns the Issue to its author, who can then review it and flag it as Closed.
Closed Issues will disappear from the List. However, they remain saved in the Issue database and all Closed Issues can be accessed by clicking on the three-dots menu icon at the top-right of the Issues Card and toggling the Show Closed Issues command.
Job Assign to Job Assign a Job when creating or editing an Issue. Set specific colours for each Job in Licences and Jobs. The Issues List can be Filtered according to Job Assigned when the relevant Filter Tool is used. Job Assigned also affects the colour of the bar to the left of each Issue in the Issues List.
Note that users with the Job to which an Issue is assigned have the ability to re-assign that Issue to a different Job.
Filter by Job of Creator
To filter the Issues List by the Job of the user that each Issue was created by, tick and untick the Jobs in the Issues Menu. For example, in this picture the Asset Manager Job has been unticked, so any Jobs created by Asset Managers will not appear in the Issues List (until it is reticked or the page is refreshed).
23

Type Set the Issue’s Type to reflect the focus of the Issue: is it e.g. a Clash, Risk, or Design error? This information is searchable by the Issues List Filter tool (see above). For instance, if someone were to click on the magnifying glass icon at the top of the Issues Card, and then type in “Clash”, only Issues with the Type set to “Clash” will appear in the Issues List. (It is possible to add custom Issue Types to this list via Model Settings.)
Due Date Attach Due Date information which only an Admin of the Model/Federation can change. To alter a user’s permissions for Models or Federations, visit the Assign Permissions menu. Any changes to this information (as with all other information within an Issue) will show up in the Issue Comments section for that Issue. This “Edit History” can be easily viewed by Printing the Issues List. An Issue’s Edit History cannot be altered or deleted.
Pins Use a Pin to pinpoint the location of an Issue
Pins show up on the Model when the Issues Card is not displayed, and show through walls. Clicking a Pin moves the 3D Repo Viewer to the viewpoint saved within that Pin’s Issue. In the Issue Creator, the Pin icon is in the bottom-left next to the Screenshot icon. Click this Pin icon, then click where you want to place the Pin on your Model. Once you have placed the Pin where you want it, click the Pin icon in the Issue Creator to exit Pin placement.
24

Object Visibility and Selection Selected Objects, Tree visibility, Clip effect, and Pin placement are saved with an Issue. Use this feature to add helpful visual details to an Issue.
During an Issue’s creation, you can:
- Select or deselect multiple Objects by clicking while holding the Ctrl key. Hold Shift to use Selection Boxes.
- Adjust the Object visibility by clicking on the Eye icons within the Tree Card.
- Get a cross-section view of the Model by using the Clip Card (on the left bar).
- Place a Pin by clicking the Pin icon, then clicking where you want it on the Model.
When you click the Save icon in the Issue Creator’s bottom-right corner, a snapshot is taken of these settings and saved with the Issue. When you click on the Issue later, the Object selection and visibility (etc.) returns to what it was in this snapshot, and so you see the Model as it was viewed at the point of Issue creation. The 3D Repo Viewer also returns to the viewpoint it had at the moment of Issue creation.
25

Screenshots
An Issue’s Screenshot appears in the Issues List.
1. Click the Screenshot button when creating an Issue.
2. You can now draw on this image, which is a capture of the 3D Repo Viewer’s perspective when the Screenshot button was clicked. If you wish to change the perspective, exit the Screenshot Creator by clicking the cross in the top right corner, move the 3D Repo Viewer to your preferred Screenshot perspective, and click the Screenshot button once you are satisfied with the viewpoint.
3. Once you have drawn any helpful annotations (and have attained a good Screenshot view), click the circular Save button in the bar at the bottom of the Screenshot box.
4. If you wish to retake the Screenshot, simply click the Screenshot button again. Note that this will overwrite any existing Screenshot, since each Issue can only have one Screenshot. To attach further Screenshots, attach them with Issue Comments.
26
Comments You can also add a Screenshot to Issue Comments.
To add Comments, enter the Issue Editor (click the Issue, then the blue bar that has an arrow).
At the bottom of the Issue Editor, there is a box in which to write a Comment, a button to attach a Screenshot to the Comment, and a button to Submit the Comment.
Filter Tools
The number of Issues can grow quickly: the two Filter Tools help to search through them.
1. Activate the Filter Tool in the Issues header and start typing. 2. The Tool returns any Issues whose name, Type, or Job
assignment match what you have typed. 3. To reset the filter, click the cross button to the right of the text.
You can also Filter Issues by the Job of the user that created them by ticking or unticking Jobs in the “Created by:” section of the Issues Card’s Options Menu (shown here on the left).
27

Print List Print a complete or Filtered Issues List, or save it as a PDF.
A complete Issues List can be printed by just clicking the Print command in the Issues Menu. (Access the Issues Menu by ensuring the Issues Card is active on the left-hand icon bar, and then clicking the three-dots menu icon in the top-right corner of the Issues Card.)
This will open the Issues List into a new tab in your browser, in a printable format (i.e. there will only be the text and Screenshots of the Issues). Press Ctrl P and use your browser’s print wizard to send the content of this new tab to your local printer, or to save it as a PDF (by setting the Print Destination to a “Microsoft Print to PDF” or “Save as PDF” - if you encounter difficulties with this, try searching the internet for “Save webpage as PDF”, perhaps with the name of your browser e.g. Chrome). You can also print a Filtered Issues List, by using the Issue Filter Tools before clicking Print.
28

Import or Export Issues Issues Lists can be transferred to or from other platforms via the BCF format.
The ICF format carries Model data, but cannot carry Screenshots or textual comments. BCF, or BIM Collaboration Format, is a file format that adds Screenshots, textual comments, and more, separate to the ICF Model data layer. This allows information about Model Issues to be transferred alone, meaning that comments about Models can be communicated without the transfer of large files containing the 3D modelling data. Issues concerning a Model can be created in software such as Revit or Navisworks (through the use of third-party plugins if necessary) and then, if exported in BCF format, can be uploaded to 3D Repo. Likewise, Issues can be conveyed back to Revit and other software if you Export it in BCF format from 3D Repo.
Import/Export options are available in the Issues Menu.
Hide/Show Additional Information If you are using a small screen and you want to gain more space in the Issues Card (e.g. to view more Comments) then click on the arrow as shown below to collapse the Issue’s options panel. You can also adjust the size of UI elements by pressing CTRL + or CTRL - on your keyboard.
29

Groups Select and save Groups of Objects, then Isolate them or highlight them with colours.
Note that Groups do not carry across from Models into Federations those Models are in.
Create Group 1. Open the Groups Card (by clicking the Groups button in the bar on the left). 2. Click the plus button in the Card’s bottom-right corner to create a new Group. 3. Select Objects in the viewer or in the Tree (holding Ctrl while clicking to Multi-Select). 4. Change the Group’s name, and add a Description. 5. A random colour is assigned to new Groups; you can change the Group’s colour by
clicking on Group Colour (the paint bucket icon) in the bottom-left of the Card. The Group will be painted in this colour whenever Colour Override is enabled for it.
6. Save the Group by clicking the circular Save icon in the bottom-right of the Card.
30

Edit Group 1. Select a Group and click the blue arrow to Edit it. 2. Hold the Ctrl key and click Objects to add or remove
them from the Group (or use Shift to add/remove using Selection Boxes).
a. The Reset to Saved Selection button can be used to refresh the Object selection if you make any mistakes (e.g. clicking on nothingness, which will deselect all of the Objects). This button is the anti-clockwise arrow in the bottom-left of the Card, to the right of the bucket.
3. Edit the Group’s Name, Description, and Colour. 4. Save the Group with the bottom-right Save button.
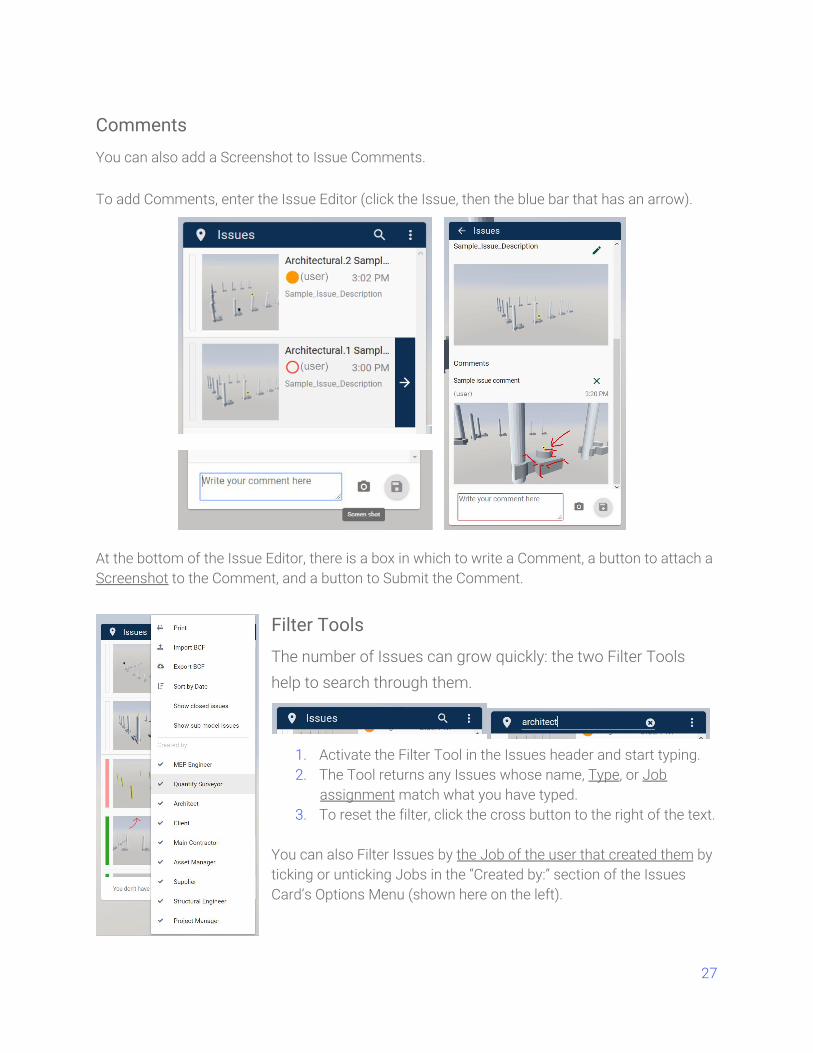
Isolate Group You can Isolate a Group by clicking the Eye icon in the Groups Menu.
31
Once one Group is Isolated, clicking another Group in the List brings it into display as well. To return from the Isolate effect, click the Show All button at the bottom of the screen.
32

Multi-Select Hold Ctrl while selecting Groups in the Card to Multi-Select them. This can be used: - to speed up deletion of multiple Groups or - to quickly highlight the Objects from multiple Groups (since selected Objects show through any intervening material).
Colour Override Highlight Groups in different colours.
Temporary Colour Override can be toggled with the Colour Override button in the Groups Card (the icon that looks like a drip, to the right of the eye icon). Colour Override makes a Group’s objects appear in the colours that were specified within the Group Creator/Editor.
33

Toggle All Colour Overrides / Delete All Groups These options are available in the Groups Card’s Options Menu, accessed by clicking on the three-dots icon in the top-right of the Groups Card. Click on Override All in the Groups Card’s Options Menu to toggle the Colour Overrides for all Groups on that model, making their objects appear in the colours that were specified within the Group Creator/Editor.
Note that Delete All Groups cannot be undone.
34

Views Saved Views provide easy access to points of interest on Models and Federations
Create View Click the green plus icon in the bottom-right of the Card to enter the View Creator. To create a View, place the 3D Repo Viewer where you want the Saved View to be created, give the View a helpful Name, and then click the green save icon in the bottom-right of the Card. Note that only the View’s name can later be changed. If you would like to reposition the View, create another View in the location you wish and then delete the old View.
Load View To load a View into the 3D Repo Viewer, simply click on it in the Views card.
Edit View Name To rename a View, click the View in the Views Card and then click on the pen icon to the right of the View’s name. Edit the text in the box, then click the Save button to rename the View, or click the cross button to cancel renaming the View.
Delete View In the Views Card, click on the View you wish to delete and then click on the bin icon in the bottom-left of the Card. This will delete the selected View.
35

Tree Use the Tree Card to manage Object selection and visibility.
The Tree Card shows all Objects within the Model/Federation and displays their hierarchy within the 3D Model. Click the plus/minus buttons to expand/collapse the hierarchy of the Tree. The Eye icons control the Objects’ visibility. Click to toggle between visible/hidden.
means an Object is visible;
means an Object is hidden;
means that one or more of the children (nested) Objects is hidden. If an Object is selected in the Tree, it is highlighted in the 3D view. Double-click on any Object in the Tree to zoom to it. To filter Objects in the Tree click on the Filter button and enter the desired keyword.
Clip Use the Clip Tool to cut a cross-section through your Model.
1. Click the blue Clip button at the left edge of the screen: the Clip Card will appear.
2. Select the axis (X/Y/Z), and move the slider to Clip the Model.
3. Click the Invert Clip Direction icon to flip which way Clip is active along the chosen axis (X/Y/Z).
4. The Eye icon in the header of the Clip Card activates/deactivates Clipping.
36

Compare 3D DIFF Compare will highlight where Models differ from one another; 3D CLASH Compare will highlight where Models clash with each other (i.e. where they do not differ).
To open the Compare Card, click on the Compare button in the left-hand icon bar whilst in the 3D Repo Model Viewer. Use the two tabs at the very top of the Card to switch Compare mode.
3D DIFF Compare
Compare revisions of a Model to find out what changed between them. The 3D DIFF Compare Tool highlights removed Objects red, and added Objects green.
Change the Base Model revision by selecting your desired revision from the selection bar beneath the 3D Repo logo at the middle of the screen.
37

The 3D DIFF Compare Tool will compare the Base Model against the Target Model, looking for differences. Remember: the 3D DIFF Tool compares between different revisions of one or more Models. By default the Target Model will be one revision lower than the Base Model.
To change a Target Model revision, click the arrow beside the Model name and select from the drop-down revision menu.
To use the DIFF Compare Tool on these two revision selections, click on the red Compare button in the bottom-right corner of the Compare Card. The revision comparison will load, and any changes between revisions will be displayed as red (for Objects removed since the earlier revision) or green (for additions since the earlier revision).
When Compare is selected, the Base Model and the Target Model will be visible simultaneously. Base and Target allow you to instantly view the earlier or later revision in isolation. To disable 3D DIFF, click on the green Compare button in the bottom-right corner of the Card.
38

3D CLASH Compare
The 3D CLASH Compare Tool will check if any Objects in the visible Base Models clash with any of the Objects in the visible Target Models. Note that you can only use the 3D CLASH Compare Tool on Federations.
When you first open the 3D CLASH Compare Tool, all of the Models in the Federation are set to visible. You can adjust this by clicking the Eye button to the left of the Model names until only the Models you wish to compare are visible. Click the red button in the bottom-right to activate the 3D CLASH Compare Tool. Note that this must be re-activated each time you change the Model selection. Note that you can also change the revisions of the Target Models by clicking the arrow to the right of their Model names.
39

The 3D Clash Compare Tool can be used in conjunction with the Clip Tool.
Note that when you log a clash in the Issues List, other users may not know e.g. which models are clashing. If it is not obvious which Objects clash, you can inform users within the Issue Description or in an Issue Comment.
40

GIS (Geographical Information Systems) The 3D Repo Model Viewer supports map integration via the GIS Tool.
If GIS Reference Information has been input (in Model Settings), activating the GIS Tool will load in map tiles onto the Model. If the map has loaded into the wrong place around the Model, check that the GIS References are accurate. If maps flicker, check the model’s units are correct.
41

Models & Federations
Model Settings Click the Settings button in the Model Menu, to the right of any Model in the Teamspaces Panel. Here, you can view the Model ID and Model Type, change the Model’s name, add Issue Types (tags or labels), and insert GIS Reference Information. You can also add 4D Sequence Tags to Models to allow users to click through a Model Sequence in VR.
42

Model Type / Model Code Issue names begin with the Model Type or Model Code.
A Model’s “Type” (e.g. Architectural) is set during Model creation (pictured right). This Type information will appear at the start of every Issue in the Issues List (unless a Model Code has been set). The full name of each Issue as it appears in the Issues List will be the Model Type (of the Model which the Issue was created in), then a full stop, and then the chronological Issue number of that Issue (i.e. the first Issue created on an Architectural Model will start “Architectural.1”), and then finally the Issue Title that was entered during Issue creation. After a Model has been created, its Model Type cannot be changed. However, this does not mean that the name of every Issue created within that Model will have to begin with the Model Type (which could get confusing if, for example, the Model Type were entered incorrectly). The name of each Issue will begin with the Model Type unless a Model Code is entered within the Model Settings. Whatever is entered as this Model Code will appear in place of the Model Type in each Issue’s name. Note that a Model Code can be a maximum of 5 characters in length.
Model Codes can be used to tell between Models which are of an identical Type.
Let’s say you have two important Architectural Models in your Federation, among other Model Types. It could get quite confusing if Issues created in either of these Architectural Models appeared in the Federation’s Issues List as Architectural.1, etc. To tell these Models of the same Type apart, then, you can edit their Model Settings (by clicking Settings in the Model Options within the Teamspaces Panel), and add a different Model Code to each. In this way, the Issue names could be made to start with “Arch1” and “Arch2”, for instance.
43

Issue Types Add Issue Types to filter the Issues List by different labels/tags.
Use Issue Types to filter Issues by any label you wish. For instance, you might use Issue Types to filter the Issues by the level they are on or the area they are in, or by type of Issue, etc.
To add an Issue Type to a Model, click on the Model Menu (to the right of the Model’s name in the Teamspaces Panel) and select Model Settings. Click where it says Enter issue types… and type the name you want to give the new Issue Type, then press Enter. The text you typed in should appear at the end of the list of Issue Types above. Once you have added an Issue Type to a Model, you will be able to add that Issue Type to any Issues within that Model. The Filter Tool filters the Issues List by Issue Type, among other things. For instance, only Issues with the Issue Type “Clash” will appear when “clash” is entered into the Filter Tool. Note that an Issue Type must be added within a Model’s Settings before it can be added to that Model’s Issues. This applies to Models and to Federations: you can add an Issue Type to a Federation in Federation Settings just as you would for a Model.
44

GIS Reference Information “Geographical Information Systems” references allow the Model to be located within the world and to be projected onto a map of its real-life surroundings within the Viewer.
GIS references are needed to use the GIS Tool within the 3D Repo Model Viewer.
Survey Point information is specified on site, while Project Point information will be available in the program that was used to model the building (e.g. Revit).
45

Profile
Edit User’s Information In the Profile page you can change the entries for your first name, last name and email address. (You cannot change your username.)
Update Password Type your old and your new password in the Profile page, then click UPDATE PASSWORD.
Add Profile Picture Click on the profile picture icon beneath the username, in the upper-left area of the homepage.
46

Billing
Licence Purchases
Licences enable you to assign permissions to other 3D Repo users.
Purchase a Licence in Billing, then assign it to a user within Licences & Jobs.
Subscription 1. Fill in all required fields. 2. Click the CONFIRM button. You will be redirected to PayPal where you will finalise the
subscription.
History All previous payments can be viewed in the HISTORY tab on the Billing page.
Quotas Your quota of alloted server space will depend on which 3D Repo subscription you have purchased. See http://3drepo.org/pricing/ for details.
Licences & Jobs See our pricing page for more details: http://3drepo.org/pricing/
Manage Licences 1. In the Licences page, type the
username you wish to add to your Teamspace.
2. Click on the ASSIGN button. 3. The new user appears in the
list beneath. 4. Select the user’s Job from
the drop-down menu. 5. Click on the green minus
button next to the user to revoke their Licence.
47

Manage Jobs Jobs help to group users depending on their role in a Project.
A list of default Jobs is available, but new, custom Jobs can be added easily.
1. In the Jobs tab on the Licences & Jobs page, type the name of a new Job. 2. Click on the ADD button. 3. You can now find the Job in the list beneath, and change its colour if applicable. 4. To remove a Job from the list, simply click on the green minus button next to it.
Job colours here affect the Issues List: the bar to the left of each Issue that has been assigned to that Job appears in the colour selected here.
48

Assign Permissions As Admin of your Teamspace, you can license other 3D Repo users to have certain permissions with regard to your Teamspace, Projects, and Models/Federations.
Access the Permissions Menu to the lower-left of the Teamspaces Panel, or in the Model Menu. Note that in order to have e.g. Collaborator permissions for a Federation, the user must have Collaborator permissions for all Models within that Federation.
49
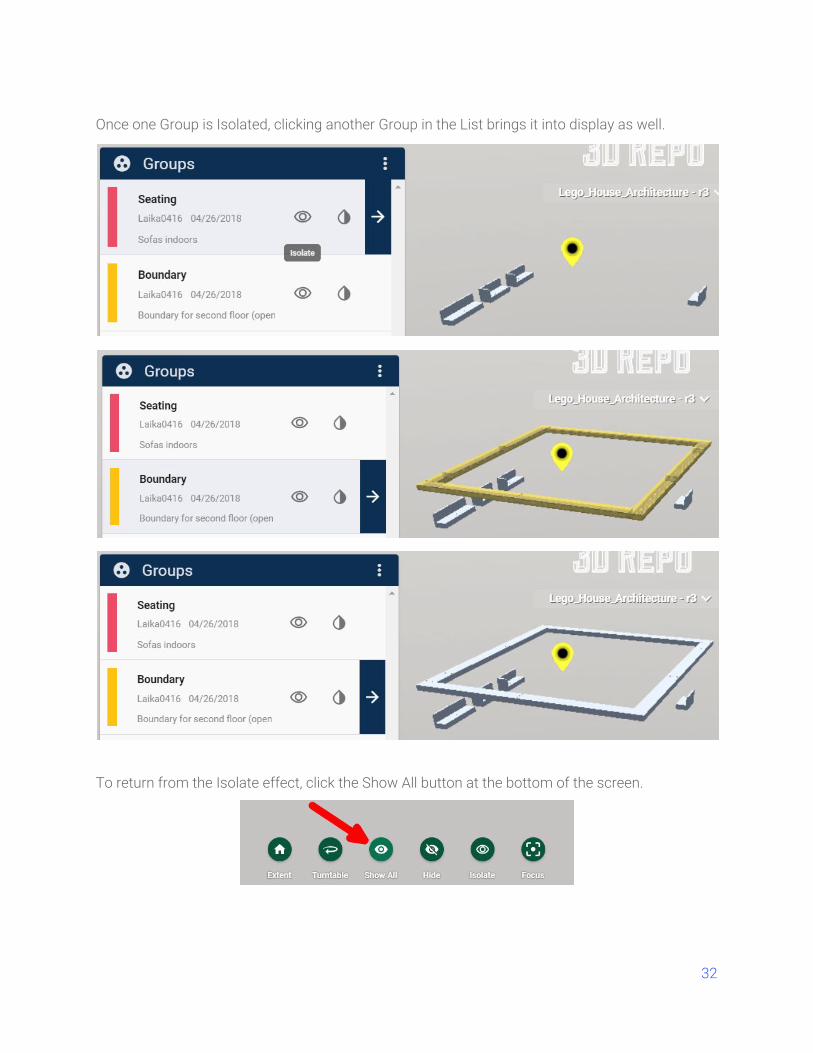
The following is a table outlining 3D Repo’s permissions system with regard to Issues:
In addition to the above:
A Viewer may view the Model/Federation, view all Groups, Saved Views, and Tree information within that Model/Federation, and use the Clip, Compare, GIS, BIM, and Measure tools. A Commenter has no additional permissions outside of those outlined in the Issues table above. A Collaborator may download the Model file and upload new revisions for it.
50

Touchscreen 3D Repo also has touchscreen capabilities, and so can be used within web browsers on iPads, tablets, and mobile phones. Smaller systems may experience difficulties in loading large models.
Virtual Reality 3D Repo has VR capabilities, and can be used with the HTC Vive among other technologies. See the 3D Repo VR User Manual.
Lite Mode Lite Mode does not load in the model data.
Lite Mode loads Issues data without loading in the model data, and so can be used to quickly view the Issues information about a Model or Federation without transferring large amounts of data, saving time and potentially money (depending on your data plan). There is the option to activate Lite Mode at any time by clicking the Profile icon in the top-right corner of the screen.
Lite Mode is automatically active for mobile devices, because there is not usually enough memory space on these devices to store large model files.
3drepo.io Infrastructure 3drepo.io is a cloud repository running on top of a NoSQL database MongoDB. All servers are located in the UK.
51

Workflow
Model Management Below is an example of Model Management for a construction project. Project P consists of multiple Models federated in 3D Repo. Each consultant or subcontractor uploads their part to the respective Model in 3D Repo. Partial Models can be collected in Navisworks, saved as NWD and uploaded as one Model. Alternatively, all partial Models are collected in Revit or Archicad and exported as one IFC.
Project P P_FED - Federated Model
P_ARCH - Architectural Model P_STRUCT - Structural Model P_MEP - MEP Model
52

Important Information about Uploading Models
Units All Models have to be in the same units when uploaded to 3drepo.io. Be aware that some exports (e.g. FBX export from Navis) give an option to change a Model’s units but don’t scale the Model. A Federation’s units are set during its creation, and cannot be changed after this. They can be viewed in Federation Settings, accessible through the menu button in the Teamspace Panel.
Coordinates Whether it is a new revision or another Model in the same Federation, all your Models need to share the same coordinates system to avoid any issues in 3D Repo or on the construction site.
About Revit Shared Coordinates IFC export with Shared Coordinates
Formats 3drepo.io supports over 40 formats. Most common are IFC for BIM packages, and FBX, OBJ, DAE for imports from other tools. Unsupported formats may work if uploaded via the 3D Repo Navis Plugin.
IFC Recommended IFC export settings for the best results in your BIM workflow:
Revit - IFC2x3 Coordination View 2.0 or IFC2x3 Extended FM Handover View Archicad - General Translator
Navis Plugin You can also upload models directly from Navisworks with the 3D Repo Navis Plugin.
1. Download the Navis Plugin from the Autodesk App Store, and install it. 2. Open your Navis model. 3. Remove/detach any unwanted objects that are far away from the main model (ideally, fix
this in your authoring tool) 4. Launch the 3D Repo Plugin: Export add-ins > 3D Repo Plugin 5. Log in using your credentials. 6. Specify Teamspace, Project, Federation, Model, and units, and then click Upload.
The Model has to be part of a Federation to appear in the Navis Plugin’s drop-down menu. Consult the 3D Repo Navis Plugin User Manual and the YouTube tutorial for more information.
53