
User Guide Core Impact 19.1 - S4 Applications
342
User Guide Core Impact 19.1
-
Upload
khangminh22 -
Category
Documents
-
view
2 -
download
0
Transcript of User Guide Core Impact 19.1 - S4 Applications

User GuideCore Impact 19.1

Copyright Terms and Conditions
The content in this document is protected by the Copyright Laws of the United States of America and other countries worldwide. Theunauthorized use and/or duplication of this material without express and written permission from HelpSystems is strictly prohibited.Excerpts and links may be used, provided that full and clear credit is given to HelpSystems with appropriate and specific direction tothe original content. HelpSystems and its trademarks are properties of the HelpSystems group of companies. All other marks areproperty of their respective owners.
201907250425

Introduction 9
Welcome 9
Installing and Activating Core Impact 11
Minimum System Requirements for Core Impact 19.1 11
Installing Core Impact 12
Activating the product 16
Activation Via Internet 16
Activation Via Email or Phone 17
Database Creation Wizard 17
Database Migration Wizard 18
Set Up Core Impact 18
How to Integrate with Metasploit 22
Automatic Integration with Metasploit 22
Manual Integration with Metasploit 22
Transferring a Core Impact Installation 23
Usage Statistics 25
Un-installing Core Impact 27
Understanding Licenses 29
Managing Installed Licenses 29
Backup/Restore Core Impact Licenses 30
Core Impact Architecture 32
Core Impact Architecture Features 32
Architecture Components 33
Core Impact Quickstart 36
Getting Started: The Dashboard 36
Software Updates 37
Module Updates 37
The Scheduler 37
Create a Workspace 41
User Guide Core Security, a HelpSystems Company page: iii
Table of Contents

Core Impact Console 44
Rapid Penetration Test (RPT) 48
Network RPT 49
Network Information Gathering 49
Network Attack and Penetration 63
Local Information Gathering 72
Privilege Escalation 74
Clean Up 76
Network Report Generation 77
One-Step Network RPT 77
Windows Domain IG Wizard 83
Client Side RPT 86
Client-side Report Generation 87
One-Step Client-side Tests 87
Client-Side Information Gathering 90
Client-Side Attack Phase: Attack and Penetration 100
Client-Side Attack Phase: Phishing 117
Local Information Gathering 124
Privilege Escalation 125
Clean Up 127
Web Applications RPT 128
WebApps Information Gathering 129
WebApps Attack and Penetration 149
WebApps Browser Attack and Penetration 154
WebApps Local Information Gathering 158
WebApps Report Generation 159
One-Step WebApps RPT 159
Core Impact and the OWASP Top 10 163
Remediation Validation 183
Reports 186
One-Step RPTs 200
Exporting Data from Core Impact 200
page: iv Core Security, a HelpSystems Company User Guide
Table of Contents

Workspaces and Teaming 204
Workspaces 204
Creating a New Workspace 204
Opening an Existing Workspace 208
Closing a Workspace 209
Deleting a Workspace 209
Importing and Exporting Workspaces 209
Teaming 214
Testing a Wireless Environment 218
WiFi Attack and Penetration 219
WiFi Modules 226
WiFi Reporting 228
Testing Network Devices 230
Network Device Information Gathering 230
Network Device Attack and Penetration 231
Post-exploitation Modules for Network Devices 232
Network Device Reporting 233
Working with Modules 234
Running Modules 235
Dragging and Dropping Modules 236
Specifying Host Ranges 237
Multiple Targets 238
Specifying Port Ranges 239
Launching Recently-executed Modules 241
Stopping Modules 242
Relaunch Modules 242
Resume Wizards 243
Using the Executed Modules View 243
Analyzing Module Output 244
Searching for Modules 246
Editing/Deleting Modules from the Modules Panel 247
Custom Modules 248
User Guide Core Security, a HelpSystems Company page: v
Table of Contents

Macro Modules 251
Creating Macro Modules 251
Using Macro Modules 253
Getting Module Updates 254
Controlling Agents 256
About Agents and WebApps Agents 256
Interacting with Agents 257
Deploying Agents 268
Interacting with WebApps Agents 274
Core Impact Entities 278
Network View 280
Understanding Visibility Changes 281
Client Side View 282
Web View 284
Managing Entities 285
Entity Details 290
Entity Properties 291
Editing the Value of a Property 292
Adding a New Property to a Container 293
Leveraging PowerShell 296
PowerShell Modules 296
Integration 298
Integration with Metasploit 298
Integration with PowerShell Empire 299
Core Impact Agent 300
PowerShell Empire Agent 300
Importing Data from Vulnerability Scanners 300
Using Imported Information 301
Obtaining and Utilizing User Credentials 304
About Identities in Core Impact 304
Obtaining the Password Hashes from a Compromised Host 304
Exporting the SAM hives and Volume Shadow Copy restore NTDS.DIT 305
page: vi Core Security, a HelpSystems Company User Guide
Table of Contents

Injecting code directly into the LSASS process 305
Kerboros Golden & Silver Tickets 305
Sniffing Password Hashes from the Network 306
Using the Core CloudCypher Service 307
Logging Keystrokes on a Compromised Host 308
Collecting Saved Login Credentials 308
Using Obtained Passwords 309
Setting Console Options 310
Modules 310
Agents 312
Entities 314
Network 315
One-step RPT 317
User Actions 319
Search Engines 321
Community Usage 322
Core CloudCypher 322
Other 323
Customizing Toolbars and Keyboard Shortcuts 326
Customizing Toolbars 326
CVE and Core Impact 330
Core Impact Underlying Technology 332
Agent Technology 332
The ProxyCall Interface 332
Python 332
SysCall Proxying 333
About Agents 334
Agent Auto Injection 336
Communication Channels 337
Contact Core Security 342
Sales Support 342
Product Support 342
User Guide Core Security, a HelpSystems Company page: vii
Table of Contents

Customer Portal 342
page: viii Core Security, a HelpSystems Company User Guide
Table of Contents

IntroductionWelcome
Welcome to the "Core Impact 19.1 User Guide"!
Core Impact elevates the practice of penetration testing to the new standards of qualityrequired by today's organizations. The application provides you with not only a comprehensiveand scalable framework in which to perform penetration tests, but also a controlled environmentin which to perform them. Core Impact allows you to do the following:
l Automate the penetration testing process, targeting hosts, users, web applications, WiFinetworks and network devices.
l Safely and efficiently determine how a malicious attacker might gain access to or disruptyour information assets.
l Define and execute a repeatable and scalable testing methodology.
l Increase team productivity.
l Leverage security knowledge and expertise across penetration tests.
The chapters that follow teach you how to use Core Impact as efficiently as possible so you canrapidly achieve each one of these goals. If you have already installed Core Impact and created aWorkspace, you can also get a jump-start and view the available Quick Guides - these will guideyou through some basic penetration tests with Core Impact.
User Guide Core Security, a HelpSystems Company page: 9

page: 10 Core Security, a HelpSystems Company User Guide

Installing and Activating CoreImpact
Before you install Core Impact , please read the Release Notes (included with the distribution). Ifyou do not read the Release Notes, you may overlook important information regarding theinstallation, configuration and use of the product.
WARNING:Antivirus software will interfere with the installation of Core Impact and may interfere withCore Impact's operation. Disable antivirus scanners during installation and then exclude thefollowing Core Impact installation directories from your antivirus tool's scanning locations:
l %ProgramData%\IMPACT
l c:\Program Files\Core Security (on 32-bit operating systems)
l c:\Program Files (x86)\Core Security (on 64-bit operating systems)
Minimum System Requirements for CoreImpact 19.1
The following operating systems are certified platforms for Core Impact. These platforms havebeen tested thoroughly by Core Security staff.
l Windows 10 Enterprise 64 bit
l Windows 10 Pro 64 bit
The following operating systems are supported platforms for Core Impact. These platforms havealso been tested and, although they are not certified, they are fully expected to provide a stableplatform for Core Impact.
l Windows Server 2016 Standard
In addition to an accepted operating system, the below minimum requirements should be met:
l Intel Core i5 (4th Generation)
l 8 GB RAM
l 4 GB Free Hard Disk Space (hard disk capacity requirements increase with the quantity ofhigh-volume test workspaces)
l Internet Explorer 11.0 or later
l A Windows-compatible Ethernet networking card. Core Impact works with wirelessnetwork interface cards.
l Screen resolution: 1024 x 768 minimum (1280 x 1024 recommended)
Please note the following important details about Core Impact:
User Guide Core Security, a HelpSystems Company page: 11

Installing and Activating Core Impact / Installing Core Impact
l In order to create a Fake Access Point using Core Impact, you must use a Pineapple Nano(https://www.wifipineapple.com/) wireless network auditing tool.
l In order for you to install and use Core Impact, you must have Administrator privileges onthe system.
l Unless otherwise stated by a module or exploit, Core Impact is compatible to run on andtarget US English versions of the specified operating systems only.
l Connecting directly with a DSL/Cable modem using PPTP will limit some of the product'sfunctionality (packet capture and custom packet crafting).
l Some modules (such as Remediation Validation, Resume, Agent Redploy) may not run onWorkspaces generated from a previous version of Core Impact. These modules willautomatically detect this condition and abort on startup so as to prevent executing aninvalid command.
Installing Core ImpactCore Impact is distributed as a self-installing Windows executable (.exe). If you are currentlyrunning an older version of Core Impact, you do not need to uninstall it before installing thelatest version.
1. If you have a download link for the software, save the distribution to a temporarydirectory and double click the CORE_IMPACT-19.1.exe file. If you are using analternative distribution media such as a CD, double click on the .exe file. Whendistributed as a download, the installer is encrypted with a pass phrase which you shouldhave received via email. You will be presented with a dialog for entering this pass phrase.
Decrypting the installer
If the passphrase is correct, the installer will self-decrypt and start. The Welcome DialogBox of the InstallShield Wizard appears.
The installer reads every character entered into the decrypter, including white spaces.Ensure you have removed trailing spaces if you copy and paste the passphrase into thefield.
2. If you do not have certain required software already installed on your computer, theinstaller will install them for you. Click the Install button if/when prompted.
3. In the License Agreement Window, read the product license for Core Impact . To acceptthe license, click the I accept the terms ... radio button and then click Next. If the licenseis not accepted, Core Impact will not install.
License Agreement Window
page: 12 Core Security, a HelpSystems Company User Guide

Installing and Activating Core Impact / Installing Core Impact
4. You will be prompted for the destination location. You can change the destination folderby pressing the Browse button. Press Next to continue.
Destination Location Window
5. Antivirus software will interfere with the installation of Core Impact and may interferewith Core Impact's operation. This page of the wizard is a reminder to disable antivirusscanners during installation.
Antivirus Product Warning
User Guide Core Security, a HelpSystems Company page: 13

Installing and Activating Core Impact / Installing Core Impact
Temporarily disable any Antivirus tools running on your machine, then click the Nextbutton.
6. If you have had Core Impact installed on your system previously, you may see a warningthat all previous files except the Core Impact database will be erased.
Previous Installation Warning
If needed, back up your previous installation's files, then click the Next button.
7. The installation Wizard will display a summary of the installation. Review the informationand click Next.
Start Copying Files Window
page: 14 Core Security, a HelpSystems Company User Guide

Installing and Activating Core Impact / Installing Core Impact
The installation of Core Impact will begin. Core Impact may also install any dependenciesit needs - this is normal and these installers should be allowed to continue.
8. The wizard will notify you when the installation is complete.
Installer Finished
9. Click the Finish button.
Core Impact's installation process also installs the following required software:
l Microsoft Visual C++ 2010 Redistributable (x86)
l Microsoft Windows Installer 4.5
l Microsoft .NET Framework
l Microsoft SQL Server 2012 SP1 Express
l Crystal Reports 2008 Runtime SP3
User Guide Core Security, a HelpSystems Company page: 15

Installing and Activating Core Impact / Activating the product
l Microsoft Internet Information Server 7.5 Express
l Microsoft Windows Installer 4.5
If you had a previous version of Core Impact installed or if this is a brand new installation, theMigration Wizard may appear when you first launch Core Impact. For more details on this, seeDatabase Migration Wizard.
After installing Core Impact, you should install the 3rd party software program provided byCore Security. Simply follow the prompts and allow the required third party application toinstall.
Activating the productThe first time you run Core Impact on a new computer you will be presented with theActivation Wizard. You must activate Core Impact in order for it to operate.
1. When the Activation Wizard opens, click the Next button.
2. Select Activate automatically ... if you want to activate over the Internet. Select Activatevia telephone or email if you don't have an active Internet connection. Then click theNext button.
Activation Mechanism
Activation Via InternetIf you have an active Internet connection on the computer where Core Impact is installed, theproduct can activate automatically through the network. Core Impact will connect to theInternet based upon settings that you enter during the activation process. You can configureCore Impact to:
page: 16 Core Security, a HelpSystems Company User Guide

Installing and Activating Core Impact / Database CreationWizard
l Use Internet Explorer settings: this is the default setting and assumes that you configuredyour Internet connection via Internet Explorer's Tools -> Internet Options -> Connectionsform.
l Use a Direct connection to the Internet
l Use a proxy server
Activate Core Impact
You can change these connection settings in Core Impact after the initial installation bynavigating to the Tools -> Options -> Network configuration screen from the CoreImpactconsole.
Activation Via Email or PhoneIf the computer on which you are installing Core Impact does not have an active connection tothe Internet, you can activate the product via email or by phone. The Activation Wizard willpresent you with a Reference Code specific to the computer on which Core Impact is running.Please contact Core Security via email or phone with the code referenced in the Wizard (seeContact Support for contact information) and you will be given an Activation Key to activate theproduct.
Database Creation WizardIf you are installing Core Impact for the first time on a machine, the Database Creation Wizardwill automatically begin when you launch Core Impact. Simply follow the on-screen prompts tocomplete the creation process.
Database Creation Wizard
User Guide Core Security, a HelpSystems Company page: 17

Installing and Activating Core Impact / Database MigrationWizard
Database Migration WizardIf you install Core Impact after having an older version, the Database Migration Wizard willupgrade your database(s). If it is a brand new install of Core Impact, the Database MigrationWizard will create a database for you. Simply follow the on-screen prompts to complete themigration process.
Database Migration Wizard
Set Up Core Impact
page: 18 Core Security, a HelpSystems Company User Guide

Installing and Activating Core Impact / Set Up Core Impact
When you first launch Core Impact, the Setup Wizard will open which will allow you to setnetwork configurations and community usage preferences. Network settings can be changed atany time by accessing Network Options in Core Impact. Community usage preferences can alsobe modified by accessing Community Usage Options.
1. When the Setup Wizard opens, click the Next button.
Setup Wizard
2. Select your preferred Network Interface from the drop-down menu, then click the Nextbutton.
Setup Wizard
3. Define how your system connects to the Internet. If you Use a proxy server, enter yourproxy's connection details, then click the Next button.
Setup Wizard
User Guide Core Security, a HelpSystems Company page: 19

Installing and Activating Core Impact / Set Up Core Impact
4. Core Impact provides the ability to connect to the Core CloudCypher, which is a paidweb-based service that attempts to determine the plain text passwords for discoveredNTLM Hashes from Windows machines. From the Automatically Submit Credentials dropdown, select one of the following options:
l Yes: Hashes will be automatically submitted to the CloudCypher service.
l No: Hashes will not be automatically submitted to the CloudCypher service. Youwill still be able to submit them manually.
l Never: The ability to send hashes to the CloudCypher service will not be availablein your current installation of Core Impact.
If you choose either Yes or No, you can modify this setting in the Core CloudCypherOptions section of the Preferences, after the installation has been completed.
You can also enter an email address to which notifications will be sent when a crackingprocess has completed.
Setup Wizard
page: 20 Core Security, a HelpSystems Company User Guide
Installing and Activating Core Impact / Set Up Core Impact
Then click the Next button.
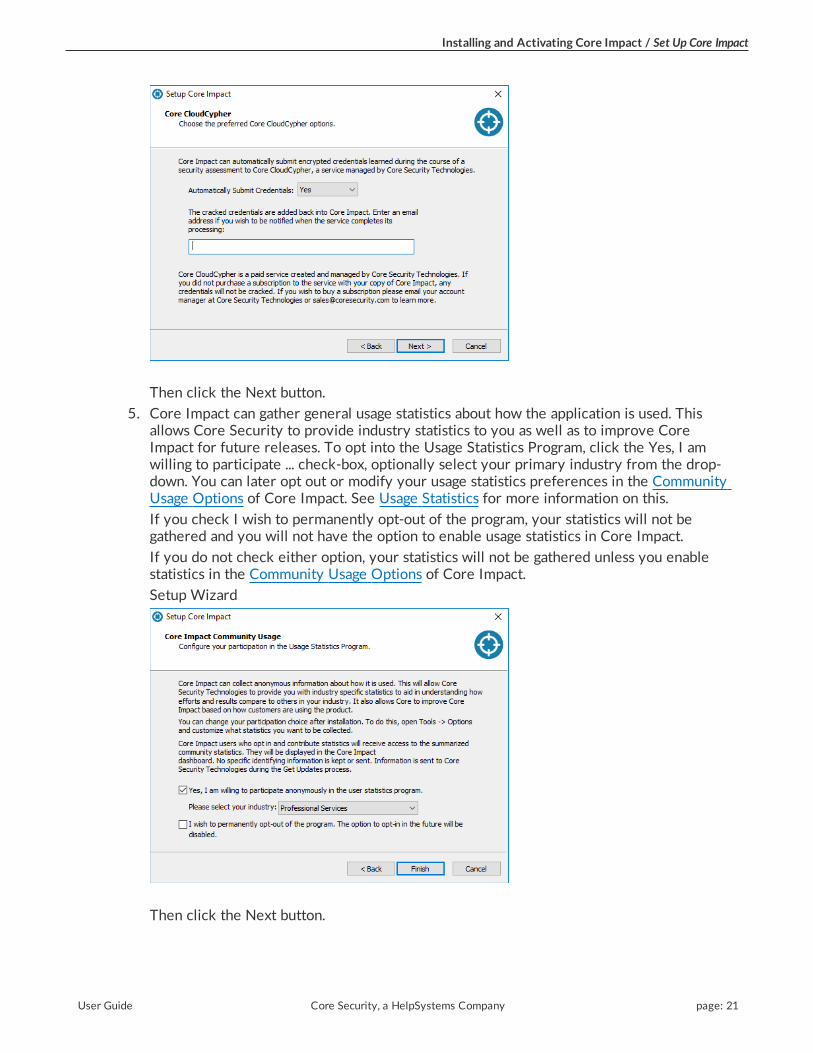
5. Core Impact can gather general usage statistics about how the application is used. Thisallows Core Security to provide industry statistics to you as well as to improve CoreImpact for future releases. To opt into the Usage Statistics Program, click the Yes, I amwilling to participate ... check-box, optionally select your primary industry from the drop-down. You can later opt out or modify your usage statistics preferences in the CommunityUsage Options of Core Impact. See Usage Statistics for more information on this.
If you check I wish to permanently opt-out of the program, your statistics will not begathered and you will not have the option to enable usage statistics in Core Impact.
If you do not check either option, your statistics will not be gathered unless you enablestatistics in the Community Usage Options of Core Impact.
Setup Wizard
Then click the Next button.
User Guide Core Security, a HelpSystems Company page: 21
Installing and Activating Core Impact / How to Integrate with Metasploit
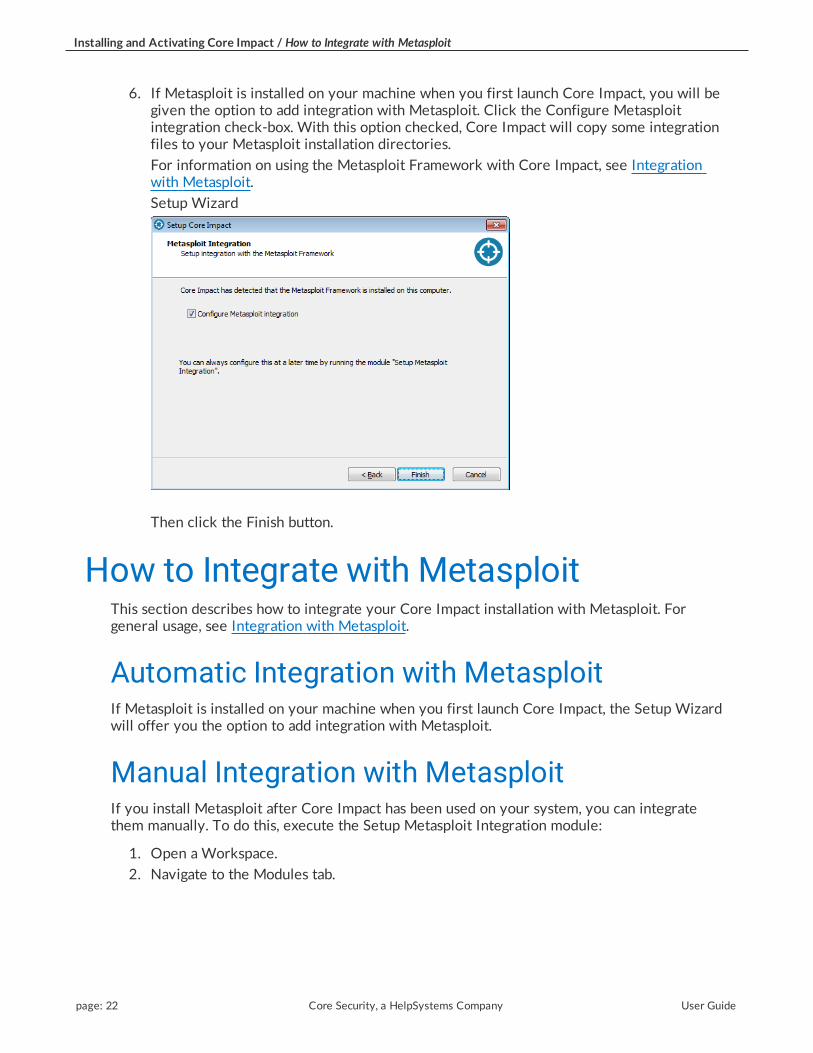
6. If Metasploit is installed on your machine when you first launch Core Impact, you will begiven the option to add integration with Metasploit. Click the Configure Metasploitintegration check-box. With this option checked, Core Impact will copy some integrationfiles to your Metasploit installation directories.
For information on using the Metasploit Framework with Core Impact, see Integrationwith Metasploit.
Setup Wizard
Then click the Finish button.
How to Integrate with MetasploitThis section describes how to integrate your Core Impact installation with Metasploit. Forgeneral usage, see Integration with Metasploit.
Automatic Integration with MetasploitIf Metasploit is installed on your machine when you first launch Core Impact, the Setup Wizardwill offer you the option to add integration with Metasploit.
Manual Integration with MetasploitIf you install Metasploit after Core Impact has been used on your system, you can integratethem manually. To do this, execute the Setup Metasploit Integration module:
1. Open a Workspace.
2. Navigate to the Modules tab.
page: 22 Core Security, a HelpSystems Company User Guide

Installing and Activating Core Impact / Transferring a Core Impact Installation
3. Locate and double-click the Setup Metasploit Integration module. (Open the Metasploitfolder or use the search bar and search for "metasploit".)
Setup Metasploit Integration Module
4. Click Ok on the module parameters window - there are no parameters for you toconfigure.
Your Core Impact installation will be configured to interact with the Metasploit Framework. SeeIntegration with Metasploit for usage.
Transferring a Core Impact InstallationIf you need to transfer an installed and activated version of Core Impact to a different computerbecause you are upgrading your hardware, you will need to follow the below steps:
1. Backup your Core Impact license (see Backup the Core Impact License).
2. Deactivate your Core Impact installation.
a. From the Core Impact dashboard screen, select Tools -> Deactivate Core Impact
User Guide Core Security, a HelpSystems Company page: 23

Installing and Activating Core Impact / Transferring a Core Impact Installation
b. The Deactivation Wizard will appear. Click the Next button.
Deactivation Wizard
c. Select a Deactivation Method - either via Internet connection or via telephone oremail - then click the Next button.
Deactivation Method
d. If deactivating via the Internet, you will then need to verify the Internet connectionmethod.
Internet Connection
page: 24 Core Security, a HelpSystems Company User Guide

Installing and Activating Core Impact / Usage Statistics
e. If deactivating via telephone or email, your next step will be to contact CoreSecurity and provide them with the Reference Code in order to receive yourdeactivation key. Enter the deactivation key into the field provided.
Telephone / Email Deactivation
Click the Next button.
f. The deactivation will proceed and a notification will appear when complete.Now that Core Impact is deactivated, you can proceed with the un-install.
3. Un-install Core Impact (see Un-installing Core Impact).
4. Install Core Impact on the new computer.
5. Use the Restore License procedure with the license backed up in step 1.
6. Activate the new installation (see Activating Core Impact).
Usage Statistics
User Guide Core Security, a HelpSystems Company page: 25

Installing and Activating Core Impact / Usage Statistics
Core Impact can gather statistics about how the application is used and will report theinformation to Core Security for analysis. Conclusions drawn from the data will be used toprovide you with industry statistics as well as to improve Core Impact in future releases. BeforeCore Impact transmits any usage information, the data is made anonymous (stripped of anyidentifying data) and encrypted. You can view your statistics by performing the following steps:
1. Open a Core Impact workspace.
2. Navigate to the Modules view and make sure the Network entity view is active.
3. In the Module search bar, enter the string "stats". This should cause the View Local Statsmodule to appear.
4. Double-click the View Local Stats module. The module's parameters will appear.
5. Set the ALL WORKSPACES parameter according to your preference.
l NO: Will show statistics for current workspace only.
l YES: Will show statistics for all workspaces.
6. Click the OK button.
View the Module Log tab to monitor the module's progress. View the Module Output tabto view the statistics.
Statistics GatheredBelow is a list of statistics that can be collected. You can opt in or out of any or all of these byconfiguring the Community Usage Options in Core Impact.
Overall Usage
A summary of all systems discovered since the last usage report, including:
l Operating Systems discovered including version and service pack level
l Services discovered with operating system
l TCP open ports discovered
l UDP open ports discovered
Modules
l Total runtime of all modules since last usage report
l Average runtime of modules since last usage report
l Modules run manually
l Modules run via Wizard (RPT)
Workspaces
l Number of workspaces
l Number of hosts per workspace
l Number of web pages per workspace
Entities
Hosts, emails, web applications and their vulnerabilities (anonymized).
page: 26 Core Security, a HelpSystems Company User Guide
Installing and Activating Core Impact / Un-installing Core Impact
Exploit usage
Summary of exploits (successful and failed) from Attack & Penetration and Privilege Escalationthat were run since the last usage report.
Non-Exploit modules
Summary of non-exploit modules (Information Gathering modules) that were run since the lastusage report.
Reporting
Summary of reports run, including frequency and size of reports.
Pivot Usage and Depth
l Pivoting frequency and depth.
l List and count of modules used per agent.
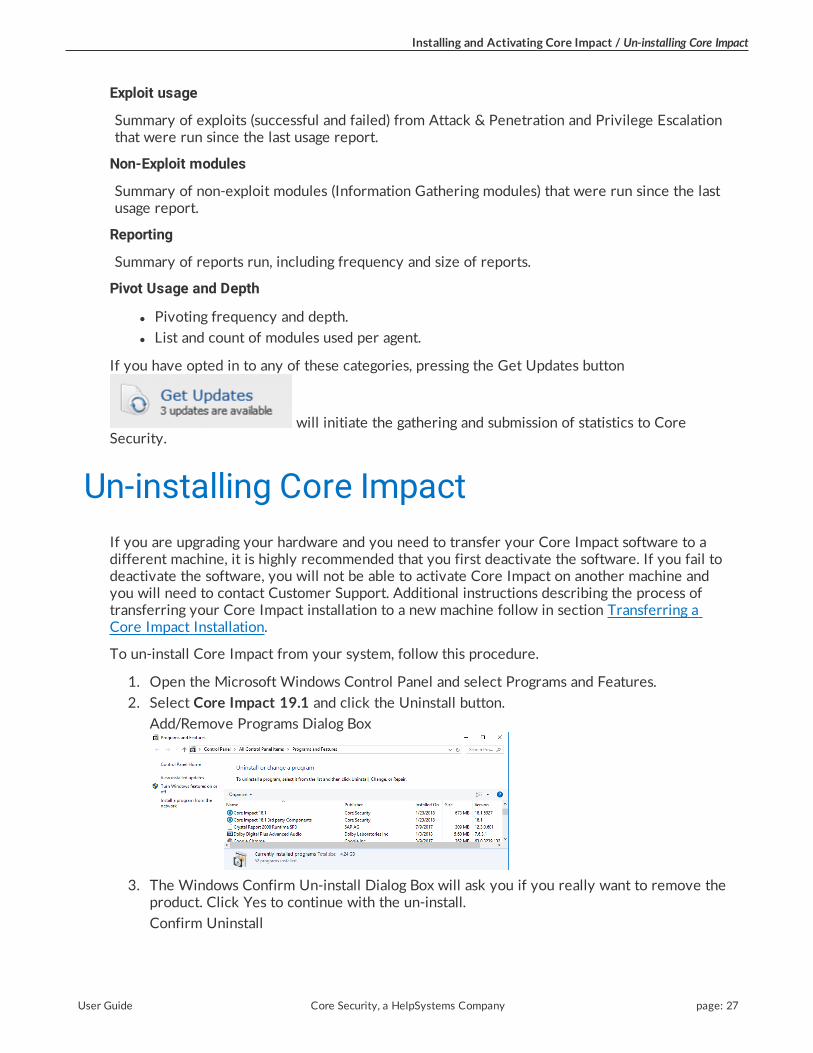
If you have opted in to any of these categories, pressing the Get Updates button
will initiate the gathering and submission of statistics to CoreSecurity.
Un-installing Core ImpactIf you are upgrading your hardware and you need to transfer your Core Impact software to adifferent machine, it is highly recommended that you first deactivate the software. If you fail todeactivate the software, you will not be able to activate Core Impact on another machine andyou will need to contact Customer Support. Additional instructions describing the process oftransferring your Core Impact installation to a new machine follow in section Transferring aCore Impact Installation.
To un-install Core Impact from your system, follow this procedure.
1. Open the Microsoft Windows Control Panel and select Programs and Features.
2. Select Core Impact 19.1 and click the Uninstall button.
Add/Remove Programs Dialog Box
3. The Windows Confirm Un-install Dialog Box will ask you if you really want to remove theproduct. Click Yes to continue with the un-install.
Confirm Uninstall
User Guide Core Security, a HelpSystems Company page: 27

Installing and Activating Core Impact / Un-installing Core Impact
All Core Impact files except configuration and database files will be removed from your system.
page: 28 Core Security, a HelpSystems Company User Guide

Understanding Licenses / Managing Installed Licenses
Understanding LicensesYour Core Impact distribution is configured to work under one or more licenses. Licensesdefine the targets you can test with the product and also define the machine on which you canrun Core Impact. Remember, you can add additional licenses to your distribution withoutreinstalling the product.
Navigate in Core Impact to Tools -> License manager to view your license details. A limitedlicense has the following factors associated with it:
Starting date
The date on which the license becomes valid.
Expiration date
The date on which the license expires. When a license expires, targets within a workspacecannot be modified and new targets cannot be added.
IPs quantity
The maximum number of targets (unique IP addresses) that you can test with Core Impact.
Remaining IPs
The remaining number of IPs that you can test.
IP Changes
The maximum number of IPs that you can remove after testing.
Remaining Changes
The remaining number of IPs that you can change. Clicking the Used IPs button will allow youto remove IPs from the list.
IP Ranges
The range of IP addresses that can be tested with the product. You can add and modify targetsthat belong to any of the listed ranges.
Managing Installed LicensesYou can use the License manager to view installed licenses and install new ones. To use theLicense manager, follow this procedure:
1. Select Tools -> License manager from Core Impact main menu.
License manager Dialog Box
page: 29 Core Security, a HelpSystems Company User Guide

Understanding Licenses / Backup/Restore Core Impact Licenses
2. Click on any of the licenses listed in the Available licenses Panel to display its properties,or click on Add new to install a new license from a downloaded license file. You will thenbrowse to its location and select it.
To purchase additional licenses, or if you wish to extend an existing license, contact CoreSecurity.
Backup/Restore Core Impact LicensesCore Impact allows users a convenient way to back up and subsequently restore their license(s).
Backup the Core Impact License1. Make sure all Workspaces are closed and click Tools -> Backup/Restore Impact Licenses...
2. Leave the Backup radio button selected.
3. Either type the full path or browse (using the ellipsis button) to the target file for thebackup. The file will be a (.bak) file.
Backup Core Impact License
4. Click the OK button.
5. Click the OK button on the verification pop-up message.
User Guide Core Security, a HelpSystems Company page: 30

Understanding Licenses / Backup/Restore Core Impact Licenses
Restore the Core Impact License1. Make sure all Workspaces are closed and click Tools -> Backup/Restore Impact Licenses...
2. Select the Restore radio button.
3. Either type the full path or browse (using the ellipsis button) to the source .bak file ofthe backup.
Restore Core Impact License
4. Click the OK button.
5. Click the OK button on the verification pop-up message.
page: 31 Core Security, a HelpSystems Company User Guide

Core Impact ArchitectureCore Impact Architecture Features
Core Impact delivers the following features within its framework:
A repeatable process for penetration testing: Core Impact supports all the steps needed for asuccessful network, client-side and web applications penetration test. It approaches all phases ofa penetration test in an intuitive and usable fashion, and consistently provides the user with anup-to-date view of all information accumulated during the current penetration test.
Flexibility: Core Impact provides a flexible penetration testing framework, capable of adoptingmethodologies defined by the user and adapting to different target configurations.
Scalability: Core Impact provides a highly scalable penetration testing solution:
l Test web applications with up to 200 web pages.
l Run client-side tests through over 3,000 target email accounts.
l Run network tests of up to 8 half-populated class-C networks.
Commercial-grade exploit code: Core Impact provides you with up-to-date support for a widerange of exploits for different platforms, operating systems, and applications, and multiplecombinations of versions. These exploits allow you to gain and retain access on the target host orapplication.
A powerful framework for developing exploits and tools that aid in the penetration testingprocess: Core Impact's framework enables your team of Information Security experts todevelop and customize new or existing tools quickly by providing a mechanism for acquiring andreusing knowledge and experience from successive penetration tests and different penetration-
testing teams. When possible, it also enables the creation of exploit code and scripts that areindependent of the target operating system or hardware architecture.
Some exploits/tools are platform-dependent due to the nature of the functionality they provide(for example, a 'chroot breaker' module will not work on a Windows system).
Transparent pivoting: Core Impact execution subsystem, together with its agent technology,enables modules to run from intermediate compromised hosts without modification. Thispowerful capability allows you to seamlessly stage or proxy attacks through intermediate hoststo probe further into the network.
Complete logging of test activities: All of the activities completed within Core Impact'sframework are logged and stored in a database for later analysis and reporting.
It is not in the current scope of the product to provide a secure non-repudiable log of all theactivities performed by the user (a log that would allow for "auditing the tester"), but it doesgreatly simplify the reporting and clean-up stages of the penetration test.
User Guide Core Security, a HelpSystems Company page: 32
Core Impact Architecture / Architecture Components
Architecture ComponentsAt a basic level, Core Impact architecture achieves the following:
l Performs actions on behalf of the user (these actions are represented by modules).
l Deploys and controls agents on the target network. Agents perform the actions (modules)the user indicates.
l Centralizes the collection of information and keeps track of every performed action.
l Generates reports.
Core Impact architecture consists of a number of components working together to firstcompromise and then interact with the target host or application. The three primarycomponents of the architecture are Agents, Modules and the Console. All knowledge obtainedduring assessments is consolidated in a central repository of information called the EntityDatabase. These components are described in the sections below.
AgentsAgents are a fundamental component of Core Impact's architecture. For Network and Client-side tests, an OS agent is a program that is installed by Core Impact on a compromised systemimmediately following a compromise. For Web Application tests, an agent represents knowledgeof an exploitable vulnerability in the web application, but does not represent any code CoreImpact has placed in the Web Application. The agent's primary purpose is to perform operationsrequested by the Console host (ultimately representing the user's orders) on the compromisedsystem. Agents can also perform operations on other agents, a process known as "chaining." Formore details about agents, see Controlling Agents.
ModulesModules are individual operations, or a group of operations, that are executed by an agent. Forexample, modules can launch specific attacks against a target host, such as a web server, andperform information gathering tasks ranging from packet sniffing to active port scanning.Modules can also call and execute other modules.
See Working With Modules for more information on how to run and manage modules in CoreImpact . If you are interested in developing modules for Core Impact, please refer to the "CoreImpact Developer's Guide."
The ConsoleThe Console consists of Core Impact Graphical User Interface and serves as an initial launchingpoint for all modules, a management tool to visualize the network being attacked, and areporting tool for outputting resultant information. The Console is the centralized gatheringpoint for all information obtained from agents that may be deployed across multiple targets andvarying operating systems. The Console provides visualization of data ranging from a specificnetwork scan output to a module's successful exploit against a remote system.
The Console comes with an embedded agent that, by default, is the starting point of anypenetration test. This agent is called the "localagent".
page: 33 Core Security, a HelpSystems Company User Guide

Core Impact Architecture / Architecture Components
By interacting with the Console, you control the execution of Core Impact modules. Sincemodules run on a specific agent, there is always a selected agent for execution. This agent will bereferred to in this document and in the Console itself as the default source agent. By default,when the Console starts, the "localagent" is selected as the default source agent.
Entity DatabaseThe Entity Database constitutes the single and centralized repository of information gathered byCore Impact. It contains information such as module output, complete activity logs, informationabout target systems (hosts that are known, client-side information, operating systems, openports, etc.), and agent deployment. This information is entered either manually by the user orthrough the automatic processing of module output. You can assess the state of the wholepenetration test simply by looking at this database at any time.
Structured information such as target networks, hosts, client emails, vulnerable web pages,deployed agents, open ports on a host, and found user accounts are represented as objects in thisdatabase. These database objects are referred to in the product as "entities."
An entity is any object that can be managed by the database. All entities can serialize and de-serialize themselves to and from XML, allowing you to easily manipulate the data in otherprograms. Any findings of a module that can be shared are in the form of entities. Entities alsoinclude the functionality to compare different revisions of themselves and resolve conflicts (forexample, allowing the user to choose between different port scan results for the same hosts).Upon initialization, some default entities are created and added to the database. These entitiesare:
l A host entity representing the local console host ('localhost')
l The local agent ('localagent')
See Core Impact Entities for a more in-depth look at the Entity Database and how to manage itfrom Core Impact's Console.
User Guide Core Security, a HelpSystems Company page: 34

page: 35 Core Security, a HelpSystems Company User Guide

Core Impact QuickstartGetting Started: The Dashboard
After installing the latest version of the software (if you have not done so, please refer toInstalling Core Impact for detailed installation instructions) look for the Core Impact folder inthe START menu and select the Core Impact icon. You will be presented with the Core ImpactDashboard. The Dashboard is divided into several components, each presenting you with real-time information about your Core Impact installation as well as summaries of the product'smarket-leading commercial-grade exploit coverage.
The Dashboard will show:
l Product-related Alerts such as available software updates for Core Impact or licenseexpiration notices.
l Updates Tab
l A list of the currently-available exploits, utilities, and maintenance modules that arepending installation. These keep Core Impact current with the latest attack trendsand vulnerability threats.
l Graphical representations of the Modules Released over the previous 6 monthperiod.
l Statistics Tab
l A graphical summary of Core Impact’s exploit coverage in two summarized tables:Target Entry Points and Modules by Category.
l If you have opted in to the usage statistics program (see Usage Statistics), you willsee the Usage tab which will display details about the usage of your Core Impactinstallation.
l Scheduler Tab: Use this tab to view and create scheduled tests. See Using the Scheduler.
l Creating or Opening Workspaces
l Using Core Impact's Teaming features
l Generating Reports
l Remediation Validation
The Core Impact Dashboard
User Guide Core Security, a HelpSystems Company page: 36

Core Impact Quickstart / Getting Started: The Dashboard
The real-time alerts for pending modules, new software updates, and 6-month tally of modulescan be disabled by navigating to Tools -> Options -> Network and checking the Do not connectto the Internet to get news check-box.
Software UpdatesAfter installation, and before starting to work with Core Impact, make sure your softwareversion is the latest available and that it is up to date with the latest modules and exploits. Asnoted in the previous section, the Dashboard will display an alert when there is a new CoreImpact release available, but you can also check for updates manually:
l To check for software updates, click Tools -> Check for new Impact Release...
Please note that new software downloaded through the Software Update feature iselectronically watermarked with your active license. It will not work with other licenses.
Module UpdatesIn addition to having the most recent version of Core Impact installed, you will want to ensurethat the software is up to date with the latest attack trends and vulnerability threats. UnlikeSoftware Updates, Module Updates do not require a re-installation of the Core Impactapplication. Core Impact offers two methods of keeping users informed of new updates. Bothmethods require that a connection to the Internet is available, either directly or via proxyserver:
1. Dashboard. The Dashboard will display a list of the currently-available exploits, utilities,and maintenance modules that are pending installation.
2. Update Notifier. The Update Notifier will appear in the system tray whenever there areupdates available, regardless of whether Core Impact is running. The notifier will checkfor updates on a regular interval that you can define by navigating to Tools -> Options ->Other. If the Enable Update Notifier setting is checked, then the Update Notifier willcheck for updates as frequently as is specified in the minutes between checks field. If theEnable Update Notifier setting is un-checked, then it will not run at all.
After you have been notified via one of the 2 methods above, click on the Get Updatesbutton located on the left side of the Dashboard. This button will also initiate thetransmission of usage statistics if you have opted in to the Usage Statistics program (seeUsage Statistics).
Core Impact 's update and news features access information over the Internet, using themethod as configured in the Tools -> Options -> Network form. If you change locationsfrom a non-proxy network to one that has a proxy server, you will need to update theNetwork settings accordingly.
The SchedulerCore Impact allows you to run certain tests on an automated schedule, giving you a lights-outapproach to your penetration tests. When you schedule a test, the test creates and runs in itsown Workspace.
page: 37 Core Security, a HelpSystems Company User Guide

Core Impact Quickstart / Getting Started: The Dashboard
You can run the following tests with the Scheduler:
l Vulnerability Scanner Validator
l Network Vulnerability Test
l Client-side Vulnerability Tests
l WebApps Vulnerability Scanner Validator
l WebApps Vulnerability Test
With the Scheduler, you can do the following:
l Create new scheduled tests
l Manage existing scheduled tests
l View executed scheduled tests
The Scheduler window contains the following components:
l The Scheduled Tasks pane shows all tests that are scheduled to run. It also lists theirfrequency, when they were last executed, and any errors that occurred during their lastrun.
l The Executed Scheduled Tasks pane shows a log of all tests that have been executed.
l The Task Details pane shows details of a task selected in the Executed Scheduled Taskspane.
To create a new scheduled test:
1. Navigate on the Dashboard to the Scheduler tab.
Scheduler
2. Click Create One-Step RPT Task. A drop-down menu will open, showing the availabletests.
3. Select from the drop-down of available tests. The respective RPT wizard will open.
4. Enter a Task Name for your Scheduled test, then complete the wizard.
5. The next form of the wizard will contain schedule frequency. Select the date and time thatthe test should first run. Then select how often the test should run.
Scheduled Task Frequency
User Guide Core Security, a HelpSystems Company page: 38
Core Impact Quickstart / Getting Started: The Dashboard
Then click the Next button.
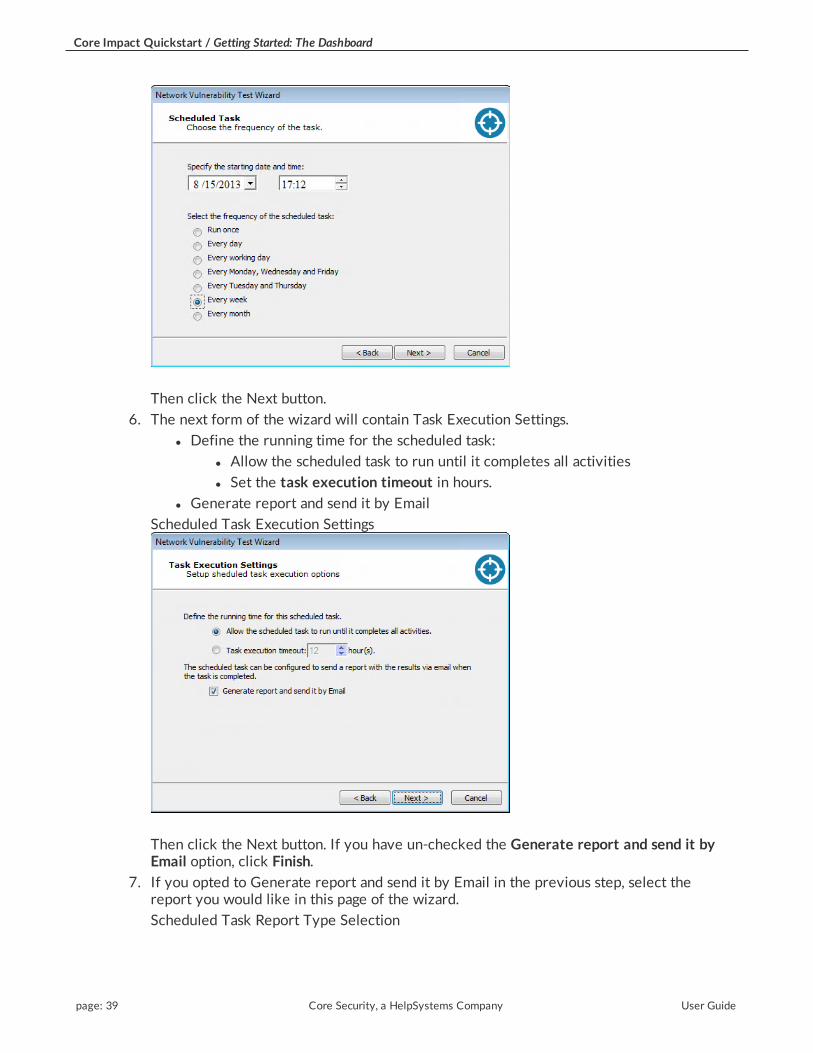
6. The next form of the wizard will contain Task Execution Settings.
l Define the running time for the scheduled task:
l Allow the scheduled task to run until it completes all activities
l Set the task execution timeout in hours.
l Generate report and send it by Email
Scheduled Task Execution Settings
Then click the Next button. If you have un-checked the Generate report and send it byEmail option, click Finish.
7. If you opted to Generate report and send it by Email in the previous step, select thereport you would like in this page of the wizard.
Scheduled Task Report Type Selection
page: 39 Core Security, a HelpSystems Company User Guide

Core Impact Quickstart / Getting Started: The Dashboard
Then click the Next button.
8. Choose from the available Report Customizations. Settings will vary depending on thetype of report you selected in the previous step.
Scheduled Task Report Customization
Then click the Next button.
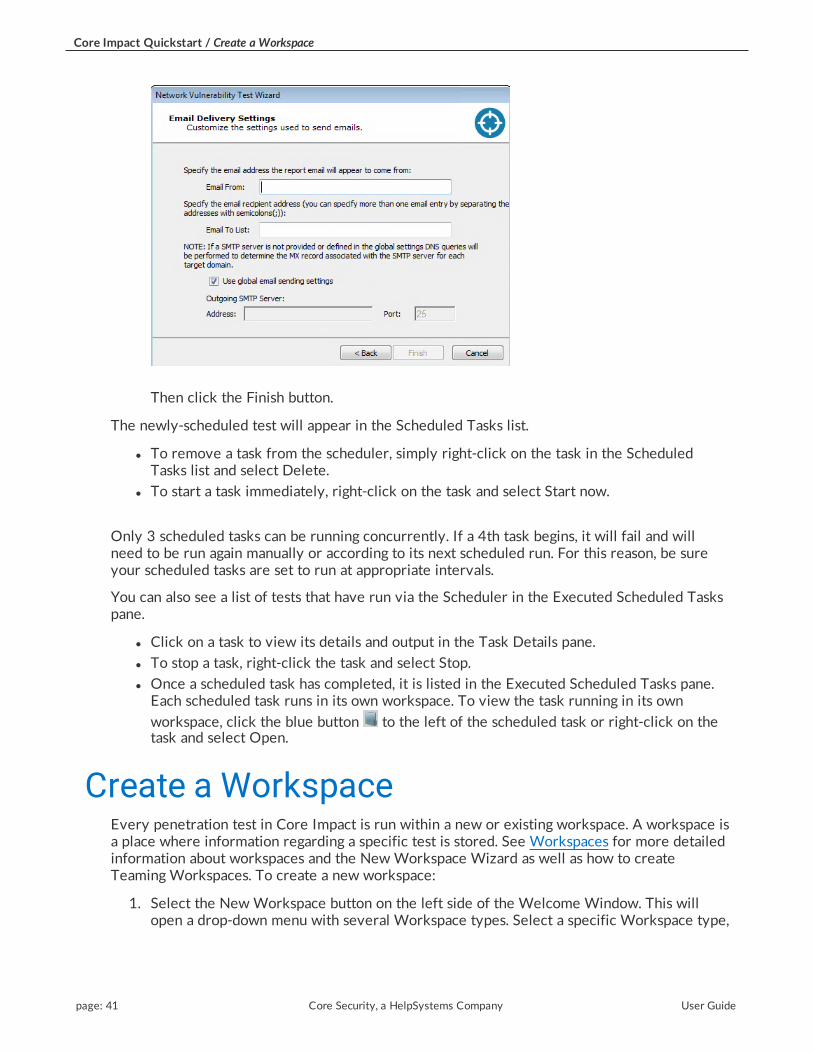
9. Enter Email Delivery Settings for delivery of the report:
l Email From: Specify the email address he report will appear to come from
l Email To List: Specify the email recipient address(es)
l Use global email sending settings: Check this option if the SMTP settings have beendefined in the Options. If not, uncheck this option and enter the Outgoing SMTPAddress and Port number.
Scheduled Task Report Email Delivery Settings
User Guide Core Security, a HelpSystems Company page: 40
Core Impact Quickstart / Create a Workspace
Then click the Finish button.
The newly-scheduled test will appear in the Scheduled Tasks list.
l To remove a task from the scheduler, simply right-click on the task in the ScheduledTasks list and select Delete.
l To start a task immediately, right-click on the task and select Start now.
Only 3 scheduled tasks can be running concurrently. If a 4th task begins, it will fail and willneed to be run again manually or according to its next scheduled run. For this reason, be sureyour scheduled tasks are set to run at appropriate intervals.
You can also see a list of tests that have run via the Scheduler in the Executed Scheduled Taskspane.
l Click on a task to view its details and output in the Task Details pane.
l To stop a task, right-click the task and select Stop.
l Once a scheduled task has completed, it is listed in the Executed Scheduled Tasks pane.Each scheduled task runs in its own workspace. To view the task running in its own
workspace, click the blue button to the left of the scheduled task or right-click on thetask and select Open.
Create a WorkspaceEvery penetration test in Core Impact is run within a new or existing workspace. A workspace isa place where information regarding a specific test is stored. See Workspaces for more detailedinformation about workspaces and the New Workspace Wizard as well as how to createTeaming Workspaces. To create a new workspace:
1. Select the New Workspace button on the left side of the Welcome Window. This willopen a drop-down menu with several Workspace types. Select a specific Workspace type,
page: 41 Core Security, a HelpSystems Company User Guide

Core Impact Quickstart / Create a Workspace
depending on your testing goals, or select Blank Workspace. The workspace types aredesigned as an Assisted Start and will automatically launch a web browser withdocumentation specific to the type you select. The resulting workspace, however, will becapable of executing any kind of penetration test. For example, if you create an ExploitBased Client Side workspace, you will still be able to run Network tests within it.
New Workspace Types
2. Enter a Workspace name and passphrase for your new workspace and click Finish.Optionally, you can enter extended workspace details by checking the Set extendedworkspace information box, then clicking Next.
Workspace Name and Passphrase
3. If you checked the Set extended workspace information box in the previous step,complete the form, then click Next.
Extended Workspace Information
User Guide Core Security, a HelpSystems Company page: 42

Core Impact Quickstart / Create a Workspace
4. Select a License for your new workspace and click Next.
License Dialog Box
5. A Workspace key is generated every time a new workspace is created. This key is onlyused for communication with remote agents that perform client authentication. Thismeans that different users of Core Impact use different workspace keys and will not beable to connect to the same agents. It is important to note that this key does not currentlyprotect the information inside Core Impact database, and that its sole purpose is toprotect the workspace's deployed agents from being accessed by another Core Impactworkspace.
Move your mouse inside the rectangle to generate a new key pair, and click Next. Referto Crypto Channel for more information on how Core Impact uses this key pair.
Key Generation Dialog Box
page: 43 Core Security, a HelpSystems Company User Guide

Core Impact Quickstart / Core Impact Console
6. A summary of the new Workspace will appear. Click Finish.
Completing the New Workspace Wizard Dialog Box
The Core Impact Console now appears, complete with the name of your workspace displayed inthe title bar. You now have a workspace in which to run penetration tests.
Core Impact ConsoleAfter creating a new workspace, the Core Impact Console appears. The Console is the mainwindow that you will use to start scans, launch attacks, and manage agent activity. The six panelsthat make up the Console are described in detail below.
Core Impact Console
User Guide Core Security, a HelpSystems Company page: 44

Core Impact Quickstart / Core Impact Console
1. The Modules Panel. Provides access to Core Impact Modules. Modules are the actionsyou can perform during a penetration test. This panel has two views, Rapid PenetrationTest (RPT) and Modules, accessed by corresponding tabs at the bottom of the panel. Thesteps in the RPT view are high-level actions that can be used to execute an automatedpenetration test. See Rapid Penetration Test (RPT) or Working With Modules for adetailed description of this panel and modules in general.
2. The Entity View Panel. Displays information about the target hosts, users, or web pages.This panel has three views, Network, Client Side and Web, accessed by the correspondingtabs at the top of the panel. Each view corresponds with the type of target, whether it bea computer host, user and email, or web application. See Core Impact Entities for moreinformation about the Entity View Panel.
3. The Executed Modules Panel. Displays information about each one of the modules, oractions that a user has performed in Core Impact. Core Impact keeps a complete log ofevery executed module within its database. See the section called “Using the ExecutedModules View” for more information.
4. The Executed Module Info Panel. Displays information about the currently selectedcompleted action in the Executed Modules Panel directly above it. By default this paneldisplays information about the last executed module. It contains three tabs: ModuleOutput (module output report), Module Log (module log lines) and Module Parameters(module parameters at execution time). See the section called “Analyzing Module Output”for more information.
5. The Entity List. Displays the list of entities for the active view. If viewing the Networkview, you will see your discovered hosts in this panel as well as any agents. For theClient-side view, this panel will show email addresses and, for the Web view, you canview your web pages.
6. The Quick Information Panel. Displayed in the bottom part of the Console, the QuickInformation Panel displays information about the currently selected item in the EntityView. For example, if you select a user entity, the panel displays details about that user. Ifyou select a host, the panel displays information about that host. Refer to the sectioncalled “Entity Details” for more information about this panel.
If the panels in your layout become unmanageable, you can return them to their defaultlocations by choosing the Reset Layout option from the View dropdown menu.
Navigation of the Core Impact Console is straight forward - simply click among the availablepanels and their tabs, or use the View drop-down menu to activate or hide a console component
page: 45 Core Security, a HelpSystems Company User Guide

Core Impact Quickstart / Core Impact Console
or toolbar. Within the View drop-down menu, you can also select from 3 Layouts to quicklyshow/hide various panels of the Core Impact Console. Choose from Classic, Wide Screen orLimited.
Layout Options
User Guide Core Security, a HelpSystems Company page: 46

page: 47 Core Security, a HelpSystems Company User Guide

Rapid Penetration Test (RPT)Core Impact's Rapid Penetration Tests (RPT) are step-by-step automations of the penetrationtesting process. Core Impact allows users to perform a RPT on a variety of target types but keepin mind that Core Impact also provides test capabilities for wireless networks as well as networkdevices such as routers and switches. The following RPTs are available in Core Impact:
l Network RPT: Scan your systems (servers, network devices, surveillance cameras etc.) forknown exploits and test their vulnerability. Attempt to capture and store identities(usernames/passwords, cookies, SSH keys, etc.) from targets. Core Impact also provides aOne-Step Network Vulnerability Test and Vulnerability Scanner Validator Test.
l Client Side RPT: Simulate social engineering attacks to test the efficacy of your user-levelsecurity. The Attack Phase is separated into Attack and Penetration (for exploit-basedattacks) and Phishing, for testing the vulnerability of your user community to Phishingattacks. Also provided is a One-Step One-Step Client-side Tests.
l Web Applications RPT: Evaluate the security of your web applications and make sureyour organization is proactively assessing the OWASP Top 10 security risks. Core Impactalso provides a One-Step WebApps Vulnerability Test and Remediation Validator Test.
With any of these RPTs, the end goal is to expose the exploitable vulnerabilities in a system bypenetrating and analyzing that system. The RPTs sequence through steps that automate commonand repetitive tasks typical of a penetration test, such as gathering information, executingattacks, learning about compromised systems, escalating privileges, cleaning up, and generatingreports.
Each step defines a high-level task that has been automated with easy-to-use wizards. If you area new user, this basic automation mode will simplify the use of the product. If you are an expertuser, RPT will allow you to execute common tasks more efficiently. Individual module selectionis always available to you using the Modules View (see Working With Modules for moreinformation).
You can run each step of the RPT process individually, but running steps in the order outlined bythe Panel is highly recommended as some steps might require information obtained in aprevious step. For example, Network Attack and Penetration will automatically select attacksbased on what is known about the specified targets. Because this information is typicallyprovided by Network Information Gathering, it generally makes sense to gather informationbefore initiating the attack Wizard.
The Network RPT, Client Side RPT and Web Applications RPT Panels
User Guide Core Security, a HelpSystems Company page: 48

Rapid Penetration Test (RPT) / Network RPT
Remember, there are many modules in Core Impact that are not executed by the RPTs but thatcan be very powerful when used in a comprehensive security testing program. The ModuleReference Guide (available via the Start menu) contains details about all available modules.
Network RPTThe Network RPT allows you to target your internal information systems and evaluate them forknown exploits.
Network Information GatheringThe Network Information Gathering step provides you with information about a target networkor individual machine. This step is typically accomplished by executing modules from theInformation Gathering sub-category such as Network Discovery, Port Scanning, OSIdentification, and Service Identification.
If you used a network mapping tool (such as Nmap) or a vulnerability scanner (such as Nessus)you can use the RPT to import your scanner data file and the Information Gathering will run onthe host data within that file.
Use these links to learn how to run the Network Information Gathering RPT:
l Target specific IP addresses
l Use Nmap to perform Information Gathering
l Import data from 3rd party vulnerability scanner
Target specific IP addressesTo run the Network Information Gathering step, follow this procedure:
1. Make sure that the Network RPT is active.
2. Click on Network Information Gathering to open up the Information Gathering Wizard.
3. Select Use Core Impact to perform Information Gathering ....
Target Discovery Method
page: 49 Core Security, a HelpSystems Company User Guide

Rapid Penetration Test (RPT) / Network RPT
Then click Next.
4. Select the IP version of the network where the RPT will run:
l IP version 4: Skip to IPv4 Network Range Selection.
l IP version 6: IPv6 Network Range Selection.
Target Network IP Version
Then click Next.
5. Select the type of scan you would like to perform:
l Passive network discovery of the IPv6 network: The RPT will passively listen tonetwork traffic and identify hosts that are transmitting on IPv6.
l Provide IPv6 addresses to scan: Manually select addresses for the IPv6 network.
Network Discovery Mode Selection
User Guide Core Security, a HelpSystems Company page: 50

Rapid Penetration Test (RPT) / Network RPT
Then click Next.
6. Specify the target IP ranges (IPv4) you want to scan. You can also click on the ellipsis () button to the right of the Network range field to enter a Single IP, an IP Range, or CIDRNotation, as well as import a group of IP addresses from a file in the IP Address RangesSelection dialog box. See Specifying Host Ranges for more information on IP ranges. Afteryou have entered the range, click Next.
Network Range Selection
7. There are 3 network scan types you can perform:
l FAST: The test captures the minimal amount of data needed in order to launchattacks. There will be no additional steps in the Wizard if you select this option.
l DETAILED: The test runs more modules in order to discover additional, potentiallyuseful details about target systems. There will be additional steps in the Wizard ifyou select this option.
page: 51 Core Security, a HelpSystems Company User Guide

Rapid Penetration Test (RPT) / Network RPT
l CUSTOM: You configure how Core Impact will execute the Information Gatheringprocess. There will be additional steps in the Wizard if you select this option.
If you select FAST, click Finish to complete the Network Information Gathering RPT step.Or, if you selected DETAILED or CUSTOM, click Next and proceed to the next step in thisprocedure to enter additional information about your scan.
Network Scan Type
8. One or more port scanners may be executed as part of this RPT step. Use the PortScanning Customization Dialog Box to customize how these port scans are performed.
Port Scanning
Select a scanning method to perform the TCP port scan.
l Fast SYN. Selecting Fast SYN will induce Core Impact to use this method if theoperating agent has Pcap installed and is not the localagent. If the agent is not thelocalagent, and it does not have Pcap installed, then the scan method will default toTCP Connect.
User Guide Core Security, a HelpSystems Company page: 52
Rapid Penetration Test (RPT) / Network RPT
l TCP Connect. Selecting TCP Connect will induce this method irrespective of theagent in use. This is the slowest performing scan method.
Ultimately, the type of agent being used to launch the scan will influence the portscanning method, and your selection may be overridden. The below table shows whichport-scanning methods can be used depending on where the Information Gathering isbeing launched.
Port Scanning Methods
Launched from ... Fast SYN TCP Connectlocalagent YES YESAgent with WinPcap installed YES YESAgent without WinPcap installed NO YES
Specify how many milliseconds to wait between each discovery attempt.
You can use the ellipsis ( ) button to the right of the Port range field to change or addport range groups. See the section called “Specifying Port Ranges” for more information.
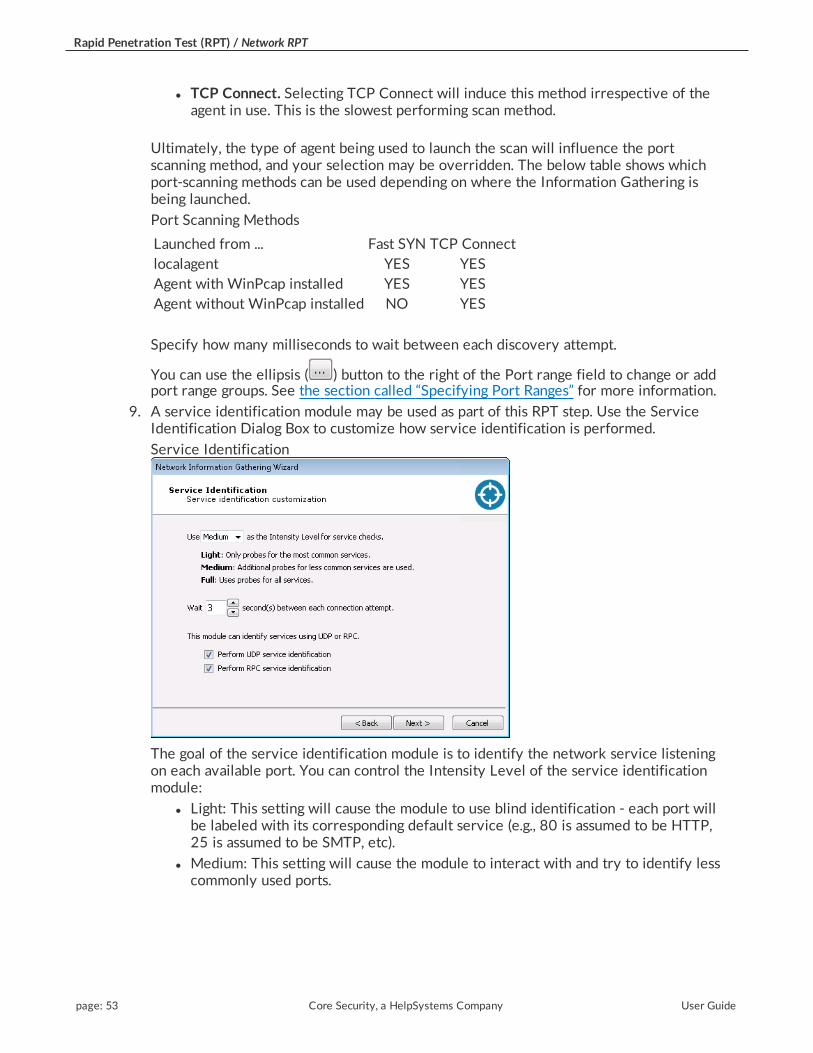
9. A service identification module may be used as part of this RPT step. Use the ServiceIdentification Dialog Box to customize how service identification is performed.
Service Identification
The goal of the service identification module is to identify the network service listeningon each available port. You can control the Intensity Level of the service identificationmodule:
l Light: This setting will cause the module to use blind identification - each port willbe labeled with its corresponding default service (e.g., 80 is assumed to be HTTP,25 is assumed to be SMTP, etc).
l Medium: This setting will cause the module to interact with and try to identify lesscommonly used ports.
page: 53 Core Security, a HelpSystems Company User Guide

Rapid Penetration Test (RPT) / Network RPT
l Full: This setting will cause the module to connect to and interact with every openport and attempt to identify the network service listening on that port.
Adjust the interval (in seconds) between connections to a target port.
You can activate UDP and/or RPC service identification by checking the appropriatePerform service identification check-box(es).
10. Core Impact can attempt to gather (grab) credentials from the target host(s). Anycredentials that are found will then be stored in the Identities folder in the Network EntityDatabase. These credentials can optionally be sent to the Core CloudCypher service forcracking. Select which remote identity grabbers should be used during the InformationGathering test. Then click Next.
Identity Grabbers
11. The RPT can also check for Network Exposures in targeted hosts.
l Check for Network Exposures: An information security exposure is a systemconfiguration issue or a mistake in software that allows access to information orcapabilities that can be used by a hacker as a stepping-stone into a system ornetwork. Whereas an information security vulnerability is a mistake in software thatcan be directly used by a hacker to gain access to a system or network.
Advanced Settings
User Guide Core Security, a HelpSystems Company page: 54

Rapid Penetration Test (RPT) / Network RPT
The module will run and information will be displayed on the Module Log Panel of theConsole. You have now completed the first step of a Network Rapid Penetration Test.
Use Nmap to perform Information GatheringTo run the Network Information Gathering step, follow this procedure:
1. Make sure that the Network RPT is active.
2. Click on Network Information Gathering to open up the Information Gathering Wizard.
3. Select Use Nmap to perform Information Gathering against the target IP addresses.
Target Discovery Method
Then click Next.
page: 55 Core Security, a HelpSystems Company User Guide

Rapid Penetration Test (RPT) / Network RPT
4. Select the IP version of the network where the RPT will run:
l IP version 4: Skip to IPv4 Network Range Selection.
l IP version 6: IPv6 Network Discovery Mode Selection.
Target Network IP Version
Then click Next.
5. Select the type of scan you would like to perform:
l Passive network discovery of the IPv6 network: The RPT will passively listen tonetwork traffic and identify hosts that are transmitting on IPv6.
l Provide IPv6 addresses to scan: Manually select addresses for the IPv6 network.
Network Discovery Mode Selection
Then click Next.
User Guide Core Security, a HelpSystems Company page: 56

Rapid Penetration Test (RPT) / Network RPT
6. Specify the target IP ranges (IPv4) you want to scan. You can also click on the ellipsis () button to the right of the Network range field to enter a Single IP, an IP Range, or CIDRNotation, as well as import a group of IP addresses from a file in the IP Address RangesSelection dialog box. See Specifying Host Ranges for more information on IP ranges. Afteryou have entered the range, click Next.
Network Range Selection
7. There are 3 network scan types you can perform:
l FAST: The test captures the minimal amount of data needed in order to launchattacks. There will be no additional steps in the Wizard if you select this option.
l DETAILED: The test runs more modules in order to discover additional, potentiallyuseful details about target systems. There will be additional steps in the Wizard ifyou select this option.
l CUSTOM: You configure how Core Impact will execute the Information Gatheringprocess. There will be additional steps in the Wizard if you select this option.
If you select FAST, click Finish to complete the Network Information Gathering RPT step.Or, if you selected DETAILED, click Next and proceed to the Advanced Settings of thewizard. If you selected CUSTOM, click Next step further customize the NmapInformation Gathering.
Network Scan Type
page: 57 Core Security, a HelpSystems Company User Guide

Rapid Penetration Test (RPT) / Network RPT
8. If you selected CUSTOM in the previous step, configure the Nmap Network Discoverysettings. One or more port scanners may be executed as part of this RPT step; select ascanning method to perform the TCP port scan.
l Nmap Default: Uses the Nmap Default scanning method.
l Fast SYN. Selecting Fast SYN will induce Core Impact to use this method if theoperating agent has Pcap installed and is not the localagent. If the localagent is inuse, then the scan method will automatically default to Fast TCP, giving you theoptimum available performance. If the agent is not the localagent, and it does nothave Pcap installed, then the scan method will default to TCP Connect.
l TCP Connect: Selecting TCP Connect will induce this method irrespective of theagent in use. This is the slowest performing scan method.
l ICMP: Uses Internet Control Message Protocol to perform the TCP port scan.
Ultimately, the type of agent being used to launch the scan will influence the port scanningmethod, and your selection may be overridden. The below table shows which port-scanning methods can be used depending on where the Information Gathering is beinglaunched.
Port Scanning Methods
Launched from ... Fast TCP Fast SYN TCP Connectlocalagent YES YES YESAgent with WinPcap installed NO YES YESAgent without WinPcap installed NO NO YES
Specify how many milliseconds to wait between each discovery attempt.
You can use the ellipsis ( ) button to the right of the Port range field to change or addport range groups. See the section called “Specifying Port Ranges” for more information.
Nmap can resolve the name of each discovered IP address using DNS. Check the Resolvenames ... check box to enable this option.
Nmap Network Discovery
User Guide Core Security, a HelpSystems Company page: 58

Rapid Penetration Test (RPT) / Network RPT
Then click Next.
9. Customize the Nmap scan:
l TCP Port Range
l UDP Port Range
l Scan Delay
Adjust the Wait interval (in seconds) between connections to a target port.
Nmap Customization
Then click Next.
10. The goal of the service identification module is to identify the network service listeningon each available port. You can control the Intensity Level (1-9) of the serviceidentification module.
Adjust the Wait interval (in seconds) for host to respond before the scan times out.
Nmap Customization
page: 59 Core Security, a HelpSystems Company User Guide

Rapid Penetration Test (RPT) / Network RPT
Then click Next.
11. The RPT can also check for Security Cameras or Network Exposures in targeted hosts.
l Security cameras are increasingly being added to corporate network infrastructuresand can therefore be targets for network-based attacks. Checking the Performcamera information gathering option will instruct the RPT to identify activecameras within the range of targeted systems and identify potential vulnerabilities.
l Check for Network Exposures: An information security exposure is a systemconfiguration issue or a mistake in software that allows access to information orcapabilities that can be used by a hacker as a stepping-stone into a system ornetwork. Whereas an information security vulnerability is a mistake in software thatcan be directly used by a hacker to gain access to a system or network.
Advanced Settings
Then click Finish.
User Guide Core Security, a HelpSystems Company page: 60

Rapid Penetration Test (RPT) / Network RPT
The module will run and information will be displayed on the Module Log Panel of theConsole. You have now completed the first step of a Network Rapid Penetration Test.
Import data from 3rd party vulnerability scannerTo run the Network Information Gathering step, follow this procedure:
1. Make sure that the Network RPT is active.
2. Click on Network Information Gathering to open up the Information Gathering Wizard.
3. Select Import data from results of 3rd party scanner.
Target Discovery Method
Then click Next.
4. Select the application from which you have an output file:
Source Application
page: 61 Core Security, a HelpSystems Company User Guide

Rapid Penetration Test (RPT) / Network RPT
Then click Next.
5. Click the ellipsis ( ) button and browse to and select the output file.Input File
Then click Next.
6. The RPT will display a note about the results of external applications. Once you've readthe note and are ready to proceed, click the Next button.
Information
7. The RPT can perform camera information gathering and also check for Network Exposuresin targeted hosts.
l Security cameras are increasingly being added to corporate network infrastructuresand can therefore be targets for network-based attacks. Checking the Performcamera information gathering option will instruct the RPT to identify activecameras within the range of targeted systems and identify potential vulnerabilities.
User Guide Core Security, a HelpSystems Company page: 62

Rapid Penetration Test (RPT) / Network RPT
l Check for Network Exposures: An information security exposure is a systemconfiguration issue or a mistake in software that allows access to information orcapabilities that can be used by a hacker as a stepping-stone into a system ornetwork. Whereas an information security vulnerability is a mistake in software thatcan be directly used by a hacker to gain access to a system or network.
Check the desired options, then click Finish to start the RPT. The module will run andinformation will be displayed on the Module Log Panel of the Console. You have nowcompleted the first step of a Network Rapid Penetration Test.
Advanced Settings
Network Attack and PenetrationThe Network Attack and Penetration RPT step uses previously-acquired information about thenetwork (such as the information you gathered using the Network Information Gathering step)to automatically select and launch remote attacks.
For each target host, this step requires the following information, all of which is obtainedautomatically by the Network Information Gathering step:
l IP address: The targets have to be in the Entity View. This can be done either by hand(Right-click -> New host in the Entity View) or by using a Network Discovery module.
l OS and architecture: In order to build the correct payload, attacks need to know thetarget host's operating system and architecture. This can be obtained by using themodules in the OS detection module folder or set by hand using the Entity Propertiesdialog. Refer to Entity Properties for more information.
l Port and service information: For each host, a listing of network services listening onspecific ports is needed. This can be done by using a Port Scanning module and theservice identification module (Service Identification) in the Information Gathering modulefolder, or set by hand using the Entity Properties dialog. Refer to Entity Properties formore information.
To run the Network Attack and Penetration step, click on the step and click Next when theWizard appears.
page: 63 Core Security, a HelpSystems Company User Guide

Rapid Penetration Test (RPT) / Network RPT
1. Click on the Network Attack and Penetration step, then click Next when the Wizardappears.
2. On the Target Selection screen, click the ellipsis ( ) button.Target Selection
The Entities Selection window will open.
3. In the Entities Selection window, select the host(s) that you wish to target with the Attackand Penetration. Only hosts that are represented in the Entity View can be targeted.
Entities Selection
Then click the OK button to return to the Wizard.
4. Click the Next button.
Target Selection
User Guide Core Security, a HelpSystems Company page: 64

Rapid Penetration Test (RPT) / Network RPT
5. On the Attack Method step of the Wizard, select the Attack method(s) to be performedand their sequence.
l Select Launch Exploit modules to identify code execution vulnerabilities if youwant the Attack and Penetration to attempt to find vulnerabilities in the targethosts' OS or any installed programs.
l Select Launch Identity modules to identify authentication weaknesses if you wantthe Attack and Penetration to attempt to gather identities (usernames/passwords,cookies, SSH keys, etc.) from the target host(s).
l If you select both of these options, select whether the identity testing shouldexecute before or after the exploits are launched.
Attack Method
Click the Next button.
page: 65 Core Security, a HelpSystems Company User Guide

Rapid Penetration Test (RPT) / Network RPT
6. Make Exploit Selection options.
l Some exploits could potentially leave a target service unavailable. These exploitscan be excluded from this test by unchecking the Use exploits that might leave aservice unavailable check-box.
l Check the Stop launching new exploits after an agent is deployed check-box if youwant the attack to stop after the first agent is deployed.
When more than one exploit are running concurrently against a host, they will beallowed to complete even after an agent is deployed. Because of this, more than oneagent may be installed even when this option is checked.
l Some exploits could take a long time to exploit a specific server, due to a long brute-force process. These exploits can be excluded from this step by unchecking the Useexploits that take a long time to run check-box.
l If you want to attempt to penetrate any Network Devices that are among yourtargets, you can check the Use Authentication Weakness exploits against NetworkDevices check-box.
Exploit selection
Click the Next button.
7. This step specifies how exploits are prioritized by the RPT:
l Release Date: Exploits are sorted by the disclosure date of the vulnerability theytarget.
l Speed: Exploits that require on average the fewest number of attempts are run first.
l Privilege Level: Exploits that deploy an agent with administrator privileges are runfirst.
l Chance of Leaving a Service Unavailable: Exploits that might leave the targetservice unavailable are run first. This option will not be visible if you did not selectthe Use exploits that might leave a service unavailable option in the previous step.
Each of the Order of exploit execution options operate at the port and service level oftargeted hosts. Because port and service level attacks run in parallel, it may appear that
User Guide Core Security, a HelpSystems Company page: 66

Rapid Penetration Test (RPT) / Network RPT
your selection is not given priority over the others. For example, if you select Speed asthe primary order attribute, a slow-running exploit may still run before fast ones if it isthe only applicable exploit for a specific service on the target host.
Order of Exploit Execution
Then click the Next button.
8. If you opted to Launch Identity modules to identify authentication weaknesses, this stepspecifies which identity modules are run during the Attack and Penetration. First select aTesting Type - when you select a type, its description will appear below the drop-downmenu.
l Default Identities
l Known Identities
l Known and Default Identities
l Dictionary Attack
l Custom
Next select the service for which you want Core Impact to test for identities.
Identity Attack Selection
page: 67 Core Security, a HelpSystems Company User Guide

Rapid Penetration Test (RPT) / Network RPT
Then click the Next button.
9. If you selected the Custom or Dictionary Attack in the previous step, you will need todefine the Custom Dictionary Attack. For both Usernames and Passwords, you can supplya text file that contains the text strings you wish to use for the test and/or type in a list oftext strings separated by commas.
Identity Attack Configuration
Then click the Next button.
10. If you selected Default or Known Identities in the previous step, you will need toconfigure the test further.
l Attack Type
l Quick: A short list of the most common identities for each service will beused
l Deep: An extended list of common identities for each service will be used
l Passwords: Use the default password list or pass a custom file to Core Impact
User Guide Core Security, a HelpSystems Company page: 68
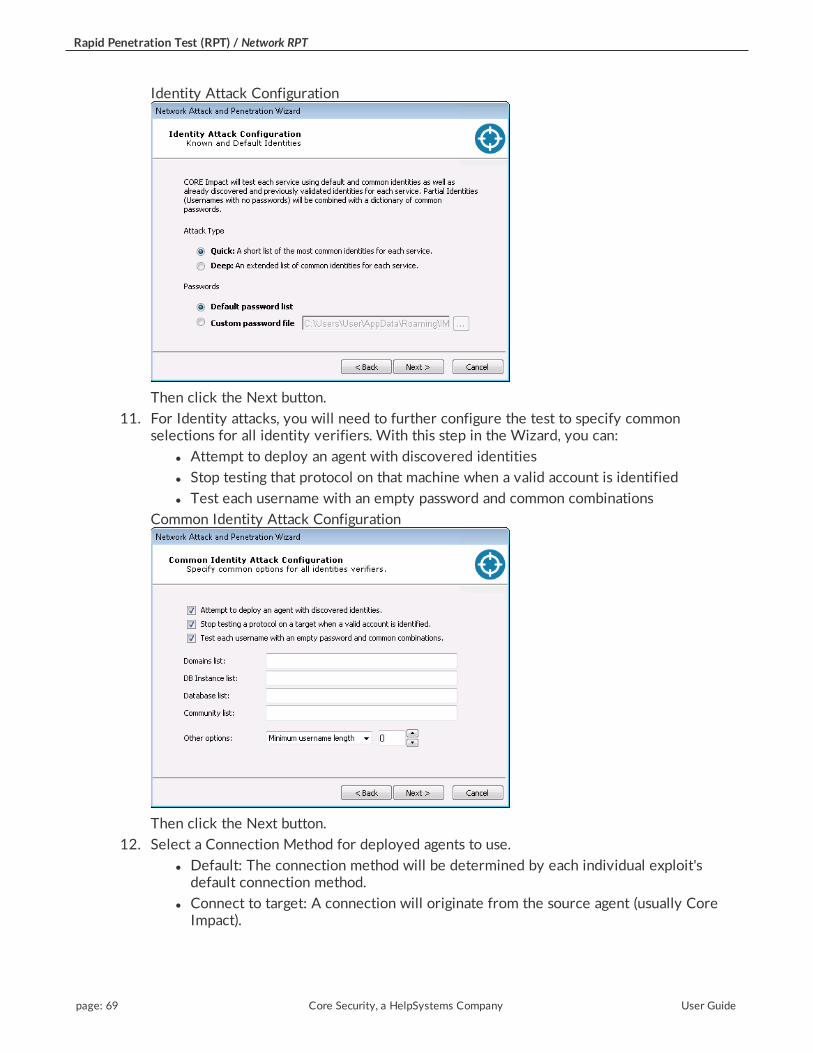
Rapid Penetration Test (RPT) / Network RPT
Identity Attack Configuration
Then click the Next button.
11. For Identity attacks, you will need to further configure the test to specify commonselections for all identity verifiers. With this step in the Wizard, you can:
l Attempt to deploy an agent with discovered identities
l Stop testing that protocol on that machine when a valid account is identified
l Test each username with an empty password and common combinations
Common Identity Attack Configuration
Then click the Next button.
12. Select a Connection Method for deployed agents to use.
l Default: The connection method will be determined by each individual exploit'sdefault connection method.
l Connect to target: A connection will originate from the source agent (usually CoreImpact).
page: 69 Core Security, a HelpSystems Company User Guide

Rapid Penetration Test (RPT) / Network RPT
l Connect from target: A connection will originate from the remote agent on thetarget host.
l Reuse connection: The agent will reuse the same connection that was used todeliver the attack.
Only exploits with the specified connection method will be run (if you select "Reuseconnection", only exploits with that capability will be selected). For more informationregarding agent connection methods see Establishing Agent Communication Channels.
Set the port where the agent will listen by either checking the Use a random port check-box or entering the preferred agent port in the Use specific port field.
Agents - Communication Parameters
Click the Next button.
13. Select Expiration Settings for deployed agents to use. You can Use global settings (whichare defined in the Agent Options), set a specific date, or disable expiration.
Agents - Expiration Settings
User Guide Core Security, a HelpSystems Company page: 70

Rapid Penetration Test (RPT) / Network RPT
Click the Next button.
14. If your Core Impact installation is integrated with the Metasploit Framework (see How toIntegrate with Metasploit on how to perform the integration steps), the Network Attackand Penetration RPT will offer to run Metasploit as a part of its test sequence. CoreImpact will select which Metasploit exploits are appropriate for the targeted host(s).
Metasploit exploits
Click the Next button.
15. If you want any modules to run as soon as an agent is connected, check the Automaticallyrun modules on agents as they are deployed check-box. Then click the Change... button toselect the module you wish to run.
If you would like multiple modules to autorun, create a macro module (see Create MacroModules) that is made up of the modules you wish to run, then enter the macro moduleinto the autorun field.
page: 71 Core Security, a HelpSystems Company User Guide

Rapid Penetration Test (RPT) / Network RPT
Post Exploitation Actions
Click the Finish button.
The module will run and information will be displayed on the Executed Module Info Panel of theConsole. The Network Attack and Penetration step will run multiple attacks in parallel againsteach target host. Each exploit automatically launched by this step will be shown as a child of theAttack and Penetration module in the Execute Modules panel. You have successfully launched anattack.
Local Information GatheringThe Local Information Gathering RPT step collects information about hosts that have an agentdeployed on them. This macro uses the deployed agent to interact with the compromised hostand gather information such as precise OS information, agent privileges, users and installedapplications.
To run the Local Information Gathering step, click on the step and click Next when the Wizardappears.
Agent selection Dialog Box
User Guide Core Security, a HelpSystems Company page: 72

Rapid Penetration Test (RPT) / Network RPT
1. By default, information will be gathered on all connected agents. To select one or more
specific agents, click the Selected agents radio button and then click the ellipsis ( )button next to the Selected agents field. Follow the prompts to select your desired agents.
Agent selection Dialog Box
Click the Next button.
2. Select the module categories that you want to run against the previously-selected agent(s). Then click Finish.
Modules to run
page: 73 Core Security, a HelpSystems Company User Guide

Rapid Penetration Test (RPT) / Network RPT
The module will run and information will be displayed on the Module Output and ModuleLog panels of the Console.
Privilege EscalationThe Privilege Escalation RPT step executes local privilege escalation attacks on connectedagents not running as the super user or the administrator. This macro automatically selects andexecutes exploits from the Exploits/Local module folder and some modules from theExploits/Tools folder, such as Revert To Self or Chroot Breaker.
After successfully running Privilege Escalation, you may want to run the Local InformationGathering step to obtain more information from the compromised hosts. If an in-depthpenetration test is being performed (and depending on the target network's topology), it ispossible to change the current source agent and cycle back to the Information Gathering step.Refer to Set as Source for information regarding the source agent. All the initial 4 steps willexecute from any Core Impact agent.
To run the Privilege Escalation RPT step, click on the step and click Next when the Wizardappears.
Agent selection Dialog Box
User Guide Core Security, a HelpSystems Company page: 74

Rapid Penetration Test (RPT) / Network RPT
1. Specify which agents will run the Privilege Escalation macro. By default, all currently-connected agents will perform this step (All agents will perform a check to see if they arealready running as SYSTEM or root. If they are, they will not attempt to perform PrivilegeEscalation.) An agent name will be automatically set if the macro was dropped over aspecific agent. To choose one or more specific agents select the Selected agents radio
button, then click the ellipsis ( ) button to the right of the field. Follow the prompts toselect your desired agents. Then click the Next button.
2. For each target host, this macro selects relevant attacks from the Exploits/Local Modulefolder based on the target's platform. The default selections on the Exploit selectionscreen are intended to minimize the risk of exploits leaving services unavailable and/oralter the modules' performance. For example, by checking the Do not use exploits forpatched vulnerabilities option, Core Impact will potentially have less work to do, as it canskip exploits that it detects have been patched.
Exploit selection Dialog Box
page: 75 Core Security, a HelpSystems Company User Guide

Rapid Penetration Test (RPT) / Network RPT
3. Select whether you want Core Impact to automatically run a module on agents as they aredeployed. If you check this option, then click the Change ... button to select the specificModule to autorun.
Exploit Configuration Dialog Box
4. Click Finish. The module will run and information will be displayed on the Module Outputand Module Log panels.
Clean UpThe Clean Up step automatically uninstalls every currently-connected agent. Agents areuninstalled in post order to support complex agent chains (see Agent Chaining). Check the Selectto confirm uninstall of every connected agent check-box and then click Finish to clean up alldeployed agents.
Clean Up Dialog Box
User Guide Core Security, a HelpSystems Company page: 76

Rapid Penetration Test (RPT) / Network RPT
Network Report GenerationThe Network Report Generation RPT step allows you to automatically generate robust systemreports by processing information collected about the target systems and the differentpenetration tests you have performed. Report instructions are consolidated in the RPT Reportssection.
One-Step Network RPTThe Network RPT includes the following One-Step tests that can be run in a single step,providing detailed reports of the test's findings.
l Network Vulnerability Test
l Remediation Validator
l Vulnerability Scanner Validator Test
One-Step Network Vulnerability TestAbout the Network Vulnerability TestCore Impact's One-Step Network Vulnerability test allows you to target one or more computersin order to evaluate their vulnerability to known exploits. When the test runs, Core Impact willaccess the computers and report back any vulnerabilities that are exploitable. Advanced optionsfor One Step RPT actions are available in the One-step RPT Options, accessible via the Toolsdropdown menu.
Before running the One-Step Network Vulnerabilities test, you will need to know the IP address(es) or address range of the computer(s) you want to test.
Starting the One-Step Network Vulnerability TestThe below steps illustrate how to run a One-Step Network Vulnerability Test manually. You canalso execute this test using the Scheduler - see Using the Scheduler for more details.
To manually run a One-Step Network Vulnerability test:
1. Make sure the One-Step RPT is active.
2. Click Network Vulnerability Test under the One-Step heading.
3. The Network Vulnerability Test Wizard will appear. Click the Next button to proceedwith the Wizard.
4. In the Target network IP version step, select whether your targets use IP version 4 or IPversion 6. Then click Next.
Target network IP version
page: 77 Core Security, a HelpSystems Company User Guide

Rapid Penetration Test (RPT) / Network RPT
5. If you select IP version 4, you will then need to enter the IP address(es) that you want totest In the Network Range field,. Use a comma to separate IP addresses and an asterisk (*)as a wildcard - sample shown below.
Network Range Selection
6. Define the running time for this module. Choose to Allow the module to run until itcompletes all activities or define a time frame (in hours) when the module executionshould time out.
Module Execution Settings
User Guide Core Security, a HelpSystems Company page: 78

Rapid Penetration Test (RPT) / Network RPT
If you select IP version 6, you will then need to select how Core Impact should performnetwork discovery. It can either do a Passive network discovery, or you can manuallyprovide IPv6 addresses.
Network Discovery Mode Selection
7. Click the Finish button to begin the test.
To check on the status of your test, click the Module Output tab.
One-Step Remediation ValidatorAbout the Remediation ValidatorCore Impact's Remediation Validator test allows you to target one or more hosts in order toevaluate the success of remediation actions. If you identify vulnerabilities in a host, and thosevulnerabilities are addressed, you can run the Remediation Validator to make sure that theremediation was successful.
page: 79 Core Security, a HelpSystems Company User Guide

Rapid Penetration Test (RPT) / Network RPT
Before running the One-Step Remediation Validator test, you will need to know the IP address(es) or address range of the computer(s) you want to test.
Starting the Remediation ValidatorThe below steps illustrate how to run a One-Step Remediation Validator manually. You can alsoexecute this test using the Scheduler - see Using the Scheduler for more details.
To manually run a One-Step Remediation Validator test:
1. Make sure the One-Step RPT is active.
2. Click Remediation Validator under the One-Step heading.
3. The Remediation Validator Wizard will appear. Click the Next button to proceed with theWizard.
4. In the Target Selection step, click on the ellipsis ( ) button to the right of the Targetsfield and select the target(s) against which you want to run the Remediation Validator.Click the Next button.
Targets Selection
5. In the Remediation Validation Options step, check the Consider vulnerabilities as solved iforiginal attack path cannot be reproduced option if you want the test to markvulnerabilities as "solved" (and not "indeterminate") if the original attack path cannot beused. Click the Finish button to begin the test.
Remediation Validation Options
User Guide Core Security, a HelpSystems Company page: 80

Rapid Penetration Test (RPT) / Network RPT
To check on the status of your test, click the Module Output tab. You can view the resultingreport by using the RPT Reports function at any time
One-Step Vulnerability Scanner ValidatorAbout the Vulnerability Validation testIf you use a third-party tool to run vulnerability scans against your information systems, you canfeed the output from that tool into Core Impact's Vulnerability Scanner Validator. Core Impactwill evaluate the scan's output and provide you with a prioritized validation of your system'sweaknesses.
Before running a Vulnerability Scanner Validator, you will need to have the output file from asupported third-party vulnerability scanner. A list of supported scanners is shown as you beginthe test.
Starting a Vulnerability Scanner ValidatorThe below steps illustrate how to run a One-Step Vulnerability Scanner Validator test manually.You can also execute this test using the Scheduler - see Using the Scheduler for more details.
To manually run a One-Step Vulnerability Scanner Validator test:
1. Make sure the One-Step RPT is active. The available one-step tests will appear.
2. Click Vulnerability Scanner Validator.
3. The Vulnerability Scanner Validator Wizard will appear. Click the Next button to proceedwith the Wizard.
4. Select the third-party scanner from which you got your results.
Source Application
page: 81 Core Security, a HelpSystems Company User Guide

Rapid Penetration Test (RPT) / Network RPT
Click the Next button.
5. Enter the details of the scanner's output. The output format you are importing isdependent on the Vulnerability Scanner you selected in the previous step. Some scannersexport their results to a file while others require you to access their data directly from thescanner's database.
Input File
6. Define the running time for this module. Choose to Allow the module to run until itcompletes all activities or define a time frame (in hours) when the module executionshould time out.
Module Execution Settings
User Guide Core Security, a HelpSystems Company page: 82

Rapid Penetration Test (RPT) / Network RPT
7. Click the Finish button to begin the test.
To check on the status of your test, click the Module Output tab.
Windows Domain IG WizardIn addition to the Rapid Penetration Test that runs several modules in series automatically,there are several modules that you can run manually to run more advanced informationgathering and attack steps. The Windows Domain IG Wizard module can be executed manuallyfrom the Modules tab. This module helps you perform information gathering automatically in anetwork where a Windows Domain is configured. It uses the following modules:
l Enumerate Trusted Domains
l Enumerate Domain Account Policies
l Enumerate Domain Administrators
l DCE-RPC SAMR dumper
l Enumerate Domain Groups
l Enumerate Domain Machines
l Enumerate User Accounts with SPNs
To run the Windows Domain IG Wizard:1. Locate the Windows Domain IG Wizard module in the Modules tab and double-click it to
launch.
page: 83 Core Security, a HelpSystems Company User Guide

Rapid Penetration Test (RPT) / Network RPT
2. Enter the fully qualified domain name (FQDN) of the domain to be tested. Then click theNext button.
3. Choose the authentication type to use. Then click the Next button.
User Guide Core Security, a HelpSystems Company page: 84

Rapid Penetration Test (RPT) / Network RPT
4. Click the ellipsis button and select an Identity to be used when connecting to the domaincontroller. Then click the Next button.
5. Check the modules that you would like to be used after authentication on the controller.Then click the Next button.
6. If using the Enumerate User Accounts with SPNs option, you will have additional options.
l Retrieve Service Ticket for enumerated user accounts: Check this option to haveCore Impact attempt to capture Kerberos service tickets for the user accounts itfinds. Then define the path and name of the file in which the service tickets shouldbe stored.
l Attempt to crack enumerated user accounts' Service Tickets: If you opt toRetrieve Service Tickets, check this option if you would like Core Impact to try tocrack the hashes of the obtained Service Tickets. If successfully cracked, the hasheswill be stored as plain passwords in the Entity Database as Identities.
page: 85 Core Security, a HelpSystems Company User Guide

Rapid Penetration Test (RPT) / Client Side RPT
Then click the Finish button to begin the test.
Client Side RPTIn contrast with traditional remote exploits which target services that the penetration tester cansee over the network or Internet, client-side exploits target applications running on users'workstations. Because these applications are under the control of the end-user and do notactively listen on the network, s uccessful exploitation typically requires some form of end-userinteraction. This interaction might entail the end-user opening an email attachment, clicking on aspecially-crafted URL, or browsing to a specific website. Convincing the end-user to perform therequired action is often more dependent on social engineering than on technical expertise. Forexample, many contemporary attacks such as Phishing and some email viruses require userinteraction, even though they are designed to exploit a technical vulnerability such as a bufferoverflow.
Core Impact 's client-side exploits are an excellent representation of these attacks. The Client-side RPT allows you to simulate a social engineering attack by sending email to your communityof users. The tests can be tailored by you to appear legitimate but will initiate an attack on anyuser's computer should they follow an action prompted by the email contents. The RPT beginsby scouring the Internet, your intranet, or any other specific web site for email addresses thatmatch a domain of your choice, just as an attacker might do. The test will also look fordocuments and search within them and their metadata to find data that could be used to craft aclient-side attack. With the Client-side RPT, you can learn a) how prevalent your users' emailaddresses are on the Internet, b) how careful your user community is when they receive email,c) how vulnerable their desktop computers are to known exploits, and d) how effective yourantivirus, email filtering, content filtering, intrusion prevention and intrusion detection policiesare.
If you want to use a means other than email to deliver a client-side attack, see the Decouplingthe Attack Vector from the Exploit Mechanism section.
Follow the below links to learn about the different Client-Side testing steps:
User Guide Core Security, a HelpSystems Company page: 86

Rapid Penetration Test (RPT) / Client Side RPT
l Client-Side Information Gathering on page 90
l Client-Side Attack Phase: Attack and Penetration on page 100
l Client-Side Attack Phase: Phishing on page 117
l Local Information Gathering on page 124
l Privilege Escalation on page 125
l Clean Up on page 127
Client-side Report GenerationThe Client-side Report Generation step allows you to automatically generate robust systemreports by processing information collected about the target systems and the differentpenetration tests you have performed. Report instructions are consolidated in the RPT Reportssection.
One-Step Client-side TestsCore Impact provides 2 One-Step Client-side tests:
l One-Step Client-side Vulnerability Test This test targets specific applications on yourusers' computers. By sending an email to your users, they initiate the test and CoreImpact reports back the results to you. Jump to Starting a Client-side Vulnerability Test.
l One-Step Client-side Auto Test: If you have a standard desktop image that you deploy toyour desktop users, use the One-Step Client-side Auto Test to test a single machine withthe build and expose it to many client-side exploits at one time. Jump to Starting a Client-side Auto Test.
Starting a Client-side Vulnerability TestBefore running a Client-side Vulnerability Test, you must:
1. Prepare a file that contains the email address(es) of your target users. This should be a.txt file that contains email addresses separated by commas.
2. Configure the Outgoing E-mail Information in the One-Step section of Core Impact'sOptions.
3. Determine which application on the users' computers you want to test.
The below steps illustrate how to run a One-step Client-side Vulnerability test manually. Youcan also execute this test using the Scheduler - see Using the Scheduler for more details.
To manually run a One-step Client-side Vulnerability Test:
1. Activate the Client-Side RPT.
2. Click Client-side Vulnerability Test under the One-Step heading.
3. The Client-side Vulnerability Test Wizard will appear. Click the Next button to proceedwith the Wizard.
page: 87 Core Security, a HelpSystems Company User Guide

Rapid Penetration Test (RPT) / Client Side RPT
4. Click the ellipsis ( ) button next to the Import email addresses from a file field andnavigate to your email text file.
Email Address Targets
Select the file and click the Open button.
Each address in the file will receive an email asking the recipient to click a link within theemail, initiating the test on their computer.
5. Set the Wait for client-side connections for x hour(s) value according to your preference.If you set this value to 5 hours, then recipients of the email must act within 5 hours ortheir test will not contribute to your client-side vulnerability test results.
6. Select from the Client-side application to attack drop-down menu. This will determine theapplication that is tested when users click the link within the email they receive.
7. Click the Finish button.
To check on the status of your test, click the Module Output tab.
Starting a Client-side Auto TestThe below steps illustrate how to run a One-step Client-side Auto test manually. You can alsoexecute this test using the Scheduler - see Using the Scheduler for more details.
To manually run a One-step Client-side Auto Test:
1. Activate the Client-Side RPT.
2. Click Client-side Auto Test under the One-Step heading.
3. The Client-side Auto Test Wizard will appear. Click the Next button to proceed with theWizard.
4. The test needs an agent in order to run on the target host. Select an existing agent orchoose and configure the Install Agent using SMB option.
Auto Test Agent Selection
User Guide Core Security, a HelpSystems Company page: 88

Rapid Penetration Test (RPT) / Client Side RPT
Click the Next button.
5. On the Auto Test Parameters Selection form:
l Check the Use Exploits that require user interaction if you want the test to useexploits that would require a user to take action in order for the exploit to succeed.
l Select which applications are to be checked for vulnerabilities:
l Execute all available client-side exploits (Attach and/or Web Browserexploits).
l Select a specific application to target from the Application drop-down menu.
Auto Test Parameters Selection
6. Click the Finish button.
To check on the status of your test, click the Module Output tab.
page: 89 Core Security, a HelpSystems Company User Guide

Rapid Penetration Test (RPT) / Client Side RPT
Client-Side Information GatheringUsing the Client-side Information Gathering wizard, you can harvest email addresses that arevisible from the Internet or your intranet. Harvesting email addresses from your registereddomain in the Internet gives you a good idea of your end-users' exposure to identification byexternal attackers. For example, email addresses of your employees can be collected byattackers externally through company press releases, trade show presentations, news articles,professional organizations, company web pages, and other public domain. The Client-sideInformation Gathering modules will also look for downloadable documents and search withinthem for email addresses. The Client-Side Information Gathering wizard also supports importingmultiple email address targets from a text file or you can skip this step and manually enter emailaddresses into the Entity Database's Client Side view (see Client Side View).
To begin the Client-side Information Gathering:
1. Ensure that the Client-side RPT is activated.
2. Click Client-side Information Gathering and the Wizard will appear. Click the Next buttonto begin.
3. The first step of the Wizard is the Email Address Gathering form. This form determineswhat resources Core Impact should leverage to locate and add email addresses to itsentity database. You can select more than one option and each option will have furtherconfigurations in subsequent steps of the wizard.
l Crawl Web Site: Core Impact can search within a specific web site to explore foremail addresses or documents.
You must select Crawl Web Site if you want the Information Gathering step tosearch for documents. With this option selected, subsequent steps in the wizard willallow you to specify how the documents are handled and analyzed.
l Search Engines: Use common search engines to locate email addresses in public on-line records. An attacker might use the exact same method to locate target emailaddresses.
l LinkedIn: Select this option to have Core Impact search through the web siteLinkedIn.com to locate users for a specific company.
l PGP, DNS and WHOIS server entries: Use Public Internet Databases to locate emailaddresses.
l Import from a file: Select this option if you have a local file that contains your targetemail addresses.
User Guide Core Security, a HelpSystems Company page: 90
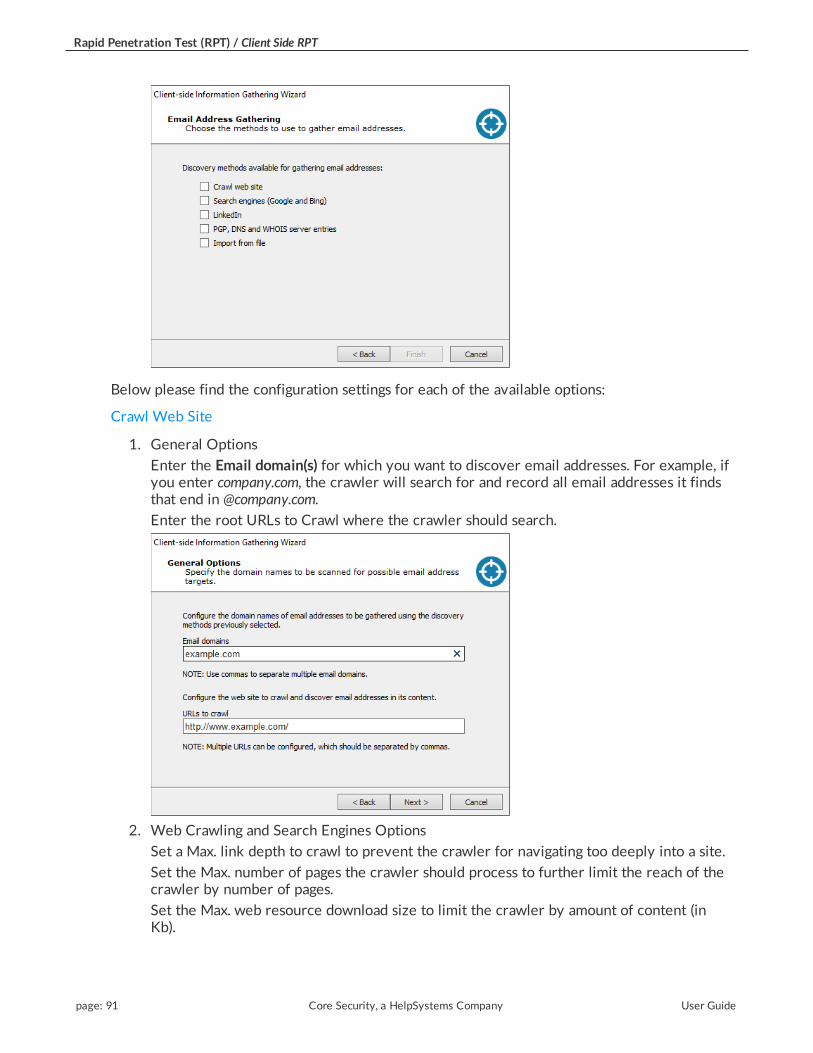
Rapid Penetration Test (RPT) / Client Side RPT
Below please find the configuration settings for each of the available options:
Crawl Web Site
1. General Options
Enter the Email domain(s) for which you want to discover email addresses. For example, ifyou enter company.com, the crawler will search for and record all email addresses it findsthat end in @company.com.
Enter the root URLs to Crawl where the crawler should search.
2. Web Crawling and Search Engines Options
Set a Max. link depth to crawl to prevent the crawler for navigating too deeply into a site.
Set the Max. number of pages the crawler should process to further limit the reach of thecrawler by number of pages.
Set the Max. web resource download size to limit the crawler by amount of content (inKb).
page: 91 Core Security, a HelpSystems Company User Guide

Rapid Penetration Test (RPT) / Client Side RPT
3. Client-Side Information Gathering Setup
Select Advanced options to enable additional settings in the wizard.
Select HTTP proxy options to enable additional settings in the wizard.
4. Advanced Options
Search inside Microsoft Office, OpenOffice and PDF documents: With this option, CoreImpact will scan the metadata of any found documents and record any pertinent data suchas the path the file was saved to, the original document author, etc.
Restrict document search to crawled domains: Check this option if you do not want CoreImpact to stray outside of the explicit target domain(s). Oftentimes, links to documentslead to other domains and this option will prevent Core Impact from retrieving thosedocuments.
User Guide Core Security, a HelpSystems Company page: 92

Rapid Penetration Test (RPT) / Client Side RPT
5. HTTP Proxy Options
Direct connection to the Internet will connect to the Internet without connecting to aproxy server.
Use the proxy settings defined in the global Network options will follow the settings thatare in the Tools -> Options -> Network form.
Use Internet Explorer proxy settings will follow the settings as defined in your InternetExplorer preferences.
Use custom proxy settings will follow the proxy settings in the fields just below.
Search Engines (Google and Bing)
1. General Options
Enter the Email domain(s) for which you want to discover email addresses. For example, ifyou enter company.com, the crawler will search for and record all email addresses it findsthat end in @company.com.
page: 93 Core Security, a HelpSystems Company User Guide

Rapid Penetration Test (RPT) / Client Side RPT
2. Web Crawling and Search Engines Options
Set a Max. link depth to crawl to prevent the crawler for navigating too deeply into a site.
Set the Max. number of pages the crawler should process to further limit the reach of thecrawler by number of pages.
Set the Max. web resource download size to limit the crawler by amount of content (inKb).
Set the Max. number of results from Google to process.
Set the Max. number of results from Bing to process.
3. Client-Side Information Gathering Setup
Select Advanced options to enable additional settings in the wizard.
Select HTTP proxy options to enable additional settings in the wizard.
User Guide Core Security, a HelpSystems Company page: 94

Rapid Penetration Test (RPT) / Client Side RPT
4. Advanced Options
Search inside Microsoft Office, OpenOffice and PDF documents: With this option, CoreImpact will scan the metadata of any found documents and record any pertinent data suchas the path the file was saved to, the original document author, etc.
5. HTTP Proxy Options
Direct connection to the Internet will connect to the Internet without connecting to aproxy server.
Use the proxy settings defined in the global Network options will follow the settings thatare in the Tools -> Options -> Network form.
Use Internet Explorer proxy settings will follow the settings as defined in your InternetExplorer preferences.
Use custom proxy settings will follow the proxy settings in the fields just below.
page: 95 Core Security, a HelpSystems Company User Guide

Rapid Penetration Test (RPT) / Client Side RPT
1. General Options
Enter the Email domain(s) for which you want to discover email addresses. For example, ifyou enter company.com, the crawler will search for and record all email addresses it findsthat end in @company.com.
2. LinkedIn Options
In the Configure the company ... field, enter the name of the company whose users youwant to discover. The search will attempt to locate the company in LinkedIn and thendiscover users of that company.
In the Set the pattern used ... field, select a Predefined naming convention/pattern of thetarget email addresses or enter a custom pattern. Core Impact will attempt to create emailaddresses using this convention for the users it locates for the company name entered
above.
User Guide Core Security, a HelpSystems Company page: 96

Rapid Penetration Test (RPT) / Client Side RPT
3. Client-Side Information Gathering Setup
Select HTTP proxy options to enable additional settings in the wizard.
4. HTTP Proxy Options
Direct connection to the Internet will connect to the Internet without connecting to aproxy server.
Use the proxy settings defined in the global Network options will follow the settings thatare in the Tools -> Options -> Network form.
Use Internet Explorer proxy settings will follow the settings as defined in your InternetExplorer preferences.
Use custom proxy settings will follow the proxy settings in the fields just below.
page: 97 Core Security, a HelpSystems Company User Guide

Rapid Penetration Test (RPT) / Client Side RPT
PGP, DNS and WHOIS server entries
1. General Options
Enter the Email domain(s) for which you want to discover email addresses. For example, ifyou enter company.com, the crawler will search for and record all email addresses it findsthat end in @company.com.
2. Client-Side Information Gathering Setup
Select HTTP proxy options to enable additional settings in the wizard.
User Guide Core Security, a HelpSystems Company page: 98

Rapid Penetration Test (RPT) / Client Side RPT
3. HTTP Proxy Options
Direct connection to the Internet will connect to the Internet without connecting to aproxy server.
Use the proxy settings defined in the global Network options will follow the settings thatare in the Tools -> Options -> Network form.
Use Internet Explorer proxy settings will follow the settings as defined in your InternetExplorer preferences.
Use custom proxy settings will follow the proxy settings in the fields just below.
Import from file
1. Importing Options
page: 99 Core Security, a HelpSystems Company User Guide

Rapid Penetration Test (RPT) / Client Side RPT
Click the ellipsis ( ) button and navigate to the import file containing the emailaddresses. The file can be one of the following:
l .CSV file: Use "email" and "name" columns
l .TXT file: email addresses delimited by a comma
When you have reached the end of your configurations, click the Finish button. The Wizard willclose and the Client-side Information Gathering module will begin. You will be able to see itsprogress in the Executed Modules pane. Once completed, the Module Output pane will displaythe step's findings. Click to the Client Side tab of the Entity View to see the new email addressesthat were found by the module (see Client Side View for more information).
Client-Side Attack Phase: Attack andPenetrationOnce the target email addresses have been identified and added to Core Impact's database, youcan then use the Client-side Attack and Penetration step of the Client-side RPT process to attackone or more end-users. This wizard guides you step-by-step through the process of selectingemail address targets, the attack type, selecting the attack category (e.g., web browser, emailclient, attachment, or Trojan attack), and selecting an email template to use for the client-sideattack. You can customize each email to increase the authenticity of the attack and the likelihoodthat an untrained end-user will fall for a social engineering attack. If an end-user's system iscompromised with a client-side attack, an agent is deployed and you can then pivot (see Set asSource) from that agent to run network attacks using the Network RPT process from inside yournetwork thus bypassing any perimeter defenses.
You can also opt to deliver a client-side exploit using a means other than email. For example, youmay want to load the attack files onto a USB drive or otherwise distribute the files to targetusers. For details on this process see the Decoupling the Attack Vector from the ExploitMechanism section.
User Guide Core Security, a HelpSystems Company page: 100

Rapid Penetration Test (RPT) / Client Side RPT
The Client-side Attack and Penetration wizard has many option paths that can vary dependingon the settings you choose. To begin the Attack and Penetration:
1. Click Client-side Attack and Penetration and the Wizard will appear. Click the Nextbutton to begin.
2. Select the Attack Type
l Single exploit attack: This option will send 1 attack in an email to your targets.
l Multiple exploits attack: This option will send several different attacks via email toyour targets.
Attack Type Selection
Below please find the configuration settings for each of the available options:
Single Exploit Attack
1. Targeting with Single Exploit.Select the desired Exploit type:
l Web Browser: These attacks take advantage of web browser vulnerabilities or webbrowser plug-ins. The email recipient must click on a link that opens a web page.The web page will be pre-established by Core Impact to launch an attack againstthe user's system.
l Mail Client: These exploits take advantage of vulnerabilities in the recipient's emailclient software.
l Attach: These attacks require that an attachment be opened by the email recipient.The attachment will be pre-designed to exploit vulnerabilities in a third partyapplication.
l Trojan: These involve attaching an agent to the email. If a user executes theattachment, the agent is deployed on their machine. This option includes some
page: 101 Core Security, a HelpSystems Company User Guide

Rapid Penetration Test (RPT) / Client Side RPT
unique configurations - see Settings for Trojan Attack on page 113.
2. Exploit selection method
Exploit List: Select this option if you want to specify which exploit should be targeted oncompromised hosts. Then click the Change ... button to select an exploit or module nameto send in your attack.
Target Application List: Select this option if you want to specify an application to target,then select from the Application drop-down menu. Core Impact will send the most recentexploit for that application.
3. Email Target Selection
Click the From: button to select an address that will appear in the header of the emailbeing sent. Click the To: button to select recipient email addresses from the EntityDatabase's Client Side View.
User Guide Core Security, a HelpSystems Company page: 102

Rapid Penetration Test (RPT) / Client Side RPT
If the desired addresses are not yet in the Client Side View, you can add them using thesame procedure as if you were working in the Client Side View directly. Right-click in theview, then select New..., then select Email.
4. Email Template Selection
Predefined email template:Core Impact includes several email templates that you canuse to craft your Client-side attack.
Import and edit email from email client: You can use an actual email (from eitherOutlook or Thunderbird) as the basis for a new template.
5. End User Experience
Core Impact ships with several email templates that are located in%ProgramData%\IMPACT\components\modules\classic\install\templates. You can customize these templates to maximize the chance that your users will takeaction in the email. Click the ellipsis button to select a new template, or to modify the one
page: 103 Core Security, a HelpSystems Company User Guide

Rapid Penetration Test (RPT) / Client Side RPT
that is selected. When working on the Email template, click to the Edit tab (shown below)and modify as needed. In addition to customizing the body text, you can add tags to theemail so that it contains data that is specific to the recipient and will therefor appear morelegitimate.
Email Subject: Enter the text you would like to appear as the subject of the email. This willbe populated by default but you can over-write the text.
Select CSV file for targets' data tags: By default, the email templates only include ahandful of basic tags. If you'd like to add more tags to the email, you can import the tagsand their values using a .csv file. The .csv file must be formatted in the following way:
l Row 1: the names of the tag fields. The first tag name must be 'target'
l Rows 2 - x: the values of the tags. The 'target' value must be the email address ofthe target
Below is an example of how the .csv may appear:
target, nickname, company, [email protected], Johnny, JD Corp, VP of Customer [email protected], Azzo, JD Corp, Secretary
After importing the .csv file, you can edit the template and reference content from the.csv file by using the custom tag: <%csv:[field_name]%>. For example,<%csv:nickname%> or <%csv:position%>.
6. Client-side Attack Setup
Select additional options to configure.
User Guide Core Security, a HelpSystems Company page: 104
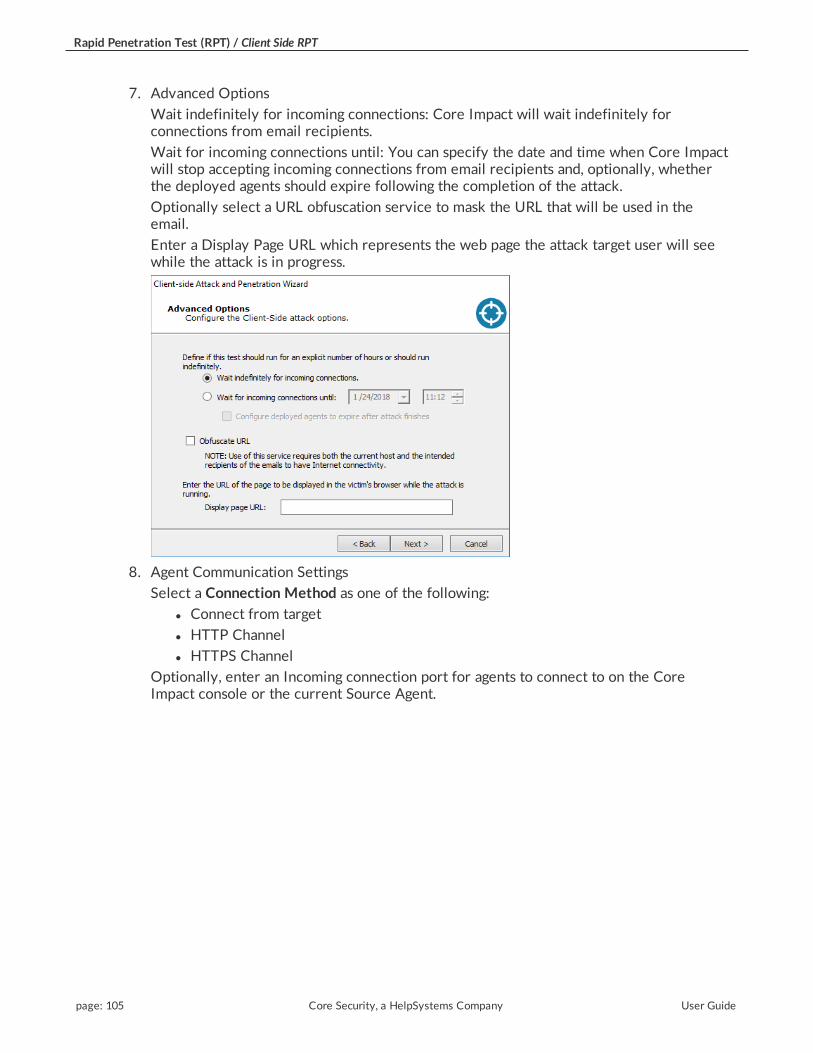
Rapid Penetration Test (RPT) / Client Side RPT
7. Advanced Options
Wait indefinitely for incoming connections: Core Impact will wait indefinitely forconnections from email recipients.
Wait for incoming connections until: You can specify the date and time when Core Impactwill stop accepting incoming connections from email recipients and, optionally, whetherthe deployed agents should expire following the completion of the attack.
Optionally select a URL obfuscation service to mask the URL that will be used in theemail.
Enter a Display Page URL which represents the web page the attack target user will seewhile the attack is in progress.
8. Agent Communication Settings
Select a Connection Method as one of the following:
l Connect from target
l HTTP Channel
l HTTPS Channel
Optionally, enter an Incoming connection port for agents to connect to on the CoreImpact console or the current Source Agent.
page: 105 Core Security, a HelpSystems Company User Guide

Rapid Penetration Test (RPT) / Client Side RPT
9. Post Exploitation Options
Grab SMB credentials
With this option checked, Core Impact will attempt to force the target to authenticate tothe web server with its encrypted SMB credentials (NTLM challenge/response). Ifsuccessful, Core Impact operators can export these challenge/responses in John theRipper format. Check the SMB Encrypted Credentials Exporter module for moreinformation.
Automatically run modules on agents as they are deployed
With this option checked, Core Impact will automatically run a module that you selectwhen an agent is deployed on a target system. You can then determine whether themodule is executed once per exploited host or once per deployed agent. In the belowexample, the Make Agent Persistent module will be run for each host where an agent isdeployed.
User Guide Core Security, a HelpSystems Company page: 106

Rapid Penetration Test (RPT) / Client Side RPT
10. Email Sending Settings
Enter the SMTP Server and SMTP Port for your email SMTP server. Optionally, chooseSTARTTLS as the Connection security and then enter the Username and Password foryour SMTP server.
If you want to limit the number of emails that are sent at one moment, set a Chunk Size.This value will determine the maximum number of emails that will be sent at one time.
Enter the Delay (in seconds) that you want Core Impact to wait in between sendingchunks of email in this attack.
11. Web Server Settings
The web server used in the attack can be run on any active agent that was previouslydeployed. This feature is convenient in situations where the potential targets might not beable to connect directly to the machine where Core Impact is running. When using thelocalagent (the default) for the web server, make sure the target workstations will be ableto connect to it. If the computer running Core Impact is sitting behind a NAT device, youmust activate and configure the NAT support in Network Options and configure yourNAT device to redirect the appropriate ports back to the computer running Core Impact.Check to ensure that the Port value of the Web Server module (80 by default) is alsoredirected.
Enter the Agent and URL components to be sent to attack target users:
Agent: Select the agent that will host the HTTP server linked to in the emails.
Port: Enter the port on which the HTTP server will listen.
Check the Use Secure Socket Layer option and configure, if using.
page: 107 Core Security, a HelpSystems Company User Guide

Rapid Penetration Test (RPT) / Client Side RPT
Multiple Exploit Attack
1. Email Target Selection
Click the From: button to select an address that will appear in the header of the emailbeing sent. Click the To: button to select recipient email addresses from the EntityDatabase's Client Side View.
If the desired addresses are not yet in the Client Side View, you can add them using thesame procedure as if you were working in the Client Side View directly. Right-click in theview, then select New..., then select Email.
2. Email Template Selection
Predefined email template:Core Impact includes several email templates that you can useto craft your Client-side attack.
Import and edit email from email client: You can use an actual email (from either Outlookor Thunderbird) as the basis for a new template.
User Guide Core Security, a HelpSystems Company page: 108

Rapid Penetration Test (RPT) / Client Side RPT
3. End User Experience
Core Impact ships with several email templates that are located in%ProgramData%\IMPACT\components\modules\classic\install\templates. You can customize these templates to maximize the chance that your users will takeaction in the email. Click the ellipsis button to select a new template, or to modify the onethat is selected.
Email Subject: Enter the text you would like to appear as the subject of the email. Thiswill be populated by default but you can over-write the text.
Select CSV file for targets' data tags: By default, the email templates only include ahandful of basic tags. If you'd like to add more tags to the email, you can import the tagsand their values using a .csv file. The .csv file must be formatted in the following way:
l Row 1: the names of the tag fields. The first tag name must be 'target'
l Rows 2 - x: the values of the tags. The 'target' value must be the email address ofthe target
Below is an example of how the .csv may appear:
target, nickname, company, [email protected], Johnny, JD Corp, VP of Customer [email protected], Azzo, JD Corp, Secretary
After importing the .csv file, you can edit the template and reference content from the.csv file by using the custom tag: <%csv:[field_name]%>. For example,<%csv:nickname%> or <%csv:position%>.
page: 109 Core Security, a HelpSystems Company User Guide

Rapid Penetration Test (RPT) / Client Side RPT
4. Client-side Attack Setup
Select additional options to configure.
5. Advanced Options
Wait indefinitely for incoming connections: Core Impact will wait indefinitely forconnections from email recipients.
Wait for incoming connections until: You can specify the date and time when Core Impactwill stop accepting incoming connections from email recipients and, optionally, whetherthe deployed agents should expire following the completion of the attack.
Optionally select a URL obfuscation service to mask the URL that will be used in theemail.
Enter a Display Page URL which represents the web page the attack target user will seewhile the attack is in progress.
User Guide Core Security, a HelpSystems Company page: 110

Rapid Penetration Test (RPT) / Client Side RPT
6. Agent Communication Settings
Select a Connection Method as one of the following:
l Connect from target
l HTTP Channel
l HTTPS Channel
Optionally, enter an Incoming connection port for agents to connect to on the CoreImpact console or the current Source Agent.
7. Email Sending Settings
Enter the SMTP Server and SMTP Port for your email SMTP server. Optionally, chooseSTARTTLS as the Connection security and then enter the Username and Password foryour SMTP server.
If you want to limit the number of emails that are sent at one moment, set a Chunk Size.This value will determine the maximum number of emails that will be sent at one time.
Enter the Delay (in seconds) that you want Core Impact to wait in between sendingchunks of email in this attack.
page: 111 Core Security, a HelpSystems Company User Guide

Rapid Penetration Test (RPT) / Client Side RPT
8. Web Server Settings
The web server used in the attack can be run on any active agent that was previouslydeployed. This feature is convenient in situations where the potential targets might not beable to connect directly to the machine where Core Impact is running. When using thelocalagent (the default) for the web server, make sure the target workstations will be ableto connect to it. If the computer running Core Impact is sitting behind a NAT device, youmust activate and configure the NAT support in Network Options and configure your NATdevice to redirect the appropriate ports back to the computer running Core Impact. Checkto ensure that the Port value of the Web Server module (80 by default) is also redirected.
Enter the Agent and URL components to be sent to attack target users:
Agent: Select the agent that will host the HTTP server linked to in the emails.
Port: Enter the port on which the HTTP server will listen.
Check the Use Secure Socket Layer option and configure, if using.
User Guide Core Security, a HelpSystems Company page: 112

Rapid Penetration Test (RPT) / Client Side RPT
When you have reached the end of your configurations, click the Finish button. The Wizard willclose and the Client-side Attack and Penetration modules will begin. You will be able to seeprogress in the Executed Modules pane. Once completed, the Module Output pane will displaythe step's findings.
Settings for Trojan Attack1. Select the Trojan Packing and Delivery:
This step allows you to determine how the Trojan attack is packaged before it is emailedto your targets. Select from the following options:
l Not Packed: Trojan will be sent as an executable file (.exe).
l PKZIP: Trojan will be sent as a PKZIP compressed file.
l GZIP: Trojan will be sent as a GZIP compressed file.
l Microsoft Excel: This option will package the trojan inside of a Microsoft Excelmacro. Browse to select your Excel file and then click the Next button to configurethe Duration of Client-side Attack.
l Adobe Acrobat: This option will package an agent into a .pdf file. Browse to selectyour .pdf file and then click the Next button to configure the Duration of Client-side Attack.
l Infected binary:This option will package an agent into an .exe file. Browse to selectyour .exe file and then click the Next button to configure the Duration of Client-side Attack.
Then click the Next button.
Trojan Packing and Delivery
2. Select the Target Platform:
For Trojan attacks, select the platform of the system where the Trojan is going to bereceived and launched.
Then click the Next button and skip to the Duration of Client-side Attack section of thisguide.
page: 113 Core Security, a HelpSystems Company User Guide

Rapid Penetration Test (RPT) / Client Side RPT
Target Platform
Advanced Client-Side Attack Options
Decoupling the Attack Vector from the Exploit MechanismClient-side testing in Core Impact allow you to send email to target users and have their actionsin the email trigger an exploit. You may, however, wish to deliver the attack with a means otherthan email (e.g. a file share server or site or via a USB stick). If so, you can accomplish this bylaunching the exploit module manually and changing the delivery method. To do this:
1. Click the Modules tab to access the Modules View (make sure the Client Side tab in theEntity view is active).
2. Expand the Exploits folder, then the Client Side folder.
3. Under the Client Side folder, double-click the exploit that you wish to launch. This willopen the exploit's email template.
4. On the template window, click the Switch to File button.
Switch to File button
User Guide Core Security, a HelpSystems Company page: 114

Rapid Penetration Test (RPT) / Client Side RPT
5. The form will change to the File Generation for Decoupled Attack form that contains 2fields:
l Attack Description: A text description of the attack file.
l Select location to save ... : The path to the folder on your system where you want
Core Impact to save the attack file. Use the ellipsis ( ) button to navigate to thedesired location.
File Generation for Decoupled Attack
Complete the 2 fields and press the Generate File button.
6. Core Impact will generate the attack file(s) and place it in the location you specified. Youcan then deliver the attack according to your test plan.
Agent Auto InjectionClient-side exploits automatically enable the deployed agent to escape to a different processrather than running in the one originally exploited. This is an important discriminator of CoreImpact commercial-grade exploits because it ensures that the agent will continue working evenafter the end-user exits the client-side application or if the client-side application becomesunstable after exploitation.
For example, the IE IFRAME Buffer Overflow exploit takes advantage of a vulnerability in IEand deploys an agent into IE's iexplore.exe process. After exploitation, IE may becomeunresponsive, and it is very likely that the end-user driving it will restart it, eliminating theagent in the process. In this example, after the agent is successfully deployed the Module Logsays:
escaping to process: c:\winnt\explorer.exe, pid: 1408
This log line indicates that the agent will attempt to escape to the explorer.exe process on PID1408. After injecting a new agent into this process, the new agent will connect back to theconsole and the old agent will terminate. That is why you will see two new agents appear on theEntity View (one alive and one uninstalled) when using exploits with this functionality. To learnmore about agent auto injection see Agent Auto Injection.
Agent Connection ParametersBy default, when a Client-side exploit is executed, the new agent communicates back to thesource agent (usually the localagent). If you want to use a different agent for this, you can do soby configuring and launching the exploit manually through the Modules View.
To do this:
1. Click the Modules tab to access the Modules View.
2. Expand the Exploits folder, then the Client Side folder.
page: 115 Core Security, a HelpSystems Company User Guide

Rapid Penetration Test (RPT) / Client Side RPT
3. Under the Client Side folder, double-click the exploit that you wish to launch. This willopen the exploit's email template.
4. On the template window, click the Parameters button.
Client-side Exploit Parameters button
The exploit's parameters form will open.
5. Expand the Agent Connection section.
6. To select a different agent for the exploit's agent to communicate back to, click in the
Agent field and then click the ellipsis ( ) button.Client-side Exploit Parameters
7. In the Select Agent Connection window, locate and place a check next to the desiredagent, then click the OK button.
8. Continue to configure the client-side exploit and launch the attack.
User Guide Core Security, a HelpSystems Company page: 116

Rapid Penetration Test (RPT) / Client Side RPT
Client-Side Attack Phase: PhishingOnce the target email addresses have been identified and added to Core Impact's database, youcan then use the Client-side Phishing RPT process to attack one or more end-users with aPhishing attack. This wizard guides you step-by-step through the process of selecting emailaddress targets, selecting the Phishing type (browser redirect or web page clone), and selectingan email template to use for the Phishing attack. You can customize each email to increase theauthenticity of the attack and the likelihood that an untrained end-user will fall for a socialengineering attack. You can even import an actual email (from Outlook or Thunderbird) tocreate your Phishing email. If an end-user is fooled by a Phishing attack and clicks the link orenters sensitive information, Core Impact will record this information.
The Client-side Phishing wizard has many option paths that can vary depending on the settingsyou choose. To begin the Phishing attack:
1. Click Phishing and the Wizard will appear. Click the Next button.
2. On the Phishing Type Selection form, select which type of Phishing attack you want torun:
l Web Page Redirect: This option will simulate the first component of a Phishingattack whereby users receive an email containing a link and, if users click the link,their email address will be flagged in the Client Side entity view. This test willillustrate how careful your user community is when receiving links via email. Ifselecting this test, enter the URL where the browser is redirected after the userclicks the link.
l Web Page Clone: This option will simulate a complete Phishing attack wherebyusers receive an email containing a link and, if users click the link, they are taken toa false front web page and are prompted to enter sensitive data (username,password, etc). If selecting this test, enter the URL of the web form that you wantCore Impact to impersonate. For example, if you want the test to impersonate abank login screen, enter the URL for the actual site (e.g.http://www.samplebank.com). When Core Impact executes the test, it will navigateto and copy the framework of the actual page and host it as a landing spot for userswho click the link within the test's email. The page that Core Impact hosts will lookexactly like the real site.
l If any users enter data into the test's web form, Core Impact will save thedata they entered, illustrating how a real Phishing attack can capturesensitive data. Uncheck the Save submitted form data option if you do notwant Core Impact to save this data.
l Redirect user after data submission: If users enter data into the test's webform - falling victim to your simulated Phishing attack - you might want toredirect them to a web page that tells them of their error and reiterates thecaution one must take when clicking links within emails. Check this optionand enter a URL for the redirect page.
Phishing Type Selection
page: 117 Core Security, a HelpSystems Company User Guide

Rapid Penetration Test (RPT) / Client Side RPT
Click Next.
3. Click the From: button to select an address that will appear in the header of the emailbeing sent. Click the To: button to select recipient email addresses from the EntityDatabase's Client Side View.
If the desired addresses are not yet in the Client Side View, you can add them using thesame procedure as if you were working in the Client Side View directly. Right-click in theview, then select New..., then select Email.
Click the Next button.
Email Target Selection
4. Email Template Selection
Predefined email template:Core Impact includes several email templates that you can useto craft your Client-side attack.
User Guide Core Security, a HelpSystems Company page: 118

Rapid Penetration Test (RPT) / Client Side RPT
Import and edit email from email client: You can use an actual email (from eitherOutlook or Thunderbird) as the basis for a new template.
5. Complete the End User Experience form. Core Impact ships with several email templatesthat are located in%ProgramData%\IMPACT\components\modules\classic\install\templates. You can customize these templates to maximize the chance that your users will takeaction in the email. Click the Change button to select a new template, or to modify theone that is selected.
6. Email Subject: Enter the text you would like to appear as the subject of the email. Thiswill be populated by default but you can over-write the text.
Select CSV file for targets' data tags: By default, the email templates only include ahandful of basic tags. If you'd like to add more tags to the email, you can import the tagsand their values using a .csv file. The .csv file must be formatted in the following way:
l Row 1: the names of the tag fields. The first tag name must be 'target'
l Rows 2 - x: the values of the tags. The 'target' value must be the email address ofthe target
Below is an example of how the .csv may appear:
target, nickname, company, [email protected], Johnny, JD Corp, VP of Customer [email protected], Azzo, JD Corp, Secretary
After importing the .csv file, you can edit the template and reference content from the.csv file by using the custom tag: <%csv:[field_name]%>. For example,<%csv:nickname%> or <%csv:position%>.
End User Experience
page: 119 Core Security, a HelpSystems Company User Guide

Rapid Penetration Test (RPT) / Client Side RPT
l The template form has Preview and Edit tabs. Make any changes on the Edit tab anduse the Preview tab to see how your email will appear to recipients.
Edit and Preview Email Template
Within the email template file, you can include several tags that may bring furtherauthenticity to the email:
l <%to%> target email address
l <%from%> source email address (spoofed)
l <%subject%> Subject entered in the email
l <%linkbegin%> This text will appear linked to the attack url <%linkend%>
l <%username%> Replaces the name of the target
User Guide Core Security, a HelpSystems Company page: 120

Rapid Penetration Test (RPT) / Client Side RPT
l <%imagetag%> This tag will render to a 1 pixel image. If the email recipientallows their email client to display external elements, this image will berequested of the Core Impact web server. Core Impact will then record thatthe email has been viewed.
Click the OK button when your template is complete.
Click the Next button.
7. Client-side Phishing Attack Setup
Select additional options to configure.
8. Advanced Options
Wait indefinitely for incoming connections: Core Impact will wait indefinitely forconnections from email recipients.
Wait for incoming connections until: You can specify the date and time when Core Impactwill stop accepting incoming connections from email recipients and, optionally, whetherthe deployed agents should expire following the completion of the attack.
Grab SMB credentials: With this option checked, Core Impact will attempt to force thetarget to authenticate to the web server with its encrypted SMB credentials (NTLMchallenge/response). If successful, Core Impact operators can export thesechallenge/responses in John the Ripper format. Check the SMB Encrypted CredentialsExporter module for more information.
Optionally select a URL obfuscation service to mask the URL that will be used in theemail.
page: 121 Core Security, a HelpSystems Company User Guide

Rapid Penetration Test (RPT) / Client Side RPT
9. On the Email Sending Settings form:
a. Enter the SMTP Server and SMTP Port for your email SMTP server. Optionally,choose STARTTLS as the Connection security and then enter the Username andPassword for your SMTP server.
b. If you want to limit the number of emails that are sent at one moment, set a ChunkSize. This value will determine the maximum number of emails that will be sent atone time.
c. Enter the Delay (in seconds) that you want Core Impact to wait in between sendingchunks of email in this attack.
Then click the Next button.
Email Sending Settings
User Guide Core Security, a HelpSystems Company page: 122
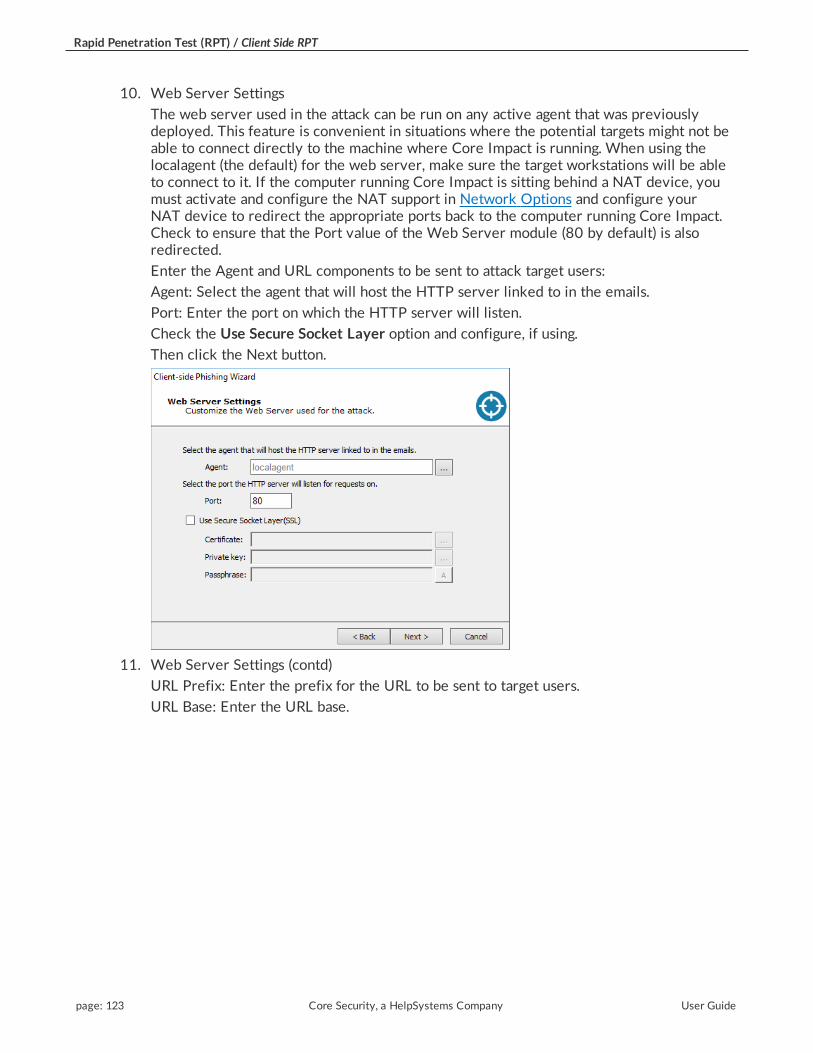
Rapid Penetration Test (RPT) / Client Side RPT
10. Web Server Settings
The web server used in the attack can be run on any active agent that was previouslydeployed. This feature is convenient in situations where the potential targets might not beable to connect directly to the machine where Core Impact is running. When using thelocalagent (the default) for the web server, make sure the target workstations will be ableto connect to it. If the computer running Core Impact is sitting behind a NAT device, youmust activate and configure the NAT support in Network Options and configure yourNAT device to redirect the appropriate ports back to the computer running Core Impact.Check to ensure that the Port value of the Web Server module (80 by default) is alsoredirected.
Enter the Agent and URL components to be sent to attack target users:
Agent: Select the agent that will host the HTTP server linked to in the emails.
Port: Enter the port on which the HTTP server will listen.
Check the Use Secure Socket Layer option and configure, if using.
Then click the Next button.
11. Web Server Settings (contd)
URL Prefix: Enter the prefix for the URL to be sent to target users.
URL Base: Enter the URL base.
page: 123 Core Security, a HelpSystems Company User Guide

Rapid Penetration Test (RPT) / Client Side RPT
When you have reached the end of your configurations, click the Finish button. The Wizard willclose and the Client-side Phishing modules will begin. You will be able to see progress in theExecuted Modules pane. Once completed, the Module Output pane will display the test'sfindings.
Local Information GatheringThe Local Information Gathering RPT step collects information about hosts that have an agentdeployed on them. This macro takes advantage of the deployed agent to interact with thecompromised host and gather information such as precise OS information, agent privileges, usersand installed applications.
To run the Local Information Gathering step, click on the step and click Next when the Wizardappears.
1. By default, information will be gathered on all connected agents. To select one or more
specific agents, click the Selected agents radio button and then click the ellipsis ( )button next to the Selected agents field. Follow the prompts to select your desired agents.
Agent selection Dialog Box
User Guide Core Security, a HelpSystems Company page: 124

Rapid Penetration Test (RPT) / Client Side RPT
2. On the Modules to run step, select the Module Categories that you want to executeduring the test.
To learn which modules are run in each category, refer to the Core Impact ModuleReference guide or view the Quick Information pane while the Local InformationGathering module is selected in your Core Impact workspace.
3. Click Finish. The module will run and information will be displayed on the Module Outputand Module Log panels of the Console.
Privilege EscalationThe Privilege Escalation RPT step executes local privilege escalation attacks on connectedagents not running as the super user or the administrator. This macro automatically selects andexecutes exploits from the Exploits/Local module folder and some modules from theExploits/Tools folder, such as Revert To Self or Chroot Breaker.
page: 125 Core Security, a HelpSystems Company User Guide

Rapid Penetration Test (RPT) / Client Side RPT
After successfully running Privilege Escalation, you may want to run the Local InformationGathering step to obtain more information from the compromised hosts. If an in-depthpenetration test is being performed (and depending on the target network's topology), it ispossible to change the current source agent and cycle back to the Information Gathering step.Refer to Set as Source for information regarding the source agent. All the initial 4 steps willexecute from any Core Impact agent.
To run the Privilege Escalation RPT step, click on the step and click Next when the Wizardappears.
Agent selection Dialog Box
1. Specify which agents will run the Privilege Escalation macro. By default, all currentlyconnected agents will perform this step (All agents will perform a check to see if they arealready running SYSTEM or root-level access. If they are, they will not attempt to performPrivilege Escalation.) An agent name will be automatically set if the macro was droppedover a specific agent. Uncheck the All connected agents check-box if you wish to onlytarget that agent. To choose a single agent other than the one displayed, or to selectmultiple agents on which to escalate privileges, uncheck the All connected agents check-
box and click the ellipsis ( ) button next to the Only on agent field. Follow the promptsto select your desired agents.
User Guide Core Security, a HelpSystems Company page: 126

Rapid Penetration Test (RPT) / Client Side RPT
2. Click Next.
Exploit selection Dialog Box
3. For each target host, this macro selects relevant attacks from the Exploits/Local Modulefolder based on the target's platform. The default selections on the Exploit selectionscreen are intended to minimize the risk of exploits leaving services unavailable. For amore aggressive attack strategy, check or uncheck the appropriate check-boxes.
4. Click Finish. The module will run and information will be displayed on the Module Outputand Module Log panels.
Clean UpThe Clean Up step automatically uninstalls every currently-connected agent. Agents areuninstalled in post order to support complex agent chains (see Agent Chaining). Check the Selectto confirm uninstallation of every connected OS agent check-box and then click Finish to cleanup all deployed agents.
Clean Up Dialog Box
page: 127 Core Security, a HelpSystems Company User Guide

Rapid Penetration Test (RPT) /Web Applications RPT
Web Applications RPTWith software being increasingly deployed over the Internet, the threat of attacks specific toweb applications is a growing concern. Core Impact's WebApps RPT lets users test thevulnerability of their web-based applications or mobile application backends and gives them anopportunity to address any vulnerabilities. The Web Applications RPT tests the following attacktypes:
l SQL Injection attacks occur when SQL queries are passed through the user interface of aweb application and are executed in the database. Core Impact also tests for Blind SQLInjection attacks which can pose an additional threat to web applications.
l PHP Remote File Inclusion vulnerabilities allow malicious users to execute their own PHPcode on the vulnerable web application.
l PHP Local File Inclusion vulnerabilities
l Cross Site Scripting (XSS) occurs when attackers are able to inject arbitrary code intovulnerable web servers. The malicious code is ultimately executed by the web browsers ofunsuspecting users of the vulnerable web application.
l Hidden Web Pages: It is not uncommon for web applications to contain active pages thatare not directly linked to from within the application. These tend to be "secret" pages foruse by application administrators who know their direct URLs. Core Impact will attempt tolocate these pages and add them to your scenario for further vulnerability assessment.
l WebDav implementations that are configured poorly can be exploited and used to change,remove, or replace important files on a web server. Core Impact will alert you if thiscapability exists.
l OS Command Injection vulnerabilities occur if the application takes user input as asystem-level command.
l Sensitive Information vulnerabilities are those where an application does not encrypt datastored in its database.
User Guide Core Security, a HelpSystems Company page: 128

Rapid Penetration Test (RPT) /Web Applications RPT
l Weak Credentials vulnerabilities exist when an application's authentication functions havenot been implemented with strong passwords. Applications with weak credentials aresusceptible to dictionary attacks.
l Weak SSL Ciphers: If a web application supports weak SSL ciphers, it may be vulnerableto traffic interception and modification.
WebApps Information GatheringThe WebApps Information Gathering step scans the domain of a known web-based applicationand identifies pages and/or web services that may be vulnerable to potential attacks. To beginInformation Gathering:
1. Click the Web View tab of the Entity View. The WebApps RPT steps will appear in theRPT Panel.
2. Click WebApps Information Gathering and the Wizard will commence. Click the Nextbutton.
3. The WebApps RPT applies to Scenarios that you define.
A Scenario serves as a context in which you can test a web application and it will provideclarity to the results of the WebApps modules. You can use multiple scenarios to test thesame web application with varying settings, or segment a web application and test eachpart independently in a different scenario.
If you are creating a new Scenario, enter its name in the Scenario Name field. If you wish
to Use an existing scenario, click the appropriate radio button and click the ellipsis ( )button to select the desired Scenario. For this option to work, a scenario must alreadyexist in the Web View.
Scenario and Crawling Method Selection
Click the Next button.
page: 129 Core Security, a HelpSystems Company User Guide

Rapid Penetration Test (RPT) /Web Applications RPT
4. On the Mode selection step of the wizard, select from the following options:
l Crawl a known web application: With this option, Core Impact will crawl a webapplication whose address you provide and attempt to locate pages that it cansubsequently test for vulnerabilities. If you select this option, see Crawling ModeSelection.
l Discover web applications in hosts running HTTP servers: If you already have hostsin your Network Entity tab, some of them may have HTTP servers running whichcan be an indicator that they are hosting web applications. This option will causeCore Impact to evaluate those hosts and attempt to identify web pages. If you selectthis option, see Discover WebApps in Hosts.
Information Gathering mode selection
Click the Next button.
Discover WebApps in Hosts
1. On the Hosts selection step, click the ellipsis ( ) button and select the host(s) that youwant Core Impact to scan for Web Applications.
Hosts selection
User Guide Core Security, a HelpSystems Company page: 130

Rapid Penetration Test (RPT) /Web Applications RPT
Click the Next button.
2. Set the Automatic web site crawling configuration options:
l Use the Select a browser to impersonate drop-down menu to determine whichbrowser type and version the WebApps RPT should run the test as.
l If you want to set a Max. number of pages the crawler should process, check thebox and enter a numeric value.
l Select the Max. depth level to crawl. This value dictates how many links deep intothe web application the RPT will go. Keep in mind that, even with a low value in thisfield, there could be many links that the crawler will follow.
l If you want the RPT to not venture outside of the domain you entered in step 1,check the Restrict crawling to starting page domain check-box. If you check thisoption, you can then enter specific domains other than the starting page domainthat are open to the RPT.
l Check Detect web server and application framework if you want the RPT to try anddiscover structural details about the web application.
Automatic Web Crawling Options
page: 131 Core Security, a HelpSystems Company User Guide

Rapid Penetration Test (RPT) /Web Applications RPT
Click the Next button.
3. Set the Automatic web site crawling configuration options:
l Check Evaluate JavaScript code included in web site if you want Core Impact toevaluate JavaScript code for known vulnerabilities.
l Check Follow links in robots.txt files in web site if you would like Core Impact to tryand locate a robots.txt file that may exist in the root of the target web
application's web server. Oftentimes, web application administrators will use arobots.txt file to instruct search engines and other web robots to not searchcertain pages. If the Core Impact web crawler locates the robots.txt file, it canfollow the links listed in the file and try to locate further vulnerabilities. Note thatthis setting will respect the Restrict crawling to starting page domain option.
l The Send forms found in web pages option will instruct the crawler to try andsubmit any forms that it finds in the web application. With this option, pages that areavailable only after the form is submitted can be accessed and lead to potentialvulnerabilities. The crawler can Send with default values - use whatever defaultvalues are assigned to the field(s) or it can Send with auto-generated data.
Automatic Crawling Options (contd)
User Guide Core Security, a HelpSystems Company page: 132

Rapid Penetration Test (RPT) /Web Applications RPT
Click the Next button.
4. On the Web Services Discovery Options form, you can opt for the RPT to look for anySOAP-based web services. Select from the available parameters. If any web servicesvulnerabilities are identified, they will be listed in the Web view of the entity database.
l Search for SOAP web services definitions: Check this option if you want theRPT to look SOAP-based web services. Core Impact will look for links to .wsdl files.If any are found, they will be parsed and Core Impact will capture the details of thetarget web service in the entity database.
l Append '?wsdl' to every found URL: It is possible that a web application will use aSOAP-based web service but not have an explicit link to a .wsdl file within its pages.Select this option if you want Core Impact to automatically append any found linkwith the '?wsdl' extension. Keep in mind that this will double all of the requestsmade by Core Impact and will cause the Information Gathering step to run longer.
l How method parameters values should be filled: Select an option for determiningvalues that the target web service may request.
l Complete with default values: For any functions provided by the webservice, Core Impact will select the single most likely value to satisfy eachfunction.
l Complete with autogenerated data: For any functions provided by the webservice, Core Impact will select multiple likely values for each function.
l Define the authentication method for SOAP operations:
l Use the same as for crawling web pages: Use this option if theSOAP operations will not require authentication, or if authentication isrequired but you have already entered it for use in Web Crawling.
l Use SOAP WS-Security: Manually enter a Username and Password for CoreImpact to use to satisfy the SOAP WS-Security.
Web Services Discovery Options
page: 133 Core Security, a HelpSystems Company User Guide

Rapid Penetration Test (RPT) /Web Applications RPT
Core Impact can detect SOAP-based or RESTful web services. Because SOAP-based webservices always have a .wsdl file, these can be detected using Automatic or Interactiveweb crawling. RESTful web services employ no such definition file so, in order to detectRESTful web services, you must use Interactive web crawling so that Core Impact can tryand detect JSON type calls in the web traffic.
5. Click the Finish button. The RPT will begin and you can monitor its progress in theExecuted Modules pane.
Crawling Mode selectionThe Automatic and Interactive web crawling methods have different configurations options. Skipto the appropriate section of this document:
l Automatic Web Crawling: Enter the URL where the RPT should begin scanning for pagesthen click the Next button. See Automatic Web Crawling for additional steps andconfigurations.
l Interactive Web Crawling: Navigate the target web site and Core Impact will capture allvisited web pages. See Interactive Web Crawling.
l Interactive crawling of a mobile application backend: See Interactive Crawling of aMobile Application Backend.
l Import web resources from Burp Suite: Using this option, users can import the output filefrom Burp Suite Professional. On the following page, browse to and locate the .xml file andclick Finish to start the wizard.
Crawling mode selection
User Guide Core Security, a HelpSystems Company page: 134

Rapid Penetration Test (RPT) /Web Applications RPT
Automatic Web CrawlingWith Automatic web crawling, the RPT scans for web pages. Any pages that are found are thendisplayed in the Web View tab of the entity view.
1. If a proxy server is needed to access the web application, select the appropriate proxyoption and, if necessary, enter the server details.
l Direct connection to the Internet will connect to the Internet without connecting toa proxy server.
l Use the proxy settings defined in the global Network options will follow the settingsthat are in the Tools -> Options -> Network form.
l Use Internet Explorer proxy settings will follow the settings as defined in yourInternet Explorer preferences.
l Use custom proxy settings will follow the proxy settings in the fields just below.
Proxy Settings
page: 135 Core Security, a HelpSystems Company User Guide

Rapid Penetration Test (RPT) /Web Applications RPT
Click the Next button.
2. Set the Automatic web site crawling configuration options:
l Use the Select a browser to impersonate drop-down menu to determine whichbrowser type and version the WebApps RPT should run the test as.
l If you want to set a Max. number of pages the crawler should process, check the boxand enter a numeric value.
l Select the Max. depth level to crawl. This value dictates how many links deep intothe web application the RPT will go. Keep in mind that, even with a low value in thisfield, there could be many links that the crawler will follow.
l If you want the RPT to not venture outside of the domain you entered in step 1,check the Restrict crawling to starting page domain check-box. If you check thisoption, you can then enter specific domains other than the starting page domain thatare open to the RPT.
l Check Detect web server and application framework if you want the RPT to try anddiscover structural details about the web application.
Automatic Web Crawling Options
User Guide Core Security, a HelpSystems Company page: 136

Rapid Penetration Test (RPT) /Web Applications RPT
Click the Next button.
3. Set additional Automatic web site crawling options:
l Check Evaluate JavaScript code included in web site if you want Core Impact toevaluate JavaScript code for known vulnerabilities.
l Check Follow links in robots.txt files in web site if you would like Core Impact totry and locate a robots.txt file that may exist in the root of the target webapplication's web server. Oftentimes, web application administrators will use arobots.txt file to instruct search engines and other web robots to not searchcertain pages. If the Core Impact web crawler locates the robots.txt file, it canfollow the links listed in the file and try to locate further vulnerabilities. Note thatthis setting will respect the Restrict crawling to starting page domain option.
l The Send forms found in web pages option will instruct the crawler to try andsubmit any forms that it finds in the web application. With this option, pages thatare available only after the form is submitted can be accessed and lead to potentialvulnerabilities. The crawler can Send with default values - use whatever defaultvalues are assigned to the field(s) or it can Send with auto-generated data.
l Use the Link parsing module field to assign a module to handle dynamic hyperlinkswithin the web application. This is an advanced feature that requires users to createthe custom module.
Please contact Core Security's Customer Support (see Contact Core Security) for asample plugin module.
l If you want the web crawler to log in to the web application, check the Use sessionmanagement in your website check-box. Checking this box will add 2 additionalsteps to the Wizard.
Automatic Web Crawling Options (contd)
page: 137 Core Security, a HelpSystems Company User Guide

Rapid Penetration Test (RPT) /Web Applications RPT
Click the Next button.
4. If you opted in step the above form to have the web crawler log in to the web application(Session Management):
l Form based: Use this type if the web application has a login page that containsusername and password fields. You will be asked in the next page of the wizard toenter a username and password or to select an existing Identity.
l HTTP: Use this type if the web application presents users with integrated Windowsauthentication (Kerberos or NTLM) before allowing them to view any pages fromthe application.
l SSL client certificate: Use this option to provide a certificate to the InformationGathering step (jump to Session Management - SSL).
l Custom: Use this type if the web application has a login page but does not usestandard login fields (e.g. username and password). You will need to create a custommodule that will match your web application's authentication requirements. TheLogin on Forms module is provided as a template for use when developing your owncustom module (see Custom Modules).
l If applicable, enter the Username and Password that should be used to authenticateagainst the web site.
l Recorded login steps: If you have recorded the login steps for your target webapplication, select this option and the web crawler will use that recording to log intothe site. Core Impact will prompt you if it requires any manually input data(CAPTCHA, etc) when it uses the recorded login steps. See Recording Login Stepsfor information on recording login steps.
Click the Next button.
Session Management
User Guide Core Security, a HelpSystems Company page: 138

Rapid Penetration Test (RPT) /Web Applications RPT
5. Continue with Session Management options by selecting a Core Impact module that willprevent the RPT from executing links that might terminate the session.
You can extend Core Impact's functionality by writing your own custom modules. Formore information about writing custom modules, please contact Customer Support (seeContact Support).
If you chose to Do form based authentication in the previous step, the RPT step willattempt to automatically detect the web application's login page, login form, and username and password fields. Because there are no standards for login forms, this automaticdetection may not succeed, in which case you should opt to Configure parameters tocustomize login form detection. Once this option is checked, you can enter a specificpage, form and username/password fields that the RPT step should use for sessionmanagement.
Session Management (contd)
Click the Finish button.
page: 139 Core Security, a HelpSystems Company User Guide

Rapid Penetration Test (RPT) /Web Applications RPT
6. If you chose to Do SSL client certificate authentication in the previous step, configure thecertificate details that Core Impact should use for the test.
Session Management (contd)
Click the Finish button.
Once the Wizard closes, the RPT will proceed and attempt to identify pages - if any are found,they will be saved in the Web View under the appropriate scenario.
Interactive Web CrawlingWith interactive web crawling, you set your web browser to use Core Impact as a proxy andthen navigate your web application. As you navigate the web application, Core Impact willcapture each page that you view and add them to the Web View under the appropriate scenario.After selecting the Interactive Web Crawling radio button, continue to configure the RPT:
1. If a proxy server is needed to access the web application, select the appropriate proxyoption and, if necessary, enter the server details.
l Direct connection to the Internet will connect to the Internet without connecting toa proxy server.
l Use the proxy settings defined in the global Network options will follow the settingsthat are in the Tools > Options > Network form.
l Use Internet Explorer proxy settings will follow the settings as defined in yourInternet Explorer preferences.
l Use custom proxy settings will follow the proxy settings in the fields just below.
Proxy Settings
User Guide Core Security, a HelpSystems Company page: 140

Rapid Penetration Test (RPT) /Web Applications RPT
Click the Next button.
2. Set the Interactive Crawling Options.
l Restrict crawling to specific domain : If you want the RPT to not record pagesoutside of a specific domain, check the Restrict crawling to specific domain check-box. If you check this option, you must then enter the specific domain(s) to whichthe crawler will be restricted.
l Detect web application framework: The Detect web application framework ischecked by default. This setting will cause the RPT step to find out details about theunderlying web application platform.
Core Impact can detect SOAP-based or RESTful web services. Because SOAP-based web services always have a .wsdl file, these can be detected using Automaticor Interactive web crawling. RESTful web services employ no such definition fileso, in order to detect RESTful web services, you must use Interactive web crawlingso that Core Impact can try and detect JSON type calls in the web traffic.
l Listen only to local connections: By default, the Listen only to local connectionsoption is enabled, which means that only connections from the machine where CoreImpact is installed can connect to the proxy for Interactive Web Crawling. If youuncheck this option, any device with access to the proxy can connect to it and CoreImpact will capture and evaluate the web traffic for pages and web services.
l Use a custom SSL CA certificate: This option is necessary for instances when theweb app connects to the application server using https (SSL) and authenticates bychecking the certificate provided by the server. When the application server isusing a certificate authority controlled by the user, you can provide the SSL CAcertificate file and the password associated with it, so that Core Impact's web proxymodule can generate the necessary certificates on-the-fly for the hosts accessed bythe web application during the interactive crawling session.
l SSL CA Certificate file: Browse to and select the certificate file
l SSL CA certificate password: Enter the password associated with the SSLCA Certificate
Interactive Crawling Options
page: 141 Core Security, a HelpSystems Company User Guide

Rapid Penetration Test (RPT) /Web Applications RPT
Click the Next button.
3. The final page of the interactive web crawling Wizard contains a notification about how toproceed with the RPT step. You will need to configure your web browser to use127.0.0.1:8080 as its web proxy before you begin navigating your web application. Whenyou are finished browsing the application, you will then need to manually terminate theWebApps Information Gathering module in Core Impact.
Click the Finish button.
Web Browser Configuration
Once the Wizard closes, check the Module Output pane to learn the HTTP Proxy, then set yourbrowser to use that proxy.
Module Output
User Guide Core Security, a HelpSystems Company page: 142

Rapid Penetration Test (RPT) /Web Applications RPT
You will manually access and navigate the target web application - Core Impact will save thepages you visit in its entity view under the appropriate scenario.
Interactive Crawling of a Mobile Application BackendWith Interactive web crawling of a mobile application backend, you configure your mobiledevice to use Core Impact as a proxy and then use your application on your mobile device. Asyou use the mobile application, Core Impact will harvest the requests being made on the serverand use these requests as baselines to test the target backend web services and try to identifyvulnerabilities in them.
More on Mobile Application Backend:
When a user runs an application (app) on a mobile device, that app typically requires aconnection to a backend server. For example, an app providing the weather will need to connectto a remote server using web services in order to receive the latest weather data, then displayit on the mobile device.
When performing Mobile Application Backend Testing in Core Impact, you are essentiallyrunning a WebApps test whereby Core Impact sits in between a mobile app and its backendserver. Core Impact will then harvest the requests being made on the server and use theserequests as baselines to test the target backend web services and try to identify vulnerabilitiesin them. This simulates what a malicious person may do in order to exploit and extractinformation from the servers.
page: 143 Core Security, a HelpSystems Company User Guide

Rapid Penetration Test (RPT) /Web Applications RPT
With Core Impact Mobile Application Backend Testing capabilities, you can make sure that theweb services used as the backend of your mobile app are not vulnerable to a malicious attack.Use the Interactive crawling of a mobile application backend option when performingWebApps Information Gathering in order to leverage Core Impact's web services testingcapabilities to further extend your penetration testing practice.
1. If a proxy server is needed to access the mobile application backend, select theappropriate proxy option and, if necessary, enter the server details.
l Direct connection to the Internet will connect to the Internet without connecting toa proxy server.
l Use the proxy settings defined in the global Network options will follow the settingsthat are in the Tools -> Options -> Network form.
l Use Internet Explorer proxy settings will follow the settings as defined in yourInternet Explorer preferences.
l Use custom proxy settings will follow the proxy settings in the fields just below.
Proxy Settings
Click the Next button.
2. Set the Interactive Crawling Options.
l Restrict crawling to specific domain : If you want the RPT to not record pagesoutside of a specific domain, check the Restrict crawling to specific domain check-box. If you check this option, you must then enter the specific domain(s) to whichthe crawler will be restricted.
l Detect web application framework: The Detect web application framework ischecked by default. This setting will cause the RPT step to find out details about theunderlying mobile application backend platform.
Core Impact can detect SOAP-based or RESTful web services. Because SOAP-basedweb services always have a .wsdl file, these can be detected using Automatic orInteractive web crawling. RESTful web services employ no such definition file so, inorder to detect RESTful web services, you must use Interactive web crawling so thatCore Impact can try and detect JSON type calls in the web traffic.
User Guide Core Security, a HelpSystems Company page: 144

Rapid Penetration Test (RPT) /Web Applications RPT
l Use a custom SSL CA certificate: This option is necessary for instances when themobile app connects to the application backend using https (SSL) and authenticatesby checking the certificate provided by the server. When the application backendis using a certificate authority controlled by the user, you can provide the SSL CAcertificate file and the password associated with it, so that Core Impact's web proxymodule can generate the necessary certificates on-the-fly for the backend hostsaccessed by the mobile application during the interactive crawling session.
l SSL CA Certificate file: Browse to and select the certificate file
l SSL CA certificate password: Enter the password associated with the SSLCA Certificate
Interactive Crawling Options
Click the Next button.
3. The final page of the Interactive crawling of mobile application backend wizard containsa notification about how to proceed with the RPT step. You will need to:
l Complete the wizard and check the Module Output to learn the address where theproxy will listen for connections
l When you are finished using the application, you will then need to manuallyterminate the WebApps Information Gathering module in Core Impact.
Click the Finish button.
Mobile device configuration
page: 145 Core Security, a HelpSystems Company User Guide

Rapid Penetration Test (RPT) /Web Applications RPT
Once the Wizard closes, check the Module Output pane to learn the HTTP Proxy address, thenset your mobile device to use that proxy.
Module Output
You will manually access and navigate the target mobile application - Core Impact will evaluatethe traffic and identify web services that may be vulnerable to subsequent attack.
Checking for Backup/Old Copies of Web PagesIt is not uncommon for web application administrators to backup or store old copies of webpages on the server along with the active pages for the web application. Core Impact's Check forbackup/old copies of Web Pages module - when run - will attempt to locate these pages for a
given scenario and then add them to the scenario for further vulnerability assessment. Toexecute the module:
1. Navigate to the Modules view and make sure that the Web entity tab is active.
2. Type the string "backup" into the module search field. This should reveal the Check forbackup/old copies of Web Pages module.
3. Double-click the Check for backup/old copies of Web Pages module. The module'sparameters will appear.
4. Set the module's parameters to reflect your preferences:
l TARGET: The scenario that the module will target.
l EXTENSIONS: The module will scan for files that include these extensions(commonly used for backup or old files). Modify this list to expand the search.
User Guide Core Security, a HelpSystems Company page: 146

Rapid Penetration Test (RPT) /Web Applications RPT
l ADD FOUND PAGES: If set to "true", any pages that are found by the module willbe added to the scenario in the TARGET field. If set to "false", the pages will not beadded.
Check for backup/old copies of Web Pages Module Parameters
5. Click the OK button. The Module will run - check the Module Log pane for output and/orerror details.
Recording Web Site Login StepsIt is not uncommon for web applications to require additional login steps, after a username andpassword have been provided. For example, usage agreements must be accepted, or captchasmust be passed. In these situations, Core Impact cannot successfully pass these steps in anAutomatic Web Crawling session and therefor cannot find the pages in the web app. To addressthis, you can record the login steps for the web application and then, in the Session Managementstep of the WebApps Information Gathering wizard, instruct Core Impact to use the recording inorder to log in.
To record the login steps:
page: 147 Core Security, a HelpSystems Company User Guide

Rapid Penetration Test (RPT) /Web Applications RPT
1. Navigate to the Modules view and make sure that the Web entity tab is active.
2. Type the string "record" into the module search field. This should reveal the Record Loginmodules.
3. Double-click the Record Login module. The module's parameters will appear.
4. Set the module's parameters to reflect your preferences:
l TARGET: The scenario that the module will target.
l START URL: The URL for the web site where the recording will start.
There are several other parameters that may apply to your environment, but the aboveare the primary settings for the recording.
5. Click the OK button.
6. View the Module Log tab for the Record Login module in the Executed Modules pane.This will contain information you need in order to complete the recording:
l Proxy: Configure your web browser to the proxy as indicated
l URL: The target URL of the web application
7. After setting your web browser's proxy as indicated, navigate in your browser to theURL provided. The Record Login Assistant will open.
8. Click the Start record login procedure button and the Record Login Assistant will presentyour target web page in the lower frame. Log into the site and perform all necessary stepsthat Core Impact will need in order to locate the pages within the web application.
User Guide Core Security, a HelpSystems Company page: 148

Rapid Penetration Test (RPT) /Web Applications RPT
9. If your web application requires user input that could change between uses - such as acaptcha - click the Start Interactive Steps button prior to taking the steps in therecording session. Once the steps are completed, click Stop Interactive Steps. When thelogin steps are subsequently played back in Core Impact, the interactive steps will bepresented and the user can satisfy them as the test is executed.
10. When you are finished, click the Stop button. You can then close the web browserwindow and Core Impact will save the recording for use in WebApps Automatic WebCrawling. If Core Impact requires your input as it plays out the recording, you will beprompted to provide input.
WebApps Attack and PenetrationIf the WebApps Information Gathering step identifies target pages and/or web services, theWebApps Attack and Penetration step can detect whether those pages will be vulnerable to anumber of different attack types. To begin the WebApps Attack and Penetration step:
1. Click WebApps Attack and Penetration in the RPT process panel. The Wizard will begin.
Click the Next button.
2. On the Target Selection page, click the ellipsis ( ) button to display a list of existingscenarios.
Target Selection
The Entities Selection box will appear.
3. Place a check next to each scenario that is to be tested for vulnerabilities. You canalternatively check individual pages within the scenario.
Entities Selection
page: 149 Core Security, a HelpSystems Company User Guide

Rapid Penetration Test (RPT) /Web Applications RPT
Click the OK button.
4. You will return to the wizard. Click the Next button.
Target Selection
There are many options in the WebApps Attack and Penetration wizard and severalcombinations of attacks you can perform. For the sake of documenting the options, we willprovide instructions on each attack path individually, but please understand that these optionscan be combined to undertake a complex and comprehensive test.
On the Risk Types pages of the Wizard, select any of the following options. These security riskscorrelate with the OWASP Top 10 security risks for web applications (see the OWASP web sitefor more info):
A1:2017 - Injection
A2:2017 - Broken Authentication
A3:2017 - Sensitive Data Exposure
A4:2017 - XML External Entities
A5:2017 - Broken Access Control
User Guide Core Security, a HelpSystems Company page: 150

Rapid Penetration Test (RPT) /Web Applications RPT
A6:2017 - Security Misconfiguration
A7:2017 - Cross Site Scripting (XSS)
A8:2017 - Insecure Deserialization
A9:2017 - Using Components with Known Vulnerabilities>
Other
l Look for PHP Remote or File Inclusion vulnerabilities
l Look for unvalid redirects and Forwards
l Look for hidden/backup pages
Execute exploits for known vulnerabilities of checked risk types: Check this option if you wantCore Impact to attempt to execute exploits as a part of the test.
Click the Finish button and then the WebApps Attack and Penetration step will commence. Youwill be able to see module progress in the Executed Modules panel and specific output in theModule Log panel.
If the WebApps Attack and Penetration is successful, depending on the test, a WebApps Agentsmay appear under vulnerable pages in the Entity View. See Interacting with WebApps Agentsfor information about how to leverage the WebApps Agents. Additionally, if a vulnerability isfound, it is assigned a Vulnerability ID which will allow Core Impact users to track reportedvulnerabilities after testing. The Vulnerability ID will appear in the ''Information'' pane when thevulnerable web page is selected and also in the name of the agent that is deployed for the page.For example, if the SQLi Analyzer finds a vulnerability and assigns it ID 7, an agent configuredfrom that vulnerability will be named ''SQL Agent (7)''.
If the WebApps Attack and Penetration successfully penetrated a known web service, aWebApps agent will be installed. These agents function the same as those on web pages, butthey exploit vulnerabilities in the web service.
Running Cross Site Request Forgery (CSRF)If a web application contains a form in which Cross Site Request Forgery (CSRF), this does notnecessarily mean there is a security risk. For example, if a form does not have the capability tomake any database changes or return database content, CSRF cannot be used to do any harm.For this reason, Core Impact requires that tests for CSRF risks be interactive - Core Impact willidentify where CSRF is possible and you will determine whether these instances are securityrisks.
To run a Cross Site Request Forgery test:
1. Click the Web entity tab, then click the Modules tab to view the Modules list.
page: 151 Core Security, a HelpSystems Company User Guide
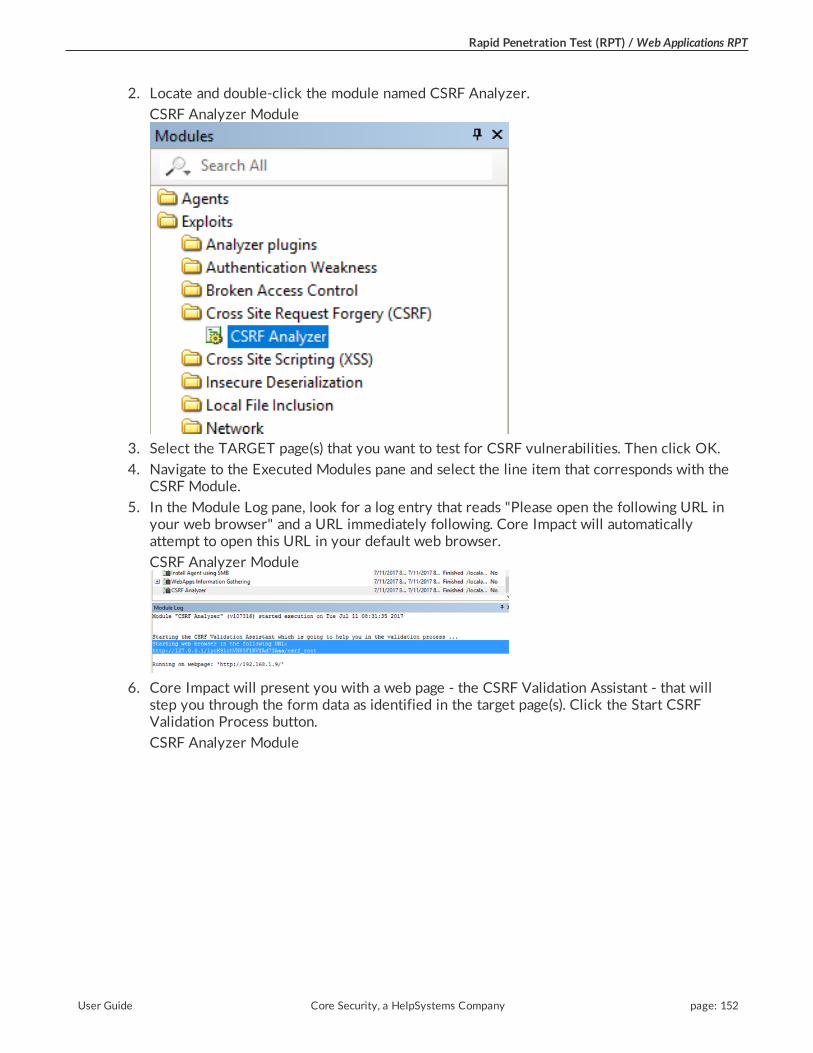
Rapid Penetration Test (RPT) /Web Applications RPT
2. Locate and double-click the module named CSRF Analyzer.
CSRF Analyzer Module
3. Select the TARGET page(s) that you want to test for CSRF vulnerabilities. Then click OK.
4. Navigate to the Executed Modules pane and select the line item that corresponds with theCSRF Module.
5. In the Module Log pane, look for a log entry that reads "Please open the following URL inyour web browser" and a URL immediately following. Core Impact will automaticallyattempt to open this URL in your default web browser.
CSRF Analyzer Module
6. Core Impact will present you with a web page - the CSRF Validation Assistant - that willstep you through the form data as identified in the target page(s). Click the Start CSRFValidation Process button.
CSRF Analyzer Module
User Guide Core Security, a HelpSystems Company page: 152

Rapid Penetration Test (RPT) /Web Applications RPT
7. Core Impact will display the first form that it identified from the target page(s). Enter datainto the field(s) and click the Test Form button to test the form. If you know that the formis not a security risk or do not want to test the form, click the Skip button to move to thenext form.
In the below screenshot, the form appears to be creating a new user in a web application,so you would want to enter valid information to see if you are able to successfully createa user.
CSRF Analyzer Module
8. The next form will display the results of the action. You must then determine whether theform presents a security risk. If it does, click the Attack worked button. If not, click theAttack didn't work button.
In the below example, the target page returned the confirmation "User added", indicatingthat we were successful in creating a new user in the system using CSRF. Because this is asecurity risk, we would click the Attack worked button.
CSRF Analyzer Module
page: 153 Core Security, a HelpSystems Company User Guide

Rapid Penetration Test (RPT) /Web Applications RPT
9. If you click Attack worked for any of your web pages, those pages will be visible in theCSRF folder of the Web entity view.
Running Insecure Cryptographic StorageThis is a post-exploit test that tries to access and identify sensitive information in the webapplication's database. If there is a SQL agent for a target, you can test this risk in the followingways:
l Local Information Gathering: The WebApps Local Information Gathering RPT step willautomatically attempt to locate sensitive data in the database.
l Check for Sensitive Information module: If you want to test for this risk manually, makesure you have a SQL agent on the target page(s) and then run the module called Check forSensitive Information.
Check for Sensitive Information Module
WebApps Browser Attack and PenetrationIf you opted to search for Cross Site Scripting vulnerabilities in the WebApps Attack andPenetration step, then you can run the WebApps Browser Attack and Penetration step to exploitany vulnerable web pages. This RPT step will send to your list of recipients an email with a linkthat will simulate a XSS attack. To run the WebApps XSS Attack and Penetration wizard:
User Guide Core Security, a HelpSystems Company page: 154

Rapid Penetration Test (RPT) /Web Applications RPT
1. Click the WebApps Browser Attack and Penetration step to begin. The Wizard will open.
Click the Next button.
2. On the XSS Agent Selection form, click the ellipsis ( ) button to Select an XSS Agent toleverage.
XSS Agent Selection
3. The Entities Selection window will open. Navigate to the XSS folder under Vulnerablepages, then locate and select an XSS Agent.
Entities Selection
Click the OK button to return to the wizard form.
4. On the Email Target Selection form, use the From: button to select an email address fromthe entity database that will serve as the sender of the test email. Use the To: button toselect email address(es) from the entity database that will serve as recipients of the testemail.
page: 155 Core Security, a HelpSystems Company User Guide

Rapid Penetration Test (RPT) /Web Applications RPT
Email Target Selection
Click the Next button.
5. Use the Change button to modify the template of the email that will be sent to targetusers. Then set the Email Subject so that it entices users to open and take action in theemail.
Email Template Selection
Then click the Next button.
6. End User Experience
Core Impact ships with several email templates that are located in%ProgramData%\IMPACT\components\modules\classic\install\templates. You can customize these templates to maximize the chance that your users will takeaction in the email. Ensure that the email template and email Email Subject are set
User Guide Core Security, a HelpSystems Company page: 156

Rapid Penetration Test (RPT) /Web Applications RPT
appropriately for your test. Click the ellipsis button to select a new template, or to modifythe one that is selected.
Select CSV file for targets' data tags: By default, the email templates only include ahandful of basic tags. If you'd like to add more tags to the email, you can import the tagsand their values using a .csv file. The .csv file must be formatted in the following way:
l Row 1: the names of the tag fields. The first tag name must be 'target'
l Rows 2 - x: the values of the tags. The 'target' value must be the email address ofthe target
Below is an example of how the .csv may appear:
target, nickname, company, [email protected], Johnny, JD Corp, VP of Customer [email protected], Azzo, JD Corp, Secretary
After importing the .csv file, you can edit the template and reference content from the.csv file by using the custom tag: <%csv:[field_name]%>. For example,<%csv:nickname%> or <%csv:position%>.
7. Email Sending Settings
Enter the SMTP Server and SMTP Port for your email SMTP server. Optionally, chooseSTARTTLS as the Connection security and then enter the Username and Password foryour SMTP server.
If you want to limit the number of emails that are sent at one moment, set a Chunk Size.This value will determine the maximum number of emails that will be sent at one time.
Enter the Delay (in seconds) that you want Core Impact to wait in between sendingchunks of email in this attack.
page: 157 Core Security, a HelpSystems Company User Guide

Rapid Penetration Test (RPT) /Web Applications RPT
The WebApps Browser Attack and Penetration step will commence. You will be able to seemodule progress in the Executed Modules panel and specific output in the Module Log panel.Note that a Web Server module will also start. This web server will deliver the simulated attackto the users when they click the link in the email they received.
WebApps Local Information GatheringThe WebApps Local Information Gathering RPT step performs information gathering using SQLiand PHP-RFI Agents that are already in your entity database.
For SQLi and PHP-RFI Agents, the following modules will run:
l Get Databases Version
l Get Databases Logins
l Get Databases Schema
l Check for Sensitive Information
For PHP-RFI Agents the following module will run:
l Get Local Path of web page using RFI Agent (PHP)
To run a WebApps Local Information Gathering:
1. Click the WebApps Local Information Gathering step to begin. The Wizard will open.Clickthe Next button.
2. Click the ellipsis ( ) button to select a Scenario on which to run the RPT step.Then click the Finish button.
WebApps Information Gathering Wizard
User Guide Core Security, a HelpSystems Company page: 158

Rapid Penetration Test (RPT) /Web Applications RPT
The Local Information Gathering will run, displaying its progress and results in the Module Logand Module Output panes.
WebApps Report GenerationThe WebApps Report Generation RPT step allows you to automatically generate robust systemreports by processing information collected about target web pages you have identified. Reportinstructions are consolidated in the RPT Reports section.
One-Step WebApps RPTThe WebApps RPT includes the following One-Step tests that can be run in a single step,providing detailed reports of the test's findings.
l WebApps Remediation Validator
l WebApps Vulnerability Scanner Validator
l WebApps Vulnerability Test
One-Step WebApps Remediation ValidatorOftentimes, the team who tests for vulnerabilities is different than the team who fixes them.Core Impact's One-Step WebApps Remediation Validator allows testers to easily re-testsystems that have already been identified as vulnerable.
To run a One-Step WebApps Remediation Validator test:
1. Make sure the One-Step RPT is active. The available one-step tests will appear.
2. Click WebApps Remediation Validator.
page: 159 Core Security, a HelpSystems Company User Guide

Rapid Penetration Test (RPT) /Web Applications RPT
3. The Remediation Validator Wizard will appear. Click the Next button to proceed with theWizard.
4. Select the Target WebApps (or Scenario) that you want to test.
WebApps Remediation Validator: Target Selection
Click the Finish button. Core Impact will re-test the vulnerable targets and verify whetherthe vulnerabilities still exist.
To check on the status of your test, click the Module Output tab.
One-Step WebApps Vulnerability Scanner ValidatorIf you use a third-party tool to run vulnerability scans against your existing web applications, youcan feed the output from that tool into Core Impact's Vulnerability Scanner Validator. CoreImpact will evaluate the scan's output and provide you with a prioritized validation of yoursystem's weaknesses.
Before running a Vulnerability Scanner Validator, you will need to have the output file from asupported third-party vulnerability scanner. A list of supported scanners is shown as you beginthe test.
The below steps illustrate how to run a One-Step WebApps Vulnerability Scanner Validator testmanually. You can also execute this test using the Scheduler - see Using the Scheduler for moredetails.
To manually run a One-Step WebApps Vulnerability Scanner Validator test:
1. Make sure the One-Step RPT is active. The available one-step tests will appear.
2. Click WebApps Vulnerability Scanner Validator.
3. The Vulnerability Scanner Validator Wizard will appear. Click the Next button to proceedwith the Wizard.
4. Select the third-party scanner from which you got your results.
Source Application
User Guide Core Security, a HelpSystems Company page: 160

Rapid Penetration Test (RPT) /Web Applications RPT
Click the Next button.
5. Enter the details of the scanner's output. The output format you are importing isdependent on the Vulnerability Scanner you selected in the previous step. Some scannersexport their results to a file while others require you to access their data directly fromthe scanner's database.
Input File
Click the Next button.
6. Select the method that the test should use to reestablish a connection to the target webapplication.
l No session restore: With this option, Core Impact will not attempt to log into thetarget web application.
l Interactive session restore: With this option, you set your web browser to use CoreImpact as a proxy and then authenticate in your web application. Core Impact willthen use the resulting session to validate the vulnerability scanner information. This
page: 161 Core Security, a HelpSystems Company User Guide
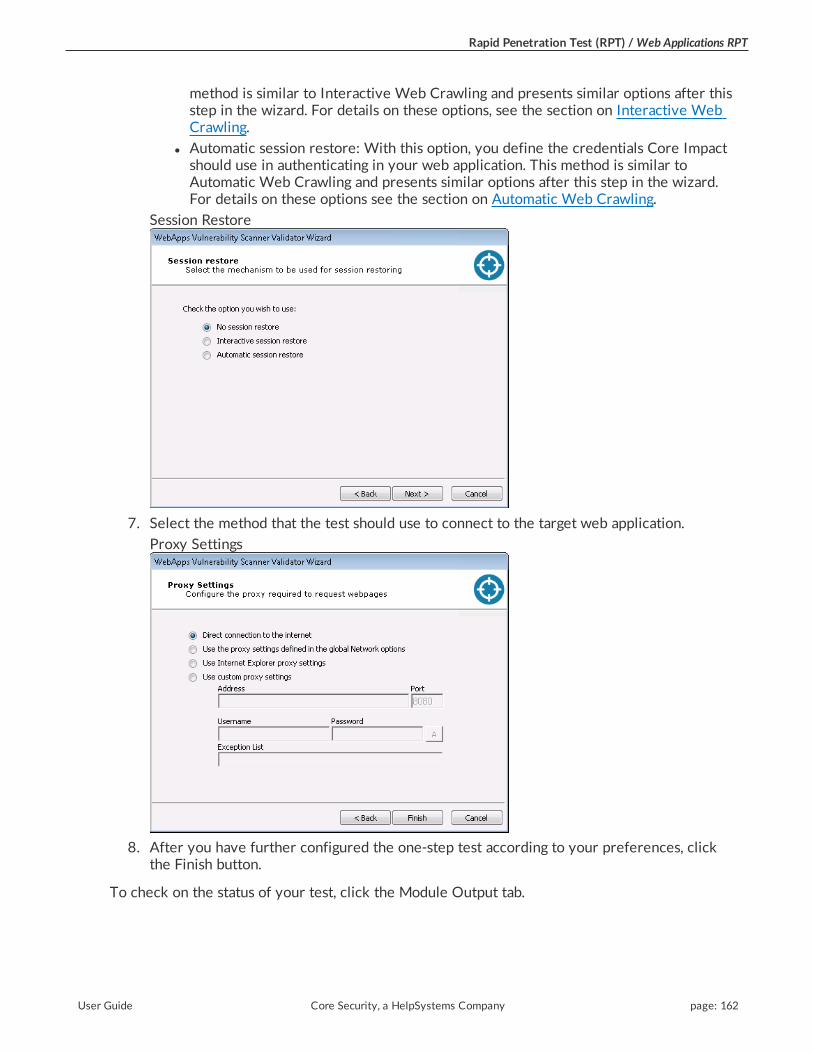
Rapid Penetration Test (RPT) /Web Applications RPT
method is similar to Interactive Web Crawling and presents similar options after thisstep in the wizard. For details on these options, see the section on Interactive WebCrawling.
l Automatic session restore: With this option, you define the credentials Core Impactshould use in authenticating in your web application. This method is similar toAutomatic Web Crawling and presents similar options after this step in the wizard.For details on these options see the section on Automatic Web Crawling.
Session Restore
7. Select the method that the test should use to connect to the target web application.
Proxy Settings
8. After you have further configured the one-step test according to your preferences, clickthe Finish button.
To check on the status of your test, click the Module Output tab.
User Guide Core Security, a HelpSystems Company page: 162

Rapid Penetration Test (RPT) /Web Applications RPT
One-Step WebApps Vulnerability TestCore Impact's One-Step WebApps Vulnerability Test allows you to target a web applications inorder to evaluate its vulnerability to known exploits as well as the OWASP Top 10 securityrisks. When the test runs, Core Impact will access the web application and attempt to locatepages that contain vulnerabilities to any of the risks you select. This One-step test convenientlycombines the WebApps Information Gathering (Automatic Web Crawling only) and WebAppsAttack and Penetration RPT steps into a single test that you can easily schedule or execute in asingle test step.
The One-Step WebApps Vulnerability Test does not require you to create a Scenario beforeinitiating the test as is the case with the WebApps RPT. When you run the One-step WebAppsVulnerability Test, Core Impact will automatically create a new Scenario in which you can viewand manage the test results.
The following section describes how to run a One-Step WebApps Vulnerability Test manually.You can also execute this test using the Scheduler - see Using the Scheduler for more details.
To manually run a One-Step WebApps Vulnerability Test:
1. Make sure the One-Step RPT is active.
2. Click WebApps Vulnerability Test under the One-Step heading.
3. The WebApps Vulnerability Test Wizard will appear. Click the Next button to proceedwith the Wizard.
4. The One-step test uses wizard steps from the WebApps Information Gathering wizardand the WebApps Attack and Penetration wizard. Please view those sections for detailson the screens that follow.
5. Click the Finish button to begin the test.
To check on the status of your test, click the Module Output tab.
Core Impact and the OWASP Top 10Core Impact is designed to make it easy for your organization to assess the OWASP Top 10security risks for web applications (see http://www.owasp.org for details on OWASP). You canidentify OWASP Top 10 2017 exposures with Core Impact 19.1 in the following ways:
A1:2017-Injectionl Safely identify both traditional and blind SQL injection vulnerabilities
l Dynamically create and inject SQL queries in an attempt to access the database
l Interact with the compromised database
l Detect and exploit OS Command Injection weaknesses in web applications
l Reveal the implications of a breach by taking control of the web server
A2:2017-Broken AuthenticationGuess usernames and passwords
page: 163 Core Security, a HelpSystems Company User Guide

Rapid Penetration Test (RPT) /Web Applications RPT
A3:2017-Sensitive Data Exposurel Identify unencrypted data upon successfully accessing a SQL database
l Identify exposed credit card numbers, social security numbers and email addresses
l Define custom searches for other types of sensitive data
l Flag weak encryption in HTTPS-secured sites
A4:2017-XML External Entities (XXE)l Identify XML External Entities vulnerabilities affecting different programming languages,
libraries and methods:
l Java 1.8+, Python, PHP 5, PHP 7 and ASP
l XML payloads included in GET, POST and request body
l Leverage identified XXE vulnerabilities to perform post-exploitation actions, such asreading from the file system.
A5:2017-Broken Access Controll Search, follow and identify:
l hidden pages
l backup/old pages
l robots.txt files
l Access admin, backup and old pages via authenticated and unauthenticated sessions
l Record multiple authentication profiles and identify pages having broken or lacking accesscontrol mechanisms.
A6:2017-Security Misconfigurationl Identify WebDAV attacks
l Identify common/default credentials present
A7:2017-Cross-Site Scripting (XSS)l Identify and confirm the exploitability of GET- and POST-based XSS vulnerabilities,
including:
l URL-based, reflective XSS
l persistent (or stored) XSS
l XSS in dynamic Adobe Flash objects
A8:2017-Insecure Deserializationl Launch exploits for known insecure deserialization vulnerabilities affecting common
frameworks and applications.
l Leverage insecure deserialization issues to pivot to the underlying server.
User Guide Core Security, a HelpSystems Company page: 164

Rapid Penetration Test (RPT) /Web Applications RPT
A9:2017-Using Components with Known Vulnerabilitiesl Leverage multi-vector testing to identify security misconfiguration issues across:
l the web application
l the underlying server
l the backend environment
A10:2017-Insufficient Logging & Monitoringl Record all testing activities within Impact and match them against the application's logs
and monitoring output to manually validate coverage and identify potential blind spots.
A1:2017 InjectionBelow we document the steps to test the OWASP A1:2017 Injection security risk only. Pleasenote that you can combine tests and run more than one on a specific target or set of targets.
1. On the Risk Types pages of the Wizard, select A1 - Injection and any of the followingoptions:
l Look for SQL Injection vulnerabilities
l Look for OS Command Injection Vulnerabilities
A1 - Injection
Then click Next until you are past the Risk Types selection. For the following steps wewill have ONLY selected A1 - Injection.
2. SQL Injection tests can be performed for any of the following page parameters:
l Request parameters
l Request cookies
Select any of these by placing a check next to the desired option(s).
page: 165 Core Security, a HelpSystems Company User Guide

Rapid Penetration Test (RPT) /Web Applications RPT
3. The WebApps Attack and Penetration step can exert varying levels of testing on the webpage's parameters. Select the depth of the test using the drop-down menu:
l FAST: quickly runs the most common tests
l NORMAL: runs the tests that are in the FAST plus some additional tests
l FULL: runs all tests
4. If you know in advance how the target web application's error pages will appear - whattext will be in the body or the header - check the Use custom error page detection check-box. You will further configure this feature in a subsequent step in the Wizard.
SQL Injection Test Configuration
5. If you opted to Use custom error page detection in the earlier step, you can add one ormore rules that Core Impact will check when it receives data from the web application.Each rule can apply to the header of the document or the data content. You then candefine whether the header or data does or does not contain certain text strings. Forexample, if you know that the web application will produce error pages that contain in thepage body the sentence "We're Sorry. An unknown error occurred while processing yourrequest. Please try again", then you could create a custom error configuration as shownbelow:
Custom Error Page Detection Configuration
User Guide Core Security, a HelpSystems Company page: 166

Rapid Penetration Test (RPT) /Web Applications RPT
If Core Impact identifies an error page, it will then evaluate whether it (or the conditionsthat produced the error page) are vulnerable to SQL Injection attacks.
Use the Apply the above conditions when the HTTP status code was: list to indicate thatcustom error rules should only be applied if Core Impact receives a specific HTTP statuscode with the page.
6. To configure a module to avoid testing pages that could terminate the session, use the
ellipsis ( ) button. By default, the Session arguments avoid list module will be enabledfor this purpose. Click the Clear button if you do not want any module to perform thisfunction.
You can extend Core Impact's functionality by writing your own custom modules. Formore information about writing custom modules, please contact Customer Support (seeContact Support).
Session Management
page: 167 Core Security, a HelpSystems Company User Guide

Rapid Penetration Test (RPT) /Web Applications RPT
7. Click the Finish button to begin the test. If you had selected other Risk Types, click Nextto make additional configurations.
If the WebApps Attack and Penetration is successful, then WebApps Agents will appear undervulnerable pages in the Entity View. See Interacting with WebApps Agents for information abouthow to leverage the WebApps Agents. Additionally, if a vulnerability is found, it is assigned aVulnerability ID which will allow Core Impact users to track reported vulnerabilities aftertesting. The Vulnerability ID will appear in the ''Information'' pane when the vulnerable webpage is selected and also in the name of the agent that is deployed for the page. For example, ifthe SQLi Analyzer finds a vulnerability and assigns it ID 7, an agent configured from thatvulnerability will be named ''SQL Agent (7)''.
A2:2017 Broken AuthenticationBelow we document the steps to test the OWASP A2:2017 Broken Authentication security riskonly. Please note that you can combine tests and run more than one on a specific target or set oftargets.
1. On the Risk Types pages of the Wizard, select A2 - Broken Authentication
A2 - Broken Authentication
Then click Next until you are past the Risk Types selection. For the following steps we willhave ONLY selected A2 - Broken Authentication.
2. Check the Train with valid credentials box and then enter a Username and Password ifyou would like the RPT to log into the web application so that it can learn (be trained) howa valid login appears. Alternatively, you can select custom dictionary files from which CoreImpact can draw usernames and/or passwords.
Authentication tests configuration
User Guide Core Security, a HelpSystems Company page: 168

Rapid Penetration Test (RPT) /Web Applications RPT
3. Check the Use a custom file for usernames option if you want to provide a file thatcontains a list of usernames the RPT can use in the test.
4. Check the Use a custom file for passwords option if you want to provide a file thatcontains a list of passwords the RPT can use in the test.
5. Click the Finish button to begin the test. If you had selected other Risk Types, click Nextto make additional configurations.
If the WebApps Attack and Penetration is successful, then WebApps Agents will appear undervulnerable pages in the Entity View. See Interacting with WebApps Agents for informationabout how to leverage the WebApps Agents. Additionally, if a vulnerability is found, it isassigned a Vulnerability ID which will allow Core Impact users to track reported vulnerabilitiesafter testing. The Vulnerability ID will appear in the ''Information'' pane when the vulnerableweb page is selected.
A3:2017 Sensitive Data ExposureBelow we document the steps to test the OWASP A3:2017 Sensitive Data Exposure securityrisk only. Please note that you can combine tests and run more than one on a specific target orset of targets.
1. On the Risk Types pages of the Wizard, select A3 - Sensitive Data Exposure andoptionally one of the following options:
l Look for Sensitive Information in Documents: In addition to searching throughHTML pages for sensitive data, Core Impact can search through documents that arelinked from the HTML pages.
l Look for Weak SSL Ciphers: Check this option if you want Core Impact to look alsofor weak SSL ciphers in the target web pages.
A3 - Sensitive Data Exposure
page: 169 Core Security, a HelpSystems Company User Guide

Rapid Penetration Test (RPT) /Web Applications RPT
Then click Next until you are past the Risk Types selection. For the following steps we willhave ONLY selected A3 - Sensitive Data Exposure and its related options.
2. If you selected Look for Sensitive Information in documents, you will have the belowform to configure. You can instruct Core Impact to Search for credit card numbers orSearch for social security numbers in any documents it finds. Additionally, add a CustomSearch Pattern to help Core Impact find specific data - enter an extended regularexpression and that would be run across all the HTML pages that the wizard is targeting.
Sensitive Information in Documents tests configuration
3. Check the Apply search filters inside Microsoft Office, OpenOffice and PDF Documentsoption if you want the test to search inside of documents that are linked from theHTML pages.
4. Check the Save documents matching search filters option if you want Core Impact to saveany documents where it locates sensitive data. Then provide a path where the documentsshould be saved.
User Guide Core Security, a HelpSystems Company page: 170

Rapid Penetration Test (RPT) /Web Applications RPT
5. To configure a module to avoid testing pages that could terminate the session, use the
ellipsis ( ) button. By default, the Session arguments avoid list module will be enabledfor this purpose. Click the Clear button if you do not want any module to perform thisfunction.
You can extend Core Impact's functionality by writing your own custom modules. Formore information about writing custom modules, please contact Customer Support (seeContact Support).
Session Management
6. Click the Finish button to begin the test. If you had selected other Risk Types, click Nextto make additional configurations.
A4:2017 XML External EntitiesBelow we document the steps to test the OWASP A4:2017 XML External Entities security riskonly. This test is used to identify XML External Entities (XXE) vulnerabilities on web pages andcurrently supports the following vulnerable libraries:
l Java 1.8+
l Python
l PHP 5
l PHP 7 (XML External Entities resolutions disabled by default)
l ASP
1. On the Risk Types pages of the Wizard, select A4 - XML External Entities
A4 - XML External Entities
page: 171 Core Security, a HelpSystems Company User Guide

Rapid Penetration Test (RPT) /Web Applications RPT
Then click Next until you are past the Risk Types selection. For the following steps we willhave ONLY selected A4- External Entities.
2. Click the Finish button to begin the test. If you had selected other Risk Types, click Nextto make additional configurations.
If one or more vulnerable pages are found, then a new XXE Agent will appear under vulnerablepages in the Entity View. See Interacting with WebApps Agents for information about how toleverage the WebApps Agents.
A5:2017 Broken Access ControlBelow we document the steps to test the OWASP A5:2017 Broken Access Control security riskonly. This test will navigate your target web application first as an admin user, then as a user withlesser privileges. The output will be a delta report, showing how the access differs between the2 user accounts. As is noted on the WebApps Attack and Penetration Wizard, the A5 - Broken
User Guide Core Security, a HelpSystems Company page: 172

Rapid Penetration Test (RPT) /Web Applications RPT
Access Control risk is tested using the Broken Access Control Analyzer module.
1. To execute a test for Broken Access Control, open the Modules tab and make sure theWeb entity database is active.
2. Navigate to or search for the Broken Access Control Analyzer module.
3. Double-click the module to start the wizard.
4. Enter the name of the baseline profile, or leave the default name, then click the Nextbutton.
page: 173 Core Security, a HelpSystems Company User Guide

Rapid Penetration Test (RPT) /Web Applications RPT
5. Configure how Core Impact can log in to your web application. With the first option, CoreImpact will allow you to log in to your web application but it will record your steps so thatit can perform them automatically at a later stage. Click the Next button.
6. When Core Impact is ready, it will instruct you to set up a proxy for your web browserand then log into your web application as a baseline user. Click the Next button.
User Guide Core Security, a HelpSystems Company page: 174

Rapid Penetration Test (RPT) /Web Applications RPT
7. Optionally Restrict captured pages by domain if you want place limits on where in theweb application that Core Impact can go. Click the Next button.
8. Using the web browser and previously-defined proxy, navigate to your web applicationand log in using the baseline credentials. Click the Next button.
page: 175 Core Security, a HelpSystems Company User Guide

Rapid Penetration Test (RPT) /Web Applications RPT
9. Core Impact will present you with a list of pages found. Select which one(s) you want totest for broken access control. Click the Next button.
10. Select the type of profiles to be tested - the profile's test will be compared to thebaseline's. Click the Next button.
11. Enter a Profile Name and then configure how to obtain a session for the profile. You cancapture the session interactively - as was done for the Baseline - or you can import the
User Guide Core Security, a HelpSystems Company page: 176

Rapid Penetration Test (RPT) /Web Applications RPT
session from an existing scenario. Click the Next button.
12. Just as was done with the Baseline, navigate to your web app and log in with the newProfile's credentials. Click the Next button.
page: 177 Core Security, a HelpSystems Company User Guide

Rapid Penetration Test (RPT) /Web Applications RPT
13. Select the pages that you would like Core Impact to test as the Profile user. Click theNext button.
14. Click the Finish button to begin the tests.
If the WebApps Attack and Penetration is successful, then WebApps Agents will appear undervulnerable pages in the Entity View. See Interacting with WebApps Agents for information abouthow to leverage the WebApps Agents.
A6:2017 Security MisconfigurationBelow we document the steps to test the OWASP A6:2017 Security Misconfiguration securityrisk only. Please note that you can combine tests and run more than one on a specific target orset of targets.
1. On the Risk Types pages of the Wizard, select A6 - Security Misconfiguration
A6 - Security Misconfiguration
User Guide Core Security, a HelpSystems Company page: 178

Rapid Penetration Test (RPT) /Web Applications RPT
l Look for WebDAV vulnerabilities: Check this option if you want the test to locatepages that have WebDAV vulnerabilities. If found, Core Impact will create aWebDAV agent which represents the knowledge of how to exploit a poorlyconfigured web server.
l Look for default host credentials: Check this option if you want the test to locatepages that use default usernames and passwords.
Then click Next until you are past the Risk Types selection. For the following steps wewill have ONLY selected A6 - Security Misconfiguration
6. Click the Finish button to begin the test. If you had selected other Risk Types, click Nextto make additional configurations.
If the WebApps Attack and Penetration is successful, then a new XXE Agent will appear undervulnerable pages in the Entity View. See Interacting with WebApps Agents for informationabout how to leverage the WebApps Agents.
A7:2017 Cross Site Scripting (XSS)Below we document the steps to test the A7:2017 Cross Site Scripting (XSS) security risk only.Please note that you can combine tests and run more than one on a specific target or set oftargets.
1. On the Risk Types pages of the Wizard, select A7 - Cross Site Scripting (XSS)
A7 - Cross Site Scripting (XSS)
page: 179 Core Security, a HelpSystems Company User Guide

Rapid Penetration Test (RPT) /Web Applications RPT
Then click Next until you are past the Risk Types selection. For the following steps we willhave ONLY selected A7 - Cross Site Scripting (XSS).
2. Select the specific browser that you would like to target, or select Any to target all types.
XSS Tests Configuration
3. To configure a module to avoid testing pages that could terminate the session, use the
ellipsis ( ) button. By default, the Session arguments avoid list module will be enabledfor this purpose. Click the Clear button if you do not want any module to perform thisfunction.
You can extend Core Impact's functionality by writing your own custom modules. Formore information about writing custom modules, please contact Customer Support (seeContact Support).
Session Management
User Guide Core Security, a HelpSystems Company page: 180

Rapid Penetration Test (RPT) /Web Applications RPT
4. Click the Finish button to begin the test. If you had selected other Risk Types, click Nextto make additional configurations.
If the WebApps Attack and Penetration is successful, then WebApps Agents will appear undervulnerable pages in the Entity View. See Interacting with WebApps Agents for informationabout how to leverage the WebApps Agents. Additionally, if a vulnerability is found, it isassigned a Vulnerability ID which will allow Core Impact users to track reported vulnerabilitiesafter testing. The Vulnerability ID will appear in the ''Information'' pane when the vulnerableweb page is selected and also in the name of the agent that is deployed for the page. Forexample, if the SQLi Analyzer finds a vulnerability and assigns it ID 7, an agent configured fromthat vulnerability will be named ''SQL Agent (7)''.
A8:2017 Insecure DeserializationBelow we document the steps to test the A8:2017 Insecure Deserialization security risk only.Please note that you can combine tests and run more than one on a specific target or set oftargets.
1. On the Risk Types pages of the Wizard, select A8 - Insecure Deserialization
A8 - Insecure Deserialization
page: 181 Core Security, a HelpSystems Company User Guide

Rapid Penetration Test (RPT) /Web Applications RPT
2. Click the Finish button to begin the test. If you had selected other Risk Types, click Nextto make additional configurations.
If the WebApps Attack and Penetration is successful, it will execute exploits for known insecuredeserialization vulnerabilities based on the web application fingerprint performed during theInformation Gathering phase.
A9:2017 Using Components with Known VulnerabilitiesBelow we document the steps to test the A9:2017 Using Components with KnownVulnerabilities security risk only. Please note that you can combine tests and run more than oneon a specific target or set of targets.
1. On the Risk Types pages of the Wizard, select A9 - Using Components with KnownVulnerabilities
A9 - Using Components with Known Vulnerabilities
User Guide Core Security, a HelpSystems Company page: 182

Rapid Penetration Test (RPT) / Remediation Validation
2. Click the Finish button to begin the test. If you had selected other Risk Types, click Nextto make additional configurations.
If the WebApps Attack and Penetration is successful, then a new XXE Agent will appear undervulnerable pages in the Entity View. See Interacting with WebApps Agents for informationabout how to leverage the WebApps Agents.
Remediation ValidationCore Impact allows testers to efficiently re-test Network and Web assets that have previouslybeen identified as vulnerable. Because the remediation responsibilities usually fall on a differentteam, Remediation Validation is an important step for penetration testers. Core Impact'sRemediation Validation test results will be output to a report, comparing new results withoriginal results. In many cases, the Remediation Validator supports agent redeployment andremediation on testing scenarios where OS agents, WebApps agents, and Network SQL agentsare used together to detect vulnerabilities.
View illustration
In the below illustration, Host C is compromised as Core Impact is able to leveragevulnerabilities in Hosts A and B. When performing Remediation Validation on this scenario,Core Impact will attempt to recreate the same attack path and redeploy the same agents inorder to determine if the vulnerabilities have been remediated.
Using Core Impact, testers have several methods of initiating a Remediation Validation test:
l From within a Workspace: Network and WebApps RPTs provide One-step RemediationValidation tests. Jump to those sections to learn more.
l From the Dashboard:
1. From the Core Impact dashboard, click the Remediation Validation button. TheRemediation Validation wizard will open.
2. Select a Workspace in which you want the validation to occur, select whether youwould like results for Network, Web applications, or both, then click Next.
Workspace Selection
page: 183 Core Security, a HelpSystems Company User Guide

Rapid Penetration Test (RPT) / Remediation Validation
3. Check the Consider vulnerabilities as solved if original attack path cannot bereproduced option if you want the test to mark vulnerabilities as "solved" (and not"indeterminate") if the original attack path cannot be used. Then click Next.
Remediation Validation Options
4. Select the report(s) that you would like Core Impact to generate and select a localfolder where the report(s) should be saved. Then click Next.
Reporting Configuration
User Guide Core Security, a HelpSystems Company page: 184

Rapid Penetration Test (RPT) / Remediation Validation
5. Select the report format that you would like. Then click Next.
6. If you would like to receive the reports via email, check the Core Impact optionand complete the remainder of the form. Then click Finish.
Reporting Configuration
page: 185 Core Security, a HelpSystems Company User Guide

Rapid Penetration Test (RPT) / Reports
The targeted workspace will open and the Remediation Test will automatically run. Youcan then check the Module Output for status and completion information.
ReportsEach of the Rapid Penetration Tests provides rich reports that can be used to consolidate, viewand distribute your test findings as well as to plan ongoing prevention and remediation efforts.Reporting options are similar for each RPT and several reports are available for multiple RPTs.
l Types of Reports
l List of Available Reports
l Running Crystal Reports
l Running Spreadsheet Reports
l Creating User Spreadsheet Reports
l Running Reports from the Dashboard
For any report that consolidates data for more than one workspace, unique IP addresses andunique email addresses are treated differently for data summaries. For example, if the same IPaddress is discovered in 3 different workspaces, the report's Summary of Discovered Hosts willshow a count of 3 hosts. Alternatively, if the same email address is reported in 3 differentworkspaces, the report's Summary of Targeted Users will show a count of 1 email address.
Types of Reportsl Crystal Report: This option uses SAP Crystal Reports as the engine to generate report
data. Jump to Running Crystal Reports. Some reports are available only as Crystal Reports.
l Spreadsheet: Some Core Impact reports use Excel as the reporting engine. Check only theSpreadsheet checkbox to see which reports qualify. Jump to Running SpreadsheetReports.
User Guide Core Security, a HelpSystems Company page: 186
Rapid Penetration Test (RPT) / Reports
l User Spreadsheet: Any report that is available as a Spreadsheet report can be modifiedand customized to suit your specific business requirements. Once a report has beencustomized, it will be listed in the User Spreadsheet category. Jump to Creating UserSpreadsheet Reports.
List of Available ReportsNetwork Host Report
Available in the Network and Client-side RPTs, this is a detailed report about the hosts youtested using Core Impact, grouped by host IP address unless otherwise configured. Reporteddata Includes:
l Number of compromised hosts
l Services and applications found on each host
l Average number of exploited vulnerabilities on those hosts
l The CVE names of the vulnerabilities found on each compromised host
l If available, a screen shot from the compromised host.
This report is closely linked to the Vulnerability report (see below). (For Network RPT andClient-side RPT only)
Customization options:
l Host Selection: You can select specific hosts on which to run the report, or report on allknown hosts.
l Include host list grouped by services: Select this option to have the host data grouped bythe services they were running.
l Include host list grouped by ports: Select this option to have the host data grouped by
l Include application list for each host: Select this option to include detected applicationsfor each host in the report.
l Include closed ports for each host: Select this option to include detected closed ports foreach host in the report.
l Black and white charts: Select this option to have charts created in black and whiteinstead of in color.
Full Executive Report
Available in the General category, this is a report presents a summary of the penetration testconducted by Core Impact.
Identity Report
This report provides details about discovered identities harvested by brute force or post-exploitation actions. When executing up the report, you have the following options:
l Report format: Select either XLSX or PDF.
l Show hashes and passwords: Select either Yes or No.
Network Exposure Report
This report details the exposures that were found during the Information Gathering stage of the
page: 187 Core Security, a HelpSystems Company User Guide

Rapid Penetration Test (RPT) / Reports
RPT. Exposures are information that while not being a vulnerability might help an attacker toconduct information gathering activities. When executing up the report, you have the followingoptions:
l Report format: Select either XLSX or PDF.
Network Report
This report provides detailed information about hosts found and all vulnerabilities found thatwere successfully exploited. When executing up the report, you have the following options:
l Report format: Select either XLSX or PDF.
l Show hashes and passwords: Select either Yes or No.
Network Mitigation Report
This report provides detailed information about the vulnerabilities found, organized as achecklist to serve as a reference document for issues that need to be addressed. Whenexecuting up the report, you have the following options:
l Report format: Select either XLSX or PDF.
Network Vulnerability Validation report
Available in the Network RPT, this is a report containing validation information forvulnerabilities imported from external vulnerability scanners. When executing the report, youhave the following options:
l Report format: Select either XLSX or PDF.
PCI Vulnerability Validation report
Available in the Network RPT, this is a report containing validation and severity information forvulnerabilities imported from external vulnerability scanners.
Customization options:
l Host Selection: You can select specific hosts on which to run the report, or report on allknown hosts.
l Black and white charts: Select this option to have charts created in black and white insteadof in color.
Network Remediation Validation report
Available in the Network RPT, this is report compares the Workspace's original results withthose after remediation efforts have been performed.
Network Video Camera report
Available in the Network RPT, this report provides detailed information about the video camerasfound during the testing carried out by Core Impact and the risks and weaknesses associated tothem
When executing the report, you have the following options:
l Report format: Select either XLSX or PDF.
User Guide Core Security, a HelpSystems Company page: 188

Rapid Penetration Test (RPT) / Reports
Vulnerability Report
Available in the Network, Client-side and WebApps RPTs, this is a detailed report about thevulnerabilities that were successfully exploited on each host (versus potential vulnerabilities).This report provides details for each of the exploited vulnerabilities listed for compromisedhosts in the Host Report. Data includes Common Vulnerabilities and Exposure (CVE) as well asCommon Vulnerability Scoring System (CVSS) details.
When executing the report, you have the following options:
l Report format: Select either XLSX or PDF.
Network Wellness Report
Available in the Network RPT, this report indicates the amount of testing that was performedand shows which tests resulted in a vulnerability being found on the selected targets. Whenexecuting the report, you have the following options:
l Report format: Select either XLSX or PDF.
Client-Side Penetration Test Report
Available in the Client-side RPT, this is a detailed report of Client-side Penetration Testsincluding:
l Summary of client-side attack types
l Email messages sent to deliver attacks or lure users to a malicious web site
l Exploits used in client-side attacks
Customization options:
l Black and white charts: Select this option to have charts created in black and whiteinstead of in color.
Client-Side Phishing Report
Available in the Client-side RPT, this is a detailed report of Client-side Phishing test results,including:
l Summary data of client-side targets
l Percentage of targets who viewed the attack email
l Percentage of targets who visited the Phishing web site
l Percentage of targets who entered data into the Phishing web site
Customization options:
l Black and white charts: Select this option to have charts created in black and whiteinstead of in color.
User Report
Available in the Client Side RPT, this is a detailed report about all the users that werediscovered and targeted as a part of the penetration test.
Customization options:
page: 189 Core Security, a HelpSystems Company User Guide

Rapid Penetration Test (RPT) / Reports
l Black and white charts: Select this option to have charts created in black and white insteadof in color.
Host Based Activity Report
Available in the Network RPT, this is a report showing all modules run for each detected host.
Customization options:
l Host Selection: You can select specific hosts on which to run the report, or report on allknown hosts.
l Black and white charts: Select this option to have charts created in black and white insteadof in color.
FISMA Exploited Vulnerabilities Report
Available in the Network and Client Side RPTs, this is a report that shows a summary anddetailed information of vulnerabilities exploited by Core Impact. This report is designed tocomply with standards and requirements of the U.S. Government Federal Information SecurityManagement Act (FISMA) and can help you achieve NIST SP 800-53A compliance.
Customization options:
l Black and white charts: Select this option to have charts created in black and white insteadof in color.
l Show additional information for vulnerabilities: Select this option to include more detailsabout vulnerabilities included in the report.
l Include identities: Select this option to include identities in the report output.
l Obfuscate plain text password: If including identities, check this option to mask anypasswords.
l Group validated identities by: If including identities, identities will be grouped byHost or by Service.
Delta Report
Available in the Network, Client-side and WebApps RPTs, the Delta Report will show a side-by-side comparison of test statistics for any 2 workspaces.
Customization options:
l Select 2 workspaces to compare.
Trend Report
A Trend report is a summary report which shows graphically the changes across 2 or moreworkspaces. This report is only available when Running Reports from the Dashboard.
Customization options:
l Timeline to be used in the report: Select the scale of the report as daily, weekly, monthly,quarterly, or yearly.
l Select attack categories to be included in the report: Select from Network, Client-Side,and Web.
User Guide Core Security, a HelpSystems Company page: 190

Rapid Penetration Test (RPT) / Reports
l Black and white charts: Select this option to have charts created in black and whiteinstead of in color.
l Show numbers in charts: Select this option to have numbers visible on output chart.
Executive Report
Available in the Network, Client-side and WebApps RPTs, this is a summary report of allcompleted penetration test activities and their results. Reported data includes:
l Summary of exploited vulnerabilities
l Summary of discovered hosts and network devices
l Summary of targeted users
l Most exploited vulnerabilities (overall and by operating system)
Customization options:
l Black and white charts: Select this option to have charts created in black and whiteinstead of in color.
The Network Executive Report is available as a Spreadsheet Report
Attack Graph Report
For any attack vector where you have successfully penetrated a system, you can obtain agraphical representation of the test by running the Attack Graph report. The Attack Graphillustrates your penetration test by using nodes and edges as in this example:
Attack Graph Report Sample
A node represents any participant in the attack - either a system or application.
An edge (arrowed line) represents an attack. The type of edge indicates the type of attackaccording to the below key:
l Solid Network attacks
l Dashed Client-side attacks
l Dotted WebApps attacks
page: 191 Core Security, a HelpSystems Company User Guide

Rapid Penetration Test (RPT) / Reports
Attack Graphs are created using Graphviz, which can be downloaded at www.graphviz.org.Graphs can be produced in a raw .dot format which can then be edited with Graphviz'gvedit.exe as well as other 3rd party tools.
Customization options:
l Output filename: The name of the file that will contain the attack graph. If you don'tchange the Output Filename, the resulting report file will be saved in%programfiles%/core security/Impact/bin.
l Edge color: The color of the attack lines between nodes (red or black).
l Edge detail: Select Full if you want the graph to display each exploit as its own edge. So ifthere were 14 exploits used, you will see 14 edges. Select Compacted to show a singleedge for each attack type between two nodes. In Compacted mode, you will see edgeswith different thicknesses. The thick edges indicate that several attacks were performedbetween the same two nodes but using different exploits.
l Node detail: This setting determines how much information is displayed per node. Withany of these options, the nodes are shown in tiers based on their distance from thelocalhost node.
l Full: In this mode, the node displays verbose identification information (IP address,URL or web browser and version). All other Node Detail modes are compacted inthat they display icons to indicate the type of node.
l Compacted BFS (Breadth-First Search): In this mode, each node contains a numberin parentheses that represents the order in which the node was attacked.
l Compacted In Degree: In this mode, the nodes contain two numbers. The firstnumber (not in parentheses) shows the number of distinct exploits with which thenode was attacked (this number would correspond with the number of edgesconnecting to the node). The number in parentheses is a rank (starting at 0) based onnumber of attacks received. For example, a node showing 34 (0) was attacked with34 exploits and it was also the node that received the most attacks. In this mode,you should see localhost as having the highest number rank and no number ofattacks.
l Compacted Out Degree: In this mode, the nodes contain two numbers. The firstnumber (not in parentheses) shows how many attacks originated from the node. Thenumber in parentheses is a rank (starting at 0) based on number of attacksperformed. For example, a node showing 2 (5) performed 2 attacks and there were5 nodes that performed the same or more attacks.
Activity Report
Available in the Network, Client-side and WebApps RPTs, this is a detailed report of all modulesexecuted in Core Impact, grouped by date/time run and module.
Customization options:
l Log detail level: select from Low, Medium or High.
l Include only parent level tasks: Select this option to prevent the report from showingdetails on sub-modules.
Network Wireless Report
Available in the Network RPT, this report shows detail on all known wireless relationships that
User Guide Core Security, a HelpSystems Company page: 192
Rapid Penetration Test (RPT) / Reports
have been found while Testing a Wireless Environment. When executing the report, you havethe following options:
l Report format: Select either XLSX or PDF.
WiFi Fake Access Points Report
Available in the Network RPT, this report provides a summary of information about attackswhile Testing a Wireless Environment using a Fake Access Point.
WiFi MiTM Report
Available in the Network RPT, this report shows data about results of Man In The Middle(MiTM) attacks.
WebApps Executive Report
Available in the WebApps RPT, this report summarizes the most relevant information obtainedduring the penetration test. This report includes information about discovered hosts,compromised vulnerabilities and executed tasks.
Customization options:
l Select how to show the exploited assets: select from Do not include, Most Exploited Webpages, List All Exploited Assets.
Information Publicly Accessible Report
Available in the Client Side RPT, this report presents the results from the search of documentsand any metadata within the discovered documents during Client Side Information Gathering.This report includes information about discovered hosts, compromised vulnerabilities andexecuted tasks.
Customization options:
l Show Sensitive Data: Check this option to include sensitive data in the report.
WebApps Remediation Validation Report
Available in the WebApps RPT, this report provides a comparison between the original data andthe remediated results.
WebApps Vulnerability Report
Available in the WebApps RPT, this report provides detailed information about allvulnerabilities that were successfully exploited during the penetration test.
Running Crystal ReportsTo run a Crystal report:
1. Click the Report Generation step for your RPT. The Report Generation wizard will open.
2. Click Next to begin.
3. Select the report category from the drop-down menu.
page: 193 Core Security, a HelpSystems Company User Guide

Rapid Penetration Test (RPT) / Reports
4. Check only the Crystal Report check-box to display only the Crystal Reports. Select theReport that you wish to run and click the Next button. The report selections in the belowimage are from the Network Report Generation wizard; options will vary for other RPTs.
Report Type
5. Make any Report customizations that are available. Customizations will vary for thedifferent report types.
Then click the Next button.
Client-side Report Customizations
6. For WebApps RPT Reports only, click the ellipsis ( ) button to choose the scenario(s) forwhich you would like a report. Then click the Next button.
7. For certain Network and Client-side RPT Reports, you must select the Workspace(s) for
which you would like a report. On the Workspace Selection page, click the ellipsis ( )button to choose the workspace(s) for which the report should run.
8. For any workspace that you want to include in the report, select it on the left (AvailableWorkspaces) and click the Add button to move it to the Selected Workspaces pane. If youadd a workspace that isn't the currently-opened workspace, you will be prompted for theworkspace's password.
Workspace Selection
User Guide Core Security, a HelpSystems Company page: 194
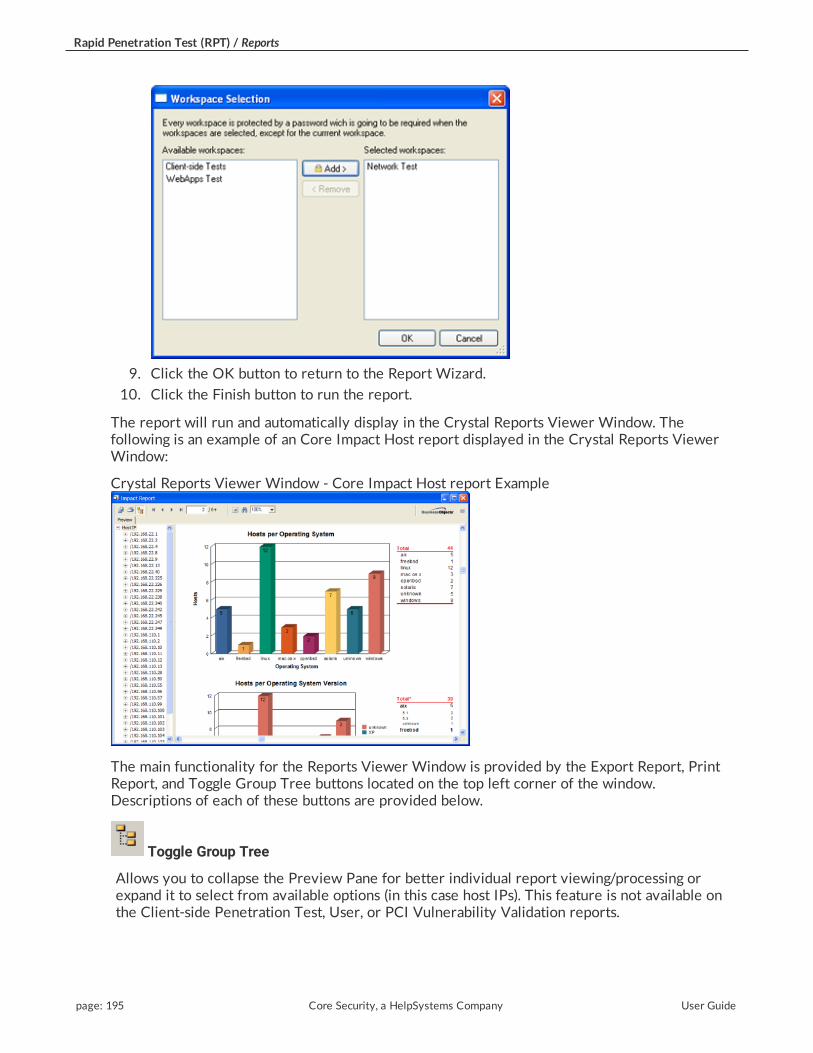
Rapid Penetration Test (RPT) / Reports
9. Click the OK button to return to the Report Wizard.
10. Click the Finish button to run the report.
The report will run and automatically display in the Crystal Reports Viewer Window. Thefollowing is an example of an Core Impact Host report displayed in the Crystal Reports ViewerWindow:
Crystal Reports Viewer Window - Core Impact Host report Example
The main functionality for the Reports Viewer Window is provided by the Export Report, PrintReport, and Toggle Group Tree buttons located on the top left corner of the window.Descriptions of each of these buttons are provided below.
Toggle Group Tree
Allows you to collapse the Preview Pane for better individual report viewing/processing orexpand it to select from available options (in this case host IPs). This feature is not available onthe Client-side Penetration Test, User, or PCI Vulnerability Validation reports.
page: 195 Core Security, a HelpSystems Company User Guide

Rapid Penetration Test (RPT) / Reports
Print Report
Allows you to print your report using the standard Windows Print Dialog Box.
Export Report
Allows you to export your report to your chosen destination in your chosen document format.
If you are exporting your report, the Export Dialog Box will appear and you will be prompted toprovide information on report format and destination, and then the export file location.
Report Generation - Export Dialog Box
After you provide this information, the Export Records Dialog Box will appear and export yourreport.
Running Spreadsheet ReportsTo run a Spreadsheet report:
1. Click the Report Generation step for your RPT. The Report Generation wizard will open.
2. Click Next to begin.
3. Check only the Spreadsheet check-box to display those reports that can be generated asSpreadsheet reports.
User Guide Core Security, a HelpSystems Company page: 196
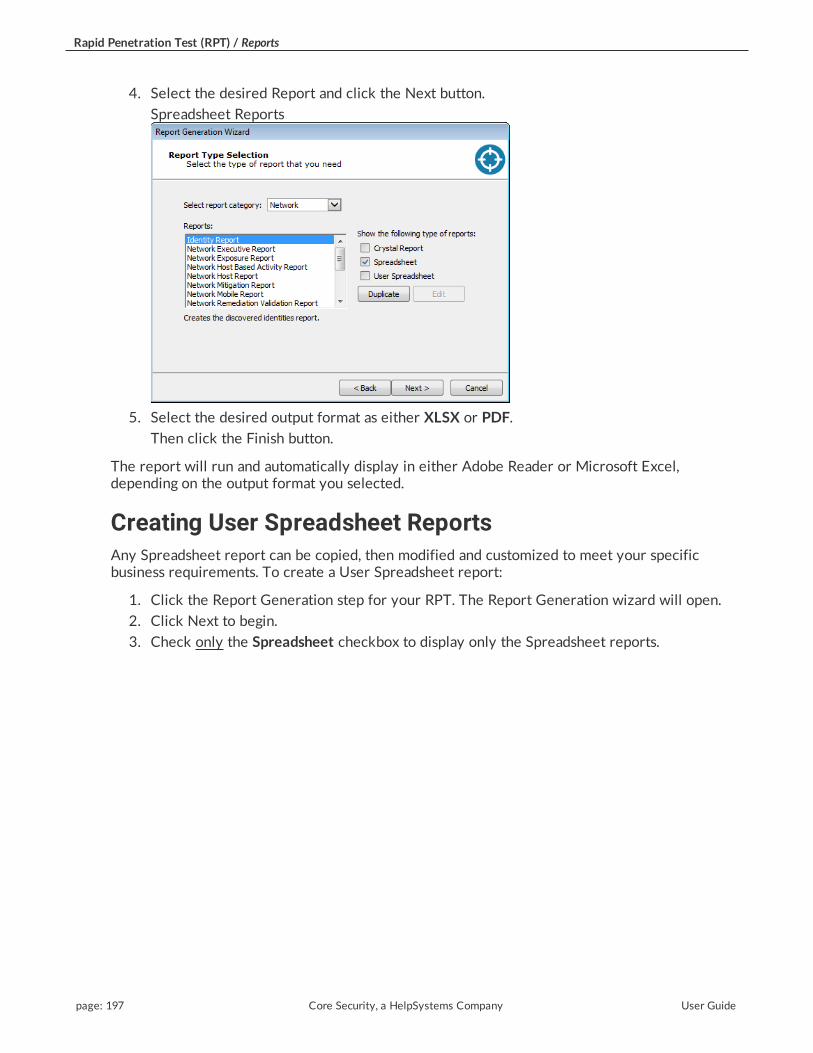
Rapid Penetration Test (RPT) / Reports
4. Select the desired Report and click the Next button.
Spreadsheet Reports
5. Select the desired output format as either XLSX or PDF.
Then click the Finish button.
The report will run and automatically display in either Adobe Reader or Microsoft Excel,depending on the output format you selected.
Creating User Spreadsheet ReportsAny Spreadsheet report can be copied, then modified and customized to meet your specificbusiness requirements. To create a User Spreadsheet report:
1. Click the Report Generation step for your RPT. The Report Generation wizard will open.
2. Click Next to begin.
3. Check only the Spreadsheet checkbox to display only the Spreadsheet reports.
page: 197 Core Security, a HelpSystems Company User Guide

Rapid Penetration Test (RPT) / Reports
4. Select the Report that you want to modify and click the Duplicate button.
Spreadsheet Reports
5. The Report Source field will display the name of the report that you are copying. In theReport Name field, enter a new, unique name for your User Spreadsheet report.Optionally, enter a Description of the new report.
Spreadsheet Reports
Then click the OK button.
6. The report template will open in Microsoft Excel. Follow the below guidelines andexamples for modifying the report template:
Example: To Replace the Logo Image in the Template
1. Click the Core Impact logo image in the Header area of the spreadsheet.
User Guide Core Security, a HelpSystems Company page: 198

Rapid Penetration Test (RPT) / Reports
2. Click the Picture button on the Excel toolbar.3. Microsoft Excel will present a pop-up message, stating that "Only one picture can
be inserted in each section of the header". Click Replace.
4. Browse to and select the image file that you want to use in the report template.Click Open.
5. Save and close the Excel file.
When you subsequently run this custom report in Core Impact, it will contain yourupdated image in the header.
Example: To Add Columns from the Template Tables
1. Add a new worksheet to the Excel file and name the new worksheet (e.g. NewData). This worksheet will contain the data that you wish to display in the report.
2. Right-click on any worksheet tab and select Unhide...
3. The worksheets that are hidden by default are named with an underscore (e.g. _exp_data) and contain the raw data that the reporting worksheets reference. Selectwhich raw data worksheet(s) you wish to unhide and click OK.
4. On your new worksheet (New Data), create pivot tables or regular tables thatreferences the data from the hidden worksheet(s). Do not reference explicit cells orcolumns. Instead, reference the Ranges that are included in the template.
5. Right-click on the tab of any worksheet that should be hidden and select Hide.
6. Save and close the Excel file.
When you subsequently run this custom report in Core Impact, it will contain yournew worksheet and the resulting data from the table(s) you added.
Guidelines for Modifying Report Templates
DO NOT
l Delete columns from the template. Use the Hide function in Excel to hide one ormore columns from the template.
l Delete tabs from the template. Use the Hide function in Excel to hide one or moretabs from the template.
YOU MAY
l Change the logo image in the template.
l Rename columns
l Create new tabs that contain pivot tables, charts, etc. that reference the data in thereport.
7. When you are finished modifying the template, save and close the template file.
page: 199 Core Security, a HelpSystems Company User Guide

Rapid Penetration Test (RPT) / One-Step RPTs
Your new User Spreadsheet can now be executed in the same was as the Spreadsheet Reportsexcept you will find them in the User Spreadsheet category.
Running Reports from the DashboardReports can also be executed from the Core Impact Dashboard which can be more convenient ifyou want to report on data across multiple workspaces.
1. Click the Reports button .The Reports wizard will appear.
2. Click the Next button.
3. Select the Report Category from the drop-down menu as either General, Network,Client-side, or WebApps.
4. Select the report you want to run, then click the Next button.
5. If applicable, select the workspaces for which you want the report to run.
6. If applicable, set any other customization options that are available.
7. Click the Finish button.
One-Step RPTsCore Impact provides One-Step tests that can be run in a single step, providing detailed reportsof the test's findings.
l Network One-Step Tests
l WebApps One-Step Tests
Exporting Data from Core ImpactThere are several ways that you can export data in order leverage Core Impact's test results.
User Guide Core Security, a HelpSystems Company page: 200
Rapid Penetration Test (RPT) / Exporting Data from Core Impact
Impact Workspace dataIf you have an external system into which you want to import Core Impact workspace data(hosts, entities, agents, vulnerabilities, etc), you can customize and use the Export ImpactWorkspace to XML File module. To customize the module:
1. Make sure the Network Entity tab is active, then locate the Export Impact Workspace toXML File module in the Modules tab (use the search feature or navigate to the Import-Export folder).
2. Right-click on the module, then select Edit.
3. Modify the module .py file as desired, then use Save As to save the file with a new name.
4. Click the Modules menu, then select Reload. This will refresh the modules list and shouldreveal your new, custom export module.
SCAPYou can export vulnerability data from Core Impact that is compatible with a Security ContentAutomation Protocol (SCAP) system. To do this:
1. Make sure the Network Entity tab is active, then locate the Export results in SCAP xmlformat module in the Modules tab (use the search feature or navigate to the Import-Export folder).
2. In the module parameters window, select the destination of the xml file, then click OK.
3. Navigate in Windows to the location of the export file. You can then use the file with yourSCAP system.
You can also view the publish and last updated dates for the exploits used within Core Impact.To extract this information, perform the below query from the Windows command line or usinga SQL Client connected to Core Impact's SQL database.
Command Line Query
osql -E -S .\IMPACT -d corevuln -Q "SELECT 'CVE-' + CAST(vuln_ncve_year AS VARCHAR) +'-' + CAST(vuln_ncve_number AS VARCHAR) AS CVE, vuln_published AS Published, vuln_lastchange AS LastChange FROM corevuln.dbo.vulnerability"
SQL Client Query
SELECT 'CVE-' + CAST(vuln_ncve_year AS VARCHAR) + '-' + CAST(vuln_ncve_number ASVARCHAR) AS CVE, vuln_published AS Published, vuln_lastchange AS LastChange FROMcorevuln.dbo.vulnerability
PCI Connect FormatYou can export workspace data in XML format acceptable for importing to the QualysGuard PCIConnect format. To do this:
1. Make sure the Network Entity tab is active, then locate the Export results in PCI Connectformat module in the Modules tab (use the search feature or navigate to the Import-Export folder).
page: 201 Core Security, a HelpSystems Company User Guide

Rapid Penetration Test (RPT) / Exporting Data from Core Impact
2. Double-click the module.
3. In the module parameters window, select the destination of the xml file, then click OK.
4. Navigate in Windows to the location of the export file. You can then use the file withQualysGuard.
Identities ExportUse the Identities Exporter module to export identities in JSON format from one Workspacefor import into another. Use the Identities Importer module to import identities.
To export identities:
1. Navigate to the Modules tab, making that the Network tab of the Entity Database is active
2. Locate and execute the Identities Export module
3. In the module properties window, select the Identities you wish to export and enter thepath for the Output File.
4. Click OK.
The identities you selected will be exported in JSON format and available at the location youspecified in the module properties.
User Guide Core Security, a HelpSystems Company page: 202

page: 203 Core Security, a HelpSystems Company User Guide

Workspaces and TeamingEvery penetration test in Core Impact is run and run within a Workspace. A workspace is aplace where information regarding a specific test is stored. This chapter walks you through theworkspace creation procedure in greater depth, and also teaches you how to close, remove, andimport/export Workspaces as well as how to create collaborative Teaming Workspaces.
WorkspacesA Core Impact workspace includes the following:
l Rapid Penetration Tests. Within a workspace, you can run any of the available RPTs (seeRapid Penetration Test (RPT)) as well as interact with the individual modules for moreadvanced control (see Working With Modules).
l The Entity Database. Information about the target network, users or web pages acquiredduring the penetration test. This includes (but is not limited to) discovered targets, theirproperties and deployed agents.
l The Executed Modules log. Information related to the modules you have run such as time,duration, status, source agent, parameters, and generated output.
All workspace information is stored in the Console's database, which is found in an .mdf file inthe SQL Server directory that corresponds with Core Impact .
Creating a New WorkspaceTo create a workspace, follow this procedure:
1. Choose File -> New workspace from Core Impact's main menu or click on the NewWorkspace icon ( ) on the toolbar.
2. Select the New Workspace button on the left side of the Welcome Window. This willopen a drop-down menu with several Workspace types. Select a specific Workspace type,depending on your testing goals, or select Blank Workspace. The workspace types are
designed as an Assisted Start and will automatically launch a web browser withdocumentation specific to the type you select. The resulting workspace, however, will becapable of executing any kind of penetration test. For example, if you create an ExploitBased Client Side workspace, you will still be able to run Network tests within it.
New Workspace Types
User Guide Core Security, a HelpSystems Company page: 204
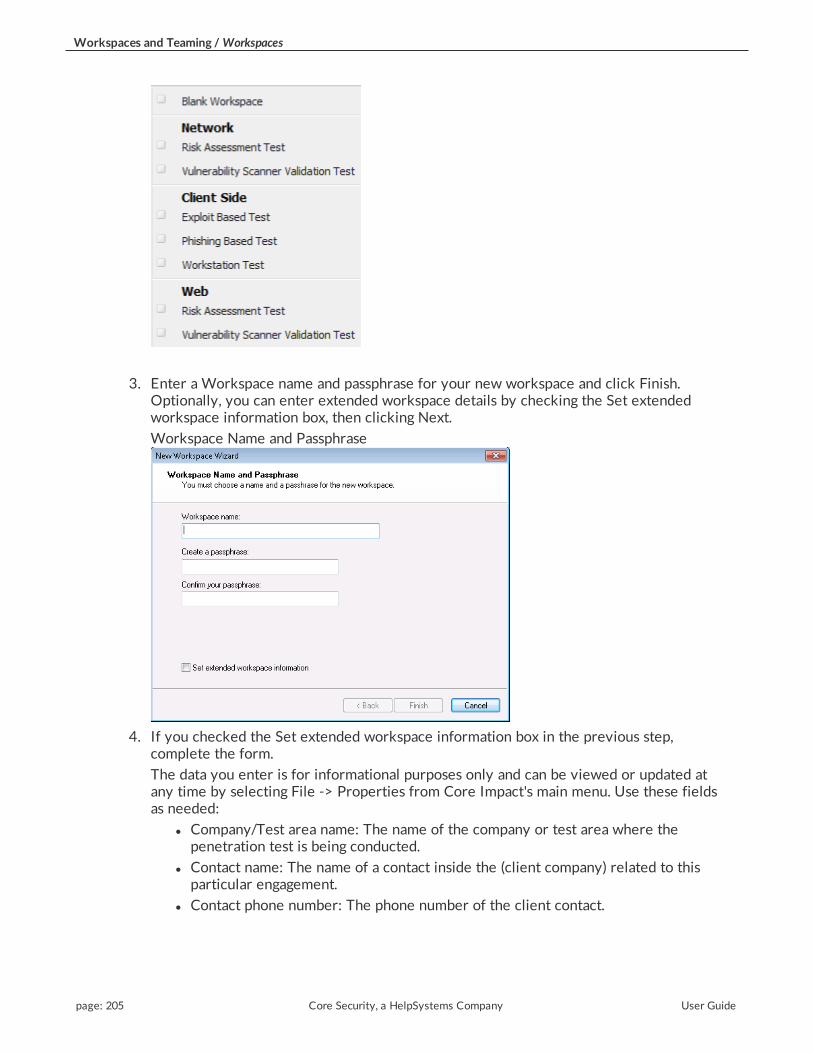
Workspaces and Teaming /Workspaces
3. Enter a Workspace name and passphrase for your new workspace and click Finish.Optionally, you can enter extended workspace details by checking the Set extendedworkspace information box, then clicking Next.
Workspace Name and Passphrase
4. If you checked the Set extended workspace information box in the previous step,complete the form.
The data you enter is for informational purposes only and can be viewed or updated atany time by selecting File -> Properties from Core Impact's main menu. Use these fieldsas needed:
l Company/Test area name: The name of the company or test area where thepenetration test is being conducted.
l Contact name: The name of a contact inside the (client company) related to thisparticular engagement.
l Contact phone number: The phone number of the client contact.
page: 205 Core Security, a HelpSystems Company User Guide

Workspaces and Teaming /Workspaces
l Contact e-mail: The email address of the client contact.
l Location: The location of the client.
l Workspace comment: Any comments about the workspace and the tests to beperformed within it.
l Engagement start date and deadline.
Click Next after entering a name for the new workspace.
New Workspace Wizard
5. If you are using a Consulting/Engagement license, when you create a new workspace, youmust assign an appropriate license to it. For enterprise licenses, the General License is thedefault for all Workspaces. Currently-installed licenses will be displayed in the Availablelicenses panel of the New Workspace Wizard Dialog Box. Refer to Understanding Licensesfor more information about using different Core Impact licenses. Click Next after youchoose the desired license.
New Workspace Wizard
User Guide Core Security, a HelpSystems Company page: 206

Workspaces and Teaming /Workspaces
6. A Workspace key is generated every time a new workspace is created. This key is onlyused for communication with remote agents that perform client authentication. Thismeans that different users of Core Impact use different workspace keys and will not beable to connect to the same agents. It is important to note that this key does not currentlyprotect the information inside Core Impact's database, and that its sole purpose is toprotect the workspace's deployed agents from being accessed by another Core Impactworkspace.
Move your mouse inside the rectangle to generate a new key pair, and click Next. Referto the section called “Crypto Channel” for more information on how Core Impact uses thiskey pair.
Key Generation Dialog Box
7. After checking that all the information displayed in the Completing the New WorkspaceWizard Dialog Box is correct, click Finish. The new workspace is created and willautomatically open.
Completing the New Workspace Wizard Dialog Box
page: 207 Core Security, a HelpSystems Company User Guide

Workspaces and Teaming /Workspaces
Opening an Existing WorkspaceTo open an existing Core Impact workspace, follow this procedure.
1. Click the Open Workspace button on the left, or select File -> Open workspace from Core
Impact's main menu, or click on the Open Workspace icon ( ) on the toolbar. The OpenWorkspace Dialog Box appears.
Open Workspace
2. Click on the workspace you wish to open, then enter the corresponding Passphrase. Notethat, if any Workspaces were created as Teaming Workspaces, they will be labeled assuch.
3. Check the Start a teaming session with the selected workspace option if you want otherusers to be able to work in the Workspace using the Teaming capabilities (for Networktesting only). You will then be asked to add users to the Workspace. See Teaming for moredetails.
4. Click the Open button to open the Workspace.
User Guide Core Security, a HelpSystems Company page: 208

Workspaces and Teaming /Workspaces
Closing a WorkspaceTo close the active workspace, choose File -> Close workspace from Core Impact's main menu.If there are modules running when you close a workspace (or shut down Core Impact), you willbe asked if you want to stop running modules:
l Yes: The workspace (or Core Impact) will be closed and all running modules will bestopped.
l No: The workspace (or Core Impact) will be closed and all running modules will remainrunning. Any exploits launched after the workspace is closed will be able to registeragents with Core Impact and will be visible in the Entity Database when you subsequentlyopen the workspace.
l Cancel: The workspace will not be closed and all running modules will remain running.
Stop Running Modules Prompt
When you close a workspace, all in-memory (non-persistent) agents deployed from thatworkspace will be uninstalled automatically.
Deleting a WorkspaceTo permanently remove a workspace, choose File -> Delete workspace from Core Impact'smain menu. The Delete Workspace Dialog Box will appear. Check the workspace(s) you wish todelete and click the Delete button. The workspace(s) will be removed from the Console'sdatabase.
Importing and Exporting WorkspacesCore Impact allows you to move Workspaces from one database file to another. This
functionality is useful when you wish to share workspace information among several differentusers, or for purposes of data backup.
You can import Workspaces into and export Workspaces out of any Core Impact database file. Asingle database file can hold multiple Workspaces at the same time. Before importing orexporting Workspaces, close any active workspace to ensure that the database is not beingupdated. Import/Export features are disabled when there is an active workspace open in theconsole.
page: 209 Core Security, a HelpSystems Company User Guide

Workspaces and Teaming /Workspaces
The Import/Export Wizard will guide you through the process of importing or exportingWorkspaces from different database formats. To use the Wizard, first ensure that allWorkspaces are closed, and then follow one of the below procedures:
l Import a Workspace
l Export a Workspace
Import a WorkspaceFollow the below procedure to import a workspace into Core Impact:
1. If you have a workspace opened, close it by navigating to File -> Close Workspace.
2. Navigate to Tools > Import/Export Workspaces from Core Impact main menu. When theImport/Export Workspace Wizard appears, click Next.
3. Using the drop-down menu, select the Data source type of the import file as either
Microsoft Access or Microsoft SQL Server. Click the ellipsis button ( ) then navigate toand select the source file. Click the Open button to return to the Import Wizard.
Choose a Data Source
Click Next.
4. Select a workspace from the next dialogue box. This will be the workspace into which theexternal file will be imported.
Select a Workspace
User Guide Core Security, a HelpSystems Company page: 210

Workspaces and Teaming /Workspaces
Click the Next button.
5. From the drop-down menu, select the destination of the import. The default option will beImpact's Database.
Choose a destination
Click the Next button.
6. Click the Finish button once the Import operation is completed.
Completing the Import Workspace Wizard
page: 211 Core Security, a HelpSystems Company User Guide

Workspaces and Teaming /Workspaces
Export a WorkspaceFollow the below procedure to export a workspace from Core Impact:
1. If you have a workspace opened, close it by navigating to File -> Close Workspace.
2. Navigate to Tools -> Import/Export Workspaces from Core Impact's main menu. When theImport/Export Workspace Wizard appears, click Next.
3. To export a workspace from your Core Impact installation, select Impact's Database as theData source type.
Choose a Data Source Dialog Box
Click the Next button.
User Guide Core Security, a HelpSystems Company page: 212

Workspaces and Teaming /Workspaces
4. Select the workspace that you wish to export from the Select a Workspace list.
Select a Workspace Dialog Box
Click the Next button.
5. Using the drop-down menu, select the Data destination type for the workspace asMicrosoft SQL Server.
Then click the ellipsis button ( ) to define the destination source file for the export.Choose a destination Dialog Box
Click the Next button.
page: 213 Core Security, a HelpSystems Company User Guide

Workspaces and Teaming / Teaming
6. Click the Finish button and the Export operation will begin.
Completing the Export Workspace Wizard Dialog Box
TeamingCore Impact allows more than one user to collaborate on a single workspace for testing, givingteams the ability to share data and delegate testing tasks. To use Core Impact's Teamingcapabilities, at least one Teaming Session must be created. Then, users can join that session andshare the workspace.
Teaming Workspaces are not supported on Windows XP and Windows 2003.
Create a Teaming SessionYou can open an existing Workspace and enable it as a Teaming Session (see Opening an ExistingWorkspace). To create a new Teaming Workspace from scratch, start on the main Core Impactdashboard:
1. Click the Teaming button on the left, then select New Session. The New WorkspaceWizard will open.
2. Begin by giving the new Workspace a name, then enter the Passphrase (twice). Then clickNext to continue. You can opt to Set extended workspace information; this will requireyou enter additional details about the workspace.
New Teaming Workspace
User Guide Core Security, a HelpSystems Company page: 214

Workspaces and Teaming / Teaming
3. Enter the name of the Session Owner. Then click the Add button to add each user whomyou want to be able to use the new Workspace. Once you've added all the necessaryusers, click Finish.
Teaming Configuration
4. Core Impact will create the new workspace and start the Teaming session.
Once the Teaming workspace has been created, other users will be able to join the workspaceusing the name/passwords you defined. They will also need to know the address of the machinewhere the Teaming Workspace resides. See Join a Teaming Session for more details on thisprocess.
As the creator of the Teaming Workspace, you must leave the Workspace open in order forother users to join it. If you close a Teaming Workspace, the users you added will be removed.If you want to re-open the Workspace as a Teaming Workspace, use the Open Workspace stepsas you normally would (see Opening an Existing Workspace), selecting the Workspace, then
page: 215 Core Security, a HelpSystems Company User Guide

Workspaces and Teaming / Teaming
check the option Start a Teaming Session with the Selected Workspace. You can then add usersto the Workspace and begin a new Teaming session.
Join a Teaming SessionTo join an existing Teaming Session, start on the main Core Impact dashboard:
1. Click the Teaming button on the left, then select Join Session.
2. Enter the Server IP address where the existing Teaming Session is running. Then enteryour User name and Password. These details should be provided to you by the user whocreated the Teaming Session. Click Connect to join the session.
Join Teaming Session
The Teaming Workspace should open and you can take advantage of the collaborative options inaddition to all of Core Impact's testing capabilities. See Using a Teaming Session.
Using a Teaming SessionWhen you are collaborating on a single Workspace - using Teaming - all joined users will see allentities, executed modules and their output. In addition, there are several features that willmake the collaboration more successful for you and your team:
l Entity Assignments. To prevent users from working on the same entities (targets), you canassign entities to specific users who have joined the session. To assign an entity to a user,right-click on the host in the entity view, select Teaming Users, and then click Assign. Youwill then be able to assign the entity to specific user(s).
Assign Entity
User Guide Core Security, a HelpSystems Company page: 216

Workspaces and Teaming / Teaming
l Entity Filtering. Once you are in a teaming workspace, the entity database willautomatically contain a folder called My Hosts of hosts that have been assigned to you.This will make it easier for you to locate and manage the entities for which you areresponsible for testing. The below screenshot is from the view of the TeamingWorkspace's leader where hosts have been assigned to the user RedTeam Member 1.
Filter Entities
page: 217 Core Security, a HelpSystems Company User Guide

Testing a Wireless EnvironmentThe use of 802.11 wireless networks (WiFi) is increasing throughout the enterprise. With WiFi,security professionals are presented with a new realm of challenges as attackers no longer needto be physically plugged in to access information systems. Core Impact provides several ways inwhich testers can evaluate the security of these wireless networks which serve as both keepersof and conduits to sensitive data.
Although the WiFi tests are not among Core Impact's Rapid Penetration Test (RPT), they aresimple to launch and easy to integrate into one's penetration testing practice. The WiFi tests areexecuted from the Modules View so, if you are not already familiar with how to run modulesdirectly, review the section Working With Modules. Additionally, see the section WirelessVector Reporting for how to report on your wireless penetration test results.
When you discover wireless networks and devices, they will be represented in the Wirelessfolder of the Network tab of the Entity view as shown below.
Wireless Entities
As mentioned, the WiFi testing capabilities in Core Impact are accessed directly throughmodules, but we will use the RPT model (Information Gathering, Attack & Penetration, PrivilegeEscalation, Clean Up, Report Generation) to organize and describe the available modules as wellas to highlight any noteworthy parameters.
The below tests are specifically designed for use on WiFi networks. The modules are availableby navigating to the Modules View and expanding the WiFi folder (ensure that the Networkentity tab is active):
In order to create a Fake Access Point using Core Impact, you must use a Pineapple Nano(https://www.wifipineapple.com/) wireless network auditing tool.
The following sections will cover each phase of a WiFi test in greater detail.
User Guide Core Security, a HelpSystems Company page: 218

Testing aWireless Environment /WiFi Attack and Penetration
The module will run and you can view its progress in the Module Log pane. If the modulesucceeds, Core Impact will store the WPA details along with the access point in the entity view.At this point, you could run the Join WiFi Network module and attempt to connect to the accesspoint.
WiFi Attack and PenetrationOnce you have identified wireless devices, you can continue to take steps to illustrate thespecific risks involved with a wireless breach:
Fake Access PointMiTM attacks are most effective when the attacker is connected to the same network as thevictim. If you are unable to join a found access point, or if you prefer to target beaconingwireless devices, you can create a Fake Access Point and target any devices that connect to it.With this method, Core Impact is literally in the middle - between a victim and the networkapplications and site from which they are requesting data. This creates more reliableopportunities to manipulate the user's experience, discretely capture sensitive data from them,or to exploit a vulnerability on their machine and install an OS agent.
In order to use the Fake Access Point Wizard or Fake Access Point module, first install CoreImpact's 3rd party package which includes the TAP-Win32 Adapter driver. Additionally, inorder to create a Fake Access Point using Core Impact, you must use a Pineapple Nano(https://www.wifipineapple.com/) wireless network auditing tool.
To create a Fake Access Point, use the Fake AP Wizard module:
1. Ensure that the Network Entity tab is active, then click the Modules view.
2. Expand the WiFi folder and locate the Fake Access Point Wizard module.
3. Double-click the Fake Access Point Wizard module and, when the wizard opens, click theNext button.
4. Begin by clicking the ellipsis ( ) button and selecting your Wifi Pineapple Interface.Airpcap Interface Setup
page: 219 Core Security, a HelpSystems Company User Guide

Testing aWireless Environment /WiFi Attack and Penetration
Then click the Next button.
5. On the Access Point Setup page, set the identifying details of your fake access point.
l ESSID: The name of the Access Point. Leave this blank if you set Karma Attack to"true".
l Pineapple Username: The username for the Pineapple device.
l Pineapple Password: The password for the Pineapple device.
l Karma Attack: If "false", the Access Point will use the name entered in the ESSIDparameter. If "true", the Access Point will use whatever name the target device isbeaconing for. For newer Pineapple devices, this setting correlates to the AllowAssociates option of the PineAP module.
l Add Hosts: Set this parameter to "true" if you want any connected devices to beadded to the Hosts folder of the Network entity database for further testingpossibilities.
l Stop after: Set to Hours, Minutes, Packets, or Seconds to set a stop-after limit forthe module.
Access Point Configuration
User Guide Core Security, a HelpSystems Company page: 220

Testing aWireless Environment /WiFi Attack and Penetration
Then click the Next button.
6. On the Connectivity Setup page, you can select whether your fake access point willprovide Internet connection sharing (ICS) or not:
l ICS: Select this option if you want to share an Internet connection with any userswho connect to your fake access point. You will have additional configurations thatcorrespond to this selection.
l Offline: Select this option if you don't want to share an Internet connection withusers who connect to your fake access point.
Connectivity Setup
Then click the Next button.
page: 221 Core Security, a HelpSystems Company User Guide
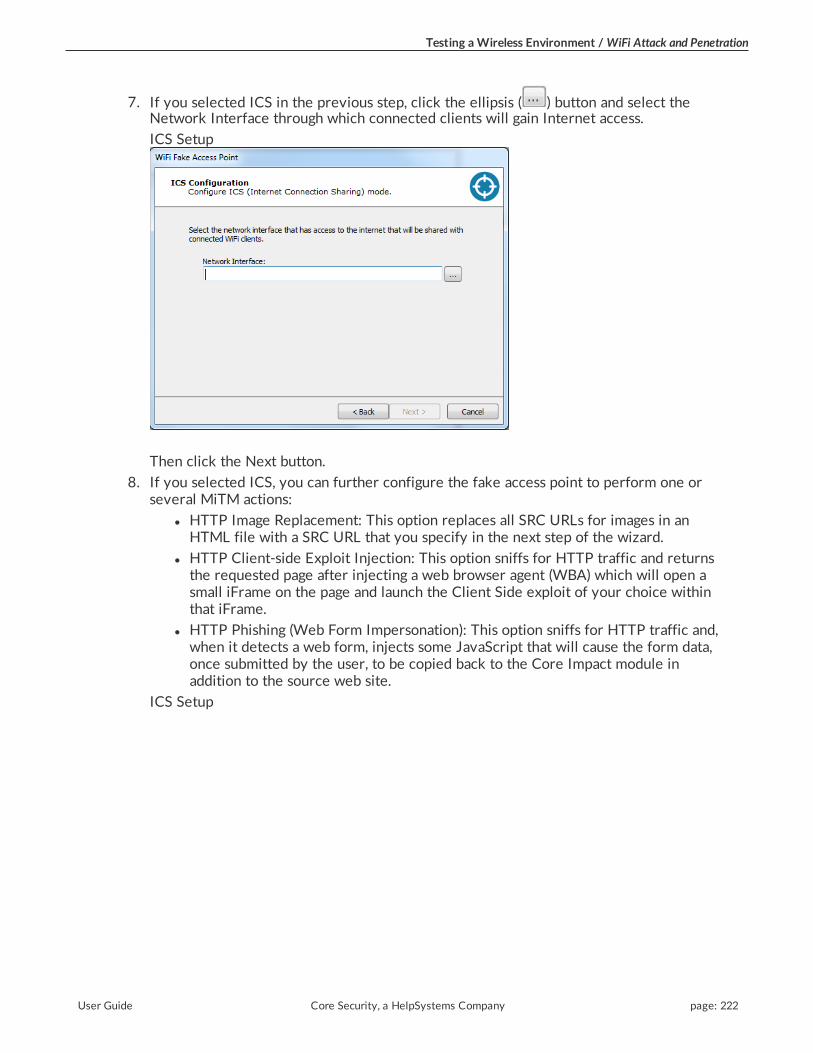
Testing aWireless Environment /WiFi Attack and Penetration
7. If you selected ICS in the previous step, click the ellipsis ( ) button and select theNetwork Interface through which connected clients will gain Internet access.
ICS Setup
Then click the Next button.
8. If you selected ICS, you can further configure the fake access point to perform one orseveral MiTM actions:
l HTTP Image Replacement: This option replaces all SRC URLs for images in anHTML file with a SRC URL that you specify in the next step of the wizard.
l HTTP Client-side Exploit Injection: This option sniffs for HTTP traffic and returnsthe requested page after injecting a web browser agent (WBA) which will open asmall iFrame on the page and launch the Client Side exploit of your choice withinthat iFrame.
l HTTP Phishing (Web Form Impersonation): This option sniffs for HTTP traffic and,when it detects a web form, injects some JavaScript that will cause the form data,once submitted by the user, to be copied back to the Core Impact module inaddition to the source web site.
ICS Setup
User Guide Core Security, a HelpSystems Company page: 222

Testing aWireless Environment /WiFi Attack and Penetration
Then click the Next button.
9. For each of the MiTM actions you selected in the previous step, enter additional details:
l HTTP Image Replacement
l Image URL: Enter the URL for the image that you would like to replaceimages requested by a connected client.
l Target URL Filter: Optionally add a filter so that the HTTP ImageReplacement only occurs for requests that match the filter.
l HTTP Client-side Exploit Injection
l Exploit Module: Click the Change button and select the exploit module youwould like to run on machines who request data through your fake accesspoint.
l Target URL Filter: Optionally add a filter so that the HTTP Client-side ExploitInjection only occurs for requests that match the filter.
l HTTP Phishing (Web Form Impersonation)
l Save Submitted Data:
l Target URL Filter: Optionally add a filter so that the HTTP Phishing onlyoccurs for requests that match the filter.
MiTM Modules Configuration
page: 223 Core Security, a HelpSystems Company User Guide

Testing aWireless Environment /WiFi Attack and Penetration
Then click the Next button.
10. For both ICS and Offline Fake Access Points, you can create fake services that the AccessPoint will simulate. Check the services you want to enable and configure them in the nextstep of the Wizard.
Fake Services Setup
Then click the Next button.
11. For both ICS and Offline Fake Access Points, configure the fake services that you enabledin the previous step.
Fake Services Configuration
User Guide Core Security, a HelpSystems Company page: 224

Testing aWireless Environment /WiFi Attack and Penetration
Then click the Finish button. The module will run and you can view its progress in theModule Log pane.
The Fake Access Point Wizard facilitates setting up a fake access point but you can alsoconfigure and run the Fake Access Point module manually to accomplish the same task.
When the module completes, you should see your Fake Access Point in the WiFi folder of theNetwork Entity tab. If any wireless devices connect to it, you will see them below your fakeaccess point.
WiFi Fake Access Point in Entity Database
The following modules are specifically designed to perpetrate MiTM attacks when you havewireless devices connected to a Fake Access Point (see WiFi Modules for more details).
l Fake AP HTTP Client-side Exploit Redirection: This module sniffs for HTTP traffic andresponds to the requester with client-side exploit of your choice.
page: 225 Core Security, a HelpSystems Company User Guide

Testing aWireless Environment /WiFi Modules
l Fake AP HTTP One Link Multiple Client-side Exploits Redirection : This module sniffs forHTTP traffic and responds to the requester with a page that initiates the One-Clickexploits.
l Fake AP HTTP Web Page Replacement: This module sniffs for HTTP traffic and respondsby sending a single HTML file of your choice.
l Fake AP HTTP Replace Links with Client-side Exploit Redirection: This module sniffs forHTTP traffic and returns the requested page after injecting a web browser agent (WBA)which alters any hyperlinks within the page. Altered links will point to a page that containsa client-side exploit of your choice.
l Fake AP HTTP Client-side Exploit Injection: This module sniffs for HTTP traffic andreturns the requested page after injecting a web browser agent (WBA) which will open asmall iFrame on the page and launch the Client Side exploit of your choice within thatiFrame.
l Fake AP HTTP One Link Multiple Client-side Exploits Injection: This module sniffs forHTTP traffic and returns the requested page after injecting a web browser agent (WBA)which will attempt to install an agent on the victim's machine by cycling through allavailable client-side exploits until one is successful.
l Fake AP HTTP Phishing (Web Form Impersonation): This module sniffs for HTTP trafficand, when it detects a web form, injects some JavaScript that will cause the form data,once submitted by the user, to be copied back to the Core Impact module in addition tothe source web site.
l Fake AP HTTP Image Replacement: This module replaces all SRC URLs for images in anHTML file with a SRC URL specified by the Core Impact user.
Some of these modules employ a Web Browser Agent (WBA). The use of a WBA is a methodwhereby Core Impact intercepts a page being sent back to the victim, and then injects someJavaScript into the page before sending it along to the victim. Because the page is originatingfrom the legitimate application or web site, the victim's browser will consider the script to betrusted and the Core Impact code that is injected can function without the victim being alerted.
WiFi ModulesIn the Modules view, you will find a WiFi folder which contains all of the pertinent testingmodules for your WiFi environment. For your convenience, the modules are listed here withbrief descriptions and notable parameters.
User Guide Core Security, a HelpSystems Company page: 226

Testing aWireless Environment /WiFi Modules
WiFi Modules
Fake Access Point
This module creates a Fake Access Point to which beaconing wirelessdevices may connect. You must run this module to create an Access Pointbefore executing any of the Fake AP modules.
l ESSID: The name of the Access Point. Leave this blank if you setKARMA to "true".
l BSSID: The MAC address for the Fake Access Point. Be sure tochange this if creating multiple Access Points so that your tests aredetailed individually in WiFi reporting.
l CHANNEL: The channel that you want the Access Point to use.
l STOP_AFTER_TYPE: Set to Hours, Minutes, Packets, or Seconds toset a stop-after limit.
l STOP_AFTER_VALUE: Enter a value based on the STOP_AFTER_TYPE setting.
l KARMA: If set to false, the Access Point will use the name enteredin the ESSID parameter. If set to true, the Access Point will usewhatever name(s) the target devices are beaconing for.
l MODE: If set to ICS, connected devices can obtain Internet accessthrough your Internet Connection Sharing settings. You then usethe ICS Settings to configure further. If set to Offline, you then useOffline Settings to configure further.
l ICS Settings: If MODE is set to ICS, define the PUBLIC_INTERFACE as the network interface through which connecteddevices will obtain Internet access.
l Offline Settings:If MODE is set to Offline, define the IP_ADDRESSto be used as a fake IP address for the TAP interface.
l Advanced - ADD HOSTS: Set this parameter to true if you wantany connected devices to be added to the Hosts folder of theNetwork entity database for further testing possibilities.
Fake AP HTTPClient-side ExploitRedirection
This module sniffs for HTTP traffic and responds to the requester withclient-side exploit of your choice.
l MODULE: The client-side exploit to be sent to TARGET(S).
l URL FILTER: The HTTP request that Core Impact should respondto.
Fake AP HTTP OneLink Multiple ClientSide One ExploitsRedirection
This module sniffs for HTTP traffic and responds to the requester withmultiple client-side exploits until one is successful.
page: 227 Core Security, a HelpSystems Company User Guide

Testing aWireless Environment /WiFi Reporting
Fake AP HTTP WebPage Replacement
This module sniffs for HTTP traffic and responds by sending a singleHTML file of your choice.
l IP_IGNORE_RANGE: Range of IP addresses whose wireless trafficis to be ignored by the module.
l FILE: The HTML file that is to be sent back when a connecteddevice makes an HTTP request that matches the URL FILTERparameter. This file cannot exceed 4Kb.
l URL FILTER: The HTTP request that Core Impact should respondto.
Fake AP HTTPReplace Links withClient-side ExploitRedirection
This module sniffs for HTTP traffic and returns the requested page afterinjecting a web browser agent (WBA) which alters any hyperlinks withinthe page. Altered links will point to a page that contains a client-sideexploit of your choice.
l MODULE: The client-side exploit to be sent to TARGET(S).
l URL FILTER: The HTTP request that Core Impact should respondto.
Fake AP HTTPClient-side ExploitInjection
This module sniffs for HTTP traffic and returns the requested page afterinjecting a web browser agent (WBA) which will attempt to run an exploitof your choice.
l MODULE: The client-side exploit to be sent to TARGET(S).
l URL FILTER: The HTTP request that Core Impact should respondto.
Fake AP HTTP OneLink Multiple Client-side ExploitsInjection
This module sniffs for HTTP traffic and returns the requested page afterinjecting a web browser agent (WBA) which will attempt to install anagent on the victim's machine by cycling through all available client-sideexploits until one is successful.
Fake AP HTTPPhishing (Web FormImpersonation)
This module sniffs for HTTP traffic and, when it detects a web form,injects some JavaScript that will cause the form data, once submitted bythe user, to be copied back to the Core Impact module in addition to thesource web site.
l Save Submitted Data: If "Yes", the data sent via the form will besaved by Core Impact.
l URL FILTER: The HTTP request that Core Impact should sniff for.
Fake AP HTTPImage Replacement
This module replaces all images in an HTML file with one specified by theCore Impact user.
l Image URL: The URL to the image you want to replace existingimages with.
WiFi ReportingAs with all attack vectors in Core Impact, you can view the results of your WiFi testing in a clearand actionable report. Several Core Impact reports will include data about your WiFi tests. Fordetails on selecting and running reports, see RPT Reports.
User Guide Core Security, a HelpSystems Company page: 228

page: 229 Core Security, a HelpSystems Company User Guide

Testing Network DevicesNetwork Devices such as routers and switches are of critical importance to the operation andsecurity of a business’ technology environment. Not only do they relay all network traffic butthey also allow networks to be connected to one another. If one of these devices is breached byan attacker, the disruption and data loss that might follow could be severe. With command of aswitch, for example, an attacker could view and manipulate the data passing through it and eveninject their own malicious data, creating potential for more infiltration. Likewise, with control ofa router’s configuration, one could gain access to other networks that otherwise would not bedetectable. Network Devices are the gateways and dispatchers to the systems you aim toprotect, so their security needs to be a top priority as well.
Network Devices tests are begun in Core Impact's Network RPT, which includes options fordiscovering and attempting to gain access to Network Devices. Post-exploitation steps forNetwork Devices are performed by launching various Core Impact modules from the ModulesView so, if you are not already familiar with how to run modules directly, review the sectionWorking With Modules. Additionally, see RPT Reports for how to report on your NetworkDevice penetration test results.
When you discover Network Devices, they will be represented in the Hosts folder of theNetwork tab of the Entity view as shown below.
Network Device Entities
The below tests are specifically designed for use on Network Devices networks. The modulesare available by navigating to the Modules View and searching for the module name (ensure thatthe Network entity tab is active).
Network Device Information GatheringThe Network Information Gathering step of Core Impact’s Network Rapid Penetration Test(RPT) will record any systems it locates within your target network, including network devices.If the RPT is able to discern the operating system of a machine and confirm it to be a network
User Guide Core Security, a HelpSystems Company page: 230
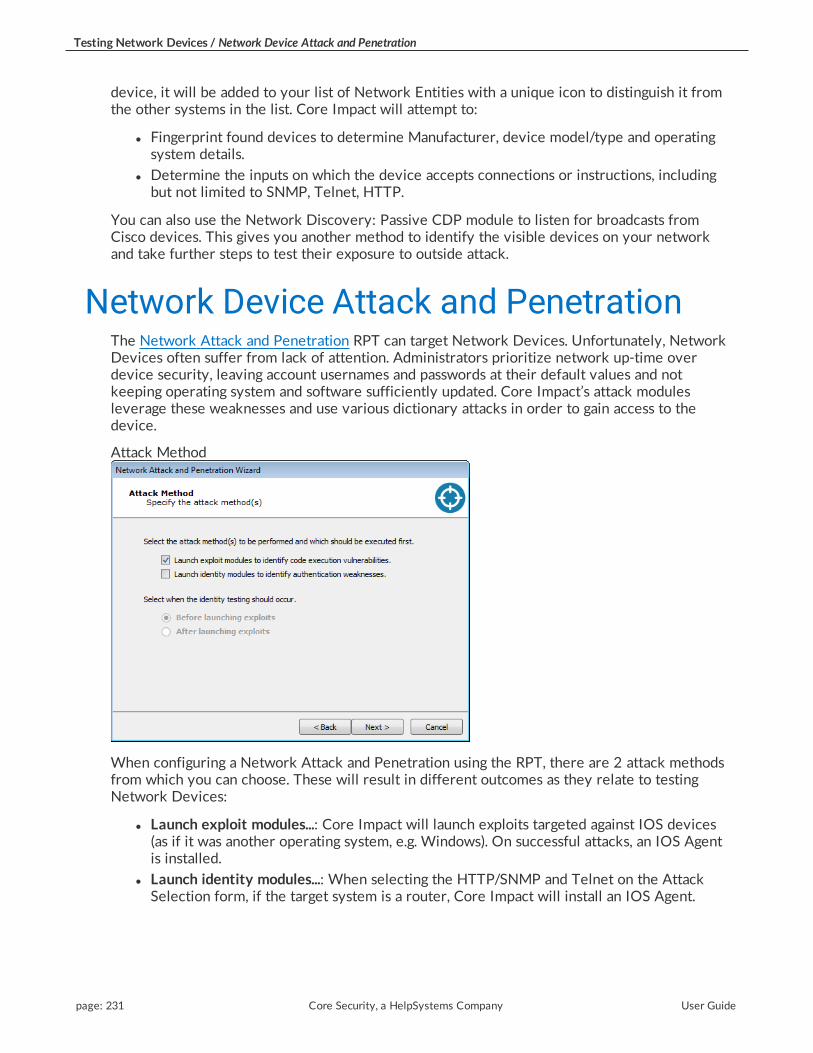
Testing Network Devices / Network Device Attack and Penetration
device, it will be added to your list of Network Entities with a unique icon to distinguish it fromthe other systems in the list. Core Impact will attempt to:
l Fingerprint found devices to determine Manufacturer, device model/type and operatingsystem details.
l Determine the inputs on which the device accepts connections or instructions, includingbut not limited to SNMP, Telnet, HTTP.
You can also use the Network Discovery: Passive CDP module to listen for broadcasts fromCisco devices. This gives you another method to identify the visible devices on your networkand take further steps to test their exposure to outside attack.
Network Device Attack and PenetrationThe Network Attack and Penetration RPT can target Network Devices. Unfortunately, NetworkDevices often suffer from lack of attention. Administrators prioritize network up-time overdevice security, leaving account usernames and passwords at their default values and notkeeping operating system and software sufficiently updated. Core Impact’s attack modulesleverage these weaknesses and use various dictionary attacks in order to gain access to thedevice.
Attack Method
When configuring a Network Attack and Penetration using the RPT, there are 2 attack methodsfrom which you can choose. These will result in different outcomes as they relate to testingNetwork Devices:
l Launch exploit modules...: Core Impact will launch exploits targeted against IOS devices(as if it was another operating system, e.g. Windows). On successful attacks, an IOS Agentis installed.
l Launch identity modules...: When selecting the HTTP/SNMP and Telnet on the AttackSelection form, if the target system is a router, Core Impact will install an IOS Agent.
page: 231 Core Security, a HelpSystems Company User Guide

Testing Network Devices / Post-exploitation Modules for Network Devices
If the Attack and Penetration step succeeds in gaining access to a network device, you will seean IOS Agent deployed under that device in the entity database. This IOS Agent represents theinformation of how to exploit a network device vulnerability.
IOS Agent
Once an IOS agent exists in your Network view under a Network Device, you have the ability toperform post-exploit activities on the device.
Post-exploitation Modules for NetworkDevices
If an IOS Agent has been associated with a Network Device, there are several modules that youcan run to prove that the device is vulnerable to attack. These modules are non-aggressivebecause, were something to materially change on the device, the network and its users could besignificantly disrupted.
Network Device Post Exploitation Modules
IOS ShellThis module will open a shell and allow you to interface with the networkdevice.
GetConfiguration
This module will attempt to get the configuration file of the device. Be sure toinstall the 3rd Party Tools provided with your Core Impact installer so thatyou can take advantage of encryption cracking capabilities.
Cisco IOS Agent- PrivilegeEscalation
This module attempts to create a Telnet connection whereby testers canmake changes on the device. The change(s) made in order to achieve thisconnection are recorded and can then be reverted using the Cisco IOS Agent- Privilege Escalation Clean Up module.
Access ListPiercing
This module compromises the filtering of network visibility that a routermaintains allowing the Core Impact user to access networks that werepreviously off-limits. Changes can be reverted using the Access List Piercing -Clean Up module.
User Guide Core Security, a HelpSystems Company page: 232

Testing Network Devices / Network Device Reporting
InterfaceMonitoring
This module takes advantage of a legitimate monitoring feature included inmany switches and results in the Core Impact user receiving copies of datapackets that were not originally intended for them. Changes can be revertedusing the Interface Monitoring - Clean Up module.
Set DeviceName
With this module, Core Impact can rename the network device. This won'tdisrupt the operation of the device but can be an eye-opening display of arouter or switch's vulnerability to malicious attacks. Changes can be revertedusing the Set Device Name - Clean Up module.
Network Device ReportingAs with all attack vectors in Core Impact, you can view the results of your Network Devicetesting in a clear and actionable report. Several Core Impact reports will include data aboutyour Network Devices:
l Vulnerability Report: A list of all vulnerabilities found (see Vulnerability Report for moredetails).
l Activity Report: A list of all modules run and their output (see Activity Report for moredetails).
l Executive Report: A summary of vulnerabilities by type (see Executive Report for moredetails).
page: 233 Core Security, a HelpSystems Company User Guide

Working with ModulesCore Impact modules are the mechanisms that underlie the RPTs - they are your individual
tools for penetration testing. Modules help you complete simple tasks such as resolvinghostnames or very complex ones such as exploiting a buffer overflow vulnerability on a remotehost. When you perform a Rapid Penetration Test (RPT), the system executes individual modulesbehind the scenes for you. Modules can be executed individually, or you can use modules toexecute other modules. These macro modules execute other modules in the manner and orderyou desire.
Please navigate in Core Impact to Help -> Contents -> Module Reference to see acomprehensive list of available modules.
Individual modules can be accessed from the Modules View of the Console, shown below.
Modules View - Individual Modules Displayed
On the Modules View, modules are organized into folders (also known as 'categories') that referto the module's general purpose or use. When you select a module, information such as versionand a description of what the module does is displayed in the Quick Information Panel at thebottom of the Console.
The list of available modules is automatically created from Core Impact's module directorywhen you open the first workspace. This list can be recreated at any time by selecting Modules -> Reload from Core Impact's drop-down menu.
The Modules view will only show modules that are applicable for the currently-select entityview. For example, if the Client Side entity view is active, only modules that apply to client-sidetesting will be visible in the Modules View.
Additionally, the Modules view automatically highlights modules that are applicable to the objecttype that is selected (if any) in the entity view. For example, if a host with a known operatingsystem is currently-selected in the Network entity view,Core Impact will highlight only those
User Guide Core Security, a HelpSystems Company page: 234

Working with Modules / Running Modules
modules in the Modules view that work on or against that specific host's operating system. Notethat you can run a non-highlighted module to try to validate an assumption on the target'soperating system. The colors used for highlighting can be changed in the Modules category ofthe Options Dialog Box (Tools -> Options) - see Modules Options.
Refer to Core Impact's Module Reference documentation for an in-depth look at each of CoreImpact's modules.
Running ModulesTo run a module, you can either double-click on it or drag and drop it onto a target. Somemodules will require additional parameters be set prior to execution. When you run a module,the Module Parameters Dialog Box appears. Each module specifies the parameters it needs. Thefirst time a module is executed, default values are used for all parameters.
For information about a specific parameter and its possible values, select the parameter in theModule Parameters Dialog Box and press F1 to display contextual help describing the selectedparameter.
Module Parameters Dialog Box
When you launch a module, the TARGET value in the Module Parameters Dialog Box isautomatically set to the currently-selected object in the Entity View Panel. All the remainingparameters are set to their default values. You can change these values before clicking OK,which will execute the module. Some modules, such as modules in the Shells category, do notneed any parameters.
Example: Running the Remote Desktop Access Module
Core Impact's Remote desktop access module - when run - will use a connected agent to try toleverage a remote desktop tool (e.g. VNC) on the host and open a remote desktop session. Torun this module:
page: 235 Core Security, a HelpSystems Company User Guide

Working with Modules / Running Modules
1. Navigate to the Modules view and make sure that the Network entity tab is active.
2. Type the string "remote desktop" into the module search field. This should reveal theRemote desktop access module.
3. Double-click the Remote desktop access module. The module's parameters will appear.
4. Set the module's parameters to reflect your preferences and environment:
l Port: Set to port number to connect to.
l Use a tunnel: Set to YES if the connection will use a tunnel.
l View only: Set to YES to establish a view-only remote desktop session. You willhave no user input.
l 8 bits: Set to YES to create a low resolution remote desktop session. Set to NO tocreate a high resolution session.
l Scale: Set the scale of the screen to be displayed as a percentage.
l Inject into another process: Set to YES in order to inject the remote desktopprocess into another process that is already running on the target that has access tothe desktop.
l Password: Enter the password to be used in the server on the target host. Passwordshould be 8 bytes - if it is more, only the first 8 bytes are used.
Remote Desktop Access Module Parameters
5. Click the OK button.The Module will run - check the Module Log pane for output and/or error details.
Dragging and Dropping ModulesThe most common way of executing a module is to drag and drop it onto a valid target in theEntity View Panel. This method is particularly convenient when the module needs a target withwhich to interact. Whenever a module is dropped onto an entity, the TARGET parameter in the
User Guide Core Security, a HelpSystems Company page: 236

Working with Modules / Running Modules
Module Parameters Dialog Box is automatically set to the name of that entity (modules can alsobe dropped over a group of entities, see the section called “Multiple Targets” for moreinformation). If the module does not require a TARGET parameter, dragging and dropping hasthe same effect as double-clicking it.
Some modules that typically require a target for execution are the different port scanners, RPCendpoint mapper, and OS identification and attack modules, including client-side exploits.
Some modules specify the class of TARGET they work with (agents, hosts, emails, etc.). Whendragging and dropping these modules, the Console will only allow you to drop them onto targetsof a valid class.
Specifying Host RangesModules that work with IP addresses accept address ranges instead of a host. These modulesuse the TARGETRANGE parameter instead of TARGET in the Module Parameters Dialog Box.These ranges follow the syntax specified in the table below.
Host Range Syntax
Specific ranges192.168.1.0/24192.168.1.*192.168.1.0-255
Multiple ranges192.168.1.*; 192.168.2.0/26192.168.1.1-4,8,9; 192.168.2.100-120
You can also specify these ranges by clicking on the ellipsis button ( ) next to theTARGETRANGE parameter's Value column.
Select Ranges Dialog Box
page: 237 Core Security, a HelpSystems Company User Guide

Working with Modules / Running Modules
The Select Ranges Dialog Box lets you add ranges in four different ways:
l Single IP. A single IP address.
l IP Range. A continuous range of IP address starting on the From address to the Toaddress.
l CIDR Notation. A network in the CIDR format, where the first four numbers specify thenetwork name and the number on the right side of the slash represents the number of "1"sin the binary representation of the network's netmask.
l Import From File. A text file with a list of IP addresses and/or ranges. Click on the ellipsisbutton to browse for the file.
Click on the Add button as many times as necessary to build the desired target range. Click OKwhen you are done. The TARGETRANGE parameter will reflect your changes.
Multiple TargetsYou can execute any module against a network folder using any of the methods described above.Core Impact's Console will behave differently during this operation according to whether themodule accepts host ranges or not.
If the module accepts host ranges (receives a TARGETRANGE parameter), the Console will notupdate the TARGETRANGE parameter since it denotes an IP list and might not make sensewhen dropping over a folder. Typically, modules that need TARGETRANGE create new objectsrather than work with existing ones.
If the module does not accept host ranges (receives a TARGET parameter), a ";" -separated list ofhosts with the selected folder contents will be automatically created and set as the TARGETparameter for the module. Upon execution, the module will iterate over each one and processthem.
User Guide Core Security, a HelpSystems Company page: 238

Working with Modules / Running Modules
You can also specify multiple target hosts for a given module by clicking on the ellipsis buttonnext to the TARGET parameter's Value column.
Multiple TARGET selection
Using the TARGET selection dialog, you can select the specific hosts you wish to target bychecking/unchecking the check-box to the left of each host's name. When you are finished, clickOK and you will be returned to the Module Parameters dialog. The TARGET parameter will be
set to the selected hosts.
Entities Selection
Specifying Port RangesModules that require a set of port numbers to do their work will ask you to provide a value forthe PORT RANGE parameter. This parameter can be a list of comma-separated port numbers
page: 239 Core Security, a HelpSystems Company User Guide

Working with Modules / Running Modules
and ranges (as in "22,23,80,100-200"), a list of predefined port ranges, or a combination of both.Core Impact includes several predefined port ranges:
l DYNAMIC. Includes all the default TCP ports relevant to the currently-installed remoteexploits. For instance, if Core Impact only had two exploits, one for SSH and the other forSMTP, then the DYNAMIC port range would be equivalent to "22,25".
l NMap Top 12. Includes the top 12 ports likely to be opened (as identified by NMap - seehttp://nmap.org/book/nmap-services.html)
l NMap Top 50. Includes the top 50 ports likely to be opened (as identified by NMap - seehttp://nmap.org/book/nmap-services.html)
l NMap Top 100. Includes the top 100 ports likely to be opened (as identified by NMap -see http://nmap.org/book/nmap-services.html)
l NMap Top 500. Includes the top 500 ports likely to be opened (as identified by NMap -see http://nmap.org/book/nmap-services.html)
l NMap Top 1000 (NMap default). Includes the top 1000 ports likely to be opened (asidentified by NMap - see http://nmap.org/book/nmap-services.html)
l tcp-all. Includes all default TCP ports for known TCP services.
Selecting tcp-all will cause the module to check all 65,535 ports, which will add aconsiderable amount of time to the module's runtime.
You can select any combination of these predefined port ranges by using the Port RangeSelection Dialog box. To open this dialog box click on the Value column for the PORT RANGE
parameter and click on the ellipsis ( ) button.
Port Range Selection Dialog Box
To select/unselect a given port range check/uncheck the check-box to the left of the range'sname. You can add an additional range by typing it in the Additional ports field at the bottom ofthe dialog box.
User Guide Core Security, a HelpSystems Company page: 240

Working with Modules / Running Modules
You can also define additional port ranges and give them a name for future reference. To add anew range, click on the New button. The Port Range Groups dialog appears.
Port Range Groups Dialog Box
To add a new range, click on the button. When finished click OK. Your new port range willbe listed along with the predefined ranges, and you can now use it either by itself or incombination with other port ranges.
Launching Recently-executed ModulesThe Console tracks modules you have recently executed and allows you to launch thesemodules from the Entity View Panel by right clicking on the desired target and selecting amodule from the Recent Modules list.
You can also relaunch modules directly from the Executed Modules pane - see ResumingModules.
Recent Modules Command
page: 241 Core Security, a HelpSystems Company User Guide
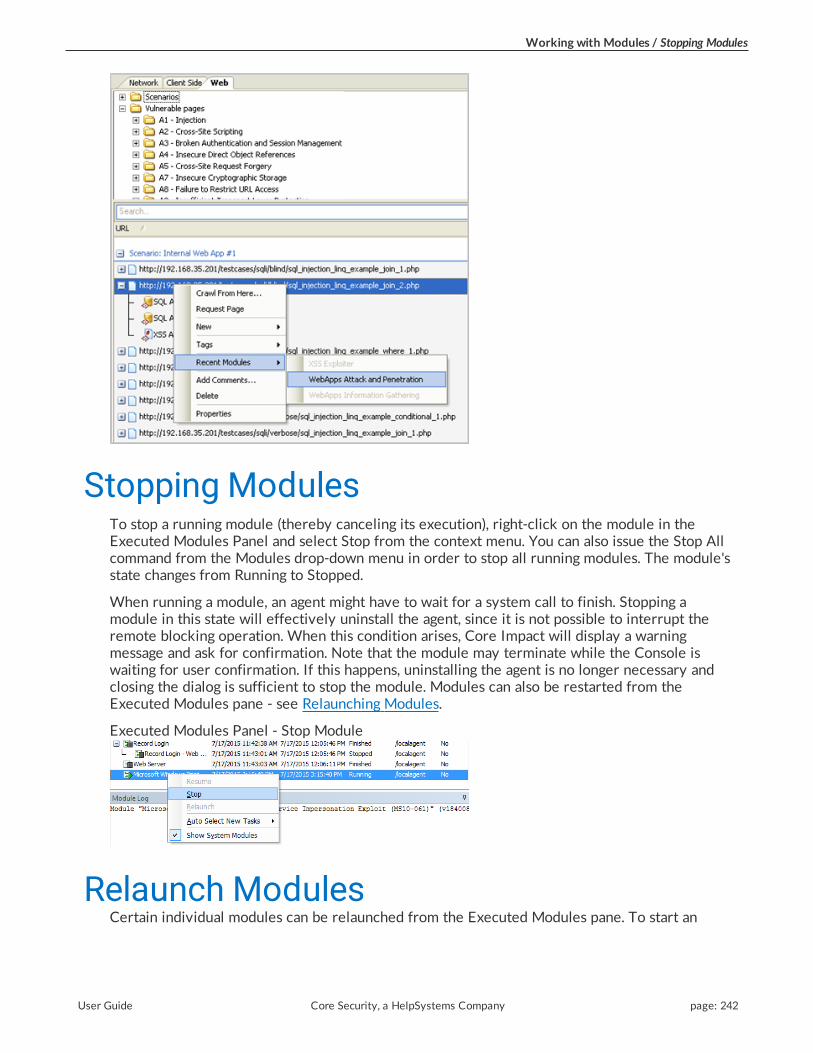
Working with Modules / Stopping Modules
Stopping ModulesTo stop a running module (thereby canceling its execution), right-click on the module in theExecuted Modules Panel and select Stop from the context menu. You can also issue the Stop Allcommand from the Modules drop-down menu in order to stop all running modules. The module'sstate changes from Running to Stopped.
When running a module, an agent might have to wait for a system call to finish. Stopping amodule in this state will effectively uninstall the agent, since it is not possible to interrupt theremote blocking operation. When this condition arises, Core Impact will display a warningmessage and ask for confirmation. Note that the module may terminate while the Console iswaiting for user confirmation. If this happens, uninstalling the agent is no longer necessary andclosing the dialog is sufficient to stop the module. Modules can also be restarted from theExecuted Modules pane - see Relaunching Modules.
Executed Modules Panel - Stop Module
Relaunch ModulesCertain individual modules can be relaunched from the Executed Modules pane. To start an
User Guide Core Security, a HelpSystems Company page: 242

Working with Modules / Resume Wizards
executed module again, right-click on the module in the Executed Modules Panel and selectRelaunch from the context menu. The module will begin using the same parameters that wereused on its most recent run.
Executed Modules Panel - Relaunch Module
ResumeWizardsIf a Rapid Penetration Test is manually stopped or otherwise terminated before it completes,the wizard can be resumed, and the whole process will begin where it left off. To resume anRPT test, right click on the RPT level in the Executed Modules Panel and select Resume.
If you know your RPT will take 2 hours to complete, but you only have a 1-hour window inwhich to perform the test each day, you can run the RPT for an hour, then stop it. The next day,you can Resume the RPT and it will begin where it left off.
Executed Modules Panel - Resume Wizard
Using the Executed Modules ViewWhenever a module changes execution status (starts executing, finishes, aborts with an error, oris canceled by the user), a log entry is filed within the workspace's database. This information isavailable to you in the Executed Modules Panel. By default, the Executed Modules panel willshow the primary modules that are executed but, if you would like to view all modules that arerun, right-click on any entry in the panel and select Show System Modules.
You can also relaunch modules directly from the Executed Modules pane - see RelaunchingModules. Wizards can be resumed if they were terminated before completing - see ResumingWizards.
Executed Modules Panel
page: 243 Core Security, a HelpSystems Company User Guide

Working with Modules / Analyzing Module Output
This panel provides information related to specific executions of a module using the fieldsdescribed in the table below.
Executed Modules Panel Field Descriptions
Fieldname
Description
NameName of the module that is executing/was executed and anicon describing the status of its execution
Started Date and time the module was startedFinished Date and time the module finished executingStatus Current execution statusSourceAgent
Name of the agent selected as source when the module wasexecuted
ResumableDisplays whether the module can be restarted from theExecuted Modules pane (Yes or No)
Executed Module Status Definitions
Icon Status Definition
InitializingThe module is initializing but has yet to startexecuting
Running The module is running
Stopped The module has been canceled by the user
Stopped andResumable
The module has stopped but can be resumed inthe Executed Modules pane
AbortedThe module has aborted execution due to anerror condition
Finished The module has finished executing
Analyzing Module OutputExecuted modules produce two kinds of output: formatted output (referred to in this documentsimply as 'Output') and unformatted or debug output. You can view both types of output in the
User Guide Core Security, a HelpSystems Company page: 244

Working with Modules / Analyzing Module Output
Executed Module Info Panel located just below the Executed Modules Panel on the Console.The Executed Module Info Panel displays information related to the currently selected modulein the Executed Modules list. To display information about another module, select that modulein the Executed Modules Panel.
Executed Module Output Panel
This panel can display three different types of information regarding the executed module:Output, Log, and Parameters. Select the type of information you wish to view using the tabs atthe bottom of the window.
Module Output
The Module Output Tab shows the formatted output report of the module. Each modulereports different information on this tab depending on its goal and the results obtained. TheModule Output tab will also include a dynamic progress bar and pie chart for certain measures.The visibility of these graphs is dependent upon an active Internet connection.
Module Output
Module Log
The Module Log Tab shows all the logging/debugging information messages that a moduleproduced while executing. The level of detail included in these messages is specific to eachmodule.
page: 245 Core Security, a HelpSystems Company User Guide
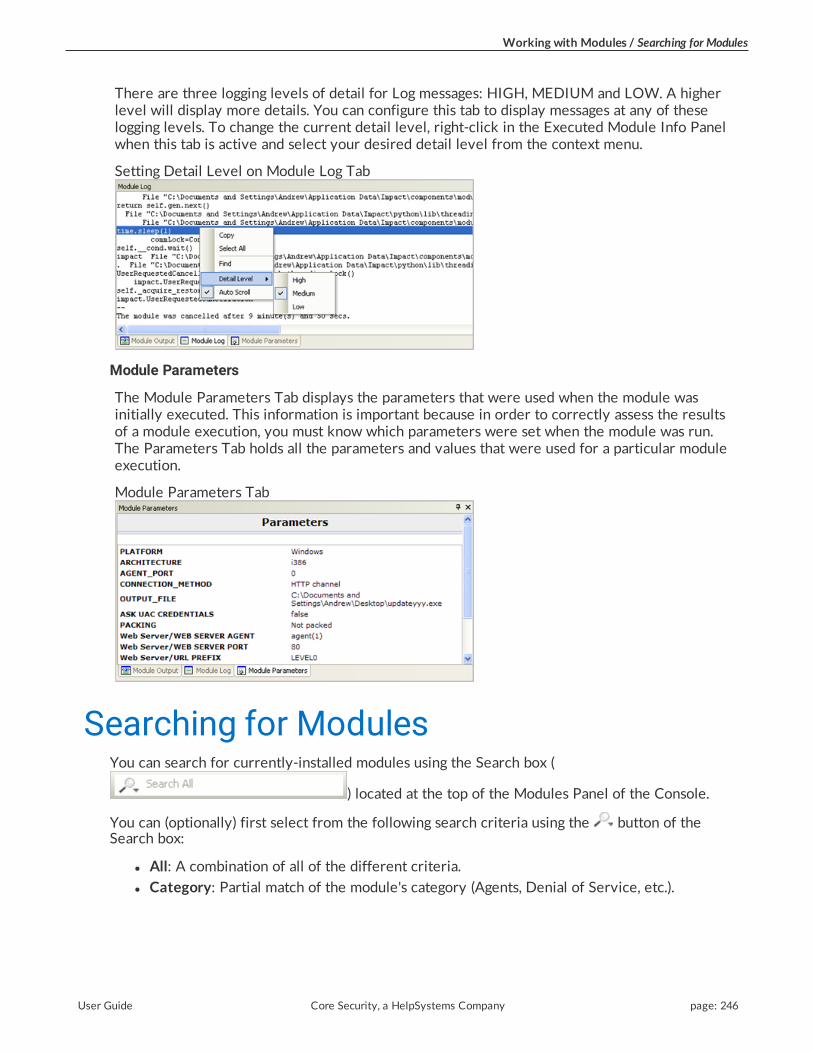
Working with Modules / Searching for Modules
There are three logging levels of detail for Log messages: HIGH, MEDIUM and LOW. A higherlevel will display more details. You can configure this tab to display messages at any of theselogging levels. To change the current detail level, right-click in the Executed Module Info Panelwhen this tab is active and select your desired detail level from the context menu.
Setting Detail Level on Module Log Tab
Module Parameters
The Module Parameters Tab displays the parameters that were used when the module wasinitially executed. This information is important because in order to correctly assess the resultsof a module execution, you must know which parameters were set when the module was run.The Parameters Tab holds all the parameters and values that were used for a particular moduleexecution.
Module Parameters Tab
Searching for ModulesYou can search for currently-installed modules using the Search box (
) located at the top of the Modules Panel of the Console.
You can (optionally) first select from the following search criteria using the button of theSearch box:
l All: A combination of all of the different criteria.
l Category: Partial match of the module's category (Agents, Denial of Service, etc.).
User Guide Core Security, a HelpSystems Company page: 246

Working with Modules / Editing/Deleting Modules from the Modules Panel
l CVE: Partial match of the module's associated CVE name (mostly related to exploitmodules). Examples: "2003", "2003-0719", "CVE-2003-0722". When searching for aspecific vulnerability by CVE name, it is recommended that you omit the "CAN"/"CVE" atthe beginning of the name.
l Name: Partial match of the module's name. Examples: "IIS", "apache", "discovery", "SSL".
l Service: Exact match of the module's target service (mostly related to exploits). Examples:"http", "https", "smtp", "netbios-ssn".
l Supported System: Partial match of the module's supported systems (generally related toexploit modules). Examples: "windows", "sp4", "windows 2000 server - sp2".
l Application: Partial match of the application that the modules can target (generallyrelated to exploit modules).
Modules Tab - Search Box Search Criteria
Next, type your desired search text in the Search box. The Modules Panel automatically displaysthe search results. To clear your search and display all modules again, click on the Clear Search (
) button located to the right of the Search box. Remember, the Modules view will only showmodules that are applicable for the active Entity View. For example, if the Client Side entity tabis active, only modules that are applicable for client-side testing will appear in the Modulesview.
Below the Modules pane, you will have 2 options for filtering the list of available modules:
l Filter modules by target: Check this box if you want the list to only display modules thatare relevant for the target (entity) that you currently have selected in the entity database.
l Show modules without target: Check this box if you want the list to display modules thatdon't have a TARGET parameter. This option is used in conjunction with the Filtermodules by target option.
Editing/Deleting Modules from theModules Panel
To edit a module, right click on it in the Modules Panel and select Edit from its context menu.The configured editor for .py files will be opened for the selected module. For this operation to
page: 247 Core Security, a HelpSystems Company User Guide

Working with Modules / CustomModules
succeed, a text editor must be defined in the Modules Options, accessible from the Tools drop-down menu..
Edit Module Command
To delete a module, right-click on it in the Modules Panel and select Delete from its contextmenu. Note that deleting a module from this panel deletes it from the Modules View and movesthe python file to the Deleted Files folder.
Delete Module Command
You can refresh the currently available modules list at any time by selecting Modules -> Reloadfrom Core Impact's main menu.
CustomModulesThe modules that perform Core Impact’s security tests are constantly being updated with thelatest threats. The power to create these modules is accessible to all users through Core Impact'sopen, standard Python language interface. The New Module Wizard makes this even easier byguiding the user through the process of creating module templates, which they then simplypopulate with Python script.
This process requires a working knowledge of the Python Programming Language. Seehttp://www.python.org for more information.
User Guide Core Security, a HelpSystems Company page: 248

Working with Modules / CustomModules
Creating a Custom ModuleTo create a new module:
1. Navigate in Core Impact's menu bar to Modules -> New Module...
2. The New Module Wizard will open. Click the Next button to proceed.
3. Complete the first form with the following details:
l Name: The name of the module as it will appear in the modules list.
l File name: The Python (.py) file where the module will be written and stored in thefile system.
l Category: The location in the Modules list where the new module will reside. Bydefault, custom modules are saved in the My Modules folder, but you can change
this by clicking on the ellipsis button ( ) and selecting a new location.l Brief description: Optional description of the module. This description cannot
contain special characters or carriage returns.
New Module Wizard - Module Name and Description
Click the Next button after the form is complete.
4. In the Module Parameters box, click the plus sign ( ) icon to add a new parameter to the
module. To subsequently remove a parameter, select it and click the delete ( ) icon.New Module Wizard - Module Parameters
page: 249 Core Security, a HelpSystems Company User Guide

Working with Modules / CustomModules
5. For each parameter, enter the following attributes:
l Type: The category of parameter. For example, ip_range, string, ports, os, etc.
l Name: The name of the parameter. For example, TARGET, Operating System, PortNumbers, etc.
l Default Value: The default value of the parameter when the module is executed.
l Description: A brief description of the parameter.
When all parameters are established, click the Next button.
6. On the final page of the wizard, you will see confirmation that you have provided all therequired information.
Click the Finish button and the Module will be created.
You can view the progress of the generation process by selecting the New ModuleGenerator module in the Executed Modules panel, then clicking on the Module Log tab.
Module Log from New Module Generator
7. Once it is created, the new .py file will open automatically in your default text editor.
At this point, the module is not complete. It is only a template that still needs to becustomized before it will be functional.
User Guide Core Security, a HelpSystems Company page: 250

Working with Modules / Macro Modules
Inside of the .py file, you will find commented guidance on how to edit and complete yournew module.
Modify your .py file as needed, then save and close the file. Your new module can then bemanaged just as any other module in Core Impact.
Macro ModulesMacro Modules allow you to combine multiple Core Impact modules into a single modulepackage and then to execute it on your target systems or use it as an auto-runnable post-exploitation step. With Macro Modules, you can automate common tasks that are usually run insequence with some preset parameters. For instance, the Information Gathering Example Macroin the My Macros module folder will do the following:
1. Run the Network Discovery - ICMP module against a specified netblock.
2. Run the Network Discovery - TCP Connect module against a specified netblock.
3. Run the OS Detection module against each of the scanned hosts.
Macro Modules are no different from other Core Impact modules except for the fact that theytake advantage of automation features built into Core Impact's API.
Creating Macro ModulesYou can create powerful macros graphically using Core Impact's Macro Creation Wizard.
You must be in an opened Workspace to create a Macro Module but, after the Macro is created,it will be available across all Workspaces in your Core Impact instance.
To create a Macro Module:
1. In an opened Workspace, navigate in Core Impact's menu bar to Modules -> CreateMacro...
2. The Macro Wizard will open. Click the Next button to proceed.
3. Complete the first form with the following details:
l Name: The name of the macro as it will appear in the modules list.
l View: The entity view for which the module will be visible. For example, if youselect Network, then the Network entity tab must be active in order for the newmodule to appear in the Modules View.
l Category: The folder in the Modules list where the new macro will reside. Bydefault, new Macros are saved in the My Macros folder, but you can change this byclicking on the drop-down menu and selecting a new location.
l Brief description: Optional description of the Macro.
l Auto Runnable: If this option is checked, you can configure an exploit toautomatically run this Macro Module if the exploit successfully launches an agent.
Name, description and category
page: 251 Core Security, a HelpSystems Company User Guide

Working with Modules / Macro Modules
Click the Next button after the form is complete.
4. Drag and drop each module that you want to include in the macro from the Availablemodules pane (left) to the Execution order pane (right).
Macro Wizard - Modules and execution order Dialog Box
You can change the execution order of the modules in the Execution order pane bydragging a module to a different position in the sequence. A dotted line is displayed tohelp you see where the module will be dropped.
To remove a module from the sequence, select it and press the Delete key.
Click the Next button to proceed with the wizard.
User Guide Core Security, a HelpSystems Company page: 252

Working with Modules / Macro Modules
5. For each module in the sequence, you can select which parameters will be manually setby the user when the macro is run and which will be set by default. To configure this:
a. Select the module in the Modules to execute pane.
b. In the Module parameters pane, for each parameter, place a check in the Askcolumn if you want the user to input the parameter value when the macro isexecuted. If the Ask box is not checked, the data in the Value column will be usedwhen the macro is executed.
c. Change any data in the Value column by clicking on the value. Some parameterswill offer a simple text field or a drop-down menu, and others will show an ellipsis (
) button that, when clicked, will provide more options for setting the value.d. Some parameters can be inherited from the results of a module higher in the
sequence by checking the Inherit TARGET from check-box. After checking this box,select the module from which the current module should obtain its TARGET value(s). If the module selected in the drop down box outputs more than one value, themodule will be run on each one.
Macro Wizard - Setting Arguments for the Network Discovery Module
e. Click the Finish button and the Macro Module will be created.
You can view the progress of the generation process by selecting the Meta ModuleGenerator module in the Executed Modules panel, then clicking on the Module Log tab.
Using Macro ModulesMacro Modules are used just as other modules in Core Impact. If you configured your macro tobe auto runnable, you can use this macro as a post-exploitation step with several of the RPTs. Toexecute a macro module manually, follow these steps:
1. Locate the macro in the Modules Panel. When the macro was created, you specified alocation for it.
2. Launch the macro by either double-clicking it or dragging and dropping it onto an item inthe Entity Database.
page: 253 Core Security, a HelpSystems Company User Guide

Working with Modules / Getting Module Updates
3. The macro module's parameter dialog box will open.
If you wish, set the parameters and then click OK to execute the macro module.
See Running Modules for more details.
Getting Module UpdatesCore Impact's Get Updates performs two important functions:
l Downloads and installs the latest set of Core Impact modules.
l Gathers and submits Usage Statistics to Core Labs if you have opted into the UsageStatistics program (see Usage Statistics).
To get the latest set of Core Impact modules, select Modules > Get Updates... from CoreImpact's main menu, click on the Get Updates button on the Welcome Screen, or use the UpdateIMPACT modules module from the Maintenance module category.
Get Updates Command
Core Impact will create a new HTTP connection to the update server, download any availableupdates, and install them. If you use a proxy server to browse the Internet set the UpdateSettings options accordingly (see Network Options). In some cases (indicated by the updatemodule) Core Impact will need to be restarted before you can continue.
When you are done downloading module updates, view the Executed Module Info Panel for theUpdate IMPACT modules module for a report of which updates were downloaded.
You need an active Internet connection to connect to the update server.
User Guide Core Security, a HelpSystems Company page: 254

page: 255 Core Security, a HelpSystems Company User Guide

Controlling AgentsCore Impact agents are the results of penetration tests. They work with Core Impact to executemodules (your chosen tasks) on target systems. Every module needs an agent in order for it tooperate.
Note that although a module is automatically assigned an agent (the source agent) for execution,it might interact with other agents to accomplish its goal. Refer to the specific module'sdocumentation for more information.
About Agents and WebApps AgentsAn Agent (sometimes referred to as an OS Agent) represents an entity on a target system thatserves as your conduit to that system. When you create a new workspace there is one agentpresent, localagent, that comes with the Console. This agent is always the starting point of a newNetwork or Client-side test since modules that perform initial operations are first executed fromthe Console. As hosts are compromised, Core Impact deploys agents on those targets. When thisoccurs, you can instruct any module to run from an agent other than localagent. (see Set asSource in the Interacting with Agents section).
When an Agent is being prepared to be deployed on a target system, a cookie is generated sothat the agent can be identified by and connect to Core Impact. This cookie will allow any agentto connect back to Core Impact, even after the Core Impact workspace has been restarted (seeClosing a Workspace for details on closing a workspace and leaving modules running).
If Core Impact successfully exploits a host but antivirus or intrusion detection systems (IDS)prevent the agent from being installed, the host will be tagged as 'vulnerable but not exploitable'.This classification will be shown in the host's Quick Info, the Attack and Penetration Summary,as well as in the Vulnerability Report.
IOS Agents are the result of Network Device testing. They represent the information of how toexploit a network device vulnerability. If an IOS agent exists in your Network view under aNetwork Device, then you have the ability to perform certain post-exploit activities on thedevice such as opening a command shell. See Post Exploitation Modules for Network Devices.
Android Agents are specifically designed to operate on Android devices.
WebApps Agents are the result of WebApps testing. They represent the information of how toexploit a web application vulnerability. If a WebApps agent exists in your Web View, then youhave the ability to perform certain activities on the web application's server. In this regard, aWebApps agent is similar to an OS agent.
The different types of WebApps agents are described below:
l SQL Agent: Represents the knowledge of how to exploit a web application using SQLInjection.
l RFI Agent for PHP: Represents the knowledge of how to exploit a web application usingPHP File Inclusion.
l XSS Agent: Represents the knowledge of how to exploit a web application using Cross SiteScripting.
User Guide Core Security, a HelpSystems Company page: 256

Controlling Agents / Interacting with Agents
l Web Browser Agent: Obtained when you gain control of a web browser through a XSSattack. Web Browser Agents are launched on XSS agents.
l OS Command Injection Agent: An OS command injection attack is possible when anattacker is able to execute system level commands through a vulnerable page in a webapplication. Applications are considered vulnerable to an OS command injection attack ifthey take user-supplied input and use it directly in a system level command.
l WebDav Agent: Represents the knowledge of how to exploit a poorly configured webserver.
The below graphic illustrates how Agents and WebApps Agents are created and what steps canbe taken from them. Note that from a WebApps Agent, one can optionally deploy an OS agent.
Agents Summary
See Interacting with WebApps Agents for information on how to use WebApps Agents.
Interacting with AgentsYou can perform several functions by right-clicking on an agent and selecting from the contextmenu.
page: 257 Core Security, a HelpSystems Company User Guide

Controlling Agents / Interacting with Agents
The menu may vary depending on the type of agent, its current status and other global settings:
l Set as Source: By default, the localagent is the source agent for all attacks. If a new agentis deployed on a host machine, you can set that agent as the source and all future attackswill be initiate from that agent. This process is referred to as pivoting. With a remotesource agent, you can launch new Network and WebApps tests that might otherwise beless effective from the localagent. If, however, you want to simply run a module using aremote agent, click on that agent (focus on it) and then run the desired module. Themodule will automatically attempt to run using the focused agent.
l Uninstall Allows you to uninstall a currently-connected agent.
l Connect: Allows you to reconnect with a persistent agent.
User Guide Core Security, a HelpSystems Company page: 258

Controlling Agents / Interacting with Agents
l Create Remote Interface (requires PCAP plugin for Windows be installed): With thisoperation, you can create a VPN connection with the targeted host. With this tunnel inplace, you can then run applications (besides Core Impact) that are on your local systemand have them interface with the host. For example, if you were able to - through othertesting steps - learn the user's email username and password, you could set up your ownemail client to use their credentials, demonstrating a severe breach potential.
With this remote interface, once the VPN connection is in place, your system is equallyvisible to the host and the host network, making your testing more prone to detection.
l Shell: Executes a fully functional terminal on the host.
l PowerShell Shell: Executes a fully functional PowerShell terminal on the host.
l Mini Shell: Implements a limited set of commands on the host.
l Python Shell: Executes a Python shell on the host.
l Browse Files: Allows file browsing on the host.
l Make Persistent: This option will install an agent in the filesystem of the compromisedcomputer so that it can be used across system reboots for prolonged penetration tests.
l Install Pcap Plugin: Installs the Pcap plug-in on the selected agent to enable fasterscanning and to add support for packet capture and packet injection to a remote pivotedagent.
l Shell with AV Evasion: Executes a shell via the agent. This shell contains antivirus evasionqualities that will reduce the chances that it will be detected by the host machine's AVprocesses.
l Recover: This option can recover the connection to a non-persistent agent that wasdisconnected unexpectedly.
l Set Reconnection Policy: Use this option to modify the Reconnection Policy for a specificagent - these settings override the global Reconnection Policy set in Agents Options.
l Update Connection Status: This option will gather performance statistics for a connectedagent.
l Redeploy: Any agents that were previously active can be redeployed using this option.Core Impact will re-execute the exploits that were used to originally install the agent and,if successful, will re-active the agent.
l Get Username: If applicable, this action will execute the Get Current Username moduleand report back the current username in the Module Log tab of the Executed Modulespane.
l Get Screenshot: If applicable, this action will execute the Get Screenshot module andsave a screen image of the host. The image will be visible in the Module Output tab of theExecuted Modules pane.
l Mimikatz: If applicable, this action will execute the Mimikatz module and captureusernames and passwords on the host machine. Results will be shown in the ModuleOutput tab of the Executed Modules pane.
l Recent Modules: This menu will show modules that you have recently executed so thatyou can easily repeat them for a selected agent.
l Add Comments...: Use the Add Comments... option to enter your own notes regarding theagent.
l Delete: Use this option to delete an agent from a host as well as from the entity view.
page: 259 Core Security, a HelpSystems Company User Guide

Controlling Agents / Interacting with Agents
l Properties: This option will show properties of the agent in the Entity Properties pane.
The ShellAgents can execute a fully functional terminal on the remote host. Select Shell from an agent'scontext menu to launch the Shell and you will have the ability to perform all functions that youcould with cmd.exe on Windows or /bin/sh on a Unix system.
Running Info in a Shell
The Mini ShellThe Mini Shell uses a console-like interface to interact with an agent. Because the Mini Shelldoes not require the presence or availability of a shell in the remote host, it implements only alimited set of commands. One of the major benefits of using the mini shell is that it hides shell-like functionality from host intrusion detection systems that may trigger an alert when a shellcommand is executed. The mini-shell also allows you to transfer files between the agent andyour local computer, something the Shell does not permit. Select Mini Shell from an agent'scontext menu to launch the Mini Shell. Type help to get a list of valid Mini Shell commands.
Running Commands in a Mini Shell
User Guide Core Security, a HelpSystems Company page: 260

Controlling Agents / Interacting with Agents
The Python ShellIn order to interface with the agent using a fully functional Python Shell, right-click on the agentand select Python Shell from the context menu. This shell will accept any valid pythoncommands.
Python Shell
The File BrowserYou can use the File Browser to browse files in the host where the agent is running. Files andcomplete folders can be uploaded to or downloaded from the target host's file system. To accessthe File Browser, right-click on the desired agent and select Browse Files from the contextmenu.
Browse Files
page: 261 Core Security, a HelpSystems Company User Guide
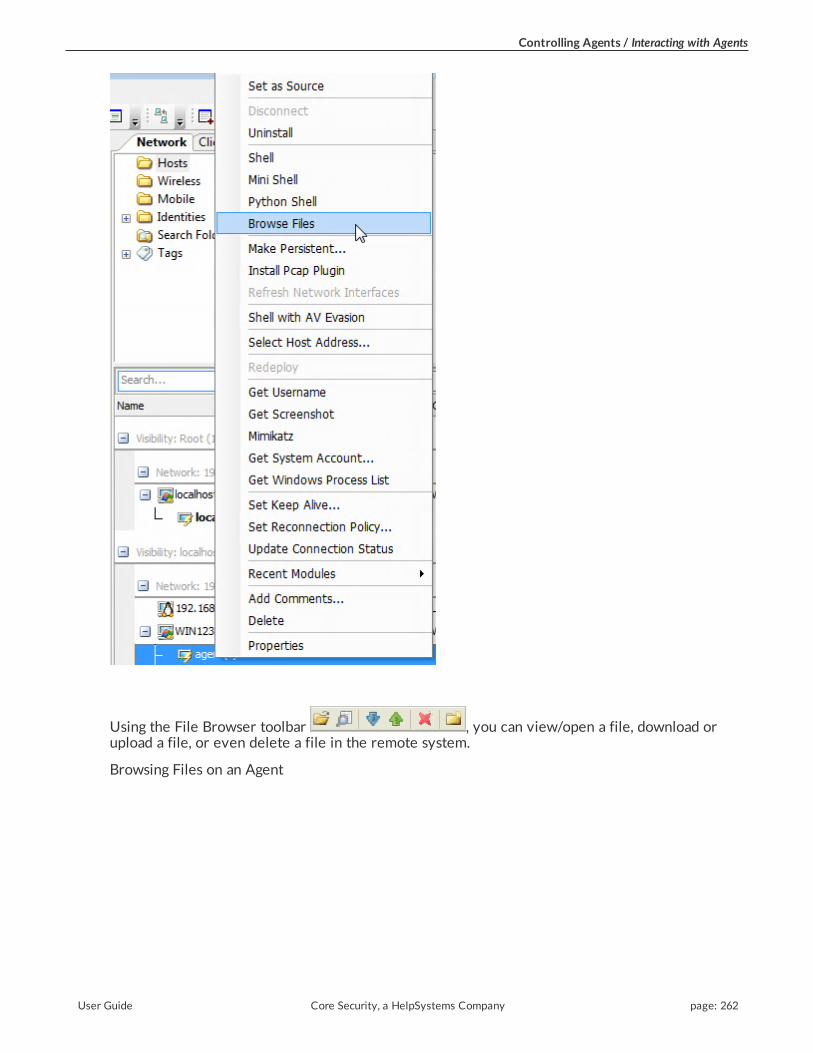
Controlling Agents / Interacting with Agents
Using the File Browser toolbar , you can view/open a file, download orupload a file, or even delete a file in the remote system.
Browsing Files on an Agent
User Guide Core Security, a HelpSystems Company page: 262

Controlling Agents / Interacting with Agents
Setting Source AgentsWhen you run a module (see Running Modules) the Console automatically runs the module fromthe point of view of the agent that is currently set as the source agent. You can tell which agentis currently the source agent because it will be marked with boldface in the Entity View Panelof the Console.
You can make any agent the source agent at any time by right clicking on the agent in theEntity View and selecting the Set as source option from the context menu. Note that the agentneeds to be in the "connected" state to be eligible for source agent status.
To return to the default setting of localagent as source agent, right click on localagent and select
Set as Source or click on the Set localagent as source button ( ) on the Entity View toolbar.
Remote Network InterfaceOnce an agent has been Set as Source, you can create a VPN connection with the targeted host.With this tunnel in place, you can then run applications (besides Core Impact) that are on yourlocal system and have them interface with the host. For example, if you were able to - throughother testing steps - learn the target user's email username and password, you could set up yourown email client to use their credentials and access their mail servers, demonstrating a severebreach potential.
To set up this tunnel, set the agent as source as described in the previous section, then drag-and-drop the module Remote Network Interface onto the agent.
With this remote interface, once the VPN connection is in place, your system is equally visibleto the host and the host network, making your testing more prone to detection.
Agent StatesAgents exist in one of three states. The following table describes these agent states and showsthe icon that represents each in the Entity View Panel of Core Impact's Console.
page: 263 Core Security, a HelpSystems Company User Guide

Controlling Agents / Interacting with Agents
Agent States
Icon State DescriptionDeployed butunconnecuted
The agent has been successfully deployed in the remote system but itis not connected to the console.
Deployed andconnected
An active communication channel exists between the console and theremote agent.
UninstalledThe agent has been removed from the remote system and is no longeractive.
Making Agents PersistentBy default, agents are deployed in memory only and will not survive if the host system isrebooted. To prevent this, you can make an agent Persistent which will cause the agent toincrease its presence on its host machine by creating a service and establishing itself in the host'sfile system. If you wish to configure an agent to be Persistent:
1. Right-click on the agent in the Entity View and select Make Persistent (An alternatemethod is to run the "Make agent persistent" module in the Agents module folder againstthe desired agent in the Entity View).
Make Agent Persistent command
User Guide Core Security, a HelpSystems Company page: 264

Controlling Agents / Interacting with Agents
2. In the parameters window, select the connection method.
l Connect from target: A new TCP connection will be created originating from theremote agent on the target host back to the host where the current source agent islocated. The Reconnection Policy that is set in Agents Options will determine thefrequency and duration of the attempted reconnection.
l Connect to target: A new TCP connection will be created originating from the hostwhere the source agent is located, terminating at the remote agent on the targethost.
l HTTP Channel
l HTTPS Channel
page: 265 Core Security, a HelpSystems Company User Guide

Controlling Agents / Interacting with Agents
Also select the PORT number. If you leave the port at 0, the connection will occur overthe agent's original connection port.
Make Agent Persistent Parameters
3. Press the OK button.
A new agent will be created, representing the Persistent Agent.
This process requires that the remote agent has administrator privileges.
After an agent is made persistent, you will be able to reconnect it to its rebooted target host. Todo this, after the host is rebooted:
1. Right click on the agent.
2. Select Disconnect.
3. Right click on the agent again.
4. Select Connect.
The agent will reconnect to the rebooted target host.
Connecting AgentsTo connect a persistent agent that is in the unconnected state, right click on the agent in theEntity View Panel and select Connect. Because connecting an agent can be a complex technicaltask, the Console uses a built-in module called Agent Connect to connect to the agent.
You can view the status of the Agent Connect Module in the Executed Module Info Panel just asyou can with any other executed module. Check the Module Log to see if an error occurred inthe module's execution (refer to the section called “Analyzing Module Output” for informationon how to consult module status and output).
Agent Connect Module - Module Log Panel Displaying Error Text
User Guide Core Security, a HelpSystems Company page: 266

Controlling Agents / Interacting with Agents
Uninstalling AgentsYou can uninstall a connected agent from the remote system by right clicking the agent in theEntity View Panel and choosing the Uninstall command from the context menu.
Once you uninstall an agent, it is no longer available to you. However, the agent's entity remainsin the database for logging and reporting purposes. You can remove it by right clicking over onthe agent and selecting Delete. Note that if you choose to remove an agent in this manner, itwill not be included in future reports.
Issuing a disconnect command to an in-memory agent (the default agent) effectively uninstallsthat agent. Disconnecting from a persistent agent leaves the agent on the filesystem and allowsyou to reconnect to it at a later time. Deleting an agent removes it from the database, but itdoesn't perform an uninstall on the target machine. Always uninstall before deleting an agent.
SQL, XSS and PHP Agents represent knowledge of how to exploit a vulnerability on a web page,they do not represent running code on the page/application. Therefore there is no need (orability) to uninstall a WebApps Agent.
IPv4 and IPv6Core Impact supports agent communication over both IPv4 and IPv6. In situations where youwould like to launch modules that do not have a target specified, you might want to set yourlocalagent to use a IPv6 address. For example, if you launch the Web Server module, and youwant the server to listen on an IPv6 address, you would first want to follow the below steps tochange your localagent from IPv4 (the default) to an IPv6 address. Follow these steps in theNetwork View of the entity database:
1. Right-click on the localagent. This is the item to which installed agents communicate backto in Core Impact.
2. From the right-click menu, click Select Host Address...
3. Click inside of the Value field where the current host IP address is listed (by default, this
will be an IPv4 address) and click the ellipsis button ( ) to the right of the host address.4. Check the box next to the IPv6 (link-local) address for your network adapter.
5. Click the OK buttons until you've returned to the Core Impact workspace.
Switch to IPv6
page: 267 Core Security, a HelpSystems Company User Guide

Controlling Agents / Deploying Agents
Any agents deployed after making this change will communicate back to the localagent using theaddress you specified (either IPv4 or IPv6).
Deploying AgentsAgents are typically deployed when you launch an attack module to exploit a vulnerability or toexploit end-users' lack of security awareness (client-side social engineering attacks). Successfulexploits deploy a new agent after compromising the target system. When an attack modulecreates a new agent and commits it to the Entity Database, the agent automatically appears inthe module's output panel and inside the compromised host in the Entity View Panel.
You can also manually deploy agents by using a generic file-transfer-and-execute module or fromoutside of Core Impact's Console. If you choose to manually deploy an agent, you must registerthe agent's existence in the Entity Database or the Console will not recognize it. To register theagent, go to the Modules Tab and use the Register modules located in the Agents category.
There is no limit on the number of agents you can install on a single host.
Deploying an Agent Using Valid User CredentialsCore Impact can use a valid username and password to deploy an agent on a remote host. Incontrast to agents deployed using the exploitation process, these agents are deployed not byexploiting a vulnerability but by logging into the target hosts with the specified username andpassword. This is especially useful when valid credentials are obtained from cracking passwordhashes gathered from a compromised host.
Agents can be deployed in this manner through a variety of different protocols. Utility modulesfor doing this can be found in the Agents folder of the Modules panel. Some examples of thesemodules are:
l Install Agent using SMB: Installs an agent by connecting to a network share.
l Install Agent Using WMI: Installs an agent using Windows Management Instrumentation.
l Install an agent using ssh: Installs an agent by connecting through SSH.
l Install an agent using rlogin: Installs an agent by connecting through rlogin. This modulecan take advantage of trust relationships created by.rhosts files.
l Install an agent using telnet: Installs an agent using the telnet service.
l Install an agent using unix-portshell: Installs an agent on a Unix target using a shell boundto a port.
l Install an agent using VNC Protocol: Installs an agent using the VNC protocol.
l Install an agent using win-portshell: Installs an agent on a Windows target using a shellbound to a port.
To deploy agents using a valid username and password, follow this procedure:
1. Select the desired target hosts for which you have a valid username and password.
2. Select the install module from the Agents folder that corresponds with the install protocolyou wish to use.
User Guide Core Security, a HelpSystems Company page: 268

Controlling Agents / Deploying Agents
3. Launch the module by dragging and dropping the module to the target host in the EntityView. This will evoke the Module Parameters .
4. Change the USER and PASSWORD parameters to the username and password for thetarget host and click OK.
5. A new agent with the privileges of the specified user will be installed on the target host.You can continue to work with this agent as usual.
Establishing Agent Communication ChannelsCore Impact's Console must establish a communication channel with each agent in order tocontrol it. Communication channels are established in a number of different ways depending onthe agent deployment method and agent type.
When agents are deployed by an exploit module or a utility module, the exploit's AgentConnection/CONNECTION METHOD parameter will control the way the communicationchannel is established. Agents will use a TCP connection as a communication channel. Theoptions available for the Agent Connection/CONNECTION METHOD parameter are:
l Connect to target. A new TCP connection will be created originating from the hostwhere the current source agent is located, terminating at the remote agent on the targethost. The Agent Connection/PORT parameter will control the specific TCP port wherethe remote agent will listen for incoming connections from the source agent.
If Core Impact is running on a computer behind a NAT device (such as a home DSLrouter), a connection method different than "Connect to" will not be effective right away.To support "Connect from", "Reuse connection" and "HTTP channel " in this scenario,activate the NAT support using the Network section of the Options Dialog Box. Open theOptions Dialog Box by selecting Tools > Options fromCore Impact's main menu. Refer toNetwork Options for a description of these settings.
l Connect from target. A new TCP connection will be created originating from the remoteagent on the target host back to the host where the current source agent is located. TheAgent Connection/PORT parameter will control the specific TCP port to which theremote agent will attempt to connect to on the source agent host. If the specified port isalready in use by another exploit, the agent connector has the ability to reuse that sameport. Some client-side exploits will attempt to use the HTTP Connect feature first when"Connect from" is selected. See HTTP Connect Channel for more information on HTTPConnect.
l Reuse connection. The agent will reuse the same TCP connection that was used to deliverthe attack. For instance, if the agent is deployed using an attack against a web serverlistening on TCP port 80, the agent will use that initial connection to communicate back tothe Console.
l HTTP channel. A new HTTP connection will be created from the remote agent on thetarget host to the host on which the HTTP Tunnel resides. In the cases where the remotehost has a HTTP proxy defined, the remote agent will connect to the HTTP Tunnel endpoint through the configured proxy. Additional settings related to this connection methodcan be configured within the "HTTP Tunnel" section in the module's parameters. SeeHTTP Tunnel Channel for more information.
page: 269 Core Security, a HelpSystems Company User Guide

Controlling Agents / Deploying Agents
l HTTPS channel. A new HTTPS connection will be created from the remote agent on thetarget host to the source agent. Additional settings related to the HTTPS Channel can beconfigured in Agents Options.
The HTTPS connection method will work on Windows target hosts if one of the followingconditions is met:
l The OS version is older than Windows Vista
l If Windows Vista or newer, the Check for server certificate revocation isunchecked in the Security section of the Advanced tab of the Internet ControlPanel. This setting is enabled by default.
l If Windows Vista or newer with the Check for server certificate revocation enabled,the target host has Internet access directly or through a proxy server.
Agent Expiration DateSeveral modules that deploy agents will offer a Agent Expiration and Agent Expiration Dateconfigurations so that, at the defined date and time, the agent will automatically uninstall from itshost. Setting the Agent Expiration to Use global settings will inherit the global Agent Expirationsettings in Options - Agents. You can see this option in the below example module Install Agentusing unix-portshell:
Agent Expiration Date
Agent ChainingAgent chaining allows you to connect to a newly-installed agent behind a firewall using anexisting, connected agent's communication channel. As you deploy successive agents, chainingallows the Console to maintain a single connection versus many.
Agent Chaining Example
User Guide Core Security, a HelpSystems Company page: 270

Controlling Agents / Deploying Agents
The diagram above demonstrates the necessity of agent chaining. Chaining becomes even morecritical if your network employs packet filtering. For example, the scenario illustrated abovemight include a packet filter in the DMZ network that filters connections from the Internet tothe internal private network. In this case, once a host in the DMZ was compromised, the onlyway in which you could connect to agents inside the internal network would be to re-use theoriginal agent's channel.
Agents are "chained" to the agent that was set as source when they were connected. Typicallythis means that agents are chained directly to the localagent (the Console), but the chainingrelationship automatically changes as you change source agents. This behavior is referred to asimplicit chaining.
Remember, if you want to simply run a module using a remote agent, click on that agent (focuson it) and then run the desired module. The module will automatically attempt to run using thefocused agent.
Viewing Agent ChainsIf you switch source agents often, it is easy to lose mental track of current agent chains. To viewagent chains, use the Show agent chaining route module located in the Agents category on theModules Tab of the Console to obtain agent chaining information. This module receives an agentas its target and displays the current route used to reach it. The following example includestypical information displayed on the Module Log Panel after running this module.
Module "Show agent chaining route" started execution onWed Mar 20 20:37:18 2002
Chaining route for agent: agent(5)/localagent -> agent(1) -> agent(2) -> agent(5).--Module finished execution after 1 secs.
page: 271 Core Security, a HelpSystems Company User Guide

Controlling Agents / Deploying Agents
Re-routing Agent ChainsOnce you establish a chaining route to an agent, Core Impact will attempt to reconstruct thatroute each time the agent is reconnected. To reset the chaining route for an agent, follow thisprocedure.
1. Run the Delete agent chaining route module against the agent (Modules Tab/ Agentscategory).
2. Enter the new agent's name in the Value column, or use the ellipsis button to the right ofthe field to select it and click OK. If you leave the proxy agent value for the new agentblank, the next time that the agent is connected a new route will be set with the currentsource agent.
3. Click OK. The module will execute and information about the agent route is displayed inthe Executed Module Info Panel of the Console.
Using Agent Plug-insAgents can use plug-ins to add functionality to a deployed agent. The following plug-ins areavailable and, once installed on an agent, extend that agents capabilities for as long as it exists.Plug-ins are automatically removed when the agent is uninstalled:
l PCAP. Provides packet-capture capabilities for the agent. An agent with the PCAP plug-incan execute modules that require packet capture (for example, Port Scanner - Fast SYN,Password Sniffer or Network Discovery - Passive). Only the localagent and agents withthis plug-in installed can execute modules that require packet capture. For convenience,this plug-in can be installed by right-clicking on an agent and selecting Install Pcap Plugin.
The PCAP plug-in requires the presence of a packet-capture driver (WinPcap) in Windowshosts. If there is no version of WinPcap installed on the machine, the driver is installedand removed when the PCAP plug-in is installed/uninstalled.
l TCP Proxy. Allows you to create TCP tunnels from Core Impact's Console to the agent. Bytaking advantage of this plug-in, you can redirect a local TCP port in the computer runningCore Impact to a remote TCP port on the other side of the agent. Use the TCP ProxyPlugin module in the Agents/Plugins module folder to open new TCP tunnels. You willthen be able to tunnel SSH traffic through that machine and pass it along to an SSH server.
l HTTP Proxy over TCP Proxy. If the TCP Proxy plugin is already installed on the agent,you can use the HTTP Proxy over TCP Proxy plugin to browse a web server that is visiblefrom the agent's host machine.
You can install or remove plug-ins using the modules in the Agents/Plugins/Install module folder.
Recovering AgentsIf you have a Reconnection Policy established for an agent (see Set Reconnection Policy orAgents Options), then you can use the Recover option to attempt to reconnect to an agent thathas unexpectedly lost its connection to the Core Impact console.
User Guide Core Security, a HelpSystems Company page: 272

Controlling Agents / Deploying Agents
Set Reconnection PolicyBy default, if an agent is not set to be persistent, and there is no reconnection policy, then theagent automatically self-destructs when it loses connectivity to Core Impact's source agent,even if the connection is disrupted for only an instant. To prevent this, you can set aReconnection Policy for the agent and then determine how that agent attempts to reconnect tothe Core Impact console following an unexpected disconnection. Using the Set ReconnectionPolicy option overrides any global reconnection settings in Agents Options.
To update an agent's reconnection policy:
1. Right-click on the agent.
2. Select Set Reconnection Policy. The module's parameters will appear.
3. Set the parameters of the policy and click the OK button.
l ENABLE POLICY: This should be set to true if you want the agent to be able toreconnect to its source agent following an unexpected disconnection.
l CONNECTION TYPE: This should be set to Connect From if the Connection Policyis enabled. This means that the agent will try to initiate a connection back to thesource agent.
l RETRY INTERVAL: This value determines how often an agent should attempt toconnect back to the Core Impact console.
l RETRY TIMEOUT: This value determines how long the agent should attempt toconnect back to the Core Impact console.
l AGENT PORT: The port on which you would like the reconnection to occur. Enter0 to reuse the agent's original connection port.
Set Agent Reconnection Policy
The agent's Reconnection Policy has now been modified.
page: 273 Core Security, a HelpSystems Company User Guide

Controlling Agents / Interacting with WebApps Agents
Update Connection StatusWhen you run the Update Connection Status command on a connected agent, Core Impact willtest the agent for 2 types of performance:
l Connection (upload and download) speed between the Core Impact console and agent
l Performance of the agent on its host machine (measured in system calls per second)
The resulting performance data will appear in the Module Log pane and also stored in the agent'sQuick Information.
Common Agent Error MessagesThis section describes error messages you may encounter when working with Core Impact'sagents.
syscall not supported by target
The module was not meant to run on the platform on which the source agent was deployed. Forexample, the signal syscall is not part of the Windows Operating System. If a module uses it,it will run on every agent except agents deployed on the Windows platform, where it will abortand generate the syscall not supported by target message.
The module's description will include information about the supported platforms. Additionally,module highlighting will not highlight a module which requires a syscall not supported by thesource agent.
the server is unreachable
The remote agent is down. Communication has been disrupted due to a networking problem ora loss of control by the agent.
pcap_plugin is not installed
The PCAP plug-in (see Using Agent Plug-ins) is not installed in the agent. Right click the agentand select Install Pcap Plugin to install it.
Interacting with WebApps AgentsWebApps Agents will appear below individual pages in the Web View. The default name of theWebApps agent indicates 2 important characteristics:
l Vulnerability type: A WebApps agent will either be a SQL Agent, RFI Agent for PHP, XSSAgent, XXE Agent, or a Web Browser Agent that is attached to a XSS Agent.
l Vulnerability: When you click on the parent page of a WebApps agent , the QuickInformation panel will display a numbered list of vulnerabilities that are confirmed andhave associated WebApps agent. If a WebApps agent was deployed using the 2ndvulnerability, then its name will contain a 2 [e.g. SQL Agent (2)].
After a WebApps agent has been created in the Web View, you can perform a number offunctions by right-clicking on the object:
User Guide Core Security, a HelpSystems Company page: 274

Controlling Agents / Interacting with WebApps Agents
Change Display Name
Allows you to change the WebApps agent's name from the default to a custom name.
Add Comments
Presents text entry area for your commentary.
Properties
Activates the Entity Properties panel of the Console, showing the WebApps agent's details.
New
Allows you to create a new Scenario in the Web View..
Recent Modules
Shows a list of recently-executed modules for ease of access.
Delete
Removes the WebApps agent.
In order to leverage XSS Agents, you must run the WebApps Browser Attack and Penetrationstep.
Running a Shell with a WebApps AgentIf a SQL Agent exists in your Web View, then you have the ability to use a command console(shell) to interface with the application's database:
l SQL Shell: This console uses the SQL vulnerability to provide a SQL-based commandprompt to the web application's database.
l Command Shell using SQL Agent: This console uses the SQL vulnerability to provide anoperating system command prompt to the machine where the web application's databaseresides.
Currently, Core Impact's SQL Agents can interface with the following databases:
l MS SQL Server 2008
l MS SQL Server 2005
l MySQL 4.1
l MySQL 5.0
l MySQL 5.1
l Oracle 9i
l Oracle 10g
l DB/2 9.5
If an RFI Agent for PHP exists in your Web View, then you have the ability to use a commandconsole (shell) to interface with the PHP engine:
page: 275 Core Security, a HelpSystems Company User Guide

Controlling Agents / Interacting with WebApps Agents
l Scripting Shell using RFI Agent (PHP): This console uses the PHP vulnerability to provide acommand prompt to the PHP engine. This console accepts PHP commands.
l Command Shell using RFI Agent (PHP): This console uses the PHP vulnerability to providea command prompt to the machine where the PHP engine is running. This console acceptscommon shell commands such as ls, cat, dir, etc.
If a Web Browser Agent exists is attached to a XSS Agent n your Web View, then you have theability to use a shell to interface with the target web browser:
l Javascript Shell: This console allows you to execute Javascript code on the Web BrowserAgent.
To initiate a command console via a WebApps agent:
We will use a SQL Agent in this example but the steps are essentially the same for the otherapplicable WebApps agents.
1. Activate the Web View of the Entity View to show your scenarios.
2. Expand a scenario to show a SQL Agent.
3. Click to select the WebApps agent upon which you want to run a module. By doing this, allcompatible modules will automatically become highlighted in the Modules View.
4. Activate the Modules View tab on the console.
5. Expand (double-click) the Shells folder.
6. Click and drag the SQL Shell module from the Modules View and drop it onto the targetWebApps agent.
7. Click the OK button.
A SQL Console will appear, giving you the ability to make direct queries of the web application'sdatabase.
SQL Shell
Deploying an Agent with a WebApps AgentTo deploy an OS agent through a SQL Agent or RFI Agent for PHP:
User Guide Core Security, a HelpSystems Company page: 276

Controlling Agents / Interacting with WebApps Agents
We will use an RFI Agent for PHP in this example but the steps are essentially the same for theother applicable WebApps agents..
1. Activate the Web View of the Entity View to show your scenarios.
2. Expand a scenario to show an RFI Agent for PHP.
3. Click to select the WebApps agent upon which you want to run a module. By doing this,all compatible modules will automatically become highlighted in the Modules View.
4. Activate the Modules View tab on the console.
5. Expand (double-click) the Agents folder.
6. Click and drag the Install OS Agent using RFI Agent (PHP) module from the Modules Viewand drop it onto the target WebApps agent .
Module: Install OS Agent using RFI Agent (PHP)
7. Click the OK button.
The module will run, showing its output in the Module Log panel.
8. When the module completes, navigate to the Visibility View and you should see the newagent under the web application host.
Once an agent has been deployed on the web application's server, you can then interact withthat agent using a variety of options which are detailed in the remainder of this chapter.
page: 277 Core Security, a HelpSystems Company User Guide

Core Impact EntitiesWhen you run a penetration test with Core Impact, information acquired from target systems,end-users or web applications is stored in the system as entities. Entities are then accessed in asingle and centralized repository by users or by any Core Impact module.
Any finding by a module that can be shared is represented in Core Impact as an entity and willbe visible in the Entity View Panel. Modules use the target entities' properties to gatherinformation needed by the module to execute properly. For example, a module requiring anopen TCP port might query the target host's properties for information about target ports. In thisexample, the target host is an entity.
The Entity View Panel provides the functionality for you to access the various entities in thesystem. The panel includes three "views" that allow you to see and work with different targetinformation resulting from your various tests:
l Network View
l Client Side View
l Web View
You access these views using the tabs at the top of the Entity View Panel.
Entity View Panel Showing View Tabs
The following types of items are stored in the Entity Database:
l Hosts: Host entities represent target systems. The entity contains information such as IPaddresses, operating systems, architecture, ports, and vulnerabilities found.
l Wireless Access Point: Wireless Network entities represent individual wireless accesspoints. The entity contains information such as SSID, security method, wireless channel
User Guide Core Security, a HelpSystems Company page: 278

Core Impact Entities /
and signal strength. Additionally, you may create Fake Access Points using the FakeAccess Point Module - these will also appear in the entity database.
l Wireless End Station: Wireless End Stations represent individual devices (PCs, hand-helddevices) that are connected to a wireless access points.
l Agents: Agent entities represent agents running on remote systems. An agent entity holdsinformation about an agent's state and its communication channel.
l Tags: Tags are user-defined labels that can be attached to an entity. This allows forcustom grouping of entities for easy access and management. There are several pre-defined tags for each entity type. For example, the Network Tags include Camera,Network Device, Database, and Web Server.
l Search Folder: Search Folders are designed to be dynamic lists of entities. The searchfolder will automatically be populated with (and updated to include) entities that matchyour search criteria (such as "Windows hosts"). The search folders in the entity databaseallow for multiple search criteria, making them another way for users to organize andmanage their targets.
l Emails: Email entities are email addresses used for client-side attacks. An email entitycontains an email address and, optionally, a person's name.
l Scenarios: Scenarios are repositories for WebApps test objects.
l Vulnerable Pages: Vulnerable Pages are the outcome of a successful WebAppsInformation Gathering session. These are pages that are associated with a web applicationthat may be susceptible to one of various vulnerabilities. The Web Entity view isorganized according to the OWASP Top 10 vulnerabilities (see the OWASP web site formore info).
l WebApps Agents: WebApps Agents represent the knowledge of how to exploit a SQLi,PHP or XSS vulnerability in a web page.
l Identities: For Network and Web views, the Entity Database will list all existing Identities,which can include usernames, IDs or other identifying properties of a system.
In addition, the following two entities are created and added to the database when you create aworkspace:
l A host entity representing the local console host (localhost).
l An agent called the localagent that represents the Core Impact software running on thelocal console host.
Each icon displayed in the Entity View Panel represents a different entity type. These icons aredescribed in the table below.
Entity Icon Descriptions
Icon Description
Windows Host
Linux Host
OpenBSD Host
FreeBSD Host
Mac OS X Host
page: 279 Core Security, a HelpSystems Company User Guide

Core Impact Entities / Network View
Icon Description
Unknown Host
Network Device
IOS Host
IOS Agent
Agent (Refer to ControllingAgents for more info onagents)
Network folder
Folder
Search Folder
Tag
Scenario (Web View only)
Page (Web View only)
SQL Agent (Web View only)
RFI Agent for PHP (Web Viewonly)
XSS Agent (Web View only)
Web Browser Agent (WebView only)WebDav Agent (Web Viewonly)
OS Command Injection Agent
LFI Agent
A wireless device (station)connected to a wireless accesspoint
A Fake Wireless Access Point,created from executing theFake Access Point module.
Network ViewThe Network View Tab displays the entire entity hierarchy of the target network that resultsfrom a Network RPT. You can use it to view the current state of all the entities in the activeworkspace's database. By providing access to all entities in the target network, the NetworkView allows you to assess the state of the overall penetration test.
Entity View - Network View
User Guide Core Security, a HelpSystems Company page: 280

Core Impact Entities / Network View
The Network view will contain all of the systems (host machines, network devices, or wirelessdevices) that have been identified by a test. Each type is shown in its respective folder.
Understanding Visibility ChangesAs with all of the entity tabs, the views are simply lists of entities that are organized andgrouped by certain attributes. By default, the Network view shows entities grouped by Visibilityand Network, as illustrated in the below figure.
Network View
page: 281 Core Security, a HelpSystems Company User Guide

Core Impact Entities / Client Side View
With the default view, hosts are organized primarily by what host they are visible from and,secondarily, by their network. The grouping can of course be changed by right-clicking on thecolumn headers and selecting a new Arrange By value (see Grouping Entities). Users can alsochange the view and quickly focus in on a specific host as a visibility level by right-clicking onthe host and selecting Show Hosts Visible from Here. This action is the same as using the searchfunction to filter the view by visibility (see Entity Search).
Client Side ViewCore Impact 's Client Side view allows you to customize and manage the client-side targetinformation generated by your client-side penetration tests. Client-side entities take the form ofEmail addresses that may or may not contain an associated user's name.
Entity View - Client Side View
User Guide Core Security, a HelpSystems Company page: 282

Core Impact Entities / Client Side View
Core Impact's client-side entities allow you to manipulate and view target information for client-side exploits and modules, and execute attacks against targets in a convenient and customizedmanner. Entities are added to this view from the Client Side Information Gathering RPT, client-side modules such as HTTP Email Address Grabber, or by adding them manually.
To manually add an entity to the Client-side view:
1. Activate the Client Side tab of the Entity View.
2. Right-click on the Emails folder.
3. Select New, then select Email...
4. Enter the email Address and Name of the user.
New Email Entity
Click the OK button.
page: 283 Core Security, a HelpSystems Company User Guide

Core Impact Entities /Web View
The New Email module will run and, after a brief moment, you will see the new email appear inthe Entity View.
Entity Tags and Search Folders further enhance the usability of this view.
When you click on an email entity, its Quick Information will show the entity's details includingwhere the email address was discovered (under Sources). This can be useful if the Client SideInformation Gathering step found email addresses from the Internet - if you know where theywere found, you can take steps to have them removed.
You can launch attacks against specific client-side entities in the Client-side View by using theClient-side RPT wizards or manually dragging modules from Core Impact Modules View anddropping them onto a specific search folder or entity. For example, if you wanted to launch anemail exploit (such as "Firefox compareTo exploit") against a group of targets, dragging anddropping the exploit onto a search folder would result in the exploit running against all emailaddresses in that folder. Alternatively, for a more focused attack, you could drag the exploit ontoa single person in the same folder, which would result in the exploit attacking only that entity.The above scenario can more easily be performed using the Client-side RPT Attack andPenetration wizard.
For information on using Core Impact modules, see Working With Modules.
Web ViewCore Impact 's Web View shows the results of all web application testing.
Entity View - Web View
By default, when you first open your workspace, the Web View will be empty. To populate theview you can run WebApps Information Gathering, or you can follow these steps:
User Guide Core Security, a HelpSystems Company page: 284

Core Impact Entities / Managing Entities
1. Right-click inside of the Web View.
2. Select New -> New Scenario.
A Scenario serves as a context in which you can test a web application and it will provideorganized structure to the results of the WebApps modules. You can use multiplescenarios to test the same web application with varying settings, or segment a webapplication and test each part independently in a different scenario.
3. In the resulting Module Parameters box, enter the details for your Scenario:
Module Parameters for New Scenario
NAME Provide a name that will help you identify this WebApps scenario
HTTPPROXY
If there is a proxy server, select from the drop-down menu theappropriate value:
l Use Core Impact settings will follow the settings that are in theTools -> Options -> Network form.
l Use Custom HTTP Proxy will follow the proxy value in the nextfield (CUSTOM HTTPPROXY)
l Use Internet Explorer settings will follow the settings as definedin your Internet Explorer preferences
CUSTOMHTTPPROXY
If HTTPPROXY is set to Use Custom HTTP Proxy, enter the name oraddress of the proxy server to be used.
USERAGENTSelect from the drop-down menu the browser type and version thatthe WebApps test will simulate.
CUSTOMUSERAGENT
If the USERAGENT is set to Custom, enter the name of the browser tobe simulated.
4. Click the OK button.
The new Scenario will appear in the Web View with the following subordinate folders:
l Pages: Any pages that are identified by WebApps Information Gathering will be visibleunder this folder.
l Vulnerabilities: Any potential or confirmed vulnerabilities will appear under this folder.
l Broken Links: As the web crawler searches for pages, it may find a link that generates a404 Not Found error. In this case, the link will be added to the Broken Links folder.
Managing EntitiesIn addition to the automated functions of the Entity View panels, there are several operationsthat can be performed manually in order to better manage the data and organize yourpenetration targets.
The steps provided here will apply across all view panels.
Adding Entities ManuallyIn the entity view panels, you can manually add entities.
Follow these steps to manually add a new Email:
page: 285 Core Security, a HelpSystems Company User Guide

Core Impact Entities / Managing Entities
1. Activate the Client Side View.
2. Right-click on the Emails folder.
3. Select New, then select Email...
4. In the Module Parameters window, enter the new email address and user name.
5. Click the OK button.
The new Email entity will appear in the Client Side view. Follow these same steps to manuallyadd entities to the Network and Web Views.
Grouping EntitiesThe display of entities allows management and organization through its columns. You can right-click on column headers to obtain options for adding or removing columns or to control entitygrouping based on existing attributes. You can also click and drag the columns to re-sequencethem to your preference.
To control the entity display, right-click on one of the columns and you will see the followingmenu.
The menu provides the following visual controls for the entity list:
l Use the Arrange by menu to quickly arrange the entities by one of their attributes. Withthis menu, you can use the Show in Groups option to have the entities grouped by aselected attribute.
l The Sort Ascending / Sort Descending options change the direction of the list's sort. Youcan also simply click on a column header to change the sort order.
l The Group by this field option will group the entities by the attribute on which you right-clicked.
l The Group by box option will open a box into which you can click and drag columnheaders. This feature allows you to achieve a multiple grouping layout.
l Select Remove Column to hide a column from the entity list.
l Use the Field Chooser to add columns to the view. When the field chooser appears, simplyclick and drag the new columns to the desired location among the existing column headers.
l Click Reset Layout to return the view to its default setup.
User Guide Core Security, a HelpSystems Company page: 286

Core Impact Entities / Managing Entities
Entity TagsIn order to facilitate the management and organization of your target information, Core Impactallows you to add custom tags and apply them to entities. Once you assign a tag to your entities,you can quickly view all entities that contain that tag.
To create a new tag in the Network View:
1. Activate the Network View.
2. Right-click on Tags.
3. Select New, then select Tag...
4. In the Module Parameters window, enter the Tag value.
5. Click the OK button.
The new Tag will appear under the Tag heading. You now will need to assign that tag to one ormore entities.
To assign a tag to one or more Network entities:
1. Activate the Network View.
2. Click the Hosts folder to view all available Network entities.
3. In the list of Network entities, select the entity(ies) that you wish to tag (use the Ctrl orShift keys to select multiple entities).
4. Right-click on a selected entity.
5. Select Tags, then select the new tag value.
The selected entity(ies) will now be tagged with your custom tag. Subsequently, if you want toview only those entities with a specific tag, you simply select the tag and a filtered list ofentities will appear below.
Each entity view panel contains its own distinct list of tags.
Entities can be tagged with more than one tag.
Adding Comments to an EntityYou can add custom text to an entity in any of the views using comments. Comments areautomatically saved within the active workspace. To add or edit an entity's comment, right clickon it in the Entity View Panel and select Add comments... from the context menu.
Adding a comment to an entity.
page: 287 Core Security, a HelpSystems Company User Guide

Core Impact Entities / Managing Entities
You edit comments in the Entity comments Dialog Box that appears. After you edit them, thecomments are added to the entity database as a new entity property (see the section called“Entity Properties”).
Entity comments Dialog Box
Entity SearchEach Entity View includes a Search Bar that you can use to filter entities by specific criteria.Filtering by condition allows you to quickly create a new "view" within the entity view. Forexample, in the below images, the string "sample" is entered into the search bar in the ClientSide view. This action quickly filters all Emails, showing only those that contain the string"sample". The second image shows further search filtering made available by clicking the options
arrows ( ) to the right of the search bar. The example shows that the list was filtered further bysearching for those emails that contained the string "index" in the Name field.
Entity Search Examples
User Guide Core Security, a HelpSystems Company page: 288

Core Impact Entities / Managing Entities
To close the search results, click on a folder or tag in the view panel or click the reset button ( )at the right side of the search bar.
Search FoldersSearch folders are a powerful feature that allow you to view a dynamic list of entities based oncustom-specified characteristics.
To create a new Search Folder:
1. Activate the desired view.
2. Right-click on Search Folder.
3. Select New, then select Search Folder...
4. In the Module Parameters window, enter the Name of the search.
5. From the Add Criteria drop-down menu, select as many search criteria as needed.
6. Then enter the search data for all selected criteria (to remove a criterion, click the
remove button ( ) on the right).7. Click the OK button.
The new search folder will appear below the Search Folder heading. To activate your searchfolder, simply click on it and the dynamic results will appear in the entity list below.
Deleting EntitiesTo delete an entity from the entity database (in any view), right-click on it and select Deletefrom the context menu.
Deleting a host will effectively delete all the entities in and below its visibility level. Note thatsince these deleted entities will include agents, the tasks performed by these agents will nolonger be included in future reports.
Deleting an Entity from the Database.
page: 289 Core Security, a HelpSystems Company User Guide

Core Impact Entities / Entity Details
Viewing all Modules Run on an EntityYou can easily learn which module(s) have been executed on a specific Entity (Host, E-mail, etc.).To do this, right-click on the entity and select Show Modules Executed on this Target. TheExecuted Modules panel will update to show only those modules that have been executed ontarget you selected.
Show modules executed on this target
Entity DetailsWhen you select an entity in a view panel, summary information about that entity will bedisplayed in the Quick Information Panel located at the bottom of the Console. Next to the
User Guide Core Security, a HelpSystems Company page: 290

Core Impact Entities / Entity Properties
Quick Information panel is the Entity Properties tab which contains more details about theentity. Use the Entity Properties tab to edit the entity's properties.
Host Entities can contain a lot of data. The Quick Information Panel or a host displays threecategories of information related to that host: General, Ports & Services, and Exposures. Each ofthe information categories is described below.
l General: Displays host Name, IP (IP address), OS (Operating System), Architecture, andother general info.
Quick Info - Host Properties
l Ports & Services: Displays information about identified open ports and the networkservices identified as running on those ports. Fields include TCP Ports, UDP Ports, andDCERPC. Ports and Services information is typically provided by the NetworkInformation Gathering step on the RPT Panel.
Quick Info - Ports & Services
l Exposures: Displays available information about potential Exposures gathered from theselected host.
Quick Info - Exposures
Entity PropertiesEntities can hold structured information in the form of properties. The user or a module canquery or modify existing entity properties and even create arbitrary ones with new information.
page: 291 Core Security, a HelpSystems Company User Guide

Core Impact Entities / Entity Properties
Properties can be viewed and modified through the Entity Properties Dialog Box. You canactivate or deactivate this dialog box using the Views -> Entity Properties option of the main
menu or by clicking the icon on the Views Toolbar. Additionally, you can activate the EntityProperties dialog for a specific entity by right-clicking on that entity and selecting Propertiesfrom the context menu.
Entity Properties Dialog Box
The Entity Properties Dialog Box is a dockable window, which means that you can move itaround to a different location, leave it floating, or hide it. To "dock" the window, drag it by itstitle bar to the desired position. Windows can only be docked against the Console's edges. To"un-dock" the window, double click in its title bar.
Individual properties are organized into containers (displayed in bold-face in the PropertiesDialog Box). Each container can be expanded or collapsed using the arrow head in front of itsname. Containers can also hold other containers.
Hidden properties. Some special system properties have a hidden attribute that keeps themfrom being displayed in the Entity Properties Dialog Box. If you wish, you can make theseproperties visible using the Show hidden properties option in the Entity Properties Tab of theOptions Dialog Box (use Tools -> Options).
Editing the Value of a PropertyTo manually change the value of a specific property, click on the Value cell of the property'srow. The value will be replaced by an edit box that allows you to enter new information or adrop down box that allows you to select from a list of valid values.
Entity Properties Dialog Box - Editing Values
User Guide Core Security, a HelpSystems Company page: 292

Core Impact Entities / Entity Properties
Adding a New Property to a ContainerTo add a new property to a container, follow this procedure.
1. Right-click on the container's name in the Entity Properties Dialog Box (to add a propertyto an entity's root container, right-click on the entity's name). Select Add new from thecontext menu.
Entity Properties Dialog Box - Add New Property to Container
page: 293 Core Security, a HelpSystems Company User Guide

Core Impact Entities / Entity Properties
2. The Property value Dialog Box will appear. Enter a Name, select a Type, and enter a Valuefor the new property. (See field definitions below.) Then click OK.
Property Value
Name
A name for the new property.
Type
There are many Types that the new property can be - a few examples are listed in the followingtable:
Type Descriptionarch Host architecturebool true or falsecertificate The host's certificatecontainer A generic property containerentity_name An Entity namefile A file in the agent's filesystemint Any integer valuenull No value. Useful for sets
User Guide Core Security, a HelpSystems Company page: 294

Core Impact Entities / Entity Properties
Type Descriptionos Host operating systemport A TCP/UDP portports A container of portsset A set of properties. Sets can only contain null propertiesstring Any string valueuint16 An unsigned integer 16 bits longuint32 An unsigned integer 32 bits longxmldata Unparsed XML data
The types entity, entity listed, xmldata, and user are not currently configurable by the user.
Value
The initial value for the new property. This value can be edited using the Entity PropertiesDialog Box.
See the screenshot below for an example of the use of custom properties. In this example, theuser has created a custom container called vmware and added the emulated OS and emulatedarchitecture properties. This allows the user to add custom information to this host's properties,effectively consolidating all known information about the target host.
Entity Properties Dialog Box - Creating a Custom Container with New Information
page: 295 Core Security, a HelpSystems Company User Guide

Leveraging PowerShellCore Impact provides testers several ways to leverage the PowerShell interface when targetingWindows hosts. PowerShell commands are executed in the host machine's memory, preventingtheir detection from AntiVirus or other detection tools.
Continue reading below to learn about the available Modules that are designed specifically touse PowerShell or click to read about Integration with PowerShell Empire.
PowerShell ModulesThere are several modules available in Core Impact that leverage the PowerShell interface toenhance your penetration testing program. The easiest way to locate these modules is to use the
Search box ( ) located at the top of the Modules Panel of theConsole and type the text "powershell". This will automatically filter the module list and showonly those modules that are related to PowerShell capabilities.
PowerShell Shell: Run this module on an existing agent to open a PowerShell command lineshell and interact directly with the host machine. This module is also available as an option whenyou right-click on an existing host agent. See Interacting with Agents on page 257 for more.
When using the PowerShell Shell, type the command #help to see additional commands thatare provided by Core Impact.
Run PowerShell Script: Run this module to execute a script that you've prepared locally on thehost machine. A script can be used to create a function, retrieve system information, etc. TheModule Output tab will show the script commands in green followed by the command output inred.
Get installed PowerShell Version: Run this module on an agent to learn what version ofPowerShell is currently installed on the host machine.
Deploy PowerShell Empire agent: This module is used in conjunction with an active instance ofPowerShell Empire. For more on this, see Integration with PowerShell Empire.
Install Agent using PowerShell Empire Agent: This module is used in conjunction with an activeinstance of PowerShell Empire. For more on this, see Integration with PowerShell Empire.
User Guide Core Security, a HelpSystems Company page: 296

page: 297 Core Security, a HelpSystems Company User Guide
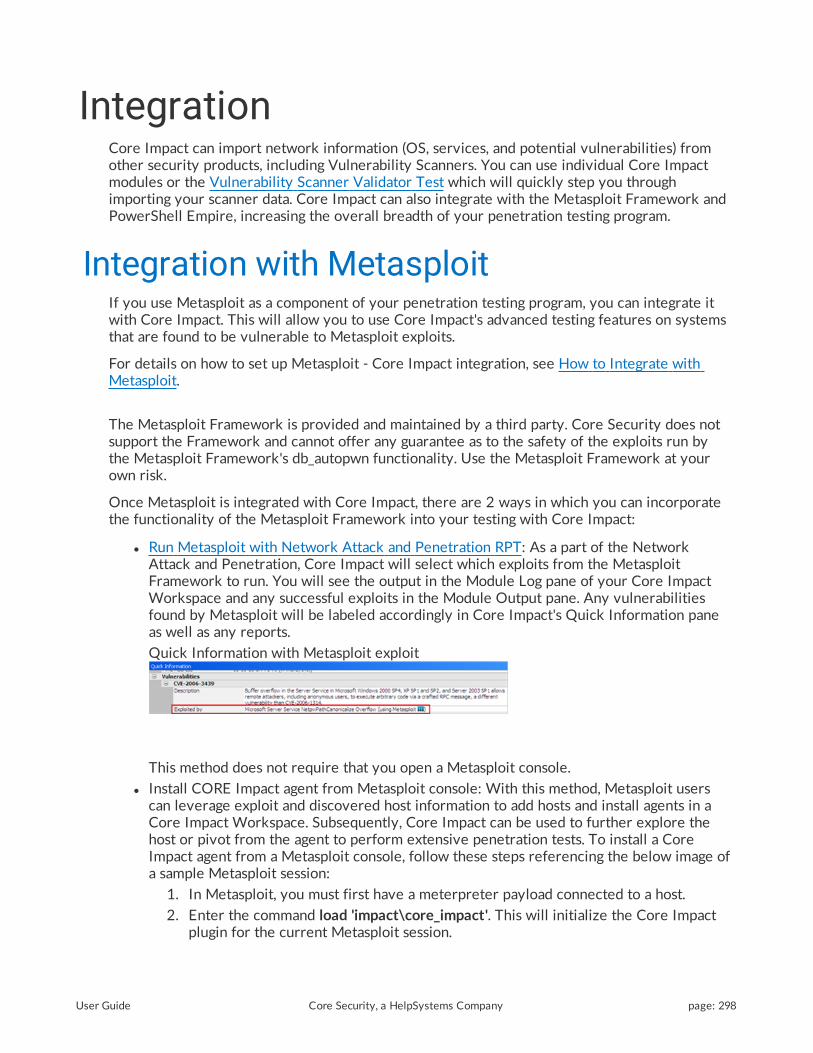
IntegrationCore Impact can import network information (OS, services, and potential vulnerabilities) fromother security products, including Vulnerability Scanners. You can use individual Core Impactmodules or the Vulnerability Scanner Validator Test which will quickly step you throughimporting your scanner data. Core Impact can also integrate with the Metasploit Framework andPowerShell Empire, increasing the overall breadth of your penetration testing program.
Integration with MetasploitIf you use Metasploit as a component of your penetration testing program, you can integrate itwith Core Impact. This will allow you to use Core Impact's advanced testing features on systemsthat are found to be vulnerable to Metasploit exploits.
For details on how to set up Metasploit - Core Impact integration, see How to Integrate withMetasploit.
The Metasploit Framework is provided and maintained by a third party. Core Security does notsupport the Framework and cannot offer any guarantee as to the safety of the exploits run bythe Metasploit Framework's db_autopwn functionality. Use the Metasploit Framework at yourown risk.
Once Metasploit is integrated with Core Impact, there are 2 ways in which you can incorporatethe functionality of the Metasploit Framework into your testing with Core Impact:
l Run Metasploit with Network Attack and Penetration RPT: As a part of the NetworkAttack and Penetration, Core Impact will select which exploits from the MetasploitFramework to run. You will see the output in the Module Log pane of your Core ImpactWorkspace and any successful exploits in the Module Output pane. Any vulnerabilitiesfound by Metasploit will be labeled accordingly in Core Impact's Quick Information paneas well as any reports.
Quick Information with Metasploit exploit
This method does not require that you open a Metasploit console.
l Install CORE Impact agent from Metasploit console: With this method, Metasploit userscan leverage exploit and discovered host information to add hosts and install agents in aCore Impact Workspace. Subsequently, Core Impact can be used to further explore thehost or pivot from the agent to perform extensive penetration tests. To install a CoreImpact agent from a Metasploit console, follow these steps referencing the below image ofa sample Metasploit session:
1. In Metasploit, you must first have a meterpreter payload connected to a host.
2. Enter the command load 'impact\core_impact'. This will initialize the Core Impactplugin for the current Metasploit session.
User Guide Core Security, a HelpSystems Company page: 298

Integration / Integration with PowerShell Empire
3. Enter the command install_impact_agent. This is an optional step that simplydisplays the parameters that should be used with the install_impact_agentcommand.
4. Enter the command install_impact_agent with the associated parameters. In theexample below, the meterpreter session (-s) is set to 1, the existing Workspace (-w)is set to AlexMS, and the Workspace's passphrase (-p) is set to aaaaaaaa.
5. The console will display a message when the agent has been deployed in CoreImpact. At this point, you can open your Core Impact Workspace and use the fullyfunctional agent. The Metasploit session is no longer needed and can be closed.
Install agent from Metasploit Console
Integration with PowerShell EmpireIf you use PowerShell Empire as a component of your penetration testing program, youcan integrate it with Core Impact. This will allow you to use Core Impact's advancedtesting features in conjunction with PowerShell Empire's post-exploitation capabilities.
Using Core Impact with PowerShell Empire requires that both programs are running andcan access one another across the network.
Before integrating your Core Impact instance with a host using PowerShell, you will needto launch the Empire REST API:
1. Initiate the Empire console using the --rest option so that the REST API will bereachable.
2. You can set a password on the Empire console using the --password option, butthis password will then need to be entered in the Core Impact modules that aresubsequently used in the integration.
page: 299 Core Security, a HelpSystems Company User Guide

Integration / Importing Data from Vulnerability Scanners
3. Launch a listener in the Empire console using the below commands:
listenerset Name StartingListenerRun
Core Impact and PowerShell Empire can work together in 2 scenarios:
Core Impact AgentIf you have exploited a host using Core Impact and an active agent is installed on the hostmachine, use the following steps to leverage PowerShell Empire:
1. In Core Impact, locate and run the module Deploy PowerShell Empire Agent.
2. Configure the Module so that it can locate and log into the instance of PowerShellEmpire.
3. Once the module is running, you can use PowerShell Empire to interface with thetarget host, through the Core Impact agent.
PowerShell Empire AgentIf you have exploited a host manually and have an active agent installed on the hostmachine via PowerShell Empire, use the following steps to leverage Core Impact:
1. In Core Impact, locate and run the module Install Agent using PowerShell EmpireAgent.
2. Configure the Module so that it can locate the instance of PowerShell Empire andthe existing agent. The Agent Name will be a string of letters and numbers (e.g.VASDGF314524GWWR)
3. Once the module runs, a new host will be added in Core Impact showing visibilitythrough the PowerShell Empire host. You can now use Core Impact to interact withthe agent.
Importing Data from VulnerabilityScanners
Core Impact comes ready to accept data from the following products:
Different importing modules for each product are available within the Import-Export folder inthe Modules view.
The following modules are included in Core Impact's Network modules:
l GFI LANguard
l IBM Enterprise Scanner
l IBM Internet Scanner
l McAfee Vulnerability Manager (formerly McAfee Foundstone)
User Guide Core Security, a HelpSystems Company page: 300

Integration / Importing Data from Vulnerability Scanners
l Microsoft Baseline Security Analyzer
l Nexpose
l Nessus
l Nmap
l PatchLink VMS
l Qualys Guard
l Retina
l SAINT
l STAT Guardian
l Tenable Security Center
l Tripwire IP360
l nCircle
The following modules are included in Core Impact's Web modules:
l Acunetix Web Vulnerability Scanner
l Burp Suite Professional
l Cenzic
l HP WebInspect
l IBM Rational AppScan
l NTOSpider
l Qualys Web Application Scanner
To manually use a module to import data from one of these scanners, use the modules found inthe Import-Export folder. Double-clicking on any of these modules will open the parametersdialog where you can specify the location of the output file where the product data is stored.Refer to each module's documentation for additional information related to the specific product.
In addition, you can export all entities in Core Impact's database (everything found in the EntityViews) to a parsable format to facilitate the application's integration with other products.
Using Imported InformationImporting network information can replace the Network Information Gathering step if theseactivities have already been performed by the original scanner. After importing information youcan advance immediately to step 2 of the Network RPT process, Network Attack andPenetration.
To use imported network information within the Network RPT process, follow this procedure:
1. Import data from a scanner. The originally-scanned hosts will appear on the Entity View.
2. Run the Network Attack and Penetration RPT step (see Network Attack and Penetration)or individual exploits from the Exploits/Remote module folder against the imported hosts.The Network Attack and Penetration step will use the imported OS, and serviceinformation to select and execute applicable exploits.
3. If any attack was successful, continue working with the deployed agents using RPT orindividual modules as usual.
page: 301 Core Security, a HelpSystems Company User Guide

Integration / Importing Data from Vulnerability Scanners
If the imported data includes vulnerability information (as is the case when importing fromvulnerability scanners), this information can be used to drive exploit selection, providing anautomated mechanism for validating potential vulnerabilities. In this case, instead of utilizing theNetwork Attack and Penetration step from RPT, you can launch the "Attack and Penetrationusing imported data" module from the Import-Export module folder.
To validate potential vulnerabilities follow this procedure:
1. Import data from a scanner. The originally scanned hosts will appear in the Entity View.
2. Run the "Attack and Penetration using imported data" module from the Import-Exportmodule folder against the imported targets (see Running Modules for more information).This module will only select exploits that match potential vulnerabilities identified by thevulnerability scanner.
3. If any of the attacks were successful, continue working with the deployed agents usingRPT or individual modules as usual. A successfully-deployed agent validates theexploitability of a potential vulnerability.
4. To generate a report of the vulnerabilities imported from a vulnerability scanner thatwere exploited using Core Impact, you can use the PCI Vulnerability Validation report.
User Guide Core Security, a HelpSystems Company page: 302

page: 303 Core Security, a HelpSystems Company User Guide

Obtaining and Utilizing UserCredentials
Core Impact can collect user credentials from a compromised host through a deployed agent.These Identities can later be used for cracking password hashes, if necessary, and then installingadditional agents as a valid user. It is fairly typical of most network setups that certain
usernames and passwords are shared among multiple components. If some of the passwords forthese accounts can be cracked, Core Impact provides functionality to deploy additional agentsusing this information.
About Identities in Core ImpactAn Identity is a token that could be used by an Identity Verifier in an authentication transaction.
Any Identities that are found by Core Impact are stored in the EntityDatabase (Network and Web). Any Core Impact module that usesIdentities, will have an IDENTITY parameter for faster selection. Therewill also be USER/PASSWORD and NTLM Hashes parameters availablein situations where you want to use a custom identity not present in thedatabase.
Below are examples of modules that use Identities (this is anabbreviated list):
l WMI Shell
l Windows Service Manager
l Windows Secrets Dump
l Install Agent Using SMB
l Install Agent Using WMI
Obtaining the Password Hashes from aCompromised Host
In the case of a UNIX-like system such as Linux, the agent can be used to download the/etc/shadow file from the target. This file can then be used to download password hashes tobe fed to a password cracker. This can be done easily using the File Browser within the agent'scontext menu, or by using the "get" command from the mini-shell. Please note that in a normalsetup, the agent will have to be running with root privileges on the system to be able to accessthe /etc/shadow file.
In the case of Windows systems, the password hashes are stored in the machine's SAM (SecurityAccounts Manager) and NTDS.DIT for Active Directory configurations. The files holding thisdata are locked while the OS is running and cannot be accessed directly by the user. However, itis possible to access this information with different approaches.
User Guide Core Security, a HelpSystems Company page: 304

Obtaining and Utilizing User Credentials / Kerboros Golden & Silver Tickets
Exporting the SAM hives and Volume ShadowCopy restore NTDS.DITThis approach is the least intrusive (since no injection takes place) and can be achieved with theWindows Secrets Dump module. This module can be run remotely (if you have AdministrativeIdentities against the target host) or locally under an agent running as Administrator or SYSTEM.
Injecting code directly into the LSASS processThis procedure is more intrusive and must be used if the previous one didn't work.
1. Start with an agent deployed on the Windows machine from which you want to recoverthe password hashes. The agent has to be running as SYSTEM for this procedure to besuccessful. If the agent is not currently running as SYSTEM, use the Privilege Escalationstep on the RPT view (see Privilege Escalation).
2. Select this agent on the Entity View.
3. Run the Password Dump from SAM module from the Information Gathering/Local folderin the Modules Panel. If the agent is currently running as part of the LSASS process (i.e., itwas deployed with an exploit for a vulnerability within LSASS), then simply running themodule will collect all the user's password hashes. If this is not the case, then the Agentprocess injector module will automatically be executed, injecting a new agent into theLSASS process from which the Password Dump from SAM module will be able to collectpassword hashes.
In additional to the Password Hashes stored in the compromised host, there are usuallyIdentities present in memory as well. Sometimes those identities are even in clear-text form. Inorder to access these identities use the Mimikatz local module.
Kerboros Golden & Silver TicketsCore Impact allows users to create Kerberos tickets that can be used in a penetration testingcampaign. You can use the following modules:
l Create Kerberos Golden Ticket: creates a Kerberos Golden Ticket for a designated user
l Create Kerberos Silver Ticket: creates a Kerberos Silver Ticket for a designated user
l New Kerberos Identity: creates a new identity to test against a Kerberos KDC
page: 305 Core Security, a HelpSystems Company User Guide

Obtaining and Utilizing User Credentials / Sniffing Password Hashes from the Network
Sniffing Password Hashes from theNetwork
Usernames, passwords and password hashes can sometimes be obtained by sniffing networktraffic. To sniff the network looking for passwords, use the "Password Sniffer" module from theroot of the Information Gathering folder in the Modules Panel. This module requires the agent tohave packet capture capabilities. Agents that have this capability are the localagent and agents
with the Pcap plugin running with root/administrator privileges.
To start looking for passwords by capturing packets, do the following:
1. Start by selecting an appropriate agent for this activity. As mentioned before, the agentmust be able to capture packets from the network. The host on which the agent is runningmust also be positioned in the network at a point where it makes sense to sniff networkpackets, as only packets going through the same network segment will be seen by thathost. Also keep in mind that in switched environments, all network packets are notreceived by every host on the same network segment.
2. Launch the Password Sniffer module from the Information Gathering folder. The modulewill run and continually capture appropriate packets, extracting password or hashinformation when possible. This information will be stored in the Entity Database.
Running the Password Sniffer module
User Guide Core Security, a HelpSystems Company page: 306

Obtaining and Utilizing User Credentials / Using the Core CloudCypher Service
Captured usernames and passwords will be stored in the Entity Database. Captured NTLMhashes can be exported to a password cracker. This procedure is described in the followingsection.
Using the Core CloudCypher ServiceIf you have purchased access to the Core CloudCypher service, you can send hashes directlyfrom Core Impact to the service to attempt to crack them. Core Impact can be configured inCore CloudCypher Options to send them automatically or, if you want to do so manually, byselecting Tools > Submit Credentials to Core CloudCypher.... You can then enter the hosts thatcontain hashes.
Submit Credentials to Core CloudCypher
page: 307 Core Security, a HelpSystems Company User Guide

Obtaining and Utilizing User Credentials / Logging Keystrokes on a Compromised Host
Logging Keystrokes on a CompromisedHost
Username and password information can sometimes be obtained by logging keystrokes on acompromised machine when an authorized user logs into the host or uses the compromised hostto log into a different host. Core Impact has a built-in keylogger utility module for Windowssystems that can be installed after an agent has been deployed.
To install the Windows keylogger follow this procedure:
1. Select an appropriate agent to deploy the keylogger. The agent must be running on theWindows host where the keylogger will be installed and must have Administrator orSYSTEM privileges.
2. Run the "Keylogger" module from the Information Gathering/Local folder. Defaultparameters will configure the keylogger to store the log in memory. Refer to the module'sdocumentation for additional information.
3. The keylogger will now start logging keystrokes on the host.
4. The logged keystrokes will be downloaded and stored in the specified file.
Collecting Saved Login CredentialsSome applications can save login information as a convenience for the user. Examples ofapplications that have some form of password auto-completion are:
l Internet Explorer
l MSN Messenger
l Outlook Express
l Outlook 2003 & 2007
l Firefox
l Putty
l Thunderbird
l Trillian
l Yahoo Messenger
In some cases it is possible to recover these credentials. To attempt recovering savedcredentials from a compromised host, follow this procedure:
1. Select an appropriate agent to collect credentials. The agent must be running on the hostwhere you want to search for login credentials.
2. Run any of "Password Dump from ..." modules from the Information Gathering/Localfolder.
3. The module will start to attempt to recover credentials on the compromised host.Obtained credentials will be added to the host entity as properties.
User Guide Core Security, a HelpSystems Company page: 308

Obtaining and Utilizing User Credentials / Using Obtained Passwords
Using Obtained PasswordsCore Impact can use obtained username and password information to deploy agents. In contrastto the agents deployed by the exploitation process, these agents are deployed not by exploitinga vulnerability but by logging into the target hosts with the specified username and password.
When using the SMB protocol to install an agent on a Windows host, it is possible to usepassword hashes to log in as opposed to using a fully recovered password. This technique,sometimes referred to as "Pass the hash" is implemented in the "Install Agent using SMB"module from the Agents module folder. When run against a host from which hashes have beenobtained (the hashes are stored in the host properties, within the Identities container), themodule will automatically cycle through the available hashes until one is successful.
To learn more about deploying agents with a valid username and password, see Deploying anAgent Using Valid User Credentials.
page: 309 Core Security, a HelpSystems Company User Guide

Setting Console OptionsYou can configure Core Impact's Console to meet your particular needs and preferences bysetting global options. Options are accessible from the main menu using the Tools > Optionscommand. Each of the configurable option categories visible on the left panel of the dialog boxpictured below is described in the following sections.
Options Dialog Box
ModulesThe Modules panel of the Options Dialog Box includes options related to module execution andmodule highlighting. Follow these steps to set the Modules options:
1. Select the Tools > Options command from the main menu.
2. Click the Module category and set your options using the fields described below. Thenclick OK.
Modules Settings
User Guide Core Security, a HelpSystems Company page: 310

Setting Console Options / Modules
Auto select new tasks
Select whether you want new tasks to be automatically selected in the Executed Modules pane.If set to Disabled, new tasks will not automatically be selected. If set to Main Tasks, only newparent tasks will be selected. If set to All Tasks, each new task that is started will beautomatically selected.
Allow dropping modules over unsupported targets
If you select this check-box, the console will not block the execution of a module against anunsupported target (for instance, running a Windows exploit against a Unix server).
Show system modules
If you select this check-box, the Executed Modules pane will show all executed modules. If youuncheck this option, System modules (such as the running of a web server) will not be shown.You can also show/hide system modules by right-clicking on a module in the Executed Modulespane and checking/unchecking Show System Modules.
SSL server certificate verification
By default, the Python interpreter that is embedded in Core Impact will not set up SSLconnections when the server certificate verification fails. Check this option to require thatCore Impact perform valid SSL connections.
Execute modules in debugging mode
If you select this option and the Log detail level option is set to High, modules are moreverbose and generate more log lines in the Module Log view. You will then have the option toAttach Debugger to Running Modules which will, if selected, attach the debugger to anymodules that are currently running.
page: 311 Core Security, a HelpSystems Company User Guide

Setting Console Options / Agents
Max. concurrent modules executing
The maximum amount of modules that can be run concurrently. When this maximum is reached,new modules will wait in the initialized state until others finish.
Log detail level
Select the verbosity level of the Modules log as either High, Medium (default), Low.
Add current time to every log line
If you select this option, each log line in the Module Log view will be time stamped.
Filter modules by target
If this option is selected, the Modules tab will only show modules that are applicable towhatever target is selected in the Entities database. You can then optionally specify - with theShow modules without target setting - whether modules that don't have a TARGET parametershould be visible. These options are both visible at the bottom of the Modules tab.
Module Editing
This field allows you to set the preferred application for editing modules. To change from the
default (Notepad), click the browse icon ( ) and navigate to your preferred text editingapplication.
Highlighting
This section is used to select the color that modules are highlighted in the Modules View of thepanel. When you select an OS agent or WebApps agent in the entity view, the applicablemodules will automatically be highlighted for ease of identification.
RPT Pane
If you select this option, changing to a different entity pane will automatically change the RPTview to match it.
AgentsThe Agents panel of the Options Dialog Box includes options related to agents. Follow thesesteps to set the Agents options:
1. Select the Tools-> Options command from the main menu.
2. Click the Agents category and set your options using the fields described below. Thenclick OK.
Agents Settings
User Guide Core Security, a HelpSystems Company page: 312

Setting Console Options / Agents
Set new agents as source
If you select the Set new agents as source check-box, whenever a new agent is created it willbe set as the current default source agent. If the check-box is not set, you will have to manuallyset the new agent as source.
Use encrypted channel for agents
This check-box controls whether to use a secure communication channel between the agentsand the console.
Play sound on agent installation
This check-box controls whether to play a sound when a new agent is installed. The sound fileto be played is defined in the following registry key:
HKCU\Software\Core Security\Impact\Sounds
Agent Expiration
Set up expiration date on deployed OS agents
Check this global option if you want deployed OS agents to automatically expire after adefined amount of time.
Expiration Period
Set the expiration period in Days, Weeks or Months.
HTTPS Channel
Override CORE Impact SSL certificate with external certificate
page: 313 Core Security, a HelpSystems Company User Guide

Setting Console Options / Entities
Check this option if you want to use your own SSL certificate to facilitate agents' use of theHTTPS Channel.
Certificate path
The path to the SSL certificate.
Private Key path
The path to the SSL certificate's private key. If applicable, check the Private Key file isencrypted checkbox.
Private Key file passphrase
The passphrase to the certificate's private key.
Reconnection Policy
Use Reconnection Policy
Check this option if you want agents that lose connectivity to the Core Impact console toattempt to reconnect. Without a Reconnection Policy, agents that lose connectivity will self-destruct. This is a global setting but it can be overridden for an individual agent - see SetReconnection Policy for details.
Reconnection Attempt Interval
This value determines how often an agent should attempt to connect back to the Core Impactconsole.
Reconnection Attempt Timeout
This value determines how long the agent should attempt to connect back to the Core Impactconsole.
Port
Specify a port on which you would like the reconnection to occur. Enter 0 to reuse the agent'soriginal connection port.
EntitiesThe Entities Panel of the Options Dialog Box includes options related to the management of theEntity Database. Follow these steps to set Entities options:
1. Select the Tools -> Options command from the main menu.
2. Click the Entities category and select or deselect the check-boxes described below. Thenclick OK.
Entities Settings
User Guide Core Security, a HelpSystems Company page: 314

Setting Console Options / Network
Show hidden properties
If you select this check-box, hidden properties will be displayed in the Entity Properties Editor.
Show modules
If you select this check-box the Entity Properties Window will display properties for thecurrently-selected module in the Modules Panel.
Warn TARGET's visibility
If you select the Warn TARGET's visibility check-box, Core Impact will warn the user whenexecuting a module against a TARGET that is outside the current source agent's visibility level.
Group hosts by netmask
Networks are identified and grouped in the entity view if they match this netmask address.
NetworkThe Network Panel of the Options Dialog Box includes options related to the management ofnetwork interfaces. Follow these steps to set network interface options:
1. Select the Tools -> Options command from the main menu.
Network Settings
page: 315 Core Security, a HelpSystems Company User Guide

Setting Console Options / Network
Network Interface for packet capture
Use the Network Interface for packet capture drop-down box to select the network interfacethat will be used for modules that use PCAP when they are executed in the local agent. Theselected interface’s IP address is also used as the URL of the malicious web server for client-side attacks.
Internet connection
This section is used to set connection preferences. Click the radio button that corresponds withhow your Core Impact console can connect to the Internet:
l Use Internet Explorer Settings: This will use the same connectivity configurations thatexist in your Internet Explorer settings.
l Direct connection to the Internet: Use this if your Core Impact console has a directconnection to the Internet.
l Use a proxy server: Also enter the Address, Port, Username and Password for the proxyserver.
These settings are used in two places: when downloading Modules updates, and whenconnecting to the Internet to get News. These settings are captured and stored from theparameters entered during the Core Impact installation and product activation.
Network Address Translation (NAT)
Core Impact is behind a NAT
Check this box if Core Impact is deployed behind a NAT device.
User Guide Core Security, a HelpSystems Company page: 316

Setting Console Options / One-step RPT
Public Address
Enter the external IP address of the NAT device.
Port Range
Enter the range of ports that are being redirected (forwarded) from the NAT device to theConsole.
The settings in the NAT Panel control the way Core Impact exploits will behave when usingdifferent agent connection methods. Note that changing these settings does not change yourNAT device configuration. You must do that manually.
To support the Connect from connection method, all the ports within the specified Port Rangehave to be redirected to the internal address for the host running Core Impact . An agentdeployed with the Connect from connection method will try to connect to the Public AddressIP on a port within the defined Port Range. The Console will wait for that incoming connectionon the same port.
When NAT is activated, the Reuse connection method utilizes the specified Public Address tofind the correct TCP session in the target host's memory. In some cases, it will not be possibleto exploit the same target service twice in a row using Reuse connection unless the first agentis disconnected before you launch the second attack.
Dashboard
If you do not wish to receive news about module or software updates, select the Do notconnect to the Internet ... check-box. Core Impact will oftentimes display messages on the topof the Dashboard about new exploits or related information. Checking this option will preventthese messages from appearing.
One-step RPTThe One-step RPT Panel of the Options Dialog Box configures the One-step RPTs. Follow thesesteps to set One-step RPT options:
1. Select the Tools -> Options command from the main menu.
2. Click the One-step RPT category and set the options according to the below descriptions.Then click OK.
One-step RPT Settings
page: 317 Core Security, a HelpSystems Company User Guide

Setting Console Options / One-step RPT
Exploit Options
l Try to exploit all possible vulnerabilities for each target host: If this option is not checked,the One-Step RPT will stop testing a designated target as soon as an exploit is successful.
l Do not use exploits that might shut down a service: Check this option to prevent the One-Step RPT from running any exploits that could potentially either stop or restart the serviceor application being targeted.
l Use exploits that take a long time to run: If this option is not checked, the One-Step RPTwill only run exploits that will take less than 10 minutes to complete.
Module Connection Settings
l Connection method: When the One-step RPT successfully exploits a target computer, anagent is deployed on that target. An agent is a temporary piece of code that runs in thetarget computers RAM and communicates back to Core Impact. The Connection Methodsetting determines how the deployed agent and Core Impact connect to one another:
l Default: Core Impact will try to use each exploit's default connection method.
l Connect To: Core Impact will initiate a connection to the agent on the target system.The target system will listen on the port specified below. You might select this
method if there are network or firewall restrictions on traffic sent to the CoreImpact machine.
l Connect From: Core Impact will wait for a connection from the target system'sagent. The Core Impact host will listen on the port specified below. You might selectthis method if there are network or firewall restrictions on traffic sent to themachines to be tested.
User Guide Core Security, a HelpSystems Company page: 318
Setting Console Options / User Actions
l HTTP Channel: Core Impact will act as a web server and accept incomingconnections from the target system to TCP port 80. This method only applies forClient-side Vulnerabilities tests. If this method is selected and a you run a NetworkVulnerabilities test, the Default Connection Method will be used.
l HTTPs Channel: Core Impact will act as a web server and accept incomingconnections using SSL from the target system to TCP port 443. This method onlyapplies for Client-side Vulnerabilities tests. If this method is selected and a you runa Network Vulnerabilities test, the Default Connection Method will be used.
l Use random port (in the range 1024 - 65535): Check this option to allow Core Impact torandomly select a port for it or target systems to listen on (depends on the ConnectionMethod selected).
l Custom port: Check this option (and enter a port number) to manually define the port onwhich Core Impact or target systems will listen on (depends on the Connection Methodselected).
NOTE:
Regardless of the connection method you choose, it will be important for youto ensure that your Core Impact machine and the target machine(s) cancommunicate to one another using the designated ports. If you elect to use arandom port, then make sure all ports in the high range are open. If the highrange of ports are limited or restricted, then set a custom port number andensure that Core Impact machine and the target system(s) can communicateon that port.
Outgoing E-mail Information (for Client-side Vulnerability Test)
l From: The address you enter here will appear as the From: address in the email Client-side Vulnerability test.
l E-mail template: Use a template that contains the body of your email. Click the ellipsis
button to browse for and select a template file. You will see several sample templatefiles included in your Core Impact installation. These are located in the\data\templates directory of your Core Impact installation.
l Subject: The text entered here will appear as the Subject of the e-mail.
Outgoing SMTP Server (for Client-side Vulnerability Test)
l Address and Port: In order for Core Impact to send email (in either a Client-side test or tosend post-test reports), you must provide the address and port of an active SMTP server.
User ActionsUser Actions are custom commands that can apply to entities (hosts, email addresses, webpages). When you right-click on an entity, the User Actions appear in the list of availablecommands.
User Actions Settings
page: 319 Core Security, a HelpSystems Company User Guide

Setting Console Options / User Actions
To create a User Action, perform these steps:
1. Access the User Actions Options (Tools -> Options).
2. Click the New button.
3. Enter a Name for the new user action (e.g. Ping). This is the name that will appear in theright-click menu.
4. Select the Entity type to which the action should apply (e.g. host). Your new action willonly appear when you right-click on an entity of the type selected here.
5. Enter a Program that will be used to execute your action. For the Ping example, one wouldenter the path to the ping executable (ping.exe). The Program field can includeenvironment variables such as %ProgramFiles%, %ProgramData%, etc and Entitycharacteristics such as host [ip], email [address] and web page [url].
6. Optionally, enter any Parameters to pass along to the Program. The Parameters field caninclude environment variables such as %ProgramFiles%, %ProgramData%, etc and Entitycharacteristics such as host [ip], email [address] and web page [url].
7. Click the OK button.
Your new User Action will appear when you right-click on an entity that matches the type youselected in step 4. For example, if you created a User Action for Hosts, navigate to the Networkentity view, click on the Hosts folder, then right-click on a host. Navigate to the User Actionsoption - this should reveal the available User Actions that can apply to Hosts, including your newaction.
User Action Example
User Guide Core Security, a HelpSystems Company page: 320

Setting Console Options / Search Engines
Search EnginesClient-side Information Gathering supports the use of API-based searches for some searchengines (Bing and Yahoo!). If your company has an API ID for a search engine, you can enter itin the Options form. When Core Impact's Client-side Information Gathering uses that searchengine, the engine will know that the searches are not from a robot and will not put forth anycaptcha challenges or otherwise restrict the search.
On the Search Engines Options form, select the Search Engine from the drop-down menu, thenenter the API ID for that search engine. Then click the OK button.
Search Engines Settings
page: 321 Core Security, a HelpSystems Company User Guide

Setting Console Options / Community Usage
Community UsageThe Community Usage Panel of the Options Dialog Box determines what information CoreImpact will gather and provide anonymously to Core Labs for statistical analysis of theapplications use. Follow these steps to set Community Usage options:
1. Select the Tools > Options command from the main menu.
2. Click the Community Usage category and select which types (if any) of data you are willingto provide. Then click OK. All data will be gathered and transmitted automatically and allinformation will be kept anonymous.
Community Usage Settings
To gather and send your usage statistics, see Usage Statistics.
Core CloudCypherThe Core CloudCypher Panel of the Options Dialog Box determines whether Core Impact willautomatically submit encrypted credentials (hashes) to its on-line password cracking service.
If while Installing Core Impact you opted to Never Automatically Send Credentials, the CoreCloudCypher options panel will not be visible.
Follow these steps to set Core CloudCypher options:
User Guide Core Security, a HelpSystems Company page: 322

Setting Console Options / Other
1. Select the Tools > Options command from the main menu.
2. Click the Core CloudCypher category and set the Automatically Submit Credentialsoption to Yes or No, depending on your preference. You can also enter an email addressto be notified when credentials have finished being processed.
3. Then click OK.
Core CloudCypher Options
OtherThe Other category of options includes configurations for additional Core Impact features:
l The Update Notifier is a utility that will run in the background to check for availablemodule updates even when Core Impact is not running. If updates are identified, theNotifier will appear in the system tray. If the Enable Update Notifiersetting is checked,then the Update Notifier will check for updates as frequently as is specified in theMinutes between checks field.
If the Enable Update Notifier setting is unchecked, then it will not run at all.
l Wireshark is a software utility that is required if you plan to use the Wireless AirPcap
Traffic Sniffer. Simply click the ellipsis button and navigate to the path of yourWireshark executable.
Other Settings
page: 323 Core Security, a HelpSystems Company User Guide

Setting Console Options / Other
User Guide Core Security, a HelpSystems Company page: 324

page: 325 Core Security, a HelpSystems Company User Guide

Customizing Toolbars and KeyboardShortcuts
Keyboard shortcuts and Console toolbars can be customized using the Customize dialog box. Toopen this dialog box, select the Tools -> Customize command from the main menu.
Customize Dialog Box
Customizing ToolbarsYou can activate or deactivate toolbars, create new toolbars or remove existing toolbars usingthe Toolbars Panel of the Customize dialog box. Active toolbars will automatically appear at thetop of the Console.
To add or remove commands from a toolbar, click on the Commands tab of the Customize dialogbox. Use drag-and-drop to add or remove specific commands from an existing toolbar.
Adding commands to a toolbar
User Guide Core Security, a HelpSystems Company page: 326

Customizing Toolbars and Keyboard Shortcuts /
Customizing Keyboard ShortcutsYou can navigate through Core Impact using your keyboard and you can assign customkeystrokes to many of Core Impact's basic navigational features using the Keyboard tab of theCustomize dialog box.
Customizing keyboard shortcuts
There are several default keystrokes already set up when you install Core Impact:
page: 327 Core Security, a HelpSystems Company User Guide
Customizing Toolbars and Keyboard Shortcuts /
l Create new workspace = Ctrl + W
l Open workspace = Ctrl + K
l View entity properties = Ctrl + Shift + P
l View executed modules = Ctrl + Shift + X
l View modules = Ctrl + Shift + M
l View quick information = Ctrl + Shift + Q
l View module log = Ctrl + Shift + L
l View module parameters = Ctrl + Shift + A
l View module output = Ctrl + Shift + O
l Open options = Ctrl + E
l Search modules = F5
To use the Keyboard tab and customize your keystrokes, use the following sections of theproperties box:
Category
Commands are grouped into categories (such as Edit or View) which correspond with the MainMenu and the Toolbar.
Commands
The actions you can perform using the keyboard command.
Key assignments
Used to assign new keyboard shortcuts or remove existing ones. Commands can have multiplekeyboard shortcuts.
Press new shortcut key
Changes the keyboard shortcut for any command.
User Guide Core Security, a HelpSystems Company page: 328

page: 329 Core Security, a HelpSystems Company User Guide

CVE and Core ImpactThe Common Vulnerabilities and Exposures (CVE) is a reference of standardized names forvulnerabilities and other Information Security exposures. The goal of CVE is to standardize thenames for all publicly-known vulnerabilities and security exposures.
About CVE Compatibility. A "CVE-compatible" tool (Web site, database, or service) is one thatuses CVE names in such a way that it can cross-link with other repositories that also use CVEnames.
Within Core Impact , CVE names are used to uniquely identify the vulnerabilities exploited byeach attack module. When the Quick Information Panel displays information about the currentlyselected attack, it includes an overview of the Properties and several sections includingVulnerabilities, Description, Supported Systems, etc.
Quick Information Panel
The CVE name on the Vulnerabilities tab is also a link which takes you to the CVE web site forindustry-derived information on the vulnerability.
Quick Information Panel
You can also search for attack modules by CVE name. To find all attacks related to a specificCVE name, select the CVE search criteria in the Search box in the Modules Panel and enter thedesired name in the text box.
Modules Panel - Searching by CVE Name
User Guide Core Security, a HelpSystems Company page: 330

CVE and Core Impact /
See Searching for Modules for more information on how to search for modules using theSearch box on the Modules Panel.
For more information regarding CVE, refer to the official CVE web site at http://cve.mitre.org.
page: 331 Core Security, a HelpSystems Company User Guide

Core Impact Underlying TechnologyAgent Technology
Agents are a critical component of Core Impact's architecture because they provide thefunctionality to execute code in the form of modules, either locally or on other agents. Thefollowing sections describe the key underlying technology employed by Core Impact agents.
The ProxyCall InterfaceEvery module execution in Core Impact is associated with a source agent, the default agent thatthe module uses to interact with the operating system (OS). The interaction between the agentand the OS is achieved using the ProxyCall Interface, a common interface for all platforms. TheProxyCall Interface abstracts the operating system's user-mode services using syscalls for UNIXand Win32 API functions for Windows. This common interface makes Core Impact's modulesavailable in all platforms where a ProxyCall implementation exists. A ProxyCall implementationprovides the module with one function call for each available syscall in the underlying OS and amechanism to call arbitrary syscalls if needed.
For example, the gethostname()syscall is part of this common interface. In a UNIX ProxyCallimplementation the gethostname() call is translated in its corresponding syscall into the OS'skernel. In a Windows implementation it is translated into a call to the gethostname()functionwithin the wsock32.dll dynamic library.
There are two main branches in the ProxyCall hierarchy:
l UnixProxyCall and ProxyCallv2 for Unix, provide services for marshalling calls toany system call supported by the underlying UNIX-like OS. These calls are sent directlyinto the system kernel.
l WindowsProxyCall and ProxyCallv2 for Windows, provide services for marshallingcalls to any DLL entry-point function by first dynamically loading the library into theprocess space of the agent using the LoadLibrary call, then obtaining the offset of thedesired function in the loaded library using the GetProcAddress call, and lastly jumpinginto it.
PythonCore Impact 's Console uses a Python Virtual Machine (see http://www.python.org/) to runmodules. The only significant difference between the typical Python VM distribution and theone distributed with Core Impact is that Core Impact 's VM uses the ProxyCall Interface toimplement all of Python's system services.
This means that:
l Python's file object uses the ProxyCall Interface for all its functions.
l Python's socket object uses the ProxyCall Interface for all its services.
l Basic OS services implemented in the sys and os modules use the ProxyCall Interface.
User Guide Core Security, a HelpSystems Company page: 332

Core Impact Underlying Technology / Agent Technology
A Python script that is typically used to open a socket will open a ProxyCall socket when runinside Core Impact . (This is why Core Impact modules do not look significantly different fromtypical Python code.)
SysCall ProxyingIf a ProxyCall implementation forwards the call to a remote server instead of directly callingthe underlying OS syscall, remote execution will be simulated. Whenever a module is run by aremote source agent, all the module's calls into the ProxyCall interface are forwarded to aremote ProxyCall server. This is known as SysCall Proxying.
The following example describes how SysCall Proxying works:
1. A module is executed using a remote agent deployed in host victim.
2. The module calls the gethostname() from the agent's ProxyCall interface.
3. The function marshals its arguments into a structure that is specific to the remotesystem's OS and generates a remote call into the ProxyCall server running in thevictim host.
4. The server in victim calls the real gethostname() function in victim's operating system,marshals the result, and sends it back to the client.
5. The client ProxyCall implementation returns the results to the module.
6. The module prints the gethostname() results to the console as if it was running invictim.
Inside Core Impact's architecture ProxyCall servers are implemented as target-dependentassembly code. Optimized for size, these tiny SysCall servers are the basic component ofagents.
Using a SysCall server as payload for an exploit also makes the task of customizing a shellcodeunnecessary. Once the remote agent is up and running, further syscalls can be executed in theremote system.
The following example describes how this works:
1. An attack module that exploits a vulnerability in a ftp daemon succeeds and installs anagent.
2. You connect to the newly deployed agent and realize that you are inside a chroot jail.
3. You select the new agent as source and run a setuid module and a chroot breaker module.
4. The agent is freed from the chroot jail.
The successful completion of the process described above would typically require the exploitdeveloper to change the exploit's shellcode to accommodate the change made in step 3. Itwould also depend on the user successfully exploiting the vulnerability again, which might notbe possible.
For a comprehensive explanation of Syscall Proxying, refer to "Syscall Proxying - SimulatingRemote Execution" by Maximiliano Caceres.
page: 333 Core Security, a HelpSystems Company User Guide

Core Impact Underlying Technology / Agent Technology
About AgentsCore Impact agents can multi-task (run multiple modules) and have a Secure CommunicationChannel. Once deployed, they can provide all system calls and arbitrary code execution onplatforms with built-in stack protection. Local agents use Python Virtual Machine and localSyscall implementation embedded in the console connected to the database.
The following table lists the platforms that agents support.
Agent-supported Platforms
User Guide Core Security, a HelpSystems Company page: 334

Core Impact Underlying Technology / Agent Technology
Platform
Ubuntu Linux 5-14 (x86 / x86-64)RedHat Linux 6, 7, 8, 9 (x86)Red Hat Enterprise Linux AS 3, ES 3, WS 3, AS 4, ES 4, WS 4, AS 5, ES 5,WS 5, AS 5.1, ES 5.1, WS 5.1 (x86)Mandrake Linux 7.1, 7.2, 8, 8.1, 8.2, 9, 9.2, 10 (x86)Mandriva Linux 2006, 2007, 2008.1 (x86)Linux Fedora Core 2 - 10 (x86)Linux Fedora 7 - 8 (x86)SuSE Linux 7-9.3 (x86)OpenSUSE 10.1-2 (x86)SUSE Linux Enterprise 10 - 11 (x86)OpenBSD 3.5 - 3.9, 4.0 - 4.9 (x86)Windows 10 (x86 / x86-64)Windows 8.1 (x86 / x86-64)Windows 8 (x86 / x86-64)Windows 7 (x86 / x86-64)Windows 2012 R2 (x86-64)Windows 2012 (x86 / x86-64)Windows 2008 (x86 / x86-64)Windows 2000 (x86)Windows XP (x86 / x86-64)Windows 2003 (x86)Windows Vista (x86 / x86-64)Mac OS X 10.9.x (Mavericks) (x86-64)Mac OS X 10.10.x (Yosemite) (x86-64)Mac OS X 10.11.x (El Capitan) (x86-64)Mac OS X 10.6.x – 10.8.x (x86-64)Mac OS X 10.4.6 - 10.4.11 (x86)Mac OS X 10.5.0 - 10.5.2 (x86)FreeBSD 5.5 - 7(i386)Cisco 2611XMCisco 2811Cisco 2911Cisco 3640Cisco 3725
The following table compares the functionality and attributes of the different deployment typesof Core Impact agents. Because the communication channels available to agents are dependenton privilege level, the table includes both agents and agents running "as root". Note that someagent functionality listed below (such as sniffing and IP spoofing) is dependent on the presenceof optional product plug-ins.
Agent Functionality and Attribute Comparison
page: 335 Core Security, a HelpSystems Company User Guide

Core Impact Underlying Technology / Agent Auto Injection
CategoryMulti-task?
Crypto?SendICMP?
Sniff?SpoofIP?
PersistentRealShell
Agent yes yes no no no no yesAgent as root / Administrator yes yes yes no no yes yesAgent + PCAP as root /Administrator
yes yes yes yes yes yes yes
Local Agent yes N/A yes yes yes N/A (yes) no
Agent Auto InjectionIn certain situations, the process in which the agent is currently executing has a limited lifetime.For instance, when exploiting client side vulnerabilities in Internet Explorer (IE), it is fairlycommon for IE to stop responding. This situation typically causes the user to re-start IE, therebykilling the deployed agent. Similarly, if the user finishes using the application that was exploitedhe or she might close it, once again killing the deployed agent.
To accommodate these cases, Core Impact includes functionality to allow the agent to escape toan alternate process in the exploited host after successful exploitation. This functionality isknown as agent auto injection.
Technical DetailsAgent auto injection is implemented within the exploitlib library in the agentEscape()method. This method runs right after a client-side exploit has added the agent to the database.The agentEscape() method:
1. Enumerates running processes on the compromised host.
2. Searches for the PIDs of explorer.exe by default.
3. Injects a new agent into the process found in the previous step. This new agent connectsdirectly to the source agent (i.e., it doesn't chain with the existing agent) using the sameconnection method used by the original agent ("HTTP Tunnel" in client-side exploits).
4. Disconnects and terminates the original agent once a connection with the second agent isestablished.
As mentioned in step 2, the agent will search for explorer.exe by default. This is specifiedwithin the exploit.py file located in%ProgramData%\IMPACT\components\modules\exploits\site-packages\impact\exploitlib, and can be edited to include any other preferreddestination processes.
The list is defined within the escapeToProcess attribute in the Exploit.__init__() method asfollows:
self.escapeToProcesses = [ 'explorer.exe', 'svchost.exe',iexplore.exe' ]
User Guide Core Security, a HelpSystems Company page: 336

Core Impact Underlying Technology / Communication Channels
If you escape to a system process, the agent will not be able to determine the local user's proxysettings (if needed).
Communication ChannelsCore Impact's agents communicate using communication channels. Channels provide reliablecommunication between two agents and, in some cases, data transformations such as encryption.
Different channel implementations are available depending on the network scenario. You mustdecide which channel to use for communication with an agent before you deploy the agent. Thisdecision is typically made when you set parameters for an attack module (a module that willeventually deploy an agent) or when you set parameters for the deployment of an agent. Inaddition to selecting the channel, you must also set channel-specific parameters.
A special channel called Crypto is available that provides data encryption and sessionauthentication (see Crypto Channel). This channel is usually layered on top of another transportchannel that provides the actual communication.
Allowing for broad testing capabilities, Core Impact will function across IPv6 backbonenetworks. In the case of dual-stack systems, Core Impact will automatically use only the IPv4stack for security testing. All Internet services from Core Security to Core Impact, such asproduct activation and updates, will remain IPv4 based.
TCP ChannelThe TCP Channel provides communication using the underlying OS TCP sockets. You can set upa TCP Channel from the source agent to the target, or from the target to the source agent. Thelatter option is useful for scenarios where packet filtering disallows inbound connections andonly allows outbound connections. Depending on the vulnerable application, it is sometimespossible to reuse an existing TCP connection as an agent communication channel. In attackmodules, this behavior is typically configured with the Agent Connection/CONNECTIONMETHOD parameter.
HTTP/s Connect ChannelThis feature is now used by default by every client-side exploit when using the "Connect from"agent connection method. It can be overridden on a per-exploit basis if an alternate method ispreferred. The HTTP/s Connect Channel enhances the regular TCP channel (using "ConnectFrom") by allowing agents in Windows hosts to use the CONNECT method from the HTTP 1.1protocol to connect back to the current source agent (usually the console) through a proxy.
A typical use scenario for this feature would be an external penetration test where the testedworkstations can only browse the Internet through a proxy.
Technical DetailsProxies that support the CONNECT command allow for tunneling any arbitrary TCP connectionthrough the original HTTP connection.
To start communication, the agent sends the following command to the proxy:
page: 337 Core Security, a HelpSystems Company User Guide

Core Impact Underlying Technology / Communication Channels
CONNECT host:port HTTP/1.0
The proxy then connects to the indicated host and port and, if the connection is established,responds with the following:
HTTP/1.0 200 Connection established
After receiving this response, the agent can use the same open socket as if it were directlyconnected with the host. The proxy will then transparently forward all data in both directions.
ConfigurationThe agent code auto-detects proxy settings by reading Internet Explorer's (IE's) configuration forthe active user. Settings include the proxy's address, listening port, and if necessaryauthentication information (username and password).
If the connection fails, the agent defaults to the Connect From connection method and attemptsto connect back directly to the current source agent.
Known Issues and Limitationsl Agents connecting back using a proxy will appear in the Entity View within a host with the
proxy's IP address (instead of the actual host's address).
l Most proxies only allow tunneling port 443 (HTTPS). If Agent Connection/PORT isnot 443, the proxy will probably deny the connection. Because of the single connectionlimitation mentioned above, client-side exploits have a default AgentConnection/PORT of 0, which indicates a random port within the valid range (usually40001 to 60000, but depends on NAT preferences).
l The current payload for this connection method only supports reading IE's configurationfrom the registry. If the user is not using IE or if IE is not configured correctly, theconnection method will fail and default to Connect From.
l Proxies usually keep activity logs which include activity related to the CONNECTcommand. It is reasonable to assume that the source agent's address will be recorded inthis log.
Notes for Exploit DevelopersTo force the activation of this connection method, set the egg's "WebProxyTunnel" parameter to"yes." Set the same parameter to "no" to force deactivation. Additionally, it is possible to hard-code the proxy configuration within the exploit, reducing the payload's final size by excluding theauto detection code. To hard-code the proxy's address and port set the "proxy_ip" and "proxy_port" parameters to the desired values.
For example, to force this connection method in an exploit hard coding the proxy address to192.168.1.1 port 80 you can use the following code:
self.egg['WebProxyTunnel'] = 'yes'self.egg['proxy_ip'] = '192.168.1.1'self.egg['proxy_port'] = 80
User Guide Core Security, a HelpSystems Company page: 338

Core Impact Underlying Technology / Communication Channels
The implementation for this connection method can be found in the WebProxyTunnelEgg.py filelocated in the %ProgramData%\IMPACT\components\modules\classic\site-packages\impact\LibEgg folder.
HTTP Tunnel ChannelThe HTTP Tunnel Channel provides communication using the HTTP protocol. Core Impactagents can use this communication channel to connect through an HTTP proxy verifying thepresence of a valid HTTP communication.
A typical use scenario for this channel would be an external penetration test where the testedworkstations can only browse the Internet through a protocol validating proxy.
Technical DetailsSimilar to agents using the HTTP Connect channel (see HTTP Connect Channel), these agentswill automatically get connection settings from Internet Explorer.
Agents use GET requests to read data from the console and send data back using POSTrequests. These requests use "application/x-www-form-urlencoded" as their MIME Content-Type. In order for communication through a proxy to succeed, the proxy has to allow GET,POST, and the "application/x-www-form-urlencoded" Content-Type.
If the proxy is filtering "application/x-www-form-urlencoded" content, the agent will not be ableto communicate back to the console. This situation should be rare, as this content type is usedby regular web forms.
Exploits implementing this method use a helper module called "HTTP Tunnel". This moduletranslates between HTTP and the agent protocol in a manner that's transparent to the user.
HTTP Tunnel components
Agents using this method will first connect with their configured HTTP proxy (using IE's proxysettings) and then request an HTTP URL from the HTTP Tunnel. Upon receiving the request,the HTTP Tunnel will translate the HTTP request to the ProxyCall interface and send it to theCore Impact Console.
Crypto ChannelThe Crypto Channel provides data encryption and session authentication. Key agreement forcommunication is performed using RSA and encryption is performed using 256-bit AES.
Each Core Impact workspace has a public-secret-key pair which is used for key agreement inCrypto Channels. Each agent packaged with Crypto will have a copy of the workspace's public-key which will be used to authenticate the Console. This means that only the Console containingthe workspace that created the agent will be able to connect to it.
page: 339 Core Security, a HelpSystems Company User Guide

Core Impact Underlying Technology / Communication Channels
DNS ChannelThe addition of the new DNS Channel payload into Core Impact increases the success rate ofclient-side exploit attempts by using the DNS protocol. DNS provides a number of advantagesover other protocols as a communications channel. Most remote exploitation attempts via client-side vulnerabilities aim to attack workstations. Workstations are almost always pre-configured touse an internal DNS server, and this internal DNS server is almost always configured to relayDNS requests for external domains out to the Internet. This means that most internal networksare vulnerable to DNS channeling attacks. Core Impact now leverages this common securitydesign flaw to tunnel the Core Impact agent communications out of the target network and backto the Core Impact host.
DNS also does not require authentication and typically does not need to bypass security controlssuch as web content filters, whereas HTTP channels often do. Reverse TCP payloads also rely onoutbound firewall rules to be mis-configured, and combined with the probability of guessing theopen outbound port, the likelihood of the success rate for this payload is reduced dramatically.The new DNS Channel payload is able to bypass all of these security controls in order to escapethe internal network. This is an important advance within Core Impact since it means that thechance of successful exploitation is much higher when using the DNS Channel payload, leading tomore reliable exploitation. The DNS Channel payload is also smaller than other payloads withinCore Impact, allowing it to fit within more exploits without necessarily having to rely on slowermore complex techniques such as egg hunters.
Once the agent is installed on the target system, all of the communications back to Core Impactare performed over DNS. All of the features available within the Core Impact agent are madeavailable via the DNS protocol, including an interactive shell, taking screenshots of the victimmachine, and installing the pcap plugin to sniff and download network traffic.
There are ways to protect against this type of attack, such as implementing a Split DNSArchitecture that will allow organizations to prevent DNS requests from exiting their internalnetwork. This would prevent the DNS probes from leaving the organization and reaching theCore Impact host. Most organizations do not currently use Split DNS (except for larger, moresecurity-aware organizations) and, therefore, this attack has an extremely high success rate.Network IDS systems could also potentially be configured to detect trends of multiple large DNSrequests to a single domain.
User Guide Core Security, a HelpSystems Company page: 340

page: 341 Core Security, a HelpSystems Company User Guide

Contact Core SecuritySales Support
For all Sales inquiries, including purchasing new licenses or license extensions:
Phone: (678) 304-4500
Product SupportProduct support for active customers is provided Monday - Friday, 7AM - 7PM US EasternTime.
Phone: (678) 304-4485
Customer PortalTo access the Customer Portal, go to http://www.coresecurity.com, navigate to Support, thenclick Customer Portal.
1000 Holcomb Woods Parkway, Suite 401Roswell, GA30076USA
User Guide Core Security, a HelpSystems Company page: 342