Upgrading COM+ Components - Microsoft
18
347 Upgrading COM+ Components COM+ services and Microsoft Transaction Server components are the backbone of most major Microsoft Visual Basic business applications. This chapter starts with an introduction to implementing COM+ services in Microsoft .NET and then moves on to describe how to upgrade basic COM+ components. Although the emphasis is on transactional objects and object construction, the informa- tion here applies to the upgrading of all kinds of COM+ components. From this chapter you should take away a basic understanding of how COM+ compo- nents are implemented in Visual Basic .NET, and you should have an idea of the effort required to upgrade your existing components. Note This chapter is definitely not for someone who is not familiar with COM+. It makes no attempt to introduce the concepts behind the code. For that, a wealth of resources is available through Microsoft Press publications and the MSDN documentation, both online and included with Visual Basic .NET. COM+ Application Types To frame the discussion, let’s start by taking a look at COM+ applications. According to the Microsoft Developer Network (MSDN), there are three basic types of user-creatable COM+ applications. Each has particular features, C1661587x.fm Page 347 Friday, November 16, 2001 8:30 AM
-
Upload
khangminh22 -
Category
Documents
-
view
0 -
download
0
Transcript of Upgrading COM+ Components - Microsoft

347
Upgrading COM+ Components
COM+ services and Microsoft Transaction Server components are the backboneof most major Microsoft Visual Basic business applications. This chapter startswith an introduction to implementing COM+ services in Microsoft .NET andthen moves on to describe how to upgrade basic COM+ components. Althoughthe emphasis is on transactional objects and object construction, the informa-tion here applies to the upgrading of all kinds of COM+ components. From thischapter you should take away a basic understanding of how COM+ compo-nents are implemented in Visual Basic .NET, and you should have an idea of theeffort required to upgrade your existing components.
Note This chapter is definitely not for someone who is not familiarwith COM+. It makes no attempt to introduce the concepts behind thecode. For that, a wealth of resources is available through MicrosoftPress publications and the MSDN documentation, both online andincluded with Visual Basic .NET.
COM+ Application TypesTo frame the discussion, let’s start by taking a look at COM+ applications.According to the Microsoft Developer Network (MSDN), there are three basictypes of user-creatable COM+ applications. Each has particular features,
C1661587x.fm Page 347 Friday, November 16, 2001 8:30 AM

348 Part III Getting Your Project Working
advantages, and restrictions that make it appropriate for specific applicationarchitectures. The three types are as follows:
� Server application A COM+ application that runs in its own pro-
cess. Server applications can support all COM+ services.
� Library application A COM+ application that runs in the processof the client that creates it. More specifically, the components in alibrary application are always loaded into the process of the creator.Library applications can use role-based security but do not supportremote access or queued components.
� Application proxy A set of files containing registration informa-tion that allows a client to remotely access a server application.When run on a client computer, an application proxy file writesinformation about the COM+ server application—including itsCLSID, ProgID, RemoteServerName, and marshaling information—tothe client computer. The server application can then be accessedremotely from the client computer.
Note Server applications differ from library applications in how theyare instantiated. A library application’s components are created in thesame process as the calling application. A server application’s compo-nents are created out of process. When you attempt to instantiate anobject remotely, it is not possible to create that component in the caller’sprocess; therefore, only server applications are capable of instantiationby remote applications, due to their out-of-process nature.
The vast majority of COM+ applications fall into the first two categories,and those will be the focus of the development content in this chapter. Thethird, application proxy, is a specialization of the server application and can betreated as a logical extension of the discussion contained here.
Using COM+ in Visual Basic .NETBefore getting into the how-to of upgrading, it’s important to take a step backand investigate how COM+ services are implemented in .NET. For those of youwho are curious as to what has happened to COM+ in .NET, fear not. COM+ is stillthe same sprightly beast that it was before you installed Visual Studio .NET. The
C1661587x.fm Page 348 Friday, November 16, 2001 8:30 AM

Chapter 16 Upgrading COM+ Components 349
.NET Framework exposes all of the existing COM+ services to Visual Basic .NETapplications. Table 16-1 lists the COM+ services available to .NET developers.
Despite implementation differences, underneath the .NET Framework thestalwart heart of COM+ still beats. The .NET Framework COM+ services are built ontop of COM+, rather than being a substitute for it. These are the same services thatyou are already familiar with; they are just implemented differently.
The fact that COM+ is a set of native application services (it does not runon the common language runtime with Visual Basic .NET) raises interestingquestions: Is this COM interop, and is there a performance penalty? The shortand simple answer is no. COM+ services are able to call directly into the run-time environment and vice versa without COM interop wrappers or variable
Table 16-1 COM+ Services Supported in Visual Basic .NET
Service Description
Automatic transaction processing Applies declarative transaction process-ing features.
BYOT (bring your own transaction) Allows a form of transaction inheritance.
COM Transaction Integrator (COMTI)
Encapsulates Customer Information Con-trol System (CICS) and Internet Mail Ser-vice (IMS) applications in Automation objects.
Compensating Resource Manager Applies atomicity and durability proper-ties to nontransactional resources.
Just-in-time activation Activates an object on a method call and deactivates it when the call returns.
Loosely coupled events Manages object-based events.
Object construction Passes a persistent string value to a class instance on construction of the instance.
Object pooling Provides a pool of ready-made objects.
Private components Protects components from out-of-process calls.
Queued components Provides asynchronous message queuing.
Role-based security Applies security permission based on role.
SOAP services Publishes components as XML Web services.
Synchronization Manages concurrency.
XA interoperability Supports the X/Open transaction process-ing model.
C1661587x.fm Page 349 Friday, November 16, 2001 8:30 AM

350 Part III Getting Your Project Working
marshaling overhead. The technical details as to why are too involved to gointo here (this is not to say that the authors don’t need to be reminded of themperiodically), but rest assured—you will not pay a performance penalty forchoosing to use COM+ services through the .NET Framework instead ofthrough Visual Basic 6. In fact, thanks to the new power of Visual Basic .NET,more COM+ services are available to you than ever before, and you have moreleverage to use them. In addition, Visual Basic .NET makes implementingCOM+ applications far easier than in Visual Basic 6 and gives the developer asignificant amount of control over component deployment issues.
Note At this point, you might be wondering why COM interop doesn’tcome into play with COM+. Isn’t COM+ the same as COM? Yes andno. COM+ was designed as an application infrastructure for develop-ing COM components for the enterprise. While there is a high level ofintegration between the two technologies, COM+ is not really COM.This difference enables COM+ to call directly into the runtime (andvice versa) without the overhead and marshaling associated with aCOM interop method call.
What about the differences between COM+ in Visual Basic 6 and COM+ in.NET? While they do exist, COM+ is COM+ no matter how you look at it. On theother hand, an ActiveX DLL is by no means a managed assembly (a Visual Basic.NET DLL), and this has specific benefits (see the discussion of attributes later inthis chapter). Visual Basic .NET is designed to provide more integrated supportfor COM+, above and beyond that found in Visual Basic 6. To help illustrate thedifferences, let’s take a look at how COM+ applications are built in Visual Basic.NET.
COM+ Requirements in Visual Basic .NETBy now you should be familiar with the namespace structure, if not the content,of the .NET Framework. Support for COM+ services is implemented in the Sys-tem.EnterpriseServices namespace. Any component wishing to take advantageof COM+ (aside from adding a reference to the System.EnterpriseServices.dllassembly) must meet all of the following requirements:
� It must inherit from the ServicedComponent class or from anotherclass derived from ServicedComponent.
� It must apply attributes specifying the COM+ services supported bythe class.
C1661587x.fm Page 350 Friday, November 16, 2001 8:30 AM

Chapter 16 Upgrading COM+ Components 351
� The assembly containing the COM+ component must have a strongname.
The sections that follow discuss each of these requirements.
Inheriting from the ServicedComponent ClassWe have mentioned that there are differences between the implementation ofCOM+ in Visual Basic 6 and its implementation in Visual Basic .NET. One ofthese differences is that in Visual Basic 6 any class can implement a COM+ ser-vice by implementing specific interfaces from the COM+ services type library.The downside to this approach is that you have to implement a great deal ofboilerplate code yourself. In .NET, the situation is quite different. All compo-nents that want to leverage COM+ services need to inherit their objects from theServicedComponent class. This class provides a framework for your customcomponent that enables context sharing between COM+ and .NET Frameworkclasses. In addition, it provides a host of features that enable self-registrationand support for new .NET features like remoting and XML Web services.
This change means that your COM+ classes take on the following struc-ture. (Note that this is by no means a complete implementation.)
Imports System.EnterpriseServices
‘ A trivial COM+ ClassPublic Class COMPlusClass Inherits ServicedComponent ‘ Required to support COM+
Public Sub New() MyBase.New() End SubEnd Class
Instead of implementing external interfaces to handle events such asConstruct, Activate, and Deactivate, you use member functions of the Serviced-Component class. To implement specific features that you need, you overridethe base class functionality. This makes your class look like the following:
Imports System.EnterpriseServices
‘ A trivial COM+ ClassPublic Class COMPlusClass Inherits ServicedComponent ‘ Required to support COM+
Public Sub New() MyBase.New() End Sub
(continued)
C1661587x.fm Page 351 Friday, November 16, 2001 8:30 AM

352 Part III Getting Your Project Working
Protected Overrides Sub Construct(ByVal ConstructionString _As String)
End Sub
Protected Overrides Sub Activate() End Sub
Protected Overrides Sub Deactivate() End SubEnd Class
Starting to look familiar yet? It’s still not even close to being complete,however. We have created the base framework for our COM+ class, but weneed to provide more information about what we intend it to do and what ser-vices it supports. That is where attributes come into play.
Working with AttributesAttributes are a new feature in Visual Basic .NET. Attributes are specializedclasses that are applied to code elements, allowing you to provide descriptivemetadata about your component. At compile time, attributes are emitted intometadata that is available to the common language runtime or to custom toolsand applications through the System.Reflection namespace. You can explicitlymark objects and methods with attributes that affect their behavior.
You attach an attribute to a component by preceding the component witha reference to the attribute and providing any relevant parameters or flags. Thiscall to the constructor is placed within angle brackets (<>) in Visual Basic.Whenever you create a new application in Visual Basic .NET, a file calledAssemblyInfo.vb is created. This file contains a set of common attributes foryour project. The file typically looks like this:
Imports System.ReflectionImports System.Runtime.InteropServices
‘ General Information about an assembly is controlled through ‘ the following set of attributes. Change these attribute values to ‘ modify the information associated with an assembly.
‘ Review the values of the assembly attributes
<Assembly: AssemblyTitle(““)> <Assembly: AssemblyDescription(““)> <Assembly: AssemblyCompany(““)> <Assembly: AssemblyProduct(““)> <Assembly: AssemblyCopyright(““)>
C1661587x.fm Page 352 Friday, November 16, 2001 8:30 AM

Chapter 16 Upgrading COM+ Components 353
<Assembly: AssemblyTrademark(““)> <Assembly: CLSCompliant(True)>
‘ The following GUID is for the ID of the typelib if this project‘ is exposed to COM
<Assembly: Guid(“17465E40-15E9-4F52-8954-CF931AC54747”)>
‘ Version information for an assembly consists of the following‘ four values:
‘ Major Version‘ Minor Version ‘ Build Number‘ Revision
‘ You can specify all the values or you can default the Build and‘ Revision Numbers by using the ‘*’ as shown below:
<Assembly: AssemblyVersion(“1.0.*”)>
In addition to this standard set of attributes, the System.EnterpriseServicesnamespace defines a host of attributes specific to COM+. These attributes pro-vide a combination of services. Some specify feature support; others specifyyour application’s default COM+ settings. Table 16-2 contains a list of COM+specific attributes.
Table 16-2 COM+ Specific Attributes
Attribute ScopeUnconfigured Default Value
Configured Default Value
ApplicationAccessControl Assembly False True
ApplicationActivation Assembly Library No default
ApplicationID Assembly Generated GUID No default
ApplicationName Assembly Assembly name No default
ApplicationQueuing Assembly No default No default
AutoComplete Method False True
ComponentAccessControl Class False True
COMTIIntrinsics Class False True
ConstructionEnabled Class False True
Description AssemblyClassMethodInterface
No default No default
C1661587x.fm Page 353 Friday, November 16, 2001 8:30 AM

354 Part III Getting Your Project Working
Let’s see how our sample COM+ class looks with some of these importantattributes:
Imports System.EnterpriseServices
<Assembly: ApplicationName(“Sample COMPlus Application”)> <Assembly: ApplicationActivation(ActivationOption.Library)>
‘ A trivial COM+ Class with attributes
EventClass Class No default FireInParallel = FalseAllowInprocSubscribers = TruePublisherFilter = Null
EventTrackingEnabled Class False True
ExceptionClass Class No default No default
InterfaceQueuing ClassInterface
False True
JustInTimeActivation Class False True
LoadBalancingSupported Class False True
MustRunInClientContext Class False True
ObjectPooling Class False True
PrivateComponent Class No default Private
SecureMethod AssemblyClassMethod
No default No default
SecurityRole AssemblyClassInterface
No default No default
Synchronization Class False Synchronization-Option.Required
Transaction Class False Transaction-Option.RequiredTransactionIsolation-Level.SerializableTimeout = infinite
Table 16-2 COM+ Specific Attributes (continued)
Attribute ScopeUnconfigured Default Value
Configured Default Value
C1661587x.fm Page 354 Friday, November 16, 2001 8:30 AM

Chapter 16 Upgrading COM+ Components 355
<Transaction(TransactionOption.Required), _ ConstructionEnabled([default]:=“ This is a test”), _ ObjectPooling()> _
Public Class COMPlusClass
Inherits ServicedComponent ‘ Required to support COM+
Public Sub New() MyBase.New()
End Sub
Protected Overrides Sub Construct(ByVal ConstructionString _As String)
Trace.WriteLine(“Construct() : “"“ & ConstructionString & “""“) End Sub
Protected Overrides Sub Activate() Trace.WriteLine(“Activate()”) End Sub
Protected Overrides Sub Deactivate() Trace.WriteLine(“Activate()”) End Sub
<AutoComplete()> Public Sub DoTasks()
End SubEnd Class
This example demonstrates the use of all three scopes (method, class, andassembly) of attributes and shows how you can specify support for variousCOM+ features. Some of these attributes are fairly obvious and are not too biga leap from Visual Basic 6 (the Transaction attribute, for example). Others high-light the ability of attributes to better control deployment. An example of thelatter is the ConstructionEnabled attribute. This particular attribute allows thedeveloper to specify a default construction string that will be visible (and mod-ifiable) in the Component Services Microsoft Management Console (MMC).
C1661587x.fm Page 355 Friday, November 16, 2001 8:30 AM

356 Part III Getting Your Project Working
While other COM+ attributes provide only default settings for use duringself-registration, the AutoComplete attribute provides a fundamentally new twiston programming with transactions. Marking a method with AutoCompletecauses SetCommit to be called automatically if the method terminates normally.This saves the developer a fair bit of work. If an unexpected error occurs (in theform of an unhandled exception), SetAbort is called automatically. You can stillcall SetAbort on your own based on a logical violation, but it is no longer nec-essary for you to explicitly commit or abort the transaction in every circum-stance. This attribute reduces a great deal of repetition by requiring code onlyfor the extraordinary cases. The following example shows how simple imple-menting transactions now becomes with the AutoComplete attribute:
Imports System.EnterpriseServices<Transaction(TransactionOption.Required)>Public Class Sample COMPlusClass
Inherits ServicedComponent
<AutoComplete()>Public Function DoTransactionTask() As Boolean
‘ Do Your stuff. ‘ Calls set complete automatically if no exception is generated
End FunctionEnd Class
All COM+ settings can be set using attributes on a class or method, insteadof using the property pages found in Visual Basic 6. This approach makes set-tings more explicit and less prone to accidental change.
We’ve only been able to scratch the surface of the topic of attributes here,but hopefully this discussion has given you a decent idea of how to use them.Attributes are used extensively throughout Visual Basic .NET to implement allsorts of functionality—not only COM+ features but also newer features like XMLWeb services.
Creating a Strong Name for Your AssemblyIf you are registering a component as part of a COM+ application, you mustprovide a strong name for the assembly. A strong name consists of an assem-bly’s identity—its simple text name, version number, and culture information (ifprovided)—strengthened by a public key and a digital signature generatedover the assembly. Assemblies with the same strong name are expected to beidentical.
C1661587x.fm Page 356 Friday, November 16, 2001 8:30 AM

Chapter 16 Upgrading COM+ Components 357
Generating Key-Pair FilesTo sign an assembly with a strong name, you must have a public/private keypair. This public and private cryptographic key pair is used during compilationto create a strong-named assembly. You can create a key pair using the StrongName tool (Sn.exe). Key-pair files usually have an .snk extension.
Note The Sn.exe tool is provided with the .NET Framework SDK andVisual Basic .NET, but it is not normally available from the standardcommand-line prompt. To use the tool, on the Programs menu, pointto Microsoft Visual Studio .NET and then to Visual Studio .NET Tools,and choose Visual Studio .NET Command Prompt. This command-line tool has all of the necessary environment variables set to run all ofthe Framework SDK and Visual Studio .NET tools.
To create a key pair, type the following at the command prompt:
sn –k <filename>
In this command, filename is the name of the output file containing the keypair. The following example creates a key pair called COMPlusClass.snk.
sn –k COMPlusClass.snk
Once you create the key pair, you must put the file where Visual Basic canfind it. When signing an assembly with a strong name, Visual Basic looks for thekey file in the directory containing the Visual Studio solution. Put the key file inthe appropriate project directory, and add the following assembly attribute nearthe top of the COMPlusClass.vb file:
<Assembly: AssemblyKeyFile(“COMPlusClass.snk”)>
Note Although we chose to name the key file after the class it wascreated for, the key file itself has nothing specifically to do with the class.The key file is applied at the assembly level to ensure that the applica-tion has a unique signature. That is, after all, why the strong name fea-ture exists. It allows for the definition of unique applications regardlessof any possible naming conflicts. This uniqueness becomes veryimportant when dealing with applications that have machine scope.
C1661587x.fm Page 357 Friday, November 16, 2001 8:30 AM

358 Part III Getting Your Project Working
Registering COM+ ApplicationsNow that you know all of the requirements for COM+ components, it’s time totalk about how to register the components with COM+. There are two ways toregister .NET COM+ applications. The first is easier: dynamic registration. Thismethod requires the least amount of work on your part and will be done foryou as long as you specify the appropriate attributes in your assembly manifest.The second option is manual registration. It requires you to do a little morework but is not substantially more difficult than dynamic registration.
Dynamic RegistrationDynamic registration is a process whereby COM+ components are self-registered.Other than specifying a set of assembly attributes, you need only make sure thatyour COM+ application (whether it is in a separate assembly or not) resides inyour application’s bin directory. Fusion will find the assembly and automaticallyregister the COM+ application, using all of the attributes you have specified.
What Is Fusion?Fusion is the mechanism that enables the common language runtime tohandle run-time assembly binding. It is responsible for finding an appro-priate assembly that contains the objects required by your application.This is the essential tool that enables side-by-side application deploymentand eliminates the need for registering assemblies and type libraries.While fusion is a complex concept, all you really need to know is that itis responsible for binding your application’s assemblies at run time andmakes it possible to eliminate DLL conflicts from Visual Basic .NET.
As an example, we have provided the COMPlusClass project on the com-panion CD. This project contains one form and one COM+ component. Run-ning the project brings up the main form, shown in Figure 16-1.
F16km02
Figure 16-1 COMPlusClass sample application.
C1661587x.fm Page 358 Friday, November 16, 2001 8:30 AM

Chapter 16 Upgrading COM+ Components 359
Clicking the Go button causes the COMPlusClass to be instantiated. When thishappens, the component is automatically registered in COM+. You can see this inthe Component Services MMC, which should look something like Figure 16-2.
F16km01
Figure 16-2 Installed COMPlusClass application in COM+.
It can’t get much easier than that, can it? If you check the properties of theCOM+ application in the MMC, you will see the effects of the attributes youspecified in the application itself. Replacing the application defined in COM+ isas simple as deleting it from the Component Services console and running theapplication again.
Manual RegistrationManually registering an assembly can be done for both library and server appli-cations. You register an application manually by running the RegSvcs.exe utilityon your application’s assembly. Here is the general syntax of this command:
regsvcs [assemblyname]
This utility does the following:
1. Loads the assembly.
2. Registers the assembly.
3. Generates a type library.
4. Registers the type library.
C1661587x.fm Page 359 Friday, November 16, 2001 8:30 AM

360 Part III Getting Your Project Working
5. Installs the type library into the request application.
6. Configures the class.
You can use the RegSvcs.exe utility to customize the registration process andalso as a general maintenance utility that you use to remove COM+ applications.
Upgrading COM+ ComponentsUnfortunately, because a Visual Basic .NET COM+ services application has tobe implemented in quite a different manner than a Visual Basic 6 COM+ ser-vices application, the Upgrade Wizard cannot do much for your Visual Basic 6COM+ components. It upgrades the business logic, database code, and otherparts of your application, but it doesn’t upgrade the transaction attributes. Theimplementation differences are not a one-to-one mapping, so upgrading theparts dealing with COM+ support is best left to the developer. This leaves youwith a fair bit of work to do on your own. To better illustrate what is going onhere, let’s look at a Visual Basic 6 sample called SimpleTransaction, included onthe companion CD. This is an ActiveX DLL project with a single class, Simple-Class, that is marked as RequiresNewTransaction. The SimpleClass.cls codelooks like this:
Implements ObjectControlImplements IObjectConstruct
Dim ctxt As ObjectContextDim connStr As StringConst m_module As String = “SimpleTransaction.SimpleClass"
Private Sub IObjectConstruct_Construct(ByVal pCtorObj As Object) connStr = pCtorObj.ConstructStringEnd Sub
Private Sub ObjectControl_Activate() Set ctxt = GetObjectContext(m_module)End Sub
Private Function ObjectControl_CanBePooled() As Boolean ObjectControl_CanBePooled = TrueEnd Function
Private Sub ObjectControl_Deactivate()End Sub
C1661587x.fm Page 360 Friday, November 16, 2001 8:30 AM

Chapter 16 Upgrading COM+ Components 361
Public Sub DoTasks() On Error GoTo HandleError Dim conn As Connection Set conn = New Connection Dim sqlCmd As String sqlCmd = “This is a sample query" conn.Open connStr conn.Execute sqlCmd ctxt.SetComplete Exit Sub HandleError: ctxt.SetAbortEnd Sub
After running this sample project through the Upgrade Wizard, you havea Visual Basic .NET class that looks like this:
Option Strict OffOption Explicit OnPublic Class SimpleClass Implements COMSVCSLib.ObjectControl Implements COMSVCSLib.IObjectConstruct Dim ctxt As COMSVCSLib.ObjectContext Dim connStr As String Const m_module As String = “SimpleTransaction.SimpleClass” Private Sub IObjectConstruct_Construct(ByVal pCtorObj As Object) _ Implements COMSVCSLib.IObjectConstruct.Construct ‘ UPGRADE_WARNING: Couldn’t resolve default property of object ‘ pCtorObj.ConstructString... connStr = pCtorObj.ConstructString End Sub Private Sub ObjectControl_Activate() Implements _ COMSVCSLib.ObjectControl.Activate ctxt = COMSVCSLibAppServer_definst.GetObjectContext(m_module) End Sub Private Function ObjectControl_CanBePooled() As Boolean _ Implements COMSVCSLib.ObjectControl.CanBePooled ObjectControl_CanBePooled = True End Function
(continued)
C1661587x.fm Page 361 Friday, November 16, 2001 8:30 AM

362 Part III Getting Your Project Working
Private Sub ObjectControl_Deactivate() _ Implements COMSVCSLib.ObjectControl.Deactivate End Sub Public Sub DoTasks() On Error GoTo HandleError Dim conn As ADODB.Connection conn = New ADODB.Connection Dim sqlCmd As String sqlCmd = “This is a sample query” conn.Open(connStr) conn.Execute(sqlCmd) ctxt.SetComplete() Exit Sub HandleError: ctxt.SetAbort() End SubEnd Class
As you can see, the Upgrade Wizard leaves the work of implementing theCOM+ parts of the class to you. While this task is quickly accomplished for thissimple example, you should be aware that bigger applications will take time ifthe classes have a large set of transactional components. You will need to referto the Visual Basic 6 version of each class to ensure that you transfer the correcttransactional attributes to Visual Basic .NET. Otherwise, you may see unex-pected and potentially undesirable behavior.
Using the previous example, let’s walk through the steps necessary to getthe class working:
1. Add a reference to System.EnterpriseServices.
2. Change the class to inherit from EnterpriseServices.ServicedCompo-nent, and remove all COMSVCS Implements statements.
3. Add the necessary COM+ attributes to the class (Transaction, Con-strutionEnabled, ObjectPooling, and so on).
4. Change the COM+ interface methods Activate, Construct, andDeactivate to be member methods that override base methods onServicedComponent.
5. Add the AutoComplete attribute to the DoTasks method. Remove theexplicit commit and abort code.
C1661587x.fm Page 362 Friday, November 16, 2001 8:30 AM
Chapter 16 Upgrading COM+ Components 363
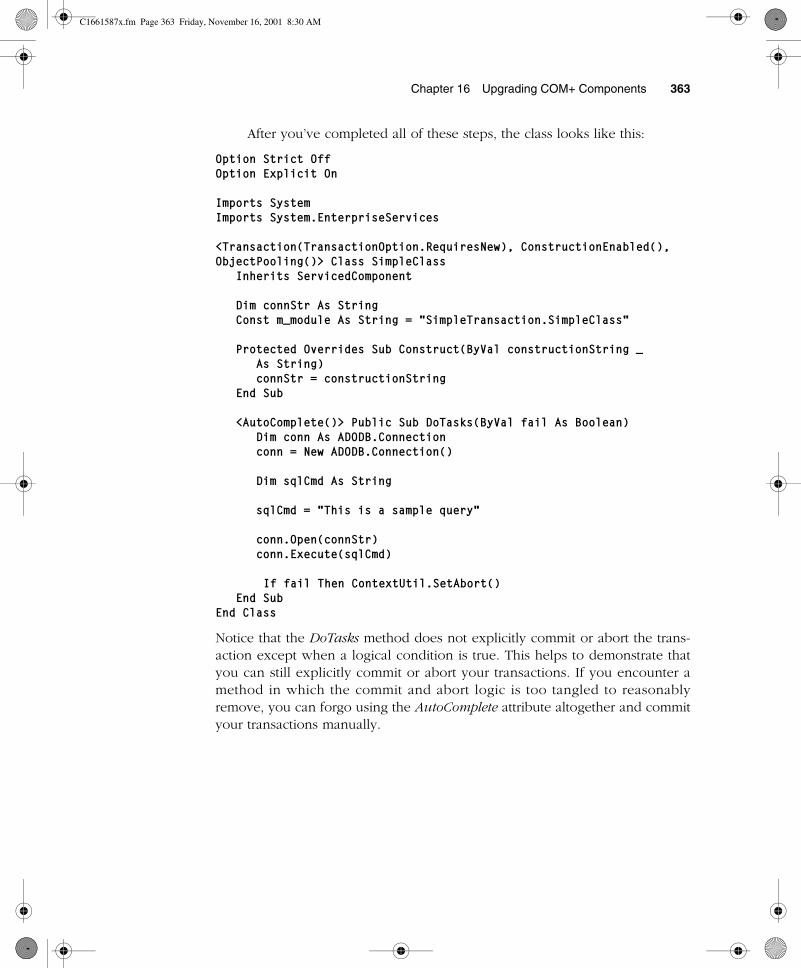
After you’ve completed all of these steps, the class looks like this:
Option Strict OffOption Explicit On
Imports SystemImports System.EnterpriseServices
<Transaction(TransactionOption.RequiresNew), ConstructionEnabled(), ObjectPooling()> Class SimpleClass Inherits ServicedComponent
Dim connStr As String Const m_module As String = “SimpleTransaction.SimpleClass”
Protected Overrides Sub Construct(ByVal constructionString _As String)
connStr = constructionString End Sub
<AutoComplete()> Public Sub DoTasks(ByVal fail As Boolean) Dim conn As ADODB.Connection conn = New ADODB.Connection()
Dim sqlCmd As String
sqlCmd = “This is a sample query”
conn.Open(connStr) conn.Execute(sqlCmd)
If fail Then ContextUtil.SetAbort() End SubEnd Class
Notice that the DoTasks method does not explicitly commit or abort the trans-action except when a logical condition is true. This helps to demonstrate thatyou can still explicitly commit or abort your transactions. If you encounter amethod in which the commit and abort logic is too tangled to reasonablyremove, you can forgo using the AutoComplete attribute altogether and commityour transactions manually.
C1661587x.fm Page 363 Friday, November 16, 2001 8:30 AM

364 Part III Getting Your Project Working
Making .NET and COM Components Work TogetherPrevious chapters have discussed issues regarding COM interop and how bestto handle it in your applications. Although these discussions were directed atstandard COM components, much of the information also applies to usingCOM+ applications from .NET. It is possible to import server, library, and proxyapplications into your Visual Basic .NET projects. The imported objects are usedjust as they are in any other COM interop scenario. In addition, if your applica-tion has a ServicedComponent class that calls into the imported COM+ applica-tion, the context will propagate transparently across the interop boundary. Youneed to take into account some special considerations if you intend for your.NET serviced components to work with COM clients:
� Avoid using parameterized constructors.
� Avoid using static methods.
� Define event-source interfaces in managed code.
� Include HRESULTs in user-defined exceptions.
� Supply GUIDs for types that require them.
� Expect inheritance differences.
Conclusion
Upgrading your COM+ application to Visual Basic .NET is not a totally auto-matic process. The Upgrade Wizard does the hard work, upgrading your appli-cation structure and business logic, but legwork on your part is necessary toadd the ServicedComponent Inherits statement, the COM+ attributes, and callsto the SetComplete and SetAbort methods.
We’ve covered how to upgrade COM+ (and Microsoft Transaction Server)transactional components; however, there is a lot more to COM+ services thansimply transactions. So in a way, we are just scratching the surface of what ispossible. To learn more about using COM+ services, see the topics “ServicedComponent Overview,” “Writing Serviced Components,” and “Summary of Ser-vices” in the Visual Basic .NET Help.
C1661587x.fm Page 364 Friday, November 16, 2001 8:30 AM