TV Art 55 Art 48 Art 40 - Loewe.tv
144
TV Art Art 55 Art 48 Art 40 User manual 36427021
-
Upload
khangminh22 -
Category
Documents
-
view
1 -
download
0
Transcript of TV Art 55 Art 48 Art 40 - Loewe.tv

TV
Art
Art 55Art 48Art 40
User manual
3642
7021

Art 40-55User manual
2
ImprintLoewe Technologies GmbHIndustriestraße 11D-96317 Kronachwww.loewe.tv
Editorial date 11/16-3.0 TB© Loewe Technologies GmbH, KronachID: 2.2.13.0
All rights including translation, technical modifications and errors reserved.
n
Imprint

Art 40-55User manual
3
Table of contents
Imprint ...........................................................................................2
Welcome ........................................................................................5Scope of delivery .......................................................................................... 5
About this user manual ............................................................................... 5
For your safety ..............................................................................6
Remote control button mapping ................................................8
Operating controls on the TV set ...............................................9
Connections rear side of the device ........................................10
Preparing the TV set ...................................................................11Installing the TV set ..................................................................................... 11
Set covers ..................................................................................................... 11
Cable fixing ................................................................................................... 11
Connecting the TV set ................................................................................ 11
Preparing the remote control unit .............................................................12
Switching the TV set ON/OFF ...................................................................13
General information on menu operation ................................. 14
On-screen displays ......................................................................17Explanation of keys ......................................................................................17
Explanation of symbols ..............................................................................17
Automatic menu info ..................................................................................17
Permanent clock display ............................................................................17
Operation without remote control ............................................17
Initial installation ....................................................................... 18Initial installation wizard ..............................................................................18
TV set as a monitor ....................................................................................29
Home view .................................................................................. 30Home view - Favourites .............................................................................30
Home view - Sources .................................................................................30
TV ................................................................................................. 31Setting the volume ......................................................................................31
Select station ...............................................................................................31
Status display ..............................................................................................33
Function list (TV mode) .............................................................................34
AV list (AV Source) ......................................................................................34
Electronic Programme Guide – EPG........................................................35
Teletext .........................................................................................................38
HbbTV / MediaText ....................................................................................40
Picture in Picture (PIP) ................................................................................41
Digital Recorder ..........................................................................................42TV viewing with time shift .......................................................................42Archive recording .....................................................................................43DR+ archive ..............................................................................................45DR+ Streaming ........................................................................................49Follow-Me function ..................................................................................49
Timer ............................................................................................................50
Video ........................................................................................... 54Video playback ............................................................................................55
Additional functions for DR+ archive playback ......................................58
Audio/Radio ............................................................................... 61Audio playback ...........................................................................................62
Radio mode (DVB radio) ...........................................................................64
Radio mode (Internet radio) .....................................................................65
Photo .......................................................................................... 66Photo display ............................................................................................... 67
Web ............................................................................................. 68MediaNet .....................................................................................................68
Browser ........................................................................................................70
System settings ......................................................................... 71Picture .......................................................................................................... 72
Sound ........................................................................................................... 75
Stations ........................................................................................................ 76Automatic scan TV+Radio ..................................................................... 77Manual Scan TV / Radio .........................................................................78Station lists TV / Radio ...........................................................................80Compose / edit Personal list ...................................................................81Update station list automatically ...........................................................82Transfer all station lists ............................................................................82
Control .........................................................................................................83Language ..................................................................................................84EPG ............................................................................................................84Parental lock .............................................................................................85Energy efficiency ......................................................................................86Quick start mode .....................................................................................86Software update....................................................................................... 87On-screen displays ..................................................................................92Time and date ..........................................................................................92DVB settings .............................................................................................93PIP ..............................................................................................................93DR+ ...........................................................................................................94Standard Teletext .....................................................................................95HbbTV .......................................................................................................96Hard disks .................................................................................................96Export log file ............................................................................................ 97WEB key function..................................................................................... 97
Multimedia / Network ................................................................................98Network settings ......................................................................................98Multimedia settings ................................................................................101Renderer ..................................................................................................101
Connections ..............................................................................................102Sound components ..............................................................................103Antenna DVB ..........................................................................................106AV connection settings .........................................................................106Digital Link ............................................................................................... 107Gaming mode ........................................................................................ 107
Extras .........................................................................................................108Integrated features ................................................................................109Reset to factory settings .......................................................................109Conditional Access module (CA module) ...........................................110

Art 40-55User manual
4
Table of contents
External devices ........................................................................112Devices to the HDMI connections ...........................................................112
Digital Link HD ............................................................................................113
Devices on AV .............................................................................................114
Connecting the speaker system (AUDIO OUT) ....................................116
Connecting the HiFi/AV amplifier ............................................................116
Audio playback from external devices .................................................... 117
IR-Link ......................................................................................................... 117
Serial interface RS-232C (RJ12) .............................................................. 117
Setting the remote control .......................................................................118
Teaching the remote control .................................................. 119
Troubleshooting ........................................................................121
Technical Data .......................................................................... 123Signals via AV (PC IN) / HDMI ................................................................ 124
Signal input groups .................................................................................. 124
Accessories ............................................................................... 125Upgrade kits / conversion kits / cables ................................................ 125
Mounting options ..................................................................................... 126
VESA standard .......................................................................................... 127
Environment .............................................................................128
Legal information .....................................................................128
Miscellaneous ...........................................................................129CA module error codes ........................................................................... 129
Glossary ....................................................................................130
EC Declaration of Conformity.................................................133
Index ..........................................................................................134
Service .......................................................................................138
Code page .................................................................................139
Notes ......................................................................................... 141

Art 40-55User manual
5
Welcome
Thank you,
for choosing a Loewe product and having placed your trust in us.
With Loewe you have not simply decided on a modern and technically innovative TV set, but for timeless design, sharp picture quality, brilliant sound for movies and music as well as intuitive operation with the Loewe remote control unit, smart phone or tablet. In short, Loewe is perfect for home entertainment – Made in Germany.
We look forward to welcome you as our customer and hope that you enjoy your Premium Home Entertainment made by Loewe.
Many features, one result: perfect Home Entertainment.
Just more entertainment.The Loewe Assist Media user interface is intuitive and graphically optimised. This is how you quickly find your desired content – from TV set to online.In the user guide refer to Home view.
Perfectly networked.Thanks to its numerous connections, your Loewe TV becomes your entertainment centre. Connect it to the Internet, DVD/Blu-ray player, external speakers, etc.In the user guide refer to Media+
Hard disk for your TV archive.Record the TV programme on an externally connected hard disk or pause it and continue watching it at a later date. With DR+ (Digital Recording), all this is no problem for your Loewe TV set.In the user guide refer to Digital Recorder.
Your contact person.We are happy to help you with any questions regarding your TV set and other Loewe products. In the user guide refer to Service.
CustomerCare
Center
Scope of delivery
LCD TV set
Mains cable
Antenna cable
Remote control Assist with two batteries
Attache-câble à velcro
User guide
Installation instructions for the setup solution
Table Stand Art 55 (Art 55)
Table Stand Art 40/48 (Art 40/48)
Tool kit for mounting the set-up solution
About this user manualFor best results regarding safety and the longevity of the set, we recommend you read the chapter For your safety before switching the TV set on for the first time.
The chapter glossary gives explanations of certain terms used in the TV set and the user manual.
Paragraphs which begin with the symbol indicate important instructions, tips or conditions for the following settings.
Terms which you will find in the menus or printed on the remote control or TV set are written in bold type.
The necessary control elements are shown in the descriptions to the left of the text containing the instructions for action.
Depending on the connected accessory equipment the menus in the TV set can differ from those described here.
All the station names, programme contents, the illustrated photos, titles, albums and album covers in this user manual are examples.
In addition to the remote control, a PC keyboard can be connected to one of the USB ports on your TV and then used to control your TV set.
In the user manual, this symbol indicates places in which the use of a keyboard is particularly advantageous.
The user guide and the user manual for your TV set are updated at irregular intervals. We recommend an occasional examination on the Support Portal of the Loewe homepage.
General information on the operation of the TV setFor further information on the user interface and the general operation of your TV set see chapter General information on the operation.
Interactive data servicesIn some countries the stations also broadcast interactive data services with their programmes, leading to the functions of individual keys not being available or only so to a limited extent. You can find out more about this in chapter TV, section HbbTV / MediaText.
Important informationLoewe does not accept any liability for the nature and content of receivable Internet services. This also applies to the Loewe MediaNet portal. With its devices, Loewe provides the technical platform that fundamentally enables such material to be received. Loewe cannot make any guarantees regarding changes in scope and content, particularly with regard to the future and after going to press. The receivable online services are not included in the delivery and can vary depending on the product and country.
Art 40-55User manual
6
For your safety, and to avoid unnecessary damage to your unit, please read and follow the safety instructions below:
Intended use and ambient conditions
This TV set is intended exclusively for receiving and playing visual and audio signals. Your set is designed for operation in dry rooms. It must not be used in rooms with a high level of humidity (e.g. bathroom, sauna).Please be aware that your TV set may react sensitively against dust and soot particles in the ambient air. Excessive loads of this type may damage the device or even lead to a malfunction.Please take care for clean air environment to avoid any damage of your device.
Soot and dust deposits can accumulate behind the front panel glass of the LCD TV set without a visible source of soot being present. These soot and dust deposits are also known as “fogging” or “magic dust”. There are scattered instances of this phenomenon, but especially during the warm-up period and after renovation work or in new constructions. Various factors are mentioned as the cause, see too the reports on the Internet. In such cases cleaning or replacement of the panel is excluded from the guarantee, since it does not involve a set defect, but rather an external influence.
If the unit is used outdoors, make sure that it is protected from moisture (rain, dripping water and splashing water or dew). High humidity and dust concentrations lead to leakage currents in the device. This can result in a shock hazard when touching it or even fire.
If you have moved the unit out of the cold into a warm environment, leave it switched off for about an hour to avoid the formation of con-densation.
Do not place objects containing liquids on top of the unit. Protect the appliance against dripping and splashing water.Candles or naked flames must be kept away from the TV set at all times to prevent it from catching fire.
Never place the TV set in a location where it is exposed to vibrations. This may lead to damage.
Transporting
Move the device in vertical position only. Get hold of the device on the upper and lower edges of the housing.
Do not stand it up on the bottom edge, so as to reduce the risk of damage and soiling. If the set has to be put down during packing/unpacking, place the TV set with its entire front surface lying flat on soft material. Use a blanket or the fleece from the packing material as an underlay.
The LCD screen is made of glass or plastic and can break if not handled properly.Always wear rubber gloves to carry the TV set if the LCD screen is damaged and liquid crystal might be leaking out. In the case of skin contact immediately rinse thoroughly with water.
Power supply
Incorrect voltages can damage the unit. This device may only be connected to a power supply with the voltage and frequency indicated on the type plate using the supplied mains cable. The mains plug of the TV set must be easily accessible so that the device can be disconnected from the mains at any time. When unplugging the unit from the mains, pull at the connector body and not at the cable. The cables in the mains plug could otherwise be damaged and could cause a short-circuit when plugged in again.
Lay the mains cable so that it cannot be damaged. Do not step on the mains cable. The mains cable may not be kinked or laid over sharp edges nor be exposed to chemicals; the latter also applies to the unit as a whole. A mains cable with damaged insulation can cause electric shocks and poses a fire risk.
Air circulation and high temperatures
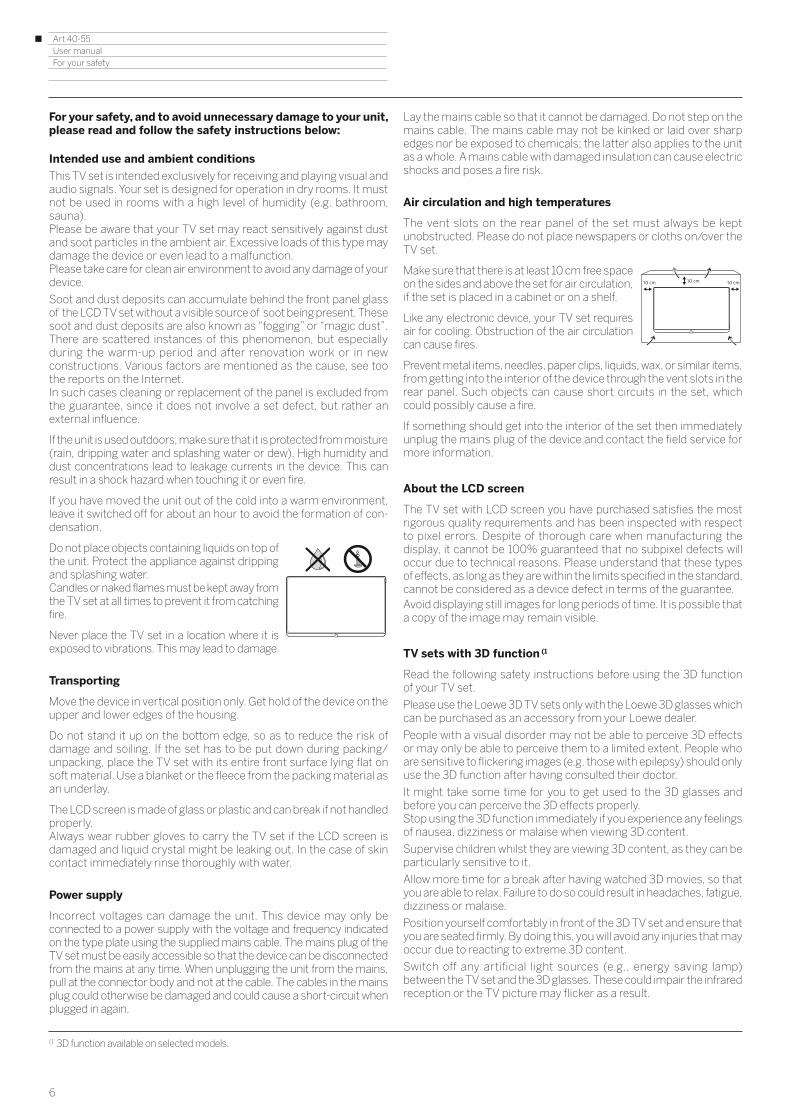
The vent slots on the rear panel of the set must always be kept unobstructed. Please do not place newspapers or cloths on/over the TV set.
Make sure that there is at least 10 cm free space on the sides and above the set for air circulation, if the set is placed in a cabinet or on a shelf.
Like any electronic device, your TV set requires air for cooling. Obstruction of the air circulation can cause fires.
Prevent metal items, needles, paper clips, liquids, wax, or similar items, from getting into the interior of the device through the vent slots in the rear panel. Such objects can cause short circuits in the set, which could possibly cause a fire.
If something should get into the interior of the set then immediately unplug the mains plug of the device and contact the field service for more information.
About the LCD screen
The TV set with LCD screen you have purchased satisfies the most rigorous quality requirements and has been inspected with respect to pixel errors. Despite of thorough care when manufacturing the display, it cannot be 100% guaranteed that no subpixel defects will occur due to technical reasons. Please understand that these types of effects, as long as they are within the limits specified in the standard, cannot be considered as a device defect in terms of the guarantee.Avoid displaying still images for long periods of time. It is possible that a copy of the image may remain visible.
TV sets with 3D function (1
Read the following safety instructions before using the 3D function of your TV set.
Please use the Loewe 3D TV sets only with the Loewe 3D glasses which can be purchased as an accessory from your Loewe dealer.
People with a visual disorder may not be able to perceive 3D effects or may only be able to perceive them to a limited extent. People who are sensitive to flickering images (e.g. those with epilepsy) should only use the 3D function after having consulted their doctor.
It might take some time for you to get used to the 3D glasses and before you can perceive the 3D effects properly.Stop using the 3D function immediately if you experience any feelings of nausea, dizziness or malaise when viewing 3D content.
Supervise children whilst they are viewing 3D content, as they can be particularly sensitive to it.
Allow more time for a break after having watched 3D movies, so that you are able to relax. Failure to do so could result in headaches, fatigue, dizziness or malaise.
Position yourself comfortably in front of the 3D TV set and ensure that you are seated firmly. By doing this, you will avoid any injuries that may occur due to reacting to extreme 3D content.
Switch off any artificial light sources (e.g., energy saving lamp) between the TV set and the 3D glasses. These could impair the infrared reception or the TV picture may flicker as a result.
10 cm 10 cm 10 cm
For your safety
(1 3D function available on selected models.

Art 40-55User manual
7
For your safety
Set-up
Loewe flatscreen TV sets are specified for Loewe accessories. The TV set is suitable for mounting in many different ways. Note the assembly instructions regarding the different possible mounting options.
When using accessories from other manufacturers take care that the TV set can be easily inclined or rotated on the respective mounting option.
For mounting options from other manufacturers with motor drive, make sure that the TV set cannot be rotated manually. The use of mounting options from other manufacturers with locks in certain positions is generally discouraged.
When rotating the TV set it is essential to ensure that the pressure exerted on the device frame is not too large. Especially in case of large-format displays there is a risk to damage the screen.
Before setting up the device, please check that the final location is suitable to bear the load of the device in terms of surface (sensitivity to pressure) and stability (statics).This is particularly the case for the high-gloss painted surfaces and surfaces that are made from real wood / real wood veneer or plastic surfaces.
Place the TV set with the table or floor stand only on a level, sturdy, horizontal base. Particularly ensure that the set does not protrude to the front when placed in or on pieces of furniture. Place the TV set in a normal position for use. TV set may only be used in an upright horizontal position. It may not be tilted by more than 10 degrees. The TV set must never be operated in portrait position, lying flat or hanging overhead from the ceiling.
Set up the device where it is not exposed to direct insolation and where it is not exposed to additional heating by radiators.
When using the VESA mounting points, please refer to the information in chapter Accessories, section VESA standard.
Supervision
Do not let children operate the TV set unsupervised and do not let them loiter and play close to the set. The set could tip over, be pushed off or pulled down from the stand surface and injure someone.
Do not allow the switched-on TV set to run unattended.
Volume
Loud music can lead to ear damage. Avoid extreme volume especially over long periods and when using headphones.
Thunder storms
Pull out the mains plug and all connected antenna cables from the TV set in a thunderstorm. Overvoltage caused by lightning strokes can damage the set via the antenna system, as well as via the mains. The mains plug and all connected antenna cables should also be pulled out during long periods of absence.
±10°
Automatic shutdown
If the TV is not operated for 4 hours (adjustment of volume, programme change, etc.) the TV will automatically switch to stand-by mode to save energy. A prompt to terminate this shutdown process appears one minute before expiry of the 4 hours.
The automatic shutdown is active in the energy efficiency mode Home Mode.
Automatic shutdown does not occur when using the radio without screen display (screen off).
Cleaning and care
Switch off the TV set with the main switch prior to cleaning.
Clean the TV set, the screen, and the remote control unit with a soft, moist, clean and colour-neutral cloth only, without any aggressive or scouring cleaning agents.
Repairs and accessories
Never remove the back of the TV set yourself. Have your TV set repaired or serviced by authorised television technicians only.
Only use original accessories such as Loewe stands, if possible.

Art 40-55User manual
8
Remote control
(1 The assignment of these keys can be changed (see chapter External devices, section Setting the remote control).(2 The assignment of these keys can be changed (see chapter System settings, section Control – Web key function).(3 Depending on the corresponding settings (see chapter System settings, section Control – HbbTV).(4 Only with externally connected USB hard disk.
Remote control button mappingDepending on the selected operating mode (TV/Video/Audio/Photo/Web) and function (e.g. DR+, EPG, PIP, Teletext, HbbTV, etc.), the key assignment may differ from the assignment described here (see the corresponding chapter in this user manual).
1 Sound mute/on.2 LED display for currently operated device.
3 Call the TV mode.
4 Reassign remote control to SetTop-Box (1 (presetting: Apple TV).
5 Pressing briefly: Open the DR+ archive. Pressing longer: Call timer list.
6 Add current object to Home favourites.
7 EPG (Electronic Programme Guide) on/off.
8 Teletext/MediaText (3 on/off.
9 Pressing briefly: Call function list for the active operating mode. Pressing longer: Call System settings.
10 V+/V- increase/reduce volume.
11 Pressing briefly: Call station list. Pressing longer: Call expanded station list. In the menu: confirm/call up.
12 Green coloured key: screen on/off in Audio/Radio mode.
13 Red coloured key: call preferred value-added network service, if available (3.
14 Pressing briefly: skip backwards. Pressing longer: winding backwards.
15 Pressing briefly: direct recording (with determination of recording duration) (4. Pressing longer: One Touch Recording (4.
16 Pause / Start/pause the timeshift television (4.
17 Stop / End timeshift (return to live image) (4.
18 Pressing briefly: skip forwards. Pressing longer: winding forwards.
19 Play / Start/continue timeshift television (4.
20 Blue coloured key: call station function list (selection of language/sound, subtitles or channel/video track).
21 Pressing briefly: Yellow coloured key: call history. Pressing longer: Yellow coloured key: call last station.
22 Navigation on the user interface, select objects. In the menu / lists: select/set.
23 P+/P– next/previous station.
24 Pressing briefly: step / level back. Pressing long: close all displays.
25 Press briefly during an on-screen display: info display. Info text appropriate to the content that can assist you further, should you have any questions about your TV set.
Press briefly, without on-screen display: access status display. With status display open and repeatedly pressing the key call the detailed information on the broadcast.
Press longer: show Explanation of keys.
26 PIP (picture in picture) on/off.
27 Call up the Home view.
28 Call up the AV list.
29 Select stations with numeric buttons directly. In the menu: enter numbers or letters.
30 Call MediaNet (standard assignment) (2.
31 Reassign remote control to video device (1 (presetting: BluTech Vision 3D).
32 Call radio mode (standard assignment) (1.
33 Switches the TV set on (mains switch must be turned on) or switches to standby mode. Press longer while TV set is switched on: TV set and all CEC-enabled devices connected
to the HDMI ports will be switched off to standby (System Standby).
1
2
3
4
5
6
7
8
9
10
11
12
13
14
15
16
32
18
192021
22
23
24
25
26
27
28
29
30
31
33
17

Art 40-55User manual
9
1 Mains switch:
The mains switch is located on the bottom of the set. Always return the TV set to Standby mode before switching it off
with the main switch.
2 On/Off key:
Switching on in standby mode. Switching off to the standby mode.
3 IR receiver:
Infrared receiver for receiving the remote control commands.
4 Display:
white: TV set in standby.
Depending on the ambient brightness, the white LED display is dimmed (1 and lights up with a different degree of brightness.
If the TV set is in quick start mode, the white LED display is not dimmable and starts with full brightness.
white, intermittent: TV set starts.
green: TV set switched on.
red: timer recording active.
blue: TV set in standby and background operation active (EPG data updating, software update).
5 Infrared transmitter:
When showing 3D content (2, the 3D glasses Loewe Active Glasses 3D are controlled via the infrared sensor.
6 Key M:
TV set in standby mode: switch TV set on in TV mode. TV set switched on: call direct control on TV set. In direct control on TV set: up .
7 Key R:
TV set in standby mode: switch TV set on in radio mode. TV set switched on: toggle TV mode and radio mode. Direct control on TV set: down .
8 Key +:
TV set in standby mode: switch TV set on in TV mode. Increase volume. Direct control on TV set: to the right .
9 Key – :
TV set in standby mode: switch TV set on in TV mode. Reduce volume. Direct control on TV set: to the left .
Operating controls on the TV set
Functions of the operating elements
M
R
+-
4
18 9
2
3
7
6
5
(1 Automatic dimming depending on the room brightness (OPC) must be activated (see chapter System settings, section Picture).(2 3D function available on selected models.

Art 40-55User manual
10
1 Slot for Kensington lock
2 AC IN - Mains connection Mains socket – 220-240 V ~ 50 / 60 Hz
3 LAN - Network connection RJ-45 – Ethernet / Fast Ethernet
4 HDMI 1 ARC - HDMI input 1 (with Audio Return Channel) HDMI – Digital Video IN (4K@30Hz)/Audio IN/OUT (1
HDMI – Digital Video IN (4K@60Hz; 4:2:0)/Audio IN/OUT (2
5 HDMI 2 - HDMI input 2 HDMI – Digital Video IN (4K@30Hz)/Audio IN (1
HDMI – Digital Video IN (4K@60Hz; 4:2:0)/Audio IN (2
6 ANT TV - Antenna/cable analogue / DVB-T/T2 / DVB-C IEC socket – 75 Ohm / 5 V / 80mA
7 ANT SAT 1 - Satellite antenna (Sat tuner 1) DVB-S/S2 F socket – 75 Ohm / 13/18 V / 500mA
8 ANT SAT 2 - Satellite antenna (Sat tuner 2) DVB-S/S2 F socket – 75 Ohm / 13/18 V / 500mA
9 SPDIF OUT - Audio output (digital) Cinch socket (orange)
10 USB 3.0 - USB connection USB type A – USB 3.0 (max. 900mA)
11 HEADPHONE - Headphone connection Jack 3,5 mm – Headphones 32–200 Ohm
12 HDMI 3 - HDMI input 3 HDMI – Digital Video IN (4K@30Hz)/Audio IN (1
HDMI – Digital Video IN (4K@60Hz; 4:2:0)/Audio IN (2
13 AUDIO OUT - Audio output (analogue) L/R – (Jack 3,5 mm)
14 RS-232C - Serial interface (3 – (RJ12)
15 AV - Micro AV socket (3
Audio/Video IN with Scart adapter: Y/C (S-VHS/Hi 8) CVBS (VHS/8 mm) RGB L/R Audio/Video IN with VGA adapter: PC/STB video signal Component (YPbPr) L/R
16 COMMON INTERFACE - CI slot 1 (standard V1.3)
17 COMMON INTERFACE - CI slot 2 (standard V1.3)
18 HDMI 4 UHD - HDMI input 4 (4
HDMI – Digital Video IN (4K@60Hz)/Audio IN
19 USB - USB connection USB type A – USB 2.0 (max. 500mA)
20 USB - USB connection USB type A – USB 2.0 (max. 500mA)
Connections rear side of the device
Position and function of the connections
(1 In case of TV set types Art 40 (Full HD).(2 In case of TV set types Art 55/48/40 (Ultra HD).(3 The adaptor is available as an accessory from your dealer.(4 In case of TV set types Art 40 (Full HD): connection does not exist.
K
3 4
11
12
6 7
15
5 10
19
18
16
17
1
13 14
20
2 8 9

Art 40-55User manual
11
Installing the TV set
Mounting options / Installation notes
Mount the supplied mounting option. While doing so, look for the corresponding directions in the installation instruction.
Your Loewe dealer can assist you in finding other mounting options that suit your needs.
Choose a place for installing your TV set where no bright light or sunlight shines directly onto the screen. This could cause reflections which impair the picture.
3 times the screen diagonal can be taken as a guide value for the viewing distance (e.g., for a 40-inch set approx. 3 m for SD signal). The viewing distance can be reduced with an HD/UHD signal.
Set covers
Covers for rear and side connections
In order to remove the rear side cable covers pull them simply from the device.
To fit the cover, insert the lugs at the top edge of the cover into the corresponding cut-outs in the rear panel and push up the cover until it snaps in.
The side cover of the TV set can also be completely removed. For this, open it as far as it will go and gently pull on the open cover.
The cover detaches from the holder and gives free access to the connection area. To replace the cover, simply push it until it latches back into place.
A cable bushing connects the lateral and posterior terminal region. In this way you can pass the cables of the lateral connections through and lay them out together with the rear connecting cables.
Cable fixingUsing the Velcro cable tie supplied, you can fix the rear cables. For the Art 55/48/40 this is done by a fixation at the table stand (see installation instructions of the table stand).
Art 55/48/40
Preparing the TV set
Connecting the TV set
Connecting to the mains supply
Remove the cover for the connections.
Connect the TV set to a 220-240V mains socket:
A cable bushing connects the lateral and posterior terminal region. In this way you can pass the cables of the lateral connections through and lay them out together with the rear connecting cables.
Connecting antennas
Cable (analogue) / DVB-C / DVB-T antenna:
Plug the cable of antenna, cable TV system or room antenna into the ANT TV socket. If you want to use analogue cables / DVB-C connection and a DVB-T antenna together, use an external antenna switch (available from your dealer).
Satellite antenna DVB-S:
Depending on the used satellite system, connect a connecting cable from the multi-switch or directly from the LNC to the ANT-SAT and ANT-SAT2 sockets of the TV set respectively.
When connecting the TV set to a single cable community antenna, connect the ANT-SAT and ANT-SAT2 sockets directly to the appropriate SAT antenna socket.
When connecting the TV set to a DiSEqC single cable community antenna (in accordance with EN 50494), connect the ANT-SAT socket directly to the appropriate SAT antenna socket.
In case of a DiSEqC one cable communal system you require only one antenna cable. Further distribution of the signal to the two reception routes is accomplished by the TV set’s satellite tuner.
It is possible, however, to continue using an existing SAT cabling with two antenna cables in a DiSEqC one cable communal system. If two transmission channels of the DiSEqC single cable community exist, one system channel is used per satellite antenna cable (see also chapter Initial installation, section DiSEqC single cable community antenna).
Ask your dealer in this regard.
R TV
Cableanalogue /DVB-C
DVB-T DVB-S

Art 40-55User manual
12
Preparing the remote control unit
Inserting or replacing batteries
Press on the embossed arrow whilst pushing the battery cover down.
Only use leak-proof micro-cells of the LR 03 (AAA) Alkali-Manganese type. Do not use different types of batteries and old and new batteries together.
The batteries used must not be exposed to excessive heat such as sunlight, fire or similar!
The position of the batteries is indicated in the battery compartment (in opposite directions). Pay attention to the correct polarity of + and – when inserting the batteries.
If the batteries are too weak after longer use, the TV set prompts you to change the batteries. Dispose of used batteries in an environmentally friendly way (see chapter Environment / Legal information).
Push the cover back on from below after having inserted the batteries.
Adjusting the remote control for operating the TV set
Press the TV key.
See in chapter External devices,section Setting the remote control how to operate other Loewe appliances and how to re-programme the remote control keys.
AAA LR03 AAA LR03
Preparing the TV set
Connecting the TV set to the Home network
You may link your TV set to the home network by a wired connection (Ethernet, Powerline adapters separately available) or by a wireless radio connection (WLAN). For wireless connections, the TV set has an internal WLAN antenna.
In order to play back data from your home network your Loewe TV supports the UPnP AV standard.
For the network adaptor configuration, see chapter System settings, section Multimedia / Network – Network settings.
Under no circumstances may the TV set be wired and at the same time connected by a wireless connection to the same network, e.g. router. This may cause severe operational faults!
Example for a wired connection
Connect the LAN socket of your TV set to the LAN switch/router of your home network with a network cable (available from your dealer).
Example for a wireless connection
You can connect the TV set to your home network by a wireless radio connection via the WLAN antenna inside the set.
Shadow effects of various materials, such as reinforced concrete, metal surfaces, etc., attenuate the WIFI signal sometimes significantly or completely.
Help for configuration problems
Loewe cannot provide any support for PC hardware and software or network components owing to the diverse configuration options with home networks.Please contact the administrator of your home network and/or specialist dealer for support when setting up and for maintenance of network connections, storage media, media server software and network devices such as routers.
DSL
LAN switch/routerTV set PC
DSL
WLAN routerTV set PC

Art 40-55User manual
13
Switching the TV set ON/OFFSwitching TV set to the standby mode
Switch the mains switch on the bottom side of the device to position I.
The indicator in the control panel on the front side lights up white. The set is now in standby mode.
Switching the TV on/off on the control unit
To switch the TV set into Operating mode or switch it off into Standby mode, press the middle of the On/Off button.
By pressing one of the buttons on the control panel, the TV set can also be turned on. Using the keys M/+/- you switch the TV set to TV mode and to radio mode when using the R key.
Meaning of the colour of the LEDs in the On/Off button:
white: TV set in standby.
Depending on the ambient brightness, the white LED display is dimmed (1 and lights up with a different degree of brightness.
If the TV set is in quick start mode, the white LED display is not dimmable and starts with full brightness.
white, intermittent: TV set starts.
green: TV set switched on.
red: timer recording active.
blue: TV set in standby and background operation active (EPG data updating, software update).
After switching on the TV set, it takes a few seconds for further operating commands to be processed (Exception: Quick start mode, see chapter System settings, section Control – Quick start mode). Your TV set is ready to operate as soon as the status indicator in the control panel lights up in green.
M
R
+-
Switching the TV set on by means of the remote control
Press the on/off key.
Or:
Press the TV key.
The previously watched station will be called.
Or:
Press numerical keys 1-9.
The corresponding station will be called.
After switching on the TV set, it takes a few seconds for further operating commands to be processed (Exception: Quick start mode, see chapter System settings, section Control – Quick start mode). Your TV set is ready to operate as soon as the status indicator in the control panel lights up in green.
Switching the set off with the remote control (Standby)
Press the on/off key.
Before switching off the set with the mains switch, we recommend you to switch it to standby mode.
Switching off the TV set and connected additional devices (System standby)
Press on/off key long:
Switch TV set and all CEC-capable devices connected to the HDMI interfaces OFF to Standby mode (System Standby).
Quick start mode
If you enable the Quick Start Mode and you switch on the TV set from standby, the TV picture can be immediately seen without delay. You can specify the times at which your device will be in the Quick Start Mode. Please note that in this case you will have a higher energy consumption.
You can find the Quick Start Mode under System settings Control Quick start mode.
Default setting for the Quick Start Mode: off.
Technical informationSwitching off the TV set with the mains switch during operation or an inadvertent disruption to the power supply (e.g. power failure) can cause damage to the hard disk file system of an externally connected hard disk and hence loss of the recorded broadcasts.
Before switching off the set with the mains switch, we recommend you to switch it to standby mode.
However, if unexpected problems occur when operating the hard disk, formatting the external hard disk may rectify this. Refer to the instructions in chapter System settings, section Control – Hard disks.
Loewe are not liable for the loss of data on the hard disk externally connected to your TV set. To avoid data loss, we recommend copying important recordings to an additional external storage medium.
Switching the TV set ON/OFF
Control unitMains switch
Display
(1 Automatic dimming depending on the room brightness (OPC) must be activated (see chapter System settings, section Picture).

Art 40-55User manual
14
General information on menu operation
General information on menu operationThe most important keys for navigation will be explained in general. The numbers in the text refer to the figure showing the remote control in chapter Remote control.
The arrow keys 22 help you to navigate in the menus and lists of the TV set and for selecting menu items. They are arranged in the middle of the remote control in a circle around the OK key 11 . Later in this user manual they will be represented as follows:
Select the desired item.
The OK key 11 is used to confirm a selection, for calling the highlighted menu item and for opening the station list. In this user manual, an instruction for this key looks like the following:
OK confirm.
Using the numerical keys of your remote control 29 you enter programme channels and teletext pages directly. With key 0 you open the AV list. In this user guide, entering numbers with numerical keys is shown as follows:
Entering programme channel directly.
The numerical keys are also used to enter text (see chapter General information on menu operation,section Entry of characters by remote control).
The Home view is the central overview page for all of your TV set‘s operating modes. You reach Home view with the HOME key 27 .
HOME: Call Home view.
Pressing the BACK key 24 briefly brings you one level up in the wizard. Pressing the BACK key longer closes all opened fade-ins. An example for the BACK key in this user manual:
BACK: Stop text entry and exit entry box.
Pressing longer on the INFO key 25 displays an explanation of the most important key functions of the current operating mode (e.g. TV mode, teletext, PIP, etc.).
If the function for a key is not available, this will be indicated by an inserted symbol on the right above.
Structure of the Menu screen
Basically, the structure of the different menu screens is similar, depending on the fact if a wizard, rendering media content or a setup menu are concerned. The structure is explained by means of three different illustrations.
Screen structure: Wizard
(A) Title bar with name of the wizard and the current operating step.
(B) Selected items, whose number can be different according to the operating step.
(C) Bottom line showing the available operating controls. If required, instructions and information are inserted.
Screen structure: Rendering of media content (example: Audio player)
(A) Title bar with selected album / subdirectory.
(B) Menu item Back to exit the menu or to go back to the previous menu item.
(C) Selection of album or title
(D) Time bar
(E) Bottom line with the different symbols for controlling the playback function.
A
C
B
INITIAL INSTALLATION - Menu language
Proceed withBack with
Which menu language do you want to use for operation?
Deutsch (de) Ελληνικά (el) Svenska (sv)
English (en) Polski (pl) Dansk (da)
Français (fr) Magyar (hu) Português (pt)
Italiano (it) Suomi (fi) Русский (ru)
Español (es) Slovenščina (sl) Norsk (no)
Nederlands (nl) Slovenčina (sk) (zh)
Čeština (cs) Türkçe (tr)
Chasing Cars Shut Your EyesHands Open
Snow Patrol / Eyes Open
00:00 02:56 04:27
A
C
B
D
E
Back

Art 40-55User manual
15
General information on menu operation
Screen structure: Setup (example: picture)
(A) Selected function in the Home overview (here: system settings)
(B) Home Menu System settings, with selected menu item Picture.
(C) Menu items Picture focusing on Contrast.
(D) Help text for the selected menu item Picture > Contrast.
Navigation: Selection of elements (example: On-screen displays)
Highlighting and thus selecting the symbols/elements or menu items on the screen can be effected by the arrow keys on the remote control. So you can see all the time where you are. As soon as there is a bar above a symbol or text, this is a selected element.
(A) Selectable elements / menu items.
(B) The text in the line where the marker is currently located is white.
(C) Move the selection marking by means of the arrow keys to the menu item to be set.
The position of the marking is to see by a grey rectangle.
In most cases, the marked menu item will be automatically adopted. The font colour of the previously active item will change to grey, that of the newly selected item to white.
In a few menus, to confirm a selected menu item is required by pressing OK.
Picture
Picture ad-justment
Contrast
Brightness
Colour in-tensity
Image+Active
Picture for-mat
more ...
If your desired display format has not been automatically selected then you can choose it in the 3D settings menu. You may display the 3D image in 2D or vice versa.
A CB D
...... On-screendisplays
Display time
Volume display
Automatic menu info
Key explanation
Permanent clock display
Automatic HDMI hint
Right info display
Switch off curtain
On-screen displays
If you select "on" here, the informational text belonging to each selected menu item will always appear simultaneously.
Back
< 7sec >
off on
off on
off on
off on
off on
off on
< 7sec >
< 7sec >
off on
on
off on
off on
on
off on
< 7sec >
AB C
Navigation: Wizards
If the menu item(s) (marked white) is/are already correctly preset:
Go to next step.
Otherwise:
Mark the menu item that you want to change. The update will be adopted automatically. The fount colour of the previously active item will change to grey. If not,
OK confirm the selection.
Go to next step.
Navigation: Element selection in lists using initials
Using the numerical keys of the remote control you can jump into list, e.g., Internet radio station lists.
If the list is sorted in alphabetical order, you jump to the entered letter. For example, when pressing the key 7 three times you jump to the first list element starting with letter R.
In case of numerical sorting, you can directly select the stations with the numerical keys.
Please specify whether you want to search for scrambled stations too.Note: Scrambled stations can only be received with an integrated CA module and additional card.
Scrambled stations
Search method
Symbol rate
Accept Logical Channel Number
DVB-S settings (ASTRA1 19,2°E)
Back with Proceed with
no yes
Network search Frequency search
22000
no yes

Art 40-55User manual
16
General information on menu operation
Entering characters with on-screen keyboard
For certain functions, entering letters or characters is required, e.g., for Web addresses (URLs) in the browser or for renaming archive entries. An on-screen keyboard appears for entering text.
Select character / on-screen button, OK Adopt character.
In the event of letters with a triangular, additional letters are displayed when pressing the OK button longer (2 sec).
For the selection of special characters use the .-/ field.
To conclude the entry:
Select Adopt, OK confirm the selection.
Entry of characters by remote control
Alternatively to the on-screen keyboard you can also enter the desired characters by means of the remote control (as with the keypad of a mobile phone).
Select text entry field.
Under the 1st letter of the name you will see a line indicating the current input position.
Input position one character to the right (also for blanks).
Input position one character to the left.
Input the letters one after another. When using the remote control, press the numerical keys just as on a mobile phone keypad (0-9) until the desired symbol is displayed. The available letters are printed on the individual numeric buttons.
You find the exact key assignment in the character table in the right column.
To conclude the entry:
Select Adopt, OK confirm the selection.
q
a
y
1
w
s
x
2
e
d
c
3
r
f
v
4
t
g
b
5
z
h
n
6
u
j
m
7
i
k
.-/
8
o
l
9
P
0
ABC
http://www.loewe.tv
.com .net . /.dewww.
Enter/change internet address Back
Adopt Cancel
Delete Cancel AdoptSpace
(2 sec) on a letter with a triangle shows more lettersOK
Table of characters for entering text by means of the remote control
Key Characters (uppercase - lowercase)
1 [space] 1
2 A B C 2 Ä Æ Ã Å Ā À Á Ć Ç Č - a b c 2 ä æ ã å ā â à á ć ç č
3 D E F 3 Ė Ë Ē Ę Ê È É - d e f 3 ė ë ē ę ê è é
4 G H I 4 Ï Ī Į Î Ì Í - g h i 4 ï ī į î î ì í
5 J K L 5 - j k l 5
6 M N O 6 Ö O E Õ Ō Ô Ò Ó Ø - m n o 6 ń ñ ö o e õ ō ô ò ó ø
7 P Q R S 7 ß - p q r s 7 ß
8 T U V 8 Ü Ū Û Ù Ú - t u v 8 ü ū û ù ú
9 W X Y Z 9 - w x y z 9
0 . 0 - / _ : + , ; ? ! = & # % ~ @ $ * ’ ( ) ” § \ { } [ ] < > ´ ` ^ |

Art 40-55User manual
17
On-screen displaysOperation without remote control
Operation without remote controlChanging Volume
+ / – Increase/reduce volume.
Switching radio on or off or switching to radio
R Radio on or switch between TV and Radio.
Calling direct control on TV set
M Call direct control on TV set.
R Scroll down.
M Scroll up.
– Scroll left.
+ Scroll right, adopt settings, confirm.
Close all displays
Press M longer.
Explanations of the settings:
Operating mode
Switch between TV and radio operation.
Stations selection
Call Station selection.
AV selection Select AV interface.
3D Calling 3D settings (1.
Contrast Set contrast.The power consumption of the TV set depends directly on the value set here.
Picture format
Selecting the picture format.
Service The Service menu item is provided for service purposes by dealers only.
Operatingmode
Station selec-tion
AV selection
3D
Contrast
Picture for-mat
Service
Explanation of keysAn explanation of the main operating keys that can be used at the moment, can be displayed. The availability of the key explanation is dependent on the currently active operating situation.
INFO press longer: show Explanation of keys.
INFO or BACK: hide Explanation of keys.
Explanation of symbolsOn screen pages with operating symbols in the bottom line, an explanation of the function appears as soon as the symbol is selected.
Automatic menu infoThe automatic menu info provides an info text for the selected menu item appropriate to the on-screen display that can assist you further with the operation of your TV set.
An on-screen display is displayed.
The factory setting is that the info display is shown automatically for each menu item. In this case you can temporarily hide the info texts with the INFO key.
Permanent clock displayThe clock display can be permanently shown. It is always visible as long as no other display is made.
You can switch the permanent clock display on or off in Home view under System Settings Control more ... On-screen displays.
Timer list
Menu options
Station list
Expanded station list
Value-added service
Last station
Language / sound
Timeshift
Recording
Key explanation
(2sec)
(2sec)
(2sec)
USB1 -> CRW_7266b Back
... Energy effi-ciency
Home Mode
Premium Mode
Shop Mode
The priority here is low energy consumption in home use. In this case, the TV switches off automatically for the sake of savingenergy, after it has been out of operation for four hours.
(1 3D function available on selected models.

Art 40-55User manual
18
Initial installation
Initial installation wizard
Initial installation after switching on for the first time
The Initial installation wizard starts automatically with an initial installation. It may be called repeatedly again (see chapter System settings,section Extras – Repeat initial installation).
If a parental lock is activated, the access code must be entered before repeating initial installation (see chapter System settings, section Control – Parental lock).
For information on navigation within the wizard refer to chapter General information on menu operation.
First installation wizard routine
The selected settings affect the routine of the Initial installation wizard.
Select desired Menu language.
Selecting the language of the user guidance is the wizard’s first step. Then you simply follow the instructions on your TV screen.
Proceed to next step.
A licence agreement will be displayed.
Scroll through the licence agreement. OK Confirm the licence agreement and proceed to
the next step.
Select Energy efficiency.
Determine how energy efficient your TV set shall be. The value for the contrast (and thus the brightness of the background lighting) is adapted and the automatic dimmer activated or deactivated depending on the presetting.
The automatic shutdown is active in the mode Home Mode.
Deutsch (de) (el) Svenska (sv)
English (en) Polski (pl) Dansk (da)
Français (fr) Magyar (hu) Português (pt)
Italiano (it) Suomi (fi) (ru)
Español (es) Slovenščina (sl) Norsk (no)
Nederlands (nl) Slovenčina (sk) 中文 (zh)
Čeština (cs) Türkçe (tr)
INITIAL INSTALLATION - Menu language
Proceed with
Which menu language do you want to use for operation?
Menu language
Here you define how energy efficiently you operate your TV. With the "Home Mode" setting you put the focus on low energy consumption for home use. The "Premium Mode" is optimised to a brighter environment with a higher energy consumption. The "Shop Mode" is designed for operation in a showroom.
Note: If you select "Home Mode" here, the TV set will automatically switch off to save energy after no longer being operated for 4 hours.
Energy efficiency
Back with Proceed with
Home mode Premium mode Shop mode
Energy efficiency
Home mode:
The emphasis for home use is on low energy consumption. The automatic dimmer is activated.
Premium mode:
This mode optimises the settings to a brighter environment at a higher energy consumption. The automatic dimmer is activated.The use of this energy efficiency setting must be confirmed afterwards once again.
Shop mode:
The picture settings are aligned to operation in the presentation room. The automatic dimmer is deactivated. If the ambient brightness diminishes, the energy consumption is not reduced.The use of this energy efficiency setting must be confirmed afterwards once again.
The presetting can be changed later in the System settings under Control Energy efficiency.
Proceed to next step.
Select Location of TV set (national defaults are adopted).
For certain locations (e.g., Australia), there is finally a selection screen where you can indicate in which state/territory the device is being operated.
Proceed to next step.
Select the Operating mode.
Use the TV set as a TV set:Continued with Connect antennas cable(s) (see next page).
Use the TV set just as a monitor:see chapter Initial installation, section TV set as a monitor
Energy efficiency
(continued)
Please specify the location of your TV set so that the available stations can be sortedaccording to the specify country.
Location of TV set
Back with Proceed with
(DK) Denmark
(E) Spain
(F) France
(FIN) Finland
(H) Hungary
(I) Italy
(IRL) Ireland
(L) Luxembourg
(N) Norway
(NL) Netherlands
(NZ) New Zealand
(P) Portugal
(PL) Poland
(RUS) Russia
(S) Sweden
(SK) Slovakia
(SLO) Slovenia
(TR) Turkey
(UK) United Kingdom
Other country
Location of TV set
Operating mode
Please specify if you wish to use the full TV function of your set, or if you wish to use itpurely as a monitor.
Operating mode
As TV set As monitor only
Back with Proceed with

Art 40-55User manual
19
Initial installation
Select antenna cable. OK Connect/disconnect antenna cable. Select the antenna cables that are connected to
your TV. Ahead of each selected antenna, the symbol
appears.
Cable analog: analogue stations via cable
Terrestrial (DVB-T): digital stations via antenna
Cable (DVB-C): digital stations via cable
Satellite (DVB-S/cable 1): digital stations via satellite
Satellite (DVB-S/cable 2): digital stations via satellite
Proceed to next step.
The rest of the initial installation wizard routine depends on the selected antennas (Cable analogue, DVB-T, DVB-C, DVB-S) in step Connect antennas cable(s).
The different antennas/types of reception are described in the following sections of initial installation.
Antenna cable(s) for: to antenna socket(s):
Cable analog ANT TV
Terrestrial (DVB-T) ANT TV
Cable (DVB-C) ANT TV
Satellite (DVB-S / cable 1) ANT SAT
Satellite (DVB-S / cable 2) ANT SAT2
Your television will automatically search for stations. With , highlight which antenna cables are available for your TV set and connect them to the correct antenna sockets, which are specified here in the right-hand column.
Connect antenna cable(s)
Back with Proceed with
OK
Connect antennas
cable(s)
Setting options for reception via Cable analog:
If you have not selected Cable analog in step Connect antenna cable(s) in the initial installation, proceed to the next section Setting options for DVB-T reception.
The selection of a Colour standard is only required when the Location of TV set Other country was selected. Otherwise, the country-specific default settings will be preset when selecting the Location of TV set. This step will be skipped then
Select appropriate colour standard.
Proceed to next step.
Please select the TV/colour standard.
Automatic BG+L SECAM-BG
PAL-BG SECAM-DK
PAL-DK SECAM-L
PAL-I NTSC
TV/col. standard
Back with Proceed with
TV/col. standard

Art 40-55User manual
20
Initial installation
Setting options for DVB-T reception:
If you have not selected Terrestrial (DVB-T) in step Connect antenna cable(s) in the initial installation, proceed to the next section Setting options for DVB-C reception.
If several networks are available via DVB-T, you can decide which network you want to receive your channels from.
Select network, OK Confirm selection.
Proceed to next step.
Select and adapt settings for DVB-T reception.
Scrambled stations
You can state whether coded stations are to be searched for in the search/update. Select yes to save all found scrambled stations. However, these stations can only be received in connection with a CA module and the appropriate Smart Card.
The handling of the CA module is described in the chapter System settings, section Extras – CA module.
Search method
If you want to run the station search independently of the channel grid, select Frequency search for the search method.
Accept Logical
Channel Number
In various countries, digital stations (DVB-T) are transmitted with a preset channel number per station, known as Logical Channel Numbers (LCN).
If you select yes here, these default channel slots will be used and the channels of the preferred signal source will be sorted as per LCN. The stations in the station list can no longer be shifted.
Proceed to next step.
Network selection
Please state from which network you wish to receive your station.Note: The newly selected parameter must be confirmed with the button.
Freeview
other network
Network selection (DVB-T)
Back with Proceed with
OK
Please specify whether you want to search for scrambled stations too.Note: Scrambled stations can only be received with an integrated CA module and additional card.
DVB-T settings
Search method
Accept Logical Channel Number
Scrambled stations no yes
Channel search Frequency search
no yes
Back with Proceed with
Settings
Select supply voltage no / yes.
If you use a DVB-T antenna that requires a supply voltage (active antenna) and which is not already supplied via a power adaptor, then select yes (5V) for the antenna’s power supply.
How to align your DVB-T antenna is described in chapter System settings, section Connections – Antenna DVB.
Proceed to next step.
Please state here whether your DVB-T antenna needs a supply voltage. Antennas with an integrated amplifier need a supply voltage on the antenna line.
Supply voltage DVB-T antenna
no (0V) yes (5V)
Back with Proceed with
Supply voltage

Art 40-55User manual
21
Initial installation
Setting options for DVB-C reception:
If you have not selected Cable (DVB-C) in step Connect antenna cable(s) in the initial installation, proceed to the next section Setting options for DVB-S reception.
If several networks are available via DVB-C, you can decide which network you want to receive your channels from. The normal DVB-C settings are derived from the selection of the location or network and do not need to be changed. Exactly which of the following settings are present is dependent on which network is selected.
Select network. OK Confirm selection.
Proceed to next step.
Select and adapt settings for DVB-C reception.
Scrambled stations
You can state whether coded stations are to be searched for in the search/update. Select yes to save all found scrambled stations. However, these stations can only be received in connection with a CA module and the appropriate Smart Card.
The handling of the CA module is described in the chapter System settings, section Extras – CA module.
Search method
If you select Frequency search here, a search is performed for all receivable stations. With Network search, only the stations which the networks supply are searched - either for all receivable networks or only for the particular network specified under Network ID.
Start frequency
The DVB stations are only searched for in the frequency range above the start frequency.
Network selection
Please state from which network you wish to receive your station.Note: The newly selected parameter must be confirmed with the button.
Unitymedia
Standard
Network selection (DVB-C)
Back with Proceed with
OK
Please specify whether you want to search for scrambled stations too.Note: Scrambled stations can only be received with an integrated CA module and additional card.
DVB-C settings
Scrambled stations
Search method
Start frequency
Network ID
Accept Logical Channel Number
no yes
Network search Frequency search
044.00 MHz
none 00000
no yes
Back with Proceed with
Settings
Network ID If you select none here, DVB signals of all current transmitter networks are searched automatically (recommended for most cable networks).If, on the other hand, you specify a certain network ID (necessary in the cable networks of some countries), only DVB signals of this broadcasting network are searched for automatically. Your cable provider has the information you need.
Accept Logical
Channel Number
In various countries, digital stations (DVB-C) are transmitted with a preset channel number per station, known as Logical Channel Numbers (LCN).
If you select yes here, these default channel slots will be used and the channels of the preferred signal source will be sorted as per LCN. The stations in the station list can no longer be shifted.
Proceed to next step.

Art 40-55User manual
22
Initial installation
Setting options for DVB-S reception:
If you have not selected Satellite (DVB-S/cable x) in step Connect antenna cable(s) in the initial installation, proceed to the next section Setting options for all types of reception.
Select network. If several networks are available via DVB-S, you can
decide which network you want to receive your channels from.
Proceed to next step.
Selecting the satellite system.
Specify how you receive which satellite(s) (single satellite or type of satellite system). Ask your dealer in this regard.
The normal DVB-S settings are derived from the selection of the location and do not need to be changed in most cases.
Single satellite
Reception of a single satellite via a connected LNC (LNB).
2 satellites on 22 kHz switchbox
Reception of two different satellites with two LNCs (LNBs) which are connected to the TV set by a 22 kHz switchbox.
2 satellites on toneburst
switch
Reception of two different satellites with two LNCs (LNBs) which are connected to the TV set by a toneburst switch.
Max. 4 satellites
on DiSEqC multiswitch
The TV set controls a DiSEqC multiswitch to which up to four LNCs (LNBs) for different satellites are connected.
DiSEqC one cable
communal system
Select setting if the TV set is connected to a DiSEqC single-cable system (according to EN 50494). Several Sat receivers can be connected to one Sat cable.
Network selection
Please state from which network you wish to receive your station.Note: The newly selected parameter must be confirmed with the button.
ASTRA LCN
Standard
Network selection (DVB-S)
Back with Proceed with
OK
Please define which satellites you receive or which satellite equipment you use.
Select satellite installation
Indietro con Avanti con
Single satellite
2 satellites on 22 kHz switchbox
2 satellites on toneburst switch
Max. 4 satellites on DiSEqC multiswitch
DiSEqC one cable communal system
Other communal installation
Select satellite
installation
other communal installation
Select setting if the TV set is connected to a single-cable system (without DiSEqC). Several Sat receivers can be connected to one Sat cable. Contrary to a DiSEqC one cable communal system there are restrictions in the range of certain reception frequencies in "common" single-cable community systems.
Proceed to next step.
The rest of the initial installation wizard routine depends on the selected satellite system in step Select satellite installation.
The different satellite systems are described in the following sections of initial installation.

Art 40-55User manual
23
Initial installation
Setting options for the satellite system (single satellite):
Select satellite, OK Confirm selection.
Proceed to next step.
Select Dual band (low/high) or Single band. Here you specify if you use a Dual Band (Universal)
LNB or a Single LNB.
Proceed to next step.
Set LNB frequencies. OK Adopt settings.
The setting of the LNB frequency is only called when you have used the setting Single band in step Dual / single band.
Normally, you do not need to change the values for high and low band, unless the LNC (LNB) of your satellite system uses a different oscillator frequency (important for the frequency display).
Proceed to next step.
Proceed to section Setting options for DVB-S reception (continued).
Optus D1160°E
Türksat 42°E
Hellas Sat2 39°E
Eutelsat 36A 36°E
Eutelsat 28A 28,5°E
ASTRA2 28,2°E
ASTRA3 23,5°E
Eutelsat 5 West A 5°W
Nilesat 7°W
Eutelsat 7 West A 7,2°W
Eutelsat 8 West A 8°W
Eutelsat 12 West A 12,5°W
Telestart12 12,5°W
Intelsat901 18°W
ASTRA1 19,2°E
Eutelsat 16A 16°E
Hot Bird 13°E
Eurobird 9A 9°E
Eurobird 7A 7°E
ASTRA4A 4,8°E
Thor/Intelsat10-02 0,8
Select satellites
Please specify here which satellite you receive.Note: The newly selected parameter must be confirmed with the button.
Back with Proceed with
OK
Select single satellite
Here, please specify whether you are using a Dual Band (Universal) LNB or a Single Band LNB.
Dual/single band (ASTRA1 19,2°E)
Dual band (low/high) Single band
Back with Proceed with
Dual/single band
Please specify the oscillator frequency for your LNB.Note: The newly selected parameter must be confirmed with the button.
LNB frequencies
ASTRA1 19,2°E low Band 9750 MHz 10000 MHz 10200 MHz 10600 MHz
Back with Proceed with
OK
LNC frequencies
Setting options for the satellite system (2 satellites on 22 kHz switchbox / 2 satellites on toneburst switch):
Mark Satellite 1 / Satellite 2, select satellite.
OK Adopt settings.
Proceed to next step.
Set LNB frequencies. OK Adopt settings.
Normally, you do not need to change the values unless the LNC (LNB) of your satellite system uses a different oscillator frequency (important for the frequency display).
Proceed to next step.
Proceed to section Setting options for DVB-S reception (continued).
Thor/Intelsat10-02 0,8
Eutelsat 5 West A 5°W
Nilesat 7°W
Eutelsat 7 West A 7,2°W
Eutelsat 8 West A 8°W
Eutelsat 12 West A 12,5°W
Telestart12 12,5°W
ASTRA3 23,5°E
ASTRA1 19,2°E
Eutelsat 16A 16°E
Hot Bird 13°E
Eurobird 9A 9°E
Eurobird 7A 7°E
ASTRA4A 4,8°E
Select satellites
Please select satellite 1 and satellite 2.Note: The newly selected parameter must be confirmed with the button.
Back with Proceed with
OK
none
Optus D1160°E
Türksat 42°E
Hellas Sat2 39°E
Eutelsat 36A 36°E
Eutelsat 28A 28,5°E
ASTRA2 28,2°E
Satellit 1 Satellit 2
Satellite selection
Please select the LNB frequency for the Low Band.Note: The newly selected parameter in each case must be confirmed with the button.
ASTRA1 19,2°E Low Band 9750 MHz 10000 MHz 10200 MHz 10600 MHz
Hot Bird 13°E Low Band 9750 MHz 10000 MHz 10200 MHz 10600 MHz
LNB frequencies
OK
Back with Proceed with
LNB frequencies
Please specify the oscillator frequency/frequencies of your LNB.Note: The newly selected parameter in each case must be confirmed with the button.
ASTRA1 19,2°E low band 9750 MHz 10000 MHz 10200 MHz 10600 MHz
ASTRA1 19,2°E high band 10600 MHz 10750 MHz 11000 MHz 11250 MHz
Hot Bird 13°E low band 9750 MHz 10000 MHz 10200 MHz 10600 MHz
Hot Bird 13°E high band 10600 MHz 10750 MHz 11000 MHz 11250 MHz
OK
Back with Proceed with
LNC frequency
(22 kHz Switch box)
LNC frequencies (Toneburst
switch)

Art 40-55User manual
24
Initial installation
Setting options for the satellite system (max. 4 satellites on DiSEqC multiswitch):
Select and adapt settings for the DiSEqC multiswitch.
OK Adopt settings.
Repeat rate The refresh rate determines how often a DiSEqC command is output. A refresh is only necessary with cascaded systems.
Control voltage
The control voltage controls the switching of the polarisation level (horizontal/vertical) in non-DiSEqC capable components (e.g., control of single LNBs via DiSEqC multiswitch).
22kHz signal The 22 kHz signal controls the switching between high and low band in the Band setting. The Position setting controls the selection of the satellites in non-DiSEqC capable components.
Toneburst The Toneburst controls the selection of the satellites in non-DiSEqC but Toneburst capable components with the Position and Option settings.
Proceed to next step.
Mark Satellite 1 ... Satellite 4, Select satellite.
OK Adopt settings.
Proceed to next step.
With the refresh rate you determine how often a DiSEqC command is output. This is onlynecessary in a cascaded system. Your system provider will bei able to tell you more about this.
Settings DiSEqC multiple switch
Back with Proceed with
Repeat rate none 1 2
Control voltage 13 / 18V off on
22kHz signal Band Position off
Toneburst off Position Option
DiSEqC multiple
switch
Thor/Intelsat10-02 0,8
Eutelsat 5 West A 5°W
Nilesat 7°W
Eutelsat 7 West A 7,2°W
Eutelsat 8 West A 8°W
Eutelsat 12 West A 12,5°W
Telestart12 12,5°W
ASTRA3 23,5°E
ASTRA1 19,2°E
Eutelsat 16A 16°E
Hot Bird 13°E
Eurobird 9A 9°E
Eurobird 7A 7°E
ASTRA4A 4,8°E
Select satellites
Please select satellite 1 to satellite 4.Note: The newly selected parameter must be confirmed with the button.
Back with Proceed with
OK
none
Optus D1160°E
Türksat 42°E
Hellas Sat2 39°E
Eutelsat 36A 36°E
Eutelsat 28A 28,5°E
ASTRA2 28,2°E
Satellit 1 Satellit 2 Satellit 3 Satellit 4
Satellite selection
.
Set LNB frequencies. Normally, you do not need to change the values. OK Adopt settings.
Proceed to next step.
Proceed to section Setting options for DVB-S reception (continued).
. LNB frequencies
Please select the LNB frequencies for both High and Low Bands.Note: The newly selected parameter in each case must be confirmed with the button.
ASTRA1 19,2°E low band 9750 MHz 10000 MHz 10200 MHz 10600 MHz
ASTRA1 19,2°E high band 10600 MHz 10750 MHz 11000 MHz 11250 MHz
Hot Bird 13°E low band 9750 MHz 10000 MHz 10200 MHz 10600 MHz
Hot Bird 13°E high band 10600 MHz 10750 MHz 11000 MHz 11250 MHz
Eutelsat W2 16°E low band 9750 MHz 10000 MHz 10200 MHz 10600 MHz
Eutelsat W2 16°E high band 10600 MHz 10750 MHz 11000 MHz 11250 MHz
Türksat 42°E low band 9750 MHz 10000 MHz 10200 MHz 10600 MHz
Türksat 42°E high band 10600 MHz 10750 MHz 11000 MHz 11250 MHz
OK
Back with Proceed with
LNC frequencies

Art 40-55User manual
25
Initial installation
Setting options for the satellite system (DiSEqC one cable communal system):
Select One channel or Two channels.
The number of system channels can be selected only when just one DVB-S antenna cable is used when selecting antennas.
Here you specify if you use one or two transmission channels in your one cable communal system.
In case of two channels - as far as they are available in your system - different stations can be simultaneously viewed on the main picture and on PIP.
You get more information on your system from your dealer.
Proceed to next step.
Select DiSEqC single cable communal installation.
Proceed to next step.
Select satellites from list, OK Confirm selection.
Proceed to next step.
Number of system
channel used
Number of system channels used
One channel Two channels
Do you wish to use one or two transmission channels in your single cable communalinstallation? With two channels - provided they are available to you from the installation - itis possible to watch different stations at the same time in the main screen and in the PIP.
Retour avec Continuer avec
User defined DELTA SUM-918 KATHREIN EXR-501
DELTA SUM-514 DELTA SUM-928 KATHREIN EXR-551
DELTA SUM-516 DELTA MSU-50x KATHREIN EXR-552
DELTA SUM-518 DELTA MSU-90x/170x KATHREIN EXR-154
Select DiSEqC single cable communal installation
Please enter here which DiSEqC single cable system you are using. The following setting parameters of your system are then adapted accordingly.
Back with Proceed with
DiSEqC one cable
communal installation
Thor/Intelsat10-02 0,8
Eutelsat 5 West A 5°W
Nilesat 7°W
Eutelsat 7 West A 7,2°W
Eutelsat 8 West A 8°W
Eutelsat 12 West A 12,5°W
Telestart12 12,5°W
ASTRA3 23,5°E
ASTRA1 19,2°E
Eutelsat 16A 16°E
Hot Bird 13°E
Eurobird 9A 9°E
Eurobird 7A 7°E
ASTRA4A 4,8°E
Select satellites
Please specify here which satellite you receive.Note: The newly selected parameter must be confirmed with the button.
Back with Proceed with
none
Optus D1160°E
Türksat 42°E
Hellas Sat2 39°E
Eutelsat 36A 36°E
Eutelsat 28A 28,5°E
ASTRA2 28,2°E
OK
Satellite selection
.
Set LNB frequencies. Normally, you do not need to change the
values unless the LNC (LNB) of your satellite system uses a different oscillator frequency (important for the frequency display).
OK Adopt settings.
Proceed to next step.
Select and adjust settings for the DiSEqC single cable communal installation.
OK Adopt settings.
The manual registration must be made for both ANT SAT jacks when either two DVB-S antenna cables or two system channels are used.
Transmission channel
Select the desired transmission channel.
Transmission frequency
Select the corresponding transmission frequency.
PIN protection If your system is designed for it, it is possible to protect your used transmission data from use by other subscribers with a PIN.
Define/change PIN
Here you can determine and change the PIN for PIN protection. Only possible, when yes has been selected for PIN protection.
Proceed to next step.
Proceed to section Setting options for DVB-S reception (continued).
.
Please specify the oscillator frequency for the Low Band. High band frequency is auotm. adjustedNote: The newly selected parameter must be confirmed with the button.
LNB frequencies
ASTRA1 19,2°E low Band 9750 MHz 10000 MHz 10200 MHz 10600 MHz
ASTRA1 19,2°E high Band 10600 MHz 10750 MHz 11000 MHz 11250 MHz
Back with Proceed with
OK
LNB frequencies
Please log on to your DiSEqC single-cable system that is connected to the antenna input ANT SAT and specify the desired transmission channel and associated transmission frequency. Please also indicate whether your single-cable system has a broad frequency band instead of a division into high and low band. If your antenna system is designed for this, it is possible to protect your used transmission data from being used by other participants by having a PIN.Note: The newly selected parameter in each case must be confirmed with the button.
Transmission channel 1 2 3 4 5 6 7 8
Transmission frequency 1284 MHz 1400 MHz 1516 MHz 1632 MHz 1748 MHz
PIN protection Ja Nein
Define/change PIN 000
Manual registration (for socket ANT SAT)
OK
Back with Proceed with
Manual registration (for socket ANT SAT)

Art 40-55User manual
26
Initial installation
Setting options for the satellite system (other communal installation):
Select satellite. OK Confirm selection.
Proceed to next step.
Select and adapt settings.
LNC frequency
Normally, you do not need to change the values for high and low band, unless the LNC (LNB) of your satellite system uses a different oscillator frequency (important for the frequency display).
Supply voltage
If your set is connected to a single-cable system without external voltage supply, you can connect the antenna supply (13V or 18V / max. 500mA).
Proceed to next step.
Proceed to section Setting options for all types of reception.
Optus D1160°E
Türksat 42°E
Hellas Sat2 39°E
Eutelsat 36A 36°E
Eutelsat 28A 28,5°E
ASTRA2 28,2°E
ASTRA3 23,5°E
Eutelsat 5 West A 5°W
Nilesat 7°W
Eutelsat 7 West A 7,2°W
Eutelsat 8 West A 8°W
Eutelsat 12 West A 12,5°W
Telestart12 12,5°W
Intelsat901 18°W
ASTRA1 19,2°E
Eutelsat 16A 16°E
Hot Bird 13°E
Eurobird 9A 9°E
Eurobird 7A 7°E
ASTRA4A 4,8°E
Thor/Intelsat10-02 0,8
Select satellites
Please specify here which satellite you receive.Note: The newly selected parameter must be confirmed with the button.
Back with Proceed with
OK
Select single satellite
LNB frequency, supply voltage
ASTRA1 19,2°E 9750 MHz 10000 MHz 10200 MHz 10600 MHz
Supply voltage off 13V 18V
Please specify the oscillator frequency for your LNB.If your TV set is connected to a single cable system without an external power supply, youcan connect the antenna supply (13 or 18V/max. 350mA) with „13V“ or „18V“.
Back with Proceed with
LNB frequencies,
Supply voltage

Art 40-55User manual
27
Initial installation
Setting options for DVB-S reception (continued):
After you have made the previous settings, you should receive picture and sound of the selected satellites (only possible for Astra1 and HOTBIRD).
Proceed to next step.
Select and adapt settings.
If several satellites are received, the following settings must be made for every satellite. The type of settings available may differ depending on the selected satellite or network.
Scrambled stations
You can state whether coded stations are to be searched for in the search/update. Select yes to save all found scrambled stations. However, these stations can only be received in connection with a CA module and the appropriate Smart Card. Handling of the CA module is described in chapter System settings, section Extras – CA module.
Search method
If you select Frequency search here, a search is performed for all receivable stations. With Network search, from all receivable networks all the stations are searched which are supplied by these networks.
Depending on the selected network, this step might possibly be skipped.
Symbol rate The symbol rate is specified by the satellite provider and normally does not need to be changed.
Accept Logical
Channel Number
In various countries, digital stations (DVB-S) are transmitted with a preset channel number per station, known as Logical Channel Numbers (LCN).
If you select yes here, these default channel slots will be used and the channels of the preferred signal source will be sorted as per LCN. The stations in the station list can no longer be shifted.
Proceed to next step.
Proceed to section Setting options for all types of reception.
Test reception
You should now receive a picture and sound from the following satellite:
Astra1 19,2°E C/N Level
Otherwise, please adjust your antenna. If it is already correctly adjusted, please continue all the same, without receiving picture or sound for the moment.
Back with Proceed with
Settings
Please specify whether you want to search for scrambled stations too.Note: Scrambled stations can only be received with an integrated CA module and additional card.
Scrambled stations
Search method
Symbol rate
Accept Logical Channel Number
DVB-S settings (ASTRA1 19,2°E)
Back with Proceed with
no yes
Network search Frequency search
22000
no yes

Art 40-55User manual
28
Initial installation
continued on the next page
Setting options for all types of reception:
Select desired languages and alternative languages for subtitles and audio for DVB programmes.
Set up audio commentary for the visually impaired.
OK Confirm selection.
Proceed to next step.
You will see a list of the selected settings. You can go back step by step with the key to make any changes to the settings.
OK Start automatic search.
Now, the TV set searches for TV and radio stations.It searches successively for stations from the selected signal sources. The progress of search is shown by a progress bar.
In case of a repeated initial installation routine (via Home view under System settings Extras) all stored stations will be first deleted here.
The number of found TV stations is displayed.
Proceed to next step.
The number of found radio stations is displayed.
Proceed to next step.
You can preset the desired languages and reserve languages for subtitles and audio for DVB programmes here.
You may preset whether you would always like to hear a special tone for visually-impaired persons (if provided by the station), which describes the operation in more detail, with the aid of an audio commentary. In "System Settings -> Sound," you can set its volume in relation to the "normal" volume by means of the "Audio commentary volume."
Note: The newly selected parameter in each case must be confirmed with the button.
Subtitle and audio languages (DVB)
Subtitle (DVB) Audio (DVB) Audio commentary
Favoured language Alternative language
OK
Back with Proceed with
German Italian Czech Hungarian S
Englisch Spanish Greek Finnish T
French Dutch Polish Slovenian S
Subtitle and audio
languages (DVB only)
Your TV performs the following automatic search with the listed settings. If you wish to correct them, please scroll back.
Check search settings
Start automatic search Antenne Wizard Cancel
Back with
Adopt with
Location of TV set (UK) United KingdomSignal source(s) Cable analogue, DVB-T, DVB-C, DVB-SSatellite system Single satelliteSatellite(s) ASTRA1 19,2°E
OK
Check search
settings
The automatic station search and sort have been stopped.
1164 new TV station(s) has (have) been found.
Result TV
Proceed with
Info station search
.
Select Age-related lock. OK Confirm selection.
You can specify an age limit for your TV set here. DVB broadcasts which have an appropriate age identification are locked and can only be watched after entering the access code.
In some countries, the yes/no option does not exist for some channels, and a compulsory age check must be entered.
Proceed to next step.
The data capture for time and date is set to automatic ex factory. If time and date are automatically obtained via the receive path, no entry is necessary.
For more information, see the chapter System settings, section Control – Time and Date.
Proceed to next step.
.
If you enter an age restriction here, all DVB programmers are locked which have an appropriate age code and can only be watched by entering the access code.Note: The newly selected parameter must be confirmed with the button.
Age-related lock
Proceed with
No age-related lock Special security level
OK
Age-related lock
Please enter the date and time if none has been entered or if they are incorrect.
Time and date
Date 14.01.2015
Time 16:30:00
Back with Proceed with
Time and date

Art 40-55User manual
29
Initial installation
Select sound components. OK Confirm selection.
This selection indicates which sound components you want to use to hear your TV sound. Depending on the selection, the sound component wizard starts with which you can make further settings.
The sound component wizard is described in chapter System settings, section Connections – Sound components and can also be started at any time beyond the initial installation.
Proceed to next step.
Select option.
With the selection, specify whether you want to configure the available network adaptor now.
Configure now: Make settings for network adaptor and proxy server (see chapter System settings,section Multimedia / Network – Network settings).
Do not configure or configure later: Skip network adaptor configuration.
Proceed to next step.
Please specify here via which sound components you want to listen to your TV sound. If you select a "Speaker system", this must be connected to the DIGITAL AUDIO LINK socket on the back of the TV set (with an additional adapter if necessary).Note: The newly selected parameter must be confirmed with the button.OK
Back with Proceed with
Sound playback via ...
TV speakers
HiFi/AV amplifier
HiFi/AV amplifier or TV speakers (switchable)
Sound playback
via ...
Please specify if you wish to configure a network at this time. You can also perform this at amore convenient time later (via 'System settings->Multimedia->Netzworksettings->Networking').
Network configuration
Configure now Do not configure or configure later
Back with Proceed with
Network configuration
Select option.
When selecting Information on new software updates, your TV set checks at definite intervals whether a newer software than the one installed in the TV set is available in the Internet. A screen message appears when a new software update is found.
Back: Exit wizard.
The initial installation wizard is complete.
TV set as a monitorYou can also use your TV set just as a monitor, i.e. if you only use it with a PC. The tuner in the TV set cannot be used in this mode.
Select AV connection.
The selected AV connection is shown when switching the TV on.
Proceed to next step.
Initial setup continues with the Time and date setup.
Software-Update
Back with Finish wizard with
You have the option of performing a software update via the Internet. Please specify whether the TV set is to automatically inform you about newly available software.In accordance with the local laws and regulations, we would like to point out that set numbers, the installation location of your TV set, previous updates and the current software version will be processed and stored by an IT system, if you wish to perform software updates via the Internet. This data ensures that we are always able to offer you an optimum service. All data is treated as confidential.Note: you can change this setting at any time by selecting the following options: "System Settings -> Control->Software update -> via Internet"."
Inform about new software Do not inform
Inform about new software
HDMI 1
HDMI 2
HDMI 3
HDMI 4
PC IN
AVS
AV
VIDEO
Please specify which AV channel your TV set should switch on to.
Selection of Switch-on channel
Back with Proceed with

Art 40-55User manual
30
Home view
Home viewThe Home view is the central overview page for all of your TV set‘s operating modes.
The list of options on the left gives you access to the operating modes TV, Video, Audio/Radio, Photo and Web. By means of System settings you have access to more functions and you can configure your TV set.
The right part of the screen displays the favourites depending on the selected operating mode (see also right column) and the available sources.
The number of selectable items varies depending on the TV equipment, network connection, available media/media servers and connected gadgets.
Call Home view
HOME: Calling the Home view.
Select menu item / Favourite / Source, OK call.
Description of the individual sections/functions:
Home: Under the item Home all favourites of the different sections are summarized.
TV: You can access the TV favourites and a variety of sources such as Station lists, EPG, Timer) via the item TV.
See chapter TV for further information.
Video: The item Video gives you access to videos from local (USB, home network) and online sources.
See chapter Video for further information.
Audio/Radio: With item Audio/Radio you find music files from your local server(s) and USB storage media as well as from DVB and Internet radio.
See chapter Audio/Radio for further information.
Photo: Via menu item Photo you can view photos from your local media on your TV screen.
See chapter Photo for further information.
Web: Here you have access to multimedia content in the Internet (MediaNet) as well as a high-quality web browser.
See chapter Web for further information.
System settings: In menu item System settings you find the configuration menu of the TV set e.g., with settings for picture, sound, connections or sound components.
See chapter System settings for further information.
Das Erste HD
ProSieben
Loewe channel
ZDF HD
VOX
LUMAS
RTL Television
arte HD
YouTube
kabel eins
SAT.1ZDF HD
THE LIBERATION OF ART
Web
Photo
Audio/Radio
Video
TV
Home
System settings
Home view - Favourites You will find your favourites on the right of the individual operating modes.
By selecting the operating mode, the favourites are filtered accordingly. When selecting Home, the favourites of all operating modes are displayed together.
After an initial installation, some favourites will already be automatically created depending on the installation site of the TV set and of existing Internet links (e.g. TV stations, online links).
Creating favourites
In the operating modes of the TV set you can define the current object (e.g. station, music title, teletext page, website, photo, etc.) as favourite. In the selected operating mode, the active object will be added as favourite and placed at the end.
Create favourite.If there are more favourites than can be shown on one page, this will be indicated by rectangular symbols in the upper line of Home view. Example:
Three pages with favourites exist. The first page of them is indicated. Equivalent is the display with the symbols for the source selection.
P+/P– Scrolling through the individual pages.
Editing favourites
You can edit the existing favourites in Home view. Change the sequence of your favourites as you wish or delete favourites you do not need any more.
HOME: Calling the Home view.
Select the favourite to be changed.
MENU: Change favourite.Move favourite or delete it (see below).
Moving favourites
Move favourite to new position.
BACK: Finish procedure.
Deleting favourites
TEXT: Delete selected favourite.
BACK: Finish procedure.
Home view - SourcesTo the right of your favourites, if any, you will find the selection of sources in the individual operating modes.Depending on the operating mode, this can be, for example, different station lists (analogue, DVB-T, DVB-C, DVB-S, AV-list, extended station list), DVB radio, Internet radio, timer list, MediaNet, external USB storage devices, media servers on the network or the DR+ archive of the internal hard disk.
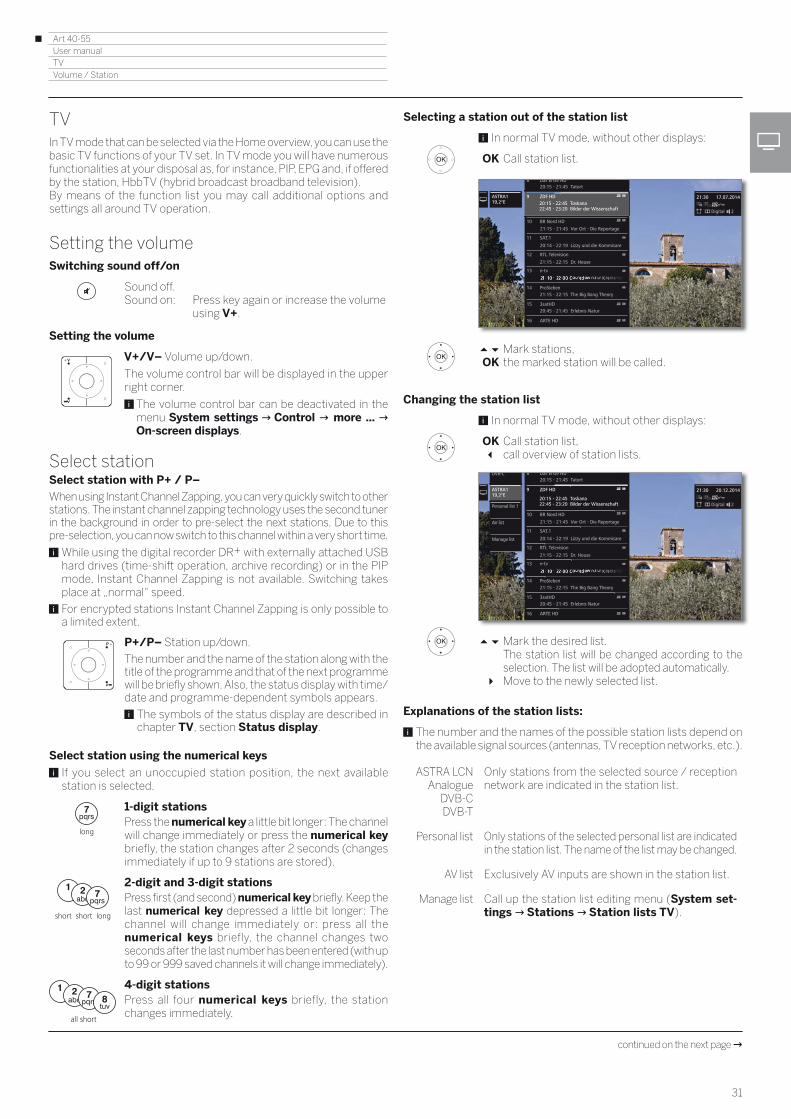
Art 40-55User manual
31
TVVolume / Station
TVIn TV mode that can be selected via the Home overview, you can use the basic TV functions of your TV set. In TV mode you will have numerous functionalities at your disposal as, for instance, PIP, EPG and, if offered by the station, HbbTV (hybrid broadcast broadband television). By means of the function list you may call additional options and settings all around TV operation.
Setting the volumeSwitching sound off/on
Sound off.Sound on: Press key again or increase the volume
using V+.
Setting the volume
V+/V– Volume up/down.
The volume control bar will be displayed in the upper right corner.
The volume control bar can be deactivated in the menu System settings Control more ... On-screen displays.
Select stationSelect station with P+ / P–
When using Instant Channel Zapping, you can very quickly switch to other stations. The instant channel zapping technology uses the second tuner in the background in order to pre-select the next stations. Due to this pre-selection, you can now switch to this channel within a very short time.
While using the digital recorder DR+ with externally attached USB hard drives (time-shift operation, archive recording) or in the PIP mode, Instant Channel Zapping is not available. Switching takes place at „normal“ speed.
For encrypted stations Instant Channel Zapping is only possible to a limited extent.
P+/P– Station up/down.
The number and the name of the station along with the title of the programme and that of the next programme will be briefly shown. Also, the status display with time/date and programme-dependent symbols appears.
The symbols of the status display are described in chapter TV, section Status display.
Select station using the numerical keys
If you select an unoccupied station position, the next available station is selected.
1-digit stationsPress the numerical key a little bit longer: The channel will change immediately or press the numerical key briefly, the station changes after 2 seconds (changes immediately if up to 9 stations are stored).
2-digit and 3-digit stationsPress first (and second) numerical key briefly. Keep the last numerical key depressed a little bit longer: The channel will change immediately or: press all the numerical keys briefly, the channel changes two seconds after the last number has been entered (with up to 99 or 999 saved channels it will change immediately).
4-digit stationsPress all four numerical keys briefly, the station changes immediately.
long
short short long
all short
Selecting a station out of the station list
In normal TV mode, without other displays:
OK Call station list.
Mark stations,OK the marked station will be called.
Changing the station list
In normal TV mode, without other displays:
OK Call station list, call overview of station lists.
Mark the desired list.The station list will be changed according to the selection. The list will be adopted automatically.
Move to the newly selected list.
Explanations of the station lists:
The number and the names of the possible station lists depend on the available signal sources (antennas, TV reception networks, etc.).
ASTRA LCNAnalogue
DVB-CDVB-T
Only stations from the selected source / reception network are indicated in the station list.
Personal list Only stations of the selected personal list are indicated in the station list. The name of the list may be changed.
AV list Exclusively AV inputs are shown in the station list.
Manage list Call up the station list editing menu (System set-tings Stations Station lists TV).
Digital 2
21:30 17.07.20149 ZDF HD
10 BR Nord HD
11 SAT.1
12 RTL Television
13 n-tv
14 ProSieben
15 3satHD
16 ARTE HD
8 Das Erste HD
ASTRA119,2°E 20:15 - 22:45 Toskana
22:45 - 23:20 Bilder der Wissenschaft
21:15 - 21:45 Vor Ort - Die Reportage
20:14 - 22:19 Lizzy und die Kommisare
21:15 - 22:15 Dr. House
21:15 - 22:15 The Big Bang Theory
20:45 - 21:45 Erlebnis Natur
20:15 - 21:45 Tatort
Digital 2
21:30 20.12.20149 ZDF HD
10 BR Nord HD
11 SAT.1
12 RTL Television
13 n-tv
14 ProSieben
15 3satHD
16 ARTE HD
8 Das Erste HD
ASTRA119,2°E
20:15 - 22:45 Toskana22:45 - 23:20 Bilder der Wissenschaft
21:15 - 21:45 Vor Ort - Die Reportage
20:14 - 22:19 Lizzy und die Kommisare
21:15 - 22:15 Dr. House
21:15 - 22:15 The Big Bang Theory
20:45 - 21:45 Erlebnis Natur
20:15 - 21:45 TatortDVB-C
AV list
Manage list
Personal list 1
continued on the next page

Art 40-55User manual
32
TVStation
Selecting stations by means of the expanded station list
In normal TV mode, without other displays:
OK Call station list, call function list.
Mark expanded station list, call expanded station list.
P+/P– Scrolling in the station list page by page.
Mark stations. OK The marked station will be called.
Or:
For numerical sorting: Enter the channel number. The marker will jump to the selected station.
OK The marked station will be called.
For alphabetical sorting: Enter the first letter. The first station for the specified letters is marked.
Mark the station. OK The marked station will be called.
Filter and sort options of the expanded station list
Using the on-screen buttons on the bottom line of the expanded station list you can filter and sort the station list by various options.
MENU: Switching between list and bottom line.
0..9 Numerical sorting of the station list.
A..Z Alphabetical sorting of the station list.
Searching This allows you to do targeted searches for stations. The station name is to be entered via the on-screen keyboard. The entry is described in chapter General information on the operation.
Signal source
Select the signal source, the stations of which are to be displayed in the extended station list (e.g., Analogue, DVB-C, DVB-T, ASTRA LCN, Personal station list, AV list).
All stations Here you can filter the content of the station list according to various criteria. Shall All Stations, only HD stations, stations that are Locked or Scrambled or Unscrambled, CI+ Protected stations be indicated.
13 ZDF.kultur HD
14 ZDFinfokanal HD
15 SAT.1 HD
16 RTL HD
17 ProSieben HD
18 VOX HD
19 kabel eins HD
20 SUPER RTL HD
21 N24 HD
22 TELE5 HD
23 SPORT1 HD
24 NICK/CC HD
1 Das Erste HD
2 ZDF HD
3 BR Nord HD
4 SAT.1
5 RTL
6 n-tv
7 ProSieben
8 3sat HD
9 ARTE HD
10 EinsPlus
11 Eurosport
12 ZDF Neo HD
2 ZDF HD
21:00-21:45Toskana
Expanded station list
A..Z < All stations >< ASTRA LCN >Search
Back
Selecting stations by personal lists
You can save your preferred stations in personal lists (e.g., for several users). Each personal list can contain up to 99 stations.
Personal list available (creating a new personal list via Manage list New personal list).
In normal TV mode, without other displays.
OK Call station list. Open overview of station lists.
Mark the desired personal list.The station list will be changed according to the selection. The list will be adopted automatically.
Move to the newly selected list.
Mark the station.OK The marked station will be called. Or:
Select station directly with numerical keys.
Explanation of the icons following the station names:
Locked station.
HDTV station.
DVB-T station (digital terrestrial via antenna).
DVB-C station (digital via cable).
DVB-S station (digital via satellite).
Scrambled station.
HistoryRecently selected stations are saved in History.
In normal TV mode, without other displays:
Yellow button: call History.
Select entry,OK call.
The last station can also be selected directly:Yellow button pressing longer: last station (1.
Digital 2
21:30 20.12.201411 ZDF HD
15 BR Nord HD
13 SAT.1
12 RTL Television
16 ProSieben
14 3satHD
10 Das Erste HDASTRA119,2°E
20:15 - 22:45 Unterwegs22:45 - 23:20 Bilder der Wissenschaft
21:15 - 21:45 Vor Ort - Die Reportage
20:14 - 22:19 Lizzy und die Kommisare
21:15 - 22:15 Dr. House
21:15 - 22:15 The Big Bang Theory
20:45 - 21:45 Erlebnis Natur
20:15 - 21:45 Tatort
Personal list 1
AV list
Manage list
ZDF HD
VOX
Das Erste HD
(1 Software version 2.1.x and higher.
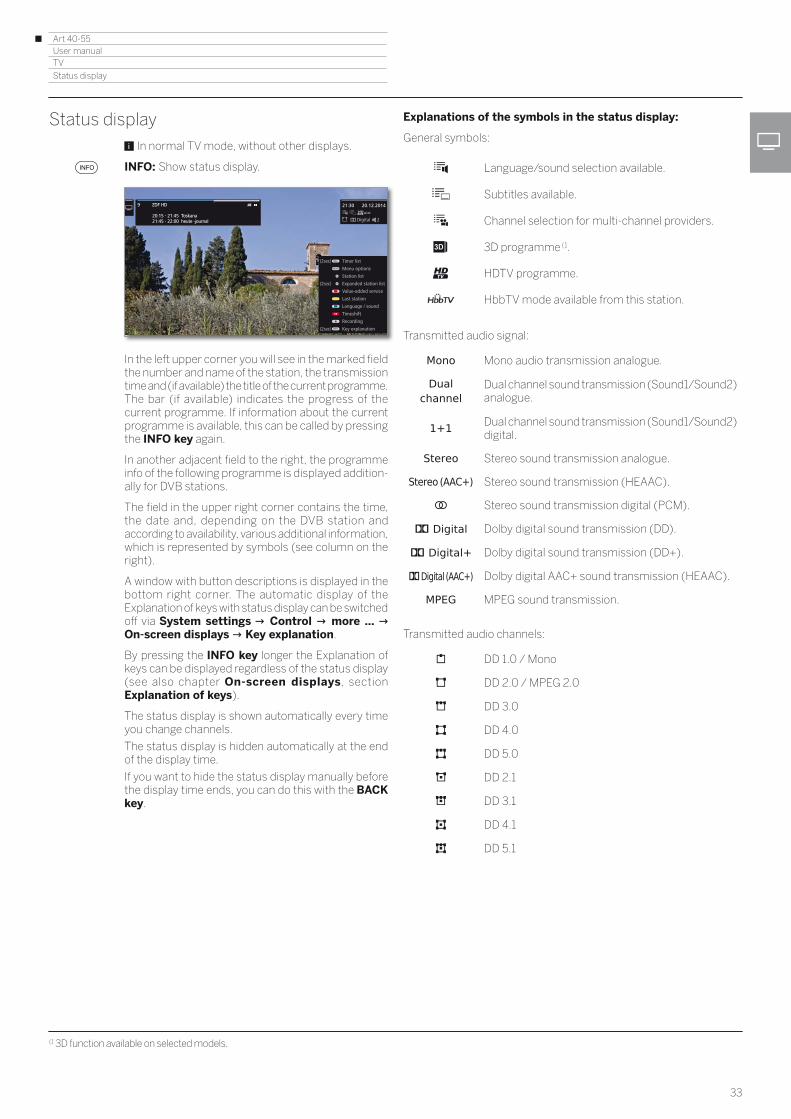
Art 40-55User manual
33
TV
Status display
Status display In normal TV mode, without other displays.
INFO: Show status display.
In the left upper corner you will see in the marked field the number and name of the station, the transmission time and (if available) the title of the current programme.The bar (if available) indicates the progress of the current programme. If information about the current programme is available, this can be called by pressing the INFO key again.
In another adjacent field to the right, the programme info of the following programme is displayed addition-ally for DVB stations.
The field in the upper right corner contains the time, the date and, depending on the DVB station and according to availability, various additional information, which is represented by symbols (see column on the right).
A window with button descriptions is displayed in the bottom right corner. The automatic display of the Explanation of keys with status display can be switched off via System settings Control more ... On-screen displays Key explanation.
By pressing the INFO key longer the Explanation of keys can be displayed regardless of the status display (see also chapter On-screen displays, section Explanation of keys).
The status display is shown automatically every time you change channels.
The status display is hidden automatically at the end of the display time.
If you want to hide the status display manually before the display time ends, you can do this with the BACK key.
Digital 2
21:30 20.12.20149 ZDF HD
20:15 - 21:45 Toskana 21:45 - 22:00 heute -journal
Timer list
Menu options
Station list
Expanded station list
Value-added service
Last station
Language / sound
Timeshift
Recording
Key explanation
(2sec)
(2sec)
(2sec)
Explanations of the symbols in the status display:
General symbols:
Language/sound selection available.
Subtitles available.
Channel selection for multi-channel providers.
3D programme (1.
HDTV programme.
HbbTV mode available from this station.
Transmitted audio signal:
Mono Mono audio transmission analogue.
Dual channel
Dual channel sound transmission (Sound1/Sound2) analogue.
1+1 Dual channel sound transmission (Sound1/Sound2) digital.
Stereo Stereo sound transmission analogue.
Stereo (AAC+) Stereo sound transmission (HEAAC).
Stereo sound transmission digital (PCM).
Digital Dolby digital sound transmission (DD).
Digital+ Dolby digital sound transmission (DD+).
Digital (AAC+) Dolby digital AAC+ sound transmission (HEAAC).
MPEG MPEG sound transmission.
Transmitted audio channels:
DD 1.0 / Mono
DD 2.0 / MPEG 2.0
DD 3.0
DD 4.0
DD 5.0
DD 2.1
DD 3.1
DD 4.1
DD 5.1
(1 3D function available on selected models.

Art 40-55User manual
34
TVFunction list / AV list
Function list (TV mode)The function list contains settings and additional options. Die individual List items will be briefly explained as follows:
The function list can be opened for the current station or the selected station list. Depending on this, some list items may possibly not be available.
Function list for the current station:
MENU: Call function list.
Function list for the selected station list:
OK Call station list, call function list.
Select function, OK call.
Explanations of the symbols in the function list:
Open Expanded station list.
Call up Language / sound. The available sound formats and their designations depend on the programme being broadcast.
Menu item will only be indicated when several languages/sound tracks are available.
Call up Subtitles selection. Menu item will only be indicated when subtitles are available.
Open recording dialogue to programme a Recording.
Set Sound mode (number of speakers).
Call up Sound settings.
Call up and adjust Headphone volume.
Call up Picture settings.
Activate PIP.
Move picture vertically up/down.
Switch screen off.Switching the screen ON again: OK, BACK or green coloured key.
The menu item is only shown when DVB radio, Internet-radio or an AV source is active.
Add current station as Favourite to Home view.
Changes the Sorting between numerically and alphabetically. Menu item is displayed only when the function list for the station list is opened (see above).
9 ZDF HD
20:15 - 21:45 Toskana 21:45 - 22:00 heute -journal
Recording
Subtitles
Sound mode
You can open the entire station list in full screen mode here. It can be filtered in accordance with specific criteria.
Explanations of the symbols in the function list (continued):
Call Edit station list.Delete stations, shift stations, restore deleted stations.
Menu item is displayed only when the function list for the station list is opened (see left column).
Call Rename.The name of analogue stations and the designations of the connections in the AV list can be changed.
Call Store stations.Add current station to a favourites list.
The menu item is only shown, when at least one favourites list is available.
AV list (AV Source)Selecting the AV source via the AV list
In normal TV mode, without other displays.
Open station list AV list.
Select desired connection,OK switch over.
If the selected AV source provides a signal (picture), it should be visible now.
When selecting VIDEO, you switch to the signal source Cable analogue, channel E36. The TV set can display the signal from an external source via the antenna input TV ANT.
Only playback of the audio signal from the AV source (screen is off)
To play only the sound of a connected media player (e.g. MP3 player), the AV sources can be selected so that the screen goes blank.
Switching off the screen reduces the power consumption of the TV set.
Open station list AV list.
Select desired connection,OK press at least for two seconds.
Selecting the AV source via the station list
In normal TV mode, without other displays.
OK Call station list. Call overview of station lists.
Select AV list.The AV list will be displayed.
Move to the AV list.
Select desired AV source, OK switch to AV source.
2 HDMI 22 HDMI 2
1 HDMI 11 HDMI 1
3 HDMI 33 HDMI 3
4 HDMI 44 HDMI 4
5 PC IN5 PC IN
6 AVS
AV list

Art 40-55User manual
35
TV
Electronic Programme Guide
Electronic Programme Guide – EPGEPG stands for Electronic Programme Guide and provides you with on-screen programme details. With the system, as with a printed programme guide, you can learn about the current programme. In addition programmes can be sorted according to certain topics, memorised, and also recordings can be programmed.
Starting and ending EPG
EPG: Switch EPG on / off.
EPG is only available for DVB stations.
The first time you start EPG, a wizard will start that guides you through the necessary presettings.
Depending on the number of stations selected for EPG, it may take some time until the programme information is displayed.
EPG wizard
In this dialogue you decide, for which station EPG data should be collected and displayed. With the number of stations the time for nocturnal data acquisition will increase. We recommend, also for reasons of distinctness to select only those stations, which you receive regularly.
When the EPG is started for the first time:
Continue in the wizard and call up the EPG Station selection.
MENU: Switch between the station list and the on-screen buttons in the bottom line.
Changing the station list:
Mark station list in the bottom line, OK select desired station list.
Select station for EPG:
Mark the the single station, OK Select / deselect station for EPG.
For display in the EPG, the selected stations are marked with a check mark .
Or:
Select Mark all. OK All stations of the station list will be activated for EPG.
Or:
Select Unmark all. OK No station is activated for EPG.
18:00 - 18:50Verbotene Liebe
10
11
1212
13
1414
15
19:25 - 20:15Küstenwache
17:58 - 18:29Die Simpsons
16:55 - 17:55taff
18:00 - 18:50SOKO Wismar
19:05 - 19:40Alles was zählt
17:30 - 18:00Unter uns
19:15 - 19:59push - das SAT.1 Magazin
18:29 - 18:58Die Simpsons
18:58 - 20:14Galileo
18:00 - 18:30 18:30 18:45
19:00 - 20:0018:00 - 19:0017:00 - 18:00
17:15 - 18:00Brisant
17:46 18:00 19:00 20:00
DVB-C
10
11 19:40 - 20:15
18:31 - 19:1517:59 - 18:3117:29 - 17:59
18:50 - 19:45
Today News
Meaning of the colours in the EPG
The coloured labels indicate the genre of the respective programme. When filtering with genre selection in the header, the programmes of the selected genre will be highlighted.
Movies
News
Show
Sports
Child
Music
Arts
Social
Education
Hobby
Series
EPG Operation
In the left column there is a list of stations of the selected source/sta-tion list (e.g. DVB-C, personal list). With the on-screen buttons in the header of the EPG you can select the day of the programme preview, change the source and filter the programmes as to their genre.
P+/P– Scrolling in the station list page by page.
Scrolling in the station list. Scrolling through the programmes.
OK short: (highlighted TV programme is running): EPG will be closed and the programme is selected.
short: (highlighted programme not yet started): Detailed information on the selected programme will be called.
long: Change preview image to the station of the highlighted programme.
INFO: short: Call detailed information on the selected programme (see next page).
long: show Explanation of keys.
REC: Schedule the recording of the highlighted programme.
Control in header:
MENU: Go to header.
Mark selection of date, source, genre.OK Accept changes.
MENU: Move from date to genre or from genre to station list.

Art 40-55User manual
36
TVElectronic Programme Guide
Calling additional information about the programmes
INFO: Call up detailed information.
If there is more information on the selected programme, it will be indicated here. You find further information on the indicated programme in the bottom line:
View Watch selected TV programme.
The menu item is only available when the selected programme is on the air.
Memorise Memorise the programme for later watching / listening. For further information see next page.
This menu item is only available when the selected programme has not started yet.
Depending on the presetting the TV set will switch on by itself when it is in standby.
Delete memo
For programmes being memorised you can also delete the memo.
Timer list Call up timer list.
(Recording)
Schedule the recording of the selected programme for a time.
(Favourite)Schedule the recording of the selected programme for a time. Additionally, an entry to the Home favourites will be added as soon as the recording starts.
5 ProSieben 16:45 20.12.14
16:30-16:58 How I Met Your Mother
Eine Halloween-Party auf dem Dach seines Wohnhauses steht bevor, und
auch dieses Jahr lässt sich Ted das Ereignis nicht entgehen. Doch eigentlich
hofft er, ein Mädchen, das er vor vier Jahren dort getroffen hat, endlich
wiederzusehen.
Barney findet die Idee völlig dämlich und versucht, seinen Freund zu einer
Party bei Victoria‘s Secret zu überreden. Ted gibt die Hoffnung nicht auf,
doch dann taucht spät abends eine ganz andere Frau auf dem Dach auf
und gesellt sich zu ihm ...
5 ProSieben
Detailed info Back
View Timer list
Switching to the current broadcast
Mark current broadcast. OK press briefly: switch to current broadcast.
The electronic programme guide will be closed.
Programme preview
Mark desired station in the station list. OK press long: show preview.
In the top left window, the current programme of the selected station is displayed now.
Jumping to time or station
The marking must be in the station list.
Press the numerical key (0 through 9). The window Select Time/Station is shown.
Select time or station, Enter numbers.
When entering a time, you always jump to the next occurrence of the entered time (24-hour window). If the time is already passed today, the time entered will appear on the following day.
Always enter five digits for station presets, e.g. 00001 for preset 1 or 00134 for preset 134.
OK Activate jump.
18:00 - 18:50Verbotene Liebe
10
11
1212
13
1414
15
19:25 - 20:15Küstenwache
17:58 - 18:29Die Simpsons
16:55 - 17:55taff
18:00 - 18:50SOKO Wismar
19:05 - 19:40Alles was zählt
17:30 - 18:00Unter uns
19:15 - 19:59push - das SAT.1 Magazin
18:29 - 18:58Die Simpsons
18:58 - 20:14Galileo
18:00 - 18:30 18:30 18:45
19:00 - 20:0018:00 - 19:0017:00 - 18:00
17:15 - 18:00Brisant
17:46 18:00 19:00 20:00
DVB-C
10
11 19:40 - 20:15
18:31 - 19:1517:59 - 18:3117:29 - 17:59
18:50 - 19:45
All genresToday Select time
22:00
?????

Art 40-55User manual
37
TV
Electronic Programme Guide
Recording a programme via EPG
You can programme timer recordings of TV programmes conveniently using the EPG.
Select the desired broadcast.
RECORD key: Programme timer recording for the TV programme.
Timer data dialogue is opened.
Check the timer data and update it if necessary (e.g. directory, start, end, recording type).
See chapter TV,section Timer for explanations of the setting options in the Timer data menu.
Select Record station, OK adopt.
In the EPG a recording symbol is placed behind the title of the programme.
Memorising a programme via the EPG
A programme that has not started yet can be memorised. For memo-rised programmes, the TV set will ask at the beginning of a programme if it should change the channel accordingly or switch on from the stand-by mode if this is activated in the menu System settings Control EPG TV on when memorised.
Mark the desired programme. OK Call up detailed information.
Mark Memorise, OK Memorise programme.
In the EPG, a memorise symbol is placed behind the title of the programme .
After a software update, it is likely that Memos of programmes are deleted. After a software update, please check your timer list (see chapter TV, section Timer).
18:00 - 18:50Verbotene Liebe
10
11
1212
13
1414
15
19:25 - 20:15Küstenwache
17:58 - 18:29Die Simpsons
16:55 - 17:55taff
18:00 - 18:50SOKO Wismar
19:05 - 19:40Alles was zählt
17:30 - 18:00Unter uns
19:15 - 19:59push - das SAT.1 Magazin
18:29 - 18:58Die Simpsons
18:58 - 20:14Galileo
18:00 - 18:30 18:30 18:45
19:00 - 20:0018:00 - 19:0017:00 - 18:00
17:15 - 18:00Brisant
17:46 18:00 19:00 20:00
DVB-C
10
11 19:40 - 20:15
18:31 - 19:1517:59 - 18:3117:29 - 17:59
18:50 - 19:45
Today News
Recorder
Programme
Folder
Station
Date
Beginning
End
Recording type
Timer data - Recording
Record station
Back
Data part 1 Data part 2
Once only Mon-Fri Daily Weekly Series
DR+
18:00 - 18:50 Verbotene Liebe
Main folder
Das Erste HD
27.01.2015
18:00
18:50
Adapting the EPG Overview
The options to be selected are in the header, if not, press MENU key.
Select day or genre.OK Confirm selection.
Example If you look for the next newscast select and news under genre. Newscasts will be highlighted.
Adapting the EPG view
PIP: Switch in EPG view between standard and compact view.
Standard view:
Compact view:
Configuring EPG
You can find the EPG settings in the chapter System settings,section Control – EPG).
18:00 - 18:50Verbotene Liebe
10
11
1212
13
1414
15
19:25 - 20:15Küstenwache
17:58 - 18:29Die Simpsons
16:55 - 17:55taff
18:00 - 18:50SOKO Wismar
19:05 - 19:40Alles was zählt
17:30 - 18:00Unter uns
19:15 - 19:59push - das SAT.1 Magazin
18:29 - 18:58Die Simpsons
18:58 - 20:14Galileo
18:00 - 18:30 18:30 18:45
19:00 - 20:0018:00 - 19:0017:00 - 18:00
17:15 - 18:00Brisant
17:46 18:00 19:00 20:00
DVB-C
10
11 19:40 - 20:15
18:31 - 19:1517:59 - 18:3117:29 - 17:59
18:50 - 19:45
Today News
Verbotene Liebe
10 ZDF HD
11 ARD HD
15 ProSieben
17 SPORT1
19 SIXX
13 VOX
14 Sat. 1
16 kabel eins
18 RTL2
Küstenwache
Die Simpsons
SOKO Wismar
Alles was zähltUnter uns
push - das SAT.1 Magazin
Die Simpsons Galileo
17:46 18:00 19:00 20:00
Navy CIS
taff
X-Diaries Köln 50667
mieten, kaufen, wohnen
Berlin - Tag & Nacht
Private Practice Grey‘s Anatomy Top Dog ModelEmergency Room
Brisant
DVB-C All genresToday

Art 40-55User manual
38
TV
Teletext
TeletextYour TV set supports the two operating systems TOP text and FLOF. Up to 2000 pages are stored in order to get quick access.
Starting and ending Teletext
TEXT: Call teletext.
The function of the TEXT key can be set under System settings Control more ... HbbTV Function of the TEXT key.
The factory default is Standard teletext first (see also chapter System settings, section Control – HbbTV).
TEXT: Switching between Standard Teletext and MediaText.
Pressing the BACK key ends Teletext.
Key functions for Standard Teletext operation
INFO press longer: Show Explanation of keys.
IINFO or BACK: Hide Explanation of keys.
0-9: Directly enter the page number.
0 AV: Stop self changing pages.
9: Zoom in the page (press several times).
Page selection with the coloured keys
Red key: One page back or back to previous page (depending on Teletext provider).
Green key: Advance one page.
Yellow key: To next topic.
Blue key: To next range of topics.
The coloured bars (with TOP text) or the coloured writing (with FLOF text) in the last to bottom line show you which colour button you need to use to select which topic areas and topics.
Page selection with P+/P–
P+ call next Teletext page.P– call previous Teletext page.
Tagesschau.... 101 Kultur........ 400Wirtschaft.... 170 Wissen........ 500Sport..... 200/600 Ratgeber...... 530Programm...... 300 Inhalt (A-Z).. 790
Syrien: Botschafter läuft über .. 107EuGH hebt Saatgut-Verbot auf .... 121Bundeswehr:Feldpostaffäre beendet 112Neun Tote bei Lawinenunglück ..... 142
Live: Ticker, 11.Etappe der Tour. 666Galatasaray will Hamit Altintop.. 211NBA: Kaman spielt mit Nowitzki... 220
100 100 ARDtext Do 20.12.14 14:12:42
ARD Text
– + Wirtschaft Nachrichten
14:00 Tagesschau14:10 ARD-Mittagsmagazin ..... 31215:00 Tagesschau
Das Erste Back
Additional page selection possibilities
First possibility:
INFO: Call overview page 100.
Second possibility:
Directly enter the page number.
Third possibility:
The page includes 3-digit page numbers.
Mark desired page number.
OK Call page.
Fourth possibility:
The page consists of several sub-pages, indicated by the symbol and the arrows in the bottom line.
Go to bottom line.
Mark or ,OK select previous / next sub-page.
The number of the current sub-page is shown between the arrows.
Explanation of the symbols in the Teletext bottom line
Symbol (icon)
Remote control key
Description
– For Teletext pages with sub-pages: Show previous sub-page.
– For Teletext pages with sub-pages: Show next sub-page.
Hide TV picture (Teletext as full screen).
Insert TV picture (Split screen Teletext/TV Picture).
– Activate Newsflash mode.
– Show hidden information on the Teletext page.
– Hide information on the Teletext page again.
Add current Teletext page to the favourites in Home view.
Call function list with Teletext settings.
Tagesschau.... 101 Kultur........ 400Wirtschaft.... 170 Wissen........ 500Sport..... 200/600 Ratgeber...... 530Programm...... 300 Inhalt (A-Z).. 790
Syrien: Botschafter läuft über .. 107EuGH hebt Saatgut-Verbot auf .... 121Bundeswehr:Feldpostaffäre beendet 112Neun Tote bei Lawinenunglück ..... 142
Live: Ticker, 11.Etappe der Tour. 666Galatasaray will Hamit Altintop.. 211NBA: Kaman spielt mit Nowitzki... 220
100 100 ARDtext Do 20.12.14 14:12:42
ARD Text
– + Wirtschaft Nachrichten
14:00 Tagesschau14:10 ARD-Mittagsmagazin ..... 31215:00 Tagesschau
Das Erste Back

Art 40-55User manual
39
TVTeletext
Newsflash
Some text pages, e.g., live tickers, will be permanently updated. In order to keep track of changes and also to be able to watch the TV programme at the same time you may hide the Teletext temporarily and can still remain informed on updates of the page.
Mark Newsflash, OK confirm.
The future behaviour of the News function depends on the type of the Teletext page:
In case of Full screen Teletext pages the Teletext will be hidden. In the bottom right corner, there will be a symbol for the activated news function.
A screen message appears when the contents of the page has changed.
Show updated page,
Select yes or no. OK Confirm selection.
In case of Teletext pages which cover only a part of the Teletext page, e.g., News tickers, the respective part will be faded in and permanently updated.
End News function
OK show Teletext again.
Or:
BACK: exit Teletext.
The Teletext page has been updated. Would you like to see it now?
yes no
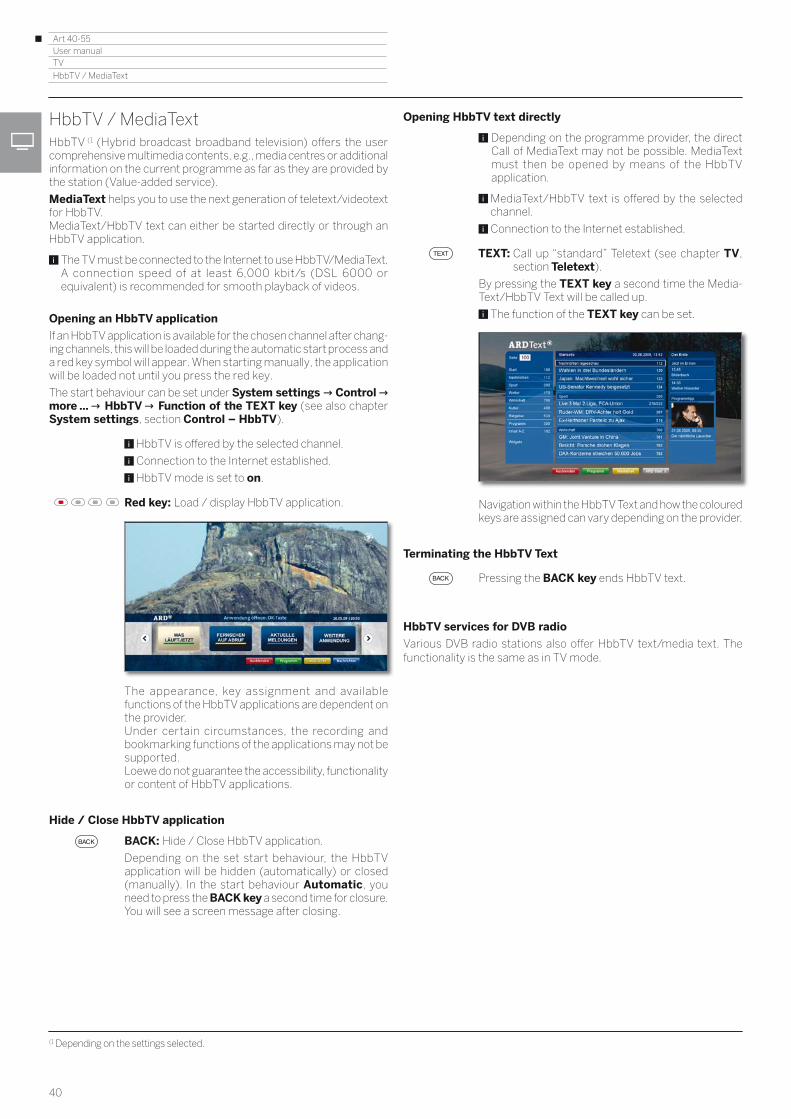
Art 40-55User manual
40
(1 Depending on the settings selected.
TV
HbbTV / MediaText
HbbTV / MediaTextHbbTV (1 (Hybrid broadcast broadband television) offers the user comprehensive multimedia contents, e.g., media centres or additional information on the current programme as far as they are provided by the station (Value-added service).
MediaText helps you to use the next generation of teletext/videotext for HbbTV. MediaText/HbbTV text can either be started directly or through an HbbTV application.
The TV must be connected to the Internet to use HbbTV/MediaText. A connection speed of at least 6,000 kbit/s (DSL 6000 or equivalent) is recommended for smooth playback of videos.
Opening an HbbTV application
If an HbbTV application is available for the chosen channel after chang-ing channels, this will be loaded during the automatic start process and a red key symbol will appear. When starting manually, the application will be loaded not until you press the red key.
The start behaviour can be set under System settings Control more ... HbbTV Function of the TEXT key (see also chapter System settings, section Control – HbbTV).
HbbTV is offered by the selected channel.
Connection to the Internet established.
HbbTV mode is set to on.
Red key: Load / display HbbTV application.
The appearance, key assignment and available functions of the HbbTV applications are dependent on the provider. Under certain circumstances, the recording and bookmarking functions of the applications may not be supported. Loewe do not guarantee the accessibility, functionality or content of HbbTV applications.
Hide / Close HbbTV application
BACK: Hide / Close HbbTV application.
Depending on the set start behaviour, the HbbTV application will be hidden (automatically) or closed (manually). In the start behaviour Automatic, you need to press the BACK key a second time for closure. You will see a screen message after closing.
Opening HbbTV text directly
Depending on the programme provider, the direct Call of MediaText may not be possible. MediaText must then be opened by means of the HbbTV application.
MediaText/HbbTV text is offered by the selected channel.
Connection to the Internet established.
TEXT: Call up “standard” Teletext (see chapter TV, section Teletext).
By pressing the TEXT key a second time the Media-Text/HbbTV Text will be called up.
The function of the TEXT key can be set.
Navigation within the HbbTV Text and how the coloured keys are assigned can vary depending on the provider.
Terminating the HbbTV Text
Pressing the BACK key ends HbbTV text.
HbbTV services for DVB radio
Various DVB radio stations also offer HbbTV text/media text. The functionality is the same as in TV mode.

Art 40-55User manual
41
TVPIP
Picture in Picture (PIP)The concurrent display of two different images is referred to as Picture in Picture.
Starting and ending PIP mode
PIP: Show/hide PIP display.
Simultaneous display of... (yes) / – (no)
a digitally broadcast channel (DVB-T/C/S) and picture from an AV source (e.g., AV, HDMI1)
a channel via digital satellite (DVB-S) and a channel via analogue cable television
a digitally broadcast channel DVB-T/C and a channel over analogue cable television
a digitally broadcast channel over DVB-T/C and a satellite broadcaster (DVB-S)
two channels over analogue cable television –
two digitally broadcast channels (DVB-T/C/S)
a free-to-air and an encrypted digitally broad-cast channel (DVB-T/C/S)
two encrypted channels
an SDTV channel and an HDTV channel (DVB-C/S)
two HDTV channels (DVB-C/S)
Picture change and station selection are restricted during recording.
Selecting the station of the PIP picture
If the frame colour of the PIP picture is not green, press the green key.
Select the station as usual. (see also chapter TV, section Select station).
Select the station for the main picture
If the frame colour of the PIP picture is not white, press the green key.
Select the station as usual. (see also chapter TV, section Select station).
Coloured key functions
If the frame colour of the PIP picture is not green, press the green key.
Yellow key: Swaps contents of TV picture and PIP picture.
Blue key: Start/stop PIP scan in the PIP picture.
PIP Settings
The size of the PIP display can be set in the System settings under Control more ... PIP (see also chapter System settings, section Control – PIP).
The functions and settings can be executed and done via the PIP menu as well.
If the frame colour of the PIP picture is not green, press the green key.
MENU: Call menu.
Select function, OK call.

Art 40-55User manual
42
TV
Digital Recorder
TV viewing with time shiftYou can use the Digital Recorder of your Loewe TV set to record programmes on an externally connected USB hard disk.
After you have started the timeshift television, the programme will be recorded in the background. You can stop the TV programme at any time and continue watching it later with a time shift. The maximum time shift is three hours.
During timeshift operation, the programme is not stored permanently. If you would like to save programmes for a longer time, use the archive recording (see next page).
Recording of analogue stations is not possible.
Time-shifted operation is perhaps not possible or only to a limited extent for programmes of stations working with CI Plus encryption.
Interrupt watching (start timeshift television)
Press PAUSE key.
The TV image becomes a freeze frame and the DR+ status display appears.
At the top you will see the number and name of the station, start, end and the title of the current programme.
In the lower part of the screen at the beginning of the time bar you find the starting time of the background recording. On the right hand side of the bar you can see the time at which the time shift recorder will be full (automatically extends by 30 minutes, up to a max. 3 hours).
The time above the bar at the PAUSE key shows the current time.
Digital 2
20:47 20.12.2014
20:10 20:40 21:10
2 ZDF 20:15 - 21:45 Rundreise Gardasee
Time shift07:03 min
Back
Continue (time shift viewing)
Press PLAY key.
You can now continue watching the TV programme at the time when you had pressed the PAUSE key.
The Playback symbol appears instead of the Pause symbol .
For further options of time-shift watching see chapter Video, section Video playback.
Returning to live picture (end timeshift television)
Press STOP key.You see the station’s live picture again.
Switch to a different station
If you switch the channel, the time-delayed recording (time shift) is restarted. The current time-delayed recording is discarded (time shift buffer is emptied).
When switching between encrypted and unencrypted contents of the same station the timeshift buffer is also cleared.
When doing this, the timeshift television is interrupted and you see the live picture of the broadcast.
As a precaution, start archive recording of interesting broadcasts when watching stations with changing coding.
Setting bookmarks
You can manually set bookmarks during time-shift TV watching. For this, the time shift recording is converted into an archive recording.
Digital 2
20:47 20.12.2014
20:10 20:40 21:10
2 ZDF 20:15 - 21:45 Rundreise Gardasee
Time shift07:03 min
Back

Art 40-55User manual
43
TVDigital Recorder
Archive recordingProgrammes that you wish to watch at a later date can be recorded in the Digital Recorder Archive (DR+ archive) of an externally connected USB hard disk.
A recording can be made manually (instant recording / direct recording) or as timer recording. The timer data can again be entered manually or more comfortably, for example, via EPG.
If EPG or teletext data is available, the Digital Recorder stores the title and additional information on each programme in the archive.
If additional languages are being transmitted for a DVB broadcast, these will also be recorded. DVB subtitles can also be recorded.
You can watch another programme or playback a recorded TV programme from the archive while recording a TV programme into the archive. But you can also play back the programme that you are just recording with time-shift.
With multi recording two programmes can be recorded simultaneously (see chapter TV, secion Digital Recorder – Multi recording).
During the archive recording, the bar showing the recording progress is red.
Recording of analogue stations is not possible.
Recordings of CI Plus encrypted programmes (e.g. RTL HD, Sat 1 HD, Pro 7 HD, etc.) are perhaps not possible or only to a limited extent.
Instant recording (One touch recording) / Direct recording
With One Touch Recording, the recording starts immediately at the press of a button. For direct recording, the recording will start only after entering the recording duration.
The programme will be recorded starting from the point at which recording was started. If the programme (or a part of it) is in the timeshift buffer (see left column, timeshift television), this part is also saved.
One Touch Recording
Press REC key longer: The current programme is recorded immediately.
Direct recording:
Press REC key briefly.
Select recording duration, OK confirm.
If desired, adjust timer data (e.g. directory, start, end, recording type).
Select Record station, OK adopt.
Watching other stations during archive recording
After you have started the recording, you can switch to another station.
The second channel can be watched in time-shift TV whilst a recording is taking place (Time shift during archive recording).
Viewing another programme from the archive during archive recording
After you have started the recording, you can also watch a programme you have already recorded.
Open the DR+ archive.
Mark the recorded programme,OK view programme.
The recording process is continued in the background.
Time shift viewing during archive recording
Whilst an archive recording is taking place you can play back the programme that is being recorded or watch a programme on another channel using time delay.
PAUSE key: Switch to freeze picture.The recording is continued in the background.
Display during time-shift viewing and archive record-ing:
PLAY key: Continue playback.You will now see the time-shift archive recording.
For further options of time-shift watching see chapter Video, section Video playback.
STOP key: End time shift and return to the live picture of the current archive recording.
Subsequent archive recording
You can also save an already viewed and finished broadcast in the archive provided there has been no change of station in between.
Skip or wind back to the desired broadcast and start the recording.
Setting bookmarks during archive recording
During a running archive recording you can create bookmarks (by press-ing the PLAY key a little longer). You will see a message on the screen.
Bookmarks also serve as starting and end points of intervals.
1 Das Erste
Digital 2
21:09 20.12.2014
2 ZDF 20:15 - 21:45 Rundreise Gardasee
20:15 21:04 21:50Time shift05:00 min
Back

Art 40-55User manual
44
TV
Digital Recorder
Subtitles
Subtitles of a broadcast can also be stored during recording.
The recording of subtitles in DR+ continuous mode must be activated in the settings.
Calling up the subtitles during a later playback is similar to calling subtitles in TV mode.
Timer-controlled recording
Comfortably select your favourite programme for recording from the EPG. The timer overview has room for 50 entries.
You will find further information on timer-recording in chapter Extras, section Timer.
Switching off the TV set during recording
You can switch off the TV to standby whilst recording. The recording is continued in the standby mode.
Never switch the TV set off at the mains and do not pull the plug of the TV set out of the socket. Otherwise the recording will be lost!
Stop recording early
You can end a current archive recording prematurely.
Press STOP key.
A message appears in the right upper corner of the screen.
OK Stop recording.
The recording process is ended. The portion of the TV broadcast recorded up to this point is saved on the hard disk and can be played back via the DR+ archive.
You can also end a running recording by deleting the corresponding Timer entry in the Timer overview (see chapter TV, section Timer).
Stop recording?Stop recording?
yesyes nono
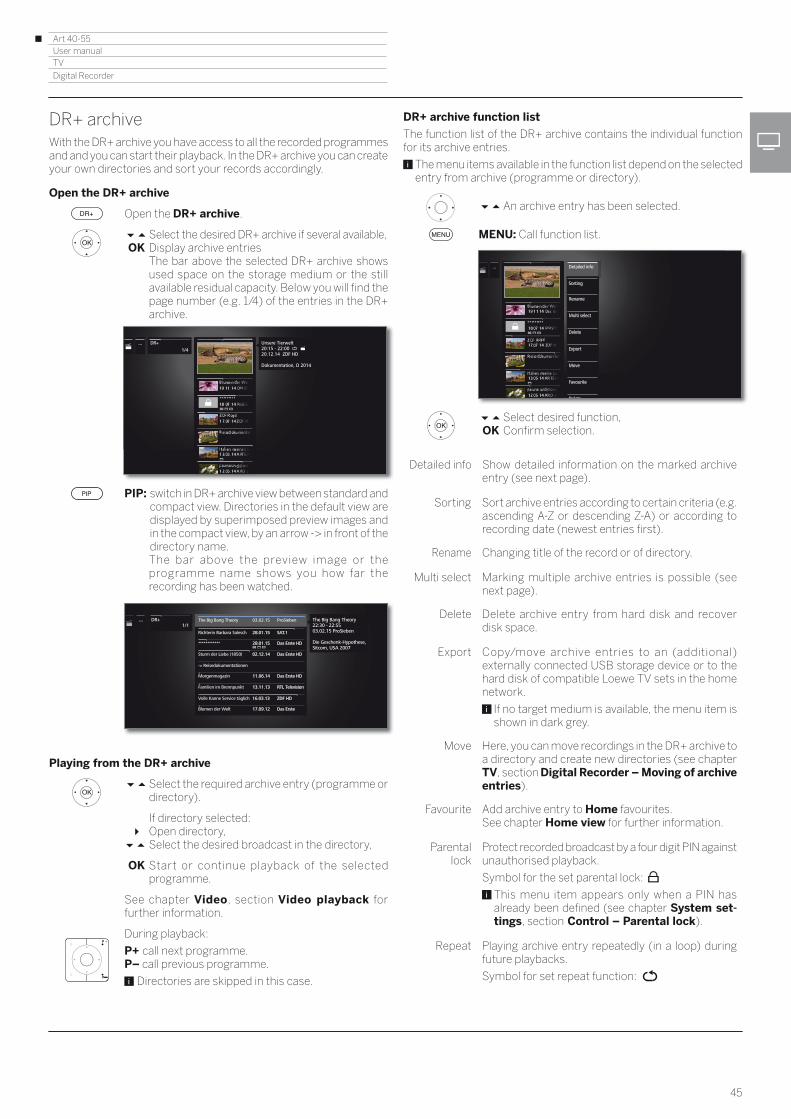
Art 40-55User manual
45
TV
Digital Recorder
DR+ archiveWith the DR+ archive you have access to all the recorded programmes and and you can start their playback. In the DR+ archive you can create your own directories and sort your records accordingly.
Open the DR+ archive
Open the DR+ archive.
Select the desired DR+ archive if several available, OK Display archive entries The bar above the selected DR+ archive shows
used space on the storage medium or the still available residual capacity. Below you will find the page number (e.g. 1/4) of the entries in the DR+ archive.
PIP: switch in DR+ archive view between standard and compact view. Directories in the default view are displayed by superimposed preview images and in the compact view, by an arrow -> in front of the directory name.
The bar above the preview image or the programme name shows you how far the recording has been watched.
Playing from the DR+ archive
Select the required archive entry (programme or directory).
If directory selected: Open directory,
Select the desired broadcast in the directory,
OK Start or continue playback of the selected programme.
See chapter Video, section Video playback for further information.
During playback:
P+ call next programme.P– call previous programme.
Directories are skipped in this case.
...... Unsere Tierwelt20:15 - 22:0020.12.14 ZDF HD
Dokumentation, D 2014
DR+
1/4
...... The Big Bang Theory 03.02.15 ProSieben
Volle Kanne Service täglich 16.03.13 ZDF HD 16.03.13 ZDF HD
Richterin Barbara Salesch 28.01.15 SAT.1 28.01.15 SAT.1
************ 28.01.15 Das Erste HD 28.01.15 Das Erste HD
Sturm der Liebe (1850) 02.12.14 Das Erste HD 02.12.14 Das Erste HD
Morgenmagazin 11.06.14 Das Erste HD 11.06.14 Das Erste HD
-> Reisedokumentationen
Familien im Brennpunkt 13.11.13 RTL Television13.11.13 RTL Television
Blumen der Welt 17.09.12 Das Erste17.09.12 Das Erste
The Big Bang Theory22:30 - 22:5503.02.15 ProSieben
Die Geschenk-Hypothese,Sitcom, USA 2007
DR+ 1/1
DR+ archive function list
The function list of the DR+ archive contains the individual function for its archive entries.
The menu items available in the function list depend on the selected entry from archive (programme or directory).
An archive entry has been selected.
MENU: Call function list.
Select desired function,OK Confirm selection.
Detailed info Show detailed information on the marked archive entry (see next page).
Sorting Sort archive entries according to certain criteria (e.g. ascending A-Z or descending Z-A) or according to recording date (newest entries first).
Rename Changing title of the record or of directory.
Multi select Marking multiple archive entries is possible (see next page).
Delete Delete archive entry from hard disk and recover disk space.
Export Copy/move archive entries to an (additional) externally connected USB storage device or to the hard disk of compatible Loewe TV sets in the home network.
If no target medium is available, the menu item is shown in dark grey.
Move Here, you can move recordings in the DR+ archive to a directory and create new directories (see chapter TV, section Digital Recorder – Moving of archive entries).
Favourite Add archive entry to Home favourites.See chapter Home view for further information.
Parental lock
Protect recorded broadcast by a four digit PIN against unauthorised playback.
Symbol for the set parental lock:
This menu item appears only when a PIN has already been defined (see chapter System set-tings, section Control – Parental lock).
Repeat Playing archive entry repeatedly (in a loop) during future playbacks.
Symbol for set repeat function:
... Detailed info
SortingSorting
RenameRename
Multi selectMulti select
DeleteDelete
ExportExport
MoveMove
FavouriteFavourite
DeleteDelete

Art 40-55User manual
46
TVDigital Recorder
Displaying detailed information on the recording
If detailed information exists on the recorded broadcast from the EPG, you can deplay it.
The desired entry in the DR+ archive is marked.
MENU: Call function list.
Mark Detailed info, OK Display detailed information on the broadcast.
To the right of the preview image you can see a brief description of the programme content, if available.
Beneath the preview image is the progress bar that indicates how far the programme has already been been viewed. Below the progress bar, information such as station name, time and date of broadcast, as well as title of the recorded programme are given.
Changing the title of an archive recording or folder
Desired entry (programme or folder) is highlighted in the DR+ archive.
MENU: Call function list.
Mark Rename, OK Call.
Select characters, OK Move character to input line.
For further information on character input see chapter General information on menu operation.
End input with Adopt. This saves the change permanently.
Or:BACK: Cancel renaming.
Die mehrteilige Dokumentation "Unsere Tierwelt" liefert Ihnen bisher nie gezeigte, unglaubliche Einblicke in die heimische Welt der Tiere.
Das Erste HD20:15 - 22:00Unsere TierweltUnsere Tierwelt
Detailed info Back
View
......
Unsere Tierwelt|
Q
A
Y
1
W
S
X
2
E
D
C
3
R
F
V
4
T
G
B
5
Z
H
N
6
U
J
M
7
I
K
.-/
8
O
L
9
P
0
abc
Rename
Rename Back
Space Delete Cancel Adopt
(2 sec) on a letter with a triangle shows more lettersOK
Multi select
Multiple selection allows to mark several archive entries and then perform a desired action via the function list (e.g. export, delete).
The DR+ archive is opened, multiple selection was called in the DR+ archive function list.
Select archive entry,OK Confirm selection (archive entry becomes blue).
Repeat as often as desired.
MENU: Call function list.
Select desired function (e.g. delete),OK Confirm selection.
The marked archive entries will be deleted.
Deleting recordings from the archive
The desired entry in the DR+ archive is marked.
STOP key: Call delete dialogue.
OK Confirm deletion. The DR+ archive will be displayed again.
Or:
MENU: Call function list.
Mark Delete, OK call.
OK Confirm deletion. The DR+ archive will be displayed again.
It may take some time to delete recordings from external hard disks, depending on the length of the programme and recording quality.
To delete a folder, all archive entries in the folder need to be deleted.
...... Unsere Tierwelt20:15 - 22:0021.09.12 ZDF HD
Unsere Tierwelt
DR+
1/4
... Blumen der Welt (10)19:00 - 19:4519.09.12 Das Erste HD
Blumen der Welt (10)
DR+ 3/9DR+ 3/9

Art 40-55User manual
47
TV
Digital Recorder
Export of archive entries
You can copy/archive entries from an externally connected USB storage device to another storage medium or to the hard disk of compatible Loewe TV sets in the home network.
If no target medium is available, the menu item is shown in dark grey.
Copying/moving recordings, which originate from a CI Plus encrypted station, is perhaps not possible or only to a limited extent.
The desired entry in the DR+ archive is marked.
MENU: Call function list.
Mark Export, OK call.
Select Target if several are available, OK adopt.
Select Copy or Move. OK Start the procedure.
After a successful moving, the recording is automatically deleted from the source.
The dubbing of archive entries takes place in the background. You see a screen message, when copying has finished.
The status of copying assignments in progress/pending can be seen in the timer list.
The TV set must not be switched off with the mains switch during the copying process!
... Export
Timer data Back
Target
Programme
EXTHDD
20.09.12 ZDF HD Unsere Tierwelt
USB2
Copy MoveCopy
Moving of archive entries (folder management)
In the DR+ archive, you can create new directories when using the function move.
Into these directories you can move existing archive entries or do a new recording directly there. For this purpose you simply choose the desired directory in the recording control (timer data). You can determine the name of the new directory yourself. The DR+ archive root directory has the fixed designation main directory.
It is not possible to nest several directories into one another.
With multiple selection it is possible to move several archive entries simultaneously to a folder.
Moving an archive entry to a new folder
The desired entry in the DR+ archive is marked.
MENU: Call function list.
Mark Move, OK call.
Select New folder,OK call.
The on-screen keyboard will be displayed to enter the folder names.
Select character,OK Move character to input line.
For further information on character input see chapter General information on menu operation.
If the name of the folder is completely entered, complete with Adopt.The new folder is created in the DR+ archive and the selected archive entry is moved into the folder.
Moving an archive entry into an existing folder
Archive entry to be moved to a folder is highlighted in the DR+ archive.
MENU: Call function list.
Mark Move, OK call.
Select Target (folder name) if several are available,
OK adopt.
Mark Execute,OK adopt.
The selected archive entry is moved to the selected folder.
... Move
Move Back
Target
Programme 20.09.12 ZDF HD Unsere Tierwelt
Execute New folderExecute
Reisedokumentationen

Art 40-55User manual
48
TVDigital Recorder
Locking/unlocking a movie (Parental lock)
You can lock movies that your children are not permitted to view, for instance. Playback is then only possible after entering a PIN.
In order to activate the Parental lock, a code number (PIN) must have been defined beforehand (see chapter System settings, section Control – Parentol lock).
The desired entry in the DR+ archive is marked.
MENU: Call function list.
Mark Parental lock, OK Call.
Select Yes / No,OK Adopt.
The titles of locked films in the DR+ archive will be replaced by asterisks * when a parental lock is active and thus cannot be read anymore. The detailed information for the recording cannot be called up. The cover of the recording will be replaced by a picture of a lock. In addition, the entry will be labelled with the symbol .
Viewing a locked movie
The desired locked entry in the DR+ archive is marked.
When the access code of the parental lock has not been entered yet:
OK call entry of PIN.
Enter your PIN.
After the access code has been entered, the lock of the archive entries will be temporarily released.
OK View film.
... Parentallock
yes
nono
Adopt with OK
... DR+
1/4

Art 40-55User manual
49
TVDigital Recorder
DR+ StreamingUsing the DR+ streaming function you can watch movies with your TV set (DR+ Streaming Client) from other Loewe TV sets via the home network. These TV sets (1 must make their DR+ archives available in the home network (DR+ Streaming Server).
To use DR+ streaming, at least two Loewe TV sets are required, of these, at least one TV set with integrated hard disk (with Chassis SL1xx, SL2xx, SL3xx as DR+ Streaming Server).
The TV sets also need to be connected via a network (wireless connection via Wi-Fi or cable connection via Ethernet, PowerLine).
Archive entries can only be provided or released in the network by TV sets with integrated hard disks (DR+).
In case of these TV sets which are used as DR+ Streaming Servers, the DR+ archive must be made available for other TV sets:
System settings Control more ... DR+ DR+ Streaming Share DR+ archive with other devices yes.
Archive entries released in the network can be replayed by all TV sets with chassis SL1xx, SL2xx, SL3xx and Chassis MB180.
In case of these TV sets used as DR+ Streaming Clients, access to other DR+ archives must be enabled:
System Settings Control more ... DR+ DR+ Streaming Also use other archives yes.
Functions requiring write access to a device that enables the recording to be viewed are not available when viewing a DR+ archive entry over the network.
Such functions are, for example, child protection, delete protection, renaming, deleting entry or bookmark, setting bookmark, deleting or hiding parts of the recording.
Playback of DR+ archive entry via the network
Open the DR+ archive.
Select desired archive of the corresponding device,
OK Display archive entries.
Select the required archive entry, OK Play archive entry.
See chapter Video, section Video playback for further information.
...... Amazonas19:15 - 20:1520.12.14 ZDFinfo
Reise-Dokumentation, D 2014
Remote TV
1/1
Follow-Me functionThe follow me function enables you to interrupt a current programme in a TV set (main device) with integrated hard disk and to continue viewing it with your TV set (secondary device) from the point of interruption..
To use Follow-Me function, at least two Loewe TV sets are required, of these, at least one TV set with integrated hard disk (with Chassis SL1xx, SL2xx, SL3xx).
The TV sets also need to be connected via a network (wireless connection via WLAN or cable connection via Ethernet, PowerLine).
On the main TV set, the function must be enabled (1: System settings Control more ... DR+ DR+ Streaming
Share DR+ archive with other devices yes.
On the target TV set (secondary device), the function must be enabled:
System Settings Control more ... DR+ DR+ Streaming Also use other archives yes.
Start Follow-Me function on main device
Press PAUSE key.
The TV image becomes a freeze frame and the DR status display appears.
Activate Follow-Me .
You will see a message on the screen.
The archive recording starts in approximately 20 seconds without an entry. The TV set switches itself off after starting the recording. The broadcast is adopted into the DR archive.
The recording TV set will make the broadcast available to the network from now.
You can indicate the beginning of a Follow-Me recording at the target TV sets in your network by a screen display.
Continue viewing the programme at the second device
Call on the TV set, where you want to view the broadcast, the DR archive of the recording TV set.
Open the DR+ archive.
Select archive of the recording TV set (main device),
Display archive entries.
Select Follow-Me recording,OK View recording.
Digital 2
20:40 20.12.2014
20:10 20:40 21:10
2 ZDF 20:15 - 21:45 Rundreise Gardasee
Time shift00:03 min
Back
(1 Only in units with integrated hard disc.

Art 40-55User manual
50
TimerIn the timer menu you will find the Timer List and the Timer Services. All programmed recordings, earmarked programmes and copy jobs are listed in the timer list.
The timer services menu offers you convenient alarm services see chapter TV, section Timer – Timer Services).
Calling the timer menu
HOME: Calling the Home view.
Select TV,
select Timer (at sources), OK call.
Or:
press longer: call the timer menu.
Select Timer list.
Add new You can also programme new recordings, earmark other programmes and copy pre-recorded programmes from the DR+ archive to an external USB hard disk by means of the timer list.
When you have programmed timer recordings, the TV set can only be switched off to the standby mode. Never switch the TV set off at the mains and do not pull out the plug of the TV set out of the socket. Otherwise no timer recordings can be made.
When a software update occurs it may happen that timer entries and memorised programmes are deleted. After such a software update, check your timer list.
Explanation of the symbols in the timer list:
Recording
Recording in progress
Marked programme
Repeated recording (daily, weekly or Mon-Fri)
Serial recording
22.12. 10:32 - 11:00 ProSieben How I Met Your Mother
22.12. 12:15 - 12:44 ProSieben Malcolm mittendrin
22.12. 20:15 - 21:15 RTL Television Wer wird Millionär?
23.12. 20:00 - 20:15 Das Erste HD Tagesschau
Timer
Add new
Timer list Timer Services
Mon
Mon
Back
>All entries
New instruction: New recording
In the Timer list:
Mark Create newly, OK call.
Mark New recording, OK call. The function list for recording will be
opened.
Mark the desired option, proceed.
Manual recording
Programme the recording manually.
For further information see next side.
Current programme
Record currently watched TV programme.
For further information see next side.
Menu item will only be indicated when EPG data are available for the current station.
Following programme
Record following programme.
For further information see next side.
Menu item will only be indicated when EPG data are available for the current station.
Recording via EPG
Programme recording of a programme via the electronic programme guide (EPG).
For more information refer to chapter TV, section EPG – Recording a programme via EPG.
Open DR+ archive
The DR+ archive of an externally connected USB hard disk is opened.
For more information refer to chapter TV, section Digital-Recorder – DR+ Archive.
9Recording
Current programme9 ZDF HD 20:15 - 21:45Toskana
20:15
Following programme9 ZDF HD 21:45 - 22:10heute journal
Recording via EPG
Manual recording
Open DR+ Archive
Thereby you can record the programme currently being watched.
TVTimer

Art 40-55User manual
51
New recording – Manual recording (current station)
In the Timer list, New recording is selected.
Mark recording duration.
The selection of a recording duration programmes always a recording of the currently viewed station. For Any station and time see below.
OK Call Timer data dialogue.
The selected recording duration is preset in the timer data. Check timer data and correct them, if required. In case of a previous selection of ??? Min, enter definitely the recording dura-tion.
Mark Adopt to Timer. OK Confirm timer data and adopt timer instruction.
Recording has been started.
New recording – Manual recording (other station)
Manual recording has been selected (see above).
Mark Any station and time, OK Call Station selection.
Mark desired station, OK Adopt station in timer data.
Check timer data and correct them, if required.
Mark Adopt to Timer. OK Confirm timer data and adopt timer instruction.
New recording – Current programme
After calling the Current programme the timer data dialogue will be displayed. The current programme is preset in the timer data.
Check timer data and correct them, if required.
Mark Adopt to Timer. OK Confirm timer data and adopt timer instruction.
Recording has been started.
New recording – Following programme
After calling the Following programme the timer data dialogue will be displayed. The following programme of the current station is preset in the timer data.
Check timer data and correct them, if required.
Mark Adopt to Timer. OK Confirm timer data and adopt timer instruction.
New copy job
You should copy recordings that you want to save permanently on an external USB hard disk.
Copying recordings, which originate from a CI Plus encrypted station, is perhaps not possible or only to a limited extent.
In the Timer list:
Mark Create newly, OK call.
Mark New copy, OK call.
The DR+ archive will be called. For further information for exporting archive entries refer to chapter TV, section Digital-Recorder – Export of archive entries.
Record conflict
When programming a new recording, it can happen that there will be an overlapping with already stored timer recordings. In this case, the recording conflict dialogue will open.
Here you can determine which of the recordings you want to be executed, and you must eventually specify which of the programmes shall be fully recorded and which are cut.
Select recording, OK change status.
The symbol before the recording shows you what happens to the recording.
If the status for each recording is ok:
Mark store recordings, OK call.
The timer data of the recordings will be adjusted accordingly.
Explanation of the symbols in the conflict manager:
TV programme is completely recorded.
Recording is cut off (at the beginning and/or end). Pay attention to the start and end time of the recording.
The recording is deleted.
TVTimer

Art 40-55User manual
52
Delete/change programmed timer instruction
Use this function in the timer list if you want to delete recordings already programmed, to end a running timer recording or to change a timer instruction.
The Timer list is displayed.
Mark desired timer instruction,
The text of a currently active timer instruction is red. If you delete this timer instruction, the recording is stopped.
OK Change marked timer instruction. The timer instruction will be displayed.
Or:
STOP: Delete marked timer instruction.
OK Confirm delete. Timer instruction will be deleted.
24.09. 10:32 - 11:00 ProSieben How I Met Your Mother
24.09. 12:15 - 12:44 ProSieben Malcolm mittendrin
24.09. 20:15 - 21:15 RTL Television Wer wird Millionär?
25.09. 20:00 - 20:15 Das Erste HD Tagesschau
Timer
Timer list Timer Services
Mon
Mon
Back
>All entriesAdd new
Change with Delete withOK
Entering the Timer data
After selecting the station you wish to record, timer data will be displayed.
The setting options for the timer data differ depending on the way (EPG, manually) the recording has been programmed.
Update timer data, if required, or press OK for confirmation.
Please also read the instructions in chapter System settings, section Extras – CA module concerning the recording of encoded programmes.
Explanations of the setting options in the menu Timer data – Standard settings
Folder If available, select the directory into which the recording will be directly saved.The DR+ archive root directory has the fixed designation Main folder.
Default setting: Main folder.
Station Station for which the recording is carried out.
Date Day of recording.
Beginning Starting time of the recording.
End End time of the recording.
Recording type
Programmes can be recorded in different ways:
Once only: The programme will be recorded at the specified time.
Mon-Fri: The programme will always be recorded from Monday to Friday at the specified time.
Daily: The programme will be recorded every day at the specified time.
Weekly: The programme will be recorded every week at the specified time.
Serial (1: A programme running regularly, but with different start times, can be conveniently programmed. In this case, the TV set is checking ervery day at the specified time, whether the programme is available in the EPG data. If so, the program is recorded, if not, the next review will be made the following day.
9
Recorder
Programme
Folder
Station
Date
Beginning
End
Recording type
Timer data - Recording
Standard settings
Additional optionsCurrent programme101 Das Erste HD 20:15 - 21:45Tatort: Jagdzeit
20:15
Back
Once only Mon-Fri Daily Weekly Serial
Record station Detailed info
DR+
20:15 - 21:45 Tatort: Jagdzeit
Main folder
Das Erste HD
23.07.2014
20:15
21:45
(1 only available if EPG data exists.
TVTimer

Art 40-55User manual
53
Explanations of the setting options in the menu Timer data – Additional options
Lock recording
Only allow later playback of this recording after enter-ing the PIN number (Parental lock).
If a PIN still has not been entered under System settings Control Parental lock, the Parental lock will at first be activated. See chapter System settings, section Control – Parental lock for further information.
Delete protection
Safeguard the recording from being deleted auto-matically by using the delete manager.
Auto time control (1
Your TV set can use the automatic time control (Accurate Recording) for recording a programme.The automatic time control takes control of the corresponding monitoring of the start and end time for DVB stations. The recording is started at the be-ginning of the broadcast and switched off at the end, even if the start and/or end time have been changed by the programme provider.
The automatic time control is not supported by all stations.
If yes is selected and automatic time control is not supported by the recorded channel then no recording is made.
If the programme information (Event-ID) should not be available any more for the recording of a programmed broadcast. e.g., due to a programme change or because the Event-ID has been changed by the station, the programme cannot be recorded. The broadcasters alone are responsible for the transfer of this data for using automatic time control. The availability of the appropriate data cannot be guaranteed by Loewe.
Recording subtitles
Select whether broadcast subtitles are to be recorded too.
In case of a direct recording the presetting is taken from System settings Control more ... DR+ Recording subtitles.
Favourite When selecting yes the recording will be added to the Home favourites.
Timer ServicesThis menu offers you convenient alarm services. Programmed alarms are also active when the TV set has been switched off to standby.If the TV set is switched on from the standby mode by alarm, a screen message appears. If this is not confirmed within 5 minutes with the OK key, the TV set switches automatically off again for safety reasons.The TV set can also be switched off automatically at certain times. A screen warning appears one minute before automatic switch off. The automatic switch off can be interrupted by pressing any key.
Call Timer Services
HOME: Calling the Home view.
Select TV,
select Timer (at sources),OK call.
Or:
press longer: call the timer menu.
Select Timer Services.
Select the desired setting,OK change.
OK adopt.
Explanations of the setting options:
Switch off once
The set switches to the standby mode automatically at the specified time.If a time is specified which has already passed on the same day, the set switches off at this time the next day.
Switch off daily
The set switches to the standby mode automatically every day at the specified time.
One time alarm
The set alerts you once today at the specified time.If a time was specified which has already passed on the same day, the alarm is saved for the next day.
Wake up Mon-Fri
The set regularly alerts you from Monday to Friday at the set time.
Wake up SatWake up Sun
The TV set alerts on Saturdays or Sundays regularly at the specified time.
Wake up with Indicate whether the TV set should enter the TV or radio mode from stand-by during an alarm. The station, which was last active, is activated.
Switch off once no yes, at ??:??
Switch off daily no yes, at ??:??
One-time alarm no yes, at ??:??
Wake up Mon-Fri no yes, at ??:??
Wake up Sat no yes, at 15:??
Wake up Sun no yes, at ??:??
Wake up with TV Radio
Timer Iist Timer Services
BackTimer
Adopt with OK
(1 only available if EPG data exists.
TVTimer

Art 40-55User manual
54
n
Video
VideoThe item Video gives you access to videos from local (USB, home network) and online sources.
High definition movie material (HD movies) from format 720p upwards (resolution 1280 x 720 or higher) should be played back via a wired connection. If there is a wireless connection, then technical limitations (e.g., fault liability, bandwidth limitations) can cause disruptions in the playback right up to a complete breakdown of the playback.
Calling video selection
HOME: Calling the Home view.
3465 Select Video.
3456 Select favourite (if any) or source, OK call.
Possible video sources
The media sources shown here depend on the devices available/used.
DR+ archive Programmes that you have recorded on an external hard disk with USB connection using the Digital Recorder are compiled in the DR+ archive. Via the DR+ archive you can replay, edit or delete your recorded programmes.
For further information see chapter TV, section Digital Recorder – DR+ archive.
MediaNet Call MediaNet.
For further information see chapter Web, section MediaNet.
USB USB storage media on the USB connections of your TV set. The exact designation depends on the relevant storage medium.
Please also observe the notes regarding USB sticks in chapter Miscellaneous, section Soft-ware update!
Tatort Media_NASMedia01
DR+
Grey´s Anatomy Medianet
Web
Photo
Audio/Radio
Video
TV
System settings
Home
Favorites Sources
DR+ archive
Video function list
The video function list contains the individual functions for your videos.
A video source has been selected.
The menu items available in the function list depend on the currently marked object (data source, directory, file).
MENU: Call function list.
65 Select desired function, OK confirm selection.
Sorting Sort media files in the opened directory in alphabeti-cal (ascending A-Z or descending Z-A) order, file size or date (newest entries first).
Favourite Add marked media file to the Favourites in Home view.
Select video
A video source has been selected.
The directory structure and the form of presentation of the title selection is dependent on the selected source.
65 Select desired directory, OK open directory. Repeat procedure if necessary.
65 Select desired video, OK start or continue playback of the selected video.
See chapter Video, section Video playback for further information.
Video_2.avi0.68 GB
Video_3.avi1.03 GB
Video_4.avi0.04 GB
Video_5.avi0.29 GB
Video_6.avi0.19 GB
Video_7.avi0.74 GB
Video_8.avi0.51GB
...... Sorting
Favourite
...... Here you can sort entries according to specific criteria.
Video_2.avi0.68 GB
Video_3.avi1.03 GB
Video_4.avi0.04 GB
Video_5.avi0.29 GB
Video_6.avi0.19 GB
Video_7.avi0.74 GB
Video_8.avi0.51GB
USB1...... Source: USB1Title: Video_1.aviSize: 0.47 GB
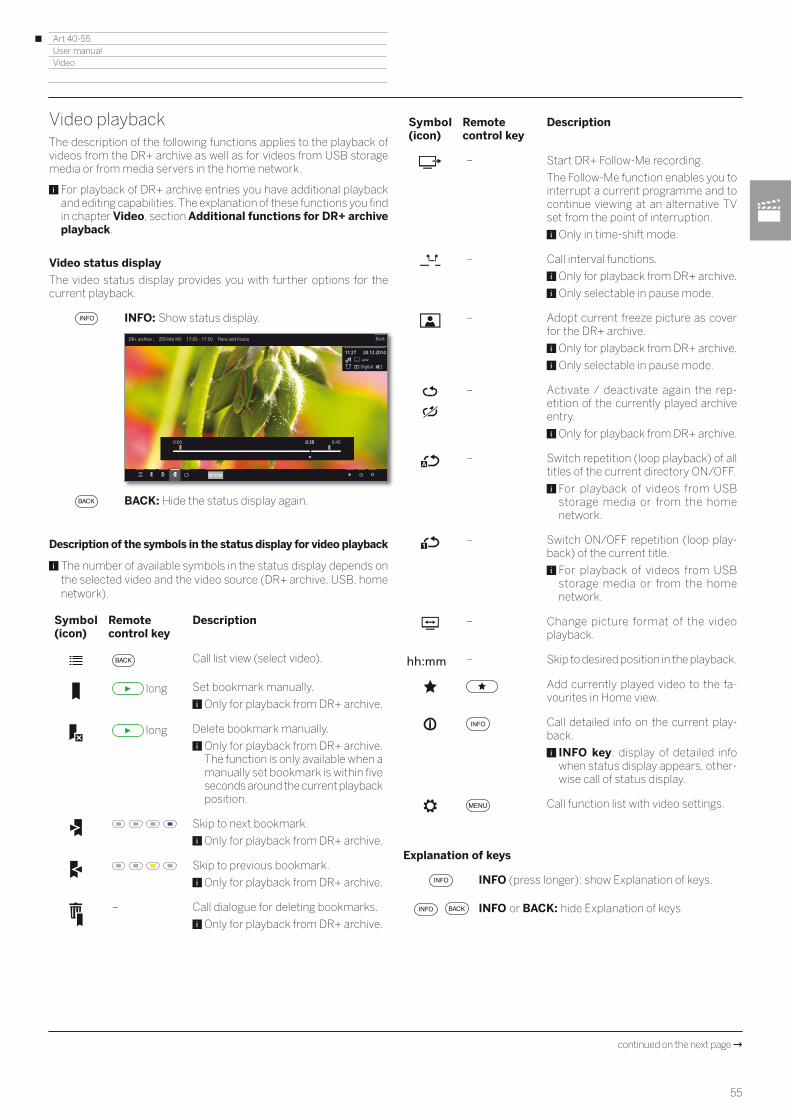
Art 40-55User manual
55
Video
Video playbackThe description of the following functions applies to the playback of videos from the DR+ archive as well as for videos from USB storage media or from media servers in the home network.
For playback of DR+ archive entries you have additional playback and editing capabilities. The explanation of these functions you find in chapter Video, section Additional functions for DR+ archive playback.
Video status display
The video status display provides you with further options for the current playback.
INFO: Show status display.
BACK: Hide the status display again.
Description of the symbols in the status display for video playback
The number of available symbols in the status display depends on the selected video and the video source (DR+ archive, USB, home network).
Symbol (icon)
Remote control key
Description
Call list view (select video).
long Set bookmark manually.
Only for playback from DR+ archive.
long Delete bookmark manually.
Only for playback from DR+ archive.The function is only available when a manually set bookmark is within five seconds around the current playback position.
Skip to next bookmark.
Only for playback from DR+ archive.
Skip to previous bookmark.
Only for playback from DR+ archive.
– Call dialogue for deleting bookmarks.
Only for playback from DR+ archive.
11:27
hh:mm
Digital 2
0:00 0:38 0:45
20.12.2014
BackDR+ archive : ZDFinfo HD 17:05 - 17:50 Flora und Fauna
Symbol (icon)
Remote control key
Description
– Start DR+ Follow-Me recording.
The Follow-Me function enables you to interrupt a current programme and to continue viewing at an alternative TV set from the point of interruption.
Only in time-shift mode.
– Call interval functions.
Only for playback from DR+ archive.
Only selectable in pause mode.
– Adopt current freeze picture as cover for the DR+ archive.
Only for playback from DR+ archive.
Only selectable in pause mode.
– Activate / deactivate again the rep-etition of the currently played archive entry.
Only for playback from DR+ archive.
– Switch repetition (loop playback) of all titles of the current directory ON/OFF.
For playback of videos from USB storage media or from the home network.
– Switch ON/OFF repetition (loop play-back) of the current title.
For playback of videos from USB storage media or from the home network.
– Change picture format of the video playback.
– Skip to desired position in the playback.
Add currently played video to the fa-vourites in Home view.
Call detailed info on the current play-back.
INFO key: display of detailed info when status display appears, other-wise call of status display.
Call function list with video settings.
Explanation of keys
INFO (press longer): show Explanation of keys.
INFO or BACK: hide Explanation of keys
hh:mm
continued on the next page

Art 40-55User manual
56
Video
Pause playback (freeze picture)
PAUSE key: Switch to freeze picture.
PLAY key: Continue playback.
Jump
By briefly pressing the or keys you can skip forwards and back-wards in the movie.
The jump distance is adjustable in the System settings under Control more ... DR+ Jump distance (see also chapter System settings, section Control DR+).
Skip forwards.
Skip backwards.
11:27
Digital 2
20.12.2014
0:00 0:38 0:45
hh:mm
BackDR+ archive: ZDFinfo HD 17:05 - 17:50 Flora und Fauna
11:27
Digital 2
20.12.2014
0:00 0:40 0:45
hh:mm
BackDR+ archive: ZDFinfo HD 17:05 - 17:50 Flora und Fauna
11:27
Digital 2
20.12.2014
0:00 0:38 0:45
hh:mm
BackDR+ archive: ZDFinfo HD 17:05 - 17:50 Flora und Fauna
Skipping with Smart jump
The Smart jump function ensures that the jump width is halved each time the jump direction is changed or doubled after three jumps in the same direction (max. 8 minutes). This way you can quickly find a certain spot of the recording.
The settings for Smart jump you find in the System settings under Control more ... DR+ Smart jump.
You are looking for a particular scene in a running programme:
Depending on your needs, press the key (back-wards) or (forwards) briefly several times, to roughly jump to the area of the programme you are looking for.
If you skipped the desired scene of the programme, jump in the opposite direction. This jump is executed in halfs of the jump distance.
If you skipped the desired scene of the programme again, jump again in the opposite direction. In the process, the jump distance is cut in half again.
By halving the jump distance again when changing direction you can gradually approach the desired location.
Jump by entering a time
You can jump to any position in the video by entering a time.
Show status bar.
mark hh:mm (Jump to ...).
Enter the desired time with the numerical keys.
OK Execute jump.
11:27
Digital 2
20.12.2014
0:00 0:36 0:45
hh:mm
BackDR+ archive: ZDFinfo HD 17:05 - 17:50 Flora und Fauna
11:27
Digital 2
20.12.2014
0:00 0:22 0:45
00:22
BackDR+ Archiv: ZDFinfo HD 17:05 - 17:50 Flora und Fauna

Art 40-55User manual
57
Video
Wind
To search for desired scenes in movies you can fast forward and rewind at three different speeds. Sound is not audible during winding.
or press a little bit longer.
By each brief pressing of or the speed will increase until you switch back to the first speed.
The different winding speeds are represented by the symbols shown below.
In case of time-shift viewing, playback is automatically activated when the end of the recording is reached. You are then about 10 seconds behind the live picture or when rewinding at the beginning of the time shift recording.
In case of Fast forward of archive entries, playback will finish at the end of the recording. The DR+ archive is displayed again.
PLAY key: Continue playback.
In the case of Internet videos, please wait until these are buffered in the memory. This can take a few seconds, depending on the bit rate of the film and Internet speed.
11:27
Digital 2
20.12.2014
0:00 0:40
hh:mm
BackDR+ archive: ZDFinfo HD 17:05 - 17:50 Flora und Fauna
11:27
Digital 2
20.12.2014
0:00 0:43
hh:mm
BackDR+ archive: ZDFinfo HD 17:05 - 17:50 Flora und Fauna
Repeat
Videos can be repeated, i.e., replayed in an endless loop. Depending on the source (DR+ archive, USB storage medium, media server in the network), single or all videos can be replayed in an endless loop.
Repeated playback of DR+ archive entries
INFO: Show status bar.
Mark Repeat ,OK confirm.
The current archive entry will be replayed repeatedly. The repetition setting remains active for this archive entry even when the playback is finished.
To deactivate playback again:
Mark Repeat off ,OK confirm.
Repeating videos from USB storage media or media servers
INFO: Show status bar.
Mark Repeat title ,OK Switch the repetition of the individual video ON/
OFF.
The repeat setting remains until it will be deacti-vated or another video is replayed.
Or:
Mark Repeat all ,OK Switch repetition of all titles of the current
directory ON/OFF.
The repeat setting remains until it will be deactivated or another directory in the overview is selected.
Repeat title and Repeat all cannot be activated simultaneously. Using one of the two functions deactivates the respective other one.

Art 40-55User manual
58
Video
Select language/sound
Videos, especially those recorded from TV broadcasts, can contain several sound tracks.
Select sound track/language:
INFO: Show status bar.
Mark Settings , OK Call settings.
Mark Language/sound, OK call Language/Sound selection.
mark desired sound or desired language, OK select sound track.
Changing the picture format
Function is not available for all videos.
INFO: Show status bar.
Mark Change Picture format , OK set picture format.
You can choose between small or full image settings.
Small image setting shows the video close to the original resolution. The video status bar is permanently shown below the image.
The full image setting enlarges the image to fit the entire screen. The status bar can be set to visible or hidden.
Dolby Digital2.0Dolby Digital2.0
Dolby Digital5.1Dolby Digital5.1
Language /sound
stereo Adopt with OK You can select other movie languages and other sound formats here.
Additional functions for DR+ archive playbackThere are additional editing and playback functions for playback of recorded programmes from the DR+ archive of an externally connected USB hard disk.
Setting bookmarks
To retrieve interesting scenes in a movie later, you can manually set the bookmarks. In addition, there are also automatically set bookmarks for the start/end of a programme.
In programmes sent in Dolby Digital 5.1 format, the commercials are detected and automatically bookmarked at the beginning and end of the advertising block.
In case of a running time-shift recording (timeshift television), this will be converted into an archive recording when a blank is set.
PLAY key (press longer): Set bookmark.
You will see a message on the screen. The status bar is then faded in and you will see the set bookmark above the bar for the playback.
Automatically set bookmarks are white. Manually set bookmarks are blue.
Jumping to Bookmarks
INFO: Show status bar.
Mark next bookmark ,
OK Jump to next bookmark.
Mark previous bookmark ,
OK Jump to next bookmark.
Or:
Blue key: Skip to next bookmark.
Gellow key: Skip to previous bookmark.
11:27
Digital 2
20.12.2014
0:00 0:38 0:45
hh:mm
BackDR+ archive: ZDFinfo HD 17:05 - 17:50 Flora und Fauna
11:27
Digital 2
20.12.2014
0:00 0:41 0:45
hh:mm
BackDR+ archive: ZDFinfo HD 17:05 - 17:50 Flora und Fauna

Art 40-55User manual
59
Video
Deleting individual bookmarks
Jump to the manually set bookmark to be deleted.
Press PLAY key for a little bit longer: Delete bookmark.
Deleting the Bookmark during playback
You can delete your manually set bookmarks during the playback of the DR+ Archive entry.
Manually set bookmarks are blue, automatically set bookmarks are displayed in grey. Automatically set bookmarks cannot be deleted.
PAUSE key: Switch to freeze picture.
Mark Delete bookmark , OK call delete dialogue.
Delete all bookmarks
All manually set bookmarks (blue) in the current recording are deleted.
Delete bookmark ←
The manually set bookmark to the left of the current position will be deleted.
Delete bookmark →
The manually set bookmark to the right of the current position will be deleted.
OK Confirm selection.
PLAY key: Continue playback.
11:27
Digital 2
20.12.2014
0:00 0:23 0:45
hh:mm
BackDR+ archive: ZDFinfo HD 17:05 - 17:50 Flora und Fauna
11:27
Digital 2
20.12.2014
0:00 0:38 0:45
Back
Delete bookmark ← CancelDelete bookmark →Delete all bookmarks
DR+ archive: ZDFinfo HD 17:05 - 17:50 Flora und Fauna
Interval functions
The intervals between manually or automatically set bookmarks (intervals) can be faded out for future playbacks. In addition to that, unwanted intervals at the beginning or end of your recorded broadcast can be deleted.
An archive entry is replayed.
INFO: Show status bar.
Move to the desired interval in the recorded broadcast by skipping or winding.
PAUSE: Stop play.
Mark Interval functions ,OK Call interval functions.
Hiding intervals
The Interval functions are activated.
mark Hide,OK hide current interval.
This interval will be skipped when the archive entry is replayed in the future.
0:00 0:38 0:45
11:27
Digital 2
20.12.2014
Back
Hide Delete to start Delete to endCancel
DR+ archive: ZDFinfo HD 17:05 - 17:50 Flora und Fauna
0:00 0:38 0:45
11:27
Digital 2
20.12.2014
Back
Hide Delete to start Delete to endCancel
DR+ archive: ZDFinfo HD 17:05 - 17:50 Flora und Fauna
11:27
Digital 2
20.12.2014
0:00 0:40 0:45
hh:mm
BackDR+ archive: ZDFinfo HD 17:05 - 17:50 Flora und Fauna

Art 40-55User manual
60
Video
Show hidden sectionsA screen message will appear when a hidden section is skipped during replay of a DR+ archive entry.
In System settings Control more ... DR+ Notify hidden sections yes must be selected.
When message appears on screen, select yes, OK confirm.
During future replays, the hidden section is displayed again.
Deleting part of the recording
An archive entry is replayed.
INFO: Show status bar.
Press PAUSE key at such a position from which the recording shall be deleted up to the beginning or to the end.
Mark Interval functions , OK Call interval functions.
Mark Delete to start or Delete to end, OK confirm.
Mark Confirm delete OK Delete part of recording.
Deleting intervals
Defined intervals will be deleted when you delete the corresponding bookmark at the beginning or the end of the interval.
11:27
Digital 2
20.12.2014
0:00 0:38 0:45
Back
Hide Delete to start Delete to endCancel
DR+ archive: ZDFinfo HD 17:05 - 17:50 Flora und Fauna
11:27
Digital 2
20.12.2014
0:00 0:38
hh:mm
BackDR+ archive: ZDFinfo HD 17:05 - 17:50 Flora und Fauna
Determine cover picture
The covers for the display of the entry in the DR+ archive can be freely determined by you during an archive replay:
Jump / wind to the desired position in the recording.
PAUSE key: Switch to freeze picture.
Mark Adopt as cover picture ,OK confirm.
You will see a message on the screen. The image will be displayed next to the broadcast in the DR archive in future.
PLAY key: Resume play.
Subtitles
When recording a programme, any existing subtitles can be recorded as well and displayed when playing back.
An archive entry is replayed.
Subtitles were recorded too (see chapter TV, section Timer – Entering the Timer data).
INFO: Show status bar.
Mark Settings ,OK call settings.
Mark Subtitles,OK call up available subtitles.
Mark the desired subtitles, OK show/hide subtitles.
Subtitles off Adopt with OK
German
Here you can display the programme subtitles, if they are provided.

Art 40-55User manual
61
n
Audio/Radio
Audio/RadioWith item Audio/Radio you find music files from your USB storage media and media servers in the home network and you access DVB and Internet radio.
Calling Audio selection
HOME: Call the Home view.
3465 Select Audio/Radio,
3456 Select favourite (if any) or source, OK call.
Possible Audio/Radio sources
The media sources shown here depend on the devices available/used.
DVB radio The TV set can receive digital radio stations via DVB.
For further information see chapter Audio/Radio, section Radio mode (DVB radio).
Internet radio The TV set can receive digital radio stations via the Internet.
For further information on Internet radio see chapter Audio/Radio, section Radio mode (Internet radio).
MediaNet Call MediaNet.
For further information see chapter Web, section MediaNet.
USB USB storage media which are connected to the USB of your TV set.The exact designation depends on the relevant storage medium.
Please also observe the notes regarding USB sticks in chapter Miscellaneous, section Soft-ware update!
WMP11 Examples for media servers in your home network. The exact designation depends on the media server used.
Back to Black Media_NASMediaNet
Media02Media01
Born to die
BR-KLASSIK
Web
Photo
Audio/Radio
Video
TV
System settings
Home
Favorites Sources
DVB radio Internet radio
Audio/Radio function list
The audio/radio function list contains the individual functions for your music titles.
An audio source has been selected.
The menu items available in the function list depend on the currently marked object (data source, directory, file).
MENU: Call function list.
65 Select desired function, OK Confirm selection.
Sorting Sort media files in the opened directory in alphabetical (ascending A-Z or descending Z-A) order, file size or date (newest entries first).
Favourite Add marked media file to the Favourites in Home view.
Select music title
An audio source has been selected.
The directory structure and the form of presentation of the title selection is dependent on the selected source.
65 Select desired directory, OK open directory. Repeat procedure if necessary.
65 Select desired music title, OK Start or continue playback of the selected
music title.
See chapter Audio, section Audio playback for further information.
...... Misty Miller01 Little Thing Called Love02 Dancing With The Devil03 Remember04 Evergreen Love05 Bones06 Hope07 Wild Thing08 Eve09 Ollie10 Home11 Vampire
02:1503:4203:0703:0102:4203:3903:4403:4003:4903:4203:29
Sorting
Favourite
Here you can sort entries according to specific criteria.
Misty Miller01 Little Thing Called Love
02 Dancing With The Devil03 Remember04 Evergreen Love05 Bones06 Hope07 Wild Thing08 Eve09 Ollie10 Home11 Vampire
03:4203:0703:0102:4203:3903:4403:4003:4903:4203:29
......02:15

Art 40-55User manual
62
Audio/Radio
Audio playbackDescription of the symbols in the status display for audio playback
Symbol Remote control key
Description
Call list view (select music title / station).
– Switch repetition (loop playback) of all titles of the current directory ON/OFF.
Only for playback of music titles via USB / Home network.
– Switch ON/OFF repetition (loop play-back) of the current title.
Only for playback of music titles via USB / Home network.
– Switch shuffle playback for the titles of the current directory ON/OFF.
Only for playback of music titles via USB / Home network.
Switch off the TV screen.
Add the current station / music title to the favourites in Home view.
Show EPG detailed info on the current broadcast.
Only for DVB radio.
Call detailed info on the played music titles.
Only for playback of music titles via USB / Home network.
Call function list with audio settings.
Explanation of keys
INFO (press longer): show Explanation of keys.
INFO or BACK: hide Explanation of keys.
Chasing Cars Shut Your EyesHands Open
Snow Patrol / Eyes Open
00:00 02:56 04:27
Back
Pause playback
PAUSE key: Stop current playback.
PLAY key: Continue playback.
Wind
You can fast forward music titles at four different speeds. Sound is not audible during winding.
Press a little bit longer.
With each brief pressing of the speed will increase until you switch back to the first speed.Available speeds: 2x, 4x, 8x, 16x.
PLAY key: Continue playback.
Chasing Cars Shut Your EyesHands Open
00:00 02:56 04:27
Snow Patrol / Eyes Open Back
Chasing Cars Shut Your EyesHands Open
00:00 02:56 04:27
Snow Patrol / Eyes Open Back
Chasing Cars Shut Your EyesHands Open
00:00 04:10
Snow Patrol / Eyes Open Back

Art 40-55User manual
63
Audio/Radio
Select another title / play current title from start
BACK: Call music selection.
Select music title as described in chapter Audio/Radio, section Selecting music titles.
Or:
Press P+ or briefly: Play next title of current album / directory.
Press P– or briefly:Play current title from start.
Press P– or briefly again: Play previous title of the current album / directory.
Or:
Go to line with music titles, scroll in music titles.
OK Start playback of the marked title.
Repeat
Music titles can be repeated, i.e., replayed in an endless loop.
Mark Repeat title , OK Switch the repetition of the individual music title
ON/OFF.
The repeat setting remains until it will be deactivated or another music title is replayed.
Or:
Mark Repeat all , OK Switch repetition of all music titles of the current
directory ON/OFF.
The repeat setting remains until it will be deactivated or another directory in the overview is selected.
Repeat title and Repeat all cannot be activated simultaneously. Using one of the two functions deactivates the respective other one.
Repeat and Shuffle (see right column) cannot be activated at the same time. Activating a repeat operation deactivates shuffle.
Chasing Cars Shut Your EyesHands Open
Snow Patrol / Eyes Open
00:00 02:56 04:27
Back
Shuffle playback
The music titles of your current medium are replayed in random order.
Mark Shuffle playback ,OK Switch shuffle playback of the titles in current
album / directory ON/OFF.
Repeat and Shuffle (see left column) cannot be activated at the same time. Activating the shuffle playback deactivates repeat.
Switching the screen ON/OFF
Green key: Switch screen OFF.
Or:
Mark Screen off ,OK Switch screen off.
Switching off the screen reduces the power consumption of the TV set.
Switch on the screen with the remote control:
Press green key.
Switch on the screen on the TV set:
Press R on the ring cursor on the TV set.
Ending playback
STOP key: End playback and return to music selec-tion.
Chasing Cars Shut Your EyesHands Open
Snow Patrol / Eyes Open
00:00 02:56 04:27
Back

Art 40-55User manual
64
Audio/Radio
Radio mode (DVB radio)The TV set can receive digital radio stations via DVB.
The AUDIO key has been preset to radio mode in the factory.
Switching Radio mode on
AUDIO key on the remote control.The last used radio mode (DVB or Internet) is called.
Or:
HOME: Calling the Home view.
Select Audio/Radio.
Select DVB radio, OK call.
For the first use of DVB-Radio the first station in the radio station list is called, otherwise the station last used.
Certain radio stations show instead of the above symbol, a station logo.
Station switching
The radio mode is switched on and a radio station has been selected (see above).
P+/P– Station up/down.
The number and the station name are displayed briefly. Also, the status display with time/date and programme-dependent symbols appears.
Or:
Enter the station directly using the numerical keys.
Or:
OK call station list.
Select station, OK call.
2 ANTENNE BAYERN
3 Bayern 3
2 ANTENNE BAYERN
4 Bayern 1
5 Radio Eins
6 hr1
7 hr2
... ASTRA119,2°E
DVB-C
Explanation of keys
INFO (press longer): show Explanation of keys.
INFO or BACK: hide Explanation of keys.
DVB radio function list
MENU: Call function list.
Or:
OK Call station list, call function list.
Select function,OK call.
See chapter TV, section Function list for further information.
HbbTV services for DVB radio
Various DVB radio stations also offer HbbTV text/media text. The functionality is the same as in TV mode. (see chapter TV, section HbbTV / MediaText).
Switching the screen on/off
Green key: Switch screen OFF.
Switching off the screen reduces the power consumption of the TV set.
Switch on the screen with the remote control:
Press green key.
Switch on the screen on the TV set:
Press R on the ring cursor on the TV set.
Exit radio mode
Press AUDIO key or
TV key: TV mode is called.
Or:
HOME: Calling the Home view.
Select another operating mode,OK call.

Art 40-55User manual
65
Audio/Radio
Radio mode (Internet radio)The TV set can receive digital radio stations via the Internet.
The names of the directories and stations in the Internet radio mode are given by the provider vTuner. Changing the order of stations or renaming them is not possible here.
Internet radio is only accessible if a connection to the Internet has been established.
Switching Radio mode on
AUDIO key on the remote control.The last used radio mode (DVB or Internet) is called.
Or:
HOME: Calling the Home view.
Select Audio/Radio.
Select Internet radio, OK call.
You see the radio station list.
Mark desired directory, OK open directory. Repeat procedure if necessary.
Select station, OK call.
For further information on the control of the Internet radio see chapter Audio/Radio, section Audio playback.
Station switching
BACK: call station list.
Select stations as described above. Or:
P+/P– Scroll through the current Internet radio directory to look for stations. Or:
Keys 2-9: Input the first letter. The station list will jump to the first station of the corresponding letter.
Explanation of keys
INFO (press longer): show Explanation of keys.
INFO or BACK: hide Explanation of keys.
Internet radio function list
MENU: Call function list.
Select function, OK call.
See chapter TV, section Function list for further information.
Internet radio LocalLocal
by Genreby Genre
Artist SearchArtist Search
by Locationby Location
RecommendationsRecommendations
New StationsNew Stations
FavoritesFavorites
Artist Search (Search for artists)
By means of the search for artists, you can quickly and easily see all radio stations that just play music by this artist. The result list is sorted for now and most played.
Internet radio station list is opened.
Select search for artists, OK on-screen keyboard is opened.
Enter name of the band or singer using the keyboard (see also chapter General information on the operation, section Entering characters with on-screen keyboard),
OK adopt, search is started.
Select station, OK call.
Station search
You can search an Internet radio station directly by name using the menu item Station search. The procedure is similar to the Artist Search described above.
Switching the screen on/off
Green key: Switch screen OFF.
Or:
Select Screen off ,OK Switch screen off.
Switching off the screen reduces the power consumption of the TV set.
Switch on the screen with the remote control:
Press green key.
Switch on the screen on the TV set:
Press R on the ring cursor on the TV set.
Exit radio mode
TV key: TV mode is called.
Or:
HOME: Calling the Home view.
Select another operating mode,OK call.
... Artist Search New search(Coldplay)New search(Coldplay)
Antenne BayernViva la Vida Now (15:31)Antenne BayernViva la Vida Now (15:31)
Bayern 3Clocks Now (15:31)Bayern 3Clocks Now (15:31)
Madhouse Radio Most playedMadhouse Radio Most played
MagicStar Most playedMagicStar Most played
Radio Gong Most playedRadio Gong Most played
Spreeradio Most playedSpreeradio Most played
Babelsberg HitradioBabelsberg Hitradio

Art 40-55User manual
66
n
Photo
PhotoVia menu item Photo you can view photos from your local media and from online sources on your TV screen.
Calling Photo selection
HOME: Calling the Home view.
3465 Select Photo.
3456 Select favourite (if any) or source, OK call.
Possible photo sources
The media sources shown here depend on the devices available/used.
MediaNet Call MediaNet.
For further information see chapter Web, section MediaNet.
USB USB storage media on the USB connections of your TV set.The exact designation depends on the relevant storage medium.
Please also observe the notes regarding USB sticks in chapter Miscellaneous, section Soft-ware update!
CRW_0652b CRW_0457b
Media02
Media_NASMedia01
CRW_0284b
CRW_0533bCRW_0172b USB1Medianet
Web
Photo
Audio/Radio
Video
TV
System settings
Home
Favourites Sources
Photo function list
The photo function list contains the individual functions for your photos.
A photo source has been selected.
The directory structure and the form of presentation of the photo selection is dependent on the selected source (example of a menu image: source server home network).
The menu items available in the function list depend on the currently marked object (data source, directory, file).
MENU: Call function list.
65 Select station, OK call.
Slide show Start slide show of the photos in the currently selected directory (see next page for further information).
Sorting Sort media files in the opened directory in alphabetical (ascending A-Z or descending Z-A) order, file size or date (newest entries first).
Favourite Add marked media file to the Favourites in Home view.
Photo Here you can do frequently used picture settings (Slide show speed, Crossover, Automatic rotate).
Select photo
A photo source has been selected.
The directory structure and the form of presentation of the photo selection is dependent on the selected source (example of a menu image: USB source).
65 Select desired directory, OK open directory. Repeat procedure if necessary.
65 Select desired photo, OK View photo zoomed to full screen.
See next page for further information – Photo display.
Picture_025
Picture_026
Picture_027
Picture_039
Picture_040
Picture_045
Picture_046
Picture_047
Picture_048
Slide show
Favourite
Sorting
Photo
...... Here you can run the images as a slideshow in the selected folder.
Pictures...... Source: USB1Title: CRW_7266bDate: 19.07.2013Size: 4036 KB
Source: USB1Title: CRW_7266bDate: 19.07.2013Size: 4036 KB
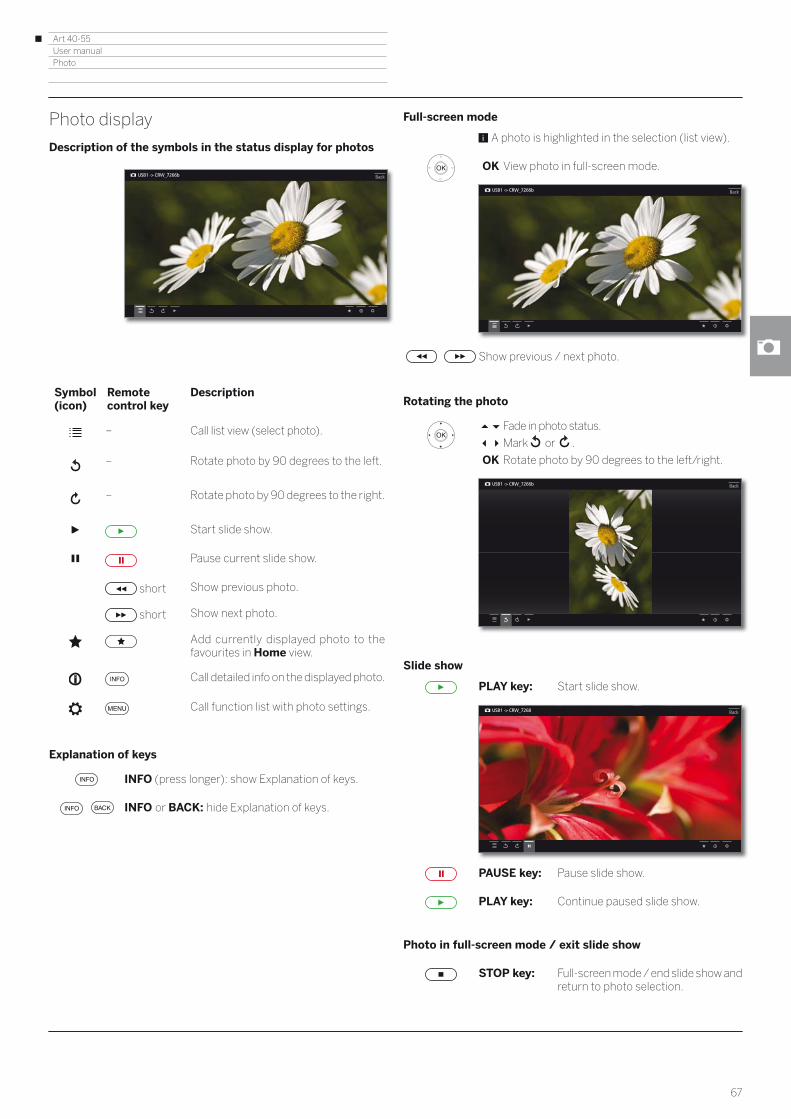
Art 40-55User manual
67
Photo
Photo display
Description of the symbols in the status display for photos
Symbol (icon)
Remote control key
Description
– Call list view (select photo).
– Rotate photo by 90 degrees to the left.
– Rotate photo by 90 degrees to the right.
Start slide show.
Pause current slide show.
short Show previous photo.
short Show next photo.
Add currently displayed photo to the favourites in Home view.
Call detailed info on the displayed photo.
Call function list with photo settings.
Explanation of keys
INFO (press longer): show Explanation of keys.
INFO or BACK: hide Explanation of keys.
USB1 -> CRW_7266b Back
Full-screen mode
A photo is highlighted in the selection (list view).
OK View photo in full-screen mode.
Show previous / next photo.
Rotating the photo
Fade in photo status.
Mark or .
OK Rotate photo by 90 degrees to the left/right.
Slide show
PLAY key: Start slide show.
PAUSE key: Pause slide show.
PLAY key: Continue paused slide show.
Photo in full-screen mode / exit slide show
STOP key: Full-screen mode / end slide show and return to photo selection.
USB1 -> CRW_7266b Back
USB1 -> CRW_7266b Back
USB1 -> CRW_7268 Back

Art 40-55User manual
68
Web
WebHere you have access to multimedia content in the Internet (MediaNet) as well as a high-quality web browser.
Calling the Web selection
HOME: Calling the Home view.
Select Web.
Select favourite (if any) or source, OK call.
Possible Web sources
MediaNet Under the menu item MediaNet you will find a continually expanding platform for interactive TV applications from the Internet (see next column).
All applications are optimised for use on the TV.
Browser Call Web browser of the TV set.
For further information see chapter Web, section Browser.
Loewe channel
YouTube
MediaNetLUMAS
Deezer Aupeo
THE LIBERATION OF ART
Web
Photo
Audio/Radio
Video
TV
System settings
Home
Favorites Sources
Browser
MediaNet
Call MediaNet
To use the full functionality of MediaNet, the TV set must be connected to the Internet.
WEB: Call MediaNet (1.
or
HOME: Call Home view.
Select Web.
Select MediaNet,OK call.
The upper portion of the MediaNet home screen contains new online content.The lower portion of the MediaNet home screen contains Recommendations given by Loewe.
The given content may change from time to time without prior notice.
Select Home,OK go to the right to choose the online content.
Mark the desired online content,OK Display/play content.
The navigation within the various applications depends on the provider.
Functions in the MediaNet home screen
Home Displays the MediaNet home screen with a choice of new online content and recommendations.
Browse Under Browse you can list and call the online content by subjects.
Settings In the Settings for MediaNet you can select countries, for example, to take advantage of various services.
Imprint Providing the legally required information on the parties responsible for the content.
Exit MediaNet
HOME: Call Home view and select another function.
New
Recommendations
MediaNet - HomeHome
Browse
Settings
Imprint
(1 The assignment of these keys can be changed (see chapter System settings, section Control – Web key function).

Art 40-55User manual
69
Web
MediaNet – Browse
Under the item Browse, you browse the full range of applications by topic.
MediaNet-Browse is called.
Filtering applications
Select the genre / topic, OK call applications of the genre.
Select desired application, OK open application
Change filter
Go to column with genres / topics.
Select another genre / topic, OK call applications of the selected genre.
Exit Browse
BACK: Return to the MediaNet home screen.
Or:
Go to column with genres / topics.
Select Back, OK return to the MediaNet home screen.
All
MediaNet - BrowseAll
Recommendations
Video
Photo
Service
Games
Entertainment
News
Back
Games
MediaNet - BrowseGames
Entertainment
News
Sport
Music
Service
Define application as favourite
Mark the desired application.
Add the marked application to the Home favourites.
The favourite is added to view Home of web favourites and queued at the end.
MediaNet – Settings
Here, you can find setting options for MediaNet.
MediaNet settings are called.
Select the desired setting,OK call.
Country Selection
Select countries from which you want to get information on services (see below).
Imprint Providing the legally required information on the parties responsible for the content.
Country Selection
Mark country,OK select / deselect country.
Various services (applications, etc.) from countries that are marked with a tick are offered in MediaNet.
Exit Settings
BACK: Return to the MediaNet home screen.
Or:
Go to column with settings.
Select Back,OK return to the MediaNet home screen.
MediaNet - Country Selection
Select Countries to display various services
Country Selection
Imprint
Back
Germany Belgium
Austria Netherland
Switzerland Luxemburg
France UK
Italy Denmark
Spain Sweden
Portugal Finland

Art 40-55User manual
70
Web
BrowserYou can access Internet sites directly using the integrated Opera browser. The web browser can also be used without an Internet connection. Thus you can access local devices which provide a web interface (e.g., router, home control, home network server).
Calling the Web browser
HOME: Calling the Home view.
Select Web,
Select Browser, OK call.
Start page will be opened.
INFO: display browser status.
Explanation of the symbols in the browser status
Update the displayed Internet site.
Define current site as homepage.
100% Change zoom factor of the displayed site / browser.
Add displayed Web site as favourite to Home view.
Navigation on Web sites
P+/P– Scroll page vertically.
/ Scroll page horizontally.
Mark the link or text entry box with blue selection frame,
OK open link or confirm text input.
For the entry of text, press a numerical key (0-9) repeatedly as with a mobile phone until the desired character appears. The available letters are printed on the individual numerical keys.
Yellow key: Delete character.
BACK: Stop text entry and exit entry box.
Entering a URL (Internet address)
Browser status is displayed.
Mark the URL (Internet address) of the indicated Internet site,
OK Open address entry box.
Select required character,OK Accept character.
In the event of letters with a triangular, additional letters are displayed when pressing the OK button longer (2 sec).
Delete character to the left of the cursor.
.-/ The selection switches to special characters.
abc Switch between upper/lower case.
Space Enter blank space.
Delete Delete all characters.
Cancel Cancel input. The entry box will be closed and the previous Internet site will be displayed again.
Accept Accept address and open new Internet site.
The characters may also be entered by the USB keyboard or the numerical keys of the remote control (see left column).
Exit Browser
Web site is displayed. Browser status is hidden
HOME: Call Home view and select another function.
q
a
y
1
w
s
x
2
e
d
c
3
r
f
v
4
t
g
b
5
z
h
n
6
u
j
m
7
i
k
.-/
8
o
l
9
P
0
ABC
http://www.loewe.tv
.com .net . /.dewww.
Enter/change internet address Back
Adopt Cancel
Delete Cancel AdoptSpace
(2 sec) on a letter with a triangle shows more lettersOK

Art 40-55User manual
71
System settings
System settingsUnder the menu item System settings in the Home menu you find all settings and adaptabilities of your TV set.
Calling System settings
HOME: Call Home view.
Select System settings, OK call.
Or:
Press MENU key longer: call System settings.
Explanations of the setting options:
Picture Here you do the settings referring to the representa-tion of the picture signal on your TV set.
Menu items Picture: Picture adjustment, Contrast, Brightness, Color intensity, Image+ Active, Picture format.
Menu items Picture more ...: Colour temperature, Sharpness, Move picture up/down, Auto dimming, Film quality improvement (DMM), Digital Noise Control (DNC), Skin tone, Deblocking filter.
For more information refer to chapter System settings, section Picture.
Sound Under this menu item you find the settings for sound playback.
Menu items Sound: Sound adjustment, Loudness, Sound picture syn-chronisation, Volume adjustment.
Menu items Sound more ...: Auto volume, AV output signal, Maximum volume, Maximum switch on volume, Balance.
The available menu items may vary and depend on the connected audio component.
For more information refer to chapter System settings, section Sound.
Stations Move and delete TV and radio stations. In addition to that you can automatically and manually update the complete station list. Your stations can also be arranged and optionally sorted in personal lists.
Picture
Sound
Station
Control
Connections
Multimedia / Network
Here you can adjust among other things: Contrast, colour, brightness, picture adjustment, sharpness, picture format.
Extras
Menu items Stations: Automatic scan TV+Radio, Manuell scan (incl. antenna status), Station lists TV, Station lists Radio, Update station list automatically, Transfer all station lists.
For more information refer to chapter System settings, section Stations.
Control In this menu you find settings for additional functions of your TV set like EPG, picture in picture (PIP), digital recorder (DR+) as well as interfunctional settings like time and date, parental lock or software update.
Menu items Control: Language, Parental lock, EPG, Energy efficiency, Quick start mode, Software.
Menu items Control more ...: On-screen displays, Time and date, DVB settings, PIP, DR+, Standard Teletext, HbbTV, Hard disks, Export log file, WEB key function.
For more information refer to chapter System settings, section Control.
Multimedia /Network
By means of the Multimedia / Network menu you configure your network adaptor and network access.
By means of the menu item renderer you can allow external devices to access your TV set (renderer) via app to render (play back) contents there.
Menu items Multimedia / Network: Network settings, Multimedia settings, Renderer.
For more information refer to chapter System settings, section Multimedia / Network.
Connections Use this menu to configure the TV set for operation with external devices.
The sound component wizard leads you comfortably through the configuration of your used audio equipment such as speaker systems or HiFi/AV amplifiers.
For more information, refer to the instruction manu-als of the equipment used.
Menu items Connections: Sound components, Antenna DVB, AV connecting settings, Digital Link, Gaming mode.
For more information refer to chapter System settings, section Connections.
Extras Under this menu item you can display the features of your TV set, repeat the initial startup or reset the device to the factory settings.
Also, DR+ streaming can be enabled, by means of which the TV set provides the contents of the DR+ archive on the network.
Menu items Extras: DR+ Streaming, Integrated features, Repeat initial installation, Reset to factory settings.
For more information refer to chapter System settings, section Extras.
(1 3D function available on selected models.

Art 40-55User manual
72
System settingsPicture
PictureHere you do the settings referring to the representation of the picture signal on your TV set.
Calling picture settings
HOME: Call Home view.
Mark System settings, OK call System settings.
Mark Picture, go to next column.
Select desired picture function, proceed to next column.
Explanations of the picture settings:
3D Do the settings for your TV set‘s 3D display (1 (see next page).
Picture adjustment
You can switch between several fixed picture adjustment modes and the personal picture values that you have set here.
See chapter System settings, section Picture – Picture adjustment for further information.
Contrast The contrast setting depends on the brightness of the room. The brighter the surroundings the higher the contrast should be set.The power consumption of the TV set depends directly on the value set here.
Brightness Set the brightness so that the black areas of the picture only just appear black.
Colour intensity
Set the colour intensity to suit your personal taste. The colours should appear natural. You can pinpoint this by the colour of peoples‘ faces for example.
Image+ Active
Image+ Active is a special picture improvement developed by LOEWE which provides a detailed and contrasting, sharper, natural and true colored picture which is rich in detail and contrast.
Picture format
Select the format so that the screen is used to the fullest possible extent without affecting the natural proportions.
See chapter System settings, section Picture – Selecting the picture format for further information.
more ... call with OK (see right-hand column).
Picture 3D
Picture ad-justment
Contrast
Brightness
Colour in-ten
Image+Active
Picture for-mat
more ...
If your desired display format has not been automatically selected then you can choose it in the 3D settings menu. You may display the 3D image in 2D or vice versavice versa.
Colour temperature
Here, you can give the TV picture a warmer or colder hue according to your personal taste.
Sharpness Here you can adjust picture sharpness to obtain the best definition.
Move picture up/down
In various picture formats, font or graphic insertions are not or only partially visible at the bottom or at the top.You can move the picture up or down with the up/down menu control keys to make the displays visible.
Menu item only available in the picture formats panorama or zoom.
Auto dimming
Two automatic dimming functions are available here which enable you to adapt the TV picture to the room brightness, improve the visual contrast and reduce the power consumption of your TV.
Depending on video (VBD+): The background lighting is reduced depending on the current video content and the video signal is simultaneously amplified in order to get an improved contrast of your TV picture (Video compensated Backlight Dimming – VBD).
Depending on the environment (OPC): The contrast of your TV picture is automatically reduced vs. decreasing room brightness (Optical Power Control – OPC).
Due to a reduction in the luminance in 3D mode for technical reasons, this function is deactivated when showing 3D content.
Auto format (AMD)
When auto format is switched on, the TV set recognizes the picture format for Cinemascope or widescreen films and adjusts itself accordingly.
Film quality improvement
(DMM)
DMM reduces jolt in rapid picture object movements and rolling text displays. This applies especially for movies.
Digital Noise Control (DNC)
With active DNC (Digital Noise Control) you can eliminate or reduce picture noise.
Skin tone Adjust the skin tone so that the most natural facial skin colour is achieved.
Gamma brightness correction
If image seems over- or underexposed, you can adjust it here accordingly.
Deblocking filter
To minimise the visible interference to the picture caused by modern compression methods for images and image sequences (formation of small blocks), a so-called deblocking filter can be activated which counteracts this interference.
PC IN display
For some PC image formats, horizontal as well as vertical position and the phase position of the image can be corrected.
For more information, see chapter System set-tings, section Picture – Selecting the picture format.
Menu item only available if there is a valid PC signal via the VGA adapter at the AV connection.
(1 3D function available on selected models.(2 Not available for device type Art 40 (full HD).
(2

Art 40-55User manual
73
3D function (1
You can use the 3D functionality of your TV set to display 3D material transmitted by a channel or from an external player that is connected.
You require a pair of Loewe Active Glasses 3D to be able to use the 3D functionality in its entirety (see chapter Accessories). Please read the operating instructions included with the 3D glasses.
3D mode
For 3D content that is being played back from an external HDMI player, the 3D display format is normally recognised correctly when the factory setting 3D mode Automatic is selected. You may need to set the 3D mode manually to view 3D content from broadcasters.
Owing to a reduction in the luminance in 3D mode for technical reasons, Auto-dimming - Room and Auto-Dimming - Video (VBD+) are deactivated when 3D contents is displayed.
If the TV set is operated with the remote control during a 3D playback, flicker effects can occur in the 3D glasses when doing this.
Calling 3D mode
HOME: Call Home view.
Mark System settings, OK call System settings.
Mark Picture, go to next column.
Mark 3D, go to next column.
Select 3D mode.
... 3D
3D Back
With this you can select the correct display format, should this not be recognised automatically, or you can deactivate the 3D mode.
3D-Modus
Automatic Side by side Top/bottom
Explanations concerning the 3D mode
Automatic If the TV is set to this setting (factory setting), then the TV set automatically switches over to the correct 3D mode, if this is possible and supported by the broadcaster. Only change the setting if the 3D content is not displayed correctly.
side by side To display 3D content in side by side format. When viewing 3D content with this setting, two almost identical images are displayed next to each other and put together correctly by the TV set.
The 3D mode is Automatic reset the next time you switch on the TV set.
top/bottom To display 3D content in top/bottom format. When viewing 3D content with this option, two almost identical images are displayed one above the other and put together correctly by the TV set.
The 3D mode is Automatic reset the next time you switch on the TV set.
Picture format / 3D mode
If 3D contents are recognised by the TV device, the picture format cannot be subsequently changed. The picture format when in 3D operation is always 16:9 PC.
Instruction / Symbol
If 3D content is detected by the TV set, a corresponding message appears. The instruction text will disappear after the display time has elapsed.
In the status display, 3D content is indicated by an icon.
The following images will be displayed in 3D mode. For this part, put the 3D glasses on and then switch them on. Viewing 3D images for extended periods of time can tire out the eyes and/or cause feelings of dizziness.
Digital 2
20:42 21.01.2013125 ASTRA 3D
20:15 - 21:00 ASTRA 3D Demo21:00 - 21:45 ASTRA 3D Demo
(1 3D function available on selected models.
System settingsPicture

Art 40-55User manual
74
System settingsPicture
Picture adjustment
By selecting one of the preset picture adjustment modes (Home Mode, Premium Mode, Cinema Mode or Shop Mode), the picture settings for the respective currently active signal input group are set to predefined values.
You can use Personal Mode to specify individual settings for contrast, colour intensity, colour temperature, sharpness and digital noise suppression. Here you can enter your own specifications for each signal input group.
You find a listing of the various signal input groups in chapter Technical Data, section Signal input groups.
Calling picture adjustment
HOME: Call Home view.
Mark System settings, OK call System settings.
Mark Picture, go to next column.
Mark Picture adjustment, go to next column.
Select mode, OK adopt selected mode.
When selecting one of the three preset picture adjustment modes you have to specify additionally if the mode shall be set only for the currently selected signal source, e.g., Only for HD Digital or for the entire TV.
Explanations of the picture adjustment modes:
Home Mode The emphasis for the picture settings is here on low energy consumption for home use. In this case, the TV set switches automatically off after 4 hours of unattended time.
Premium Mode
The picture settings in Premium Mode are optimised for a brighter environment at the cost of higher energy consumption.
Cinema Mode
The cinema mode is optimised for video and photo playback.
Shop Mode The picture settings in Shop Mode are adjusted to operation in the presentation room.
Personal Mode
Here, you can recall your last personal picture settings.
... Picture ad-justment
Home Mode
Premium Mode
Shop Mode
CinemaMode
Personal Mode
The priority here is low energy consumption in home use. In this case the TV switches off automitically for the sake of saving energy, after it has been out of operation for four hours.
Adopt with Adopt with OK
Selecting the picture format
The setting options depend on the transmitted picture content.
HOME: Call Home view.
Mark System settings, OK call System settings.
Mark Picture, go to next column.
Mark Picture format, go to next column.
Select format,OK adopt selected format.
Explanations of the picture formats for HD signals:
4:3 TV16:9 TV
Proportionally correct display of 4:3 or 16:9 broadcasts. You select this mode when the signal is not supplied by a PC (normal case). A small part of the picture is truncated. This may be necessary to hide possible interference at the edge of the picture, which arises from the signal supplied.
4:3 PC16:9 PC
Proportionally correct display of 4:3 or 16:9 broadcasts without loss of information. You select this mode when the signal is supplied by a PC.
4:3 Zoom16:9 Zoom
Proportionally correct display. Maximum picture magnification. Displayed text may get lost.
Explanations of the picture formats for SD signals:
16:9 Proportionally correct display of 16:9 broadcasts.
4:3 Proportionally correct display of 4:3 broadcasts.
Panorama 1 Proportionally correct display of 4:3 broadcasts on the 16:9 screen. Station logo and subtitles remain visible.
Panorama 2 Format filling display (factory default) of 4:3 broad-casts on the 16:9 screen. Station logo and subtitles remain visible.
Zoom Proportionally correct display. Maximum picture magnification. Displayed text may get lost.
PALplus Is a 4:3-compatible 16:9 picture broadcast supplied by the station which is detected automatically.
16:9 TV
16:9 PC
16:9 Zoom
4:3 TV
4:3 PC
4:3 Zoom
... Picture for-mat
This 16:9 TV mode enables a proportionally correct display of 16:9 pictures. You select this mode when the picture signal is not supplied by a PC (normal case).

Art 40-55User manual
75
System settingsSound
Sound
Calling the sound settings
The selectable menu items depend on the selected station and the connected sound components.
HOME: Call Home view.
Mark System settings, OK call System settings.
Mark Sound, go to next column.
Select sound function, proceed to next column.
Explanations of the sound settings:
Sound via Playback over the TV speakers or an external hi-fi amplifier.
The menu item Sound via only appears if HiFi/AV amplifier or TV speakers (switchable) is set in the audio components wizard (see chapter System settings, section Connections – Sound components).
Sound adjustment
Here, you can adapt preset sound characteristics of the respective broadcast. Selectable are, e.g., Speech, Classical, Pop, Custom music and Film soundtracks. For personal music and film sound you can do the settings for pitch and bass sound (high and low frequencies).
Loudness Proper boost of bass and treble tones at low volume.
Sound picture
synchronisa-tion
If the sound and picture are not precisely in sync, you may correct this here. Move the mark on the bar downwards, slowing down the sound compared with the picture. Move the mark upwards, speeding it up compared with the picture. Time adjustment of the sound occurs in steps of 10 ms in each case.
only available for DVB stations.
Volume adjustment
The volume can differ according to the individual sta-tions. If the sound is too loud or too quiet in relation to other stations, adjust the volume.
When the menu is open, you can select the stations one after another with P+/P– and adjust every single station conveniently.
more ... call with OK.
Sound Sound viaSound via
SoundadjustmentSoundadjustment
Volume ad-justmentVolume ad-justment
LoudnessLoudness
more ...
Here you can choose whether you would like to hear the sound via the TV speakers or via the sound projector.
Sound pic-
Explanations of the sound settings (continued):
Loudspeaker/Headphone
sound
For analogue stations:Selection options for Mono/ Stereo or Sound 1 or Sound 2 for bilingual programmes, separately for the loudspeakers and the headphones.
Auto volume The volume may vary when receiving stations with different standards, when switching from station to station or during commercials. You can reduce these differences in volume by selecting auto volume on. For music and live broadcasts you get a better sound spectrum with auto volume off.
Maximum volume
You can limit the volume adjustment of the loudspeakers. This prevents selecting a volume which is too loud.
Maximum switch on
volume
Set the sound level to be heard after switching on the TV set with the mains switch or after a power failure. When switching on the TV set in standby mode, the volume last used is retained unless it was above this switch-on level. Otherwise it is limited by this.
Balance Set stereo balance so that the volume impression is identical on the left and right.

Art 40-55User manual
76
System settingsStations
StationsUnder the item Stations you find all settings concerned with station search for TV and DVB radio as well as functions for creating and editing the various station lists.
Station management is not possible as long as a programmed timer recording is active.
If at least one station is locked, the access code must be entered prior to automatic search. The procedure for radio stations or Station lists Radio is similar to that for TV stations or Station lists TV. Therefore, this procedure is described only for TV stations.
Call Stations menu
HOME: Call Home view.
Mark System settings, OK call System settings.
Mark Stations, go to next column.
Select desired function, proceed to next column.
Explanations of setting possibilities in the Stations menu:
Automatic scan
TV+Radio
Here you start the wizard that searches and stores all TV and DVB radio stations (see chapter System settings, section Stations – Automatic scan TV+Radio).
Manual scan (incl.
antenna status)
Here, you can enter all the settings available for a TV station (see chapter System settings, section Stations – Manual Scan TV / Radio).
Station lists TV
Station lists Radio
Here you can move and delete TV stations/ DVB radio stations in all lists. You can put together your most frequently watched programmes in one or more lists of personal favourites (see chapter System settings, section Stations – Station lists TV / Radio).
Update station list
automatically
If the channel list is not up to date, it will be updated automatically, provided the parameter Allow is selected (see chapter System settings, section Stations – Update station list automatically).
Transfer all station lists
Here you can export or import all station lists of this TV set (see chapter System settings, section Stations – Transfer all station lists).
Stations
Station listsTV
Station listsRadio
Update sta-tion list auto
In this mode you open a wizard which automatically searches and saves all the TV and radio stations. Please follow the instructions in the dialogues below.

Art 40-55User manual
77
Automatic scan TV+RadioFor automatic scan TV+Radio, a search wizard will be started that searches for new stations which are not yet stored.
You have to repeat the initial installation and automatically search for new stations if you want to delete all the existing stations and automatically search for new ones.
HOME: Call Home view.
Mark System settings, OK call System settings.
Mark Stations, go to next column.
Mark Automatic scan TV+Radio, go to next column.
In the upper info text the current search settings will now be displayed:
If you want to change these search settings:
Select Change search settings, OK wizard guides you through the search settings
(see column on the right).
If you agree with these settings:
Select Start search/update, OK start scan.
BACK: Cancel current search/update.
Explanations of some search settings:
Signal source Select cable (analogue), DVB-T, DVB-C or DVB-S depending on which signal source you want to search for new stations.Use the Antenna wizard to call the configuration of the DVB-T and DVB-S antennas.
Calling up the DVB antenna configuration causes the Change search settings dialogue to be quit. You must call up the dialogue again after finishing the configuration.
Cable (analogue)
TV/colour standard
With the selection of TV set location the conventional TV standard/colour standard is the default. It should only be changed if stations with other standards are to be searched.
...... Your TV carries out the update of the station list (search for new stations; delete stations no longer broadcast) with the following settings:
Location of TV set D Germany Signal source Cable analogue
Change search settings Start search/update
SEARCH WIZARD - Check search settings
End with
Explanations of some search settings (continued):
DVB-T/C/SNetwork selection
If several networks are available, you can decide which network you want to receive your channels from.
DVB-T/C/SSettings
With the selection of set location the conventional settings will be preset. Only change these defaults if you are familiar with other parameters.
Scrambled stations: (DVB-T/C/S)
You can state whether scrambled stations are to be searched for in the search/update. If you select yes, coded stations will also be searched for. However, these stations can only be received in connection with a CA module and the appropriate Smart Card. Ask your dealer which Smart Card you need to receive certain stations.
Search method: (DVB-T)
If you want to run the station search independently of the channel grid, select Frequency search for the search method.
Search method: (DVB-C)
If you select Frequency search here, a search is performed for all receivable stations. With Network search, only the stations which the networks sup-ply are searched - either for all receivable networks or only for the particular network specified under Network ID.
Network ID: (DVB-C)
If you select none here, DVB signals of all current broadcasting networks are scanned automatically (recommended for most cable networks).If, on the other hand, you specify a certain network ID (necessary in the cable networks of some countries), only DVB signals of this broadcasting network are searched for automatically. Your cable provider has the information you need.
Search method: (DVB-S)
If you select Frequency search here, a search is performed for all receivable stations. With Network search, from all receivable networks all the stations are searched which are supplied by these networks.
Accept Logical Channel Number: (DVB-T/C/S)
In various countries, digital stations (DVB-T/C/S) are transmitted with a preset channel number per station, known as Logical Channel Numbers (LCN).
If you select yes here, these default channel slots will be used and the channels of the preferred signal source will be sorted as per LCN. The stations in the station list can no longer be shifted.
System settingsStations
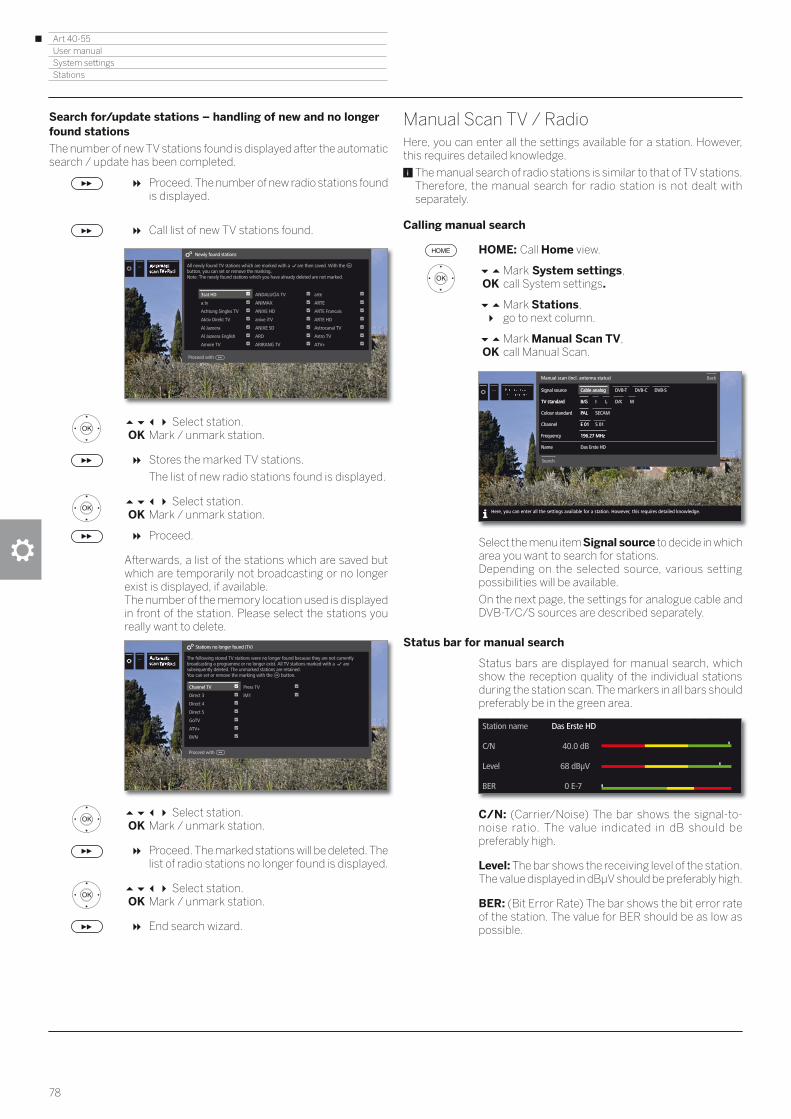
Art 40-55User manual
78
System settingsStations
Search for/update stations – handling of new and no longer found stations
The number of new TV stations found is displayed after the automatic search / update has been completed.
Proceed. The number of new radio stations found is displayed.
Call list of new TV stations found.
Select station. OK Mark / unmark station.
Stores the marked TV stations.
The list of new radio stations found is displayed.
Select station. OK Mark / unmark station.
Proceed.
Afterwards, a list of the stations which are saved but which are temporarily not broadcasting or no longer exist is displayed, if available. The number of the memory location used is displayed in front of the station. Please select the stations you really want to delete.
Select station. OK Mark / unmark station.
Proceed. The marked stations will be deleted. The list of radio stations no longer found is displayed.
Select station. OK Mark / unmark station.
End search wizard.
...
All newly found TV stations which are marked with a are then saved. With the button, you can set or remove the marking.Note: The newly found stations which you have already deleted are not marked.
Newly found stations
Proceed with
OK
3sat HD ANDALUCÍA TV arte
a.tv ANIMAX ARTE
Achtung Singles TV ANIXE HD ARTE Francais
Aktiv Direkt TV anixe iTV ARTE HD
Al Jazeera ANIXE SD Astrocanal TV
Al Jazeera English ARD Astro TV
Amore TV ARIRANG TV ATV+
...
The following stored TV stations were no longer found because they are not currently broadcasting a programme or no longer exist. All TV stations marked with a are subsequently deleted. The unmarked stations are retained.You can set or remove the marking with the button.
Stations no longer found (TV)
Proceed with
Channel TV Press TV
Direct 3 iM1
Direct 4
Direct 5
GoTV
ATV+
BVN
OK
Manual Scan TV / RadioHere, you can enter all the settings available for a station. However, this requires detailed knowledge.
The manual search of radio stations is similar to that of TV stations. Therefore, the manual search for radio station is not dealt with separately.
Calling manual search
HOME: Call Home view.
Mark System settings, OK call System settings.
Mark Stations, go to next column.
Mark Manual Scan TV, OK call Manual Scan.
Select the menu item Signal source to decide in which area you want to search for stations.Depending on the selected source, various setting possibilities will be available.
On the next page, the settings for analogue cable and DVB-T/C/S sources are described separately.
Status bar for manual search
Status bars are displayed for manual search, which show the reception quality of the individual stations during the station scan. The markers in all bars should preferably be in the green area.
C/N: (Carrier/Noise) The bar shows the signal-to-noise ratio. The value indicated in dB should be preferably high.
Level: The bar shows the receiving level of the station. The value displayed in dBμV should be preferably high.
BER: (Bit Error Rate) The bar shows the bit error rate of the station. The value for BER should be as low as possible.
... Signal source Cable analog DVB-T DVB-C DVB-S
TV standard B/G I L D/K M
Colour standard PAL SECAM
Channel E 01 S 01
Frequency 196.27 MHz
Name Das Erste HD
Signal source Cable analog DVB-T DVB-C DVB-S
TV standard B/G I L D/K M
Colour standard PAL SECAM
Channel E 01 S 01
Frequency 196.27 MHz
Name Das Erste HD
Manual scan (incl. antenna status)
Here, you can enter all the settings available for a station. However, this requires detailed knowledge.
Back
Search
Station name Das Erste HD
C/N 40.0 dB
Level 68 dBμV
BER 0 E-7

Art 40-55User manual
79
System settingsStations
Manual search for cable analogue (analogue cable reception):
Manual search is called.
Cable analogue has been selected as signal source.
Mark and adjust settings, OK confirm as the case may be.
Mark Search, OK start search.
If a station has been found:
Mark Store/Overwrite, OK store station.
Explanations on the search settings for cable analogue:
Signal source Selection of range in which you want to search for the station.
TV standard If necessary, ask your dealer which standard to select for specific channels or AV equipment.
Colour standard
If necessary, ask your dealer which standard to select for specific channels or AV equipment.
Channel Direct input of channel.
Frequency Direct input of station frequency. Range for entry: 044.75 MHz - 859.25 MHz.
Name Here, the name of the found station is displayed. You can change the name of the station.
... Signal source Cable analog DVB-T DVB-C DVB-S
TV standard B/G I L D/K M
Colour standard PAL SECAM
Channel E 01 S 01
Frequency 196.27 MHz
Name Das Erste HD
Signal source Cable analog DVB-T DVB-C DVB-S
TV standard B/G I L D/K M
Colour standard PAL SECAM
Channel E 01 S 01
Frequency 196.27 MHz
Name Das Erste HD
Manual scan (incl. antenna status)
Here, you can enter all the settings available for a station. However, this requires detailed knowledge.
Back
Search
Manual DVB-T/C/S search:
Manual search is called.
Mark and adjust settings,OK confirm as the case may be.
Mark Search,OK start search.
When a DVB transponder has been found:
Mark the station,OK Station will be ticked with . If necessary,
repeat for several stations.
Stations that already exist in the station overview will be displayed with their station number on the left.
Mark Store/Overwrite,OK Stations marked with will be stored.
Explanations of some search settings:
Signal source
(DVB-T/C/S)
Selection of range in which you want to search for the station.
Channel(DVB-T)
Direct input of channel.
Satellite (DVB-S)
Here you can select the satellite where the stations are to be searched for.
Band(DVB-S)
Here you can select the frequency band in which shall be searched. Setting ranges: horiz/low 10694 - 11906 MHz
horiz/high 11544 - 12756 MHzvert/low 10694 - 11906 MHzvert/high 11544 - 12756 MHz
Frequency(DVB-T/C/S)
DVB-T/C: Direct input of station frequency.DVB-S: Direct input of LNC frequency
Symbol rate(DVB-S)
Here you can specify the symbol rate Range: 1000-45000
... Signal source Cable analog DVB-T DVB-C DVB-S
Frequency 330.00 MHz
QAM modualtion 256
Symbol rate 6900
Netzwork Standard
Station name Das Erste HD
C/N 40.0 dB
Level 68 dBμV
BER 0 E-7
Search
BackManual scan (incl. antenna status)
Here, you can enter all the settings available for a station. However, this requires detailed knowledge.
1 Das Erste HD
13 arte
14 Einsfestival
20 WDR Köln HD
26 EinsPlus
1 Das Erste HD
13 arte
14 Einsfestival
20 WDR Köln HD
26 EinsPlus
32 tagesschau24
54 Phoenix
87 ARD-alpha
32 tagesschau24
54 Phoenix
87 ARD-alpha
...
Found stations
Search Store/Overwrite
Mark/unmark with OK
Back

Art 40-55User manual
80
System settingsStations
Station lists TV / RadioUnder the menu item Station lists TV or Station lists Radio you can edit (delete block, move block, restore deleted stations, delete list) various lists, e.g., DVB-T, ASTRA LCN, DVB-C, etc. You can also create and edit new Personal lists.
The function of Station lists Radio is similar to that of Station lists TV. Therefore, editing of Station lists Radio will not be dealt with separately.
Change station list
If at least one station is locked, the access code must be entered before changing stations.
HOME: Call Home view.
Mark System settings, OK call system settings.
Mark Stations, go to next column.
Select Station lists TV, go to next column.
Mark desired station list, call list.
Here, you can delete and move station blocks as well as restore deleted stations.
The following section describes how to proceed if you wish to Delete block, Move block,Restore stations and Delete list.
Delete block
Select Delete Block, move to list.
Select beginning of block, OK mark beginning of block.
Select end of block, OK mark end of block (selected stations are coloured
blue).
Select Execute delete, OK block will be deleted, or
select Cancel procedure, OK cancel delete.
19 Z
20 Z
21 Z
22 S
23 R
24 P
25 H
26 S
27 N
10 Das Erste
11 ZDF
12 arte
13 RTL HD
14 SAT.1 HD
15 ProSieben HD
16 VOX HD
17 kabel eins HD
18 Super RTL HD
1 Das Erste HD
2 ZDF HD
3 RTL
4 SAT.1
5 ProSieben
6 VOX
7 kabel eins
8 arte HD
9 Super RTL
ASTRA LCN
DVB-C
DVB-T
...
ASTRA LCN
Newpersonal list
Back
Delete range Move range Restore stations
Here you can move stations around in all the lists, delete stations and restore stations you have previously deleted. You can edit frequently-used stations in one or more personal lists.
Delete list
Move block / Change order
Stations with LCN cannot be reordered. In this case, the function Move block is hidden.
Select Move block, move to list.
Select beginning of block,OK mark beginning of block.
Select end of block,OK mark end of block (selected stations are coloured
blue).
Select insert position,OK Confirm insert position.
Select Execute move,OK block will be moved, or
select Cancel procedure,OK cancel move.
Restore stations
Select Restore stations, move to list.
Select beginning of block,OK mark beginning of block.
Select end of block,OK mark end of block (selected stations are coloured
blue).
Select Restore stations,OK stations will be added again to the station list, or
select Cancel procedure,OK cancel restore.
Delete list
Select Delete list,OK confirm delete list.
OK Confirm delete.
19 Z
20 Z
21 Z
22 S
23 R
24 P
25 H
26 S
27 N
10 Das Erste
11 ZDF
12 arte
13 RTL HD
14 SAT.1 HD
15 ProSieben HD
16 VOX HD
17 kabel eins HD
18 Super RTL HD
1 Das Erste HD
2 ZDF HD
3 RTL
4 SAT.1
5 ProSieben
6 VOX
7 kabel eins
8 arte HD
9 Super RTL
... ASTRA LCN
DVB-C
DVB-T
ASTRA LCN
Back
Delete range Move range Restore stations Delete list
Cancel process Execute move
Newpersonal list

Art 40-55User manual
81
System settingsStations
Compose / edit Personal listEach personal list can contain up to 99 stations. You can compose the personal lists to suit your convenience (e.g., topic lists). Other persons using this TV set can create their own personal lists. You can create up to six personal lists.
Creating and updating personal station lists is not possible as long as a programmed timer recording is active.
Create / edit New personal list
HOME: Call Home view.
Mark System settings, OK call System settings.
Mark Stations, go to next column.
Mark Station lists TV, go to next column.
Mark New personal list, OK New personal list x will be created.
x stands for the number of the personal list. The number depends on how many list were already created.
Mark the station in the station list which is to be added to the personal list.
OK adds the station to the personal list. The new station will be added at the end of the
personal list. Proceed in the same way with addi-tional stations.
Call up additional options.
ASTRA LCNDVB-TDVB-C
Examples of station lists. Select the station list from which you add stations to the personal list. In the personal list you can store stations from different sources.
Sorting The sorting procedure for the source station list may be changed between numerical and alphabetical.
BACK: Store and close station list.
... 14 ProSieben
13 n-tv
1 SAT.1
2 ZDF HD
3 BR Nord HD
4 3sat HD
5 ZDF Neo HD
15 3sat HD
16 ARTE HD
17 EinsPlus
18 Eurosport
19 ZDF Neo HD
20 ZDF.kultur
ASTRA119,2°E
Personal list 1
Newpersonal list
Add station to personal list: Mark in right-hand column and press to add.
Delete station from personal list: Mark and press to remove.
Select other station list / sorting in right-handcolumn with "right menu control button"
Use to save new list.
OK
OK
Adding stations to Personal list
The Personal list must be opened to add new stations to it.
Select Add/remove Stations in the function list.
How to add stations is described in the left column.
Deleting stations from the Personal list
The Personal list must be opened to delete stations in it.
Select Add/remove Stations in the function list,OK activate.
go to personal list.
Mark the station to be deleted in the personal list,OK activate. Function of the coloured keys in standard
PIP functionality.
BACK: Store and close station list.
Move / reorder stations in the Personal list
The personal list must be opened to move stations in it.
Select Move stations in the function list,OK activate.
Select station to be moved in the Personal list, OK mark (station will be coloured red).
Select insert position (insert position will be marked with a red line),
OK Execute move. Proceed in the same way with additional stations.
BACK: Store and close station list.
Renaming the Personal list
The Personal list to be renamed must be opened.
Select Rename list in the function list,OK activate.
Enter new name.
Select Adopt.OK New name for the personal list will be adopted.
Delete Personal list
The Personal list to be deleted must be opened. Deleting of the list is irrevocable.
Select Delete list in the function list,OK activate.

Art 40-55User manual
82
System settingsStations
Update station list automaticallySome programme providers offer an automatic update of the sta-tion lists (Dynamic Channel Management). You may Allow or Block an automatic station list update. If automatic updating is allowed, a screen message about an available update appears whenever the list is changed.
Allow/block updates
HOME: Call Home view.
Mark System settings, OK call System settings.
Mark Stations, go to next column.
Mark Update station list automatically, go to next column.
Select Allow or Block, OK adopt.
If the channel list is not up to date, it will be updated automatically, provided the option Allow is selected.
Updating the station list
A message appears whenever the TV is switched on if the network provider changes their channel list.
In Update station list automatically, Allow must be selected.
Select the desired procedure.
... Allow
Block
If the channel list is not up to date, it will be automatically updated provided the parameter "Allow" is selected.
Because your network provider has changed its station list, it has to be adapted on your TV set as well. Please specify when you wish to do this.
At once
After switch off to standby
Later
Update station list
Proceed with
At once The station list will be immediately updated. Normally this occurs in the background without interfering further with the TV‘s operation. In exceptional cases, it is however possible that during this process an automatic station change may be necessary.
After switch off to
standby
The channel list will be updated the next time the TV set is switched off into standby mode.
Later Updating the channel list will be postponed to a later date. When the TV set is switched on and off, the update message will appear again.
OK Confirm selection.
Transfer all station listsYou can export all station lists of your TV set to a USB storage device or import station lists.
Calling Transfer all station lists
HOME: Call Home view.
Mark System settings, OK call System settings.
Mark Stations, go to next column.
Mark Transfer all station lists, OK call.
Select a target if several USB storage media are available.
Mark Export or Import, OK confirm selection.
When you import station lists, all station lists are overwritten in this device.
Before you remove the USB storage again, you need to safely disconnect it with ‚Unmount‘ from the TV set to prevent data loss.
...
Back
Export Import Unmount
Transfer allstation lists
Here you can export or import all station lists of this TV set. To do this, select the data storage device. Before you remove the USB storage again, you need to safely disconnect it with 'Unmount' from the TV set to prevent data loss. Attention: When you import station lists, all station lists are overwritten in this device!
Target USB1
Transfer all sation lists
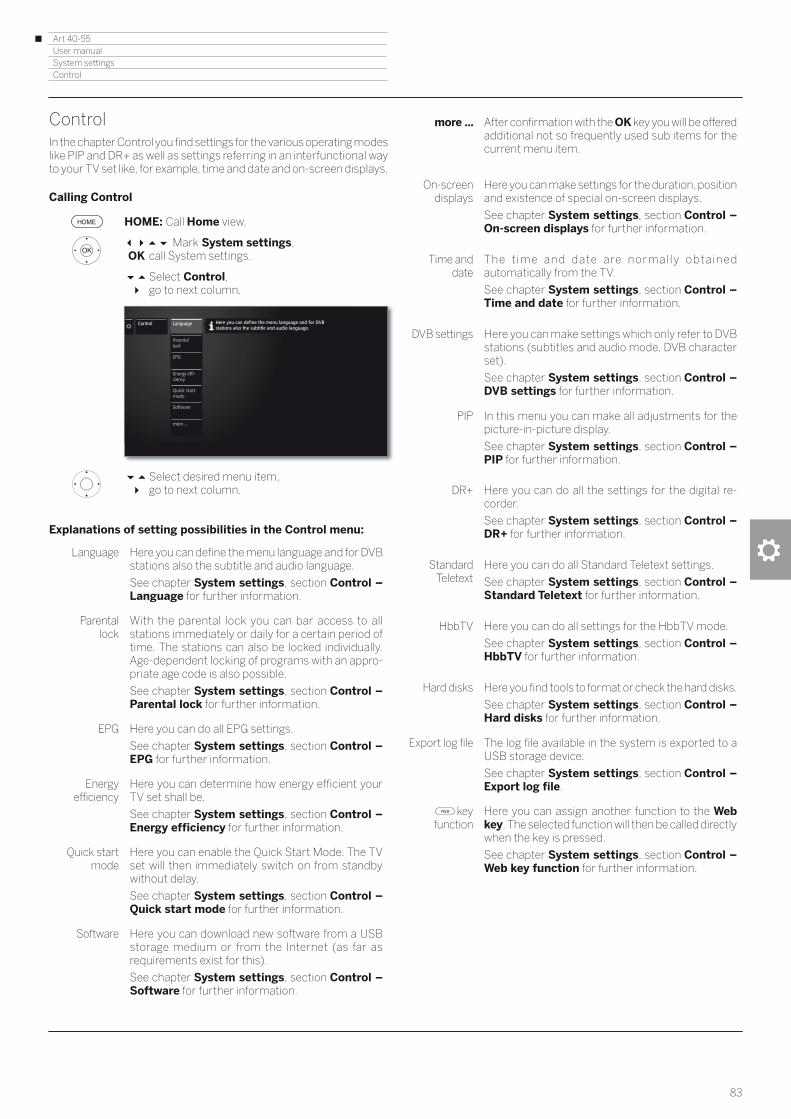
Art 40-55User manual
83
System settingsControl
ControlIn the chapter Control you find settings for the various operating modes like PIP and DR+ as well as settings referring in an interfunctional way to your TV set like, for example, time and date and on-screen displays.
Calling Control
HOME: Call Home view.
Mark System settings, OK call System settings.
Select Control, go to next column.
Select desired menu item, go to next column.
Explanations of setting possibilities in the Control menu:
Language Here you can define the menu language and for DVB stations also the subtitle and audio language.
See chapter System settings, section Control – Language for further information.
Parental lock
With the parental lock you can bar access to all stations immediately or daily for a certain period of time. The stations can also be locked individually. Age-dependent locking of programs with an appro-priate age code is also possible.
See chapter System settings, section Control – Parental lock for further information.
EPG Here you can do all EPG settings.
See chapter System settings, section Control – EPG for further information.
Energy efficiency
Here you can determine how energy efficient your TV set shall be.
See chapter System settings, section Control – Energy efficiency for further information.
Quick start mode
Here you can enable the Quick Start Mode. The TV set will then immediately switch on from standby without delay.
See chapter System settings, section Control – Quick start mode for further information.
Software Here you can download new software from a USB storage medium or from the Internet (as far as requirements exist for this).
See chapter System settings, section Control – Software for further information.
Control Language
Parental lock
Energy effi-ciency
Software
more ...
EPG
Here you can define the menu language and for DVB stations also the subtitle and audio language.
Quick start mode
more ... After confirmation with the OK key you will be offered additional not so frequently used sub items for the current menu item.
On-screendisplays
Here you can make settings for the duration, position and existence of special on-screen displays.
See chapter System settings, section Control – On-screen displays for further information.
Time and date
The t ime and date are normally obtained automatically from the TV.
See chapter System settings, section Control – Time and date for further information.
DVB settings Here you can make settings which only refer to DVB stations (subtitles and audio mode, DVB character set).
See chapter System settings, section Control – DVB settings for further information.
PIP In this menu you can make all adjustments for the picture-in-picture display.
See chapter System settings, section Control – PIP for further information.
DR+ Here you can do all the settings for the digital re-corder.
See chapter System settings, section Control – DR+ for further information.
Standard Teletext
Here you can do all Standard Teletext settings.
See chapter System settings, section Control – Standard Teletext for further information.
HbbTV Here you can do all settings for the HbbTV mode.
See chapter System settings, section Control – HbbTV for further information.
Hard disks Here you find tools to format or check the hard disks.
See chapter System settings, section Control – Hard disks for further information.
Export log file The log file available in the system is exported to a USB storage device.
See chapter System settings, section Control – Export log file.
key function
Here you can assign another function to the Web key. The selected function will then be called directly when the key is pressed.
See chapter System settings, section Control – Web key function for further information.
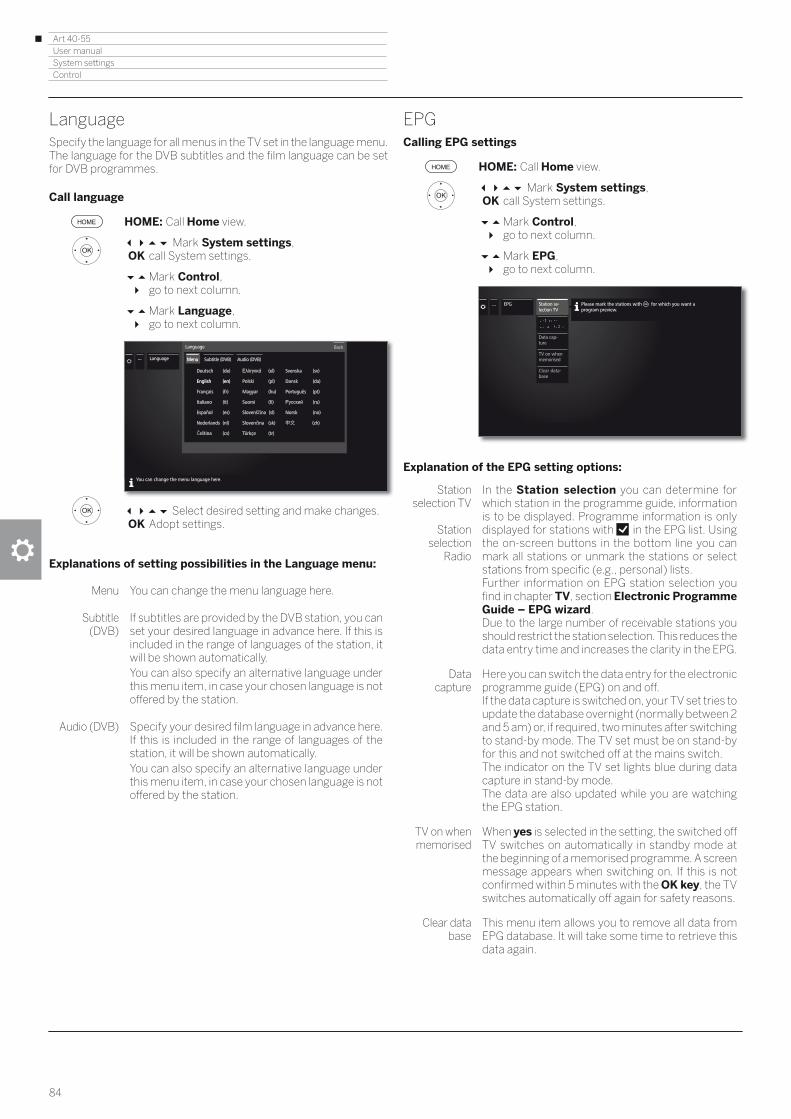
Art 40-55User manual
84
System settingsControl
LanguageSpecify the language for all menus in the TV set in the language menu. The language for the DVB subtitles and the film language can be set for DVB programmes.
Call language
HOME: Call Home view.
Mark System settings, OK call System settings.
Mark Control, go to next column.
Mark Language, go to next column.
Select desired setting and make changes. OK Adopt settings.
Explanations of setting possibilities in the Language menu:
Menu You can change the menu language here.
Subtitle (DVB)
If subtitles are provided by the DVB station, you can set your desired language in advance here. If this is included in the range of languages of the station, it will be shown automatically. You can also specify an alternative language under this menu item, in case your chosen language is not offered by the station.
Audio (DVB) Specify your desired film language in advance here.If this is included in the range of languages of the station, it will be shown automatically.You can also specify an alternative language under this menu item, in case your chosen language is not offered by the station.
......... Language Menu Subtitle (DVB) Audio (DVB)
Deutsch (de) (el) Svenska (sv)
English (en) Polski (pl) Dansk (da)
Français (fr) Magyar (hu) Português (pt)
Italiano (it) Suomi (fi) (ru)
Español (es) Slovenščina (sl) Norsk (no)
Nederlands (nl) Slovenčina (sk) 中文 (zh)
Čeština (cs) Türkçe (tr)
Menu Subtitle (DVB) Audio (DVB)
Deutsch (de) (el) Svenska (sv)
English (en) Polski (pl) Dansk (da)
Français (fr) Magyar (hu) Português (pt)
Italiano (it) Suomi (fi) (ru)
Español (es) Slovenščina (sl) Norsk (no)
Nederlands (nl) Slovenčina (sk) 中文 (zh)
Čeština (cs) Türkçe (tr)
Language
You can change the menu language here.
Back
EPGCalling EPG settings
HOME: Call Home view.
Mark System settings, OK call System settings.
Mark Control, go to next column.
Mark EPG, go to next column.
Explanation of the EPG setting options:
Station selection TV
Station
selection Radio
In the Station selection you can determine for which station in the programme guide, information is to be displayed. Programme information is only displayed for stations with in the EPG list. Using the on-screen buttons in the bottom line you can mark all stations or unmark the stations or select stations from specific (e.g., personal) lists.Further information on EPG station selection you find in chapter TV, section Electronic Programme Guide – EPG wizard. Due to the large number of receivable stations you should restrict the station selection. This reduces the data entry time and increases the clarity in the EPG.
Data capture
Here you can switch the data entry for the electronic programme guide (EPG) on and off. If the data capture is switched on, your TV set tries to update the database overnight (normally between 2 and 5 am) or, if required, two minutes after switching to stand-by mode. The TV set must be on stand-by for this and not switched off at the mains switch. The indicator on the TV set lights blue during data capture in stand-by mode.The data are also updated while you are watching the EPG station.
TV on when memorised
When yes is selected in the setting, the switched off TV switches on automatically in standby mode at the beginning of a memorised programme. A screen message appears when switching on. If this is not confirmed within 5 minutes with the OK key, the TV switches automatically off again for safety reasons.
Clear data base
This menu item allows you to remove all data from EPG database. It will take some time to retrieve this data again.
...... EPG Station se-lection TV
Data cap-ture
TV on when memorised
Please mark the stations with for which you want a program preview.
OK
Clear data-base

Art 40-55User manual
85
System settings
Control
Parental lockYou can select and set various security options to prevent unauthorised use of the TV set and to protect your children from unsuitable programmes.
Call Parental lock menu
HOME: Call Home view.
Mark System settings, OK call System settings.
Mark Control, go to next column.
Mark Parental lock, go to next column.
Define a four digit access code (PIN) the first time you open it. Note the access code (PIN) well.
The access code must not consist of the same four digits.
Mark Confirm, OK activate.
The new PIN must be entered and confirmed again.
The Parental lock menu will be opened.
The four-digit access code (PIN) must be entered when the parental lock is opened in future. For security reasons, it appears encrypted (****) when entering.
Note for unlocking
As soon as the PIN has once been entered to unlock your TV set, all currently set parental locks will be disabled temporarily. Besides of the general locks described in this chapter, this is also valid for parental lock of DR+ archive entries. Parental locks will only be re-enabled when the TV set is switched off.
1 2 3 4 5 6 7 8 9 0
|
...... Parental lock Define 4 digit access code and memorise it, please.(Note: The same digit must not be used four times).Define 4 digit access code and memorise it, please.(Note: The same digit must not be used four times).
Parental lock
Cancel
Back
With the parental lock you can bar access to all stations immediately or daily for a certain period of time. The stations can also be locked individually. Age dependent locking of prorams with an appropriate age code is also possible.
...... Parental lock
Lock all stations Lock single stations Age-related lock Change acces code Deactivate
Immediately no yes
Daily no yes, from 00:00 until 00:00
Parental lock
Back
You can bar access to all stations. This can be done immediately or daily for a certain period of time.
Explanations of setting possibilities in the Parental lock menu:
Lock all stations
The TV set is locked immediately the menu is exited. All programmes can then only be watched after entering the access code.The lock can be activated both Immediately and for a Daily defined period.The lock remains active until it is switched off in the menu.
Lock single stations
You can lock / unlock individual or all of the stations in the station list specifically.The lock remains active until it is switched off in the menu.
Age-related lock
Some DVB stations also broadcast an age classification. If the age set here is below the broadcast age limit, the programme can only be watched after entering the access code.
Change access code
You can change your access code at any time. Enter the new access code in place of the old one.
Deactivate All set parental locks (locked stations, age-dependent locks, locked films in the DR+ archive) are cancelled. The current secret code is deleted. When the parental lock is reactivated all the previous parental locks are set again automatically.
Reset All currently set parental locks are finally cancelled. The access code is deleted.
Protection of minors for CI Plus programmes
Youth-protected broadcasts of programme providers with CI Plus encoding possibly require you to enter the secret number (PIN) of the CA module.
The Parental lock PIN of the CA module can be store in the TV set.
We recommend selecting the secret number of the TV set according to the secret number of the CA module, since the secret number of the CA module cannot be changed. This means that you must only remember one secret number.
Code number
The code number cancels all entered access codes. It can be used for example if you have forgotten your PIN. In the supplied user guide you find a note on the access code number. Remove this one from the user guide and keep it in a safe place.

Art 40-55User manual
86
System settings
Control
Energy efficiencyDetermine how energy efficient your TV set shall be. The value for the contrast (and thus the brightness of the background lighting) is adapted and the automatic dimmer activated or deactivated depending on the presetting.
Call Energy efficiency
HOME: Call Home view.
Mark System settings, OK call System settings.
Mark Control, go to next column.
Mark Energy efficiency, go to next column.
Select desired setting and make changes. OK Adopt settings.
Explanations of the setting options in the energy efficiency menu:
Home Mode The emphasis for home use is on low energy consumption. The automatic dimmer is activated.
Choosing Home Mode automatically activates shutdown.
Premium Mode
This mode optimises the settings to a brighter environment at a higher energy consumption. The automatic dimmer is activated.The use of this energy efficiency setting must be confirmed afterwards once again.
Shop Mode The picture settings are aligned to operation in the presentation room. The automatic dimmer is deactivated. If the ambient brightness diminishes, the energy consumption is not reduced.The use of this energy efficiency setting must be confirmed afterwards once again.
... Energy effi-ciency
Home Mode
Premium Mode
Shop Mode
The priority here is low energy consumption in home use. In this case, the TV switches off automatically for the sake of savingenergy, after it has been out of operation for four hours.
Quick start modeIf you enable the Quick Start Mode and you switch on the TV set from standby, the TV picture can be immediately seen without delay. You can specify the times at which your device will be in the Quick Start Mode.
Please note that in this case you will have a higher energy consumption.
Default setting for the Quick Start Mode: no
Call Quick start mode
HOME: Call Home view.
Mark System settings, OK call System settings.
Mark Control, go to next column.
Mark Quick start mode, go to next column.
Select desired setting and make changes. You can individually change the suggested times.
OK Adopt settings.
... Quick startmode
Here you can specify the times at which your device should be in quick start mode.
Quick start mode Back
Here you can specify the times at which your device should be in quick start mode.
Period1 no yes, from 06:00 until 09:00
Period2 no yes, from 11:00 until 15:00
Period3 no yes, from 18:00 until 21:00

Art 40-55User manual
87
Software updateIt is possible to update the software on your Loewe TV set.
In the software update (package update) all the software releases in the TV are scanned and updated as required.
Here you can download a new piece of software from different sources (if existing).
Current software versions can be downloaded from the Loewe Internet site (see below) and installed on your TV set using a USB stick.
If your TV set is connected to the Internet, the TV set can be updated directly via the Internet (see chapter System settings, section Control – Manual update via the Internet).
Updating the software is not possible as long as a programmed timer recording is active.
When a software update occurs it may happen that timer entries and memorised programmes are deleted. After such a software update, check your timer list (see chapter TV, section Timer – Timer list).
Please be aware of the requirements of your USB stick in section Technical data – Media.
Software download from the Loewe Internet site for update via USB
Where available, you can download new software for your TV set from our homepage.
Visit our homepage under:
www.loewe.tv/int/my-loewe
Choose the item Register now on the Service homepage. Simply follow the steps in the registration process.
After the successful registration process and subsequent login to the support homepage you have to register your TV set (have the article number and serial number ready – both of these are on a label stuck to the back of the set or can be looked up under System settings → Extras → Integrated features.
Then you will get a list of downloadable contents for your TV set including the software. Download the data and unpack all the files in this ZIP archive into the main directory of your USB stick.
Then carry out the software update as described below.
USB stick - requirements
USB sticks tested by Loewe and compatible in type and format can be ordered from the Loewe dealer using the article no. 90456.900.
If you would like to use your own USB stick, please follow these tips/conditions:
• Formatting in FAT32.
• Just one partition.
• Do not use encrypted USB sticks.
• Do not use USB sticks that simulate a CD ROM drive.
• There may be no hidden files on the device.
• For some types of device, the construc-tion of the USB stick is significant.
Maximum dimensions in mm: 70x20x10.
• If in doubt, the USB stick should be formatted as “FAT32” without “extended attributes”.
In order to avoid problems during the software update of the tv set the USB stick in use should meet the requirements.
n
System settings
Control

Art 40-55User manual
88
System settings
Control
Software update via USB storage deviceTo do this, plug the USB stick with the downloaded software into a free USB port of the TV set.
Calling Software update
HOME: Call Home view.
Mark System settings, OK call System settings.
Mark Control, go to next column.
Mark Software, go to next column.
Mark Software update, go to next column.
Mark Via USB, call Software update. The version of the software package that is
currently installed will be displayed.
Proceed. The TV set searches for a new software package
on the USB stick.
If a new software version is available after the search, an on-screen message appears (see right hand column).If several different software packages are found on the USB stick, the latest software package is always used.
If no new software package was found in the search:
BACK: End of wizard.
...... Via USB Current software: 1.1.11.0
To load a new piece of software, you first need to search for said software on a USB storage device that is connected (e.g. USB stick). Press the key to start the search.
SOFTWARE UPDATE WIZARD - Current software
Proceed with Cancel with
New software package found
Proceed starts loading of the new software.
Or:
BACK: End of wizard.The update will then not be carried out.
Load new software package
The software is loaded in several steps. The total loading and programming process can take up to approx. 50 minutes in total. Please do not switch off your TV set with the mains switch during the entire loading and programming process.
After the update, the TV set is automatically powered off and on again.
Depending on the software loaded, it is possible that the device may not turn off automatically after the update. Therefore, please supervise the update process.
When the TV set is switched on again, a message is displayed.
BACK: End of wizard.
...... Via USB
New software
Proceed withProceed with End withEnd with
A new software version was found.
New software: V1.1.14.0 (Current software: V.1.1.11.0)
If you now wish to load the new software, press the button. Otherwiseclose with the button.
Ensure that the TV set is not switched off at the mains while it is loading thedata.
A new software version was found.
New software: V1.1.14.0 (Current software: V.1.1.11.0)
If you now wish to load the new software, press the button. Otherwiseclose with the button.
Ensure that the TV set is not switched off at the mains while it is loading thedata.
60%...... Via USB
Note: The loading and programming process can take up to approx. 50 minutes in total. Please do not switch off your TV set at the mains during the loading and programming process.
Note: Depending on the loaded software, it is possible that the device cannot automatically switch off after the update. Therefore, please monitor the update process.
Updating software
The "V1.1.14.0" software is currently being programmed, please wait ...
The software was successfully updated.
Hint
Finish wizard with

Art 40-55User manual
89
System settings
Control
Manual update via the InternetIf an Internet connection is available, new software can be downloaded directly and installed onto the TV set.
Calling Software update
HOME: Call Home view.
Mark System settings, OK call System settings.
Mark Control, go to next column.
Mark Software, go to next column.
Mark Software update, go to next column.
Mark Via Internet, go to next column. You will see a message on the screen regarding
data protection.
If you are not in agreement with the relevant data being passed on:
BACK: Exit the update process. The update will then not be carried out.
Otherwise: Confirm data protection message by press-ing .
The version of the software package that is currently installed will be displayed.
Proceed.
The TV set connects to the Internet and scans the update server for new software.
If a new software version is available after the search, an on-screen message appears (see right hand column).
If no new software package was found in the search:
BACK: End of wizard.
... Start update In accordance with § 33 of the Federal Data Protection Act (BDSG) we point out that machine numbers and the installation site of your TV set , as well as the current updates and the current software status in each case, are processed and saved by a computer system if you use the button to confirm. This data ensures that we are always able to provide you with optimal service. All data is handled confidentially.
If you do not wish this to be the case, please press the button.
SOFTWARE UPDATE WIZARD - Data protection
Proceed with End with
...... Start update Current software: 1.1.11.0
To load a new piece of software, you first need to search for said software on the update server. Press the key to start the search.
SOFTWARE UPDATE WIZARD - Current software
Proceed withBack with
New software package found
Proceed starts loading of the new software.
Or:
BACK: End of wizard.The update will then not be carried out.
Load new software package
Only the parts of the software package that are not up to date will be automatically downloaded from the Internet and updated.
Each part of the software is downloaded individually from the Internet and is then programmed.
The total time required for all the software parts to be downloaded from the Internet is dependent on the speed of data transfer that is being used.
The total programming process can take up to 50 minutes in total.Please do not switch off your TV set with the mains switch during the entire loading and programming process.
After the update, the TV set is automatically powered off and on again.
Depending on the software loaded, it is possible that the device may not turn off automatically after the update. Therefore, please supervise the update process.
When the TV set is switched on again, a message is displayed.
BACK: End of wizard.
......
New software
Proceed withProceed with End withEnd with
A new software version was found.
New software: V1.1.14.0 (Current software: V1.1.11.0)
If you now wish to load the new software, press the button. Otherwiseclose with the button.
Ensure that the TV set is not switched off at the mains while it is loading thedata.
A new software version was found.
New software: V1.1.14.0 (Current software: V1.1.11.0)
If you now wish to load the new software, press the button. Otherwiseclose with the button.
Ensure that the TV set is not switched off at the mains while it is loading thedata.
Start update
60%...
in total. Please do not switch off your TV set at the mains during this time.
Note: Depending on the loaded software, it is possible that the device cannot automatically switch off after the update. Therefore, please monitor the update process.
in total. Please do not switch off your TV set at the mains during this time.
Note: Depending on the loaded software, it is possible that the device cannot automatically switch off after the update. Therefore, please monitor the update process.
Updating software
The "V1.1.14.0" software is currently being programmed, please wait ...Start update

Art 40-55User manual
90
Software update via Antenna A software update via antenna is only available for stations of the Freeview DVB-T platform in the UK and Ireland.
Calling Software update
HOME: Call Home view.
Mark System settings, OK call System settings.
Mark Control, go to next column.
Mark Software, go to next column.
Mark Software update, go to next column.
Mark Via Antenna, call Software update. You will see a message on the screen regarding
data protection.
Proceed. The TV set searches for a new software package.
If a new software version is available after the search, an on-screen message appears (see below).
If no new software package was found in the search:
BACK: End of wizard.
New software package found
Proceed starts loading of the new software.
Or:
BACK: End of wizard. The update will then not be carried out.
... Via antenna Current software: 1.1.11.0
For loading a new software, it is mandatory to have the antenna cable attached to the TV. Start search pressing the key .
SOFTWARE UPDATE WIZARD - Current software
Proceed with Cancel with
...
Proceed withProceed with End withEnd with
Via antenna
New software
A new software version was found.
New software: V1.1.14.0 (Current software: V1.1.11.0)
If you now wish to load the new software, press the button. Otherwiseclose with the button.
Ensure that the TV set is not switched off at the mains while it is loading thedata.
A new software version was found.
New software: V1.1.14.0 (Current software: V1.1.11.0)
If you now wish to load the new software, press the button. Otherwiseclose with the button.
Ensure that the TV set is not switched off at the mains while it is loading thedata.
Load new software package
The software is downloaded in several steps. The total downloading and programming process can take up to approx. 50 minutes in total. Please do not switch off your TV set with the mains switch during the entire loading and programming process.
After the update, the TV set is automatically powered off and on again.
Depending on the software loaded, it is possible that the device may not turn off automatically after the update. Therefore, please supervise the update process.
When the TV set is switched on again, a message is displayed.
BACK: End of wizard.
60%...
in total. Please do not switch off your TV set at the mains during this time.
Note: Depending on the loaded software, it is possible that the device cannot automatically switch off after the update. Therefore, please monitor the update process.
in total. Please do not switch off your TV set at the mains during this time.
Note: Depending on the loaded software, it is possible that the device cannot automatically switch off after the update. Therefore, please monitor the update process.
Updating software
The "V1.1.14.0" software is currently being programmed, please wait ...Via antenna
The software was successfully updated.
Hint
Finish wizard with
System settings
Control
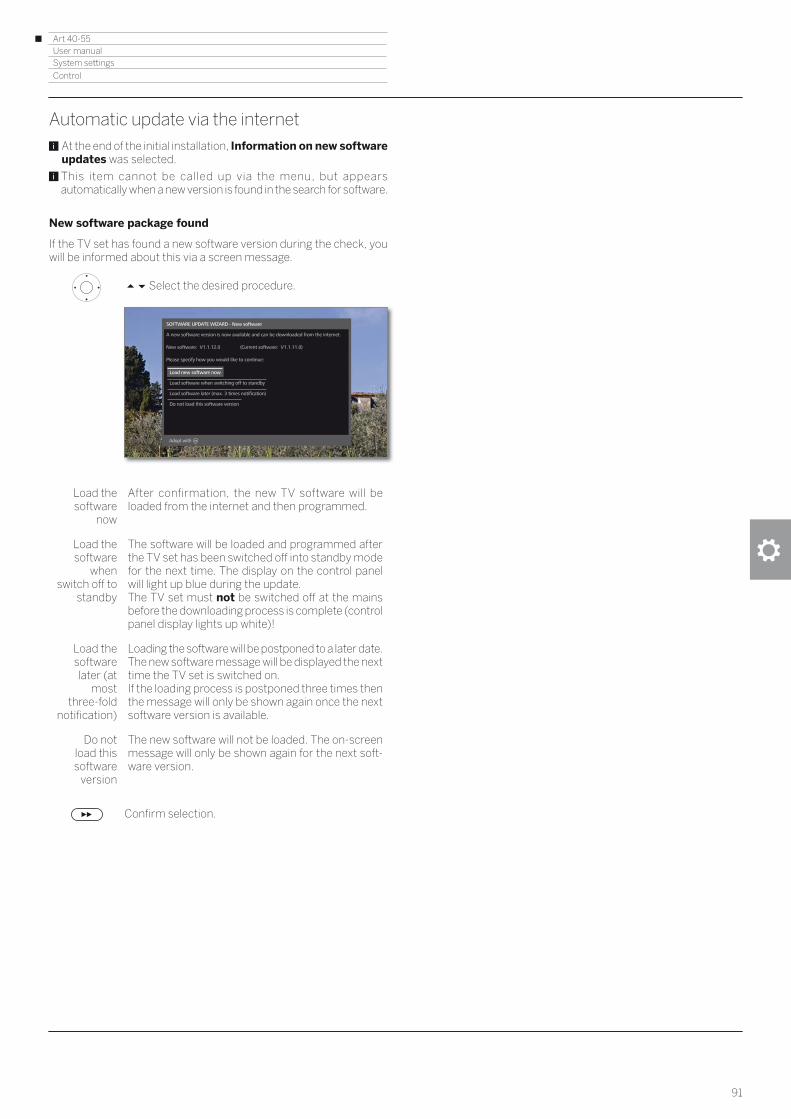
Art 40-55User manual
91
Automatic update via the internet At the end of the initial installation, Information on new software updates was selected.
This item cannot be called up via the menu, but appears automatically when a new version is found in the search for software.
New software package found
If the TV set has found a new software version during the check, you will be informed about this via a screen message.
Select the desired procedure.
Load the software
now
After confirmation, the new TV software will be loaded from the internet and then programmed.
Load the software
when switch off to
standby
The software will be loaded and programmed after the TV set has been switched off into standby mode for the next time. The display on the control panel will light up blue during the update.The TV set must not be switched off at the mains before the downloading process is complete (control panel display lights up white)!
Load the software later (at
most three-fold
notification)
Loading the software will be postponed to a later date. The new software message will be displayed the next time the TV set is switched on.If the loading process is postponed three times then the message will only be shown again once the next software version is available.
Do not load this software
version
The new software will not be loaded. The on-screen message will only be shown again for the next soft-ware version.
Confirm selection.
A new software version is now available and can be downloaded from the internet.
New software: V1.1.12.0 (Current software: V1.1.11.0)
Please specify how you would like to continue:
Load new software now
Load software when switching off to standby
Load software later (max. 3 times notification)
Do not load this software version
SOFTWARE UPDATE WIZARD - New software
Adopt with OK
System settings
Control
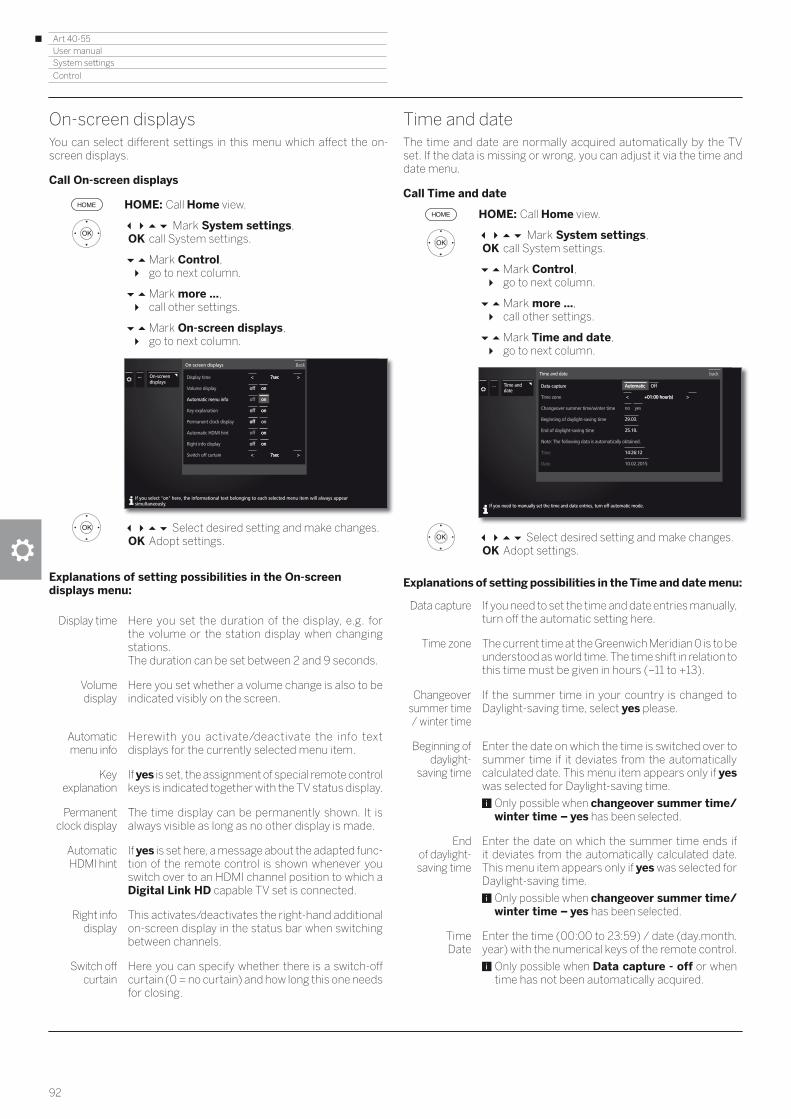
Art 40-55User manual
92
System settings
Control
On-screen displaysYou can select different settings in this menu which affect the on-screen displays.
Call On-screen displays
HOME: Call Home view.
Mark System settings, OK call System settings.
Mark Control, go to next column.
Mark more ..., call other settings.
Mark On-screen displays, go to next column.
Select desired setting and make changes. OK Adopt settings.
Explanations of setting possibilities in the On-screen displays menu:
Display time Here you set the duration of the display, e.g. for the volume or the station display when changing stations. The duration can be set between 2 and 9 seconds.
Volume display
Here you set whether a volume change is also to be indicated visibly on the screen.
Automatic menu info
Herewith you activate/deactivate the info text displays for the currently selected menu item.
Key explanation
If yes is set, the assignment of special remote control keys is indicated together with the TV status display.
Permanent clock display
The time display can be permanently shown. It is always visible as long as no other display is made.
Automatic HDMI hint
If yes is set here, a message about the adapted func-tion of the remote control is shown whenever you switch over to an HDMI channel position to which a Digital Link HD capable TV set is connected.
Right info display
This activates/deactivates the right-hand additional on-screen display in the status bar when switching between channels.
Switch off curtain
Here you can specify whether there is a switch-off curtain (0 = no curtain) and how long this one needs for closing.
...... On-screendisplays
Display time
Volume display
Automatic menu info
Key explanation
Permanent clock display
Automatic HDMI hint
Right info display
Switch off curtain
On-screen displays
If you select "on" here, the informational text belonging to each selected menu item will always appear simultaneously.
Back
< 7sec >
off on
off on
off on
off on
off on
off on
< 7sec >
< 7sec >
off on
on
off on
off on
on
off on
< 7sec >
Time and dateThe time and date are normally acquired automatically by the TV set. If the data is missing or wrong, you can adjust it via the time and date menu.
Call Time and date
HOME: Call Home view.
Mark System settings, OK call System settings.
Mark Control, go to next column.
Mark more ..., call other settings.
Mark Time and date, go to next column.
Select desired setting and make changes. OK Adopt settings.
Explanations of setting possibilities in the Time and date menu:
Data capture If you need to set the time and date entries manually, turn off the automatic setting here.
Time zone The current time at the Greenwich Meridian 0 is to be understood as world time. The time shift in relation to this time must be given in hours (–11 to +13).
Changeover summer time / winter time
If the summer time in your country is changed to Daylight-saving time, select yes please.
Beginning of daylight-
saving time
Enter the date on which the time is switched over to summer time if it deviates from the automatically calculated date. This menu item appears only if yes was selected for Daylight-saving time.
Only possible when changeover summer time/winter time – yes has been selected.
End of daylight-saving time
Enter the date on which the summer time ends if it deviates from the automatically calculated date. This menu item appears only if yes was selected for Daylight-saving time.
Only possible when changeover summer time/winter time – yes has been selected.
TimeDate
Enter the time (00:00 to 23:59) / date (day.month.year) with the numerical keys of the remote control.
Only possible when Data capture - off or when time has not been automatically acquired.
... Time and date
Data capture
Time zone
Changeover summer time/winter time
Beginning of daylight-saving time
End of daylight-saving time
Note: The following data is automatically obtained.
Time
Date
Time and date
Automatic Off
< +01:00 hour(s) >
no yes
29.03.
25.10.
14:26:12
10.02.2015
Automatic Off
< +01:00 hour(s) >
29.03.
25.10.
14:26:12
back
If you need to manually set the time and date entries, turn off automatic mode.

Art 40-55User manual
93
System settings
Control
DVB settingsYou can make general pre-settings for DVB stations.
Calling DVB settings
HOME: Call Home view.
Mark System settings, OK call System settings.
Mark Control, go to next column.
Mark more ..., call other settings.
Mark DVB settings, go to next column.
Explanation of the DVB setting options:
Subtitlemode
Here you can preset whether a subtitle is always to be displayed as soon as it is offered by the station. A special subtitle for impaired hearing can also be selected.Subtitles are not offered by all stations. Many stations only broadcast subtitles by teletext.
DVB character
set
Select the DVB character set so that the title of the broadcast of your favourite received station or the texts of your CA module are displayed correctly.
Audio commentary
You can preset the system here to always play a special soundtrack for the visually impaired whenever one is available. This soundtrack uses an audio commentary to describe the action taking place on-screen.
... DVB settings Subtitle mode Off normal For hearing-impaired persons
DVB character set Western European Standard Polish Greek Turkish
Audio commentary off on
Subtitle mode Off normal For hearing-impaired persons
DVB character set Western European Standard Polish Greek Turkish
off on
DVB settings
Back
Here you can preset whether a subtitle is always to be displayed as soon as it is offered by the station. A special subtitle for impaired hearing can also be selected.
PIP
Adjust size of the PIP image
HOME: Call Home view.
Mark System settings, OK call System settings.
Mark Control, go to next column.
Mark more ..., call other settings.
Mark PIP, go to next column.
Select desired setting and make changes. OK Adopt settings.
Explanations of setting possibilities in the PIP Settings menu:
Size You can choose if your second picture faded in (picture in picture) shall be displayed small or large.
... PIP
PIP
Size Small Large
Here you may select the size of your Picture-in-Picture fade-in.
Back

Art 40-55User manual
94
(1 for devices in DK, FIN, N or S: yes.
System settings
Control
DR+ You can adapt the digital recorder to suit your needs when you record programmes on an externally attached USB hard disk.
Call settings for the digital recorder
HOME: Call Home view.
Mark System settings, OK call System settings.
Mark Control, go to next column.
Mark more ..., call other settings.
Mark DR+, go to next column.
Mark desired setting, go to next column.
Make settings, OK confirm setting.
Explanation of the DR+ setting options
Recording You can set a pre-record and post-record time for timer recordings made without auto time control. This minimizes the risk that a part of the broadcast is not recorded due to the broadcast starting earlier and/or finishing later.
Factory setting: pre-record time: 1 min, post-record time: 5 min.
Notify hidden
sections
If an entry has been hidden in an archive recording, you can get informed by a screen message when skipping a hidden area.
Factory setting: yes.
Jump distance
Set the standard jump distance (in minutes) used for jumping forwards or backwards in the movie by briefly pressing the or keys.
Factory setting: 2 min.
Smart jump If the „Smart jump“ mode is activated you can approach a desired place by pressing the and buttons alternately and halving the jump width. After every 3rd jump in the same direction the jump width is doubled (up to a maximum of 8 minutes).
If off is set you always jump the same currently set jump width (time) with the and buttons.
Factory setting: on
DR+
Notify hid-den sections
Jump dis-tance
Smart Jump
RecordingRecording
Recordingsubtitles
DR+Streaming
You may set the pre-record and post-record times here....
Serial recording tolerance
The serial recording tolerance is necessary to avoid recording a serial more than once when it is broadcast more than once a day. It is only recorded when it begins within the given time interval (start time +- series recording tolerance).Use the numeric button on the remote control to enter the time (always two-digit for 01 to 60 min.).
Factory setting: ± 30 min.
Recording subtitles
Select here whether subtitles are to be recorded for DVB stations.
Factory setting: no (1.
DR+ Streaming
Here, all settings are made in order to use the DR+ archives of other LOEWE TV sets in the home network.
See next page for further information.

Art 40-55User manual
95
System settings
Control
Standard TeletextIn the Standard Teletext menu you can configure the Teletext.
Call Teletext settings
HOME: Call Home view.
Mark System settings, OK call System settings.
Mark Control, go to next column.
Mark more ..., call other settings.
Mark Standard Teletext, go to next column.
Explanations of the Standard Teletext menu functions:
Character set Teletext character set can be switched to other lan-guages (Russian, Greek, Polish and Turkish).
... Standard Teletext
Characterset
The programme preview pages and the page for the programme subtitles arespecified here.
Call DR+ streaming settings
The DR+ settings are called (see previous page).
Mark DR+ Streaming, go to next column.
Mark desired setting, go to next column.
Make settings, OK confirm setting.
Explanation of the setting options for DR+ streaming
Also use other
archives.
Setting yes enables you, via the archive, to also view recordings from other TV sets that have accessible movies within the home network (client function).
Notify started
„Follow me“ recording
Please indicate here whether your TV should provide automatic notification when a programme is available for viewing as soon as this has been started as a „Follow me“ recording on another TV in the network.
DR+ device name
Give your TV set a unique name for quick identification in the network.
DR+ device group name
Give a name for your TV set group.Using different group names enables you to group your TV sets as required. Only TV sets under the same group name can exchange data.
IP port number
IP port numbers are preset ex-factory. Under normal circumstances they do not require amending.
... DR+Streaming
Use Archiveother TVs
DR+ devicename
Notify start-
DR+ devicegroup name
IP portnumber
By selecting "yes" here, you can view films from the DR+ archives of other Loewe TVs that have been set up for this function, as long as these units have had their DR+ archives made accessible. Again, this takes place using your home network.

Art 40-55User manual
96
System settings
Control
HbbTVHere you can do all settings for the HbbTV mode.
Call HbbTV settings
HOME: Call Home view.
Mark System settings, OK call System settings.
Mark Control, go to next column.
Mark more ..., call other settings.
Mark HbbTV, go to next column.
Mark desired setting, go to next column.
Make settings, OK confirm setting.
Explanation of the setting options for HbbTV
HbbTV-Modus
When the HbbTV mode is active (factory setting), additional services and further information (e.g., also from the Internet) can be viewed if these are offered by the current station.
Start behaviour of
HbbTV-stations
If HbbTV mode – on has been selected, you can specify if an available HbbTV application should be loaded automatically after the channel has been changed or if this should only occur manually after the red key has been pressed once. The startup behaviour can be set for TV and radio stations.
After loading the HbbTV application, an on screen message is displayed (depending on the channel that is being viewed).
Function of the TEXT
key
With the setting Standard Teletext first (factory setting), the standard Teletext is opened when the TEXT key is pressed for the first time. Pressing the TEXT key for a second time will then display the MediaText. Pressing the TEXT key for a third time will bring you back to the TV picture. If MediaText first is selected, the TEXT key will do the exact opposite.
Depending on the programme provider, the direct Call of MediaText may not be possible. MediaText must then be opened by means of the HbbTV application.
... HbbTV HbbTVmode
When the HbbTV mode (Hybrid broadcast broadband TV mode) ist actvie, additional services and further information (e.g. from the Internet) can be viewed if these offered by the current station.
Hard disks
Formatting the external hard disk
If problems occur when operating the external hard disk, these may be fixed by formatting the hard disk.Additionally, you can re-format the hard disk in order to quickly and easily delete all the data stored on it.
Warning!Formatting the hard disk will erase all data stored on it!
HOME: Call Home view.
Mark System settings, OK call System settings.
Mark Control, go to next column.
Mark more ..., call other settings.
Mark Hard disks, go to next column.
Mark Format external one,confirm.
A warning note will be displayed.
OK Press at least for three seconds to start format-ting.
Or:BACK: Cancel procedure
Never ever switch off the TV set during a formatting process.
After the formatting, a message will appear on the screen showing the results of the formatting and tips on how to resolve any problems that exist, should there be any.
After the formatting the TV set must be switched off and on again.
Note on formatting external USB disks:
The TV set supports the two hard disk file systems FAT 32 and NTFS.
External hard disks are formatted by the TV in the FAT32 file system to full capacity.
With FAT32, the maximum size of a file is 4 GB.
For a parallel use of TV and PC, we recommend that you reformat the hard disk on a PC to NTFS.
... Hard disks Formatexternal one
CAUTIONDo you really want toformat the external hard drive?
Formatting deletes allthe data on the hard drive.
To start formatting, holddown the button for at least three seconds.
OK
If problems occur when operating the external hard disk, these may be fixed by formatting the hard disk. However, please be aware that thiswill delete all data on the storage medium.

Art 40-55User manual
97
WEB key functionYou can assign the Web key on the remote control unit a particular function (MediaNet, picture/sound menu, sound mode, etc.). The selected function will then be called directly when the key is pressed.
Call WEB key settings
Default setting: MediaNet
HOME: Call Home view.
Select System settings, OK call System settings.
Select Control, go to next column.
Select more ..., call other settings.
Select key function, go to next column.
Select function, OK Adopt.
... keyfunction
Sound/pic-ture music
Soundmode
Picture for-mat
Headphonevolume
3D
Internet ra-dio
Photo
Video
You can assign the button another function here. The selected function is then accessed directly when the button is pressed.
WEB WEB Adopt with OK
System settings
Control
Export log fileTo resolve problems, a log file can be provided for the service. The log file can be exported to a USB storage device or manually or automa-tically transferred via the Internet.
The log file can be transferred via the Internet only when an online connection exists. The transferred data is anonymous and purely of technical nature without reference to person, location or IP address. Browser history or login details are not stored or transferred.
Call export of the log file
HOME: Call Home view.
Mark System settings, OK call System settings.
Mark Control, go to next column.
Mark more ..., call other settings.
Mark Export log file, go to next column.
Select I agree, if you accept the privacy policies,
OK Confirm selection.
Select Via Internet, Via USB or Settings.
When selecting Via Internet:
Mark Export log files now, OK confirm selection.
This transfers all stored log files to the Loewe server.
After successful transmission, a reference number will be displayed that you can specify as a reference when making inquiries.
...
Confirm with OK
Back
I agree I don't agree
Export logfile
Dear Sir or Madam,For securing our quality standards and for statistical analysis your device transmits technical data to our server. This data is anonymous and of a technical nature without reference to person, location or IP address.All data will be deleted from our servers not later than 4 weeks.
More information can be found in our privacy policy. (https://www.loewe.tv/uk/service/datenschutz.html)
Export log file
...
Back
Export logfile
Export Unmount
Here you can export the log file existing in the system. This one can be provided to the service for troubleshooting.
Before you remove the USB storage again, you need to safely disconnect it with “Unmount” from the TV set to prevent data loss.
Target USB1
Via Internet Via USB Settings
Export log file
When selecting Via USB:
Select a target if several USB storage media are available.
Mark Export,OK confirm selection.
Before you remove the USB storage again, you need to safely disconnect it with Unmount from the TV set to prevent data loss.
When selecting Settings:
Mark the desired setting.
Autom. Export
Herewith you enable/disable the automatic export of the problem file as soon as a problem situation has occurred.
When set to on, the file is automatically transferred to the Loewe server and stored as soon as a problem situation has occurred.
...
Back
Export logfile
Export log file
Hereby you enable/disable the automatic export of the problem file as soon as a problem situation has occurred. The file is transferred to the Loewe server and stored there.
Autom. export on off
Via Internet Via USB Settings

Art 40-55User manual
98
System settings
Multimedia / Network
Network settingsUnder Network settings you make settings to your network adaptors and the various types of media.
Call network settings
HOME: Call Home view.
Mark System settings, OK call System settings.
Mark Multimedia / Network, go to next column.
Mark Network settings, go to next column.
Select desired menu item, go to next column.
Explanations of the setting options in the network menu:
Networking Here, the network wizard starts that guides you through all necessary settings to your network (see right hand column).
Reset to factory
settings
Here, all network settings are reset to factory de-faults.
Host name Give your TV set a name so that it can be uniquely identified in the network.
Proxy server Do the settings for using a proxy server. The proxy server wizard will be called.See chapter System settings, section Multimedia / Network – Proxy server for further information.
Wake on LAN/WiFi
Here you can specify whether it is permitted to access your TV set by LAN/WLAN in standby mode. This allows you to switch on your TV, for example. Please note that the TV set consequently uses more power in standby mode.
After switching off the TV set into standby mode, it takes minimum 30 seconds for the TV set to be ready for reception of a signal (Wake on LAN/WLAN) to power on via LAN/WLAN.
If you want to switch on your TV set via the Loewe Smart TV2move App by Wake on WLAN, you have to configure in your router‘s encryption permanently on WPA2. Setting WPA / WPA2 may not be used.
... Network settings
Networking The following antenna wizard guides you through all the necessary settings relevant to your network.
Host name
Proxy server
Wake onLAN/WiFi
Network
The network wizard guides you through all the necessary settings relevant to your networkAt the beginning you see the current network status.
Proceed to next step.
Proceed to next step.
Select network mode.Select how you want to connect your TV set to your network.
OK Confirm selection.
Off Deactivates all existing network adaptors of your TV set.
On, wired only
Access to the network only via a network cable. The wireless access is deactivated.
On, wireless only
Access to the network only via WLAN. The access via a network cable is deactivated.
Depending on which type of network (wireless or wired) was selected, the appropriate settings appear below.
Network status
.
... Networking
NETWORK WIZARD - Network status
Proceed with
Current settings:Networking WiredIP configuration Automatic
Additional information:IP address 172.16.10.141Subnet mask 255.255.0.0Gateway 172.16.0.1DNS server 1 172.16.0.1DNS server 2 192.168.1.1MAC address 18:16:0f:71:af:92
End with
Security hint.
... Networking This next step allows you to connect your TV device to the Internet. This enables you to use of a number of different services and get the most out of your device’s technical capabilities.For data protection reasons, we would like to point out that once the device is connected to the Internet data will be transferred between your TV device and the Internet as this is a prerequisite for use. As a result, your TV device is subject to the same risks and dangers as any other device with Internet capabilities, e.g. computer, smartphone, etc.In this respect, Loewe guarantees that this data will not be personally exploited in any way. However, a statistical analysis of anonymised data records may be carried out. If you have any questions, please contact your dedicated Loewe advisor or call the Loewe Hotline.
Internet Security hint
Back with Proceed with
Network mode
.
... Networking Please select the desired network mode from the list or switch it off completely.
Note: The newly selected parameter must be confirmed with the button.
off
On, wired only
On, wireless only
Select network mode
Back with

Art 40-55User manual
99
System settings
Multimedia / Network
Configuration of the built-in LAN adaptor
As network operation was selected On, wired only.
Select type of IP configuration.
automatic Automatic configuration of the IP address via DHCP server or via multiple protocols according to UPnP specification (including DHCP).
After selecting IP configuration – automatic proceed to the network status.
manual Enter your fixed IP addresses manually.
If manual has been selected under IP configuration:
Enter IP, Subnet mask, Gateway and DNS server addresses in succession with the numerical keys on the remote control.
Proceed to network status.
You see the current network status again.
BACK: End of wizard.
IP configuration
.
... Networking You can define the necessary parameters for the IP configuration yourself ("manual") or set this to be done automatically. The automatic setting occurs through a DHCP server or by means of several protocols in accordance with the "Universal Plug and Play" specification (UPnP)."
IP configuration
Back with Proceed with
Automatic Manual
.
...
IP address 192.168.000.123
Subnet mask 255.255.255.000
Gateway 192.168.000.100
DNS server 1 192.168.000.010
DNS server 2 192.168.001.010
Back with Proceed with
Netzworking
Manual IP configuration
Please specify the static IP address of the network adapter.
Manual IP-configuration
Network status
.
... Networking
NETWORK WIZARD - Network status
Proceed with
Current settings:Networking WiredIP configuration Automatic
Additional information:IP address 172.16.10.141Subnet mask 255.255.0.0Gateway 172.16.0.1DNS server 1 172.16.0.1DNS server 2 192.168.1.1MAC address 18:16:0f:71:af:92
End with
Configuration of the built-in WLAN bridge adaptor
As network operation was selected On, wireless only. The TV set now searches for wireless routers.
After the end of the search:
Select a base station to which the TV shall be connected.
OK Confirm selection and proceed to the entry of the Wi-Fi password.
If the desired access point is not found:
Mark Search again,OK repeat search for wireless routers.
Or: Mark Enter access point manually,
OK enter manually the SSID of the desired access point, e.g., when the SSID of the access point is not transferred.
The TV set automatically detects the type of encryption used and informs you. You will find the supported encryption types in chapter Technical data.
If your wireless network is not encrypted: Proceed to IP configuration.
Proceed to password entry.
Enter WLAN password.
In case of an unknown WLAN key, contact your network administrator.
For WEP encryption
Select the WEP index,OK proceed to IP configuration.
Select type of IP configuration.For the further workflow of the network wizard see left column under IP configuration.
Access point selection
.
... Networking Please choose the access point to which the TV should connect.Note: The newly selected parameter must be confirmed with the button.
Access point selection
Search again Enter access point manually
OK
FritzBox 7490
Netgear
Router ABC
Back with Proceed with
WPA passphrase
.
... Networking The selected base station uses WPA encryption, for which a password consisting of between 8 and 64 characters is required. Please insert it in the dialogue below.
WPA passphrase
Back with Proceed with

Art 40-55User manual
100
System settings
Multimedia / Network
Explanation of the settings in the network status:
Network shows the current type of connection (wireless or wired).
IP configuration
The current assignment method for the IP address of your TV set (automatic or manual).
IP address Your current IP address.
Subnet mask Your current subnet-mask IP address.
Gateway The IP address of your gateway.
DNS server 1 Your current first DNS server IP address.
DNS server 2 Your current second DNS server IP address.
Network SSID
(for wireless connection only)The name of your network.
MAC address (TV)
(for wired connection only)Indicates the MAC address that is built into the hard-ware of your TV set’s wired network adaptor (LAN).
MAC address (WLAN)
(for wireless connection only)Indicates the MAC address that is built into the hardware of your TV set’s wireless network adaptor (WLAN).
Connection status
Gives you information about the current status of your wireless connection (save settings, connecting, login failed, access point not found, not connected, connection established).
Link quality
Specifies the signal strength as a percentage.
Proxy serverIn the proxy server wizard you make arrangements for your TV set for a connection with a home network with proxy server.
A proxy server is not necessary for most home networks.
Contact your home network administrator if you are unclear about the proxy server settings.
Specify if a Proxy server is used in your home network.
Mark Use or Don’t use,
The following settings will only be requested after the selection of Use.
Proceed to next step.
Proceed to entry of the proxy server name.
Specify the name or IP address of the proxy server used.
Proceed to next step.
Proceed to entry of the proxy port number.
Specify the network port number of the proxy server.
Proceed to next step.
Specify whether your proxy server requires a special login.
Mark No login or Login necessary,
Proceed to next step.
Enter your login data for the proxy server.
User name and password are requested only after selecting Proxy server login.
Use proxy server
.
... Proxy server Here you can choose whether to use a proxy server for network access or not. Most home-networks work without a proxy server.
Proxy server - Use proxy server
Proceed with End with
Don‘t use Use
Proxy server name
.
... Proxy server In the following dialogue, please enter the proxy server's name or IP address.
Proxy server name
Back with Proceed with
Proxy port number .
... Proxy server Please specify the proxy server's port number in the following dialogue.
Proxy port number
Back with Proceed with
Proxy server login
.
... Proxy server Here you can specify whether the indicated proxy server requires you to log in with a username and password.
Proxy server login
Proceed withBack with
No login Login necessary

Art 40-55User manual
101
System settings
Multimedia / Network
Multimedia settingsUnder this menu item you find further settings for Audio, Video and Photo.
Calling the Multimedia settings menu
HOME: Call Home view.
Mark System settings, OK call System settings.
Mark Multimedia / Network, go to next column.
Mark Multimedia settings, go to next column.
Select desired settings.
Explanations of the setting options in the Multimedia settings menu:
Auto return to music
player
The music player will reappear whenever another dialogue, e.g., music selection is called during playback, and no keys are pressed for the set time period. You can specify if and after which time the music player reappears (selection options are No, After 1 min, After 5 min).
... Multimediasettings
When navigating through the files if you pause in this view you can input whether and when the view should automatically return to the player.
RendererHere you can allow external devices to access your TV set (renderer) via app to render (play back) contents there.
Call up renderer menu
Default setting: on
HOME: Call Home view.
Mark System settings, OK call System settings.
Mark Multimedia / Network, go to next column.
Mark Renderer, go to next column.
Select the setting on or off.
... Renderer on
off
You can allow external devices here and access your TV (renderer) via an app to play content there.

Art 40-55User manual
102
System settings
Connections
ConnectionsSettings for the connection of external appliances are made in this menu.
The menu item Connections is not available while a timer record-ing is active.
Calling the connections menu
HOME: Call Home view.
Mark System settings, OK call System settings.
Mark Connections, go to next column.
Select desired settings.
Explanations of setting possibilities in the Connections menu:
Sound components
The sound components wizard helps you to configure the components that are used to reproduce the TV sound.
See chapter System settings, section Connections – Sound components for further information.
Antenna DVB Here you can set the parameters of the DVB-T and the DVB-S antenna with the antenna wizard.
See chapter System settings, section Connections – Antenna DVB for further information.
AV connecting
settings
In the AV connecting settings the parameters for the AV connection socket can be adapted.
See chapter System settings, section Connections – AV connecting settings for further information.
Digital Link All settings for Digital Link are made here.
See chapter System settings, section Connections – Digital Link for further information.
Gaming mode
Here you can set a faster display of your activities on the screen for various inputs of the TV set, e.g., for games consoles.
See chapter System settings, section Connections – Gaming mode for further information.
Connections Sound com-ponents
Antenna DVB
AV connect-ing settings
A wizard guides you step by step through the configuration of your sound reproduction components.
Digital Link
Gamingmode

Art 40-55User manual
103
System settings
Connections
Sound componentsThe sound components wizard helps you to configure the components that are used to reproduce the TV sound. For sound reproduction, you can configure the TV loudspeakers, loudspeaker systems as well as analogue and digital HiFi/AV amplifiers.
Calling the sound components wizard
For information on navigation within the wizard, see chapter General information on menu operation.
HOME: Call Home view.
Mark System settings, OK call System settings.
Select Connections, go to next column.
Select Sound components, go to next column.
Select Sound component. For selectable items see below. OK Confirm selection.
Proceed to next step.
...
... Sound com-ponents
SOUND COMPONENTS WIZARD - Sound playback via ...
Finish wizard with
Please specify here via which sound components you want to listen to your TV sound. If you do not want to listen exclusively via the built-in speakers, all additional speakers or devices must be connected with the audio output sockets AUDIO DIGITAL OUT.If you have a TV set without built-in speakers, the items relating to the TV speakers may not be selected.Note: The newly selected parameter must be confirmed with the button.
OK
TV speakers
Speaker system (AUDIO OUT)
HiFi/AV amplifier
HiFi/AV amplifier or TV speakers (switchable)
Sound playback via ...
Some sound components can only be selected when the respective device is connected to the TV set.
TV speakers
Sound reproduction via the built-in TV speakers (factory setting).
With the selection of TV speakers the wizard will end.
Speaker system
(AUDIO OUT) (1
Sound reproduction via a loudspeaker system or active loudspeakers (connection to AUDIO OUT).
How to connect a speaker system to AUDIO OUT, see chapter External devices, section Connecting the speaker system (AUDIO OUT).
How to configure a speaker system at AUDIO OUT, see chapter System settings, section Connctions – Adjusting the speaker system (AUDIO OUT).
If a speaker system is connected to AUDIO OUT and you want to return to selecting TV speakers, switch the subwoofer of the speaker system off before you select the TV speakers. At the AUDIO OUT connection, the audio signal is output with maximum volume setting in the TV speaker selection.
If you are using a speaker system at the AUDIO OUT jack, the headphone volume can no longer be controlled separately..
HiFi/AV amplifier
Sound reproduction via an external analogue or digital audio amplifier.
How you connect a HiFi/AV amplifier see chapter External devices, section Connecting the HiFi/AV amplifier.
How you configure a HiFi/AV amplifier see chapter System settings , section Connections – Adjusting the HiFi/AV amplifier.
HiFi/AV amplifier or
TV speakers (switchable)
Sound reproduction optionally via an external analogue or digital audio amplifier or via the built-in TV loudspeakers.
The selection options for switching between sound components can be called via the function list under Sound settings.
(1 Software version 2.1.x and higher.

Art 40-55User manual
104
Subwoofer + ext. front speakers
Select yes here if you want to use the built-in TV speakers as centre speakers.
If you select no here, the external front speakers also transmit the centre sound parts additionally.
Proceed to connect the Subwoofer.
Adjust the volume of the ext. sound system optimally to the TV volume.
An audio broadband signal is transmitted via the AUDIO OUT jack. Therefore, the level of the front speakers and the subwoofer varies uniformly with the volume setting.
Back: Finish wizard.
This ends the sound components wizard for connecting and setting up a speakers system.
... Sound com-ponents
TV loudspeakers as centre speaker
Please specify whether you want to use your built-in TV speakers as active centre speakers of your multi-channel speaker system.
no yes
Proceed withBack with
0dB
TV
0dB
0dB
TV loudspeakers
as centre speaker
-12 dB +3 dB +12 dB
3dB
TV
3dB
3dB
... Sound com-ponents
Adjust ext. Speakers level
Here you can optimally adjust the volume of the external sound system to the TV's volume.
Back with Finish wizard with
Adjust ext. Speakers
level
Adjusting the speaker system (AUDIO OUT)
Sound playback via ... – Speaker system (AUDIO OUT) (1
Enter here that you want to hear the TV sound via a speaker system connected to AUDIO OUT.
For information on navigation within the wizard, see chapter General information on menu operation.
Speaker system (AUDIO OUT) was selected in the Sound components wizard. Afterwards you can switch on the power switch of the subwoofer.
If you are using a speaker system at the AUDIO OUT jack, the headphone volume can no longer be controlled separately.
Select TV speakers + Subwoofer or Subwoofer + ext. front speakers.
Specify here whether you want to operate the speakers of the TV set with an additional subwoofer or a subwoofer with external front speakers at the AUDIO OUT socket of the TV set.
Continue with the appropriate selection.
TV speakers + Subwoofer
Adjust the volume for the subwoofer.
Back: Finish wizard.
This ends the sound components wizard for connecting and setting up a speakers system.
... Sound com-ponents
Connect speakers
Please specify here whether you are using the TV speakers with an additional subwoofer or if you wish to connect a subwoofer + external front speakers. (AUDIO OUT socket).
TV speakers + Subwoofer Subwoofer + ext. front speakers
Proceed withBack with
0dB
TV TV
Connectspeakers
-12 dB +2 dB +12 dB
TV TV
2dB
... Sound com-ponents
Adjust subwoofer level
You can adapt the volume of the subwoofer optimally to the TV volume.
Level
Back with Finish wizard with
Adjust subwoofer
level
System settingsConnections
(1 Available as of software version 2.1.x.

Art 40-55User manual
105
System settingsConnections
Adjusting the HiFi/AV amplifier
Sound playback via ... - HiFi/AV amplifier
The sound components wizard permits configuration of different audio amplifiers (stereo amplifiers, surround amplifiers, analogue or digital) with different digital audio formats (Dolby Digital, dts, MPEG, and stereo/PCM). See the user guide of the audio amplifier for more information.
For information on navigation within the wizard see chapter General information on menu operation.
HOME: Call Home view.
Mark System settings, OK call System settings.
Select Connections, go to next column.
Select Sound components, Call sound components wizard.
Mark HiFi/AV amplifier or HiFi/AV amplifier or TV speakers (switchable),
OK Confirm selection.
HiFi/AV amplifier
Select setting when an amplifier is connected and the TV speakers are not used.
HiFi/AV amplifier or
TV speakers(switchable)
Select setting when an amplifier is connected and the TV speakers are used. In the sound mode selection the audio reproduction can then be switched between the amplifier and the TV speakers.
Proceed to next step.
Select whether the sound is to be transmitted digitally or analogue to the the amplifier (see right hand column):
digital: Proceed to Sound formats. analogue: proceed to Type of amplifier.
...
... Sound com-ponents
SOUND COMPONENTS WIZARD - Sound playback via ...
Proceed with End with
Please specify here via which sound components you want to listen to your TV sound. If you do not want to listen exclusively via the built-in speakers, all additional speakers or devices must be connected with the audio output sockets AUDIO DIGITAL OUT.If you have a TV set without built-in speakers, the items relating to the TV speakers may not be selected.Note: The newly selected parameter must be confirmed with the button.
OK
TV speakers
Speaker system (AUDIO OUT)
HiFi/AV amplifier
HiFi/AV amplifier or TV speakers (switchable)
Sound reproduction
via ...
... Sound com-ponents
Type of sound transmission
Please select whether the TV sound signal should be transmitted to the HiFi/AV amplifier by a digital (via the SPDIF OUT) or analog (via the AUDIO OUT) signal.
digital analogue
Proceed withBack with
Type of sound transmission
Select sound formats which can be decoded with the digital amplifier (see operating manual of the used amplifier).
OK adopt sound formats.
Proceed to next step.
Please select the amplifier type which is connected (surround or stereo amplifier).
Back: Finish wizard.
Sound formats ... Sound com-
ponents
Stereo (PCM)
dts
MPEG
Dolby Digital
Stereo (PCM)
Sound formats
Please specify, what kind of sound formats can be processed by your HiFi/AV amplifier and mark them by the button .
Proceed withBack with
OK
... Sound com-ponents
Amplifier Type
Please specify which amplifier type is connected.
Surround amplifier Stereo amplifier
Proceed withBack with
Amplifier Type
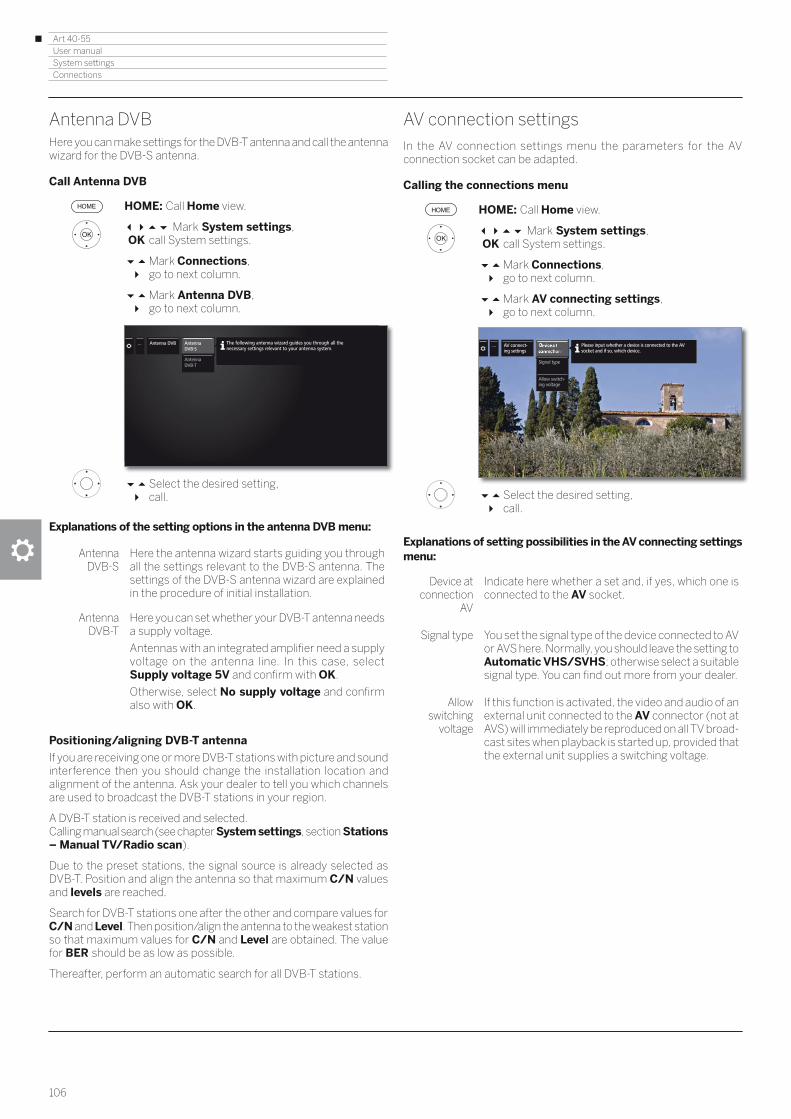
Art 40-55User manual
106
System settingsConnections
Antenna DVBHere you can make settings for the DVB-T antenna and call the antenna wizard for the DVB-S antenna.
Call Antenna DVB
HOME: Call Home view.
Mark System settings, OK call System settings.
Mark Connections, go to next column.
Mark Antenna DVB, go to next column.
Select the desired setting, call.
Explanations of the setting options in the antenna DVB menu:
Antenna DVB-S
Here the antenna wizard starts guiding you through all the settings relevant to the DVB-S antenna. The settings of the DVB-S antenna wizard are explained in the procedure of initial installation.
Antenna DVB-T
Here you can set whether your DVB-T antenna needs a supply voltage.
Antennas with an integrated amplifier need a supply voltage on the antenna line. In this case, select Supply voltage 5V and confirm with OK.
Otherwise, select No supply voltage and confirm also with OK.
Positioning/aligning DVB-T antenna
If you are receiving one or more DVB-T stations with picture and sound interference then you should change the installation location and alignment of the antenna. Ask your dealer to tell you which channels are used to broadcast the DVB-T stations in your region.
A DVB-T station is received and selected.Calling manual search (see chapter System settings, section Stations – Manual TV/Radio scan).
Due to the preset stations, the signal source is already selected as DVB-T. Position and align the antenna so that maximum C/N values and levels are reached.
Search for DVB-T stations one after the other and compare values for C/N and Level. Then position/align the antenna to the weakest station so that maximum values for C/N and Level are obtained. The value for BER should be as low as possible.
Thereafter, perform an automatic search for all DVB-T stations.
... Antenna DVB AntennaDVB-S
Antenna DVB-T
The following antenna wizard guides you through all the necessary settings relevant to your antenna system.
AV connection settingsIn the AV connection settings menu the parameters for the AV connection socket can be adapted.
Calling the connections menu
HOME: Call Home view.
Mark System settings, OK call System settings.
Mark Connections, go to next column.
Mark AV connecting settings, go to next column.
Select the desired setting, call.
Explanations of setting possibilities in the AV connecting settings menu:
Device at connection
AV
Indicate here whether a set and, if yes, which one is connected to the AV socket.
Signal type You set the signal type of the device connected to AV or AVS here. Normally, you should leave the setting to Automatic VHS/SVHS; otherwise select a suitable signal type. You can find out more from your dealer.
Allow switching
voltage
If this function is activated, the video and audio of an external unit connected to the AV connector (not at AVS) will immediately be reproduced on all TV broad-cast sites when playback is started up, provided that the external unit supplies a switching voltage.
... AV connect-ing settings
Signal type
Please input whether a device is connected to the AV socket and if so, which device.
Allow switch-ing voltage

Art 40-55User manual
107
System settingsConnections
Digital LinkIn the digital link menu you make further setting for comfortably linking external devices to the TV set.
Call Digital Recorder Link menu
HOME: Call Home view.
Mark System settings, OK call System settings.
Mark Connections, go to next column.
Mark Digital Link, OK call Digital Link.
Select the desired setting, call.
Explanations of the setting options in the Digital Link menu:
Digital Link HD
functionality
Herewith you can allow or forbid the automatic communication between the TV set and linked external devices (e.g., BluRay player). Among other things, it's role is that these devices switch mutually on and off.
Remote switch on of
the TV set
Here you can select whether the TV set is to switch on automatically from Standby mode, if Digital Link HD or Digital Link Plus capable devices connected to an HDMI or to AV inputs start playback or display a screen menu.
Menu item only available if at Digital Link HD - Functionality on has been selected.
Shutdown of the ext.
device via TV button
You can select here whether the external Digital Link HD device that is currently playing back should be automatically shut down as soon as you switch back to the TV or another AV channel.
Menu item only available if at Digital Link HD - Functionality on has been selected.
... Digital Link Thus you can permit (on) or prohibit (off) automatic communication between the TV set and external devices connected to it (e.g. BluRay player) via the HDMI cable. Oneof its functions is to switch these devices on and off alternately.
Digital Link
Remote
Shutdown
Gaming modeFor the inputs of your TV set on which game consoles, PC applications or even Karaoke machines are operated, we recommend you to activate the Gaming mode.
Your activities are then displayed quicker on the screen by reducing the complex picture improving techniques.
This mode can be set separately for every input of your TV set.
Call Gaming mode menu
HOME: Call Home view.
Mark System settings, OK call System settings.
Mark Connections, go to next column.
Select Gaming mode,OK call.
Select connection,OK Gaming mode for selected connection on/off.
You can recognise AV connections with set Gaming mode by the symbol after the connection name. A dice icon is shown in the extended station list behind the corresponding AV input when filtering on the AV list.
Retour
... HDMI 1
HDMI 2
HDMI 3
HDMI 4
PC IN
AVS
AV
VIDEO
... Gamingmode
Set Gaming mode for inputs...
Mark/unmark with
For the inputs of your TV set on which game consoles, PC applications or even Karaoke machines are operated, we recommend you to activate the "Gaming mode". Your activities are then displayed quicker on the screen by reducing the complex, picture improving techniques. This mode can be set separately for every input of your TV set.
Back
OK
1 HDMI 1
2 HDMI 2
3 HDMI 3
4 HDMI 4
5 PC IN
6 AVS
7 AV
8 VIDEO
2 HDMI 2
Expanded station list
A..Z < All stations >< AV list >Search
Back

Art 40-55User manual
108
ExtrasExtras contains additional functions and settings (e.g., Integrated features, Repeat initial installation, CA module settings).
Call Extras
HOME: Call Home view.
Mark System settings, OK call System settings.
Mark Extras, go to next column.
Select the desired setting, call.
Explanation of the subitems of Extras
Integrated features
Call information on the integrated features of the TV set (see next page).
Repeat initial installation
You can repeat the Initial installation again at any time. You are guided through the various menus where i.a. an automatic TV/radio station search is automatically carried out.Caution: All stored stations and all created personal lists will be deleted by this!
I If a parental lock is activated, the access code must be entered before repeating initial installation.
Reset to factory
settings
Resetting various settings to their factory defaults (see next page).
CA module[Name]
Make settings for your CA modules.
This menu item appears only it at least one CA module is plugged in.
The exact designation of the menu item and available subitems depends on your CA module(s).
See chapter System settings, section Extras – CA module for further information.
Extras Here you can obtain information on the integrated features of your TV set.
Repeat ini-tial installatio
Integrated features
Reset tofactory settin
System settingsExtras

Art 40-55User manual
109
Integrated featuresHere you can obtain information on the integrated features of the TV set.
See the rating plate on the rear of the set for the precise product designation.
Call Integrated features
HOME: Calling the Home view.
Mark System settings, OK call System settings.
Mark Extras, go to next column.
Mark Integrated features, OK call Integrated features (1.
Select category (e.g. hardware, software, etc.),
If necessary, scroll content up/down.
Hardware Under the Hardware item, you can find the article and serial number of your TV set, the MAC address and the chassis type with all existing hardware components.
Software Under the item software, the current software ver-sion and the installed software features of your TV set are displayed.
Upgrade Under the item Upgrade you can find the installed software features with their respective status.
Activated: software feature is installed and can be used.
Not active: software feature is installed, but can not be used.
... Integratedfeatures
Manufacturer LOEWE
Serial number 834
Article number 54443W50
Chassis SL320
CI Plus PRODUCTION
Nicam
DD/DTS
PIP
Digital Recorder (DR+)
Channel 1 A/T/T2/C/C2/S/S2
Channel 2 T/T2/C/C2/S/S2
Wi-Fi module
Integrated features
Back
Here you can obtain information on the integrated features of your TV set.
Move content up and down with the cursor
Hardware Software Upgrade
Reset to factory settingsHere you can reset some of the settings to the factory default values.
Call Reset to factory settings
HOME: Calling the Home view.
Mark System settings, OK call System settings.
Mark Extras, go to next column.
Mark Reset to factory settings, OK call.
Select a category you want to reset, OK call.
Select Start reset, OK call.
Entire TV Set This resets the entire TV set to factory defaults. By resetting the entire TV set to the factory default state, all the settings you made and all stored stations will be deleted. Thereafter, an initial installation of the TV set is carried out again (see chapter Initial installation).
Picture/sound
The current image and sound parameters of your TV set will be deleted and reset to the factory defaults.
Network The current network settings of your TV set will be deleted and reset to the factory defaults.
HDMI The HDMI setting is reset to the factory settings.
Browser The current browser settings of your TV set will be deleted and reset to the factory defaults. All data stored in the course of use are deleted.
Media data base
Your current media database is deleted because the database is reinitialised. The information from the removable media (USB) and possibly the DR+ archive are then re-read. The system then automatically performs a system reset.
...... This resets the entire TV set to its factory settings.Entire TV Set
Network
Picture/sound
HDMI
Browser
Media database
System settingsExtras
(1 The screen graphic displayed is only an example. Depending on the device type, the available hardware/software components may be different.

Art 40-55User manual
110
Conditional Access module (CA module)In order to receive coded digital stations, a Conditional Access module (CA module) and a Smart Card must be inserted in the CI slot of your TV set.
The CA module and the Smart Card are not part of the set of equipment supplied with the TV set. They are usually available from your dealer. Loewe does not provide any guarantee for the functioning of the CA module.
The TV set must first recognise and set up the CA module during initial operation. Therefore, it can take up to a minute until decoding starts during initial operation.
Inserting the Smart Card into the CA module
Push the Smart Card into the CA module as far as it will go. The side of the card with the gold chip on it should be pointing towards the thicker side of the insertion slot (see illustration). Note the direction of the arrow printed on the Smart Card.
Inserting the CA module into the TV set’s CI slot
Switch off TV set using the mains switch.
Remove the cover from the rear of the set.
Insert the CA module carefully into one of the two CI slots, ensuring that the contact side goes in first. Do not use force. Make sure the module is not twisted in the process. Push the CA module in as far as it will go.
Finally, close the side cover.
Troubleshooting (CA module)
The following information can help, if problems should occur when running a CA module:
Switch the TV set off to the standby mode. Remove the CA-module from the TV set. Switch the TV set off completely. Wait a few seconds. Reinsert the CA module. Switch the TV set on again.
Should errors continue to occur, you will get further information resulting from the two-digit error code (only with CI Plus capable CA modules). You will find the table with the error codes in chapter Miscellaneous, section CA module error codes. If in doubt, contact your dealer.
Smart CardCA module
Co
nta
ct s
ide
Common Interface (CI / CI Plus)Common Interface, also called CI, is a interface in the TV set, into which a Conditional Access Module (CA module, see right column) can be plugged. The CA module and the smartcard from a corresponding Pay TV supplier enable reception of encrypted stations.
CI Plus is an advanced development of the DVB Common Interface Standard. CI Plus slots are in principle downward compatible to the previous CI standard, i.e. CA modules and Smart Cards according to the past CI standard can continue to be used in CI Plus slots, as far as the programme provider permits this.
Programme providers who use the CI Plus standard can assign different rights for their broadcast programmes. For instance, the programme provider can restrict or completely prevent recording or later watching of an encoded programme. If there are such regulations, these also apply to timeshift television accordingly. A screen message informs you of this fact, if you would like to record such a programme. Recording is carried out in such a case (an appropriate entry is displayed in the DR+ archive), later watching of the programme, however, is not possible at all or only for a limited period (e.g., 10 days). A possible time limitation of the playback will also appear in the corresponding entry in the DR+ archive.
All restrictions mentioned here are the responsibilities of the broadcaster. The TV simply values the signalling set by the broadcaster as neutral.
Furthermore, the programme provider can prevent external copying of protected programmes.
It could be necessary to enter the youth protection PIN of the CA module when programming the data, if you want to record a CI Plus protected programme, which has been protected against viewing by minors. The Parental lock PIN can also be stored in the TV set. The access code of the TV set is required for watching the programme later.
Software update for CI Plus capable CA modules
From time to time, there will be new system software for your CA module software. There are two software update types.
Recommended update:Information on an available update is displayed. You can either run this or cancel the procedure. If you do not install the update, the information will reappear in regular intervals until the update has been installed.
Forced update:Information on an available update is displayed. The module does no longer decode until the update has been successfully implemented.
System settingsExtras

Art 40-55User manual
111
Searching for scrambled stations
If no search for encrypted stations was performed during initial startup, this can be done later using the search wizard.
HOME: Call Home view.
Select System settings, OK call System settings.
Mark Stations, go to next column.
Automatic scan TV+Radio, go to next column.
Select Change search settings, OK wizard guides you through the search settings.
Under scrambled stations you have to select yes.
Next select Start search/update, OK start updating the station list.
Calling CA module information
This menu is only available when a CA module is plugged in.
HOME: Call Home view.
Mark System settings, OK call System settings.
Mark Extras, go to next column.
Select desired CA module.
The indicated name depends on the inserted CA module.
go to next column.
Select Module menu, OK call information.
The content of this menu depends on the provider of the CA module.
Smartcard rights
If two CA modules are used in parallel to decode stations, you specify here the rights of both smartcards.
Mark Smartcard rights go to next column.
Select Same rights or Different rights.
If you select Same rights, the TV set assumes that both smartcards have the same rights and can be used for Dual Recording in parallel. In this case, the Station mapping function is not available.
When selecting Different rights, you can assign the stations to be decoded to the respective CA module.
Station mapping
If two CA modules are both used for the decoding of stations, you decide here which station shall be decoded by which CA module.
The station mapping settings will only be taken into account, if two CA modules are plugged.
This menu item is only available if under Smartcard rights the item Different rights was selected.
This statement refers explicitly to the CI slots of the TV set and not to the modules plugged into it! When the modules are exchanged, the mapping must be repeated.
Mark Station Mapping, call station list.
Select CA module for mapping.
Mark station, OK map station to the selected CA module / cancel
mapping.
Behind the assigned station is the number of the corresponding CI slot.
Storage the PIN for recordings
Store the programme provider PIN belonging to your CA module in order to decode CI plus programmes with parental lock for recording.
The menu option is available only if the plugged CA module supports storing the parental lock PIN.
Mark Storage of PIN for recordings, call PIN entry box.
Mark the desired CA module in the headline.
Go to the PIN input line, use the numerical keys to enter the programme provider PIN.
Or:
Mark figure, OK adopt figure to input line.
To conclude the entry:
Mark Adopt, OK save PIN.
Removing the CA module
Switch off TV set using the mains switch.
Remove the cover from the rear of the set.
Pull the CA module out of the CI slot.
Replace the cover.
System settingsExtras
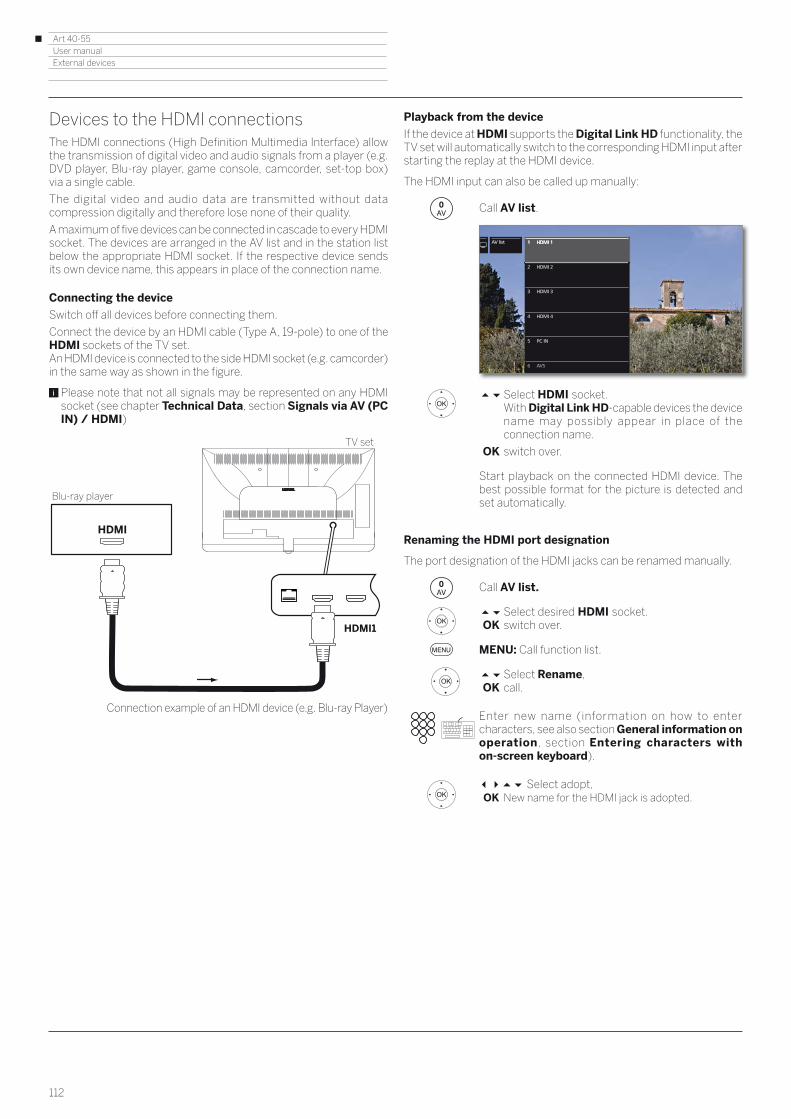
Art 40-55User manual
112
External devices
Devices to the HDMI connectionsThe HDMI connections (High Definition Multimedia Interface) allow the transmission of digital video and audio signals from a player (e.g. DVD player, Blu-ray player, game console, camcorder, set-top box) via a single cable.
The digital video and audio data are transmitted without data compression digitally and therefore lose none of their quality.
A maximum of five devices can be connected in cascade to every HDMI socket. The devices are arranged in the AV list and in the station list below the appropriate HDMI socket. If the respective device sends its own device name, this appears in place of the connection name.
Connecting the device
Switch off all devices before connecting them.
Connect the device by an HDMI cable (Type A, 19-pole) to one of the HDMI sockets of the TV set. An HDMI device is connected to the side HDMI socket (e.g. camcorder) in the same way as shown in the figure.
Please note that not all signals may be represented on any HDMI socket (see chapter Technical Data, section Signals via AV (PC IN) / HDMI)
Connection example of an HDMI device (e.g. Blu-ray Player)
HDMI
HDMI1
Blu-ray player
TV set
Playback from the device
If the device at HDMI supports the Digital Link HD functionality, the TV set will automatically switch to the corresponding HDMI input after starting the replay at the HDMI device.
The HDMI input can also be called up manually:
Call AV list.
Select HDMI socket. With Digital Link HD-capable devices the device
name may possibly appear in place of the connection name.
OK switch over.
Start playback on the connected HDMI device. The best possible format for the picture is detected and set automatically.
Renaming the HDMI port designation
The port designation of the HDMI jacks can be renamed manually.
Call AV list.
Select desired HDMI socket. OK switch over.
MENU: Call function list.
Select Rename, OK call.
Enter new name (information on how to enter characters, see also section General information on operation, section Entering characters with on-screen keyboard).
Select adopt, OK New name for the HDMI jack is adopted.
2 HDMI 22 HDMI 2
1 HDMI 11 HDMI 1
3 HDMI 33 HDMI 3
4 HDMI 44 HDMI 4
5 PC IN5 PC IN
6 AVS
AV list
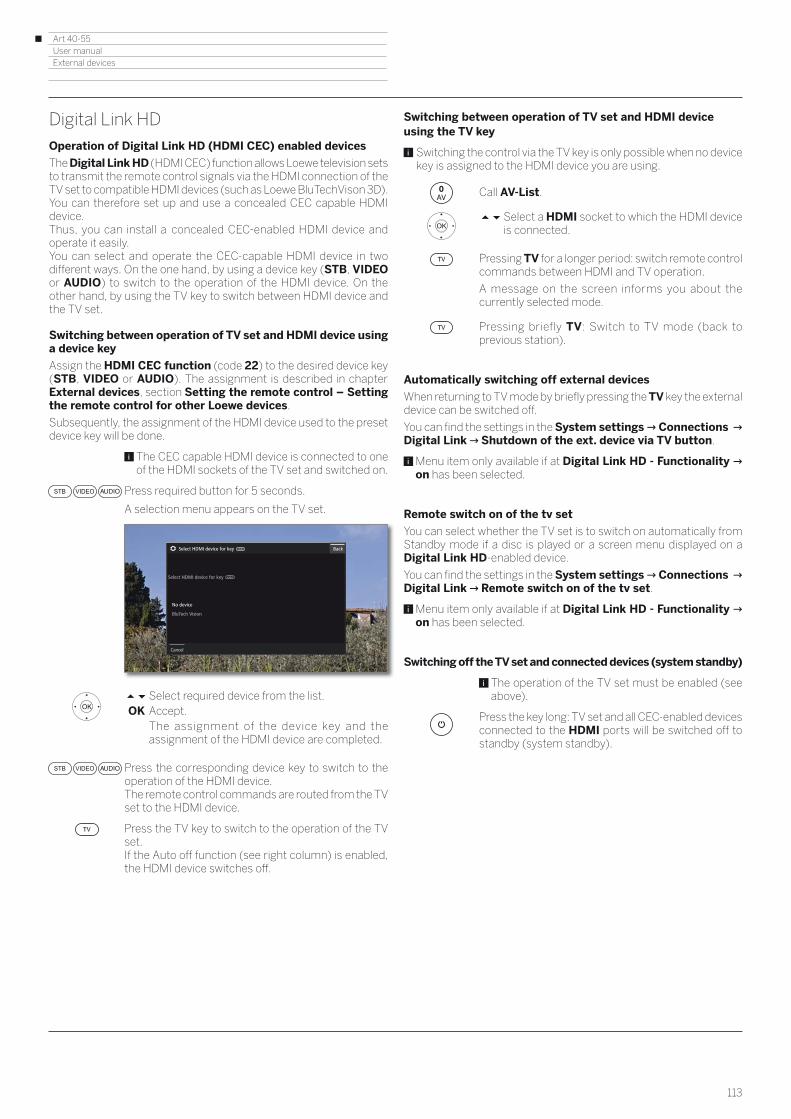
Art 40-55User manual
113
External devices
Digital Link HDOperation of Digital Link HD (HDMI CEC) enabled devices
The Digital Link HD (HDMI CEC) function allows Loewe television sets to transmit the remote control signals via the HDMI connection of the TV set to compatible HDMI devices (such as Loewe BluTechVison 3D). You can therefore set up and use a concealed CEC capable HDMI device.Thus, you can install a concealed CEC-enabled HDMI device and operate it easily.You can select and operate the CEC-capable HDMI device in two different ways. On the one hand, by using a device key (STB, VIDEO or AUDIO) to switch to the operation of the HDMI device. On the other hand, by using the TV key to switch between HDMI device and the TV set.
Switching between operation of TV set and HDMI device using a device key
Assign the HDMI CEC function (code 22) to the desired device key (STB, VIDEO or AUDIO). The assignment is described in chapter External devices, section Setting the remote control – Setting the remote control for other Loewe devices.
Subsequently, the assignment of the HDMI device used to the preset device key will be done.
The CEC capable HDMI device is connected to one of the HDMI sockets of the TV set and switched on.
Press required button for 5 seconds.
A selection menu appears on the TV set.
Select required device from the list. OK Accept. The assignment of the device key and the
assignment of the HDMI device are completed.
Press the corresponding device key to switch to the operation of the HDMI device.The remote control commands are routed from the TV set to the HDMI device.
Press the TV key to switch to the operation of the TV set. If the Auto off function (see right column) is enabled, the HDMI device switches off.
Select HDMI device for key
No device
BluTech Vision
Select HDMI device for key Back
Cancel
Switching between operation of TV set and HDMI device using the TV key
Switching the control via the TV key is only possible when no device key is assigned to the HDMI device you are using.
Call AV-List.
Select a HDMI socket to which the HDMI device is connected.
Pressing TV for a longer period: switch remote control commands between HDMI and TV operation.
A message on the screen informs you about the currently selected mode.
Pressing briefly TV: Switch to TV mode (back to previous station).
Automatically switching off external devices
When returning to TV mode by briefly pressing the TV key the external device can be switched off.
You can find the settings in the System settings Connections Digital Link Shutdown of the ext. device via TV button.
Menu item only available if at Digital Link HD - Functionality on has been selected.
Remote switch on of the tv set
You can select whether the TV set is to switch on automatically from Standby mode if a disc is played or a screen menu displayed on a Digital Link HD-enabled device.
You can find the settings in the System settings Connections Digital Link Remote switch on of the tv set.
Menu item only available if at Digital Link HD - Functionality on has been selected.
Switching off the TV set and connected devices (system standby)
The operation of the TV set must be enabled (see above).
Press the key long: TV set and all CEC-enabled devices connected to the HDMI ports will be switched off to standby (system standby).

Art 40-55User manual
114
Connecting a DVD player to the TV set
A DVD player has been selected in the System settings AV connecting settings Device at connection AV.
Switch off all devices before connecting them.
Connect the Scart output of the DVD player to the TV set’s AV socket using the Scart adaptor (1 .
Use a fully equipped Scart cable (available from your dealer) for this.
Playback from AV device
If the device at AV supports the Digital Link Plus functionality or if in the System settings Connections AV connecting settings Allow switching voltage yes, the TV set will automatically switch to the corresponding AV input after starting the replay at the AV device.
The AV input can also be called manually, however.
Call AV list.
Select AV, OK switch over.
Start playback on the connected device.
Connection example of a DVD player
AV
AVDVD player
TV set
8 VIDEO8 VIDEO
7 AV7 AVAV list Note: If you press for at least two seconds to switch to the selected channel, the screen switches off and you will only hear the sound.With the button (green), you can switch the screen back on and off.
OK
External devices
(1 Adaptor is available as an accessory (see chapter Accessories).
Devices on AVThe AV connection socket offers the possibility to connect e.g. a DVD player, video/DVD recorder or PC via two different adapters.
The required adapters (Scart or VGA adapter) are available as an accessory from your Loewe dealer (see chapter Accessories).
The AV sockets can process different signal types. Which signal type your accessory device provides can be found in the operating manual of the appropriate device.
Owing to the large number of AV devices available on the market, we can only mention a few examples for the connection of accessory equipment to the AV socket here.
Remote TV switch on via Digital Link
You can select whether the TV set is to switch on automatically from Standby mode if a disc is played or a screen menu displayed on a Digital Link Plus-enabled device connected to AV.
You can find the settings in the System settings Connections Digital Link Remote switch on of the TV set.
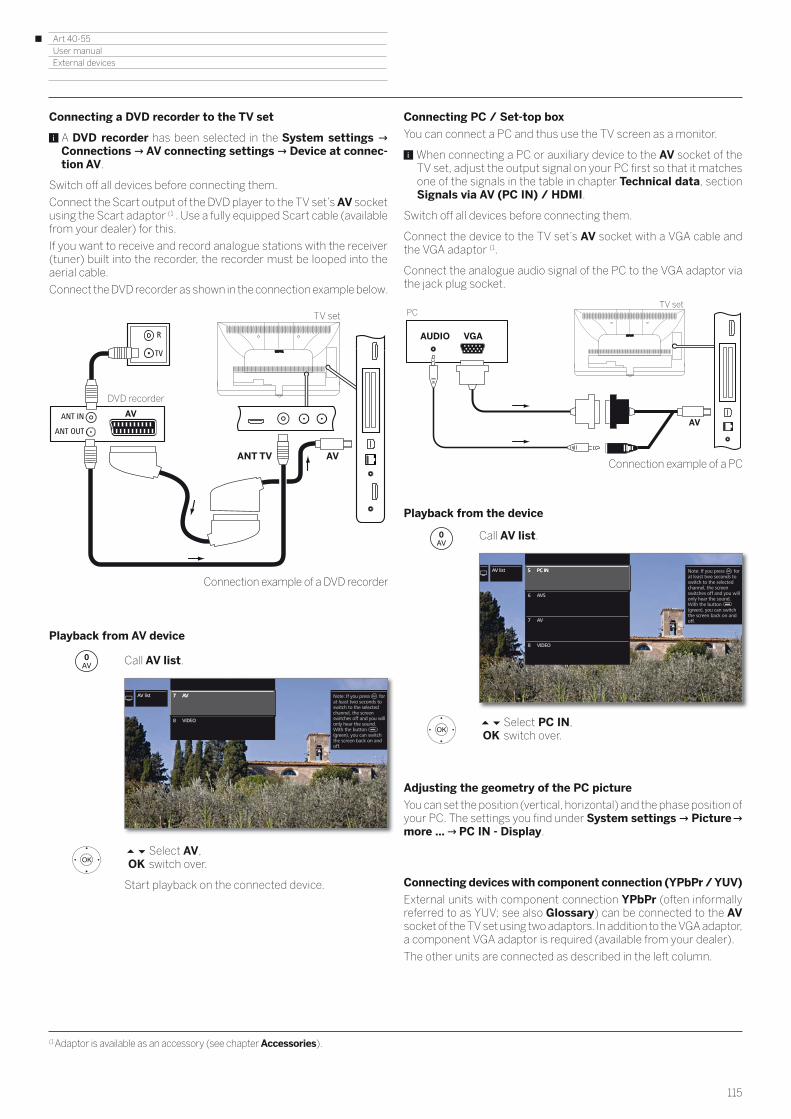
Art 40-55User manual
115
External devices
(1 Adaptor is available as an accessory (see chapter Accessories).
Connecting a DVD recorder to the TV set
A DVD recorder has been selected in the System settings Connections AV connecting settings Device at connec-tion AV.
Switch off all devices before connecting them.
Connect the Scart output of the DVD player to the TV set’s AV socket using the Scart adaptor (1 . Use a fully equipped Scart cable (available from your dealer) for this.
If you want to receive and record analogue stations with the receiver (tuner) built into the recorder, the recorder must be looped into the aerial cable.
Connect the DVD recorder as shown in the connection example below.
Playback from AV device
Call AV list.
Select AV, OK switch over.
Start playback on the connected device.
Connection example of a DVD recorder
ANT IN
ANT OUT
AV
R
TV
AVANT TV
DVD recorder
TV set
8 VIDEO8 VIDEO
7 AV7 AVAV list Note: If you press for at least two seconds to switch to the selected channel, the screen switches off and you will only hear the sound.With the button (green), you can switch the screen back on and off.
OK
Connecting PC / Set-top box
You can connect a PC and thus use the TV screen as a monitor.
When connecting a PC or auxiliary device to the AV socket of the TV set, adjust the output signal on your PC first so that it matches one of the signals in the table in chapter Technical data, section Signals via AV (PC IN) / HDMI.
Switch off all devices before connecting them.
Connect the device to the TV set’s AV socket with a VGA cable and the VGA adaptor (1.
Connect the analogue audio signal of the PC to the VGA adaptor via the jack plug socket.
Playback from the device
Call AV list.
Select PC IN, OK switch over.
Adjusting the geometry of the PC picture
You can set the position (vertical, horizontal) and the phase position of your PC. The settings you find under System settings Picture more ... PC IN - Display.
Connecting devices with component connection (YPbPr / YUV)
External units with component connection YPbPr (often informally referred to as YUV; see also Glossary) can be connected to the AV socket of the TV set using two adaptors. In addition to the VGA adaptor, a component VGA adaptor is required (available from your dealer).
The other units are connected as described in the left column.
Connection example of a PC
VGAAUDIO
AV
PCTV set
6 AVS6 AVS
5 PC IN5 PC IN
7 AV7 AV
8 VIDEO8 VIDEO
AV list Note: If you press for at least two seconds to switch to the selected channel, the screen switches off and you will only hear the sound.With the button (green), you can switch the screen back on and off.
OK

Art 40-55User manual
116
External devices
Connecting the HiFi/AV amplifierConnecting digital HiFi/AV amplifiers
Connect the digital audio output of the TV set SPDIF OUT to the digital audio input of the amplifier via a cinch cable:
Connect digital audio (pre) amplifier via audio return channel (HDMI ARC)
Connect the HDMI1 socket of the TV using an HDMI cable with the HDMI socket of the ARC-compatible audio (pre) amplifier (e.g.Loewe MediaVision 3D). It is not necessary to log-in the amplifier separately with the TV set.
Connecting analogue HiFi/AV amplifiers
Use a stereo cinch/jack adaptor cable to connect the analogue audio output AUDIO OUT to the analogue audio input of the amplifier:
Reproducing sound via an HiFi/AV amplifier
The sound reproduction via connected HiFi/AV amplifiers can be adjusted in the sound components wizard (see chapter System set-tings, section Connections – Sound components).
DIGITAL IN
SPDIFOUT
Digital amplifier
TV set
AUDIOOUT
AUDIO INRL
Analogue amplifier
TV set
Connecting the speaker system (AUDIO OUT)You can easily connect a speaker system using the AUDIO OUT interface of your TV set.
Switch off all devices before connecting the speaker system.
The subwoofer is connected to the TV set via the AUDIO OUT interface.
Connect the analogue audio output AUDIO OUT of the TV set with a stereo cinch/jack adapter cable to the Line IN audio inputs left/right of the subwoofer.
Further information on the wiring of the speakers you find in the instruction manual of the subwoofer or the speakers.
Only turn in the power switch of the subwoofer after having selected the menu item Speaker system (AUDIO OUT) in the Sound Component Wizard. Otherwise, the sound system will operate with maximum volume.
If you are using a speaker system at the AUDIO OUT jack, the head-phone volume can no longer be controlled separately.
Configuration of the speaker system (AUDIO OUT)
When configuring the sound system in the sound components wizard enter if you want to use e.g. external front speakers or how the TV speaker is used (see chapter System settings, section Connections – Sound components).
Only turn in the power switch of the subwoofer after having selected the menu item Speaker system (AUDIO OUT) in the Sound Component Wizard. Otherwise, the sound system will operate with maximum volume.
AUDIO OUT
TV set
Subwoofer
Line INleft
Line INright
Frontleft
Frontright
Example of connecting a speaker system to your TV set

Art 40-55User manual
117
(1 Adaptor available as an accessory (see chapter Accessories).
Audio playback from external devicesConnect external AV devices (e.g., MP3 player) for sound reproduction to the AV inputs of the TV set.
Connecting an external appliance (e.g. MP3 player)
Connect the output (jack socket) of the MP3 player via the VGA adaptor (1 to the AV socket of the TV set.
Select AV input
The selection of the AV input for a device at the AV socket (connection as described above) is describe here as an example. The procedure is similar to the selection of the other AV inputs.
Call up the AV list.
Mark desired AV source, OK switch to AV source.
Start playback on the external device after selecting the AV input.
Only playback of the audio signal from the AV source (screen is off)
To play only the sound of a connected media player (e.g. MP3 player), the AV sources can be selected so that the screen goes blank.
Switching off the screen reduces the power consumption of the TV set.
Switching off the screen is possible for the AV sources HDMI1, HDM2, HDM3 and HDMI 4 UHD via the function list.
Call up the AV list.
Select desired connection, OK press at least for two seconds.
Green key: Press the green key to switch the the screen on and off again.
AV
MP3 player TV set
Connection example of an MP3 player
8 VIDEO8 VIDEO
7 AV7 AVAV list Note: If you press for at least two seconds to switch to the selected channel, the screen switches off and you will only hear the sound.With the button (green), you can switch the screen back on and off.
OK
External devices
IR-LinkThe IR Link function allows the operation of concealed additional devices made by other manufacturers via the Loewe TV set. The remote control commands are passed from the IR receiver of the TV set via an externally connected infrared transmitter to the additional device.The code system for remote control commands that control the additional device is RC5. The control of the additional device is only possible when the TV set is switched on.The infrared transmitter required is available as an accessory from your dealer (see chapter Accessories).
Connecting the infrared transmitter to the TV set
Insert the connector plug of the infrared transmitter into the RS-232C socket of the TV set.
Lay the cable of the infrared transmitter to the front area of the ad-ditional device used.
Installing the infrared transmitter on the additional device
Find the right position on the desired device (optical connection between transmitter diode and IR receiver of the concealed device).
Remove the protective film from the adhesive surface of the infrared transmitter.
Attach the infrared transmitter at this position.
RS-232C
IR
TV set
Serial interface RS-232C (RJ12)You can connect a home network system of different manufacturers (e.g. AMX, Crestron) to your TV set via the RS-232C (RJ12) interface.
As to the configuration of the RS-232C (RJ12) interface and for further information on the various home networking systems contact your dealer please.
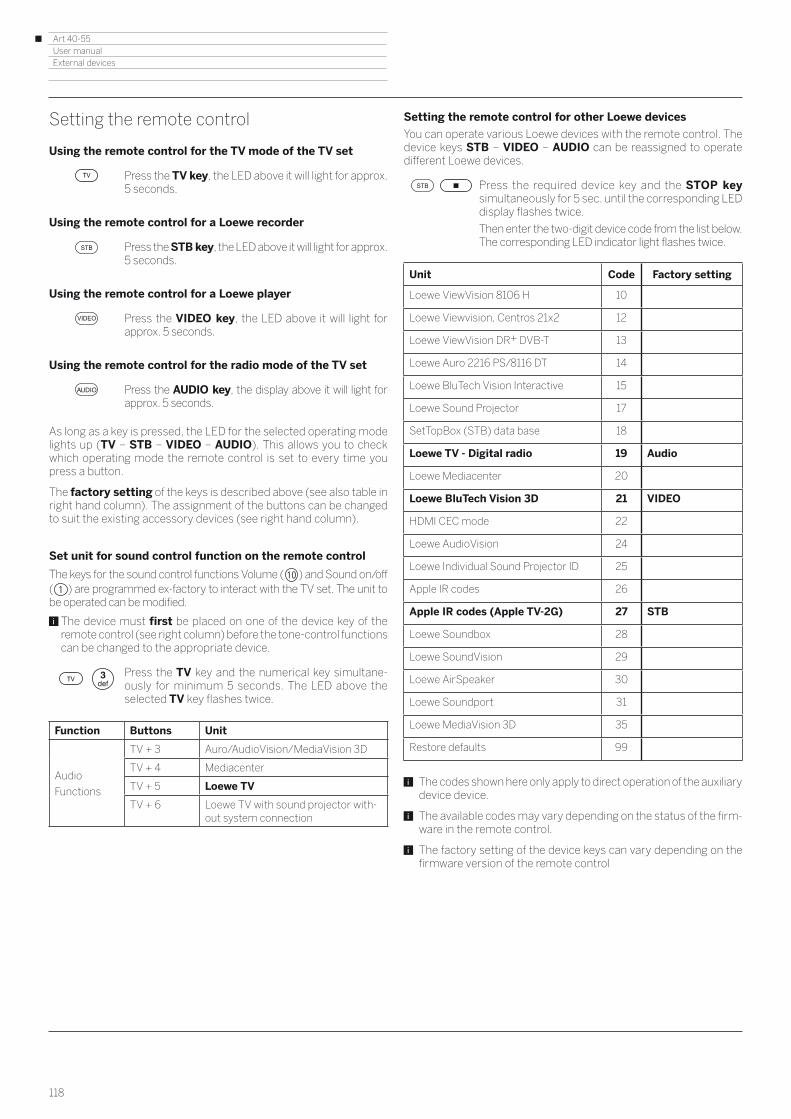
Art 40-55User manual
118
External devices
Setting the remote control
Using the remote control for the TV mode of the TV set
Press the TV key, the LED above it will light for approx. 5 seconds.
Using the remote control for a Loewe recorder
Press the STB key, the LED above it will light for approx. 5 seconds.
Using the remote control for a Loewe player
Press the VIDEO key, the LED above it will light for approx. 5 seconds.
Using the remote control for the radio mode of the TV set
Press the AUDIO key, the display above it will light for approx. 5 seconds.
As long as a key is pressed, the LED for the selected operating mode lights up (TV – STB – VIDEO – AUDIO). This allows you to check which operating mode the remote control is set to every time you press a button.
The factory setting of the keys is described above (see also table in right hand column). The assignment of the buttons can be changed to suit the existing accessory devices (see right hand column).
Set unit for sound control function on the remote control
The keys for the sound control functions Volume ( 10 ) and Sound on/off ( 1 ) are programmed ex-factory to interact with the TV set. The unit to be operated can be modified.
The device must first be placed on one of the device key of the remote control (see right column) before the tone-control functions can be changed to the appropriate device.
Press the TV key and the numerical key simultane-ously for minimum 5 seconds. The LED above the selected TV key flashes twice.
Function Buttons Unit
Audio
Functions
TV + 3 Auro/AudioVision/MediaVision 3D
TV + 4 Mediacenter
TV + 5 Loewe TV
TV + 6 Loewe TV with sound projector with-out system connection
Setting the remote control for other Loewe devices
You can operate various Loewe devices with the remote control. The device keys STB – VIDEO – AUDIO can be reassigned to operate different Loewe devices.
Press the required device key and the STOP key simultaneously for 5 sec. until the corresponding LED display flashes twice.
Then enter the two-digit device code from the list below. The corresponding LED indicator light flashes twice.
Unit Code Factory setting
Loewe ViewVision 8106 H 10
Loewe Viewvision, Centros 21x2 12
Loewe ViewVision DR+ DVB-T 13
Loewe Auro 2216 PS/8116 DT 14
Loewe BluTech Vision Interactive 15
Loewe Sound Projector 17
SetTopBox (STB) data base 18
Loewe TV - Digital radio 19 Audio
Loewe Mediacenter 20
Loewe BluTech Vision 3D 21 VIDEO
HDMI CEC mode 22
Loewe AudioVision 24
Loewe Individual Sound Projector ID 25
Apple IR codes 26
Apple IR codes (Apple TV-2G) 27 STB
Loewe Soundbox 28
Loewe SoundVision 29
Loewe AirSpeaker 30
Loewe Soundport 31
Loewe MediaVision 3D 35
Restore defaults 99
The codes shown here only apply to direct operation of the auxiliary device device.
The available codes may vary depending on the status of the firm-ware in the remote control.
The factory setting of the device keys can vary depending on the firmware version of the remote control

Art 40-55User manual
119
Teaching the remote control
Teaching the remote controlBy means of key code 18 (Set-Top Box data base) your remote control Assist may be taught for your Set-Top Box (e.g., decoder, external cable tuner). Thus, you spare yourself the use of several remote controls.
For the use of 2-digit key codes see chapter External devices, section Setting the remote control.
The following options are available for teach-in:
- Entering a 3-digit code number
- Read-out of the programmed Set-Top Box code
- Teaching individual keys
- Delete learned codes
In the following, the STB key is dealt with as an example since device code 18 is preset for this key ex-works. Code 18 may also be assigned to the VIDEO and AUDIO keys; the following description applies accordingly.
Entering a 3-digit code number
The STB key can be programmed directly by means of a device-dependent 3-digit code. You find a list of these codes in chapter Code page at the end of this instruction manual.
Keep the STB and OK keys depressed for five seconds. The LED above the STB key flashes twice.
Enter the 3-digit code from the list. The LED above the STB key lights up for 1 second.
OK end the programming mode. After a successful programming the LED flashes twice.
When entering a wrong code number, the LED lights up for 2 seconds. Do this programming once again.
Read-out of the programmed Set-Top Box code
The code of the currently programmed device on the STB key can be indicated by the remote control.
Keep the STB and OK keys depressed for five seconds. The LED above the STB key flashes twice.
Press INFO key.
The LED above the STB key shows the programmed code by flashing. The figure "0" will be indicated by flashing 5 times.
Teaching individual keys
All keys (except the TV, STB, VIDEO and AUDIO device keys as well as the V+/- keys and ) can be taught for the operation of units which are not contained in the integrated data base. The functions of the selected button are then completely or partially overwritten with the new codes.
Place the TV remote control and the remote control to be replaced in such a way that the infrared windows face each other at a distance of 1-5 cm (see sketch).
Keep the STB and the red key simultaneously depressed for five seconds. The LED above the STB key lights up permanently.
Press key to be taught on the TV remote control.
The LED above the STB key flashes.
On the original remote control press the button which is to be taught.
The LED above the selected STB key flashes twice.
If the code is not correctly recognised, the LED above the STB key flashes ten times. Then repeat your entry on the original remote control. If necessary correct the allocation of the two remote controls. Continue with the other buttons as described above.
To end the teaching mode, press the STB key again.
After 10 seconds without an entry the teaching mode is automatically terminated.
It is possible that not all remote control codes can be taught.
You can make a note of the functions, which you have allocated to the keys, on the notes pages at the end of this instruction manual.
1-5 cm

Art 40-55User manual
120
Teaching the remote control
Deleting individual key functions
You can delete the taught function of an individual button.
Press STB and green key simultaneously for five seconds. The LED above the STB key lights up perma-nently.
Press key to be deleted on the TV remote control.
The LED above the STB key flashes twice.
Continue with the deletion of other buttons as described above.
To end the deletion mode, press the STB key again.
The LED above the STB key flashes once.
Deleting all functions of the key for a device
You can delete all taught functions which you have set on the STB key.
Press STB and yellow key simultaneously for five seconds. The LED above the STB key flashes twice.
Deleting all functions of the keys for all devices
You can delete all taught functions which you have set on the TV, STB, VIDEO or AUDIO buttons.
Press STB and blue key simultaneously for five seconds. The LEDs above the keys for the devices flash twice.

Art 40-55User manual
121
Troubleshooting
Problem Possible cause Remedy / Instructions
The TV set switches off automatically. The automatic shutdown switches off the TV set to save energy after 4 hours of inactivity as soon as at least one signal input group is set up in the energy efficient mode Home Mode.
Using automatic shutdown is recommended for the purposes of energy saving and safety.
All menus are displayed in the wrong lan-guage.
The menu language was set incorrectly. Set the menu language:
Press HOME key. Call last menu item (bottom left). Mark the fourth item from above in the following list and move to next column to the right. Call first list item with OK. Select the language and confirm it with OK.
General problems when connecting external devices via an AV input.
The Signal type is set incorrectly. Set the correct signal type (System settings Connections AV connection settings Signal type).
If AV standard or Signal type is set to “Automatic” then this can lead to false detections with non-standard signals. In this case standard and signal must be set according to the information in the operating manual of the external device.
With Teletext various characters are displayed incorrectly.
The wrong character set has been set in the System settings.
Set the correct character set: System settings Control more ... Standard Teletext Character set Standard or select the appropriate character set.
Errors occurred when running a CA module. Switch the TV set off. Remove the CA-module from the TV set. Wait a few seconds. Reinsert the CA module. Switch the TV set on again.
No sound via the external digital audio am-plifier.
a) The external digital audio amplifier does not support the selected sound format (Dolby Digital, dts, MPEG).
b) TV set and external digital audio amplifier are not connected with each other.
a) Set PCM stereo on the DVD player in the sound selection. For DVB stations switch Language/Sound
b) Connect SPDIF OUT from the TV set to a digital input of the external digital audio amplifier and select the appropriate input to this.
A programmed recording was not made. The provider deleted the programme from the EPG data, for example due to a programme change.The station from which the recording was made does not support automatic time control (Accurate Recording).
Only the broadcasting organisations are responsible for transmitting data for the automatic time control. The availability of the appropriate data cannot be guaranteed.
There is no start or end of a programmed recording although the automatic time control (Accurate Recording) was used.
The transmission time of the program was delayed and the channel from which the recording was made has not updated the data.
Only the broadcasting organisations are responsible for transmitting data for the automatic time control. The availability of the appropriate data cannot be guaranteed.
No IP address will be issued to your TV set in spite of automatic IP configuration.
No DHCP server is working on your network. Set up a DHCP server.
Assign the IP addresses for the TV set manually.

Art 40-55User manual
122
Troubleshooting
Problem Possible cause Remedy / Instructions
Despite video or music file being played back, no sound can be heard.
a) The TV set is set to mute or the volume has been turned down too much.
b) An audio device that does not exist or that is not connected, is registered under System settings Connections Sound components (e.g., HiFi/AV am-plifier).
a) Increase the volume by pressing the V+ key on the remote control for a longer time. This will also cancel any mute setting.
b) Connect the audio device and switch it on. In the Sound components wizard change
back to TV speakers.
A media file that is displayed can not be played back.
The format of the file is not supported (see also limitations in chapter Technical data, section Media – File formats supported.
No remedy.
Characters received in the WLAN code of the wireless router cannot be entered for the network configuration at the TV set.
The device does not support all special characters.
Change the WLAN key of the router.
When searching for wireless routers, no device is found.
The router is not ready for wireless communication.
Check your wireless router.
Try to make the connection again a few minutes later.

Art 40-55User manual
123
Technical Data
Technical dataChanges of technical data and design of the equipment reserved.
Loewe device type: Art 55 Art 48 Art 40 Art 40
Part number: 54459xxx 54458xxx 54457xxx 54450xxx
EU energy efficiency class: see enclosed energy label or under www.loewe.tv/int/my-loewe
Screen diagonal: 140 cm / 55 inch 122 cm / 48 inch 102 cm / 40 inch 102 cm / 40 inch
Power consumption On-Mode (max.)(Audio output 1/8 of the maximum value): 226 W 162 W 123 W 102 W
Power consumption On-Mode (home) (1:Annual energy consumption (1: see enclosed energy label or under www.loewe.tv/int/my-loewe
Power consumption Standby Mode: Power consumption when set is switched off:
0,38 W0 W
0,38 W0 W
0,38 W0 W
0,38 W0 W
Resolution: Ultra HD 3840 x 2160 px Full HD 1920 x 1080 px
Display technology / Picture format: LCD with Edge-LED-Backlight / 16:9
Viewing angle (horizontal / vertical): 178° / 178°
Device dimensions without stand (W x H x D):Device dimensions with stand (2 (W x H x D):
123,0 x 75,2 x 5,5 cm123,0 x 78,1 x 32,0 cm
107,8 x 66,9 x 5,5 cm107,8 x 69,8 x 25,0 cm
91,0 x 57,4 x 5,5 cm91,0 x 60,4 x 25,0 cm
91,0 x 57,4 x 5,5 cm91,0 x 60,4 x 25,0 cm
Weight without stand (approximate):Weight with stand (2 (approximate):
27,2 kg30,6 kg
18,5 kg20,7 kg
15,2 kg17,5 kg
15,1 kg17,4 kg
Ambient temperature: 5° C – 35° C
Relative humidity (non-condensing): 20 – 80%
Air pressure: 800 – 1114 hPa (0 – 2000 m above sea level)
Chassis designation: SL 410 SL 310F
Power supply: 220 V – 240 V/50–60 Hz
Tuner: terr./cable:Satellite:
VHF/Hyperband/UHF4 levels: 13/18V/22kHz / 16 levels: DiSEqC 1.0 / single-cable system: EN 50494
Range: terr./cable:Satellite:
Terr./cable: 45 MHz up to 860 MHzSatellite: 950 MHz up to 2150 MHz
Station storage locations incl. AV and radio: 6000
TV standards: analogue:digital:
B/G, I, L, D/K, M, NDVB-T/T2, DVB-C, DVB-S/S2 (UHD via DVB to max. 60 Hz)
B/G, I, L, D/K, M, NDVB-T/T2/C/S/S2
Colour standards: SECAM, PAL, NTSC, NTSC-V, PAL-V (60 Hz)
Sound formats: analogue (FM):analogue (NICAM):
digital (MPEG):
Mono, Stereo, Dual channelMono, Stereo, Dual channelMono, Stereo, Dual channel, PCM, Dolby Digital, Dolby Digital Plus, Dolby Digital Pulse, Dolby MS11
Audio output power (sine / music): 2 x 20W / 2 x 40W 2 x 10W / 2 x 20W
Acoustic speaker concept: Speaker Box
Teletext: TOP / FLOF / HiText (Level 2.5)
Page memory: 2000
LAN: Standards supported: 10 Mbit/sec Ethernet (10Base-T) / 100 Mbit/sec Fast Ethernet (100Base-T)
WLAN: Standards supported:Frequency range used:
Types of encoding that are supported:
IEEE 802.11a/b/g/n, 802.11ac2400-2483,5 MHz and 5150-5725 MHzWEP 64 and 128 Bit (ASCII and HEX), WPA PSK, WPA2 AES
Home networking standard: Universal Plug and Play Audio / Video (UPnP AV)
File formats supported (3: Pictures:Audio:Video:
JPEG, PNGMP3, M4A (AAC LC), WMA (without lossless), FLAC, WAV (PCM), Ogg VorbisAVI (MPEG-1/2, XviD, AC3, MP3), WMV (WMV9, VC-1, WMA9, WMA Pro), MP4 (XviD, H.264/MPEG-4 AVC, AAC LC), MOV (H.264/MPEG-4 AVC, AAC LC), MKV (H.265/HEVC, H.264/MPEG-4 AVC, AC3), FLV (H.264/MPEG-4 AVC, H.263, MP3, AAC LC), MPG (MPEG-1, MPEG Audio), TS/PS (MPEG-2, H.264/MPEG-4 AVC, MPEG2 Audio, AC3), VOB (MPEG-2, MPEG2 Audio, AC3)
H.264/MPEG-4 AVC upto Profil High (Level 4.2)
(1 The energy consumption per year is calculated on the basis of a daily four-hour operation of the TV set on 365 days. The actual energy consumption will depend on the way the TV set is used. On-Mode (home) values less than 100 W must have decimal places (,0).
(2 Supplied mounting option: Table Stand Art 55 (Art 55), Table Stand Art 40/48 (Art 40/48).(3 For the playability of the individual formats no guarantee can be given.

Art 40-55User manual
124
Signals via AV (PC IN) / HDMIThe following table shows the compatible signals which may be represented by your TV set using the appropriate adapter at the AV connection (PC IN) or at the HDMI connections (HDMI1, HDMI2, HDMI3, HDMI 4 UHD (2).
Set the output signal on your device so that it matches one of the signals in the table.
Please note that not all signals may be represented at every HDMI socket or at AV (PC IN).
Format Horizontal x Vertical
Frame frequency
Connection
480i60 720 x 480i 60Hz PC IN, HDMI 1-3
576i50 720 x 576i 50Hz PC IN, HDMI 1-3
480p60 720 x 480p 60Hz PC IN, HDMI 1-4
576p50 720 x 576p 50Hz PC IN, HDMI 1-4
720p50 1280 x 720p 50Hz PC IN, HDMI 1-4
720p60 1280 x 720p 60Hz PC IN, HDMI 1-4
1080i50 1920 x 1080i 50Hz PC IN, HDMI 1-4
1080i60 1920 x 1080i 60Hz PC IN, HDMI 1-4
1080p24 1920 x 1080p 24Hz PC IN, HDMI 1-4
1080p25 1920 x 1080p 25Hz PC IN, HDMI 1-4
1080p30 1920 x 1080p 30Hz PC IN, HDMI 1-4
1080p50 1920 x 1080p 50Hz PC IN, HDMI 1-4
1080p60 1920 x 1080p 60Hz PC IN, HDMI 1-4
VGA 640 x 480 60Hz PC IN, HDMI 1-4
SVGA 800 x 600 60Hz PC IN, HDMI 1-3
XGA 1024 x 768 60Hz PC IN, HDMI 1-3
WXGA 1360 x 768 60Hz HDMI 1-3
SXGA 1280 x 1024 60Hz PC IN, HDMI 1-3
3840 x 2160p 24Hz HDMI 1-4
3840 x 2160p 25Hz HDMI 1-4
3840 x 2160p 30Hz HDMI 1-4
3840 x 2160p 50Hz HDMI 4
3840 x 2160p 60Hz HDMI 4
Technical Data
Signal input groupsIn your TV set the signals are sorted in various signal input groups according to their source. In addition to the source, the type of signal is also distinguished.
For each signal input group, there are individual values for the picture settings.
Signal group name
Signal source/Signal type
SD Analog cable analogue, interfaces AV, AVS, PC IN (1 (SD)
SD Digital DVB (SD), DR+ (SD), MPEG-Encoder
SD Media Player
full screen display of SD videos via USB, Network, VOD and media centre (incl. HbbTV media centre)
SD HDMI Playback of SD video via HDMI, e.g., DVD player
HD Analog PC IN (1 (HD)
HD Digital DVB (HD), DR+ (HD)
HD Media Player
full screen display of HD videos via USB, Network, VOD and media centre (incl. HbbTV media centre)
HD HDMI Playback of HD videos via HDMI, e.g., Blu-Ray player
3D HD 3D playback of HD videos (analogue or digital)
3D SD 3D playback of SD videos (analogue or digital)
3D Media Player
full screen display of 3D videos (SD/HD) via USB, Network, VOD and media centre (incl. HbbTV media centre)
3D HDMI Playback of 3D videos via HDMI, e.g., 3D Blu-Ray player
Photo Player Playback of Photos via USB and network
Browser Display of Web sites in the Browser (incl. Media apps)
VGA PC IN (1 (PC) or HDMI (PC)
(1 with VGA adaptor on AV connection.(2 For device type Art 40 (full HD): No connection available.

Art 40-55User manual
125
AccessoriesThe following accessories are obtainable from your Loewe dealer.
Mounting options:
A variety of options for mounting your TV set on the floor, table, and wall are available.
An overview of the available placement options can be found in the chapter accessories, section placement options.
Loewe sound systems:
You can combine your TV set with Loewe sound components. Several possible combinations of speakers and subwoofers are available.
Loewe 3D Blu-ray player:
With the Loewe Blu-ray player BluTech Vision 3D you’re fully kitted out to watch Blu-ray discs with 2D and 3D material. With the Loewe system integration you control BluTech Vision 3D and your Loewe TV set simultaneously using the Assist remote control.
Loewe MediaVision 3D:
Loewe MediaVision 3D is partly an audio system: It plays your favourite sound via the integrated iPod/iPhone dock and automatically identifies songs or film music with the MusicID function. Loewe MediaVision 3D is also a home cinema system, ensuring a perfect all-round audio visual experience - thanks to the fast and precise Full-HD 3D Blu-ray drive and a 5.1 decoder. Not least, Loewe MediaVision 3D is a colourful feast for the eyes: because it can be beautifully customised by individual intarsia.
Loewe Assist Easy:
The reduced focused design of Loewe Assist Easy remote control guarantees survey at first sight, nevertheless all important functions are controllable with one hand. Therefore it is the optimal control centre of the new user interface Loewe Assist Media. As a multifunctional remote control it is able to control further Loewe products in addition.
Loewe 3D glasses (part. no. 71133082):
The Loewe 3D shutter Active 3D Glasses give you clear 3D enjoyment and are compatible with all Loewe 3D flat screen TVs.
Loewe Vesa adaptor bolts M6x32 (part. no. 90473988):
Mounting a Loewe flatscreen TV set to a holder according to the VESA standard necessarily requires the use of Loewe Vesa adaptor bolts to prevent damage to the TV set.
See chapter Accessories, section VESA standard for further information.
Upgrade kits / conversion kits / cables
USB extension (part no. 70167080):
To ensure the accessibility of the USB connections or to be able to insert USB sticks with a large housing, a USB extension can be connected to the TV set. You can purchase the USB extension via your Loewe dealer.
Adapter Micro-AV / 25cm / Scart (part no. 72150080) set of 3:
The Loewe scart adaptor allows you to extend your TV set by adding an AV socket to connect, e.g., DVD players or DVD recorders.
Adapter Micro-AV / 25cm / VGA (part no. 72155080) set of 3:
The VGA adaptor enables the connection of a PC monitor or a Set-top box.Additionally to the video inputs, the adaptor for VGA is equipped with a 3.5 mm stereo jack socket for analogue sound.
Converter RJ12 / 5m / IR (part no. 70533082) set of 3:
Converter of RJ12 to an IR transmitter to operate concealed additional devices of other manufacturers via the Loewe TV set.
Adapter RJ12 / 2,5m / RS232 (part no. 70499082) set of 3:
RJ12 to 9-pin Sub-D connector adaptor cable for the integration of the TV set in professional home automation systems, such as GIRA, CRESTRON, AMX.
Feature Upgrade Stick SL3xx (part no. 72341080):
By means of the feature upgrade stick you can expand the functionality of your Loewe TV set. After any necessary software updates and plugging in the feature upgrade stick, the new features such as Bluetooth music player (audio streaming), Bluetooth keyboard, etc. are available.
DR+ Feature Disk (part no. 72462W00):
Like the Feature Upgrade Stick SL3xx the DR+ Feature Disk also expands the functionality of your Loewe TV set. After any necessary software updates and plugging in the DR+ Feature Disk, the new features are available.
The DR+ Feature Disk represents a recording medium for your TV set. Just quickly record and view your desired TV programmes, of course, whenever you want it.
Accessories
Subject to availability.

Art 40-55User manual
126
Mounting options
Accessories
(1 Only in conjunction with appropriate adaptor to be ordered separately.(2 Only in conjunction with VESA Size 400 adapter.(3 Only in conjunction with VESA Size 300 adapter.(4 Only in conjunction with VESA Size 200 adapter.
Art 55: 72188B00Art 48: 72188B00Art 40: 72188B00
Art 55: 72188B00 + 71365T00Art 48: 72188B00 + 71365T00Art 40: 72188B00 + 71365T00
Art 55: 65486B10 (2
Art 48: 65486B10 (3
Art 40: 65486B10 (4
Art 40: 71277B00 (4
Art 55: 71363B00 (2
Art 48: 71363B00 (3
Art 40: 71363B00 (4
Art 55: 72111Q80 Art 48: 72101Q80Art 40: 72101Q80
Wall Mount Isoflex 32-55Wall Mount WM 67
Floor Stand Universal 32-55 Floor Stand Connect 40-55
Screen Lift Plus Wall Stand Flex 32-46 Loewe Rack TS
Art 55: 72190B00 (1
Art 48: 72190B00 (1
Art 40: 72190B00 (1
Art 55: 71361T20 (Vesa Size 400)Art 48: 71391T20 (Vesa Size 300)Art 40: 71389T20 (Vesa Size 200)
Table Stand Art 55Table Stand Art 40/48
Table Stand Connect 55Table Stand Connect 40/48
Floor Stand Connect + Equipmentboard
Art 55: included in deliveryArt 48: included in deliveryArt 40: included in delivery
Different versions, sizes and colours available to match Loewe TV, sound system and equipment
Art 55: 72115W80Art 48: 72115W80Art 40: 72115W80
Wall Mount Slim/Vesa Size 200/300/400

Art 40-55User manual
127
VESA standardInstructions on using third-party mounting options according to the VESA standard
Loewe flat screen TV sets are specified for Loewe accessories. When using third-party mounting options according to the VESA standard, the manufacturer‘s instructions on the mounting options must be observed. Loewe accepts no liability for the use of mounting options from other manufacturers.
On the rear wall of the TV set, there are four points of screw connections to receive the VESA adapter bolts. Mounting a Loewe flat screen TV set to a holder according to the VESA standard necessarily requires the use of Loewe VESA adaptor bolts. Otherwise, the TV set may be damaged.
Screw the Loewe VESA adapter bolts with a torque of approx. 4 Nm into the screwing points of the TV rear panel (see Fig. 1). First, possibly existing screws in the four screwing points must be removed.
The Loewe VESA adaptor bolts are used to ensure stability and the necessary minimum distance of 5 mm between rear wall of the TV set and VESA holder (see Fig. 2). The VESA holder must not rest on the rear panel.
When mounting the TV set, always check that all four Loewe VESA adaptor bolts are used. For each mounting point, only one VESA adapter bolt may be used. It is inadmissible to screw several VESA adapter bolts or extend individual adapter bolts.
Measure the hole distance between the screwing points of your TV set. A hole distance of 400 x 400 mm on the rear of the TV set means VESA 400 standard. Thus, a suitable mount bracket must also correspond to the VESA 400 standard. If the VESA standard of your TV set fits the standard of the desired bracket, the bracket has also to be approved for the weight and size of the TV set (for weight and TV set size refer to chapter Technical Data).
Loewe is not responsible for the permissible load-carrying capacity and the professional fixing of the holder.
Please observe additionally and definitely the points described in the chapter on safety instructions.
If you use a Vesa mounting options from other manufacturers, you can order the Vesa adapter bolts M6x32 (No. 90473.988) at your authorized dealer of Loewe.
21
Accessories

Art 40-55User manual
128
n
Environment / Legal information
Environment Legal information
Environmental protectionPower consumption
Your TV set is equipped with an eco-standby power supply. In the standby mode, the power consumption drops to low power (see chapter Technical data). If you want to save even more energy then switch the device off with the mains switch. Please also note that the EPG data (Electronic Programme Guide) is lost under certain circumstances and possibly programmed timer recordings cannot be carried out by the TV set.
The TV set will be completely separated from mains only when you unplug the mains cable.
The power consumed by the TV set during operation depends on the energy efficiency preset in the initial installation or on the setting in the system settings.If you activate the automatic dimming, your TV picture will adapt to the ambient brightness. This reduces the power consumption of the TV set.
If the TV set is not operated for 4 hours (adjustment of volume, programme change, etc.) the TV set will automatically switch to stand-by mode to save energy. A prompt to terminate this shutdown process appears one minute before expiry of the 4 hours.
Cardboard box and packaging
You have made a decision to purchase a high-quality technical product with a long service life. For disposal of the packaging, we have paid a fee to a commissioned recycler to pick up the packaging from the dealer in accordance with national legislation.
The device
The EU directive 2002/96/EG regulates the proper way to recycle, handle and utilise used electronic devices. Old electronic appliances must therefore be disposed of separately. Never dispose of this device in normal domestic waste! You can hand in your old unit free of charge at identified
collection points or to your dealer if you buy a similar new unit. Other details about re-acceptance (also for non-EU countries) are available from your local municipal administration.
Batteries
The batteries supplied as initial equipment do not contain any pollutants such as cadmium, lead, or mercury.In accordance with the Battery Directive, used batteries should no longer be disposed of in the domestic waste. Dispose of your batteries at no charge in the collection containers which are set up for this purpose in retail stores.
LicencesManufactured under licence from Dolby Laboratories. “Dolby” and the double-D symbol are trademarks of Dolby Laboratories.
This set contains a software which is partly based on the work of the Independent JPEG Group.
This product includes software developed by the OpenSSL Project for use in the OpenSSL Toolkit (http://www.openssl.org/).
This software is provided by the OpenSSL project “as is“ and any expressed or implied warranties, including, but not limited to, the implied warranties of merchantability and fitness for a particular purpose are disclaimed. In no event shall the OpenSSL project or its contributors be liable for any direct, indirect, incidental, special, exemplary, or consequential damages (including, but not limited to, procurement of substitute goods or services; loss of use, data, or profits; or business interruption) however caused and on any theory of liability, whether in contract, strict liability, or tort (including negligence or otherwise) arising in any way out of the use of this software, even if advised of the possibility of such damage.
This product includes cryptographic software written by Eric Young ([email protected]).
This product includes software written by Tim Hudson ([email protected]).
This product contains software which was developed by third parties and / or software which is subject to GNU General Public License (GPL) and/or GNU Lesser General Public License (LGPL). You can pass on and modify them in accordance with Version 2 of the GNU General Public License or optionally every later version which is published by the Free Software Foundation.The publication of this programme by Loewe is carried out WITHOUT ANY GUARANTEE OR SUPPORT, particularly without an implicit guarantee concerning MARKET MATURITY or the USABILITY FOR A SPECIFIC PURPOSE. Details can be found in the GNU General Public License. You can obtain the software via the Loewe customer service department. The GNU General Public License can be downloaded from: http://www.gnu.org/licenses/.

Art 40-55User manual
129
CA module error codes In case of problems with a CA module, error codes are displayed by TV set. The following table from the CI specification shows the meaning of the error codes.
Error Code +
Error condition Error detec-ted by
Host action CI Plus Module action Comments
00 N/A None None
01 CICAM CICAM goes to pass - through mode (1.
02 CICAM - CICAM goes to pass-through mode (1.- a revocation notification message is displayed.
03 CICAM/Host - If EMI>0 CICAM goes to pass-through mode, otherwise switches to DVB CI mode- a response error notification message is displayed.
The service operator and CAS may choose under what conditions to descramble when operating in DVB CI mode.
04 CICAM/Host - If EMI>0 CICAM goes to pass-through mode, otherwise switches to DVB CI mode- a response error notification message is displayed.
The service operator and CAS may choose under what conditions to descramble when operating in DVB CI mode.
05 CICAM None Recommended:- CICAM retries the download 2 times- a response error notification message is displayed.
06 CICAM None Recommended:- CICAM retries the download 2 times- a response error notification message is displayed.
07 CICAM None Recommended:- CICAM retries the download 2 times- a response error notification message is displayed.
08 CICAM None CICAM goes to pass - through mode
09 CICAM/Host Host stops the CICAM. CICAM goes to pass - through mode
10 CICAM/Host Host stops the CICAM. CICAM goes to pass - through mode
11 CICAM/Host Host stops the CICAM. CICAM goes to pass - through mode
12 CICAM/Host Host stops the CICAM. CICAM goes to pass - through mode
13 Host Host stops the CICAM. None
14 Host Host goes to DVB-CI mode (2.
None
15 Host Host stops the CICAM. None
16 CICAM None - CICAM goes to pass- through mode- a response error notification message is displayed.
17 CICAM None - CICAM goes to DVB-CI mode (3
- a response error notification message is displayed.
18 CICAM None - CICAM goes to pass- through mode- a response error notification message is displayed.
19 CICAM None - CICAM goes to DVB-CI mode (3
- a response error notification message is displayed.
20 CICAM None - CICAM goes to DVB-CI mode (3
- a response error notification message is displayed.
21 CICAM None - CICAM goes to DVB-CI mode (3
- a response error notification message is displayed.
22 CICAM Requires Update
CICAM None - CICAM goes to pass- through mode- a response error notification message is displayed.
23-127 Reserved for CI Plus
CICAM None - a response error notification message is displayed.
128-255 Private Use for Service Operator
CICAM None - a response error notification message is displayed.
(1 The CICAM relays the transport stream unaltered and does not descramble any services (CI Plus or DVB).(2 The Host behaves like a DVB - CI compliant Host.(3 The CICAM descrambles only services that require no CI Plus prote ction (DVB-CI fallback mode).
Miscellaneous

Art 40-55User manual
130
Glossary
0-924p motion picture display: Movies released on Blu-ray Disc sup-port the 24p motion picture display. The Blu-ray player transfers the original film format to the television with 24 frames per second. The DMM (DigitalMovieMode) set in the factory calculates and inserts additional intermediate pictures, which suppress film jerking typical for the cinema, thereby providing for a smooth motion sequence.
AAdministrator: Person who administers the network, i.e. takes care of setting up and maintaining all components belonging to the network.
Active antenna: An antenna with its own power supply or amplification which can improve the reception in areas with a poor coverage.
ARC: Abbreviation for Audio Return Channel.
Audio Return Channel: The audio return channel which was introduced with the HDMI Standard 1.4 is used when an audio system with audio (pre) amplifier, e.g. Loewe MediaVision 3D, is connected to a TV set via HDMI. The digital audio signal of the TV set (e.g. the sound of the cur-rent TV program) can be transferred to the audio amplifier via the audio return channel of the HDMI cable. Thus the same cable which is normally responsible for transferring image data from a connected media player to the TV set transfers the audio data in the opposite direction. In this way, the audio return channel makes the cinch cable, which has previously been required in addition to the HDMI cable, redundant.
Automatic time control: Also called Accurate Recording. Similar to VPS for analogue stations the automatic time control monitors the start and end times of programmes from DVB stations. If these times deviate from the data programmed in the timer data, the running time of the recording is adapted automatically. The automatic time control is not supported by all DVB stations.
AV socket: Socket for audio and video signals.
AV sources: Audio/Video source.
AVI: Abbreviation for Audio Video Interleave, a video container file format developed by Microsoft. A single AVI video file can contain several audio, video and text data streams (thus the name container format).
BBand: Name for a transmission range.
Blu-ray Disc: The follow-up format of DVD. The contents of about five DVDs fit onto one Blu-ray Disc (abbreviated BD). Therefore, the Blu-ray disc provides enough space for high-resolution images and multi-channel sound formats.CBMP: Abbreviation for Bitmap, a grid graphics format designed for Microsoft Windows and OS/2 that is wide spread and therefore sup-ported by almost every popular graphics software package without any problems.
CCA Module: The Conditional Access module contains the cod-ing system and compares the transmitted code with the one on the Smart Card. If they match, the appropriate stations or programmes are decoded.
CEC: Abbreviation for Consumer Electronics Control. CEC provides uni-versal component control functions for entertainment electronics devices (e.g. System standby, One Touch Play). CEC is referred to by Loewe as Digital Link HD.
Channel (WLAN): Devices that want to communicate with each other have to use the same WiFi channel. In Europe the WiFi frequency band is currently divided into 13 channels.
Cinch cable: Cable for transmitting sound or pictures.
CI slot: See Common Interface.
Client: Also called network client, describes an end device such as your TV set that is connected to the network and gets data from a (media) server to make it accessible to the user.
Common Interface: The Common Interface (CI slot) is a standard-ised interface. By inserting suitable decoding modules (CA modules) and a Smart Card coded digital programmes can be used.
Common Interface Plus: CI Plus is an advancement of the Common Interface standard. CI Plus slots are in principle downward compatible to the previous CI standard, i.e. CA modules and Smart Cards accord-ing to the past CI standard can continue to be used in CI Plus slots, as far as the programme provider permits this. Additionally, extended regulations apply however to CI Plus.
Component: See Component connection.
Component connection: Also referred to as Component. Connec-tion where the video signal is transferred via three separate (Cinch) connections. It comprises the brightness signal Y as well as the colour difference signals Pb (blue component) and Pr (red component).
Conditional Access module: See CA module.
DDHCP: Abbreviation for Dynamic Host Configuration Protocol. DHCP allows automatic assignment of IP addresses with the aid of a DHCP server.
DHCP server: Network service which takes care of automatic assign-ment of IP addresses to clients.
Digital Link HD: System for controlling units via the HDMI connection of the Loewe TV set when they have been set up in a covered position.
DMM: Abbreviation for Digital Movie Mode. Whether a studio record-ing, live broadcast, or feature film – the broadcast images are always displayed optimally. Still images are reproduced in all their sharpness and tranquillity. By creating intermediate images, DMM enables perfect studio quality, even with quick movements.
DNC: Abbreviation for “Digital Noise Control”. Weak TV signals (ana-logue) can generate disruptive picture noise. DNC adjusts the effect of digital noise reduction to the picture contents.
DNS: Abbreviation for Domain Name System. Readable names (e.g. www.loewe-int.de) are assigned to numerical IP addresses. DNS servers are responsible for the resolution of readable addresses into the corresponding IP addresses.
DRM: Digital Rights Management. Processes to control copyright protected data. To be used correctly, DRM protected contents require not only a DRM capable device but also the possession of a license issued by the provider (to be paid for).
DTS: Digital Theatre Systems; Digital multi-channel audio.
DVB-C/-S/-T: Digital Video Broadcasting stands for digital television. Technical DVB is the standardised process for transmitting digital content (television, radio, multi-channel audio, room sound, EPG, Teletext, and other supplemental services) through digital technology. CST for terrestrial or antenna distribution.
DVD: Abbreviation for Digital Video Disc and later Digital Versatile Disc.
DVD preceiver: Combi device of DVD player and radio without inte-grated amplifier.
Dynamic contrast ratio: Here the light intensity of the display is adapted in case of a high black content in the picture. The so-called backlights are dimmed automatically and the contrast ratio increases temporarily, i.e. dynamically.
EElectronic Programme Guide: See EPG.
EPG: Electronic Programme Guide is the electronic variant of a printed TV guide. Using the EPG you can watch the TV programme of the TV station, transfer the appropriate data. The list of programmes contains the title, beginning and end and duration of the programme. In addition brief descriptions of the content of the programmes are also displayed.
Ethernet: Cable linked data net technology for local networks (LANs). Also covers standards for e.g. plug connectors and transfer speeds.
Euro AV socket: Interface for connecting video devices to a TV set. This socket is also referred to as Scart socket.
Art 40-55User manual
131
Glossary
Exif: Standard format for additional data with modern digital cameras, e.g. date and time, aperture, light sensitivity, alignment of the camera (portrait/landscape).
FFLOF: Full Level One Facilities. Teletext system in which names and numbers of the jump destinations are transmitted in the bottom line on every page. This guides the reader to related topics for example. An information about which pages exist and which pages have sub-pages is not available in FLOF.
GGateway: Transition to another network; in this case connection from the home network to the Internet.The network device that establishes this connection is normally used as a standard gateway. As a rule, the DSL router also represents the Internet gateway.
HHbbTV: HbbTV (Hybrid broadcast broadband television) is an industry standard that offers an open platform for technology that is not depend-ent on manufacturers. HbbTV combines TV programmes with online services seamlessly over broadband Internet (DSL).
HDCP: High-bandwidth Digital Content Protection. Coding system provided for the DVI and HDMI interfaces for secure transmission of audio and video data.
HDMI: High Definition Multimedia Interface, represents a newly de-veloped interface for the fully digital transfer of audio and video data.
HD Ready: A quality seal that is awarded to products that are capable of displaying high-definition television (HDTV).
HDTV (HD): High Definition Television is a collective term, designating a series of high-resolution television standards.
High and low band: Transmission ranges for satellites.
Host: Computer that the server services are provided from, i.e. that makes data available. Refer also to media server.
IID3 tags: Additional information for MP3 and WMA audio files. Infor-mation about the singer, title, album and album cover can be saved here among other things. This data is then processed by the PC using an ID3 tag editor.
IP address: IP addresses (Internet Protocol Addresses) are used to identify devices in an Internet Protocol (IP) network. IP addresses are made up of four groups of numbers of three digits each.
IR-Link: The IR Link function allows the operation of accessory de-vices with concealed installation made by other manufacturers via the Loewe TV set. The infrared sensor required for this is available as an ac-cessory and can be connected to the IR-Link connection of the TV set.
JJPEG/JPG: Joint Photographic Experts Group is a committee, which has developed a standardised method for the compression of digital images. This method JPEG (JPG for short), named after the commit-tee, is a commonly used graphic format for photos.
LLAN: Abbreviation for Local Area Network. Mainly used as a name for networks with cabling (Ethernet).
LCD: Liquid Crystal Display.
LCN: Logical Channel Numbers. In stations with LCN, the channel location number belonging to the station is also transmitted by the provider. The stations are sorted according to these channel location numbers.
LNB/LNC: The crucial electronic component of a satellite antenna is referred to as an LNB (Low Noise Block Converter). It is mounted in the focal point of a parabolic antenna. The designation LNC (Low Noise Converter) indicates that conversion to a lower intermediate frequency takes place. The supplemental block in the LNB refers to the fact that a whole frequency range (a block) is converted in each case.
MMAC address: Hardware address of a network adaptor, e.g., he net-work card in the PC. It is issued permanently by the manufacturer and is used to uniquely identify devices in networks.
Mbit/sec: Information about the transfer rate in networks in megabits, i.e. millions of characters per second. With WLAN the maximum speed is 11 (IEEE 802.11b), 54 (IEEE 802.11g) or 300 (IEEE 802.11n) Mbit/sec, in wired networks 10 Mbit/sec or 100 Mbit/sec (Fast Ethernet).
Media Server: Stands for the device on which multimedia content is stored, but is also the name for the service provided by the device that makes this data available to the network.
Modulator: Transmitter in the video or DVD recorder so that the devices can receive signals via the tuner of the TV device.
Mono: Single channel sound.
MP3: Data format for compressed audio files.
MPEG: Digital compression method for video.
Multimedia content: Videos, music files and photos are grouped together under this term.
NNAS: The term describes a hard disk which is independently linked to the network (i.e. without a PC).
Network ID: NID refers to the so-called programme ID number, also known as network ID – a number between 0 and 8191. This specifica-tion is necessary in specific cable networks of some countries. Then only DVB signals of this station network are searched for.
NICAM: Audio standard. Is used in Denmark, England, France, Swe-den, and Spain.
NTSC: American colour standard, stands for National Television Standards Committee.
PPage Catching: For teletext, refers to marking and calling a page number.
PAL: European colour standard, stands for phase alternation line.
PCM: Pulse Code Modulation for digital sound.
Picture in Picture: See PIP.
PIP: Picture in Picture; a function which displays two pictures on the screen.
Pixel: Also called picture element or pel. Denotes both the smallest unit of a digital graphic grid and its display on a screen with grid control.
Pixel error: A pixel error is a defective pixel, usually on an LCD. Pixel errors may be caused by production errors. They are expressed for example by a constantly lit pixel or a constantly black pixel. Single defective pixels however are excluded from a guarantee.
PNG: Abbreviation for Portable Network Graphics, a freely available grid graphics format for loss-free compression.
Port: It allows assignment of data packages to various services which are running on one device under the same network address.
Powerline: Powerline designates a type of wired network connection in which data is transferred via the domestic electricity network using optionally available adaptors.

Art 40-55User manual
132
Glossary
P (continuation)Progressive JPEG: Progressive JPEGs are built up gradually. The quality of the picture increases progressively during the loading process.
ProScan/Progressive Scan: Progressive Scan (abbr. PS) or full picture method is a technique in the picture build-up of monitors, TV sets, beamers, and other display devices in which the output device is not sent line interlaced half pictures – unlike in the interlace technique – but real full pictures.
PSK: Clients that wish to connect to a wireless network secured with PSK must know this key.
RRGB: Colour signals Red, Green and Blue.
Router: Device for connecting several networks, e.g., home network and Internet.
SSatellite tuner: Receiver for satellite programmes.
SDTV: Standard Definition TeleVision.
SECAM: French colour standard, stands for Séquentiel à mémoire.
Set-top box: Set-top box (STB for short) refers to a device in enter-tainment electronics which is connected to another device, usually a TV set, and offers the user additional functional options.
Signal input group: Depending on the applied signal, the signal sources are divided into different groups.
Signal strength: Strength of the received antenna signal.
Signal quality: Quality of the incoming antenna signal.
Smart Card: The Smart Card is an electronic chip card issued by the respective programme provider or by the certification free Pay TV operators. It contains the code which is decoded by the CA module.
Static contrast ratio: Describes the difference between the brightest and darkest picture display.
Stereo: Dual channel sound.
Switch: Device for connecting several computers to a network.
Switching voltage: Video devices supply this voltage to switch the TV set to playback.
Symbol rate: Specifies the transmission speed for data transmission.
TTerrestrial: In data transmission a wireless transmission that does not use satellites as intermediate station is referred to as terrestrial.
TFT: Thin Film Transistor. One widely distributed application is control of liquid crystal flat screens, for which a signal transistor is used for each pixel. This design of display is also referred to as active matrix, however it is frequently also referred to as TFT display.
Tuner: Another term for receiver.
UUltra HD: Ultra HD (abbr. for Ultra High Definition) is a digital high-definition video format, which is about four times the resolution of HDTV.
USB: Universal Serial Bus. Serial bus system for connecting external devices (USB card reader, USB stick).
UPnP AV Is used to control network devices from all manufacturers. Has become a widespread standard for home networking.
VVGA: PC interface for connecting a monitor.
WWEP: Abbreviation for Wired Equivalent Privacy. Former standard process in the WiFi encryption, now outdated.
Wired network: see LAN.
Wireless network: see WLAN.
WLAN: Abbreviation for Wireless Local Area Network. Also abbrevi-ated as wireless network.
WMA: Abbreviation for Windows Media Audio, Microsoft own audio data format. As with MP3 files, the content is compressed here as well.
WMV: Abbreviation for Windows Media Video, proprietary Microsoft video data format.
WPA: Abbreviation for Wi-Fi Protected Access. Replaced WEP as standard encryption for wireless networks.
YYcc/Ypp: Colour standards for Set-top boxes..
YCbCr: Digital colour model, informally also incorrect designation for signals in standard resolution (SDTV). The YCbCr colour model, in which, e.g., DVDs are coded, has been developed from the YUV colour model used in analogue television technology. With YCbCr, the data is transferred via digital interfaces such as DVI or HDMI without being converted.
YPbPr: Analogue colour model, see also Component connection. The analogue YPbPr signal is generated from the YCbCr signal by a converter in the source player and then output at the 3 component outputs of the source player.
YUV: The YUV colour model is used for analogue television in accord-ance with the standards PAL and NTSC. YUV is often informally re-ferred to when YPbPr (for analogue connections/cables) or YCbCr (in digital applications) is actually meant. YUV only occurs in quadrature modulation during PAL or NTSC transfer and is not otherwise used.

Art 40-55User manual
133
EC Declaration of Conformity
-
.
. -
.
Dieses Gerät entspricht den grundlegenden Anforderungen und den weiteren entsprechenden Vorgaben der Richtlinie 1999/5/EG. Es darf in allen Ländern der EU sowie zusätzlich in Island, Norwegen und der Schweiz betrieben werden. In Frankreich und Italien ist die Nutzung nur in Innenräumen zulässig.
Dette udstyr er i overensstemmelse med de væsentlige krav og andre relevante bestemmelser i Direktiv 1999/5/EF. Det må kun anvendes i EU-landene samt i Island, Norge og Schweiz. I Frankrig og Italien er det kun tilladt at anvende det inden-dørs.
Este equipo cumple con los requisitos esenciales así como con otras disposiciones de la Directiva 1999/5/CE. Puede operar en todos los países de la UE y adicionalmente en Islandia, Noruega y Suiza. En Francia e Italia, su uso está permitido únicamente en espacios interiores.
Tämä laite täyttää direktiivin 1999/5/EY olennaiset vaatimukset ja on siinä asetettujen muiden laitetta koskevien määräysten mukainen. Laitetta saa käyttää kaikissa EU-maissa sekä Islannissa, Norjassa ja Sveitsissä. Ranskassa ja Italiassa laitetta saa käyttää vain sisätiloissa.
Cet appareil est conforme aux exigences essentielles et aux autres dispositions pertinentes de la Directive 1999/5/EC. L‘utilisation est possible dans tous les pays de l‘UE, en Islande, en Norvège et en Suisse. En France et en Italie l‘utilisation est autorisée uniquement dans des espaces fermés.
This equipment is in compliance with the essential requirements and other relevant provisions of Directive 1999/5/EC. It may be operated in all countries in the EU and also in Iceland, Norway and Switzerland. In France and Italy it may only be used indoors.
.
Questo apparato é conforme ai requisiti essenziali ed agli altri principi sanciti dalla Direttiva 1999/5/CE. Può essere messo in funzione in tutti i paesi dell‘UE e inoltre in Islanda, Norvegia e in Svizzera. In Francia e in Italia è consentito l‘uso solo in ambienti chiusi.
Dette utstyret er i samsvar med de grunnleggende krav og andre relevante bestemmelser i EU-direktiv 1999/5/EF. Det kan brukes i alle EU-land og dessuten i Island, Norge og Sveits. I Frankrike og Italia er kun innendørs bruk tillatt.
Dit apparaat voldoet aan de essentiele eisen en andere van toepassing zijnde bepalingen van de Richtlijn 1999/5/EG. Het gebruik is toegestaan in alle landen van de EU en ook in IJsland, Noorwegen en Zweden. In Frankrijk en Italië is het gebruik slechts binnenshuis toegestaan.
Este aparelho está em conformidade com os requisitos fundamentais e todas as restantes disposições da Diretiva 1999/5/CE. Pode ser utilizado em todos os países da UE assim como na Islândia, Noruega e Suíça. Em França e Itália a sua utili-zação apenas é permitida em espaços interiores.
Denna utrustning är i överensstämmelse med de väsentliga kraven och andra relevanta bestämmelser i Direktiv 1999/5/EC. Apparaten får användas i alla länder inom EU liksom på Island, i Norge och i Schweiz. I Frankrike och Italien får apparaten användas endast inomhus.

Art 40-55User manual
134
Index
0-9
3D ......................................................................................................723D function .......................................................................................73
A
Access code .................................................................................... 85Adding stations to personal list ....................................................... 81Additional functions for DR+ archive playback ............................. 58Adjusting the HiFi/AV amplifier .....................................................105Adjusting the sound .........................................................................75Adjust size of the PIP image ........................................................... 93Allow switching voltage ..................................................................106Antenna DVB ....................................................................71, 102, 106Antenna DVB-S ..............................................................................106Antenna DVB-T ...............................................................................106ARC ................................................................................................. 116Archive recording ............................................................................ 43Artist Search ................................................................................... 65Audio commentary ......................................................................... 93AUDIO key ...................................................................................... 118Audio playback
Playback ....................................................................................... 62Audio playback from external devices ...........................................117Audio/Radio .............................................................................. 30, 61Audio return channel ..................................................................... 116Auto dimming ................................................................................... 71Auto dimming - Room .............................................................. 72, 73Auto dimming - Video (VBD+) ........................................................73Auto format (AMD) ..........................................................................72Automatic menu info ....................................................................... 17Automatic rotate ............................................................................. 66Automatic scan TV+Radio ........................................................71, 76Automatic shutdown .........................................................................7Automatic time control ................................................................... 53Auto volume ..................................................................................... 71AV connecting settings ....................................................71, 102, 106AV list ............................................................................................... 34AV output signal ............................................................................... 71
B
Balance .......................................................................................71, 75Batteries ........................................................................................... 12Blu-ray player ................................................................................. 112Bookmarks
Delete ........................................................................................... 59Delete individual ones ................................................................. 59Jump ............................................................................................ 58Set ..........................................................................................43, 58
Brightness ..................................................................................71, 72Browser ............................................................................................ 70
C
Cable fixing ........................................................................................11Camcorder ..................................................................................... 112CA modul ........................................................................................ 110Change title of an archive recording .............................................. 46Changing the station list .................................................................. 31
Character table ................................................................................ 16CI slot .............................................................................................. 110Cleaning and care ..............................................................................7Clear data base ............................................................................... 84Clock display .................................................................................... 17Code number .................................................................................. 85Color intensity .................................................................................. 71Coloured keys .................................................................................. 38Colour intensity ................................................................................72Colour temperature ...................................................................71, 72Common Interface Plus ................................................................. 110Component connection ................................................................ 115Compose / edit Personal list ........................................................... 81Connecting antennas .......................................................................11Connecting HiFi/AV amplifier ........................................................ 116Connecting home network .............................................................. 12Connecting the speaker system (AUDIO OUT) ........................... 116Connecting the TV set ......................................................................11Connections ............................................................................... 10, 71Contrast ......................................................................................71, 72Control .............................................................................................. 71Create new personal list .................................................................. 81Crossover ........................................................................................ 66
D
Data capture .................................................................................... 84Deblocking filter .........................................................................71, 72Delete
Bookmarks .................................................................................. 59individual bookmarks .................................................................. 59Recording ..................................................................................... 46
Delete managerSet delete protection for timer recording .................................. 53
Delete personal list .......................................................................... 81Deleting blocks ................................................................................ 80Deleting stations from the personal list ......................................... 81Devices on AV ................................................................................. 114Digital Link ........................................................................71, 102, 107Digital Link HD ................................................................................ 113Digital Link HD functionality ..........................................................107Digital Noise Control (DNC) ......................................................71, 72Direct recording .............................................................................. 43Display .............................................................................................. 13DR+ .............................................................................................71, 94DR+ archive ..................................................................................... 45DR+ Streaming ...........................................................................49, 71
Notify started „Follow me“ recording ........................................ 95DR+ Streaming settings ................................................................. 94
Also use other archives ............................................................... 95DR+ device group name ............................................................. 95DR+ device name ........................................................................ 95IP port number ............................................................................ 95
DVB character set ........................................................................... 93DVB settings ...............................................................................71, 93DVD player ...................................................................................... 112

Art 40-55User manual
135
Index
E
Edit new personal list ....................................................................... 81Edit personal list ............................................................................... 81Energy efficiency ..................................................................18, 71, 86Environment ...................................................................................128EPG .............................................................................................35, 71Explanation of keys .......................................................................... 17Explanation of symbols ................................................................... 17Export archive entries ......................................................................47Export log file ..............................................................................71, 97Extras ........................................................................................71, 108
F
Favourites ........................................................................................ 30Film quality improvement (DMM) ............................................71, 72FLOF ................................................................................................. 38Follow-Me function ...................................................................49, 55Function list ..................................................................................... 34Function of the TEXT key ................................................................ 96
G
Game console ........................................................................ 107, 112Gaming mode ...................................................................71, 102, 107Gamma brightness correction ........................................................72General information on menu operation ........................................ 14
H
Hard disks ...................................................................................71, 96Formatting ................................................................................... 96
HbbTV ..................................................................................40, 71, 96HbbTV-Modus ................................................................................. 96HbbTV text ...................................................................................... 40HDMI ............................................................................................... 112HDMI CEC ....................................................................................... 113Headphone volume ........................................................................ 34History ............................................................................................. 32Home ............................................................................................... 30Home networking systems ............................................................117Home view ....................................................................................... 30
I
Image+ Active ............................................................................71, 72Initial installation wizard .................................................................. 18Installing the TV set ..........................................................................11Instant Channel Zapping ................................................................. 31Instant recording ............................................................................. 43Integrated features ...........................................................71, 108, 109Interval functions ............................................................................ 59
Deleting part of the recording .................................................... 60Hide .............................................................................................. 59
J
Jump ................................................................................................ 56Jump distance ................................................................................. 94Jumping to Bookmarks .................................................................. 58
L
Language ...................................................................... 18, 71, 84, 121Licence agreement .......................................................................... 18LNC/LNB .............................................................................23, 25, 26Loudness ....................................................................................71, 75
M
Mains switch .................................................................................9, 13Manual scan TV ................................................................................76Manuell scan (incl. antenna status) ................................................ 71Maximum switch on volume ........................................................... 71Maximum volume ......................................................................71, 75MediaNet ......................................................................................... 68
Browse ......................................................................................... 69Exit ................................................................................................ 68Settings ........................................................................................ 69
Mobile phone keyboard ................................................................... 16Move block ...................................................................................... 80Move picture up/down ...............................................................71, 72Move stations in the personal list ................................................... 81Moving of archive entries ................................................................47Multimedia / Network ..................................................................... 71Multimedia settings ..................................................................71, 101Multi select ...................................................................................... 46Music playback
end ............................................................................................... 63Repeat .......................................................................................... 63Shuffle playback .......................................................................... 63Winding ........................................................................................ 62
N
Networking ...................................................................................... 98Network selection ..................................................................... 20, 21Network settings ........................................................................71, 98Notify hidden sections .................................................................... 94Numerical keys ........................................................................... 14, 31
O
One touch recording ....................................................................... 43On/Off button .....................................................................................9On-screen displays ....................................................................71, 92OPC ...................................................................................................72
P
Page selection ................................................................................. 38Parental lock ........................................................................ 48, 71, 85PC .................................................................................................... 114PC IN - Display ..................................................................................72Permanent clock display ................................................................. 17Personal list ..................................................................................... 32
Add station ................................................................................... 81Create new list .............................................................................. 81Delete list ...................................................................................... 81Delete station ............................................................................... 81Move station ................................................................................. 81Rename list ................................................................................... 81

Art 40-55User manual
136
Index
Photo ..........................................................................................30, 66Exit .................................................................................................67Full-screen mode ..........................................................................67Rotate photo .................................................................................67Slide show .....................................................................................67
Picture ............................................................................................... 71Picture adjustment ..............................................................71, 72, 74Picture format ......................................................................71, 72, 74
4:3 .................................................................................................7416:9 ................................................................................................74PALplus .........................................................................................74Panorama .....................................................................................74Zoom .............................................................................................74
Picture settings ................................................................................72PIP ............................................................................................... 41, 71PIP Settings ..................................................................................... 93Positioning/aligning the DVB-T antenna ......................................106Post-record time ............................................................................. 94Pre-record time ............................................................................... 94Proxy server .............................................................................98, 100
Q
Quick start mode .......................................................................71, 86
R
Radio mode ...............................................................................64, 65Record conflict ................................................................................. 51Recording ........................................................................................ 94Remote control .................................................................... 8, 12, 118Remote TV switch on of the TV set ..............................................107Renaming the HDMI port designation .......................................... 112Renaming the personal list .............................................................. 81Renderer ....................................................................................71, 101Repeat initial installation .................................................... 18, 71, 108Reset to factory settings .................................................71, 108, 109Restore stations .............................................................................. 80
S
Safety ............................................................................................. 6, 7Satellite selection ......................................................... 23, 24, 25, 26Satellite system ............................................................................... 22Scope of delivery ................................................................................5Scrambled stations ................................................ 20, 21, 27, 77, 111Search for artists ............................................................................ 65Selecting a station out of the station list ........................................ 31Select station ................................................................................... 31
using the numerical keys ............................................................. 31via personal lists .......................................................................... 32with P+/P- .................................................................................... 31
Serial interface RS-232C (RJ12) ....................................................117Serial recording tolerance .............................................................. 94Service ............................................................................................138Set covers ..........................................................................................11Setting the volume ........................................................................... 31Set-top box ..................................................................................... 112Sharpness ..................................................................................71, 72Shutdown of the ext. device via TV button ...................................107
Side by side ......................................................................................73Signal type ......................................................................................106Skin tone .....................................................................................71, 72Slide show speed ............................................................................ 66Smart Card ..................................................................................... 110Smart jump ...............................................................................56, 94Software ............................................................................................ 71Software download ..........................................................................87Software update
Automatic update via the internet ..............................................91Manually via Antenna .................................................................. 89Via Antenna ................................................................................. 90Via USB memory medium ......................................................... 88
Sound ..........................................................................................71, 75Sound adjustment .....................................................................71, 75Sound components ................................................. 71, 102, 103, 116Sound picture synchronisation ....................................................... 71Sources ............................................................................................ 30Standard Teletext ............................................................................. 71Standby mode .................................................................................. 13Start behaviour of HbbTV-stations ............................................... 96Station lists Radio ............................................................... 71, 76, 80Station lists TV .................................................................... 71, 76, 80Stations .......................................................................................71, 76Station search ................................................................................. 65Status display .................................................................................. 33STB key ........................................................................................... 118Stop recording early ....................................................................... 44Subtitle .........................................................................44, 60, 93, 94Supply voltage 5V ..........................................................................106Switching off the TV set during recording ..................................... 44Switch off .......................................................................................... 13Switch on .......................................................................................... 13Switch-on volume ............................................................................75Switch to live picture ....................................................................... 42System settings ........................................................................ 30, 71
T
Teletext ............................................................................................ 38Time and date ............................................................................71, 92Time display ..................................................................................... 17Timer ................................................................................................ 50
Timer list ...................................................................................... 50Timer Services ............................................................................ 53
Timer data ....................................................................................... 52Automatic time control ............................................................... 53Beginning ..................................................................................... 52Date .............................................................................................. 52Delete protection ......................................................................... 53End ............................................................................................... 52Favourite ...................................................................................... 53Folder ........................................................................................... 52Lock recording ............................................................................. 53Recording subtitles ..................................................................... 53Recording type ............................................................................ 52Station .......................................................................................... 52
Timer Services ................................................................................ 50Time shift ......................................................................................... 42

Art 40-55User manual
137
Index
TOP .................................................................................................. 38Top/bottom ......................................................................................73Transfer all station lists ..............................................................71, 76TV ............................................................................................... 30, 31TV key ........................................................................................12, 118TV on when memorised ................................................................. 84TV viewing with time shift ........................................................42, 43
U
Update station list automatically ..............................................71, 76UPnP ................................................................................................. 12USB stick ..........................................................................................87
V
Value-added service ...................................................................8, 40VBD+ .................................................................................................72VESA standard ............................................................................... 127Video ..........................................................................................30, 54VIDEO key ....................................................................................... 118Video playback
Change picture format ................................................................ 58Jump by entering a time ............................................................. 56Playback ....................................................................................... 55Repeat ...........................................................................................57Selecting language/sound .......................................................... 58Winding .........................................................................................57
Viewing a locked movie .................................................................. 48Viewing another movie from the archive during archive recording .. 43Volume adjustment ......................................................................... 71
W
Wake on LAN/WiFi .......................................................................... 98Watching other stations during archive recording ....................... 43Web ............................................................................................30, 68WEB key function .......................................................................71, 97
Y
YPbPr .............................................................................................. 115YUV ................................................................................................. 115

Art 40-55User manual
138
n
Service
Qualifi Pty Ltd 24 Lionel Road Mt.Waverley VIC 3149 Australia Tel +61-03-8542 1111 Fax +61-03-9543 3677 E-mail: [email protected]
Loewe Opta Benelux NV/SA Uilenbaan 84 2160 Wommelgem, België Tel +32 - 3 - 2 70 99 30 Fax +32 - 3 - 2 71 01 08 E-mail: [email protected]
Telion AG Rütistrasse 26 8952 Schlieren, Schweiz Tel +41 - 44 732 15 11 Fax +41 - 44 732 15 02 E-mail: [email protected]
Guangdong MG Audio Development Co.Ltd No.8 Jinghu Rd. Xinhua St. Huadu Reg. GZ, PRC Tel +86-(0)20-22675666 Fax +86-(0)20-22675777 E-mail: [email protected]
Xiamen Tenote Investment Co. Ltd 26F 3# Xinglin Bay Operation Center, No.478 xinglinwan Avenue, Jimei District, Xiamen, Fujian, PRC Tel +86-400 088 1566 E-mail: [email protected]
Hadjikyriakos & Sons Ltd. 121 Prodromos Str., P.O Box 21587 1511 Nicosia, Cyprus Tel +357 - 22 87 21 11 Fax +357 - 22 66 33 91 E-mail: [email protected]
BaSys CS s.r.o. Sodomkova 1478/8 10200 Praha 10 - Hostivar, Česká republika Tel +420 234 706 700 Fax +420 234 706 701 E-mail: [email protected]
Loewe Technologies GmbH, Customer Care Center Industriestraße 11 96317 Kronach, Deutschland Tel +49 9261 99-500 Fax +49 9261 99-515 E-mail: [email protected]
EET Europarts Loewe Denmark Bregnerødvej 133 D 3460 Birkerød, Denmark Tel +45 - 82 19 19 E-mail: [email protected]
Gaplasa S.A. Conde de Torroja, 25 28022 Madrid, España Tel +34 - 917 48 29 60 Fax +34 - 913 29 16 75 E-mail: [email protected]
Loewe France SAS Rue du Dépôt, 13 Parc de l l‘Europe, BP 10010 67014 Strasbourg Cédex, France Tel +33 - 3- 88 79 72 50 Fax +33 - 3- 88 79 72 59 E-mail: [email protected]
EET Europarts Loewe Finland Metsänneidonkuja 12 02130 Espoo, Finland Tel +358 9 47 850 900 www.eeteuroparts.fi
Loewe UK Limited 1st Floor, 237A Kensington High St London W8 6SA, UK Tel +44 - (0) 207 368 1100 Fax +44 - (0) 207 368 1101 E-mail: [email protected]
Issagogiki Emboriki Ellados S.A.321 Mesogion Av. 152 31 Chalandri-Athens, Hellas Tel +30 - 210 672 12 00 Fax +30 - 210 674 02 04 E-mail: christina_argyropoulou@
isembel.gr
Plug&Play Ltd. Bednjanska 8, 10000 Zagreb Hrvatska (Kroatia) Tel +385 1 4929 683 Fax +385 1 4929 682 E-mail: [email protected]
Loewe Italiana S.r.L. Via Monte Baldo, 14/P – 14/N37069 Dossobuono di Villafranca di
VeronaTel +39 - 045 82 51 690 Fax +39 - 045 82 51 622 E-mail: [email protected]
Clear electronic entertainment Ltd 13 Noah Mozes St. Agish Ravad Building Tel Aviv 67442, Israel Tel +972 - 3 - 6091100 Fax +972 - 3 - 6092200 E-mail: [email protected]
Nonplus Ultra Home Automation Pvt LtdFirst Floor, No. 615, Second Main RoadIndiranagar Stage I, IndiranagarBangalore 560038IndiaTel +91 80 41114599E-mail: [email protected]
Pars Royal Taramesh LOEWE Gallery #3 Shariati St. Opp. Soheil St. P.O Box 1914965537 Tehran, Iran Tel + 98 21-22391661 E-Mail: [email protected]
JOR ACCU-TECH Solutions Co. 1-Kharija Al-Ashja‘i Street Jabal Al-Weibdeh P.O.Box 9668 Amman 11191, Jordan Tel: +962-6-465-9985 Fax: +962-6-465-0119 E-Mail: [email protected]
LOEWE Show Room Olaya Street, Near Kingdom Center RIYADH, SAUDI ARABIA P.O Box 92831 Riyadh 11663 Tel +966-11-4640927 Fax +966-11-4640759 E-mail: [email protected]
Kpartners, SIA A.Čaka iela 80 Rīga, LV-1011, Latvia Tel +3 71 - 67 29 29 59 Fax +3 71 - 67 31 05 68 E-mail: [email protected]
A Cappella Ltd. Ausros Vartu 5, Pasazo skg. 01129 Vilnius, Lithuania Tel +370 - 52 12 22 96 Fax +370 - 52 62 66 81 E-mail: [email protected]
EET Europarts ASOlaf Helsetsvei 6 (Vekstsenteret)0694 Oslo, Norge Tel +47 - 22919500 E-mail: [email protected]
Gaplasa S.A. Rua Professor Henrique de Barros Edifício Sagres, 2º. C 2685-338 Prior Velho, Portugal Tel +351 - 21 942 78 30 Fax +351 - 21 940 00 78 E-mail: [email protected]
3LOGIC Sp.z o.o. ul. Zakopiańska 153 30-435 Kraków Tel +48 - 12 640 20 00 Fax +48 - 12 640 20 01 www.3logic.pl
V2 Indonesia 5th Intiland tower Jl. Jenderal Sudirman 32 Jakarta 10220, INDONESIA Tel +62-21 57853547 E-mail: [email protected]
I Control SAL Gemmaizeh, Rmeil. Building 328 1st Floor Beirut, Lebanon Tel +961 1 446777 / 1 587446 Fax +961 1 582446 E-mail: [email protected]
Service Center Loewe Aptekarsky per.4 podjezd 5A 105005 Moscow, Russia Tel +7 - 499 940 42 32 ( ext. 454 ) Fax +7 - 495 730 78 01 E-mail: [email protected]
EET Europarts AB Loewe Sweden Box 4124 SE-131 04, Nacka, Sverige Tel +46 - 8 507 510 00 E-mail: [email protected]
Atlas Care Centre 11 changi south street 3 #03-01 builders centre Singapore 486122 Tel +65 - 6745 2028 Fax +65 - 6546 7861 E-mail: [email protected]
ENKAY GROUP SERVISPLUS MUSTERI HIZMETLERI Alemdag Cad. Site Yolu No:18 Umraniye, Istanbul, TÜRKIYE Tel 444 4 784 E-mail: [email protected]
Volco Enterprise Close CorporationUnit 87 on Mastiff (Road)Longlake Ext 1, Lingbro Business Park2165 JohannesburgTel +27 11 608 1228Fax +27 11 608 1740E-mail: [email protected]
© by Loewe Technologies 01.08.16

Art 40-55User manual
139
STBABSAT 166, 169AEGIR 179AIWA 141AKAI 033, 104ALBA 060, 017, 067, 104, 111, 126, 180, 201ALCATEL 336ALDES 133, 168, 179, 201ALLSAT 033, 048, 059, 077, 201ALLSONIC 133, 168, 226ALLTECH 060, 137, 225ALPHA 033ALTAI 047AMITRONICA 060AMPERE 047, 186, 207AMSTRAD 060, 006, 047, 071, 097, 132, 165, 174, 175, 186, 212, 216, 217, 227, 228ANGLO 060ANKARO 060, 051, 133, 161, 162, 168, 226ANTTRON 017, 077, 180APOLLO 017ARCON 025, 051, 079, 132, 136, 161ARMSTRONG 033, 175ARTHUR MARTIN 130ASA 009ASAT 025, 033ASLF 060AST 127, 194ASTACOM 171, 172ASTON 032, 095ASTRA 013, 021, 025, 098, 099 164, 175, 178, 190, 222, 223ASTRO 006, 091, 094, 176, 177, 179, 180, 181AUDIOTON 059, 180AUSTAR 212, 332AVALON 047AXIS 054, 210, 223, 226BARCOM 021, 051BEKO 067BEST 051, 226BIRMINGHAM CABLE 343BLAUPUNKT 090, 176BLUE SKY 060, 217BOCA 163, 169, 175, 186, 199, 207, 222BRAIN WAVE 094, 161BRANDT 069BRITISH SKY BROADCASTING 050, 227BRITISH TELECOM 341BROADCAST 013BROCO 060, 223BRUNS 133BSKYB 227BT 104, 171, 172, 229, 335BT SATELLITE 171BUBU SAT 060BUSH 048, 077, 106, 126BVV 161CABLETIME 308, 311, 312, 333, 334CAMBRIDGE 006, 104, 199CANAL 019CANAL DIGITAL 128CANAL PLUS 128, 019, 320, 321CANAL SATELLITE 128, 191, 211CANARY 137CARAT.SOM 054CHAPARRAL 012, 134CHESS 197CITYCOM 135, 164, 203, 204, 230CLARK 180CLATRONIC 094CLEMENS KAMPHUS 133, 210CLYDE CABLE VISION 317CNT 179COMCAST 004COMCRYPT 320, 321COMMANDER 161, 162COMMLINK 168COMMUNICADO 054COMTEC 054, 168
CONDOR 164, 226CONNEXIONS 047, 096, 226, 231CONRAD 006, 010, 164, 169, 226, 230CONTEC 054, 135, 169COSAT 059CROWN 175CRYPTOVISION 067, 315CYBERMAXX 116CYRUS 037DAERYUNG 047DAEWOO 060, 017, 025DANSAT 048, 077DAUMLING 163D-BOX 045, 214DECCA 038DECSAT 310DECSAT CANAL 310DELFA 212DEUTSCHE TELEKOM 056DEW 025, 054DIAMOND 225DIRECTV 144DISCOVERER 197DISEQC 171, 172DISK EXPRESS 051DISMOND 225DISTRATEL 119, 146, 147, 149, 185, 217DISTRISAT 033, 059DNR 161DNT 033, 037, 047, 231DRAKE 029DST 017DUAL 025DUNE 226DYNASAT 196ECHOSTAR 060, 021, 047, 086, 088, 128, 211, 213EIF 014, 198EINHELL 060, 006, 017, 097, 163, 168, 169, 175, 186, 222ELEKTA 179ELSAT 071ELTA 017, 033, 059, 226ELTASAT 059EMANON 017EMME ESSE 133, 213, 226ENGEL 060EP SAT 067EURIEULT 185, 217EUROCRYPT 021, 067EURODEC 110, 232EUROPA 006, 033, 161, 162, 164, 169, 212EUROPEAN 163EUROSAT 175, 225EUROSKY 164, 175, 186, 226EUROSTAR 164, 215, 233, 234EUTRA 137, 203EXATOR 017, 104, 180FAGOR 059FERGUSON 023, 048, 067, 077, 106, 108, 111, 124, 206FIDELITY 006, 071, 097FILMNET 318FINLANDIA 021, 067FINLUX 009, 010, 021, 067, 220FINNSAT 110FLAIR MATE 060FORCE 068FOXTEL 235, 022, 319FRACARRO 017, 087, 196, 213FRANCE TELECOM 344FREECOM 017, 193, 201FREESAT 137FTE 060, 080, 136, 137, 169, 196, 199, 212, 226FUBA 010, 014, 017, 021, 047, 051, 088, 135, 176, 220, 226G SAT 077, 130GALAXI 051GALAXIS 054, 059, 133, 161, 168, 209, 210, 211, 212, 223, 226, 236, 237, 238GALAXISAT 127GARDINER 204
GEC 317GENIX 024GENERAL-INSTRUMENTS 332GIUCAR RECORD 089GMI 175GOLDBOX 128, 191, 211GOODMANS 067, 111GRAETZ 088, 099GRANADA 021, 099GRANDIN 185, 239GROTHUSEN 017, 193GRUNDIG 026, 003, 067, 090, 097, 171, 172, 176, 217, 227, 240, 241, 242, 020, 307, 316 HANSEATIC 197HANTOR 017, 094HANURI 179HARTING UND HELLING 133HASE & IGEL 161HELIOCOM 164HIGH PERFORMANCE 085, 122HINARI 017, 077HIRSCHMANCE 090HIRSCHMANN 006, 009, 010, 047, 081, 113, 133, 171, 172, 176, 196, 203, 216, 219, 243HISAWA 094HITACHI 067, 106, 111, 120HNE 165HOUSTON 059, 071, 161, 162, 171HUMAX 212, 236, 244, 005HUTH 013, 054, 059, 094, 133, 136, 161, 162, 163, 164, 168, 169, 175, 186HYPERVISION 345ICX 138IKUSI ALLSAT 136IMEX 185IMPERIAL 126INGELEN 088, 099INNOVATION 116INTERNATIONAL 186INTERTRONIC 175INTERVISION 042, 059, 164, 170INVIDEO 213ITALTEL 213ITT 021, 067, 088, 099, 120, 123ITT NOKIA 009, 010, 021, 067, 088, 099, 120, 123, 214JEEMON 059JERROLD 138, 330, 332, 341, 343JOHANSSON 059, 094JOK 171, 172, 200, 229JSR 059JVC 003, 104KABELVISION 330KAMM 060, 215KATHREIN 060, 033, 037, 080, 081, 090, 091, 094, 096, 112, 114, 135, 166, 176, 180, 196, 204, 218, 245, 246KEY WEST 163KOLON 017KONIG 164KOSCOM 210KOSMOS 080, 081, 133, 193KR 059, 137, 180, 203KREISELMEYER 176K-SAT 060KYOSTAR 017, 180KYOTO GMI ATLAN 143L&S ELECTRONIC 226LASAT 054, 164, 175, 179, 186, 199, 222, 226LEMON 161, 162, 247LENCO 060, 017, 025, 079, 161, 162, 164, 193, 221, 223, 226LENNOX 042, 059LENSON 006LEXUS 033LEYCO 104LG (GOLDSTAR) 079, 107, 193LIFESAT 197, 226LIFETEX 116LOKIA 088
LORENZEN 161, 162, 163, 164, 165, 186LORRAINE 193LUPUS 226LUXOR 006, 010, 021, 088, 097, 099, 120, 123, 130, 214LYONNAISE 110M&B1 197MACAB 225, 232, 248, 329MAGAI 080MANATA 060, 171, 172MANHATTAN 042, 059, 067, 106, 111, 151, 171, 172, 179, 210, 221MARANTZ 033, 037MASCOM 081MASPRO 060, 026, 003, 093, 096, 106, 108, 113, 137, 161, 176, 242MASTER_S 135MATSUI 003, 109, 171, 172, 176MAX 164MB 197MEDIABOX 191, 211MEDIAMARKT 175MEDIASAT 006, 128, 191, 211, 223MEDION 060, 226MEDISON 060MEGA 033MELECTRONIC 204MEMPHIS 054, 134METRONIC 060, 017, 117, 119, 121, 131, 146, 147, 149, 151, 152, 153, 154, 156, 157, 168, 175, 179, 180, 185, 204, 217METZ 090, 176MICRO 164, 180MICRO ELECTRONIC 060MICRO MAXX 116MICRO STAR 116MICRO TEC 060MICRO TECHNOLOGY 060, 190, 223MICRONIK 249MINERVA 003, 090MITSUBISHI 067, 090MITSUMI 222MNET 320, 321, 342MORGAN 060, 033, 059, 132, 163, 169, 175, 186, 199, 207, 222, 250MOVIE TIME 328MR ZAPP 329MULTICHOICE 100, 235MULTISTAR 080MURATTO 127, 193MYRYAD 037MYSAT 060NAVEX 094NEC 030, 073NEIRU 079NETA P 140NETWORK 077NEUHAUS 060, 006, 059, 161, 162, 164, 169, 210, 223,NEUSAT 060, 161, 210NEXTWAVE 138NIKKO 060, 175, 201NOKIA 009, 010, 021, 045, 067, 088, 099, 105, 120, 123, 211, 214, 242, 251, 346NOMEX 221NOOS 329NORCO 221NORDMENDE 017, 067, 179, 206NOVIS 094NSC 328NTC 133, 203NTL CABLETELL 332OCEANIC 225OCTAGON 017, 025, 054, 161, 162, 180OKANO 080, 133, 175OLYMPIC 133ONDIGITAL 187, 188, 189ONO 301OPTEX 059, 135, 196, 208
Code page

Art 40-55User manual
140
OPTIMA 133OPTUS 332ORBIT 025, 194ORBITECH 006, 017, 103, 169, 181, 224ORIGO 126, 221OSAT 097OTTO VERSAND 090OXFORD 104PACE 001, 022, 044, 048, 050, 067, 077, 098, 108, 124, 189, 202, 227, 242, 252, 253, 319, 347PACIFIC 225PACKSAT 171, 172PALCOM 092PALLADIUM 003, 006, 017, 175PALSAT 006PANASAT 235, 254PANASONIC 031, 067, 124, 227PANDA 021, 048, 067, 164, 176, 210PATRIOT 104PHILIPS 026, 003, 033, 037, 051, 067, 077, 124, 128, 144, 156, 161, 162, 169, 171, 172, 176, 180, 187, 188, 191, 204, 211, 218, 229, 242, 313, 323, 329, 345 PHOENIX 054, 077PHONOTREND 042, 059, 133, 142, 168, 212PIONEER 128, 191, 211, 302PIXX 255PLANET 126, 213POLSAT 110POLYTRON 047, 135PREDKI 017, 094PREISNER 047, 103, 163, 169, 175, 186, 199, 222PREMIER 059, 133PREMIERE 191, 211, 214, 007PROMAX 067PROSAT 168, 170PROSONIC 165PROTEK 225PROVISAT 201PROVISION 179PVP STEREO VISUAL 330PVP STEREO VISUAL MATRIX 341PYE 003PYXIS 208, 210QUADRAL 168, 169, 170, 171, 172, 173, 226QUELLE 090, 097, 164, 165QUIERO 110RADIOLA 033, 037RADIX 047, 137, 216RAINBOW 137, 180RC 138RC-1000 104RED STAR 226REDPOINT 223REDSTAR 226RFT 033, 037, 161, 162, 168, 224ROADSTAR 060ROVER 060, 170SABA 077, 108, 161, 164, 171, 172, 179, 200, 201, 206, 217, 229SABRE 067SAGEM 205, 329SAKURA 054, 057SALORA 021, 088, 099, 120, 130, 303SAMSUNG 017, 080, 127, 132, 211, 243, 302, 324SAT 006, 071, 127, 194SAT PARTNER 017, 094, 133, 179, 180, 193, 201SAT TEAM 060SATBOX 304SATCOM 013, 164, 197SATEC 060, 077, 242SATECO 017SATELCO 226SATFORD 013SATLINE 170
SATMASTER 013SATPARTNER 017, 079, 094, 133, 179, 180, 193, 201SATSTATION 151SAVA 077, 108, 161, 164, 171, 172, 179, 200, 201, 206, 217SCHACKE 180SCHAUB LORENZ 088, 099SCHNEIDER 171, 172, 218SCHWAIGER 077, 114, 135, 161, 164, 169, 197, 217, 255SCIENTIFIC ATLANTA 305, 306, 325, 326SEDEA-ELECTRONIQUE 017SEEMANN 047, 104, 175, 223SEG 017, 094, 165, 178, 190, 197, 226SELECO 059, 213SEPTIMO 146, 151, 154SERVI SAT 059SIEMENS 090, 176, 199SILVA 079, 193SINTRACK 013SKANTIN 060SKARDIN 223SKINSAT 006SKR 060SKY 034, 050, 189, 227, 001SKY MASTER 060, 133, 168, 170, 197, 215SKY PLUS 002SKYLAB 051SKYMAX 033SKYSAT 197SKYVISION 059SL 161, 165, 175, 186SM ELECTRONIC 060SMART 186SONY 067, 211, 227SR 222STARLAND 060STARRING 094STARSAT 080STRONG 017, 025, 179, 180, 186, 196, 211, 226, 235STS 328STV 014STVI 014, 137SUMIDA 175SUNNY SOUND 226SUNSAT 060, 223SUNSTAR 163, 175, 186, 222, 226SUPERCABLE 343SUPERNOVA 189TAGRA 059TANDBERG 008TANDY 085, 122TANTEC 067, 108TATUNG 067TCM 116TECHNILAND 013, 059TECHNISAT 006, 028, 033, 047, 102 103, 181, 184, 224, 231TECHNOWELT 164TECO 025, 175, 222TELASAT 164, 197TELECIEL 180, 201TELECOM 060TELEDIREKT 077TELEFUNKEN 017, 083, 171 , 172TELEKA 026, 006, 047, 081, 103, 180, 161, 164, 175, 203, 210TELEMASTER 179TELEMAX 018TELEPIU 320, 321TELE PLUS ONE 320, 321TELESAT 164, 197TELESERVICE 311, 314TELESTAR 006TELETECH 215TELEVES 006, 067TELEWIRE 059TENSAI 025, 094TEVION 116THOMSON 060, 049, 067, 128, 155, 164, 171, 172,
191, 205, 206, 211THORENS 225THORN 067THORN-FERGUSON 023, 048, 067TIOKO 135, 175TLEWIRE 059TOKAI 033TONNA 060, 006, 013, 059, 067, 171, 210TOPFIELD 011TORX 341TOSHIBA 067, 145TPS 129, 205TRENDLINE 222TRENDPLAIN 222TRGRA 088TRIAD 085, 101, 127, 193, 194TRIASAT 006, 220TRIAX 060, 006, 033, 047, 211, 220, 230TRISTAR 025TUDI 327TWINNER 115, 119UNIDEN 058, 071, 080, 148, 208UNISAT 033, 054, 175UNITED CABLE 330, 341UNITOR 051, 094UNIVERSUM 003, 009, 071, 164, 165, 176VAIADIGITAL 078VARIOSAT 176VARIOSTAT 176VECTOR 178VENTANA 033, 037VESTEL 165VIASAT 016VIDEOCRYPT 023VIDEOTRON 331VIDEOWAY 331VIDIO WAY 015VIPER 054VIRGIN MEDIA 063VISIOPASS 309, 313, 329VISIOSAT 060, 194, 200VIVA 161, 162VORTEC 017, 082, 083, 132, 142VTECH 127, 194, 200, 204WELA 060, 163, 169, 186WESTMINSTER 335WETEKOM 006, 197, 207WEWA 067WIBO 175WINERSAT 094WINTERGARTEN 168WISI 006, 047, 067, 088, 123, 127, 164, 169, 176, 194, 200, 210WITTENBERG 071WOLSEY 085, 122WOORISAT 179WORLD 094WORLDSAT 171, 172XCOM 169XCOM MULTIMEDIA 046XRYPTON 226XSAT 060, 046, 166, 169YES 189ZAUNKONIG 161ZEHNDER 051, 080, 114, 127, 135 165, 179, 204, 226, 255ZENITH 034, 314ZETA-TECHNOLOGY 033ZODIAC 180ZWERGNASE 163, 175
Code page

Art 40-55User manual
141
Notes

Art 40-55User manual
142
Notes