Trusted Solaris Administrator's Procedures - Oracle Help Center
634
A Sun Microsystems, Inc. Business 901 San Antonio Road Palo Alto, CA 94303 U.S.A. Trusted Solaris Administrator’s Procedures Part No.: 805-8008-10 Revision A, July 1997 Sun Microsystems Federal, Inc.
-
Upload
khangminh22 -
Category
Documents
-
view
1 -
download
0
Transcript of Trusted Solaris Administrator's Procedures - Oracle Help Center

A Sun Microsystems, Inc. Business901 San Antonio RoadPalo Alto, CA 94303U.S.A.
Trusted SolarisAdministrator’s Procedures
Part No.: 805-8008-10Revision A, July 1997
Sun Microsystems Federal, Inc.

PleaseRecycle
Copyright 1997 Sun Microsystems, Inc. 2550 Garcia Avenue, Mountain View, California 94043-1100 U.S.A. All rights reserved.
This product or document is protected by copyright and distributed under licenses restricting its use, copying, distribution, and decompilation. No part ofthis product or document may be reproduced in any form by any means without prior written authorization of Sun and its licensors, if any. Third-partysoftware, including font technology, is copyrighted and licensed from Sun suppliers.
Parts of the product may be derived from Berkeley BSD systems, licensed from the University of California. UNIX is a registered trademark in the U.S. andother countries, exclusively licensed through X/Open Company, Ltd.
Sun, Sun Microsystems, the Sun logo, SunSoft, SunDocs, SunExpress, and SunOS, OpenWindows, NFS, Sun Ultra, Ultra, JumpStart, Solaris, Solstice,Solstice AdminSuite, Solstice AdminTools, Solstice Autoclient, Solstice CacheOS, Disksuite, ToolTalk, X11/NeWS, Trusted NeWSprint, IPC, OpenBoot,SHIELD, XView, SunInstall, and Trusted Solaris are trademarks, registered trademarks, or service marks of Sun Microsystems, Inc. in the U.S. and othercountries. All SPARC trademarks are used under license and are trademarks or registered trademarks of SPARC International, Inc. in the U.S. and othercountries. Products bearing SPARC trademarks are based upon an architecture developed by Sun Microsystems, Inc . X/Open® is a registered trademarkand "X" device is a trademark of X/Open Company Limited, Netscape is a trademark of Netscape Communications Corporation, and PostScript is atrademark of Adobe Systems, Incorporated.
The OPEN LOOK and Sun™ Graphical User Interface was developed by Sun Microsystems, Inc. for its users and licensees. Sun acknowledges thepioneering efforts of Xerox in researching and developing the concept of visual or graphical user interfaces for the computer industry. Sun holds a non-exclusive license from Xerox to the Xerox Graphical User Interface, which license also covers Sun’s licensees who implement OPEN LOOK GUIs andotherwise comply with Sun’s written license agreements.
RESTRICTED RIGHTS: Use, duplication, or disclosure by the U.S. Government is subject to restrictions of FAR 52.227-14(g)(2)(6/87) and FAR 52.227-19(6/87), or DFAR 252.227-7015(b)(6/95) and DFAR 227.7202-3(a).
DOCUMENTATION IS PROVIDED “AS IS” AND ALL EXPRESS OR IMPLIED CONDITIONS, REPRESENTATIONS AND WARRANTIES,INCLUDING ANY IMPLIED WARRANTY OF MERCHANTABILITY, FITNESS FOR A PARTICULAR PURPOSE OR NON-INFRINGEMENT, AREDISCLAIMED, EXCEPT TO THE EXTENT THAT SUCH DISCLAIMERS ARE HELD TO BE LEGALLY INVALID.
Copyright 1997 Sun Microsystems, Inc., 2550 Garcia Avenue, Mountain View, Californie 94043-1100 Etats-Unis. Tous droits réservés.
Ce produit ou document est protégé par un copyright et distribué avec des licences qui en restreignent l’utilisation, la copie, la distribution, et ladécompilation. Aucune partie de ce produit ou document ne peut être reproduite sous aucune forme, par quelque moyen que ce soit, sans l’autorisationpréalable et écrite de Sun et de ses bailleurs de licence, s’il y en a. Le logiciel détenu par des tiers, et qui comprend la technologie relative aux polices decaractères, est protégé par un copyright et licencié par des fournisseurs de Sun.
Des parties de ce produit pourront être dérivées des systèmes Berkeley BSD licenciés par l’Université de Californie. UNIX est une marque déposée auxEtats-Unis et dans d’autres pays et licenciée exclusivement par X/Open Company, Ltd.
Sun, Sun Microsystems, le logo Sun, SunSoft, SunDocs, SunExpress, et Solaris SunOS, OpenWindows, NFS, Sun Ultra, Ultra, JumpStart, Solstice, SolsticeAdminSuite, Solstice AdminTools, Solstice Autoclient, Solstice CacheOS, Disksuite, ToolTalk, X11/NeWS, Trusted NeWSprint, IPC, OpenBoot, SHIELD,XView, SunInstall, et Trusted Solaris sont des marques de fabrique ou des marques déposées, ou marques de service, de Sun Microsystems, Inc. aux Etats-Unis et dans d’autres pays. Toutes les marques SPARC sont utilisées sous licence et sont des marques de fabrique ou des marques déposées de SPARCInternational, Inc. aux Etats-Unis et dans d’autres pays. Les produits portant les marques SPARC sont basés sur une architecture développée par SunMicrosystems, Inc. .X/Open® est une marque enregistrées et "X" device est une marque de X/Open Company Limited, Netscape est une marque deNetscape Communications Corporation, et PostScript est une marque de Adobe Systems, Incorporated.
L’interface d’utilisation graphique OPEN LOOK et Sun™ a été développée par Sun Microsystems, Inc. pour ses utilisateurs et licenciés. Sun reconnaît lesefforts de pionniers de Xerox pour la recherche et le développement du concept des interfaces d’utilisation visuelle ou graphique pour l’industrie del’informatique. Sun détient une licence non exclusive de Xerox sur l’interface d’utilisation graphique Xerox, cette licence couvrant également les licenciésde Sun qui mettent en place l’interface d’utilisation graphique OPEN LOOK et qui en outre se conforment aux licences écrites de Sun.
CETTE PUBLICATION EST FOURNIE "EN L’ETAT" ET AUCUNE GARANTIE, EXPRESSE OU IMPLICITE, N’EST ACCORDEE, Y COMPRIS DESGARANTIES CONCERNANT LA VALEUR MARCHANDE, L’APTITUDE DE LA PUBLICATION A REPONDRE A UNE UTILISATIONPARTICULIERE, OU LE FAIT QU’ELLE NE SOIT PAS CONTREFAISANTE DE PRODUIT DE TIERS. CE DENI DE GARANTIE NE S’APPLIQUERAITPAS, DANS LA MESURE OU IL SERAIT TENU JURIDIQUEMENT NUL ET NON AVENU.

iii
Contents
Preface. . . . . . . . . . . . . . . . . . . . . . . . . . . . . . . . . . . . . . . . . . . . . . . . . . . . xlvii
Part 1 —Procedures Common to All Tasks and Administrative Roles
1. Assuming a Role and Working in a Role Workspace . . . . . . . 3
Review of Administrative and Non-administrative Role Concepts 4
Administrative Roles. . . . . . . . . . . . . . . . . . . . . . . . . . . . . . . . 4
Non-administrative Roles. . . . . . . . . . . . . . . . . . . . . . . . . . . . 4
Logging In and Assuming a Role . . . . . . . . . . . . . . . . . . . . . 4
Auditing of Administrative Actions . . . . . . . . . . . . . . . . . . . 5
How Logins are Enabled. . . . . . . . . . . . . . . . . . . . . . . . . . . . . 5
Preventing Logins From Being Disabled After a Reboot . . 6
Working in the Administrative Role Workspace . . . . . . . . . . . . 7
Application Manager Folders and Actions Icons . . . . . . . . 8
Using Administrative Applications in Solstice_AppsApplications Folder. . . . . . . . . . . . . . . . . . . . . . . . . . . . . . 8
Using Administrative Actions in the System_AdminApplications Folder. . . . . . . . . . . . . . . . . . . . . . . . . . . . . . 8

iv Trusted Solaris Administrator’s Procedures—July 1997
Accessing the Application Manager . . . . . . . . . . . . . . . . . . . 9
Accessing Commands and Actions . . . . . . . . . . . . . . . . . . . . 11
Using the Profile Shell To Do Other Tasks . . . . . . . . . . . . . . 11
Administrative vi . . . . . . . . . . . . . . . . . . . . . . . . . . . . . . . . . . 12
Administrative Role Procedures . . . . . . . . . . . . . . . . . . . . . . . . . 12
▼ To Log In and Assume an Administrative Role. . . . . . . 12
▼ To Switch Among Administrative Role Workspaces and theNormal User Workspaces . . . . . . . . . . . . . . . . . . . . . . . . . 21
▼ To Work at Multiple Labels While in an AdministrativeRole . . . . . . . . . . . . . . . . . . . . . . . . . . . . . . . . . . . . . . . . . . . 21
▼ To Launch Administrative Applications . . . . . . . . . . . . 23
▼ To Launch Administrative Actions . . . . . . . . . . . . . . . . . 24
▼ To Create A New Administrative Action for Editing anAdministrative File . . . . . . . . . . . . . . . . . . . . . . . . . . . . . . 24
▼ To Add Actions Outside the System_Admin Folder. . . 26
▼ To Prevent Logins From Being Disabled After a Reboot 26
2. Miscellaneous Tasks and Procedures . . . . . . . . . . . . . . . . . . . . 29
Getting a Hexadecimal Equivalent for Labels and Clearances 30
▼ To Get a Hexadecimal Equivalent for a CMW Label, an SL,IL, or Clearance . . . . . . . . . . . . . . . . . . . . . . . . . . . . . . . . . 30
Extending Extendable Security Mechanisms . . . . . . . . . . . . . . . 31
Understanding Authorizations . . . . . . . . . . . . . . . . . . . . . . . 32
Extending the Trusted Solaris Authorizations . . . . . . . . . . . 33
auth_names.h . . . . . . . . . . . . . . . . . . . . . . . . . . . . . . . 33
auth_name(4TSOL) . . . . . . . . . . . . . . . . . . . . . . . . . . . 35
▼ To Add An Authorization . . . . . . . . . . . . . . . . . . . . . . . . 36

Contents v
Extending the Trusted Solaris Privileges . . . . . . . . . . . . . . . 37
priv_names.h . . . . . . . . . . . . . . . . . . . . . . . . . . . . . . . 37
priv_names(4TSOL) . . . . . . . . . . . . . . . . . . . . . . . . . . 39
▼ To Add a Privilege. . . . . . . . . . . . . . . . . . . . . . . . . . . . . . . 40
Changing the Trusted Stripe. . . . . . . . . . . . . . . . . . . . . . . . . . . . . 42
▼ To Change the Font or Color of the Trusted Path Indicator42
Working with MLDs . . . . . . . . . . . . . . . . . . . . . . . . . . . . . . . . . . . 43
MLD Prefix/MLD Adornment. . . . . . . . . . . . . . . . . . . . . . . . 44
How SLDs Are Created. . . . . . . . . . . . . . . . . . . . . . . . . . . . . . 44
How SLDs Are Named . . . . . . . . . . . . . . . . . . . . . . . . . . . . . . 44
Restriction on the Creation of MLDs and Its Effects . . . . . . 45
MLD and SLD Prefixes . . . . . . . . . . . . . . . . . . . . . . . . . . . . . . 46
Creating, Changing, Finding Your Way Around In, and DeletingMLDs. . . . . . . . . . . . . . . . . . . . . . . . . . . . . . . . . . . . . . . . . . 46
▼ To Find Out if a Directory is an MLD . . . . . . . . . . . . . . . 49
▼ To Create an MLD from the File Manager . . . . . . . . . . . 49
▼ To Create an MLD from the Command Line . . . . . . . . . 49
▼ To Identify an MLD . . . . . . . . . . . . . . . . . . . . . . . . . . . . . . 50
▼ To Identify an SLD. . . . . . . . . . . . . . . . . . . . . . . . . . . . . . . 51
▼ To Address the Entire MLD . . . . . . . . . . . . . . . . . . . . . . . 51
▼ To Change the MLD Prefix of a File System. . . . . . . . . . 51
▼ To Remove an MLD. . . . . . . . . . . . . . . . . . . . . . . . . . . . . . 52
Part 2 —Administering Users, Roles, Profiles and Mail
3. Managing User Accounts. . . . . . . . . . . . . . . . . . . . . . . . . . . . . . . 57

vi Trusted Solaris Administrator’s Procedures—July 1997
Things to Do Before Setting Up Accounts . . . . . . . . . . . . . . . . . 58
Decisions To Make Before Setting Up User Accounts . . . . . . . . 58
How Responsibilities for Managing Users Are Divided. . . . . . 60
Managing Users: Divided Between Two Administrative Roles61
System Administrator Responsibilities . . . . . . . . . . . . . . . . . 61
Security Administrator Responsibilities . . . . . . . . . . . . . . . . 61
Alternatives to Two-Role Administration. . . . . . . . . . . . . . . 62
Authorizations for Access to Account Management Tasks 62
Managing Startup Files in a Trusted Solaris System . . . . . . . . . 65
Controlling Which Startup Files Are Read While the WindowSystem is Coming Up . . . . . . . . . . . . . . . . . . . . . . . . . . . . 65
How the Reading of Start Up Files Is Controlled for the ProfileShell User . . . . . . . . . . . . . . . . . . . . . . . . . . . . . . . . . . . . . . 67
Startup Files Launched When a Shell Comes Up, . . . . . . . . 68
Skeleton Directories. . . . . . . . . . . . . . . . . . . . . . . . . . . . . . . . . 69
Using .copy_files and .link_files . . . . . . . . . . . . . . . 70
If .copy_files is Used to Copy Files Between SLDs: 70
If .link_files is Used to Link Files Between SLDs: 71
Worksheet for Copy and Link Files . . . . . . . . . . . . . . . 72
Administering the Automatic Running of Jobs Using cron , at , andbatch . . . . . . . . . . . . . . . . . . . . . . . . . . . . . . . . . . . . . . . . . . . . 73
Review of Concepts . . . . . . . . . . . . . . . . . . . . . . . . . . . . . . . . . 73
crontab Files . . . . . . . . . . . . . . . . . . . . . . . . . . . . . . . . . 73
atjob Files . . . . . . . . . . . . . . . . . . . . . . . . . . . . . . . . . . . 74

Contents vii
Supporting Jobs at Multiple Labels in the SpoolDirectories . . . . . . . . . . . . . . . . . . . . . . . . . . . . . . . . . . . . 74
Determining Whether the Profile Shell is Used By a Job . . 74
Running Privileged Commands in at or cron Jobs. . . . . . . 75
Using a UNIX Domain Socket for Communications . . . . . . 76
Ancillary Files . . . . . . . . . . . . . . . . . . . . . . . . . . . . . . . . . . . . . 76
Access to at and cron . . . . . . . . . . . . . . . . . . . . . . . . . . . . . . 76
Allowing Access to Jobs Owned by Others . . . . . . . . . . . . . 77
at.admin and cron.admin Files . . . . . . . . . . . . . . . . . . . . 78
Conditions for Access to Other’s Jobs. . . . . . . . . . . . . . . . . . 78
Conditions for at -related Commands. . . . . . . . . . . . . 78
Conditions for the crontab Command . . . . . . . . . . . 79
Changes to crontab (1TSOL). . . . . . . . . . . . . . . . . . . . . . . . . 80
Changes to the at Command. . . . . . . . . . . . . . . . . . . . . . . . . 81
Changes to the atq Command . . . . . . . . . . . . . . . . . . . . . . . 81
Changes to the atrm Command . . . . . . . . . . . . . . . . . . . . . . 82
Miscellaneous . . . . . . . . . . . . . . . . . . . . . . . . . . . . . . . . . . . . . . 82
User Setup Procedures . . . . . . . . . . . . . . . . . . . . . . . . . . . . . . . . . 83
▼ To Make .login and .profile Looked at During Login forBourne, C and Korn Shell Users . . . . . . . . . . . . . . . . . . . 83
▼ To Separate the Shell Initialization Files for Each Shell 83
▼ To Propagate Startup Files to Home Directory SLDs . . 84
4. Managing Roles. . . . . . . . . . . . . . . . . . . . . . . . . . . . . . . . . . . . . . . 87
Differences Between Role Accounts and User Accounts . . . . . 88

viii Trusted Solaris Administrator’s Procedures—July 1997
Differences Between Administrative and Non-Administrative RoleAccounts . . . . . . . . . . . . . . . . . . . . . . . . . . . . . . . . . . . . . . . . . . 88
Non-administrative Roles. . . . . . . . . . . . . . . . . . . . . . . . . . . . 88
When to Create a Non-administrative Role . . . . . . . . 89
Administrative Roles. . . . . . . . . . . . . . . . . . . . . . . . . . . . . . . . 89
When to Create a New Administrative Role . . . . . . . 90
Things That Need the Trusted Path Attribute . . . . . . 90
Dividing the Tasks of Managing User and Role Accounts . . . . 91
Authorizations for Access to Account Management Tasks . . . 92
Authorization for Specifying Information for One’s Own Role 94
Alternatives to Two-Role Administration. . . . . . . . . . . . . . . . . . 94
Creating a New Role . . . . . . . . . . . . . . . . . . . . . . . . . . . . . . . . . . . 95
Required Privileges . . . . . . . . . . . . . . . . . . . . . . . . . . . . . . . . . 95
Override Privileges . . . . . . . . . . . . . . . . . . . . . . . . . . . . . . . . . 96
DAC Override Privileges . . . . . . . . . . . . . . . . . . . . . . . 96
MAC Override Privileges . . . . . . . . . . . . . . . . . . . . . . . 96
Options for Avoiding the Need for Privilege . . . . . . . 96
Verifying the Use of Security Attributes Within SecurityPolicy . . . . . . . . . . . . . . . . . . . . . . . . . . . . . . . . . . . . . . . . 97
Example: Using the Man Page When Configuring mountin a Profile . . . . . . . . . . . . . . . . . . . . . . . . . . . . . . . . . . . . 97
▼ To Configure a New Role . . . . . . . . . . . . . . . . . . . . . . . . . 98
5. Using the User Manager to Configure User and Role Accounts 99
Understanding the Information Entered in the User Manager DialogBoxes . . . . . . . . . . . . . . . . . . . . . . . . . . . . . . . . . . . . . . . . . . . . . 100
Identity . . . . . . . . . . . . . . . . . . . . . . . . . . . . . . . . . . . . . . . . . . . 102

Contents ix
User Name, User ID, Group Name(s) and Group Id(s) 102
Comment. . . . . . . . . . . . . . . . . . . . . . . . . . . . . . . . . . . . . 103
Shell . . . . . . . . . . . . . . . . . . . . . . . . . . . . . . . . . . . . . . . . . 104
Account Type . . . . . . . . . . . . . . . . . . . . . . . . . . . . . . . . . 105
Password. . . . . . . . . . . . . . . . . . . . . . . . . . . . . . . . . . . . . . . . . . 106
Background About Creating a Password or Selecting OtherPassword Options . . . . . . . . . . . . . . . . . . . . . . . . . . . . . 106
Background on the Password Duration and WarningFields . . . . . . . . . . . . . . . . . . . . . . . . . . . . . . . . . . . . . . . . 109
Background About Selecting a Method for PasswordGeneration. . . . . . . . . . . . . . . . . . . . . . . . . . . . . . . . . . . . 109
Background on the Account Status Menu Options . . 112
Background About Checking NIS+ Credential TableSetup . . . . . . . . . . . . . . . . . . . . . . . . . . . . . . . . . . . . . . . . 113
Home . . . . . . . . . . . . . . . . . . . . . . . . . . . . . . . . . . . . . . . . . . . . . 113
Why Say Yes to Automatic Creation of Home Directories?113
Skeleton Path Considerations . . . . . . . . . . . . . . . . . . . . 114
Controlling the Use of Shell Initialization Files . . . . . 114
Labels . . . . . . . . . . . . . . . . . . . . . . . . . . . . . . . . . . . . . . . . . . . . 116
Background on the Clearance and Minimum Label . 116
Background on Displaying Labels . . . . . . . . . . . . . . . . 117
Background on Showing or Hiding SLs and ILs . . . . 119
Profiles. . . . . . . . . . . . . . . . . . . . . . . . . . . . . . . . . . . . . . . . . . . . 120
Roles . . . . . . . . . . . . . . . . . . . . . . . . . . . . . . . . . . . . . . . . . . . . . 122
Idle . . . . . . . . . . . . . . . . . . . . . . . . . . . . . . . . . . . . . . . . . . . . . . . 122

x Trusted Solaris Administrator’s Procedures—July 1997
Setting Up or Modifying a User or Role Account . . . . . . . . . . . 124
▼ To Launch the User Manager . . . . . . . . . . . . . . . . . . . . . . 124
▼ To Load a List of User and Role Accounts Using the LoadDialog Box . . . . . . . . . . . . . . . . . . . . . . . . . . . . . . . . . . . . . 125
▼ To Load Users or Exit (optional) . . . . . . . . . . . . . . . . . . . 127
▼ To Find or Sort Accounts . . . . . . . . . . . . . . . . . . . . . . . . . 128
▼ To Add, Modify or Delete Accounts . . . . . . . . . . . . . . . . 129
6. Managing Mail . . . . . . . . . . . . . . . . . . . . . . . . . . . . . . . . . . . . . . . 157
Overview of Trusted Solaris Mail Features. . . . . . . . . . . . . . . . . 158
Multilabel Directories for Outgoing and Incoming Mail . . 159
Mailboxes in Multilabel Directories . . . . . . . . . . . . . . . . . . . 160
Mail Notification . . . . . . . . . . . . . . . . . . . . . . . . . . . . . . . . . . . 162
Reading of Mail . . . . . . . . . . . . . . . . . . . . . . . . . . . . . . . . . . . . 163
How Mail Gets Its Sensitivity Label . . . . . . . . . . . . . . . . . . . 164
Changing Mail Aliases . . . . . . . . . . . . . . . . . . . . . . . . . . . . . . . . . 164
Enabling the Use of .mailrc Files in Home Directory MLDs164
.copy_files . . . . . . . . . . . . . . . . . . . . . . . . . . . . . . . . . 165
.link_files . . . . . . . . . . . . . . . . . . . . . . . . . . . . . . . . . 165
Using the .copy_files and .link_files Along WithSkeleton Directories . . . . . . . . . . . . . . . . . . . . . . . . . . . . 165
▼ To Propagate a .mailrc to All Accounts’ Home DirectorySLDs . . . . . . . . . . . . . . . . . . . . . . . . . . . . . . . . . . . . . . . . . . 166
Creating and Initializing New Local and NIS+ ManagedAliases. . . . . . . . . . . . . . . . . . . . . . . . . . . . . . . . . . . . . . . . . 166
▼ To Edit Aliases . . . . . . . . . . . . . . . . . . . . . . . . . . . . . . . . . . 167
Allowing Users to List the Entire Mail Queue . . . . . . . . . . . . . . 167

Contents xi
▼ To Allow Listing of the Mail Queue . . . . . . . . . . . . . . . . 168
Tracing Sendmail’s Activities . . . . . . . . . . . . . . . . . . . . . . . . . . . . 168
▼ To Trace Sendmail for Trusted Solaris Information . . . . 170
Troubleshooting Mail Delivery Difficulties . . . . . . . . . . . . . . . . 171
▼ To Check for a Properly Configured Network Connection forSending Mail . . . . . . . . . . . . . . . . . . . . . . . . . . . . . . . . . . . 172
Configuring Trusted Solaris Mail Delivery Options for Mail BelowUsers’ Minimum Labels . . . . . . . . . . . . . . . . . . . . . . . . . . . . . 176
How Sendmail Handles Mail Below the Recipient’s MinimumSL. . . . . . . . . . . . . . . . . . . . . . . . . . . . . . . . . . . . . . . . . . . . . 177
Mail Handling Options . . . . . . . . . . . . . . . . . . . . . . . . . 177
▼ To Configure Mail Delivery Options for Mail Below Users’Minimum Labels . . . . . . . . . . . . . . . . . . . . . . . . . . . . . . . . 178
Substituting an Alternate Mail Application . . . . . . . . . . . . . . . . 180
Tip . . . . . . . . . . . . . . . . . . . . . . . . . . . . . . . . . . . . . . . . . . . . . . . 181
▼ To Substitute an Alternate Mail Application in the FrontPanel for All Users. . . . . . . . . . . . . . . . . . . . . . . . . . . . . . . 181
▼ To Create a Multilevel Action for the Alternate MailApplication. . . . . . . . . . . . . . . . . . . . . . . . . . . . . . . . . . . . . 185
▼ To Install an Alternate Mailer in the Front Panel . . . . . 188
7. User Manager Data Collection Worksheet . . . . . . . . . . . . . . . . 191
User or Role Account Worksheet . . . . . . . . . . . . . . . . . . . . . . 192
8. Managing Execution Profiles for Users and Roles . . . . . . . . . 193
Review of Terms. . . . . . . . . . . . . . . . . . . . . . . . . . . . . . . . . . . . . . . 194
Execution profiles . . . . . . . . . . . . . . . . . . . . . . . . . . . . . . . . . . 194
Effective UID and GID . . . . . . . . . . . . . . . . . . . . . . . . . . . . . . 195

xii Trusted Solaris Administrator’s Procedures—July 1997
Actions . . . . . . . . . . . . . . . . . . . . . . . . . . . . . . . . . . . . . . . . . . . 195
Enabling Attributes . . . . . . . . . . . . . . . . . . . . . . . . . . . . . . . . . 196
Restrictive Attributes. . . . . . . . . . . . . . . . . . . . . . . . . . . . . . . . 196
Privileges in Profiles . . . . . . . . . . . . . . . . . . . . . . . . . . . . . . . . 196
Background on Execution Profiles . . . . . . . . . . . . . . . . . . . . . . . . 197
Use of the Profile Manager to Create or Modify Execution Profiles198
Using the Control Buttons on the Profile Manager Dialog Boxes198
Picking a Naming Service . . . . . . . . . . . . . . . . . . . . . . . . . . . . 199
Filtering Profiles. . . . . . . . . . . . . . . . . . . . . . . . . . . . . . . . . . . . 200
When Adding a New Profile. . . . . . . . . . . . . . . . . . . . . 201
When Modifying an Existing Profile . . . . . . . . . . . . . . 201
Launching an Empty Profile Manager. . . . . . . . . . . . . 201
Launching the Profile Manager Loaded With an ExistingProfile. . . . . . . . . . . . . . . . . . . . . . . . . . . . . . . . . . . . . . . . 202
Bringing Up a Blank Profile Definition, Loading an ExistingProfile, or Saving Changes Within the Profile Manager 207
Entering or Changing the Profile Name or Description . . . 208
Switching Among Actions, Commands, and AuthorizationsModes . . . . . . . . . . . . . . . . . . . . . . . . . . . . . . . . . . . . . . . . . 209
Working With the Excluded and Included Lists . . . . . . . . . 209
Moving Items Between Lists. . . . . . . . . . . . . . . . . . . . . 210
Dragging and Dropping Into the Included List . . . . . 211
Moving and Clearing Many List Items With the Select All andClear All Buttons . . . . . . . . . . . . . . . . . . . . . . . . . . . . . . . . 211

Contents xiii
Working With Common Features of the Commands and ActionsModes . . . . . . . . . . . . . . . . . . . . . . . . . . . . . . . . . . . . . . . . . 211
Expanding and Contracting Application Group andDirectory Listings in the Command and Actions Modes211
Using the Buttons to Set Security Attributes on Commandsand Actions . . . . . . . . . . . . . . . . . . . . . . . . . . . . . . . . . . . 212
Setting Privileges on Commands and Actions . . . . . . 214
Setting a Label Range for a Command or Action. . . . 215
Working in Command Mode . . . . . . . . . . . . . . . . . . . . . . . . . 217
Loading A New Directory. . . . . . . . . . . . . . . . . . . . . . . 218
Viewing a Command’s Man Page . . . . . . . . . . . . . . . . 219
Working in Authorizations Mode . . . . . . . . . . . . . . . . . . . . . 219
Working in Actions Mode. . . . . . . . . . . . . . . . . . . . . . . . . . . . 221
▼ To Access the Profile Manager . . . . . . . . . . . . . . . . . . . . . 223
▼ To Pick a Naming Service and Filter for Profiles . . . . . . 224
Specifying a New Profile. . . . . . . . . . . . . . . . . . . . . . . . . . . . . 227
Modifying an Existing Profile . . . . . . . . . . . . . . . . . . . . . . . . 228
Execution Profile Procedures . . . . . . . . . . . . . . . . . . . . . . . . . . . . 229
▼ To Enter the Name and Description for a New Profile . 229
▼ To Specify Commands in the Profile Manager . . . . . . . 229
▼ To Specify Actions in an Execution Profile. . . . . . . . . . . 230
▼ To Specify Authorizations in an Execution Profile . . . . 232
Part 3 —Managing Hosts and Networks
9. Trusted Solaris Concepts for Managing Hosts and Networks 235

xiv Trusted Solaris Administrator’s Procedures—July 1997
Trusted Solaris Networking . . . . . . . . . . . . . . . . . . . . . . . . . . . . . 236
Example of a Single Security Domain . . . . . . . . . . . . . . . . . . 237
Example of Multiple Security Domains . . . . . . . . . . . . . . . . 238
Static Routing and Issues About the Use of Trusted Solaris HostsAs Routers . . . . . . . . . . . . . . . . . . . . . . . . . . . . . . . . . . . . . 238
Network Accreditation Range Requirements. . . . . . . . . . . . 239
Static Routing . . . . . . . . . . . . . . . . . . . . . . . . . . . . . . . . . . . . . . . . . 240
10. Specifying Security Attributes in Trusted Network Databases andSetting Up Routing . . . . . . . . . . . . . . . . . . . . . . . . . . . . . . . . . . . . 247
Goals of Trusted Networking . . . . . . . . . . . . . . . . . . . . . . . . . . . . 248
How Security Attributes Are Added to Packets . . . . . . . . . . . . 249
IP Options . . . . . . . . . . . . . . . . . . . . . . . . . . . . . . . . . . . . . . . . . 249
CIPSO Labels in Packets . . . . . . . . . . . . . . . . . . . . . . . . . . . . . 250
RIPSO Labels in Packets . . . . . . . . . . . . . . . . . . . . . . . . . . . . . 251
MAC Enforcement on Outgoing Messages. . . . . . . . . . . . . . . . . 252
MAC Enforcement on Incoming Messages. . . . . . . . . . . . . . . . . 253
Trusted Network Databases . . . . . . . . . . . . . . . . . . . . . . . . . . . . . 254
Host Types and Trusted Networking . . . . . . . . . . . . . . . . . . . . . 255
Host Types Supported . . . . . . . . . . . . . . . . . . . . . . . . . . . . . . . . . . 256
Trusted Solaris 2.x (sun_tsol ) Host Type . . . . . . . . . . . . . . 257
Security Attributes Specifiable for the Trusted Solaris 2.5 HostType . . . . . . . . . . . . . . . . . . . . . . . . . . . . . . . . . . . . . . . . . . . 257
TSIX (tsix ) Host Type . . . . . . . . . . . . . . . . . . . . . . . . . . . . . . 260
Security Attributes Specifiable for TSIX Hosts. . . . . . . . . . . 260
MSIX (msix ) Host Type . . . . . . . . . . . . . . . . . . . . . . . . . . . . . 263

Contents xv
CIPSO (cipso ) Host Type . . . . . . . . . . . . . . . . . . . . . . . . . . . 265
RIPSO (ripso ) Host Type . . . . . . . . . . . . . . . . . . . . . . . . . . . 267
Unlabeled (unlabeled ) Host Type. . . . . . . . . . . . . . . . . . . . 269
Setting Up Trusted Routing . . . . . . . . . . . . . . . . . . . . . . . . . . . . . 271
Creating Entries in the Trusted Networking Databases . . . . . . 273
Using tnrhdb Options to Achieve a Closed or Open Type ofNetwork Configuration . . . . . . . . . . . . . . . . . . . . . . . . . . 273
Hierarchical Fallback Mechanism . . . . . . . . . . . . . . . . 274
Open Configuration Using a Wildcard . . . . . . . . . . . . 274
Closely-controlled Configuration. . . . . . . . . . . . . . . . . 274
Setting Up Templates . . . . . . . . . . . . . . . . . . . . . . . . . . . . . . . 275
Precedence Rules for Attributes in Trusted Network Databases 276
Example of Combined Entries . . . . . . . . . . . . . . . . . . . . . . . . 276
Network Accreditation Range . . . . . . . . . . . . . . . . . . . 279
Procedures . . . . . . . . . . . . . . . . . . . . . . . . . . . . . . . . . . . . . . . . . . . 280
▼ To Access the Trusted Network Databases from the DatabaseManager . . . . . . . . . . . . . . . . . . . . . . . . . . . . . . . . . . . . . . . 280
▼ To Assign a Template to a Single Host in the tnrhdb . 282
▼ To Assign a Template to a Group of Hosts in the tnrhdb 284
▼ To Create a Wildcard tnrhdb Entry for All Hosts NotOtherwise Specified . . . . . . . . . . . . . . . . . . . . . . . . . . . . . 287
▼ To Set an Accreditation Range in a Host Template orNetwork Interface Entry . . . . . . . . . . . . . . . . . . . . . . . . . . 290
▼ To Configure a Network Interface . . . . . . . . . . . . . . . . . . 291
▼ To Add a New Entry or Modify an Existing Entry intnidb(4TSOL) . . . . . . . . . . . . . . . . . . . . . . . . . . . . . . . . . 292

xvi Trusted Solaris Administrator’s Procedures—July 1997
▼ To Substitute a Valid CIPSO Label for the ADMIN_HIGHSensitivity Label . . . . . . . . . . . . . . . . . . . . . . . . . . . . . . . . 296
▼ To Set Up a Simple Default Route for a Network with OneGateway . . . . . . . . . . . . . . . . . . . . . . . . . . . . . . . . . . . . . . . 297
▼ To Set Up Trusted Routing . . . . . . . . . . . . . . . . . . . . . . . . 297
11. Managing Files and File Systems. . . . . . . . . . . . . . . . . . . . . . . . 303
Overview of Files, Directories, and File Systems . . . . . . . . . . . . 304
Review of File, Directory, and Filesystem Access Terminology 305
Access Control List . . . . . . . . . . . . . . . . . . . . . . . . . . . . . . . . . 305
Access Permissions . . . . . . . . . . . . . . . . . . . . . . . . . . . . . . . . . 305
Access Policy for Files, Directories, and File Systems . . . . . 306
Accreditation Range . . . . . . . . . . . . . . . . . . . . . . . . . . . . . . . . 308
Adorned Name . . . . . . . . . . . . . . . . . . . . . . . . . . . . . . . . . . . . 309
CMW Label. . . . . . . . . . . . . . . . . . . . . . . . . . . . . . . . . . . . . . . . 309
Classification . . . . . . . . . . . . . . . . . . . . . . . . . . . . . . . . . . . . . . 309
Clearance . . . . . . . . . . . . . . . . . . . . . . . . . . . . . . . . . . . . . . . . . 309
Compartments . . . . . . . . . . . . . . . . . . . . . . . . . . . . . . . . . . . . . 309
Discretionary Access Control . . . . . . . . . . . . . . . . . . . . . . . . . 310
Dominate. . . . . . . . . . . . . . . . . . . . . . . . . . . . . . . . . . . . . . . . . . 310
Execution Profile Mechanism. . . . . . . . . . . . . . . . . . . . . . . . . 310
Information Label . . . . . . . . . . . . . . . . . . . . . . . . . . . . . . . . . . 310
Information Label Floating. . . . . . . . . . . . . . . . . . . . . . . . . . . 311
Label . . . . . . . . . . . . . . . . . . . . . . . . . . . . . . . . . . . . . . . . . . . . . 311
Label Range . . . . . . . . . . . . . . . . . . . . . . . . . . . . . . . . . . . . . . . 311
Mandatory Access Control . . . . . . . . . . . . . . . . . . . . . . . . . . . 311

Contents xvii
Markings . . . . . . . . . . . . . . . . . . . . . . . . . . . . . . . . . . . . . . . . . . 312
Minimum Label . . . . . . . . . . . . . . . . . . . . . . . . . . . . . . . . . . . . 312
Multilevel Directory . . . . . . . . . . . . . . . . . . . . . . . . . . . . . . . . 313
Permission Bits . . . . . . . . . . . . . . . . . . . . . . . . . . . . . . . . . . . . . 314
Privilege . . . . . . . . . . . . . . . . . . . . . . . . . . . . . . . . . . . . . . . . . . 314
Process. . . . . . . . . . . . . . . . . . . . . . . . . . . . . . . . . . . . . . . . . . . . 314
Security Administrator . . . . . . . . . . . . . . . . . . . . . . . . . . . . . . 314
Security Attribute . . . . . . . . . . . . . . . . . . . . . . . . . . . . . . . . . . 315
Security Policy . . . . . . . . . . . . . . . . . . . . . . . . . . . . . . . . . . . . . 315
Sensitivity Label. . . . . . . . . . . . . . . . . . . . . . . . . . . . . . . . . . . . 316
Session Clearance. . . . . . . . . . . . . . . . . . . . . . . . . . . . . . . . . . . 316
Single-level Directory . . . . . . . . . . . . . . . . . . . . . . . . . . . . . . . 316
Strictly Dominate . . . . . . . . . . . . . . . . . . . . . . . . . . . . . . . . . . . 316
System Accreditation Range. . . . . . . . . . . . . . . . . . . . . . . . . . 317
User Accreditation Range . . . . . . . . . . . . . . . . . . . . . . . . . . . . 317
User Clearance . . . . . . . . . . . . . . . . . . . . . . . . . . . . . . . . . . . . . 317
Attributes on Files and Directories . . . . . . . . . . . . . . . . . . . . . . . 318
Changing Security Attributes on Files and Directories. . . . . . . 320
Changing Labels and Privileges. . . . . . . . . . . . . . . . . . . . . . . 320
Changing File and Directory Attribute Flags . . . . . . . . . . . . 321
Attributes on File Systems . . . . . . . . . . . . . . . . . . . . . . . . . . . . . . 323
Variable Attribute File Systems . . . . . . . . . . . . . . . . . . . . . . . 323
Specifying Variable Attributes on File Systems . . . . . . . . . . 324
Fixed Attribute File Systems . . . . . . . . . . . . . . . . . . . . . . . . . 325

xviii Trusted Solaris Administrator’s Procedures—July 1997
Types of File Systems That May Be Mounted in the Trusted SolarisSystem . . . . . . . . . . . . . . . . . . . . . . . . . . . . . . . . . . . . . . . . . . . . 327
Specifying Mount Time Security Attributes . . . . . . . . . . . . . . . . 330
Attribute Precedence Rules. . . . . . . . . . . . . . . . . . . . . . . . . . . . . . 331
Example of Specifying Security Attributes for a Fixed Attribute FileSystem Mounted from an Unlabeled Host . . . . . . . . . . . . . . 333
Trusted Solaris NFS Mounts . . . . . . . . . . . . . . . . . . . . . . . . . . . . . 334
Trusted Solaris and NFS . . . . . . . . . . . . . . . . . . . . . . . . . . . . . . . . 334
Exporting Directories for Mounting by Other Hosts. . . . . . . . . 335
Troubleshooting Mount Failures . . . . . . . . . . . . . . . . . . . . . . . . . 336
File and File System-related Procedures . . . . . . . . . . . . . . . . . . . 336
▼ To Change Labels and Privileges on Files and Directories336
▼ To Specify Alternative Security Attributes While Creating aLocal File System . . . . . . . . . . . . . . . . . . . . . . . . . . . . . . . . 339
▼ To Set Security Attributes on a Standard File System or ResetSecurity Attributes for an Existing Trusted Solaris FileSystem. . . . . . . . . . . . . . . . . . . . . . . . . . . . . . . . . . . . . . . . . 339
▼ To Specify Mount-time Security Attributes on the CommandLine . . . . . . . . . . . . . . . . . . . . . . . . . . . . . . . . . . . . . . . . . . . 340
▼ To Specify Mount-time Security Attributes in the MountTable . . . . . . . . . . . . . . . . . . . . . . . . . . . . . . . . . . . . . . . . . . 340
▼ To Share a Directory for Mounting by Other Hosts . . . 343
▼ To Mount a TMPFS-type File System Using the CommandLine . . . . . . . . . . . . . . . . . . . . . . . . . . . . . . . . . . . . . . . . . . . 343
▼ To Mount a CDROM (HSFS-type File System) Using theCommand Line . . . . . . . . . . . . . . . . . . . . . . . . . . . . . . . . . 343
▼ To Trouble Shoot Mount Failures . . . . . . . . . . . . . . . . . . 344

Contents xix
12. Managing NIS+ . . . . . . . . . . . . . . . . . . . . . . . . . . . . . . . . . . . . . . . 345
Managing Multiple Trusted Solaris Hosts in a Security Domain 346
Managing Standalone Trusted Solaris Hosts. . . . . . . . . . . . . . . . . 346
NIS+ Constraint on Using the Root Role to Use Solstice SystemAdministration Tools. . . . . . . . . . . . . . . . . . . . . . . . . . . . . . . . 347
New Trusted Solaris NIS+ Tables and Files Not Administered ByNIS+. . . . . . . . . . . . . . . . . . . . . . . . . . . . . . . . . . . . . . . . . . . . . . 347
Adding Trusted NIS+ Tables . . . . . . . . . . . . . . . . . . . . . . . . . . . . 348
Adding a New Host and Giving It Credentials . . . . . . . . . . . . . 348
NIS+-Related Procedures . . . . . . . . . . . . . . . . . . . . . . . . . . . . . . . 349
▼ To Save NIS+ Tables and Restore Them After Reinstalling theTrusted Solaris System . . . . . . . . . . . . . . . . . . . . . . . . . . . 349
13. Changing Configurable Trusted Solaris Kernel Switches . . . 353
Behaviors Controlled by Configurable Trusted Solaris KernelSwitches . . . . . . . . . . . . . . . . . . . . . . . . . . . . . . . . . . . . . . . . . . 354
Needed Terms and Concepts . . . . . . . . . . . . . . . . . . . . . . . . . . . . 354
tsol_admin_high_to_cipso . . . . . . . . . . . . . . . . . . . . . . 354
tsol_enable_il . . . . . . . . . . . . . . . . . . . . . . . . . . . . . . . . . . 355
tsol_enable_il_floating . . . . . . . . . . . . . . . . . . . . . . . . . . . . . . 355
tsol_float_sysv_msg_il . . . . . . . . . . . . . . . . . . . . . . . . . . . . . . 355
tsol_float_sysv_sem_il. . . . . . . . . . . . . . . . . . . . . . . . . . . . . . . 355
tsol_float_sysv_shm_il . . . . . . . . . . . . . . . . . . . . . . . . . . . . . . 356
tsol_reset_il_on_exec . . . . . . . . . . . . . . . . . . . . . . . . . . . . . . . . 356
Upgraded Names. . . . . . . . . . . . . . . . . . . . . . . . . . . . . . . . . . . 356
tsol_hide_upgraded_name s . . . . . . . . . . . . . . . . . . . . . . . 356
tsol_privs_debug . . . . . . . . . . . . . . . . . . . . . . . . . . . . . . . . 357

xx Trusted Solaris Administrator’s Procedures—July 1997
How Kernel Switches Are Set and Changed . . . . . . . . . . . . . . . 357
▼ To Change Kernel Switch Setting in the /etc/system File359
Distributing Changed Kernel Switch Settings to Hosts Across theNetwork . . . . . . . . . . . . . . . . . . . . . . . . . . . . . . . . . . . . . . . . . . 361
▼ To Remotely Distribute the system File . . . . . . . . . . . . 361
14. Managing Printing . . . . . . . . . . . . . . . . . . . . . . . . . . . . . . . . . . . . 363
Needed Terms. . . . . . . . . . . . . . . . . . . . . . . . . . . . . . . . . . . . . . . . . 364
Banner/Trailer Pages. . . . . . . . . . . . . . . . . . . . . . . . . . . . . . . . 364
Body Pages . . . . . . . . . . . . . . . . . . . . . . . . . . . . . . . . . . . . . . . . 364
How Trusted Solaris Features Address Information Labeling andAccess Control for Printers . . . . . . . . . . . . . . . . . . . . . . . . . . . 365
Assigning Labels to Print Jobs . . . . . . . . . . . . . . . . . . . . . . . . . . . 366
Using a Label Range on Printers to Control Which Jobs Can Print367
Printing of Labels on Printer Output. . . . . . . . . . . . . . . . . . . . . . 368
Default: Information Label . . . . . . . . . . . . . . . . . . . . . . . . . . . 368
Alternate Body Page Labeling Options. . . . . . . . . . . . . . . . . 368
Changing the Default Label on Body Pages . . . . . . . . . . . . . 369
Labels, Job Numbers, and Handling Information Printed on Bannerand Trailer Pages . . . . . . . . . . . . . . . . . . . . . . . . . . . . . . . . . . . 370
Changing the Default Labels and Warnings on Print Jobs . 370
label_encodings (4TSOL) . . . . . . . . . . . . . . . . . . . . . 370
/usr/lib/lp/postscript/tsol_separator.ps 372
Supported Printers and Types of Output . . . . . . . . . . . . . . . . . . 378
Printing PostScript Files . . . . . . . . . . . . . . . . . . . . . . . . . . . . . 378

Contents xxi
Printing ASCII and Unsupported File Contents . . . . . . . . . 379
Sending Jobs to Printers Connected to Other Print Servers 379
Permitting Publicly-readable Jobs to Be Printed by DefaultWithout Labeled Pages . . . . . . . . . . . . . . . . . . . . . . . . . . . 379
Configuring Printers. . . . . . . . . . . . . . . . . . . . . . . . . . . . . . . . . . . 381
Modified Utilities and Man Pages . . . . . . . . . . . . . . . . . . . . . . . . 382
Authorizations to Bypass Printing Defaults . . . . . . . . . . . . . . . . 383
Printing-related Procedures . . . . . . . . . . . . . . . . . . . . . . . . . . . . . 384
▼ To Access the Printer Manager . . . . . . . . . . . . . . . . . . . . 384
▼ To Install a Printer on a Print Server . . . . . . . . . . . . . . . . 386
▼ To Configure a Restricted Label Range for a Printer Using theDevice Manager . . . . . . . . . . . . . . . . . . . . . . . . . . . . . . . . . 392
▼ To Add Access to a Remote Printer . . . . . . . . . . . . . . . . . 394
▼ To Specify SLs to Print Instead of ILs on Body Pages . . 396
▼ To Allow Some Users to Print Jobs Without Banners andTrailers . . . . . . . . . . . . . . . . . . . . . . . . . . . . . . . . . . . . . . . . 397
▼ To Suppress the Printing of Page Labels on All Print Jobs398
▼ To Allow Some Users to Print Jobs Without Page Labels 398
▼ To Set Up Automatic Printing of Publicly-readable JobsWithout Labels . . . . . . . . . . . . . . . . . . . . . . . . . . . . . . . . . . 399
15. Managing Device Allocation and Setting Device Label Ranges401
Needed Terms and Concepts . . . . . . . . . . . . . . . . . . . . . . . . . . . . 402
Security Risks Associated With Use of Devices . . . . . . . . . . 402
Clearing Objects Prior to Reuse . . . . . . . . . . . . . . . . . . . . . . . 403

xxii Trusted Solaris Administrator’s Procedures—July 1997
How Allocation/Deallocation Make Object Reuse Possible 403
How Manually-allocatable Devices are Allocated andDeallocated and Administered . . . . . . . . . . . . . . . . . . . . 403
How Devices With Removable Media Are Handled. . . . . . 406
Controlling the Location of Devices in the Trusted SolarisSystem. . . . . . . . . . . . . . . . . . . . . . . . . . . . . . . . . . . . . . . . . 407
Device-Clean Scripts . . . . . . . . . . . . . . . . . . . . . . . . . . . . . . . . 407
Device-Clean Script for Tape Devices . . . . . . . . . . . . . 408
Device-Clean Scripts for Floppy Disks and CD-ROM 408
Device-Clean Script for Audio . . . . . . . . . . . . . . . . . . . 409
Writing New Device-Clean Scripts . . . . . . . . . . . . . . . 409
Label Considerations. . . . . . . . . . . . . . . . . . . . . . . . . . . . . . . . 410
Restricted Label Range . . . . . . . . . . . . . . . . . . . . . . . . . 410
MAC Rules for Device Access . . . . . . . . . . . . . . . . . . . 411
Proper Handling of Information Stored on Removable Media411
Considerations When Importing and Exporting Information411
Lock Files for Allocatable Devices . . . . . . . . . . . . . . . . . . . . . 412
Allocate Error State . . . . . . . . . . . . . . . . . . . . . . . . . . . . . . . . . 413
How Non-Allocatable Devices Are Managed . . . . . . . . . . . 413
Default device_allocate File Contents and Settings. . . 413
How Device Allocation Works . . . . . . . . . . . . . . . . . . . . . . . . 415
Setting Policy for a Device . . . . . . . . . . . . . . . . . . . . . . . . . . . 419
Managing Device Allocation and Setting Device Label Ranges 419
Device Management Procedures . . . . . . . . . . . . . . . . . . . . . . . . . 420

Contents xxiii
▼ To Add a New Device Allocation Authorization. . . . . . 420
▼ To Manage Devices Using the Device Allocation Manager420
▼ To Add a New Allocatable Device or Make an ExistingDevice Allocatable. . . . . . . . . . . . . . . . . . . . . . . . . . . . . . . 423
▼ To Add a New Non-Allocatable Device . . . . . . . . . . . . . 430
▼ To Change or Add a Device Clean Script . . . . . . . . . . . . 433
16. Adding Software . . . . . . . . . . . . . . . . . . . . . . . . . . . . . . . . . . . . . . 435
Review of Terms and Concepts . . . . . . . . . . . . . . . . . . . . . . . . . . 437
Controls for Software Creation and Use . . . . . . . . . . . . . . . . 438
Controls for Importing Software . . . . . . . . . . . . . . . . . . . . . . 438
Privileges . . . . . . . . . . . . . . . . . . . . . . . . . . . . . . . . . . . . . . . . . 438
Required Privileges . . . . . . . . . . . . . . . . . . . . . . . . . . . . . . . . . 439
Override Privileges . . . . . . . . . . . . . . . . . . . . . . . . . . . . . . . . . 439
Alternatives to Assigning Privilege. . . . . . . . . . . . . . . . . . . . 440
Principle of Least Privilege. . . . . . . . . . . . . . . . . . . . . . . . . . . 440
File Privilege Sets . . . . . . . . . . . . . . . . . . . . . . . . . . . . . . . . . . . 440
How Two Standard Programs Use Privilege in Trusted Solaris441
Actions . . . . . . . . . . . . . . . . . . . . . . . . . . . . . . . . . . . . . . . . . . . 441
Effects of the Execution Profiles on the Use of Commands andActions . . . . . . . . . . . . . . . . . . . . . . . . . . . . . . . . . . . . . . . . 442
The Profile Shell, the System Shell, and Trusted Processes 443
Processes, Programs, and Their Privileges . . . . . . . . . . . . . . . . . 445
Process Privilege Sets . . . . . . . . . . . . . . . . . . . . . . . . . . . . . . . 445
Examples of How Processes Acquire Privileges . . . . . . . . . 447

xxiv Trusted Solaris Administrator’s Procedures—July 1997
In a Standard Shell . . . . . . . . . . . . . . . . . . . . . . . . . . . . . 447
In a Profile Shell . . . . . . . . . . . . . . . . . . . . . . . . . . . . . . . 448
How a Process Executing the mount Command AcquiresPrivileges . . . . . . . . . . . . . . . . . . . . . . . . . . . . . . . . . . . . . . 449
Why Inheritable Privileges Are Important . . . . . . . . . . . . . . 450
When a Program File Has No Allowed Privileges . . . 450
When a Program File Has No Forced Privileges . . . . 451
How Privileges Are Assigned to Commands and Actions . . . . 453
Giving Forced Privileges to a Command . . . . . . . . . . . . . . . 453
Giving Inheritable Privileges to a Command or Action . . . 454
Why Privileged Programs Need to Use Trusted Shared Libraries454
Default Trusted Shared Library Directories . . . . . . . . . . . . . 455
Shared Libraries Used by Third Party or Site-CreatedApplications . . . . . . . . . . . . . . . . . . . . . . . . . . . . . . . . . . . . 455
Example of Privileged Java Applications Using Java Libraries456
Starting Commands With or Without Trusted Solaris SecurityAttributes During Boot . . . . . . . . . . . . . . . . . . . . . . . . . . . . . . 457
Using Scripts in the /etc/init.d Directory to Start and StopServices . . . . . . . . . . . . . . . . . . . . . . . . . . . . . . . . . . . . . . . . 459
Security Administrator’s Tasks in Adding Software. . . . . . . . . 460
Issues Around the Adding of Privileges to Any Software . 460
When Adding Existing Programs . . . . . . . . . . . . . . . . . . . . . 461
Things to Think About When a Program Fails WithoutPrivileges . . . . . . . . . . . . . . . . . . . . . . . . . . . . . . . . . . . . . . 462
When Applications Need to Be Installed as Root . . . . . . . . 463

Contents xxv
When Applications Need to Run As Root . . . . . . . . . . . . . . 464
When Adding a New Trusted Program . . . . . . . . . . . . . . . . 464
Developer’s Responsibilities. . . . . . . . . . . . . . . . . . . . . 464
Security Administrator‘s Responsibilities. . . . . . . . . . 465
When Adding Actions. . . . . . . . . . . . . . . . . . . . . . . . . . . . . . . 465
Modifying the Front Panel and Workspace Menu. . . . . . . . 467
Creating and Using Shell Scripts . . . . . . . . . . . . . . . . . . . . . . 469
Summary of Shell Script Behavior in Trusted Solaris Systems470
How Program File Are Protected From Being Able to UseInheritable Privileges If Edited . . . . . . . . . . . . . . . . . . . . 472
Procedures for Adding Software . . . . . . . . . . . . . . . . . . . . . . . . . 472
▼ To Add A Package from a CD-ROM . . . . . . . . . . . . . . . . 472
▼ To Set Up an Application to Run WIth a Real UID of Root473
▼ To Set Up An Application to Run With An Effective UID ofRoot . . . . . . . . . . . . . . . . . . . . . . . . . . . . . . . . . . . . . . . . . . . 473
▼ To Find Out Which Privileges an Application Needs . . 473
▼ To Give Forced Privileges to a Command . . . . . . . . . . . 476
▼ To Allow Trusted Programs to Link to Trusted Libraries 478
▼ To Write a Profile Shell Script That Runs PrivilegedCommands . . . . . . . . . . . . . . . . . . . . . . . . . . . . . . . . . . . . . 479
▼ To Write a Standard Shell Script That Runs PrivilegedCommands When Executed in a Profile Shell . . . . . . . . 480
▼ To Specify Commands to Run With or Without SpecialAttributes During Boot . . . . . . . . . . . . . . . . . . . . . . . . . . . 481
▼ To Restore Privileges Lost When a File is Edited. . . . . . 483

xxvi Trusted Solaris Administrator’s Procedures—July 1997
17. Host Administration Checklist . . . . . . . . . . . . . . . . . . . . . . . . . 485
A. Profile Summary Tables . . . . . . . . . . . . . . . . . . . . . . . . . . . . . . . . 487
Execution Profile Content Summary . . . . . . . . . . . . . . . . . . . . . . 488
Finding Commands in Execution Profiles . . . . . . . . . . . . . . . . . 493
Finding Actions in Execution Profiles . . . . . . . . . . . . . . . . . . . . . 506
B. Profile Definition Tables . . . . . . . . . . . . . . . . . . . . . . . . . . . . . . . 511
Profile Names, Purposes, and Roles Tables . . . . . . . . . . . . . . . . 512
Profile Name: All . . . . . . . . . . . . . . . . . . . . . . . . . . . . . . . . . . . . . . 514
Profile Name: All Authorizations . . . . . . . . . . . . . . . . . . . . . . . . 515
Profile Name: Audit Control . . . . . . . . . . . . . . . . . . . . . . . . . . . . 516
Profile Name: Audit Review . . . . . . . . . . . . . . . . . . . . . . . . . . . . 519
Profile Name: Basic Actions . . . . . . . . . . . . . . . . . . . . . . . . . . . . . 520
Profile Name: Basic Commands . . . . . . . . . . . . . . . . . . . . . . . . . . 522
Profile Name: Convenient Authorizations . . . . . . . . . . . . . . . . . 525
Profile Name: Enable Login . . . . . . . . . . . . . . . . . . . . . . . . . . . . . 526
Profile Name: Maintenance and Repair . . . . . . . . . . . . . . . . . . . 527
Profile Name: Media Backup . . . . . . . . . . . . . . . . . . . . . . . . . . . . 528
Profile Name: Media Restore . . . . . . . . . . . . . . . . . . . . . . . . . . . . 530
Profile Name: NIS+ Administration . . . . . . . . . . . . . . . . . . . . . . 532
Profile Name: NIS+ Security Administration . . . . . . . . . . . . . . . 533
Profile Name: Nothing . . . . . . . . . . . . . . . . . . . . . . . . . . . . . . . . . 534
Profile Name: Object Access Management . . . . . . . . . . . . . . . . . 535
Profile Name: Object Label Management . . . . . . . . . . . . . . . . . . 537
Profile Name: Object Privilege Management . . . . . . . . . . . . . . . 539

Contents xxvii
Profile Name: Outside Accred . . . . . . . . . . . . . . . . . . . . . . . . . . . 541
Profile Name: Privileged Shells . . . . . . . . . . . . . . . . . . . . . . . . . . 541
Profile Name: System Management. . . . . . . . . . . . . . . . . . . . . . . 542
Profile Name: System Security . . . . . . . . . . . . . . . . . . . . . . . . . . . 549
Profile Name: User Management . . . . . . . . . . . . . . . . . . . . . . . . . 552
Profile Name: User Security . . . . . . . . . . . . . . . . . . . . . . . . . . . . . 553
Profile Name: inetd . . . . . . . . . . . . . . . . . . . . . . . . . . . . . . . . . . . . 554
Profile Name: boot . . . . . . . . . . . . . . . . . . . . . . . . . . . . . . . . . . . . . 557

xxviii Trusted Solaris Administrator’s Procedures—July 1997

xxix
Figures
Figure 1-1 Disabled Logins Dialog Box for a User Not Authorized to EnableLogins . . . . . . . . . . . . . . . . . . . . . . . . . . . . . . . . . . . . . . . . . . . . . . . 6
Figure 1-2 Disabled Logins Dialog Box for a User Authorized to EnableLogins . . . . . . . . . . . . . . . . . . . . . . . . . . . . . . . . . . . . . . . . . . . . . . . 6
Figure 1-3 Workspace Switch Area with a Button for the admin AdministrativeRole . . . . . . . . . . . . . . . . . . . . . . . . . . . . . . . . . . . . . . . . . . . . . . . . . 7
Figure 1-4 Application Manager Icon Selected in the Front Panel, and theSystem_Admin Folder Selected in the Application Manager. 9
Figure 1-5 Administrative Actions. . . . . . . . . . . . . . . . . . . . . . . . . . . . . . . . . 10
Figure 1-6 Disabled Logins Dialog Box for a User Not Authorized to EnableLogins . . . . . . . . . . . . . . . . . . . . . . . . . . . . . . . . . . . . . . . . . . . . . . . 12
Figure 1-7 Disabled Logins Dialog Box for a User Authorized to EnableLogins . . . . . . . . . . . . . . . . . . . . . . . . . . . . . . . . . . . . . . . . . . . . . . . 13
Figure 1-8 Workstation Information Dialog Box . . . . . . . . . . . . . . . . . . . . . 14
Figure 1-9 Single Label Indicator on the Message of the Day Dialog Box 15
Figure 1-10 Label Builder Dialog Box for a Single-sensitivity Label Session 17
Figure 1-11 Session Clearance Dialog Box . . . . . . . . . . . . . . . . . . . . . . . . . . . 19
Figure 1-12 Choosing the Assume admin Role Option from the Trusted PathMenu . . . . . . . . . . . . . . . . . . . . . . . . . . . . . . . . . . . . . . . . . . . . . . . . 20

xxx Trusted Solaris Administrator’s Procedures—July 1997
Figure 1-13 Role Password Dialog Box . . . . . . . . . . . . . . . . . . . . . . . . . . . . . . 20
Figure 1-14 Creating a New Role Workspace From the Trusted Path Menu 21
Figure 1-15 A New admin_1 Workspace Button for a New Administrative RoleWorkspace . . . . . . . . . . . . . . . . . . . . . . . . . . . . . . . . . . . . . . . . . . . 22
Figure 1-16 Relabeling an Administrative Role Workspace . . . . . . . . . . . . 23
Figure 2-1 Format of a tsolprof Entry. . . . . . . . . . . . . . . . . . . . . . . . . . . . 32
Figure 2-2 An Example tsolprof Entry . . . . . . . . . . . . . . . . . . . . . . . . . . . 32
Figure 2-3 Profiles in a tsoluser Entry for an Administrative Account 33
Figure 2-4 TSOL_AUTH Defined Authorizations in auth_names.h . . . 34
Figure 2-5 TSOL_AUTH_RESERVED Authorizations in auth_names.h 34
Figure 2-6 Authorizations Available for Extension. . . . . . . . . . . . . . . . . . . 35
Figure 2-7 Format of the auth_name File . . . . . . . . . . . . . . . . . . . . . . . . . . 35
Figure 2-8 Definition for the enable logins Authorizations in the auth_nameFile . . . . . . . . . . . . . . . . . . . . . . . . . . . . . . . . . . . . . . . . . . . . . . . . . . 36
Figure 2-9 Specifying a Manifest Constant for a New Authorization inauth_names.h . . . . . . . . . . . . . . . . . . . . . . . . . . . . . . . . . . . . . . . 36
Figure 2-10 Specifying a Name and a Description For A New Authorization inauth_name . . . . . . . . . . . . . . . . . . . . . . . . . . . . . . . . . . . . . . . . . . . 37
Figure 2-11 Manifest Constants and Numbers for Default Privileges inpriv_names.h . . . . . . . . . . . . . . . . . . . . . . . . . . . . . . . . . . . . . . . 38
Figure 2-12 Privilege Numbers Reserved for Trusted Solaris Use . . . . . . . 38
Figure 2-13 Privileges Available for Extension . . . . . . . . . . . . . . . . . . . . . . . 39
Figure 2-14 Format of the priv_name File . . . . . . . . . . . . . . . . . . . . . . . . . . 39
Figure 2-15 Definition for the file_audit privilege in the priv_name File 40
Figure 2-16 Comment from the priv_names. h File . . . . . . . . . . . . . . . . . . 41
Figure 2-17 Specifying a Manifest Constant for a New Privilege inpriv_names.h . . . . . . . . . . . . . . . . . . . . . . . . . . . . . . . . . . . . . . . 42

Figures xxxi
Figure 2-18 Specifying a Name and a Description for a New Privilege inpriv_name . . . . . . . . . . . . . . . . . . . . . . . . . . . . . . . . . . . . . . . . . . . 42
Figure 2-19 Example SLD Name for the Third SLD Created in a HomeDirectory . . . . . . . . . . . . . . . . . . . . . . . . . . . . . . . . . . . . . . . . . . . . . 48
Figure 2-20 Example SLD Name for the Fourth SLD Created in a HomeDirectory . . . . . . . . . . . . . . . . . . . . . . . . . . . . . . . . . . . . . . . . . . . . . 49
Figure 2-21 Preparing the File Manger Before Deleting an MLD . . . . . . . . 53
Figure 3-1 User Manager: Navigator . . . . . . . . . . . . . . . . . . . . . . . . . . . . . . . 63
Figure 3-2 How $HOME/.dtprofile is installed . . . . . . . . . . . . . . . . . . . 66
Figure 3-3 Default Setting in the/usr/dt/config/sys.dtprofile . 66
Figure 3-4 How $HOME/.dtprofile is Bypassed for Users with a DefaultShell of pfsh(1MTSOL) . . . . . . . . . . . . . . . . . . . . . . . . . . . . . . . . 68
Figure 3-5 .mailrc Example. . . . . . . . . . . . . . . . . . . . . . . . . . . . . . . . . . . . . 68
Figure 3-6 Startup Files for Commonly Used Applications. . . . . . . . . . . . 69
Figure 3-7 Planning Worksheet for Copying and Linking Startup Files BetweenSLDs. . . . . . . . . . . . . . . . . . . . . . . . . . . . . . . . . . . . . . . . . . . . . . . . . 72
Figure 3-8 Changing to a Skeleton Directory Created for C Shell Startup Files84
Figure 3-9 Startup Files in /etc/skel/skelC . . . . . . . . . . . . . . . . . . . . . 85
Figure 4-1 Division of Account and Profile Configuration ResponsibilitiesBetween Security Administrator and System Administrator . 91
Figure 4-2 User Manager: Navigator . . . . . . . . . . . . . . . . . . . . . . . . . . . . . . . 92
Figure 5-1 User Manager: Navigator . . . . . . . . . . . . . . . . . . . . . . . . . . . . . . . 100
Figure 5-2 System-wide PAM Settings . . . . . . . . . . . . . . . . . . . . . . . . . . . . . 111
Figure 5-3 Lock-out Password Dialog Box . . . . . . . . . . . . . . . . . . . . . . . . . . 123
Figure 5-4 Launching the User Manager . . . . . . . . . . . . . . . . . . . . . . . . . . . 125
Figure 5-5 User Manager: Load Dialog Box with Filter Users Menu . . . . 126
Figure 5-6 User Manager: Main Window and Menus . . . . . . . . . . . . . . . . 127

xxxii Trusted Solaris Administrator’s Procedures—July 1997
Figure 5-7 View Menu with Sort By Submenu . . . . . . . . . . . . . . . . . . . . . . 128
Figure 5-8 User Manager: Find Dialog Box . . . . . . . . . . . . . . . . . . . . . . . . . 128
Figure 5-9 User Manager Edit Menu . . . . . . . . . . . . . . . . . . . . . . . . . . . . . . . 129
Figure 5-10 User Manager: Navigator . . . . . . . . . . . . . . . . . . . . . . . . . . . . . . . 130
Figure 5-11 User Manager: Identity Add Dialog Box . . . . . . . . . . . . . . . . . . 132
Figure 5-12 Controls on the User Manager: Identity Dialog Box . . . . . . . . 133
Figure 5-13 User Manager: Password Dialog Box . . . . . . . . . . . . . . . . . . . . . 134
Figure 5-14 Password Dialog Box: Password Menu . . . . . . . . . . . . . . . . . . . 135
Figure 5-15 User Manager: Set Password . . . . . . . . . . . . . . . . . . . . . . . . . . . . 135
Figure 5-16 Password Generator Dialog Box . . . . . . . . . . . . . . . . . . . . . . . . . 136
Figure 5-17 Password Dialog Box: Password Duration and Expiration DateFields . . . . . . . . . . . . . . . . . . . . . . . . . . . . . . . . . . . . . . . . . . . . . . . . 138
Figure 5-18 Password Dialog Box: Warning Field. . . . . . . . . . . . . . . . . . . . . 138
Figure 5-19 Password Dialog Box: Generation Field and Menu . . . . . . . . . 139
Figure 5-20 Password Dialog Box: Status Field and Menu . . . . . . . . . . . . . 140
Figure 5-21 Credential Table Setup Check Box . . . . . . . . . . . . . . . . . . . . . . . 140
Figure 5-22 Controls on the User Manager: Password Dialog Box. . . . . . . 140
Figure 5-23 User Manager: Home Directory Dialog Box . . . . . . . . . . . . . . . 142
Figure 5-24 Controls on the User Manager: Home Dialog Box . . . . . . . . . . 143
Figure 5-25 User Manager: Labels Dialog Box . . . . . . . . . . . . . . . . . . . . . . . . 144
Figure 5-26 Label Builder for Setting the Account’s Clearance . . . . . . . . . . 145
Figure 5-27 Label Builder for Setting the Minimum SL . . . . . . . . . . . . . . . . 147
Figure 5-28 Controls on the User Manager: Labels Dialog Box. . . . . . . . . . 148
Figure 5-29 User Manager: Profiles Dialog Box . . . . . . . . . . . . . . . . . . . . . . . 150
Figure 5-30 Controls on the User Manager: Profiles Dialog Box. . . . . . . . . 151
Figure 5-31 User Manager: Roles Dialog Box. . . . . . . . . . . . . . . . . . . . . . . . . 152

Figures xxxiii
Figure 5-32 Controls on the User Manager: Roles Dialog Box . . . . . . . . . . 153
Figure 5-33 User Manager: Idle Dialog Box with Idle Time Menu . . . . . . . 154
Figure 5-34 Controls on the User Manager: Idle Dialog Box . . . . . . . . . . . . 154
Figure 5-35 Controls on the User Manager Navigator . . . . . . . . . . . . . . . . . 155
Figure 5-36 User Manager: Main Window and File Menu. . . . . . . . . . . . . . 155
Figure 6-1 /var/spool/mqueue MLD and its Contents at DifferentSensitivity Label. . . . . . . . . . . . . . . . . . . . . . . . . . . . . . . . . . . . . . . 160
Figure 6-2 Mailboxes in SLDs at Different Sensitivity Labels . . . . . . . . . . 161
Figure 6-3 Mail Subpanel With Mail at Multiple Labels . . . . . . . . . . . . . . 162
Figure 6-4 Window Label on a Mail Reader Launched at a Sensitivity Label ofINTERNAL_USE_ONLY When Information Labels are Enabled163
Figure 6-5 Window Label on a Mail Reader Launched at a Sensitivity Label ofINTERNAL_USE_ONLY When Information Labels are Disabled164
Figure 6-6 Sendmail Data Flow Example . . . . . . . . . . . . . . . . . . . . . . . . . . . 169
Figure 6-7 OpenWindow’s mailtool Action Definition from sunOW.dt 181
Figure 8-1 Profile Manager: Load Dialog Box . . . . . . . . . . . . . . . . . . . . . . . 198
Figure 8-2 Profile Manager: Load, Naming Service NIS+ . . . . . . . . . . . . . 199
Figure 8-3 Profile Manager: Load, Naming Service None . . . . . . . . . . . . . 200
Figure 8-4 Profile Manager: Load, Profile Filter Choices . . . . . . . . . . . . . . 200
Figure 8-5 Choosing None from the Profile Manager: Load, Profile FilterMenu . . . . . . . . . . . . . . . . . . . . . . . . . . . . . . . . . . . . . . . . . . . . . . . . 201
Figure 8-6 Empty Profile Manager in Action Mode . . . . . . . . . . . . . . . . . . 202
Figure 8-7 Choosing All from the Profile Manager: Load, Filter Profiles Menu203
Figure 8-8 Profile Manager: Load, Highlighting a Profile Name . . . . . . . 203
Figure 8-9 Profile Manager With A Profile Loaded . . . . . . . . . . . . . . . . . . 204

xxxiv Trusted Solaris Administrator’s Procedures—July 1997
Figure 8-10 Specifying a Profile to be Loaded in the Profile Manager By Using aRegular Expression . . . . . . . . . . . . . . . . . . . . . . . . . . . . . . . . . . . . 205
Figure 8-11 Privileged Shells Profile Listed in the Profile Manager: Open DialogWhen P* is Specified in the Filter Profiles Text Field . . . . . . . . 205
Figure 8-12 Profile Manager Loaded With the Privileged Shells Profile . . 206
Figure 8-13 The Profile Manager Profiles Menu For Opening, Saving, andClosing Profiles . . . . . . . . . . . . . . . . . . . . . . . . . . . . . . . . . . . . . . . 207
Figure 8-14 Profile Manager: Open, Highlighting a Profile Name . . . . . . . 208
Figure 8-15 The Profile Name and Description Fields in the Profile Manager208
Figure 8-16 The Profile Manager View Menu For Switching Between Actions,Commands, and Authorizations . . . . . . . . . . . . . . . . . . . . . . . . . 209
Figure 8-17 Profile Manager Loaded With the Privileged Shells Profile . . 210
Figure 8-18 Expanding a Grouping Name to List All of Its Contents . . . . 212
Figure 8-19 Buttons for Setting Privileges, Label Range, UID and GID. . . 213
Figure 8-20 Buttons for Setting Privileges, Label Range, UID and GID. . . 213
Figure 8-21 Profile Manager: Set Privileges Dialog Box . . . . . . . . . . . . . . . . 215
Figure 8-22 Profile Manager: Set Minimum SL Dialog. . . . . . . . . . . . . . . . . 216
Figure 8-23 The Profile Manager Command Mode. . . . . . . . . . . . . . . . . . . . 218
Figure 8-24 Entering the Pathname of the /etc Directory to Choose From ItsCommands . . . . . . . . . . . . . . . . . . . . . . . . . . . . . . . . . . . . . . . . . . . 219
Figure 8-25 The Profile Manager in Authorization Mode . . . . . . . . . . . . . . 220
Figure 8-26 Icon and Type in Action Mode . . . . . . . . . . . . . . . . . . . . . . . . . . 221
Figure 8-27 Profile Manager in Action Mode . . . . . . . . . . . . . . . . . . . . . . . . 222
Figure 8-28 The Profile Manager Icon Highlighted in the Solstice_Apps Folder223
Figure 8-29 Profile Manager: Load Dialog Box . . . . . . . . . . . . . . . . . . . . . . . 224

Figures xxxv
Figure 8-30 Choosing None from the Profile Manager: Load, Naming ServiceMenu . . . . . . . . . . . . . . . . . . . . . . . . . . . . . . . . . . . . . . . . . . . . . . . . 224
Figure 8-31 Profile Manager: Load, Profile Filter Choices . . . . . . . . . . . . . . 225
Figure 8-32 Specifying Profile Names Using a Regular Expression on the ProfileManager: Load, Filter Profiles Menu . . . . . . . . . . . . . . . . . . . . . 225
Figure 8-33 The Privileged Shells Profile Displayed When P* is Specified 226
Figure 8-34 Empty Profile Manager in Action Mode . . . . . . . . . . . . . . . . . . 227
Figure 9-1 A Single Security Domain . . . . . . . . . . . . . . . . . . . . . . . . . . . . . . 237
Figure 9-2 Two Security Domains . . . . . . . . . . . . . . . . . . . . . . . . . . . . . . . . . 238
Figure 9-3 Two Security Domains With Differing Accreditation Ranges 240
Figure 9-4 Example of 0 Hops for Communications Between Four Hosts in aSingle Security Domain . . . . . . . . . . . . . . . . . . . . . . . . . . . . . . . . 241
Figure 9-5 Example: Default and Network Routes for Two Security Domainswith a Single Gateway . . . . . . . . . . . . . . . . . . . . . . . . . . . . . . . . . 243
Figure 9-6 Example tsolgateways File for Communications Among ThreeNetworks. . . . . . . . . . . . . . . . . . . . . . . . . . . . . . . . . . . . . . . . . . . . . 245
Figure 9-7 Example Complex Gateway Configuration With Routing Tables246
Figure 10-1 Packet Format. . . . . . . . . . . . . . . . . . . . . . . . . . . . . . . . . . . . . . . . . 249
Figure 10-2 TSIX and Trusted Solaris 2.5 Packet Format . . . . . . . . . . . . . . . 249
Figure 10-3 Tnidb Selected in the Database Manager: Load List . . . . . . . . 254
Figure 10-4 Configurable Fields for the sun_tsol Host Type in the Tnrhtp 258
Figure 10-5 Configurable Fields for the tsix Host Type in the Tnrhtp . . . . 261
Figure 10-6 Configurable Fields for the msix Host Type in the Tnrhtp . . . 264
Figure 10-7 Configurable Fields for the cipso Host Type in the Tnrhtp . . 266
Figure 10-8 Configurable Fields for the RIPSO Host Type in the Tnrhtp . 268
Figure 10-9 Configurable Fields for the unlabeled Host Type in the Tnrhtp 270

xxxvi Trusted Solaris Administrator’s Procedures—July 1997
Figure 10-10 Portions of a Packet Accessible to the Trusted NetworkingSoftware . . . . . . . . . . . . . . . . . . . . . . . . . . . . . . . . . . . . . . . . . . . . . 272
Figure 10-11 Attribute Precedence Rules . . . . . . . . . . . . . . . . . . . . . . . . . . . . . 276
Figure 10-12 Assigning Some Default Attributes to Communications fromUnspecified Hosts . . . . . . . . . . . . . . . . . . . . . . . . . . . . . . . . . . . . . 277
Figure 10-13 Default Entry for the le0 Interface in the Tnidb Data. . . . . . . . 278
Figure 10-14 Two Network Interfaces and Their Network Accreditation Ranges279
Figure 10-15 Database Manager Selected in the Solstice_Apps Folder . . . . 280
Figure 10-16 Loading a Naming Service on the Database Manager. . . . . . . 281
Figure 10-17 Database Manager Selected in the Solstice_Apps Folder . . . . 281
Figure 10-18 Tnidb Selected in the Database Manager: Load List . . . . . . . . 282
Figure 10-19 Adding a Host Entry to Tnrhdb and Specifying a Template . 283
Figure 10-20 Tnrhdb Host Entry Assigned to the Template Named tsol_1 284
Figure 10-21 Adding a Network Entry to Tnrhdb and Specifying a Template 285
Figure 10-22 Tnrhdb Network Entry Assigned to the Template Named tsol 286
Figure 10-23 IP Address and Template Name for a Tnrhdb Fallback TemplateEntry . . . . . . . . . . . . . . . . . . . . . . . . . . . . . . . . . . . . . . . . . . . . . . . . 287
Figure 10-24 Tnrhdb Fallback Template Entry . . . . . . . . . . . . . . . . . . . . . . . . 288
Figure 10-25 Assigning Some Default Attributes to Communications fromUnspecified Hosts . . . . . . . . . . . . . . . . . . . . . . . . . . . . . . . . . . . . . 289
Figure 10-26 Default Interfaces Listed in the Tnidb Database. . . . . . . . . . . . 292
Figure 10-27 Tnidb Interface le0 Highlighted and the Edit > Modify OptionSelected . . . . . . . . . . . . . . . . . . . . . . . . . . . . . . . . . . . . . . . . . . . . . . 293
Figure 10-28 Interface Manager (Modify) Dialog Box . . . . . . . . . . . . . . . . . . 294
Figure 10-29 Add Option Selected from the Tnidb Edit Menu . . . . . . . . . . . 295
Figure 10-30 Interface Manager (Add) Dialog Box . . . . . . . . . . . . . . . . . . . . . 296
Figure 10-31 Database Manager: Load List with Tnrhtp Selected . . . . . . . . 298

Figures xxxvii
Figure 10-32 Database Manager: Tnrhtp Database Dialog Box with the tsol_2Template Name Selected . . . . . . . . . . . . . . . . . . . . . . . . . . . . . . . 299
Figure 10-33 Trusted Network Template Manager Modify Dialog Box . . . 300
Figure 11-1 File Manager Selected Menu . . . . . . . . . . . . . . . . . . . . . . . . . . . . 322
Figure 11-2 Attribute Precedence Rules . . . . . . . . . . . . . . . . . . . . . . . . . . . . . 332
Figure 11-3 File Manager Privileges Dialog Box . . . . . . . . . . . . . . . . . . . . . . 337
Figure 11-4 File Manager Label Builder . . . . . . . . . . . . . . . . . . . . . . . . . . . . . 338
Figure 11-5 Example vfstab_adjunct Entries. . . . . . . . . . . . . . . . . . . . . . 342
Figure 13-1 Label Configuration Defaults . . . . . . . . . . . . . . . . . . . . . . . . . . . 359
Figure 14-1 Automatic Labeling of Print Jobs . . . . . . . . . . . . . . . . . . . . . . . . 366
Figure 14-2 Example of a Printer with a Restricted Label Range . . . . . . . . 367
Figure 14-3 Information Label Automatically Printed by Default on a BodyPage . . . . . . . . . . . . . . . . . . . . . . . . . . . . . . . . . . . . . . . . . . . . . . . . . 368
Figure 14-4 Sensitivity Label Printed on Body Pages When Information LabelsAre Disabled. . . . . . . . . . . . . . . . . . . . . . . . . . . . . . . . . . . . . . . . . . 369
Figure 14-5 Typical Print Job Banner Page . . . . . . . . . . . . . . . . . . . . . . . . . . . 371
Figure 14-6 Differences on a Trailer Page . . . . . . . . . . . . . . . . . . . . . . . . . . . . 371
Figure 14-7 Application Manager Icon. . . . . . . . . . . . . . . . . . . . . . . . . . . . . . 384
Figure 14-8 Solstice_Apps Icon . . . . . . . . . . . . . . . . . . . . . . . . . . . . . . . . . . . . 384
Figure 14-9 Printer Manager Icon Selected in the Solstice_Apps Folder . . 384
Figure 14-10 Printer Manager: Load Dialog Box With None as the Only NamingService Option . . . . . . . . . . . . . . . . . . . . . . . . . . . . . . . . . . . . . . . . 385
Figure 14-11 Printer Manager . . . . . . . . . . . . . . . . . . . . . . . . . . . . . . . . . . . . . . . 385
Figure 14-12 Application Manager Icon. . . . . . . . . . . . . . . . . . . . . . . . . . . . . . 386
Figure 14-13 Solstice_Apps Icon . . . . . . . . . . . . . . . . . . . . . . . . . . . . . . . . . . . . 386
Figure 14-14 Serial Manager Icon . . . . . . . . . . . . . . . . . . . . . . . . . . . . . . . . . . . 386

xxxviii Trusted Solaris Administrator’s Procedures—July 1997
Figure 14-15 Serial Port Manager and Serial Port Manager: Modify DialogBoxes . . . . . . . . . . . . . . . . . . . . . . . . . . . . . . . . . . . . . . . . . . . . . . . . 387
Figure 14-16 Printer Manager: Selecting Install Printer from the Edit Menu 388
Figure 14-17 Printer Manager: Install Printer Dialog Box . . . . . . . . . . . . . . . 389
Figure 14-18 Device Allocation: Configuration Dialog Box . . . . . . . . . . . . . . 393
Figure 14-19 Printer Manager: Selecting Add Access to Printer from the EditMenu . . . . . . . . . . . . . . . . . . . . . . . . . . . . . . . . . . . . . . . . . . . . . . . . 394
Figure 14-20 Printer Manager: Add Access to Printer Dialog Box . . . . . . . . 395
Figure 15-1 Device Allocation Manager . . . . . . . . . . . . . . . . . . . . . . . . . . . . . 404
Figure 15-2 Device Allocation, Management, Configuration and AuthorizationsTools . . . . . . . . . . . . . . . . . . . . . . . . . . . . . . . . . . . . . . . . . . . . . . . . 405
Figure 15-3 The Default device_allocate File . . . . . . . . . . . . . . . . . . . . . . . . . 414
Figure 15-4 Listing for an Allocatable Device’s Lock File . . . . . . . . . . . . . . 415
Figure 15-5 Listing for Device Special Files for an Allocatable Tape Device 416
Figure 15-6 Device Allocate File Entry for mag_tape_0 . . . . . . . . . . . . . . . . 417
Figure 15-7 Device Special Files Associated With the Tape Device . . . . . . 417
ial Files for mag_tape_0Special Files for mag_tape_0 . . . . . . . . . . . . . . . . . . . . . . . . . . . 418
Figure 15-9 Changing Ownership, Group, and Mode of st0’s Lock File UponAllocation . . . . . . . . . . . . . . . . . . . . . . . . . . . . . . . . . . . . . . . . . . . . 419
Figure 15-10 Device Allocation Manager . . . . . . . . . . . . . . . . . . . . . . . . . . . . . 421
Figure 15-11 Device Allocation: Administration Dialog Box. . . . . . . . . . . . . 422
Figure 15-12 Application Manager Icon. . . . . . . . . . . . . . . . . . . . . . . . . . . . . . 423
Figure 15-13 Device Allocation Manager . . . . . . . . . . . . . . . . . . . . . . . . . . . . . 426
Figure 15-14 Device Allocation: Administration Dialog Box. . . . . . . . . . . . . 427
Figure 15-15 Device Allocation: Configuration Dialog Box . . . . . . . . . . . . . . 428
Figure 15-16 Device Allocation: Configuration Dialog Box . . . . . . . . . . . . . . 429

Figures xxxix
Figure 15-17 Application Manager Icon. . . . . . . . . . . . . . . . . . . . . . . . . . . . . . 430
Figure 15-18 Device Allocation: Configuration Dialog Box . . . . . . . . . . . . . . 433
Figure 16-1 Process Acquiring Forced Privileges When Run in a Normal User’sShell . . . . . . . . . . . . . . . . . . . . . . . . . . . . . . . . . . . . . . . . . . . . . . . . . 447
Figure 16-2 Process Inheriting Privileges From the Profile Shell . . . . . . . . 448
Figure 16-3 How a Program That Cannot Use Privileges Can Pass Them to AProgram That Can . . . . . . . . . . . . . . . . . . . . . . . . . . . . . . . . . . . . . 451
Figure 16-4 How Forced Privilege Shell Scripts Are Prevented From PassingForced Privileges to Their Commands . . . . . . . . . . . . . . . . . . . . 452
Figure 16-5 /etc/initd.d/sendmail Linked to /etc/rc n.d Directories457
Figure 16-6 Starting and Stopping sendmail Using the start and stop Optionswith the /etc/init.d/sendmail Script . . . . . . . . . . . . . . . . 459
Figure 16-7 How Shell Scripts Invoked in pfsh Can Pass Inheritable Privilegesto Their Commands. . . . . . . . . . . . . . . . . . . . . . . . . . . . . . . . . . . . 471
Figure 16-8 Changing the Value of tsol_privs_debug to = 1 in the systemFile . . . . . . . . . . . . . . . . . . . . . . . . . . . . . . . . . . . . . . . . . . . . . . . . . . 473
Figure 16-9 Commented Privilege Debugging Line in /etc/syslog.conf 474
Figure 16-10 Privilege Debugging Line with local0.debug String Added in/etc/syslog.conf . . . . . . . . . . . . . . . . . . . . . . . . . . . . . . . . . . 474
Figure 16-11 runpd Displaying Privilege Needed For A Process To Succeed 475
Figure 16-12 Typical Privilege Debugging Entry in/var/log/privedebug.log . . . . . . . . . . . . . . . . . . . . . . . . . . 476

xl Trusted Solaris Administrator’s Procedures—July 1997

xli
Tables
Table 1-1 Administrative Actions, Purposes, and Default Roles. . . . . . . 10
Table 2-1 MLD-related Commands and What They Do. . . . . . . . . . . . . . 47
Table 3-1 Authorizations for User Manager Buttons and Types of InformationSpecified . . . . . . . . . . . . . . . . . . . . . . . . . . . . . . . . . . . . . . . . . . . . . 64
Table 3-2 Startup Files Read by the Window System . . . . . . . . . . . . . . . . 65
Table 3-3 crontab(1TSOL) Options. . . . . . . . . . . . . . . . . . . . . . . . . . . . . . . . 80
Table 3-4 Trusted Solaris 2.5 at (1) options . . . . . . . . . . . . . . . . . . . . . . . . 81
Table 3-5 Trusted Solaris 2.5 atq (1) Changes . . . . . . . . . . . . . . . . . . . . . . 81
Table 3-6 Trusted Solaris 2.5 atrm (1) Changes. . . . . . . . . . . . . . . . . . . . . 82
Table 4-1 Commands and Applications Requiring the Trusted Path Attribute90
Table 4-2 Authorizations For Specifying Types of User Information. . . 93
Table 5-1 Password Creation Options, Descriptions and Recommendations108
Table 5-2 Password Rules for Manually Created Passwords. . . . . . . . . . 109
Table 5-3 Status Menu Options, Descriptions, and Recommendations . 112
Table 5-4 Defaults You Can Set on the User Manager Dialog Boxes . . . 131

xlii Trusted Solaris Administrator’s Procedures—July 1997
Table 6-1 Trusted Solaris Mail Handling Options . . . . . . . . . . . . . . . . . . . 178
Table 9-1 Example tnidb Entry to Restrict a Network’s Accreditation Range240
Table 10-1 Supported Classifications for RIPSO Labels . . . . . . . . . . . . . . . 251
Table 10-2 Protection Authority Flags That May Be Specified in the RIPSO SendPAF or as RIPSO Return PAF Fields. . . . . . . . . . . . . . . . . . . . . . 252
Table 10-3 Supported Host Types . . . . . . . . . . . . . . . . . . . . . . . . . . . . . . . . . 256
Table 10-4 Required and Optional Security Attributes for sun_tsol Host Types259
Table 10-5 Required and Optional Security Attributes for tsix Host Types 262
Table 10-6 Default tnidb Settings . . . . . . . . . . . . . . . . . . . . . . . . . . . . . . . . . . 291
Table 11-1 File and Directory Attributes from the Base and from TrustedSolaris Operating System . . . . . . . . . . . . . . . . . . . . . . . . . . . . . . . 318
Table 11-2 Security Attributes on Files and Directories . . . . . . . . . . . . . . . 318
Table 11-3 Trusted Solaris File System Security Attributes With DefinedSettings . . . . . . . . . . . . . . . . . . . . . . . . . . . . . . . . . . . . . . . . . . . . . . 323
Table 11-4 Attributes for Fixed File Systems with Default Values. . . . . . 326
Table 11-5 Mount Types, Examples, and Notes . . . . . . . . . . . . . . . . . . . . . . 328
Table 12-1 New NIS+ Tables . . . . . . . . . . . . . . . . . . . . . . . . . . . . . . . . . . . . . 347
Table 12-2 Configuration Files Not Administered Through NIS+. . . . . . 348
Table 12-3 nisscript for Dumping NIS+ Tables into ASCII Files . . . . . . . . 349
Table 13-1 Default Kernel Switch Settings and Values Definitions. . . . . . 357
Table 14-1 tsol_separator.ps Comments and Configurable Values 372
Table 14-2 Authorizations Related to Printing. . . . . . . . . . . . . . . . . . . . . . . 383
Table 15-1 Device-Clean Scripts for the Three Supported Tape Devices . 408
Table 15-2 Device-Clean Scripts for Floppy and CD-ROM . . . . . . . . . . . . 408
Table 15-3 Device-Clean Script for Audiotool . . . . . . . . . . . . . . . . . . . . . . . 409

Tables xliii
Table 15-4 Required Lock File Characteristics for Allocatable and AllocatedDevices . . . . . . . . . . . . . . . . . . . . . . . . . . . . . . . . . . . . . . . . . . . . . . 412
Table 15-5 Lock File Settings for Device in the Allocate Error State . . . . . 413
Table 15-6 Default Settings the device_allocate File . . . . . . . . . . . . . 414
Table 16-1 Example of an Incorrect Ordering of Profiles in an Account’s List443
Table 16-2 Default Directories for Trusted Shared Libraries . . . . . . . . . . . 455
Table 16-3 Differences in Creating and Using Actions Under Trusted SolarisRestraints . . . . . . . . . . . . . . . . . . . . . . . . . . . . . . . . . . . . . . . . . . . . 466
Table 16-4 Differences in Modifying the Workspace Under Trusted SolarisRestraints . . . . . . . . . . . . . . . . . . . . . . . . . . . . . . . . . . . . . . . . . . . . 468
Table 16-5 Default Directories for Trusted Shared Libraries . . . . . . . . . . . 478
Table 17-1 Host Administration Checklist . . . . . . . . . . . . . . . . . . . . . . . . . . 485
Table A-1 Execution Profile Contents. . . . . . . . . . . . . . . . . . . . . . . . . . . . . . 488
Table A-2 Commands and Their Associated Execution Profiles . . . . . . . 493
Table A-3 Actions and Their Associated Execution Profiles . . . . . . . . . . . 506
Table B-1 Name and Purpose of Profiles . . . . . . . . . . . . . . . . . . . . . . . . . . . 512
Table B-2 Profiles Assigned to the Default Roles . . . . . . . . . . . . . . . . . . . . 513
Table B-3 Common Profiles (in More Than One Role . . . . . . . . . . . . . . . . 514
Table B-4 Profiles That Divide Responsibilities Among Roles. . . . . . . . . 514
Table B-5 Profiles Unique to One Role. . . . . . . . . . . . . . . . . . . . . . . . . . . . . 514
Table B-6 Actions Defined for the All Profile . . . . . . . . . . . . . . . . . . . . . . . 515
Table B-7 Authorizations Defined for the All Profile . . . . . . . . . . . . . . . . 515
Table B-8 Commands Defined for the All Profile. . . . . . . . . . . . . . . . . . . . 515
Table B-9 Actions Defined for the All Authorizations Profile . . . . . . . . . 515
Table B-10 Authorizations Defined for the All Authorizations Profile. . . 515
Table B-11 Commands Defined for the All Authorizations Profile. . . . . . 516

xliv Trusted Solaris Administrator’s Procedures—July 1997
Table B-12 Actions Defined for the Audit Control Profile . . . . . . . . . . . . . 516
Table B-13 Authorizations Defined for the Audit Control Profile. . . . . . . 517
Table B-14 Commands Defined for the Audit Control Profile . . . . . . . . . . 517
Table B-15 Actions Defined for the Audit Review Profile . . . . . . . . . . . . . 519
Table B-16 Authorizations Defined for the Audit Review Profile . . . . . . . 520
Table B-17 Commands Defined for the Audit Review Profile . . . . . . . . . . 520
Table B-18 Actions Defined for the Basic Actions Profile . . . . . . . . . . . . . . 520
Table B-19 Authorizations Defined for the Basic Actions Profile . . . . . . . 521
Table B-20 Commands Defined for the Basic Actions Profile . . . . . . . . . . 521
Table B-21 Actions Defined for the Basic Commands Profile . . . . . . . . . . 522
Table B-22 Authorizations Defined for the Basic Commands Profile . . . . 522
Table B-23 Commands Defined for the Basic Commands Profile . . . . . . . 522
Table B-24 Actions Defined for the Convenient Authorizations Profile. . 525
Table B-25 Authorizations Defined for the Convenient Authorizations Profile526
Table B-26 Commands Defined for the Convenient Authorizations Profile 526
Table B-27 Actions Defined for the Enable Login Profile . . . . . . . . . . . . . . 526
Table B-28 Authorizations Defined for the Enable Login Profile . . . . . . . 526
Table B-29 Commands Defined for the Enable Login Profile. . . . . . . . . . . 527
Table B-30 Actions Defined for the Maintenance and Repair Profile . . . . 527
Table B-31 Authorizations Defined for the Maintenance and Repair Profile 527
Table B-32 Commands Defined for the Maintenance and Repair Profile. 527
Table B-33 Actions Defined for the Media Backup Profile . . . . . . . . . . . . . 529
Table B-34 Authorizations Defined for the Media Backup Profile . . . . . . 529
Table B-35 Commands Defined for the Media Backup Profile . . . . . . . . . 529
Table B-36 Actions Defined for the Media Restore Profile . . . . . . . . . . . . . 530

Tables xlv
Table B-37 Authorizations Defined for the Media Restore Profile . . . . . . 530
Table B-38 Commands Defined for the Media Restore Profile . . . . . . . . . 531
Table B-39 Actions Defined for the NIS+ Administration Profile . . . . . . . 532
Table B-40 Authorizations Defined for the NIS+ Administration Profile 532
Table B-41 Commands Defined for the NIS+ Administration Profile . . . 532
Table B-42 Actions Defined for the NIS+ Security Administration Profile 533
Table B-43 Authorizations Defined for the NIS+ Security AdministrationProfile . . . . . . . . . . . . . . . . . . . . . . . . . . . . . . . . . . . . . . . . . . . . . . . 533
Table B-44 Commands Defined for the NIS+ Security Administration Profile533
Table B-45 Actions Defined for the Enable Login Profile . . . . . . . . . . . . . . 535
Table B-46 Authorizations Defined for the Enable Login Profile . . . . . . . 535
Table B-47 Commands Defined for the Enable Login Profile. . . . . . . . . . . 535
Table B-48 Actions Defined for the Object Access Management Profile . 535
Table B-49 Authorizations Defined for the Object Access Management Profile536
Table B-50 Commands Defined for the Object Access Management Profile 536
Table B-51 Actions Defined for the Object Label Management Profile. . . 537
Table B-52 Authorizations Defined for the Object Label Management Profile538
Table B-53 Commands Defined for the Object Label Management Profile 538
Table B-54 Actions Defined for the Object Privilege Management Profile 539
Table B-55 Authorizations Defined for the Object Privilege ManagementProfile . . . . . . . . . . . . . . . . . . . . . . . . . . . . . . . . . . . . . . . . . . . . . . . 540
Table B-56 Commands Defined for the Object Privilege Management Profile540
Table B-57 Actions Defined for the Outside Accred Profile . . . . . . . . . . . . 541
Table B-58 Authorizations Defined for the Outside Accred Profile . . . . . 541

xlvi Trusted Solaris Administrator’s Procedures—July 1997
Table B-59 Commands Defined for the Outside Accred Profile . . . . . . . . 541
Table B-60 Actions Defined for the Privileged Shells Profile . . . . . . . . . . . 542
Table B-61 Authorizations Defined for the Privileged Shells Profile . . . . 542
Table B-62 Commands Defined for the Privileged Shells Profile . . . . . . . 542
Table B-63 Actions Defined for the System Management Profile . . . . . . . 542
Table B-64 Authorizations Defined for the System Management Profile. 543
Table B-65 Commands Defined for the System Management Profile. . . . 544
Table B-66 Actions Defined for the System Security Profile. . . . . . . . . . . . 549
Table B-67 Authorizations Defined for the System Security Profile . . . . . 550
Table B-68 Commands Defined for the System Security Profile . . . . . . . . 550
Table B-69 Actions Defined for the User Management Profile . . . . . . . . . 552
Table B-70 Authorizations Defined for the User Management Profile . . . 552
Table B-71 Commands Defined for the User Management Profile . . . . . . 553
Table B-72 Actions Defined for the User Security Profile . . . . . . . . . . . . . . 553
Table B-73 Authorizations Defined for the User Security Profile . . . . . . . 553
Table B-74 Commands Defined for the User Security Profile . . . . . . . . . . 554
Table B-75 Actions Defined for the inetd Profile . . . . . . . . . . . . . . . . . . . . . 554
Table B-76 Authorizations Defined for the inetd Profile. . . . . . . . . . . . . . . 554
Table B-77 Commands Defined for the inetd Profile. . . . . . . . . . . . . . . . . . 555
Table B-78 Actions Defined for the boot Profile . . . . . . . . . . . . . . . . . . . . . . 557
Table B-79 Authorizations Defined for the boot Profile . . . . . . . . . . . . . . . 558
Table B-80 Commands Defined for the boot Profile . . . . . . . . . . . . . . . . . . 559

xlvii
Preface
This Trusted Solaris Administrator’s Procedures manual provides procedures formanaging users and machines while maintaining the security of informationwithin the Trusted Solaris™ environment. This book is part of the TrustedSolaris administrator’s document set, which also includes an administrativeoverview, a guide to planning, administering, and configuring the system, andmanuals on administering auditing and administering labels.
Who Should Use This BookThis book is used by administrators who are authorized to assume any of theTrusted Solaris administrative roles. This book describes how to do the uniqueTrusted Solaris administrative tasks that are an essential part of protecting thesecurity of the system.
Before You Read This Book♦ Understand Solaris™ 2.x administration, CDE, Solstice™, and NIS+
The procedures described here are unique to Trusted Solaris administration.Administrators of Trusted Solaris must already understand how to workwithin and administer the Solaris 2.x operating environment, which is theoperating system upon which Trusted Solaris is based, and understand howto use and administer the Common Desktop Environment (CDE) windowsystem, Solstice™ AdminSuite™ system administration tools and NIS+.

xlviii Trusted Solaris Administrator’s Procedures—July 1997
♦ Read and understand the basic concepts and procedures for using thesystem, as described in the Trusted Solaris user document setAdministrators should understand how to work in the Trusted Solarisenvironment as a normal user.
♦ Read and understand the administrative concepts described in the TrustedSolaris administrator’s overview manual
♦ Understand how administrative tasks are divided among roles at your siteEach task includes a note that identifies which role has been assigned to thetask in the default configuration. Reference tables in Appendix A list theresponsibilities, the relevant actions and commands for each of the defaultroles. Your local security administrator is responsible for making alladministrators aware of the new configuration if the default administrativeroles have been reconfigured at your site.
How This Book Is OrganizedThis book has three parts and a total of 18 chapters.
Part 1 — “Procedures Common to All Tasks and Administrative Roles”
Chapter 1, “Assuming a Role and Working in a Role Workspace”
Reviews how to log in, enable logins, assume an administrative role, work inan administrative role workspace, launch administrative actions from theworkspace and administrative commands in the profile shell.
Chapter 2, “Miscellaneous Tasks and Procedures”
Describes how to get hexadecimal equivalents for labels and clearances, extendextendable mechanisms, including adding authorizations and privileges, withcross-references to the procedures for adding execution profiles and auditevents, and how to administer multilevel directories.
Part 2 — “Administering Users, Roles, Profiles and Mail”
Chapter 3, “Managing User Accounts”
Describes how the responsibilities for managing user accounts are dividedbetween two administrative roles, what decisions to make and what to dobefore setting up accounts for users and roles, and how to administer startupfiles in the Trusted Solaris system.

Preface xlix
Chapter 4, “Managing Roles”
Describes the differences between user and role accounts, how theresponsibilities for managing all roles are given to the security administrator,except for the responsibility of managing the security administrator’s own role,which is given to the system administrator. Describes how the User Manager isused in administering role accounts and introduces the profile manager that isused to configure the profiles for new roles or to modify the profiles forexisting ones.
Chapter 5, “Using the User Manager to Configure User and Role Accounts”
Describes the information that must be provided in each of the dialog boxes ofthe User Manager, then provides step by step procedures for entering therequired information in the fields.
Chapter 6, “Managing Mail”
Describes the differences between standard Solaris and Trusted Solaris mailadministration, including the new Trusted Solaris sendmail debuggingoptions and the new privacy options in the sendmail.cf file for handlingmail that is received below an account’s minimum label.
Chapter 7, “User Manager Data Collection Worksheet”
Provides a checklist of all the tasks for setting up a new user account.
Chapter 8, “Managing Execution Profiles for Users and Roles”
Describes how to use the Profile Manager to create, modify and delete profiles.This chapter includes tables listing the actions, commands and commandprivileges assigned to each of the default role and user profiles.
Part 3 — “Managing Hosts and Networks”
Chapter 9, “Trusted Solaris Concepts for Managing Hosts and Networks”
Reviews concepts that apply to managing communications and illustrates howtrusted communications can be configured between the Trusted Solarisdistributed system and multiple networks.

l Trusted Solaris Administrator’s Procedures—July 1997
Chapter 10, “Specifying Security Attributes in Trusted Network Databasesand Setting Up Routing”
Describes how to specify the security attributes and set up routing for trustednetwork communications between machines.
Chapter 11, “Managing Files and File Systems”
Describes the new file system security attributes and how to set up mountsacross the distributed system and specify the new security attributes.
Chapter 12, “Managing NIS+”
Describes how NIS+ is used to centrally administer the Trusted Solarisdistributed system and lists the new NIS+ tables.
Chapter 13, “Changing Configurable Trusted Solaris Kernel Switches”
Describes how to modify the system configuration switches that set whetherILs are displayed, whether ILs float, whether ILs are reset when a newprogram is executed with execve(2TSOL) , whether the names of upgradedfiles and directories are displayed, and whether privilege debugging mode isturned on.
Chapter 14, “Managing Printing”
Describes how to configure printing, how to add and delete labeled andunlabeled printers, and provides pointers to the manual that describes how tospecify handling caveats for printer banner and trailer pages.
Chapter 15, “Managing Device Allocation and Setting Device Label Ranges”
Describes how to set up device allocation, how to make devices allocatable,how to write and specify device clean scripts to run when a device isdeallocated and how to respond to the allocate error state. This chapter alsoincludes how to set the label range on devices.
Chapter 16, “Adding Software”
Describes how to add Sun unbundled products, UNIX applications, newtrusted programs, actions, and shell scripts, how to assess what privileges newsoftware needs and whether to give it the needed privileges. This chapterdescribes the two ways that privileges are made available to software.

Preface li
Chapter 17, “Host Administration Checklist”
Provides a worksheet for collecting information for setting up a host.
Appendix A, “Profile Summary Tables”
Summarizes the contents of the default set of execution profiles.
Appendix B, “Profile Definition Tables”
Lists for each profile all of its authorizations, commands and actions and theprivileges and security attributes associated with the commands and actions.
Related Books• Trusted Solaris User’s Guide
The rest of the Trusted Solaris administrator’s document set:
• Trusted Solaris Administration Overview• Trusted Solaris Administrator’s Procedures• Trusted Solaris Label Administration• Trusted Solaris Audit Administration• Trusted Solaris Developer’s Guide• Trusted Solaris Reference Manual• Trusted Solaris 2.5 Release Notes• Trusted Solaris 2.5 Transition Guide• Compartmented Mode Workstation Labeling: Encodings Format
What Type Styles Mean in Text and ExamplesTable P-1 explains the type styles used in this manual.
Table P-1 Typographic Conventions
Type Style Meaning Example
Filename|Command The names of commands, files, anddirectories
Edit your .login file.Use ls -a to list all files.
ScreenText Onscreen computer output machine_name%You have mail.
UserType What you type, contrasted with on-screen computer output
machine_name% suPassword:

lii Trusted Solaris Administrator’s Procedures—July 1997
Which Trusted Solaris Prompts Go With Which User TypesTable P-2 identifies which prompts go with which shells.
Variable Argument name in a command-line. To delete a file, enter rm filename.
You replace the argument with a realname or value.
machine_name% rm myfile
Title or Emphasis Book titles, new words or terms, orwords to be emphasized
Read Chapter 6 in User’s Guide. Theseare called class options.
You must be root to do this.
Table P-2 Trusted Solaris Prompts
Shell Prompt
C shell prompt hostname%
Bourne shell, Korn shell andProfile shell prompt
$
Table P-1 Typographic Conventions
Type Style Meaning Example

Part 1 — Procedures Common to All Tasksand Administrative Roles
This part of the Trusted Solaris Administrator’s Procedures manual contains twochapters that describe the tasks and procedures common to all roles.
Chapter 1, “Assuming a Role and Working in a Role Workspace” includesthese topics:
Chapter 2, “Miscellaneous Tasks and Procedures” includes these topics:
Review of Administrative and Non-administrative Role Concepts
Working in the Administrative Role Workspace
To Launch Administrative Applications
To Launch Administrative Actions
Preventing Logins From Being Disabled After a Reboot
Getting a Hexadecimal Equivalent for Labels and Clearances
Extending Extendable Security Mechanisms
To Add An Authorization
To Add a Privilege
Changing the Trusted Stripe
Working with MLDs


3
Assuming a Role and Working in aRole Workspace 1
As described in the Trusted Solaris Administration Overview, administrative tasksin the Trusted Solaris system are performed by administrators who first log inusing their own user account names and passwords, and who, after identifyingthemselves to the system, then assume a role. This chapter describes thesequence for assuming a role and provides guidance on how to work inadministrative role workspaces. This chapter covers the following major topics:
This chapter provides the procedures listed here:
Review of Administrative and Non-administrative Role Concepts page 4
Working in the Administrative Role Workspace page 7
To Log In and Assume an Administrative Role page 12
To Switch Among Administrative Role Workspaces and the Normal UserWorkspaces
page 21
To Work at Multiple Labels While in an Administrative Role page 21
To Launch Administrative Applications page 23
To Launch Administrative Actions page 24
To Create A New Administrative Action for Editing an AdministrativeFile
page 24
To Add Actions Outside the System_Admin Folder page 26
To Prevent Logins From Being Disabled After a Reboot page 26

4 Trusted Solaris Administrator’s Procedures—July 1997
1
Review of Administrative and Non-administrative Role ConceptsThe following sections review some concepts introduced in the Trusted SolarisUser’s Guide for convenience, so you can see the complete process from thepoint of view of someone logging in to do administrative work. Trusted Solarishas two types of roles: administrative roles and non-administrative roles.
Administrative Roles
Most administrative work is done administrative roles.
Administrative roles are similar in most ways to non-administrative roles,except that:
• Administrative roles are in sysadmin group 14, which is necessary forperforming NIS+-related tasks, and
• Administrative roles work in a special administrative role workspace whoseprocesses have the trusted path attribute that is required by many programsused to perform administrative tasks.
Most tasks are divided between the security administrator role and the systemadministrator role, both of which are administrative roles. A thirdadministrative role, the root role, is used to install software that requires a realUID of root in order to succeed.
Non-administrative Roles
In the default system, the only non-administrative role used to doadministration work is the operator role, which is assigned the backing up offile systems.
Logging In and Assuming a Role
In the Trusted Solaris system, administrators do not log in directly asadministrators. Following is the sequence of how roles of both types log in andbegin work in the window system (which is the same sequence for assumingnon-administrative roles except for the final bullet):

Assuming a Role and Working in a Role Workspace 5
1
• The security administrator assigns an administrative or non-administrativerole to the user’s account, using the Trusted Solaris version of the SolsticeUser Manager.
• The security administrator gives to the user both the password for the useraccount and the password for the role.
• The user who is configured to be able to assume a role logs in by supplyinghis or her own username and password.
• To begin work in the role, the user assumes the role by choosing the assumerole option from the Trusted Path menu, and by providing the rolepassword to the role password dialog box.
• For administrative roles, a special administrative role workspace becomesactive, and the person then may act in the administrative role to performadministrative tasks.
• For non-administrative roles, a normal user workspace is created that doesnot have the trusted path attribute that is checked by many administrativeprograms.
Auditing of Administrative Actions
At login, a UID that also serves as an audit ID becomes associated with allprocesses generated by the logged-in user. If a user assumes a role, the user’seffective ID changes, but the audit ID does not. The audit ID makes it possibleto trace back to an identified user account the actions that a user performswhile in a role. Requiring users to log in and identify themselves beforeassuming a role plugs one possible security hole that can occur in a normalUNIX system, in which any individual who discovers the root password canlog in directly and have unlimited anonymous access to all the information onthe system.
How Logins are Enabled
Logins are disabled by default after every reboot. When logins are disabled,only a user account with the enable logins authorization can log in or enablelogins. The purpose of disabling logins is to make it possible for the systemadministrator or other trusted employee to verify that the security of thesystem has not been compromised before allowing anyone else to log in again.

6 Trusted Solaris Administrator’s Procedures—July 1997
1
Any employee assigned the system administrator role should have the enablelogins authorization assigned in an execution profile.
If the system has been rebooted and logins have not yet been enabled, one oftwo dialog boxes displays after the user enters his or her password. If thecurrent user account is not authorized to enable logins, the dialog box shownin Figure 1-1 displays.
Figure 1-1 Disabled Logins Dialog Box for a User Not Authorized to Enable Logins
If the account logging in is authorized to enable logins, the dialog box shownin Figure 1-9 displays.
Figure 1-2 Disabled Logins Dialog Box for a User Authorized to Enable Logins
Preventing Logins From Being Disabled After a Reboot
The presence of the /etc/nologin file is checked during the login sequenceafter a host is rebooted, and logins are disabled if the nologin file is present.If it is consistent with the site’s security policy to allow logins by everyoneafter all reboots, the security administrator can edit the S05RMTMPFILES script

Assuming a Role and Working in a Role Workspace 7
1
in /etc/rc2.d to comment out the lines that create the /etc/nologin file.See “To Prevent Logins From Being Disabled After a Reboot” on page 26, ifchanging the default is consistent with your site’s security policy.
Before removing the lines that create the nologin file, save a copy ofS05RMTMPFILES, making sure that the copy has the original files’ DAC andMAC attributes in case you wish later to restore it. The S05RMTMPFILES file'sattributes to be maintained are ADMIN_LOW[ADMIN_LOW], owner root andgroup sys.
Working in the Administrative Role WorkspaceImmediately after a user assumes an administrative role for the first time, asdescribed in “To Log In and Assume an Administrative Role” on page 12, anadministrative role workspace becomes active at the role’s minimum label,ADMIN_LOW, and a new workspace button for the role displays in theworkspace switch area. The new role workspace button is highlighted alongthe edge of the left top and side and given the name of the administrative roleaccount, as shown in Figure 1-3. The administrative role can change the nameof the button just as anyone can change the name of any other workspace.
Figure 1-3 Workspace Switch Area with a Button for the admin Administrative Role
The user who has assumed a role may return to any non-administrative roleworkspace at any time to work with the commands and actions specified inthat account’s execution profile. See “To Switch Among Administrative RoleWorkspaces and the Normal User Workspaces” on page 21.
Administrative roles most often work at the ADMIN_LOW andADMIN_HIGH administrative labels. After the first workspace comes up atADMIN_LOW, if you want to create a new workspace and relabel it forworking at ADMIN_HIGH or other sensitivity label, follow the instructionsunder “To Work at Multiple Labels While in an Administrative Role” onpage 21.

8 Trusted Solaris Administrator’s Procedures—July 1997
1
Working at more than one label while you are in a role is similar to working atmore than one label as a normal user, but bringing up a new administrativerole workspace is slightly different. See “To Bring Up New Role Workspacesand Relabel Them.”
Application Manager Folders and Actions Icons
Much of the administrative work performed by administrative roles is done bylaunching administrative programs from folders within the ApplicationManager. In keeping with the principle of least privilege, the set ofadministrative programs is divided between the two major administrativeroles. If a role is not allowed to use an application, its icon does not display.
Using Administrative Applications in Solstice_Apps Applications Folder
Administrative roles do most administrative work by launching administrativeapplications from the Solstice_Apps folder within the Application Manager.See “To Launch Administrative Applications” on page 23. All configurationfiles that are managed as NIS+ maps are edited through the applications in theSolstice_Apps folder.
Using Administrative Actions in the System_Admin Applications Folder
Other tasks performed by administrative roles, such as the editing of mostconfiguration files that are not managed through NIS+, are done by using theadministrative actions that are found in Trusted Solaris version of the SystemAdministration Folder in the Applications Manager.

Assuming a Role and Working in a Role Workspace 9
1
Accessing the Application Manager
The Application Manager is accessed by clicking its icon. Figure 1-4 shows theApplication Manager icon selected in the mid-right side of the Front Panel.
Figure 1-4 Application Manager Icon Selected in the Front Panel, and theSystem_Admin Folder Selected in the Application Manager

10 Trusted Solaris Administrator’s Procedures—July 1997
1
Figure 1-5 shows the administrative actions that are in the System_Adminfolder when it is accessed by the security administrator.
Figure 1-5 Administrative Actions
Table 1-1 Administrative Actions, Purposes, and Default Roles
Action Name Action Purpose Default Role
Admin Editor Edits any specified file secadmin
Audit Classes Edits audit_class(4TSOL) secadmin
Audit Control Edits audit_control(4TSOL) secadmin
Audit Events Edits audit_event(4TSOL) secadmin
Audit Startup Edits the audit_startup.sh script [see audit_startup(1MTSOL)] secadmin
Audit Users Edits audit_user(4TSOL) secadmin
Check Encodings Runs chk_encodings(1MTSOL) on specified encodings file secadmin
Edit Encodings Edits specified label_encodings(4TSOL) file and runschk_encodings(1MTSOL)
secadmin
Name Service Switch Edits nsswitch.conf(4) secadmin

Assuming a Role and Working in a Role Workspace 11
1
See “To Launch Administrative Actions” on page 24.
All the actions are wrappers around the /usr/dt/bin/trusted_edit shellscript that brings up the adminvi restricted editor and audits any changesmade at the time the file is saved. [See “Administrative vi” on page 12 and theman page for the characteristics of adminvi(1MTSOL) .]
Accessing Commands and Actions
While in the administrative role workspace, the person acting in the role hasaccess only to the commands and actions with the attributes specified for themin the role’s execution profile or profiles. The application or action is launchedat the sensitivity label of the currently active role workspace.
Using the Profile Shell To Do Other Tasks
The profile shell, pfsh(1MTSOL) , is the default shell for administrative roles.It is used in Trusted Solaris administration to restrict each role to the minimumset of commands that the role needs for doing its tasks, while allowing thecommands to inherit any privileges they need while executing. Profile shellsmay be run at any sensitivity label. Administrators access the profile shell bybringing up dtterm or any other terminal emulator from the front panel, andthe profile shell is started in the terminal at the sensitivity label of the currentworkspace.
Set Daily Message Edits /etc/motd admin
Set Default Routes Edits /etc/defaultrouter admin
Set DNS Server Edits resolv.conf(4) admin
Set Mail Options Edits /etc/mail/sendmail.c f secadmin
Set Mount Attributes Edits vfstab_adjunct(4TSOL) secadmin
Set Mount Points Edits vfstab(4) admin
Share Filesystems Edits dfstab(4) ; does not run share(1M) admin
Table 1-1 Administrative Actions, Purposes, and Default Roles
Action Name Action Purpose Default Role

12 Trusted Solaris Administrator’s Procedures—July 1997
1
Administrative vi
The adminvi(1MTSOL) command is a modified version of the vi commandthat is restricted to prevent the user from executing shell commands and fromwriting to (saving to) any file other than the original file being edited. TheAdmin Edit action, which is assigned to the security administrator role bydefault, should be used in most cases instead of adminvi on the command lineto edit or create administrative files. The adminvi command may be assignedto any users whose default shell is the profile shell, if the securityadministrator wishes to allow those users the use of a text editor whileconstraining them to edit files with adminvi’s built-in restrictions.
Administrative Role Procedures
▼ To Log In and Assume an Administrative Role
1. Log in as a normal user, supplying your own username and password.
If you enter your username and password and the workstation informationdialog box displays as shown in Figure 1-6 on page 12, go to Step 3 on page15.
2. Enable logins if necessary (see Figure 1-6 and Figure 1-7).
a. If your account is not authorized to enable logins, notify the securityadministrator.The security administrator must verify that the security of the system hasnot been breached before enabling logins so that you can log in. SeeFigure 1-6.
Figure 1-6 Disabled Logins Dialog Box for a User Not Authorized to Enable Logins

Assuming a Role and Working in a Role Workspace 13
1
b. If your account is authorized to enable logins, click the Enable Loginsradio button to enable logins. See Figure 1-7.
Figure 1-7 Disabled Logins Dialog Box for a User Authorized to Enable Logins

14 Trusted Solaris Administrator’s Procedures—July 1997
1
Figure 1-8 Workstation Information Dialog Box
Sun Microsystems Inc. SunOS 5.5.1 TS2.5 June 24, 1997

Assuming a Role and Working in a Role Workspace 15
1
3. Review the information provided on the workstation information dialogbox (Figure 1-8 on page 14) and, if allowed, choose between a singlesensitivity label or multiple sensitivity label session.
a. Check the date and time of the last login to ensure there is nothingsuspicious about the last login, such as an unusual time of day.
b. Read the message of the day.
c. Check console messages since last logout.
d. Report any suspicious logins, messages that could indicate suspiciousactivity, or other problems to your the administrator or systemadministrator, as appropriate.
e. If your user account is configured to be able to work with multiplelabels, check or ignore the Restrict Session to a Single Label togglebox, depending on whether you want to start work in a multilabel orsingle-label session.
Note – If your account is configured to work at only one sensitivity label,“Single Level Session SL:” displays at the bottom of the workstationinformation dialog box followed by the sensitivity label at which you areconfigured to work. For example, if your single sensitivity label isCONFIDENTIAL, the text shown in Figure 1-9 displays.
Figure 1-9 Single Label Indicator on the Message of the Day Dialog Box
4. Press Return or click OK to close the workstation information dialog box.
If you checked the box next to Restrict Session to a Single Label, the SettingUser Session SL dialog box displays (see Figure 1-10 on page 17 and go toStep 5 on page 16).

16 Trusted Solaris Administrator’s Procedures—July 1997
1
If you are allowed to work at multiple sensitivity labels and if you did notcheck the box next to Restrict Session to a Single Label, on the WorkstationInformation dialog box, the Setting User Session Clearance dialog boxdisplays (see Figure 1-11 on page 19 and go to Step 6 on page 18).
5. To specify a sensitivity label for a single-label session, either accept thedefault sensitivity label or specify a sensitivity label in the Single LevelSession: Setting User Session SL Label Builder.
a. To type in the sensitivity label, use the text entry field under UpdateWith, and click Update when done.
b. To use the mouse to build the sensitivity label, choose a classificationfrom the CLASS menu and select the compartments by checking theboxes next to the compartment names under COMPS.
c. Click OK.
d. Go to Step 7 on page 19.

Assuming a Role and Working in a Role Workspace 17
1
Figure 1-10 Label Builder Dialog Box for a Single-sensitivity Label Session
Classificationmenu
Label entry fieldand Update button
Compartmentselection checkboxes
Currentlyspecified label
Type of labelbeing built

18 Trusted Solaris Administrator’s Procedures—July 1997
1
6. To specify the clearance for a multilabel session, either accept the defaultclearance shown in the Multi Level Login Setting User Session Clearancelabel builder, or specify another clearance.
a. To type in the clearance, use the text entry field below Update Withand click Update when done.
b. To use the mouse to build the clearance, choose a classification fromthe Class menu and select the compartment components by checkingthe boxes next to the compartment names in the Comps column.
c. Click OK.
d. Go to Step 7 on page 19.

Assuming a Role and Working in a Role Workspace 19
1
Figure 1-11 Session Clearance Dialog Box
7. Choose the assume role option from the Trusted Path menuFigure 1-12 on page 20 shows the Trusted Path menu for a user who isconfigured to assume the system administrator role.
Type of labelbeing built
Currentlyspecified label
Clearance labelentry field andUpdate button
Classificationmenu
Compartmentselection checkboxes

20 Trusted Solaris Administrator’s Procedures—July 1997
1
Note – The option Assume role_account_name role appears on the Trusted Pathmenu only for users who are configured to assume a role. A user configuredfor the security administrator role sees Assume secadmin Role ; a userconfigured for the system administrator role sees Assume admin Role , and soon. (secadmin is the account name for the security administrator role andadmin is the account name for the system administrator role).
Figure 1-12 Choosing the Assume admin Role Option from the Trusted Path Menu
The Role Password dialog box displays.
8. Enter the role password in the role password dialog box (see Figure 1-13),and click OK.
Figure 1-13 Role Password Dialog Box
The administrative role workspace becomes active and a new administrativerole workspace button is added to the workspace switch area.
Add Workspace
Change Workspace SL
Change Password
Query Window LabelChange Input ILShut DownHelp
TP Menu
Assume admin Role
DeleteRename
Allocate Device

Assuming a Role and Working in a Role Workspace 21
1
▼ To Switch Among Administrative Role Workspaces and the Normal UserWorkspaces
♦ Click the desired workspace’s button.
▼ To Work at Multiple Labels While in an Administrative Role
1. Add a new administrative role workspace.
a. Move the cursor to the button for a role workspace.
Note – If you do not have the cursor over an administrative role workspace’sbutton, but instead have it somewhere else in the workspace switch area, AddWorkspace adds a normal user workspace.
Figure 1-14 Creating a New Role Workspace From the Trusted Path Menu
b. Click the right mouse button on the workspace switch button to bringup the Trusted Path menu (see Figure 1-14).

22 Trusted Solaris Administrator’s Procedures—July 1997
1
c. Choose Add WorkspaceA new administrative role workspace becomes active, and a newadministrative role workspace button appears in the workspace switcharea in the Front Panel, as shown in Figure 1-15.
By default, the name of new workspace is the name of the role accountfollowed by an underline followed by a number. As shown in theexample, the name of a second administrative workspace created for theadmin role is admin_1 .
Figure 1-15 A New admin_1 Workspace Button for a New Administrative RoleWorkspace
2. Change the sensitivity label of the workspace.
a. Move the cursor to the new role workspace button.
b. Click the right (MENU) mouse button on the workspace switch buttonto bring up the Trusted Path menu.
c. Choose Change Workspace SL from the Trusted Path menu.See Figure 1-16.

Assuming a Role and Working in a Role Workspace 23
1
Figure 1-16 Relabeling an Administrative Role Workspace
The Label Builder displays.
d. Type in the desired sensitivity label in the text entry field underUpdate With on the Label Builder dialog box, and then click theUpdate button and click OK at the bottom of the dialog box whendone.The sensitivity label on the workspace changes to the sensitivity labelyou specified in the label builder.
▼ To Launch Administrative Applications
1. Click the Applications Manager icon in the Front Panel to open it.
2. Double-click the Solstice_Apps folder.
3. Double-click the icon for the desired application.

24 Trusted Solaris Administrator’s Procedures—July 1997
1
▼ To Launch Administrative Actions
1. Click the Applications Manager icon in the Front Panel to open it.
2. Double-click the System_Admin folder
3. Double-click the icon for the desired action.
▼ To Create A New Administrative Action for Editing an AdministrativeFile
1. As security administrator in an ADMIN_LOW workspace, use the AdminEdit action to open the /usr/dt/appconfig/types/C/TSOLadmin.dtfile.
2. Copy and paste the definition for one of the existing actions in theTSOLadmin.dt file.The example in this procedure modifies a copy of the Vfstab action.
3. Modify the copied action’s definitions.
a. Change the ACTION name.This example creates a new action to edit the system (4) file to modifyTrusted Solaris kernel switch settings.
b. Change the LABEL.
ACTION Vfstab{ LABEL Set Mount Points ICON Dtpenpd TYPE COMMAND WINDOW_TYPE NO_STDIO EXEC_STRING /usr/dt/bin/trusted_edit /etc/vfstab DESCRIPTION Specify the file system mount points}
ACTION EditSwitches{
LABEL Set TSOL Switches

Assuming a Role and Working in a Role Workspace 25
1
c. Change the ICON, if you have created a new icon or want to useanother existing one from /usr/dt/appconfig/icons/C .
d. Change the file name in the EXEC_STRING.
e. Change the text in the DESCRIPTION.
4. Save and Close the TSOLadmin.dt tile.
5. Copy and rename the Vfstab action file.
a. Go to /usr/dt/appconfig/appmanager/C/System_Admin .
b. Clone the Vfstab file and rename it to the name of the new action.For example, rename Vfstab to EditSwitches .
c. Make the action file executable.Select the Permissions option on the File Manager’s File menu and setthe permissions to executable for owner, group, and other, or enter thefollowing on the command line:
6. To make the action available to an administrative role on all hosts in thedistributed system, copy the modified TSOLadmin.dt and action files tothe NIS+ master and to all hosts in the distributed system, and bring upthe Profile Manager, choosing NIS+ as the naming service.Since the actions are not administered through NIS+, some other means ofdistribution must be used, such as rdist(1) or sneakernet (copying thefiles to a tape or floppy and carrying it around to install the files on eachhost).
ICON Dtpenpd
EXEC_STRING /usr/dt/bin/trusted_edit /etc/system
DESCRIPTION Modify TSOL-related kernel switches}
$ chmod 777 EditSwitches

26 Trusted Solaris Administrator’s Procedures—July 1997
1
7. To make the action available only on one host, bring up the ProfileManager, choosing None as the naming service.
8. Choose a profile, either the System Security profile or the SystemManagement profile and choose Actions from the View menu.The new action should be listed in the System_Admin application group inthe Excluded list of actions.
a. If the action edits a security-relevant file [such as the system (4) file]assign the action to the System Security profile.
b. If the action edits an administrative file that would normally bemodified by a UNIX system administrator and that does not containlabels or other security attributes [such as the group (4) file] assign theaction to the System Management profile.
9. Assign to the new action the same privileges that are assigned to the SetMount Points action: file_dac_read, file_dac_write, proc_audit_appl,proc_audit_tcb.
10. Log out and log in again.
▼ To Add Actions Outside the System_Admin Folder
Adding actions can be done as described in the Solaris Common DesktopEnvironment: Advanced User’s and System Administrator’s Guide, within thelimits of the Trusted Solaris MAC restrictions. Actions can be created eitherby using CreateAction or manually. The action should be placed in the/etc/dt/appconfig/types/C directory.
▼ To Prevent Logins From Being Disabled After a Reboot
1. Assume the security administrator role.
2. In an ADMIN_LOW workspace, use the file manager or commands in aterminal emulator to make a backup copy of/etc/rc2.d/S05RMTMPFILES .
$ cd /etc/rc2.d$ cp S05RMTMPFILES S05RMTMPFILES.orig

Assuming a Role and Working in a Role Workspace 27
1
3. Use the Admin Edit action to open the S05RMTMPFILES for editing.
4. Find the lines shown in the first screen below and comment out the activelines as shown in the second screen.
5. Save and close the file.
# The file /etc/nologin will disable all logins until the# logins are enabled by an authorized user via login(1)# or dtlogin(1).
cp /dev/null /etc/nologinecho "" >> /etc/nologinecho "NO LOGINS: System booted" >> /etc/nologinecho "Logins must be enable by an authorized user." >>/etc/nologinecho "" >> /etc/nologin
# cp /dev/null /etc/nologin# echo "" >> /etc/nologin# echo "NO LOGINS: System booted" >> /etc/nologin# echo "Logins must be enable by an authorized user." >># /etc/nologin# echo "" >> /etc/nologin

28 Trusted Solaris Administrator’s Procedures—July 1997
1

29
Miscellaneous Tasks and Procedures 2
This chapter provides information about tasks that do not fit neatly under thedivisions of tasks in other chapters in this manual and procedures forperforming those tasks. It includes the following main topics:
Getting a Hexadecimal Equivalent for Labels and Clearances page 30
Extending Extendable Security Mechanisms page 31
Understanding Authorizations page 32
Extending the Trusted Solaris Authorizations page 33
Extending the Trusted Solaris Privileges page 37
Changing the Trusted Stripe page 42
Working with MLDs page 43
MLD Prefix/MLD Adornment page 44
How SLDs Are Created page 44
How SLDs Are Named page 44
Restriction on the Creation of MLDs and Its Effects page 45
MLD and SLD Prefixes page 46
Creating, Changing, Finding Your Way Around In, and Deleting MLDs page 46

30 Trusted Solaris Administrator’s Procedures—July 1997
2
This chapter includes the following procedures:
Getting a Hexadecimal Equivalent for Labels and ClearancesAdministrators need to enter labels and clearances into the trusted networkdatabases and other configuration files in hexadecimal form. Useatohexlabel(1MTSOL) with the options shown in the following steps to getthe hexadecimal equivalents of a CMW label, sensitivity label, informationlabel or clearance.
▼ To Get a Hexadecimal Equivalent for a CMW Label, an SL, IL, orClearance
1. Assume the security administrator role, go to an ADMIN_LOWworkspace, bring up a profile shell [pfsh(1MTSOL) ].
2. To get the hexadecimal value for an ASCII CMW label (an informationlabel followed by a sensitivity label in brackets), useatohexlabel(1MTSOL) followed by the ASCII name of the CMW label.
To Add An Authorization page 36
To Add a Privilege page 40
To Change the Font or Color of the Trusted Path Indicator page 42
To Find Out if a Directory is an MLD page 49
To Create an MLD from the File Manager page 49
To Create an MLD from the Command Line page 49
To Identify an MLD page 50
To Identify an SLD page 51
To Address the Entire MLD page 51
To Change the MLD Prefix of a File System page 51
To Remove an MLD page 52
$ /usr/sbin/atohexlabel ADMIN_LOW0x000000000000000000000000000000000000000000000000000000000000000000000000000000000000000000000000000000000000000000000000000000000000[0x00000000000000000000000000000000000000000000000000000000000000000000]

Miscellaneous Tasks and Procedures 31
2
3. To get the hexadecimal value for an ASCII sensitivity label, useatohexlabel with the -s option followed by the ASCII name of thesensitivity label.
4. To get the hexadecimal value for an ASCII information label, useatohexlabel (1MTSOL) with the -s option followed by the ASCII nameof the sensitivity label.
5. To get the hexadecimal value for an ASCII clearance name, useatohexlabel(1MTSOL) with the -c option followed by the ASCII nameof the clearance.
Extending Extendable Security MechanismsThe following Trusted Solaris security mechanisms can be added to by thesecurity administrator role:
• Audit events• Audit classes• Execution profiles• Roles• Authorizations• Privileges
Adding audit events and audit classes is described in the Trusted Solaris AuditAdministration. Adding execution profiles is described in the current manual inChapter 8, “Managing Execution Profiles for Users and Roles” under “Use ofthe Profile Manager to Create or Modify Execution Profiles” on page 198.
$ atohexlabel -s s0x00060c0000000000000000000000000000000000000000000003ffffffffffff0000
$ atohexlabel -i s0x00060c0000000000000000000000000000000000000000000003ffffffffffff0000
$ atohexlabel -c sa0x0006ac0000000000000000000000000000000000000000000003ffffffffffff0000

32 Trusted Solaris Administrator’s Procedures—July 1997
2
Adding roles is described in Chapter 4, “Managing Roles” under “Creating aNew Role” on page 95. The rest of this section describes how to addauthorizations and privileges.
Understanding Authorizations
Authorizations are granted to users only indirectly through the executionprofiles that may be assigned to the user.
Zero or more authorizations are assigned to each execution profile through theSolstice Profile Manager, and are stored in the authorization field in thetsolprof(4TSOL) entry for each profile. The authorizations field containseither a comma-separated list of authorization numbers or names or the keywords all or none. Figure 2-1 shows the format of a tsolprof entry.
Figure 2-1 Format of a tsolprof Entry
As shown in Figure 2-2 the Audit Review profile has the terminal loginauthorization (#3) and the set file privilege authorization (#9).
Figure 2-2 An Example tsolprof Entry
When setting up or modifying an account, the security administrator roleassigns zero or more execution profiles using the Solstice User Manager. Thenames of the assigned profiles are stored in the profiles field in thetsoluser(4TSOL) entry for that account.
profile:description:authorizations:actions:commands:links:flags;
Audit Review:View The Audit Trail:none:none:/var/sbin;praudit; 3, 9;none;none,0x00000000000000000000000000000000000000000000000000000000000000000000,0x7ffffffffffffffffffffffffffffffffffffffffffffffffffffffffffffffffff:1:none

Miscellaneous Tasks and Procedures 33
2
Figure 2-3 shows the comma-separated list of profile names in the profile fieldof the tsoluser entry for a locally-created administrative role account,auditadmin.
Figure 2-3 Profiles in a tsoluser Entry for an Administrative Account
In the example shown in Figure 2-3, the Audit Review profile is assigned alongwith the Audit Control and Media Restore profiles to the new role.
Extending the Trusted Solaris Authorizations
Adding a new authorization consists of adding an entry for the authorizationinto these two files:
• /usr/include/tsol/auth_names.h
• /usr/lib/tsol/locale/C/auth_name
auth_names.h
The /usr/include/tsol/auth_names.h header file contains the manifestconstants and associated numbers for authorizations. Up to 128 possibleauthorizations are allowed. As shown in Figure 2-4, twenty-eight (28)
auditadmin:fixed:automatic:Audit Control,Audit Review,Media Restore,: none:5:lock:internal,showil,showsl:0x0000:0x00000000000000000000000000000000000000000000000000000000000000000000:0x7fffffffffffffffffffffffffffffffffffffffffffffffffffffffffffffffffff:utadm:res1:res2:res3

34 Trusted Solaris Administrator’s Procedures—July 1997
2
TSOL_AUTH_* authorizations are already defined; the TSOL_AUTH definitionsfor the default authorizations number from 1 to 27 (with 0 meaning noauthorizations).
Figure 2-4 TSOL_AUTH Defined Authorizations in auth_names.h
As shown in Figure 2-5, an additional thirty-six (36) authorizations (from 28 upto 63) are reserved for later Sun extension, and these are identified by the nameTSOL_AUTH_RESERVED.
Figure 2-5 TSOL_AUTH_RESERVED Authorizations in auth_names.h
TSOL_AUTH_ENABLE_LOGIN = 1,/* comment */TSOL_AUTH_REMOTE_LOGIN = 2,/* comment */TSOL_AUTH_TERMINAL_LOGIN = 3,/* comment */
.
.
.TSOL_AUTH_USER_HOME = 25,/* comment */TSOL_AUTH_PRINT_POSTSCRIPT = 26,/* comment */TSOL_AUTH_PRINT_UNLABELED = 27,/* comment */
TSOL_AUTH_RESERVED_028 = 28,/* comment */TSOL_AUTH_RESERVED_029 = 29,/* comment */TSOL_AUTH_RESERVED_030 = 30,/* comment */
.
.
.TSOL_AUTH_RESERVED_062 = 62,/* comment */TSOL_AUTH_RESERVED_063 = 63,/* comment */

Miscellaneous Tasks and Procedures 35
2
As shown in Figure 2-6, the remaining sixty-four (64) authorizations identifiedwith the AUTH_RESERVED name are available for any site to extend.
Figure 2-6 Authorizations Available for Extension
auth_name(4TSOL)
Figure 2-7 shows the format for an entry in auth_name(4TSOL) .
Figure 2-7 Format of the auth_name File
The constant value must be exactly the same as the manifest constant name forthe authorization in the /usr/include/tsol/auth.h file. The name field isa concise and descriptive name for the authorization, which is used in variousGUIs, including the profile manager.
Note – The authorization name (in the example in Figure 2-8, enable_logins) isdisplayed in the Profile Manager and other GUIs that display a list ofauthorizations.
The description field is a description of the activity permitted by theauthorization. The definition may be as long as you need it to be. Thedefinition is used in the Profile Manager to guide the security administratorwhen assigning authorizations to profiles.
AUTH_RESERVED_064 = 64,/* comment */AUTH_RESERVED_065 = 65,/* comment */AUTH_RESERVED_066 = 66,/* comment */AUTH_RESERVED_067 = 67,/* comment */
.
.
.AUTH_RESERVED_125 = 125,/* comment */AUTH_RESERVED_126 = 126,/* comment */AUTH_RESERVED_127 = 127/* comment */
constant:name:description

36 Trusted Solaris Administrator’s Procedures—July 1997
2
Figure 2-8 gives an example of an actual authorization in the defaultauth_name file. Note that the manifest constant name is in all capital letters,the name is in lowercase letters, and the description is continued from line toline with the backslash character (\).
Figure 2-8 Definition for the enable logins Authorizations in the auth_name File
▼ To Add An Authorization
1. Assume the security administrator role and use the Admin Edit action toopen the auth_names.h file for editing.
2. Contact your Trusted Solaris representative to reserve an authorizationnumber.
3. Create an entry in the auth_names.h file with the manifest constant forthe privilege (see Figure 2-9).
Figure 2-9 Specifying a Manifest Constant for a New Authorization in auth_names.h
4. Save and close the file.
5. As security administrator, use the Admin Edit action to open the/usr/lib/tsol/locale/C/auth_name file for editing.
6. Create an entry with the manifest constant, name, and definition for theauthorization in the auth_name file (see Figure 2-10).
TSOLAUTH_ENABLE_LOGIN:enable logins:Allows a user to enable logins on a \
machine that was just booted. Until logins are enabled there is \
no interactive use of the machine’s resources.
AUTH_POWER = 127,/* To leap tall MAC check failures and otherwise be irresponsible andunaccountable*/

Miscellaneous Tasks and Procedures 37
2
Caution – Make sure that the first field has the identical manifest constantdefined for the authorization in the auth_names. h file in Figure 2-9.
Figure 2-10 Specifying a Name and a Description For A New Authorization inauth_name
7. Save and close the file.
Extending the Trusted Solaris Privileges
The use of privileges is discussed in great detail elsewhere in the TrustedSolaris document set, so this section focuses on how to add privileges. Addinga new privilege consists of adding an entry for the privilege into these twofiles:
• /usr/include/sys/tsol/priv_names.h
• /usr/lib/tsol/locale/C/priv_name
priv_names.h
The /usr/include/sys/tsol/priv_names.h header file contains themanifest constants and associated numbers for privileges. Up to 128 possibleprivileges are allowed. As shown in Figure 2-11, approximately eighty-six (86)
AUTH_POWER:power user:Allows a user to bypass all MAC and DACchecks and auditing flag settings and to be otherwise totallyunaccountable for his or her actions.
!

38 Trusted Solaris Administrator’s Procedures—July 1997
2
privileges are already defined; the definitions for the default privilegesnumber from 1 to 86(with 0 meaning no privileges, and the number 62 retired,as is explained below).
Figure 2-11 Manifest Constants and Numbers for Default Privileges in priv_names.h
As shown in Figure 2-12, four (4) privileges are reserved for Trusted Solarisextension, and these are identified by the name tsol_reserved . The number62 at the top of the reserved list is the number of a retired privilege, which is aprivilege that once was defined but now is not. The policy, which is explainedat the top of the file, is for anyone retiring a privilege to add it to the top of thereserved list, and for any Sun Federal developer adding a new Trusted Solarisprivilege to get the number from the top of the reserved list.
Figure 2-12 Privilege Numbers Reserved for Trusted Solaris Use
PRIV_FILE_AUDIT = 1,/* operational */PRIV_FILE_CHOWN = 2,/* operational */PRIV_FILE_DAC_EXECUTE = 3,/* policy */
.
.
.PRIV_WIN_SELECTION = 84,/* operational */PRIV_WIN_UPGRADE_IL = 85,/* operational */PRIV_WIN_UPGRADE_SL = 86,/* operational */
/* Reserved for Trusted Solaris */
tsol_reserved62 = 62,tsol_reserved87 = 87,tsol_reserved88 = 88,tsol_reserved89 = 89,

Miscellaneous Tasks and Procedures 39
2
As shown in Figure 2-13, the remaining privileges identified with the reservedname are available for any site to extend.
Figure 2-13 Privileges Available for Extension
priv_names(4TSOL)
Figure 2-14 shows the format for an entry in priv_names(4TSOL) .
Figure 2-14 Format of the priv_name File
The constant field must be exactly the same as the manifest constant name forthe privilege in the /usr/include/sys/tsol/auth.h file. The name fieldis the name of the privilege, which must be concise and descriptive for use invarious GUIs.
Note – The privilege name (in the example in Figure 2-15, file_audit) isdisplayed in the Profile Manager, File Manager, and other GUIs that display alist of privileges.
The description field is a description of the activity permitted by the privilege.The definition may be as long as you need it to be. The definition is used in theProfile Manager to guide the security administrator when assigning privilegesto programs.
/* Reserved for ISV, GOTS, integrator, ... use */
reserved90 = 90,reserved91 = 91,reserved92 = 92,
.
.
.reserved126 = 126,reserved127 = 127,reserved128 = 128
constant:name:description

40 Trusted Solaris Administrator’s Procedures—July 1997
2
Figure 2-15 gives an example of an actual privilege in the default priv_namefile. Note that the manifest constant name is in all capital letters, the name is inlowercase letters, and the description is continued from line to line with thebackslash character (\).
Figure 2-15 Definition for the file_audit privilege in the priv_name File
▼ To Add a Privilege
1. Assume the security administrator role and use the Admin Edit action toopen the /usr/include/sys/tsol/priv_names.h file for editing
PRIV_FILE_AUDIT:file_audit:Allows a process to get or set a file's or \ directory's audit preselection information. The auditing preselection \ information may override the preselection information associated with \ a process' access to a file or directory. \ Allows a process to get or set a file's or directory's public object \ flag. The public object flag may override the successful read/search \ access preselection information associated with a process' access to \ a file or directory.

Miscellaneous Tasks and Procedures 41
2
2. Read the comment at the top of the priv_names.h file (see Figure 2-16).
Figure 2-16 Comment from the priv_names. h File
3. Contact your Trusted Solaris representative to reserve a privilege number.
/ * * ********************** IMPORTANT ********************** * * The privilege names should be maintained in alphabetical order * not numeric order. * * When a privilege is retired it should be placed in theappropriate * reserved area in the form ``tsol_reserved## = ##,’’ or * reserved## = ##,’’. * * When a new privilege is needed, it should be taken from thefirst * available privilege in the appropriate reserved area. * * ISVs, GOTS’, integrator’s who need privileges are encouraged to * request and retire them by contacting their respective Trusted * Solaris support representative. * * This file is parsed by the priv_to_str(3TSOL) functions. * * In order to guarantee correct parsing, the format of the * following priv_t definition must be preserved. * * Specifically, the following guidelines must be followed: * * 1. All privileges must have an explicitly assigned id. * DO NOT RELY ON COMPILER TO ASSIGN IDs. * * 2. One privilege id assignment per line. * DO NOT CONCATENATE OR BREAK LINES. * * 3. Do not use the ‘=’ character at anywhere other than * the privilege id assignment.* For example, DO NOT use ‘=’ in the comments.

42 Trusted Solaris Administrator’s Procedures—July 1997
2
4. Create an entry in the priv_names.h file with the manifest constant forthe privilege (see Figure 2-17).
Figure 2-17 Specifying a Manifest Constant for a New Privilege in priv_names.h
5. Save and close the file.
6. As the security administrator, use the Admin Edit action to open the/usr/lib/tsol/locale/C/priv_names file for editing.
7. Create an entry with the manifest constant, name, and definition for theprivilege in the priv_name file (see Figure 2-18).
Note – Make sure that the first field has the identical manifest constant definedfor the privilege in the priv_names.h file in Figure 2-17.
Figure 2-18 Specifying a Name and a Description for a New Privilege in priv_name
8. Save and close the file.
Changing the Trusted StripeThe trusted path indicator (TP) in the trusted stripe displays in inverted colors(swapped background and foreground) to make it easier to see with yourperipheral vision. It is also now displayed in bold font.
▼ To Change the Font or Color of the Trusted Path Indicator
1. Assume the security administrator role and in an ADMIN_LOWworkspace, use the Admin Edit action to open the /usr/dt/app-defaults/C/Dtwm file for editing.
PRIV_RISK = 90,/
PRIV_RISK:override everything:Allows a process to bypass all MAC and \DAC checks and auditing flag settings and be otherwise totally \unaccountable.

Miscellaneous Tasks and Procedures 43
2
2. Change the Dtwm*ss_key_icon definition as desired.The lines in the following example make the text display in bold.
Adding the line in the following example sets the foreground color to Red.
Working with MLDsMultilevel directories are called MLDs, and single-level directories are calledSLDs. As described in the Trusted Solaris User’s Guide, files and directories atdiffering sensitivity labels in an MLD are automatically and transparentlysegregated within SLDs at differing sensitivity labels, while the existence of theSLDs is hidden during ordinary use.
MLDs were created to allow applications that are running at differingsensitivity labels to write into what appears to be the same directory. /tmp isthe directory most often used by multiple applications, and for that reason,/tmp is an MLD in the default system. Applications are not aware that whenthey write a file into /tmp , they are actually writing the file into an SLD within/tmp that has the sensitivity label at which the application is running. Homedirectory MLDs allow accounts to create files and folders at differentsensitivity labels within their home directories. When user or role accountschange into their home directories, they do not need to be aware that they haveactually changed into an SLD that is at the same sensitivity label as theircurrent workspace.
For example, when setting up a new account for user roseanne, the UserManager creates the home directory /export/home/roseanne as an MLD.When the user changes to her home directory, for example by entering cd ~ orcd /export/home/roseanne on the command line, she is automatically and
!#ifdef TSOL
Dtwm*ss_key_icon*fontList: \
-dt-*-bold-r-normal-s*-14-*-*-*-*-*-*-*:bold
!#endif TSOL
Dtwm*ss_key_icon*foreground:Red

44 Trusted Solaris Administrator’s Procedures—July 1997
2
transparently redirected to an SLD within her home directory MLD. The SLDhas the same sensitivity label as her current process, so if she changes to herhome directory while in a NEED_TO_KNOW workspace, she actually changesinto the SLD that has the NEED_TO_KNOW sensitivity label.
The rest of this section covers the prerequisite information and describes howto work with MLDs and how to refer to an MLD as a whole so you can see anddirectly access any SLDs that it contains.
MLD Prefix/MLD Adornment
The MLD prefix is also called the MLD adornment, and, when the name of anMLD includes the MLD prefix, it is referred to as the adorned name. The adornedname of an MLD is used to directly access the top level directory where theSLDs are stored. The MLD prefix may be changed by a site as described in “ToChange the MLD Prefix of a File System” on page 51.
In the default system, the MLD prefix is ”.MLD. ”. For example, the adornedname for the /tmp MLD is /.MLD.tmp .
If an MLD is accessed using its unadorned name, the application goes to theappropriate SLD at the same sensitivity label within the MLD, while if an MLDis accessed by its adorned name, the application goes to the top level of theMLD and can view individually all the SLDs the MLD contains.
How SLDs Are Created
Each time a user accesses an MLD at a new sensitivity label for the first time, anew SLD at the sensitivity label of the current process is created
The sensitivity label of the first SLD created for a new user at first login is atthe user’s minimum sensitivity label. User roseanne’s minimum sensitivitylabel is PUBLIC, so the sensitivity label of the first SLD created for her whenshe logs in for the first time is PUBLIC.
How SLDs Are Named
SLDs always have the prefix .SLD ., and, unlike the MLD prefix, the SLD prefixcannot be changed. SLD names are given sequential numbers as new SLDs arecreated within an MLD. The name of the first SLD created in an MLD isnumbered 0 (.SLD.0), the second is numbered 1 (.SLD.1), and so forth.

Miscellaneous Tasks and Procedures 45
2
When working in a PUBLIC workspace, if roseanne uses pwd on the commandline or views her home directory folder in the File Manager, she sees the nameof the directory as /export/home/roseanne , but while she apparently isworking in her home directory, she is actually in an SLD whose sensitivitylabel is PUBLIC and whose adorned name is/export/home/.MLD.roseanne/.SLD.0 .
The numbers in the SLD names have no relation to the sensitivity label of thedirectory. For example, /export/home/.MLD.roseanne/.SLD.0 is given thenumber 0 because it is the first SLD created for the user at any sensitivity label
The MLD keeps track of the label of each SLD, and each time the MLD isaccessed a second and subsequent time at a particular sensitivity label, the useris transparently changed into the SLD at the correct sensitivity label.
With the first SLD created at PUBLIC and assigned the name .SLD.0 , the nexttime roseanne changes to her home directory while running at PUBLIC, sheactually changes transparently into the PUBLIC SLD, .SLD.0 , and any filesshe creates are stored within .SLD.0 . All this is transparent to the user unlessthe user directly refers to the MLD or SLD using the prefixes, as describedunder “MLD and SLD Prefixes” on page 46.
Restriction on the Creation of MLDs and Its Effects
An MLD can only be created within a directory that is not an MLD.
The effect of this restriction is that normal users cannot create MLDs in thedefault system because they cannot write into any directory other than theirhome directories and because their home directories are MLDs and they cannotcreate an MLD within an MLD If the system administrator creates a newdirectory that is not an MLD and that is writable by normal users, only thenwill it be possible for normal users to create MLDs.
For example, the system administrator at one site has created a directory called/shark/doc mounted by and writable by all developers at a single sensitivitylabel, so that design specifications and other project-wide documentation canbe kept in one commonly-accessible place. Anyone in the development groupcan create new directories within that directory, and anyone can change anexisting directory to an MLD. See “Creating, Changing, Finding Your WayAround In, and Deleting MLDs” on page 46 for more about this topic.

46 Trusted Solaris Administrator’s Procedures—July 1997
2
MLD and SLD Prefixes
The adorned name of the MLD is used to access the top level directory in anMLD where the SLDs at various sensitivity labels are stored.
Using the adorned name of an MLD allows you to bypass the transparentredirection to an SLD within an MLD, lets you go to the MLD directly, and letsyou view each of the single-level directories it contains. Similarly, using theadorned name of an SLD brings you directly to the SLD itself.
The following screen shows a listing of the /tmp MLD using the .MLD. prefixat the NEED TO KNOW ENG label, and shows the labels of the SLDs. .SLD.1and .SLD.2 are at sensitivity labels that dominate the sensitivity label atwhich getlabel was invoked, so the error Not owner displays for them.
Creating, Changing, Finding Your Way Around In, and Deleting MLDs
Anyone who can write into a directory (who has the DAC and MAC writeaccess or has the authorization to bypass MAC when writing into a directoryor has the commands required with the needed privileges) can create a newMLD or change an existing directory into an MLD.
• Create a new MLD• Using the File Manager as shown in “To Create an MLD from the File
Manager” on page 49
trustworthy% ls /.MLD.tmp/. *
/.MLD.tmp/.SLD.0bt+_errlog.26629 dtbcache_:0bt+_errlog.26630 ps_data
/.MLD.tmp/.SLD.4bt+errlog.631 mpa000_MmailBAAa000K4 ps_datampa000.E sel_mgr.err
trustworthy% getlabel /.MLD.tmp/.*.SLD.0 PUBLIC [PUBLIC].SLD.1 Not owner.SLD.2 Not owner.SLD.4 PUBLIC [NEED TO KNOW ENG]

Miscellaneous Tasks and Procedures 47
2
• Using the mkdir command as shown in “To Create an MLD from theCommand Line” on page 49
• Change any directory to an MLD as shown in “To Create an MLD from theCommand Line” on page 49
Other useful commands and options for working with MLDs are listed inTable 2-1. See the man pages for complete information.
Table 2-1 MLD-related Commands and What They Do (1 of 2)
MLD-related Commands and Options What They Do
adornfc dirnameSee adornfc(1TSOL)
Display the pathname of a directory with the final componentadorned (with the MLD prefix that is set for the filesystem, which is.MLD. by default). Does exactly as described, displaying thepathname with the MLD prefix, whether or not the final componentis an MLD and whether or not it is a directory. This command doesnot change anything.
getfattrflag -m dirnameSee getfattrflag(1TSOL)
Tells you whether or not the directory is an MLD.
getmldadorn filesystem_nameSee getmldadorn(1TSOL)
Displays the MLD prefix of the file system.
getsldname filesystem_name
ORgetsldname -s sensitivity_label filesystem_name
See getsldname(1TSOL)
Displays the single-level directory name for the file system.Displays the SLD name that corresponds to the sensitivity label ofthe current process.
Displays the single-level directory name for the SLD that has thespecified sensitivity label file system.
mldpwdSee mldpwd(1TSOL)
Displays the pathname of the working directory including the MLDprefix if it is an MLD and the SLD name, if it is an SLD.
mldrealpath dirnameSee mldrealpath(1TSOL)
Displays the pathname of the specified directory including theMLD prefix if it is an MLD and the SLD name, if it is an SLD.

48 Trusted Solaris Administrator’s Procedures—July 1997
2
To illustrate the relationship between the MLD and the SLD and thesensitivity label of the process, Figure 2-19 shows the output of the pwd,plabel, and mldpwd commands in a terminal at the CLASSIFIEDsensitivity label, when the user‘s home directory(/export/home/roseanne ) is an MLD, and .SLD.2 is the SLD created atthe CLASSIFIED sensitivity label. In Figure 2-19, the normal user commandpwd shows the home directory name, while mldpwd shows that the user isactually in .SLD.2 within the .MLD.roseanne directory. The CLASSIFIEDSLD was created third, so it has an SLD number of 2: .SLD.2 .
Figure 2-19 Example SLD Name for the Third SLD Created in a Home Directory
Figure 2-20 shows the output of the pwd, plabel, and mldpwd commandsin a terminal at the TOP SECRET sensitivity label. The TOP SECRET SLDwas created fourth, so it has an SLD number of 3: .SLD.3.
rm -RM MLD_dirname
See rmdir(1TSOL)
Recursively removes all SLDs to which it has DAC and MAC accesswithin the specified MLD
mkdir -M dirnameORmkdir .mld_prefix.dirnameSee mkdir(1TSOL)
Make a new MLD.
setfattrflag -m existing.dirnameSee setfattrflag(1TSOL)
Change an existing directory to an MLD
Table 2-1 MLD-related Commands and What They Do (2 of 2)
MLD-related Commands and Options What They Do

Miscellaneous Tasks and Procedures 49
2
Figure 2-20 Example SLD Name for the Fourth SLD Created in a Home Directory
▼ To Find Out if a Directory is an MLD
♦ Use getfattrflag(1TSOL) and specify the directory name (without theMLD prefix).
▼ To Create an MLD from the File Manager
1. From the File Menu, select New.
2. Enter the name of the new directory.
3. Click the button “Create New Directory as an MLD.”
▼ To Create an MLD from the Command Line
♦ Use mkdir and specify the directory name with the MLD prefix.
OR
trusted% getfattrflag -m olddiroldir: is a multilevel directory
$ mkdir .MLD.newdir

50 Trusted Solaris Administrator’s Procedures—July 1997
2
♦ Use mkdir -M and specify the directory name (without the MLD prefix).
OR (to change an existing directory to an MLD)
♦ Use setfattrflag and specify the name of an existing directory.
▼ To Identify an MLD
Several methods exist to identify a multilevel directory.
♦ Use the file command on the command line.
♦ Use mldrealpath from the command line.
♦ Use getfattrflag -m and specify the name of an existing directory.
$ mkdir -M newdir
$ setfattrflag -m oldir
trustworthy16% file /export/home/roseanne/export/home/roseanne:multi-level directory
trustworthy15% mldrealpath /export/home/roseanne/export/home/.MLD.roseanne
$ getfattrflag -m /tmp/tmp: is a multilevel directory

Miscellaneous Tasks and Procedures 51
2
▼ To Identify an SLD
♦ From the command line, use getsldname(1TSOL) followed by the nameof the MLD.
♦ Within the MLD, use mldpwd from the command line.
▼ To Address the Entire MLD
♦ Use ls to recursively list the MLD by specifying the MLD prefix:
What displays depends on the label of the current process. Referring to theentire MLD is especially useful when you want to use tar to copy thedirectory to a backup tape.
▼ To Change the MLD Prefix of a File System
1. Assume the secadmin role, and do the rest of the steps in anADMIN_LOW profile shell.
2. To change the MLD prefix on an already-created filesystem, find out thecurrent MLD prefix, and then use setfsattr with the -m option followedby the new MLD prefix.
See the setfsattr(1MTSOL) man page.
trustworthy16% getsldname /export/home/roseanne.SLD.2
$ ls -R /export/home/.MLD.admin/.SLD*
$ getmldadorn /spare.MLD.$ setfsattr -m hidden. /spare$ getmldadorn /exporthidden.

52 Trusted Solaris Administrator’s Procedures—July 1997
2
3. To use an alternate MLD prefix when creating a new filesystem, usenewsecfs with the -m option.
If you do not supply the -m option with an alternate MLD prefix, the defaultprefix applies to the newly created file system. See also thenewsecfs(1MTSOL) man page.
▼ To Remove an MLD
Note – Before being able to remove an MLD, you need to remove every SLDwithin it and any contents contained within each SLD.
1. Bring up a workspace at the highest sensitivity label in your clearance.
2. Do one of the following to remove all the SLDs and their contents that arein your account’s sensitivity label range:
a. In the File Manager, enter the adorned name of the MLD in the textentry field, and choose Go To from the File Menu.
b. Choose Show Hidden Objects from the View menu.Drag all the SLDs from the MLD into the trash or select them and choosePut in Trash from the Selected menu.
Figure 2-21 shows the File Manager in the /tmp MLD, which has beenaccessed directly using the adorned name, /.MLD.tmp, and it showsthat all the SLDs (.SLD.1 , .SLD.2 , and so on) are shown by choosingShow Hidden Objects from the View menu.
$ newsecfs -m hidden. /sparehidden.

Miscellaneous Tasks and Procedures 53
2
Figure 2-21 Preparing the File Manger Before Deleting an MLD
3. On the command line, use rm with the R, M and f options to remove theMLD, all the SLDs it contains and all of their contents.
$ rm -RMf MLD_dirname

54 Trusted Solaris Administrator’s Procedures—July 1997
2

Part 2 — Administering Users, Roles,Profiles and Mail
This part of the Trusted Solaris Administrator’s Procedures manual contains sixchapters that provide the needed background and the procedures formanaging user and role accounts, mail, and printing.
Chapter 3, “Managing User Accounts” includes these topics:
Chapter 4, “Managing Roles” includes these topics:
Decisions To Make Before Setting Up User Accounts
How Responsibilities for Managing Users Are Divided
Managing Startup Files in a Trusted Solaris System
Differences Between Role Accounts and User Accounts
Differences Between Administrative and Non-Administrative RoleAccounts
Dividing the Tasks of Managing User and Role Accounts
Authorizations for Access to Account Management Tasks
Alternatives to Two-Role Administration
Creating a New Role

Chapter 6, “Managing Mail” includes these topics:
Chapter 5, “Using the User Manager to Configure User and Role Accounts”includes these topics:
Chapter 7, “User Manager Data Collection Worksheet” provides a worksheet tocollect data before you set up user and role accounts.
Chapter 8, “Managing Execution Profiles for Users and Roles” includes thesetopics:
Changing Mail Aliases
Allowing Users to List the Entire Mail Queue
Tracing Sendmail’s Activities
Troubleshooting Mail Delivery Difficulties
Configuring Trusted Solaris Mail Delivery Options for Mail BelowUsers’ Minimum Labels
Substituting an Alternate Mail Application
Understanding the Information Entered in the User Manager DialogBoxes
Setting Up or Modifying a User or Role Account
Background on Execution Profiles
Use of the Profile Manager to Create or Modify Execution Profiles

57
Managing User Accounts 3
As described in Trusted Solaris Installation and Configuration, two user accountsare set up to assume the two administrative roles that work together as the“install team” during initial configuration of the Trusted Solaris system. Thischapter describes how to finish essential tasks that are part of planning andsetting up for all the remaining users on the system, which are not covered inthe Trusted Solaris Installation and Configuration manual. This chapter also givesadditional background needed for managing user accounts.
This chapter includes the following procedures:
Things to Do Before Setting Up Accounts page 58
Decisions To Make Before Setting Up User Accounts page 58
How Responsibilities for Managing Users Are Divided page 60
Managing Startup Files in a Trusted Solaris System page 65
Administering the Automatic Running of Jobs Using cron, at, and batch page 73
To Make .login and .profile Looked at During Login for Bourne, C andKorn Shell Users
page 83
To Separate the Shell Initialization Files for Each Shell page 83
To Propagate Startup Files to Home Directory SLDs page 84

58 Trusted Solaris Administrator’s Procedures—July 1997
3
Things to Do Before Setting Up AccountsSet up user accounts after all these preconditions are met:
• All of the following are configured:• The NIS+ master• Any install and/or boot servers for the distributed system• Each user’s primary workstation• Each user’s home directory server• Each user’s audit server(s)• Any other workstations and servers that provide any other services to the
user’s primary workstations, including the mail server
• Plan for all home directories for all users to be mounted from the NIS+server.
Note – It is desirable for an account’s home directory to be already mounted onthe NIS+ master before you set up the account. If so, the User Manager willautomatically set up the account’s home directory as a multilevel directory(MLD) for you. If you do the set up of initialization files described under “ToSeparate the Shell Initialization Files for Each Shell” on page 83, the UserManager also populates the startup files from the skeleton path to the user’shome directory SLD at the account’s minimum sensitivity label.
Decisions To Make Before Setting Up User AccountsMake the following decisions before starting, because they affect how youconfigure accounts.
Some decisions are the almost the same as those you would make if installinga network of standard Solaris or other UNIX machines. However, because youare configuring the Trusted Solaris environment, you\ should consider thesedecisions in the light of any implications they might have for your site’ssecurity and of any special requirements you might have.
♦ Decide on a convention for user login namesThe Trusted Solaris system enforces a minimum of six characters and amaximum of eight. Some organizations use first names followed by lastinitial; others use last names followed by first initial. Others have otherconventions.

Managing User Accounts 59
3
♦ Review default groups and decide whether to add any groups
If you need to define new groups, use the Solstice Group Manager. No newfields have been added for Trusted Solaris group administration. Refer tothe Solstice AdminSuite 2.1 User’s Guide, if needed.
Make the following decisions and gather the specified details that are specificto Trusted Solaris user administration, based on your site’s security policy.
♦ Choose the overall method of password generation, automatic or manual
♦ Decide how your site wants to handle mail that is sent at an SL below therecipient’s minimum SL.Make sure that the Trusted Solaris-specific privacy options in the sendmailconfiguration file sendmail.cf have values consistent with your site’ssecurity policy. See “How Sendmail Handles Mail Below the Recipient’sMinimum SL” on page 177 and “To Configure Mail Delivery Options forMail Below Users’ Minimum Labels” on page 178 in Chapter 6, “ManagingMail.”
♦ Have the following information available:• A list of the available execution profiles
The execution profiles shipped with the system are designed so that youmay never have to change or extend them. See Appendix B, “ProfileDefinition Tables,” for lists of which execution profiles are assigned toeach role and their purposes, along with lists of all commands, actions,and authorizations assigned to each profile.
If your site has special requirements, the security administrator cancreate more profiles. If other execution profiles exist at your site, see yourown internal documentation for a description.
• The available administrative and non-administrative roles.
The roles shipped with the system are designed so that you may neverhave to change or extend them. If your site has special requirements,more roles may be added or the roles may be reconfigured. If your sitehas added or modified roles, see your own internal documentation for adescription of the added or modified roles available for users at your site.
• The name of each of your site’s employees who need accounts, along withthe responsibilities, roles, clearances and minimum labels assigned to each.

60 Trusted Solaris Administrator’s Procedures—July 1997
3
Getting this information together may simply involve collecting data on thefunctions each employee performs in your organization and deciding theclearances, minimum labels, and profiles they should have. You also need todecide which employees are going to be able to assume administrative roles.At government organizations, you may need to review the governmentclearances that have been given to each employee, and use these todetermine which roles they may assume and the labels at which they maywork.
♦ Decide whether to allow sourcing of shell initialization files and whetheryou want to control the initial contents of the filesSee “Managing Startup Files in a Trusted Solaris System” on page 65.
♦ Decide which files, if any, should be copied from the first $HOMEdirectory SLD created for a user into subsequent SLDs, or whether theyshould be linked, and then modify the.copy-files , and .link-filesin /etc/skel .“To Propagate Startup Files to Home Directory SLDs” on page 84.
How Responsibilities for Managing Users Are DividedThis section gives the background needed for managing user accounts underthe following headings:
Managing Users: Divided Between Two Administrative Roles page 61
System Administrator Responsibilities page 61
Security Administrator Responsibilities page 61
Alternatives to Two-Role Administration page 62
Authorizations for Access to Account Management Tasks page 62

Managing User Accounts 61
3
Managing Users: Divided Between Two Administrative Roles
In the default Trusted Solaris system, managing users is set up to be a two-person responsibility so that no single administrator has total control of thesystem. However, because more than one person may be enabled to assumeany administrative role, administering users may be more accurately thoughtof a two-role responsibility than a two-person responsibility.
The tasks of managing user accounts are divided between these two roles:
• System Administrator• Security Administrator
Authorizations that are configured into the default execution profiles for eachof these two administrative roles control which fields in the account managermay be specified by each role. The authorizations that apply to the TrustedSolaris version of the Solstice User Manager are described under“Authorizations for Access to Account Management Tasks” on page 62.
System Administrator Responsibilities
The system administrator role is authorized to specify all the aspects of theuser account that are not security relevant, including
• User ID• Group ID• Home directory location, and• The user’s default shell
The tasks assigned to the system administrator role are the same as thoseperformed by the system administrator (superuser or root user) in standardUNIX systems.
Security Administrator Responsibilities
The security administrator specifies all security-related aspects of the user’saccount, including:
• The method of password generation• The duration of password validity (minimum and maximum days before
change is required, maximum days of inactivity, expiration date, warning)• The user’s minimum label

62 Trusted Solaris Administrator’s Procedures—July 1997
3
• The user’s clearance• The user’s external or internal label view• Whether the user sees CMW labels, SLs only or ILs only• Whether the user is audited to a greater or lesser degree than all other users
in the distributed system• Which execution profiles the user has• Which roles the user may assume• What action to take, if any, when the workstation is idle for a specifiable
amount of time
Alternatives to Two-Role Administration
Your site may choose not to divide user administration between two roles andto reconfigure the administrative roles accordingly. See Chapter 4, “ManagingRoles,” under “Dividing the Tasks of Managing User and Role Accounts” onpage 91.
Note – If administrative roles have been reconfigured at your site, the site’ssecurity administrator is responsible for informing administrators whichresponsibilities and capabilities have been assigned to each administrative role.
Authorizations for Access to Account Management Tasks
Figure 3-1 on page 63 shows the User Manager Navigator (Add) menu foradding a user or role account. Because no information has yet been specified,the User Name, UID, and Comment fields are empty. The labels on the eightbuttons below the Comment field indicate the types of information that isspecified for each account. Each button brings up a dialog box in which thenamed type of account information is specified. These buttons appear on theUser Manager: Navigator whether the navigator is being used to add or tomodify a user account.

Managing User Accounts 63
3
Figure 3-1 User Manager: Navigator
Each button requires an authorization. The authorizations are divided betweenthe default system administrator and security administrator roles to maintainthe separation of duties that is a requirement for two-person control of accountadministration.
Note – If any buttons are grayed out when an administrative role brings up theUser Manager, this means that the authorization needed for that button is notin the role’s execution profile.
Buttons for access to dialogboxes where an administrativerole specifies the named type ofaccount information

64 Trusted Solaris Administrator’s Procedures—July 1997
3
The authorization required for each button, and the information specified onthe corresponding dialog box is shown in Table 3-1.
Table 3-1 Authorizations for User Manager Buttons and Types of Information Specified
Button Authorization Name Default Role Information
Identity set user identity sysadmin • set account name, UID, primary and, supplementary GIDs,comment, shell, type of account: normal, admin role, non-adminrole
Password set user password secadmin • create a password for the account or set up account without apassword
• set duration of password validity (min and max days beforechange required, max days of inactivity, expiration date, date forwarning)
• set user’s password generation method• specify account state: open, closed• choose whether or not to update NIS+ cred table
Home set attributes relatedto home directories
sysadmin • specify whether or not to create home directory at pathname onserver
• specify path for shell initialization files• set home directory permissions• specify mail server• choose whether or not to automount home directory
Labels set user labels secadmin • set clearance and minimum label• set external or internal label view (hide or show the names of
administrative labels)• specify viewing or hiding of SLs• specify viewing or hiding of ILs
Profiles set user profiles secadmin • for user accounts only: select user profiles
Roles set list of assumableroles
secadmin • for user accounts only: select one or more roles
Idle set idle time sysadmin • specify action to take (if any) if screen is idle for the amount oftime selected from the given list

Managing User Accounts 65
3
Managing Startup Files in a Trusted Solaris SystemIn the Trusted Solaris system, because home directories are usually multileveldirectories and because the profile shell may be assigned to an account tocontrol access to commands, administrators setting up startup files mustconsider certain details that either are not as important or do not apply instandard UNIX systems. This section provides the information needed tounderstand how startup files are administered in the Trusted Solarisenvironment and provides procedures for doing the setup.
In UNIX systems, one set of startup files is read every time a user logs in whilethe window system is coming up, and another set of startup files is readwhenever a user brings up a shell [csh(1) , ksh(1) , pfsh(1MTSOL) , orsh(1) ] in a terminal emulator, such as the cmdtool , shelltool , or dtterm .The following discussion, “Controlling Which Startup Files Are Read While theWindow System is Coming Up,” only applies to the set of startup files that aresourced by the window system while it is being launched. See the discussionstarting under “Skeleton Directories” on page 69 for how to administer thestartup files that are read whenever a user brings up a csh(1) , ksh(1) ,sh(1) , or pfsh(1TSOL) .
Controlling Which Startup Files Are Read While the Window System isComing Up
See Table 3-2 for a list of shell initialization files that are read when the userlogs in, while the window system is coming up.
Table 3-2 Startup Files Read by the Window System
Shell Startup File Read
C shell /etc/.login and$HOME/.login
Bourne shell or Korn shell /etc/.profileand$HOME.profile
Profile shell (only in Trusted Solaris systems) /etc/.profileand$HOME.profile

66 Trusted Solaris Administrator’s Procedures—July 1997
3
In the base CDE window system, every account gets an editable$HOME/.dtprofile file whose primary job is to control whether the .loginor .profile files are read by the desktop when the account logs in and startsa session.
In the Trusted Solaris system, when any account (except one with thepfsh(1MTSOL) as its default shell) logs into the desktop, the window systemcopies either an /etc/dt/config/sys.dtprofile file that was created bythe site’s security administrator, if the file exists, or the default/usr/dt/config/sys.dtprofile into that account's $HOME/.dtprofile.See Figure 3-2.
Figure 3-2 How $HOME/.dtprofile is installed
As shipped, in /usr/dt/config/sys.dtprofile, the variable that enables thesourcing of either file is commented out (see Figure 3-3), and as a result thedefault action is to not source either file.
Figure 3-3 Default Setting in the/usr/dt/config/sys.dtprofile
A /etc/dt/config /sys.dtprofile may be created and edited by thesecurity administrator or the $HOME/.dtprofile may be edited by userswith any other default shell than the pfsh(1MTSOL) to allow the sourcing of.login or .profile by the window system. Any of the *.dtprofile filesmay potentially be edited to do the same types of things done in other startupfiles, such as setting environment variables and search paths for commandsand actions, and invoking commands or functions.
# DTSOURCEPROFILE=true
Was an /etc/dt/config/sys.dtprofile Yes Copy /etc/dt/config/sys.dtprofile
No
created by administrator? to $HOME/.dtprofile
Copy /usr/dt/config/sys.dtprofileto $HOME/.dtprofile

Managing User Accounts 67
3
Comments in the *.dtprofile files encourage the site‘s administrator orindividual users to modify the startup files before changing the default, whilemaking sure that the startup files do not do anything that either requires aterminal emulator or requires user interaction while the window system iscoming up. See the comments in the /etc/dt/config/sys.dtprofile fileand “To Make .login and .profile Looked at During Login for Bourne, C andKorn Shell Users” on page 83, if changing the default is consistent with yoursite’s security policy.
Note – If any modifications to a .login or .profile prevent the user fromworking, the user may use the Failsafe Session option on the login dialog.Failsafe Session allows a log in without the sourcing any startup files—toenable the user to fix the problem file.
How the Reading of Start Up Files Is Controlled for the Profile Shell User
The algorithm for the profile shell is different from that applied with the othershells, for security reasons. The profile shell restricts the set of commandsavailable to an account, and it accomplishes this by executing only thecommands specified in one of that account’s execution profiles. To support thespecial job of the profile shell, when a user’s login shell is specified as the Profileshell, the .profile file is looked at during login, but that account’s $HOMEdirectory does not get an editable version of the .dtprofile file. The defaultin /usr/dt/config/sys.dtprofile or a version modified by the securityadministrator in /etc/dt/config/sys.dtprofile is used instead of$HOME/.dtprofile file.
Note – If the user whose default shell is pfsh creates a $HOME/.dtprofile ,the setting in the personal .dtprofile can have no effect because it willnever be looked at.

68 Trusted Solaris Administrator’s Procedures—July 1997
3
Figure 3-4 How $HOME/.dtprofile is Bypassed for Users with a Default Shell ofpfsh(1MTSOL)
Startup Files Launched When a Shell Comes Up,
Shell initialization files usually set search paths and other environmentvariables and execute some useful commands and functions. Another startupfile that is useful to have in a home directory is the .mailrc , which is oftenused to specify the user’s Mail folder, inbox and mail aliases, among otherthings, as shown in Figure 3-5.
Figure 3-5 .mailrc Example
To give another example, the .newsrc file is consulted to determine whichnews groups to bring up whenever a user brings up a news viewer.
set folder=/home/roseanne/Mail
set MBOX=$HOME/Mail/inbox
alias pubs sharonv@think monicap@owl jstearns@auburn
Use settings in /etc/dt/config/sys.dtprofile .
Do test in Figure 3-2 on p. 56.
Was an /etc/dt/config/sys.dtprofile
Yes
No
Use settings in /usr/dt/config/sys.dtprofile .
created by security administrator?
Is the user’s default shell /bin/pfsh ? No
Yes

Managing User Accounts 69
3
A short list of startup files for commonly-used applications is shown inFigure 3-6.
Figure 3-6 Startup Files for Commonly Used Applications
Skeleton Directories
If there is no administrative intervention and if the system administrator rolespecifies /etc/skel as the skeleton path directory when setting up anaccount, default initialization files for all the shells (local.cshrc ,local.profile , and local.login ) are copied into the account’s $HOMEdirectory from /etc/skel . The system administrator role may:
• Add to /etc/skel other files to be copied,
• Modify or rename the default files in /etc/skel .
• Specify an alternate skeleton directory that contains site-specific skeletonfiles
The system administrator can specify an alternate directory in the HOMEdialog box when setting up a user’s account using the Trusted Solaris versionof the Solstice User Manager.
See “To Separate the Shell Initialization Files for Each Shell” on page 83 in thischapter for how to do the setup for all shells including the pfsh . Systemadministrators may set up master copies of the shell startup files in oneskeleton subdirectory for each shell and then specify in the User Manager theappropriate skeleton directory for each user’s default shell. In this way, onlythe correct startup files for the user’s $SHELL would be copied from theskeleton file directory into the first SLD created in the user’s $HOME directorythe first time the user logs in.
Startup Files for Commonly Used Applications
.cm.rc
.netscape
.mailrc
.newsrc

70 Trusted Solaris Administrator’s Procedures—July 1997
3
The copying of files from /etc/skel (or whatever skeleton path is specified)is done as it would be in other UNIX systems, but the fact that almost all homedirectories are MLDs complicate the process. In the Trusted Solaris system, thefiles are copied from /etc/skel only into the first SLD created on theaccount’s behalf at the account’s minimum (initial) label.
After initial login, while in the home directory SLD at the account’s minimumlabel, each account is responsible for renaming the file or files copied from theskeleton directory that are appropriate to his or her default shell andmodifying the files to suit their needs. For example, if a user’s default shell is aC shell and minimum (initial) sensitivity label is PUBLIC, after the first login,in the PUBLIC SLD in the home directory, the user would rename thelocal.cshrc automatically copied from /etc/skel to .cshrc , and modifythe .cshrc as desired.
Because the initialization files are only loaded into the first home directory SLDcreated at the accounts’s minimum label, more work needs to be done topropagate the files to any SLDs that may be created at other labels. For anyinitialization files to be copied or linked into other home directory SLDscreated at other labels, either the user or administrator needs to create either a.copy_files or .link_files or both, as described beginning in “Using.copy_files and .link_files” on page 70.
Using .copy_files and .link_files
Two new Trusted Solaris files .copy_files , and .link_files can now beput into the first home directory SLD created at any account’s initial sensitivitylabel to help automate the copying or linking of any startup files into anysubsequent SLD created within a user’s home directory. The user or theadministrator can list in .copy-files whatever files should be copied andlist in .link-files whatever files should be linked into any subsequentlycreated SLD(s) from the first SLD. Zero or more of either of these files can becreated in the first home SLD. Whether the files are copied or linked is at thediscretion of whoever is doing the setup.
If .copy_files is Used to Copy Files Between SLDs:
Each copy may be modified to be different in each SLD, if desired. After anyfile is copied from the first SLD into a subsequent one, the file may be editedby the user, so that different versions may appear in different SLDs. Copying

Managing User Accounts 71
3
would be desirable, for example, if users need to use different mail aliaseswhen they are working at different sensitivity labels. To put a copy of the.mailrc in each SLD after the first one, you would include the name of the.mailrc in the .copy_files file. See “To Propagate Startup Files to HomeDirectory SLDs” on page 84.
Following these steps, the system administrator role creates a skeletondirectory (or uses the default /etc/skel ) and puts into it generic copies ofstartup files. The administrator also creates in the skeleton directory a master.copy_files containing a list of any startup files to be copied and/or amaster .link_files containing a list of any startup files to be linked to allhome SLDs. When setting up user accounts, the system administrator specifiesthe pathname of the modified skeleton directory. The result of this setup is thatall the files from the skeleton directory (including the .link_files and/or.copy_files ) are copied into the user’s initial home SLD, and, based on the.link_files and/or .copy_files , the specified files are either linked orcopied to every subsequently-created SLD.
If .link_files is Used to Link Files Between SLDs:
A change made to one initialization file in one SLD is made to all the files at alllabels in all SLDs to which the file is linked.
So, for example, if a change is made to the linked .cshrc file in a Confidentialworkspace, the change would apply to all the .cshrc files in all other SLDs atall other labels. See “To Propagate Startup Files to Home Directory SLDs” onpage 84.

72 Trusted Solaris Administrator’s Procedures—July 1997
3
Worksheet for Copy and Link Files
Here are some examples of common files with a worksheet for planning whichfiles to copy or link.
Figure 3-7 Planning Worksheet for Copying and Linking Startup Files Between SLDs
Common Startup FilesList to be Copied(for .copy_files)
List to be Linked(for .link_files)
.bugtraqrc
.cm.rc
.cshrc
.dtprofile
.login
.netscape
.mailrc
.newsrc
.profile

Managing User Accounts 73
3
Administering the Automatic Running of Jobs Using cron , at , and batch
cron(1MTSOL is the clock daemon that executes commands at specific times.
This section gives a brief overview of what cron does and describes howadministering cron and its associated commands is different in the TrustedSolaris system. See the Solaris 2.x System Administration Guide, Vol. II for basiccron information. For Trusted Solaris modifications see also the modifiedman(1) pages for at(1TSOL) , atq(1TSOL) , atrm(1TSOL) , batch (1),cron(1MTSOL) , and crontab(1TSOL) .
Review of Concepts
cron maintains an internal time-ordered list of events for all scheduled jobs.Each event represents a job with the information necessary to execute it. cronruns two types of jobs:
• Single execution jobs (at_jobs) scheduled by at to be executed once at aspecified time in the future
• Single execution jobs (at_jobs) scheduled by batch , which is a front-endscript to at(1) that submits jobs to be executed right away, as soon as thesystem load level permits
• Periodic execution jobs (cron_jobs) scheduled by crontab , to be executedrepetitively at specified intervals
cron_jobs and at_jobs are scheduled by cron from reading crontab andatjob files in their respective spool directories only at the following times:
• During cron ’s own process initialization or
• After change is made to a crontab or an atjob file.
crontab Files
The crontab file is generated by a user or role account using thecrontab(1TSOL) command (which, in the Trusted Solaris system, must be inone of the account’s execution profiles). A crontab file consists of commands,one per line, that execute automatically at the time specified at the beginningof each command line. Each command line is referred to as a cron_job. Acrontab file may contain multiple cron_jobs. The spool area for the crontabfiles is /var/spool/cron/crontabs .

74 Trusted Solaris Administrator’s Procedures—July 1997
3
atjob Files
The atjob file is generated by a user or role account using the at(1TSOL) orbatch(1TSOL) command (either of which, to be used in the Trusted Solarissystem, must be in one of the account’s execution profiles). The user’s currentprocess environment when the command is executed is saved as part of thefile. Each file is referred to as an at_job. The spool area for the atjob files is/var/spool/cron/atjobs .
Supporting Jobs at Multiple Labels in the Spool Directories
In the Trusted Solaris system, the crontabs and atjobs spool directories areMLDs that hold job files at different sensitivity labels. With MLDs as spooldirectories, one user can have multiple crontab files at different sensitivitylabels within the crontabs directory, and, similarly, one user can havemultiple atjob files at different sensitivity labels within the atjobs directory.
Determining Whether the Profile Shell is Used By a Job
Caution – If the profile shell, pfsh (1TSOL), is specified to execute a job, thesecurity administrator must ensure that all of the job’s commands are also inan execution profile assigned to the invoking user.
cron_jobs are executed using pfsh if either of the following is true:
• The login shell in the account’s passwd (4) entry is the pfsh or
• The $SHELL environment variable is the pfsh
Otherwise, cron uses the default Bourne shell, sh(1) , for cron_jobs.
Because a user can use at with the -c (for csh ), -k (for ksh ), -s (for sh ), or -p(for pfsh) options to specify the shell with which the job should be run, forat_jobs there is a third case in which the profile shell is used. at_jobs areexecuted in the profile shell if either:
• The login shell in the account’s passwd entry is the pfsh or
• The $SHELL environment variable is the pfsh or
• The at command is specified with the -p option
Otherwise, at uses:
!

Managing User Accounts 75
3
• Any shell specified with either the -c , -k , or -s options or
• The default shell, sh
Running Privileged Commands in at or cron Jobs
If a command in an at or cron job needs to run with privileges, either forcedor inheritable privileges may be made available.
Allowing a command to run with forced privileges no matter who executes thecommand is not usually consistent with a site’s security policy, so the securityadministrator usually needs to do the following to make the privilegesavailable by inheritance:
• Specify the command and any privileges it needs in one of the invokinguser’s execution profiles using the Profile Manager and
• Specify that the job is executed with the profile shell, as described in“Determining Whether the Profile Shell is Used By a Job” on page 74
See “How Privileges Are Assigned to Commands and Actions” on page 453and “To Give Forced Privileges to a Command” on page 476, or “GivingInheritable Privileges to a Command or Action” on page 454 for moreinformation. See also, “To Write a Profile Shell Script That Runs PrivilegedCommands” on page 479, which uses a cronjob in the example.

76 Trusted Solaris Administrator’s Procedures—July 1997
3
Using a UNIX Domain Socket for Communications
The communication mechanism between crontab(1TSOL) , at(1TSOL) ,atrm(1) and cron(1MTSOL) in the Trusted Solaris system is a UNIX domainsocket. Using the UNIX domain socket, the trusted networking interfacesprovided by the Trusted Security Information Exchange (TSIX) library allowcron ’s clients to communicate their message and security attributes to cron ina trusted way. See also the man(1) page for libt6 (3NTSOL).
cron (1MTSOL) is modified to create and bind the UNIX domain socket to/etc/cron.d/CRON . The /etc/cron.d/CRON file is also used as a lock fileto prevent more than one execution of the clock daemon.
The clock daemon turns on the net_mac_read privilege in its effective set tomake a multilevel port, so it can receive messages at different sensitivity labels.
When a user creates, modifies, or removes a crontab or atjob file, thecrontab(1TSOL) , at(1TSOL) , or atrm(1) command sends a message(filled in with the appropriate data) along with the command’s processes’sensitivity label to notify the clock daemon. Upon receipt of a message and theassociated sensitivity label, the clock daemon interprets the message andperforms the necessary operations. The submitting processes’ sensitivity labelis used to create or remove the crontab or atjob file at the correspondingSLD.
Ancillary Files
An ancillary file is created in the crontabs MLD for each crontab file and inthe atjobs MLD for each atjob file. Modification of crontab or atjob file alsochanges the ancillary file data. The ancillary file is named username.ad for acrontab file, and jobname.ad for an atjob file. The ancillary file containsinformation used by cron to set up a job.:
Access to at and cron
Administrators can control access to at and cron by means of *.allow and*.deny files in the /etc/cron.d directory.
The two files that define the users permitted or forbidden to use at are:
• at.allow

Managing User Accounts 77
3
• at.deny
The two files that define the users permitted or forbidden to use cron are:
• cron.allow
• cron.deny
If the *.allow file exists, then the *.deny file is not checked to determine theuser’s access. If no *.allow file exists, the *.deny file is checked, and if itexists but is empty then anyone is permitted to submit jobs. In Trusted Solaris,if neither an allow or deny file exists, no user is allowed to submit a job.
The Trusted Solaris system is delivered without cron.allow and at.allowfiles. The default cron.deny and at.deny files contain the following accountnames:
Allowing Access to Jobs Owned by OthersThe default Trusted Solaris security policy does not allow users to access jobsowned by other users, but the security administrator can configure users tobypass this restriction. To allow certain users to access jobs belonging to otherusers, the security administrator can use both of the following together:
• The at.admin and cron.admin files in /etc/cron.d
• Assigning at and cron -related authorizations
daemonbinsmtpnuucplistennobodynoaccess

78 Trusted Solaris Administrator’s Procedures—July 1997
3
at.admin and cron.admin Files
As shipped, the at.admin and cron.admin files in /etc/cron.d contain thenames of special system accounts that are used by system processes. Thedefault list, which is the same in both files, is as shown here:
As shipped, the default crontabs ADMIN_LOW SLD contains crontabs foradm, sys, and uucp. There are no other default crontabs in the crontabs MLDor default at_jobs in the atjobs MLD. Any site can add additional crontabsand can also create at_jobs to run on the behalf of any of the special systemaccounts. Because no one logs into those accounts, which have no passwordsassigned, creation of or any kind of modification to cron_jobs or at_jobs run onbehalf of these accounts would otherwise not be possible without this feature.
Conditions for Access to Other’s Jobs
An account invoking at , atq , atrm , or crontab can look at, edit, or removejobs belonging to another user only if the following conditions are met.
Conditions for at -related Commands
When using at , atq , or atrm , for an account to create or access an at_jobowned by another user:
1. The specified username or the username of the specified at_job’s owner is oneof the special system account names listed in the at.admin file and 3 mustbe true, or
2. The username of the specified at_job’s owner is the name of a role accountand 3 must be true.
3. account has the modify at admin authorization in an execution profile.
binadmlpsmtpuucpnuucplisten

Managing User Accounts 79
3
4. If neither of 1 or 2 is true, the invoking account must have the modify at userauthorization in an execution profile
Conditions for the crontab Command
When using crontab , for an account to create or access a crontabs fileowned by another user:
1. The specified username is one of the special system account names listed inthe cron.admin file and 3 must be true, or
2. The specified username is one of the role account names and 3 must be true.
3. The invoking account has the modify cron admin authorization.
4. If neither of 1 or 2 is true, the invoking account must have the modify cronuser authorization in an execution profile.

80 Trusted Solaris Administrator’s Procedures—July 1997
3
Changes to crontab (1TSOL)
The Trusted Solaris modifications to the crontab(1TSOL) command aredescribed in Table 3-3.
The access control remains the same except that when neither cron.allownor cron.deny exists, no user is allowed to submit a job.
Table 3-3crontab(1TSOL) Options
Option Comments
e Create or modify a crontab file at the sensitivity label that matches theinvoking processes’ sensitivity label. A user can edit another user’scrontab file only if the conditions described in “Allowing Access to JobsOwned by Others” on page 77 are met.If the user’s passwd entry does not specify /bin/pfsh , the crontab -ecommand invokes the editor defined by the VISUAL environmentvariable. If VISUAL is null, the editor defined in the EDITOR environmentvariable is used; if neither is defined, cron uses the default editor ed(1).When the user’s passwd entry specifies /bin/pfsh , if the environmentvariable is set to vi , then adminvi is used. If the environment variable isset to be dtpad , then the TSOLdtpad editor is used. If neither variable isset, cron uses the default editor adminvi .
l Display the crontab file at the invoking processes’ sensitivity label forthe current user. A user can display another user’s crontab file only ifthe conditions described in “Allowing Access to Jobs Owned by Others”on page 77 are met.
r Remove a user’s crontab file at the invoking processes’ sensitivity labelfrom the crontabs directory. A user can remove another user’s crontabfile only if the conditions described in “Allowing Access to Jobs Owned byOthers” on page 77 are met.

Managing User Accounts 81
3
Changes to the at Command
Table 3-4 shows modified standard at options and the new -p option for at .
The access control remains the same except that when neither at.allow norat.deny exists, no user is allowed to submit a job.
Changes to the atq Command
Table 1-5 shows atq changes.
Table 3-4 Trusted Solaris 2.5 at (1) options
Option Comments
l Display information about all at_jobs owned by the current user at theinvoking processes’ sensitivity label, if no at_job number operands arespecified. If at_job number operands are specified, report informationonly for those jobs. If the at-job is not owned by the current user, displayits job information only if the conditions described in “Allowing Accessto Jobs Owned by Others” on page 77 are met.
r Remove the at_jobs with the specified at_job number operands that werepreviously scheduled. If the specified at-job is not owned by the currentuser, it is removed only if the conditions described in “Allowing Accessto Jobs Owned by Others” on page 77 are met.
p The profile shell is used to executed the job.
Table 3-5 Trusted Solaris 2.5 atq (1) Changes
Argument Comments
none Display at-jobs owned by the invoking user at the invoking processes’sensitivity label. Other user’s at-jobs are also displayed only if theconditions described in “Allowing Access to Jobs Owned by Others” onpage 77 are met.
user Display all at-jobs owned by the specified user, if user is the invoking user.If user is not the invoking user, display jobs only if the conditionsdescribed in “Allowing Access to Jobs Owned by Others” on page 77 aremet.

82 Trusted Solaris Administrator’s Procedures—July 1997
3
Changes to the atrm Command
Table 1-5 shows atrm changes.
Miscellaneous
cron(1M) is started at ADMIN_LOW sensitivity label by the boot profile, andthen it is changed to run at ADMIN_HIGH sensitivity label after it creates theUNIX domain socket at ADMIN_LOW.
Trusted Solaris 2.5 is delivered with the following crontab files:
At the ADMIN_LOW sensitivity label, pairs of crontab and ancillary files forroot, uucp, adm, and sys.
At the ADMIN_HIGH sensitivity label, pairs of crontab and ancillary files forroot, and lp.
The /var/cron/log file is created by clock daemon at ADMIN_HIGHsensitivity label. The clock daemon logs its internal messages in this log file.
Table 3-6 Trusted Solaris 2.5 atrm (1) Changes
Argument Comments
user Remove all at-jobs owned by the specified user at the invoking processes’sensitivity label, if user is the invoking user. If user is not the invokinguser, remove jobs only if the conditions described in “Allowing Access toJobs Owned by Others” on page 77 are met.
at_job # Remove at_jobs with the specified at_job number operands at theinvoking processes’ sensitivity label.
option a Remove all at-jobs owned by the invoking user at the invoking processes’sensitivity label.

Managing User Accounts 83
3
User Setup Procedures
▼ To Make .login and .profile Looked at During Login for Bourne, Cand Korn Shell Users
1. To change the default for all users on the local host, assume the securityadministrator role
2. In the ADMIN_LOW workspace in a terminal, shell or command tool,make a copy of sys.dtprofile and open it for editing.
a. Copy sys.dtprofile from /usr/dt/config to /etc/dt/config .
b. Use the Admin Edit action to open the sys.dtprofile file for editing.
3. Remove the pound sign (#) before the DTSOURCEPROFILE variableassignment at the end of the file.After editing, the line should look like this sample screen.
4. Save and close the file.
5. Reboot the host.
▼ To Separate the Shell Initialization Files for Each Shell
♦ In the system administrator role, follow the steps under “How to Set Upthe User Initialization File” in User Accounts, Printers and MainAdministration manual for Solaris 2.5.The procedure tells you how to create three shell-specific directory namesthat you will enter in the Skeleton path field in the User Account Manager.The procedure also tells you to copy the local.login file to the skelCsubdirectory, the local.profile file to the skelK subdirectory and thelocal.login file to the skelB subdirectory.
$ cd /usr/dt/config$ cp sys.dtprofile /etc/dt/config
DTSOURCEPROFILE=true

84 Trusted Solaris Administrator’s Procedures—July 1997
3
♦ As admin, create a skelP subdirectory (for a specialized version of the.profile to be installed into the home directories of users whose defaultshell is pfsh ).
♦ As admin, enter the correct skel X subdirectory name into the Skeletonpath field in the User Manager, based on the user’s default shell.
▼ To Propagate Startup Files to Home Directory SLDs
Note – Any user can put a .copy_files or .link_files into his or herinitial home SLD or modify them if they are already present by administrativeaction
Warning – Do any setup for the startup files immediately, before users have achance to work at multiple sensitivity labels. Otherwise, multiple home SLDsmay be created without startup files being propagated.
1. Assume the system administrator role.
2. In an ADMIN_LOW workspace, go to /etc/skel or whatever skeletondirectory location you wish to use.Figure 3-8 shows a skeleton directory created for startup files for the C shell,/etc/skel/skelC (according to the procedure “To Separate the ShellInitialization Files for Each Shell” on page 83).
Figure 3-8 Changing to a Skeleton Directory Created for C Shell Startup Files
$ cd /etc/skel/skelC
!

Managing User Accounts 85
3
3. Put generic copies of startup files into the skeleton directory.Figure 3-9 shows startup files for the C shell, for the calendar manager, forthe mailer and for an Internet browser
Figure 3-9 Startup Files in /etc/skel/skelC
4. Create a .copy_files or modify it, if it already exists, to list any filesyou want to have copied to all home directory SLDs.Remember that copied files may be different in each SLD.
5. Create a .link_files or modify it, if it already exists, to list any filesyou want to have linked to all home directory SLDs.Remember that all linked files are identical in each SLD.
6. When setting up user accounts, enter the pathname of the modifiedskeleton directory in the Home dialog box on the User Manager.
$ ls.cm.rc.cshrc.login.mailrc.netscape

86 Trusted Solaris Administrator’s Procedures—July 1997
3

87
Managing Roles 4
This chapter gives the necessary background and describes how to create andmodify roles under the following headings:
Differences Between Role Accounts and User Accounts page 88
Differences Between Administrative and Non-Administrative RoleAccounts
page 88
Non-administrative Roles page 88
Administrative Roles page 89
Dividing the Tasks of Managing User and Role Accounts page 91
Authorizations for Access to Account Management Tasks page 91
Alternatives to Two-Role Administration page 94
Required Privileges page 95
Override Privileges page 96
Creating a New Role page 95
To Configure a New Role page 98

88 Trusted Solaris Administrator’s Procedures—July 1997
4
Differences Between Role Accounts and User AccountsRole accounts have all the characteristics of user accounts, with the followingexceptions:
• The system does not allow role account to log in.
Administrative work must be done only by known users who havepreviously identified themselves to the system and who have beenauthenticated. This requirement is based on the need for all users andespecially for administrators to be accountable for their actions.Administrative actions performed by a user whose identity is not known arenot attributable through the auditing mechanism.
• Instead of logging into a role, already-identified and authenticated usersassume a role from the Trusted Path menu.
• A role cannot assume another role.
If you identify an account as a role account in the User Manager Identitydialog box, the Role button dims on the Navigator dialog box and if youthen click on the Role button you get an error message.
• Each role has a role workspace that gets added to the front panel when theuser assumes the role.
Differences Between Administrative and Non-Administrative Role AccountsTwo types of roles are available:
• Non-administrative
• Administrative
Non-administrative Roles
Only one non-administrative role exists in the default system:
• System Operator
The operator role exists to do backups and manage printers, and none of itsfunctions requires the Trusted Path Attribute or any of the other specialcharacteristics described under “Administrative Roles.”

Managing Roles 89
4
When to Create a Non-administrative Role
When deciding whether to create a non-administrative role compared tosimply creating a new non-role execution profile and assigning it to users, youshould think about the advantages of creating the non-administrative roledescribed here.
Non-administrative roles are able to share ownership of and access to filesbetween multiple users, and all users who can assume the same role are able toshare the same environment in a single shared workspace:
• Any files created by the role are owned by the role, so any employeeallowed to assume the role can have the same access to the files as thecreator.
• Everyone who assumes the role gets the same home directory andenvironment set up in the role workspace.
For example, you can set up several employees who are able to assume theoperator role (account name oper) on various shifts. Each user acting in theoperator role has the same home directory ($HOME/oper ), and can use thesame tools. Any files created by the role are owned by oper .
Administrative Roles
Two main administrative roles in the default Trusted Solaris system are:
• Security administrator• System administrator
A third optional administrative role, root , exists for installing software ordoing other actions where a real UID of 0 (root’s UID) is required. The root roleshould ordinarily be assigned to the same account that has the secadmin role,because while root’s capabilities are strictly limited, the root role’s mainfunction of adding software is security-sensitive
Administrative roles have the following unique characteristics:
• An administrative role is automatically assigned the sysadmin group 14 asone of its supplementary groups. Without this group ID the role cannot runadministration tools.
• The administrative role workspaces have the Trusted Path Attribute that isalso required for using the administration tools.

90 Trusted Solaris Administrator’s Procedures—July 1997
4
When to Create a New Administrative Role
Sites may create a new administrative role if they have a need for an additionalrole to use commands or applications that check for the Trusted Path Attribute.A site might create a new administrative role, for example, if it wanted tocombine the responsibilities of the three default roles into one. See “Dividingthe Tasks of Managing User and Role Accounts” on page 91.
Things That Need the Trusted Path Attribute
Table 4-1 shows the commands and applications that require the Trusted PathAttribute, and which therefore must be run in an administrative role’sworkspace.
Table 4-1 Commands and Applications Requiring the Trusted Path Attribute
For example, the Solstice AdminSuite tools, which are used for mostadministration tasks, check for the Trusted Path Attribute, so if the securityadministrator creates a new role that needs to access any of the SolsticeAdminSuite tools listed in Table 4-1, it would need to be created as anadministrative role.
audit(1MTSOL)
auditd(1MTSOL)
login(1) -d and -f options
runpd(1MTSOL)
sendmail(1MTSOL) options -ba, -bd, -bi, -bd, -bs, -bt, -bv, -M, -X, -d, and - q
Solstice AdminSuite tools:
Database Manager dbmgr
Group Manager groupmgr
Host Manager hostmgr
Printer Manager printmgr
Profile Manager prfmgr
Serial Manager serialmgr
User Manager usermgr

Managing Roles 91
4
Dividing the Tasks of Managing User and Role AccountsAs described in Chapter 3, “Managing User Accounts,” in the default TrustedSolaris system, the security administrator and system administrator roles eachconfigure a prescribed list of characteristics for user accounts. As illustrated inFigure 4-1, the security administrator role is also responsible for configuringthe security relevant characteristics of normal user accounts and the accountsfor all other roles, while, because no role can configure itself, the systemadministrator is responsible for configuring the same characteristics of thesecurity administrator role as he or she configures for user accounts.
Figure 4-1 Division of Account and Profile Configuration Responsibilities BetweenSecurity Administrator and System Administrator
security administrator role
May not create new execution profiles
system administrator role
root role
May create new execution profiles for:administrative roles
system operator role
non-administrative roles
any site-created roles
May reconfigure execution profile for: May reconfigure execution profile for:
users
identity (add, copy, modify, orpassword information
audit flags and directoriesSL range and label viewsprofiles
roles (user accounts only)idle action
System Administrator Role
May specify for user and secadminMay specify for user and other role
home directory
Security Administrator Role
accounts: role accounts:
delete accounts

92 Trusted Solaris Administrator’s Procedures—July 1997
4
Authorizations for Access to Account Management TasksFigure 4-2 shows the User Manager Navigator (Add) menu for adding a useror role account. Because no information has yet been specified, the AccountName, UID, and Comment fields are empty. The labels on the eight buttonsbelow the Comment field indicate the types of information that is specified foreach account. Each button brings up a dialog box in which the named type ofaccount information is specified. These buttons appear on the User Manager:Navigator whether the navigator is being used to add or to modify a useraccount.
Figure 4-2 User Manager: Navigator
Buttons for access to dialogboxes where an administrativerole specifies the named type ofaccount information

Managing Roles 93
4
Each button requires an authorization. The authorizations are divided betweenthe default system administrator and security administrator roles to maintainthe separation of duties that is a requirement for two-person control of accountadministration.
Note – If any buttons are grayed out when an administrative role brings up theUser Manager, this means that the authorization needed for that button is notin the role’s execution profile.
The authorization required for each button, and the information that can bespecified on the corresponding dialog box is shown in Table 4-2. See also theauth_desc(4TSOL) man page.
Table 4-2 Authorizations For Specifying Types of User Information
User Manager Button Authorization Name Number Scope of Authorization
Identity set user identity 17 Allows an administrator to set security information relatedto the user's identity via the User Manager: the user name,primary group, secondary groups, comment, and login.Needed to add, copy, or delete a user.
Password set user password 18 Allows an administrator to set password informationpertaining to a user via the User Manager, including thepassword, type of password, life time, expiration date,warning days, and the permission to set up the credentialstable.
Home set attributes relatedhome directories
25 Allows an administrator to determine such things aslocation, permissions, and initial contents of a user's homedirectory via the User Manager.
Labels set user labels 20 Allows an administrator to set various label-related piecesinformation associated with a particular user via the UserManager: the user's minimum login label, clearance, labelview, and label translation attributes.
Profiles set user profiles 22 Allows an administrator to assign profiles to a user via theUser Manager.
Roles set list of assumableroles
24 Allows an administrator to select via the User Managerwhich roles a user may assume.
Idle set idle time 23 Allows an administrator to set the idle time and determinewhich command to execute when a workstation has beenidle for the specified idle time via the User Manager.

94 Trusted Solaris Administrator’s Procedures—July 1997
4
Note – It is important to understand that the default authorizations shown inTable 4-2 on page 93 allow the role to modify the appropriate information forevery other user and role account except that of the role itself. For example, theset user password authorization allows the security administrator to configurepassword options for all other accounts except that of the securityadministrator role.
Authorization for Specifying Information for One’s Own RoleThe permit self-modification authorization allows a role who has thatauthorization to specify the authorized information for the role’s own account.
By default, neither of the administrative role profiles have this authorization.
The permit self-modification authorization allows a role only to partiallybypass the restriction on modifying one’s own role. This authorizationtherefore actually allows the role to configure for itself only those areas wherethe role already has the required authorizations. For example, if the systemadministrator adds the permit self-modification authorization to the executionprofile for a security administrator—who has the authorizations that giveaccess to the security relevant dialog boxes in the User Manager, the securityadministrator role could then only specify the security-relevant aspects of itsown account, and still would not be able to enter information in any otherfields in the dialog boxes for which the role was not authorized, such as thoseon the Identity dialog box.
Note – The permit self-modification authorization does not allow a role to editany profiles assigned to that role account.
Alternatives to Two-Role AdministrationYour site may choose not to use two role administration and may decide tocreate a single combined administrative role to do administrative tasks, if yoursite’s security policy allows.

Managing Roles 95
4
Note – Do not attempt to combine the capabilities of secadmin and sysadminin the root role because the root role cannot be added to the NIS+ admingroup, and the root role cannot run Solstice from any other host than the NIS+master. As a result, a combined root role would not be able to run any of theSolstice administration tools unless directly logged into a the NIS+ master.
Note – If your site wishes to have a single combined administrative role, makesure that the combined role includes all authorizations that are in both role’sprofiles along with the authorization permit self modification, which is describedin “Authorization for Specifying Information for One’s Own Role” on page 94.You may also wish to add the commands, authorizations, and actions assignedto the system operator role.
Creating a New RoleIn Trusted Solaris 2.5 system, each role must have its own individual account,so the system administrator and security administrator must set up an accountfor a new role. The security administrator may also need to create a new profilefor the role.
Before creating a new profile for a role, the security administrator shouldanalyze whether any of the commands required by the role need privileges inorder to do the tasks the role is assigned to do. See Chapter 16, “AddingSoftware,” and priv_desc(4TSOL) . See the man pages for guidance abouthow to determine required privileges and override privileges that may berequired by the command.
Required Privileges
When a man page that has not been modified for the Trusted Solaris systemstates that super-user is required to execute a certain command or option,remember that one or more privileges are required instead. When a commandor one of its options needs a privilege in order to succeed, that privilege is arequired privilege, which is sometimes called an operational privilege. Requiredprivileges are indicated on a Trusted Solaris man page with the words "musthave" as shown in this sentence: "The ifconfig(1MTSOL) command must

96 Trusted Solaris Administrator’s Procedures—July 1997
4
have the sys_net_config privilege to modify network interfaces." If the requiredprivilege is not given to the command in a user's execution profile by thesecurity administrator, the command will not work.
Override Privileges
Override privileges are needed for a Trusted Solaris command that is designedto work within security policy when the command fails because certain DACor MAC checks are not passed. Like required privileges, override privilegesmay be assigned at the security administrator's discretion, after making surethat the override privileges do not give the user powers beyond his or her levelof trust or allow actions beyond the scope of the task for which the profile isdesigned. On man pages, the names of privileges that may be used to overrideaccess restrictions are given in the ERRORS section. The override privilegesthat may be given to bypass DAC or MAC restrictions on files or directoriesare given below.
DAC Override Privileges
The DAC override privileges are file_dac_read and file_dac_write. If a userdoes not have DAC access to a file, the security administrator may assign oneor both of these privileges to a command, depending on whether read or writeaccess or both are desired.
MAC Override Privileges
The MAC override privileges are file_mac_read and file_mac_write. If a userdoesn't have MAC access to a file, the security administrator may assign one orboth of these privileges to the command, depending on whether read or writeaccess or both are desired.
Options for Avoiding the Need for Privilege
Besides being able to assign an override privilege, the security administratorhas other options. For example, to avoid the use of privilege the securityadministrator may specify that the command executes with another user's ID(usually the root ID 0) or group ID, one that allows access to the file ordirectory based on its permissions or its ACL.

Managing Roles 97
4
Also, when configuring an administrative role, the security administratorneeds to decide whether a command needs to run at a certain label.
Verifying the Use of Security Attributes Within Security Policy
After assessing which privileges and other security attributes a commandneeds in order to do its work, the security administrator needs to ascertainwhether the command and the role may be trusted to use the privileges andother security attributes without violating the site’s security policy.
Example: Using the Man Page When Configuring mount in aProfile
The mount(1MTSOL) command is specified in the System Maintenance profileassigned to the system administrator role. It is a fairly-simple example of howspecifying security attributes is done. In Solaris and other UNIX operatingsystems, mount without any options displays the name of the mountedfilesystems to an ordinary user. However, when run as root, mount may beused by the administrator (super-user) to mount filesystems from thecommand line or to mount filesystems specified in the /etc/vfstab table.The mount(1M) command checks for UID=0.
In Trusted Solaris, mount behaves the same for the ordinary user as it does inSolaris. However, instead of checking only for root‘s UID, mount also checksfor privileges before performing administrative tasks. The mount(1MTSOL)man page states that the sys_mount privilege is always required by thecommand in order to mount file systems and states that the command shouldbe run with UID 0. The man page states that mount must have discretionaryand MAC access both to the mount point and to the device being mounted;otherwise, MAC or DAC override privileges are required as described inIntro(2TSOL) . Additional override privileges may be required if any mount-time security attributes are specified for the mounted file system with the -Soption. The mount(1MTSOL) man page also states that to succeed whenmounting filesystems at any sensitivity label and when specifying any mount-time attributes, mount needs all of the following privileges: file_mac_read,file_dac_read, file_mac_write, file_dac_write, file_mac_search, file_dac_search.net_privaddr, proc_setsl, proc_setil, sys_mount, and sys_trans_label. Therefore,in the System Maintenance profile, the mount command is configured with aneffective UID of 0, with required privilege sys_mount and with the otherprivileges that it needs to succeed in all cases.

98 Trusted Solaris Administrator’s Procedures—July 1997
4
▼ To Configure a New Role
1. Define what the role’s responsibilities are to be, and what commands,actions, and authorizations the role will need to do its work.
2. Decide whether any of the commands need privileges or other securityattributes to do their work, and decide whether the role and the commandcan use these security attributes in a trustworthy manner.
3. Decide if the role needs to have a new execution profile, and if so, createone for it.How to use the Profile Manager to create a new role profile is described inChapter 8, “Managing Execution Profiles for Users and Roles.” SeeAppendix B, “Profile Definition Tables” for lists of the existing profiles andtheir commands, actions, and authorizations.
4. Create an account for the role.The background for this step and the procedures to create a role account arein Chapter 5, “Using the User Manager to Configure User and RoleAccounts.”

99
Using the User Manager toConfigure User and Role Accounts 5
As discussed in Chapter 3, “Managing User Accounts” and in Chapter 4,“Managing Roles,” the security administrator and system administrator rolesshare the responsibility for entering information into the various fields of theUser Manager to create and maintain accounts for users and roles.
The following two main sections in this chapter detail the types of informationneeded when specifying accounts for users and roles and then shows the stepsfor using the User Manager to add or modify user and role accounts.
Note – The terms User Manager, user name, and user ID are retained forcompatibility with earlier versions of the Solstice User Manager, even thoughthe Trusted Solaris User Manager not only configures accounts for users butalso for roles, the user name is actually an account name, which is a string ofcharacters by which a user or a role is identified to the system, and the user IDis actually the account ID that can apply to either user or role accounts.
Understanding the Information Entered in the User Manager DialogBoxes
page 100
Setting Up or Modifying a User or Role Account page 124

100 Trusted Solaris Administrator’s Procedures—July 1997
5
Understanding the Information Entered in the User Manager Dialog BoxesAccount information for users and roles is specified by the securityadministrator and system administrator roles in a series of dialog boxeslaunched from buttons on the User Manager. See Chapter 3, “Managing UserAccounts” where the division of responsibilities for configuring user accountsand the authorizations needed to access each button are described in moredetail.
The buttons that launch the dialog boxes are shown in Figure 5-1.
Figure 5-1 User Manager: Navigator
Buttons for access to dialogboxes where the administrativerole specifies the named type ofaccount information

Using the User Manager to Configure User and Role Accounts 101
5
The sections listed here describe the type of information required on each ofthe dialog boxes and discuss choices and trade-offs among the various optionsyou have when setting up an account.
Identity page 102
User Name, User ID, Group Name(s) and Group Id(s) page 102
Decisions to Make Before Starting page 103
Comment page 103
Decision to Make Before Starting page 104
Shell page 104
Using the Profile Shell To Enable Accounts page 104
Using the Profile Shell To Restrict Accounts page 104
Decision to Make Before Starting page 105
Account Type page 105
Decision to Make Before Starting page 105
Password page 106
Background About Creating a Password or Selecting OtherPassword Options
page 106
Decision to Make Before Starting page 108
Background on the Password Duration and Warning Fields page 109
Decisions to Make Before Starting page 109
Background on the Account Status Menu Options page 112
Decision to Make Before Starting page 112
Background About Selecting a Method for Password Generation page 109
Decision to Make Before Starting page 111
Background About Checking NIS+ Credential Table Setup page 113
Decision to Make Before Starting page 113
Home page 113
Why Say Yes to Automatic Creation of Home Directories? page 113
Skeleton Path Considerations page 114
Controlling the Use of Shell Initialization Files page 114
Labels page 116
Background on the Clearance and Minimum Label page 116
Decisions to Make Before Starting page 116

102 Trusted Solaris Administrator’s Procedures—July 1997
5
Identity
The system administrator enters the following information for an account inthe identity dialog box:
• The name and number that identifies the user or role• The user or role’s group and (optional) supplementary groups• A comment• A default shell (command interpreter)• Which type of account is being created, whether it is for a user, a non-
administrative role, or an administrative role
User Name, User ID, Group Name(s) and Group Id(s)
Whether the account is for a user or a role, the account’s user name, user IDnumber, group name, and group ID number are used in these ways:
• They all are associated with each process that executes a command onbehalf of the account.
• They all are associated with any files and directories created by the account.• They all are used in DAC decisions to determine whether the user has
access to files and directories created by other users based on standardUNIX file and directory permissions and access control lists (ACLs).
• For a normal user account, the user name is requested at login as part of theidentification and authentication process.
Background on Displaying Labels page 117
Label View page 117
Example of the Effects of the Label View page 118
Decision to Make Before Starting page 119
Background on Showing or Hiding SLs and ILs page 119
Decision to Make Before Starting page 119
Profiles page 120
Decisions to Make Before Starting page 121
Roles page 122
Decisions to Make Before Starting page 122
Idle page 122
Decisions to Make Before Starting page 123

Using the User Manager to Configure User and Role Accounts 103
5
• For a role account, the user name of the role account is requested when theuser assumes a role through the trusted path.
• For a normal user account, the UID becomes the audit ID, which is stored inaudit records that are generated by any auditable actions taken by that user.The audit ID stays the same throughout a login session, even if a userassumes a role and begins work under the role’s UID. The audit ID allowsadministrators to trace audited actions back to individual users.
Decisions to Make Before Starting♦ Decide the account’s user name based on your site’s convention.
User names cannot be longer than 8 characters.
♦ Decide the account’s user ID (UID) number, which is used along with theuser name to identify the account on the system.
♦ Decide the primary group for the user and if the user’s should belong to asecondary group or groups.You need to have the group names and GID numbers available to assign tothe new account.
Where This Information is Entered Into the User ManagerSee Step 2.a, b, c, and d on page 132.
Comment
For user accounts, the Comment, which is entered in the GCOS field in thepasswd (4) entry, contains the first and last name of the user, and perhaps thejob title and work phone number. Some informal organizations allowemployees to decide what goes into the comment, and sometime the entry isused for humorous purposes, such as this example for a user who writesmanuals: “Roseanne Sullivan -- Manual Laborer.” The text you enter for theuser in the Comment: field appears in the From: line when the user sendsemail, and is part of the information sent about the user if someone entersfinger(1) , among other uses:
For a role account, enter whatever comment you like.
From: Roseanne Sullivan -- Sun Federal Technical Writer

104 Trusted Solaris Administrator’s Procedures—July 1997
5
Decision to Make Before Starting♦ Provide a comment consistent with your site’s usage.
Where This Information is Entered Into the User ManagerSee Step 2.a.e on page 132.
Shell
The system administrator chooses a default shell for the user or role account,either Bourne, Korn, C, Profile or other. The Bourne, Korn, and C shells allowthe user to execute any of the commands available on the system, limited onlyby the lack of any privileges or authorizations that may be needed by thecommand or any of its options in order to succeed. In contrast, while workingin a profile shell, the account can execute only those commands that anadministrative role has specified in to be the accounts set of profiles with anyprivileges that may be specified for each individual command.
Each time any user executes a command in the profile shell, the shell consultsthe profile database to find whether the command is in any of that user’sexecution profiles and whether any privileges are specified to be inherited bythat command. If the command is in the profile database, any inheritableprivileges specified in the database for the command and any authorizations inany of the account’s execution profiles are made available for use while thecommand is executing.
Using the Profile Shell To Enable AccountsEnabling of accounts can occur because the profile shell can be used to givesome user or role accounts authorizations and access to commands that maynot be available to all users and to allow them to run those commands withprivileges that may not be available to all users.
Using the Profile Shell To Restrict AccountsThe profile shell can also be used to restrict users, because the profile shell,unlike other shells, may be used to limit the user to a specified set ofcommands.

Using the User Manager to Configure User and Role Accounts 105
5
Note – The profile shell is essential for a user when any of that user’s executionprofiles specify a command that needs to run with inheritable privilege,because the profile shell is the only shell that allows a process executing acommand to inherit privilege. No matter what default shell has been assignedto an account, every account can invoke the profile shell on the command linein another shell.
Decision to Make Before Starting♦ Identify the account’s shell.
Where This Information is Entered Into the User ManagerSee Step 2.a.f on page 132.
Account Type
The system administrator role identifies whether the account is being createdfor a normal user, a non-administrative role or an administrative role. Choosenon-administrative role or administrative role only when you are configuring anew role account as described in Chapter 8, “Managing Execution Profiles forUsers and Roles.”
The administrative role does its work in an administrative workspace and runswith the Trusted Path Attribute. Being able to work in a role workspace and tohave its processes inherit the Trusted Path Attribute, also called the TrustedPath Process Flag, are the only characteristics that are different in anadministrative role compared to a non-administrative role. The Trusted Pathattribute allows administrative roles to do certain things, like run privilegedebugging, that are not permitted to non-administrative roles.
A non-administrative role does its work in a regular user’s workspace. Beingable to configure non-administrative roles allows your site to assign to certainusers roles that restrict the users to a controlled sets of commands, actions, andattributes to perform limited tasks, without allowing them to do all the thingsallowed to administrative roles. If a non-administrative role is assigned tomultiple users either at the same time or one after another, each time anyoneassumes the role, that person works in the same environment, shares the samehome directory, and access the same files. See Chapter 4, “Managing Roles,” formore about this topic.

106 Trusted Solaris Administrator’s Procedures—July 1997
5
Decision to Make Before Starting♦ Choose “Normal User,” if you are setting up a regular user account.
You may later specify in the Role dialog box whether this user may or maynot be allowed to assume any of the existing roles.
♦ Choose “Admin. Role” if you are setting up an account for a newadministrative role.
♦ Choose “Non-Admin. Role,” if you are setting up an account for a newnon-administrative role.
Where This Information is Entered Into the User ManagerSee Step 2.a.h on page 133.
Password
The security administrator does the following in the password dialog box:
• Creates a password for the account or selects among three other options• Specifies how long before the user may change the password• Specifies how long before the user must change the password• Specifies a length of time before the password expiration date to send a
warning• Chooses a password generation method to be presented to the user when
the user changes the password through the Trusted Path• Open the account, leave it closed, or specify it as “Always Open”• Specifies whether NIS+ credentials are to be used
Background About Creating a Password or Selecting OtherPassword Options
In most cases, when setting up an account for a user or role, the securityadministrator creates a password for that user or role. The securityadministrator passes the password on to the new user to be used at first login.It is up to the user or the site to decide how soon, if ever, the user is allowed orrequired to change the password for the account.

Using the User Manager to Configure User and Role Accounts 107
5
When a user is allowed to assume an administrative role, the securityadministrator role passes the password for the role on to that user. The rolepassword is never used to log in directly to a role, but it is used to authenticatethe user who is assuming the role through the Assume Role option in theTrusted Path menu.
Both normal users and roles use their passwords when reauthenticatingthemselves if the screen automatically locks after the specified idle maximumtime has elapsed. The security administrator may later create another newpassword for a user if the user has lost the password, among other possiblereasons. The security administrator role can change passwords for all otheraccounts except that of the security administrator role.
Note – Neither the passwd(1) , nor the yppasswd(1) or nispasswd(1)commands are used in the Trusted Solaris system, either by users oradministrative roles. The security administrator can change an account’spassword through the User Manager. For each account, all password changesmust be done through the Change Password option on the Trusted Path Menuafter the account logs in and is authenticated by the system. Normal userschange passwords from the Trusted Path menu in a user workspace. Users inroles change the role passwords from the Trusted Path menu in a roleworkspace.
When either of the Type in or Choose from list are selected from the Passwordmenu, the administrative role is immediately prompted to create a passwordfor the user by the method selected.
Note – Only the “Type in” and “Choose from List” options on the Passwordmenu are recommended because those are the only two options consistent withTrusted Solaris security policy for user identification, authentication, andaccountability. Any of the other options should be used only in specializedcircumstances where a knowledgeable security administrator ascertains that

108 Trusted Solaris Administrator’s Procedures—July 1997
5
the option is both needed and allowable within the site’s security policy—keeping in mind that using it makes the system both more vulnerable andharder to maintain.
* This option is not the same as the method used in Trusted Solaris 1.x for locking an account until the security attributes had been specified. In Trusted Solaris2.x, the “Closed” option in the Status menus used instead. See Table 5-3 on page 112.
Decision to Make Before Starting♦ Decide whether to create a password for the account by typing it in or
choosing from an automatically-generated list.
Where This Information is Entered Into the User ManagerSee Step 3.a. i, ii, and iii on page 137.
Table 5-1 Password Creation Options, Descriptions and Recommendations
Password CreationOption Description
Cleared until first login Account is prompted for a password at first log in. Selecting this option requires accountsto choose a password before they have been identified and authenticated. If a new useraccount is created with this option, anyone could log in using the username and supply anypassword. Therefore, this option is not recommended for sites that want to observe therequirement that password changes should be only done by authenticated users.
Account is locked* When this option is selected, the account is locked with an invalid password and can beunlocked by assigning a new password. With this option, the account can own files butcannot log in until the account is unlocked.
No password -- setuid only This option sets up a specialized account that can own files but that can never be loggedinto, and it is never selected for user or role accounts. Accounts are set up with this optiononly for use by programs that use setuid to change their identity to the ID of the accountso that they can access files owned by the account. Existing accounts of this type on thedefault system include lp and uucp . Being able to create no-password accounts helpsreduce the risk of intruders deducing the passwords for these accounts for the purpose ofbreaking into the system.
Type in Selecting this option brings up the Password Add dialog box for the administrative role toenter the account’s password.
Choose from list Selecting this option brings up the Password generation dialog box with a list ofautomatically generated passwords from which the administrative role chooses theaccount’s password.

Using the User Manager to Configure User and Role Accounts 109
5
Background on the Password Duration and Warning Fields
The password change options limit how long intruders could potentially accessthe system if they were able to guess or steal passwords. Establishing aminimum length of time to elapse before change stops users who have justbeen given new passwords from reverting immediately to their old passwords.
Decisions to Make Before Starting♦ Decide how long before the user may change the password,
♦ Decide how long before the user must change the password, which isspecified by either:• Entering a number of days, weeks or months after “Max Change” or• Choosing an Expiration Date from the Days, Months, and Years menus.
♦ Decide the number of days, weeks, or months or a date before thepassword is to expire for a warning to be sent to the user.
Where This Information is Entered Into the User ManagerSee Step 3.c. i on page 137, ii, iii, iv, and Step 3.d on page 138.
Background About Selecting a Method for Password Generation
The method of password generation selected in the Change by menudetermines whether the manual or automatic password generator dialog box ispresented whenever the account changes the password through the TrustedPath.
The rules for passwords in Table 5-2 apply to manually-generated passwordsthat the account types in when modifying the password through the trustedpath.
Table 5-2 Password Rules for Manually Created Passwords (1 of 2)
Rules
The maximum number of characters is eight.
The minimum number of characters is six.
The password must contain at least two alphabetic characters.

110 Trusted Solaris Administrator’s Procedures—July 1997
5
Note – The rules for passwords created using the User Manager, and thepasswords created by the password generation software are slightly differentfrom those shown in on page 109 in that, for example, the automatically-generated passwords do not have numbers, and the User Manager-generatedpasswords have other requirements. Although generated passwords and theUser Manager-created passwords do not fully conform to the rules formanually-generated passwords, these passwords are also accepted by thesystem.
The values for passwords generated through the Trusted Path are set in thepluggable authentication module (PAM) values in the header filepam_headers.h , shown in Figure 5-2 on page 111.
The password must contain at least one numeric or special character.
The password must differ from the user’s login name and any reverse or circularshift of that login name. (For this comparison, upper case letters and lower caseletters are considered to be equal.)
A new password must have at least three characters different from the old. (Forthis comparison, upper case letters and lower case letters are considered to beequal.)
Table 5-2 Password Rules for Manually Created Passwords (2 of 2)
Rules

Using the User Manager to Configure User and Role Accounts 111
5
Note – The MINWEEKS, MAXWEEKS, and WARNWEEKS #defines in thePAM header file are set to -1, which is not a valid number, which allows thesevalues to be set through the User Manager for each user.
Figure 5-2 System-wide PAM Settings
Decision to Make Before StartingDecide whether the account can pick its own password or if it must pick onefrom an automatically-generated list.
Where This Information is Entered Into the User ManagerSee Step 3.e on page 139.
/*
* Miscellaneous constants
*/
#define NUMCP 13 /* number of characters for valid password */
#define PAM_TRY_AGAIN 1
#define MAX_INSIST 3 /* 3 chances to enter new passwd */
#define MINWEEKS -1 /* minimum weeks before next password change */
#define MAXWEEKS -1 /* maximum weeks before password change */
#define WARNWEEKS -1 /* number weeks before password expires */
/* to warn the user */
#define MINLENGTH 6 /* minimum length for passwords */
#define ROOTUID 0

112 Trusted Solaris Administrator’s Procedures—July 1997
5
Background on the Account Status Menu OptionsThe Status menu options are new to the Trusted Solaris version of the baseSolstice User Manager. See Table 5-3 for descriptions and recommendationsfor each of the status options.
Note – The user’s account is closed after three failed login attempts. This helpsprotect against penetration of the system by repeated attempts to guesspasswords. Trusted accounts can be exempt from this restriction if the AlwaysOpen option is set for the user.
Decision to Make Before Starting♦ Decide the account status.
Where This Information is Entered Into the User ManagerSee Step 3.f on page 139.
Table 5-3 Status Menu Options, Descriptions, and Recommendations
Status Option Description and Recommendation
Closed In effect until the account has been completely specified. Unlike account locking, which is specified inthe Password menu near the top of the Password dialog box (see Table 5-1 on page 108). this optiondoes not affect the account’s password. After three (3) failed login attempts, the status of the account isautomatically changed to closed. [The word “locked” is entered into the “lock” field in the user’s entryin the tsoluser (4) password file.] The security administrator role then must use the User Manager toreset this value to Open.
Open Use after the account has been completely specified or, using discretion, reset to this value after theaccount has been locked. The security administrator role chooses this option after setting up thesecurity-relevant characteristics of the user account., or if the account has been locked after 3 failedlogin attempts, resets this value after verifying the t This value is not accepted by the User Manageruntil the account is fully specified.
Always Open Use only when your site’s security permit an account to stay open even if the limit on failed logins isreached. This option may be used at site’s where the need for protection against the denial of service(which would occur if a malicious user attempted multiple logins with the attention of closingaccounts) is greater than the need to limit attempts to penetrate the system by repeated attempts toguess passwords.

Using the User Manager to Configure User and Role Accounts 113
5
Background About Checking NIS+ Credential Table Setup
Clicking the toggle button next to the Cred. Table Setup field, adds the NIS+principal’s public and private keys to the cred table, which establishes theaccount as a NIS+ principal and adds the accounts password to the NIS+databases. (See Chapter 5, “Administering NIS+ Credentials,” of the NIS+ andFNS Administration Guide - Solaris 2.5.)
Decision to Make Before Starting♦ Decide whether to check the Cred. Table Setup box for NIS+ credential
setup.
Where This Information is Entered Into the User ManagerSee Step 3.g on page 140.
Home
The system administrator sets the following in the Home dialog box:
• Whether or not the home directory is automatically created
• The home directory’s pathname
• The name of the server for the home directory
• The skeleton path for the shell initialization files
• The desired home directory DAC permissions
• The name of the account’s mail server
Note – Because you are prompted to specify a server for the account’s homedirectory, the server for the account’s home directory must be configuredbefore you create the account.
Why Say Yes to Automatic Creation of Home Directories?
If the system administrator does not tell the system to automatically create thehome directory, then the system administrator must set up the home directorymanually as an MLD before the user can log in. Because the system can

114 Trusted Solaris Administrator’s Procedures—July 1997
5
automatically copy start-up files to the initial SLD within the multilevel homedirectory the first time an account logs in, it is advisable to have the system dothe set up.
Skeleton Path Considerations
When you are prompted to specify a skeleton path for shell startup files, if youspecify /etc/skel as the skeleton path location without making any changes,the supplied local.cshrc , local.login and local.profile start-upfiles for all the shells are automatically copied into the account’s homedirectory. The account is responsible for renaming the appropriate copied fileand removing the files that do not apply to her or his shell. For example, if theuser’s login shell is the C shell, the user would remove the local.profileand would rename and make any desired modifications to the local.cshrcfile and local.login files.
Note – Without administrative intervention, neither the .login or .profileare looked at when the window system comes up unless the account’s defaultshell is pfsh . Also, files in a skeleton directory are copied only into the firsthome directory SLD created at the account’s initial sensitivity label, and theadministrator or user must ensure that startup files are copied to allsubsequent SLDs created at other sensitivity labels for the account. The neededbackground and procedures related to startup files are described in “ManagingStartup Files in a Trusted Solaris System” on page 65 in Chapter 3, “ManagingUser Accounts.”
Controlling the Use of Shell Initialization Files
When a user’s login shell is specified as either Bourne, Korn or C shell, keep in mind that,by default, shell initialization files are not looked at during login because a variablein a *.dtprofile file is commented out. Other comments in the *.dtprofilefiles encourage the administrator or individual users to modify the initializationfiles before removing the comment if they wish the appropriate initialization filefor a shell to be sourced, and to make sure that the initialization file does not do

Using the User Manager to Configure User and Role Accounts 115
5
anything that requires a terminal emulator or user interaction while the windowsystem is coming up.
A personal $HOME/.dtprofile file could be modified in such a way that itwould allow the user to launch commands while the window system is comingup and before the user’s profiles are in effect. To support the special purposesof the profile shell, pfsh , it is important that users not be allowed to specifyany commands that run before the user’s shell is in effect. So when a user’s loginshell is specified as the profile shell, the .profile file is looked at during login,but the profile-shell-user’s $HOME/.dtprofile file is never consulted.
For more details on these topics, see “To Make .login and .profile Looked atDuring Login for Bourne, C and Korn Shell Users” on page 83 and see“Managing Startup Files in a Trusted Solaris System” on page 65 in Chapter 3,“Managing User Accounts.”
Decisions to Make Before Starting♦ Decide the account’s home directory server.
♦ Decide whether to allow the automatic creation of a multilevel homedirectory (MLD) for the account.
♦ Decide what to put in /etc/skel , whether to let the users do their ownmodifications to shell initialization files or whether to provide your ownadministratively-controlled versions. If the latter, you must also do the setup described in “To Separate the Shell Initialization Files for Each Shell”on page 83 in Chapter 3, “Managing User Accounts.
♦ If a Trusted Solaris administrative role has created a shell-specificsubdirectory in /etc/skel for each of the shells, prepare to enter thecorrect skel X subdirectory name into the Skeleton path field in the UserAccount Manager, based on the user’s default shell.
♦ Decide the default permission bits for files the user creates (for setting theumask).
♦ Decide the mail server for the account.
Where This Information is Entered Into the User ManagerSee Step 4.a on page 141, c, d, e, f, g, and h on page 143.

116 Trusted Solaris Administrator’s Procedures—July 1997
5
Labels
The system administrator specifies the following in the Labels dialog box:
• The clearance• The minimum SL• Whether the account is allowed to view administrative labels or should be
shown alternate labels within the user accreditation range• Whether the user can view SLs• Whether the user can view ILs
Background on the Clearance and Minimum Label
The clearance defines top of the range of sensitivity labels at which the accountcan work. Administrative role accounts have a clearance of ADMIN_HIGH.
The account’s minimum sensitivity label defines the lowest sensitivity label atwhich the account can work. Administrative role accounts have a minimumsensitivity label of ADMIN_LOW. The minimum sensitivity label is thesensitivity label of the first workspace that comes up for the account after thefirst login.
During the first session or during any subsequent session, an account canchange the sensitivity label of any workspace and can specify an alternateworkspace so that any workspace at any sensitivity label within the user’spersonal label range may be first workspace that comes up during subsequentsessions.
Note – Both the account’s clearance and minimum sensitivity label must bedominated by the highest sensitivity label defined in the user accreditationrange and must dominate the minimum clearance defined in the useraccreditation range in the label_encodings(4TSOL) file.
Decisions to Make Before Starting♦ Decide a clearance for the account that dominates the minimum clearance
set in the label_encodings file.
♦ Decide the account’s minimum sensitivity label, which is the minimumsensitivity label at which the account is permitted to work.

Using the User Manager to Configure User and Role Accounts 117
5
Where This Information is Entered Into the User ManagerSee Step 5 on page 143, Step 5.a on page 144, Step 5.b on page 146.
Background on Displaying Labels
The system administrator specifies how labels are displayed for the account inthe lower part of the Labels dialog box. In the following discussion, the termCMW label is used to refer to the IL and the SL when they are shown togetherin the standard format, with the long name of the information label and anywords and the short name of the sensitivity label and of any words.
INFORMATION LABEL [SL]
Label ViewThe label view allows the security administrator to determine whether theASCII names for administrative labels are ever displayed for the account,because at some sites the names of administrative labels are considered to beclassified information. ADMIN_HIGH and ADMIN_LOW are the defaultASCII names for the administrative labels, but because the securityadministrator role is able to specify alternate names for administrative labels inthe label_encodings(4TSOL) file, your site could have other namesassigned.1 The administrative labels appear in sensitivity labels, informationlabels, and clearances.
A system-wide default label view is set in the label_encodings file. Duringinstallation, the default setting of INTERNAL is either accepted or changed bythe site’s security administrator. When each user or role’s account is being setup, the security administrator chooses one of the following for the account:
• Internal
• External
• Sys Default
Internal ViewThe INTERNAL view allows the account to see the names of the administrativelabels, which are either the strings “ADMIN_HIGH” and “ADMIN_LOW” ortheir administratively set names.
1. See Trusted Solaris Label Administration for how the security administrator role specified alternative names.

118 Trusted Solaris Administrator’s Procedures—July 1997
5
External ViewAccounts with the External option are not exposed to the ASCII names of theadministrative labels. If the label view for an account is set to EXTERNAL, theminimum valid label of the same type in the User Accreditation Range is showninstead of the ADMIN_LOW label or its site-specified equivalent. Also, whenthe account’s label view is EXTERNAL, the maximum valid label of the sametype in the User Accreditation Range is shown instead of the ADMIN_HIGHlabel or its site-specific equivalent.
Note – It is important to realize that the binary label always remains the samewhen the EXTERNAL view is set. The only difference is that the label is givenan alternative name when it is displayed to hide its real name.
Sys DefaultIf the Sys Default option is selected for an account, whatever value is specifiedin the label_encodings(4TSOL) file for the “DEFAULT LABEL VIEW” keyword (EXTERNAL or INTERNAL) in the file applies to the account.
Example of the Effects of the Label ViewHere is an example of how the default label view affects what the user sees.Remember that the IL of a newly opened file is always ADMIN_LOW becauseit is empty, while its SL is the label of the process that created it. So, if a userbegins to edit a file in a Text Editor at TOP SECRET at a site where the defaultadministrative label names are being used, the CMW label is:
ADMIN_LOW [TS]
In the example, the lowest valid IL in the user accreditation range isCONFIDENTIAL. If the account has the INTERNAL label view set, the CMWlabel displays with the administrative label ADMIN_LOW in the trusted frameof the Text Editor as: ADMIN_LOW [TS] .
If the account has the EXTERNAL label view set, the CMW label displays withthe label UNCLASSIFIED replacing the administrative label, as:UNCLASSIFIED[TS] .

Using the User Manager to Configure User and Role Accounts 119
5
Note – Ultimately, whether the IL portion and the SL portion of administrativelabels or their substitutes display, or whether the administrative labels displayat all, is determined by the values set in the SL and IL display menus below thelabel view menu.
Decision to Make Before Starting♦ Decide whether the user is allowed to see the names of administrative
labels or if the user will see the minimum valid label in the UserAccreditation Range instead of the ADMIN_LOW label and see themaximum valid label in the User Accreditation Range instead of theADMIN_HIGH label.
Where This Information is Entered Into the User ManagerSee Step 5.c on page 148.
Background on Showing or Hiding SLs and ILs
When the complete CMW label, the SL, or the IL are displayed, they appear inthe following locations, among others:
• The trusted path indicator at the bottom of the screen,
• At the top of window frames, and
• In the title bar on window icons.
When the IL and SL are displayed together in the form of a CMW label, SLsdisplay in short form inside square brackets ([]). When the SL displays alone, itdisplays in long form within the square brackets.
Decision to Make Before Starting♦ Decide if the account can view the complete CMW label, the Sensitivity
Label alone, or the Information Label alone.
Where This Information is Entered Into the User ManagerStep 5.d, and e on page 148.

120 Trusted Solaris Administrator’s Procedures—July 1997
5
Profiles
The security administrator role assigns execution profiles to accounts. Theavailable execution profiles are displayed in a scrolling list in the Profilesdialog box, along with brief descriptions. See Appendix B, “Profile DefinitionTables” for tables that list the actions, authorization, and commands definedfor each profile.
Note – The default administrative roles provided with Trusted Solaris have theneeded execution profiles already assigned. If you create a new role, you maycreate a new profile for that role; if so, create the new profile before youconfigure the role account, so that you can assign the profile to the role’saccount through the User Manager.
If you are configuring a user account and plan to assign a role to that user, youdo not need to and should not assign a corresponding role profile to the user’s account.It’s important to realize that the role accounts have their own executionprofiles, which come into effect only when the user assumes the role and ineffect, changes his or her identity to that of the role.
Note – Do not assign any role profiles to a normal user account. Doing sowould introduce some measure of risk and a good deal of confusion. To beginwith, role profiles you assigned to the user account would be in effect for theuser when the user has not assumed a role, which in most cases should not beallowed to happen. What’s more, some things that seem like they should workwould not: many of the administrative role’s commands and applications donot work outside of the administrative role workspace because they require thetrusted path attribute.
The order of profiles is also important because when the account invokes acommand or action, the profile mechanism uses the command or action thefirst time its name is found in any of the profiles in the account’s profileset—with whatever attributes have been defined for the command or action inthe profile where it is found. This is similar to how the system uses the firstinstance of a command that it finds in any directory in the user’s PATHvariable: for example, if you invoke the ps(1) command by entering ps on thecommand line, either /usr/bin/ps or /usr/ucb/ps will run depending onhow your PATH is set up, and each version has its own set of options.

Using the User Manager to Configure User and Role Accounts 121
5
Similarly, if the user executes a command or action that is defined withdiffering attributes in more than one execution profile (for example, withdiffering privileges or with setuid turned on in one but not the other), thecommand or action runs as it is defined in the first profile in which it is found in theprofile list.
You can use the sorting order of execution profiles to your advantage. For oneexample, if you want a command to run with different privileges from thosedefined for it in an existing execution profile, create a new execution profilewith the desired privilege assignments for the command and insert that newexecution profile before the existing execution profile so that the profilemechanism finds the new one first.
Also, it is possible to take advantage of the order of profiles to allow certainaccounts to run certain commands and actions with privileges or with aneffective UID or GID or at a certain sensitivity label and run all othercommands and actions with none of these special security attributes. Do thisby assigning a set of profiles that explicitly names any commands or actionsthat the account needs to run with the specific security attributes and then, atthe end of the list of profiles, give that account the All profile that permits theaccount to run any other command or action in the system without privilege.In this way, the account can use the explicitly named and configuredcommands and actions with the specified attributes and use all othercommands without any special attributes.
For more about execution profiles see “Review of Terms” on page 194 inChapter 8, “Managing Execution Profiles for Users and Roles.”
Decisions to Make Before Starting♦ Decide on at least one execution profile to assign to the account.
♦ Decide the order in which execution profiles should be listed
Where This Information is Entered Into the User ManagerStep 6.a and b on page 150, and Step 6.c and d on page 151.

122 Trusted Solaris Administrator’s Procedures—July 1997
5
Roles
The security administrator role assigns roles to normal user accounts. Theavailable roles are displayed in a scrolling list in the Roles dialog box, alongwith brief descriptions.
Role accounts cannot assume other roles, and the User Manager does not allowaccess to the Role dialog box when a role account is being configured.However, you may decide to assign multiple roles to a single user if it isconsistent with your site’s security policy.
Decisions to Make Before Starting♦ Decide which roles, if any, the account is allowed to assume.
Where This Information is Entered Into the User ManagerStep 7 on page 151.
Idle
The security administrator role specifies whether an action is taken if theworkstation remains idle for an amount of time that is specifiable by the role.The two action choices are to log out the user or lock the screen.
• Lock screen
Locks the screen after the specified period of idleness has passed. Theaccount must then supply a password to regain access to the session.Moving the mouse or pressing a key causes the dialog box shown inFigure 5-3 on page 123 to display so that the user can enter the password.

Using the User Manager to Configure User and Role Accounts 123
5
Figure 5-3 Lock-out Password Dialog Box
• Logout –
Logs the user out of the system entirely when the specified period ofidleness has passed. The user must log in again to regain access.
The security administrator role also chooses from the Idle Time menu anamount of time before either action, either 1, 2, 3, 4, 5, 10, 15, 30, 60, or 120minutes or Forever. The Forever menu option essentially prevents any actionfrom being taken when the workstation is idle.
Decisions to Make Before Starting• Decide on the consequences, if any, of a workstation sitting idle when a user
is logged on but not active, if the screen should be locked, or the user’ssession should be terminated and the user logged out.
• Decide what length of time must pass without activity on the workstationbefore the specified action will be taken.
Where This Information is Entered Into the User ManagerStep 8 on page 153.
Password:
Display locked by user <username>
CommonEnter password to unlock.
DesktopEnvironment
CDE

124 Trusted Solaris Administrator’s Procedures—July 1997
5
Setting Up or Modifying a User or Role AccountThe following procedures show how to use the various options on the UserManager to specify account information.
▼ To Launch the User Manager
1. Click the Application Manager icon in the front panel.(See Figure 5-4 on page 125 for this and the following step.)
2. Click the Solstice_Apps folder icon in the Application Manager.
3. Click the User Manager icon.The User Manager: Load dialog box displays as shown in Figure 5-5 onpage 126 and the main User Manager window displays with no users.
To Launch the User Manager page 124
To Load a List of User and Role Accounts Using the Load Dialog Box page 125
To Load Users or Exit (optional) page 127
To Find or Sort Accounts page 128
To Add, Modify or Delete Accounts page 129

Using the User Manager to Configure User and Role Accounts 125
5
Figure 5-4 Launching the User Manager
▼ To Load a List of User and Role Accounts Using the Load Dialog Box
1. From the Naming Service menu, choose the NIS+ option.
Application Manager
User Manager: Load User Manager: Main

126 Trusted Solaris Administrator’s Procedures—July 1997
5
Figure 5-5 User Manager: Load Dialog Box with Filter Users Menu
Note – NIS+ is the recommended option in the Trusted Solaris system, becauseit supports the centralized administration of all the workstations and serverstogether in one a single distributed system, which is important for both useraccountability and trusted administration. The None option should only beused in specialized circumstances where a knowledgeable securityadministrator decides that local accounts are both needed and allowable withinthe site’s security policy— even though they can make the system both harderto protect and harder to maintain.
2. Accept the domain name shown or enter another domain name in the textfield next to Domain.
3. Choose an option from the Filter Users menu.
a. Choose All to display a list of names of already-configured accountsalong with their associated user IDs and comments.
b. Choose Specify to specify a user or set of users.Next to the Specify option, do either i. or ii.
i. Enter a specific username.
ii. Enter a regular expression to filter the usernames.
c. Choose None to cause the main User Manager: Load dialog box to bedisplayed with no account names.
Filter Usersmenu
NIS+None
Naming Servicemenu
AllSpecifyNone

Using the User Manager to Configure User and Role Accounts 127
5
4. Click OK.
▼ To Load Users or Exit (optional)
Figure 5-6 User Manager: Main Window and Menus
1. Choose the Load option from the File menu to bring up the Load dialogbox (see Figure 5-6).
See “To Load a List of User and Role Accounts Using the Load DialogBox” on page 125 and Figure 5-5 on page 126 for how to use the Loaddialog box
2. Choose the Exit option to exit from all User Manager windows.
File menu Edit menu View menu Sort By submenu
Load ...
Exit
Add ...Modify ...Copy ...Set Defaults ...Delete
Find ...
Sort By
Rebuild List
NameIDComment
Account list

128 Trusted Solaris Administrator’s Procedures—July 1997
5
▼ To Find or Sort Accounts
1. Choose an option from the View menu.The View menu options are shown in Figure 5-7.
a. Choose Find to enter a target string (containing zero or morewildcards) for locating a user in the list.
i. Enter either a username, user ID, or comment.See Figure 5-8. You can only specify one type of target at a time.
ii. Click Apply or OK.OK highlights the next matching user on the User Manager list, ifany, and then the User Manager: Find dialog box disappears. Applyhighlights the next match, if any, and the Find dialog box continuesto display. If there are multiple matches, click Apply again on theUser Manager: Find dialog box to go to the next match.
Figure 5-8 User Manager: Find Dialog Box
b. Choose Sort By to display a submenu and select one of the three fieldsto sort by: Name, ID, or Comment (see Figure 5-7).
c. Choose Rebuild List to display the current list of accounts with anyadditions, deletions or modifications made since the list was lastdisplayed.
View menu Sort BysubmenuFind ...
Sort By
Rebuild List
NameIDComment
Figure 5-7 View Menu withSort By Submenu

Using the User Manager to Configure User and Role Accounts 129
5
▼ To Add, Modify or Delete Accounts
Note – As stated in Chapter 3, “Managing User Accounts,” the responsibilitiesfor setting up accounts are divided between the security administrator role,which handles the security aspects of the user’s record, and the systemadministrator role, which handles the general aspects. Another security featureis that a role cannot modify its own account.
1. Choose Add, Modify, Copy, Set Defaults, or Delete from the UserManager Edit menu shown in Figure 5-9.Selecting any of the options from the Edit menu displays one of theNavigator dialog boxes.
The Navigator (Add) dialog box is shown in Figure 5-10. The buttons in theNavigator give access to additional dialog boxes for entering the namedtypes of account information.
Note – If any buttons are grayed out when an administrative role brings up theUser Manager, this means that the authorization needed for that button is notin the role’s execution profile. The system administrator role first fills out thefields and specifies the information for which the role is authorized, and thesecurity administrator role then specifies the rest of the information and setsthe account status to Open.
Add ...Modify ...Copy ...Set Defaults ...Delete
Figure 5-9 User Manager Edit

130 Trusted Solaris Administrator’s Procedures—July 1997
5
Figure 5-10 User Manager: Navigator
Note – On all the user manager dialog boxes, clicking the Apply button savesthe data and leaves the dialog box displayed, while clicking the OK buttonregisters the data and closes the dialog box.
Note – The Audit button is not enabled in the 2.5 release of the Trusted Solarisoperating system. If you click on it, it does not respond. See the Trusted SolarisAudit Administration manual for how to set up auditing for individual users.
Buttons for access to dialogboxes where the administrativerole specifies the named type ofaccount information
Controls

Using the User Manager to Configure User and Role Accounts 131
5
d. To set defaults to apply to all new accounts, choose Set Defaults, andthen click the button that allows you to update the desired type ofinformation (optional).The defaults you can set on each of the dialog boxes are shown inTable 5-4. The defaults you cannot set are grayed out.
e. When adding a new account, choose Add or Copy, and then go toStep 2.Copy lets you create a new account by editing the fields already specifiedfor an existing account. This option allows you to keep the entries youwant from another user account while changing only the informationthat is different for the new account.
f. When modifying an existing account, choose Modify, and then go toStep 2.
g. When removing an account, choose Delete, and then go to Step 9 onpage 155.
2. Enter a new account’s identity Information, or change it for an existingaccount if desired.See “Identity” on page 102, if necessary, to review the guidelines on what tospecify in the Identity dialog box.
Table 5-4 Defaults You Can Set on the User Manager Dialog Boxes
Dialog Box Settable Defaults For Instructions, Go to:
Identity Primary Group Step 2 on page 131
Secondary Group
Log in Shell
User Type
Password All Step 3 on page 133
Home All except Path Step 4 on page 141
Labels All Step 5 on page 143
Profiles All Step 6 on page 149
Roles All Step 7 on page 151
Idle All Step 8 on page 153

132 Trusted Solaris Administrator’s Procedures—July 1997
5
a. Click on the Identity button in the User Manager Navigator.The Identity dialog box displays (see Figure 5-11).
Figure 5-11 User Manager: Identity Add Dialog Box
b. Enter the name that identifies the user or role.The name cannot be longer than eight characters.
c. Enter the numeric ID for the user or role.
d. Enter the user or role’s group and (optional) supplementary groups.
e. Enter a comment.
f. Choose a default shell from the Login Shell menu: Profile, Bourne,Korn, C, or another type that you specify.
NormalAdmin. RoleNon-Admin. Role
BourneKornCProfile
Account type menu
Login shell menu
Other

Using the User Manager to Configure User and Role Accounts 133
5
g. If you select other, enter the pathname of the shell.
Note – The profile shell should always be selected as the login shell for roleaccounts. Normal users may be configured to have the profile shell if you wantuse it to take advantage of its enabling or restricting capabilities.
h. Choose the type of account from the User Type menu.Choose either normal user, administrative role, or non-administrative role.
i. Store your changes by clicking Apply or OK at the bottom of theIdentity dialog box. (See Figure 5-12).
Clicking Apply saves the changes and leaves the dialog boxdisplayed. Clicking OK saves the changes and closes the dialog box.
Figure 5-12 Controls on the User Manager: Identity Dialog Box
j. If you are done entering information for a new account or to update anexisting account, go to Step 9 on page 155.
3. Enter a new account’s password information, or change it for an existingaccount, if desired.See “Password” on page 106, if necessary, to review the guidelines on whatto specify in the Password dialog box.
a. Click the Password button in the User Manager Navigator.The Password dialog box displays (see Figure 5-13).

134 Trusted Solaris Administrator’s Procedures—July 1997
5
Figure 5-13 User Manager: Password Dialog Box
Password menu
Cleared until first loginAccount is lockedNo password -- setuid onlyType inChoose from list
Change by menu
Type inChoose from list
Account status menu
ClosedOpen
Change by:
Account Status:

Using the User Manager to Configure User and Role Accounts 135
5
b. Choose either Type in or Choose from list from the Passwordmenu (see Figure 5-14).
Figure 5-14 Password Dialog Box: Password Menu
If you choose Type in, the dialog box shown in Figure 5-15 displays. Ifyou choose the Choose from list option, the dialog box in Figure 5-17 onpage 138 displays.
i. For a typed in password, enter the password in the Enter Passwordtext field, press the Tab key to go to the Verify Password text field,and enter the password again (see Figure 5-15).
Figure 5-15 User Manager: Set Password
Password menu
Cleared until first loginAccount is lockedNo password -- setuid onlyType In...Choose from list...

136 Trusted Solaris Administrator’s Procedures—July 1997
5
ii. To choose a password from a generated list in the PasswordGenerator dialog box, click the circle to the left of the desiredpassword, and then enter the password you selected into the textentry field below to confirm (see Figure 5-16).
Figure 5-16 Password Generator Dialog Box
The Password Generator dialog box gives a choice of five system-generated passwords. The pronunciation mnemonic shown inparentheses to the right of each password divides the password intosyllables to make it easier to remember. If you do not find agenerated password that you like, go to Step iii on page 137
Generatedpasswords
Pronunciationmnemonics
Confirmation field

Using the User Manager to Configure User and Role Accounts 137
5
iii. If you do not find a generated password that you like, click Gen toget five new generated passwords to choose among, and select one,as described in Step ii on page 136.
iv. Either click OK or press Enter to store the password.
c. Specify the duration of password validity (see Figure 5-17 on page 138)(optional).
i. In the Min Change field, enter a minimum number of days thatmust elapse after a password change before the user may changethe password on the account again.
ii. To have the password expire by a certain number of days after itslast change, put that number of days in the Max Change text entryfield.
iii. In the Max Inactive field, enter a maximum number of days thatan account can be inactive before the user account is closed.
iv. To have the password expire on a certain date, enter the date in theExpiration Date field.

138 Trusted Solaris Administrator’s Procedures—July 1997
5
Figure 5-17 Password Dialog Box: Password Duration and Expiration Date Fields
d. If a password validity duration or expiration date is set in Step c, typeinto the Warning text entry field a number of days before the passwordexpires for a warning to be sent (see Figure 5-18 on page 138.)
Figure 5-18 Password Dialog Box: Warning Field
Note – Entering meaningless combinations such as 1-none-2000 generateserrors.
Days menu
None 1 2 3 4 5 6 78 9 10 11 12 13 14 1516 17 18 19 20 21 22 2324 25 26 27 28 29 30 31
NoneJanFebMarchAprilMayJuneJulyAugSeptOctNovDec
Months menu
None1996199719981999200020012002200320042005
Years menu
MayJuneJuly

Using the User Manager to Configure User and Role Accounts 139
5
e. Set the password generation type for the userThe Generation menu in the Password dialog box lets you specifywhether the user or the system is to supply the password (seeFigure 5-19).
Figure 5-19 Password Dialog Box: Generation Field and Menu
If you choose the Choose from list option, the Password Generatordialog box displays whenever the user chooses the Change passwordoption from the Trusted Path menu. (To see the Password Generatordialog box, see Figure 5-16 on page 136).
f. Choose from the Status Menu to Open the account, leave it Closed, orset it Always Open. (See Figure 5-20A new account is closed until the security administrator opens it. Thestatus of an open account automatically changes to closed after threefailed login attempts under the account’s user name. An always-openaccount is always accessible; it is never closed as a result of multiplefailed logins.
Note – When an existing account is closed after three failed login attempts, thesecurity administrator should investigate the situation before reopening theaccount.
Generation menu
Type inChoose from List
Change by Type In

140 Trusted Solaris Administrator’s Procedures—July 1997
5
Figure 5-20 Password Dialog Box: Status Field and Menu
g. Click the toggle box next to Cred. Table Setup to add the NIS+principal’s public and private keys to the cred table. (See Figure 5-21.)
Figure 5-21 Credential Table Setup Check Box
Note – The recommended option is to check the Cred. Table Setup box whencreating a new account so that the account is added to the NIS+ cred table andthe account’s password is added to the NIS+ databases, and to leave the toggleas already specified when modifying an account, unless you change thepassword.
h. Store your changes by clicking Apply or OK at the bottom of thePassword dialog box (see Figure 5-22).Clicking Apply saves the changes and leaves the dialog box displayed.Clicking OK saves the changes and closes the dialog box.
Figure 5-22 Controls on the User Manager: Password Dialog Box
Status menu
ClosedOpenAlways Open

Using the User Manager to Configure User and Role Accounts 141
5
i. If you are done entering information for a new account or to update anexisting account, go to Step 9 on page 155.
4. Enter a new account’s home directory information, or change it for anexisting account, if desired.See “Home” on page 113, if necessary, to review the guidelines on what tospecify in the Home dialog box.
a. Click Home on the User Manager Navigator.The Home dialog box displays (see Figure 5-23 on page 142).
b. Check the Create Home Dir check box to have the account’s homedirectory created as an MLD (optional).
c. Type in the pathname for the home directory next to Path.
d. Type in the name of the home directory’s server next to Server.If the home directory is mounted on a local partition on the account’sprimary workstation, enter the name of the primary workstation.Otherwise, enter the name of the NFS server for the account’s homedirectory,
Note – The server must be configured prior to creation of the user account.
e. Check the appropriate permissions boxes under Permissions to specifythe read, write, and execute permissions for the home directory byowner, group, and other.
f. Specify the mail server (optional).
g. Check the AutoHome Setup box to have the home directory beautomounted automatically.

142 Trusted Solaris Administrator’s Procedures—July 1997
5
Figure 5-23 User Manager: Home Directory Dialog Box

Using the User Manager to Configure User and Role Accounts 143
5
h. Store your changes by clicking Apply or OK at the bottom of the Homedialog box (see Figure 5-22).Clicking Apply saves the changes and leaves the dialog box displayed.Clicking OK saves the changes and closes the dialog box.
Figure 5-24 Controls on the User Manager: Home Dialog Box
i. If you are done entering information for a new account or doneupdating an existing account, go to Step 9 on page 155.
5. Enter a new account’s label information, or change it for an existingaccount, if desired.See “Labels” on page 116, if necessary, to review the guidelines on what tospecify in the Labels dialog box.
a. Click Labels on the User Manager Navigator.The Labels dialog box displays (see Figure 5-25).

144 Trusted Solaris Administrator’s Procedures—July 1997
5
Figure 5-25 User Manager: Labels Dialog Box
a. Click the Clearance button to bring up the Clearance Builder dialogbox and enter the account’s clearance.The User Manager: Clearance label builder dialog box displays (seeFigure 5-26 on page 145.
View menu
ExternalInternal.Sys Default
SL menu
ShowHide
Clearance Builderdialog box
Label Builderdialog box
IL menu
ShowHide

Using the User Manager to Configure User and Role Accounts 145
5
Figure 5-26 Label Builder for Setting the Account’s Clearance
Classification andCompartmentsmenus
Currentlyspecified label
Label entry fieldand Update button
Type of labelbeing built
Buttons for type oflabel being set

146 Trusted Solaris Administrator’s Procedures—July 1997
5
i. To type in the clearance, use the text entry field under UpdateWith and select the Update button when you are done.
ii. To use the mouse to build the clearance, click a button next to thedesired classification in the menu and click none or more boxesnext to the desired compartment names.
iii. Click OK to close the label builder dialog box.The clearance displays in the Clearance field in the Labels dialogbox.
Note – The account’s clearance must be dominated by the maximum clearanceand must dominate the minimum clearance specified in thelabel_encodings file.
b. Click Minimum to enter the user’s minimum sensitivity label.The Minimum Sensitivity Label Builder dialog box displays (seeFigure 5-27 on page 147).
i. To type in the minimum sensitivity label, use the text entry fieldunder Update With and select the Update button when you aredone.
ii. To use the mouse to build the minimum sensitivity label, check abutton next to one of the classifications in the menu and checknone or more boxes next to the desired compartment names byusing the left mouse button.
iii. Click OK to close the label builder dialog box.The minimum sensitivity label displays in the Minimum SL field inthe Labels dialog box.
Note – The minimum SL must be dominated by the maximum SL and mustdominate the minimum SL defined in the label_encodings file.

Using the User Manager to Configure User and Role Accounts 147
5
Figure 5-27 Label Builder for Setting the Minimum SL
Classification andCompartmentsmenus
Currentlyspecified label
Label entry fieldand Update button
Type of labelbeing built
Buttons for type oflabel being set

148 Trusted Solaris Administrator’s Procedures—July 1997
5
c. Choose the account’s view of administrative labels from the options onthe View menu.
i. Choose External to substitute the maximum and minimum labelsthat are within the User Accreditation range instead of showingthe ADMIN_HIGH and ADMIN_LOW administrative labels.
ii. Choose Internal to allow the user to see administrative labelsADMIN_HIGH and ADMIN_LOW or any site-configuredalternative ASCII names.
iii. Choose Sys default to use the system default label view that isspecified in the label_encodings(4TSOL) file.
Note – The display options in the View have no effect on SLs if you do notconfigure the account to be able to see SLS and they have no effect on ILs ifeither ILs are configured not to display system-wide, or if ILs are configured todisplay system-wide but you do not configure the account to be able to see ILs.
d. Choose whether SLs are displayed for the account from the SL menu.
i. Choose Show to allow SLs to be displayed.
ii. Choose Hide to hide SLs.
e. Choose whether ILs are displayed for the account from the IL menu.
i. Choose Show to allow ILs to be displayed.
ii. Choose Hide to hide ILs.
f. Store your changes by clicking Apply or OK at the bottom of theLabels dialog box (see Figure 5-22).Clicking Apply saves the changes and leaves the dialog box displayed.Clicking OK saves the changes and closes the dialog box.
Figure 5-28 Controls on the User Manager: Labels Dialog Box
g. If you are done entering information for a new account or doneupdating an existing account, go to Step 9 on page 155.

Using the User Manager to Configure User and Role Accounts 149
5
6. Specify a new account’s profile or profiles, or change the profiles selectedfor an existing account, if desired.See “Roles” on page 122, if necessary, to review the guidelines on what tospecify in the Profiles dialog box.
a. Click Profiles on the User Manager Navigator.The Profiles dialog box displays (see Figure 5-29).

150 Trusted Solaris Administrator’s Procedures—July 1997
5
Figure 5-29 User Manager: Profiles Dialog Box
The list at the left of the dialog box displays the available executionprofiles that have not been selected. The list at the right of the dialog boxcontains the execution profiles that have been selected for this account.
b. Assign an execution profile to the account either by double-clicking itsname in the Available list, or by single-clicking it and then clicking theright arrow to move it into the Selected list.
Available profilesto select from
Profilesselected forcurrent user
Description ofhighlightedprofile
Transfer buttons

Using the User Manager to Configure User and Role Accounts 151
5
c. Remove execution profiles from the Selected list, if desired, either bydouble-clicking the name of the profile or single-clicking it and thenclicking the left arrow to move it to the Available list.
d. To change the order of an execution profile in the Selected list, single-click on the name of the execution profile and then click the up- ordown arrows to move it around in the list.
Note – As mentioned under “Profiles” on page 120, keep in mind that theorder of profiles can affect which command definitions are used, and take careto have the order reflect your true intention for a user’s use of a command.
e. Store your changes by clicking Apply or OK at the bottom of theProfiles dialog box (see Figure 5-30).Clicking Apply saves the changes and leaves the dialog box displayed.Clicking OK saves the changes and closes the dialog box.
Figure 5-30 Controls on the User Manager: Profiles Dialog Box
f. If you are done entering information for a new account or doneupdating an existing account, go to Step 9 on page 155.
7. Specify any role(s) for the account in the Roles dialog box.See “Roles” on page 122, if necessary, to review the guidelines on what tospecify in the Roles dialog box.
a. Click Roles on the User Manager Navigator.The Roles dialog box displays (see Figure 5-31 on page 152).

152 Trusted Solaris Administrator’s Procedures—July 1997
5
Figure 5-31 User Manager: Roles Dialog Box
Available roles toselect from
Current userrecord
Roles selectedfor currentuser
Description ofhighlightedrole
Transfer buttons

Using the User Manager to Configure User and Role Accounts 153
5
Note – Roles cannot assume roles, so if the Account Type field in the Identitydialog box identifies this as a role account, the Roles button is dimmed on thenavigator.
The list at the left of the dialog box displays a list of roles that have notbeen selected. The list at the right of the dialog box under Assumablecontains the roles that have been selected for this account.
b. Assign a role to the account either by double-clicking its name in theProhibited list, or by single-clicking it and then clicking the rightarrow to move it into the Assumable list.
c. Remove roles from the Assumable list, if desired, either by double-clicking the name of the role or single-clicking it and then clicking theleft arrow to move it to the Prohibited list.
d. Store your changes by clicking Apply or OK at the bottom of the Rolesdialog box (see Figure 5-22).Clicking Apply saves the changes and leaves the dialog box displayed.Clicking OK saves the changes and closes the dialog box.
Figure 5-32 Controls on the User Manager: Roles Dialog Box
e. If you are done entering information for a new account or doneupdating an existing account, go to Step 9 on page 155.
8. Specify any idle limits and actions for the account in the Idle dialog box(optional).See “Idle” on page 122, if necessary, to review the guidelines on what tospecify in the Idle dialog box.
a. Click Idle on the User Manager Navigator.The Roles dialog box displays (see Figure 5-31 on page 152).

154 Trusted Solaris Administrator’s Procedures—July 1997
5
Figure 5-33 User Manager: Idle Dialog Box with Idle Time Menu
b. Choose from the Idle Time menu a length of time for the workstationto remain idle before an action is taken.
c. Click on either Lock Screen or Logout!.
Caution – If the logout action is selected, processes running in the user’ssession are killed.
d. Store your changes by clicking Apply or OK at the bottom of the Idledialog box (see Figure 5-22).Clicking Apply saves the changes and leaves the dialog box displayed.Clicking OK saves the changes and closes the dialog box.
Figure 5-34 Controls on the User Manager: Idle Dialog Box
e. If you are done entering information for a new account or doneupdating an existing account, go to Step 9 on page 155.
Idle Time menu
5 minutes10 minutes15 minutes30 minutes60 minutes120 minutesForever

Using the User Manager to Configure User and Role Accounts 155
5
9. Click Done or Save on the User Manager Navigator.Clicking Done in the Navigator saves what you’ve entered in all of the dialogboxes and closes the Navigator. Clicking Save saves what you’ve entered andleaves the Navigator open.
Figure 5-35 Controls on the User Manager Navigator
Note – If no password information has been saved, the account stays closed.
10. Choose the Exit option from the User Manager File menu to exit from allUser Manager windows.
Figure 5-36 User Manager: Main Window and File Menu
File menu
Load ...
Exit

156 Trusted Solaris Administrator’s Procedures—July 1997
5

157
Managing Mail 6
Because mail is essentially the same in the Trusted Solaris environment as it isin the Solaris environment, the system administrator role sets up andadministers mail servers according to instructions in Chapter 9 of the Solaris2.5 User Accounts, Printers, and Mail Administration manual. The differences inhow to administer Trusted Solaris mail are described here and on thesendmail(1MTSOL) man page. This chapter covers the following topics:
Overview of Trusted Solaris Mail Features page 158
Changing Mail Aliases page 164
Enabling the Use of .mailrc Files in Home Directory MLDs page 164
Creating and Initializing New Local and NIS+ Managed Aliases page 166
Allowing Users to List the Entire Mail Queue page 167
Tracing Sendmail’s Activities page 168
Troubleshooting Mail Delivery Difficulties page 171
Configuring Trusted Solaris Mail Delivery Options for Mail BelowUsers’ Minimum Labels
page 177
How Sendmail Handles Mail Below the Recipient’s Minimum SL page 177
Mail Handling Options page 177
Substituting an Alternate Mail Application page 180

158 Trusted Solaris Administrator’s Procedures—July 1997
6
This chapter contains the following procedures:
Overview of Trusted Solaris Mail Features
In the Trusted Solaris environment, mail may be sent and received at multiplesensitivity labels by each user, and the sensitivity labels and information labels ofmail messages are preserved. The following are the highlights of how mail ishandled differently from the Solaris environment.
• MLDs are used to store mail messages queued for delivery and to storeunread mail messages.
See “Multilabel Directories for Outgoing and Incoming Mail” and“Mailboxes in Multilabel Directories” on page 160.
• Sendmail is modified to enforce sensitivity labels, to float information labels,and to route mail to a user only if the sensitivity label of the incoming mailis within the clearance and minimum sensitivity label of the user.
• Because users should not be able to list queued mail sent by other users, therestrictmailq option is set by default in the sendmail.cf file, and onlyusers in the same group as the mail queue may list jobs in the mail queue.
See “To Allow Listing of the Mail Queue” on page 168.
• The p option in the sendmail configuration file, sendmail.cf, has beenextended with Optsol ... privacy option settings that allow administratorsto specify what sendmail should do with any mail that arrives at asensitivity label below the user’s minimum sensitivity label.
To Edit Aliases page 167
To Allow Listing of the Mail Queue page 168
To Trace Sendmail for Trusted Solaris Information page 170
To Check for a Properly Configured Network Connection for SendingMail
page 172
To Configure Mail Delivery Options for Mail Below Users’ MinimumLabels
page 178
To Substitute an Alternate Mail Application in the Front Panel for AllUsers
page 181
To Create a Multilevel Action for the Alternate Mail Application page 188

Managing Mail 159
6
See “How Sendmail Handles Mail Below the Recipient’s Minimum SL” onpage 177 and “To Configure Mail Delivery Options for Mail Below Users’Minimum Labels” on page 178.
• An X-Sender-Information-Label line is added to the header of each messageby sendmail to show the information label of the original sender.
If an organization chooses to configure the system without informationlabels and, as a result, the tsol_enable_il switch is off in /etc/system ,no X-Sender-Information-Label displays.
Note – All the fields in the message header, including the X-Sender-Information-Label are vulnerable to manipulation or spoofing by anunscrupulous user, so the information label in the X-Sender line is not strictlyreliable.
• A CDE action for an alternate mail application can be substituted for thedefault dtmail action in the front panel mail subpanel.
See “Substituting an Alternate Mail Application” on page 180.
Multilabel Directories for Outgoing and Incoming Mail
The /var/spool/mqueue directory is an MLD where messages at varyingsensitivity labels are stored until they can be delivered. Figure 6-1 shows thatwhen a user changes to /var/spool/mqueue , the user is transparentlyredirected into .SLD.2 , which is the SLD whose sensitivity label is the same atthe current process. The mail messages shown in .SLD.2 are the ones waitingto be sent at the current sensitivity label.
Within the mqueue MLD, a listing of all the SLDs shows:
• .SLD.1: Permission denied (because the label of .SLD.1 strictlydominates the current sensitivity label))
• .SLD.0 is empty, and

160 Trusted Solaris Administrator’s Procedures—July 1997
6
• Messages in .SLD.2 are waiting to be sent at the current sensitivity label.
Figure 6-1 /var/spool/mqueue MLD and its Contents at Different Sensitivity Label
The Trusted Solaris software also makes /var/mail a multilabel directory(MLD) to store mail in mailboxes for all accounts. See “Mailboxes in MultilabelDirectories” for additional information.
Mailboxes in Multilabel Directories
The sendmail program creates mailbox files within the /var/mail MLD tostore mail received for accounts. For each account, a separate mailbox iscreated at each of the sensitivity labels of any mail the account has received. Asa result, each account may have multiple mailboxes: if user roseanne hasreceived mail labeled PUBLIC, NEED TO KNOW ENGINEERING and NEEDTO KNOW MARKETING, she has three separate mailboxes each at a differentsensitivity label in a separate SLD. The mailboxes are given the name of theaccount. All of user roseanne’s mailboxes are called roseanne. Role accountshave their own mailboxes, like all user accounts. Any mailboxes created for therole account secadmin are called secadmin.
The first time mail is sent to any user or role on a host at a particular sensitivitylabel, the sendmail program creates an SLD in /var/mail at the sensitivitylabel of the mail and stores the mail in a mailbox in the new SLD. Subsequentmail at the same sensitivity label whether it is for another user or the same
trustworthy% cd /var/spool/mqueuetrustworthy% mldpwd/var/spool/.MLD.mqueue/.SLD.2trustworthy% lsdfNAA00212dfNAB00212dfNAC00212trustworthy% cd /var/spool/.MLD.mqueuetrustworthy% ls -R .SLD.*ls: .SLD.1: Permission denied.SLD.0:.SLD.2:dfNAA00212dfNAB00212dfNAC00212

Managing Mail 161
6
user is put into the same SLD. When a user removes all the mail from amailbox at a specific sensitivity label, the mailbox(/var/.MLD.mail/.SLD.?/ username) is deleted.
For example, if the first mail received on the system has a sensitivity label of NEEDTO KNOW ENGINEERING and is addressed to user roseanne,/var/.MLD.mail/.SLD.0 is created at sensitivity label NEED TO KNOWENGINEERING, and the mail is put into the roseanne mailbox in .SLD.0 . If thenext time mail is received on the system, it is also has the NEED TO KNOWENGINEERING sensitivity label and is addressed to user jhoman, this secondpiece of mail is put into .SLD.0 in the jhoman mailbox. A third piece of mail toroseanne at PUBLIC causes .SLD.1 to be created; the mail is put into theroseanne mailbox in .SLD.1 . Figure 6-2 shows that the mail sent to roseanneand jhoman at NEED TO KNOW ENGINEERING is being stored in the roseanneand jhoman mailboxes in .SLD.0 , while mail sent to user roseanne at PUBLIC isin another roseanne mailbox in .SLD.1 .
Figure 6-2 Mailboxes in SLDs at Different Sensitivity Labels
$ cd /var/.MLD.mail/$ ls -R .SLD.*.SLD.0roseannejhoman.SLD.1roseanne

162 Trusted Solaris Administrator’s Procedures—July 1997
6
Mail Notification
Accounts are notified about mail arrival through the Mail subpanel on theFront Panel in whatever workspace is active. As illustrated in Figure 6-3, theMail subpanel displays a mail icon for each of the following:
• For each sensitivity label at which mail has been received by the logged-inuser account
• For each sensitivity label at which mail has been received by any role thatthe user has assumed during the current session.
Figure 6-3 Mail Subpanel With Mail at Multiple Labels
Figure 6-3 shows the Mail subpanel displayed in a workspace with theINTERNAL_USE_ONLY sensitivity label. The Mail subpanel shows mail iconsat PUBLIC, INTERNAL_USE_ONLY, and NEED_TO_KNOW for the user. The

Managing Mail 163
6
The Mail subpanel in Figure 6-3 on page 162 also shows mail at ADMIN_LOWfor the root role, which the user has assumed during the session—as indicatedby the presence of a root administrative role workspace button at the lowerright of the figure.
The mail icon at the top of a subpanel is not identified with a sensitivity label.If clicked, it displays with the sensitivity label of the current workspace, justlike the mail icon in the Front Panel.
Access to mail at various sensitivity labels is not constrained by the sensitivitylabel of the current workspace, because it does not violate the Trusted Solarissecurity policy for any user to be able to read and send mail at any sensitivitylabel for which the user is cleared. Therefore a mail reader may be launched at anyof the sensitivity labels of any of the icons displayed in the mail subpanel, no matterwhat the sensitivity label is of the current workspace.
Reading of Mail
When the recipient of the mail clicks on a mail icon, a mail reader is displayedat the sensitivity label of the incoming mail. When a complete CMW label isdisplayed, the short name of the sensitivity label is displayed in brackets.Because the sensitivity label of the mail shown in Figure 6-4 isINTERNAL_USE_ONLY the mail reader shows a sensitivity label of[INTERNAL] to the right of the PUBLIC information label.
Figure 6-4 Window Label on a Mail Reader Launched at a Sensitivity Label ofINTERNAL_USE_ONLY When Information Labels are Enabled
When information labels are disabled, the long name of the sensitivity labeldisplays within brackets. The mail reader shown in Figure 6-5 displays with asensitivity label of [INTERNAL_USE_ONLY].

164 Trusted Solaris Administrator’s Procedures—July 1997
6
Figure 6-5 Window Label on a Mail Reader Launched at a Sensitivity Label ofINTERNAL_USE_ONLY When Information Labels are Disabled
How Mail Gets Its Sensitivity Label
The sensitivity label of the mail is determined by one of the following:
• For mail coming from a Trusted Solaris or from another type of labeled hostconfigured with one of the labeled host options in the Trusted Networkingdatabases, the sensitivity label is the sensitivity label of the creating process(the sensitivity label of the mailer that sent the mail).
• For mail coming from an unlabeled machine (one that does not recognizelabels and is configured as an unlabeled machine in the Trusted Networkingdatabases), it is the default sensitivity label assigned to the host in theTrusted Networking databases.
Changing Mail AliasesSee the Solaris 2.5 “Mail Administration Guide” for how to administer mailaliases, along with the following sections that explain the exceptions that applyin the Trusted Solaris environment.
Enabling the Use of .mailrc Files in Home Directory MLDs
As in Solaris systems, individual users may put local copies of a .mailrc fileinto their home directories to create personal mail aliases. However, becauseTrusted Solaris home directories are almost always MLDs, the systemadministrator or individual user has to do some setup so that .mailrc files(and possibly other startup files) can be copied or linked into every SLDcreated within the user’s home directory at each sensitivity label. See also“Managing Startup Files in a Trusted Solaris System.”

Managing Mail 165
6
To partially automate the process of propagating .mailrc files (and otherstartup files) the system administrator can make use of standard skeletondirectories and two new Trusted Solaris files explained below:
• .copy_files and• .link_files
.copy_files
Create a .copy_file s file and list the .mailrc file in it if you want the.mailrc to be copied to each SLD. (Copied startup files can be different ineach SLD.) Copying the .mailrc , for example, would allow users topotentially have differing mail aliases in each SLD.
.link_files
Create a .link_file s file and list the .mailrc file in it if you want the.mailrc to be linked to each SLD. Linked startup files are the same in eachSLD. Linking the .mailrc , for example, would mean that any change made tothe .mailrc in any SLD would be made in all SLDs.
Using the .copy_files and .link_files Along WithSkeleton Directories
If the system administrator specifies a skeleton path directory for a useraccount, all the files in that skeleton directory are copied into the first homedirectory SLD created for the user. The system administrator can takeadvantage of this feature by putting into a skeleton directory (such as/etc/skel ) a basic .mailrc along with a .copy_files that lists the.mailrc for copying or a .link_files file that lists the .mailrc for linking.Once this has been set up, and once the .copy_files or .link_files hasbeen copied into the home directory SLD created at the user’s minimumsensitivity label, if the .mailrc file is listed in .copy_files, it is copied, andif the .mailrc files is listed in .link_files , it is linked into eachsubsequently-created SLDs whenever the account labels a new workspace witha new sensitivity label. The user may also create a .mailrc , .copy_files , ora .link_files or edit any existing files that have been propagated to any oftheir home directory SLDs after the system administrator’s intervention.

166 Trusted Solaris Administrator’s Procedures—July 1997
6
Note – Do any setup for the .mailrc using .copy_files or .link_filesyou want to make immediately before users have a chance to work at multiplesensitivity labels. Otherwise, multiple home SLDs may be created withoutstartup files being propagated.
“Controlling Which Startup Files Are Read While the Window System isComing Up” on page 65 in Chapter 3.
▼ To Propagate a .mailrc to All Accounts’ Home Directory SLDs
1. Assume the system administrator role.
2. In an ADMIN_LOW workspace, go to /etc/skel or whatever skeletondirectory location you wish to use.
3. Put a basic .mailrc file into the skeleton directory.
4. To make the .mailrc copied to all home directory SLDs, create a.copy_files or modify it, if it already exists, to list the .mailrc .
5. To make the .mailrc linked to all home directory SLDs, create a.link_files or modify it, if it already exists, to list the .mailrc .
6. When setting up user accounts, if you want to support the use of personalmail aliases enter the pathname of the skeleton directory in the Homedialog box on the User Manager.
Creating and Initializing New Local and NIS+ Managed Aliases
Aliases may be specified in NIS+ maps or in the /etc/aliases file on eachhost. The Naming Service menu on the Trusted Solaris version of the SolsticeDatabase manager allows the system administrator chose between NIS+ ornone when editing any database, including Aliases. In the Solaris 2.5 operatingsystem, the aliases (4) database is automatically initialized after any changeswhenever sendmail delivers mail and discovers that the aliases database isout of date with respect to /etc/mail.aliases . In Trusted Solaris systems,automatic initialization of the aliases (4) database is only possible whensendmail is running at ADMIN_LOW because the aliases database isstored at ADMIN_LOW. When sendmail is running at any other sensitivitylabel the file cannot be written to by sendmail .

Managing Mail 167
6
Note – The system administrator role must remember to run newaliases orsendmail with the -bi option after making any changes to the aliases.
▼ To Edit Aliases
1. Assume the system administrator role, go to the Solstice_Apps folder inthe Application Manager.
a. Click the Application Manager in the front panel.
b. Double click the Solstice_Apps folder in the Application Manager.
c. Double click the Database_Manager icon.
2. Bring up the Database Manager: Aliases Database.
a. Highlight Aliases on the Databases scrolling list.
b. From the Naming Service menu, pick NIS+ to edit the NIS+ aliasesmap or pick None to edit the local version /etc/aliases file.
c. Click OK.The Database Manager: Aliases Database displays.
3. To modify an alias, select the name of an existing alias and modify it.
a. Highlight an alias name.
b. Choose Modify from the Edit menu.The Database Manager: Modify dialog displays.
c. Change the text in the Expansion text entry field as desired.
4. To add an alias, select Add from the Edit menu.
a. Enter the alias name in the Alias text entry field.
b. Enter all addresses for the alias in the Expansion text entry fields.
Allowing Users to List the Entire Mail QueueIn the default configuration, users are not allowed to list queued mail sent byother users. In the Solaris versions of in the /etc/mail/sendmail.cf file,the restrictmailq option is available to be used but it is not set by default.

168 Trusted Solaris Administrator’s Procedures—July 1997
6
In the Trusted Solaris implementation, restrictmailq is set by default in thesendmail.cf file, and only users in the same group as the mail queue maylist jobs in the mail queue.
Note – Even if an administrator performs one of the steps described below toallow listing of the mail queue, only users who have the mailq or sendmailcommands in one of their profiles can list the mail queue—by entering eithermailq or sendmail with the -bp option. Also, these commands show mail onlyat labels dominated by the user’s process.
▼ To Allow Listing of the Mail Queue
1. To allow all users to list the mail queue, remove the restrictmailqoption in the /etc/mail/sendmail.cf file.
2. To allow a group of users to list the mail queue:
a. Create a new group.
b. Add the desired set of users to the group.
c. Use chgrp(1) to change the group of /var/spool/mqueue to the newgroup.
Tracing Sendmail’s ActivitiesMultiple instances of sendmail are involved in local and remote mail delivery.Figure 6-6 on page 169 shows how data flows through the sendmailprocesses. Any mailer used to send mail (the default is dtmail ) starts aninstance of sendmail . This instance of sendmail attempts to deliver mail thatoriginates on the host, storing it in the local /var/spool/mqueue MLD untilit is delivered—in case the system crashes or anything else causes the mailmessage not to be delivered [➀ in Figure 6-6]. Normally the message isdelivered right away so its stay in the queue is only a matter of seconds.However, if the remote host is down, mail can stay in the queue a long time.
An instance of the sendmail program starts when the workstation or server isbooted, and this instance of sendmail listens at port 25 and attempts todeliver any mail that it receives from a remote host, also storing each messagein the mail queue MLD until it is delivered [➂ and ➄ in Figure 6-6]. A thirdinstance of sendmail periodically scans the mail queue and attempts to

Managing Mail 169
6
deliver any mail in the queue [➁ and ➃ in Figure 6-6]. Figure 6-6 shows someof the sendmail processes on three hosts: cascade, trustworthy, and juggle.Host trustworthy is the mail relay host for juggle.
.
Figure 6-6 Sendmail Data Flow Example
When you send mail to username@hostname and hostname is the name of aremote host, sendmail forwards the message to port 25 of hostname. As shownin Figure 6-6 on page 169, when mail addressed to homan@cascade is sent fromanother account on host cascade, sendmail #1 puts the mail into an SLD within
mailx
sendmail homan@cascade \roseanne@trustworthy \
sendmail -q
local mailer
/var/spool/.MLD.mqueue/.SLD.?/df9999
sendmail -bd
local mailer local mailer
Hostname=cascade Hostname=trustworthy Hostname=juggle
pipe
port 25 port 251
2
3
4
5
ahart@juggle
/var/.MLD.mail/.SLD.?.roseanne
sendmail -bd
sendmail -q
/var/.MLD.mail/.SLD.?.homan /var/.MLD.mail/.SLD.?.ahart
/var/spool/.MLD.mqueue/.SLD.?/df9998
/var/spool/.MLD.mqueue/.SLD.?/df9997

170 Trusted Solaris Administrator’s Procedures—July 1997
6
the /var/spool/.MLD.mqueue on cascade, where it is delivered by a localmailer. sendmail #2 on cascade periodically polls the queue and delivers mailthat could not get delivered right away. sendmail #3 and #5 on hoststrustworthy and juggle listen on port 25 for incoming mail. The messagesoriginating on cascade that are addressed to hosts trustworthy and juggle areboth put into the local /var/spool/.MLD.mqueue and sent to port 25 oftrusted, which is acting as a mail relay host in this example. The sendmail #3on trusted also puts both messages into an SLD within the local/var/spool/mqueue , where the message to roseanne@trustworthy is deliveredby the local mailer and the message to ahart@juggle is forwarded to sendmail#5, which is listening at port 25 of juggle.
Debugging sendmail using sendmail -d is described in detail in thesendmail Nutshell Handbook put out by O’Reilly & Associates, Inc. Toreview briefly, you can get debugging information by specifying sendmailwith the -d option followed by X. To limit the output of sendmail -d to aspecific aspect of sendmail’s behavior, you can specify a category optionallyfollowed by a dot (.) followed by a level from 0-9, with 9 meaning the mostinformation. A new category, 75, selects Trusted Solaris debugginginformation.
▼ To Trace Sendmail for Trusted Solaris Information
1. Assume an administrative role.
Note – To use sendmail with the -d option requires the trusted path attribute,which means that only administrative roles that have this command in therole’s execution profile can debug sendmail.
2. To debug mail on a remote machine, kill the current sendmail daemon.
$ rlogin trusted$ /usr/bin/ps -sv | grep sendmail root 210 1 0 Aug 12 ? 0:02 /usr/lib/sendmail -bd -q1h$ /usr/bin/kill -9 210

Managing Mail 171
6
3. Enter sendmail with the -d option followed by the category 75 followedoptionally by a dot (.) and a level, followed by a space and the address,followed by a message.The message can either be included by redirecting the contents of a file tothe address, as shown below, or by entering return at the end of the line. Inthe latter case, a Subject: prompt comes up; after entering the Subject, youcan create a message from the command line, using the syntax of mail(1) .
4. Review the error messages.
Troubleshooting Mail Delivery DifficultiesRemember that sendmail(1MTSOL) makes a number of checks about thedestined recipient and about the destined receiving host before sending orforwarding mail. Mail can be received by an account only if the mail is withinthat account’s sensitivity label range (between the account’s clearance andminimum sensitivity label). The account’s sensitivity label range is specified asdescribed in Chapter 5, “Using the User Manager to Configure User and RoleAccounts.” Mail can be received on a host only if the mail is within theaccreditation range of that host, as described in the following list and inChapter 10, “Specifying Security Attributes in Trusted Network Databases andSetting Up Routing.”
• Multilevel hosts with an accreditation range between ADMIN_LOW andADMIN_HIGH can receive mail at all sensitivity labels,
• Multilevel hosts that have a restricted accreditation range can receive mailonly between their maximum and minimum sensitivity labels
• Single-level (unlabeled) hosts can receive mail at only the single sensitivitylabel set up for them.
If a user is having trouble sending mail, use the following as guidelines forwhere to look:
$ /usr/lib/sendmail -d75.9 roseanne@trusted < /etc/motd

172 Trusted Solaris Administrator’s Procedures—July 1997
6
♦ Check the mail aliases.Remember that the /etc/aliases file and the mail_aliases NIS+ mapare consulted by sendmail in determining where to deliver mail. Forexample, mail to fred from a system process on his Trusted Solarisworkstation xxx would not go to fred@xxx if sendmail consults themail_aliases table and finds an alias of fred@yyy for user fred.
♦ Make sure that there is a properly configured network connectionbetween the sending and receiving hosts.Do the procedure described in “To Check for a Properly ConfiguredNetwork Connection for Sending Mail” on page 172.
▼ To Check for a Properly Configured Network Connection for SendingMail
1. Send mail using mailx .
Look at the messages from mailx . If you see a line that says, messageaccepted, go to Step 3.
2. While logged into the sending host or, if the mail server is not the same asthe sending host, while logged into the mail server, at the sensitivity labelat which the user needs to send mail, use the telnet(1) command toconnect to port 25 of the receiving host.
If the connection is set up with the correct labels in the trusted networkingdatabases for the sending and the receiving hosts, the sendmail on thedestination host prints a message like:
# mailx -v somebody@somehostSubject: test1testl.
trustworthy% telnet hostname 25
220 hostname Sendmail version ready at date

Managing Mail 173
6
Enter quit to end the connection.
If you get an error message from telnet, the connection is not properly setup with the correct labels in the trusted networking databases; go to Step 5and following and do the step that applies to the type of host you are tryingto debug. If the connection seems to be set up properly, go to Step 3.
3. At the sensitivity label of the outgoing mail, list the mail queue on thesending host or, if the mail server is not the same as the sending host, listthe mail queue on the mail server.Check the list to see if the mail is stuck on the mail server.
4. Try the procedure under “To Trace Sendmail for Trusted SolarisInformation” on page 170.
5. If the destination host is a Trusted Solaris 2.x system, do these steps tomake sure the destined user is able to receive mail within Trusted Solarissecurity policy:
a. Make sure the destined recipient has a valid user account by using theUser Manager.
b. Note the account’s minimum label and clearance in the Labels dialogin the User Manager.
c. Make sure that the sensitivity label of the mail being sent isdominated by the recipient’s maximum label and dominates therecipient’s minimum label.
i. If the sensitivity label of the mail being sent is not in therecipient’s account label range, if you can find a mutually-acceptable sensitivity label for the sender and the recipient,change the sensitivity label to one within the destined recipient’slabel range and try again.
ii. If the mail goes through, instruct the sender to send mail to thatrecipient at the mutually-acceptable label.
quit
# mailq | more

174 Trusted Solaris Administrator’s Procedures—July 1997
6
d. Make sure that the sensitivity label of the mail is within both the UserAccreditation Range and the System Accreditation range of thedestination host as defined by the label_encodings file.sendmail does not deliver mail if the sensitivity label of the mail isoutside the System Accreditation Range.
If the sensitivity label of the mail is inside the System AccreditationRange but outside the User Accreditation Range, such as mail sent atADMIN_LOW and ADMIN_HIGH, remember that a normal user bydefault cannot receive mail sent outside of the User Accreditation Range,and go on to Step e.
e. If the mail is below the minimum label of the destined user, do any ofthe following steps, if it is consistent with your site’s security policy.
See “How Sendmail Handles Mail Below the Recipient’s MinimumSL” on page 177 and “To Configure Mail Delivery Options for MailBelow Users’ Minimum Labels” on page 178.
i. To enable all users on the system to receive mail that is belowtheir minimum labels, either make sure that sendmail isautomatically upgrading the mail by specifyingtsoluserlowupgrade (the default), or make sure the mail readerdelivers the mail at the incoming label, which allows the upgradeif the account has the needed authorization, by specifyingtsoluserlowaccept .
ii. To allow the normal user accounts of all employees who are ableto assume administrative roles to receive mail from systemprocesses outside the User Accreditation Range, make sure thatthe tsoladminlowupgrade or tsoladminlowaccept options areset in the sendmail configuration file.
iii. To enable one administrative role to receive mail from systemprocesses outside the User Accreditation Range, use the ProfileManager to make sure that the administrative role has the use alldefined labels authorization.(The default administrative roles have that authorization in theirprofiles.)
6. For a destination host running the Trusted Solaris 2.5 software, on thesending host make sure that the tnrhdb/tnrhtp entries for the receivinghost are configured properly so the TS2.x system can communicate withthat host over the network.

Managing Mail 175
6
Note – You can use the tninfo(1MTSOL) command to check which templatehas been assigned which host and which host type and other attributes areassigned in the template. The -h hostname option lists the name of the templateassigned to the specified host, while the -t template_name option lists theentries specified in the template, including the host type.
a. Check that the destination host has the correct template name assignedto it in the tnrhdb(4TSOL) database and that the template in thetnrhtp(4TSOL) file correctly defines the host’s type as sun_tsol .
b. Check that the minimum and maximum sensitivity label set in theassigned template in the tnrhtp(4TSOL) allow communications at thesensitivity label of the mail that is not being delivered.
c. Once these checks are passed, the network connection ought to work.Go back and do Step 2 on page 172 and run telnet to make sure.
7. For a destination host running the Trusted Solaris 1.x software, on thesending host make sure that the tnrhdb/tnrhtp entries for the receivinghost are configured properly so the TS2.x system can communicate withthat host over the network.
a. Check that the destination host has the correct template name assignedto it in the tnrhdb(4TSOL) database and that the template in thetnrhtp(4TSOL) file correctly defines the host’s type as maxsix .
b. Check that the minimum and maximum sensitivity label set in theassigned template in the tnrhtp(4TSOL) allow communications at thesensitivity label of the mail that is not being delivered.
c. Once these checks are passed, the network connection ought to work.Go back and do Step 2 on page 172 and run telnet to make sure.
8. For a destination host running any labeled operating system that is notthe Trusted Solaris operating system, on the sending host make sure thatthe tnrhdb/tnrhtp entries for the receiving host are configured properlyso the TS2.x system can communicate with that host over the network.

176 Trusted Solaris Administrator’s Procedures—July 1997
6
a. Read the tnrhtp(4TSOL) man page if necessary to find out the correcthost type and other options to specify in the template assigned to thehost.For example, CIPSO type hosts require certain options, and RIPSO typehosts require other options. See also Chapter 10, “Specifying SecurityAttributes in Trusted Network Databases and Setting Up Routing.”
b. Create a template or copy an applicable one in the tnrhtp(4TSOL)and make sure that the correct template is assigned to the host in thetnrhdb(4TSOL) database to identify it with the appropriate host type.
c. Check that the minimum and maximum sensitivity label set in theassigned template in the tnrhtp(4TSOL) allow communications at thesensitivity label of the mail that is not being delivered.
d. Once these checks are passed, the network connection ought to work.Go back and do Step 2 on page 172 and run telnet to be sure.
9. If the destination host is not running a label-cognizant operating system,on the sending host make sure that the tnrhdb/tnrhtp entries for thereceiving host are configured properly so the TS2.x system cancommunicate with that host over the network.
a. Check that the destination host has the correct template name assignedto it in the tnrhdb(4TSOL) database that the template in thetnrhtp(4TSOL) file correctly defines the host’s type as unlabeled .
b. Check that the sensitivity label defined as the default sensitivity labelfor the unlabeled host in the assigned template in the tnrhtp(4TSOL)allows communications at the sensitivity label of the mail that is notbeing delivered.
c. Once these checks are passed, the network connection ought to work.Go back and do Step 2 on page 172 and run telnet to be sure.
Configuring Trusted Solaris Mail Delivery Options for Mail Below Users’Minimum Labels
The security administrator must make sure that the Trusted Solaris-specificprivacy options in the sendmail configuration file sendmail.cf have valuesconsistent with the site’s security policy. See the sendmail(1MTSOL) manpage, especially the TRUSTED SOLARIS DIFFERENCES section, and see theparagraphs that follow for a description of what the options do.

Managing Mail 177
6
How Sendmail Handles Mail Below the Recipient’s Minimum SL
Two types of actions may be specified for sendmail to take when mail isreceived at a sensitivity label that is below the recipient's minimum sensitivitylabel. The Optsol ... privacy option settings in the sendmail configuration filespecify the actions to take, depending on whether the mail is at ADMIN_LOWor at another label below the recipient’s sensitivity label. ADMIN_LOW mail istreated differently from other mail because ADMIN_LOW mail is always sentby a system process to an account (usually an administrative role account) thatshould see the mail, while a user cleared to a particular label in the useraccreditation range, such as CONFIDENTIAL or INTERNAL USE ONLY),should probably not be able to send mail to a user whose minimum label isSECRET or NEED TO KNOW.
These options give sites the discretion to decide which response is consistentwith their site’s security policy. The defaults (as set in/etc/mail/sendmail.cf) automatically upgrade mail sent at ADMIN_LOWand return mail sent at other labels below the user’s minimum sensitivity label.
Mail Handling Options
Three mutually exclusive options have the prefix tsoladminlow and the threeother mutually exclusive options have the prefix tsolother. Each option has anaction portion in its name to specify what sendmail should do when itreceives the mail at ADMIN_LOW or some other sensitivity label below theuser’s minimum sensitivity label. upgrade means to deliver the message at the

178 Trusted Solaris Administrator’s Procedures—July 1997
6
recipient's minimum sensitivity label. accept means to deliver the message atthe message's sensitivity label. return means to return the message to thesender.
▼ To Configure Mail Delivery Options for Mail Below Users’ MinimumLabels
1. As security administrator, use the Set Mail Options action to open thesendmail.cf file for editing.
a. Click the application manager icon on the front panel.
b. In the Application Manager folder, double-click the System_Adminicon.
c. Double-click the Set Mail Options action icon.
Table 6-1 Trusted Solaris Mail Handling Options
Option Name Effect
tsoladminlowupgrade Default setting. Accepts ADMIN_LOW mail anddelivers it at ADMIN_LOW. User may upgrade it andread it only if one of the user’s execution profiles has theSYS_ACCRED_SET authorization.
tsoladminlowaccept Accepts ADMIN_LOW mail and delivers it atADMIN_LOW. User may upgrade it and read it only ifone of the user’s execution profiles has theSYS_ACCRED_SET authorization.
tsoladminlowreturn Returns ADMIN_LOW mail to the sender
tsolotherlowupgrade Upgrades mail received at a SL below the user’sminimum SL to the user’s minimum SL. Because themail is upgraded by sendmail , the user does not needthe SYS_ACCRED_SET authorization to receive it.
tsolotherlowaccept Accepts mail below the user’s minimum label anddelivers it. User may upgrade and read it only if one ofthe user’s execution profiles has the SYS_ACCRED_SETauthorization.
tsolotherrlowreturn Default setting. Returns mail below the user’s minimumlabel to the sender.

Managing Mail 179
6
2. Search for the lines that begin Optsol , and change either of the twoexisting default settings.
See Table 6-1 on page 178, ““Trusted Solaris Mail Handling Options” for namesand descriptions of the tsol privacy options.
# TSOL actions for mail received below recipient min label# options are:# tsoladminlowupgrade - upgrade to user min label (default)# tsoladminlowaccept - accept at delivered label# tsoladminlowreturn - return to sender# tsolotherlowupgrade - upgrade to user min label# tsolotherlowaccept - accept at delivered label# tsolotherlowreturn - return to sender (default)
OptsoladminlowupgradeOptsolotherlowreturn

180 Trusted Solaris Administrator’s Procedures—July 1997
6
Substituting an Alternate Mail ApplicationBy default, dtmail is the mail application that is launched from the mail panelthe Trusted Solaris Front Panel. The Trusted Solaris system allows thesubstitution of an alternate mail application, but only the system administratorcan do the set up needed so that the mailer provides the full multilevel mailcapabilities.
Without administrative intervention, any user can drag and drop an action foran alternate mail application into the Front Panel and then access the newly-installed mailer at the sensitivity label of the current workspace. However,since mail monitoring for mail at multiple sensitivity labels does not occurwhen an action is installed this way, dragging and dropping by individualaccounts of alternate mail actions into the front panel is only appropriate at asite using a single sensitivity label.
The system administrator can either
• Modify the front panel control file so that an alternate mail action isavailable to all users (see “To Substitute an Alternate Mail Application in theFront Panel for All Users”).
• Make an alternate mail action control file available with instructions forindividual users on how to drag and drop the alternate control file into theirFront Panel mail subpanel (see “To Create a Multilevel Action for theAlternate Mail Application”).
For an alternate mail action to be installed in the front panel, the mailapplication must have an action defined. The example screens in “To Substitutean Alternate Mail Application in the Front Panel for All Users” on page 181

Managing Mail 181
6
show the substitution of the OpenWindows mailtool for Dtmail . TheOpenWindows mailtool action is defined in the/usr/dt/appconfig/types/C/sunOW.dt file as shown in Figure 6-7.
Figure 6-7 OpenWindow’s mailtool Action Definition from sunOW.dt
Tip
Note – Difficulties may arise if mail arrives while you are installing analternate mail icon or deleting the default one. For that reason , it is a good ideato stop sendmail before you start and start sendmail again after you are done.
If all the mail icons disappear from the Front Panel, investigate the account’s$HOME/.dt/fp.dynamics directory. During the operation of the system, allchanges to the Front Panel are stored in each account’s$HOME/.dt/fp.dynamics directory at the session clearance. Copy thecontents of fp.dynamics to a backup directory and restore the file one by oneuntil the Front Panel configuration is restored.
▼ To Substitute an Alternate Mail Application in the Front Panel for AllUsers
Caution – Do this procedure before accounts start getting mail on the system.If you do it later, you would need to clean up the contents of directoriescreated by the window system in every $HOME/.dt/fp.dynamics directory.
1. Assume the security administrator role and make sure you are in anADMIN_LOW workspace.
ACTION OWmailtool{ LABEL OW Mail Tool ICON OWmailtool TYPE COMMAND WINDOW_TYPE NO_STDIO EXEC_STRING /usr/openwin/bin/mailtool}
!

182 Trusted Solaris Administrator’s Procedures—July 1997
6
2. Make sure an action is defined for the alternate mail action.See “Substituting an Alternate Mail Application” on page 180.”
3. Stop sendmail .
4. Bring up the Admin Edit action from the System_Admin folder.
5. Enter /usr/dt/appconfig/types/C/dtwm.fp file in the File to Editfield.
6. Find the control section for mail shown below.
a. Leave TYPE, CONTAINER_NAME, CONTAINER_TYPE, andPOSITION_HINTS as shown below.
CONTROL Mail{ TYPE icon CONTAINER_NAME Top CONTAINER_TYPE BOX POSITION_HINTS 5 ICON DTmail LABEL Mail ALTERNATE_ICON DtMnew MONITOR_TYPE mail DROP_ACTION Compose PUSH_ACTION DTWmail PUSH_RECALL true CLIENT_NAME dtmail HELP_TOPIC FPOnItemMail HELP_VOLUME FPanel}
TYPE iconCONTAINER_NAME TopCONTAINER_TYPE BOXPOSITION_HINTS 5

Managing Mail 183
6
b. Change the ICON field to identify the icon of the replacementapplication.
c. Change the LABEL field to change the icon label that appears with theicon of the replacement application in the mail subpanel.
d. Leave ALTERNATE_ICON and MONITOR_TYPE as shown below.
e. Change DROP_ACTION or leave as shown below.
Other mailers may or may not have a Compose action. OpenWindowsmailtool does not. If you leave the DROP_ACTION as Compose, ifsomeone drags mail to the mail icon, a dtmail Compose window willcome up. If you remove the DROP_ACTION, nothing happens if mail isdragged to the mail icon.
f. Change the PUSH_ACTION field to identify the replacement action tobe run when the user clicks on the new mail icon.
The action name supplied here must be defined in the one of theapplication search paths. The OWmailtool action shown is defined insunOW.dt in the /usr/dt/appconfig/types/C directory.
ICON OWmailtool
LABEL OW Mail Tool
ALTERNATE_ICON DtMnewMONITOR_TYPE mail
DROP_ACTION Compose
PUSH_ACTION OWmailtool

184 Trusted Solaris Administrator’s Procedures—July 1997
6
g. Leave the PUSH_RECALL action as shown.
When true , if an application is launched for a second time, a newapplication is not launched if the icon for the application window isconcealed on the workspace. Instead the application window is broughtforward.
h. Change the CLIENT_NAME field to identify the executable for thereplacement application.
The path for CLIENT_NAME must be defined by an EXEC_STRING inthe action’s definition. For example, the OWmailtool action has theEXEC_STRING defined as /usr/openwin/bin/mailtool .
i. Leave the HELP_* entries as is.
7. Using the File menu options Save the changes and Close the file.
Note – The next step is only necessary if you do this procedure after the systemis running.
8. Remove all contents of the $HOME/.dt/fp.dynamics directory.
9. Restart the Workspace Manager from the workspace menu to see thechanges to the dtwm.fp go into effect in the front panel.
10. Restart sendmail .
PUSH_RECALL true
CLIENT_NAME mailtool
HELP_TOPIC FPOnItemMailHELP_VOLUME FPanel

Managing Mail 185
6
▼ To Create a Multilevel Action for the Alternate Mail Application
1. Assume the security administrator role and make sure you are in anADMIN_LOW workspace.
2. Use the Admin Edit action to bring up the/usr/dt/appconfig/types/C/dtwm.fp file to edit.
3. Find the control section for mail shown below.
4. Copy the control text to a file whose name has the .fp extension, forexample, mail.fp , and quit the dtwm.fp file.Create the new file mail.fp file in a directory such as /etc or /usr/binthat is in every user’s path.
5. Bring up the Admin Edit action from the System_Admin folder and openthe new mail.fp file for editing.
CONTROL OW_Mail{ TYPE icon CONTAINER_NAME Top CONTAINER_TYPE BOX POSITION_HINTS 5 ICON DTmail LABEL Mail ALTERNATE_ICON DtMnew MONITOR_TYPE mail DROP_ACTION Compose PUSH_ACTION DTWmail PUSH_RECALL true CLIENT_NAME dtmail HELP_TOPIC FPOnItemMail HELP_VOLUME FPanel}

186 Trusted Solaris Administrator’s Procedures—July 1997
6
6. Edit the CONTROL OW_Mail section shown below.
a. Leave TYPE, CONTAINER_NAME, CONTAINER_TYPE, andPOSITION_HINTS as shown below.
b. Change the ICON field to identify the icon of the replacementapplication.
c. Change the LABEL field to change the icon label that appears with theicon of the replacement application in the mail subpanel.
CONTROL OW_Mail{ TYPE icon CONTAINER_NAME Top CONTAINER_TYPE BOX POSITION_HINTS 5 ICON DTmail LABEL Mail ALTERNATE_ICON DtMnew MONITOR_TYPE mail DROP_ACTION Compose PUSH_ACTION DTWmail PUSH_RECALL true CLIENT_NAME dtmail HELP_TOPIC FPOnItemMail HELP_VOLUME FPanel}
TYPE iconCONTAINER_NAME TopCONTAINER_TYPE BOXPOSITION_HINTS 5
ICON OWmailtool
LABEL OW Mail Tool

Managing Mail 187
6
d. Leave ALTERNATE_ICON and MONITOR_TYPE as shown below.
e. Change DROP_ACTION or leave as shown below.
Other mailers may or may not have a Compose action. OpenWindowsmailtool does not. If you leave the DROP_ACTION as Compose, ifsomeone drags mail to the mail icon, a dtmail Compose window willcome up. If you remove the DROP_ACTION, nothing happens if mail isdragged to the mail icon.
f. Change the PUSH_ACTION field to identify the replacement action tobe run when the user clicks on the new mail icon.
The action name supplied here must be defined in the one of theapplication search paths. The OWmailtool action shown is defined insunOW.dt in the /usr/dt/appconfig/types/C directory.
g. Leave the PUSH_RECALL action as shown.
When true , if an application is launched for a second time, a newapplication is not launched if the icon for the application window isconcealed on the workspace. Instead the application window is broughtforward.
h. Change the CLIENT_NAME field to identify the executable for thereplacement application.
ALTERNATE_ICON DtMnewMONITOR_TYPE mail
DROP_ACTION Compose
PUSH_ACTION OWmailtool
PUSH_RECALL true
CLIENT_NAME mailtool

188 Trusted Solaris Administrator’s Procedures—July 1997
6
The path for CLIENT_NAME must be defined by an EXEC_STRING inthe action’s definition. For example, the OWmailtool action has theEXEC_STRING defined as /usr/openwin/bin/mailtool .
i. Leave the HELP_* entries as is.
7. Save the changes and quit the file.
8. Give users the procedure “To Install an Alternate Mailer in the FrontPanel” on page 188, after testing the procedure yourself to see if themailer shows up and works properly.
▼ To Install an Alternate Mailer in the Front Panel
1. Obtain the pathname of the correct alternate mail application’s control filefrom the system administrator.The system administrator must have done some setup for the mailer towatch for and notify you about mail at all labels within your personalaccreditation range. See “To Create a Multilevel Action for the AlternateMail Application” on page 185.
Note – Do not install an alternate mailer if the file does not end with a suffix of.fp .
Caution – Unless you have the approval of your site’s security administrator,do not install an alternate mailer from any of the application manager foldersor if the file does not end with a suffix of .fp .
2. Ask the security administrator to stop sendmail .
3. Using the File Manager, change to the directory where the alternate mailapplication’s control file resides.
4. Click the Mailer subpanel access button to bring up the subpanel.
HELP_TOPIC FPOnItemMailHELP_VOLUME FPanel

Managing Mail 189
6
5. Drag the icon for the alternate mailer’s front panel control file onto theInstall Icon dropsite in the Mail subpanel.The icon for the alternate mail application should appear in the Mail slider.
6. Click the right mouse button while the pointer is over the alternate mailand select Copy to Main Panel.
7. For each of the old mail icons in the subpanel, click the right mousebutton while the pointer is over any of the mail icons for the oldapplication and select Delete.Repeat this until all of the old icons have been removed. You cannot have amixture of mail applications running at the same time.
8. Select Restart Workspace Manager from the Workspace Menu.The size of the subpanel does not adjust correctly until the WindowManager is restarted.
9. Restart sendmail .

190 Trusted Solaris Administrator’s Procedures—July 1997
6

191
User Manager Data CollectionWorksheet 7
Note – In the User and Role Account Worksheet on the following page, thenames in the left column correspond to the labels on the buttons on the UserManager Navigator.

7
User or Role Account Worksheet
Full Name and Function of Individual or Role
Primary Host Name
Domain Name
Identity Login name: UID: Primary GID: Secondary GIDs:
Comment:
Shell: [ ] Bourne [ ] C [ ] Profile [ ] Other:
User Type: [ ] Normal [ ] Administrative Role [ ] Non-administrative Role
Home Create home dir automatically?
Home directory path:
Path to setup files:
Default permissions:
Mail server:
Password [ ] Cleared until first login [ ] Account is locked [ ] No password (setuid only)
[ ] Normal Password (Manual [ ] Normal Password (Automatic)
NOTE: Normal password options above immediately prompt the administrator to create a password for the account.
Minimum days between password change:
Maximum days before change must be made:
Expiration date: Warning (days before expiration date):
Generation (method used by account when changing password): [ ] Automatic [ ] Manual
Account state:
NIS+ credentials?
Idle Idle time : [ ] Minutes before idle action [ ] Forever [ ] System Default
Idle action: [ ] Logout [ ] Lock Screen
Labels Clearance:
Minimum sensitivity label:
View : [ ] Internal (replace names of administrative labels with closest equivalents within the useraccreditation range) [ ] External (show actual administrative labels) [ ] SysDefault
Sensitivity Labels: [ ] Show [ ] Hide; Information Labels: [ ] Show [ ] Hide
Information Labels: [ ] Show [ ] Hide
Profiles See Appendix B, “Profile Definition Tables” for names of profiles and the tools they contain.
Roles [ ] Security Administrator [ ] System Administrator [ ] Operator [ ] Root

193
Managing Execution Profiles forUsers and Roles 8
This chapter describes how to modify or add execution profiles, which areused for defining the capabilities of individual users and administrative roles.It includes the following major topics.
Review of Terms page 194
Background on Execution Profiles page 194
Use of the Profile Manager to Create or Modify Execution Profiles page 198
Picking a Naming Service page 199
Filtering Profiles page 200
Bringing Up a Blank Profile Definition, Loading an Existing Profile,or Saving Changes Within the Profile Manager
page 207
Entering or Changing the Profile Name or Description page 208
Switching Among Actions, Commands, and Authorizations Modes page 209
Working With the Excluded and Included Lists page 209
Working With Common Features of the Commands and ActionsModes
page 211
Working in Command Mode page 217
Working in Authorizations Mode page 219
Working in Actions Mode page 221
Specifying a New Profile page 227
Modifying an Existing Profile page 228

194 Trusted Solaris Administrator’s Procedures—July 1997
8
This chapter includes the following procedures:
Review of TermsThis section reviews some Trusted Solaris concepts and terms related toexecution profiles and introduces some new ones. The reviewed topics wereintroduced in the Trusted Solaris User’s Guide and discussed in the TrustedSolaris Administration Overview and are included here for convenience.
Execution profilesExecution profiles are a bundling mechanism for defining the capabilities ofindividual users and administrative roles. Each execution profile potentiallycontains a list of UNIX commands, CDE actions, and authorizations, and theexecution profile may also associate security attributes (an effective UID andeffective GID, inheritable privileges, or label constraints) with each command andaction. One or more execution profiles are assigned to each user and role. Theorder in which execution profiles are specified is significant. When multipleprofiles are assigned to a user or role, the set of authorizations is combined,and whatever command or action appears first in the list of profiles for thataccount is used with the privileges, UID, and GID as specified for its firstappearance. Execution profiles can be used to restrict users to a limited set ofapplications or commands. They also can be used to extend the capabilities ofan account, especially when used in combination with the role mechanism. Seeenabling attributes and restrictive attributes.
To Access the Profile Manager page 223
To Pick a Naming Service and Filter for Profiles page 224
To Enter the Name and Description for a New Profile page 229
To Specify Commands in the Profile Manager page 229
To Specify Actions in an Execution Profile page 230
To Specify Commands in the Profile Manager page 229
To Specify Authorizations in an Execution Profile page 232

Managing Execution Profiles for Users and Roles 195
8
Effective UID and GIDA process executing a command has an effective user ID (EUID) and effectivegroup ID (EGID) equal to the process’ real UID and real GID, unless theprocess has executed a command that has the set user ID (setuid) bit or setgroup ID (setgid) bit set. Setting an effective UID, an effective GID, or both aneffective UID and GID, by means of the setuid or setgid bit is usually donewhen a command performs checks while it is running to ensure that it is beingrun by root (UID 0). Setting the setuid or setgid bit on a command or actionallows a non-administrative user to do some things that only the superusercould do in the base system. To achieve the same effect in the Trusted Solarissystem, the security administrator role can assign an effective UID or effectiveGID to a command or action in an execution profile when the command oraction must be run by a specific user or group, most often when the commandmust be run as root.
ActionsActions are a bundling mechanism that allows one or more commands to bespecified for a particular task that in turn may be assigned to one or moreusers. An action can have a set of options and arguments specified along witheach of the command(s) and may make use of a dialog box to prompt foradditional arguments.A set of administrative actions have been created to edit files that are notmanaged through NIS+. For example, to edit the vfstab_adjunct file, thesecurity administrator uses an action called Set Mount Attributes. The SetMount Attributes action includes a command (adminvi ), an argument(vfstab_adjunct ), a label range (ADMIN_LOW to ADMIN_LOW), and aneffective UID of root and an effective GID of sys. The label range is used toensure that the vfstab_adjunct file is not edited at any other SL. Theeffective UID and effective GID ensure access to the file and ensure that thefile’s owner and group do not get changed in the process of being edited.Each action usually has its own icon, is assigned its own set of securityattributes, and may be specified in an execution profile. The icons in theApplication Manager and most of the icons in the front panel correspond toactions.Adding actions is described in the CDE User’s Guide, and the CDE AdvancedUser’s and System Administrator’s Guide, but certain aspects of Trusted Solarissecurity policy affect who can add actions, and who can use the actions.Normal users can drag and drop actions from the Application Manager to the

196 Trusted Solaris Administrator’s Procedures—July 1997
8
front panel to run at a single sensitivity label. The system administrator canregister actions and put them in the /etc/dt/appconfig/types/C directoryto make them available for everybody. See “Actions” on page 441 inChapter 16, “Adding Software,” for more about actions and how to add them.
Enabling AttributesThe optional set of override privileges, effective user ID, and effective group IDthat may be associated with commands and actions in execution profilesextends the capabilities of the command or action, enabling the account thatinvokes it to:
• Work outside of the Trusted Solaris security policy
• In a controlled way
• For a well-defined purpose
The UID, GID, and privileges are referred to as enabling attributes.
Restrictive AttributesThe label range is referred to as a restrictive attribute, because it limits the rangeof labels at which the command or action may be invoked. The default labelrange is the full range in the system accreditation range, from ADMIN_LOW toADMIN_HIGH.
Privileges in Profiles
When a command or an action is assigned one or more privileges in anexecution profile, the privileges become available to the command or actionthrough privilege inheritance. Privileges are considered to be enabling attributes.Commands inherit privilege only when invoked in a profile shell,pfsh(1MTSOL) . Actions inherit privileges through the window system,through the same database lookup used by the profile shell.
Using privilege inheritance allows finer controls on who can make use ofprivilege. Compare the use of inherited privileges to the use of forcedprivileges for a command. Forced privileges are associated with an executablefile, so forced privileges are in effect for the command no matter who invokesthe command and no matter what shell is used. In contrast, inherited

Managing Execution Profiles for Users and Roles 197
8
privileges are available only when a user or role executes the command in aprofile shell and only when one of that account’s execution profiles has thecommand specified to run with privilege.
Background on Execution ProfilesAdding and modifying profiles is an advanced topic for sites that want tocontrol what users can do and enhance what administrators can do—beyondthe controls provided in the default system.
The Trusted Solaris default set of execution profiles includes:
• Basic profiles for normal users
• Three administrative role profiles and one non-administrative role profile
Divided among the default role profiles are all the commands, actions,authorizations, and privileges necessary to fulfill both the administrativeresponsibilities of the UNIX system administrator (root/superuser) and theadded administrative responsibilities of managing a Trusted Solaris system.
The default execution profiles may be all your site ever needs to operate fullyand with the full measure of trust.1 However, once the site’s securityadministrator is thoroughly familiar with the execution profiles and how theywork, the security administrator may decide to create new execution profiles,based on the site’s answers to the following questions:
• What tasks need to be accomplished system-wide and by each individual?
• What is each individual capable of?
• What information and responsibilities can each individual be trusted with?
Before making any changes to execution profiles, especially before you createany new administrative role profiles or modify the administrative role profilesthat currently exist, make sure you thoroughly understand how the currentroles are configured—as described in tables in the Trusted Solaris AdministrationOverview—and understand what the security implications might be of anychanges or additions you might decide to make. The tables list the commands,actions, and authorizations assigned to each profile, and the security attributes(UID, GID, privileges, and label range) that apply to each command andaction.1. Trusted Solaris documentation sometimes uses the term profile and execution profile interchangeably. The
term execution profile is stressed to avoid any confusion with the installation profiles that may be createdduring installation and used as part of system jumpstart.

198 Trusted Solaris Administrator’s Procedures—July 1997
8
Use of the Profile Manager to Create or Modify Execution ProfilesIn the default configuration, the Profile Manager is assigned only to thesecurity administrator role. The Profile Manager is used at ADMIN_LOW.
When the Profile Manager is launched (as described in “To Access the ProfileManager” on page 223), the Profile Manager Load dialog box displays asshown in Figure 8-1 on page 198. It offers menus for picking a naming serviceand filtering profiles. Filtering profiles allows you to start with an existingprofile loaded into the Profile Manager or to start with the Profile Managerempty.
Figure 8-1 Profile Manager: Load Dialog Box
Using the Control Buttons on the Profile Manager Dialog Boxes
The control buttons shown in Figure 8-1 are also found on the Set Privilegesand Set UID/GID dialog boxes.
OKOK saves any changes and closes the dialog box.
ResetRestores the fields to their original state after the last save and leaves thedialog box open.
Filter Profilesmenu
Naming Servicemenu
AllSpecifyNone
NIS+None

Managing Execution Profiles for Users and Roles 199
8
CancelCancel closes the dialog box without saving any changes
HelpHelp provides context sensitive help messages.
Picking a Naming Service
Like all other Trusted Solaris AdminSuite tools, the Profile Manager requiresthat you pick a naming service. The default is NIS+, which is therecommended mechanism for centralized distribution of user and hostinformation. The None option should only be used in specializedcircumstances where a knowledgeable security administrator decides that localprofiles on individual hosts are both needed and allowable within the site’ssecurity policy. A standalone Trusted Solaris host may use either namingservice.
If you choose NIS+ for the Naming Service, any modifications you make to theset of execution profiles are stored in the NIS+ tsolprof table for thespecified domain when the Profile Manager Load dialog first displays. Thecurrent domain name appears in a text field next to the NIS+ option, as shownin Figure 8-2. If the secadmin role has been authenticated for another domain,you may update the NIS+ profiles table in that other domain by replacing thedomain name with that of the other NIS+ domain.
Figure 8-2 Profile Manager: Load, Naming Service NIS+
If you choose None for the Naming Service, the name of the local host displaysas shown in Figure 8-3. You may change the name in the Host field. Anymodifications you make to the set of execution profiles are stored in the/etc/security/tsol/tsolprof file on the specified host.

200 Trusted Solaris Administrator’s Procedures—July 1997
8
Figure 8-3 Profile Manager: Load, Naming Service None
Decision To Make Before Starting♦ Decide whether to use NIS+ or no naming service.
Filtering Profiles
The Filter Profiles menu shown in Figure 8-4 on page 200 allows you to specifywhether the Profile Manager should come up empty or come up loaded with aprofile that you specify. Which of the Filter Profile menu options you choosedepends on whether you are adding a new profile or modifying an existingprofile. See “When Adding a New Profile” or “When Modifying an ExistingProfile” on page 201.
Note – Whichever option you choose to start, after the Profile Manager comesup you may display another profile or empty the display by using the Profilesmenu, as described in “Bringing Up a Blank Profile Definition, Loading anExisting Profile, or Saving Changes Within the Profile Manager” on page 207.
Figure 8-4 Profile Manager: Load, Profile Filter Choices
Note – The Profile Manager initially displays in action mode, with lists ofexcluded and included actions. (Figure 8-6 on page 202 shows one example ofthe Profile Manager in action mode.) You can use the Profile Manager Viewmenu to switch among the modes for actions, commands, and authorizations,as described “To Specify Commands in the Profile Manager” on page 229.

Managing Execution Profiles for Users and Roles 201
8
Decision To Make♦ Decide whether you are adding a new profile and go to the appropriate
section, either “When Adding a New Profile” or “When Modifying anExisting Profile” on page 201.
When Adding a New Profile
If you are adding a new profile, you can bring up the Profile Manager either ofthese two ways:
• Empty (as described under “Launching an Empty Profile Manager” onpage 201)
• Loaded with an existing profile that you may then rename and modify (asdescribed under “Launching the Profile Manager Loaded With an ExistingProfile” on page 202).
Decision To Make Before Starting♦ Decide whether to copy and modify an existing profile or start with an
empty Profile Manager.
When Modifying an Existing Profile
To modify an existing execution profile, you launch the Profile Manager loadedwith the profile (as described under “Launching the Profile Manager LoadedWith an Existing Profile” on page 202) and you then make modifications,keeping the same name.
Launching an Empty Profile Manager
Choosing None from the Filter Profiles menu (as shown in Figure 8-5) bringsup an empty Profile Manager (as shown in Figure 8-6 on page 202).
Figure 8-5 Choosing None from the Profile Manager: Load, Profile Filter Menu

202 Trusted Solaris Administrator’s Procedures—July 1997
8
Figure 8-6 Empty Profile Manager in Action Mode
Launching the Profile Manager Loaded With an Existing Profile
Choosing either All or Specify from the Filter Profiles menu brings up a listfrom which you choose the name of a profile. When you click Load afterselecting the name, the Profile Manager comes up with an existing profileloaded.
• If you want to select an existing profile name from the names of all existingprofiles, see list item 1 on page 203.
• If you want to use a regular expression to search for the name of an existingprofile, see list item 2.b on page 205.

Managing Execution Profiles for Users and Roles 203
8
• If you want to specify the name of an existing profile, see list item 2.a onpage 204.
1. Choosing All from the Filter Profiles menu (as shown in Figure 8-7) allowsyou to pick the name of a profile from a list of all profiles (as shown inFigure 8-8).
Figure 8-7 Choosing All from the Profile Manager: Load, Filter Profiles Menu
Highlighting the name of the profile and clicking Load (as shown inFigure 8-8) opens the Profile Manager with the profile loaded (as shown inFigure 8-12 on page 206).
Figure 8-8 Profile Manager: Load, Highlighting a Profile Name

204 Trusted Solaris Administrator’s Procedures—July 1997
8
Figure 8-9 Profile Manager With A Profile Loaded
2. Choosing Specify from the Filter Profiles menu (as shown in Figure 8-10 onpage 205) allows you to specify a profile name in a text field in one of thefollowing two methods.
a. Entering a regular expression (as shown in Figure 8-10) creates a list ofprofiles to select among.

Managing Execution Profiles for Users and Roles 205
8
Figure 8-10 Specifying a Profile to be Loaded in the Profile Manager By Using aRegular Expression
The example in Figure 8-10 shows P* entered to locate any profilebeginning with P. Figure 8-11 shows the result: the Privileged Shellsprofile displays in the Profile Manager: Open dialog. Highlighting thename of the profile and clicking Load opens the Profile Manager with thePrivileged Shell profile loaded (as shown in Figure 8-12 on page 206).
Figure 8-11 Privileged Shells Profile Listed in the Profile Manager: Open Dialog WhenP* is Specified in the Filter Profiles Text Field
b. Entering the name of a known profile causes the profile name to bedisplayed for your selection.

206 Trusted Solaris Administrator’s Procedures—July 1997
8
Figure 8-12 Profile Manager Loaded With the Privileged Shells Profile

Managing Execution Profiles for Users and Roles 207
8
Bringing Up a Blank Profile Definition, Loading an Existing Profile, orSaving Changes Within the Profile Manager
Figure 8-13 shows the options on the Profile menu.
Figure 8-13 The Profile Manager Profiles Menu For Opening, Saving, and ClosingProfiles
You can use the options in the Profiles menu to do the following:
• New Profile clears the existing profile description from the Profile Manager.• Open Profile allows you to select another profile to load from the list of all
profiles. (A Profile Manager: Open dialog displays with a list of all profilesfor you to choose from, as shown in Figure 8-14.)
• Save Profile saves any changes you have made to the profile.• Close closes the Profile Manager without prompting you or saving any
unsaved changes.

208 Trusted Solaris Administrator’s Procedures—July 1997
8
Figure 8-14 Profile Manager: Open, Highlighting a Profile Name
Entering or Changing the Profile Name or Description
If you brought up the Profile Manager without a profile loaded, you may entera new profile name and description in the empty text entry fields. If you entera name and description and use Profiles->Save, a new profile is created withthe specified name.
When the Profile Manager is loaded with an execution profile, you may modifythe existing name and description. If you modify an existing profile’s nameand use Profiles->Save, a new profile is created with the modified name.
Figure 8-15 The Profile Name and Description Fields in the Profile Manager

Managing Execution Profiles for Users and Roles 209
8
Switching Among Actions, Commands, and Authorizations Modes
The Actions mode is the first one that comes up after you click OK on theProfile Manager: Load dialog (as shown previously in Figure 8-12 on page 206).Figure 8-16 shows the View menu for switching among the actions, commands,and authorizations modes.
Figure 8-16 The Profile Manager View Menu For Switching Between Actions,Commands, and Authorizations
See “Working in Command Mode” on page 217, “Working in AuthorizationsMode” on page 219, and “Working in Actions Mode” on page 221.
Working With the Excluded and Included Lists
Figure 8-17 shows an example of the Profile Manager Excluded and IncludedLists, which are used for actions, command, authorizations, and privileges. Theexample shows actions, but the methods for working with the items in theselists apply to any of the Profile Manager dialogs that show excluded andincluded lists.

210 Trusted Solaris Administrator’s Procedures—July 1997
8
Figure 8-17 Profile Manager Loaded With the Privileged Shells Profile
Moving Items Between Lists
You can move an item (whether it is an authorization, a privilege, a command,a complete directory, an individual action, or a group of actions in anapplication group) by highlighting the item’s name and using the arrow buttonto move it to the desired list.

Managing Execution Profiles for Users and Roles 211
8
Dragging and Dropping Into the Included List
As noted at the bottom of the Profile Manager, you may drag and drop itemsthat match the current mode from the File Manager into the included list. Forexample, in commands mode you could drag the icon in for the mountcommand’s executable file from the /etc folder to the included list.
Moving and Clearing Many List Items With the Select All and Clear AllButtons
All of the Profile Manager modes and the Set Privilege Dialog Box have theSelect All and Clear All buttons.
Select AllSelect All moves all of the items in the excluded list to the included list
Clear AllClear All moves any items in the included list to the excluded list
Working With Common Features of the Commands and Actions Modes
This section describes using common features of the Profile Manager’scommands and actions modes in the following subsections
Expanding and Contracting Application Group and DirectoryListings in the Command and Actions Modes
Each heading in the default excluded list stands for a group of actions (in theActions Mode) or commands (in the Commands Mode). By highlighting theheading and double-clicking on it or on its icon (if one exists), you can view allthe individual items (actions, or commands) it contains. For example, when
Expanding and Contracting Application Group and Directory Listings inthe Command and Actions Modes
page 211
Using the Buttons to Set Security Attributes on Commands and Actions page 212
Setting Privileges on Commands and Actions page 214
Setting a Label Range for a Command or Action page 215

212 Trusted Solaris Administrator’s Procedures—July 1997
8
you double-click on the highlighted Solstice Apps action heading shownpreviously in Figure 8-17 on page 210, it expands to list all the actions in thatgrouping, as shown in Figure 8-18 on page 212.
By double-clicking on an expanded command heading, you can contract thelist back to its heading or directory name. Items can be moved between theexcluded and included list one by one or they may be moved in a group bymoving the heading or directory name.
Figure 8-18 Expanding a Grouping Name to List All of Its Contents
Using the Buttons to Set Security Attributes on Commands andActions
The buttons shown in Figure 8-20 on page 213 only display when an item inthe included list is highlighted and only when security attributes may be setfor that item.

Managing Execution Profiles for Users and Roles 213
8
Figure 8-19 Buttons for Setting Privileges, Label Range, UID and GID
Figure 8-20 shows the format command highlighted, and because privileges, anSL range, UID and GID may be set on commands, the buttons are visible andusable. In contrast, because Tool Talk messages cannot have security attributes,when an action that a Tool Talk message (TT_MSG appears in the descriptionfield) is highlighted, the buttons are grayed.
Figure 8-20 Buttons for Setting Privileges, Label Range, UID and GID

214 Trusted Solaris Administrator’s Procedures—July 1997
8
Setting Privileges on Commands and Actions
After a command or action is highlighted in the Profile Manager, clicking theSet Privileges button brings up the Set Privileges dialog, as shown inFigure 8-21. A number of privileges are listed in the excluded list. Whether theincluded list is empty or not depends on whether the command has previouslybeen assigned any privileges.
DescriptionThe Description field describes what the privilege allows the process executingthe command to do to bypass security policy.

Managing Execution Profiles for Users and Roles 215
8
Figure 8-21 Profile Manager: Set Privileges Dialog Box
Setting a Label Range for a Command or Action
After a command or action is highlighted in the Profile Manager, you set alabel range by setting a minimum and maximum sensitivity label. Clicking theSet Minimum SL or Set Maximum SL button brings up a label builder. (The Set

216 Trusted Solaris Administrator’s Procedures—July 1997
8
Minimum SL dialog is shown in Figure 8-21.) Using these dialogs to set theminimum and maximum SL of a command or action is the same as using anyother Trusted Solaris label builder.
Figure 8-22 Profile Manager: Set Minimum SL Dialog

Managing Execution Profiles for Users and Roles 217
8
Working in Command Mode
This section explains how to use features of the command mode that are not onany of the dialogs in the authorizations and actions modes. It does notduplicate information provided in the following sections on topics that applyto working in command mode:
Selecting Commands from the Profile Manager View menu brings up thecommand mode, as shown in Figure 8-23 on page 218. A number of directoriesare listed in the excluded list. Whether the included list is empty or notdepends on whether the profile has been assigned any commands.
Entering or Changing the Profile Name or Description page 208
Working With the Excluded and Included Lists page 209
Working With Common Features of the Commands and Actions Modes page 211

218 Trusted Solaris Administrator’s Procedures—July 1997
8
Figure 8-23 The Profile Manager Command Mode
Loading A New Directory
You may add another directory to the excluded list by entering the pathname ofthe directory into the text entry field next to the Load button, and then clicking the

Managing Execution Profiles for Users and Roles 219
8
load button. In Figure 8-24, the /etc directory has been entered into thePathname: field next to the Load button and loaded into the excluded list.
Figure 8-24 Entering the Pathname of the /etc Directory to Choose From ItsCommands
Viewing a Command’s Man Page
When a command is highlighted in the included list, you can view its manpage starting with the DESCRIPTION section by clicking the Man Page button.
Working in Authorizations Mode
The authorizations mode does not have any features that are not on the dialogboxes for the commands and actions modes. Working in authorizations modeis described in the previous sections:
Entering or Changing the Profile Name or Description page 208
Working With the Excluded and Included Lists page 209
Working With Common Features of the Commands and Actions Modes page 211

220 Trusted Solaris Administrator’s Procedures—July 1997
8
Selecting Authorizations from the Profile Manager View menu brings up theauthorizations mode, as shown in Figure 8-25. A number of authorizations arelisted in the excluded list. Whether the included list is empty or not dependson whether the profile has been assigned any authorizations.
Figure 8-25 The Profile Manager in Authorization Mode

Managing Execution Profiles for Users and Roles 221
8
Working in Actions Mode
This section explains how to use features of the actions mode that are not onany of the dialogs in the commands and authorizations modes. It does notduplicate information provided in the following sections on these topics thatapply to working in actions mode:
Selecting Actions from the Profile Manager View menu brings up the actionsmode, as shown in Figure 8-27 on page 222. A number of actions are listed inthe excluded list. Whether the included list is empty or not depends onwhether the profile has been assigned any actions.
IconThe icon shown in Figure 8-26 is the icon assigned to the highlighted action orapplication group. As stated in the description section at the bottom ofFigure 8-27 on page 222, you can double-click the icon of an applications groupto list all of the items contained in the group.
TypeThe Type field indicates the type of item highlighted. An application group is aheading that includes a number of actions, which may be expanded to list allits included actions. When an action is highlighted, the possible types are:
COMMANDTT_MSG
Figure 8-26 Icon and Type in Action Mode
Entering or Changing the Profile Name or Description page 208
Working With the Excluded and Included Lists page 209
Working With Common Features of the Commands and Actions Modes page 211

222 Trusted Solaris Administrator’s Procedures—July 1997
8
Figure 8-27 Profile Manager in Action Mode

Managing Execution Profiles for Users and Roles 223
8
▼ To Access the Profile Manager
1. Assume the security administrator role.
2. In a workspace at ADMIN_LOW, bring up the Profile Manager in one ofthe following two ways.
a. Access the Profile Manager by clicking on the Profile Manager icon inthe Application Manager.Figure 8-28 shows the Profile Manager highlighted in the Solstice_Appsfolder.
Figure 8-28 The Profile Manager Icon Highlighted in the Solstice_Apps Folder
b. Bring up a terminal running the default profile shell for the securityadministrator role, and enter dtprofile on the command line.
The Profile Manager: Load window displays with the current domain namein the Domain field (see Figure 8-29 on page 224).

224 Trusted Solaris Administrator’s Procedures—July 1997
8
▼ To Pick a Naming Service and Filter for Profiles
1. Access the Profile Manager.If needed, see “To Access the Profile Manager” on page 223. The ProfileManager Load Dialog Box displays.
Figure 8-29 Profile Manager: Load Dialog Box
2. Choose either NIS+ or None from the Naming Service menu.
a. If you choose NIS+, accept or change the name of the domain in thetext field next to the NIS+ menu item (as shown in Figure 8-29).
b. If you choose None for the Naming Service, accept or change the nameof the local host in the text field next to the None menu item (as shownin Figure 8-30).
Figure 8-30 Choosing None from the Profile Manager: Load, Naming Service Menu
Filter Profilesmenu
Naming Servicemenu
AllSpecifyNone
NIS+None

Managing Execution Profiles for Users and Roles 225
8
3. Choose an item from the Filter Profiles menu to specify whether you wantthe Profile Manager to display with all profiles loaded, to display aspecified profile, or to display with no profile loaded.Choose All, Specify, or None, as shown in Figure 8-31.
Figure 8-31 Profile Manager: Load, Profile Filter Choices
a. If you choose All, specify a profile from the list of all profiles.
i. Click OK.
The Profiles: Load dialog box displays with all the existingexecution profiles listed.
ii. Select a profile from the list.
iii. Click Load.
The Profile Manager displays with the profile or profiles loaded.
b. If you choose Specify, specify the name of a profile to load.When you choose Specify, a text entry field displays next to the menuitem, as shown in Figure 8-32.
Figure 8-32 Specifying Profile Names Using a Regular Expression on the ProfileManager: Load, Filter Profiles Menu

226 Trusted Solaris Administrator’s Procedures—July 1997
8
i. Enter the name of an existing execution profile or a regularexpression in the text entry field.The example in Figure 8-32 shows P* entered to locate any profilebeginning with P.
ii. Click OK or press Return.A list of one or more profiles displays in the Profile Manager: Opendialog (as shown in Figure 8-33.
Figure 8-33 The Privileged Shells Profile Displayed When P* is Specified
iii. Highlight the desired profile name.
iv. Click Load.
The Profile Manager displays with the profile or profiles loaded.
c. If you chose None, go to “To Enter the Name and Description for aNew Profile” on page 229.The Profile Manager displays the list of available actions with no profilesloaded, as shown in Figure 8-34 on page 227.

Managing Execution Profiles for Users and Roles 227
8
Figure 8-34 Empty Profile Manager in Action Mode
Specifying a New Profile
Begin with:
To Access the Profile Manager page 223

228 Trusted Solaris Administrator’s Procedures—July 1997
8
When creating a new execution profile, you can rename and modify an existingprofile or start with all fields empty.
To specify an existing execution profile, on page 225 under “To Pick a NamingService and Filter for Profiles),” do Step 3.a or b.
To enter a new name and start with all fields empty, do Step 3.c. on page 226,and go to the following:
Define the new profiles actions, commands, and authorizations, as desired, asdescribed in:
Modifying an Existing Profile
When modifying an existing profile, start with:
On page 225 under “To Pick a Naming Service and Filter for Profiles,” doStep 3.a or Step 3.b to specify the name of an existing profile.
Redefine any of the profile’s sets of actions, commands, or authorizations asdesired, as described in:
To Enter the Name and Description for a New Profile page 229
To Specify Commands in the Profile Manager page 229
To Specify Actions in an Execution Profile page 230
To Specify Authorizations in an Execution Profile page 232
To Access the Profile Manager page 223
To Specify Commands in the Profile Manager page 229
To Specify Actions in an Execution Profile page 230
To Specify Authorizations in an Execution Profile page 232

Managing Execution Profiles for Users and Roles 229
8
Execution Profile Procedures
▼ To Enter the Name and Description for a New Profile
1. If the Profile Manager is not up, bring it up as described in “To Access theProfile Manager” on page 223 and “To Pick a Naming Service and Filterfor Profiles” on page 224.
2. Enter the name in the Profile Name: field.
3. Enter a description of the profile in the Description: field.
4. Choose Save from the Profiles menu.
▼ To Specify Commands in the Profile Manager
1. If the Profile Manager is not up, bring it up as described in “To Access theProfile Manager” on page 223 and “To Pick a Naming Service and Filterfor Profiles” on page 224.
2. Choose Commands from the View menu.
3. Put the name of the command you want to specify into the included list.If the directory where the command resides is not in the default list, doStep a and Step b or do Step c.
a. Enter the name of the directory where the command resides into thePathname field, click the Load button, and do Step b.
b. Expand the name of the directory where the command resides,highlight the name of the command, and move it to the included list.
c. Drag the icon for the command from its folder into the included list.
4. To specify security attributes, highlight the name of the command in theincluded list, and click on the appropriate buttons.Specify privileges in Step 5.
5. Specify privileges, if desired.
a. Click the Set Privileges button.
b. On the Set Privileges dialog box, move the desired privileges to theincluded list.

230 Trusted Solaris Administrator’s Procedures—July 1997
8
c. Click OK.
6. Specify a label range, if desired.
a. Click the Set Minimum SL button.
b. On the Set Minimum SL dialog box, specify a minimum SL.
c. Click OK.
d. Click the Set Maximum SL button.
e. On the Set Maximum SL dialog box, specify a maximum SL.
f. Click OK.
7. Specify effective UID/GID, if desired.
a. Click the Set UID/GID button.
b. On the Set UID/GID dialog box, move the desired user name to theincluded list.
c. Move the desired group name to the included list.
d. Click OK.
8. On the Profile Manager, choose Save from the Profiles menu.
9. If you are finished, choose Close from the Profiles menu.
10. If you are not finished, choose Actions or Authorizations from the Viewmenu.
▼ To Specify Actions in an Execution Profile
1. If the Profile Manager is not up, bring it up as described in “To Access theProfile Manager” on page 223 and “To Pick a Naming Service and Filterfor Profiles” on page 224.
2. Choose Actions from the View menu.
3. Put the name of the action you want to specify into the included list.
4. If the action is not in an application group in the default list, drag theicon for the action from its folder into the included list.
a. Highlight the name of the action in the included list.

Managing Execution Profiles for Users and Roles 231
8
5. Specify security attributes for an action of the appropriate type, if desired.If the type is TT_MSG, the buttons for specifying security attributes aregrayed and you cannot specify security attributes for the action. If the typeis COMMAND, click on the appropriate buttons to specify securityattributes, as described in Step 6, Step 7, and Step 8.
6. Specify privileges, if desired.
a. Click the Set Privileges button.
b. On the Set Privileges dialog box, move the desired privileges to theincluded list.
c. Click OK.
7. Specify a label range, if desired.
a. Click the Set Minimum SL button.
b. On the Set Minimum SL dialog box, build or type in a minimum SL.
c. Click OK.
d. Click the Set Maximum SL button.
e. On the Set Maximum SL dialog box, build or type in a maximum SL.
f. Click OK.
8. Specify effective UID/GID, if desired.
a. Click the Set UID/GID button.
b. Move the desired user name to the included list.
c. Move the desired group name to the included list.
d. Click OK.
9. Choose Save from the Profiles menu.
10. If you are finished, choose Close from the Profiles menu.
11. If you are not finished, choose Commands or Authorizations from theView menu.

232 Trusted Solaris Administrator’s Procedures—July 1997
8
▼ To Specify Authorizations in an Execution Profile
1. If the Profile Manager is not up, bring it up as described in “To Access theProfile Manager” on page 223 and “To Pick a Naming Service and Filterfor Profiles” on page 224.
2. Choose Authorizations from the View menu.
3. Put the name of the authorization you want to specify into the includedlist by highlighting its name and moving it to the included list.
4. Choose Save from the Profiles menu.
5. If you are finished, choose Close from the Profiles menu.
6. If you are not finished, choose Commands or Actions from the Viewmenu.

Part 3 — Managing Hosts and Networks
Most hosts running Trusted Solaris are connected to a network. Installing anon-networked standalone host is covered in the Trusted Solaris Installation andConfiguration manual. This part of the Trusted Solaris Administrator’s Proceduresmanual contains the the needed background and procedures for configuringhosts and networks. sharing files, and managing communications among hostson local and remote networks.
Chapter 9, “Trusted Solaris Concepts for Managing Hosts and Networks”provides definitions of needed concepts.
Chapter 10, “Specifying Security Attributes in Trusted Network Databases andSetting Up Routing” provides the following main topics:
Chapter 11, “Managing Files and File Systems” includes the following maintopics:
Goals of Trusted Networking
Trusted Network Databases
Setting Up Trusted Routing
Specifying Mount Time Security Attributes
Trusted Solaris and NFS

Chapter 12, “Managing NIS+” includes the following main topics:
Chapter 13, “Changing Configurable Trusted Solaris Kernel Switches” includesthe following main topics:
Chapter 14, “Managing Printing” includes the following main topics:
Chapter 15, “Managing Device Allocation and Setting Device Label Ranges”includes the following main topics:
Chapter 16, “Adding Software” includes the following main topics:
Managing Multiple Trusted Solaris Hosts in a Security Domain
Managing Standalone Trusted Solaris Hosts
New Trusted Solaris NIS+ Tables and Files Not Administered By NIS+
Adding Trusted NIS+ Tables
Behaviors Controlled by Configurable Trusted Solaris Kernel Switches
How Kernel Switches Are Set and Changed
How Trusted Solaris Features Address Information Labeling and AccessControl for Printers
Assigning Labels to Print Jobs
Using a Label Range on Printers to Control Which Jobs Can Print
Labels, Job Numbers, and Handling Information Printed onBanner and Trailer Pages
Managing Device Allocation and Setting Device Label Ranges
Review of Terms and Concepts
Security Administrator’s Tasks in Adding Software
Issues Around the Adding of Privileges to Any Software
Procedures for Adding Software

235
Trusted Solaris Concepts forManaging Hosts and Networks 9
This chapter provides the necessary concepts and background foradministering hosts on a network. Other chapters in this part of the manual,referenced below, describe procedures.
The Trusted Solaris software supports network communications betweenTrusted Solaris 2.x hosts and the following three types of hosts:
• Other Trusted Solaris 2.x hosts• Hosts running operating systems that do not recognize security attributes
(such as Solaris and other UNIX systems)• Hosts running other trusted operating systems, including Trusted Solaris 1.x
hosts.
Networking is managed by a number of different Trusted Solaris subsystems.
• Trusted NFS is used to manage mounted filesystems.
Mounts among Trusted Solaris 2.x hosts and mounts between TrustedSolaris 2.x hosts and other hosts that recognize NFS are supported. SeeChapter 11, “Managing Files and File Systems” for how to set up mounts.
• NIS+ provides centralized management of configuration files defining hosts,networks and users.
In the Trusted Solaris system, the NIS+ master can only be used to manageTrusted Solaris hosts’ data. See Chapter 12, “Managing NIS+” for how tomanage NIS+.

236 Trusted Solaris Administrator’s Procedures—July 1997
9
• Solstice AdminSuite is used to centrally manage users and hosts bymaintaining administrative data in NIS+ tables on the NIS+ master server(with the option of updating the corresponding local files on a host by hostbasis, without relying on NIS+).
To add new workstations (including diskless workstations) and servers toan already-configured distributed system, see the Trusted Solaris Installationand Configuration manual. See the other chapters of this manual for how touse the tools in Solstice AdminSuite to administer users and hosts.
• Trusted networking software supports trusted network communications.
The security administrator role specifies values in the trusted networkingdatabases to provide the desired degree of either openness or control forcommunications among hosts in a security domain and between securitydomains. See “Goals of Trusted Networking” on page 248 in Chapter 10,“Specifying Security Attributes in Trusted Network Databases and SettingUp Routing.” See “Trusted Solaris Networking” for more about the conceptof security domains.
Trusted Solaris NetworkingThe simplest, the easiest-to-protect, and the only network configuration that issubmitted for government evaluation is a single distributed system, in whichone or more hosts are:
• Running the Trusted Solaris 2.5 operating system
• Administered by the same NIS+ master server, with the same set of securityattributes for all machines and users, and
• On the same wire (or configured so as to be virtually on the same wire)
Hosts administered this way may be considered to be within the same securitydomain. Within a single security domain, no routing table is needed, because apacket sent out on the wire is picked up by all other hosts on the samenetwork. When a site decides to include other hosts on the local network thatare running other operating systems at varying levels of trust, the securityadministrator should consider providing some measure of protection for thewire.
Physical protection by the customer against tapping of such a network isassumed, because Trusted Solaris software does not provide encryption.

Trusted Solaris Concepts for Managing Hosts and Networks 237
9
A single host running the Trusted Solaris operating system by itself is alsoconsidered to be a standalone security domain. If the standalone TrustedSolaris host is connected to a network with unlabeled hosts and hosts runningtrusted software from other vendors, it needs the same types of entries in itstrusted networking databases that are needed on any other Trusted Solarishost.
Example of a Single Security Domain
Figure 9-1 shows a single security domain with host F as the NIS+ master. Allof the hosts are connected to the network by means of a single networkinterface. The network interface is the physical connector on a host that connectsit to a network cable. Most often, the interface is an Ethernet connector to anEthernet cable that links all the hosts in the local network. The networkaccreditation range for a host or for a network interface (which applies to allcommunications through the interface) is a range of sensitivity labels (SLs) or alabel range. The network accreditation range is defined by a minimumsensitivity label and a maximum sensitivity label, which are decided upon bythe security administrator and specified by the security administrator role inthe appropriate trusted networking databases.
Figure 9-1 A Single Security Domain
AB
C
D
E
F
securitydomain

238 Trusted Solaris Administrator’s Procedures—July 1997
9
Example of Multiple Security Domains
Multiple security domains made up of multiple NIS+ domains may beconnected by gateways. Figure 9-2 on page 238 shows two security domains.Host F is the NIS+ master for security domain #1, and Host K is the NIS+master for security domain #2. The two security domains are connected bygateway host G.
Figure 9-2 Two Security Domains
In Trusted Solaris administration terms, a gateway is usually a host that hasmore than one network interface and that is running Trusted Solaris software.
Static Routing and Issues About the Use of Trusted Solaris Hosts As Routers
Dynamic routing is not supported in the Trusted Solaris 2.5 system. As long asall hosts are using static routing, multiple networks may be connected usingTrusted Solaris gateways, which is the recommended configuration. Using aTrusted Solaris gateway allows the trusted networking software to use theattributes specified in the trusted network databases to enforce security policyon packets coming into and leaving the network and to support trusted routingof packets that have CIPSO and RIPSO labels.
K
J
I
H
G
FE
D
C
B
A
securitydomain #1
securitydomain #2

Trusted Solaris Concepts for Managing Hosts and Networks 239
9
Communications to a Trusted Solaris distributed system through a TrustedSolaris gateway fail from hosts that rely on dynamic routing because theTrusted Solaris host does not advertise itself as a router to the outside world,so there is no way for1gd hosts using dynamic routing to find the gateway.
To allow communications with host or hosts that rely on dynamic routing(such as Solaris hosts outside of the control of the Trusted Solaris securityadministrator), a router not running Trusted Solaris can be used. If so, keep inmind that the trusted networking features, which include the trusted routing ofCIPSO and RIPSO packets, are not available when the router is other than aTrusted Solaris host.
Network Accreditation Range Requirements
For most hosts running Trusted Solaris software, the accreditation range isspecified in the minimum sensitivity label and maximum sensitivity labelentries for the host in the tnrhdb(4TSOL) file as ADMIN_LOW toADMIN_HIGH. With this accreditation range, each host on a homogeneousTrusted Solaris distributed system can receive packets from any other host inthe same system at any valid sensitivity label. A gateway may be set up eitherto allow communications at all sensitivity labels or to restrict communicationsto a subset of all labels with hosts outside of the local distributed system.
The primary interface that connects the gateway to the Trusted Solaris networkmust always have the default network accreditation range of ADMIN_LOW toADMIN_HIGH, but the security administrator may choose to specify other,restricted, network accreditation ranges for secondary interfaces that connectthe gateway to other networks. Restricting a network’s accreditation range inthe trusted networking interface database on a gateway is one of the means bywhich the security administrator configures the appropriate degree ofopenness or control for communications at a site.
The security administrator role can restrict communications by specifying alower maximum sensitivity label or a higher minimum sensitivity label or bothin the tnidb interface definition for one or more interfaces on a gatewaymachine.

240 Trusted Solaris Administrator’s Procedures—July 1997
9
Figure 9-3 Two Security Domains With Differing Accreditation Ranges
To restrict communications the tnidb entry on gateway G in Figure 9-3 onpage 240 could be specified as shown in Table 9-1
Static RoutingFor communications outside of the local area network, the Trusted Solarisadministrator must specify gateways in one of two static routing tables in the/etc directory on each host. Two types of gateway entries can be created.
• Network gateways
A network entry routes all communications to the specified networkexclusively through the named gateway.
Table 9-1 Example tnidb Entry to Restrict a Network’s Accreditation Range
Interface Name Network Accreditation Range
le0 (interface to security domain #1) PUBLIC to INTERNAL USE ONLY
le1 (interface to security domain #2) ADMIN_LOW to ADMIN_HIGH
PUBLIC to
INTERNAL USE
ONLY
AD
MIN
_LO
W to
AD
MIN
_HIG
H
KJ
I
H
G
FE
D
C
B
A
securitydomain #1
securitydomain #2

Trusted Solaris Concepts for Managing Hosts and Networks 241
9
• Default gateways
Routing table entries for default gateways allow communications throughthe named gateway to all networks that are not specifically listed.
Note – Dynamic routing is not supported.
Both network gateways and default gateways can be specified in thetsolgateways(4TSOL) file. A routing table with only network entries wouldrestrict communications only to the specified network(s). A routing table withone or more network entries can also contain a default entry.
Default gateways for simple networks can be specified in the/etc/defaultrouter file [which is described in the route(1MTSOL) manpage]. The trusted networking software looks first for tsolgateways , and ifone exists, the defaultrouter file is not consulted. If neither file exists, norouting is possible.
Any gateways specified in the static routing tables must be directly connectedto the local area network to which the Trusted Solaris host is connected. Thenumber entered into the metric field of the tsolgateways file is equal to thenumber of gateways between the originating host and the destination.
A transmission to a host on the same network has 0 hops. Figure 9-4 showsfour hosts (H1, H2, H3, and H4) on the same network with 0 hops.
Figure 9-4 Example of 0 Hops for Communications Between Four Hosts in a SingleSecurity Domain
A transmission to a network that is connected directly to the gateway of theoriginating network has 1 hop. Figure 9-5 shows network 129.150.101.0connected directly to 129.150.102.0 by gateway G. Gateway G has a hostname for each of its interfaces: gateway-101 is the name for the interface
129.150.101.3 129.150.101.4129.150.101.2129.150.101.1
H1 H2 H3 H4

242 Trusted Solaris Administrator’s Procedures—July 1997
9
connected to the 101 network, and gateway-102 is the name for the interfaceconnected to the 102 network. Since /etc/defaultrouter can be used forsimple networks with only one gateway, hosts 1, 2, 3, and 4 on net129.150.101.0 could have a defaultrouter file specifying only gateway-101. If the tsolgateways file is used, the network address needs to bespecified as 129.150.102.0 and the metric would be specified as 1 hop.

Trusted Solaris Concepts for Managing Hosts and Networks 243
9
Figure 9-5 Example: Default and Network Routes for Two Security Domains with aSingle Gateway
(alternate) /etc/tsolgateways for hosts on network 129.150.101.0 :
129.150.102.0 gateway-101 1
/etc/defaultrouter for hosts on network 129.150.101.0 :
gateway-101
(alternate) /etc/tsolgateways for hosts on network 129.150.102.0 :
129.150.101.0 gateway-102 1
/etc/defaultrouter for hosts on network 129.150.102.0 :
gateway-102
129.150.101.3 129.150.101.4129.150.101.2129.150.101.1
129.150.102.3 129.150.102.4129.150.102.2129.150.102.1
129.150.101.5
129.150.102.5
gateway-101
gateway-102
H1 H2 H3 H4
H1 H2 H3 H4
G1

244 Trusted Solaris Administrator’s Procedures—July 1997
9
Transmission to a network two gateways away has two hops as shown inFigure 9-6 on page 245. Figure 9-6 shows an example tsolgateways file forhosts 1, 2, 3, and 4 on the network whose IP address is 129.150.110.0 . Asillustrated, gateway G1 connects network 129.150.101.0 to network129.150.102.0 , and gateway G2 connects network 129.150.102.0 tonetwork 129.150.103.0 . The first entry in tsolgateways sets a networkroute to 129.150.102.0 through gateway1-101, and the metric 1 indicatesone hop to the destination network. The second entry sets a network route to129.150.103.0 through gateway1-101, and the metric 2 indicates two hopsto the destination network.
Figure 9-7 on page 246 shows a more complex network topology, withgateways G1, G2, and G3.
See “Setting Up Trusted Routing” on page 271 and also “Setting Up TrustedRouting” on page 271 and the associated procedures in “To Set Up a SimpleDefault Route for a Network with One Gateway” on page 297 and “To Set UpTrusted Routing” on page 297, all of which are in Chapter 10, “SpecifyingSecurity Attributes in Trusted Network Databases and Setting Up Routing.”

Trusted Solaris Concepts for Managing Hosts and Networks 245
9
Figure 9-6 Example tsolgateways File for Communications Among Three Networks
129.150.101.3 129.150.101.4129.150.101.2129.150.101.1
129.150.102.2 129.150.102.3129.150.102.1
129.150.101.5
129.150.102.4
gateway1-101
gateway1-102
129.150.103.3 129.150.103.4129.150.103.2129.150.103.1
129.150.102.5
129.150.103.5
/etc/tsolgateways for hosts on net 129.150.101.0 :
/* net gateway metric*/
129.150.103.0 gateway1-101 2 129 150.102.0 gateway1-101 1
gateway2-102
gateway2-103
G1
H1 H2 H3 H4
H1 H2 H3 H4
G2
H1 H2 H3

246 Trusted Solaris Administrator’s Procedures—July 1997
9
Figure 9-7 Example Complex Gateway Configuration With Routing Tables
129.150.113.1
129.150.116.1
129.150.113.36
129.150.116.2
129.150.37.1
129.150.116.3
129.150.37.2
rest of the world
gateway1-113
gateway1-116
gateway3-116
gateway3-37
gateway2-113
gateway2-N
gateway2-N
gateway2-N
/etc/defaultrouter for host3 on net 129.150.37.0 :
gateway3-37
/* net gateway metric*/129.150.37.0 gateway1-113 1default gateway2-113
129.150.11.3
/etc/tsolgateways for host1 on net 129.150.113.0 :
/etc/defaultrouter for host2 on net 129.150.116.0 :
gateway3-116
H1
H2
H3
G1 G2
G3

247
Specifying Security Attributes inTrusted Network Databases andSetting Up Routing 10
The Trusted Solaris distributed system can consist either of a single host or anumber of hosts networked together. The security administrator specifiessecurity attributes in trusted network databases that define the Trusted Solarissystem’s view of all hosts and networks with which communications areallowed. The security administrator also sets up routing.
This chapter provides procedures for the security administrator to follow whenspecifying which hosts are allowed to communicate with the Trusted Solarissystem and which security attributes apply to communications with thesehosts. This chapter provides the following information:
• The background needed for understanding what values should be set forvarious security attributes in the trusted networking databases
• How the values set in the trusted networking databases are put to use
• How to set up routing and trusted routing
These listed sections provide needed prerequisite background information:
Goals of Trusted Networking page 248
How Security Attributes Are Added to Packets page 249
MAC Enforcement on Outgoing Messages page 252
MAC Enforcement on Incoming Messages page 253
Trusted Network Databases page 254

248 Trusted Solaris Administrator’s Procedures—July 1997
10
This chapter includes the following procedures for updating the variousdatabases to achieve the desired degree of isolation or openness incommunications.
Goals of Trusted NetworkingThe trusted networking software ensures the following:
• Proper labeling of data in network communications
• Enforcement of MAC rules when data is sent or received across the network
The tnrhdb(4TSOL) , tnrhtp(4TSOL) , and the tnidb(4TSOL) trustednetwork databases store labels and other security attributes that apply to hostsand networks and to network interfaces.
The trusted network databases also may be used by the security administratorto specify that packets from a Trusted Solaris machine are routed to certainspecified hosts only through gateways that have a security level that isconsistent with the sensitivity of the data being transmitted. This type ofrouting is called:
• Trusted routing
Host Types and Trusted Networking page 255
Setting Up Trusted Routing page 271
Creating Entries in the Trusted Networking Databases page 273
To Access the Trusted Network Databases from the Database Manager page 280
To Assign a Template to a Single Host in the tnrhdb page 282
To Assign a Template to a Group of Hosts in the tnrhdb page 284
To Create a Wildcard tnrhdb Entry for All Hosts Not Otherwise Specified page 287
To Set an Accreditation Range in a Host Template or Network InterfaceEntry
page 290
To Configure a Network Interface page 291
To Add a New Entry or Modify an Existing Entry in tnidb(4TSOL) page 292
To Set Up a Simple Default Route for a Network with One Gateway page 297
To Set Up Trusted Routing page 297

Specifying Security Attributes in Trusted Network Databases and Setting Up Routing 249
10
How Security Attributes Are Added to PacketsThe topic of how security attributes are added to packets is a prerequisite forunderstanding the definitions of host types and for understanding how tospecify security attributes in the trusted network databases. In general,network packets have the format shown in Figure 10-1:
Figure 10-1 Packet Format
Both TCP/IP and UDP/IP can be used for network communications. When ahost is specified with the Trusted Solaris 2.5 host type or the TSIX host type,the trusted networking software inserts a SAMP header after the TCP or UDPHeader and before the data. Therefore, when the host type is Trusted Solaris2.5 or TSIX, the packets have the format shown in Figure 10-2:
Figure 10-2 TSIX and Trusted Solaris 2.5 Packet Format
The options field of the IP header (shown as [IP Options] in Figure 10-2) isused for putting RIPSO or CIPSO labels and options in packets.
IP Options
The IP options field is used to carry the two supported types of IP labels:RIPSO and CIPSO labels. These labels may be specified by the Trusted Solarisadministrator to set up trusted routing. (See “Setting Up Trusted Routing” onpage 271.)
Incoming packets carry RIPSO or CIPSO labels and options when the sendinghost has a RIPSO or CIPSO host type.
Outgoing packets carry IP labels and other options in their IP options field:
• If the entry for a host with either the Trusted Solaris 2.x or TSIX host typehas its IP Label Type field set to RIPSO or CIPSO
• If the entry for a host is identified with a host type of either CIPSO orRIPSO.
Ethernet Header IP Header [IP Options] TCP or UDP Header Data Ethernet Trailer
Ethernet Header IP Header [IP Options] TCP or UDP Header SAMP Header Data Ethernet Trailer

250 Trusted Solaris Administrator’s Procedures—July 1997
10
CIPSO Labels in Packets
The trusted networking software puts a CIPSO label and a CIPSO DOI(domain of interpretation) number into the IP option for outgoing packets to ahost and also looks for a CIPSO label and DOI in the IP option of incomingpackets from a host, if the trusted network template entry for the host meet oneof these criteria:
• Assigns the host the CIPSO Host Type
• Assigns the host the Trusted Solaris 2x Host Type, setting the IP Label Typeto CIPSO
• Assigns the host the TSIX Host Type, setting the IP Label Type to CIPSO
The CIPSO label that is applied to outgoing packets is derived by the trustednetworking software from the actual Trusted Solaris sensitivity label that isassociated with the data. For example, at a site running the same labels definedin the default label_encodings file, a packet whose sensitivity label is Cwould be given a CIPSO label of CONFIDENTIAL. A direct mapping of thesensitivity label of CONFIDENTIAL to the CIPSO label of CONFIDENTIAL ispossible in this case, but most Trusted Solaris sensitivity labels probably do notmap directly to CIPSO labels. For this reason, the security administrator shouldplan the site’s labels to map well to CIPSO labels if the site plans to use CIPSOlabels for trusted routing or wishes to communicate with a host with a hosttype of CIPSO.
A CIPSO DOI (domain of interpretation) must also be specified, and the sameCIPSO DOI must be shared by:
• The sending host
• All gateway hosts through which messages travel and
• The destination host
As explained in Trusted Solaris Label Administration, the classification portion ofthe ADMIN_HIGH sensitivity label is 32767 bits and the compartments portionis 256 bits, all turned on. By default, a message is dropped if it is sent at asensitivity label that is too big to map to a CIPSO label. The Trusted Solaris 2.xADMIN_HIGH sensitivity label is one example of a sensitivity label too big tomap to a CIPSO label.

Specifying Security Attributes in Trusted Network Databases and Setting Up Routing 251
10
The security administrator can add a switch to the /etc/system file to choosewhat action should be taken when a packet has the ADMIN_HIGH sensitivitylabel, whether:
• The label should be mapped to a CIPSO label with the highest classificationand all compartments turned on, or
• The packet should be dropped.
See “To Substitute a Valid CIPSO Label for the ADMIN_HIGH SensitivityLabel” on page 296.
RIPSO Labels in Packets
The trusted networking software puts a RIPSO label into the IP option foroutgoing packets and also looks for a RIPSO label in the IP option of incomingpackets from a host, if the trusted network template entry for the host meetsone of these criteria:
• Assigns the host the RIPSO Host Type
• Assigns the host the Trusted Solaris 2x Host Type, setting the IP Label Typeto RIPSO
• Assigns the host the TSIX Host Type, setting the IP Label Type to RIPSO
RIPSO labels on outgoing packets are administratively defined. The securityadministrator specifies them in the tnrhtp database, putting the classificationin the RIPSO Send Class field and the compartment(s), or protection authorityflags (PAF) in the RIPSO Send PAF field.
Table 10-1 shows the supported RIPSO Send classifications.
Table 10-1 Supported Classifications for RIPSO Labels
Supported Classifications for RIPSO Labels
Top_Secret
Secret
Confidential
Unclassified

252 Trusted Solaris Administrator’s Procedures—July 1997
10
The RIPSO Send PAF and Return PAF fields refer to Protection AuthorityFlags, which are shown in Table 10-2. PAFs specified in the Send PAF field areused like compartment names along with the classification within the RIPSOlabels (as in Top_Secret SCI). PAFs specified in the Return PAF field are used inlabeling ICMP messages that can be generated as errors by receiving hosts inresponse to incoming RIPSO labeled packets. The classification sent back in theICMP message is the same as the RIPSO classification in the packet.
MAC Enforcement on Outgoing MessagesAccreditation range checks by the network software involve checks of thespecified sensitivity label range and checks of IP labels. (See “How SecurityAttributes Are Added to Packets” on page 249, “CIPSO Labels in Packets” onpage 250, and “RIPSO Labels in Packets” on page 251 for more about IP labels.)
The sensitivity labels of outgoing messages are compared to the accreditationrange of all of the following:
• The destination host [as specified in the template assigned to the host intnrhdb(4TSOL) /tnrhtp(4TSOL) ]
• All gateways (if any) through which the message must pass [as specified inthe gateways’s entry intnrhdb(4TSOL) /tnrhtp(4TSOL) ]
A first hop check occurs when a message is being sent from a host on onenetwork to a host on another through a gateway.
Table 10-2 Protection Authority Flags That May Be Specified in the RIPSO Send PAF oras RIPSO Return PAF Fields
Protection Authority Flags(may be used with RIPSO labels or specified as RIPSO errors)
GENSER
SIOP-ESI
SCI
NSA
DOE

Specifying Security Attributes in Trusted Network Databases and Setting Up Routing 253
10
If the check is being done on a gateway and the message is being forwardedto another gateway, another first hop check is performed based on thenetwork accreditation range of the gateway to which the message is beingforwarded.
• The network interface (as specified in the local tnidb(4TSOL))
If the sensitivity label of a message is not within the minimum andmaximum sensitivity labels specified in the accreditation range for any ofthe destination host, gateways, or the network interface, the message isdropped.
MAC Enforcement on Incoming MessagesFor incoming messages, the Trusted Solaris networking software obtainssensitivity labels and other security attributes from the packets themselveswhenever possible—which is only completely possible when the messages aresent from systems that support labels and all the other required attributes in aform recognized by the Trusted Solaris system. In many cases, messages arrivefrom hosts that are not label-cognizant or that do not send recognizable labels,or the messages do not have all of the other required attributes in their packets.In some other cases, the security attributes are not in accessible portions of thepacket (see “How Security Attributes Are Added to Packets” on page 249).
When the needed security attributes are not all available from a packet, thosethat are lacking are assigned to the message from trusted networkingdatabases. The labels and other security attributes in the trusted networkdatabases are specified by each site’s security administrator role and aredefined according to the security administrator’s assessment of the level oftrust of the sending host. Any attributes not obtainable from the host’s entryare supplemented by the attributes specified in the entry in the trustednetwork interface database that applies to the interface through which themessage arrives.
The sensitivity label of the incoming packet is obtained from:
1. The default sensitivity label supplied in the template assigned to thesending host.
2. The accreditation range assigned in the tnidb file to the interface throughwhich the message comes.

254 Trusted Solaris Administrator’s Procedures—July 1997
10
If the packet has a CIPSO label in the IP Header, the CIPSO label for thesending host is compared to the CIPSO label of the gateways and of thedestination hosts.
Trusted Network DatabasesThe security administrator uses the Trusted Solaris version of the SolsticeDatabase Manager, shown in Figure 10-3, to make entries in thetnrhdb(4TSOL) , tnrhtp(4TSOL) , and tnidb(4TSOL) trusted networkdatabases.
Figure 10-3 Tnidb Selected in the Database Manager: Load List

Specifying Security Attributes in Trusted Network Databases and Setting Up Routing 255
10
• The tnrhtp file stores templates that define sets of security attributes thatapply to various hosts types
• The tnrhdb file is used to assign templates from the tnrhtp file to hostsand networks
• The tnidb file is used to assign security attributes to network interfaces.
The values specified in the tnidb file are consulted along with any attributesspecified in the applied to the tnrhtp/tnrhdb files for individual hosts andnetworks to determine which security attributes apply to communications thatcome into the distributed system through the interface. See “MAC Enforcementon Incoming Messages” on page 253 and “Precedence Rules for Attributes inTrusted Network Databases” on page 276.
Before any of the trusted networking files is edited using the DatabaseManager, a naming service must be selected. The two choices are:
• NIS+
• None
Because the tnidb file’s values apply to the network interfaces on the localhost, the tnidb file is always a local file in /etc/security/tsol .
The tnrhdb and tnrhtp files are usually administered as NIS+ maps.However, a standalone Trusted Solaris host may be configured with no namingservice, and on such a host with no naming service, these files are kept in/etc/security/tsol .
The kernel caches all the information from tn*db databases. When no namingservice is selected, after any changes are made, the kernel cache isautomatically updated on the local host. When the NIS+ naming service isselected, it can take up to 1/2 hour for any tn*db changes to be pulled byNIS+ clients from the NIS+ master.
Host Types and Trusted NetworkingIn the entries made in a combination of the tnrhdb and tnrhtp databases,multiple hosts and networks may be associated with a specific host type. Thehost type identifies the protocols used by the kernel for interpreting a message,and the protocols tell the kernel which security attributes to look for in thepacket header.

256 Trusted Solaris Administrator’s Procedures—July 1997
10
Host Types SupportedTable 10-3 lists the host types that can be specified in a template.
Note – Trusted Solaris hosts may be specified as any of the supported hosttypes.
Note – Once a host type has been selected in the Template Manager, fields thatare not settable for the host type are grayed out and not active.
The sections listed below describe the supported host types with figures thatshow the security attributes that are supported for each type.
Table 10-3 Supported Host Types
Tnrhtp Template Manager Field Name in tnrhtp Database
Trusted Solaris 2.x sun_tsol
TSIX tsix
MSIX msix
CIPSO cipso
RIPSO ripso
Unlabeled unlabeled
Trusted Solaris 2.x (sun_tsol) Host Type page 257
TSIX (tsix) Host Type page 260
MSIX (msix) Host Type page 263
CIPSO (cipso) Host Type page 265
RIPSO (ripso) Host Type page 267
Unlabeled (unlabeled) Host Type page 269

Specifying Security Attributes in Trusted Network Databases and Setting Up Routing 257
10
Trusted Solaris 2.x (sun_tsol ) Host Type
When the sun_tsol host type is specified, the trusted networking software usesthe SAMP protocol for sending security attributes. The security attributes arerepresented in binary form, without token mapping.
The set of supported security attributes for the sun_tsol host type is not aslarge as the set supported by the tsix host type or the set supported on TS 1.xsystems: missing are supplementary groups and audit information. (In TS 1.x,audit information includes: def_audit ID, terminal ID, and audit preselectionmask; other trusted systems provide other audit information.)
Note – Token mapping is used for communications when hosts are specifiedwith the TSIX host type, which makes it possible to configure Trusted Solarishosts as TSIX hosts if you wish them to communicate with a full set of securityattributes.
Note – Diskless clients of Trusted Solaris servers must always be specified withthe sun_tsol host type.
If the IP Label Type field is set in a Trusted Solaris 2.x type host’s entry toCIPSO or RIPSO, IP options in the IP Header are used to carry CIPSO or RIPSOlabels that can be used for trusted routing of communications from TrustedSolaris 2.x hosts. See “Setting Up Trusted Routing” on page 271. Also see “IPOptions” on page 249.
Security Attributes Specifiable for the Trusted Solaris 2.5 Host Type
The security attributes that can be specified for Trusted Solaris 2.5 hosts areshown in Figure 10-4 on page 258 and explained in Table 10-4 on page 259.Fields that are not settable for the host type are grayed out and not active.
Ethernet Header IP Header [IP Options] TCP or UDP Header SAMP Header [Binary Attributes] Data Ethernet Trailer

258 Trusted Solaris Administrator’s Procedures—July 1997
10
Figure 10-4 Configurable Fields for the sun_tsol Host Type in the Tnrhtp

Specifying Security Attributes in Trusted Network Databases and Setting Up Routing 259
10
Table 10-4 Required and Optional Security Attributes for sun_tsol Host Types
Configurable Attributes Notes
minimum SL (min_sl=) Specify ADMIN_LOW or use another valid sensitivitylabel to restrict communications with the sun_tsol host.
maximum SL (max_sl=) Specify ADMIN_HIGH or use another valid sensitivitylabel to restrict communications with the sun_tsol host.
allowed privileges(allowed_privs=)
Specify to limit the effective privilege set propagatedacross the network by this host (both inbound andoutbound). Only specified privileges are allowed. “all”means that all privileges are interpreted; “none” meansthat no privileges are interpreted. In the tnrhtp templatethat applies to the host, an empty field(allowed_privs=;) means that whatever is specified inthe tnidb for this field applies. In the tnidb file, anempty field means that no privileges are applied.
IP label(ip_label=)
Optional. Valid types are: none, ripso, cipso
RIPSO label(ripso_label=)
Optional. Must be specified if IP Label Type is RIPSO.Supported Classification Level Encodings: Top_Secret,Secret, Confidential, Unclassified. Supported ProtectionAuthority Flags: GENSER, SIOP-ESI, SCI, NSA, DOE.
RIPSO error(ripso_error=)
Optional. Must be specified if IP Label Type is RIPSO.Supported Protection Authority Flags: GENSER, SIOP-ESI, SCI, NSA, DOE. The Classification Level is takenfrom the ripso_label field.
CIPSO DOI(cipso_doi=)
Optional. Must be specified if IP Label Type is CIPSO. Anumber corresponding to the host’s Domain ofInterpretation for CIPSO labeled packets.

260 Trusted Solaris Administrator’s Procedures—July 1997
10
TSIX (tsix ) Host Type
When a TSIX host type is specified, the trusted networking softwarecommunications with that host observe the TSIX standard established by theTrusted Systems Interoperability Group (TSIG), of which Sun MicrosystemsFederal, Inc. is a member. For TSIX host types, the trusted networking softwareuses the SATMP token mapping protocol. An Attribute header in the SAMPheader specifies that the attributes are in token form. Except that attributes aretransmitted in token form rather than in binary form, the packets have thesame format as the sun_tsol packets.
In a TSIX host’s entry, the IP Label Type field can be set to none or CIPSO orRIPSO. IP options in the IP Header are then used to carry CIPSO or RIPSOlabels to be used for trusted routing. See “Setting Up Trusted Routing” onpage 271.
To communicate using the TSIX host type, both the sending and receivinghosts must be within the same tsix DOT (domain of translation).
TSIX-type hosts that have the IP Label Field specified as CIPSO must have thetsol_admin_high_to_cipso switch in the /etc/system file set to 1 or theTSIX host cannot communicate with Trusted Solaris hosts. See Chapter 13,“Changing Configurable Trusted Solaris Kernel Switches” for more details.
Security Attributes Specifiable for TSIX Hosts
Note – Sun’s definition of the TSIX token maps is the first definition of a TSIXDOT, and other companies who wish to communicate with Trusted Solarissystems need to use the Sun-defined DOT—at least until more than one TSIXDOI is defined. There may be a TSIX DOI registry in the future to define whatthe tokens mean.
The trusted networking software assigns any missing security attributes onincoming packets from TSIX hosts by getting defaults from the trustednetworking databases.
Ethernet Header IP Header [IP Options] TCP or UDP Header SAMP Header Data Ethernet Trailer

Specifying Security Attributes in Trusted Network Databases and Setting Up Routing 261
10
The security attributes that can be specified for TSIX hosts are shown inFigure 10-5 on page 261 and explained in Table 10-5 on page 262. Fields thatare not settable for the host type are grayed out and not active.
Figure 10-5 Configurable Fields for the tsix Host Type in the Tnrhtp

262 Trusted Solaris Administrator’s Procedures—July 1997
10
Table 10-5 Required and Optional Security Attributes for tsix Host Types (1 of 2)
Configurable Attributes Notes
minimum SL (min_sl=) Specify in hexadecimal format ADMIN_LOW or useanother valid sensitivity label to restrictcommunications with the tsix host.
maximum SL (max_sl=) Specify in hexadecimal format ADMIN_HIGH or useanother valid sensitivity label to restrictcommunications with the tsix host.
allowed privileges(allowed_privs=)
Optional. Specifies limits for the effective privilege setpropagated across the network (both inbound andoutbound) by this host. Only specified privileges areallowed. “all” means that all privileges are interpreted;“none” means that no privileges are interpreted. In thetnrhtp template that applies to the host, an emptyfield (allowed_privs=; ) means that whatever isspecified in the tnidb for this field applies. In thetnidb file, an empty field means that no privileges areapplied.
forced privileges(forced_privs=)
Optional. The defined privileges are applied toincoming packets received from the host being defined,because it does not supply privileges. “all” means thatall privileges are applied; “none” means that noprivileges are applied. In the tnrhtp template thatapplies to the host, an empty field (forced_privs=; )means that whatever is specified in the tnidb for thisfield applies. In the tnidb file, an empty field meansthat no privileges are applied.
default label (def_label=)
Optional. The specified label is applied to incomingpackets received from the host being defined, because itdoes not supply privileges. If no information label isspecified, an information label of ADMIN_LOW isapplied.
default clearance Optional. The specified label is applied to incomingpackets received from the host being defined, because itdoes not supply a clearance.
default UID Optional. The specified UID is applied to incomingpackets received from the host being defined, because itdoes not supply a UID.

Specifying Security Attributes in Trusted Network Databases and Setting Up Routing 263
10
MSIX (msix ) Host Type
Labels are the only security attributes supported in communications fromMSIX hosts, and they are carried in the IP header.
The MSIX host type should be specified in templates for hosts running TS 1.x,which includes MSIX 1.0 plus some features of MSIX 2.0. Because TrustedSolaris MSIX does not support all of the features of MSIX 2.0, it should not bespecified in templates for hosts that use the MSIX 2.0 protocol.
The security attributes that can be specified for TSIX hosts are shown inFigure 10-6 on page 264. Fields that are not settable for the host type are grayedout and not active.
IP label(ip_label=)
Optional. Valid types are: NONE, RIPSO, CIPSO
RIPSO label(ripso_label=)
Optional. Required if IP Label Type is RIPSO.Supported Classification Level Encodings: Top_Secret,Secret, Confidential, Unclassified. Supported ProtectionAuthority Flags: GENSER, SIOP-ESI, SCI, NSA, DOE.
RIPSO error(ripso_error=)
Optional. Required if IP Label Type is RIPSO.Supported Protection Authority Flags: GENSER, SIOP-ESI, SCI, NSA, DOE. The Classification Level is takenfrom the ripso_label field.
CIPSO DOI(cipso_doi=)
Optional. Required if IP Label Type is CIPSO. A numbercorresponding to the host’s Domain of Interpretation forCIPSO labeled packets.
Ethernet Header IP Header [IP Options] TCP or UDP Header Data Ethernet Trailer
Table 10-5 Required and Optional Security Attributes for tsix Host Types (2 of 2)
Configurable Attributes Notes

264 Trusted Solaris Administrator’s Procedures—July 1997
10
Figure 10-6 Configurable Fields for the msix Host Type in the Tnrhtp

Specifying Security Attributes in Trusted Network Databases and Setting Up Routing 265
10
CIPSO (cipso ) Host Type
The CIPSO host type supports communications with hosts that conform to theCIPSO standard. The only security attribute supported for CIPSO hosts is aCIPSO label, which is derived from the sensitivity label of the data andinserted into the IP header of packets going to hosts of host type CIPSO. Thehost entries must specify the same domain of interpretation (CIPSO DOI) asthat of the destination host and of all gateways through which the packetsfrom that host are routed. If the sending host is specified as a CIPSO host type,the trusted networking software looks for a CIPSO label in the IP Header ofincoming packets.
The security attributes that can be specified for TSIX hosts are shown inFigure 10-7 on page 266. Fields that are not settable for the host type are grayedout and not active.
Ethernet Header IP Header [CIPSO Label in IP Options] TCP or UDP Header Data Ethernet Trailer

266 Trusted Solaris Administrator’s Procedures—July 1997
10
Figure 10-7 Configurable Fields for the cipso Host Type in the Tnrhtp

Specifying Security Attributes in Trusted Network Databases and Setting Up Routing 267
10
RIPSO (ripso ) Host Type
Supports hosts that conform to the RIPSO standard. The RIPSO labels that areused for communications with a host of type RIPSO are administrativelydefined in the template for the host, as specified in the tnrhtp(4TSOL) manpage. Templates for hosts of type RIPSO must have the RIPSO Send Class set toone of Top Secret, Secret, Confidential, Unclassified, or a hexadecimal valu.Templates must also have both the RIPSO Send PAF and Return PAF set to oneof GENSER, SIOP-ESI, CI, NSA, DOE or a hexadecimal value.
The security attributes that can be specified for RIPSO hosts are shown inFigure 10-8 on page 268. Fields that are not settable for the host type are grayedout and not active.
Ethernet Header IP Header [RIPSO Label in IP Options] TCP or UDP Header Data Ethernet Trailer

268 Trusted Solaris Administrator’s Procedures—July 1997
10
Figure 10-8 Configurable Fields for the RIPSO Host Type in the Tnrhtp

Specifying Security Attributes in Trusted Network Databases and Setting Up Routing 269
10
Unlabeled (unlabeled ) Host Type
The security attributes that can be specified for unlabeled hosts are shown inFigure 10-9 on page 270. Fields that are not settable for the host type are grayedout and not active.
Ethernet Header IP Header [RIPSO Label in IP Options] TCP or UDP Header Data Ethernet Trailer

270 Trusted Solaris Administrator’s Procedures—July 1997
10
Figure 10-9 Configurable Fields for the unlabeled Host Type in the Tnrhtp

Specifying Security Attributes in Trusted Network Databases and Setting Up Routing 271
10
Setting Up Trusted RoutingTrusted Solaris allows the system administrator to configure one of two generaltypes of gateways in static routing tables:
• Per network gateways
• Default gateways
As described in Chapter 9, “Trusted Solaris Concepts for Managing Hosts andNetworks,” the trusted networking software looks for any network gatewaysand default gateways that a site may specify in the tsolgateways(4TSOL)file before looking for default gateways specified in the/etc/defaultrouter file [which is described in the route(1MTSOL) manpage]. If neither file exists, no routing is done.
This section describes what you need to know to ensure routing of outgoingcommunications so that they only go through gateways that are configuredwith a security level that matches the sensitivity of the data being sent out.This section assumes you have read and understood “Static Routing” onpage 240 of Chapter 9.” See “To Set Up Trusted Routing” on page 297 of thischapter for the procedure.
The security administrator role begins by specifying entries with the same hosttype and with the same IP label type for:
• the sending host,• all gateways, and• the destination host
The host type must be either:
• Trusted Solaris 2.x or• TSIX and
The IP Label Type must be specified the same, either:
• RIPSO or• CIPSO.
The CIPSO label is derived by the trusted networking software from thesensitivity label of the packet, while the RIPSO label must be specified by thesecurity administrator in the RIPSO Class and RIPSO Send PAF fields in thetemplate. The CIPSO or RIPSO label of the packet is then consulted by thetrusted networking software and used in combination with information from

272 Trusted Solaris Administrator’s Procedures—July 1997
10
static routing tables to ensure that message is sent only through gateways atthe appropriate level of trust. This combination of Trusted Solaris and TSIXhost type with CIPSO or RIPSO labels enables packets to be sent with TrustedSolaris or TSIX security attributes to hosts that understand them whileproviding either a CIPSO or RIPSO label in a portion of the packet that isaccessible the trusted networking software so that it can be used to control theroutes the packet takes along the way. The trusted networking software onlylooks at the portion of the packet shown in Figure 10-10, and the TrustedSolaris and TSIX labels and other security attributes are stored between theTCP/UDP Header and the Ethernet Trailer, while the CIPSO and RIPSO labelsare stored in the IP Header portion of the packet:
Figure 10-10 Portions of a Packet Accessible to the Trusted Networking Software
Without the IP label, the trusted networking software on a gateway would notbe able to ascertain what a packet’s label is and be able to do the necessaryaccreditation checks on the next hop, because the trusted networking softwaredoes not look in the part of the packet where the label and other securityattributes are stored. The security administrator role needs to create entries foreach of the following specifying them with either the Trusted Solaris 2.x orTSIX host type, and specifying whether to use a CIPSO or RIPSO label (see “ToSet Up Trusted Routing”):
• The sending host
• Each of the trusted gateways through which the message should be routed
• The destination host.
Note – Because the CIPSO label is obtained from the actual sensitivity label ofthe data being sent out, the security administrator does not specify a CIPSOlabel. When the IP label type being used is CIPSO, the security administratorsin each of the security domains through which communications using CIPSOlabels are being routed must agree among themselves about which TrustedSolaris sensitivity labels are going to be used for communications betweenthem, since the sensitivity label is going to be converted into a equivalentCIPSO label by the trusted networking software. The security administratorsalso need to agree on the same CIPSO DOI to specify for all the host types inthe previous list.
Ethernet Header IP Header [RIPSO Label in IP Options] TCP or UDP Header . . . Ethernet Trailer

Specifying Security Attributes in Trusted Network Databases and Setting Up Routing 273
10
Note – Because the RIPSO label and RIPSO error are administratively defined,each of the hosts in the list should have the same RIPSO label and RIPSO error.When the IP label type being used is RIPSO, the security administrators in eachof the security domains through which communications using IP labels arebeing routed must agree among themselves about which RIPSO label,protection authority flags, and RIPSO error to specify for all the host types inthe previous list.
The security administrator must also put an entry for each gateway in the/etc/defaultrouter file or the /etc/tsolgateways file, identifying eachgateway either by its IP address or host name. If the hostname is used, the hostmust be listed in the local /etc/inet/hosts file. The router looks at the labelin the IP header, looks for in the routing tables for the list of gateways, andthen looks in the trusted networking database entries for a gateway from theroute table that has a label with the same protocol and the same label as theoutgoing packet.
Creating Entries in the Trusted Networking DatabasesBefore the security administrator can set up the entries in the tnrhdb , in whichtemplates are assigned to hosts and networks to templates, he or she should dothe following:
• Review the existing templates from the tnrhtp(4TSOL) file
Use the Database Manager to bring up the Tnrhtp database, select eachtemplate in turn and view its contents in Template Manager modify dialogbox.
• Modify existing templates or create any new templates needed for the site
• Decide which templates should be used for each host and network
Using tnrhdb Options to Achieve a Closed or Open Type of NetworkConfiguration
Trusted networking supports both the following types of networkconfigurations:
• An open configuration permitting communication with any host

274 Trusted Solaris Administrator’s Procedures—July 1997
10
• A closely-controlled configuration permitting communications only withspecified hosts and networks
Each site chooses whether to be inclusive or exclusive in allowingcommunications with other hosts and networks.
Hierarchical Fallback Mechanism
A hierarchical fallback algorithm is used by the trusted networking software inlooking for a host’s entry in the tnrhdb(4TSOL) database, as described in theman page. The trusted networking software first looks for an entry specific tothe host, and if it does not find one, it falls back to searching for a matchingclass C network entry, then a class B entry, a class A entry, and finally awildcard entry (IP address 0.0.0.0), if one exists. If no entry in the tnrhdbdatabase matches the IP address of the host, communications are not allowedwith the host. Both open and controlled configurations can make selective useof the fallback mechanism.
Open Configuration Using a Wildcard
The security administrator can make a wildcard entry to specify a default set ofattributes that will be assigned to any host for which an entry does not exist inthe trusted network databases, to allow communications with every host ornetwork. The template assigned to the wildcard entry is configured by thesecurity administrator in the tnrhtp(4TSOL) database, along with the othertemplates, as described under “Setting Up Templates.
Closely-controlled Configuration
Communication with the host is not permitted if the trusted network softwarecannot resolve a host’s IP address to an entry in the tnrhdb database. Tostrictly restrict communications, the security administrator can simply not usea widlcard and be very careful about using network entries.

Specifying Security Attributes in Trusted Network Databases and Setting Up Routing 275
10
Setting Up Templates
See the following procedures, which show some of the different ways thesecurity administrator may associate a host with a template.
Note – The examples assume that the tsol_1, tsol, and wildcard templates arespecified in the tnrhtp file.
To Assign a Template to a Single Host in the tnrhdb
To Assign a Template to a Group of Hosts in the tnrhdb
To Create a Wildcard tnrhdb Entry for All Hosts Not Otherwise Specified

276 Trusted Solaris Administrator’s Procedures—July 1997
10
Precedence Rules for Attributes in Trusted Network DatabasesIf the security administrator supplies any value in the tnrhtp template for ahost, the value in the tnrhtp file takes precedence over the values specifiedfor the network interface in the tnidb , as shown in Figure 10-11. As shown inFigure 10-11, the values in the tnidb apply only when values have not beenset in the tnrhdb entry for the host sending the packets.
Required fields must be specified in either one or both files. An empty defaultfield in the tnrhtp entry means that the value must be supplied in thecorresponding default field in the tnidb file.
Figure 10-11 Attribute Precedence Rules
Example of Combined Entries
In Figure 10-12, a template named wildcard is defined for unknown hosts.
Specified in thetnrhtp
?
Usethe Value
Specified in thetnrhtp
Yes
No
Default Value
Specified in the
Is theNeeded
The Needed
Default Value
tnidb
Must Be

Specifying Security Attributes in Trusted Network Databases and Setting Up Routing 277
10
Figure 10-12 Assigning Some Default Attributes to Communications from UnspecifiedHosts
For our example, the default sensitivity label in Figure 10-12 is defined in asINTERNAL_USE_ONLY[INTERNAL], the clearance is INTERNAL, thedef_uid is 12022 and def_gid field is 10. Figure 10-13 on page 278 shows a

278 Trusted Solaris Administrator’s Procedures—July 1997
10
tnidb entry for le0, and let us assume that a packet comes into this networkinterface from an unknown host, and the attributes for unknown hosts are theones that are partly defined in the tnrhtp default entry in Figure 10-12 onpage 277.
Figure 10-13 Default Entry for the le0 Interface in the Tnidb Data

Specifying Security Attributes in Trusted Network Databases and Setting Up Routing 279
10
The combined effect of the two example entries in Figure 10-12 on page 277and in Figure 10-13 on page 278 is that any packets coming from an unknownhost through the le0 interface are assigned a default label ofINTERNAL_USE_ONLY[INTERNAL], a clearance of INTERNAL, a defaultUID of 120022, and a default GID of 10.
Network Accreditation Range
Each host and network has an accreditation range. The accreditation range isset by a min_sl and a max_sl entry in the tnrhtp file for a host and in thetnidb file for a network interface.
The example in Figure 10-14 shows host G with two network interfaces, le0and le1. le0 is defined with an accreditation range of ADMIN_LOW toADMIN_HIGH, while le1 is defined with an accreditation range ofINTERNAL_USE_ONLY to NEED_TO_KNOW ENG.
Figure 10-14 Two Network Interfaces and Their Network Accreditation Ranges
Note – Communications within the Trusted Solaris distributed system requirean accreditation range of ADMIN_LOW to ADMIN_HIGH.
See “To Configure a Network Interface” on page 291.”
le0
le1
le0min_sl = ADMIN_LOWmax_sl= ADMIN_HIGH
network1
network2
le1min_sl=INTERNAL_USE_ONLYmax_sl=NEED_TO_KNOW ENG
tnidb entry on host G
host G

280 Trusted Solaris Administrator’s Procedures—July 1997
10
Procedures
▼ To Access the Trusted Network Databases from the Database Manager
1. Assume the security administrator role.
2. In an ADMIN_LOW workspace, open the Solstice Apps folder in theApplication Manager.
Figure 10-15 shows the Database Manager selected in the Solstice_Apps Folder.
Figure 10-15 Database Manager Selected in the Solstice_Apps Folder
3. Double Click on the Database Manager icon to bring up the DatabaseManager Load List.
4. Select a naming service from the Naming Service menu on the DatabaseManager Load list.
Note – By default, as shown in Figure 10-16, the NIS+ naming service isselected, and the name of the NIS+ domain displays in the Domain text entryfield.
Database_Manager

Specifying Security Attributes in Trusted Network Databases and Setting Up Routing 281
10
Figure 10-16 Loading a Naming Service on the Database Manager
Note – Remember that tnidb is always a local file, while tnrhdb and tnrhtpare managed by NIS+ unless you are configuring a standalone Trusted Solarissystem configured with no naming service. If so, all three files are local filesthat must be modified with Naming Service set to None.
a. For the tnidb , choose None.Choosing None displays the name of the current host in the Host textentry field, as shown in Figure 10-17.
Figure 10-17 Database Manager Selected in the Solstice_Apps Folder
b. For the tnrhdb and tnrhtp files, choose whichever naming serviceapplies, either NIS+ or None.
5. If the naming service is None, to configure a database on a remote host,enter the name of a host in the Host text entry field.
6. Double click the name of the trusted networking database to be edited orhighlight the name and click OK.See Figure 10-18 on page 282.

282 Trusted Solaris Administrator’s Procedures—July 1997
10
Figure 10-18 Tnidb Selected in the Database Manager: Load List
▼ To Assign a Template to a Single Host in the tnrhdb
Note – Several fields in the Template Manager dialog box have a default button(marked Def!) to their right. If the security administrator clicks the defaultbutton, a default value is supplied in the field.
1. Access the Database Manager.See “To Access the Trusted Network Databases from the Database Manager”on page 280, if needed.
2. Decide which of the templates you want to assign out of the Tnrhtpdatabase.

Specifying Security Attributes in Trusted Network Databases and Setting Up Routing 283
10
3. Highlight Tnrhdb from the Database Manager Load list and choose Addfrom the Edit menu.
4. Enter the IP address of the single host and its Template name in thedialog box that displays.Figure 10-19 shows the host identified by its IP address (192.110.120.6) andassigned to the template tsol_1.
Figure 10-19 Adding a Host Entry to Tnrhdb and Specifying a Template
5. Click the OK button at the bottom of the Database Manager: Add menu.

284 Trusted Solaris Administrator’s Procedures—July 1997
10
Figure 10-20 Tnrhdb Host Entry Assigned to the Template Named tsol_1
▼ To Assign a Template to a Group of Hosts in the tnrhdb
1. Access the Database Manager.See “To Access the Trusted Network Databases from the Database Manager”on page 280, if needed.
2. Decide which of the templates you want to assign out of the Tnrhtpdatabase.
3. Highlight Tnrhdb from the Database Manager Load list and choose Addfrom the Edit menu.
4. Enter the IP address of the network and the Template name in the dialogbox that displays.Figure 10-19 on page 283 shows a network identified by its IP address(192.110.120.0) and assigned to the template tsol.
192.110.120.6 tsol_1

Specifying Security Attributes in Trusted Network Databases and Setting Up Routing 285
10
Figure 10-21 Adding a Network Entry to Tnrhdb and Specifying a Template
Figure 10-22 on page 286 shows a new entry for the network 192.110.120.0,which has the tsol template and an entry for the host whose IP address in192.110.120.6, which has the tsol_1 template. The host whose IP address in192.110.120.6 has the tsol_1 template while all others in that network havethe tsol template.

286 Trusted Solaris Administrator’s Procedures—July 1997
10
Figure 10-22 Tnrhdb Network Entry Assigned to the Template Named tsol
Note – With the two lines shown in Figure 10-22, only hosts on the192.110.120.0 network can communicate with the security domain (whentnrhdb is a NIS+ table) or with the individual host (when tnrhdb is a localfile).
Note – Listing every host—either explicitly or implictly (by making an entryfor the network to which the host is connected)—creates a controlledconfiguration where only the listed hosts are allowed to communicate with thesystem.
5. Click the OK button at the bottom of the Database Manager: Add menu.
192.110.120.6 tsol_1
192.110.120.0 tsol

Specifying Security Attributes in Trusted Network Databases and Setting Up Routing 287
10
▼ To Create a Wildcard tnrhdb Entry for All Hosts Not OtherwiseSpecified
1. Access the Database Manager.See “To Access the Trusted Network Databases from the Database Manager”on page 280, if needed.
2. Decide which of the templates you want to assign out of the Tnrhtpdatabase.
3. Highlight Tnrhdb from the Database Manager Load list, and choose Addfrom the Edit menu.See “To Access the Trusted Network Databases from the Database Manager”on page 280, if needed.
4. Enter the wildcard IP address of 0.0.0.0 and the Template name in thedialog box that displays.Figure 10-23 assigns the wildcard template to the Tnrhdb wildcard entry.
Figure 10-23 IP Address and Template Name for a Tnrhdb Fallback Template Entry
Figure 10-24 on page 288 shows a new entry for the wildcard IP address,associating it with a template called wildcard. The new wildcard entryassigns all hosts not already-specified to the default entry.
Note – Using a wildcard entry creates a wide open configuration where anyhost is allowed to communicate with the system.
5. Click the OK button at the bottom of the Database Manager: Add menu.

288 Trusted Solaris Administrator’s Procedures—July 1997
10
Figure 10-24 Tnrhdb Fallback Template Entry
0.0.0.0 wildcard
192.110.120.6 tsol_1
192.110.120.0 tsol

Specifying Security Attributes in Trusted Network Databases and Setting Up Routing 289
10
Figure 10-25 Assigning Some Default Attributes to Communications from UnspecifiedHosts

290 Trusted Solaris Administrator’s Procedures—July 1997
10
▼ To Set an Accreditation Range in a Host Template or Network InterfaceEntry
1. Access the Database Manager.See “To Access the Trusted Network Databases from the Database Manager”on page 280, if needed.
Note – A separate tnidb file resides on each host to specify attributes for thathost’s own network interfaces, so make sure to choose None in the NamingService menu in the Database Manager load list when modifying the tnidb .
2. To set a host accreditation range in a template that is assigned to one ormore hosts, modify Tnrhtp and specify a Minimum SL and a MaximumSL.
a. Highlight Tnrhtp in the Database Manager Load list.
b. To change an existing template, highlight the name of the template andchoose Modify.
Note – Several fields in the Template Manager dialog box have a default button(marked Def!) to their right. If the security administrator clicks the defaultbutton, a default value is supplied in the field. For example, The default hostaccreditation range is from ADMIN_LOW to ADMIN_HIGH.
c. Specify the desired sensitivity labels in the Minimum SL andMaximum SL fields, using the label builder dialog boxes that displaywhen you click on the buttons.
3. To set a network accreditation range for one or more interfaces on thecurrent host.
a. Highlight Tnidb in the Database Manager Load list.
b. To change an existing template, highlight the name of the templatewhose value you want to set and choose Modify.
c. Enter the desired sensitivity label in the min_SL and max_SL fields.
Note – The default network accreditation range is from ADMIN_LOW toADMIN_HIGH.

Specifying Security Attributes in Trusted Network Databases and Setting Up Routing 291
10
▼ To Configure a Network Interface
1. If needed, before you start add the physical network interface to the host,following the hardware and software installation steps in the manualsshipped with the interface.
2. If there is more than one network interface on the host, do theconfiguration either for a router or multihomed host as described in thebase Solaris TCP/IP and Data Communications Administration Guide.
3. If the site security policy requires the default settings for any interfaceson the host be changed, change the entries as described in “To Add a NewEntry or Modify an Existing Entry in tnidb(4TSOL).”The default settings are shown inTable 10-6. If the defaults are acceptable,no changes to the tnidb(4TSOL) file are needed.
4. If the name of the new network interface is not already in the Tnidbdatabase, add it as described under “To Add a New Entry or Modify anExisting Entry in tnidb(4TSOL).”Figure 10-26 shows the names of the default network interfaces.
Table 10-6 Default tnidb Settings
Minimum SL Maximum SL Label (default) Clearance User ID Group ID Forced Privileges
ADMIN_LOW ADMIN_HIGH ADMIN_LOW[ADMIN_HIGH] ADMIN_HIGH nobody nobody [empty]

292 Trusted Solaris Administrator’s Procedures—July 1997
10
Figure 10-26 Default Interfaces Listed in the Tnidb Database
▼ To Add a New Entry or Modify an Existing Entry in tnidb(4TSOL)
1. Access the Database Manager.See “To Access the Trusted Network Databases from the Database Manager”on page 280 if needed.
2. If the name of the interface is in the default list, modify the defaultsettings.
a. Highlight the name of the interface and select Modify from the Editmenu.Figure 10-27 on page 293 shows the le0 interface name and the Modifyoption highlighted on the Edit menu.

Specifying Security Attributes in Trusted Network Databases and Setting Up Routing 293
10
Figure 10-27 Tnidb Interface le0 Highlighted and the Edit > Modify Option Selected
b. Modify the settings as desired.Figure 10-28 on page 294 shows the default settings for le0.

294 Trusted Solaris Administrator’s Procedures—July 1997
10
Figure 10-28 Interface Manager (Modify) Dialog Box
3. If the name of the interface is not in the default list, add it, and specifythe attributes desired.
a. Choose Add from the Edit menu.Figure 10-29 on page 295 shows the le0 interface name and the Addoption highlighted on the Edit menu.

Specifying Security Attributes in Trusted Network Databases and Setting Up Routing 295
10
Figure 10-29 Add Option Selected from the Tnidb Edit Menu
b. Specify the name of the added interface and its desired attributes.Figure 10-30 on page 296 shows the Interface Manager (Add) Dialog Box.

296 Trusted Solaris Administrator’s Procedures—July 1997
10
Figure 10-30 Interface Manager (Add) Dialog Box
▼ To Substitute a Valid CIPSO Label for the ADMIN_HIGH Sensitivity Label
1. Assume the security administrator role.
2. Use the Admin Edit action to open the /etc/system file for editing.

Specifying Security Attributes in Trusted Network Databases and Setting Up Routing 297
10
3. Add a line to set the tsol_admin_high_to_cipso= flag equal to 1.
The default, which is not shown in the system file, is set to 0.
▼ To Set Up a Simple Default Route for a Network with One Gateway
1. Assume the system administrator role and access the Set Routes action tocreate an /etc/defaultrouter entry with the hostname of the router.See the route(1MTSOL) man page for more about the syntax of/etc/defaultrouter .
2. Make sure there is an entry for the gateway(s) in the local /etc/hostsfile.
3. Make sure there is an entry for the gateway(s) in the local/etc/security/tsol/tnrhdb file.
▼ To Set Up Trusted Routing
Note – Do the steps below to set up the Tnrhtp template and assign it to thesending host, to each of the trusted gateways through which the messageshould pass, and to the destination host.
1. Access the Database Manager.See “To Access the Trusted Network Databases from the Database Manager”on page 280 if needed.
set tsolsys:tsol_enable_il=1
merlot
129.150.113.36 merlot
129.150.113.36:tsol

298 Trusted Solaris Administrator’s Procedures—July 1997
10
2. Double-click on the name of the Tnrhtp database, (as shown inFigure 10-31 on page 298) to bring up the Template Manager, shown inFigure 10-33 on page 300.
Figure 10-31 Database Manager: Load List with Tnrhtp Selected

Specifying Security Attributes in Trusted Network Databases and Setting Up Routing 299
10
Figure 10-32 Database Manager: Tnrhtp Database Dialog Box with the tsol_2 TemplateName Selected
3. Double-click on the name of the template to bring up the TemplateManager, shown in Figure 10-33 on page 300.The tsol_2 template is selected in Figure 10-32 on page 299.

300 Trusted Solaris Administrator’s Procedures—July 1997
10
Figure 10-33 Trusted Network Template Manager Modify Dialog Box

Specifying Security Attributes in Trusted Network Databases and Setting Up Routing 301
10
4. Change any of the fields.In the template for a gateway, you can use either the RIPSO, CIPSO, TrustedSolaris or TSIX host type.
To use a CIPSO label go to Step 5. To use a RIPSO label, go to Step 6.
5. To use a CIPSO label, which is derived from the actual sensitivity labelon the data, choose CIPSO from the IP Label Type menu and supply aCIPSO DOI.Currently, the only defined CIPSO DOI is 1. Make sure to specify the sameCIPSO DOI for the sender, all gateways, and the destination host.
6. To define a RIPSO label, specify the IP Label Type as RIPSO, select one ofthe classifications from the RIPSO Send Class menu, choose zero or moreof the supported Protection Authority flags from the RIPSO Send PAFmenu, and choose one of the supported RIPSO errors in the RIPSOReturn PAF menu.
Note – Make sure to specify the same RIPSO label and RIPSO error for thesending host, all gateways, and the destination host.
7. Click OK to apply your changes and exit the Template Manager.
8. Use the Set Routes action from the System_Admin folder in theApplication Manager to open the /etc/defaultrouter file.
9. List each gateway in the /etc/defaultrouter file by name or IP addressone line per entry, using either the host’s IP address or its host name.

302 Trusted Solaris Administrator’s Procedures—July 1997
10
Note – If the hostname is used, the host must also be listed with its IP addressin the local /etc/inet/hosts file.
The first example shows a gateway listed in /etc/defaultrouter by itshostname:
The next example shows the same gateway called routeman listed in/etc/defaultrouter by its IP address:
routeman
127.13.104.10

303
Managing Files and File Systems 11
This chapter gives the background needed to understand how to manage andmount files, directories and file systems and their specify their securityattributes in the following sections:
Review of File, Directory, and Filesystem Access Terminology page 305
Attributes on Files and Directories page 318
Changing Security Attributes on Files and Directories page 320
Attributes on File Systems page 323
Variable Attribute File Systems page 323
Specifying Variable Attributes on File Systems page 324
Fixed Attribute File Systems page 325
Types of File Systems That May Be Mounted in the Trusted SolarisSystem
page 327
Specifying Mount Time Security Attributes page 330
Attribute Precedence Rules page 331
Example of Specifying Security Attributes for a Fixed Attribute FileSystem Mounted from an Unlabeled Host
page 333
Trusted Solaris NFS Mounts page 334
Trusted Solaris and NFS page 334
Exporting Directories for Mounting by Other Hosts page 335
Troubleshooting Mount Failures page 336

304 Trusted Solaris Administrator’s Procedures—July 1997
11
This chapter provides the following procedures.
Overview of Files, Directories, and File SystemsThe Trusted Solaris system supports the same files and directories, most of thefile system types, and all the file system interfaces that are supported by thebase Solaris system.
Whenever a process tries to access a file or directory, attributes obtained fromvarious sources are used in making access control decisions. This chapterdescribes what the various attributes are and where they are obtained andgives the precedence rules that are used to decide between conflictingattributes when they are obtainable from more than one source.
Attributes may be specified:
• At the level of an the individual file or directory within a file system.
• At the level of the file system
• At mount time
To Change Labels and Privileges on Files and Directories page 336
To Specify Alternative Security Attributes While Creating a Local FileSystem
page 339
To Set Security Attributes on a Standard File System or Reset SecurityAttributes for an Existing Trusted Solaris File System
page 340
To Specify Mount-time Security Attributes on the Command Line page 340
To Specify Mount-time Security Attributes in the Mount Table page 340
To Mount a TMPFS-type File System Using the Command Line page 343
To Mount a CDROM (HSFS-type File System) Using the Command Line page 343
To Trouble Shoot Mount Failures page 344

Managing Files and File Systems 305
11
Review of File, Directory, and Filesystem Access TerminologyThe terms defined in this section are used in the discussions of how to managefiles, directories, and file systems throughout this chapter. These terms andconcepts are introduced in the Trusted Solaris User’s Guide and the TrustedSolaris Administration Overview. This review is included here for convenience.You may choose to read through these definitions before going on to the rest ofthis chapter or to skip to “Attributes on Files and Directories” on page 318 andrefer back to this section if you do not understand a term.
Within a definition, special terms used for the first time and terms that needemphasis are italicized. Words and phrases in bold within the definitions havetheir own definitions in this section.
Access Control ListAn access control list (ACL) provides a type of discretionary access controlbased on a list of entries that the owner can specify for a file or directory. Anaccess control list can restrict or permit access to any number of individualsand groups, allowing finer-grained control than provided by the standardUNIX permission bits.
Access PermissionsRead, write, and execute or search permissions on a file or directory aregranted to a process if the mandatory access control checks are passed asdescribed in access policy for files, directories, and file systems, and if one ofthe following tests is true.
• If an ACL exists for a file or directory, then the following tests areperformed in order until one is true, and then the requested access isgranted.• If the effective UID of the process is equal to the UID of the owner of the
file or directory and if the ACL grants the desired type of access to theowner.
• If the effective UID of the process is in the user list in the ACL and if boththe ACL for the owner and the ACL mask grant the desired type of accessto the named user.

306 Trusted Solaris Administrator’s Procedures—July 1997
11
• If the effective GID or a supplementary GID of the owner of process isequal to the GID of the file or directory and if both the ACL entry for theowner's group and the ACL mask both grant the desired type of access tothe owner's group.
• If the effective GID or a supplementary GID of the owner of the process isnamed in the ACL group list, and if both the ACL entry for the namedgroup and the ACL mask grant the desired type of access to the group.
• If the ACL's other entry grants the desired type of access to the owner ofthe process.
• If an ACL does not exist for the file or directory being accessed, then thefollowing tests are performed in order, and if one of them is passed thedesired access is granted.• If the effective UID of the process is equal to the UID of the owner of the
file or directory and if the owner portion (0700) of the file's permissions isset to allow the desired type of access.
• If the effective GID is equal to the GID of the file or directory and if thegroup portion (0070) of the file's permissions is set to allow the desiredtype of access.If one of the groups in the supplementary group list of theprocess is equal to the GID of the file or directory and if the group portion(0070) of the file's permissions is set to allow the desired type of access.
• If the other portion (0007) of the file's permission bits is set to allow thedesired type of access to all others.
Otherwise, access is denied, unless the process asserts the appropriate DACoverride privilege(s) described in “Access Policy for Files, Directories, and FileSystems” and in “Execution Profile Mechanism.”
Access Policy for Files, Directories, and File SystemsBecause in UNIX systems just about everything (including a spreadsheet, aprinter, a letter, a chapter of a book, or a mail message) is handled as a file thatis stored in a directory—to do just about anything the user must access filesand directories. The conditions for access are described here. (Even thoughdevices are treated as files in the UNIX system, devices have slightly differentmandatory access rules than files or directories, and these rules are separatelydescribed in this section.) A file, directory, or device may be accessed in threeways:
• The name of the file, directory, or device may be viewed,
• The contents or the attributes of the file, directory, or device may be viewed, or

Managing Files and File Systems 307
11
• The contents or the attributes of the file, directory, or device may be modified.In the Trusted Solaris system, each of these types of access is granted or deniedbased not only on whether the basic UNIX discretionary access control checkshave been passed but also on whether the mandatory access control checkshave been passed.
All types of access require that the sensitivity label of the process dominatesthe sensitivity label of all directories in the pathname and that the owner of theprocess (the person who executed the command) has discretionary searchaccess for each directory in the pathname. View access to the name of the file,directory or device requires only that this part of the check is passed.
For view access (read access) to the contents or attributes of a file or adirectory, the process' sensitivity label must dominate the sensitivity label ofthe file or directory. For view access to the contents of a device (for example, soyou can read information stored on a tape in a tape drive), the process'sensitivity label must be equal to the sensitivity label of the device. The ownerof the process also must have discretionary read access to the file, directory, ordevice.
For a process to write into a file or to modify the file's attributes, the sensitivitylabel of the file must dominate the sensitivity label of the process and must bewithin the process' clearance, which is set to be the session clearance. For aprocess to write into a directory (create a file), the sensitivity label of theprocess must equal the sensitivity label of the directory. For a process to writeto a device (for example, store information on a tape in a tape drive), thesensitivity label of the process must also equal the sensitivity label of thedevice. The owner of the process must have discretionary write access to thefile, directory, or device.
For each type of failure of a MAC or DAC check, a specific override privilegemay be applied to the command, depending on the type of access beingdenied. A privilege can be made available to a command only by the action ofa security administrator, because the security administrator must ensure thatthe user who executes the command is cleared to, or that the command may betrusted to, use the privilege in a trustworthy manner.
These conditions and the listed override privileges apply to any type of access:

308 Trusted Solaris Administrator’s Procedures—July 1997
11
• If the sensitivity label of the process does not dominate the sensitivity labelof a directory in the pathname, then the process must have the privilege tosearch up (search a directory whose sensitivity label dominates thesensitivity label of the process), which is file_mac_search.
• If the user executing the command does not have discretionary searchpermission for a directory in the pathname, then the process must have theprivilege to override search restrictions when accessing a directory, which isfile_dac_search.
These conditions and the listed override privileges apply to view (read) access:
• If the sensitivity label of the process does not dominate the sensitivity labelof a file or equal the sensitivity label of a directory or device, then theprocess must have the privilege to override MAC read restrictions, which isfile_mac_read.
• If the user executing the command does not have discretionary readpermission for the file or directory, then the process must have the privilegeto override DAC read restrictions, which is file_dac_read.
These conditions and the listed override privileges apply to modify (write)access:• If the sensitivity label of file does not dominate or if the sensitivity label of a
directory or device does not equal the sensitivity label of the process, theprocess must have the privilege that overrides MAC write restrictions,allowing the user to write up and to write above the user's clearance, whichis file_mac_write.
• If the user executing the command does not have discretionary writepermission for the file or directory, then the process must have the privilegeto override DAC write restrictions, which is file_dac_write.
Accreditation RangeAn accreditation range is actually not a range, but a set made up of labels. See“Label Range” on page 311, “User Accreditation Range” on page 317 and“System Accreditation Range” on page 317 for more about the types of labeland accreditation ranges in the Trusted Solaris system.

Managing Files and File Systems 309
11
Adorned NameThe text string .MLD. is the default adorned name for multilevel directories(MLDs). The adornment is alternately called the MLD prefix.
CMW LabelConsists of an information label followed by a sensitivity label in brackets, inthe form: INFORMATION LABEL [SENSITIVITY LABEL].
ClassificationThe classification is the hierarchical portion of a sensitivity label, informationlabel, or clearance, each of which has only one classification. In a sensitivitylabel assigned to a file or directory, a classification indicates a relative level ofprotection based on the sensitivity of the information contained in the file ordirectory. In a clearance assigned to a user and to processes that executeapplications and commands on behalf of the user, a classification indicates alevel of trust.
ClearanceThe clearance is the upper bound of the set of labels at which a user may work.The lower bound is the minimum label assigned by the security administratoras the initial label. There are two types of clearance, the user clearance and thesession clearance.
CompartmentsCompartments are an optional set of words that the site’s securityadministrator may specify to appear in a sensitivity label, information label,or clearance. The compartment represents areas of interest or work groupsassociated with the labels that contain them and with the files that are assignedthe labels and the individuals that work with them.

310 Trusted Solaris Administrator’s Procedures—July 1997
11
Discretionary Access ControlDiscretionary access control (DAC) is a type of access granted or denied by theowner of a file or directory at the discretion of the owner. The Trusted Solarissystem provides two kinds of discretionary access controls (DAC): permissionbits and access control lists
DominateWhen any type of label (sensitivity label, information label, or clearance) hasa security level equal to or greater than the security level of another label towhich it is being compared, the first label is said to dominate the second. Theclassification of the dominant label must equal or be higher than theclassification of the second label, and the dominant label must include all thewords (compartments and markings, if present) in the other label. Two equallabels dominate each other. Sensitivity labels are compared for dominancewhen MAC decisions are being made. See strictly dominate.
Execution Profile Mechanism
The execution profile mechanism allows site security administrators to bundlecommands, CDE actions, and security attributes that may be associated withthose commands and actions into an execution profile, which may then beassigned to one or more users depending on the tasks that they need toperform. Security attributes that may be specified in execution profiles includeinheritable privileges for commands and actions that may in some cases beused to override discretionary or mandatory access policy for files anddirectories and file systems. See “Overview of Files, Directories, and FileSystems” on page 304.
Information LabelAn information label is a type of label that signifies the actual security level ofthe information contained in a file or directory, and which may be used indeciding whether to downgrade the sensitivity label of the file or directory,how to physically label information stored on backup media, and how tohandle printed output or mail.

Managing Files and File Systems 311
11
Information Label Floating
Information label floating is a conjoining of two information labels that occurswhen a file or directory with one information label is accessed by a process thathas another information label, the resulting information label reflects thecombined security level of both information labels.
LabelA label is a security identifier assigned to a file or directory based on the levelat which the information being stored in that file or directory should beprotected. Depending on how the security administrator has configured thesystem, users may see the complete CMW label, only the sensitivity labelportion, only the information label portion, or no labels at all.
Label Range
A label range is actually a set of sensitivity labels assigned to commands, filesystems, and allocatable devices, which is specified by designating a maximumlabel and a minimum label. For commands, the minimum and maximum labelslimit the sensitivity labels at which the command may be executed. For filesystems, the minimum and maximum labels limit the sensitivity labels atwhich information may be stored on each file system. Trusted Solaris systemshave multilabel file systems configured with a label range from the lowestsensitivity label to the highest sensitivity label. Remote hosts that do notrecognize labels are assigned a single sensitivity label, along with any otherhosts that the security administrator wishes to restrict to a single label; thelabel range on a file system mounted from such a host is configured to berestricted to the same sensitivity label as the remote host's sensitivity label. Forallocatable devices, the minimum and maximum labels limit the sensitivitylabels at which devices may be allocated and restrict the sensitivity labels atwhich information can be stored or processed using the device. See networkaccreditation range.
Mandatory Access Control
Mandatory access control (MAC) is a type of control based on comparing thesensitivity label of a file, directory, or device or another other thing beingaccessed to the sensitivity label of the process that is trying to access it. (The

312 Trusted Solaris Administrator’s Procedures—July 1997
11
sensitivity label of the process is the same as the sensitivity label of theworkspace where the command was invoked.) Even though directories anddevices are managed like files in the UNIX system, the mandatory accesscontrol (MAC) rules that apply to directories and devices are different from theMAC rules that apply to files. Before a file may be accessed for writing, MACchecks ensure that the sensitivity label of the file dominates the sensitivity labelof the process—a policy called write up. A process cannot write to a file whosesensitivity label is higher than the process' clearance, which is set to be equalto the session clearance. (The write up policy also includes write equal.) Beforea directory or a device may be accessed for writing, MAC checks ensure thatthe sensitivity label of the directory or device is equal to the sensitivity label ofthe process—a policy called write equal. Before a file or directory may beaccessed for viewing (reading or searching), MAC checks ensure that thesensitivity label of the process dominates the sensitivity label of the file ordirectory—a policy called read down. Before a device may be accessed forviewing, MAC checks ensure that the sensitivity label of the process equals thesensitivity label of the device-a policy called read equal. (The read down policyalso includes read equal.)
The rule that applies when a process at one sensitivity label attempts to read orwrite a file at another sensitivity label is write up, read down (WURD). Therule that applies when a process at one sensitivity label attempts to write adirectory at another sensitivity label is write equal, read down. The rule thatapplies when a process at one sensitivity label attempts to write a device atanother sensitivity label is read equal, write equal.
Markings
The codewords, handling caveats, control and release markings and theassociated bits that apply to labeled information, markings are only containedin information labels.
Minimum Label
For users, the minimum label is the lower bound of the sensitivity labels atwhich a particular user can work, which is specified by the securityadministrator role while setting the user's account. For the system, thesensitivity label specified in the minimum label field by the securityadministrator in the label_encodings file sets the lower bound for all users.

Managing Files and File Systems 313
11
Multilevel Directory
A multilevel directory is a directory in which information at differingsensitivity labels is maintained in separate subdirectories called single-leveldirectories (SLDs), while appearing to most interfaces to be a single directoryunder a single name. In the Trusted Solaris system, directories are created asMLDs when they are used by multiple standard applications to store files atvarying labels; these include /tmp , /var/mail , and users' $HOME directories.A user working in an MLD sees only files at the sensitivity label of the user'sprocess. (The exception is if a user has the upgrade file authorization or thedowngrade file authorization and is able to upgrade or downgrade a file ordirectory’s sensitivity label after it is created within an MLD. If files ordirectories have been upgraded, their names are visible, unless the system(4)file switch tsol_hide_upgraded_names is changed from the default setting of 0to 1.)
The adorned name of an MLD, also called the MLD prefix, is a file systemattribute that may be changed by the system administrator role usingsetfsattr(1MTSOL) with the -m option followed by a new prefix. Theadornment may also be set on a file system at creation, using newsecfs withthe -m option followed by a prefix. To find out the current MLD prefix, usegetfsattr(1MTSOL) with the -m option. (See also “Working with MLDs” onpage 43 in Chapter 2, “Miscellaneous Tasks and Procedures.”)
Users can access an MLD two ways: either without using the adorned name(such as entering cd /tmp ) or with using the adorned name (as when enteringcd /.MLD.tmp ). Interfaces that access directories [such as cd(1) , mkdir(1) ,and ls(1) ] accept either form. If a file is being created in an MLD in which anSLD at the correct sensitivity label does not already exist, Trusted Solariscreates the SLD and assigns to it the process' sensitivity label.
When an MLD is referred to without using the adorned name. the TrustedSolaris system transparently extends the reference to the single-level directory(SLD) that corresponds to sensitivity label of the window in which thecommand is invoked; for example, entering cd /tmp puts the user into the SLDthat corresponds to the sensitivity label of the window in which the commandis invoked, such as /.MLD.tmp/.SLD.1 . Use of the adorned name allowsprograms to refer directly to the MLD instead of to the SLD that has the samesensitivity label as the process. So if the user enters cd /.MLD.tmp puts theuser into the MLD, and the user can then list all the SLDs that the currentwindow’s sensitivity label dominates.

314 Trusted Solaris Administrator’s Procedures—July 1997
11
Permission Bits
Permission bits are a type of discretionary access control in which the ownerspecifies permissions that are stored as a set of bits to signify who can read,write, or execute a file or directory. Three different sets of permissions areassigned to each file or directory: one set for the owner; one set for all membersof the group specified for the file or directory; and one set for all others. Seealso access control lists.
Privilege
A privilege is a right granted to a process executing a command that allows thecommand or one or more of its options to bypass some aspect of securitypolicy. A privilege is only granted by a site's security administrator after thecommand itself or the person using it has been judged to be able to use thatprivilege in a trustworthy manner. See “Execution Profile Mechanism” onpage 310.
Process
A process is the action that executes a command on behalf of the user whoinvokes the command. Each process receives a number of security attributesfrom the user, including the user ID (UID), the group ID (GID), thesupplementary group list, and the user's audit ID (AUID). Security attributesreceived by a process include any privileges available to the command beingexecuted, the process clearance (which is set to be the same as the sessionclearance), the sensitivity label of the current workspace, and an informationlabel. If the option RESET IL ON EXEC is selected [see system(4) ], theinformation label is set to be the lowest viewable label in the system when anew process is started. The information label floats if any information at ahigher information label is accessed by the process.
Security AdministratorIn an organization where sensitive information must be protected, the securityadministrator role is assigned to the person or persons who define and enforcethe site's security policy and who are cleared to access all information beingprocessed at the site. In the Trusted Solaris software environment, the securityadministrator role is an administrative role that is assigned to one or more

Managing Files and File Systems 315
11
individuals who have the proper clearance and whose task is to configure thesecurity attributes of all users and hosts so that the software enforces the site'ssecurity policy.
Security AttributeA security attribute is an attribute used in enforcing the Trusted Solarissecurity policy. Various sets of security attributes, both from the base Solarisand the Trusted Solaris systems, are assigned to processes, users, files,directories, file systems, hosts on the trusted network, allocatable devices, andother entities. Security attributes for users from the base Solaris system includethe user ID (UID), audit ID (AUID), group ID (GID), supplementary group IDs(SGIDs). Security attributes for users from the Trusted Solaris system includethe clearance, minimum label (initial label), and any authorizations. Animportant Trusted Solaris security attribute for files is the CMW label, thesensitivity label portion of which is used in access decisions and theinformation label portion of which may be used to track the real sensitivity ofthe information contained in the file. A sensitivity label range security attributeis assigned to file systems, to allocatable devices and to printers. A UID, GID, alabel range, and one or more privileges may be associated with commands andCDE actions by security administrators in execution profiles. The mentionedsecurity attributes and a label range called the network accreditation range areassigned to hosts in Trusted Network databases, which are used to control thesecurity of communications in a Trusted Solaris distributed system.Thesensitivity labels at which NFS mounts may be performed are limited by thesensitivity labels assigned to the NFS server in the trusted network databases.See also “Attributes on File Systems” on page 323.
Security PolicyIn the Trusted Solaris environment, the security policy is the set of DAC, MAC,and information labeling rules that define how information may be accessed.At a customer site, the security policy is the set of rules that define thesensitivity of the information being processed at that site and the measures thatare used to protect the information from unauthorized access.

316 Trusted Solaris Administrator’s Procedures—July 1997
11
Sensitivity LabelA sensitivity label is a security label assigned to a file or directory or process,which is used to limit access based on the security level of the informationcontained therein.
Session ClearanceA session clearance is a clearance in effect only during a particular loginsession, and it is set by the user when starting a session. Each process startedduring a session has a process clearance equal to the session clearance. Thesession clearance may be set either to be the same as or lower than the userclearance.
Single-level DirectoryA single-level directory (SLD) is a directory within an MLD containing files atonly a single sensitivity label. When a user working at a particular sensitivitylabel changes into an MLD, such as /tmp , the user's working directory actuallychanges to a single-label directory within the MLD, such as/.MLD.tmp/.SLD.1, whose sensitivity label is the same as the sensitivity labelat which the user is working. SLD names are created using the .SLD. prefixfollowed by a number indicating the sequence in which they were created.
Strictly DominateWhen any type of label (sensitivity label, information label, or clearance) has asecurity level greater than the security level of another label to which it isbeing compared, the first label strictly dominates the second label. Strictdominance is dominance without equality, which occurs either when theclassification of the first label is higher than that of the second label and thefirst label contains all the compartments in the second label or when theclassifications of both labels are the same while the first label contains all thecompartments in the second label plus one or more additional compartments.

Managing Files and File Systems 317
11
System Accreditation Range
The system accreditation range is the set of all valid (well-formed) labelscreated according to the rules defined by each site's security administrator inthe label_encodings file, plus the two administrative labels that are used inevery Trusted Solaris system, ADMIN_LOW and ADMIN_HIGH.
User Accreditation Range
The user accreditation range is the set of all possible labels at which anynormal user may work on the system, as defined by each site's securityadministrator. The rules for well-formed labels that define the systemaccreditation range are additionally restricted by the values specified in theACCREDITATION RANGE section of the site's label_encodings(4TSOL)file: the upper bound, the lower bound, the combination constraints and otherrestrictions.
User Clearance
The user clearance is assigned by the security administrator to set the upperbound of the set of labels at which a particular user may work at any time. Theuser may decide to accept or further restrict that clearance during anyparticular login session, when setting the session clearance after log in.

318 Trusted Solaris Administrator’s Procedures—July 1997
11
Attributes on Files and DirectoriesBesides having the attributes that are characteristic of the base Solaris filesystem, Trusted Solaris files and directories have extended security attributesstored in a shadow inode off of the inode of the object.
Table 11-1 lists the attributes supported in the base Solaris operating systemand the additional security attributes required by Trusted Solaris securitypolicy.
Table 11-2 on page 318 describes the extended attributes.
Table 11-1 File and Directory Attributes from the Base and from Trusted SolarisOperating System
Security Attributes from Solaris Base Added Trusted Solaris Security Attributes
User Id Sensitivity Label
Group Id Information Label
Permission Mode Forced Privileges
Access ACL (optional) Allowed Privileges
Default ACL (optional) File Attribute Flag
Directory Attribute Flag
Table 11-2 Security Attributes on Files and Directories (1 of 2)
Attribute Description
Sensitivity Label The sensitivity label of the file or directory
Information Label The information label of the file or directory. For directories, MLDs,and SLDs the information label may be undefined.

Managing Files and File Systems 319
11
Unlike many systems implementing MAC, the Trusted Solaris system does notimpose any order on the sensitivity labels of directories in a pathname.
Although the policy is that files and directories can be created only at the samesensitivity label as the containing directory, privileged subjects may create filesand directories at any valid sensitivity label and relabel existing files anddirectories at any valid sensitivity label to create upgraded objects. See “ToChange Labels and Privileges on Files and Directories” on page 336.
The system can also be configured so that directory entries do not show whena process does not have MAC access to the label of the file or subdirectory,which means that the names of upgraded files and directories are notvisible.The Customize Trusted Solaris dialog that displays during installationallows the install team to choose Hide upgraded names in directories ,which sets a switch in the /etc/system file. This setting can be changed afterinstallation by changing the setting of the tsol_hide_upgraded_name sswitch in the system file as described in page 356 of Chapter 13, “ChangingConfigurable Trusted Solaris Kernel Switches” and rebooting.
Directory name are cleared when a directory is removed, to meet the objectreuse requirement that the names of removed directories should no longer beaccessible.
Trusted Solaris 2.5 symbolic links have MAC and information label attributes.
The sensitivity label is set at creation and can be changed. The informationlabel is set at creation, and can be changed without causing the process’sinformation label to float.
Forced Privileges The set of privileges that this executable is guaranteed to haveavailable at start of execution.
Allowed Privileges The maximum set of privileges that this executable is allowed to useduring its execution. (Because executables that have been edited losetheir privileges, limiting the privileges that an executable can use tothose in its allowed set provides a protection against Trojan horses,because programs cannot use inheritable privileges if the programshave been edited.)
File and DirectoryAttribute Flag
Flags that indicate directory is an MLD, that a file is a public object.
Table 11-2 Security Attributes on Files and Directories (2 of 2)
Attribute Description

320 Trusted Solaris Administrator’s Procedures—July 1997
11
MLDs appear in the file system as ordinary directories with a flag identifyingthem as MLDs. MLDs require no privilege to create, delete, or use. Read-downaccess to SLDs within an MLD permits an unprivileged process to combineinformation from SLDs at its own and lower sensitivity labels. Themldpwd(1TSOL) and mldrealpath(1TSOL) commands are used to get thename of either the current working directory or of any other MLD with theMLD adornment. Mounting MLDs does not require the use of the adornedname.
For one example of how the security attributes are used to enforce the TrustedSolaris security policy, when a command such as vi(1) tries to do somethinglike create (write) a new file in a directory, the security attributes (such as theidentity of the user who invoked the command and the sensitivity label of theprocess) of the process running the command are compared to thecorresponding security attributes (in this example the UID and sensitivitylabel) of the directory where the file is being created, and the operationsucceeds or fails based on whether the required MAC and DAC checks arepassed. In this example, the user ID would have to meet the DAC requirementsspecified in the directory’s permission bits and in any ACL it might have, andthe sensitivity label of the process would have to be dominated by thesensitivity label of the directory.
Changing Security Attributes on Files and DirectoriesThe Trusted Solaris File Manager lets users and administrators changepermissions, set privileges and labels on files and directories. Overrideprivileges may be required on the commands or actions if attempted accessesare outside MAC or DAC policy.
Changing Labels and Privileges
The File Manager Selected menu has a Change Labels options to set thesensitivity label and information label, which may also be done on thecommand line by any account that has the setlabel(1TSOL) command inone of its profiles, while the Selected menu’s Change Privileges option lets youset forced and allowed privileges on executable files.
The following authorizations are required in order to set privileges and labels,either on the command line or through the File Manager Selected menuoptions:

Managing Files and File Systems 321
11
• Setting privileges requires the set file privileges authorization.
• Upgrading file and directory labels requires the upgrade file sensitivity labelauthorization
• Downgrading file and directory labels requires the downgrade file sensitivitylabel authorization.
See Figure 11-1 for the Selected menu. The options that allow the setting ofprivileges and labels are new in Trusted Solaris 2.x. See “To Change Labels andPrivileges on Files and Directories” on page 336 for how to change labels andpermissions.
Changing File and Directory Attribute Flags
The getfattrflag(1TSOL) command gets the attribute flag of a file ordirectory and the setfattrflag(1TSOL) command sets the public object flagon a file and sets the MLD flag on a directory.

322 Trusted Solaris Administrator’s Procedures—July 1997
11
Figure 11-1 File Manager Selected Menu

Managing Files and File Systems 323
11
Attributes on File SystemsFile systems supported by the Trusted Solaris system are characterized bywhether their attributes can be changed or whether they are unchangeable. Thetwo classifications are:
• Variable attribute file systems, and
• Fixed attribute file systems
A file system with the extended Trusted Solaris security attributes is referred toas a variable attribute file system or variable file system. A file system that does nothave the Trusted Solaris security attributes, but has only the standard Solarisattributes or some subset is referred to as a fixed attribute file system.
Both variable attribute file systems and fixed attribute file systems can belocally connected to a Trusted Solaris host, even on the same local disk.
Variable Attribute File Systems
All Trusted Solaris file systems are variable attribute file systems and have thetsol_attr flag as one of their extended security attributes, while other types offile systems from other UNIX systems do not have this flag and do notrecognize it. On a variable attribute file system with the tsol_attr flag:
• The Trusted Solaris security attributes are present and• The security attributes may be changed.
Table 11-3 shows the security attributes for variable-attribute file systems, withthe default values that are in effect unless they are changed or overridden atmount time by a site’s security administrator.
Table 11-3 Trusted Solaris File System Security Attributes With Defined Settings (1 of 2)
Attribute Description
Filesystem Attribute Flag The tsol_attr flag.
Filesystem MLD prefix The characters to use for the MLD prefix forMLDs on this file system (default “.MLD.”).
Filesystem Sensitivity Label Range The minimum and maximum sensitivitylevel for files and directories created on thisfile system (default ADMIN_LOW ToADMIN_HIGH).

324 Trusted Solaris Administrator’s Procedures—July 1997
11
Specifying Variable Attributes on File Systems
All file systems created during Trusted Solaris installation have the tsol_attrflag. The default file systems may be used just as they are with the defined setof security attributes. However, when site security policy requires, the securityadministrator can:
• Use the getfsattr(1MTSOL) command to get the security attributes of afile system.
• Use the newsecfs(1MTSOL) command to supply security attributes for anew Trusted Solaris file system while creating it.
Filesystem Sensitivity Label The sensitivity label to infer for all files anddirectories on this file system that do nothave an explicit sensitivity label (defaultnone)
Filesystem Information Label The information label to infer for all filesand directories on this file system that donot have an explicit information label(default none).
Filesystem Access ACL The access ACL to infer for files anddirectories on this file system that do nothave an explicit access ACL (default none).See setfacl(1) for the format.
Filesystem Default ACL The creation ACL to infer for all files anddirectories on this file system that do nothave an explicit creation ACL (defaultnone).
Filesystem Forced Privilege Set The forced privilege set to infer for allexecutable files on this file system that donot have explicit forced privileges (defaultnone).
Filesystem Allowed Privilege Set The allowed privilege set to infer for allexecutable files on this file system that donot have explicit allowed privileges (defaultnone).
Table 11-3 Trusted Solaris File System Security Attributes With Defined Settings (2 of 2)
Attribute Description

Managing Files and File Systems 325
11
See “To Specify Alternative Security Attributes While Creating a Local FileSystem” on page 339
• Use setfsattr(1MTSOL) to tune an already-existing file system
See “To Set Security Attributes on a Standard File System or Reset SecurityAttributes for an Existing Trusted Solaris File System” on page 339.
Warning – Do not change or explicitly set the security attributes of the /, /usr,or /var file systems on a Trusted Solaris host. The results are unpredictable.
Fixed Attribute File Systems
Because they are configured to have a single sensitivity label when mounted onTrusted Solaris hosts, the fixed attribute file systems are also referred to as single-label file systems.
Security administrators may associate a single CMW label (information labelwith sensitivity label) and a set of attributes with the whole fixed attribute filesystem and all the files and directories it contains when mounting it. On fixedattribute file systems, neither the information label or the sensitivity label canchange as long as an object resides in the file system.
For example, you can NFS-mount a fixed attribute file system called /sparefrom a NFS server called outside at PUBLIC[INTERNAL_USE_ONLY] usingmount with the -S option on the command line as shown here:
Say that /spare contains a file called file. You can not change the sensitivitylabel or information label of /spare/file and its information label can neverfloat. However, if you copy or move /spare/file into /tmp or/export/home/secadmin , for example, you can then change its CMW label.
The security attributes are specified for the mounted fixed file system either onthe command line using mount with the -S option or in thevfstab_adjunct(4TSOL) file.
$ mount -F nfs -S slabel=INTERNAL_USE_ONLY\; ilabel=PUBLIC outside:/spare /spare

326 Trusted Solaris Administrator’s Procedures—July 1997
11
When a fixed attribute file system (such as a file system from a Solaris system)is being mounted, if the system administrator does not specify all thefilesystem security attributes, the file system is mounted with securityattributes taken from the process mounting the file system. Table 11-4 showsthe values used when a fixed attribute file system that does not support anattribute is being mounted and a mount-time value for the attribute has notbeen supplied either on the command line or in vfstab_adjunct entry forthe file system.
Note – Empty means that the attribute has all bits off. None means that theattribute has no effect.
Table 11-4 Attributes for Fixed File Systems with Default Values
Name Value
Filesystem Access ACL None
Filesystem Default ACL None
Filesystem Allowed PrivilegeSet
Empty
Filesystem Audit PreselectionFlags
None
Filesystem Forced PrivilegeSet
Empty
Filesystem Information Label Mounting Process’sInformation Label
Filesystem Sensitivity Label Mounting Process’sInformation Label
Filesystem Label Range Mounting Process’sInformation Label
Filesystem MLD prefix .MLD.
Filesystem Attribute Flags None

Managing Files and File Systems 327
11
Types of File Systems That May Be Mounted in the Trusted Solaris SystemTrusted Solaris mount(1MTSOL) can be used to mount the following types offile systems:
• FDFS• HSFS• LOFS• NFS• PCFS• PROCFS• TMPFS• UFS
The CACHEFS filesystem type is not supported.
Multiple mount_ * mount man pages are available, such asmount_nfs(1MTSOL) and mount_ufs(1MTSOL) , but there is only onemount(1MTSOL) command. The mount man page describes security attributesthat may be set at mount time and gives the privileges, UID and GID thatmount needs in order to succeed. See also “Attributes on File Systems” onpage 323 and following for more about security attributes.
The options for doing mounts of the various file system types are described inthe appropriate mount_* man pages. The vfstab_adjunct(4TSOL) manpage describes the /etc/security/tsol/vfstab_adjunct file, wheremount time security options can be entered to be used when file systemsspecified in the /etc/vfstab are being mounted. The differences betweenfixed attribute and variable file systems are described in “Fixed Attribute FileSystems” on page 325.

328 Trusted Solaris Administrator’s Procedures—July 1997
11
Table 11-5 lists the various types of mounts with examples and notes.
Table 11-5 Mount Types, Examples, and Notes (1 of 2)
Type When Used Notes
FDFS A pseudo file system type that allows a program toaccess its own file descriptor through the file namespace
MAC and DAC isolation are assured because eachprocess can access/see only its own file descriptors.The mode (0666), group (root), and owner (root) arefabricated by the kernel and are not used in any DACdecisions. The sensitivity label and information labelare those of the backing file or directory. This is a fixedattribute file system.
HSFS Mounts a file system from a CD device. See mount_hsfs(1M) . In the Trusted Solaris system,the file system can be given fixed attributes at mounttime.
LOFS A pseudo file system type that allows virtual filesystems to be created that provide access to existingfiles using alternate pathnames
See lofs(7FS) . In the Trusted Solaris system, thesecurity attributes are identical to those of theunderlying file system.
NFS Mounts a file system from a remote NFS server. See mount_nfs(1MTSOL) . See also “Trusted SolarisNFS Mounts” on page 334. NFS mounts can beperformed on fixed and variable attribute file systems.
PCFS Mounts DOS file systems from a diskette. See pcfs(7FS) . No extended attributes can be set onthis file system type.

Managing Files and File Systems 329
11
UFS and NFS mounts are the types of mounts most commonly done.
PROCFS A pseudo file system provides access to the image ofeach process in the system. The name of each entry inthe /proc directory is a decimal numbercorresponding to a process-ID. The owner of each``file'' is determined by the process's real user-ID.
In a Trusted Solaris system, PROCFS is a variableattribute file system in which all the Trusted Solarisattributes are supported. Process access decisions arebased on the DAC and MAC attributes of the /procfile, which are imputed from the underlying process’sDAC and MAC attributes.If the calling process has theproc owner privilege, then the process can getinformation at the same sensitivity label aboutprocesses not owned by the caller. If the callingprocess has proc_mac_read privilege, the process canget information about a process that is owned by thecaller when the process’s sensitivity label dominatesthat of the caller or is disjoint. The restrictions formodifying are more granular than the ones forreading. See the proc(4TSOL) man page.
TMPFS Mounts in memory a temporary file system that usesswap pages, either in primary memory or on swapstorage. The contents disappear at reboot.
Often /tmp is mounted as a tmpfs. The advantage is ahuge increase in speed of access to whatever thetemporary file system contains, since the informationis retrieved from memory instead of from a disk. Seemount_tmpfs(1MTSOL) .
UFS Mounts a file system from a local disk See mount_ufs(1MTSOL) . UFS file systems can havefixed mount time attributes assigned or variableattributes assigned at creation or later when the filesystem is given the tsol_attr flag. See “VariableAttribute File Systems” on page 323. Note: Onunlabeled (fixed attribute) file systems, theMLD prefix generally has no useful effect—with thefollowing exception. An mld_prefix should besupplied if another file system that has the tsol_attrflag is being mounted on the unlabeled file system andif the root of that file system is an MLD. If no prefix issupplied; the default is an empty string.
Table 11-5 Mount Types, Examples, and Notes (2 of 2)
Type When Used Notes

330 Trusted Solaris Administrator’s Procedures—July 1997
11
MLDs are supported only by the following file system types:
• ufs -variable (with the tsol_attr attribute)
• nfs-variable (with the tsol_attr attribute)
• lofs , and
• tmpfs
Specifying Mount Time Security Attributes The mount command is extended to allow default values to be specified forprivilege sets, ACLs, the sensitivity label, and the information label when afixed attribute file system is being mounted. For file systems withTrusted Solaris attributes, the mount protocol is extended to retrieve theextended attributes from the file system whether it is local or remote.
The security administrator can specify security attributes at mount time eitherby using the mount -S option or setting the attributes in the file system’s entryin the vfstab_adjunct(4TSOL) file. See the mount(1MTSOL) man page and:
Allowing the system administrator to specify a set of attributes at mount time:
• Supports mounting of fixed attribute file systems that do not supportimbedded security attributes at either the file system or file and directorylevel
• Permits the security administrator to override already-defined securityattributes on variable attribute file systems
When the file system is mounted, any specified mount attributes are firstchecked against the list of supported attributes for the file system typemounted. If a mount attribute is not supported for the file system beingmounted then the mount fails and an error is returned to the caller. Forexample, on ufs file systems the mount user ID is not supported, because userIDs are supported on ufs file systems. The second check is made on the validityof the attribute value. If the attribute value is not valid then the file system isnot mounted and an error will be returned to the caller. For example, themount forced privilege set must be a subset of the mount allowed privilege set.
To Specify Mount-time Security Attributes on the Command Line page 340
To Specify Mount-time Security Attributes in the Mount Table page 340

Managing Files and File Systems 331
11
A single-label fixed attribute file system allows access to files and directoriesonly at the single sensitivity label range specified when the file system ismounted. Also, sensitivity labels and information labels are not changeable onindividual files and directories within the single-label file system. Also,because there is no information labels support, the information labels of all filesand directories in a single-label file system are treated as equal to the valuespecified at mount time, do not float and cannot be changed by user action. Itis the administrator’s responsibility to ensure that the label range and theCMW label specified accurately represent the label of all data.
A file system mounted from a host configured as an unlabeled host supportsUIDs, GIDs, and optional ACLs and default ACLs on the files and directories itcontains, but has no other security attributes. The security administratorspecifies a sensitivity label range that is actually a single label for the filesystem along with other default security attributes.
When a variable file system with tsol_attr flag is mounted by a Solaris host, theSolaris host ignores the Trusted Solaris security attributes.
Attribute Precedence RulesAny file or directory’s attribute set overrides the file system’s attribute set. Anyattributes specified when a file system is mounted override the attributes onthe underlying file system. Figure 11-2 on page 332 shows the rules.

332 Trusted Solaris Administrator’s Procedures—July 1997
11
Figure 11-2 Attribute Precedence Rules
Mount-time
Specified on theFile or
Directory?
Look upAttribute
Usethe File orDirectory’sAttribute
UseMount-timeYes
No
Yes
No
AttributeAttributeSpecified?
Isthe Attribute
Is a
File SystemAttribute
Is a
Specified?
UseFile SystemYes
Attribute
No
UseDefaults

Managing Files and File Systems 333
11
Example of Specifying Security Attributes for a Fixed Attribute File SystemMounted from an Unlabeled Host
In this example, the security administrator role has specified the followingsecurity attributes for the /public file system being mounted from a Solarishost in the vfstab_adjunct entry for the file system:
• A minimum sensitivity label and a maximum sensitivity label of PUBLIC
• A default sensitivity label of PUBLIC
• A default information label of PUBLIC
• An allowed privilege set of none
• A forced privilege set of none
Normal DAC rules apply to attempts to access files and directories in this filesystem. With the listed defaults set for the file system:
• A user can access a file in that file system (such as/public/stock.quotes ) only while in a window with a sensitivity labelof PUBLIC.
• No action of the user can change the information label or sensitivity label ofthe file as long as it resides in the /publi c file system.
• If the user copies or moves a file from the /public file system to a variablefile system with the tsol_attr flag, the file’s CMW label changes to that of theprocess that copies it, and the rest of the file’s security attributes can then bechanged.

334 Trusted Solaris Administrator’s Procedures—July 1997
11
Trusted Solaris NFS MountsWhen mount(1MTSOL) is invoked to do an NFS-type mount, mount isinvoked by definition on a Trusted Solaris NFS client to mount a file systemfrom an NFS server. The NFS server may or may not be running the TrustedSolaris operating system. The NFS server has the file system locally-mounted,and the file system can be any local file system type, hsfs, pcfs, tmpfs, ufs, andso forth. The NFS server exports the file system using share(1M) . The sharecommand and its options are either entered on the command line or in the/etc/dfs/dfstab file.
Trusted Solaris and NFSTrusted Solaris 2.5 supports both of the Network File System (NFS) protocolssupported in the base Solaris operating system and the previous major releaseof Trusted Solaris:
• NFS Version 2 (V2) (from the Solaris 1.x environment)
• NFS Version 3 (V3) (from the Solaris 2.5 environment)
When a Solaris host exports a file system using the NFS protocol, a TrustedSolaris 2.5 host can use the corresponding NFS protocol version to access thefile system at a single label.
/spare
host A, the NFS server, does a ufs mount of /sparefrom a local disk
➌ nfs mount of /sparefrom a remote hostA to hostB(host A is acting asNFS server to an NFS
host A
host Bclient, host B)
$ mount -F nfs hostA:/spare /spare
$ mount -F ufs /dev/dsk/c0t3d0s3 /spare
$ share -F nfs /spare➋ host A exports /spare
➊

Managing Files and File Systems 335
11
A Trusted Solaris host can also use the NFS protocol to export its own filesystems to unlabeled client hosts. The unlabeled client ignores the TrustedSolaris security attributes. A file or directory exported to an unlabeled client iswritable if its sensitivity label equals the sensitivity label associated with theclient host in its trusted networking database entries. A file or directoryexported to an unlabeled client is readable only if its sensitivity label isdominated by the sensitivity label associated with the client host.
To support data sharing with Trusted Solaris 1.x hosts, Trusted Solaris 2.5partially supports the 1.x version of Trusted NFS. Only the client portion ofthese protocols is supported so that Trusted Solaris 1.x hosts can export filesystems to Trusted Solaris 2.5 hosts. Since some of the extended attributes(such as privileges) are different between the different versions ofTrusted Solaris operating system, not all attributes are honored. Specifically,the extended attributes are limited to sensitivity label, information label, andpermission bit DAC.1 No guarantee is made with respect to execution of filesfrom a Trusted Solaris 1.x host. In particular, no privileged programs can beexecuted from a Trusted Solaris 1.x host.2
Any file system being mounted from a NFS server running Solaris 2.4 or earlierversions of Solaris or running Trusted Solaris 1.x needs to be mounted withvers=2 and proto=udp mount options.
The NFS protocol used (whether it is NFS V2/V3, TNFS, TSIG/TNFS) used isindependent of the type of the local file system; rather, it depends on the typeof the exporting host’s operating system. The file system type specified to themount command or in the vfstab for remote file systems is always nfs.
Exporting Directories for Mounting by Other HostsExporting directories (sharing) for mounting by other hosts is done the sameway it is done in the base Solaris system. Two new Trusted Solaris mountoptions nodev and nopriv may also be used when sharing file systems. See “ToShare a Directory for Mounting by Other Hosts” on page 343.
1. No guarantee is made that ACLs are compatibly implemented with Trusted Solaris 1.x.
2. And privileged processes on Trusted Solaris 2.5 may not have their privileges interpreted on a TrustedSolaris 1.x server.

336 Trusted Solaris Administrator’s Procedures—July 1997
11
Troubleshooting Mount FailuresIf an attempted mount fails, and if all the standard setup has been done asrequired in the base Solaris system (as described in the Solaris SystemAdministration Guide, Volume II), do the steps in “To Trouble Shoot MountFailures” on page 344.
File and File System-related Procedures
▼ To Change Labels and Privileges on Files and Directories
1. Assume the security administrator role.
2. Bring up the File Manager and highlight the file whose privileges or labelyou wish to change.
3. To change privileges, choose Change Privileges from the Selected menu.
a. On the File Manager Privileges dialog box shown in Figure 11-4 onpage 338, check the button for allowed or forced.
b. Move the desired privileges from the Excluded to the Included list.
c. Click OK.
4. To change labels, Choose Change Labels from the Selected menu.
a. On the File Manager Label Builder dialog box shown in Figure 11-4 onpage 338, check the button for SL or IL, as needed, and enter a labelDo either of Step i or Step ii.
i. Type in the text entry field under Update With.
ii. Click the desired classification, compartments or markings, asappropriate.
b. Click OK.
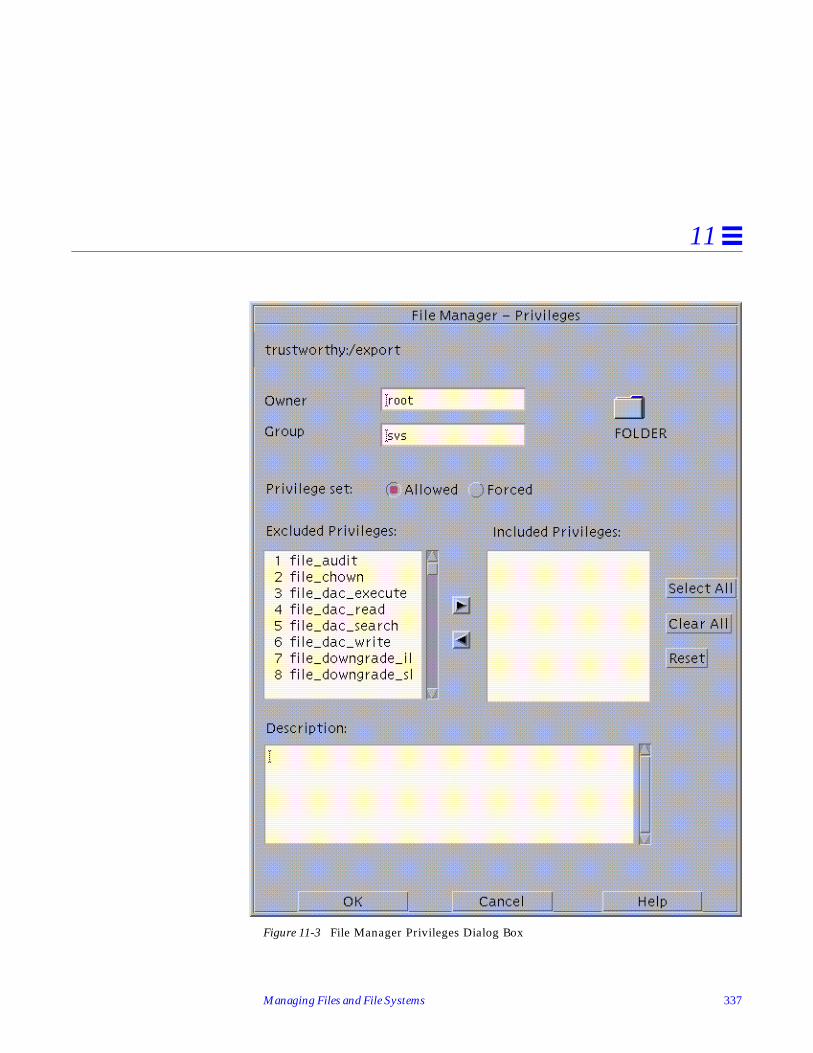
Managing Files and File Systems 337
11
Figure 11-3 File Manager Privileges Dialog Box

338 Trusted Solaris Administrator’s Procedures—July 1997
11
Figure 11-4 File Manager Label Builder

Managing Files and File Systems 339
11
▼ To Specify Alternative Security Attributes While Creating a Local FileSystem
1. Assume the security administrator role, go to an ADMIN_LOWworkspace, and invoke a profile shell [pfsh(1MTSOL) ].
2. Make the mount point directory.
3. Use the Set Mount Points Action to open the vfstab(4) file for editing.
4. Make an entry for the file system in the vfstab(4) file.
5. Execute the newsecfs(1MTSOL) command with the options that specifythe desired alternative security attributes, then mount the file system.
▼ To Set Security Attributes on a Standard File System or Reset SecurityAttributes for an Existing Trusted Solaris File System
1. Assume the security administrator role and bring up a profile shell[pfsh(1MTSOL) ] in an ADMIN_LOW workspace.
2. Unmount the file system.
3. Use the Set Mount Points Action to open the vfstab(4) file for editing.
$ mkdir /newpublic
/dev/dsk/c0t3d0s3 /dev/rdsk/c0t3d0s3 /newpublic ufs 2 yes -
$ newsecfs -l Secret;Secret /newspublic$ mount /newpublic
$ umount /spublic

340 Trusted Solaris Administrator’s Procedures—July 1997
11
4. Make sure that an entry exists for the file system in the vfstab (4TSOL)file.
5. Execute the setfsattr(1MTSOL) command with the appropriatearguments, then remount the file system.The following example sets an sensitivity label range of SECRET to SECRET.
Warning – Do not use proprietary names for mounted file systems. The namesof mounted file systems are visible to every user.
▼ To Specify Mount-time Security Attributes on the Command Line
1. Assume the system administrator role, and go to an ADMIN_LOWworkspace.In a profile shell, enter the mount command, using the -S option followed byan security attributes that you wish to specify.
The example mounts a tmpfs-type file system, swap, on /mnt .
▼ To Specify Mount-time Security Attributes in the Mount Table
1. Assume the security administrator role, and go to an ADMIN_LOWworkspace.
2. Use the Set Mount Points administrative action to open the vfstab(4)file for editing.
/dev/dsk/c0t3d0s4 /dev/rdsk/c0t3d0s4 /spublic ufs 2 yes -
$ setfsattr -l Secret;Secret /spublic$ mount /spublic
$ mount -F tmpfs -S allowed=all\;mld_prefix=hidden- swap /mnt

Managing Files and File Systems 341
11
3. Make an entry for the file system in the vfstab(4) file.
• The nosuid mount flag prevents users from using setuid in the filesystem.
• The nodevices mount flag disallows opens on device special files.• The nopriv mount flag disallows using privileges on files in the file system.
4. Save and close the file.
5. Use the Set Mount Attributes Action to open thevfstab_adjunct(4TSOL) file for editing.
6. Copy and paste the template entry, and modify the copy.
The example on Figure 11-5 on page 342 gives the following security attributesto /spublic :
• All files in the file system gets an slabel (sensitivity label) of SECRET A sothey can only be accessed at that sensitivity label or at a sensitivity label thatstrictly dominates them.
/dev/dsk/c0t3d0s4 /dev/rdsk/c0t3d0s4 /spublic ufs 2 yes nodevices,nopriv,nosuid

342 Trusted Solaris Administrator’s Procedures—July 1997
11
Figure 11-5 Example vfstab_adjunct Entries
7. Save and close the file.
## Yank the following entry and use as a template.##<mount point>; \#acc_acl=; \ . . .#audit_psa=;## attributes for an unlabeled filesystem#/spublic;\acc_acl=; def_acl=; mode=; attr_flg=; gid=; uid=; ilabel=;\slabel=”Secret A”; forced=; allowed=; low_range=”Secret A”;\hi_range=”Secret A”; mld_prefix=; mnt_flg=; audit_psa=;## attributes for an HSFS file system to mount from a# CD-ROM#/cdrom;\acc_acl=; def_acl=; mode=; attr_flg=; gid=; uid=; ilabel=;\slabel=;forced=127; allowed=all;low_range=;hi_range=; mld_prefix=hidden-; mnt_flg=; audit_psa=;## automatically mounted by /etc/init.d/MOUNTFSYS#/tmp;\acc_acl=; def_acl=; mode=; attr_flg=; gid=; uid=; ilabel=;\slabel=;forced=127; allowed=all;low_range=;hi_range=; mld_prefix=hidden-; mnt_flg=; audit_psa=;

Managing Files and File Systems 343
11
▼ To Share a Directory for Mounting by Other Hosts
1. Assume the system administrator role in an ADMIN_LOW workspace.
2. Use the Share Filesystems action to open the /etc/dfs/dfstab file forediting.
3. Make an entry for the file system you wish to export.
4. Run shareall to tell the NFS daemon nfsd(1MTSOL) to reread/etc/dfs/dfstab .
▼ To Mount a TMPFS-type File System Using the Command Line
1. Assume the system administrator role, and go to an ADMIN_LOWworkspace.
2. In a profile shell, enter the mount command, using the -S option followedby any security attributes that you wish to specify.
The example mounts a tmpfs-type file system, swap, on /mnt.
▼ To Mount a CDROM (HSFS-type File System) Using the Command Line
Note – Automatic mounting of CDROMs does not work in Trusted Solaris.
1. Assume the system administrator role, and go to an ADMIN_LOWworkspace.
share -F nfs -o nodevices,nopriv,nosuid rw -d "My Home Directory" /export/home/roseanne
$ shareall
$ mount -F tmpfs -S allowed=all\;mld_prefix=hidden- swap /mnt

344 Trusted Solaris Administrator’s Procedures—July 1997
11
2. In a profile shell, enter the mount command, using the -S option followedby any security attributes that you wish to specify.
The example mounts an hsfs-type file system at PUBLIC from/dev/dsk/c0t6d0s0 (the CD-ROM device on /mnt.
▼ To Trouble Shoot Mount Failures
1. Make sure that the IP address of the host sharing the file system is in thetnrhdb(4TSOL) file on the Trusted Solaris host doing the mounting.
If the NIS+ naming service is being used, the IP address of the host sharingthe file system must be listed in the tnrhdb table in the NIS+ domain; if nonaming service is being used, the IP address of the host sharing the filesystem must be in the /etc/security/tsol/tnrhdb file on the TrustedSolaris host doing the mounting.
2. If the host is not running the Trusted Solaris system, make sure the hosthas a valid sensitivity label assigned in the tnrhtp(4TSOL) template andthat the same sensitivity label is being used for the mount, whether thelabel range is entered after mount -S on the command line or in the/etc/security/tsol/vfstab_adjunct file.
3. If the remote single-label host is newly added to the trusted networkdatabases or its template has been changed since the local host has beenrebooted, make sure the entry for the single-label host has been updatedwith tnctl -h hostname.
4. Ensure that the mount is being done by the administrative role with themount command in one of its execution profiles.
In the default configuration, the security administrator specifies the securityattributes of mounts while the system administrator takes care of the normalSolaris aspects of mounting.
5. Make sure to mount any file system that is being mounted from a NFSserver running Solaris 2.4 or earlier versions of Solaris or Trusted Solaris1.x with vers=2 and proto=udp options to mount(1MTSOL) .
$ mount -F hsfs -o ro -S slabel=p /dev/dsk/c0t6d0s0 /mnt

345
Managing NIS+ 12
To achieve the desired uniformity of user, host, and labels information within asecurity domain with multiple Trusted Solaris hosts, Sun’s naming service(NIS+) is used to distribute most configuration information.
Administering NIS+ is described in the base documentation in:
• NIS+ Transition Guide• NIS+ and DNS Setup and Configuration Guide• NIS+ and FNS Administration Guide• Name Services Administration Guide• Name Services Configuration Guide
Setting up the NIS+ master server and NIS+ clients is described in the TrustedSolaris Installation and Configuration manual.
This chapter describes the differences in managing NIS+ in a Trusted Solarissystem. This chapter includes the following major topics:
Managing Multiple Trusted Solaris Hosts in a Security Domain page 346
Managing Standalone Trusted Solaris Hosts page 346
NIS+ Constraint on Using the Root Role to Use Solstice SystemAdministration Tools
page 347
New Trusted Solaris NIS+ Tables and Files Not Administered By NIS+ page 347
Adding Trusted NIS+ Tables page 348
Adding a New Host and Giving It Credentials page 348

346 Trusted Solaris Administrator’s Procedures—July 1997
12
This chapter includes the following procedure.
Managing Multiple Trusted Solaris Hosts in a Security DomainA security domain is generally administered as a single NIS+ domain with asingle NIS+ master. Multiple security domains may be administered togetherin a hierarchy of subdomains with multiple NIS+ masters under a single NIS+root master, which is the server at the top level of a hierarchy of NIS+ domains.There can be only one NIS+ root master. NIS+ replica servers may also becreated to provide backup NIS+ query services; the replica is associated with aparticular NIS+ master (root or non-root) and responds to NIS+ requests in theevent that the primary master is unable to respond.
Configuration files that for one reason or another cannot be administeredthrough NIS+ must be centrally administered and duplicated on individualhosts by other means.
Managing Standalone Trusted Solaris HostsTrusted Solaris hosts may or may not be connected to a network with hostsrunning other operating systems. A standalone Trusted Solaris host may eitherbe configured as its own NIS+ master server or configured with no namingservice. If a Trusted Solaris standalone host is configured without a namingservice, the configuration information is maintained in /etc , /etc/security ,and /etc/security/tsol . The administrative tools in the Trusted Solarisversion of Solstice AdminSuite allow the administrative role to specify nonaming service so that the information is stored locally.
To Save NIS+ Tables and Restore Them After Reinstalling the TrustedSolaris System
page 349

Managing NIS+ 347
12
NIS+ Constraint on Using the Root Role to Use Solstice System AdministrationTools
Sites that wish to combine administrative tasks into a single administrative rolesimilar to the root user (superuser) in standard UNIX systems cannot use theroot role as the single unified role because:
• The root role cannot be added to the NIS+ admin group, and• The root role cannot run Solstice from any other host than the NIS+ Master
Trusted Solaris version of the Solstice administration tools allow the systemadministrator and administrator administrative roles to update files on theNIS+ master. But because the root administrative role can only run Solsticewhen on the NIS+ master, a combined root role would be similarlyconstrained.
New Trusted Solaris NIS+ Tables and Files Not Administered By NIS+New Trusted Solaris NIS+ tables are listed in Table 12-1.
Table 12-2 on page 348 shows the configuration files that ordinarily must be the
Table 12-1 New NIS+ Tables
Map Name Definition
tsoluser Stores Trusted Solaris attributes and executionprofiles specified for user and role accounts
tsolprof Stores execution profiles.
tnrhdb Stores assignments between host and networkaddresses and templates in tnrhtp(4TSOL)
tnrhtp Stores templates assigned to hosts and networks intnrhdb(4TSOL)
Table 12-2 Configuration Files Not Administered Through NIS+
File Name
label_encodings(4TSOL)
system(4)

348 Trusted Solaris Administrator’s Procedures—July 1997
12
Distributing these files during initial configuration of the Trusted Solarissystem is described in the Trusted Solaris Installation and Configuration manual.Distributing updated copies of these files if later changes are made is discussedin the Trusted Solaris Label Administration manual. See also Chapter 13,“Changing Configurable Trusted Solaris Kernel Switches,” in this manual.
Adding Trusted NIS+ TablesThe security administrator can add NIS+ tables with protected data fields byusing features of the base NIS+ product. See the NIS+ administration manuals.
Adding a New Host and Giving It CredentialsThe system administrator adds a new NIS+ client host using the Host Manager,which configures a host’s relationship with the NIS+ master and sets up thehost’s credentials, while at the same time entering the host’s name and IPaddress into the hosts database. The default Secure RPC password assignedto a new host by the Host Manager is nisplus.
The Database Manager should be used only to set up communications with ahost that is not under local control, because the Database Manager only putsthe host’s name and IP address into the hosts database and does not do anyadditional configuration. For example, to allow users at a site to use ftp todownload files from a ftp server at MIT, the system administrator would addthe MIT host to the hosts database using the Database Manager. Since no oneat the local site can log into the host, it would not be necessary to set itscredentials.
NIS+-Related Procedures
▼ To Save NIS+ Tables and Restore Them After Reinstalling the TrustedSolaris System
1. Dump the NIS+ tables into ASCII files.
Note – It is a good idea to dump the NIS+ tables into ASCII files routinely, atleast every time you make a change to NIS+.

Managing NIS+ 349
12
Table 12-3 shows a script the system administrator can create to do thedumps and to create a list of group members for later re-creation of thegroups table.
Table 12-3 nisscript for Dumping NIS+ Tables into ASCII Files (1 of 2)
#!/bin/sh
# nisscript
# nisplus tables into ascii files
#
mkdir -p /var/nis-backup
chmod 700 /var/nis-backup
cp /etc/.rootkey /var/nis-backup/dot-rootkey
# standard Solaris and Trusted Solaris tables
# NOTE: Add any tables created at your site
cd /var/nis/data
for i in aliases bootparams ethers group hosts netgroup \
netmasks networks passwd protocols rpc services \
timezone tnrhdb tnrhtp tsolprof tsoluser shadow
do echo $i
/usr/lib/nis/nisaddent -d $i >/var/nis-backup/$i

350 Trusted Solaris Administrator’s Procedures—July 1997
12
2. Assume the root role and run the nisscript at ADMIN_LOW.
3. Copy the directory containing the ASCII dump files to a partition that youplan not to overwrite during installation or use tar to copy the files totape or floppy.
done
# Use the following if you have any key value tables
for i in sendmailvars tntime
do echo $i
/usr/lib/nis/nisaddent -d -t $i.org_dir key-value >/var/nis-backup/$i
done
# get a list of each group and list each member in each group
mkdir -p /var/nis-backup/groups.list
chmod 700 /var/nis-backup/groups.list
for i in `nisls groups_dir | grep -v ‘:’`
do nisgrpadm -l $i >> /var/nis-backup/groups.list/group.members
done
Table 12-3 nisscript for Dumping NIS+ Tables into ASCII Files (2 of 2)

Managing NIS+ 351
12
4. After installation, if you did not save the ASCII dump files in a savedpartition, as root at ADMIN_LOW, create a staging directory for the ASCIIdumps of NIS+ tables and restore the files from tape or floppy.The screen example illustrates what to do when restoring the ASCII NIS+files to a /setup/files directory from a tape.
5. At the appropriate point in Chapter 5, “Configuring the NIS+ Root Master,”in the Trusted Solaris Installation and Configuration manual, recreate the NIS+environment.
Make sure to include the final period (.) in the domain’s name.
6. As security administrator at ADMIN_LOW, after running the nisservercommand, run the nispopulate command in a profile shell with the -Fand -p options followed by the name of the directory where the ASCIIdump files reside.
7. Re-create the NIS+ groups and add members manually from the list ofgroup members created in the nisscript shown in Step 1.There is no easy way to recreate the NIS+ groups automatically.
# cd /setup/files# tar xvbootparamsethers...
# nisserver -r -d domain-name.
# nispopulate -F -p /setup/files

352 Trusted Solaris Administrator’s Procedures—July 1997
12

353
Changing Configurable TrustedSolaris Kernel Switches 13
For added configurability, settings of a number of Trusted Solaris kernel switchesmay be changed by a site’s security administrator role. The securityadministrator role may also set things up so that any changes to the kernelswitch settings are passed to each host in the distributed system whenever itboots. This chapter provides the needed background, terms, concepts andprocedures for changing the configuration of the Trusted Solaris kernelswitches and distributing the changes to all hosts. It includes in the followingmajor topics and procedures sections:
Behaviors Controlled by Configurable Trusted Solaris Kernel Switches page 354
Needed Terms and Concepts page 354
How Kernel Switches Are Set and Changed page 357
To Change Kernel Switch Setting in the /etc/system File page 359
Distributing Changed Kernel Switch Settings to Hosts Across theNetwork
page 361

354 Trusted Solaris Administrator’s Procedures—July 1997
13
Behaviors Controlled by Configurable Trusted Solaris Kernel Switches
Because they are configurable, the Trusted Solaris kernel switches allow each siteto control the following behaviors:
• Whether information labels are displayed at all on the system, and if so,• Whether information labels float• Whether information labels are reset to 0 upon exec
• Whether the names are displayed of files or subdirectories if their sensitivitylabels strictly dominate the sensitivity label of the containing directory
• Allow the use of runpd(1MTSOL) to determining which privileges anapplication needs to run
Needed Terms and ConceptsThis section defines the customer-configurable kernel switches and providesdefinitions for other related terms.
Note – Even though the information label-related switches are initially set asdescribed in this section and summarized in Table 13-1 on page 357, thesettings may be changed during installation as described in “How KernelSwitches Are Set and Changed” on page 357. The default settings of theswitches that are not information label-related may be overridden only by theediting of the system(4) file, as described in “To Change Kernel SwitchSetting in the /etc/system File” on page 359.
tsol_admin_high_to_cipso
As explained in Chapter 10, “Specifying Security Attributes in TrustedNetwork Databases and Setting Up Routing,” when a tnrhtp templateassigned to the destination host is specified with one of the CIPSO labelindicators, the trusted networking software derives a CIPSO label from themessage’s sensitivity label and inserts the CIPSO label into IP options portionof the message’s packets. The Trusted Solaris 2.x ADMIN_HIGH sensitivitylabel is too big to map to a CIPSO label, so, by default, a message sent to aCIPSO-identified host with the ADMIN_HIGH sensitivity label is alwaysdropped.

Changing Configurable Trusted Solaris Kernel Switches 355
13
This switch must be set to 1 to enable communications with TSIX-type hoststhat have the IP Label Field specified as CIPSO.
The security administrator can add the tsol_admin_high_to_cipso switchset equal to 1 in the /etc/system file, which causes the ADMIN_HIGHsensitivity label on a packet to be mapped to a valid CIPSO label with thehighest classification and all compartments turned on, instead of beingdropped.
tsol_enable_il
This is the master switch for enabling or disabling information label. Somesites do not find information labels useful, and this switch allows them to beturned off completely. If this switch is not enabled, the setting, displaying, andfloating of information labels is disabled. This switch is set, and thereforeinformation labels are enabled by default.
tsol_enable_il_floating
This switch is only looked at if tsol_enable_il=1. This switch is provided forsites that want to use information labels but not allow them to float. If thisvariable is not enabled, the floating of information labels is disabled. Thisswitch is set, and therefore information label floating is enabled by default.
tsol_float_sysv_msg_il
This switch is only looked at if both tsol_enable_il=1 andtsol_enable_il_floating=1. If this variable is not enabled, the floating ofinformation labels is disabled for System V Interprocess Communicationmessage queues. This switch is set to 0, and therefore information label floatingfor this mechanism is disabled by default.
tsol_float_sysv_sem_il
This switch is only looked at if both tsol_enable_il=1 and iftsol_enable_il_floating=1. If this variable is not enabled, the floating ofinformation labels is disabled for System V Interprocess Communicationsemaphores. This switch is set to 0, and therefore information label floating forthis mechanism is disabled by default.

356 Trusted Solaris Administrator’s Procedures—July 1997
13
tsol_float_sysv_shm_il
This switch is only looked at if both tsol_enable_il=1 and iftsol_enable_il_floating=1. If this variable is not enabled, the floating ofinformation labels is disabled for System V Interprocess Communicationshared memory segments. This switch is set to 0, and therefore informationlabel floating for this mechanism is disabled by default.
tsol_reset_il_on_exec
This switch is only looked at if tsol_enable_il=1. If this switch is not set, theinformation label of an executed program is set to be the conjunction of boththe information label of the calling process, the information label on theprogram file that is executed, and the information label of any other sharedlibraries that are read. If this switch is set, the information label of an executedprogram is reset to ADMIN_LOW at the beginning of execution—whichassumes that the arguments and environment passed to the process are not tobe labelled with the information label of the caller. When this switch is not set,information labels float even when a file or directory is merely listed, and forthis and purely operational reasons, information labels have a tendency toquickly float to the highest information label and thus lose their significance.This switch is set, and therefore information labels are reset to ADMIN_LOWby default.
Upgraded NamesActions by users with the upgrade file sensitivity label authorization and byprocesses with the file_mac_write and file_upgrade_sl privileges may eithercreate a new file or subdirectory or relabel an existing file or subdirectory at ansensitivity label that strictly dominates the sensitivity label of the containingdirectory; these files and subdirectories are said to be upgraded and the namesof the upgraded files and subdirectories are referred to as upgraded names.
tsol_hide_upgraded_name sAt sites that consider upgraded names to be sensitive information, thetsol_hide_upgraded_names kernel switch allows the security administratorrole to configure the system so that upgraded names are hidden. Setting thisflag prevents upgraded file names from being returned with getdents(2) .

Changing Configurable Trusted Solaris Kernel Switches 357
13
Because all directory entries must be examined before the results are returnedto the calling process, there is a performance penalty. This switch is not set, andtherefore upgraded names display by default.
tsol_privs_debug
Allows the administrative use of runpd(1MTSOL) to characterize a program‘suse of privilege. Requires additional setup; for the complete procedure, seeChapter 16, “Adding Software” under “To Find Out Which Privileges anApplication Needs” on page 473. After the application(s) have been privilegeddebugged, this variable must be reset and the machine rebooted. This switch isnot set, and therefore privilege debugging is disabled by default.
How Kernel Switches Are Set and ChangedTable 13-1 summarizes information about each of the Trusted Solaris kernelswitches that are available for setting by customers. The kernel switches areinitially set to the defaults shown in Table 13-1 by the Trusted Solarisinstallation process.
Table 13-1 Default Kernel Switch Settings and Values Definitions
Switch Name Value Definitions Default Settings
tsol_admin_high_to_cipso 0 ILs are disabled1 ILs are enabled
tsol_admin_high_to_cipso=0
tsol_enable_il 0 ILs are disabled1 ILs are enabled
tsol_enable_il=1
tsol_enable__il_floating 0 IL floating is disabled1 IL floating is enabled
tsol_enable_il_il_floating=0
tsol_float_sysv_msg_il 0 IL floating is disabledon System V messagequeues1 IL floating is enabledon System V messagequeues
tsol_float_sysv_msg_il=0
tsol_float_sysv_sem_il 0 IL floating is disabledon System V semaphores1 IL floating is enabledon System V semaphores
tsol_float_sysv_mem_il=0

358 Trusted Solaris Administrator’s Procedures—July 1997
13
During installation, the install team may accept or reset the default informationlabel-related kernel switches in the Customize Trusted Solaris Configurationdialog box, shown in Figure 13-1 on page 359. See also the Trusted SolarisInstallation and Configuration manual. Any changes to the default settings are made
tsol_float_sysv_shm_il 0 IL floating is disabledon System V sharedmemory segments1 IL floating is enabledon System V sharedmemory segments
tsol_float_sysv_shm_il=0
tsol_str_linkb 0 linkb does not drop astreams msg if an attemptis made to link it toanother message withdifferent streams attributes1 linkb drops a streamsmsg if an attempt is madeto link it to anothermessage with differentstreams attributes
tsol_str_linkb=1
tsol_hide_upgraded_names 0 Show upgraded names1 Hide upgraded names
tsol_hide_upgraded_names=0
tsol_privs_debug 0 Disable debugging1 Enable debugging
tsol_privs_debug=0
tsol_reset_il_on_exec 0 Set IL to theconjunction of the ILs ofthe calling process, theexec'd process, and anyshared libraries.1 Reset IL toADMIN_LOW upon exec.
tsol_reset_il_on_exec=1
Table 13-1 Default Kernel Switch Settings and Values Definitions
Switch Name Value Definitions Default Settings

Changing Configurable Trusted Solaris Kernel Switches 359
13
in the kernel and recorded in the /etc/system file, which is then read when thesystem is booted.
After installation, any of the kernel switches shown in Table 13-1 may bechanged by the security administrator, by modifying the system(4) file, asdescribed in “To Change Kernel Switch Setting in the /etc/system File” onpage 359.
Figure 13-1 Label Configuration Defaults
▼ To Change Kernel Switch Setting in the /etc/system File
1. As security administrator, use the Admin Editor action from theSystem_Admin folder in the Application Manager to open /etc/systemfor editing.
2. To turn on or off the variable that substitutes a CIPSO label for theADMIN_HIGH sensitivity label, find tsol_admin_high_to_cipso=and set the value to 1 (on) or 0 (off).

360 Trusted Solaris Administrator’s Procedures—July 1997
13
3. To turn on or off the variable for enabling information labels, findtsol_enable_il= and set the value to 1 (on) or 0 (off).Because the switches for information label floating and for the reset of theinformation label when a new program is executed are looked at only whenthe switch shown in Step 3 is set to 1, do either of Step a or Step b only ifyou have enabled information labels.
a. To turn on or off the variable for enabling information label floating,find tsol_enable_il_floating= and set the value to 1 (on) or 0(off).
i. To turn on or off the variable for enabling information labelfloating on System V message queues, findtsol_float_sysv_msg_il= and set the value to 1 (on) or 0 (off).
ii. To turn on or off the variable for enabling information labelfloating on System V semaphores, findtsol_float_sysv_sem_il= and set the value to 1 (on) or 0 (off).
iii. To turn on or off the variable for enabling information labelfloating on System V shared memory segments, findtsol_float_sysv_shm_il= and set the value to 1 (on) or 0 (off).
b. To turn on or off the variable for resetting information labels on exec ,find tsol_reset_il_on_exec = and set the value to 1 (on) or 0 (off).
4. To turn on or off the variable for hiding the names of files whosesensitivity labels have been upgraded, findtsol_hide_upgraded_names = and set the value to 1 (on) or 0 (off).
5. To turn on or off the variable for allowing privilege debugging, findtsol_privs_debug = and set the value to 1 (on) or 0 (off).
6. Save and close the file.
7. Reboot.
8. To distribute the changes to all hosts in the distributed system, follow thesteps in “Distributing Changed Kernel Switch Settings to Hosts Acrossthe Network” on page 361 of Trusted Solaris Label AdministrationThe security administrator can set up the boot server so that any changes tothe /etc/system file are passed to each host in the distributed system froma file consulted at boot.

Changing Configurable Trusted Solaris Kernel Switches 361
13
Distributing Changed Kernel Switch Settings to Hosts Across the NetworkModifications seldom need to be made to system(4) file after an site has beeninstalled and configured, except for changing the switch that enables privilegedebugging, and enabling privilege debugging is usually done on a single host.The security administrator can use the rdist(1) command to automaticallydistribute identical copies of the file to all machines in the distributed system.
▼ To Remotely Distribute the system File
Note – Make sure that every host has only a plus in the hosts.equiv file, andthat there are no entries in either the /.rlogin or in any $HOME/.rloginfiles.
1. As security administrator in an ADMIN_LOW workspace, use the AdminEdit action to open and modify a distfile to copy the configuration filesfrom a master directory.The example shows a sample distfile that is set up to tell rdist to copythe label_encodings and system file to all the listed hosts in thedistributed system.
2. Run the rdist command.You can either run rdist in the same directory as the distfile or userdist with the -f option followed by the full pathname of a file withsome other name.
See also the rdist(1) and hosts.equiv(4) man pages.
# #HOSTS = ( machiavelli muckraker mugwump diehard warhorse )FILES = ( /etc/security/tsol/label_encodings /etc/system )
${FILES} -> ${HOSTS}install ;
$ rdist \* OR *\$ rdist -f /home/machiavelli/jedgar/label_encodings.master/distfile.sample

362 Trusted Solaris Administrator’s Procedures—July 1997
13
3. Reboot each machine.

363
Managing Printing 14
Standard Solaris print utilities and databases and the Solstice Printer Managerhave been modified to meet Trusted Solaris requirements. The systemadministrator and the security administrator role both share printeradministration duties, which require an understanding of printeradministration concepts, as described in the Solaris System AdministrationGuide, and of how to use the Solstice Print Manager, as described in the SolsticeAdminSuite 2.1 Print Administration Guide.
This chapter provides background information on the following topics forunderstanding and managing the unique aspects of printing in the TrustedSolaris environment:
How Trusted Solaris Features Address Information Labeling and AccessControl for Printers
page 365
Assigning Labels to Print Jobs page 366
Using a Label Range on Printers to Control Which Jobs Can Print page 367
Printing of Labels on Printer Output page 368
Labels, Job Numbers, and Handling Information Printed on Banner andTrailer Pages
page 370
Supported Printers and Types of Output page 378
Configuring Printers page 381
Modified Utilities and Man Pages page 382
Authorizations to Bypass Printing Defaults page 383

364 Trusted Solaris Administrator’s Procedures—July 1997
14
This chapter also provides the following procedures:
Needed Terms
Banner/Trailer Pages
In the base Solaris printing system, jobs normally print with an optionalbanner page that contains information on, for example:
• Who submitted the job• The time of printing, and• The name of the host the job was submitted from
In the Trusted Solaris system, every job by default has a trailer page pairedwith a banner page. The banner and trailer pages contain additional security-related information about the printed output. The print service guarantees thecontent and accuracy of the information contained in the banner/trailer pages.Users may be allowed to suppress the printing of banner and trailer pages witha special authorization.
Body Pages
The body pages for a print job are the pages that contain the data submitted bya user for printing. The body pages are sandwiched between the banner andtrailer pages, and in the Trusted Solaris system, the body pages are printedwith labels at the top and bottom of each page. Users may be allowed tosuppress the labels on body pages with a special authorization.
To Access the Printer Manager page 384
To Install a Printer on a Print Server page 386
To Configure a Restricted Label Range for a Printer Using the DeviceManager
page 392
To Add Access to a Remote Printer page 394
To Specify SLs to Print Instead of ILs on Body Pages page 396
To Allow Some Users to Print Jobs Without Banners and Trailers page 397
To Suppress the Printing of Page Labels on All Print Jobs page 398
To Allow Some Users to Print Jobs Without Page Labels page 398
To Set Up Automatic Printing of Publicly-readable Jobs Without Labels page 399

Managing Printing 365
14
How Trusted Solaris Features Address Information Labeling and Access Control forPrinters
By default, the Trusted Solaris printing subsystem provides the followingfeatures:
• Banner/trailer pages on all print jobs have the print job’s sensitivity label,information label, and a unique job ID, along with site-specified specialhandling instructions that are based on the label of the print job
• The print job’s information label is printed on the top and bottom of bodypages
• Security-sensitive information about the print job and the print data itselfare protected
• Status information provided to users is controlled by MAC and DAC
• Each printer can be configured with a restricted sensitivity label range tocontrol which jobs it prints
The banner and trailer pages and the printing of labels at the top and bottom ofbody pages can be suppressed either by command line options used byauthorized user or role accounts or by administrative action that turn off thesefeatures for everyone.
The system’s MAC and DAC policies are enforced upon the data contained ineach print request. Enforcement is from the point at which the print request issubmitted until the requested data has been printed on a physical page.Attempts to subvert or circumvent the protection provisions are detectable andgenerate an audit trail.
The handling of printer output is controlled by each site according to its policyand procedures.
All labeling of printer output from hosts running the Trusted Solaris operatingsystem is automatically done according to the site’s requirements. Access toprinters is controlled by comparing the label of the print job to the label rangeof the printer.

366 Trusted Solaris Administrator’s Procedures—July 1997
14
Assigning Labels to Print JobsEach print job is automatically assigned a sensitivity label that corresponds tothe sensitivity label at which the user is working. Figure 14-1 shows anemployee reading email at a sensitivity label of INTERNAL_USE_ONLY. Whenhe sends the email to the printer by selecting the Print option from theMessage menu, the print job is automatically assigned the sensitivity labelINTERNAL_USE_ONLY.
Figure 14-1 Automatic Labeling of Print Jobs
From: berni@oahuTo: normal@trustworthySubject: p-team. Stock Purchase Exercise Date
The exercise date for ESPP is May 1, 1997.
printit
p-team.minutes.4.20.97
Window SensitivityLabel: INTERNAL USE ONLY
Print Job’s Sensitivity Label:INTERNAL_USE_ONLY
berni@oahu p-team.minutes.4.20.97 Wed May 21 14:49 43

Managing Printing 367
14
Using a Label Range on Printers to Control Which Jobs Can PrintPrinters may be configured to print only jobs whose labels are within arestricted label range. Email notifies the sender when a job does not gothrough.
The job that was sent to print at the INTERNAL_USE_ONLY label inFigure 14-1 on page 366 is accepted by the legal department's printer, becauseit is set up to print jobs that are sent at any of the following three labels:
• NEED_TO_KNOW LEGAL
• INTERNAL_USE_ONLY, and
• PUBLIC
The legal department’s printer set up as described above would reject jobs atany other sensitivity label. See Figure 14-2.
Figure 14-2 Example of a Printer with a Restricted Label Range
The setting of a restricted label range for a printer is done by the administratorusing the Device Allocation Manager, as described in:
To Configure a Restricted Label Range for a Printer Using the DeviceManager
page 392
NEED_TO_KNOW LEGAL
label range: PUBLIC to NEED_TO_KNOW LEGAL
INTERNAL_USE_ONLY
PUBLIC
NEED_TO_KNOW MARKETING
REGISTERED

368 Trusted Solaris Administrator’s Procedures—July 1997
14
Printing of Labels on Printer OutputA label is automatically printed at the top and bottom of each body page.
Default: Information Label
By default, all jobs are printed with the information label of the job. Figure 14-3shows a job whose information label is PUBLIC and sensitivity label isINTERNAL_USE_ONLY. The job printed with the PUBLIC information label atthe top and bottom of every body page.
Figure 14-3 Information Label Automatically Printed by Default on a Body Page
If information labels are disabled in the system (4) file (tsol_enable_IL=0), thena job’s sensitivity label is printed instead of its information label. See TrustedSolaris Label Administration for more about the setting of kernel switches thatenable and disable information labels by setting switches in the system (4) file.See also the secconf (2TSOL) man page.
Alternate Body Page Labeling Options
The system administrator can decide whether to change the default so that oneof the following is printed on body pages instead of the information label:
• The sensitivity label or• Some other label or• No label
PUBLIC
PUBLIC
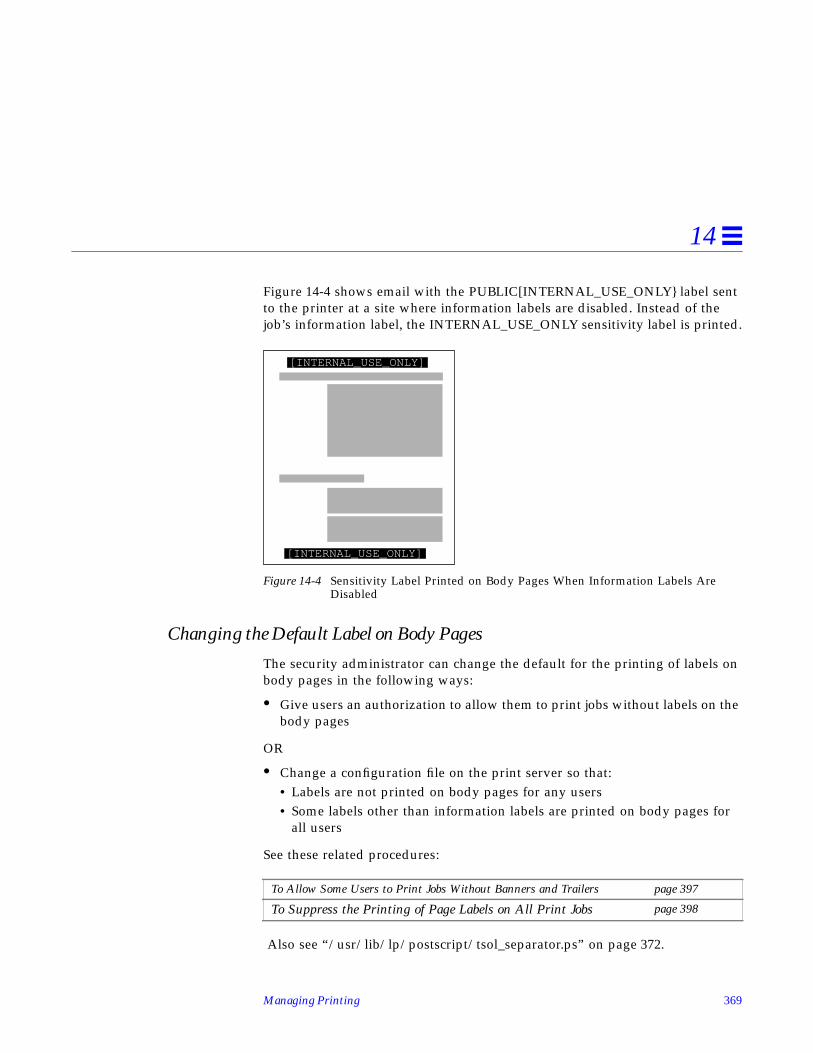
Managing Printing 369
14
Figure 14-4 shows email with the PUBLIC[INTERNAL_USE_ONLY} label sentto the printer at a site where information labels are disabled. Instead of thejob’s information label, the INTERNAL_USE_ONLY sensitivity label is printed.
Figure 14-4 Sensitivity Label Printed on Body Pages When Information Labels AreDisabled
Changing the Default Label on Body Pages
The security administrator can change the default for the printing of labels onbody pages in the following ways:
• Give users an authorization to allow them to print jobs without labels on thebody pages
OR
• Change a configuration file on the print server so that:• Labels are not printed on body pages for any users• Some labels other than information labels are printed on body pages for
all users
See these related procedures:
Also see “/usr/lib/lp/postscript/tsol_separator.ps” on page 372.
To Allow Some Users to Print Jobs Without Banners and Trailers page 397
To Suppress the Printing of Page Labels on All Print Jobs page 398
[INTERNAL_USE_ONLY]
[INTERNAL_USE_ONLY]

370 Trusted Solaris Administrator’s Procedures—July 1997
14
Labels, Job Numbers, and Handling Information Printed on Banner and TrailerPages
The banner and trailer pages that are automatically created for each print jobare printed with company-specific handling guidelines. This section describesthe types of labels and text that are printed by default on the banner and trailerpages.
Figure 14-5 on page 371 shows a banner page. Banner pages are printed beforeeach job, unless they are suppressed as described under “To Allow Some Usersto Print Jobs Without Banners and Trailers” on page 397.
Figure 14-6 on page 371 shows the differences on the trailer page. A thick blackline appears instead of a gray frame, and the page type identifier changes fromJOB START to JOB END.
Changing the Default Labels and Warnings on Print Jobs
All the text and the labels and warnings that appear on print jobs are site-configurable. The labels that appear on the print job itself and the informationshown in Figure 14-5, “Typical Print Job Banner Page,” which appears on bothbanner and trailer pages, is configured in two places:
• label_encodings(4TSOL)• /usr/lib/lp/postscript/tsol_separator.ps
label_encodings (4TSOL)
The following portions of printer trailer and banner pages are configured in thelabel_encodings(4TSOL) :
• The “protect as classification,”• The “access-related” words• The handling instructions specified in the PRINTER BANNERS line(s)• The handling instructions specified in the CHANNELS line(s)
See Chapter 3, “Specifying Labels and Handling Guidelines for PrinterOutput,” in the Trusted Solaris Label Administration manual for how to configurethese portions of the banner and trailer pages.

Managing Printing 371
14
Figure 14-5 Typical Print Job Banner Page
Figure 14-6 Differences on a Trailer Page
JOB START
57823 57823
57823 57823
NEED_TO_KNOW
NEED_TO_KNOW
This output must be protected as:NEED_TO_KNOW HRunless manually reviewed and downgraded.
The system has labeled this data:
INTERNAL_USE_ONLY
User: jhoman@sse-dev7Job: printit-7
Printed at: Thu Mar 20 19:20:45 PST 1997
Printer queue: printit
p-team.minutes.3.20.97 sse-dev7
“Protect as” classificationspecified in label_encodingsACCREDITATION RANGEsection
Handling instructions specifiedin label_encodingsPRINTER BANNERS section
Job number
Information label
“Protect as” classification plus“access-related” words definedfor SLs and ILs inlabel_encodings
Handling instructions specifiedin label_encodingsCHANNELS section
COMPANY PROPRIETARY/CONFIDENTIAL: NTK HUMAN RESOURCESDISTRIBUTE ONLY TO HUMAN RESOURCES EMPLOYEES
(NON-DISCLOSURE AGREEMENT REQUIRED)
“Protect as”statement
JOB END
57823 57823NEED_TO_KNOW
Line width change from bannerpage
Page type identifier changes

372 Trusted Solaris Administrator’s Procedures—July 1997
14
/usr/lib/lp/postscript/tsol_separator.ps
The security administrator may modify the tsol_separator.ps file in the/usr/lib/lp/postscript directory to do the following:
• Internationalize the text on the banner and trailer pages• Specify alternate labels to be printed in the various fields of the banner and
trailer pages or at the top and bottom of body pages, or• Change or omit any of the text or labels
The most-common substitution that sites choose to make is to specify that thesensitivity label prints instead of the information label at the top and bottom ofbanner pages. See:
For how to do any other customizations or internationalization, see thecomments in the tsol_separator.ps file. Table 14-1 shows the commentsand modifiable fields in the tsol_separator file, with the rest of theprogramming code removed.
To Specify SLs to Print Instead of ILs on Body Pages page 396
Table 14-1 tsol_separator.ps Comments and Configurable Values (1 of 7)
%!
%ident“@(#)tsol_separator.ps5.297/05/28 SMI; TSOL 2.x”
%% Copyright (c) 1997 by Sun Microsystems, Inc.
%% All rights reserved.
%% This PostScript file is normally used as input to the lp.tsol_separator
%% program, which will prepend code to set the values of a number of
%% variables. lp.tsol_separator is called by the printer interface script.
%% This PostScript file may be modified for local customizations or
%% internationalization. Comments marked “INTERNATIONALIZE:” show
%% places where changes may be made for internationalization. Comments

Managing Printing 373
14
%% marked “CUSTOMIZE:” show places where some typical customization
%% changes may be made.
%% The following comments describe variables set by lp.tsol_separator
%% These variables are from the print job information that can be
%% displayed with lpstat or lpq.
%%
%% /Job_HeadLabel The classification (from the sensitivity label) to
%% be displayed at the top and bottom of the banner
%% /Job_Printer Printer Name
%% /Job_Host Host job was submitted from
%% /Job_User User who submitted the job
%% /Job_JobID Job number
%% /Job_Title Job title
%%
%%
%% This variable is NO if an authorized user used the lp -o nobanner option
%% and the printer was set up to allow bannerless jobs. Otherwise it is YES.
%%
%% /Job_DoPageLabels Print page labels YES/NO.
%%
%%
%% These variables are generated from the system clock value.
%%
%% /Job_Date Date and time the job is being printed, in the
%% locale’s default format
Table 14-1 tsol_separator.ps Comments and Configurable Values (2 of 7)

374 Trusted Solaris Administrator’s Procedures—July 1997
14
%% /Job_Hash A randomly generated identifying number for
%% matching up the banner and trailer pages of the job
%%
%%
%% The following variables are the job’s Sensitivity Label and
%% Information Label as interpreted by the bcltobanner(3TSOL) library
%% routine.
%%
%% /Job_HeadLabel The classification (from the sensitivity label) to be
%% displayed at the top and bottom of the banner page.
%% /Job_Protect The sensitivity label to be displayed in the protect-as
%% field.
%% /Job_Information The information label to be displayed in the “the system
%% has labeled this data as” field. If ILs are turned off
%% in secconf, this variable will be an empty string.
%% /Job_PageLabel The information label to print at the top and bottom of
%% each page. If ILs are turned off in secconf, this
%% variable will contain the sensitivity label instead.
%% /Job_Caveats The caveats from the information label.
%% /Job_Channels The channels from the information label.
%%
%%
%% The following variables are the job’s Sensitivity Label and
%% Information Label as interpreted by the bsltos and biltos library
%% routines.
%%
%% /Job_SL_Internal The sensitivity label in internal view format.
%% /Job_SL_External The sensitively label in external view format.
Table 14-1 tsol_separator.ps Comments and Configurable Values (3 of 7)

Managing Printing 375
14
%% /Job_IL_Internal The information label in internal view format.
%% /Job_IL_External The information label in external view format.
.
.
.
%% INTERNATIONALIZE: Replace the text between
%% parentheses with the appropriate text.
%% CUSTOMIZE: The text between parentheses may be changed
%% to use different wording, or changed to empty
%% parentheses to eliminate the text.
/ILabelText (The system has labeled this data:) def
%% CUSTOMIZE: To not display the information label, change
%% this line to: /ILabel () def
/ILabel Job_Information def
.
.
.
%% CUSTOMIZE: To use a different string at the top and
%% bottom of each page, change the following line. For
%% instance, to use the sensitivity label in external view
%% format, change the line to: /PageLabel Job_SL_External def
%% To eliminate page labels complete, change this line to
%% set the page label to an empty string: /PageLabel () def
/PageLabel Job_PageLabel def
.
.
.
%% INTERNATIONALIZE: Replace the text between
Table 14-1 tsol_separator.ps Comments and Configurable Values (4 of 7)

376 Trusted Solaris Administrator’s Procedures—July 1997
14
%% parentheses with the appropriate text.
/Protect Job_Protect def
/Protect_Text1 (This output must be protected as:) def
/Protect_Text2
(unless manually reviewed and downgraded.) def
.
.
.
%% CUSTOMIZE: To not print the caveats, change
%% this line to /Caveats () def
/Caveats Job_Caveats def
%% CUSTOMIZE: To not print the channels, change
%% this line to /Channels () def
/Channels Job_Channels def
%% CUSTOMIZE: To not print the hash number, change
%% this line to /Hash () def
/Hash Job_Hash def
%% CUSTOMIZE: To not print the head label, change
%% this line to /HeadLabel () def
%% You may also substitute another string. For example, to use
%% the SL in internal view format: /HeadLabel Job_SL_Internal def
/HeadLabel Job_HeadLabel def
.
.
.
%% INTERNATIONALIZE: Replace the text between
Table 14-1 tsol_separator.ps Comments and Configurable Values (5 of 7)

Managing Printing 377
14
%% parentheses with the appropriate text.
(User: ) User (@) Host append append append
.
.
.
%% INTERNATIONALIZE: Replace the text between
%% parentheses with the appropriate text.
(Job: ) JobID append
.
.
.
%% INTERNATIONALIZE: Replace the text between
%% parentheses with the appropriate text.
(Printed at: ) Date append
.
.
.
%% INTERNATIONALIZE: Replace the text between
%% parentheses with the appropriate text.
(Printer queue: ) Printer append
.
.
.
%% INTERNATIONALIZE: Replace the text between
%% parentheses with the appropriate text.
{ TSOLJobInfo (JOB START) JobHashInfo}
.
Table 14-1 tsol_separator.ps Comments and Configurable Values (6 of 7)

378 Trusted Solaris Administrator’s Procedures—July 1997
14
Supported Printers and Types of OutputPostScript printers are the only types of supported printers. Non-PostScriptprinters should function correctly but have no support for page labels orbanner and trailer pages, so they do not meet Trusted Solaris printingrequirements.
Printing PostScript Files
By default, users may not print PostScript files. This restriction exists because aknowledgable PostScript programmer can create a PostScript file that modifiesthe labels on the printer output.
To allow an account to bypass this restriction, the security administrator rolecan assign the authorization called “print a PostScript file” to an account. Thesecurity administrator should do so only if the account doing the printing canbe trusted not to spoof the labels on printer output and if allowing anyone toprint PostScript files is within the site’s security policy. See “Authorizations toBypass Printing Defaults” on page 383.
.
.
%% INTERNATIONALIZE: Replace the text between
%% parentheses with the appropriate text.
{ TSOLJobInfo (JOB END) JobHashInfo}
.
.
.
%% End of tsol_separator.ps
Table 14-1 tsol_separator.ps Comments and Configurable Values (7 of 7)

Managing Printing 379
14
Printing ASCII and Unsupported File Contents
ASCII is the only type of supported output. The only filter that is providedwith the Trusted Solaris printing system converts text files to PostScript. Textfiles converted to PostScript by the installed filter program can be trusted tohave authentic labels and banner and trailer page text because the filter’sprograms are trusted programs that are run by the printer daemon.
Because of the restriction on submitting user-generated PostScript, a site’sadministrator may choose to install additional filters to convert commonlyused file types to PostScript that can also be trusted to have authentic labelsand banner and trailer pages. See the Solaris 2.5.1 System Administration Guidefor how filters are added.
Sending Jobs to Printers Connected to Other Print Servers
A printer connected to a host (print server) that is not running Trusted Solariscan print jobs sent from a Trusted Solaris host. However, the jobs print withoutlabels and without trailer pages and without security information on anybanner pages, and therefore this type of printing does not meet Trusted Solarisrequirements.
If consistent with a site’s security policy, the security administrator can set upprinting to a printer connected to a host (print server) that is not runningTrusted Solaris by ensuring that both of the following are true:
• The security administrator has configured the print server host with aspecific sensitivity label, and
• The print jobs are sent at the defined sensitivity label.
See Chapter 10, “Specifying Security Attributes in Trusted Network Databasesand Setting Up Routing,” for how the security administrator assigns a singlesensitivity label to an unlabeled host.
Permitting Publicly-readable Jobs to Be Printed by Default Without LabeledPages
Certain users or groups of users, such as technical writers, need to producepublicly readable documents without labels printed on the top and bottom ofthe pages. If there is a printer connected to a Solaris print server available, the

380 Trusted Solaris Administrator’s Procedures—July 1997
14
security administrator can set up the users’ environments so that the publicly-readable jobs go to the printer connected to the Solaris host while jobs at allother labels go to Trusted Solaris machines. The procedure requiresunderstanding of how to set up user accounts as described in Chapter 3,“Managing User Accounts,” and host network entries as described inChapter 10, “Specifying Security Attributes in Trusted Network Databases andSetting Up Routing.” See:
To Set Up Automatic Printing of Publicly-readable Jobs Without Labels page 399

Managing Printing 381
14
Configuring PrintersThe system administrator configures printers using these administrativeapplications:
• The modified Solstice Printer Manager—to set up local and remote printers
• The Device Allocation Manager: Administration dialog box—to specify arestricted label range for any printer
Access the Solstice Printer Manager through the Application Manager Folderfrom the Solstice_Apps folder. See “To Access the Printer Manager” onpage 384.
Access the Device Allocation Manager through the Trusted Desktop subpanelin the Front Panel or through the Allocate Device option on the Trusted Pathmenu. “To Configure a Restricted Label Range for a Printer Using the DeviceManager” on page 392
See “To Install a Printer on a Print Server” on page 386 and “To Add Access toa Remote Printer” on page 394.

382 Trusted Solaris Administrator’s Procedures—July 1997
14
Modified Utilities and Man PagesThe commands in the following list are modified to work within TrustedSolaris security policy. To use the administrative commands identified by the1MTSOL man page suffix, the account must have the administer printingauthorization. For details on these commands and the Trusted Solarisdifferences, see the man(1TSOL) pages.
• accept(1MTSOL)
• cancel(1TSOL)
• disable(1TSOL)
• enable(1TSOL)
• lp(1TSOL)
• lpadmin(1MTSOL)
• lpc(1BTSOL)
• lpmove(1MTSOL)
• lpq(1BTSOL)
• lpr(1BTSOL)
• lprm(1BTSOL)
• lpsched(1MTSOL)
• lpshut(1MTSOL)
• lpstat(1TSOL)
• lpsystem(1MTSOL)
• lptest(1BTSOL)
• reject(1MTSOL)

Managing Printing 383
14
Authorizations to Bypass Printing DefaultsThe security administrator may give to some users an authorization to bypasssome of the default features of Trusted Solaris printing.
• Print without banner and trailer pages• Print a PostScript file• Print without labels
A fourth authorization is needed to administer printing:
• Administer printing
Table 14-2 defines the authorizations that are related to printing. In order for auser or role to be able to do the action described under the Purpose heading,the authorization must be in one of the profiles assigned to the user or role.
Table 14-2 Authorizations Related to Printing
Name Purpose
administer printing Permits the user or role to administer printing usingadministrative utilities listed in “Modified Utilities andMan Pages” on page 382 to start and stop printingdaemons, list and cancel other users' print jobs, and soforth. (Assigned by default to the system administrator(admin) role.)
print without banners Permits the user or role to submit a print request usingthe lp -o nobanners option, to suppress the printingof banner and trailer pages. NOTE: For this to option towork, the Always Print Banners check box on the PrinterManager entry for the printer must not be checked.
print a PostScript file Allows a user to print a PostScript file.
print without labels Allows a user to submit a print request that specifies (bymeans of the lp -o nolabels option) that labels willnot be printed on the top and bottom of the print job’sbody pages.

384 Trusted Solaris Administrator’s Procedures—July 1997
14
Printing-related Procedures
▼ To Access the Printer Manager
1. Assume the security administrator role, and go to an ADMIN_LOWworkspace.
2. Click the Application Manager icon in the Front Panel to open it.See Figure 14-9.
Figure 14-7 Application Manager Icon
3. Double-click the Solstice_Apps icon.See Figure 14-8.
Figure 14-8 Solstice_Apps Icon
4. Double-click the icon for the Printer Manager.See Figure 14-9.
Figure 14-9 Printer Manager Icon Selected in the Solstice_Apps Folder
The Printer Manager: Load dialog box displays with None as the onlyNaming Service option, as shown in Figure 14-10 on page 385.
Solstice_Apps
Printer_Manager

Managing Printing 385
14
Figure 14-10 Printer Manager: Load Dialog Box With None as the Only Naming ServiceOption
5. Choose None for the naming service.The Printer Manager displays, as shown in Figure 14-11 on page 385.
Figure 14-11 Printer Manager
Go to “To Install a Printer on a Print Server” on page 386 or “To Add Access toa Remote Printer” on page 394.

386 Trusted Solaris Administrator’s Procedures—July 1997
14
▼ To Install a Printer on a Print Server
1. Connect the printer to a serial or parallel port on a print serve using theappropriate cable, as described in the printer’s installation manual.The printer in the screen examples is connected to the serial port/dev/term/b .
2. Click the Application Manager icon in the Front Panel to open it.See Figure 14-12.
Figure 14-12 Application Manager Icon
3. Double-click the Solstice_Apps icon.See Figure 14-13.
Figure 14-13 Solstice_Apps Icon
4. If the printer is connected to a serial port, make sure the correct baud rateis set.
a. Double-click the icon for the Serial Manager.See Figure 14-14.
Figure 14-14 Serial Manager Icon
Solstice_Apps
Serial_Manager

Managing Printing 387
14
b. On the Serial Port Manager dialog box, double-click the entry for theport to which the printer is connected.The Serial Port Manager: Modify dialog box displays. See Figure 14-15 onpage 387.
c. On the Serial Port Manager: Modify dialog box, verify that the baudrate specified for the port is set to 9600.
Figure 14-15 Serial Port Manager and Serial Port Manager: Modify Dialog Boxes
5. Access the Printer Manager from the Solstice_Apps folder.See “To Access the Printer Manager” on page 384, if needed.
Must beset to9600

388 Trusted Solaris Administrator’s Procedures—July 1997
14
6. Choose Install Printer from the Edit menu, as shown in Figure 14-16
Figure 14-16 Printer Manager: Selecting Install Printer from the Edit Menu
The Printer Manager: Install Printer dialog box displays as shown inFigure 14-17 on page 389.
7. Configure the printer.
a. Supply a name for the printer.
b. Supply a description if desired.
c. From the Printer Port menu, select the name of the port where theprinter is connected, or select Other and enter the name of an alternateport, if the printer is connected to a non-standard port.
d. Leave Printer Type and File Contents set to PostScript.
Warning – If you change the Printer Type and File Contents settings from thedefault value of PostScript, printing does not work.
e. Check the box next to Default Printer or not, as desired.
f. Only if your site does not give any users the authorization to printwithout banner and trailer pages, check the box next to Always PrintBanners.

Managing Printing 389
14
Figure 14-17 Printer Manager: Install Printer Dialog Box
g. If your sited gives any users the authorization to print without bannerand trailer pages, do not check the box next to Always Print Banners.
h. Add users to the User Access List or not, as desired.Adding the username of any one user excludes all others.
i. Click OK to save the changes and close the dialog box.
trustworthy
Leave this boxunchecked if any usersare authorized to printwithout banner andtrailer pages
tsolE
SPARCprinterE
Warning: Do not change thesedefaults. Leave PostScript forthe Printer Type and FileContents.

390 Trusted Solaris Administrator’s Procedures—July 1997
14
8. Go to the Application Manager > System_Admin folder, and use theAdmin Editor action to open the /etc/security/device_maps file forediting.
9. Add an entry for the new printer by copying and modifying the entry forthe framebuffer .The framebuffer entry in device_allocate (4TSOL) can be most easilyadapted, because the printer, like the framebuffer, is a non-allocatabledevice:.
Make the entry for the printer as shown here:
a. Put the name of the printer in the first field.
Note – Use the same name supplied for the printer in the Printer Manager.
b. Put the lp indicator in the second field.
c. Put the pathname for the device special file for the port in the thirdfield, ending with a colon.The example shows an entry for a new printer named tsolE connected onserial port /dev/ttya .
d. Save and quit the file.
10. Use the Admin Editor action to create an empty lock file in/etc/security/dev.
a. Open /etc/security/dev/ printername, with printername the same asthe name of the new printer.
b. Without editing the file, write it and quit it.
framebuffer:fb:/dev/fb:
printername:lp:/dev/ port_device_name_and_number:
tsolE:lp:/dev/ttya:

Managing Printing 391
14
c. Change the user and group to bin, the mode to 000.The example shows a lock file being modified for a printer named tsolE.The printer lock file you create should have the same permissions,owner, group, and size shown in the long listing for the new empty lockfile in the last line of the example.
11. Use the Admin Editor action to open the/etc/security/device_allocate file for editing.
12. Create an entry for the printer in device_allocate (4TSOL) by copyingand modifying the entry for the framebuffer .The framebuffer entry in device_allocate (4TSOL) can be most easilyadapted, because the printer, like the framebuffer, is a non-allocatabledevice:
Make the entry for the printer as shown here.
a. Put the name of the printer in the first field.
b. Put the lp name in the second field.
c. Leave the device_minimum and device_maximum label fields (fields 3and 4) unmodified.
$ chown bin tsolE$ chgrp bin tsolE$ chmod 000 tsolE$ ls -l | grep tsolE---------- 1 bin bin 0 Feb 24 11:58 tsolE
framebuffer;fb;0x000...;0x7fff...;*;/bin/true
printername;lp;0x000...;0x7fff...;*;/bin/true

392 Trusted Solaris Administrator’s Procedures—July 1997
14
d. Make sure that the authorization field (field 5) has an asterisk (* ),which indicates the device is not allocatable, and that thedevice_clean field (field 6) entry for printers is /bin/true .The example shows an entry for a new printer named tsolE.
e. Save and quit the file.
13. To change the label range of the printer from ADMIN_LOW toADMIN_HIGH, if desired, follow the steps under “To Configure aRestricted Label Range for a Printer Using the Device Manager” onpage 392.
▼ To Configure a Restricted Label Range for a Printer Using the DeviceManager
1. Assume the security administrator role and go to an ADMIN_LOWworkspace on the print server.
2. Install the printer using the Printer Manager.See “To Install a Printer on a Print Server” on page 386.
3. To change the label range from the default range of ADMIN_LOW toADMIN_HIGH, use the Device Allocation Manager.
a. As admin in an ADMIN_LOW workspace, bring up the DeviceAllocation Manager.Either select the Allocate Device option from the Trusted Path menu orlaunch the Device Allocation Manager action from the Trusted Desktopsubpanel in the Front Panel.
b. Click the Device Administration button to display the DeviceAllocation: Administration dialog box.
c. Highlight the name of the new printer in the Devices list.
d. Click the Configure button to display the Device Allocation:Configuration dialog box. See Figure 14-12 on page 386.
tsolE;lp;0x000...;0x7fff...;*;/bin/true

Managing Printing 393
14
e. Change the label range as desired by clicking the Min Label and MaxLabel buttons and using the label builders that display to select thedesired sensitivity label.
f. Click the OK button on the Configuration dialog box to save the labelchanges, click the OK button on the Administration dialog box to closeit, and then close the Device Allocation Manager.
Figure 14-18 Device Allocation: Configuration Dialog Box
tsolE
lp
/bin/true
No users

394 Trusted Solaris Administrator’s Procedures—July 1997
14
▼ To Add Access to a Remote Printer
1. Access the Printer Manager.See “To Access the Printer Manager” on page 384, if needed.
2. Choose Add Access to Printer from the Edit menu, as shown inFigure 14-19.
Figure 14-19 Printer Manager: Selecting Add Access to Printer from the Edit Menu
The Printer Manager: Add Access to Printer dialog box displays, as shown inFigure 14-20 on page 395.
3. Specify access to a remote printer from the local host.
a. Type in the name of the remote printer in the Printer Name field.
b. Type in the print server’s name in the Print Server field.
c. OPTIONAL. Type a description in the Description field.
d. OPTIONAL. Check the box next to Default Printer.
e. Click OK to save the changes and close the dialog box.

Managing Printing 395
14
Figure 14-20 Printer Manager: Add Access to Printer Dialog Box
4. Specify access to a printer for a remote print client, if desired.
a. In the field above the Add and Delete buttons, type in the name of aremote print client’s name.
b. Type in the name of the printer in the Printer Name field.
c. Type in the print server’s name in the Print Server field.
d. OPTIONAL. Type a description in the Description field.
e. OPTIONAL. Check the box next to Default Printer.
f. Click the Add button to add the name of the print client to the list.If you are done, go to Step g. To add more clients go back to Step a.
g. Click OK to save the changes and close the dialog box.

396 Trusted Solaris Administrator’s Procedures—July 1997
14
▼ To Specify SLs to Print Instead of ILs on Body Pages
1. Assume the security administrator role, and go to an ADMIN_LOWworkspace
2. Go to the Application Manager > System_Admin folder and use theAdmin Editor action to bring up the/usr/lib/lp/postscript /tsol_separator.ps file for editing.
3. Find the following line:
4. Change Job_PageLabel to whichever of the following settings you wish touse:
The following line causes the external label view of the sensitivity label tobe printed on body pages.
5. Save and close the file.
/PageLabel Job_PageLabel def
%% /Job_SL_Internal The sensitivity label in internal view format.
%% /Job_SL_External The sensitivity label in external view format.
%% /Job_IL_Internal The information label in internal view format.
%% /Job_IL_External The information label in external view format.
/PageLabel - def

Managing Printing 397
14
▼ To Allow Some Users to Print Jobs Without Banners and Trailers
Warning – If the Always Print Banner check box on the Printer Manager ischecked, banner and trailer pages always print, even if the user has the printwithout banners authorization and uses the -o nobanners option to lp .
1. As security administrator, bring up the Printer Manager in anADMIN_LOW shell.
2. Make sure that the Always Print Banner check box on the PrinterManager is not checked.
3. Make sure that the print without banners authorization is in one of theprofiles assigned to each user or role that is allowed to print withoutbanner and trailer pages.
4. Make sure that the user or role submits jobs using lp with the -onobanners option.
trustworthy% lp -o nobanners staff.mtg.notes
Always Print Banner

398 Trusted Solaris Administrator’s Procedures—July 1997
14
▼ To Suppress the Printing of Page Labels on All Print Jobs
1. Assume the security administrator role, and go to an ADMIN_LOWworkspace
2. Use the Admin Editor action from the System_Admin folder to bring upthe /usr/lib/lp/postscript /tsol_separator.ps file for editing.
3. Find the following lines:
4. Replace Job_PageLabel with an empty parentheses.
▼ To Allow Some Users to Print Jobs Without Page Labels
1. Make sure that the print without labels authorization is in one of theprofiles assigned to each user or role that is allowed to print jobs withoutlabels at the top and bottom of each page.
2. Make sure that the user or role submits jobs using lp with the -onolabels option.
Doing this procedure allows the authorized user or role to print jobs withoutlabels when working at any sensitivity label.
%% To eliminate page labels complete, change this line to%% set the page label to an empty string: /PageLabel () def /PageLabel Job_PageLabel def
%% To eliminate page labels complete, change this line to%% set the page label to an empty string: /PageLabel () def /PageLabel () def
trustworthy% lp -o nolabels staff.mtg.notes

Managing Printing 399
14
▼ To Set Up Automatic Printing of Publicly-readable Jobs Without Labels
1. Make sure that the tnrhdb/tnrhtp entries for the Solaris print serverspecify the default sensitivity label as the site’s public sensitivity label(such as PUBLIC or UNCLASSIFIED).
2. Do the following three steps for each user or role you want to allow toprint all publicly-readable files without page labels.
a. Make sure that the public label is in the personal sensitivity labelrange for each account.
b. Instruct each user about how to appropriately define the PRINTERvariable in the .login file in the user’s publicly-labeled homedirectory SLD.
i. Go to the publicly-labeled home directory SLD.
ii. Open the .login file for editing.
iii. Define the PRINTER variable to be the name of the printerconnected to a Solaris print server.
iv. Save and quit the file.
c. Instruct each user about how to appropriately define the PRINTERvariable in the .login file in all other SLDs to be a printer connectedto a Trusted Solaris print server. Tell them to do the following for eachSLD at which they work:
i. Go to the home directory SLD.
ii. Open the .login file for editing.
iii. Define the PRINTER variable to be the name of a printerconnected to a Trusted Solaris print server.
iv. Save and quit the file.
d. Have each affected account log out and log in again to put the changedprinter definitions in effect.
e. Have each affected account create and print jobs from the publicly-labeled SLD.

400 Trusted Solaris Administrator’s Procedures—July 1997
14

401
Managing Device Allocation andSetting Device Label Ranges 15
This chapter describes how to manage device allocation and how to set labelranges on two types of nonallocatable devices: hosts and printers. The chapterincludes background and procedures in the following sections.
Needed Terms and Concepts page 402
Security Risks Associated With Use of Devices page 402
Clearing Objects Prior to Reuse page 403
How Allocation/Deallocation Make Object Reuse Possible page 403
How Manually-allocatable Devices are Allocated and Deallocatedand Administered
page 403
How Devices With Removable Media Are Handled page 406
Controlling the Location of Devices in the Trusted Solaris System page 407
Device-Clean Scripts page 407
Label Considerations page 410
Proper Handling of Information Stored on Removable Media page 411
Considerations When Importing and Exporting Information page 411
Lock Files for Allocatable Devices page 412
Allocate Error State page 413
How Non-Allocatable Devices Are Managed page 413
Default device_allocate File Contents and Settings page 413

402 Trusted Solaris Administrator’s Procedures—July 1997
15
This chapter provides the following device allocation procedures:
Needed Terms and ConceptsThis section reviews some terms and concepts introduced in the Trusted SolarisUser’s Guide and the Trusted Solaris Administration Overview and adds moredetailed information needed to understand how to perform the tasks describedin this chapter.
Security Risks Associated With Use of Devices
As an example of the security risks associated with the use of various I/Odevices, consider how tape devices are typically used. Because tape devices aretypically accessible to all users on a distributed system, an unscrupulous usercould covertly read information from another user’s tape while the tape was ina commonly-accessible tape device. In general, the device-allocationmechanism reserves devices to access by one user at a time and makes sure thedevice is cleared of information before making it available to another user.
How Device Allocation Works page 415
Setting Policy for a Device page 419
Managing Device Allocation and Setting Device Label Ranges page 419
To Add a New Device Allocation Authorization page 420
To Manage Devices Using the Device Allocation Manager page 420
To Add a New Allocatable Device or Make an Existing Device Allocatable page 423
To Add a New Non-Allocatable Device page 430
To Change or Add a Device Clean Script page 433

Managing Device Allocation and Setting Device Label Ranges 403
15
Clearing Objects Prior to Reuse
Object reuse permits devices to be accessed by multiple users, by ensuring thefollowing conditions
• Only the user (or process acting on behalf of the user) who has allocated adevice can access information contained on the device while it is allocated.
• Sensitive information is cleared from the device at deallocation, before thedevice can be allocated again and reused by another user or process.
How Allocation/Deallocation Make Object Reuse Possible
Some devices are automatically allocated and deallocated on behalf of the user.To meet the object reuse requirement, the Trusted Solaris allocation mechanismautomatically clears information from some devices (such as computermemory and disks) between allocations. Other devices are user-allocatable.
How Manually-allocatable Devices are Allocated and Deallocated andAdministered
The allocate(1MTSOL) and deallocate(1MTSOL) commands anddevice_clean(1MTSOL) scripts are used in manual allocation, deallocation,and clearing of other devices that are not automatically allocated anddeallocated. Devices are allocated, configured, and managed through theDevice Allocation Manager. Figure 15-1 shows the Device Allocation Manger,which can be invoked only by an account that has the device allocationauthorization. The Device Maintenance button on the bottom displays only forthe administrative role.

404 Trusted Solaris Administrator’s Procedures—July 1997
15
Figure 15-1 Device Allocation Manager
Figure 15-2 on page 405 shows, left to right and top to bottom, the DeviceAllocation Manager, the Device Allocation: Administration dialog box, theDevice Allocation: Configuration dialog box, and the Device Allocation:Authorizations dialog box.

Managing Device Allocation and Setting Device Label Ranges 405
15
Figure 15-2 Device Allocation, Management, Configuration and Authorizations Tools
Device Allocation Manager main window Device Allocation Administration dialog
Device Allocation Configuration dialog box Device Allocation Authorizations dialog box

406 Trusted Solaris Administrator’s Procedures—July 1997
15
As shown in Figure 15-2 on page 405, when the Device Administration button isclicked on the Device Allocation Manager, the Device Allocation: Administrationdialog box displays. Clicking the Revoke Button forces deallocation of a selecteddevice, clicking the Reclaim button restores a selected device from the allocateerror state, and clicking the Configure button, also as shown, brings up theDevice Allocation: Configuration dialog box. On the Device Allocation:Configuration dialog box, the Device Name, Device Type, and Clean Programfields are text entry fields. The Min Label and Max Label buttons bring up LabelBuilders, and the Allocatable By menu lets the administrator choose betweenmaking a device allocatable by All Users, No Users, or Authorized Users. Whenthe Authorizations button is clicked, the Device Allocation: Authorizations dialogbox displays, in which the administrator can choose to change the defaultallocate device authorization to another one in the list of availableauthorizations, or choose to add multiple authorizations to the Required list.For adding a new authorization, if needed, see “To Add a New DeviceAllocation Authorization” on page 420. After a new authorization is added, itappears in the Not Required list in the Device Allocation: Authorizationsdialog box.
For details on using the Device Allocation Manager, see “To Manage DevicesUsing the Device Allocation Manager” on page 420.
How Devices With Removable Media Are Handled
Some of the devices that are manually allocated and deallocated allowinformation to be imported to and exported from the Trusted Solaris system bymeans of removable media. Because the removable media used in devices suchas tape and floppy drives should not be cleared, device clean scripts either ejectthe media or prompt the user to eject the media before freeing the device forother users.
For devices that store information on and retrieve it from removable media,object reuse requires that the media be removed from the device before it isallocated to another user. The media must also be properly labeled with aphysical label that reflects the CMW label (INFORMATION LABEL[SENSITIVITY LABEL] combination) of the stored information. Device cleanscripts executed by the Trusted Solaris deallocate command enforce thisrequirement by prompting the user to eject the media before completingdeallocation and by providing the CMW label to use on the media’s physicallabel. The deallocate command succeeds only after the media has beenejected.

Managing Device Allocation and Setting Device Label Ranges 407
15
Controlling the Location of Devices in the Trusted Solaris System
Successful control of access to devices partly depends on the devices beingfound only in certain locations in the file system. In the Trusted Solaris system,all device special files (which are used to manipulate devices) should be underthe root (/) file system in the /dev and the /devices directory. All other filesystems should be mounted with the Trusted Solaris nodev option, whichprevents users from being able to bypass the device allocation mechanism byusing devices located outside of the root file system.
For more about using the nodevices option, see “To Specify Mount-timeSecurity Attributes in the Mount Table” on page 340. See also themount(1MTSOL) man page.
Device-Clean Scripts
A device-clean script is run any time a device is deallocated (either by a user’sdeallocating it or by an administrator’s action to forcibly deallocate it). If yoursite adds additional allocatable devices to the system, new scripts may need tobe created. See the following descriptions of the existing device-clean scriptsfor ideas on how they work.

408 Trusted Solaris Administrator’s Procedures—July 1997
15
Device-Clean Script for Tape Devices
Table 15-1 shows the three supported tape devices and the name of the device-clean script used for all.
The st_clean script uses the rewoffl option to mt(1) to do the device-cleanup. If the script is run during system boot, it queries the device to see if itis on line and has any storage medium in it. If necessary, the script prompts theuser to eject the storage media, and then it displays the appropriate CMW labelfor the user to write on a physical label on the storage media.
Until deallocation completes, 1/4 inch tape devices are placed in the allocateerror state, and 1/2 inch tape devices are taken off-line, to force the securityadministrator to manually clean up the device before any user can allocate itagain if a user has not completed deallocation.
Device-Clean Scripts for Floppy Disks and CD-ROM
Table 15-2 shows the device-clean scripts for the floppy disk drives and CD-ROM devices.
These scripts use the eject(1) command to eject the medium from the drive.If these scripts are run during boot time, the appropriate CMW label for themedium displays on the console; at other than boot time, the scripts promptthe user to affix to the medium a physical label with the appropriate CMWlabel. If eject(1) fails, the device is placed in the allocate error state
Table 15-1 Device-Clean Scripts for the Three Supported Tape Devices
Tape Device Type Device-Clean Script
SCSI 1/4 inch tape st_clean
Xylogics 472 1/2 inch tape st_clean
Archive 1/4 inch tape st_clean
Table 15-2 Device-Clean Scripts for Floppy and CD-ROM
Disk Device Type Device-Clean Script
floppy fd_clean
CD-ROM sr_clean

Managing Device Allocation and Setting Device Label Ranges 409
15
Device-Clean Script for Audio
The audio device is cleaned up using the audio_clean(1) program.
This program performs an AUDIO_DRAIN ioctl to flush the device, andthen an AUDIO_SETINFO ioctl to reset the device configuration to default.In addition this program retrieves the audio chip registers using theAUDIOGETREG ioctl , and any registers deviating from default are resetusing AUDIOSETREG ioctl . Because the audio device does not contain anyremovable medium, it does not require an external physical label, andtherefore the CMW label is not displayed by the audio_clean script.
Writing New Device-Clean Scripts
Devices that a site can make allocatable are modems, terminals, graphicstablets, and the like. A new device-clean scripts would need to be created foreach of these devices, and the script would need to fulfill object-reuserequirements for the type of device. Device_clean scripts should also be createdfor any added tape devices, except for a Xylogics or an Archive tape drive,which can use the default st_clean script(/etc/security/lib/ST_CLEAN ). See the device_clean(1MTSOL) manpage.
The default location for device-clean scripts is /etc/security/lib . Device-clean scripts must return 0 for success and greater than 0 for failure. Failure orinability to forcibly eject the medium must put the device in the allocate errorstate.
Table 15-3 Device-Clean Script for Audiotool
Disk Device Type Device-Clean Script
audiotool audio_clean

410 Trusted Solaris Administrator’s Procedures—July 1997
15
The deallocate command passes 4 parameters to the device-clean scripts asshown here:
The option letters -I|-F|-S help the script determine its running mode. -Iis needed during system boot only. All output must go to the systemconsole. -F is for forced clean up and -S is for standard cleanup. These areinteractive and assume that the user is there to respond to prompts. Withthe -F option, the script must attempt to complete the cleanup if one part ofthe cleanup fails.
-[A|D] indicates whether the clean script is called from allocate ordeallocate .
device_name is a string with the name of the device
cmw_label is a hexadecimal representation of the CMW label
Label Considerations
For normal users, information can only be exported or imported at a singlesensitivity label, which is the sensitivity label at which the user allocates adevice.
Restricted Label Range
Label ranges may be set for certain types of nonallocatable devices: hosts andprinters. The default label range set for the frame buffer may be modified sothat access to a Trusted Solaris host is restricted; and when a host has a printerattached, the label range for that printer may also be modified to limit the labelrange of jobs that it will print.
A restricted label range may be used to reflect the security of the physicallocation of a device or to limit access to only those users with certainclearances.
st_clean -[I|F|S] -[A|D] device_name cmw_label

Managing Device Allocation and Setting Device Label Ranges 411
15
MAC Rules for Device Access
MAC rules control access to a device. The label range of the device is checkedagainst the sensitivity label of the user’s process. The sensitivity label at whichthe device is accessed must be within the device's label range. If the user’sprocess sensitivity label is not within the label range of the device, allocation ofthe device is denied.
Allocation of a device assigns a sensitivity label to all the device special filesassociated with the device. The sensitivity label assigned to the device specialfiles is determined by the process of the user allocating the device.
Proper Handling of Information Stored on Removable Media
The security administrator must instruct the site’s users about appropriatephysical and procedural controls for tapes, CD-ROMs, and floppy disks,because removable media must be labeled properly, and access to informationcontained on the removable media must be controlled.
After information is exported to the tape or floppy, the user must eject themedia from the device and label it with the sensitivity label and informationlabel (CMW label) provided by the Trusted Solaris system at the time ofdeallocation. The medium must be stored and access to it must be controlled insuch a way to protect it from unauthorized access.
Considerations When Importing and Exporting Information
Using tar (1TSOL) With Device AllocationThe only normal user command modified to store and retrieve Trusted Solarissecurity attributes is tar(1TSOL) , which stores security attributes for each filewhen the T option is used with the c and r options and retrieves securityattributes when T is used with the x and t options.
Note – If a tar command fails when it attempts to access a device, the devicemay not have been allocated.

412 Trusted Solaris Administrator’s Procedures—July 1997
15
To Export InformationA media device (for a tape or floppy) must be allocated at the sensitivity labelof the information that is to be stored on the device.
To Import InformationWhen a device that contains a tape or floppy used for storage of information isallocated for reading, the user must allocate the tape drive at the sensitivitylabel shown on the physical label on the tape.
To Import Information Whose Information Label Is Lower Than ItsSensitivity LabelIf the information label specified on a floppy or tape’s physical label is lowerthan the sensitivity label, a user with the downgrade information authorizationmay decide to downgrade the sensitivity label of the information to match theinformation label. The device would be then allocated at a sensitivity labelequal to the information label specified on the physical label, which wouldresult in the information being imported at a sensitivity label equal to the tapeor floppy’s information label instead of at its sensitivity label.
Lock Files for Allocatable Devices
Each allocatable device needs a lock file, which is a zero-length file created in/etc/security/dev . Lock files are sometimes referred to as DAC filesbecause they must have a certain set of DAC permissions, owner, and group inorder to be allocatable. If no lock file exists for an allocatable device, or if thecharacteristics are not correct, the device cannot be allocated, and no one canaccess the device.
Table 15-4 Required Lock File Characteristics for Allocatable and Allocated Devices
DAC permissions (mode) Owner Group
Allocatable 000 bin bin
Allocated 600 user user’s group

Managing Device Allocation and Setting Device Label Ranges 413
15
Allocate Error State
As shown in Table 15-5, an allocatable device is in the allocate error state if it isowned by user allocate and group wheel with a device special file mode of0100 and sensitivity label of ADMIN_HIGH. Device clean scripts put a deviceinto the allocate error state until an administrative role uses the Reclaim buttonon the Device Allocation: Maintenance dialog box (as shown in “DeviceAllocation: Administration Dialog Box” on page 422).
How Non-Allocatable Devices Are Managed
The frame buffer is the only non-allocatable device with an entry in the defaultlabel_encodings file. A site that wishes to restrict access to an individualworkstation or server should restrict the label range on the framebuffer. Entriesfor printers can also be added, as described in “To Configure a Restricted LabelRange for a Printer Using the Device Manager” on page 392, when a printserver is being configured. The frame buffer and any added printers should beconfigured by default with ADMIN_LOW to ADMIN_HIGH label range and withan asterisk(* ) in the authorization field to indicate that the device is notallocatable. Currently, these are the only two device types whose label rangemay be restricted in the device_allocate file. Changes to the label range ofany other device has no effect.
Default device_allocate File Contents and Settings
Each allocatable device has the following characteristics configured by default:
• Sensitivity label range: ADMIN_LOW ADMIN_HIGH• A device-clean script• A lock file created in /etc/security/dev with mode 000, owner allocate,
group wheel, and a CMW label of ADMIN_LOW[ADMIN_LOW].
The frame buffer and printer entries are configured by default withADMIN_LOW;ADMIN_HIGH label ranges and with an asterisk(* ) in theauthorization field to indicate that the device is not allocatable.
Table 15-5 Lock File Settings for Device in the Allocate Error State
DAC permissions (mode) Owner Group sensitivity label
Error State 100 bin bin ADMIN_HIGH

414 Trusted Solaris Administrator’s Procedures—July 1997
15
Figure 15-3 shows the contents of the default device_allocate(4TSOL) filewhile Figure 15-3 gives the default settings in tabular form.
Figure 15-3 The Default device_allocate File
mag_tape_0;st;0x00000000000000000000000000000000000000000000000000000000000000000000;0x7fffffffffffffffffffffffffffffffffffffffffffffffffffffffffffffffffff;allocate device;/etc/security/lib/st_cleanaudio;audio;0x00000000000000000000000000000000000000000000000000000000000000000000;0x7fffffffffffffffffffffffffffffffffffffffffffffffffffffffffffffffffff;allocate device;/etc/security/lib/audio_clean_wrappercdrom_0;sr;0x00000000000000000000000000000000000000000000000000000000000000000000;0x7fffffffffffffffffffffffffffffffffffffffffffffffffffffffffffffffffff;allocate device;/etc/security/lib/sr_cleanframebuffer;fb;0x00000000000000000000000000000000000000000000000000000000000000000000;0x7fffffffffffffffffffffffffffffffffffffffffffffffffffffffffffffffffff;*;/bin/true
Table 15-6 Default Settings the device_allocate File
Name Type Description Label Range Authorization FieldDevice-CleanScript
mag_tape_0, st SCSI device ADMIN_LOW;ADMIN_HIGH
ALLOC st_clean
cdrom_0 sr CD-ROM ADMIN_LOW;ADMIN_HIGH
ALLOC sr_clean
audio audio audio chip ADMIN_LOW;ADMIN_HIGH
ALLOC audio_clean
framebuffer fb frame buffer(sets the host’slabel range)
ADMIN_LOW;ADMIN_HIGH
* none

Managing Device Allocation and Setting Device Label Ranges 415
15
How Device Allocation Works
1. When a device is allocated, the allocate(1MTSOL) command checks forthe presence of a lock file under the device name in the/etc/security/dev directory.
Figure 15-4 shows a long listing of the lock file for the mag_tape_ N devicein /etc/security/dev . As required for the allocate command tosucceed, the lock file is owned by bin with group bin , and it has a mode of000 .
Figure 15-4 Listing for an Allocatable Device’s Lock File
2. If the lock file exists with the proper owner, group and permissions, theallocate command checks for the presence of the necessary device specialfiles associated with the device in the /dev directory.
Figure 15-5 on page 416 shows the use of ls -lg in the /dev directory. Thelisting shows that the device special files for the tape device are set upproperly, with owner allocate , group wheel , and mode 000.
falloon% cd /etc/security/devfalloon% ls -ltotal 0---------- 1 bin bin 0 Feb 24 21:58 mag_tape_0---------- 1 bin bin 0 Feb 24 21:59 mag_tape_1

416 Trusted Solaris Administrator’s Procedures—July 1997
15
Figure 15-5 Listing for Device Special Files for an Allocatable Tape Device
3. If the lock file and the correct device special files do not exist or if they donot have the correct user, group, and permissions, then the device cannot beallocated by the current user, and the attempted allocation fails.
4. If the previous checks succeed, the allocate command then checks for anentry for the device in the device_allocate file, and checks whether thedevice’s entry indicates that the device is allocatable.
untouchable% ls -lg /devc--------- 1 bin bin 18, 4 May 12 13:11 nrst5c--------- 1 bin bin 18, 20 May 12 13:11 nrst13c--------- 1 bin bin 18, 28 May 12 13:11 nrst21c--------- 1 bin bin 18, 12 May 12 13:11 nrst29 .
.
.c--------- 1 bin bin 18, 0 May 12 13:11 rst5c--------- 1 bin bin 18, 16 May 12 13:11 rst13c--------- 1 bin bin 18, 24 May 12 13:11 rst21c--------- 1 bin bin 18, 8 May 12 13:11 rst29
untouchable% ls -lg /dev/rmt/c--------- 1 bin bin 18, 0 May 12 13:11 0c--------- 1 bin bin 18, 16 May 12 13:11 0nc--------- 1 bin bin 18, 24 May 12 13:11 0bc--------- 1 bin bin 18, 8 May 12 13:11 0lc--------- 1 bin bin 18, 0 May 12 13:11 0mc--------- 1 bin bin 18, 16 May 12 13:11 0hc--------- 1 bin bin 18, 24 May 12 13:11 0cc--------- 1 bin bin 18, 8 May 12 13:11 0uc--------- 1 bin bin 18, 8 May 12 13:11 0lnc--------- 1 bin bin 18, 0 May 12 13:11 0mnc--------- 1 bin bin 18, 16 May 12 13:11 0hnc--------- 1 bin bin 18, 24 May 12 13:11 0cnc--------- 1 bin bin 18, 8 May 12 13:11 0unc--------- 1 bin bin 18, 24 May 12 13:11 0ubc--------- 1 bin bin 18, 8 May 12 13:11 0bnc--------- 1 bin bin 18, 0 May 12 13:11 0ubn

Managing Device Allocation and Setting Device Label Ranges 417
15
Figure 15-6 shows the entry for mag_tape_0 in the device_allocate filewith the string “allocate device” in the allocate field, which indicates thatthe device is allocatable. (See the device_allocate(4TSOL) man page.)
Figure 15-6 Device Allocate File Entry for mag_tape_0
5. If all the previously listed conditions are met, the device is allocated to theuser.
Allocation changes the ownership and permissions of the device special filesassociated with the device in the /dev directory. Figure 15-7 shows thedevice special files associated with a tape device in thedevice_maps(4TSOL) file.
Figure 15-7 Device Special Files Associated With the Tape Device
mag_tape_0;st;0x00000000000000000000000000000000000000000000000000000000000000000000;0x7fffffffffffffffffffffffffffffffffffffffffffffffffffffffffffffffffff;allocate device;/etc/security/lib/st_clean
mag_tape_0:\ st:\ /dev/rst5 /dev/nrst5 /dev/rst13 /dev/nrst13 /dev/rst21/dev/nrst21 /dev/rst29 /dev/nrst29 /dev/rmt/0 /dev/rmt/0n/dev/rmt/0b /dev/rmt/0l /dev/rmt/0m /dev/rmt/0h /dev/rmt/0c/dev/rmt/0u /dev/rmt/0ln /dev/rmt/0mn /dev/rmt/0hn /dev/rmt/0cn/dev/rmt/0un /dev/rmt/0ub /dev/rmt/0bn /dev/rmt/0ubn:\

418 Trusted Solaris Administrator’s Procedures—July 1997
15
Figure 15-8 shows the changes to the permissions and ownership of theassociated device special files when user vanessa allocates the tape device.As shown in the partial listing of the associated device special files, themode is changed to 600 , the owner is changed to vanessa, and the group ischanged to staff.
Figure 15-8 Checking the Existence, Ownership, Group, and Mode of Device SpecialFiles for mag_tape_0
c. Allocating a command changes the ownership, group, and mode of thelock file associated with the device in the /etc/security/devdirectory.
untouchable% ls -lag /devcrw------- 1 vanessa staff 18, 4 May 12 13:11 nrst5crw------- 1 vanessa staff 18, 20 May 12 13:11 nrst13crw------- 1 vanessa staff 18, 28 May 12 13:11 nrst21crw------- 1 vanessa staff 18, 12 May 12 13:11 nrst29 .
.
.crw------- 1 vanessa staff 18, 0 May 12 13:11 rst5crw------- 1 vanessa staff 18, 16 May 12 13:11 rst13crw------- 1 vanessa staff 18, 24 May 12 13:11 rst21crw------- 1 vanessa staff 18, 8 May 12 13:11 rst29
untouchable% ls -lg /dev/rmt/crw------- 1 vanessa staff 18, 0 May 12 13:11 0crw------- 1 vanessa staff 18, 16 May 12 13:11 0ncrw------- 1 vanessa staff 18, 24 May 12 13:11 0bcrw------- 1 vanessa staff 18, 8 May 12 13:11 0lcrw------- 1 vanessa staff 18, 0 May 12 13:11 0mcrw------- 1 vanessa staff 18, 16 May 12 13:11 0hcrw------- 1 vanessa staff 18, 24 May 12 13:11 0ccrw------- 1 vanessa staff 18, 8 May 12 13:11 0ucrw------- 1 vanessa staff 18, 8 May 12 13:11 0lncrw------- 1 vanessa staff 18, 0 May 12 13:11 0mncrw------- 1 vanessa staff 18, 16 May 12 13:11 0hncrw------- 1 vanessa staff 18, 24 May 12 13:11 0cncrw------- 1 vanessa staff 18, 8 May 12 13:11 0uncrw------- 1 vanessa staff 18, 24 May 12 13:11 0ubcrw------- 1 vanessa staff 18, 8 May 12 13:11 0bncrw------- 1 vanessa staff 18, 0 May 12 13:11 0ubn

Managing Device Allocation and Setting Device Label Ranges 419
15
Figure 15-9 shows that the owner of /etc/security/dev/st0 ischanged to vanessa and the mode is changed to 600 (read and write forthe owner.
Figure 15-9 Changing Ownership, Group, and Mode of st0’s Lock File Upon Allocation
Setting Policy for a DeviceThe device mechanism has a number of access control policies already defined.These defined policies may be assigned to new devices using thedevpolicy(1MTSOL) command, which uses information from thedevice_policy(4TSOL) file.
Managing Device Allocation and Setting Device Label RangesAfter installation of the software and during configuration, the securityadministrator initially defines which devices should be allocatable and whatthe label range should be on the appropriate devices. The securityadministrator role either accepts or changes the default configuration fordevices and their defined characteristics. After the system is up and running, ifa new device is added, the security administrator must decide whether tomake the new device allocatable.
By using the Device Maintenance dialog box accessed from the DeviceAllocation tool, the security administrator role can make the following changesto the defaults. (See the procedures starting on page 420.)
• Make a new device or existing device allocatable
• Make an allocatable device available to all users, no users, or authorizedusers
• Restrict the label range on a (non-allocatable) host or printer.
untouchable% ls -lg /etc/security/dev/st0-rw------- 1 vanessa staff 0 Dec 6 15:21 /etc/security/dev/mag_tape_0

420 Trusted Solaris Administrator’s Procedures—July 1997
15
Device Management Procedures
▼ To Add a New Device Allocation Authorization
1. Read “Extending Extendable Security Mechanisms” on page 31 ofChapter 2, “Miscellaneous Tasks and Procedures.”
2. Do the procedure under “To Add An Authorization” on page 36 inChapter 2.
▼ To Manage Devices Using the Device Allocation Manager
1. The security administrator role should make the following decisionsbefore starting:
a. Find out which devices are listed in the device_allocate file, whattheir default characteristics are, and which devices can be madeallocatable.
b. Define which devices, if any, should be allocatable at your site.
c. Decide whether to make additional devices allocatable.
d. Decide which normal users, if any, should be allowed to allocatedevices.
e. Decide whether to accept or change the default label range settings onthe listed non-allocatable devices.
2. Assume the security role in an ADMIN_LOW workspace, and bring upthe Device Allocation Manager.
Either select the Allocate Device option from the Trusted Path menu orlaunch the Device Allocation Manager action from the Trusted Desktopsubpanel in the Front Panel. The Device Allocation Manager displays, asshown in Figure 15-10 on page 421.

Managing Device Allocation and Setting Device Label Ranges 421
15
Figure 15-10 Device Allocation Manager
3. Click the Device Administration button to bring up the Device AllocationMaintenance dialog box shown in Figure 15-11 on page 422.

422 Trusted Solaris Administrator’s Procedures—July 1997
15
Figure 15-11 Device Allocation: Administration Dialog Box
1. Use the Administration dialog box to view the status of a device byhighlighting the name of the device and checking the State: field.
2. If a device is in the Allocate Error State, click the Reclaim button toreclaim it.
3. If a device is allocated, either notify the owner to deallocate it or click theRevoke button to forcibly deallocate it.
4. Click OK to save the changes and close the dialog box.

Managing Device Allocation and Setting Device Label Ranges 423
15
▼ To Add a New Allocatable Device or Make an Existing DeviceAllocatable
Follow the instructions in the Installing Device Drivers manual for Solaris, ifneeded, then do the following Trusted Solaris-specific steps.
1. Assume the security administrator role and go to an ADMIN_LOWworkspace.
2. Click the Application Manager icon in the Front Panel to open it.See Figure 15-12.
Figure 15-12 Application Manager Icon
3. Double-click the System_Admin icon to access the administrative actions.
4. If no listing exists for the new device in /etc/security/device_maps ,add the device’s name along with a list of all the device special filesassociated with the device.Use dminfo(1MTSOL) to check if the device is listed in thedevice_maps(4TSOL) file. See the dminfo(1MTSOL) man page andfollow the format in the device_maps(4TSOL) man page.
a. Use the Admin Editor action to open the/etc/security/device_maps file for editing.
b. Add a list of all the device special files associated with the device.Shown is the entry for the mag_tape_0. Copy and modify it if you addanother magnetic tape drive.
mag_tape_0:\ st:\ /dev/rst4 /dev/nrst4 /dev/rst12 /dev/nrst12 /dev/rst20/dev/nrst20 /dev/rst28 /dev/nrst28 /dev/rmt/0 /dev/rmt/0n/dev/rmt/0b /dev/rmt/0bn /dev/rmt/0l /dev/rmt/0m /dev/rmt/0h/dev/rmt/0c /dev/rmt/0u /dev/rmt/0ln /dev/rmt/0mn /dev/rmt/0hn/dev/rmt/0cn /dev/rmt/0un /dev/rmt/0ub /dev/rmt/0ubn:\

424 Trusted Solaris Administrator’s Procedures—July 1997
15
c. Save and quit the file.
5. Use the Admin Editor action to create an empty lock file in/etc/security/dev.
a. Open /etc/security/dev/ devicename, with devicename the same asthe name of the new device listed in the first field of the device_mapsfile.
b. Without editing the file, save and quit it.
c. Change the user and group of the file to bin, the mode to 000.The lock file you create should have the same permissions, owner,group, and size shown in the long listing for the new empty lock file inthe last line of the example.
6. Create a device-clean script if needed for the new device.If you add a Xylogics or an Archive tape drive, you can use or modify thest_clean script; otherwise, create your own. See “Device-Clean Scripts” onpage 407.
7. Create an entry for a new allocatable device in the/etc/security/device_allocate file.
a. Use the Admin Editor action to open the/etc/security/device_allocate file for editing.
b. Copy and modify some other entry for a similar device.The example shows a copy of the entry for mag_tape_0.
i. Put the name of the device in the first field.
ii. Put the device type in the second field.
$ chown bin device_name$ chgrp bin device_name$ chmod 000 device_name$ ls -l | grep device_name---------- 1 bin bin 0 Feb 24 11:58 device_name
new_device_name;st;0x00000000000000000000000000000000000000000000000000000000000000000000;0x7fffffffffffffffffffffffffffffffffffffffffffffffffffffffffffffffffff;allocate device;/etc/security/lib/st_clean

Managing Device Allocation and Setting Device Label Ranges 425
15
iii. Leave the device_minimum and device_maximum label fields(fields 3 and 4) unmodified.
iv. Leave the name of the required authorization(s) in fieldunmodified.
v. Put the name of the device_clean (1MTSOL) script in field 6.
c. Save and quit the file.
8. To change the label range from the default range, to change the deviceallocation authorization, or to change whether the device is allocatable orwhether allocation requires an authorization, use the Device AllocationManager.
a. Assume the security role in an ADMIN_LOW workspace, and bring upthe Device Allocation Manager.Either select the Allocate Device option from the Trusted Path menu orlaunch the Device Allocation Manager action from the Trusted Desktopsubpanel in the Front Panel. See Figure 15-10 on page 421.

426 Trusted Solaris Administrator’s Procedures—July 1997
15
Figure 15-13 Device Allocation Manager
b. Click the Device Administration button to display the DeviceAllocation: Administration dialog box.See Figure 15-14 on page 427.

Managing Device Allocation and Setting Device Label Ranges 427
15
Figure 15-14 Device Allocation: Administration Dialog Box
c. Highlight the name of the device in the Devices list and click theConfigure button to display the Device Allocation: Configurationdialog box.See Figure 15-15 on page 428.

428 Trusted Solaris Administrator’s Procedures—July 1997
15
Figure 15-15 Device Allocation: Configuration Dialog Box
d. Change the label range if desired from the default range ofADMIN_LOW to a ADMIN_HIGH by clicking the Min Label and MaxLabel buttons and using the label builders that display to select thedesired sensitivity label.
e. Change the name of the device_clean(1MTSOL) script as desired byediting the name in the text entry field to the right of Clean Program.
f. Change who can allocate the device from the default of AuthorizedUsers by clicking the arrows to the right of the Allocatable By menu tochange to All Users or No Users as desired.
g. Add a new device allocation authorization, if desired.To add a new authorization, see Chapter 2, “Miscellaneous Tasks andProcedures,” under “Extending Extendable Security Mechanisms” onpage 31. After a new authorization is added it appears in the NotRequired list of the Device Allocation: Authorizations dialog box.
Allocatable By Menu
Authorized UsersAll UsersNo Users
Minimum Label Field
Maximum Label Field
Clean Program Field
Authorizations Button

Managing Device Allocation and Setting Device Label Ranges 429
15
h. Change the authorizations as desired from the default of allocatedevice by clicking the Authorizations button to display the DeviceAllocation: Authorizations dialog box.See Figure 15-16.
Figure 15-16 Device Allocation: Configuration Dialog Box
i. Change the default allocate device authorization, if desired, byselecting it in the Required list and using the arrows to move it tothe Not Required List, and then selecting and moving anotherauthorization from the Not Required list to Required.

430 Trusted Solaris Administrator’s Procedures—July 1997
15
ii. Add multiple authorizations to the Required list. if desired, bymoving them from the Not Required to the Required list.
i. Click the OK button on the Configuration dialog box to save the labelchanges, click the OK button on the Administration dialog box to closeit, and then close the Device Allocation Manager.
j. If desired, configure a non-default policy for the device. See thedevice_policy(4TSOL) man page for the default policies andoptions.
▼ To Add a New Non-Allocatable Device
Follow the instructions in the Installing Device Drivers manual for Solaris, ifneeded, then do the following Trusted Solaris-specific steps.
1. Assume the security administrator role and go to an ADMIN_LOWworkspace.
2. Click the Application Manager icon in the Front Panel to open it.See Figure 15-12.
Figure 15-17 Application Manager Icon

Managing Device Allocation and Setting Device Label Ranges 431
15
3. Double-click the System_Admin icon to access the administrative actions.
4. For a device newly-added to the system, if no listing exists for it in/etc/security/device_maps , add a list of all the device special filesassociated with the device.Use dminfo(1MTSOL) to check if the device is listed in thedevice_maps(4TSOL) file. See the dminfo(1MTSOL) man page andfollow the format in the device_maps(4TSOL) man page.
The framebuffer entry in device_allocate(4TSOL) can be most easilyadapted, because the framebuffer is a non-allocatable device:.
The example shows an entry for a printer named tsolE connected on serialport /dev/ttya .
5. Save and quit the file.
6. Use the Admin Editor action to create an empty lock file in/etc/security/dev.
a. Open /etc/security/dev/ devicename, with devicename the same asthe name of the new device listed in the first field of the device_mapsfile.
b. Without editing the file, save and quit it.
c. Change the user and group to bin, the mode to 000.The example shows a lock file being modified for a printer named tsolE.The printer lock file you create should have the same permissions,owner, group, and size shown in the long listing for the new empty lockfile in the last line of the example.
framebuffer:fb:/dev/fb:
tsolE:lp:/dev/ttya:
$ chown bin tsolE$ chgrp bin tsolE$ chmod 000 tsolE$ ls -l | grep tsolE---------- 1 bin bin 0 Feb 24 11:58 tsolE

432 Trusted Solaris Administrator’s Procedures—July 1997
15
7. Create an entry for the new device in the/etc/security/device_allocate file.
a. Use the Admin Editor action to open the/etc/security/device_allocate file for editing.
b. Create an entry in device_allocate(4TSOL) by copying andmodifying some other entry for a similar device.
The example shows the framebuffer entry cloned and renamed (theframebuffer is another non-allocatable device)
c. Put the name of the device in the first field.
d. Put the device type in the second field.
e. Leave the device_minimum and device_maximum label fields (fields 3and 4) unmodified.
f. Leave the asterisk (*), which means the device is not allocatable, in therequired authorization(s) in field 5.
g. Leave the name of the device_clean(1MTSOL) script in field 6 as/bin/true .
h. Save and quit the file.
8. To change the label range from the default range of ADMIN_LOW toADMIN_HIGH, use the Device Allocation Manager.
a. As admin in an ADMIN_LOW workspace, bring up the DeviceAllocation Manager.Either select the Allocate Device option from the Trusted Path menu orlaunch the Device Allocation Manager action from the Trusted Desktopsubpanel in the Front Panel.
b. Click the Device Administration button to display the DeviceAllocation: Administration dialog box.
c. Highlight the name of the new device in the Devices list.
d. Click the Configure button to display the Device Allocation:Configuration dialog box. See Figure 15-18 on page 433.
tsolE:lp:0x000...:0x7fff...;*;/bin/true

Managing Device Allocation and Setting Device Label Ranges 433
15
e. Change the label range as desired by clicking the Min Label and MaxLabel buttons and using the label builders that display to select thedesired sensitivity label.
f. Click the OK button on the Configuration dialog box to save the labelchanges, click the OK button on the Administration dialog box to closeit, and then close the Device Allocation Manager.
Figure 15-18 Device Allocation: Configuration Dialog Box
▼ To Change or Add a Device Clean Script
1. Write the script so that all usable data is purged from the physical deviceand that it returns 0 for success.
2. For devices with removable media, attempt to eject the media if the userdoes not do so and put the device into the allocate error state if the mediais not ejected.
3. Put the script into /etc/security/lib .
tsolE
lp
/bin/true
No users

434 Trusted Solaris Administrator’s Procedures—July 1997
15
4. Use the Device Allocation Manager to specify the new script for a device.
a. As admin in an ADMIN_LOW workspace, bring up the DeviceAllocation Manager.Either select the Allocate Device option from the Trusted Path menu orlaunch the Device Allocation Manager action from the Trusted Desktopsubpanel in the Front Panel.
b. Click the Device Administration button to display the DeviceAllocation: Administration dialog box.
c. Highlight the name of the device in the Devices list to which you wantto assign the new script.
d. Click the Configure button to display the Device Allocation:Configuration dialog box. See Figure 15-18 on page 433.
e. Change the name of the device_clean(1MTSOL) script as desired byediting the name in the text entry field to the right of Clean Program.
f. Click the OK button on the Configuration dialog box to save the labelchanges, click the OK button on the Administration dialog box to closeit, and then close the Device Allocation Manager.

435
Adding Software 16
Security administrators can add the following types of software:
• Sun unbundled products and third-party applications that neitherunderstand nor enforce Trusted Solaris security policy
• New programs, created by in-house developers using Trusted Solarisprogramming interfaces, that understand labels and MAC (mandatoryaccess control) and that work within Trusted Solaris security policy
• New actions (created or approved by the security administrator)• Shell scripts (created or approved by the security administrator)
Security administrators may also add to or modify the commands that runduring start-up in run control scripts.
This chapter summarizes how the creation and use of commands, actions, andscripts is different in the Trusted Solaris system than it is in the base Solarissystem. This chapter reviews how privileges are used by commands andactions and provides guidance on how the security administrator does thefollowing:
• Brings in new software• If the software needs privileges in order to run, finds out what privileges the
software needs• Decides whether giving any needed privileges to the new software is
consistent with the site’s security policy, and• Makes privileges available to the software• Makes privileges available to commands in run control scripts

436 Trusted Solaris Administrator’s Procedures—July 1997
16
See the Trusted Solaris Developer’s Guide for more about how programs useprivileges.
This chapter covers these main topics:
This chapter provides these procedures:
Controls for Software Creation and Use page 438
Controls for Importing Software page 438
Privileges page 438
Alternatives to Assigning Privilege page 440
Effects of the Execution Profiles on the Use of Commands and Actions page 442
The Profile Shell, the System Shell, and Trusted Processes page 443
Processes, Programs, and Their Privileges page 445
Why Inheritable Privileges Are Important page 450
How Privileges Are Assigned to Commands and Actions page 453
Why Privileged Programs Need to Use Trusted Shared Libraries page 454
Starting Commands With or Without Trusted Solaris Security AttributesDuring Boot
page 457
Security Administrator’s Tasks in Adding Software page 460
Issues Around the Adding of Privileges to Any Software page 460
When Adding Existing Programs page 461
When Adding a New Trusted Program page 464
When Adding Actions page 465
Modifying the Front Panel and Workspace Menu page 467
Creating and Using Shell Scripts page 469
To Add A Package from a CD-ROM page 472
To Set Up an Application to Run WIth a Real UID of Root page 473
To Set Up An Application to Run With An Effective UID of Root page 473
To Find Out Which Privileges an Application Needs page 473
To Give Forced Privileges to a Command page 476
To Allow Trusted Programs to Link to Trusted Libraries page 478
To Write a Profile Shell Script That Runs Privileged Commands page 479

Adding Software 437
16
Review of Terms and ConceptsAs configured in the default system, the security administrator role is the onlyaccount that is able to do the following:
• Import and export software at multiple sensitivity labels• Install software at ADMIN_LOW in the public directories (such as /etc and
/usr/bin ) that allow use of the software by multiple users at all sensitivitylabels.
• Assign privileges to program files, although this ability may be given toother accounts by assigning the needed authorization.
• Use the Profile Manager to assign privileges that are in effect when acommand or action is executed in a trusted process from which it can inheritprivileges.
Note – Because applications, whether they are externally or internallyobtained, and shell scripts are added to a site’s execution profiles ascommands, the term command is used frequently in this chapter when referringto applications, site-developed executable programs, and shell scripts.
See “Privileges,” and the following sections, which define what it means for acommand to have privileges and for a command or action to inherit privileges.
Assuming that a site has procedures to screen imported software for virusesand worms, the security administrator, in most cases, does not need to beconsulted before programs or scripts are imported, created or used if thesoftware meets the following criteria:
• It does not need to run with privilege• It does not need to run with an effective UID or GID that differs from the
real UID or GID of the invoking user• It does not need to run at multiple labels
To Write a Standard Shell Script That Runs Privileged Commands WhenExecuted in a Profile Shell
page 480
To Specify Commands to Run With or Without Special Attributes DuringBoot
page 481
To Restore Privileges Lost When a File is Edited page 483

438 Trusted Solaris Administrator’s Procedures—July 1997
16
Controls for Software Creation and Use
The security administrator controls beforehand who can create programs,actions, and shell scripts by controlling what commands and actions are madeavailable to individual accounts through the profile mechanism. For example,if a user or role account is not allowed to use the Create Action action or someother tool that would allow the editing of files that create an action, thataccount simply cannot create an action. And, even if an account can create anaction, the account would not be able to use any new action that he or shemight create, without the security administrator’s cooperation, unless theaccount already has the All profile, which turns off all checks for the use ofcommands or actions. To allow anyone without the All profile to use a newaction, the security administrator would have to add the action to site’sprofiles. The All profile also turns off all checks for commands, and wouldenable an account to run any standard shell and enter any existing or newcommand or script.
Programs and shell scripts are controlled in a slightly different manner thanactions. If an account is allowed to use a terminal or an application that allowshim or her to create a new program or shell script, the resulting new programor shell script can be executed by the creator or by anyone who has access tothe software and who has a standard UNIX shell. For accounts (such assecadmin and admin accounts) that have the profile shell and no other shellassigned, the security administrator would need to add the name of the newcommand to one of the account’s profiles in order for the account to use it,unless the account also has the All profile.
Controls for Importing Software
Similar mechanisms are in place for controlling the importing of programs,actions and scripts as there are for creating them. The security administratorcontrols who can bring in software by granting or denying the device allocationauthorization to an individual. If an account has the device allocationauthorization, the account is then restricted to importing or exporting data at asingle sensitivity label within that user’s clearance.
Privileges
Having privilege means having the capability to override some aspect ofsecurity policy.

Adding Software 439
16
In standard UNIX systems, only commands running with the user ID of 0 canrun with all the powers of the superuser, while commands running with anyother user ID have none. In the Trusted Solaris system, however, a commandwith any user ID may be configured to use some but not all of powers that arereserved for the superuser in standard UNIX system. The ability of the UNIXsuper-user to bypass access restrictions, to execute restricted commands, and touse some command options not available to other users has been replaced withprivileges. The superuser in standard Solaris and other UNIX operatingsystems has all privileges in the system, including the ability to bypass allDAC restrictions. The privileges mechanism in Trusted Solaris breaks thepower of the superuser into many small pieces and provides additional powerthat may be needed to bypass MAC restrictions. Providing discrete privilegesmakes it possible to assign to programs only those privileges they need to dotheir work and no more.
Required PrivilegesWhen a command or one of its options or an action needs a privilege in orderto succeed, that privilege is a required privilege; if a required privilege is notavailable to a command, option or action, it will not work at all. Requiredprivileges are indicated on the man page with the words “must have” asshown in this sentence: "The ifconfig(1MTSOL) command must have thesys_net_config privilege to modify network interfaces."
Override PrivilegesWhen a command or action is designed to work within security policy, andthen it fails when certain DAC or MAC checks are not passed, an overrideprivilege may be assigned at the security administrator's discretion. On manpages, the names of privileges that may be used to override access restrictionsare given in the ERRORS section.The DAC override privileges are file_dac_read and file_dac_write. The MACoverride privileges are file_mac_read and file_mac_write. If a user does nothave DAC or MAC access to a file, the security administrator may assign oneor both of these privileges to a command or action, depending on whetherMAC or DAC applies and on whether read or write access or both are desired.

440 Trusted Solaris Administrator’s Procedures—July 1997
16
Alternatives to Assigning Privilege
Besides being able to assign an override privilege to a command or action tomake it work, the security administrator has other options:
• Assign an effective UID• Assign an effective GID• Assign a sensitivity label at which the command executes
For example, to avoid the use of privilege the security administrator mayconfigure a command or action to execute with another user's ID or analternate group ID that allows access to the file or directory based on itspermissions or its ACL. When software executes with another UID or GID thanthe real UID or GID of the person who invoked it, it is said to be running withan effective UID or GID. For another example, the command or action may bespecified to run at a sensitivity label that removes the need to give it a MACoverride privilege.
Principle of Least Privilege
The principle of least privilege requires that each command or action in thesystem be granted the most restricted set of privileges that it needs to do therequired task for the person who is using it. The principle of least privilege issupported by making privileges available to programs on an as-needed basis,and by using privilege bracketing, which is used within programs to turn theuse of the program’s privileges on and off so that privileges are only in effectwhile they are being used for a specific purpose during the run time of theprogram. See the Trusted Solaris Developer’s Guide for more about privilegebracketing.
File Privilege Sets
Executable program files can have two file privilege sets associated with them:forced and allowed. The allowed privilege set determines which privileges may bemade available to a program, while any privileges in a program file’s forcedprivilege set are always made available to the program, as long as theprivileges are also in the allowed set, no matter what shell the program isexecuted in or who invokes it.

Adding Software 441
16
How Two Standard Programs Use Privilege in Trusted Solaris
The ways that ls(1) and mount(1MTSOL) use privileges illustrates some ofthe principles talked about so far in this chapter.
ls(1B) is an example of a well-known Trusted Solaris program that does notneed privileges in order to work, as long as it is used to list files that DAC andMAC restrictions allow it to see. Therefore, ls has no required privileges.However, the security administrator could assign override privileges if he orshe wants to allow ls to bypass DAC or MAC security policy for some reason.
When executed by a normal user for the purpose of seeing which file systemsare mounted on that user’s machine, mount(1MTSOL) needs no privileges.When used to mount file systems, mount always needs the privilegesys_mount (so sys_mount is a required privilege for mount ). Depending onwhether it is being used to mount file systems remotely or to specify mount-time security attributes, mount also may need several other override privileges.In the default configuration, the executable program file for mount is specifiedwith all allowed privileges and no forced privileges. The System Managementprofile (which is assigned to the system administrator role) has mount definedwith all the privileges mount needs to inherit when mounting file systems. Seethe mount(1MTSOL) man page for more details of mount’s privilegerequirements.
Actions
Actions are a feature from the CDE window system that are also usedextensively in the Trusted Solaris window system, with a number ofrestrictions on their use and creation that are necessary to make themcompatible with the Trusted Solaris security policy. The restrictions on theiruse and creation are described in “When Adding Actions” on page 465.
Actions are instructions that are written to automate tasks such as opening filesfor editing or running applications. Actions are defined much like applicationmacros or programming functions. Each action is defined with a name that isused to run the action. Actions can be attached to icons, Front Panel controls,and menu items.

442 Trusted Solaris Administrator’s Procedures—July 1997
16
Effects of the Execution Profiles on the Use of Commands and Actions
The security administrator may enable an account to bypass system securitypolicy by specifying one or more of the following in the account’s executionprofiles:
• Authorizations• Privileges assigned to specific commands or actions• Effective UIDs or GIDs assigned to specific commands or actions
The privileges specified in execution profiles are made available to commandsand actions by inheritance. Commands can inherit privileges and can run withan effective UID or GID or a sensitivity label specified in one of the invokingaccount’s profiles only when they are invoked in a profile shell or in a systemshell. Actions can inherit privileges and can run with an effective UID or GIDor a specific sensitivity label only when they are launched from one of thetrusted processes in the window system (which are described in “The ProfileShell, the System Shell, and Trusted Processes” on page 443).
A user account may be given the All profile that bypasses all checks on the useof actions or commands, and then the account can use all actions or commandswithout inheritable privileges—giving that account the freedom of accessavailable to a standard UNIX user.
If an account has a standard UNIX shell, either as the default shell or listed inone of its profiles, the user can execute all commands in that shell (withoutinheritable privileges) but may not be able to launch all actions, depending onhow actions are configured in the account’s profiles. A user or role account isrestricted to use only the set of actions that are explicitly specified in thataccount’s execution profiles (unless one of the profiles is the All profile).Commands are handled differently; only if an account is given a profile shell asthe default shell is the account is restricted to use only those commands thatare listed in the account’s profiles
Each account may have multiple profiles. The order in which profiles areassigned is important. The profile shell and trusted processes in the windowsystem search the profiles in the order specified for the account in the UserManager. If more than one profile is assigned to an account, the order issignificant because the first time the profile shell or trusted process finds thecommand or action in any profile, the command or action is given whateversecurity attributes have been assigned to it in the first profile where it appears.

Adding Software 443
16
For example, Table 16-1 shows user account roseanne has All, ProfileA,ProfileB, and ProfileC, in that order, in its set of profiles.
If roseanne executes command1, the profile mechanism finds the All profile first,which allows the use of any command without special attributes, and stopsthere, allowing roseanne to execute the command without giving it privilegesor other special attributes. If the task that roseanne needs to do requires thatcommand1 has privileges 7, 9, and 12 in order to succeed, the securityadministrator should move ProfileC to the top of roseanne’s list of profiles.
If the All profile is assigned to an account, it should be at the bottom of anaccount’s list of profiles, where it can act as a type of fallback mechanism forcommands, allowing the account to use any command without privileges,effective UID or GID or specified sensitivity label, if the command is nototherwise explicitly specified in one of the account’s other profiles.
The Profile Shell, the System Shell, and Trusted Processes
The profile shell, pfsh(1MTSOL) , is the default shell for the securityadministrator and the system administrator roles, and the pfsh may beassigned, at the discretion of the security administrator, as the default shell forany other user or role account. Any account with the profile shell as its defaultshell is restricted to use only commands that are specified in the account’s executionprofiles.
The system shell, sysh(1MTSOL) , is a shell that is used to control the use ofprivileges by commands run from run control (rc) scripts. sysh allows anycommand to execute but consults profiles for any privileges, effective user ID,effective group ID, and sensitivity label with which the command is to be run.See “Starting Commands With or Without Trusted Solaris Security AttributesDuring Boot” on page 457 for more about sysh.
Table 16-1 Example of an Incorrect Ordering of Profiles in an Account’s List
Account name Default Shell Profiles Command
roseanne pfsh All all commands with inheritable=none
ProfileA command1 with inheritable=1,2,3
ProfileB command1 with inheritable=2,3,5
ProfileC command1 with inheritable=7,9, 12

444 Trusted Solaris Administrator’s Procedures—July 1997
16
The window system’s trusted processes are:
• The Front Panel• Subpanels of the Front Panel• The Workspace Menu• The File Manager and• The Application Manager
Trusted processes in the window system are available to everyone, butaccounts are restricted to be able to access from the window system only theactions that are specified in the account’s execution profiles. For example, theadministrative actions that are used for editing configuration files, which are inthe System_Admin folder in the Application Manager, can only be used if theyare in one of the account’s profiles. Therefore, because Edit Encodings is in theObject Label profile assigned to the security administrator role, he or she canuse the Edit Encodings action, but he or she cannot use the Set Mount Pointsaction because it is not in any of the role’s profiles.
In the File Manager, if an action is not in one of the account’s profiles, the iconfor the action is not visible. In the Workspace Menu, if an action is not in one ofthe account’s profiles, the action is visible, but an error comes up if the actionis invoked.
The CDE window manager, dtwm(1), calls the Xtsolusersession script,which then works with the window manager to invoke actions launched fromthe window system. Just as the profile shell consults an account’s profileswhen the account attempts to invoke a command, Xtsolusersession alsoconsults the account’s profiles when the account attempts to launch an action.In either cases, if the action is in the user’s profiles, it is run with any specifiedprivileges or an effective UID or GID if those are specified.
The profile shell and the window manager run with all privileges, because theyneed to pass any inheritable privileges specified for a command to thecommand when it is executing.

Adding Software 445
16
Processes, Programs, and Their PrivilegesA process is derived from a file containing an executable program. At anyinstant, a process is always executing a program. A process is created using thefork(2) system call, which creates a duplicate of the calling process. The newprocess inherits all the parent’s attributes, including the currently executingprogram. A process can change the program it is executing with the exec(2)system call, which replaces the entire process address space with new versionsderived from the program file named in the execve call.For example, the process running the profile shell, pfsh , uses execve toexecute the mount command.
Process Privilege Sets
Four privilege sets are associated with each process:
• Permitted Privileges
The privileges in a process’s permitted privilege set are those the process isallowed to use.
• Effective Privileges
The privileges in a process’s effective privilege set are those a process iscurrently using. System calls that check for privilege check a process’s set ofeffective privileges.
• Inheritable Privileges
The privileges in a process’s inheritable privilege set are those a process maypass to another process when another program is invoked with an exec(2) .
• Saved Privileges
The privileges in a process’s saved privilege set contains the set of privilegesactually inherited across an execve . The contents of the saved privilege setbecome invalid if a process changes its effective user ID.

446 Trusted Solaris Administrator’s Procedures—July 1997
16
When a process executes a program through the execve(2TSOL) system call,the permitted (P) and effective (E) privilege sets are reset equal to the samevalue, which is the intersection of the process' previously existing inheritable(I) privileges and the program file's allowed (A) privileges intersected with theprogram file's forced (F) privileges:
The saved privilege set is set initially to the intersection of the existinginheritable privilege set and the file's allowed privileges:
Keeping the saved privilege allows the process to determine which privileges it hadwhen the currently executing program was invoked.When a new program is invoked, the inheritable privilege set is initially set tobe the same as the inheritable privileges of the process that invoked the currentprogram:
See “Why Inheritable Privileges Are Important” on page 450 for the benefits ofsetting the inheritable privileges without reference to the forced or allowedprivileges on an executing program.If the effective UID is set by setuid(2TSOL) , to be different from the original,the effective set is copied to the saved set and the effective set is cleared:
If the process changes its effective user ID back to the original, the savedprivilege set is copied to the effective set, thus restoring its privileged state:
P=E=(I[process] union F[program] restricted by A[program])
S=(I[process] intersected by A
I[new]=I[old]
S=E; E=0
E=S

Adding Software 447
16
Examples of How Processes Acquire Privileges
The following examples show how a process acquires privileges in a standardUNIX shell compared to how a process acquires privileges in a profile shellwhen a program is executed. The first example shows that when a programexecutes in a standard UNIX shell, the program’s process can use onlyprivileges that are in the program’s forced and allowed privilege sets. Thesecond example shows that when a program executes in a profile shell, theprogram’s process can acquire privileges from the shell’s inheritable set, whichit can use if the privileges are also in the allowed privilege set of the programitself. In the examples, for brevity, the privileges are assigned numbers insteadof names.
In a Standard Shell
The circle on the left side of Figure 16-1 stands for a standard UNIX shell’sprocess in which the user enters the command programX . The inheritableprivilege set shown for the shell’s process is null because standard shells’processes have no privileges.
Figure 16-1 Process Acquiring Forced Privileges When Run in a Normal User’s Shell
standard C shell
programX
process executesprogramX
B.
A.standard UNIX shell process with inheritable=none,
..
C.process running programX now has permitted=1,3,5; effective=1,3,5;
B.
A. C.
process% programX
programX file’s privilege sets: forced=1,3,5; allowed=1,3,5,11,12,19
inheritable=none

448 Trusted Solaris Administrator’s Procedures—July 1997
16
In Figure 16-1 on page 447, the square in the middle stands for the programX ,which has forced and allowed privileges as shown. The forced privileges are 1,3, and 5. The allowed privileges are 1, 3, 5, 11, 12, and 19. The circle on theright stands for the process executing programX in which the permitted andeffective privileges sets are given the forced privileges associated with theprogram file. Figure 16-1 illustrates that when the parent process is a standardshell, and therefore it has no inheritable privileges, the privilege sets associatedwith a new process contain only the forced privileges acquired from theprogram file, and the inheritable set of the new process remains empty.
In a Profile Shell
In Figure 16-2, a user or a role account executes programY in a profile shell.
Figure 16-2 Process Inheriting Privileges From the Profile Shell
In Figure 16-2 on page 448, the profile shell checks which user or role isexecuting the command, checks to make sure the command is in one of theaccount’s profiles, checks to see if any privileges have been specified for the
profile shell
programY
process executesprogramY
B.
A.In one of the invoking account’s profiles, programY has inheritable=10,12,19,
.B.programY file’s privilege sets: forced=none, allowed=10,12,19C.process running programY now has inheritable=10,12,19; effective=10,12,19;
so pfsh sets its own inheritable=10,12,19 and executes programY.
permitted=10,12,19
A. C.
process$ programY

Adding Software 449
16
command in any of the account’s profiles, and puts only the specifiedprivileges into its own inheritable set. As shown in the illustration, theexecutable programY itself has no forced privileges, and its allowed setincludes 10, 12, and 19. Because programY has the three privileges 10, 12 and19 in its allowed set, the process running programY can inherit privileges 10,12 and 19 from the parent process, and privileges 10, 12, and 19 are put into theprocess’s effective and permitted sets.
If there are no privileges in a program file‘s allowed set, then the permittedand effective sets for the process running the program always will be empty.
How a Process Executing the mount Command Acquires PrivilegesThis section shows how the mount command used in the example in “HowTwo Standard Programs Use Privilege in Trusted Solaris” on page 441 isexecuted in a profile shell process and acquires privileges. When mount isexecuted in the profile shell, the process running pfsh does the following:
• It checks that the invoking account has the mount command in one of itsprofiles
• It puts the sys_mount privilege and the other privileges that are specifiedfor mount in the invoking account’s profiles into its own (pfsh ’s own)inheritable set
• It runs execve , which creates a process running the mount command
In mount ’s process, the inheritable privileges are set to be the same as theinheritable privileges of the profile shell’s process that invoked mount . Thenthe forced and allowed privileges on mount ’s program file are used inconjunction with the inheritable set in determining the process’s permitted,effective, and saved sets.
To determine the permitted and effective set, a process’s inheritable privilegesare first combined with any additional privileges from the forced set on theprogram file—which does not apply here since mount has no forced privileges.The combination of both the inheritable and forced privileges is limited to theallowed privileges specified for the program file, and because the mountprogram file has all allowed privileges, mount can use all of its inheritableprivileges, and, as a result, the permitted and effective sets of the processrunning mount are set equal to the inheritable privilege set.
mount ’s saved privilege set is set to be the inheritable set and the forced andallowed privileges on mount’s program file.

450 Trusted Solaris Administrator’s Procedures—July 1997
16
Why Inheritable Privileges Are ImportantInheritable privileges are discussed in detail under “Process Privilege Sets” onpage 445. Inheritable privileges are important for security administratorsbecause privilege inheritance is used by:
• The profile mechanism to pass privileges to commands invoked in theprofile shell
• The system shell to pass privileges to commands invoked in the systemshell]
• Trusted processes in the window system to pass privileges to actions
As described in “Process Privilege Sets” on page 445, when a process executesa new program, the process’s new inheritable set equals the process’s oldinheritable set before the new program was executed: I[new]=I[old].The resultis that the inheritable privileges available for one program to pass to anotherprogram are not affected by the forced or allowed privileges on the currentlyexecuting program. Maintaining the inheritable set without reference to theprogram file’s forced or allowed set has the following two effects:
• The benefit of setting I[new]=I[old] without reference to allowed privilegesis that privileges can be passed from a process executing a program thatcannot use the privileges to one that can.
See “When a Program File Has No Allowed Privileges” for details.
• The benefit of setting I[new]=I[old] without reference to forced privileges isthat forced privileges cannot be used by shell scripts.
See “When a Program File Has No Forced Privileges” on page 451 fordetails.
When a Program File Has No Allowed Privileges
When a program file has does not have allowed privileges, the inheritable setof the process executing the program is not reduced to match the allowedprivileges on the program. A process executing a program that has no allowedprivileges cannot use any privileges (because it cannot put any privileges intoits effective set even if it inherits privileges from another trusted process). Sucha process, however, can pass its inheritable privileges through to anotherprogram that it executes, one which might have allowed privileges and whichtherefore can use the inheritable privileges. See Figure 16-3, “How a ProgramThat Cannot Use Privileges Can Pass Them to A Program That Can.”

Adding Software 451
16
Figure 16-3 How a Program That Cannot Use Privileges Can Pass Them to A ProgramThat Can
When a Program File Has No Forced Privileges
The inheritable set of a process cannot be increased by the forced privileges onthe program. Any forced privileges on a shell script are not passed tocommands invoked in forced privilege shell script. The result is that privilegescannot be used by shell scripts executed in standard UNIX shells, sh(1) ,csh(1) , and ksh(1) . See Figure 16-4 on page 452, “How Forced PrivilegeShell Scripts Are Prevented From Passing Forced Privileges to TheirCommands.”
profile shell process$ programA
programA
process executesprogramA
process executesprogramB
A.
B.
C.
D.
E.
A.In one of the invoking account’s profiles, programA has inheritable=10,12,19, so pfsh sets its owninheritable=10,12,19 and executes programA .B.programA file’s privilege sets: forced=none, allowed=noneC.process executing programA has inheritable=10,12,19; effective=noneD.programB file’s privileges sets: forced=none;allowed=10,12,19E.process executing programB has inheritable=10,12,19;effective=10,12,19
programB

452 Trusted Solaris Administrator’s Procedures—July 1997
16
Figure 16-4 How Forced Privilege Shell Scripts Are Prevented From Passing ForcedPrivileges to Their Commands
standard C shell
% scriptA
scriptA
process executesscriptA
process executescsh
A.
B.
C.
D.
E.
A.The invoking shell csh for scriptA has no privileges, so its inheritable=noneB.scriptA ’s file privilege sets: forced=10,12,19, allowed=10,12,19C.process executing scriptA has inheritable=none, effective=10,12,19, permitted=10,12,19D.cah ’s file privileges sets:forced=none;allowed=allE.
csh
process
ls
F.
process executing csh has inheritable=none, effective=none, permitted=noneF.ls ’s file privileges sets:forced=none;allowed=allG.process executing ls has inheritable=none, effective=none, permitted=none
process executesls
G.

Adding Software 453
16
How Privileges Are Assigned to Commands and ActionsTrusted Solaris commands and actions have already been assessed as describedin this chapter and have been assigned privileges if any privileges are requiredfor them to do their work. After a site is configured, a privilege should begranted by a site's security administrator only if the security administrator isconvinced that the command or action itself or the person invoking thecommand or action will use the privilege in a trustworthy manner.
The security administrator makes privileges available by:
• Assigning forced privileges to the executable file itself (for commands only)or
• Making them inheritable by a command when it is invoked in the profileshell or when it is launched from a trusted process in the window system orby an action when it is launched from a trusted process in the windowsystem.
Giving Forced Privileges to a Command
The security administrator can assign forced privileges to an executable file fora command by using the File Manager—Privileges dialog box or by enteringthe setfpriv(1TSOL) command in a profile shell, as described under “ToGive Forced Privileges to a Command” on page 476.
When a command with forced privileges is executed by any user in any shell,the forced privileges are put into the effective set of the executing program.The only way to prevent anyone from executing such a command withprivilege would be by controlling access to the command itself—by giving anaccount the profile shell as its default shell and by not assigning the commandor any terminal emulator in any of that account’s profiles.
To change the privileges on an executable file, the process’s sensitivity labelmust allow MAC write access to the file; DAC write permission is not required.The forced and allowed privilege sets of a file can only be changed either bythe owner at the same sensitivity label (write-equal) or by a securityadministrator (as configured in the default system) in an ADMIN_LOWworkspace (write-up).
To give more detail, the forced and allowed privilege sets of a file can only bechanged by:

454 Trusted Solaris Administrator’s Procedures—July 1997
16
• The owner of the file or• A process with the file_setpriv privilege or• An account with the set file privileges authorization
See also the setfpriv(1TSOL) man page.
Note – If you assign forced privileges using the File Manager—Privilegesdialog box, it automatically assigns the same set of allowed privileges.However, the setfpriv command does not allow you to set any forcedprivileges unless they are in the file’s set of allowed privileges or unless youare setting the allowed and forced set appropriately in the same command line.
Giving Inheritable Privileges to a Command or Action
The security administrator can specify inheritable privileges for a command oran action in an execution profile (using the Profile Manager) and assign theprofile to a user or role account using the User Manager. See Chapter 5, “Usingthe User Manager to Configure User and Role Accounts,” and Chapter 8,“Managing Execution Profiles for Users and Roles” for how to use the UserManager and Profile Manager.
Note – For privileges to be made available by inheritance, the privileges mustbe available in the command’s allowed privilege set.
Why Privileged Programs Need to Use Trusted Shared LibrariesMost applications use shared library routines. In Trusted Solaris, the securityadministrator needs to make sure that shared libraries used by any applicationthat requires privilege(s) are in a trusted directory. The dynamic linking ofprivileged applications to shared libraries is restricted—to ensure thatprivileged applications can never use untrusted libraries. A privilegedapplication that tries to link to an untrusted library fails with an error like:error: cannot load **** libraries.

Adding Software 455
16
Default Trusted Shared Library Directories
The default trusted shared libraries are stored in the directories listed inTable 16-2..
The directories listed in Table 16-2 are protected by mandatory anddiscretionary access controls to keep anyone but administrators from writinginto them or modifying existing library files.
Shared Libraries Used by Third Party or Site-Created Applications
If at all possible, when a third party or site-created application is givenprivilege(s) by a site’s security administrator, any shared libraries on which thetrusted application relies should be moved into one of the default trustedshared library directories shown in Table 16-2. Another alternative is to definea shared library’s directory as trusted, but this alternative should not be usedunless the libraries cannot be moved into one of the existing trusteddirectories. To identify a library directory as trusted, the security administratorlists the directory pathname for a privileged application’s library in a rtld filein /etc/security/tsol .
Note – Any application that is given privilege becomes trusted. The securityadministrator must make sure that a program that needs privileges is actuallyworthy of trust. Because any application’s libraries listed in rtld becometrusted, they require the same level of protection as the default libraries. Thesecurity administrator should ensure that the MAC and DAC permissions onany directory listed in rtld are the same as they are on the default trustedlibraries.
See the ld(1TSOL) man page for information on the link editor for object filesand on the rtld file.
Table 16-2 Default Directories for Trusted Shared Libraries
Trusted C function libraries /usr/lib and /etc/libTrusted extensions to X Server /usr/openwin/lib and /usr/dt/lib

456 Trusted Solaris Administrator’s Procedures—July 1997
16
Example of Privileged Java Applications Using Java Libraries
Like any other privileged applications, Java applications that are givenprivileges in order to work also need to have their shared libraries identified astrusted, as described in the previous two sections. Here is a request for helpfrom a service representative:
Because the site’s security administrator cannot change the location of thelibrary to which the application is dynamically linking, the securityadministrato needs to update /etc/security/tsol/rtld with the path ofthe Java libaries (/usr/java/lib / for example). See “To Allow TrustedPrograms to Link to Trusted Libraries” on page 478.
I have a customer that is having problems running Javaapplications with privileges. He gets errors:error can't loadjava libraries

Adding Software 457
16
Starting Commands With or Without Trusted Solaris Security Attributes DuringBoot
As is the case in the base Solaris system, the commands that run during boot ofthe Trusted Solaris system may be added to or otherwise modified byadministrative action.The base behavior is described in “Run Control Scripts”in the Solaris System Administration Guide, Volume 1 and on the init.d (4) manpage. See the README in each /etc/rc n.d directory for some guidelinesabout the numbering of the scripts that start system services.
During boot, the /sbin/rc n scripts execute the scripts in the corresponding/etc/rc n.d directories. The number n in the run control scripts’ names andrun control directories’ names stands for the run level.
The scripts in the /etc/rcn.d directories are hard links to scripts actuallylocated in /etc/init.d . For example, sendmail scripts with different namesin the /etc/rc0.d , rc1.d , and rc2.d directories are actually hard links tothe /etc/init.d/sendmail script. The three links to/etc/init.d/sendmail in the /etc/rc n.d directories are shown inFigure 16-5.
Figure 16-5 /etc/initd.d/sendmail Linked to /etc/ rc n.d Directories
A script in the /etc/rcn.d directories starts with a S prefix when the scriptneeds to be run with the start option, and it starts with a K prefix when itneeds to be run with the stop option. In run levels 0 and 1, sendmail isstopped (as indicated by the K prefix on the filename), and in run level 2,sendmail is started (as indicated with the S prefix on the filename).
/etc/rc0.d/
K57sendmail
/etc/rc1.d/
K57sendmail
/etc/rc2.d/
S88sendmail

458 Trusted Solaris Administrator’s Procedures—July 1997
16
After installing a new script into /etc/init.d , the security administratordoes the following:
• Identifies where in the boot sequence the script needs to be started and/orstopped
• In one or more /etc/rc n.d directory, makes a hard link to the script in/etc/init.d
• Uses the proper prefix in the target file’s name for either starting orstopping
• Uses the proper numbers in the target file’s name to help determine theorder in which the script is executed during the run level
The point in the boot sequence at which a new script should be run alsodetermines whether the security administrator puts the command run by thescript into an execution profile stored in a local tsolprof file or into anexecution profile stored in the tsolprof NIS+ map, as discussed in moredetail in “To Specify Commands to Run With or Without Special AttributesDuring Boot” on page 481.
In the Trusted Solaris system, the /sbin/ rcn scripts have been modified to usethe system shell, sysh(1MTSOL) , instead of the Bourne shell, sh(1) . In thedefault Trusted Solaris system, a boot execution profile has been set up tospecify security attributes for commands started during boot. In the /sbin/ rcnscripts, /bin/sysh is used without a profile name argument because it looksat the boot profile by default.
Warning – Do not modify the boot profile or the /sbin/ rcn scripts.
The security administrator should follow the steps in “To Specify Commandsto Run With or Without Special Attributes During Boot” on page 481 to createnew profile that has the name of the command run by the script and shoulduse the sysh shell in the script, telling the sysh to consult the new profile byusing sysh ’s setprof option.

Adding Software 459
16
Using Scripts in the /etc/init.d Directory to Start and Stop Services
In Solaris, the superuser can start and stop any command (also referred to aservice) in the /etc/init.d directory by entering the name of the commandfollowed by either the start or stop options. For example, the superuser canenter:
Figure 16-6 Starting and Stopping sendmail Using the start and stop Options withthe /etc/init.d/sendmail Script
Stopping sendmail and other commands in a Trusted Solaris system as shownin Figure 16-6 does not require privileges, but the command must be run by anadministrative role in an administrative role workspace with the trusted pathattribute and the script name must be in one of the account’s executionprofiles.
Most commands run during Trusted Solaris boot usually need to inheritprivileges when starting, so entering the /etc/init.d pathname of a script tostart a command would succeed only if the script is invoked in a shell that hasthe needed privileges and other attributes. And the /etc/init.d/ scriptwould have to be in one of the account’s profiles with the needed privileges,unless the account has the Privileged Shells execution profile or has the syshcommand in another execution profile.
See each command’s man page for the privileges that a command needs. Forexample, the sendmail(1MTSOL) command’s man page states that it needsthe net_mac_read, net_privaddr, proc_nofloat, proc_setil, file_mac_read, andfile_mac_search privileges to run the options that it runs with during boot andthat it needs to run at ADMIN_HIGH with an effective UID of 0, so thecommand in the above example to start sendmail would work only if runwith the specified attributes.
For example, the root role has the Privileged Shells profile, so root can enterpfsh followed by sysh to run the system shell with all privileges, beforerunning either of the commands shown above.
# /etc/init.d/sendmail startand# /etc/init.d/sendmail stop

460 Trusted Solaris Administrator’s Procedures—July 1997
16
Security Administrator’s Tasks in Adding SoftwareThe default Trusted Solaris programs and actions have already been assignedprivileges, effective UIDs or effective GIDs when any of these are required forthe programs or actions to do their work. This section discusses the issues andtasks associated with the adding of the following types of software:
• Sun unbundled products and third-party applications that neitherunderstand nor enforce Trusted Solaris security policy
• New programs, created by in-house developers using Trusted Solarisprogramming interfaces, that understand labels and MAC (mandatoryaccess control) and that work within Trusted Solaris security policy
• New actions (created or approved by the security administrator)• Shell scripts (created or approved by the security administrator)
Some programs run at a single level with no privileges required, so the securityadministrator can simply install them at ADMIN_LOW in a public directoryand assign them as desired as commands in the execution profiles of users androles without assigning privileges or modifying any other attributes to makethe programs work. Other programs that need to bypass security policy mayneed to be assigned privileges, but before that is done, analysis and testing isrequired.
Issues Around the Adding of Privileges to Any Software
To recap a basic principle of privilege management, software needs privilegesor other security attributes only when it needs to circumvent some aspect ofthe system security policy in order to do its work.
To find out what privileges a program needs, the security administrator canturn on the tsol_privs_debug switch in system (4) and use runpd asdescribed in “To Find Out Which Privileges an Application Needs” onpage 473 to find out what privileges are being requested, but that is only thebeginning.
If a program needs to override DAC or MAC restrictions on accessing a file,the security administrator might decide to assign an effective UID or GID tomake the privilege unnecessary, as described in “Alternatives to AssigningPrivilege” on page 440.

Adding Software 461
16
When software has been assigned privileges or an alternate UID or GID, thesoftware becomes trusted by virtue of the fact that it is being allowed to bypassaspects of the Trusted Solaris security policy. The problem is that if you allowsoftware to bypass security policy, you can make software trusted even thoughit might not be trustworthy. The security administrator must not give anyprivileges to software until convinced that the software can use the privilegesin a trustworthy manner. Only when it has been scrutinized and found to beusing its privileges within the system security policy, can a program be called atrustworthy program.
When Adding Existing Programs
Do the following when your site wishes to add any existing programs to aTrusted Solaris system, whether it is an application written outside of yourorganization, a Solaris unbundled software program, or a program written inhouse:
1. Find out if the application can run at all in the Trusted Solaris system.If it runs without privilege or any modification, you are done.
2. Find out why the program failed,Some unbundled software packages and third-party applications written forSolaris cannot run because of certain modifications made to theTrusted Solaris operating system to enforce security policy. For example,software that links with the kernel may be incompatible with Trusted Solarismodified kernel data structures. For similar reasons, loadable device driversand other software may not be capable of operating in the environmentunless changes are made to the code.
If the application is linked to the kernel or relies on aspects of the operatingsystem that have been modified, the program probably is not capable ofrunning on Trusted Solaris even if privileges were added unless other codechanges were made.
3. If the program does not rely on aspects of the Solaris operating system thathave been modified for Trusted Solaris, but it fails without privileges, findout what privileges or other attributes it needs.
4. If the program does require the use of privilege, assess whether the programwill use its privileges in a trustworthy manner.See “Things to Think About When a Program Fails Without Privileges” onpage 462.

462 Trusted Solaris Administrator’s Procedures—July 1997
16
5. If the program can safely run with the privileges or other attributes itrequires in a manner that does not violate the Trusted Solaris security policyor the security policy of your installation, you may then assign the requiredprivilege(s) as described in “How Privileges Are Assigned to Commandsand Actions” on page 453.
6. If you have access to the source code of a program, you may add privilegesin some cases, after a security consultant or programmer knowledgableabout security modifies the code.These modifications might include privilege bracketing or adding code thatmakes the program aware of the Trusted Solaris security policy.
7. If you make privileges available to a program, you need to make sure thatany libraries used by the program are identified as trusted. See “WhyPrivileged Programs Need to Use Trusted Shared Libraries” on page 454.
8. If the program cannot use its privileges in a trustworthy manner and itcannot be modified, do not make it available.
Things to Think About When a Program Fails Without Privileges
The most obvious type of program that fails without privileges underTrusted Solaris is one that executes with setuid root . This kind of programmay be assigned an effective UID of root in a profile.
Most applications are written in environments that do not have the securitymechanisms needed by evaluated systems at B1 and above such as MAC andinformation labeling. For this reason, it is necessary that the person whoassesses the program thoroughly understands security and thoroughlyunderstands what the new program is trying to accomplish.
Be especially careful when allowing any program to violate Trusted Solarispolicies such as MAC and information labeling, which have no analogs instandard UNIX systems. While UNIX applications that need to violate DACoften are implemented to make careful checks before doing so on a user’sbehalf, a standard UNIX application certainly does not make similar checksabout MAC. If you give such a program a MAC-override privilege, you mayunintentionally provide a way for users to override MAC arbitrarily.
Some of the security considerations you must assess are illustrated by thebehavior of rcp(1) , which is a commonly used UNIX program. The rcpcommand, which copies files across a network, runs with setuid root .

Adding Software 463
16
Running as root allows the program to run with all privileges in a standardUNIX system. Although the program is allowed to bypass DAC restrictions, itknows enough to check for DAC permissions on a file to make sure the userwho executed the rcp command has permission to access the file. But rcp hasno knowledge of MAC restrictions. If you gave it the file_mac_read orfile_mac_write privilege, rcp would not have the built-in ability to do thesame kind of checks for MAC relationships when accessing a file for a user; sorcp would not be able to use the privileges you assigned it in a manner thatenforced the security policy of the system.
If you simply assign a similar program the privileges it needs to run and donot modify it to work within the security policy of the Trusted Solaris, theprogram violates system security. In order to make it run without violatingsystem security, you would need to add to the program’s source code. Forexample, if a program needed to bypass MAC restrictions when reading andwriting files, you would need to modify the source code by adding code to dothe necessary MAC checks.
Some software may need privileges for reasons that are not obvious. Even if itis not performing any function that seems to violate system security policy, anapplication may be doing something internally that does violate security, suchas keeping track of its operations in a shared log file, or reading from/dev/kmem (see kmem(7D). Sometimes these internal policy overrides are notparticularly important to the application’s correct operation but merelyprovide a convenient feature for users. If your organization has access to thesource code, the offending policy overrides may be removed without impacton the performance of the application.
If the program would violate aspects of Trusted Solaris security policy, such asreading and writing files without doing MAC checks, then you shouldprobably either make sure the required MAC checks are added to the sourcecode, if you can, or not port the program.
When Applications Need to Be Installed as Root
Often the software that installs a particular application or package requires areal UID of root in order to succeed. Because the profile mechanism only allowsthe security administrator to assign an effective UID to an application, assigninga UID of root to the installation program in a profile would not fill the

464 Trusted Solaris Administrator’s Procedures—July 1997
16
requirement. The security administrator can enable this type of application tobe installed by doing the steps in “To Set Up an Application to Run WIth aReal UID of Root.”
When Applications Need to Run As Root
When an application has been written to run as root, the security administratorhas three options (all of which should be assessed for consistency with thesite’s security policy):
• If a real UID of root is not required, set up the application to run with aneffective UID of rootSee “To Set Up An Application to Run With An Effective UID of Root.
• Find out what privileges the application needs and assign only the neededprivileges, after determining that the application can use the privileges in atrustworthy manner.See “To Find Out Which Privileges an Application Needs” on page 473.
• Assign the root role (temporarily or permanently) to the desired account(s)and assign the command to one of the account’s profiles.See“To Set Up an Application to Run WIth a Real UID of Root.”
When Adding a New Trusted Program
Even though the program’s developer can determine which privileges to putinto the program’s source code, if the security administrator does not assign aprivilege that the program needs, then the program cannot use the privilege.Because both the security administrator and the developer must work togetherto add privileges to trusted programs, the use of privilege by new programscan be said to be another Trusted Solaris administrative task that is under two-person control. If it cannot override the security policy, the program may notdo all the things you expect it to do, or it may not even run in the TrustedSolaris system.
Developer’s Responsibilities
A developer who writes a program to be added to a Trusted Solaris systemmust do the following:
1. Understand whether the program requires privileges to do its work.

Adding Software 465
16
2. Know and follow techniques, such as privilege bracketing, for safely usingprivileges in programs
3. Be aware of the security implications when assigning privileges to aprogram and make sure that the program does not violate security policy.
4. Work with the security administrator to place shared libraries linked to theprogram in a trusted directory as described in “Why Privileged ProgramsNeed to Use Trusted Shared Libraries” on page 454 and use the trusteddirectory location when compiling the program in Step 1 in “To AllowTrusted Programs to Link to Trusted Libraries” on page 478.
See the Trusted Solaris Developer’s Guide for additional instructions on how touse privileges in programs.
Security Administrator‘s Responsibilities
As the security administrator, you must ensure that a program that usesTrusted Solaris system calls and routines to work within security policy doesnot compromise the security of the Trusted Solaris system in any way.
1. Make sure the programmer and the program distribution process is trusted.
2. From one of these sources, find out which privileges are required by theprogram:
a. Ask the programmer.
b. Search the source code for any privileges that the program expects to use.
c. Use runpd as described in “To Find Out Which Privileges an ApplicationNeeds” on page 473.
3. Scrutinize the source code to make sure it behaves in a trustworthy mannerwhen using the privileges it needs to operate.
When Adding Actions
The process of creating and using actions is pretty much the same in theTrusted Solaris system as it is in the base. Adding actions is described in theCDE Advanced User’s Guide and System Administrator’s Guide.

466 Trusted Solaris Administrator’s Procedures—July 1997
16
In Trusted Solaris, use of actions is controlled by the execution profilemechanism and by MAC. Actions may be assigned inheritable privileges inany execution profile, and they can run with privileges if they are invokedwithin one of the window system’s trusted processes that can pass themprivileges from its inheritable set. In the Trusted Solaris system, a number ofactions have been assigned privileges in execution profiles that are assigned tocertain roles by default. Table 16-3 summarizes the main differencesencountered in creating and using actions in the Trusted Solaris system.
Table 16-3 Differences in Creating and Using Actions Under Trusted Solaris Restraints(1 of 2)
Base CDE Trusted Solaris
New actions may be created by anyone withinthe originator’s home directory, and a new actionis automatically usable by its creator.
An action is only usable by a user or role if the action is one of theaccount’s execution profiles.
If the Create Action action or commands or actions that permit theediting of files are in an account’s profile, the user or role can create anew action in the account’s home directory, but the account may not beable to use the new action.
There are two ways a user can use any new action: if the securityadministrator adds the name of the new action to one of the account’sexecution profiles, or if the person has the All profile. The All profileturns off all checks for actions, and as a result any existing and potentialactions may then be used by that account.
Only if the account is allowed to use the action by its execution profiles,will the account be able to launch the action from its home directorythrough the File Manager.

Adding Software 467
16
Modifying the Front Panel and Workspace Menu
The CDE Advanced User’s Guide and System Administrator’s Guide describes howto modify components such as the Front Panel and Workspace Menu. Ordinaryusers are not allowed to modify the Front Panel and Workspace menu startupfiles, although they may drag and drop actions onto the Front Panel withoutsecurity risks and therefore without restrictions.
Nobody but the security administrator can modify the configuration files forthe Front Panel. The use of privileges by actions and their UID, GID, andsensitivity label are controlled through the profile mechanism, but anycommand specified in the configuration files for the Front Panel, its Subpanels,and the Workspace menu runs as root with all privileges. Because commandsare not controlled but actions are, the security administrator must be cautiousif doing customizations of any of these files and should use only f.action tolaunch an action, never use f.exec to execute a program.
A new action’s files may be copied to publicdirectories under /etc/dt to make the newactions available to others.
MAC restrictions prevent the copying of new actions to publicdirectories. The public directories where actions are kept are notwritable by normal users or non-administrative role accounts, sonew actions cannot be moved to these public locations.
Actions can be dragged and dropped to theFront Panel.
The Front Panel is part of the trusted path. The window managerrecognizes only the administratively-added actions that arelocated in /usr/dt and /etc/dt subdirectories where system-wide action files are kept. So, even if a normal user account or anon-administrative role account creates a new action in theaccount’s home directory and has the All Accounts profile, newactions dragged to the Front Panel from the user’s homedirectory cannot be recognized by the window manager, whichonly looks in the public directories.
The only way that actions can do privilegedoperations is if they are run by root.
If actions are specified to have privileges in one of the invokingaccount’s execution profiles, actions can inherit privileges whenthey are launched from a trusted process. Therefore, the onlyway that actions can do privileged operation is if they have beenassigned privileges in the accounts profiles.
Table 16-3 Differences in Creating and Using Actions Under Trusted Solaris Restraints(2 of 2)
Base CDE Trusted Solaris

468 Trusted Solaris Administrator’s Procedures—July 1997
16
For example, the /usr/dt/config/C/sys.dtwmrc file specifies the menus andthe contents of the Front Panel. The example shows the menu line that launchesDtterm terminal.
If the security administrator changed f.action Dtterm tof.exec /usr/dt/bin/dtterm , the terminal would come up as root with allprivileges, while the Dtterm action would run with only the privilegesspecified for it in the account’s profiles.
This manual contains two procedures that modify existing files to create newactions, one to create an alternate mail application that can run with privilegein the Front Panel and one to add an administrative action that can run withinherited privileges to the System_Admin folder for the purpose of editinganother configuration file. See “To Create A New Administrative Action forEditing an Administrative File” on page 24 of Chapter 1 and “Substituting anAlternate Mail Application” on page 180 of Chapter 6.
Table 16-4 summarizes the main differences that apply to modifying theworkspace under Trusted Solaris.
“Terminal...” f.action Dtterm
Table 16-4 Differences in Modifying the Workspace Under Trusted Solaris Restraints
Base CDE Trusted Solaris
Any user can copy the system-wide version ofthe dtwmrc (4) file into $HOME/.dt and modifythe workspace menu to bring up actions andinvoke commands.
Even if a dtwmrc file is copied to any $HOME directory, the windowsystem does not use that file.
Any action or command invoked through theworkspace menu or from the Front Panel runswith the UID of the invoking user.
Any command invoked through the workspace menu or from the FrontPanel runs as root with all privileges while any action invoked the sameway would come up only with the privileges and other attributesspecified for it in the account’s profile.

Adding Software 469
16
Creating and Using Shell Scripts
If an account has been assigned a normal UNIX shell (sh , csh , ksh ), theaccount can create new shell scripts that can run any command in the systemwithout privileges. Therefore, if none of its commands need privileges, a shellscript can be used by anyone who has access to the software and who is able toaccess a terminal or shell tool in which to run the shell script.
Making privileges available to commands run in shell scripts may be doneonly by security administrators. To begin with, here is a review of the TrustedSolaris constraints that affect how a shell script can be made to run with orwithout privileges.
Remember that the two ways any command can run with privilege are:
• The command’s executable file has the needed privileges in both its forcedand allowed sets, or
• The command has the needed privileges specified in a profile assigned tothe person or role that invokes the command, the program file for thecommand has the needed privileges in its allowed set, and the command isbeing run in a profile shell from which it can inherit privilege
Making privileges available to a command within a shell script is not the sameas making privileges available to a command when it is run on a commandline, either in a shell tool or terminal emulator that is running a sh , csh , orksh shell. Forced privilege commands can run with privilege in the sh , csh ,and ksh shells because the forced privileges attached to the program file areavailable to the executing command even though the shell does not have anyprivileges. Assigning forced privileges to a sh , csh , or ksh shell script doesnot give any privileges to the commands executed by the shell script becauseeven though the shell started from the script runs with the forced privileges,the shell does not have any privileges in its inheritable set. See the rules forhow processes get privileges, which are described in “Process Privilege Sets”on page 445.

470 Trusted Solaris Administrator’s Procedures—July 1997
16
Warning – To prevent unauthorized tampering with object code or systemscripts, whenever any executable program file is edited, any forced andallowed privileges previously given to that file are deleted. If a program file’sallowed set is empty, it cannot use inheritable privileges, which are masked bythe allowed set. However, in Trusted Solaris 2.5, the forced and allowedprivileges for a shell script are not consulted by the profile mechanism whenmaking inheritable privileges available. For this reason, shell scripts are morevulnerable than programs to being modified without detection. Before makingshell scripts available that use inheritable privileges, the security administratorshould keep in mind that the same protection against tampering that isavailable for programs is not available to shell scripts.
Summary of Shell Script Behavior in Trusted Solaris Systems• If none of its commands need privileges, a shell script can be created by
anyone who is allowed to use a text editor and can used by anyone who hasaccess to the software and who is able to access a terminal or shell tool inwhich to run the shell script.
• Forced privilege shell scripts do not pass privileges to commands that theycontain.
• Allowed privileges on shell scripts have no effect on which privileges itsprograms can use.
The allowed privilege set of the invoked shell’s file is checked rather thanthat of the script’s file.
• A standard shell script that is invoked in a profile shell can pass privilegesto commands that it runs only if the shell script is listed with the privilegesrequired by its commands in one of the invoking user’s profiles.
The shell script can pass any of its privileges to be inherited by thecommands it executes if the commands themselves have the allowedprivileges they need on their program files. Because the commands arebeing run in a standard shell, it is no use to list them with privileges in oneof the invoking account’s profiles—because standard shells do not consultthe profiles database. See Figure 16-7 “How Shell Scripts Invoked in pfshCan Pass Inheritable Privileges to Their Commands,” on page 471.

Adding Software 471
16
Figure 16-7 How Shell Scripts Invoked in pfsh Can Pass Inheritable Privileges to TheirCommands
See “To Write a Profile Shell Script That Runs Privileged Commands” onpage 479.
• Shell scripts that use the profile shell can pass privileges to their commandsin whatever shell they are running, if the commands are listed with therequired privileges in one of the invoking user’s profiles.
See “To Write a Profile Shell Script That Runs Privileged Commands” onpage 479.
profile shell
$ scriptB
scriptB
process executesscriptB
process executescsh
A.
B.
C.
D.
E.
A.In one of the invoking account’s profiles, scriptB has inheritable=20,22,29, so pfsh
B.scriptB’ s file privilege sets: forced=none, allowed=none (but its file privilege setsare not consulted)C.
csh ’s file privileges sets: forced=none; allowed=allE.process executing csh has inheritable=20,22,29; effective=20,22,29;
csh
process
sets its own inheritable=20,22,29
process executesls
G.
permitted=20,22,29F.ls’ s file privilege sets: forced=none; allowed=all
ls
F.
G.process executing ls has inheritable=20,22.29; effective=20,22,29; permitted=20,22,29
D.process executing scriptB has inheritable=20,22,29

472 Trusted Solaris Administrator’s Procedures—July 1997
16
How Program File Are Protected From Being Able to Use InheritablePrivileges If Edited
To prevent unauthorized tampering with object code, any forced and allowedprivileges previously given to a file are deleted whenever any executableprogram file is edited. This prevents someone from editing a file so that it usesprivileges in a manner that was not originally intended. The securityadministrator can save the list of privileges on such a file before editing it andrestore them afterwards, as described in “To Restore Privileges Lost When aFile is Edited” on page 483.
Procedures for Adding Software
▼ To Add A Package from a CD-ROM
1. Assume the system administrator role, and in an ADMIN_LOWworkspace, make a directory for the CD-ROM, using the File ManagerNew Folder option or mkdir on the command line.
2. Mount the CD-ROM.
3. Go to /cdrom/Trusted_Solaris and run pkgadd with the -d optionfollowed by the name of the package.
$ mkdir /cdrom
$ mount -o ro -F hsfs /dev/dsk/c0t6d0/s0 /cdrom
$ cd /cdrom/Trusted_Solaris$ pkgadd -d . package_name

Adding Software 473
16
▼ To Set Up an Application to Run WIth a Real UID of Root
1. Use the User Manager to assign the root role to the user account oradministrative role account that is responsible for doing the installation.
2. Use the Profile Manager to assign the name of the application program toone of the profiles assigned to the root role.
3. If desired, use the User Manager to remove the root role from the accountwhen the task is done.
▼ To Set Up An Application to Run With An Effective UID of Root
1. Use the Profile Manager to assign the command name of the applicationprogram to an appropriate profile and give the command a UID of root.
2. Use the User Manager to assign the profile with the added command toany user account or administrative role account as desired.
▼ To Find Out Which Privileges an Application Needs
1. As security administrator role in an ADMIN_LOW workspace, use theAdmin Edit action to open the /etc/system file for editing.
2. Search for set tsolsys and set the value of tsol_privs_debug=1.See Figure 16-8.
Figure 16-8 Changing the Value of tsol_privs_debug to = 1 in the system File
3. Save the changes to the file and close it.
4. Use the Admin Edit action to open the /etc/syslog.conf file forediting.
set tsolsys:tsol_privs_debug=1

474 Trusted Solaris Administrator’s Procedures—July 1997
16
5. Find the lines shown in Figure 16-9.
Figure 16-9 Commented Privilege Debugging Line in /etc/syslog.conf
6. Remove the comment (#) at the beginning of the line that beginskern.debug , and add local0.debug after kern.debug .See Figure 16-10.
Figure 16-10 Privilege Debugging Line with local0.debug String Added in/etc/syslog.conf
Note – Uncommenting kern.debug enables privilege-debugging of anapplication’s use of system calls. Adding the local0.debug string enablesdebugging of X window calls and is needed for privilege- debugging windowapplications.
7. Save the changes to the file and close it.
8. Create the log file in /var/log .
a. In an ADMIN_HIGH workspace, navigate to the /var/log directoryusing the File Manager.
b. Use the New File option from the File Manager File menu and enterprivdebug.log in the New File Name field.
c. Change the owner of the privdebug.log file to root.
9. Reboot the machine.
# Un-comment the following line to enable privilege debugging with# the runpd command. See runpd(1MTSOL).#kern.debug; /var/log/privdebug.log
# Un-comment the following line to enable privilege debugging with# the runpd command. See runpd(1MTSOL).kern.debug;local0.debug /var/log/privdebug.log
$ reboot

Adding Software 475
16
10. Assume the secadmin role (or a role that has runpd in one of its profiles).
11. On the command line in a pfsh at the appropriate sensitivity label, enterthe runpd command followed by the full pathname of the commandwhose use of privilege you want to check.
Note – To test which privileges a program needs when run as a normal user,you should run runpd with a user ID of someone who is not in a role. To dothis, you could create an action including runpd and assign the EUID of anormal user to that action, and then put the action in a profile for the securityadministrator role.
Note – The sensitivity label at which to invoke runpd depends on who will beusing the application you are testing. While an administrative role might runthe application at one of the administrative labels, a normal user would run theapplication at one of the labels in the user accreditation range.
As shown in Figure 16-11, runpd displays the name of the privilege(s) thatthe program needs in order to succeed followed by the type of accessattempted (create in the example) followed by the name of the resource(RAW_SOCKET in the example).
Figure 16-11 runpd Displaying Privilege Needed For A Process To Succeed
$ ping redondoping: socket: Not owner$ runpd /usr/sbin/ping redondoredondo is aliverunpd: child terminated with a status of 0process /usr/sbin/ping pid 1096 lacking privilege net_rawaccessto perform create method upon resource RAW_SOCKET (Mar 29 11:39)$

476 Trusted Solaris Administrator’s Procedures—July 1997
16
12. See also the log file for the privilege debugging messages.A typical privilege debugging log entry looks like the example shown inFigure 16-12.
Figure 16-12 Typical Privilege Debugging Entry in /var/log/privedebug.log
The privilege numbers appear after the word "privilege." In the exampleabove, the command ping is lacking privilege numbers 36. You can, ifnecessary, look up the privilege number in the/usr/include/sys/tsol/priv_names.h file to find its name. Forexample, the privilege number 36 is associated with the namenet_rawaccess. The numbers following the privilege number and the word“to” are the number of the type of access attempted followed by the numberof the resource.
13. To give the needed privileges see “To Give Forced Privileges to aCommand” on page 476 or and Chapter 8, “Managing Execution Profilesfor Users and Roles” for how to use the Profile Manager to assigninheritable privileges.
Note – For a command to be able to use either forced or allowed privileges, theprivileges must be available in the command’s allowed privilege set.
14. To turn off privilege debugging, restore all the changes you made to the/etc/system file and the /etc/syslog.conf file in Step 1 on page 473through Step 7 on page 474 and reboot the machine.
▼ To Give Forced Privileges to a Command
1. As the file’s owner, as any user with the act as file owner authorization, oras the security administrator, go to the directory where the program file islocated.Use the File Manager to navigate to the directory or use cd(1) on thecommand line.
$ cat /var/log/privdebug.log Mar 29 12:18:43 crazy unix: DEBUG: /usr/sbin/ping pid 294 lackingprivilege 36 to 5 79

Adding Software 477
16
2. Make sure the file is executable.Use the File Manager—Permissions dialog box to make sure that theExecute box is checked for Owner, Group and Other. Alternately, if you havethe chown command in your profiles and are the owner of the file, if you arein the security administrator role, or if you have the change file ownerauthorization, you may use chown(1) on the command line to make thecommand executable by everyone.
3. Make sure the command has allowed privileges equal to the forcedprivileges you plan to assign.
a. If you are using the File Manager—Permissions dialog box, select theAllowed button, assign Allowed Privileges, and then select the Forcedbutton, and assign the Forced Privileges.
b. If you have setfpriv(1TSOL) with the needed privileges in one ofyour profiles (as the security administrator role does in the defaultconfiguration), use setfpriv to assign the same privileges in both theallowed and forced sets.The example shows the setting of file_dac_read and file_dac_write asallowed and forced privileges.
$ setfpriv -s -f file_dac_read,file_dac_write -p file_dac_read,file_dac_write test.priv.file

478 Trusted Solaris Administrator’s Procedures—July 1997
16
▼ To Allow Trusted Programs to Link to Trusted Libraries
1. If adding a newly-created privileged application, do the following steps.
a. Move the libraries that the application uses into one of the defaulttrusted library directories in Table 16-5
For example for a privileged Java application that uses /java/liblibraries, move the /java/lib directory and the files it contains into/usr/lib , changing the permissions to 755.
b. Give the pathname of the trusted library to the programmer to usewhile linking the program.
2. If porting an existing application that needs privileges, add the directoryname for the library to the rtld file.
Note – Because the libraries for an existing application are fixed, you need toidentify the library directory as trusted in the /etc/security/tsol/rtld .
a. Use the Admin Edit action to create or open the/etc/security/tsol/rtld file for editing.
b. Specify the pathname of the library directory.The example shows the path of a Java library directory used by aprivileged Java application.
c. Save and quit the rtld file.
Table 16-5 Default Directories for Trusted Shared Libraries
Trusted C function libraries /usr/lib and /etc/libTrusted extensions to X Server /usr/openwin/lib and /usr/dt/lib
$ ls /usr/lib. . .-r-xr-xr-x 1 bin 1912 Oct 25 1995 getoptcvt*drwxr-xr-x 2 bin 1024 Dec 5 1995 iconv/drwxr-xr-x 2 bin 1024 Dec 5 1995 java/**. . .
/usr/java/lib

Adding Software 479
16
▼ To Write a Profile Shell Script That Runs Privileged Commands
1. Start the script with /bin/pfsh (instead of another shell) on the first line.
2. Determine which commands need privileges and which privileges areneeded.In the example, /usr/lib/fs/nfs/nfsfind is a cron job owned by rootthat needs privileges in order to run successfully at ADMIN_HIGH. Thetfind command needs the file_dac_search and file_dac_read privileges andthe rm command needs the file_dac_search, file_dac_write, file_dac_read,and file_mac_write privileges.
3. Use the Profile Manager to update an appropriate profile to list each of thecommands that need to run within the shell script and to assign thecommands the privileges they need.To continue with the example, to enable root to run the example cron scriptwith the needed privileges, the security administrator uses the ProfileManager to update the Object Label Management profile (which is assigned
#!/bin/pfsh
#!/bin/pfsh# Copyright (c) 1993, 1997 by Sun Microsystems, Inc.
#ident "@(#)nfsfind.sh 1.5 97/05/21 SMI; TSOL 2.x"## Check shared NFS filesystems for .nfs* files that# are more than a week old.## These files are created by NFS clients when an open file# is removed. To preserve some semblance of Unix semantics# the client renames the file to a unique name so that the# file appears to have been removed from the directory, but# is still usable by the process that has the file open.
if [ ! -s /etc/dfs/sharetab ]; then exit ; fi
for dir in `awk '$3 == "nfs" {print $1}' /etc/dfs/sharetab`do tfind $dir -M -name .nfs\* -mtime +7 -mount -exec rm -f {} \;done

480 Trusted Solaris Administrator’s Procedures—July 1997
16
to root by default) to include the tfind command with the file_dac_searchand file_dac_read privileges and the rm command with the file_dac_search,file_dac_write, file_dac_read, and file_mac_write privilege.
Warning – Be aware that when you add commands to a profile and give themprivileges or other security attributes, the commands execute with thoseattributes not only in the profile shell script but also whenever they areinvoked on the command line in the profile shell—as long as the profile is ineffect for the invoking account. So, for example, if you put tfind and rm intothe Object Label Management profile with the privileges listed in the example,they then will execute in a profile shell with those privileges for whateveraccount has the Object Label Management execution profile as well aswhenever the shell script is invoked by anyone in a standard shell.
▼ To Write a Standard Shell Script That Runs Privileged Commands WhenExecuted in a Profile Shell
1. Start the script with any standard shell (not /bin/pfsh ) on the first line.
2. Determine which commands need privileges and which privileges areneeded.The example, called autosetpriv , would allow the security administratorto assign a defined set of forced and allowed privileges to a file calledexecutable. The setfpriv command in this script needs thefile_setpriv privilege.
#!/bin/csh

Adding Software 481
16
Note – This shell script is just for the sake of example. A normal shell scriptwould accept the privileges and the filename as arguments and do errorchecking. Do not use this shell script unless you want to assign the namedprivileges to an executable file called executable , which would then havethose forced and allowed privileges available no matter who executes it.
3. Assume the security administrator role.
4. Use the Profile Manager to list the shell script in an appropriate profileand to give the script all of the privileges needed by any commands thatrun within the shell script.To enable the script called autosetpriv to run with the file_setprivprivilege needed by the setfpriv command, the security administratorwould use the Profile Manager to update the Object Privileges profile(which is assigned to secadmin by default) to include the autosetprivscript and assign to autosetpriv the file_setpriv privileges.
5. Test, debug, and execute the shell script as desired in the profile shell.
▼ To Specify Commands to Run With or Without Special Attributes DuringBoot
1. Assume the security administrator role.
2. Create a new script to start and stop the desired command, using thesystem shell, sysh(1MTSOL) .See “Run Control Scripts” in the Solaris System Aministration Guide, Volume 1for the basics and see the sysh(1MTSOL) man page.
#/bin/cshsetfpriv -s -f ipc_mac_write,ipc_upgrade_il,proc_setsl,sys_trans_label-a ipc_mac_write,ipc_upgrade_il,proc_setsl,sys_trans_label executable
$ /bin/pfsh$ autosetpriv
#!/bin/sysh

482 Trusted Solaris Administrator’s Procedures—July 1997
16
3. Put the new script into the /etc/init.d directory.Usually the name given to the script is the name of the command it startsand stops. For example, the name of the script in /etc/init.d to start andstop sendmail is sendmail .
4. For each run level at which the command should be started or stopped, goto the appropriate /etc/rc n.d directory and create a hard link from aproperly-named target file to the /etc/init.d directory.
a. Use the proper prefix in the target file’s name for either starting (S) orstopping (K).
b. Use the proper numbers in the target file’s name to help determine theorder in which the script is executed during the run level.
If the command does not need security attributes you are done.
5. If the command started by the script needs any security attributes tosucceed, bring up the Profile Manager and pick a naming service.
a. If the command needs to start before networking services are up, selectNone from the Naming Service menu on the Profile Manager, so thatthe profile is created locally in /etc/security/tsol/tsolprof .
b. If the command needs to start after networking services are up, selectNIS+ from the Naming Service menu on the Profile Manager, so thatthe profile is created in the tsolprof NIS+ map on the NIS+ master.
6. Use the Profile Manager to create a new profile that lists the command andassigns privileges, UID, GID, or a sensitivity label, as needed.For an example from the default Trusted Solaris system, the sendmaildaemon is started by the /etc/rc2.d/S88sendmail script during bootwith the -bd and -q1h arguments. The man page describes that sendmailneeds to run with an effective UID of 0 at ADMIN_LOW and needs thenet_mac_read, net_privaddr, proc_nofloat, proc_setil, file_mac_read, andfile_mac_search privileges for the -bd and -q options, so the sendmailcommand is configured in the boot profile with UID of 0, a sensitivity labelof ADMIN_LOW and with the required privileges.
$ cd /etc/rc2.d$ ln /etc/init.d/ scriptname [S|K] nnscriptname

Adding Software 483
16
7. If the command started by the script needs any security attributes tosucceed, use the sysh ‘s setprof option in the /etc/init.d shell scriptto identify the name of an execution profile.
a. Use the Admin Edit action to bring up the script file in /etc/init.dfor editing.
b. Type in the setprof command followed by the name of the newprofile created in Step 5.
c. Save and close the script.
8. Reboot the system.
▼ To Restore Privileges Lost When a File is Edited
1. As security administrator, use getfpriv(1TSOL) to list the privileges onthe file and direct the output into a temporary file.
2. After editing the program, use the File Manager to make the fileexecutable (if needed) and to restore the privileges.
setprof new_profile_name
$ reboot

484 Trusted Solaris Administrator’s Procedures—July 1997
16

485
Host Administration Checklist 17
This chapter provides a checklist that you can photocopy and use as aworksheet when installing new hosts on the netwrok. The first columnidentifies the dialog box and the second column presents the information thatneeds to be supplied. The third column is provided for your convenience sothat you can write down your intended input prior to running the software.
Table 17-1 Host Administration Checklist (1 of 2)
Dialog Box Title Contents Your Answer
Host Name
Networked? Yes | No
IP address
Ethernet address
Primary network interface Interfaces of workstation.
Name service NIS+ | None None.

486 Trusted Solaris Administrator’s Procedures—July 1997
17
Trusted Solarisconfiguration
Multiple user Sensitivity Labels?Hide Upgraded Names?Enable ILs?Float ILs?Reset ILs upon EXEC?
Subnet Yes | No
Subnet mask 255.255.255.0
Time zone Offset from GMT |Geographical
Date and Time
System type Standalone | OS server |Diskless
Software group End user | Developer | Entire
Customize? Yes | No
Disk(s) to use Disks visible to the workstation.
Preserve? Disks to leave as they are.
Auto-layout file systems? Yes | No
File systems to auto-layout /, /usr, /var, /opt,swap
Begin installation Yes | No
Reboot Yes | No
Root password
Table 17-1 Host Administration Checklist (2 of 2)
Dialog Box Title Contents Your Answer

487
Profile Summary Tables A
This appendix provides three tables for working with execution profiles. Yoursite may have customized the default profiles, and if so, the customizationswill not be reflected here.
Execution Profile Content Summary page 488
Finding Commands in Execution Profiles page 493
Finding Actions in Execution Profiles page 506

488 Trusted Solaris Administrator’s Procedures—July 1997
A
Execution Profile Content SummaryTable A-1 lists each execution profile and the commands, actions, andauthorizations assigned to it in the default configuration. The table alsoindicates in parentheses () to which roles each profile is assigned by default. Ifyou need the specific security attributes assigned to actions and command in aparticular profile, see the individual profile tables in Appendix B, “ProfileDefinition Tables” or use the Profile Manager to view that profile.
Table A-1 Execution Profile Contents
Profile (Default Role Assignments)
Commands Actions Authorizations
All (Root)
All commands All actions
All Authorizations (Root)
All authorizations
Audit Control Profile (Security Administrator)
bsmconv, bsmunconv, mkdir, writeaudit,audit, auditconfig, auditd, auditstat,format, mkfs, mount, mountall, newfs,newsecfs, share, shareall, tunefs, umount,umountall, unshare, unshareall
AuditClass, AuditControl,AuditEvent, AuditStartup,AuditUser
set user audit flags,set/get file audit flags, act as file owner
Audit Review Profile (System Administrator)
awk, cat, grep, sed, tail, auditreduce,praudit
Basic Actions (Security Administrator, System Administrator, System Operator, Root)
tsolxagent, ttsession Dtcalc, Dtcm, Dtfile,Dthelpview, SDTimage,Dtmail, Dtmanpageview,Dtterm, Dtpad, Dttrash,Print, Dtappmgr,DtTTMediaOpen,DtfileHome,InvokeFILEMGR,InvokeMAILER,OpenFolder, DtUnlink,Open, TextEditor, Trash

Profile Summary Tables 489
A
Basic Commands (Security Administrator, System Administrator, System Operator, Root)
adminvi, awk, cat, cd, chmod, clear, cmp,col, compress, cp, cut, df, diff, diff3,dircmp, dirname, du, echo, env, expr, false,fgrep, file, fold, getlabel, grep, head, hostid,hostname, id, join, ldd, ln, look, lp, ls,mailq, man, mkdir, more, mv, niscat,nisdefaults, niserror, nisgrep, nismatch,nistest, nroff, page, pfsh, pg, pr, pwd, rcp,rlogin, rm, rmdir, script, sdiff, sleep, sort,spell, stty, tail, tbl, test, tfind, time, touch,troff, true, tty, uname, uncompress, uniq,which, who, rsh, whereis, whoami
Convenient Authorizations
enable logins, modify cron admin, print aPostScript file, print without labels, remotelogin, set application search path
Enable Login (System Administrator)
enable logins
Maintenance and Repair (System Administrator)
autopush, clri, adb, netstat, add_drv,aspppd, cachefslog, clri, crash, eeprom,fsck, fsdb, fsirand, grpck, halt, ncheck,ping, poweroff, prtconf, pwck, reboot,rem_drv, snoop, spray, strace, syslogd,tokmapd, tunefs
enable logins, remote login, terminal login
Media Backup(System Operator)
mt, tar, ufsdump Tar, TarList, OWtapetool,TarList, TarUnpack,OWtapetool
allocate device
Media Restore (System Administrator)
cpio, mt, tar, ufsrestore TarList, TarUnpack,OWtapetool
allocate device
Table A-1 Execution Profile Contents
Profile (Default Role Assignments)
Commands Actions Authorizations

490 Trusted Solaris Administrator’s Procedures—July 1997
A
NIS+ Administration (System Administrator)
nischttl, nisln, nisctl, nisping,nisshowcache, nisstat, nistnsetup,nistntime, nscd
NIS+ Security Administration (Security Administrator)
chkey, nisaddcred, nischgrp, nischmod,nischown, nisgrpadm, nismkdir,nispasswd, nisrm, nisrmdir, nistbladm,nisaddent, nisclient, nispopulate, nisserver,nissetup, nisupdkeys, newkey, nisinit,nislog
Object Access Management (Security Administrator)
chgrp, chmod, chown, getfacl, getfattrflag,getlabel, setfacl, setfattrflag
Dtfile, Dttrash, DtfileHome,InvokeFILEMGR
act as file owner, change file owner
Object Label Management (Security Administrator)
setfattrflag, cp, getlabel, getmldadorn,getsldname, mldpwd, mldrealpath, mv, rm,setfattrflag, setlabel, tfind, procplabel,atohexlabel, chk_encodings, hextoalabel,tokmapctl
Dtfile, Dttrash,CheckEncodings,EditEncodings, DtfileHome
allocate device, bypass view of file contentson drag and drop, downgrade filesensitivity label, upgrade file sensitivitylabel, use all defined labels
Object Privilege Management
adb, getfpriv, kill, ldd, pkginfo, setfpriv,testfpriv, truss, procppriv, procpprivtest,pkgadd, pkgchk, pkgrm, runpd, swmtool
Dtfile, DtfileHome,InvokeFILEMGR
set file privileges
Outside Accred (Security Administrator, System Administrator, System Operator)
use all defined label
Privileged Shells (Root)
csh, ksh, sh
Table A-1 Execution Profile Contents
Profile (Default Role Assignments)
Commands Actions Authorizations

Profile Summary Tables 491
A
System Management (System Administrator)
adminvi, cancel, date, disable, enable, kill,lp, lpstat, mailq, newaliases, nice, ps, rdist,renice, rup, vmstat, xhost, pattr, pclear,pcred, pfiles, pflags, plabel, pldd, pmap,prun, psig, pstack, pstop, ptime, ptree,pwait, pwdx, accept, allocate, deallocate,format, getfsattr, in.named, init,list_devices, lpadmin, lpfilter, lpmove,lpshut, lpsystem, lpusers, mkfile, mkfs,mount, mountall, newfs, ping, reject, share,shareall, showmount, swap, umount,umountall, unshare, unshareall
Dbmgr, Hostmgr,DNS_Resolve, EditMotd,Vfstab, ShareFS
administer printing, modify at users,modify bootparams, modify cron users,modify ethers, modify hosts, modify locale,modify netmasks, modify networks,modify protocols, modify rpc, modifyservices, modify timezone
System Security (Security Administrator)
adminvi, disable, enable, ps, accept,add_drv, allocate, autopush, deallocate,drvconfig, format, getfsattr, mkfs, newfs,newsecfs, ping, reject, rem_drv, setfsattr,tnchkdb, tnctl, tnd, tninfo
Dbmgr, Printermgr,Serialmgr, TrustedEditor,Nsswitch, SendMail,Vfstab_adjunct
modify at admin, modify cron admin,modify netgroup, modify tnidb, modifytnrhdb, modify tnrhtp, print a PostScriptfile, print without labels, remote login
User Management (System Administrator)
groupmgr, usermgr Groupmgr, Usermgr modify aliases, set attributes related tohome directories, set user identity
User Security (Security Administrator, Root)
dbmgr, profmgr, usermgr modify auto_home, set idle time, set list ofassumable roles, set user audit flags, setuser labels, set user password, set userprofiles, set/get file audit flags, use alldefined labels
Table A-1 Execution Profile Contents
Profile (Default Role Assignments)
Commands Actions Authorizations

492 Trusted Solaris Administrator’s Procedures—July 1997
A
boot
mountall, lpsched, auditd, cron, in.named,inetd, nscd, rpcbind, syslogd, tnd
act as file owner, allocate device, bypassview of file contents on drag and drop,change file owner, downgrade filesensitivity label, enable logins, paste to adowngraded window, paste to anupgraded window, permit self-modification, print a PostScript file, printwithout labels, remote login, set applicationsearch path, set attributes related to homedirectories, set file privileges, set idle time,set list of assumable roles, set user auditflags, set user identity, set user labels, setuser password, set user profiles, set/get fileaudit flags, terminal login, upgrade filesensitivity label, use all defined labels
inetd
rpc.cmsd, rpc.ttdbserverd, in.ftpd,in.rexecd, in.rlogind, in.rshd, in.telnetd,in.tftpd, sadmind
Table A-1 Execution Profile Contents
Profile (Default Role Assignments)
Commands Actions Authorizations

Profile Summary Tables 493
A
Finding Commands in Execution ProfilesTable A-2 lists each command contained in any execution profile and theexecution profile(s) to which it is assigned. Remember that a command may belisted in more than one execution profile and could have a different set ofsecurity attributes in each profile in which it is listed. The table also indicatesthe full path of the command as well as whether it has any security attributes:minimum label, maximum label, setUID value, setGID value, and privileges.The term privs indicates that the command has one or more privileges. Forspecific privilege information, see the individual profile tables in Appendix B,“Profile Definition Tables” or use the Profile Manager to determine whichprivileges are applied to the command within that profile.
Table A-2 Commands and Their Associated Execution Profiles
Command Profile Path Security Attributes
accept System Management /usr/sbin/accept privs
accept System Security /usr/sbin/accept privs
adb Maintenance and Repair /usr/bin/adb
adb Object Privilege Management /usr/bin/adb
add_drv Maintenance and Repair /usr/sbin/add_drv
add_drv System Security /usr/sbin/add_drv
adminvi Basic Commands /usr/bin/adminvi
adminvi System Management /usr/bin/adminvi
adminvi System Security /usr/bin/adminvi
allocate System Management /usr/sbin/allocate privs
allocate System Security /usr/sbin/allocate privs
aspppd Maintenance and Repair /usr/sbin/aspppd
atohexlabel Object Label Management /usr/sbin/atohexlabel
audit Audit Control /usr/sbin/audit UID = 0, privs
auditconfig Audit Control /usr/sbin/auditconfig min label = ADMIN_LOW,max label = ADMIN_LOW,UID = 0, privs
auditd Audit Control /usr/sbin/auditd UID = 0, privs
auditd boot /usr/sbin/auditd privs

494 Trusted Solaris Administrator’s Procedures—July 1997
A
auditreduce Audit Review /usr/sbin/auditreduce min label = ADMIN_HIGH,UID = 0, privs
auditstat Audit Control /usr/sbin/auditstat UID = 0
autopush Maintenance and Repair /etc/autopush
autopush System Security /usr/sbin/autopush
awk Audit Review /usr/bin/awk min label = ADMIN_HIGH,max label = ADMIN_HIGH,UID = 0
awk Basic Commands /usr/bin/awk
bsmconv Audit Control /etc/security/bsmconv min label = ADMIN_LOW,max label =ADMIN_LOW, UID = 0
bsmunconv Audit Control /etc/security/bsmunconv min label = ADMIN_LOW,max label = ADMIN_LOW,UID = 0
cachefslog Maintenance and Repair /usr/sbin/cachefslog
cancel System Management /usr/bin/cancel UID = 71
cat Audit Review /usr/bin/cat min label = ADMIN_HIGH,max label = ADMIN_HIGH,UID = 0
cat Basic Commands /usr/bin/cat
cd Basic Commands /usr/bin/cd
chgrp Object Access Management /usr/bin/chgrp privs
chkey NIS+ Security Administration /usr/bin/chkey
chk_encodings Object Label Management /usr/sbin/chk_encodings
chmod Basic Commands /usr/bin/chmod
chmod Object Access Management /usr/bin/chmod privs
chown Object Access Management /usr/bin/chown privs
clear Basic Commands /usr/bin/clear
clri Maintenance and Repair /etc/clri
Table A-2 Commands and Their Associated Execution Profiles
Command Profile Path Security Attributes

Profile Summary Tables 495
A
clri Maintenance and Repair /usr/sbin/clri
cmp Basic Commands /usr/bin/cmp
col Basic Commands /usr/bin/col
compress Basic Commands /usr/bin/compress
cp Basic Commands /usr/bin/cp
cp Object Label Management /usr/bin/cp privs
cpio Media Restore /usr/bin/cpio
crash Maintenance and Repair /usr/sbin/crash
cron boot /usr/sbin/cron min label = ADMIN_LOW,max label = ADMIN_HIGH,UID = 0, privs
csh Privileged Shells /usr/bin/csh privs
cut Basic Commands /usr/bin/cut
date System Management /usr/bin/date privs
dbmgr User Security /opt/SUNWadm/2.1/bin/dbmgr privs
deallocate System Management /usr/sbin/deallocate privs
deallocate System Security /usr/sbin/deallocate privs
df Basic Commands /usr/bin/df
diff Basic Commands /usr/bin/diff
diff3 Basic Commands /usr/bin/diff3
dircmp Basic Commands /usr/bin/dircmp
dirname Basic Commands /usr/bin/dirname
disable System Management /usr/bin/disable privs
disable System Security /usr/bin/disable privs
drvconfig System Security /usr/sbin/drvconfig
du Basic Commands /usr/bin/du
echo Basic Commands /usr/bin/echo
eeprom Maintenance and Repair /usr/sbin/eeprom
Table A-2 Commands and Their Associated Execution Profiles
Command Profile Path Security Attributes

496 Trusted Solaris Administrator’s Procedures—July 1997
A
enable System Management /usr/bin/enable privs
enable System Security /usr/bin/enable privs
env Basic Commands /usr/bin/env
expr Basic Commands /usr/bin/expr
false Basic Commands /usr/bin/false
fgrep Basic Commands /usr/bin/fgrep
file Basic Commands /usr/bin/file
fold Basic Commands /usr/bin/fold
format Audit Control /usr/sbin/format UID = 0, privs
format System Management /usr/sbin/format UID = 0, privs
format System Security /usr/sbin/format UID = 0, privs
fsck Maintenance and Repair /usr/sbin/fsck
fsdb Maintenance and Repair /usr/sbin/fsdb
fsirand Maintenance and Repair /usr/sbin/fsirand
getfacl Object Access Management /usr/bin/getfacl privs
getfattrflag Object Access Management /usr/bin/getfattrflag privs
getfpriv Object Privilege Management /usr/bin/getfpriv
getfsattr System Management /usr/sbin/getfsattr privs
getfsattr System Security /usr/sbin/getfsattr GID = 3
getlabel Basic Commands /usr/bin/getlabel
getlabel Object Access Management /usr/bin/getlabel privs
getlabel Object Label Management /usr/bin/getlabel privs
getmldadorn Object Label Management /usr/bin/getmldadorn
getsldname Object Label Management /usr/bin/getsldname
grep Audit Review /usr/bin/grep min label = ADMIN_HIGH,max label = ADMIN_HIGH,UID = 0
grep Basic Commands /usr/bin/grep
Table A-2 Commands and Their Associated Execution Profiles
Command Profile Path Security Attributes

Profile Summary Tables 497
A
groupmgr User Management /opt/SUNWadm/2.1/bin/groupmgr
grpck Maintenance and Repair /usr/sbin/grpck
halt Maintenance and Repair /usr/sbin/halt UID = 0, privs
head Basic Commands /usr/bin/head
hextoalabel Object Label Management /usr/sbin/hextoalabel privs
hostid Basic Commands /usr/bin/hostid
hostname Basic Commands /usr/bin/hostname
id Basic Commands /usr/bin/id
in.ftpd inetd /usr/sbin/in.ftpd privs
in.named boot /usr/sbin/in.named min label = ADMIN_LOW,max label = ADMIN_HIGH,UID = 0, privs
in.named System Management /usr/sbin/in.named min label = ADMIN_LOW,max label = ADMIN_HIGH,UID = 0, privs
in.rexecd inetd /usr/sbin/in.rexecd privs
in.rlogind inetd /usr/sbin/in.rlogind privs
in.rshd inetd /usr/sbin/in.rshd privs
in.telnetd inetd /usr/sbin/in.telnetd privs
in.tftpd inetd /usr/sbin/in.tftpd privs
inetd boot /usr/sbin/inetd min label = ADMIN_LOW,max label = ADMIN_HIGH,privs
init System Management /usr/sbin/init privs
join Basic Commands /usr/bin/join
kill Object Privilege Management /usr/bin/kill
kill System Management /usr/bin/kill privs
ksh Privileged Shells /usr/bin/ksh privs
ldd Basic Commands /usr/bin/ldd
Table A-2 Commands and Their Associated Execution Profiles
Command Profile Path Security Attributes

498 Trusted Solaris Administrator’s Procedures—July 1997
A
ldd Object Privilege Management /usr/bin/ldd
list_devices System Management /usr/sbin/list_devices
ln Basic Commands /usr/bin/ln
look Basic Commands /usr/bin/look
lp Basic Commands /usr/bin/lp
lp System Management /usr/bin/lp
lpadmin System Management /usr/sbin/lpadmin max label = ADMIN_LOW,UID = 0
lpfilter System Management /usr/sbin/lpfilter max label = ADMIN_LOW,UID = 0
lpmove System Management /usr/sbin/lpmove max label = ADMIN_LOW,UID = 0
lpsched boot /usr/lib/lp/lpsched min label = ADMIN_HIGH,max label = ADMIN_HIGH,privs
lpshut System Management /usr/sbin/lpshut UID = 0
lpstat System Management /usr/bin/lpstat max label = ADMIN_LOW
lpsystem System Management /usr/sbin/lpsystem max label = ADMIN_LOW,UID = 0
lpusers System Management /usr/sbin/lpusers max label = ADMIN_LOW,UID = 0
ls Basic Commands /usr/bin/ls
mailq Basic Commands /usr/bin/mailq GID = 2
mailq System Management /usr/bin/mailq GID = 2, privs
man Basic Commands /usr/bin/man
mkdir Audit Control /usr/bin/mkdir privs
mkdir Basic Commands /usr/bin/mkdir
mkfile System Management /usr/sbin/mkfile
mkfs Audit Control /usr/sbin/mkfs privs
mkfs System Management /usr/sbin/mkfs UID = 0, privs
Table A-2 Commands and Their Associated Execution Profiles
Command Profile Path Security Attributes

Profile Summary Tables 499
A
mkfs System Security /usr/sbin/mkfs UID = 0, privs
mldpwd Object Label Management /usr/bin/mldpwd
mldrealpath Object Label Management /usr/bin/mldrealpath
more Basic Commands /usr/bin/more
mount Audit Control /usr/sbin/mount UID = 0, privs
mount System Management /usr/sbin/mount UID = 0, privs
mountall Audit Control /usr/sbin/mountall UID = 0, privs
mountall boot /sbin/mountall max label = ADMIN_HIGH,privs
mountall System Management /usr/sbin/mountall UID = 0, privs
mt Media Backup /usr/bin/mt
mt Media Restore /usr/bin/mt
mv Basic Commands /usr/bin/mv
mv Object Label Management /usr/bin/mv privs
ncheck Maintenance and Repair /usr/sbin/ncheck
netstat Maintenance and Repair /usr/bin/netstat
newaliases System Management /usr/bin/newaliases UID = 0, privs
newfs Audit Control /usr/sbin/newfs UID = 0, privs
newfs System Management /usr/sbin/newfs UID = 0, privs
newfs System Security /usr/sbin/newfs UID = 0, privs
newkey NIS+ Security Administration /usr/sbin/newkey
newsecfs Audit Control /usr/sbin/newsecfs privs
newsecfs System Security /usr/sbin/newsecfs UID = 0, privs
nice System Management /usr/bin/nice
nisaddcred NIS+ Security Administration /usr/bin/nisaddcred
nisaddent NIS+ Security Administration /usr/lib/nis/nisaddent
niscat Basic Commands /usr/bin/niscat
nischgrp NIS+ Security Administration /usr/bin/nischgrp
Table A-2 Commands and Their Associated Execution Profiles
Command Profile Path Security Attributes

500 Trusted Solaris Administrator’s Procedures—July 1997
A
nischmod NIS+ Security Administration /usr/bin/nischmod
nischown NIS+ Security Administration /usr/bin/nischown
nischttl NIS+ Administration /usr/bin/nischttl
nisclient NIS+ Security Administration /usr/lib/nis/nisclient privs
nisctl NIS+ Administration /usr/lib/nis/nisctl
nisdefaults Basic Commands /usr/bin/nisdefaults
niserror Basic Commands /usr/bin/niserror
nisgrep Basic Commands /usr/bin/nisgrep
nisgrpadm NIS+ Security Administration /usr/bin/nisgrpadm
nisinit NIS+ Security Administration /usr/sbin/nisinit
nisln NIS+ Administration /usr/bin/nisln
nislog NIS+ Security Administration /usr/sbin/nislog
nismatch Basic Commands /usr/bin/nismatch
nismkdir NIS+ Security Administration /usr/bin/nismkdir
nispasswd NIS+ Security Administration /usr/bin/nispasswd
nisping NIS+ Administration /usr/lib/nis/nisping
nispopulate NIS+ Security Administration /usr/lib/nis/nispopulate
nisrm NIS+ Security Administration /usr/bin/nisrm
nisrmdir NIS+ Security Administration /usr/bin/nisrmdir
nisserver NIS+ Security Administration /usr/lib/nis/nisserver privs
nissetup NIS+ Security Administration /usr/lib/nis/nissetup
nisshowcache NIS+ Administration /usr/lib/nis/nisshowcache
nisstat NIS+ Administration /usr/lib/nis/nisstat
nistbladm NIS+ Security Administration /usr/bin/nistbladm
nistest Basic Commands /usr/bin/nistest
nistnsetup NIS+ Administration /usr/lib/nis/nistnsetup
nistntime NIS+ Administration /usr/lib/nis/nistntime
Table A-2 Commands and Their Associated Execution Profiles
Command Profile Path Security Attributes

Profile Summary Tables 501
A
nisupdkeys NIS+ Security Administration /usr/lib/nis/nisupdkeys
nroff Basic Commands /usr/bin/nroff
nscd boot /usr/sbin/nscd min label = ADMIN_LOW,max label = ADMIN_HIGH,privs
nscd NIS+ Administration /usr/sbin/nscd privs
page Basic Commands /usr/bin/page
pattr System Management /usr/proc/bin/pattr privs
pclear System Management /usr/proc/bin/pclear privs
pcred System Management /usr/proc/bin/pcred privs
pfiles System Management /usr/proc/bin/pfiles privs
pflags System Management /usr/proc/bin/pflags privs
pfsh Basic Commands /usr/bin/pfsh
pg Basic Commands /usr/bin/pg
ping Maintenance and Repair /usr/sbin/ping
ping System Management /usr/sbin/ping
ping System Security /usr/sbin/ping
pkgadd Object Privilege Management /usr/sbin/pkgadd
pkgchk Object Privilege Management /usr/sbin/pkgchk
pkginfo Object Privilege Management /usr/bin/pkginfo
pkgrm Object Privilege Management /usr/sbin/pkgrm
plabel System Management /usr/proc/bin/plabel privs
pldd System Management /usr/proc/bin/pldd privs
pmap System Management /usr/proc/bin/pmap privs
poweroff Maintenance and Repair /usr/sbin/poweroff UID = 0, privs
pr Basic Commands /usr/bin/pr
praudit Audit Review /usr/sbin/praudit min label = ADMIN_HIGH,UID = 0, privs
Table A-2 Commands and Their Associated Execution Profiles
Command Profile Path Security Attributes

502 Trusted Solaris Administrator’s Procedures—July 1997
A
procplabel Object Label Management /usr/proc/bin/plabel privs
procppriv Object Privilege Management /usr/proc/bin/ppriv privs
procpprivtest Object Privilege Management /usr/proc/bin/pprivtest privs
profmgr User Security /opt/SUNWadm/2.1/bin/profmgr privs
prtconf Maintenance and Repair /usr/sbin/prtconf
prun System Management /usr/proc/bin/prun privs
ps System Management /usr/bin/ps privs
ps System Security /usr/bin/ps privs
psig System Management /usr/proc/bin/psig privs
pstack System Management /usr/proc/bin/pstack privs
pstp System Management /usr/proc/bin/pstop privs
ptime System Management /usr/proc/bin/ptime privs
ptree System Management /usr/proc/bin/ptree privs
pwait System Management /usr/proc/bin/pwait privs
pwck Maintenance and Repair /usr/sbin/pwck
pwd Basic Commands /usr/bin/pwd
pwdx System Management /usr/proc/bin/pwdx privs
rcp Basic Commands /usr/bin/rcp
rdist System Management /usr/bin/rdist
reboot Maintenance and Repair /usr/sbin/reboot UID = 0, privs
reject System Management /usr/sbin/reject privs
reject System Security /usr/sbin/reject privs
rem_drv Maintenance and Repair /usr/sbin/rem_drv
rem_drv System Security /usr/sbin/rem_drv privs
renice System Management /usr/bin/renice privs
rlogin Basic Commands /usr/bin/rlogin
rm Basic Commands /usr/bin/rm
Table A-2 Commands and Their Associated Execution Profiles
Command Profile Path Security Attributes

Profile Summary Tables 503
A
rm Object Label Management /usr/bin/rm privs
rmdir Basic Commands /usr/bin/rmdir
rpc.cmsd inetd /usr/dt/bin/rpc.cmsd privs
rpc.ttdbserverd inetd /usr/dt/bin/rpc.ttdbserverd privs
rpcbind boot /usr/sbin/rpcbind min label = ADMIN_HIGH,max label = ADMIN_HIGH,privs
rsh Basic Commands /usr/ucb/rsh
runpd Object Privilege Management /usr/sbin/runpd
rup System Management /usr/bin/rup
sadmind inetd /usr/sbin/sadmind privs
script Basic Commands /usr/bin/script
sdiff Basic Commands /usr/bin/sdiff
sed Audit Review /usr/bin/sed min label = ADMIN_HIGH,max label = ADMIN_HIGH,UID = 0
setfacl Object Access Management /usr/bin/setfacl privs
setfattrflag Object Access Management /usr/bin/setfattrflag privs
setfattrflag Object Label Management /usr/bin/setfattrflag
setfpriv Object Privilege Management /usr/bin/setfpriv privs
setfsattr System Security /usr/sbin/setfsattr privs
setlabel Object Label Management /usr/bin/setlabel privs
sh Privileged Shells /usr/bin/sh privs
share Audit Control /usr/sbin/share UID = 0, privs
share System Management /usr/sbin/share UID = 0, privs
shareall Audit Control /usr/sbin/shareall UID = 0, privs
shareall System Management /usr/sbin/shareall UID = 0, privs
showmount System Management /usr/sbin/showmount
sleep Basic Commands /usr/bin/sleep
Table A-2 Commands and Their Associated Execution Profiles
Command Profile Path Security Attributes

504 Trusted Solaris Administrator’s Procedures—July 1997
A
snoop Maintenance and Repair /usr/sbin/snoop
sort Basic Commands /usr/bin/sort
spell Basic Commands /usr/bin/spell
spray Maintenance and Repair /usr/sbin/spray
strace Maintenance and Repair /usr/sbin/strace
stty Basic Commands /usr/bin/stty
swap System Management /usr/sbin/swap privs
swmtool Object Privilege Management /usr/sbin/swmtool
syslogd boot /usr/sbin/syslogd min label = ADMIN_LOW,max label = ADMIN_HIGH,privs
syslogd Maintenance and Repair /usr/sbin/syslogd
tail Audit Review /usr/bin/tail min label = ADMIN_HIGH,max label = ADMIN_HIGH,UID = 0
tail Basic Commands /usr/bin/tail
tar Media Backup /usr/bin/tar privs
tar Media Restore /usr/bin/tar privs
tbl Basic Commands /usr/bin/tbl
test Basic Commands /usr/bin/test
testfpriv Object Privilege Management /usr/bin/testfpriv privs
tfind Basic Commands /usr/bin/tfind
tfind Object Label Management /usr/bin/tfind privs
time Basic Commands /usr/bin/time
tnchkdb System Security /usr/sbin/tnchkdb privs
tnctl System Security /usr/sbin/tnctl privs
tnd boot /usr/sbin/tnd privs
tnd System Security /usr/sbin/tnd privs
tninfo System Security /usr/sbin/tninfo privs
Table A-2 Commands and Their Associated Execution Profiles
Command Profile Path Security Attributes

Profile Summary Tables 505
A
tokmapctl Object Label Management /usr/sbin/tokmapctl privs
tokmapd Maintenance and Repair /usr/sbin/tokmapd privs
touch Basic Commands /usr/bin/touch
troff Basic Commands /usr/bin/troff
true Basic Commands /usr/bin/true
truss Object Privilege Management /usr/bin/truss
tsolxagent Basic Actions /usr/dt/bin/tsolxagent
ttsession Basic Actions /usr/dt/bin/ttsession
tty Basic Commands /usr/bin/tty
tunefs Audit Control /usr/sbin/tunefs UID = 0, GID = 3, privs
tunefs Maintenance and Repair /usr/sbin/tunefs UID = 0, privs
ufsdump Media Backup /usr/sbin/ufsdump GID = 3, privs
ufsrestore Media Restore /usr/sbin/ufsrestore privs
umount Audit Control /usr/sbin/umount UID = 0, privs
umount System Management /usr/sbin/umount UID = 0, privs
umountall Audit Control /usr/sbin/umountall UID = 0, privs
umountall System Management /usr/sbin/umountall privs
uname Basic Commands /usr/bin/uname
uncompress Basic Commands /usr/bin/uncompress
uniq Basic Commands /usr/bin/uniq
unshare Audit Control /usr/sbin/unshare UID = 0, privs
unshare System Management /usr/sbin/unshare UID = 0, privs
unshareall Audit Control /usr/sbin/unshareall privs
unshareall System Management /usr/sbin/unshareall UID = 0, privs
usermgr User Management /opt/SUNWadm/2.1/bin/usermgr privs
usermgr User Security /opt/SUNWadm/2.1/bin/usermgr privs
vmstat System Management /usr/bin/vmstat
Table A-2 Commands and Their Associated Execution Profiles
Command Profile Path Security Attributes

506 Trusted Solaris Administrator’s Procedures—July 1997
A
Finding Actions in Execution ProfilesTable A-3 lists each action contained in any execution profile and the executionprofile(s) to which it is assigned. Remember that an action may be contained inmore than one execution profile. The table also indicates any security attributesassigned to the action: minimum label, maximum label, setUID value, setGIDvalue, and privileges. The term privs indicates that the action has one or moreprivileges. For specific privilege information, see the individual profile tablesin Appendix B, “Profile Definition Tables,” or use the Profile Manager todetermine which privileges are actually applied to the action within thatprofile.
whereis Basic Commands /usr/ucb/whereis
which Basic Commands /usr/bin/which
who Basic Commands /usr/bin/who
whoami Basic Commands /usr/ucb/whoami
writeaudit Audit Control /usr/bin/writeaudit privs
xhost System Management /usr/openwin/bin/xhost privs
Table A-3 Actions and Their Associated Execution Profiles
Actions Profiles Security Attributes
AuditClass Audit Control min label = ADMIN_LOW,max label = ADMIN_LOW,privs
AuditControl Audit Control min label = ADMIN_LOW,max label = ADMIN_LOW,privs
AuditEvent Audit Control min label = ADMIN_LOW,max label = ADMIN_LOW,privs
AuditStartup Audit Control min label = ADMIN_LOW,max label = ADMIN_LOW,privs
Table A-2 Commands and Their Associated Execution Profiles
Command Profile Path Security Attributes

Profile Summary Tables 507
A
AuditUser Audit Control min label = ADMIN_LOW,max label = ADMIN_LOW,privs
CheckEncodings Object Label Management privs
Dbmgr System Management privs
Dbmgr System Security privs
DNS_Resolve System Management privs
Dtappmgr Basic Actions
Dtcalc Basic Actions
Dtcm Basic Actions
Dtfile Basic Actions
Dtfile Object Access Management
Dtfile Object Label Management
Dtfile Object Privilege Management
DtfileHome Basic Actions
DtfileHome Object Access Management
DtfileHome Object Label Management
DtfileHome Object Privilege Management
Dthelpview Basic Actions
Dtmail Basic Actions
Dtmanpageview Basic Actions
Dtpad Basic Actions
Dtterm Basic Actions
Dttrash Basic Actions
Dttrash Object Access Management
Table A-3 Actions and Their Associated Execution Profiles
Actions Profiles Security Attributes

508 Trusted Solaris Administrator’s Procedures—July 1997
A
Dttrash Object Label Management
DtTTMediaOpen Basic Actions
DtUnlink Basic Actions
EditEncodings Object Label Management privs
EditMotd System Management max label = ADMIN_LOW,privs
Groupmgr User Management
Hostmgr System Management
InvokeFILEMGR Basic Actions
InvokeFILEMGR Object Access Management
InvokeFILEMGR Object Privilege Management
InvokeMAILER Basic Actions
Nsswitch System Security privs
Open Basic Actions
OpenFolder Basic Actions
OWtapetool Media Backup
OWtapetool Media Restore
Print Basic Actions
Printermgr System Security
SDTimage Basic Actions
SendMail System Security privs
Serialmgr System Security
ShareFS System Management privs
Tar Media Backup
TarList Media Backup
Table A-3 Actions and Their Associated Execution Profiles
Actions Profiles Security Attributes

Profile Summary Tables 509
A
TarList Media Restore
TarUnpack Media Restore
TextEditor Basic Actions
Trash Basic Actions
TrustedEditor System Security privs
Usermgr User Management privs
Vfstab System Management privs
Vfstab_adjunct System Security privs
Usermgr User Management privs
Table A-3 Actions and Their Associated Execution Profiles
Actions Profiles Security Attributes

510 Trusted Solaris Administrator’s Procedures—July 1997
A

511
Profile Definition Tables B
This appendix contains tables that show:
• The names and purposes of all the execution profiles in the default system
• All the actions, authorizations, and commands defined for each executionprofile shipped with the default system
This chapter contains the following sections.
Profile Names, Purposes, and Roles Tables page 512
Profile Name: All page 514
Profile Name: All Authorizations page 515
Profile Name: Audit Control page 516
Profile Name: Audit Review page 519
Profile Name: Basic Actions page 520
Profile Name: Basic Commands page 522
Profile Name: Convenient Authorizations page 525
Profile Name: Enable Login page 526
Profile Name: Maintenance and Repair page 527
Profile Name: Media Backup page 528
Profile Name: Media Restore page 530
Profile Name: NIS+ Administration page 532
Profile Name: NIS+ Security Administration page 533
Profile Name: Object Access Management page 535

512 Trusted Solaris Administrator’s Procedures—July 1997
B
Profile Names, Purposes, and Roles Tables
Profile Name: Object Label Management page 537
Profile Name: Object Privilege Management page 539
Profile Name: Outside Accred page 541
Profile Name: Privileged Shells page 541
Profile Name: System Management page 542
Profile Name: System Security page 549
Profile Name: User Management page 552
Profile Name: User Security page 553
Profile Name: inetd page 554
Profile Name: boot page 557
Table B-1 Name and Purpose of Profiles (1 of 2)
Profile Name Purpose
All Give account access to all existing and potential commands and actions without securityattributes, like a normal UNIX user
All Authorizations Give account all authorizations
Audit Control Administer the audit subsystem
Audit Review View the audit trail
Basic Actions Use common actions you need in CDE
Basic Commands Use rudimentary commands no role can do without
Convenient Authorizations Authorize account to enable logins, print a PostScript file, print without labels, andlogin remotely
Enable Login Allow yourself and other users to log in after boot
Maintenance and Repair Use commands needed to maintain or repair a system
Media Backup Backup files
Media Restore Restore files from backup
NIS+ Administration Use NIS+ scripts/commands that are not security-related
NIS+ Security Administration Use NIS+ security-related scripts/commands
Object Access Management Change ownership and permissions on files

Profile Definition Tables 513
B
Object Label Management Change labels of files and set up system-wide labels
Object Privilege Management Install new applications, analyze use of privilege, and change privileges on executablefiles
Outside Accred Operate outside system accreditation range
Privileged Shells Run Borne, Korn, and C shell with all privileges.
System Management Do general administrative tasks such as mounting file systems, editing systemdatabases, managing print queues, and so forth
User Management Manage aspects of creating or managing user attributes that are not security-related(complement of the “User Security” profile)
User Security Create or modify a user’s security attributes (complement to the “User Manager”profile)
System Security Do essential system security tasks such as setting labels on mounted file systems,trusted network configuration, and so forth
inetd Privileges for programs executed by the inetd. Do not assign this profile to users.
boot System start-up/shutdown profile.
Table B-2 Profiles Assigned to the Default Roles
Security Administrator System Administrator Root Operator
Audit Control Audit Review All Basic Actions
Basic Actions Basic Actions All Authorizations Basic Commands
Basic Commands Basic Commands Privileged Shells Outside Accred
NIS+ Security Administration Enable Login NIS+ Security Administration Media Backup
Object Access Management User Security
Object Label Management
Object Privilege Management
Outside Accred
System Security
User Security
Table B-1 Name and Purpose of Profiles (2 of 2)
Profile Name Purpose

514 Trusted Solaris Administrator’s Procedures—July 1997
B
Profile Name: AllDefinition: all commands and all actions (to set up a normal UNIX user). Noauthorizations. All checks for commands and actions are disabled, so anycommand or action, existing or future) can be used without special attributes,such as privileges.
Table B-3 Common Profiles (in More Than One Role
Security Administrator System Administrator System Operator
Basic Actions Basic Actions Basic Actions
Basic Commands Basic Commands Basic Commands
Outside Accred Outside Accred Outside Accred
Table B-4 Profiles That Divide Responsibilities Among Roles
Security Administrator System Administrator System Operator Root
Audit Control Audit Review
NIS+ Security Administration NIS+ Administration NIS+ Security Administration
System Security System Management
User Security User Management User Security
Media Restore Media Backup
Table B-5 Profiles Unique to One Role
Security Administrator System Administrator Root
Object Access Management Enable Login All
Object Label Management Maintenance and Repair All Authorizations
Object Privilege Management Media Restore Privileged Shells

Profile Definition Tables 515
B
Profile Name: All AuthorizationsDefinition: All authorizations in the system
Table B-6 Actions Defined for the All Profile
Action(s) Minimum label Maximum Label UID GID Privilege(s)
* (All existing and potential) none none none none none
Table B-7 Authorizations Defined for the All Profile
Authorizations
none
Table B-8 Commands Defined for the All Profile
Pathname Minimum Label Maximum Label UID GID Privilege(s)
*/ (All existing and potential) none none none none none
Table B-9 Actions Defined for the All Authorizations Profile
Action(s) Minimum label Maximum Label UID GID Privilege(s)
none none none none none none
Table B-10 Authorizations Defined for the All Authorizations Profile
Authorizations
all

516 Trusted Solaris Administrator’s Procedures—July 1997
B
Profile Name: Audit ControlDefinition: Administer the audit subsystem.
Table B-11 Commands Defined for the All Authorizations Profile
Pathname Minimum Label Maximum Label UID GID Privilege(s)
none none none none none none
Table B-12 Actions Defined for the Audit Control Profile
Action(s) Minimum label Maximum Label UID GID Privilege(s)
AuditClass ADMIN_LOW ADMIN_LOW none none file_dac_readfile_dac_writeproc_audit_applproc_audit_tcb
AuditControl ADMIN_LOW ADMIN_LOW none none file_dac_readfile_dac_writeproc_audit_applproc_audit_tcb
AuditEvent ADMIN_LOW ADMIN_LOW none none file_dac_readfile_dac_writeproc_audit_applproc_audit_tcb
AuditStartup ADMIN_LOW ADMIN_LOW none none file_dac_readfile_dac_writeproc_audit_applproc_audit_tcb
AuditUser ADMIN_LOW ADMIN_LOW none none file_dac_readfile_dac_writeproc_audit_applproc_audit_tcb

Profile Definition Tables 517
B
Table B-13 Authorizations Defined for the Audit Control Profile
Authorizations
set user audit flagsset/get file audit flags
Table B-14 Commands Defined for the Audit Control Profile
Pathname Minimum Label Maximum Label UID GID Privilege(s)
/etc/security/bsmconv ADMIN_LOW ADMIN_LOW 0 none none
/etc/security/bsmunconv ADMIN_LOW ADMIN_LOW 0 none none
/usr/bin/mkdir none none none none file_dac_write
/usr/bin/writeaudit none none none none proc_audit_applproc_audit_tcb
/usr/sbin/audit none none 0 none file_mac_readproc_audit_tcboroc_mac_writesys_audit
/usr/sbin/auditconfig ADMIN_LOW ADMIN_LOW 0 none sys_audit
/usr/sbin/auditd none none 0 none file_mac_writeproc_set_clroroc_set_iloroc_set_slsys_audit
/usr/sbin/auditstat none none 0 none none
/usr/sbin/format none none 0 none all
/usr/sbin/mkfs none none none none all

518 Trusted Solaris Administrator’s Procedures—July 1997
B
/usr/sbin/mount none none 0 none file_dac_readfile_dac_searchfile_mac_readfile_mac_searchfile_mac_writenet_privaddrproc_setilproc_setslsys_mountsys_trans_label
/usr/sbin/mountall none none 0 none file_dac_readfile_dac_searchfile_mac_readfile_mac_searchfile_mac_writenet_privaddrproc_setilproc_setslsys_mountsys_trans_label
/usr/sbin/newfs none none 0 none all
/usr/sbin/newsecfs none none none none all
/usr/sbin/share none none 0 none sys_nfs
/usr/sbin/shareall none none 0 none sys_nfs
/usr/sbin/tunefs none none 0 3 none
Table B-14 Commands Defined for the Audit Control Profile
Pathname Minimum Label Maximum Label UID GID Privilege(s)

Profile Definition Tables 519
B
Profile Name: Audit ReviewDefinition: View the audit trail
/usr/sbin/umount none none 0 none file_dac_readfile_dac_searchfile_mac_readfile_mac_searchfile_mac_writenet_privaddrproc_setilproc_setslsys_mountsys_trans_label
/usr/sbin/umountall none none 0 none file_dac_readfile_dac_searchfile_mac_readfile_mac_searchfile_mac_writenet_privaddrproc_setilproc_setslsys_mountsys_trans_label
/usr/sbin/unshare none none 0 none sys_nfs
/usr/sbin/unshareall none none 0 none sys_nfs
Table B-15 Actions Defined for the Audit Review Profile
Action(s) Minimum label Maximum Label UID GID Privilege(s)
none none none none none none
Table B-14 Commands Defined for the Audit Control Profile
Pathname Minimum Label Maximum Label UID GID Privilege(s)

520 Trusted Solaris Administrator’s Procedures—July 1997
B
Profile Name: Basic ActionsDefinition: The common actions you need in CDE
Table B-16 Authorizations Defined for the Audit Review Profile
Authorizations
none
Table B-17 Commands Defined for the Audit Review Profile
Pathname Minimum Label Maximum Label UID GID Privilege(s)
/usr/bin/awk ADMIN_HIGH ADMIN_HIGH 0 none none
/usr/bin/cat ADMIN_HIGH ADMIN_HIGH 0 none none
/usr/bin/grep ADMIN_HIGH ADMIN_HIGH 0 none none
/usr/bin/sed ADMIN_HIGH ADMIN_HIGH 0 none none
/usr/bin/tail ADMIN_HIGH ADMIN_HIGH 0 none none
/usr/sbin/auditreduce ADMIN_HIGH none 0 none file_dac_readsys_audit
/usr/sbin/praudit ADMIN_HIGH none 0 none file_dac_readsys_audit
Table B-18 Actions Defined for the Basic Actions Profile (1 of 2)
Action(s) Minimum label Maximum Label UID GID Privilege(s)
Dtcalc none none none none none
Dtcm none none none none none
Dtfile none none none none none
Dthelpview none none none none none
SDTimage none none none none none
Dtmail none none none none none

Profile Definition Tables 521
B
Dtmanpageview none none none none none
Dtterm none none none none none
Dtpad none none none none none
Dttrash none none none none none
Print none none none none none
Dtappmgr none none none none none
DtTTMediaOpen none none none none none
DtfileHome none none none none none
InvokeFILEMGR none none none none none
InvokeMAILER none none none none none
OpenFolder none none none none none
DtUnlink none none none none none
Open none none none none none
TextEditor none none none none none
Trash none none none none none
Table B-19 Authorizations Defined for the Basic Actions Profile
Authorizations
none
Table B-20 Commands Defined for the Basic Actions Profile
Pathname Minimum Label Maximum Label UID GID Privilege(s)
/usr/dt/bin/tsolxagent none none none none none
/usr/dt/bin/ttsession none none none none none
Table B-18 Actions Defined for the Basic Actions Profile (2 of 2)
Action(s) Minimum label Maximum Label UID GID Privilege(s)

522 Trusted Solaris Administrator’s Procedures—July 1997
B
Profile Name: Basic CommandsDefinition: Use rudimentary commands no role can do without
Table B-21 Actions Defined for the Basic Commands Profile
Action(s) Minimum label Maximum Label UID GID Privilege(s)
none none none none none none
Table B-22 Authorizations Defined for the Basic Commands Profile
Authorizations
none
Table B-23 Commands Defined for the Basic Commands Profile (1 of 4)
Pathname Minimum Label Maximum Label UID GID Privilege(s)
/usr/bin/adminvi none none none none none
/usr/bin/awk none none none none none
/usr/bin/cat none none none none none
/usr/bin/cd none none none none none
/usr/bin/chmod none none none none none
/usr/bin/clear none none none none none
/usr/bin/cmp none none none none none
/usr/bin/col none none none none none
/usr/bin/compress none none none none none
/usr/bin/cp none none none none none
/usr/bin/cut none none none none none
/usr/bin/df none none none none none
/usr/bin/diff none none none none none
/usr/bin/diff3 none none none none none

Profile Definition Tables 523
B
/usr/bin/dircmp none none none none none
/usr/bin/dirname none none none none none
/usr/bin/du none none none none none
/usr/bin/echo none none none none none
/usr/bin/env none none none none none
/usr/bin/expr none none none none none
/usr/bin/false none none none none none
/usr/bin/fgrep none none none none none
/usr/bin/file none none none none none
/usr/bin/fold none none none none none
/usr/bin/getlabel none none none none none
/usr/bin/grep none none none none none
/usr/bin/head none none none none none
/usr/bin/hostid none none none none none
/usr/bin/hostname none none none none none
/usr/bin/id none none none none none
/usr/bin/join none none none none none
/usr/bin/ldd none none none none none
/usr/bin/ln none none none none none
/usr/bin/look none none none none none
/usr/bin/lp none none none none none
/usr/bin/ls none none none none none
/usr/bin/mailq none none none 2 none
/usr/bin/man none none none none none
/usr/bin/mkdir none none none none none
/usr/bin/more none none none none none
/usr/bin/mv none none none none none
Table B-23 Commands Defined for the Basic Commands Profile (2 of 4)
Pathname Minimum Label Maximum Label UID GID Privilege(s)

524 Trusted Solaris Administrator’s Procedures—July 1997
B
/usr/bin/niscat none none none none none
/usr/bin/nisdefaults none none none none none
/usr/bin/niserror none none none none none
/usr/bin/nisgrep none none none none none
/usr/bin/nismatch none none none none none
/usr/bin/nistest none none none none none
/usr/bin/nroff none none none none none
/usr/bin/page none none none none none
/usr/bin/pfsh none none none none none
/usr/bin/pg none none none none none
/usr/bin/pr none none none none none
/usr/bin/pwd none none none none none
/usr/bin/rcp none none none none none
/usr/bin/rlogin none none none none none
/usr/bin/rm none none none none none
/usr/bin/rmdir none none none none none
/usr/bin/script none none none none none
/usr/bin/sdiff none none none none none
/usr/bin/sleep none none none none none
/usr/bin/sort none none none none none
/usr/bin/spell none none none none none
/usr/bin/stty none none none none none
/usr/bin/tail none none none none none
/usr/bin/tbl none none none none none
/usr/bin/test none none none none none
/usr/bin/tfind none none none none none
/usr/bin/time none none none none none
Table B-23 Commands Defined for the Basic Commands Profile (3 of 4)
Pathname Minimum Label Maximum Label UID GID Privilege(s)

Profile Definition Tables 525
B
Profile Name: Convenient AuthorizationsDefinition: Authorize account to enable logins, print a PostScript file, printwithout labels, and login remotely.
/usr/bin/touch none none none none none
/usr/bin/troff none none none none none
/usr/bin/true none none none none none
/usr/bin/tty none none none none none
/usr/bin/uname none none none none none
/usr/bin/uncompress none none none none none
/usr/bin/uniq none none none none none
/usr/bin/which none none none none none
/usr/bin/who none none none none none
/usr/ucb/rsh none none none none none
/usr/ucb/whereis none none none none none
/usr/ucb/whoami none none none none none
Table B-24 Actions Defined for the Convenient Authorizations Profile
Action(s) Minimum label Maximum Label UID GID Privilege(s)
* none none none none none
Table B-23 Commands Defined for the Basic Commands Profile (4 of 4)
Pathname Minimum Label Maximum Label UID GID Privilege(s)

526 Trusted Solaris Administrator’s Procedures—July 1997
B
Profile Name: Enable LoginDefinition: Allow yourself and other users to log in after boot
Table B-25 Authorizations Defined for the Convenient Authorizations Profile
Authorizations
enable loginstsol_auth_reserved13print a PostScript fileprint without labelsremote loginset application search path
Table B-26 Commands Defined for the Convenient Authorizations Profile
Pathname Minimum Label Maximum Label UID GID Privilege(s)
/usr/ucb none none none none none
Table B-27 Actions Defined for the Enable Login Profile
Action(s) Minimum label Maximum Label UID GID Privilege(s)
none none none none none none
Table B-28 Authorizations Defined for the Enable Login Profile
Authorizations
enable logins

Profile Definition Tables 527
B
Profile Name: Maintenance and RepairDefinition: Use commands needed to maintain or repair a system
Table B-29 Commands Defined for the Enable Login Profile
Pathname Minimum Label Maximum Label UID GID Privilege(s)
/usr/ucb none none none none none
Table B-30 Actions Defined for the Maintenance and Repair Profile
Action(s) Minimum label Maximum Label UID GID Privilege(s)
none none none none none none
Table B-31 Authorizations Defined for the Maintenance and Repair Profile
Authorizations
enable loginsremote loginterminal login
Table B-32 Commands Defined for the Maintenance and Repair Profile (1 of 2)
Pathname Minimum Label Maximum Label UID GID Privilege(s)
/etc/autopush none none none none none
/etc/clri none none none none none
/usr/bin/adb none none none none none
/usr/bin/netstat none none none none none
/usr/sbin/add_drv none none none none none
/usr/sbin/aspppd none none none none none
/usr/sbin/cachefslog none none none none none

528 Trusted Solaris Administrator’s Procedures—July 1997
B
Profile Name: Media BackupDefinition: Back up files
/usr/sbin/clri none none none none none
/usr/sbin/crash none none none none none
/usr/sbin/eeprom none none none none none
/usr/sbin/fsck none none none none none
/usr/sbin/fsdb none none none none none
/usr/sbin/fsirand none none none none none
/usr/sbin/grpck none none none none none
/usr/sbin/halt none none 0 none none
/usr/sbin/ncheck none none none none none
/usr/sbin/ping none none none none none
/usr/sbin/poweroff none none 0 none sys_boot
/usr/sbin/prtconf none none none none none
/usr/sbin/pwck none none none none none
/usr/sbin/reboot none none 0 none sys_boot
/usr/sbin/rem_drv none none none none none
/usr/sbin/snoop none none none none none
/usr/sbin/spray none none none none none
/usr/sbin/strace none none none none none
/usr/sbin/syslogd none none none none none
/usr/sbin/tokmapd none none none none net_privaddrproc_setclrproc_setsl
/usr/sbin/tunefs none none 0 none all
Table B-32 Commands Defined for the Maintenance and Repair Profile (2 of 2)
Pathname Minimum Label Maximum Label UID GID Privilege(s)

Profile Definition Tables 529
B
Table B-33 Actions Defined for the Media Backup Profile
Action(s) Minimum label Maximum Label UID GID Privilege(s)
Tar none none none none none
TarList none none none none none
OWtapetool none none none none none
Table B-34 Authorizations Defined for the Media Backup Profile
Authorizations
allocate device
Table B-35 Commands Defined for the Media Backup Profile
Pathname Minimum Label Maximum Label UID GID Privilege(s)
/usr/bin/mt none none none none none
/usr/bin/tar none none none none file_auditfile_dac_readfile_dac_searchfile_downgrade_ilfile_downgrade_slfile_mac_readfile_mac_writefile_upgrade_ilfile_upgrade_slsys_trans_label
/usr/sbin/ufsdump none none none 3 file_auditfile_dac_readfile_dac_searchfile_downgrade_ilfile_downgrade_slfile_mac_readfile_mac_writesys_trans_label

530 Trusted Solaris Administrator’s Procedures—July 1997
B
Profile Name: Media RestoreDefinition: Restore files from backup
Table B-36 Actions Defined for the Media Restore Profile
Action(s) Minimum label Maximum Label UID GID Privilege(s)
TarList none none none none none
TarUnpack none none none none none
OWtapetool none none none none none
Table B-37 Authorizations Defined for the Media Restore Profile
Authorizations
allocate device

Profile Definition Tables 531
B
Table B-38 Commands Defined for the Media Restore Profile
Pathname Minimum Label Maximum Label UID GID Privilege(s)
/usr/bin/cpio none none none none none
/usr/bin/mt none none none none none
/usr/bin/tar none none none none file_auditfile_chownfile_dac_readfile_dac_searchfile_dac_writefile_downgrade_ilfile_downgrade_slfile_mac_readfile_mac_searchfile_mac_writefile_ownerfile_setdacfile_setidfile_setprivfile_upgrade_ilfile_upgrade_slsys_devicessys_trans_label
/usr/sbin/ufsrestore none none none none file_auditfile_chownfile_dac_readfile_dac_searchfile_dac_writefile_downgrade_ilfile_downgrade_slfile_mac_readfile_mac_searchfile_mac_writefile_nofloatfile_ownerfile_setdacfile_setidfile_setprivfile_upgrade_ilfile_upgrade_slsys_trans_label

532 Trusted Solaris Administrator’s Procedures—July 1997
B
Profile Name: NIS+ AdministrationDefinition: Use NIS+ scripts/commands that are not security-related
Table B-39 Actions Defined for the NIS+ Administration Profile
Action(s) Minimum label Maximum Label UID GID Privilege(s)
none none none none none none
Table B-40 Authorizations Defined for the NIS+ Administration Profile
Authorizations
none
Table B-41 Commands Defined for the NIS+ Administration Profile
Pathname Minimum Label Maximum Label UID GID Privilege(s)
/usr/bin/nischttl none none none none none
/usr/bin/nisln none none none none none
/usr/lib/nis/nisctl none none none none none
/usr/lib/nis/nisping none none none none none
/usr/lib/nis/nisshowcache none none none none none
/usr/lib/nis/nisstat none none none none none
/usr/lib/nis/nistnsetup none none none none none
/usr/lib/nis/nistntime none none none none none
/usr/sbin/nscd none none none none file_dac_writefile_setidnet_mac_readnet_upgrade_slproc_dumpcoreproc_nofloatproc_setclrsys_net_configsys_trans_label

Profile Definition Tables 533
B
Profile Name: NIS+ Security AdministrationDefinition: Use NIS+ security-related scripts/commands
Table B-42 Actions Defined for the NIS+ Security Administration Profile
Action(s) Minimum label Maximum Label UID GID Privilege(s)
none none none none none none
Table B-43 Authorizations Defined for the NIS+ Security Administration Profile
Authorizations
none
Table B-44 Commands Defined for the NIS+ Security Administration Profile (1 of 2)
Pathname Minimum Label Maximum Label UID GID Privilege(s)
/usr/bin/chkey none none none none none
/usr/bin/nisaddcred none none none none none
/usr/bin/nischgrp none none none none none
/usr/bin/nischmod none none none none none
/usr/bin/nischown none none none none none
/usr/bin/nisgrpadm none none none none none
/usr/bin/nismkdir none none none none none
/usr/bin/nispasswd none none none none none
/usr/bin/nisrm none none none none none
/usr/bin/nisrmdir none none none none none
/usr/bin/nistbladm none none none none none
/usr/lib/nisaddent none none none none none

534 Trusted Solaris Administrator’s Procedures—July 1997
B
Profile Name: NothingDefinition: Do not allow the account to do anything except log in
/usr/lib/nisclient none none none none file_dac_readfile_dac_writefile_mac_readnet_mac_readnet_reply_equalnet_setclrnet_setidnet_setprivproc_nofloatsys_net_config
/usr/lib/nispopulate none none none none file_dac_readfile_mac_readnet_mac_readnet_reply_equalnet_setclrnet_setidnet_setprivnet_upgrade_slproc_nofloatproc_setclrproc_setslsys_net_config
/usr/lib/nisserver none none none none none
/usr/lib/nis/nissetup none none none none none
/usr/lib/nis/nisupdkeys none none none none none
/usr/sbin/newkey none none none none none
/usr/sbin/nisinit none none none none none
/usr/sbin/nislog none none none none none
Table B-44 Commands Defined for the NIS+ Security Administration Profile (2 of 2)
Pathname Minimum Label Maximum Label UID GID Privilege(s)

Profile Definition Tables 535
B
Profile Name: Object Access ManagementDefinition: Change ownership and permissions on files
Table B-45 Actions Defined for the Enable Login Profile
Action(s) Minimum label Maximum Label UID GID Privilege(s)
none none none none none none
Table B-46 Authorizations Defined for the Enable Login Profile
Authorizations
none
Table B-47 Commands Defined for the Enable Login Profile
Pathname Minimum Label Maximum Label UID GID Privilege(s)
none none none none none none
Table B-48 Actions Defined for the Object Access Management Profile
Action(s) Minimum label Maximum Label UID GID Privilege(s)
Dtfile none none none none none
Dttrash none none none none none
DtfileHome none none none none none
InvokeFILEMGR none none none none none

536 Trusted Solaris Administrator’s Procedures—July 1997
B
Table B-49 Authorizations Defined for the Object Access Management Profile
Authorizations
act as file ownerchange file owner
Table B-50 Commands Defined for the Object Access Management Profile (1 of 2)
Pathname Minimum Label Maximum Label UID GID Privilege(s)
/usr/bin/chgrp none none none none file_chownfile_dac_readfile_dac_searchfile_mac_readfile_mac_searchfile_ownerfile_setdacfile_setid
/usr/bin/chmod none none none none file_dac_readfile_dac_searchfile_mac_readfile_mac_searchfile_setdacfile_setid
/usr/bin/chown none none none none file_chownfile_dac_readfile_dac_searchfile_mac_readfile_mac_searchfile_owner
/usr/bin/getfacl none none none none file_dac_searchfile_mac_readfile_mac_search
/usr/bin/getfattrflag none none none none file_auditfile_dac_searchfile_mac_readfile_mac_search

Profile Definition Tables 537
B
Profile Name: Object Label ManagementDefinition: Change labels of files and set up system-wide labels.
/usr/bin/getlabel none none none none file_dac_searchfile_mac_readfile_mac_search
/usr/bin/setfacl none none none none file_dac_readfile_dac_searchfile_dac_writefile_mac_readfile_mac_searchfile_setdac
/usr/bin/setfattrflag none none none none file_auditfile_dac_searchfile_mac_searchfile_mac_writefile_owner
Table B-51 Actions Defined for the Object Label Management Profile
Action(s) Minimum label Maximum Label UID GID Privilege(s)
Dtfile none none none none none
Dttrash none none none none none
CheckEncodings none none none none file_dac_readfile_dac_writeproc_audit_applproc_audit_tcbsys_trans_label
EditEncodings none none none none file_dac_readfile_dac_writeproc_audit_applproc_audit_tcb
DtfileHome none none none none none
Table B-50 Commands Defined for the Object Access Management Profile (2 of 2)
Pathname Minimum Label Maximum Label UID GID Privilege(s)

538 Trusted Solaris Administrator’s Procedures—July 1997
B
Table B-52 Authorizations Defined for the Object Label Management Profile
Authorizations
allocate devicebypass view of file contents on drag and dropdowngrade file sensitivity labelupgrade file sensitivity labeluse all defined labels
Table B-53 Commands Defined for the Object Label Management Profile (1 of 2)
Pathname Minimum Label Maximum Label UID GID Privilege(s)
/usr/bin/cp none none none none file_mac_write
/usr/bin/getlabel none none none none file_dac_readfile_dac_searchfile_mac_readfile_mac_searchsys_trans_label
/usr/bin/getmldadorn none none none none none
/usr/bin/getsldname none none none none none
/usr/bin/mldpwd none none none none none
/usr/bin/mldrealpath none none none none none
/usr/bin/mv none none none none file_mac_write
/usr/bin/rm none none none none file_dac_readfile_dac_searchfile_dac_writefile_mac_write
/usr/bin/setfattrflag none none none none none

Profile Definition Tables 539
B
Profile Name: Object Privilege ManagementDefinition: Install new applications, analyze user of privilege, and changeprivileges on executable files
/usr/bin/setlabel none none none none file_dac_readfile_dac_searchfile_dac_writefile_downgrade_ilfile_downgrade_slfile_mac_readfile_mac_searchfile_mac_writefile_nofloatfile_ownerfile_upgrade_ilfile_upgrade_sl
/usr/bin/tfind none none none none file_dac_readfile_dac_search
/usr/proc/bin/plabel none none none none proc_mac_readsys_trans_label
/usr/sbin/atohexlabel none none none none none
/usr/sbin/chk_encodings none none none none none
/usr/sbin/hextoalabel none none none none sys_trans_label
/usr/sbin/tokmapctl none none none none net_mac_readnet_privaddr
Table B-54 Actions Defined for the Object Privilege Management Profile
Action(s)Minimumlabel
MaximumLabel UID GID Privilege(s)
Dtfile none none none none none
DtfileHome none none none none none
InvokeFILEMGR none none none none none
Table B-53 Commands Defined for the Object Label Management Profile (2 of 2)
Pathname Minimum Label Maximum Label UID GID Privilege(s)

540 Trusted Solaris Administrator’s Procedures—July 1997
B
Table B-55 Authorizations Defined for the Object Privilege Management Profile
Authorizations
set file privileges
Table B-56 Commands Defined for the Object Privilege Management Profile
Pathname Minimum Label Maximum Label UID GID Privilege(s)
/usr/bin/adb none none none none none
/usr/bin/getfpriv none none none none none
/usr/bin/kill none none none none none
/usr/bin/ldd none none none none none
/usr/bin/pkginfo none none none none none
/usr/bin/setfpriv none none none none file_dac_readfile_dac_searchfile_dac_writefile_mac_readfile_mac_searchfile_ownerfile_setidfile_setpriv
/usr/bin/testfpriv none none none none file_dac_searchfile_mac_readfile_mac_search
/usr/bin/truss none none none none none
/usr/proc/bin/ppriv none none none none proc_mac_readproc_owner
/usr/proc/bin/pprivtest none none none none proc_mac_readproc_nofloatproc_owner
/usr/sbin/pkgadd none none none none none
/usr/sbin/pkgchk none none none none none

Profile Definition Tables 541
B
Profile Name: Outside AccredDefinition: Allow user to operate outside user accreditation range
Profile Name: Privileged ShellsDefinition: shells that run with all privilege
/usr/sbin/pkgrm none none none none none
/usr/sbin/runpd none none none none none
/usr/sbin/swmtool none none none none none
Table B-57 Actions Defined for the Outside Accred Profile
Action(s) Minimum label Maximum Label UID GID Privilege(s)
none none none none none none
Table B-58 Authorizations Defined for the Outside Accred Profile
Authorizations
use all defined labels
Table B-59 Commands Defined for the Outside Accred Profile
Pathname Minimum Label Maximum Label UID GID Privilege(s)
/usr/sbin/ none none none none none
Table B-56 Commands Defined for the Object Privilege Management Profile
Pathname Minimum Label Maximum Label UID GID Privilege(s)

542 Trusted Solaris Administrator’s Procedures—July 1997
B
Profile Name: System ManagementDefinition: Do general administrative tasks such as mounting file systems,editing system databases, managing print queues, and so forth
Table B-60 Actions Defined for the Privileged Shells Profile
Action(s) Minimum label Maximum Label UID GID Privilege(s)
none none none none none none
Table B-61 Authorizations Defined for the Privileged Shells Profile
Authorizations
none
Table B-62 Commands Defined for the Privileged Shells Profile
Pathname Minimum Label Maximum Label UID GID Privilege(s)
/usr/bin/csh none none none none all
/usr/bin/ksh none none none none all
/usr/bin/sh none none none none all
Table B-63 Actions Defined for the System Management Profile (1 of 2)
Action(s) Minimum label Maximum Label UID GID Privilege(s)
Dbmgr none none none none sys_trans_label
Hostmgr none none none none none
DNS_Resolve none none none none file_dac_readfile_dac_writeproc_audit_applproc_audit_tcb

Profile Definition Tables 543
B
EditMotd none ADMIN_LOW none none file_dac_readfile_dac_writeproc_audit_applproc_audit_tcb
Vfstab none none none none file_dac_readfile_dac_writeproc_audit_applproc_audit_tcb
ShareFS none none none none file_dac_readfile_dac_writeproc_audit_applproc_audit_tcb
Table B-64 Authorizations Defined for the System Management Profile
Authorizations
administer printingmodify at usersmodify bootparamsmodify cron usersmodify ethersmodify hostsmodify localemodify netmasksmodify networksmodify protocolsmodify rpcmodify servicesmodify timezone
Table B-63 Actions Defined for the System Management Profile (2 of 2)
Action(s) Minimum label Maximum Label UID GID Privilege(s)

544 Trusted Solaris Administrator’s Procedures—July 1997
B
Table B-65 Commands Defined for the System Management Profile (1 of 6)
Pathname Minimum Label Maximum Label UID GID Privilege(s)
/usr/bin/adminvi none none none none none
/usr/bin/cancel none none 71 none file_mac_readfile_mac_write
/usr/bin/date none none none none sys_config
/usr/bin/disable none none none none sys_devices
/usr/bin/enable none none none none sys_devices
/usr/bin/kill none none none none proc_mac_writeproc_owner
/usr/bin/lp none none none none none
/usr/bin/lpstat none ADMIN_LOW none none file_dac_readfile_mac_read
/sur/bin/mailq none none none 2 file_dac_readfile_mac_read
/usr/bin/newaliases none none 0 none net_mac_readnet_privaddrproc_nofloatproc_setil
/usr/bin/nice none none none none none
/usr/bin/ps none none none none file_dac_readproc_mac_readproc_nofloatproc_owner
/usr/bin/rdist none none none none none
/usr/bin/renice none none none none proc_mac_writeproc_owner
/usr/bin/rup none none none none none
/usr/bin/vmstat none none none none none
/usr/openwin/bin/xhost none none none none win_config

Profile Definition Tables 545
B
/usr/proc/bin/pattr none none none none file_dac_readproc_mac_readproc_owner
/usr/proc/bin/pclear none none none none file_dac_readproc_mac_readproc_ownersys_trans_label
/usr/proc/bin/pcred none none none none file_dac_readproc_mac_readproc_nofloatproc_owner
/usr/proc/bin/pfiles none none none none file_dac_readproc_mac_readproc_nofloatproc_owner
/usr/proc/bin/pflags none none none none file_dac_readproc_mac_readproc_nofloatproc_owner
/usr/proc/bin/plabel none none none none file_dac_readproc_mac_readproc_nofloatproc_ownersys_trans_label
/usr/proc/bin/pldd none none none none file_dac_readproc_mac_readproc_nofloatproc_owner
/usr/proc/bin/pmap none none none none file_dac_readproc_mac_readproc_nofloatproc_owner
/usr/proc/bin/prun none none none none file_dac_readproc_mac_readproc_nofloatproc_owner
Table B-65 Commands Defined for the System Management Profile (2 of 6)
Pathname Minimum Label Maximum Label UID GID Privilege(s)

546 Trusted Solaris Administrator’s Procedures—July 1997
B
/usr/proc/bin/psig none none none none file_dac_readproc_mac_readproc_nofloatproc_owner
/usr/proc/bin/pstack none none none none file_dac_readproc_mac_readproc_nofloatproc_owner
/usr/proc/bin/pstop none none none none file_dac_readproc_mac_readproc_nofloatproc_owner
/usr/proc/bin/ptime none none none none file_dac_readproc_mac_readproc_nofloatproc_owner
/usr/proc/bin/ptree none none none none file_dac_readproc_mac_readproc_nofloatproc_owner
/usr/proc/bin/pwait none none none none file_dac_readproc_mac_readproc_nofloatproc_owner
/usr/proc/bin/pwdx none none none none file_dac_readproc_mac_readproc_nofloatproc_owner
/usr/sbin/accept none none none none sys_devices
/usr/sbin/allocate none none none none file_chownfile_set_dac
/usr/sbin/deallocate none none none none file_chownfile_set_dac
/usr/snin/format none none 0 none all
Table B-65 Commands Defined for the System Management Profile (3 of 6)
Pathname Minimum Label Maximum Label UID GID Privilege(s)

Profile Definition Tables 547
B
/usr/sbin/getfsattr none none none none file_dac_readfile_dac_searchfile_mac_search
/usr/sbin/in.named ADMIN_LOW ADMIN_HIGH 0 none file_mac_readnet_mac_readnet_privaddrnet_upgrade_slproc_dumpcoreproc_nofloatproc_setclrsys_configsys_net_configsys_trans_label
/usr/sbin/init none none none none all
/usr/sbin/list_devices none none none none none
/usr/sbin/lpadmin none ADMIN_LOW 0 none none
/usr/sbin/lpfilter none ADMIN_LOW 0 none none
/usr/sbin/lpmove none ADMIN_LOW 0 none none
/usr/sbin/lpshut none none 0 none none
/usr/sbin/lpsystem none ADMIN_LOW 0 none none
/usr/sbin/lpusers none ADMIN_LOW 0 none none
/usr/sbin/mkfile none none 0 none none
/usr/sbin/mkfs none none 0 none all
/usr/sbin/mount none none 0 none file_dac_readfile_dac_searchfile_mac_readfile_mac_searchfile_mac_writenet_privaddrproc_setilproc_setslsys_mountsys_trans_label
Table B-65 Commands Defined for the System Management Profile (4 of 6)
Pathname Minimum Label Maximum Label UID GID Privilege(s)

548 Trusted Solaris Administrator’s Procedures—July 1997
B
/usr/sbin/mountall none none 0 none file_dac_readfile_dac_searchfile_mac_readfile_mac_searchfile_mac_writenet_priv_addrproc_setilproc_setslsys_mountsys_trans_label
/usr/sbin/newfs none none 0 none all
/usr/sbin/ping none none none none none
/usr/sbin/reject none none none none sys_devices
/usr/sbin/share none none 0 none sys_nfs
/usr/sbin/shareall none none 0 none sys_nfs
/usr/sbin/showmount none none none none none
/usr/sbin/swap none none none none sys_mount
/usr/sbin/umount none none 0 none file_dac_readfile_dac_searchfile_mac_readfile_mac_searchfile_mac_writenet_privaddrproc_setilproc_setslsys_mountsys_trans_label
Table B-65 Commands Defined for the System Management Profile (5 of 6)
Pathname Minimum Label Maximum Label UID GID Privilege(s)

Profile Definition Tables 549
B
Profile Name: System SecurityDefinition: Do essential system security tasks such as setting labels onmounted file systems, trusted network configuration, and so forth
/usr/sbin/umountall none none none none file_dac_readfile_dac_searchfile_mac_readfile_mac_searchfile_mac_writenet_privaddrproc_setilproc_setslsys_mountsys_trans_label
/usr/sbin/unshare none none 0 none sys_nfs
/usr/sbin/unshareall none none 0 none sys_nfs
Table B-66 Actions Defined for the System Security Profile (1 of 2)
Action(s) Minimum label Maximum Label UID GID Privilege(s)
Dbmgr none none none none sys_trans_label
Printermgr none none none none none
Serialmgr none none none none none
TrustedEditor none none none none file_dac_readfile_dac_writeproc_audit_applproc_audit_tcb
Table B-65 Commands Defined for the System Management Profile (6 of 6)
Pathname Minimum Label Maximum Label UID GID Privilege(s)

550 Trusted Solaris Administrator’s Procedures—July 1997
B
Nsswitch none none none none file_dac_readfile_dac_writeproc_audit_applproc_audit_tcb
SendMail none none none none file_dac_readfile_dac_writeproc_audit_applproc_audit_tcb
Vfstab_adjunct none none none none file_dac_readfile_dac_writeproc_audit_applproc_audit_tcb
Table B-67 Authorizations Defined for the System Security Profile
Authorizations
modify at adminmodify cron adminmodify netgroupmodify tnidbmodify tnrhdbmodify tnrhtpprint a PostScript fileprint without labelsremote login
Table B-68 Commands Defined for the System Security Profile (1 of 3)
Pathname Minimum Label Maximum Label UID GID Privilege(s)
/usr/bin/adminvi none none none none none
/usr/bin/disable none none none none sys_devices
/usr/bin/enable none none none none sys_devices
Table B-66 Actions Defined for the System Security Profile (2 of 2)
Action(s) Minimum label Maximum Label UID GID Privilege(s)

Profile Definition Tables 551
B
/usr/bin/ps none none none none file_dac_readproc_mac_readproc_nofloatproc_owner
/usr/sbin/accept none none none none sys_devices
/usr/sbin/add_drv none none none none none
‘/usr/sbin/allocate none none none none file_chownfile_setdac
/usr/sbin/autopush none none none none none
/usr/sbin/deallocate none none none none file_chownfile_setdac
/usr/sbin/drvconfig none none none none none
/usr/sbin/format none none 0 none all
/usr/sbin/getfsattr none none none 3 none
/usr/sbin/mkfs none none 0 none all
/usr/bin/newfs none none 0 none all
/usr/sbin/newsecfs none none 0 none all
/usr/sbin/ping none none none none none
/usr/sbin/reject none none none none sys_devices
/usr/sbin/rem_drv none none none none sys_devices
/usr/sbin/setfsattr none none none none file_dac_writefile_downgrade_ilfile_downgrade_slfile_mac_searchfile_setdacfile_setidfile_setprivfile_upgrade_ilfile_upgrade_sl
/usr/sbin/tnchkdb none none none none file_mac_readsys_trans_label
Table B-68 Commands Defined for the System Security Profile (2 of 3)
Pathname Minimum Label Maximum Label UID GID Privilege(s)

552 Trusted Solaris Administrator’s Procedures—July 1997
B
Profile Name: User ManagementDefinition: Manage aspects of creating or managing user attributes that are notsecurity-related. It is the complement of the “User Security” profile
/usr/sbin/tnctl none none none none sys_net_configsys_trans_label
/usr/sbin/tnd none none none none net_downgrade_slnet_mac_readnet_privaddrproc_setclrproc_setslsys_net_config
/usr/sbin/tninfo none none none none file_dac_readfile_mac_readsys_net_configsys_trans_label
Table B-69 Actions Defined for the User Management Profile
Action(s) Minimum label Maximum Label UID GID Privilege(s)
Groupmgr none none none none none
Usermgr none none none none sys_trans_label
Table B-70 Authorizations Defined for the User Management Profile
Authorizations
modify aliasesset attributes related to home directoriesset user identity
Table B-68 Commands Defined for the System Security Profile (3 of 3)
Pathname Minimum Label Maximum Label UID GID Privilege(s)

Profile Definition Tables 553
B
Profile Name: User SecurityDefinition: Create or modify a user’s security attributes. This profile is thecomplement to the “User Manager” profile
Table B-71 Commands Defined for the User Management Profile
Pathname Minimum Label Maximum Label UID GID Privilege(s)
/opt/SUNWadm/2.1/bin/groupmgr none none none none none
/opt/SUNWadm/2.1/bin/usermgr none none none none sys_trans_label
Table B-72 Actions Defined for the User Security Profile
Action(s) Minimum label Maximum Label UID GID Privilege(s)
Dbmgr none none none none sys_trans_label
Profmgr none none none none sys_trans_label,win_dac_readwin_mac_read
Usermgr none none none none sys_trans_label
Table B-73 Authorizations Defined for the User Security Profile
Authorizations
modify auto_homeset idle timeset list of assumable rolesset user audit flagsset user labelsset user passwordset user profilesset/get file audit flagsuse all defined labels

554 Trusted Solaris Administrator’s Procedures—July 1997
B
Profile Name: inetdDefinition: Privileges for programs executed by the inetd. Do not assign thisprofile to users.
Table B-74 Commands Defined for the User Security Profile
Pathname Minimum Label Maximum Label UID GID Privilege(s)
/opt/SUNWadm/2.1/bin/dbmgr none none none none sys_trans_label
/opt/SUNWadm/2.1/bin/profmgr none none none none sys_trans_labelwin_dac_read
/opt/SUNWadm/2.1/bin/usermgr none none none none sys_trans_label
Table B-75 Actions Defined for the inetd Profile
Action(s) Minimum label Maximum Label UID GID Privilege(s)
none none none none none none
Table B-76 Authorizations Defined for the inetd Profile
Authorizations
none

Profile Definition Tables 555
B
Table B-77 Commands Defined for the inetd Profile (1 of 3)
Pathname Minimum Label Maximum Label UID GID Privilege(s)
/usr/dt/bin/rpc.cmsd none none none none 2829file_chownfile_dac_readfile_dac_writefile_mac_readfile_mac_writefile_nofloatfile_ownerfile_setdacfile_setidnet_broadcastnet_downgrade_ilnet_downgrade_slnet_mac_readnet_nofloatnet_privaddrnet_reply_equalproc_mac_readproc_mac_writeproc_ownerproc_setid

556 Trusted Solaris Administrator’s Procedures—July 1997
B
/usr/dt/bin/rpc.ttdbserverd none none none none 2829file_chownfile_dac_readfile_dac_writefile_mac_readfile_mac_writefile_nofloatfile_ownerfile_setdacfile_setidnet_broadcastnet_downgrade_ilnet_downgrade_slnet_mac_readnet_nofloatnet_privaddrnet_reply_equalproc_mac_readproc_mac_writeproc_owner
/usr/sbin/in.ftpd none none none none file_mac_writenet_privaddrproc_audit_tcbproc_setid
/usr/sbin/in.rexecd none none none none net_privaddrproc_audit_tcbproc_setid
/usr/sbin/in.rlogind none none none none file_chownfile_mac_writefile_setdacnet_privaddrproc_audit_tcb
/usr/sbin/in.rshd none none none none net_privaddrproc_audit_tcbproc_setid
Table B-77 Commands Defined for the inetd Profile (2 of 3)
Pathname Minimum Label Maximum Label UID GID Privilege(s)

Profile Definition Tables 557
B
Profile Name: bootDefinition: System start-up/shutdown profile
/usr/sbin/in.telnetd none none none none file_chownfile_mac_writefile_setdacnet_privaddrproc_audit_tcb
/usr/sbin/in.tftpd none none none none proc_chrootproc_setid
/usr/sbin/sadmind none none none none all
Table B-78 Actions Defined for the boot Profile
Action(s) Minimum label Maximum Label UID GID Privilege(s)
none none none none none none
Table B-77 Commands Defined for the inetd Profile (3 of 3)
Pathname Minimum Label Maximum Label UID GID Privilege(s)

558 Trusted Solaris Administrator’s Procedures—July 1997
B
Table B-79 Authorizations Defined for the boot Profile
Authorizations
act as file ownerallocate devicebypass view of file contents on drag and dropchange file ownerdowngrade file sensitivity labelenable loginspaste to a downgraded windowpaste to an upgraded windowpermit self-modificationprint a PostScript fileprint without labelremote loginset application search pathset attributes related to home directoriesterminal loginset/get file audit flagsset file privilegesset idle timeset list of assumable rolesset user audit flagsset user identityset user labelsset user passwordset user profilesset/get file audit flagsterminal loginupgrade file sensitivity labeluse all defined labels

Profile Definition Tables 559
B
Table B-80 Commands Defined for the boot Profile (1 of 3)
Pathname Minimum Label Maximum Label UID GID Privilege(s)
/sbin/mountall none ADMIN_HIGH none none all
/usr/lib/lp/lpsched ADMIN_HIGH ADMIN_HIGH none none file_chownfile_dac_readfile_dac_searchfile_dac_writefile_downgrade_slfile_mac_readfile_mac_searchfile_mac_writefile_ownerfile_setdacfile_setidfile_upgrade_slnet_downgrade_slnet_mac_readnet_setidnet_setprivnet_upgrade_ilproc_audit_tcbproc_mac_writeproc_nofloatproc_ownerproc_setclrproc_setidproc_setslsys_trans_label
/usr/sbin/auditd none none none none file_mac_writeproc_setclrproc_setilproc_setslsys_audit

560 Trusted Solaris Administrator’s Procedures—July 1997
B
/usr/sbin/cron ADMIN_LOW ADMIN_HIGH 0 none file_dac_readfile_mac_writefile_ownernet_mac_readproc_audit_tcbproc_nofloatproc_setclrproc_setidproc_setilproc_setslsys_audit
/usr/sbin/in.named ADMIN_LOW ADMIN_HIGH 0 none file_mac_readnet_mac_readnet_privaddrnet_upgrade_slproc_dumpcoreproc_nofloatproc_setclrsys_net_configsys_trans_label
/usr/sbin/inetd ADMIN_LOW ADMIN_HIGH none none all
/usr/sbin/nscd ADMIN_LOW ADMIN_HIGH none none file_dac_writefile_setidnet_mac_readnet_upgrade_slproc_dumpcoreproc_nofloatproc_setclrsys_net_configsys_trans_label
/usr/sbin/rpcbind ADMIN_HIGH ADMIN_HIGH none none all
Table B-80 Commands Defined for the boot Profile (2 of 3)
Pathname Minimum Label Maximum Label UID GID Privilege(s)

Profile Definition Tables 561
B
/usr/sbin/syslogd ADMIN_LOW ADMIN_HIGH none none file_dac_writefile_mac_writefile_upgrade_ilnet_downgrade_ilnet_downgrade_slnet_mac_readnet_privaddrnet_upgrade_ilnet_upgrade_slproc_nofloatproc_setclrproc_setilproc_setslsys_trans_label
/usr/sbin/tnd none none none none net_downgrade_slnet_mac_readnet_privaddrproc_setclrproc_setslsys_net_config
/usr/sbin none none none none all
Table B-80 Commands Defined for the boot Profile (3 of 3)
Pathname Minimum Label Maximum Label UID GID Privilege(s)

562 Trusted Solaris Administrator’s Procedures—July 1997
B

563
Index
Aaccept command
modified for Trusted Solaris, 382default profile, 493
accessreview of concepts, 305 to 317
Access Control Lists, See ACLsaccess policy
files, directories and file systems, 306accounts
assigning account type, 105assigning clearances, 116assigning comments, 103assigning execution profiles, 120 to
121assigning home directories, 113 to
115assigning idle time, 122 to 123assigning labels, 116 to 119assigning passwords, 106 to 113assigning roles, 122assigning shells, 104assigning user information, 102authorizations for setting up, 62configuring, See User Managerdivision of setup tasks, 61 to 62managing, 57 to 85planning, 58 to 60
preconditions for setup, 58procedures for setting up, 124 to 155startup files, 65 to 85worksheet, 192
accreditation rangesSee also label rangesdescribed, 308
ACLsdescribed, 305
actionsadding new administrative, 24 to 26assigning to execution profiles, 221defined, 441in execution profiles, 195restricted by account profiles, 444using actions, 466
adb commanddefault profile, 493
add_drv commanddefault profile, 493
adjunct fileSee also vfstab_adjunct file
Admin Edit action, 12admin role, See system administratorADMIN_HIGH label
replacing with CIPSO label, 296ADMIN_LOW label

564 Trusted Solaris Administrator’s Procedures—July 1997
installing publicly availablesoftware, 437
administrative actionscreating, 24 to 26introduced, 444
administrative rolesapplications
launching, 23location on the desktop, 23
assumingbackground, 4 to 5procedure, 12 to 20
changing workspace SLs, 21described, 89 to 90password, 5switching workspaces, 21workspaces
display when role is assumed, 5using, 7 to 24
adminvi commanddefault profile, 493described, 12
adorned pathnamesdescribed, 309
adornmentsdescribed, 44
aliasessetting up, 164, 167
All execution profileallowing standard UNIX access to
commands and actions, 442ordering in an account’s profile
list, 443allocatable devices
managing allocation, 420allocate command
default profile, 493allocate error state, 408, 413allowed privileges, 440APIs
See also privilegesApplication Manager
as trusted process, 444passing inheritable privileges, 454
using AdminSuite, 8using Solstice_Apps, 8using System_Admin, 8
applicationsadministrative
launching, 23assigning forced privileges, 476importing, 438setting up with a real UID of 0, 473setting up with effective UID of 0, 473
aspppd commanddefault profile, 493
at commandadministrative differences, 73 to 82running privileged commands, 75Trusted Solaris changes, 81
at.allow file, 76at.deny file, 76atohexlabel command
default profile, 493atq command
administrative differences, 73 to 82Trusted Solaris changes, 81
atrm commandadministrative differences, 73 to 82Trusted Solaris changes, 82
attributesSee also security attributes
audio coprocessor, 409audit command
default profile, 493audit IDs
purpose when a role is assumed, 5auditconfig command
default profile, 493auditd command
default profile, 493auditing
See also application auditingauditreduce command
default profile, 494auditstat command
default profile, 494

Index 565
AUTH_authorization name, Seeauthorizations and auth_desc file
auth_name file, 35auth_names.h file, 33authorizations
See also auth_desc fileSee also privilegesadding, 33administering printing, 383assigning to execution profiles, 219enable logins, 6for specifying fields in the User
Manager, 61modify at admin, 78modify at user, 79modify cron admin, 79modify cron user, 79needed for users who assume
secadmin role, 5print without banners, 383print without labels, 383procedure for adding, 36required for account setup, 62required for User Manager, 92 to 94self-modification, 94tsolprof file, 32
autopush commanddefault profile, 494
awk commanddefault profile, 494
Bbanner pages
printing without, 397banners on print jobs, 378batch command
administrative differences, 73 to 82running privileged commands, 75
body pageslabels, 368specifying SLs to print instead of
ILs, 396
boot execution profile, 457bsmconv command
default profile, 494bsmunconv command
default profile, 494
Ccachefs, 327cachefslog command
default profile, 494cancel command
modified for Trusted Solaris, 382default profile, 494
cat commanddefault profile, 494
cd commanddefault profile, 494
CDE actions, See actionsCDE configuration file default, 114CDROM devices
device_clean script, 408mounting, 343
changes to printing in Trusted Solaris, 364to 393
chgrp commanddefault profile, 494
chk_encodings commanddefault profile, 494
chkey commanddefault profile, 494
chmod commanddefault profile, 494
chown commanddefault profile, 494
CIPSO(Common Internet Protocol Security
Option)host type
described, 265replacing ADMIN_HIGH, 296use in packets, 250
classifications

566 Trusted Solaris Administrator’s Procedures—July 1997
described, 309clear command
default profile, 494clearances
See also labelsassigning, 116described, 309
clri commanddefault profile, 494, 495
.cm.rc file, 68cmp command
default profile, 495CMW labels
See also labelsdescribed, 309on removable media, 403
col commanddefault profile, 495
commandsassigning to execution profiles, 217privileged
run by cron(1MTSOL), 75privileges, 461trusted, 461
commentsassigning to accounts, 103
commercial applicationsadding, 461
compartmentsdescribed, 309
compress commanddefault profile, 495
configuration files, See databases.copy_files files
using, 70cp command
default profile, 495cpio command
default profile, 495crash command
default profile, 495cron command
administrative differences, 73 to 82
running privileged commands, 75default profile, 495
cron.allow file, 76cron.deny file, 76cron command
Trusted Solaris changes, 80crontab command
administrative differences, 73 to 82csh command
default profile, 495customizations
changing printer output, 372cut command
default profile, 495
DDAC
(discretionary access control)See also security policycautions about override
privileges, 460described, 310override privileges, 439
data objects, See objectsdata packets, See packetsDatabase Manager
accessing network databases, 280adding a host to a running
system, 348databases
accessing tnidb (4TSOL), 254accessing tnrhdb file, 254accessing tnrhtp (4TSOL), 254
date commanddefault profile, 495
dbmgr commanddefault profile, 495
deallocate commanddefault profile, 495
default configuration, 413default shells
assigning to accounts, 104

Index 567
/dev/kmem kernel image filesecurity violation, 463
developersresponsibilities, 464
device allocationlock files, 412meeting the object reuse
requirement, 403device_allocate file
default contents, 414device_clean scripts
for tape devices, 408meeting object reuse
requirements, 403review, 407
devicesallocatable
default configuration, 413associated security risks, 402clearing prior to reuse, 403frame buffer, 413managing allocation, 420non-allocatable
setting the label range, 413policy for access to, 306printers
default configuration, 413required location of device special
files, 407setting policy for, 419with removable media
special object reuserequirements, 403
df commanddefault profile, 495
diff commanddefault profile, 495
diff3 commanddefault profile, 495
dircmp commanddefault profile, 495
directorieschanging flags, 321changing labels and privileges, 336
security attributes, 318 to 326sharing, 343
dirname commanddefault profile, 495
disable commandmodified for Trusted Solaris, 382default profile, 495
discretionary access control, See DACdocuments, policy for access to, 306dominance of labels
described, 310drvconfig command
default profile, 495dtwm(1) command, 444du command
default profile, 495
Eecho command
default profile, 495editing privileged executables, 472eeprom command
default profile, 495effective GIDs, See GIDseffective UIDs, See UIDsemail
aliases, 164, 167listing mail queues, 167managing, 157 to 189options, 176 to 179overview, 158 to 164switching mail tools, 180 to 189troubleshooting, 171 to 176
enable commandmodified for Trusted Solaris, 382default profile, 496
enable logins authorization, 6enabling logins
after a reboot, 5env command
default profile, 496ERRORS

568 Trusted Solaris Administrator’s Procedures—July 1997
section on man pages, 439/etc/cron.d/CRON, cron(1MTSOL) lock
file, 76/etc/init.d directory
changing scripts, 457starting and stopping scripts, 459
/etc/skel file, 69, 114executable files
assigning forced privileges, 476editing while preserving
privileges, 472privilege sets, 440
execution profilesAll
allowing standard UNIX accessto commands andactions, 442
contents, 488ordering in an account’s profile
list, 443All Authorizations
contents, 488assigning, 120, 121Audit Control
contents, 488Audit Review
contents, 488Basic Actions
contents, 488Basic Commands
contents, 489boot, 457
contents, 492controlling the use of actions, 444Convenient Authorizations
contents, 489creating new for boot commands, 457described, 310editing, 198, 232Enable Login
contents, 489importance of order, 442inetd profile
contents, 492Maintenance and Repair
contents, 489managing, 193 to 232Media Backup
contents, 489Media Restore
contents, 489NIS+ Administration
contents, 490NIS+ Security Administration
contents, 490Object Access Management
contents, 490Object Label Management
contents, 490Object Privilege Management
contents, 490Outside Accred
contents, 490overview, 194 to 197Privileged Shells
contents, 490using to start commands from
run control scripts, 459System Management
contents, 491System Security
contents, 491table of commands, 493 to 506table of profile contents, 488 to 492User Management
contents, 491User Security
contents, 491execve system call
inheriting privileges across, 450replacing the executing program, 445
exporting software, 437expr command
default profile, 496
Ffallback mechanism
creating, 287networks, 274

Index 569
false commanddefault profile, 496
FDFSmounting in Trusted Solaris, 328
fgrep commanddefault profile, 496
file commanddefault profile, 496identifying multilevel directorie, 50
File Manageras trusted process, 444passing inheritable privileges, 454Privileges dialog box, 453, 454
file privilege sets, 440file systems
changing security attributes usingmount -S command, 340
changing security attributes usingnewsecfs(1MTSOL), 339
changing security attributes usingsetfsattr(1MTSOL), 339
changing security attributes usingvfstab file, 340
managing, 303, 344review of concepts, 305 to 317security attributes, 318 to 326single label, 325types, 327
file_mac_write privilegeresulting in a file’s dominating its
directory’s SL, 356file_upgrade_sl privilege
resulting in upgraded names, 356files
changing flags, 321changing labels, 320changing labels and privileges, 336changing privileges, 320managing, 303 to 344policy for access to, 306review of concepts, 305 to 317
floating, See ILsfloppy devices
device_clean script, 408
fold commanddefault profile, 496
forced privileges, 440fork system call
creating processes, 445inheriting privileges across, 450
format commanddefault profile, 496
Front Panelas trusted process, 444modifying, 467passing inheritable privileges, 454Subpanels
as trusted processes, 444fsck command
default profile, 496fsdb command
default profile, 496fsirand command
default profile, 496
Ggateways
concepts, 240, 246default, 271per network, 271
getdents system callrestricting from returning upgraded
names, 356getfacl command
default profile, 496getfattrflag command
default profile, 496described, 321identifying multilevel directories, 50
getfpriv commanddefault profile, 496using to save privileges, 483
getfsattr commanddefault profile, 496described, 324
getlabel commanddefault profile, 496

570 Trusted Solaris Administrator’s Procedures—July 1997
getmldadorn commanddefault profile, 496
getsldname commanddefault profile, 496
GIDs(group IDs)effective
alternative to privileges, 440defaults, 460defined, 438
in execution profiles, 195grep command
default profile, 496group IDs
assigning, 102group names
assigning, 102groupmgr command
default profile, 497grpck command
default profile, 497
Hhalt command
default profile, 497head command
default profile, 497hexadecimal label equivalents
determining, 30hextoalabel command
default profile, 497Home dialog box
User Manager, 113 to 115Host Manager
adding a host to a runningsystem, 348
host typesCIPSO, 265MSIX, 263networking, 255 to 270RIPSO, 267sun_tsol, 257TSIX, 260
unlabeled, 269hostid command
default profile, 497hostname command
default profile, 497hosts
assigning templates, 282 to 286networking concepts, 235, 246worksheet, 485
HSFSmounting in Trusted Solaris, 328
Iicons
visibilityin the File Manager, 444in the Workspace Menu, 444
id commanddefault profile, 497
identification and authenticationbefore assuming a role, 5
Identity dialog boxUser Manager, 102
Idle dialog boxUser Manager, 122, 123
IDsSee also audit IDsSee also GIDsSee also UIDs
ILs(information labels)See also labelsdescribed, 310displaying and hiding, 117 to 119floating
described, 311in.ftpd command
default profile, 497in.named command
default profiles, 497in.rexecd command
default profile, 497in.rlogind command

Index 571
default profile, 497in.rshd command
default profile, 497in.telnetd command
default profile, 497in.tftpd command
default profile, 497INET Domain sockets, See networkinginetd command
default profile, 497information labels, See ILsinheritable privileges, 450init command
default profile, 497init.d directory
starting commands during boot, 457initialization files
Trusted Solaris differences, 65installation
adding software, 463internationalization
changing printer output, 372interprocess communication, See IPCIP Options field
use, 249
Jjoin command
default profile, 497
Kkernel switches
configurable, 354kill command
default profile, 497kmem(7D) kernel image file, 463ksh command
default profile, 497
Llabel ranges
See also accreditation rangesdescribed, 311devices, 414setting on individual computers, 413
label_encodings filedistributing changes, 361, 362procedures
printing without banners andtrailers, 397
printing without labeledpages, 379, 399
printing without page labels, 398labels
See also clearancesSee also information labelsSee also SLschanging on files and directories, 336described, 311displaying, 117 to 119distributing changes, 361 to 362on imported and exported data, 411physical, on removable media, 403printed body pages, 368
Labels dialog boxUser Manager, 116, 119
ldd commanddefault profile, 497, 498
libt6(3NTSOL), 76.link_files file
using, 70list_devices command
default profile, 498ln command
default profile, 498local.login file
defining printers, 399lock files
for allocatable devices, 412LOFS
mounting in Trusted Solaris, 328log files
security violation from sharing, 463.login file , 114

572 Trusted Solaris Administrator’s Procedures—July 1997
loginby administrative roles, 4 to 5
login sequence, 6look command
default profile, 498lp command
default profile, 498lpadmin command
modified for Trusted Solaris, 382default profile, 498
lpc commandmodified for Trusted Solaris, 382
lpfilter commanddefault profile, 498
lpmove commandmodified for Trusted Solaris, 382default profile, 498
lpr commandmodified for Trusted Solaris, 382
lprm commandmodified for Trusted Solaris, 382
lpsched commandmodified for Trusted Solaris, 382default profile, 498
lpshut commandmodified for Trusted Solaris, 382default profile, 498
lpstat commandmodified for Trusted Solaris, 382default profile, 498
lpsystem commandmodified for Trusted Solaris, 382default profile, 498
lptest commandmodified for Trusted Solaris, 382
lpusers commanddefault profile, 498
ls commanddefault profile, 498
MMAC
(mandatory access control)
bypassing restrictions, 439cautions about override
privileges, 462described, 311incoming packets, 253outgoing packets, 252override privileges, 439
mailaliases, 164 to 167listing mail queues, 167managing, 157 to 189messages, policy for access to, 306options, 176 to 179overview, 158 to 164switching mail tools, 180 to 189troubleshooting, 171 to 176
mailq commanddefault profile, 498
.mailrc file, 68man command
default profile, 498man pages
ERRORS sections, 439mandatory access control, See MACmarkings
described, 312minimum labels
assigning, 116minimum SLs
described, 312mkdir command
default profile, 498default profiles, 498
mkfile commanddefault profile, 498
mkfs commanddefault profile, 498, 499
mldpwd commanddefault profile, 499
mldrealpath commanddefault profile, 499identifying multilevel directories, 50
MLDs

Index 573
See also SLDsbacking up, 51described, 313identifying, 50working with, 43 to 53
modify at admin authorization, 78modify at user authorization, 79modify cron admin authorization, 79modify cron user authorization, 79more command
default profile, 499mount command
nodevices optioncontrolling location of
devices, 407default profile, 499
mountall commanddefault profile, 499
mountsmanaging, 303 to 344permitted file systems, 327procedure for TMPFS, 343troubleshooting, 344
MSIX host typedescribed, 263
mt commanddefault profile, 499
multilevel directories, See MLDsmv command
default profile, 499
Nncheck command
default profile, 499.netscape file, 68netstat command
default profile, 499network accreditation range
example, 279network accreditation ranges
described, 237requirements, 239
setting up, 290network interfaces
configuring, 291 to 296described, 237requirements, 239
networkingconcepts, 235 to 246
networksdefault labeling, 253 to 279fallback mechanism, 274procedures for configuring, 280 to
302security attributes, 248 to 279using templates, 273
newaliases commanddefault profile, 499
newfs commanddefault profile, 499
newkey commanddefault profile, 499
newsecfs commanddefault profile, 499
newsecfs command)described, 324
.newsrc file, 68NFS
mounting in Trusted Solaris, 328nice command
default profile, 499NIS+
configuration files notadministered, 347
tablesadding protected data, 348new in Trusted Solaris, 347
NIS+ client hostadding to a running system, 348
NIS+, managing, 345 to 348nisaddcred command
default profile, 499nisaddent command
default profile, 499niscat command

574 Trusted Solaris Administrator’s Procedures—July 1997
default profile, 499nischgrp command
default profile, 499nischmod command
default profile, 500nischown command
default profile, 500nischttl command
default profile, 500nisclient command
default profile, 500nisctl command
default profile, 500nisdefaults command
default profile, 500niserror command
default profile, 500nisgrep command
default profile, 500nisgrpadm command
default profile, 500nisinit command
default profile, 500nisln command
default profile, 500nislog command
default profile, 500nismatch command
default profile, 500nismkdir command
default profile, 500nispasswd command
default profile, 500nisping command
default profile, 500nispopulate command
default profile, 500nisrm command
default profile, 500nisrmdir command
default profile, 500nisserver command
default profile, 500
nissetup commanddefault profile, 500
nisshowcache commanddefault profile, 500
nisstat commanddefault profile, 500
nistbladm commanddefault profile, 500
nistest commanddefault profile, 500
nistnsetup commanddefault profile, 500
nistntime commanddefault profile, 500
nisupdkeys commanddefault profile, 501
non-administrative rolesdescribed, 88, 89
nroff commanddefault profile, 501
nscd commanddefault profiles, 501
Oobject reuse
how device allocation satisfies, 403object-reuse
review, 403oper role, See system operator
Ppackets
IP options, 249security attributes, 249 to 254
page commanddefault profile, 501
PAMSee pluggable authentication
module, 111pam_headers.h file
settings for password values, 110passwords

Index 575
assigning, 106, 113requiring changes, 111role, 5rules for manual creation, 109
pattr commanddefault profile, 501
PCFSmounting in Trusted Solaris, 328
pclear commanddefault profile, 501
pcred commanddefault profile, 501
permission bitsdescribed, 314
permissionsdescribed, 305
pfiles commanddefault profile, 501
pflags commanddefault profile, 501
pfsh commanddefault profile, 501purpose, 11
pfsh command, See also profile shellpg command
default profile, 501ping command
default profile, 501pkgadd command
default profile, 501pkgchk command
default profile, 501pkginfo command
default profile, 501pkgrm command
default profile, 501plabel command
default profile, 501pldd command
default profile, 501pluggable authentication module
default settings, 111pmap command
default profile, 501policy, See security policyporting software, 438poweroff command
default profile, 501pr command
default profile, 501praudit command
default profile, 501principle of least privilege, 440Printer Manager
launching, 384PRINTER variable
printing without labels, 399printers
label rangessetting, 413
printingauthorizations, 383configuring labels and text, 372specifying SLs to print instead of ILs
on body pages, 396suppressing page labels, 379without banners and trailers, 397without banners authorization, 383without page labels, 398
priv_name file, 39priv_names.h file, 37PRIV_privilege name, See privileges and
priv_desc fileprivilege debugging
setting tsol_privs_debug, 357privilege sets
process, 445privileged commands
run by cron command(1MTSOL), 75privileged programs, 461privileges
See also authorizationsSee also priv_desc fileadding, 37allowed, 454alternatives to using, 440

576 Trusted Solaris Administrator’s Procedures—July 1997
bracketing, 440changing on files and directories, 336DAC override, 439defined, 438described, 314effective set
defined, 445example, 441in execution profiles, 196file_dac_read
as an override privilege, 439file_dac_write
as an override privilege, 439file_mac_read
as an override privilege, 439file_mac_write
as an override privilege, 439forced
assigning, 453, 476inheritable, 450, 454inheritable set
defined, 445inheritance, 442MAC override, 439making available to commands, 453non-obvious reasons for
requiring, 463override, 96
defined, 439permitted set
defined, 445principle of least privilege, 440procedure for adding, 40required, 95, 439running with all, 444saved set
defined, 445saving and restoring an edited
executable, 483used by commands in the pfsh
shell, 443process privilege sets, 445processes
described, 314relationship to programs, 445
PROCFSmounting in Trusted Solaris, 329
procplabel commanddefault profile, 502
procppriv commanddefault profile, 502
procpprivtest commanddefault profile, 502
Profile dialog boxUser Manager, 120, 121
Profile Managerassigning actions, 221assigning authorizations, 219assigning commands, 217filtering profiles, 200procedures for using, 223 to 232setting label ranges, 215specifying privileges for commands
and actions, 454using, 198 to 232
profile shelleffect on commands, 442managing inherited privileges, 443purpose, 11startup algorithm, 67
profilesSee execution profiles
profmgr commanddefault profile, 502
programscommercial
assigning privileges to, 453new, trusted
assigning privileges to, 453relationship to processes, 445trusted
defined, 461trustworthy
defined, 461prtconf command
default profile, 502prun command
default profile, 502ps command

Index 577
default profile, 502psig command
default profile, 502pstack command
default profile, 502pstp command
default profile, 502ptime command
default profile, 502ptree command
default profile, 502pwait command
default profile, 502pwck command
default profile, 502pwd command
default profile, 502pwdx command
default profile, 502
Rrc scripts
shell use, 443rc2.d directory
S05RMTMPFILES script, 6rcp command
default profile, 502required privilege, 462
rdist commanddefault profile, 502
real UIDroot
required for applications, 464root requirement for installation, 463
rebootpreventing disable of logins, 26re-enabling logins, 5
reboot commanddefault profile, 502
reject commandmodified for Trusted Solaris, 382default profile, 502
rem_drv commanddefault profile, 502
renice commanddefault profile, 502
RIPSO(Revised Internet Protocol Security
Option)host type
described, 267use in packets, 251
rlogin commanddefault profile, 502
rm commanddefault profile, 502, 503
rmdir commanddefault profile, 503
rolesadministrative, 89 to 90combining administrative roles, 94contrasted with user accounts, 88creating, 95 to 98
override privileges, 96required privileges, 95
managing, 87 to 98non-administrative, 88 to 89password, 5procedure for creating, 98root, 89security administrator contrasted
with systemadministrator, 91
Roles dialog boxUser Manager, 122
rootsaving and restoring NIS+ tables, 349
root rolecompared with privileges, 439using to install applications, 464
root UIDrequired for applications, 464requirement for installation, 463
routingassigning default, 297concepts, 240 to 246

578 Trusted Solaris Administrator’s Procedures—July 1997
procedure for setup, 297setting up, 271 to 302
rpc.cmsd commanddefault profile, 503
rpc.ttdbserverd commanddefault profile, 503
rpcbind commanddefault profile, 503
rsh commanddefault profile, 503
run control scriptsmodifying, 457shell use, 443
runpd commanddefault profile, 503dependency on tsol_priv_debug
setting, 357rup command
default profile, 503
Ssadmind command
default profile, 503SAMP
(Security Attribute ModulationProtocol)
SATMP(Security Attribute Token Mapping
Protocol)/sbin/rc n scripts
Trusted Solaris modifications, 458/sbin/sysh shell
using during boot, 458script command
default profile, 503sdiff command
default profile, 503secadmin role, See security administratorsecurity administrators
accessing the Printer Manager, 384account management
responsibilities, 61
contrasted with systemadministrators, 91
described, 314enable logins authorization
requirement, 5modifying window configuration
files, 467system integrity
assessing after reboots, 5security attributes
described, 315file systems, 318 to 326
security domainsmultiple described, 238single described, 236
security featuresidentification and authentication for
roles, 5security mechanisms
extendable by securityadministrator, 31
security policydescribed, 315principle of least privilege, 440
sed commanddefault profile, 503
self-modification authorization, 94sendmail command
using, 168 to 171sensitivity labels, See SLssession clearances
described, 316setfacl command
default profile, 503setfattrflag command
default profile, 503described, 321
setfpriv commandrestricting assignment of forced and
allowed privileges, 454setfpriv command, 453
default profile, 503setfsattr command

Index 579
default profile, 503described, 325
setlabel commanddefault profile, 503
sh commanddefault profile, 503
share commanddefault profile, 503
shareall commanddefault profile, 503
sharing directories, 343shell scripts
summary of Trusted Solarisbehavior, 470
writing privileged, 479writing privileged using standard
shells, 480shells
assigning to accounts, 104sysh(1MTSOL), 458
showmount commanddefault profile, 503
single-level directories, See SLDsskeleton directories
defining printers, 399use in Trusted Solaris, 69
skeleton path, 114SLDs
described, 316working with, 43 to 53
SLDs (single-label directories)See also MLDs
sleep commanddefault profile, 503
SLs(sensitivity labels)See also labelsdescribed, 316displaying and hiding, 117 to 119
snoop commanddefault profile, 504
softwareexporting multiple SLs, 437
importing, 438multiple SLs, 437
installing publicly available softwareat ADMIN_LOW, 437
portingreasons against, 463
sort commanddefault profile, 504
spell commanddefault profile, 504
spray commanddefault profile, 504
spreadsheet, policy for access to, 306standard UNIX shell
effect on commands, 442startup files
.cm.rc file, 68configuring accounts, 65 to 85.mailrc file, 68.netscape file, 68.newsrc file, 68procedures for customizing, 83 to 85rc2 .d/S05RMTMPFILES , 6read at window system startup, 65
strace commanddefault profile, 504
strict dominancedescribed, 316
stty commanddefault profile, 504
sun_tsol host typedescribed, 257
swap commanddefault profile, 504
swmtool commanddefault profile, 504
sysh shellusing during boot, 458trusted processes, 443
syslogd commanddefault profile, 504
system accreditation rangedescribed, 317

580 Trusted Solaris Administrator’s Procedures—July 1997
system administratoraccount management
responsibilities, 61adding a host, 348contrasted with security
administrator, 91system security
violations, 463system shell
described, 443System V interprocess communication, See
System V IPCSystem_Admin folder
using administrative actions, 444
Ttail command
default profile, 504tape devices
device_clean scripts, 408tar command
default profile, 504allocating a media device, 411
tbl commanddefault profile, 504
TCP address(Transmission Control Protocol
address)templates
assigning to hosts, 282, 286test command
default profile, 504testfpriv command
default profile, 504tfind command
default profile, 504time command
default profile, 504TMPFS
mounting in Trusted Solaris, 329mounting procedure, 343
tnchkdb commanddefault profile, 504
tnctl commanddefault profile, 504
tnd commanddefault profile, 504
tnidb fileaccessing, 254
tninfo commanddefault profile, 504
tnrhdb fileaccessing, 254
tnrhtp fileaccessing, 254
tokmapctl commanddefault profile, 505
tokmapd commanddefault profile, 505
touch commanddefault profile, 505
troff commanddefault profile, 505
true commanddefault profile, 505
truss commanddefault profile, 505
Trusted Computing Base, See TCBtrusted networks
See networkstrusted path attribute
tools requiring, 90Trusted Path menu, 5trusted processes
defined, 444launching actions, 444passing inheritable privileges, 454
trusted programs, 461adding, 464
Trusted Solarischanges to printing, 364 to 393
trusted stripechanging display, 42
trustworthy programs, 461TSIX host type

Index 581
described, 260tsol_attr flag
described, 323tsol_enable configurable kernel
switch, 355tsol_enable_il_floating configurable
kernel switch, 355tsol_hide_upgraded_names configurable
kernel switchdefined, 356
tsol_privs_debug configurable kernelswitch
defined, 357tsol_privs_debug switch
described, 460tsol_reset_il_on_exec configurable kernel
switchdefined, 356
tsol_separator.ps fileprocedures
specifying SLs to print instead ofILs, 396
tsolxagent commanddefault profile, 505
ttsession commanddefault profile, 505
tty commanddefault profile, 505
tunefs commanddefault profile, 505
two-person controladding privileges to progams, 464
UUDP address
(User Datagram Protocol address)UFS
mounting in Trusted Solaris, 329ufsdump command
default profile, 505ufsrestore command
default profile, 505
UIDs(user IDs)assigning, 102effective
alternative to privileges, 440defaults, 460defined, 438
effective UID of root, 464in execution profiles, 195
umount commanddefault profile, 505
umountall commanddefault profile, 505
uname commanddefault profile, 505
unbundled Sun applicationsadding, 461
uncompress commanddefault profile, 505
uniq commanddefault profile, 505
UNIX domain socketused by cron(1MTSOL) and its
clients, 76unlabeled host type
described, 269unshare command
default profile, 505unshareall command
default profile, 505upgraded names
defined, 356user accounts
See also accountsSee also User Manager
user accreditation rangedescribed, 317
user clearancesdescribed, 317
User Managerassigning account type, 105assigning passwords, 106 to 113

582 Trusted Solaris Administrator’s Procedures—July 1997
assigning profiles in the desiredorder, 442
assigning profiles to accounts, 454data entries explained, 100 to 123Home dialog box, 113 to 115identity dialog box, 102Idle dialog box, 122 to 123Labels dialog box, 116 to 119procedures, 124 to 155Profile dialog box, 120 to 121required authorizations, 92, 94Roles dialog box, 122worksheet, 192
user namesassigning, 102
usermgr commanddefault profile, 505
usersSee also User Manager
Vvmstat command
default profile, 505
Wwhereis command
default profile, 506which command
default profile, 506who command
default profile, 506whoami command
default profile, 506window manager, 444window system
trusted processes, 444passing inheritable
privileges, 454worksheets
for hosts, 485for user accounts, 192
Workspace Menuas trusted process, 444
modifying, 467workspaces
administrativeusing, 7 to 24
writeaudit commanddefault profile, 506
Xxhost command
default profile, 506Xtsolusersession script, 444