Tank Farm Equipment Identification Numbering and Labeling ...
Upload
khangminh22Category
view
0download
0
This topic focuses on the setup required for numbering and printing of documents.
1

On completion of this topic, you will be able to:
Describe the options available for numbering and printing documents
Create and assign numbering series for documents and master data
Change menu names in the main menu
Set default print layouts for users and business partners
2
The sales staff at DG Industries are divided into three separate market areas, each with a different set of customers.
The sales documents produced by each area should be numbered differently so they can be tracked to each area.
Additionally, the customers for each area are coded differently.
Solution: You can define multiple document numbering and customer master data numbering ranges, and assign them to specific users.
3

In the first part of this topic, we will cover document numbering.
4

When you first create a company, the first document number is set to start at 1 for each document type, and there is a default series – the Primary series.
The document numbering function lets you define the actual document numbers allocated to each document type.
Note that the client accountant should specify the requirements for document numbering, since legal regulations can vary depending on localization.
5

To set the starting number for the default primary series, double-click the row for the document type. A new window opens, allowing you to enter the first and optionally the ending number for the series. The system will automatically allocate numbers incrementally from the first number and will record the next number to be allocated for each document type.
If only one series is required, you can use the default Primary series for all users. You can define a prefix or suffix for the series. The prefix or suffix is only relevant for printing, and is not added to the document number.
6

When a user account is created, the user has no access to the document numbering series, even to the default series. Before users can create documents, they need authorization to the series. Users are given permission to the numbering series through the corresponding Group selected on the series row. In the Group field, you can select a number between 1 and 10. This means you can define up to 10 different numbering series in total.
You need to make sure that each user who will create documents has authorization to the Group, even for the Default series, otherwise the user cannot open the initial window for this type of document. The authorization is set in the General Authorizations screen. Navigate to Administration > System Initialization > Numbering Series and select the appropriate Series – Group No. from the list. As an example, the primary series shown here has Group 1 selected, so users need the authorization Administration > System Initialization > Numbering Series > Series – Group No. 1.
Note: Users with the general authorization Document Manual Numbering also have the option to select manual numbering when creating a document and can assign a manual document number.
7

You can create multiple numbering series for each document type, with a different numbering range. This gives the customer the ability to designate specific ranges of document numbers to individual users.
To define an additional series, first open the setup window by double-clicking the document row.
Next, right-mouse click on the Primary series row and select Add Row from the context menu.
To create and maintain document series, you need the general authorization Administration > Document Numbering.
8
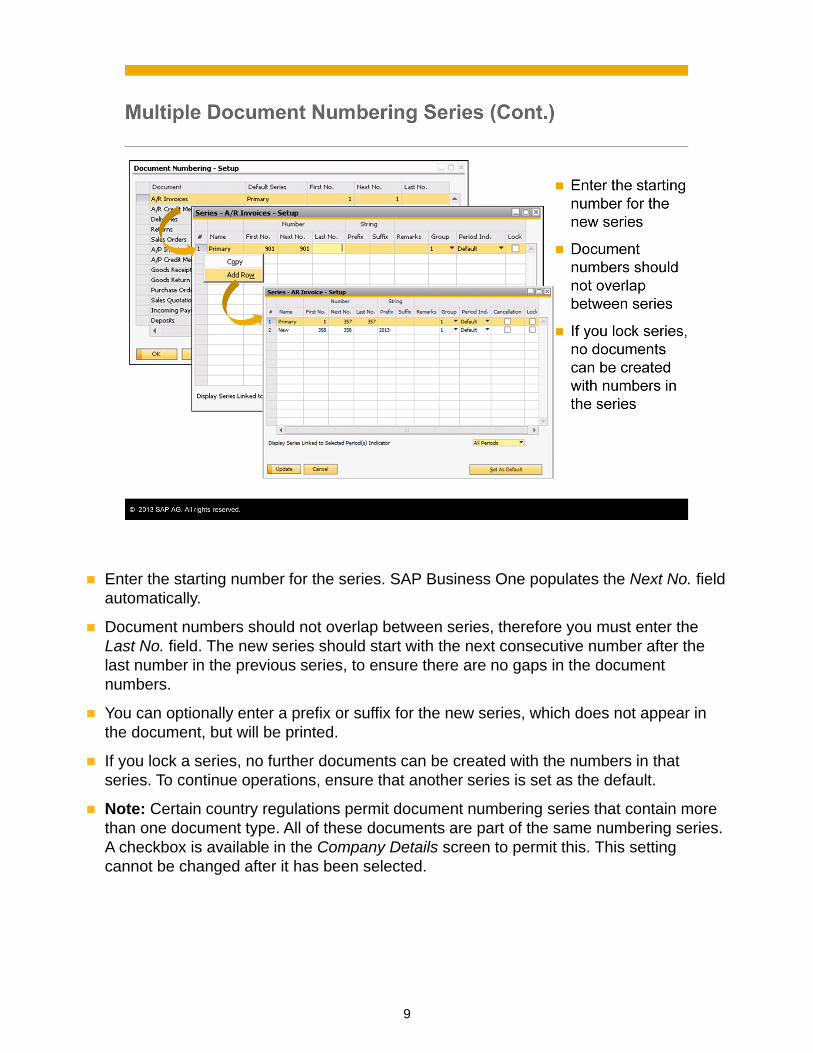
Enter the starting number for the series. SAP Business One populates the Next No. field automatically.
Document numbers should not overlap between series, therefore you must enter the Last No. field. The new series should start with the next consecutive number after the last number in the previous series, to ensure there are no gaps in the document numbers.
You can optionally enter a prefix or suffix for the new series, which does not appear in the document, but will be printed.
If you lock a series, no further documents can be created with the numbers in that series. To continue operations, ensure that another series is set as the default.
Note: Certain country regulations permit document numbering series that contain more than one document type. All of these documents are part of the same numbering series. A checkbox is available in the Company Details screen to permit this. This setting cannot be changed after it has been selected.
9

You can link a document numbering series with the posting periods for a specific fiscal year using a Period Indicator.
You can use the default period indicator that applies to all posting periods, including new ones that will be created in the future, or you can create additional period indicators by choosing Administration > Setup Financials > Period Indicators, or by selecting Define New from the numbering series row.
If you use a different period indicator for each new posting period, you can start document numbering at 1 for each new fiscal year.
Furthermore, if you link a numbering series to a specific fiscal year using the period indicator, you can restrict the posting of documents for the series to the fiscal year. Only document numbers for a series with the same period indicator as the current posting period can be posted.
If you create a new Period Indicator and want to use this for the existing posting periods, you must do this before any document postings.
10

You can also change the name of a document in the main menu. To specify a new menu name, enter it in the row for the Primary series.
You can change document names even if documents have already been entered in the system. The new name appears in the SAP Business One Main Menu and in the title bar of documents of this type.
11
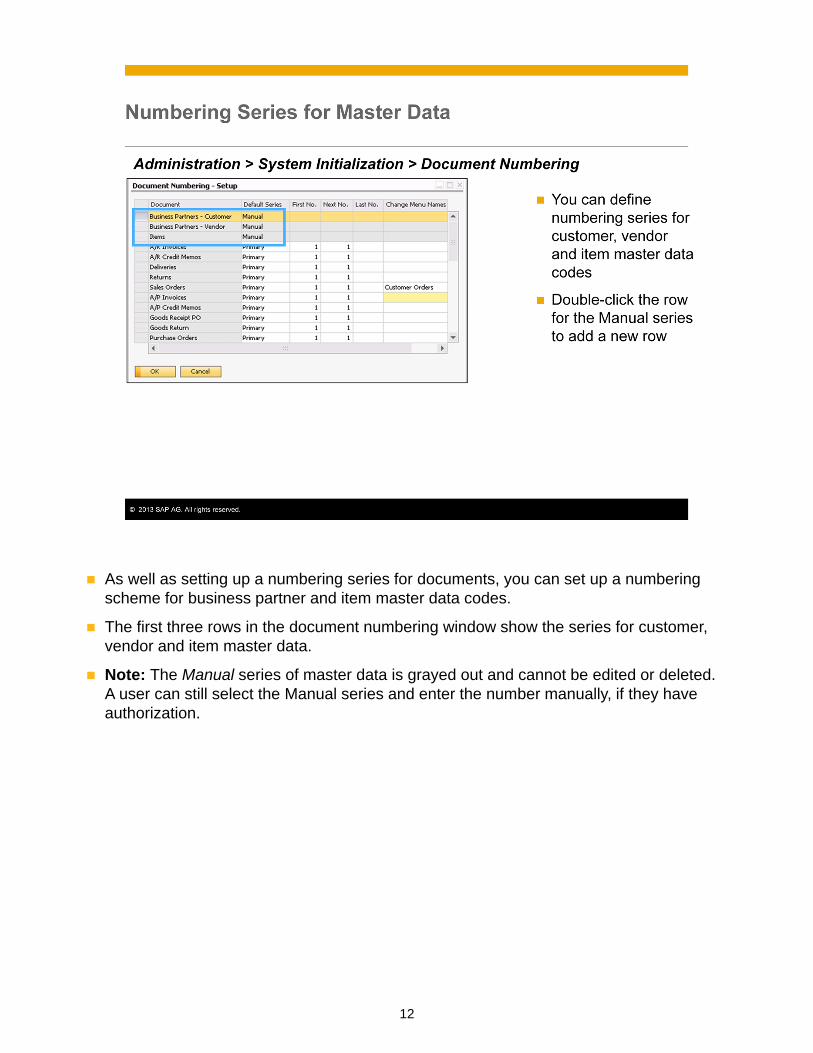
As well as setting up a numbering series for documents, you can set up a numbering scheme for business partner and item master data codes.
The first three rows in the document numbering window show the series for customer, vendor and item master data.
Note: The Manual series of master data is grayed out and cannot be edited or deleted. A user can still select the Manual series and enter the number manually, if they have authorization.
12

To define a new series, enter the first number to be allocated by the system as the code for new customer, vendor, or item master data records. When the user creates a new master data record, the system will assign this number to the master data and will increment the next number by 1.
You can enter a suffix and/or a prefix which will be added to the business partner or item code. For example, if you define a prefix as “C-”, the customer code will be allocated as C-20001. For numbering series of master data, prefixes and suffixes help avoid overlaps with other series.
You must specify the number of digits contained in the number. For example, if the first number is 1, and the number of digits is 5, the number will be allocated in the master data as 00001.
You can set the new numbering series as default for users, and also assign the series to a Group, in the same way as for document numbering series.
You can define the last number of a series to restrict its numeric range and avoid overlaps with another series.
13

In the next part of this topic, we will cover document printing.
14

Print layouts are templates that define how a document or report will look when it is printed.
SAP provides a set of predefined layouts you can use as templates to create client-specific printed documents. This is typically done for external facing documents, but you can also customize the layouts for internally used documents such as pick lists and bills of materials.
You can also create new layouts for customized reports that you develop.
15

There can be multiple print layouts for a document. To see the available print layouts, open a document and choose the Layout Designer icon from the icon toolbar. The layouts available for the current document type are shown. The one in bold is the default template that will be used when the user prints the document.
You should decide with the customer which templates will be required for each document. For example, an A/R invoice can be printed as a packing list as well as an invoice.
Note: If you print or preview a document before you add it to the system, the system automatically adds the Draft watermark to the printout.
16

It is quite possible that users might need to use more than one print layout template for a document. A user might need to use an invoice layout for each of their customer’s languages, or set a different invoice layout for certain groups of customers.
Authorized users can set a different layout to be used as default for different users or business partners. A new template can be set as default for:
All users
The current user
Specific users that you select from the list of users
Documents for business partners for which a default template has not yet been assigned
Documents for selected business partners – this allows you to select one or more business partners.
Note: To be authorized to change the default print layout currently defined for a certain document or report, the general authorization General Change Default Report is required.
In SAP Business One you can also preview a document using a different print layout (not the default layout). This is useful when you are editing print layouts during the implementation. Choose File Preview Layouts...
17

If during business processing an unauthorized user needs to change a default print layout, a prompt will display, allowing an authorized user to give permission for a one time change by entering their name and password. The user can only change the default layout for their own use, and not for other users.
18
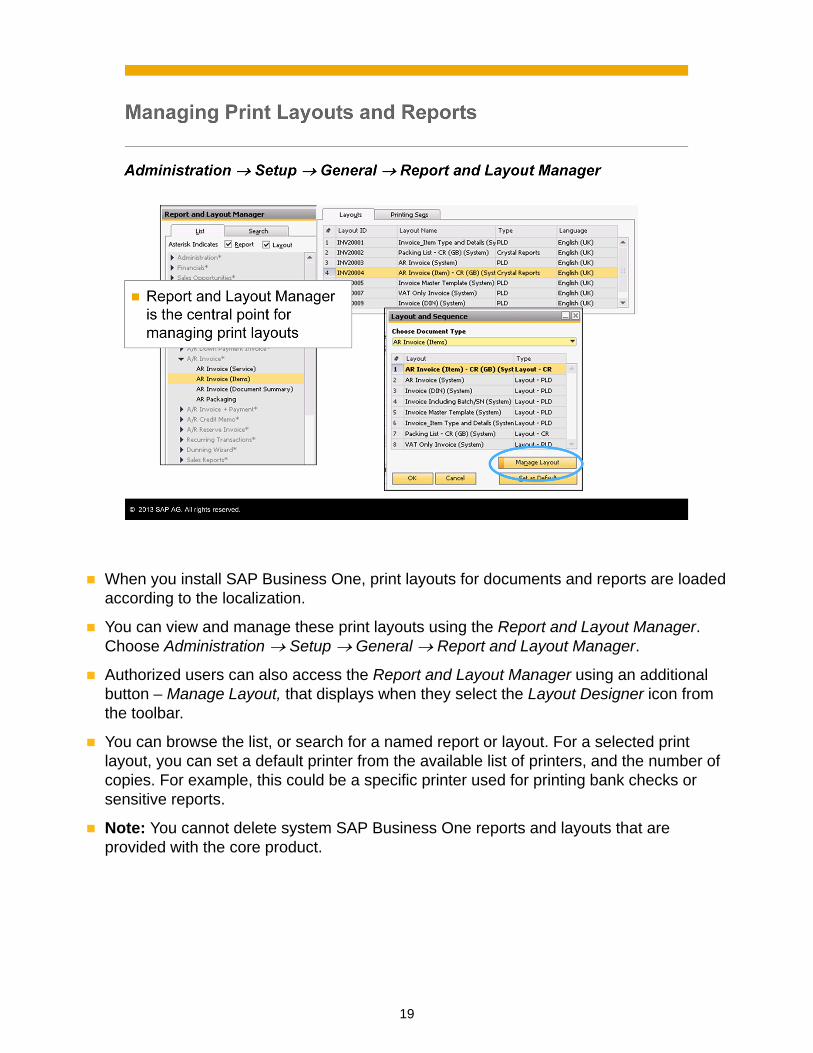
When you install SAP Business One, print layouts for documents and reports are loaded according to the localization.
You can view and manage these print layouts using the Report and Layout Manager. Choose Administration Setup General Report and Layout Manager.
Authorized users can also access the Report and Layout Manager using an additional button – Manage Layout, that displays when they select the Layout Designer icon from the toolbar.
You can browse the list, or search for a named report or layout. For a selected print layout, you can set a default printer from the available list of printers, and the number of copies. For example, this could be a specific printer used for printing bank checks or sensitive reports.
Note: You cannot delete system SAP Business One reports and layouts that are provided with the core product.
19
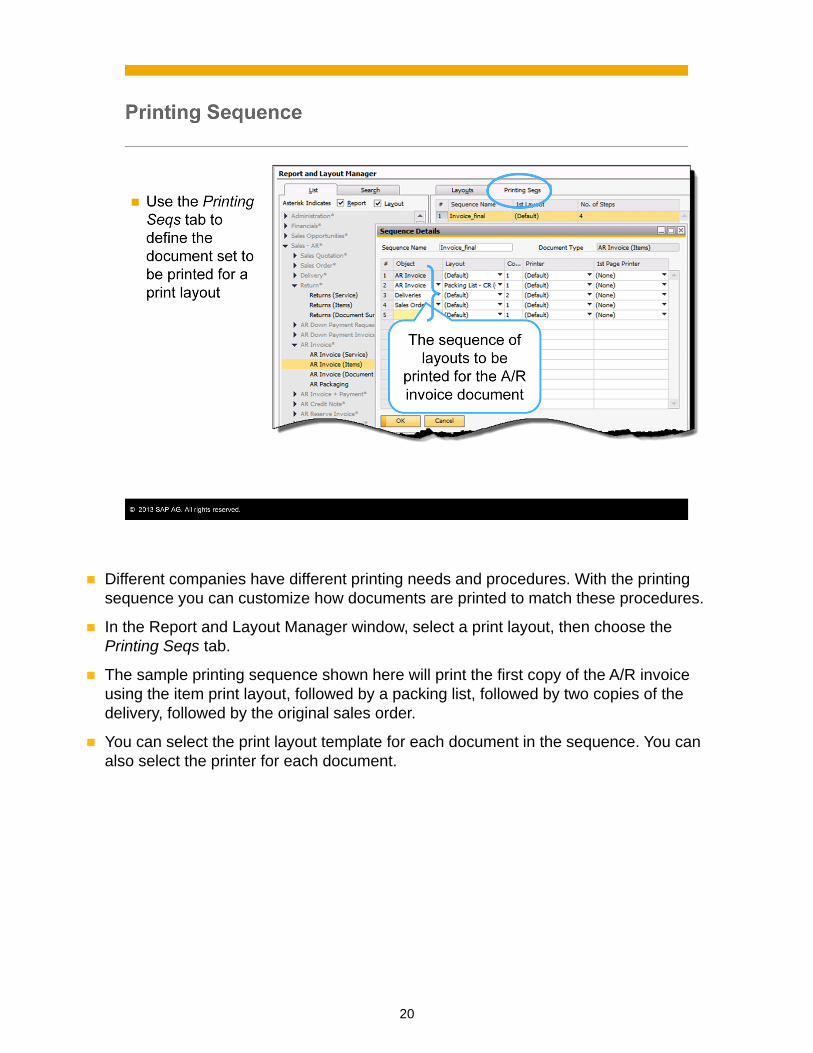
Different companies have different printing needs and procedures. With the printing sequence you can customize how documents are printed to match these procedures.
In the Report and Layout Manager window, select a print layout, then choose the Printing Seqs tab.
The sample printing sequence shown here will print the first copy of the A/R invoice using the item print layout, followed by a packing list, followed by two copies of the delivery, followed by the original sales order.
You can select the print layout template for each document in the sequence. You can also select the printer for each document.
20

Print layouts need to be customized during an implementation project, so they meet the customer’s needs for external facing documents. You will need at minimum to insert the company’s logo and address. You might need to translate the print layout to provide printed documents in a customer’s native language.
These changes can take a considerable amount of time. During an implementation you should demonstrate the various print layouts to the customer. When you identify a layout that best fits the customer’s needs, you can use that layout as the base for changes.
21

When you select a document type you will see all the print layouts for that document type. Print layouts are provided in either Crystal Reports or Print Layout Designer (PLD) format. To edit a print layout, double-click the row for the layout, or select the row and choose the Edit button.
22

If the print layout is the Crystal Reports type, the system automatically opens SAP Crystal Reports for SAP Business One designer. This allows you to edit and save the layout.
Note: SAP Crystal Reports, version for the SAP Business One application is provided with the installation files for SAP Business One. It is recommended that you install SAP Crystal Reports before you install SAP Business One. If you do not, you may need to run a script to install the integration package. The integration script is provided in the install files. Once the integration package is installed, SAP Business One is shown as a data source in Crystal Reports and the SAP Business One tables match the application menu structure.
The detailed steps for editing a print layout are not covered in this topic. For more information on editing a print layout, see the how-to guide How to Work with Crystal Reports in SAP Business One.
23
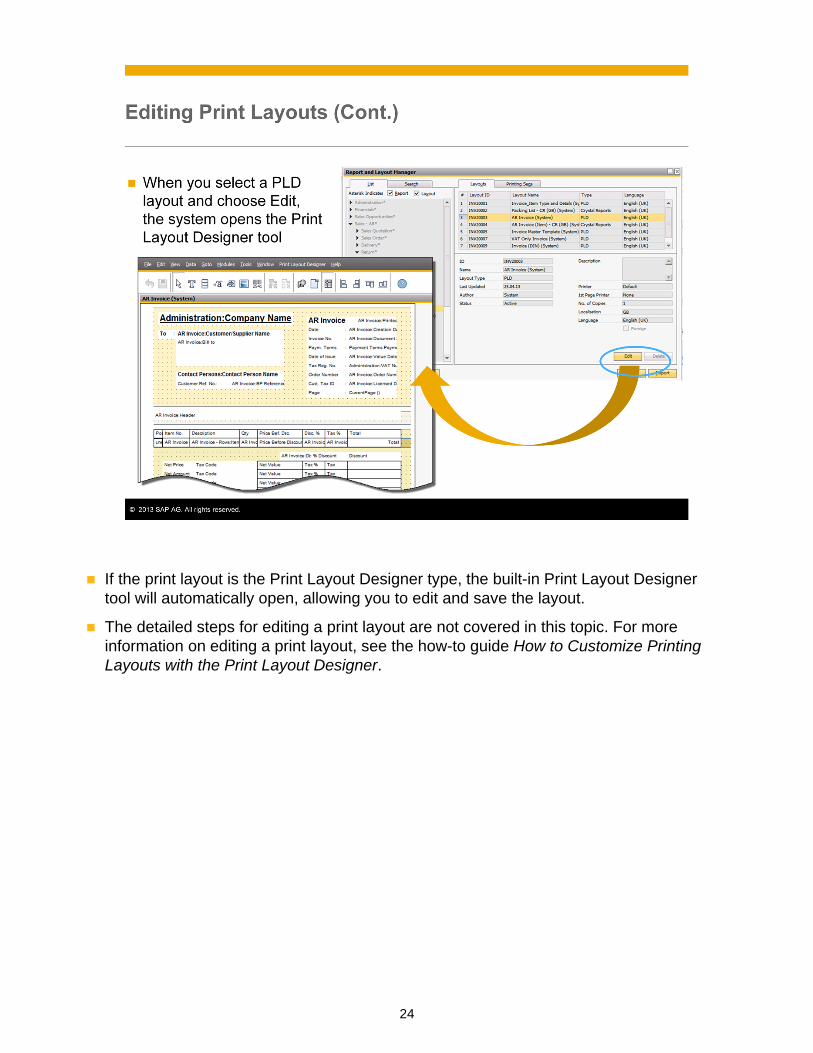
If the print layout is the Print Layout Designer type, the built-in Print Layout Designer tool will automatically open, allowing you to edit and save the layout.
The detailed steps for editing a print layout are not covered in this topic. For more information on editing a print layout, see the how-to guide How to Customize Printing Layouts with the Print Layout Designer.
24

You can export Crystal Reports layouts that you have created to another SAP Business One system. This can save time during the course of a SAP Business One implementation, when you need to move templates from one company to another, or to apply a layout to different types of documents.
To export print layouts, choose Export. A wizard opens, allowing you to select the layouts for export. The selected layouts are exported as a package (*.b1p or *.b1px file type) and can only be imported into another SAP Business One system.
To import layouts, choose Import. The wizard expects to import from a packaged file previously create in SAP Business One.
25

When you import a package of Crystal Reports print layouts, you can specify the layout as a master layout for other document types. This enables you to make common changes, such as company logo, in one layout and use this layout for other documents with a similar structure. For example, a master layout that is created for a sales invoice can be applied to sales quotations or deliveries.
To define a layout as a master layout, run the Report and Layout Import Wizard by choosing the Import button:
In the Report and Layout Selection window, select the Master Layout checkbox
In the Set Master Layout window, select the other document types to which you want to assign this layout.
Fine tune the duplicated layouts as needed. For example, you should update text fields that refer to the document type, and delete or add fields based on the specific document type.
Note: You can duplicate a PLD layout to create a new PLD layout. The utility is located under the menu Administration > Utilities > Duplicate Layout Template.
26

You can define system wide print preferences for documents, as well as per document print preferences.
An image of the company’s logo can be uploaded in the Print Preferences window. This will automatically appear in documents.
You can also define many print preferences as user defaults. The defaults can be assigned to the user’s account. The user default will take precedence over the system wide preferences.
27

Here are some key points to take from this topic:
You can set the initial document number for each document type and create multiple ranges of document numbers, for each document type.
You can allocate different document numbering ranges to different users by granting the users the general authorization to the Group associated with the document numbering range.
You can set up a numbering scheme for customer, vendor, and item master data codes.
SAP provides a set of predefined print layouts for printing documents. A document may use one of several available print layouts, and you can set different default layouts to different users, depending on their needs.
During the implementation, you need to edit the print layouts to meet the customer’s need for external facing documents. The Report and Layout Manager is the central point for managing print layouts. You can export print layouts developed using Crystal Reports to another SAP Business One system.
When you import Crystal Reports print layouts, you can designate a master layout and apply it to multiple document types. You can duplicate a layout of type print layout designer (PLD) as a template for another document.
28
You have completed the topic for document numbering and printing. Thank you for your time!
29
Copyright © 2022 FDOKUMEN