
The QUEST Questionnaire System - University of Canterbury
225
The QUEST Questionnaire System Kelvin Morton BE (Hons) A thesis submitted in partial fulfilment of the requirements for the degree of Master of Engineering in Electrical and Electronic Engineering at the University of Canterbury, Christchurch, New Zealand. 25 June 1996
-
Upload
khangminh22 -
Category
Documents
-
view
3 -
download
0
Transcript of The QUEST Questionnaire System - University of Canterbury

The QUEST Questionnaire System
Kelvin Morton BE (Hons)
A thesis submitted in partial fulfilment
of the requirements for the degree of
Master of Engineering
in
Electrical and Electronic Engineering
at the
University of Canterbury,
Christchurch, New Zealand.
25 June 1996


Ul\ s '.?. 1/\ /\ () •{C·f) V '·' () J (
ABSTRACT
The thesis looks at the implementation of a computer-based questionnaire system,
QUEST. The motivation to develop such a system arose from the lack of lifestyle ques
tionnaires for general practitioners to use in health screening. In the course of producing
a lifestyle questionnaire, the process of gathering information by questionnaire or sur
vey was examined. From this a set of requirements for a computer-based questionnaire
system were developed and two questionnaire models to meet these requirements were
designed.
The Question Order flow modei and the Required Information flow model are
presented and their advantages and disadvantages are discussed. The Question Order
flow model proved to be an unreliable way of representing a questionnaire as it focused
only on question ordering within the questionnaire structure. The Required Information
flow model was developed to overcome the main deficiencies of Question Order flow
model by focusing on the information relationships within the questionnaire structure.
The strengths and weaknesses of the implemented questionnaire systems are dis
cussed. Several actual paper questionnaires implemented with QUEST are then pre
sented, From this a. sAt of future recommendations for QUEST are made based on the
feedback of users of the system.


ACKNOWLEDGEMENTS
There are a number of people I wish to thank for their help during the preparation
of this thesis and the work which preceded it. Firstly I would like to thank Dr Chris
Carey-Smith for his input, patience and guidance over the last three years. I also thank
Dr Keith Carey-Smith for his enthusiasm in starting this project and in continuing with
the development and testing aspects of producing software that works, Tait Electronics
for their contribution towards the development of this project in the first year of my
degree, Geoff Scarr for his support and understanding during a difficult time, Dr Phil
Bune8 for getting me over the final hurdle and being so easy to work with. I would like
to thank my father for making this thesis firstly possible and then finally a reality. I
will miss you. Finally I would like to thank my family and friends for ensuring that
you are now reading this thesis (a little late maybe, but that's fine by me).
"Of course, it is very important to be sober when you take an exam. Many
worthwhile careers in the street-cleansing, fruit-picking and subway-guitar
playing industries have been founded on a lack of understanding of this
simple fact." - (Terry Pratchett, Moving Pictures)
"The only thing known to go faster than ordinary light is monarchy, ac
cording to the philosopher Ly Tin Weedle. He reasoned like this: you can't
have more than one king, and tradition demands that there is no gap be
tween kings, so when a king dies the succession must therefore pass to the
heir instantaneously. Presumably, he said, there must be some elementary
particles - kingons, or possibly queons - that do this job, but of course
succession sometimes fails if, in mid-flight, they strike an anti-particle, or
republican. His ambitious plans to use his discovery to send messages, in
volving the careful torturing of a small king in order to modulate the signal,
were never fully expanded because, at that point, the bar closed." - (Terry
Pratchett, Mort)
"Ankh-Morpork had dallied with many forms of government and had ended
up with that form of democracy known as One Man, One Vote. The Patri
cian was the Man; he had the Vote." - Discworld politics explained (Terry
Pratchett, Mort)


CONTENTS
ABSTRACT
ACKNOWLEDGEMENTS
CHAPTER 1 INTRODUCTION
CHAPTER 2 RELATED FIELDS OF RESEARCH 2.1 Questionnaire and Survey Design
2.1.1 Questionnaire Types
2.1.2 Quality of Information
2.1.3 Question Types
2.2 Expert Systems
2.2.1 Motivations for making an Expert System
2.2.2 Expert System Structure
2.2.3 Knowledge Representation
2.2.4 Inference Techniques
CHAPTER 3 QUEST DESIGN AND MODELING 3 .1 The Questionnaire Process
3.2 Computer Based Questionnaire Requirements
3.3 Question Order Flow Approach
3.3.1 The Questionnaire Structure Model
3.3.2 Implications for the Author
3.3.3 Implications for the Respondent
3.3.4 Implementations
3.3.5 Summary
3.4 Required Information Flow Approach
3.4.1 The Questionnaire Structure Model 3.4.2 Implications for the Author
3.4.3 Implications for the Respondent 3.4.4 Implementation
CHAPTER 4 QUESTEX IMPLEMENTATION 4.1 Initialisation
4.2 Database Management
iii
V
1
5
5
8
13
15 19 20 22 23
25
35
35 38
42
43
50
52 53
60 62 63 66 67
67
69 70 73

viii CONTENTS
4.3 Inference Engine 76 4.3.1 The ENG-8ubEngine Predicate 76 4.3.2 Back and Quit Functions 80
4.4 Calculations and Conditions 82 4.5 User Interface 86
4.5.1 Template Manager 86 4.5.2 Template Initialisation 90 4.5.3 Template Rendering 90 4.5.4 Queuing Multimedia Events 93 4.5.5 Display Template 96 4.5.6 Closing the Template 97
4.6 Questionnaire Summaries 99 4.6.1 Summary Processing 100 4.6.2 Summary Generation 101 4.6.3 Summary Printing 102
4.7 Summary 104
CHAPTER 5 QUESTED IMPLEMENTATION 105 ,- a Initialitmtion 106 o . .t
5.2 Database Management 107 5.3 Questionnaire Editor 109
5.3.1 Tree View 109 5.3.2 Property Panels 112 5.3.3 Questionnaire operations 116 5.3.4 Calculations and Conditions 119
5.4 Template Editor 120 5.4.1 Template Manager 121 5.4.2 Creating New Templates 122 5.4.3 Template Editor View 124
5.4.3.1 Object View 124 5.4.3.2 Object Selection 127 5.4.3.3 Object Operations 127 5.4.3.4 Object Properties 130
5.5 Summary Editor 132 5.5.1 Entering a Summary 132 5.5.2 Summary Entries 134
5.6 Quest View Implementation 135 5.7 Summary 136
CHAPTER 6 PRELIMINARY EXPERIENCE 139 6.1 Paper Questionnaire Implementations 139
6.1.1 LifeQuest 139 6.1.2 Stroke Questionnaire 140 6.1.3 Smoking Questionnaires 140 6.1.4 Readiness to Change Questionnaire 141

CONTENTS ix
6.1.5 AUDIT Questionnaire 141 6.1.6 HealthCheck Staff Questionnaire 141 6.1.7 Teenage Health and Fitness Questionnaire 142
6. 2 The User Guides 142 6.3 The Trials Programme 143 6.4 Future Recommendations
CHAPTER 7 CONCLUSION
REFERENCES
APPENDIX A DOMAIN DECLARATIONS
APPENDIX B GLOSSARY OF TERMS
APPENDIX C EXAMPLE QUESTIONNAIRES C.1 HealthCheck Questionnaire C.2 Stroke Questionnaire C.3 Smoking Questionnaire C.4 Readiness to Change Questionnaire C.5 Audit Questionnaire C.6 HealthCheck Staff Questionnaire C. 7 Teenage Health and Fitness Questionnaire
APPENDIX D THE USER GUIDES D .1 Quest ED User Guide D.2 QuestEX User Guide D.3 QuestED Tutorial
147
151
153
157
159
163 163 168 169 170
172 173 178
181 181 201
207


LIST OF FIGURES
2.1 The questionnaire process. 6
2.2 This figure represents the information flow between the respondent and
the author. 8
2.3 Semantic differential ratings for three different questionnaire types. 12
2.4 A simple representation of an Expert System. 22
2.5 An expanded representation of an Expert System. 23
2.fi The Forward chaining inference process. 28
2.7 The Backward chaining process. 29
2.8 An example problem tree with two solution nodes. 31
2.9 The tree example showing the depth-first search path. 32
2.10 The tree example showing the breadth-first search path. 33
3.1 Stages in the questionnaire design process with a computer based tool. 37
3.2 Example of the Block and Link concepts. 45
3.3 Example of the Section concept. 46
3.4 The basic depth-first search algorithm. 47
3.5 Example of the extended 'AND' branch. 49
3.6 A simplified extended 'AND' branch example implemented using 'OR'
branches. 50
3.7 The standard depth-first search algorithm. 54
3.8 The dialog box for the single select list block type. 56
3.9 Dialog box of the summary display output. 56
3.10 The QuestED tree graph representation of the standard question order
flow model. 57
3.11 This example shows the operation of a condition goal. 64
3.12 This example shows the operation of the Info goal type. 65
3.13 The pseudo-code approach for the depth-first search algorithm. 66
4.1 The structure of QuestEX's modules 70

xii LIST OF FIGURES
4.2 The QuestEX open questionnaire file dialog box. 71
4.3 Top level Data Flow Diagram for QuestEX. 73
4.4 The basic implementation of the questionnaire inference engine. 76
4.5 The method the inference engine uses to deal with goal references 77
4.6 A flowchart description of the Back and Quit functions within the infer-
ence engine. 82
4.7 An example of a Introduction goal group template 93
4.8 The exit password dialog box is QuestEX. 99
5.1 The Tree View showing the important features. 110
5.2 The horizontal tree orientation. 112
5.3 The Questionnaire Editor Options dialog box. 112
5.4 Two property panel examples. 115
5.5 Examples of the DeleteGoal rules 118
5.6 The calculation and condition parsing algorithm 120
5.7 The View Template dialog box 122
5.8 The Create New Template dialog box. 122
5.9 The difference between the three types of template is shown by the
objects with a dark border. 123
5.10 The process of creating a Text Entry template from a Single Select List
template. 124
5.11 The Template Editor View 125
5.12 The Template Object floating dialog box. 125
5.13 The New Template Object dialog box. 128
5.14 The Template Align objects dialog box. · 130
5.15 The property dialog boxes for four types of template object. 131
5.16 The View Summaries dialog box. 132
5.17 The Summary Edit dialog box. 133
5.18 The Summary Entry dialog box. 134

Chapter 1
INTRODUCTION
The QUEST system can be described as an adaptable questionnaire system. Its main
purpose is to aid the author of a questionnaire in gaining relevant information from
the target population of respondents. This document examines the concepts on which
questionnaires and expert systems are based. The models and concepts behind the
design of QUEST are then presented as is the implementation of these models. Finally,
preliminary results of the project are presented along with possible future directiom;
and improvements.
This chapter briefly outlines the history of the project since its start in 1992 and
the motivation for such a project. Finally an outline of the remaining chapters is given.
In 1992 the LifeQuest project was instigated by Dr Chris Carey-Smith of the De
partment of Electrical and Electronic Engineering at the University of Canterbury and
Dr Keith Carey-Smith of the Avon Medical Center. The aim of the project was to
implement a Medical Lifestyle Screening Questionnaire from an expert system point of
view. The declarative computer language Turbo Prolog was chosen as the development
environment. Three 3rd Professional year students, Scott Marshall, Alan Simmons
and Steve Penno, developed the LifeQuest program as part of a Knowledge Engineer
ing class assignment. Another student, David Powley, developed the LifeQuest Editor
program as a final year design project (Carey Smith et al., 1993).
The main aims for the project were:
1. To produce a questionnaire system that asks only those questions which are rel
evant.
2. To avoid the transfer of results from a paper questionnaire to computer for anal
ysis.
3. To produce a summary for each set of questionnaire results.
The LifeQuest project was developed to run on an IBM-compatible computer in the
DOS environment. The choice of this platform, along with the emphasis on functional

2 CHAPTER 1 INTRODUCTION
aspects of the project, lead to the achievement of only limited success for LifeQuest.
In particular:
1. As Prolog is a memory-hungry language by nature, the project ran into the 640K
DOS memory limit. This limited the complexity of the LifeQuest program and
the size of the actual questionnaire data.
2. A large number of database files were required to store the complete questionnaire
description. This was partly required to overcome possible memory limitations.
Each part of the questionnaire could be read in, used and then freed from memory
when finished. The number of files essentially limited the questionnaire editing
process to one application only, i.e. the LifeQuest questionnaire.
3. A Basic Text mode user interface was used. This limited the appeal and useability
of the program. While the program did what was functionally required, the
appearance of the display was not particularly aesthetically pleasing.
Despite these limitations, overall the LifeQuest project was able to meet its aims.
In 1993 the project was continued as two final year projects by Tim Russ and the
author. The initial aims for this version of the project were:
1. To develop LifeQuest as a Microsoft Windows application.
2. To generalise the questionnaire structure to enable its application to other ques
tionnaire topics.
3. To expand on LifeQuest's original functionality and user friendliness.
The main advantages seen in developing the project for the Windows environment
were the increased memory and user interface functions Windows provides. By op
erating in Enhanced mode, Windows has a far larger memory heap than DOS. This
overcomes any problem with the size of a questionnaire. Being graphically based,
Windows does much of the work of presenting the user interface. An attractive user
interface can be quickly realised using Windows development tools. This was seen as
especially advantageous for the questionnaire editor as it would behave in a similar
manner to other Windows programs. A third program was added to the system, a
Viewer that allows the questionnaire administrator to view the response files. This
program provided means for displaying and printing questionnaire results.
After the completion of the project, feedback from questionnaire authors indicated
a number of useability problems. These involved inadequate instructions in the ques
tionnaire display program and insufficient authoring feedback in the editor. These
problems were addressed by adding 'Context Sensitive Help Panels' in the display pro
grams, a Windows help file, enhanced printing and a graphical questionnaire structure
display in the editor.

3
In 1994 the author continued the project as a research project. The aims of the
research included:
1. To examine the questionnaire questioning process and develop a model of this
process.
2. To improve the useability of the Questionnaire Editor and the Questionnaire
Player
This project was instigated after the need for an adaptable health screening ques
tionnaire was identified by Dr Keith Carey-Smith in 1992. At that time only one such
system existed in New Zealand. This was the HealthCheck system developed by Dr
John Litt, Senior Lecturer in General Practice, Flinders University Medical School,
Australia. This questionnaire system had been designed to be used by patients whilst
visiting their general practice. By means of questions and feedback on a variety of
lifestyle issues, it provides patients with information on their current health status. In
Dr Carey-Smith's view, the HealthCheck system was of limited use because of following
factors:
1. The questionnaire content was fixed within the HealthCheck program.
2. The questionnaire was designed for a specific task. General practitioners would
be limited to the health categories included in the package.
3. It is not possible for a general practitioner was make changes to the questionnaire
context to better suit their own practice situation or to other types of study.
What was envisaged was a system with a set of generic questionnaire examples.
These examples could then be modified to suit the practice's particular situation. For
a more adventurous general practitioner, a new questionnaire could be designed and
implemented in order to study different topics, e.g. a teenage lifestyle questionnaire
and alcohol consumption questionnaire. The advantage here is that the system is no
longer tied to any particular context. It can be used for any type of questionnaire
and not just limited to lifestyle questionnaires. The disadvantage of this approach is
that the information gathered by the questionnaire process is not as specific as the
information gathered by a package such as HealthCheck.
Chapter two presents information from fields of research related to this project.
The two main fields presented are Questionnaire Design and Expert Systems. Ar
eas within these fields such as questionnaire types, quality of information, knowledge
representation and inference techniques that are particularly pertinent are discussed.
Chapter three looks at the design of the questionnaire models involved in the
project. The questionnaire process describes how all the involved parties interact in

4 CHAPTER 1 INTRODUCTION
the system. A set of requirements for a computer based questionnaire are established
and the next two sections describe two different methods for modeling the actual ques
tionnaire process based on the requirements. The Question Order Flow model takes
a flow chart style approach and the Required Information Flow model takes an infor
mation directed approach. The advantages and disadvantages of both approaches are
outlined from an information processing view point.
Chapter four and five outline the implementation details of the main programs
in the QUEST project. First the Questionnaire administration program QuestEX, is
presented. The name QuestEX comes from the process of Questionnaire EXecution or
administration. This followed by the implementation of Questionnaire editor program
QuestED. This name stands for Questionnaire EDitor. Chapter five also includes a
description of the Quest View program which is used to view the summarised replies
of each questionnaire respondent. Chapter six presents a number of example question
naires and their implementation. The preliminary experiences of a number of users
of QUEST are discussed. From this a series of recommendations are made on how to
improve the system in the future. Chapter seven finally draws a number of conclusions

Chapter 2
RELATED FIELDS OF RESEARCH
This chapter describes a number of fields of research which have had an impact on this
project. The Questionnaire and Survey Design section looks at the actual process of
implementing a questionnaire or survey. It then describes a number of questionnaire
types and then the types of questions that can be used within a questionnaire. The
Expert Systems section looks at the definition of an expert system and how one may be
implemented. The inference engine and knowledge acquisition processes are examined
in greater depth.
2.1 QUESTIONNAIRE AND SURVEY DESIGN
Questionnaires and surveys often come in many different forms, however most go
through the same stages or cycle of stages. These stages may be described as, ( Oppen
heim, 1966, Ch.l):
1. Decide the aims of the study and the hypotheses to be investigated.
2. Review questionnaire background information and identify target population.
3. Questionnaire design.
4. Pre-testing and revision.
5. Present the questionnaire to the target sample.
6. Analyse the replies and assemble the results.
7. Draw conclusions about the study aims and hypotheses.
The third and fourth stages often need to be repeated a number of times before a
suitable questionnaire structure is obtained. The questionnaire process is described in
figure 2.1.
A number of roles can be identified within this process. For practical purposes a
single person may perform a number of these roles. The roles are:

6
1 Decide Aim
7
2 Literature Review
CHAPTER 2 RELATED FIELDS OF RESEARCH
3 Questionnaire Design
5
4 Pretesting
Draw Conclusions 6
Analyse Replies Present Questionnaire
Figure 2.1 The questionnaire process.
1. Researcher. This is the instigator of the questionnaire process. This person
wishes to learn information about a certain target population. The researcher
will generally perform the first, second and last tasks in the questionnaire process.
2. Author. The author is responsible for designing the questionnaire's structure and
questions. The second, third and fourth tasks are performed by the questionnaire
author.
3. Supervisor. The role of the supervisor is to administer to the questionnaire to
the questionnaire respondent. As seen in section 2.1.1 the supervisor can take an
active role in presenting the question in the case of the interview questionnaire
through to a completely passive role in the mail questionnaire. The supervisor
plays a part in the fifth task.
4. Respondent. The respondent is a member of the sample population that the
research wishes to target. The respondent also plays a part in the fifth task.
5. Analyst. The questionnaire analyst processes the respondent's raw replies into
a meaningful form from which the researcher can then draw conclusions with
respect to the aims of the questionnaire. The analyst performs the sixth task in
the questionnaire process.
The tasks of the researcher would undoubtedly be best performed by a human
expert. It is the researcher who decides the aim and direction of the questionnaire.
Gathering the information relevant to the questionnaire's purpose is also best performed
by a human, although computer based library catalogues can be of assistance. The
final conclusion is again best drawn by the researcher who constructed the aim and
hypotheses of the questionnaire.
The pre-testing task is essential when creating a balanced questionnaire. Pre
testing helps reduce the bias in a questionnaire by gathering replies from a subsample
of the target population. The pre-tested replies can give an indication of how the
target sample may respond. Thus it gives a check on the validity and balance of the
questions before actually presenting the questionnaire to the target population. If the

2.1 QUESTIONNAIRE AND SURVEY DESIGN 7
questions are not satisfactory then the questionnaire design stage can be reiterated
until a satisfactory result is obtained. As the pre-testing task is a combination of
questionnaire design and presentation of the questionnaire to a subsample of the target
population it will not be considered separately. The subsample of the population maybe
chosen at random from the target population. However once this subsample has been
used to pre-test the questionnaire, it may not longer be used as part of the target
population when presenting the finalised questionnaire. This is because the subsample
have been previously exposed to the questionnaire content during the pre-testing phase.
It is important that a questionnaire not only gathers information from the respon
dents, it should also provide some sort of feedback to each respondent. Feedback is
important as it can maintain the interest of the respondent. An analogy would be
a questionnaire administered to a respondent by an interviewer who only asked the
questions. In this case the respondent would get as much information feedback from
the questionnaire as if they answered the questionnaire by themselves. As soon as the
questionnaire administrator provides more information than just the questionnaires,
the respondent is rewarded for supplying the desired information.
The information provided by the administrator falls into two categories:
1. Comprehension Related. This type of information relates to the understanding
of the questions by the respondent. To gain an accurate reply, the author must
ensure that the questions are clear and unambiguous. An administrator can help
here by rephrasing the question so the meaning is the same but the words are
more understandable. This includes the explanation of the meaning of phrases
and words.
2. Context Related. Contextual information relates directly to the questionnaire.
For example, a section introduction will contain general information about a
group of following questions. This falls into two further categories:
• Pre-response information. This information will be given prior to the ques
tions being asked. It will provide the justification for asking such questions.
The most fundamental example of this type of information is an actual ques
tion.
• Solution or Advice information. This is normally given once a number of
questions have been answered. · The questionnaire administrator can then
provide further context related information depending on the replies to the
earlier questions. For example, in a sales questionnaire, once the admin
istrator has determined the respondent is interested in a certain product,
extra information can be given on that product.
It is obvious that the pre-reponse context related information must always be
given. The comprehension related information is only given when the respondent fails

8 CHAPTER 2 RELATED FIELDS OF RESEARCH
to understand the context related information. An administrator can dynamically
adjust the comprehension information to the respondent if there is a problem.
The concepts of information gathering from the author's point of view and infor
mation feedback from the respondent's point of view produces a two way flow of infor
mation. This information flow is shown in figure 2.2. As the questionnaire proceeds,
comprehension information is given to the respondent who replies with a response. The
administrator can then provide additional feedback information to the respodent.
Respondent
• Comprehension Information
• Response Infomation
Context Information (Feedback)
Proceeding Questionnaire
•
Researcher
• Figure 2.2 This figure represents the information flow between the respondent and the author.
2.1.1 Questionnaire Types
There are four main methods of data collection using a questionnaire. These are the
questionnaire interview method, mail questionnaire, self-administered and group ad
ministered questionnaires. Each method has advantages and disadvantages for obtain
ing high quality information from the questionnaire respondent. Each method requires
three components: the respondent, the supervisor and the questionnaire. Depending
on the method, the supervisor players a greater or lesser role.
The Interview Questionnaire
The interview is used in many different situations for obtaining information from an
interviewee. Examples of this are employment, medical and television interviews. How
ever only data gathering interviews are described here. The questionnaire supervisor
here functions as the interviewer, it is their job to present the questions to the respon
dents and to record the answers and replies. The interview questionnaire has a number
strong advantages, however it also has a number of equally strong disadvantages. The
main advantage is in the flexibility a skilled interviewer can bring to the interview. The
interviewer can build and maintain rapport with the respondent during the interview
and this will maintain the respondent's interest and motivation in the interview at
hand. The interviewer can ensure the respondent has understood the questions and

2.1 QUESTIONNAIRE AND SURVEY DESIGN 9
can perform initial classification of the replies. This is called field coding. The inter
viewer can probe the respondent further when certain replies are given. Above all the
interviewer can interact with the respondent to achieve a high quality of data for each
respondent.
The interview questionnaire is very open to the possibilities of bias even though
each respondent hears the same questionnaire and the interviewing procedure is stan
dardised. The following list describes some situations where bias may occur in a inter
view questionnaire:
• The interviewer may give a hint of their own views or expectations by their tone
of voice or appearance. Agreeing with the respondent or showing surprise also
reveal the interviewer's own attitudes.
• The manner in which the questions are presented in terms of inflection and pauses
may influence the respondent.
• Leading questions and selective probing can effect balance of the original ques
Lions.
• The interviewer may misinterpret the respondent's replies or may fail to follow
the questionnaire instructions.
• The interviewer may simply react differently to different respondents which con
sequently may unconsciously change their questionnaire delivery.
Other disadvantages are in the cost of the interviews. The interviewers must be
sufficiently trained, briefed, organised and probably paid. As an incentive, the respon
dents may also need to be paid. The test sample of respondents maybe spread over a
large area and for a large sample group this may take a long period of time.
The Mail Questionnaire
The supervisor of a mail questionnaire plays far less of a role than the interviewer in the
questionnaire interview. To a large extent the respondent must supervise themselves.
This means there will be no interviewer bias, however the questionnaire must be much
simpler because there is no interviewer to provide further explanations. Because of this
simplicity, the later processing and analysis is usually easier to do than for an interview
type questionnaire. The main advantage of the mail questionnaire is its low cost. It does not require a trained interviewer to visit every member of the target population.
Most of the cost of a mail questionnaire is mainly in the planning, printing and postage
of the questionnaire. So for a lower cost, a mail questionnaire can reach a far greater
target population than the interview questionnaire. This can result in greater sampling
accuracy of the population.

10 CHAPTER 2 RELATED FIELDS OF RESEARCH
There are a number of disadvantages because there is no supervisor or interviewer
present. It lacks the personal touch an interviewer, so it can be difficult to build a rap
port with the respondent. There is nothing stopping the respondent from reading the
mail questionnaire before they attempt to answer it. This may lead to a biased result if
the respondent develops a series of replies before actually answering the questionnaire
as it was intended. Respondent may come back to questions left earlier because they
were too difficult or required further thought. This may bias the replies especially if
later questions follow a particular line of questioning. The sampling of the population
may be distorted if the intended questionnaire respondent passes the questionnaire onto
someone else. While the other person maybe clearly more appropriate, this may effect
the sampling especially if the sample population was chosen specially.
A major problem mail questionnaire suffer is response rate. Without a supervisor to
ensure completion of the questionnaire a large proportion of the sample population will
fail to return a reply. This will further introduce bias into the final analysis because the
questionnaires which are returned no longer represent the target population as it was
first chosen. This is because non-response is not a random process (Oppenheim, 1966, rn_ n\ \.Jll. L,).
The Self-Administered Questionnaire
A self administered questionnaire combines many of the advantages of both the mail
questionnaire and the interview questionnaire. The role of the supervisor in this case
is basically the supervising of the respondent while answering the questionnaire. This
gives the benefit of personal contact and allows the explanation of questions. Note
that this does not include the interpretation of questions. This contact ensures a high
response rate, accurate sampling and a minimum of interviewer bias. The supervisor
does not need to be a trained interviewer, however the supervisor must not introduce
bias unwittingly. The questionnaire would have a similar complexity to the mail ques
tionnaires, as on the whole the respondent has to attempt it by themselves. However
the possibility still exists that the respondent may misinterpret questions and make
mistakes. The respondent can still read the questionnaire through before attempting
to answer the questions which may bias the replies.
The Group-Administered Questionnaire
Group administered questionnaires combine many of the advantages of the self admin
istered questionnaires and the questionnaire interview method. It is also useful as a
large group of people can take the questionnaire at one time. More than one supervisor
maybe required to help with question explanations and to check completed question
naires. One possible advantage is that extra background information can be presented
to the group in the form of a presentation. The questions may be read out to the

2.1 QUESTIONNAIRE AND SURVEY DESIGN 11
respondents one at a time. This will ensure that every one in the group has the same
amount of time for each question and that they do them in the same order. The main
disadvantage is the risk of bias through interacting with other individuals in the sample
group. This may occur through asking questions, talking and copying.
Computer Questionnaires
Computer questionnaires are normally administered by a computer program. This
makes them most like interview questionnaires as the respondent answers a question
naire completely administered by the computer 'interviewer'. The computer question
naire has the interview questionnaire disadvantage of high cost, however this is normally
the one off capital cost of purchasing the computer equipment. On the other hand it
does not have the interviewer problems of turnover, error and bias.
Importantly the computer questionnaire can provide a consistent interface to all
the respondents, thus reducing interviewer error and respondent interpretation error
(Slack et al., 1966) . Pl>cspondent interpretation error and bias are still a problem as
the flexibility provided by a human interviewer is lacking. The computer questionnaire
can still probe for more information and give feedback to the respondent. For example
it can be used to educate and inform the respondent as well as gather information.
However this probing and feedback is programmed and not spontaneous as a human
expert could provide.
The computer questionnaire lacks the same rapport the human expert can have
with the respondent. However it benefits from the 'game effect' and anonymity. Al
though many people do not react positively to computers, many find them interesting,
challenging and fun to use. Computer games are popular partly due to the use of
colourful graphic displays and interactive feedback of information to given prompts
and actions from the user. These sort of effects can provide a motivation or rapport
factor not present in the other questionnaire types. Interactive feedback in a computer
questionnaire is useful in a education role (Allen and Skinner, 1987). These types of
advantages are shown in figure 2.3 which is a rating graph of a number of sematic
differential items (cold-friendly, short-long etc. etc.) from a alcohol, drug and tobacco
use study which used a computer questionnaire as the data gathering tool (Skinner and
Allen, 1983).
One area in which computer questionnaires have been successfully used is health
screening and risk assessment. Computer screening programs have been used to iden
tify various at risk groups within a medical practice (Moughan, 1988). Many respon
dents react more positively towards a computer questionnaire when faced with difficult
or possibility embarrassing situations or topics. This agrees with tests using Media
Mediated interview ( computer and/ or video interfaces) techniques. This suggests that

12
Cold
Short
Relaxing
Light
Interesting
Fast
,,,,,,,,,,,,,✓ I I I I I I I I I I I I I I
\ \ \\
\ \
\ \ \ \
////
<//
\\ \\
\
'\\
CHAPTER 2 RELATED FIELDS OF RESEARCH
Computer Self Interview / ./ Friendly
,,.,,.,,.,,.,,."'"' .
/
Long
Threatening
Heavy
Boring
Slow
Extremely Moderately Neutral Moderately Extremely
Figure 2.3 Semantic differential ratings for three different questionnaire types.
such interviews induced talkativeness in the respondent when compared with face-to
face interviews (Yoshida et al., 1993).
A further advantage of computer questionnaires comes during the collection of the
respondent's replies. With a paper questionnaire, the replies are normally entered in
a database before being further processed and analysed. This requires skilled data
entry workers who can rapidly and quickly enter the respondent data. A computer
questionnaire on the other hand can save the respondent's replies immediately after
then questionnaire has been completed and without data entry errors. These replies
are then available for corrections, analysis and report building.
In summary some of the main advantages and disadvantages of these five types
of questionnaire are given in table 2.1. Each of these questionnaire types is suited to
different situations:
• Interview. Best with experienced interviewers and when detailed and thorough
information is required from the respondents.
• Mail. Good when low cost is a factor, a large sample population is reachable by
mail, respondent error is acceptable but response rates are often poor.
• Self. Good when the respondents can be gathered together and have sufficient
literacy and comprehension skills to complete the questionnaire.

2.1 QUESTIONNAIRE AND SURVEY DESIGN 13
• Group. Good when a large group of respondents are gathered in one place and
when a controlled delivery of the questionnaire is possible.
• Computer. Best questionnaire type when respondents answer the questionnaire
individually. Ensures a controlled and consistent delivery of the questionnaire.
Table 2.1 Advantages and disadvantages of five types of questionnaire. Type Advantages Disadvantages
Interview • Flexibility • Interviewer bias • Explanation • Interviewer error • Probe • Interviewer turnover • Rapport • High costs • Motivation
Mail • Low Cost • Poor response rate • Large Sample • Respondent error • Accurate Sampling • Respondent bias • No Interviewer Bias • Lacking personal touch
• Respondent Self • High response rate • Unskilled supervisor bias
• High accuracy • Respondent bias • Minimal interview bias • Respondent interpretation error • Don't need skilled interviewer • Supervisor provides explanations
Group • Sample of respondents can be • Tainted replies through talking, controlled together copying and asking questions • Similar benefits as Self
Computer • Anonymity for respondent • Fear of Computers • Complex skipping patterns • Author bias • 'Game' effect • Setup costs • Programmed probe ability • Computer illiteracy e Programmed explanation • Lack of rapport, impersonal • No interviewer bias • Convenient analysis
2.1.2 Quality of Information
Loss of inf<:ffmation is always going to occur in a questionnaire. This loss of information
will lower the quality of the final information produced during the questionnaire analysis
phase. The best that can be done is to minimise the loss. This can be done by
understanding how the loss occurs and accounting for it. There are three important
factors which affect the quality of the information gathered by a questionnaire:
1. Respondent Bias and Error. Respondent bias arises through a number of factors.
Background factors influence how the respondent will approach the interview.
Each respondent will have fixed attitudes, personality characteristics, motives

14 CHAPTER 2 RELATED FIELDS OF RESEARCH
and goals. These may come from various group memberships and loyalties such
as age, sex, race, religion, income and education. Psychological factors such as
the respondent's sensitivity to the interviewer's attitudes, and in particular the
interviewer's attitude to them is likely to be a great source of potential bias.
The respondent's behaviour which may cause bias is almost entirely due to their
reaction to the interviewer's behaviour.
2. Interviewer Bias and Error. Interviewer bias is a problem which consists of two
parts: the first part relates to the question, and the second to the question de
livery. In the design of the questions bias can be introduced simply through
the choice of words in the question. For example a question on the state of the
economy can be biased towards well educated people if it used complex language
and jargon. In a closed question, the choices of the predetermined replies in
fluence how respondents answers the question. By not including a particular
relevant reply, the respondent may be forced into choosing a reply they normally
would not (Labaw, 1980, Ch. 13). It has even been suggested that even asking
a question may motivate a respondent to form new opinions or change existing
opinions (Bridge and Al, 1977). The Interviewer can also bias the respondent's
reply through the question delivery. Interviewer bias can arise from errors in ask
ing the question, incorrectly probing the respondent for further information and
errors in recording the respondents replies. Motivation of the respondent by the
interviewer can lead to bias as the interviewer may under-motivate the respondent
to provide worthwhile answers. Alternatively the interview may over-motivate or
inappropriately motivate the respondent to give replies other than they normally
would (Kahn and Cannell, 1957, Ch. 7). The interviewer may bias the results
simply by not bP.ing able to accurately record all the details of the respondent's
answer on paper. For example, once recorded on paper, the respondent's expres
sions and emphasis are lost, which may lead to a misrepresentation of what the
respondent actually meant.
3. Invalid and Dirty Data. Mistakes in recording the respondent's replies lead to
invalid and dirty data. These mistakes may occur initially as the interviewer
records the responses or at a later stage when the responses are entered into a
database. If this data is not corrected before the analysis is carried out, then
erroneous conclusions will result. Some of this data is obviously incorrect as it
lies outside of an acceptable range. This is called. dirty data and it often can
only be corrected by re-asking the question to the respondent. Data that is not
obviously incorrect may never be detected and thus will affect the final results.
The quality of the respondent's replies can also be effected by their attitude to
computers. While some people find computers interesting and fun, other people do not

2.1 QUESTIONNAIRE AND SURVEY DESIGN 15
react well to computers. This can effect the quality of the final questionnaire analysis
and will result in a bias towards these people more computer literate. A number of
factors may contribute to this problem:
1. Lack of Motivation. This may arise from a number of sources, for example:
(a) Boredom. A person who is not interested in the task at hand will not
put the effort to their replies, thus resulting in a loss of quality. A boring
computer questionnaire will be as bad as a boring paper questionnaire in
this respect. However a multimedia capable computer questionnaire should
able to interest most people when the questionnaire is well designed.
(b) Apathy. Again a problem for all forms of questionnaires and a more difficult
problem to solve than boredom as it requires a change in the respondent's
attitude.
2. Fear of Computers. Many people have an unwillingness towards things they know
little about. This can cause a reluctance to use an unfamiliar appliance. Com
puters appear to raise this reluctance more than most other products of new
technology. Although computers have been in use in various forms for the last
fifty years, only now are they becoming widely used and accepted. Initially most
people saw computers as machines only used by a small sector of society. This
was compounded by the amount of knowledge and training that was required to
operate the early computers. In the last ten years, the miniaturisation of comput
ers has lead to their proliferation into the 'home computer' market. With people
starting to use and see computers in the home environment they are becoming
kss reluctant to use them. However a large number in the population who haven't
grown up with computers still fear this 'new' technology.
3. Confidentiality. It seems a fair assumption that if you can't always trust a person
with your confidential details, you can't trust a computer with the same infor
mation. As the issue of privacy has arisen in recent times it is important to
safeguard any sensitive information from the possibility of illegal access. Unfor
tunately it isn't possible to give the Hippocratic oath to a computer. In the end
it is the computer operator's responsibility for ensuring confidentiality and using
any available measures to achieve this.
2.1.3 Question Types
There are two categories of question types with respect to the question wording. These
are open questions and closed questions. In general, all questions are either open
or closed. An open question requires the respondent to give a free response which
is not governed by any sort of choice. The main advantage of the open question is

16 CHAPTER 2 RELATED FIELDS OF RESEARCH
the freedom the respondent has while answering the question. Once the question has
been fully understood, the respondent can answer in their own words to express their
feelings in relation to the question. In has been shown that open questions have an
advantage over closed questions in certain subjects. For example it has been shown that
estimates for drinking and sexual activity were more accurately reported when using
open questions (Bradburn et al., 1979, Ch. 2). Closed questions included response
categories such as "never, once a year, ever few months, monthly, once a week, several
times a week and daily". It appeared that people were less likely to admit to the high
frequency categories in the presence of the low frequency categories. The open form
is also preferred when not enough information is known to make appropriate response
categories (Converse and Presser, 1986, Ch. 2). In this situation poorly chosen response
categories for a closed question will produce biased results from the respondent.
There are a number of disadvantages for the open question form. Open questions
are easy to design and ask, but due to their imprecise nature, they can be very difficult
to use in the final analysis. The open question responses are generally classified or
'coded'. This can result in a loss of information and in the richness of the respondent's
replies~ This step can be quite involved and requires trained staff in an attempt to
minimise the amount of information lost. Another disadvantage is the risk that the
respondent will answer what happens to be uppermost in their mind. So if the respon
dent is influenced by the interviewer or the questions then the replies can be biased.
The respondent may not provide full answers as they may be put off by having to
write long written responses. The open question appears more appropriate when the
objective is to learn the respondent's attitude, their level of information on which the
attitude or opinion is formed, the frame of reference within which the question, and
the intensity of their feeling (Kahn and Cannell, 1957, Ch. 6).
Closed questions give the respondent a choice from a list of alternative replies. The
respondent may select one or any number of the replies. Typically a closed question
may be as simple as a Yes/No question or as complex as a graduated scale for measuring
an intensity response. The respondent is expected to choose the alternative reply which
comes closest to or best represents their feelings, attitudes or knowledge of a situation.
The main advantage of closed questions is in their simplicity. A closed question will
generally only be interested in a single concept while a open question m_aybe interested
in a number of concepts. This has the benefits that the question is quicker and easier to
answer for the respondent. More questions can be answered in a shorter period of time
and the replies can be analysed more readily and at a cheaper cost. Closed questions
being more specific than open questions are more likely to communicate the same frame
of reference, or put the all respondents in the same frame of mind. This leads to more
consistent replies across the sample population. Compared to an open question, the
closed question maybe more difficult to formulate as a balanced set of replies must
be found the question. Finding these replies maybe require several iterations of pre-

2.1 QUESTIONNAIRE AND SURVEY DESIGN 17
testing or pilot testing on a group of test respondents. The different replies from the
test respondent can be used to define the different replies. However this approach will
reduce any ambiguous respondent replies that may occur with open questions. For
example the question "People look for different things in a job. What would you most
prefer in a job?". If the question was open, and a reply was "the pay", then this is
ambiguous as it could mean either "high pay" or "steady pay". A closed question that
includes these categories amongst others, would solve this problem as the more specific
replies would give the respondent a better idea of the nature of the question.
However the closed question also has disadvantages (Converse and Presser, 1986,
Ch. 2). The respondent is forced to answer a question with a fixed number of choices.
The predefined replies may irritate the respondent if they feel the replies fail to do
justice to their own ideas (Oppenheim, 1966, Ch. 2). These choices may introduce bias
if the predefined replies are not carefully chosen. The replies may lead to respondent
into a certain frame of mind which may then influence the way later questions are
answered.
The closed question is appropriate when our objective is limited to the classifica
tion of the respondent with respect to some simple attitude or perception. The more
complex and ambitious the objectives the harder and less satisfactory it is to formulate
simple and effective closed questions when a single open question may suffice feeling
(Kahn and Cannell, 1957, Ch. 6).
It is also often advantageous to ask open and closed questions together. When used
in this manner the closed questions provide a statistical count and the open questions
provide the meaning of the statistical count (Labaw, 1980, Ch. 13). Using an open
follow up question to a closed question can reveal flaws in the in choice of replies in the
closed question. The open question can indicate if the respomlent did not completely
comprehend the either closed question or the predefined replies. On the other hand
by asking an open question first will give a response in the respondent's own language
and containing their own ideas. Although this is useful, it is difficult to compare with
answers from other respondents. Also there is no certainty that the answer contains all
the factors important to the respondent. So a similar closed question can then be asked
which may contain predefined answers that did not earlier occur to the respondent. This
app~oach ensures that the results of several respondents can be readily be compared
and that all respondents have considered the 'universe of content' before giving their
replies (Oppenheim, 1966, Ch. 2).
Closed Question Types
There are a number of types of closed questions. Their main feature is that they do
not ask the respondent to write anything, although they may require the respondent
to read and think about the question. The question usually contains a list of checks or

18 CHAPTER 2 RELATED FIELDS OF RESEARCH
choices, from which it is possible to calculate a score. These are more suitable for mail,
group and computer questionnaire types. for A number of different question types are
listed here (Oppenheim, 1966, Oh. 4) :
• Checklists. These contain terms which the respondent can easily understand
and which more briefly and compactly expresses their views than their answer
to an equivalent open-ended question. They are best used when testing specific
hypothesises as they can be difficult to interpret. For example,
Please give your opinion on these attributes of a prospective husband:
V. Important Important Indifferent Undesirable 1. Good looks 2. Kindness 3. Money 4. Dependability 5. Sense of humor 6. Ambition 7. Moral character 8. Domesticity 9. Intelligence 10. Good health
• Ratings. Similar to checklists but they are designed to give a numerical value
to some kind of judgement. Ratings can be used as: an objective assessment
of a particular item of interest, an indication of the respondent's attitudes or
understanding, or as a self-rating of the respondent themselves. For example,
Out of 5, how would you rate the last film you saw:
1. Outstanding 2. Above Average 3. Average 4. Below Average 5. Disappointing
• Rankings. This means to arrange a list in order with respect to some common
aspect. Ranking involves a comparison between the items in the list to decide
the order of the ranked list. Rankings are more useful when telling us something
about the respondent rather than the list being ranked. This is because ranking
tells nothing of the difference between ranks which is as important as the rank
sequence. Also the actual comparison maybe difficult especially when the list has
a large number of items. For example tennis players are 'ranked' according to
their performances over a year of tournaments.

2.2 EXPERT SYSTEMS 19
• Inventories. An inventory of a list of items which the respondent is asked to
check in a particular way. Often the respondent is asked to indicate which items
in the list apply to them. They are relatively crude, as if can be difficult to make
a balanced list of items which apply well to a large category of the respondent
population. However it can be useful way of gathering broad information on a
wide series of topics quickly. For example,
Does any member of you family have any of the following problems either now, or in the past?
1. Heart attack or angina 2. High blood pressure 3. Bowel cancer 4. Diabetes 5. Asthma 6. Melanoma 7. Alcohol problems
• Grids. A grid can be though of as a t-wo dimensional inventory, It is a simple
method of quickly gather information without having to ask a lot of questions.
For examples a grid might have a number of illnesses and complaints on one axis
and common remedies on the other axis. With each respondent checking those
remedies they would use for each illness a picture can be built up of the preferred
treatments and situation they are applied under.
2.2 EXPERT SYSTEMS
The field of Expert Systems is a part of the larger field of Artificial Intelligence (AI).
"In the simplest sense, AI is the study of developing computer programs that exhibit
human-like intelligence" (Durkin, 1994, Ch. 1). The initial work done in the field of
AI in the 1950's was based on computational logic. From this attempts were made to
develop general purpose systems which could solve a variety of problems. However this
general purpose approach failed to deliver the promised results because of two main
reasons (Durkin, 1994, Ch. 1):
1. The limited performance of computers in the 1960's.
2. The general-purpose problem-solving strategies of the time were too weak for
complex problems.
After a low period in the 1970's, research began to pick up in the field of AI when
researchers began to realise that intelligent behaviour is dependent on the knowledge
one has to reason with rather than the methods of reasoning. This led to the concept
of knowledge-based or expert systems (Durkin, 1994, Ch. 1).

20 CHAPTER 2 RELATED FIELDS OF RESEARCH
Two lessons were learnt from research into the field of AI:
1. General-purpose reasoning techniques were too limited to solve real problems.
2. Systems which were focused on simple issues performed better than general
purpose systems.
These led to the definition of an Expert System: 'Solves problems using a computer
model of expert human reasoning, reaching the same conclusions that a human expert
would reach if faced with a comparable problem' (Weiss and Kulikowski, 1984, Oh. 1).
2.2.1 Motivations for making an Expert System
The definitions indicate that an expert system somehow incorporates the knowledge of
a human expert. The expert system is also able to apply this knowledge to a particular
situation to produce a satisfactory solution. Given that a human expert can also
produce these results, why use expert systems? There are two general reasons why an
expert system might be built (Durkin, 1994, Oh. 1):
1. Replacement of a Human Expert. While this is not a particularly good option
for the human expert, there are a number of advantageous reasons for this:
• Make available expertise after hours or in other locations. An expert system
can operate all hours of the day. It can be cheaply duplicated and distributed
to areas where there is no human expert.
• Automate a routine task requiring an expert. An expert system will produce
the same quality of results no matter how many times the task is performed.
• Record expertise. If a human expert has retired, taken a new job or has died,
then their expertise is no longer available. Recording the expert's knowledge
allows their expertise to be used further or passed on.
• Reduce costs. Human experts are expensive to train and to retain. An expert
system's greatest expense is in development. The subsequent maintenance
costs of the expert system will be much less than the salary of the human
expert.
• Provide expertise in hostile environments. An example of this is the DEN
DRAL expert system. This was developed for the NASA unmanned missions
to Mars. DENDRAL was able to provide expert chemical analysis of the
Martian soil.
2. Assisting a Human Expert. Assisting a human expert is a more common appli
cation for an expert system. This situation is desirable when the human expert
is capable of performing the task, but gets support from the expert system. The
reasons for doing this are:

2.2 EXPERT SYSTEMS 21
• Improving productivity. A human expert would be aided by letting an expert
system initially perform the task at hand. The expert system would be able
to provide an initial attempt at a solution which the human expert can
review. The human expert is fully able to perform the task, but an expert
system would provide additional support.
• Provide effective management of complex problems. A human expert may
have difficulties in keeping all the variables from a complex problem in mind,
for example, in project management. An expert system has no limit other
than program memory on the number of variables it can keep track of.
• Consistent recall of information and knowledge. A human expert would
tend to forget information and knowledge used infrequently. A expert sys
tem remembers all information equally, so would have no difficulty applying
knowledge from extreme or exceptionally cases.
While these reasons aid the productivity of a certain task there are more motives
for building an expert system. These go beyond the productivity considerations (Weiss
and Kulikowski, 1984, Ch. 1):
1. Disseminating rare and costly expertise. With the increasing use of low cost mi
crocomputers, the development of expert systems enables expertise to be shared
amongst a larger population. Human experts are often in short supply and when
available have little time available. The human expert's advantages lie in the flex
ibility of human response and the ability of sensory pattern recognition. While
an expert system can not even attempt to match a human in these areas, an ex
pert system can record the systematic approach of a human expert. A situation
where a human non-expert provides the perceptual input and an expert system
processes a solution is better than not having any form of expert assistance.
2. Formalising expert knowledge. Human experts often work in areas where scien
tific knowledge lags behind practical knowledge. These experts attempt to solve
problems without a detailed scientific understanding of the problem. The expert
may suggest experiments that will support or reject ideas about the problem.
These ideas maybe developed with further experiments on other instances of the
problem. By formalising the expert's knowledge, an expert system can reproduce
the human expert's reasoning producing further alternatives for experimentation.
The results of these experiments can then further add to the practical knowledge
of the problem.
3. Integrating diverse sources of knowledge. Due to different backgrounds, different
human experts often have differing ,opinions with different approaches when solv
ing problems. Each expert's approach may be just as valid as the next expert. By
incorporating different expert's opinions on a problem into an expert system the

22 CHAPTER 2 RELATED FIELDS OF RESEARCH
quality of the expert system's knowledge base is increased. This is because the
expert system can then provide more alternative solutions. While some solutions
may not as appropriate given a certain situation, the knowledge the solution is
based on is not irrelevant. This knowledge however may be more appropriate
in another situation. So by integrating diverse sources of knowledge the expert
system can better represent the state of human knowledge.
2.2.2 Expert System Structure
It is apparent that an expert system contains at least:
1. Knowledge Database.
2. Reasoning or Inference mechanism.
3. User.
The relationship between these components is shown in Figure 2.4
Expert System
Knowledge Inference User
Database Engine
Figure 2.4 A simple representation of an Expert System.
The Knowledge database holds the two types of information. These can be termed
Knowledge Base and the Working Memory. The Knowledge base can be defined as
"Part of an expert system that contains the domain knowledge" (Durkin, 1994, Ch.
2). This is analogous to the long term memory of a human expert. The Working
Memory can be defined as "Part of an expert system that contains problem facts that
are discovered during the session" (Durkin, 1994, Ch. 2). This is analogous to the
human expert's short term memory. The facts in the working memory typically are
either information entered by the user of the system or information inferred by the ex
pert system's inference engine. The inference mechanism is usually called an Inference
Engine. It can be defined as "The processor in an expert system that matches facts
contained in the working memory with the domain knowledge contained in the knowl
edge base, to draw conclusions about the problem" (Durkin, 1994, Ch. 2). The user
of an expert system provides the initial set of conditions for the solution by inserting
a set of facts into the working memory. The inference engine uses these facts and the
knowledge in the knowledge base to produce a new set of facts. This inference process

2. 2 EXPERT SYSTEMS 23
may also require extra information from the user, which once obtained can result in
further facts. This process of obtaining facts and inferring new facts continues until a
goal state is reached. This goal state is the inferred solution to the problem.
This simple representation of an expert system can be further expanded as shown
in Figure 2.5.
User User
Interface
Knowledge Base Editor
Inference Engine
Knowledge Base
Working Memory
Explanation ----~ Facility
Expert System
Figure 2.5 An expanded representation of an Expert System.
This introduces three more components, these are:
1. User interface.
2. Explanation facility.
3. Knowledge Base Editor.
The User Interface provides the mechanism which allows the inference engine to
obtain facts from the user. This provides either a natural language, graphical, menu
driven or question-and-answer interface to the user. Feedback of information also occurs
through the user interface. The Explanation Facility generally can indicate to the user
why and how a particular question is being asked. A why explanation can make the
user more comfortable with the line of questioning and can provide insight into what
issues the expert believes are important. The why explanation attempts to indicate the
conclusion the system is working towards. A how explanation provides justification for
a particular conclusion. It displays the facts and rules used to arrive at the conclusion.
The Knowledge Base Editor allows the human expert to modify the knowledge base.
This allows the addition of new knowledge, helps to maintain correct knowledge syntax
and performs consistency checks on the new knowledge information.
2.2.3 Knowledge Representation
The Knowledge base contains the knowledge or information relevant to the task of
the expert system. In this sense knowledge can be defined as an 'Understanding of a

24 CHAPTER 2 RELATED FIELDS OF RESEARCH
subject area' (Durkin, 1994, Ch. 3). In order to use this knowledge in a computer
program, a way of structuring the knowledge must be found. This structure must
allow the computer program to apply this knowledge in a similar way to how a human
expert would. This structuring of the knowledge is known as knowledge representation.
It has been defined as 'The method used to encode knowledge in an expert system's
knowledge base' (Durkin, 1994, Ch. 3).
Just as there are a large number of potential applications for expert systems, there
are also a large number of ways to structuring the knowledge for each application.
Although the type of knowledge for each application may be different, it has been
found that many of the knowledge types are similar and can be categorised. These
categories are (Durkin, 1994, Ch. 3):
1. Procedural knowledge. This describes how to solve a problem. Rules, strategies,
agendas and procedures are used to provide direction on how to do something.
2. Declarative knowledge. This describes what is known about a problem. A list of
true or false statements are used to describe a concept or object.
3. Meta-knowledge. This is knowledge about knowledge. This describes how to
represent knowledge in an attempt to efficiently use that knowledge. Properly
described and structured knowledge allows the inference or reasoning process to
proceed more efficiently.
4. Heuristic knowledge. This describes a rule-of-thumb that is used to guide the
reasoning process. Generally a human expert will formulate heuristic knowledge
from past experience of solving similar problems.
5. Structural knowledge. This describes how knowledge structure which often rep
resent a human expert's model of the problem. The human expert's model of
concepts, sub-concepts and objects is typical of this type of knowledge.
Given these types of knowledge different methods of representing the knowledge
have evolved. Mylopoulos and Levesque (1984) have classified four types of represen
tation schemes (Brodie et al., 1984):
-1. Logical Representation schemes. This class of representations uses expressions in
formal logic to represent a knowledge base. Inference rules and proof procedures
apply this knowledge to problem instances. Examples of this are first order
predicate calculus, propositional logic and reasoning with logic.
2. Procedural representation schemes. Procedural schemes represent knowledge as
a set of instructions for solving a problem. This contrasts with the declarative
representations provided by logic and semantic networks. Rule based systems
and production systems are examples of procedural representation schemes.

2.2 EXPERT SYSTEMS 25
3. Network representation schemes. Network representations capture knowledge as a
graph in which the nodes represent objects or concepts in the problem domain and
the arcs represent relations or associations between them. Examples of this are
sematic networks, conceptual dependencies, conceptual graphs and inheritance
networks.
4. Structured representation schemes. Structured representation languages extend
networks by allowing each node to be a complex data structure consisting of
named slots with attached values. Examples of this are scripts, frames and ob
jects.
2.2.4 Inference Techniques
An inference mechanism or engine in an Expert system is used to combine the knowl-
. edge in the knowledge base with the facts from the working memory. The result of
this combining in new knowledge or facts which can be placed back into the work
ing memory. This process starts normally with a well defined goal in mind which the
process must be able to recognise. The process then repeats until thi::i goal has been
achieved. This inference process must be controlled in order to produce an efficient
solution (Durkin, 1994; Parsaye and Chignell, 1988). Various control strategies have
been established to identify the goals of the system and to guide the system's reasoning
towards the goals.
The term 'inference' is the name of the technique used in expert systems to model
the reasoning process human experts use to solve a problem. A number of forms of
human reasoning are presented in the next section. The following sections then describe
a number of techniques used in the inference engine of an expert system.
Reasoning
Human reasoning is 'the process of working with knowledge, facts, and problem solving
strategies to draw conclusions'. Understanding how humans reason provides insight into
how to guide knowledge processing in an expert system. There are five main forms of
human reasoning (Durkin, 1994, Ch. 4):
• Deductive reasoning. This the deduction of new information from logically related
known information. The basic form of deductive inference is the modus ponens
rule. For example,
If A is true and if A implies B is true, then B is true.
• Inductive reasoning. This is used to arrive at a general conclusion from a limited
set of facts through the process of generalisation. A generalisation is formed

26 CHAPTER 2 RELATED FIELDS OF RESEARCH
which we believe applies to all cases of a certain type, on the basis of a smaller
number of cases. For example,
For a set of objects, X = { a, b, c, d, ... }, if property P is true for a, P is true for b,
and if P is true for c, . . . then P is true for all X.
• Abductive reasoning. Abduction is a form of deduction that forms conclusions
which might follow from the available information, but it might also be wrong.
For example,
If B is true and if A implies B is true, then A is true?
• Analogical reasoning. In this form of reasoning, humans draw from the differences
and similarities in their knowledge and experiences to guide their reasoning about
some new knowledge. For example if we know information about a certain object
A, if we are then told that object B is like object A then we can draw analogies
between A and B to form new information about object B.
• Common-sense reasoning. This form of reasoning replies more on good judgments
than on exact logic. The good judgements are also referred to as heuristics or rules
of thumb. These rules of thumb are usually formed from a human experiences.
The heuristic provides a reasonable indication of where a solution may be found.
However this does not guarantee that a solution will be found, only that the
direction indicated is a reasonable place to start looking for a solution.
Logical Inference
Logical inference forms a basis of two most common inference techniques, backward
chaining and forward chaining. These two techniques are presented in the following two
sections. Logical inference is the oldest form of knowledge representation in computers.
Propositional logic and predicate calculus are two forms of logic which have been well
used in the artificial intelligence field. Both techniques use symbols to represent knowl
edge and operators applied to the symbols to produce logical reasoning (Durkin, 1994,
Ch. 4).
• Modus Ponens. The basis of modus ponens is the definition, 'Rule of logic that
asserts that if we know A is true and that A imples B is true, then we assume -
that B is true.' Working with set of implications or rules and initial data, modus
ponens forms a series of logical assertions. Thus the inference process is driven
by the asserted information. This is the basis of data-driven or forward chaining
expert systems. It is suited to applications where it is important to learn as much
information as possible from available information.
• Resolution. Resolution is defined as 'Inference strategy used in logical systems
to determine the truth of an assertion' (Durkin, 1994, Ch. 4). It was first

2.2 EXPERT SYSTEMS 27
introduced in 1965 by Robinson. It is based on a technique called proof by
refutation which attempts to prove a proposition P is true by proving that the
negation of P, ,P, cannot be true. Resolution can be performed using either
propositional logic or predicate calculus, although the predicate calculus form is
more complex. Resolution focuses on the goal it is attempting to establish, and
only considers information relevant to the proving the goal.
• Non-resolution. The process of resolution makes no distinction between goals,
premises or rules. This can be confusing when attempting to prove a goal, as the
goal can be lost within the resolution as easily as the premises and rules. The non
resolution or natural-deduction technique on the other hand attempts to prove a
statement in a goal-directed fashion. Natural-deduction uses a back-chain rule of
inference, for example,
Rule:
Lives_In(John,New Zealand) /\ Lives_In(X,New Zealand) • Likes(X,All Blacks)
Goal: • Likes(John,All Blacks)
To prove the goal, the rules are scanned for a conclusion which matches Likes(
John, All Blacks). Iffound the conclusion becomes a new sub goal of the process.
If Lives_In(X, New Zealand) implies Likes(Jolm, All Blacks) then a new sub goal
to prove is Lives_In(John, New Zealand). Natural resolution shares some of the
same features as goal-driven or backward-chaining expert systems.
Forward chaining
Simply put, forward chaining attempts to find a solution to a problem by examining
available facts. An obvious example is a diagnosis. Here an expert will attempt to find
a set of initial general symptoms or facts. This information is then used by the expert
to infer a initial conclusion or hypothesis which can be explored further. In this case
the data drives the expert's reasoning process to a conclusion.
Forward chaining has been defined by Durkin as an 'Inference strategy that begins
with a set of known facts, derives new facts using rules whose premise match the known
facts, and continues this-process until a goal state is reached or until no further rule
has premises that match the known or derived facts.' This definition is shown in the
flow-chart in Figure 2.6.
In this flow-chart the inference process starts with the adding of the known in
formation into the working memory. The first rule in the knowledge base is matched
against the facts in the working memory. If at least one matching rule is found then
that rule is 'fired' by adding its conclusion into the working memory. If there is more
than one rule match, then the conflict resolution stage determines which rule is fired.

28 CHAPTER 2 RELATED FIELDS OF RESEARCH
Insert Information I into working memory J
~-------- Check first rule
Add conclusion to
working memory
Resolve rule
conflicts
~
/ Premisem~
T~~ingme~
~",/,
Check next rule
T ·~~
Rules remain?>
/ ,/
i: F
--S-to_p __ ]
Figure 2.6 The Forward chaining inference process.
The process then repeats back to checking the first rule for a match given the new infor
mation in the working memory. If a match is not found at any stage then the next rule
is checked for a match. If cycle repeats until there are no more rules left to fire. Using
this method, a forward chaining process concludes everything possible from available
information. This may not always be appropriate as unnecessary conclusions maybe
drawn, however the inference engine has no way of knowing whether the information
is useful or not.
Forward chaining can be viewed as a three step process:
1. Match or Recognise. Match all the rules against the working memory and deter
mine which rules can fire.
2. Resolve Conflicts. If more than one rule can fire, choose the one to fire according
to some strategy.
3. Act. Fire the rule and add the conclusion to the working memory.
When multiple rules are matched from the knowledge base, a strategy is needed to
decide which rule to fire. Various strategies have been proposed. Some of these are:
• Fire the first rule that matches.
• Don't fire a rule which has already been fired. This can be used to prevent possible
looping the inference process. This strategy may be used by other strategies.

2.2 EXPERT SYSTEMS 29
• Fire all matching rules then add all the new facts into the working memory.
• Fire the matching rules in sequence so that a new fact can be used when matching
rules further down the sequence.
• Fire the most specific rule. That is fire the rule which has the least number of
arguments or premises.
• Fire the highest priority rule. This can be used to place emphasis on more
important rules.
Backward chaining
Backward chaining approaches the inference process from a completely opposite direc
tion to that of forward chaining. Whereas forward chaining starts with information
which is used to infer a solution or goal, backward chaining starts with a goal and then
tries to find information to prove or support the goal. Durkin's definition is 'Inference
strategy that attempts to prove a hypothesis by gathering supporting information'
(Durkin, 1994, Ch. 4). The backward chaining approach is described in Figure 2.7.
Next rule found
Prove Goal
i Check working memory Yes available Goal
for matching a fact state matches fact
Not available
--
Find rule. with No~ Goal is primitive. Ask Goal state matching conclusion user for goal's state matches
user reply Yes
r
Make the rule's premises into
sub-goals.
+ Prove all All sub-goals true
sub-goals. Goal state is 'true'
Not all sub-goals are true
~ Backtrack to find No more rules.
another rule Goal state is 'false'
Figure 2. 7 The Backward chaining process.
I
Return Goal's I
I state I
~ ·~
This process operates recursively in order to prove the goal in question. The steps
involved in the process are:

30 CHAPTER 2 RELATED FIELDS OF RESEARCH
• The working memory is checked to see if there is a fact which matches the goal.
The existence of such a fact immediately proves or disproves the goal and the
process returns.
• The knowledge base is then searched for a rule with a matching conclusion. If no
such rule exists then the goal is termed 'primitive'. This simply means that the
solution to the goal is not determined by a rule, rather the solution is obtained
by asking the user for the state of the goal. Once the user has answered then the
process returns.
• If a matching rule is found then proving each premise in the rule will prove the
rule. The rule's premises then become sub-goals of the current goal.
• The sub goals of the current goal are then proved in the same fashion as the
current goal. This is performed by calling the backward chaining process for each
sub goal. If all the sub-goals are proven 'true' then the rule and consequently the
goal are also proven true, and the process returns.
• If not all the sub-goals are proven 'true', then the process backtracks to find
another rule from the knowledge base. This next rule will be used to try and
prove the goal. If there are no more rules in the knowledge base then the goal
can not be proven, so the process returns with a false state.
The process does not end until the goal at the top level of the recursion is processed.
Combined Approach
Both of the forward and backward chaining techniques have their advantages and dis
advantages. These are outlined in Table 2.2
As both methods have there advantages and disadvantages, the use of which
method depends mainly on the problem to be solved. The simplest way to choose
which method to use is to think of how a human expert would solve the problem.
Another alternative is to use both methods to solve the problem. This is also
a common approach used by human experts. For example in a diagnosis problem,
the human expert initially gathers information and infers a set of possible hypothesis.
Each hypothesis is then tested by gathering supporting information. So this combines
forward chaining for the first task with backward chaining for the second. This is called
the separate system approach. It can be further expanded by using meta-rules in the
forward chaining process which fire on a certain conditions. The meta-rules can then
start a backwards chaining process to verify the condition. Once the condition has
been verified, then forward chaining process can resume.

2.2 EXPERT SYSTEMS 31
Table 2.2 Method
Forward
Backward
Searching
The advantages and disadvantages of the backward and forward chaining processes. Advantages Disadvantages
• Good for problems which begin with data gathering and then infer from the data. • Can provide a large amount of new data from a small initial set of data. • Good for planning, monitoring, control and interpretation tasks.
• Good for problems which proves a hypothesis. • Questioning remains focused on a given goal. • Only searches for data relevant to the current problem. • Good for diagnostic; prescription and debugging tasks.
• No means for differentiating important data from less important data. • The system will ask all possible questions even when only a few questions are needed for a conclusion. • Totally unrelated questions may be asked.
• Often will continue to follow a given line of reasoning, even when it is no longer valid.
Searching is an important area of problem solving using expert systems. Typically a
backward chaining problem can be represented graphically by a tree structure. This
is normally known as the inference tree or the problem space. Within this inference
tree may exist any number of solution or goal nodes. To solve the problem represented
by the tree, one of these solution nodes must be fouu<l by searching the tree. Further
solution nodes can be found by backtracking within the tree until all the solutions are
found or the tree has been exhaustively searched. For example, say that Figure 2.8
contains a problem tree with a number of nodes labelled from a to 1 and two solution
nodes f and j.
Figure 2.8 An example problem tree with two solution nodes.
There are a number of methods for searching a problem tree. Two of these are the

32 CHAPTER 2 RELATED FIELDS OF RESEARCH
depth-first and breadth-first. A depth first search looks for a solution down a path until
a solution or a dead end is found. If the dead-end is found then the search backtracks
and goes down another path. This continues until a solution node is found or the
tree has been exhaustively searched. The depth first search lends itself to a recursive
approach. This is shown by the following psuedo-Prolog description of a recursive
depth-first procedure (Bratko, 1990, Ch. 11),
To find a solution path, Sol, from a given node, N, to some goal node:
1. if N is a goal node then Sol = [N)
2. if there is a child node, Nl, of N, such that there is a path Soll from Nl to a
goal node, then Sol = [N - Sol)
Figure 2.9 shows how the depth-first search visits the nodes in the example.
Figure 2.9 The tree example showing the depth-first search path.
In this example, the solution [a,b,e,j) would be found first. Further backtracking
would find the second solution [a,c,fj.
A breadth-first looks for a solution of along all the nodes on one level of the problem
tree before processing those nodes at a lower level. The description of the search method
is (Bratko, 1990, Ch. 11),
To do the breadth-first search when given a set of candidate paths:
1. If the first path contains a goal node as its head then this is a solution of the
problem.
2. Otherwise remove the first path from the candidate set and generate the set of
all possible one-step extensions of this path, adding this set of extensions at the
end of the candidate set, and execute breadth-first search on this updated set.
This is shown in Figure 2.10. This shows that the shorter solution path, [a,c,fj, is
found before the longer solution, [a,b,e,j).
Table 2.3 (Durkin, 1994, Ch. 4) describes some of the advantages and disadvantages
between the depth-first and breadth-first methods. Both methods are guaranteed to

2.2 EXPERT SYSTEMS 33
Figure 2.10 The tree example showing the breadth-first search path.
find a solution as they exhaustively search the problem space. However this makes
them both inefficient when dealing with large problem trees.
Table 2.3 The advantages and disadvantages of the depth-first and breadth-first search techniques. Method Advantages Disadvantages
Depth
Breadth
• If the solution is known to be deep within the problem tree, this will get to the solution without wasting time looking for shallow solutions. • Maintains focus on the current line of reasoning within the problem tree. In an expert system, this would mean a sequence of questions would be related to a certain issue.
• LJoes not miss easy solutions. Shallow solutions within the problem tree will be found quickly and efficiently.
• Inefficient for shallow solutions. May take a long time to find a shallow solution. It may unsuccessfully search exhaustively a branch of the tree before searching a branch with a shallow solution.
• Inefficient for deep solutions. For solution located deep in the problem tree, this will take a long time to find it. • Provides poor focus on a line of reasoning. Nodes are processed in a seemingly unrelated order.
There are a number of methods to overcome some of these disadvantages. Depth
first with iterative deepening combines the advantages of the depth-first and breadth
first searches. A depth-bound is used to limit the depth of the search. Initially this
bound is set to 1, so the all the nodes to a depth of 1 are searched, as in the breadth
first case. The bound is then increased, and the next two levels are searched and so
on. This guarantees the that shallow solutions are found but is also efficient when the
solutions are deep in the problem tree. The best-first search is known as an informed
search unlike the three earlier uninformed searches. This method uses knowledge about
the problem to guide the search. A heuristic is used to choose which goals are likely

34 CHAPTER 2 RELATED FIELDS OF RESEARCH
to lead to a solution. This approach mimics human reasoning closely, and when the
heuristics are chosen well can lead to a very efficient search. However the method does
not search the problem tree exhaustively, so there is no guarantee of finding a solution.

Chapter 3
QUEST DESIGN AND MODELING
This chapter outlines the design concepts and justification used in the Quest project.
The first section examines the questionnaire process and discusses the advantages and
disadvantages of a computer-based approach. Section 3.2 examines the requirements
of such an approach. Section 3.3 then presents a questionnaire structure model based
around the explicit ordering of questions within a questionnaire. This approach is called
the Q11estion Order Flow model. Two variations of this model are presented along with
the implementation and consequent conclusions about the approach. Finally section
3.4 presents the Required Information flow model which focuses on the information
requirements of the questionnaire process.
3.1 THE QUESTIONNAIRE PROCESS
In chapter 2, the steps in questionnaire development were identified. The sequence of
four tasks in figure 2.1 with dark borders are the most suitable for computer aided
assistance of some form:
1. Questionnaire construction. This task can benefit from a questionnaire editor
program. Such a tool allows the author to design a questionnaire in a consistent
manner.
2. Questionnaire pre-testing. This task will gain the least from direct computer
assistance as it requires a group of respondents to trial the questionnaire. The
respondent's replies are then analysed to determine if the questionnaire includes a
balanced set of questions. If it does not then design phase must be reiterated in or
der to produce a balanced questionnaire. As the pre-testing is mini-questionnaire
in itself, the tools used in the other three tasks can be of benefit here.
3. Questionnaire presentation. A computer based questionnaire presentation pro
gram is able to present a questionnaire in the same manner every time. This
helps reduce any bias normally introduced by a human questionnaire supervisor.

36 CHAPTER 3 QUEST DESIGN AND MODELING
4. Questionnaire replies analysis. A computer tool is normally used to process the
questionnaire replies once the replies were manually entered. A computer based
analysis tool that has knowledge of the questionnaire format is able to directly
access the saved replies from the questionnaire presentation program.
The prime function of a questionnaire is to retrieve meaningful information from
a sample population. In order to achieve this, the questionnaire author first decides
what information is required. Then the questions necessary to meet these requirements
must be formulated. These questions can then be presented to the respondent. The
respondent answers the questions as fully as possible. The information in the respon
dent's replies are then collated by the author. If the right questions were chosen by the
author, the author now has the information required.
In general the author formulates the questionnaire by hand. The questionnaire is
then prepared for the respondent to reply to the questions. This is done by clearly
displaying the questionnaire on paper usually with the aid of a typewriter or word
processor. The respondent will then take the formatted questionnaire and reply by
answering either directly onto the questionnaire sheet or a specially prepared answer
form. Once finished, the author then collates the replies by hand. The raw question
naire data can then be interpreted by hand or computer to produce an overall result
for each respondent's replies.
The actual processes of creating and preparing the questionnaire and then collating
and manipulating the data can be a complicated task for the author. The respondent
may find answering a detailed questionnaire difficult especially if the instructions are
difficult. Often a questionnaire or survey needs a trained administrator to go through
the questionnaire with the respondent. The tasks then of the author and the respondent
both can involve large amounts of work.
A computer based tool can reduce the amount of work required by the author.
This allows the author to more thoroughly test the questionnaire before presenting it
to the target respondents. Alternatively the author could put more effort into produc
ing an interactive questionnaire. An interactive questionnaire that provides feedback
to the respondent may be more motivating than a plain paper questionnaire for the
respondent.
Figure 3.1 shows a diagram of the questionnaire system with the use of a com
puter based tool. A computer based tool can aid the author with the questionnaire
design and preparation processes. A computer program can then be used to display to
questionnaire to the respondent and collate and store the respondent's replies. Finally
another computer program can process and manipulate the replies from a number of
respondents according to the author's wishes. The author can retrieve these processed
results and draw conclusions from them.

3.1 THE QUESTIONNAIRE PROCESS
Manipulate Response Data
Collate Responses
Design Questionnaire
Prepare Questionnaire
Administer Questionnaire
Figure 3.1 Stages in the questionnaire design process with a computer based tool.
37
Every questionnaire is made up of questions. An important problem is how the
questions relate to each other. Related to this problem are decisions of when and why
a question should be asked. When an author is obtaining information from a respon
dent, the respondent will be able to follow the author's line of questioning better if the
questions asked are related in some way. For example, a number of random unrelated
questions are likely to confuse the respondent. If a number of related questions are
asked together, then it follows that those questions form a group or section of ques
tions. Within each group of questions, there may be a number of questions which are
not appropriate to ask depending on certain conditions. For example, if the reply to
question A was 'yes', then ask question B otherwise skip forward to question C. Ques
tions such as B and C are conditionally dependent on the replies of other questions.
Obviously the conditionally dependent questions should be asked only if the necessary
replies are available. Therefore an ordering is defined for groups of questions with these
properties.
For each of the three main functions identified previously that a computer based
system must handle ( questionnaire preparation, questionnaire administration and sum
marising the results) a separate application would be logical. Each application would
then communicate with each other through the use of files. A questionnaire file would
contain a complete description of a questionnaire. The questionnaire file would be
produced by the questionnaire editor application and be read by the questionnaire
administrator application. The administrator application would produce a reply file
which would be read by the summary application. Finally the summary application
would store a number of reply files in a questionnaire database file. The questionnaire
database file would hold a number of reply files from a specific questionnaire. The
following section takes these observations of the questionnaire process and produces a
list of requirements which a computer based questionnaire system should follow.

38 CHAPTER 3 QUEST DESIGN AND MODELING
3.2 COMPUTER BASED QUESTIONNAIRE REQUIREMENTS
The following two statements concisely describe the questionnaire process:
"A series of predefined questions are presented to a respondent. The re
spondent's replies are retrieved and stored. Once all the relevant questions
have been presented, the replies are then summarised for further analysis."
"The major aim of a computer based questionnaire system is to maximise
the information gained from a respondent population while minimising er
rors and bias."
These two statements imply a number of requirements for a computer based ques
tionnaire system:
• The questionnaire author must be able to specify a series of questions and the
ordering relationship betv1een the questions.
• The author must be provided with a sufficient set of question types to be able to
ask most questions.
• The ordering relationship between questions must allow the author to create
complex questionnaires. This includes the ability to structure questions around
the answers to other questions.
• The author must be able to specify a summary format which can be automatically
generated from the respondent's replies to the questions.
• When presenting the questionnaire to the respondent, the system must be able
to interpret the questionnaire structure utilising the respondent's replies when
necessary.
• Each question must be presented to the respondent in a simple and obvious
manner, and provide a mechanism to receive the respondent's reply.
• A replies storage facility is required to hold all the respondent's replies while the
questionnaire is being administered to the respondent. Once the questionnaire
has been presented to the respondent, a further means of permanently storing
the respondent's replies is necessary.
• A facility must be available to analyse a series of summaries of the respondents'
replies in order to provide statistics over the whole respondent population.

3.2 COMPUTER BASED QUESTIONNAIRE REQUIREMENTS 39
An expert systems approach would seem appropriate for a computer based ques
tionnaire system. If the problem in this case is considered as questionnaire administra
tion, then the definition of an expert system from section 2.2 can be paraphrased as
"a system which is capable of administering a questionnaire using a computer model
of a questionnaire process, then reaching the same conclusions that a human expert
would reach given the same questionnaire and respondent". Section 2.2.1 gives two
general reasons why expert systems are used. In terms of replacing a human expert, a
computer based questionnaire system would be beneficial for the following reasons:
1. The expertise encoded into the questionnaire's structure would be available at
all times of the day and at different locations. This is possible because the
questionnaire file could be cheaply copied and distributed to various locations.
2. It would automate the task of administering the questionnaire. This would guar
antee consistent quality of the questionnaire presentation every time the ques
tionnaire was administered.
3. The cost of training a new computer operator for the system would be minimal
compared to the training cost for an adequately trained human questionnaire
administrator.
In the case of a general medical practice, a computer based health screening ques
tionnaire could provide the general practitioner with vseful information about the pa
tient before the patient sees the doctor. The computer based system can assist and
improve the productivity of the human expert, namely the doctor, by performing an
initial assessment of the patient. The doctor is able to quickly assess the accuracy of
the assessment and make a decision once the recommendations have been verified.
The most important factor in a computer based questionnaire system is the method
used to represent the questionnaire structure. The method used will dictate the strategy
used to interpret the questionnaire structure. Section 2.2.4 indicates that a forward
chaining approach would not be useful because of the following disadvantages:
• Related questions would have to be placed on the same level within the ques
tionnaire tree structure. This is counter-intuitive as people tend to group related
questions and information down the same branch in the tree. In other words,
people form hierarchical trees of information. With a forward chaining system,
organising conditional dependencies between questions on the same level within
the questionnaire tree structure would be difficult. This would also affect ques
tions on the lower levels of the structure which would be subject to the same
dependencies as those in higher levels.
• Important questions should have the greatest significance when deciding which
questions are asked next. So the important questions should be asked first. In

40 CHAPTER 3 QUEST DESIGN AND MODELING
a forward chaining system, asking the questions in any order will produce the
same result. This is because the rules in such a system are only fired after the
questioning process has finished.
• All questions within the questionnaire will be asked. From this the inference
process would form conclusions about the respondent. This is a very general
approach which is not suitable for proving or disproving a hypothesis. The first
item in the list in section 2.1 mentions that one of the first tasks in questionnaire
design is to decide on the hypothesis to be investigated. The hypothesis may only
take one question to be answered or it may require all the questions, either way
only the relevant questions should be asked.
A backward chaining system would not suffer these three deficiencies primarily
because it uses a hierarchical tree style arrangement for the questionnaire tree structure.
Firstly with a hierarchical tree structure, related questions would be arranged into the
same branch within the tree. Secondly the most important questions can be placed
towards the top of the hierarchy, and so would be asked before questions lower down.
Thirdly, the more important questions could be used to dictate which questions further
down the branch are asked or skipped.
The main disadvantage of a backward chaining system is that it may continue to
follow a line of reason which is no longer valid. In the case of a questionnaire, this is
not acceptable. Consider a branch in which the first question is "Are you female?".
Questions lower in the branch may ask questions about feminine issues which would
not be appropriate for a male respondent. Obviously some control over this situation
is necessary, and as these types of question-skipping patterns are an integral part of
the questionnaire design it shouid be the questionnaire author who controls them.
So a facility for implementing skipping patterns must be built into the questionnaire
representation structure.
A computer based questionnaire authoring tool at the most basic level will facilitate
in the preparation of a questionnaire. It will be able to provide a set of primitive
questionnaire manipulation functions. Examples of these functions may be Create
Question, Delete Question, Insert Question, Move Question, Edit Question. Using
these functions, an author will be able to prepare a questionnaire. However the whole
task of producing a questionnaire is a case of Knowledge Acquisition. The information
needed to build a questionnaire must be acquired from the author. An authoring tool
must be intuitive for the author to use as it is effectively taking the place of a knowledge
engineer. Normally a knowledge engineer would obtain the information from the human
expert and incorporate the knowledge into the expert system. However in this case the
questionnaire author and the questionnaire authoring tool must both make up for the
absence of the knowledge engineer. Such a tool needs to be capable of editing all facets

3.2 COMPUTER BASED QUESTIONNAIRE REQUIREMENTS 41
of a questionnaire. This includes the questionnaire structure, content, appearance and
output.
Section 2.1.1 indicates that two of the disadvantages of computer based question
naires are computer illiteracy and a lack of rapport between the respondent and the
computer questionnaire administrator. These problems reflect on the quality of infor
mation the respondent gives in response to the questions because of possible respondent
bias and/ or errors. As one of the main requirements is to minimise error and maximise
information during questionnaire administration, it is important to provide a suitable
environment for the respondent. The computer based questionnaire's user interface
must be simple, intuitive and easy to use. The lack of rapport can be compensated for
by utilising multimedia displays and feeding extra information back to the respondent.
It is most important that the results of the questionnaire session can be easily
extracted from the respondent's replies. Gaining suitable information from the re
spondent's replies is the whole purpose of implementing a questionnaire. However the
raw replies will not always tell enough to evaluate the questionnaire's hypothesis. The
replies must be collated, verified and analysed before any judgements can be made.
This type of work can be performe<l very well by a number of computer applications,
however the data often has to be entered manually. A computer based questionnaire
system has the advantage that the respondent's replies have already been stored. How
ever, the raw responses are not always stored in a convenient form. The replies would
be much more useful if they could be summarised by the questionnaire program. This
summary would be a report of the respondent's replies and any useful information de
rived from them. As the author has designed the questionnaire they should be able to
design suitable summaries, one for informing the respondent, and one for the author.
Summaries are useful for processing each respondent's replies, however it would
be advantageous to analyse a series of respondent's replies statistically. While there
are a number of well established statistical programs available it would be worthwhile
including a simple statistical capability which is tuned to questionnaire analysis. For
further processing the respondent's replies could be exported to a dedicated statistics
package.
To sum up, the following list outlines the requirements for a computer based ques-
tionnaire system:
• Flexible questionnaire structure model.
• Scheme for interpreting the questionnaire structure model.
• An questionnaire editing interface which allow manipulation of the questionnaire
structure, appearance and summary facilities.
• Simple and flexible user interface between the questionnaire administrator and
the respondent.

42 CHAPTER 3 QUEST DESIGN AND MODELING
• Scheme for summarising and storing the respondent's replies.
• Facility for analysing the respondent's replies and summary in order to produce
statistics useful in evaluating the survey hypothesis.
The following two sections outline two different methods for representing a ques
tionnaire in terms of the above requirements. The Question Flow Model defines the
questionnaire as a hierarchical flow chart type structure. The Required Information
Model approaches the questionnaire as a tree of information driven goals.
3.3 QUESTION ORDER FLOW APPROACH
The Question Flow Model was the model originally designed for the questionnaire sys
tem. It is based on the idea that a questionnaire is a group of ordered questions. These
questions are arranged in a flow chart style graph pattern. This style of questionnaire
representation went through three revisions before a number of limitations in the model
made it necessary to try another approach. The three revisions are:
1. The LifeQuest medical questionnaire. This is the original questionnaire model
developed by Dave Powley, Steve Penna, Scott Marshall, and Alan Simmons in
1992 under the supervision of Dr Chris Carey-Smith. This model described the
questionnaire using a series of Prolog internal databases, each database residing
in its own file. The questionnaire content was fixed as a health screening ques
tionnaire due to the requirements of the project and the format of the internal
databases.
2. The QUEST Questionnaire System Version 1. This was the system developed
by Tim Russ and the author in 1993. The questionnaire model was largely re
fined by incorporating all the internal database files into a single database file.
The database formats were expanded to store extra information about the ac
tual questionnaire and to accommodate new facilities such as multimedia. This
generalised the model and allowed new questionnaires to be implemented on the
system.
3. The QUEST Questionnaire System Version 2. This system was the last revision
of this approach. Again it expanded the scope of the questionnaire model to
improve the model's flexibility and useability. This model also included provi
sion for programmable summary and user interface capabilities. A review of the
model was carried out in 1994 and a number of limitations of the model were
outlined. After these limitations were examined, a number of the limitations
proved prohibitively difficult to resolve satisfactorily. Consequently the model
was abandoned for a more flexible approach (see section 3.4).

3.3 QUESTION ORDER FLOW APPROACH 43
The following sub sections outline the questionnaire model, the interpretation of
the model, the implications of the model for the author and respondent, the implemen
tations of the model and the conclusion drawn about the model.
3.3.1 The Questionnaire Structure Model
Two models for the question order flow approach are outlined here. The first is from
version 1 of the Quest Questionnaire System and is referred to as the standard ques
tion order flow model. The second model is from the second version of the Quest
system and is referred to as the extended question order flow model. In both cases
the information encoded by each model can be though of as structural knowledge of
the questionnaire as described in section 2.2.3. The actual knowledge representation
scheme used is a combination of both the network and structured methods. This is
because the questionnaire structure is stored as a tree graph with the arcs between
the tree nodes indicating an ordering and information about each node is stored as
attribute slots within an object.
Standard Question Order Flow Model
As the name of this model implies it is structured around the ordering of a set of
questions. As one of the requirements mentioned in section 3.2, this model must be
able to implement question skipping patterns. This is implemented with the concepts
of blocks and links.
• Blocks. A block is the main functional element in this model. For example each
question in the questionnaire is a question block. Each block has the following
fields:
- Blockld. Uniquely identifies the block.
- Question Text. The actual question to ask the respondent.
- Replies List. A list of text strings. The number of list items determines
what kind of question is asked.
- Link Conditions. A list of link condition items. Each item in the list must
prove true before the following block can be executed.
- Picture. A filename of a picture file to display with the question.
- Help Text. Text string which gives information on how to answer the ques-
tion.
- Why Text. Text string which describes why the question is being asked.
• Links. A link is used to describe the ordering of the blocks. The ordering of the
blocks is done by specifying a parent block and a child block. Once the parent

44 CHAPTER 3 QUEST DESIGN AND MODELING
block has been executed, each link with a matching parent block field indicates
one possible child block to process.
When a block is processed, the question it represents is shown to the respon
dent using the information in the block's fields. When the respondent has answered
the question, the reply is stored along with the associated Blockid field in a replies
database. These replies can be used when the questionnaire inference engine processes
the questionnaire structure.
In order to facilitate a wide range of questionnaires, a suitable range of question
types are necessary. To meet these requirements the following question types were
devised (section 2.1.3 describes the open and closed question types):
• Text Entry. This is an open question type. A question is asked of the respondent,
and the respondent replies by entering a text response using the keyboard.
• Single Select List. This is a rating type of closed question. The respondent replies
to a question by selecting a single item from a predefined list of responses.
• Multiple Select List. This is an inventory type of closed question. The respondent
replies to a question by selecting any number of items from a predefined list of
responses.
• Information. This is not a question but a means of providing feedback to the
respondent.
Each of the blocks could potentially evoke a response from the respondent. This reply
is in the form of a text list. Consequently the link conditions were based around a text
string reply to a previous block in the questionnaire. This is discussed further below.
Figure 3.2 shows a simple example that includes a number of blocks and links.
Table 3.1 lists the blocks and links involved in this example. Each block entry in the
table lists the Blockid, Link Condition fields and the block type.
Table 3.1 The list of blocks and links within the example. Blocks Links block(1, []) block(iOO, []) block(101, []) block(102, []) block(103, []) block(200, []) block(201, []) block(202, [link(201, 11 Yes 11
)])
block (203, [] ) block(204, [link(201, 11 No 11
)])
question_space(i,100) question_space(i,200) question_space(i00,101) question_space(101,102) question_space(102,103) question_space(200,201) question_space(201,202) question_space(201,204) question_space(202,203)

3.3 QUESTION ORDER FLOW APPROACH 45
Block 101 Block 201
Block 102
Block 103 Block 203
Figure 3.2 Example of the Block and Link concepts.
The figure also introduces the concept of sections of questions and section introduc
tions. It is obvious that there are two main branches within the tree structure and the
numbering of the blocks reflects this. Blocks 100 to 103 form one section of questions
and Blocks 200 to 204 form another. Since, when asking a group of questions, it makes
sense to introduce the questions to the respondent, an introduction block type is de
fined to provide such an introduction. Blocks 1, 100 and 200 would all be introduction
blocks. By definition block 1 is always the questionnaire introduction block, block 100
is the section introduction block for blocks 101 to 103. Likewise block 200 is the section
introduction block for blocks 201 to 204.
The use of link conditions introduces the concept of 'OR' branching within the
questionnaire structure. Question skipping patterns are implemented through the use
of these OR branches. The split between blocks 202 and 204 represent an OR branch.
This is because the flow of the questionnaire would either go down one branch or
the other branch. The link conditions for each question determines which branch is
followed. This is discussed further in section 3.3.1.
In general the flow of a questionnaire is from top to the bottom. If a branch is taken,
then the flow continues down until the bottom of that branch is found, at which time
the questionnaire has ended. However this does not work well for sections of questions.
Each section of questions should be asked one after another without any conditions
attached. So the sections of questions are separated into 'sub-questionnaires'. The
sections are then arranged in order in a separate but simpler tree. Within this top
level questionnaire tree, section blocks are arranged through 'AND' branching. This
is because the first section and the second section and the third section and so on,
are processed. Figure 3.3 shows this situation. So a two-level hierarchy defines the
separation between the questionnaire level which contains the sections and the section
level which contains the questions.

46
Section I
Block 100 Section Intro
Block 101
Block 102
Block 103
End Section
CHAPTER 3 QUEST DESIGN AND MODELING
Block 200 Section Intro
Block 201
Figure 3.3 Example of the Section concept.
The summary and summary analysis requirements outlined in the previous section
were not explored at this stage. However a scoring system for the LifeQuest program
was designed by Scott Marshall in 1992. This scoring system was strongly linked to the
LifeQuest questionnaire content, and no effort was made to generalise it to the same
level as the authoring and administering aspects of the updated Quest system.
Questionnaire Model Interpretation
Given the questionnaire structure model, the means for interpretation is basicaUy a
modified depth-first search. This search is based around three predicate databases:
the question_space database which describes the question order relationships, the
blocks database which contains the details of each block, and the replies database
which stores the respondent's replies to each question.
The questionnaire structure is interpreted using a backward chaining algorithm to
implement a depth-first search. The goal in this search is simply the last block in a
branch. Once this block has-been reached then that section of questionnaires has been
processed. For example in figure 2.8 (see page 31) node a would be the start of the
section and nodes h, i, j, k and 1 are all valid goals of the depth-first search. Figure
3.4 contains a simple version of this algorithm which is very similar to the algorithm
which appeared in the LifeQuest version of this model.
Line 1 is the head of the predicate and takes the argument Blockid. In line 2 a
match is sort for Blockid in the question_space database, if no match is found then
there are no more questions to ask within this section. This predicate will fail and will

3.3 QUESTION ORDER FLOW APPROACH 47
Figure 3.4 The basic depth-first search algorithm.
1: DepthFirst(Blockld) :-2: question....space(Blockld, NewBlockld), 3: block(NewBlockld, LinkConditions) , 4: TestConditions(LinkConditions), ! , 5: Reply = AskQuestion (NewBlockld) , 6: assert(replies(Reply)), 7: Depth...First(NewBlockld).
8: DepthFirst (_) : - ! .
% Gets next block id % gets block's link conditions % tests all the link conditions % if true, ask block's question % Store respondent's reply % Recurse to the next block
% Catch end of section
backtrack to the next clause which is in line 8. This clause catches the fail and succeeds
at the end of a section. Otherwise the match will have obtained the block identifier of
the next block in the section NewBlockid. In line 3 the link conditions for this block
are obtained from the block database. These link conditions are tested in line 4 by the
Test Conditions predicate. This predicate will fail if none of the conditions evaluate
true and the algorithm will backtrack to line 2 in order to obtain the next block which
follows Blockid. If the predicate succeeds then the question associated with that block
is asked of the respondent, and the reply is saved in lines 5 and 6. Line 7 then calls
the head of the predicate with the next block identifier as the parameter in a recursive
fashion. This continues until the end of a branch is reached.
The Test Conditions predicate makes use of the replies database to check the
state of the conditions. The LinkConditions list consists of links or references to
the replies of other blocks. Each link is checked against the corresponding reply
in the replies database. If the corresponding reply matches then link reply the
TestLinkConditions predicate succeeds.
The AskQuestion(Blockid) predicate is responsible for displaying the question
to the respondent. The respondent's reply is also retrieved by this predicate and is
returned so it can be saved in the replies database.
Typically an even simpler version of this algorithm will be used to implement the
simple AND branching that controls the order in which the sections are presented.
Extended Question Order Flow Model
The Extended Question Order Flow model is an extended version of the standard
question order flow model. The first main extension addresses the information that
each block can return from the respondent after a question is asked. The previous
model simply returned a text list. This has been expanded to returning three different
reply list types, these are:
1. Text List. Returns a list of text strings.

48 CHAPTER 3 QUEST DESIGN AND MODELING
2. Index List. Returns a list of indices which correspondent to the index to a list
based question type.
3. Variable List. Returns a list of real numbers.
The relevance of these becomes apparent with the new block types. There are two
new block types, however each of the existing block types benefit from the enhanced
reply types. All of the blocks are described here:
1. Text Entry. As before, simply returns the text reply.
2. Numeric Entry. The respondent must enter a number as a response. The text
representation of the reply is stored in the text list, the integer representation in
the index list and the real representation in the variable list.
3. Single Select List. A real value may be associated with each item in the predefined
list of responses. The respondent does not see this value, only the predefined
items. When a selection has been made, the text representation of the chosen
item is stored i11 the text list, the index of the item in the index list and the
associated value in the variable list.
4. Multiple Select List. As for the Single Select List question, except that the
respondent can select any number of the predefined items. Note that this is the
only question block type that can generate multiple entries in the reply lists. All
the other question blocks generate single entries in the reply lists.
5. Information. Provides some feedback to the respondent. This block generates an
empty list for each of the reply lists.
6. Calculation. This block can evaluate an arithmetic, relational or logical expres
sion. The results of the evaluation are stored within the reply list in the same
manner as the other questions. It is possible to reference any other block reply
within the expression in order to perform a calculation on a number of respondent
entries. Each reference contains an indicator to the type of referenced reply. For
example, the calculation 'g(4,v) + g(5,v)' means add the variable list of block 4
to the variable list of block 5.
The link conditions in the standard model were a property of the block. The link
just provided a simple connection between the blocks. However in terms of a flow
orientated model, the link condition property made better sense as a property of the
link itself. In this way the questionnaire flows down a path or link if the conditions for
that link are meet. Also since the reply type has been expanded to three types, each
link condition should explicitly refer to the type of the referenced block in the same
manner as the Calculation block.

3.3 QUESTION ORDER FLOW APPROACH 49
The standard model provides a two level hierarchy for the questionnaire level, which
contains the ordered sections, and the section level which contains the questions. The
extended model retains this two level structure, however with a couple of modifications.
Instead of the limited AND branching in the questionnaire level, this is expanded to
allow OR branching in the same fashion as the section level. This allows conditional
links within this top level. For example a section or group of sections can now be
bypassed or skipped through the use of an OR branch.
A further extension of the AND branching was considered for the section level. This
form of AND branch is used to implement branching based on a reply to a multiple
select list question. Currently a link condition can contain a reference to a multiple
select list reply. However if a multiple select question contains a number of predefined
items, it is difficult to create a tree structure which has a link associated for each item.
For example, say a question is asked about family medical history "Have any of the
following problems worried your family in the last year?" and the predefined replies are:
Chest pain, Depression, Excessive thirst, and Wheeziness. For each of these replies a
information block should be displayed giving more information on the problem. The
extended AND branch allows this type of structure to be ea8ily set up. This situation
is shown in Figure 3. 5.
Block 100 Section Intro
Block 203
End Section
Figure 3.5 Example of the extended 'AND' branch.
Figure 3.6 shows the complexity involved in implementing this type of structure
using the standard model. This figure does not show any of the link conditions and only
includes three information blocks as opposed to the four in the above example. While
not impossible to do in the standard model it would be complicated and error-prone.
With the growing complexity of the model it was decided to give some protection
to the author when creating link conditions. A problem of ensuring "questionnaire
consistency" was identified as an area worth investigation. Questionnaire consistency
means that all the references made in the questionnaire are valid logically and also in

50 CHAPTER 3 QUEST DESIGN AND MODELING
Figure 3.6 A simplified extended 'AND' branch example implemented using 'OR' branches.
context. A consistent questionnaire can be interpreted as intended by the inference
process without error. However ensuring a questionnaire is consistent is a difficult
process. This is discussed further in the next section.
3.3.2 Implications for the Author
The author's involvement in the system model is a complex one as the author is as
sumed to perform several tasks. These tasks are questionnaire design, questionnaire
preparation and response analysis. It is assumed that the author wants to know cer
tain information about a group of respondents. Therefore the author is responsible
for producing a questionnaire and gathering the response information later. Once the
information is analysed, the author now has the information desired.
An important factor in this process is the author's understanding of the question
naire model. If the model is complex then the author will find it difficult to produce
a questionnaire. However a simple questionnaire model may require more effort when
producing a complex questionnaire. The concept of a flow-chart graph is familiar to
most people. It shows the relationships between a number of tasks or functions in a
simple order-related fashion. This concept is easily understandable and can be learnt
quickly.
The concept of skipping patterns is also familiar to most people. Most paper
questionnaires use skipping patterns of some form. The merging of the concepts of
flow-chart graph and skipping patterns introduces new complications for the author.
With the question order flow model, it is the author's responsibility to ensure that the
skipping patterns are correctly implemented. The skipping patterns in this model are

3.3 QUESTION ORDER FLOW APPROACH 51
controlled through the use of the link conditions. A link condition is associated with
a link between two blocks. The link condition determines if the link between these
blocks should be followed, i.e. the second block is processed after the first block if the
condition is met. Each link condition contains a reference to another block's reply. In
order for the link condition to be evaluated, the referenced block must have already
been processed. If this not the case then the questionnaire is inconsistent.
There are a number of possible types of questionnaire inconsistencies:
• In Links. As described in the paragraph above. A link condition has a reference
to another block. If this block is deleted or moved ahead of the link condition
then a link inconsistency occurs.
• In Calculations. Calculations will normally contain references to other blocks in
a similar fashion to the link conditions. A Calculation inconsistency will occur if
the referenced block is deleted or moved ahead of the calculation.
• Down a Branch. Conditional inconsistencies occur when there is more than one
way to reach a block or link. If a link condition references a block which is down
one side of a 'OR' branch, then it is possible that the other branch could have
been taken to reach the current link. In this case the link condition does not have
the required information to evaluate the condition.
These inconsistencies will occur either when the author is initially entering the
questionnaire for the first time or when the questionnaire is being revised at a later
date. It is expected that most of the inconsistency problems will occur during the
revision phase. During this revision phase the questionnaire will be updated to fit
the changing requirements of the author. It is more likely that the author will make
more errors during this phase as simple changes made may effect iarge parts of the
questionnaire. The author could manually check the questionnaire for inconsistencies
once the changes have been made. However it is possible that fatal inconsistencies
remain which effect the correct flow and logic of the questionnaire. Hence there is a
need for a consistency checker.
If the author has trouble learning the questionnaire model or has only just started
learning, then they will probably make more mistakes. At this stage a questionnaire
'wizard' or 'expert' tool may be of some help to the author. A_questionnaire wizard is
a small program that talks the author through the process of creating a simple ques
tionnaire. It does this by presenting a series of dialog boxes each containing questions
on various aspects of the questionnaire design. Generally the information entered in
the initial dialog boxes determine the type and number of questions later on. A simple
sequence of questions would be:
1. General Questionnaire properties. Ask for the type of questionnaire and whether
to automatically generate a summary.

52 CHAPTER 3 QUEST DESIGN AND MODELING
2. Questionnaire Introduction. Ask for the title and introduction of the question
naire.
3. Sections Setup. Ask for the total number of sections within the questionnaire.
4. For the number of section entered, ask for the section name and section introduc
tion.
Such a procedure would be able to create a simple skeleton structure of a question
naire, but with no questions. Extending this procedure to create a number of questions
is more difficult and would make for a longwinded process for the author. At this
stage it would be better to have an 'insert question block' wizard. This could ask
more localised questions about a smaller section of the questionnaire and then create
a small block of questions within a section. Anoth~r alternative is to have a set of
questionnaire templates. These templates are blank questionnaire structures designed
with specific applications in mind. The author could load the template questionnaire
closest to their needs. They would then fill in the blank questions and add or remove
any extra questions.
3.3.3 Implications for the Respondent
The implications for the respondent are straightforward. The requirement that there
be a "Simple and flexible user interface between the questionnaire administrator and
the respondent" insists on this. The respondent must simply be able to comprehend the
presented information or question and then respond in the appropriate manner. When
presenting the information, there should be as little distraction to the respondent as
possible. On the other hand the respondent should be given as much information to
help them understand the question but not enough to confuse them.
In order to do this the user interface must have the following properties:
• A question display. This just presents the question text to the respondent. This
should be large enough and sufficiently clear for all people to read clearly.
• A response field. This provides facilities for the respondent to enter an answer.
It may take the form of a listbox of predefined items or a edit field for entering ~~
text. It should be obvious how to enter the reply without addition help.
• A reply complete control. Once the respondent has entered their response they
need to be able to indicate that they have finished entering their response. This
can be done by clicking on a 'OK' or 'Continue' button on the screen with the
mouse.
A user interface which implements these concepts should allow a respondent to
progress through all the questions and sections in the questionnaire without trouble.

3.3 QUESTION ORDER FLOW APPROACH 53
3.3.4 Implementations
As indicated by the standard and extended versions of this model, there are two dif
ferent implementations. Each implementation consisted of three programs: QuestED
is the questionnaire editor, QuestEX is the questionnaire administration program and
Quest View is the questionnaire summary viewing program. QuestEX is the key pro
gram in both implementations for a number of reasons:
• It is the program that administers the questionnaire to the respondents.
• It must be able to interpret the questionnaire structure.
• It must be able to clearly present the questions and receive a reply.
• It must be able to produce a summary of the respondent's replies.
These reasons are discussed further also with the implementation of QuestED and
Quest View in the following sections.
Standard Question Order Flow Implementation
This implementation was the first Microsoft Windows 3.1 based implementation of
QUEST. This had a number of advantages over the first LifeQuest program:
• Virtual memory. This overcame the 640Kb DOS memory limitation. This limited
the complexity of the LifeQuest program and the size of the LifeQuest question
naire. The Windows virtual memory manager allowed the implementation of
large programs with an extremely large memory heap.
• A standardised user interface. The Windows user interface provides a common
appearance to a set of common functions. Consequently only a small set of user
actions need to be learnt in order to be proficient at operating the Windows user
interface.
• Graphics Device Interface ( GDI). This provides a transparent interface to a large
number of hardware display devices. This device independence allows for a power
ful set of graphics primitives which can be easily manipulated on different display
hardware.
However the first implementation required a different approach to that of console
type programming. Windows programs are event driven, which does not suit a recursive
depth-first search algorithm. An early version of QuestEX was implemented with such
a recursive depth-first inference engine, however while this version worked well initially,
it would crash spectacularly after processing around twenty questions. This happened

54 CHAPTER 3 QUEST DESIGN AND MODELING
because Window 3.1 is a cooperative multi-tasking system. The inference engine would
not yield to the system, therefore it denied the operating system a chance to perform
tasks such as updating the screen and freeing system resources.
This problem was solved by using a state machine approach. This approach used a
Windows timer to act as an event generator. This timer is set up as a one shot timer,
with a period of 0.25 seconds. It is started at the beginning of a questionnaire session.
When the timer event fires a global variable containing the current block identifier
(state) is retrieved. A search predicate is then called to determine the next block
identifier to ask based on the current block identifier and the respondents replies. This
is similar to finding the next state in a state machine from the current state and the
state machine inputs. Once the next block identifier is known, the associated question
can be asked. Once the question's reply has been retrieved and stored, the one shot
time is activated again and the process is repeated. The use of the timer is important
as it gives the operating system an idle period in which it can perform its system duties.
Figure 3.7 contains a simple version of the timer event handler.
Figure 3. 7 The standard depth-first search algorithm.
1: TimerHandler % One shot timer event handler. 2: currentblock(Blockid), % Retrieve the current block id. 3: FindNextBlocks(Blockid,Nextids), ! , 1/. Find all child blocks. 4: PickNextBlock(Nextids,NextBlockid), 1/. Pick which child block to take. 5: Reply= AskBlockQuestion(NextBlockid),% Ask block's question. 6: assert(replies(Reply)), % Store respondent's reply 7: assert(currentblock(NextBlockid)), % Store new block id. 8: SetTimer(0.25,TimerHandler). % Set timer for next 'recursion'. 9: 10: Timer Handler : - ! . % End of Section.
This algorithm is similar to the basic search algorithm as presented in figure 3.4.
The main differences are:
1. Use of the timer to call the algorithm and each iteration, line 1 and 8.
2. The current block identifier is saved in the global database current block instead
of being passed as a argument in the basic version, lines 2 and 7.
3. The basic version uses a back tracking approach to find the next child block. This
next block's link conditions are evaluated and if false, the algorithm backtracks
to find the next child block. This version finds a list of all the child blocks in line
3 using the FindNextBlocks predicate. The PickNextBlock predicate in line 4
then determines which block from the list should be followed.
The need to call predicates to perform the tasks in lines 3 and 4 is non-determinism.
A Prolog program running under Windows is not allowed to include any non-determinis
tic predicates. Backtracking is one of the main causes of non-deterministic predicates

3.3 QUESTION ORDER FLOW APPROACH 55
in Prolog. Non-deterministic predicates can be removed by careful use of recursion
techniques. The FindNextBlocks predicate can still fail, which signifies that there are
no more child blocks to process. In this case the TimerHandler predicate backtracks
to the second clause in line 10 which immediately succeeds.
The QuestEX user interface was designed around a series of dialog boxes. There
was a dialog box for each type of block. Each dialog box had a number of features in
common. These are:
• Question text field: Displays the question or section text.
• Response field. This is where the respondent can enter their reply. Depending
on the block type it be a text edit field or a scrolling list box field.
• A series of buttons. These are:
1. 'OK' button. Pressing this indicates that respondent has finished entering
their reply.
2. 'Quit' button. Indicates that the respondent wishes to quit the current
questionnaire session.
3. 'Back' button. Pressing this button takes the respondent back to the last
question asked. It is useful when the respondent realises they have made an
error in their reply to a previous question.
4. 'Help' button. Displays a simple help message which is intended to provide
additional comprehension information for the current question. Also a list of
reasons why the current question is being asked is displayed. Each question
in a section has a 'why' reason which takes into account the link conditions
that question. For the path through the section that the respondent has
travelled, each block's reason is added to a list and is then displayed to the
respondent. This gives a simple explanation of how their responses lead to
the current question.
• An optional picture field. An area in which a windows metafile (WMF) picture
could be displayed.
Figure 3.8 shows the typical style of these dialog boxes. The main advantage of
using these dialog boxes was their simplicity. They were easy to setup and the arrange
ment of the controls within each dialog box could be manipulated with a standard
Windows dialog box editor.
The summary facilities of this version were very limited. At the end each ques
tionnaire session, the respondent's replies were formatted into a list of the questions
and the associated replies. This list is shown in figure 3.9 which shows the summary
display. From here the respondent could get a print-out of this summary list.

56 CHAPTER 3 QUEST DESIGN AND MODELING
Question:
at It your ethnic origin?
Pll~ase ulect a Single Item from the 11st, and press OK Caucasian Polyneslan lndlan Asiatic other origin
Figure 3.8 The dialog box for the single select list block type.
Summiuy:
Kelvin Morton
- How oid an, you? 22
• What ls your ethnic origin? Caucasian
-What Is your occupation? Student
- What Is your g11nder? Male
• Have any ofth11s11 problems worried you In th11 last month?
• Have any of the following problems worried you In the last montl"l?
Figure 3.9 Dialog box of the summary display output.

3.3 QUESTION ORDER FLOW APPROACH 57
The replies are then saved into a simple database file. The Quest View program
could then be used to load the reply files. Once loaded each file could be displayed and
printed in the same manner as in QuestEX.
The questionnaire editor QuestED was initially based upon the original LifeQuest
editor in terms of editing a questionnaire structure. It provided three main editing
functions for the questionnaire header, sections and the questions.
Editing the questionnaire header allows the author to change the questionnaire
title, questionnaire introduction, questionnaire background and exit password. Editing
the sections allows the author to create and remove sections, and to change the section
ordering and each section introduction and picture. Question editing is more complex.
Firstly the author can create, delete and edit questions within a particular section.
Once a question has been created, the question type, text, picture, help text and why
text can be defined. Finally the question can be linked to other questions in the
sections. This is done by selecting which questions precede the current question. The
link conditions are created by firstly selecting a block id from a list of single select type
question blocks. These single select type question blocks always precede the current
block in the questionnaire. Secondly a reply is chosen from a list of predefined responses
for the selected block.
Initially these were the only editing functions QuestED provided. This provided
little feedback to the author in terms of the questionnaire structure. It was difficult for
the authors to clearly see any mistakes made during questionnaire entry. Consequently
a tree graph facility was added to QuestED which showed to structure of the questions
within a section. Figure 3.10 shows this facility.
Question 303 Single-Select
Question 302 Single-Select
Question 304 Single-Select
Q.uestlon,306, . Single;Sflect
Figure 3.10 The QuestED tree graph representation of the standard question order flow model.

58 CHAPTER 3 QUEST DESIGN AND MODELING
Extended Question Order Flow Implementation
This implementation of the question order flow model was never completed. However
many parts of it were carried over into the Required Information flow implementation.
The most notable of the parts carried over is the template manager, which provides
a customizable full screen questionnaire user interface without the restrictions of the
earlier dialog box based approach. An early decision made for this implementation was
to continue to use Prolog for the QuestEX program. The QuestED and Quest View
programs would then use a mixture of Prolog for the questionnaire data management
and C++ for the user interface functions. Later this allowed the template manager to
be used in the Required Information flow implementation almost without change as it
written in Prolog. The QuestEX user interface and the template manager are discussed
further in section 4.5.
A prototype of the QuestED user interface was also made. The aim of this pro
totype was to test the interaction between the c++ user interface modules and the
Prolog data management modules. The Borland Object Windows Library (OWL) ap
plication framework was used to implement the QuestED user interface. The user
interface was to based around a questionnaire view in which the flow chart style graph
of the questionnaire appeared. Next to this graph was a panel which contained a series
of block properties, hence the name property panels. Each block type has a different
panel which resembles a dialog box fixed into the main window frame. Each property
panel contains a number of fields which relate to specific properties for each block type.
As the author selects a block from the flow chart graph, the details for that block are
displayed within the associated property panel. The author can then modify any of
these properties which are saved when another block is selected.
The prototype was abie to establish that the property panel method for displaying
the block information was satisfactory. The property panels could be displayed quickly
containing all the necessary block data. All the relevant information concerning a
block was then available to the author at a moment's glance. This made it easy to
scan through a number of blocks in order to find a particular item. However the
prototype was able to establish that the methods for displaying the flow chart block
graphs lacked performance. Even though a fairly crude algorithm was being used to
draw the chart, the drawing process slowed down significantly once more than 30 blocks
were displayed on the screen. While this was not a large problem on a fast pentium
based IBM compatible computer, on slow machines the delay would be unacceptable. It
became apparent that a single program written in either Prolog or c++ would perform
better, because of the overhead in structuring a program coded in two very different
programming languages.
The main problem with this implementation was with consistency checking. As
previously mentioned the task of ensuring that the author has produced a consistent

3.3 QUESTION ORDER FLOW APPROACH 59
questionnaire is not trivial. The actual process of checking the questionnaire takes a
reasonable amount of time. One method for performing this checking is path unwind
ing. As the questionnaire structure is a tree graph with well defined start and end
points, all the possible paths through the questionnaire can be created. Each path
would have a list of link conditions, and all the referenced blocks within the list must
lie down that path. If a referenced block can not be found down a path, then that
reference is inconsistent. For an increase in size of the questionnaire, the time to check
the questionnaire grows disproportionately. The resulting delay would prove very dis
concerting to the questionnaire author, especially when in general the author is likely to
make relatively few mistakes when entering the questionnaire for the first time. More
mistakes would be expected when the questionnaire was being revised.
The following cases show a number of the alternative consistency checking methods
considered:
1. In the worst case, the consistency checker would process the whole questionnaire
after every change to the questionnaire structure. This would introduce an un
acceptable delay for the author after each change.
2. Only the current section would be checked as any error would likely occur locally
to where the author was editing. Any references to blocks within other sections
could be ignored. Although this would catch the majority of errors within a
section, those errors which are ignored are probably more serious in terms of
maintaining the questionnaire structure.
3. As for item 2 except that any references to blocks within other sections would
be processed at a section level. After editing questions within a section, all the
possible branches within that section would be stored along with all the link
conditions for each branch. In this way any reference to that block from another
section would only need to look up this list of branches for that section. If the
reference is to a block which lies in a conditional branch, then consistency cannot
be guaranteed as it depends on firstly the condition and secondly the respondent's
reply.
4. One of the above methods could be available as a function that the author can
invoke. In this way the author can choose when to check for possible errors. The
author could also have a choice of the check complexity, for example a simple test
would just check the current section as in method 3 or a full test would check
the whole questionnaire as in method 1. Full tests could also be performed after
loading and before saving a questionnaire.
Each method would display a list of the warnings to the author. Each warning
would have to be addressed before the author could proceed. This could be a matter
of fixing the problem completely or just dismissing or ignoring the warnings.

60 CHAPTER 3 QUEST DESIGN AND MODELING
While all these consistency checking methods were investigated, it was decided
that:
• The actual implementation of any of these schemes would slow the editing process
down too much for the author. It would not be an intuitive process for the author
to continually check for these errors. Especially if the questionnaire has been well
designed in the first place. In this case there should be not structural errors,
although errors may occur when entering the questionnaire data.
• It would difficult to 100% guarantee a error free questionnaire after the checking
process. The checking process could only spot consistency errors which have
actually been identified. If the model still contained flaws which had not been
classified then the consistency checker would not spot them, and unpredictable
behaviour could result.
• The use of such a tool is a reactive measure. We are trying to spot an error
which has already occurred. It would be simpler in the long run if the ques
tionnaire structure had some in-built characteristic which avoided the problem of
consistency checking.
3.3.5 Summary
A number of problems with the Standard Question Order Flow model had been dis
covered in the course of its design and implementation process. These problems are:
1. An untraceable database bug in the editor. This reduced reliability and useability.
2. Only a simple print-out of respondent's answers was available as a summary. No
form of 'intelligent' summary could be generated. This requires extra work for
the author to extract the required information from the replies.
3. The only response type offered was the text string. This meant that the inference
engine could not easily manipulate or process the responses.
4. The inference engine was unable to take advantage of a reply to a multiple select
list question. Any replies to a question of this type could only be displayed in the
summary. Therefore conditional branching was unavailable for question replies
with multiple entries.
5. The inference engine had no ability to combine the replies from a number of
questions. It could perform a conditional OR branch on the responses from
a number of single select list questions. But it could not execute any sort of
mathematical or relational expressions.

3.3 QUESTION ORDER FLOW APPROACH 61
6. The questionnaire editing interface was largely unchanged from the original ver
sion. A hierarchy of three dialogue boxes provided the means for editing the
questionnaire header, the section headers and the questions.
7. The complete flow of a questionnaire section was not completely obvious even
with the tree graphics. The tree graphics provided only a limited amount of
information about the questions in a section. For each question only the type, id
number, the links to and from, and the existence of a condition were apparent.
To find complete information about a question, the author would have to traverse
through a number of dialogue boxes.
8. The possibility for consistency errors existed. This was due to the fact that a
question could contain references to another question within the structure of the
questionnaire. A number of possible types of inconsistency could then occur. The
referenced question could be deleted. The question containing the reference could
lie before the referenced question. The referenced question could also lie down a
branch in the flow which may or may not be traversed.
9. Although user interface for the questionnaire display program was adequate, it
lacked flexibility. Every questionnaire had the same appearance. Each question
form consisted of standard Windows buttons and list boxes. The questionnaire
author was largely unable to customise the appearance of their questionnaire. A
customised appearance would appear more attractive to the respondent, espe
cially if it fitted the surroundings, e.g. using a medical centre's logo.
In response to these deficiencies in the standard model an extended questionnaire
model was proposed. The implementation of this model fixed many of the implemen
tation related problems in the standard model. In addition the following extensions
were made to the actual questionnaire model:
1. The number of question types was increased. Included in the additional types
were numeric entry questions, the response of which can be easily processed. The
list type questions were expanded, so that a selected response returns three pieces
of information; the response's text string, the response's list index and an author
defined numeric value.
2. A conditional 'AND' type branch type was added to the inference engine func
tionality. This type of branching consists of a number of sub-branches. Each
sub-branch is associated with a single responses from a multi select list reply.
A return block terminates each end of the sub-branches. A default sub-branch
provides the means for continuing past the conditional 'AND' branch. If none
of the responses in the multi select list was chosen, then the default sub-branch

62 CHAPTER 3 QUEST DESIGN AND MODELING
is taken immediately. For every selected response the associated sub-branch is
followed.
3. To enable the combination of a number of question replies, a calculation block
is used. The calculation block is able to evaluate mathematical, relational and
logical expressions. This block uses a response's numeric value or list index in a
mathematical expression. The numerical value, list index and the text string can
be used in a relational or logical expression.
4. The ability to generate multiple summaries was added. This was accomplished
by defining a separate summary structure and mechanism. The questionnaire
still operates in the same manner, but once finished the summary mechanism
post-processes the respondent's replies. More than one summary can be defined
for each questionnaire, e.g. a summary for the author, the respondent and one
for importing into a spreadsheet or database.
The problem of questionnaire consistency, while probably only of secondary im
portance to the author, initially proved a major hurdle. While it is possible for an
author to produce an error-free questionnaire without the help of consistency checking,
it was felt that it was necessary to help the author to learn the limitations of the ques
tionnaire model. In the event, consistency checking proved to be too computationally
intensive, unduly hindering the author in attempts to create a questionnaire. What
seemed necessary was a questionnaire model with a form of questionnaire consistency
built in.
3.4 REQUIRED INFORMATION FLOW APPROACH
The Required Information model was designed to overcome the need to ensure con
sistency in the questionnaire structure. The main source of inconsistencies in a ques
tionnaire stem from the use of references to other questions and the focus on the order
of questions within the questionnaire. With the Question Flow model it was difficult
to completely guarantee that a referenced question has actually been asked. The Re
quired Information model takes a different approach by still grouping related questions
together, but not rigidly defining an order for the questions. The focus is instead on
the information flow. In this model the links between goals represent a child-parent
relationship. This relationship states that the parent goal requires a piece of informa
tion from the child. Thus references to other goals can be guaranteed since as the link
between the parent goal and the child goal also defines the question order.

3.4 REQUIRED INFORMATION FLOW APPROACH 63
3.4.1 The Questionnaire Structure Model
The main components of the Required Information model are the goals themselves.
These goals are similar to the blocks used in the Extended Question Flow model. Like
a block their purpose or 'goal' is to gain or derive some information relevant to the
questionnaire at hand. The information is stored as the same text list, index list,
variable list structure as in the Extended Question Flow model. The main difference
is that each reply structure also stores a goal state along with the response. There are
a number of types of goals, namely:
1. Question goal. The question goals are basically the same as their Extended
Question Flow equivalents. For all types of question goals, the reply state will be
true, however this can be changed by a condition goal.
2. Condition goal. All types of goal may have an associated condition child goal.
The condition goal provides the means for changing the state of its parent goal.
The condition goal itself performs a relational expression. It is executed before
· its parent goal 80 that the result of the condition can determine the state of
the parent. If the condition evaluates true, then the parent goal will then be
executed, otherwise the parent's state is set false and it is skipped. The condition
goal obtains the necessary information to evaluate the condition from its own
child goals.
In the simplest case there would be one sub goal. An example is shown in Figure
3.11. When the parent goal Gl is executed without the condition goal, the two
children Q4 and Q5 are executed in order. However with the condition goal C2,
the condition goal is executed before the parent. Because the condition goal
doesn't have enough information to complete its execution, it must execute its
own child goal Q3. Upon executing goal Q3, the respondent is asked the question
"Do you want to continue? (y /n)". The reply to this question is stored as the
reply to goal Q3. Once its child goal has finished executing, the condition goal
now has enough information to evaluate "Q3 = 'y' ", which it does. The result
of this condition is either true or false depending on the respondent's selection.
Now the condition goal has finished, the parent goal Gl examines the result of
the condition goal. If it is false, then the parent goal aborts its own execution
and sets its own state to false. However if the result is true, the parent's state is
set to true and the two children goals Q4 and Q5 are executed. This provides a
means for creating skipping patterns within the questionnaire.
3. Group goal. The group goal provides a mechanism for controlling the question
naire flow over a number of goals. It in effect takes a number of goals and 'groups'
them together so they appear as one. This allows the author to enforce a hierar
chical structure on the questionnaire as a group goal may appear as a sub goal

64 CHAPTER 3 QUEST DESIGN AND MODELING
C2 Q3 - Condition Goal ~ Do you want to
Q3='y' Continue?(y/n)
01 ,._ Parent Goal Q4
~
Child Goal 1
~ QS Child Goal 2
Figure 3.11 This example shows the operation of a condition goal.
of a parent group goal. An example of this is when number of related questions
are grouped together into a section of questions. This is the same concept as the
sections in the Question Flow model. However the group goal is more powerful as
it may further subdivide a section of questions into sub-sections. If a group goal
has a condition sub goal, then this condition determines whether the group goal's
other children as processed. The information collected by a group goal flows no
further up the questionnaire tree structure. It may however be referenced by
other goals or a summary. Figure 3.11 demonstrates this situation where the
parent goal G 1 is a group goal.
4. Calculation goal. The calculation goal is similar to the Question Flow calculation.
Its purpose is to combine the replies from any number of responses. The actual
calculation is composed of any number of sub goal references and mathematical
operators. Relational, logical and arithmetical calculations are possible. The
referenced sub goals are directly linked to the calculation goal as in the Group
goal case. If during the execution of the sub goals, the state of a sub goal is false
then any remaining sub goals are ignored. This is because the calculation goal can
no longer obtain all the information it requires to evaluate the calculation. The
calculation goal's state is set to false as a result to indicate that the calculation
failed.
5. Info goal. The info (information) goal is complementary to the question goals.
Whereas the question goals gather information from the respondents, the info goal
provides information feedback to the respondents. It is similar in structure to the
group goal as it can group sub goals together, but the sub goals are executed
first. The information the sub goals collect can be presented to the respondent
in a fashion chosen by the author in the info goal. Thus the author can provide
feedback on the output of any goal in the questionnaire. For example see Figure
3.12,

3.4 REQUIRED INFORMATION FLOW APPROACH
11 Info Goal
Your Weight is Q3
C2 Condition Goal
Q3 > 100kg
r Q3 : ' What is your : : Weight? : ,_ .. - - - - - - - - _1
Q3 What is your
Weight?
Figure 3.12 This example shows the operation of the Info goal type.
65
When the info goal 11 is executed it first executes its condition goal C2. The
Condition goal in turn executes the question goal Q3. This goal obtains the
weight of the respondent. This condition goal determines whether the respondents
weight is over 100 kg. If it is not, then the condition is false and the Info goal
does not execute it's other sub goal or display its information to the respondent.
If the condition is true then it will execute its other sub goal. Note however that
this sub goal is question goal 3 again but this time it is being referenced. This
is indicated by the dashed border of the goal. Thus the info goal can take the
result of question 3 and format it in the information text, "Your weight is Q3".
This is then displayed to the respondent.
Simplistically the structure of a questionnaire can be created by joining a number
of question goals to parent group goals. These group goals form the questionnaire
sections. They then join to a single parent group goal which forms the questionnaire
introduction goal.
Questionnaire Model Interpretation
The model is interpreted by using a recursive depth-first search routine. Because a
questionnaire structure forms a hierarchical tree, the search engine can be started
from any node within the tree and will call itself during the processing of the tree
branches. An important difference from the depth-first technique introduced in section
2.2.4 is that there is no one particular solution goal in the questionnaire. So the
depth-first search routine will attempt to process every goal in the questionnaire space.
Therefore there is no need to find a solution path as this may include every goal in
the questionnaire space. The depth-first search routine is based on two lists, called
Open and Closed. The Open list contains the goals that have been generated but
have not been processed. The Closed list contains all those goals that have been
processed. The pseudo-code in figure 3.13 demonstrates the basic approach (Luger and
Stubblefield, 1989, Ch. 3),
Line 7 is important as it is when the functionally of each goal is actioned. This
functionality depends entirely on the type of the goal. The details of this and the
recursive implementation of the above algorithm are discussed further in 4.3.

66 CHAPTER 3 QUEST DESIGN AND MODELING
Figure 3.13 The pseudo-code approach for the depth-first search algorithm.
1: procedure depthJirst_search
2: Initialise: Open= [Start], Close= []
3: while Open -f; [] do 4: begin 5: remove the next goal from the left of Open, call it X;
6: generate all possible children of X;
7: act on X;
8: put X on closed;
9: eliminate any children of X already on either open or closed, as these will cause loops in the search;
10: put the remaining children of X, in order of discovery, on the left of Open;
11: end; 12: end.
3.4.2 Implications for the Author
The Required Information questionnaire model is initially more difficult to master
than the Question Order flow model. This is because the aim of the model is much
deeper. The Question Order flow model focuses on the somewhat superficial aspects
of questionnaire design, namely the ordering of the questions. This is an easy concept
to understand as most· people have been questionnaire respondents at some time. The
respondent's main impression of the questionnaire is a sequence of related questions.
However the author is more concerned with the information the questions provide
rather than their order. The need for enough quality information from a questionnaire
to prove or disprove a hypothesis is the most important factor for the questionnaire
author.
The Required Information flow model is based around this idea of gathering in
formation. The author must then define what information is required for the survey
hypothesis. This information must be broken down into progressively smaller sub
hypotheses, until it is possible to ask a single question for each sub-hypothesis. This
process should ideally be carried out regardless of how the questionnaire is to be imple
mented. However the Required Information flow model requires this type of approach
from the very beginning of the questionnaire process.
The Question Order flow model allows the author a more relaxed approach when
defining the questionnaire information hierarchy. The author can take more liberties
with the structure of the questionnaire, and so be more vulnerable to irregularities

3.4 REQUIRED INFORMATION FLOW APPROACH 67
in the sequence of questions. These irregularities show up as inconsistencies in the
questionnaire structure.
The Required Information flow model maps the questionnaire information hierar
chy onto the questionnaire structure. This guarantees the consistency of the question
naire as each branch in the questionnaire structure deals with the same information,
except at different levels of detail. The author can still modify the order of individual
questions in the questionnaire, but only within the same level of branch. So while the
author has to deal with a more conceptually challenging questionnaire model, they gain
the benefits of a structured approach to questionnaire design and guaranteed question
naire consistency.
3.4.3 Implications for the Respondent
The implications for the respondent should be no different with this model from the
Question Order flow model. The respondent still will see the sequence of questions in
the same order for the same questionnaire.
3.4.4 Implementation
The implementation of the Required Information approach is outlined in the following
two chapters. Chapter 4 describes the implementation of the Required Information
model for the questionnaire administration program, QuestEX. It describes the im
plementation of the inference engine, the user interface and the summary generation
facilities. Chapter 5 discusses the implementation of the questionnaire editing tool,
QuestED. It overviews the questionnaire editor, the user interface editor, and the sum
mary editor.


Chapter 4
QUESTEX IMPLEMENTATION
QuestEX is the name of the program used to implement the Required Information
questionnaire model discussed in section 3.4. The QuestEX program was implemented
using PDC Prolog for Windows. PDC Prolog includes all the standard bindings to the
Windows Application Programming interface (API). A large proportion of the Win
dows API functions are available as defined in the Microsoft Win16 API Programmer's
Reforence. A small proportion of these functions can not be correctly handled by Pro
log. These functions typically involve array handling which is not a predefined type
in Prolog. Therefore a number of helper functions are available via the PDC Prolog
Windows bindings to allow access to these functions.
QuestEX consists of a number of components. These components and their func
tion are described in the following list. Figure 4.1 shows how the components interact
with each other:
• MEX. The main QuestEX module. Handles initialisation of the program as a
Windows Application.
• ENG. The QuestEX Inference engine. This module controls the execution of the
questionnaire.
• CALC. The Calculation module evaluates any calculation and condition goal
expressions.
• LOG. The File Log module provides a simple log file service.
• INFO. The Information goal module generates the text used by the information
goals.
• SUM. The Summary module generates the questionnaire summary after a ques
tionnaire session.
• TMP. The Template manager is responsible for creating, displaying and oversee
ing the user interface aspects of QuestEX.

70 CHAPTER 4 QUESTEX IMPLEMENTATION
• DBX. The Database manager handles the memory storage needs of QuestEX.
This include loading the external database questionnaire files, storing the replies
internally and saving the raw replies in an external database.
------~ :)
Text Log File :• _) ~--
Printer Device
LOG
TMP
PRINT SUM
Summary Text File
CALC
Figure 4.1 The structure of QuestEX's modules
~
r-:ueslionnai
Database ,''
'1 Raw Replies Database
',, ~--
The ENG inference engine module is the most important module in the program. It
controls how the questionnaire is presented to each respondent. Dividing the program
into the modules listed above allowed the development of each module to proceed as
independently as possible. This required that the interfaces between the modules be
defined at an early stage.
This modularity proved important when the decision was made to change the
inference enginP- from the Question Flow model to the Required Information model. It
allowed the specifications of QuestEX's other major components to remain unchanged.
For example the User interface component is identical for both implementations while
the Summary component requires only minimal changes. -
The following sections discuss each of the components presented in Figure 4.1.
4.1 INITIALISATION
The initialisation of QuestEX occurs in two stages. The first stage occurs when Ques
tEX begins as a Windows program, and the second stage when the QuestEX main
window is created. The steps involved in the first initialisation stage are:
1. Initialise the printer module.
2. Load the questionnaire file.
3. Create the main QuestEX Window.

4.1 INITIALISATION 71
4. Set up any security options.
The QuestEX printer module must be initialised before the questionnaire is loaded.
This is because the printer selection and setup options are available from the load
questionnaire dialog box. So it is necessary to save the default printer state before the
questionnaire administrator chooses which questionnaire file to load.
The filename of the questionnaire can be presented to QuestEX in two different
ways. The first method is via the program line parameter. This can be accomplished
by either specifying the questionnaire filename after 'Questex.exe' in the Program Man
ager icon properties or by double clicking on a questionnaire file with the correct file
association setup. An attempt is made to load the questionnaire filename specified on
the command line into QuestEX.
The second method displays a modified GetOpenFileName common dialog box as
shown in figure 4.2. This dialog box allows the user to select a questionnaire file by
manipulating the file and directory list boxes. An 'Exit QuestEX' button provides a
method for quitting QuestEX at this stage. After selecting a questionnaire file, the
'OK' button starts the questionnaire. The 'Printer Setup' button displays the Print
Setup common dialog box. From this dialog box the user can select the desired output
printer, and the printer configuration can be changed via the 'Options' button in this
dialog box. Once the filename has been obtained, QuestEX attempts to open it. If this
questionnaire load fails because the file does not exist or the file is the wrong format this
method is repeated until a suitable file is found or the user presses the 'Exit QuestEX'
button.
1.qs2/i. 2.qs2 ·•• audit.qs2 evaluate.qs2 hcstaff.qs2 helthfit.qs2 multtest.qs2 . plc1J~gi? .... ·
Figure 4.2 The QuestEX open questionnaire file dialog box.
Once a questionnaire has been loaded, the main QuestEX window is created. This
is done by registering an application window class. The most important information
the application window class contains is a pointer to the main window procedure. From

72 CHAPTER 4 QUESTEX IMPLEMENTATION
the window class a maximised popup window is created. This produces a full screen
window without any decorations such as title bars, borders and system buttons. This
window serves as the main application window. The purpose of the main application
window is just to manage the remaining initialisation steps and to be a parent window
for the template window.
If the 'Safe Mode' questionnaire option has been enabled, task switching must be
disabled while QuestEX is running. To achieve this the main application window is
made 'System Modal'. When a window is system modal then only that window can
receive input messages from the keyboard or the mouse. All other programs running
in the system effectively are stopped from running. An example of a system modal
window is the 'Exit Window' dialog box which appears when closing Program Manager
in Windows 3.1. Optionally a virtual keyboard driver can be installed when Windows
starts. This keyboard driver operates at a system level and it used to intercept the
'Ctrl-Alt-Del' key combination. This driver is initialised when QuestEX starts and
disabled when QuestEX closes. Thus when in 'Safe Mode' QuestEX effectively takes
over the operating system until QuestEX is closed.
Once the main appiication has been created a window initialisation message is sent
to the main window procedure. The steps involved in the second initialisation stage
are:
1. Initialise the Inference Engine.
2. Initialise the Template Module.
3. Initialise the Log-file module.
Initialising the inference engine involves resetting the two global databases used
by the inference engine. The first database is the responses database which holds the
replies entered by the questionnaire respondent. The second database is used while
processing the reverse polish notation calculations.
The template module requires the most initialisation. A Windows class must be
created along with the template window based on this class. Again the most important
information in this template class is the pointer to the template windows procedure. ·-
The template window is a child window of the main application window. The resolution
of the screen display is obtained using the GetSysternMetrics system call. The size
of the template window is then set to this resolution is ensure a full screen display.
The four questionnaire buttons windows are then created as children of the template
window. These buttons are only created during initialisation as they can be easily
enabled and disabled and moved around once the questionnaire is running. The buttons
are also subclassed. This means a message hook is installed into each button's own
window procedure. Any messages that are sent to the buttons can be caught and

4.2 DATABASE MANAGEMENT 73
processed. This is discussed further in section 4.5. Finally the questionnaires File Info
object is stored globally in the template module. The Fileinfo object contains the
questionnaire options which apply directly to a number of template functions. For
example if the questionnaire has a password, this must be prompted for when exiting
the questionnaire from the questionnaire introduction screen.
The Log-file module is initialised by checking for the 'Enable Log File' option in
the questionnaire options. If the option is enabled, then a log file is created in the same
directory as the questionnaire file.
4.2 DATABASE MANAGEMENT
QuestEX has three main external data stores. These are: the questionnaire file, the
raw replies file and the summary file. In addition the temporary response database
forms an internal data store. Figure 4.3 is a data-flow diagram which shows these data
stores and the data flows between them.
/ ~'
IS ' ( ummary L Summary
Summary Descriptions
:'f'\ Manager ,' ~ Output
~~, ~
~'
Q · • F'l ----~11o,111o,1t' Inference ) uest10nna1re 1 e ;-1
Questionnaire \ Engine ,--.,: , Description '~ ~~Responses\',
,~,"' I ~... "' / ., 1 Response database
Tern~!~~ r., Descnptwns ,, ( Template
"'( Manager
/~~ Answe~~,/ ~~estions
User Interface
Input
I User Interface
Output
--------Summary File
~ Raw Replies File
Figure 4.3 Top level Data Flow Diagram for QuestEX.
The Questionnaire file is a Prolog external database which contains three main
sources of information: the questionnaire description, the template descriptions and
the summary descriptions. A Prolog external database is a binary representation of
Prolog domain objects. Objects of the same type are stored in chains and there can be
as many chains as required . There are separate chains for the questionnaire description,
goal objects, question objects, template objects and summary objects. Each chain is

74 CHAPTER 4 QUESTEX IMPLEMENTATION
a serial list of objects, but this list can be indexed by a binary tree created in parallel
with each chain. The binary tree is searched using an ASCII search string as a key. The
goal, question, template and summary are all indexed by a numeric identifier which is
converted into a two character text string. This key string is used as the binary tree
search index.
The domain declarations for the goal and question objects are:
goalobj = g(goalid,goaltype,condgoalid,subgoallist)
questionobj = q(goalid,goaltype,textlist,responselist,mmlist,templateid)
Each goal in a questionnaire has both goalobj and questionobj entries. The
goalid and goal type fields are repeated in both objects; this provides all the necessary
information about a goal in different parts of the system. For example, goalobj is
mainly used in QuestEX's inference engine and in QuestED's tree scanning routines.
questionobj is mainly used in QuestEX's template manager and in QuestED question
panel editor. The fields in these objects are:
• goalid - a unique integer identifier used to idei1tify i11<livi<lual goals.
• goaltype - indicates the type of each goal. See table 4.1 for a list of goal type
indentifiers.
• condgoalid - the goalid of the goal object's condition goal.
• subgoalist - a list of goalid identifiers for the goal object's sub goals.
• textlist - a list containing textlist items. These items typically contain textual
question information or goal options
• responselist - a list containing response items. These are typically the pre
defined list responses for list type questions or reverse polish notation expression
for calculation goals.
• mmlist - a list containing multimedia items. These define the multimedia events
for the goal.
• templateid - an integer identifier of the goal's template object.
The template object and summary object domain declarations are:
templateobj = t(templateid, NameStr, goaltype, Modelnt, ErrorStr, objectlist)
summaryobj = s(summaryid,string,integer,sumprint,sumfile,sumentrylist)
Both of theses objects are discussed further in sections 4.5.1 and 4.6.1 respectively.
The final object stored in the questionnaire file database is the file information object, it is declared as:

4.2 DATABASE MANAGEMENT 75
Table 4.1 Goal type indentifiers (cf. goal type)
Goaltype Description Goaltype Description gt_notype Goal has no type gt_group Group goal
gt_calc Calculation goal gt_condcalc Condition goal gt_textentry Text Entry goal gt_numentry Numeric Entry goal
gt_singlesimple Single Select goal gt...multisimple Multiple Select goal gt_info Information goal
fileobj = i(goallist,templatelist,summarylist,textlist)
This object is stores information about all the other object types in the question
naire. The goallist, templatelist and summarylist each contain the a list of the
all the object identifiers in the associated object chains. By recursing through each
list, the object identifiers can be converted into the ASCII binary tree search index.
This index references directly into the object chain obtaining the object in the most
efficient manner. The final textlist list is used as a container for all the questionnaire
options. Each option is stored as a option(optionid, value) field, where the optionid
indicates the particular option. See appendix A for the full textlist declaration.
Table 4.2 shows the possible values the optionid field.
Table 4.2 Questionnaire options identifiers.
Goaltype Description qopt_passwordenabled Indicates if the questionnaire has an exit password.
qopt_passwordtext The password text string. qopt_logfile Indicates if a log file is to be generated. qopt_security Indicates the level of the questionnaire security.
The external questionnaire database file is opened and copied in its entirety into memory. Once in memory it behaves in exactly the same manner as if it was still a disk file. However the advantage here is speed and as the size of a typical questionnaire is less than 100 kilobytes there is no problem with memory consumption. The memory database is used in a read-only fashion as presenting the questionnaire makes no changes to the questionnaire structure. When the questionnaire objects are required by various parts of QuestEX a series of interface functions retrieve the information. These functions are:
DBX_GetGoalEntry(Goalid,Goalobj)
DBX_GetQuestionEntry(Goalid,Questionobj)
DBX_GetTemplateEntry(Templateid,Templobj)
DBX_GetSummaryEntry(Summaryid,Summaryobj)
The identifier for the required object is converted into the ASCII binary tree search
index. This index references directly into the object chain and obtains the object in
the most efficient manner.

76 CHAPTER 4 QUESTEX IMPLEMENTATION
4.3 INFERENCE ENGINE
The questionnaire inference engine is implemented in Prolog using a pair of recursive
predicates. The reasons for this are:
1. A hierarchy tree is a recursive structure. For instance, each node in the tree can
be treated as a parent to a number of child nodes.
2. The Prolog list type is best processed recursively. The Open and Closed lists
introduced in section 3.4.1 are best implemented using Prolog lists.
Figure 4.4 shows the basic predicate implementation for such a recursive approach.
For clarity unnecessary code has been removed.
Figure 4.4 The basic implementation of the questionnaire inference engine.
ENG...Engine([J ,J :- ! . % ENG...Engine(0penList,CloseList)
ENG...Engine([CurrentJ0pen] ,Closed) DBX_GetGoalEntry(Current,Goalinfo), ENG-8ubEngine(0pen,Goalinfo), !, ENG...Engine(0pen,[CurrentlClosed]).
The first predicate is the recursion catch clause. This predicate succeeds when
the Open list is empty and there are no more goals to process. As ENG.Engine is tail
recursive the succeeding catch clause causes each clause in the recursion to succeed and
so the predicate succeeds.
This is a very simple recursive predicate, the power and flexibility of the inference
engine comes from a number of extra clauses and the ENG_SubEngine predicate. Cur
rently the Closed list is not used. Figure 4.5 shows an slightly extended version which
guards against processing the same goal twice. If a reply for Current goal already
exists, then there is no need to ask the question for that goal again. This in effect
performs a reference to the first instance of the Current goal in the questionnaire. The
parent goal of the second instance of the Current goal can make direct use of this goal's
reply as it already exists.
4.3.1 The ENG_SubEngine Predicate
The ENG _SubEngine predicate is essentially a large case structure with an entry for
each different goaltype. In general for each goal type there are four sub-cases. These
four cases arise from the Condi tionGoal and SubGoal List fields of the Goallnfo
variable pass to the ENG_SubEngine predicate. Each case relies on whether the Goal
in question has a Condition goal or not, and whether the goal has sub goals or not.
For each of the four cases, each goal type is generally handled in the same manner. A
general description of each of the four cases follow.

4.3 INFERENCE ENGINE 77
Figure 4.5 The method the inference engine uses to deal with goal references
ENG....Engine([J ,_) :- ! . % ENG....Engine(OpenList,CloseList)
ENG....Engine([CurrentlOpen] ,Closed) reply(Current,b_true,_), !, % succeeds if a reply already exists. ENG....Engine(Open, [CurrentlClosed]).
ENG....Engine([CurrentlOpen] ,Closed) :DBX_GetGoalEntry(Current,Goalinfo), ENG-8ubEngine(Open,Goalinfo), ! , ENG....Engine(Open, [CurrentlClosed]).
Case 1 - No Condition, No Children
This case occurs for non conditional question goals, as question goals have no child
goals. This case has little meaning for condition and calculation goals as they require
child goals to provide information for evaluating their expression. Info and Group goals
can use this case, but a Group goal without child effectively performs the exact same
function of a Info goal. The procedure for this case is generally:
1. Get the goal's question object.
2. Get the goal's template object.
3. Queue any sequenced music (see case 2).
4. Prepare and display the template.
5. Kill any queued sequenced music.
6. Check how the template was terminated.
7. Save the appropriate response in the reply database.
Case 2 - No Condition, Has Children
This case occurs•-only for control goals, not question goals,. There is no general case
which for this case. Each control goal type has their own implementation. The Calcu
lation, Condition and Info goals follow the following pattern:
1. Call the ENG_Engine predicate for the SubGoalList. This recursively processes
all the children of the current goal. The children's replies are then be available
for the parent goal to use.
2. Get the goal's question object.

78 CHAPTER 4 QUESTEX IMPLEMENTATION
3. Execute the functionality specific to that goal type. For instance the info goal
combines its information text with any goal references it makes. The Calculation
and Condition goals evaluates their expressions.
4. Get the goal's template object.
5. Queue any sequenced music.
6. Prepare and display the template.
7. Kill any queued sequenced music.
8. Check how the template was terminated.
9. Save the appropriate response in the reply database.
It is important to note that as Calculation and Condition goals do not display a
user interface they do not do steps 4 to 8. The Group is similar but different enough
to merit its own sequence of tasks, these are:
l. Get the goal's question object.
2. Get the goal's template object.
3. Queue any sequenced music.
4. Prepare and display the template.
5. Call ENG_Engine predicate for the SubGoalList. This recursively processes all
the children of the current goal. The children's replies are then be available for
the parent goal to use.
6. Kill any queued sequenced music.
7. Check how the template was terminated.
8. Save the appropriate response in the reply database.
The Group goal does not have any 'functionality' in the sense of the other three
controls goals. The Info goal is the closest to the Group goal in functionality except in
the order of the tasks. The Info goal processes its children and then displays its user
interface. The Group on the other hand displays its user interface first and then pro
cesses its children. Another important different of the group goal is with the sequenced
music. The Group goal's music starts playing when it displays its template. The se
quenced music is not be killed until after the children goals have been processed. This
allows the group goal to manage a sequence of music for a whole section of child goals.
This is why the sequenced music is handled in the ENG--.SubEngine predicate when all

4.3 INFERENCE ENGINE 79
the other multimedia functions are handled when rendering the template. More con
trol is required over when the music is started and stopped, as music has typically a
longer duration than a sound bite or an animation. See section Figure 4.5.4 for more
discussion.
Case 3 - Has Condition, No Children
This case is similar to the first case except for the addition of the condition. The
condition is processed in the same manner as the child goals, by calling the ENG_Engine
predicate. When this predicate returns the result of the condition goal is available to
test. The procedure for this case is:
1. Call the ENG_Engine predicate for the Condition goal. This recursively processes
the condition goal and any child goals it may have.
2. Test the result of the condition goal. If it is false then a 'false' response for
this goal is saved in the reply database, and the procedure ends. Otherwise the
procedure contiues.
3. Get the goal's question object.
4. Get the goal's template object.
5. Queue any sequenced music (see case 2).
6. Prepare and display the template.
7. Kill any queued sequenced music.
8. Check how the template was terminated.
9. Save the appropriate 'true' response in the reply database.
Case 4 - Has Condition, has Children
Again this case is very similar to case 2, the only difference being the condition goal
processing. The procedure is only shown for the group goal:
1. Call the ENG_Engine predicate for the Condition goal. This recursively processes
the condition goal and any child of it.
2. Test the result of the condition goal. If it is false then a 'false' response for
this goal is saved in the reply database, and the procedure ends. Otherwise the
procedure contiues.
3. Get the goal's question object.

80 CHAPTER 4 QUESTEX IMPLEMENTATION
4. Get the goal's template object.
5. Queue any sequenced music.
6. Prepare and display the template.
7. Calls ENG_Engine predicate for the SubGoalList. This recursively processes all
the children of the current goal. The children's replies are then be available for
the parent goal to use.
8. Kill any queued sequenced music.
9. Check how the template was terminated.
10. Save the appropriate response in the reply database.
4.3.2 Back and Quit Functions
The Back and Quit functions have been provided to allow the questionnaire respondent
to have some control their questionnaire session. The Back function steps the question
naire back one question, thus allowing the respondent to re-enter a question. The Quit
function allows the respondent to exit the current questionnaire session. This returns
QuestEX back to the questionnaire introduction.
Both the Quit and Back functions are closely related in their operation. There are
three different states that the XULAskQuestion function can return after presenting
the question to the respondent. These states depend on which button was pressed by
the respondent. The states are:
1. Return State := qs_ok. This is returned if the respondent pressed the 'OK'
button. It indicates that the inference engine should proceed as normal. qs_ok
is defined as the integer 0.
2. Return State > qs_ok. This is returned if the respondent pressed the 'Back'
button. The actual value of Return State indicates which goal was being pro
cessed at the time.
3. Return State < qs_ok. This is returned if the respondent pressed the 'Quit'
button. The absolute value of Return State indicates which goal was being
processed at the time.
This Return State is passed back from ENG_SubEngine to ENG_Engine where is also
checked for. If the Return State is qs_ok then the questionnaire proceeds as normal.
Otherwise ENG_Engine immediately returns this state to its calling predicate. As the
whole inference engine is recursive this steps back out through the recursion until the
original ENG_Engine predicate call returns.
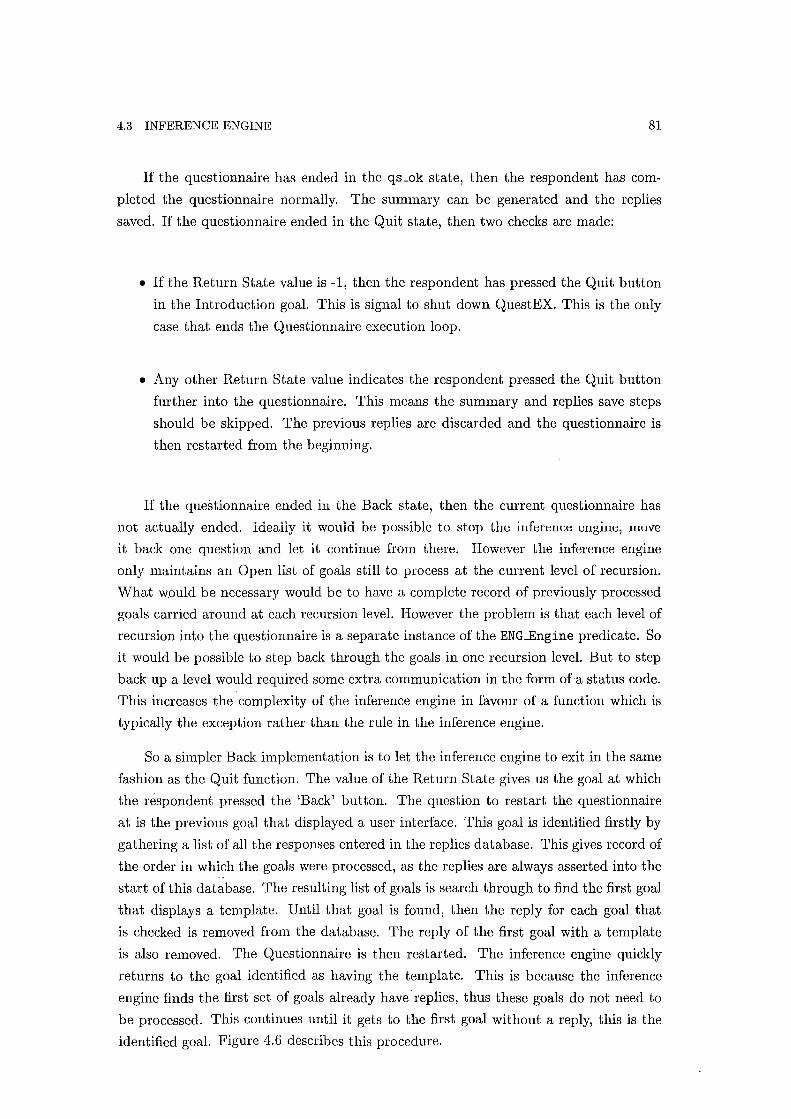
4.3 INFERENCE ENGINE 81
If the questionnaire has ended in the qs_ok state, then the respondent has com
pleted the questionnaire normally. The summary can be generated and the replies
saved. If the questionnaire ended in the Quit state, then two checks are made:
• If the Return State value is -1, then the respondent has pressed the Quit button
in the Introduction goal. This is signal to shut down QuestEX. This is the only
case that ends the Questionnaire execution loop.
• Any other Return State value indicates the respondent pressed the Quit button
further into the questionnaire. This means the summary and replies save steps
should be skipped. The previous replies are discarded and the questionnaire is
then restarted from the beginning.
If the questionnaire ended in the Back state, then the current questionnaire has
not actually ended. Ideally it would be possible to stop the inference engine, move
it back one question and let it continue from there. However the inference engine
only maintains an Open list of goals still to process at the current level of recursion.
What would be necessary would be to have a complete record of previously processed
goals carried around at each recursion level. However the problem is that each level of
recursion into the questionnaire is a separate instance of the ENG...Engine predicate. So
it would be possible to step back through the goals in one recursion level. But to step
back up a level would required some extra communication in the form ofa status code.
This increases the complexity of the inference engine in favour of a function which is
typically the exception rather than the rule in the inference engine.
So a simpler Back implementation is to let the inference engine to exit in the same
fashion as the Quit function. The value of the Return State gives us the goal at which
the respondent pressed the 'Back' button. The question to restart the questionnaire
at is the previous goal that displayed a user interface. This goal is identified firstly by
gathering a list of all the responses entered in the replies database. This gives record of
the order in which the goals were processed, as the replies are always asserted into the
start of this database. The resulting list of goals is search through to find the first goal
that displays a template. Until that goal is found, then the reply for each goal that
is checked is removed from the database. The reply of the first goal with a template
is also removed. The Questionnaire is then restarted. The inference engine quickly
returns to the goal identified as having the template. This is because the inference
engine finds the first set of goals already have replies, thus these goals do not need to
be processed. This continues until it gets to the first goal without a reply, this is the
identified goal. Figure 4.6 describes this procedure.

82 CHAPTER 4 QUESTEX IMPLEMENTATION
Start '-::
Clear Replies I+---Generate
~ Questionnaire Database Summary
I T ·+
Questionnaire Recursion Questionnaire 1oK • Save
Recursion Process Ends Ends Replies
t Back Quit
~ Ask Respondent State_ Exit
Question Quit = -1 , QuestEX
Backl ,r ' Set Return Set Return Retrieve List Save Aborted
State= back State= quit of Replies Replies
+ Remove replies between I Find last Goal Clear Replies
~ current goal and last I~ with a template Database goal with a template !
Figure 4.6 /1 flo,vchart description of the Dack and Quit functions ,vithin the inference engine.
4.4 CALCULATIONS AND CONDITIONS
The calculations in QuestEX are performed by evaluating reverse polish notation
(RPN) expressions. Each expression is stored within the goal's question object in
two forms. The first form is the text representation of the expression, stored within the
text list field of the question object. It is not used in the evaluation of the expression.
The second form is the reverse polish notation form, stored within the responselist
field of the question object. To utilise the responselist field the domain declaration
for the response type is:
response= r(stringlist,reallist,indexlist); ci(integer); cr(real);
cs(string); v(goalid,symbol); o(operator)
The r(stringlist,reallist,indexlist) item is only used for the list based
question responses, and is ignored in this context. The remaining objects in this dec
laration are used for the RPN expressions:
1. c i( integer). A constant index or integer value.
2. er (real). A constant variable or real value.
3. cs (string). A constant string item.

4.4 CALCULATIONS AND CONDITIONS 83
4. v (goalid, symbol). A goal reference. The goalid parameter denotes the goal
to reference and the symbol parameter indicates the type of the reference, either
an index, variable or string. The symbols used are "V", "I" and "S".
5. o (operator). An expression operator of some form.
The first four objects all obtain information from some source to be used in the
expression. The source for the first three objects is the actual object, as the information
is encoded as part for the object. The fourth object obtains information by referencing
the result of another goal. The final object is used to perform mathematical operations.
The calculation responselist is processed in a recursive loop. A internal database
calc (response) is used as a push down stack while the calculation is being evaluated.
Each embedded constant from the first three constant calculation objects above is
inserted into a response object and pushed onto the top of the calculation stack. For
example, a ci (23) object would be pushed onto the stack as r ( [] , [] , [23]) and
cs("Hello") as as r(["Hello"], [], []). For the goal reference object v(goalid,
symbol) the questionnaire reply for that particular goal is retrieved. This reply is
guaranteed to be available as the child goals of calculation are processed before the
expression is evaluated. The referenced reply is then inserted into a response and
pushed onto the calculation stack in the same way as the constant objects.
The expression operator o (operator) is handled differently as it provides the main
functionality of the calculation module. The operator domain is defined as:
operator= one_ary(symbol); two_ary(symbol); func(symbol)
The two_ary (symbol) operator is used for operations that take two arguments.
The func (symbol) is used for function operators. Currently there are no operators
defined for the one_ary(symbol) operator as there are very few of these operators. One
notable example here is the unary minus; currently the QuestED calculation parser is
unable to differentiate between the binary and the unary minus so the unary minus
operator has not been implemented. The symbol that both these operators contain
is a string token which denotes the particular operation. Table 4.3 shows these text
strings.
Table 4. 3 The Calculation Operators
Functions I Two-ary Operators
SIN EXP ABS + AND --
cos LN SQRT - OR > TAN LOG 10 TRUNC * XOR <
ATAN ROUND I <> RANDOM MOD >=
DIV <=

84 CHAPTER 4 QUESTEX IMPLEMENTATION
At the RPN level there is no real difference between the func (symbol) and
one_ary(symbol) operators. Currently they both pop a single response value off the
stack, perform the operation and return the new value to the top of the stack. The
only real difference is in the syntax of the expression, for example, "sin(5)" differs from
"2 - -3" where the second minus is the unary minus.
The relational and Boolean operators work on the index field of a response item.
The response r ( [] , [] , [0]) is defined as boolean false and r ( [] , [] , [A]), where A
-=I= 0 is boolean true.
The arguments for the operator types are 'popped' off the calculation stack as
required. After the operation has been completed, the resulting output response is
pushed back onto the calculation stack. Function operators can take a list of variable
(real) arguments and produce a list of variable output. This means that it can process
the variable list response from a multi-select question in a batch form. The argument
list is processed recursively and the output list is built up when coming out of the
recursion. Each function symbol token is matched to a Prolog function pointer. This
function pointer is then called to evaluate the desired function. The particular functions
used wP.re chosen from the standard Prolog mathematical functions. Each function is
evaluated inside a 'trap' predicate. This catches any arithmetic overflow or division by
zero exceptions. If an exception occurs then the function returns an empty response
r ( [] , [] , [] ) . This empty response is caught at a higher level and the result of the
entire calculation goal is an empty response with a false state.
The Two-ary operators are more complex. Whereas the function operators worked
with variable arguments, the two-ary operators work with all three argument types.
Also it is possible to mix types within an operation. For example it is permissible to add
a index argument to a variable argument to produce a variable output. However it is not
permissible to subtract a string argument from a variable argument. Table 4.4 shows
the currently possible conversions between argument types for two-ary operations.
Table 4.4 The type conversions for Two-ary operations
I Argument A I Argument B I Output Type I Index Index Index String String String
Variable Variable Variable Variable Index Variable
Index Variable Variable
The steps then required to evaluate a two-ary operations are:
1. Decode input argument list.
2. Perform type conversions if necessary.
3. Count number of items in each list.

4.4 CALCULATIONS AND CONDITIONS 85
4. Check argument list lengths.
5. Evaluate operation on the argument lists.
It necessary to determine the lengths of each list as there are four possibilities when
performing the operations. An analogy is vector and scalar addition. For example the
four possibilities for addition are:
1. Scalar addition, one item per list. [A] + [B] = [C].
2. Vector addition, equal number of items per list. [Al,A2] + [Bl,B2] = [Cl,C2].
Where Cl = Al + Bl and C2 = A2 + B2.
3. Vector offset addition, one list has one item. [Al,A2,A3] + [Bl] = [Cl,C2,C3].
Where Cl= Al+ Bl, C2 = A2 +Bland C3 = A3 + Bl.
4. Illegal operation. Lists do not contain the same number of items. [Al,A2] +
[Bl,B2,B3] = ?.
The argument lists are processed recursively in a manner suiting the lengths of the
lists. Each two-ary token is matched to a Prolog function pointer in the same way as
the function tokens. This function pointer is then used to evaluate the desired function.
Again the particular functions used were chosen from the standard Prolog mathematical
operators. Each operation is responsible for checking possible error conditions which
may occur. For example, the integer division operator for strings returns an error. The
whole list recursion routine is evaluated inside a 'trap' predicate. This catches any
unexpected arithmetic exceptions. If an error or exceptions occur then the function
returns an empty response r ( [] , [] , [] ) . This empty response is caught at a higher
level and the result of the entire calculation goal is an empty response with a false
state.
Once all the items in calculation responselist have been processed, the calcula
tion has ended. If the calculation was well formed as an expression, there should be one
remaining item on the calculation stack. This last item is the answer to calculation.
If the answer is an empty response item such as r ( [] , [] , [] ) then a calculation error
has occurred and the calculation goal's state is set to false by the inference engine.
Otherwise the answer calculation item is returned to the inference engine, which stores
it as the questionnaire response to the current calculation goal.
Conditions are handled in much the same way as calculations. The main difference
is that the condition responselist consists of three parts: the left hand side, the right
hand side and the relation. The relation appears last in the list because of the reverse
polish notation nature of the list. In QuestED the condition is entered as the three
separate parts mentioned earlier. However once parsed into RPN form the three parts
are concatenated into one condition list. The condition list is processed by passing it

86 CHAPTER 4 QUESTEX IMPLEMENTATION
to the same RPN evaluator is the calculation list. The difference this time being that
the last item in the calculation stack should be a index response. This is because a
relationship operator was the last operator to be proceeded. If the index response is
r ( [] , [] , [OJ) then the condition has evaluated false, otherwise the condition is true.
This result is passed back to the inference engine which stores it as the questionnaire
response for the current condition goal.
4.5 USER INTERFACE
The User Interface in QuestEX was designed with the following aims in mind:
1. It should provide a sufficient variety of question types for a wide range of possible
questionnaire types. The four question types implemented were Text entry, Nu
meric entry, Single selection list and Multiple selection list. The two information
types, Group and Info, provide the ability to give information feedback to the
respondent.
2. It should provide an author definable questionnaire interface for the respondents.
Allowing the author to customise a questionnaire's user interface can create a bet
ter rapport between the respondent and the questionnaire administrator ( Ques
tEX).
3. It requires Multimedia capabilities. Multimedia is becoming a major driving force
in the acceptance of personal computers as a consumer product. Multimedia is
seen as a contrast against the user-unfriendly nature of computers. It provides
features to which a consumer can easily identify with.
The concept of a screen template was created to implement these aims. A template
is a description of how a series of objects should appear on the screen. A number of
these template objects arc required for every template as they provide some basic
questionnaire operations. For example each template must contain an 'OK' button as
the respondent presses this button to indicate that they have finished answering the
question. The other template objects are purely for decoration. For each question
there could be any number of templates which could be used interchangeably without
effecting the questionnaire operation, only the question appearance.
In QuestEX, nearly all the user interface functions are provided by the Template
Manager. In the following sections the roles of templates and the Template Manger
are described.
4.5.1 Template Manager
The Inference Engine calls the Template Manager whenever the current goal requires
some interaction from the respondent. The Template Manager performs the following

4.5 USER INTERFACE 87
tasks:
1. Initialises the screen display for QuestEX.
2. Renders the template using the current goal information to a memory bitmap or
metafile.
3. Opens appropriate multimedia devices for sound, music and animation events.
4. Displays the rendered template and enters an internal message loop.
5. Retrieves the respondent's replies.
6. Closes multimedia devices and cleans up any allocated resources.
The screen display initialisation is only performed once when QuestEX is started.
The remaining four steps are handled by the XULAskQuestion predicate. The
XULAskQuestion predicate requires two input parameters, QstDbj and Templ•bj. The
QstObj object contains the question specific information for the current goal. The
Templ•bj object contains a complete description of the screen template. When the
template is ended by the questionnaire respondent, the XULAskQuestion predicate re
turns two variables, Answer and State. The Answer variable contains a responselist
structure which holds the respondent's reply. The State variable indicates how the
template was ended, either by pressing the 'OK' button, 'Back' button or the 'Quit'
button.
If the question has no template, as in the case of a hidden group goal, then the pred
icate returns immediately and the respondent sees nothing of the goal. Otherwise the
question and template objects are stored globally in an internal database. This so they
can be accessed when the private message loop is operating. The TMP YrepareWindow
sub-predicate then prepares and renders the template and TMP _ShowWindow displays
the template on the screen. The private message loop is then entered. At this stage,
the template has appeared on the screen and the respondent can interact with the
template items, allowing them to enter a reply. Once the respondent has signalled the
end of the template with one of the three buttons mentioned previously, the private
message loop ends. The respondent's reply is then retrieved from the template and
any resources associated with the template are freed. The XULAskQuestion predicate
then ends returning the answer and state for that goal.
Each template has a number of properties. These are defined by the domain:
templateobj = t(templateid, NameStr, goaltype, Modeint, ErrorStr, objectlist)
The template properties defined by the templateobj domain are:
• templateid - An unique integer identifier used to identify individual templates.

88 CHAPTER 4 QUESTEX IMPLEMENTATION
• NameStr - The text name of the template. It is defined by and is used to identify
the template to the questionnaire author.
• goaltype - Indicates what goal type this template can be used for. A goal can
only use a template which has the same goal type. The 'gt_' prefix denotes a
goal type constant.
• Modeint - The template display mode. This can be either 'metafile' or 'bitmap'.
The metafile mode is more efficient in terms of memory, however the time required
to draw the template on the screen increases with the complexity of the template.
The bitmap mode generates a complete screen bitmap in memory and always
takes a constant amount of time to draw on the screen. The size of the off-screen
bitmap increases with the screen resolution as does the time to draw the bitmap.
The bitmap mode must be used if the template contains graphic images. The
two modes are denoted by the tmp_bitmap and tmp...metafile constants.
• ErrorStr - This is the error message displayed to the respondent when a mistake
is made when entering a reply. For example when a respondent presses the 'OK'
button in a Single Select question with out selecting a response.
• obj ectlist - An ordered list of template objects. Each object represents a single
part of the template user interface. The first item in the list is the first item to
be drawn on the screen, therefore it is at the back of the template. The last item
in the list therefore is on the top of the template. The child windows controls,
buttons, listboxes and edit fields are by default on top of the template and so
appear last in the objectlist.
There are sixteen different types of template objects. They are all represented by the object domain:
object= obj(objid,objtype,rect,fnt,colour1,colour2,style,objextra)
objextra = text(string); select(colour); none
objectlist = object*
The object properties defined by the object domain are:
• obj id - A unique integer identifier to identify individual objects within a tem
plate.
• objtype - Indicates the type of the template object. The obj_ denotes a object
type constant. See table 4.5 for the full list of object types.
• rect - A standard rectangle structure which defines the size and location of the
template object. The rectangle structure is defined as,
rect = rct(Leftint,Topint,Rightint,Bottomint).

4.5 USER INTERFACE 89
• fnt - A font structure which defines the font name and font size of the font used
in the object. The font structure is defined as,
fnt = f(FontNameStr,FontSizeint).
• colour1 - This defines the primary colour of the object. The primary colour is
normally the colour of an object's text, or solid fill.
• colour2 - This defines the secondary colour of the object. The secondary colour
is not always used but it is normally the background colour of an object.
• style - The style parameter is used to define a series of styles for an object.
Currently only the text based objects use the style parameter to set text alignment
options.
• objextra - This parameter allows the inclusion of extra information relevant
only to particular goal types. Mostly this parameter is left as 'none' however the
miscellaneous text object and button objects use this field to store miscellaneous
text and the button la.hel. The list box object uses this field to store a third
colour value. This colour value defines the background colour of a selected list
item.
Table 4.5 gives a full breakdown of the different template object types and which
parameters are used in the object structure. The Mode column indicates whether the
object is drawn as a static graphic or created as a window. A window based object is
able to redraw itself dynamically and respondent to events in the system.
Table 4.5 The attributes of each template object type.
objtype rect fnt colour1 colour2 style objextra Mode o b j _backgnd - - BackGnd - - none Gfx
obj_questext Yes Yes Text - Yes none Gfx obj_helptext Yes Yes Text - Yes none Gfx obj_titletext Yes Yes Text - Yes none Gfx obj Jnisctext Yes Yes Text - Yes text(Misc) Gfx
obj_okbutt Yes Yes Text Face - text(Label) Win obj _backbutt Yes Yes Text Face - text(Label) Win obj_quitbutt Yes Yes Text Face - text (Label) Win obj _helpbutt Yes Yes Text Face - text(Label) Win obj_editbox Yes Yes Text BackGnd - none Win obj _list box Yes Yes Text BackGnd - select(Clr) Win
obj_line Yes - Line - - none Gfx obj_fillrect Yes - Fill Border - none Gfx obj _ellipse Yes - Fill Border - none Gfx obj_statrect Yes - - - - none Gfx obj_animrect Yes - - - - none Win

90 CHAPTER 4 QUESTEX IMPLEMENTATION
4.5.2 Template Initialisation
The template manager is initialised immediately after a questionnaire has been loaded.
At this stage nothing has been displayed on the screen. There are four tasks carried
out when the template manager is initialised:
1. The physical screen size in pixels is obtained from the system. This is then stored
for later reference. These sizes are most important as each template covers the
whole screen, and all objects within the template are scaled within these values.
This makes each template independent of the actual screen resolution.
2. A Window Class is created. Before creating a window to display the templates
on, a window class must first be registered. The windows class defines a number
of fundamental properties that every window based on that class possesses. The
most important of the properties is a function pointer to that class' window
procedure. The window procedure is a function that the operating system calls
whenever there is an event or message for that window.
3. A Template windo-w is created based on the window class that has just been
registered. The template window is created as a child of the application window.
As the application is currently hidden when the Template manager is initialised,
the template window does not yet appear on the screen.
4. A series of child windows of the template window are created. These are the
template buttons. The template buttons always occur in every template, although
they may not be visible. They are therefore created once when the template is
initialised. When a new template is rendered, the buttons are moved to the new
position defined in the template. This means the buttons are re-used in every
template, and are only destroyed when the QuestEX ends.
4.5.3 Template Rendering
To render the template a memory Device Context must be created. Windows uses a
device context to represent a physical device. This physical device may be the screen,
a printer, a bitmap or a metafile for example. Each device context contains a large
set of attributes -which describe the state or context of the device. Examples of these
attributes are the font, pen, brush, mapping mode, extents, drawing mode and so
on. QuestEX offers two template display modes: metafile and bitmap. These two
modes require the creation of different device contexts, namely the memory bitmap and
metafile device context. Once a device context has been created, it can be treated the
same regardless of which method was used to create it. Two steps remain in initialising
the device context, first an information context is created, and the coordinate system
must be setup in both the device context and the information context. An information

4.5 USER INTERFACE 91
context contains the same attributes as the device context, except that it can not
be written to, or drawn on. It is however useful for obtaining information such as
text widths which can not be obtained from a metafile context. The same settings
are maintained for both the device context and the information context to ensure
consistency between them.
The device context mapping mode is set to the anisotropic mapping mode. This
means the logical coordinate system for the device context is 'stretched' to fit the
physical coordinate system. The logical coordinate system is set to the constants
tmp...xsize,tmp_ysize. These constants are defined as 640 and 480 respectively, this
is the size of the lowest screen resolution Windows supports. The physical coordinate
system is set to Cx and Cy. These being in the current screen resolution. So, irrespective
of the current screen resolution, the logical coordinate system is defined by the constants
tmp...xsize, tmp_ysize. The position and size of all the template objects lie within these
two constants.
To render the template objects into the device context, the object list from the
templateobj is recursively processed an object at a time. The TMP_DrawObject predi
cate is called for each object. This predicate contains a clause for each of the template
object types. The simplest clause is the obj_backgnd clause, it draws the template
background. As indicated by Table 4.5 the colour1 field of the template object con
tains the background colour value BackGnd. To draw the background solid brush is
created using the BackGnd variable. The Windows FillRect function then paints a
rectangle the size of the screen and using the coloured brush.
The obj _ellipse clause which draws an ellipse on the template is slightly more
complex. Both the colour1 and colour2 fields of the template object are meaningful
this time. colour1 represents the fill colour of the ellipse and colour2 represents the
outline colour of the ellipse. The logical size of the ellipse is contained in the Rect
field of the template object. Brush and pen objects are created using colour1 and
colour2. When the new brush and pen objects are selected into the device context,
the old object handles are saved. The Windows Ellispe function then draws the ellipse
into the device context using the logical size variable Rect. Finally the old brush and
pen objects are selected back into the device context and the newer objects are freed
from memory.
All the simple graphical objects do much the same thing as the ellipse clause. The
window based objects however are different. The position of a child window relative
to its parent window is given in physical coordinates, not logical coordinates. The
information context created earlier is used to transform the logical coordinates back to
physical coordinates. The object can then be accurately positioned within the template.
The back, quit and help buttons are optional for each goal. The options for these
buttons is stored in the goal's question object textlist field. Regardless of the state

92 CHAPTER 4 QUESTEX IMPLEMENTATION
of the option, the position of the button is calculated, and a font object based on the
object's fnt field is created. Most of the object information is then stored in a global
database. The Window based buttons are all 'owner draw', meaning that QuestEX is
responsible for drawing the button, not Windows. Consequently the object information
must be accessible during the message loop as the owner draw events occur as Windows
messages. A global database is the only suitable method available in Prolog for storing
global information. Each button window is then moved to its new physical position
and the TMP _ShowWindow predicate shows or hides the it depending on the value of the
option variable.
The two response objects, the edit field and the listbox, are created anew for each
template. This is because it is not possible to change the operation of these controls
once created. For example, it is not possible to change a list box from single selection
mode to extended selection mode once created. If one of these objects has been created,
then it is destroyed when each template's resources are freed. Compare this to the four
button objects which are only created once and are re-used in all the templates.
Once the template has been completely rendered, the memory device context is
closed giving either a bitmap or a metafile handle. This handle refers to a Graphics
Device Interface (GDI) object. This GDI object contains the memory representation of
the template. The object handle stored in a global internal database until it is required
when drawing the template on the screen.
The help text object is handled differently from all the other template objects.
This is because the help text object effectively defines a dynamic place holder while all
the other non window based template objects are static, meaning that all they do not
change once that template has been rendered. However the contents of the help text
object can change depending on the actions of the respondent. The following messages
can appear in the help text object:
1. The help text string defined in for a particular goal. This stored in a goal's ques
tion object textlist field. This message would be used to give help information
relevant to the current question.
2. The template error message. This message provides some help on the usage of
the template. It is stored in the template's ErrorStr field. For example, pressing
the 'OK' button in a numeric entry question without entering an answer.
3. The less than minimum error message (numeric entry only). This message is
displayed when the respondent enters a number less than the defined minimum
for the question. This consists of the template error string ErrorStr plus "The
number must be greater than%." where the% symbol contains the defined mim
imum.

4.5 USER INTERFACE 93
4. The greater than maximum error message (numeric entry only). As for the pre
vious message but with the defined maximum.
Each of these messages are created in their own mini template metafile which has
the same coordinate system as the main template. The metafile handles for these
templates are stored in an internal database. A message can be displayed by play
ing the desired metafile after the main template has been drawn on the screen. The
TMP _ShowHelp predicate sets the current help message and forces a screen redraw which
redraws then main template and then the current help message. See section 4.5.5 for
further information. When the template resources are freed, all the help message
metafiles are freed as well. See Figure 4. 7 for an example of a template .
.. i~\s .. ;~~~f)fi~. · fJ~t~edonto 'aO
·. yotjrfamily~.·. •'.
... , :'.t:!ml9·S1HiEJifr•1~tiri~•·t··•· .. lqu~;tionn~ir~·andbt1;JJt~mnatic,l\.on·if WiU.·b~r· ·. ·~· ers~;inclodfng parerttspr othefcrnembers gf :
i tWt;itris{cifthfi<. •i '\Pijhairi~i~}o :->'i . ' <'.· \ >'1) detect an~t.pr:§b,tems)hat Yo!lmay haye:and wish to disci,l~s •· , • , furthen eil67r1t~Jhe•dp~9r or .n.ur~~· . . > .. ·· .. , . /i :
·.·.J~j'improveth~•'oiltethalyoyfd~9tor,~n~;r(!!'lr!3e .can.give• YOH)'f~: . . andybll :eople'.gen~fally, >' . .... . · ·r,t .
Figure 4. 7 An example of a Introduction goal group template
4.5.4 Queuing Multimedia Events ,-
There are four different types of Multimedia events. These are sequenced MIDI musi'c,
digital WAVE audio, AVI video animations and static graphic images. The first three
types are provided by the Windows Media Control Interface (MCI) services. The MCI
services allow installable multimedia drivers to be added to windows. The interface
to each multimedia driver is defined by the MCI services which provides a simple and
consistent interface to a wide variety of drivers. The MCI services defines both a high
level and a low level command interface. The low level command interface allows direct
manipulation of WAVE and MIDI files. The high level interface provides a simple set

94 CHAPTER 4 QUESTEX IMPLEMENTATION
of commands for opening, playing and closing multimedia files. The mciSendString
function provides a simple and convenient method for sending MCI commands. As
a parameter it takes a string containing the command and any associated argument.
The MCI interprets this string and executes the command. A return code indicates
the success of the command. If the command was not successful, then calling the
mciGetErrorString returns a text error message indicating the problem. This text
error message is written to the questionnaire log file.
To play an MCI multimedia file, the following steps are taken:
1. Open the file for the appropriate device. The command string to do this is created
using the prolog string format predicate:
format (MCIStr, "open % type wave audio alias sound " , SoundFile).
The SoundFile string variable contains the filename to open. 'type waveaudio'
indicates the MCI device to open, and 'alias sound' gives the waveaudio device
an alias which is used to refer to the device later. Each device is opened while
the template is being rendered.
2. Play each device. This starts the device playing. At this stage the template is in
the process of being displayed on the screen. The command string for this is:
mciSendString("play sound notify", 1111, 0, TmpWnd)
This plays the device with the alias sound. 'notify' indicates that when the
device has finished playing the file, a notification should be sent to the template
window denoted by TmpWnd.
3. When a notification message is sent to the window TmpWnd a check is made to
determine which device sent the message. Once the device is known, a check is
made to see whether this device should then repeat or loop the file. The Loop
option is originally stored in the flag list field of the multimedia item structure.
The multimedia item structure is stored in the MMList field of the questionnaire
object. The Loop option is stored in a temporary database until the notification
message is received. If the Loop option is set then, the following command strings
are sent:
mciSendString(''seek sound to start", 1111, 0, 0),
mciSendString("play sound notify", 1111, 0, TmpWnd)
The first command returns the device to the start of the file, and the second plays
the device again. The looping for the sequenced music is more complicated, see
below for more details.
4. Finally when the templa,te 0
is finished, the devices must be closed. The is done
with:

4.5 USER INTERFACE
mciSendString("close sound", "", 0, 0),
This simply closes the device called sound.
95
The loop notification for the sequenced music device is more complex as it deals
with a playlist of files. When a goal sets up a music play list, it initialises a special
temporary database:
music(MusicGoalType,Goalid,Deviceid,PlayList,ToPlayList,MusicRandom)
The most important fields in this database are the final three. The PlayList con
tains the complete list of tracks in the current play list. The ToPlayList initially starts
out the same as PlayList; however as each new track is played, the track is removed
from the ToPlayList. When the ToPlayList is finally empty, it is re-initialised with
the PlayList. The MusicRandom flag indicates whether the next track to play should
be the first in the ToPlayList, or a random choice.
The graphic images are handled differently to the three other Multimedia events.
The MCI interface provides no support for graphic images. The Windows Graphics
Device Interface (GDI) does however provide a set of low level functions for manipu
lating bitmap graphics and graphic primatives. There are two main types of images
commonly used in Windows, bitmap images and metafile images. Bitmap images are
normally stored in a file as device independent bitmaps (DIB). These DIB images con
tain a colour palette and a bitmap of palette indices. Once a DIB is loaded, it is then
converted into a device dependent bitmap and can be displayed on screen.
Metafile images consist of a list of graphic primitives which are stored in a binary
form. There are a number of simple Windows functions to create, open and play
metafile images. However basic metafile images contain no information about the
actual size of the image, in image coordinates. So while it is easy to scale a metafile
image, it is difficult to accurately control the scaling. Placeable metafiles include a
small header block which contains size information, however it is not compatible with
the ·windows functions to manipulate metafiles. This can be handled by stripping off
the header, but this is difficult in Prolog.
As Prolog is not as suitable for handling these image types, a C or C++ library
would be required. A suitable library was found in Borland c++ 4 Developer's Guide
by Nabajyoti Barkakati (Barkakati, 1994). It provides facilities for loading Windows
Bitmap (BMP), Zsoft's PC PaintBrush (PCX), Targa (TGA), Tagged Image File For
mat (TIFF) and Graphics Interchange Format (GIF) images. The library makes use of
the Borland Application Framework library called ObjectWindows Library or OWL.
While convenient, the OWL library increased the size of the final dynamic link library.
So all the OWL code was replaced with standard Window API calls. This resulted in
a saving of around lO0Kbytes for the dynamic link library.
An important requirement of the image library is the speed of image decoding.
While rendering a template it is important that the respondent doesn't have to wait

96 CHAPTER 4 QUESTEX IMPLEMENTATION
more than a second. This rules out those image formats that use compression schemes,
i.e. TIFF and GIF. Another restriction is the quality of the support for the image
format. The Targa file format is capable of storing 24bit graphic images, however the
image library only supported 8bit images.
The BMP format implemented 2,4 and 8 bit mode and the PCX implemented a
24bit mode. This gave sufficient coverage of the common colour depths. However the
image library did not support the Windows metafile format (WMF). Due the object
orientated approach to the image library it was possible to define the sub-image source
code for loading and displaying both standard metafile images and placeable metafile
images.
To further improve the performance of the image library, an image cache was
devised. The image manager allows the up to 15 images be loaded at one time. Given
the filename of an image, the image manager identifies the format of the image and
loads it accordingly. If the image is already in the cache, then the load function returns
immediately. Once loaded the image is converted to DDB and stored in the cache.
When the image is displayed, the DDB from the cache is displayed onto a supplied
device context. The exception here is for metafile:; which are not converted to a DDB
and are consequently drawn using the standard Windows function PlayMetafile. The
image cache is normally cleared after each template.
4.5.5 Display Template
Displaying the template once it has been rendered and the multimedia objects have
been queued is simple. This task consists of two steps:
1. Play any queued multimedia events. This maybe either a movie or a sound clip.
2. Invalidate the template window. Making any window or region of the screen
invalid forces Window to update that area as soon as possible. Thus the template
is redrawn.
Immediately after the template window has been updated, QuestEX enters a pri
vate own message loop. In a normal Windows application, the application message
loop would be used to receive and dispatch window messages. Although QuestEX has
a standard application message loop it is better to use a private message loop while
a question is being asked. In this way only those messages that are directly relevant
to QuestEX need be processed. Also it is possible to start the private message loop
and then end it when the respondent has entered a reply. It is not possible to end the
application message loop without ending the application.
There are a number of important messages that are processed while the private
message loop is active These messages are trapped within the template window proce
dure:

4.5 USER INTERFACE 97
• wn1-paint. This message indicates that the template window should draw itself.
This message occurs when the template window has been invalidated, for example
when the template is first displayed. In response to this message, the template
object handle stored within a global internal database is retrieved. This object
handle is then used to transfer the template from memory to the screen. The
current help message as set by the TMP _ShowHelp predicate is retrieved and the
associated help message metafile is played on to the screen.
• wm_ctlcolor. This message is processed to change the colour of any text edit
fields or list box field with in the template. All colour attributes of the control
can be changed, for instance the text colour and background colour of a edit
field. The background colour of a list box can be changed, however the owner
draw message is responsible for drawing the text of each list box item.
• wm...keydown. This message is handled to provide a keyboard interface for the four
templates button. The 'B', 'Q', 'H' and enter keys generate events for the Back,
Quit, Help and OK buttons respectively.
• wm_syskeydown. The message is 'eaten' to stop any system key events from
occurring. For instance it blocks the 'Alt-F4' key press which would normally
close the application.
• wm_command. The template message receives a wm_command when one of the four
templates button are pressed.
• wm_drawi tern. This message indicates that one of the template window's child
controls needs to be redrawn. The four buttons and the list box controls all have
the 'owner draw' attribute set to allow different fonts and colour to be used within
them. The information required to draw a button or a list box item is stored in
a global internal database when the item was rendered.
• mm_mcinotify. This message is received when a multimedia device has finished
playing. See 4.5.4 for more details.
• wm_timer. The timer message is used for the popup help message. A question
help message can be displayed after a set period of time.
4.5.6 Closing the Template
There are three different methods for ending the template, each method is associated
with three template buttons: 'OK', 'Back' and 'Quit'. Each method makes use of
an internal database answer (response, State) for storing the result of the template.
The answer database contains a response item for holding the respondent's entry for
the current question. The goalid item holds the return state of the template. This

98 CHAPTER 4 QUESTEX IMPLEMENTATION
is defined to be Return State = qs_ok = 0 if the respondent ended the template by
pressing 'OK', Return State > qs_ok = current goal id if the 'Back' button was
pressed and Return State < qs_ok = - current goal id if the 'Quit' button was
pressed.
The 'Back' method for ending the template is the simplest. The answer database
is set as answer (r ( [] , [] , []) , Goal id). The private message is terminated by posting
the wm_endtemplate message into the private message loop queue. This is a window
message defined by QuestEX for its own use. It is the only message that stops the
private message loop. Once the message loop has ended, control returns to the last
sub-predicate in the XULAskQuestion predicate. This is the TMP _ClearWindow sub
predicate, it's task is to clean up the resources used in the template process. This
involves:
1. Closing and freeing any multimedia devices and files.
2. Freeing font and brush resources used for the owner draw controls.
3. Freeing the metafile help messages resources.
4. Finally freeing the memory template bitmap or metafile resource.
The responselist Answer and the State variables stored in the answer database
are retracted and 'returned as output arguments in the XULAskQuestion predicate.
The 'Quit' method for ending the template contains two separate cases, which are:
1. The current goalid is 1. This means the respondent has pressed the 'Quit' whist
in the questionnaire introduction goal. The questionnaire password option is
stored in the questionnaire options. This is obtained, from which there are two
further cases:
• If the questionnaire password option is enabled, then the password is ex
tracted from the questionnaire options and the Password Exit dialog box
is displayed. See Figure 4.8. The password must be typed correctly before
pressing the 'OK' button. The password check is not case sensitive. If the
password is incorrect or the respondent pressed 'Cancel' then control returns
to the current template.
• If the password is disabled, then a simple Yes/No dialog box prompts the
respondent for confirmation for exiting QuestEX. If the respondent choose
'No' then control returns to the current template.
2. Otherwise the respondent has pressed the 'Quit' from some other goal. A simple
Yes/No dialog box prompts the respondent for confirmation for ending the current
questionnaire session. If the respondent chose 'No' then control returns to the
current template.

4.6 QUESTIONNAIRE SUMMARIES 99
Figure 4.8 The exit password dialog box is QuestEX.
In both cases if the respondent chooses to quit then the answer database is set as
answer (r ( [] , [] , [] ) , -Goal id). The private message loop is terminated by posting
the wm_endtemplate message into the application message queue. The template clean
up proceeds is the same fashion as for the 'Back' case.
The 'OK' method for ending the template involves retrieving the respondent's
answer from the template reply fields. Each of the different question types has it's own
method for obtaining this information and checking its validity. For a numeric entry
question, the reply is first converted to a number and then checked to see if it lies
between the optionally specified minimum and maximum values for the question. If
any of these tests fail then the appropriate help message is displayed to the respondent
and the template is not terminated. Likewise for a text entry question a help message
is displayed if the respondent does not enter a reply and the same occurs for a single
select question if an item is not selected. If the reply is valid then it is stored with the
answer database and the private message loop is ended.
4.6 QUESTIONNAIRE SUMMARIES
A questionnaire summary is a text based form which contains a formatted text report
of a questionnaire session. A questionnaire session is a single run through of a question
naire by a respondent. For each questionnaire any number of summaries maybe defined.
The actual context of each summary is defined by the questionnaire author. A 'tracker'
file keeps track of the individual questionnaire sessions. The summary generation for
a questionnaire session revolves around the following sequence of tasks:
1. Obtaining the list of Summaries to generate.
2. Retrieving the session number from the tracker file and calculating the next ses
sion number.
3. Processing each summary.
4. Saving the new session list to the tracker file.
The list of summaries is obtained from the questionnaire file info structure which
the Database manager maintains. This structure contains a list of all the summaries

100 CHAPTER 4 QUESTEX IMPLEMENTATION
defined for the questionnaire. The tracker file is maintained by the summary generator
to distinguish between individual questionnaire sessions. The tracker file is identified
by having the same filename as the questionnaire file, but having the filename extension
'trk'. The contents of the file is a string representation of an integer list. The list is
ordered with the most recent session first. For example, after five questionnaire sessions
the file would contain the string, "[5,4,3,2,1]". This format was chosen as it is simple
to convert between Prolog terms and strings read from files. The new session number
for the current session is calculated by incrementing the greatest session number. It is
then appended to the session list and saved back to the tracker file.
4.6.1 Summary Processing
Each individual summary is stored in the following structure:
summaryobj = s(summaryid, Name, Style, sumprint, sumfile, sumentrylist)
The most important fields in the swTunaryobj object are the fii1al tl1ree. Tl1e
sumentrylist field is a list of the individual summary entries. There is a summary
entry for each questionnaire goal. The sumprint and sumfile objects contain the
output characteristics for the summary object. The following set of tasks are followed
for each summary:
1. Obtain the Summary object from the Database manager.
2. Both the sumfile and sumprint structures contain a boolean Enabled option. This option indicates whether the summary is saved to a file or printed. Both the options for these structures are checked, if they are both False, then this summary is not saved or displayed in any form. Therefore the summary processing for this summary is aborted and the next summary is then processed.
sumprint = sp(Enabled, Stretch, FontName, FontSize)
sumfile = sf(Enabled, Directory, Filename)
3. Otherwise the summary is created with the summary output saved in a temporary
file. See section 4.6.2 for further details on the summary generation. The tem
porary filename is obtained using the Windows API function GetTempFileName.
This ensures a unique filename in a designated temporary directory.
4. A test is made on the size of the temporary file. If it is empty then the remainder
of the processing for this summary object is aborted and the next summary is then
processed. This situation may happen if a file error occurs during the summary
creation for example.

4.6 QUESTIONNAIRE SUMMARIES 101
5. The information in the sumfile object is then used to write the summary out
to a file. If however the Enabled field is false, then this operation is skipped.
Otherwise a filename is constructed from the Directory and Filename fields and
the questionnaire session number. The Directory term refers to a subdirectory
of the questionnaire directory, that is the directory of the main questionaire file.·
The Filename provides the first five characters of the file name, and the session
number the last three. For example, if the questionnaire directory is 'C: \quest\',
the Directory field is 'smoke', the Filename field is 'file' and the session number
is 5, then the full filename is 'C:\quest\smoke\file005.txt'.
6. The sumprint object is used to print the summary out to a printer. See section
4.6.3.
7. The temporary file is then deleted from the system temporary directory.
4.6.2 Summary Generation
'T'hP artn,:, 1 ,mmmary gPnPration rPynlyPg ,:,round prnrP~~ing Parh of thP PntriP~ in t hP
sumentrylist of the sumrnaryobj. The sumentrylist is a list of summary entries,
which is defined as:
sumentry = se(goalid,Enabled,Type,Description,Style)
The goal id field relates directly to the associated questionnaire goal for this entry.
The sumrnarylist contains an entry for every goal in the questionnaire. The Enabled
field indicates if the entry is to be actually used within the summary. If the Enabled
field is false then this entry does not appear in the summary. While having an entry
for every goal is excessive, it means that an entry removed from the summary retains
its Description and Style as the only field that is changed is the Enabled field. The
Type field indicates the type of the goal reference. This is essentially the same as for
the goal references in the main questionnaire, "S" for string, "I" for index and "V"
for variable. The Description field contains the text that appears in the summary.
In most cases the Description contains a ' ~ ' character. This indicates where the
formatted goal response is inserted. For example, say an entry has a Description field
"Age of Patient=~ years", a Style of "V", and an associated response of r(0,(23.5],[]),
then formatted summary entry is "Age of Patient = 23.5 years"
Each summary is generated as a 80 column text file. Therefore consideration must
be given to the width and positioning of each summary entry within the text file.
For instance long lines must be wrapped on to the next line. However this allows a
number of formatting possibilities for each entry, for example tabs, blank line, centred
lines and right justified lines. To facilitate this, a column counter is maintained. This
column counter holds the end position of the last entry in the file. From this position,

102 CHAPTER 4 QUESTEX IMPLEMENTATION
the formatting for the next entry can be calculated. The Style field in the sumentry
object indicates the formatting for the entry. Table 4.6 shows all the possible formatting
options,
Table 4.6 The different summary entry formatting options.
Identifier Description Counter sumf..none Performs no formatting, next entry follows Adds entry length
immediately. sumf ..newline Inserts a new line, next entry follows on Reset to 1
the next line. sumf _blankline Inserts two new lines, leaving a blank line. Reset to 1
sumf_tab Inserts spaces up to the next 8 character Adds up to 8 boundary.
sumf..halftab Inserts spaces up to the next 40 character Adds up to 40 boundary.
sumf_centered Inserts spaces before the entry to center Reset to 1 the entry on the line, next entry follows on next line.
sumf_right Inserts spaces before the entry to right jus- Reset to 1 tify the entry on the line, next entry fol-lows on next line.
In all cases if the column counter exceeds 80 characters, then line current entry is
broken at the first space from the right hand line of the end entry that is within the
80 character line length. The entry then continues on the next line.
The actual sequence of tasks to process each summary entry is:
1. Gets the reply from the database manager for the referenced goal.
2. If the goal state is false, then skip this entry and do the next.
3. If the goal response if empty, that is [r ( [] , [] , [])], then the respondent has se
lected none of the items in a multi select question. As this tells us no information,
then skip this entry and do the next.
4. Make the a text string from the goal response based on the entries' Type field.
5. Insert the new response text string into the entries' Description string field.
6. Apply the formatting Style to the new Description string to produce the Sum
mary string. Update the column counter accordingly.
7. Write the Summary string out to the temporary file.
4.6.3 Summary Printing
The QuestEX printer module is initialised when QuestEX starts. This allows the author
to choose the output printer and the printer setup from the Open questionnaire dialog

4.6 QUESTIONNAIRE SUMMARIES 103
box. These settings are saved until it is time to print a summary. If the author did not
choose a printer at the initial stage, then the default system printer is used.
Once the output printer settings are in order a Windows device context is obtained
based on that printer. From the device context the physical printer page information
can be obtained. This information is used to format the summary page layout. Table
4.7 shows all the information required to format the page.
Quantity SxPage SyPage Sxlnch Sylnch
Sx•ffset
Sy•ffset
0rgX
0rgY
Width
Height
CyChar CxChar
MaxLines
Table 4. 7 The information required to format a summary page
How obtained GetDeviceCaps GetDeviceCaps GetDeviceCaps GetDeviceCaps Printer Escape
Printer Escape
Calculation
Calculation
Calculation
Calculation
GetTextMetrics GetTextMetrics Calculation
Description Width of DC in pixels. Height of DC in pixels. Number of pixels per logical inch across the DC. Number of pixels per logical inch down the DC. Horizontal offset from top-left corner to the actual printing area. Vertical offset from top-left corner to the actual printing area. •rgX = (prnt...xmargin*Sxlnch) - Sx•ffset. The Printable origin. prnt_xmargin is a constant which defines the printing margin in inches. DrgY = (prnt_ymargin*Sylnch) - Sy•ffset. The Printable origin prnt_ymargin is a constant which defines the printing rn.argin in inches. Width= SxPage - 2*DrgX. The printable page width. Height= SyPage - 2*DrgY. The printable page height. Height of a character cell. Average character width. MaxLines = Height div CyChar. Number of lines in a page.
The CxCl:i.ar and CyChar variables are obtained once the desired printer font has
been selected into the printer device context. The font originally comes from the
surnprint object presented in section 4.6.1. This object contains three fields related to
the printer font:
1. FontName. This is the face name of the font.
2. FontSize. This size of the font in points.
3. Stretch. This indicates whether the font is stretched to fit the page. If this
field is false, then the values for FontName and FontSize are used to generate
the font. If it is true, then the FontSize field is ignored. The actual font width
is calculated so that 80 characters fit across the page. The font height is also
recalculated so the font maintains the correct aspect ratio.

104 CHAPTER 4 QUESTEX IMPLEMENTATION
Setting the Stretch field to true is useful with fast graphics printers, such as a
Laser printer. Laser printers can print stretched 'Irue-Type fonts quickly and easily.
For dot-matrix printers it is better to choose a printer font which is not stretched,
rather than a 'Irue-Type font. Once the font has been selected into the device context
the temporary file containing the summary can be printed. To do this it is simply a
case of reading each line from the file and drawing it onto the device context. A counter
is used to record the number of lines printed and to provide the vertical coordinate of
each line of text. When the counter reaches the MaxLines value, it is reset to zero and
a 'New Frame' printer escape is sent to start a new page. This continues until the entire
file has been printed.
4.7 SUMMARY
In summary, the QuestEX program consists of four main components, these are:
1. Inference engine. This controls the interpretation and execution of each question
naire.
2. Questionnaire database manager. This manages the questionnaire structure in
formation and the resulting replies from the respondents.
3. Template manager. This interprets the questionnaire user interface descriptions
and controls the interaction with the respondents.
4. Summary manager. This processes the respondent's replies into a form described
by the questionnaire author.
Each of these components manages the manner in which QuestEX interacts with
the questionnaire respondents. The questionnaire file describes how each component
should behave and consequently governs this interaction. The highly organised struc
ture of the questionnaire file can not be interpreted manually. It is the task of the ques
tionnaire editor, QuestED, to present this structure to the author in a comprehendible
fashion. The implementation details of how QuestED achieves this is described in the
following chapter.

Chapter 5
QUESTED IMPLEMENTATION
QuestED is the name of the program that implements the questionnaire editing func
tions for the Information Driven flow model discussed in section 3.4. QuestED also
provides functions for editing the questionnaire appearance and questionnaire sum
maries. This chapter presents the implementation of these functions within QuestED.
The reply and summary processing functions of the Quest View program are also briefly
described.
QuestED has been implemented using the new Visual Prolog Interface (VPI) from
PDC Prolog. At this stage, the Visual Prolog compiler is still in beta testing. This
version consists of a integrated development environment (IDE) and a VPI library.
The IDE provides all the facilities for creating Microsoft Windows based projects, in
cluding: a syntax highlighting editor, dialog box editor, icon and bitmap editor and
hypertext help file editor. The beta release 3 version was initially evaluated in March
1995. While the potential was seen in this version, it was not stable enough as an
integrated development environment or as a class library. Beta release 4 arrived in
April and was seen as stable enough to use. It also contained a series of VPI 'packages'
which provided additional functionality, but which were undocumented. These pack
ages provide facilities for drawing hierarchical trees, drawing context sensitive toolbars,
managing dialog boxes and embedding syntax highlighting and hypertext text editors
within an application. The tree package was seen useful in the representation of the
questionnaire structure.
QuestED consists of the four major components, these are:
1. Database Manager. The Database Manager module provides access to the ques
tionnaire file. It manages the information within the questionnaire file for the
other components in QuestED through a series of functions.
2. Questionnaire Editor. The Questionnaire Editor module allows the author to
create and manipulation the content and structure of a questionnaire.
3. Template Editor. The Template Editor module allows the author the question
naire's appearance. This may by done by modifying the existing questionnaire

106 CHAPTER 5 QUESTED IMPLEMENTATION
user interface or by creating an entirely new look.
4. Summary Editor. The Summary Editor module allows the author to create cus
tomised reports. Any number of summaries can be defined for different purposes.
The following sections describes each of these components in greater detail.
5.1 INITIALISATION
QuestED has one main initialisation phase. The VPI framework performs some of
the initialisation such as creation of the main window and its associated toolbars and
menus .. Once the main window has been created the following initialisation steps are
performed:
1. Initialise the questionnaire editor's user interface
2. Initialise the template editor
3. Initialise the database manager.
4. Update the QuestED toolbar and menu.
The first step of initialising the questionnaire editor's user interface involves a
number of tasks. Firstly a number of initialisation options are loaded from QuestED's
private initialisation file which resides in the Windows directory. These options are
used during the creation of the questionnaire tree view window which follows and are
discussed further in section 5.3.1. Once the tree view has been created the first property
panel is created and positioned inside the QuestED main window and next the tree
view window. A number of global flags relating to the questionnaire user interface are
set up at this stage.
The initialisation of the template editor is comparatively very simple. It involves
the initialisation of a set of global flags for the template module. This step is very
simple as the template editor is created anew each time the author edits a template, so
much of the initialisation for the template editor occurs when template view window
is created.
The database manager is also very simple as much of the real database initialisation
occurs when a questionnaire is actually created or loaded. Again the database manager
simply initialises a set of global flags for the module. Note that in each of the above
three initialisation cases, each set of global flags is only global to the module in which
they reside. There is no true 'global' information in QuestED as this does not conform
to the principle of data hiding.

5.2 DATABASE MANAGEMENT 107
5.2 DATABASE MANAGEMENT
While the database manager in QuestEX has the relatively simple tasks of opening
a questionnaire file and reading the questionnaire objects when required, QuestED's
database manager has a more complex role. QuestED has to deal with the load
ing and saving of database information temporarily stored within QuestED. Whereas
QuestEX provides the single service of obtaining questionnaire information from the
questionnaire file, QuestED provides three services. These are: obtaining questionnaire
information, modifying questionnaire information and managing the questionnaire file.
As discussed in section 4.2 the questionnaire file is a Prolog external database
which consists of a number of object chains. The information within each chain is ac
cessed through a binary search tree which associates object identifiers with the object's
position within the chain. The QuestED database manager provides an interface to
the questionnaire file for other modules within QuestED. It does this by reading in
all the questionnaire objects from the external questionnaire file into internal storage.
Access to the internal questionnaire object store is through a set of functions which are
presented iater.
There are two methods for storing the questionnaire information, one is to use
a Prolog external database which resides in memory; this is similar to how QuestEX
manages the questionnaire file. The other method is to use Prolog internal databases.
This second method has been implemented with an aim of using the first method
in a future version of QuestED. The internal database method has the advantage of
simplicity. Objects can be stored and removed from an internal database with Prolog
assert and retract functions. Searching an internal database is done through matching
and unification as the internal database appears as a predicate. A disadvantage is that
the internal databases are slower when searching for an object to match. Simple tests
have shown the binary tree/external database method is faster when generating and
searching the questionnaire tree. However it is also more complex to implement.
The database manager handles the questionnaire file in a fashion seen in most
\Vindows applications. The following functions implement the options found normally
within the application file menu:
• DBD...NewFile. This function creates a new empty questionnaire. The question
naire introduction goal 'Group 1' is automatically created for the author.
• DBD_OpenFile. This function displays the standard Windows 'open' file dialog
box similar to that shown in figure 4.2. The author can choose the questionnaire
file they wish to load.
• DBD_SaveFileAs. This function displays the standard Windows 'save as' file
dialog box. From this the author can choose the name of an already existing file

108 CHAPTER 5 QUESTED IMPLEMENTATION
or enter a new filename. The current questionnaire is then saved to a file with
this filename.
• DBD_SaveFile. This function saves the current questionnaire under the name
that was used to load it. If the current questionnaire has not been saved before
then, the DBD_SaveFileAs function is called.
• DBD_CloseFile. This function can not be invoked from the file menu. However
it is called before a new questionnaire is loaded or created. Its task is to save the
current questionnaire and remove it from the internal storage. If the questionnaire
has not been saved recently then it will prompt the author to do so. If there is
no questionnaire currently loaded then this function does nothing.
Saving a questionnaire is simply the reverse operation of loading it. All the objects
within the internal databases are copied back to the external database chains in a new
external database. When this has been done the fileinfo chain is updated with the
information about the objects in each chain.
When a questionnaire is created or opened, all the information in the external database is copied into equivalent internal databases. Reading the information from the internal databases is very similar to how the QuestEX database manager works. There are a set of five functions which perform these tasks:
DBD_GetGoalEntry(goalid,goalobj)
DBD_GetQuestionEntry(goalid,questionobj)
DBD_GetTernplateEntry(ternplateid,ternplateobj)
DBD_GetTernplateNarneEntry(string,ternplateobj)
DBD_GetSurnrnaryEntry(surnrnaryid,surnrnaryobj)
Tl1ere is an extra te1nplate fu11ction as templates can be ide11tified by name as well
by the template identifier.
The task of modifying the questionnaire information is suitably straight forward,
however it involves a large group of functions. These functions can be divided into
three groups: Creating objects, modifying existing objects and deleting objects. These
functions are all that is required to manipulate the questionnaire information. The
creation functions are:
goalid DBD_NewGoalEntry()
templateid DBD_NewTernplateEntry(goaltype)
DBD_CreateNewTernplate(string,string,goaltype)
surnrnaryid DBD_NewSurnrnaryEntry()
The DBD....NewGoalEntry() function creates both the goal object and the question
object. The DBD_CreateNewTemplate function is used to derive a new template from
an existing template, see section 5.4.2 for further details. The modification functions
are:

5.3 QUESTIONNAIRE EDITOR
DBD_ReplaceGoalEntry(goalid,goalobj)
DBD_ReplaceQuestionEntry(goalid,questionobj)
DBD_ReplaceTemplateEntry(templateid,templateobj)
DBD_ReplaceSummaryEntry(summaryid,summaryobj)
DBD_ReplaceAllSummaryEntries(summaryobjlist)
109
The Summaries in a questionnaire are edited in the summary editor. The summary
editor makes temporary copies of all the summaries, so when the summary editor
finishes all the summaries are replaced with the last function. The deletion objects are:
DBD_DeleteGoalEntry(goalid,goalobj)
DBD_DeleteQuestionEntry(goalid,questionobj)
DBD_DeleteTemplateEntry(templateid,templateobj)
DBD_DeleteNamedTemplate(string)
DBD~DeleteSummaryEntry(summaryid,summaryobj)
DBD_DeleteAllSummaryEntries(goalid)
There are two delete template functions as templates can be identified by either
name or template identifier. The final function deletes each individual summary entry
for a particular goal goalid from each summary. This is used in the DeleteGoal
questionnaire operation which is discussed in section 5.3.3.
5.3 QUESTIONNAIRE EDITOR
The Questionnaire Editor implementation is based around two concepts:
e Data accessibility. All the questionnaire information that defines a questionnaire
must be easily accessible.
• Context sensitive data and control validation. The user can only invoke functions
that are sensible in the current context.
The following sections introduce a number of implementations which address these
two concepts.
5.3.1 Tree View
The 'free View of QuestED represents a questionnaire as a hierarchical tree structure.
An example of this is shown in Figure 5.1. The VPI tree package is used to draw the
tree. The tree package provides the following useful features:
• A recursive list based tree representation.
• Automatic scrolling and tree window re-sizing.

110 CHAPTER 5 QUESTED IMPLEMENTATION
• Each node can drawn with a different pen colour and style.
• Each node can be selected with the mouse, and the associated mouse event can
be caught and processed.
• The tree font, size and orientation can all be easily changed to suit the author.
• Tree nodes can be collapsed and expanded to hide or show nodes within the tree
structure.
These features made the tree package an ideal way for representing the tree based
questionnaire data. The tree package represents the tree in a recursive list structure
which can only be built in a recursive fashion. This recursive nature can be seen in the
following domain declaration which describes each node the tree structure,
TREE tree(TREE_SELECTDR,TREE_NODE_MARK, TREELIST ,TREE_ARROW_TYPE) TREELIST = TREE*
The TREE_SELECTDR field contains the string label of the node, TREE__NODE._MARK
indicates if the node has been emphasised and TREE_ARROW_TYPE is a structure which
describes how the node is drawn. The TREELIST field contains another list of tree node
structures each tree of which is a child node. The tree is built using a recursive routine
similar to the QuestEX inference engine in structure. It is a depth first search which
maintains an open list to store the goals yet to visit.
Hidden Group Goals
Questionnaire
Introduction~ Group Goa!__
Group 3
Condition Goal
Single Select Goal
Figure 5.1 The Tree View showing the important features.
Goals
Figure 5.1 shows several of the cases the tree scanning routine handles, these are:

5.3 QUESTIONNAIRE EDITOR 111
• 'Group l'. The Questionnaire Introduction goal is always the first goal in the
questionnaire tree. It is the only goal in the open list when the depth-first tree
scanning routine begins.
• Condition Goal. The Condition goal of a parent goal is always the first in the
list of child goal tree nodes. It is drawn with a 'marked' border which is thicker
than the borders of the other goals.
• Referenced Goals. A record is keep of each goal processed by the tree scan
routine. An internal database is used for this purpose. If a goal has already been
encountered then it must be a reference goal. Reference goals are drawn using a
different TREK . .ARROW_TYPE to differentiate them from normal goals.
• Selected Goal. The currently selected goal appears inverted in the tree view. The
mouse is used to select a goal node by clicking on it. When a reference goal is
selected, the first actual occurrence of the goal is selected
• Expandable Goals. These goals are parent goals with at least one child, otherwise
called control goals. Initially only reference goals are expandable as their child
goals have already been displayed further up the tree. Attempting to expand
a reference goal will select the first occurrence of that goal. Any control goal
can be expanded or collapsed by double clicking on it. This is useful when the
questionnaire is getting large and you do not want to see the whole questionnaire
while editing.
• Goal Labels. The goals are labelled with a goal type identifier and a number. The
numbers generally reflect the order in which they are encountered in a depth-first
fashion. Table 5.1 lists the goal labels for each goal type.
Table 5.1 The goal labels of the QuestED Tree view.
Goal type Label Goal type Label gt_group Group gt_info Info gt_calc Cale gt_condcalc Cond
gt_textentry Text gt..numentry Num gt_singlesimple SList gt...mul tisimple MList
gt..notype None
The Tree View can be changed between two modes of operation. These are the
horizontal and vertical tree orientation modes. This is a feature provided by the Visual
Prolog tree package. The horizontal tree orientation displays the tree with all the sibling
child goals arranged on the same horizontal level. The questionnaire introduction goal
appears at the top of the tree view. The vertical tree orientation displays sibling child
goals arranged vertically and with the root goal at the left hand side. Figure 5.1 shows
the tree view in the vertical orientation. Figure 5.2 shows the tree view in the horizontal

112 CHAPTER 5 QUESTED IMPLEMENTATION
orientation and figure 5.3 shows the Questionnaire Editor Options dialog box which is
used to change the view orientation.
T ,L I T
I I I I INum sllNum 6llsust 7llsust sl
Figure 5.2 The horizontal tree orientation.
5.3.2 Property Panels
Questionnaire Editor Options El Ii ;Tree Orienl~tioi{ S .. it ; C;Vertical (Root goat on Left) · If !r• '.H~t1t~1®'.io(~9j)latJopJ
t~~·, Figure 5.3 The Questionnaire Editor Options dialog box.
The property panels provide information about the goals in the TI:ee view. When a goal
is selected in the tree view, the properties of that goal are displayed in the property
panel. The goal's properties can then be edited or changed. When another goal is
selected, the properties are verified and saved.
Each property panel is a modeless child dialog box. Being a modeless dialog box, it
does not have to be closed before continuing with other operations. This is in contrast
to a modal dialog box, which must be closed before continuing. For example, an Open
file dialog box is modal dialog box, while a floating tool box is a modeless dialog box.
As a child dialog box, each panel sits directly on top the main QuestED window. It
is a sibling to the tree view window and whenever the parent is moved or re-sized the
property panel is also moved or re-sized.
For each goal type, there are two property panel dialog resources. Both are identical
except for the dialog box font. The fonts used are 'MS Sans Serif' 8 point, and 'Small
Fonts' 7 point. The 'MS Sans Serif' font is the default Windows 95 dialog box font.
The 'Small Fonts' font is roughly 80% the size of the default font. The smaller size
enables the largest property panel to fit vertically within the QuestED window at the
640x480 screen resolution. By default the larger panel size is used. The Questionnaire
Editor Options dialog box has an option for enabling the smaller panel size. (see figure
5.3).
When a questionnaire is loaded into QuestED, there must be a selected goal in
the tree view. So the associated property panel must also be displayed. The function

5.3 QUESTIONNAIRE EDITOR 113
which manages this process is DULChangePanel. The DULChangePanel performs the
following tasks:
• Verifies the information contained in the property panel for the current goal. If
the information is not valid, the function returns an error code. Most of the
information in each property panel is normally valid. For example the title text,
question text and various options need no verification. However the calculation
and condition expressions must be parsed, and the result of the parsing process
indicates whether the expression is invalid. DULChangePanel returns an appro
priate status code to indicate the invalid information in the panel. The author
will then be prompted to correct the panel entry.
• Retrieves the validated information for the currently selected goal from the panel
as goal and question objects.
• Attempts to load the new dialog panel resource. A check is made if the new
dialog panel is the same as the old dialog panel. This occurs if the goal type of
the selected goal matches the goal type of the previously selected goal type. The
new dialog panel does not need to be loaded. Otherwise the dialog panel is loaded
and the QuestED menu is changed to reflect the functions available on the dialog
panel. Initially the dialog panel is invisible and has not been positioned within
the QuestED window.
• Places the new goal and question object information into the newly loaded dialog
panel.
• The size of the dialog panel is calculated, and the dialog panel is moved to the
new position and made visible. At this point the dialog panel is drawn in the
new window with all the fields containing the new goal information.
• The old dialog panel is destroyed freeing the GDI resources it was using.
Each Property panel contains a number of fields and controls for manipulating the
goal information. These are arranged into the following four groups: Goal Information,
Reply Field, Options and User Interface. Not all of the property panels contains these
groups and the controls and fields within each group changes from ggal type to goal
type. The advantage of these groups is that the author can associate the same infor
mation with a certain group between different goal types. The purpose of each group
is as follows:
• Goal Information. This group contains information directly related to the goal
as a question in a questionnaire. For example, it may contain the goal identifier,
goal type, question text, title text, condition goal and sub goal list. Only the
control goals include a sub goal list.

114 CHAPTER 5 QUESTED IMPLEMENTATION
• Reply Field. Only the question goals have a Reply Field group. In the case of
a text based question it contains single line and scrolling options. For the list
based questions it contains the list of pre-defined responses and the controls for
manipulating the responses.
• Options. These are general options for enabling or disabling many of the user
interface functions. This group appears only for these goals that have a user
interface. This group may contain options to enable the Restart, Back and Help
buttons, and set up help timer and numeric limits options.
• User Interface. Only the goals that can display a user interface have this group.
This group contains the functions for setting the goal multimedia options, testing
the goal and for editing and selecting a template.
Table 5.2 shows which groups are shown in each panel.
Table 5.2 Caption not done
Property Panel Goal Reply Options User Goal Type Information Field Interface gt__notype Yes No No No gt_group Yes No Yes Yes gt_info Yes No Yes Yes gt_calc Yes No No No
gt_condcalc Yes No No No gt_textentry Yes Yes Yes Yes gt..numentry Yes Yes Yes Yes
gt_singlesimple Yes Yes Yes Yes gt_mul tisimple Yes Yes Yes Yes
Figure 5.4 shows two examples of property panels, namely the calculation property
panel and the text entry property panel.
Dividing the property panels into such groups provides the author with a consistent
interface for all the goal types. If the author knows a certain goal should have child
goals, then they will be defined in the Goal Information property group.
Although eacn property panel is a separate dialog box, they are all served by a
single dialog box procedure DULpaneLeh. The use of a single dialog box procedure
means this dialog procedure is large, however it takes advantage of many of the common
functions the property panels share. A separate dialog box procedure for each of the
property panels would lead to large amounts of repetition. DULpaneLeh serves as a
user interface layer between the author and the questionnaire module.
There are two types of changes that can be made to a goal when it is selected the
tree view. These are:

5.3 QUESTIONNAIRE EDITOR 115
-·--··- ··--- --
Goallnformi;lcln ~;·; . . ·... ,, : Goal ID: 13 >T~pt: CaJ9~latio.n .
(a) The calculation property panel. (b) The text entry property panel.
Figure 5.1 Tv.ro property panel examples.
1. Panel Changes. This relates directly to the information displayed in the panel.
This information can be edited on the panel and is only saved when the ques
tionnaire is saved or another goal is selected. The question text and calculation
expressions are examples of panel changes.
2. Questionnaire Operations. This relates to information that maybe displayed on
the panel; but can not be edited on the panel. To make a change to this informa
tion, an operation rilust be invoked. This is normally done with a push button
control. Consequently a dialog box may be displayed which allows the infor
mation to be changed. Alternatively the operation may invoke a simple function
which requires no further author interaction. Adding a condition goal or selecting
a user interface template are examples of questionnaire operations.
On receiving a user interface event from a particular control, the appropriate
DULpaneLeh clause gathers the relevant information to pass to the questionnaire mod
ule. The questionnaire module then performs on operation on the goal data and returns
any changes back to the user interface to display to the author.
Not all the controls on each property panel are enabled, and so can not be acti
Yated unless certain conditions are met. This is control validation or context sensitive
control enabling. This is used through out QuestED, not just within the property pan
els. It provides visual feedback to the questionnaire author about what commands are
available. From this the author can see how the different questionnaire options and
functions affect other parts of the questionnaire. Table 5.3 outlines some of the situa-

116 CHAPTER 5 QUESTED IMPLEMENTATION
tions where the context sensitive control enabling is used. The mode selector controls
are the panel controls which state the state or mode of the affected controls.
Table 5.3 Context Sensitive Property Panel Controls Mode selector Affected controls Purpose Controls Condition Goal Condition Goal Initially a goal will have no condition goal, so Add button Del button the only valid operation is to add a condition
goal. Once added, the opposite situation occurs since the condition goal can be deleted.
Sub Goal Sub Goal Up, Down, Once a sub goal has been created it appears list box Delete and various in the sub goal list. Once it has been selected,
Insert buttons then it can be moved up, down, deleted or be inserted into the goal field .
Help Timer Help Timer field Once the Help Timer checkbox has been button enabled, the author can select a time period
using the Help Timer up/down field control.
Template Select Template Multimedia, Once a template has been selected for a goal, button Test and Edit buttons the used interface functions Lecome availaLle.
Limits check Lower and Upper The numeric entry goal type can have numeric box Limit fields limits placed on its response. Checking the
Limits checkbox enables the Lower and Upper Limit fields.
5.3.3 Questionnaire operations
The questionnaire module consists of a series of functions which deal with the modifi
cation of the questionnaire structure and question responses. These functions can be
divided into four groups: goal operations, condition operations, child operations and
response operations. Each of these functions requires only the information to perform
its function and then returns only the changes. This reduces the coupling to the other
modules and means the functions can be used at any time by any module. Note that
while many of these operations return new goal and question objects, this is only for
the convenience of the calling module. These new objects have already been committed
to memory by the operation.
The two goal operations work directly on a particular goal. The operations are:
• ChangeGoal(goalid,goalobj ,questionobj). For the goal indicated by
goalid this operation replaces the goal object and question object with the two
input arguments goalobj and questionobj.
• DeleteGoal(goalid,goallist). This is a recursive routine which can delete a
branch of the questionnaire tree. The goalid argument keeps track of the highest

5.3 QUESTIONNAIRE EDITOR 117
goal to be deleted by this operation. The goallist keeps track of the remaining
goals in the branch. Again it effectively works as a depth first search to remove all
the child goals of the goal goalid. Each goal is deleted as the depth first search
comes out of its recursion. This means the child goals are deleted before the
parent goals. For each goal, the goal and question objects are deleted from the
questionnaire via calls to the database manager. Also any summary entries for
the current goal are removed to maintain consistency between the questionnaire
and the summary. Not every child goal in a branch is deleted as referenced goals
may be defined outside of the branch. The following rules are apply for each child
goal in a condemned branch:
1. If the child goal is unique, (i.e., the child goal is not referenced by another
goal) then it is deleted. Consider figure 5.5(a). If goal I1 is deleted, then
this rule applies for it and the two child goals.
2. If the parent goal goalid is being deleted and there are all the instances of
a particular child goal down the condemned branch, then all these instances
uf that child goal are deleted. In figure 5.5(b) it is goal I1 is again being
deleted. This rule will apply for both instances of goal Q3 and rule 1 will
apply for goals I1 and C2.
3. If there is more than one instance of a particular child goal, and only some
of the instances are down the condemned branch, then only these instances
of the child goal are deleted. This situation is show in figure 5.5(c). If goal
I1 is deleted, then this rule will apply for the first instance of goal Q3, as
the second instance of goal Q3 is not a child of goal Il.
The two condition operations manipulate the condition goal of a particular goal,
namely:
• AddCondi tion(goalid, goalobj). A new condition goal is created and the goalid
of this new goal is set as the condition goal for the parent goal goalid. The new
goal object for goalid is returned.
• Del Condition (goalid, goalob j). The condition goal for the goal goal id is
deleted using the DeleteGoal operation. goalid's condition goal is set to 0, i.e.
no condition goal.
The five child goal operations work with the child goal list for a particular goal:
• AddChild(goalid,Flag,goaltype,Refgoalstr,goalobj). This operation gov
erns the addition of new goals to the questionnaire. Each new goal is always added
as a child of a parent goal goalid. There are two clauses for this operation, each
for a different situation.

118
ll lnj, Goal
Your Weight is Q3.
CHAPTER 5 QUESTED IMPLEMENTATION
Q3 What is your
Weight?
(a) Unique child goal
11 lnj, Goal
Your Weight is Q3. ~ Q3 : ' What is your : : Weight? : I_ - - - - - - - - - _I
Q3 What is your
Weight?
(b) All child goals down the same branch
ll lnj, Goal
Your Weight is Q3.
C4 Calculation Goal
C4=2 * Q3
~ Q3 : ' What is your : : Weight? : '-----------'
Q3 What is your
Weight?
( c) Some child goals down the same branch
Figure 5.5 Examples of the DeleteGoal rules
1. Flag = idc...new_goal and goal type = valid goal type. A new goal of type
goal type is created.
2. Flag = idc_existing_goal. This creates a reference to an existing goal.
The refgoalstr argument contains the label of the referenced goal, for
example 'Info 1' for information goal Il. This string label is decoded to give
the referenced goal id. This goal id is then used to create a child reference
goal of the parent goal goalid.
• DelChild(Parentid,Childid,goalobj). This deletes the goal Childid of the
parent goal Parentid. The child goalid is removed from the parent's child goal
list, and the child goal is deleted using the questionnaire operation DeleteGoal.
• MoveChildUp(goalid,Index,goalobj). This operation is used to modify the
order of goalid's child goal list. The child goal at position Index in the parent's
child goal list is moved up one position. This is assuming that the goal is not
already at the top of the list.
• MoveChildDown (goal id, Index, goalob j). The child goal at position Index in
the parent's child goal list is moved down one position. This is assuming that the
goal is not already at the bottom of the list.

5.3 QUESTIONNAIRE EDITOR 119
The final four operations manipulate the list based response entries for the single
select and multiple select goal types:
• AddListitem(goalid, ItemStr, ItemVal ,responselist). This operation adds
a new entry to the response list of goal goalid. This new entry consists of
the response item r( [ItemStr], [ItemVal], [Index]), where Index is an integer
position of the item with in the list.
• Edi tListitem(goalid, Index, ItemStr, Item Val, responselist). This opera
tion replaces the entry at position Index in the response list of the goal goalid.
• DeleteListitem(goalid,Index,responselist). This operation removes the
response item at position Index in the goal goalid's response list.
• CopyResponseToGoals (responselist, goallist). This operation is different as
it can effect a number of question objects rather than just one. It is used to copy
the predefined list responses of one goal to a list of other goals. For example,
a questionnaire has ten multiple choice questions, and each question has the
same set of responses. The ten questions can be created, the responses can be
entered for the first question. This function can then copy the responses from the
first question to the remaining nine questions. The responselist contains the
responses to be copied and goallist is a goalid list identifying the target goals.
5.3.4 Calculations and Conditions
The Calculation and Condition expressions are stored in two forms by QuestED. These
are the text representation and a reverse polish notation (RPN) form. The text form
is stored because the author can interpret it and the RPN form is stored as QuestEX
can interpret this form easily. The expressions are parsed as part of the property panel
verification process. If the expression is successfully parsed then property panel process
continues uninterrupted. However if a parsing error occurs then an error message is
displayed indicating which part of the expression could not be read. The property
panel verification process stops here and the author must correct the expression before
- continuing.
The parsing process consists of three parts: bracket checking, the actual parsing
and child testing. The bracket checking determines if the expression contains the
correct number of brackets. The number of left-hand brackets must equal the number
of right-hand for the expression to be valid. Once this check has succeeded then the
main parsing process begins.
The parsing process is based around the algorithm shown in figure 5.6 (Ral
son, 1971, ppl54-194).

120 CHAPTER 5 QUESTED IMPLEMENTATION
Figure 5.6 The calculation and condition parsing algorithm
While Expression!= 1111
token= GetToken(Expression)
if token= 11)
11 then remove head of Operator list and place in the tail of RPN list.
if token= 11(
11 then place token in head of Operator list.
if token=. <an operator> then
else
Wend
if head of Operator list= 11(
11 then remove head of Operator list and replace it with token.
else if priority(token) <= priority(head of Operator list) then remove head of Operator list and place in tail of RPN list, Put token in head of Operator list.
else put token in head of Operator list.
put token in the tail of RPN list.
When this process finishes and assuming that the Expression string was well
formed, the RPN list will contain the reverse polish notation form of the original ex
pression. The Operator list is used as a temporary stack during the processing of
the expression. Table 4.3 lists the operators which the QuestEX RPN evaluator can
handle. Each token in the RPN list is then converted into a responselist object as
described in section 4.4.
Child testing is performed to see whether the goal references made within the
expression match up with the entries in the goal's child goal list. If a referenced goal
in the expression in not a child then a error message is displayed to the author. Only
child goals of the calculation or condition goal are allowed to appear in the expression.
A condition consists of three parts: the left hand side, the relational operator and
the right hand side. Each of these expressions are converted to RPN form separately.
The final RPN form is found by concatenating the left hand side form with the right
hand side form and then the relational operator form is attached to the end. This
ensures that the relation operator is processed last giving a boolean result.
5.4 TEMPLATE EDITOR
Templates are described in section 4.5. Their role is to provide a description of the
screen's appearance for each question. The template editor provides the means for
editing existing templates and creating new templates.
The template editor consists of two parts, the template manager dialog box and

5.4 TEMPLATE EDITOR 121
the template editing view. Each template contains a template object list. This list
contains an ordered series of template objects. The task of the template editor is to
allow the questionnaire author to manipulate these template objects within a template.
5.4.1 Template Manager
The Template Manager is based around the 'View Templates' dialog box (see figure
5. 7). There are five template operations available in the View Templates dialog box
and a list of all the templates in the current questionnaire. The availability of each
operation is dependent on the currently selected template in the template list. The
operations are:
1. Select. This operation selects a template for the currently selected questionnaire
goal. This is available only if the type of currently selected questionnaire goal
matches the type of the template selected in the template list. For example it is
available if the current questionnaire is a group goal and the selected template is
also a group goal.
2. Edit. The Edit operation loads the currently selected template from the template
list into the Template Editor View, see section 5.4.3. This operation is available
for all templates, except the template 'None' for obvious reasons. All templates
maybe edited, including the default templates.
3. Create. This operation is used to create new customised templates. See section
5.4.2 for details.
4. Delete. The Delete operation removes the currently selected template from the
questionnaire. A prompt is displayed asking for confirmation for the delete action.
If 'OK' is selected, then the template is deleted from the questionnaire. This
operation is only available for templates created with the 'Create' operation.
The default templates can not be deleted, as they provide the base from which
to create new templates.
5. Properties. The Property operation displays a dialog box containing the template
properties. There are three properties which can be changed:
• Name. This is the name of the template. Changing this name will change
the template name in the template list.
• Invalid Entry. This is the message displayed to the respondent when they
make a mistake entering a response, for example if the respondent presses
the question 'OK' button without entering a text response in a text entry
question. The Invalid Entry message is displayed in the template's 'Help
Text' rectangle and a beep is played through the computer's speaker.

122 CHAPTER 5 QUESTED IMPLEMENTATION
• Display Mode. This governs how the template is drawn onto the screen. The
Metafile mode takes less memory but more complex templates take longer
to draw. The bitmap mode takes more memory, but always takes a constant
amount of time to draw on the screen. Note that the time to draw on the
screen does not include the time to render the template in memory. If the
template contains any image rectangles, then the Display Mode defaults to
Bitmap mode. This is because 256 colour bitmap images can not be correctly
rendered into a Metafile device context.
Figure 5.7 The View Template dialog box
5.4.2 Creating New Templates
A new template is created by choosing the Create operation from the View Template
dialog box. The currently selected template from the Template list is used as the basis
for the new template. This base type can be any of the goal types, even one different to
that of the intended new template. The New Template dialog then appears, as shown
in figure 5.8.
'Name: {My_NewTe~plate
, T argefD•P,e: jGroup_
Figure 5.8 The Create New Template dialog box.
This dialog box contains three important fields:
1. Name. This is the name of the new template.
2. Target Type. This drop down list contains an entry for all the goal types that can
display a template. The goal types are the group, info, single sel, multi sel, text

5.4 TEMPLATE EDITOR 123
entry and numeric entry goal types. This group of six can be compressed three
main template types: information types, list types and the text entry types.
3. Based On. This static text field just indicates which template was selected from
the template list in the View Template dialog box.
It is quite legitimate to create one type of template based on a completely different
type of template. This allows the author to create a single group goal template with a
whole series of customisations and enhancements over the default group goal template.
This new group goal template can then be used to create a complete set of templates
with this same visual style. The new set of templates inherit the customisations and
enhancements from the enhanced group goal.
This is possible because of the structure of the templates. Within each of the
three main template types there is only one template object which is unique to that
type. For the information types, the unique object is the template title field. For the
list entry types, it is the listbox and for the text entry types it is the text field. So
by knowing what type of template is being created and what was the basis template,
the unique object can be removed and replaced with the appropriate new object. For
example, when creating a text entry template from a group goal template, a copy is
made of the group goals' template object list. The title text object is removed from
the copied template list. The text field object is copied from the default text entry's
template object list and is inserted into the copied template object list. So the copied
template object contains all the original template objects from the group goal minus
the title text object plus the text edit object. Figure 5.9 shows the unique objects in
each default template and Table G.4 lists all the conversion possibilities.
I Title Text I I I I I
Question Text Question Text
I I I I Question Text
I I Help Tex!
Help Text
I I I Help Text I [2K] I Edit Box I [2K] Lisi Box [2K]
~ I Help I I Back I ~ 0§,J I Back I ~ ~ I Back I
Figure 5.9 The difference between the three types of template is shown by the objects with a dark border.
Table 5.4 The conyersion table for the three types of template. -
From\ To Information types Text entry types List types Information types No change Add edit, Del title Add list, Del title Text entry types Add title, Del edit No change Add list, Del edit
List types Add title, Del list Add list, Del title No change

124 CHAPTER 5 QUESTED IMPLEMENTATION
The whole process for creating a new text entry template from a customised single
select template is shown in Figure 5.10. The only problem with this approach is with
the positioning of the unique objects in the new template. Since the object is added
to the template is from the associated default template, it retains its position from
the default template. When this object is inserted into the new template, it will likely
overlap some other template object. The author must then manually adjust the position
of the object to achieve the correct template appearance.
Customized Single-Sel Tern late
BI Question Text I Im,g,
I Help Text I I Li!it Box I
I Qu1, 1 ~ j Back j @o
I Question Text j
I Help Text I
I Edit Box l@o
~ ~ i B,ck I
Default Text Entry Template
Remove List-box object
Question Text
Help Text
~ ~ I Back j
Edit Box
Remove Edit box object
18 I
@o
New Customized Text Entry Template
I Im,ge II Question Text
I Help Text
Edit Box
18 I
Figure 5.10 The process of creating a Text Entry template from a Single Select List template.
5.4.3 Template Editor View
The Template Editor View is shown in Figure 5.11. This view appears in the same
frame window that the questionnaire view appeared in. The questionnaire view toolbar
and status bar are removed to give a larger view of the template. The floating Template
Objects dialog box takes the place of the questionnaire view toolbar. It is shown in
Figure 5.12. The Template Objects dialog box contains a list of objects within the
displayed template and a series of buttons which perform a series of object operations
(see section 5.4.3.3).
5.4.3.1 Object View
The object view appears within Figure 5.11. It consists of the large light grey area just
below the menu bar. The object view represents the entire screen display of QuestEX.
The template objects which appear within each template are described in Table 5.5.
The mandatory column indicates whether the object must appear in every template.

5.4 TEMPLATE EDITOR
EQTemr>lateED - Default Group Goal 11!!!11';11&1 .Exit Qb)ects
I Quit Button I
Title Text
Question Text
Help Text
Figure 5.11 The Template Editor View
BackGroun ......... J Object: Title Text i'. Question Text ! .,... .. --""' Help Text H :i Add · Of( Button I' , Help Button Back Button Quit Bufton
r-...... .....i I' J,----,-"',,,-1
I OK Button I
eack Button\
Figure 5.12 The Template Object floating dialog box.
125

126 CHAPTER 5 QUESTED IMPLE~1ENTATION
The three objects with 'Unique' in this column are mandatory for the particular tem
plate types that they only appear in. These are the list, text and information templates
types.
Table 5.5 The template objects that appear within an object view.
Object Mandatory Appearance Background Yes Grey area that covers the Object view. Question Text Yes White rectangle labelled 'Question Text'. Help Text Yes White rectangle labelled 'Help Text'. Title Text Unique White rectangle labelled 'Title Text'. Miscellaneous Text No White rectangle labelled 'Misc Text'. OK Button Yes White rectangle labelled 'OK Button'. Back Button Yes White rectangle labelled 'Back Button'. Quit Button Yes White rectangle labelled 'Quit Button'. Help Button Yes White rectangle labelled 'Help Button'. Edit Field Unique White rectangle labelled 'Edit Box'. List Field Unique White rectangle labelled 'List Box'. Line No Black line labelled 'Line'. Filled Rectangle No White rectangle labelled 'Question Text'. Ellipse No White eHispe iabelled 'Rectangle". Image Rectangle No White rectangle labelled 'Image A', new im-
ages are labelled alphabetically. Animation Rectangle No White rectangle labelled 'Animation'.
The object view is drawn with size proportional to the size of the main QuestED
window. This has the advantage that the view will always fit within the window,
regardless of the window's size. This is beneficial for computers with low screen resolu
tions such as lap-top computers. This scaling is achieved by using the Windows screen
mapping modes to automatically scale the object view graphics. This is achieved in
a similar fashion to how QuestEX scales the templates to the screen. Using the \-PI
library the notation is slightly different. The window mapping mode is set to the ar
bitrary mapping mode. This is essentially the same as the anisotropic mapping mode
used in QuestEX. So the logical coordinate system for the window will stretch to fit
the physical coordinate system. The logical coordinate system is set to the constants
tmp__xsize, tmp_ysize. These constants are defined as 640 and 480 respectively, this
is the size of the lowest screen resolution Windows supports. The physical coordinate
system is set to the current size of the window. So irrespective of window size, the
logical coordinate system is defined by the constants tmp__xsize, tmp_ysize. Note the
main difference between this and the QuestEX is that the physical coordinate system
is set relative to the window, not the screen.
The actual template is drawn by recursing through the template object list. Each
object in the list is drawn according to the appearance details in Table 5.5. This is
a far simpler process than rendering the template in QuestEX because of the simple
representation of each object.

5.4 TEr-,I PLATE EDITOR 127
5.4.3.2 Object Selection
There are two methods for selecting template objects within the template view. The
first method is to select an object item from the list in the Template Objects dialog
box. The object item in the list will then be highlighted. More than one list obj_ect can
be selected at a time. To select a group of objects, first select a single object by clicking
on it, then select a second object while holding down the 'Shift' key. All the objects
from the first object to the second object in the list will be selected. Alternatively
holding down the 'Ctrl' key will select additional objects individually. This is standard
list behaviour in the Windows operating system. A selection rectangle will also appear
in the editor view around the associated graphical object.
The second method for selecting is to use the editor view. An object can be selected
by clicking on its graphical representation. A selection rectangle will appear around
the object. Clicking off a graphical object will select the background object. The
corresponding entry in the Template object list is also highlighted. More than one
object can be selected by two methods:
1. Select the first object by clicking on it. Then when clicking on additional objects
hold down the Ctrl or Shift key. The additional objects will be added to the
original selection.
2. Dragging a rectangle around a group of objects. Any objects inside the dragged
rectangle are selected.
The· selection rectangle is a child window of the main template view window. It
is created with no background, no menu, and no caption. Thi8 just leaves a sizable
border, which is used as the selection rectangle.
5.4.3.3 Object Operations
There are two categories of operations in the template editor, those that can be applied
to a single object, and those that can be applied to a number of objects. Most of these
operations are available on the Template Editor menu bar and in the series of buttons
on the Template Objects dialog box, see Figure 5.12. There is one operation that can
be invoked at any time, namely:
• Add. This operation is used to add new objects to the template. Invoking the
operation displays the New Template Object dialog box as shown in Figure 5.13.
This figure shows the available objects: Misc. Text, Line, Rectangle, Ellipse,
Graphic Image and Animation. Only one Animation object can be added to a
template, so this item will not appear if it already exists in the template. After
selecting the desired object and pressing the 'OK' button, the mouse cursor will

128 CHAPTER 5 QUESTED IMPLEMENTATION
change to a standard arrow shape and the word 'Add'. By clicking the left
mouse button within the template, an object of default size will appear (100 by
60 template units). This new object will be centred around the point of the
mouse click. Alternatively the size of the new object can be set by clicking the
left mouse button and dragging out a rectangle on the template. When the left
mouse button is released, a new object created the same size and position as the
dragged out rectangle.
ij$i4jlji4j,Mfu§ejM,x I . ·-, '• ... · ...
Line f ; OK' -·~+ I; ~1r~!:ngla (; : CJ:~~ ;~~-I Ii Graphic Ima. ge'..:-f · -,.Hdn :;c;; j ;; Ani111illi()[l_ :, . . · .. . • " '" ·
Figure 5.13 The New Template Object dialog box.
The single object operations are:
• Delete Object. This removes the selected object from the template. Only objects
that have been added to the template can be deleted. These include the Misc
Text, Line, Rectangle, Ellipse, Image and Animation objects. All other objects
can not be removed from the template as they perform specific tasks. Some of
these permanent objects can be disabled using the property panel user interface
options.
• Back. This moves the selected object towards the back of the template. When an
object is at the back of a template, then all other template objects will appear in
front of the object. An object cannot be moved behind the Background template
object for obvious reasons. The Button objects (OK, Help, Back and Quit) and
the reply objects (List box and Edit field) cannot be moved back because they
are windows which will always appear in front of the graphical objects. The order
of the object list in the Template Object dialog box reflects the template order.
The object at the back of the template is at the top of the list, whilst the object
at the front is at the bottom of the list.
• Forward. This moves the selected obje..ct towards the front of the template. The
Background object, the Button objects and the reply objects can not be moved
forward for the same reasons as in the Back operation.
• Props. This operation displays the object properties. See section 5.4.3.4. This
operation can also be invoked by double clicking on a selected object.
• Move. The Move operation is used to move objects around within the template.
It is not invoked from the menu or the Template Object dialog box. There are
two ways to move an object:

5.4 TEMPLATE EDITOR 129
1. Using the mouse. By clicking the selected object with the left mouse button
and dragging, the selection window will move will the mouse. Moving the
selection window to a new position and releasing the mouse button, the
selected object will be moved to the new position.
2. Using the keyboard. Once an object is selected, it can be moved by using
the arrow keys on the keyboard. Pressing one of these keys will move the
object 1 unit in the desired direction. Holding down the Shift key while
pressing one of the arrow keys will move the object 8 units in the desired
direction.
• Centre. This operation displays a prompt dialog which asks the user to select
either a horizontal or vertical direction or both. Once chosen the selected object
is moved to the centre of the template in the desired direction.
The multiple object operations are only available if more than one object has been
selected. The operations are:
• Align. The Align objects operation allows the author align any number of objects
horizontally and vertically. The Template Align Objects dialog box is displayed,
see Figure 5.14. The dialog box shows the following options. Both the horizontal
and vertical options are similar so only the horizontal options are discussed.
- No Change. No change is made to the alignment of the selected objects.
They remain in the same position in the selected direction.
- Left Sides/Tops. All the selected objects are moved so that the left side/
top of each object is the same as the leftmost/topmost object.
- Centres. The average coordinate in the desired direction of all the selected
objects is calculated. All the selected objects are moved so that the centre
of each object equals the average center coordinate.
- Right Sides/Bottoms. All the selected objects are moved so that the right
side/bottom of each object is the same as the rightmost/bottom-most object.
- Space Equally. The total amount of space between the selected objects is -
calculated. This is divided by the number of objects minus 1. The selected
objects are moved so that there is this equal amount of space between each
object. Regardless of the size of the objects, there will always be the same
amount of space between them. This also works for a negative amount of
space between the objects, for example if the objects overlap.
• Centre. This operation displays a prompt dialog which asks the user to select
either a horizontal or vertical direction or both. Once chosen the selected objects

130 CHAPTER 5 QUESTED IMPLEMENTATION
=======··········-··~~ Template Align Objects E.f
Figure 5.14 The Template Align objects dialog box.
are treated as a single object. They are moved to the center of the template
in the desired direction. The relative positioning of the objects is maintained.
For example, all four buttons are spaced equally in a horizontal direction. By
selecting them all and invoking the center operation, all four can be centred in
the middle of the template whilst retaining their relative positions.
• Move. As for the single object case, a group of selected objects can be moved
with the mouse or the keyboard.
5.4.3.4 Object Properties
Each template object has a series of properties these are shown in Table 4.5. Once the
properties operation has been invoked for an object, the object's associated Property
dialog box appears. Because not every object contains the same properties, the dialog
boxes differ. However the object types can be grouped into similar objects. For these
similar objects a single dialog box is used. The object groups are:
• Text. The Text properties consists of text colour, font, alignment, size and posi
tion. The alignment refers to whether the text is left, right, centred or propor
tionally justified within the rectangle. The size and position of the text rectangle
can be changed directly here. The colour of the text is shown by the colour of the
'Text Colour' button's face. Pressing this button displays the Windows Standard
colour selection dialog box. The facename and size of the font is displayed under
the text colour. The font size is the height of the font in template coordinates.
The 'Misc Text' button is enabled when the object being examined is a Miscel
laneous Text ooject. Pressing this button opens a dialog box with a edit field
where the miscellaneous text can be entered.
• Graphic. The Graphic properties consists of fill and border colour, size and
position. The two colour properties behave the same as in the Text case, as do
the size and position properties.
• Button. The Button properties consists of the button text, text and button face
colours, button font, size and position. The button text allows the author to

5.4 TEMPLATE EDITOR 131
change the label on a button. The remaining properties behave the same as in
the Text case.
• Line. There are two sets of Line properties, line colour and size and position.
These both work in the same fashion as in the Text case. There are also two more
sets of controls: 'Mirror' and 'Make Line'. Mirror is used to flip the line about
either the horizontal or vertical axis. This is necessary because of a limitation
of the selection rectangle. It is possible using the selection rectangle to change
the size of an object by dragging the bottom right-hand corner of the selection
rectangle. However it is not possible to drag this corner above and/ or to the left
of the top left corner. This is the standard behaviour for a window. This means
that the line must always point between 3 and 6 o'clock. By allowing the mirror
operations the orientation of the line can be changed to suit all angles. The Make
Line Vertical and Horizontal controls set the line either vertical or horizontal.
Once again due the behaviour of the selection window it is not possible to set the
line either vertical or horizontal by dragging the corner of the selection window.
Note also that once a line is either vertical or horizontal it can not be moved or
re-sized by dragging the selection window.
• Background. The back ground properties only consist of the background colour.
The colour control works in the same fashion as the Text case.
Figure 5.15 shows the property dialog boxes associated with the text, graphic,
button and iine property groups.
Iem1>late Iext Prope1ties -\ " , £i
( a) Text dialog box.
Button Properties l3
( c) Button dialog box.
OK I Cancel ' j: ffo!r I
(b) Graphic dialog box.
( d) Line dialog box.
Figure 5.15 The property dialog boxes for four types of template object.

132 CHAPTER 5 QUESTED IMPLEMENTATION
5.5 SUMMARY EDITOR
The generation of QuestEX's Summaries are described in section 4.6. Their role is to
provide a more comprehendible of form the respondent's replies. The summary editor
provides the means for creating customised summaries.
The summary editor is based around the 'View Summaries' dialog box (see figure
5.16 ). This dialog box serves as the summary manager.
Figure 5.16 The \liew Sunnnarie8 diaiog box.
Initially there are no entries in the Summaries list box and the 'Delete' and 'Edit'
button are disabled. Pressing the 'Add' button creates a new summary based on the
questionnaire as it currently stands. An existing summary can be deleted by selecting
it from the Summaries list box can pressing the 'Delete' button. No confirmation is
asked for this action, however this action and any other actions within the Summary
Editor can be discarded by pressing the 'Cancel' button. An existing summary can be
modified by selecting it from the Summaries list box and pressing the 'Edit' button.
This will open the Summary Edit dialog box was in discussed in the next section.
5.5.1 Entering a Summary
Entering a summary is done in the 'Summary Edit' dialog box. If a new summary is
created then the author is first asked if this summary is to be 'Person Readable' or
'Computer Readable'. If they select 'Computer Readable' then the number of options
within the Summary Edit dialog box are reduced. This to produce a simple text format
ted ASCII file which most spreadsheet and database applications can read. However
the method for constructing the summary is no different from the Person Readable
summary. Figure 5.17 shows the 'Summary Edit' dialog box.
There are a number of important features in this dialog box, namely:
1. Summary Name. This allows the author to enter a name for their summary. This
name only appears in the Summary Editor.

5.5 SUMMARY EDITOR 133
Figure 5.17 The Summary Edit dialog box.
2. Output To. This field is followed by two checkboxes: 'File' and 'Printer'. Check
ing these options indicate where the summary will be sent after it has been gen
erated. They also enable the following two controls. See section 4.6.1 for further
details.
3. Filename Setup. Pressing this button displays the 'Summary File Setup' dialog
box. Contained within the dialog are two text fields: Directory and Filename.
By default the Directory field is the same as the first eight characters of the
Summary Name. The Filename field defaults to 'file'. The information entered
here is stored in the sumfile object for the current summary.
4. Printer Setup. Pressing this button displays the 'Summary Printer Setup' dialog
box. Contained within the dialog are a printer font field and a 'Stretch to Page'
checkbox. The current printer font can be changed by pressing the 'Change'
button, this displays the standard Window font selection dialog box. 'Stretch to
Page' checkbox determines whether the printer font will be stretched so that the
80 character width summary will fit the full width of the page. The information
entered here is stored in the sumprint object for the current summary.
5. Questionnaire List. This list initially contains an entry for every goal in the
current questionnaire. It is used to indicate which goals are not included in
the current summary. When editing a summary, if any new goals have been
added to the questionnaire then they will appear in this list. Multiple entries can
be selected in this list. Selecting an item from the list will change the current
selection in the questionnaire tree view and the property panel.
6. Summary List. This list contains all the goals which appear in the summary.

134 CHAPTER 5 QUESTED IMPLEMENTATION
The order of this list is important as it determines the order that each goal will
appear in the generated summary. Selecting an item from the list will change the
current selection in the questionnaire tree view and the property panel.
7. Add/Del buttons. These buttons transfer the selected items from the Question
naire list to the Summary list and vice versa. As the Questionnaire list is a
multiple select list any number of entries can be transferred to the Summary list.
However only one entry can be transferred from the Summary list back to the
Questionnaire List.
8. Edit button. Pressing this button will display the 'Summary Entry' dialog box.
This is discussed further in the next section.
9. Up/Down button. These buttons are used to change the order of the selected
entry in the Summary list.
5.5.2 Summary Entries
Each summary is based around an ordered series of summary entries which are intro
duced in section 4.6.2. When a number of summary entries have been added to the
Summary list the author can select an entry and press the 'Edit' button. This will
display the 'Summary Entry' dialog box which is shown in Figure 5.18.
summary Enttv- - "e, , , - , El
~:~: jsmokeperdBJI: h --~- -1, OK 11 Cancel
Deim~er. I Newline .3 Type: Jstring _a --"----'I
Figure 5.18 The Summary Entry dialog box.
This dialog box allows the author to change the attributes of each entry. By default
the text in the Text field for questions, calculations and conditions is the goal prefix
string plus goal's associated question text plus the suffix string': ~ '. The goal prefix
string is either 'Qstn %:', 'Cale %:' or 'Cond %:' depending on the goal type. The
prefix string is attached to give an indication in the summary of the associated goal
identifier. The suffix string is necessary as it includes the ' ~' character which denotes
the position where the respondent's reply will be inserted. For group and information
goal types the default text is simply their title text. Ultimately the content of the text
field is entirely up to the questionnaire author and the default entries are just guides.
For computer-readable summaries the default text is simply the '~' character.
The Delimiter field contains a list of seven formatting choices. The particular
choice indicates what formatting will be applied to the end of the summary entry text.
The choices are:

5.6 QUESTVIEW IMPLEMENTATION 135
• None. Does not apply any formatting. The next summary entry will start imme
diately after the current entry. This is good for arranging entries into sentences.
• New Line. Forces the next summary entry onto the next line in the summary.
This is good for starting new paragraphs.
• Blank Line. Forces the next summary entry to skip a line so that a blank line
appears between it and the current entry. Blank line delimiters are good for
making section headings.
• Tab. Inserts 8 space characters after the current entry. This will automatically
wrap onto the next line if the line length is exceeded. These are useful for tab
separated lists and simple columns.
• 1/2 Page Tab. Moves insertion point forward to the next 40 character boundary.
This is either in the middle of the page or the start of the next line.
• Centred Line. Centres the current summary entry into the middle of the current
line. The next entry appears on the next line. This is good for section headings.
• Right Line. Justifies the end of the current summary entry against the right hand
margin. The next entry appears on the next line.
The Type field contains the list of the three standard response types, namely:
String, Index and Variable.
5.6 QUESTVIEW IMPLEMENTATION
QuestView is the name of the program that implements the questionnaire summary
viewing and statistics functions discussed in section 3.2. The intended functions of
Quest View are:
1. Viewing of summaries generated by QuestEX.
2. Re-creation of summaries from the raw replies data.
3. Management of the summary files. This includes the printing, moving, deleting
and archiving of summary files which are no longer in immediate use.
4. Management of the raw replies data. This data is automatically saved by Ques
tEX into an external database after a questionnaire session. The author should
be able to export, move, delete or edit the each session replies' within in order to
clean any dirty data and improve the quality of information.
5. Generation of statistical information from a set of raw replies.

136 CHAPTER 5 QUESTED IMPLEMENTATION
Currently QuestView only implements the first item from the above list. The four
remaining items need to be implemented before QUEST can be seen as a useful tool.
The finished Quest View will be based around the questionnaire file. Loading this
file will identify what summary files and raw replies databases belong to it. Quest View
will then offer two operating modes, one focusing the management of the summary
text files and the other on the management of the raw replies database. The summary
mode will be primarily based around the generation and viewing the summary files.
The replies mode will be based around the regeneration of summary files, editing and
correcting dirty raw replies and the generation of statistics from groups of replies files.
The statistic function of the replies mode will be concerned mainly generation
of simply statistics such as averages, proportions and standard deviations for each
goal in the questionnaire. The format of the statistics will vary with each goal type.
For instance, Group and Information goal types will only display the proportion of
respondents who visited the goal. Numeric entry goal types will be able to additionally
display the average and standard deviation for all those respondents who answer the
question. The list based goal types will show the proportion of respondents who selected
each predefined reply.
5.7 SUMMARY
In summary, the QuestED program consists of four main components, these are:
1. Questionnaire database manager. This manages the questionnaire structure in
formation and the loading and saving of this information to a file.
2. Questionnaire Editor. This handles the displaying and editing the of question
naire structure. The author must use the questionnaire editor when creating a
questionnaire.
3. Template Editor. This handles the displaying and editing the of questionnaire
user interface. This author's use of the template editor is optional as each ques
tionnaire can use the default user interface.
4. Summary Editor. This handles the displaying and editing the of questionnaire
user interface. The author need only use the summary editor when a summarised
hard copy of the replies is required, however is it recommended.
QuestED attempts to provide a comprehendible editing interface for creating ques
tionnaires using the information driven model. The editing environment is highly
graphical which provides the author with a visual representation of the questionnaire
structure and user interface. The next chapter attempts to determine the success of this
approach by implementing a series of existing paper questionnaires using the QUEST

5.7 SUMMARY 137
system. These questionnaires and user guide documentation are used in a small trial
program. The results of this trial are presented in the next chapter.


Chapter 6
PRELIMINARY EXPERIENCE
In order to determine whether or not the information-driven questionnaire model is
successful or not, the Quest system has been distributed to a number of people in
terested in such a questionnaire tool. Part of this process is converting a number of
existing questionnaires to the information driven model. These questionnaires can then
serve as examples of what can be done using the system. Also the system has to be
documented in the form of user manuals. The following sections outline a number of
converted paper questionnaires, the user guides, feedback from users of the system and
a set of recommendations based on the feedback.
6.1 PAPER QUESTIONNAIRE IMPLEMENTATIONS
A number of paper questionnaires have been successfully converted to the information
driven model. In many of these cases the actual questionnaire has been enhanced
through the use of calculations within the questionnaire, interactive user interfaces and
information feedback to the questionnaire respondents. A number of these converted
questionnaires are described here.
6.1.1 LifeQuest
This questionnaire was used as the initial questionnaire for the Quest project, at that
stage called LifeQuest. It is a general lifestyle health screen questionnaire. It was en
visaged that it would be used in a general practitioner's waiting room. A patient would
complete the questionnaire while waiting for their appointment with the doctor. The
summarised results of the questionnaire would be immediately available for the doctor
who could make an initial assessment of the patient. The LifeQuest questionnaire was
hard-coded into the LifeQuest program. While the structure of the questionnaire could
be modified to suit the need of the general practitioner, the LifeQuest program could
not be adapted to another questionnaire. The content of this questionnaire was derived
from the Health Check questionnaire, which is described in section 6.1.6 and a Health

140 CHAPTER 6 PRELIMINARY EXPERIENCE
and Fitness Questionnaire. See appendix C.1 for the paper version of the HealthCheck
questionnaire. The origin of the Health and Fitness Questionnaire is unknown.
Initially the LifeQuest questionnaire consisted of five sections, personal, drinking,
smoking, diet and safety. However the total number of questions within the question
naire was limited due to the DOS memory constraints. When implemented in the first
Windows version of Quest, the LifeQuest questionnaire included an additional medical
section. The number of questions were increased to provide a better mix of questions.
However the actual value of the questionnaire was limited as it had not been designed
for a particular survey, but was rather a collection of questions from two different
questionnaires.
6.1.2 Stroke Questionnaire
The Stroke questionnaire is a very simple demonstration questionnaire which shows
how to set up a simple calculation. It is based on the calculation of a risk factor
which indicates whether a patient is at risk from stroke. The risk factor calculation
was devised by Dr Will Coppola and presented in the British Journal of General Prac
tice(Coppola, 1994). See appendix C.2 for more information on this questionnaire.
This questionnaire is used in the QuestED tutorial, see section 6.2.
6.1.3 Smoking Questionnaires
The smoking questionnaire was used to demonstrate the capabilities of Quest at the
Royal New Zealand College of General Practitioners Conference in Christchurch, 1995.
Co-Supervisor Dr Keith Carey-Smith suggested a questionnaire from the "Front Line"
smoking cessation programme, "Helping your Patients Stop Smoking". This ques
tionnaire was arranged by D Kent and P Barham in 1986 at the Auckland School of
Medicine. The original source was the article :, Guidelines of Smoking Cessation" by
M Kunze and M Wood (Kunze and Wood, 1984) which appeared in UICC Techincal
Report. The purpose of this questionnaire was to demonstrate the ability to ask a series
of questions on patient smoking habits. The replies are then used to determine if the
patient is addicted to nicotine. The questionnaire is _based two groups of three single
choice questions. Each question is a five point rating between 'Always' and 'Never'.
The sum of the ratings from each group of questions indicates the dependence of the
patient on nicotine and their motivation for quitting smoking. The implemented ques
tionnaire has a number of miscellaneous questions which gather patient details and
a series of conditional information goals which provide feedback to the patient when
certain conditions are met. Appendix C.3 contains a table of the main questions in the
smoking questionnaire. This questionnaire is used in the QuestED tutorial, see section
6.2.

6.1 PAPER QUESTIONNAIRE IMPLEMENTATIONS 141
6.1.4 Readiness to Change Questionnaire
The Readiness to Change Questionnaire was developed by the National Drug and Al
cohol Research Centre at the University of New South Wales in Australia. It is a twelve
question questionnaire which determines the stage of the respondent in overcoming a
drug or alcohol problem. There are three possible stages: pre-contemplation, contem
plation and action. Pre-contemplation indicates the respondent has not thought about
changing their lifestyle. Contemplation means the respondent has started to think
about changing their lifestyle, and action means the patient is attempting to change
their lifestyle. The twelve questions are divided into three groups of four and are rat
ings which range from 'Strongly Agree (+2)' to 'Strongly Disagree (-2)'. Each group
corresponds to one of the three stages and the sum of the ratings for the questions
within the group form the group score. The group with the highest score indicates
the stage of the respondent. Appendix C.4 gives the entire questionnaire and marking
schedule.
6.1.5 AUDIT Questionnaire
The AUDIT questionnaire's purpose is to determine if the respondent has a drinking
problem. It uses a series of ten rating single choice questions. Each question's rating
revolves around frequency scale which typically ranges between 'Never (0)' to 'Daily or
almost daily (4)'. The sum of all the questions is calculated to give an overall score.
See appendix C.5 for the complete set of questions. The overall score is interpreted as
in Table 6.1.
Table 6.1 The AUDIT questionnaire scoring scale
Score Interpretation <8 No drinking problem.
8-10 Hazardous drinking style. > 10 Severe drinking style. <11 90% chance of not being a problem drinker. > 11 80% chance of being a problem drinker. > 25 Alcohol dependent.
6.1.6 HealthCheck Staff Questionnaire
In 1994, the Royal New Zealand College of General Practitioners (RNZCGP) Research
Unit at the University of Auckland School of Medicine produced a report on computer
assisted health screening programmes (McAvoy et al., 1994). The focus of this study
was a computer program called HealthCheck. HealthCheck is described within the
report as "a computer assisted, self administered lifestyle assessme:r;it questionnaire de
signed to be used independently by patients attending their general practitioner. The

142 CHAPTER 6 PRELIMINARY EXPERIENCE
programme includes questions on modifiable risk factors such as alcohol consumption,
cigarette smoking, diet stress, weight, blood pressure, cervical screening, breast exami
nation, immunisation status and use of over the counter medication". This programme
was developed in 1988 by Dr John Litt, Senior Lecturer in General Practice, Flinders ;,
University Medical School, Australia. The aims of the study were to: 1) assess the mer
its of HealthCheck for patients and staff at a sample of general practices and 2) assess
staff attitudes during this survey. A series of additional questionnaires were created to
meet these aims. There was a patient questionnaire, three staff questionnaires and a
phone interview questionnaire. The HealthCheck Staff questionnaire implemented here
comprises the first two staff questionnaires. See appendix C.6 for the full questionnaire.
6.1. 7 Teenage Health and Fitness Questionnaire
The origin of this questionnaire is unknown, it is different from the Health and Fitness
Questionnaire mentioned in section 6.1.l. The Teenage Health and Fitness Question
naire is a confidential health screening questionnaire aimed at assessing various aspects
of a teenagers lifestyle. The aims of the questionnaire are stated to be to:
• detect any problems that the subject may have and wish to discuss further, either
with the doctor or nurse.
• improve the care the doctor and practice nurse can give the subject and young
people generally.
The questionnaire covers: general health, relationships, personal safety and a se
ries of general questions. It is almost completely implemented using single selection
questions. The majority of these questions are 'Yes/No' questions and the remainder
are variations on a frequency scale, i.e. 'Frequently /Occasionally /Never'. See appendix
C. 7 for the full questionnaire.
6.2 THE USER GUIDES
There are three manuals which document the Quest system. These are the QuestED
user guide, the QuestEX user g~ide and the QuestED tutorial. At this stage there
is no on-line help built into the system. Eventually a fully context-sensitive help file
is planned which will provide a complete description of the system and how it works.
Appendix D contains a copy of each of the manuals. The QuestED user guide is
divided into four parts. The first part describes the questionnaire concepts behind the
questionnaire system and the information driven model. The questionnaire editor part
describes the installation of the Quest System, the user interface and the operations
used to manipulate the questions and questionnaire structure.· The template editor
part describes the purpose of templates within Quest, template editor user interface

6.3 THE TRIALS PROGRAMME 143
and the operations that can be performed on the template and the template objects.
The summary editor section describes how the a questionnaire summary is generated
and the operations used to generate a summary.
The QuestEX user guide is divided into two parts: the author's user guide and the
respondent's user guide. The author's user guide describes how the system is installed
and run. This includes loading the appropriate questionnaire file and setting up the
default printer. The respondent's user guide provides a set of instructions on how to
complete a questionnaire. It outlines the questionnaire introduction, what appears on
the screen and how to interact with it. The section introductions and question are
outlined in a similar manner.
The QuestED tutorial provides two simple questionnaires which a questionnaire
author can use to familiarise themselves with the questionnaire editor. The first is
a simplified version of the smoking questionnaire introduced in section 6.1.3. It first
analyses the problem of what information is required. It then breaks the problem down
in order to identify the questions, the question relationships and the question order.
'T'hP t.ut.nrial t.hPn gnPs t.hrnugh t.hP st.Pps t.n Pnt.Pr this qnpst.innrniirP int.n Q11Pst.F,D 'T'hP
second questionnaire is the stroke questionnaire which was introduced in section 6.1.2.
As the actual questionnaire is quite simple, this tutorial focuses on creating a summary
for the questionnaire and modifying the questionnaire user interface.
6.3 THE TRIALS PROGRAMME
There have been two trials of the LifeQuest and QUEST systems with prospective
general practitioners. The first was instigated as part of a Masters of Engineering
1fanagement project by Ropate Siwatibu. Ropate's project was a business plan study
of QUEST with the focus of the plan on applying QUEST to medical health screening
tasks (Siwatibau, 1994). His trial targeted general practitioners in the Christchurch
area and included a paper questionnaire and a follow-up personal interview. A personal
interview was offered to eleven general practitioners who were interested in the QUEST
system as a tool they could use in their practice. In each interview they were shown
QUEST version 1 which implemented the Question Order Flow model. A number
of suggestions, comments and problems were made regarding this version. A brief
summary of them are:
• Suggestions.
- Must be more user friendly.
Should implement a full (medical) questionnaire when selling the package.
Must have sections on screening, family history, lifestyle and past history.

144 CHAPTER 6 PRELIMINARY EXPERIENCE
- Patient information need to be able to be updated, e.g. if a patient changes
job.
Must have a scoring system to provide feedback to patients.
Get rid of mouse.
Change default selection to most questions.
Have a section on sexual safety.
Give patients the option of skipping sections or not filling in questions.
Have animated graphics on screen to attract patients.
Have a central database whereby GPs could compare their data.
Vital to have risk factors highlighted by the program.
• Comments.
- Vast potential for gathering data.
Could get nurse to help patient fill out questionnaire and collect other in
formation such as height, blood pressure, etc.
First time patients should be guided through the first sitting.
Concern about patients tampering with the computer.
Need to stress confidentially to the patients.
• Problems.
- Need new hardware.
- Need more paper for print outs.
- Needs to be compatible with other medical database software.
A number of the suggestions related directly to the content of the LifeQuest ques
tionnaire. These are of a greater concern to the questionnaire author and can be
largely disregarded in this discussion. However it is important that the questionnaire
system can provide all the facilities to accommodate the needs of the questionnaire
author. The suggestions relating to the user interface of questionnaire were considered
for QUEST version 2. For example attempts were made to improve the user interface
and to include graphics and animation to attract the patients. However the mouse was
not removed as it is seen as a worthwhile method of replying to questions. The sugges
tions about highlighting risk factors and the scoring system were provided for by the
new calculation and condition goal facilities. This is a general solution to the scoring
system problem as it relies on the questionnaire author to create the scoring system
within in questionnaire. This approach can be applied and adapted to a wider range of
applications than if the scoring system was simply targeted at lifestyle questionnaires.

6.3 THE TRIALS PROGRAMME 145
The comments again were largely directed towards the content of the questionnaire
and the management of how the questionnaire is administered. The comment about
requiring a nurse to guide the patient through the questionnaire is a potential problem
as this somewhat defeats the point of having the computer administer the questionnaire.
It may be necessary to have a nurse walk the patient through the first few questions in
order to show the patients the basics of the system. Efforts have been made in QUEST
version 2 to make the system more secure against respondents who may wish to tamper
with the computer. It is now possible for QuestEX to 'take over' the operating system
and stop the respondent from leaving the questionnaire either by task switching away
or by rebooting the computer with the 'Ctrl-Alt-Del' key sequence. This however does
not stop the respondent turning the computer off and then restarting it.
The problems section reflect the changing personal computer scene. New appli
cation invariably seem to need more computing resources than before. The QUEST
version 1 was a set of fairly light weight Windows programs in terms of computer re
sources. QUEST version 2 has followed recent trends and is more resource hungry,
and this is largely due to the use of the Visual Prolog libraries in QuestED and the
multimedia capabilities of QuestEX. So the requirements for new computer hardware
are higher. The problem with summary print-outs have been addressed through the
new summary manager. By being able to decide exactly what goes into a summary the
author can reduce paper consumption and increase the amount of r~levant information
on each summary. The compatibility problem with other applications was considered.
The best solution was as a simple text exporting capability. Most spreadsheet and
database application can import text files. Again this is a general approach to the
problem as a solution involving one or two medical database problems would have been
too restrictive.
The second_ trial involved a small group of general practitioners who expressed an in
terest in an early prototype version of QUEST version 2. This version was demonstrated
at the Royal New Zealand College of General Practitioners Conference in Christchurch,
1995. From this a group of eleven from throughout New Zealand received a test version
of QUEST version 2 along with the user guides and examples presented in the previous
sections. The idea was to get them familiar with the questionnaire model by reading
the user guides and by following the tutorial. An evaluation questionnaire was included
with the example questionnaires as a means of providing feedback on the new version
of QUEST. During the trial period a number of updated versions of QUEST version
2 were sent out to the recipients. These updated versions fixed a number of problems
which arose through the testing process. Unfortunately the results of this trial were
not as successful as the previous trial. This could be attributed to a number of reasons:
• Bad experiences with one of the early releases. In total there were three updates
sent out to the recipients and one letter explaining how to rectify further problem.

146 CHAPTER 6 PRELIMINARY EXPERIENCE
These updates fixed specific problems which only appeared during the testing
phase. One of the problems was particularly bad in that it was able to render the
Windows operating system unusable. This type of experience may have soured
the recipients' view of QUEST.
• Poor choice of test population. The choice of general practitioners as test recip
ients seemed necessary as they were the targeted users in the case of a Lifestyle
questionnaire. However general practitioners are particularly busy people at the
best of times, and many of them may not have had the resources and time to
investigate the QUEST system a tool useable in their practice.
• The trial group was too small. To produce a meaningful result, the size of the
trial group should have been larger. This would have resulted in more general
feedback about the system.
• Lack of time and resources. This would have allowed more communication be
tween the recipients and the project author. Extra time would have allowed
a more thorough investigation of the general practitioners' problems with the
system.
However a number of positive outcomes occurred from the amount of preliminary
feedback from a small few of the recipients. The author's own feedback and experi
ences were also useful in evaluating the problems with the questionnaire model and the
subsequent implementation.
The problems seen in the system are most important are they indicate where the
system needs adjustment. Some of the problems seen were:
• The terminology used was not obvious. Much of this terminology has come from
the knowledge engineering aspects of the project. This would confuse people
unfamiliar with this field.
• There needs to be a summary display for the patient. Currently only a print-out
is available which is not as effective as a summary displayed on the screen.
• Summary editor was logical but laborious. This process is not stream-lined
enough especially when compared to the questionnaire and template editors, both
of which are graphical in nature.
• Performance of QuestED is slow for large questionnaires. The questionnaire tree
view window slows down markedly once a questionnaire grows large. This is
problem with the VPI tree package.
• There is no way of including the replies of one goal in a question goal. The
question goal types can not include references to other goals with their question
text as the Info goal type can.

6.4 FUTURE RECOMMENDATIONS 147
• The LifeQuest questionnaire is not up to scratch. The actual design and content
of this questionnaire is some what unsatisfactory for use in a general practice.
• The replies viewing aspects of the system are currently lacking. Quest View is
currently only a simple summary viewer which allows no process of the replies.
Such processing should include the cleaning of erroneous replies data, manage
ment of the raw reply files and summary files, and generation of text summaries
and statistics.
The advantages of the system are equally important. Some of the positive feedback
about the system was:
• Tree representation was less confusing than the flow chart representation for com
plex questionnaires.
• The questionnaire model is sufficiently simple to understand when creating ques
tionnaires.
• The graphical display of QuestEX was especially good for young children. Chil
dren often see the questionnaire as a fun activity and will complete the questions
without realising they are involved in a study. The multimedia capabilities are
especially useful here.
• The template editor gives the author a great deal of flexibility in creating their
own user interface. This is an important advantage as it gives the patient some
thing familiar to identify with.
6.4 FUTURE RECOMMENDATIONS
The last section presented a number of advantages and disadvantages. The disadvan
tages need to be addressed before the system can be used in either a general practice
or in another field. Along with presented disadvantages there are a number of recom
mendations for each program component of the system. These are:
Questionnaire Model.
• Generalise the model further by allowing question goals to have child goals.
The child goals would be used to create the question text in much the same
manner as Info goals do now. This would mean that all goal types can have
children.

148 CHAPTER 6 PRELIMINARY EXPERIENCE
QuestEX.
• Include a summary display screen. This would display a summary to the
respondent once the questionnaire had finished. At present only a summary
print-out is available which does not have the impact of seeing the completed
summary appear on the screen soon after finishing the questionnaire.
• Improve the 'back' function. Currently this does not perform consistently.
This is mainly due to the way Group goals are processed and must function
in an expected manner otherwise the respondent may be confused.
• Add further multimedia enhancement to the system. Possibilities include
touch screen or Pen for Windows support and adding text to speech capa
bilities so the questionnaire can be read out to the respondent. Both of these
enhancements will improve the useability of QUEST by hiding the fact that
it is a personal computer based system. A speaking, keyboard-less touch
screen based implementation will appear less like a computer and so will be
more accessible to people not used to dealing with computers.
QuestED.
• Provide a list based view of the questionnaire tree. This would be an al
ternative method of editing the questionnaire structure. A list based view
would be perform inherently faster than the graphical tree view. This is
because a list does not have to perform the same amount of calculation to
draw the list as the tree does. The list view would still show the question
naire tree in a hieratical form but in a similar fashion to the directory view
in the Windows File Manager.
• Improve the summary editor. Currently the summary editor has been de
scribed as 'logical but laborious'. It is clearly not up to same the standard as
the questionnaire editor and the template editor. Efforts must be made to
produce a more form based approach to editing the summaries. An approach
based around the VPI hypertext editor looks the most promising. Hypertext
links could be used to represent references to goals within the questionnaire
structure. Clicking on the hypertext link would allow the reference to be
edited.
• Produce on-line help for the QUEST system. This would be accessible
through QuestED. Currently the only help available is through the user
guides. Such a help system would be based around the existing user guides
but would bring together the information in the user guides into a single
reference.
• Generally improve the user interface of the questionnaire editor. This in
cludes re-organising the menu structure, adding drop and drag functionality

6.4 FUTURE RECOMMENDATIONS 149
to the tree view, be able to cut and paste goals and provide context sensi
tive help and menu handling. These improvements will bring QuestED into
line with a number of popular Windows applications. So making easier for
questionnaire author to learn the QuestED user interface.
Quest View.
• The functions discussed in section 5.6 need to be implemented.
Once these recommendations have been implemented, QUEST will provide all the
necessary features to implement a small to medium scale survey. The intention is that
the QUEST system be made available to those people and organisation who have ex
pressed an interest in it. Currently these include Dr Keith Carey-Smith for the Quality
Assurance department of the Royal New Zealand College of General Practitioners and
more recently John Kaiser at the Centre for Information Management at the Univer
sity of Otago. Another option is distribute QUEST as a shareware application using
the free advertising opportunities offered by the World Wide Web and the shareware
archives such as Simtel and Winsite.


Chapter 7
CONCLUSION
In conclusion, this thesis has examined the process of implementing a questionnaire
or a survey from concept to conclusion. The questionnaire process is a sequence of
tasks which encompasses the aims, design, implementation, presentation, analysis and
conclusion of a questionnaire or survey. It is important to appreciate the process as a
questionnaire is not simply a collection of related questions. There is a purpose and
method behind each question.
Two questionnaire models were designed for the questionnaire process: the Ques
tion Order flow approach and the Required Information flow approach. The models
Yiew the questionnaire process differently. The Question Order flow model views each
questionnaire as a collection of sequenced questions. The Required Information flow
model views the questionnaire as a hierarchical tree of information with the most gen
eral information at the root of the tree and the most specific on the leaves.
Both of these models have been implemented. The Question Order flow model
,..,.as shown to be flawed and the implementation of this model showed this to be the
case. This was due to the way that questions and conditions refer to the replies of
other questions. The Required Information flow model was designed to overcome these
flaws. The implementation of this model successfully demonstrated better reliability
in performance and in the representation of a questionnaire. The implementation of
the two main components in this system are presented: the questionnaire editor and
the questionnaire administrator. The questionnaire editor program allows an author
to design a questionnaire and implement its structure, user interface and output. The
questionnaire administrator program interprets this information and can present it to
a series of questionnaire respondents. The respondent's replies are then summarised
and can be further analysed in order to produce a conclusion.
The results of two trials for both the Question Order flow model and the Required
Information flow model are presented. The trials together were only marginally suc
cessful but did produce a number of useful recommendations and user feedback. This
feedback has helped to shape the project and has lead to a number of future recom
mendations on what should be done to complete the project.


REFERENCES
ALLEN, B. and SKINNER, H.A. (1987), 'Life assessment using microcomputer', In
BUTCHER, J.N. (Ed.), Computerized Psychological Assessment, Basic Books
Inc., Chap. 7, pp. 108-123.
BARKAKATI, N. (1994), Borland C++ 4 Developer's Guide, Sams Publishing, Indi
anapolis, Indiana.
BRADBURN, N.M., SUDMAN, S. and ET AL. (1979), Improving Interview Method
and Questionnaire Design, Jossey-Bass Inc., San Francisco, California, first ed.
BRATKO, I. (1990), PROLOG Programming for Artificial Intelligence, Addison
Wesley, Reading, Massachusetts, second ed.
BRIDGE, G.R. and AL, E. (1977), 'Interviewing changes attitudes-sometimes', Public
Opinion Quarterly, Spring.
BRODIE, M.L., MYLOPOULOS, J. and SCHMIDT, J.W. (1984), On Conceptual Mod
elling, Springer-Verlag, New York.
CAREY-SMITH, C., POWLEY, D. and CAREY-SMITH, K. (1993), 'An adaptable
health screening questionnaire', In KASABOV, N.K. (Ed.), Artificial Neural
Networks and Expert Systems, IEEE Computer Society Press, Dunedin, New
Zealand, pp. 259-260.
CONVERSE, J.M. and PRESSER, S. (1986), Survey Questions, Handcrafting the Stan
dard Questionnaire, Quantitative Applications in the Social Sciences, SAGE Pub
lications Inc., Beverly Hills, California.
COPPOLA, W. (1994), 'Test developed to spot likely stroke victims', British Journal
of General Practice.
DURKIN, J. (1994), Expert Systems, Design and Development, Macmillian Publishing
Company, New York.
KAHN, R.L. and CANNELL, C.F. (1957), The Dynamics of Interviewing, John Wiley
and Sons, Inc., New York.

154 REFEREKCES
KUNZE, M. and WOOD, M. (1984), 'Guidelines on smoking cessation', UICC Techincal
Report, Vol. 79.
LABAW, P.J. (1980), Advanced Questionnaire Design, Abt Books, Cambridge, Mas
sachusetts.
LOGIE, A.R., MADIRAZZA, J. and WEBSTER, I. (1976), 'Patient evalulation of
a computerised quesitionnaire', Computers and Biomedical Research, Vol. 9,
pp. 169-176.
LUGER, G.F. and STUBBLEFIELD, W.A. (1989), Artificial Intelligence and the De
sign of Expert Systems, The Benjamin/Cummings Publishing Company, Inc.,
Redwood City, California, first ed.
MCAVOY, B.R., POWELL, A.M. and ADAMS, P.J. (1994), Feasibility Study of a Com
puter Assisted Health Screening Programme for Use in General Practice Settings,
Technical Report, RNZCGP Research Unit, Department of General Practice,
School of Medicine, University of Auckland.
MOUGHAN, C.J. (1988), 'Prevention in general practice', The New Zealand Family
Physician, Summer.
OPPENHEIM, A.N. (1966), Questionnaire Design and Attitude Measurement, Basic
Books, Inc., New York.
PARSAYE, K. and CHIGNELL, M. (1988), Expert Systems for Experts, John v\·iley
and Sons, Inc., New York.
RALSON, A. (1971), Introduction to programming and computer science, McGraw-Hill
Inc.
SIWATIBAU, R. (1994), QUEST Business Plan, Master's thesis, Univeristy of Can
terbury.
SKINNER, H.A. and ALLEN, B. (1983), 'Does the computer make a difference. com
puterized versus face-to-face versus self-report assessment of alcohol, drug and
tobacco use', Journal of Consulting and Clinical Psychology, Vol. 51, No. 2,
pp. 267-275.
SKINNER, H., ALLEN, B., MCINTOSH, M. and PALMER, W. (1985), 'Lifestyle as
sessment: Applying microcomputers in family practice', British Medical Journal,
Vol. 290, January, pp. 212-214.
SLACK, W.V., HICKS, G.P., REED, C.E. and VAN CURA, L.J. (1966), 'A computer
based medical-history system', The New England Journal of Medicine, Vol. 274,
No. 4, January, pp. 194-198.

155
WEISS, S.M. and KULIKOWSKI, C.A. (1984), A Practical Guide to Designing Expert
Systems, Rowman and Allanheld, Totowa, New Jersey.
YOSHIDA, A., HAGITA, Y., YAMAZAKI, K. and YAMAGUCHI, T. (1993), 'Which
do you feel comfortable, interview by a real doctor or by a virtual doctor?', IEEE
International Workshop on Robot and Human Communication.


Appendix A
DOMAIN DECLARATIONS
The following domain declarations are taken from the file 'quest.dam'. These define all
the variable 'types' used in the entire QUEST project. For the purpose of clarity the
domains are grouped together and are commented as groups.
GLOBAL DOMAINS
% General purpose integer based indentifier types.
goalid,goalstate,goaltype,style,templateid,summaryid,objid,objtype,menutype
= integer
% General purpose list domains.
stringlist = string*
indexlist = integer*
reallist = real*
% textlist stores text strings and options for a particular goal
textitem = ti(integer,string); option(integer,integer); limit(integer,real)
textlist = textitem*
% responselist stores list items, rpn calculation expressions and replies for
% the inference engine.
response= r(stringlist,reallist,indexlist); ci(integer); cr(real);
cs(string); v(goalid,symbol); o(operator)
r~sponselist = response*
responselistlist = responselist*
% store multimedia event informations and options for each goal.
mmitern = mm(integer,SLIST,textlist) %mm(mmtype,mmstring,rnmoptions)
% creates a series of list type based on simpler types. All are used in the
% goalobj and questionobj types.
mmlist = mmitern*
ternplatelist = templateid*

158
summarylist = summaryid*
goallist = goalid*
APPENDIX A DOMAIN DECLARATIONS
% The following two objects completely describe a goal. The fileobj holds
% questionnaire options and id lists for all the objects in the questionnaire.
goalobj = g(goalid,goaltype,goalid,goallist)
questionobj = q(goalid,goaltype,textlist,responselist,mmlist,templateid)
fileobj = i(goallist,templatelist,summarylist,textlist)
% The following five objects are used within the templateobj object. A
% list of templateobj's make up a template description of the user interface
% for a goal object.
fnt = f(string,integer)
objextra = text(string);select(COLOR);none
object= obj(objid,objtype,RCT,fnt,COLOR,CDLOR,style,objextra)
objidlist = objid*
objectlist = object*
templateobj = t(templateid,string,goaltype,integer,string,objectlist)
% The following 6 objects provide the basis for each summary entry.
sumentry = se(goalid,BOOLEAN,string,string,style)
sumentrylist = sumentry*
sumprint = sp(BDOLEAN,BOOLEAN,string,integer)
sumfile = sf(BDDLEAN,string,string) % directory, filename template
summaryobj = s(summaryid,string,integer,sumprint,sumfile,sumentrylist)
summaryobjlist = summaryobj*
% The next five objects are used when evaluating RPN expressions.
operator= one_ary(symbol); two_ary(symbol); func(symbol); special(symbol)
funccalc = determ real (real) - (i) % func calculations predicate domain
twovarcalc determ (real,real,response) - (i,i,o)
twoidxcalc = determ (integer,integer,response) - (i,i,o)
twostrcalc determ (string,string,response) - (i,i,o)
% The three reply objects are used to store the respondent's replies
replyobj = ro(goalid,goalstate,responselist)
replyobjlist = replyobj*
rawreplyobj = rr(integer,integer,integer,integer,integer,replyobjlist)
% day,month,year, hour, min, reply list
% these final domains are used for file ID operations
db_selector = qstfile ; qstdb; qstreplies
file= logfile; tempoutfile; summaryfile

Appendix B
GLOSSARY OF TERMS
Author The person who defines the form and context of the questionnaire.
AVI File A file format for storing digitised sound and video information.
Block The name of the fundamental question building block in the Question Order
flow model.
Child Goal A goal which provides information for a parent goal which is higher up
in the questionnaire tree structure.
Command Enabling The process of enabling user interface controls in response to
some user action.
Database File A file that contains the all the reply files for a particular questionnaire.
Expert System A knowledge based computer program that provides 'expert quality'
solutions to problems in a specific domain.
External Database A binary file format used by the PDC Prolog language for storing
information in an efficient database structure.
Goal The name of the fundamental question building block in the Required Informa
tion flow model.
Inference Engine The part of a Expert System which applies it's knowledge to the
solution of the problem.
Internal Database An database storage method used by PDC Prolog language to
maintain information during a program's execution. Can also be saved as text
based file format.
Knowledge Representation The study of how information can be represented and
stored within a computer system.
Light Pen A device that allows the user to draw on or point at a computer screen.
The computer then recognises the point of contact.

160 APPENDIX B GLOSSARY OF TERMS
Link Another fundamental building block within the Question Order flow model.
Microsoft Windows An operating system shell that incorporates a Graphical User
Interface.
MIDI File A common format for compactly storing musical information.
Multimedia The use of many different media to deliver information.
OWL The Borland Object Windows Library. A C++ application framework library
for programming Windows applications.
PDC Prolog A non-standard version of Prolog designed to run on IBM compatible
computers. A language based on logic and symbolic programming.
QuestED Part of the QUEST Questionnaire system. Used to create and edit ques
tionnaires.
QuestEX Part of the QUEST Questionnaire system. Used to display and run ques
tionnaires.
Question Order flow The name of a questionnaire representation model used in the
QUEST questionnaire system. Structured a questionnaire around a sequence of
questions.
Questionnaire File A file containing the complete description of a questionnaire.
Quest View Part of the QUEST Questionnaire system. Used to summarise and store
questionnaire replies.
Reply File A file generated by QuestEX, contains the replies to the questionnaire
process.
Require Information flow The name of a questionnaire representation model used
in the QUEST questionnaire system. Structured a questionnaire the information
dependencies within that questionnaire.
Respondent The person who replies to the questionnaire.
RPN Expression A mathematical expression where the mathematical operators ap
pear after the arguments in the expression.
Sound Card A device for playing digital sound and music waveforms.
Summary A form based report of the respondent's replies.
Template A description of the questionnaire screen for a particular goal type.

161
Touch Screen A pen shaped device which recognises when and where are user touches
the monitor surface.
Tree View A structured hierarchical tree display of the questionnaire in the Require
Information flow model.
Wave File A file containing digitally recorded sound information.


Appendix C
EXAMPLE QUESTIONNAIRES
C.1 HEALTHCHECK QUESTIONNAIRE

HEALTH
A Questionnaire. Please fill in details below where applicable.
SURNAME
FIRST NAME
ADDRESS
SUBURB
CITY ____ P.CODE
SPECIAL ID No. __
D.OF BIRTH (dd/mm/yy)
AGE __ YEARS.
OCCUPATION
I
HEIGHT (CMS) centimetres.
WEIGHT (KGS) ___ kilograms
INSTRUCTIONS Circle the answers that are correct for you for the following questions.
GENDER 1. Male ?. Female
ETHNIC ORIGIN 1. Caucasian 2. Polynesian 3. Indian 4. Asiatic 5. Other origin.
FAMILY ILLNESS HISTORY Does any parent, brother or sister have any of the following health problems, either now, or in the past?
1. Heart attack (coronary) or angina prior to age 60 years
2. High blood pressure 3. Bowel cancer 4. Diabetes 5. Asthma 6. Breast cancer 7. Alcohol problems :l. Melanoma 0. None of the above
CHECK~
PERSONAL HEALTH/ILLNESS Have you now, or at any time in the past, any of the following diseases or illnesses?
1. High blood pressure 2. Heart attack/coronary/angina 3. Asthma 4. Cancer (incl. melanoma) 5. Diabetes
Have you now, or at any time in the past 5 years. any of the following diseases or illnesses?
6. Stroke or CVA 7. Epilepsy 8. Nervous breakdown or depression
needing medication and/or sick leave in the last 5 years.
9. None of any of the above
CURRENT HEALTH PROBLEMS. Have any of the following problems worried you in the last month?
Possible Early Cancer Signs 1. Mole that darkens, or grows,
itches, or bleeds unexpectedly 2. Unexpected change in bowel habit 3. Sores that do not heal 4. Persistent cough, hoarseness, or
coughing up blood 5. Any unusual bleeding or bruising 6. Lump in breast or nipple discharge 7. Loss or gain in weight without a
change in diet B. Passing blood/mucus in bowel
motion (faeces/stool)
Other Possible Illness Signs 9. Chest pain or discomfort with
exercise, eating or cold weather 10. Depression or thoughts of suicide 11. Marked excess in thirst 12. Wheeziness - marked & limiting 13. Unexpected shortness of breath 14. Severe or persistent indigestion 15. Unexplained fainting, vertigo,
or dizzy spells 16. Pain that is affecting sleep or
limiting daily activities
Copyright 1988 Dr S.J.Culpan Lifelong Health Services

PERSONAL CANCER RISKS. . Circle any of the following that apply to you.
1. Fair skin that burns easily 2. More than 5 brown raised moles of
any size/shape on right arm 3. Exposure to asbestos in past 4. Unsafe exposure to radiafion or
radio-active materials. 5. Exposure to any chemicals known to
cause cancer in some people 6. Don't eat a serving of carrot,
pumpkin, squash, or green leafy vegs. at least 4 - 6 times a week
7. Don't eat a serving of cabbage or cauli or broccoli or sprouts at least 4 - 6 times a week
8. Don't get regular cervical (Pap) smears 9. Do not perform breast self exam 1 o Eat nitrate foods (salted/pickled/cured)
at least twice wkly e.g. salami/pickles/hams
SMOKING 1. Never smoked 2. Stopped smoking over 10 years ago 3. Stopped smoking 5 - 1 O years ago 4. Stopped smoking 0 - 5 years ago 5. Smoke up to 10 cigarettes per day 6. Smoke 1 0 to 20 cigarettes per day 7. Smoke 20 to 40 cigarettes per day 8. Smoke over 40 cigarettes per day 9. Smoke pipe or cigars only
ALCOHOL How often do you drink alcohol? 1 . Every day usually 2, 3 - 5 days a week 3. 1 - 2 days a week 4. Occasionally 5. Never
On average how many alcohol drinks would you have per week? (One drink equals one nip of spirit, 1 glass of wine, 1 can of beer, and 2 - 3 cans of low alcohol beer.)
1. None 2. 1 - 7 drinks per week 3. 8 - 14 drinks per week 4. 15 - 28 drinks per week 5. Over 28 drinks per week
CAFFEINE Add up the number of cups of coffee, tea, and cola drinks you average a day. (Exclude decaffeinated coffee)
1. 0 - 3 cups per day 2. 4 - 6 cups per day 3. 7 or more cups per day
MEDICATIONS Are you taking any medicines prescribed by your
• doctor or bought from the chemist?
1. Yes 2. No
EXERCISE On average, how many times a week do you do exercise for at least 30 minutes on end {hard enough to make you puff and sweat)? e.g jogging, aerobics, brisk walking, swimming & active sports.
1, Less than once a week 2. 1 - 2 times weekly 3. 3 - 4 times a week 4. More than 4 times a week
SAFETY HABITS
Driving When driving or travelling with someone, do you?
1. Always drive within the speed limit 2. Drive within 5km/hr of limit and
decrease speed for poor conditions 3. Often drive over the speed limit 4. Usually drive over the limit
Seat Belts When travelling by car do you?
1. Always wear a seat-belt. 2. Usually wear a seat-belt. 3. Often do not wear a seat belt 4. Never wear a seat belt
Driving and Drinking Alcohol When driving do you?
1. Never drive after drinking - or never drive - or never drink at all
2. Drive after drinking only low alcohol beer 3. Drive only if you have only drunk up
to 1 drink per hour 4. Drive after drinking more than 1 drink/hour
Swimming Can you? 1. Swim well even in open sea, &
for more than 100 metres. 2. Swim for a short distance 3. Dog-paddle 10 feet if needed. 4. Manage to float only 5. Not able to swim or float
Resuscitation. Do you? 1. Have a training in first aid and know how to
I
do mouth to mouth breathing and heart massage. 2. Not know how to do mouth to do mouth
breathing and heart massage .. ./2

STRESS/DISTRESS
Circle any of the following that fit the way you have been feeling recently
1. Often depressed or very unhappy. 2. Not able to cope with every day
hitches at home or work. 3. Seldom tired or fatigued apart
from after hard physical work 4. Difficult to socialise - avoid
meeting people. 5. Steeping under 7 hours a night 6. Don't think t am doing a good job
of life at present 7. Enjoy most days - work and home 8. Have no friends or people I can
talk to if I need help or advice 9. Desperate for help 10 Have disturbing or unreal thoughts
DIET AND EATING HABITS
Choose the answer that best fits your average eating habits.
BREAKFAST Do you eat a good breakfast -(Cereal or at least 3 pieces whole-meal bread, optional fruit or fruit juice)
1. Hardly ever 2. About once a week 3. 2 - 4 days a week 4. Almost every day
BREAD, CEREAL & GRAIN PRODUCT Unrefined Whole Grain Foods High fibre and whole grain breads and rolls, bran or oat based biscuits, pastas, brown rice, high fibre cereals without sugar (such as oat based, bran, weetbix, cornflakes, muesli & porridge )
Refined Low fibre Foods. White bread, sugar coated cereals, biscuits, cakes, doughnuts, white rolls and buns
1. Eat mostly only refined type 2. Eat more refined than whole grain 3. Eat equal amounts of both 4. Eat more whole grain than refined 5. Eat mostly only whole grain type
MEAT POULTRY SEAFOOD 1. Eat mainly red meat, and or food such as
chicken with skin, luncheon or salami, pates, crayfish or prawns.
2. Mostly eat red meat,but also eat some white poultry meat or fish
3. Eat equal amounts of red meat & fish/poultry. 4. Eat mainly fish or skinless poultry. 5. Rarely eat any meat, poultry or
fish - mainly vegetarian.
COOKING METHODS Choose the way you tend to cook, or the foods you would choose to eat.
Low fat foods Bake, broil, steam, or grill. Use vegetable oils and sparingly, no butter, few eggs added, low-fat dressings.
High fat foods Frying or roasting, deep frying, batters, gravies and rich sauces, added cheese. Solid fats and butter to cook with. Eggs added
1. Eat mostly only high fat type 2. Eat more high fat than low fat 3. Eat equal amounts of both 4. Eai more iow fat than high fat 5. Eat mostly only low fat type
EGGS Mark the number of eggs you eat on average per week, (Add those used in cooking if possible.)
1. O - 3 eggs per week 2. 4 - 7 eggs per week 3. 8 - 14 eggs per week 4. More than 14 per week
DAIRY PRODUCTS Choose the answer that best fits your eating patterns and habits.
Low Fat Dairy Products Low-fat milk/cheeses/yoghurts, soya products, cottage cheese.
High Fat Dairy Products Hard cheeses, cheddar, cotby, and processed cheeses, cream, ice-cream, whole-fat milk.
1. Eat mostly only low fat type 2. Eat more low fat than high fat 3. Eat equal amounts of both 4. Eat more high fat than low fat 5. Eat mostly only high fat type 6. Eat no dairy products
... /3

FRUITS & VEGETABLES On average, how many servings of fruit an.d vegetables do you eat per day? · (1 serving equals one piece of fruit or a small cup of vegetables.or 1 glass fruit. juice)
1. Up to one serving a day· 2. 2 servings per day 3. 3 servings per day 4. 4 servings per day 5. 5 or more servings per day
BUTTER/MARGARINE SPREADS When using the following, do you usually use and eat?
1. Butter 2. Some butter /some margarine 3. Mainly margarine 4. Only low fat/low cholesterol
high polyunsaturated margarine 5. Do not use butter or margarine.
SALT Do you usually?
1. Add salt at table and cooking -OR - eat crisps, salted nuts, pickles, several days every week.
2. Add salt to cooking only -OR - lightly salt at table only and -only occasionally eat crisps and nuts.
3. Not add salt to cooking or at table and avoid salty foods.
TAKEAWAYS How often do you eat takeaways such as hot chips, battered and deep fried foods, hamburgers, fried chicken, pies and ice-creams or thick-shakes?
1. Most days 2. 2 - 3 times a week 3. No more than once a week 4. Less than once a week 5. Rarely or never
BETWEEN MEAL SNACKS Do you snack between meals? (biscuits, muesli or snack bars)
1. Yes 2. No
HEALTH DATA ENTRY (To be filled In by test personnel only)
Height (not in shoes) ___ ems
Weight (clothed) ___ kgs
Frame Size 1. Small (circle choice) 2. Medium 3. Large
Resting pulse (beats/min)
Blood Pressure (lying or seated)
Systolic Pressure
Diastolic Pressure
Flexibility
Body fat Upper
Middle
Lower
___ mm
___ mm
___ ems
TOTAL mm
Known % body fat ___ %
Lung Function Peak Flow Actual ___ (litres/min)
F.V.C. Actual
F.E.V.1 Actual
Aerobic Capacity.
Predict __ (litres/min)
___ (litres)
___ (litres/min)
Known Aerobic Capacity
or
___ Litres 0/min
___ mls/kg/min
Bicycle Ergometry One Stage
Watts Heart Rate
BLOOD TESTS. Total Cholesterol (mmol/1)
HDL Cholesterol (mmol/1)
Glucose (mmol/1)
G.G.T. (mmol/1) .. ./4

168 APPENDIX C EXAMPLE QUESTIONNAIRES
C.2 STROKE QUESTIONNAIRE
Test developed to spot likely stroke victims
Most high risk stroke paclents attending general practice surgeries could be identi!ied using a simple scoring system, say specialists In the UK.
Using age, systolic blood pressure, current cigarette consumptlon and evidence of angina! chest pain, researchers were able to predict 82 per cent of all ..itrokes over Jive years in tl ,e high risk group_
The patient needs r:,o extra investlgaclon or d ,tailed medical history so the test could be pedormed by prac-
tice nurses at low cost. Dr Will Coppola, study co
author and clinical research fellow at London's Royal Free Hospital, said the system, based on analysis of data of 7735 men aged 40 to 59 years in the British Regional Heart Study, could also be used for women.
~it will enable GPs to pick out people at particularly high risk and com:entrale preventive action on those who need it most, w said Dr Coppola.
The paper, published in the April edition o! the British
STROKE PREVENTION ___________ _
Scoring systems • Multiply age of patient by nine • Add 2.85 x systolic blood pressure • Add 70 if anglnc1 is present • Add 90 if the patient smokes between one and 20
cigarettes a day & Add 130 tf patient smokes more than 20 cigaret :es a clay • Tilrget patients scoring over 1001
Journal of Ceneruf PfaCtice says Intervention for the 20 per cent oI patients at the highest risk would provide the majority of stroke prevention required.
The researchers recommend patients scoring over 1001 are targeted for intervention treatment
They call !or doctors lo !c>cus on mandgingsmoklngand
hyµertenslon and stress the Importance ol avoiding Inactivity. This, claim the researchers, is associated w!th up lo a three-fu'.d rise in stroke risk.
Their study found a combination ol smoking ancl hypertension, while not as sensitive as the scoring system, was a better indicator of risk than any single factor. I

C.3 SMOKING QUESTIONNAIRE 169
C.3 SMOKING QUESTIONNAIRE
PRE:OICTIV'E SCALE OF DEPENDENCE AND MOTIVA.TION
Dependence Always Frequently Occasionally Seld.orn Never
J..: I feel irritable & moody when I haven ' t smoked f'or a while~ 5 4 3 2 1
B: I usually have a cigarette within 3 0 mins of waking;. 5 4 '3 2 1
C ! I develop a craving for a cigarette when 5 4 '3 2 1 without them.
Motivation to Quit Strongly- Mildly- Mildly- Strongly-Agree Agree Disagree Disagree
D: I am confident of quitting in 1 2 3 4 the next 4 ..,.ks .
E: By continuing s:noking I risk d.eveloping ser i-ous heart and , 2 '3 4 lung problems.
F: I very much want to quit smoking immediately. 1 2 3 4
A+ B + C ), 9 = HIGHLY DEPElIDENT D + E + F,4- = WELL MOTIVATED

170 APPENDIX C EXAMPLE QUESTIONNAIRES
C.4 READINESS TO CHANGE QUESTIONNAIRE
The following questionnaire is designed to identify how you personally feel about your drinking right now. Please read each of the questions below carefully, and then decide whether you agree or disagree with the statements. Please tick lhc answer of your choice lo each question. Your answers are completely private and confidential.
1. I don't think I drink loo much.
2. I am trying lo drink less than I used to.
3. I enjoy my drinking, but sometimes I drink too much.
4. Sometimes I think I should cut down on my drinking.
5. Il's a waste of lime thinking about my drinking.
6. I have just recently.changed my drinking habits.
7. Anyone can talk about wan ling lo do something about drinking, but I am uctually doing something about it.
8. I am at the stnge where I should think about drinking less alcohol.
9. My drinking is a problem ·,ometimes.
10. There is no need form.~ 10 think about ch:,nging my drinking.
11. I am actually changing my drinking habits right now.
12. Drinking less alcol: ! be pointless for me.
S lron!!ly Disagree Unsure Disagree
Agree Strongly Agree
CJ CJ CJ CJ CJ
CJCJCJCJCJ
CJ CJ CJ CJ CJ
CJ CJ CJ CJ CJ
CJ CJ CJ CJ CJ
For Official Use Only
lpl:: j :·: 1::, . . ·.·.:)(:•·•{:.: ... :.: :•:.-. · .. ··t·:···••:
·:~;;J. IA!:'.\ /(·:::-;}/_:=: . : : :;~:~) ·• .. ;·:::-,;:•-::::; .. :::::•:>-;: -:::::::::.:
~~j
::fl

Scoring the Readiness to Change Questionnaire.
The Prccontcmplation items are numbers 1, 5, 10 & 12, the Contemplation items are numbers 3, 4, 8 & 9, 'thd the Action items are numbers 2, 6, 7 & 11. All items are to be scored on a 5-point rating scale ranging from:
[I] Strongly disagree
DJ Disagree
[TI Unsure
GIJ Agree
@J Strongly agree
To calculate the score for each scale, simply add lhe item scores for the scale in question. The range of each scale is -8 through 0 to +8. A negative scale score reflects an overall disagreement with items measuring the stage of change, whereas a positive score represents overall agreement. The highest scale score represents the Stage of Change Designation.
Note: If two scale scores are equal, then the scale farther along the continuum of change (Precontemplation - Contemplation - Action) represents the subject's Stage of Change Designation. For example, if a subject score.s 6 on Lhe Precontemp!ation scale, 6 on the Contemplation scale and -2 on the Action scale, then the subject is assigned to the Contemplation stage.
Note that positive scores on the Pre.contemplation scale signify a lack of readiness to change. To obtain a score for Precontemplation which represents the subject's degree ofreadiness to change, directly comparable to scores on the Contemplation and Action scales, simply reverse the sign of the Precontemplation score (see below).
If one of the four items on a scale is missing, the subject's score for that scale should be pro-rated (i.e. multiplied by 1.33). If two or more items are missing, the scale score cannot be calculated. In this case the Stage of Change Designation will be invalid.
Scale Scores
Prcconlemplation Score ~
Contemplation Score CJ Action Score D
Stage of Change Dc·signation (P,C or A). CJ
Readiness to Change
Precontemplation
Contemplation
Action
CJ CJ CJ
(reverse score)
(same score)
(same score)

172 APPENDIX C EXAMPLE QUESTIONNAIRES
C.5 AUDIT QUESTIONNAIRE
The AUDIT. Questionna~re
1, How often do you have a drink containing alcohol? (0) Never {1} Monthly (2) Two to four
or less times a month (3) Two to three
times a week
2. 'How many drinks containing alcohol do you have on a typical day when you are drinking? [Code number of standard drinks]'• (0) 1 or 2 (1) 3 or 4 (2) 5 or 6 (3) 7 to 9
3. How often do you have six or more drinks on one occasion? (0) Never (1) Less than (2) Monthly (3) Weekly
· mo~h~
(4) Four or more times a week
(4) 10 or more
(4) Daily or almost daily
4. How often during the last year have you found that you were not able to stop ddnYJng onca you had started? (0) Never · . (1) Less than (2) Monthly ·. (3) Weekly .. · (4) Daily or
monthly · · almost daily
5 .. How often during the last year have you failed lo do what was normally expected from you because of drinking? (0) Never (1) Less than (2) Monthly (3) Weekly (4) Daily or
monthly almost daily
6. How often dunng the last year have you needed a first drink in the morning to get yourself going after a heavy drinking sess,on? (0) Never (1) Less than (2) Monthly (3) Weekly (4) Daily or
monthly · almost daily
7. How often during the last year have you had a feeling of guilt or remorse after drinking? (0) Never (1) Less than (2) Monthly · (3) Weekly
monthly · (4) Daily or
almost daily
8. How often during the last year have you been unable to remember what happened the night before because you had been · drinking? ·
(0) Never (1) Less than (2) Monthly monthly
9. Have you or someone else been injured as a result of your drinking? (0) No (2) Yes, but not in (4) Yes, during
the last year the last year
(3) Weekly (4) Daily or almost daily
10. Has a relative, friend, doctor, or other health worker been concerned about your drinking or suggested that you should cut down? (0) No (2) Yes, but not in
the last year (4) Yes, during
the last year

C.6 HEALTHCHECK STAFF QUESTIONNAIRE 173
C.6 HEALTHCHECK STAFF QUESTIONNAIRE
HEALTHCHECK
PRACTICE STAFF QUESTIONNAIRES - 1 AND 2 (Pre and Post Test)
AGE: .................... years
GENl)ER:
ROLE IN THE PRACTICE
D Receptionist D Nurse D Doctor D Other (please specify)
1 How comfortable do you feel with the use of computers? (please circle)
Strong 1 2 3 4 5 6 discomfort
2 How often do you use a computer?
(i) daily • (ii) two to three times
per week • (iii) once weekly • (iv) less than weekly •
7
3 Do you see computers as a useful instrument in Health education?
Not 1 2 3 4 5 6 7 useful
Very comfortable
Very useful

4 Which age group do you see as most likely to use computers
Age 18-30 30-45 45-60 60 +
5 In your contact with patients generally how often do you educate or advise them about health risks and lifestyles as they affect their health? Would you say
(i) All the time • (ii) Most of the time • (iii) Some of the time • (iv) Rarely or never • (v) Not applicable •
6 At the present time, how important do you see healLl-i promotion as an aspect of this practice.
Very 1 2 3 important
4 5 6 7 Very unimportant
7 The following are behaviours that some health professionals believe to be related to
health. How important do you think the following behaviours are in promoting the health of the average person? (Please circle one number for each.)
(i) Not smoking
Very important 1 2 3 4 Very unimportant
(ii) Exercising regularly
Very important 1 2 3 4 Very unimportant
(iii) Drinking alcohol moderately
Very important 1 2 3 4 Very unimportant
(iv) not drinking alcohol at all
Very important 1 2 3 4 Very unimportant

(v) not using cannabis
Very imponant 1 2 ,.,
4 Very unimponant j
(vi) avoiding excess calories
Very imponant 1 2 3 4 Very unimportant
(vii) reducing stress
Very important 1 2 3 4 Very unimportant
(viii) not using narcotics or other abusable ·substances
Very important 1 2 3 4 Very unimportant
8 If you are a member of Clinical Staff indicate how much you agree or disagree with each of the following statements about working with problem drinkers. "Problem drinkers" refers to people with hannful alcohol use, but excludes late-stage alcoholics. (Please circle one number for each question.)
I feel I know enough about the causes of drinking problems to carry out my role when working with problem drinkers.
Strongly agree 1 2 3 4 5 6 7
Strongly disagree
I feel I can appropriately advise my patients about drinking and its effects.
Strongly agree 1 2 3 4 5 6 7
Strongly disagree
I feel I have the right to ask patients questions about drinking when necessary.
Strongly Strongly agree 1 2 3 4 5 6 7 disagree
I want to work with problem drinkers
Strongly Strongly agree 1 2 3 4 5 6 7 disagree

Pessimism is the most realistic attitude to take with problem drinkers.
Strongly agree 1 2 3 4 5 6 7
Strongly disagree
I feel I do not have much to be proud of when working with problem drinkers
Strongly agree 1 2 3 4 5 6 7
All in all, I'm inclined to feel I am a failure with problem drinkers
Strongly agree 1 2 3 4 5 6 7
In general, it is rewarding to work with problem drinkers
Strongly agree 1 2
,, 4 5 c. 7 .) u
In general, I like problem drinkers.
Strongly agree 1 2 3 4 5 6 7
Strongly disagree
Strongly disagree
Strongly disagree
Strongly disagree
9 How much do you agree with the following statements? (Please tick the appropriate box)
(i) Infonnation on health status helps people make healthy choices.
strongly agree agree neither agree disagree strongly nor disagree disagree
• • • • • (ii) Patients want infonnation about health status.
strongly agree agree neither agree disagree strongly nor disagree disagree
• • • • •

(iii) GP' s have no part to play in the treatment of drug and alcohol problems.
strongly agree agree neither agree disagree strongly nor disagree disagree
• • • • •
(iv) Public health education has only worked well with well educated people.
strongly agree agree
• •
neither agree nor disagree
•
disagree
•
strongly disagree
•

178 APPENDIX C EXAMPLE QUESTIONNAIRES
C.7 TEENAGE HEALTH AND FITNESS QUESTIONNAIRE
TEENAGE HEALTH & FITNESS QUESTIONNAIRE
Reference Number :
Date of Birth:
Sex:
Please ignore any questions you do not wish to answer
GENERAL HEALTH
1. Do you think you enjoy good health?
2. Do you have regular dental checks?
3. How often do you exercise?
4. Do you think your diet is healthy?
5, Do you eat regular meals?
6. Do you think you need ta lase weight?
7. Do you have difficulty sleeping?
B. Ar-e ther-e par-ts of your- body that you not happy with? e.g hair-,skin,weight.
If yes, what?
9. Is there anyone in your- family with:
Diabetes High blood pr-essure Hear-t disease Asthma
ar-e
-
Mast of the time Some of the time Hardly ever
YES / NO
Most days About once weekly Hardly ever
Usually Probably could
improve
Usually Usually not
YES I NO
Frequently Occasionally Never
YES I NO
YES I NO YES I NO YES I NO YES I NO

TEENAGE HEALTH & FITNESS QUESTIONNAIRE
HEALTH~ RELATIONSHIPS
1. Do you feel you get enough support from your family
your friends
others
2. Do you feel good about yout··self?
3. Do you find yourself feeling down?
4. Do you feel lonely?
5. Do you have a close friend?
6. Do you feel free to make your own decisions
Most of the Some of the Hardly ever
Most of the Some of the Hardly aver
Most of the Some of the Hardly ever
Most of the Some of the Hardly ever
Never-Sometimes Often
NeverSometimes Often
YES I NO
time time
time time
time time
time time
r-egarding relationships? Usually
7. Are you concerned about the possibility of
B.
9.
pregnancy sexually tr-ansmitted diseases AIDS
Do you feel you have been "used" in any previous sexual situation?
Do you feel you need any information on contraception?
Sometimes Never
YES YES YES
I / I
NO NO NO
Sometimes ~evefiiOnally
YES I NO

TEENAGE HEALTH & FITNESS QUESTIONNAIRE
HEALTH~ PERSON~L SAFETY
1
2.
A-fter- using alcohol, marijuana, glue or- pills have you ever . -. a. Not -felt in contr-o l o-f your- actions b. Driven a car-c. Felt regr-et for- something you did d. Got into trouble e. Felt that you would be better- o-f-f
i-f you hadn't
Have you been a passenger- in a car- when the dr-iver- has consumed alcohol, mari~uana,
YES I YES I YES I YES I
YES I
glue or pills? YES I
I
I
3. Do you smoke cigarettes? If so, how many per day on aver-age? Do you want help to give up smoking?
HEALTH INFORMATION
1.
..., ,;.,
3.
4.
5.
When your-idea bike do you wear a helmet
When you ar-e in a car do you make sur-e you wear a seat belt?
Have you access to enough health in-formation?
Do you have any wor-ries about cancer or any other disease?
I-f yes, what?
(Jo you have any health concerns or- pr-oblems you wish to discuss fur-ther?
I-f yes, what?
- - - - - - - - - -
Did you find this questionn.aire help-ful?
- - - - - - - - - - -
YES
YES
Always Sometimes Never
Always Sometimes Never-
YES I
YES I
YES ./
YES I
NO NO NO NO
NO
NO
NO
NO
NO
NO
NO
NO

Appendix D
THE USER GUIDES
D.1 QUESTED USER GUIDE


The QUEST Questionnaire System
QuestED User Guide
Version 2.0
Wednesday, June 26, 1996
QuestED User Guide.
This Users guide is divided into four parts. The first part introduces the concepts behind the QUEST Questionnaire System. The three following parts describe the use of the Questionnaire Editor, the Summary Editor and the Template Editor.
1. Questionnaire Concepts. 3
2. The Questionnaire Editor. 8
2.1 Installing QUEST. 8
2.2 Running QuestED. 8
2.3 File Operations 9
2.4 The Tree Panel 10
2.5 The Property Panel 11
2.6 Goal Operations 13
2.7 Reply Field Operations 16
2.8 User Interface Operations 18
2.9 Multimecllia Options. 20
2.10 Questionnaire Operations 22
2.H Editor Options. 24
3. The Summary Editor 25
4. The Template Editor 28
4.1 Template Operations. 28
4.2 The Template Editor. 30
4.3 Object Properties 33

1. Questionnaire Concepts.
The QUEST Questionnaire system consists of three main components. Figure shows a simple n:lalionship hctwccn these components. The components arc,
QuestED - This is a tool that allows a questionnaire author to manipulate questionnaire files. The questionnaire file completely describes the content, appearance and behavior of the questionnaire. The structure of a questionnaire consists of a hierarchy tree. Each node of the tree is called a goal. Each goal's aim is to obtain a piece of information either from the respondent or from other goals. For each questionnaire, multiple output summaries may be defined for different purposes.
QuestEX - This component plays the questionnaire file generated by QuestED. Running the questionnaire involves displaying to the questionnaire respondent each questionnaire goal. The respondent then enters an appropriate reply to that questionnaire goal. Each goal need not necessarily be a question; it may be a section heading or an information goal. The respondent's replies arc then saved and summarized according to the summary defined in QuestED.
QuestView - This program allows the saved reply files to be viewed at a later date. The questionnaire summaries for that file can be regenerated if necessary. Quest View can also produce an overall summary of a series of individual summaries. This overall summary can show a statistical breakdown of for each of the questions i.n the questionnaire.
QUEST
QuestEX QuestED QuestView
Figure 1: The System Overview.
The fundamental unit in the QUEST system is the question goal. A goal's purpose is to obtain a piece of information and then past it on to a parent goal. The goal may obtain its information from one of two places, the questionnaire respondernt, or another goal. The goal may pass the information it has obtained on to a summary and/or another goal. Each piece of information consists of three parts, a text string, an integer index, and a real variable. This allows for up to three representations for a reply. For example, the answer to the question 'How many days are there in a week?' can be represented as "7", 7, and 7.00.
From this, there must be number of different basic goal types. The two main types are Question goals and Control goals. Question goals simply ask the respondent for the answer to a question. The types of Question goals are,
1. Text Entry. This goal asks the respondent to enter a text reply. An example heing 'Whal is your name?' The answer is stored as a text string.
2. Numeric Entry. This goal asks the respondent to enter a numeric reply. Only a numeric reply is considered valid, and the respondent can not continue until a valid number is entered. Upper and lower limits can be placed on the entry. For example the question, 'How many days of sick leave did you take last year?' can use the limits O and 365 to ensure a valid reply. The answer is stored as a text string and as a real variable.
3. Single Select List. This goal displays a list of pre-determined items to the respondent. The respondent must choose one of the items from the list. The chosen item's list index is stored as the integer index and the item's text is stored as the text string. A 'value' may also be associated with each item in the list. For example the associated value maybe a weighting that can be used in a calculation. The chosen item's associated value is stored as the real variable.
4. Multi Select List. This goal is similar to the Single Select List in that a list of items is presented to the respondent. However the respondent may choose any number of items from the list, including none. Again each value may have an associated value.
The Control goals get their name from the fact they control other goals. These other goals are called sub goals as they are effectively subordinate to the control goal. Alternatively the control goal may be viewed as a 'Parent' goal to it's 'Child' goals. The purpose of the Control goals is to organize the questionnaire into a meaningful structure in the context of a particular questionnaire. Examples of this are the grouping of a series of goals, and the conditional execution of a goal. The types of Control goals are,
I. Group Goal. The group goal acts to 'group' together a series of sub goals together. For example, a questionnaire has a number of well-defined sections of questions. A group goal can be used as the section introduction for each of these sections of questions. The group goal is the only goal that has an optional user interface. By using a user interface the group goal can act as section introduction as in the previous example. The group goal's user interface is displayed before it's sub goals are processed. However when used without a user interface, the group goal can invisibly group goals together. The value of this will become apparent when condition goals are discussed.
2. Calculation Goal. The calculation goal provides the facilities to evaluate arithmetic, logical and relation expressions. These expressions may consist of regular calculations and goal references. The goal references refer to the replies of the calculation's sub goals. For example, a calculation goal may add the responses to two numeric entry questions. The calculation goal has the ability to process all

the part of a response, text, index and variable. For example, an index maybe added to a variable. As long as the operation in valid, the correct conversion between types will occur. It is obvious that a text string can not be added to a real variable for example. The calculation goal has no user interface and executes transparently to the respondent.
3. Info Goal. The info goal's purpose is to display some useful information to the respondent. For example, it may display information on why a series of questions is being asked. It is similar to both the Group goal and the Calculation goal in certain respects. Like the group goal it displays information to the respondent, and does not require an answer or reply. However the info goal's user interface does not display until after it's sub goals have been executed. This is because it may use the responses from a number of sub goals in the information it gives to the respondent. Like a calculation goal it may reference its own sub goals. Thus it processes the sub goals and then displays the information in the user interface.
4. Condition Goal. The condition goal is different lo all other goal types as it acts as a sub goal to all other types of goal. As a special sub goal, the condition goal is executed BEFORE the parent goal. The condition goal contains similar expression evaluation scheme as the calculation goal. However for a condition goal, the expression must evaluate either true or false. The result of the expression determines whether or not the parent goal is processed. If the expression is true, then the parent is processed. If the expression is false the parent is not processed and the parent's next sibling is processed. For example, group goal's condition goal can determine whether an entire section of questions is asked.
The Table 1 summarizes all the goal types. The abbreviations in the Reply Type column are T for Text, I for Index and V for Variable reply.
Goal Type User Interface Child Goals Process Order Reply Type Text Entry Yes No NA T Numeric Entry Yes No NA T,V Single Select List Yes No NA T,I and/or V Multi Select List Yes No NA T,I and/orV Group Optional Yes Before None Info Yes Yes After None Calculation No Yes After T orV or I Condition No Yes After True/False
Table 1: Summary of the various goal types
To create a questionnaire the various combinations of goals must be put together in a hierarchical tree. When the questionnaire is played, the tree is interpreted in a depth first fashion. For an example, consider a small questionnaire that seeks to determine the height/weight ratio of a respondent. This requires the following information; the respondent's name, height, weight. A calculation goal is also required to calculate the height/weight ratio. Figure 2 shows a possible tree structure for this. The dashed arrow shows how the tree is traversed in a depth-first fashion.
Figure 2: The tree structure of a simple questionnaire.
The following example demonstrates the use or a condition goal. Consider a questionnaire that asks a person's age. It will then display the age, but only if the person wants it to be shown. This requires two questions, a numeric entry goal for the age and a single select goal for the yes/no choice. An Info goal will display the age, but a condition goal attached to the info goal determines if the age will be shown. Figure 3 shows the tree structure of this example. There are several important points to note here,
I. Goal 2 is a sub goal of both goals 1 and 3. It is perfectly acceptable for a goal to be a sub goal of several different parent goals. The first time QuestEX processes goal 2, it will ask the question associated with goal 2. When QuestEX encounters goal 2 again, the information is already available. Thus the situation is a reference to goal 2. A referenced goal is shown in QuestED with a dotted border.
2. Goal 4 is a condition goal of goal 3. When QuestEX encounters goal 3, it will immediately check for a condition goal. On finding goal 4, it will execute goal 4 and it's condition. To do this goal 4 must execute goal 5. Once the result from goal 5 is available goal 4 evaluates the condition. If the condition is true, then goal 3 completes its processing by displaying its information. If the condition is false, then is goal 3 abandoned. A condition goal is shown with a heavy border.
Along with a goal's reply value, a goal also has a state. If a goal has not processed then it has no state. If a goal is successfully processed then its state is true otherwise its state is false. There are only two situations where the state of a goal can be set false. These are,
I. By a Condition goal. If a parent goal's condition goal returns false, then the parent goal's state is set false.
2. In a Calculation goal. If a sub goal of calculation goal returns false then the calculation goal's state is set false. This is because the calculation goal no longer has all the information required to complete the expression.

...... ~ ... ,✓
' ' ' ',
........ -- ..... :--~, 2 ' ' , ' ' , ' ' ,,...- ... \ : Numeric Entry J :
/ \ 1\ Whatisyour ,' ,' /, \ \" Age? / /
,,------"' \,~::-----::,,, ' ' ' ' ' ' ,
Figure 3: Info and Condition goal example.
The depth-first method of defining a questionnaires' structure is not immediately intuitive. The first version of Quest took a Flow Chart approach to defining the questionnaire structure. The flow chart approach is more obvious when defining the order and question flow aspects of a questionnaire. The hierarchy tree approach used in the current version of Quest approaches the questionnaire structure definition different. The questionnaire is seen as a number of information sources flowing from the respondent, through the processing elements of the questionnaire and out to a summary form. The information gathered is regarded as more important than the actual ordering of the questions. By focusing on the flow of information rather than the flow of questions, Quest is able to make a more consistent approach to the whole questionnaire process.
The user interface of a questionnaire is defined by a series of templates. A template is a description of how the screen should appear for a particular goal type. Each template consists of a number of objects. Some of the template objects are simple graphic primitives such as lines, circles and rectangles. Others are just place holders, for example the Question Text object defines where a goal's actual question text is drawn on the screen. A number of goals may share a template, or individual goals may have their own templates. New templates may be created and modified as needed.
A number of Summaries may be defined for each questionnaire. Each summary consists of a number of summary entries which map to the goals in the questionnaire structure. Each entry is a piece of text plus a goal reference. When the summary is processed, each entries' text is formatted with the goal reply and is written out to a file. The entry text and the formatting is completely author-definable, so custom summaries can be easily created for different purposes.
2. The Questionnaire Editor.
2. 1 Installing QUEST.
QUEST is distributed via floppy disk. To install QUEST insert the floppy disk labeled 'QUEST -- Disk #1' into a floppy disk drive. Then run the setup program on the floppy disk, this can be done by,
1. Double clicking SETUP.EXE in file manager or Explorer. Start file manager, and change to the floppy disk drive that contains the QUEST files. Use the mouse to double click on the SETUP. EXE file item, or select the SETUP. EXE file item with the arrow keys and TAB and press ENTER.
2. Using the Rwi command in either file manager or Explorer. Select the Run command from either file manager's or program manager's File menu. Type in the full path for the SETUP. EXE file at)d press the Enter key or the OK button.
Now follow any prompts that are displayed during installation.
2.2 Running QuestED.
QuestED can be started in a number of different ways,
1. By double clicking on a program manager icon or shortcut. This is the recommended way of starting QuestED. The icon or shortcut should have been created during installation.
2. By double clicking QUESTED.EXE in File Manager or Explorer. To start QuestEX this way, run file manager or Explorer and change to the directory containing QuestEX. Use the mouse to double click on the QUESTED. EXE file item, or select the QUESTED. EXE file item with the arrow keys and TAB and press ENTER.
3. By using the Run command. Select the Run command from either file manager's or program manager's File menu or the Start Menu. Type in the full path for the QUESTED. EXE file and press the Enter key or the OK button.
4. By file association. During installation a file association is setup for the extension . QS2
and the program as QUESTEX. EXE. This can be changed so that association is with QUESTEX. EXE. Then QuestEX can be started by double clicking on the .QS2 data file in file manager. Note that an association can only be set-up for QuestEX or QuestED, not both.

5. With a command line argument. When using the above methods I and 3, a path and filename for a .QS2 questionnaire file can be specified after the QuestED executable filename. This will automatically load the questionnaire file once QuestED has started. For example, the following command line will start QuestED and load the questionnaire file HEALTH. QS2.
C:\QUEST\QUESTED.EXE C:\QUEST\HEALTH.QS2
Once started QuestED will appear as in Figure 4.
Tool Bar
Tree Panel
Status Bar
Figure 4: QuestED's initial appearance.
2.3 File Operations
Initially there are three options in the file menu. These are,
I. New. Creates a new questionnaire within QuestED. 2. Open. Opens an existing questionnaire file into QuestED. 3. Exit. Closes QuestED immediately.
Once a questionnaire has been either created or opened into QuestED, the file menu changes. In addition to the three options above, there are two more options,
1. Save. Saves the current questionn11ire file. If no filename has been given then the standard Save File dialog box prompts the user to enter a filename•.
Property Panel
2. Save As. The standard Save File dialog hox prompts the user lo enter a filcname. The cum:nl questionnaire is then saved under this filcnamc.
2.4 The Tree Panel
Once a questionnaire has been loaded in QuestED, the Tree Panel will appear as in Figure 5.
Slist21
Hidden Group Goals-s;;:: I --l.r
Questionnaire Introduction~ Group Goal
Selected Goal
Figure 5: Tree panel view.
The important points in this figure are,
Cale 131 -~t1lff: Referenced t'SListB~
)=Lfs~,:: o: Goals
e
1. Selected Goal. The currently selected goal appears inverted.
2. Goal Notation. Each goal is labeled with a short goal type identifier and the goal number identifier. The Goal type identifiers are given in Table 2.
3. Questionnaire Introduction Group Goal. Goal number I is always defined as the Questionnaire Introduction goal. This is the first screen the respondent sees when the questionnaire starts.
4. Hidden Group goals. Goal 3 and 6 simply 'group' their sub goals together so that they appear as one goal. Both these goals are hidden to the respondent as they have no user interface.
5. Condition Goal. All the condition goals have a thick border to differentiate from other sub goals.
6. Referenced Goals. The referenced goals have a dotted border to indicate that they are not the first instance of the goal.

7. Expandable Goal. It is possible to collapse the children of a goal by double clicking the left mouse button on it. The collapsed goal then appears with a rounded border. Double click on the goal to expand the hidden sub goals.
Goal type I Label f Goal type I Label Group Goal Grau Text Info Goal Info Num
Calculation Goal Cale Slist Condition Goal Cond Multi Select List MList
Table 2: Goal type ahhrevaitions.
2.5 The Property Panel
The Property Panel is located to the left of the Tree Panel. Its purpose is to show the properties of the currently selected goal in the tree panel. The properties of the selected goal can be directly modified in the property panel. For the different types of goal, there is a different property panel, but they all share features. There are four different property groups that may appear on each panel. These are,
1. Goal Information. Gives basic information about a goal. For example, the goal identifier, goal type, condition goal, description, title and sub goals. The description differs for each of the goal types. That is a calculation goal has a calculation, a condition goal has a condition, etc. The Question goal types do not have the sub goal field. Figure 6 shows the Group and Text Entry grnup information panels.
Figure 6: Two of the Goal Information panels.
Reply Field. Only Question goals have this group. This group sets the options for the question's reply field. For example a single select list question's pre-defined choices are entered here. Figure 7 shows the Text entry and single select list reply fields.
Figure 7: The Text Entry and Sinl(le Select Ust Reply Fields.
Option field. This group contains a series of options relating mainly to that goal type. Figure 8 shows the standard option field and the numeric entry option field.
Figure 8: The two option fields.
User Interface. This group only applies for those goals that are allowed to display a user interface. This is all goals excluding the condition and calculation types. Figure 9 shows the user interface field.
Figure 9: The User interface field.
Table 3 summarizes the various combinations of the above four fields on each property panel. In the Goal Info column, Simple means that just the basic fields are in the Goal Information group. Sub goals means that a list of sub goals and sub goal manipulation controls are also present.
Goal Type Goal Info Reply Field Options Field User Interface Grouo Sub goals No Yes Yes Info Sub goals No Yes Yes Calculation Sub goals No No No Condition Sub goals No No No TextEntrv Simple Yes Yes Yes Numeric Entrv Simole Yes Yes Yes Single Select List Simple Yes Yes Yes Multi Select List Simple Yes Yes Yes
Table 3: Summary of the Property Panel for each goal type.

2. 6 Goal Operations
There are a number of operations that can be performed on a goal. Some of these operalions apply lo certain goal types only while others apply lo all goals. All these operations can be invoked through the Goals menu or from the Properties Panel. Each of the operations are described below,
• Add Condition. This operation adds a condition sub goal to the current goal. This is the only way to
~5~~~-~~~~~-~~J'.:'.~,.
i Add coii4ltio~ ·cir1+K·····1 ; .Qelet~Condltlon .• Ctrl··!-0 •... ·
add a condition goal. This operation is available :.~;;.~ •. •.~"!fu_:,.:;,.:l'.<«•w:~%:~:. for all goal types, unless the current goal already has a condition goal.
• Delete Condition. This operation removes the condition sub goal of the current goal. It will also delete any sub goals of the condition goal. A dialog box will be displayed asking for confirmation of the delete. See also the entry 'Delete Sub Goal'. This operation is only available when the current goal has a condition goal.
The next four operations only apply to the Control Goals. All the control goals can have sub goals. These operations manipulate the sub goals of the current goal.
• Add Sub Goal. This operation adds a sub goal to the current goal's sub goal list. The dialog box in Figure JO will appear. This dialog box gives the choice of adding a new goal or adding a reference to an existing goal. Using the radio button will enable the drop down list associated with each choice. When adding a new goal. the goal type of the new goal can be chosen from the drop down list. When referencing an existing goal the drop down list contains a list of all the goals in the questionnaire.
Figure 10: The Add Suh Goal diaioK hox.
• Delete Sub Goal. This operation is used to delete a goal from the questionnaire. To use it, a sub goal must first be selected from the Sub Goal list on the Property Panel. A dialog box will be displayed asking for confirmation of the delete. It is important to note that deleting a Control goal will also delete the sub goals of the control goal in a recursive fashion. Three rules however govern what is deleted,
I. If the goal is unique, that is, it is not referenced by any other goal then it will be deleted.
2. If the goal is not unique and the other referenced instance of the goal is also down the branch being deleted then both goals are deleted.
3. If the goal is not unique and the other referenced instance of the goal is not down the branch being deleted then goal is deleted, hut the referenced goal remains.
This simply ensures that branches are correctly maintained. For example in Figure 5 if 'Group 6' was selected as the current goal. We could then delete the sub goal 'Info 11 '. This would delete both the original and referenced instances of 'Cale 13'. However only the referenced instances of goal 8, 9 and JO would be deleted. The original goals 8, 9 and I O would still exist. If a summary entry has been defined for the goal being deleted, then that summary entry will be deleted as well. For more information on summaries see section 3.
• Move Sub Goal Up. This operation is used to move a sub goal forward in the questionnaire order. Thus it is possible to arrange the order of goal within a group of goals.
• Move Sub Goal Down. This operation is used to move a sub goal back in the questionnaire order. It does the opposite of the Move Sub Goal Up operation.
For example in Figure 5 if 'Group 6' was selected as the current goal. We could then reorder the goals 8, 9 and 10 by moving them forward and back using the Move Sub Goal operations.
The Calculation, Info and Condition goal types all have an Insert Sub Goal Reference operation. This is because the sub goals of the goal types contribute to the functionality of the goal type. For example the sub goals of the Calculation goal are used as variables in the calculation's expression. The Condition goal uses its sub goals in a similar fashion. The Info can embed its sub goal replies in its user interface text.
Figure 11: The three goal types with the Insert Reference Operution.
The Calculation and Info goal types are similar as the reference can be inserted in one place. That is either in the calculation or the information text. The Condition is different as each condition consists of three parts, the left hand side, the relation and

----·-~--- -- --=-
the right hand side. A goal reference may be insert in either the left hand side or the right hand side of the expression.
To insert a reference first select the place in the goal's text where you want the reference to appear. Then select the goal you want to reference from the sub goal list. Press the Insert button for that Property Panel. The dialog box in Figure I 2 is displayed. Choose from the drop down list how you want the reference displayed. This is either as a Text string, integer Index or a real Variable. A reference such as g(l3,i) will be created and inserted into the goal's text The 'g' indicates a goal reference, the '13' is the sub goal being referenced, and the 'i' is the variable type. The variable type can be either 'i' for index, 's' for string or 'v' for variable.
Insert Referenc~ I , ,. 0 £1
" Figure 12: An example of the Insert Reference dialog box.
Note that there is difference between a 'Goal Reference' and a 'Reference Goal'. 'Goal References' only exist in the context of the above three goal type's functionality. A 'Reference Goal' is the second instance of a particular goal. That is a goal with a dotted border in the tree panel.
2. 7 Reply Field Operations
The Reply Field operations can only be performed on the Question goal types. Figure 13 shows the reply field for the Single Select List and the Multi Select List goal types. The list box contains the pre-defined replies that are presented to the respondent in the question. Each item in the list box shows the text for the reply and if the 'Use Values' check box is checked, the value associated with that item. If 'Use Values' is unchecked, then only the reply text is shown in the list box. 'Use Values' is important as it allows a numeric variable to be associated with each item.
Figure 13: The Reply field for the Two U,t based Question types.
The 'Center Item' check box allows all the replies to be displayed centered in the list when presented to the respondent. Otherwise the replies are displayed left justified.
The four buttons in the Reply Field allow for the direct manipulation of the responses.
• Add Reply. This operation displays the dialog box in Figure 14. If 'Use Values' is unchecked, then the Value field is not displayed in this dialog box. Here the attributes for the new reply can be entered.
• Edit Reply. This operation is available when a reply has been selected from the reply list box. It displays the dialog box in Figure 14 but it contains the attributes from the selected reply.
• Delete Reply. This operation is available when a reply has been selected from the reply list box. It will delete the selected reply.
Figure 14: The edit reply dialog box.
• Copy Replies. This operation allows the replies from one list based goal to be copied to other list based goals. The dialog box in Figure 15 appears. All the list based questions in the current questionnaire appear in the multi-select list box.
-------
I

Any number of questions can be selected here. After closing the dialog box, the replies in the currently selected goal wiJI be copied to the questions selected in the dialog box. For example there maybe a large number of similar list based questions in a questionnaire. First all the list based questions would be created in the questionnaire. The replies would then be defined for the first list based question. The Copy Replies operation would then be used to copy these replies to all the other questions in the questionnaire.
Figure 15: The Copy Replies dialog box.
Figure 16 shows the Reply Field for the Text Entry and the Numeric Entry question goals. By default the edit field for these two questions is multi line and non scrolling. This means when the respondent reaches the end of the first line of text, the text cursor in the edit field will move to the start of the next line in the edit field. Once the respondent has filled the edit field with text, then no more text can be entered. However by checking the 'Single Line' check box, the edit field wiJI be limited to a single line. Checking the 'Scrolling' check box will allow the edit field to scrolling once the respondent has filled up the field.
Figure 16: The Reply Field for the Text based Questions.
2.8 User Interface Operations
The User Interface operations affect how the current goal will appear when the questionnaire is played. Each goal's user interface is based on a template. A 1
template is a description of how the screen will appear. A number of goals may share a template and consequently they will all appear similar. Each template is defined for a particular goal type as the different goal types require different user interface. For example a Text Entry template contains an edit field whereas a Single Select List template has a list box instead. For convenience a set of default templates have been provided. For a better understanding of the templates see section 4.
While the templates make it possible to define the minimum number of user interfaces for a questionnaire, it is possible to further alter the appearance of each goal. Each goal that has a user interface has a set of options. These options control how the goal's template is displayed. Figure 8 shows the two option fields for all the goals. The controls in each field are,
• Restart Button. If this is checked then the Restart or 'Quit' button wiJI appear in the template. Pressing this button ends the current questionnaire session.
• Back Button. If this is checked then the 'Back' button wiJI appear in the template. Pressing this button will take the respondent back to the last question answered.
• Help Text. The text that is entered in this field is displayed in the templates Help text field.
• Help Button. If this is checked then the 'Help' button will appear in the template. The Help Text will remain hidden until the Help Button is pressed. If Help Button is unchecked then the Help Text will display immediately.
• Help Timer. If this is checked then the Help Text will be hidden until the specified time interval has elapsed. Once elapsed the help text is displayed in the Help Text field. The time interval can be changed via the spin control.
• Limits. This only applies for the Numeric Entry goal type. If this is checked, then a lower and upper limit can be set for the goal. The respondent must enter a number within these limits. This is useful in stopping the respondent entering ridiculous numbers.
By default each goal uses the default template for its type. To customize the goals setting the following operations are used.
• View Templates. This operation displays the Template Manager. This is shown in Figure 28. The Template Manager is discussed further in section 4.

• Select Template. This operation displays the list of templates that match the current goal's type. The desired template can be chosen from this list.
• Edit Template. Choosing this option starts the Template Editor for the cu:rrcnt goal. Por more information sec section 4.
• Test Goal. Choosing this operation gives a preview of how the goal will appear when the questionnaire is played. To close the preview press the 'OK' Button.
• Multimcclia. This operation clisplays the Multimcclia options clialog box for the current goal. This is shown in Figure 17. It is further discussed in the next section.
2.9 Multimedia Options.
Figure 17 shows the Multimedia dialog box. Each goal that has a user interface has a set of associatccl multimedia options. There arc four multimedia groups in the dialog box, Digital Audio, Video Animation, Music and Graphic Images.
Figure 17: The Multimedia options dialog box.
Digital Audio. Checking 'Wave Audio' control enables the digital audio option for this goal. Pressing the 'Select File' button displays a standard open file dialog box. Use this dialog box to choose a Wave file (*.WAY). Note that the Wave file should be in the same directory as the main questionnaire file. Checking the 'Loop Audio' control makes the audio clip repeat continuously.
Video Animation. Checking the 'A YI Animation' control enables the video animation option for this goal. Note that it will also disable the 'Digital Audio' option as the Video Animation and the Digital Audio must share a single sound channel. Use the 'Select File' button to choose an animation file (*.AV!). If the current goal's template contains an animation rectangle then the animation file will be played in this rectangle. Checking the 'Fit Animation to Rectangle' will stretch the animation to the animation rectangle. Otherwise the Animation will play centered in the animation rectangle. Checking the 'Keep Aspect Ratio' control forces the animation to play with its pre-defined aspect ratio even when stretched. Checking the 'Disable Animation Audio' disables the animation's audio channel and re-enables the Digital Audio's audio channel. Checking the 'Loop Animation' control makes the animation repeat continuously. With the correct MCI drivers it is also possible to play Apple Quicktime Movie files (*.MOY) and MPEG files (*.MPG).
Music. Checking the 'Midi Music' controls enables the music option for this goal. Pressing the 'Add' button displays an extended select open file dialog box. Use this dialog box to select any number of MIDI music sequence files (* .MID). The selected music files will be added to the play list. The 'Remove' button is used to remove any

selected MIDI file from the play list. For all goals except the Group goal, the files on the play list are played one at a time. When the respondent presses the 'OK' button the music is stopped. With a Group goal, the music starts when the group goal is displayed. The play list stops when all the group goal's sub goals have been processed or another goal is processed that has its Music option enabled. Thus a play list for the entire questionnaire can be defined in the questionnaire introduction goal. This play list will play continuously for the duration of the questionnaire. Checking the 'Randomize Tracks' control mixes the play list randomly so the play list will be different each time.
Graphic Images. Like the Video Animation, this option requires that Image rectangles are defined in the goal's template. Each Image rectangle in the template is initially listed in the image list, as 'Image A -- None'. 'Image A' identifies the image rectangle as it appears in the Template Editor. 'None' indicates that a file has not been assigned for this image. To assign an image, select it from the image list and press the 'Insert' button. This will display an open file dialog box. Choose a file image from one of the allowed types, Windows Bitmap (*.BMP), Zsoft PaintBrush (*.PCX) and Windows Metafile (*.WMF). To deselect an image select it from the image list and press the 'Remove' button. To change the image properties, select the image from the list and press the 'Image Properties' button. This will display a dialog box containing a 'Stretch Image' control. Checking this control causes the image to stretched the image rectangle as defined in the template editor.
2. 10 Questionnaire Operations
The Questionnaire operations effect how a questionnaire works as a whole. There are currently three questionnaire operations, Questionnaire options, Renumber questionnaire and Run QuestEX.
Choosing the Questionnaire Options operation displays the dialog box in Figure 18a. There are three fields within this dialog box, all relating to the operation of the questionnaire,
• Exit Password. By checking the 'Enable Password' control, a password can be entered in the Password edit control. When the 'Quit' button is pressed from the Questionnaire Introduction screen the dialog box in Figure 19. The correct password must be entered before QuestEX will close. This is a useful way of stopping the respondent from exiting QuestEX.
• Enable Log File. As QuestEX is running, it can produce a log file of the operations during its execution. This can be a useful source of information when a questionnaire is behaving unexpectedly. It is recommended that the log file be disabled once the questionnaire is working correctly. This is because the log file grows each time the questionnaire is played. Thus it can build up to a rather large file.
• Security Mode. To further enhance the protection that the Exit Password gives a questionnaire, the security modes can be enabled. There are currently two modes. The 'Testing Mode' allows the questionnaire to run as a normal Windows application would. It is possible to task switch away from QuestEX while it is playing a questionnaire. Task switching is accomplished by either using the AltTab or Ctrl-Esc key combinations. The 'Safe Mode' disables task switching while QuestEX is running. Therefore the only way to exit QuestEX is by pressing the 'Quit' button on the Questionnaire introduction screen. Unfortunately the respondent can still press the Ctrl-Alt-Del key combination. This is quite serious as the respondent can close Windows in this situation. There are three possible ways of dealing with this problem,
I. Physically disabling the 'Delete' key. On many keyboards it is possible to remove the keys. This is done by inserting a screwdriver under the key and gently levering it off. This could indeed be done for all the 'Delete' keys' neighbors. The hole in the keyboard could then be covered with card board and tape.
2. Configuring QuestEX to be the Windows Shell program. This option would load QuestEX as the system shell instead of Program Manager or Explorer. Thus it would be no longer possible to run other Windows programs in the same session. QuestEX would be the only program running. The benefit of

this is if the computer boots straight into Windows then it will automa1ically run QuestEX. So if a respondent keeps on rebooting the computer QuestEX will always automatically start. This is a short term goal for the Quest system.
3. A Window Virtual device driver for the keyboard could be written that disables the Ctrl-Alt-Del key combination at an operating system level. This is a long term goal for the Quest system and is the best solution for this problem.
Figure 18: The Questionnaire Options dialog box.
Figure 19: The Exit Password dialox box in QuestEX.
The Renumber Questionnaire operation scans the questionnaire and renumbers it according to the order that QuestEX processes the goals. This is a useful operation for a number of reasons.
1. It shows the order in which the goals are processes and consequently the order in which the questions are asked.
2. It can clean up the goal numbering especially after a lot of editing.
3. It can force the Tree Panel to correctly display the questionnaire tree. Occasionally the Tree Panel may not expand a goal correctly. This may occur if a collapsed goal is moved forward in the questionnaire order. Using the Renumber Questionnaire will expand the questionnaire structure correctly.
The Run QuestEX operation starts QuestEX as if you had just run it from Program Manager or the Explorer. You can then start any questionnaire as you would normally. Note to run the current questionnaire in QuestED, it must be manually saved before running QuestEX.
2. 11 Editor Options.
The Editor Options govern how QuestED displays the Tree Panel and the Property panel. Selecting the Editor Options menu item will display the dialog box in Figure 20. There are three main editor settings that can be changed by this dialog box.
Figure 20: The Editor Options dialog box.
The Tree Orientation group affects how the Tree Panel displays the questionnaire tree. The Vertical option displays the Questionnaire Introduction goal on the left side of the panel. The sub goals are then processed from top to bottom and each level of the hierarchy expands to the right. The Horizontal option displays the Questionnaire Introduction goal at the top of the panel. The sub goals are processed from left to right and the levels expand top to bottom. See Figure 21 for an example of the two options.
The Tree Font setting can be used to change the appearance and size of the tree font. The tree font is used in the label for each leaf in the questionnaire tree. By increasing the size of the font, the size of each leaf is also increased.
The Panel Font setting can be used to change the size of the of Property Panel. When using the low resolution of 640 by 480 pixels the bottom portions of many of the property panels may be obscured. Checking the 'Small Panel Size' control makes each panel use a smaller font for the panels. This should ensure that all the panels are completely visible.
~~i~-1~
Figure 21: The two possible tree panel orientations, Horizontal and Vertical.

3. The Summary Editor
The summary editor allows an author to define a series of 'reports' for each respondent that answers a questionnaire. Each report is called a 'Summary'. Each summary can be saved in an ASCII text file and can also be printed to a printer. For each questionnaire, any number of summaries can be defined. The point of this is that one summary can be defined for the author's records, one for the respondent and so on.
Each summary consisl5 of a series of summary entries. Each summary entry corresponds to a goal in the questionnaire. However not every goal in the questionnaire needs to be included in the summary. Each summary entry is similar to an Info goal. It consists of three parts,
I. A goal reference. This defines the 'type' of the goal reply used in the summary entry. This is either the Text string, Integer index or Numeric Variable.
2. A text string. This text string is what will be displayed in the summary. By default it is the same as the questionnaire text but does not have to be. The most important part of the text string is the '"' symbol. This is where the goal reference is inserted. So in order to actually see what the respondent entered into the questionnaire, this symbol must be somewhere in the text string.
I
3. A formatting delimiter. This defines what follows the summary entry. It is used to provide simple formatting options for the summary. The following delimiters may be used,
• None. No formatting, so the next summary entry will immediately follow the current entry. Useful creating a paragraph of text out of a number of summary entries.
• New Line. Inserts a new line after the current summary entry. The next summary entry will start on the next line.
• Blank Line. Inserts a blank line after the current summary entry. The next entry will start after skipping a line. This is useful creating headings out of group goal entries.
• Tab. Inserts a tab stop after the current entry. Tab stops occur every eight characters. This is useful for lining up entries into columns. It is also useful for creating summaries that can be imported in to spreadsheet and database applications. Most spreadsheet and database applications can import tab separated and comma separated text files.
• ½ Page Tab. Inserts a half-page tab stop. This is useful for lining entries in two columns across the page.
• Centered Line. Centers the current entry across the line. Useful making headings.
• Right Line. Aligns the current entry to the right hand side of the summary.
Summaries are created from the Summary Manager. Choose the 'View Summaries' menu option to display the Summary Manager dialog box. See Figure 22.
Figure 22: The Summary Manager dialog box.
Press the 'Add' button to create a new summary. The Summary Style dialog box will appear, see Figure 23. Choose the appropriate choice and press the 'OK' button. The Person Readable style gives the full range of formatting delimiters and the default summary entries are based on the associated goals question text. The Computer Readable style limits the range of formatting delimiters to those more suited to importing into other applications. The default summary entries are simply based on the goal reference symbol '"'.
Figure 23: The Summay Style dialog box.
Once the choice has been made the Summary Edit dialog box appears. See Figure 24. The Summary Options group has three main controls. The Summary Name field is where the name of the summary is entered. If the summary is to be saved to disk, then check the 'Output lo File' control. Likewise check the 'Output to Printer' if the summary is to be printed.
Figure 24: The Summary Edit dialog box.

Once one of the 'Output to' options have been enabled, that option can be further customized with 'Filename Setup' and 'Printer Setup' button. Figure 25 shows both the 'File Setup' and 'Print Setup' dialog boxes. The Directory field in the 'File S:etup' dialog specifies a directory name that is created below the questionnaire directory. The Filename field is combined with the number of the respondent to create a filename. The summary is then saved using this filename. The Printer font used while printing the summary can be changed in the 'Print Setup' dialog box by pressing the 'Change' button. Any font maybe chosen, but fixed pitch fonts such as Courier produces the best output. When using a True Type font the size of the font can be matched to the size of the printer page by checking the 'Stretch to Page' control.
summary Print SetupH.,, •• I ,II l3 j
Figure 25: The Summary 'File Setup' and 'Print Setup' dialog boxes.
Jn the Summary Entries group are the 'Questionnaire List' and the 'Summary List'. Each item in the 'Questionnaire List' is a goal from the current questionnaire. Selecting a number of items from this list box and pressing the 'Add ->' button transfers the selected items to the 'Summary List'. Each item that appears in the summary list will be used in generating the actual summary. Items maybe transferred back to the 'Questionnaire List' by selecting them in the 'Summary List' and pressing the '<- Del' button.
Three operations can be performed on the summary entries in the 'Summary List'. The entries can be moved up and down in the summary order by selecting them and pressing either the 'Up' and 'Down' buttons. Once selected an entry can be edit,:d by pressing the 'Edit' button or by double clicking on it. This displays the dialog box in Figure 26. The three fields in this dialog box correspond to the three parts of the summary entry discussed earlier.
Summary Entry I ,I J I ml
Figure 26: The summary entry dialox box.
Once the all the required summary entries have been defined, exit from the Summary Edit dialog by pressing the 'OK' button. Any changes to the summary can be discarded by pressing 'Cancel'. In the Summary View dialog box a summary can be deleted from the questionnaire by selecting the summary from the list and pressing the 'Delete' button. An existing summary can be edited by pressing the 'Edit' Button. This will display the Summary Edit dialog box again.
4. The Template Editor
The Template Editor is used to create a customized user interface for a questionnaire. A template is a description of how the screen should appear for a particular goal type. One template can be used for all goals of a particular type or each goal can have its own template. The objects within a template describe where the object should be positioned and how it should appear. The actual content for the object is defined by the goal. For example, all question templates contain a question text object. The question text object is used to position and format each goal's actual question text. An animation object provides the positioning for the animation file defined in the goal's multimedia properties.
A set of default templates has been provided as a starting place for your user interface. Each of these templates can be modified to suit, and new templates can be created based upon these default templates. For example the Questionnaire Introduction goal uses the Default Group Goal template. However a new template may be based on this style and then modified to suit the Questionnaire Introduction better.
4. 1 Template Operations.
The simplest operation template operation for a goal is to select a template. Choosing the 'Select Template' menu item or pressing the 'Select' button on the Property Panel will display the Select Template dialog box. See Figure 27. Only the templates that match the current goal's type appear in the list. The 'None' template option is only available if the current goal is a group goal. Choose the desired template ·and press the 'OK' button.
Figure 27: The Template Select dialog box.
To view all the templates in the current questionnaire choose the 'View Templates' menu option. This displays the 'View Templates' dialog box, as shown in Figure 28. This dialog box is effectively the template manager. There are five main operations that can be invoked from here.
• Select. If enabled, this function selects the template for the currently selected goal.
• Edit. Selecting this option opens the template editor with the selected template. See Section 4.2.

Figure 28: The Template Manaxer dialox box.
• Create. A new template can be created based on another template with this operation. This allows the creation of a customized template that is used as the base for all the other templates in the questionnaire. For example, the default Group Goal template maybe customized with a series of images and graphic objects. This New Group Goal template can then be used as the base for each of the other goal types. The customized objects in the New Group Goal template are transferred to the new derived templates. To create a new Text Entry template, select the base template from the Template list in the 'View Templates' dialog box and pressing the 'Create' button. The New Template dialog box in Figure 29 will appear. Enter the new templates' name in the Name edit field and choose the template target type from the drop down list. In the example this will be 'Text Entry'. Press the 'OK' button. The new template will appear in the template list of the View Template dialog box. The Create operation is able to convert to and from all the different goal types if so needed. For example a Single Select list template can be created from and Info Goal template, and so on.
New Template , , ""' £J
;:r .. ~ :~~}
c.i,o~
:'if;• OK 'I
~~,~F ;~,, -~~"1''' ·.-t Figure 29: The New Template dialox box.
• Delete. This operation will delete the currently selected template from the Template list. A confirmation message box will appear before the template is deleted.
• Properties. This operation displays the Template Properties dialog box as in Figure 30. The default properties of each template can be changed here. The fields are,
I. Name. The name of the template can be changed in this field.
2. Help Message. This is the default help message that is displayed when the respondent performs an inappropriate action. For example the respondent presses the 'OK' button in a Text Entry question without entering a reply.
3. Display Mode. The display mode controls whether the template is drawn as a metafile picture or a bitmap picture. In general the metafile option is drawn faster, but slows as the number of template objects increases. The bitmap option always is drawn at the same speed, but is slower than the metafile option for simple templates. The bitmap option is chosen by default when the template contains one or more graphic images.
Figure 30: The Template Properties dialox hox.
The current goal and its template can be previewed by choosing the 'Test Goal' menu item or pressing the 'Test' button on the Property panel. This displays the goal's user interface exactly as it would appear in QuestEX. The multimedia properties of the current goal are also played. To exit from the preview mode, press the template's 'OK' button.
4.2 The Template Editor.
The Template Editor is a graphical template object editor. The Property and Tree Panels are hidden, and the Template View appears. The Template View contains a simple graphical object representation of the template and a floating dialog box. The floating dialog box contains the template object list and a series of buttons. Figure 31 shows a view of the Template Editor. The important points in this figure are,
• Template Title. The name of the template appears in the title bar of QuestED.
• Template Objects. Most of the template objects appear in the Template view as white rectangles with a text label.
• Template Background. This shows the boundaries of the template in the Template View.
• Template Object List Dialog. This dialog box contains a list of all the objects in the template. The order the objects appear in the list directly relates to which ohjeets appear in front of other objects. For instance the background is always first on the list, so it appears underneath all other objects. The button objects all appear at the end of the list, and appear in front of the other objects.

• Selected Items. The items selected in the Template list appear bounded by the Selection Rectangle in the Object View.
• Selection Rectangle. This rectangle appears around the selected objects in the Template View.
Template Title
Template Object List Dialog Box
Selected Items
Figure 31: The Template Editor.
Objects may be selected in a number of different ways,
Template Background
Template Objects
Selection Rectangle
1. Clicking on an object in the Template View. Multiple objects are selected by clicking on objects whilst holding down either the Control or Shift Key.
2. Clicking on an empty part of the screen and dragging the selection rectangle around any number of template objects.
3. Selecting an object from the Template Object List. Multiple objects are selected by clicking on entries whilst holding down either the Control or Shift Key. This is useful for selecting objects that are obscured by other selected objects.
There are a number of operations that can be performed on template objects. These are available through the Template View menu and from the Template List dialog box.
• Add Object. Selecting this operation displays the 'New Object' dialog box, see Figure 32. Select from the list the object to be added to the template and press the 'OK' button. Now when the mouse cursor is over the Template View it will have the word 'Add' next to the point. Simply click on the Template View or drag out an area to place the new object. Note that only one animation object is allowed.
New Template Ob ••• f:i J
Figure 32: The New Template Object dialog box.
• Delete Object. A single object can be deleted from the template by selecting and the delete operation. Note that only objects added to the template with the Add Object operation can be deleted from the template. The default template objects can not be deleted.
• Arrange Forward. A single object can be moved forward in the template order with the operation. Moving the object forward will move it towards the bottom of the Template list. Note that an object can not be moved forward past the button objects as they sit on top of the screen by default.
• Arrange Back. A single object can be moved back in the template order with the operation. Moving the object back will move it towards the top of the Template list. Note that an object can not be moved back past the background as the background sits at the back of the screen by default.
• Align Objects. A group of objects can be aligned with respect to each other by using this command. Choosing this operation displays the Align Objects dialog box as in Figure 33. Object can be aligned horizontally and/or vertically by choosing the appropriate options. The options are,
1. No Change. Leaves the selected objects unchanged in that particular direction.
2. Left Sides/Tops. Aligns all the selected object's left/top edges to that of the leftmost/topmost object.
3. Centers. Aligns all the selected objects about the average position of all the objects.
4. Right Sides/Bottoms. Aligns all the selected object's right/bottom edges to that of the rightmost/bottom most object.
5. Space Equally. Spaces the selected objects according to the average amount of free height/width between the objects.
Figure 33: The Align Objects dialog box.

• Center Selection. A group of objects can be centered within the template either horizontally or vertically. A single object will be centered in the middle of the template. A group of objects will be centered as if they were a single object in the middle of the template.
• Move Selection. The current selected objects can be moved with either the keyboard or the mouse. Use the Cursor keys to move the selection up, down, left and right one unit at a time. To move the selection by larger steps, hold down the Shift key. Alternatively, click on the current selection with the mouse and drag the selection rectangle with the mouse. The current selection will be moved to the new position.
• Object Properties. The properties for a single object can be displayed by selecting the option as described above or by the object in the Template View or by double clicking it's entry in the Template List. This will display the object property dialog box for that object. The object properties are discussed in the ne,"<t section.
To exit the template editor, select the 'Exit' menu item on the menu bar. The current template will be saved and the Tree Editor will appear.
4.3 Object Properties
There are four main types of template objects. These are Background, Button, Text and Graphic. Within these four main types there are a number of sub types. These are all discussed following,
• Background. This is the background for the template. It is a single colour rectangle that covers the whole screen. It is possible to have different colour backgrounds for different template. Figure 34 shows the Background object's template dialog box.
Figure 34: The Background template object's property dialog box,
• Button. There are four buttons used in each template. These are the 'OK' button, the 'Quit' button the 'Back' and the 'Help' button. Figure 35 shows the 'OK' button's property dialog box. Each of these buttons have the following properties,
I. Button Text. Can be used to change the text the button shows. For example the 'OK' button can be changed to 'Start' or 'Continue'.
2. Text Colour. The foreground colour of the button text. Pre~s the associated 'Change' button to choose a different colour.
3. Button Font. The font used to draw the Button Text. Press the 'Change' button to choose a different font.
4. Face Colour. The colour of the button face. 5. Button Size. These fields show the size of the button in template units.
Thus the absolute size and position of the button can be set from here.
Figure 35: The Button object's properties dia/og box.
• Text. There are four main types of template text objects. 'Title' text, 'Question' text, 'Help' text and 'Miscellaneous' text. Figure 36 shows the text object's property dialog box. Each text object has the following properties,
l. Text Colour. The foreground colour of the text. Press the associated 'Change' button to choose a different colour.
2. Text Font. The font used to draw the Button Text. Press the 'Change' button to choose a different font.
3. Text Alignment. Describes how the text will be formatted within its rectangle. Possible options are left, right, centered and justified.
4. Text Size. These fields show the size of the text object in template units. Thus the absolute size and position of the object can be set from here.
Figure 36: The Text object's properties dialog box.
• Graphic. There are five different types of graphic. These are Rectangle, Ellipse, Graphic Image, Animation and Line. The first four graphic types use the graphic object property dialog box in Figure 37. Each of these four graphic objects have the following properties,
1. Fill Colour. The foreground colour of the object. Press the associated 'Change' button to choose a different colour. The graphic image and animation objects do not have this property.
2. Border Colour. The colour used to draw the edge of the object. The graphic image and animation objects do not have this property.

3. Graphic Size. These fields show the size of the graphic object in template units. Thus the absolute size and position of lhe object can be set from here.
Figure 37: The Graphic object's property dialog box.
The Line graphic has a different property dialog box as shown in Figure 38. The line object behaves slightly differently to the other graphic objects as it can be horizontal or vertical. The Line Properties dialog box has the following controls,
1. Line Colour. The foreground colour of the object. Press the associated 'Change' button to choose a different colour.
2. Mirror Horizontal. Pressing this button flips the line around the vertical axis.
3. Mirror Vertical. Pressing this button flips the line around the horizontal axis.
4. Make Line Horizontal. Pressing this button makes the line hotizontal. Once a line is horizontal it can not moved by the normal methods in the Template View. It can only be moved by adjusting the Graphic Size fields.
5. Make Line Vertical. Pressing this button makes the line vertical. Once a line is vertical it can not moved by the normal methods in the Template View. It can only be moved by adjusting the Graphic Size fields.
6. Graphic Size. These fields show the size of the line object in template units. Thus the absolute size and position of the object can be set from here.
Figure 38: The Line object's property dialog box.

D.2 QUESTEX USER GUIDE 201
D.2 QUESTEX USER GUIDE


The QUEST Questionnaire System
QuestEX User Guide
Version 2.0
Wednesday, June 26, 1996
Preliminary QuestEX User Guide.
This Users guide is divided into two parts. These are the Author's guide and the Respondent's guide. The author's guide explains the steps required to setup the QUEST system. The respondent's guide explains the steps involved in using QuestEX while answering a questionnaire.
1. Author's User Guide.
1.1 Installing QUEST.
QUEST is distributed via floppy disk. To install QUEST insert the floppy disk labeled 'QUEST - Disk #I' into a floppy disk drive. Then run the setup program on the floppy disk, this can be done by,
1. Double clicking SETUP.EXE in file manager. Start file manager, and change to the floppy disk drive that contains the QUEST files. Use the mouse to double click on the SETUP. EXE file item, or select the SETUP. EXE file item with the arrow keys and TAB and press ENTER.
2. Using the Run command in either file manager or program manager. Select the Run command from either file manager's or program manager's File menu. Type in the full path for the SETUP. EXE file and press the Enter key or the OK button.
Follow any prompts that are displayed during installation.

1.1.1 Running QuestEX.
QuestEX can be started in a number of different ways,
1. By double clicking on a program manager icon or shortcut. This is the recommended way of starting QuestEX. The icon or shortcut should have been created during installation.
2. By double clicking QUESTEX.EXE in File Manager or Explorer. To start QuestEX this way, run file manager or Explorer and change to the directory containing QuestEX. Use the mouse to double click on the QUESTEX. EXE file item, or select the QUESTEX. EXE file item with the arrow keys and TAB and press ENTER.
3. By using the Run command. Select the Run command from either lile manager's or program manager's File menu or the Start Menu. Type in the full path for the QUESTEX. EXE file and press the Enter key or the OK button.
4. By.file association. During installation a file association is setup for the extension . QS2
and the program as QUESTEX. EXE. This can be changed so that association is with QUESTEX . EXE. Then QuestEX can be started by double clicking on the .QS2 data file in file manager. Note that an association can only be set-up for QuestEX or QuestED, not both ..
5. With a command line argument. When using the above methods 1 and 3, a path and filename for a .QS2 questionnaire file can be specified after the QuestEX executable filename. This will automatically load the questionnaire file once QuestEX has started. For example, the following command line will start QuestEX and load the questionnaire file HEALTH. QS2.
C:\QUEST\QUESTEX.EXE C:\QUEST\HEALTH.QS2
If QuestEX is started using a command line argument or by file assocmt10n, the questionnaire file will be automatically loaded. QuestEX will then proceed straight to the questionnaire introduction. Otherwise a standard file open dialog box, as shown in figure 1, will appear. Once a questionnaire has been selected, QuestEX will proceed to the questionnaire introduction. The 'Exit QuestEX' button allows you to exit QuestEX.
2
Figure 1: The open questionnaire.file dialogue box
1.1.2 Printer Setup.
Pressing the 'Printer Setup' button allows you to choose the default printer for QuestEX. The standard printer setup dialog box, as shown in figure 2, will appear.
Figure 2: The open questionnaire file dialogue box.
From this dialog box choose the target printer from either the 'Default Printer' or from the list of 'Specific Printers'. Details such as paper orientation and size can also be setup here. For more detailed options press the 'Options .. .' button. The 'Network .. .' button can be used to setup printers on a Network.
3

2. Respondent's User Guide.
2. 1 The Questionnaire Introduction.
The first screen the respondent will see is the Questionnaire Introduction screen. This is the start of the questionnaire. The screen appearance of the Questionnaire Introduction is determined by the author of the questionnaire, however there are a number of items which will always appear on the introduction. These are,
• A Questionnaire Title. This just states the name of the questionnaire.
• A Questionnaire Description. The purpose of this description is to inform the respondent on what to expect in the questionnaire. It should 'sign-post' the questionnaire, indicating what will be asked, and in roughly what order.
• The 'OK' Button. Pressing this button will start the questionnaire. This button may however have any name. For instance it may appear as the 'Continue' or 'Start' button. Pressing the 'Enter' key has the same effect as pressing the 'OK' button.
Then there are a number of items which may or may not appear. Some of these are,
• The 'Help' Button. Pressing this button will display some information about the questionnaire some-where on the Introduction screen. Pressing the 'Alt-H' key combination has the same effect as pressing the 'Help' button.
• The 'Quit' Button. Pressing this button on a Questionnaire Introduction screen allows you to exit QUEST. If the Questionnaire has an Exit Password, then the dialog box in figure will appear, as in figure 3. Enter the password and press the 'OK', QuestEX will close. If the Questionnaire does not have a password, then a yes/no prompt asking for confirmation will appear. Pressing 'Yes' will close QuestEX, otherwise you will return to the Questionnaire Introduction screen. Pressing the 'Alt-Q' key combination is the same as pressing the 'Quit' button.'
Figure 3: The Exit Password dialog box
• Graphics. Pictures just to enhance the introduction's appearance. Sound and Music may also accompany the introduction screen.
• Animation. A window that shows a video or graphic animation .
.d
Once the 'OK button has been pressed, the questionnaire will start. Figure 4 shows a typical Questionnaire Introduction screen. Here the 'OK' Button has been labeled 'Start'.
Fignre 4: An example Questionnaire Introduction Screen.
2.2 The Section Introductions.
The next screen that appears is likely to be a Section Introduction, although this may not be the case. The Section Introductions appear very similar to the Questionnaire Introduction. Their purpose is to introduce each sub-section in the questionnaire. Again the same sort of items can appear in the Section Introduction as in the Questionnaire Introduction. There are also other items which may or may not appear these are,
• The 'Back' Button. Pressing this button will take you back to the last question you answered or the beginning of the questionnaire, which is closer. This allows you to re-enter your answer for that question. Pressing the 'Alt-B' key combination has the same effect as pressing the 'back' button
• The 'Quit' Button. Pressing this button on a section or question screen will initially prompt you for confirmation of the Quit action. If you answer 'Yes' then you will be taken back to the Questionnaire Introduction screen. If you answer 'No' then you will return to the current question or section.

2.3 The Questions.
There are a number of different types of question that QUEST can ask. For each type, the respondent is prompted to reply in a different way. All the question types have a number of common features. These arc,
• The Question Text. This is the actual question the respondent is to answer.
• An 'OK' button. Pressing this button indicates that the respondent has entered their reply. If the reply has not be entered correctly, then a message is displayed indicating this, and the respondent is prompted to re-enter the reply. Pressing the 'Enter' key has the same effect as pressing the 'OK' button.
• A Reply Box. The reply box varies with the type of question. Each question type is given and the reply box is described.
1. Text Entry: The reply box is a text entry field. The respondent types their reply into this field. Any kind of text reply can be entered.
2. Numeric Entry: As for the Text Entry, the reply box is a text entry field. However if the respondent dbes not enter a number, or if the number entered does not lie within a specific range the respondent is asked to re-enter their reply.
3. Single Selection List: The reply box is vertically scrolling list box. Within the list box is a set of pre-determined replies. One of these replies must be selected. The mouse can be used to select an item by positioning the cursor over the required item and pressing the left mouse button. The Arrow keys maybe used to move the selection bar up and down.
4. Multi-Selection List: Again the reply box is a vertically scrolling list box full of predetermined replies. However the respondent can now choose any number of the replies. This includes no replies. The Arrow keys maybe used to move the selection bar up and down. The Space bar can select and deselect each reply.
5. Information: There is no reply box for this type of question, in fact it isn't even a question. Its only purpose is lo display information for the respondent.
If a 'Help' button appears in the question, pressing it will display some predetermined help information some where within the current screen. Also in certain situations this information maybe displayed after a set period of time.
The questionnaire is complete when all the questions have been asked. The Questionnaire Introduction screen is then displayed. Depending on the questionnaire, a summary of the respondent's replies can be printed out.
6

L
D.3 QUESTED TUTORIAL 207
D.3 QUESTED TUTORIAL

The QUEST Questionnaire System
QuestED Tutorial
Version 2.0
Wednesday, June 26, 1996
Preliminary QuestED Tutorial.
This Tutorial presents the step by step construction of two simple questionnaires, 'Smoking' and 'Stroke'. These two small questionnaires are included in the Quest examples directory. Also in this directory are several other example questionnaires including 'Health check Staff survey', 'Audit' and the 'National Drug and Alcohol Research Readiness to Change' questionnaires. All these questionnaires demonstrate different aspects of Quest's capabilities.
This tutorial covers the questionnaire, summary and user interface aspects of the 'Smoking' and 'Stroke' questionnaires. For each questionnaire, the information requirements are examined and reduced in to questions. A step by step guide then shows bow to enter the questionnaires into QuestED. The 'Stroke' questionnaire tutorial covers the generation of a simple summary, and simple changes to the questionnaire's user interface.
Finally there is an evaluation questionnaire which we would like you to complete. This questionnaire will allow you to t:nler any suggestions and criticisms you have found in the Quest System. It will provide useful information and feedback for the developers on the current state of the project. For more information on this, read the 'Readme.txt' file in the Quest directory.
By all means load and experiment with the example questions with both QuestED and QuestEX. This will give you a better feel for the system.

1. Smoking Questionnaire.
This Smoking questionnaire originated from Dr. Keith Carey-Smith at the time of the General Practitioners conference in Christchurch, July 1995. It's original purpose was to test the new capabilities of Quest V2.0. The Smoking questionnaire is just a small part of what would be a larger questionnaire, but it demonstrates the concept~ well. The main aim of the questionnaire is to learn if the questionnaire respondent is possibly addicted to nicotine.
The best way to approach this problem is to break the problem into progressively smaller and smaller pieces. This hierarchical approach is very similar to how Quest represents a questionnaire. Quest breaks a questionnaire into 'Goals'. Questions, Calculations and Conditions are goals. Note that these goals all gather information of some sort from the respondent. Group and Info goals however give information to the respondent.
The top level of the problem is to determine the answer to 'ls the patient possibly addicted to nicotine?'. The answer is yes if they display the right symptoms. This situation is represented in Figure 1.
Addicted to Nicotine
Figure 1: Step I. The simplest level of the smoking questionnaire.
So what are the correct symptoms? The patient is possibly an addict if
• they crave cigarettes when without. • or they feel irritable if they haven't smoked for a while. • or they usually smoke with in thirty minutes of waldng.
This second step is shown in Figure 2.
Of course asking these questions to every patient is inefficient. We can do better by focusing on patients who have a greater risk of being an addict. Firstly the patient must at least smoke to be considered at risk. Secondly a heavy smoker has an increased risk.
Is An Addict
Yes
Yes·
Addicted to Nicotine
No
NotAn Addict
Figure 2: Step 2. Including the detailed symptoms.
By eliminating non-smokers and light-smokers from the equation, we can make the questionnaire more efficient and effective. This latest step is shown in Figure 3. To determine if the patient is a heavy smoker we ask them how many cigarettes they smoke per day. If it is over a certain amount them we can consider them at risk.
IsAn Addict
Ye
Addicted to Nicotine
No
Craves cigarettes
when without. No
Figure 3: Step 3. Eliminating redundant questions with further conditions.

The steps required to enter this questionnaire into QuestED are as follows. If you make a mistake and have to delete questions, use the QuestionnairelB_enumber Questionnaire menu command to renumber the questionnaire. A phrase that appears in bold is either a menu command, the name of a dialog box. property panel control or fields or an option that appears within QuestED. A phrase with a box around it is a reference to a goal in the questionnaire tree view.
I. Use the f:ilel['.iew menu command to create a new questionnaire. Enter some questionnaire introduction text into the Goal Information: Description field on the property panel. Also enter a title into the Goal Information: Title field.
2. Create a Single Select sub goal of !Group 1lby pressing the Sub Goals: Add button. From the Add Sub Goal dialog box, choose the A New Goal option and then the SingleSel List item from the drop down list. Press OK. Select the newl Slist 21 goal. Enter the question "Do you smoke" in the Goal Information: Question Text and replies 'Yes' and 'No' using the Reply Field: Add button.
3. Select the!Group 11 goal, and create the Group 3 sub goal as done in step 2 except select the Group Goal item from the drop down list. As thelGroup 31 goal will be hidden, select it, press the User Interface: Select button and select None from the Select Template dialog box, press 'OK'.
4. The Group 3 goal is conditional on the answer of Goal 2, so press the Condition Goal: Add button. The condition goallCond 4 lwill appear.
5. Select thelCond 4 goal. To link the SList 2 goal to the Cond 4 goal, press the Sub Goals: Add button. From the Add Sub Goal dialog, s~l!!.':~ _t]-ie Existing Goal option and choose the SList 2 item and press 'OK'. ~~~[~1 _ _2_: will appear as a referenced child goal of Cond 4. Your questionnaire should look like Figure 4.
1Group11 ~ Group 31--liiil-:~l~i-j:
Figure 4: The smoking questionnaire after 5 steps.
6. To create the Goal 4's condition, select the SList 2 item from the Sub Goals: list. Press the Insert into: LHS button. From the Insert Reference dialog box choose the List Index option and press OK. Select the '=' sign in the Relation field and enter '1' into the RHS field.
7. Now select Group 3, and create SList 5 as in step 2. Select thelSList slgoal and enter the question, "How many cigarettes do you smoke per day?" and the responses 'Between I and 5', 'Between 5 and 10', 'Between 10 and 20' and 'Above20'.
8. Select Group 3 and create Group Goal 6 as in step 3. As the/Group BI goal will be hidden, select it and press the User Interface: Select button and select None.
9. Group Goal 6 is conditional on the answer of Goal 5, so press the Condition Goal: Adld button. Condition Goal 7 will appear.
JO.Select the/Cond 7lgoal. To link Goal 5 to Goal 7, press the Sub Goals: Add button. From the Add ~.l!J:>. _<;;oal dialog, select the Existing Goal option and choose the SList 5 item. :_$]..j~l_!i: will appear as a referenced child goal of Goal 7. Your questionnaire should look like Figure 5.
!Group11 f~i.:~tj:
Figure 5: The smoking questionnaire after JO steps.
11. To create the Goal 7' s condition, select the SList 5 item from the Sub Goals: list. Press the Insert into: LHS button. From the Insert Reference dialog box choose the List Index option and press OK. Select the '>=' sign in the Relation field and enter '3' into the RHS field. This condition will be true if one of the last two responses in Goal 5 were selected by the patient.
12. Select the Grau 6 goal and create three Single Select Goals 8, 9 and 10 as in step 2. Select SList 8 and enter the question, "Do you feel irritable if you haven't smoked for a while?" and the replies 'Yes' and '.No'. Enable the Reply Field: Use Values check box. A 'O' will appear before each of the responses. Double click on the 'Yes' reply. In the Edit Reply Item with Value dialog box, change the 'O' value to 'I' and press OK.
13. Press the Reply Field: Copy button. The Copy Replies dialog box will appear with a list containing all of the Single Select questions. From the list select SList 9 and SList 10 and press OK.
14. Select Goals 9 and 10 and enter the questions "Do you usually smoke with in thirty minutes of waking?" and "Do you crave for a cigarette when without them?" respectively. Enable the Reply Field: Use Values option for both goals. Note that the 'Yes' and 'No' replies have been copied from SList 8.
15. To display a warning to the patient, select ~d create Info Goal 11 as in step 2. Your questionnaire should look like Figure 6.
f~~-1:
Figure 6: the smoking questionnaire after 15 steps.
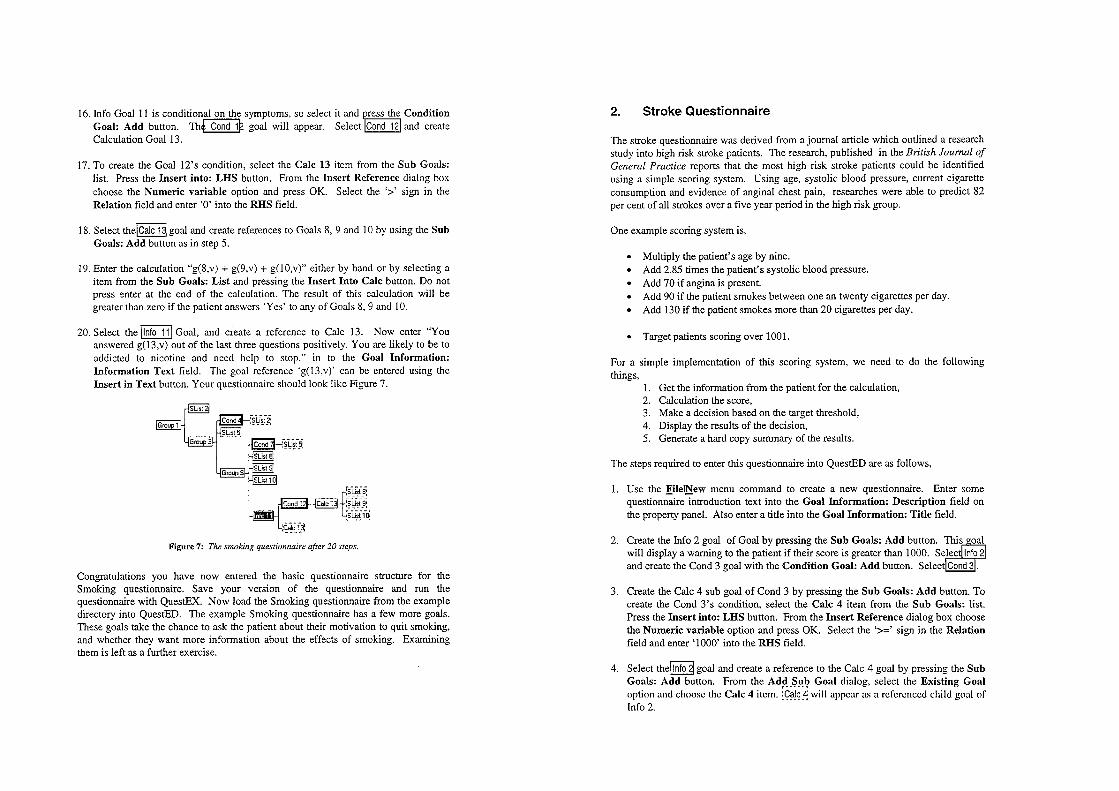
16. Info Goal I I is conditional on the symptoms, so select it and ress the Condition Goal: Add button. Th~ goal will appear. Select Cond 12 and create Calculation Goal 13.
17. To create the Goal 12's condition, select the Cale 13 item from the Sub Goals: list. Press the Insert into: LHS button. From the Insert Reference dialog box choose the Numeric variable option and press OK. Select the '>' sign in the Relation field and enter '0' into the RHS field.
18. Select thelCalc 1~ goal and create references to Goals 8, 9 and I 0 by using the Sub Goals: Add button as in step 5.
19. Enter the calculation "g(8,v) + g(9,v) + g(I0,v)" either by hand or by selecting a item from the Sub Goals: List and pressing the Insert Into Cale button. Do not press enter at the end of the calculation. The result of this calculation will be greater than zero if the patient answers 'Yes' to any of Goals 8, 9 and I 0.
20. Select the I info 111 Goal, and create a reference to Cale 13. Now enter "You answered g(l3,v) out of the last three questions positively. You are likely to be to addicted to nicotine and need help to stop." in to the Goal Information: Information Text field. The goal reference 'g(l3,v)' can be entered using the Insert in Text button. Your questionnaire should look like Figure 7.
Figure 7: The smoking questionnaire after 20 steps.
Congratulations you have now entered the basic questionnaire structure for the Smoking questionnaire. Save your version of the questionnaire and run the questionnaire with QuestEX. Now load the Smoking questionnaire from the example directory into QuestED. The example Smoking questionnaire has a few more goals. These goals take the chance to ask the patient about their motivation to quit smoking, and whether they want more information about the effects of smoking. Examining them is left as a further exercise.
2. Stroke Questionnaire
The stroke questionnaire was derived from a journal article which outlined a research study into high risk stroke patients. The research, published in the British Journal of General Practice reports that the most high risk stroke patients could be identified using a simple scoring system. Using age, systolic blood pressure, current cigarette consumption and evidence of anginal chest pain, researches were able to predict 82 per cent of all strokes over a five year period in the high risk group.
One example scoring system is,
• Multiply the patient's age by nine. • Add 2.85 times the patient's systolic blood pressure. • Add 70 if angina is present. • Add 90 if the patient smokes between one an twenty cigarettes per day. • Add 130 if the patient smokes more than 20 cigarettes per day.
• Target patients scoring over 1001.
For a simple implementation of this scoring system, we need to do the following things,
I. Get the information from the patient for the calculation, 2. Calculation the score, 3. Make a decision based on the target threshold, 4. Display the results of the decision, 5. Generate a hard copy summary of the results.
The steps required to enter this questionnaire into QuestED are as follows,
I. Use the 
5. Enter the following information text into the Info 2 goal, "Your risk factor is g(4,v). This is greater than 1001. You maybe at risk from stroke." and the title "Results - Warning Possible Risk".
6. Select thelCalc4 goal, and create two Numeric Entry Goals 5 and 6. Then Create two Single Select Goals 7 and 8. Your questionnaire should look like Figure 8.
1m,111~
Figure 8: The stroke questionnaire after 6 steps.
8. Select the~ goal and enter the question "What is your Age?". Enable the 'Limit' check option and enter 0 and 120 as the lower and upper limits.
9. Select the I Num el goal and enter the question "What is your systolic blood pressure?". Again enable the 'Limit' check option and enter sensible limit values.
I 0. Select the ISList 71 goal and enter the question "Do you have angina?" and the responses 'Yes' and 'No'. Check the 'Use Values' option and change the value for 'Yes' from Oto 1.
I
11. SelectlSList ij goal and enter the question "How many cigarettes do you smoke per day?" and the responses 'None', 'Between I and 20' and 'Over 20'. Check the 'Use Values' option and change the value for 'Between I and 20' to 90 and the value for 'Over 20' to 130.
12. Select the!Calc4goal and enter the calculation "9*g(7,v) + 2.85*g(6,v) + 70*g(5,v) + g(8,v)" either by hand or by selecting a item from the Sub Goals: List and pressing the Insert Into Cale. Do not press enter at the end of the calculation.
13. Select the !Group 11 goal and create Information Goal 9. This Info Goal will be conditional so select it and create Condition Goal I 0 with the Condition Goal: Add. Select~
14. Link Cale 4 to Cond 10 with the Sub Goals: Add button, as in step 4.
15. To create the Cond I0's condition, select the Cale 4 item from the Sub Goal: list. Press the Insert into: LHS button. From the Insert Reference dialog box choose the Numeric variable option and press OK. Select the '<=' sign in the Relation field and enter 'I 000' into the RHS field.
16. Select the ~oal and create a reference to Cale 4 as in step 4. :{.~1~Iwill appear as a referenced child goal of Info 9.
17. Enter the following information text into Info 9, "Your risk factor is g(4,v). This is not greater than 1001, so you are not currently considered at risk.". Also enter the title, "Results - Patient Not At Risk".
You have now created the stroke questionnaire. It should appear as in Figure 9.
Figure 9: The correct appearance of the Stroke Questionnaire.
Next to create a simple summary for the stroke questionnaire follow these steps,
I. Choose the ~ummarylyiew Summaries menu option. The View Summaries dialog box will appear, press the Add button. Press the 'OK' button the Summary Style dialog box.
2. In the Summary Edit dialog box, enter your summary name into Name: field.
3. Select all of the items in the Questionnaire List except for the two condition items. Press the Add -> Button. These items will be transferred to the Summary List.
4. Use the 'Up' and 'Down' buttons to re-order the items in the Summary List. Make the order; I, 5, 6, 7, 8, 4, 9 and 2.
5. For each of the items in the Summary List double click on it and change the default text to suit. Make sure you leave any'/\' symbols in each entry's text. Use the delimiter option to format and group the summary entries. For example use the 'Blank Line' delimiter for Goals I and 4, and '1/2 Page Tab' for Goals 5 and 7.
The example Stroke Questionnaire from the example directory produces the following summary output,

Patient Stroke Evaluation
Patient Age?: 32 Angina?: Yes Risk= 929.65
Patient is not at Risk
Blood pressure: 169 Smokes per day?: Between 1 and 20
To make some simple user interface changes to the stroke questionnaire, select the !Group 1lgoal. Then press the User Interface: Edit button. The main window changes to show the screen layout for the Default Group Goal Template. This is the template the Group 1 goal is using. To change the colour and font of the template title,
1. Select the rectangle with the label 'Title Text'.
2. Press the Props button on the Template Object <lialog box. Alternatively you can double click on the rectangle itself. The Template Text Properties dialog box will appear.
3. Use the two Change buttons to alter the colour, font and font size of the title text..
4. The Alignment of the title text can also be changed to either left, centered, right or justified.
5. Select the Exit menu option to return to the questionnaire editor.
6. To see the changes you have made to the template, select the User Interface: Test button. This will show you the goal exactly as it will appear in QuestEX. Press the OK button to return to the questionnaire.
The properties of any object in the Template Editor display can be shown by double clicking on the selected object.
Finally make sure you save and run each of the tutorial questionnaires with QuestEX.