The Monarch Butterfly - Georgian Bay Biosphere Reserve
46
Page 1 The Monarch Butterfly A Multi-Lesson Unit Plan on the Monarch Butterfly, Pollinators, and Milkweed Description of Unit Students will recognize that the Monarch butterfly is a significant species with a unique life history. Students will explore concepts including: butterfly life cycle, pollination, plant growth, and migration. They will recognize that people have complex relationships with Monarchs and the plants which sustain them. Students will discuss ways that humans interact with Monarchs, how human activities can threaten Monarch survival, and consider actions they can take to conserve pollinator species. Students will also explore many facets of plants including structure, function, and importance. Grade Level: 1-3 This lesson is designed to for use with Grades 1-3 over the course of several weeks. Activities can also be used independently. Activities are designed to meet Ontario science curriculum standards for the grades indicated, however some teachers may wish to adjust activities slightly for a different grade. Learning Environment: Indoor classroom Outdoor garden or green space Prep Time: See each Lesson for specifics Length of Unit: Approximately 1 -2 months Length of Lesson: See each Lesson for specifics Key Vocabulary: Monarch, Chrysalis, Metamorphosis, Milkweed, Glider, Roots, Photosynthesis, Flower, Stamen, Pistil, Leaf, Seed, Stem Staffing: 1 educator Materials: See each grade level’s cover page and each lesson for specifics Groupings: Whole class, small groups Teaching/Learning Strategies: Discussion Observing and recording Kinesthetic games Reading & Writing Video exploration At a Glance Connect with the Georgian Bay Biosphere Reserve Website: gbbr.ca Phone: (705)-774-0978 Email: [email protected] This lesson plan and included media/ materials are the property of GBBR unless otherwise stated.
-
Upload
khangminh22 -
Category
Documents
-
view
4 -
download
0
Transcript of The Monarch Butterfly - Georgian Bay Biosphere Reserve

Page 1
The Monarch Butterfly A Multi-Lesson Unit Plan on the Monarch Butterfly,
Pollinators, and Milkweed
Description of Unit
Students will recognize that the Monarch butterfly is a significant species with a unique life history. Students will explore concepts including: butterfly life cycle, pollination, plant growth, and migration. They will recognize that people have complex relationships with Monarchs and the plants which sustain them. Students will discuss ways that humans interact with Monarchs, how human activities can threaten Monarch survival, and consider actions they can take to conserve pollinator species. Students will also explore many facets of plants including structure, function, and importance.
Grade Level: 1-3 This lesson is designed to for use with Grades 1-3 over the course of several weeks. Activities can also be used independently. Activities are designed to meet Ontario science curriculum standards for the grades indicated, however some teachers may wish to adjust activities slightly for a different grade.
Learning Environment: Indoor classroom Outdoor garden or green space
Prep Time: See each Lesson for specifics
Length of Unit: Approximately 1 -2 months
Length of Lesson: See each Lesson for specifics
Key Vocabulary: Monarch, Chrysalis, Metamorphosis, Milkweed, Glider, Roots, Photosynthesis, Flower, Stamen, Pistil, Leaf, Seed, Stem
Staffing: 1 educator
Materials: See each grade level’s cover page and each lesson for specifics
Groupings: Whole class, small groups
Teaching/Learning Strategies: Discussion Observing and recording Kinesthetic games Reading & Writing Video exploration
At a Glance
Connect with the Georgian Bay Biosphere Reserve
Website: gbbr.ca
Phone: (705)-774-0978
Email: [email protected]
This lesson plan and included media/materials are the property of GBBR unless otherwise stated.

Page 2
Page
Grade 1
Unit Outline 4
Lesson 1: An Introduction to Monarch Butterflies 5
Lesson 2: A Monarch’s Life Cycle 6-7
Lesson 3: Monarch’s Basic Needs 8
Lesson 4: Insects in Winter 9-10
Lesson 5: Observing Monarch Butterflies 11-13
Extension Activities 14
Grade 2
Unit Outline 16
Lesson 1: The Truth About Monarch Butterflies 17
Lesson 2: Create a Garden Insect Wall 18-21
Lesson 3: Exploring Monarch Migration 22-23
Lesson 4: Warning! I’m Brightly Coloured! 24
Lesson 5: Exploring Monarch Flight 25-29
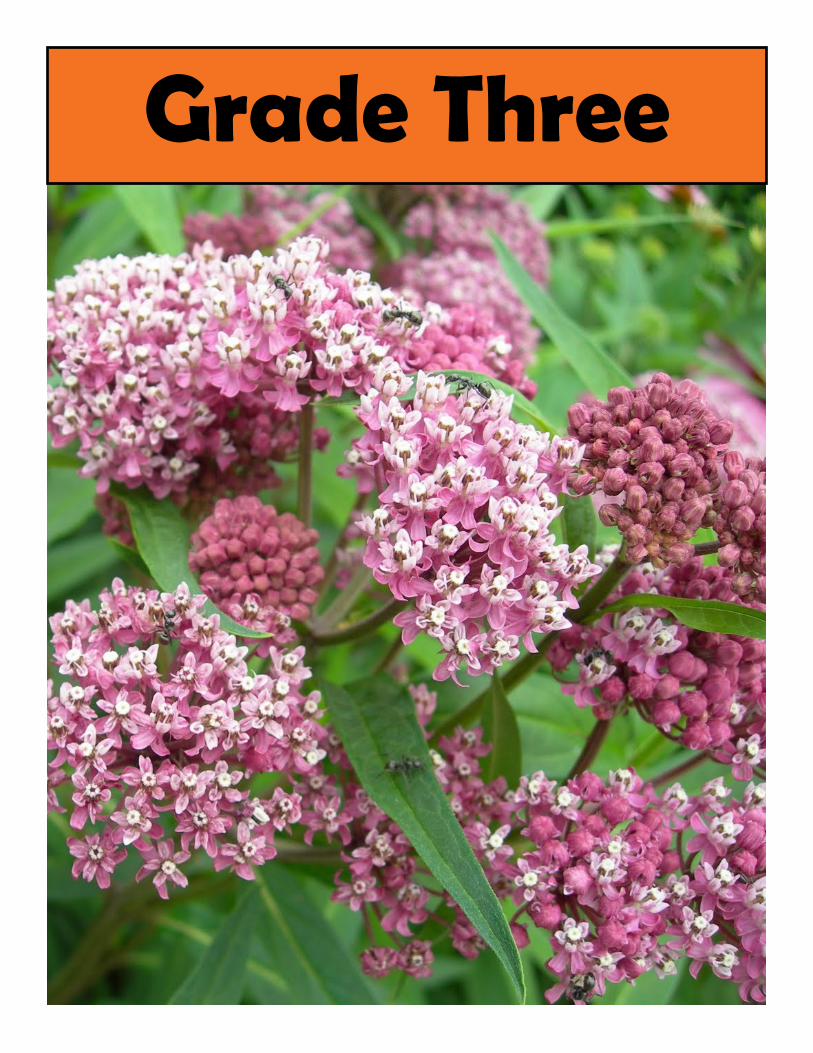
Grade 3
Unit Outline 31
Lesson 1: I Notice, I Wonder, It Reminds Me 32
Lesson 2: A Plant’s Basic Needs… 33-34
Lesson 3: Parts of a Plant… 35-42
Lesson 4: Plants and People… 43-44
Lesson 5: We Speck for the Trees 45
Resources and Further Reading 46
Table of Contents

Page 3
Grade One
Page 4
Unit Outline
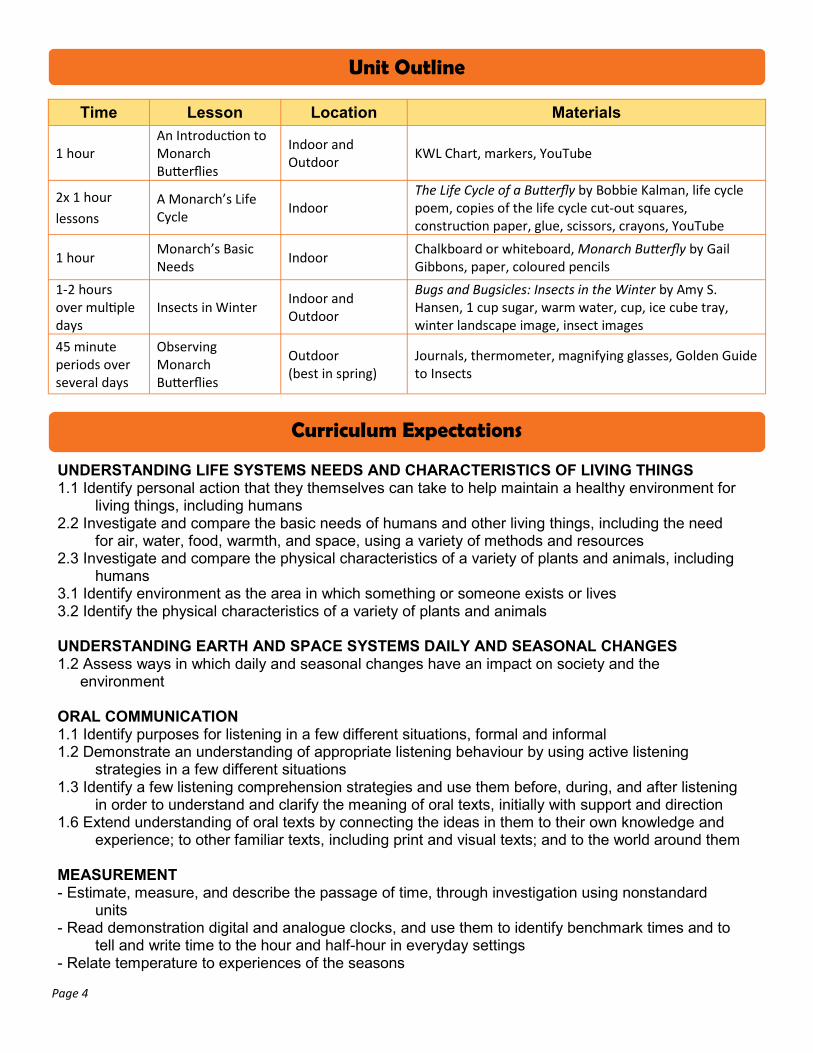
UNDERSTANDING LIFE SYSTEMS NEEDS AND CHARACTERISTICS OF LIVING THINGS 1.1 Identify personal action that they themselves can take to help maintain a healthy environment for
living things, including humans 2.2 Investigate and compare the basic needs of humans and other living things, including the need
for air, water, food, warmth, and space, using a variety of methods and resources 2.3 Investigate and compare the physical characteristics of a variety of plants and animals, including
humans 3.1 Identify environment as the area in which something or someone exists or lives 3.2 Identify the physical characteristics of a variety of plants and animals UNDERSTANDING EARTH AND SPACE SYSTEMS DAILY AND SEASONAL CHANGES 1.2 Assess ways in which daily and seasonal changes have an impact on society and the
environment ORAL COMMUNICATION 1.1 Identify purposes for listening in a few different situations, formal and informal 1.2 Demonstrate an understanding of appropriate listening behaviour by using active listening
strategies in a few different situations 1.3 Identify a few listening comprehension strategies and use them before, during, and after listening
in order to understand and clarify the meaning of oral texts, initially with support and direction 1.6 Extend understanding of oral texts by connecting the ideas in them to their own knowledge and
experience; to other familiar texts, including print and visual texts; and to the world around them MEASUREMENT - Estimate, measure, and describe the passage of time, through investigation using nonstandard
units - Read demonstration digital and analogue clocks, and use them to identify benchmark times and to
tell and write time to the hour and half-hour in everyday settings - Relate temperature to experiences of the seasons
Curriculum Expectations
Time Lesson Location Materials
1 hour An Introduction to Monarch Butterflies
Indoor and Outdoor
KWL Chart, markers, YouTube
2x 1 hour
lessons
A Monarch’s Life Cycle
Indoor The Life Cycle of a Butterfly by Bobbie Kalman, life cycle poem, copies of the life cycle cut-out squares, construction paper, glue, scissors, crayons, YouTube
1 hour Monarch’s Basic Needs
Indoor Chalkboard or whiteboard, Monarch Butterfly by Gail Gibbons, paper, coloured pencils
1-2 hours over multiple days
Insects in Winter Indoor and Outdoor
Bugs and Bugsicles: Insects in the Winter by Amy S. Hansen, 1 cup sugar, warm water, cup, ice cube tray, winter landscape image, insect images
45 minute periods over several days
Observing Monarch Butterflies
Outdoor (best in spring)
Journals, thermometer, magnifying glasses, Golden Guide to Insects

Page 5
This activity gives students a chance to brainstorm what they already know and what they want to
know about Monarch butterflies to help launch a study rooted in observation. This activity is best
done in March or April to start the spring/summer unit on Monarchs.
Time Needed: 30 minutes indoors, 30 minutes outdoor school yard walk
Materials: KWL chart, markers, YouTube access
Lesson 1: An Introduction to Monarch Butterflies
Use a Know – Want to Know – Learned (KWL)
chart, to begin the study of Monarch butterflies.
Ask students what they already know about
Monarch butterflies and record their ideas under
the KNOW section of the chart. Review the
statements listed on the KWL chart.
Next ask students what they want to know about
Monarchs and record their ideas as questions
under the WANT TO KNOW section of the
chart. Tell students that questions often begin
with “Question Starter” words that help us
recognize a question is being asked. Brainstorm
or share examples of these words, then
challenge students to make up questions about
KNOW WANT TO KNOW LEARNED
Monarchs have
black and
orange wings.
How do the
caterpillars move?
We don’t see
Monarchs in
the winter.
What do Monarchs
like to eat?
Monarchs like
flowers.
Can you touch
Monarchs?
Monarch butterflies. Questions should begin
with a Question Starter word.
If students struggle to develop their own
questions, encourage them to imagine what
they might ask a Monarch butterfly if they could.
Have them think about the things a butterfly
must do or see in a day, and come up with a
question based on these activities. Once the list
of questions is sufficient in length, discuss how,
as a class, you will get the answers to these
questions. Inform the class that you will be
visiting Monarchs at the school in the place they
are most likely to be found. Where is this place?
The gardens!
Tell students that the last part of the chart is for
what we LEARNED, which will be completed
once our study is complete.
Watch the video Kids News Break - Monarch
Butterflies (3 min) as a further introduction to
Monarchs. www.youtube.com/watch?
v=WAHpP6Vgmik&t=83s
Lead the class on a walk through the school
yard and discuss the video and questions
outdoors. Look for milkweed plants in areas they
might grow and look at the plant closely with
students. Milkweed will be present in many of
the activities students complete. Question Starter Words
Who…?
What…?
Where…?
Why…?
When…?
How…?
Did…?
Does…?
Can…?
Should…?
Would…?
Could…?
Is…?
If…?
Do…?
May…?
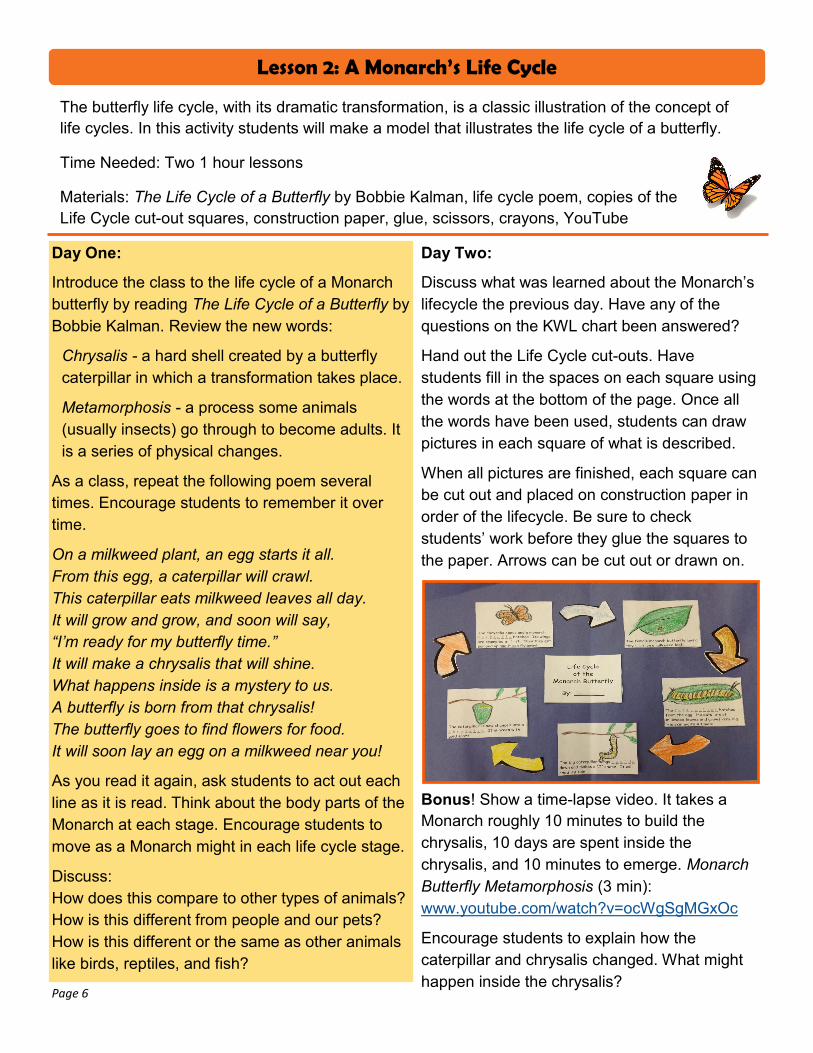
Page 6
The butterfly life cycle, with its dramatic transformation, is a classic illustration of the concept of
life cycles. In this activity students will make a model that illustrates the life cycle of a butterfly.
Time Needed: Two 1 hour lessons
Materials: The Life Cycle of a Butterfly by Bobbie Kalman, life cycle poem, copies of the
Life Cycle cut-out squares, construction paper, glue, scissors, crayons, YouTube
Lesson 2: A Monarch’s Life Cycle
Day One:
Introduce the class to the life cycle of a Monarch
butterfly by reading The Life Cycle of a Butterfly by
Bobbie Kalman. Review the new words:
Chrysalis - a hard shell created by a butterfly
caterpillar in which a transformation takes place.
Metamorphosis - a process some animals
(usually insects) go through to become adults. It
is a series of physical changes.
As a class, repeat the following poem several
times. Encourage students to remember it over
time.
On a milkweed plant, an egg starts it all.
From this egg, a caterpillar will crawl.
This caterpillar eats milkweed leaves all day.
It will grow and grow, and soon will say,
“I’m ready for my butterfly time.”
It will make a chrysalis that will shine.
What happens inside is a mystery to us.
A butterfly is born from that chrysalis!
The butterfly goes to find flowers for food.
It will soon lay an egg on a milkweed near you!
As you read it again, ask students to act out each
line as it is read. Think about the body parts of the
Monarch at each stage. Encourage students to
move as a Monarch might in each life cycle stage.
Discuss:
How does this compare to other types of animals?
How is this different from people and our pets?
How is this different or the same as other animals
like birds, reptiles, and fish?
Day Two:
Discuss what was learned about the Monarch’s
lifecycle the previous day. Have any of the
questions on the KWL chart been answered?
Hand out the Life Cycle cut-outs. Have
students fill in the spaces on each square using
the words at the bottom of the page. Once all
the words have been used, students can draw
pictures in each square of what is described.
When all pictures are finished, each square can
be cut out and placed on construction paper in
order of the lifecycle. Be sure to check
students’ work before they glue the squares to
the paper. Arrows can be cut out or drawn on.
Bonus! Show a time-lapse video. It takes a
Monarch roughly 10 minutes to build the
chrysalis, 10 days are spent inside the
chrysalis, and 10 minutes to emerge. Monarch
Butterfly Metamorphosis (3 min):
www.youtube.com/watch?v=ocWgSgMGxOc
Encourage students to explain how the
caterpillar and chrysalis changed. What might
happen inside the chrysalis?
Page 7
Life Cycle
Monarch Butterfly
By: ____________
The female Monarch butterfly lays a
tiny _ _ _ on a milkweed leaf.
The chrysalis opens and a Monarch
_ _ _ _ _ _ _ _ _ hatches. Its wings are
crumpled at first. Then they get pumped
up and it can fly away!
The _ _ _ _ _ _ _ _ _ _ _ hatches
from the egg. He eats lots of milkweed
leaves and grows very big. His skin
molts 4 times!
The caterpillar is now changed into a
_ _ _ _ _ _ _ _ _ . It is green with gold
spots.
The big caterpillar hangs _ _ _ _ _ _
down and makes a “J” shape. It will
shed its skin.
WORD BANK:
chrysalis upside butterfly caterpillar egg

Page 8
In this activity students will review what basic needs are for all living things. Then through a video
and walk outdoors, students will think about what the basic needs of a Monarch butterfly are.
Time Needed: Introduction 15 - 20 minutes, Monarch activities 30 - 40 minutes
Materials: Chalkboard or whiteboard, The Monarch Butterfly by Gail Gibbons, paper,
coloured pencils
Lesson 3: Monarch’s Basic Needs
If your class has not reviewed plants and
animals’ basic needs, begin by asking questions
such as:
• What do humans need to survive?
• What do plants and animals need to live?
• How are all living things alike?
• How are living things different?
Guide your class in generating a list of basic
needs by asking them if they have pets. Ask the
class what a pet cat needs to live and stay
healthy? How about a hamster?
• What factors do you think about when taking
care of pets?
• Can all pets live in a small tank? Why not?
• Would these animals survive outside in
summer and in winter?
Tell students that in a healthy environment, an
animal or plant will find everything it needs to
survive. There are five basic needs - food,
water, air, shelter (from predators and/or the
elements), and space to live. See if students
can identify them by providing clues (take a
deep breath, talk about breakfast, point out the
weather).
Ask the class to describe the school garden.
How is it different than their home? What is it
like in the gardens? What kind of animals live
there? Do the needs of animals in the garden
differ from pets? Do they differ from the needs
of humans?
To learn more about Monarchs, what they do,
and what they may need, read The Monarch
Butterfly by Gail Gibbons. Discuss the following
questions:
• What do we know that butterflies need?
• What are the non-living needs of the
Monarch? (ex. water, sunlight)
• Can a Monarch’s needs be meet anywhere?
• What would happen to the Monarch if there
were no more milkweed plants?
As a class, walk to the school garden or nearby
green space. Observe different plants, animals,
and objects. Review each by asking: “How may
this help a Monarch or another animal meet its
needs?”
While outdoors, look at milkweed emphasizing
that this plant is a very important basic need, it
cannot be swapped out for any other plant!
Gradually encourage students to think about a
Monarch’s basic needs in more detail. Examples
may be: Monarchs also need milkweed to make
a chrysalis on; Monarchs sometimes need
shelter from wind but they also need winds to
help travel.
Back indoors,
task students to
draw a picture
of a Monarch
butterfly in
nature
surrounded by
plants, animals
or other things
that help it to
meet its basic
needs.
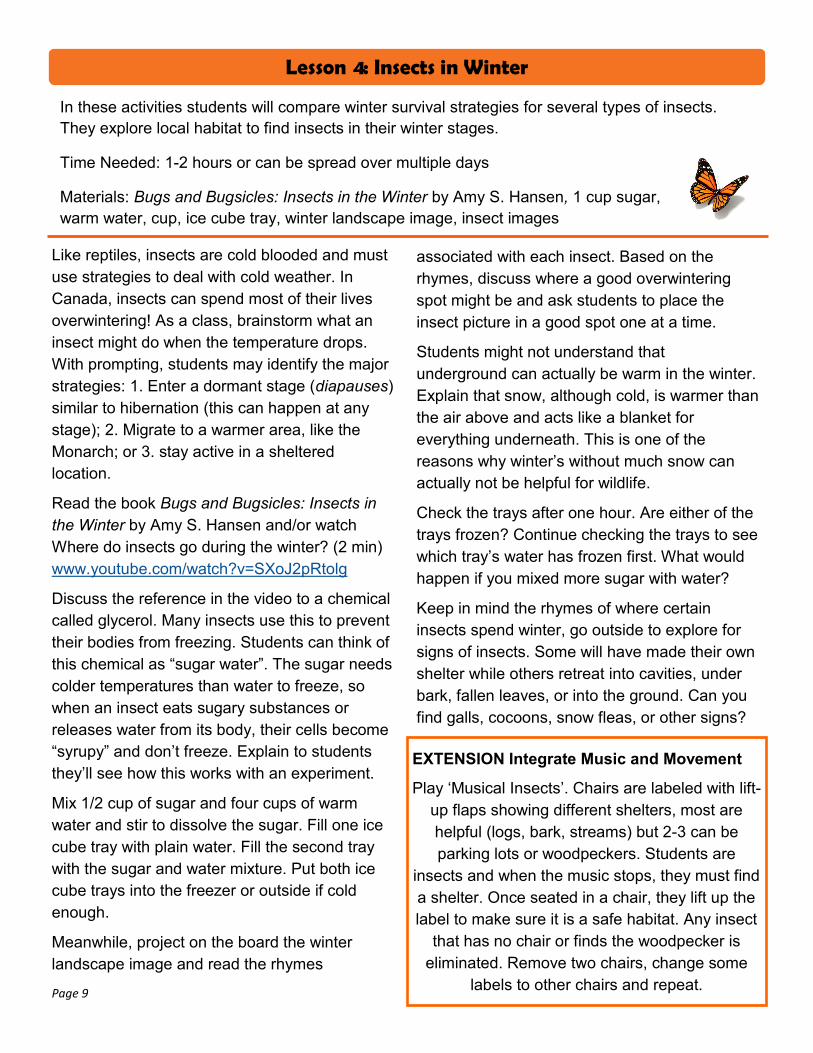
Page 9
In these activities students will compare winter survival strategies for several types of insects.
They explore local habitat to find insects in their winter stages.
Time Needed: 1-2 hours or can be spread over multiple days
Materials: Bugs and Bugsicles: Insects in the Winter by Amy S. Hansen, 1 cup sugar,
warm water, cup, ice cube tray, winter landscape image, insect images
Lesson 4: Insects in Winter
Like reptiles, insects are cold blooded and must
use strategies to deal with cold weather. In
Canada, insects can spend most of their lives
overwintering! As a class, brainstorm what an
insect might do when the temperature drops.
With prompting, students may identify the major
strategies: 1. Enter a dormant stage (diapauses)
similar to hibernation (this can happen at any
stage); 2. Migrate to a warmer area, like the
Monarch; or 3. stay active in a sheltered
location.
Read the book Bugs and Bugsicles: Insects in
the Winter by Amy S. Hansen and/or watch
Where do insects go during the winter? (2 min)
www.youtube.com/watch?v=SXoJ2pRtolg
Discuss the reference in the video to a chemical
called glycerol. Many insects use this to prevent
their bodies from freezing. Students can think of
this chemical as “sugar water”. The sugar needs
colder temperatures than water to freeze, so
when an insect eats sugary substances or
releases water from its body, their cells become
“syrupy” and don’t freeze. Explain to students
they’ll see how this works with an experiment.
Mix 1/2 cup of sugar and four cups of warm
water and stir to dissolve the sugar. Fill one ice
cube tray with plain water. Fill the second tray
with the sugar and water mixture. Put both ice
cube trays into the freezer or outside if cold
enough.
Meanwhile, project on the board the winter
landscape image and read the rhymes
associated with each insect. Based on the
rhymes, discuss where a good overwintering
spot might be and ask students to place the
insect picture in a good spot one at a time.
Students might not understand that
underground can actually be warm in the winter.
Explain that snow, although cold, is warmer than
the air above and acts like a blanket for
everything underneath. This is one of the
reasons why winter’s without much snow can
actually not be helpful for wildlife.
Check the trays after one hour. Are either of the
trays frozen? Continue checking the trays to see
which tray’s water has frozen first. What would
happen if you mixed more sugar with water?
Keep in mind the rhymes of where certain
insects spend winter, go outside to explore for
signs of insects. Some will have made their own
shelter while others retreat into cavities, under
bark, fallen leaves, or into the ground. Can you
find galls, cocoons, snow fleas, or other signs?
EXTENSION Integrate Music and Movement
Play ‘Musical Insects’. Chairs are labeled with lift-
up flaps showing different shelters, most are
helpful (logs, bark, streams) but 2-3 can be
parking lots or woodpeckers. Students are
insects and when the music stops, they must find
a shelter. Once seated in a chair, they lift up the
label to make sure it is a safe habitat. Any insect
that has no chair or finds the woodpecker is
eliminated. Remove two chairs, change some
labels to other chairs and repeat.

Page 10
INSECT
OVERWIN
TER
STAGE
PREP/
ACTIVITY
LEVEL
OVERWINTER
SPOT POEM
Ants,
Carpenter Adult
Anti-freeze;
Inactive In trees or logs
Carpenter ants, the wood of trees explains your
name. It is where you winter too, one and the
same.
Bumblebees Queen
Re-fertilized eggs
inside queen;
inactive
Underground,
under leaves or
logs
Bumblebee queen, you waved goodbye to other
bees. Now under logs where no one sees.
Crickets
(Most) Egg Inactive In the ground
Crickets, once so loud at night. Now under the
earth out of earshot and out of sight.
Dragonflies
Egg,
Nymph, or
Adult
Egg: inactive;
Nymph: Semi-
active; Adult:
migrate/ active
Egg and Nymph:
Bottom of a pond;
Adult: may
migrate
Dragonfly nymph you’re staying under the water.
You might be there for years, even when the
weather gets hotter.
Fireflies
(Most) Larva Inactive Underground
Fireflies you lay as “worms” underground. We’ll
need spring to come for you to crawl around.
Goldenrod
Gall Fly Larva
Anti-freeze;
inactive Goldenrod stems
Goldenrod Gall Fly, the home you’ve made stands
out to all. So big compared to the egg so small.
Grasshopper Egg Inactive In the ground
Grasshopper eggs, you were tucked safe under
grass. To be hidden under snow until winter is
past.
Honeybees Adult Store food; semi-
active In tree or box
Honeybees are on a break from busily making
honey. You’ll stay in the warm hive but pop out if
it’s sunny.
House Fly Adult Inactive except
when warm
In building or
hollow trees
Houseflies, I know you’re in my home out of sight.
On a warm sunny day, you crawl out into the light.
Ladybugs Adult Cluster together;
inactive
Under leaves/
grasses or in
buildings
Ladybugs, where did you go? To hide under the
leaves with insect friends and foe.
Monarch Adult Migrate; semi
active
Mexico or
California
Monarch butterfly, I know where you go! You fly
thousands of miles south to Mexico.
Mosquitoes Adult
Females inactive Sheltered place
Adult females you’ve found a small hole to pass
the time. In the spring, I know how you like to dine!
Paper
Wasps Queen
Fertilized eggs;
inactive In the ground
Wasp queen, you waved goodbye to your kind.
Now under-ground you’ll stay, away from sunshine.
Woolly Bear Larva inactive Under leaves/
grasses
Woolly Bears, under leaves and snow you are fast
asleep. But I’ve seen you on snow, how slowly you
creep.

Page 11
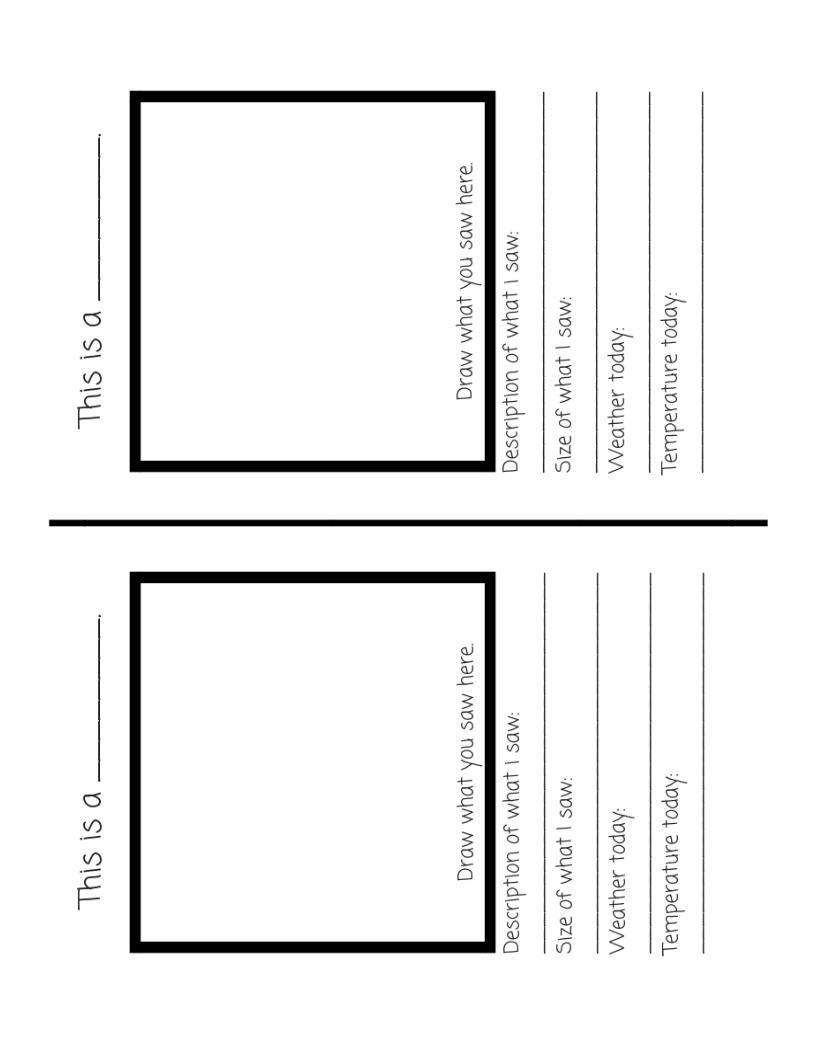
This activity combines key components of the unit into regular visits to a garden or green space
for observation and measurement. It is best started in spring when the school garden or nearby
green spaces are beginning to grow and the first Monarchs are returning to Ontario.
Students will practice observation by looking at Monarch butterflies and other insects,
as well as plants in the garden.
Time Needed: 45 minute periods over several days
Materials: Journals, thermometer, magnifying glasses, Golden Guide to Insects
Lesson 5: Observing Monarch Butterflies
Review the time of year with students (spring).
Inform students that adult Monarch butterflies fly
to Mexico during Ontario’s winter and will be
returning in the upcoming weeks.
Tell students that it’s time to learn more about
Monarchs by looking for these animals! Inform
the class that over the next few weeks, they will
be visiting Monarch gardens often to watch
changes over time and journaling what they see.
It is important that students record the same
information each time the class goes outside.
Brainstorm a list of things for everyone to
observe and record. These might include:
• Weather (clouds,
sun, rain, wind)
• Temperature
• Time and date
• Number of insects
and Monarchs
• Type of insects
• Life cycle stage
• Other wildlife
• Height of plants
• Number of flowers
• Colour of flowers
• Other features
(shape)
Students can work in pairs or individually. They
will need to write or draw observations. You may
wish to create a worksheet listing the things to
record for each visit, or a journal could be built
as an art project using recycled materials (scrap
paper, cereal boxes, yarn).
Going Outside – Daily Plan
Instruct students on proper behaviour around
insects and plants: respect the animals, don’t
pick plants and don’t scare the insects if they fly
close to you.
Visit the school garden or green space. Start by
recording common measurements together,
such as start time, date, temperature, and
weather.
Individually or in pairs, instruct
students to select one site in which to
sit and observe. You can call this their
’sit spot’. This is where they will return
each time they visit the garden, and
the surrounding plants will be the ones
used for recording.
Allow 30 minutes for students to
record and draw the surroundings.
Use the Golden Guide to Insects to
identify any animals you see.
Discuss results with class. What type
of animals did you see? What flowers
were visited the most by pollinators?
What colours were the flowers? Remind class
that many native species of bees, flies, and
butterflies help pollinate flowers in Canada.
Source: choices4children.blogspot.com
Page 12
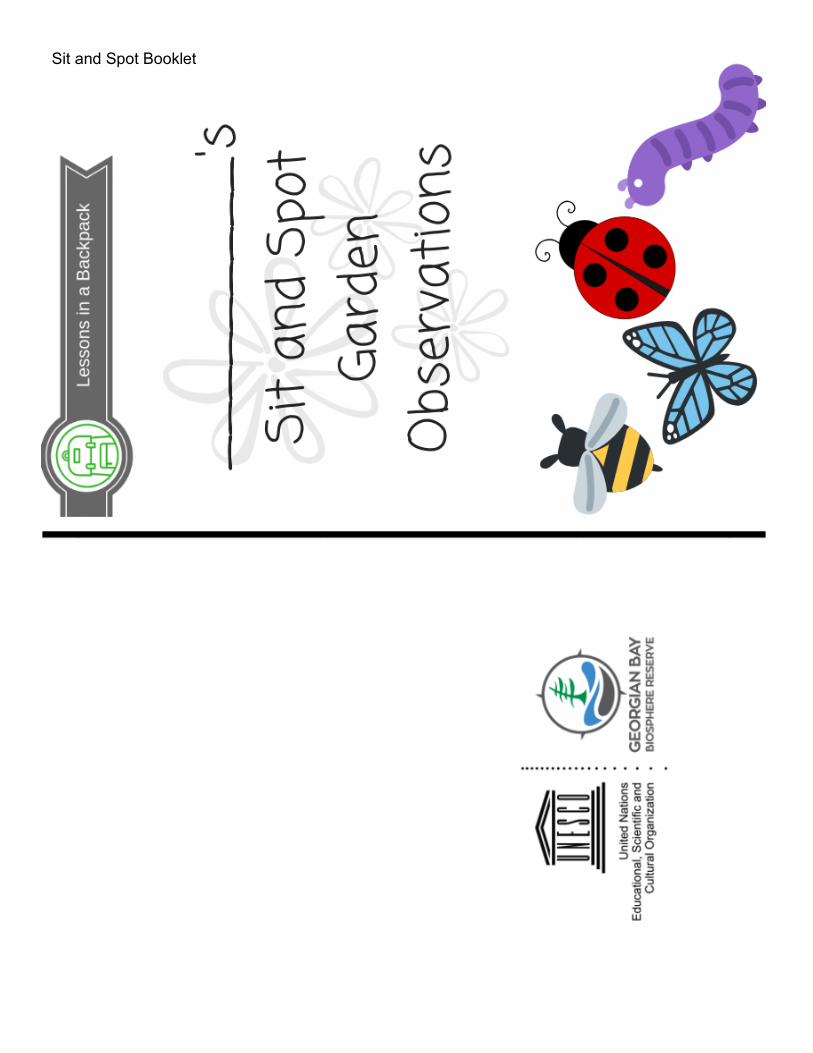
Sit and Spot Booklet
Page 13
Page 14
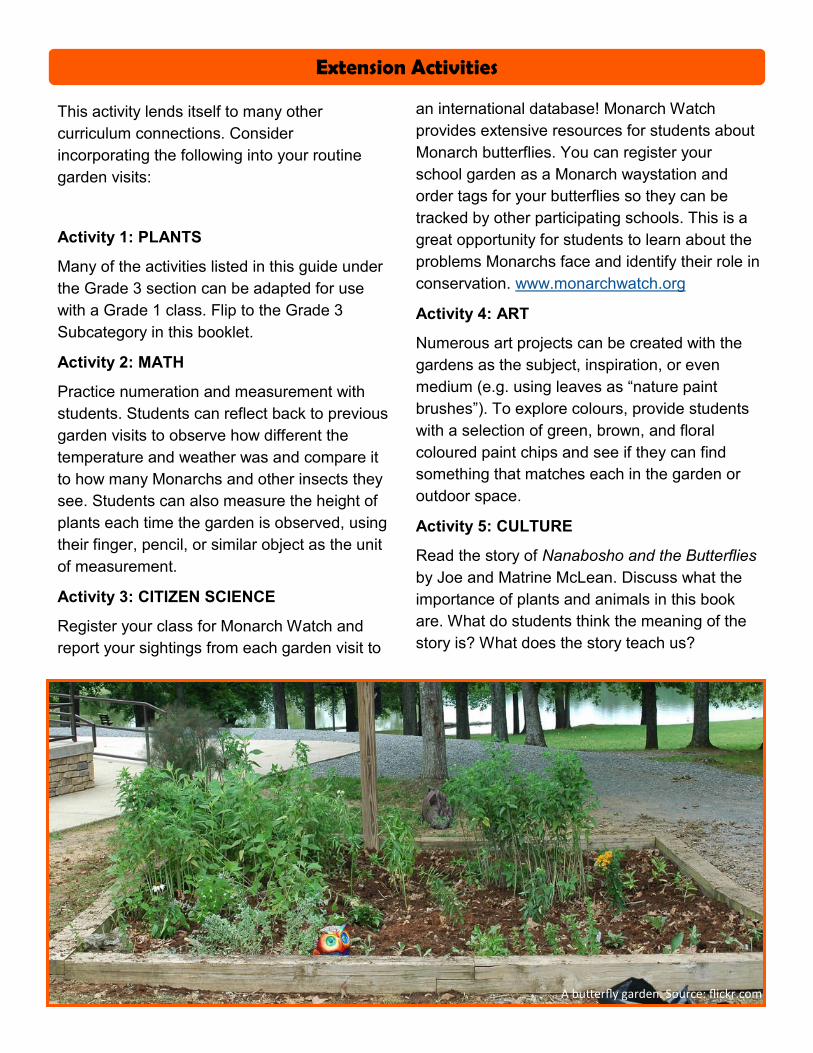
Extension Activities
This activity lends itself to many other
curriculum connections. Consider
incorporating the following into your routine
garden visits:
Activity 1: PLANTS
Many of the activities listed in this guide under
the Grade 3 section can be adapted for use
with a Grade 1 class. Flip to the Grade 3
Subcategory in this booklet.
Activity 2: MATH
Practice numeration and measurement with
students. Students can reflect back to previous
garden visits to observe how different the
temperature and weather was and compare it
to how many Monarchs and other insects they
see. Students can also measure the height of
plants each time the garden is observed, using
their finger, pencil, or similar object as the unit
of measurement.
Activity 3: CITIZEN SCIENCE
Register your class for Monarch Watch and
report your sightings from each garden visit to
A butterfly garden. Source: flickr.com
an international database! Monarch Watch
provides extensive resources for students about
Monarch butterflies. You can register your
school garden as a Monarch waystation and
order tags for your butterflies so they can be
tracked by other participating schools. This is a
great opportunity for students to learn about the
problems Monarchs face and identify their role in
conservation. www.monarchwatch.org
Activity 4: ART
Numerous art projects can be created with the
gardens as the subject, inspiration, or even
medium (e.g. using leaves as “nature paint
brushes”). To explore colours, provide students
with a selection of green, brown, and floral
coloured paint chips and see if they can find
something that matches each in the garden or
outdoor space.
Activity 5: CULTURE
Read the story of Nanabosho and the Butterflies
by Joe and Matrine McLean. Discuss what the
importance of plants and animals in this book
are. What do students think the meaning of the
story is? What does the story teach us?

Page 15
Grade Two

Page 16
Unit Outline
UNDERSTANDING LIFE SYSTEMS GROWTH AND CHANGES IN ANIMALS 1.1 Identify positive and negative impacts that animals have on humans and the environment, form an opinion about
one of them, and suggest ways in which the impact can be minimized or enhanced 1.2 Identify positive and negative impacts that different kinds of human activity have on animals and where they live,
form an opinion about one of them, and suggest ways in which the impact can be minimized or enhanced 2.3 Investigate the life cycle of a variety of animals, using a variety of methods and resources 2.4 Observe and compare changes in the appearance and activity of animals as they go through a complete life cycle 3.1 Identify and describe major physical characteristics of different types of animals 3.2 Describe an adaptation as a characteristic body part, shape, or behaviour that helps a plant survive in its
environment 3.3 Identify ways in which animals are helpful to, and ways in which they meet the needs of, living things, including
humans, to explain why humans should protect animals and the places where they live 3.3 Describe ways in which living things, including humans, depend on air and water DATA MANAGEMENT AND PROBABILITY
− Demonstrate an ability to organize objects into categories, by sorting and classifying objects using two attributes simultaneously
− Collect and organize primary data that is categorical or discrete, and display the data using one-to-one correspondence in concrete graphs, pictographs, line plots, simple bar graphs, and other graphic organizers, with appropriate titles and labels and with labels ordered appropriately along horizontal axes, as needed
DATA RELATIONSHIPS
− Read primary data presented in concrete graphs, pictographs, line plots, simple bar graphs, and other graphic organizers, and describe the data using mathematical language
− Pose and answer questions about class generated data in concrete graphs, pictographs, line plots, simple bar graphs, and tally charts
− Demonstrate an understanding of data displayed in a graph, by comparing different parts of the data and by making statements about the data as a whole
ATTRIBUTES, UNITS, AND MEASUREMENT SENSE
− Estimate and measure length, height, and distance, using standard units and non-standard units
− Record and represent measurements of length, height, and distance in a variety of ways
Curriculum Expectations
Time Lesson Location Materials
25-30 minutes
The Truth about Monarchs
Indoor A Monarch Butterfly Story by Melissa Kim
1 hour over
2 days
Create a Garden Insect Wall
Indoor and Outdoor
Parts of an Insect worksheet, Insect Close up Worksheet, Insect Golden Guide, camera (optional), journals, pencils
1-2 hours Monarch Migration
Indoor Placemat or other mats, rope to mark boundaries
30 minutes Warning! I’m Brightly Coloured
Indoor and Outdoor
Slide show, butterfly cutouts for Lesson 5
1.5-2 hours Exploring Monarch Flight
Indoor and Outdoor
Glider pattern, stiff paper, tape measure, Butterfly Glider Worksheet, scissors, glue, tape, graph paper, ruler, 2 pennies per glider. For student-designed gliders: additional paper of varying weight and stiffness, paperclips, play dough for weight.
Page 17
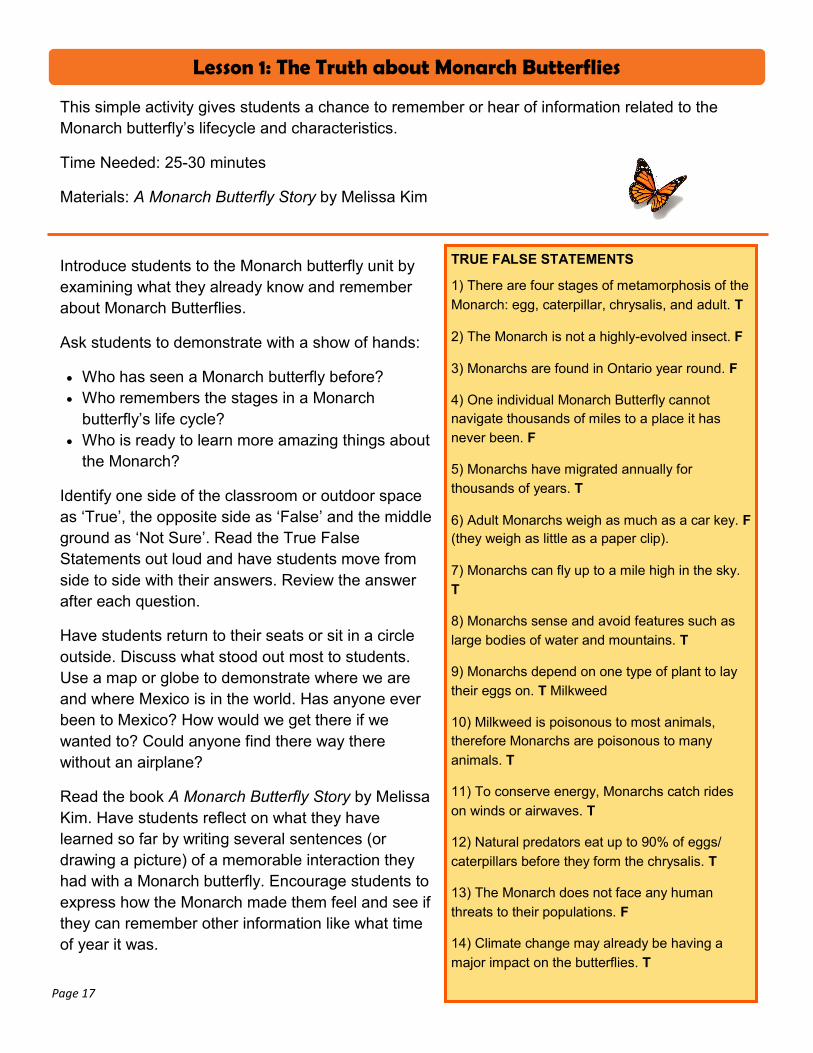
This simple activity gives students a chance to remember or hear of information related to the
Monarch butterfly’s lifecycle and characteristics.
Time Needed: 25-30 minutes
Materials: A Monarch Butterfly Story by Melissa Kim
Introduce students to the Monarch butterfly unit by
examining what they already know and remember
about Monarch Butterflies.
Ask students to demonstrate with a show of hands:
• Who has seen a Monarch butterfly before?
• Who remembers the stages in a Monarch
butterfly’s life cycle?
• Who is ready to learn more amazing things about
the Monarch?
Identify one side of the classroom or outdoor space
as ‘True’, the opposite side as ‘False’ and the middle
ground as ‘Not Sure’. Read the True False
Statements out loud and have students move from
side to side with their answers. Review the answer
after each question.
Have students return to their seats or sit in a circle
outside. Discuss what stood out most to students.
Use a map or globe to demonstrate where we are
and where Mexico is in the world. Has anyone ever
been to Mexico? How would we get there if we
wanted to? Could anyone find there way there
without an airplane?
Read the book A Monarch Butterfly Story by Melissa
Kim. Have students reflect on what they have
learned so far by writing several sentences (or
drawing a picture) of a memorable interaction they
had with a Monarch butterfly. Encourage students to
express how the Monarch made them feel and see if
they can remember other information like what time
of year it was.
Lesson 1: The Truth about Monarch Butterflies
TRUE FALSE STATEMENTS
1) There are four stages of metamorphosis of the
Monarch: egg, caterpillar, chrysalis, and adult. T
2) The Monarch is not a highly-evolved insect. F
3) Monarchs are found in Ontario year round. F
4) One individual Monarch Butterfly cannot
navigate thousands of miles to a place it has
never been. F
5) Monarchs have migrated annually for
thousands of years. T
6) Adult Monarchs weigh as much as a car key. F
(they weigh as little as a paper clip).
7) Monarchs can fly up to a mile high in the sky.
T
8) Monarchs sense and avoid features such as
large bodies of water and mountains. T
9) Monarchs depend on one type of plant to lay
their eggs on. T Milkweed
10) Milkweed is poisonous to most animals,
therefore Monarchs are poisonous to many
animals. T
11) To conserve energy, Monarchs catch rides
on winds or airwaves. T
12) Natural predators eat up to 90% of eggs/
caterpillars before they form the chrysalis. T
13) The Monarch does not face any human
threats to their populations. F
14) Climate change may already be having a
major impact on the butterflies. T

Page 18
Students will observe and compare insects in the school garden or green space. Students will
describe the physical characteristics of the creatures and research them to identify what species
they could be. This activity is meant to dispel fears that insects are scary or that all insects bite.
Time Needed: 1 hour over 2 days
Materials: Parts of an Insect worksheet, Insect Close up Worksheet, Insect Golden
Guide, camera (optional), journals, pencils
In a science notebook or on regular paper,
have students list some words to describe it.
Then photograph or sketch it. Using the
Insects Golden Guide, try to identify what the
insect is. Once back in the classroom, hand
out the Insect Close Up worksheet and
continue to use the Insects Golden Guide or
look online to find out more about this type of
insect:
a) Name and Kind of Insect with Photo
b) What does it look like?
c) Where does it live?
d) What does it eat?
e) Life Cycle
f) Fun Facts
If you can’t ID an insect your class found,
email the Georgian Bay Biosphere at
[email protected]. Display all the Close Up
worksheets on the wall. As a class, look for
connections among the insects - does one
insect eat another? Are two similar looking?
Make the connections stand out by using yarn
to illustrate links.
EXTENSION Conduct an Insect Bioblitz!
Enter all the types of insects found into a
table, add an unknown option, and provide a
copy to each student pair. Allow 30 - 60
minutes outside for the class to slowly make
their way across the school yard or garden.
Students should look for all insects as they
walk and tally what they find on the list. Which
insect is found most? This activity can be
adapted so students search different areas
and compare their results.
Lesson 2: Create a Garden Insect Wall
Day One
Tell students that they will be looking at more
insect species in addition to the Monarch butterfly.
Ask students to brainstorm a list of insects they
have seen around their homes and the school.
Encourage them to remember details: were there
many insects or only one? What time of year was
it? What was this insect doing?
Ask students to compare their list with the pupil
next to them for 5 minutes. Then compare in small
groups. Each group can share 2-3 of the most
interesting or significant insect encounters with the
class. You might point out that while most insects
are harmless and in some cases helpful to people,
the stories that are told are usually of large insects
or ones that are “scary”. Insects get a bad
reputation.
What makes an insect an insect? Hand out the
Insect Worksheet to students and ID the parts of
an insect.
Day Two:
Visit the school garden or a nearby green space.
Review proper outdoor behavior and how to show
respect for plants and animals. You may also wish
to point out that students should observe wasps
only from a distance, or not at all. Students should
work in pairs to locate one type of insect or bug in
the school yard or garden. They can observe it for
at least 10 minutes to ensure they see its
characteristics and behaviour.
Page 19
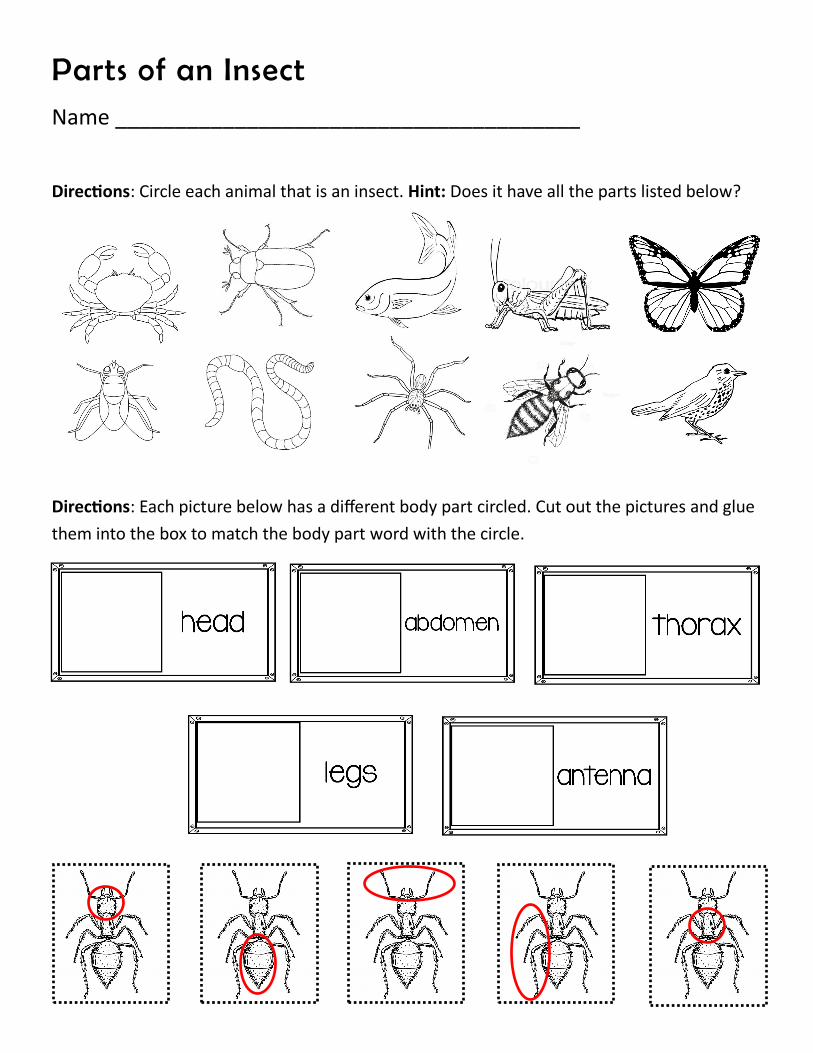
Parts of an Insect
Name _______________________________________
Directions: Circle each animal that is an insect. Hint: Does it have all the parts listed below?
Directions: Each picture below has a different body part circled. Cut out the pictures and glue
them into the box to match the body part word with the circle.
Page 20
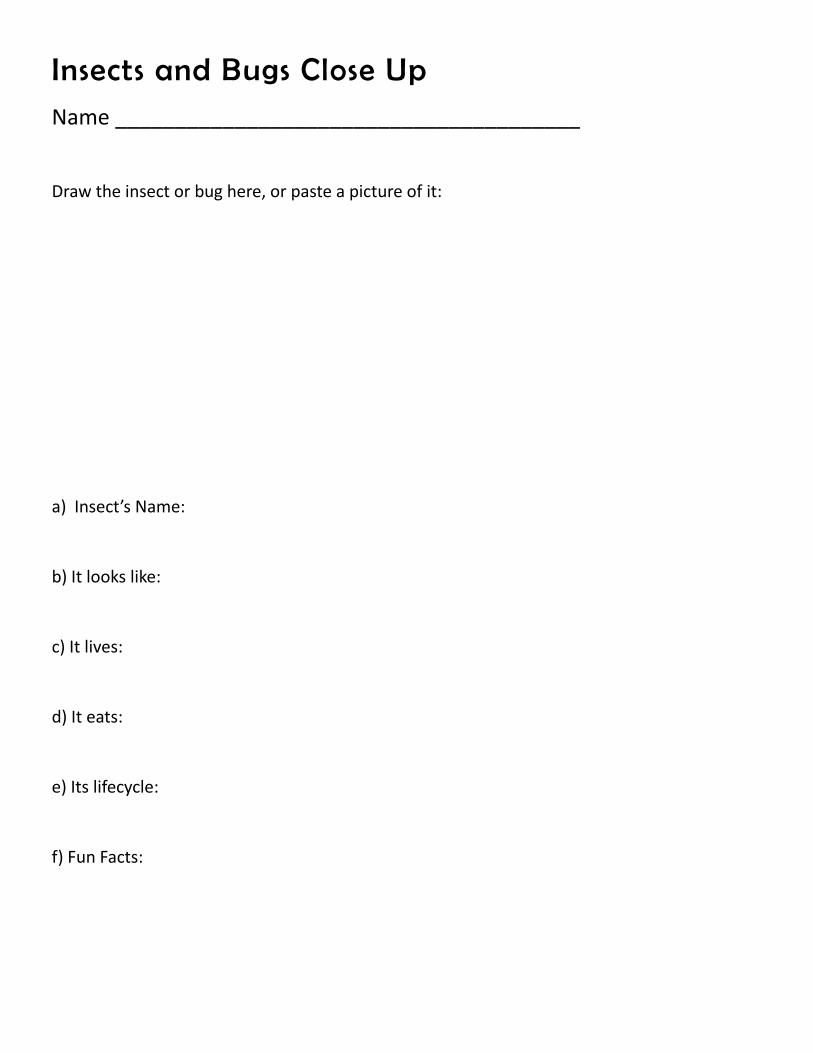
Insects and Bugs Close Up
Name _______________________________________
Draw the insect or bug here, or paste a picture of it:
a) Insect’s Name:
b) It looks like:
c) It lives:
d) It eats:
e) Its lifecycle:
f) Fun Facts:

Page 21
Bio group Tally Number Observed
Caterpillars
Wasps & Bees
Butterflies
Spiders
Mosquitoes
Lady Bugs
Unknown
Keep a tally of what you observe in the garden!
INSECT BIOBLITZ
Graph what you have observed in the garden! Create a scale that is appropriate for the
amount of data that you have collected.
Caterpillars Wasps/Bees Butterflies Spiders Mosquitoes Lady Bugs Unknown
Name:__________________________________

Page 22
Students will make paper butterflies using a template and then modify this template to make the
most efficient glider.
Time Needed: 1-2 hours
Materials: Placemats/other mats, rope to mark boundaries
Lesson 3: Exploring Monarch Migration
Reintroduce students to Monarch migration by
watching one of these videos:
• Monarch Migration - HD Documentary (48 min)
www.youtube.com/watch?v=RPQimPt2HYc
• Monarch Butterflies: Great Migration (5 min)
www.youtube.com/watch?v=QpffQtKN-gk
Tell students they will experience this migration - not
a field trip to Mexico - but an outdoor game.
Outside or in the gym, set up the playing field. Have
“Mexico” at one end and “Ontario” about 15 meters
away. Draw sidelines in the ground between the site
or use rope to mark boundaries. Lay placemats at
each site and scattered between the two sites, these
represent Milkweed gardens, Mexican forests, and
other nectaring sites.
Explain that students are Monarchs in their summer
habitat (Ontario). They spend their summer
nectaring on flowers and laying eggs on milkweed
plants. Students need to be touching placemats at
all times. Up to three students can have their foot on
one placemat at a time.
To migrate successfully each student needs to
flutter their wings and make 5 stops on the way to
different placemats. If at any time a student cannot
put a foot on a placemat, that means they cannot
find what they need to live. They will “die” and move
to the sidelines temporarily.
Fall has come to Ontario. The days are shorter,
flowers are fading and it is cooler out. The student
Monarchs know it is time to migrate south. Have one
practice round before starting the migrations.
FIRST MIGRATION Year 1700. Your ancestors
have migrated for thousands of years. Its your turn
to migrate slowly between summer and winter
sites, there is more than enough for all the
Monarchs.
SECOND MIGRATION Year 1950. There has been
an agriculture boom in the US for years. Natural
prairies and fields were converted to corn fields
and farmers spray pesticides to kill wildflowers and
other plants that complete with their crops.
(Remove placemats).
THIRD MIGRATION Year 2000. Loggers have
removed many trees from the Mexican forests.
This is a huge loss of habitat. (Remove placemats).
Some students will be standing along the sidelines
after this migration. Assure them they may be able
to re-enter the game.
FOURTH MIGRATION Year 2002. People in
Canada and US are learning about the problems
Monarchs face and are helping by planting
milkweed. Add placemats to the migration route
and to Ontario. The Monarch population has
increased! (Students from sidelines can re-join).
FIFTH MIGRATION Year 2005. What a great year!
The Mexican government put in new logging
regulations and the weather is perfect for
migrating. The Monarch population has increased!
(Students from sidelines can re-join).
SIXTH MIGRATION Year 2008. This is the hottest
year in recorded history. The climate is changing,
there is drought across the migration route and
winds have changed direction. This affects your
flight and the cycle of milkweed. (Remove
placemats in Ontario and on route).
SEVENTH MIGRATION Year 2030. Students get
to decide. What will happen next for the Monarch
butterflies?

Page 23
More migration scenarios can be added using
the Negative and Positive Factors chart. After
the final migration, discuss how the game was
realistic and what other hazards Monarchs face.
Discuss how long the journey takes for a
Monarch and the odds of successfully making
the trip.
This activity could include a math component by
counting the number of Monarchs that migrate
successfully, the number that don’t make it, and
graphing these numbers after several
migrations.
EXTENSION Symbolic Migration
Participate in a symbolic migration with
Journey North! Journey North organizes a
“symbolic migration” of Monarch butterflies
annually and schools across the U.S. and
Canada can sign up to participate with schools
in Mexico.
Participating Canadian classes create paper
butterflies which are then mailed to schools in
Mexico. They will arrive around November 1
(the Mexican Day of the Dead) just as the real
Negative Factors Positive Factors
• Illegal logging in Mexico’s forests • Snowstorms • Disease outbreak • Pesticide use in agriculture and along
roadways • Unseasonal temperatures
• Moderate temperatures • Human action, helping protect and restore
sections of winter habitat • Government regulations and action preserving
habitat
• Expanded agriculture, eliminating milkweed
• Housing or business developments and other forms of habitat loss
• Very rainy summer weather resulting in shorter growing season for nectar plants
• Pesticide use in agriculture and along roadways
• Drought conditions which hurt both nectaring plants and milkweed
• Stable weather patterns and favourable winds • Groups of students and citizens who plant
butterfly gardens and participate in citizen science
• Road ditches with milkweed growing in them do not get mowed
Win
ter
Hab
ita
t S
um
me
r H
ab
ita
t
Photo: Journey North
Monarch butterflies will, and spend the winter
with the participating Mexican schools.
In spring, paper butterflies return to each
participating school just as real Monarchs return
north. The paper butterflies that will be returned
to each school are from other schools in the
U.S., Canada, and Mexico, which turns this
activity into a geography exercise too! For
current instructions, deadlines, etc. visit: https://
journeynorth.org/symbolic-migration
When paper butterflies return to your school,
have students post them in the hallway with a
map for the whole school to see.

Page 24
Students will make paper butterflies using a template and then modify this template to make the
most efficient glider.
Time Needed: 30 minutes
Materials: slide show, butterfly cutouts for Lesson 5
Lesson 4: Warning! I’m Brightly Coloured!
Ask students to think of some colourful insects
and other animals. Continue the conversation by
asking if students think that bright colours might
help protect animals from predators.
Look at an image of a skull and cross bones on
a container label and ask if they know what it
means. Students will probably know that the
symbol indicates the container is poisonous.
Explain that warning colouration, or
aposematic colouration, works the same
way. It is a strategy some plant and animal
species use to avoid predation. A
combination of reds, orange, yellow and
sometimes white is an animal’s way of
saying “I am poisonous don’t eat me” or “I
will taste really bad, don’t eat me!”.
Predators know these colours mean toxicity
or poor taste and usually will heed the
warning and not eat them.
See if students can remember from the first
activity that Monarch caterpillars eat
milkweed, which is poisonous. This is how
a Monarch butterfly’s body obtains poison.
The colour of a Monarch tells animals to
avoid eating it, and many predators will
leave it alone.
Examine photos of other brightly patterned
animals such as poison dart frogs,
ladybugs, and coral snakes. Even a skunk’s
pattern warns other animals it is dangerous.
People use similar strategies, for example
with different kinds of traffic signs.
Hand out the cut outs that will be needed for the
next activity. Have students colour them in using
their best warning colours.
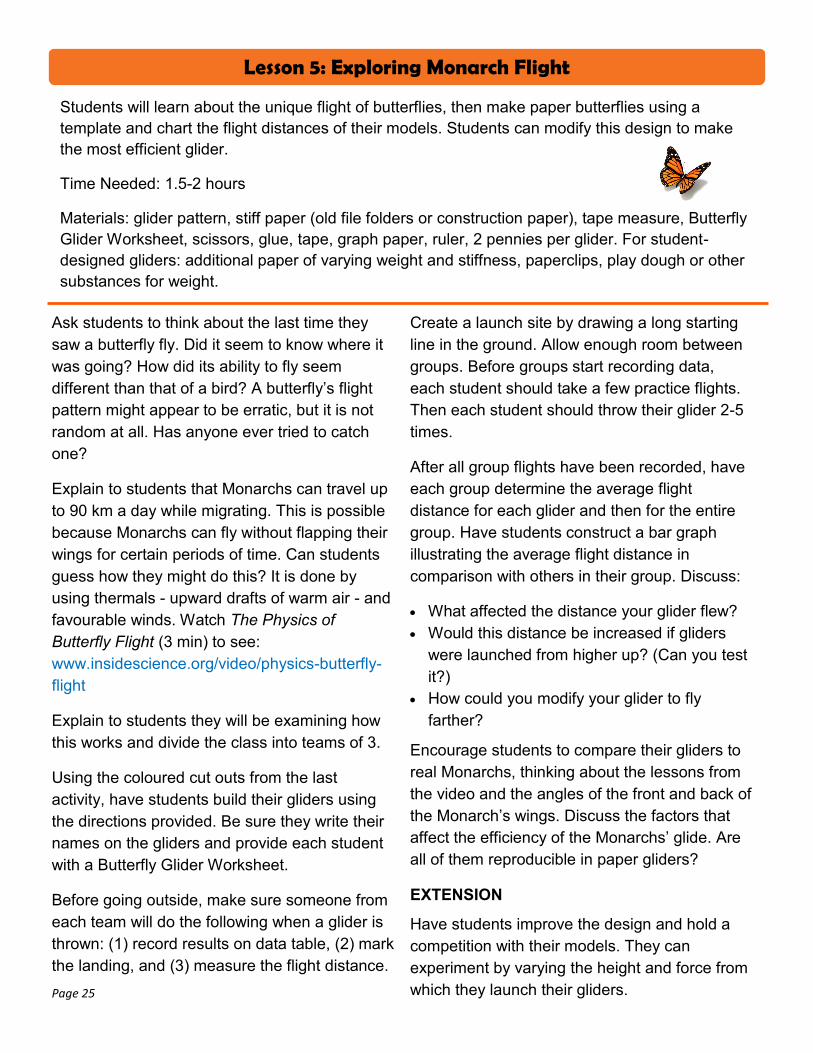
Page 25
Students will learn about the unique flight of butterflies, then make paper butterflies using a
template and chart the flight distances of their models. Students can modify this design to make
the most efficient glider.
Time Needed: 1.5-2 hours
Materials: glider pattern, stiff paper (old file folders or construction paper), tape measure, Butterfly
Glider Worksheet, scissors, glue, tape, graph paper, ruler, 2 pennies per glider. For student-
designed gliders: additional paper of varying weight and stiffness, paperclips, play dough or other
substances for weight.
Lesson 5: Exploring Monarch Flight
Ask students to think about the last time they
saw a butterfly fly. Did it seem to know where it
was going? How did its ability to fly seem
different than that of a bird? A butterfly’s flight
pattern might appear to be erratic, but it is not
random at all. Has anyone ever tried to catch
one?
Explain to students that Monarchs can travel up
to 90 km a day while migrating. This is possible
because Monarchs can fly without flapping their
wings for certain periods of time. Can students
guess how they might do this? It is done by
using thermals - upward drafts of warm air - and
favourable winds. Watch The Physics of
Butterfly Flight (3 min) to see:
www.insidescience.org/video/physics-butterfly-
flight
Explain to students they will be examining how
this works and divide the class into teams of 3.
Using the coloured cut outs from the last
activity, have students build their gliders using
the directions provided. Be sure they write their
names on the gliders and provide each student
with a Butterfly Glider Worksheet.
Before going outside, make sure someone from
each team will do the following when a glider is
thrown: (1) record results on data table, (2) mark
the landing, and (3) measure the flight distance.
Create a launch site by drawing a long starting
line in the ground. Allow enough room between
groups. Before groups start recording data,
each student should take a few practice flights.
Then each student should throw their glider 2-5
times.
After all group flights have been recorded, have
each group determine the average flight
distance for each glider and then for the entire
group. Have students construct a bar graph
illustrating the average flight distance in
comparison with others in their group. Discuss:
• What affected the distance your glider flew?
• Would this distance be increased if gliders
were launched from higher up? (Can you test
it?)
• How could you modify your glider to fly
farther?
Encourage students to compare their gliders to
real Monarchs, thinking about the lessons from
the video and the angles of the front and back of
the Monarch’s wings. Discuss the factors that
affect the efficiency of the Monarchs’ glide. Are
all of them reproducible in paper gliders?
EXTENSION
Have students improve the design and hold a
competition with their models. They can
experiment by varying the height and force from
which they launch their gliders.

Page 26
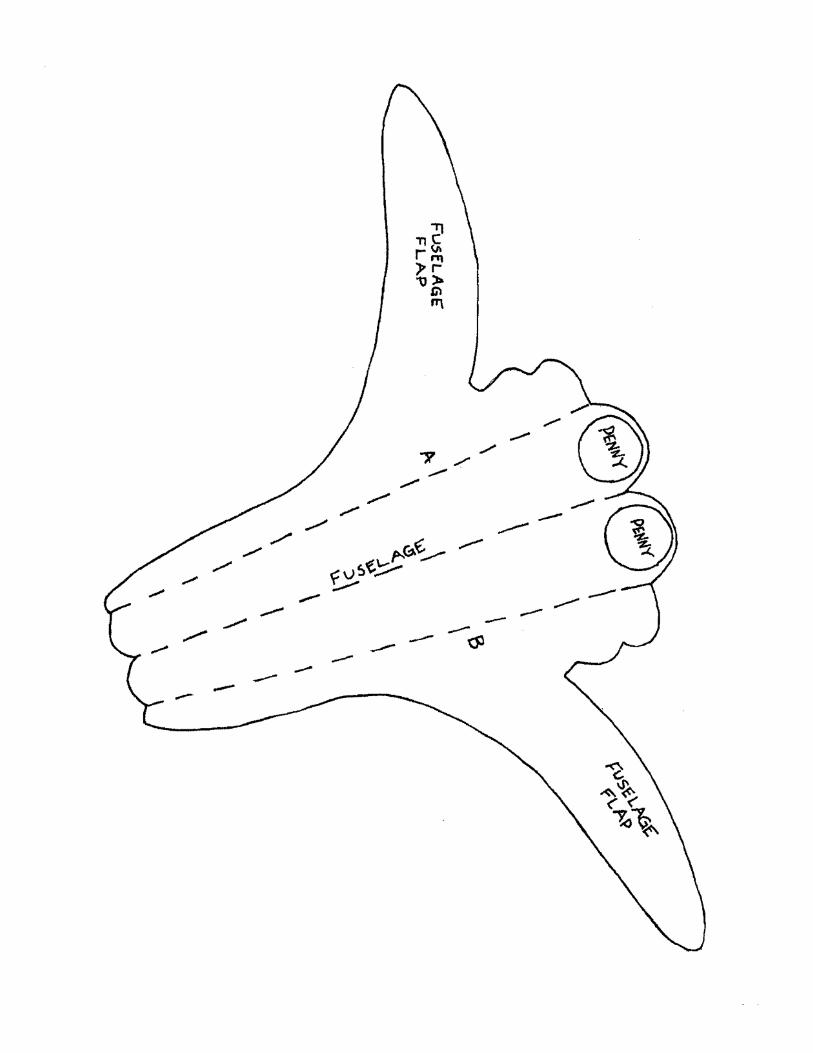
Directions for Butterfly Glider
Construction
1. Trace body/wing and fuselage templates (see patterns) onto stiff paper and cut
them out.
2. Fold fuselage on all creases. Fold center crease of fuselage section so that flaps
point up, then fold outside creases A and B down.
3. Place a penny on each side of fuselage front and tape them in place. This should
also seal the front of fuselage.
4. Cover the entire top of both fuselage flaps with glue.
5. Align the fuselage with body/wing section and press together.
6. Allow glue to dry.
7. Crease body/wing section along the center, to allow the wings to move/flap. It
should look like a butterfly would if you looked it in the eyes:
8. Crease wings to an upward position.
Launching
1. Hold front area of fuselage between thumb and index finger.
2. Throw with a firm toss.
3. Adjust creases between flights, if necessary.
Reference: Flight of the Butterflies
Page 27

Page 28

Page 29
Butterfly Glider Worksheet
Name _______________________________________
Directions: Record the travel distances of all the gliders in your group.
Find the Average: Add up the distance of all five throws and write in the total row below.
Then divide each total by the number of throws to determine your average.
1. Try varying the height from which you launch your glider. How does this affect the distance
your glider flies?
2. What happens to your glider if you throw it harder?
Launch Student 1 Student 2 Student 3 Student 4
1
2
3
4
5
Student 1 Student 2 Student 3 Student 4
Total =
Divided By=
Average=
Page 30
Grade Three

Page 31
Unit Outline
UNDERSTANDING LIFE SYSTEMS GROWTH AND CHANGES IN PLANTS
1.1 Assess ways in which plants are important to humans and other living things, taking different points of view into consideration, and suggest ways in which humans can protect plants
1.2 Assess the impact of different human activities on plants, and list personal actions they can engage in
2.2 Observe and compare the parts of a variety of plants
2.4 Investigate ways in which a variety of plants adapt and/or react to their environment, including changes in their environment, using a variety of methods
2.5 Use scientific inquiry/experimentation skills and knowledge acquired from previous investigations, to investigate a variety of ways in which plants meet their basic needs.
2.6 Use appropriate science and technology vocabulary, including stem, leaf, root, pistil, stamen, flower, adaptation, and germination, in oral and written communication
2.7 Use a variety of forms to communicate with different audiences and for a variety of purposes
3.1 Describe the basic needs of plants, including air, water, light, warmth, and space
3.2 Identify the major parts of plants, including root, stem, flower, stamen, pistil, leaf, seed, and fruit, and describe how each contributes to the plant’s survival within the plant’s environment
3.4 Describe how most plants get energy to live directly from the sun and how plants help other living things to get energy from the sun
3.5 Describe ways in which humans from various cultures, including Aboriginal people, use plants for food, shelter, medicine, and clothing
3.6 Describe ways in which plants and animals depend on each other
Curriculum Expectations
Time Lesson Location Materials
30 mins I Notice, I Wonder, It Reminds Me
Outdoor None
45 mins A Plant’s Basic Needs
Indoor 3 opaque containers - one containing soil, one water, one a flashlight, one nothing - taped shut
40 min periods over 4 days
Parts of a Plant Indoor List broken down in each section
1 hour and 30 minutes
Plants and People Indoor
Household items such as ketchup, cloth, after sun lotion, aspirin, postage stamp, rope, paper, sunflower oil, rubber, chewing gum, plant to product worksheet, letter-sized paper, markers, paper sleeves, dry erase markers
30 min - 1.5 hrs plus project time
The Lorax Indoor and Outdoor
Video or book copy of Dr. Seuss’ The Lorax, different materials based on student led projects

Page 32
Students use this field practice routine to think in-depth about plants as subjects of study. At their
own pace, and initially without information sharing, students will develop ideas and focus on dis-
covery, prompting a degree of excitement on the study of plants.
Time Needed: 30 minutes
Materials: None
Lesson 1: I Notice, I Wonder, It Reminds Me...
Introduce or complement a unit on plant study
with the I Notice, I Wonder, It Reminds Me. Sit
in a circle and begin by discussing as a class:
• What does it mean to observe something?
• Who would do this regularly and well? (ex.
detectives, farmers, scientists, athletes).
• What could make one person better at
observing than another?
• Are you a strong nature observer?
To work together to become better observers,
have everyone pick up a plant piece (already on
the ground like a leaf or stick). Define what an
observation is - something we see or detect
using our senses - and encourage students to
start with the prompt: I notice… This could be
colour, texture, shape, smell, weight, size, and
many more. Review statements which are not
observations (ex. I notice… it is a leaf, it is cool,
it is chewed by bugs - without seeing bugs).
Have students practice making observations out
loud with a student next to them for 1 minute.
Then stop and work with the other student next
to them for 1 minute. Ask the class if any pairs
would like to share their observations and, if
needed, review any opinion or identification
statements and adapt to observations.
Begin asking ‘I wonder...’ questions about the
plant piece with partners. Students should ask
as many questions as possible for 1 minute.
Pairs can then share with other students for 1
minute. Groups can share the most interesting
questions with the class.
Introduce the last prompt, it is something
students already know, ‘It reminds me of…’ to
describe the objects appearance or other
information such as an experience. Sometimes
it can be helpful to focus on one part of the
object. (Ex. The veins on this leaf remind me of
my fingerprints, the shape of this leaf reminds
me of a heart, this stick reminds me of a movie
about loggers). Once again, have students work
in pairs for 1 minute, then share with the group.
Point out how much they have come to know
and relate to their plant piece. Look around to
see how much more there is to be discovered.
Set a boundary outdoors and allow students 15
minutes to continue their observation using new
subjects such as entire plants. Encourage
students to share with each other as they
observe. Introduce tools such as hand lenses,
containers, and journals. If some students
become disengaged, draw their attention to
something particularly interesting.
Conclude with a group discussion:
• What surprised students when they were
observing?
• Did they observe something they have never
seen before?
• Do they feel like stronger observers now?
This routine can be repeated many times in the
school year, and may become a weekly routine.
It is a good idea to repeat it as the study on
plants, and encourage students to use their new
vocabulary in observations.
Page 33
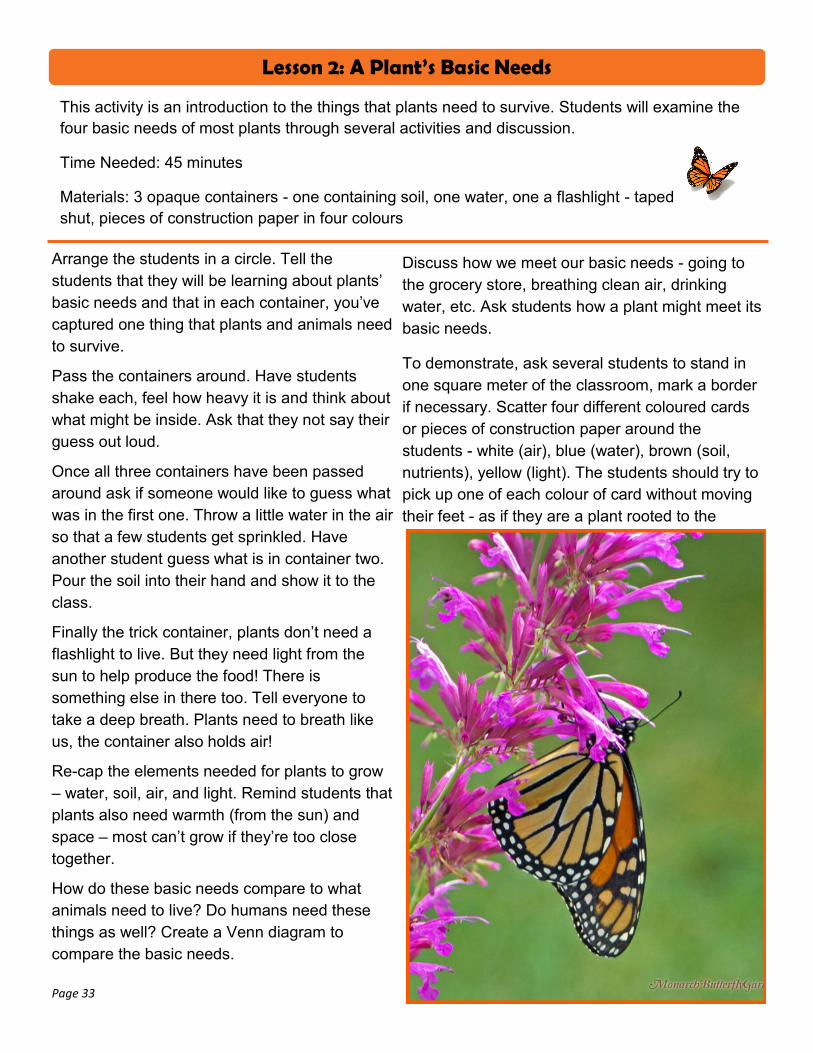
This activity is an introduction to the things that plants need to survive. Students will examine the
four basic needs of most plants through several activities and discussion.
Time Needed: 45 minutes
Materials: 3 opaque containers - one containing soil, one water, one a flashlight - taped
shut, pieces of construction paper in four colours
Lesson 2: A Plant’s Basic Needs
Arrange the students in a circle. Tell the
students that they will be learning about plants’
basic needs and that in each container, you’ve
captured one thing that plants and animals need
to survive.
Pass the containers around. Have students
shake each, feel how heavy it is and think about
what might be inside. Ask that they not say their
guess out loud.
Once all three containers have been passed
around ask if someone would like to guess what
was in the first one. Throw a little water in the air
so that a few students get sprinkled. Have
another student guess what is in container two.
Pour the soil into their hand and show it to the
class.
Finally the trick container, plants don’t need a
flashlight to live. But they need light from the
sun to help produce the food! There is
something else in there too. Tell everyone to
take a deep breath. Plants need to breath like
us, the container also holds air!
Re-cap the elements needed for plants to grow
– water, soil, air, and light. Remind students that
plants also need warmth (from the sun) and
space – most can’t grow if they’re too close
together.
How do these basic needs compare to what
animals need to live? Do humans need these
things as well? Create a Venn diagram to
compare the basic needs.
Discuss how we meet our basic needs - going to
the grocery store, breathing clean air, drinking
water, etc. Ask students how a plant might meet its
basic needs.
To demonstrate, ask several students to stand in
one square meter of the classroom, mark a border
if necessary. Scatter four different coloured cards
or pieces of construction paper around the
students - white (air), blue (water), brown (soil,
nutrients), yellow (light). The students should try to
pick up one of each colour of card without moving
their feet - as if they are a plant rooted to the

Page 34
Animals Plants
Shelter
Oxygen
Water
Warmth
Food (Nutrition)
Space
Soil
Carbon dioxide
ground. If a student doesn’t collect all the
colours, they didn’t survive as a plant.
See if the class can determine what basic need
each colour represents. Then see if the class
can guess which plant part utilizes each
element.
Encourage students to come up with a few
examples of plant based items that need air,
water, sun, and soil to grow. For example, the
cotton in your shirt was grown in soil and
needed sun, air, and water to live. Or apples
grow in orchards. Apple trees need soil, air,
Plant’s and Animal’s Basic Needs
water, and light to grow.
Take students outside and repeat the I Notice, I
Wonder, It Reminds Me activity while thinking
about the plant’s basic needs.
EXTENSION
Check out GBBR’s Healthy Soils = Healthy Plants
Lesson about plants’ needs and anatomy at
www.gbbr.ca/lessons-in-a-backpack.
Page 35
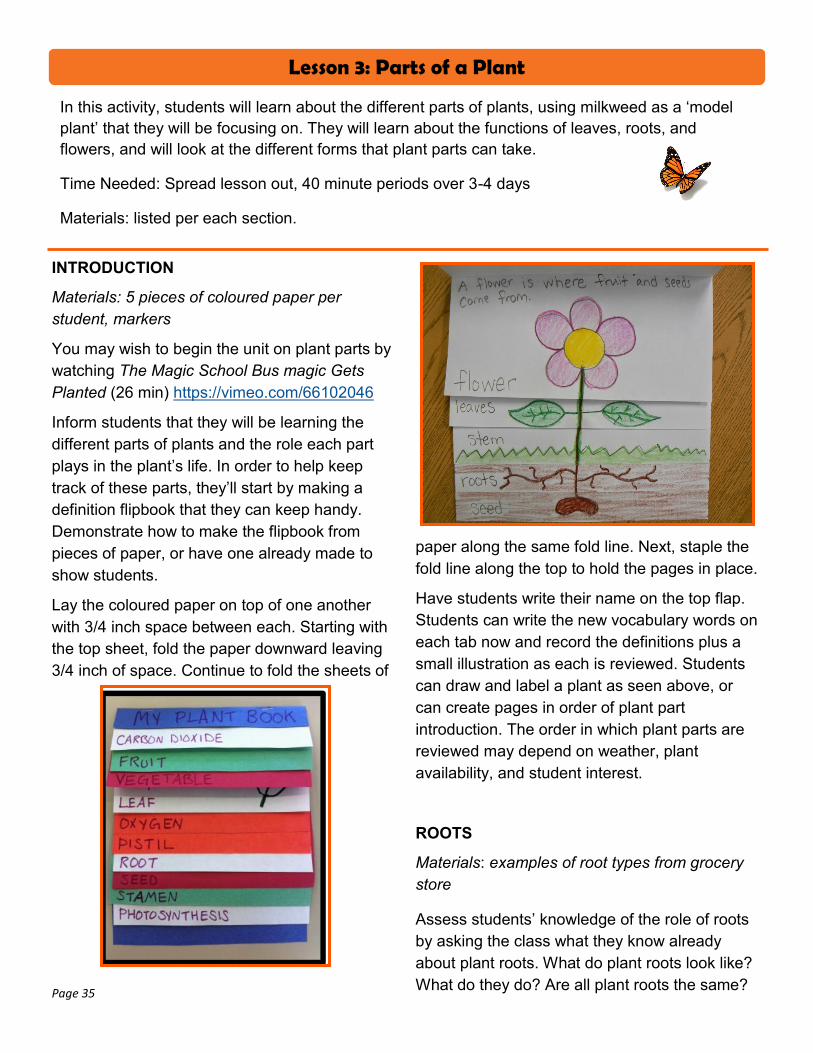
In this activity, students will learn about the different parts of plants, using milkweed as a ‘model
plant’ that they will be focusing on. They will learn about the functions of leaves, roots, and
flowers, and will look at the different forms that plant parts can take.
Time Needed: Spread lesson out, 40 minute periods over 3-4 days
Materials: listed per each section.
Lesson 3: Parts of a Plant
INTRODUCTION
Materials: 5 pieces of coloured paper per
student, markers
You may wish to begin the unit on plant parts by
watching The Magic School Bus magic Gets
Planted (26 min) https://vimeo.com/66102046
Inform students that they will be learning the
different parts of plants and the role each part
plays in the plant’s life. In order to help keep
track of these parts, they’ll start by making a
definition flipbook that they can keep handy.
Demonstrate how to make the flipbook from
pieces of paper, or have one already made to
show students.
Lay the coloured paper on top of one another
with 3/4 inch space between each. Starting with
the top sheet, fold the paper downward leaving
3/4 inch of space. Continue to fold the sheets of
paper along the same fold line. Next, staple the
fold line along the top to hold the pages in place.
Have students write their name on the top flap.
Students can write the new vocabulary words on
each tab now and record the definitions plus a
small illustration as each is reviewed. Students
can draw and label a plant as seen above, or
can create pages in order of plant part
introduction. The order in which plant parts are
reviewed may depend on weather, plant
availability, and student interest.
ROOTS
Materials: examples of root types from grocery
store
Assess students’ knowledge of the role of roots
by asking the class what they know already
about plant roots. What do plant roots look like?
What do they do? Are all plant roots the same?

Page 36
How do the roots support a plant’s basic needs?
Review the main functions of a plant’s roots:
1. Anchor the plant to provide stability,
2. Bring water into the plant from the ground,
3. Store sugar and starch produced in the
leaves.
Observing Root Types
Divide the class in to several groups. Provide
each group with one example of a plant root
from the grocery store and allow 5 minutes to
examine each before rotating the examples.
(Examples might be herbs, carrots, radishes,
turnips, onions, potatoes). Challenge the
students to make between 3-5 different
observations of the roots (e.g. colour, weight,
shape, length).
As a class, review the major observations about
each root. Students may have already identified
that some roots are large and central and others
are stringy. Write the two main types on the
board - fibrous and tap - and see if students can
name other plants that fall into these categories.
Re-growing Plants from Roots
Explain that the class will be witnessing the
stored energy in these plant’s roots by “re-
growing” them over the next few weeks.
Place the grocery store plant examples in jars
with a bit of water on a window sill. (This works
well with green onions, lettuce, carrot tops). You
may want to task groups to measure and record
the growth every day, keep the roots moist but
not overwatered, and even take pictures of the
plant every day to make a time-lapse video.
Root Wrap-Up
Travel outside with your class to observe roots
in a natural space or garden. Some will be
readily observable, like tree roots, while others
may need to be uncovered. Dandelions are an
excellent taproot example which can be
carefully pulled up. Ask students why they think
some plants, often “weeds”, grow back after we
pull them out of the ground?
LEAVES
Materials: handful of leaves from outdoors,
water, jar(s), baking soda, Photosynthesis
worksheet, milkweed leaves, leaf variety image,
pencil, paper
Making Connections
While talking about fibrous and tap roots, you
may wish to show examples or pictures of
common milkweed and swamp milkweed and
get students to categorise them. Swamp
milkweed has fibrous roots, while common
milkweed has a taproot.

Page 37
Assess student’s knowledge of leaves by asking
the class what they know already about plant
leaves. What do they look like? What do they
do? How do leaves support a plant’s basic
needs? In what ways are leaves used by
people?
Explain that leaves have many important roles
for plants and animals but as a class you’re
going to learn about two of them: their ability to
turn sunlight into food for the plant and their
ability to intake carbon dioxide and release
oxygen.
Watching Leaves Breathe
Ask the students to remember what we’re
breathing in. Explain that although ‘air’ contains
many different elements, we’re relying on the
oxygen to live. Plants rely on carbon dioxide in
the same way. Luckily for us, plants and animals
each ‘exhale’ what the other needs!
Use fresh leaves from outdoors, try several
different types, to observe the oxygen produced
from plant leaves. Divide the class into groups
and provide each with a large bowl, a jar, and a
6 to 8 inch section of leaf. Task each group to fill
their bowl with water and stir in 2 teaspoons of
baking soda. The baking soda will provide the
plants with carbon dioxide.
Have one student place the plant into a jar then
lower the jar sideways into the bowl until it fills
with water. Make sure no air bubbles are in the
jar then turn it upside down in the bowl. Place in
a sunny window or under a light.
Photosynthesis
While the plants are sitting in the window, begin
to discuss the other major role of leaves: making
food for the plants. Write the word
“photosynthesis” on the board and explain this is
the term used to describe how a plant turns
sunlight, water, and carbon dioxide into food.
The process is complex, essentially plants use
sunlight for energy in a similar way that we use
heat to change cake batter into a cake. Instead
of a cake, the plant makes glucose or sugar,
which provides it with the energy to grow and
live. The sugar can be stored for a long time and
can be eaten by animals like us!
Watch Photosynthesis - Biology basics for
children (4:52 min) and complete the
photosynthesis worksheet: www.youtube.com/
watch?v=3pD68uxRLkM
After the video and worksheet are complete
(allow at least 20 minutes) observe the plants. A
bubble should have formed at the top of the jar
and small bubbles should be seen on the
leaves. Most bubbles will come from the area
nearest the light. The bubbles contain the
oxygen being given off by the plant!
Milkweed Leaves
To discuss how leaves can be beneficial to
other creatures, talk about different animals that
use leaves for food, or for habitat. Potential
examples could be:
Common milkweed sap monarchmilkweedmapper.org
Page 38
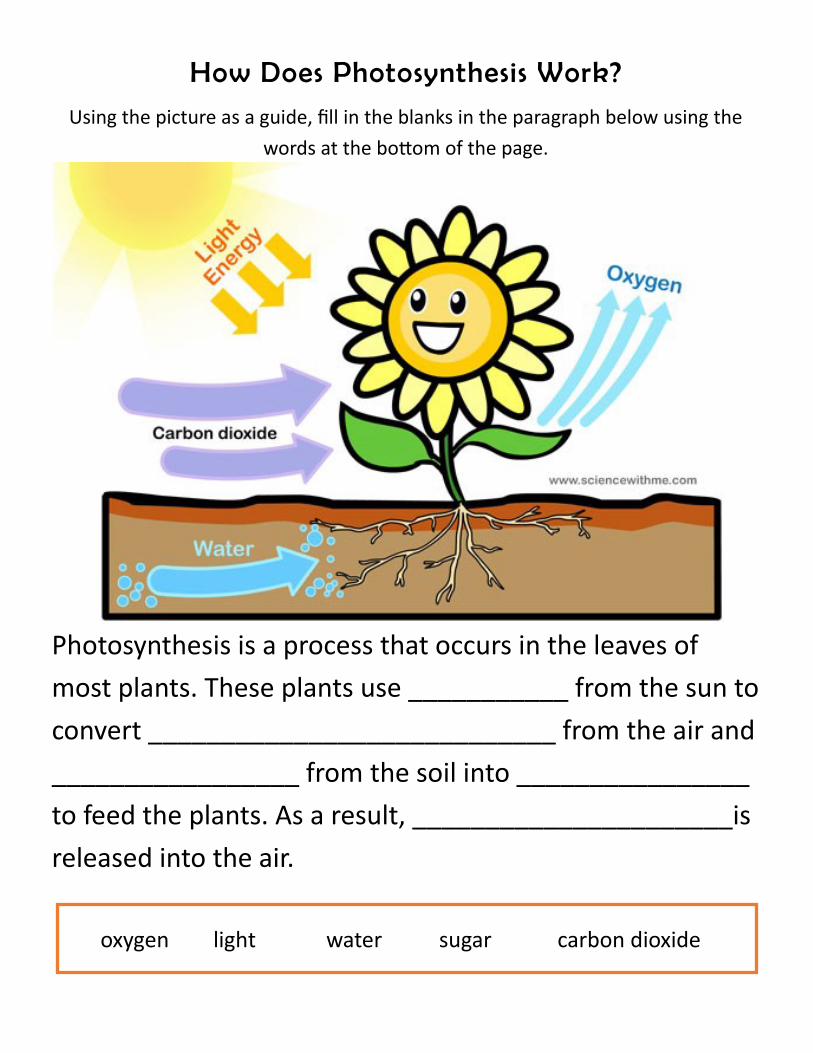
How Does Photosynthesis Work?
Photosynthesis is a process that occurs in the leaves of
most plants. These plants use ___________ from the sun to
convert ____________________________ from the air and
_________________ from the soil into ________________
to feed the plants. As a result, ______________________is
released into the air.
oxygen light water sugar carbon dioxide
Using the picture as a guide, fill in the blanks in the paragraph below using the
words at the bottom of the page.

Page 39
• Deer and other large wildlife that eat leaves,
• Aphids that eat leaves, and ladybugs that eat
aphids,
• Caterpillars that eat the leaves, and form
cocoons/chrysalis on the leaves.
After mentioning caterpillars, talk with students
about how Monarch caterpillars only eat
milkweed, which is why it’s so important for
Monarch butterflies. If you have a large patch of
milkweed nearby, organize students into groups
or pairs and have them rip one milkweed leaf in
half to observe the milky white sap inside.
Tell students that this sap is mildly toxic, and
eating this sap makes Monarch caterpillars (and
therefore Monarch butterflies) taste bitter to
animals that try to eat them, and can even make
these animals sick.
Make sure that students wash their hands after
touching the milkweed sap.
Leaf Variety
Discuss with your class how different leaves
appear based on what they’ve seen already.
Display an image like the one below which
shows a variety of shapes and features.
Knowing which plants produce which type of
leaf is one of the ways that we can tell what type
of plant we’re looking at. Can students think of
any examples or name any of the leaves?
Instruct the class they will be going outside to
make leaf rubbings to record the variety of
leaves around us. Demonstrate how to make a
leaf rubbing inside first using a pencil and paper.
(Hold the paper over top of the leaf with one
hand, and tilting the pencil on its side, gently rub
the pencil across the entire leaf. The shape and
veins will transfer to the paper very well with this
technique).

Page 40
Prepare each student to head outside ensuring
they have several sharp pencils and blank paper
or a journal. Students can practice with leaves
that have fallen on the ground and eventually
use leaves still on a plant if they’re careful not to
tear them. Exploring the leaves in a school
garden might show how different plant leaves
can appear, and that some plants are actually
closely related.
STEM
Materials: white flowers (daisies, Queen Anne’s
Lace, yarrow), celery, milkweed, water, jars,
food colouring.
Have a discussion with students about the
function of a plant’s stem. A plant’s stem
physically supports the leaves and flowers, and
transports water and nutrients from the roots up
to the leaves. Once the leaves use this water
and nutrients to create food for the plant, the
stem transports the food to the rest of the plant.
Use celery and a white flower (e.g. Queen
Anne’s Lace) to demonstrate how plant stems
absorb water and nutrients. You will need jars of
water and food colouring to represent nutrients
for the plant.
Day 1
Place celery and Queen Anne’s Lace cuttings in
glasses of water mixed with food colouring.
Make sure to cut off the bottom tip of each stem.
Leave these cuttings overnight. Try this with
milkweed flowers, does the sap change colour?
Day 2
Check on the plants with the students, and have
them discuss their observations. Did the colour
of the celery stalk change? What about the
Queen Anne’s Lace flowers?
Explain to the students that the celery and
Queen Anne’s Lace use ‘capillary action’ to
bring water and nutrients (the food colouring) up
to the plant’s leaves and flowers.
FLOWERS
Materials: flower diagram, flower tally sheet ,
pencils, clip boards
Show a diagram of a simple flower (lilies and
daffodils work well) and review the parts of the
flower with students including petals, stamen,
and pistil.
Explain that flower petals act as an attractant for
pollinator animals (such as birds or insects) and
that the stamen produces pollen, which sticks to
pollinators as they feed on the flower’s nectar.
As the pollinator moves to another flower to
continue feeding, the pollen becomes attached
to the flower’s pistil, and the flower is pollinated.
Only pollinated flowers can produce viable
seeds. Some plants are pollinated by wind,
meaning they do not need animals to help them.
Task students to draw a flower in their flip book,
and have them label the petals, stamen, and
pistil.
Once students have drawn the basic parts of a
flower, discuss the different shapes of flowers.
Celery stalk capillary action h2oiq.org
Page 41
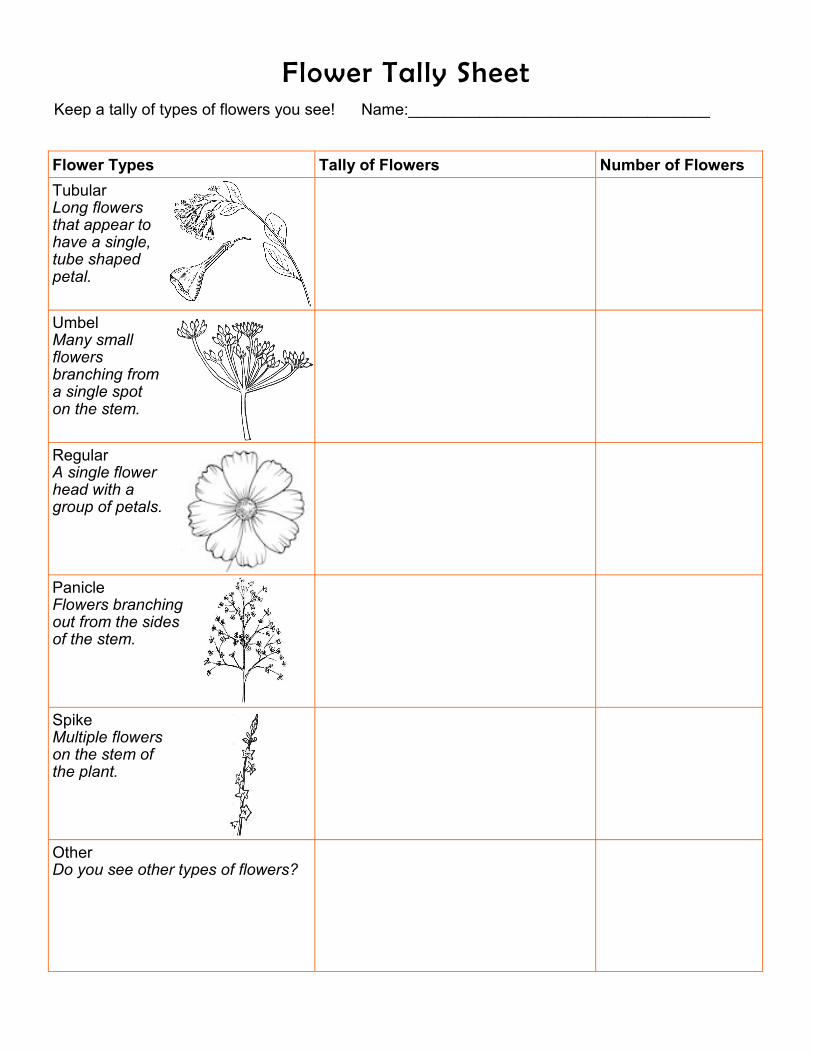
Flower Tally Sheet
Flower Types Tally of Flowers Number of Flowers
Tubular Long flowers that appear to have a single, tube shaped petal.
Umbel Many small flowers branching from a single spot on the stem.
Regular A single flower head with a group of petals.
Panicle Flowers branching out from the sides of the stem.
Spike Multiple flowers on the stem of the plant.
Other Do you see other types of flowers?
Keep a tally of types of flowers you see! Name:__________________________________

Page 42
Does anyone have a favourite flower and what
does it look like? What colours can flowers be?
Why are some small and some very large? Why
do some plants have multiple flowers but others
only have one?
Talk about different types of flower
arrangements students have seen, and prepare
students to go outside.
Once students are outside, hand out tally sheets
and pencils to groups, pairs, or individual
students. Hike around a garden or natural space
and tally the different types of flowers students
see. Once back inside, have students count and
share the plants that they tallied to see which
kind is most common and least common. Might
this change if done during different seasons?
Bonus
Check out the Pollination Power Lesson in a
Backpack at gbbr.ca/lessons-in-a-backpack.
SEEDS
Materials - pictures of milkweed, umbrella, spray
bottle, flashlight, seed examples.
Show students pictures of milkweed throughout
its maturation, and discuss as you go through
them how the milkweed is changing (e.g.
sprouting, flowering, seedpods).
Ask students if they know that seeds travel. If
so, why might a seed need to travel? Seeds
need to move away from their ‘parent plants’
because the parent plants have the same basic
needs and they will compete with other plants to
get them.
To demonstrate this, have a student pretend to
be a plant and stand underneath an umbrella.
Next, have several objects (e.g. pinecones,
seed packets, beanbags) scattered around the
student under the umbrella to act as seeds.
Take the spray bottle and spray the umbrella
with water, to show that seeds won’t get the
water they need if they stay too close to the
plant they come from. Use the flashlight to show
the same concept for sunlight. Have students
discuss different ways that seeds could travel
away from the host plant.
At this point, bring out the seedpod of a
milkweed plant, and show students the seeds
inside. They should notice that the seeds have
fluffy tufts on them, and you can discuss how
milkweed seeds are propagated by floating
away on the wind. See if students can come up
with any other seeds that spread with wind
(such as dandelion seeds).
Using different seeds (milkweed, thistle,
pinecones, sunflower seeds), talk with students
about the different ways that plants spread their
seeds.
• Wind travel - milkweed seedpods move
with the wind by using fluff to catch a
breeze and carry them.
• Burrs or hitchhikers - thistle’s barbs attach
to the fur of passing animals, like Velcro,
and are transported away.
• Fruits - many seeds are eaten by animals,
and transported in their stomachs before
animals defecate, releasing seeds. Can
students think of seeds they have seen
while eating fruits?
If it is fall, take students out on a walk to see
what sort of seedpods they can find. Take
pictures with iPads, and create a class collage
of seedpod photos.
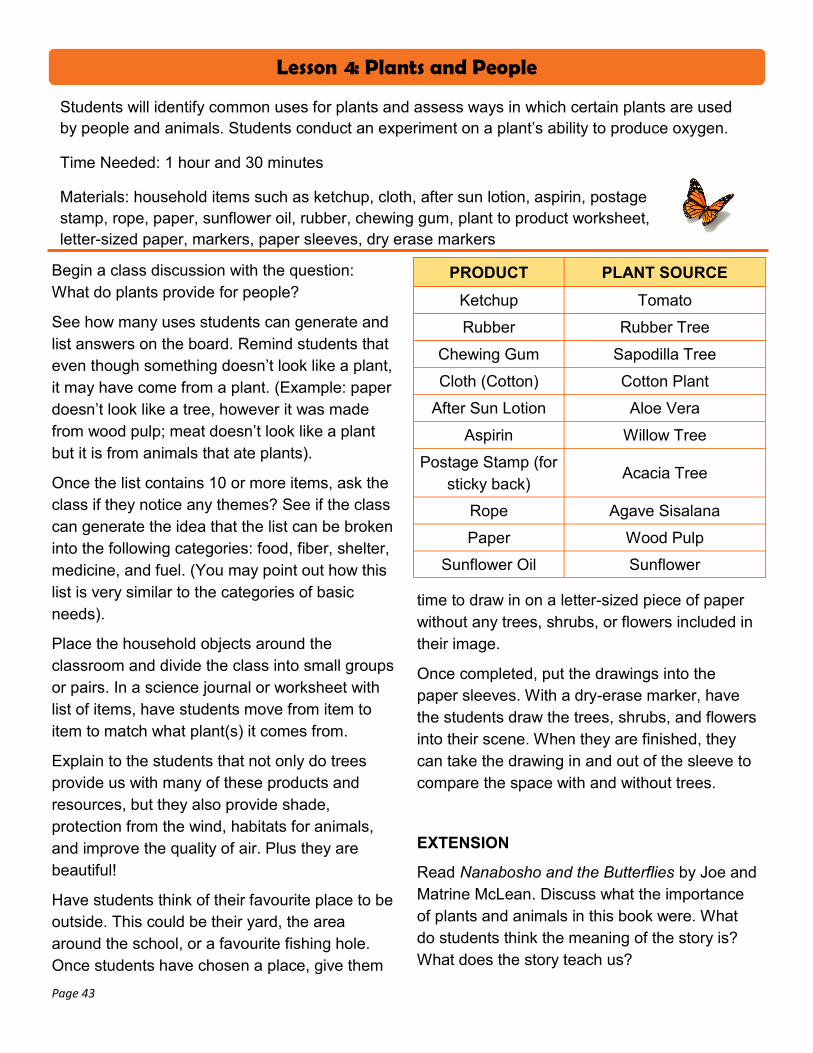
Page 43
Students will identify common uses for plants and assess ways in which certain plants are used
by people and animals. Students conduct an experiment on a plant’s ability to produce oxygen.
Time Needed: 1 hour and 30 minutes
Materials: household items such as ketchup, cloth, after sun lotion, aspirin, postage
stamp, rope, paper, sunflower oil, rubber, chewing gum, plant to product worksheet,
letter-sized paper, markers, paper sleeves, dry erase markers
Lesson 4: Plants and People
Begin a class discussion with the question:
What do plants provide for people?
See how many uses students can generate and
list answers on the board. Remind students that
even though something doesn’t look like a plant,
it may have come from a plant. (Example: paper
doesn’t look like a tree, however it was made
from wood pulp; meat doesn’t look like a plant
but it is from animals that ate plants).
Once the list contains 10 or more items, ask the
class if they notice any themes? See if the class
can generate the idea that the list can be broken
into the following categories: food, fiber, shelter,
medicine, and fuel. (You may point out how this
list is very similar to the categories of basic
needs).
Place the household objects around the
classroom and divide the class into small groups
or pairs. In a science journal or worksheet with
list of items, have students move from item to
item to match what plant(s) it comes from.
Explain to the students that not only do trees
provide us with many of these products and
resources, but they also provide shade,
protection from the wind, habitats for animals,
and improve the quality of air. Plus they are
beautiful!
Have students think of their favourite place to be
outside. This could be their yard, the area
around the school, or a favourite fishing hole.
Once students have chosen a place, give them
PRODUCT PLANT SOURCE
Ketchup Tomato
Rubber Rubber Tree
Chewing Gum Sapodilla Tree
Cloth (Cotton) Cotton Plant
After Sun Lotion Aloe Vera
Aspirin Willow Tree
Postage Stamp (for
sticky back) Acacia Tree
Rope Agave Sisalana
Paper Wood Pulp
Sunflower Oil Sunflower
time to draw in on a letter-sized piece of paper
without any trees, shrubs, or flowers included in
their image.
Once completed, put the drawings into the
paper sleeves. With a dry-erase marker, have
the students draw the trees, shrubs, and flowers
into their scene. When they are finished, they
can take the drawing in and out of the sleeve to
compare the space with and without trees.
EXTENSION
Read Nanabosho and the Butterflies by Joe and
Matrine McLean. Discuss what the importance
of plants and animals in this book were. What
do students think the meaning of the story is?
What does the story teach us?

Page 44
PRODUCT PLANT SOURCE
Ketchup
Rubber
Chewing Gum
Cotton Cloth
After Sun Lotion
Aspirin
Postage Stamp
(for sticky back)
Rope
Paper
Sunflower Oil
Tomato
Rubber Tree
Sapodilla Tree
Cotton Plant
Aloe Vera
Willow Tree
Acacia Tree
Agave Sisalana
Wood Pulp
Sunflower
WORD BANK:
Name:__________________________________ Plants & People

Page 45
Read (and/or watch if there is time!) Dr. Seuss’
The Lorax with the class.
Following the viewing or reading, challenge
students to consider the following questions.
Students may engage in a class discussion, in
group discussion, or record their thinking in
journals.
• What motivated the Once-ler? (human wants/
needs, industry)
• What change did we observe in the
environment during the story?
• What was the environment like before
industry? What about after industry?
• Can you think of examples of this that you’ve
heard of?
• What is the message of the story?
Lesson 5: We Speak for the Trees!
Record a Podcast Create a PowerPoint
presentation Write a Photo Essay
Make a Collage &
Summary Page Create a News Cast Create a Dramatic Skit
Make an Informative
Poster
Student idea approved
by the teacher.
Build a Model &
Summary Page
Students will learn the story of Dr. Seuss’ The Lorax and then think critically about the meaning of
the story and how it applies to their community. Students will pick a project to expand on their
ideas.
Time Needed: 30 min - 1 hour and 30 minutes
Materials: copy of the Lorax book or video, additional materials per student group
based on project selected.
Students will make connections between the
Lorax and their community. Discuss with class:
• What resources do we have in our
community?
• How are they being used?
• How are they being sustained? What can we
do to implement sustainability?
Students, individually or in pairs, will choose a
resource in the community and become an
advocate for their resource similar to how the
Lorax was an advocate for the trees. Students
will outline uses of the resource and the impact
of the resource and what would happen if we no
longer had it. They may choose to present their
ideas in one of the following mediums presented
on this picnic blanket:

Page 46
Resources and Further Reading
READING FOR GRADES 1-3
Hurry and the Monarch by Antoine O’Flatharta
Monarch and Milkweed by Helen Frost
Monarch! Come Play With Me by Ba Rea
Monarch Butterflies Life Cycles by Julie Murray
Monarch Magic!: Butterfly Activities & Nature Discoveries by Lynn Rosenblatt
National Geographic Readers: Great Butterfly Migrations by Laura Marsh
The Butterfly Book by Kersten Hamilton
The Life Cycle of a Butterfly by Angela Royston
RESOURCES FOR GRADES 4+
Chasing Monarchs: Migrating with the Butterflies of Passage by Robert M. Pyle
Learning from Monarchs – A Teachers Handbook by Ba Rea
Monarch Butterfly: A Wonder of Nature edited by Juan C. Morales and Salvador F. Crotte
The Amazing Monarch: The Secret Wintering Grounds of an Endangered Butterfly by Windle Turley
The Incredible Journey of the Butterflies, PBS Home Video www.pbs.org/wgbh/nova/butterflies/
The Last Monarch Butterfly: Conserving the Monarch Butterfly in a Brave New World by Phil Schappert
The Monarch Butterfly: Biology and Conservation by Karen S. Oberhauser and Michelle J. Solensky
The Monarch Butterfly: International Traveler by Dr. Fred Urquhart
The Monarch Butterfly: Uniting a Continent by Karen Oberhauser, Monica Missrie, Eduardo Rendon and Eligio Garcia Serrano
LESSON REFERENCES A Manual for the Environmental Educator: Monarch Butterfly Royal Mail www.fs.fed.us/wildflowers/pollinators/Monarch_Butterfly/documents/royal_mail/monarch_pub.pdf Flight of the Butterflies: Educator Guide www.flightofthebutterflies.com Fondo Mexicano para la Conservacion de la Naturaleza http://fmcn.org/?lang=en Journey North www.learner.org/jnorth/monarch Maryland Science Center www.marylandsciencecenter.org Monarchs in the Classroom www.monarchlab.org Monarch Watch www.monarchwatch.org/