The Frequency Element: Using The Equalizer - MusicTech Wiki
33
Chapter 7 The Frequency Element: Using The Equalizer Even though an engineer has every intention of making his recording sound as big and as clear as possible during tracking and overdubs, it often happens that the frequency range of some (or even all) of the tracks are somewhat limited when it comes time to mix. This can be due to the tracks being recorded in a different studio where different monitors or signal path was used, the sound of the instruments themselves, or the taste of the artist or producer. When it comes to the mix, it’s up to the mixing engineer to extend the frequency range of those tracks if it’s appropriate. In the quest to make things sound bigger, fatter, brighter, and clearer, the equalizer is the chief tool used by most mixers, but perhaps more than any other audio tool, it’s how it’s used that separates the average engineer from the master. “I tend to like things to sound sort of natural, but I don’t care what it takes to make it sound like that. Some people get a very preconceived set of notions that you can’t do this or you can’t do that, but as Bruce Swedien said to me, he doesn’t care if you have to turn the knob around backwards; if it sounds good, it is good. Assuming that you have a reference point that you can trust, of course.” —Allen Sides “I find that the more that I mix, the less I actually EQ, but I’m not afraid to bring up a Pultec and whack it up to +10 if something needs it.” —Joe Chiccarelli
-
Upload
khangminh22 -
Category
Documents
-
view
5 -
download
0
Transcript of The Frequency Element: Using The Equalizer - MusicTech Wiki
Chapter 7The Frequency Element: Using The EqualizerEven though an engineer has every intention of making his recording sound asbig and as clear as possible during tracking and overdubs, it often happens thatthe frequency range of some (or even all) of the tracks are somewhat limitedwhen it comes time to mix. This can be due to the tracks being recorded in adifferent studio where different monitors or signal path was used, the sound ofthe instruments themselves, or the taste of the artist or producer. When it comesto the mix, it’s up to the mixing engineer to extend the frequency range of thosetracks if it’s appropriate. In the quest to make things sound bigger, fatter, brighter, and clearer, theequalizer is the chief tool used by most mixers, but perhaps more than any otheraudio tool, it’s how it’s used that separates the average engineer from the master.
“I tend to like things to sound sort of natural, but I don’t care what it takes to make it sound like that. Some people get a very preconceived set of notions that you can’t do this or you can’t do that, but as Bruce Swedien said to me, he doesn’t care if you have to turn the knob around backwards; if it sounds good, it is good. Assuming that you have a reference point that you can trust, of course.” —Allen Sides
“I find that the more that I mix, the less I actually EQ, but I’m not afraid to bring up a Pultec and whack it up to +10 if something needs it.”—Joe Chiccarelli

The Goals Of Equalization While we may not think about it when we’re doing it, there are three primarygoals when equalizing:
To make an instrument sound clearer and more defined.
To make the instrument or mix bigger and larger than life.
To make all the elements of a mix fit together better by putting eachinstrument in its own predominate frequency range.
Sometimes just being aware of which of these you’re trying to accomplish at themoment can help you get the sound you’re looking for quickly and easily, ratherthan just randomly twisting some knobs until you think it might sound right.

The Frequency Bands and What They Do Before we examine the various methods of equalization, it’s important to notespecific areas of the audio frequency bandwidth and how they affect what wehear. The audio band can effectively be broken down into six distinct ranges,each one having an enormous impact on the total sound (see Table 7.1). Table 7.1: The Audible Frequency Ranges

di Gar Kulka, Leo. “Equalization - The Highest, Most Sustained Expression of the Recordist’s Heart.” Recording Engineer/Producer, Vol. 3, Number 6, November/December 1972 For those of you who have an easier time visualizing the audio spectrum in one-octave increments (like those found on a graphic equalizer), here’s an octave

look at the same chart (see Table 7.2). Table 7.2: Graphic Equalizer Chart

EQ Methods Since each specific song, arrangement, instrument, and player is unique, it’simpossible to give anything other than some general guidelines when it comes toequalization methods. That said, there are a number of methods that can quicklyand easily get you in the ballpark, as long as you know what you’re going for.Remember that different engineers have different ways of arriving at the sameend, so if the following doesn’t work for you, keep trying. The method doesn’tmatter, only the end result. Before these methods are outlined, it’s really important that you observe thefollowing:
Listen! Open up your ears and listen carefully to all the nuances of thesound. Everything you hear is important.
Make sure you’re monitoring at a comfortable level—not too loudand not too quiet. If it’s too quiet, you may be fooled by the non-linearity of the speakers and overcompensate. If it’s too loud, certainfrequencies may be masked or overemphasized by the non-linearitiesof the ear itself, and again you will overcompensate.

Method One: Equalize For Definition Even source material that’s been recorded well can sound lifeless, thanks tocertain frequencies being overemphasized or others being severely attenuated.More often than not, the lack of definition of an instrument is because of toomuch lower midrange in approximately the 400 to 800Hz area. This area adds a“boxy” quality to the sound. Sometimes it’s because the sound is lacking in the3kHz to 6kHz area that makes it undefined. Subtractive equalization is a methodthat allows you to zero in on the frequencies that are masking the definition in asound.
1. Set the Boost/Cut control to a moderate level of cut (8 or 10dB shouldwork)
2. Sweep through the frequencies until you find the frequency where thesound has the least amount of boxiness and the most definition (see Figure7.1).
3. Adjust the amount of cut to taste. Be aware that too much cut makes thesound thinner.
Figure 7.1: Low-end frequency sweep

© 2017 Bobby Owsinski, All Rights Reserved There are two spots in the frequency spectrum where the subtractive equalizationis particularly effective: between 200Hz and 600Hz and between 2kHz and4kHz. This is because most directional microphones provide a natural boost at200 to 600Hz because of the proximity effect brought about by close-miking,and many mics (especially those known for being good vocal mics) have apresence boost between 2kHz and 4kHz. Dipping those frequencies a few dB(more or less as needed) can make the track sound much more natural than ifyou were to try to add frequencies instead. If there were a limited number of microphones (or even just one) used to recordall the instruments in a home studio, these two frequency bands (or any otherwhere there’s a peak in the response) will build up as more and more instrumentsare added. By dipping those frequency bands a bit, you’ll find that many of theinstruments can sit better in the mix without having to add much EQ at all.
“What I hate to see is an engineer or producer start EQing before they’ve heard the sound source. To me, it’s kinda like salting and peppering your food before you’ve tasted it. I always like to listen to the sound source first, whether it’s recorded or live, and see how well it holds up without any EQ or whatever.” —Bruce Swedien
TIP: Always try attenuating (cutting) the frequency first. This is preferablebecause all equalizers add phase shift as you boost, which results in anundesirable coloring of the sound. Usually, the more EQ you add, the morephase shift is also added and the harder it may be to fit the instrument intothe mix as a result. Many engineers are judicious in their use of EQ, butthat being said, anything goes! If it sounds good, it is good.

Alternate Method 1. Starting with your EQ flat, remove all the bottom end below 100Hz by
turning the low-frequency control to full cut.2. Using the rest of your EQ, tune the mid-upper midrange until the sound is
thick yet distinct.
3. Round it out with a supporting lower-mid tone to give it some body.4. Slowly bring up the mud-inducing bottom end enough to move air, but not
so much as to make the sound muddy.5. Add some high-frequency EQ for definition (see Figure 7.2).
Figure 7.2: EQing for more definition © 2017 Bobby Owsinski, All Rights Reserved
“I just try to get stuff to sound natural, but at the same time be very vivid. I break it down into roughly three areas: mids, the top and the bottom; then there’s low mids and high mids. Generally, except for a very few instruments or a few microphones, cutting flat doesn’t sound good to most people’s ears, so I’ll say, ‘Well, if this is a state-of-the-art preamp and a great mic and it doesn’t sound that great to me, why?’ Well, the midrange is not quite vivid enough. Okay, we’ll look at the 3k, 4k range, maybe 2500. Why don’t we make it kind of come to life like a shot of cappuccino and open it up a little bit?
Then maybe I’m not hearing the air around things, so let’s go up to 10k or 15k and just bump it up a little bit and see if we can kind of perk it up. Now, all that sounds good, but our bottom is kind of undefined. We don’t have any meat down there. Well, let’s sweep through and see what helps the low end. Sometimes, depending on different instruments, a hundred cycles can do wonders for some instruments. Sometimes you need to dip out at 400 cycles, because that’s the area that sometimes just clouds up and takes the clarity away, but a lot of times adding a little 400 can fatten things up.” —Ed Seay

Method 2: Equalize For Size Making a sound bigger or larger than life usually comes from the addition ofbass and sub-bass frequencies in the 40Hz to 250Hz range, although most willcome from an area just below 100Hz, a region just above 100Hz, or both. To use the method, the low-frequency band of your EQ must be sweepable.
1. Set the Boost/Cut control to a moderate level of Boost (8 or 10dB shouldwork).
2. Sweep through the frequencies in the bass band until you find thefrequency where the sound has the desired amount of fullness.
3. Adjust the amount of Boost to taste. Be aware that too much Boost willmake the sound muddy.
4. Go to the frequency either half or twice the frequency that you used inStep 2 and add an amount of that frequency as well. Example: If yourfrequency in Step 2 was 120Hz, go to 60Hz and add a dB or so as well. Ifyour frequency was 50Hz, go to 100Hz and add a bit there (see Figure7.3).
Figure 7.3: EQing for size © 2017 Bobby Owsinski, All Rights Reserved
“I feel that equalizers are best used when used the least. I use

them most to get rid of tones that are somehow not flattering. I’ll most often use parametrics, sharp and subtractive, to look for the two or three biggest out-of-sorts characteristics. A snare drum for instance, has any number of boinks that I’ll locate, and I may take them out or bring them up as I’m listening to the whole presentation, but I’ll already know what and where they are.” —George Massenburg

Method 3: Juggling Frequencies Most veteran engineers know that soloing an instrument and equalizing itwithout hearing the other instruments will probably start making you chase yourtail as you make each instrument bigger and brighter sounding. When thathappens, you’ll find in no time that the instrument you’re EQing will begin toconflict with other instruments or vocals frequency-wise. That’s why it’simportant to listen to other instruments while you’re EQing. By jugglingfrequencies, they’ll fit together better so that each instrument has its ownpredominate frequency range. Here’s how it’s done. 1. Start with the rhythm section (bass and drums). The bass should be clear and
distinct when played against the drums, especially the kick and snare. Youshould be able to hear each instrument distinctly. If not, do the following:
Make sure that no two equalizers are boosting at the samefrequency. If they are, move one to a slightly higher or lowerfrequency.
If an instrument is cut at a certain frequency, boost the frequency ofthe other instrument at that same frequency. For example, if thekick is cut at 500Hz, boost the bass at 500Hz (see Figure 7.4).
2. Add the next most predominant element, usually the vocal, and proceed asabove.
3. Add the rest of the elements into the mix one by one. As you add eachinstrument, check it against the previous elements, as above.
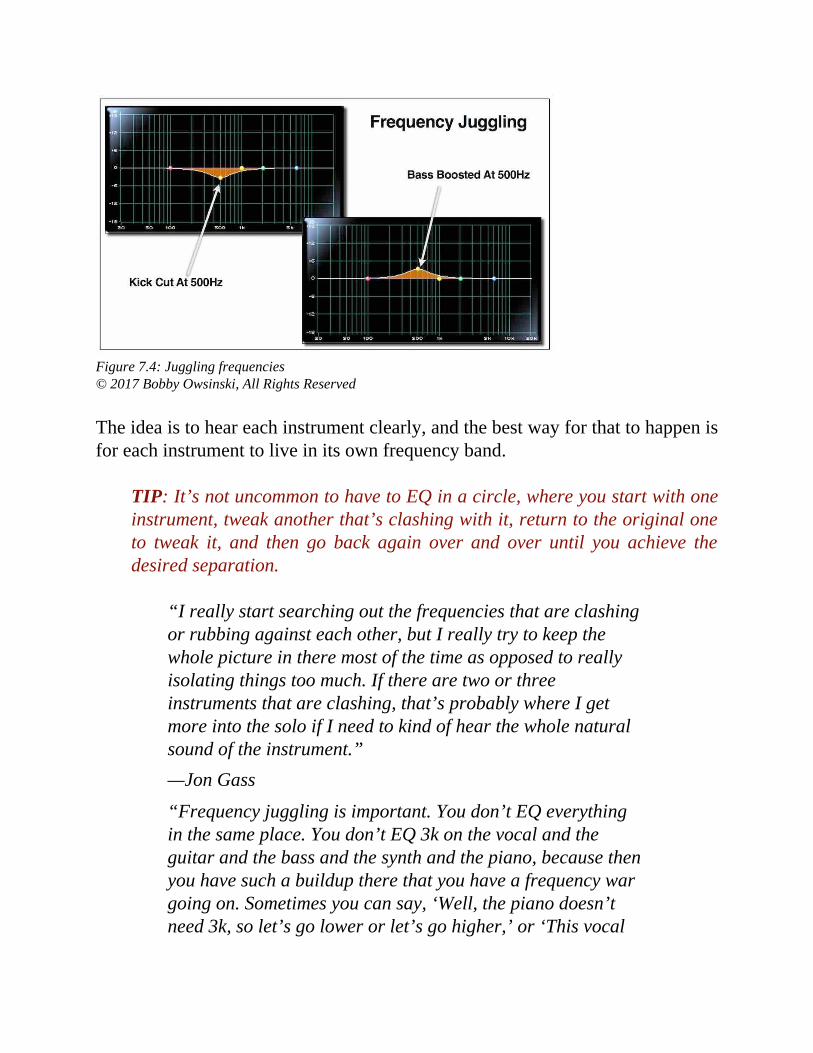
Figure 7.4: Juggling frequencies© 2017 Bobby Owsinski, All Rights Reserved The idea is to hear each instrument clearly, and the best way for that to happen isfor each instrument to live in its own frequency band.
TIP: It’s not uncommon to have to EQ in a circle, where you start with oneinstrument, tweak another that’s clashing with it, return to the original oneto tweak it, and then go back again over and over until you achieve thedesired separation.
“I really start searching out the frequencies that are clashing or rubbing against each other, but I really try to keep the whole picture in there most of the time as opposed to really isolating things too much. If there are two or three instruments that are clashing, that’s probably where I get more into the solo if I need to kind of hear the whole natural sound of the instrument.” —Jon Gass
“Frequency juggling is important. You don’t EQ everything in the same place. You don’t EQ 3k on the vocal and the guitar and the bass and the synth and the piano, because then you have such a buildup there that you have a frequency war going on. Sometimes you can say, ‘Well, the piano doesn’t need 3k, so let’s go lower or let’s go higher,’ or ‘This vocal

will pop through if we shine the light not in his nose, but maybe toward his forehead.’ In so doing, you can make things audible, and everybody can get some camera time.” —Ed Seay
Easy-To-Remember Golden Rules Of Equalization➡ If it sounds muddy, cut some at 250Hz.
➡ If it sounds honky, cut some at 500Hz.
➡ Cut if you’re trying to make things sound better.
➡ Boost if you’re trying to make things sound different.
➡ You can’t boost something that’s not there in the first place.

Finding An Offending Frequency Sometimes a sound has a frequency that sticks out of the mix like a pickaxe inyour ear. The method to find it and attenuate it is similar to EQ Method 1.
1. Set the Boost/Cut control to a moderate level of boost. Eight or 10dBshould work (see Figure 7.5).
2. Sweep through the frequencies until the frequency that’s giving youtrouble leaps out.
3. Adjust the amount of cut to taste until the offending frequency is inbalance with the rest of the sound. Be aware that too much cut can alsodecrease the definition of the sound.
Figure 7.5: Finding the offending frequency © 2017 Bobby Owsinski, All Rights Reserved
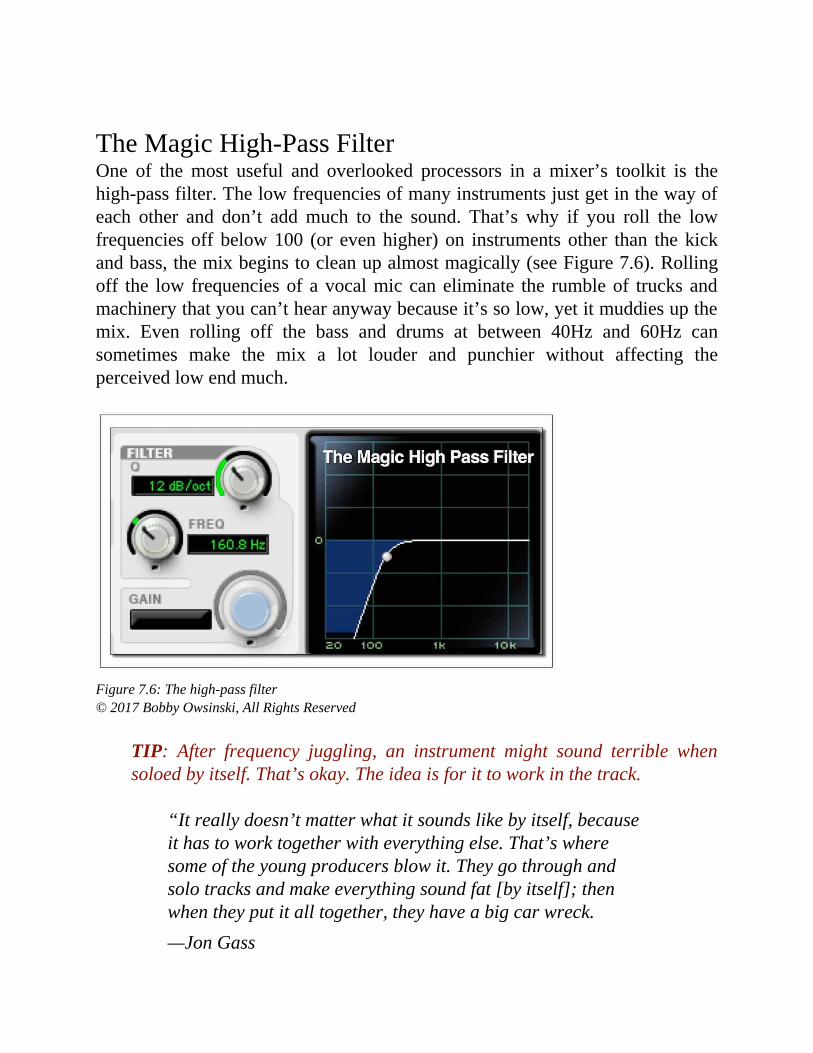
The Magic High-Pass Filter One of the most useful and overlooked processors in a mixer’s toolkit is thehigh-pass filter. The low frequencies of many instruments just get in the way ofeach other and don’t add much to the sound. That’s why if you roll the lowfrequencies off below 100 (or even higher) on instruments other than the kickand bass, the mix begins to clean up almost magically (see Figure 7.6). Rollingoff the low frequencies of a vocal mic can eliminate the rumble of trucks andmachinery that you can’t hear anyway because it’s so low, yet it muddies up themix. Even rolling off the bass and drums at between 40Hz and 60Hz cansometimes make the mix a lot louder and punchier without affecting theperceived low end much.
Figure 7.6: The high-pass filter © 2017 Bobby Owsinski, All Rights Reserved
TIP: After frequency juggling, an instrument might sound terrible whensoloed by itself. That’s okay. The idea is for it to work in the track.
“It really doesn’t matter what it sounds like by itself, because it has to work together with everything else. That’s where some of the young producers blow it. They go through and solo tracks and make everything sound fat [by itself]; then when they put it all together, they have a big car wreck. —Jon Gass

The Magic Frequencies Every instrument has at least one frequency that might be considered “magic.”That means that you might want to try those frequencies first to make aninstrument or voice sound fuller or more distinct. These are outlined in Table7.3. Table 7.3: Magic Frequencies For Mix Elements

6 Trouble Frequency AreasWhenever an engineer has trouble dialing in the EQ on a track, chances are itsbecause of one or more of the 6 trouble frequency areas. These are areas wheretoo much or too little can cause your track to either stick out like a sore thumb,or disappear into the mix completely. Let's take a look.
200Hz (Mud) - Too much can cause the track or the mix to soundmuddy or boomy, while not enough of it can make it sound thin. It's afine line, but many times mixers err on the side of too much and endup with a track that's too thick that clutters up the mix.
300 to 500Hz (Boxy) - Too much of this frequency area results in thedreaded "boxiness" sound, or if you're listening to a floor tom or kick,the "beach ball" effect. It's also a spot that some less expensivemicrophones (especially dynamics) tend to emphasize, which is whymany mixers almost automatically cut a a few dB of this area out ofthe kick drum during the mix.
800Hz (Walmart) - Too much in this area results in what's sometimesknown as the "Walmart" sound, meaning that it sounds like a cheapstereo purchased in a department store. Try it for yourself - get a cheappair of computer speakers and you'll find that 800Hz is what you'llmostly hear. Obviously, too much of this frequency range is not a goodthing.
1k to 1.5kHz (Nasal) - This is the nasal range of the frequencyspectrum and, as the name suggests, too much results in a vocalist thatsounds like she's singing through her nose. Once again this is primarilya microphone problem in that it's poorly matched to the vocalist, butnotching a bit out during the mix can fix it.
4kHz to 6kHz (Presence) - This frequency range is frequentlyunderutilized during the mix, resulting in a track that lacks definition.Without it, things tend to sound dull, but too much can make the tracksound thin or, in the case of a vocal, sibilant.
10kHz+ (Air) - Another widely overlooked frequency band, this

provides clarity and adds a certain "realness" to the track. Manyvintage mics have a lot of the air frequencies, which is why we prizethem for their sound. The Maag Audio EQ4P has a special "Air Band"designed to provide those frequencies with a minimum of phase shift,but you can dial it in other equalizers as well.
Sometimes just tweaking a few of these 6 frequency ranges can take a mix fromdull to exciting, or muddy to clear, so keep them in mind during your next mix.

The Relationship Between Bass And Drums Perhaps the most difficult task of a mixing engineer is balancing the bass anddrums (especially the bass and kick). Nothing can make or break a mix fasterthan how these instruments work together. It’s not uncommon for a mixer tospend hours on this balance (both level and frequency) because if therelationship isn’t correct, then the song will just never sound big and punchy. So how do you get this mysterious balance? To have the impact and punch that most modern mixes exhibit, you have tomake a space in your mix for both of these instruments so they won’t fight eachother and turn the mix into a muddy mess. While simply EQing your bass highand your kick low (or the other way around) might work at its simplest, it’s bestto have a more in-depth strategy, so to make them fit together, try the following:
1. EQ the kick drum between 60 and 120Hz, as this will allow it to beheard on smaller speakers. For more attack and beater click, addbetween 1kHz and 4kHz. You may also want to dip out some of theboxiness that lives between 200 and 600Hz. EQing in the 30 to 60Hzrange will produce a kick that you can feel if your speakers are largeenough, but that can also make it sound thin on smaller speakers andprobably won’t translate well to a variety of speaker systems. Most 22-inch kick drums like to center somewhere around 80Hz, for instance.
2. Bring up the bass with the kick. The kick and bass should occupyslightly different frequency spaces. The kick will usually be in the 60 to80Hz range, whereas the bass will emphasize higher frequencies anywherefrom 80 to 250 (although sometimes the two are reversed depending uponthe song). Before you continue to EQ at other frequencies, try filtering outany unnecessary bass frequencies (below 30Hz on kick and 50Hz on thebass, although it varies according to style and taste) so the kick and bassare not boomy or muddy. There should be a driving, foundational qualityto the combination of these two together.

A common mistake is to emphasize the kick with either too much level or toomuch EQ and not enough on the bass guitar. This gives you the illusion that yourmix is bottom-light, because what you’re doing is effectively shortening theduration of the low-frequency envelope in your mix. Since the kick tends to bemore transitory than the bass guitar, this gives you the idea that the low-frequency content of your mix is inconsistent. For pop music, it’s best to havethe kick provide the percussive nature of the bottom while the bass fills out thesustain and musical parts.
3. Make sure the snare is strong; otherwise, the song will lose its drivewhen everything else is added in. This usually calls for at least somecompression (see Chapter 9, “The Dynamics Element”). You may need aboost at 1kHz for attack, 120 to 240Hz for fullness, and 10kHz for snap.As you bring in the other drums and cymbals, you might want to dip alittle of 1k on these to make room for the snare. Also, make sure that thetoms aren’t too boomy. (If so, try rolling them off a bit below 60Hz firstbefore you begin to EQ elsewhere.)
4. If you’re having trouble with the mix because it’s sounding cloudyand muddy on the bottom end, turn off the kick drum and bass todetermine what else might be in the way in the low end. You might notrealize that there are some frequencies in the mix that aren’t musicallynecessary. With piano or guitar, you’re mainly looking for the mids andtop end to cut through, while any low end might be just getting in the wayof the kick and bass, so it’s best to clear some of that out with a high-passfilter. When soloed the instrument might sound too thin, but with the restof the mix the bass will sound so much better, and you won’t really bemissing that low end from the other instruments. Now the mix will soundlouder, clearer, and fuller. Be careful not to cut too much low end from theother instruments, as you might lose the warmth of the mix.
5. For dance music, be aware of kick drum to bass melody dissonance.The bass line is very important and needs to work very well with the kickdrum when it’s reproduced over the huge sound systems commonly foundin today’s clubs. If your kick has a center frequency of an A note and thebass line is tuned to A#, they’re going to clash. Tune your kick samples tothe bass lines (or vice versa) where needed.
6. If you feel that you don’t have enough bass or kick, boost the level,

not the EQ. This is a mistake that everyone makes when they’re firstgetting their mixing chops together. Most bass drums and bass guitarshave plenty of low end and don’t need much more, so be sure that theirlevel together and with the rest of the mix is correct before you go addingEQ. Even then, a little goes a long way.
“I put the bass up first, almost like the foundation part, then the kick in combination with the bass to get the bottom. Sometimes you can have a really thin kick by itself, but when you put the bass with it, it seems to have enough bottom because the bass has more bottom end. I build the drums on top of that.”
—Benny Faccone
“I’ll get the drums happening to where they have some ambience, then put the vocal up and get that to where that’s sitting right. Then I’ll start with the bass and make sure that the kick and the bass are occupying their own territory and not fighting each other.” —Jerry Finn

EQ Techniques General Tips
Use a narrow Q (bandwidth) when cutting and a wide Q whenboosting.
If you want a sound to stick out of the mix, roll off the bottom; if youwant it to blend in, roll off the top.
The fewer instruments that are in the mix, the bigger each one shouldsound.
Conversely, the more instruments in the mix, the smaller each oneneeds to be for everything to fit together.
It’s usually better to add a small amount at two frequencies than alarge amount at one.
Be aware that making an instrument sound great while soloed maymake it impossible to fit together with other instruments in the mix.

For Snare To find the “point” on the snare, boost the upper midrange about 5 or 6dB at2kHz or so. Open up the bandwidth (if that parameter is available) until you getthe snare to jump out, then tighten the bandwidth until you get only the part ofthe snare sound that you want most. Then fine-tune the frequency until you needthe least amount of boost to make it sit in the mix yet have some definition.

For Drums “In the old days you always pulled out a little 400 on the kick drum. You always added a little 3k and 6k to the toms. That just doesn’t happen as much anymore because when I get the project, even with live bands, the producer’s already triggered the sound he wanted off the live performance, so the drums are closer.” —Dave Pensado

For Kick Try boosting 4kHz, cut 200 to 400Hz, and then boost the lowfrequencies around 60 to 100Hz to find the drum’s resonance.
One fairly common effect used in R&B is to trigger a 32Hz tone withthe kick, then gate it so it has the same volume envelope. Blend andcompress both the original kick and the 32Hz tone to taste.
For a metal kick, add a bit of 3kHz or so on the kick drum to functionas the “nail in the paddle”sound.
For a kick meant for a club, emphasize the 200 to 300Hz range whilerolling off the extreme low end. The club system makes up thedifference, so if you mix the bottom of it the way you think you’ll hearit in a club, you’re probably going to overload the house sound system.
If your bass is a very pure sine wave–like sound and your kick is an808, they may mask each other. If the kick is lower-sounding than thebass, add a sample with some mid or top punch. If the kick is higherthan the bass, you can add some distortion or a plugins like MaxxBass(see Figure 7.7) to add higher harmonics to the bass. Make sure youcheck both on small speakers.
Figure 7.7: Waves MaxxBass Courtesy of Waves Audio Ltd


For Bass The ratio between the low bass (80 to 120Hz) and the mid bass (120 to200Hz) is important. Try using two fairly narrow-peaking bands, oneat 100Hz and another at 150Hz, boosting one and cutting the otherslightly. If the bass is too “warm,” sometimes reducing the lower bandcan make it more distinct without removing the deeper fundamentalsthat live in the 100Hz band.
For clarity on the bass, try boosting some of the 800Hz area, since thiscan provide definition without getting too snappy-sounding.
A four-band parametric will allow you to adjust several bands below200Hz. Try attenuating the low frequencies around 40 to 70Hz, thenslightly boosting the frequencies from 80 to 120Hz where thefundamental lies, then boost the frequencies from 130 to 200Hz wherethe over- tones and cabinet/neck/body resonances live.
Muddy bass can mean a lot of things, but at a minimum it usuallyinvolves a lack of presence of the higher harmonics. Most bass trackshave a sweet spot between 60Hz and 1.2kHz where the upper-orderharmonics sing, and this is the place to boost for more presence in themix.
Take a low-cut filter and center it at 250Hz so that all the lows of thebass are attenuated. Now take a bell-shaped EQ and boost it 4dB witha narrow band and sweep around the 80 to 180Hz region to find whereyour bass frequencies fit best in the track. Once you find it, widen thebandwidth and boost more if necessary. If you want more density onthe bottom, you may need to do this with another bell filter on thefrequencies below the previous one. This should tighten up the lowend, add space for a kick drum, and make your mix less boomy.
High-pass filter the bass anywhere from 40 to 80Hz. It’s amazing howmuch that can help the bass tighten up sometimes.
Any instrument with low-frequency content (below 500Hz) can affectthe sound of the bass. This includes kick, keyboards, (male) vocals,double bass, celli, low-tuned guitars, and so on. Cut the low end

(anywhere below 80 to120Hz) from tracks where the low end isn’tneeded. This will help those tracks to cut through while leaving morespace in the mix for the bass and the kick.
Removing the 250Hz region information from instruments such asguitars, keyboards, and even vocals is often of more use than cutting itfrom the bass.
To achieve more definition from a bass guitar, first make a duplicateof the bass track and then process the duplicate track in your DAWwith the Moogerfooger Low-Pass plugins. Set the plugins’s Mixparameter to 10, the Resonance to 1, and the overall Amount to 1. Nowturn the frequency control up until you get a well-defined sub tone.Group both bass tracks to a separate bus and create a new aux track. Besure to assign the input to the same bus. Then, on the original basstrack in your DAW, use an EQ plugins to roll some of the low subsout. Next, blend the original bass track with the Moogerfooger track tocreate a fat, solid composite bass sound. The aux track will nowbecome the bass master track. Finally, EQ and compress that aux trackto fine-tune the bass sound to taste. The same tip can also be used onkick drums.
With hip-hop and electronic music, the bass tends to contain a lot ofinformation in the 30 to 60Hz range that you can feel. Many hip-hop orEDM records will raise the low-frequency target area slightly higher tothe 70 to 100Hz range and elongate the duration to create the illusionthat there’s a lot of bass information so that it can sound full on smallermonitors. Be careful not to over-EQ, though. Clubs and cars with hugebass drivers are already hyped in this frequency range.
With rock bass, the idea is to create an aggressive in-your-face basssound. For this the focus will be mainly on the amp sound. Boostanywhere between 50 and 100Hz for the bottom end, dip between 400to 800Hz (this will allow the guitars and vocal to have more room tospeak musically) and boost between 1.5 and 2.5kHz for midrange.
TIP: Be aware that mixing the DI sound with the amp sound might causephasing problems in the midrange, so be sure to check the polarity with the

phase parameter and use the selection with the most bass. (Althoughsometimes the out-of-phase sound can work better in the mix, so be sure tocheck.)
“The one thing that did change for me over time was my not liking 200Hz. That frequency couldn’t be touched in the early days because we didn’t have an EQ that was centered there, and it wasn’t until later on that I decided that I didn’t like it and began to pull it out [of the bass and kick.” —Ken Scott

For Guitars For a fatter-sounding guitar, boost the midrange about 9dB or so andsweep the frequencies until you hear the range where the guitar soundsthick but still bright enough to cut through the mix. Back the boostdown to about the point where the guitar cuts through the mix withoutbeing too full-sounding.
“I use EQ differently from some people. I don’t just use it to brighten or fatten something up, I use it to make an instrument feel better. Like on a guitar, instead of just brightening up the high strings and adding mud to the low strings, I may look for a certain chord to hear more of the A string. If the D string is missing in a chord, I like to EQ and boost it way up to +8 or +10 and then just dial through the different frequencies until I hear what they’re doing to the guitar. I’m trying to make things more balanced in the way they lay with other instruments.” —Don Smith
Boosting 10kHz on guitars will accentuate finger noise and tiny stringmovements. Boosting 5 to 8kHz will allow the guitar to better cutthrough the mix. Boosting 1k to 5kHz will give the guitar morepresence.
Consider filtering the guitar with both high-pass and low-pass filters.If you leave too much low end in a distorted electric guitar, it willcompete with the rhythm section. Too much above 8kHz can competewith the cymbals.

For Vocals Boost a little 125 to 250Hz to accentuate the voice fundamental andmake it more “chesty” sounding.
2k to 4kHz accentuates the consonants and makes the vocal seemcloser to the listener.
“On a vocal sometimes I think, ‘Does this vocal need a diet plan? Does he need to lose some flab down there? Or sometimes we need some weight on this guy, so let’s add some 300 cycles and make him sound a little more important.’” —Ed Seay
“I think of EQ as an effect, much the same way you would add chorus or reverb to a particular instrument or vocal. For example, I might have a vocal where I think it’s really EQed nicely, and then I’ll add a little more 3k just to get it to bite a little more. Then it just makes me feel like the singer was trying harder, and it brings out a little bit of passion in his or her voice.” —Dave Pensado


![[en]=> (LV-CAN200) - Teltonika Wiki](https://static.fdokumen.com/doc/165x107/63348b9f4e43a4bcd80d4495/en-lv-can200-teltonika-wiki.jpg)