The Clivia Beginner's Bible.pdf
253
Kevin Walters—’Monica Conquest’ - 2000
-
Upload
khangminh22 -
Category
Documents
-
view
2 -
download
0
Transcript of The Clivia Beginner's Bible.pdf

Kevin Walters—’Monica Conquest’ - 2000

It began in March 2019 and now two years onwards, the
Reference Book Series on growing Clivias for Beginners is
closed, with this 11th Edition, a Special Edition called
“A Clivia Beginner’s BIBLE”.
Statistics kept since the beginning in 2019 and shown in the
10th Edition in a spreadsheet shows that the interest in the
written word no longer is a tradition. Society now demands
quick responses to any questions they might have rather than
investigate and at the same time educate themselves. Looking
at the Clivia pictures on Facebook holds more interest than
finding answers to their problems.
I thank the Clivia Society of South Africa for their
endorsement of my Reference Books in particular, the President,
Glynn Middlewick. This Society plays a substantial role in
continuing the profile of the Clivia Species for the benefit
of many people throughout the world.
The content of the Clivia Beginner’s Bible is drawn from many
avenues around the world. The Bible is supported by the Ten
Reference Books currently published via www.FlipBookPDF.net ,
and the content of the Website https://www.growingclivias.com
which includes educational YouTube Videos on the care and
management of Clivias.
I thank everyone for their support with the Reference Book
Series since its inception.
Thank you
Gary Conquest, Growing Clivias for Beginners, Australia © 2021

Page Article Author
11th EDITION - A Clivias Beginner's BIBLE
Clivia Activity Guide for Southern Hemisphere Clivia Society, South Africa
Clivia Reference Library Growing Clivias for Beginners
Clivia Society Endorsement of Reference Book Series Clivia Society, South Africa
Flipbook Links for the Reference Book Series Growing Clivias for Beginners
Pests and Mineral Deficiencies in Clivias Clivia Society, South Africa
Diseases affecting Clivia Clivia Society, South Africa
Pests and Diseases on your Clivia Makhro Home and Garden
19 Clivia Care and Culture Jim Shields, USA
21 Clivia Genus and Comparison Clivia Society, South Africa
28 Clivia Species and Hybrid Identification Growing Clivias for Beginners
35 Clivias, the first 12 months, from seed to seedling Peter Haeusler, Australia
41 CLIVIA, Create your own, Grow your own Tony Barnes, New Zealand
47 Cultivation of Clivia Prof Mark Laing, South Africa
52 Growing Clivia in a Cold Climate Jim Shields, USA
55 Nutrition Christo Lotter
57 Cultivation of Clivia Melbourne Clivia Group, Australia
58 Collecting, Growing and Breeding Clivia John Craigie, Australia
67 Fertilising Clivia Lisa Fox, Clivia Market, Australia
70 Picking Green Berries Bill Morris, Australia
71 Picking unripe Berries Clivia Enthusiasts Group
72 Tips on growing Clivias Home and Garden Magazine
77 The Cultivation of Clivia - The Basics Clivia Society, South Africa
81 Propagating Clivias from Seed Tanya Visser, South Africa
84 Sowing Seed Dragonfly, South Africa
89 Seed Germination Harry Eramus, Australia
91 Pollinating Dragonfly, South Africa
96 Plant Nutrition Jim Shields, USA

Page Article Author
11th EDITION - A Clivias Beginner's BIBLE
98 Hints on Growing Clivias Clivia Society, South Africa
122 Hints on Growing Clivias Brian Steven, Australia
123 Insecticide, Fungicide & Fertilising Guide Australia Growing Clivias for Beginners
124 Clivia Ph Level Pierre de Coster, Belgium
125 Clivia Pollination Bill Morris, Australia
127 Clivia Pollen Storage Jim Shields, USA
129 Germinating Clivia Miniata Seeds Anonymous
130 Germinating Clivia Seeds Melbourne Clivia Group, Australia
131 Pollen Storage Greg Anderson, Australia
134 Neem Oil benefits Neem Products Australia
149 Neem Oil General Fact Sheet USA National Pesticide Info Center, USA
152 NPK Definition Anonymous
153 Pollination in Clivia John Manning, South Africa
159 Storage of Seeds, all seed types Anonymous
162 Terminology for describing Clivia plants Hannes Robbertse, South Africa
164 The Role played by the various elements of Nutrition Marc Visser, Belgium
180 Summer care of your Clivias Ken Smith, Australia
181 Clivias can take tough Love Megan Backhouse, SMH
184 Dividing Clivia Clumps Jim Shields USA
185 Growing Clivias - everything you need to know Flowers acress Sydney Blog
198 How to divide a Clivia Anastasia Leon, USA
201 Harvesting and Storage of Pollen the Late Sakkie Nel, South Africa
203 Manipulation of flowering period Clivia miniata Craig Honiball, South Africa
210 Manipulation of flowering in Clivia miniata Prof PJ Robbertse, South Africa
216 Raising Seedlings Lisa Fox, Clivia Market, Melbourne
222 Germinating Seeds Lisa Fox, Clivia Market, Melbourne
225 Photographing Clivia Lisa Fox, Clivia Market, Melbourne

Page Article Author
11th EDITION - A Clivias Beginner's BIBLE
228 Clivia in Spring Lisa Fox, Clivia Market, Melbourne
231 Preparing Clivia for exhibition Lisa Fox, Clivia Market, Melbourne
234 Winter care of Clivia Lisa Fox, Clivia Market, Melbourne
237 Why won't my Clivia flower Lisa Fox, Clivia Market, Melbourne
240 Stuck Flowers Lisa Fox, Clivia Market, Melbourne
242 Pest Fact Sheet - Mealy Bug Nursery and Garden Industry
250 Pests and Diseases Frikkie Marais, South Africa
care for all Clivias from seeds, seedlings to mature plants is included. Clivia Education at the click of a
button. I do hope and trust that the information within this Clivia Beginner's Bible is helpful to you.
Gary Conquest, Growing Clivias for Beginners, Westbrook, Australia - May 2021
that is why I have added different opinions on Clivia Subjects within this collection of information.
There is also available Ten Reference Books on growing Clivias for Beginners. Nearly 2,000 pages of
collective information on how and what to do to care for Clivias. These ten Reference Books are available
to view from Flipbooks and can be downloaded to your hard drive. The Links to these Reference Books are
contained in a website, https://www.growingclivias.com . A YouTube suite of Videos on how to grow and
The above list of documents are only a small spectrum of information on growing Clivias. The Information
contained within this Clivia BEGINNER'S BIBLE was obtained from many sources such as the Clivia
Society of South Africa, the Internet, many experts with massice Clivia knowledge who believe as I do that
knowledge is power and to use that power to educate and pass on the knowledge in order to grow those
beautifil flowers called 'Clivias'. You never stop learning, there is always a better way to do things, that

Clivia Activity Guide for the Year in the Southern Hemisphere
The Clivia Calendar
I have enjoyed growing clivias for twenty-five years. The following is a brief description of the cultural practices I employ. This does not mean that there are no other ways of achieving success. Indeed, there are many other ways of growing clivias as no two Clivia cranks will be unanimous on all aspects of growing their favourite plant!
The Clivia Calendar (based on Southern Hemisphere growing conditions)

ACTIVITY J F M A M J J A S O N D
HARVESTING SEED
GERMINATING SEED
PLANTING SEED
PLANTING OUT
SEEDLINGS
POTTING-ON
DIVIDING
ANDTRANSPLANTING
FEEDING
LOOK OUT FOR PESTS
Harvesting seed: Seed from the previous spring’s blossoms will ripen from April to July. As soon as the berry becomes soft to gentle pressure (something like ascertaining when a peach is ready for eating) it is ready for picking. This may be while the berry is still completely green. It is not essential to postpone harvesting until the berries turn colour. Remove the skin, the gelatinous pulp and the enveloping membrane from the seed. Dust lightly with a suitable contact fungicide and store in a ventilated container.
Planting seed: I generally commence germinating my seed some two weeks after harvesting. Some growers will do so immediately after harvesting, while others will wait for several months until ambient temperatures rise in spring. The seed is placed between moist

sheets of paper towel placed in any suitable container. Follow the same procedure as in primary school when germinating beans! Place the container in a warm spot to stimulate germination. If you are really hasty for results, then invest in a heated germinator specially designed for this purpose.
As soon as the seed begins to germinate, transfer it to the seedbeds. Here I use containers at least 15 – 20 cm deep. The containers are filled with 1:1 mixture of polystyrene pellets (2 – 5 mm diameter) and sifted compost. Compact the substrate slightly, then place the germinating seed on the surface. Cover the seed with about 1 cm of the same mix with a thin layer of coarse sand on top. The sand will prevent the fine mix from being washed out of the container when watering with a hose. If the compost is properly prepared and heats up well during decomposition, most weed seeds and pathogenic fungi will be destroyed. Under these circumstances it is not necessary to fumigate the compost prior to it being used in seedbeds. If, however, you experience damping-off of the young plantlets, then resort to either fumigation or heat-sterilisation of the compost, or use specially prepared commercial substrates for the purpose. Do not delay transfer of the germinating seed to the seedbed too long, or you will damage the growing radicle (rootlet) or the root hairs which cling to the paper towel.
Keep the seedbeds in a shady place. Keep moist but not wet or soggy.
Planting out seedlings: When the first leaf of the seedlings reaches a length of five to ten cm, transfer the seedlings to individual 15 cm plant pots. I prefer the tapered to the cylindrical design as it is easier to remove the young plant and soil from the pot when potting-on into larger containers. The potting mix should approximate the medium in which clivias thrive in their natural habitat i.e.. the leaf litter found on the forest floor. My mix consists primarily of garden compost to which some milled pine bark has been added.
Clivias grow slowly and in their natural habitat are subjected to strong competition from other roots for available nutrients. In other words, they do not need a nutrient-rich medium to thrive, but rather a loose, friable medium in which to develop. If your compost heap is not invaded by roots of nearby trees which deplete available nutrients, it will not be necessary to add any slow-release fertilizer to your potting mixture. The nutrients released by the compost being converted into humus will be more than adequate for the growing plant. Many growers swear blind that foliar feeding really stimulates growth – my conviction is that this is entirely imaginary. Young plants can best be grown in dappled shade. Shade cloth with an 80% light-exclusion factor would appear to be the ideal alternative.
Potting-on: A year after planting out the seedlings they are ready to be transferred to 17,5 cm (7 inch) pots. At this stage I provide some drainage at the bottom of the pots. Crushed stone or brick is suitable, but heavy. Broken pieces of polystyrene make for less weight, but cinders are ideal in that they are light and provide excellent drainage. It can also be argued that cinders will contain traces of most nutrients (with the obvious exception of nitrogen) to supplement the potting mix in the event of a trace element deficiency.
In the potting-on procedure, disturb the plants as little as possible – hence the usefulness of a tapered pot. If plants are watered prior to transfer they will slip out of the pot more easily.
A further year on, the plants are potted-on to 20 cm (8 inch) pots and again one year later into 25 cm (10-inch pots). Clivias can be flowered in 20 cm pots, but larger plants will respond to the additional space provided by larger pots.

Dividing and transplanting: There are many old-wives’ tales concerning the do’s and dont’s of dividing and transplanting clivias. One of these is that if you disturb a plant in any way it will not flower in the coming spring. Well, I have yet to experience this! Another is that pot-bound plants will flower more profusely than their counterparts having adequate room in their containers. There may be more substance to this claim but after twenty-five years it has escaped my observation!
I believe that- in the warmer parts of the country – clivias can be divided or transplanted at any time during the year without detrimental results. Given the choice, however, spring and summer are preferable for these operations, as the divided/transplanted plants will establish more quickly.
In the case of a single offset to be removed, disturb the plant as little as possible and gently pull the roots apart. If, however, you are dividing an old well-established plant with many growing points and the plant is pot bound as well, it is a good idea to use a jet of water from a hose to remove all the soil around the root ball, before teasing the roots apart. Where offshoots are still attached to the mother plant these should be cut off and the cuts dusted with flowers of sulphur or copper oxychloride before repotting.
Soil preparation
a) Texture, structure and pH: Clivias do not like wet feet, hence good drainage is essential. In the preparation of compost, a sandy or sandy-loam soil should be used. More important, however, in ensuring good drainage is an open structure of the growing medium. Adequate compost and milled bark will ensure this. The pH of this mixture should be in the region of 5.5 to 6.5 which approximates that of the leaf litter in the Clivias natural habitat.
b) Nutrition: As already mentioned, I do not believe in the feeding of clivias grown in a compost-rich medium. Where cultivation occurs in sand or milled bark only – where available nutrients are virtually absent, or are leached out rapidly as there are few colloids to retain them – feeding is desirable. When fertilizer is added to the growing medium a slow-release formulation such as Osmocote is recommended. Where foliar feeding is resorted to, spring applications should contain more nitrogen to stimulate vegetative growth. During summer the emphasis should be on phosphorus to strengthen growth while late summer applications should concentrate on potassium to stimulate the developing flowers. No feeding is recommended during the dormant winter months. 30:10:10, 18:18:18 and 10:20:30 or similar formulations are suggested for the progressing season.
Watering: Liberal watering should commence immediately the plants show signs of life in spring. This should continue throughout the growing season but be curtailed as temperatures drop in late autumn. Many growers discontinue watering completely during the winter months.
Where the texture and structure of the growing medium is ideal there is little danger of overwatering – even during winter. Over-watering of plants growing in a less-than-ideal medium will precipitate root-rot. When this becomes evident remove plants from the soil and permit callus-development after treating with a suitable fungicide before re-potting.
Diseases: Damping-off of young seedlings is probably the worst disease to contend with. As mentioned earlier this problem can be eliminated by using a pathogen-free germinating mix. Some plants seem to show a predisposition to fungal attack of the foliage. This problem is

best overcome by a strict selection in the breeding programme. No plant is worth constant pampering and treatment – no matter how special it is! Another problem, which may be encountered, is the appearance of rust pustules on the underside of the leaves. This will occur when particularly humid conditions prevail. Improved ventilation will remedy the situation. Treatment of affected plants with a systemic fungicide (e.g. funginex) will prevent spread of the disease, but affected leaves will remain unattractive. Occasionally in late summer plants will simply topple over and, on closer examination, will have rotted off at ground level. Only a small percentage of plants will be thus affected and, upon dusting with a suitable fungicide and callusing for a period can be successfully re-potted with minimal setback to the plant.
Pests: By far the greatest problem is the amaryllis borer. Several generations of moths will oviposit on the underside of leaves of both young and adult plants per year. If left untreated the larvae will tunnel down in the leaf and in severe infestations completely destroy the corm. From early October until late April plants should be inspected several times a week. The tell-tale sign of sub-laminar tunnels indicates immediate treatment with a suitable insecticide (e.g. chlorpyrifos or carbaryl). A full cover-spray is essential. Choose an insecticide with low mammalian toxicity, which will degrade rapidly thus limiting pressure on the environment to a minimum. As even light infestations can do considerable cosmetic damage, you have to intercept the borer at an early stage. Many growers apply prophylactic treatments throughout the summer months, but this is superfluous provided the grower is on his toes.
Mealybugs can be a nuisance and disfigure the emerging leaves, as the insects are particularly populous in the leaf sheaths. To ensure that the insecticide (eg chlorpyrifos or carbaryl) penetrates between the leaves at the base of the plant add a spreading agent, which reduces the surface tension of the spray liquid thus promoting penetration. A repeat treatment some seven to ten days later is recommended.
the Late Bing Wiese (From Clivia Club Newsletter Volume 8, Number 2, Winter 1999)
Clivia Society of South Africa
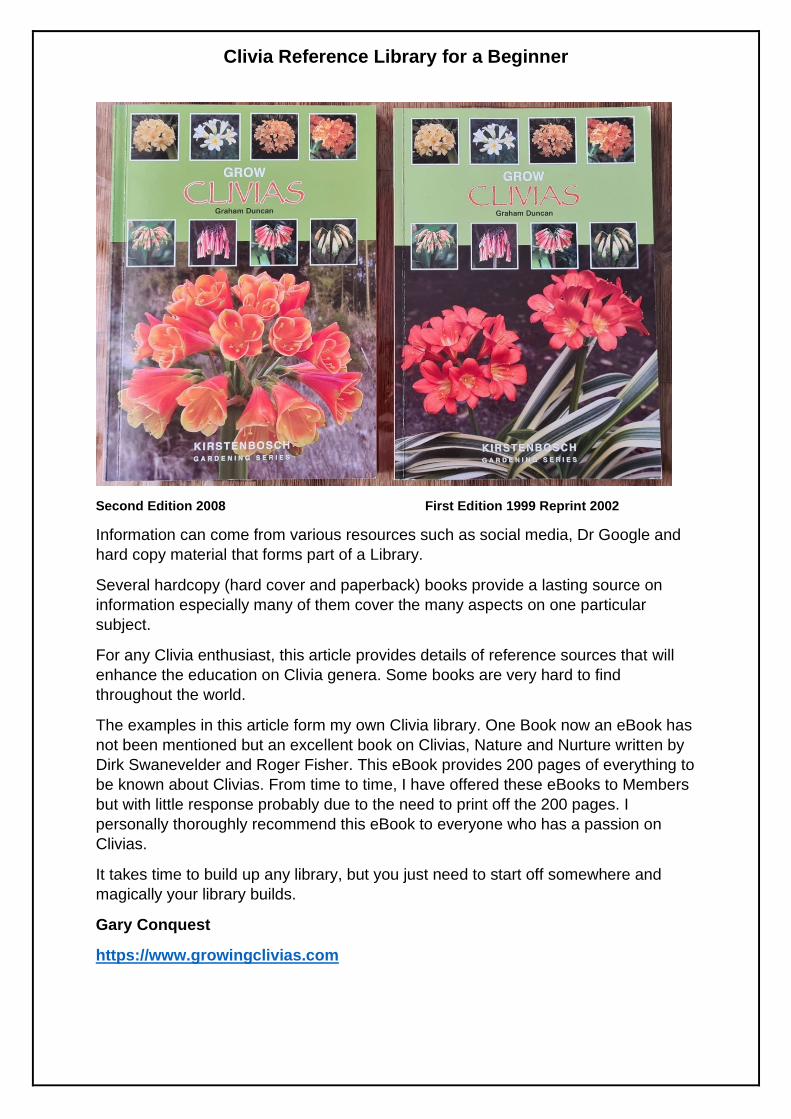
Clivia Reference Library for a Beginner
Second Edition 2008 First Edition 1999 Reprint 2002
Information can come from various resources such as social media, Dr Google and
hard copy material that forms part of a Library.
Several hardcopy (hard cover and paperback) books provide a lasting source on
information especially many of them cover the many aspects on one particular
subject.
For any Clivia enthusiast, this article provides details of reference sources that will
enhance the education on Clivia genera. Some books are very hard to find
throughout the world.
The examples in this article form my own Clivia library. One Book now an eBook has
not been mentioned but an excellent book on Clivias, Nature and Nurture written by
Dirk Swanevelder and Roger Fisher. This eBook provides 200 pages of everything to
be known about Clivias. From time to time, I have offered these eBooks to Members
but with little response probably due to the need to print off the 200 pages. I
personally thoroughly recommend this eBook to everyone who has a passion on
Clivias.
It takes time to build up any library, but you just need to start off somewhere and
magically your library builds.
Gary Conquest
https://www.growingclivias.com

Clivia Reference Library for a Beginner
First Edition 2010
Second Edition 2007 (First Edition 2005)
(a Version is available in South African language)
First Edition 1986 (Reprinted 1990, 1994) Only Edition printed 2002

Clivia Reference Library for a Beginner
First Edition, first print 2016
Clivia Society of South Africa – Clivia Yearbook (21) (Annual) and Clivia News (Quarterly)
An Australian Book,
Fourth Edition 2010 (First Edition 1984)

Official Endorsement of Reference Books for growing Clivias for Beginners
Hi Gary Conquest, On behalf of the Clivia Society, I wish to thank you for your efforts in promoting clivia.
You are welcome to use any of the literature published by the Clivia Society for your
educational purposes. The Society as the owner of its articles grants you the right to use
the articles, as long as they are not used for personal gain.
I wish you luck with your projects. Regards, Glynn Middlewick. Chairman of the Clivia Society. 23 November 2020
I have had the above endorsement since the first Reference Book was published in April
2019 and I sincerely value this endorsement towards improving the knowledge of Clivia
throughout the world.
Gary Conquest JP(Qual)

Links for FLIPBOOKPDF Online to the Reference Book SERIES
1st Edition Reference Book for growing Clivias for Beginners
LINK https://my.flipbookpdf.net/CZDBi
2nd Edition Reference Book for growing Clivias for Beginners
LINK https://my.flipbookpdf.net/ZZgwG
3rd Edition Reference Book for growing Clivias for Beginners
LINK https://my.flipbookpdf.net/CxzBk
4th Edition Reference Book for growing Interspecific Hybrids
LINK https://my.flipbookpdf.net/C4diI
5th Edition Reference Book for growing Clivias for Beginners
LINK https://my.flipbookpdf.net/EGSO1
6th Edition Reference Book for growing Clivias for Beginners
LINK https://my.flipbookpdf.net/Sm9Tm
7th Edition Reference Book for growing Clivias for Beginners
LINK https://my.flipbookpdf.net/YyEzi
8th Edition Reference Book for growing Clivias for Beginners
LINK https://my.flipbookpdf.net/0k8IQ
9th Edition Reference Book for growing Clivias for Beginners
LINK https://my.flipbookpdf.net/3WgNh
10th Anniversary Edition Reference Book for growing Clivias for Beginners
LINK https://my.flipbookpdf.net/ataeG
The Reference Books are available at https://www.growingclivias.com


19/253

20/253

Clivia Genus In September 1815 the first scientific collection of a clivia was made near the mouth of the Great Fish River in the Eastern Cape Province by the intrepid explorer and naturalist William Burchell. Similar plants were collected from the same area a few years later in the early 1820’s by James Bowie and sent to England, where in 1828 Kew botanist John Lindley described them as Clivia nobilis in honour of Lady Charlotte Florentine Clive, Duchess of Northumberland.
Clivia is part of the Amaryllid family (Amaryllidaceae; Haemantheae).
There are at present six described species of Clivia:
(to view press down on Ctrl on keyboard then click on each name. This will bring you to a new window on your screen)
• Clivia nobilis • Clivia miniata • Clivia gardenii • Clivia caulescens • Clivia robusta • Clivia mirabilis
21/253

Species Comparison Chart
C. mirabilis C. nobilis C. robusta C. gardenii C.caulescens C. miniata
Date described
2002 1828 2004 1856 1954 1854
Distribution W escarpment
SE coast E coast E escarpment
NE escarpment
E escarpment
Habitat Arid humic sandstone scree
Sandstone slopes to coastal sand dunes
Swamp forest in wet sand, drainage at cliff ledges
Humic scree on sandstone
Epiphytic on sandstone / trees in moss, humus on sandstone
Humic scree on sandstone, rhyolites, dolerite
Flowering time
October to mid-November (late Spring)
August to January (Spring – Summer)
late March – early August (Autumn – Winter)
May to July (late Autumn to mid-Winter)
September to November (Spring)
August to November (Spring – early Summer)
Peduncle colour
? Green Reddish then green
Reddish then green
Green Green
22/253

C. mirabilis C. nobilis C. robusta C. gardenii C.caulescens C. miniata
Perianth shape
pendulous tubular
pendulous tubular
pendulous tubular
pendulous tubular
pendulous tubular
upright trumpet
Perianth width
11 mm 10 mm 50-70mm
Perianth length
25-40mm 40-70mm 35 mm
Flower colour
Bicoloured orange/yellow turning orange-red with age, with green tips fading as it opens
Dark orange with green tips, but varies from pinkish yellow to dark red
Orange-red with green tips
Orange-red with pronounced green tips; but varies from yellow to brownish red
Orange-red with green tips
Orange with white or yellow throat; but varies from almost white through yellow to dark red
No of flowers
20-48 20-50 15-40 10-20 14-50 10-40
23/253

C. mirabilis C. nobilis C. robusta C. gardenii C.caulescens C. miniata
Stigma & style
Not exserted protruding 6 mm
Exserted > 7mm
protruding 6mm
various
Fruit shape Irregular glebulose-gongyloid
Round to teardrop
Round Round to oblong
Round
Round to pointed, slightly irregular
Fruit ripens February – April 4-7months
winter 9months
winter 15months
winter 6months
winter 9months
Ovary colour
Orange-red then green
Sometimes red then green
Rarely red then green
No. of seed in fruit
(1)2-4 (-7)*
1-2(-6) 1-2(-4) 1-2 1-4 1-4 (-25)
Seed size ±10mm ±9(6-1)mm 10-18mm 9-18m ±12(9-13)mm
±12 mm
24/253

C. mirabilis C. nobilis C. robusta C. gardenii C.caulescens C. miniata
Seed membrane colour
colourless purplish red colourless colourless colourless colourless, rarely reddish
Seed radicle
radicle produced by the germinating seed is very thin, about 1.5 mm thick
3 mm 3 mm 3 mm
Stem non-aerial non-aerial
aerial to 450 mm with buttress roots when growing in swampy conditions
non-aerial
aerial, up to 3 m in mature specimens
slightly aerial with age
25/253

C. mirabilis C. nobilis C. robusta C. gardenii C.caulescens C. miniata
Leaf length (mm)
600-1200 300-800 300-1200 350-900 300-600 400-900
Leaf width (mm)
30-50 25-50 30-90 25-60 35-70 25-70
Leaf median stripe
Pronounced Moderate to weak
Weak to none
None None None
Leaf substance
Stiff Stiff Soft Soft Soft Soft
Leaf texture
Rough Slightly rough to smooth
Smooth Smooth Smooth Smooth
Leaf margin
Smooth Rough Smooth Smooth Smooth Smooth
Leaf apex Rounded point
Indented Rounded Pointed Pointed Pointed
26/253

C. mirabilis C. nobilis C. robusta C. gardenii C.caulescens C. miniata
Leaf base Pigmented purple red
Non-pigmented
Non-pigmented
Non-pigmented
Pigmented red to non-pigmented
Non-pigmented
*Explanation: minimum 1 seed, 2 to 4 on average, 7 maximum
27/253

Clivia Species and Hybrids Identification
Web: https://www.growingclivias.com - Facebook: Growing Clivias for Beginners
Multipetal
Spider
28/253

Clivia Species and Hybrids Identification
Web: https://www.growingclivias.com - Facebook: Growing Clivias for Beginners
Recurve
Bi Colour
29/253

Clivia Species and Hybrids Identification
Web: https://www.growingclivias.com - Facebook: Growing Clivias for Beginners
Ghost
Bi Colour
30/253

Clivia Species and Hybrids Identification
Web: https://www.growingclivias.com - Facebook: Growing Clivias for Beginners
Pink Picotte
Green Throat
31/253

Clivia Species and Hybrids Identification
Web: https://www.growingclivias.com - Facebook: Growing Clivias for Beginners
Florid White Lips
C. robusta
C. nobilis
32/253

Clivia Species and Hybrids Identification
Web: https://www.growingclivias.com - Facebook: Growing Clivias for Beginners
C. mirabilis
C. miniata
33/253
Clivia Species and Hybrids Identification
Web: https://www.growingclivias.com - Facebook: Growing Clivias for Beginners
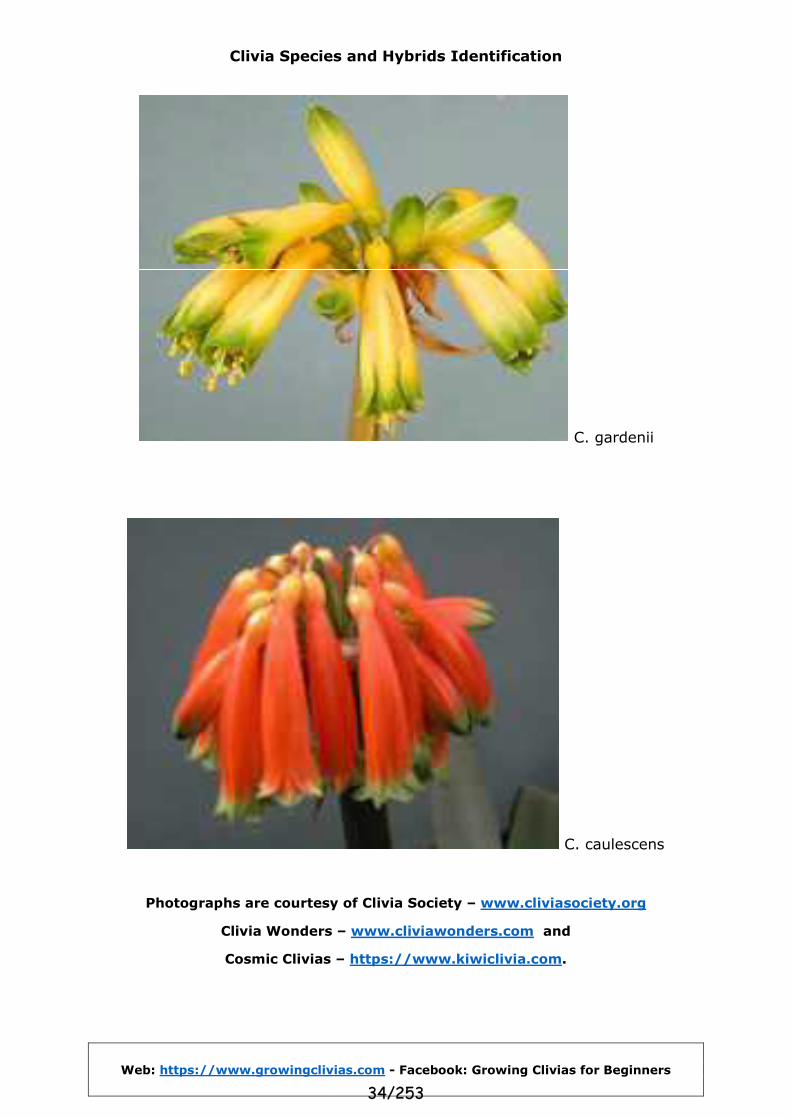
C. gardenii
C. caulescens
Photographs are courtesy of Clivia Society – www.cliviasociety.org
Clivia Wonders – www.cliviawonders.com and
Cosmic Clivias – https://www.kiwiclivia.com.
34/253
CLIVIAS, THE FIRST 12 MONTHS: FROM SEED TO SEEDLING
Peter Haeusler
Clivias are basically hardy, tolerant plants, and will cope with remarkably diverse conditions. There is no single, absolute, or perfect path that I or anyone can say you must follow to get results. We are all constantly learning, and it is through innovation, experimentation, sharing our knowledge and experiences, and above all through careful reflection on practices and outcomes that we gain new insights, increase our understanding, and hopefully achieve great results with our Clivias. In the course of the following paragraphs I will outline the approach I have taken in that crucial first 12 months, when we take each Clivia from little more than potential – a seed – through to a robust seedling with several leaves and well on the path to realising that potential. Over the past five years I have germinated about 700-800 seeds each year, with an overall germination rate consistently around 95%. On average I would, in all honesty, lose less than 10 seedlings each year – touch wood!
There are several inter-related goals when it comes to propagating Clivias, and these underscores the importance of your management practices.
These goals include: Maximizing your germination rate, achieving at the same time relatively quick germination; i. Achieving a good, consistent growth rate post-germination; ii. Minimizing losses through insect attack, rot and fungal disease; and ultimately, iii. Growing strong seedlings, with good leaf colour (and lustre), and healthy root systems.
Preparation As with so many areas of endeavour, sound preparation and consistent effort bears fruit. You need to think carefully about your seed germination arrangements, with different methods having their strengths and limitations. By all means experiment as you work out what suits you and do take into account the time you can commit to this stage as some propagation methods will be more demanding of your time than others. Shelter, yet good ventilation and sunlight are essential ingredients. As always, the mix you use must be well aerated and well drained, and you must manage carefully the amount of water your seeds are getting. Finally, the need for sound hygiene cannot be over-emphasised. This last aspect often fails to get the attention it deserves, yet it is a crucial element.
Propagating box I have built my own propagating boxes (Fig. 8). Essentially, it’s a simple box arrangement built around a heated, thermostatically-controlled propagating tray (Garden Express at Monbulk sell single, double and four tray models). The propagating box has a simple hinged lid, with a clear corrugated polycarbonate sheeting (Laser lite) cover ─ the corrugations allowing a good amount of air circulation, but the overall effect of the lidded box arrangement is still to retain a good deal of warmth and humidity (the temperature remains set at 23°-25°C).
35/253
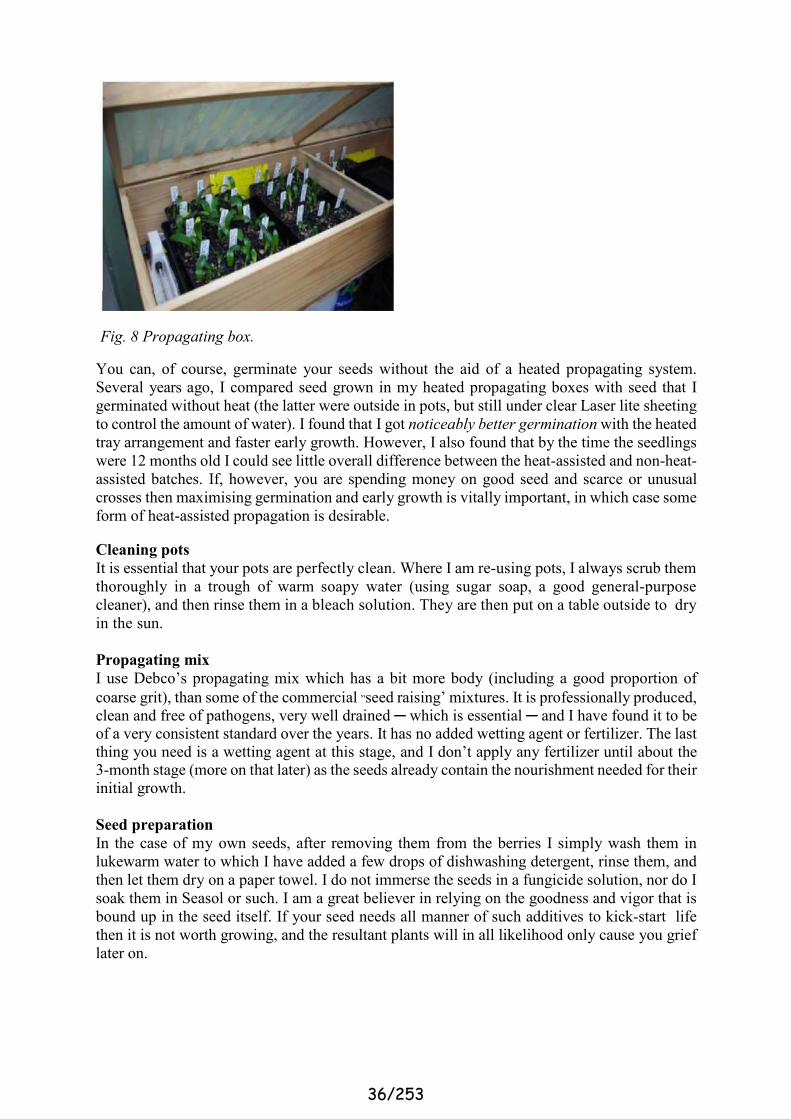
Fig. 8 Propagating box.
You can, of course, germinate your seeds without the aid of a heated propagating system. Several years ago, I compared seed grown in my heated propagating boxes with seed that I germinated without heat (the latter were outside in pots, but still under clear Laser lite sheeting to control the amount of water). I found that I got noticeably better germination with the heated tray arrangement and faster early growth. However, I also found that by the time the seedlings were 12 months old I could see little overall difference between the heat-assisted and non-heat- assisted batches. If, however, you are spending money on good seed and scarce or unusual crosses then maximising germination and early growth is vitally important, in which case some form of heat-assisted propagation is desirable.
Cleaning pots It is essential that your pots are perfectly clean. Where I am re-using pots, I always scrub them thoroughly in a trough of warm soapy water (using sugar soap, a good general-purpose cleaner), and then rinse them in a bleach solution. They are then put on a table outside to dry in the sun.
Propagating mix I use Debco’s propagating mix which has a bit more body (including a good proportion of coarse grit), than some of the commercial „seed raising’ mixtures. It is professionally produced, clean and free of pathogens, very well drained ─ which is essential ─ and I have found it to be of a very consistent standard over the years. It has no added wetting agent or fertilizer. The last thing you need is a wetting agent at this stage, and I don’t apply any fertilizer until about the 3-month stage (more on that later) as the seeds already contain the nourishment needed for their initial growth.
Seed preparation In the case of my own seeds, after removing them from the berries I simply wash them in lukewarm water to which I have added a few drops of dishwashing detergent, rinse them, and then let them dry on a paper towel. I do not immerse the seeds in a fungicide solution, nor do I soak them in Seasol or such. I am a great believer in relying on the goodness and vigor that is bound up in the seed itself. If your seed needs all manner of such additives to kick-start life then it is not worth growing, and the resultant plants will in all likelihood only cause you grief later on.
36/253

In terms of seed that I purchase, providing it looks well cleaned with no traces of plant matter then I simply plant the seeds without further ado. If, however, the seed looks a bit „spotty’, feels sticky, or hasn’t been well cleaned I will wash it in warm soapy water, then soak the seed in a fungicide solution (e.g. Mancozeb) for say an hour. Then, when the seed is dry, I’ll plant it up. However, my experience with seed which is a bit spotty and/or sticky is that even when treated in this manner I still seem to experience problems with the seedlings down the track in terms of fungal infection. I do not continue to deal with any grower who sells me seed which is „suspect’ in such ways, or indeed seed which is otherwise „scrappy’. There are good reputable sellers out there and if you are unsure about who to buy seed from then seek advice from some of the experienced members of the Group.
The first three months
Planting seeds and germination I like to start my seed planting in July after the Winter solstice. The days are slowly beginning to lengthen and, as we know, plants everywhere start to respond to those early signals that Spring is coming. Any seed that I receive prior to this time is kept in a cool area out of direct light until I am ready to start planting – making sure that if they are stored in plastic bags there are a couple of holes for aeration. The pots I use for seed propagation are 80mm square and 100mm deep. Twelve of these fit neatly into a 290mm X 350mm plastic tray (with slotted, not solid, base), and these in turn fit neatly into the heated propagating trays I mentioned earlier.
Each pot is filled to close to the top with the propagating mix. I put up to about 6 seeds per pot, always keeping the one cross to a pot so that I can keep a good sense of how the cross is proceeding, variation in pigmentation, leaf form and so forth. Details of the cross are recorded on a plastic label inserted into a slit on the pot rim. This includes: the cross; the breeder; the date the seed was planted; and, number of seeds planted (if I have, say, 12 seeds of the cross I will record the number of seeds as 6/12 which reminds me that there is another pot of 6 seeds of this cross).
There seems to be a lot of discussion about how to „situate’ the seed in the mix. Basically, I sit it on the mix and press it down lightly, with the top half of the seed still visible. If I can see an „eye’ (the bud or germination point) then I will point that roughly downwards. While this was something, I was anxious to „get right’ in the early days, I am now less fussed as seeds are, unsurprisingly, adept at „getting it right’ themselves. In addition, sometimes the „eye’ is not easy to locate in which case I will generally put the smoother rounded surface of the seed facing up. Once I have put the desired number of seeds into the pot, I then barely cover them with a mix made up in equal parts of coarse sand and the propagating mix. This is a bit heavier and doesn’t wash about easily when watering, thereby helping hold the seed firm as it germinates.
Germination will generally occur between 4-6 weeks, even up to 8 weeks (I have found some varieties to be consistently slower than others, so patience may be needed). The radicle (primary root) develops, followed by the first seedling leaf. You need, however, to watch the seeds as they germinate, as sometimes the radicle will push the seed right up out of the mix. In such cases I have a screwdriver at hand and simply make a bit of a hole and pop the seed into it, root first of course, taking care not to fully bury the seed. Then just firm the mix – ever so carefully – around the root and seed.
37/253

So, just to be clear, I do not germinate my seeds in sphagnum moss. Time is at a premium for me, so seeds are put straight into the pots (and mix) that they will germinate in and indeed remain in for up to the first 10-12 months of their lives. This minimises handling and disturbance. Moreover, the approach has borne very good results in terms of germination, plant development and overall health. Even if I had more time, I would not now change this method. The (individual cross-based) community pot approach also affords a good sense of how each cross is developing and allows easy assessment of pigmentation results for instance.
Fig. 9 Interspecific of Shige Sasaki’s breeding (TK Yellow x Hirao) X (Gardenii x Hirao). Flowered this year at 3.5 years You can, of course, use larger community pots for larger numbers of seeds. Be very careful, however, about the size of your pots as a large quantity of mix can translate to a wet and cold mass, leading in turn to fungal and other problems. The other advantage of the smaller pots such as I use is that each cross has a degree of isolation from the others. If a fungal problem emerges that cross can be readily isolated from the others and treated.
Watering and humidity While they remain in the propagating boxes, I water my pots of seed twice weekly. On the weekend when I have a bit more time, I remove the trays of pots and dampen (not saturate!) the matting underneath. Then I put the trays of pots back in place and water the actual pots. This helps generate some humidity – you will see the condensation on the underside of the Laser lite on cool days and evenings – which makes for a good growing environment.
BUT be very careful not to create an overly warm and overly humid environment otherwise you will soon have fungal problems in your seedlings, and at this age it is nigh on impossible to save a seedling once afflicted. This is very definitely a case where prevention through careful management is better than cure!
For the watering I use a 1.5 litre soft drink bottle with a plastic rose type of watering fitting screwed on (these bottle top waterers can be obtained from The Diggers Club). This is a gentle way of watering the seed which doesn’t wash the mix away from around the seed.
Pest and disease management early on Rather than insect pests, it is rot and fungal disease that you particularly need to guard against early on. If fungal infection takes hold it can cause a great deal of damage quickly as emerging seedlings have little capacity to fight infection, unlike a mature plant. For this reason, rigorous attention to the pillars of good preparation ─ clean pots, good clean mix, clean and healthy seed ─ is vitally important. If you start to encounter something like damping off then, yes, apply an appropriate treatment such as Fongarid. But, remove affected plants immediately – on no account leave seedlings you are treating alongside healthy plants.
38/253

Above all, look carefully at your practices and try to get to the underlying cause of your problem. If numerous seedlings across different crosses are „falling over’ due to fungal infection, then the chances are that there is something in your practices that needs to be changed. Perhaps you are over-watering, or the seed-raising environment is too humid. In such cases seek advice from a couple of experienced growers.
Fig. 10 ‘Everton Green Goblin’ breeding from Val Thurston. First flowered last year at 3 years.
In terms of insect pests, I have not experienced insect-related problems while seedlings are at that early stage in the propagating box. Quite a few growers talk about the adverse impact of fungus gnats. I do get very small fly-like insects darting around the propagating boxes but have never seen any sign at all that these are having a harmful effect on the seedlings (either leaves or roots). However, as a precaution I locate several insect traps in each box. These stiffened plastic sheets are about 100mm X 200mm, bright yellow (the yellow is said to be insect-attracting), and very sticky. They are designed to control for thrips among tomato plants for instance (Bunnings sell a version, but I obtain mine from Muir & Sons in Silvan). I certainly find that a large number of these tiny flies get trapped on the sheets so in that sense they are very effective.
After three months
Hardening off When the seedlings are about 3 months old the pots are removed from the propagating box, although I try and avoid doing this during a cold spell. I tend to be guided very much by the size of the seedlings, and as we know different crosses will develop at very different rates. Essentially, I am looking for the seedlings to be about 75mm high before moving them out. For a couple of weeks, the pots being removed are left in trays on top of the propagating boxes where they will still derive a little heat (note that my propagating boxes are in an outdoor area which is semi enclosed and itself has a Laser lite roof, with shade cloth pulled across when the weather heats up). Easing the seedlings out in this way serves to harden them off somewhat.
39/253

Location for young seedlings
Fig. 11 Seedlings
When my community pots of seedlings are moved out of the propagating area, they are then located in a special area within one of my shade houses (Fig. 11). In addition to the shade cloth cover this special seedling area has a clear Laser lite roof (never use the darkened polycarbonate roofing as this will block too much UV, leading to poor leaf colour and weak growth). This means that I can continue to control the amount of water the seedlings get which I believe is particularly important while they are getting established and developing their root systems.
My seedlings stay in this area until I am ready to pot them into individual 100mm pots at 10- 12 months. This area where I keep them remains relatively cool even in the hottest parts of summer. There are a couple of large deciduous tree nearby. This, in combination with the shade cloth structure (the cloth only goes down to the shelf height, about 45cm above ground level), means a reasonably bright, generally airy, yet sheltered and cool aspect. This, I believe, provides an excellent growing environment. Plants develop nicely with great root and leaf development, and I barely lose a seedling once they are out in this setting.
Watering and fertilizing From this stage onwards, the seedlings are watered weekly, and twice weekly in the summer. It is a generous watering (using a fine rose head) to the point that the water runs through the bottom of the pots. Seedlings need to be kept moist, but on no account should they be growing in soggy conditions. This, once again, is why it is so important to have a well- drained mix. On no account should your pots of seedlings be sitting in trays or situations where the water may lie around the base of the pots.
Only once seedlings reach the 3-month mark and are moved out of the propagating box do I apply fertilizer. Rather than chemical fertilizers, my strong preference is for organic products such as Seasol and Power Feed (or something like Charlie Carp) which I feel are easily absorbed and “softer‟ on the young plants. These are applied roughly fortnightly at half strength.
40/253

Pest and disease control
Fig. 12 Seedlings at 3 months, 12 months and 2 years.
As always, you need to watch for signs of fungal infection. Mancozeb is not overly “heavy duty‟ and I prefer to use it if the need arises. If, in the summer months, we get a spell of particularly humid weather I may spray the seedlings with Mancozeb as a preventive, otherwise I spray plants only on a need basis.
Twelve months, and beyond
By the time your seedlings reach 10-12 months old they should be a good height (15cm plus), with up to 4 leaves, and nicely developed root systems (see Fig. 12 of seedlings at 3 and 12 months, and a 2-year-old plant). Of course, there will be considerable variation depending on the cross. Some seedlings will be lower and spreading, with perhaps broad leaves. Others, such as Clivia gardenii, Clivia robusta and interspecifics can be much taller with amazingly developed root systems. At this stage I pot them up into individual pots (100mm) using a well-drained, moderately coarse, and above all well-composted mix. And for the first time I will apply a chemical fertilizer, a slow release fertilizer (I use 8-9-month Osmocote Exact which has added micro nutrients).
Fig. 13 Interspecific flower of Sean Chubb’s breeding. First flowered last year at 4 years. Has had a magnificently elevated umbel last year and again this year!
If you have grown your plants well from day one, they will reward you and power along now. Moreover, time and again I see that seedlings which have got off to a great start are less prone to fungal and rot problems later. Most of my plants potted up into 100mm pots at 12 months are literally bursting out of these pots a year later, at which time they will be moved on to 150mm pots. But that’s another story!
Courtesy of Peter Haeusler, Melbourne Clivia Group and well known Clivia enthusiast.
41/253
CLIVIA - CREATE YOUR OWN AND GROW YOUR OWN.
Have you tried growing your own plants from seed? It’s fun, can be challenging, and is
far more economical if you need lots of them. Of course, the downside is that it’s
considerably slower too, and doesn’t fit with today’s instant “I want it big and I want it
now” kind of philosophy, if that’s where you’re at. And you need to be reasonably well
organised and think in advance. If things are attempted at the wrong time, out of season,
they’re seldom successful, and often result in disappointment. In nature, everything has
its season, and can’t be rushed. I’ve found that becoming more aware of the seasons and
cycles of the natural world is an extremely relaxing and rewarding experience, and
sowing seed and nurturing plants to maturity and harvest is one of the best ways to raise
that awareness.
But why not go a step further, and actually do the pollinating and make your own seed
as well? Hybridizing is easy and doesn’t necessarily involve a lot of skill. Creating new or
different flowers is a real thrill and adds a completely new dimension to your gardening
hobby. And I am talking flowers here. Who wants to make new varieties of vegetables?
Not me! Boring! Leave that to scientists. I want to create new flowers. I confess to being
a compulsive pollinator!
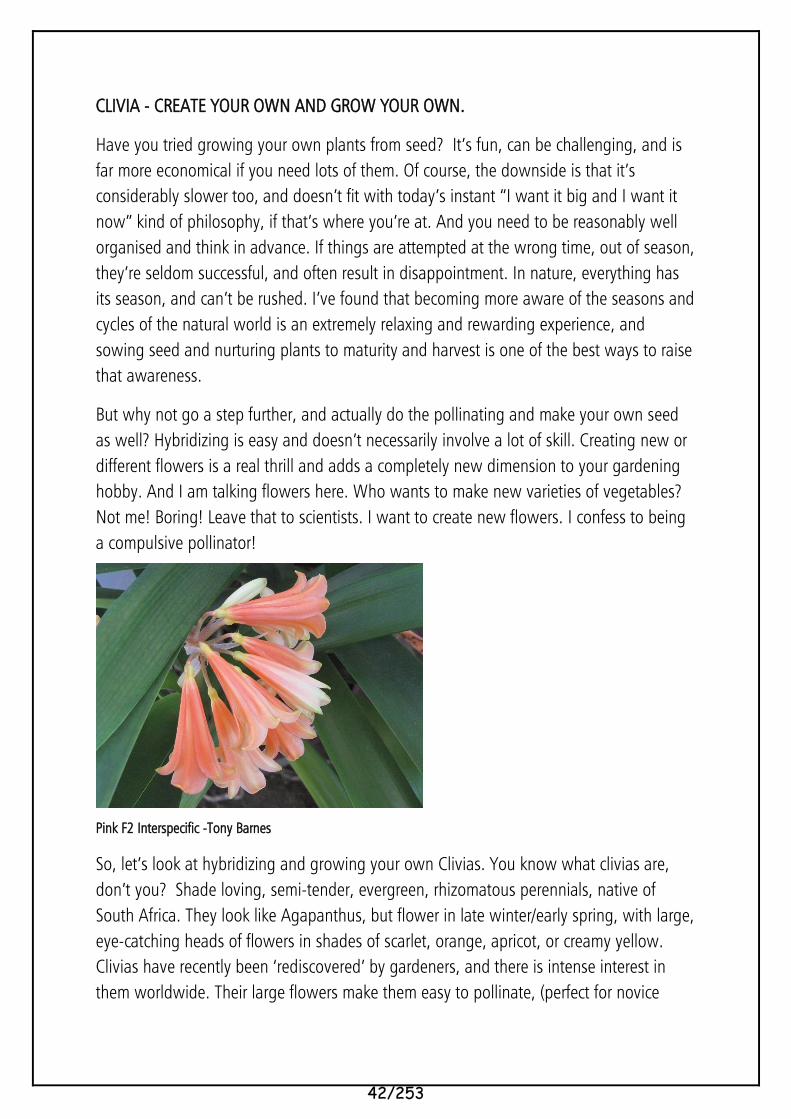
Pink F2 Interspecific -Tony Barnes
So, let’s look at hybridizing and growing your own Clivias. You know what clivias are,
don’t you? Shade loving, semi-tender, evergreen, rhizomatous perennials, native of
South Africa. They look like Agapanthus, but flower in late winter/early spring, with large,
eye-catching heads of flowers in shades of scarlet, orange, apricot, or creamy yellow.
Clivias have recently been ‘rediscovered’ by gardeners, and there is intense interest in
them worldwide. Their large flowers make them easy to pollinate, (perfect for novice
42/253

plant breeders!), and the seed is large and easy to handle. The only drawback is that they
are slow growing, taking on average three to four years to flower from seed. But don’t be
put off by that, it simply makes the thrill of the ultimate flowering so much greater!
In their natural habitat in South Africa, clivias flower at the end of the dry season, and are
pollinated by moths, butterflies and perhaps small sunbirds. Here in NZ, it is quite wet
during their flowering time, there is little insect activity, and the pollen is killed by the
rain, so often pollination is limited, and little seed is set. A good reason to interact with
nature and pollinate by hand.
Just in case you’ve forgotten the elementary botany you learned at school oh so long
ago, we need to quickly look at basic flower structure. The flowers of Clivia miniata are
made up of three sepals and three petals, collectively called tepals, which are held in a
circular whorl. From the centre of the flower extends the pistil, connecting the ovary,
which is below the petals, to the slightly sticky receptive parts called stigmata at the
upper tip. Arranged around the pistil and attached to the base of each sepal/petal are the
six thin filaments carrying on their tips the anthers, which split open to release pollen.
When grains of pollen, (male parts), come into contact with and stick to the stigma,
(female anatomy), pollination occurs. The grain of pollen produces a tiny tube which
grows down towards the ovaries in search of an ovule, (egg), and when one is located,
sperm is produced, which fertilizes the ovule and begins the development of a seed. The
seeds are enclosed in a fleshy pulp, and take several months to mature, being viable
(ripe) enough to germinate (begin growing) after about six months. If left on the plant,
the berries containing the seeds will soften and colour up red or yellow after about ten
months, and can remain on the plant, staying viable and looking attractive, for anything
up to two years. (The whole purpose of the colour change is to attract birds/small animals
to eat the pulp and release and scatter the seed, which is not palatable to them). Each
berry can contain up to fifteen seeds, which are large and composed mostly of
endosperm, (stored food), which the germinating plantlet uses as an energy source over
F2 Gardenii Interspecific – Tony Barnes
43/253

the first few months of its life.
The mechanics of pollinating are simple, all you need to do is transfer pollen from one
flower on to the stigma of another flower on another plant. This can be done with a
small paintbrush, the tip of your finger, or a pair of tweezers. It is best done in the
morning when the flowers have been open only a day or two, while the pollen is dry and
dusty, and the stigma tip has just split into three and is still sticky and receptive to receive
the pollen. If the flowers are old, the pollen may have been killed by rain, and the stigma
may have dried out so that the pollen will not stick to it.
Clivias are self-fertile to a certain extent (i.e. you can use the pollen of the same flower to
pollinate it), with limited seed produced. This type of cross is called selfing. However, if
two different plants are used, both sets of genes are mixed resulting in a better seed set
and more vigorous seedlings, which combine characteristics of each parent. The seedlings
produced from the first cross –pollination between two different plants are called F1
Hybrids. Because these offspring carry a mixture of genes, a much wider selection of
different characteristics will emerge in the second generation of hybrids, (F2 hybrids), as
new gene combinations take place. F2 hybrids are produced by pollinating the F1 plants
with themselves (selfing), or other F1 sibling plants, or back onto the original parents
(backcrossing). The larger the gene pool of the parents, the more variation and diversity
can be expected in the resulting seedlings.
Wittig Pink F2 Hybrid – Tony Barnes
If you want to try hybridising, look for the plant/flower characteristics that appeal to you,
e.g. colour, flower shape, number of flowers per head, leaf shape etc., and select your
parent plants that have these. If pollinating always try to improve the quality of plant or
44/253

flower by using pollen from a plant with superior attributes to the one you are using as a
pod (mother) parent. Having said that, in my experience the characteristics of the mother
plant are usually more obvious in the offspring than those of the pollen (father) plant. If
you have a variegated leafed plant, the variegation is only carried on the maternal side,
so always use a variegated plant as mother if wanting variegated offspring. Even then do
not expect more than 50% of seedlings to be variegated.
Suppose you have three different clivias flowering, an apricot one with narrow tepals and
thin leaves, a deep orange, scarlet one with larger flowers and wide leaves, and a creamy
yellow one. What colours would the resulting plant be if we cross-pollinated these?
Without knowing the background parentage, it is impossible to accurately predict, but
the chances are high that all the offspring will be varying shades of orange/apricot, as the
orange colour is dominant over the yellow. The colour pigment in the outer layer of cells
in the flower tepals is red anthocyanin, and the inner layers contain carotenoids, which
are yellow, so that in a normal clivia flower we look through the red onto the yellow,
making the flower appear orange. A yellow flower is produced on a plant that has a
genetic mutation which blocks production of the red anthocyanin pigments. Conversely a
true red flower, (extremely rare), is a different mutation that results in lack of yellow
carotenoid pigments. The density of the plastids, (cells carrying the pigments), determines
the shade of colour. Flower colour can be determined by looking at the bases of new
seedlings. Yellow or peach coloured seedlings have green, unpigmented leaf bases,
whereas orange or scarlet flowered plants are produced from seedlings with a dark,
pigmented base. This is only obvious in the first year or so of growth.
After picking your berries, remove the outer pulp and clean the seed, washing it in a
fungicide, (dishwashing detergent does the same job of sterilization of any nasties), and
let it dry for about a week before sowing it. A much better germination is obtained from
fresh seed, although it can be stored in paper bags in a fridge for several months, so long
as it does not dry out and shrivel up.
I sow my seed on damp sphagnum moss and cover it with more moss. It can be sown in
coarse seedling mix, but must be only very lightly covered, or it has a tendency to rot. It
can be germinated in a sealed plastic bag filled with damp pine needles, or simply
scattered on the ground in a moist shady place in the garden. Germination takes a
several weeks and can be speeded up considerably if the seed can be given some heat. A
bottom heat pad set at about 22degrees is great, or a hot water cupboard also works
well. It is essential that seeds are kept just damp, and not too wet.
45/253

One leaf is produced in about four months, and at a year old, seedlings should have two
leaves, and can be potted up, once again using a very coarse, free draining mix. Using a
weak liquid foliar feed every month gives an extra boost. Plants will flower once they
have produced 12 – 14 leaves, usually after three to four years. And with what avid
anticipation we await as those first buds gradually colour up and open to reveal our own
unique creation! Of course, it was worth it, but beware, hybridizing is addictive!
Courtesy of Tony Barnes, Ngamamaku Garden, Taranaki, New Zealand.
www.ngamamakugarden.co.nz email: [email protected]
.
White and Gold – Tony Barnes
46/253

Cultivation of Clivia
Clivia Cultivation
Growing Clivias is not difficult if you remember a few basic rules relating to potting media, watering, feeding, light and temperature and pests and diseases. Below are a series of articles written by experts on various aspects of Clivia Culture
Growing media © Copyright Mark Laing. Used with permission.
Six species of Clivia are endemic to South Africa, the most commonly grown being Clivia miniata, which is now cultivated all around the world. In Europe, it is grown as an indoor pot plant. Their natural habitat is on South-facing slopes, under trees, and often on top of rocks. They are semi-epiphytic plants (“air plants”), living above ground with their roots in leaf litter, deriving their nutrients from the humus, as the leaf litter decomposes. Their large white roots provide an amazing “sponge”, giving Clivias excellent drought tolerance and nutrient storage. We need to recreate these soil conditions if we are to optimize their growth.
When we cultivate Clivias away from their natural environment, several key elements need to be considered:
1. Clivias do not like to be planted into soil. Their roots are not designed for living in soil, so they often rot off, leaving only the surface roots alive. They stay alive but flower poorly.
2. Clivia roots have a requirement for lots of oxygen around the roots. They hate “wet feet” and waterlogging. Heavy clay soils or heavy growing media are bad for their cultivation.
3. Tall pots drain more than short pots. The height of the pot or the bag determines its drainage capacity, as a factor of the porosity of the medium used.
4. Drainage requires a physical connection from the bottom of the pot onto soil or a capillary mat. If the pot is in the air, then a waterlogged bottom layer (a perched water table) will occur: the medium in the pot will act like a sponge and will not release water out of its bottom layer unless there is capillary action sucking water away from it. So, do not put gravel or polystyrene chunks at the bottom of pots; keep it all one medium. Place Clivia pots onto a layer of sand or onto capillary mats. Do not leave them up in the air or on bricks.
47/253

5. When we mix media with different particle sizes, the result is called a matrix. What happens is that the small particles fill the pore spaces of the big particles, making a dense mixture. This is the secret of concrete: sand particles fill the spaces between gravel chunks, and the cement then binds them in place. Drainage from pure sand, or pure gravel is high. But when they are mixed in the right ratio, drainage is reduced to very little. So, the principle is that when we mix particles sizes of a growing medium, we reduce oxygen content and drainage, and increase water-holding capacity. If we add sand to a bark medium, we make it heavier, with less oxygen and it drains LESS well. Remember that Clivia are VERY dependent on a high oxygen content in its growing medium.
6. Sand is not all the same. It depends upon what rocks it came from originally: quartzite, granite, dolerite, etc. In general, quartzite sand is the best to use because it has the right chemical and physical properties. What one needs to avoid using is river sand derived from a decomposing rock such as granite. These decomposing sands usually have lots of fine particles that clog up a medium, and when sourced from a river, often carry diseases and nematodes (eelworm). Whatever sand is used in a growing medium, it is important to sieve out all the fine particles (< 0.25 mm), using the coarser particles for growing purposes.
7. Composts and growing media are not all the same. What one is looking for in a perfect growing medium is.
(a) A physically and chemically stable medium (it must not decompose or break down or collapse or compost further)
(b) A good water holding capacity
(c) A good oxygen content, hence good drainage (air-filled porosity).
(d) A good cation exchange capacity (CEC) (how much fertilizer the medium absorbs and then releases to the plants).
Consider the main options in artificial growing media in South Africa:
1. Composted pine bark
This medium is derived from fresh pine bark. A large pile of this is chopped up into large chunks, lime, nitrogen and water are added, and a composting process is started. Every week for 6-12 weeks, the pile is turned upside down to re-oxygenated it, and is re-watered. The pile heats up to 60-70°C each week until composting is completed. In the process, the bark is degraded to a lignin core, the biodegradable cellulose and hemicellulose being decomposed by bacteria and fungi. The result is a black, odourless medium with excellent physical and chemical properties: physically stable, no toxins, good drainage and oxygen content, and a good CEC. It is also completely free of plant diseases and nematodes. An inadequately composted pine
48/253

bark will still be a bit reddish, will often smell of pine and will still get hot when in a pile. Plants grow poorly in inadequately composted pine bark media.
A range of different particle sizes (coarseness) is available, which allows one to pick and choose according to the crop. Mature Clivia prefer a coarse medium, often marketed as a coarse potting mix. But a seedling mix is useful for growing out Clivia seed.
2. Vermiculite
This medium is derived from a mica from Phalaborwa, which is heated till the mica “pops” like popcorn. It is widely used in the USA as a growing medium. However, it is problematic as it has a very high pH of around 9.0 which is far too high for most plants, and it decomposes, compacting into a dense, oxygen deprived medium. It is not suitable for use with Clivias.
3. Perlite
This medium is derived from a rock that is heated till it puffs up, like popcorn. It has a very high porosity and drainage and is excellent for cuttings. Clivias grow well in it but their irrigation and fertilization have to be managed very carefully because the perlite holds very little water or nutrients.
4. Polystyrene balls
These are often added to growing media. However, they add nothing, and may result in a denser and more compact medium with poorer drainage.
5. Coir peat or Coco peat
This is a medium derived from the outer husk of coconuts. It has excellent water holding capacity, but it drains poorly. It can be useful to add to a composted pine bark medium to increase water retention, by adding 10-30% by volume to a composted bark medium. Do not use more than 30% or waterlogging problems may occur.
6. Sphagnum peat
Again, it has excellent water retention but poor drainage. It can be useful in mixtures.
7. Mushroom compost
This is not a good growing medium as it is derived from straw, so every bit of it will be decomposed by bacteria and fungi. The effect is that what starts out as a nice fluffy medium soon becomes a heavy, waterlogged medium. Use it to mulch lawns, etc.
49/253

8 Chicken litter
This is a poor growing medium as it is based on wood shavings or sawdust, both of which decompose rapidly. It is excellent as a mulch for lawns and gardens.
9. Wood shavings and sawdust
Again, this is a poor option for a growing medium because the particles decompose, breaking down into smaller and smaller particles, getting denser and denser, shutting out all oxygen. Another problem is that, as the bacteria and fungi break down the wood, they “steal” fertilizer from plants, so the plants always look sickly and yellow. It can be used for a single crop of cucumbers or tomatoes grown hydroponically in bags but should not be used for a perennial crop like Clivia.
10. Bagasse
This is a poor growing medium as it is all cellulose and decomposes constantly. It also has a high salt content. Avoid it as a growing medium for any crop.
11. Topsoil
Soil is a terrible medium to put into a pot. Without earthworms to lighten the soil, and make for aeration and drainage, the soil compacts into a dense, hard “brick” Adding sand or any other medium does not help: it just makes a dense “concrete”, and the clay in the soil binds it all together like a cement. Topsoil may also carry plant diseases.
12. Garden compost
This is usually derived from leaves and other organic matter. It is excellent to mulch with but does not work well as a basic growing medium.
The worst medium I have seen used was made up of sand, sawdust and topsoil in equal portions. Once it had been in a pot for a month, it made excellent bricks for the building industry! And the Clivia roots died of waterlogging and lack of oxygen.
In South Africa we are fortunate in having an excellent growing media industry based on composted pine bark. If the composting has been conducted properly, and the right grade of medium is chosen, then any potted plants will prosper in composted pine bark. Clivias are best when grown in a large pot or bag, in a coarse potting mix. Alternatively, they can be put on top of the ground and then covered with a coarse potting mix, to simulate their natural conditions. They will survive if planted into soil, but their growth and flowering will be reduced.
Fertilization for Clivias may be in the form of slow release fertilizer granules or dilute liquid fertilizers applied regularly, or both. Their nutrient requirements appear to be
50/253

simple, and they respond well to most general fertilizers. Keeping the N: K ratio (nitrogen to potassium) at 1:1 or 1:2 will ensure good flowering. Too much nitrogen on its own results in lots of leaves and little flowering.
If you want to know more about growing media, there is a superb Australian book, which is highly relevant to our conditions: Handreck, K. A. and Black, N.D. (1994) Growing media for ornamental plants and turf. University of New South Wales Press, Sydney.
Mark Laing
51/253

Growing Clivia in a Cold Climate © Copyright 2002 by James E. Shields. Used with permission.
Starting Seeds under Lights
I grow Clivia in central Indiana (USA). This is in the Midwest, between the Great Lakes to the north and the Ohio River to the south. We have hot summers and cold winters: usual afternoon high temperatures in summer are 86°F (about 30°C) and this past summer our afternoons exceeded 90°F (32°C) on more than thirty days. Our hottest days do not exceed 100°F (about 38°C). In winter, we have several snowfalls each year, and our lowest morning temperatures vary from +6°F (-14°C) to -20°F (-28°C) in our occasional very cold spells. This is U.S. Department of Agriculture cold hardiness zone.
This is not a place where clivias are garden plants. They absolutely have to be protected indoors or in a greenhouse over winter. In summer, they do very well outdoors, so long as they are in medium to heavy dappled shade. I grow my mature clivias outdoors in summer in our lath house, and in a home greenhouse in winter.
Clivia seeds tend to ripen around Christmas time here in Indiana, just as winter is getting a good start. That means we start them indoors during winter, along with Nerine and Haemanthus and other later-ripening seeds. While a sunny window would be a possibility, and we do have a couple of home greenhouses, neither works well for us. The sunny windowsill is a shortcut for the cat and gets too hot on sunny days. The greenhouses are too cool in winter for optimal starting of Clivia seeds. The most satisfactory alternative that I have found is to start them indoors under fluorescent lights.
Clivia seeds kept too warm will dry out rather than germinate. Left too cold, they simply wait for nicer temperatures. I have arrived at a working temperature range for Clivia germination that seems to be satisfactory: warmer than 65°F but no warmer than 80°F (about 18°C to 26 or 27°C). I keep the young Clivia seedlings under the lights and in this temperature range for about six months. Generally, it is summer by then, and they can be moved outdoors into our lath house (probably 60 to 70% shade) for the summer.
I use a mixture of PromixT and sand in a ratio of 2 parts Promix to 1 part and by volume. PromixT is a peat-based soil-free potting mix containing perlite and vermiculite in addition to the peat. It also shows quite a few small twigs and bits of sticks, and I suspect that there is also some fine charcoal added to it.
I plant all my especially prized seeds, one seed to a pot, in 5½ inch (about 14 cm) square by 5½ inch deep plastic pots. The seed is pressed into the surface of the potting mix, and then the pot is stood in a bucket of water to thoroughly wet all the potting soil clear to the surface. The well-wetted pot is finally set in a tray with other pots of the same lot, and the whole is moved into the light room and placed under the fluorescent lights. Initially the lights may be as low as a few inches above the
52/253

seeds. As the leaves grow, the lights are raised to stay above the leaves for as long as possible.
If you want to start hundreds or thousands of clivias from seed at one time, this approach needs to be modified. Plant the seeds from a single batch in a larger community container, such as a polystyrene foam box or tray. It should be at least 5 inches deep and must have plenty of drainage holes in the bottom.
As we have come to grow more and more clivias and bulbs from seed, I have had to have a wall full of shelves installed for the plant lights. They are in my computer room, which stays a bit warmer than the rest of the house all year around. There are four shelves mounted on one wall. Each shelf is 22½ inches deep (about 57 cm) by 9 ft. 10½ inches long (about 3 meters), made of ½ inch plywood and supported by 2-inch x 4-inch lumber. The vertical spacing between shelves is about 22½ inches. The shelves and the walls behind them and at the ends were painted with a matt white enamel latex paint to maximize light efficiency. Each shelf is illuminated by two pairs of two-tube 40-watt fluorescent tubes in shop light fixtures, for a total of eight 40-watt tubes per shelf. Each fixture is hung on chains so their heights can be adjusted as needed. Each shelf offers 18.5 square feet of space, for a total of 74 square feet (about 6.8 sq. meters) under these lights.
Pots are placed in plastic trays on the shelves under the lights. The pots are watered from below, by pouring water into the trays, to avoid washing the seeds loose from the potting medium. Fungus gnats may become a problem and can be controlled by sprinkling granules of Marathon® on the surface and watering into the soil. The insecticide is watered into the soil by gently watering the pot from above. Marathon® contains 1% imidacloprid as the active agent. It is manufactured by Olympic Horticultural Products for the greenhouse and nursery trade in the USA.
Growing seedlings on
As Clivia seedlings in containers grow, they produce more and more roots. When the roots begin to fill the pot or to grow out through the drainage holes in the bottom of the pot, it is time to move the plant into a larger pot. It is critical to the development of the young plant that it be able to produce as many healthy roots as possible.
When the seedling is moved to a larger container, it is also time to change from the sandy, peat, starting medium to a more sharply draining mix. Some growers recommend using orchid potting mixes for growing Clivia plants, but I have not tried that yet. I have been using a gritty mix with reasonable success. The composition is roughly PromixT, plus sand, plus granite chick starter grit (about 1/8 in mesh, or 3 mm) in a ratio of 2 parts Promix to 1-part sand to 1-part granite grit by volume. The components are mixed dry in a small concrete mixer until well mixed, or up to an hour. Promix is a commercial soil-less peat-based potting mixture, produced in Canada.
The seedling is removed from its original pot and as much as possible of the original growing medium is shaken gently off the roots. Be careful not to damage the roots.
53/253

The next step is to re-pot in a slightly larger container. If the seedling had been growing in a 5½-inch (about 14 cm) square pot, you can plant it in a 1-gallon container about 6½ inches (16 or 17 cm) in diameter and 6½ inches deep. Plug the drainage holes loosely with a bit of sphagnum moss and work the gritty mix carefully in among the roots. At this point, I usually pot the crown of the seedling slightly above the surface of the potting mix in the new pot.
Until the young Clivia plants reach a size such that they are capable of blooming, they have no need for a dry or cool rest period in winter. I try to keep the one- and the two-year old plants growing actively through the entire winter. The two-year olds are all in the greenhouse, while some of the one-year old plants are still under lights and the rest in the greenhouse. Keep the greenhouse warm, at about 60°F, at least, and use supplemental lighting if necessary. I have two 400-watt high intensity metal halide lamps hung above one bench in my lean-to greenhouse, but I am not currently using them. Except during the coldest periods (cold inside the greenhouse, that is), water and feed the young plants regularly with a very dilute solution of soluble plant food. I recommend using Peters 20-20-20 soluble with trace elements, at about ¼ to ½ level teaspoonful (about 5 ml) per gallon (about 1.5 to 3 grams in 4 litres.)
When using a continuous feeding regimen such as this, it is necessary to water to excess at each watering, so the accumulating salts are regularly flushed out the bottom of the pot. This is another reason that a quick-draining growing medium is advisable.
My aim is to grow large, healthy seedlings to blooming size in 30 months. I do not always achieve this, but a significant fraction of the seedling plants I have grown so far have bloomed in 30 to 36 months. I do this in a relatively harsh climate, using my own home, a lath house, and a glass and aluminium lean-to home greenhouse. I am not ever going to keep the Belgian Clivia growers awake at night with worry!
Jim Shields
54/253

Nutrition © Copyright by Christo Lötter. Used with permission.
You will always find the letters N.K.P. (in South Africa) on the container in which you buy your fertilizer. N (nitrogen) stimulates luxuriant growth but has to be balanced by K (Potash), otherwise the plant tissues will become soft (thin cell walls) and will have less resistance to disease and drought. Assisted by calcium, potassium plays an important part in the growth zone at the bases of the leaves and peduncles. A deficiency of potassium will result in flowers blooming between leaves. It also affects the size, intensity of colours, quality and life span of flowers. P (phosphorous) plays an important role in the development of a good root system AND will determine the number of flowers in the umbel and the number of ovules in the locules. Nutrition and the quality of your seeds (see accompanying figure) The food supply of your seeds is exendospermous which means that it is a separate food supply for the embryo plant and is stored outside the cotyledon, (seed leaf of the embryo) but the embryo plant is attached to the food supply by the epicotyl and serves as a channel through which the food – after it has been made soluble by enzymes – can reach the developing embryo plant. Just below the longitudinal slit through which the first seed leaf appears, we find the hypocotyl from which the radicle develops. On the radicle you will see a dense growth of adhesive root hairs. In nature this serves to adhere to anything with which it comes into contact (even a radicle from another seed). The radicle tends to grow straight down to anchor the developing embryo plant firmly. For all this growth, a lot of energy (food) is needed. The chlorophyll in the leaves of the plant form simple sugars from CO2 and H2O during photosynthesis. Potassium is needed to convert the simple sugars into starch, which is stored in the food supply of the seed. Plant protein is also synthesized from sugars and mineral salts (especially nitrogenous salts) and is likewise stored in the seeds as a good supply for the developing embryo after germination.
It is therefore important to feed your plants well with at least a basic 3.1.5. fertilizer and, if possible, with the necessary trace elements. The Scott’s Peters Professional fertilizers (15 .11.29 = N3: P2 : K6) has the important additional phosphorous and potassium for reasons already explained. I feed my plants at least once a month with a hydroponic mixture just to make sure that the plant medium does not become deficient in trace elements which are equally important (for example: Fe and Mg are both necessary to form chlorophyll).
So, if you feed your plants well during the development of the seeds, they will be larger and germinate and develop faster with an adequate food supply available for development until the first true leaf has developed to a stage where the seedling can manufacture its own food. If the seeds do not have ample food supply, the developing seedlings become runts and the subsequent development will be slow.
55/253

Nutrition of seedlings
I recommend spraying seedlings with a plant stimulant like concentrated liquid seaweed extract (Kelpak) which contains auxins such as Gibberellins and Cytokinins or Supranure, which contains indoleacetic acid. (Commence this programme only after all the stored food in the seed has been used up.) Use a hydroponic mixture – mainly for the trace elements – about once a month.
Christo Lötter
56/253

57/253

ffm{fecffirug, ffirmw&sag mxed ffireedts*g Clivia%**d [m a L]]aa.1].emg"futg Nwrsery Envirc]mrmeffit
}m}*m ilraigie, Amstr*r&ia
Pine Mountain Nursery is located onthe middle reaches of the Brisbane River at
Pine Mountain, Queensland, Australia. It is
approximately one hour's drive inland fromthe city of Brisbane (offthe Warrego Highway)
and about one hour's drive further west toToowoomba.
The nursery is a small family owned
business operated by my wife Gail and me.
Gail operates and manages the nursery. Arange of warm climate bulbs, annuals andgeneral landscaping plants are grown forthe wholesale and mail order markets. Plantbreeding has become a passion with me,
particularly with Agapanthus and Clivia.Breeding new flower colours h Agapanthus is
advancing along a similar path to Clivia andseveral new Agapanthus flower colours and
tlpes will be internationally reieased throughPine Mountaint marketer, Ozbreed Pty Ltd,within the next few years.
It is somewhat unusual for plant breedingto be undertaken in a small wholesale nursery
environment that produces a range ofgenerallandscape plants. This is particularly so giventhe investment needed in infrastructure,breeding stock and carrying the bulk of ones
breeding efforts through to flowering. In theabsence of winning the lottery or being in thefinancial position to enjoy early retirement,one needs at the very least to keep your dayj ob.
Other vital ingredients include motivation, a
lot ofpatience and passion.
The motivation came during a time when Iparticipated in a Leadership Programme thatran orrer two years. One of the programme
benefits was exposure to many 'earthy" buttruly remarkable people. I recall meetings man who had spent over half his workinglife as a boner in a meat works. One day thisgentleman decided that if he continued towork as a boner then that is all he would ever
be, so he resigned. The manager of the meatworks could not believe that his best bonerwanted to leave and more particularly, thathe had no idea about what he wanted to do,
possessed little money and only owned an old
Flowering time inside a shadehouse at Pine Mountain Nursery
58/253

light truck. The manager gave his departingemployee good counsel, including what was
described as ten common sense laws. At the
time I met him this gentleman was already the
largest wool producer in Australia, owned anetwork of abattoirs and exported over half a
billion dollars worth of meat goods annually.
Three ofthese laws had lasting signiflcance:. use what you're got. dont do the easy stuff, because everyone
else does that. if you always use the same ingredients
you will always make the same cake.
Plant breeding fitted in well with these three
common sense "laws'l
Clivia GrowingIn 1998 the first commercial purchase
of 2,000 orange C. miniata seeds was made.Unfortunately the success with raisingthis seed (strike rate above 90%o) was notreflected in the subsequent purchase of500 cream C. miniata seed (strike rateabout 207o). With confidence in strikingseed restored from a subsequent purchaseof seed imported from |apan, seed was
actively acquired from respected breedersaround the world, either directly orindirectly through agents.
At about the same time, a ratge of Cliviaplant types was sourced from breeders andgrowers within Australia. The greatest boostcame with the acquisition of a large partof a collection owned by Gordon lulian.Gordon previously lived in Toowoombaand continued his Clivia breeding passion
from Tasmania. Whilst a large genetic poolof Clivia sourced from Australia, Belgium,China, Japan, South Africa and the UnitedStates is grown, advancing the generationalbreeding efforts of Gordon |ulian remains a
priority area, particularly the pastels.
Challenging Climatic ConditionsAt the time of purchase of the property in
1993 we had no idea that the location was subject
to extreme temperatures. The property was
purchased because its frontage onto the middlereaches of the Brisbane River provided a ready
source ofclean running water and also because
of the scenic amenity of the area with over 600
acres ofhilly protected nature reserve within 500
metres of the property, against a backdrop ofmountains. Living near a reserve can be magical,
with early morning sights ofkangaroos, wallabies,
echidnas, koalas, goannas, but also some less
welcome visitors in the form of dingoes (wilddogs), lots of snakes and the occasional wild pigl
Another factor was that we wanted our childrento grow up in a rural environment.
The isolation comes at a cost. It takes 40
minutes in travel time for a round trip tothe post office to dispatch mail order plants.
We have to make arrangements with a localnursery (15 mhutes away) to dispatch or collect
plants from transport companies and there's a
three hour round trip to deliver plants to the
wholesale plant markets in Brisbane. Each day
I travel about two and a half to three hours toand from work.
In terms ofa plant hardiness zorre category,
the somewhat arbitrary zoning means very littlebecause of extreme temperature variations.
Although the property is perched about 40
metres above the river it is in the shadow ofthe hilly and mountainous backdrop. Very lowhumidity allows night time temperatures todrop well below normal, particularly in winterwhen overnight temperatures can be low downto - 50 to - 70 Celsius for about seven days a year.
Summer daily temperatures t)?ically get to 330 C
and climb above 40o C for at least seven days.
The daytime humidity is typically relative$ low;
ranging from the low thirties to forties.
8759/253

\A4rilst the cold can be managed, masteringextremes in summer weather patterns remainschallenging. Sadly, with the extreme heat thereare Cliyia fatalities and great efforts went intotrying to solve that problem, from reformulatingand testing various potting media, controilingwater qualiry proactively managing pests anddiseases, to even designingnew shade structures.In hindsight it may have been more eflective tojust move to a nice cool place like Toowoombal
Over the 200512006 summer, temperaturesat Pine Mountain exceeded 400 C for a week inDecember and two other periods in late ]anuaryand February. On one day in December theambient air temperature in the large Clivia shed(40 metres by 18 metres) reached 45o C at aboutone metre above ground level. Now some bookswill rightly point out that at prolonged hightemperatures plants should not survive. AboutL00 Clivia "fell over" through this period andabout two-thirds of these are regenerating. Inpercentage terms, the ioss, whilst insignificant atunder a small fraction of one p ercentof the Cliyiapopulation, is nevertheless disappointing.
Managing High TemperaturesIn order to manage extreme temperatures
some basic understanding of the impact ofhigh temperatures on plant behaviour was
essential. With apologies to scientific andlearned horticultural professionals, here is a
simple guide to what happens in a heat event.
Photosynthesis is a synthesizing reaction inwhich carbon dioxide and water are convertedinto carbohydrates, with oxygen and water as thebyproducts. Respiration is a degrading reactionin which carbohydrates are ultimately brokendown to carbon dioxide and water with therelease of stored energy for cellular metabolismand functioning. The rate of photosynthesis in a
plant rises as temperature increases. For Cliyia,
Comparing the colours
the optimum level of photoqarthesis may be upto 28o C. Up to this point the respiration rate (its
rate of use of food reserves to keep it going) also
slowly increases. As temperature rises above theoptimum, the photosynthetic rate declines andthe respiration rate increases dramatically. The
plant starts to use its food reserves faster than itcan produce them, and slowly starves.
Water is an essential part of photosprthesis.
Water is lost through the leaves throughtranspiration. Transpiration is a passive process.
\Arhen the sun rises, plants simply open theirpores (stomata) and permit the evaporation ofwater from the leaves. As water is lost from theleaves a state oftension, or negative pressure, is
formed in the transpiration stream (the xylem)that extends down the plant from the leaves tothe roots. Through this negative pressure, wateris drawn from the root zone, into the roots andthrough the vessels into the leaves. The rate ofloss of water vapor by the plant is a functionof the atmospheric demand for moisture. Athigh temperatures the air is capable of holdingmore moisture than cooler air, and theatmospheric demand for moisture accelerates
the transpiration process.
_.""r u*ra::,isr:l#*
8860/253

At high temperatures the root zone ofClivia can be damaged. Kevir.r Handrech
and Neil Biack in "Growing Medium for
Ornamental Plants'l University of New South
Wales Press Ltd (2002) make some very
soberirrg comments:
. four hour bursts at 40-450 C will kill root
tips oJ many plants but they may regenerate
...longer periods above 10" C will be more
likely to cause Permanent die'back
. roots killed or damaged by high
temperatures are easily invaded by
pathogens.
Root death and damage allects the plant"s
ability to dran wateL from the root zone and
therefore in-rpedes the efliciency of the xylem
process. Darnaged roots combined with high
atmospheric demands for n-roisture, may
create a situation lr,here the xylem cannot
supply sulficient water into the foliage for
transpiration. The plar-rt lvill exercise a variety
of mechanisms to cope. These rnechanisms
may include, for example:
. slightly closing its stomata in an attempt
to slon, dolvn its transpiration rate
. discarding older leaves (1owel leaves
yellow r'vither and die) reduces the leaf
area available for transpiration.
Ultimately the plant mav close its stomata to
retain moisture and prevent additional water
1oss. Wl-ren the stomata are closed, no carbon
dioxide is absorbed. This in turn impedes the
gron th of the plant by stopping photosynthesis
and the plant starves and ultimately "ste\,t's"
and rray die. \\rithout intending to be too
controversial a furthel survival mechanism
Clivitt may have available is to discard all
foliage, leaving the plant base and roots intact
so that later legeneration can occur. At very
high ten-rperatllres a parent plant may "fal1 over"
leaving the ollsets unallected. An obr,lous sign is
bacterial infection, but this is seen as a secondarl'
effect of damage caused by a starYation event.
Leaf cell na1ls subject to a starvation event /water stress become clarr-raged ar-rd r,'ulnerable to
bacterial inlection.
What is the fate of the basal part of a plar.rt
that has fallen over? Clitia, planted ln gardens,
that have fallen over after a severe heat event
regeneratelvith no bacterial treatment or external
assistance. Wrth Clivia in pots regeneration can
occur provided the bacterial infection can be
eliminated and this usually involves cleaning
up the basal area, but not always. Simply pulling
off or cutting off a damaged plant top rnay be
all that is needed, if done before the bacterial
inr.asion gets into fu1l swing.
Managing High Temperature Events
During extreme temperature events light
waterir.rg is undertaker.r daily at the earliest
possible time. As temPeratures rise arnbient
air temperatures and humidity inside and
outside of shade houses may be monitored at
regular intelvals. Potting mix temperatures,
medium noisture levels and air florvs u'ithinthe structures rnay also be checked.
As temperatures rise, relative humidity
'v-- t{q'-}.*e!
89
Good colour and large tepals rnake an attractive flon'er
61/253

may fall and atmospheric demand formoisture increases. This vapour pressure
deficit in the ambient air is the driving forcefor transpiration. Strategies to help lowertemperatures/manage humidity may include:
. flooding the floor with water
. gsing fogging systems but ensuringfoliage is kept dry
. using fans and evaporative coolers
. controlling air flows through the shade
house via roofvents, side and end vents. using external shade screens and
i nternal ceiling curtains. preventing or minimising overnight dew
Strategies to protect the piants may include:
. good hygiene practices
. using preventative chemical applicationsfor fungal and bacterial protection
. ensuring plant nutrient balances remainin check
. aPPlying chemical polymers to leaves toreduce the rate of transpiration
. using light coloured pots for heat
reflection. gsing unglazed terracotta pots (mini
evaporative coolers!). clumping pots together to help maintain
ambient humidity around the pots butnot so much as to impede good air flows
. removing plants offbenches and placingthem on the floor
. modifying the potting medium to assist
in root protection
Optimum GrowingMediumClivia in their natural habitat may be seen
as semi-epiphytic plants, living above theground with their roots in leaf litter, on topof rocks, cliffs, or seen as epiphltes on trees.
Ample oxygen around the root zone is vital tothe plant's overall health.
Like many neophyte Cllvla enthusiasts,
the pursuit of the optimum growing mediumbecame an all-consuming pastime withvarious ingredients and blends constantlyput to the test. Ingredients tested inciudedcommercial potting mixes, composted pinebark, crushed rock, fresh manure (sadly noelephant dung was available!), orchid mixes,
peat mixes, perlite, river gravels, sand, etc.
Some ingredients were readily discarded (horse
manure, peats and soils) and others were foundto be not sufficiently robust (orchid blends,
whilst initially performing well had a finiteusefulness - the bark chips break down, clogdrainage outlets and can cause waterlogging).Combining various particle size ingredientscauses compaction and also wateriogging.
So, is there a perfect, "one standard fitsall" potting medium? We are yet to find one.
It depends upon many factors and what worksfor us may not work in other areas. Some
circumstances that need to be considered mavinclude:
. Plant maturity
. Container size, air fiil porosity and
irrigation lrequency. ClimateNote the size ofthe flower compared to the leaves
62/253

The basics elements of a good medium
remain important - it must be relatively
robust (wont rapidly break down), have good
air porosity/drainage, good available water
holding capacity and good cntion exchange
capacily (fertilizer drawn down is minimised).
The medium used for striking seed is a
sterile crushed rock based material placed intrays of 99 cells. One seed is put into each
cell and the trays are then placed on heating
mats. A minimum temperature of 240 C ismaintained. The medium in the trays is kept
moist.
Struck seedlings are potted into 75mm
tubes when the main root is at least 3cm in
length. The medium used is a slightlymodified
standard bark based potting mix. The mix is
modifled to slightly lower air porosity and
drainage capability. Seedlings are potted up
into 175mm pots when about 12 months old
and the potting medium is again altered, this
time to raise air fiII porosity.
Plants selected for breeding are potted up
into 250mm pots at about two years of age.
Higher air fill porosity is needed in mixes inlarger pots. An added requirement is to provide
some increased protection to the plant and
root zone from heat transmission. Two mixes
are used - one for the root zone with higher
air porosity and insulating characteristics, and
one for the basal zone with lower air porosity
characteristics for moisture maintenance
around the base. With higher air porosity,
the medium will contain reduced levels ofavailable water and more frequent irrigation
occurs during hot weather, but not so much as
to contribute to water logging.
Repotting and Pot{ing UP
Repotting and potting up are activities that
are now undertaken all year round. Once,
these actMties were neYer undertaken in the
summer months. The key to potting up was
found to be water or more precisely the lack ofit. Water is not applied to Clivia that have been
newly potted for at least three days and then
only small quantities of water are introduced
over the next week or so. Watering plants
after potting up in hot conditions can be fatal
particularly when roots have been damaged
and have not had time to seal in order to keep
out pathogens.
WateringWe have disconnected the sprinklers and
hand water all ov Clivia. Whilst rainwater is
preferred, from time to time river water must
be used. All water used on Clivia is chlorinated
and the pH is adjusted back. Watering is a
aigie grown llowers comPuler
9l63/253

function of understanding your environment,your potting medium characteristics andknowing yow Cliu i a t:yp es.
CliuiaBreedingA quick scan around the nursery reveals
masses of colour coded pots of Cliviacollections, with a growing emphasis onbroadleaf t1pes, including diflerent flowercolour types and multitepals. Also broadand narrow variegated qpes from Belgium,China, fapan and South Africa can beseen. As a relatively young collection, eachflowering season brings a heightened sense ofanticipation as the breeding efforts of fellowClivia enthttsiasts and our own efforts revealthemselves for the first time.
Each year the flower show gets bigger andbetter than ever before and there is a greatsense of exhilaration standing in a large shedaround lots of flowering Clitia.If there is onedisappointment at this time it is that the publicare not allowed to visit the nursery. Occasionallythe odd flower tlpe turns up and a decision ismade whether or not to destroy the plant.
For many years the coilection of yellowsand split for yellow (Orange x Yellow) x yellow
obtained from Gordon |ulian have been thecentre of breeding efforts. With increasingquantities of plants grown from imported seednow coming into flower, the genetic diversityofthe collection continues to grow. Each yearthere may be a number of breeding themes,depending upon pollen stocks taken in theprevious year and current flower availability.Apart from C. miniata, other species of Cliviagrown are C. caulescens, C. gardenii, C. nobilisand a range ofinterspecfic crosses.
The broadleaf splits for yellow crossesprovide an opportunity to breed broader leaf
types. To date we have found it challenging toachieve broadleaf yellow and pastel flowering
Qpes, but progress is being made. Crossingthe broadest-leaf pastels in 2004 resulted inabout 507o of the seedlings being unpigmented.About 33%o of these unpigmented seedlings aredeveioping broad leaves. This may be a moreefficient way to develop broadieaf yellows thancrossing broadleaf split for yellows back overyellows.
A major focus has been on breedingstrong green-centre C. miniata types withan ambition of producing some stable greenflowering types. A couple of Clivia in thenursery have a history of flowering green.Green flowers are very slow to open, producelittle pollen and stay open for many months,to the point that the flowers become quiteugly. With a change to hydroponic fertilizersin 2005 to boost groMh and flowering,the green flowers reverted back to normalfl owering green-centre oranges.
!\4rilst the focus on green-centres anddeveloping greens continues, in the last coupleof years emphasis is also being placed oninterspecific crosses, peach and pastel pinkcolours. For example, Pine Mountain currentlyhas over 1,000 peach types at various stages ofmaturity, up to 250 mm pots. \A/hilst most ofthese peach crosses have unpigmented bases,
a couple of hundred are pigmented, includingmany acquired from international breeders.Again, most of the breeding efforts in these areas
will be retained through to flowering. In the nextcouple ofyears the focus will turn also to reds,multitepals and variegates, as increased numbersof these plants come into flower for the first time.
Strong green-centre orange Belgium andSahin Twin tlpes hold a special fascinationand we have been accumulating the seedlings
9264/253

from these t1pes.
Using the split for yellow types, a number ofdifferent colour green-centre types have been
produced, including bronze green-centres
with extensions of the green, to "vein like"markings up the tepals. Also other splits can
have some quite vivid orange red colours.
Straight pastel colours have also been a
focus in the last couple of years. Some near
transparent tepal types and pink pastel types
showed up in the 2005 flowering season.
Further deveiopment on the flower colours
is required. The straight pastels with well-
developed tepals remain hard to beat.
Over the last few years a Clivia called'Orange Yellow' has been crossed over
creams, pastels and peaches. It has strongyellow veins running up the tepals. If thisplant is allowed to flower in a very brightarea, the tepal colour on emerging flowers is
dominantly yellow with orange outer areas.
Every seedling that has been produced fromthis plant has been pigmented. Again, the
seedlings are being accumulated and most
will be retained until flowering. The offsets
from this plant all have pigmented bases.
During peak flowering periods, there isvery little time available outside of Clivia
selection and breeding. Most of the Clivia
are grown in 175 mm pots and plants judged
to be suitable for breeding are potted up into250 mm pots, photographed and coded. The
genetic background of the plant, if known, isalso recorded. Decisions are then taken about
pollen collection, storage and cross pollination.Flowering Clivia r.ot kept for breeding are
sold out to wholesale markets for landscape
and nursery trade. Plants kept for breeding inprior years are re-assessed and some may also
be sold out to the trade, while those judged
inferior and are simply destroyed.
The seiection process ls
somewhat flawed as Cliviaflowers improve as plants
mature, but space remains
an important consideration.Limitations on space have
meant a move away from the
production of typicai orange
flowering C. miniata and
only four stock plants remain.
Nevertheless, growing ourspecial crosses through toflowering provides a lot ofsatisfaction besides gaining
a greater understanding ofthe potential of breeding
Progfammes.
Photographs by |ohn Craigie
'Orange Yellow'with its interesting patterned tepal
9365/253

Collecting, Growing and Breeding Clivia Update
John Craigie’s article on Collecting, Growing and Breeding Clivia was published in the
Clivia Society Yearbook 8 in the period 2006/2007.
Since then, John has instilled many improvements to his Nursery at Pine Mountain
outside Brisbane. Some of these improvements include:
• Fans are no longer used • Hand watering has ceased and replaced by overhead sprinklers • Plants are never watered when temperatures exceed 35 degrees Celsius but
watered on prior or later days when temperatures are lower • Liquid fertilisers are never used when temperatures exceed 25 degrees Celsius • Using chunky media mixes has ceased and replaced with fine media mixes
professionally designed with a high air-filled porosity • Water quality has become highly important with all water chlorinated and the pH
reset to 6.4 and left to stand 24 hours before use • minimising water stress promotes healthy plants better able to resist plant pests
Pine Mountain Nursery is a family owned mail order and wholesale nursery specialising
in breeding new agapanthus, clivia and warm climate bulbs.
https://www.pinemountainnursery.com.au
https:/bestagapanthus.com.au
https:bestclivias.com.au
Mobile: +61409 277 790
66/253

Fertilizing Clivia
Clivia love fertilizer. Fertilizing your plant will result in darker green
leaves, more growth, a better root system and better flowers. I
have often seen plants in need of a good fertilizing and the leaves
have taken on a more lime green colour. Nothing looks better than
a healthy plant with dark green leaves and new leaves developing.
I use a slow release fertiliser that lasts for 12 months on my plants.
A small amount is mixed throughout the potting medium and a
handful is sprinkled around the top of the pot. I also give my plants
a liquid fertiliser once per month. These are plants in pots. Plants
in the garden would also benefit from a slow release fertiliser and
the occasional watering can of liquid fertiliser.
The following fertilisers are the most popular ones used at
present. There are many better fertilisers not listed here but
I have not had experience with the others.
Seasol
Seasol is not a fertiliser. It is more of a tonic. I find it great to give to
a stressed plant or when I have just repotted a plant. I use it on
plants that seem to have a problem or have dried out too much. It 67/253

is reported to be good for root growth. I use it diluted in water and
watering it in with a watering can.
Charlie Carp
Charlie Carp is a very smelly liquid fertiliser. I have heard some
experts say that it is not as good as others such as Aquasol due to
the carp living in fresh water and not sea water. I have used Charlie
Carp extensively and find it great, however be aware you will need
a shower afterwards. I also like the thought that we are helping to
get rid of the carp in our rivers.
Thrive
Thrive is also a great fertiliser. I find that it is great for the growth of
the leaves and not so much for inducing flowering. I use it at times on
my seedlings.
Osmocote
I love Osmocote but to buy it in the quantity I need, it is too
expensive. There is a similar product available called Multicote
which has the same properties as Osmocote and is a great slow
release fertiliser. The one I use lasts for 12 months.
Powerfeed
This product is made by the same company as Seasol. I use this on my
young seedlings as I find it is not too strong and encourages growth. I
use this as a foliar spray.
68/253

Seamungus
This product I also use on seedlings. It comes in a pellet form or a
crumble form. I find this not too strong and very good for the young
plants.
Courtesy of Clivia Market www.cliviamarket.com
69/253

70/253

71/253
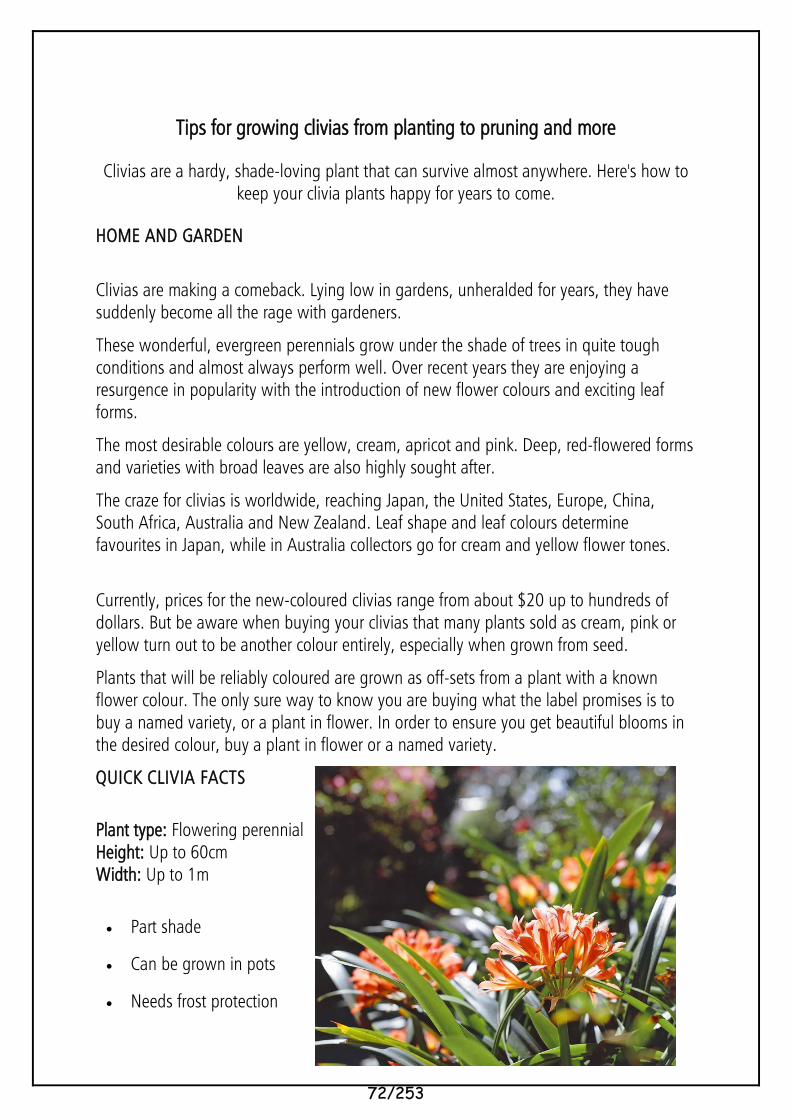
Tips for growing clivias from planting to pruning and more
Clivias are a hardy, shade-loving plant that can survive almost anywhere. Here's how to keep your clivia plants happy for years to come.
HOME AND GARDEN
Clivias are making a comeback. Lying low in gardens, unheralded for years, they have suddenly become all the rage with gardeners.
These wonderful, evergreen perennials grow under the shade of trees in quite tough conditions and almost always perform well. Over recent years they are enjoying a resurgence in popularity with the introduction of new flower colours and exciting leaf forms.
The most desirable colours are yellow, cream, apricot and pink. Deep, red-flowered forms and varieties with broad leaves are also highly sought after.
The craze for clivias is worldwide, reaching Japan, the United States, Europe, China, South Africa, Australia and New Zealand. Leaf shape and leaf colours determine favourites in Japan, while in Australia collectors go for cream and yellow flower tones.
Currently, prices for the new-coloured clivias range from about $20 up to hundreds of dollars. But be aware when buying your clivias that many plants sold as cream, pink or yellow turn out to be another colour entirely, especially when grown from seed.
Plants that will be reliably coloured are grown as off-sets from a plant with a known flower colour. The only sure way to know you are buying what the label promises is to buy a named variety, or a plant in flower. In order to ensure you get beautiful blooms in the desired colour, buy a plant in flower or a named variety.
QUICK CLIVIA FACTS
Plant type: Flowering perennial Height: Up to 60cm Width: Up to 1m
• Part shade
• Can be grown in pots
• Needs frost protection
72/253

CLIVIAS ARE SHADE TOLERANT
The popularity of clivias coincides with more gardeners seeking out evergreen plants to cover the ground en masse with the added bonus of flowers.
Gardeners are always looking for plants that flower in winter when there is a lack of colour.
Landscapers and designers love to use clivias, as they are generally trouble-free plants for that difficult, shady spot.
• Clivia caulescens has narrow, tubular-shaped flowers, soft-red in colour with green tips, and very long leaves, often reaching 1m or more. This species flowers in spring.
• Clivia gardenii has tubular-shaped red flowers with a green tip and narrow leaves about 75cm long. C. gardenii flowers from autumn to spring.
• Clivia nobilis features pendulous, green-tipped tubular flowers that bloom in mid-winter to spring, with spot flowering at other times.
• Clivia miniata is the best-known species to be grown in gardens, offering clusters of lovely salmon-coloured open flowers.
COLLECTABLE CLIVIAS
It is with Clivia miniata that the most exciting colours and forms are to be found.
Some interesting forms of Clivia miniata include yellow, cream and the Belgian hybrids, known for their deep red flowers, protruding stamens and broad, thick leaves.
BUYING CLIVIA SEEDS
Despite the number of colourful clivias around, named varieties can sometimes be difficult to find.
Most clivias are sold simply by colour so your best bet is to buy them in nurseries when they are already in bloom, so you can be sure of the colour that you're getting.
Clivias are sold as plants by nurseries and specialist growers. The price of clivias depends on the pot size and the variety.
The familiar salmon-orange Clivia miniata sell from $5–$8.
73/253

The desirable cream, pink, yellow and Belgian varieties start at $20–$30 a pot for seed-grown plants. Named varieties are usually more expensive and may be $50–$100 or more.
HOW TO GROW CLIVIAS
Clivias are easy to grow, but their position is vital. Early morning sun or dappled shade is best, with protection from midday and afternoon sun. Clivias planted out in the open will become scorched and unsightly on the first hot sunny day.
In cold climate areas, clivias will need protection from frost. The far-reaching canopy of a deciduous tree over the top of a clivia patch will drastically reduce the likelihood of frost damage.
Clivias are tough plants that grow in any type of well-drained soil. Their fleshy roots benefit from organic matter dug in at planting time or when plants are being lifted and divided.
Although clivias are drought-hardy, needing little additional watering, they will respond to extra watering in their growth period from spring to summer.
Feeding at this time with a liquid fertiliser applied every couple of weeks will help growth but hold off from autumn onwards when the plant is resting up before its next flowering period in late winter and spring.
74/253

HOW FAR APART SHOULD CLIVIAS BE PLANTED?
Clivias generally grow to about 30cm in width, so spacing your seedlings 30cm apart should be sufficient.
HOW TO PRUNE CLIVIAS
Once flowering season is finished, cut back the flowers right at the base of the stem. It is also a good time to clean up the rest of the plant by removing any yellowed, brown or damaged leaves. Clip leaves right at the base.
You may also want to prune back clivias to prevent them from becoming overgrown or unruly. Never prune more than one third of the plant within a 12 month time span.
GROWING CLIVIAS IN POTS
Potted clivias look lovely on a patio or decorating a shady courtyard.
In pots and containers, clivias like to be pot bound and can be left undisturbed for many years. My grandmother grew them beautifully for more than 20 years without ever disturbing the roots by repotting.
Do not over-water them when in pots, nor have them sitting in saucers of water, as their fleshy roots can rot if they are over saturated.
CAN YOU GROW CLIVIAS INDOORS?
Potted clivias can be moved around and used as colourful accents at flowering time, or even brought indoors for several weeks of colour. The flower spike also makes a lasting cut flower in a vase or mixed arrangement.
HOW TO PROPAGATE CLIVIAS
To be sure of getting a plant that's true to the colour of the parent plant, grow clivias by division. This is best done when the flowering period has finished in late spring or early summer.
Clivias also grow readily from fresh seed. Clivia seed is ripe when the seed pods change from green to red or yellow.
CLIVIA DISEASES AND PESTS
Slugs and snails always like to sneak around the base of clivia foliage, especially during a moist winter, so keep a check and use bait, or go on a night hunt on a wet evening.
75/253

Possums can also eat the ripening seed pods, so you will need to be extra vigilant against these marsupials if you plan on collecting the seed for propagation.
TREATING CATERPILLARS ON CLIVIAS
A recent pest problem is the native lily caterpillar. This yellow and black striped caterpillar attacks clivia leaves, feeding down into the base of the plant. Fungal rot follows a lily caterpillar attack.
Control the insect with a registered insecticide as soon as damage is visible. To prevent rot, drench with a good phosphorus-based fungicide.
FUN FACT Clivias are named after Lady Clive, the Duchess of Northumberland, who was the granddaughter of Robert Clive, an early British imperialist in India.
CLIVIAS GARDEN DESIGN
The key to success with clivias is to mass them under trees, as a garden edging or along a shaded fence.
Even when not in flower, the leafy clumps are an attractive green ground cover.
A cluster of clivias (bottom left) have been planted in the shade of jacaranda tree in this multi-functional family garden . Photo: Martina Gemmola
76/253

Cultivation of Clivia The basics
A promotional brochure from the Clivia Society 2014
All enquiries to [email protected] or Sakkie Nel at 012-361-6415 or 082-861-1492
77/253

A SHORT GUIDE TO THE CULTIVATION OF CLIVIAS
Species: There are six species of Clivia which are indigenous to South Africa. One of the species has upright
flowers, Clivia miniata and the other five species have pendulous flowers – Clivia nobilis, Civia gardenii, Clivia
caulescens, Clivia robusta and Clivia mirabilis.
Cultivation: The following recommendations apply to all the Clivia species, however here we will concentrate
on the spectacular miniata species.
Position
In the natural habitat Clivia plants grow in dappled shade, often on top of rocks, obtaining their nutrition from
the leaf litter.
For the successful cultivation of Clivias we need to recreate the natural conditions for optimal growth.
Fortunately the Clivia, in addition to being drought tolerant and relative hardy, except to severe frost, is very
forgiving to a large variety of potting media and garden soil mixtures.
Planting in positions receiving the afternoon sun will result in scorched leaves. The early morning sun does not
damage the Clivia leaves and is an acceptable position. Dense shade may result in the Clivias not flowering.
Planting Media
Clivia roots need a lot of air around them and they do not like to stand in water. The soil must be well drained.
A Clay soil is not suitable for growing Clivia as the water will not drain away from the roots. A sandy soil is also
not suitable as there will be too little moisture for the roots. A well composted coarse pine bark mix provides
the ideal growing medium. Commercial Clivia mixes are available. Garden soil is vary variable in composition
and adding good quality compost and coarse potting mixtures for good drainage is the most suitable way of
preparing the garden soil for Clivias.
Nutrition
A slow release fertiliser such as 3-1-5 fed in Spring and Autumn is ideal for the Clivia plants.
Watering.
Water liberally in Spring when there is evidence of growth. Decrease the amount of water in winter as the
growth rates are slower or have stopped. If the soil in which the Clivia is planted is well drained, watering will
not result in a problem, such as root rot.
Seed propagation
Once your Clivias have flowered, you may wish to increase the numbers by pollination. This is an easy way of
increasing numbers, but there is a three to four year wait for the plant to flower, usually after it has at least
twelve leaves. Clivia miniata flower in September but may flower at any time and even surprise you in winter
with a flower. Pollination is achieved by placing the yellow pollen of the anthers on the stigmatic lips of each
flower. There are six anthers with pollen and one single stigma in the centre of each flower. Pollinate in the
early morning for a few days while the stigma is still sticky and fresh looking.
A berry will develop if the pollination was successful. Leave the berry on the flower stalk/ peduncle/scape
until the colour changes from green to orange or yellow. Harvesting the seed before the colour change occurs
may be unsuccessful. Harvesting the seed from July onwards in the Southern Hemisphere ensures successful
germination.
Germination of the Seed
The berry should be opened and the seeds exposed. A fine membrane surrounding the seed should also be
removed. Wash the seed pulp in a mixture of a teaspoon of dishwasher liquid in a litre of water. This makes
the removal of the slimy tissue surrounding the seeds much easier and acts as a “sterilising” agent.
78/253

After the seeds are clean, wash off the soapy solution and soak the seeds in a freshly mixed up solution (use
the recommended strength) of antifungal mixture. Fungi are the main enemy of germinating seeds.
The seed may be germinated in a damp paper towel sealed in a zip lock bag or between paper towels in a
sealed plastic container and should be kept in a warm place, or on top of the fridge. Keep the paper towel only
moist and not too wet. The seed may also be pressed down in seedling soil to the depth of half the seed
height, then keep the soil moist in a shaded protected area. A covering of oak leaves or newspaper or glad
wrap may be used to keep curious animals out of the tray.
Once the radicle projects from the seed or when the root is 2cm long, place the seeds in communal seed trays
and keep moist. When the plants have about eight leaves they may be planted in individual small pots. Don’t
use too large a pot for the transplanted seedling.
While the seedling has the seed attached no feeding of the plant is necessary. Seedling fertiliser or foliar feed
may be started once the seeds fall off the seedling. You may add some pelletized chicken manure to the
bottom half of your seedling mix, so that nutrients are available once the roots reach that depth.
Multiplying by division: Clivia plants in pots need to be divided when there is no healthy potting soil left in the
pot. Clivias in the garden need only be divided when the clumps grow into each other and the overall qualities
of the blooms deteriorate.
Lift the whole Clivia plant out of the ground or out of the pot. Before dividing an offset make sure that there
are roots attached to the offset. Use a sharp clean knife and divide the offset. The offset may often break off
quite easily. Cover the open wounds with an antifungal solution e.g. Chlorothalonil (Bravo.) Don’t overwater
the newly planted offset.
Pests and Diseases:
Pests: The main pests of the Clivia plant are the Amaryllis caterpillar and the Leaf Miner. The snout beetle
does cause a problem in some areas. The leaf miner causes leaf disfiguration. Control the leaf miner with
Imidacloprid (Confidor/Kohinor/Bandit). The lily borer/amaryllis caterpillar develops from eggs laid by moths
on the underside of the leaves. The larvae of these lily borers burrow a channel down the leaves into the
growth stem of the Clivia. The main fan may die, but usually offsets grow from the main rhizome of the plant.
The best insecticide for the amaryllis caterpillar is Cypermethrin (Ripcord) or Dimethoate (Aphicide).
Mealy bug is another pest that occurs when plants are overcrowded and there is poor ventilation between
plants. This pest is well controlled by imidacloprid (Confidor).
Diseases: The diseases affecting Clivia include viruses, bacteria and fungi. By far the biggest problem here is
with fungal infections.
Viral infection of Clivia gives the leaves a mosaic pattern and the flowers may have split colours. As there is no
cure for a virus infection, destroy the plant, and prevent further spread of the disease.
Bacterial diseases can cause stem rot. This gives a characteristic foul smell when present. Scrape out the
rotten part of the plant. Pour dilute bleach over the area and wait for the area to dry. Keep the soil relatively
dry until the bacterial rot has cleared up. Bacteria usually cause damage following on some previous physical
injury to the plant.
Fungal infections cause brown marks on Clivia leaves. These are particularly common in warm and moist
conditions. Remove the damaged and discoloured leaves. Spray with chlorothalonil. (Bravo) or a systemic
fungicide. E.g prochloraz (Octave ).
79/253

From left to right and from the top downwards:
Clivia nobilis, Clivia miniata, Clivia mirabilis
Suspected viral infection of leaves, Clivia gardenii, Clivia flower arrangement with freesias
Clivia robustus, “Frats” Clivia, Clivia caulescens
Clivia miniata, Clivia mirabilis, Clivia miniata multitepal
80/253

81/253

82/253

83/253
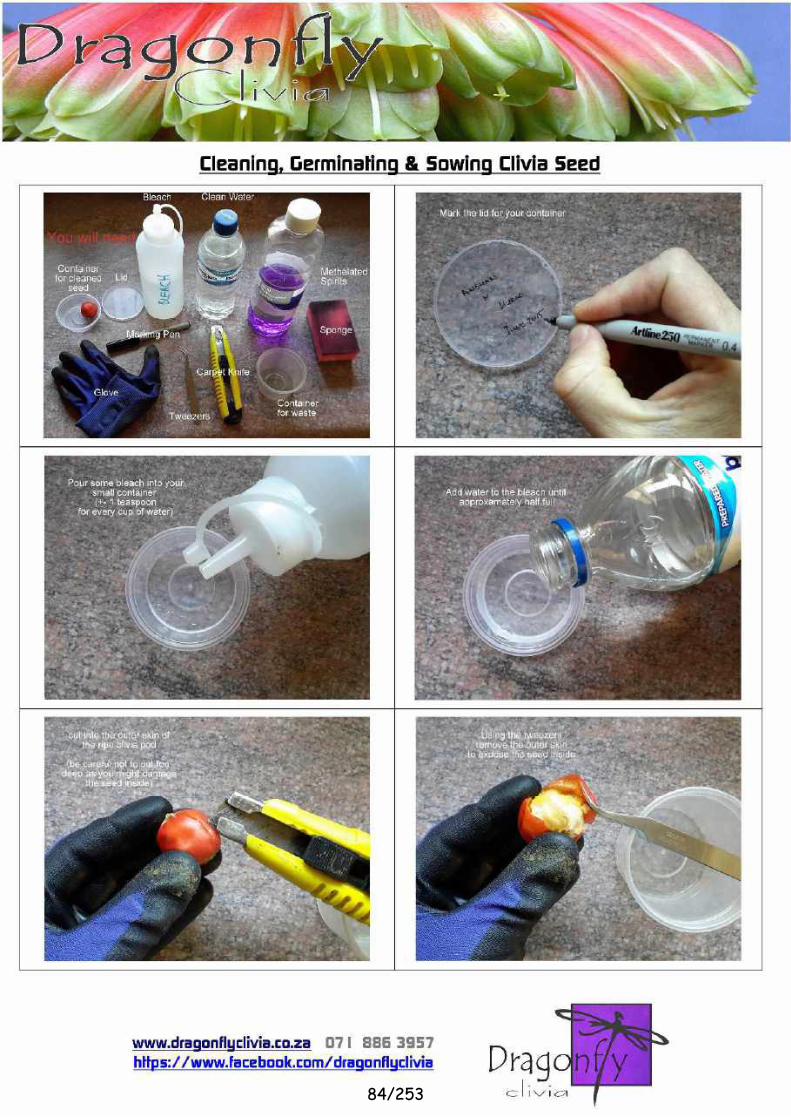
84/253

85/253

86/253

87/253

88/253

Germination of Clivia seed by Harry Erasmus
Each Clivia grower has his/her own growing methods, which work best for their nursery, and the following is an example of my procedure. The life of a healthy seedling starts after the pollination takes place on the plant and the seed sets and starts to develop. The seed will grow to maturity over a period of 7 months to one year on the plant and must be fed constantly during this time to create a viable fertile seed. The food supply for seed is exendospermous, which means that it is a separate food supply for the embryo plant and is stored outside the cotelydon. The seed will need a lot of energy to shoot the radical and to develop the embryo plant to the first leaf in its first few weeks and later months. It is therefore important to feed the plant with the basic fertilisers and the necessary trace elements in this period at least once a month. If the seeds do not have an ample supply of sugars, trace elements and mineral salts they will develop slowly and could possibly not be viable. To start, you have to remove the seed from the berry coating and the inner membrane of the fruit-wall. This membrane must be removed to prevent the seeds becoming infected with bacteria or fungi. Wash the seeds with dilute, 1ml to 1litre, dishwasher detergent, and rinse with clean water. Please note this operation mechanically removes spore, fungi and bacteria but does not actually, kill the organisms. After this operation the seeds should be dried for at least 7 - 10 days in a clean open container before germination. Dust them lightly with fungicide or rinse with Sporekill (1ml in 5litres of water). After the drying period, rinse the seeds with clean water and place the moist seeds in Ziplock bags to stimulate germination. Place the bags in a dark, temperature-controlled area between 18 - 23°C and wait for them to germinate. The Ziplock bags must be sealed to keep the moisture in and fungal spores out. if you see any problems in the bag, e.g. rotting seeds or fungus, remove the seeds with these problems and put a knifepoint of fungicide in the bag. In general, I do not like to germinate my seeds with fungicides but use it as a precautionary measure if problems occur. Receiving seeds from sources other than your own is always a risk because you do not know the quality of the food supply during seed-set and growing, or even details of other hygiene criteria in use by the supplier. This is one of the main reasons why I stick to seed suppliers I know and only cross the line for very special seed. I will add photos of seeds that I received from my dear friend Keith Rose where you can still see healthy seeds on seedlings in their third leaf stage. When you receive seeds from other sources treat them with the same procedure as you would for your own seeds but give them at least one additional mechanical wash and rinse with Sporekill, after which place them directly in the Ziplock bags for germination. Ask the supplier, before ordering seeds, for the history regarding feeding during seed-set to maturity. This will guide you to determine whether to purchase from that supplier or not. Once the seeds show a reasonable growth of root - 25 mm/1 inch - plant them into containers using a good friable seedling mix with enough space to grow on for at least one year to 18 months before transplanting them into individual pots of 10cm to 12.5cm in size, i.e. 4 to 5 inches. Even in warmer and more humid
89/253

Germination of Clivia seed by Harry Erasmus
areas of the world you can successfully use this method, it will adequately handle bacteria and fungi but requires regular inspection of the seed during the germination period. When trouble arises, prompt action is what will possibly save your seeds. Please remember wash your hands very thoroughly before handling seeds and after they have been sanitised, it is preferable to put them onto a paper towel in your hands and not onto your bare palm. Obviously if you can work with latex gloves it's always better. Also, never cough or sneeze over your seeds as, like it or not, your breath contains horrors beyond belief! Be very careful of the root sprouting from the seed since any mechanical damage to it will sound its death knell. I know this method will help you achieve very high percentages of germination and seedling maturity and although it does seem rather long and complicated it's well worth the effort. Good luck with your germination. Harry Erasmus - [email protected]
90/253

www.dragonflyclivia.co.za 071 886 3957 https://www.facebook.com/dragonflyclivia
How we Pollinate our Clivia
91/253

www.dragonflyclivia.co.za 071 886 3957 https://www.facebook.com/dragonflyclivia
How we Pollinate our Clivia
92/253
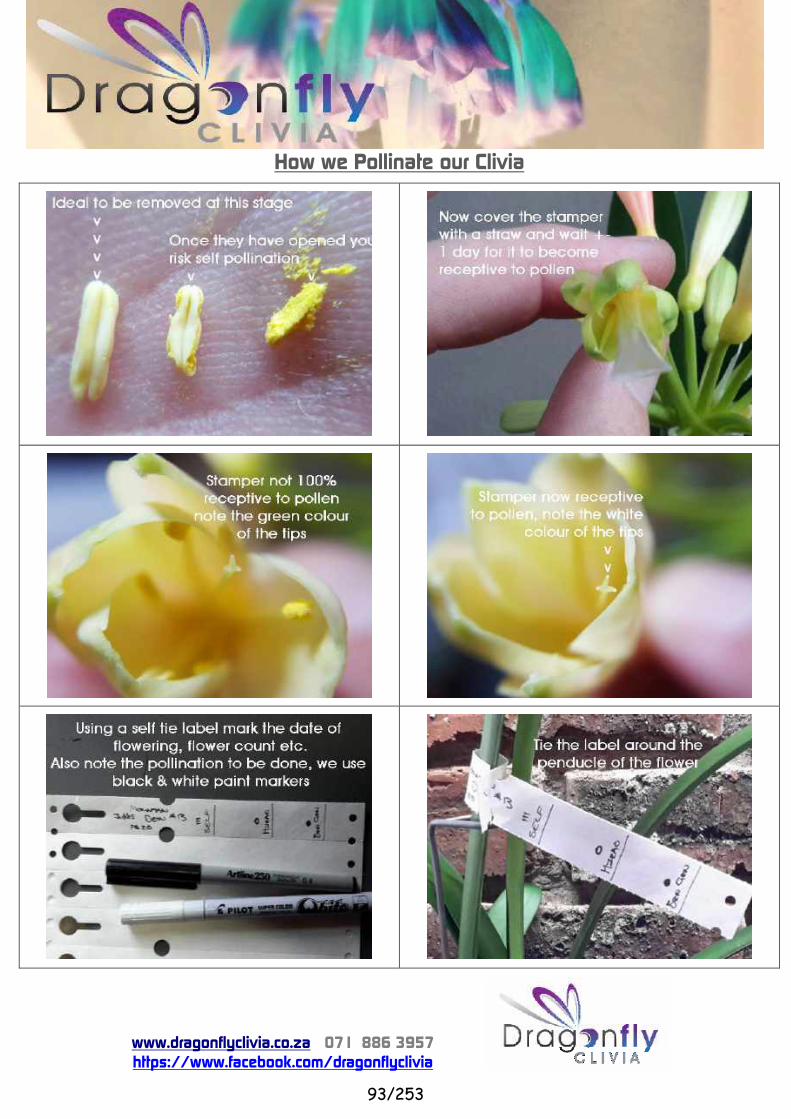
www.dragonflyclivia.co.za 071 886 3957 https://www.facebook.com/dragonflyclivia
How we Pollinate our Clivia
93/253

www.dragonflyclivia.co.za 071 886 3957 https://www.facebook.com/dragonflyclivia
How we Pollinate our Clivia
94/253

www.dragonflyclivia.co.za 071 886 3957 https://www.facebook.com/dragonflyclivia
How we Pollinate our Clivia
95/253

CliviaNet: Plant Nutrition
Feeding Your Clivias
Plant nutrition is a complicated subject. Nutritional requirements of plants can be drastically affected by differences in composition of the growing medium. It will depend slightly on the kind of water supply you have -- what dissolved minerals does it already contain? The ambient temperatures in your growing area will affect the uptake and utilization of inorganic nutrients by the plants. It will depend even on the intensity of the light the plants are receiving.
That said, in general you have to provide the growing plant over the course of the year with the kinds and amounts of nutrients that are retained in the healthy plant tissues. I have not seen those numbers for Clivia (as far as I can remember, anyway) but for most monocots, from tulips and daffodils to daylilies, it amounts to N - P - K [nitrogen - phosphate - potassium] in ratios around 3 : 1 : 4 (as found, e.g., in 15 - 5 - 20 fertilizer).
Soils with a significant clay content will bind ammonium (a useful form of nitrogen) and potassium reversibly by ion-exchange mechanisms (think of zeolite water softeners). Clay also binds phosphate, but much more tightly. Excessive bound phosphate can in turn sequester iron, making it unavailable to the plants. If you grow plants in clay containing media, you have to carefully limit the amount of phosphate in the fertilizers you give the plants.
When we grow plants in media that are devoid of clay, excess phosphate can wash right on through the container. When that happens, it does not accumulate to where it interferes with iron uptake by the plants. Excess phosphate in the fertilizer is wasted, but it is also the cheapest component.
Soils containing lignins and other organic matter (e.g., decomposing peat) will have additional ion exchange capacity, and they can reversibly bind ammonium and potassium up to the limits of their capacities. Such reversibly bound nutrients are readily available to the plants as they are needed. Excess N and K (potassium) will be washed on through the medium and out the bottom of the container, posing no hazards to the growing plants.
Cheap fertilizers contain sodium salts as sources of phosphate, and they contain potassium chloride (KCl) as the source of potassium. When the plant takes up the phosphate and the potassium, the residue is sodium plus chloride, or Sodium Chloride, common table and sea salt (NaCl). Excess accumulation of NaCl in the growth medium is deleterious to the plant. The sodium will also compete for ion exchange binding with ammonium and potassium, lowering the effective nutrient reservoir held in the growth medium. It does not pay to go cheap on fertilizers for growing valuable plants.
The secondary nutrients, like calcium, magnesium, sulfate, and iron, also have to be provided. Hard water usually contains calcium and often also some magnesium. Sulfate is often a component of fertilizers, where it occurs as ammonium sulfate or potassium sulfate. Use of high sulfate fertilizer can affect the pH of the growth medium. You need to pay attention to what form the sulfate is in and how much you are adding, in case the pH is modified inadvertently.
Good sources of calcium are calcium nitrate (soluble) and gypsum (calcium sulfate, slightly soluble). Magnesium is found along with calcium in dolomite limestones, from which both are very
96/253

slowly released into the growth medium. Magnesium sulfate is also an excellent and soluble source of magnesium as well as of sulfate.
Iron is best added as a chelated or sequestered form; a common commercial preparation is "Sequestrene"™ and another is Iron EDTA. Adding iron sulfate will cause a strongly acidic reaction in the growth medium, lowering the pH. Excess iron sulfate can also bind phosphate irreversibly and deprive the plants of phosphate.
The trace elements or micronutrients include boron, copper, cobalt, iodide, manganese, molybdenum, selenium, vanadium, and zinc. The appropriate level is different for each individual micronutrient. Iodide, selenium, and vanadium are often omitted entirely. Adding micronutrients at levels above the ppm (part per million) to ppb (parts per billion) level can cause toxic reactions in the plants. They are best added using a commercial fertilizer specially formulated with the correct levels of trace elements.
When we grow plants in containers in soilless media, we are virtually growing them hydroponically. Every nutrient, from nitrogen and phosphate to vanadium and zinc, has to be provided. When it comes to growing Clivia, there is not much information in the scientific literature to specifically guide us. Here is where sharing experience is especially useful.
Courtesy of Jim Shields USA [email protected] http://www.clivianet.org
former Chairman, North American Clivia Society (NACS)
97/253

HINTS ON GROWTNG CLIVIA
Updated 2018
�98/253
Produced by the Clivia Society
www.cliviasoeiety. q{g or information at infc@eliviasoeietElg
The opinions expressed in this publication do not necessarily reflect the
views of the Clivia Society
A big thank you to Felicity Weeden for her help with this update.
CONTENTS:
Clivia - terminology of a flower
Growing media for Clivla
Nutrition
Multiplying yon Clivia - seed
Multiplying your Clivia - offsets
Pests and Diseases
Breeding Suggestions
Clivia Anatomy
Species of Clivia
Introduction.
Page 3
Page 4
Page B
Page 9
Page 13
Page 14
Page 18
Page20
Page 24
Listed below are guidelines for growing clivia. Most readers will adapt the
information and formulate a programme to suit their own growing
conditions.
�99/253

CLIVIA - TERMNOLOGY OF A FLOWER
The flowerhead is called an umbel. The umbel is made up of individual
flowers. The stem bearing the umbel is called the scape or peduncle.
OPTIMUM GROWING MEDIA F0rfi. CLIWA IN A POT.
�100/253
Clivia plants in the habitat are often found on rocks and living on the
nutrients derived from fallen leaf litter. To ensure an ideal growing
environment for your Clivia, creating similar conditions as is found in the
natural habitat, would be the ideal.
Several factors need to be considered when choosing a suitable growing
medium:
l. Clivict roots are not designed for growing in a heavy potting medium. The
plant may survive but flowering may not be ideal.
2. Clivia need a lot of oxygen around their roots. A medium such as clay is
unsuitable and may result in root rot. Clivia pTatts do not grow ideally when
their roots are always wet. (C. robusta is an exception. This plant enjoys
swamp and drier conditions.)
3. For the best drainage of a potting medium, use the same medium/potting
soil in the whole pot.
4. Adding finer components, such as river sand, the finer particles may
influence the drainage of the potting soil and result in more water retained in
the potting mix.
The ideal mix for growing Ctivia in a pot is as follows:
a. A mixture that does not continue to decompose. (Like compost). A
stable mixture is ideal - no further composting which will results in
compacting your potting medium.
b. A mixture that retains water we1l.
c. A mixture that allows a good supply of oxygen to the Clivia roots, an
open medium is better than a healy clay medium.
�101/253

d. A mixture that absorbs your added fertllizer and then releases the
fertilizer to the Clivia roots.
TIM MAIN OPTIONS AVAILABLE FOR GROWING MIXES:
COMPOSTED PINE BARK.
Fresh pine bark is chopped into large chunks and treated with lime, nitrogen
and water to start a composting process. For 6 - 12 weeks the bark is
'turned' and the process repeated. The decomposing bark reaches
temperatures of 60-70 degtees centigrade, as does a eompost heap. At the
end of this process the bark is degraded into a stable medium, 'lignin core',
which is not break down any further. Bacteria and fungi also help break
down the components of the bark.
The result is a black, odourless medium with excellent properties for
growing Clivia. This composted bark provides good drainage and oxygen
supply and holds and releases fertilizer to the roots. The mixture also has not
diseases present.
Ifyou check your composted pine bark, the colour should not be reddish or
smell of pine. All plants do not grow well in pine bark that has not been fully
decomposed.
A range of different bark sizes are available. Mature Clivia ptefer a coarse
growing medium, often marketed as a coarse potting mix. A seedling mix is
useful for growing Clivia seed.
�102/253

VERMICULITE.
It is not an ideal medium as it has a variable pH. Vermiculite decomposes
into a compact, dense medium with poor drainage and oxygen content.
PERLITE.
It has a yery porous and drains well. Clivia plants grow well in it, but
watering and feeding need to be carefully managed. Add perlite to a mixture
if you want to improve the drainage of the mixture.
COIR/COCA PEAT.
Peat holds water well, but it drains poorly. If you want your mixture to hold
more water, peat may be added, up to 30 percent of your potting mixture. m.
SPHAGNUM PEAT.
Expensive and not freely available. This product has similar characteristics
to the coca peat mentioned above.
MUSHROON'I COYIPOST.
This product does undergo further decomposition and in a pot may compact
the mixture and result in more water retention.
WOODSHAVINGS AND SAWDUST.
Fresh shavings and sawdust are not a suitable medium for growing Clivia.
These products decompose into smaller particles, resulting in a denser
�103/253

T
mixture with less oxygen in the mixture. The organisms that break down the
wood products, fungi and bacteria, use up the nitrogen in the mixture and
there will not be enough nitrogen available for the roots of the Clivict.
BAGASSE.
This is unsuitable as a potting mix, as it decomposes furlher and results in a
mixture with a poor oxygen supply and too much water retention.
soIL
Soil types vary a lot. Some are very sandy and drain well. Other soils may
have too much clay which may compact too much and not drain well.
Depending on your soil type, success may be achieved using your own local
soil type for growing Clivia in a pot.
GARDEN COMPOST.
It is excellent as a mulch. This compost does continue to decompose in a pot
and will compact the potting medium.
SUITABLE MIX FOR CLIVIA PLANTS IN A POT:
Properly composted pine bark is freely available and an excellent choice for
potted Clivia.
Clivia requiea free draining potting mixture with a good oxygen content
around the roots. The potting mixture should be on the acidic side. The best
pH is between 5.5 and 6.5.
�104/253

8
SUITABLE PLANTING CONDITIONS FOR CLIVIA PLANTS IN
THE GARDEN:
Clivia plants like a semi-shaded position in the garden. Heavy shade may
result in poor flowering conditions for Clivia. Clivia usually tolerate the
early moming sun, but the afternoon sun may result in leaf burn. Be aware
that problems may arise wilh Clivia planted under trees. in this position the
Clivia, depending on the tree t1pe, may have to compete with the tree roots
for nutrition and they will not necessarily thrive. If the soil under the trees
cannot be mulched or composted, try growing the Clivia plants in large pots
under the trees.
In the garden the Cliviq plants are easy to grow. Add enough compost to
your garden soil to ensure that the soil drains well. Add 3:l :5 fertilizer to the
soil with planting and again in spring and autumn. Further mulching will
also help with retention of moisture and the plants will grow well.
SHADEHOUSE PROVISIONS FOR GROWING CLIVIA:
Clivia plants do not tolerate direct midday and afternoon sunlight when
grown outdoors.
To grow Clivia outdoors, in a shade house, use an eightypercent shade cloth
to protect the Clivia plants from the sun.
FERTILIZING.
This may be in the form of slow release/controlled release ferlilizer granules
or ordinary garden 3-1-5. After applying the fertilizer, the plants should be
watered well. Don't place the fertilizer on or close to the stem of the plant.
Ferlilizer may be applied during spring and autumn. Foliar feed is also
suitable and should be applied as directed. Feeding the Clivia plants by
�105/253
9
feeding the roots is an easier way to provide nutrition to a plant that has such
a good root system. Keeping the N:K ratio (nitrogen to potassium ratio) at
1 : 1 or 1 :2 in the fertilizer used, will ensure good flowering. Too much
nitrogen may result in excessive leaf growth and not much flowering' Trace
elements are important and are usually included in your fertilizers, if not,
they must be provided by applying a suitable trace element product.
GROWING THE SIZE OF YOUR CLIWA COLLECTION BY SEED
PRODUCTION
Collecting and storing of pollen.
Ideally pollen should be gathered when it is fluffy and ripe.
Various containers may be used to store your pollen. These include:
1 . Small plastic containers with a lid. (Eppendorf tubes)' The anthers may be
removed and placed in a small plastic container with a tightly fiuing lid. The
details of the pollen should then be written on the outside of the container.
The pollen may also be brushed off with a fine paint brush into these tubes.
2. The pollen or anthers may be stored in very small zip lock bags and
labelled.
3. Gel capsules may also be used to store the pollen or anthers.
The pollen containers are then stored in the fridge. The secret is to keep the
pollen dry to retain the viability.
�106/253

t0
Pollination.
Pollination can take place once the pollen is ripe (fluffy). The pollen may be
removed with a small paint brush or the whole anther may be removed.
Apply the pollen to the stigma when it is sticky and receptive to pollen. The
tips of the stigmatic aflns are the sites at which the pollen should be placed.
Some hybridizers believe in re-pollinating the stigmas, while others pollinate
once on1y.
The best time to pollinate the stigmas, is in the early morning, before the
heat dries out the stigmatic surfaces. A fuilher suitable time is in the late
aftemoon. Bees are also active at these times. The interaction of the pollen
on the stigma is more effective in a warmer environment. A good practice
with pollination, is to bring the plants into an enclosed area, where
accidental wind pollination will be avoided. If a stigma is reluctant to accept
pollen because it is dry, cut the styie arm in hall to expose the viable tube in
the centre. Paint this with a dilution of sugar water (1 tsp to a cup of water),
ailow to this to stand for a few minutes and then apply the pollen to the
treated style arm.
To prevent the self-pollination of a plant, the anthers may be removed
(emasculation) or a cut straw may be used to cover the stigma or stamens.
Pollination of the flowers in an umbel may be made with different pollen
samples. Good labelling is essential. The pedicel may be marked with a
permanent marker to identify the pollen source. Tie-on labels may be used.
The pod parent is always written first on the label and the follow with the
name of the pollen parent.
�107/253

Harvesting the seed.
When should the berries be harvested? This question is often asked, as early
harvesting may perhaps result in poor germination.
It is not essential to wait until the benies have changed colour fully, from
green to orange, for example.
It is quite satisfactory to harvest the seed from May - June (Southern
hemisphere) when the berries are found to be slightly soft. Once harvested
the berries should be cleaned by removing the outer skin and fleshy layer
around the seeds. The membrane around the individual seeds should also be
removed. Leaving the membranes on the seed may encourage fungal
infection developing. Wash the seeds in soapy water and dry on a clean
towel.
If you decide to harvest the berries later in the year, the seed is more difficult
to clean.
Fresh seed is the best choice to purchase to ensure good germination. Seeds
do dry out with time and their viability decreases.
GERMINATING C L IVIA SEED.
There are many ways of germinating Clivia seed.
1. One simple method is to fill a seed tray with seedling soil or potting mix.
Wet the medium thoroughly, then place the seeds on the medium and press
the seeds down lightly. Place the tray of seeds in a large plastic bag and seal
the bag.
Store the tray in a wafln place. Leave the covered tray for about a month
before inspection. Check for moisture content of the medium and look for
�108/253

12
the presence ofany fungal infection. The more often an inspection takes
place, the higher the chances of allowing spores in the air to settle on your
seed. Check the trays at least once a month. Some of the roots may not
penetrate the seedling soil. If this happens, make a small hole in the mixture
and piace the root in this hole and lightly compress the soil around the root.
Once the little plants are well established, the covering plastic bag should be
removed from the trays and the trays of seedlings placed in a warm shady
position. Feeding the seedling can staft once the seed drops offthe seedling.
With this method of germination, it is possible to grow the seedlings, if not
overcrowded, until large enough to plant into individual pots.
2. Zip lock plastic bags may be used to seal the seeds which are piaced
befween damp absorbent paper. Here the advantage is that the zip lock bags
take up very little space and many more seeds may be germinated in a small
area.
3. Seeds placed on silica sand in a Tupperware container, kept warm and
moist also works well. The moisture content needs to be checked regularly.
The sand dries out faster ifuse is made ofheating pads under the container.
Whichever system you choose, always ensure that there is sufficient
moisture, but not too wet and keep a sharp eye out for fungal infections.
PLANTING OUT SEEDLINGS.
There are as many ideas as there are growers.
Here is a guide: You may adapt the guide to suit yourself.
At 12 to 18 months transfer seedlings to l5cm pots and then when there are
7 - 8 leaves, repot into 20cm pots. It should be possible to flower the plants
in the 20cm pots.
�109/253

IJ
WATERING.
What is the ideal amount of water to give and when should you water?
The Clivia plant is an evergreen plant that grows faster when the
temperatures are higher and stops when the temperafures are too high or too
low.
The plant never stops growing completely under normal circumstances in
nature. The amount of water to give will depend on your local
circumstances. More water in summer and less in winter is a practical
approach. Ifyou have a high rainfall, no extra water is necessary. Your
potted Clivia plants should all have the same potting mix so that the water
requirements will be easier to assess and be similar.
Checking the mixture in your pot will give you a good idea of whether
watering is required. Water logging is unlikely, if your potting medium
drains well.
GROWING THE SIZE OF YOUR CLIVIA COLLECTION BY
OFFSET REMOVAL
Clivia plants may be divided at any time of the year. The ideal times are
probably once the blooming season is over at the end of September and then
again in autumn when the weather is cooler and fungal infections are not as
common.
To divide a large plant: Remove the plant carefully from the pot. Remove
the potting mix from the roots using a stream of water from a hose pipe ifnecessary. Choose the offsets to be removed. Ensure that each offset to be
�110/253

removed has adequate roots. Use a clean, sharp knife and remove the offset
from the mother plant. Treat the cut surfaces of the mother plant and the
offset with Flowers of Sulphur or some other fungicide.
Allow the cut edges to dry out, perhaps overnight before repotting. Sterilize
your knife before using it again on the next plant. The blade may be placed
in buming methylated spirits or a sterilizing solution to ensure no cross
infection. An offset, while still attached to the mother plant, will grow faster.
Wait until the offset has at least 9 -10 leaves before removing it from the
mother plant.
PESTS AND DISEASES.
The following pests are to be found on Clivia in South Africa:
Amaryllis caterpillar or Lily Borer. (Brithys crini)This pest causes a lot
of damage to the Clivia plant. If you fail to notice the larua, the damage to
the plants is remarkable. The larva burows down the leaf into the centre of
the plant and may destroy the growing point. This caterpillar is less common
in the Cape.
These caterpillars are more active October and April (the warmer months).
The moths are grey/white and fly around your plants in the evenings. They
lay eggs on the underside ofthe leaves. Once the eggs hatch and the larvae
stafied feeding, evidence may be seen on the top-side of the leaf. The larvae
tunnel down the leaf. At this stage they are easily vrsible between the upper
and lower epidermis of the leaf. Rub the eggs off the underside of the leaves
and spray the plants with cypermethrin or deltamethrin. Biological control
wtth Bacillus thuringiensis vqr. kurstaki.
�111/253

15
Mealy Bugs. This pest is found on plants throughout the country. It is
usually associated with overcrowding of plants, with poor air movement
between the plants. Hot conditions promote the infestation of mealie bugs.
The mealie bug is usually found on the underside of the older leaves, but ilthe infestation is severe, they may be found any,vhere on the plant or pot,
often targeting the younger leaves. The treatment here is preferably a
systemic insecticide such as imidacloprid. Cypermethrin may also be used
with a wetter/sticker solution. Imidacloprid granules may be scattered
around the base of the plant. Imidacloprid, on the package insert, is advised
to be used as a drench, thus allowing the absorption of the mixture by the
roots. Plants may be immersed in a bucket of the imidacloprid mixture or
applied to each pot. Read the inserl for the mixing instructions. Spraying
with this product has been suggested and is easier to apply. Mineral oil may
also be used. Ensure that the correct dosage is used.
Scale
Many different types of scale atlack Cliviq leaves. These pests can increase
in number at a rapid rate. Look out lor the flat white younger scales and
physically rub them off or spray with a suitable insecticide. The scale causes
an unattractive spot on the leaf where it was attached and may cause rings of
lighter green on the Clivia leaf. Treat with mercaptothion or cypermethrin. A
light oil such as oieum or neem oil may also be used to treat the scale.
Snout Beetles.
This pest seems to be more frequently seen in the Cape. They are about l0
mm in length and muddy brown in colour. The beetles multiply rapidly and
�112/253

16
are devastating to the leaves, flowers and beries. The problem can quickly
be identified by looking at the leaves and noticing the notched appearance of
the leafedges.
Attempts may made by catching them at night with a torch light. An easier
and more effective method of treatment is to spray with cypermethrin or
mercaptothion with an added sticker/spreader.
Thrips
Minute insects with four naffow wings. They feed by rasping the plant leaf
surface, leaving small silver blotches. Treat with cypermetkin, imidacloprid
or mercaptothion with an added wetter/sticker.
White Fly
Small four - winged insects. The wings and body are covered by a white
powder. The larvae suck the sap on the underside of the leaves. Treat with
pyiproxyfen or cypermethrin.
Slugs and Snails
These pests feed only under damp conditions. A shiny trail of viscid solution
is left by the snails. They like feeding on the younger leaves and substantial
damage may be caused to the leaves. Use any suitable snail bait to combat
them.
�113/253

11
Red Spider
Minute reddish-brown spiders with four pairs of legs. These weave a web on
the underside of the leaves. Yellowing of the leaves may result. Treat with
bi Fenthrin or mercaprorh ion.
Fungal and Bacterial Diseases.
The commonest bacterial infestation is by the bacterium Erwiniq
carotovora. This is fortunately not that common. If a rotten mass is found in
the centre of the plant and is foul smelling, it is probably caused by this
organism. Scrape out the rotten material. Use dilute bleach to treat the
cleaned wound site. Not many anti-bacterial agents are available in the
nurseries.
Fungal infections are more common. They are often unsightly. Brown spots
appearing on leaves, Colletotrichum (anthracnose), may also spread to
adjacent plant leaves. Treatment with a systemic antifungal agent is
recommended.
Fungi are also responsible for root rot, damping off, seed rot and ,rust, like
appearances. Treat with an antifungal agent. An example of a contact
fungicide is chlorothalonil'Bravo' and of a systemic fungicide is triforine
'Funginex'. Copper oxychloride is good for treating soil pathogens such as
damping off and root rot. This is applied as a drench.
�114/253

18
Viral Diseases.
The appearance of a mosaic pattern on the green leaves may indicate a viral
infection is present. Claims are made that this pattern could be attributed to
mineral deficiencies. If the pattem persists, dispose of the plant to the
municrpal bin as a safety precaution.
To ensure the control ofdiseases and pests, the products used to treat the
disease or pest must be given in the correct dosages and should be repeated
after 7 to 14 days. Take precautions to ensure your own safety when using
these toxic sprays or powders, by using protective clothing, a hat, goggles
and a mask.
SUGGESTIONS FOR BR.EEDING THAT SPECIAL PLANT:
Clivia hybridizers soon realise that the explanation for some flower colour
result, can only be understood by a muitiple gene pattern of inheritance. No
simple law of inheritance is suitable for explaining how some flower colours
appear in Clivia plants. The variation of flower colours continues to
fascinate the collectors and breeders of Clivia. With all Cliviabteeding, the
best results are achieved by growing all the seed produced from a cross and
then carefully selecting from these plants for fufther breeding.
Breed Better Yellows.
Excellent yellow Clivia are freely available. Most of the yellow C/lvla
flowers may be divided into Groups called I and 2. Yellow flowers that do
not fall into either Group 1 or Group 2 are also found. If you wish to breed
yellow Clivia,breed Group 1 yellows with Group 1 yellows and Group 2
with Group 2. If you should breed a Group 1 Yellow with a Group 2 Yellow,
�115/253

19
the resulting flowers will be orange. Natal yelrow is considered to belong to
Group 2 Yellows and often has a great deal of green in the flower. 'vico
Yellow' on the other hand is a reliable Group 1 yellow. There are some
plants that are compatible with both Group i and Group 2 yellows. The
offspring are all yellow - called 'Universal yellows'. It is therefore
necessary to know which group your plants belong to, should you want to
breed a yellow flowering plant.
when breeding for a desired result, you should select the strongest seedlings
from a cross and cross pollinate these when they flower. with the next
generation the most robust or strongest seedlings are chosen and then, when
flowering, crossed with each other (sibling crosses). This method is called
'line breeding' and continues until the desired results are achieved.
Breed broad leaf yellows.
Here the pod parent, the mother, is chosen with the broad reaf. Use the best
you have available. This plant will probably have an orange flower. The
pollen parent should be chosen from the best yellow flower pollen you have.
The first-generation ofrspring will all have orange flowers. cross this
generation with each other and some of the progeny will flower yellow.
Select the best broad leaf yellows and cross them with one another. continue
to select the best broad ieaf yellows and cross them with each other until
your goal is reached.
Breed variegated yellows:
use the best available variegated plant, probably with an orange flower, as
the mother (pod parent). Pollinate this plant with your best available yellow
pollen. The offspring will all bloom orange. These orange flowering plants
�116/253

20
all 'can1r' the yellow colour genes from the polien parent (father). Halfthe
inheritance is from each parent (halforange and halfyellow). The orange
colour is 'dominant' over the yellow colour and thus all the offspring willbe
orange. These offspring, when flowering, must be crossed with each other.
Some of the offspring will be yellow, variegated plants. Continue crossing
the best ofthese until your desired result is achieved.
CLIVIA ANATOMY
The flowerhead or umbel is cailed the inflorescence' The stem bearing the
umbel is called the scape or peduncle.
The shorl stems attaching the individual flowers to the scape/peduncle are
called pedicels.
The seed capsule is called the ovary and is found below the perianth (the six
tepals of the flower). The perianth consists of three inner and three outer
perianth members called tepals (inner and outer whorls). Within the
perianth, six stamens are found. Each stamen is made up of an anther which
bears the pollen and the stalk of the anther, called the filament. The style is
found in the centre of the perianth (flower). The stigma with three tiny arms
is found at the tip of the style. The style extends down into the flower and
ends at the ovary. The stigmatic arms, the style and the ovary make up the
pistii. The tips of the stigmatic arms are the points at which the poliination
needs to take place.
The ovary is made up of three cavities, each containing eight to ten olules.
Once pollinated and ferlilized, each ovuie will form a seed. The developing
seeds will stimulate the ovary wall to grow and form the succulent fruit.
�117/253

21
CliviaEruit and Seed
The Clivia Fruit is a berry which contains the seed.
The Seeds are naked as they do not have a seed-coat.
The seeds are recalcitrant, meaning that they can germinate spontaneously.
This germination may occur in the ripe fruit. The seed may be stored for a
limited time-period, as they become dehydrated and then will no longer be
viable.
The seed consists ofa single cotyledon. The cotyledon has the endosperm
which encloses the embryo of the seed. The embryo forms the radicle (root)
and the plumule (leaf shoot). The tip of the radicle may be identified as a
dark spot on the seed. During germination the cotyledon elongates and
pushes the radicle and plumule out of the seed. The radicle elongates to
become the primary root and immediately produces a colar of root hairs.
The primary root does not normally form secondary roots. The primary root
has a limited life span and is replaced by adventitious roots
118/253

22
L€ur\reb (6 &t*,
^ftrJ& x(l)
Ga$&r. Baro.r
Pto*.r.-t[*,"r)
�119/253

L-)
F.o.ca*
-gDuN(.L'.rJN
S<-aea
�120/253

24
�121/253

Hints on growing Clivias with Brian Steven
© Brian Steven 2020
PESTS AND DISEASES
Although the weather is now cooler with
autumn here, there are still the nuisance
pests and diseases around our Clivias,
and of course later in the year after
winter they could appear again.
The following are the main pests and
diseases that growers should keep
under control.
PESTS — MEALYBUG
The main worry for Clivia growers. Beware
of the mealybug, they can take over a plant
in quick time.
They are usually found on the newer
growths. If not controlled, they can really
make a mess of the plant. Light infes-
tations can be controlled by wiping a
cotton bud, dipped in metho or a surgical
spirit on to the insects. Sprays and dusts
can be used for larger outbreaks.
Confidor is a very successful insecticide.
For those who like to use the natural
sprays of course Pyrethrum is the
insecticide.
Remember when handling insecticides
and fungicides take precautions and
please wear protective gloves and mask.
SNAILS AND SLUGS
Following the record summer rains, the
snails and slugs have been appearing
in numbers. These should always be
kept under control . It is marvelous what
a slug or snail can do to a new growth
or lovely Clivia flower if they get the
chance. Check plants and pots
regularly, especially during damp
weather. Keep them in check with one
of the snail baits spread around.
LILY BORER
These are black caterpillars with a yellow
band and can cause major damage to
Clivia plants. This caterpillar tunnels into
the leaves and stem and if left to its own
devices will kill the plant.
There have also been reports of differ-
ent types of caterpillars chewing the
Clivia leaves.
Kill them by squashing by hand or use a
systemic stomach pesticide.
Other less prevalent pests are aphids,
thrips, and red spider mite. Check with
your nurseryman on methods to rid
your collection of these.
FUNGAL and BACTERIAL DISEASES
Look out for any outbreak. Clivias are a
good candidate for fungal and bacterial
diseases.
Even though the weather is cooler now,
various diseases can still appear in
Clivias such as seed rot, root rot, rust,
leaf spot and bacterial rot. We all have
had the experience of a young seedling
or a semi-mature Clivia plant in our
collections "falling over." This problem
is usually caused by too wet a potting
mix or not enough aeration in the mix.
Make sure you have an open mix and
watch the watering.
Often larger plants can be saved by
cutting off the rotting material and
dusting with Flowers of Sulphur to dry
out the infected plant. If the roots are
unaffected by the rot, often the plant
will throw new growths. Even the top
part of the plant can be planted out
after cleaning off the rotted parts.
Hopefully it will develop new roots.
There are various fungicides like
Copper Oxychloride, Mancozeb,
Fongarid and Zineb. Use as directed.
WATERING
Watering should be kept to a minimum
(April-May) on large plants, but don't
let young seedlings in small pots dry
out.
FEEDING
Fertilizer can still be applied to young
seedlings. Be very careful with the seed-
lings and only use fertilizers like blood
and bone, Nitrosol, seaweed fertilisers or
half strength Thrive. The fertilizing of the
larger plants can now be eased off.
Some enthusiasts give their mature
plants a good dose of trace elements
and potassium currently to help the
flowering and add vigor to the plants.
PLANTING OUT SEEDLINGS
These are probably the last months
planting out young seedlings should be
undertaken. Young plants should be
planted out when the first leaf is at least
10cm and preferably when a second
leaf is on the way. Plant them out in
individual small pots or community
pots (several plants in the one pot).
The potting mix should be like the potted
adult plants growing medium. Make sure
the seedlings are kept under shade of at
least 80% and do not over-water. Use
fertiliser as above. DO NOT OVERPOT.
If you have seedlings at least 2 months
old and are growing well and look
healthy, pot them on to bigger pots.
Small chopped up pieces of styrene or
beads can be placed in the bottom of the
pots to lighten the load and help
drainage. Remember not to disturb the
roots of the plants too much.
DIVIDING and TRANSPLANTING
The general opinion is that Clivias in
warm climates can be divided and re-
potted any time of the year without
detrimental results. Please don't divide
any large plants that you may be exhib-
iting in September or you may ruin the
flowering. Remember if offsets are be-
ing removed, handle the plant gently,
pulling the roots apart. Don't forget to
dust any cut with Flowers of Sulphur to
prevent any rotting.
�122/253

THRIVE YATES 500gms 2 spoons = 9 Litres
All Purpose Soluble Fertilizer
CONFIDOR BAYER 200ml =
60 Litres
Insect Destroyer KENDON 250ml 20ml/1 Litre
(Natural Pvrethrum)
SUCCESS Ultra YATES 200ml 5ml/1 Litre
(Insect Control)
FUNGUS GUN YATES 750ml Prepared ready
(Systemic Fungus Control)
CHARLIE CARP Charlie Carp 1 Litre 1 Litre = 300 Litres
(All Purpose Fertilizer)
Potash Liquid Searles 250ml Makes 500 Litres
(Fruit & Bloom Booster)
MAXGUARD Scott Defender 1 Litre 50ml = 1 Litre
(Systemic, Contact & Residual Insecticide
Concentrate)
NITROSOL AMGROW 1 Litre Makes 250 Litres
(Liquid Plant Food)
MANOZEB Searles 200gms 20gms = 10 Litres
(Fungicide)
'
Tomato/Vegetable Dust YATES 500gms Sprinkle On
(Insecticide & Fungicide)
Tomato Spray BRUNNINGS 750ml Prepared ready
(Insecticide & Fungicide)
ANTI ROT YATES 500ml 5/10ml = 1 Litre
(Phosacid Systemic Fungicide)
CLIVIA Spraying Guide - Fertilizer/Insecticide/Fungicide/Systemic solutions
CLIVIA Insecticides / Fungicides / Fertilisers - Australia
�123/253
growing medium. The scale ranges from 0 to 14 with the neutral point at 7. The lower the number is below 7, the higher the acidity; conversely the higher the number is above 7, the higher the alkalinity.
Experience has taught us that Clivia can tolerate a wide scale of pH -let us say from 3.5 to 6.5.
Above 6 their growth becomes stunted and there is ye l l owing of the i r l eaves .
I experienced that myself last year, and a fellow grower experienced major problems in the same year at 6.2.
It is important that the potting mix has the correct pH right from the inception of the plant's growth. Management of the pH is a problem because it is not easy to fix it for every individual pot.
We should aim for a pH of 4.3 to 5.5.
I estimate that for the average potting mix of pure peat and peat with pine needle compost 3.0 to 3.5 kg calcium carbonate is required per cubic m e t r e of mix .
I no longer use pine needle compost but rather a mixture of coconut fibre and peat and compressed peat pieces.
Our calcium fertilizers in Belgium have varying compositions. They are all based on calcium carbonate but some contain in addition 3% to 30% of magnesium carbonate. These are to be preferred because not only do they provide essential magnesium, but magnesium carbonate is 5 to 6 times more soluble than calcium carbonate. Thus 1 kilogram of magnesium carbonate will
neutralize more acid than 1 kilogram of calcium carbonate and is therefore more effective in raising the pH.
Nutrition
I referred the editors to the article written by Marc Vissers on the roles played by the various elements of nutrition in the life, growth and health of a plant, which was made available to them with his consent.
However, it has always been difficult to establish the ideal feeding program for Clivia because they respond slowly and not always clearly. My target figures are:
pH of H2O 4.50 to 6.0 Conductivity 200 to 400
milligrams per litre potting mix
N
P
K
Ca
Mg
Fe
30.00 to 140.00
min. 30.00
150.00 to 250.00
400.00 to 1200.00
150.00 to 250.00
min. 1.00
C. miniata 'Shaja Moja'. Winner - pot plant section NC 2001 Grower: Dawie van Heerden
The pH scale shows the acidity or alkalinity of the
�124/253

BEGINNERS LUCK – Bill Morris
Beginners are often bemused by pollination and consider it a magical task that only a few initiated can perform. It is of course, quite simple and easy to do once you know what to do. It has also been found that pollination is far more successful when carried out under certain conditions.
If we look into our miniata flower, we can quite easily see six stamens with the anthers on top supported by the slender filament which is affixed to the base of the petals. The seventh little stem in the flower divides into three at the top, and this is the style which grows out of the ovary and on the triple tip it carries the stigma. This stem projects a little further out of the flower than the others. In our case the stigma is on the ends of the three divisions. When the flower first opens the three divisions of the stigma are not fully opened, but in a day or two they extend out, and you can see sticky exudate on them. At the same time the anthers open up and the pollen is clearly visible.
All one needs to do is to transfer pollen from the ripe anther to the ready stigma and fertilisation can take place. Of course, if you do it on the same plant, then you would have self-pollinated or "selfed" the plant. Broadly speaking, there are two types of breeding that you can go in for. Inbreeding, and outbreeding. In inbreeding you use self-pollination, or closely related pollen. For example, you may have three or four plants from the same stock. If you cross-pollinated with these plants this would be inbreeding. If you got pollen from an outside source and applied it to your plants, this would be outbreeding.
Pollen is destroyed by warm temperatures and loses its viability in warm weather. Thus, it is recommended that pollination should take place when it is cool, as in the early morning. One could snap the filament of a stamen off and carry it between two fingers and apply it to the mother plant. You could take a small paint brush and scoop up some pollen with this and apply it to the plant you wish to fertilise. Of course, you would avoid contaminants such as water, chemicals and foreign bodies.
You may need to transport the pollen, and it could be knocked off the anthers into a vial or capsule which you can get at the chemist. You can store the pollen for over a year in the refrigerator or the freezer. However, it must be kept dry. It is also best removed from the anthers, as these can rot, and the pollen will suffer.
So, you have become a plant breeder, and will need to keep records to have accurate accounts of your breeding achievements. It is best to keep a record in a book. One could have a column for the date, one for the mother plants number, one for the pollen-parent's number and a
�125/253

column that records the amount of seed produced. If this line was numbered A1 because it was the first line in the first book, these seeds could be identified in further breeding records as being A1 seeds or plants. It would then be possible to trace back in a simple manner some twenty years and twenty books later, how you arrived at some of your show winners.
POLLINATING CLIVIAS
In an early newsletter our editor described how to pollinate clivias using a small brush. As I have a large number of plants and do quite a lot of pollinating, I have found the brush method slow. It also suffers from the difficulty of having to clean the brush of pollen if one wants to make a different cross. This also takes time.
So, for many years I have simply used my fingers. Lightly pinching an anther, the portion of the sexual apparatus of the flower which carries the pollen, will transfer quite a lot of pollen to the surface of the index finger and thumb. Brushing this surface across the end of the stigma of the flower transfers the pollen to this female receptive part of the flower. It is best not to do this as soon as the flower opens as the stigma may not be fully developed at that stage. I like to repeat my pollinations a number of times with intervals of a complete day between pollinations to ensure that some are done when the stigma is most receptive.
In pollinating my yellows, where I use pollen from my best couple of plants on most of the other yellows, I have now found it easier and quicker to simply pinch the stigma very gently with both of my pollen covered fingers and slightly roll the stigma between them. Once you get used to it, it is very easy to do. Again, I repeat the pollination a number of times over the period the flowers are out. It is important not to pinch tight enough to damage the stigma. I have found this method very successful, and it is about as fast as anyone can manage.
It is much easier to clean one's fingers than a brush. I simply wipe them hard on my own garden clothing a number of times. Occasional pollen grains may remain trapped in the skin ridges and valleys, but very few, and they are overwhelmed by the millions of pollen grains from the next anther that supplies the pollen to be used next.
Bill Morris, Australia
�126/253

Clivia Pollen Storage
Pollen of Clivia as well as that of most other plants in the Amaryllis Family, the Amaryllidaceae, can be stored for extended periods of time and still retain useful viability. The length of time that a sample of pollen can be stored will depend on several factors:
The genus and species of the plant. Clivia pollen is said to retain viability for many years Nerine pollen appears to retain viability for several years Hippeastrum ("amaryllis") pollen keeps for a maximum of 12 months Hymenocallis pollen retains viability for only a few months Daylily (Hemerocallis, not an amaryllids) pollen stays viable for many years The extent to which the pollen was dried before storage. Clivia pollen is quite dry at the time of ripening Most pollens require drying in air or over a drying agent for 12 to 48 hours before storage.
�127/253

Blue Silica Gel crystals are a good drying agent, but Drierite® is better. The temperature at which it is stored. For immediate use, a few hours later, room temperature storage is quite satisfactory Short term storage (days or weeks) in a refrigerator at ca. 39°F (4°C) is satisfactory Long term storage (months or years) must be done at subfreezing temperatures; the colder, the better.
Storage should be done in a tightly closed container. I prefer using 1.5 mL microcentrifuge tubes of polyethylene or polypropylene (Eppendorf tubes). Two or three anthers of Clivia are removed from their "stems" (filaments) (see Anatomy of a Flower). Place the anthers in a microcentrifuge tube, and leave open at the top.
Dry the anthers. In very dry climates, such as deserts and semi-deserts, drying in air will probably suffice. In humid climates, such as the North-eastern U.S.A., it is better to place the microcentrifuge tube with its anthers in a larger container with some drying agent such as Blue Silica Gel Crystals, for 12 to 24 hours. When dry, cap the microcentrifuge tube tightly. Label the tube with the botanical name and the date. Store the tube in a home freezer.
Best of luck with your pollen!
Jim Shields USA – Shields Gardens
�128/253

Germinating Clivia Miniata seeds
Clivia berries take approximately 10 to 12 months to mature indicated by a colour change. Green berries transform into dark orange to pale cream and in-between hues. These coloured berries are an attraction to various animals.
In South Africa, monkeys eat the soft pulpy outer berry, discarding the seeds which
are poisonous. Thus, Clivias have been found growing on tree branches. In Australia, rats are known to eat the fleshy portion of the berry and collecting the seed into piles.
For successful germination of Clivia seeds some of the following points may be of assistance:
1) Be sure to remove all soft berry pulp surrounding the seed. 2) Carefully strip off the thin membrane around each seed. Use a soft cloth if you
find this difficult rotating the seed until it is clean. Do not use sharp instruments as this may remove more layers or damage the embryonic shoot.
3) Non- removal of the thin membrane surrounding the seed tends to promote fungus formation.
4) Use normal Clivia growing mix, placing the seeds on the mix surface and lightly dust with a fungicide (i.e. Mancozeb).
5) Barely cover the seeds with the Clivia growing mix. 6) Keep the growing mix and seeds MOIST and free draining, never wet. Do not
cover seeds/mix with plastic or lids or fungus will be a problem. 7) After a short while you should be rewarded by a leaf sprout breaking through
the mix. Sometimes, when the rot pushes down into the mix it can encounter a hard patch sending the seed into the air. Using a small stick, make a hole in the mix and place the aerial seedling into the hole so that the seed is level with the mix surface.
8) Be vigilant and check for small fungus gnats that can damage your seedlings. (The larval stage of the gnat can attack the seedling root which may facilitate fungus attack). If fungus gnats are present, spray with pyrethrum.
9) Continue your culture until seedlings have two or more leaves. Then pot into 100mm/4-inch containers. DO NOT COVER POT.
10) For Clivia seeds sourced from elsewhere or overseas, seeds may be partially dehydrated and subsequently take longer to germinate. (Soaking dehydrated wizened seed in a plant tonic (i.e. Seasol) may rehydrate seed).
11) Note that Clivia seed have relatively short-term viability. The International seed repository has to replace Clivia seed each one to two years.
Happy and successful seed cultivation.
Anonymous
�129/253

�130/253

SIMPLE METHODS FOR POLLEN STORAGE
by Greg Anderson (based on his personal experiences)
Not all our plants will flower simultaneously and some occasionally miss a
season altogether so storage of pollen can be a useful tactic for plant breeders. If you
are only looking to retain the pollen for the one season it is as easy as keeping it in the
fridge where it will remain quite healthy for many months. Our editor, Andrew, has
reported that he has successfully used pollen stored in this way for several years, but
other growers like to freeze the containers when storing for longer periods. This is where
the collection method is important.
Firstly, you need to make sure that only the anther is placed in the container. The
filament contains a significant amount of sticky fluid and moisture is enemy number
one. If even the smallest segment of filament remains attached to the anther it runs the
risk of spoiling your precious pollen. You will need to pluck the anthers with fine point
tweezers and place them into you preferred container. This should then be placed in
the fridge for about two or three weeks to allow all the pollen sacs to ripen and
disperse their contents. The anthers will then dry out completely within your container.
If sufficiently dry the pollen will coat the edge of the container when shaken and the
dehydrated anthers may be discarded as they are of no further use. I don't know why
the pollen adheres to the walls of the containers (static electricity?) but when it does
you know you can successfully transfer it to the freezer for longer term storage.
Image 1 shows: (i) anthers with ripe pollen sacks and segments of the filament
attached. (ii) anthers with ripe pollen sacks and no filament; (iii) immature anthers with
no ripe pollen sacs. This third group can successfully be removed from the blooms just
as they start to open (image 2) and has two advantages. Firstly, it will reduce the risk of
unintended self-pollination – this is important if you want to be certain of the integrity
of your cross. Secondly, you need not waste the pollen from these anthers. Whilst in
�131/253
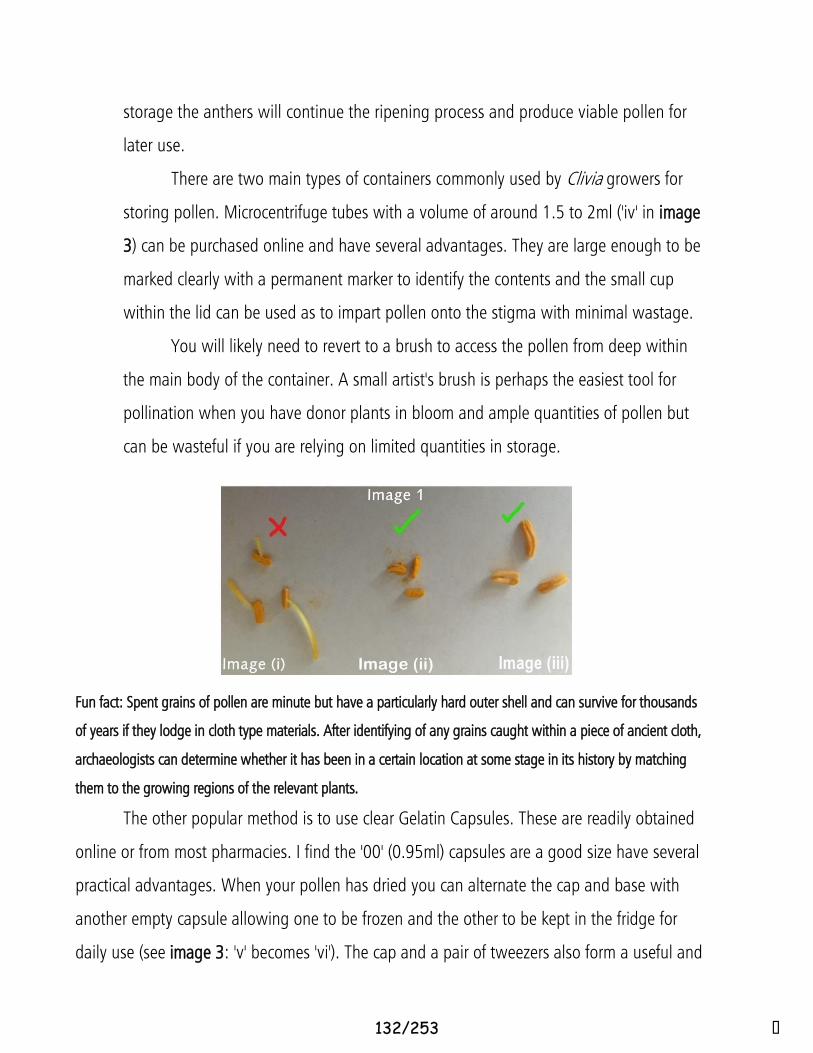
storage the anthers will continue the ripening process and produce viable pollen for
later use.
There are two main types of containers commonly used by Clivia growers for
storing pollen. Microcentrifuge tubes with a volume of around 1.5 to 2ml ('iv' in image
3) can be purchased online and have several advantages. They are large enough to be
marked clearly with a permanent marker to identify the contents and the small cup
within the lid can be used as to impart pollen onto the stigma with minimal wastage.
You will likely need to revert to a brush to access the pollen from deep within
the main body of the container. A small artist's brush is perhaps the easiest tool for
pollination when you have donor plants in bloom and ample quantities of pollen but
can be wasteful if you are relying on limited quantities in storage.
Fun fact: Spent grains of pollen are minute but have a particularly hard outer shell and can survive for thousands
of years if they lodge in cloth type materials. After identifying of any grains caught within a piece of ancient cloth,
archaeologists can determine whether it has been in a certain location at some stage in its history by matching
them to the growing regions of the relevant plants.
The other popular method is to use clear Gelatin Capsules. These are readily obtained
online or from most pharmacies. I find the '00' (0.95ml) capsules are a good size have several
practical advantages. When your pollen has dried you can alternate the cap and base with
another empty capsule allowing one to be frozen and the other to be kept in the fridge for
daily use (see image 3: 'v' becomes 'vi'). The cap and a pair of tweezers also form a useful and
�132/253
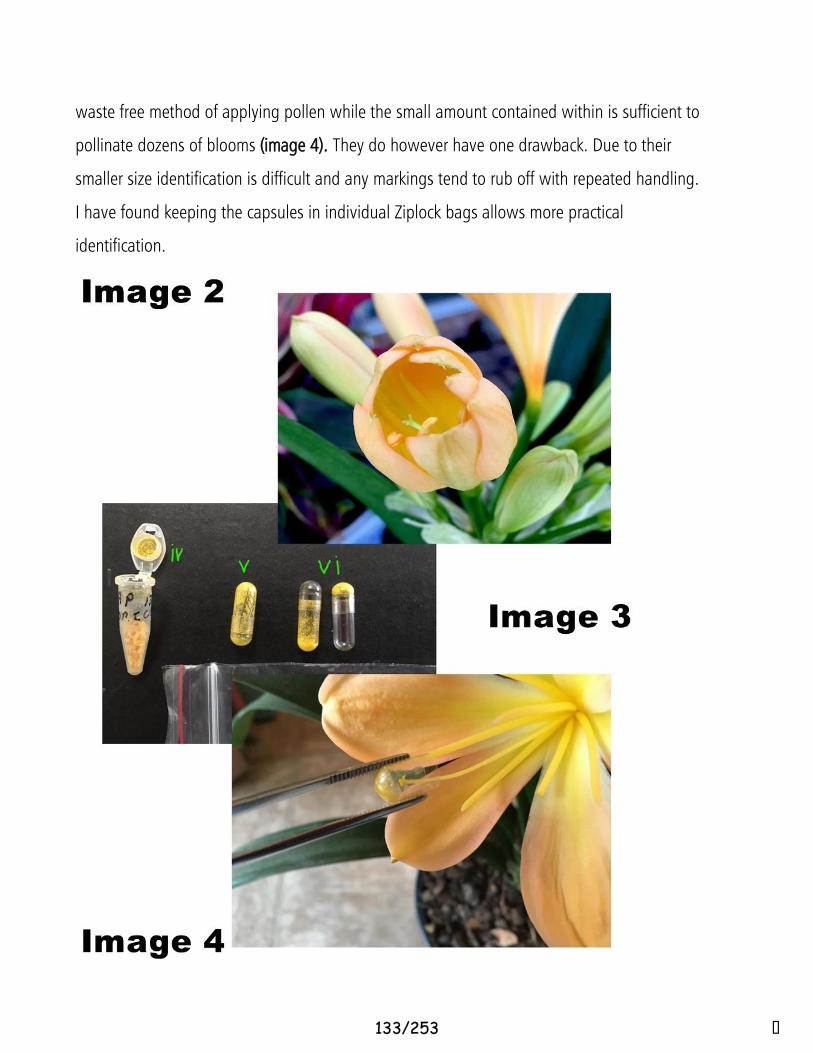
waste free method of applying pollen while the small amount contained within is sufficient to
pollinate dozens of blooms (image 4). They do however have one drawback. Due to their
smaller size identification is difficult and any markings tend to rub off with repeated handling.
I have found keeping the capsules in individual Ziplock bags allows more practical
identification.
�133/253

Neem Oil benefits © 2020 Growing Clivias for Beginners
24 AMAZING BENEFITS AND USES OF NEEM OIL FOR PLANTS
When searching for a safe and effective product to control insects and disease in your lawn and garden, look no
further than neem oil. It’s a powerful organic solution to your most difficult-to-manage infestations.
What is neem oil? Neem oil is a natural byproduct of the neem tree. The oil is harvested from the trees’ seeds
and leaves. While it has been used as natural pesticide for hundreds of years, you’ll also find it in many products
you use in your home, including:
• Cosmetics
• Toothpastes
• Dog shampoo
• Soaps
People in India have been using the neem leaf for its medicinal properties for thousands of years to help:
�134/253

Neem Oil benefits © 2020 Growing Clivias for Beginners
• Strengthen the immune system
• Detoxify blood
• Improve liver function
• Maintain a healthy circulatory, digestive and respiratory system
With all of its benefits, neem oil is probably best known for its use as a safe and effective insecticide. Let’s take a
look at the some of the top neem oil benefits and uses in the garden.
1. IT’S SAFE TO USE AROUND PETS AND WILDLIFE.
Synthetic pesticides that work on contact often build up in the surrounding environment, leaving toxic residue
behind that can harm and even kill pets and other animals in the area.
Neem oil, on the other hand, is biodegradable and non-toxic. It’s safe for birds, pets, fish, livestock or other area
wildlife when used. Safer® Brand’s neem pesticide products also degrade quickly during rainfall and under
ultraviolet rays.
2. IT’S ORGANIC AND BIODEGRADABLE.
Neem oil is a natural derivative of the neem tree (Azadirachta indica), an evergreen variety native to India. This
makes it organic and biodegradable. In fact, the Environmental Protection Agency has found neem oil to have
“…no unreasonable adverse effects,” making it safe for the U.S. population and the environment.
�135/253

Neem Oil benefits © 2020 Growing Clivias for Beginners
To extract neem oil, the tree seeds are crushed. Then water or a solvent is added to finish the process. Neem oil
can have different active chemicals depending on how it is processed. Some products are made from cold-
pressed neem seeds or by further processing the neem oil.
3. IT DOESN’T CREATE “DEATH ZONES” AS OTHER INSECTICIDES CAN.
Neem oil insecticide does not create a dead zone around treated plants, trees or shrubs like other synthetic
insecticides can. It only targets leaf-sucking and chewing insects.
Synthetic pesticides creep away from the sprayed areas to create “death zones” that can kill beneficial insects as
well as other animals.
4. YOU CAN USE IT TO CONTROL INSECTS AT ALL STAGES OF DEVELOPMENT.
Neem oil kills insects at all stages of development — adult, larvae and egg. The active chemical in neem oil,
azadirachtin, gets rid of insects in a few different ways:
• As an antifeedant
• As a hormone disruptor
• By smothering
Azadirachtin will force the insect or pest to stop eating the leaves.
�136/253

Neem Oil benefits © 2020 Growing Clivias for Beginners
When insects come into contact with neem oil, it also prevents the bug from transforming into its next stage of
development by disrupting regulatory hormones.
5. IT EFFECTIVELY CONTROLS HUNDREDS OF INSECTS.
Neem oil is an effective pesticide that gets rid of over 200 species of insects, not just a few. Some of the most
common include:
• Aphids
• Mites
• Scale
• Leaf hoppers
• White flies
• Caterpillars
• Mites
• Mealybugs
• Thrips
6. NEEM OIL INSECTICIDES ARE EFFECTIVE AT CONTROLLING NEMATODES.
Nematodes are difficult to control and can be very destructive to plants. Certain extracts from neem kernels have
shown to provide good control over root-knot nematodes — one of the most destructive kinds. Neem oil works
by preventing larvae from hatching.
�137/253

Neem Oil benefits © 2020 Growing Clivias for Beginners
7. BENEFICIAL EARTHWORMS WON’T BE HARMED.
While traditional chemical pesticides can harm earthworms, neem oil has the opposite effect by encouraging
earthworm activity.
Why is this important? Earthworms are beneficial to garden soil. As they tunnel though the dirt, they create
pathways that allow air and rainwater to reach plant roots. These little guys also leave behind excrement, known
as casts, that contain nutrients for the soil, including potassium, nitrogen and phosphorous. When earthworms
die, their decaying bodies also help fertilize the soil
8. IT CAN BE USED AS A DORMANT-SEASON APPLICATION OR A FOLIAR SPRAY.
Since neem oil can kill insects at varying stages, you can use it as a dormant-season application to kill overwinter
pests and eggs or as a foliar spray to repel and kill insects.
Use neem oil as a dormant oil spray to control a number of insects, including:
• Tent caterpillars, leaf rollers and other caterpillar eggs that remain on plant leaves during winter
• Aphids that cause leaf curling the following spring
• Mites that overwinter on plant leaves
• Scale insects
�138/253

Neem Oil benefits © 2020 Growing Clivias for Beginners
You can also use neem oil as foliar spray during the growing season to control common pests, such as:
• Aphids
• Spider mites
• Whiteflies
• Leafhoppers
9. YOU CAN CONTROL LAWN GRUBS WITH NEEM OIL.
Lawn grubs are the larval stage of Japanese beetles, and they can be very destructive to your lawn. They tunnel
under turf and nibble on grass roots. You’ll notice large brown or bare spots in areas of high grub activity.
Neem oil also works to control Japanese beetles by preventing them from laying eggs that become destructive
larvae. It also inhibits grub growth and repels them from the grass roots. For best results, spray the lawn with
neem oil at night and reapply after rainfall.
10. NEEM CAKES DOUBLE AS A GOOD FERTILIZER AND AN EFFECTIVE PESTICIDE.
A neem cake is made from organic manure, a byproduct of cold-pressed neem fruit and kernels. Neem cakes are
extra special because they act as both a pesticide and a fertilizer.
They fertilize the soil by extending the availability of nitrogen and help control nematodes, white ants, and
grubs.
�139/253

Neem Oil benefits © 2020 Growing Clivias for Beginners
11. YOU CAN SAFELY USE IT ON YOUR INDOOR PLANTS.
One of the worst feelings is seeing your indoor plants overrun with aphids.
Neem oil is safe to use indoors to prevent pests and disease. Just spray the leaves to kill pests without having
the worry of harming your kids or household pets.
12. IT’S SAFE FOR GREENHOUSE USE.
The conditions in a greenhouse provide the perfect environment for mites, aphids, scale insects and whiteflies.
Don’t give these pests a chance! Use Safer® Brand’s neem oil products to prevent these insects from destroying
your plants.
13. NEEM OIL IS A GREAT FUNGICIDE.
You can use neem oil to prevent or even kill fungus on your plants. Use neem oil for powdery mildew and other common fungal diseases, including:
�140/253

Neem Oil benefits © 2020 Growing Clivias for Beginners
• Black spot
• Scab
• Rust
• Leaf spot
• Anthracnose
• Tip blight
To prevent fungi, spray susceptible plants every seven to 14 days until the fungus is no longer a threat. To kill
fungi, spray plants once a week until the fungi clears up, and then spray every two weeks to keep it from coming
back.
14. IT ALSO WORKS AS A BACTERICIDE.
Neem oil can kill fire blight, a bacterial disease that causes the leaves of plants to wilt and appear as though they
have been burned.
To prevent fire blight, you must spray trees while dormant. The bacterium that causes fire blight cankers
overwinter on branches, twigs and trunks of trees.
15. NEEM OIL CAN PROTECT YOUR FRUIT TREES AND BERRY BUSHES.
Whether you have an orchard or just a few fruit trees in your backyard, you can control the pests that ruin your crop with neem oil. Apple trees are often plagued with worms, the two most common being the coddling moth and the meal worm. These pests enter the apples and make them unfit to eat.
�141/253

Neem Oil benefits © 2020 Growing Clivias for Beginners
To keep your fruit trees and berry bushes insect free, spray your plants and trees early — before blossoming,
then again when the petals drop, and every two weeks after to control these pests.
Common fruit-tree insect that neem oil will protect against include:
• Wooly apply aphids
• Rose leafhoppers
• Tarnished plant bug
• Leafhoppers
Berries are often plagued by powdery mildew and other fungal diseases that can be treated with neem oil,
including:
• Fire blight
• Verticillium wilt
• Orange rust
16. PROTECT YOUR VEGGIES FROM PESTS AND FUNGUS.
Neem oil has a dual purpose in the vegetable garden as both a pesticide and a fungicide. It works on arthropod
pests that often eat your vegetables, including tomato hornworms, corn earworm, aphids and whiteflies.
In addition, neem oil also controls common fungi that grow on vegetable plants, including:
• Mildews
• Rusts
• Leaf spots
• Wilts
• Stem rots
If you want to use neem oil on vegetable plants, spray them in the evening and again in the morning. Spraying
at these times helps ensure you are not causing any harm to beneficial insects, such as bees, that help pollinate
vegetable plants.
�142/253

Neem Oil benefits © 2020 Growing Clivias for Beginners
17. NEEM OIL CAN PROTECT YOUR NUT TREES AND OTHER ORNAMENTAL TREES.
Fall webworms, similar to tent caterpillars, are common pests of numerous nut trees, such as walnut and pecan
trees. These pests can ruin the leaves, fruits and nuts of host trees. Fall webworms build silky nests in the
crotches of tree branches.
In order to eliminate worms and caterpillars on trees, the neem oil must come in contact with the pest when you
spray it.
18. NEEM OIL KEEPS THE MOSQUITOS AWAY.
It’s nice to know that what you’re spraying on your plants to protect them from pests, viruses and fungus can
also keep your gardening time mosquito free. While neem oil insecticides shouldn’t be applied to your skin
because of inert ingredients, you could apply straight neem oil if you wanted to.
19. IT CAN PROTECT YOUR HERBS.
The same pests and fungi that plague your vegetable garden can also attack your herbs. These pests include:
�143/253

Neem Oil benefits © 2020 Growing Clivias for Beginners
• Aphids
• Leaf miners
• Spider mites
• Gray mold
• Rusts
• Whiteflies
You can spray neem oil on herbs, just as you do other plants. Some herbs may be tenderer than others,
especially those with fuzzy or hairy leaves, so spray a small area first to make sure they can tolerate the neem oil.
20. IT COMES IN A VARIETY OF FORMULAS.
Neem oil comes in a variety of formulas and concentrations, so you can find the one best suited for your needs.
Neem oil is sometimes mixed with insecticidal soap to help boost the neem oil’s pest-killing power.
You can also find neem products in other forms, including:
• Wettable powders
• Granules
• Dust
• Emulsifiable concentrates
21. INSECTS DON’T BECOME RESISTANT TO NEEM OIL.
�144/253

Neem Oil benefits © 2020 Growing Clivias for Beginners
Insects do not become immune to neem oil pesticides, as they can with other types of pesticides. This means
that neem oil remains effective, even after repeated applications.
22. IT DOESN’T POLLUTE WATER.
Because neem oil is biodegradable and non-toxic, it will not pollute ground water or cause toxic runoff into
streams and nearby bodies of water. You can use it with total peace of mind.
23. EASY TO APPLY AND CAN BE USED UP UNTIL THE DAY OF HARVEST.
No matter what concentration of neem oil you use, all you need to do is mix it with water and spray it directly on
plant leaves. Follow the label’s directions to make sure you are mixing the right proportions of oil and water.
Many pesticides can’t be used during certain stages of plant growth; however, neem oil can be used throughout
the planting season up until the day you harvest so your plants are never without protection.
24. NEEM OIL USED APPROPRIATELY WON’T HARM BEES, BUTTERFLIES AND LADYBUGS.
�145/253

Neem Oil benefits © 2020 Growing Clivias for Beginners
Pollinators are becoming rare. Chemical pesticides inhibit the bees’ ability to gather food, which ultimately leads
to their death. However, neem oil when used in smaller quantities won’t harm medium to large hives or the
honeybees so you can keep your pollinators and plants alive.
Since neem oil only targets bugs who chew on leaves, neem oil insecticides are safe to use around butterflies,
ladybugs, and most other beneficial insects.
NEEM OIL FOR PLANTS: PRODUCTS TO GET THE JOB DONE - USA
While simple neem oil has many benefits outside of just protecting your garden, in order to give your plant, the
best chance of keeping pests away, healing from disease and preventing fungus we’ve formulated two different
organic neem oil insecticide products.
• Safer® Brand Garden Defense Concentrate with Neem Oil contains clarified hydrophobic extract of
neem oil that makes a more effective product with a longer shelf life and less phytotoxicity
compared to crude neem oil.
• Safer® Brand End ALL™ With Neem Oil RTU is a ready-to-use 1-gallon product that treats up to
700 square feet.
• Safer® Brand BioNEEM® Insecticide with Neem Oil Concentrate is perfect for protecting your
ornamental plants, shrubs and flowers.
• Safer® Brand Neem Oil Concentrate creates up to 16 gallons of Neem Oil spray, allowing you to
tackle fungus, mites and insects.
• Safer® Brand Neem Oil RTU spray is a fungicide, miticide and insecticide that requires no
premixing, just spray it on the plants you want to protect.
To start taking advantage of all the benefits of neem oil for plants, browse the neem oil products from Safer®
Brand and choose the best one for your gardening needs.
NEEM OIL FOR PLANTS: PRODUCTS TO GET THE JOB DONE – South Africa
BIONEEM ACTIVE INGREDIENTS : min 1500ppm AZADIRACHTIN (AJAY BIOTECH)
The key insecticidal ingredient found in the neem tree is AZADIRACHTIN, a naturally occurring substance that
belongs to an organic molecule class called tetranortriterpenoids.
�146/253

Neem Oil benefits © 2020 Growing Clivias for Beginners
It is structurally similar to insect hormones called ‘ecdysones’ which control the process of metamorphosis as the
insects pass from larva to pupa to adult. Metamorphosis requires the careful synchrony of many hormones and
other physiological changes to be successful, and azadirachtin is an ‘ecdysone blocker’. It blocks the insect’s
production and release of these vital hormones. Insects then will not moult, thus breaking their life cycle.
Azadirachtin also serves as a feeding deterrent for some insects. Depending on the stage of life cycle, insect
death may not occur for several days. However, upon ingestion of minute quantities, insects become quiescent
and stop feeding. Residual insecticidal activity is evident for up to seven days or longer, depending on insects
and application rate.
Bioneem is used to control a wide range of insects (up to 200 insect types) including white flies, leaf miners,
mealybug, thrips, fruit flies, leaf hopper, red spider mite, weevils and many more. Azadirachtin is relatively
harmless to insects that pollinate crops and trees, such as butterflies, spiders and bees; ladybugs that consume
aphids; and wasps that act as a parasite on various crop pests. This is because neem products must be ingested
to be effective. Thus, insects that feed on plant tissue succumb, while those that feed on nectar or other insects
rarely contact significant concentrations of neem products.
Acute toxicity study of Bioneem to the Earthworm LC50 > 3000 mg / kg. Acute oral toxicity study of Bioneem to
mice LD50 – 5650 mg / kg. Neem products are recognised in organic guidelines by IFOAM. Bioneem has been
found to be compatible with most commonly used fungicides, insecticides and fertilizers. Physical compatibility
should first be checked out. (Read label).
Do not apply in temperatures above 30 degrees C. Bioneem is an emulsifiable concentrate.
INFORMATION
APPLICATION RATES: vary between 300 ml – 500 ml per 100 L water, depending on the growth stage of plant
and insect pressure.
PACKAGING: 250ml, 500ml, 5ℓ, 10ℓ, 25ℓ containers.
REGISTRATION:
RSA Registration # L 6958 Act 36 / 1947
Certified organic by Ecocert
�147/253

Neem Oil benefits © 2020 Growing Clivias for Beginners
NEEM OIL FOR PLANTS: PRODUCTS TO GET THE JOB DONE – Australia
Neem Plant Spray - Concentrated 250ml, 1L, 5L & 20L
Our Concentrated Neem Plant Spray contains pure Neem Seed Oil which has been cold pressed, along with an Australian Certified Organic wetting agent.
Ideal for using on commercial crops, home gardens with lawns, shrubs, ornamental plants, vegie beds, hydroponics, etc., as well as organic and non-organic growers.
Can be applied (diluted) on its own or with other liquid fertilisers, can improve growth of crops and be used as a plant food. Traditional uses indicate this product is non-toxic to humans, animals, birds, bees & earthworms.
Neem has a rich organic odour and has many beneficial uses. Traditional uses indicate Neem is non-toxic to humans, animals, birds, bees & earthworms. Neem oil contains natural organic Sulphur, proteins, vitamins, glycerines, and various beneficial trace elements. Ideal for use on ornamentals, flowers, vegetable gardens , fruit trees and for the commercial grower.
Neem is an organic formulation suitable for managing a broad range of chewing and sucking insects including caterpillars, curl grubs, thrips, grasshoppers, aphids, scale, mites, lawn armyworm, citrus leaf minor, whitefly, two-spotted mite, mealybugs and fungus gnats in soil. It is ideal for sooty mould.
Our Neem Plant Spray Concentrate contains cold pressed Neem Seed Oil and a certified organic wetting agent. Together they have excellent ‘sticker’ abilities. Mix with water at a rate of between 100 to 1 (10ml to 1 litre water) and 200 to 1 depending on requirements. Spray to cover all parts of the plant. One Litre equates to approx 100-200 litres of spray.
Between 1 1/2 - 2 litres of concentrated spray to 1 hectare is recommended. Spraying should be repeated 7 days after initial spraying and as necessary thereafter. It can be applied on its own or in conjunction with other liquid products to improve growth of crops and as a plant food.
References
USA - https://www.saferbrand.com/articles/benefitsusesneemoilforplants South Africa - https://biogrow.co.za/products/bioneem/ Australia http://neemproductsaustralia.com/productspage/neemplantspray/neemplantsprayconcentrated/
�148/253

1 National Pesticide Information Center 1.800.858.7378
GENERAL FACT SHEET
NEEM OIL
What is neem oilNeem oil is a naturally occurring pesticide found in seeds from the neem tree. It is yellow to brown, has a bitter taste, and a garlic/sulfur smell. It has been used for hundreds of years to control pests and diseases. Components of neem oil can be found in many products today. These include toothpaste, cosmetics, soaps, and pet shampoos. Neem oil is a mixture of components. Azadirachtin is the most active component for repelling and killing pests and can be extracted from neem oil. The portion left over is called clarified hydrophobic neem oil.
What are some products that contain neem oilNeem oil and some of its purified components are used in over 100 pesticide products. They are applied to a wide variety of crops and ornamental plants for insect control. Neem oil can be formulated into granules, dust, wettable powders or emulsifiable concentrates.
Always follow label instructions and take steps to avoid exposure. If any exposures occur, be sure to follow the First Aid instructions on the product label carefully. For additional treatment advice, contact the Poison Control Center at 1-800-222-1222. If you wish to discuss a pesticide problem, please call 1-800-858-7378.
How does neem oil workNeem oil is made of many components. Azadirachtin is the most active. It reduces insect feeding and acts as a repel-lent. It also interferes with insect hormone systems, making it harder for insects to grow and lay eggs. Azadirachtin can also repel and reduce the feeding of nematodes. Other components of neem oil kill insects by hindering their ability to feed. However, the exact role of every component is not known.
How might I be exposed to neem oil People can be exposed to chemicals by eating them, breathing them in, through skin contact and eye contact. Since neem oil is used on a variety of crops, people are mainly exposed to neem oil in their diet. People who apply neem oil may also be exposed if they inhale the mist or dust, let the product touch their skin, or fail to wash their hands be-fore eating or smoking. However, the label includes directions for keep-ing exposure low. For example the label might require applicators to wear protective clothing.
149/253

GENERAL FACT SHEET
NEEM OIL
2 National Pesticide Information Center 1.800.858.7378
What are some signs and symptoms from a brief exposure to neem oilNeem oil can be slightly irritating to the eyes and skin. Azadirachtin, a component of neem oil, can be very irritating to the skin and stomach. The remaining portion of neem oil is made of fatty acids, essential oils and other substances that are com-monly eaten in a normal diet. These substances are generally recognized as safe (GRAS) by the United States Food and Drug Administration.
In other countries, neem oil has been used on cats for flea control. Some adverse reactions have been reported. Symptoms include feeling sluggish, excessive saliva-tion, impaired movement, trembling, twitching, and convulsions. Some of the cats died. However, most of them recovered within 1 to 5 days.
What happens to neem oil when it enters the bodyClarified hydrophobic neem oil (without azadirachtin) is made of fatty acids and glycerides. These substances are commonly found in food. When they enter the body, they are broken down, used for energy, and incorporated into cells.
In one study, scientists injected insects with azadirachtin. They found 90% of the dose in the insects’ feces within 7 hours. The remaining portion lingered in the insects’ bodies for 24 days after the injection.
Is neem oil likely to contribute to the development of cancerNo. People have been exposed to neem oil in many ways for hundreds of years. During this time no association with increased cancer risk has been found. Studies showed that neem oil did not alter or damage genes. In laboratory tests, animals were fed neem oil for 90 days. They did not have increased cancer rates.
Further, one study found that certain components of neem oil caused cancer cells in hamsters to stop growing or die. Another study looked at prostate cancer cells from humans. Researchers found that neem leaf extract was able to slow their growth.
Has anyone studied non-cancer effects from long-term exposure to neem oilIn rat studies, no effects were reported when the rats were fed either azadirachtin or clarified hydrophobic neem oil throughout their lives.
150/253

3 National Pesticide Information Center 1.800.858.7378
GENERAL FACT SHEET
NEEM OIL
Are children more sensitive to neem oil than adultsIn general, children may be especially sensitive to pesticides compared to adults.When rats were fed neem oil in one study, their pregnancies ended. In another study, rats were fed azadirachtin in their diet throughout their lives. No effects to their offspring were found. Additionally, neem oil is used in toothpaste, cosmetics, soaps and traditional medicines around the world. Therefore, people of all ages are commonly exposed to neem oil. No data were found to show that children are more sensitive than adults to neem oil.
What happens to neem oil in the environmentAzadirachtin, a major component of neem oil, is rapidly broken down. Microbes and light break down the pesticide in soil, water and on plants. The half-life of azadirachtin in soil ranges from 3 - 44 days. In water, the half-life ranges from 48 minutes to 4 days. It also rapidly breaks down on plant leaves; the half-life is 1 - 2.5 days. The remaining components of neem oil are broken down by microbes in most soil and water envi-ronments.
Can neem oil affect birds, fish, or other wildlifeNeem oil is practically non-toxic to birds, mammals, bees and plants. Neem oil is slightly toxic to fish and other aquatic organisms. Azadirachtin, a component of neem oil, is moderately toxic to fish and other aquatic animals. It is impor-tant to remember that insects must eat the treated plant to be killed. Therefore, bees and other pollinators are not likely to be harmed.
Where can I get more information For more detailed information about neem oil please visit the list of referenced resources or call the National Pesticide Information Center, between 8:00 AM and 12:00 PM Pacific Time (11:00 AM to 3:00 PM Eastern Time), Monday - Friday, at 1-800-858-7378 or visit us on the web at http://npic.orst.edu. NPIC provides objective, science-based answers to questions about pesticides.
Date Reviewed: March 2012
NPIC is a cooperative agreement between Oregon State University and the U.S. Environmental Protection Agency (U.S. EPA, cooperative agreement # X8-83458501). The information in this publication does not in any way replace or supercede the restrictions, precautions, directions, or other information on the pesticide label or any other regulatory requirements, nor does it necessarily reflect the position of the U.S. EPA.
151/253
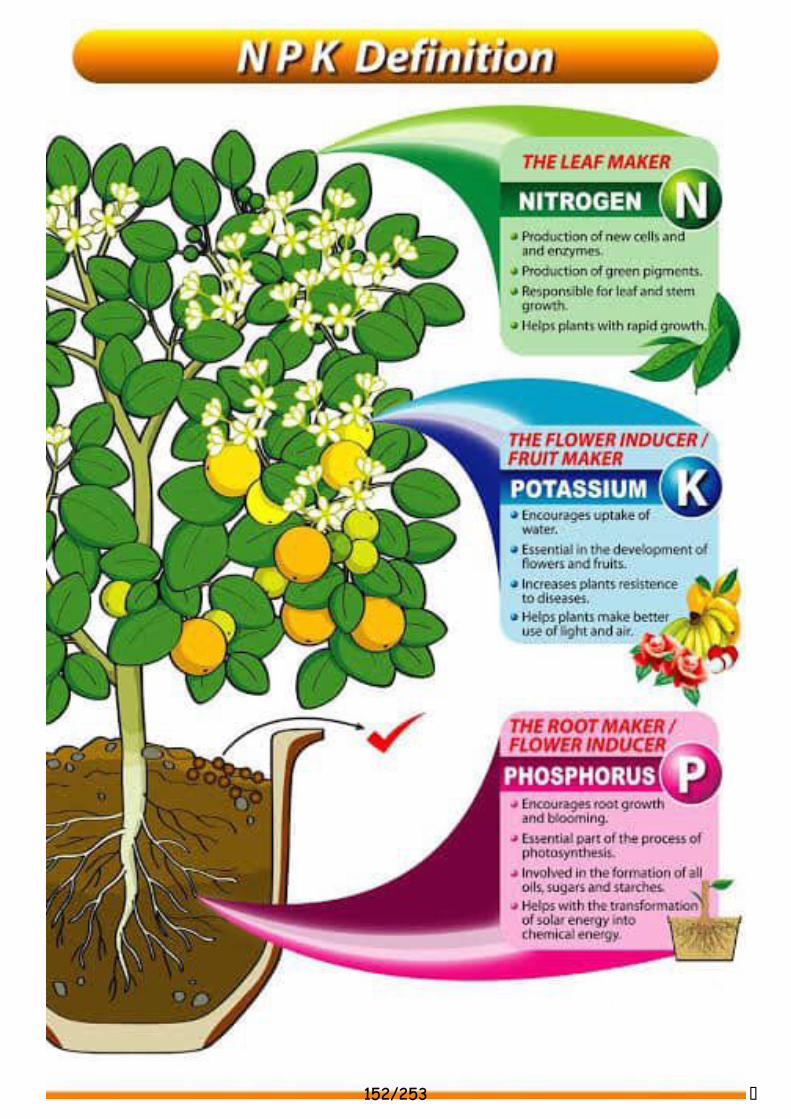
�152/253

Specialised pollination systems are frequent in the southern African flora (|ohnson & Steiner, 2000) and may in fact be the norm in many parts of the world. Certainly the extensive studies on the pollination of Iridaceae have confirmed their existence and predominance
ffi mEfiflxamtf,msx fm Clivia& $erhm Mamn$m6, Sctmfh A*riea
IntroductionVery little is known about the pollination
biology of Amaryllidaceae although it is
evidently diverse, judging from the varietyof flower forms found within the family. Thefirst documented record of moth-poliinationin a southern African representative of thefamlly, Crinum yariabile, for instance, is justa few years old (Manning & Snijman, 2002).Observed or inferred pollinating agents
include sunbirds, butterflies and moths, bees,
and long-proboscid flies (Meerow & Snijman,1998) - in fact most of the common pollinatingagents. Actual observations based on wildplants are in the minority. This is not unusual,however, and it is only Iridaceae among thegeophltes that have been at all intensivelystudied. Observations on cultivated plantsare of little use since the natural pollinatorsare unlikely to be present in such situations,
and in the majority of instances we must inferthe pollination systems from the form of theflower. This can, however, often be done witha high degree of certainty because of the close
reiationship between pollinator type and floralform. The close correlation between pollinatorneeds (in thg form of floral rewards) and floralattractants (shape, colour, and odour) led tothe recognition of the existence of distinctfloral syndromes (Faegri & van der PilI, 1979).
These are associations of floral characteristicsthat correlate with specific pollinator groups.As a consequence it is often possible to predictwith some degree of certainty the pollinatorgroup for which a particular plant species isadapted from the appearance of the flowersalone. Nectar is by far the most common floralreward, valuable to many insects as an energy-rich carbohydrate source, but other species are
visited for the proteins in pollen, or for floraloils, or even for the shelter offered by certainflowers. Plant species differ in the degree towhich they are specialised for a particulargroup of pollinator. Some are generalists thatattract a wide variety of pollinating agents,
while others are specialists, attracting just a
single group (or even species) ofpoilinator. Themore specialised, or exclusive, the pollinationsystem, the easier it is to infer the pollinator.Even the specialised pollination systems,
however, are seldom exclusive, showing somedegree of 'leakinessl by which we mean thatother groups of floral visitors may also act as
pollinators, although always to a lesser extent.
r€
ooa
*o
Moths on Clivia miniata
153/253

in this family. With this background, therefore,
let us look at what is known and lr,hat can be
inferred about the pollination systems in Clivia.
Floral MorphologyTrvo distinct floral tlpes are evident in Clivia:
Tubular: Flowers nodding; perianth sub-
cylindrical, 35-50 mm long and B-10 mm indiameter, the tepals not or scarcely flaring at
the mouth, orange with green tips; stamens
erect, the anthers close together, protruding up
to 8 mm beyond the tepals or hidden in the
mouth of the flower; style central; unscented.(See Fig. 1A).
perianth, within the flora1 tube below the leve1
of filament insertion. The base of the filamentspresses against the style and act as a valve to
close the mouth of the flora1 tube, preventing
the nectar from exuding out ofthe tube.
Floral LongevityIndividual flowers of Clivia are long-1asting,
with unpollinated flowers remaining fresh
for 2-3 weeks. There does not appear to be a
significant dillerence in longevity betrveen the
two floral types but further observations are
required.
NectarClivia flowerc produce large amounts of
moderately concentrated nectar (Tab1e 2).
Volumes secreted per day range between
13-36 microlitres (one microlitre is
equivalent to one thousandth of a milliiitre,or one n-rillionth of a litre), and there does
not appear to be a difference in nectarvolumes between the two flora1 types.
Nectar concentration ranges between
13-27% sllcrose equivalents. Species withtubular flowers appear to secrete slightlymore dilute nectar (13-18 %) than the
species with funnel-shaped flowers (22
27o/o)bfi further observations are requiredto confirm this.
o
;
Fig. 1: Distinct Flor.er Shapes
Funnel-shaped: Florvers spreading; perianthfunnel-shaped, 70-80 mm long and 50-60mm in diameteq the tepals flaring widely at the
mouth, orange with a paler, yellorvish throat;stamens slightly spreading, the anthers well-spaced in a ring at the n-routh of the florver;
style declinate and lyir-rg on the bottom tepal;
usually unscented but son-retin-res reported to
have a sweet-floral fragrance. (See Fig. 1B & C).
In both types the nectar accumuiates ina reservoir in the lolver 5 10 mm of the
A€e
154/253

Table l: Floral and nectar characteristics of Cliyia. (- indicates no observations)
Species FlowerShape
Scent Longevity(Days)
Nectar Volume(Microlitres)
Nectar Concentration(% Sucrose Equivalents)
C, caulescens Tube x l3 l8C, gardeaii,:; Tube x 36 :1J:!4
C,..,:t*iliiiakt:,t:,1:,:l:,1, Fnnilel xt\/, lr8,r11r,r20rtt, :24i7,6'.
C. mirabilis Tuhe x +14
C. nobilis Tube x
irlrl,..ri. r::.:ri:ii::::,r.:::.7
Floral visitorsWild plants: Observations have been
made on single populations of four species
of Clivia. These indicate that the species withtubular flowers are visited by various species ofsnnbirds, while C. miniata, with funnel-shapedflowers, is visited by swallowtail butterflies.Sunbirds alight on the stout peduncle andreach into the nodding flowers with theirbeaks. Pollen is deposited at the base of thebeak. The butterflies, in contrast, alight directlyon the flowers, brushing the anthers l,vith theirbodies and wings.
Cultivated plants: Various observationshave been made of insects visiting cultivatedplants of C. miniata. These mostly involyehoneybees, Apis mellfera (Hymenoptera:Anthophoridae) and hoverflies (Diptera:Syrphidae) (Abel pers. comm.) but alsonoctuid moths (Fisher, 2004). The flies
and bees alight on the anthers on1y, wherethey gather pollen (Fig. 2), while the mothssettled within the flowers.
ConclusionsSpecies of Clivia produce two flora1 types
that accord with two dift-erent specialisedfloral syndromes. The tubular flowers thatcharacterise the majority of species are typicalof other southern African bird-pollinatedplants of the gullet-type, both in shape andcoloration (Rebelo, 1987; Goldblatt et al.,
1999). The long beaks of sunbirds are adaptedto probing for nectar in narrow tubuiar flowers,from which r.isitors with shorter mouthpartsare denied access to the nectar. The divisionof the flower into two sections: a tubular,nectar-containing portion at the base that is
more or iess blocked by the insertion of thefilaments; and a cylindrical upper portion is
Table 2: Pollinator observations in wild populations of Clivia. (- indicates no observations)
Species Visitor Localitv data
C. caulescens Black Sunbird Codt Window (Manning pers. obs.)
C, gardenii Sunbird species KZN coast (Val Thurston pers. obs.)
C. miniata Citrus Swallowtail Morgan's Bay (Colin Patersol.fqles pers, otisi)
C. mirabilis Malachite Sunbird Oorlogskloof (Manning pers. otrs. )
C. nobilis
�155/253
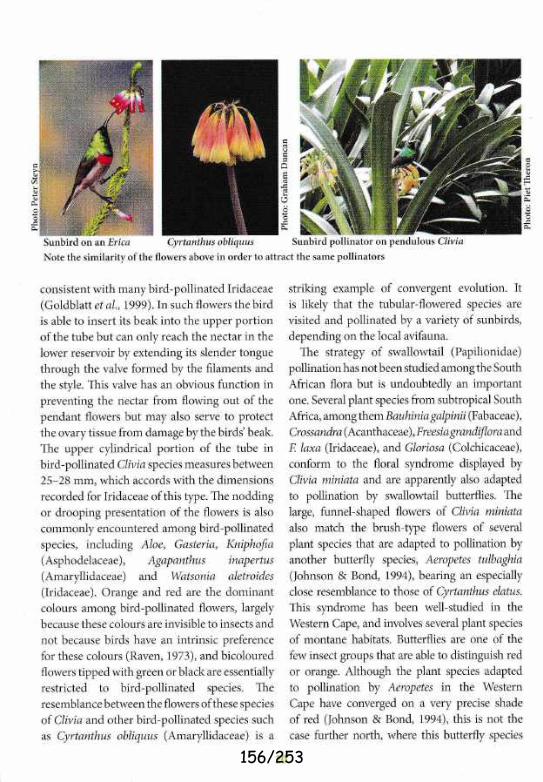
Iower reservoir by extending its slender tongue through the valve formed by the filaments and pollination has not been studied among the South the style. This valve has an obvious function in African flora but is undoubtedly an important preventing the nectar from flowing out of the one. Several piant species from subtropical South
pendant flowers but may also serve to protect Africa, among them B auhini a galp i ni i (F ab ace ae),
the ovary tissue from damage by the birds' beak. Cr o s s an dr a ( Acanthaceae ), Fre e s ia gr an diJl o r a ar,d The upper cylindrical portion of the tube in F. loxa (kidaceae), and Gloriosa (Colchicaceae),
bird-pollinate d Cliv ia specres measures befi,veen conform to the floral syndrome displayed by 25-28 mm, which accords with the dimensions Chyia miniata and are apparently also adapted recorded for Iridaceae ofthis rype. The nodding to pollination by swallowtail butterflies. The
or drooping presentation of the flowers is also large, funnel-shaped flowers of Clivia miniata commonly encountered among bird-poilinated also match the brush-qpe flowers of several
species, including Aloe, Gasteria, KniphoJia plant species that are adapted to pollination by (Asphodelaceae), Agapanthus inapertus another butterfly species, Aeropetes tulbaghia (Amaryllidaceae) and Watsonia aletroides (fohnson & Bond, 1994), bearing an especially (Iridaceae). Orange and red are the dominant close resemblance to those of Cyrtanthus elatus.
colours among bird-pollinated flowers, largely This syndrome has been well-studied in the because these colours are invisible to insects and Western Cape, and involves several plant species
not because birds have an intrinsic preference of montane habitats. Butterflies are one of the for these colours (Raven, 1973), arrd bicoloured few insect groups that are able to distinguish red flowers tipped with green or black are essentially or orange. Although the plant species adapted
restricted to bird-pollinated species. The to pollination by Aeropetes in the Western resemblance betn een the flowers ofthese species Cape have converged on a very precise shade
of Clivia and other bird-pollinated species such of red (|ohnson & Bond, 1994), this is not the
as Cyrtanthus oblirluus (Amaryllidaceae) is a case further north, where this butterfly species
a
d
Note the similarity of the flowers above in order to attract the same pollinators
consistent with many bird-poilinated Iridaceae(Goldblatt et al., 1999).In such flowers the birdis able to insert its beak into the upper portionofthe tube but can only reach the nectar in the
striking example of convergent evolution. Itis likely that the tubular-flowered species are
visited and pollinated by a variety of sunbirds,
depending on the local avifauna.
The strategy of swallowtail (Papilionidae)
Cyrtanthus obliquusSunbird on an Erica Sunbird pollinator on pendulous Clivla
156/253

visits flowers in a range of hues between orange
and red. Orange or red flowers are also highlyattractive to swallowtail butterflies, includingPapilio nireus, which are also attracted to thepale blue of Plumbago (personal observation).The exposed anthers in C. miniata are well-placed to brush the body and wings of visitingbutterflies and the position of the stigmaalong the circumference of the ring of anthersensures that it is best positioned to brushpollen off the insect. The Citrus Swallowtail,Papilio demodocus, is widespread throughAfrica, and although it favours more open,wooded country (Van Son, 1949) it is often seenpatrolling the edges offorest patches and bushclumps, where its larval food plants grow. Theseare mainly forest trees in the Citrus family, suchas Calodendron, Clausena and Toddalia. It ishighly probable that other sp ecies of Papilio alsowsit Clivia miniata.
The large amounts of more dilute nectarsecreted by the bird-pollinated species ofCliyia are typical of other bird-pollinatedplants. Nectar of bird-pollinated Iridaceaetypically ranges between 15-40 microlitres(as much as 119 microlitres in large-floweredWatsonia species), at a concentration of l0-25o/o (rarely up to 35%) sucrose equivalents(Goldblatt et al., 1999). Plants adapted topollination by Aerop etes, tr't contrast, typicallysecrete smaller quantities, ranging between2-27 microlitres, of moderately concentratednectar in the range l5-35o/o sucroseequivalents (fohnson & Bond, 1994) butthere is substantial overlap between the two.The more concentrated nectar secreted byClivia miniata is consistent with pollinationby large butterflies, as is the developmentof fragrance in some forms. Fragrance is animportant attractant in several butterfly-pollinated species (Andersson et al., 2002)but is not part of the floral syndrome in bird-pollinated species.
The short mouthparts of the honeybees andhoverflies observed visiting cultivated plantsof C. miniata preclude them from reaching thenectar and it is also evident that these insectswere concerned respectively with gathering andeating pollen. It is not inconceivable, however,
that the bees in particular (hoverflies are far moreaccomplished fliers), may accidentally brushagainst the stigma and succeed in transferringpollen to it. Noctuid moths,however, may be moresuccessfi.rl as pollinators.
During field studies aroundNieuwoudMlle I have
frequently observed thatnoctuid moths becomeactive during the iate
afternoon, when they visita variety of flowers that are
adapted to pollination byother agents. The extent oftheir involvement as such
secondary pollinators has
not been assessed but may be
signiflcant. There is no doubt,however, that these insects
are incidental pollinators ofClivia at best, and their rolein wild populations remainsto be assessed.
Both groups of primarypollinators in Cliy ia, swbir ds
and swallowtail butterflies, are polylecticforagers that visit a wide variety of flowers fornectar. Theyare thus not dependent onCliviaas a food source. In contrast, Clivia species
have evolved specialised pollination systemsthat rely on a single group of pollinators.Further observations are likely to reveal thateach Clivia species is pollinated by severaldifferent species of sunbird or swallowtail thatcomprise local suites ofspecies present at thedifferent localities.
!q
E
U
Though frequentfloral visitors, antsare rnlikely Cliviapollinators.
�157/253

Evolutionary considerationsThe cladistic analysis of Clivia (Conrad &
Reeves, 2002) is consistent with the hypothesis
that bird-pollination is ancestral in the genus
and that the switch to butterfly pollinationis a subsequent, derived characteristic. Inthis context it is highly significant that the
divergence among the bird pollinated taxa inthe genus has taken place along a geographical
cline, with little or no overlap between each. Itis only C. miniata, that is adapted to pollinationby butterflies, which occurs across the range ofany other specles (in this case across the ranges
of three different species). Fertile hybrids can
be produced between all of the species ofCliyia artd it is presurnably this adaptation to
different pollinators that made it possible forC. miniata to expand its range in this r'vay. The
substantial overlap in floral coloration and
nectar quality between bird and large butterflypollination makes the shift between them an
easy evolutionary event.
References
Andersson, S., Anders Nilsson, L., Groth, I. &Bergstrom, G., (2002). Floral scents in butterf\-pollinated plants: possible convergence in chemical
composition. Botanical Journal oJ the Linnean Society
140:129-153.
Conrad, F. & Reeves, G., (2002). Molecular systematics
of the genus Clivia. CLIVIA 4,20 - 23.
Faegri, K. & van der PUl, L., (1979). Tlrc principles oJ
pollination blologl. Pergamon Press, Oxford.
Fisher, R., (2004). NZCC Neu.zletter r.ol. 2.3
Goldblatt, P, Manning, f.C. & Bernhardt, P, (1999).
Er.idence of bird pollination in Iridaceae of southern
Africa. Adansonitt 27: 25 40.
Johnson, S.D. & Bond, \,{J., (1994). Red florvers ancl
butterfly pollination in the fynbos of South Africa.1r; M. Arianoutsou & R.H. Grotes. Plant-AnimalInteractions in Mediterranean-Type Ecosystems, 1,37
148. Klurver Academic Publisl.rers.
|ohnson, S.D. & Steiner, K.S., (2000). Generalization
versus specialization in plant pollination systems. Izndsin Ecology and Evolution 15: 140- 1 43.
Nlanning, J.C. & Sni.jman, D., (2002) Harvkmoth-
pollination it Crinum variabile (Amarvllidaceae) and
the biogeograph,v of sphlngophily in southern AfricanAn.raryllidceae. South Aliican lournal o.f Botany 68:
212 216.
NIeerou., A.\\1 & Snijn-ran, D., (I998). Amarl.llidaceae.
In: K. Kubitzki. The Fanilies arul Genera of Vascular
Plants lll, 83- I 20. Springer-\'erlag, Berlin.
Raven, PH., (I973). Wh,v arre bird-r.isited florvers
predominantly red? Evolution 26: 67 1.
Rebelo, A.G., (1987'). Bird pollination in the Cape Jlora.ln; A.G. Rebelo. A preliminary synthesis of pollinatlor.r
biologv in the Cape flora, 83-108. South AJrican
National ScientiJic Programmes Report 141.
Van Son, G., (1949). The ButterJTies oJ southern AJiica.
Part 1. Papilionidae and Pieridae. liansv:ral Museum,
Pretoria.
Acc(iqj
aa
Northern Club Shoq Owner: Dawie van Heerden A moth on a light coloured Cllt la.
�158/253

How to Store Your Seeds, any seed types
Have you ever had the perfect flowers in your garden and planted the seeds from the same packet the next year to have them fail to sprout? Perhaps you've stumbled across an old packet of beans that you tossed in a spare corner of your garden, thinking they'd never sprout just to have them come up with vibrant, productive plants? The difference between these two situations is usually a very simple one: seed storage conditions. In this article, we'll discuss how to best store your seeds to retain the best possible germination rate to help make your gardening experience a success.
Though they seem like little more than bits of organic matter in your hand, we've all seen the miracle that takes place when seeds are planted in fertile, damp ground. From a child's bean plant project in early primary school through to the largest agricultural concerns in the country, the entire process starts with viable seeds that have been properly prepared and stored in the right conditions. But why are storage conditions so important to seed viability?
Seeds are a living organism. They're in a dormant state, but much like animals that go through hibernation, that doesn't mean the seeds don't have specific needs to continue to flourish. Think about a pygmy possum. If one were hibernating and the nest grew too cold or was flooded with water, the possum wouldn't be able to survive, even though its needs for warmth and oxygen are decreased while in that state. Seeds also have needs while they are in a dormant state. For the most part, this entails removing particular elements from the environment in a controlled fashion. Moisture, light, time, and heat are the three most common elements that will cause problems in the seed's germination rate.
Expected seed lifespan
But how long can you store those corn seeds from your great aunt's garden before they lose viability? If they're stored properly, it could be a great deal longer than you'd think. There are a number of seeds which, with appropriate storage, can last up to ten years. These long-lived seeds include many varieties in the nightshade family, including tomatoes and capsicum, as well as sunflowers and beans. However, other plants have a much shorter window of viability. Onion family seeds tend to have a very short lifespan, from six months to two years.
You'll also notice significant differences between varieties in a particular type of plant. Cauliflower seeds, for example, will still germinate for three to four years after harvest. However, the White Rock variety of cauliflower often loses viability after only a single year, a disappointment for gardeners who appreciate the variety's dependability, early yield, and delicious flavour. Generally speaking, though, the majority of seeds will survive about three years in proper storage conditions.
But where are the outliers in seed viability over time? A couple recent archeological finds have revived species of plants that had been lost to extinction. A Canadian archeological dig discovered a jar of squash seeds that were about 800 years old. The clay vessel helped moderate humidity and kept the seeds in the dark while Canada's naturally cool climate prevented the seeds from losing viability, allowing the large squash to be grown again and revived from its extinct status. When Herod the Great's palace in Israel was excavated in the 1960's, a small clay jar of Judean date palms was discovered that was dated to 2,000 years old and had been extinct for fifteen centuries. Stored carefully for over four additional decades, a botanist decided to plant one in 2005 to see what would happen. It germinated, reviving another lost species. By comparison, some alpine species drop to a 50% germination rate within 95 days.
�159/253

Preparing your seeds for storage
What did these two extinct species have in common in terms of storage? Both were buried, providing a lower temperature that conditions at the surface would provide. The clay pots they were stored in provided a naturally dry environment, preventing the seeds from sprouting prematurely. The darkness of the jar's interior prevented the seeds from trying to sprout to take advantage of photosynthesis. These are the same conditions you'll want to encourage in your seed storage activities. If you're only storing the seeds for a few months, a cupboard or drawer in your home is usually a viable option, but for longer-term storage, you'll want to take additional measures.
One other very important task to undertake is proper labeling of your stored seeds. Though it won't affect the overall seed viability, it may prevent you from providing the right storage conditions if you move the seeds into the wrong environment, believing them to be a different species or variety. During the hustle and bustle of gardening, save yourself the aggravation of leaving your seeds unlabeled. Make sure you include the main type, the variety name, and the date opened or harvested to help you determine viability down the road.
Storing seeds
How to Store Your Seeds
To avoid any unnecessary loss in quality store your seeds in a dark, dry, cool location. A cupboard or a drawer is normally sufficient for short term storage (i.e.: 6 months).
If you intend to store your seeds for a longer period, we recommend you store them in your fridge, this will dramatically increase the life of your seeds. Seeds should be put in an airtight container/jar together with some desiccant/silica gel (if unavailable an envelope filled with powdered milk or rice is a good alternative).
Make sure not to freeze your seeds, if done incorrectly freezing can kill seeds instantly.
When removing your seeds from the fridge allow the container to come to room temperature before opening, this avoids condensation.
Keeping cool:
One of the top two factors in extending seed viability involves controlling temperature. In the wild, fluctuating temperatures cause seeds to sprout, while constant cool temperatures allow the seeds to remain dormant, much as winter temperatures do in the wild. One way to meet the need for constant cool temperature is by storing the seeds in an air-tight container with a desiccant in the refrigerator, preferably in a larger sealed container or drawer that won't warm up every time the door is opened.
Though it may be tempting to freeze the seeds, be aware that doing this incorrectly can instantly kill plant seeds for many species.
The importance of moisture content:
Moisture content is the other major factor in stored seed viability. Seeds are designed to only sprout when they have sufficient moisture to support the seedling. That means the easiest way to prevent seeds from sprouting is by storing seeds that have been sufficiently dried and using a low-humidity environment that prevents this process from starting.
The easiest way to achieve a low-humidity environment is to store the seeds in an air-tight container with a desiccant. The desiccant can be a specific product for seed storage, a silica packet or two from a
�160/253

new bag, pair of shoes or medicine bottle or a bit of rice or powdered milk in a paper envelope. If you've decided to store your seeds in a refrigerator to prolong their viability, make sure they are dried sufficiently prior to being placed in the refrigerator in an air-tight container. When you remove the seeds, keep the container sealed until it has reached room temperature. If you don't, the humidity in the room air can condense on the seeds, causing earlier germination than you may intend.
Light:
Light is the last main factor that will affect the lifespan of stored seeds. When seeds are stored it is important to block out all light and store seeds in total darkness. This can easily be achieved by storing seeds in thick paper bags/envelopes or an opaque container.
The methods mentioned above apply to the majority of herb, vegetable and flower seeds, but as with all things in life, there are exceptions to the rule. Some seeds for instance actually need to be stored in damp conditions to remain viable.
Storing seeds is a great way to save money and plant household favourites in succession, but only if done correctly. By following our tips here, you'll easily be able to successfully store your seeds for a significantly longer period of time.
�161/253
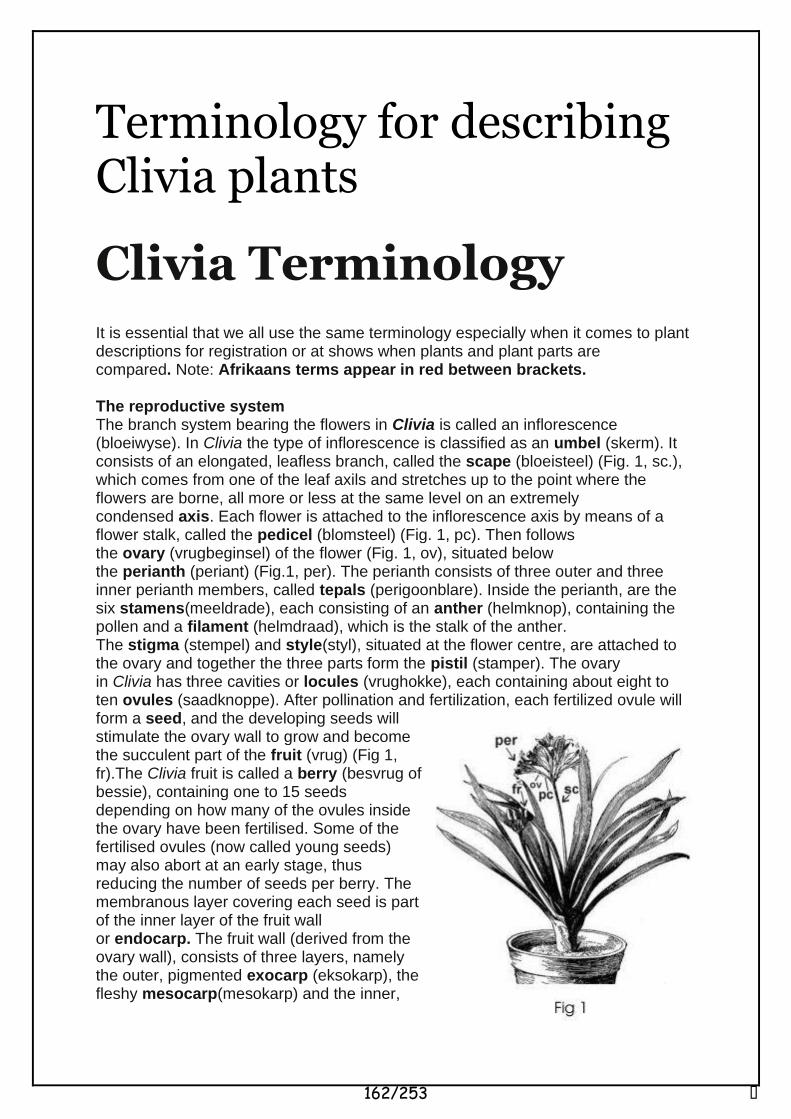
Terminology for describing Clivia plants
Clivia Terminology
It is essential that we all use the same terminology especially when it comes to plant descriptions for registration or at shows when plants and plant parts are compared. Note: Afrikaans terms appear in red between brackets. The reproductive system The branch system bearing the flowers in Clivia is called an inflorescence (bloeiwyse). In Clivia the type of inflorescence is classified as an umbel (skerm). It consists of an elongated, leafless branch, called the scape (bloeisteel) (Fig. 1, sc.), which comes from one of the leaf axils and stretches up to the point where the flowers are borne, all more or less at the same level on an extremely condensed axis. Each flower is attached to the inflorescence axis by means of a flower stalk, called the pedicel (blomsteel) (Fig. 1, pc). Then follows the ovary (vrugbeginsel) of the flower (Fig. 1, ov), situated below the perianth (periant) (Fig.1, per). The perianth consists of three outer and three inner perianth members, called tepals (perigoonblare). Inside the perianth, are the six stamens(meeldrade), each consisting of an anther (helmknop), containing the pollen and a filament (helmdraad), which is the stalk of the anther. The stigma (stempel) and style(styl), situated at the flower centre, are attached to the ovary and together the three parts form the pistil (stamper). The ovary in Clivia has three cavities or locules (vrughokke), each containing about eight to ten ovules (saadknoppe). After pollination and fertilization, each fertilized ovule will form a seed, and the developing seeds will stimulate the ovary wall to grow and become the succulent part of the fruit (vrug) (Fig 1, fr).The Clivia fruit is called a berry (besvrug of bessie), containing one to 15 seeds depending on how many of the ovules inside the ovary have been fertilised. Some of the fertilised ovules (now called young seeds) may also abort at an early stage, thus reducing the number of seeds per berry. The membranous layer covering each seed is part of the inner layer of the fruit wall or endocarp. The fruit wall (derived from the ovary wall), consists of three layers, namely the outer, pigmented exocarp (eksokarp), the fleshy mesocarp(mesokarp) and the inner,
�162/253

membranous endocarp (endokarp). The suffix “carp” refers to fruit.
Please note that the Clivia fruit is not a pod or seed pod as so often seen in the literature. Pods are the fruit of peas, beans and other leguminous plants and the Clivia is surely not a legume. The Clivia fruit is also not a seed, since the seeds are contained inside the fruit which is classified as a berry. In future, please use the names given in bold in the above paragraph.
The Vegetative Parts
The vegetative plant starts with the germinating seed. Clivia seeds are naked since they do not have a seed coat. They are also recalcitrant (onortodoks), which means that they can germinate spontaneously, even in the ripe fruit; they can only be stored for a limited period of time and will die if desiccated beyond a certain point. The
seed consist of the endosperm (kiemwit) enclosing the embryo (embrio) consisting of one cotyledon (c in the figure), a plumule (pluimpie) and a radicle (kiemwortel of radikula). The whole embryo is embedded in the endosperm and the tip of the radicle can be observed as a dark spot on the one end of the mature seed. During germination the cotyledon elongates to about 0,5 to 1 cm, thus pushing the plumule and radicle out of the seed, whilst the radicle starts to elongate to become the primary root (primêre wortel). The primary root immediately produces a collar of root hairs (wortelhare) behind the root tip, and continues to do so as the root grows. The primary root (r1 in the figure) normally does not form secondary roots(sywortels). It has a limited life span and is soon followed by adventitious roots(bywortels) originating from the first and later nodes (r2 in the figure).
The junction of the plumule or apical bud (apikale groeiknop) and the primary root forms the first node (knoop) of the stem where the cotyledon with its cotyledonary sheath(saadlobskede) (cs in the figure) is attached. The cotyledon acts as a haustorium, (suigorgaan) responsible for absorbing nutrients from the endosperm. The first vegetative leaf (b1 in the figure), produced by the apical meristem (apickale meristeem) of the plumule, consists of a sheath (blaarskede) with a very small lamina (blaarskyf). In orange and red Clivias the sheath of the first leaf is pigmented.
Figure 2 shows a young seedling (kiemplant) of Clivia miniata (1) as well as a longitudinal section of a slightly older seedling (2). The figure was copied from R Wettstein (1935). Handbuch der Systematischen Botanik.
Hannes Robbertse
�163/253

[This article is a summary by us of extracts from a more detailed technical paper, preparedly Marc Visserjor the Experimental Nursery Bloemisterij, Belguim, as the first part of a Manual for serious plant growers. We have left out the more advanced chemical and other technical data but a full copy of the translation of the paper into English is available on request. Readers who are not at all technically inclined will benefit particularly from the very handy and practical diagnostic tables setting out the symptoms of and a key to the recognition of nutritional problems. These will be found in sections four and five. In section six we have also added a key for the symbols of the chemical elements referred to. Eds.]
CONTENTS:
1. Introduction
Page
44
2. Theoretical Background to the Various Nutrients
Important Plant components, molecules and elements
Protein molecules Polysaccharides Fats Chlorophyll ADP- and ATP- molecules RNA- and DNA- molecules Hormones Enzymes activators and coenzymes Polyvalent elements The most important element in the cell sap - K
45
45 45 46 46 47 47 47
48 48
48
Page The most important element in the cell wall - Ca 48 Summary of constituents, and composition of plants 49
Important life processes in the plant 50
General Summary of various life processes in the plant 50 Photosynthesis 50 Respiration 50
3. Functions of the elements 52 4. Symptoms of deficiency and
surplus and risk factors 56 5. Key to the recognition of
nutritional aberrations 58 6. Table of chemical symbols used 59
1. INTRODUCTION
Many symptoms of stress are seen in pot plants. While problems may arise due to spray damage, sunburn, desiccation, cold or frost, physiological effects etc., the most common cause is a surplus or deficiency of a specific nutrient.
Some unders tanding of the underlying theory is necessary for one to gain a better insight into nutrition and the problems that arise from a surplus or deficiency in specific nutrients.
�164/253

2. THEORETICAL BACKGROUND TO THE VARIOUS ELEMENTS
IMPORTANT PLANT MATTER, MOLECULES AND ELEMENTS
Plants consist of 90% water and 10% dry matter.
The dry matter can be divided into organic and inorganic materials.
The greatest portion consists of complicated organic compounds which are formed from only C, H and O. These elements make up together 94% of the dry matter in plants. They are synthesized from water, H2O (from the soil) and carbon dioxide, CO2 (from the air.)
All the organic compounds are synthesized via the sugars that are formed dur ing photosynthesis. These sugars are very soluble and are transported from the green parts of the plant throughout the whole plant. In various parts of the plant they are used in the synthesis of various organic molecules (complex sugars, proteins, fats, chlorophyll, ).
The inorganic materials make up only 6% of the dry matter. The most important element of these is N that occurs inter alia in the living plant material (proteins). Sulphur is also an essential constituent of proteins. But after these, also Mg and Fe (leaf formation), Ca and K (cell membranes) and P (energy storing and release) are absolutely essential for complete plant development. These are the major elements.
All these elements must either be present in the soil or must be suppl ied through fertilization.
In order to appreciate the functions of the various elements it is important to know the structures of the important plant molecules in which they are incorporated.
C. miniata 'Inspiration' Grower: Keith Rose The following plant const i tuents are discussed:
Protein molecules. Polysaccharides or sugar molecules. Fats. Chlorophyll or leaf pigment. ADP- and ATP-molecules. RNA- and DNA-molecules. Hormones. Enzyme activators and Coenzymes. Polyvalent elements. The most important element in the cell sap: K. The most important element in the cell structure: Ca. Summary of components and composition of plants.
Protein molecules Importance:
The dry matter of the living part of every cell consists especially of proteins. These proteins are essential components of the living organism. They determine to a large degree the cell structure and also control all chemical reactions in the cell: enzymes are indeed also proteins. Absorbed nitrate, sulphate and carbon are converted to form amino acids which are joined together to form peptides. Various polypeptide chains together form a protein. The promoting elements are Mn and Mo.
Polysaccharides Importance:
Polysaccharides or sugars are firstly
�165/253

important energy sources for plants: they are p roduced du r ing pho tosyn thes i s ( t r a p p i n g of p h o t o e n e r g y ) and its consequence, all energy rich compounds which can be broken down (= oxidized) dur ing respirat ion to make available chemical energy. This energy is necessary for all life processes in the plant, for heat p roduc t ion by the plant , for g rowth (mechanical energy: roots must thrust channels in the soil, leaves must develop from buds, ).
Polysaccharides are essential to the plant for the construction of cell structures: cellulose chains give strength to cell membranes.
The sugar content of fruits is also determined by them.
Elements:
They are formed from C, H, and O and a c c o r d i n g l y a r e a l s o k n o w n a s carbohydrates. The majority of sugars are very soluble and are thus readily distributed throughout the plant.
Promoting elements:
- Mg and Mn derive importance from being constituents of enzymes that regulate carbohydrate metabolism (eg. with Mn deficiency sugar deficiency occurs in roots).
- B not only is involved in sugar synthesis but also in phloem transport to the growth points, fruits and leaf nodes, ....
Since the formation of elementary sugars only takes place in the green parts of the plant, these must be transported throughout the p l a n t to the n o n - g r e e n p a r t s .
Fats
Importance:
Both fats (many single bonds) and oils (many unsaturated bonds, double bonds, ) occur in the cytoplasm of plant cells. On one side they serve as an energy source when too few sugars are available while on the other they are impor t an t in cell wal ls as phospholipids.
Some lipids can also determine the colour of plant parts, e.g. carotenoids (the orange colour of carrots).
C.miniata Breeder and grower: Y. Nakamura
C. miniata variegated Breeder: Y. Nakamura
Chlorophyll, green leaf pigment
Importance:
This molecule belongs to the group of pigments and consequently results in the colour of p l an t s ; more specifically, chlorophyll a is responsible for the green colour of plants. Furthermore, chlorophyll is of crucial importance for photosynthesis. It can absorb light energy.
Composition:
The chlorophyll molecule is composed of C, H, O, N, and Mg. Mg is the central atom and a deficiency of Mg or N therefore manifests itself immediately as a lighter green plant colour.
�166/253

Synthesis:
In the formation of chlorophyll, Fe is also important because Fe is a constituent of the enzymes that stimulate the formation of the pigment.
ADP- and ATP-molecules
Importance:
The molecule ATP is responsible for the trapping of light energy as chemical energy (photosynthesis) and for the energy transport in the plant (ATP is released dur ing respiration). Without this molecule energy transport to the various parts of the plant would be endangered and the life processes and movements of the place could not take place.
Elements:
These molecules are composed of the elements C, H, O, N, and P and P plays a crucial role.
Synthesis:
ATP or adenosine t r iphosphate that is available for plant processes principally formed during respiration (see p. 50). ATP is the molecule, which stores light energy in the form of chemical energy.
RNA- and DNA-molecules
= ribonucleic acid and desoxyribonucleic acid
Importance:
These molecules determine the genetic structure of every plant: every plant has a different DNA composition.
Elements:
There are five elements, C, H, O, N and P.
Promoting elements:
-Mg is a constituent of the enzyme RNA-polymerase that produces RNA.
-B is also important in the formation of nucleic acids.
C. miniata. Grower: Bertie Guillaume
Hormones Importance
Various hormones function within the plant as growth and flowering regulators. They participate in various conversion processes within the plant such as protein synthesis, respiration, etc.
Elements:
Their elements are, C, H, O, N and CI.
Promoting elements:
-Zn is necessary for the formation of IAA (indoleacetic acid) and B drives the breakdown of IAA.
-Mo is necessary for the formation of ABA (abscisic acid)
Well known hormones:
N-containing:
-Indoleacetic acid (IAA) for the promotion of growth and root formation. Influence on cell stretching = auxine
N-free:
-Naphthylacetic acid (NAA): promotes root formation.
-Gibberellic acid (GA): promotes growth in height and flowering.
�167/253

Interspecific Clivia 'Apricot Flush'. Breeder and grower: Brian Tarr
Enzyme activators and Coenzymes
Activators: Many free metal ions (cations) can activate enzymes. Among these Mn++, Co++, Mg++, Zn++, Mo6+ and Ni++ fulfil this role.
Coenzymes: Many enzymes require for their activity the presence of coenzymes; these are mostly complicated organic compounds containing metal ions: Fe, Cu, Zn, Mo,
Polyvalent elements
In photosynthesis elements having many va lency s ta tes are very i m p o r t a n t :
-iron: Fe2+ and Fe3+
-copper: Cu+ and Cu2+
-manganese: Mn2+,. Mn3+, Mn4+, Mn6+, Mn7+
-molybdenum: Mo2+, Mo6+
These have the capacity to oxidise or reduce and thus t ransport electrons to other compounds. This electron transport is necessary for photosynthesis.
The most important element in the cell sap: K = not incorporated in plant molecules
By far the most important element in this connection is K, which is present as the K+ -ion. The potassium ions remain in solution or occur adsorbed on specific plant
Interspecific Clivia 'Pink Sensation'. Breeder and grower: Wessel Lotter
structures. It thus accounts for a great deal of the salt concentration and consequently the osmotic pressure of the cell sap (together with the other ions in solution), and it is hereby very important amongst other things for the water balance of plants. Nitrates and chlor ides also play a major role in osmoregulation.
The most important element in the cell wall: Ca
Ca strengthens the cell wall by making bridges between the phospholipids and other cell wall materials. Furthermore this element, together with K, determines the distribution of load on the cell wall and the porosity.
In addit ion the carbohydrates are also important in membrane formation; only water soluble sugars are suitable for this, namely cellulose chains (one talks of cell material), The cell wall must not be subject to degradation. In contrast to reserve sugar chains such as starch, cellulose is very stable (does not react easily with other materials, does not dissolve).
K, Mg, and B also play an important role in the formation of the cell wall.
�168/253

Clivia miniata 'Ramona'. Breeder: Dave Conway Clivia miniata 'Quin's Moon'. Class winner KZN Grower: Hugh Bollinger 2001. Breeder: Y. Nakamura Grower: Pat Quin
Summary of components and composition of plants
Table 1 below presents a collective summary of the different plant molecules or elements discussed.
Important components and molecules
1. Proteins, Enzymes
2. Polysaccharides, Sugars
3. Fats, Oils, Lipids 4. Chlorophyll, Green leaf
pigment
5. ATP
6. DNA
7. Hormones
8. Enzyme activators
and Coenzymes
9. Polyvalent elements
10. Most important ion(s) in cell sap
11. Most important element(s) in cell wall
Constituent elements
C, H, O, N, S, (P)
C,H,0 C, H, O, P
Mg, C, H, O, N
C H, O, N, P
C H, O, N, P
C, H, O, (N, Cl)
Mn++, Co++, Mg++, Zn + + ,Mo 6 + ,Ni + +
Fe, Cu, Mn, Mo
Fe, Cu, Mn, Mo
K+, (N03", Cl")
Ca (P, C, H, O, Mg, B)
Anabolic elements (promote formation)
Mn, Mo
Mg, Mn, B
Fe
Polyvalent elements
Mg,B Zn,Mo
From the s u m m a r y the e n o r m o u s importance of the elements C, H and O that occur in all plant molecules is apparent.
N also occurs in most of the important molecules.
�169/253

IMPORTANT LIFE PROCESSES IN THE PLANT
General
The plant uses solar energy to synthesize sugars from primary materials, water and C02 (photosynthesis = trapping of solar energy and sugar synthesis).
Everything that lives must respire, also the plant. The synthesized sugars serve this purpose. During respiration they are broken down and the plant gains energy for its activities, such as plant development , chemical reactions in the plant , heat maintenance, etc.
( r e s p i r a t i o n = b r e a k d o w n of photosynthesised sugars with the release of chemical energy).
Note: both unsuitable simple sugars, also complex sugar molecules and even synthesized fats are employed in respiration; in emergency situations even proteins can be respired.
Not all sugars formed during photosynthesis are consumed in respiration. The surplus sugars (residual sugar) can be used for increasing dry material and thus growth. During growth the plant produces more sugar than it uses (growth = conversion of residual sugar to new plant molecules
[= new plant dry matter], with the energy derived from respiration).
During growth various materials are formed: complex sugars (sugar synthesis), also other carbohydrates including acids and fats (fat synthesis), and also proteins; the protein synthesis is similarly indirectly linked to the sugar cycle.
For r a p i d g r o w t h a grea t dea l of photosynthesis (sugar formation) and respiration (sugar breakdown but energy production) must occur. Photosynthesis occurs only in the presence of light (thus during the day) and only in the green parts of the plant. Respiration processes take place day and night in the whole of the plant.
Consequently, for growth to occur there m u s t be more p h o t o s y n t h e s i s t h a n respiration. It is therefore important to accelerate photosynthesis by providing h igher t empera tu res du r ing the day (primarily for photosynthesis) than in the night (for only respiration).
Summary of various life processes in the plant.
Photosynthesis: Conversion of light energy into chemical energy, sugar formation
Basic reaction: coupling of carbon dioxide and w a t e r to form s imple s u g a r s .
The importance of polyvalent elements in photosynthesis:
The presence of various polyvalent elements p r o m o t e s t h e l i g h t r e a c t i o n s i n photosynthesis, e.g. Fe, Mo, Cu and Mn (see p. 48). These function as intermediaries in the electron transport that takes place in the light reactions.
When and in what parts of the plant does photosynthesis occur:
Plants photosynthesise only by day or with artificial illumination.
Photosynthesis only occurs in the green parts of plants with large surfaces (especially leaves),
- to a lesser extent in green parts with a smaller surface (thick plant par ts , or yellow / patchy leaves, growth points, )
- never in roots and other non-green parts: flowers.
Distribution of sugars to the roots and other non-green parts is consequently necessary.
Respiration:
Conve r s ion of v a r i o u s energy r ich compounds (sugars, fats, ...) to energy-poor compounds, with release chemical energy.
�170/253

This energy can be used by the plant for:
chemical activity (reactions)
mechanical activity
heat regulation in the plant
When and in what parts does the plant respire:
Plants respire both by day and by night.
Respiration occurs in all parts of the plant. Both green and non-green sections use energy for their growth and consequently must respire (= energy release). Deficient sugar synthesis or transfer will result in much faster growth retardation or die-off in the non-green sections because, with
Clivia miniata runner up any other colour section CC 2001. Breeder: Y. Nakamura Grower: Charl Malan
disruption of the sugar reserves, these will not grow or life-critical proteins will be broken down.
Protein Synthesis:
That is conversion of absorbed nitrate/ sulphate / carbon to proteins, (see p.45)
Polysaccharide Synthesis:
Conversion of absorbed carbon / water to complex sugars, (see p. 45)
Fat Synthesis:
Conversion of simple sugars to fats, (see p. 46)
Clivia miniata winner narrow variegated leaf in flower section NC 2001. Grower: Rory Niven
�171/253

3. FUNCTIONS OF THE ELEMENTS (Table 2)
The majority of elements have multiple functions in the plant. Table 2 presents a condensed summary of the important functions by element.
ELEMENT
Nitrogen (N)
Phosphorus (P)
Potassium (K)
FUNCTION IN THE PLANT
quantitatively the most important element, especially important during the vegetative growth phase
the most important constituent of living plant material, namely proteins and enzymes
constituent of leaf green (chlorophyll molecule) and thereby responsible for the green plant colour and photosynthesis
constituent of DNA (genetic material), vitamins, ATP (energy transport), ....
Nitrates play a part in osmoregulation
especially important during rooting, also after flowering when more phosphorus is necessary
P is a constituent of the most important energy transporter in the cell, namely the ATP molecule (without energy no life processes in the plant!)
P forms strong bonds with C atoms (C-P-C bonds): these are important in the structure of the cell wall, and of the DNA molecules
P is also a constituent of some proteins, and of importance for the formation of some enzymes
together with N quantitatively the most important element, especially important for flowering.
K is the principal element that determines the strength and porosity of the cell wall, and gives resistance to adverse conditions
K has a regulating function in maintenance of water balance: it controls the osmotic pressure of the cell sap and the opening and closing of the stomata
K provides a better utilization of light energy during photosynthesis, and makes possible the transport of the synthesized sugars in the plant
many enzymes function only in the presence of K
�172/253

ELEMENT
Magnesium (Mg)
Calcium (Ca)
Iron (Fe)
Manganese (Mn)
FUNCTION IN THE PLANT
Mg is the central atom in the chlorophyll molecule (leaf green), and thereby is essential for photosynthesis and therewith for the green leaf colour
Mg is of importance for internal ion- and energy transport; it promotes the mobility of phosphates, so also that of the ATP molecule.
Mg is part of enzymes acting as intermediaries in the carbohydrate cycle. A deficiency of Mg results in a sugar deficiency and this manifests itself in the non-green portions (such as roots and fruits, with consequent root inhibition)
Ca is very important for the structure and porosity of the cell walls
Ca stimulates a limited number of enzymes, inter alia those functioning as intermediaries in respiration (= energy release)
Fe stimulates some intermediary enzymes in the synthesis of chlorophyll, and is thereby indirectly of importance for photosynthesis
Fe is one polyvalent ion that can switch valency (2+ and 3+). Thereby the element is involved in electron transport during photosynthesis
Fe is important for root meristem growth
Mn is like Fe a polyvalent ion that can switch valency (2+ and 3+). Thereby it is involved in electron transport that occurs in photosynthesis
Mn activates various intermediary enzymes in protein synthesis (it promotes nitrate reduction and the conversion of nitrites in amino acids
Mn deficiency raises nitrate levels in the leaves
just as Mg, Mn also forms part of enzymes that control carbohydrate metabolism; a Mn deficiency results in a sugar deficiency in the roots
Mn also activates the enzyme that breaks down IAA
�173/253

ELEMENT
Boron (B)
Molybdenum (Mo)
Sulphur (S)
Zinc (Zn)
FUNCTION IN THE PLANT
B is directly involved in the synthesis of the enzyme that controls cell division, it inhibits the breakdown of the growth hormone IAA, and is thereby extremely important for root formation and the activity of the growth points
B is essential for healthy cell walls; it stabilises cell wall structures, stimulates wood formation and thereby inter alia is responsible for increased resistance, e.g. frost resistance of fruit.
B is responsible for starch as well as sugar synthesis in sugar transport (via phloem to the growth points inter alia)', thereby it increases the sugar content of fruits and tubers.
B stimulates the growth of tubers, flower- and pollen production, promotes the fertility of pollen,
B is also important in the synthesis of nucleic acids (RNA, DNA)
Mo activates 2 enzymes that are responsible for nitrate incorporation (- nitrate reduction) in amino acids (lowers the nitrate concentration in the plant, raises the protein concentration).
Mo is also of importance in N fixation
Mo is a polyvalent ion that can switch valency (2+ to 6+). Just as Fe is the element involved in photosynthesis.
Mo is a catalyst for various enzymes, and is inter alia also necessary for the formation of the hormone ABA
S is the least known major element and is important in the young plant stage
It is a component of proteins (disulphide bridges bind amino acids together) and is thus very important for protein synthesis
In S deficiency the starch concentration is raised because the carbohydrate metabolism is slowed down (less breakdown of starch reserve)
Zn is necessary for the formation of the growth hormone IAA, indoleacetic acid, that is responsible for the stretching of the side-and middle veins of leaves
Zn activates some intermediary enzymes in protein synthesis (peptidase, proteinase, .... = breakdown of proteins)
�174/253

ELEMENT
Copper (Cu)
Sodium (Na)
Chlorine (Cl)
FUNCTION IN THE PLANT
Cu is thanks to its polyvalency (just as Fe, Mn and Mo) important for reactions in electron transport as in photosynthesis.
Cu is necessary for lignification of plant parts (wood formation) and thereby improves the strength of plants
Cu also functions as intermediary in hormone maintenance (auxin formation) and thereby stimulates germination and growth.
further, Cu is of importance in the synthesis of vitamins, and as intermediary in carbohydrate- and N metabolism
Na is of importance in tissues with a special photosynthesis system (C4, CAM).
Cl is of importance in osmoregulation and in the maintenance of cell electrical neutrality in the plant
Cl also plays a part in photosynthesis, in particular in the oxygen production reaction
Cl is also a component of specific hormones
Clivia miniata orange broad tepal section NC 2001. Grower: Bertie Guillaume
Clivia miniata Topaz Dream'. Grower: Keith Rose
Clivia miniata x Norman Weitz
denii. Breeder and grower: Interspecific Clivia 'Orange Belle'. Breeder and grower: Brian Tarr
�175/253

4. SYMPTOMS OF DEFICENCY AND SURPLUS, + RISK FACTORS (Table 3)
For the cultivator it is in the first place interesting and important to know whether he has either a deficiency or a surplus problem. Therefore we compiled a summary in which we present per element how the nutrition problems are manifested and where on the plant they occur. Together with this the risk factors are presented.
A possible rule-of-thumb for deficiency effects is the following:
- the major component elements N, P, K en Mg are very mobile in the plant and appear
first in the older leaves! This applies also to Mn+.
- the trace element deficiency as well as the calcium deficiency are seen mostly in the younger leaves.
- surplus effects are seen mostly in younger leaves; this is accompanied by a secondary calcium-, iron- or magnesium deficiency. Occasional B, Cl, Mn surplus is seen mostly in older leaves.
ELEMENT
Nitrogen (N)
Phosphorus (P)
Potassium (K)
Calcium (Ca)
Iron (Fe)
DEFICIENCY
SYMPTOMS
•light green colour old leaf; later whole plant •much root growth
•less rooting •red colour in old leaf (sometimes blue-green)
•yellowing of old leaf edge • incomplete / slow flowering
•leaf edge necrosis to yellowing of young leaves (beginning at tip) •transparency in leaf • die-back at growth points
•yellowing of young leaf between veins (over whole leaf)
RISK ENVIRONMENT
•winter: little fertilization mixing of organic matter in the soil
•high pH, excessive liming • after cold or drought •beginning of cultivation: greatest necessity
•winter: little fertilization •high N, Ca, Mg-fertilization •end of cultivation: greatest necessity
•dark, low humidity weather •much K, NH4
•high pH •much Ca, Cu, Mn, Zn •wet cold soil
SURPLUS
SYMPTOMS
•dark leaf •less rooting •excessive plant growth
• dwarf growth (short stem, small leaf (=Zn deficiency)
•yellowing of old leaf (Mg deficiency) •yellowing of young leaf (Ca deficiency) • fewer leaves
•yellowing of young leaf (Fe deficiency)
•red leaf edges and veins
RISK ENVIRONMENT
•too intense N fertilization
•Uncommon, only in soil cultivation
•excessive K fertilization
•pH too high
• excessive foliar Fe fertilization
�176/253

ELEMENT
Manganese (Mn)
Boron (B)
Molybdenum (Mo)
Sulphur (S)
Copper (Cu)
Sodium (Na)
Chlorine (Cl)
DEFICIENCY
SYMPTOMS
•yellowing of old leaves between veins (locally in leaf) •less root growth
• non-developing growth point •malformed leaves beginning at base in young leaf
•light green colouration of young / old leaf =N deficiency •long small leaves, rank form •inhibited rooting
• complete yellowing of young leaf (veins more transparent than leaf pulp
•rigid growth yellowing to dark blue-green colour & curling of young leaf • die-off of buds •meristem necrosis - bushy growth
RISK ENVIRONMENT
•high pH •much Ca, K •wet cold soil
•high pH •high Ca values •boron free cultivation
•low pH = the acid sickness
• only in soil culture
•high pH •too much Ca
SURPLUS
SYMPTOMS
•purple brown spots in old leaf (later in leaf edges) •later yellowing of young leaf (Fe deficiency) •bushy growth
• leaf tip necrosis in old leaf (leaf edge necrosis)
•dark colour •less root growth causes marked pH decline
• dwarf growth; •reduced root growth •yellowing of young leaf (Fe deficiency)
• growth inhibition
•rooting inhibition •leaf edge necrosis in old leaf •dark colour
RISK ENVIRONMENT
•very low pH
•low Ph, little Ca •bad irrigation water / fertilizers
•does not occur
•bad fertilizers or irrigation water
•low pH
•bad fertilizers or irrigation water
•bad fertilizers or irrigation water
�177/253
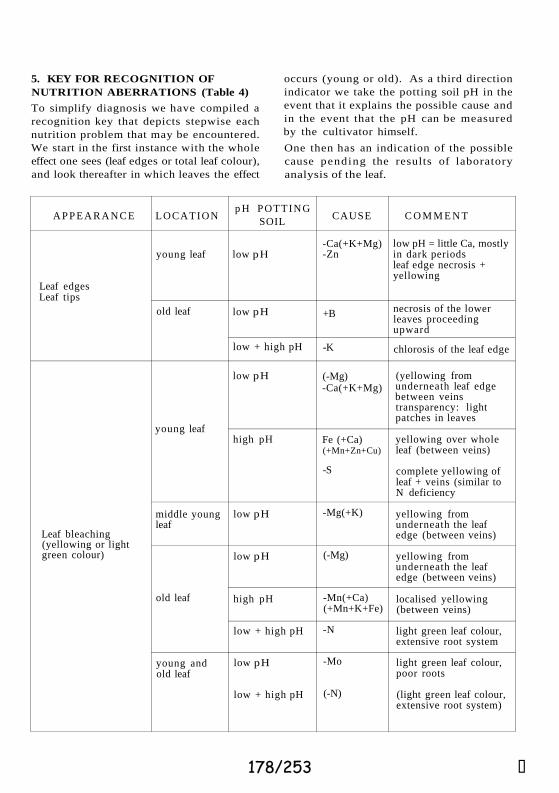
5. KEY FOR RECOGNITION OF NUTRITION ABERRATIONS (Table 4)
To simplify diagnosis we have compiled a recognition key that depicts stepwise each nutrition problem that may be encountered. We start in the first instance with the whole effect one sees (leaf edges or total leaf colour), and look thereafter in which leaves the effect
occurs (young or old). As a third direction indicator we take the potting soil pH in the event that it explains the possible cause and in the event that the pH can be measured by the cultivator himself.
One then has an indication of the possible cause pending the results of laboratory analysis of the leaf.
A P P E A R A N C E
Leaf edges Leaf tips
Leaf bleaching (yellowing or light green colour)
LOCATION
young leaf
old leaf
young leaf
middle young leaf
old leaf
young and old leaf
p H POTTING SOIL
low pH
low pH
low + high pH
low pH
high pH
low pH
low pH
high pH
low + high pH
low pH
low + high pH
CAUSE
-Ca(+K+Mg) -Zn
+B
-K
(-Mg) -Ca(+K+Mg)
Fe (+Ca) (+Mn+Zn+Cu)
-S
-Mg(+K)
(-Mg)
-Mn(+Ca) (+Mn+K+Fe)
-N
-Mo
(-N)
C O M M E N T
low pH = little Ca, mostly in dark periods leaf edge necrosis + yellowing
necrosis of the lower leaves proceeding upward
chlorosis of the leaf edge
(yellowing from underneath leaf edge between veins transparency: light patches in leaves
yellowing over whole leaf (between veins)
complete yellowing of leaf + veins (similar to N deficiency
yellowing from underneath the leaf edge (between veins)
yellowing from underneath the leaf edge (between veins)
localised yellowing (between veins)
light green leaf colour, extensive root system
light green leaf colour, poor roots
(light green leaf colour, extensive root system)
�178/253
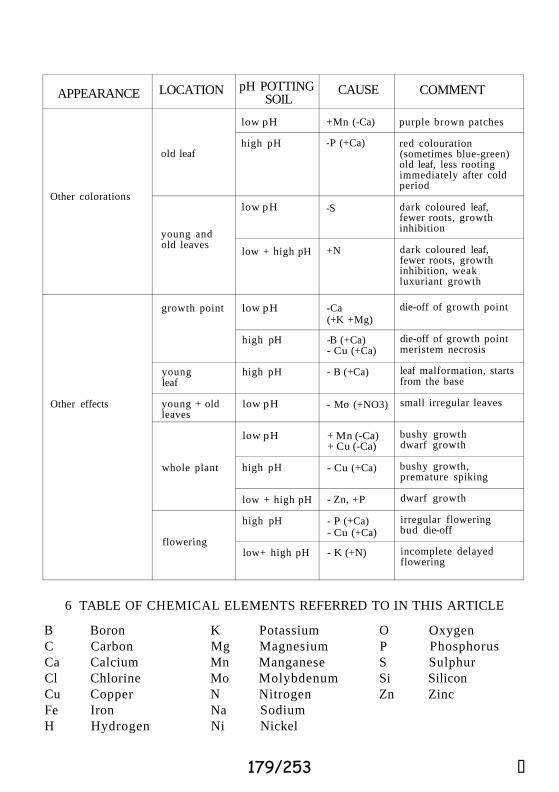
6 TABLE OF CHEMICAL ELEMENTS REFERRED TO IN THIS ARTICLE
B Boron K Potassium O Oxygen C Carbon Mg Magnesium P Phosphorus Ca Calcium Mn Manganese S Sulphur Cl Chlorine Mo Molybdenum Si Silicon Cu Copper N Nitrogen Zn Zinc Fe Iron Na Sodium H Hydrogen Ni Nickel
APPEARANCE
Other colorations
Other effects
LOCATION
old leaf
young and old leaves
growth point
young leaf
young + old leaves
whole plant
flowering
pH POTTING SOIL
low pH
high pH
low pH
low + high pH
low pH
high pH
high pH
low pH
low pH
high pH
low + high pH
high pH
low+ high pH
CAUSE
+Mn (-Ca)
-P (+Ca)
-S
+N
-Ca (+K +Mg)
-B (+Ca) - Cu (+Ca)
- B (+Ca)
- Mo (+NO3)
+ Mn (-Ca) + Cu (-Ca)
- Cu (+Ca)
- Zn, +P
- P (+Ca) - Cu (+Ca)
- K (+N)
COMMENT
purple brown patches
red colouration (sometimes blue-green) old leaf, less rooting immediately after cold period
dark coloured leaf, fewer roots, growth inhibition
dark coloured leaf, fewer roots, growth inhibition, weak luxuriant growth
die-off of growth point
die-off of growth point meristem necrosis
leaf malformation, starts from the base
small irregular leaves
bushy growth dwarf growth
bushy growth, premature spiking
dwarf growth
irregular flowering bud die-off
incomplete delayed flowering
�179/253

�180/253

Clivias can take tough love - but a little tenderness goes a long way
By Megan Backhouse https://www.smh.com.au/ Sydney Morning Herald
August 19, 2016 Say the words "dry-shade" and one of the first plants to spring to mind is the clivia. These strappy-leaved South African stalwarts can hold up for years in a dim, parched corner and still produce sunny umbels of bell-shaped flowers from about now.
You find them steadily multiplying in abandoned gardens or in soils thick with tree roots. But resilient as the Clivia might be, collector Michael Barrett insists the genus comes into its own with attention.
A creamy Clivia in Michael Barrett's garden. CREDIT:EDDIE JIM
He fertilises and waters them and keeps an eye out for mealybugs in their foliage and snails on their new flowers. He makes sure the light levels are just right to ensure the leaves remain a deep glossy green. This last point is more difficult than you might imagine, given Barrett's garden is positively bathed in sunshine.
But his devotion to the plant came before his house, and so he makes the most of a side path and two shade houses.
�181/253
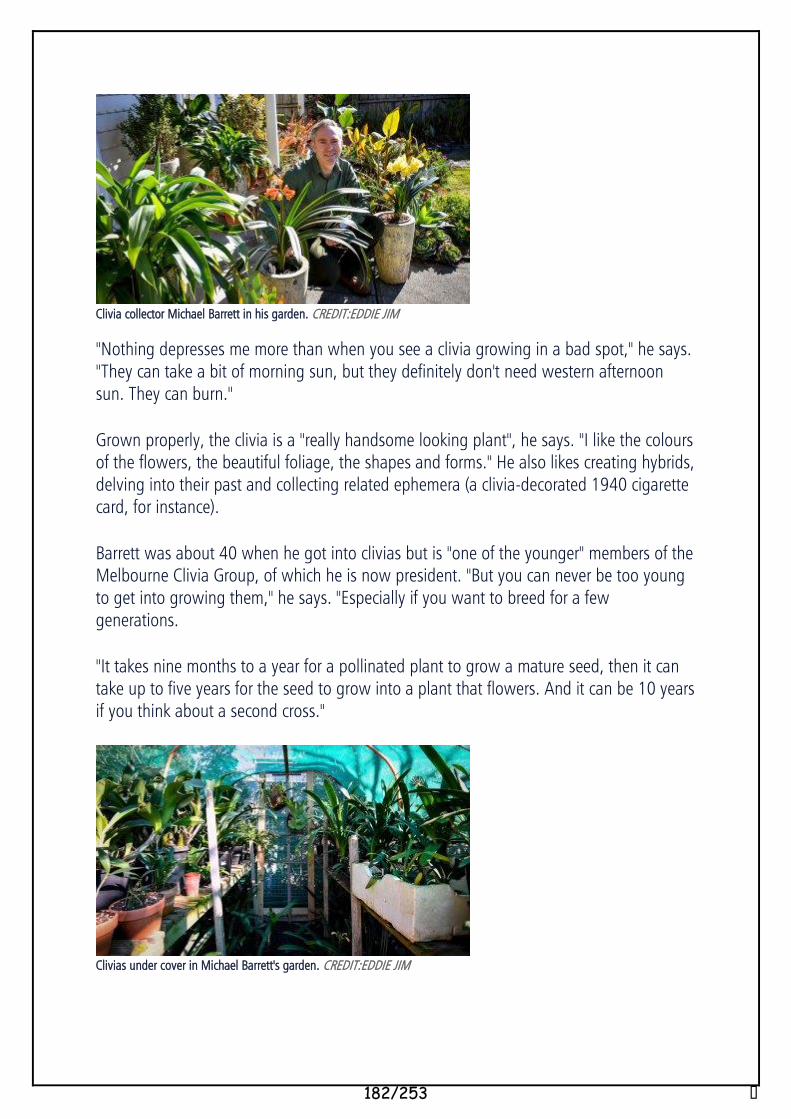
Clivia collector Michael Barrett in his garden. CREDIT:EDDIE JIM
"Nothing depresses me more than when you see a clivia growing in a bad spot," he says. "They can take a bit of morning sun, but they definitely don't need western afternoon sun. They can burn."
Grown properly, the clivia is a "really handsome looking plant", he says. "I like the colours of the flowers, the beautiful foliage, the shapes and forms." He also likes creating hybrids, delving into their past and collecting related ephemera (a clivia-decorated 1940 cigarette card, for instance).
Barrett was about 40 when he got into clivias but is "one of the younger" members of the Melbourne Clivia Group, of which he is now president. "But you can never be too young to get into growing them," he says. "Especially if you want to breed for a few generations.
"It takes nine months to a year for a pollinated plant to grow a mature seed, then it can take up to five years for the seed to grow into a plant that flowers. And it can be 10 years if you think about a second cross."
Clivias under cover in Michael Barrett's garden. CREDIT:EDDIE JIM
�182/253

While there are only six species in the /Clivia/ genus, there are thousands of hybrids. The first to be recorded was the Clivia x cyrtanthiflora, bred in Europe in the 19th century between C. nobilis and C. miniata. With late winter-early spring being an ideal time to plant clivia seeds, Barrett now has several heated propagation trays on the go in his indoor sunroom. To create hybrids, he transfers the pollen of one plant to the stigma of another, then harvests the resulting berry, which contains numerous seeds about the size of a pea.
A Clivia flower prepares to burst forth. CREDIT: EDDIE JIM
"It's part-science and part-art," he says. "You get excited about what you can produce. Seeing a clivia flower for the first time is a big unveiling. You might expect bigger blooms or multi petals or green flowers combined with variegated leaves." There are endless variations, with flowers in everything from safety-vest orange to burned bronze, peach, yellow, cream, or combinations. Some flowers have green throats while others develop a trunk-like stem and those bred in Belgium before the First World War have extra-broad leaves. "People send you lists of seed crosses and it makes a salacious read. It's like reading a menu where you want to eat everything." But sometimes breeders hit on such a winning combination that they don't want it to change. The only way to produce an identical clivia is to remove off-sets, as even the seed of the plant won't be true. While Barrett has hundreds of potted clivias, his aim is to create a sustainable collection with only the "best examples" of various flower colours and leaf forms. "The difference between collecting plants and Carlton Ware – which I went through a phase with as well – is that plants need attention. I want a collection that I can house and care for properly."
The Melbourne Clivia Group. melbournecliviagroup.org.au
�183/253

Dividing Clivia Clumps
Well-grown Clivia plants eventually get too large. When my plants start to crowd in a 5-gallon container,
I know it is time to divide and repot. The first task will be to get the plant out of its container. In a plastic
container, the simplest way is to get a stout, sharp knife and slice through the plastic, all the way from top
to bottom, two or three times. Try to hold the knife as nearly parallel to the container wall as possible
while cutting, to avoid damaging too many roots. Plants in clay or ceramic containers will be tougher to
extract and might require the assistance of a couple of strong gardeners. I often end up simply cracking
ceramic pots carefully with a hammer.
If the plant is growing in the ground, you face a much tougher job. You may want to just dig out a section
of the plant, leaving the rest of it undisturbed. Dig around the outside of the clump, cutting through as
few roots as possible. When the outer boundary of the section of the clump you want to dig up is
exposed, you can cut very carefully through into the centre of the clump. Spare as many of the roots as
possible.
Once the clump is extracted from its container or from the ground, remove as much of the soil from the
roots as you can. Shake as much soil off as you can. Use your fingers to work into the spaces between the
roots where soil is held and loosen it up.
Now comes the traumatic part: cutting through the rhizomes to free the various offsets. Use a long, sharp,
and sturdy knife. Cut through the thick rhizome between the crowns, leaving as much of the rhizome on
the freed division as possible. All I can say is, "Try to do as little damage as possible!" Take your time,
be careful, and don't cut your fingers in the process.
Some points to remember:
1. Wetness encourages rot. Rot is your enemy!
2. Don't put wet paper towels, or anything else wet, on the roots or anywhere else. Those roots
survive for months at a time in the wild in a very dry environment. They will do just fine, left
bare-root and dry for days if not longer.
3. Do let the divisions sit in air, bare root and dry, for several days after you divide them. Keep them
in the shade at all times when they are out of the ground.
4. I personally would use dilute Clorox® or hydrogen peroxide solutions only if the plant showed
overt signs of rot. In any case, do not replant until all portions of the plant's below-soil surfaces
are quite dry.
5. Then when you pot them up, you can cover the cut surface with medium -- just don't water for at
least several more days.
I haven't tried it on Clivia, but when we divide clumps of Hemerocallis (daylilies), we powder the cut
surfaces with dry fungicide. We used to use benlate (benomyl) for this, but now we use Cleary 3336®
(thiophanate-methyl) wettable powder. Be sure to wear rubber gloves to protect your skin from irritation
by the fungicide if you do try this.
SHIELDS GARDENS LTD. [email protected]
�184/253

F L O W E R S
GROWING CLIV IAS: EVERYTHING YOU NEED TO KNOW
Posted on October 6, 2020
Native to South Africa, clivia plants are popular houseplants that can survive in almost any
environment. They are evergreen perennials, thrive in shaded areas, and come in many
different colours.
You can easily grow clivias both indoors and outdoors, preferably in containers, depending
on the climate.
The interesting thing about Clivia plants is that over the years, they’ve become surprisingly
popular with collectors. As a result, clivias can be quite expensive, some plants selling for
$50 or more.
Read on to find out why people love Clivia plants so much and how to properly grow and
care for them.
�185/253

Clivia Plants 101
Clivia, also known as Bush Lily, Natal Lily, or Kaffir Lily, is a very attractive houseplant that
grows natively in the warm climate of southern Africa and Swaziland.
In their natural habitat, clivia plants grow under the shade of trees, so they are adapted to
receiving low levels of light. As a result, Clivias are easy-to-grow and require little care,
while offering lush foliage and stunning blooms in a wide range of colors.
There are six officially recognized species of Clivia plants: C. caulescens, C. gardenia, C.
miniata, C. mirabilis, C. nobilis, and C. robusta. Clivia miniata is the most widely cultivated,
and it can be found in floral gardens all over the world, especially in Australia, America,
Belgium, and China.
Clivias belong to the family Amaryllidaceae so they share a lot of similarities with their more
popular cousin the Amaryllis. Both have tubular-shaped flowers, but clivia blooms are
smaller and are usually red, salmon, orange, or yellow. Their evergreen foliage is smooth and
luxuriant, and their flowers will last for many weeks.
As mentioned above, these stylish flowering perennials are easy to grow indoors, so they are
a perfect option if you are not an experienced gardener. And even if you are, there’s no
reason to ignore these beautiful houseplants.
Clivia plants are quite valuable and they are known for their long life, so it is not uncommon
for people to put them in their wills. Clivias are expensive because they have high
ornamental value and a long-lasting flowering interval. In addition to that, cultivating Clivia
plants takes two to three years, which is a lot compared to other flowering plants. In
Australia, Clivia collectors prefer plants with cream and yellow blooms, while Japanese
collectors favor plants that have uniquely-shaped leaves.
�186/253

The prices for nicely-colored clivias can vary from $20 to hundreds of dollars. Therefore, it’s
best to be cautious when buying expensive clivias or clivia seeds because many plants that
are labeled as pink, cream, or yellow, turn out to be different colors. The best way to know
that you’re getting a valuable plant is by purchasing a plant from a certified seller, one that
is in bloom, or one that’s grown as off-set from a known plant.
Short History of Clivia Cultivation
Clivias were originally discovered in the 1800s by English explorers who were searching for
exotic plants in the subtropical forests of southern Africa. The first specimen was recorded
in 1813, by William John Burchell, a renowned British explorer who called it ‘forest
cyrtanthus’.
During the Victorian Era, Clivia plants became popular among rich Europeans. Lady
Charlotte Percy, a Duchess from the Clive family, was the first to cultivate these amazing
plants in England, and that’s how the genus got its name – ‘Clivia’.
Once they became popular ornamental plants in Great Britain, Clivias spread to other
countries quite quickly. Their close resemblance to amaryllis, their dramatic foliage, and
their vibrant blossoms surely contributed to their popularity.
But the success of Clivia plants didn’t stop there. Today, these perennials are as popular as
ever. So much so, that Clivia breeders work tirelessly to create beautiful and strong
variations worth hundreds and even thousands of dollars. All over the world, numerous
groups of Clivia enthusiasts meet regularly to display their new plants and to check the
competition.
If you are a Clivia lover, you can join the Melbourne Clivia Group or the Toowoomba Clivia
Society.
�187/253

How to Grow Clivias
The greatest thing about clivias, besides their beautiful flowers, is the fact that they are so
easy to grow. They can survive some neglect and they won’t mind if you forget about them
once in a while, but they also need a little love and care.
They love the shade, so make sure they receive plenty of dappled shade and protection from
the midday sun.
Clivias will benefit from a small amount of natural light such as early morning sun, as long as
it’s not too intense. The foliage of Clivia plants is sensitive and can become scorched if the
plant sits out in the sun, even if it’s just for one day.
If you live in a colder region, make sure you protect your clivias from frost. If you grow them
in containers, it’s best to move them indoors.
The growing season for Clivia plants is from spring through fall. The optimal temperatures
for this interval are between 21°C (70°F) or more during the day and no less than 10°C (50°F)
at night. Once the growing period is over, the clivias will go through a dry resting phase that
will be followed by intense blooming. When grown in favourable conditions, clivias produce
flowers around February. Expert growers encourage blooming by pot-binding or root-
binding the plants (allowing the roots to fill the container).
�188/253

What Soil Suits Clivias Best?
In their natural habitat, clivias are found growing on top of rotting logs and other types of
organic materials. Therefore, they are not very picky when it comes to the soil as long as it
is well-draining and loamy.
Any good potting medium will work, especially if it’s a gritty mix of leafmould, pine bark, and
sand. Some growers opt for a soil mix that consists of 5 parts bark, 1 part peat, and 1 part
perlite. Small particle mediums such as fine sand, peat, or anything smaller than a pea can
lead to root rot.
Clivias have a fleshy root system that enjoys organic matter, so you can add more whenever
you repot the plants. When repotting your Clivia plant, make sure you keep the neck of the
bulb above the soil level.
How to Water Clivia Plants?
�189/253

Clivias can withstand a little drought. They prefer to get more water during the growing
season (spring-fall) and less during the cold winter months. As a general rule, clivias need
slightly moist soil but you can also apply the ‘soak and dry’ technique, to avoid overwatering.
Check the top two inches of soil and add more water only when it feels dry to the touch.
The dormancy phase lasts between 12 and 14 weeks and starts in late fall. At this point, you
should move your plants indoors and withhold water and fertilizer.
It is also recommended to adjust the frequency and amount of watering based on the
temperatures and the surrounding environment.
How Much Light Do Clivia Plants Need?
Like many flowering houseplants, Clivias thrive in bright indirect light. You can place your
Clivia near a bright east or west-facing window. If the sun shines too brightly during the
day, you can protect your plant with sheer curtains.
During the summer, Clivias can be grown outdoors, as long as they get plenty of shade.
Although they can get used to brighter conditions over time, brutal sun exposure should
always be avoided.
The best thing about Clivias is that they are low-light plants. This means that you don’t have
to worry about them getting enough light. You can simply place them wherever you want,
even in a dimly lit corner, and they’ll still grow. But, without a few hours of light per day,
they will probably not flower.
�190/253

What Temperatures and Humidity Levels Are Best for Clivias?
During the growing season (spring-summer), the optimal temperature for Clivia plants is
around 15°C (60°F). Clivias cannot tolerate intense heat, so for optimal growth, the
temperatures shouldn’t exceed 18°C (65°F).
Clivias can tolerate a very small amount of frost, as long as the average temperatures don’t
drop below 4°C (40°F). When exposed to heavy frost, clivias will drop their leaves.
To encourage flowering, maintain the temperatures between 10°C and 15°C (50°F – 60°F)
and withhold watering and fertilizing until a flower stem appears (or for at least two
months).
Clivias don’t need a lot of humidity so misting them is not recommended.
Do Clivia Plants Need Fertilizer?
Yes, you can fertilize your clivias with liquid fertilizer or with a slow-release one during the
growth season.
If you use a liquid fertilizer, apply it twice a month. A 6-6-6 nitrogen, phosphorus, and
potassium slow-release fertilizer will feed the plants for at least three months.
�191/253

Don’t use fertilizer during the cold winter months because that’s when the plant is resting.
You can resume once your clivia produces its first flowers (usually in late winter or early
spring).
How to Propagate Clivia Plants from Seeds?
There are two effective ways to propagate your beloved Clivias: through seeds and offsets.
If you choose the first method, you should know that only pollinated Clivias will produce
seeds. In the wild, this process is carried out by pollinators such as insects and birds. But in
a controlled environment, you’ll have to take care of the pollination process yourself. It’s not
as difficult as it sounds. All you have to do is transfer the pollen from one flower to another
by using a soft, thin paintbrush.
Do this for 5 consecutive days. If a green pod appears at the base of the flower, your efforts
were not in vain. The pod will quickly develop into a grape-sized berry that will change its
color to red, peach, or yellow as it matures. The color of the berries will usually indicate the
color of the flowers so you’ll know whether or not you have a valuable specimen from the
get-go.
So, the clivia seed pots can be harvested as soon as they change their colour. The next step
is planting them. Press them halfway into the compost while leaving the darker part facing
upwards. Don’t cover the container and keep it out of the sun.
You can also find clivia seeds on the market, but shop with caution, especially if they are
expensive.
How to Propagate Clivia Plants from Offsets?
If propagating Clivia plants from seeds sounds a bit difficult, there’s an easier way to make
more plants out of one. You can separate the offsets from the mature plant and plant them
in a separate container. Expert growers advise us to divide the offsets during the growth
period, preferably after the plant has flowered.
To propagate your Clivia through division, expose the offset by washing away the compost
and use a sterilized sharp knife to cut it off. Move it to a new container filled with a well-
draining medium and, water thoroughly, and use a fungicide to prevent pests and diseases.
�192/253

Growing Clivias in Pots
Clivias make perfect houseplants because they thrive when planted in pots. It’s highly
recommended to plant your clivias in containers that can be moved around, instead of
planting them in the ground because can’t tolerate extreme heat, direct sun, and frost.
Additionally, Clivias can live for decades and you might want to leave yours to future
generations.
To encourage flowering, plant your Clivia in a deep container that’s at least 20cm (8 inches)
in diameter and that has drainage holes. You can leave your Clivia in the same pot for
several years until its root system fills outgrows it entirely. These plants thrive when they
are pot bound, so they don’t need frequent repotting. To revitalize the soil, add a fresh layer
every year.
The Six Different Species of Clivia
All six species of Clivia are evergreen and have a fleshy root system that enables them to
withstand drought by storing plenty of water. Although people seemed to have forgotten
about Clivia plants for a while, they have recently been “rediscovered” and are more popular
than ever.
Because they can thrive in pretty much any environment, Clivias are perfectly adapted to
modern life. They can be grown indoors and outdoors, preferably in containers. These
spectacular plants will reward you with their colorful flowers if you offer them a deep, tight
container, plenty of shade, some water now and then, and if you keep them out of the direct
sun.
�193/253
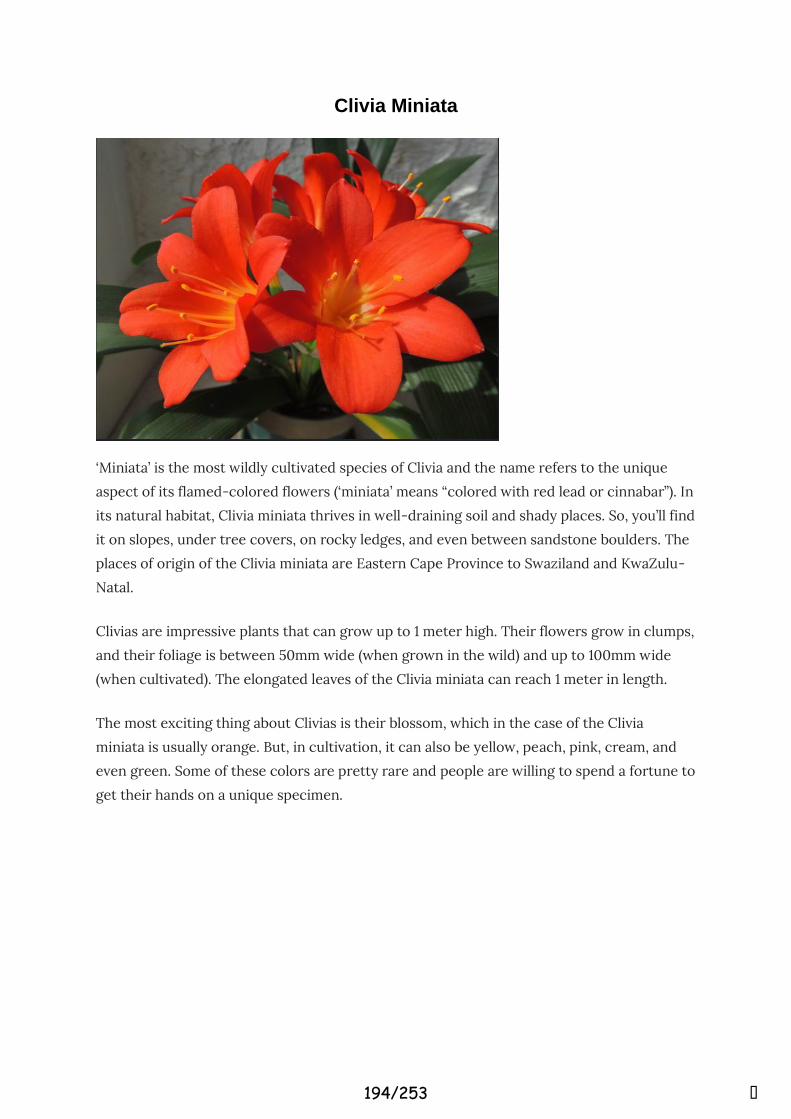
Clivia Miniata
‘Miniata’ is the most wildly cultivated species of Clivia and the name refers to the unique
aspect of its flamed-colored flowers (‘miniata’ means “colored with red lead or cinnabar”). In
its natural habitat, Clivia miniata thrives in well-draining soil and shady places. So, you’ll find
it on slopes, under tree covers, on rocky ledges, and even between sandstone boulders. The
places of origin of the Clivia miniata are Eastern Cape Province to Swaziland and KwaZulu-
Natal.
Clivias are impressive plants that can grow up to 1 meter high. Their flowers grow in clumps,
and their foliage is between 50mm wide (when grown in the wild) and up to 100mm wide
(when cultivated). The elongated leaves of the Clivia miniata can reach 1 meter in length.
The most exciting thing about Clivias is their blossom, which in the case of the Clivia
miniata is usually orange. But, in cultivation, it can also be yellow, peach, pink, cream, and
even green. Some of these colors are pretty rare and people are willing to spend a fortune to
get their hands on a unique specimen.
�194/253

Clivia Caulescens
Although Clivia caulescens is a lesser-known cousin of the Clivia miniata, it is just as
beautiful, if not even more. What makes Clivia caulescens unique is the shape of its flowers,
which are quite different from the flowers of the miniata.
The blossoms of the C. caulescens dangle gracefully downwards, are salmon-red and have
contrasting green tips. Another great thing about this type of Clivia is that it can flower
several times a year and its flower stalks can sometimes produce as many as 50 gorgeous
blooms.
Clivia Gardenii
Clivia gardenia is somewhat similar to Clivia caulescens in terms of flowers and growth
requirements, but its foliage is different. The leaves of the C. gardenii can reach 1m in
length, they have pointed tips, and they have a pale section near the stalk. The flowers of the
C. gardenia are usually red or orange, but you can also find rare cultivars that produce pink
or yellow flowers.
�195/253

Clivia Mirabilis
Finding a beautiful flower in an inhospitable environment was a miracle for the explorers, so
this Clivia was named ‘mirabilis’. C. mirabilis was discovered recently and in 2001, it was
confirmed as a different type of Clivia. You’ll rarely find it in cultivation because it’s very
sensitive to over-watering and without perfect drainage, its roots will quickly rot. In the
wild, C. mirabilis grows in the Northern Cape, in the Oorlogskloof Reserve where it thrives
in evergreen forests and the cracks of sandstone rocks. The thick roots of the C. mirabilis
prefer a rocky environment, and prefer dry environments, especially during the dormancy
period.
This Clivia can grow up to 1.2 meters in height and its foliage has distinctive white
variegation which fades as the plant matures. The blooms are tubular and similar to those of
the C. gardenii and C. caulescence and are orange, red, or pink.
Clivia Nobilis
What makes Clivia nobilis special is the fact that it was the first species of Clivia discovered
and it was named after Lady Charlotte Florentia Clive, the Duchess of Northumberland. In
the wild, C. nobilis is only found in the coastal areas of the Eastern Cape. It thrives under the
thick canopy of evergreen forests, in coastal dunes, on river banks, and rocky terrain.
The main particularities of the C. nobilis are its serrated leaves and its slow-developing
seedlings. So, if you want to grow this species of clivia you need to have plenty of patients.
The good news is that C. nobilis will reward your patience by producing up to 60 florets at a
time. Furthermore, they are much more tolerant to being grown in containers and gardens
than other clivias. They are less sensitive to drought and they aren’t often disturbed by
fungal diseases.
�196/253

Clivia Robusta
As the name implies, this clivia is considered a robust version of the C. gardenii. In the wild,
it thrives near water, in swampy areas, and other shady corners of the forest. It can grow up
to 2 meters in height and its majestic leaves can be to 1.2 meters long and almost 1 meter
wide.
The pendulous flowers of the C. robusta can vary in color from orange-red with green tips
to green-yellow, peach, or pink. As mentioned above, this species of clivia is very similar to
C. gardenia, but what makes it special is its ability to adjust to almost any type of
environment, from moist and fertile soil to well-draining mix.
Final Thoughts Now you are a clivia expert and you can successfully grow this amazing plant at home. We
hope that our guide convinced you to add a clivia to your collection, to care for it, and to
pass it on to your children. If you’ve never had a clivia plant, we recommend starting with an
affordable and forgiving cultivar, such as C. robusta or a red C. miniata.
Courtesy of
�197/253

How to Divide a Clivia
How to Care for Clivia Lilly
Clivia miniata, commonly called natal lily, grows as a houseplant or outdoors in the warm climates of U.S. Department of Agriculture plant hardiness zones 9 through 11. It produces showy flowers and has leathery foliage. Although it will reproduce from seeds, natal lily is much easier to propagate from divisions and the new plants will bloom in just one to two years while seed-grown plants can take up to five years. The divisions will perform best if gathered from mature, 3- to 4-year-old plants, and you should divide the natal lily after flowering to help ensure a successful outcome.
1
Soak the blade of a sharp, non-serrated knife in a 10 percent bleach solution or in a mixture of equal parts rubbing alcohol and water for five minutes. Rinse the blade and allow it to dry completely before use.
2
Inspect the natal lily to find the offsets, or baby plants, around the base. Look for smaller clumps of foliage with more than 1 inch of space between them and the parent plant. Avoid offsets that are too close to the parent plant because it's too easy to damage the main root system during the division process.
3
Dig down midway between the natal lily offset and the main plant using a small shovel with a narrow, pointed blade. Keep digging until you uncover the fleshy connecting rhizome. Carefully remove the soil from around and beneath the rhizome so it is completely exposed.
4
Cut straight down through the rhizome using the sanitized knife. Cut cleanly to avoid creating torn or jagged edges. Dig down to a 4-inch depth in a 4-inch diameter circle around the severed offset. Avoid disturbing the root system too much while digging up the offset.
�198/253
5
Work the pointed shovel blade underneath the natal lily offset at a 45-degree angle. Gently pry the root ball loose from the soil. Lift the natal lily from the ground and move it to a shaded spot. Fill the hole left by the offset with soil from the site to protect the roots of the parent plant.
6
Crumble off all of the soil clinging to the natal lily offset. Inspect the rhizome for signs of rot, such as soft spots, visibly blackened areas or if the rhizome smells mouldy or rotten. Cut off the damaged portions using a sharp paring knife.
7
Set the natal lily divisions in a cool, shady spot for a few days to allow the cuts dry out and heal over. Keep the divisions away from heat sources and areas with high humidity. Check them in a few days and pot them up once the cut surface looks dried out and slightly white in colour.
8
Pot each natal lily division in an individual pot. Choose pots with drainage holes at the base and a diameter no more than 1 inch larger than the rhizome. Wash the pot in hot water if it has been used for other plants and allow it to dry completely.
9
Fill the bottom one-third of the pot with fresh potting soil. Hold the natal lily division in the pot so the tips of the roots rest on the soil's surface. Fill around the roots with more potting soil until the soil level reaches halfway up the rhizome.
10
Firm the soil gently to increase contact between it and the roots. Add more soil so the natal lily rhizome is covered by a 1/4-inch-thick layer. Prune back the foliage by one-half to limit moisture loss from the leaves during the rooting process.
11
Place the pots in a shady, sheltered spot outdoors. Don't water for the first five days after potting to decrease the chances of rot or mildew in the divisions. Keep the soil consistently but lightly moist in spring and summer, and stop watering in winter when the plants are dormant.
Things You Will Need
Knife
Bleach or rubbing alcohol
Shovel
Paring knife
Plant pots
Potting soil
�199/253

Pruning shears
Warnings
All parts of the natal lily is poisonous, so keep them away from pets and small children.
Wear gloves when handling natal lily divisions, or wash your hands thoroughly after working with them to avoid accidental ingestion.
About the Author
Anastasia Leon began writing professionally in 2001. Her experience as a horticulturalist and nurseryman informs her work, which has appeared in publications such as Mother Earth News and Modern Farmer. Leon is a certified master gardener and holds a Bachelor of Arts from the University of California, Santa Cruz.
�200/253

�201/253

�202/253

MANIPULATION OF FLOWERING PERIOD AND SHOOT MULTIPLICATION
IN CLlVlA MINIATA (LINDLEY) REGEL
by
CRAIG BRENTON HONffiALL
SUBMITTED IN PARTIAL FULFILMENT OF THE REQUIREMENTS FOR THE
DEGREE MAGISTER SCIENTIAE AGRICULTURAE : ORNAMENTAL
HORTICULTURE
in the
DEPARTMENT OF PLANT PRODUCTION AND SOIL SCIENCE
FACULTY OF NATURAL AND AGRICULTURAL SCIENCES
UNIVERSITY OF PRETORIA
PRETORIA
NOVEMBER 2000
�203/253

To my mother
Elle a ferme sa vie comme un livre d'images Sur les mots les plus doux qui se soient jamais dits Elle qui croyait l' amour perdu dans les nuages Elle l' a redecouvert au creux du dernier lit
Et riche d'un sourire au terme du voyage Elle a quitte son corps comme on quitte un bateau En emportant la paix gravee sur son visage En nous laissant au creur un infini fardeau
Elle souriait de loin du creur de la lumiere Son arne etait si claire aux franges de la nuit On voyait du bonheur jusque dans sa misere Tout I' amour de la terre qui s' en allait sans bruit
Comme autour d'un chagrin les voix se font plus tendres Un ecrin de silence entourait nos regards Les yeux n' ont plus besoin de mots pour se com prendre Les mains se parlent mieux pour se dire au revoir
Moi qui ne savait rien de la vie eternelle J'esperais qu'au-delit de ce monde de fous Ceux qui nous ont aimes nous restent encore fideles Et que parfois leur souftle arrive jusqu'it nous
Elle souriait de loin du creur de la lumiere Et depuis ce jour lit je sais que dans sa nuit II existe un ailleurs ou I'ame est plus legere Et que j'aurais moins peur d 'y voyager aussi
Elle a ferrne sa vie comme un livre d' images Sur les mots les plus doux qui se soient jamais dits Elle qui croyait I'amour perdu dans les nuages Elle I'a redecouvert au creux du dernier lit
Et riche d'un sourire au terme du voyage Elle a quitte son corps comme on quitte un ami En emportant la paix gravee sur son visage En nous laissant it l' arne une peine infinie
.4
MaMere Yves Duteil
204/253

Acknowledgements
The contributions of the following people and organisations are gratefully acknowledged :
Prof Hannes Robbertse for his support, patience and faith in acting as project supervisor
Prof H Groeneveld and Dr M Van der Linde for statistical analyses
The members and committee of the Clivi a Club for financial assistance and plant material
Abbott Laboratories SA (Pty) Ltd and Zeneca Agrochemicals SA (pty) Ltd for plant growth
regulators
205/253

MANIPULATION OF FLOWERING PERIOD AND SHOOT MULTIPLICATION IN CLIVIA MINIATA (LINDLEY) REGEL
by
CRAIG BRENTON HONIBALL
SUPERVISOR. Prof P. 1. ROBBERTSE
DEPARTMENT . Plant Production and Soil Science
DEGREE. MSc(Agric) • Ornamental Horticulture
Abstract
Clivia miniata Regel is widely cultivated as a garden ornamental and a pot plant and can be forced to flower outside the natural flowering period by applying a cold treatment. Under local conditions this could be achieved by using a treatment of7.5 -10 °C for 14 days. This caused a significant number of the cold treated plants to flower earlier in the season with the result that the naturally short flowering period could be extended. The 14 day period of cold treatment which was required was shorter than a period of 60 days previously described.
Little information exists regarding its use as a cut flower . It was found that inflorescences could be harvested at the stage when all flowers were still closed and that more than 90% of flowers opened and developed normal colouration either in distilled water or in a commercial postharvest product (Chrysal AKC™). The product also reduced the incidence of stem splitting.
Clivia has been propagated in vitro with varying degrees of success but the methods are still relatively slow. Commercial protocols for propagation exist but have not been published. Therefore, the use of in vivo foliar applications ofpaclobutrazol (PAC) and Promalin TM (PRO), to stimulate branching and shoot formation, was investigated. The main effect of PAC could be seen as the stimulation of bud formation from meristematic zones on the abaxial side ofleaf bases in the older, proximal axils . The mean number of shoots produced by PAC at concentrations between 250 and 25 000 ppm varied from 2.3 to 7.1 per plant, without any statistically significant difference between treatments . However, at concentrations of5 000 ppm and higher, growth inhibition was unacceptable. PRO had the effect of stimulating bud formation from leaf bases situated near the apical meristem, in the younger distal axils . PRO also caused dichotomous branching of apical meristems. PRO applied 10 times, at 200 or 500 ppm a.i ., resulted in branching of 50% of treated plants into 2 or 3 modules. However, the latter results could not be analysed statistically. The most significant benefit arising from the use of PRO was survival of the parent plant without any inhibition of vegetative growth. Both PAC and PRO had a negetive effect on flowering at the concentrations tested. The use of PAC to stimulate in vitro shoot formation was attempted unsuccessfully, probably due to an inappropriate medium composition.
An understanding of plant architecture is important when trying to manipulate propagation and phenology. Clivia has a modular growth form and exhibits sympodial branching under natural circumstances.
Keywords: Amaryllidaceae, cut flowers, flower forcing, suckers, vegetative propagation
IV 206/253

CONTENTS Abstract . . . . . . . . . . . . . . . . . . . . . . . . . . . . . . . . . . . . . . . . . . . . . . . . . . IV
Abbreviations . . . . . . . . . . . . . . . . . . . . . . . . . . . . . . . . . . . . . . . . . . . . .. 3
CHAPTER
1 Introduction
1. 1 Literature review . . . . . . . . . . . . . . . . . . . . . . . . . . . . . . . . . . . . . . 4 1. 1. 1 Botany and history .............................. 4 1.1.2 Cultivation .................................... 4 1.1.3 B.iochemistry and physiology . . . . . . . . . . . . . . . . . . . . . .. 5
1.2 Aims ............................................... 5 1.3 References .......................................... 6
2 Extending flowering period in Clivia miniata (Lindley) Regel using a cold treatment
2.1 Summary. . . . . . . . . . . . . . . . . . . . . . . . . . . . . . . . . . . . . . . . . .. 9 2.2 Introduction. . . . . . . . . . . . . . . . . . . . . . . . . . . . . . . . . . . . . . . .. 9 2.3 Materials and methods ................................ 10 2.4 Results and discussion. . . . . . . . . . . . . . . . . . . . . . . . . . . . . . . .. 10 2.5 References. . . . . . . . . . . . . . . . . . . . . . . . . . . . . . . . . . . . . . . .. 14
3 The potential of Clivia miniala (Lindley) Regel as a cut flower
3.1 Summary .......................................... 15 3.2 Introduction. . . . . . . . . . . . . . . . . . . . . . .. . .............. 15 3.3 Materials and methods ................................ 16 3.4 Results and discussion . . . . . . . . . . . . . . . . . . . . . . . . . . . . . . . .. 16 3.5 References. . . . . . . . . . . . . . . . . . . . . . . . . . . . . . .. ........ 19
4 Promotion of shoot formation in Clivia miniata (Lindley) Regel with paclobutrazol and Promalin TM
4.1 Summary. . . . . . . . . . . . . . . . . . . . . . . . . . . . . . . . . . . . . . . . .. 20 4.2 Introduction. . . . . . . . . . . . . . . . . . . . . . . . . . . . . . . . . . . . . . .. 20 4.3 Materials and methods ................................ 21
4.3.1 The effect ofpaclobutrazol ....................... 21 4.3.2 Alleviation ofPAC induced growth inhibition by GA3 ... 21 4.3.3 Promalin™ application through the leaves ............ 22 4.3.4 Promalin™ application through the roots ............. 22 4.3.5 Anatomical investigation ....................... " 22
4.4 Results and discussion . . . . . . . . . . . . . . . . . . . . . . . . . . . . . . . .. 23 4.4.1 The effect of paclobutrazol ....................... 23 4.4.2 Alleviation ofPAC induced growth inhibition by GA3 ... 25 4.4.3 Promalin™ application through the leaves ............ 27 4.4.4 Promalin™ application through the roots ............. 27 4.4.5 Anatomical investigation ......................... 29
1 �207/253

4.5 Costs ofpaclobutrazol and Promalin™ treatments ............ 34 4.6 Conclusions and recommendations ....................... 34 4.7 References. . . . . . . . . . . . . . . . . . . . . . . . . . . . . . . . . . . . . . . ., 35
5 The use of paclobutrazol to stimulate multiple shoot formation in Clivia minima (Lindley) Regel in vitro
5.1 Summary .......................................... 37 5.2 Introduction. . . . . . . . . . . . . . . . . . . . . . . . . . . . . . . . . . . . . . .. 37 5.3 Materials and methods ................................ 37 5.4 Results and discussion ................................. 38 5.5 References ......................................... 38
6 Dlustration of the natural and manipulated plant architecture of Clivia miniata (Lindley) Regel
6.1 Summary... . . . . . . . . . . . . . . . . . . . . . . . . . . . . . . . . . . . . . . 40 6.2 Introduction ........................................ 40 6.3 Materials and methods ................................ 40 6.4 Results and discussion. . . . . . . . . . . . . . . . . . . . . . . . .. . ..... 41
6.4. 1 Natural architecture . . . . . . . . . . . . . . . . . . . . . . . . . . . .. 41 6.4.2 Manipulated architecture. . ...................... 42
6.5 References. . . . . . . . . . . . . . . . . . . . . . . . . . . . . . . . . . . . . . . . . 43
7 General conclusions ....................................... 44
Appendix: Statistical analyses .............................. 45
2 �208/253

Abbreviations
a. 1. : active ingredient CHRYS : Chrysal AKC™ cm : centimeter 2,4-D : 2,4-dichlorophenoxyacetic acid dH20 : distilled water g : gram GA3 : gibberellic acid GA4 : gibberellin no. 4 GA7 : gibberellin no. 7 1 : litre ml : millilitre mm : millimeter mg : milligram M : Mol/litre MS : Murashige and Skoog PRO : PromalinTM
PAC : paclobutrazol ppm : parts per million
3 �209/253

57Manipulation of Flowering in Clivia
2) Mechanisation issues: Tray fi lling and potting machine combination. Seed sowing machine and plug production. Trolley and crate system to transport plants. Truck with tailgate lift. Irrigation systems. Computerised accounting, production planning, and labelling.
3) Labour performance issues: Emphasise on teamwork. Skills training to complete various processes effectively. Employ people according to their abilities and treat them fairly. Employees are encouraged to take responsibility.
4) Nursery layout issues: Lessons learned from the past. Advantages of the layout of the new section.
5) Customer service issues: Delivery up to point of sale. All products pre labelled and priced. Cash and carry customer convenience.
Manipulation of Flowering in Clivia©
P.J. RobbertseDepartment of Plant Production and Soil Science, University of Pretoria, 0002, South Africa
INTRODUCTIONThe genus Clivia Lindl. belongs to the family Amaryllidaceae and comprises four spe-cies, all endemic to Southern Africa. Three of the species, C. caulescens R. A. Deyer, C. gardenii Hook., and C. nobilis Lindl. have tubular, pendulous fl owers, while C. miniata Lindl. Regel have erect, trumpet-like fl owers. The latter species is the most miniata Lindl. Regel have erect, trumpet-like fl owers. The latter species is the most miniatawidely cultivated as a garden or pot plant and is, therefore, also the most researched of the four species. In this talk I will concentrate on the fl owering of C. miniata.of the four species. In this talk I will concentrate on the fl owering of C. miniata.of the four species. In this talk I will concentrate on the fl owering of
The fl owering period of C. miniataThe fl owering period of C. miniataThe fl owering period o is in early spring and under South African f C. miniata is in early spring and under South African f C. miniataconditions peaks in August-September although it is possible to manipulate the fl owering period to some extent by regulating the growing temperature (Mori and Sakanishi, 1974; De Smedt et al., 1996; Honball, 2001) and lighting (Vissers and Haleydt, 1994). Before attempting to manipulate fl owering in any plant, however, it is important to have a thorough understanding of the growth model of the plant and in this talk it will be treated as one of the major aspects.
GROWTH MODELA Clivia plant raised from seed, has a single axis consisting of a true stem-part Clivia plant raised from seed, has a single axis consisting of a true stem-part Cliviacovered with the closely spaced leaf sheaths forming a pseudostem. Figures 1A and 1B show a longitudinal section of the stem apex of a Clivia plant showing the apical Clivia plant showing the apical Cliviabud and next to it a young infl orescence bud. After having observed the growth and
�210/253

Combined Proceedings International Plant Propagators’ Society, Volume 52, 2002
am
infl
Figure 1A. Longitudinal section of clivia stem showing infl orescence bud (infl ) and new apical bud (am).
Figure 1B. Longitudinal section of clivia stem showing more advanced stage of infl ores-cence bud (inf) and new apical bud (new).
�211/253

Manipulation of Flowering in Clivia
Figure 2. Growth model of Clivia miniata. Growth model of Clivia miniata. Growth model of mod 1 = fi rst module, representing the juvenile phase with twelve leaves and an infl orescence; mod 2 and 3 = second and third modules, each with four leaves and a terminal infl orescence bud (infl ); ls = basitonic, lateral shoot (offset).
�212/253

Combined Proceedings International Plant Propagators’ Society, Volume 52, 2002
Figure 3. Longitudinal section of clivia stem, showing the true stem (st), the pseudo-stem consisting of leaf sheaths and an aborted infl orescence bud (inf).
Figure 4. Flowering plant, infl orescence without elongated scape, fl owers appearing between the leave sheaths.
inf
st
�213/253

fl owering of Clivia plants over a period of years and relating these observations to Clivia plants over a period of years and relating these observations to Cliviathe structure as depicted in Fig. 1A and 1B, it can be stated that sexually mature C. miniata plants have a sympodial, modular growth system.miniata plants have a sympodial, modular growth system.miniata
Plants grown from seed have a juvenile phase of about 3 to 4 years during which phase the growth is monopodial (no branching occur and the terminal bud produces leaves only). After the formation of about 12 to 14 leaves by the terminal bud, the latter is transformed into an infl orescence bud and a new terminal bud arises next to the infl orescence bud (Fig. 1A and B). After a quiescent period, the “new” apical bud produces a fl ush of about four new leaves before being transformed into the next infl orescence in the same way as its predecessor. The result of such an episode is the formation of one module, consisting of a condensed stem with four leaves and a terminal infl orescence bud. Due to the condensed nature of the stem, the modular parts cannot be distinguished as separate units.
Depending on the environment and nutrition of the plant, two or more of these growth fl ushes or modules can be produced per season and towards fall, the same axis may therefore consist of a number of modules, each terminating in a semi-dormant infl orescence bud (Fig. 2). The infl orescence buds are imbedded amongst the leaf sheathes of the pseudostem-part of the axis and are, therefore, not visible unless the leaf sheaths are torn apart (Fig. 3).
FLOWERING AND MANIPULATION OF FLOWERINGExternal and internal factors are now required for further development of the infl orescence buds before fl owering can occur. It is known that temperature plays a major role in the stimulating fl ower bud development and scape elongation (de Smedt et al., 1996 and Honibal and Robbertse, 2001). After fl ower bud initiation, bud development and scape elongation do not stop completely but slows down drastically, with the result that in the same plant or shoot, the fi rst-formed infl ores-cence buds, the fl ower buds are in a more advanced stage of development and the scapes are longer compared to those of later-formed infl orescence buds (De Smedt et al., 1996). Although not yet experimentally proven, it seems as if fl ower bud de-velopment proceeds slowly in the semi-dormant infl orescence buds and fl owering will eventually occur with or without scape elongation once the fl ower buds have reached a certain developmental stage. Scape elongation, on the other hand is de-pendent on a preceding chilling period (Honniball and Robbertse, 2001). The age of the infl orescence bud and the scape seems to be an important factor determining the receptivity of the scape for the chilling or vernalizing effect. The result is that only infl orescence buds, which have reached a minimum age, will be receptive to the chilling. In the absence of a chilling period, out-of-season fl owering will occur in those infl orescence buds in which the fl ower buds have reached the stage where an-thesis (opening of the fl owers) can no longer be postponed. This will lead to fl owers appearing amongst the leaves without scape elongation (Fig. 4). This phenomenon was observed in plants that were grown in a greenhouse for a period of 3 years at a temperature regime of 20 to 30°C. These plants fl owered sporadically right through the year and most of the infl orescences were without elongated scapes as depicted in Fig. 4. In some cases the fl ower buds aborted as shown in Fig. 3. Exceptions, how-ever, did occur where some of the infl orescences did have elongated scapes, showing that other factors like nutrition, water stress, high temperatures or a slight drop
Manipulation of Flowering in Clivia
�214/253

Combined Proceedings International Plant Propagators’ Society, Volume 52, 2002
in temperature might also be involved in triggering scape elongation. Although the main fl owering period is just prior to, or during the spring equinox, fl owering often also occurs during the autumn equinox, but then mostly with un-elongated scapes. Much more research is, however, needed to solve the mystery.
CONCLUSIONJudging from the present knowledge, it is clear that C. miniata infl orescence buds are formed spontaneously due to the sympodial, modular growth of the plant. Chill-ing of at least 10 days at about10°C is required for triggering scape elongation prior to fl owering. The infl orescence bud, and more specifi cally the individual fl ower buds, must have reached a minimum developmental stage in order for the scape to be receptive for the chilling treatment. In most cases only one infl orescence bud per branch (axis) has reached this stage at the end of the growing season, thus produc-ing only one infl orescence during spring. In the case of more vigorous plants, more than one infl orescence can be produced during the same fl owering period. Plants can be manipulated to fl ower out of season and more than once per year by subject-ing them to chilling conditions as mentioned above.
LITERATURE CITEDDe Smedt, V., J.M. Van Huylenbroeck, and P.C. Debergh. 1996 Infl uence of tempera-
ture and supplementary lightening on the growth and fl ower initiation of Clivia min-ture and supplementary lightening on the growth and fl ower initiation of Clivia min-ture and supplementary lightening on the growth and fl ower initiation ofiata Regel. Scientia Hort. 65:65-72.iata Regel. Scientia Hort. 65:65-72.iata
Honiball, C.B. and P.J. Robbertse. 2001. Low temperature treatment advances fl owering in Clivia miniata (Lindl.) Regel. S. Afr. J. Soil 18:169-170.Clivia miniata (Lindl.) Regel. S. Afr. J. Soil 18:169-170.Clivia miniata
Mori, G. and Y. Sakanishi. 1974. Effect of temperature on fl owering of Clivia miniata. J. Japan. Soc. Hort. Sci. 42:326-332.
Vissers, M. and B. Haleydt. 1994. Bloeibeïnvloedingbij Clivia. Verbondsnieuws Belg. Sierteelt 38:36-37.
�215/253

Raising seedlings
After germinating seed, when should the seedlings be potted?
If you germinated seed on top of potting mix in a small pot then
there is no need to transplant the seedlings at this stage. They can
happily grow together in a community pot until they are about 2
years of age. I have included a photo of some happy seedlings that are about 18 months old.
If you have germinated the seed in a small cell tray, when would
you transplant the seedling?
Once the seed has a root growing down into the mix and the root is
at least 1 – 2cm long, and there is a green leaf growing upward and
the leaf is least 1 – 2cm long then I transplant the seedling. Of
course, you can wait longer until the seedling is larger, but the root
has a limited chance to grow downward in a cell tray. If possible, it
is better to germinate the seeds on the top of a pot and then there
is no need to transplant them. In my case, as I have so many seeds
to germinate, I use cell trays so I can place them on heat mats to
hurry up the process.
�216/253

What do you transplant them into?
If I have to transplant baby seedlings, I do this very gently as they
are fragile at this stage. I mostly use 50mm native tubes as I can fit
50 tubes in one stand, and I am placing 2 seedlings per tube.
Seedlings are quite happy sharing with a friend or if you are
planting into a small pot, they are happy in a community pot with a
few others. I have included a photo of seedlings in my seedling
shade house happily sharing. I also use 100mm pots as community
pots.
I put them into seed raising mix that I make up, though the store
bought one is fine. Poke a little hole in the mix and place the
seedling root into the hole. Gently firm the mix around the seedling
and then fully water so all mix is wet.
�217/253

Where do I place the pots and how do I look after the seedlings?
Keep the seedlings out of the sun completely. The best place to
keep them is in a shaded and sheltered position, preferably on the
south side of your house under the eaves, under a verandah, or in
the house is good too. When my seedlings are first repotted after
germination, it is still winter here in Melbourne. I feel it is too cold
for them in the shade house, even though it has a solar weave cover
over it. The seedlings have lived their short lives on a heat mat, so I
keep the pots in my germination area until spring. Once I feel the
temperatures rising and the frosts are over, I take the pots down to
the shade house.
Be careful not to place the pots where the seedlings may come into
contact with hail, heavy rain or wind. As mentioned, they are a bit
fragile at this stage.
Thoroughly water the pots once or twice a week. Seedlings like to
be kept very slightly damp but not wet. Wet will kill them. They
should not be sitting in water or a saucer of water. The water needs
to drain out the bottom of the pot. If you feel they are drying out
too much, give them a spray each day with a water spray bottle, or
give them a light spray with a hose.
�218/253

Should I fertilise them?
The seedlings will still have their seed attached for about 6 months
and they get nourishment from the seed. Most seed raising mixes
have a slow release fertiliser in them, so I don’t think it is vitally
important to fertilise them in the first 6 months. If I am using a foliar
spray fertiliser on plants in the same shade house then I will spray
the babies as well.
Once they are 6 months old then it is a good idea to give them a
weakened solution of a soluble fertiliser regularly. There are many
good fertilisers available but the ones I have used are PowerFeed
and Seamungus. In a perfect world, I would use the weakened
solution on the seedlings once a month in Spring, Summer and
Autumn. Unfortunately, I am not disciplined enough with too many
seedlings, so I make sure they also have Osmocote.
What about Pests and Diseases?
With seedlings, the worst pests are caterpillars, mealy bug and
fungus gnats, but you may also experience problems with other
pests depending on where you live. A caterpillar can decimate a
little seedling overnight. Mealy bugs and Fungus Gnats can cause
damage that can result in rot and the seedling ‘falling over’.
Prevention is better than cure. Spraying regularly with Eco-oil can
go a long way toward prevention. Yellow sticky traps are good for
killing fungus gnats.
�219/253

When do I repot them individually or plant into the garden?
I would not plant the seedlings in the garden until they are about 2
years of age, unless they will be in a well-sheltered position and
safe from frost, storms, sun, hail and heavy rain. It also doesn’t hurt
to use a small bamboo stake or similar and a soft tie to secure the
seedling so there is no movement when you wriggle the seedling.
This will help them to grow roots and establish. Make sure they go
into a well-drained soil and water them in.
I find the period between baby seedling and 2 year old is a
dangerous time to repot seedlings. They do not like to be disturbed
and need at least 3 leaves before I would attempt to repot. This is
why I do not sell seedlings on my website until they are at least 2
years of age.
If you are planning to keep your plants in pots for the future, you
can leave them in the community pot until they are bulging to get
out. Although if they are left too long, then there is no goodness left
in the seed raising mix and also the roots are limited as to where
they can grow.
As I usually use 100mm pots for community pots of 5 – 10 seedlings,
when I repot them at 2 years of age, I would most likely pot one
seedling per 100mm pot. If some seedlings are still a bit small even
though they are 2 years old, then I would keep all the small
�220/253

seedlings in the community pot for a longer period of time and just
repot the larger seedlings.
With seedlings, it is better to keep them in a slightly small to snug
sized pot than to overpot them.
Clivia Market, Lilydale, Victoria 3140, Australia
PH: 0417087667
Email: [email protected]
�221/253

Germinating seeds
There are so many different methods of germinating Clivia seeds,
and I have probably tried most of them over the years. Everything
from putting the seeds in a Chinese take-away container with
sphagnum moss, placing them in a plastic bag with sphagnum
moss to adding a dome or cover on top of the seed tray to create a
mini-greenhouse effect. I have even tried leaving the seeds in a
glass of water to see if they would germinate at some expert’s
suggestion.
There is no right or wrong way of germinating seeds. Some
methods work well for some people and the best thing is to stick to
what works for you.
What I will outline here is a very simple method that works well and
is easily achievable for the layman.
Do I need to wash or soak the seeds when I receive them?
Growers generally wash the seeds when they are peeling them from
the berries. In most cases this is with a dish washing liquid that
does have some anti-bacterial properties. The seeds should be
clean and free of any membrane material or dirt when you receive
them. I do wash any seeds I receive from other growers in water
with dish washing liquid added. This ensures that I am starting with
clean seed as often international seed has been rolled in Sulphur
Powder which tends to sting the eyes and taste revolting if it gets
on your hands and eventually your mouth.
�222/253

Years ago, I used to soak seed for 24 hours in either diluted bleach,
Super Thrive or HB101 but at the end of the day, I don’t believe it
made any difference to the germination of the seed. As long as the
seed is fresh and clean, it does not need to be soaked. I have at
times received shriveled up seed and have soaked it in water to see
if it improved the outcome, but I think that was wishful thinking.
What is an easy way of germinating Clivia seeds?
Fill a small pot with seed raising mix which is easily available at
Bunnings or possibly your supermarket. You can also use potting
mix or a number of other types of medium, but I have found
seedlings do well in seed raising mix.
Wet the mix thoroughly and place the seeds on the top of the mix.
Do not bury the seeds. They are happy sitting on the top. You will
notice on each seed there is a small, raised bump. This is called the
radicle and is where the root will grow out and hopefully
downward. Sometimes it is necessary to gently turn the seed over
once germination has happened so the root grows down into the
mix.
Place the pot in a warm position but not in direct sunlight. Keep a
water spray bottle handy and each day give the seeds a little spray.
They like to be a little damp but not too wet as this will encourage
rot. Germination should happen within a few weeks.
This method allows air flow around the seeds and lessens the
chances of fungus, mould and rot. If you see small flying insects
hanging around the pot, spray with Pyrethrum. These could
possibly be Fungus Gnats which will harm the health of your
sprouting seeds or seedlings.
�223/253

Do I need to use a heat mat?
Years ago, people used to place the seed trays on top of the fridge
as they received bottom heat from the old fridges, but I believe new
fridges are different now and these days, they are built in to
cabinets. Heat mats or bottom heat certainly speeds up the
germination process but is not necessary.
I use heat mats which can be purchased online for around $50 each
as I have so many seeds to germinate each year that they have to
queue up to get on the seed trays. By speeding up the germination
process, I can get through the germinating process in half the time
it would have taken without heat.
If you are not in a hurry then there is no need to buy a heat mat.
What happens after the seeds have germinated?
After germination a root will grow down into the mix. Sometimes it
may be necessary to poke a little hole in the mix with your finger
and gently place the root into it if the root is growing sideward. The
roots need to be kept a little damp and not dry out. When they are
growing out of the mix, they can dry out easily.
Soon after you will see a small green leaf developing. All going well
there is no need to do anything other than keep them a little damp
by watering the pot thoroughly once per week. If you think the mix
is drying out too fast for the one week watering, then water as often
as you think is needed to keep them a little damp but not wet.
Growing Clivia from seed can be a fun and fascinating road of
discovery. Each different cross can be so variable, and the bad news
is, it is an addiction without a cure.
Clivia Market, Lilydale, Victoria 3140, Australia
PH: 0417087667
Email: [email protected]
�224/253

Photographing Clivia
I am not going to pretend for a moment here that I am a great
photographer or even a remotely good one. I am very pleased with
many of the Clivia photographs I take and perhaps that is because I
take so many, a few would have to turn out satisfactory. Or,
perhaps I have a good eye for what makes a plant look attractive
and at its best. I think that is the answer. The most professional
photographer in the world may not necessarily photograph your
plant to look how you would like it to look.
This article aims to be simple and not get into fancy cameras or
settings. I have taken many photos with a simple Nikon camera that
has automatic settings, and I have taken some fabulous photos
with my iphone6.
When a flower is first opening, it is so tempting to want to
photograph it immediately, however the plant will not likely look
its best until all the flowers are open. I tend to take a few photos as
�225/253
it is opening and then take more when the flowers are fully open.
That way I am covered should something happen, and I am not able
to photograph the plant when it is fully open. An example is a pink
flower that opened this season. I photographed the plant as the
one flower opened and had planned to photograph the entire
flower head in a few days. That night it was extremely windy, and
the pot was blown over, damaging all the flowers. I was pleased I
had at least that one photograph.
Before I photograph a plant, I gently wipe all leaves to remove dust
or marks. Nothing looks worse than a beautiful flower in a
photograph with dusty or dirty leaves. If I will be photographing the
pot then I clean that too. Generally, I do not photograph pots.
If there is a spike in the pot to hold a previous flower up, or to hold
this particular peduncle up, then I will remove it for the
photographs.
I turn the pot around to determine the best angle for the flower
arrangement. Sometimes what you consider the front of the plant
does not photograph as well as the back of the plant where there
may be more flowers. It is important for balance, so it is a good idea
to gently swivel the pot in a full 360 degree turn to work out where
the best balance is.
The background for me is always a nightmare. I have bought
numerous black cloth from stores and have never been happy with
it. Somehow it tends to attract light and shine in places rather than
be a matt black. I will keep experimenting and hopefully find the
right material. I try to have a neutral type of background, whether
that be a black material background, a pale coloured wall, or some
other surface which is flat and matt. Photographing a flower with a
busy background should be reserved for excellent photographers
who are able to blur out the background and focus on just the
flowers. I am not one of those.
�226/253

The lighting is very important. I try very hard to capture the exact
colour of the flowers. If I photograph indoors, sometimes the colour
tends to look a bit pastel compared to if I photograph outside.
Often I will try a few different locations and backgrounds before
deciding what works for this particular flower. The time of the day
makes a difference with the lighting.
Trying to judge what angle works best with photographing a
particular flower takes practice and also just a flair for it.
Sometimes positioning the camera low and shooting upward
towards the flowers works best, other times shooting at an even
level is best and other times, shooting slightly sideward works best.
I think beauty is in the eye of the beholder and everyone sees the
flower at its best in a different light.
Photographs that frustrate me and are so often seen on Facebook,
websites and forums are the ones where the flower is slightly blurry
(or highly blurry) and out of focus, the colour is not correct making
the leaves look slightly blue, over exposed photographs and over-
done photographs where you can’t believe they are real as they
look too sculptured and manicured.
Good photographs are very important for people who wish to sell
plants, or sell seeds from those plants, and also to have a good
record of your own flowering. It is worth taking some extra time to
get the best possible photographs that you possibly can.
An example of good and ordinary photographs taken with a Nikon
automatic camera and an iPhone can be seen on the Clivia Market
2015 flowers Flickr album – flic.kr/s/aHsk895E1N
Clivia Market, Lilydale, Victoria 3140, Australia
PH: 0417087667
Email: [email protected]
�227/253

Clivia in Spring
For the Clivia enthusiast, is there ever a more exciting time than
spring?
It is interesting that the seasons are so different each year. I
remember last year that I had dozens of plants in the house to try to
encourage the flower spikes to rise faster than they normally would
so I could display the plant at the Clivia Expo. However, this year, I
worry that many flowers will be past their prime by the time the
Expo rolls around and only have 3 plants in my house. The only
reason I have these 3 plants in my house where it is warm is
because either the flower bud has not developed at all in the past
few weeks and appears to be stuck down low, or in one case, it
looks like the buds will open while still down between the leaves.
Of course, being in pots makes it easy for me to bring them into the
house. If they are garden plants then there is not much you can do
except keep an eye on any buds that appear stuck down in the
leaves or are opening down in the leaves, as rot can set in and
damage/kill the plant. I have at times, use clothes pegs to force the
leaves open so more air will circulate around the stuck flower.
�228/253

Sprinkling Sulphur Powder down around the stuck buds may assist
with eliminating rot, or worst case, you may have to cut the stuck
buds or stuck flowers out with a knife, and then sprinkle Sulphur
Powder on the open wounds.
Hopefully none of that will happen and you will have tons of stems
elongating full of flower buds. I tend to bring all my flowering plants
up to the house so I can look at them all the time. I can keep a
check on how the stems are elongating, clean the leaves so they
will look good for photography after the flowers open, fertilise
them, and generally just stare at them and daydream of what the
first flowering plants may turn out like.
At this time of the year (early September), I am starting my spraying
regime for the year. Although mealy bug is not a huge problem over
winter due to the colder environment, small pockets of the little
blighters may have survived and will thrive once the warmer
weather arrives. I spray all the plants again to hopefully knock them
off at this early stage.
My plants have not been watered very often over winter, so I have
just recently gone through and given them all a good drink. Already
I can see that the great majority of plants have new leaves so have
started their growing cycle for the year. It is the perfect time to
water and fertilise them. My plants have a 12 month slow-release
fertiliser in their pot already, but I have gone through and given
them a slightly diluted liquid fertiliser, in this case, I used Aquasol.
This is also a good time to look for potential problems. Any plant
that does not have new leaves, I have to wonder why. I squeeze the
base of the plant to test it is solid. A plant that has rotted through
the middle will be spongy when squeezed. A plant that I am sure
has rotted through the middle, I will pull off all the leaves, or cut
through them with a knife, so the base is left with the roots. If the
roots are healthy and there is enough good material left in the base,
then eventually this stump may grow offsets. Plants try very hard to
�229/253

survive and will produce offsets when they know they are sick or
dying. If I do not think there is rot in the middle and I am sure the
roots are ok, and yet the plant has not produced new leaves, I
sprinkle Sulphur Powder down between the leaves (just in case),
give the plant a good fertilisation and then keep an eye on it to try
to diagnose what is wrong.
A few downfalls with bringing a plant into a warm house are that
the darker house will result in a more washed out colour on the
flower. Even if it is situated in front of a sunny window, I find the
flower colour is not completely accurate if the plant has been in a
warm house. Also, if the flower generally has a green throat or
green tips to the petals, this may be reduced by being housed in a
warm environment. Green likes the cold.
Enjoy your budding plants as it is a long time until next spring.
Clivia Market, Lilydale, Victoria 3140, Australia
PH: 0417087667
Email: [email protected]
�230/253

Preparing Clivia for exhibition
This is a timely topic for me considering the Melbourne Clivia Group
Expo is only 9 days away as I write this. This is not just for people
who wish to exhibit their plants, but even for people who would just
like the plants looking their best when visitors come to see them
flower. Often we see photographs that people have posted on a
forum or Facebook and although the flower may be beautiful, the
leaves look dirty, yellowing or generally very untidy. Being a bit of a
neat freak, I like my flowering plants to look their optimum whether
exhibiting them or not.
It is always preferable for a plant to progress their flower spike and
flower outside the house where it is cold and has good lighting. The
reason for this is that the colour of the flower will be truer and if
there is a green throat to the flower then it will be more prominent.
Most years at this particular time of the year, I have to bring many
of my plants into the house where it is warm to speed up the flower
�231/253

spike and flowers open, so I can exhibit them at the expo. A warm
house is the fastest way of bringing up a spike or getting a flower to
open. However, it is important to place the plant near a window or
in a location that has good lighting. A common problem with
beginners is to place the plant in a slightly dark room or location
and the flowers end up looking more of a pastel or lighter colour
than they usually would. I made this mistake many years ago and
wondered why my pastel was orange the next year when flowering
outside.
It is amazing how quickly flowers can open when in a warm house,
though with 9 days until the expo and still many green buds,
perhaps I left this a bit late. In the right circumstances you can
speed the flower spike up by bringing into the house, but then put
the plant outside just before the flowers open. If you are not in a
hurry to have the flowers then you may have the luxury of leaving
the plant outside until the flowers open naturally.
It is important to place something under the pot such as a saucer or
even a piece of cardboard as moisture from the pot can find its way
out and onto the floor surface ruining your carpet or floor boards.
Around the time that I need to bring the plants in the house, I have
a good look at the plant and remove any outer leaves that may be
looking a bit worn or unbalance the plant. I wipe the leaves with a
damp cloth to remove dust or spray residue. I also look for leaves
that are broken, yellowed on the ends or have any fungal spots.
Using scissors, I trim off the damaged part of the leaf but I shape
the end of the leaf to match the rest of the leaf ends. This looks so
much better than a straight cut across the leaves.
I also give the plant a good water with a weakened liquid fertiliser
or similar to give the flowering a bit of a boost. If the plant is a little
crooked in the pot, I may use a small stake to try to straighten the
base. Make sure you water the plant once per week if it is in a warm
house and heating will dry the pot out faster. Also check for little
�232/253

creepies and crawlies such as Mealy bug, spiders, ear wigs or other
nasties.
The day before show day, I clean the outside of the pot with water
and a touch of vinegar in the water. This will remove any staining
around the drain holes of the pot. If the pot is in really poor
condition and won’t come up clean, I place the plant and pot inside
a new pot. It needs to be a good tight fit and you would barely
realise that it is a pot within a pot.
With cleaning a plant, some people use water with a touch of milk
to shine up the leaves. I have tried this but these days I tend to lean
towards water with a tad of White Oil in the water. You need to
ensure that you do not add too much White Oil or the leaves will
look greasy. Just a drop or two into the water will give the leaves a
lovely shine without looking oily.
I use a small paintbrush to get at dirt or any other litter that falls
down between the leaves. If the top of the potting mix in the pot
looks a little, old or messy, I lightly top the pot with a new layer. If
the flower has a long peduncle and will be travelling by vehicle to a
venue, it may be necessary to place a long stake in the pot and
gently tie the peduncle to the stake so there is not a lot of
movement. It is amazing in a car how much the flower spike shakes
around with the normal movement of the vehicle. You can always
remove the stake and tie when you arrive at the venue. If you feel
the peduncle needs the support then leave the stake and tie. I
understand in official shows that this is frowned upon, however for
display purposes this is fine. Plant ready for exhibition.
Clivia Market, Lilydale, Victoria 3140, Australia
PH: 0417087667
Email: [email protected]
�233/253

Winter care of Clivia
Different seasons require different care of your plants, particularly
plants in pots. For most Clivia, winter is a time of a degree of
dormancy. There is very little root growth or leaf growth during this
time.
Clivia need about 6 weeks of cold weather in order to flower. Often
species plants such as Gardenii and interspecifics may be flowering
during this time.
Watering
I have heard of growers with plants in pots under cover who do not
water at all over winter. I do still water my plants but not as often as
I do during the growing season. With plants in pots under cover, I
�234/253
water around every 10 days though I always feel the potting mix to
determine how dry it is first. With my plants in pots that do get
rained on, I may only water every 2 – 3 weeks depending on how
much rain we have had and how dry the mix is.
Clivia planted in the garden probably will not need watering over
winter. There will be enough moisture in the ground to keep them
happy. If you are in an area of low rain fall, you may need to give
them the odd watering.
Repotting and Dividing
You can repot or divide a Clivia any time of the year though winter
is not the best time as the plant will take longer to establish due to
the low root growth during the cold season.
Fertilising
I don’t fertilise my plants over winter as I want them to go through
their dormant period and not be induced to grow.
Pests and diseases
Mealy bug tends to disappear of lessen during winter as they prefer
a warm humid environment. Having said that, it is still important to
keep an eye out for Mealy bug as well as snails, slugs, earwigs and
other creepies.
Other care
As berries are ripening and colouring up, often mice or possums
think they look like something that may be good to eat and try to
eat them. Usually you find berries missing and seed scattered
around where they have been dropped when deemed inedible. If
the berries are important to you as you wish to harvest seed, it may
be worth covering the berries with netting to protect them.
�235/253

Watch for water dripping from trees or bushes in the garden.
Normal dripping is fine but sometimes the plant may be in a
position where it gets extensive water pouring down on it. This can
damage leaves and cause rot.
Also watch for leaves and debris building up in the leaves of your
plant. After autumn with all the trees losing their leaves, these can
easily catch around the base of the plant as well as in the leaves.
These leaves then get soggy with the rain and can cause rot.
Winter is a great time as it means we are closer to flowering season.
Clivia Market, Lilydale, Victoria 3140, Australia
PH: 0417087667
Email: [email protected]
�

Why won’t my Clivia flower?
This is a question I have heard many times over. It can be
frustrating when you have waited and are excited about the
flowering season only to find your plant doesn’t flower.
There are so many reasons why a plant does not flower.
Age of the plant
My first question is ‘How old is the plant?’ Often people buy a Clivia seedling at a market or nursery not realising that it can take around
five years to reach flowering size. This comes as a shock to those
that thought the plant would be fast growing and flower within two
years. Some buyers are told that the plant will flower when it
reaches 4 years of age, or when it has 11 leaves. This is only a guide
and not necessarily accurate. All plants are different and reach
maturity at different times. I have had plants flower at 3 – 4 years of
�

age and yet I have other plants that are now 10 years old and I am
still waiting. The species, C. nobilis, is notoriously slow to flower
often taking more than 10 years.
Health of the plant
With C. miniata, the flower embryo develops around
January/February timeframe and the plant flowers in September. If
the plant was stressed or was in bad condition around this time, the
flower embryo may not develop. Even if the health of the plant
improves after this and looks great in September, it may have
missed flowering due to its health at that critical time of
development.
Clivia love a good fertilisation regularly. Although Clivia in the
garden may flower for many years without being fertilised, the
flowers do tend to become more scarce and smaller. A good regular
fertilisation will keep the plant healthy and producing flowers each
year.
Environmental conditions
Clivia are subject to weather conditions like other plants. They
need at least 6 weeks of cold weather to flower. After this cold spell,
the warming temperatures prompt the plant to commence
flowering. Plants that are kept in pots inside a warm house may
miss this cold spell and not flower. Best to put an inside plant out
on an outside verandah or cold room for a while. In some countries
where it is gets to freezing point over winter, growers keep their
plants in a basement or garage where it is cool but not freezing.
Clivia can flower at slightly different times each year depending on
if we have had a cold winter or a warmish winter. Although most C. miniata flower in September, some are a little slower and may
flower in October or November.
�

The amount of light seems to also be a factor. I have seen a huge
array of lovely healthy plants planted in the ground under a forest
of tall trees. They rarely flower and I believe it is because it is too
dark for them. ‘Bright shade’ is the best.
Often a first time flowering plant will not flower the second year.
Perhaps the energy involved in producing the flower and usually
berries as well, exhausts the plant. Some growers will not pollinate
a first time flower. Every now and again it seems that even a plant
that flowers regularly will take a break.
Potash
Many people swear by using Potash to promote flowering. I have
tried Potash for the last few years, just a small amount sprinkled
around the plant and then watered in. Knowing the flower embryo
develops around January/February, I use the Potash in
November/December. I cannot say whether it has worked or not.
Some plants have flowered when I didn’t think they would but
others that I felt should have flowered, did not. I will keep using the
Potash as it can’t do any harm and anything that may help flowers
to develop sounds like a good idea to me.
Clivia Market, Lilydale, Victoria 3140, Australia
PH: 0417087667
Email: [email protected]
�

Stuck flowers
I have seen many people ask questions on various forums regarding
plants with flowers stuck down between the leaves and what they
can do to get the flower stem to come up. I have also heard of some
very weird and wonderful remedies that are ‘guaranteed’ to bring
the flowers up.
This can happen to a plant during normal flowering season, but I
have found it is more common when a plant is flowering out of
season. I don’t worry if I can see buds down between the leaves and
they seem to take a while to come up. Some plants are just slower
than others at elongating the peduncle, however when the flowers
start to open when still down firmly between the leaves, then I take
action. I have had a number of plants where the stuck flowers have
eventually rotted and caused damage to the crown of the plant.
My solution is quite simple. Give the plant a good watering and
bring it into the house where it is warm. The warmth in the house
brings the peduncle up quite remarkably. The photo on this page
shows a plant that has flowered out of season in the shadehouse.
The flowers were opening down between the leaves. The second
photo shows the flowers one week later after being in a warm
house, and yes, my house is very warm. I do like the heater.
�

Forget about closing the plant in a dark cupboard, giving it all sorts
of chemicals, banana peels, or cutting the head off a chicken and
dancing naked at midnight. At the end of the day, I have found the
warm house works almost every time. I have only had one plant
that the flowers did not come up. Later I realised that I had been
too late in bringing the plant in. Rot had already started down in
the buds and the damage was already done. I had to cut quite a bit
of the crown out to save the plant.
Why do some plants have stuck flowers? I don’t really know. As I
have mentioned, it does tend to happen when a plant flowers out of
season. A plant may flower normally every year and then one year it
will have stuck flowers with no real rhyme or reason for it. Some
may say a lack of fertiliser, though I can say that is not the case with
my plants.
If your plant has stuck flowers and it is in the garden where you
cannot bring it into a warm house, I suggest keeping a close eye on
it. Water tends to gather down between the leaves and contribute
to the rot. Sometimes I use clothes pegs to hold the leaves apart as
then more air can get to the affected area. If you can see that rot is
starting or you are concerned about it as the stem has not come up
at all, then cut the buds, flowers and stem out. Make sure you
sprinkle Sulphur Powder or Mancozeb on the cut areas to help
eliminate fungal problems.
Clivia Market, Lilydale, Victoria 3140, Australia
PH: 0417087667
Email: [email protected]
�

Nur
sery
levy
at w
ork:
Nu
rser
y P
rod
uct
ion
Pla
nt
Hea
lth
& B
iose
curi
ty P
roje
ct
Mealybugs A pest of a different scale
Background
Mealybugs are a specific type of scale insect from the family Pseudococcidae. They often secrete a thin covering of mealy wax across their body, hence their common name. Like other scale insects, mealybugs are sucking pests that can be present across all of Australia on many host plant species. Some species of mealybugs are very serious pests of particular plant species, others are not. Some species may feed on a large number of host plant species, others only on a small number. Mealybugs are most often present on leaves and stems, particularly in tight, protected spaces. However, some mealybugs feed on roots. For information on other types of scale insects, refer to the scale insect factsheet available on the NGIA website.
There are a number of mealybug species that may be commonly encountered in production nurseries,;these include longtailed mealybug (Pseudococcus longispinus), obscure mealybug, (P. affinis), citrus mealybug (Planococcus citri), ground mealybugs (Rhizoecus spp.) and many others. Some native mealybug species are common problems on native plants, e.g. Melanococcus albizziae can kill Acacia and Australicoccus grevilleae can cause significant damage to Grevillea. It is likely that at least one mealybug species will feed on most plant species found in a production nursery, at least from time to time. It is beyond the scope of this factsheet to detail the biology and host range of every mealybug species that could be present in production nurseries across Australia. This factsheet is necessarily general, providing information typical across the group; exceptions will occur. It is recommended to have mealybug species that are encountered in your nursery identified to facilitate the management of the pest more specifically. Identification is particularly important when the infestation is widespread, when management actions have failed or when they reoccur frequently. Furthermore, some species of mealybugs are serious pests overseas, but are not present in Australia.
Fig. 1. Adult, egg masses and immature citrus mealybug individuals, photo by the United States National Collection of Scale Insects Photographs, bugwood.org.
�

and are generally able to move short distances. Nymphs are similar to females, but smaller, and will moult through three to four nymphal instars. However, male nymphs can be more elongated than female nymphs and have four to five nymphal stages. Males also have a pupal stage before emerging as an adult.
Generally, mealybugs complete their life cycle in 1-3 months, depending upon temperature and host plant. Cooler temperatures increase the generation time (slow it down), warmer temperatures decrease it (speed it up). Therefore, 4-10 generations can occur each year. Temperatures of about 25°C and high relative humidity are optimal for many mealybugs. Mealybugs tend to be present continuously, but may be less active in relatively cool conditions. Their populations often reach peaks in spring and autumn and it is common to see all stages on a plant at the same time (e.g. egg masses, nymphs and adults simultaneously).
Male mealybugs do not feed and only survive for a few days to mate with females. However, many species of mealybugs do not have males; females reproduce asexually. Females of most species lay their eggs into a waxy mass with at least 50-100 eggs, some species may lay up to about 600 eggs in their life time. Females of some species can survive for 10-20 days without a host plant. Eggs tend to hatch in 5-10 days, but may be
2
Description
Mealybugs are small, oval, soft-bodied insects that are often covered in a white powdery wax. The powdery wax sometimes extends off the body as long marginal filaments. While most species of mealybugs are white, off-white or light grey, some species are yellow, pink or orange. The mouthparts of all mealybugs are hair-like, being extremely long and thin. If individuals are carefully removed from plants when they are feeding, these mouthparts can be observed under a microscope.
Adult females are similar to nymphs, but larger. Females are often about 3-6 mm in length. Females lay egg sacs or masses that are covered by cottony secretions, similar in appearance to cotton wool. Adults generally have longer marginal filaments than nymphs, however they can be broken off naturally. Eggs within the mass tend to be yellow to orange. However, not all mealybugs lay eggs, longtailed mealybug produces live young (crawlers). In most instances, only females and nymphs will be observed on plants. Males, when they occur, are small gnat-like insects (about 2 mm long), with two pairs of wings.
Upon hatching, first instar nymphs (crawlers) are very small, often less than a millimetre long, and are reasonably mobile. Crawlers have the least amount of wax present on their bodies and are the most vulnerable to mortality from pesticides and environmental conditions.
Life cycle
Mealybugs are slow moving and feed on plant sap. Mealybugs tend to live in aggregations, often on the underside of leaves, on stems around petioles and branches and other concealed areas, e.g. in dense foliage, where fruit are touching or leaves overlap and near flower buds and growing tips. Mealybugs feeding on grasses and grass-like plants are often present under the leaf sheath. Some species may be on above ground parts and on roots, other species are solely root feeding (see section below on root feeing mealybugs).
Unlike most other scale insects, subsequent nymphal stages and adults have functional legs,
Fig. 2. Citrophilus mealybug (Pseudococcus calceolariae - above - photo by USDA ARS, Bugwood.org) and Pseudococcus sp. mealybugs on hoop pine.
Cryptolaemus
Hoop pine ‘mealybug’

3
longer during unfavourable environmental conditions. Crawlers may remain under the egg mass for some time before moving away, perhaps up to several weeks.
Damage
Feeding may occur on all plant parts. High populations slow plant growth and cause premature leaf or fruit drop and twig dieback. At first, plants may appear to lack vigour, leaves then yellow and may drop. Feeding on growing tips and buds can cause distorted growth as they inject toxins into the plant. At high populations plants can completely wilt and die. The white fluffy growth can also cause plants to be cosmetically unsaleable. Furthermore, mealybugs produce honeydew, a sticky, sugary solution, on which black sooty mould grows and can be unattractive. Ants often attend mealybugs to harvest the honeydew. This may cause mealybug infestations to be even more troublesome as it may reduce predation and parasitism by natural enemies.
Root feeding mealybugs
The most common root feeding mealybugs are from the genus Rhizoecus, although others occur. They can remain undetected on roots for quite a long time without specific monitoring. These species appear as cotton-like masses on infested roots. Their bodies do not have long wax filaments, like that of many foliage feeding mealybugs. Their biology is similar to mealybugs discussed above, however, crawlers are the main source of spread between plants. Crawlers may move out of drainage holes with water, and they may be dispersed with plant debris and on equipment.
Damage from root feeding mealybugs is similar to those above ground. However, they are often very difficult to detect at low populations and therefore build to high populations. Highly infested plants must often be thrown out. Note that root mealybugs can sometimes be present on weeds in pot plants, but not on the actual nursery plant. Therefore some discernment is required, as such situations do not require plants to be discarded.
Fig. 3. Mealybug infestation causing stunting of seedling avocado (above) and roots infested with Rhizoecus mealybugs (below - photo by USDA ARS, bugwood.org).
Mealybugs as virus vectors
Mealybugs are known vectors of several plant viruses, including Banana streak virus, Grapevine leafroll associated virus and Pineapple mealybug-wilt associated virus, all of which occur in Australia. Other viruses vectored by mealybugs also occur overseas. They are not particularly good vectors as they crawl, rather than fly, from plant to plant, unless they are distributed by wind currents or ants. Consequently, spread of virus from mealybugs tends to be slow; these viruses can be spread through other means.
Host range
As a group mealybugs attack a very broad range of plants including fruits and vegetables, indoor plants and outdoor ornamentals like annuals, perennials, shrubs, palms, grasses and trees. In other words, almost all plant species present in a nursery can be fed upon by at least one mealybug species. Some mealybug species have a very wide host range and are more likely to be encountered in a production nursery. For example, citrus mealybug has been reported across plants from about 50 plant families and can be a pest on

4
begonia, boronia, cactus, calathea, canna lily, citrus, coleus, croton, cycads, cyclamen, dahlia, eriostemon, narcissus, tulip and many other plant species. Long tailed mealybug is reported from about 30 plant families and can be a pest of bromeliad, bulbs, citrus, custard apple, fern, fuschia, grapefruit, grape, hibiscus, Japanese maple, olive, orchid, palm, passionfruit, pine, pomefruit, stonefruit, Zamia and many other species. Fortunately, not all mealybugs have a very wide host range. For example, M. albizziae has only been reported feeding on Acacia spp. and banana.
As stated earlier, it is important to have mealybugs identified. This will allow you to investigate the host range of the species, its biology and information known on specific management of the pest.
Monitoring
Monitoring in nurseries is essential for all pests, diseases and general plant health. Monitoring provides essential information for making management decisions. In any given time, it will detect the presence and numbers of mealybugs, their natural enemies (predators and parasitoids) and other pests and diseases. Regular monitoring can be used to determine the change in numbers, i.e. whether populations are increasing or decreasing. This information is extremely valuable and informs how effective each management action has been.
Monitoring for mealybugs should include visual observations including turning over leaves, looking for black sooty mould and the presence of ants on plants. Plant beating (gently but firmly hitting foliage against a uniform coloured tray) can also be effective for species that can be dislodged from the plant. However, some species may not be monitored effectively in this way. Plants that have mealybug damage or are otherwise unhealthy, should be examined more carefully. Use a x10 or x20 hand lens where necessary and examine areas that mealybugs are likely to hide on the plant (joints between branches and other crevices). Detecting root mealybugs always involves taking plants out of pots and checking root health. This should be completed as part of regular plant health monitoring.
Once mealybugs have been observed, check for the presence of egg masses and crawlers. This is important as it indicates that populations will increase quickly if management actions are not taken. The proportion of different life stages present, most notably crawlers, may also change the exact actions taken; crawlers are susceptible to pesticides, but other stages are more tolerant.
Management of mealybugs
Management of mealybugs should focus on preventing infestations and managing populations before they cause economic loss. Mealybugs are notoriously difficult to control once established as they hide in cryptic areas of the plants and tolerate many pesticides. Fortunately mealybugs can be managed effectively if nursery managers are proactive. These management actions include cultural, chemical and biological control options.
Fig. 4. Pink hibiscus mealybug (Maconellicoccus hirsutus) on stems and leaves of hibiscus, photos by Florida Department of Agriculture and Consumer Services, Buwood.org

of the consignment.
Avoid movement of infested plant material within the growing area.
Avoid staff movement in areas known to be infested with mealybugs and other pests. If necessary, disinfest clothing and equipment after working in such areas.
Provide an optimal growing environment, including appropriate nutrition, water, growing media and other conditions; weak plants are more susceptible to damage at lower populations of pests.
Control ants as they spread crawlers and protect mealybugs from natural enemies.
Thoroughly disinfest recycled pots to avoid transferring eggs and nymphs from crop to crop.
Only propagate from clean mother stock plants. In other words, do not take cuttings from plants that have mealybugs (or other pests) present. Even one crawler on a cutting (which is virtually impossible to detect) will multiply the problem significantly.
Keep the growing area and surrounds free of weeds.
Ensure adequate plant spacing. This allows greater air movement and increases pesticide coverage. It also reduces ideal environments for mealybugs to develop and increases the ease of detection.
Biological control
There are a number of natural enemies that can be used to manage mealybugs including commercially available predatory insects and naturally occurring parasitoid wasps and predators. There are also a range of fungi and bacteria that may infect and kill mealybugs, although these are less likely to substantially reduce populations unless they become very abundant. Almost all pesticides will negatively impact predator populations. It is recommended to seek advice from the biological control agent producer prior to releasing a predator for the first time so that their release is optimised. If pesticides have been applied, ensure that a sufficient time period has been elapsed before releasing predators. This informbiological control agent producer.
ation can be found online or from the Fig. 5. mealybug (photo by Sonya Broughton, WA Ag, Bugwood.org).
Cryptolaemus montrozieri larva (below) feeding on a
5
Cultural management practices minimise infestations by mealybugs (and other scale insects).
Always inspect new stock carefully, particularly host plant species that are prone to attack from mealybugs (and other pests and diseases). Inspect all plant parts, including roots for any signs of pests.
Monitor plants regularly, including roots. Plant species that are prone to mealybugs (or other pests) should be monitored more consistently. Refer to monitoring section.
Remove plants with heavy infestations, taking care to reduce spread of mealybugs while doing so. If infestations are limited to a particular branch and it can be pruned, remove this plant material and monitor closely to ensure the rest of the plant is clean.
Remove crop debris and disinfest the growing area after removing a consignment of plants that have had mealybugs with a suitable product, e.g. farmcleanse, bleach or similar product. Mealybugs can survive for weeks on crop debris and in egg masses that have fallen off plants. This practice will also reduce other pests and diseases that may be lingering from previous crop cycles.
When only a small number of plants are present with a low rate of infection, squash mealybugs and egg batches. Squashing large numbers of mealybugs may irritate skin, but can be avoided by using rubber gloves. The presence of a small number of individuals should prompt regular and rigorous inspections

6
Cryptolaemus - Cryptolaemus montrouzieri
Cryptolaemus (pronounced: Crip-toe-lee-mus mon-tro-zere-ee) is an Australian native ladybird that is widespread and feeds on a range of mealybug species. It is commonly known as the mealybug destroyer. Both larvae and adults feed on mealybug, and can be used to control mealybug infestations, hence its common name. Adults are about 4mm long, oval in shape with an orange head and black wing covers. Adults and small larvae only feed on eggs and very small mealybug nymphs; larger larvae feed on larger mealybugs including adults. Larvae are covered with white waxy filaments, making them very similar in appearance to mealybugs, but are more mobile and appear to have banding along their body. When carefully removed from the plant, they can be turned over to see their well-developed legs and chewing mouthparts. Females can lay up to 10 eggs per day directly into mealybug egg masses and up to about 500 eggs over their lifetime. The lifecycle of Cryptolaemus takes about 4-7 weeks from egg to adult, depending upon temperature and food source. They will also consume some soft scales when more preferred food is not available. It is commercially available from Bugs for Bugs.
Green lacewings – Mallada signata
The green lacewing has a relatively wide host range, feeding on aphids, spider mites, various scales, mealy bugs, moth eggs and small caterpillars as well as whitefly species. Pollen and nectar can also be ingested. Larvae, but not adults, are predacious. Adults have a green body and hold their transparent wings tentlike over their body and feed on pollen and nectar. Females live for 3-4 weeks and lay up to 600 eggs. Almost all lacewing species are predators and often lay their eggs on thin white stalks with a bulbous white egg at the end; most species lay multiple eggs in the same area, most often in a straight or roughly straight line or in a horseshoe arrangement. Green lacewing larvae grow to nearly 1 cm in length before pupating and typically place the remains of their prey on top of spines protruding from their back. In fact, research suggests that green lacewing larvae with trash-packages are more active and forage more efficiently, while those without trash-packages are more likely to become inactive. After about 12 days, larvae pupate and emerge as adults about 9 days later. Females must be about 7 days old before laying their first egg.
Green lacewing is well adapted to relatively warm conditions and very sensitive to persistent and or broad spectrum chemical applications, although reduced risk pesticides have a relatively minor negative effect on this insect. Green lacewing is commercially available from Bugs for Bugs.
Larva
Adult
Fig. 6. Cryptolaemus montrozieri adult (above - photo by Dan Papacek), green lacewing adult (middle - photo by Sonya Broughton, WA Ag, Bugwood.org), green lacewing larva (below—photo by Dan Papacek, Bugs For Bugs).
Mealybugs

7
Chemical control
Mealybugs are difficult insects to manage using pesticides alone. Contact products tend to slough off their waxy body and they may be tolerant to systemic products. If pesticides are to be used to manage mealybugs it is recommended to apply contact products only when there is a high proportion of crawlers present. Crawlers are very susceptible to many pesticides, including oil-based products. If high populations of large mealybugs are present a systemic product will be required, perhaps combined with an oil or detergent-based product if this will not cause a phytotoxic reaction to the plant. Also, consider modifying the way that pests are managed, such that monitoring is conducted more frequently; increase the use of cultural management options.
Consecutive weekly pesticide applications will almost always be required if using pesticides to manage mealybugs. Even then, total control may not be achieved. It is always recommended to rotate between active ingredients from at least three different mode of action groups. This will reduce the likelihood of inducing pesticide resistance substantially.
Pesticides will almost always significantly reduce predator populations. Some products can be active against predators for months after application, but have limited or negligible impact on pest populations after the initial application. Therefore, carefully consider whether it is necessary to apply pesticides, particularly when they have a long residual impact on predator populations. Cryptolaemus and green lacewing are very effective predators that should be considered instead of applying pesticides.
With that said, there are a number of insecticides that are registered against mealybugs relevant to production nurseries. Some products have a general nursery stock registration, others may only be registered on a subset of species grown in the nursery production sector. Table 1 summarises products specifically registered against mealybugs. However, mealybugs are scale insects. Therefore products registered against scale insects may be legally applied to mealybugs (refer to the scale insect factsheet available at the NGIA website). Always ensure that you read the label and that it fits your exact situation; not all active ingredients listed in Table 1 are registered in all states or on all nursery plants. Refer to the nursery pesticide application best practice manual for more information.
Further reading
Llewellyn, R. (Ed). 2000. The Good Bug Book, second edition. Integrated Pest Management Pty Ltd., Richmond, NSW.
Goodwin, S., M. Steiner, R. Parker, L. Tesoriero, G. Connellan, E. Keskula, B. Cowper, A. Medhurst, and C. Rodriguez, C. (2000) Integrated Pest Management in Ornamentals: Information Guide. Horticulture Series: Agrilink, your growing guide to better farming. Manual. Agrilink Series QAL0004, Queensland Horticulture Institute. Brisbane, Queensland. Available at: http://era.daf.qld.gov.au/2208/6/005-ipm.pdf
Citrus mealybug parasite – Leptomastix dactylopii
Originally from South America, this small brown wasp (about 3mm long) has distinctive, long antennae, similar in length to the rest of its body. It is a parasitoid wasp, laying its eggs in citrus mealybug only. This species is extremely efficient in finding and parasitising citrus mealybug, even at low densities, but will not attack other species of mealybugs.
Adults live for about a month and can lay about 80 eggs over her lifetime. Females lay their eggs in large mealybug nymphs or adults that have not started to lay eggs. Larvae develop inside mealybugs, which probably stop feeding and will not lay eggs to be laid once parasitised. Eventually, the mealybug changes to a ‘mummy’, being oval, bloated and legless. Adults wasps emerge from mealybugs after about 2-3 weeks, starting their life cycle over again. This species is available commercially from Bugs for Bugs.
Fig. 7. Leptomas x dactylopii adult

8
Mode of action group
Active ingredient
Example product name
Registration information Mobility1 Toxicity to beneficials2
1A Carbaryl Bugmaster Mealybugs on raspberry only C H – 4+ weeks residual
1B Chlorpyrifos Lorsban PER14547 Pseudococcus mealybugs on persimmon only; PER14240 all mealybugs on bananas; mealybugs on apples and pears, coffee, duboisia, pineapple, cucurbits and grapes, citrus mealybug on citrus. Labels vary.
C H – 2-4 weeks residual
1B Diazinon Diazinon All mealybugs on nursery plants. C H – 2-3 weeks
1B Fenthion Lebaycid All mealybugs on ornamental crops. S H – 2-4 weeks, probably longer
1B Methidathion Suprathion All mealybugs on ornamentals, trees and shrubs in nurseries, also selected fruit crops.
C H – at least 3-4 weeks
1B Methomyl Lannate Citrus mealybug on citrus only. S H – at least 1 week, probably much longer
1B Omethoate Folimat All mealybugs on selected ornamentals and native plants.
S Probably H, probably with a moderate to long residual period
2B Fipronil Regent PER12983 Root mealybugs on non-food nursery stock. Drench or granular formulation.
S H – at least 2 weeks, probably longer
3A Beta-cyfluthrin
Tempo Mealybugs on azaleas, hibiscus, pelargoniums and roses only
C Probably H with at least 2-4 weeks residual
3A Bifenthrin Fivestar Longtailed mealybug on Carnations and other ornamental plants and pears; labels vary
C Probably H with at least 2-4 weeks residual
4A Acetamiprid Crown Citrus mealybug on palms, orchids and other ornamental plants; PER13831 Mealybugs on date palms only as drench or foliar application
S H – probably for 2-4 weeks, perhaps longer
4A Clothianidin Samarai Longtailed and tuber mealybug on apples and pears.
S H – probably for at least 3 weeks.
4A Imidacloprid Confidor PER13794 all mealybugs on date palms and ginger only; all mealybugs on shrubs, plants and ornamental trees; citrus mealybug only on ornamental plants. Labels vary.
S
Foliar spray: H – at least 2-4 weeks
Drench: L – no residual
4C Sulfoxaflor Transform Certain mealybugs on citrus, grape and pome fruit.
S Not known
9C Flonicamid Mainman Tuber mealybug on apples only. S L – no residual
16 Buprofezin Applaud PER14769, all mealybugs and scale insects on nursery stock and non-bearing fruit trees
T L-M – 2-3 weeks residual for Cryptolaemus, no residual for green lacewing or Leptomastix.
NA Paraffin/petroleum oil
Various Specific mealybugs on particular crops. Labels vary.
C L-M – no residual
NA Potassium salts of fatty acids
Natrasoap All mealybugs on most nursery plants C Not known, probably L-M with a short residual period
1 C = contact, S = systemic, T = translaminar; L = low, M = moderate, H = high. 2 Information was obtained from the Kopert and Biobest side effects website and Llewellyn (2000).
Table 1. Active ingredients registered against mealybugs relevant to Australian production nurseries. Also see general registrations against scale insects in the scale insect fact sheet.
This document was prepared by Andrew Manners and John Duff (Agri-science Queensland, Department of Agriculture and Fisheries, Ecosciences Precinct, GPO Box 267, Brisbane QLD 4001) as part of NY11001 Plant health biosecurity, risk management and capacity building for the nursery industry in 2015. Thanks go to Lindy Coates for helpful comments on previous versions of this factsheet. Photographs in this factsheet have been taken by DAF staff unless otherwise acknowledged.
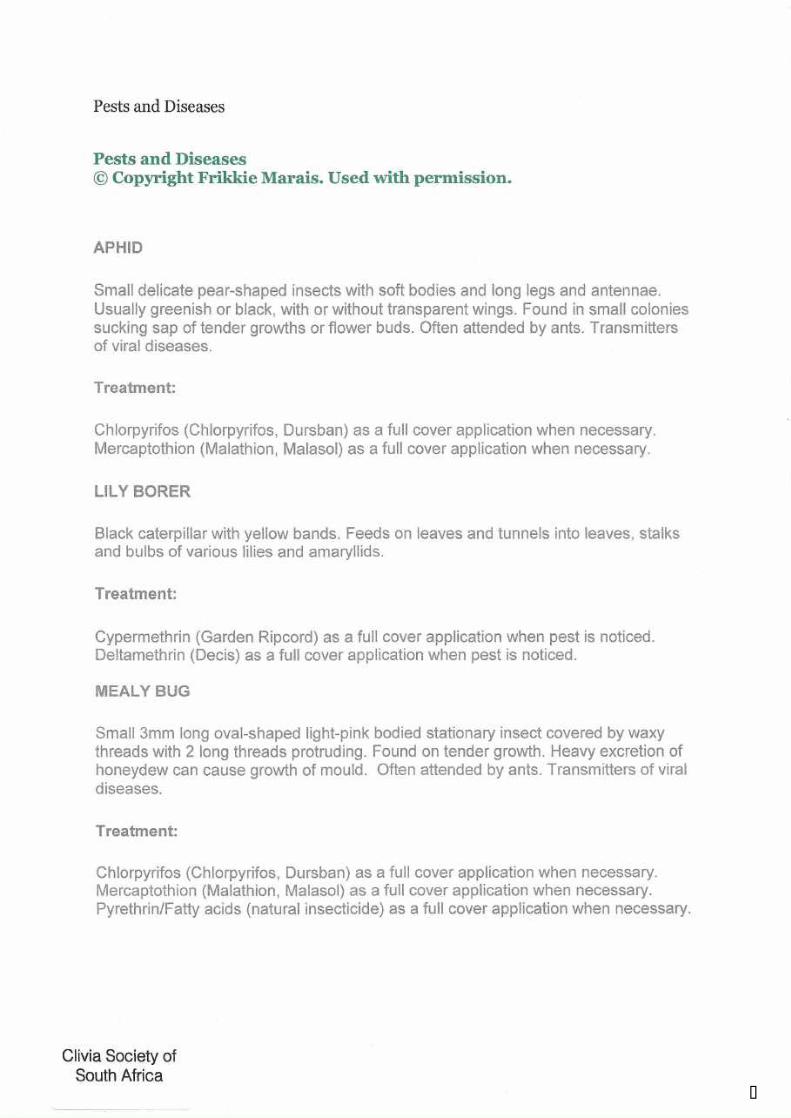
�
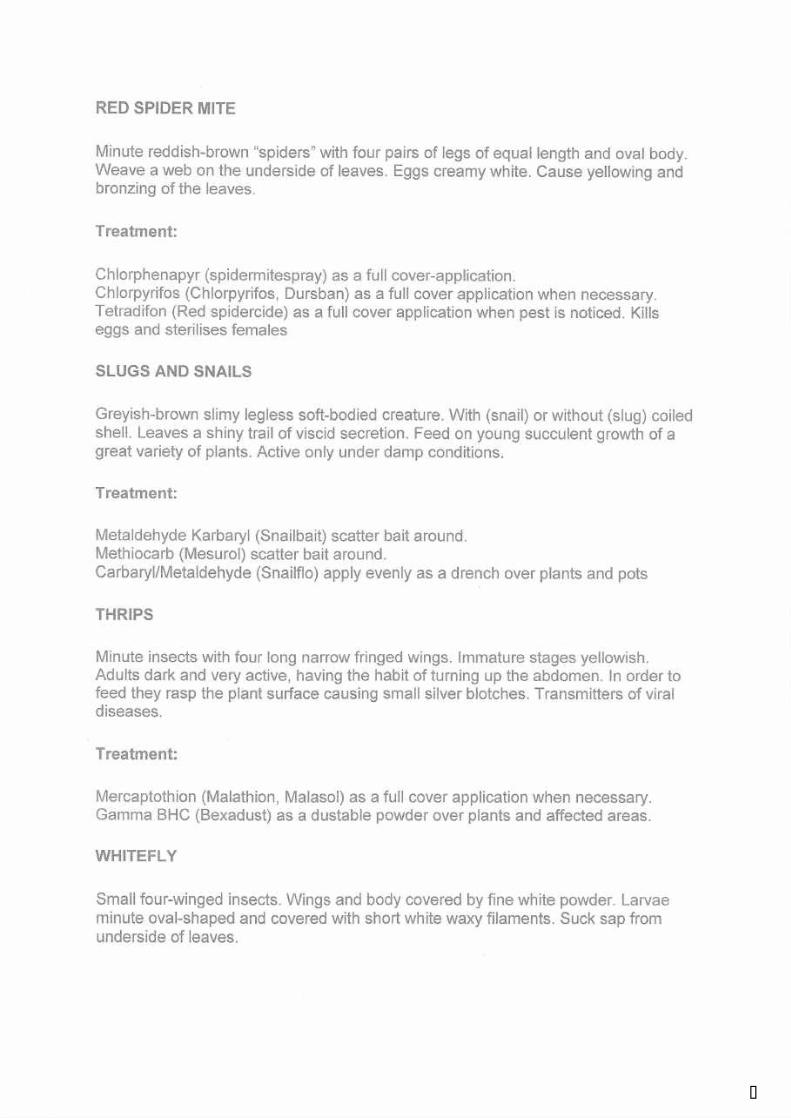
�

�

Kevin Walters—’Monica Conquest’ - 2000
To celebrate in a way, the Publication of the Reference Book Series on growing Clivias for Beginners and the Publication of this Clivia Beginner’s Bible, I would like to assist more Beginners getting involved with the grow-ing of the Clivia Species, I will offer further reading material to assist their journey in their involvement with Clivias.
For those Beginners who would like a copy of the well known eBook of Clivia—Nature and Nurture by Dirk Swanevelder and Roger Fisher and a copy of the 1999 First Edition of Grow Clivias by Graham Duncan then all you need to do is go to https://www.growingclivias.com , scroll down to CONTACT US and send me an email letting me know your desire to have these eBooks in your Clivia Library.
I have many copies of both available to distribute, first in best dressed, un-til they run out.
Enjoy your Clivia journey, the beauty of these plants just keep rewarding you. Take care, Gary Conquest, Growing Clivias for Beginners. May 2021.