
Oracle Data Guard 11gR2 Administration Beginner's Guide
404
www.allitebooks.com
-
Upload
khangminh22 -
Category
Documents
-
view
4 -
download
0
Transcript of Oracle Data Guard 11gR2 Administration Beginner's Guide

Oracle Data Guard 11gR2 Administration Beginner's Guide
Learn how to build and maintain Data Guard configurations with real-life, practical examples
Emre Baransel
Nassyam Basha
BIRMINGHAM - MUMBAI
www.allitebooks.com

Oracle Data Guard 11gR2 Administration Beginner's Guide
Copyright © 2013 Packt Publishing
All rights reserved. No part of this book may be reproduced, stored in a retrieval system, or transmitted in any form or by any means, without the prior written permission of the publisher, except in the case of brief quotations embedded in critical articles or reviews.
Every effort has been made in the preparation of this book to ensure the accuracy of the information presented. However, the information contained in this book is sold without warranty, either express or implied. Neither the authors, nor Packt Publishing, and its dealers and distributors will be held liable for any damages caused or alleged to be caused directly or indirectly by this book.
Packt Publishing has endeavored to provide trademark information about all of the companies and products mentioned in this book by the appropriate use of capitals. However, Packt Publishing cannot guarantee the accuracy of this information.
First published: June 2013
Production Reference: 1170613
Published by Packt Publishing Ltd.Livery Place35 Livery StreetBirmingham B3 2PB, UK.
ISBN 978-1-84968-790-4
www.packtpub.com
Cover Image by Sandeep Babu ([email protected])
www.allitebooks.com

Credits
AuthorsEmre Baransel
Nassyam Basha
ReviewersSyed Jaffar Hussain
Michael Seberg
Joel Perez
Acquisition EditorMartin Bell
Lead Technical EditorSusmita Panda
Technical EditorsAnkita Meshram
Veena Pagare
Zafeer Rais
Copy EditorsInsiya Morbiwala
Aditya Nair
Alfida Paiva
Laxmi Subramanian
Project CoordinatorLeena Purkait
ProofreadersDirk Manuel
Stephen Copestake
IndexerHemangini Bari
GraphicsAbhinash Sahu
Production CoordinatorAparna Bhagat
Cover WorkAparna Bhagat
www.allitebooks.com

About the Authors
Emre Baransel is a graduate of Electrical and Electronic engineering and has two Master's, one in Business Administration and the other one in Information Systems. He has been working in the IT industry for the past 10 years. He has worked for one of the largest fixed-line and GSM technology-based companies in Turkey. He was nominated as an Oracle ACE in 2012. He's an Oracle Certified Professional (OCP), a founding member of TROUG (Turkish Oracle User Group), and a blogger at emrebaransel.blogspot.com. He has spoken at the Oracle Open World in the US and at user group conferences in different countries of Europe. He has also contributed to the Oracle RMAN 11g Backup and Recovery book in 2010. He has focused specially on high database availability and disaster recovery solutions, cloud technologies, and database security.
First of all, I would like to thank the love of my life, my wife Tulay, for her patience and support during the time I was writing this book, and my super sweet son Demir for his presence in my life. I would also like to thank my co-author Nassyam for his great effort on this book under intense work pressure, the technical reviewers Jaffar, Joel, and Michael for their valuable time, and the Packt Publishing team for all their help and labor on this book. Thousands of hours were spent on this book by many different people. Thank you all who made this book possible.
www.allitebooks.com

Nassyam Basha is a Database Administrator. He has around seven years of IT experience of which the last five years have been as a Production Oracle DBA. He is a post graduate who holds a master's degree in Computer Applications from the University of Madras. He started working with dBase and FoxPro, and has participated in several projects with FoxPro and Oracle database starting from Oracle 7. He is an Oracle 10g Certified Professional having good knowledge in Oracle technologies such as Data Guard, RMAN, RAC, and performance tuning. He has completed more than 90 Data Guard setups on all platforms, from RAC to non-RAC and successful cluster migrations with switchovers and failovers for many business-critical production databases with major Data Guard-related issues. He actively participates in Oracle-related forums such as OTN, having 9000+ posts, using the profile Freelists (https://forums.oracle.com/forums/profile.jspa?editMode=true&userID=651869). He maintains an Oracle technology-related blog, (www.oracle-ckpt.com) and he is reachable at [email protected].
Above and beyond all others, I have to thank my Almighty Allah and my parents N. Abdul Aleem and Rahimunnisa. Without them I wouldn't have been able to be what I am today. A special thanks to my brother Nawaz Basha who has been with me all the time, in joy and even in sadness, and to my family members Zaheer Ahamed, Farhana, Riyana, niece Fathima Zehra, and my nephew Azzoo. I would also like to express my gratitude to Oracle professionals such as Shahbaz, Mohammad Farhan, Syed Jaffar Hussain, Chinar Aliyev, Michael Seberg, Uwe Hesse, Mohamed Houri, Adi Narayana, and all my friends along with my favorite authors Larry Carpenter and Joseph Meeks. I shall not forget to thank my clients and colleagues who have provided me with invaluable opportunities to expand my knowledge and shape my career. My heartfelt appreciation goes to the technical reviewers of this book, Syed Jaffar Hussain, Michael Seberg, and Joel Perez for the time they have spent reviewing this book, and to Packt Publishing's team members, Stephanie Moss, Leena Purkait, and Martin Bell for their support. Thanks to all of them and to their team members for giving me the opportunity to write this book. Last but not the least, I would like to say a big thanks to Emre Baransel who gave me the opportunity to co-author this book with him. His help, along with his direction were strong assets to write. Thank you Emre.
www.allitebooks.com

About the Reviewers
Syed Jaffer Hussain has been an Oracle Database Expert for over 14 years in his 20 years of Information Technology (IT) career. Over the past 14 years of his Oracle journey, he has been associated with several local and large-scale international banks where he implemented and managed very complex cluster and non-cluster environments with hundreds of business critical databases. Recognizing his efforts and contribution towards the community, Oracle awarded him the prestigious Best DBA of the year award in 2011, and bestowed him with the Oracle ACE Director status. He has also acquired a number of industry best-Oracle credentials, such as Oracle Certified Master (OCM), Oracle RAC Expert, and OCP DBA 8i, 9i, 10g, and 11g in addition to ITIL expertise.
Syed is an active Oracle speaker. He regularly presents technical sessions and webinars on various Oracle technologies at many Oracle events. You can visit his technical blog at http://jaffardba.blogspot.com, where he discusses and writes about workarounds/solutions for the issues confronted by him in his day-to-day activities.
Apart from being a part of the core Technical Review committee for a few Oracle technology-oriented books, he has also co-authored the books Oracle 11g R1/R2 Real Application Cluster Essentials and Oracle Expert RAC.
I would like to thank the Almighty and my parents for giving me everything I needed to become what I am today in life. Also, I owe a very big thanks to my wife Ayesha and my three champs (Ashfaq, Arfan, and Aahil) for allowing me to concentrate on my work by sacrificing their family time. Last but not the least, from the bottom of my heart, I would like to thank every individual who stood behind me and supported me morally during my ups and downs and encouraged me all through my life.
www.allitebooks.com

Michael Seberg has worked with Oracle since Version 7.3 in programming and administration. In the spring of 2010, Michael took on data protection for his employer, designing a complete failover site for Oracle using Data Guard. He has done extensive testing of switchover, failover, and monitoring of Data Guard. An Oracle generalist, Michael also works with Fusion Middleware, Forms and Reports, PHP, JSP, and Linux. He also does development in PL SQL, Object Pascal, and Java. Michael maintains a large personal website dedicated to Oracle technologies. He is a frequent contributor to the Oracle Technology Network (OTN) forum.
I would like to thank my wife Andrea for her commitment and patience with me.
Joel Perez is an expert DBA with over 12 years of specialized experience in several database areas with special focus on high availability and disaster recovery solutions (RAC, RMAN, Data Guard, and so on), upgrades, backup and recovery, database hardening, performance tuning, and others. During these years, Joel has worked as a Senior Consultant with a large number of companies and clients in various countries namely Venezuela, Panama, Costa Rica, Dominican Rep., Haiti, Nicaragua, Guatemala, Colombia, Honduras, Ecuador, Mexico, India, and others. Joel is a frequent speaker at many events such as OTN LAD TOUR. Among other complementary activities, Joel teaches high availability courses in Oracle University of several countries in Latin America and publishes articles for OTN LAD. Joel was the first Latin American to be named OTN Expert in the year 2003. Joel has been an Oracle ACE since 2004 and an Oracle ACE Director since 2012.
www.allitebooks.com

www.PacktPub.com
Support files, eBooks, discount offers and moreYou might want to visit www.PacktPub.com for support files and downloads related to your book.
Did you know that Packt offers eBook versions of every book published, with PDF and ePub files available? You can upgrade to the eBook version at www.PacktPub.com and as a print book customer, you are entitled to a discount on the eBook copy. Get in touch with us at [email protected] for more details.
At www.PacktPub.com, you can also read a collection of free technical articles, sign up for a range of free newsletters and receive exclusive discounts and offers on Packt books and eBooks.
TM
http://PacktLib.PacktPub.com
Do you need instant solutions to your IT questions? PacktLib is Packt's online digital book library. Here, you can access, read and search across Packt's entire library of books.
Why Subscribe? � Fully searchable across every book published by Packt
� Copy and paste, print and bookmark content
� On demand and accessible via web browser
Free Access for Packt account holdersIf you have an account with Packt at www.PacktPub.com, you can use this to access PacktLib today and view nine entirely free books. Simply use your login credentials for immediate access.
Instant Updates on New Packt BooksGet notified! Find out when new books are published by following @PacktEnterprise on Twitter, or the Packt Enterprise Facebook page.
www.allitebooks.com

Table of ContentsPreface 1Chapter 1: Getting Started 7
What is Data Guard? 7Standby database 8
Physical standby database 9Logical standby database 10Snapshot standby database 10
Oracle Data Guard evolution 11Version 7.3 – stone age 11Version 8i – first age 11Version 9i – middle age 12Version 10g – new age 12Version 11g – modern age 13
Oracle Data Guard architecture 14Data Guard services 15
Redo transport services 15Apply services 18
Time for action – monitoring Redo Apply 19SQL Apply (logical standby databases) 23
Role transitions 23Switchover 24Failover 24
User interfaces for administering Data Guard 25SQL*Plus 25DGMGRL 25Enterprise Manager 25
Time for action – using interfaces to monitor Data Guard 26Data Guard background processes 29
www.allitebooks.com

Table of Contents
[ ii ]
Other replication solutions and Data Guard 30Storage-based replication solutions 30GoldenGate and Streams 31
Summary 34Chapter 2: Configuring the Oracle Data Guard Physical Standby Database 35
Preconfiguration for Data Guard 35Data loss consideration 36Network bandwidth consideration 37Preparing the primary database 37
Archive log mode 37Time for action – enabling the archive log mode 38
Force logging 39Time for action – enabling force logging 40
Standby redo logs 40Time for action – configuring standby redo logs on primary 41
Fast recovery area (FRA) 42Time for action – enabling FRA 43
Understanding initialization parameters 44DB_NAME 44DB_UNIQUE_NAME 44LOG_ARCHIVE_CONFIG 45LOG_ARCHIVE_MAX_PROCESSES 46LOG_ARCHIVE_DEST_n 46LOCATION and SERVICE 47VALID_FOR 47SYNC and ASYNC 48AFFIRM and NOAFFIRM 49COMPRESSION 49MAX_CONNECTIONS 49MAX_FAILURE 50REOPEN 50NET_TIMEOUT 51DELAY 51LOG_ARCHIVE_DEST_STATE_n 52
Creating the physical standby database 53Standby database related initialization parameters 53
FAL_SERVER 53STANDBY_FILE_MANAGEMENT 54DB_FILE_NAME_CONVERT 54LOG_FILE_NAME_CONVERT 55
The physical standby database instance 55Time for action – starting the physical standby instance and making it ready for the RMAN duplicate 55
Using RMAN duplicate to create physical standby databases 61

Table of Contents
[ iii ]
Time for action – running an RMAN duplicate 62Post-installation steps 65
Verifying the standby database configuration 65Time for action – verifying the standby database configuration 65
Managing Redo Apply 67Time for action – starting, stopping, and monitoring MRP 67
Verifying synchronization between the primary and standby databases 71Time for action – verifying synchronization between the primary and standby databases 72Time for action – testing real-time apply 74Summary 77
Chapter 3: Configuring Oracle Data Guard Logical Standby Database 79Logical standby database characteristics 79
Not everything must be duplicated 80Use for reporting at all times 80Independent standby database objects 80Protecting writes on replicated standby tables 81Limitation for specific data types and objects 81High availability and disaster recovery considerations 82
Preparation for the configuration 82Time for action – checking for the unsupported data types 83Time for action – searching for and fixing any table row uniqueness problem 85Creating a logical standby database 87Time for action – making a physical standby database environment ready for conversion 88Time for action – converting a physical standby database into a logical standby database 90Verifying the logical standby database 94Time for action – checking the redo transport service status 94Time for action – checking the SQL Apply service status 96Customization and management in a logical standby database 98
Selective replication in a logical standby database 98Time for action – working with skip rules on a logical standby database 98
Data base Guard settings for the logical standby database 103Time for action – changing the Database Guard setting 104
Disabling database guard for a session 105Creating objects on the logical standby database 106
Creating and re-creating tables 106Creating scheduler jobs 106Creating materialized views 107

Table of Contents
[ iv ]
Time for action – creating objects on the logical standby database 107Automatic deletion of archived logs 111
Deletion of the foreign archived logs 111Deletion of the local archived logs 113
Summary 113Chapter 4: Oracle Data Guard Broker 115
Introduction to Data Guard broker 115Data Guard broker features and benefits 117
Centralized and simple management 117Cloud Control integration 117Oracle Data Guard and RAC 117Role transition with Data Guard broker 118Data Guard fast-start failover 118
Recommendation 118Data Guard broker components 119
Oracle Data Guard broker server-side components 119Data Guard Monitor process (DMON) 120Configuration file 121
Oracle Data Guard broker client-side components 121DGMGRL utility 121Enterprise Manager Cloud Control client 121
Implementation of Oracle Data Guard broker 122Time for action – initial setup of Data Guard broker 122Time for action – connecting to Data Guard broker 125Time for action – basic monitoring with Data Guard broker 127Management with Data Guard broker 131
Enabling and disabling broker configuration 131Time for action – disabling broker configuration 131
Enabling and disabling a standby database 132Time for action – disabling and enabling database 133
Changing configuration and database properties using broker 134Time for action – changing the database name 135
Changing the state of the database 137Troubleshooting Data Guard broker 138Data Guard tracing 139
Most Common Data Guard broker issues 139ORA-16797: database is not using a server parameter file 139ORA-10458:standby database requires recovery 140ORA-16737:the redo transport service for standby database "string" has an error 141ORA-16715:redo transport-related property string of standby database "string" is inconsistent 142

Table of Contents
[ v ]
ORA-12514:TNS:listener does not currently know of service requested in connect descriptor 143
Current listener description 143Oracle Data Guard fast-start failover 144Time for action – configuring fast-start failover 146
Troubleshooting observer configuration 149Script to stop and start observer 151
Summary 151Chapter 5: Data Guard Protection Modes 153
The Maximum Protection mode 154The Maximum Performance mode 155The Maximum Availability mode 155Choosing the correct mode for your requirements 156Changing Data Guard protection mode 157Time for action – changing the protection mode with SQL*Plus 157Time for action – changing the protection mode with Data Guard broker 163Time for action – changing the protection mode with Enterprise Manager Cloud Control 165Summary 172
Chapter 6: Data Guard Role Transitions 173Role transition considerations 173Switchover 174
Performing switchover with a physical standby database using SQL*Plus 176Time for action – preliminary tests before performing switchover 176Time for action – switchover with a physical standby using SQL*Plus 179
Performing switchover with a physical standby database using broker 184Time for action – switchover with a physical standby using broker 184
Performing switchover with a physical standby database using EM Cloud Control 185
Time for action – switchover with a physical standby using EM Cloud Control 186Performing switchover with a logical standby database using SQL*Plus 187
Time for action – switchover with a logical standby database using SQL*Plus 188Performing switchover with a logical standby database using broker 192
Time for action – switchover with a logical standby using broker 192Failover 194
Performing failover with a physical standby database 195Time for action – failover with a physical standby database using SQL*Plus 196
Performing failover with a logical standby database 199Time for action – failover with a logical standby using broker 199Summary 201

Table of Contents
[ vi ]
Chapter 7: Active Data Guard, Snapshot Standby, and Advanced Techniques 203
Oracle Active Data Guard 204Why Active Data Guard? 204Oracle Data Guard license 207Enabling Active Data Guard 208
Time for action – enabling Active Data Guard if Redo Apply is running using SQL *PLUS 208Time for action – enabling Active Data Guard if the standby database is shut down 209Time for action – enabling Active Data Guard using broker 210
Monitoring Active Data Guard 212From primary 212From standby 213
Active Data Guard with applications 213Active Data Guard with PeopleSoft 214
Time for action – Active Data Guard with PeopleSoft 215Active Data Guard with EBS 216Active Data Guard with TopLink 217Active Data Guard with Oracle BI 218Active Data Guard with SAP 218
Active Data Guard features 219EXPDP from standby database using NETWORK_LINK (ADG) 219
Time for action – exporting a database backup from Active Data Guard 219Time for action – using the ASH report from the standby database 220Using a snapshot standby database 223Time for action – converting to a snapshot standby database 223Time for action – converting to a physical standby database 225Cascade standby databases 227
Limitations with cascade standby database 228Time for action – cascade standby database 228Advanced compression in Data Guard 231Time for action – enabling advanced compression 231Preparation of standby on a cross-platform Data Guard 233Time for action – creating a cross-platform Data Guard setup 234Data Guard tuning and wait events 237
Network tuning 237Redo transport and apply tuning 238Data Guard wait events 240
Summary 241

Table of Contents
[ vii ]
Chapter 8: Integrating Data Guard with the Complete Oracle Environment 243The Oracle Enterprise Manager Cloud Control integration 243Time for action – adding the Data Guard configuration into Cloud Control 244
Cloud Control Data Guard administration home page 250Modifying the Data Guard configuration 251
Time for action – enabling/disabling fast-start failover 254Monitoring Data Guard performance 258Using Incident Manager to monitor Data Guard 259
Time for action – setting the threshold and creating an incident for estimated failover time metric 261RMAN integration 264
Integration requirements and best practices 264Physical standby requirement 264RMAN Catalog requirement 264Using a different DB_UNIQUE_NAME 265General RMAN best practices 265
RMAN settings for the Data Guard environment 265Registering primary database in the catalog 266Configuring RMAN settings for primary database: 266Configuring RMAN settings for standby database 268Checking the RMAN configuration 268
Time for action – recovering a primary database using a standby database disk backup 270
Using block change tracking with Data Guard 272RAC integration 273
A RAC primary database with a single instance standby database 274A RAC primary database with a RAC standby database 275
Summary 275Chapter 9: Data Guard Configuration Patching 277
What is patch and what are patch types? 277Interim patch 278CPU/SPU patches 278PSU patches 278Patch set 278Patching on Data Guard 279
Best practices of patching 279Upgrading OPatch 279Performing prerequisite checks of patch 280How to clean up patch history? 281Patching on Data Guard configuration 282
How to apply an interim/bug patch on logical standby? 282

Table of Contents
[ viii ]
Time for action – applying a patch on logical standby 283How to apply a PSU patch on physical standby database using broker? 287
Time for action – applying PSU on a physical standby database 288How to apply patch set on physical standby (11.2.0.1 to 11.2.0.3)? 296
Time for action – patch set upgrade of physical standby 296Summary 304
Chapter 10: Common Data Guard Issues 305Recreating the standby control file 306Time for action – recreating the standby control file 307Dealing with redo transport authentication problems 311Time for action – changing the SYS password in a Data Guard environment 311Time for action – changing the redo transport user 313Dealing with UNNAMED datafiles 315Time for action – resolving UNNAMED datafile errors 315Closing a gap with an RMAN incremental backup 317Time for action – closing a gap with an RMAN incremental backup 318Fixing NOLOGGING changes on the standby database 322Time for action – fixing NOLOGGING changes on a standby database with incremental datafile backups 323Time for action – fixing NOLOGGING changes in the standby database with incremental database backups 325Turning on Data Guard tracing 326Gathering diagnostic data 328
Alert log and trace files 328Time for action – monitoring the database alert log using ADRCI 330
Data Guard broker logs 334Dynamic performance views 335
Summary 338Chapter 11: Data Guard Best Practices 339
Configuring a connection failover 339Transparent Application Failover (TAF) 340
Configuring the client-side TAF 341Configuring the server-side TAF 341
Fast Connection Failover (FCF) 344Time for action – configuring FCF for JDBC connections 344
Fast Application Notification (FAN) 346The archived log deletion policy on the standby database 347Time for action – the recommended configuration for archived log maintenance on a standby database 347

Table of Contents
[ ix ]
Using flashback on a standby database 348Time for action – using flashback on a standby database 349Database rolling upgrade using the transient logical standby database 355Time for action – performing a rolling upgrade using the transient logical standby database 355Corruption detection, prevention, and automatic repair with Oracle Data Guard 366
DB_BLOCK_CHECKSUM 367DB_BLOCK_CHECKING 368DB_LOST_WRITE_PROTECT 369Automatic block media repair 369
Summary 370Pop Quiz Answers 371
Chapter 1, Getting Started 371Chapter 5, Data Guard Protection Modes 371Chapter 9, Data Guard Configuration Patching 372Chapter 10, Common Data Guard Issues 372
Index 373


Preface
Data Guard is the Oracle technology that meets high availability, disaster recovery, and data protection requirements for the Oracle Database, and is the market leader product for this scope. In enterprise systems, Data Guard is very widely used, so managing Data Guard configurations is a common task of Oracle DBAs. This administration task is not just about installing and keeping standby databases synchronized with the primary database. DBAs also provide standby databases for reporting and testing purposes, recovering partial data by using them, performing role transitions for disaster recovery testing or for planned maintenance operations, integrating Data Guard with the existing Oracle environment, and so on. As an Oracle DBA, you need to learn how to install and maintain Data Guard and benefit from it as much as possible.
In this practical book, you'll not only be introduced to Oracle Data Guard, you'll also see all aspects of Data Guard administration with examples, recipes, and best practices. We'll start by learning about the fundamental components of Data Guard, and then continue with configuring physical and logical standby databases of Data Guard. The important details and best practices of Data Guard administration will be covered later on.
What this book coversChapter 1, Getting Started, includes an introduction to Oracle Data Guard. Configuration elements, the architecture of the physical and logical standby databases, Data Guard services, the history of Data Guard, and a comparison with other replication solutions are covered in this chapter.
Chapter 2, Configuring the Oracle Data Guard Physical Standby Database, explains how to prepare the configuration from scratch, create a physical standby database including post tasks with a step-by-step approach, and verify the physical standby database recovery including real-time apply.
www.allitebooks.com

Chapter 3, Configuring Oracle Data Guard Logical Standby Database, shows you how to prepare a logical standby database configuration with pre and post steps. Customization and management in a logical standby database are also covered.
Chapter 4, Oracle Data Guard Broker, explains the detailed implementation of the Data Guard broker, monitoring and managing Data Guard using the broker, troubleshooting the Data Guard broker, and configuring fast-start failover (FSFO).
Chapter 5, Data Guard Protection Modes, focuses on the three data protection modes of Oracle Data Guard. You'll learn how to choose the correct mode for your requirements and how to change modes using SQL*Plus, the Data Guard broker, and Enterprise Manager Cloud Control.
Chapter 6, Data Guard Role Transitions, will include the necessary steps to accomplish successful switchover and failover operations in the physical and logical standby database environments. It also covers different tools to perform role transitions.
Chapter 7, Active Data Guard, Snapshot Standby, and Advanced Techniques, explains what Active Data Guard is, how to integrate applications with Active Data Guard, and several advantages of using it, such as performing Data Pump exports, gathering ASH reports, and advanced compression. This chapter also describes how to use snapshot standby, implement cascade standby databases, configure the cross-platform Data Guard setup, and also provides a brief on Data Guard tuning.
Chapter 8, Integrating Data Guard with the Complete Oracle Environment, explains the configuration steps required to integrate Data Guard with Enterprise Manager Grid Control, RMAN, and RAC. Integrating Data Guard with these products is crucial to make an efficient configuration and take advantage of all of these products together.
Chapter 9, Data Guard Configuration Patching, explains how to apply one-off patches and patch set updates to databases in a Data Guard environment, and some best practices of patching.
Chapter 10, Common Data Guard Issues, gives practical information for dealing with some very common issues in Data Guard that every administrator needs to know and experience.
Chapter 11, Data Guard Best Practices, includes very important information regarding how to make a Data Guard configuration perfect and take maximum advantage of Data Guard properties. Connection failover, deletion of archived log files, using flashback, database rolling upgrade using transient logical standby and corruption detection, and prevention and automatic repair with Oracle Data Guard are covered.

What you need for this bookIn order to follow the exercises in this book, you must install the Oracle Database 11g Release 2 software on two separate database servers (primary and standby). You can use a virtual machine to create virtual database servers on your PC. Also, a database has to be created on the primary database server. The Oracle management software, Enterprise Manager 12c Cloud Control, needs to be installed to follow specific exercises using this tool.
Who this book is forIf you are an Oracle DBA who wants to configure and administer Data Guard and improve your knowledge on Data Guard with a step-by-step approach and hands-on scenarios, this book is for you. With a basic understanding of Oracle database administration you'll easily be able to follow the book.
ConventionsIn this book, you will find several headings appearing frequently.
To give clear instructions of how to complete a procedure or task, we use:
Time for action – heading1. Action 1
2. Action 2
3. Action 3
Instructions often need some extra explanation so that they make sense, so they are followed with:
What just happened?This heading explains the working of tasks or instructions that you have just completed.
You will also find some other learning aids in the book, including:
Pop quiz – headingThese are short multiple-choice questions intended to help you test your own understanding.

Preface
[ 4 ]
Have a go hero – headingThese are practical challenges that give you ideas for experimenting with what you have learned.
You will also find a number of styles of text that distinguish between different kinds of information. Here are some examples of these styles, and an explanation of their meaning.
Code words in text, database table names, folder names, filenames, file extensions, pathnames, dummy URLs, user input, and Twitter handles are shown as follows: The LOG_ARCHIVE_DEST_n parameters must be configured properly on every instance of primary and standby databases to show remote archiving destinations.
A block of code is set as follows:
LOG_ARCHIVE_CONFIG ={ [ SEND | NOSEND ] [ RECEIVE | NORECEIVE ] [ DG_CONFIG=(remote_db_unique_name1, ... remote_db_unique_name9) | NODG_CONFIG ]
When we wish to draw your attention to a particular part of a code block, the relevant lines or items are set in bold:
2 DBMS_SCHEDULER.CREATE_JOB ( 3 JOB_NAME => 'REFRESH_EMPDEPT_MV_PRIMARY' , 4 JOB_TYPE => 'PLSQL_BLOCK',
Any command-line input or output is written as follows:
RFS LogMiner: Registered logfile [/u01/app/oracle/archive_std/1_106_791552282.arc] to LogMiner session id [1]
...
LOGMINER: Begin mining logfile for session 1 thread 1 sequence 106, /u01/app/oracle/archive_std/1_106_791552282.arc
LOGMINER: End mining logfile for session 1 thread 1 sequence 106, /u01/app/oracle/archive_std/1_106_791552282.arc
New terms and important words are shown in bold. Words that you see on the screen, in menus or dialog boxes for example, appear in the text like this: Expand the Data Guard Performance category and click on the Estimated Failover Time section.

Preface
[ 5 ]
Warnings or important notes appear in a box like this.
Tips and tricks appear like this.
Reader feedbackFeedback from our readers is always welcome. Let us know what you think about this book—what you liked or may have disliked. Reader feedback is important for us to develop titles that you really get the most out of.
To send us general feedback, simply send an e-mail to [email protected], and mention the book title through the subject of your message.
If there is a topic that you have expertise in and you are interested in either writing or contributing to a book, see our author guide on www.packtpub.com/authors.
Customer supportNow that you are the proud owner of a Packt book, we have a number of things to help you to get the most from your purchase.
Downloading the example codeYou can download the example code files for all Packt books you have purchased from your account at http://www.packtpub.com. If you purchased this book elsewhere, you can visit http://www.packtpub.com/support and register to have the files e-mailed directly to you.

Preface
[ 6 ]
ErrataAlthough we have taken every care to ensure the accuracy of our content, mistakes do happen. If you find a mistake in one of our books—maybe a mistake in the text or the code—we would be grateful if you would report this to us. By doing so, you can save other readers from frustration and help us improve subsequent versions of this book. If you find any errata, please report them by visiting http://www.packtpub.com/submit-errata, selecting your book, clicking on the errata submission form link, and entering the details of your errata. Once your errata are verified, your submission will be accepted and the errata will be uploaded to our website, or added to any list of existing errata, under the Errata section of that title.
PiracyPiracy of copyright material on the Internet is an ongoing problem across all media. At Packt, we take the protection of our copyright and licenses very seriously. If you come across any illegal copies of our works, in any form, on the Internet, please provide us with the location address or website name immediately so that we can pursue a remedy.
Please contact us at [email protected] with a link to the suspected pirated material.
We appreciate your help in protecting our authors, and our ability to bring you valuable content.
QuestionsYou can contact us at [email protected] if you are having a problem with any aspect of the book, and we will do our best to address it.

1Getting Started
The objective of this chapter is to make you familiar with the Oracle Data Guard 11gR2 environment. We will discuss the definition, properties, and history of Data Guard. You will become accustomed with the concepts of standby databases and how Data Guard provides the robust solution of high availability and disaster recovery.
In this chapter, we will discuss the following topics:
� The definition and features of Data Guard
� The evolution of Data Guard
� The architecture and topology of Data Guard
� Comparison of Data Guard with other replication solutions
Let's get on with learning what Oracle Data Guard is and its primary features are.
What is Data Guard?Data Guard, which was introduced as the standby database in Oracle database Version 7.3 under the name of Data Guard with Version 9i, is a data protection and availability solution for Oracle databases. The basic function of Oracle Data Guard is to keep a synchronized copy of a database as standby, in order to make provision, incase the primary database is inaccessible to end users. These cases are hardware errors, natural disasters, and so on. Each new Oracle release added new functionalities to Data Guard and the product became more and more popular with offerings such as data protection, high availability, and disaster recovery for Oracle databases.

Getting Started
[ 8 ]
Using Oracle Data Guard, it's possible to direct user connections to a Data Guard standby database automatically with no data loss, in case of an outage in the primary database. Data Guard also offers taking advantage of the standby database for reporting, test, and backup offloading. Corruptions on the primary database may be fixed automatically by using the non-corrupted data blocks on the standby database. There will be minimal outages (seconds to minutes) on the primary database in planned maintenances such as patching and hardware changes by using the switchover feature of Data Guard, which changes the roles of the primary and standby databases. All of these features are available with Data Guard, which doesn't require an installation but a cloning and configuration of the Oracle database.
A Data Guard configuration consists of two main components: primary database and standby database. The primary database is the database for which we want to take precaution for its inaccessibility. Fundamentally, changes on the data of the primary database are passed through the standby database and these changes are applied to the standby database in order to keep it synchronized.
The following figure shows the general structure of Data Guard:
StandbyDatabaseUpdate (RedoApply or SQLApply)
PrimaryDatabaseUpdates(DBWn)
StandbyDatabase
Database Server A
Primary InstanceRedo Transport
Database Server B
Standby Instance
PrimaryDatabase
Storage A Storage B
Let's look at the standby database and its properties more closely.
Standby databaseIt is possible to configure a standby database simply by copying, cloning, or restoring a primary database to a different server. Then the Data Guard configurations are made on the databases in order to start the transfer of redo information from primary to standby and also to start the apply process on the standby database.

Chapter 1
[ 9 ]
Primary and standby databases may exist on the same server; however, this kind of configuration should only be used for testing. In a production environment, the primary and standby database servers are generally preferred to be on separate data centers.
Data Guard keeps the primary and standby databases synchronized by using redo information. As you may know, transactions on an Oracle database produce redo records. This redo information keeps all of the changes made to the database. The Oracle database first creates redo information in memory (redo log buffers). Then they're written into online redo logfiles, and when an online redo logfile is full, its content is written into an archived redo log.
An Oracle database can run in the ARCHIVELOG mode or the NOARCHIVELOG mode. In the ARCHIVELOG mode, online redo logfiles are written into archived redo logs and in the NOARCHIVELOG mode, redo logfiles are overwritten without being archived as they become full. In a Data Guard environment, the primary database must be in the ARCHIVELOG mode.
In Data Guard, transfer of the changed data from the primary to standby database is achieved by redo with no alternative. However, the apply process of the redo content to the standby database may vary. The different methods on the apply process reveal different type of standby databases.
There were two kinds of standby databases before Oracle database Version 11g, which were: physical standby database and logical standby database. Within Version 11g we should mention a third type of standby database which is snapshot standby. Let's look at the properties of these standby database types.
Physical standby databaseThe Physical standby database is a block-based copy of the primary database. In a physical standby environment, in addition to containing the same database objects and same data, the primary and standby databases are identical on a block-for-block basis. Physical standby databases use Redo Apply method to apply changes. Redo Apply uses Managed recovery process (MRP) in order to manage application of the change in information on redo.
In Version 11g, a physical standby database can be accessible in read-only mode while Redo Apply is working, which is called Active Data Guard. Using the Active Data Guard feature, we can offload report jobs from the primary to physical standby database.

Getting Started
[ 10 ]
Physical standby database is the only option that has no limitation on storage vendor or data types to keep a synchronized copy of the primary database.
Logical standby databaseLogical standby database is a feature introduced in Version 9iR2. In this configuration, redo data is first converted into SQL statements and then applied to the standby database. This process is called SQL Apply. This method makes it possible to access the standby database permanently and allows read/write while the replication of data is active. Thus, you're also able to create database objects on the standby database that don't exist on the primary database. So a logical standby database can be used for many other purposes along with high availability and disaster recovery.
Due to the basics of SQL Apply, a logical standby database will contain the same data as the primary database but in a different structure on the disks.
One discouraging aspect of the logical standby database is the unsupported data types, objects, and DDLs. The following data types are not supported to be replicated in a logical standby environment:
� BFILE
� Collections (including VARRAYS and nested tables)
� Multimedia data types (including Spatial, Image, and Oracle Text)
� ROWID and UROWID
� User-defined types
The logical standby database doesn't guarantee to contain all primary data because of the unsupported data types, objects, and DDLs. Also, SQL Apply consumes more hardware resources. Therefore, it certainly brings more performance issues and administrative complexities than Redo Apply.
Snapshot standby databasePrincipally, a snapshot standby database is a special condition of a physical standby database. Snapshot standby is a feature that is available with Oracle Database Version 11g. When you convert a Physical standby database into a snapshot standby database, it becomes accessible for read/write. You can run tests on this database and change the data. When you're finished with the snapshot standby database, it's possible to reverse all the changes made to the database and turn it back to a physical standby again.
An important point here is that a snapshot standby database can't run Redo Apply. Redo transfer continues but standby is not able to apply redo.

Chapter 1
[ 11 ]
Oracle Data Guard evolutionIt has been a long time that the Oracle Data Guard technology has been in the database administrator's life and it apparently evolved from the beginning until 11gR2. Let's look at this evolution closely through the different database versions.
Version 7.3 – stone ageThe functionality of keeping a duplicate database in a separate server, which can be synchronized with the primary database, came with Oracle database Version 7.3 under the name of standby database. This standby database was constantly in recovery mode waiting for the archived redo logs to be synchronized. However, this feature was not able to automate the transfer of archived redo logs. Database administrators had to find a way to transfer archived redo logs and apply them to the standby server continuously. This was generally accomplished by a script running in the background.
The only aim of Version 7.3 of the standby database was disaster recovery. It was not possible to query the standby database or to open it for any purpose other than activating it in the event of failure of the primary database. Once the standby database was activated, it couldn't be returned to the standby recovery mode again.
Version 8i – first ageOracle database Version 8i brought the much-awaited features to the standby database and made the archived log shipping and apply process automatic, which is now called managed standby environment and managed recovery, respectively. However, some users were choosing to apply the archived logs manually because it was not possible to set a delay in the managed recovery mode. This mode was bringing the risk of the accidental operations to reflect standby database quickly.
Along with the "managed" modes, 8i made it possible to open a standby database with the read-only option and allowed it to be used as a reporting database.
Even though there were new features that made the tool more manageable and practical, there were still serious deficiencies. For example, when we added a datafile or created a tablespace on the primary database, these changes were not being replicated to the standby database. Database administrators had to take care of this maintenance on the standby database. Also when we opened the primary database with resetlogs or restored a backup control file, we had to re-create the standby database.
www.allitebooks.com

Getting Started
[ 12 ]
Version 9i – middle ageFirst of all, with this version Oracle8i standby database was renamed to Oracle9i Data Guard. 9i Data Guard includes very important new features, which makes the product much more reliable and functional. The following features were included:
� Oracle Data Guard Broker management framework, which is used to centralize and automate the configuration, monitoring, and management of Oracle Data Guard installations, was introduced with this version.
� Zero data loss on failover was guaranteed as a configuration option.
� Switchover was introduced, which made it possible to change the roles of primary and standby. This made it possible to accomplish a planned maintenance on the primary database with very less service outage.
� Standby database administration became simpler because new datafiles on the primary database are created automatically on standby and if there are missing archived logs on standby, which is called gap; Data Guard detects and transmits the missing logs to standby automatically.
� Delay option was added, which made it possible to configure a standby database that is always behind the primary in a specified time delay.
� Parallel recovery increased recovery performance on the standby database.
In Version 9i Release 2, which was introduced in May 2002, one year after Release 1, there were again very important features announced. They are as follows:
� Logical standby database was introduced, which we've mentioned earlier in this chapter
� Three data protection modes were ready to use: Maximum Protection, Maximum Availability, and Maximum Performance, which offered more flexibility on configuration
� The Cascade standby database feature made it possible to configure a second standby database, which receives its redo data from the first standby database
Version 10g – new ageThe 10g version again introduced important features of Data Guard but we can say that it perhaps fell behind expectations because of the revolutionary changes in release 9i. The following new features were introduces in Version 10g:
� One of the most important features of 10g was the Real-Time Apply. When running in Real-Time Apply mode, the standby database applies changes on the redo immediately after receiving it. Standby does not wait for the standby redo logfile to be archived. This provides faster switchover and failover.

Chapter 1
[ 13 ]
� Flashback database support was introduced, which made it unnecessary to configure a delay in the Data Guard configuration. Using flashback technology, it was possible to flash back a standby database to a point in time.
� With 10g Data Guard, if we open a primary database with resetlogs it was not required to re-create the standby database. Standby was able to recover through resetlogs.
� Version 10g made it possible to use logical standby databases in the database software rolling upgrades of the primary database. This method made it possible to lessen the service outage time by performing switchover to the logical standby database.
10g Release 2 also introduced new features to Data Guard, but these features again were not satisfactory enough to make a jump to the Data Guard technology. The two most important features were Fast-Start Failover and the use of Guaranteed restore point:
� Fast-start failover automated and accelerated the failover operation when the primary database was lost. This option strengthened the disaster recovery role of Oracle Data Guard.
� Guaranteed restore point was not actually a Data Guard feature. It was a database feature, which made it possible to revert a database to the moment that Guaranteed restore point was created, as long as there is sufficient disk space for the flashback logs. Using this feature following scenario became possible: Activate a physical standby database after stopping Redo Apply, use it for testing with read/write operations, then revert the changes, make it standby again and synchronize it with the primary. Using a standby database read/write was offering a great flexibility to users but the archived log shipping was not able to continue while the standby is read/write and this was causing data loss on the possible primary database failure.
Version 11g – modern ageOracle database version 11g offered the expected jump in the Data Guard technology, especially with two new features, which are called Active Data Guard and snapshot standby. The following features were introduced:
� Active Data Guard has been a milestone in Data Guard history, which enables a query from a physical standby database while the media recovery is active.
� Snapshot standby is a feature to use a physical standby database read/write for test purposes. As we mentioned, this was possible with 10gR2 Guaranteed restore point feature but 11g provided the continuous archived log shipping in the time period that standby is read/write with snapshot standby.

Getting Started
[ 14 ]
� It has been possible to compress redo traffic in a Data Guard configuration, which is useful in excessive redo generation rates and resolving gaps. Compression of redo when resolving gaps was introduced in 11gR1 and compression of all redo data was introduced in 11gR2.
� Use of the physical standby databases for the rolling upgrades of database software was enabled, aka Transient Logical Standby.
� It became possible to include different operating systems in a Data Guard configuration such as Windows and Linux.
� Lost-write, which is a serious data corruption type arising from the misinformation of storage subsystem on completing the write of a block, can be detected in an 11g Data Guard configuration. Recovery is automatically stopped in such a case.
� RMAN fast incremental backup feature "Block Change Tracking" can be run on an Active Data Guard enabled standby database.
� Another very important enhancement in 11g was Automatic Block Corruption Repair feature that was introduced with 11gR2. With this feature, a corrupted data block in the primary database can be automatically replaced with an uncorrupted copy from a physical standby database in Active Data Guard mode and vice versa.
We've gone through the evolution of Oracle Data Guard from its beginning until today. As you may notice, Data Guard started its life as a very simple database property revealed to keep a synchronized database copy with a lot of manual work and now it's a complicated tool with advanced automation, precaution, and monitoring features. Now let's move on with the architecture and components of Oracle Data Guard 11gR2.
Oracle Data Guard architectureThe main architecture of Oracle Data Guard 11gR2 includes a primary database, up to 30 standby databases, the redo transport services, (which automatically ship the redo log data from the primary to standby server), and Apply Services (which applies the changes in redo on the standby database). There are of course some background processes special to a Data Guard configuration, which run the services in question.
In a Data Guard configuration, the switchover and failover concepts are also very important. By performing a switchover, it's possible to change the roles of the primary and standby databases and change the direction of the redo shipping. Failover is the option that we must use to open a standby database to user connection in read/write mode, when the primary database is inaccessible.
The last Data Guard components that we'll mention in this chapter are user interfaces to monitor and administrate a Data Guard configuration. These are SQL*Plus, Oracle Enterprise Manager Cloud Control, and Data Guard broker command-line interface (DGMGRL).

Chapter 1
[ 15 ]
Data Guard servicesThese services are the vital points of a Data Guard configuration. Database administrators should decide and use the proper configuration to supply the business needs and tune these services to comply with SLAs.
Redo transport servicesIn a primary database, when a user commits a transaction, the relevant redo data is written into online redo logfiles from memory (Redo Log Buffer). After the online redo log group becomes full it is archived into an archived redo logfile with a log switch. It's possible to configure Data Guard sending the redo data to standby databases from the log buffer as the transactions are committed (by LGWR process) or from the online redo logfiles when they're being archived (by ARCn processes). Shipping redo data with ARCH will result in more data loss in the case of primary database failure because the data change information in the current online log of primary will be lost.
The following diagram shows the Data Guard configuration with ARCH transportation mode:
SGA (RedoLog Buffer)
OnlineRedo Logs
ArchivedRedo Logs
Apply
StandbyDatabaseLGWR
ARCH
PrimaryDatabase
Redo Transport overNetwork
ArchivedRedo LogsRFS
LOG TRANSPORT WITH ARCH ATTRIBUTE
Here are the important properties of the log transport with the ARCH attribute:
� Logs are sent by the ARCH process; the LNS process is not in use
� Standby redo logs are not mandatory on the standby database
� Data in the unarchived online redo log will be lost in a failover

Getting Started
[ 16 ]
If LGWR is used for the redo transportation, it's possible to guarantee zero data loss failovers by creating a Data Guard configuration in which the primary database waits for confirmation from the standby database that redo has been received, before it informs that the commit is completed. This configuration is called Synchronous redo transport (SYNC). However, this may affect the performance of the primary database.
The following diagram shows the Data Guard configuration with LGWR and SYNC transportation mode:
SGA (RedoLog Buffer)
LGWR
PrimaryDatabase
Redo Transport overNetwork
LOG TRANSPORT WITH LGWR & SYNC ATTRIBUTES
LNSStandbyRedo LogsRFS
ACK
OnlineRedo Logs
ACK
Apply
User Commit Commit ACK
DATABASE USER
StandbyDatabase
The following points explain the diagram in a better way:
� Redo is read and sent to the standby database directly from the log buffer by the LNS process
� Acknowledgment needed from the standby database (RFS to LNS and LNS to LGWR) to send COMMIT ACK to the database user
� It's mandatory to use standby redo logs
� Zero data loss in failover can be guaranteed with this configuration
� There maybe slower response times on the primary database
� The primary database stops giving service in a network disruption incident between primary and standby

Chapter 1
[ 17 ]
If SYNC redo transport is chosen in an 11g Data Guard configuration, the performance decrease on the primary database will be less than the earlier releases. Previously, the primary database used to finish writes to the online redo log first and then send redo to the standby database. There were two consecutive I/O operations that the primary database needs to wait for in order to complete the commit. In 11g these two I/O operations run in parallel. The primary database does not wait for finishing writes to online redo log and it sends the redo data to standby at the same time.
The other option is to use the Asynchronous redo transport (ASYNC) method, which avoids the impact to primary database performance. In this method, the primary database never waits for any acknowledgment from the standby database in order to complete the commit. In the ASYNC redo transport method we have the performance gain; however, this method does not guarantee zero data loss failovers because it does not guarantee all the committed transactions being received by the standby database at any moment.
SGA (RedoLog Buffer)
LGWR
PrimaryDatabase
Redo Transport overNetwork
LOG TRANSPORT WITH LGWR & ASYNC ATTRIBUTES
LNSStandbyRedo LogsRFS
OnlineRedo Logs
Apply
User Commit Commit ACK
DATABASE USER
StandbyDatabase
The following points explain the diagram in a better way:
� No acknowledgment needed from standby to send the COMMIT ACK to the database user
� Redo is read and sent to standby from the Redo Log Buffer or online redo logs by the LNS process. If LNS cannot catch the send data in the Redo Log Buffer before it is recycled, it automatically reads and sends redo data from the online redo log.
� The committed transactions that weren't shipped to standby yet, may be lost in a failover
� Potential slower response time on primary database with SYNC mode is not valid here

Getting Started
[ 18 ]
Protection modesData Guard offers three data protection modes, which serve different business needs in terms of data protection and performance. You can find the properties of these modes in the following comparison table:
Mode Redo transport Action with no standby database connection
Risk of data loss
Maximum Protection
SYNC and LGWR The primary database needs to write redo to at least one standby database. Otherwise it will shut down.
Zero data loss is guaranteed.
Maximum Availability
SYNC and LGWR Normally works with SYNC redo transport. If the primary database cannot write redo to any of its standby databases, it continues processing transactions as in ASYNC mode.
Zero data loss in normal operation, but not guaranteed.
Maximum Performance
ASYNC and LGWR/ARCH
Never expects acknowledgment from the standby database.
Potential for minimal data loss in a normal operation.
Apply servicesData Guard automatically transfers redo data from the primary to standby database and applies it on the standby database. Redo transport services work independent of apply services and never wait for Redo Apply but if there's a problem on redo transportation, apply services normally stop and wait for the new redo to arrive. The most important categorization in apply services is the Redo Apply and SQL Apply. These apply methods create the infrastructure of physical and logical standby databases.
As a property of Data Guard, both in Redo Apply and SQL Apply, the standby database validates the redo data in order to prevent physical corruptions that may occur at the primary database from reflecting to the standby database. By default, the standby database writes received redo data into the standby redo logfiles and apply services do not apply redo until the standby redo log is archived as an archived redo log. If we use the real-time apply feature, which became available with 10g, the apply services don't wait for the archival operation and apply the redo data as it's received and written into the standby redo logs.
It's also possible to specify a delay value to keep the standby database behind the primary database with the specified minutes. This may be chosen to prevent human error operations on the primary database to be applied to standby immediately. However, as we discussed previously, after the support of flashback database, there's no need to define a delay in Data Guard configuration.

Chapter 1
[ 19 ]
Redo Apply (physical standby databases)Redo Apply keeps a block-by-block copy of the primary database. By default, Redo Apply automatically runs a parallel apply processes, which is equal to the number of CPUs of the standby database server minus one. These parallel recovery processes are controlled by the MRP process, which is the background process responsible for the application of redo data.
Redo Apply has the following benefits for its users:
� There are no unsupported data types, objects, and DDLs
� Redo Apply has higher performance when compared with SQL Apply or any other replication solutions
� It offers simple management by keeping the database structure exactly the same as the primary database with its fully automated architecture
� It's possible to take advantages of Active Data Guard and snapshot standby for reporting and testing
� Backups taken from physical standby databases are ready to be restored to primary. So we can offload the backup from primary
� Redo Apply offers a strong corruption detection and prevention mechanism.
� It's possible to use physical standby databases for the rolling upgrades of the database software, which is known as transient logical standby
� The real-time apply feature applies the redo as it's received. This feature makes it possible to query real-time or near real-time data from the standby database
By offering these features, Redo Apply (physical standby database) has become a very popular and widely used-technology for the high availability and disaster recovery of Oracle databases.
Monitoring Redo ApplyWhile Redo Apply runs on the standby database, administrators need to monitor the status of the apply process and check if it's working in accordance with the selected configuration. As mentioned, the MRP process is responsible from the Redo Apply process and monitoring the status of this process will give us valuable information on what's going on with Redo Aapply.
Time for action – monitoring Redo ApplyWe'll install Data Guard configuration beginning with Chapter 2, Configuring Oracle Data Guard Physical Standby Database. So, you will not be able to perform the actions in this chapter on the test environment. Please just read the actions to consolidate the given theoretical information mentioned earlier.

Getting Started
[ 20 ]
We'll query the v$managed_standby view on the standby database for monitoring. The Data Guard configuration is in the Maximum Performance mode with ASYNC and LGWR attributes. We'll change the redo transport and apply characteristic and monitor the behavior of Data Guard.
1. For our first test, a one hour delay is defined. Let's check this by running the following query on the primary database:SQL> select name, value from v$parameter where name like 'log_archive_dest_2';NAME VALUE------------------- ----------------------------------------log_archive_dest_2 SERVICE=TEST_STANDBY LGWR ASYNC VALID_FOR=(ONLINE_LOGFILES,PRIMARY_ROLE) DB_UNIQUE_NAME=TEST DELAY=60
We can see that a 60-minute delay is defined on the primary database. This doesn't mean that the redo data will be sent with a 60-minute delay. This setting means the redo data will be sent immediately but the standby database will not apply the redo that was received in the last 60 minutes.
Downloading the example code
You can download the example code files for all Packt books you have purchased from your account at http://www.packtpub.com. If you purchased this book elsewhere, you can visit http://www.packtpub.com/support and register to have the files e-mailed directly to you.
2. So let's see what's happening on the standby side by running the following query on the standby database. (Note: We can connect to a standby database from the standby database server with the sqlplus / as sysdba command. This allows us to connect to the database as a sys user and with password file authentication.)SQL> select process, status, thread#, sequence#, block#, blocks from v$managed_standby;
PROCESS STATUS THREAD# SEQUENCE# BLOCK# BLOCKS--------- ------------ ---------- ---------- ---------- ----------ARCH CONNECTED 0 0 0 0ARCH CONNECTED 0 0 0 0MRP0 WAIT_FOR_LOG 1 461 0 0RFS IDLE 0 0 0 0RFS IDLE 1 469 1727085 40
3. The output shows that the log with the sequence 469 is being received from primary, but the MRP process is still waiting for the log with the sequence number 461. Let's check if this log has been received:SQL> select name, archived from v$archived_log where sequence#=461;

Chapter 1
[ 21 ]
NAME ARC----------------------------------------------------------- --+FRA/test/archivelog/2012_08_08/thread_1_seq_461.2606.7908 YES
4. So the log sequence 461 was received but MRP is not applying it because of the configured 60-minute delay on the primary database. We can see this situation more clearly on the alert log:RFS[1]: Archived Log: '+FRA/test/archivelog/2012_08_08/thread_1_seq_461.2606.79081019 9'Wed Aug 8 22:31:28 2012RFS[1]: Archive log thread 1 sequence 461 available in 60 minute(s)Wed Aug 8 23:14:48 2012Media Recovery Log +FRA/test/archivelog/2012_08_08/thread_1_seq_460.2841.790809291Media Recovery Delayed for 60 minute(s)
The highlighted line in the previous code shows that the log sequence 461 was received at 22:31 but will be available to use only after 60 minutes.
5. Now let's cancel the delay on the media recovery and monitor again. On the primary database perform the following:SQL> alter system set log_archive_dest_2='SERVICE=TEST_STANDBY LGWR ASYNC VALID_FOR=(ONLINE_LOGFILES,PRIMARY_ROLE) DB_UNIQUE_NAME=TEST';System altered.
6. After a few minutes on the standby database perform the following:SQL> select process, status, thread#, sequence#, block#, blocks from v$managed_standby;
PROCESS STATUS THREAD# SEQUENCE# BLOCK# BLOCKS--------- ------------ ---------- ---------- ---------- ------ARCH CONNECTED 0 0 0 0ARCH CLOSING 1 470 3432448 403MRP0 WAIT_FOR_LOG 1 471 0 0RFS IDLE 0 0 0 0RFS IDLE 1 471 878728 2
We can see that, the MRP is not waiting for any old sequence; it's waiting for the log sequence that is on the way from primary to standby. (Because the LGWR attribute is used on log transport, this log is the current log sequence on the primary.)

Getting Started
[ 22 ]
7. Let's look at the alert log again:Thu Aug 09 00:27:16 2012Media Recovery Log +FRA/test/archivelog/2012_08_09/thread_1_seq_470.515.790820745Thu Aug 09 00:27:57 2012Media Recovery Waiting for thread 1 sequence 471 (in transit)
As you can see there's no text in alert log about the delay, because it was cancelled. The MRP process applied the log sequence 470 and started to wait for the next log (471) to completely arrive and get archived. It also indicates that the next log is in transit, which means it is currently being received by RFS.
8. Let's convert the Redo Apply mode to real-time apply and see how Data Guard will apply the redo as it received from the primary database. First we'll stop Redo Apply on the standby database and start again in the real-time apply mode:SQL> ALTER DATABASE RECOVER MANAGED STANDBY DATABASE CANCEL;Database altered.SQL> ALTER DATABASE RECOVER MANAGED STANDBY DATABASE USING CURRENT LOGFILE DISCONNECT FROM SESSION;Database altered.
9. After a few minutes we will check the status of the processes:SQL> select process, status, thread#, sequence#, block#, blocks from v$managed_standby;PROCESS STATUS THREAD# SEQUENCE# BLOCK# BLOCKS--------- ------------ ---------- -------- --------- -------ARCH CONNECTED 0 0 0 0ARCH CLOSING 1 472 3432448 403MRP0 APPLYING_LOG 1 473 1985328 4096000RFS IDLE 0 0 0 0RFS IDLE 1 473 1985957 11
Now it's obvious that MRP is applying the log as it arrives to standby. The RFS process is transferring the log sequence 473, which is the current log on the primary side, and at the same time the MRP process is applying the same log sequence. Look at the block number column; we can see that MRP is applying the redo blocks that have just arrived.
You should also know that, even there is a DELAY value specified on the primary database; if the apply mode is real-time apply on the standby database, the DELAY will be ignored. You'll see the following lines in the standby alert log in such a case:Managed standby recovery started with USING CURRENT LOGFILE
Ignoring previously specified DELAY 60 minutes

Chapter 1
[ 23 ]
What just happened?You have just seen the Redo Apply behavior on different Data Guard configurations such as delayed, non-delayed, and real-time apply. You learned how to query the status of the important Data Guard processes MRP and RFS on the standby database.
Pop quiz – real-time apply considerationQ1. What's the risk of using real time apply and how can we overcome this risk?
SQL Apply (logical standby databases)The SQL Apply technology resides on mining the standby redo logs, building SQL transactions that apply the changes in question, and finally, executing the SQL on the standby database, which is read/write accessible. This process is more expensive in terms of hardware resource usage as a matter of course. The LSP process manages the application of changes to a logical standby database.
The general purpose of building a logical standby database is reporting the needs with read/write access requirement. SQL Apply is not suitable for disaster recovery and high availability as much as Redo Apply because of the unsupported data types and logically different database infrastructure.
SQL Apply offers the following benefits to its users:
� The logical standby database is always read/write accessible while SQL Apply is running; so that users may run reports, create temporary tables and indexes for performance issues. Also it's possible to create objects and keep data on the standby database, which do not exist on primary.
� The logical standby database is open for read/write activity. But normally there are no writes possible on the standby objects, which exist on primary. This feature maintains the consistency of the replicated primary data.
� It's possible to upgrade the Oracle database software version with almost no downtime using a logical standby database.
Role transitionsRole transitions basically enable users to change the roles of the databases in a Data Guard configuration. There are two role transition options in Data Guard, which are switchover and failover.

Getting Started
[ 24 ]
SwitchoverIn a basic Data Guard configuration with one primary and one standby database, a switchover operation changes the roles of these databases, and so the direction of the redo shipping. In a correctly designed configuration, archived log shipping in the opposite direction starts immediately after switchover and clients do not need to change their connection descriptions in order to connect the new primary database.
If there is more than one standby database in a Data Guard configuration, it's possible to perform switchover between the primary and any of the standby databases. After the switchover, the new primary database can continue to send redo to all of the standby databases in the configuration.
Regardless of the configuration of Data Guard, a switchover operation always guarantees zero data loss. This brings high reliability to switchover and thus it's widely used for planned maintenance operations, such as hardware or operating system upgrades, database software rolling upgrade, and other infrastructure maintenances. Switchover reduces the downtime for these maintenance operations by a significant amount of time.
FailoverFailover is the operation of converting a standby database to a primary database, because of a failure in the original primary database. If the flashback database is disabled on the primary database, failover is an operation with no return. In other words, we have to flashback the failed primary database to a state before failover in order to re-establish the configuration. Without flashback, Data Guard configuration needs to be built from scratch.
A manual database failover may be performed in the case of failure with the initiative of the database owner. However, this will require extra outage for the decision making. If fast-start failover is used, which is a 10g release 2 feature, the failover operation will perform automatically.
Fast-start failoverThis property of automating the failover operation can only be used in Data Guard broker enabled configuration. The observer process which runs on a different server from the primary and standby databases, continuously monitors the accessibility of the primary database. If both the observer and the standby database cannot reach the primary database for a predefined length of time, a fully-automated failover process is started. With 11g Release 2, we call it fully automated, because this process includes changing the role of the standby as primary, starting the database services on the new primary database, disconnecting the client from the failed primary database, and redirecting them to the new primary database.

Chapter 1
[ 25 ]
If the observer establishes the connection with the original primary database again after the failover, it informs the database that the failover was performed and it will automatically reinstate the database using flashback. In order to configure fast-start failover, we need to specify the fast recovery area and enable flashback on the primary and standby databases.
Keep in mind that in Version 11g, Data Guard must be on Maximum Availability or Maximum Performance mode in order to use fast-start failover. In 10g Release 2, only Maximum Availability mode is supported for fast-start failover.
User interfaces for administering Data GuardThere are three options for a database administrator to manage a Data Guard environment, which are SQL*Plus command-line interface, Oracle Enterprise Manager, and Data Guard broker command-line interface (DGMGRL). In almost every IT infrastructure management interface, command-line tools offer great flexibility and detailed options and the graphical interfaces are user friendly, simple, and automated.
SQL*PlusSQL*Plus provides all kinds of administration and monitoring operations for the administrators, but you'll need to access each server in the Data Guard configuration and do the operations separately. It's also sometimes painful to have easy readable outputs from SQL*Plus.
DGMGRLData Guard broker command-line interface (DGMGRL) is the Data Guard broker tool that automates and centralizes Data Guard management. Using DGMGRL we can run some consecutive operations such as switchover and failover with just one command. Also, the status of the Data Guard configuration can be queried with special Data Guard broker commands via DGMGRL. Outputs are designed to be easily readable.
Enterprise ManagerEnterprise Manager offers an integrated graphical user interface for Data Guard broker enabled Data Guard configurations. It's possible to graphically monitor the general configuration information, performance, synchronization status of Data Guard, and also perform administration tasks such as switchover, failover, adding, and removing standby database from configuration.

Getting Started
[ 26 ]
Time for action – using interfaces to monitor Data Guard1. At the first step we will use SQL*Plus to gather information from Data Guard and
monitor its status. The connection to the standby database must be from the standby database server with password file authentication if the standby database is on mount mode and so not accessible from outside. If Active Data Guard is enabled, it's also possible to connect a standby database remotely. Let's connect to the standby database and gather the main Data Guard configuration information:$sqlplus / as sysdbaSQL> select database_role,open_mode,protection_mode from v$database;
DATABASE_ROLE OPEN_MODE PROTECTION_MODE---------------- -------------------- --------------------PHYSICAL STANDBY READ ONLY WITH APPLY MAXIMUM PERFORMANCE
SQL> select recovery_mode from v$archive_dest_status where recovery_mode !='IDLE';
RECOVERY_MODE-----------------------MANAGED REAL TIME APPLY
We have a physical standby database with the Maximum Performance mode. The value of the OPEN_MODE column is READ ONLY WITH APPLY, which indicates that Active Data Guard is enabled. The output of the second query shows that real-time apply is being used as the recovery mode.
2. Now let's check the status of the Data Guard synchronization:SQL> select name, value from v$dataguard_stats;NAME VALUE------------------------- ---------------transport lag +00 00:00:00apply lag +00 00:00:00apply finish timeestimated startup time 231
The output shows that we have a fully synchronized standby database, where there is no redo transport and apply lag. The estimated startup time value is 231 seconds, which is an estimate of the time needed to start and open the standby database.

Chapter 1
[ 27 ]
3. Now we'll see an example about how to use Data Guard broker command-line interface (DGMGRL) to gather information about the Data Guard status. We can run DGMGRL on the primary database server and connect locally or we can also connect from a remote server. Let's connect from the primary database server locally:$dgmgrlDGMGRL> connect sys/password;Connected.We have connected to the primary database with the sys user. Now we can check the configuration.DGMGRL> show configuration;Configuration - TEST Protection Mode: MaxPerformance Databases: Turkey - Primary database India - Physical standby database
Fast-Start Failover: DISABLED
Configuration Status:SUCCESS
4. We had the general configuration information with the show configuration command. At the end of the output we see the configuration status as SUCCESS, which means, everything in the broker configuration is working properly. However, we can also see a status of warning or error. We can also run the show database command for some general information:DGMGRL> show database 'India';Database Name: India Role: PHYSICAL STANDBY Enabled: YES Intended State: ONLINE Instance(s): indiaCurrent status for "India":SUCCESS
In order to gather detailed information from the databases in the Data Guard configuration, we use the keyword verbose in the show database command such as show database verbose 'India'.

Getting Started
[ 28 ]
5. The last interface to monitor and manage a Data Guard configuration is the Enterprise Manager Cloud Control, with the former name Enterprise Manager Grid Control. The following screenshot shows the interface for the monitoring and administration of Data Guard. Detailed information will be given in Chapter 8, Integrating Data Guard with the Complete Oracle Environment, about using Enterprise Manager Cloud Control for Data Guard management:
What just happened?You have just seen examples of monitoring the Data Guard environment with three different interfaces. These examples are just intended to give you a first impression of what these interfaces look like. Properties and details of the tools in question will be covered in the next chapters.

Chapter 1
[ 29 ]
All of these interfaces can be used to monitor and manage the Data Guard; however, they all have their own pros and cons. If you already use Enterprise Manager Cloud Control in your current IT infrastructure, Data Guard installations must be added as targets in order to take advantage of its visual and easy monitoring and management potential. If you don't have Cloud Control but have multiple Data Guard installations, you should think about using it to overcome the challenges of central monitoring.
Data Guard background processesIn a Data Guard configuration we can see some Oracle Data Guard specific background processes in both, primary and standby databases. These processes perform the operations of redo transport and apply services. Data Guard broker also has some specific background processes. We can see the description and duties of the most important Data Guard processes as follows:
� MRP0 (Managed Standby Recovery Process) coordinates the read and apply process of redo in a physical standby database.
� RFS (Remote File Server) is responsible for receiving the redo data, which is sent by the primary database to the standby database.
� LSP0 (Logical Standby Coordinator Process) coordinates the SQL Apply processes, which are the mining processes and apply processes.
� LSP1 (Logical Standby Dictionary Build Process) is used on the logical standby databases when a switchover or failover is in action.
� LSP2 (Logical Standby Set Guard Process) is used to operate Database Guard settings. Database Guard specifies which objects will be protected for modification in a logical standby database.
� NSAn (Redo Transport NSA1 Process) is used on the primary database to ship redo data to the standby database when ASYNC mode is being used. There may be multiple NSA processes such as NSA1 and NSA2.
� NSSn (Redo Transport NSA1 Process) is also used on the primary database to ship redo data to the standby database. However, only when the SYNC mode is being used.
� DMON (Data Guard Broker Monitor Process) runs on every instance in a Data Guard broker configuration. It communicates with local database and DMON processes of the remote databases. The broker-related requests and the monitoring information are transferred on this communication channel.
� FSFP (Data Guard broker fast-start failover pinger process) is used for the management of fast-start failover status.

Getting Started
[ 30 ]
Other replication solutions and Data GuardThere are many options to replicate an Oracle database data to a remote system. In the scope of disaster recovery, Oracle Data Guard and storage-based replication solutions such as EMC Symmetrix Remote Data Facility (SRDF), HP Continuous Access, Hitachi Universal Replicator and TrueCopy, IBM Global Mirror, and Metro Mirror are the main players in the market. When talking about Oracle database replication we also have to mention Oracle's well-known replication technologies GoldenGate and Streams. However, these products were not developed for disaster recovery fundamentally. Their primary aim is replication for ETL and data warehouse.
There are also some third-party tools capable of replicating Oracle database data, but here we'll mention about the most commonly-used technologies: Data Guard, storage-based replication solutions, GoldenGate, and Streams.
Storage-based replication solutionsStorage-base replication solutions technologies are based upon the storage-array based replication of data. Thus, the source of data does not matter. All kinds of application and database data can be replicated to a remote location, where Data Guard is only able to replicate Oracle databases.
In general there are two kinds of storage-based replication: synchronous and asynchronous replication. Synchronous replication means that each update to the source storage unit must also be updated in the target storage unit before another update can process. This guarantees zero data loss in the case of primary site failure. However, synchronous replication affects the I/O respond performance of the primary system depending on the distance between sites and network capacity. Therefore, this technology is distance limited. Synchronous replication technologies support up to 300 km distance between sites in the current technology level.
Asynchronous replication provides a long-distance replication solution with minimal impact on performance. In some products, the main problem with the asynchronous mode is the data consistency on the secondary site. The primary site sends a periodic, incremental copy of updates to the secondary site instead of a constant stream of updates. So there is no guarantee that dependent write operations on the primary site are transferred and applied to the remote destination in the same sequence.

Chapter 1
[ 31 ]
Using storage-based replication solutions, it's not possible to start an Oracle instance and query database on the secondary site using the disks with the replicated data because of the data inconsistency issue. However Data Guard offers Active Data Guard, which enables users to query the standby database while replication is on the go. Some other advantages of Data Guard over storage-based replication solutions are enhanced corruption detection and prevention, automated database failover (fast-start failover), and RMAN backup offloading features that may not benefit from the use of storage-based replication solutions.
GoldenGate and StreamsGoldenGate is a data replication and integration tool for heterogeneous environments. It provides real-time capture, transformation, routing, and delivery of database transactions across heterogeneous systems (Oracle, DB2, MySQL, SQL Server, Sybase, Teradata, Netezza, and so on). Oracle agreed to acquire GoldenGate software in 2009 and then released 10.4, 11.1, and 11.2 versions with new enhancements. On the other hand, Streams is a built-in feature of the Oracle database that was first announced with database Version 9.2 and allows information sharing within an Oracle database or between Oracle databases.
Their common property is their capability of capturing, propagating, and applying data changes between Oracle databases.
On the other hand their main differences are:
� The heterogeneous platforms and data integration support of GoldenGate is different from that of Streams
� License conditions for Streams is included in the Oracle Enterprise Edition license and GoldenGate is a self-licensed product
Because of the GoldenGate's wider technology infrastructure and flexibility over Streams, Oracle announced that Oracle Streams will continue to be supported, but will not be actively enhanced and the best elements of Oracle Streams will be evaluated for inclusion with Oracle GoldenGate. It was also indicated that GoldenGate is the strategic product of Oracle on data distribution and data integration.
Oracle recommends Data Guard for full Oracle database protection with the high availability and disaster recovery purpose and recommends GoldenGate for information distribution and consolidation, application upgrades, changes, and also applications desiring flexible high availability needs.
www.allitebooks.com

Getting Started
[ 32 ]
An important feature of GoldenGate that makes the product different from its counterparts is the bidirectional replication capability, which is also called active-active replication. With this feature the primary and standby concepts are replaced by two active primary sites. Updates on site A are replicated to site B, and updates on site B are replicated to site A. The main challenges here are conflict handling and loop detection. A conflict is likely to occur in a bi-directional environment, where the same row or field is being updated at both sides and the changes are replicated. In this situation, a decision needs to be made if both transactions fail, or one transaction overwrites the other. The other key point is loop detection. If an update is replicated from site A to site B and then the same update from site B to site A, and so on, this loop needs to be detected and solved. The following diagram shows the general structure of an active-active GoldenGate configuration:
PrimaryDatabase
A
Source Trail
Target Trail
Redo Logs
PrimaryDatabase
B
Redo LogsSource Trail
Target Trail
Network
Production Site A Production Site B
GoldenGate is a preferred solution to extract data from production databases in order to feed the data warehouse. It offers much flexibility to select specific data on the database and if needed transform the data before it hits the target.
The replication market's leaders, namely, Data Guard, storage-based replication products, and GoldenGate are compared in the following table with their most important features. Streams is out of this comparison because of the strategy mentioned by Oracle on its replication products:

Chapter 1
[ 33 ]
Data Guard Storage-based replication
GoldenGate
Hardware independency
Supported. Possible to choose different server/storage vendors for primary and standby.
Not Supported. Must use the same storage vendor on both sides.
Supported. Possible to choose different server/storage vendors for primary and standby.
Software independency
Not supported. Only Oracle database replication.
Supported. All kinds of database and application data can be replicated.
Limited support. Different database products can be replicated.
Zero data loss capability
Supported with Maximum Protection mode.
Limited support with synchronous replication (distance limitation about 300 km).
Not supported.
Corruption detection and prevention
Supported. Not supported. Not supported.
Bidirectional replication within one database
Not supported. Not supported. Supported. Two active sites may send updates to each other.
Query standby data
Supported with Active Data Guard and Snapshot standby features.
Not supported. Supported with continuously read/write accessible target databases.
Inside database selective replication
Limited support with logical standby databases.
Not supported. Supported. Data may be selected and transformed before it hits the target.
Automatic database failover
Supported with fast-start failover feature.
Not supported. Not supported.
GUI based management
Supported. Supported. Supported.
RMAN backup offload
Supported. The primary database RMAN backups can be offloaded to a physical standby and backups will physically be the same.
Not supported. Supported. In a full replication of primary, RMAN backups may be offloaded but backups will only logically be the same, not physically.

Getting Started
[ 34 ]
Data Guard Storage-based replication
GoldenGate
Cascaded destinations for replication
Supported. Supported. Supported.
License License required only for Active Data Guard. Otherwise no extra license required.
License required for storage replication software.
License required for GoldenGate software.
The information on this table reflects the general characteristics of the storage-based replication products. All vendor products don't offer the exact same features; also the features for the same objective may have different capabilities and restrictions.
After reviewing the comparison table, it's obvious that Data Guard has better properties for high availability and disaster recovery purposed Oracle database replication. Storage-based replication products offer disaster recovery solution for the complete IT infrastructure data; however, when the case is Oracle databases, they cannot offer the Oracle integrated, flexible, and automatized features as in Data Guard. On the other side, we can see that GoldenGate was positioned especially for ETL and data integration requirements and it has great flexibility in this field. However, it also cannot reach Data Guard standards on data protection and disaster recovery.
SummaryYou've reached the end of this chapter. This chapter provided the foundation for the rest of this book. We covered the definition, general properties, and history of Oracle Data Guard.
It's very important to know the capabilities and general properties of similar products when implementing an IT solution. We have now gained an understanding of what Data Guard and the other main Oracle database replication products offer to its users. We're able to make decisions for the implementation of our replication requirements.
The next chapter will explain the configuration process of a physical standby database in detail.

2Configuring the Oracle Data Guard
Physical Standby Database
In this chapter, the installation of the physical standby database will be covered in three steps. The first step will be to prepare the environment for the installation, especially the preinstallation tasks on the database. Then the second step for creating a physical standby database will be covered. In the last step, the Data Guard installation will be verified to see if it is installed correctly.
In this chapter, we'll discuss the following topics:
� Planning and understanding requirements � Preparation for the configuration � Step-by-step instructions to create the physical standby database � Verifying the physical standby database configuration (post-installation steps)
Before preparing the configuration, you should know the business criticality of your database, how to avoid failures, and how much data you are ready to lose.
Preconfiguration for Data GuardThe Data Guard configuration contains a primary database that transmits redo data to a standby database. The standby database is remotely located from the primary database for disaster recovery and backup operations. You can also configure the standby database at the same location as the primary database. However, for disaster-recovery purposes and to make it highly available, it's strongly recommended to configure standby in a geographically remote location.

Configuring the Oracle Data Guard Physical Standby Database
[ 36 ]
Before implementing a Data Guard configuration, take into account concepts such as high data availability, efficient systems utilization, and data protection.
� Availability: Outages should be tolerated transparently and should be recovered quickly in case of server failures or any network failures
� Protection: Ensure minimum data loss; standby data should be isolated from production faults such as storage failures, site failures, data corruptions, or operator errors
� Utilization: Standby resources should be utilized for productive use in case of any planned maintenance or for application access
Data loss considerationBefore implementing any high-availability solution, you need to determine the acceptable amount of data loss. Data loss should not be calculated in terms of time (for example, seconds or minutes); it should be calculated in terms of transactions. The following example is drafted from a production database. Notice how much data can be lost in 60 seconds. During the peak hours of your business, run the Stats pack or AWR snapshot at periodic intervals 2-3 times. In the report, take a look at the Load profile section. The Per second column of the Redo size row is the redo generation rate of your database:
Load profile
Per second Per transaction
Redo size 16615645.13 9172093.26
Instance activity stats
Statistic Total Per second Per transaction
Redo size 16615645.13 16615645.13 9172093.26
In the Instance activity stats table, the redo size generated is 16615645.13 bytes per second—that is nearly 15.9 MB per second and nearly 950 MB per minute. Are you ready to lose 950 MB of data? You may want to rethink your recover plan. It must be calculated in terms of transactions.
Based on your transactions rate, calculate how much redo is generated and how much data loss is acceptable. You can configure Data Guard to have zero data loss.
Chapter 2
[ 37 ]
These load profiles and statistics can be gathered using the following utilities:
� After 9i: To execute the AWR report, use SQL>@?/rdbms/admin/awrrpt.sql
� Oracle 9i: To execute the Stats pack report, use SQL>@?/rdbms/admin/spreport.sql
Network bandwidth considerationWe need to determine the network bandwidth required for a Data Guard physical standby implementation. Network latency is a huge factor in the amount of redo you will be able to transport from your primary site to the standby site. This value is unique to your network, and if you have a high latency network you might not be able to sustain the required rate of redo shipping. The wide area network between the primary site and standby site may be used by more than just Data Guard. So, the bandwidth requirements have to be sorted out. The formula used by Oracle, assuming a conservative TCP/IP network overhead of 30 percent, is as follows:
Required bandwidth (Mbps) = ((Redo rate bytes per sec. / 0.7) * 8) / 1,000,000
Based on this formula, according to the redo size from the preceding example, the required bandwidth is equal to 189.8930872 mbps (((16615645.13/ 0.7) * 8) / 1,000,000). Of course, according to the preceding example, bandwidth should be very high, because it's an example taken during a huge job with lot of DML activity. This means that the peak redo generation rate is a good indicator of your Data-Guard-related network requirements. Make sure that, while specifying your network requirements with your network service provider, you also consider other applications and their Service Level Agreements (SLAs) using the same network. The preceding formula indicates the network bandwidth that should be available to Data Guard; it does not indicate what the entire network bandwidth should be between your primary and DR data centers.
Preparing the primary databaseThis topic describes Data Guard parameters and how to prepare the standby database creation and configuration. What prerequisites are mandatory to be completed before configuring the standby database? We will discuss each and every task that needs to be accomplished.
Archive log modeFor any primary database, there are some basics you should configure. One of these is to run the primary database in the archive log mode, which is a mandatory step. You can create a database in the archive log mode or the noarchive log mode and you can change this later.

Configuring the Oracle Data Guard Physical Standby Database
[ 38 ]
If the primary database is already in the archive log mode, you can skip this step and proceed with the next one. If this has not been done, perform the following procedure to put the primary database in the archive log mode.
Time for action – enabling the archive log modePerform the following steps on the primary database:
1. Check whether archiving has been enabled or disabled, as follows:SQL> archive log list
Database log mode No Archive Mode
Automatic archival Disabled
Archive destination USE_DB_RECOVERY_FILE_DEST
Oldest online log sequence 6
Current log sequence 8
2. Perform a clean shutdown, as follows:SQL> shutdown immediate
Database closed.
Database dismounted.
ORACLE instance shut down.
Ensure that you have performed a clean shutdown; if not, you may see this error: ORA-00265: instance recovery required, cannot set ARCHIVELOG mode.
3. Start the database in the mount state.SQL>startup mount
ORACLE instance started.
Total System Global Area 818401280 bytes
Fixed Size 2217792 bytes
Variable Size 515901632 bytes
Database Buffers 297795584 bytes
Redo Buffers 2486272 bytes
Database mounted.
4. Enable the archive log mode.SQL> alter database archivelog;
Database altered.

Chapter 2
[ 39 ]
5. Open the database as follows:SQL> alter database open;
Database altered.
6. Check if archiving has been enabled or not.
SQL> archive log list
Database log mode Archive Mode
Automatic archival Enabled
Archive destination USE_DB_RECOVERY_FILE_DEST
Oldest online log sequence 6
Next log sequence to archive 8
Current log sequence 8
After enabling the archive log mode, perform a log switch and check whether the archive log is created or not from the v$archived_log view, as follows:
SQL> select * from v$archived_log;
What just happened?After mentioning some considerations about Data Guard, we've completed the mandatory task of enabling the archive log mode on the primary database.
Force loggingFor a physical standby to be a mirror copy, it must receive redo for the changes made to the primary database. In the primary database, when a segment is defined with the NOLOGGING attribute and if a NOLOGGING operation updates the segment, the online redo logfile will be updated with minimal information. This is preferred to complete operations faster but it's not supported in a primary database with the Data Guard configuration. When the redo/archived logfile containing the NOLOGGING operation is used to recover the datafiles on the standby database, Oracle invalidates such blocks and the error ORA-26040 along with error ORA-1578 are reported by SQL statements in the next block reads. You can see the following errors if operations are performed by NOLOGGING:
ORA-01578: ORACLE data block corrupted (file # 4, block # 84)
ORA-01110: data file 4: ' /u01/app/oracle/oradata/orcl/users01.dbf'
ORA-26040: Data block was loaded using the NOLOGGING option

Configuring the Oracle Data Guard Physical Standby Database
[ 40 ]
Time for action – enabling force loggingPerform the following steps on the primary database:
1. Check the force logging status as follows:SQL> select name, force_logging from v$database;
NAME FOR
--------- ---
ORCL NO
2. Enable the force logging mode as follows:Enabling Force Logging on Primary Database is mandatory.
SQL> alter database force logging;
Database altered.
3. Check the force logging status again as follows:SQL> select name,force_logging from v$database;
NAME FOR
--------- ---
ORCL YES
In the alert log, you'll see following lines:
alter database force logging
ALTER DATABASE FORCE LOGGING command is waiting for existing direct writes to finish. This may take a long time.
Completed: alter database force logging
What just happened?We've put the primary database in the force logging mode, which is required for the Data Guard physical standby database to work properly.
Standby redo logs Standby redo logfiles are used by a standby database to store the redo received from the primary database. The redo received by a standby database via redo transport is written to the current SRL group by the Remote File Server (RFS) background process. When a log switch occurs on the primary database, RFS writes the redo to the next standby redo log group and the previously used standby redo log group is archived on the standby database by an ARCn process.

Chapter 2
[ 41 ]
Configuring the standby redo logfiles on the primary database is optional. After a switchover, the primary database role will be changed to standby; if SRLs were configured, the new standby will be ready to receive redo data and write them into the standby redo logfiles.
The SRL files must be the same size as your online redo log (ORL) files. You also need to have enough SRL groups; that is, one more than the number of ORL groups. Let's suppose you have three ORL groups in the primary database; then, n+1 (that is, four) SRL groups should be configured. On RAC databases you should create n+1 SRL groups for each thread. For example, in an RAC primary database with two instances and three ORL groups per instance, we should create 2*(3+1) SRL groups (that is, 8 groups).
We'll use the RMAN duplicate method to create the physical standby database; if SRLs exist on primary, they'll be automatically created on standby.
Some other considerations on creating SRL groups are as follows:
� In RAC, do not forget to create SRLs for each thread by specifying the thread number on the shared disks.
� If you add any ORLs in the primary database later, you'll have to add SRLs on primary and each standby database. If you resize ORLs, you have to resize SRLs too.
� It's not recommended to multiplex SRLs, because multiplexing may adversely affect redo transport performance and SRL availability is not crucial as ORL availability is.
Time for action – configuring standby redo logs on primaryRun the following procedures on the primary database to create standby redo logfiles:
1. Check the ORL's members and the sizes of each member as follows:SQL> select a.group#, a.status, a.bytes/1024/1024 SizeMB, b.member from v$log a, v$logfile b where a.group#=b.group# order by group#;
GROUP# STATUS SizeMB MEMBER
------ -------- ---------- --------------------------------------
1 INACTIVE 100 /u01/app/oracle/oradata/orcl/redo01.log
2 CURRENT 100 /u01/app/oracle/oradata/orcl/redo02.log
3 INACTIVE 100 /u01/app/oracle/oradata/orcl/redo03.log
4 INACTIVE 100 /u01/app/oracle/oradata/orcl/redo04.log

Configuring the Oracle Data Guard Physical Standby Database
[ 42 ]
In this single instance of the primary database, we have four redo log groups, each with one member and a size of 100 MB. We should create at least five standby redo log groups.
2. Add the standby redo logfiles as shown in the following example:SQL> alter database add standby logfile group 11 ('/u01/app/oracle/oradata/orcl/standby_redo01.log') size 100m;
SQL> alter database add standby logfile group 12 ('/u01/app/oracle/oradata/orcl/standby_redo02.log') size 100m;
SQL> alter database add standby logfile group 13 ('/u01/app/oracle/oradata/orcl/standby_redo03.log') size 100m;
SQL> alter database add standby logfile group 14 ('/u01/app/oracle/oradata/orcl/standby_redo04.log') size 100m;
SQL> alter database add standby logfile group 15 ('/u01/app/oracle/oradata/orcl/standby_redo05.log') size 100m;
3. Check the status of new the standby redo logfiles:SQL> select group#,bytes,status from v$standby_log;
GROUP# BYTES STATUS
------ --------- ----------
11 104857600 UNASSIGNED
12 104857600 UNASSIGNED
13 104857600 UNASSIGNED
14 104857600 UNASSIGNED
15 104857600 UNASSIGNED
What just happened?We've completed the optional task of creating standby redo logs on the primary database. Again, if the standby redo logs were created on primary, the RMAN duplicate will create them on standby automatically.
Fast recovery area (FRA)Prior to 11g R2, FRA stood for Flash Recover Area, but since Oracle Database 11g R2, FRA stands for Fast Recovery Area. It's a place on the disk where the database automatically manages naming, retention, and deletion of recovery-related files. FRA can contain control files, online redo logfiles, archived redo logs, flashback logs, and RMAN backups. It's not mandatory but strongly recommended to configure FRA.

Chapter 2
[ 43 ]
In order to enable FRA, you need to set two initialization parameters and you don't need to shut down and restart the database. Note that, in Oracle RAC, these parameters should have the same values across instances and the location must be on shared storage.
Time for action – enabling FRAPerform the following steps on the primary database now. We'll be enabling FRA on the standby database later.
1. Check the default FRA location as follows:SQL> show parameter db_recovery_file_dest
NAME TYPE VALUE
------------------------------------ ----------- -----------
db_recovery_file_dest string
2. Configure the FRA size.SQL> alter system set db_recovery_file_dest_size=4g;
System altered.
3. Configure the FRA destination.SQL> alter system set db_recovery_file_dest='/u01/app/oracle/flash_recovery_area';
System altered.
4. Control the FRA configuration.SQL> show parameter db_recovery_file_dest
NAME VALUE
---------------------- ------------------------
db_recovery_file_dest /u01/app/oracle/flash_recovery_area
db_recovery_file_dest_size 4G
In RAC databases, use the keyword sid='*'; this ensures that the change will apply to all instances in the cluster.
What just happened?We've enabled the Fast Recovery Area on the primary database, which is not mandatory but a recommended step. When preparing init.ora for a standby instance and starting this instance in the following steps, we'll also set FRA-related initialization parameters for standby, so FRA will also be enabled on the standby database.

Configuring the Oracle Data Guard Physical Standby Database
[ 44 ]
Understanding initialization parametersIn the primary database, there are some parameters that are related to the Data Guard configuration and need to be verified or modified. Now we're going to look into the details of these parameters.
When changing an initialization parameter, if you are using a PFILE, you need to edit the file and execute an ALTER SYSTEM SET command, parameter= 'value' scope=memory, to load the change into the system. If you use an SPFILE, you can just execute the ALTER SYSTEM SET command, parameter= 'value' scope=both, which will set the change in memory and write it to the SPFILE to make the change valid at the next database restart.
DB_NAMEThe DB_NAME parameter specifies the database identifier up to eight characters. This parameter must be the same in all the instances of the RAC database and also in the physical standby database. This parameter is validated at MOUNT status when the instance reads the control file; if the DB_NAME parameter does not match the name of the database mentioned in the control file, you will get the following error:
"ORA-01504: database name 'Dummy' does not match parameter db_name 'orcl'"
You don't need to configure or change this parameter in the Data Guard physical standby configuration.
DB_UNIQUE_NAMEThis parameter specifies a unique name for each database having the same DB_NAME parameter. This parameter must be different on the primary, standby, or logical standby database. The DB_UNIQUE_NAME parameter is limited to 30 characters. It can contain alphanumeric, underscore (_), dollar ($), and pound (#) characters but must begin with an alphabetic character. This parameter is static, so it requires bouncing the database in order to change this parameter. If this parameter is not set explicitly, its value will be the same as that of the DB_NAME parameter. You can use the following statement to change the value of the DB_UNIQUE_NAME parameter:
SQL> alter system set db_unique_name='turkey_un' scope=spfile;
� The DB_UNIQUE_NAME parameter allows a location-specific alias to be created for a database. It is better to avoid using names related to the role, such as primary and standby. These names work well until a switchover is performed, at which point the switchback operation can be very confusing. Therefore, always try to use a geographical value for the DB_UNIQUE_NAME parameter, such as Turkey or India.

Chapter 2
[ 45 ]
� The DB_UNIQUE_NAME parameter will be the same in all RAC databases across all instances. In RAC databases, only the instances are hosted in different nodes but they are using only one database. Database-unique names can be different in primary and standby because they are sharing neither configuration files nor datafiles.
The following table shows the naming format that we're going to use for the physical standby Data Guard configuration example:
Parameter Primary Physical standby
Instance name TURKEY INDIA
DB_NAME ORCL ORCL
DB_UNIQUE_NAME TURKEY_UN INDIA_UN
Net service name TURKEY INDIA
LOG_ARCHIVE_CONFIGUsing this parameter, you can enable or disable sending/receiving redo logs to/from databases. You also specify the list of the DB_UNIQUE_NAME parameter of each database in the Data Guard configuration with this parameter.
Use the following syntax to change this parameter:
LOG_ARCHIVE_CONFIG ={ [ SEND | NOSEND ] [ RECEIVE | NORECEIVE ] [ DG_CONFIG=(remote_db_unique_name1, ... remote_db_unique_name9) | NODG_CONFIG ] }
Its default value is SEND, RECEIVE, NODG_CONFIG and we only need to update the DG_CONFIG part as follows:
SQL> alter system set log_archive_config= 'DG_CONFIG=(turkey_un,india_un)' scope=both;
This is a dynamic parameter in which you can add or remove the DB_UNIQUE_NAME parameters from the configuration. It's mandatory to set this parameter for RAC databases in Data Guard. However, it's also recommended to set this for single-instance databases. The order of unique names doesn't matter and all unique names in the Data Guard configuration should be included.

Configuring the Oracle Data Guard Physical Standby Database
[ 46 ]
LOG_ARCHIVE_MAX_PROCESSESThis parameter specifies the number of archiver processes in a database. In Data Guard, it's important to have enough archiver processes on the primary database. Think of the value of this parameter as the number of channels where redo can be transferred to the standby database. In peak database times and in gap resolution, if the number of the LOG_ARCHIVE_MAX_PROCESSES value is not sufficient on the primary database, redo shipping may suffer.
Its default value is 2 in 10g (which is generally not sufficient in Data Guard) and 4 in 11g. Depending on the number of remote destinations and redo activity on the primary database, you may need to increase the value. Keep in mind that increasing the value means more resource usage and database start/stop times will also be affected.
It's also important to set a sufficient value for LOG_ARCHIVE_MAX_PROCESSES on the standby database for switchover purposes, and especially if the cascade Data Guard configuration is in use and the standby database is sending redo to another destination.
LOG_ARCHIVE_DEST_nThese parameters, where n is from 1 to 31 in 11g R2, are used to define destinations to the archive redo data. The LOCATION or SERVICE attribute must be defined with this parameter and indicates a local disk destination and remote database destination respectively. It's an important part of the Data Guard configuration and shows the redo transport flow and its properties.
When you have already configured LOG_ARCHIVE_CONFIG=DG_CONFIG(...) and you try to set/change the attributes of log_archive_dest_n without specifying DB_UNIQUE_NAME, the following errors will occur:
� ORA-02097: The parameter cannot be modified because the specified value is invalid
� ORA-16052: The DB_UNIQUE_NAME attribute is required
You must use one of the DB_UNIQUE_NAME parameters of DG_CONFIG in every modification of this parameter.
There are many attributes of the LOG_ARCHIVE_DEST_n parameter and we'll learn most of the important ones in the following sections. Keep in mind that the destination must contain either a LOCATION or SERVICE attribute; the other attributes are optional.

Chapter 2
[ 47 ]
LOCATION and SERVICEAs mentioned earlier, each destination must specify a valid attribute, either of LOCATION or SERVICE, to identify either a local location or a remote destination where redo transport services will send redo data.
The destinations from LOG_ARCHIVE_DEST_1 through LOG_ARCHIVE_DEST_10 can contain either the LOCATION or SERVICE attribute, while destinations from LOG_ARCHIVE_DEST_11 through LOG_ARCHIVE_DEST_31 can contain only the SERVICE attribute, which does not support the LOCAL destination. For the LOCAL destination, you can specify a disk location or FRA. When specifying the SERVICE attribute, a valid Oracle Net Service name that identifies the remote Oracle database instance is used, where the redo data will be sent.
The following is the example for the LOCATION attribute:
SQL> alter system set log_archive_dest_1='LOCATION=/u01/app/oracle/oraarch';
If you are using FRA, it will be as follows:
SQL> alter system set log_archive_dest_1='LOCATION=USE_DB_RECOVERY_FILE_DEST';
The following is an example for the SERVICE attribute:
SQL> alter system set log_archive_dest_2='SERVICE=india db_unique_name=india_un';
VALID_FORThis attribute specifies in which states the destination will be valid. It's optional when setting the LOG_ARCHIVE_DEST_n parameter but has to be specified for each redo transport destination of the Data Guard databases so that the redo transport continues after a role transition. This attribute works with two pair of keywords, which are REDO_LOG_TYPE and DATABASE_ROLE.
REDO_LOG_TYPE can be set to the following values:
� ONLINE_LOGFILE is valid only when archiving online redo logfiles
� STANDBY_LOGFILE is valid only when archiving standby redo logfiles
� ALL_LOGFILES is valid when archiving either ORLs or SRLs

Configuring the Oracle Data Guard Physical Standby Database
[ 48 ]
DATABASE_ROLE can be set to the following values:
� PRIMARY_ROLE is valid only when the database role is primary
� STANDBY_ROLE is valid only when the database role is standby
� ALL_ROLES is valid when the database is either primary or standby
When the VALID_FOR attribute is not specified, online redo logfiles and standby redo logfiles will be archived depending on the role of the database. The destination will be enabled even if the role is primary or standby. This is equivalent to the ALL_LOGFILES,ALL_ROLES setting on the VALID_FOR attribute.
It makes sense to use the ALL_LOGFILES,ALL_ROLES mode in the LOCAL archiving destinations.
SYNC and ASYNCRemember that synchronous and asynchronous redo transport modes were covered in Chapter 1, Getting Started. The SYNC and ASYNC keywords are used to specify whether the redo transport mode will be synchronous or asynchronous.
SYNC will be specified when you want to send redo using the synchronous method. In order to commit a transaction on the primary database, related redo data needs to be received by all the destinations that are set with the SYNC attribute. This protection mode is used in either Maximum Protection or Maximum Availability mode. The SYNC attribute does not support destinations from LOG_ARCHIVE_DEST_11 through LOG_ARCHIVE_DEST_31. The SYNC attribute example is shown as follows:
SQL> alter system set log_archive_dest_2='SERVICE=india LGWR SYNC db_unique_name=india_un';
The redo data generated by a transaction doesn't need to be received by a destination that has the ASYNC attribute before that transaction can commit. This attribute will be selected by default if you do not specify either the SYNC or ASYNC keyword. This method is used in the Maximum Performance mode:
SQL> alter system set log_archive_dest_2='SERVICE=india LGWR ASYNC db_unique_name=india_un';

Chapter 2
[ 49 ]
AFFIRM and NOAFFIRMThese attributes control when the destination database acknowledges received redo data. Two options are before and after writing to the standby redo log. The AFFIRM attribute ensures that a redo transport destination will send an acknowledgment after writing it to the standby redo logfiles; NOAFFIRM ensures that the redo transport destination will send an acknowledgment before writing it to the standby redo log. This attribute is used with the SERVICE attribute when specifying remote destinations. To view the attribute configuration, you can use the v$archive_dest view with the AFFIRM column.
If both AFFIRM and NOAFFIRM are not specified, it defaults to AFFIRM when the SYNC attribute is specified and NOAFFIRM when the ASYNC attribute is specified.
SQL> alter system set log_archive_dest_2='SERVICE=india SYNC AFFIRM DB_UNIQUE_NAME=india_un';
System altered.
SQL> select affirm from v$archive_dest where dest_id=2;
AFF
---
YES
COMPRESSIONThis attribute is used to specify whether redo data is compressed before transmission. Compression of redo is useful when there is a bandwidth issue in the network between primary and standby databases. The amount of redo data passing over the network decreases, which improves redo transport performance.
You should remember that compression is a CPU-intensive operation and this compression is an option of Oracle Advanced Compression; so, in order to enhance this feature you must purchase a license. The COMPRESSION attribute example is as shown follows:
SQL> alter system set log_archive_dest_2='SERVICE=india COMPRESSION=ENABLE DB_UNIQUE_NAME=INDIA_UN';
MAX_CONNECTIONSThis specifies the number of connections to the redo destination when sending archived redo logfiles. MAX_CONNECTIONS will be used only if the redo transport services use ARCH. You can set the MAX_CONNECTIONS value from 1 through 5. However, it's limited with the number of ARCn processes that is specified with LOG_ARCHIVE_MAX_PROCESSES.

Configuring the Oracle Data Guard Physical Standby Database
[ 50 ]
Any standby database using ARCn processes will not use standby redo logs if the MAX_CONNECIONS attribute is specified. So we cannot use real-time Redo Apply with MAX_CONNECTIONS.
SQL> alter system set log_archive_dest_2='SERVICE=india MAX_CONNECTIONS=3 db_unique_name=india_un';
SQL> select MAX_CONNECTIONS from v$archive_dest where dest_id=2;
MAX_CONNECTIONS
---------------
3
MAX_FAILUREThis attribute defines how many times the database will attempt to reconnect to a failed standby database before giving up. When you set the MAX_FAILURE attribute, you also have to set the REOPEN attribute. Once the failure count is greater than or equal to the value you specified, the REOPEN attribute value will set to zero internally. This will cause the database to transport redo data to an alternate destination corresponding to the ALTERNATE attribute.
SQL> alter system set log_archive_dest_1='LOCATION=USE_DB_RECOVERY_FILE_DEST REOPEN=8 MAX_FAILURE=4';
System altered.
SQL> select MAX_FAILURE,FAILURE_COUNT,REOPEN_SECS from v$archive_dest where dest_id=1;
MAX_FAILURE FAILURE_COUNT REOPEN_SECS
----------- ------------- -----------
4 0 8
REOPENThe redo transport services will try to reopen the failed remote destination after a specified number of seconds. By default, the database attempts to reopen failed destinations at the set log-switch time. You can use this attribute to shorten the interval of redo transport reconnect attempts.
SQL> alter system set log_archive_dest_2='SERVICE=INDIA reopen=90 db_unique_name=INDIA_UN';
System altered.

Chapter 2
[ 51 ]
SQL> select reopen_secs,max_failure from v$archive_dest where dest_id=2;
REOPEN_SECS MAX_FAILURE
----------- -----------
90 0
NET_TIMEOUTThis attribute is used only with the SYNC redo transport mode. Depending on the value of the NET_TIMEOUT attribute, the LGWR process will block and wait for acknowledgment from a redo transport destination. If the acknowledgment is not received within the time specified, an error will be logged and the transport session to that destination is terminated. If not set, its default value is 30 seconds.
Before setting this attribute, consider your network bandwidth. If you specify lower values such as 1 to 5 seconds, the primary database may often disconnect from the standby database due to transient network errors. A minimum value of 10 should be considered.
SQL> alter system set log_archive_dest_2='SERVICE=INDIA SYNC NET_TIMEOUT=20 db_unique_name=india_un';
System altered.
SQL> select net_timeout from v$archive_dest where dest_id=2;
NET_TIMEOUT
-----------
20
DELAYThis attribute is used to set a delay between the primary and standby databases. When DELAY is used, redo is sent to the standby database with no delay but Redo Apply waits for the delay time before applying the archived log.
SQL> alter system set log_archive_dest_2='SERVICE=india delay=10 db_unique_name=india_un';
System altered.
SQL> selectdelay_mins,destination from v$archive_dest where dest_id=2;
DELAY_MINS DESTINAT
---------- --------
10 india

Configuring the Oracle Data Guard Physical Standby Database
[ 52 ]
If real-time apply is used on the standby database, this attribute will be ignored even if you specify it. You can also override this parameter by using the NODELAY option in the managed recovery command.
SQL> ALTER DATABASE RECOVER MANAGED STANDBY DATABASE NODELAY;
Now we've finished learning the most important attributes of the LOG_ARCHIVE_DEST_n parameter. Remember that these optional attributes should be used depending on the need. You should use the defaults in the initial configuration and consider changing the defaults later depending on the necessity.
LOG_ARCHIVE_DEST_STATE_nThese parameters, where n is from 1 to 31, indicate the state of the related redo log destination configured by the LOG_ARCHIVE_DEST_n parameter. The default value is ENABLE, which means the redo destination is active. If you want to make the destination inactive, you can set the LOG_ARCHIVE_DEST_STATE_n parameter to DEFER. This destination will be excluded until it is reenabled. If any log archive destination has been configured as a failover archive location, the LOG_ARCHIVE_DEST_STATE_n status will be ALTERNATE.
SQL> alter system set log_archive_dest_state_2='defer';
System altered.
SQL> show parameter log_archive_dest_state_2
NAME TYPE VALUE
----------------------------- ----------- -------
log_archive_dest_state_2 string defer
This parameter is useful in planned maintenance on databases. For example, when patching the primary database, you can stop sending redo to standby locations.
What just happened?We've gone through the preconfiguration steps of the Data Guard physical standby database installation. We also learned the properties and options of primary database initialization parameters related with Data Guard. Now we're going to start installing the physical standby database.

Chapter 2
[ 53 ]
Creating the physical standby databaseIn order to create a physical standby database, we first need to install Oracle database binaries to the standby database server and then start a standby database instance. Installing Oracle binaries is out of this book's scope, so it's assumed a standby server is ready with the Oracle database software installed. We will start by covering a standby database instance and copying database files from primary to standby, but first let's look at the initialization parameters that we need to set on standby before starting the instance.
Standby database related initialization parametersThe following are the important Data-Guard-related initialization parameters we set on physical standby databases.
FAL_SERVERThis parameter specifies from where the standby database should request missing archived logs if there is a gap in the logs. It is used only when the database is in the standby role and has a gap in the received archived logs.
A redo gap occurs when the redo transport doesn't run for a while. A maintenance operation on the standby server or a network interruption may cause this. Setting this parameter allows the standby to find the missing redo and have it transported.
On the standby database, you need to set the Oracle Net Service name of the primary database as the value of this parameter. Also, taking account of a possible switchover, don't forget to set FAL_SERVER on the primary database with the value of the standby database service name.
The FAL_CLIENT parameter is no longer required in 11g. In earlier releases, you set the FAL_CLIENT parameter on the standby database, and the value is the Oracle Net Service name that the primary database uses to connect the standby database. In 11g, when it's not set, the primary database will obtain the client service name from the related LOG_ARCHIVE_DEST_n parameter.

Configuring the Oracle Data Guard Physical Standby Database
[ 54 ]
STANDBY_FILE_MANAGEMENTThe STANDBY_FILE_MANAGEMENT parameter is used only for the environment of the physical standby databases. By default, its value is MANUAL. By setting this parameter to AUTO, we'll make sure that, when we add or drop datafiles on our primary database, those files are also added or dropped on the standby database. Setting this parameter to AUTO can cause files to be created automatically on the standby database and it can even overwrite existing files; we should be careful when we set both DB_FILE_NAME_CONVERT and STANDBY_FILE_MANAGEMENT and ensure that the existing datafiles on standby won't be overwritten.
SQL> alter system set standby_file_management='AUTO';
System altered.
When the parameter is set to MANUAL, if any datafile is added in primary, you'll see the following errors:
File #5 added to control file as 'UNNAMED0007' because
the parameter STANDBY_FILE_MANAGEMENT is set to MANUAL
The file should be manually created to continue.
MRP0: Background Media Recovery terminated with error 1274
Some recovered datafiles maybe left media fuzzy
Media recovery may continue but open resetlogs may fail
DB_FILE_NAME_CONVERTIn some cases, the directory structure may not be the same in source/primary and destination/standby database locations. The DB_FILE_NAME_CONVERT parameter is used to convert the file locations of datafiles. When you add a datafile in the primary database, assuming you have a STANDBY_FILE_MANAGEMENT parameter setting of AUTO, it will create a datafile on the standby database according to the settings of the DB_FILE_NAME_CONVERT parameter. Before setting DB_FILE_NAME_CONVERT, make sure that filesystem exists and is writable.
When setting this parameter, we must specify one or more paired strings. The first string is the pattern of the primary database file location whereas the second string is the pattern of the standby database file location.
The following is an example of DB_FILE_NAME_CONVERT:
alter system set db_file_name_convert= "'/u01/app/oracle/oradata/turkey_un', '/u01/app/oracle/oradata/india_un'" scope=spfile;
When using ASM, the settings are very simple. We need to mention only the disk groups of primary and standby as follows:
alter system set db_file_name_convert="'+DATA_AREA','+DATA_STBY'" scope=spfile;

Chapter 2
[ 55 ]
Note that this is a static parameter and it requires the instance to restart for the change to become active.
LOG_FILE_NAME_CONVERTThis parameter plays a similar role to DB_FILE_NAME_CONVERT and is valid for online and standby redo logfiles. The LOG_FILE_NAME_CONVERT parameter converts the file location of a new logfile on the primary database to the desired location on the standby database.
SQL> alter system set log_file_name_convert= "'/u01/app/oracle/oradata/turkey_un', '/u01/app/oracle/oradata/india_un'" scope=spfile;
The DB_FILE_NAME_CONVERT and LOG_FILE_NAME_CONVERT parameters can be used for physical standby databases and RMAN Duplicate/TSPITR (Tablespace Point-in-Time Recovery) operations. It cannot be used on logical standby databases and for RMAN restore operations.
The physical standby database instanceNow it's time to start a database instance on the standby server. In our example, we're going to start a single database instance, not RAC. If an RAC standby database is going to be configured, you need to start instances on RAC nodes and then register the instances to cluster. Considerations about RAC standby databases will be covered in Chapter 8, Integrating Data Guard with the Complete Oracle Environment.
Time for action – starting the physical standby instance and making it ready for the RMAN duplicate
Execute the following steps to start a database instance on the standby server and make it ready for the RMAN duplicate operation.
1. Create a service in Windows.
If you are creating a Data Guard configuration in Windows, you must create a service using the oradim utility as follows:oradim -NEW -SID <sid> -STARTMODE manual -PFILE C:\app\oracle\product\11.2.0\admin\<sid>\pfile\init.ora
You can skip this step if the environment is not Windows.

Configuring the Oracle Data Guard Physical Standby Database
[ 56 ]
2. Set the standby database initialization parameters:
Copy the PFILE from the primary system to the standby system under the $ORACLE_HOME/dbs directory with the proper name (initINDIA.ora in our example). Make changes as needed if the control file locations will be different on the standby database and then change locations. The diagnostic destination and memory must be checked. You also need to set the standby-related parameters we've just covered. Use the following example to compare parameters of the primary and standby databases.
We haven't set Data-Guard-related parameters on the primary database yet. We'll set them after the RMAN duplicate operation finishes successfully. The following primary initialization parameters will be the final status.
In this example, the database files on the primary database are under the /u01 directory and the database files on the standby database are under the /u02 directory. This has been configured intentionally to show you the settings of the related initialization parameters.
The following are the primary database parameters:control_files='/u01/app/oracle/oradata/orcl/control01.ctl','/u01/app/oracle/flash_recovery_area/orcl/control02.ctl'
db_name='orcl'
db_file_name_convert='/u02/app/oracle/oradata/orcl','/u01/app/oracle/oradata/orcl' # for switchover purpose
db_recovery_file_dest='/u01/app/oracle/flash_recovery_area'
db_recovery_file_dest_size=4070572032
db_unique_name='turkey_un'
diagnostic_dest='/u01/app/oracle'
fal_server='INDIA' # for switchover purpose
instance_name='TURKEY'
local_listener='LISTENER'
log_archive_dest_1='LOCATION=USE_DB_RECOVERY_FILE_DEST VALID_FOR=(ALL_LOGFILES,ALL_ROLES)'
log_archive_dest_2='SERVICE=INDIA LGWR ASYNC VALID_FOR=(ONLINE_LOGFILES,PRIMARY_ROLE) DB_UNIQUE_NAME=INDIA_UN'
log_archive_config='DG_CONFIG=(turkey_un,india_un)'
log_archive_max_processes=8
log_file_name_convert='/u02/app/oracle/oradata/orcl','/u01/app/oracle/oradata/orcl' # for switchover purpose

Chapter 2
[ 57 ]
memory_target=822083584
remote_login_passwordfile='EXCLUSIVE'
standby_file_management='AUTO' # for switchover purpose
The following are the standby database parameters:
control_files='/u02/app/oracle/oradata/orcl/control01.ctl','/u02/app/oracle/flash_recovery_area/orcl/control02.ctl'
db_name='orcl'
db_file_name_convert='/u01/app/oracle/oradata/orcl','/u02/app/oracle/oradata/orcl'
db_recovery_file_dest='/u02/app/oracle/flash_recovery_area'
db_recovery_file_dest_size=4070572032
db_unique_name='india_un'
diagnostic_dest='/u02/app/oracle'
fal_server='TURKEY'
instance_name='INDIA'
local_listener='LISTENER'
log_archive_dest_1='LOCATION=USE_DB_RECOVERY_FILE_DEST VALID_FOR=(ALL_LOGFILES,ALL_ROLES)'
log_archive_dest_2='SERVICE=TURKEY LGWR ASYNC VALID_FOR= (ONLINE_LOGFILES,PRIMARY_ROLE) DB_UNIQUE_NAME=turkey_un' # for switchover purpose
log_archive_config='DG_CONFIG=(turkey_un,india_un)'
log_archive_max_processes=8
log_file_name_convert='/u01/app/oracle/oradata/orcl','/u02/app/oracle/oradata/orcl'
memory_target=822083584
remote_login_passwordfile='EXCLUSIVE'
standby_file_management='AUTO'
3. After preparing the standby instance parameter file, set the Oracle user environment variables and start the standby instance in the No Mount status.[oracle@oracle-stby ~]$ export ORACLE_HOME= /u01/app/oracle/product/11.2.0/db_1
[oracle@oracle-stby ~]$ export ORACLE_SID=INDIA
[oracle@oracle-stby ~]$ sqlplus / as sysdba
SQL*Plus: Release 11.2.0.1.0 Production on Sun Aug 12 12:17:01 2012

Configuring the Oracle Data Guard Physical Standby Database
[ 58 ]
Copyright (c) 1982, 2009, Oracle. All rights reserved.
Connected to an idle instance.
SQL>startup nomount
ORACLE instance started.
Total System Global Area 818401280 bytes
Fixed Size 2217792 bytes
Variable Size 507513024 bytes
Database Buffers 306184192 bytes
Redo Buffers 2486272 bytes
SQL> select host_name,status from v$instance;
HOST_NAME STATUS
-------------------- ------------
oracle-stby STARTED
4. The following are the SQL*Net configurations.
With 11g, we can use RMAN duplicate without the need of primary database backup. The RMAN duplicate using the active database feature reads from the original database files. In order to use this feature, we have to perform static registration of the service to the listener. To do this, we configure both the listener and TNS names. The standby database instance must be in the NOMOUNT state before the duplicate command. In the NOMOUNT state, the database instance will not self-register with the listener. Another item to note is that you must use a dedicated server to connect when the database is in the NOMOUNT state.
Before we jump into configuration, let's describe static service information. Static service information is normally not required in the listener.ora configuration file. In order to perform duplicate using active database to connect instance in NOMOUNT status, we are using static listener entry. The parameters required for static service information are SID_NAME, GLOBAL_DBNAME, and ORACLE_HOME.
� SID_NAME: The Oracle SID is the instance identifier, as in the INSTANCE_NAME parameter of the parameter file
� GLOBAL_DBNAME: The GLOBAL_DBNAME parameter is typically a concatenation of the DB_DOMAIN and DB_NAME parameters in the parameter file or the same as the SERVICE_NAMES parameter in the parameter file
� ORACLE_HOME: It's the installation directory of the Oracle database software

Chapter 2
[ 59 ]
Configure the listener and TNS configuration on both the primary and standby databases. The following is the example of the standby database's listener.ora configuration:LISTENER=
(DESCRIPTION=
(ADDRESS_LIST=
(ADDRESS=(PROTOCOL=tcp) (HOST= oracle-stby)(PORT=1521))
(ADDRESS=(PROTOCOL=ipc)(KEY=extproc))))
SID_LIST_LISTENER =
(SID_LIST =
(SID_DESC =
(SID_NAME = PLSExtProc)
(ORACLE_HOME = /u01/app/oracle/product/11.2.0/db_1)
(PROGRAM = extproc))
(SID_DESC =
(GLOBAL_DBNAME = india_un)
(SID_NAME = INDIA)
(ORACLE_HOME = /u01/app/oracle/product/11.2.0/db_1)))
The following will be the TNS entry primary database used to connect the standby database:
INDIA =
(DESCRIPTION =
(ADDRESS = (PROTOCOL = TCP)(HOST = oracle-stby)(PORT = 1521))
(CONNECT_DATA =
(SERVER = DEDICATED)
(SERVICE_NAME = india_un)))
PMON automatically registers with the listener listening on the default port, 1521. If the listener is listening from a non-default port, or if this is an RAC database, the LOCAL_LISTENER parameter must be set to register PMON with the listener. Set the LOCAL_LISTENER parameter to the local listener alias, the name of the listener in the listener.ora file. Also, the LOCAL_LISTENER value has to be resolved using the tnsnames.ora file or in an Oracle Names Server.
5. Now start the listeners on both the primary and standby servers.$lsnrctl start
When the listener is running, check the database accessibility and response time, using tnsping from both primary to standby and standby to primary databases.

Configuring the Oracle Data Guard Physical Standby Database
[ 60 ]
The registered services with the listener of primary should be similar to the following screenshot:
The registered services with the listener of standby are as follows:

Chapter 2
[ 61 ]
6. Copy the password file from the primary system to standby. You can find this file under the $ORACLE_HOME/dbs directory with the name orapwSID. Copy it to the same directory on the standby server and rename correspondingly.
7. If you have configured the encryption wallet on the primary database, copy the wallet to the standby system. If you have more than one standby database, you must copy these files to every standby location. You can access the encrypted data from standby when the wallet module contains the master encryption key from the primary database.
What just happened?We're ready to start the RMAN duplicate. Let's revisit the actions that have been performed on the primary and standby systems:
Task Primary Standby
Instance status Open No mount
Archive log mode Enabled N/A
FRA Enabled Enabled
Force logging Enabled N/A
SQL* net configuration Configured Configured
PFILE/SPFILE Exists Copied, renamed, and modified
Password file Exists Copied and renamed
Control file Exists Will be created automatically (standby CF)
Standby redo logs Created Will be duplicated
Data files Exists Will be duplicated
Using RMAN duplicate to create physical standby databasesIn order to create a physical standby database, we have several methods depending on the release features. We've already mentioned that we'll use the RMAN duplicate from the active database method. In this method, there's no need to take a backup in primary and copy it on the standby system.
Here is an overview of the other methods used to create a standby database:
� Hot backups: Backups taken from the primary database by executing the ALTER DATABASE BEGIN BACKUP command can be used to create a standby database.
� RMAN backups: Full (level 0) RMAN database backups can also be used for the standby configuration.

Configuring the Oracle Data Guard Physical Standby Database
[ 62 ]
� Cloud Control: This is the only graphical interface we can use to create a standby database configuration. It offers online duplicates, existing or new RMAN backups, and handles the steps of copying the init.ora file and the password file.
For the first two methods, all the preconfigurations we've set until now are still needed.
When creating the active database duplicate, RMAN copies the datafiles directly from the primary database to the standby database over the network; in such cases, the primary database must be opened or mounted. Before we start creating the RMAN duplicate, we start the standby instance in the NOMOUNT status; after successful duplication, RMAN leaves the instance in the MOUNT status.
Time for action – running an RMAN duplicatePerform the following steps to create a standby database with the RMAN duplicate method:
1. Check the primary database status; it must be either open or mount.SQL> select db_unique_name,database_role,open_mode from v$database;
DB_UNIQUE_ DATABASE_ROLE OPEN_MODE
---------- ---------------- --------------------
turkey_un PRIMARY READ WRITE
2. Run the RMAN command from the standby system. Connect the primary and standby instances using Oracle Net Service names.[oracle@oracle-stbydbs]$ rman target sys/free2go@turkey auxiliary sys/free2go@india
Recovery Manager: Release 11.2.0.1.0 - Production on Thu Jul 26 18:41:06 2012
Copyright (c) 1982, 2009, Oracle and/or its affiliates. All rights reserved.
connected to target database: ORCL (DBID=1316772835)
connected to auxiliary database: ORCL (not mounted)
RMAN will show the connected sessions as shown previously, which provided the primary status—either open or mounted. Also, standby is in the NOMOUNT status.

Chapter 2
[ 63 ]
3. Now execute the DUPLICATE command.RMAN> duplicate target database for standby from active database;
The output will be similar to the one as shown in the following screenshot:
The tail of the output logfile will be as follows:
Starting Duplicate Db at 26-JUL-12using target database control file instead of recovery catalogallocated channel: ORA_AUX_DISK_1channel ORA_AUX_DISK_1: SID=19 device type=DISK...contents of Memory Script:{ backup as copy current controlfile for standby auxiliary format '/u02/app/oracle/oradata/orcl/control01.ctl'; restore clone controlfile to '/u02/app/oracle/flash_recovery_area/orcl/control02.ctl' from '/u02/app/oracle/oradata/orcl/control01.ctl';}executing Memory Script....sql statement: alter database mount standby database...Starting backup at 26-JUL-12using channel ORA_DISK_1channel ORA_DISK_1: starting datafile copyinput datafile file number=00001 name=/u01/app/oracle/oradata/orcl/system01.dbfoutput file name=/u02/app/oracle/oradata/orcl/system01.dbf tag=TAG20120726T160751channel ORA_DISK_1: datafile copy complete, elapsed time: 00:01:04channel ORA_DISK_1: starting datafile copy...

Configuring the Oracle Data Guard Physical Standby Database
[ 64 ]
sql statement: alter system archive log currentcontents of Memory Script:{ switch clone datafile all;}executing Memory Scriptdatafile 1 switched to datafile copyinput datafile copy RECID=2 STAMP=789667774 file name=/u02/app/oracle/oradata/orcl/system01.dbf...Finished Duplicate Db at 26-JUL-12
When a restore is in progress, you can monitor how much is complete and how much is still pending using the v$session_longops view from the primary database.
4. Configure the primary database initialization parameters required for Data Guard.
SQL> alter system set log_archive_dest_2='SERVICE=INDIA LGWR ASYNC VALID_FOR=(ONLINE_LOGFILES,PRIMARY_ROLE) DB_UNIQUE_NAME=INDIA_UN' scope=both sid='*';
SQL> alter system set log_archive_config= 'DG_CONFIG=(turkey_un,india_un)' scope=both sid='*';
SQL> alter system set log_archive_max_processes=8 scope=both sid='*';
Configure the following parameters in order to make the Data Guard configuration ready for a role-change operation:SQL> alter system set fal_server='INDIA' scope=both sid='*';
SQL> alter system set standby_file_management='AUTO' scope=both sid='*';
SQL> alter system set db_file_name_convert= '/u02/app/oracle/oradata/orcl','/u01/app/oracle/oradata/orcl' scope=spfile sid='*';
SQL> alter system set log_file_name_convert= '/u02/app/oracle/oradata/orcl','/u01/app/oracle/oradata/orcl' scope=spfile sid='*';
Note that the last two settings are made on SPFILE; therefore, a database restart is required to make the changes valid.
What just happened?We've successfully restored the standby database with the standby role using Oracle 11g RMAN duplicate of the active database method. We've also discussed different methods used to create a standby database from primary.

Chapter 2
[ 65 ]
Post-installation stepsIn this section, we'll verify the standby database status, start Redo Apply to synchronize the standby database with the primary database, and see how we check the status of Redo Apply at the end.
Verifying the standby database configurationAfter creating the physical standby database and enabling redo transport services, you may want to verify the standby database configuration and also check if the database changes are being successfully transmitted from the primary database to standby.
Time for action – verifying the standby database configurationRun the following actions to verify the standby database configuration and redo transport services:
1. Connect the standby database using SQL*Plus and check for the database role and status to ensure the database role is the physical standby.SQL> select db_unique_name,database_role,open_mode from v$database;
DB_UNIQUE_NAME DATABASE_ROLE OPEN_MODE
--------------- ---------------- --------------------
india_un PHYSICAL STANDBY MOUNTED
2. Check the standby database, SPFILE.SQL> show parameter spfile
NAME TYPE VALUE
------ ------- --------------------------------------------------
spfile string /u01/app/oracle/product/11.2.0/db_1/dbs/spfileINDIA.ora
If you have started the standby instance with PFILE, you should create an SPFILE and start an instance again using the new SPFILE.

Configuring the Oracle Data Guard Physical Standby Database
[ 66 ]
3. Use the v$datafile view to check the location of the datafiles in the standby database. The standby database datafile must be under the /u02 directory because of the DB_FILE_NAME_CONVERT parameter setting.SQL> select name from v$datafile;
NAME
---------------------------------------------
/u02/app/oracle/oradata/orcl/system01.dbf
/u02/app/oracle/oradata/orcl/sysaux01.dbf
/u02/app/oracle/oradata/orcl/undotbs01.dbf
/u02/app/oracle/oradata/orcl/users01.dbf
/u02/app/oracle/oradata/orcl/example01.dbf
4. Use the v$logfile view to check the location of online and standby redo logfiles in the standby database.SQL> select group#,type,member from v$logfile;
GROUP# TYPE MEMBER
---------- ------- ----------------------------------------------
3 ONLINE /u02/app/oracle/oradata/orcl/redo03.log
2 ONLINE /u02/app/oracle/oradata/orcl/redo02.log
1 ONLINE /u02/app/oracle/oradata/orcl/redo01.log
4 ONLINE /u02/app/oracle/oradata/orcl/redo04.log
10 STANDBY /u02/app/oracle/oradata/orcl/standby_redo01.log
11 STANDBY /u02/app/oracle/oradata/orcl/standby_redo02.log
12 STANDBY /u02/app/oracle/oradata/orcl/standby_redo03.log
13 STANDBY /u02/app/oracle/oradata/orcl/standby_redo04.log
14 STANDBY /u02/app/oracle/oradata/orcl/standby_redo05.log
Note that the online redo logfiles and standby redo logfiles in the primary database are created under the /u01 directory, whereas logfiles in the standby database are under /u02. This change occurred because of the settings of the LOG_FILE_NAME_CONVERT parameter.
SQL> show parameter log_file_name_convert
NAME TYPE VALUE
---------------------- ----------- ----------------------------log_file_name_convert string /u01/app/oracle/oradata/orcl,
/u02/app/oracle/oradata/orcl

Chapter 2
[ 67 ]
5. Verify if the redo transport service is active using the v$managed_standby view on the standby database:
SQL> SELECT THREAD#,SEQUENCE#,PROCESS,CLIENT_PROCESS,STATUS,BLOCKS FROM V$MANAGED_STANDBY;
THREAD# SEQUENCE# PROCESS CLIENT_P STATUS BLOCKS
---------- ---------- --------- -------- ------------ ----------
1 148 ARCH ARCH CLOSING 6
1 147 ARCH ARCH CLOSING 8
1 149 RFS LGWR IDLE 1
0 0 RFS UNKNOWN IDLE 0
You must see RFS processes running on the standby database, which are responsible for writing redo information that the primary database sends to standby.
What just happened?We've verified the standby database mode, status, and database files. We've also seen that the redo transport service is actively working between primary and standby.
Managing Redo ApplyAs discussed in Chapter 1, Getting Started, Redo Apply is the synchronization method of the physical standby databases. Now let's see how can we start, stop, and monitor Redo Apply.
Time for action – starting, stopping, and monitoring MRPBefore starting Redo Apply services, the physical standby database must be in the MOUNT status. From 11g onwards, the standby database can also be in the OPEN mode. If the redo transport service is in the ARCH mode, the redo will be applied from the archived redo logfiles after being transferred to the standby database. If the redo transport service is in LGWR, the Log network server (LNS) will be reading the redo buffer in SGA and will send redo to Oracle Net Services for transmission to the standby redo logfiles of the standby database using the RFS process. On the standby database, redo will be applied from the standby redo logs.
Redo apply can be specified either as a foreground session or as a background process; it can also be started with real-time apply.
To execute the following commands, the control file must be a standby control file. If you execute these commands in a database in the primary mode, Oracle will return an error and ignore the command.

Configuring the Oracle Data Guard Physical Standby Database
[ 68 ]
1. Start Redo Apply in the foreground.
Connect to the SQLPlus command prompt and issue the following command. If the media recovery is already running, you will run into the error ORA-01153: an incompatible media recovery is active.SQL> ALTER DATABASE RECOVER MANAGED STANDBY DATABASE;
Database altered.
Whenever you issue the preceding command, you can monitor the Redo Apply status from the alert logfile. Managed standby recovery is now active and is not using real-time apply. The SQL session will be active unless you terminate the session by pressing Ctrl + C or kill the session from another active session. Press Ctrl + C to stop Redo Apply.
SQL> ALTER DATABASE RECOVER MANAGED STANDBY DATABASE;
ALTER DATABASE RECOVER MANAGED STANDBY DATABASE
*
ERROR at line 1:
ORA-16043: Redo apply has been canceled.
ORA-01013: user requested cancel of current operation
After starting media recovery, you may see errors such as the following, which are expected. This is in fact an enhancement to the Data Guard technology introduced in 10gR2 to improve speed of switchover/failover. In previous versions, role transition would require us to clear the online redo logfiles before it can become a primary database. Now, the database attempts to clear the ORLs when starting Redo Apply. If the files exist, they will be cleared; if they do not exist, it reports one of the following errors. It attempts to create the online redo logfiles before starting recovery. Even if this is not possible because of different structure or log_file_name_convert is not set, Redo Apply does not fail.
2. Start Redo Apply in the background.
In order to start the Redo Apply service in the background, use the disconnect from session option. This command will return you to the SQL command line once the Redo Apply service is started. Run the following statement on the standby database:
SQL> alter database recover managed standby database disconnect from session;
Database altered.

Chapter 2
[ 69 ]
3. Check the Redo Apply service status.
From SQL*Plus, you can check whether the Media Recover Process (MRP) is running using the V$MANAGED_STANDBY view:SQL> SELECT THREAD#,SEQUENCE#,PROCESS,CLIENT_PROCESS,STATUS,BLOCKS FROM V$MANAGED_STANDBY;
THREAD# SEQUENCE# PROCESS CLIENT_P STATUS BLOCKS
---------- ---------- --------- -------- ------------ ----------
1 146 ARCH ARCH CLOSING 1868
1 148 ARCH ARCH CLOSING 6
0 0 ARCH ARCH CONNECTED 0
1 147 ARCH ARCH CLOSING 8
1 149 RFS LGWR IDLE 1
0 0 RFS UNKNOWN IDLE 0
0 0 RFS UNKNOWN IDLE 0
0 0 RFS N/A IDLE 0
1 149 MRP0 N/A APPLYING_LOG 204800
9 rows selected.
From the PROCESS column, you can see that the background process name is MRP0; Media Recovery Process is ACTIVE and the status is APPLYING_LOG, which means that the process is actively applying the archived redo log to the standby database. From the OS, you can monitor the specific background process as follows:[oracle@oracle-stby ~]$ ps -ef|grep mrp
oracle 5507 1 0 19:26 ? 00:00:02 ora_mrp0_INDIA
From the output, you can simply estimate how many standby instances are running with background recovery. Only one Media Recovery Process can be running per instance.
Also, you can query from v$session.
SQL> select program from v$session where program like '%MRP%';
PROGRAM
-------------------------
oracle@oracle-stby (MRP0)

Configuring the Oracle Data Guard Physical Standby Database
[ 70 ]
4. Stop Redo Apply.
To stop the MRP, issue the following command:SQL> ALTER DATABASE RECOVER MANAGED STANDBY DATABASE CANCEL;
Database altered.
From the alert logfile, you will see the following lines:Sun Aug 05 21:24:16 2012
ALTER DATABASE RECOVER MANAGED STANDBY DATABASE CANCEL
Sun Aug 05 21:24:16 2012
MRP0: Background Media Recovery cancelled with status 16037
Errors in file /u02/app/oracle/diag/rdbms/india_un/INDIA/trace/INDIA_mrp0_5507.trc:
ORA-16037: user requested cancel of managed recovery operation
Managed Standby Recovery not using Real Time Apply
Recovery interrupted!
After stopping the MRP, no background process is active and this can be confirmed by using the V$MANAGED_STANDBY or V$SESSION view shown as follows:
SQL> SELECT THREAD#,SEQUENCE#,PROCESS,CLIENT_PROCESS,STATUS,BLOCKS FROM V$MANAGED_STANDBY;
THREAD# SEQUENCE# PROCESS CLIENT_P STATUS BLOCKS
---------- ---------- --------- -------- ------------ ----------
1 146 ARCH ARCH CLOSING 1868
1 148 ARCH ARCH CLOSING 6
0 0 ARCH ARCH CONNECTED 0
1 147 ARCH ARCH CLOSING 8
1 149 RFS LGWR WRITING 1
0 0 RFS UNKNOWN IDLE 0
0 0 RFS UNKNOWN IDLE 0
0 0 RFS N/A IDLE 0
8 rows selected.
SQL> select program from v$session where program like '%MRP%';
no rows selected

Chapter 2
[ 71 ]
5. Start real-time apply.
To start Redo Apply in real-time apply mode, you must use the USING CURRENT LOGFILE option as follows:SQL> ALTER DATABASE RECOVER MANAGED STANDBY DATABASE USING CURRENT LOGFILE DISCONNECT FROM SESSION;
Database altered.
From the standby alert logfile, you will see the following lines:
Sun Aug 05 15:31:21 2012
ALTER DATABASE RECOVER MANAGED STANDBY DATABASE USING CURRENT LOGFILE DISCONNECT FROM SESSION
Attempt to start background Managed Standby Recovery process (INDIA)
Sun Aug 05 15:31:21 2012
Note that stopping a Redo Apply service in the real-time mode is not different from stopping the standard Redo Apply.
What just happened?We've seen how to start, stop, and monitor the Redo Apply service on the physical standby database. Also, the method to start Redo Apply in the real-time mode is covered. These are important tasks of an Oracle database administrator managing a Data Guard environment.
Verifying synchronization between the primary and standby databasesWe must now ensure that the standby database is synchronized with the primary database after starting Redo Apply.
www.allitebooks.com

Configuring the Oracle Data Guard Physical Standby Database
[ 72 ]
Time for action – verifying synchronization between the primary and standby databases
By using the following steps, you can control whether the standby database is synchronized with primary:
1. On the standby database, query the V$ARCHIVED_LOG view for the archived and applied sequences.
For the last archived sequence, use the following:SQL> SELECT MAX(SEQUENCE#) FROM V$ARCHIVED_LOG;
MAX(SEQUENCE#)
--------------
145
For the last applied sequence, use the following:SQL> SELECT MAX(SEQUENCE#) FROM V$ARCHIVED_LOG WHERE APPLIED='YES';
MAX(SEQUENCE#)
--------------
144
From the preceding two queries, we see that the latest sequence, 145, is being archived or written into the standby redo logfiles. There's expected to be a lag of one sequence between archived and applied columns.
2. Check the status of the latest log sequence.SQL> SELECT SEQUENCE#,APPLIED FROM V$ARCHIVED_LOG ORDER BY SEQUENCE#;
SEQUENCE# APPLIED
---------- ---------
140 YES
141 YES
142 YES
143 YES
144 YES
145 IN-MEMORY
The log sequence 145 is still being shipped.

Chapter 2
[ 73 ]
3. On the primary database query for the last archived logfile, perform a couple of log switches and then monitor if those archives are transported and applied.SQL> SELECT MAX(SEQUENCE#) FROM V$ARCHIVED_LOG;
MAX(SEQUENCE#)
--------------
145
Perform log switches several times and check.
SQL> alter system switch logfile;
System altered.
SQL> SELECT MAX(SEQUENCE#) FROM V$ARCHIVED_LOG;
MAX(SEQUENCE#)
--------------
148
4. On the standby query for new archived logfiles and applied archived logfiles, query if the new archive log sequences are applied on standby.SQL> SELECT SEQUENCE#,APPLIED FROM V$ARCHIVED_LOG ORDER BY SEQUENCE#;
SEQUENCE# APPLIED
---------- ---------
143 YES
144 YES
145 YES
146 YES
147 YES
148 YES
The APPLIED column on standby will be very helpful to determine which sequence is generated and which sequences are applied. In the previous scenario, the archives generated on primary and archives applied on standby have the same sequence number; hence, standby is synchronized with the primary database.
The value of the APPLIED column for the most recently received logfile will be IN-MEMORY, or YES if that logfile has been applied.

Configuring the Oracle Data Guard Physical Standby Database
[ 74 ]
What just happened?It's very important to know methods to verify synchronization between primary and standby databases. We've now seen one of these methods.
Time for action – testing real-time applyIf real-time apply is enabled, the apply services can apply redo data without waiting for the current standby redo logfile to be archived. This allows faster role transitions because you avoid waiting for a redo log to be transported to the standby database and then applied. In this example, we'll see how changes are transferred and applied to the standby database. The redo log that includes changes is not archived on primary.
1. In order to use real-time apply, the redo transport service from primary to standby must use LGWR. Run the following query on the primary database and check the log archive destination configuration.SQL> show parameter log_archive_dest_2
NAME TYPE VALUE
------------------- -------- ----------
log_archive_dest_2 string SERVICE=INDIA LGWR ASYNC VALID_FOR =(ONLINE_LOGFILES,PRIMARY_ROLE) DB_UNIQUE_NAME=INDIA_UN
2. In the standby database, start Redo Apply using the USING CURRENT LOGFILE option.SQL> ALTER DATABASE RECOVER MANAGED STANDBY DATABASE USING CURRENT LOGFILE DISCONNECT FROM SESSION;
Database altered.
3. Check the current status of processes related to Data Guard in the physical standby database. You need to verify that the status of the MRP0 process is APPLYING LOG:SQL> SELECT THREAD#,SEQUENCE#,PROCESS,CLIENT_PROCESS,STATUS,BLOCK#,BLOCKS FROM V$MANAGED_STANDBY;
THREAD# SEQUENCE# PROCESS CLIENT_P STATUS BLOCK# BLOCKS
------- ---------- --------- -------- -------- -------- ----------
0 0 ARCH ARCH CONNECTED 0 0
0 0 ARCH ARCH CONNECTED 0 0
0 0 ARCH ARCH CONNECTED 0 0
0 0 ARCH ARCH CONNECTED 0 0
1 149 ARCH ARCH CLOSING 61440 1244
0 0 RFS N/A IDLE 0 0

Chapter 2
[ 75 ]
1 150 RFS LGWR IDLE 8823 1
1 150 MRP0 N/A APPLYING_LOG 23 204800
4. Create a table in the primary database by selecting the data logs from another table.SQL> create table packt.oracle as select * from scott.emp;
Table created.
SQL> select count(*) from packt.oracle;
COUNT(*)
----------
81920
No log switches have been performed on the primary database.
5. Now monitor the number of redo blocks for the current redo log, written on primary, sent to standby, and applied on standby.
The redo blocks for the primary database:SQL> SELECT THREAD#,SEQUENCE#,PROCESS,CLIENT_PROCESS,STATUS,BLOCK#,BLOCKS FROM V$MANAGED_STANDBY;
THREAD# SEQUENCE# PROCESS CLIENT_P STATUS BLOCK# BLOCKS
------- -------- ------- ------ --------- ---------- ----------
1 143 ARCH ARCH CLOSING 1 2
0 0 ARCH ARCH CONNECTED 0 0
0 0 ARCH ARCH CONNECTED 0 0
1 149 ARCH ARCH CLOSING 61440 1244
1 146 ARCH ARCH CLOSING 2049 1868
1 150 LNS LNS WRITING 9016 1
The redo blocks for the standby database:
SQL> SELECT THREAD#,SEQUENCE#,PROCESS,CLIENT_PROCESS,STATUS,BLOCK#,BLOCKS FROM V$MANAGED_STANDBY;
THREAD# SEQUENCE# PROCESS CLIENT_P STATUS BLOCK# BLOCKS
------- -------- ------- ------ ----------- ---------- ----------
0 0 ARCH ARCH CONNECTED 0 0
0 0 ARCH ARCH CONNECTED 0 0
0 0 ARCH ARCH CONNECTED 0 0

Configuring the Oracle Data Guard Physical Standby Database
[ 76 ]
0 0 ARCH ARCH CONNECTED 0 0
1 149 ARCH ARCH CLOSING 61440 1244
0 0 RFS N/A IDLE 0 0
1 150 RFS LGWR IDLE 8910 1
1 150 MRP0 N/A APPLYING_LOG 8910 204800
6. You can also check the apply lag on the standby database using the V$DATAGUARD_STATS view in terms of time. Run the following query on the standby database:SQL> SELECT name, value, datum_time, time_computed FROM V$DATAGUARD_STATS WHERE name like 'apply lag';
NAME VALUE DATUM_TIME TIME_COMPUTED
---------- ------------ ------------------- -------------------
apply lag +00 00:00:00 08/05/2012 22:14:16 08/05/2012 22:14:18
The apply lag metric is zero, which means there's no lag. This value is calculated with the data periodically received from the primary database. The DATUM_TIME parameter shows when this data was last sent from primary to the standby database. The TIME_COMPUTED column shows when the apply lag value was calculated. Normally, the difference between these two values should be less than 30 seconds.
The following query to the V$STANDBY_EVENT_HISTOGRAM view shows the history of apply lag values since the standby instance was last started:
SQL> SELECT * FROM V$STANDBY_EVENT_HISTOGRAM WHERE NAME = 'apply lag' AND COUNT > 0;
NAME TIME UNIT COUNT LAST_TIME_UPDATED
---------- ---------- ------------- -------- -----------------
apply lag 0 seconds 431 08/05/2012 22:14:21
apply lag 1 seconds 7 08/05/2012 22:13:31
7. On the physical standby database (which is read-only and in the real-time apply mode), query the row number for the table that we created on primary.SQL> select count(*) from packt.oracle;
COUNT(*)
----------
81920

Chapter 2
[ 77 ]
We can see that the changes were applied on the standby database without waiting for a log switch either on the primary or standby database. This is achieved by the LGWR redo transport mode on primary and real-time Redo Apply mode on the standby database.
What just happened?The recommended Redo Apply method, real-time apply, is verified and we've seen that the redo switch is not required to apply changes to the standby database in the real-time apply mode.
Have a go hero – checking the network latency effect on real-time applyIn order to check if network latency and bandwidth have any effect on real-time apply, run an insert operation on the primary and commit. Right after the commit, query the physical standby database to see if the changes are applied immediately. You may see some seconds of delay, which is most probably caused by network performance.
SummaryWe have finished this chapter by describing Data Guard physical standby database creation, configuration, and controlling. We used the RMAN duplicate from the active database method, which is the easiest and most efficient way of creating a physical standby database. This method doesn't require a backup staging disk area in either primary or standby servers because it performs a direct copy from primary files to standby. This chapter also covered pre and post steps of creating a standby database with RMAN duplicate. We learned starting, stopping, and monitoring Redo Apply and the synchronization method of physical standby databases, including real-time apply. In the next chapter, we'll learn about building a Data Guard logical standby database environment.


3Configuring Oracle Data Guard
Logical Standby Database
The objective of this chapter is to show you how to create and manage a logical standby database environment. We've already learned what a logical standby database is and what are its highlights. Now it's time to study the installation and administration of the logical standby database with hands-on examples.
In this chapter we'll discuss the following topics:
� Features and working principles of the logical standby database
� The pre-installation steps for a logical standby database configuration
� Creating a logical standby database from a physical standby database
� Verification of the newly created logical standby database configuration
� Customizing the environment with selective replication, Database Guard settings and creating an independent database object on the logical standby database
Logical standby database characteristicsIt's important to know the logical standby database properties well in order to decide if your business needs the physical or logical option. The different log apply modes make them distinct solutions for data replication, high availability, and disaster recovery. By using SQL Apply (the log apply method of logical standby databases), Data Guard mines the redo data (which was transferred from the primary database), builds the SQL statements (which will result in the same data change as in the primary database).

Configuring Oracle Data Guard Logical Standby Database
[ 80 ]
Finally executes these SQL statements on the logical standby database as shown in the following diagram:
PRIMARY STANDBY
Redo
Transport
Standby
Redo Logs
Build SQL From Redo
and Execute SQL
Primary
Database
Logical
Standby
Database
Maintaining this kind of standby database has its own pros and cons. Now let's see what they are.
Not everything must be duplicatedDepending on your conditions, there may be cases where you don't want all the data in your primary database to be replicated. This is not possible with a physical standby database; however, the logical standby database offers to skip replication of some tables or schemas.
Use for reporting at all timesIt's possible to use a logical standby database anytime to offload reporting jobs from the primary database because a logical standby database is always open for user connections. This is also available with the Oracle version 11g physical standby feature of Active Data Guard but it requires an additional license.
Independent standby database objectsA logical standby database may contain additional schemas and objects that do not exist on the primary database. This feature also relies on the fact that the logical standby database is a read/write accessible database. We can use this feature particularly for the reporting jobs running on the standby database. It's possible to create indexes and materialized views on the standby database, which can be expensive to maintain on the primary database. Also, many reporting tools require us to create global temporary tables. These reporting tools may run on a logical standby database but not on an Active Data Guard standby, because Active Data Guard allows only read operations on the standby database.

Chapter 3
[ 81 ]
Protecting writes on replicated standby tablesThe replicated data on a standby database normally needs to be non-modifiable in order to provide data consistency. Logical standby database is capable of guaranteeing this with the use of Database Guard settings. It's also possible to configure a logical standby database in order to allow users to create new objects and modify the data on these non-replicated objects or not allow any modification on the standby database.
Limitation for specific data types and objectsThere are specific Oracle database objects and data types that are not supported for replication in a logical standby database configuration. Updates on the following objects will not be replicated to a logical standby:
� Tables containing LOB columns stored as SecureFiles (unless the compatibility level is set to 11.2 or higher)
� Tables with virtual columns
We should also keep in mind that changes on the tables or sequences owned by SYS are not applied by SQL Apply, because SYS organizes its own structure on the logical standby database. We should be careful so as to not put any user data under SYS objects or create any object under the SYS schema in the primary database manually.
Another important point is redo will not be generated for DML on Global Temporary Tables. Hence, they're out of the replication scope.
The following data types are also not supported in a logical standby database configuration. If a table contains a column with one of these data types, the entire table will be skipped by SQL Apply:
� BFILE
� Collections (including VARRAYS and nested tables)
� Multimedia data types (including spatial, image, and Oracle text)
� ROWID and UROWID
� User-defined data types
And last but not least, DDL statements for materialized views and database links are skipped by SQL Apply. Therefore, these objects must be handled manually on the logical standby database, if necessary.

Configuring Oracle Data Guard Logical Standby Database
[ 82 ]
High availability and disaster recovery considerationsA logical standby database can be used for switchover or failover just like the physical standby database configuration. We can also configure fast-start failover with the logical standby environment. These properties make the logical standby database an appropriate solution for high availability and disaster recovery. However, the following considerations are very important if you use the logical standby database for high availability and disaster recovery:
� There is no guarantee that all primary data will be present in the logical standby database. We should be aware of the unsupported objects that will not be replicated. If there are important tables on your primary database, which will not be replicated because of the unsupported data type, you should consider the physical standby database for these purposes.
� Once we failover to a logical standby database, all other standby databases in the configuration must be recreated. This is not the same on physical standby configuration. Physical standby databases are able to send redo to other standby databases in the configuration after a switchover or failover. If you consider using more than one standby, using a physical standby for disaster recovery will be more effective.
� Physical standby offers higher recovery performance than the logical standby because it consumes less memory, CPU, and I/O resource on the apply process. If the primary database has high redo generation rate, you can consider using a physical standby for the purposes in question.
� The management of a logical standby configuration is more complex than that of physical. In a physical standby database we start Redo Apply and it's guaranteed that all the changes on the data will be replicated to standby. Logical standby will require more manual administrator interferences and they need to be consistently synchronized and work with optimum performance.
Preparation for the configurationNow it's time to get our hands dirty in the process of creating a logical standby database. First we'll start preparing the primary database for the configuration. Then we'll convert a physical standby database into a logical standby database. This is the method of creating logical standby Data Guard configuration.
You can use the physical standby database that we created together in Chapter 2, Configuring Oracle Data Guard Physical Standby Database for this purpose. However, we'll need a physical standby in the following chapters to study on. So, it would be better to create a separate physical standby database with one of the mentioned methods to use in the logical standby configuration.

Chapter 3
[ 83 ]
There are some prerequisites that we need to complete before starting the configuration. One of them is checking the primary database for specifying any tables that will be skipped by SQL Apply because of the unsupported data types. It doesn't make sense to build a configuration where you're not sure which objects will and will not be replicated.
The other important control is ensuring the objects that will be replicated and maintained by SQL Apply are uniquely identified. As the logical standby is actually a standalone database, synchronizing it with SQL statements might result in ROWIDs being different on primary and standby databases. Thus, primary ROWID cannot be used to identify the corresponding row in the logical standby database. SQL Apply needs another unique identifier to apply changes, which are the primary keys, non-null unique-constraint/index, or all columns of bounded size, respectively depending on their existence.
Time for action – checking for the unsupported data typesIn order to be aware of what will and will not be replicated, we should check which primary database tables are not supported for the logical standby database.
1. Run the following query on the primary database to see the unsupported table names:SQL> SELECT * FROM DBA_LOGSTDBY_UNSUPPORTED_TABLE ORDER BY OWNER,TABLE_NAME;
OWNER TABLE_NAME---------- ------------------------------IX AQ$_ORDERS_QUEUETABLE_GIX AQ$_ORDERS_QUEUETABLE_HIX AQ$_ORDERS_QUEUETABLE_IIX AQ$_ORDERS_QUEUETABLE_LIX AQ$_ORDERS_QUEUETABLE_SIX AQ$_ORDERS_QUEUETABLE_TIX AQ$_STREAMS_QUEUE_TABLE_CIX AQ$_STREAMS_QUEUE_TABLE_GIX AQ$_STREAMS_QUEUE_TABLE_HIX AQ$_STREAMS_QUEUE_TABLE_IIX AQ$_STREAMS_QUEUE_TABLE_LIX AQ$_STREAMS_QUEUE_TABLE_SIX AQ$_STREAMS_QUEUE_TABLE_TIX ORDERS_QUEUETABLEIX STREAMS_QUEUE_TABLEOE CATEGORIES_TABOE CUSTOMERSOE PURCHASEORDER

Configuring Oracle Data Guard Logical Standby Database
[ 84 ]
OE WAREHOUSESPM ONLINE_MEDIAPM PRINT_MEDIASH DIMENSION_EXCEPTIONS
22 rows selected.
As mentioned earlier, we use a newly created 11g release 2 database, which only includes built-in example schemas. The unsupported tables are from the IX, OE, PM, and SH schemas. Now let's check the reasons for which these tables are on the unsupported list.
2. Run the following query for one of the unsupported tables to check the reason. We're now running STREAMS_QUEUE_TABLE under the IX schema:SQL> SELECT DISTINCT(ATTRIBUTES) FROM DBA_LOGSTDBY_UNSUPPORTED WHERE OWNER='IX' and TABLE_NAME = 'STREAMS_QUEUE_TABLE';
ATTRIBUTES-----------------AQ queue table
We've only queried the ATTRIBUTES column of the DBA_LOGSTDBY_ UNSUPPORTED view for a specific table name. The ATTRIBUTES column displays the reason the table is not supported by SQL Apply. If the structure of the table is unsupported, the ATTRIBUTES column will show the description for that. In the example we can see that STREAMS_QUEUE_TABLE is unsupported because it is an AQ queue table.
3. If the structure of the table is supported but some columns in the table have unsupported data types, the ATTRIBUTE column will be NULL. Let's check which columns of which tables have ATTRIBUTE value NULL, in other words which tables have unsupported data types on specific columns.SQL> SELECT OWNER, TABLE_NAME, COLUMN_NAME,DATA_TYPE FROM DBA_LOGSTDBY_UNSUPPORTED WHERE ATTRIBUTES IS NULL;
OWNER TABLE_NAME COLUMN_NAME DATA_TYPE----- ---------------------- ------------------------ ---------PM ONLINE_MEDIA PRODUCT_PHOTO_SIGNATURE OBJECTPM ONLINE_MEDIA PRODUCT_THUMBNAIL OBJECTPM ONLINE_MEDIA PRODUCT_VIDEO OBJECTPM ONLINE_MEDIA PRODUCT_AUDIO OBJECTPM ONLINE_MEDIA PRODUCT_TESTIMONIALS OBJECTPM ONLINE_MEDIA PRODUCT_PHOTO OBJECTPM PRINT_MEDIA AD_HEADER OBJECT

Chapter 3
[ 85 ]
PM PRINT_MEDIA AD_GRAPHIC BFILEOE CUSTOMERS CUST_ADDRESS OBJECTOE CUSTOMERS PHONE_NUMBERS VARRAYOE CUSTOMERS CUST_GEO_LOCATION OBJECTOE WAREHOUSES WH_GEO_LOCATION OBJECTSH DIMENSION_EXCEPTIONS BAD_ROWID ROWID
13 rows selected.
We can see that 5 tables have unsupported columns and will be ignored by SQL Apply like the others, because of their table structure.
Keep in mind that the changes on the unsupported tables will still be sent by the redo transport service; however, SQL Apply will ignore the changes on the unsupported tables. Another point is the unsupported tables will exist on the logical standby database, because a logical standby is converted from a physical standby database, which is an exact copy of the primary. These tables will exist but will not be updated by SQL Apply on the logical standby database.
What just happened?We've seen how to query unsupported data for logical standby in the existing database. This information is important in the decision of using logical standby databases.
Now let's search for any table row uniqueness problem in the primary database and how to fix the issue if it exists.
Time for action – searching for and fixing any table row uniqueness problem
1. In order to check for any table row uniqueness, we can run the following query on the primary database:SQL> SELECT * FROM DBA_LOGSTDBY_NOT_UNIQUE;
OWNER TABLE_NAME B------------------------------ ------------------------------ -SCOTT BONUS NSCOTT SALGRADE NSH SALES NSH COSTS NSH SUPPLEMENTARY_DEMOGRAPHICS N

Configuring Oracle Data Guard Logical Standby Database
[ 86 ]
This query was run on a newly created 11g release 2 database, which only includes built-in example schemas. The output shows that several tables from SCOTT and SH schemas have row uniqueness problem.
The BAD_COLUMN column has two values, which are Y and N. If you see the rows with BAD_COLUMN=Y, it means that the table column is defined using an unbounded data type, such as LONG or BLOB. If two rows contain the same data except in their LOB columns, the replication will not work properly for this table. If the application ensures the rows are unique, we should consider adding a disabled primary key RELY constraint to these tables. When RELY is used, the system will assume that rows are unique and not validate them on every modification to the table. This method will avoid the overhead of maintaining a primary key on the primary database. However, if there's no such uniqueness, we must add a unique-constraint/index to the columns on the primary database.
BAD_COLUMN=N means that there is enough column information to maintain the table in the logical standby database; however, the transport and apply services will run more efficiently if you add a primary key to the table. We should again consider adding a disabled RELY constraint to these tables.
2. Let's add a disabled primary key RELY constraint to the BONUS table in the SCOTT schema. First we check the columns of the table using the following query:SQL> DESC SCOTT.BONUS Name Null? Type ----------------- -------- ---------------------------- ENAME VARCHAR2(10) JOB VARCHAR2(9) SAL NUMBER COMM NUMBER
3. Now we add the disabled RELY constraint to the ENAME column of the table:SQL> ALTER TABLE SCOTT.BONUS ADD PRIMARY KEY (ENAME) RELY DISABLE;
Table altered.
4. We can check the DBA_LOGSTDBY_NOT_UNIQUE view again to see if the BONUS table has disappeared from the list using the following query:SQL> SELECT * FROM DBA_LOGSTDBY_NOT_UNIQUE;
OWNER TABLE_NAME B------------------------------ ------------------------------ -SCOTT SALGRADE NSH SALES NSH COSTS NSH SUPPLEMENTARY_DEMOGRAPHICS N

Chapter 3
[ 87 ]
5. We should add disabled RELY constraints to the rest of the tables above. Now we're ready for the next step, which is creating the logical standby database.
What just happened?We've just seen the prerequisite steps to create a logical standby database configuration. The first step was checking the unsupported tables that will not be replicated, in order to be aware which data will be missed on the logical standby and to decide whether to use the logical option or not. The next step is searching for and fixing any table row uniqueness problem, for properly working redo transport and SQL Apply services.
Creating a logical standby databaseAs mentioned, a physical standby database is needed to create a logical standby database. It is assumed that we have a Data Guard configuration with a primary and one or more physical standby databases, which are synchronized with the primary. In order to create a logical standby database, we should first check the primary and the physical standby databases and make them ready for a logical standby conversion. These configurations are as follows:
� Stopping the media recovery on the standby
� Configuring primary database initialization parameters to be ready for a logical standby role transition
� Building the LogMiner dictionary on the primary
� If standby is RAC, converting it to a single instance temporarily
After completing these tasks, we continue the process of converting the physical standby into a logical standby with the following tasks:
� Recovering the standby to the SCN that the LogMiner dictionary was built with
� Re-enabling RAC on the standby if it exists
� Modifying the archival initialization parameters for the standby
� Opening the database with resetlogs
� Starting SQL Apply on the standby
It's important to complete all these steps for a successful logical standby database configuration.

Configuring Oracle Data Guard Logical Standby Database
[ 88 ]
If Data Guard broker is used, it's advised to remove the physical standby database from the broker configuration before starting the logical standby conversion process. If you don't, broker will still show the standby database as a physical standby even if you convert it to a logical standby database and you'll struggle with this problem later on.
Time for action – making a physical standby database environment ready for conversion
You can perform the following steps to make a physical standby database environment ready for conversion:
1. Stop the media recovery on the physical standby with the following statement:SQL> ALTER DATABASE RECOVER MANAGED STANDBY DATABASE CANCEL;
Database altered.
2. In order to prepare the primary database for possible switchovers with the logical standby in future, we will make some changes on the archival initialization parameters. This step is optional and if you don't plan any switchovers between the primary and logical standby in the future, you can skip this step. Run the following statements on the primary database to change the parameters:SQL> ALTER SYSTEM SET LOG_ARCHIVE_DEST_1='LOCATION=/u01/app/oracle/archive VALID_FOR=(ONLINE_LOGFILES,ALL_ROLES) DB_UNIQUE_NAME=TURKEY_UN' SCOPE=BOTH;
System altered.
SQL> ALTER SYSTEM SET LOG_ARCHIVE_DEST_3='LOCATION=/u01/app/oracle/archive_std VALID_FOR=(STANDBY_LOGFILES,STANDBY_ROLE) DB_UNIQUE_NAME=TURKEY_UN' SCOPE=BOTH;
System altered.
In this configuration LOG_ARCHIVE_DEST_1 will archive the online logfiles to the archived logfiles even if the database is primary or logical standby (ALL_ROLES option). After a switchover when the database role is logical standby, this setting will archive the local online redo logfiles and not the standby redo logs. It will be filled with the redo transferred from primary.

Chapter 3
[ 89 ]
The LOG_ARCHIVE_DEST_3 parameter (not set in physical standby Data Guard configuration) will be omitted when the database is primary (STANDBY_ROLE option). If the database role is logical standby, this parameter will archive the standby redo logs that contain redo generated and sent by the primary database.
There is already LOG_ARCHIVE_DEST_2 defined on the primary database that sends redo to the standby. We are not going to change this parameter. The value of this parameter should resemble the following:
SERVICE=INDIA LGWR ASYNC VALID_FOR=(ONLINE_LOGFILES,PRIMARY_ROLE) DB_UNIQUE_NAME=INDIA_UN
3. Execute the following statement on the primary database to make it ready to support a logical standby configuration. This package enables supplementary logging on the primary database, which ensures that the updates contain enough information to identify each modified row. It also builds the LogMiner dictionary and identifies the SCN that SQL Apply has to start mining redo.SQL> EXECUTE DBMS_LOGSTDBY.BUILD;
PL/SQL procedure successfully completed.
If the database version is 11gR2, the supplemental logging information is automatically propagated to any existing physical standby database in the configuration. In earlier releases, we must enable supplemental logging on the physical standby database, if we're going to switchover to a physical standby database. Otherwise, after the switchover, the new primary database will not be able to properly feed the logical standby database with redo.
4. If the physical standby is RAC, you must convert it to a single instance before the logical database conversion. Use the following statements for this purpose:SQL> ALTER SYSTEM SET CLUSTER_DATABASE=FALSE SCOPE=SPFILE;SQL> SHUTDOWN ABORT;SQL> STARTUP MOUNT EXCLUSIVE;
What just happened?We're now ready to continue with the conversion of the standby database from physical to logical.

Configuring Oracle Data Guard Logical Standby Database
[ 90 ]
Time for action – converting a physical standby database into a logical standby database
1. Execute the following special recovery command on the standby database in order to recover it until the SCN that the dictionary was built:SQL> ALTER DATABASE RECOVER TO LOGICAL STANDBY ORCL2;
Database altered.
2. At the same time, if you check the standby database alert log you'll see the following lines:Media Recovery Log /u01/app/oracle2/archive/1_106_791552282.arc
Media Recovery Log /u01/app/oracle2/archive/1_107_791552282.arc
Incomplete Recovery applied until change 1873735
Media Recovery Complete (INDIA)
...
RESETLOGS after incomplete recovery UNTIL CHANGE 1873735
Resetting resetlogs activation ID 1319360408 (0x4ea3d798)
standby became primary SCN: 1873733
...
RECOVER TO LOGICAL STANDBY: Complete - Database shutdown required after NID finishes
*** DBNEWID utility started ***
DBID will be changed from 1319333016 to new DBID of 773141456 for database ORCL
DBNAME will be changed from ORCL to new DBNAME of ORCL2
Starting datafile conversion
Datafile conversion complete
Database name changed to ORCL2.
Modify parameter file and generate a new password file before restarting.
Database ID for database ORCL2 changed to 773141456.
All previous backups and archived redo logs for this database are unusable.
Database has been shutdown, open with RESETLOGS option.
Succesfully changed database name and ID.
*** DBNEWID utility finished succesfully ***
Completed: ALTER DATABASE RECOVER TO LOGICAL STANDBY ORCL2

Chapter 3
[ 91 ]
We can see that the MRP applied the changes until a specific SCN. This SCN is the point at which the LogMiner dictionary was built. Then the standby database was activated and became the primary database. The rest of the lines show the process of changing the DB_NAME of the database. If you look at the recovery command, you'll see that we specified the name ORCL2 at the end. The database name needs to be changed for the physical standby database to become a logical standby and ORCL2 will be the new name of the standby database. All of these changes were applied to the database by the recovery command we ran.
In the alert log, we can see the following line:
modify parameter file and generate a new password file before restarting.
If spfile is being used, the DB_NAME parameter will be changed automatically after this command. If pfile is in use, we need to manually change the DB_NAME to the new value in the init.ora file.
Prior to 11g it was necessary to create a new password file, but it's not required in 11g. So we can ignore this line of the alert.log.
3. If the standby database is RAC, we can enable the cluster again using the following query:SQL> ALTER SYSTEM SET CLUSTER_DATABASE=TRUE SCOPE=SPFILE;SQL> SHUTDOWN;SQL> STARTUP MOUNT;
4. There are two kinds of archived redo logfiles on the logical standby databases. The first one is created from the online redo logs and the second is created from the standby redo logs. We'll create separate destinations for these archived logfiles using the following query:SQL> ALTER SYSTEM SET LOG_ARCHIVE_DEST_1='LOCATION=/u01/app/oracle/archive VALID_FOR=(ONLINE_LOGFILES,ALL_ROLES) DB_UNIQUE_NAME=INDIA_UN';
System altered.
SQL> ALTER SYSTEM SET LOG_ARCHIVE_DEST_2='SERVICE=TURKEY ASYNC VALID_FOR=(ONLINE_LOGFILES,PRIMARY_ROLE) DB_UNIQUE_NAME=TURKEY_UN';
System altered.

Configuring Oracle Data Guard Logical Standby Database
[ 92 ]
SQL> ALTER SYSTEM SET LOG_ARCHIVE_DEST_3='LOCATION=/u01/app/oracle/archive_std VALID_FOR=(STANDBY_LOGFILES,STANDBY_ROLE) DB_UNIQUE_NAME=INDIA_UN';
System altered.
Here, the first destination will be used for archiving the online redo logs of the logical standby database. The second destination was already set in physical standby setup and was defined in order to be used in a switchover (PRIMARY_ROLE option is used). The last destination, LOG_ARCHIVE_DEST_3 will be used for archiving the standby redo logs that contains the redo generated and transferred from the primary database.
5. We used specific and different destinations for the archived logs for a better understanding in this example. However, using fast recovery area for this purpose with the LOCATION=USE_DB_RECOVERY_FILE_DEST option is a good practice. In Oracle 10g, the logical standby database was not supported to keep the foreign archived logfiles (archived logs that were generated from standby redo logs) in the flash recovery area (FRA). In 11g, this is supported. In order to use FRA for archiving, you should first enable FRA by setting the following parameters:SQL> ALTER SYSTEM SET DB_RECOVERY_FILE_DEST_SIZE=10G;SQL> ALTER SYSTEM SET DB_RECOVERY_FILE_DEST='/U01/APP/ORACLE/FRA';
6. Then set LOG_ARCHIVE_DEST_1 as follows:SQL> ALTER SYSTEM SET LOG_ARCHIVE_DEST_1='LOCATION=USE_DB_RECOVERY_FILE_DEST';
7. LOG_ARCHIVE_DEST_1 will be enough to archive both online and standby logfiles and we will not need LOG_ARCHIVE_DEST_3 in this case. The directory structure will be automatically created as follows:/u01/app/oracle2/fra/INDIA_UN/foreign_archivelog à for the files archived from standby logs
/u01/app/oracle2/fra/INDIA_UN/archivelog à for the files archived from online logs
8. Now restart the standby database and open it with the resetlogs option as shown in the following query:SQL> SHUTDOWN IMMEDIATE;SQL> STARTUP MOUNT;SQL> ALTER DATABASE OPEN RESETLOGS;
Database altered.
The database is now read/write opened for user connections. We only need to start SQL Apply to finish the logical standby configuration.

Chapter 3
[ 93 ]
9. Start SQL Apply on the logical standby database by executing the following statement:SQL> ALTER DATABASE START LOGICAL STANDBY APPLY IMMEDIATE;
Database altered.
Let's check what happened behind when we executed this statement, by reading the alert logfile for the standby database as follows:
alter database start logical standby apply immediate
LOGSTDBY: Creating new session for dbid 1319333016 starting at scn 0x0000.00000000
LOGSTDBY: Created session of id 1
...
LSP0 started with pid=33, OS id=15629
Completed: alter database start logical standby apply immediate
LOGMINER: Parameters summary for session# = 1
LOGMINER: Number of processes = 3, Transaction Chunk Size = 201
LOGMINER: Memory Size = 30M, Checkpoint interval = 150M
LOGMINER: SpillScn 0, ResetLogScn 0
When the statement executed, a new session was created for the SQL Apply, and then the LSP0 process was started, which is the Logical Standby Coordinator Process responsible for managing the LogMiner and Apply processes. Along with LSP0, miner processes were also started.
LOGMINER: Begin mining logfile during dictionary load for session 1 thread 1 sequence 105, /u01/app/oracle/archive_std/1_105_791552282.arc
Thread 1 advanced to log sequence 3 (LGWR switch)
Current log# 3 seq# 3 mem# 0: /u01/app/oracle2/datafile/ORCL/redo03.log
Archived Log entry 2 added for thread 1 sequence 2 ID 0x2e14f3f9 dest 1
LOGMINER: End mining logfiles during dictionary load for session 1
At this point, we can see that SQL Apply mines the redo in order to find the dictionary and build it on the standby. If it's not able to find the necessary archived log sequences, it requests them from the primary database.
RFS LogMiner: Registered logfile [/u01/app/oracle/archive_std/1_106_791552282.arc] to LogMiner session id [1]
...

Configuring Oracle Data Guard Logical Standby Database
[ 94 ]
LOGMINER: Begin mining logfile for session 1 thread 1 sequence 106, /u01/app/oracle/archive_std/1_106_791552282.arc
LOGMINER: End mining logfile for session 1 thread 1 sequence 106, /u01/app/oracle/archive_std/1_106_791552282.arc
Now the configuration is over and logical standby starts the apply processes and applies all the logs to be synchronized with the primary database.
What just happened?We have finished all the required steps to create a logical standby database. Now it's time to verify if the logical standby services are working properly.
Verifying the logical standby databaseThere are two services that we need to check for the verification of the logical standby configuration, which are the redo transport service and the SQL Apply service. There are several ways to check the status of these services. You can use alert log and trace files (whenever necessary) or you can query the views of the logical standby database that contains information about the status of the Data Guard services. Another way for controlling is modifying the primary database tables and querying the same tables on the logical standby. We'll now query the most useful views to gather information about the configuration and service status.
Time for action – checking the redo transport service statusThe following steps can be performed to check the redo transport service status:
1. The first query to be executed to be sure that the redo transport service is working properly will be the V$DATAGUARD_STATS view.SQL> SELECT NAME, VALUE, TIME_COMPUTED FROM V$DATAGUARD_STATS WHERE NAME='TRANSPORT LAG';
NAME VALUE TIME_COMPUTED---------------------- -------------------- ----------------------transport lag +00 00:00:00 08/27/2012 18:06:30
The TIME_COMPUTED value has to be up-to-date. We can see that there is no redo transport lag in our logical standby configuration. We'll see a time value if there is a problem with the redo transport. Also, if there is an excessive redo generation on the primary database, this value may increase because the redo transport may not catch up with the redo generation. The lag must be zero again when the standby synchronized at the end.

Chapter 3
[ 95 ]
2. By executing the following SQL query on the logical standby, we can check logs with which sequences are being transferred from primary and also which sequences are being archived from the local database online redo logs.SQL> SELECT PROCESS, STATUS, THREAD#, SEQUENCE#, BLOCK#, BLOCKS FROM V$MANAGED_STANDBY;
PROCESS STATUS THREAD# SEQUENCE# BLOCK# BLOCKS--------- ------------ ---------- ---------- ---------- ----------ARCH CLOSING 1 90 90112 1026ARCH CONNECTED 0 0 0 0ARCH CLOSING 1 91 90112 1026ARCH CLOSING 1 92 90112 1018RFS IDLE 0 0 0 0RFS RECIEVING 1 114 6828 1RFS IDLE 0 0 0 0RFS IDLE 0 0 0 0
The primary database is currently sending redo to the logical standby. We can see that the RFS process, which is responsible for redo transportation on standby databases, is currently receiving the redo with sequence number 114. It's also obvious that the ARCH processes are archiving the online redo logs of the logical standby database and the last archived log has the sequence number 92.
Don't forget that the sequences being received by RFS and the sequences being archived from the online redo logs by ARCH have no relationships. For example, the log sequence 90 archived from the online redo log of the logical standby database does not contain the same redo data with the sequence 90, which is received from the primary database.
3. On the other hand, we can use the following query to check which sequences were received from the primary database and if they were applied or not:SQL> SELECT FILE_NAME, SEQUENCE# as SEQ#, DICT_BEGIN AS BEG, DICT_END AS END,APPLIED FROM DBA_LOGSTDBY_LOG ORDER BY SEQUENCE#;
FILE_NAME SEQ# BEG END APPLIED------------------------------------------- --- --- --- --------/u01/app/oracle2/archive_std/1_105_791552282.arc 105 YES YES YES/u01/app/oracle2/archive_std/1_106_791552282.arc 106 NO NO YES/u01/app/oracle2/archive_std/1_107_791552282.arc 107 NO NO YES

Configuring Oracle Data Guard Logical Standby Database
[ 96 ]
/u01/app/oracle2/archive_std/1_108_791552282.arc 108 NO NO YES/u01/app/oracle2/archive_std/1_109_791552282.arc 109 NO NO YES/u01/app/oracle2/archive_std/1_110_791552282.arc 110 NO NO YES...
The YES value of the DICT_BEGIN and DICT_END columns show by the archived log sequences that the LogMiner dictionary build was in place. The APPLIED column shows whether the archived log sequence was applied by SQL Apply or not.
What just happened?We've verified that redo transport service of Data Guard, the logical standby configuration, is running healthfully.
Now let's see how we check SQL Apply service to see if it's running properly. It's very important to verify that changes are being applied on the standby database.
Time for action – checking the SQL Apply service statusThe following steps can be performed to check the SQL Apply service status:
1. Use the following query on the logical standby database, to check the general SQL Apply status:SQL> SELECT * FROM V$LOGSTDBY_STATE;
PRIMARY_DBID SESSION_ID REALTIME_APPLY STATE--------------- ---------- --------------- --------------- 1319333016 1 Y APPLYING
At the STATE column, we can see INITIALIZING, WAITING FOR DICTIONARY LOGS, LOADING DICTIONARY, WAITING ON GAP, APPLYING, and IDLE values, which describe the status of the SQL Apply clearly with their names.
2. The DBA_LOGSTDBY_LOG view, that we have queried in the Checking the Redo Transport Service Status action, will be very helpful to find the last applied archived log sequence and to check if there are archived log sequences that were received but not applied. Another view V$LOGSTDBY_PROCESS is helpful to control the status of the processes responsible for SQL Apply.
SQL> SELECT TYPE, STATUS_CODE, STATUS FROM V$LOGSTDBY_PROCESS;
TYPE STATUS_CODE STATUS------------ ----------- ----------------------------------------COORDINATOR 16116 ORA-16116: no work available

Chapter 3
[ 97 ]
ANALYZER 16116 ORA-16116: no work availableAPPLIER 16123 ORA-16123: transaction 11 22 786 is waiting for commit approvalAPPLIER 16117 ORA-16117: processingAPPLIER 16117 ORA-16117: processingAPPLIER 16117 ORA-16117: processingAPPLIER 16123 ORA-16123: transaction 11 25 786 is waiting for commit approvalREADER 16127 ORA-16127: stalled waiting for additional transactions to be appliedBUILDER 16116 ORA-16116: no work availablePREPARER 16117 ORA-16117: processing
Output shows all the processes in the SQL Apply and their status. The READER, PREPARER, and BUILDER processes are responsible for the mining of the redo. On the other side, COORDINATOR, ANALYZER, and APPLIER processes work together to apply the changes to the database. We can see that the READER process is waiting for the transactions to be applied, so that memory will become available and it will read more redo. On the other side, some APPLIER processes apply redo and some wait for commit approval to continue applying redo as shown in the following diagram:
SQL APPLY PROCESS
Standby
Redo LogsReader Builder Coordinator
analyzer
Logical
Standby
Database
Redo Mining Apply
ApplierPreparer
What just happened?We have seen several queries to gather information about the logical standby configuration. We have verified that the newly created logical standby is synchronized with the primary and everything works fine.
Redo transport and SQL Apply, which are the two main services of logical standby, can be monitored at any time using the mentioned methods.

Configuring Oracle Data Guard Logical Standby Database
[ 98 ]
Have a go hero – check the services in a broken configurationNow stop the listener on the logical standby site and run some operation on the primary database. New archived logs will be created but primary would not send these logs to standby. This will cause a gap between primary and standby. In the case of a gap, query redo transport and SQL Apply services with the same queries. Start the listener and continue checking the status.
Customization and management in a logical standby databaseAfter the initial configuration of a logical standby database, we should make customizations to benefit from the standby at the highest level. Let's see what kind of customizations we are able to do and how we manage a logical standby database environment.
Selective replication in a logical standby databaseIn principle, we cannot directly specify what to replicate to a logical standby database, but we can specify tables for SQL Apply to skip. When this feature is used, the redo data about the tables specified in the skip rules is still transferred to the standby database, but at the mining stage SQL Apply will omit the relevant redo on the logical standby. We use DBMS_LOGSTDBY.SKIP for this purpose.
Time for action – working with skip rules on a logical standby database
We are now going to create some skip rules on the logical standby database in order to skip replication of DDL or DML operations on some tables. Then we'll see how to query the existing skip rules and finally the method for disabling the rules.
1. We need to create skip rules for tables and schemas, but first we need to stop SQL Apply using the following query:SQL> ALTER DATABASE STOP LOGICAL STANDBY APPLY;
2. Then, the following statement will create a skip rule to skip changes caused by DML statements on the EMP table of the SCOTT schema. Execute the following statement on the logical standby database:SQL> EXECUTE DBMS_LOGSTDBY.SKIP(STMT => 'DML', SCHEMA_NAME => 'SCOTT', OBJECT_NAME => 'EMP');
PL/SQL procedure successfully completed.

Chapter 3
[ 99 ]
3. If we also want skip DDL statements encountered for this table, the following statement will create another skip rule:SQL> EXECUTE DBMS_LOGSTDBY.SKIP(STMT => 'SCHEMA_DDL', SCHEMA_NAME => 'SCOTT', OBJECT_NAME => 'EMP');
4. The next rule will disable DML replication for a complete schema. Execute the following statement to skip all DML changes to the HR schema:SQL> EXECUTE DBMS_LOGSTDBY.SKIP(STMT => 'DML', SCHEMA_NAME => 'HR', OBJECT_NAME => '%');
The wildcard character in the previous code can also be used in different ways such as TMP_%, which refers to the tables with the prefix TMP_.
5. The following example is disabling some statements to run on the logical standby database. The CREATE/DROP DIRECTORY commands will not be executed by SQL Apply:SQL> EXECUTE DBMS_LOGSTDBY.SKIP(STMT => 'DIRECTORY');
6. Specify a procedure for DDL statements. Suppose we have different directory structures on primary and logical standby database servers. When we add a new datafile on primary under /u01/app/oracle/datafile/ORCL, we want the logical standby database to create the datafile under /datafile/ORCL. We can use the DBMS_LOGSTDBY.SKIP procedure with the PROC_NAME parameter for this goal. Let's create a rule for this purpose. First we'll create a procedure to replace datafile names. Run the following create procedure statement on the logical standby with sys user:SQL> create or replace procedure sys.change_ts_ddl ( 2 old_stmt in varchar2 3 , stmt_typ in varchar2 4 , schema in varchar2 5 , name in varchar2 6 , xidusn in number 7 , xidslt in number 8 , xidsqn in number 9 , action out number 10 , new_stmt out varchar2 11 ) as 12 begin 13 new_stmt := replace(old_stmt, '/u01/app/oracle2/datafile/ORCL','/datafile/ORCL'); 14 action := dbms_logstdby.skip_action_replace; 15

Configuring Oracle Data Guard Logical Standby Database
[ 100 ]
16 exception 17 when others then 18 action := dbms_logstdby.skip_action_error; 19 new_stmt := null; 20 21 end change_ts_ddl; 22 /
7. Now create a rule to invoke this procedure before running the replicated tablespace DDL commands on the logical standby database using the following query:SQL> EXECUTE DBMS_LOGSTDBY.SKIP(STMT => 'TABLESPACE', PROC_NAME => 'SYS.CHANGE_TS_DDL');
PL/SQL procedure successfully completed.
8. Create and alter the tablespace commands executed on the primary database. They will now be modified on the logical standby database before being executed. The path of the datafiles in the statements will change from /u01/app/oracle2/datafile/ORCL value to /datafile/ORCL. Now let's add a datafile on the primary database as follows:SQL> ALTER TABLESPACE SYSTEM ADD DATAFILE '/U01/APP/ORACLE/DATAFILE/ORCL/SYSTEM02.DBF' SIZE 1G;
Tablespace altered.
9. Start SQL Apply on the logical standby as follows:SQL> ALTER DATABASE START LOGICAL STANDBY APPLY IMMEDIATE;
Database altered.
10. On the alert logfile of the logical standby database, we'll see the following line, which states that the procedure worked as planned:Completed: alter tablespace system add datafile '/datafile/ORCL/system02.dbf' size 1G
11. If something goes wrong and the database cannot execute the procedure, SQL Apply will stop and you'll see the related error outputs on the alert log. For example, if there are missing arguments in the procedure, the following errors will be written into the alert logfile:krvxerpt: Errors detected in process 42, role Apply Slave.
dglspc: unhandled failure calling user procedure 604
...
PLS-00306: wrong number or types of arguments in call to 'CHANGE_TS_DDL'

Chapter 3
[ 101 ]
ORA-06550: line 1, column 443:
PL/SQL: Statement ignored
ORA-06550: line , column :
LOGSTDBY Analyzer process AS00 server id=0 pid=41 OS id=13178 stopped
LOGSTDBY Apply process AS03 server id=3 pid=44 OS id=13184 stopped
LOGSTDBY Apply process AS04 server id=4 pid=45 OS id=13186 stopped
LOGSTDBY Apply process AS02 server id=2 pid=43 OS id=13182 stopped
LOGSTDBY Apply process AS05 server id=5 pid=46 OS id=13188 stopped
LOGMINER: session#=1, reader MS00 pid=37 OS id=13172 sid=145 stopped
LOGMINER: session#=1, preparer MS02 pid=40 OS id=13176 sid=178 stopped
LOGMINER: session#=1, builder MS01 pid=38 OS id=13174 sid=156 stopped
12. Now, we query the rules. Let's check what rules we have created, which data will not be replicated, and what procedures were defined for what kind of SQL statements on the logical standby database. We'll use the DBA_LOGSTDBY_SKIP view to gather this information. Run the following query on the logical standby database:SQL> SELECT OWNER, NAME,STATEMENT_OPT, PROC FROM DBA_LOGSTDBY_SKIP WHERE STATEMENT_OPT <> 'INTERNAL SCHEMA';
OWNER NAME STATEMENT_OPT PROC-------- ------------------ --------------- ------------------ DIRECTORYSCOTT EMP DMLSCOTT EMP SCHEMA_DDLHR % DML TABLESPACE SYS.CHANGE_TS_DDL
We can see all the rules we created in this output. The first rule disables running the directory DDL commands on the logical standby database. The DML and DDL statements on the EMP table of the SCOTT schema will be skipped by SQL Apply. Also all the tables of the HR schema are out of replication scope in terms of DML operations. At the last line of the output, we can see the rule we created, which defines a procedure for the DDL operations on the logical standby database. The SYS.CHANGE_TS_DDL procedure will be executed prior to the replicated tablespace DDL commands on the logical standby databse. This procedure will change the directory of the datafiles.

Configuring Oracle Data Guard Logical Standby Database
[ 102 ]
13. Disable a skip rule. We may want to re-enable replication for a table or schema in the logical standby database. In this case we will use DBMS_LOGSTDBY.UNSKIP procedure to remove the skip rule for that table or schema. However, prior to this we need the current state of the table and its data on the logical standby database to start the replication again. For this purpose we will use the DBMS_LOGSTDBY.INSTANTIATE_TABLE procedure. This procedure will drop and recreate the table if it still exists on the logical standby database. The current data will be imported but associated indexes and constraints will not be replicated. First, we stop SQL Apply as follows:SQL> ALTER DATABASE STOP LOGICAL STANDBY APPLY;
14. We need a database link to connect to the primary database to read and lock the table in the primary database. The link must connect to the primary database with a user who has privileges to read and lock the table, as well as the SELECT_CATALOG_ROLE procedure. Let's create this database link on the logical standby database as follows:SQL> CREATE PUBLIC DATABASE LINK INSTANTIATE_TABLE_LINK CONNECT TO SYSTEM IDENTIFIED BY ORACLE USING 'TURKEY';
Database link created.
15. Then execute the INSTANTIATE_TABLE procedure as follows:SQL> EXECUTE DBMS_LOGSTDBY.INSTANTIATE_TABLE (SCHEMA_NAME => 'SCOTT', TABLE_NAME => 'EMP', DBLINK => 'INSTANTIATE_TABLE_LINK');
PL/SQL procedure successfully completed.
This procedure uses Data Pump on the background. It locks the table on the primary for a moment and records that SCN. Then the drop table, create table and export/import operations are performed. After the procedure is completed, logical standby uses the SCN value for consistent replication of the table. You'll see the following lines in the alert log of the logical standby database, which indicates the use of Data Pump import:
DM00 started with pid=36, OS id=12415, job SYS.SYS_IMPORT_TABLE_01
DW00 started with pid=37, OS id=12426, wid=1, job SYS.SYS_IMPORT_TABLE_01
16. Now we must delete the DML and DDL skip rules of SCOTT.EMP table from the logical standby database using DBMS_LOGSTDBY.UNSKIP as follows:SQL> EXECUTE DBMS_LOGSTDBY.UNSKIP(STMT => 'DML', SCHEMA_NAME => 'SCOTT', OBJECT_NAME => 'EMP');
PL/SQL procedure successfully completed.

Chapter 3
[ 103 ]
SQL> EXECUTE DBMS_LOGSTDBY.UNSKIP(STMT => 'SCHEMA_DDL', SCHEMA_NAME => 'SCOTT', OBJECT_NAME => 'EMP');
PL/SQL procedure successfully completed.
17. We're ready to start the SQL Apply again as follows:SQL> ALTER DATABASE START LOGICAL STANDBY APPLY IMMEDIATE;
What just happened?Now you know how to disable replication for a table or schema in a logical standby database configuration. You have learned how to use the DBMS_LOGSTDBY.SKIP procedure for this purpose. We also mentioned how to specify a procedure to run before DDL statements with an example of automatically changing the datafile directory structures for the tablespace DDL commands on the logical standby database. Then we saw how to query and disable the skip rules. The DBMS_LOGSTDBY.INSTANTIATE_TABLE procedure is used to re-build the table on the standby and the DBMS_LOGSTDBY.UNSKIP procedure removes the skip rule for the specified table or schema.
Database Guard settings for the logical standby databaseIn order to control user modification to tables on the logical standby database we will use the Database Guard setting. Database Guard offers the following three options:
� ALL: This setting will prevent all database users except SYS from modifying any table in the logical standby database. This is the default mode of a logical standby database.
� STANDBY: In standby mode, users may modify the database tables, which are out of the replication scope. The tables maintained by SQL Apply are still not modifiable by users except SYS.
� NONE: Users are free to modify any tables that they have necessary privileges for. This is the mode of a primary database.
Note that we can set the Database Guard to ALL in a primary database to keep it read-only for a while without a shutdown.

Configuring Oracle Data Guard Logical Standby Database
[ 104 ]
Time for action – changing the Database Guard settingAs we mentioned before, the default Database Guard mode for a logical standby database is set to ALL. Let's try to insert data into the HR.REGIONS table, which is out of the replication scope because of the skip rule we created.
1. Connect the logical standby database with SYS user. Check the Database Guard mode and skip rules with the following query:SQL> SELECT GUARD_STATUS FROM V$DATABASE;
GUARD_S-------ALL
SQL> SELECT OWNER, NAME,STATEMENT_OPT, PROC FROM DBA_LOGSTDBY_SKIP WHERE STATEMENT_OPT <> 'INTERNAL SCHEMA';
OWNER NAME STATEMENT_OPT PROC-------- ------------ --------------- ------------------ DIRECTORYHR % DML TABLESPACE SYS.CHANGE_TS_DDL
Database Guard mode is ALL and all HR tables are skipped by SQL Apply.
2. Now connect with the HR user and insert a row to the REGIONS table:SQL> CONN HR/HRConnected.SQL> INSERT INTO HR.REGIONS VALUES (10,'TEST');insert into hr.regions values (10,'test') *ERROR at line 1:ORA-16224: Database Guard is enabled
It's not possible to insert into a table, which is not part of the replication because the database guard mode is ALL.
3. Let's change the mode to STANDBY and try to insert in the table again using the following query:SQL> ALTER DATABASE GUARD STANDBY; Database altered.

Chapter 3
[ 105 ]
SQL> CONN HR/HRConnected.
SQL> INSERT INTO HR.REGIONS VALUES (10,'TEST');
1 row created.
We're now able to modify the tables with skip rules.
4. Let's try to modify a table that is not skipped by SQL Apply:
SQL> CONN SCOTT/TIGERConnected.SQL> INSERT INTO DEPT VALUES (50,'TEST','TEST');insert into dept values (50,'test','test') *ERROR at line 1:ORA-16224: Database Guard is enabled
What just happened?We're now ready to change the logical standby database settings in order to let users modify non-replicated standby tables, all standby tables, or make the standby completely protected to user modification.
If only specific users need to modify standby tables, session-based disabling of database guard is more sensible.
Disabling database guard for a sessionIf specific users on the logical standby need to modify tables and you do not want other users to have this opportunity, users can disable the Database Guard in their current sessions only and you can keep the logical standby on ALL or STANDBY mode. Execute the following statement to disable Database Guard for the current session:
SQL> ALTER SESSION DISABLE GUARD;
Session altered.
The user must be granted the alter database privilege in order to disable Database Guard in its session.

Configuring Oracle Data Guard Logical Standby Database
[ 106 ]
Have a go hero – testing the NONE Database Guard modeNow set your Database Guard mode to NONE and try to insert into the table SCOTT.DEPT with the user Scott again. You should be able to modify all tables, which are also being modified with SQL Apply. Also, think about using the Database Guard mode as NONE. How could you control the accuracy of the data for the replicated tables when the users are free to modify them?
Creating objects on the logical standby databaseWith a proper configuration, users are free to create database objects on the logical standby databases. However, we need to know some characteristics of the standby objects that are not handled by SQL Apply.
Creating and re-creating tablesIn order to create a standalone table on the logical standby database, the Database Guard mode must be STANDBY or NONE. One other way is to disable Database Guard for the current session and creating the table, which works even when the Database Guard is ALL.
On the other hand, if we somehow lose a table on the logical standby, which is inside the scope of replication and we want to create it again with the up-to-date data, it's possible to use the built-in DBMS_LOGSTDBY.INSTANTIATE_TABLE procedure.
Creating scheduler jobsThe logical standby database supports the replication of the jobs created with the DBMS_JOB package. These jobs will be created but will not run on the standby database. However, in case of failover or switchover, jobs will automatically start running on the new primary database.
The scheduler jobs created with DBMS_SCHEDULER are not replicated to the logical standby. However, in 11g there is a new attribute called database_role for this package, which makes scheduler jobs possible to be run on logical standby. By default, this attribute equals to the database_role value of the v$database view. You can create a job on the logical standby database and if you don't specify the value for the database_role attribute, the job will be run as long as the database role is logical standby.
Again if you don't specify the value for the database_role attribute, the scheduler jobs created on the primary database will be run on the database as long as the role is primary and will not be replicated to logical standby. If you want to keep the job running after a switchover or failover on the new primary, you must create the same scheduler job on the logical standby with the database_role attribute as Primary.

Chapter 3
[ 107 ]
If you plan to create a scheduler job on the logical standby database with database_role Standby, you should also create one in the primary database with database_role Standby. So that, when a switchover is performed, the job will still be running on the new standby.
Creating materialized viewsWhen we create a logical standby database, all materialized views and materialized view logs on the primary database also exist on the logical standby. However, SQL Apply skips DDL statements related to materialized views and logs. So the newly created, altered or dropped materialized views and logs on the primary database will not be handled on the logical standby.
If we need to have any materialized view (existing on the primary or not) on the logical standby we are able to create it. The MVs created on the standby can be refreshed using a fast, complete, or forced refresh. Refreshes may be on-commit, which will be triggered by SQL Apply or on-demand with scheduling or manual execution.
Time for action – creating objects on the logical standby database
Now let's try to create some objects on the logical standby database. First we will create a test table with the HR user. The Database Guard mode is ALL, which is the default.
1. Connect the logical standby database with SYS user and execute the following query:SQL> SELECT GUARD_STATUS FROM V$DATABASE;
GUARD_S-------ALL
SQL> CONN SCOTT/TIGERConnected.SQL> CREATE TABLE TEST (A NUMBER);create table test (a number)*ERROR at line 1:ORA-01031: insufficient privileges

Configuring Oracle Data Guard Logical Standby Database
[ 108 ]
The error message specifies a privilege problem but this is not due to the lack of create table privilege for the HR user. We receive this error because the Database Guard mode does not allow for creation of the table. Let's change it and try again.
2. Connect with the SYS user using the following query:SQL> ALTER DATABASE GUARD STANDBY;Database altered.
SQL> CONN SCOTT/TIGERConnected.
SQL> CREATE TABLE TEST (A NUMBER);Table created.
SQL> INSERT INTO TEST VALUES (1);1 row created.
SQL> COMMIT;Commit complete.
We're able to create a table when the Database Guard mode is STANDBY or NONE. What about an index? There is no doubt that we can create an index for the test table, which is a standalone standby object not maintained by SQL Apply.
3. Let's try to create an index on a table that is being replicated.SQL> CONN SCOTT/TIGERConnected.SQL> CREATE INDEX TESTIDX ON DEPT (LOC);create index testidx on dept (loc) *ERROR at line 1:ORA-16224: Database Guard is enabled
The Database Guard mode is STANDBY and we are not able to create an index on a standby table handled by SQL Apply.
4. We should disable the Database Guard in session and try again. In order to disable Database Guard, the user needs the Alter Database privilege as shown in the following query:SQL> GRANT ALTER DATABASE TO SCOTT;Grant succeeded.
SQL> CONN SCOTT/TIGERConnected.

Chapter 3
[ 109 ]
SQL> ALTER SESSION DISABLE GUARD;Session altered.
SQL> CREATE INDEX TESTIDX ON DEPT (LOC);Index created.
If an index is being created on a table that is handled by SQL Apply, we need to disable Database Guard for that session.
5. Let's try if the same applies to the materialized views. Suppose a materialized view for a query on the EMP and DEPT tables of the user SCOTT was created on the primary database. As MV DDLs are not replicated with SQL Apply and we need the MV on the standby, we need to create it in the physical standby database. Let's create the MV using the following query:SQL> CONN SCOTT/TIGER Connected.SQL> CREATE MATERIALIZED VIEW SCOTT.EMPDEPT REFRESH ON DEMAND ENABLE QUERY REWRITE AS SELECT E.ENAME, D.DNAME FROM SCOTT.EMP E, SCOTT.DEPT D WHERE E.DEPTNO=D.DEPTNO;Materialized view created.
We are able to create a materialized view without disabling Database Guard for that session.
6. Now we will create a scheduler job to refresh the MV periodically on the logical standby databse:SQL> GRANT CREATE JOB TO SCOTT;GRANT SUCCEEDED.
SQL> CONN SCOTT/TIGERCONNECTED.
SQL> BEGIN 2 DBMS_SCHEDULER.CREATE_JOB ( 3 JOB_NAME => 'REFRESH_EMPDEPT_MV' , 4 JOB_TYPE => 'PLSQL_BLOCK', 5 JOB_ACTION => 'BEGIN DBMS_MVIEW.REFRESH (LIST =>''SCOTT.EMPDEPT'', METHOD => ''C''); END; ', 6 START_DATE => SYSDATE, 7 REPEAT_INTERVAL => 'FREQ=MONTHLY;BYMONTHDAY=1;BYHOUR=0', 8 END_DATE => NULL, 9 ENABLED => TRUE, 10 END; 11 /
PL/SQL procedure successfully completed.

Configuring Oracle Data Guard Logical Standby Database
[ 110 ]
We didn't specify a value for the DATABASE_ROLE attribute, so it will have the default, which is the current role of the database, STANDBY. This job will run as long as this database role is logical standby.
We assume that MV exists on primary and a scheduler job is also running for the refresh of the MV on the primary database (with the DATABASE_ROLE attribute of PRIMARY). We also created the MV and a job for its refresh on the logical standby now. But what happens if we perform a switchover? Both scheduler jobs on the primary and standby will not run because of their DATABASE_ROLE attribute. So let's create one more scheduler job on standby and primary to be ready for switchover and failover.
7. On the standby database, enter the following set of statements:SQL> CONN SCOTT/TIGERCONNECTED.
SQL> BEGIN 2 DBMS_SCHEDULER.CREATE_JOB ( 3 JOB_NAME => 'REFRESH_EMPDEPT_MV_PRIMARY' , 4 JOB_TYPE => 'PLSQL_BLOCK', 5 JOB_ACTION => 'BEGIN DBMS_MVIEW.REFRESH (LIST =>''SCOTT.EMPDEPT'', METHOD => ''C''); END; ', 6 START_DATE => SYSDATE, 7 REPEAT_INTERVAL => 'FREQ=MONTHLY;BYMONTHDAY=1;BYHOUR=0', 8 END_DATE => NULL, 9 ENABLED => TRUE); 10 END; 11 /
PL/SQL procedure successfully completed.
SQL> BEGIN DBMS_SCHEDULER.SET_ATTRIBUTE(NAME => 'REFRESH_EMPDEPT_MV_PRIMARY', ATTRIBUTE => 'DATABASE_ROLE', VALUE => 'PRIMARY');END;/
PL/SQL procedure successfully completed.
8. Now do the same for the primary database. Create a job with the name REFRESH_EMPDEPT_MV_STANDBY and set the DATABASE_ROLE attribute to STANDBY.

Chapter 3
[ 111 ]
What just happened?The most important feature of the logical standby database is its ability to access the standby and run reports with the flexibility of creating index, temporary tables, and materialized views on it. By creating these objects, you can achieve more performance on the reports. Also some reporting tools that require creating temporary objects can run on logical standby databases. In this section we have studied the methods, limitations, and considerations of creating database objects on the logical standby and tried to implement some of them. This information will help you customize the logical standby for your own needs.
Have a go hero – skip, disable guard, insert, instantiate, and disable skipIn order to revise what we saw in this chapter, execute the following exercise:
You will do some application tests and you'll do so on the logical standby database. The table SCOTT.SALGRADE will be modified in this test and when the test finishes, you want to revert all the changes to the table and configure the replication once again.
1. Disable replication for the table SCOTT.SALGRADE by creating a skip rule with DBMS_LOGSTDBY.SKIP.
2. To simulate the test, insert rows into this table on the logical standby after disabling Database Guard.
3. Reverse changes made to the table by restoring it from primary. Use the DBMS_LOGSTDBY.INSTANTIATE_TABLE procedure.
4. Remove the skip rule with the DBMS_LOGSTDBY.UNSKIP procedure.
5. Insert into the table SCOTT.SALGRADE on primary and check if the insert was replicated to standby.
Automatic deletion of archived logsThe two types of archived redo logfiles on the logical standby database need to be deleted as they become unnecessary depending on our data retention specifications. The archived logs containing redo that were sent from the primary database are called foreign archived logs and the archived log produced by the logical standby itself, containing the changes on the standby database are called local archived logs. Oracle handles this deletion process automatically while offering some customization.
Deletion of the foreign archived logsIt's possible to keep foreign archived logs on the fast recovery area defined by DB_RECOVERY_FILE_DEST or on another directory or ASM disk group outside the fast recovery area. The Archivelog deletion policy differs depending on whether the foreign archived logs are in FRA or not.

Configuring Oracle Data Guard Logical Standby Database
[ 112 ]
Files inside the fast recovery areaIf we specified the log archive destination for the standby logfiles as LOCATION=USE_DB_RECOVERY_FILE_DEST, the foreign archive logs will be kept in FRA. A foreign archived log in FRA is automatically deleted by the logical standby database if all the redo it contains were applied and then the retention time period specified by DB_FLASHBACK_RETENTION_TARGET passes. The default value for this parameter is 1440 minutes, which is one day. This value is also valid if we did not specify any value for this parameter.
Files outside the fast recovery areaBy default, even if we keep the foreign archived log outside the FRA, logical standby handles the automatic deletion of these files. The retention time value for the applied foreign archived logs can be defined with the following syntax:
SQL> EXECUTE DBMS_LOGSTDBY.APPLY_SET ('LOG_AUTO_DEL_RETENTION_TARGET','4320');
The default value for LOG_AUTO_DEL_RETENTION_TARGET is the DB_FLASHBACK_RETENTION_TARGET initialization parameter value in the logical standby database.
If we don't want the logical standby database to automatically delete the foreign archived logs, we can use the following procedure:
SQL> EXECUTE DBMS_LOGSTDBY.APPLY_SET('LOG_AUTO_DELETE', 'FALSE');
When we disable automatic deletion of foreign archived logs, the DBA_LOGMNR_PURGED_LOG view will help us identify the logs, which are ready to be deleted depending on the retention policy. In order to refresh this view use the following statement:
SQL> EXECUTE DBMS_LOGSTDBY.PURGE_SESSION;
PL/SQL procedure successfully completed.
SQL> SELECT * FROM DBA_LOGMNR_PURGED_LOG;
FILE_NAME--------------------------------------------------/u01/app/oracle2/archive_std/1_455_791552282.arc/u01/app/oracle2/archive_std/1_456_791552282.arc/u01/app/oracle2/archive_std/1_457_791552282.arc/u01/app/oracle2/archive_std/1_458_791552282.arc/u01/app/oracle2/archive_std/1_459_791552282.arc
5 rows selected.
We can now manually delete these files from the filesystem.

Chapter 3
[ 113 ]
Deletion of the local archived logsLocal archived logs that were generated from online redo logs of the standby database are created in the same way within the primary databases. Unlike foreign archived logs, logical standby databases do not delete these archived logs automatically unless they're kept in the fast recovery area.
You can use RMAN to handle the deletion of the local archived logs. If a backup strategy is used to backup the logical standby database, we should consider the deletion of the local archived logs in this strategy as we do on the primary databases.
SummaryIn this chapter we have created a logical standby database using an existing physical standby database and verified redo transport and SQL Apply services. Then we practiced several customizations on the logical standby database.
Installing a robust Data Guard logical standby configuration and customizing the environment to achieve the best performance and effectiveness are the main role of the Database Administrator. The logical standby database offers many more customization possibilities when compared with the physical standby database. This fact makes its success more dependent on the configuration and customization.
The following chapter will show you how the Data Guard broker is configured and used to monitor and manage the Data Guard environment.


4Oracle Data Guard Broker
This chapter covers the implementation and management of the Data Guard administration framework Data Guard broker.
The following topics will be discussed in this chapter:
� Implementing the Data Guard broker
� Monitoring and managing using Data Guard broker
� Troubleshooting the Data Guard broker
� Configuring a fast-start failover
Introduction to Data Guard brokerThe Data Guard broker is a utility provided with the Oracle database server of the Enterprise edition. It includes the functionality to manage standby databases. It is also an integral part of Data Guard and of Oracle's Database Enterprise Manager. Broker interfaces are instinctive and easy, allowing for centralized control of the Data Guard configuration that makes the Data Guard an enhanced high availability and disaster protection solution. The Data Guard broker makes it easy to maintain and administer several standby databases. It maintains its own configuration files and runs a background process Data Guard Monitor Process (DMON) on both primary and standby database servers.
The Oracle Data Guard broker was introduced in the 9i Release 2, but the Oracle Database 11g version introduced several enhancements to the Data Guard broker feature so that a DBA could easily manage a complex and multidatabase disaster recovery environment.

Oracle Data Guard Broker
[ 116 ]
The Data Guard broker consolidates the setup, upkeep, and monitoring of Data Guard configurations. The Data Guard broker when used with the Enterprise Manager becomes a powerful tool, offering configuration, monitoring, alerts, performance analysis, easy switchovers, and automatic failovers.
The Data Guard Monitor (DMON) process and configuration file resides on the server side. However the Oracle Data Guard broker can be managed by DGMGRL or OEM from the client side as well. The Data Guard broker can be configured on existing or new standby databases and on either physical or logical standby databases.
The Data Guard broker is an additional utility of the standby database that makes the maintenance and administration of several standby databases at once much easier. The Data Guard broker uses its own background process (DMON) on each primary and standby database and its own configuration file for interaction. The DMON process is started if you set the initialization parameter DG_BROKER_START to TRUE. This parameter is a dynamic parameter, and you can set it to TRUE or FALSE without any database bounce. To create and maintain the configuration files, you need to create a Data Guard configuration using either the Data Guard wizard from Cloud Control or you need to create it manually via the command-line DGMGRL.
The Data Guard broker framework facilitates the configuration and setup of Data Guard, monitors the redo log transport, and monitors the log apply services. It also helps in Data Guard operating tasks, such as switchovers, failovers, fast-start failovers, and reinstating the primary database. This can be better illustrated with the following diagram:
Primary SystemArchive Files
Real-Time Apply
Data Guard GUI(OEM) orCLI(DGMGRL)
DMON
PrimaryDatabase
Standby System
Archive Files
DMON
StandbyDatabaseSRLs
ORLs Remote ARCH

Chapter 4
[ 117 ]
Data Guard broker features and benefitsThe Data Guard broker can be configured on existing or new Data Guard configurations either with physical or with logical standby databases with a global configuration.
Centralized and simple managementThe Data Guard broker provides a graphical user interface and command-line interface for the simple management and automation of management and operational tasks across multiple databases in a Data Guard configuration. The broker monitors all of the systems within a single Data Guard configuration. You can perform all management operations locally or remotely through the broker's easy-to-use interfaces, such as the Data Guard management pages in Oracle Enterprise Manager Cloud Control, that is, the broker's graphical user interface and the Data Guard command-line interface called DGMGRL.
Cloud Control integrationIntegration with Enterprise Manager Cloud Control simplifies the management of standby databases by using graphical consoles. All operations are controlled through navigation when managed with Cloud Control. Role transitions (switchovers and failovers) can be performed, and redo transport and log apply services can be monitored using graphical consoles. In the case of any warning or error occurring in the Data Guard configuration, alerts can be received via e-mails. Enterprise Manager can perform Oracle Net Services configurations as they are required to support redo transport and log apply services.
To enable all the features required by Data Guard with Cloud Control, the following compatibility of Enterprise Manager with broker requirements should be met:
Database Version Enterprise Manager Cloud / Grid Control
10.2.0.X 10.2.0.1 and above
11.1.0.X 10.2.0.5
11.2.0.X 10.2.0.5 with patches
Oracle Data Guard and RACOracle Data Guard and RAC are the two products that combine in such a way that they enhance or emphasize each other's qualities. RAC refers to node or instance failures; it provides automatic instance recovery from failures, such as node failures, instance crashes, or service lost failures, that do not affect data. It also provides scalability along with high availability. On the other hand, Data Guard provides data protection through the use of transactional images in primary and standby databases. Data Guard enables recovery from site disasters or data corruptions.

Oracle Data Guard Broker
[ 118 ]
In RAC, all the instances of nodes share the same data, including control files and datafiles, but the Data Guard data/control/redo logfiles are exclusive to primary and standby databases.
Use of Data Guard broker with RAC databases is supported by Oracle 10g.
Role transition with Data Guard brokerPerforming role transitions with the broker helps avoid the need to perform tiresome tasks. To perform a switchover between a primary and standby database using SQL*Plus, you have to execute the commands step-by-step and check the synchronization and switchover status from both sites, the switchover status of both the sites, and the step-by-step commands from the primary and standby locations. The broker simplifies the performance of switchover and failover operations by gathering many tasks under a single command.
Data Guard fast-start failoverFast-start failover was introduced to reduce unplanned downtime. Automatic database failover may occur because a primary database is down, due to designated health-check conditions, or due to the request of an application. FSFO (fast-start failover) is a feature of the broker that records information about the failover target, informs how long to wait after a failure before triggering another failover, and also records other FSFO-specific properties. When a fast-start failover is enabled, the Data Guard broker automatically fails over to a synchronized standby site in the event of a disaster at the primary site; it requires no intervention by the DBA. In addition to this, applications are automatically notified of the role transition. The disadvantage is that even though both the primary and standby databases' state is good, if there is any connectivity issue between the primary server and the observer server, failover will be initiated.
Data Guard FSFO is being supported with the Maximum Availability mode from Version 10.2 and with the Maximum Performance mode from Version 11.1.
RecommendationTo sum up, the Data Guard broker can restart failed processes, manage CRS, automate switchovers/failovers, integrate with OEM so you can use GUI for management, and collect additional metrics for monitoring. On the other hand, one advantage of using SQL*Plus is that it requires you to have a full understanding of what's going on behind the scenes. We would recommend setting up a Data Guard configuration manually at least once, for the purpose of your own learning. You will have a better scope to learn. The broker has the advantage of providing shortcuts to the functions you might need to perform with your Data Guard configuration. If you use SQL*Plus to manage Data Guard, you'll likely develop scripts that are already duplicating some broker functionality.

Chapter 4
[ 119 ]
For example, the first time that you create a standby and the first time you run a switchover, it would be good to do it with SQL*Plus and tail the alert log so that you can understand the parameters and see how it works. After you have successfully done a few switchovers manually, move to the Data Guard broker, and you will appreciate how much easier it is, how many errors it fixes, as well as understanding exactly what it is doing.
Data Guard broker componentsWe can divide the Data Guard broker components into two—client-side and server-side interfaces—as shown in the following diagram:
Data Guard Broker
Server Side Client Side
Data Guard Monitor
ConfigurationFile
DMONProcess
DGMGRL GRID EM
Oracle Data Guard broker server-side componentsThe components of the Data Guard broker are the Data Guard Monitor process and the configuration file, as shown in the following diagram:
Primary System
PrimaryDatabase
DMON
Standby System_2Standby System_1
StandbyDatabase_1
StandbyDatabase_2
Configuration file
DMON
DMON
Configuration file Configuration file

Oracle Data Guard Broker
[ 120 ]
Data Guard Monitor process (DMON)The DMON is installed as part of the Oracle database software and manifests as a background component when enabled. The DMON process on the primary database is the owner of the configuration. DMON controls all the databases by using configuration files. It maintains profiles of all the database objects in the configuration in the form of a binary configuration file. The configuration is maintained by the DMON process in all the standby databases of either a physical or a logical configuration. This two-way communication channel is used to pass requests between databases, to monitor the health of all the databases in the broker configuration using Oracle Net Services. DMON runs for every database instance that is managed by the broker. Whenever a broker command is issued, the following steps will occur:
1. The request will be processed on the primary database.
2. The DMON process coordinates with all the standby databases of the Data Guard configuration.
3. It then updates the changes, properties, and configuration in its configuration file.
4. The DMON process contacts and updates the configuration file of each database in the setup.
The following diagram illustrates the DMON process:

Chapter 4
[ 121 ]
Configuration fileThe configuration file is a server-side component. Database profiles are stored in a configuration file that holds all the settings needed by Data Guard. This file holds the configuration information of all the databases that are part of the configuration, and the state of each database in the configuration. The broker configuration files in Oracle 11gR2 can now reside on disks having any sector size (physical block size) up to 4KB. The component coordinate database state transitions and updates database properties dynamically with the broker. The broker propagates the changes to all the databases and their server parameter files in the configuration. Oracle uses two configuration files to store the last-known good configuration settings during the modification of the configuration properties or state by the DMON process.
Oracle Data Guard broker client-side componentsThe Data Guard broker client-side components are the broker command-line interface (DGMGRL) and the Enterprise Manager Cloud Control client. Both utilities are used to manage Data Guard configurations consisting of primary and standby databases.
DGMGRL utilityUsing DGMGRL, you can change property values directly by using the command-line utility. It includes commands to create an observer process that monitors the whole configuration, including the primary and standby, to evaluate if a failover is necessary, and to initiate FSFO. It's also possible to add new standby databases to the configuration. Instead of managing primary and standby databases with various SQL*Plus statements, the broker provides a single, unified interface.
The Data Guard broker's parameter values must be changed by using broker interfaces. If the broker is active and you perform any parameter changes or role transitions by using SQL*Plus, it can create inconsistency in the configuration.
From the command utility DGMGRL, you can obtain a list of all of the commands supported with the help command as follows:
DGMGRL> help
Enterprise Manager Cloud Control clientAs we have discussed, in the Cloud Control integration, it's the graphical interface that we can use to manage Data Guard configurations. It's possible to perform all of the operations supported by DGMGRL by using the Enterprise Manager Cloud Control interface.

Oracle Data Guard Broker
[ 122 ]
Implementation of Oracle Data Guard brokerWe will cover the initial setup and connection methods of the Data Guard broker and basic monitoring using the broker in this section.
Time for action – initial setup of Data Guard brokerWe will now see the initial setup of the Data Guard broker in an existing Data Guard configuration.
1. Ensure that both the primary and standby databases are up and running as shown in the following query:SQL> select db_unique_name,open_mode,database_role from v$database;DB_UNIQUE_NA OPEN_MODE DATABASE_ROLE------------ -------------------- ----------------turkey_un READ WRITE PRIMARY
SQL> select db_unique_name,open_mode,database_role from v$database;DB_UNIQUE_NA OPEN_MODE DATABASE_ROLE------------ -------------------- ----------------india_un READ ONLY WITH APPLY PHYSICAL STANDBY
2. Ensure that both the primary and standby databases are using server parameter files, so that the broker can form a healthy relationship between the broker properties and parameter values as follows:SQL> show parameter spfileNAME TYPE VALUE----------- ----------- ------------------------------spfile string /u01/home/oracle/product/11.2.0/ db_1/dbs/spfileTURKEY.ora
3. This step is optional. Set the configuration file location parameters on both the primary and standby databases. The default location of the broker configuration file in Windows is $ORACLE_HOME/dbs in Unix and %ORACLE_HOME%\database. If you want to keep them in a non-default location, change the parameters as shown. If you don't set these parameters, the files will automatically be created under the default locations in the following steps. The following commands are used to change the parameters:ALTER SYSTEM SET dg_broker_config_file1 = '\u01\app\oracle\broker_turkey01.dat' scope=both sid='*';
ALTER SYSTEM SET dg_broker_config_file2 = '\u01\app\oracle\broker_turkey02.dat ' scope=both sid='*';

Chapter 4
[ 123 ]
Or in an ASM filesystem, use the following command:
ALTER SYSTEM SET dg_broker_config_file1 = '+DATA_AREA/turkey/broker_turkey01.dat' scope=both sid='*';
ALTER SYSTEM SET dg_broker_config_file2 = '+DATA_AREA/turkey/broker_turkey02.dat' scope=both sid='*';
In RAC databases, set the broker configuration file location to a shared location and use the same value on all the instances.
4. Start the DMON process on both the primary and standby databases by setting the DG_BROKER_START parameter as follows:SQL> alter system set dg_broker_start=TRUE scope=both;System altered.
5. For UNIX systems, you can now check the existence of the DMON process using the ps command as follows:$ps -ef|grep dmon
oracle 27335 1 0 02:39 ? 00:00:00 ora_dmon_TURKEY
6. In the alert logfile, you will see the following:Thu Aug 30 02:39:11 2012
DMON started with pid=35, OS id=27335
Thu Aug 30 02:39:11 2012
ALTER SYSTEM SET dg_broker_start=TRUE SCOPE=BOTH;
Starting Data Guard Broker (DMON)
7. If you monitor the DMON logfile, you'll see the error ORA-27037/ORA-16572 as shown in the following command line. This is expected behavior. These errors will be freed after creating the configuration using the broker utility DGMGRL:2012-08-30 02:39:14.332 DMON: cannot open configuration file "/u01/home/oracle/product/11.2.0/db_1/dbs/dr1turkey_un.dat", retrying
2012-08-30 02:39:15.341 DMON: cannot open configuration file "/u01/home/oracle/product/11.2.0/db_1/dbs/dr1turkey_un.dat"
2012-08-30 02:39:15.341 ORA-27037: unable to obtain file status
2012-08-30 02:39:15.341 inux-x86_64 Error: 2: No such file or directory
2012-08-30 02:39:15.342 Additional information: 3
2012-08-30 02:39:15.342 DMON: Error opening "/u01/home/oracle/product/11.2.0/db_1/dbs/dr1turkey_un.dat", error = ORA-16572

Oracle Data Guard Broker
[ 124 ]
8. The configuration files will be created under the specified location or in the default directory automatically. The Data Guard broker will maintain two copies of its configuration files as follows:SQL> show parameter DG_BROKER_CONFIG_FILENAME TYPE VALUE----------------------- ------- -----------------------------dg_broker_config_file1 string /u01/home/oracle/product/11.2.0/ db_1/dbs/dr1turkey_un.datdg_broker_config_file2 string /u01/home/oracle/product/11.2.0/ db_1/dbs/dr2turkey_un.dat
9. Connect DGMGRL on the primary system and create the configuration as follows:[oracle@oracle-primary ~]$ dgmgrl
DGMGRL for Linux: Version 11.2.0.1.0 - 64bit Production
Copyright (c) 2000, 2009, Oracle. All rights reserved.
Welcome to DGMGRL, type "help" for information.
DGMGRL> connect sys/free2go
Connected.
10. You will need to specify a configuration name and the unique name of the primary database. The configuration name can be anything, but the name of the primary database must be DB_UNIQUE_NAME as shown in the following query:SQL> show parameter db_unique_nameNAME TYPE VALUE----------------- ----------- ------------------------------db_unique_name string turkey_un
DGMGRL> CREATE CONFIGURATION 'PACKT' AS PRIMARY DATABASE IS 'turkey_un' CONNECT IDENTIFIER IS TURKEY;Configuration "PACKT" created with primary database "turkey_un"
In the previous command, TURKEY_UN refers to DB_UNIQUE_NAME and TURKEY refers to Oracle Net Services name. The primary database will be added to the configuration and the metadata will be updated in the broker configuration file.
11. Add a standby database to the Data Guard broker configuration as follows:SQL> show parameter db_unique_nameNAME TYPE VALUE----------------- ----------- ------------------------------db_unique_name string india_un
DGMGRL> ADD DATABASE 'INDIA_UN' AS CONNECT IDENTIFIER IS 'INDIA';Database "INDIA_UN" added

Chapter 4
[ 125 ]
12. Enable the Data Guard broker configuration. After adding the standby database to the broker, the configuration will be disabled by default, as follows:DGMGRL> show configuration;
Configuration - PACKT
Protection Mode: MaxPerformance
Databases:
turkey_un - Primary database
INDIA_UN - Physical standby database
Fast-Start Failover: DISABLED
Configuration Status:
DISABLED
DGMGRL> enable configuration;
Enabled.
DGMGRL> show configuration;
Configuration - PACKT
Protection Mode: MaxPerformance
Databases:
turkey_un - Primary database
INDIA_UN - Physical standby database
Fast-Start Failover: DISABLED
Configuration Status:
SUCCESS
What just happened?We have seen the configuration of the Data Guard broker and how to add existing databases to the broker configuration.
Time for action – connecting to Data Guard brokerYou can connect the DGMGRL interface locally by specifying only the username with the password, or just using / if OS authentication is possible. If you are connecting from a remote machine, you must use Oracle Net Services name to connect the Data Guard broker. Use the following steps to see some examples of broker connections:
1. To connect from either a primary or a standby database server with OS authentication enabled, you can connect using / as follows:[oracle@oracle-primary ~]$ dgmgrl /
DGMGRL for Linux: Version 11.2.0.1.0 - 64bit Production

Oracle Data Guard Broker
[ 126 ]
Copyright (c) 2000, 2009, Oracle. All rights reserved.
Welcome to DGMGRL, type "help" for information.
Connected.
DGMGRL>
2. In order to connect to the broker CLI database, authentication is required. Add the following line to the sqlnet.ora file to gain authentication:[oracle@oracle-primary admin]$ cat sqlnet.ora|grep SQLNET
SQLNET.AUTHENTICATION_SERVICES = (NONE)
3. Connecting with OS authentication will not be possible as shown in the following command line:[oracle@oracle-primary]$ dgmgrl /
DGMGRL for Linux: Version 11.2.0.1.0 - 64bit Production
Copyright (c) 2000, 2009, Oracle. All rights reserved.
Welcome to DGMGRL, type "help" for information.
ORA-01031: insufficient privileges
4. Connect using database user SYS login credentials as follows:[oracle@oracle-primary]$ dgmgrl sys/free2go
DGMGRL for Linux: Version 11.2.0.1.0 - 64bit Production
Copyright (c) 2000, 2009, Oracle. All rights reserved.
Welcome to DGMGRL, type "help" for information.
Connected.
5. Try connecting it from the primary to the standby database, and vice versa, using the Oracle Net Services name as follows:[oracle@oracle-stby ~]$ dgmgrl sys/free2go@turkey
DGMGRL for Linux: Version 11.2.0.1.0 - 64bit Production
Copyright (c) 2000, 2009, Oracle. All rights reserved.
Welcome to DGMGRL, type "help" for information.
Connected.
6. You can also include DGMGRL commands in the connection string. The following command will connect to the broker and show us the output of the show database 'turkey_un' statement:[oracle@oracle-primary ~]$ dgmgrl sys/free2go "show database 'turkey_un'"
DGMGRL for Linux: Version 11.2.0.1.0 - 64bit Production
Copyright (c) 2000, 2009, Oracle. All rights reserved.
Welcome to DGMGRL, type "help" for information.

Chapter 4
[ 127 ]
Connected.
Database - turkey_un
Role: PRIMARY
Intended State: TRANSPORT-ON
Instance(s):
TURKEY
Database Status:
SUCCESS
7. When the SILENT keyword is used, it will suppress the introduction lines of DGMGR as follows:[oracle@oracle-primary]$ dgmgrl -silent sys/free2go@turkey "show configuration verbose"
Configuration - PACKT
Protection Mode: MaxPerformance
Databases:
turkey_un - Primary database
INDIA_UN - Physical standby database
Fast-Start Failover: DISABLED
Configuration Status:
SUCCESS
8. Exit the broker command-line interface with the EXIT command as follows:DGMGRL> exit
[oracle@oracle-primary ~]$
What just happened?We have seen how to connect to the command line utility DGMGRL using different approaches, after the configuration of the Data Guard broker.
Time for action – basic monitoring with Data Guard brokerNow we'll see how to perform basic Data Guard monitoring using the broker interface DGMGRL.
1. Check the configuration status with the following command. It provides the overall health status of the Data Guard configuration. If the Configuration Status resulted to SUCCESS, it means that the Data Guard configuration is working properly. Output can also be WARNING or ERROR as follows:DGMGRL> show configuration;
Configuration - PACKT

Oracle Data Guard Broker
[ 128 ]
Protection Mode: MaxPerformance
Databases:
turkey_un - Primary database
Error: ORA-16778: redo transport error for one or more databases
INDIA_UN - Physical standby database
Error: ORA-01031: insufficient privileges
Fast-Start Failover: DISABLED
Configuration Status:
ERROR
2. Check the database status to find out if there are any warnings or errors in the databases of the Data Guard configuration. Use the following command from the DGMGRL utility:DGMGRL> show database turkey_un;
Database - turkey_un
Role: PRIMARY
Intended State: TRANSPORT-ON
Instance(s):
TURKEY
Error: ORA-16737: the redo transport service for standby database "INDIA_UN" has an error
Database Status:
ERROR
3. Check the redo transport status. LogXptStatus is the database property that returns an output containing the status of the redo transport services to each of the enabled standby databases. This property is applicable to the primary database as shown in the following command line:DGMGRL> show database turkey_un 'LogXptStatus';
LOG TRANSPORT STATUS
PRIMARY_INSTANCE_NAME STANDBY_DATABASE_NAME STATUS
TURKEY INDIA_UN ORA-01031: insufficient privileges
4. Check Status Report. This is the database property that returns a list of errors or warnings about the status of the database. In RAC databases, it includes the status of all the running instances as follows:DGMGRL> show database turkey_un 'StatusReport';
STATUS REPORT
INSTANCE_NAME SEVERITY ERROR_TEXT

Chapter 4
[ 129 ]
TURKEY ERROR ORA-16737: the redo transport service for standby database "INDIA_UN" has an error
5. Check Inconsistent Properties. This will return an output that shows all the database properties whose values are contained in the broker configuration file and are inconsistent with the values in the database. In RAC databases, a database-specific property may be inconsistent only on some instances as shown in the following line:DGMGRL> show database turkey_un InconsistentProperties;
INCONSISTENT PROPERTIES
INSTANCE_NAME PROPERTY_NAME MEMORY_VALUE SPFILE_VALUE BROKER_VALUE
TURKEY LogArchiveTrace 255 00
6. Check the TopWaitEvents property that specifies the top five events that waited for the most amount of time in the specified instance as follows:DGMGRL> show instance 'TURKEY' 'TopWaitEvents';
TOP SYSTEM WAIT EVENTS
Event Wait Time
rdbms ipc message 162825637
DIAG idle wait 15930581
SQL*Net message from client 15074233
jobq slave wait 12516954
Streams AQ: qmn slave idle wait 7973917
7. Gather the same information using SQL*Plus as from the v$system_event view follows:SQL> select event,TIME_WAITED from v$system_event order by time_waited desc;EVENT TIME_WAITED---------------------------------------- -----------rdbms ipc message 162816106DIAG idle wait 15929381SQL*Net message from client 15069275jobq slave wait 12516954Streams AQ: qmn slave idle wait 7973917

Oracle Data Guard Broker
[ 130 ]
8. Check the SendQEntries database property. The following output shows all the logfiles of the primary database that were not successfully archived to standby databases as shown in the following command line:DGMGRL> show database turkey_un 'SendQEntries';
PRIMARY_SEND_QUEUE
STANDBY_NAME STATUS RESETLOGS_ID THREAD LOG_SEQ TIME_GENERATED TIME_COMPLETED FIRST_CHANGE# NEXT_CHANGE# SIZE (KBs)
INDIA_UN ARCHIVED 788992101 1 227 09/01/2012 01:48:13 09/01/2012 01:48:14 2107092 2107097 1
INDIA_UN ARCHIVED 788992101 1 228 09/01/2012 01:48:14 09/01/2012 01:48:16 2107097 2107101 2
INDIA_UN ARCHIVED 788992101 1 229 09/01/2012 01:48:16 09/01/2012 01:48:17 2107101 2107104 1
CURRENT 788992101 1 230 09/01/2012 01:48:17 2107104 1
9. Check the RecvQEntries database property that reports on all the logfiles that were received by the standby database but not yet applied. If there are no rows, it means that all the logfiles have been applied as follows:DGMGRL> show database 'INDIA_UN' 'RecvQEntries';
STANDBY_RECEIVE_QUEUE
STATUS RESETLOGS_ID THREAD LOG_SEQ TIME_GENERATED TIME_COMPLETED FIRST_CHANGE# NEXT_CHANGE# SIZE (KBs)
NOT_APPLIED 788992101 1 238 09/01/2012 01:55:31 09/01/2012 01:56:04 2107788 2107823 20
NOT_APPLIED 788992101 1 239 09/01/2012 01:56:04 09/01/2012 01:56:05 2107823 2107826 1
NOT_APPLIED 788992101 1 240 09/01/2012 01:56:05 09/01/2012 01:56:07 2107826 2107831 2
NOT_APPLIED 788992101 1 241 09/01/2012 01:56:07 09/01/2012 01:56:07 2107831 2107834 1

Chapter 4
[ 131 ]
To get the status of the database or configuration with the previous commands, you can connect DGMGRL from the primary or standby database servers or even from the observer system if it exists.
What just happened?We have seen how to connect to the Data Guard broker configuration and check the configuration status, database status, status of the instance with properties, and property values using the DGMGRL command-line utility.
Management with Data Guard brokerWhen the Data Guard configuration is managed with the Data Guard broker, you must use DGMGRL or the Cloud Control interface to make changes. In this topic, we will discuss management scenarios with the Data Guard broker.
Enabling and disabling broker configurationAs we have seen, after the successful creation of the Data Guard broker configuration, the configuration will be in disabled status, and we have to enable it in order to monitor all the databases of the configuration. We must enable the configuration only from the primary database. After the configuration has been enabled from primary, it will communicate this information to standby and the Data Guard broker instance Slave Process (NSV0). We can also disable it later if we don't want the broker to manage the Data Guard configuration.
Time for action – disabling broker configurationBroker management of the primary database and all of its standby databases can be disabled using the DISABLE CONFIGURATION command. After disabling the configuration, it won't be possible to fetch any information from the Data Guard broker by using DGMGRL.
1. Before disabling the configuration, let's check the status of the broker configuration, as follows:DGMGRL> show configuration;
Configuration - PACKT
Protection Mode: MaxPerformance
Databases:
turkey_un - Primary database
INDIA_UN - Physical standby database
www.allitebooks.com

Oracle Data Guard Broker
[ 132 ]
Fast-Start Failover: DISABLED
Configuration Status:
SUCCESS
The current status of the configuration is SUCCESS.
2. Disable the configuration as follows:DGMGRL> disable configuration;
Disabled.
3. Check the current configuration status as follows:DGMGRL> show configuration;
Configuration - PACKT
Protection Mode: MaxPerformance
Databases:
turkey_un - Primary database
INDIA_UN - Physical standby database
Fast-Start Failover: DISABLED
Configuration Status:
DISABLED
You can disable the configuration either from the primary or the standby database. On disabling the broker, databases will not be monitored by the broker. This command won't remove the broker configuration from the configuration file. You're still able to perform changes on the database properties. However, the changes will only be applicable once you enable the configuration again.
What just happened?We've already seen how to enable configuration of the broker from the initial setup of the Data Guard broker implementation; now we have learned how to disable the Data Guard broker configuration.
Enabling and disabling a standby databaseUsing DGMGRL, it's possible to disable or enable the standby databases of a Data Guard configuration in order to stop broker management for that database.

Chapter 4
[ 133 ]
Time for action – disabling and enabling databaseFollow these steps to test disabling and enabling the standby database:
1. Check the status of the standby database as follows:DGMGRL> show database 'INDIA_UN';
Database - INDIA_UN
Role: PHYSICAL STANDBY
Intended State: APPLY-ON
Transport Lag: 0 seconds
Apply Lag: 0 seconds
Real Time Query: ON
Instance(s):
INDIA
Database Status:
SUCCESS
2. Disable the database from the configuration as follows:DGMGRL> disable database 'INDIA_UN';
Disabled.
3. Check the database status after disabling it from the configuration as follows:DGMGRL> show database 'INDIA_UN';
Database - INDIA_UN
Role: PHYSICAL STANDBY
Intended State: APPLY-ON
Transport Lag: (unknown)
Apply Lag: (unknown)
Real Time Query: OFF
Instance(s):
INDIA
Database Status:
DISABLED
4. Physical standby information still exists in the configuration, but the database will be in a DISABLED state and won't be monitored by the broker. However, the configuration status will be SUCCESS.

Oracle Data Guard Broker
[ 134 ]
5. Now enable the database to the broker configuration as follows:DGMGRL> enable database 'INDIA_UN';
Enabled.
6. After enabling the database, the Data Guard broker instance slave process will be started at the standby database name mentioned in the command. Implicitly, a log switch will occur in order to synchronize the environments.
7. Check the final database status as follows:DGMGRL> show database 'INDIA_UN';
Database - INDIA_UN
Role: PHYSICAL STANDBY
Intended State: APPLY-ON
Transport Lag: 0 seconds
Apply Lag: 0 seconds
Real Time Query: ON
Instance(s):
INDIA
Database Status:
SUCCESS
Now the database is enabled and is part of the broker configuration again.
What just happened?We've learned how to disable and enable Data Guard broker management completely, and how to disable and enable only a standby database of the configuration.
Changing configuration and database properties using brokerAfter the creation of the Data Guard configuration using DGMGRL, you can edit the configuration or single database properties. The following command is an example of a configuration change that changes the fast-start failover threshold value to 60 seconds. This command can be run either from the primary or the standby database:
DGMGRL> show configuration 'FastStartFailoverThreshold';
FastStartFailoverThreshold = '30'
DGMGRL> edit configuration set property FastStartFailoverThreshold=60;
Property "faststartfailoverthreshold" updated
DGMGRL> show configuration 'FastStartFailoverThreshold';
FastStartFailoverThreshold = '60'

Chapter 4
[ 135 ]
These changes will be updated in all the configuration files.
On the other hand, database property changes are specific to either the primary or a standby database. It won't perform changes in the rest of the configuration. In case it's a clustered database, these changes will be applicable for all of the instances of that database. An example to change the archive log tracing level to 10 in the standby database only is as follows:
DGMGRL> show database 'INDIA_UN' 'LogArchiveTrace';
LogArchiveTrace = '0'
DGMGRL> edit database 'INDIA_UN' SET PROPERTY LogArchiveTrace=10;
Property "logarchivetrace" updated
DGMGRL> show database 'INDIA_UN' 'LogArchiveTrace';
LogArchiveTrace = '10'
Have a go hero – more examples on property changesNow it's your turn to try changing some database properties. You can practice with the following parameters by monitoring, changing, and restoring their values as follows:
DGMGRL> EDIT DATABASE 'INDIA_UN' SET PROPERTY 'LogArchiveFormat'= 'log_%t_%s_%r_%d.arc'; DGMGRL> EDIT DATABASE 'INDIA_UN' SET PROPERTY LogXptMode=SYNC;
DGMGRL> EDIT DATABASE 'INDIA_UN' SET PROPERTY LogShipping=OFF;
DGMGRL> EDIT DATABASE 'INDIA_UN' SET PROPERTY NetTimeout=30;
DGMGRL> EDIT DATABASE 'INDIA_UN' SET PROPERTY 'ReopenSecs'=400;
DGMGRL> EDIT DATABASE 'INDIA_UN' SET PROPERTY ArchiveLagTarget=800;
DGMGRL> EDIT DATABASE 'INDIA_UN' SET PROPERTY 'DbFileNameConvert' = '/u01/app/oracle/oradata/orcl/, /u02/app/oracle/oradata/orcl/';
DGMGRL> EDIT DATABASE 'INDIA_UN' SET PROPERTY DelayMins='540';
Time for action – changing the database nameFollow these steps to change DB_UNIQUE_NAME of a database in the Data Guard broker configuration.
1. Prior to changing the database name, disable the database from the configuration as follows: DGMGRL> show database 'INDIA_UN';
Database - INDIA_UN
Role: PHYSICAL STANDBY

Oracle Data Guard Broker
[ 136 ]
Intended State: APPLY-ON
Transport Lag: 0 seconds
Apply Lag: 0 seconds
Real Time Query: ON
Instance(s):
INDIA
Database Status:
SUCCESS
DGMGRL> disable database 'INDIA_UN';
Disabled.
2. Change the DB_UNIQUE_NAME value of the standby database as follows:SQL> select db_unique_name,database_role from v$database;DB_UNIQUE_NAM DATABASE_ROLE------------- ----------------india_un PHYSICAL STANDBYSQL> alter system set db_unique_name='INDIA_NEW' scope=spfile;System altered.
DB_UNIQUE_NAME is a static parameter, so you must use scope with SPFILE. If you are using PFILE, edit PFILE and bounce the database.
3. Now shut down and start up the database and check for the new value of DB_UNIQUE_NAME as shown in the following query:SQL> select db_unique_name,database_role from v$database;DB_UNIQUE_NAM DATABASE_ROLE------------- ----------------INDIA_NEW PHYSICAL STANDBY
4. Rename the database name in the Data Guard broker as follows:DGMGRL> edit database 'INDIA_UN' rename to 'INDIA_NEW';
Succeeded.
5. Enable the database as follows:DGMGRL> enable database 'INDIA_NEW';
Enabled.
DGMGRL> show configuration;
Configuration - PACKT
Protection Mode: MaxPerformance
Databases:

Chapter 4
[ 137 ]
TURKEY_UN - Primary database
INDIA_NEW - Physical standby database
Fast-Start Failover: DISABLED
Configuration Status:
SUCCESS
After making changes in the database name, perform a couple of log switches and check for synchronization between both sites and also check the configuration status.
What just happened?We've changed the database unique name of the standby database that is managed with the Data Guard broker.
Changing the state of the databaseIn order to perform state changes in databases, you must use Data Guard broker interfaces when these are managed with the databases.
For example, use the following command in order to turn off redo transport to all remote destinations on the primary database:
DGMGRL> edit database 'TURKEY_UN' SET STATE="LOG-TRANSPORT-OFF";
Succeeded.
To stop and start redo transport services to specific standby databases, use the following command:
DGMGRL> edit database 'INDIA_UN' SET PROPERTY 'LogShipping'='OFF';
Property "LogShipping" updated
DGMGRL> SHOW DATABASE 'INDIA_UN' 'LogShipping';
LogShipping = 'OFF'
DGMGRL> edit database 'INDIA_UN' SET PROPERTY 'LogShipping'='ON';
Property "LogShipping" updated
DGMGRL> SHOW DATABASE 'INDIA_UN' 'LogShipping';
LogShipping = 'ON'

Oracle Data Guard Broker
[ 138 ]
Have a go hero – more examples on state changesNow try changing the states of the standby database using the following parameters. Also monitor the broker logfile and alert logfile whenever changing the configuration to track the operations behind as shown in the following commands:
DGMGRL> EDIT DATABASE 'INDIA_UN' SET STATE='READ-ONLY';
DGMGRL> EDIT DATABASE 'INDIA_UN' SET STATE='OFFLINE';
DGMGRL> EDIT DATABASE 'INDIA_UN' SET STATE='APPLY-OFF';
DGMGRL> EDIT DATABASE 'INDIA_UN' SET STATE='TRANSPORT-OFF';
DGMGRL> EDIT DATABASE 'INDIA_UN' SET STATE='ONLINE' WITH APPLY INSTANCE='INDIA_UN2';
Do not forget that some of the operations restart the instance.
Troubleshooting Data Guard brokerIn this section, we will discuss the most common issues that may arise when Data Guard is managed with the broker. In the case of an outage or problem, we first consider gathering diagnostic information. We must refer to the alert logfile in the Automatic Diagnostic Repository destination starting from Oracle 11g. In earlier versions, the alert logfile is located in BACKGROUND_DUMP_DEST. The trace file drc<sid>.log for the Data Guard broker is also located in the ADR destination.
The v$diag_info view can be used to list all the important ADR locations for the Oracle database instance as shown in the following code:
SQL> SELECT NAME,VALUE FROM V$DIAG_INFO;NAME VALUE------------------------- -------------------------------------------Diag Enabled TRUEADR Base /u01/app/oracleADR Home /u01/app/oracle/diag/rdbms/turkey_un/TURKEY..........Default Trace File /u01/app/oracle/diag/rdbms/turkey_un /TURKEY/trace/TURKEY_ora_16735.trcActive Problem Count 0Active Incident Count 0

Chapter 4
[ 139 ]
Data Guard tracingThe LOG_ARCHIVE_TRACE parameter is used to trace redo transport and apply services on both the primary and standby databases. By default, the parameter is disabled and its value is 0. The Data Guard tracing levels are as follows. Depending on the required tracing value, the level can be changed online:
� 0: Disable archived log tracing (default) � 1: Track archival of the redo logfile � 2: Track the archival status of each archived log destination � 4: Track archival operational phase � 8: Track the archived log destination activity � 16: Track the detailed archived log destination activity � 32: Track archived log destination parameter modifications � 64: Track the ARCn process state activity � 128: Track FAL (fetch archived log) server related activities � 256: Track RFS logical client � 512: Track the LGWR redo shipping network activity � 1024: Track the RFS Physical client � 2048: Track RFS/ARCn Ping Heartbeat � 4096: Track Real Time Apply � 8192: Track Redo Apply (media recovery or physical standby)
If you want to turn on more than one tracing level, you can set LOG_ARCHIVE_TRACE to the sum of these levels. For example, setting it to 3 will turn on tracing archival of the redo logfile and the archival status of each archived log destination.
Most Common Data Guard broker issuesNow we will discuss some general Data Guard broker issues.
ORA-16797: database is not using a server parameter fileIf you ever start an instance with PFILE instead of SPFILE, DMON will not be able to communicate with the databases. SPFILE is mandatory for communicating with remote destinations to fetch required information from the broker configuration file and server parameter files. This issue can eventually be identified from DGMGRL by retrieving configuration information as follows:DGMGRL> show configuration;
Configuration - PACKT

Oracle Data Guard Broker
[ 140 ]
Protection Mode: MaxPerformance
Databases:
TURKEY_UN - Primary database
INDIA_UN - Physical standby database
Error: ORA-16797: database is not using a server parameter file
Fast-Start Failover: DISABLED
Configuration Status:
ERROR
Create a new SPFILE on the standby system from PFILE, and bounce the standby database as follows:
SQL> create spfile from pfile;File created.SQL> shutdown immediateSQL> startup mount
After the creation of SPFILE from PFILE, in the next startup Oracle picks SPFILE even though PFILE exists.
DGMGRL> show configuration;
Configuration - PACKT
Protection Mode: MaxPerformance
Databases:
TURKEY_UN - Primary database
INDIA_UN - Physical standby database
UK_UN - Physical standby database
Fast-Start Failover: DISABLED
Configuration Status:
SUCCESS
ORA-10458:standby database requires recoveryFor a database to open, it must have consistency over all the data files. This can occur in case the recovery has been terminated in the previous sessions or the standby control file SCN is has not been synchronized with the data files as shown in the following query:
SQL> alter database open;alter database open*

Chapter 4
[ 141 ]
ERROR at line 1:ORA-10458: standby database requires recoveryORA-01196: file 1 is inconsistent due to a failed media recovery sessionORA-01110: data file 1: '/u02/app/oracle/oradata/orcl/system01.dbf'
DGMGRL> show database 'INDIA_UN';Database - INDIA_UN Role: PHYSICAL STANDBY Intended State: APPLY-ON Transport Lag: (unknown) Apply Lag: (unknown) Real Time Query: OFF Instance(s): INDIA Database Warning(s): ORA-16770: Redo Apply not started since physical standby database is openingDatabase Status:WARNING
Now the database status is in MOUNT. Either start Redo Apply from DGMGRL or bounce DMON so that DMON will initiate MRP to perform a recovery. Once enough number of archived logs are applied to provide consistency, you can open the database.
ORA-16737:the redo transport service for standby database "string" has an errorUsually, the ORA-16737 error occurs if there is any communication problem with the standby database. You can query the LogXptStatus property to see the error message and you can also review the Data Guard broker logfile as follows:
DGMGRL> show database TURKEY_UN 'LogXptStatus';
LOG TRANSPORT STATUS
PRIMARY_INSTANCE_NAME STANDBY_DATABASE_NAME STATUS
TURKEY INDIA_UN ORA-12541: TNS:no listener
DGMGRL> show database 'INDIA_UN';
Database - INDIA_UN
Role: PHYSICAL STANDBY
Intended State: APPLY-ON
Transport Lag: (unknown)

Oracle Data Guard Broker
[ 142 ]
Apply Lag: (unknown)
Real Time Query: OFF
Instance(s):
INDIA
Database Status:
DGM-17016: failed to retrieve status for database "INDIA_UN"
ORA-12541: TNS:no listener
ORA-16625: cannot reach database "INDIA_UN"
Check the listener of the status and start the listener. Wait until the Oracle service is registered with the listener, or you can manually register it as follows:
SQL> alter system register;
Ensure that the service is registered with the listener.
ORA-16715:redo transport-related property string of standby database "string" is inconsistentUsually, the ORA-16715 error occurs if there is any inconsistency between the initialization parameters and configuration file. By querying the database status from DGMGRL, we can see the parameter that is not consistent.
DGMGRL> show database 'TURKEY_UN';
Database - TURKEY_UN
Role: PRIMARY
Intended State: TRANSPORT-ON
Instance(s):
TURKEY
Warning: ORA-16715: redo transport-related property DelayMins of standby database "INDIA_UN" is inconsistent
Database Status:
WARNING
SQL> select delay_mins,destination from v$archive_dest where dest_id=2;
DELAY_MINS DESTINATION
---------- ------------
10 india
DGMGRL> show database 'TURKEY_UN' 'DelayMins';
DelayMins = '0'

Chapter 4
[ 143 ]
From the previous two queries, we can see that there is inconsistency between SPFILE and the configuration files. Either we have to edit the configuration file's property value to 10 or change the initialization parameter's value to 0.
ORA-12514:TNS:listener does not currently know of service requested in connect descriptorOne example of an ORA-12514 error is a post-switchover case. After performing a switchover using DGMGRL, Data Guard requires a shutdown and startup of both the primary and standby databases. This issue can occur if any necessary entry is missing in the listener.ora file. DGMGRL is unable to connect to the database after it has been stopped while performing the switchover.
Current listener descriptionThe command for the current listener is as follows:
SID_LIST_LISTENER =
(SID_LIST =
(SID_DESC =
(SID_NAME = PLSExtProc)
(ORACLE_HOME = /u01/home/oracle/product/11.2.0/db_1)
(PROGRAM = extproc)
)
(SID_DESC =
(GLOBAL_DBNAME = india_un)
(SID_NAME = INDIA)
(ORACLE_HOME = /u01/home/oracle/product/11.2.0/db_1)
)
)
Add the correct entry of GLOBAL_DBNAME in the SID list description of the listener. This step is applicable for both the primary and standby databases.
Format GLOBAL_DBNAME=db_unique_name_DGMGRL.db_domain as follows:
SID_LIST_LISTENER =
(SID_LIST =
(SID_DESC =
(SID_NAME = PLSExtProc)

Oracle Data Guard Broker
[ 144 ]
(ORACLE_HOME = /u01/home/oracle/product/11.2.0/db_1)
(PROGRAM = extproc)
)
(SID_DESC =
(GLOBAL_DBNAME = india_un_DGMGRL)
(SID_NAME = INDIA)
(ORACLE_HOME = /u01/home/oracle/product/11.2.0/db_1)
)
)
DGMGRL> show database 'TURKEY_UN' "StaticConnectIdentifier"
StaticConnectIdentifier = '(DESCRIPTION=(ADDRESS=(PROTOCOL=IPC)(KEY=EXTPROC1521))(CONNECT_DATA=(SERVICE_NAME=turkey_un_DGMGRL)(INSTANCE_NAME=TURKEY)(SERVER=DEDICATED)))'
Oracle Data Guard fast-start failoverIn Data Guard configurations, in case of any disasters in primary database systems or any corruptions or errors in the database that are not recoverable quickly, a failover can be performed manually on the standby database to convert it to a primary database and use it for production services. Another option is to automate the failover using the fast-start failover feature. A fast-start failover can be configured or managed either by DGMGRL or grid control.
If a fast-start failover is not configured and the production database is completely unavailable, and if you want to perform a failover on the standby database in such a case, you first have to understand the status of the standby database, whether all the archived logs or redo has been applied or not. Then you have to perform a failover manually. After the failover, you have to recreate a new standby database. These steps will increase the downtime of the system. Fast-start failover will be invoked automatically if the primary site is unavailable. Also, it'll recover the standby database, perform the failover, and reinstate the old primary database if possible.
Starting from 11g, you can implement a fast-start failover even in the Maximum Performance mode. It supports asynchronous redo transport.

Chapter 4
[ 145 ]
The previously mentioned points can be illustrated in the following diagram:
An observer is required to configure a fast-start failover. It should be configured in a location rather than on the primary and standby databases. It acts as a client and monitors both the primary and standby databases at all times. We must install either the Oracle Client Administrator software or the full Oracle Database software to the observer host.
Based on the FastStartFailoverThreshold value, observer automatically initiates the failover procedure. After performing the failover, the end users will connect to the database again and old connections will be redirected to the new primary database.
You can configure observer either in the primary or standby system, but for the best configuration of FSFO, the observer, primary, and standby databases should be on separate servers.

Oracle Data Guard Broker
[ 146 ]
Time for action – configuring fast-start failoverThe following steps will help you configure FSFO in a configuration managed by the Data Guard broker:
1. Check if Data Guard is in the Maximum Performance(11gRx) or Maximum Availability mode using the following command:DGMGRL> show configuration
Configuration - PACKT
Protection Mode: MaxPerformance
Databases:
TURKEY_UN - Primary database
INDIA_UN - Physical standby database
Fast-Start Failover: DISABLED
Configuration Status:
SUCCESS
2. If your configuration is in the Maximum Availability mode, make sure that LogXptMode is set to synchronous redo transport.
3. Make sure you have configured a flashback database and fast recovery area. This is applicable on both the primary and standby databases and helpful in case you want to reinstate the old primary database or perform a flashback as shown in the following query:SQL> select flashback_on from v$database;FLASHBACK_ON------------------NO
4. We must set some parameters before turning on flashback. These parameters are DB_FLASHBACK_RETENTION_TARGET, DB_RECOVERY_FILE_DEST_SIZE, and DB_RECOVERY_FILE_DEST. The following query shows you how to set these parameters:SQL> ALTER SYSTEM SET DB_FLASHBACK_RETENTION_TARGET=5760;System altered.SQL> ALTER SYSTEM SET DB_RECOVERY_FILE_DEST_SIZE=20G;System altered.SQL> ALTER SYSTEM SET DB_RECOVERY_FILE_DEST='/data/FLASHBACK';System altered.SQL> ALTER DATABASE FLASHBACK ON;Database altered.

Chapter 4
[ 147 ]
If you are using 11g ORACLE_HOME for observer, note that it is incompatible with 10g databases.
5. In the Oracle Net Services configuration, the listener.ora file needs to include a service with GLOBAL_DB_NAME , as follows, to enable the broker to automatically start the databases in the case of a switchover. This configuration is applicable on both servers. To set up the configuration, shut down the listener, make the changes, and restart the listener as follows: (SID_LIST =
(SID_DESC =
(SID_NAME = PLSExtProc)
(ORACLE_HOME = /u01/home/oracle/product/11.2.0/db_1)
(PROGRAM = extproc)
)
(SID_DESC =
(GLOBAL_DBNAME = turkey_un_DGMGRL)
(SID_NAME = TURKEY)
(ORACLE_HOME = /u01/home/oracle/product/11.2.0/db_1)
)
)
6. Setting the FastStartFailoverTarget value is required if there are multiple standby databases available in the Data Guard configuration. Use the following commands for the same:DGMGRL> edit database 'TURKEY_UN' SET PROPERTY FastStartFailoverTarget='INDIA_UN';
Property "faststartfailovertarget" updated
DGMGRL> edit database 'INDIA_UN' SET PROPERTY FastStartFailoverTarget='TURKEY_UN';
Property "faststartfailovertarget" updated
7. FSFO has two configuration properties. The FastStartFailoverLagLimit property refers to how much data loss is acceptable in terms of seconds. The FastStartFailoverThreshold property refers to the number of seconds for which the configuration will wait before initiating the failover process as follows:DGMGRL> EDIT CONFIGURATION SET PROPERTY FastStartFailoverLagLimit=30;
Property "faststartfailoverlaglimit" updated

Oracle Data Guard Broker
[ 148 ]
DGMGRL> EDIT CONFIGURATION SET PROPERTY FastStartFailoverThreshold=30;
Property "faststartfailoverthreshold" updated
If you want to change the fast-start failover target property to a different standby database, you have to disable FSFO, and then after changing the property, you have to re-enable FSFO.
8. Enable fast-start failover as shown in the following command:DGMGRL> enable fast_start failover;
Enabled.
9. Assuming Oracle software is installed on the observer host, start observer. The following command must be issued on the observer server:$dgmgrl -logfile /tmp/obsvr.log sys/free2go@TURKEY "start observer" &
The previous command statement is executed in the background because the start observer command doesn't return the DGMGRL prompt to the user.
10. Verify the FSFO configuration as follows:DGMGRL> SHOW FAST_START FAILOVER;
Fast-Start Failover: ENABLED
Threshold: 30 seconds
Target: INDIA_UN
Observer: oracle-ha
Lag Limit: 30 seconds
Shutdown Primary: TRUE
Auto-reinstate: TRUE
Configurable Failover Conditions
Health Conditions:
Corrupted Controlfile YES
Corrupted Dictionary YES
Inaccessible Logfile NO
Stuck Archiver NO
Datafile Offline YES
Oracle Error Conditions:

Chapter 4
[ 149 ]
(none)
SQL> select DB_UNIQUE_NAME, FS_FAILOVER_STATUS, FS_FAILOVER_CURRENT_TARGET from v$database;
DB_UNIQUE_NA FS_FAILOVER_STATUS FS_FAILOVER_CURRENT_TARGET
------------ ---------------------- ------------------------------
turkey_un TARGET UNDER LAG LIMIT INDIA_UN
The FS_FAILOVER_STATUS value will be in "TARGET UNDER LAG LIMIT" if it is in the Maximum Performance mode, and in case it is in the Maximum Availability mode, the value will be SYNCHRONIZED.
What just happened?We've just seen how to configure a fast-start failover after setting the required parameters, and also verified the status of the configuration after starting the observer.
Troubleshooting observer configurationAfter configuring the observer, sometimes the process may be dropped and you may see errors in the configuration as shown later. In such a case, FSFO may not be able to initiate a failover in the case of primary database failure as follows:
ORA-16824: multiple warnings, including fast-start failover-related warnings, detected for the database
For any troubleshooting issue, first look at the configuration status as follows:
DGMGRL> show configuration;
Configuration - PACKT
Protection Mode: MaxPerformance
Databases:
TURKEY_UN - Primary database
Warning: ORA-16824: multiple warnings, including fast-start failover-related warnings, detected for the database
INDIA_UN - (*) Physical standby database
Warning: ORA-16824: multiple warnings, including fast-start failover-related warnings, detected for the database
Fast-Start Failover: ENABLED
Configuration Status: WARNING

Oracle Data Guard Broker
[ 150 ]
2012-09-09 19:01:15.111 00000000 1269603843 Operation HEALTH_CHECK continuing with warning, status = ORA-16819
2012-09-09 19:01:15.112 00000000 1269603843 Operation HEALTH_CHECK continuing with warning, status = ORA-16819
Check for the status report of the configuration as follows:
DGMGRL> show database 'TURKEY_UN' 'StatusReport';
STATUS REPORT
INSTANCE_NAME SEVERITY ERROR_TEXT
* WARNING ORA-16819: fast-start failover observer not started
As per the previous error, the observer is not running. The process may have been dropped or the observer system may have rebooted. Connect to the broker utility from the observer system using Oracle Net Services and start observer as follows:
$dgmgrl -logfile /tmp/obsvr.log sys/free2go@TURKEY "start observer" &
Check the configuration status as follows:
DGMGRL> SHOW FAST_START FAILOVER;
Fast-Start Failover: ENABLED
Threshold: 30 seconds
Target: INDIA_UN
Observer: oracle-ha
Lag Limit: 30 seconds
Shutdown Primary: TRUE
Auto-reinstate: TRUE
Configurable Failover Conditions
Health Conditions:
Corrupted Controlfile YES
Corrupted Dictionary YES
Inaccessible Logfile NO
Stuck Archiver NO
Datafile Offline YES
Oracle Error Conditions:
(none)

Chapter 4
[ 151 ]
Script to stop and start observerTo make the observer process highly available and running all the time, we may need to bounce the observer process when needed. So we can prepare a script and run it as a job regularly. It can be scheduled as an OS-level job. The following shell script example can be used on Linux/Unix systems:
# start and Stop Observer
export ORACLE_BASE=/u02/app/oracle
export ORACLE_HOME=/u01/home/oracle/product/11.2.0/db_1
export PATH=$ORACLE_HOME/bin:$PATH
dgmgrl << eof
connect sys/free2go@turkey
STOP OBSERVER;
START OBSERVER;
eof
SummaryIn this chapter, we have learned the Data Guard broker architecture, the importance of using the Data Guard broker, and how to monitor and manage Data Guard using the broker, including how to troubleshoot with real-time issues and explained steps to configure a fast-start failover.
The next chapter will cover the configurations of Data Guard protection modes in detail.


5Data Guard Protection Modes
Protection mode decision is crucial and database administrators need to work with IT managers and other responsible people to determine RTO (Recovery Time Objective) and RPO (Recovery Point Objective) values and to select the most appropriate mode for their Data Guard configurations. After the decision is made, setting the data protection mode is a simple operation that can be performed by SQL*Plus, Data Guard command-line interface (DGMGRL) or Enterprise Manager Cloud Control.
Data Guard offers three data protection modes, which meet different business requirements as mentioned in Chapter 1, Getting Started.
The following are the different modes:
� Maximum Protection
� Maximum Performance
� Maximum Availability
Let's look at the details of these protection modes and see how we can switch between the different modes.

Data Guard Protection Modes
[ 154 ]
The Maximum Protection modeThe Maximum Protection mode is referred to as the Guaranteed Zero Data Loss configuration. A primary database operating on the Maximum Protection mode doesn't provide an acknowledgment to the users that the commit is completed until transactions are successfully transferred to at least one standby destination. This setup requires the SYNC redo transport service using the LGWR attribute and guarantees that no data will be lost on the standby database in case of a primary database failure.
Of course, guaranteeing zero data loss comes at a cost. Because the primary database will always wait for an acknowledgment from standby destinations to continue its operation, there will be performance implications on the primary database. However, with 11g, the performance effect of using the SYNC redo transport service is less than the earlier releases. In the previous releases, the primary database doesn't send a redo to the standby database before completing the write to online redo logs. In 11g, the database writes redo to online redo logs and sends it to standby destinations simultaneously. This behavior reduces the time waited to complete a commit for a primary database.
Consider the following points before setting the Maximum Protection mode:
� Network bandwidth between sites is essential in this mode. If the bandwidth and latency of a network fails to satisfy real-time transport of redo generated by the primary database, there will be serious performance- and database-availability problems on the primary database.
� Using more than one standby database (preferably a physical standby one) for a Maximum Protection configuration is a good practice, which will increase the uptime of the primary database on standby and network failures. Also, the data protection will continue even if you lose the primary database and failover to one of the standby databases. It would be better to locate each standby database on different locations if possible.
� The primary database must be on the mount mode when changing the data protection mode from Maximum Performance to Maximum Protection.
� On all standby databases of the Data Guard configuration, the standby redo logs need to be created with the correct number and size before using the Maximum Performance mode. It's also a good practice to create standby redo logs in the primary database in order to be ready for a switchover.
� It wasn't possible to use a logical standby database with the Maximum Protection mode before 10g, because standby redo logs weren't supported by logical standby databases. Starting with 10g, we're able to use a logical standby with the Maximum Protection mode; however, we have to consider unsupported data types in such a case.

Chapter 5
[ 155 ]
The Maximum Performance modeThis is the mode in which the primary database's availability is completely independent of the redo transport service. In other words, a primary database never waits for any acknowledgment from standby destinations to complete a transaction. Thus, we don't suffer from standby network-connection problems or standby availability-related performance problems and availability problems in the primary database.
This mode is the default protection mode and the log transport service must use the ASYNC mode with the LGWR or ARCH attribute. However, with 11g, ARCH transport is not recommended because it doesn't offer any advantage in terms of performance, and offers less data protection.
In the normal operation of the Maximum Performance configuration, the redo data, which is on the way from primary to standby, is at risk from primary database failures. The amount of data at risk is dependent to the bandwidth of the network.
The Maximum Availability modeThe Maximum Availability mode is the data protection mode that has the ability to run as a Maximum Protection or Maximum Performance mode depending on the accessibility of standby databases. In a normal operation where the standby is up and able to receive redo data synchronously, the primary database acts like the Maximum Protection mode and waits for acknowledgment from the standby database to complete transactions. However, the key point of the Maximum Availability mode is the behavior of the primary database when it's not able to receive acknowledgment from any standby database. It waits for a predefined period of time and if the connection cannot be established, the primary database continues its operation as a Maximum Performance mode database. The number of seconds that the primary waits before marking a standby inaccessible is defined with the NET_TIMEOUT attribute of the LOG_ARCHIVE_DEST_n parameter. The default value of this parameter is 30 seconds. In a Data Guard configuration with the Maximum Availability mode, the primary database does not stall for more than NET_TIMEOUT seconds if it's not able to access any standby database.
When the primary database is not able to connect to the standby database for NET_TIMEOUT seconds, it stops sending connection requests to the standby database and continues completing transactions. Then, the primary retries connecting to the standby immediately after every online log switch. We can use the REOPEN attribute to set the time (in seconds) for which the primary attempts to reconnect to the standby. When the connection is established, the missing archived redo logs will be sent to the standby by the ARCH process simultaneously with the online redo transport.
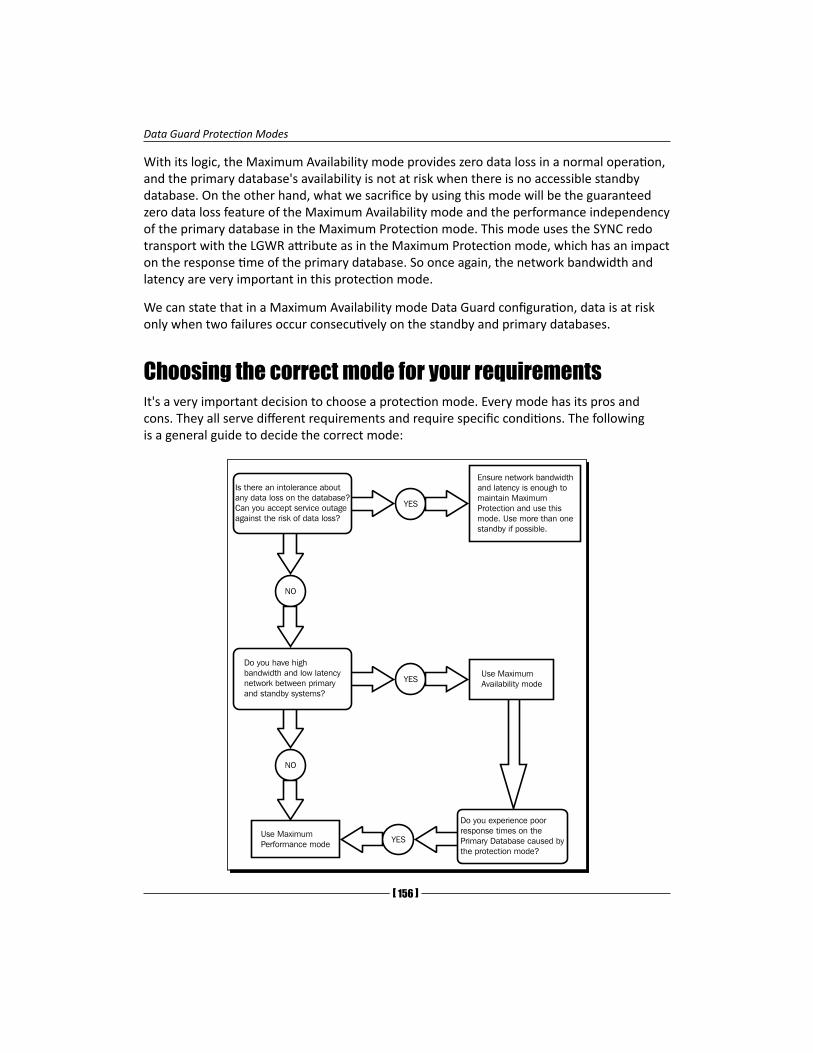
Data Guard Protection Modes
[ 156 ]
With its logic, the Maximum Availability mode provides zero data loss in a normal operation, and the primary database's availability is not at risk when there is no accessible standby database. On the other hand, what we sacrifice by using this mode will be the guaranteed zero data loss feature of the Maximum Availability mode and the performance independency of the primary database in the Maximum Protection mode. This mode uses the SYNC redo transport with the LGWR attribute as in the Maximum Protection mode, which has an impact on the response time of the primary database. So once again, the network bandwidth and latency are very important in this protection mode.
We can state that in a Maximum Availability mode Data Guard configuration, data is at risk only when two failures occur consecutively on the standby and primary databases.
Choosing the correct mode for your requirementsIt's a very important decision to choose a protection mode. Every mode has its pros and cons. They all serve different requirements and require specific conditions. The following is a general guide to decide the correct mode:
Is there an intolerance about
any data loss on the database?
Can you accept service outage
against the risk of data loss?
NO
Do you have high
bandwidth and low latency
network between primary
and standby systems?
NO
Use Maximum
Performance mode
YES
Ensure network bandwidth
and latency is enough to
maintain Maximum
Protection and use this
mode. Use more than one
standby if possible.
YESUse Maximum
Availability mode
YES
Do you experience poor
response times on the
Primary Database caused by
the protection mode?

Chapter 5
[ 157 ]
We've now learned the properties of the data protection modes and we're able to determine the correct mode according to our needs. Note that, if we decide to use the Maximum Protection or Maximum Availability modes but encounter performance problems, we should try to tune the database, server, disk, and network infrastructure before scaling down the data protection level.
Changing Data Guard protection modeAs mentioned earlier, changing the protection mode of Data Guard's configuration is not a challenging task, and it can be performed dynamically by using the SQL*Plus, DGMGRL or Enterprise Manager Cloud Control.
Let's see the examples of switching between protection modes using different interfaces.
Time for action – changing the protection mode with SQL*PlusNow we'll convert Data Guard's configuration from Maximum Performance to Maximum Protection and then to the Maximum Availability mode using SQL*Plus commands. At the end, we'll convert it back to the Maximum Performance mode.
1. We have a physical standby configuration, which is in the Maximum Performance mode (by default) with ASYNC redo transport, without standby redo logs, and does not use Real-Time Apply. We'll try to convert it to the Maximum Protection mode. Let's execute the conversion command in the primary database without any change in the configuration as follows:SQL> SELECT PROTECTION_MODE FROM V$DATABASE;
PROTECTION_MODE--------------------MAXIMUM PERFORMANCE
SQL> ALTER DATABASE SET STANDBY DATABASE TO MAXIMIZE PROTECTION;ALTER DATABASE SET STANDBY DATABASE TO MAXIMIZE PROTECTION *ERROR at line 1:ORA-01126: database must be mounted in this instance and not open in any instance

Data Guard Protection Modes
[ 158 ]
2. It's not possible to convert a standby in the Maximum Performance mode to the Maximum Protection and Maximum Availability modes when the primary database is open. We need to put the primary in a mount state in order to make this change. We can use use the following query:SQL> SHUTDOWN IMMEDIATESQL> STARTUP MOUNTSQL> ALTER DATABASE SET STANDBY DATABASE TO MAXIMIZE PROTECTION;
Database altered.
SQL> ALTER DATABASE OPEN;alter database open*ERROR at line 1:ORA-03113: end-of-file on communication channelProcess ID: 24904Session ID: 113 Serial number: 3
3. We've restarted the primary database in the mount mode and changed the protection mode. However, when we tried to open it, we encountered an ORA-03113 error. We can see why the database raised this error in the alert logfile as follows:LGWR: Destination LOG_ARCHIVE_DEST_2 is using asynchronous network I/O
LGWR: Minimum of 1 synchronous standby database required
Errors in file /u01/app/oracle2/diag/rdbms/TURKEY_UN/TURKEY/trace/TURKEY_lgwr_24854.trc:
ORA-16072: a minimum of one standby database destination is required
4. The LOG_ARCHIVE_DEST_2 parameter, which is used for the physical standby database log transport, is defined with the ASYNC attribute that is used for the Maximum Performance protection mode. In order to convert the database to Maximum Protection or Maximum Availability, we must change the ASYNC attribute to SYNC as follows:SQL> ALTER SYSTEM SET LOG_ARCHIVE_DEST_2='SERVICE=INDIA LGWR SYNC VALID_FOR=(ONLINE_LOGFILES,PRIMARY_ROLE) DB_UNIQUE_NAME=INDIA_UN';
System altered.

Chapter 5
[ 159 ]
We should also change the LOG_ARCHIVE_DEST_n parameter, which is "VALID_FOR = PRIMARY_ROLE", in the standby database to the SYNC redo transport mode. If we don't, the protection mode will not operate after a switchover because ASYNC cannot be used with the Maximum Protection mode. This step needs to be executed whenever changing the protection mode requires a redo transport mode change.
SQL> ALTER DATABASE OPEN;alter database open*ERROR at line 1:ORA-03113: end-of-file on communication channelProcess ID: 25062Session ID: 113 Serial number: 3
5. We encountered the same error. Let's check the alert log again, shown as follows:ORA-16086: Redo data cannot be written to the standby redo log
LGWR: Error 16086 verifying archivelog destination LOG_ARCHIVE_DEST_2
Destination LOG_ARCHIVE_DEST_2 is UNSYNCHRONIZED
LGWR: Error 16086 disconnecting from destination LOG_ARCHIVE_DEST_2 standby host 'INDIA'
LGWR: Continuing...
LGWR: Minimum of 1 applicable standby database required
Errors in file /u01/app/oracle2/diag/rdbms/TURKEY_UN/TURKEY/trace/TURKEY_lgwr_25020.trc:
ORA-16072: a minimum of one standby database destination is required
6. In order to set Maximum Protection or Maximum Availability modes, we must create standby redo logfiles in the standby database. Stop Redo Apply, create standby redo logs and start Redo Apply again as Real-Time Apply on the standby database:SQL> ALTER DATABASE RECOVER MANAGED STANDBY DATABASE CANCEL;
Database altered.
SQL> alter database add standby logfile group 4 size 52428800;SQL> alter database add standby logfile group 5 size 52428800;SQL> alter database add standby logfile group 6 size 52428800;SQL> alter database add standby logfile group 7 size 52428800;

Data Guard Protection Modes
[ 160 ]
In Chapter 2, Configuring Oracle Data Guard Physical Standby Database, remember we mentioned that the standby redo log group number must be one more than that of the online redo log group number, and the size of standby redo logfiles must be the same as that of online redo logfiles.
SQL> ALTER DATABASE RECOVER MANAGED STANDBY DATABASE USING CURRENT LOGFILE DISCONNECT FROM SESSION;
Database altered.
7. Start the primary database and query the data protection mode as follows:SQL> STARTUP MOUNTSQL> ALTER DATABASE OPEN;
Database altered.
SQL> SELECT PROTECTION_MODE FROM V$DATABASE;
PROTECTION_MODE--------------------MAXIMUM PROTECTION
8. We can see from the following code that the mode changes the information on the standby database alert log also:Completed: ALTER DATABASE RECOVER MANAGED STANDBY DATABASE USING CURRENT LOGFILE DISCONNECT FROM SESSION
RFS[5]: Assigned to RFS process 1086
RFS[5]: Identified database type as 'physical standby': Client is LGWR SYNC pid 21839
Primary database is in MAXIMUM PROTECTION mode
Changing standby controlfile to MAXIMUM PROTECTION mode
9. Now try to shut down the standby database as shown in the following query:SQL> SHUTDOWN IMMEDIATEORA-01154: database busy. Open, close, mount, and dismount not allowed now

Chapter 5
[ 161 ]
10. As you can see, it's not possible to shut down a standby database in the Maximum Protection mode if it's the only standby database alive. We'll see the following lines in the standby database alert log when we try to shut it down:Attempt to shut down Standby Database
Standby Database operating in NO DATA LOSS mode
Detected primary database alive, shutdown primary first, shutdown aborted
11. Now kill the SMON process to simulate a failure on the standby database server as follows:$ ps -ef |grep smon_INDIAoracle 7064 1 0 Sep16 ? 00:00:00 ora_smon_INDIA$ kill -9 7064
12. The Oracle instance will be terminated in the standby database after the kill command. Now try modifying the primary database by inserting data into a table as shown in the following query:SQL> INSERT INTO HR.REGIONS VALUES (102,'TEST');
1 row created.
SQL> COMMIT;
13. The commit statement will wait and not be executed. At this stage, the primary database will not accept any change because of the Maximum Protection mode's characteristic. Then the instance will be terminated by LGWR as shown in the following alert log lines:Destination LOG_ARCHIVE_DEST_2 is UNSYNCHRONIZED
LGWR: All standby destinations have failed
******************************************************
WARNING: All standby database destinations have failed
WARNING: Instance shutdown required to protect primary
******************************************************
LGWR (ospid: 21839): terminating the instance due to error 16098
Instance terminated by LGWR, pid = 21839
Mount the standby database and start recovery at this stage.

Data Guard Protection Modes
[ 162 ]
14. Now let's try to change the data protection mode to Maximum Availability as shown in the following query:SQL> ALTER DATABASE SET STANDBY DATABASE TO MAXIMIZE AVAILABILITY;
Database altered.
15. It's possible to perform this protection mode change without putting the primary database in the mount state. We can see the change in the standby database alert log as follows:Primary database is in MAXIMUM AVAILABILITY mode
Changing standby controlfile to MAXIMUM AVAILABILITY mode
Standby controlfile consistent with primary
16. Try to shut down the standby database as shown in the following query:SQL> SHUTDOWN IMMEDIATEORA-01109: database not openDatabase dismounted.ORACLE instance shut down.
17. It's possible to shut down the standby database in the Maximum Availability mode. It's also possible to modify the primary database when there is no standby alive, as shown in the following query:SQL> INSERT INTO HR.REGIONS VALUES (102,'TEST');
1 row created.
SQL> COMMIT;
Commit complete.
18. In this step, we'll change the protection mode back to Maximum Performance. Don't forget to set the LOG_ARCHIVE_DEST_n attribute to ASYNC as shown in the following query:SQL> ALTER DATABASE SET STANDBY DATABASE TO MAXIMIZE PERFORMANCE;
Database altered.
SQL> ALTER SYSTEM SET LOG_ARCHIVE_DEST_2='SERVICE=INDIA LGWR ASYNC VALID_FOR=(ONLINE_LOGFILES,PRIMARY_ROLE) DB_UNIQUE_NAME=INDIA_UN';
System altered.

Chapter 5
[ 163 ]
What just happened?We've seen how to change the data protection mode of a Data Guard configuration using the SQL* Plus command line interface. If you didn't set up Data Guard broker or Cloud Control, this is the only way to change the protection mode.
Another way of performing protection mode changes in Data Guard is using Data Guard broker. If Data Guard broker was configured and being used, then it's recommended to use the broker in order to change the protection mode.
Time for action – changing the protection mode with Data Guard broker
Now execute the following steps in order to use Data Guard broker commands for changing the Data Guard protection mode:
1. We now have Maximum Performance as the default protection mode in our configuration. Let's check it through DGMGRL. We can connect the interface from the primary or standby as follows:$ dgmgrlDGMGRL for Linux: Version 11.2.0.1.0 - 64bit ProductionCopyright (c) 2000, 2009, Oracle. All rights reserved.Welcome to DGMGRL, type "help" for information.DGMGRL> CONNECT /DGMGRL> SHOW CONFIGURATION;Configuration - PACKT Protection Mode: MaxPerformance Databases: TURKEY_UN - Primary database INDIA_UN - Physical standby databaseFast-Start Failover: DISABLEDConfiguration Status:SUCCESS
2. Try to convert the configuration from Maximum Performance to the Maximum Availability mode as shown in the following command line:DGMGRL> EDIT CONFIGURATION SET PROTECTION MODE AS MaxAvailability;
Error: ORA-16627: operation disallowed since no standby databases would remain to support protection mode Failed.
Again, we should remember that we have to set the SYNC attribute of log_archive_dest_n before converting the protection mode from Maximum Performance to Maximum Availability and Maximum Protection.

Data Guard Protection Modes
[ 164 ]
3. Check and then change the log transport service attribute via DGMGRL, as shown in the following statements:DGMGRL> SHOW DATABASE VERBOSE 'TURKEY_UN' LogXptMode;
LogXptMode = 'ASYNC'
DGMGRL> SHOW DATABASE VERBOSE 'INDIA_UN' LogXptMode;
LogXptMode = 'ASYNC'
4. The log transport service attribute should be changed for both the primary and standby databases as shown in the following command line:
For primary:DGMGRL> EDIT DATABASE 'TURKEY_UN' SET PROPERTY LOGXPTMODE='SYNC';
Property "logxptmode" updated
DGMGRL> SHOW DATABASE VERBOSE 'TURKEY_UN' LogXptMode;
LogXptMode = 'SYNC'
For standby:
DGMGRL> EDIT DATABASE 'INDIA_UN' SET PROPERTY LOGXPTMODE='SYNC';
Property "logxptmode" updated
DGMGRL> SHOW DATABASE VERBOSE 'INDIA_UN' LogXptMode;
LogXptMode = 'SYNC'
5. Ensure that the standby redo logs exist and are created with the correct size on the standby database, as shown in the following query:SQL> select group#,bytes from v$standby_log;
GROUP# BYTES---------- ---------- 4 52428800 5 52428800 6 52428800 7 52428800
6. Now change the protection mode to Maximum Availability as shown in the following command line:DGMGRL> EDIT CONFIGURATION SET PROTECTION MODE AS MaxAvailability;
Succeeded.

Chapter 5
[ 165 ]
7. Check the configuration status as follows:DGMGRL> SHOW CONFIGURATION;Configuration - PACKT Protection Mode: MaxAvailability Databases: TURKEY_UN - Primary database INDIA_UN - Physical standby databaseFast-Start Failover: DISABLEDConfiguration Status:SUCCESS
The Protection status is changed to Maximum Availability. Ensure that the configuration status is SUCCESS.
What just happened?We've successfully changed the protection mode from Maximum Performance to Maximum Availability using the DGMGRL command line interface.
Have a go hero - protection mode transitions with DGMGRLNow change the Data Guard protection mode from Maximum Availability to Maximum Protection via DGMGRL. You should be able to make this change without restarting the primary database. Then try mode transition from Maximum Performance to Maximum Protection where you'll be prompted with the following warning:
ORA-16570: database needs restart
It's time to see how the protection mode can be changed with some clicks. Enterprise Manager Cloud Control offers great for monitoring and managing Data Guard environments. Changing the protection mode is also quite easy with this interface.
Time for action – changing the protection mode with Enterprise Manager Cloud Control
The following steps must be performed in order to change the protection modes of Data Guard's configuration using Enterprise Manager Cloud Control:
1. On the database's home page, click on Availability and then on Data Guard Administration.

Data Guard Protection Modes
[ 166 ]
2. In the Data Guard Administration page, we see the current protection mode of Data Guard. The mode is Maximum Protection and we'll change it to Maximum Availability by clicking on Protection Mode as shown in the following screenshot:

Chapter 5
[ 167 ]
3. Next, we will see the Change Protection Mode page with options and their brief explanations. Select Maximum Availability and click on Continue as shown in the following screenshot:
4. The next page will show you the standby databases in the Data Guard configuration. If there's more than one standby, we can select one or more to support the protection mode. Select the database and click on Continue as shown in the following screenshot:

Data Guard Protection Modes
[ 168 ]
5. In the next page, we'll see a confirmation page; click on Yes to continue.
6. The protection mode will be changed to Maximum Availability and we'll see the following Data Guard Administration page showing the new protection mode of the configuration:
7. Now, let's change the protection mode to Maximum Performance, which requires a modification to LOG_ARCHIVE_DEST_n to convert the SYNC redo transport mode to ASYNC. Click on Protection Mode on the Data Guard Administration page, select Maximum Performance, and click on Continue.
8. We'll come up with a confirmation page, which indicates that the redo transport mode of SYNC will be changed to ASYNC. Click on Yes to continue as shown in the following screenshot:

Chapter 5
[ 169 ]
9. The protection mode will be changed in this step, and again we'll be directed to the Data Guard Administration page showing the new protection mode. If we check the primary database alert logfile during this stage, we can see the LOG_ARCHIVE_DEST_n parameter showing the standby database that is changed to support the ASYNC redo transport.
10. Now let's change it back to the Maximum Protection mode. As we know, this operation will require you to restart the primary database. Let's see how Cloud Control handles this. When we repeat the same steps mentioned previously to change the protection mode and then click on Continue after selecting the standby database, we'll see the following page, which requires operating the system credentials for a user who can access the Oracle Home. This is the user that will be used to stop and mount the primary database. Enter a username and password or use a previously saved credential, if it exists. Click on Continue as shown in the following screenshot:

Data Guard Protection Modes
[ 170 ]
11. A confirmation screen will indicate that the primary database will be restarted. Click on Yes to continue, as shown in the following screenshot:
12. We will see the process of changing the protection mode in the following screen. This may take some time because it will include a restart of the primary database:
13. During this process, read the alert logfile of the primary database. You'll see the ALTER SYSTEM statement change the LOG_ARCHIVE_DEST_n parameter to the SYNC attribute. Then shutdown immediate and startup mount will be executed. After the instance starts, we can see that the following changes are applied automatically:ALTER DATABASE SET STANDBY DATABASE TO MAXIMIZE PROTECTION;
ALTER SYSTEM SET log_archive_trace=0 SCOPE=BOTH SID='TURKEY';
ALTER SYSTEM SET log_archive_format='%t_%s_%r.arc' SCOPE=SPFILE SID='TURKEY';

Chapter 5
[ 171 ]
ALTER SYSTEM SET standby_file_management='MANUAL' SCOPE=BOTH SID='*';
ALTER SYSTEM SET archive_lag_target=0 SCOPE=BOTH SID='*';
ALTER SYSTEM SET log_archive_max_processes=4 SCOPE=BOTH SID='*';
ALTER SYSTEM SET log_archive_min_succeed_dest=1 SCOPE=BOTH SID='*';
These are the Cloud Control managed automatic changes. We should check the values and change the parameters again if necessary. For example, the LOG_ARCHIVE_MAX_PROCESSES value of 4 may not be sufficient for our Data Guard environment if there is an excessive redo generation rate. So we should set it to a higher value.
14. When the process is completed, you'll be directed to the Data Guard Administration page, which shows the new protection mode value as Maximum Protection, as shown in the following screenshot:

Data Guard Protection Modes
[ 172 ]
However, we see some errors and the status of the database is shown in the screenshot. If we examine the alert log, we can see that the primary database is mounted but not opened. Open the database manually with the ALTER DATABASE OPEN statement to complete the action.
What just happened?Congratulations, all the Data Guard management interfaces are used to switch between protection modes and you're ready to perform all kind of mode-change operations. The SQL*Plus interface is the most administrator-controlled interface, but it also has the most number of manual options. Administration is simpler but less controlled with DGMGRL and Cloud Control.
Pop quiz – precautions for primary database availability issue in the Maximum Protection mode
Q1. The discouraging part of using the Maximum Protection mode is its effect on the primary database's performance and availability. Performance is affected by the latencies of the log transport and the apply services, which can be fixed by increasing the network, server, and disk performances. The primary database availability issue is caused by the inaccessibility of the standby database. What can we do to minimize the risk of the standby database's inaccessibility?
SummaryWe've reached the end of this chapter and we have learned the details of the Data Guard protection modes and how to change the mode with all possible interfaces. The protection mode of the Data Guard configuration is an important consideration. Before designing the network, server, and disk infrastructure for the Data Guard installation, we should first decide the protection mode depending on the business requirements.
The next chapter will include information about role transitions in Data Guard. Also, details for performing switchover and failover operations will be covered for both physical and logical standby database configurations.

6Data Guard Role Transitions
Switchover and failover are the role transition options in Data Guard. Physical and logical standby databases have different practices in this context. In this chapter we will cover the necessary steps to accomplish a successful switchover or failover in a physical or logical standby database environment.
Role transition considerationsIn Data Guard, we can simply distinguish switchover and failover as planned and unplanned role transitions. A switchover is a planned role transition between the primary database and one of its standby databases. Switchover can be considered to reduce downtime during scheduled maintenance on the primary system or to test stability for future role transitions. Switchover guarantees no data loss. Using switchover, the primary database can transit to a standby role, and the standby database can transit to the primary role at any point of time. Switchover can be performed through Cloud Control, the Data Guard broker command-line interface, or by issuing SQL*Plus commands.
Once the standby database is configured and is functioning properly, you can test switchover. Switchover is used to reduce primary database downtime during any OS or hardware upgrades, which require an extended outage. A switchover allows the primary database to switch roles with its standby database. Once the maintenance on the primary server has been performed, you can switch the databases back to their original roles.
In the case of primary database failure, you need to perform failover to transit from the standby database role to the primary role. After a failover, the original primary database cannot participate in the Data Guard configuration without the use of flashback. So if the original primary database is still accessible, you should always consider a switchover first.

Data Guard Role Transitions
[ 174 ]
A failover is performed when the production database (all instances of an Oracle RAC production database) fails. By performing failover, one of the standby databases is transitioned to take over the production role, allowing business operations to continue. Once the failover is complete and applications have resumed, the administrative staff can turn its attention to resolving the problems with the failed system. Failover may or may not result in data loss depending on the Data Guard protection mode in effect at the time of the failover.
SwitchoverA switchover is a planned role transition between the primary database and a standby database within the same Data Guard configuration. Switchover is used to reduce the downtime of production databases during any scheduled maintenance on the production server, to test the server capability or any changes at hardware level, or to check future role transitions. During switchover, there is no data loss and the role of each database changes from primary database to standby database and vice versa as shown in the following diagram:
Before Switchover After Switchover
Primary Instance
Turkey_un
RedoStandby Instance
India_un
Database Database
TURKEY INDIA
Database Database
Standby Instance
Turkey_un
Primary Instance
India_un
Redo
TURKEY INDIA
Data Guard switchover is also a good way to move databases to new hardware. We can perform RMAN backup and restore the database to the new server, but the disadvantage of using RMAN is that we have to open the database with resetlogs. Another alternative would be shutting down the database and copying all files onto the new server. But this method will take a lot of time depending on the size of the database, and also it's not easy to perform this method in the ASM framework.
Then what is the alternate solution to move the database to another server without OPEN RESETLOGS or the option of COLD backup?

Chapter 6
[ 175 ]
Data Guard is a good choice in this situation. The following steps can be performed to move a database to new servers using Data Guard:
1. Implement Data Guard and create a standby database on the new hardware.
2. Test the new hardware using the standby database read-only (Active Data Guard) or the standby database read-write (snapshot standby) option.
3. Perform switchover in a planned maintenance window.
4. Decommission the old primary server hardware.
We always initiate switchover from the primary database. As stated before, switchover can be performed using SQL*Plus, the Data Guard broker, or Enterprise Manager Cloud Control. Whenever we initiate switchover, redo generation will be stopped immediately and no other operations will be allowed to be performed and the current log sequence will be archived, which is also known as End of Redo (EOR). You can monitor the EOR status from v$archived_log. After switchover, we can see when and during which log sequence the switchover has been performed as seen in the following code:
SQL> select thread#,sequence#,END_OF_REDO,END_OF_REDO_TYPE from v$archived_log; THREAD# SEQUENCE# END END_OF_RED---------- ---------- --- ---------- 1 337 NO 1 337 NO 1 338 YES SWITCHOVER
If it is an RAC database, redo will be archived from each of the active instances. Once again, the switchover process sends a flag to all of instances for the final redo to be generated by the log switch. If the Data Guard configuration has multiple standby databases, the primary database will be switched to one of the standby databases. In this case, the final online redo logs will be transferred from the primary database to all of the standby databases.
While the process of switchover is going on, restarting of primary and standby databases is expected behavior. Once switchover completes and it is properly configured, redo will automatically be transferred from the new primary database to the new standby database.
One last note about the change in switchover procedures of RAC databases in 11gR2:
� In versions before 11gR2, if the primary and standby were RAC databases, you had to shut down all of the primary instances except one and also shut down all of the standby instances except one. Once you perform switchover successfully, you can bring back the remaining cluster instances for both primary and standby databases.
� In the 11gR2 version, you still have to shut down all primary instances except one. However, it's not mandatory to close standby instances. We can perform switchover while all standby instances are in mount state.

Data Guard Role Transitions
[ 176 ]
Performing switchover with a physical standby database using SQL*PlusNow we are going to perform switchover between the primary and standby databases. Performing the switchover operation is not a big deal if we have prepared the environment and verified our configuration. In order to do this, we must control the related initialization parameters on both the primary and standby databases and check the network bandwidth between primary and standby locations. If we are going to use the current standby as the future production database, we must check for the hardware resources of the server. The next exercise will show how we can prepare the Data Guard environment for a switchover.
Time for action – preliminary tests before performing switchover
In order to perform switchover, we have to prepare and verify both the primary and standby databases. Perform the following steps:
1. Check the standby redo logfile status on the primary database as follows:SQL> select group#,member,type from v$logfile where type='STANDBY';
GROUP# MEMBER TYPE---------- ---------------------------------------------- ------- .. ........ 14 /u01/app/oracle/oradata/orcl/standby_redo05.log STANDBY 16 /u01/app/oracle/oradata/orcl/standby_redo06.log STANDBY6 rows selected.
Standby redo logfiles should have been created on the primary database; this is so that after performing switchover, the new standby database can receive redo using standby redo logfiles. This will help us save time in the post-configuration steps.
2. Verify the log archive destination on the standby database, which will be active after the switchover and will be used to transfer redo to the new standby database as follows:SQL> show parameter log_archive_dest_2NAME TYPE VALUE-------------------- ------ ------------------------------log_archive_dest_2 string SERVICE=TURKEY LGWR ASYNC VALID_FOR= (ONLINE_LOGFILES,PRIMARY_ROLE) DB_UNIQUE_NAME=turkey_un'

Chapter 6
[ 177 ]
3. Verify if the temporary files of the temporary tablespaces are created on the standby database. Compare the result of the following query from the primary and standby databases.SQL> select file_name,bytes/1024/1024 "Size MB",maxbytes/1024/1024 "MaxSize MB",autoextensible from dba_temp_files;
FILE_NAME Size MB MaxSize MB AUT---------------------------------------- ------- ---------- ---/u02/app/oracle/oradata/orcl/temp01.dbf 20 32767.9844 YES
If temporary files don't exist on the standby database or the number and size of temporary files don't match in the primary and standby databases, create or modify the temporary files on the standby database properly.
If you have created a standby database using the RMAN command DUPLICATE in Oracle 11gR2, the temporary files will be created by default.
4. Check if any offline datafiles exist on primary as well as standby. If they do exist, bring them online using the following code:SQL> select name from v$datafile where status='OFFLINE';
5. Verify the status of the redo transport and apply services against any gap and synchronization issues as follows:SQL> select db_unique_name, status, protection_mode, synchronization_status, synchronized from v$archive_dest_status where dest_id=2;
DB_UNIQUE_NAME STATUS PROTECTION_MODE SYNCHRONIZATION_STATUS SYN-------------- ------- ----------------- --------------------- ---INDIA_UN VALID MAXIMUM PERFORMANCE CHECK CONFIGURATION YES
6. In the previous output, you can ignore the synchronization status CHECK CONFIGURATION if the database is in Maximum Performance mode. If the configuration is either Maximum Protection or Availability, the status OK will be returned when there are no synchronization issues. Check the maximum archived log sequences on the primary and standby databases.
� From primary – to obtain the maximum number of archived log sequences for each instance, the following code can be used:SQL> select thread#,max(sequence#) from v$archived_log group by thread#;

Data Guard Role Transitions
[ 178 ]
THREAD# MAX(SEQUENCE#)---------- -------------- 1 335
� From standby – to obtain the maximum number of archived log sequences for each instance, the following code can be used:SQL> select thread#,max(sequence#) from v$archived_log where applied='YES' group by thread#;
THREAD# MAX(SEQUENCE#)---------- -------------- 335
7. Now verify if the MRP process is running or not by running the following statement on the standby database:SQL> select thread#,sequence#,process,status,client_process from v$managed_standby where thread#=1;
THREAD# SEQUENCE# PROCESS STATUS CLIENT_P---------- ---------- --------- ------------ -------- 1 335 ARCH CLOSING ARCH 1 333 ARCH CLOSING ARCH 1 334 ARCH CLOSING ARCH 1 336 MRP0 APPLYING_LOG N/A 1 336 RFS IDLE LGWR
The current sequence 336 is being written into the standby redo logfiles and the MRP process is applying this sequence at the same time.
8. It's also possible to query the v$dataguard_stats view on the standby database to check the synchronization status:SQL> select name,value,time_computed from v$dataguard_stats;
NAME VALUE TIME_COMPUTED ---------------------- ------------- --------------------transport lag +00 00:00:00 10/10/2012 15:07:51 apply lag +00 00:00:00 10/10/2012 15:07:51 apply finish time +00 00:00:00 10/10/2012 15:07:51estimated startup time 16 10/10/2012 15:07:51
SQL> !dateWed Oct 10 15:07:52 IST 2012

Chapter 6
[ 179 ]
9. Ensure that no backup jobs are running. Disable the RMAN and EXP/EXPDP backup jobs from CRONTAB if they exist.
10. If the primary and standby databases are monitored with EM Cloud/Grid Control and you're performing switchover using SQL*Plus or Data Guard broker, black out the database until the task is completed.
11. Set the JOB_QUEUE_PROCESSES parameter value to 0 so that no more jobs will be started. After the completion of switchover, reset it with the previous value.SQL> alter system set JOB_QUEUE_PROCESSES=0 scope=both sid='*';
12. If the primary database is RAC, ensure all the remaining primary instances except one are shut down. If Active Data Guard is in use, disable it and ensure that all standby instances are in the mount state.
13. It's advisable to take a full backup of the database either from primary or standby.
What just happened?We have just performed all the preliminary checks before performing switchover. Now we will explain how switchover will be performed, step by step, on primary and standby databases.
Time for action – switchover with a physical standby using SQL*Plus
Perform the following steps using the SQL*Plus connection for both the databases:
1. We have to check whether the primary database is ready for switchover to standby or not. Check the switchover status from the primary database by issuing the following command and verify that the status is either TO STANDBY or SESSIONS ACTIVE:SQL> select switchover_status from v$database;SWITCHOVER_STATUS--------------------TO STANDBY
The previous output shows that the primary database is ready to switch to the standby database role. The SESSIONS ACTIVE status indicates that some user sessions are still connected to the database. Such a case does not pose an obstacle for switchover. When output is SESSIONS ACTIVE, you have to perform switchover using the keyword WITH SESSION SHUTDOWN. This is so that those sessions will be terminated during the switchover.

Data Guard Role Transitions
[ 180 ]
2. Perform the switchover command from the primary database.SQL> alter database commit to switchover to physical standby with session shutdown;Database altered.
3. This step covers what actually happens during switchover in detail. We need to monitor the alert logfile of both the primary and standby databases in parallel. The different types of logfiles are as follows:
� The switchover-related log from the primary alert logfile:Wed Oct 10 16:12:26 2012
alter database commit to switchover to physical standby with session shutdown
ALTER DATABASE COMMIT TO SWITCHOVER TO PHYSICAL STANDBY [Process Id: 23631] (TURKEY)
� Prior to switchover, the current log sequence number is 335. After performing switchover, all the transactions will be written to the online redo logfiles and the log switch will be forced on the primary database.Wed Oct 10 16:12:30 2012
Archived Log entry 764 added for thread 1 sequence 336 ID 0x4e7c64e3 dest 1:
......
Waiting for potential switchover target to become synchronized...
Wed Oct 10 16:12:47 2012
Active, synchronized Physical Standby switchover target has been
� The MRP status on the standby database alert log:Wed Oct 10 16:12:47 2012
Media Recovery Log /u02/app/oracle/flash_recovery_area/INDIA_UN/archivelog/2012_10_10/o1_mf_1_337_87bn9793_.arc
Media Recovery Waiting for thread 1 sequence 338
� The log sequence 337 is also switched and applied on standby. Now all the processes will be terminated and the redo thread of each respective thread will be closed; no further log switches can be performed. At the end, EOR will be generated as follows:
ARCH: End-Of-Redo Branch archival of thread 1 sequence 338
Archived Log entry 767 added for thread 1 sequence 338 ID 0x4e7c64e3 dest 1:
.......

Chapter 6
[ 181 ]
Backup controlfile written to trace file /u01/app/oracle/diag/rdbms/turkey_un/TURKEY/trace/TURKEY_ora_23631.trc
Archivelog for thread 1 sequence 338 required for standby recovery
Switchover: Primary controlfile converted to standby controlfile succesfully.
� When EOR is generated, you can view the status of the sequence 338 from the primary database, as shown in the following code:SQL> select thread#,sequence#,END_OF_REDO,END_OF_REDO_TYPE from v$archived_log; THREAD# SEQUENCE# END END_OF_RED---------- ---------- --- ---------- 1 337 NO 1 337 NO 1 338 YES SWITCHOVER
� The sequence 338 including EOR will be applied on the standby database (INDIA) as shown in the following code:Resetting standby activation ID 1316775139 (0x4e7c64e3)
Media Recovery End-Of-Redo indicator encountered
Media Recovery Applied until change 3085369
MRP0: Media Recovery Complete: End-Of-REDO (INDIA)
MRP0: Background Media Recovery process shutdown (INDIA)
� After performing recovery, the switchover process will be completed on the old primary database (TURKEY) as shown in the following code:Wed Oct 10 16:12:58 2012
Switchover: Complete - Database shutdown required (TURKEY)
Completed: alter database commit to switchover to physical standby with session shutdown
� During switchover command execution on the primary database, if you monitor the switchover status of the standby database closely, you can capture it as shown in the following code:SQL> select switchover_status from v$database;SWITCHOVER_STATUS--------------------NOT ALLOWED
SQL> /SWITCHOVER_STATUS--------------------

Data Guard Role Transitions
[ 182 ]
SWITCHOVER PENDING
SQL> /SWITCHOVER_STATUS--------------------TO PRIMARY
4. Perform switchover from the standby database. By default the switchover status of the standby database will be NOT ALLOWED. After processing switchover from the primary database, during recovery the status will be changed to SWITCHOVER PENDING. Once End-of-Redo is applied on standby, the database will be ready to become primary as shown in the following code:SQL> SELECT SWITCHOVER_STATUS FROM V$DATABASE;SWITCHOVER_STATUS--------------------TO PRIMARY
5. Run the SWITCHOVER command on the standby database as shown in the following code:SQL> ALTER DATABASE COMMIT TO SWITCHOVER TO PRIMARY WITH SESSION SHUTDOWN;Database altered.
On the alert logfile you will see the following:Wed Oct 10 18:01:15 2012
ALTER DATABASE COMMIT TO SWITCHOVER TO PRIMARY WITH SESSION SHUTDOWN
ALTER DATABASE SWITCHOVER TO PRIMARY (INDIA)
Maximum wait for role transition is 15 minutes.
.............
SwitchOver after complete recovery through change 3085369
...............
Standby became primary SCN: 3085367
Switchover: Complete - Database mounted as primary
6. Now, from the new primary database (INDIA), you can check at what SCN the standby database role been changed, as shown in the following code:SQL> select CURRENT_SCN,STANDBY_BECAME_PRIMARY_SCN from v$database;CURRENT_SCN STANDBY_BECAME_PRIMARY_SCN----------- -------------------------- 3156173 3085367

Chapter 6
[ 183 ]
7. Change the open mode of the new primary to READ-WRITE. After successful switchover from standby to the primary database, the instance status will be MOUNTED as shown in the following code:SQL> select db_unique_name,database_role,open_mode from v$database;DB_UNIQUE_NAME DATABASE_ROLE OPEN_MODE-------------------- ---------------- --------------------INDIA_UN PRIMARY MOUNTED
Open the database with the following statement:
SQL> alter database open;Database altered.
8. Restart the new standby database and start Redo Apply. After switchover, the new standby instance will be in the NOMOUNT status.SQL> select status from v$instance;STATUS------------STARTED
Now perform a clean shutdown with SHUTDOWN IMMEDIATE and then start up the new standby database in the READ ONLY mode if Active Data Guard will be used. Then start Redo Apply on the standby database (TURKEY)
SQL> alter database recover managed standby database using current logfile disconnect from session;Database altered.
SQL> select db_unique_name,open_mode from v$database;DB_UNIQUE_NAME OPEN_MODE--------------- --------------------turkey_un READ ONLY WITH APPLY
If you have multiple standby databases in the Data Guard configuration, start Redo Apply on each standby database.
After starting Redo Apply on another standby database, whenever EOR is applied on the standby database, the MRP process will be terminated immediately. Then you have to start Redo Apply again.

Data Guard Role Transitions
[ 184 ]
Performing switchover with a physical standby database using brokerSwitchover can also be performed using the Data Guard broker. Managing switchover with the broker is very simple. In SQL*Plus, we have to manage commands from both the primary and standby databases. When using the broker, the SWITCHOVER command is executed from either the primary or the standby database.
Time for action – switchover with a physical standby using broker1. If the primary database is RAC and you perform switchover with the broker, it will
shut down all the remaining instances except one; and if there are any issues in terminating the instances, the switchover will exit without success. So ensure that all the primary instances are down except the one.
2. Even though the broker will verify the state of the both the primary and standby databases, it's recommended to check the database state manually as follows:DGMGRL> show configuration;
Configuration - PACKT
Protection Mode: MaxPerformance
Databases:
turkey_un - Primary database
INDIA_UN - Physical standby database
Fast-Start Failover: DISABLED
Configuration Status:
SUCCESS
3. Now connect to the DGMGRL and issue the command as shown in the following screenshot:

Chapter 6
[ 185 ]
When performing a switchover, connect the database to the DGMGRL using a complete password such as connect sys/******, because DGMGRL doesn't support OS authentication.
4. After performing the switchover, the broker configuration file is updated regarding the role transition.2012-10-11 13:08:31.463 02001000 1799321493 DMON: Switchover - updated Seq.MIV to 1.0 (2.1.1799321493), writing metadata to "/u01/home/oracle/product/11.2.0/db_1/dbs/dr2INDIA_UN.dat"
2012-10-11 13:08:31.477 02001000 1799321493 DMON: posting primary instances for SWITCHOVER phase 3
5. After updating the configuration file, the broker configuration restarts the new primary database in read-write mode and the new standby database will be terminated and restarted with the previous configuration; that is, the Read Only With Apply mode.
6. Now, after performing the switchover, check the configuration status using DGMGRL as follows:DGMGRL> show configuration;
Configuration - PACKT
Protection Mode: MaxPerformance
Databases:
INDIA_UN - Primary database
turkey_un - Physical standby database
Fast-Start Failover: DISABLED
Configuration Status:
SUCCESS
What just happened?We have discussed how to perform switchover from the primary database to the standby database and vice versa using SQL*Plus and also the Data Guard broker utility DGMGRL.
Performing switchover with a physical standby database using EM Cloud ControlAs discussed at the beginning of this chapter, we can use the Enterprise Manager Cloud Control Data Guard administration interface to perform the switchover operation. This is an easy but less controlled way of performing a switchover. Let's see how we use Cloud Control in this context.

Data Guard Role Transitions
[ 186 ]
Time for action – switchover with a physical standby using EM Cloud Control
Assuming a Cloud Control installation and Data Guard integration is already set up, perform the following steps on the Cloud Control interface.
1. On the Data Guard Administration home page, click on Switchover as shown in the following screenshot:
2. Enter credentials to connect the standby and primary hosts.
3. On the confirmation page, click on Yes to start the switchover. At the bottom of the screen, check Swap Monitoring Settings if you want the current Enterprise Manager monitoring settings (including metric thresholds) for the primary and standby databases to be swapped after the role change, as shown in the following screenshot:

Chapter 6
[ 187 ]
4. We'll see the switchover processing window on the next screen. A notification will appear, Switchover completed successfully, when the process is completed successfully. The following screenshot is the processing screen:
Similarly, we can use the Failover button on the Data Guard Administration home page to initiate a failover.
Performing switchover with a logical standby database using SQL*PlusSo far we have explained the switchover procedure between primary and physical standby databases. In the same manner, we can perform a switchover between the primary database and the logical standby database. However, there are some differences in this operation.
For versions above 11g, there's no need to shut down either the primary or the logical standby database for a switchover.

Data Guard Role Transitions
[ 188 ]
Time for action – switchover with a logical standby database using SQL*Plus
Now we will see a step-by-step approach to perform a switchover between the primary and the logical standby database:
1. Check the switchover status of the primary database. Ensure that the status is either TO STANDBY or SESSIONS ACTIVE; if so, you are safe to perform a switchover as shown in the following code:SQL> select switchover_status from v$database;SWITCHOVER_STATUS--------------------TO STANDBY
In case of RESOLVABLE GAP, wait until SQL was applied on the logical standby database; for other statuses, troubleshoot and fix the synchronization for the switchover process to be successful.
2. Prepare the primary database for switchover. Execute the following command from the primary database so that the current primary database will be accepted to perform a switchover to a logical standby database:SQL> alter database prepare to switchover to logical standby;Database altered.
On the primary alert log, issue the following command:
Fri Oct 12 08:50:50 2012
alter database prepare to switchover to logical standby
ALTER DATABASE PREPARE TO SWITCHOVER TO LOGICAL STANDBY (TURKEY)
Completed: alter database prepare to switchover to logical standby
3. After issuing the previous command, the switchover status will be PREPARING SWITCHOVER.
4. Prepare the logical standby database for switchover. After issuing the switchover initiation command from the primary database, you can execute the following code from the standby database:SQL> alter database prepare to switchover to primary;Database altered.

Chapter 6
[ 189 ]
On the standby alert log, issue the following command:
Fri Oct 12 08:51:55 2012
alter database prepare to switchover to primary
ALTER DATABASE SWITCHOVER TO PRIMARY (INDIA)
ALTER DATABASE PREPARE TO SWITCHOVER TO PRIMARY (INDIA)
5. Perform the switchover from the primary database. After performing step 4, the switchover status in the current primary database will change from PREPARING SWITCHOVER to TO LOGICAL STANDBY. In this stage, both the databases wait for acknowledgment from each other. Now check the switchover status on the primary database as shown in the following lines:SQL> select switchover_status from v$database;SWITCHOVER_STATUS--------------------TO LOGICAL STANDBY
6. You must ensure that there are no active transactions during switchover. Therefore, clean up the transactions and proceed to switchover over. The SWITCHOVER command waits until this transaction is complete, as shown in the following code:SQL> select addr,status,flag from v$transaction;ADDR STATUS FLAG---------------- ---------------- ----------000000008EF5A950 ACTIVE 7683
SQL> select username,status from v$session where username is not null and username not in ('SYS','PUBLIC');USERNAME STATUS---------- --------PACKT ACTIVE
7. Even after you perform the previous step, the session is still in the ACTIVE mode. Let's see what happens in the alert logfile when the switchover is issued, as follows:SQL> alter database commit to switchover to logical standby;
On the primary alert logfile you will see the following:
Fri Oct 12 14:51:12 2012
alter database commit to switchover to logical standby
ALTER DATABASE COMMIT TO SWITCHOVER TO LOGICAL STANDBY (TURKEY)
.........
Fri Oct 12 14:52:25 2012
Waiting for transactions in flight at scn 0x0000.003337d6 to complete

Data Guard Role Transitions
[ 190 ]
Perform commit from the user session as follows:
SQL> show userUSER is "PACKT"SQL> commit;Commit complete.
After performing commit from the user session, the switchover will be processed successfully and we'll see Database altered as the output on the session in which we ran the switchover statement, as shown in the following code:SQL> alter database commit to switchover to logical standby;Database altered.
On the primary alert logfile you can perform the following:
LOGSTDBY: Switchover complete (TURKEY)
LOGSTDBY: enabling scheduler job queue processes.
JOBQ: re-enabling CJQ0
Completed: alter database commit to switchover to logical standby
Note that during switchover, log apply services will be stopped on the logical standby database. Now check the latest status on the former primary database using the following code:
SQL> select db_unique_name,database_role,open_mode from v$database;DB_UNIQUE_NAME DATABASE_ROLE OPEN_MODE--------------- ---------------- --------------------turkey_un LOGICAL STANDBY READ WRITE
8. Perform the switchover from the logical standby database.
9. We have completed the required steps on the primary database. Now check the status on the current logical standby database (INDIA) and issue the following switchover command:SQL> select switchover_status from v$database;SWITCHOVER_STATUS--------------------TO PRIMARYSQL> alter database commit to switchover to primary;
Database altered.

Chapter 6
[ 191 ]
The switchover from the logical standby to the primary was successful, as can be seen in the following command-line output:Fri Oct 12 15:04:43 2012
alter database commit to switchover to primary
ALTER DATABASE SWITCHOVER TO PRIMARY (INDIA)
ALTER DATABASE COMMIT TO SWITCHOVER TO PRIMARY (INDIA)
LOGSTDBY: Successful close of the current log stream:
LOGSTDBY: primary: [1316772835]
.............
Completed: alter database commit to switchover to primary
10. During switchover, there will be zero data loss and the session will still be in the ACTIVE mode. The following output shows that the session is still in the ACTIVE mode on the former primary database:SQL> select sysdate from dual;SYSDATE--------------------12-OCT-2012 15:10:10SQL> show userUSER is "PACKT"SQL> select username,logon_time from v$session where username is not null and username not in ('SYS','PUBLIC');USERNAME LOGON_TIME---------- --------------------PACKT 12-OCT-2012 14:44:06
11. Check the status of new primary database using the following code:SQL> select db_unique_name,database_role,open_mode from v$database;DB_UNIQUE_NAME DATABASE_ROLE OPEN_MODE--------------- ---------------- --------------------india_un PRIMARY READ WRITE
12. Start SQL Apply and monitor the logical standby database. Both the new primary database and the logical standby database are ready. Now start SQL Apply on the new logical standby database as follows:SQL> !ps -ef|grep lsporacle 24824 8569 0 16:06 pts/1 00:00:00 /bin/bash -c ps -ef|grep lspSQL> alter database start logical standby apply immediate;Database altered.

Data Guard Role Transitions
[ 192 ]
SQL> !ps -ef|grep lsporacle 24860 1 1 16:08 ? 00:00:01 ora_lsp0_TURKEYoracle 24914 8569 0 16:09 pts/1 00:00:00 /bin/bash -c ps -ef|grep lsp
On the standby alert logfile you will see the following:Fri Oct 12 16:08:01 2012
alter database start logical standby apply immediate
ALTER DATABASE START LOGICAL STANDBY APPLY (TURKEY)
with optional part IMMEDIATE
Attempt to start background Logical Standby process
Fri Oct 12 16:08:01 2012
LSP0 started with pid=35, OS id=24860
Completed: alter database start logical standby apply immediate
What just happened?We've seen the step-by-step approach to perform a switchover between the primary and logical standby database using SQL*Plus. We've also monitored switchover transactions by tracking the alert logfile on both databases.
Pop quizQ1. You've prepared either the primary or the standby database to perform switchover and then you have decided not to perform switchover. Is it possible to cancel it?
Performing switchover with a logical standby database using brokerManaging any role transition or other administrative tasks of Data Guard with the broker is quite easy. Now we will see the step-by-step approach of a switchover between primary and logical standby databases using the DGMGRL utility.
Time for action – switchover with a logical standby using brokerPerform the following steps to change the roles of the primary and logical standby databases:
1. Check the configuration of Data Guard. In the broker's configuration, we have one primary database and one logical standby database already configured. Ensure that the status is SUCCESS before performing a switchover as shown in the following code:DGMGRL> show configuration;Configuration - PACKT

Chapter 6
[ 193 ]
Protection Mode: MaxPerformance Databases: INDIA_UN - Primary database turkey_un - Logical standby databaseFast-Start Failover: DISABLEDConfiguration Status:SUCCESS
2. Perform a switchover using the DGMGRL command. Before performing switchover, connect to the DGMGRL utility using the complete username and password of the SYS user instead of connecting with / as shown in the following code:DGMGRL> connect sys/*******Connected.
Once authenticated, initiate the switchover with the following command as shown in the screenshot:
On the alert logfile you will see the following:
2012-10-12 17:24:03.052 02001000 1399597225 DMON: posting standby instances for SWITCHOVER phase 5
2012-10-12 17:24:03.053 INSV: Received message for inter-instance publication
............
2012-10-12 17:23:05.766 02001000 1399597225 DMON: dispersing message to standbys for SWITCHOVER phase BEGIN
3. Check the configuration of Data Guard once again. After performing a switchover, the broker will start SQL Apply on the new logical standby database as shown in the following code:[oracle@oracle-ha dbs]$ ps -ef|grep lsporacle 14604 1 0 17:23 ? 00:00:02 ora_lsp0_INDIAoracle 15232 6342 0 17:31 pts/1 00:00:00 grep lsp
DGMGRL> show configuration;Configuration - PACKT Protection Mode: MaxPerformance Databases:

Data Guard Role Transitions
[ 194 ]
turkey_un - Primary database INDIA_UN - Logical standby databaseFast-Start Failover: DISABLEDConfiguration Status:SUCCESS
What just happened?We have successfully completed the switchover operation in a logical standby Data Guard configuration using the Data Guard broker.
FailoverFailover is initiated when a serious problem exists on the primary database, making it inaccessible. This problem generally arises from hardware or software errors on the server or storage layer; also, a disaster may cause complete or partial loss of services. In such cases, we can convert a standby database role to primary by performing failover and continue providing it with production database service. Performing a Data Guard failover operation for production purposes is a serious consideration and needs a lot of caution. The following considerations are important in this context:
� Failover decision must be taken with regard to the service Recovery Time Objective (RTO) value.
� The standby database hardware must be powerful enough to sustain production load.
� Multiple standby databases are recommended; this is so that data protection continues after a failover operation.
� If the flashback database is not enabled on the primary database, after a failover it's not possible to include the old primary database into the Data Guard configuration again. This means we'll have to restore the database on the primary side. If flashback is enabled, it's possible to reinstate the failed primary database without a full restore operation. The following diagram explains the failover process:

Chapter 6
[ 195 ]
Before Failover After Failover
Primary Instance
Turkey_un
RedoStandby Instance
India_un
Database Database
TURKEY INDIA
Database Database
Primary Instance
Turkey_un
Primary Instance
India_un
Redo
TURKEY INDIA
Before performing failover, ensure that all the available redo is being applied on the standby database for minimum data loss. Remember that it's also possible to guarantee a zero data loss failover by using the Maximum Protection mode. Also note that once the failover process is finished, the new primary database will be started in Maximum Performance mode even though your previous Data Guard protection mode is either Maximum Protection or Maximum Availability.
Failover can be performed manually with SQL*Plus, the Data Guard broker, Cloud Control, or automatically using the Fast Start failover with an observer. In automatic failover, the observer will monitor the state of the primary database and all the standby databases of the Data Guard configuration. Whenever the primary database is not accessible, the observer will wait according to the predefined parameter FastStartFailoverThreshold and then perform the failover to the standby database.
As stated before, if the flashback database is enabled and the standby database role is changed to primary by FSFO and if the observer reestablishes the connection to the failed primary database as well as reinstates it as a new standby database, the new primary database starts sending redo to the new standby database.
Performing failover with a physical standby databaseJust as with the switchover operation, the failover operation can be performed on both the physical and logical standby databases. We'll now see both scenarios.

Data Guard Role Transitions
[ 196 ]
Time for action – failover with a physical standby database using SQL*Plus
Follow these steps to complete a failover on the physical standby Data Guard environment:
1. If you're able to mount a primary database, perform the following command to flush the redo from the primary online redo logfiles:SQL> alter system flush redo to INDIA_UN;
Use DB_UNIQUE_NAME of the standby database so that redo will be sent to the respective standby database.
2. Check the status of both the primary and standby databases. With the primary database in the MOUNT state, check the maximum archive log sequence that has been generated as shown in the following code:SQL> select max(sequence#) from v$archived_log;MAX(SEQUENCE#)-------------- 462
3. If the primary database is inaccessible, refer to the alert logfile for the latest log switch sequence or go to the archive log location and check the maximum sequence number as shown in the following command:Fri Oct 12 22:20:30 2012
Thread 1 advanced to log sequence 462 (LGWR switch)
Current log# 1 seq# 462 mem# 0: /u01/app/oracle/oradata/orcl/redo01.log
...........
Archived Log entry 1064 added for thread 1 sequence 462 ID 0x4eede1f7 dest 1:
Optionally, you can use the following:
[oracle@oracle-primary 2012_10_12]$ls -alrt
-rw-r----- 1 oracle oinstall 40261120 Oct 12 22:20 o1_mf_1_461_87jllpq3_.arc
-rw-r----- 1 oracle oinstall 41197056 Oct 12 23:08 o1_mf_1_462_87jodh9n_.arc
The maximum archive sequence generated is 462, which we can see by querying v$archived_log, the alert logfile, or the file systems.

Chapter 6
[ 197 ]
4. Now check the maximum sequence applied on the standby database using the following code:.SQL> select max(sequence#) from v$archived_log where applied='YES';MAX(SEQUENCE#)-------------- 449
There are 13 archive logs that are not applied on the standby database. If they're not shipped from primary, you should transfer those archived logfiles and register and apply them to the standby database. If shipped but not applied, you must start Redo Apply on the standby database.
If the primary server is completely unavailable, you have to perform recovery on the standby database until the maximum transported archive log sequence.
5. Initiate failover by stopping Redo Apply and running the recover command with the finish force option on the standby database as shown in the following command:SQL> alter database recover managed standby database cancel;Database altered.SQL> alter database recover managed standby database finish force;Database altered.
The FINISH keyword is used for failover and recovers the current standby redo logfiles. The FORCE keyword is used to terminate RFS processes immediately so that failover will not wait for them to exit.
On the alert logfile you will see the following:
Terminal Recovery: log 10 reserved for thread 1 sequence 463
Recovery of Online Redo Log: Thread 1 Group 10 Seq 463 Reading mem 0
Mem# 0: /u02/app/oracle/oradata/orcl/standby_redo01.log
Identified End-Of-Redo for thread 1 sequence 463
Incomplete Recovery applied until change 3476339 time 10/12/2012 23:08:22
Media Recovery Complete (INDIA)
Terminal Recovery: successful completion

Data Guard Role Transitions
[ 198 ]
If the recovery command raises an error because of a possible gap, try to resolve it. If this is not possible, continue failover with the following command and proceed to step 5.
SQL> alter database activate physical standby database;
If the recover command completes successfully, continue with the next step.
6. Complete failover to the physical standby database by converting it from the standby role to primary as follows:SQL> alter database commit to switchover to primary with session shutdown;Database altered.
On the alert logfile you will see the following:
Standby became primary SCN: 3476337
Fri Oct 12 23:34:36 2012
Setting recovery target incarnation to 3
Switchover: Complete - Database mounted as primary
Completed: alter database commit to switchover to primary
After that, perform the following code:
SQL> select db_unique_name,database_role,standby_became_primary_scn from v$database;DB_UNIQUE_NAME DATABASE_ROLE STANDBY_BECAME_PRIMARY_SCN-------------------- ---------------- --------------------------INDIA_UN PRIMARY 3476337
7. After performing failover, the new primary database will be in the MOUNT state. Shut down and start up the new primary database as shown in the following code:
SQL> SHUTDOWN IMMEDIATE;SQL> STARTUP;
Have a go heroWe have just performed a failover to a physical standby database. Now go ahead and perform a failover to the logical standby database using SQL*Plus. In this case, after step 1 and 2, you just need to use the following command on the logical standby to perform a failover:
SQL> ALTER DATABASE ACTIVATE LOGICAL STANDBY DATABASE FINISH APPLY;

Chapter 6
[ 199 ]
Performing failover with a logical standby databasePerforming failover with a logical standby database has some disadvantages because of the following points:
� A logical standby database functions with SQL Apply instead of Redo Apply and there are limitations to accept the incoming DML from primary and also unsupported data types. So we can't guarantee that all the changes from the primary database have been successfully applied on the logical standby database.
� Once you perform failover, you have to recreate other standby databases for the configuration.
So it's not recommended to perform failover to the logical standby database if it's possible to perform failover to a physical standby. Also, depending on the RTO, RMAN restore and recovery is preferred over failover to a logical standby.
Time for action – failover with a logical standby using brokerFollow these steps to perform failover to a logical standby database using the Data Guard broker:
1. Check both the primary and logical standby databases' status. If the primary database is completely unavailable, you can check the configuration status from the logical standby database as shown in the following code:DGMGRL> show configuration;Configuration - PACKT Protection Mode: MaxPerformance Databases: turkey_un - Primary database INDIA_UN - Logical standby databaseFast-Start Failover: DISABLEDConfiguration Status:ORA-12514: TNS:listener does not currently know of service requested in connect descriptorORA-16625: cannot reach database "turkey_UN"DGM-17017: unable to determine configuration status

Data Guard Role Transitions
[ 200 ]
2. Perform the failover to the logical standby database. Connect to the DGMGRL utility of the logical standby database and issue the command shown in the following screenshot to perform failover:
On the alert logfile, you will see the following:
2012-10-13 16:00:00.862 Executing SQL [ALTER DATABASE activate logical standby database finish apply]
2012-10-13 16:00:02.348 SQL [ALTER DATABASE activate logical standby database finish apply] Executed successfully
2012-10-13 16:00:02.354 RSM: refreshing IncarnationTable internal property. New value is '2,3166193,796392156,1*1,3166192,796392049,0#'
2012-10-13 16:00:02.366 Database Resource SetState succeeded
During failover to a physical or logical standby database using broker, you can use the IMMEDIATE option to perform failover without waiting for applying any redo. You can use the following command:
DGMGRL> FAILOVER TO <DB_UNIQUE_NAME> IMMEDIATE
3. Check the status of the new primary database. After a successful failover, the new primary database will be in READ WRITE mode as shown in the following code:SQL> select db_unique_name,database_role,open_mode from v$database;DB_UNIQUE_NAME DATABASE_ROLE OPEN_MODE-------------------- ---------------- --------------------india_un PRIMARY READ WRITEDGMGRL> show configuration;Configuration - PACKT Protection Mode: MaxPerformance Databases: INDIA_UN - Primary database turkey_un - Logical standby database (disabled) ORA-16661: the standby database needs to be reinstatedFast-Start Failover: DISABLEDConfiguration Status:SUCCESS

Chapter 6
[ 201 ]
What just happened?We have discussed how to perform failover to a physical standby database and a logical standby database. To perform this, we have used both SQL*Plus and the Data Guard broker.
SummaryIn this chapter, we focused on planned outages, unplanned outages, and how to perform role transitions against them. We've seen the key points and all the possible techniques to perform role transitions, which are SQL*Plus, the Data Guard broker, and Enterprise Manager 12c Cloud Control.
In the next chapter, we'll learn about configuring and using Active Data Guard and snapshot standby database. These are very important features of Data Guard. Also, some advanced topics such as cascading standby databases, advanced compression, cross platform configuration, and Data Guard tuning will be covered.


7Active Data Guard, Snapshot Standby,
and Advanced Techniques
Active Data Guard and snapshot standby databases are two very important new features of Oracle 11g. With Active Data Guard, it's possible to use a physical standby database read-only mode while the replication is ongoing. The snapshot standby feature is used to run a standby database in a read-write mode for testing purposes where all the changes made to the snapshot standby can be reverted. This chapter includes details of these features along with several other advanced techniques.
The following features will be covered in this chapter:
� Oracle Active Data Guard
� Using snapshot standby databases
� Cascade standby database and more options
� Oracle Advanced Compression
� Preparing the standby database on a cross-platform
� Data Guard tuning

Active Data Guard, Snapshot Standby, and Advanced Techniques
[ 204 ]
Oracle Active Data GuardEarlier versions of Oracle 11g standby databases have limitations as they can be used either for a recovery purpose or for a read-only purpose without recovery. From 11gR1 onwards, Oracle introduced more features, and standby databases can now work in recovery even in an open status. While recovery is in progress, real-time data can be accessible to the users just as production data is. Real time query can be used if Oracle Active Data Guard option has been purchased. Apart from that, some additional benefits of Active Data Guard are as follows:
� You can use applications on Active Data Guard and the additional processing from the production can be reduced so that both primary and standby databases can be utilized.
� If any ad-hoc jobs are running on Active Data Guard and if they don't meet the SLA provided by the STANDBY_MAX_DATA_DELAY parameter using triggers, they can immediately be redirected to the primary database.
� Automatic block recovery. If there are any corrupted blocks in the primary database, Active Data Guard will copy the good state of the block from standby and it will be recovered in the primary database.
� Active Data Guard can work in both ways to recover corrupted blocks.
� Zero data loss can be achieved.
� You can load off the EXPDP jobs to the standby database.
� You can schedule RMAN jobs from the standby with a real-time query.
� You can use Statspack from the standby database.
� You can monitor Active Session History (ASH) reports.
Why Active Data Guard?Most of the customers choose the Active Data Guard license for both disaster protection and also for securing read-only access to the applications. Note that all the applications (for example, SAP) don't support Active Data Guard; further, we will discuss several top applications that support Active Data Guard. If we pick any live database, most of the query ratios will be of the read-only (select queries) operations and there will be few read and write (insert/update/delete/merge) transactions. I would like to highlight a sample example in order to differentiate between read-only and read-write operations in any business. There are no restrictions on the storage of data types, DML, or DDL operations. Reports can view the latest data from the standby as real-time apply is on. Moreover, you can simplify tuning and Active Data Guard that is certified with Exadata.

Chapter 7
[ 205 ]
The following are the basic requirements and licenses that you must have in order to use Data Guard for a standby system:
� Server hardware
� Power systems
� An operating system (Linux/Unix, Windows) license
� Oracle Enterprise Edition license
These all are the necessary requirements needed to build a standby system. You must have already made lot of effort to configure a standby database for high availability; thus it is worth to add an additional license of Active Data Guard. Of course you can question, why should I choose Active Data Guard and what benefits can we gain from this additional costly step?
In any business, as we discussed earlier, most of the operations are not transactional (Select statements). For read-only queries, if 1000 user sessions are concurrently accessing the production database and the resources are allocated to the user sessions, then the users can either perform a physical or logical I/O depending on the data being cached into a buffer cache. Even though you have a standby database performing all of the previous transactions/operations from a production database, it can have additional disadvantages as follows:
� Load average
� CPU busy
� Swapping/paging
� System calls
The following diagram illustrates a database without Active Data Guard:

Active Data Guard, Snapshot Standby, and Advanced Techniques
[ 206 ]
Apart from read-only and read-write operations on the database, there may be other scheduled backup jobs configured on the database such as EXPDP, RMAN backup jobs, and gathering of statistics on a daily or round-robin basis. In the previous diagram, the standby site is just performing recovery, and there will be no load until and unless a switchover takes place in case of disaster recovery. Active Data Guard is not limited to simply reporting; you can use the OLTP query workload with the required modifications on the applications. Overall, it's a simple administration process because no tasks are required to detect and resolve the data conflicts, and no troubleshooting is necessary for any trail errors. Of course, you may need to adjust the settings and tune the old standby database in case the primary database is unavailable. Oracle Active Data Guard can be configured from a primary standalone to a standalone database or from an RAC primary to a standby standalone database or from an RAC primary to RAC standby databases also. In order to maintain business continuity in case of disaster recovery, we can implement Active Data Guard with fast-start failover. By implementing Active Data Guard, it can enable the flexible use of resources for multiple purposes. The following diagram illustrates the discussed points:
The previous diagram explains how to eliminate contention between read-only and read-write operations. Now we will discuss what are the jobs that can be moved from the primary database if Active Data Guard is enabled and how to offload these operations to a physical standby database(s) to avoid additional processing from the production database. In this chapter, we have explained with examples how to use ASH reports with Active Data Guard and other options. It can be further understood with the help of the following diagram:

Chapter 7
[ 207 ]
Even though applications are used from a standby system, they can connect to a primary database anytime whenever read-write operations are required.
Oracle Data Guard licenseBefore you implement and use Active Data Guard, it is necessary to understand the licensing involved with this feature. If you are implementing Active Data Guard, then both the primary and standby servers must be licensed. For the licensing prices, you must always visit Oracle Technology price list for the Active Data Guard. The price may vary depending on the license of the named user or processor license. If licensing is done by the processor, the licenses may not match due to variance in core factors between the times the respective programs were licensed. For any future reference, you can check for the latest updates on http://www.oracle.com/in/corporate/pricing/index.html.
With the Enterprise edition, Active Data Guard is accessible, but you must have the license to use this feature. You can also verify whether Active Data Guard is used or not, using the view v$option as follows:
SQL> select parameter,value from v$option where parameter='Active Data Guard';
PARAMETER VALUE
-------------------- -------
Active Data Guard TRUE

Active Data Guard, Snapshot Standby, and Advanced Techniques
[ 208 ]
Enabling Active Data GuardEnabling Active Data Guard is not a challenging task; it requires minimal effort. Here we are not making any changes at the database level, we are just enhancing the option of the Enterprise edition by enabling Active Data Guard. There are no changes to be made to the primary database, and we just need to ensure that redo transport is an LGWR process so that real-time data can be viewed by the users.
Time for action – enabling Active Data Guard if Redo Apply is running using SQL *PLUS
1. If you have previously upgraded your database from Version 10gRx to 11gRx, then in order to use Active Data Guard the compatible parameter must at least be set to 11.0.0 as shown in the following query:SQL> show parameter compatibleNAME TYPE VALUE------------------------------- ----------- --------------------compatible string 11.2.0.0.0
2. If you are using Active Data Guard for the first time, your standby database will definitely be in the MOUNT status and MRP will be in progress; hence, cancel MRP. After cancelling MRP, make sure MRP is not running any more either through the OS level grep commands or the v$managed_standby view as shown in the following query:SQL> select db_unique_name,open_mode from v$database;DB_UNIQUE_NA OPEN_MODE------------ --------------------INDIA_UN MOUNTEDSQL> alter database recover managed standby database cancel;Database altered.SQL> !ps -ef|grep mrporacle 27188 5882 0 11:56 pts/1 00:00:00 /bin/bash -c ps -ef|grep mrporacle 27190 27188 0 11:56 pts/1 00:00:00 grep mrp
3. Open the database in the Read-Only mode to enable Active Data Guard as follows:SQL> alter database open ;Database altered.SQL>SQL> select db_unique_name,open_mode from v$database;

Chapter 7
[ 209 ]
DB_UNIQUE_NA OPEN_MODE------------ --------------------INDIA_UN READ ONLYNow restart Redo Apply SQL> alter database recover managed standby database using current logfile disconnect from session;Database altered.
4. Verify whether redo-apply is enabled or not using the following query:
SQL> select process,status,sequence# from v$managed_standby where process like '%MRP%';PROCESS STATUS SEQUENCE#--------- ------------ ----------MRP0 APPLYING_LOG 522
Time for action – enabling Active Data Guard if the standby database is shut down
1. If the standby database is completely shut down, use the following steps to enable Active Data Guard. Now start the database normally as follows:[oracle@oracle-stby ~]$ sqlplus / as sysdbaSQL*Plus: Release 11.2.0.1.0 Production on Tue Nov 6 12:13:27 2012Copyright (c) 1982, 2009, Oracle. All rights reserved.Connected to an idle instance.SQL> startupORACLE instance started.Total System Global Area 818401280 bytesFixed Size 2217792 bytesVariable Size 528484544 bytesDatabase Buffers 285212672 bytesRedo Buffers 2486272 bytesDatabase mounted.Database opened.SQL>

Active Data Guard, Snapshot Standby, and Advanced Techniques
[ 210 ]
2. Once the database is opened successfully, by default it will be in the Read Only mode because it's a standby control file. Now start Redo Apply as follows:
SQL> select db_unique_name,open_mode from v$database;DB_UNIQUE_NAME OPEN_MODE--------------- --------------------INDIA_UN READ ONLYSQL>SQL> alter database recover managed standby database using current logfile disconnect from session;Database altered.SQL>
Time for action – enabling Active Data Guard using brokerIf Data Guard is managed using a broker, it is always simple and even easier to manage it from Oracle 11gR2. When both broker and MRP are running on the standby, you can open the database at any time for reporting purposes.
1. Check the configuration and state of the database as follows:DGMGRL> show configuration;
Configuration - PACKT
Protection Mode: MaxPerformance
Databases:
turkey_un - Primary database
INDIA_UN - Physical standby database
Fast-Start Failover: DISABLED
Configuration Status:
SUCCESS
DGMGRL>
SQL> select db_unique_name,open_mode from v$database;
DB_UNIQUE_NAME OPEN_MODE
--------------- --------------------
INDIA_UN MOUNTED
SQL>
SQL> !ps -ef|grep mrp
oracle 4686 1 0 16:31 ? 00:00:00 ora_mrp0_INDIA

Chapter 7
[ 211 ]
oracle 4815 3948 0 16:35 pts/1 00:00:00 /bin/bash -c ps -ef|grep mrp
Open Database for the use of Active Data Guard
SQL> alter database open read only;
Database altered.
SQL>
DGMGRL> show configuration;
Configuration - PACKT
Protection Mode: MaxPerformance
Databases:
turkey_un - Primary database
INDIA_UN - Physical standby database
Fast-Start Failover: DISABLED
Configuration Status:
SUCCESS
DGMGRL>
From the previous command, it looks as if the database is opened successfully; internally it will perform the following three operations:
� Completed: ALTER DATABASE RECOVER MANAGED STANDBY DATABASE CANCEL
� Completed: ALTER DATABASE OPEN READ-ONLY
� Completed: ALTER DATABASE RECOVER MANAGED STANDBY DATABASE THROUGH ALL SWITCHOVER DISCONNECT USING CURRENT LOGFILE
If you are using Oracle 11gR1 with Data Guard broker, then use a combination of Data Guard broker and SQL *Plus to enable Active Data Guard using the following commands:DGMGRL> edit database 'INDIA_UN' SET STATE='APPLY-OFF';
SQL> alter database open read only;
DGMGRL> edit database 'INDIA_UN' SET STATE='APPLY-ON';

Active Data Guard, Snapshot Standby, and Advanced Techniques
[ 212 ]
What just happened?We've just revised how to enable Active Data Guard using SQL *Plus and also using Data Guard broker.
After performing the previous steps to enable Active Data Guard, we will see how to find out whether the Active Data Guard feature is enabled or not. There is no direct column in any view/tables to find out whether the Active Data Guard feature is enabled or not. But if we merge two columns of two tables and if both the processes are running, then it is for reporting purpose as shown in the following query:
SQL> select 'YES' Active_DataGuard from v$managed_standby ms, v$database db where ms.process like '%MRP%' and db.open_mode like '%READ ONLY%';
ACTIVE_DATAGUARD
--------------------
YES
Monitoring Active Data GuardWe have successfully enabled Active Data Guard on a standby database; no further steps need to be performed on the primary database if real-time apply is running. There are several ways to find whether Active Data Guard is enabled or not.
From primaryTo determine if Active Data Guard is enabled from the primary, v$archive_dest_status describes the status of all local and remote destinations, including several options such as database role and recovery mode, as follows:
SQL> select dest_name,status,database_mode,recovery_mode from v$archive_dest_status where dest_id=2;DEST_NAME STATUS DATABASE_MODE RECOVERY_MODE---------------------- --------- -------------- --------------------LOG_ARCHIVE_DEST_2 VALID OPEN_READ-ONLY MANAGED REAL TIME APPLY

Chapter 7
[ 213 ]
From standbyUsing the standby database you can check whether the standby database is Mount status Read Only, or READ ONLY WITH APPLY by using v$database as follows:
SQL> select open_mode from v$database;OPEN_MODE--------------------READ ONLY WITH APPLY
By using a custom query you can merge the views as follows:
SQL> select 'YES' Active_DataGuard from v$managed_standby ms, v$database db where ms.process like '%MRP%' and db.open_mode like '%READ ONLY%';ACTIVE_DATAGUARD--------------------YESSQL> SELECT * FROM V$STANDBY_EVENT_HISTOGRAM WHERE NAME = 'apply lag' AND COUNT > 0;NAME TIME UNIT COUNT LAST_TIME_UPDATED---------- ---------- ---------------- ---------- --------------------apply lag 0 seconds 5787 11/06/2012 23:01:28apply lag 1 seconds 98 11/06/2012 23:01:09apply lag 2 seconds 8 11/06/2012 22:45:06apply lag 3 seconds 6 11/06/2012 22:45:37apply lag 4 seconds 4 11/06/2012 22:43:03apply lag 5 seconds 4 11/06/2012 22:45:43
The v$standby_event_histogram view is accessible only if the database is OPEN with READ-ONLY mode and real-time apply is on, that is Active Data Guard. However, this view is also accessible from MOUNT but it returns no information.
Active Data Guard with applicationsActive Data Guard has limitations with several applications; your application may or may not be compatible with Active Data Guard to use its features. Before purchasing the license, you should check the compatibility of the applications. Here we will discuss briefly some of the top applications that are used for business and how it works with Active Data Guard.

Active Data Guard, Snapshot Standby, and Advanced Techniques
[ 214 ]
Active Data Guard with PeopleSoftFrom PeopleSoft Version 8.51, reports can be executed in the Active Data Guard database instead of running in the production/primary OLTP database. Specific to PeopleSoft applications, it uses reporting tools such as NVisions. These job queries select against the database and retrieve the results into an Excel spreadsheet as per the user's formatting. Internally it calls a number of batch jobs and some of the queries may use hints such as parallel if they create any SQL profiles and these can cause much load on production. All NVision reports are pure select queries. Only the tree performance tuning parameters/settings that are enabled will have DML statements on Treeselector tables otherwise any NVisions report on PS_LEDGER, PS_LEDGER_BUDG is always pure select process. NVisions are reports that can run on FIN, HR, or EPM(DWH). If you enable Active Data Guard on a standby database, components such as the PSQUERY viewer, the TREE viewer, QAS, G&R, and the XMLP viewer should always run on the standby system. To enhance this feature you must perform configuration changes in both the process scheduler server and the application server. The following diagram explains Active Data Guard with PeopleSoft:
If you perform changes in the component's properties of the application designer, you can run more components on the standby system; even the process scheduler definitions can be configured on the standby system by setting the read-only option in it. With the option of Active Data Guard, database links and remote synonyms that are defined by scripts from PeopleTools can run batch programs on a standby system.

Chapter 7
[ 215 ]
Time for action – Active Data Guard with PeopleSoftPeopleSoft with Active Data Guard require DB links because they will update the processes' tables using DB links so that remote synonyms are required to give access to the standby system. But a very detailed analysis is required if you consider implementing Active Data Guard. Perform the following steps to implement Active Data Guard with PeopleSoft:
1. Create a standby database and enable Active Data Guard.
2. Add a new database service for accessing Active Data Guard on the primary database in case there is any maintenance on the standby server.
3. Confirm that Oracle Net Services is configured between the Active Guard database and the application servers; also ensure that the Oracle net configuration points to the database service instead of a specific instance and includes both the primary and standby listeners, so that PeopleSoft can connect to any of the services that are not started or running also.
4. In PeopleSoft, we do not have much control to use any custom scripts, and we must always go for the derived scripts from PeopleSoft. To enhance this Active Data Guard feature with PeopleSoft, ensure that the following scripts are available:psadmin.sql($PS_HOME/scripts/unix)
createlocalsynonyms.sql($PS_HOME/scripts)
createremotesynonyms.sql($PS_HOME/scripts)
createdblinktoprimarydb.sql($PS_HOME/scripts)
5. Create a secondary access ID as ACCESS_ID on the primary database using the script psadmin.sql. ACCESS_ID is the RDBMS ID with which PeopleSoft applications are connected to the database so that it will create an owner ACCESSID besides the default user SYSADM.
6. Insert the corresponding database name and username in the table PSDBOWNER and perform a commit after the insert.
7. From the application designer, add a new SYMBOLICID for ACCESSID.
8. Create a dedicated application user attached to the secondary SYMBOLICID attribute.
9. Create a database link to the primary database using the following query:SQL> create database link Prim_ADG connect to sysadm identified by password using 'TURKEY_UN';
10. Create a local synonym using the derived script createlocalsynonyms.sql.
11. Create a remote synonym using the derived script createremotesynonyms.sql.

Active Data Guard, Snapshot Standby, and Advanced Techniques
[ 216 ]
12. Confirm that the standby system is able to synchronize it all the time without any delay and also check for the newly created database link.
13. Now configure the batch server on both the primary and standby systems.
14. Modify the psprcs.cfg file with StandbyDBname, StandbyDBType, StandbyUserId, and StandbyUserPsswd.
15. After modifying the PRCSDOM batch server, reconfigure it using the $PS_HOME/appserv/psadmin script.
16. Now start the batch server PRCSDOM after all the modifications and confirm the standby connections using v$session.
17. By setting DDDAUDIT to read-only, you can perform the tests.
The earlier discussed steps are specific to how to configure the batch server. Of course you can configure an application server on Active Data Guard but the configuration is different.
Active Data Guard with EBSActive Data Guard can be implemented on EBS but there are some limitations specific to EBS R12; you should meet software and patches requirements, as discussed in the following table:
Oracle products Minimum version
Additional patches
Oracle EE 11gR1 > = 11.1.0.7 Recording ADG violations: <patch 10070167> patch 10134846
Oracle EE 11gR2 >=11.2.0.2 Included in a patch set; no additional patches required
Oracle EBS >=12.1.3 Infrastructure patch 9434627 9434627:R12.FND.B
Enabling patch 9505793 9505793:R12.FND.B
and patch 9526837 9526837:R12.FND.B.
If you want to use concurrent manager reporting, you must use parallel concurrent processing with new processing nodes that are set up to handle Active Data Guard reports. Ensure that there is no network latency between the primary and standby systems. In Active Data Guard, the concurrent manager connects to the primary database and only the reports will be connected to the Active Data Guard database. However, no DMLs are allowed on Active Data Guard; DML will be executed via database links to the primary database. Hence, it is applicable to both the user and the dictionary DML.

Chapter 7
[ 217 ]
In brief, first clone an application tier to set up parallel concurrent processing and then register the node for batch processing only. Now start the application and register a new concurrent manager, assigning it the node co-located with Active Data Guard. To ensure that this manager only handles reports for meeting the requirements of Active Data Guard, use the exclude/include rules. Customers may use Active Data Guard instances to execute SQL that does not require a write activity. In terms of the use of E-Business Suite with Active Data Guard, if the concurrent program is not on the list of supported reports, then it is not certified by Oracle Development and is considered a customization. For more configuration limitations over Active Data Guard, refer to the installation documents.
Active Data Guard with TopLinkOracle TopLink is a part of Oracle Fusion Middleware; it's an advanced framework that provides development tools and runtime capabilities so that the development and maintenance efforts are reduced, thereby increasing the application functionality. It can successfully transform object-oriented data into relation data or Extensible Markup Language(XML). TopLink can address the difference between Java objects and data sources. Its engine has a great mechanism to use read pool for all non-transitional transactions and write pool for the actual transactions. The same concept can be implemented with Active Data Guard by processing read-only operations to a standby database and read-write transactions to a primary database; the high-level steps are as follows:
� TopLink can read objects using the read-only database connection and it uses a locking mechanism so that users have the option to choose and update the object later. It can detect a conflict.
� Once an object is processed to higher application layers, it will be converted into the HTML format and some of the attributes will be hidden, and they will be visible once the form is submitted.
� In the next level that the object will be passed to, the application server acts as the TopLink object and along with its changes, it will be saved in the database through the read-write connection pool.
� After the commit of the UPDATE statement, the redo data will of course be transported to the physical standby database and it will be applied to the same.

Active Data Guard, Snapshot Standby, and Advanced Techniques
[ 218 ]
Active Data Guard with Oracle BIOracle Business Intelligence Suite EE Plus is an element of Enterprise BI products. From 11g onwards, OBIEE is based on the web service oriented, unified architecture. OBIEE 11g delivers ad hoc queries and analysis, OLAP, and its functionality. It can access multiple enterprise sources including Oracle and also non-Oracle data, and it has advanced enterprise reporting and publishing features.
OBIEE 10.1.3.4 has been certified with Oracle Active Data Guard 11g. The OBIEE server is mostly related to the read-only application server and the read-only operations that we can run on the Active Data Guard standby database with some configuration changes. Hence, we can share the load with the standby database and avoid many read-only operations on the primary database. By enabling Active Data Guard, scalability can be enhanced significantly. To improve query performance, OBIEE has the mechanism to create temporary tables; so we have to disable OBIEE from creating temporary tables and from modifying scripts to use the primary connection pool explicitly for any DML statements. The high-level steps to use OBIEE with Active Data Guard are as follows:
� Create a database connection to the Active standby database
� Disable temporary table creation
� Using the OBIEE server administrator tool, create a write-back connection pool that points to the primary database for any DML transactions
� To monitor the queries and their elapsed time, the OBIEE server has been provided with the Usage Tracking functionality and you can mention the OBIEE server to write in tables using the primary connection to modify NQSConfig.INI file of your SA_HOME\config directory.
� OBIEE has another feature known as Event Polling, which has the mechanism to notify the cache system to invalidate the outdated data cache
Thus, OBIEE with Oracle 11g Active Data Guard provides high-scalable solutions, and with proper configurations, the OBIEE repository can adapt OBIEE for read-only requirements of an Active Data Guard standby database.
Active Data Guard with SAPMany DBAs seem to have the misconception that Active Data Guard can be configured for SAP systems. They must be aware of the fact that Active Data Guard cannot be used to run any SAP system against the standby database for any reporting purpose. Active Data Guard allows only read-only access to the standby database. But SAP systems are never read-only. Therefore this would not work. Of course, you can run any administrative task against the standby server that is read-only. Since you cannot start a SAP system against an Active Data Guard standby system, you are limited to pure Oracle-related administration tasks.

Chapter 7
[ 219 ]
Active Data Guard featuresIn the license of Active Data guard, apart from read-only operations we have some more features and a couple of examples that we are going to discuss on how to use Active Data Guard more than just named Read-Only. Most of the tasks that run on the standby and primary database will be used only if DML operations are required. Also, we can offload operations to physical standby databases and hence we can put more additional processing on production databases, thereby we can eliminate the contention between read-only and read-write operations.
EXPDP from standby database using NETWORK_LINK (ADG)In the previous section, we created database links on the primary database and we created remote synonyms to be used by the physical standby database. In this procedure we will be performing all the operations in the standby database only in the case of creating or updating master tables after which it routes transactions to the primary database via database links.
Apart from application usage, we can use Active Data Guard even for fully exporting the database. For a huge OLTP transactional database of size 600 GB to 700 GB, the elapsed ETA to export a full backup is around 5 hours to 6 hours using high parallelism of 32. During the export job, it is always expected to have a high load average that can cause much CPU busy depending on the hardware configurations. Hence, for almost 5-6 hours there will be huge activity both on the database and also at the server level because CPU cores are serving the EXPDP job. If you want to use EXPDP from a standby database, you must schedule the job from the primary database because it has to create a master table, and all the database reads will be performed from the standby database so that disk I/Os can be reduced on the primary database.
Time for action – exporting a database backup from Active Data Guard
In order to export a database backup from Active Data Guard, perform the following steps:
1. Ensure that your standby database is in the Read Only mode and the MRP process should not be running, as shown in the following query:SQL> select open_mode from v$database;OPEN_MODE--------------------READ ONLY
2. Create a directory in the primary database logically and create the same directory name physically at the OS level as follows:SQL> create directory expdp_india as '/u02/backups/expdp';Directory created.SQL>

Active Data Guard, Snapshot Standby, and Advanced Techniques
[ 220 ]
3. Create a database link from the primary database so that TNS string should point to the standby database, as shown in the following query:SQL> create public database link exp_turkey connect to system identified by "free2go" using 'india';Database link created.SQL>
4. Now execute EXPDP from the primary database as follows and ensure that you have proper roles and privileges to export the backups:[oracle@oracle-primary ~]$ expdp system/free2go directory=EXPDP_INDIA network_link=exp_turkey tables=packt.oracle dumpfile=Sample_Standby.dmp logfile=FULL_standby.log
Export: Release 11.2.0.1.0 - Production on Wed Nov 7 15:55:28 2012
........................
Starting "SYSTEM"."SYS_EXPORT_TABLE_02": system/******** directory=EXPDP_INDIA network_link=exp_turkey tables=packt.oracle dumpfile=Sample_Standby.dmp logfile=FULL_standby.log
Estimate in progress using BLOCKS method...
Dump file set for SYSTEM.SYS_EXPORT_TABLE_02 is:
/u02/backups/expdp/Sample_Standby.dmp
Job "SYSTEM"."SYS_EXPORT_TABLE_02" successfully completed at 15:55:41
[oracle@oracle-primary ~]$
What just happened?We've just revised how to perform a logical backup of a database with the method of export (EXPDP) by reading data of a standby database to reduce the number of I/Os from the primary database.
Time for action – using the ASH report from the standby database
From 11gR2 onwards, the Active Session History report can be created to monitor the performance of a standby database from the standby system. To use this feature, ensure that the database is up-and-running in the Read-Only mode and the session history has retained the memory. Then, you can perform the following steps:

Chapter 7
[ 221 ]
1. Generate an ASH report using the ashrpt.sql script. Before using this report you must know what parameters we have to pass while the report is running, for example, duration between two dates and times. Use the ashrpt.sql script as follows:SQL> @?/rdbms/admin/ashrpt.sql
Current Instance
~~~~~~~~~~~~~~~~
DB Id DB Name Inst Num Instance
----------- ------------ -------- ------------
1316772835 ORCL 1 INDIA
You are running ASH report on a Standby database. To generate the report
over data sampled on the Primary database, enter 'P'.
Defaults to 'S' - data sampled in the Standby database.
Enter value for stdbyflag: S
Using Primary (P) or Standby (S): S
Once you initiate the ASH report, you can choose the text or HTML option for the report. The default mode of the ASH report is HTML. In the second phase you have the option to choose the instance type, so select the instance type as Standby.
2. Now you have to specify the timeframe to generate the ASH report. Specific to this report, you can choose Sysdate-10. Hence, from the current date and time it will get the session history report for the past 10 minutes as follows:Enter begin time for report:
-- Valid input formats:
-- To specify absolute begin time:
-- [MM/DD[/YY]] HH24:MI[:SS]
-- Examples: 02/23/03 14:30:15
-- 02/23 14:30:15
-- 14:30:15
-- 14:30
-- To specify relative begin time: (start with '-' sign)
-- -[HH24:]MI
-- Examples: -1:15 (SYSDATE - 1 Hr 15 Mins)
-- -25 (SYSDATE - 25 Mins)
Defaults to -15 mins
Enter value for begin_time: -10
Report begin time specified: -10

Active Data Guard, Snapshot Standby, and Advanced Techniques
[ 222 ]
3. You can mention the report name or it will be created using the default name, which uses the time and interval of the selection as shown in the following code:
</table><p /><br /><a class="awr" href="#top">Back to Top</a><p /><p />End of Report</body></html>Report written to ashrpt_1_1107_1557.htmlSQL>
This report will be generated from the default directory where you been logged into the SQL *Plus session. Now you can save or open in any browser to view the statistics.
A sample ASH report output of a standby database is shown in the following screenshot:
You can see the wait events Standby redo I/O and RFS write that are related to a standby database, as shown in the following screenshot:

Chapter 7
[ 223 ]
What just happened?We've just revised how to generate an active session history report from a standby database; this report helps us to find out the top wait events with the standby database and also to find any sort of issue either with the database or with redo being written.
Have a go hero – running Statspack from a standby databaseYou can add a standby instance in Statspack to create reports specifically related to a standby database. The high-level steps are as follows:
1. Ensure Statspack is already installed using @?/rdbms/admin/sbcreate.sql.
2. The database must not shut down between two snapshot times to gather reports. For that, use the script @?/rdbms/admin/sbreport.sql.
Using a snapshot standby databaseThe snapshot concept was introduced from the 11g Version, which allows the use of a physical standby database in the read-write mode for a short period of time. You can convert a physical standby to a snapshot standby by using either traditional SQL *Plus or using the Data Guard broker and grid control at any time. Even if you convert it to a snapshot standby, it will still receive data continuously from the production database archive, so that in the next conversion from a snapshot to a physical standby it will be used for recovery. In case you have performed recovery at any point in time, the new incarnation will be started. Even though a new incarnation has started, the snapshot standby database will still continue accepting redo from the primary database. If your standby database is clustered and has more than one node, then shut down all the auxiliary RAC instances of the standby prior to performing a snapshot. Note that you should not put a standby database in the snapshot mode for a long time; it results in huge archive logs between the production database and the standby database and in case of critical databases it can have a serious impact.
Time for action – converting to a snapshot standby databasePerform the following steps to convert a physical standby database to a snapshot standby database:
1. To convert a physical standby database to a snapshot standby database, flashback should be enabled and the database should be brought to the MOUNT status after cancelling recovery as follows:SQL> select open_mode,database_role,flashback_on from v$database;OPEN_MODE DATABASE_ROLE FLASHBACK_ON-------------------- ---------------- ------------------MOUNTED PHYSICAL STANDBY YES

Active Data Guard, Snapshot Standby, and Advanced Techniques
[ 224 ]
2. Now process the following command to convert the physical standby database to a snapshot standby database:SQL> ALTER DATABASE CONVERT TO SNAPSHOT STANDBY;
Database altered.
SQL>
Wed Nov 07 20:10:27 2012
ALTER DATABASE CONVERT TO SNAPSHOT STANDBY
Created guaranteed restore point SNAPSHOT_STANDBY_REQUIRED_11/07/2012 20:10:27
........
Standby became primary SCN: 3938237
Wed Nov 07 20:10:29 2012
Setting recovery target incarnation to 3
CONVERT TO SNAPSHOT STANDBY: Complete - Database mounted as snapshot standby
Completed: ALTER DATABASE CONVERT TO SNAPSHOT STANDBY
3. Internally, a standby database creates a restore point so that we can convert the snapshot standby database to a physical standby database at any time, and the standby database will be converted as a primary with a new incarnation as follows:SQL> select open_mode,database_role,resetlogs_change#,prior_resetlogs_change# from v$database;OPEN_MODE DATABASE_ROLE RESETLOGS_CHANGE# PRIOR_RESETLOGS_CHANGE#---------- ---------------- ---------------- ---------------------MOUNTED SNAPSHOT STANDBY 3938240 945184
4. After successful conversion, you can now validate the snapshot standby database as follows:SQL> select name,restore_point_time from v$restore_point;NAME RESTORE_POINT_TIME------------------------------------------ ---------------- ---SNAPSHOT_STANDBY_REQUIRED_11/07/2012 20:10:27 08.10.27.000000000 PM

Chapter 7
[ 225 ]
Even though the old standby database is converted to a snapshot standby database, the archives will be received from the primary database whenever log switch occurs, and note that the database will be in the MOUNT status after conversion as follows:
Wed Nov 07 21:07:27 2012
RFS[5]: Selected log 11 for thread 1 sequence 619 dbid 1316772835 branch 788992101
Wed Nov 07 21:07:27 2012
Archived Log entry 14 added for thread 1 sequence 618 ID 0x4eede1f7 dest 1:
You have to explicitly open the database so that it will be ready for read and write purposes.
What just happened?We've just revised how to convert a database from a physical standby to a snapshot standby using the SQL* Plus command using a step-by-step approach.
Time for action – converting to a physical standby databaseTo convert from the snapshot mode to a physical standby, the procedure is the same as discussed earlier. Perform the following steps:
1. For validation, perform some DML transactions to verify the number of rows of any table before and after the conversion, as shown in the following query:SQL> select open_mode from v$database;OPEN_MODE--------------------READ WRITESQL> conn packt/packt;Connected.SQL> select count(*) from packt.oracle;COUNT(*)----------41943040SQL> insert into oracle select * from oracle where sal > 4500;2097152 rows created.SQL> commit;Commit complete.SQL> select count(*) from packt.oracle; COUNT(*)---------- 44040192

Active Data Guard, Snapshot Standby, and Advanced Techniques
[ 226 ]
2. Shut down the database and put it in the MOUNT status to initiate the conversion as follows:SQL> alter database convert to physical standby;Database altered.SQL>
The following output will be visible:
Wed Nov 07 22:28:12 2012
alter database convert to physical standby
ALTER DATABASE CONVERT TO PHYSICAL STANDBY (INDIA)
krsv_proc_kill: Killing 2 processes (all RFS)
Flashback Restore Start
Wed Nov 07 22:30:23 2012
Flashback Restore Complete
3. After successful conversion, the instance will be brought to the STARTED status, and you have to perform complete shutdown and startup in the Read Only mode with the recovery mode as the standby database for the purpose of reporting, as shown in the following query:SQL> select count(*) from packt.oracle; COUNT(*)---------- 41943040
From step 1, the number of rows inserted are 2097152, and after performing a flashback to the restore point, all the newly inserted rows will be reverted.
You can convert a physical standby database to snapshot standby database either a Maximum Performance or Maximum Availability mode. It's not supported with the Maximum Protection mode and the snapshot standby is never considered to perform switchover or failover.
What just happened?We've just revised how to convert a database from a snapshot standby to a physical standby using the SQL* Plus command and we also verified how the new DMLs are reverted using the flashback restore point.
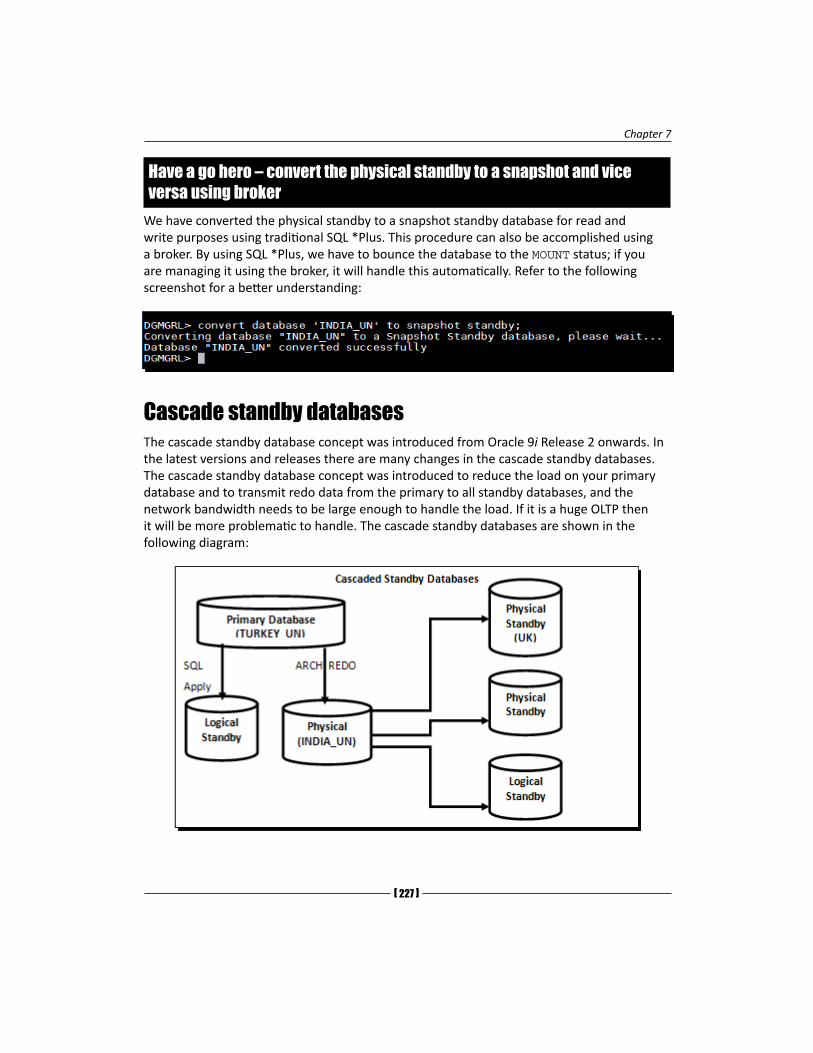
Chapter 7
[ 227 ]
Have a go hero – convert the physical standby to a snapshot and vice versa using broker
We have converted the physical standby to a snapshot standby database for read and write purposes using traditional SQL *Plus. This procedure can also be accomplished using a broker. By using SQL *Plus, we have to bounce the database to the MOUNT status; if you are managing it using the broker, it will handle this automatically. Refer to the following screenshot for a better understanding:
Cascade standby databasesThe cascade standby database concept was introduced from Oracle 9i Release 2 onwards. In the latest versions and releases there are many changes in the cascade standby databases. The cascade standby database concept was introduced to reduce the load on your primary database and to transmit redo data from the primary to all standby databases, and the network bandwidth needs to be large enough to handle the load. If it is a huge OLTP then it will be more problematic to handle. The cascade standby databases are shown in the following diagram:

Active Data Guard, Snapshot Standby, and Advanced Techniques
[ 228 ]
Limitations with cascade standby databaseThe limitations with a cascade standby database are as follows:
� Data cannot be transmitted to other standby databases from a logical standby or a snapshot standby database.
� Data Guard broker is not supported in a cascade standby database environment.
� Cascading is not supported in RAC on versions prior to 11.2.0.2.
� If you are using synchronous redo transport, they cannot cascade redo data in a Maximum Protection mode.
� If the primary database is transmitting redo to the standby redo logfiles and writing into standby redo logfiles once SRL is full and archived, then the respective archive sequence will be transmitted and applied to the cascade standby database(s). This will delay redo to the cascade database.
Time for action – cascade standby databasePerform the following steps for a cascade standby database:
1. Verify whether each destination's status is valid or not from v$archive_dest as follows:ID STATUS DB_MODE TYPE RECOVERY_MODE PROTECTION_MODE SRLs ACTIVE ARCHIVED_SEQ#--- --------- --------------- ---- ----------------------- -------------------- ---- ------ --------------- 1 VALID OPEN ARCH IDLE MAXIMUM PERFORMANCE 0 0 731 2 VALID OPEN_READ-ONLY LGWR MANAGED REAL TIME APPLY MAXIMUM PERFORMANCE 6 1 731 3 VALID OPEN_READ-ONLY LGWR MANAGED REAL TIME APPLY MAXIMUM PERFORMANCE 6 1 731
All remote destinations are using real-time apply with read only for reporting purpose in the Maximum Performance mode. It is to ensure that the standby database has enough standby redo logfiles so that there would be no interruption while sending data to the cascade standby database.
2. Increase the LOG_ARCHIVE_MAX_PROCESSES parameter on the standby database so that more archive processes will run frequently to send data to all remote destinations in parallel as follows:SQL> show parameter log_archive_max_processesNAME TYPE VALUE---------------------------- ----------- ----------log_archive_max_processes integer 5

Chapter 7
[ 229 ]
SQL> alter system set log_archive_max_processes=30;System altered.SQL> show parameter log_archive_max_processesNAME TYPE VALUE---------------------------- ----------- -----log_archive_max_processes integer 30
SQL>
3. Configure the parameter as follows from the primary, standby, and cascade databases according to the database type.
From the primary (TURKEY) database, you can configure as follows:DB_UNIQUE_NAME=turkey_unLOG_ARCHIVE_CONFIG=DG_CONFIG=(TURKEY_UN,INDIA_UN,UK_UN)LOG_ARCHIVE_DEST_2=service=INDIA VALID_FOR=(ONLINE_LOGFILES,PRIMARY_ROLE) DB_UNIQUE_NAME=INDIA_UNFAL_SERVER='INDIA_UN'
From the standby (INDIA) database, you can configure as follows:DB_UNIQUE_NAME=india_unLOG_ARCHIVE_CONFIG=DG_CONFIG=(TURKEY_UN,INDIA_UN,UK_UN)LOG_ARCHIVE_DEST_2=service=UK VALID_FOR=(STANDBY_LOGFILES,STANDBY_ROLE) DB_UNIQUE_NAME=UK_UNFAL_SERVER='UK_UN'
From the cascade standby (UK) database, you can configure as follows:DB_UNIQUE_NAME=uk_unLOG_ARCHIVE_CONFIG=DG_CONFIG=(TURKEY_UN,INDIA_UN,UK_UN)
Apart from these parameters, you can configure more destinations if your environment contains more standby databases that are either physical or logical.
4. Verify the physical standby and cascade standby databases.
Verify it from the primary (TURKEY) database as follows:SQL> select db_unique_name,database_role from v$database;DB_UNIQUE_NA DATABASE_ROLE------------ ----------------turkey_un PRIMARY
ID STATUS DB_MODE TYPE PROTECTION_MODE ---------- --------- --------------- ----------------------------- 1 VALID OPEN ARCH MAXIMUM PERFORMANCE 2 VALID OPEN_READ-ONLY LGWR MAXIMUM PERFORMANCE

Active Data Guard, Snapshot Standby, and Advanced Techniques
[ 230 ]
SQL> select max(sequence#) from v$archived_log;MAX(SEQUENCE#)-------------- 747
Verify it from the standby (INDIA) database as follows:
SQL> select db_unique_name,database_role from v$database;DB_UNIQUE_NA DATABASE_ROLE------------ ----------------INDIA_UN PHYSICAL STANDBYSQL> select max(sequence#) from v$archived_log where applied='YES';
MAX(SEQUENCE#)-------------- 747
Verify it from the cascade standby (UK) database as follows:
SQL> select db_unique_name,database_role from v$database;DB_UNIQUE_NA DATABASE_ROLE------------ ----------------uk_un PHYSICAL STANDBY ID STATUS DB_MODE TYPE RECOVERY_MODE SQL> select max(sequence#) from v$archived_log where applied='YES';
MAX(SEQUENCE#)--------------- 747
If we define a cascade physical standby database from a physical standby database, then initially the redo will be transmitted from the primary database to the physical standby database. Thus, once the standby redo logfile is archived, that archive will be transferred and applied on the cascade physical standby database. Hence, there is an expected delay in data between the primary database and the cascade standby database. From the earlier outputs, we know that the maximum sequence generated in the primary is 747 and an archive has been applied on the physical standby and also on the cascade physical standby database.
What just happened?We've just explained the concept of a cascade standby database, the advantages associated with it, and also a step-by-step configuration of a cascade standby database.

Chapter 7
[ 231 ]
Advanced compression in Data GuardOracle Database 11g Advanced Compression introduced several set of options. Oracle also introduced compression for network traffic. With the option of advanced compression, the primary database will send the redo data and may be transported in a compressed format to reduce network consumption on the standby database. In the earlier releases, redo has been compressed over the network using third-party utilities such as WAN accelerators and other tools. To use the compression feature of Oracle, you must have purchased the license of Oracle 11g advanced compression. By licensing this option, archive gaps can be resolved up to three times faster, thereby providing better protection, and network utilization can be controlled by reducing the redo transfer time. Compression is supported for all the redo transport modes such SYNC and ASYNC and for the transport methods such as ARCH and LGWR to resolve gaps of Data Guard. These are compatible with all the protection modes—Maximum Performance, Maximum Protection, and Maximum Availability.
Before implementing compression, ensure that sufficient CPU resources are available and the database redo rate is higher than the available network bandwidth to take advantage of compression. This feature can be used in 11gR1 by setting the undocumented parameter _REDO_TRANSPORT_COMPRESS_ALL to TRUE along with the attribute COMPRESSION=ENABLE in LOG_ARCHIVE_DEST_n. From 11gR2 onwards, this parameter is no longer required.
Time for action – enabling advanced compressionPerform the following steps in order to enable advanced compression:
1. Check for the current settings of the remote destinations and options of compression as follows:SQL> select parameter,value from v$option where parameter='Advanced Compression';PARAMETER VALUE------------------------- -----Advanced Compression TRUE
SQL> select dest_id,compression,db_unique_name from v$archive_dest where dest_id=2; DEST_ID COMPRESSION DB_UNIQUE_NAME---------- --------------- ------------------------------ 2 DISABLE INDIA_UN

Active Data Guard, Snapshot Standby, and Advanced Techniques
[ 232 ]
2. Enable compression by modifying the remote destination parameter as follows:SQL> alter system set LOG_ARCHIVE_DEST_2='service=INDIA LGWR ASYNC COMPRESSION=ENABLE VALID_FOR=(ONLINE_LOGFILES,PRIMARY_ROLE) DB_UNIQUE_NAME=INDIA_UN';System altered.SQL> select dest_id,compression,db_unique_name from v$archive_dest where dest_id=2; DEST_ID COMPRESSION DB_UNIQUE_NAME---------- --------------- ------------------------------ 2 ENABLE INDIA_UN
3. Perform a large number of DML transactions for testing purposes as follows:SQL> conn packt/packtConnected.SQL> insert into oracle select * from oracle;41943040 rows created.SQL> commit;Commit complete.SQL>
4. Redo the size for the session of Packt as follows:SQL> ; 1 select v$session.sid, username, value redo_size 2 from v$sesstat, v$statname, v$session 3 where v$sesstat.STATISTIC# = v$statname.STATISTIC# 4 and v$session.sid = v$sesstat.sid 5 and name = 'redo size' 6 and value > 0 7 and username is not null 8* order by valueSQL> / SID USERNAME REDO_SIZE---------- ------------------------------ ---------- 48 packt 2125379564
5. Advanced compression uses the mechanism of the zlib engine at level 1 as gzip. So you can verify it using the gzip command as follows:
[oracle@oracle-primary 2012_11_08]$ gzip -1 o1_mf_1_753_89q187xv_.arc
[oracle@oracle-primary 2012_11_08]$ ls -ltr o1_mf_1_749_89q13d2*
-rw-r----- 1 oracle oinstall 8209301 Nov 8 15:37 o1_mf_1_749_89q13d2z_.arc.gz

Chapter 7
[ 233 ]
[oracle@oracle-primary 2012_11_08]$ gzip --list o1_
mf_1_749_89q13d2z_.arc.gz
compressed uncompressed ratio uncompressed_name
8209301 101288960 91.9% o1_mf_1_749_89q13d2z_.arc
[oracle@oracle-primary 2012_11_08]$
In the previous output, after enabling compression, nine percent of the actual data has been compressed and transported to the standby database. Note that the compression ratio may vary.
What just happened?We've just revised advanced compression with its brief introduction and also tested how compression of redo works in a Data Guard environment using a step-by-step approach.
Preparation of standby on a cross-platform Data GuardCross-platform Data Guard was introduced in Oracle 11g Release 1. We may have 32-bit primary and 64-bit standby database combinations on some platforms of 10g, but from 11g onwards it supports even heterogeneous platforms ranging from Linux/Unix to Windows or vice versa. Most of the customers choose this procedure for moving the database on a different OS. Migration is made simple by this procedure with the same incarnation of a database. Prior to moving the production to a heterogeneous platform, it is recommended to test the standby in the read-write mode for the capacity of the standby server.
Note that you must create a cross-platform standby database on the same database's release and patch set. You can have different hardware manufacturers, hardware configuration, processors, operating systems, and operating system versions. From 11g onwards you can configure Data Guard broker between the cross-platforms, and you can configure the cross-platform standby by using the Oracle grid manager also.
Operating system
Operating system release
Database release Database version
Primary database
Linux Enterprise Linux Server release 5, 64 bit
11g 11.2.0.1.0 - 64 bit
Standby database
Windows Windows 7, 64 bit 11g 11.2.0.1.0 - 64 bit

Active Data Guard, Snapshot Standby, and Advanced Techniques
[ 234 ]
Time for action – creating a cross-platform Data Guard setupIn order to create a cross-platform Data Guard setup, perform the following steps:
1. Check certification by Oracle support for Oracle database versions of the operating systems on the website https://support.oracle.com/epmos/faces/CertifyHome?_adf.ctrl-state=dattfx3qm_9&_afrLoop=878199589056576.
Each Operating System, according to the 32/64 bit architecture, can be verified whether it is certified by Oracle or not. Oracle Database 11.2.0.1.0 is certified on Microsoft Windows x64 (64-bit) 7.
2. Determine the platform ID of both the primary and standby database as follows:SQL> select platform_id, platform_name from v$database;PLATFORM_ID PLATFORM_NAME----------- ------------------------------ 13 Linux x86 64-bitSQL> select platform_id, platform_name from v$database;
PLATFORM_ID PLATFORM_NAME----------- ------------------------------ 12 Microsoft Windows x86 64-bit
3. If the platform ID of both the primary and standby systems is different, check for the compatibility and supported Data Guard configuration from My Oracle Support note Data Guard Support for Heterogeneous Primary and Physical Standbys in Same Data Guard Configuration [ID 413484.1].
4. Create PFILE and configure the listener with a static entry in the standby system, as we discussed in Chapter 2, Configuring the Oracle Data Guard Physical Standby Database. Add the following additional parameters mentioned in the standby database. It will be useful in case of a switchover too because the filesystem as well as the OS of the primary and standby systems are different.
Perform the following on the primary database:db_file_name_convert='/u01/app/oracle/oradata/orcl','D:\APP\ADMIN\ORADATA\INDIA'
log_file_name_convert='/u01/app/oracle/oradata/orcl','D:\APP\ADMIN\ORADATA\INDIA'
Perform the following on the standby database:
db_file_name_convert='D:\APP\ADMIN\ORADATA\INDIA', '/u01/app/oracle/oradata/orcl'
log_file_name_convert='D:\APP\ADMIN\ORADATA\INDIA', '/u01/app/oracle/oradata/orcl'

Chapter 7
[ 235 ]
5. Now create a service on Windows that is specific to a standby instance. This is applicable if your standby is on the Windows Operating System as shown in the following command line:C:\Windows\system32>oradim -new -sid INDIA -INTPWD free2go -startmode auto -pfile d:\app\admin\product\11.2.0\dbhome_1\database\initINDIA.ora
Instance created.
C:\Windows\system32>
To create a service in Windows, run the command prompt with Administrator privileges by right-clicking on the application.
6. Set the environment variables and a startup instance in the NOMOUNT status as follows:C:\Windows\system32>set ORACLE_SID=INDIA
C:\Windows\system32>echo %ORACLE_SID%
INDIA
C:\Windows\system32>sqlplus / as sysdba
SQL*Plus: Release 11.2.0.1.0 Production on Fri Nov 9 08:50:32 2012
Copyright (c) 1982, 2010, Oracle. All rights reserved.
Connected to an idle instance.
SQL> startup nomount
ORACLE instance started.
Total System Global Area 818401280 bytes
Fixed Size 2180184 bytes
Variable Size 482347944 bytes
Database Buffers 331350016 bytes
Redo Buffers 2523136 bytes
SQL>
7. Connect to the primary database with a standby auxiliary instance using the net service name as follows:C:\Windows\system32>rman target sys/free2go@turkey auxiliary sys/free2go@india
Recovery Manager: Release 11.2.0.1.0 - Production on Fri Nov 9 11:26:28 2012
Copyright (c) 1982, 2009, Oracle and/or its affiliates. All rights reserved.

Active Data Guard, Snapshot Standby, and Advanced Techniques
[ 236 ]
connected to target database: ORCL (DBID=1316772835)
connected to auxiliary database: ORCL (not mounted)
RMAN>
Refer the following screenshot:
8. After the successful duplication of a standby database, start MRP on the standby database and verify whether redo data is transferring into heterogeneous platforms as follows:SQL> alter database recover managed standby database using current logfile disconnect from session;Database altered.SQL>
The following output will appear:
MRP0 started with pid=20, OS id=3916
Serial Media Recovery started
Managed Standby Recovery starting Real Time Apply
.............
Media Recovery Log D:\APP\ADMIN\FLASH_RECOVERY_AREA\INDIA_UN\ARCHIVELOG\2012_11_09\O1_MF_1_776_89S7S0KJ_.ARC
Media Recovery Waiting for thread 1 sequence 777 (in transit)
What just happened?We've implemented Data Guard in Chapter 2, Configuring the Oracle Data Guard Physical Standby Database for the homogenous platforms of the Operating System. Here we have explained how to configure Data Guard on cross-platform environments ranging from Linux to Windows.

Chapter 7
[ 237 ]
Data Guard tuning and wait eventsSpecific to standby database(s), we may have performance issues to read redo data and to transport over a network, redo write phase because of bad RAID configurations, Redo Apply phase because of huge redo, improper memory settings, or the issues can be with bugs. Here we will discuss some of them.
Network tuningStandby databases will be placed geographically in different locations with WAN for high availability in case of a disaster. Even though you keep your standby database geographically far away, you should have reasonable bandwidth to avoid data lag between the primary and standby databases. It can be a bigger problem if you are using synchronous redo with AFFIRM. Consider the use of a high latency network to fulfill redo rate shipping as follows:
Required network bandwidth = ((Redo rate bytes per sec. / 0.7) * 8) / 1,000,000 = bandwidth in Mbps.
By using this formula according to the redo generation rate, you can estimate the required network bandwidth. You can get redo rate in bytes per second from DBA_HIST_SNAPSHOT or from the AWR/Statspack reports.
Network throughput can be increased by setting Oracle net parameters RECV_BUF_SIZE and SEND_BUF_SIZE equal to three times of Bandwidth Delay Product. To calculate Bandwidth Delay Product, the bandwidth of the link and the Network Round Trip time are required. RTT is measured by the complete two-way travel from the primary to standby database, including the standby and primary databases.
BDP = (Network speed * RTT) /8
By this calculation, the optimal send and receive buffer sizes can be estimated with the following formula:
Socket buffer size = 3 * (Bandwidth Speed) * (RTT)
Or you can also use the following:
Socket buffer size = 3 * (BDP)
If the value of the socket buffer size is 11718750 bytes, the socket buffer size can be set as the following in sqlnet.ora or at the Operating System level:
[oracle@oracle-primary admin]$ cat sqlnet.ora|grep BUF_SIZE
RECV_BUF_SIZE=11718750
SEND_BUF_SIZE=11718750
[oracle@oracle-primary admin]$

Active Data Guard, Snapshot Standby, and Advanced Techniques
[ 238 ]
You can also configure to send and receive buffer sizes to the net service for connector descriptor in the client-side sqlnet.ora file as follows:
INDIA = (DESCRIPTION = (RECV_BUF_SIZE=11718750) (SEND_BUF_SIZE=11718750) (ADDRESS = (PROTOCOL = TCP)(HOST = 192.168.180.20)(PORT = 1521)) (CONNECT_DATA = (SERVER = DEDICATED) (SERVICE_NAME = india_un) ) )
If you are replicating data remotely either using database links for materialized views or Data Guard, the data will be transferred over the network in terms of data sized units (SDU); if a large amount of redo is being transmitted, you can increase the size of the SDU buffer to improve performance and network utilization. You can configure it in the sqlnet.ora file as DEFAULT_SDU_SIZE, which ranges from 512 bytes to 32767 bytes. The default SDU size of 2048 bytes is applicable for the client and dedicated server, where for the shared server the default SDU will be 32767 bytes.
On the standby databases, you can configure either in the sqlnet.ora or listener.ora file where we can specify buffer parameters for the address in description as follows:
SID_LIST_LISTENER = (SID_LIST = (SID_DESC = (SDU = 32767) (GLOBAL_DBNAME = india_un) (SID_NAME = INDIA) (ORACLE_HOME = /u01/home/oracle/product/11.2.0/db_1) ) )
Redo transport and apply tuningIf you are using a redo transport type such as ARCH, consider increasing the number of LOG_ARCHIVE_MAX_PROCESSES parameters. The default value in 11gR2 is 4 and it can be controlled from 1 to 30, if you set this parameter with a higher value. According to the archive processes and the system configuration, all the ARCn processes work in parallel to resolve the archive gaps.

Chapter 7
[ 239 ]
Choose the optimal value after several tests with an archive gap resolution as follows:
SQL> select * from V$PGASTAT where name='total PGA allocated';NAME VALUE UNIT-------------------- ---------- ------------total PGA allocated 249153536 bytes
The following output can be extracted using the view v$process:
PROGRAM PGA_USED_MEM PGA_MAX_MEM
------------------------------ ------------ -----------
oracle@oracle-stby (ARC2) 11270688 12050576
oracle@oracle-stby (ARC1) 11297656 12050576
oracle@oracle-stby (ARC4) 28942512 30924944
oracle@oracle-stby (ARC3) 28942512 30924944
oracle@oracle-stby (ARC0) 28942512 30924944
So every archive process is consuming nearly 30 MB of memory; this calculation is completely based on the memory management you have used. Consider the parameter value LOG_ARCHIVE_MAX_PROCESSES depending on the available resources.
If you are using synchronous redo transport with LGWR redo, consider decreasing the value of NET_TIMEOUT to avoid outages on the production database's performance; this value can be defined from one to 1200 according to 11gR2 and the default value is 30 seconds. Oracle recommends setting the value of NET_TIMEOUT to 10 seconds or less to avoid disconnection from the standby database.
Redo data is received from the primary to standby database and it will be applied by the background process MRP0. Redo Apply is a block-to-block physical replication of the primary database. It uses media recovery to read records from standby redo logfiles into memory and applies directly to the standby database. If you start MRP as alter database recover managed standby database disconnect from session, only one MRP process will be started to perform recovery. For huge OLTP databases, there are various possibilities for having a lot of redo to be applied on a standby database, with a single background process recovery being delayed. So we can initiate parallel recovery and it starts slave processes along with MRP background processes as follows:
SQL> alter database recover managed standby database using current logfile disconnect from session parallel 5SQL> !ps -ef|grep pr0oracle 32243 1 0 19:33 ? 00:00:00 ora_pr00_INDIAoracle 32245 1 0 19:33 ? 00:00:00 ora_pr01_INDIAoracle 32247 1 0 19:33 ? 00:00:00 ora_pr02_INDIA

Active Data Guard, Snapshot Standby, and Advanced Techniques
[ 240 ]
oracle 32249 1 0 19:34 ? 00:00:00 ora_pr03_INDIAoracle 32251 1 0 19:34 ? 00:00:00 ora_pr04_INDIAoracle 32253 1 0 19:34 ? 00:00:00 ora_pr05_INDIAoracle 32292 31785 0 19:34 pts/2 00:00:00 /bin/bash -c ps -ef|grep pr0
In the previous example, we have explicitly mentioned parallelism with the number 5. We can also mention parallel without any specific value so that parallelism will be the default for the number of CPUs.
Data Guard wait eventsData Guard wait events are classified into primary-and standby-related wait events. According to the new releases, many of the wait events are introduced; some of them are as follows:
� Data Guard wait events on the primary database with an ARCH transport
These wait events are specific to sending redo from the primary database to the standby database using ARCH with synchronous or asynchronous redo transport. There is an ARCH wait on ATTACH, an ARCH wait on SENDREQ, and an ARCH wait on DETACH.
� Data Guard wait events on the primary database with LGWR transport
If you are using real-time apply with LGWR redo transport, the LNS process will be working with the standby RFS server in redo transport and the wait events can be LNS wait on ATTACH, LNS wait on SENDREQ, LNS wait on DETACH, LGWR wait on LNS, LNS wait on LGWR, and LGWR-LNS wait on a channel.
� Database wait events related to Data Guard
These wait events are applicable even in a normal system and are related to I/O. They are log file sync, log file parallel write, and DB file sequential read.
� Data Guard wait events on a standby database
These wait events will occur in case time is spent on I/O on the standby. They are RFS write, RFS random I/O, and RFS sequential I/O.

Chapter 7
[ 241 ]
Use the following query to get the details about all wait events:
SQL> select event,total_waits,time_waited,total_timeouts from v$system_event order by total_waits desc;EVENT TOTAL_WAITS TIME_WAITED ---------------------------------------- ----------- ----------- parallel recovery slave next change 260168 381493 control file sequential read 67687 2373 parallel recovery change buffer free 60053 82981 parallel recovery read buffer free 18975 24964 SQL*Net vector data from client 10534 79202
For an in-depth analysis of the events discussed, use a load profile of AWR or a Statspack report or performance dynamic views, and the wait events can be varied from environment to environment depending on the configurations and settings.
SummaryIn this chapter we have briefly discussed about the new feature of Oracle 11gRx and Active Data Guard and their compatibility with several applications. Then we learned how logical backups work and how to generate ASH reports with the ADG feature.
We also worked on how to prepare a cascade standby database, advanced compressions with Oracle Data Guard, and how to prepare Data Guard in cross-platform environments (ranging from Linux to Windows). In the next chapter we will discuss how to integrate Data Guard with GRID EM, RMAN, and RAC.


8Integrating Data Guard with the
Complete Oracle Environment
After preparing a Data Guard configuration by creating one or more standby databases, we should also integrate this configuration with the existing Oracle environment. This integration lets us benefit from Oracle Data Guard more effectively, makes it more robust and easily manageable, and also serves the purpose of Maximum Availability.
In this chapter, we'll discuss integrating the Data Guard configuration with the following Oracle software products:
� Oracle Enterprise Manager Cloud Control
� Recovery Manager (RMAN)
� Real Application Cluster (RAC)
Let's start with learning how we can incorporate Data Guard installations into an existing Enterprise Manager Cloud Control configuration.
The Oracle Enterprise Manager Cloud Control integrationThe Oracle Enterprise Manager product family involves products to monitor and manage IT environments right from servers to applications and services. Cloud Control 12c (formerly named as Grid Control) is the comprehensive and integrated management solution of Oracle; it has been intended to control all IT infrastructure and cloud-based IT services.

Integrating Data Guard with the Complete Oracle Environment
[ 244 ]
From the database management perspective, Cloud Control offers unique properties to control the Oracle Database environment centrally. In addition to traditional database management features, Cloud Control has the following packs to address all kinds of administrative requirements. You can use these packs after purchasing the related license:
� Oracle Diagnostic Pack for Database
� Oracle Tuning Pack for Database
� Oracle Lifecycle Management Pack for Database
� Data Masking Pack
� Oracle Test Data Management Pack
� Exadata Management
Data Guard management does not require an extra pack, so it's a built-in feature in Cloud Control. We can monitor and manage Data Guard configurations using the Availability tab in the Database Management home page. However, in order to use Cloud Control's Data Guard management features, we first need to add the Data Guard configurations into Cloud Control properly. Let's see how we can accomplish this.
It has been assumed that an Enterprise Manager Cloud Control 12c server is already installed and ready to use. It has also been assumed that the EM agent software is installed on servers in the Data Guard configuration, so the hosts have been added as targets to the Cloud Control environment. Preparing this environment is out of the scope of this book; so if you don't have a Cloud Control environment but want to prepare it, please refer to the related documentation at http://docs.oracle.com.
Time for action – adding the Data Guard configuration into Cloud Control
1. We have a Data Guard configuration of one primary, one physical standby, and one logical standby database. The hosts in the Data Guard configuration were added as targets to Cloud Control. Now the first thing we need to do is add the databases as targets. Log in to the Cloud Control interface, and on the main page click on Targets and then Databases. See the following screenshot showing no database targets. Click on Add to create a database target.

Chapter 8
[ 245 ]
2. The next page will ask for the host that runs on the database. First add the primary database as the target, so type the hostname of the primary database server and click on Continue.
3. Cloud Control will discover all the databases running on the specified host, including ASM instances, if they exist. Select the primary database and click on the configure button that is shown with a wrench icon:

Integrating Data Guard with the Complete Oracle Environment
[ 246 ]
4. On the database configuration screen shown in the following screenshot, control the autofilled fields; type the password of the DBSNMP user and also the connect string for the database. We can click on Test Connection to check if Cloud Control is able to connect to the database. Click on Next to continue. A review screen will show up; check the information and click on OK.
5. After completing the configuration of the database target, turn back to the screen showing the discovered databases. Click on Finish and then on the Summary page; then click on Save. The primary database will be added to the database target list.
It may take a few minutes to gather information about the status of the database target. So at the beginning, there will be no information in some fields of the database management screens.

Chapter 8
[ 247 ]
6. Repeat the same steps to add all the standby databases to the target database list. At the end, we'll be able to see all the databases of the Data Guard configuration as targets on the database targets screen:
7. All the databases are listed, but Cloud Control is not aware yet that these databases are in the same Data Guard configuration. In order to complete the integration, click on the name of the primary database. On the database home screen, click on Availability and then click on Add Standby Database. We'll see a database login screen as shown in the following screenshot. We need to connect to the primary database as SYSDBA to add a standby database. So type the login information for the sys user and select the SYSDBA role. We can save this login information for logging in again in the future, and also set it as a preferred credential as shown in the following screenshot. Click on Login to continue.

Integrating Data Guard with the Complete Oracle Environment
[ 248 ]
8. We'll see the Add Standby Database wizard screen. Besides adding an existing standby to Cloud Control, it's also possible to create a new standby database with this wizard. Now select the Manage an existing standby database with Data Guard broker option and click on Continue:
9. Now we can see the two standby databases. Select one of them and click on Next. If there is only one standby database, just click on Next:
10. Enter the login credential in the next step and click on Next.

Chapter 8
[ 249 ]
11. The next step will show the standby archive location and Data Guard connect identifier. If FRA is enabled, the standby archive location will be shown as USE_DB_RECOVERY_FILE_DEST. In the connect identifier, it's possible to select the connect descriptor used by Enterprise Manager for the standby database or use an existing net service name, which is the same as the example used in our book. Click on Next to continue:
12. A review screen will show up. Check the information and click on Finish to complete integrating the standby database with the primary database.
After this step, Enterprise Manager will execute several ALTER commands on the primary and standby databases. This is a reconfiguration of the Data Guard parameters in order to guarantee a properly integrated Data Guard environment. Check the primary and standby database alert logs to see the ALTER commands.
What just happened?We've now completed integrating the existing Data Guard environment with Enterprise Manager Cloud Control, and we're able to benefit from the Data Guard monitoring and management properties of Cloud Control.

Integrating Data Guard with the Complete Oracle Environment
[ 250 ]
Have a go heroAdd the logical standby database, if it exists, with the same steps. Note that physical and logical standby databases have no difference when integrating with the primary database on Cloud Control.
Cloud Control Data Guard administration home pageWe can access the Data Guard administration home page, shown in the following screenshot, by clicking on Availability and then on Data Guard Administration on the database home page of any of the databases in the Data Guard configuration. It's possible to monitor and manage Data Guard properties using this screen.
This screen provides general information about the status of Data Guard. We can see the member databases and roles of the Data Guard configuration, the protection mode, Active Data Guard, and the fast-start failover status, the transport and apply lags, if they exist, the last received and applied log sequences, and the estimated failover time on this screen. So it provides a lot of useful information at a single glance.

Chapter 8
[ 251 ]
Whereas a lot of this information can also be gathered easily with other interfaces, it's very practical to access it all in one screen. The Estimated Failover Time information shows the approximate number of seconds required for the failover to this standby database. It is very useful to compare the current Data Guard status with Recovery Time Objective (RTO), which is the disaster recovery element specifying the duration of time within which a business process (database in our case) must be restored after a disaster.
Besides monitoring the Data Guard configuration, this screen also provides links to change the Data Guard properties, which is covered in the next section. We will use the Data Guard Administration interface of Cloud Control to modify the configuration.
Modifying the Data Guard configurationThe Data Guard Administration home page offers quick links to change a property when showing its current value. For example, in the Overview section, the Protection Mode field shows Maximum Performance; when we click on the Maximum Performance link, we can access the Change Protection Mode screen. Also, Fast-Start Failover shows Disabled, and when we click on Disabled, we see the Fast-Start Failover: Configure screen.
You can edit primary database properties by clicking on Edit in the Primary Database section. The screen will offer three tabs to change the properties:
� General: Using this tab, we can stop/start the redo transport services, view the alert logs of all the databases in the configuration, open the telnet session for the database hosts and disable/enable the Data Guard broker.

Integrating Data Guard with the Complete Oracle Environment
[ 252 ]
� Standby Role Properties: This tab enables us to set the standby role properties that will be valid after a role change. We can set the Redo Transport Mode field to SYNC or ASYNC, enable/disable redo compression, set the timeout and delay, choose an archive log location for the standby role, and specify the filename convert parameters.
� Common Properties: In this tab, there are some properties that are not role-specific, such as the connect identifier, number of archiver processes, and level of tracing output generated by the Data Guard processes.

Chapter 8
[ 253 ]
At the bottom of the Data Guard Administration home page, we have buttons to perform the following tasks:
� To edit the standby database properties, which offer similar options to the primary database
� To start a switchover or failover to a target standby
� To convert a physical standby into a snapshot standby database
� To add a new standby database to the Data Guard configuration
We can also enable/disable Active Data Guard using the link under Real-time Query. If we click on the sequence numbers of the last received and applied archive logs, we'll see the Log File Details screen that lists the log files that have not been received and those that have been received but not applied by the standby databases in the Data Guard configuration.
Now let's try changing a Data Guard property. The following section will show how to enable or disable the fast-start failover.

Integrating Data Guard with the Complete Oracle Environment
[ 254 ]
Time for action – enabling/disabling fast-start failover1. The fast-start failover feature, which can be used for automated failovers in
standby databases in the case of a primary database outage, can be enabled and disabled using Cloud Control. On the Data Guard Administration home page, in the Overview section click on Disabled in the Fast-Start Failover field. This will enable us to access the fast-start failover configuration page. At the top of the page, it's indicated that there's no specified Observer for the Data Guard configuration. Select the standby database that will be the fast-start failover target, and then click on Configure Observer.

Chapter 8
[ 255 ]
2. Fill the observer hostname and Oracle Home information for the primary and alternate observers. If a problem on the observer is detected, Enterprise Manager will restart it on the primary observer host and fall back to the alternate host when necessary. (We can optionally specify connect identifiers for the primary and standby databases.) If not, the observer will use the connect identifiers used in the Data Guard configuration. Click on OK to continue.
Oracle recommends that the observer be on a separate host from the primary and standby database servers.

Integrating Data Guard with the Complete Oracle Environment
[ 256 ]
3. We'll return to the fast-start failover configuration page. At the bottom of the page, we'll see the Failover Properties and Primary Database Properties sections.
There are two properties in the Failover Properties section; they are set to 30 seconds by default, but can be changed. The Failover Threshold property is the amount of time that the primary database must be unreachable to initiate the failover, and Lag Limit is the maximum lag between the primary and standby databases, beyond which a fast-start failover will not be allowed. Now click on Edit next to User Configurable Failover Conditions. We're able to specify conditions that should cause a fast-start failover if detected on the primary database in this page. Click on OK to apply any changes and go back to the fast-start failover configuration page.
4. Check all the fast-start failover settings and click on Continue. The following steps will require OS credentials to connect primary and alternate observer hosts.

Chapter 8
[ 257 ]
5. Now we must enable flashback logging on the primary and standby databases if it has not yet been enabled. We need to specify the Flash Recovery Area path, Flash Recovery Area Size, and Flashback Retention Time if flashback logging is not enabled. If it's enabled, we can see the current values. Specify the values and click on Continue.
6. The last page will request a confirmation about enabling flashback logging, starting the observer on the specified host, and enabling a fast-start failover. Click on Yes to continue.
7. We can see the progress as shown in the following screenshot. If it is accomplished successfully, we'll see the message, The fast-start failover mode has been successfully changed. Also, the fast-start failover status will show Enabled to INDIA_PS and the observer hostname will appear on the Data Guard Administration home page.
What just happened?We've seen which properties of Data Guard can be changed with the Enterprise Manager Cloud Control interface. We've also examined the steps and options for enabling a fast-start failover using Cloud Control.
Have a go heroNow enable and disable the real-time query (Active Data Guard) option on the physical standby database using Cloud Control. At the same time, check the standby alert log file to track the statements run on the database.

Integrating Data Guard with the Complete Oracle Environment
[ 258 ]
Monitoring Data Guard performanceEnterprise Manager Cloud Control offers a separate screen to monitor Data Guard performance. We can access this screen by clicking on Availability and then on Data Guard Performance on the database home page. Here's a screenshot of the Data Guard Performance page:
We will see the following information on the performance page:
� The redo generation rate of the primary database
� The lag times for all the standby databases
� The Redo Apply rate for all the standby databases

Chapter 8
[ 259 ]
The redo generation rate of the primary database and the Redo Apply rates of the standby database are important information for Data Guard management. We can use this information to calculate how much time it takes for resynchronization when there's a lag. Also, we can use this information to calculate Recovery Time Objective (RTO) when a physical standby is opened as a snapshot standby or when we stop synchronization for maintenance operations.
Note that the apply rate on this screen is not the Redo Apply capacity of the standby database. It shows the current state of Redo Apply. So if the load on the database is low, we'll see lower apply rates than its actual capacity. We can determine the Redo Apply capacity of a standby database when the Redo Apply process does not wait for a new redo to arrive. So we can achieve this by stopping Redo Apply for a while and starting it again or increasing the redo generation rate on the primary database to a higher value.
On the Data Guard Performance screen, we can click on the charts to reach the historical information.
The Data Guard Performance screen of Cloud Control has another part named Test Application. We can see the Start and Stop buttons here. When we start a test application, it generates a load on the primary database. Then we can pause or stop it at any time. This is useful if you want to see the behavior of a low-load Data Guard configuration under heavy load.
Using Incident Manager to monitor Data Guard Enterprise Manager Cloud Control 12c provides a centralized incident management console called Incident Manager. This console is an advanced interface to track, diagnose, and resolve default and user-defined incidents. Additionally, it provides features to help rectify the root causes of recurring incidents. Incident Manager also provides lifecycle operations for incidents. It's possible to assign the ownership of an incident to a specific user, set the priority for an incident, escalate it or suppress it for a later time, and track an incident's status.
From the Data Guard management perspective, Incident Manager can help administrators be informed about the issues related to Data Guard, and help track and resolve them. We can define thresholds to default Data Guard metrics and also create user-defined metrics using SQL statements. When the current state of a metric reaches its threshold, an incident is created automatically.

Integrating Data Guard with the Complete Oracle Environment
[ 260 ]
To access the default metrics of Data Guard on the database home page, perform the following steps:
1. Click on Oracle Database.
2. Click on Monitoring.
3. Click on All Metrics.
4. Expand the Data Guard Failover, Data Guard Fast-Start Failover Observer, Data Guard Performance, and Data Guard Status (only in the primary database) categories to see all the related metrics. The primary and standby databases have different metrics as we can see in the following screenshot:
It's possible to define the thresholds of some of these metrics. We can define two values: the Warning and Critical thresholds. However, some of them are not editable because they're simple 0/1 controls such as Observer Status or Failover Occurred.
These metrics produce incidents; we can see the details of an incident on the Incident Manager page, which is accessible from the Enterprise menu, select Monitoring, and then Incident Manager. It's also possible to monitor incidents for a specific database by clicking on the Oracle Database menu and then going to Monitoring | Incident Manager on the database home page.

Chapter 8
[ 261 ]
Time for action – setting the threshold and creating an incident for estimated failover time metric
Perform the following steps to set a threshold and create an estimated failover time metric:
1. Open the database home page for the standby database by navigating to Targets | Databases and then clicking on the name of the standby database.
2. Navigate to the metrics page by navigating to Oracle Database | Monitoring | All Metrics.
3. Expand the Data Guard Performance category and click on the Estimated Failover Time section:

Integrating Data Guard with the Complete Oracle Environment
[ 262 ]
4. Click on Modify Thresholds. Enter 15 for Warning Threshold and 20 for Critical Threshold. Then click on Save Thresholds:
5. Navigate to the Data Guard Administration page by navigating to Availability | Data Guard Administration. Click on Edit to edit the standby database properties.
6. Stop the Redo Apply process by selecting Apply Off and click on Apply:

Chapter 8
[ 263 ]
7. Navigate to the Data Guard performance page by navigating to Availability | Data Guard Performance and start the test application. After the test application is started, load will be generated on the primary database. Because we have stopped the Redo Apply process on the standby database, an apply lag will occur and the estimated failover time will increase.
8. Open the Incident Manager by navigating to Enterprise | Monitoring | Incident Manager. Refresh the page until an incident comes up about the estimated failover time. We can see an example incident in the following screenshot:
9. Stop the test application and then start the Redo Apply process on the standby database.
What just happened?We've seen the Data Guard performance monitoring and the Incident Management properties of Cloud Control. We've also run an example to automatically create an incident on an estimated failover time metric. These incidents may help database administrators a lot, for monitoring their Data Guard environments.

Integrating Data Guard with the Complete Oracle Environment
[ 264 ]
RMAN integrationBacking up a database is one of the usual DBA tasks and is a mandatory job on production systems. Recovery Manager (RMAN) has been supplied and recommended by Oracle, and provides effective, fast, and manageable methods to back up, restore, and recover an Oracle Database. Therefore, it is the most commonly used backup and recovery manager for Oracle Databases.
When used with Data Guard, RMAN offers extra safety and effectiveness to database administrators. It's possible to use a backup taken on the standby in order to restore and recover a primary database, and vice versa. Datafile, control file, and archived log file backups are interchangeable in a Data Guard environment. So we can prefer carrying the backup load on the primary database to a standby, or back up both the primary and standby for more data security. We can also use standby databases for the block change tracking (BCT) feature; it increases the incremental backup performance by identifying the changed data blocks since the last incremental backup.
Integration requirements and best practicesWe need to build an integrated environment to take advantage of using RMAN in a Data Guard configuration. Let's see the requirements and best practices for integrating these two Oracle database components.
Physical standby requirementThe most important point of this integration is the fact that only physical standby databases can be used for interchangeable backups. If you recall, logical standby databases are not block copies of the primary database, so they may be in a different physical structure from it. So it's not possible to use a logical standby backup to restore and recover a primary database. The backup consideration of logical standby databases must be dealt with separately. However, a physical standby backup can be used to restore and recover the primary or any other physical standby databases in the Data Guard configuration.
RMAN Catalog requirementAn RMAN Catalog application is used to record the backup information of different databases in a centrally located system for easy access and use in case of database breakdowns. It's an option that is preferred in an environment with a large number of Oracle databases; however, RMAN Catalog has to be used in a Data Guard environment for successful integration. Otherwise, it will not be possible for the databases to be aware of backups taken from others in the same Data Guard configuration without a manual operation.

Chapter 8
[ 265 ]
We should place the RMAN Catalog in a separate server from the primary and standby database servers, so that it will be possible to access the catalog that contains the necessary backup information in the case of any database server breakdown. We should also consider the high availability and disaster recovery requirements of the RMAN Catalog database.
Using a different DB_UNIQUE_NAMEIn 11g, databases in the Data Guard configuration should have different DB_UNIQUE_NAME values. We're saying should because, if it's a simple configuration with no broker, fast-start failover, TAF, and so on, it's possible to run Data Guard with the same DB_UNIQUE_NAME value on the primary and standby databases. However, this is not a recommended configuration.
When performing a backup in a Data Guard environment, RMAN records the backup information by associating it with the DB_UNIQUE_NAME value of the database. So it's important to set different values for the primary database and for all the standby databases for a proper integration.
General RMAN best practicesWe should follow some general best practices when using RMAN for backing up and recovering Oracle databases. These best practices are also valid in a Data Guard configuration. Some of them are as follows:
� Enabling a fast recovery area for an effective disk backup strategy
� Keeping the flashback database on in order to return the database and objects to their state at a previous point in time without a full restore of the database
� Using SPFILE and setting AUTOBACKUP on to automate backups of SPFILE and the control file at the end of all RMAN backup operations
� Enabling block change tracking for fast increment backups
� Configuring an appropriate parallelism setting for the better performance of RMAN operations
RMAN settings for the Data Guard environment After learning the requirements and best practices, now let's see what we should accomplish to create an integrated environment.

Integrating Data Guard with the Complete Oracle Environment
[ 266 ]
It is assumed that there is an RMAN Catalog database ready to use. For testing purposes, you can use your Data Guard test servers to create a catalog. Creating an RMAN catalog is not within the scope of this book, so you should follow related documentation to complete this job, which is quite easy.
Registering primary database in the catalogWe'll start with introducing the primary database to the RMAN Catalog application using the REGISTER command. Only the primary database has to be registered in the RMAN Catalog application. A physical standby database will be registered automatically when we connect it as a target to the RMAN Catalog application.
Run the following commands on the primary host to register the primary database in the RMAN Catalog application:
$ rman
Recovery Manager: Release 11.2.0.1.0 - Production on Wed Oct 10 13:46:15 2012
Copyright (c) 1982, 2009, Oracle and/or its affiliates. All rights reserved.
RMAN> CONNECT TARGET /
connected to target database: ORCL (DBID=1319333016)
RMAN> CONNECT CATALOG RMAN/RMAN@RMANCAT
connected to recovery catalog database
RMAN> REGISTER DATABASE;
database registered in recovery catalog
starting full resync of recovery catalog
full resync complete
Configuring RMAN settings for primary database:After registering the primary database in the catalog, we should now configure some RMAN settings. First, specify a retention policy to specify for how long a period of time it is guaranteed to do a point-in-time recovery. Backups older than the retention policy will be marked as OBSOLETE, which means that they are not needed.
RMAN> CONFIGURE RETENTION POLICY TO RECOVERY WINDOW OF 7 DAYS;

Chapter 8
[ 267 ]
If backups are to be run on the primary database, turn on automatic backup of the control file and turn on backup optimization; this will prevent the unnecessary backup of a datafile that has been unchanged since its last backup.
RMAN> CONFIGURE CONTROLFILE AUTOBACKUP ON;
RMAN> CONFIGURE BACKUP OPTIMIZATION ON;
We should set an archived log deletion policy for the primary database. If archived log backups will be taken from the primary database, we can set the policy to NONE in order to let the database manage the deletion regarding the FRA space or set a policy to mark the archived logs as OBSOLETE depending on the number of existing disk/tape backups.
RMAN> CONFIGURE ARCHIVELOG DELETION POLICY TO NONE;
We can also use the following command instead of the previous one:
RMAN> CONFIGURE ARCHIVELOG DELETION POLICY TO BACKED UP 1 TIMES TO DEVICE TYPE DISK;
If archived log backups are not taken from the primary database, the retention policy will mark them as OBSOLETE as they are shipped/applied on the standby databases:
RMAN> CONFIGURE ARCHIVELOG DELETION POLICY TO APPLIED ON ALL STANDBY;
You can also use the following command:
RMAN> CONFIGURE ARCHIVELOG DELETION POLICY TO SHIPPED TO ALL STANDBY;
We'll now specify net service names for the databases in the Data Guard configuration with the following commands:
RMAN> CONFIGURE DB_UNIQUE_NAME TURKEY_UN CONNECT IDENTIFIER 'TURKEY';
RMAN> CONFIGURE DB_UNIQUE_NAME INDIA_PS CONNECT IDENTIFIER 'INDIAPS';
Using these net service names, the RMAN target database will connect to other databases of the Data Guard when the RESYNC CATALOG FROM DB_UNIQUE_NAME command is executed. This command is used to make RMAN Catalog consistent with the specified database control file. It updates physical database structure (tablespace, datafile), archived log, and backup records in the catalog. It's good practice to use the RESYNC CATALOG FROM DB_UNIQUE_NAME ALL command in the scheduled RMAN script in a Data Guard environment.
We specified that it's not necessary to register standby databases in RMAN Catalog because they'll automatically be registered when connected as a target. The CONFIGURE DB_UNIQUE_NAME command also implicitly registers the standby database in the catalog if it has not been registered yet.

Integrating Data Guard with the Complete Oracle Environment
[ 268 ]
Let's check those databases of Data Guard that are known to RMAN Catalog. We'll be able to see all the databases specified with the CONFIGURE DB_UNIQUE_NAME command:
RMAN> LIST DB_UNIQUE_NAME OF DATABASE;
List of Databases
DB Key DB Name DB ID Database Role Db_unique_name
------- ------- ----------------- --------------- ------------------
2 ORCL 1319333016 PRIMARY TURKEY_UN
2 ORCL 1319333016 STANDBY INDIA_PS
Configuring RMAN settings for standby databaseWe should first decide whether we'll use a physical standby as the source for database backups. The best practice is to back up both the primary and the standby databases. If this is not preferred, the network between the primary and standby databases is determinant. It won't be feasible to run backups only on the standby, where it's connected to the primary database over a WAN network. This will dramatically affect the restore time on the primary database, which is not acceptable. If both databases are in the same LAN, we can consider running backups only on the standby database.
If backups are to be taken from the standby database, connect the RMAN Catalog application and the physical standby as targets to configure the settings for the standby database. We should turn on automatic backup for the control file and backup optimization.
RMAN> CONFIGURE CONTROLFILE AUTOBACKUP ON;
RMAN> CONFIGURE BACKUP OPTIMIZATION ON;
Then we should set the archived log deletion policy. We should use the similar strategy that is mentioned in the primary database RMAN settings. So if we want to back up the archived logs on the standby, we should set the deletion policy to NONE or set a policy to mark the archived logs as OBSOLETE depending on the number of existing disk/tape backups. If no archived log backup is running on the standby, use the APPLIED ON STANDBY policy for archived log deletion.
Checking the RMAN configurationWe can check the configuration for all the databases in the Data Guard configuration by connecting to any of the databases and the recovery catalog. Use the SHOW ALL command with the FOR DB_UNIQUE_NAME option to check the values of the RMAN parameters for the specified database:
RMAN> SHOW ALL FOR DB_UNIQUE_NAME TURKEY_UN;
RMAN configuration parameters for database with db_unique_name TURKEY_UN are:

Chapter 8
[ 269 ]
CONFIGURE RETENTION POLICY TO RECOVERY WINDOW OF 7 DAYS;
CONFIGURE BACKUP OPTIMIZATION OFF; # default
CONFIGURE DEFAULT DEVICE TYPE TO DISK; # default
CONFIGURE CONTROLFILE AUTOBACKUP OFF; # default
CONFIGURE CONTROLFILE AUTOBACKUP FORMAT FOR DEVICE TYPE DISK TO '%F'; # default
CONFIGURE DEVICE TYPE DISK PARALLELISM 1 BACKUP TYPE TO BACKUPSET; # default
CONFIGURE DATAFILE BACKUP COPIES FOR DEVICE TYPE DISK TO 1; # default
CONFIGURE ARCHIVELOG BACKUP COPIES FOR DEVICE TYPE DISK TO 1; # default
CONFIGURE MAXSETSIZE TO UNLIMITED; # default
CONFIGURE ENCRYPTION FOR DATABASE OFF; # default
CONFIGURE ENCRYPTION ALGORITHM 'AES128'; # default
CONFIGURE COMPRESSION ALGORITHM 'BASIC' AS OF RELEASE 'DEFAULT' OPTIMIZE FOR LOAD TRUE ; # default
CONFIGURE DB_UNIQUE_NAME 'TURKEY_UN' CONNECT IDENTIFIER 'TURKEY';
CONFIGURE DB_UNIQUE_NAME 'INDIA_PS' CONNECT IDENTIFIER 'INDIAPS';
CONFIGURE ARCHIVELOG DELETION POLICY TO APPLIED ON ALL STANDBY;
CONFIGURE SNAPSHOT CONTROLFILE NAME TO '/u01/app/oracle2/product/11.2.0/dbhome_1/dbs/snapcf_INDIAPS.f'; # default
RMAN> SHOW ALL FOR DB_UNIQUE_NAME INDIA_PS;
RMAN configuration parameters for database with db_unique_name INDIA_PS are:
CONFIGURE RETENTION POLICY TO RECOVERY WINDOW OF 7 DAYS;
CONFIGURE BACKUP OPTIMIZATION ON;
CONFIGURE DEFAULT DEVICE TYPE TO DISK; # default
CONFIGURE CONTROLFILE AUTOBACKUP ON;
CONFIGURE CONTROLFILE AUTOBACKUP FORMAT FOR DEVICE TYPE DISK TO '%F'; # default
CONFIGURE DEVICE TYPE DISK PARALLELISM 1 BACKUP TYPE TO BACKUPSET; # default
CONFIGURE DATAFILE BACKUP COPIES FOR DEVICE TYPE DISK TO 1; # default
CONFIGURE ARCHIVELOG BACKUP COPIES FOR DEVICE TYPE DISK TO 1; # default
CONFIGURE MAXSETSIZE TO UNLIMITED; # default
CONFIGURE ENCRYPTION FOR DATABASE OFF; # default
CONFIGURE ENCRYPTION ALGORITHM 'AES128'; # default

Integrating Data Guard with the Complete Oracle Environment
[ 270 ]
CONFIGURE COMPRESSION ALGORITHM 'BASIC' AS OF RELEASE 'DEFAULT' OPTIMIZE FOR LOAD TRUE ; # default
CONFIGURE DB_UNIQUE_NAME 'TURKEY_UN' CONNECT IDENTIFIER 'TURKEY';
CONFIGURE DB_UNIQUE_NAME 'INDIA_PS' CONNECT IDENTIFIER 'INDIAPS';
CONFIGURE ARCHIVELOG DELETION POLICY TO NONE;
CONFIGURE SNAPSHOT CONTROLFILE NAME TO '/u01/app/oracle2/product/11.2.0/dbhome_1/dbs/snapcf_INDIAPS.f'; # default
We've successfully completed the integration of the Data Guard environment with RMAN. At this stage, all the databases in the Data Guard administration will be aware of any backup taken with RMAN Catalog connection. If the backup is on tape and there is an accurate configuration between the tape library and all the database servers, any database in the Data Guard administration can use that backup for a restoration. If the backup is on the disk, it has to be on a shared filesystem across all databases of the Data Guard administration in order to be used by other databases. Otherwise, we need to transfer the backup files to other database servers and register them manually if needed.
Now let's perform a recovery scenario in which the primary datafile is lost and recovered using the backup of the standby database datafile that is then taken to the disk immediately.
Time for action – recovering a primary database using a standby database disk backup
1. Let's simulate a case where a datafile is lost by renaming one of the datafiles. Shut down the database, rename the datafile with the mv command, and start the database again. We'll see the cannot identify/lock data file error on startup.SQL> shutdown immediate
$ mv /u01/app/oracle2/datafile/ORCL/users01.dbf /u01/app/oracle2/datafile/ORCL/users01.dbf.old
SQL> startup
ORACLE instance started.
Total System Global Area 1603411968 bytes
Fixed Size 2213776 bytes
Variable Size 872417392 bytes
Database Buffers 671088640 bytes
Redo Buffers 57692160 bytes

Chapter 8
[ 271 ]
Database mounted.
ORA-01157: cannot identify/lock data file 4 - see DBWR trace file
ORA-01110: data file 4: '/u01/app/oracle2/datafile/ORCL/users01.dbf'
2. Now we'll run an RMAN datafile backup using the standby database as the source and locating the backup file in the primary database. Connect the standby database as the target, and the primary database as the auxiliary; then back up the datafile. It's not mandatory to connect RMAN Catalog because we'll register the backup file to the primary database's control file manually.$ rman
RMAN> connect TARGET sys/password@INDIAPS
RMAN> connect AUXILIARY sys/password@TURKEY
RMAN> backup as copy datafile 4 auxiliary format '/backup/users01_bckp.dbf';
Starting backup at 10-OCT-12
allocated channel: ORA_DISK_1
channel ORA_DISK_1: SID=1239 device type=DISK
channel ORA_DISK_1: starting datafile copy
input datafile file number=00004 name=/u01/app/oracle2/datafile/INDIAPS/users01.dbf
output file name=/backup/users01_bckp.dbf tag=TAG20121010T164250 RECID=10 STAMP=796322590
channel ORA_DISK_1: datafile copy complete, elapsed time: 00:00:25
Finished backup at 10-OCT-12
3. We must register the backup file to the primary database control file with the RMAN CATALOG command. On the primary database server, connect the database as the target and execute the following statements:$ rman
RMAN> connect target /
connected to target database: ORCL (DBID=1319333016)
RMAN> catalog datafilecopy '/backup/users01_bckp.dbf';
using target database control file instead of recovery catalog
cataloged datafile copy
datafile copy file name=/backup/users01_bckp.dbf'
RECID=4 STAMP=796322862

Integrating Data Guard with the Complete Oracle Environment
[ 272 ]
4. Switch the datafile 4 to the backup copy that we registered in the previous step:RMAN> switch datafile 4 to copy;
datafile 4 switched to datafile copy "/backup/users01_bckp.dbf"
5. Execute the RECOVER DATABASE command on SQL*Plus and open the primary database:
SQL> recover database;
Media recovery complete.
SQL> alter database open;
Database altered.
What just happened?We've gone through Data Guard and RMAN integration and then executed a primary database recovery example scenario in which the standby database backup was used. If the backup has been performed on the standby database to be taped periodically, we can also use these tape backups to restore files to the primary database.
Have a go heroNow simulate the opposite situation, that is, a datafile loss on the standby database. Rename a datafile on the standby database and then recover the database using a backup of the datafile taken from the primary database.
Using block change tracking with Data GuardBlock change tracking is a useful RMAN feature that is used to increase incremental backup performance. If it's enabled, changed blocks in each datafile will be recorded in a change-tracking file. When we perform an incremental RMAN backup, this file will be used to identify the changed blocks, so it will not be necessary for the RMAN incremental backup job to scan every block in the datafiles. This considerably improves the performance of the incremental backup jobs and some minimal performance overhead on the database during normal operations.

Chapter 8
[ 273 ]
The ability to use standby databases for block change tracking is an 11g feature and requires an Oracle Active Data Guard license. This feature removes the performance overhead of BCT from primary databases. We use the following SQL statement on the standby database to enable BCT:
SQL> ALTER DATABASE ENABLE BLOCK CHANGE TRACKING USING FILE '/backup/bct/block_change.log';
Database altered.
SQL> SELECT FILENAME, STATUS FROM V$BLOCK_CHANGE_TRACKING;
FILENAME STATUS
---------------------------- ----------
/backup/bct/block_change.log ENABLED
When enabled, the block change tracking file that is 10 MB in size is created and grows as needed. It won't be wrong to estimate its maximum size as a few gigabytes.
Besides the advantages provided by block change tracking for backup performance, there are several important bugs for enabling block change tracking on the standby database; this causes the backup jobs to hang and it causes incorrect backups and data loss. These bugs (for example, bugs 9869287, 9068088, 10094823, and so on) were fixed in the later releases, so it's important to check for relevant BCT bugs in the database version before enabling it on the physical standby.
Block change tracking can be disabled with the following statement:
SQL> ALTER DATABASE DISABLE BLOCK CHANGE TRACKING;
RAC integrationReal Application Cluster (RAC) is a widely used Oracle cluster product that provides high availability and scalability for Oracle databases. When configuring Data Guard on RAC databases, there are some points that we need to take into consideration in order to build a proper integration. For a RAC primary database, we may prefer configuring single instance or RAC standby databases. These configurations will be discussed separately. A single instance primary database and RAC standby database configuration is not common and doesn't require any special attention.

Integrating Data Guard with the Complete Oracle Environment
[ 274 ]
A RAC primary database with a single instance standby databaseCreating a single instance standby database for a RAC primary database is a very frequently encountered configuration. The following points are important when configuring a single instance standby for a RAC primary database:
� The LOG_ARCHIVE_DEST_n parameter in the primary database, which shows the standby database, must be configured with the SID='*' option. This will enable a redo transport service on all nodes of the primary database.
� Every instance of the primary database must be able to resolve the service name specified in the LOG_ARCHIVE_DEST_n parameter pointing to the standby database.
� The number of standby redo log files on the standby database must be calculated according to the number of instances and redo log groups in the primary database. The following formula can be used to determine the number of standby redo logs:
(number of primary redo log groups + 1) * number of threads on primary
For example, if we have three redo log groups for each instance of a two-node RAC primary database, we must create (3+1)*2=8 standby redo log groups on the standby database. The size of the standby redo logs should be equal to that of the primary online redo logs. Use the following statement format to create standby logs:
ALTER DATABASE ADD STANDBY LOGFILE THREAD 1
GROUP 11 SIZE 100M,
GROUP 12 SIZE 100M,
GROUP 13 SIZE 100M,
GROUP 14 SIZE 100M,
ALTER DATABASE ADD STANDBY LOGFILE THREAD 2
GROUP 15 SIZE 100M,
GROUP 16 SIZE 100M,
GROUP 17 SIZE 100M,
GROUP 18 SIZE 100M;
� When the maximum protection mode is used, if one of the instances can't reach the standby for a pre-specified time, that instance will be shut down. Other instances that have connectivity to the standby database will continue to operate. If all instances of the primary database lose connection to the standby database for the pre-specified time, the primary database will be shut down.
� During the switchover operation to a physical standby, only one instance can be opened in the primary database.

Chapter 8
[ 275 ]
A RAC primary database with a RAC standby databaseNow let's see what we should pay attention to when creating a RAC standby database for a RAC primary database:
� The most important point in this configuration is the fact that recovery cannot be active on all instances of the standby database. Only one instance can be used for recovery.
� The LOG_ARCHIVE_DEST_n parameters must be configured properly on every instance of the primary and standby databases to show remote archiving destinations. Remote destinations configured on the standby database will be used after a switchover.
� Standby redo logs must be created on a shared location, such as a cluster file system or ASM, using the formula and format given in the previous section. All instances of the standby database must be able to access the standby redo logs.
� The local archiving destination of the standby database must be the same and it should be a shared location for all instances.
� The consideration about the maximum protection mode in the previous section is still valid.
� During a switchover, only one primary and one standby instance can be active. Other instances must be shut down.
The integration of Data Guard and RAC was covered under the titles of two different configurations where the standby database is a single instance of a RAC. Using RAC with Data Guard is a common solution that combines high availability and disaster recovery purposes in a dependable way. Oracle recommends this configuration in its maximum availability architecture.
SummaryWe've reached the end of the chapter. The integration of Data Guard with Enterprise Manager Cloud Control, RMAN, and RAC was covered with examples. As mentioned before, it's not enough only to install a Data Guard configuration; we should also integrate it with the current Oracle database environment and the other Oracle products in use, whenever possible. This will help us build a comprehensive, effective, and highly available database system.
The next chapter will show you how to apply database patches to Oracle Data Guard environments with key points and best practices.


9Data Guard Configuration Patching
Patching demands more from production systems to fix the existing bugs in the software to avoid outages in critical databases even when there are no workarounds available. These patches will be delivered by the development team of Oracle. Some patches come with scripts and some do not.
In this chapter we shall discuss the different types of patches, importance of patching, and how to apply patches on a database with Data Guard configuration, either on physical or logical standby databases.
What is patch and what are patch types?Patching basically is the correction or fixing of existing bugs in the software. It can be fixing of security vulnerabilities, and any corrections will be delivered by Oracle in terms of patches, and we have to apply them in Oracle home and need to execute scripts depending on the type of patch. The different types of patches are as follows:
� Bug fix patches (for example, internal errors, memory- or SGA-related bugs, high CPU usage, and so on)
� CPU/SPU patches
� PSU patches
� How to upgrade a patch set level (11.2.0.1 to 11.2.0.3)

Data Guard Configuration Patching
[ 278 ]
Interim patchInterim patches are also known as one-off patches. For every bug that Oracle delivers, depending on the version and release, bug fixes can be delivered as patches or they will be fixed in the next releases or versions. An interim patch is a fix only for a particular bug. Bugs differ from environment to environment depending upon the OS and Oracle version. Interim patches come in a zipped format, and you have to unzip them before applying the patch. Every interim patch contains the following:
� Metadata of patch: This contains the patch ID, bugs that have been fixed using the patch, and so on
� Payload: It contains the files that will be modified by the OPatch utility � Custom scripts: These contain scripts for preprocessing and postprocessing that
need to run before and after the patching
CPU/SPU patchesYou should not get confused between Critical Patch Update (CPU)and Security Patch Update (SPU) as CPU terminology has been changed to SPU from October 2012. Before that, the terminology was CPU. CPU patches were introduced in January 2005 and they are released every quarter, which is four times a year.
PSU patchesPatch Set Updates (PSU) are cumulative patches for a particular product version. They are cumulative of CPU and include security fixes, wrong results, data corruption, and additional bugs. They have a low risk and do not require changes that require recertification such as dictionary changes, major algorithm changes, and any optimizer plan changes. On an average, each PSU contains typically 25 to 100 bug fixes per PSU. For PSU-related information, you can find more details from the MOS Note:854428.1: Introduction to Database Patch Set Updates. When you apply PSU and CPU, you may come across conflicts. PSUs contain CPUs of every quarter. You can apply PSU patches on any CPU and it is very difficult to go back to CPUs from PSUs.
Patch setA patch set provides bug fixes and it includes all the libraries that have been rebuilt to implement the bug fixes in the set. They are fully tested and integrated product fixes and are certified to work with each other. These can be applied on a database, RAC, and client software. If you are going to perform a fresh installation of a database with the latest release and patch set 11.2.0.3, then there is no need of installing 11.2.0.1 and then upgrading it to 11.2.0.3; instead of that, you can directly install the software of 11.2.0.3. This option has been introduced from 11gR onwards. If you have already installed 11.2.0.2 and then upgraded it to 11.2.0.3, this patch set removes the patches applied (bugs and CPU/PSUs) in the previous RDBMS version.

Chapter 9
[ 279 ]
Patching on Data GuardIf you have already been maintaining a production database for many years, have probably applied patches to fix bugs, and also applied CPU/PSU patches for the previously discussed reasons, and if your requirement is to create a Data Guard environment for high availability of your production database, then ensure that all the patches that you have applied on the standby database are the same as the primary database. You can also consider the option of cloning ORACLE_HOME for this. It also happens to be the best option. The reason is that the standby database is an exact copy of the primary database in terms of databases and software. Hence, the environment should be compatible and same in terms of patching. If there is any incompatibility with the patch, and the requirement is to perform a switchover/failover and in the past you have applied any patch to fix ORA-00600 on the primary and not applied the same on the standby, then the bug can hit you again. Thus, ensure that all the patches of the primary have been applied on the standby also. Consider it as a basic rule to apply patching first on a standby database and then on a primary database; the standby database can be either physical or logical.
What just happened?We have seen what patching is, different types of patches (interim/bug, CPU/SPU, PSU, and patch set), and how patching is important in a Data Guard environment.
Best practices of patchingBefore using the OPatch utility, ensure that the OPatch directory is set to the path. It is applicable for all the environments (UNIX or Windows). Then we can start using the OPatch utility as follows:[oracle@oracle-primary ~]$ export PATH=$ORACLE_HOME/OPatch:$PATH
[oracle@oracle-primary ~]$ opatch -help
Invoking OPatch 11.1.0.6.6
Oracle Interim Patch Installer version 11.1.0.6.6
Copyright (c) 2009, Oracle Corporation. All rights reserved.
Upgrading OPatchIf you have installed Oracle 11gR2, the OPatch version will be 11.1.0.6.6 by default. If you proceed to apply any latest patches of 11.2.0.1, you must upgrade the OPatch version as well. The following error will be displayed if you try to apply a higher update of the patch and if your OPatch version is lower:OPatch version : 11.1.0.6.6
.......

Data Guard Configuration Patching
[ 280 ]
ApplySession failed: Patch ID is null.
System intact, OPatch will not attempt to restore the system
OPatch failed with error code 73
From the logfile /u01/home/oracle/product/11.2.0/db_1/cfgtoollogs/opatch/opatch2012-12-15_11-57-48AM.log, the following message will be shown:
INFO:Starting ApplySession at Sat Dec 15 11:57:49 IST 2012
INFO:Starting Apply Session at Sat Dec 15 11:57:49 IST 2012
SEVERE:OUI-67073:ApplySession failed: Patch ID is null.
INFO:System intact, OPatch will not attempt to restore the system
INFO:Finishing ApplySession at Sat Dec 15 11:57:51 IST 2012
To fix this issue, first upgrade the OPatch utility by downloading Patch 6880880 for your OS and Oracle release. Of course, the patch number will be the same even though your database version and release will be different, but you just need to select the related OS and database version. The following screenshot illustrates the same:
Then, after downloading the patch and unzipping it in the $ORACLE_HOME location, you should be able to apply the patch as follows:
[oracle@oracle-stby patches]$ opatch -help
Oracle Interim Patch Installer version 11.2.0.3.0
Copyright (c) 2012, Oracle Corporation. All rights reserved.
Performing prerequisite checks of patchBefore applying any interim CPU patch that is applied through OPatch, it is strongly recommended to perform a prerequisite check in the ORACLE_HOME file that you are going to patch. Patches that are specific to security may be some of the patches that are already applied. Such a patch/patches needs to rollback and again has to apply a merge patch after applying security patches. These merge patches can be requested from Oracle support if they aren't available. Note that no down time is required to perform this check.

Chapter 9
[ 281 ]
You can perform the prerequisite check as follows:
opatch prereq CheckConflictAgainstOHWithDetail -phBaseDir /home/oracle/patches/9711859
Oracle Interim Patch Installer version 11.2.0.3.0
Copyright (c) 2012, Oracle Corporation. All rights reserved.
PREREQ session
Oracle Home : /u01/home/oracle/product/11.2.0/db_1
Central Inventory : /u01/app/oraInventory
from : /u01/home/oracle/product/11.2.0/db_1/oraInst.loc
OPatch version : 11.2.0.3.0
OUI version : 11.2.0.1.0
Log file location : /u01/home/oracle/product/11.2.0/db_1/cfgtoollogs/opatch/opatch2012-12-15_23-41-35PM_1.log
Invoking prereq "checkconflictagainstohwithdetail"
Prereq "checkConflictAgainstOHWithDetail" passed.
OPatch succeeded.
[oracle@oracle-stby 9711859]$
How to clean up patch history?If you are applying any CPU, PSU, or interim patches, OPatch will consume a large amount of disk space under $ORACLE_HOME/.patch_storage. To perform a cleanup, use the file orapatch.util.cleanup. The folder patch_storage contains the backup of the affected libraries and modules that have been updated. Cleanup can be performed as follows:
[oracle@oracle-primary ~]$ opatch util cleanup
Oracle Interim Patch Installer version 11.2.0.3.0
Copyright (c) 2012, Oracle Corporation. All rights reserved.
................
Invoking utility "cleanup"
OPatch will clean up 'restore.sh,make.txt' files and 'rac,scratch,backup' directories.
You will be still able to rollback patches after this cleanup.
Do you want to proceed? [y|n]
y
User Responded with: Y
.................

Data Guard Configuration Patching
[ 282 ]
"/u01/home/oracle/product/11.2.0/db_1/.patch_storage" after cleanup is 79575030 bytes.
UtilSession: Backup area for restore has been cleaned up. For a complete list of files/directories
deleted, Please refer log file.
OPatch succeeded.
[oracle@oracle-primary ~]$
To find out the OPatch version, use the OPatch utility as follows:
[oracle@oracle-stby admin]$ opatch version
OPatch Version: 11.2.0.3.0
OPatch succeeded.
[oracle@oracle-stby admin]$
What just happened?We have seen how to interface patching using the OPatch utility and options available with OPatch in the Performing prerequisite of patch and How to clean up patch history? sections.
Patching on Data Guard configurationWe will see how to apply patches (bug fixes and PSU) on the Data Guard configurations of physical standby and logical standby databases with and without the Data Guard broker in place. In the later part of this chapter, we will cover how to apply a patch set from 11.2.0.1 to the latest patch set level 11.2.0.3. Applying patches on physical standby is similar to doing the same on logical standby. Changes depend on what kind of patches we are applying. For bug fixes you have to apply the patch only on ORACLE_HOME, and if you are applying CPU or PSU patches, you have to run the scripts such as the catbundle.sql script. Note that it is a cumulative script.
How to apply an interim/bug patch on logical standby?Now we will apply one bug fix Patch 9711859: ORA-600 [KTSPTRN_FIX-EXTMAP] DURING EXTENT ALLOCATION on a logical standby environment of 11.2.0.1.

Chapter 9
[ 283 ]
Time for action – applying a patch on logical standby1. Disable log shipping in a standby database and stop SQL Apply in it. First we need
to stop SQL Apply in the standby database and disable log shipping from the primary database as follows:SQL> select db_unique_name,database_role from v$database;DB_UNIQUE_NAME DATABASE_ROLE--------------- ----------------turkey_un PRIMARYSQL> ALTER SYSTEM SET LOG_ARCHIVE_DEST_STATE_2='DEFER';System altered.SQL>
2. Stop SQL Apply in the logical standby database as follows:SQL> select db_unique_name,database_role from v$database;DB_UNIQUE_NAME DATABASE_ROLE--------------- ----------------INDIA_UN LOGICAL STANDBYSQL> ALTER DATABASE STOP LOGICAL STANDBY APPLY;Database altered.SQL>
3. Stop the database services of the primary and standby and perform a backup of ORACLE_HOME.
4. After applying a patch, more objects can become invalid. Hence. gather all the invalid objects and keep a count of them so that they can be recompiled after the activity as follows:SQL> select owner,object_name,object_type,status from dba_objects where status <> 'VALID' and OWNER !='PUBLIC' and OBJECT_TYPE!='SYNONYM';
5. Ensure a valid and latest Cold/RMAN backup prior to applying the patch, and also ensure that all the applications are stopped completely. You can check for active sessions from v$session.SQL> shutdown immediate
Database closed.
Database dismounted.
ORACLE instance shut down.
SQL>
[oracle@oracle-primary ~]$ lsnrctl stop

Data Guard Configuration Patching
[ 284 ]
LSNRCTL for Linux: Version 11.2.0.1.0 - Production on 15-DEC-2012 22:52:16
Copyright (c) 1991, 2009, Oracle. All rights reserved.
Connecting to (DESCRIPTION=(ADDRESS=(PROTOCOL=IPC)(KEY=EXTPROC1521)))
The command completed successfully
[oracle@oracle-primary ~]$
6. Make sure that no Oracle-related services are running and perform a backup of ORACLE_HOME and of Oracle's inventory using the tar command as follows:[oracle@oracle-primary backup]$ tar -zcpvf /home/oracle/backup/11.2.0_Home_Inventory_Backup_$(date +%Y%m%d).tar.gz /u01/home/oracle/product/11.2.0/db_1 /u01/app/oraInventory
/u01/home/oracle/product/11.2.0/db_1/
/u01/home/oracle/product/11.2.0/db_1/uix/
..............
/u01/app/oraInventory/ContentsXML/inventory.xml
/u01/app/oraInventory/ContentsXML/comps.xml
/u01/app/oraInventory/ContentsXML/libs.xml
[oracle@oracle-primary backup]$
You can use the tar ball in case there are any libraries that are corrupted and you are unable to access the Oracle home after applying the patch.
7. Apply a patch on both primary and standby.
8. We apply patch 9711859, which is a fix for Patch 9711859: ORA-600 [KTSPTRN_FIX-EXTMAP] DURING EXTENT ALLOCATION on both primary and standby databases. We have already performed the prerequisite check to apply the patch and ensured that you have exported OPatch to the environment path to use the OPatch utility as follows:[oracle@oracle-primary 9711859]$ export PATH=/u01/home/oracle/product/11.2.0/db_1/OPatch:$PATH
[oracle@oracle-primary 9711859]$ opatch apply
Oracle Interim Patch Installer version 11.2.0.3.0
...............
Applying interim patch '9711859' to OH '/u01/home/oracle/product/11.2.0/db_1'
Verifying environment and performing prerequisite checks...
All checks passed.

Chapter 9
[ 285 ]
.............
Is the local system ready for patching? [y|n]
y
User Responded with: Y
Backing up files...
Patching component oracle.rdbms, 11.2.0.1.0...
Verifying the update...
Patch 9711859 successfully applied
Log file location: /u01/home/oracle/product/11.2.0/db_1/cfgtoollogs/opatch/9711859_Dec_15_2012_23_46_16/apply2012-12-15_23-46-16PM_1.log
OPatch succeeded.
[oracle@oracle-primary 9711859]$
9. Once you initiate patching on the database server, the patch will prompt you to enter the support identifier's e-mail address for sending frequent updates on latest patches. The patch will then ask you to give a confirmation. Now verify that the patch has been applied and you are able to view it from the inventory as follows:[oracle@oracle-primary ~]$ opatch lspatches -bugs
9711859;;9711859
[oracle@oracle-primary ~]$
or[oracle@oracle-primary ~]$ opatch lsinventory|grep 9711859
Patch 9711859 : applied on Sat Dec 15 23:47:18 IST 2012
9711859
[oracle@oracle-primary ~]$
10. You must perform the previous steps in both primary and standby databases.
11. Start the primary database, the logical standby databases, and listeners, and enable apply services. Enable log shipping from the primary database as follows:SQL> startupORACLE instance started.Total System Global Area 2238099456 bytesFixed Size 2215304 bytesVariable Size 1040188024 bytesDatabase Buffers 1191182336 bytesRedo Buffers 4513792 bytesDatabase mounted.Database opened.
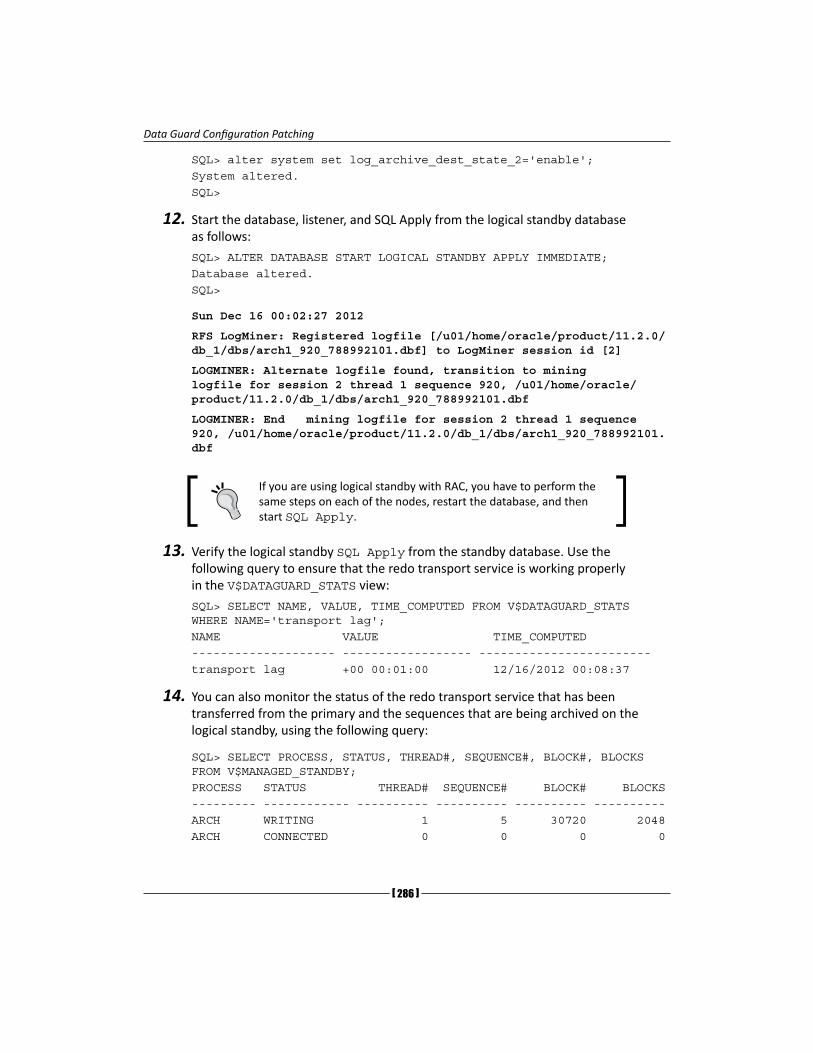
Data Guard Configuration Patching
[ 286 ]
SQL> alter system set log_archive_dest_state_2='enable';System altered.SQL>
12. Start the database, listener, and SQL Apply from the logical standby database as follows:SQL> ALTER DATABASE START LOGICAL STANDBY APPLY IMMEDIATE;Database altered.SQL>
Sun Dec 16 00:02:27 2012
RFS LogMiner: Registered logfile [/u01/home/oracle/product/11.2.0/db_1/dbs/arch1_920_788992101.dbf] to LogMiner session id [2]
LOGMINER: Alternate logfile found, transition to mining logfile for session 2 thread 1 sequence 920, /u01/home/oracle/product/11.2.0/db_1/dbs/arch1_920_788992101.dbf
LOGMINER: End mining logfile for session 2 thread 1 sequence 920, /u01/home/oracle/product/11.2.0/db_1/dbs/arch1_920_788992101.dbf
If you are using logical standby with RAC, you have to perform the same steps on each of the nodes, restart the database, and then start SQL Apply.
13. Verify the logical standby SQL Apply from the standby database. Use the following query to ensure that the redo transport service is working properly in the V$DATAGUARD_STATS view:SQL> SELECT NAME, VALUE, TIME_COMPUTED FROM V$DATAGUARD_STATS WHERE NAME='transport lag';NAME VALUE TIME_COMPUTED-------------------- ------------------ ------------------------transport lag +00 00:01:00 12/16/2012 00:08:37
14. You can also monitor the status of the redo transport service that has been transferred from the primary and the sequences that are being archived on the logical standby, using the following query:
SQL> SELECT PROCESS, STATUS, THREAD#, SEQUENCE#, BLOCK#, BLOCKS FROM V$MANAGED_STANDBY;PROCESS STATUS THREAD# SEQUENCE# BLOCK# BLOCKS--------- ------------ ---------- ---------- ---------- ----------ARCH WRITING 1 5 30720 2048ARCH CONNECTED 0 0 0 0

Chapter 9
[ 287 ]
ARCH CONNECTED 0 0 0 0ARCH CLOSING 1 919 28672 1776ARCH CLOSING 1 920 1 1RFS IDLE 0 0 0 0RFS WRITING 1 921 149579 2048RFS RECEIVING 0 0 0 0
We have successfully applied a bug fix in the logical database environment and double-checked if log shipping is active after the patching, as shown previously.
To know the applied patches on ORACLE_HOME, use the following commands. It shows the patches applied with the date and time as follows:
$opatch lsinventory –all
$opatch lsinventory -detail
What just happened?We have seen how to apply an interim/bug fix (9711859) step by step in a Data Guard environment containing a logical standby database.
How to apply a PSU patch on physical standby database using broker?The CPU or PSU patches are a collection of security fixes. They are released every quarter, that is, four times a year. The CPU patches contain overall security fixes of each quarter and the PSU patches, and are cumulative. Once you have applied PSU, you can further apply only PSU for future quarters until the database is upgraded to the new base version. In this example, we will see how to apply the PSU patch on the physical standby database managed by the broker.

Data Guard Configuration Patching
[ 288 ]
Time for action – applying PSU on a physical standby database1. Disable log transport and stop MRP in the standby database. Before disabling log
transport in standby, cross-check the synchronization between the primary and standby database, as shown in the following screenshot:
2. Now cancel MRP using the broker; you can perform this step from any site as shown in the following screenshot:
3. Stop the database services of the primary and standby and perform a backup of ORACLE_HOME. Prior to shutting down all the services, gather the invalid objects of each schema to check the invalid objects after the patch has been applied using the following script:SQL> select owner,object_name,object_type,status from dba_objects where status <> 'VALID' and OWNER !='PUBLIC' and OBJECT_TYPE!='SYNONYM';

Chapter 9
[ 289 ]
4. Ensure that there is a latest and valid Cold/RMAN backup available prior to applying the patch. Also ensure that all the applications are down. You can check for active sessions from v$session as follows:SQL> shutdown immediate
Database closed.
Database dismounted.
ORACLE instance shut down.
SQL>
[oracle@oracle-primary ~]$ lsnrctl stop
LSNRCTL for Linux: Version 11.2.0.1.0 - Production on 15-DEC-2012 22:52:16
Copyright (c) 1991, 2009, Oracle. All rights reserved.
Connecting to (DESCRIPTION=(ADDRESS=(PROTOCOL=IPC)(KEY=EXTPROC1521)))
The command completed successfully
5. If no Oracle-related services are running, perform a backup of ORACLE_HOME and of the inventory using the tar command as follows:[oracle@oracle-primary backup]$ tar -zcpvf /home/oracle/backup/11.2.0_Home_Inventory_Backup_$(date +%Y%m%d).tar.gz /u01/home/oracle/product/11.2.0/db_1 /u01/app/oraInventory
/u01/home/oracle/product/11.2.0/db_1/
/u01/home/oracle/product/11.2.0/db_1/uix/
............................
/u01/app/oraInventory/ContentsXML/inventory.xml
/u01/app/oraInventory/ContentsXML/comps.xml
/u01/app/oraInventory/ContentsXML/libs.xml
[oracle@oracle-primary backup]$
You can use the tar ball in case there are any libraries that are corrupted and you are unable to access the Oracle home after applying a patch. The Tar command is applicable for UNIX systems. For Windows, the zip option can be used to compress.

Data Guard Configuration Patching
[ 290 ]
6. Apply a patch on both primary and standby. We apply the PSU July 2012 (12419378) Patch in the Data Guard environment of both primary and physical standby databases. After applying the patch, the PSU version will be (11.2.0.1.6). Now perform the prerequisite check for any conflicts; if any conflicts are found, you have to get the merge patch on top of 11.2.0.1.6 as follows:[oracle@oracle-primary 12419378]$ opatch prereq CheckConflictAgainstOHWithDetail -phBaseDir /home/oracle/patches/12419378
Oracle Interim Patch Installer version 11.2.0.3.0
.......................
Invoking prereq "checkconflictagainstohwithdetail"
ZOP-40: The patch(es) has conflicts with other patches installed in the Oracle Home (or) among themselves.
Prereq "checkConflictAgainstOHWithDetail" failed.
Summary of Conflict Analysis:
There are no patches that can be applied now.
Following patches have conflicts. Please contact Oracle Support and get the merged patch of the patches :
9711859, 12419378
Following patches will be rolled back from Oracle Home on application of the patches in the given list :
9711859
Conflicts/Supersets for each patch are:
Patch : 12419378
Conflict with 9711859
Conflict details:
/u01/home/oracle/product/11.2.0/db_1/lib/libserver11.a:/ktsx.o
OPatch succeeded.
[oracle@oracle-primary 12419378]$
7. The prerequisite applied failed because of Patch 9711859: ORA-600 [KTSPTRN_FIX-EXTMAP] DURING EXTENT ALLOCATION that was applied in the previous scenario. To resolve this conflict we have to request the merge patch to be applied. Now the action plan is shown as follows:
� Rollback the 9711859 Patch
� Apply PSU July 2012 12419378
� Apply Merge Patch 9711859 of 11.2.0.1.6

Chapter 9
[ 291 ]
The following screenshot illustrates the action plan as discussed:
8. A rollback is applied on 9711859 of 11.2.0.1.0 using the OPatch utility as follows:[oracle@oracle-primary patches]$ opatch rollback -id 9711859 Oracle Interim Patch Installer version 11.2.0.3.0
Copyright (c) 2012, Oracle Corporation. All rights reserved.
...........
RollbackSession rolling back interim patch '9711859' from OH '/u01/home/oracle/product/11.2.0/db_1'
Please shutdown Oracle instances running out of this ORACLE_HOME on the local system.
(Oracle Home = '/u01/home/oracle/product/11.2.0/db_1')
Is the local system ready for patching? [y|n]
y
User Responded with: Y
Patching component oracle.rdbms, 11.2.0.1.0...
RollbackSession removing interim patch '9711859' from inventory
Log file location: /u01/home/oracle/product/11.2.0/db_1/cfgtoollogs/opatch/9711859_Dec_16_2012_12_12_51/rollback2012-12-16_12-12-49PM_1.log
OPatch succeeded.
[oracle@oracle-primary patches]$
9. Now apply PSU July 2012 Patch 12419378 as follows:[oracle@oracle-primary 12419378]$ pwd
/home/oracle/patches/12419378
[oracle@oracle-primary 12419378]$ ls
custom etc files patchmd.xml README.html README.txt
[oracle@oracle-primary 12419378]$ opatch apply
Oracle Interim Patch Installer version 11.2.0.3.0

Data Guard Configuration Patching
[ 292 ]
Copyright (c) 2012, Oracle Corporation. All rights reserved.
Oracle Home : /u01/home/oracle/product/11.2.0/db_1
...........
Patch 12419378: Optional component(s) missing : [ oracle.client, 11.2.0.1.0 ]
All checks passed.
....................
Do you wish to remain uninformed of security issues ([Y]es, [N]o) [N]: Y
Please shutdown Oracle instances running out of this ORACLE_HOME on the local system.
(Oracle Home = '/u01/home/oracle/product/11.2.0/db_1')
Is the local system ready for patching? [y|n]
y
User Responded with: Y
Backing up files...
Patching component oracle.rdbms.rsf, 11.2.0.1.0...
..............
Verifying the update...
Patch 12419378 successfully applied
OPatch Session completed with warnings.
Log file location: /u01/home/oracle/product/11.2.0/db_1/cfgtoollogs/opatch/12419378_Dec_16_2012_12_18_09/apply2012-12-16_12-18-09PM_1.log
OPatch completed with warnings.
[oracle@oracle-stby 12419378]$
[Dec 16, 2012 12:21:46 PM] UtilSession: Backup area for restore has been cleaned up. For a complete list of files/directories
deleted, Please refer log file.
[Dec 16, 2012 12:21:46 PM] Patch 12419378 successfully applied
10. Now apply Merge Patch 9711859 of 11.2.0.1.6 as follows:[oracle@oracle-primary 9711859]$ ls
etc files README.txt
[oracle@oracle-primary 9711859]$ opatch apply
Oracle Interim Patch Installer version 11.2.0.3.0
Copyright (c) 2012, Oracle Corporation. All rights reserved.

Chapter 9
[ 293 ]
Oracle Home : /u01/home/oracle/product/11.2.0/db_1
Please shutdown Oracle instances running out of this ORACLE_HOME on the local system.
(Oracle Home = '/u01/home/oracle/product/11.2.0/db_1')
Is the local system ready for patching? [y|n]
y
User Responded with: Y
Backing up files...
Patching component oracle.rdbms, 11.2.0.1.0...
Verifying the update...
Patch 9711859 successfully applied
Log file location: /u01/home/oracle/product/11.2.0/db_1/cfgtoollogs/opatch/9711859_Dec_16_2012_12_37_13/apply2012-12-16_12-37-13PM_1.log
OPatch succeeded.
[oracle@oracle-primary 9711859]$
The previous steps must be performed on both primary and standby databases and on all the instances if it is RAC.
11. Start the primary and standby databases and execute the post scripts of Catbundle.sql in the primary database. Start both primary and standby (in the Mount status if no Active Data Guard is enabled) databases including listener services. In the primary database run the Catbundle.sql script that is located at $ORACLE_HOME/rdbms/admin, which determines the last bundle in the series that was loaded in the database by the information stored in the dba_registry_history view. It processes the information in bundle_<bundle_series>.xml, which is present in each bundle patch. The following script can be used:SQL> @?/rdbms/admin/catbundle.sql psu apply
PL/SQL procedure successfully completed.
PL/SQL procedure successfully completed.
.................
Generating apply and rollback scripts...
Check the following file for errors:
/u01/home/oracle/product/11.2.0/db_1/cfgtoollogs/catbundle/catbundle_PSU_ORCL_GENERATE_2012Dec16_12_58_39.log
6 (SYSTIMESTAMP, 'APPLY',
7 SYS_CONTEXT('REGISTRY$CTX','NAMESPACE'),
8 '11.2.0.1',

Data Guard Configuration Patching
[ 294 ]
9 6,
10 'PSU',
11 'PSU 11.2.0.1.6');
1 row created.
SQL> COMMIT;
Commit complete.
SQL> SPOOL off
SQL> SET echo off
Check the following log file for errors:
/u01/home/oracle/product/11.2.0/db_1/cfgtoollogs/catbundle/catbundle_PSU_ORCL_APPLY_2012Dec16_12_58_51.log
SQL>
12. For any errors related to post scripts you can refer to the following logs:[oracle@oracle-primary catbundle]$ pwd
/u01/home/oracle/product/11.2.0/db_1/cfgtoollogs/catbundle
[oracle@oracle-primary catbundle]$ ls
catbundle_PSU_ORCL_APPLY_2012Dec16_12_58_51.log
catbundle_PSU_ORCL_GENERATE_2012Dec16_12_58_39.log
[oracle@oracle-primary catbundle]$
If in case you want to rollback the patch applied with the bundle script, use the following script:
$opatch rollback -id 12419378
Start every instance dependent to ORACLE_HOME that has been patched and execute as follows:
sql> @$ORACLE_HOME/rdbms/admin/catbundle_PSU_<database SID>_ROLLBACK.sql
13. Verify the patch status from OPatch and the database registry. Once we have applied the patch on the binaries using OPatch, we can verify the patch with an ID from the OS level as follows:[oracle@oracle-primary ~]$ opatch lsinventory -bugs_fixed | grep -i 'DATABASE PSU'
9352237 12419378 Sun Dec 16 12:21:15 IST 2012 DATABASE PSU 11.2.0.1.1
9654983 12419378 Sun Dec 16 12:21:15 IST 2012 DATABASE PSU 11.2.0.1.2 (INCLUDES CPUJUL2010)

Chapter 9
[ 295 ]
9952216 12419378 Sun Dec 16 12:21:15 IST 2012 DATABASE PSU 11.2.0.1.3 (INCLUDES CPUOCT2010)
10248516 12419378 Sun Dec 16 12:21:15 IST 2012 database psu 11.2.0.1.4 (includes cpujan2011)
11724930 12419378 Sun Dec 16 12:21:15 IST 2012 database psu 11.2.0.1.5 (includes cpuapr2011)
12419378 12419378 Sun Dec 16 12:21:15 IST 2012 DATABASE PSU 11.2.0.1.6 (INCLUDES CPUJUL2011)
[oracle@oracle-primary ~]$
14. We can check the database registry using registry$history. This script can be executed from the standby database even in the OPEN status if the archives have been applied after running the catbundle.sql script as follows:SQL> select namespace,version,id, comments from registry$history;NAMESPACE VERSION ID COMMENTS--------------- ---------- ----------- ---------------SERVER 11.2.0.1 6 PSU 11.2.0.1.6
15. Enable redo transport in the primary, start MRP in the standby database, and verify the synchronization. After verifying the latest patch level from the primary, we can now enable the redo transport in the primary database using the Data Guard broker, as shown in the following screenshot:
16. To start redo apply services in the standby, you can give the following commands either in the primary or standby database using the Data Guard broker, as shown in the following screenshot:

Data Guard Configuration Patching
[ 296 ]
17. When the MRP service starts on the standby and broker configuration, the status is SUCCESS. Now check the archives that are generated in the primary and applied in the standby using v$archived_log with the column sequence#, as shown in the following screenshot:
18. In both the databases, the valid destination archived sequences are matching. Hence, the standby is in sync with the primary database.
Pop quizQ1. What is a terminal patch?
What just happened?We have seen how to apply PSU Patch (11.2.0.1.6) in a Data Guard environment of a physical standby database using a Data Guard broker.
How to apply patch set on physical standby (11.2.0.1 to 11.2.0.3)?To upgrade a database of a patch set from 11.2.0.1 to 11.2.0.3, we have to perform a complete installation of ORACLE_HOME for 11.2.0.3, and then we have to detach the old home. This procedure is called out-of-place upgrade and is introduced from 11gR2 onwards. In 10gRx versions, we definitely have to do in-place upgrade on the same home. Even if your requirement is to create a new database of 11.2.0.3, there is no need to install 11.2.0.1 anymore.
Time for action – patch set upgrade of physical standbyFor upgrading a patch set from 11.2.0.1 to 11.2.0.3 in the Data Guard environment with the SQL* Plus command line, execute the following steps:
1. Install 11.2.0.3 on the primary and standby server. Download Patch 10404530: 11.2.0.3.0 PATCH SET FOR ORACLE DATABASE SERVER from http://support.oracle.com, which comes with seven zipped files of total 5 GB, and unzip filesystem can be downloaded from https://edelivery.oracle.com/. Ensure that the unzipped directory's owner is Oracle. From the database directory, initiate runInstaller from the primary database server, as shown in the following screenshot:

Chapter 9
[ 297 ]
2. Once the GUI is launched, you will have several options, if you would like to get security updates by adding the e-mail address, installation options, grid installation options, product languages, and so on. In these, you must choose a new ORACLE_HOME directory outside the existing ORACLE_HOME location for installation. In the installation options, you must opt for Enterprise Edition to enable the feature of Data Guard.
3. Before you start the actual installation, runInstaller performs the prerequisite check for RPM's version, kernel settings, and swap memory settings. If any of these are not adequate, you should fix them prior to the installation from the GUI. These fixes differ from one OS to the other. Note that if some of the RPMs are of a higher version, then you can acknowledge them by ignoring them and then go ahead with the installation.
4. After copying the files, linking the libraries, and setting up the files, you have to run the /u01/home/oracle/product/11.2.0/db_2/root.sh script from the root user, as shown in the following screenshot:

Data Guard Configuration Patching
[ 298 ]
5. Open a new terminal as the root user and run the following script:[root@oracle-primary ~]# /u01/home/oracle/product/11.2.0/db_2/root.sh
Performing root user operation for Oracle 11g
The following environment variables are set as:
ORACLE_OWNER= oracle
ORACLE_HOME= /u01/home/oracle/product/11.2.0/db_2
Enter the full pathname of the local bin directory: [/usr/local/bin]:
The contents of "dbhome" have not changed. No need to overwrite.
The file "oraenv" already exists in /usr/local/bin. Overwrite it? (y/n)
[n]: y
Copying oraenv to /usr/local/bin ...
The file "coraenv" already exists in /usr/local/bin. Overwrite it? (y/n)
[n]: y
Copying coraenv to /usr/local/bin ...
Entries will be added to the /etc/oratab file as needed by
Database Configuration Assistant when a database is created
Finished running generic part of root script.
Now product-specific root actions will be performed.
Finished product-specific root actions.
[root@oracle-primary ~]#
6. Run the pre-upgrade scripts from 11.2.0.1 home of the primary database. From the previous 11.2.0.1 home of the database, spool the $ORACLE_HOME/rdbms/admin/utlu112i.sql script of 11.2.0.3 to run the pre-upgrade check as follows:SQL> @/u01/home/oracle/product/11.2.0/db_2/rdbms/admin/utlu112i.sql
Oracle Database 11.2 Pre-Upgrade Information Tool 12-16-2012 19:54:41
Script Version: 11.2.0.3.0 Build: 001
******************************************************************
Database:
******************************************************************

Chapter 9
[ 299 ]
--> name: ORCL
--> version: 11.2.0.1.0
--> compatible: 11.2.0.0.0
--> blocksize: 8192
--> platform: Linux x86 64-bit
--> timezone file: V11
*****************************************************************
Recommendations
******************************************************************
Oracle recommends gathering dictionary statistics prior to
upgrading the database.
To gather dictionary statistics execute the following command
while connected as SYSDBA:
EXECUTE dbms_stats.gather_dictionary_stats;
*****************************************************************
SQL>
7. Running utlu112i.sql is mandatory even if you are upgrading manually or using DBUA. Review the spool logfile and fix it if there are any errors and warnings; for example, invalid objects, invalid registry components, tablespaces' thresholds, and on clearing recycle bin objects.
8. Now use the script to collect the database's upgrade diagnostic information (dbupgdiag.sql) from MOS note:556610.1. If any invalid objects are found, run the $ORACLE_HOME/rdbms/admin/utlrp.sql script multiple times to validate these invalid objects in the database until there is no change in the number of invalid objects, shown as follows:SQL> @?/rdbms/admin/utlrp.sql
TIMESTAMP
-----------------------------------------------------------------
COMP_TIMESTAMP UTLRP_BGN 2012-12-16 21:16:01
........................
ERRORS DURING RECOMPILATION
---------------------------
0
PL/SQL procedure successfully completed.
PL/SQL procedure successfully completed.
SQL>

Data Guard Configuration Patching
[ 300 ]
9. Disable the log transport and stop MRP in the standby database. Check the synchronization between the primary and standby databases and then proceed to defer the remote destination to send redo transport as follows:SQL> alter system set log_archive_dest_state_2='defer';System altered.SQL>
10. Now stop MRP in the standby database from SQL* Plus as follows:SQL> alter database recover managed standby database cancel;Database altered.SQL>
11. Take a complete backup of the database and stop the primary and standby databases, including listener services.
12. Take a backup of the entire database, either cold or hot backup, using RMAN. No need to perform a backup of ORACLE_HOME because we are installing a new 11.2.0.3 home outside 11.2.0.1 home. Now shut down the primary and standby services, including the listener services.
13. Change the environment variable's settings and run the Upgrade script in the primary database.
14. Ensure that you have modified the environment variables ORACLE_HOME and LIBRARY_PATH,PATH, and they are pointing to the newly installed home 11.2.0.3. Copy INIT/SPFILE and the network configuration files and run the catupgrade.sql script to upgrade the data dictionary objects as follows:[oracle@oracle-primary ~]$ sqlplus / as sysdba
SQL*Plus: Release 11.2.0.3.0 Production on Sun Dec 16 21:26:26 2012
Copyright (c) 1982, 2011, Oracle. All rights reserved.
Connected to an idle instance.
SQL> spool /home/oracle/upgrade.log
SQL> startup upgrade
ORACLE instance started.
Total System Global Area 2238099456 bytes
Fixed Size 2230312 bytes
Variable Size 1056966616 bytes
Database Buffers 1174405120 bytes
Redo Buffers 4497408 bytes
Database mounted.
Database opened.

Chapter 9
[ 301 ]
SQL> set echo on
SQL> @?/rdbms/admin/catupgrd.sql
SQL> Rem
SQL> Rem $Header: rdbms/admin/catupgrd.sql /st_rdbms_11.2.0/3 2011/05/18 15:07:25 cmlim Exp $
SQL> Rem
SQL> Rem catupgrd.sql
.........
SQL> Rem Set errorlogging off
SQL> SET ERRORLOGGING OFF;
SQL>
SQL> REM END OF CATUPGRD.SQL
SQL>
SQL> REM bug 12337546 - Exit current sqlplus session at end of catupgrd.sql.
SQL> REM This forces user to start a new sqlplus session in order
SQL> REM to connect to the upgraded db.
SQL> exit
15. Start the database in the normal mode and run the following scripts:SQL> @$ORACLE_HOME/rdbms/admin/catuppst.sql;
TIMESTAMP
------------------------------------------------------------------
COMP_TIMESTAMP POSTUP_BGN 2012-12-16 22:26:56
PL/SQL procedure successfully completed.
This script will migrate the Baseline data on a pre-11g database
to the 11g database.
... ...
... Completed Moving the Baseline Data ...
... ...
.................
6 (SYSTIMESTAMP, 'APPLY',
7 SYS_CONTEXT('REGISTRY$CTX','NAMESPACE'),
8 '11.2.0.3',
9 0,

Data Guard Configuration Patching
[ 302 ]
10 'PSU',
11 'Patchset 11.2.0.2.0');
1 row created.
SQL> COMMIT;
Commit complete.
SQL> SPOOL off
SQL> SET echo off
Check the following log file for errors:
/u01/home/oracle/product/11.2.0/db_2/cfgtoollogs/catbundle/catbundle_PSU_ORCL_APPLY_2012Dec16_22_27_18.log
SQL>
16. Run the utlrp.sql script to compile invalid objects as follows:SQL> @$ORACLE_HOME/rdbms/admin/utlrp.sql;
TIMESTAMP
------------------------------------------------
COMP_TIMESTAMP UTLRP_BGN 2012-12-16 22:28:48
ERRORS DURING RECOMPILATION
---------------------------
0
Function created.
PL/SQL procedure successfully completed.
Function dropped.
PL/SQL procedure successfully completed.
SQL>
17. Post the upgrade scripts in the primary database. Now upgrade the time zone to the latest version using DBMS_DST, upgrade the recovery catalog, and upgrade the statistics table if it is created by the DBMS_STATS package.
18. Synchronize the standby database with the primary database. After upgrading the primary database successfully, enable remote destination to send redo transport as follows:SQL> alter system set log_archive_dest_state_2='enable';System altered.SQL>DB_NAME HOSTNAME LOG_ARCHIVED LOG_APPLIED LOG_GAP---------- -------------- ------------ ----------- -------ORCL ORACLE-PRIMARY 969 943 26

Chapter 9
[ 303 ]
19. We do have around 26 archive gaps after the upgrade. Now start MRP to apply archives on the standby database. Depending on the gaps between the primary and standby databases, it will take time to synchronize.
SQL> alter database recover managed standby database using current logfile disconnect from session;
Database altered.
SQL>
DB_NAME HOSTNAME LOG_ARCHIVED LOG_APPLIED LOG_GAP
---------- -------------- ------------ ----------- -------
ORCL ORACLE-PRIMARY 972 971 1
sSun Dec 16 23:03:46 2012
RFS[1]: Selected log 10 for thread 1 sequence 973 dbid 1316772835 branch 788992101
Archived Log entry 51 added for thread 1 sequence 972 ID 0x4eede1f7 dest 3:
Recovery of Online Redo Log: Thread 1 Group 10 Seq 973 Reading mem 0
Mem# 0: /u02/app/oracle/oradata/orcl/standby_redo01.log
What just happened?We have seen how to install an out-of-place upgrade of a database from 11.2.0.1 patch set level to 11.2.0.3 patch set, including the physical standby database.
Have a go hero – in-place patch set installationWe can perform a patch set installation either in-place or out-of-place. We have just seen how to perform an out-of-place upgrade. To do an in-place patch set installation, perform the following steps:
1. Back up INIT/SPFILE and the network configuration files.
2. Detach ORACLE_HOME from the database as ./runInstaller -detachHome ORACLE_HOME= /u01/home/oracle/product/11.2.0/db_1.
3. Remove old ORACLE_HOME (11.2.0.1).
4. Install a new patch set level, 11.2.0.3.
5. Copy INIT/SPFILE and the network configuration files to the new ORACLE_HOME directory.
6. Upgrade your database (catupgrd.sql or DBUA).

Data Guard Configuration Patching
[ 304 ]
SummaryWe've now reached the end of this chapter. In this chapter, we have seen what are the different types of patches and the best practices involved in using the OPatch utility. Apart from that we have also seen the following:
� How to apply the interim/bug fix patch on a logical standby
� How to apply a PSU patch on a physical standby database using a Data Guard broker
� How to upgrade a patch set from 11.2.0.1 to 11.2.0.3

Common Data Guard Issues
Data Guard administrators need to know methods to resolve some specific issues. These issues may originate from configuration changes, misconfiguration, or user errors. Another important point is the use of diagnostic data to identify these issues. Now we'll cover handling the most common of these Data Guard issues and the methods to access and use diagnostic data.
In this chapter, we will discuss the following topics:
� Recreating the standby control file
� Dealing with redo transport authentication problems
� Dealing with UNNAMED datafiles
� Closing a gap with RMAN incremental backups
� Fixing NOLOGGING changes in a standby database
� Turning on Data Guard tracing
� Gathering diagnostic data
Let's start with renewing the standby control file of a standby database.
10

Common Data Guard Issues
[ 306 ]
Recreating the standby control fileA standby control file essentially keeps the same information of the primary database with the control file, which is the physical structure of the database. It also contains some specific information about the Data Guard, such as whether an archive log sequence is applied or not. A standby control file is mandatory to mount a physical standby database, and we should consider keeping multiple copies of the standby control file, preferably on different disks, which is known as multiplexing.
In some cases, we may want to renew a standby control file by using a newly created one on the primary database. For example, before a switchover it's a good practice to renew the standby control file in order to guarantee that all of the redo, temp file structure, and historical archived log data are the same. In general, this is a three-step operation:
1. Create a copy of the standby control file from the primary database.
2. Transfer this standby control file from the primary database to the standby site.
3. Restart the standby database using a new standby control file.
In order to create a standby control file from a primary database, we can choose one of the following methods:
� Using the ALTER DATABASE CREATE STANDBY CONTROLFILE SQL statement:SQL> ALTER DATABASE CREATE STANDBY CONTROLFILE AS '/tmp/standby.ctl';
We can directly copy the file to the standby server with FTP or SCP and use it as the new standby control file.
� Using the BACKUP CURRENT CONTROLFILE FOR STANDBY RMAN statement:RMAN> BACKUP CURRENT CONTROLFILE FOR STANDBY FORMAT 'standbyctl.bkp';
The file will be an RMAN backup of the standby control file that we can transfer and use in order to restore the standby control file with the RESTORE STANDBY CONTROLFILE FROM RMAN statement.
This standby control file recreation operation needs some extra steps if we use Oracle-managed files (OMF). OMF automatically generates datafile names, and the names will be different in the primary and standby databases. We'll not be able to mount the standby database with the newly created standby control file because it'll search for datafiles with their names in the primary database. So we need to introduce datafiles to the standby control file in some way.

Chapter 10
[ 307 ]
Time for action – recreating the standby control file This action shows how to renew the standby control file in a Data Guard environment with OMF.
1. In the primary database, create a backup of the standby control file with the following RMAN statements:$rman target /
Recovery Manager: Release 11.2.0.1.0 - Production on Wed Dec 19 22:18:05 2012
Copyright (c) 1982, 2009, Oracle and/or its affiliates. All rights reserved.
connected to target database: ORCL (DBID=1319333016)
RMAN> BACKUP CURRENT CONTROLFILE FOR STANDBY FORMAT 'standbyctl.bkp';
Starting backup at 19-DEC-12
using target database control file instead of recovery catalog
allocated channel: ORA_DISK_1
channel ORA_DISK_1: SID=149 device type=DISK
channel ORA_DISK_1: starting full datafile backup set
channel ORA_DISK_1: specifying datafile(s) in backup set
including standby control file in backup set
channel ORA_DISK_1: starting piece 1 at 19-DEC-12
channel ORA_DISK_1: finished piece 1 at 19-DEC-12
piece handle=/u01/app/oracle2/product/11.2.0/dbhome_1/dbs/standbyctl.bkp tag=TAG20121219T221811 comment=NONE
channel ORA_DISK_1: backup set complete, elapsed time: 00:00:01
Finished backup at 19-DEC-12
You'll see that a file named standbycf.bkp is generated under the $ORACLE_HOME/dbs directory. This file will be used to restore the standby control file in the standby database.
2. Copy this backup file from the primary database to the standby site by using the scp or ftp protocols:scp $ORACLE_HOME/dbs/standbyctl.bkp standbyhost:/tmp/standbyctl.bkp

Common Data Guard Issues
[ 308 ]
3. Query the current online and standby logfile paths in the physical standby database:SQL> SELECT * FROM V$LOGFILE WHERE TYPE = 'ONLINE';
GROUP# STATUS TYPE MEMBER IS_
------ ------ ------ ----------------------------------------- ---
3 ONLINE /u01/app/oracle2/datafile/ORCL/redo03.log NO
2 ONLINE /u01/app/oracle2/datafile/ORCL/redo02.log NO
1 ONLINE /u01/app/oracle2/datafile/ORCL/redo01.lo NO
SQL> SELECT * FROM V$LOGFILE WHERE TYPE = 'STANDBY';
GROUP# STATUS TYPE MEMBER IS_
------ ------- ---- ------------------------------------------ ---
4 STANDBY /u01/app/oracle2/.../o1_mf_4_85frxrh5_.log YES
5 STANDBY /u01/app/oracle2/.../o1_mf_5_85fry0fc_.log YES
6 STANDBY /u01/app/oracle2/.../o1_mf_6_85fry7tn_.log YES
7 STANDBY /u01/app/oracle2/.../o1_mf_7_85fryh0n_.log YES
4. Shut down the standby database and delete all the online and standby logfiles:$ sqlplus / as sysdba
SQL> SHUTDOWN IMMEDIATE
$ rm /u01/app/oracle2/datafile/ORCL/redo0*.log
$ rm /u01/app/oracle2/fra/INDIA_PS/onlinelog/o1_mf_*.log
Depending on whether you use the filesystem or the ASM to store the database files, you must run the rm command on the shell or on asmcmd respectively.
5. Start up the physical standby database in the NOMOUNT mode:$ sqlplus / as sysdba
SQL> STARTUP NOMOUNT
6. On the standby server, connect to RMAN and restore the standby control file from the backup file:$rman target /
RMAN> RESTORE STANDBY CONTROLFILE FROM '/tmp/standbyctl.bkp';
Starting restore at 19-DEC-12
using target database control file instead of recovery catalog

Chapter 10
[ 309 ]
allocated channel: ORA_DISK_1
channel ORA_DISK_1: SID=1 device type=DISK
channel ORA_DISK_1: restoring control file
channel ORA_DISK_1: restore complete, elapsed time: 00:00:01
output file name=/u01/app/oracle2/datafile/INDIAPS/control01.ctl
Finished restore at 19-DEC-12
7. Mount the standby database as follows:RMAN> ALTER DATABASE MOUNT;
database mounted
released channel: ORA_DISK_1
8. If OMF is not being used, and the datafile paths and names are the same for both the primary and standby databases, skip this step and continue with the next step.
At this stage, in an OMF-configured Data Guard environment, the physical standby database is mounted, but the control file doesn't show the correct datafile names because it still contains the primary database's datafile names. We need to change the datafile names in the standby control file. Use the RMAN CATALOG and SWITCH commands for this purpose:RMAN> CATALOG START WITH '/oradata/datafile/';
For ASM, use the following commands:
RMAN> CATALOG START WITH '+DATA1/MUM/DATAFILE/';
RMAN> SWITCH DATABASE TO COPY;
9. If the flashback database is ON, turn it off and on again in the standby database:SQL> ALTER DATABASE FLASHBACK OFF;
Database altered.
SQL> ALTER DATABASE FLASHBACK ON;
Database altered.
10. If standby redo logs exist in the primary database, we only need to execute the clear logfile statement in the standby database so that they will be created automatically (the log_file_name_convert parameter must already be set properly):SQL> SELECT GROUP# FROM V$STANDBY_LOG;
GROUP#
----------
4

Common Data Guard Issues
[ 310 ]
5
6
7
SQL> ALTER DATABASE CLEAR LOGFILE GROUP 4;
Database altered.
SQL> ALTER DATABASE CLEAR LOGFILE GROUP 5;
Database altered.
SQL> ALTER DATABASE CLEAR LOGFILE GROUP 6;
Database altered.
SQL> ALTER DATABASE CLEAR LOGFILE GROUP 7;
Database altered.
If standby redo logs don't exist in the primary database, the following query will not return any rows. In this case, we need to create the standby redo logs manually:
SQL> SELECT GROUP# FROM V$STANDBY_LOG;
no row selected
SQL> ALTER DATABASE ADD STANDBY LOGFILE GROUP 4 SIZE 50M;
Database altered.
SQL> ALTER DATABASE ADD STANDBY LOGFILE GROUP 5 SIZE 50M;
Database altered.
SQL> ALTER DATABASE ADD STANDBY LOGFILE GROUP 6 SIZE 50M;
Database altered.
SQL> ALTER DATABASE ADD STANDBY LOGFILE GROUP 7 SIZE 50M;
Database altered.
11. Start a media-recovery process in the physical standby database. The online logfiles will be cleared automatically.
SQL> ALTER DATABASE RECOVER MANAGED STANDBY DATABASE USING CURRENT LOGFILE DISCONNECT FROM SESSION;
Database altered.

Chapter 10
[ 311 ]
What just happened?We've successfully changed the standby control file using the primary database as a source. With a new standby control file, some database information such as the size and number of the temporary files and the size and number of the online redo logs, will be updated in the physical standby database. These infrastructural changes are not replicated to the standby databases automatically. So if we don't apply these changes manually in the standby database, a new standby control file will fix these inconsistencies.
Dealing with redo transport authentication problemsBy default, the SYS user is used for redo transport in Data Guard configurations. Data Guard communication uses password files in the standby databases to authenticate redo transport sessions. If we change the password of the SYS user in the primary database, redo transport sessions will not be authenticated because the password file in the standby site will be outdated. So redo transport will raise the ORA-01017: invalid username/password or ORA-01031: insufficient privileges error. The primary database alert logfile will include the following lines:
Error 1017 received logging on to the standby
PING[ARC0]: Heartbeat failed to connect to standby 'INDIAPS'. Error is 16191.
It can also include the following lines:
ORA-01031: insufficient privileges
PING[ARC2]: Heartbeat failed to connect to standby 'INDIAPS'. Error is 1031.
Time for action – changing the SYS password in a Data Guard environment
The way to change the SYS password without breaking the redo transport service includes copying the primary database's password file to the standby server after changing the password. The following steps show how this can be done:
1. Stop redo transport from the primary database to the standby database. We can execute the DEFER command to defer the log destination with the ALTER SYSTEM statement:SQL> ALTER SYSTEM SET LOG_ARCHIVE_DEST_STATE_2 = 'DEFER';
System altered.

Common Data Guard Issues
[ 312 ]
If the Data Guard broker is being used, we can use the following statement:
DGMGRL> EDIT DATABASE TURKEY_UN SET STATE = 'LOG-TRANSPORT-OFF';
2. Change the SYS user's password in the primary database:SQL> ALTER USER SYS IDENTIFIED BY newpassword;
User altered.
3. Copy the primary database's password file to the standby site:$ cd $ORACLE_HOME/dbs
$ scp orapwTURKEY standbyhost:/u01/app/oracle/product/11.2.0/ dbhome_1/dbs/orapwINDIAPS
4. Try logging into the standby database from the standby server using the new SYS password:$ sqlplus sys/newpassword as sysdba
5. Start redo transport from the primary database to the standby database:SQL> ALTER SYSTEM SET LOG_ARCHIVE_DEST_STATE_2 = 'ENABLE';
System altered.
If the Data Guard broker is being used, we can use the following statement:
DGMGRL> EDIT DATABASE TURKEY_UN SET STATE = 'ONLINE';
6. Check whether the redo transport service is running normally by switching the redo logs in the primary database:
SQL> ALTER SYSTEM SWITCH LOGFILE;
System altered.
Check the standby database's processes or the alert log file to see redo transport service status:
SQL> SELECT PROCESS, STATUS, THREAD#, SEQUENCE#, BLOCK#, BLOCKS FROM V$MANAGED_STANDBY ;
PROCESS STATUS THREAD# SEQUENCE# BLOCK# BLOCKS
--------- ------------ ---------- ---------- ---------- ----------
ARCH CLOSING 1 3232 1 275
ARCH CLOSING 1 3229 1 47
ARCH CONNECTED 0 0 0 0

Chapter 10
[ 313 ]
ARCH CLOSING 1 3220 2049 1164
RFS IDLE 0 0 0 0
RFS IDLE 0 0 0 0
RFS IDLE 0 0 0 0
MRP0 APPLYING_LOG 1 3233 122 102400
RFS IDLE 1 3233 122 1
Also, if the password file of the standby database is somehow corrupted, or has been deleted, the redo transport service will raise an error and we can copy the primary password file to the standby site to fix this problem.
Pop quiz – the redo transport authentication problem in only one instance of the primary database
Suppose we have an RAC primary database, and all instances successfully transmit redo to the standby database except one. One of the primary instances shows an authentication error in the alert log file. What do we need to do to fix this issue?
What just happened?We've now changed the SYS user's password in a Data Guard environment without causing any errors in the redo transport service. Database administrators have to consider standby databases when changing a SYS password in the primary database of a Data Guard configuration. Otherwise, the redo transport will fail, and if it is not noticed quickly, this may cause data loss in case of any failover.
If we often need to change the SYS user's password in the primary database, it may be troublesome to copy the password file to the standby site every time, especially when there's more than one standby destination. In this case, the REDO_TRANSPORT_USER parameter comes to our rescue. It's possible to change the default redo transport user from SYS to another database user by setting this parameter.
Time for action – changing the redo transport user Follow these steps to change the redo transport user in the Data Guard configuration:
1. Create a new database, which will be used for redo transport in the primary database. Grant the SYSOPER privileges to this user and ensure that the standby database has applied these changes:SQL> CREATE USER DGUSER IDENTIFIED BY SOMEPASSWORD;
SQL> GRANT SYSOPER to DGUSER;

Common Data Guard Issues
[ 314 ]
Don't forget that if the password expires periodically for this user, this will pose a problem in Data Guard redo transport. So ensure that the default profile does not include the PASSWORD_LIFE_TIME and PASSWORD_GRACE_TIME settings. If it does, choose another profile for this user.
2. Stop the redo transport from the primary database to the standby databases. We can execute the DEFER command to defer the log destination with the ALTER SYSTEM statement:SQL> ALTER SYSTEM SET LOG_ARCHIVE_DEST_STATE_2 = 'DEFER';
3. Change the redo transport user by setting the REDO_TRANSPORT_ USER parameter in the primary and standby databases:SQL> ALTER SYSTEM SET REDO_TRANSPORT_USER = DGUSER;
4. Copy the primary database's password file to the standby site:$ cd $ORACLE_HOME/dbs
$ scp orapwTURKEY standbyhost:/u01/app/oracle/product/11.2.0/ dbhome_1/dbs/orapwINDIAPS
5. Start redo transport from the primary database to the standby databases:SQL> ALTER SYSTEM SET LOG_ARCHIVE_DEST_STATE_2 = 'ENABLE';
6. Check whether the redo transport service is running normally by switching redo logs in the primary database:
SQL> ALTER SYSTEM SWITCH LOGFILE;
Check the standby database processes or the alert log file to see redo transport service status:SQL> SELECT PROCESS, STATUS, THREAD#, SEQUENCE#, BLOCK#, BLOCKS FROM V$MANAGED_STANDBY ;
What just happened?The default user, who is the user for the redo transport authentication, is now changed from SYS to another database user. As mentioned, this may be useful if we change the SYS password often in the primary database.

Chapter 10
[ 315 ]
Dealing with UNNAMED datafilesThere are some reasons for a file being created as UNNAMED in the standby database, including insufficient disk space on the standby site, non-privileged directory structure on standby database, or improper parameter settings related to file management.
The STANDBY_FILE_MANAGEMENT parameter enables or disables automatic standby file management in Data Guard. When automatic standby file management is enabled, file additions and deletions in the primary database are replicated to the standby database.
For example, we add a datafile in the primary database when the STANDBY_FILE_MANAGEMENT parameter on the standby database is set to MANUAL. Due to this parameter setting, it will create an UNNAMED file under $ORACLE_HOME/dbs, and this will cause the MRP process to be killed. Errors in the alert log file will be as follows:
Errors in file /u01/app/oracle2/diag/rdbms/india_ps/INDIAPS/trace/INDIAPS_pr00_691.trc:
ORA-01111: name for data file 10 is unknown - rename to correct file
ORA-01110: data file 10: ' /u01/app/oracle2/product/11.2.0/dbhome_1/dbs/UNNAMED00010'
ORA-01157: cannot identify/lock data file 10 - see DBWR trace file
Time for action – resolving UNNAMED datafile errorsNow we'll see how to resolve an UNNAMED datafile issue in a Data Guard configuration:
1. Check for the datafile number that needs to be recovered from the standby database:SQL> SELECT * FROM V$RECOVER_FILE WHERE ERROR LIKE '%MISSING%';
FILE# ONLINE ONLINE_ ERROR CHANGE# TIME
---------- ------- ------- ----------------- ---------- ----------
10 ONLINE ONLINE FILE MISSING 0
2. Identify datafile 10 in the primary database:SQL> SELECT FILE#,NAME FROM V$DATAFILE WHERE FILE#=10;
FILE# NAME
---------- -----------------------------------------------
536 /u01/app/oracle2/datafile/ORCL/users03.dbf

Common Data Guard Issues
[ 316 ]
3. Identify the dummy filename created in the standby database:SQL> SELECT FILE#,NAME FROM V$DATAFILE WHERE FILE#=10;
FILE# NAME
---------- -------------------------------------------------------
536 /u01/app/oracle2/product/11.2.0/dbhome_1/dbs/UNNAMED00010
4. If the reason for the creation of the UNNAMED file is disk capacity or a nonexistent path, fix the issue by creating the datafile in its original place.
5. Set STANDBY_FILE_MANAGEMENT to MANUAL:SQL> ALTER SYSTEM SET STANDBY_FILE_MANAGEMENT=MANUAL;
System altered.
6. Create the datafile in its original place with the ALTER DATABASE CREATE DATAFILE statement:SQL> ALTER DATABASE CREATE DATAFILE '/u01/app/oracle2/product/11.2.0/dbhome_1/dbs/UNNAMED00010' AS '/u01/app/oracle2/datafile/ORCL/users03.dbf';
Database altered.
If OMF is being used, we won't be allowed to create the datafile with the preceding statement. We'll come across the following error:SQL> ALTER DATABASE CREATE DATAFILE '/u01/app/oracle2/product/11.2.0/dbhome_1/dbs/UNNAMED00010' AS '/u01/app/oracle2/datafile/ORCL/users03.dbf';
*
ERROR at line 1:
ORA-01276: Cannot add file
/u01/app/oracle2/datafile/ORCL/users03.dbf. File has an Oracle Managed Files file name.
In order to avoid the error, run the following command:
SQL> ALTER DATABASE CREATE DATAFILE '/u01/app/oracle2/product/11.2.0/dbhome_1/dbs/UNNAMED00010' AS NEW;
Database altered.
7. Set STANDBY_FILE_MANAGEMENT to AUTO and start Redo Apply:SQL> ALTER SYSTEM SET STANDBY_FILE_MANAGEMENT=AUTO SCOPE=BOTH;
System altered.

Chapter 10
[ 317 ]
SQL> SHOW PARAMETER STANDBY_FILE_MANAGEMENT
NAME TYPE VALUE
----------------------------------- ----------- ------------------
standby_file_management string AUTO
SQL> ALTER DATABASE RECOVER MANAGED STANDBY DATABASE USING CURRENT LOGFILE DISCONNECT FROM SESSION;
Database altered.
8. Check the standby database's processes, or the alert log file, to monitor Redo Apply:SQL> SELECT PROCESS, STATUS, THREAD#, SEQUENCE#, BLOCK#, BLOCKS FROM V$MANAGED_STANDBY;
What just happened?We've fixed a datafile creation error in the standby database by using the ALTER DATABASE CREATE DATAFILE statement. Usage of this statement varies depending on the use of Oracle-managed files.
Have a go hero Simulate the datafile creation error in your test environment. In the primary database, you can create a datafile in a path that the Oracle user doesn't have privilege to on a standby server, or fill the disk on the standby database server where datafiles reside and create a new datafile in the primary database. Then fix the datafile creation error with the method mentioned previously.
Closing a gap with an RMAN incremental backupWhen a standby database falls behind the primary database in time because of any interruption in redo transport or apply, the database can be synchronized again by applying the archived logs produced in the no-synchronization period. However, even if one of the necessary archived logfiles is not accessible, there is nothing to do for Data Guard to close the gap.
In such a case, we have to restore these archived logfiles from backups if they exist. If not, the only way to close the gap is by using an RMAN incremental backup taken from the primary database, especially to close the gap in question. We use the BACKUP INCREMENTAL FROM SCN RMAN statement for this special-purpose backup.

Common Data Guard Issues
[ 318 ]
Time for action – closing a gap with an RMAN incremental backup
Let's see all the required steps to practice this recovery operation:
1. In this practice, assume that there are missing archived logs (gap) in the standby database, and we're not able to restore these archived logs. We'll synchronize Data Guard using the RMAN incremental backup. To represent this situation, execute the DEFER command to defer the log destination in the primary database, and execute the following operation that will generate redo in the primary database:SQL> ALTER SYSTEM SET LOG_ARCHIVE_DEST_STATE_2 = 'DEFER';
2. Now we have a standby database behind the primary database, and we'll use RMAN to reflect the primary database's changes to the standby database. Stop Redo Apply in the standby database:SQL> ALTER DATABASE RECOVER MANAGED STANDBY DATABASE CANCEL;
3. Query the current system change number (SCN) of the standby database that will be used as the limit for an incremental backup of the primary database. Run the following statement on the standby database:SQL> SELECT MIN(FHSCN) FROM X$KCVFH;
MIN(FHSCN)
----------------
20606344
4. Run an RMAN incremental backup of the primary database by using the obtained SCN value.
This backup job will check all the blocks of the primary database and back up the blocks that have a higher SCN. So even if the backup size is small, it may take a long time.
RMAN> BACKUP INCREMENTAL FROM SCN 20606344 DATABASE FORMAT '/tmp/Standby_Inc_%U' tag 'STANDBY_INC';
Starting backup at 20-DEC-12
using target database control file instead of recovery catalog
allocated channel: ORA_DISK_1
channel ORA_DISK_1: SID=165 device type=DISK
backup will be obsolete on date 27-DEC-12

Chapter 10
[ 319 ]
archived logs will not be kept or backed up
channel ORA_DISK_1: starting full datafile backup set
channel ORA_DISK_1: specifying datafile(s) in backup set
input datafile file number=00001 name=/u01/app/oracle2/datafile/ORCL/system01.dbf
...
input datafile file number=00007 name=/u01/app/oracle2/datafile/ORCL/system03.dbf
channel ORA_DISK_1: starting piece 1 at 20-DEC-12
channel ORA_DISK_1: finished piece 1 at 20-DEC-12
piece handle=/tmp/Standby_Inc_03nt9u0v_1_1 tag=STANDBY_INC comment=NONE
channel ORA_DISK_1: backup set complete, elapsed time: 00:01:15
using channel ORA_DISK_1
including current control file in backup set
channel ORA_DISK_1: starting piece 1 at 20-DEC-12
channel ORA_DISK_1: finished piece 1 at 20-DEC-12
piece handle=/tmp/Standby_Inc_04nt9u3a_1_1 tag=STANDBY_INC comment=NONE
channel ORA_DISK_1: backup set complete, elapsed time: 00:00:01
Finished backup at 20-DEC-12
5. Copy the backup files from the primary site to the standby site with FTP or SCP.scp /tmp/Standby_Inc_* standbyhost:/tmp/
6. Register the backup files to the standby database control file with the RMAN CATALOG command, so that we'll be able to recover the standby database using these backup files:RMAN> CATALOG START WITH '/tmp/Standby_Inc';
using target database control file instead of recovery catalog
searching for all files that match the pattern /tmp/Standby_Inc
List of Files Unknown to the Database
=====================================
File Name: /tmp/Standby_Inc_03nt9u0v_1_1
File Name: /tmp/Standby_Inc_04nt9u3a_1_1

Common Data Guard Issues
[ 320 ]
Do you really want to catalog the above files (enter YES or NO)? YES
cataloging files...
cataloging done
List of Cataloged Files
=======================
File Name: /tmp/Standby_Inc_03nt9u0v_1_1
File Name: /tmp/Standby_Inc_04nt9u3a_1_1
7. Recover the standby database with the RMAN RECOVER statement. The Recovery operation will use the incremental backup by default as we have already registered the backup files:RMAN> RECOVER DATABASE NOREDO;
Starting recover at 20-DEC-12
allocated channel: ORA_DISK_1
channel ORA_DISK_1: SID=1237 device type=DISK
channel ORA_DISK_1: starting incremental datafile backup set restore
channel ORA_DISK_1: specifying datafile(s) to restore from backup set
destination for restore of datafile 00001: /u01/app/oracle2/datafile/INDIAPS/system01.dbf
...
destination for restore of datafile 00007: /u01/app/oracle2/datafile/INDIAPS/system03.dbf
channel ORA_DISK_1: reading from backup piece /tmp/Standby_Inc_03nt9u0v_1_1
channel ORA_DISK_1: piece handle=/tmp/Standby_Inc_03nt9u0v_1_1 tag=STANDBY_INC
channel ORA_DISK_1: restored backup piece 1
channel ORA_DISK_1: restore complete, elapsed time: 00:00:01
Finished recover at 20-DEC-12
8. In this step, we'll create a new standby control file in the primary database and open the standby database using this new control file. We've performed this process at the beginning of this chapter, so we won't be explaining it again; only the statements are given as follows:

Chapter 10
[ 321 ]
In the primary database you will see the following command lines:RMAN> BACKUP CURRENT CONTROLFILE FOR STANDBY FORMAT '/tmp/Standby_CTRL.bck';
scp /tmp/Standby_CTRL.bck standbyhost:/tmp/
In the standby database you will see the following command lines:RMAN> SHUTDOWN;
RMAN> STARTUP NOMOUNT;
RMAN> RESTORE STANDBY CONTROLFILE FROM '/tmp/Standby_CTRL.bck';
RMAN> SHUTDOWN;
RMAN> STARTUP MOUNT;
If OMF is being used, execute the following commands:
RMAN> CATALOG START WITH '+DATA/mystd/datafile/';
RMAN> SWITCH DATABASE TO COPY;
9. If new datafiles were added during the time when Data Guard had been stopped, we will need to copy and register the newly created files to the standby system, as they were not included in the incremental backup set.
We will determine if any files have been added to the primary database, as the standby current SCN will run the following query:
SQL>SELECT FILE#, NAME FROM V$DATAFILE WHERE CREATION_CHANGE# > 20606344;
10. If the flashback database is ON in the standby database, turn it off and on again:SQL> ALTER DATABASE FLASHBACK OFF;
SQL> ALTER DATABASE FLASHBACK ON;
11. Clear all the standby redo log groups in the standby database:SQL> ALTER DATABASE CLEAR LOGFILE GROUP 4;
SQL> ALTER DATABASE CLEAR LOGFILE GROUP 5;
SQL> ALTER DATABASE CLEAR LOGFILE GROUP 6;
SQL> ALTER DATABASE CLEAR LOGFILE GROUP 7;
12. Start Redo Apply in the standby database:SQL> ALTER DATABASE RECOVER MANAGED STANDBY DATABASE USING CURRENT LOGFILE DISCONNECT FROM SESSION;

Common Data Guard Issues
[ 322 ]
What just happened?We've recovered a Data Guard configuration where the standby database is behind the primary database because of a gap, and the necessary archived logfiles to recover the standby database are missing. We used the RMAN BACKUP INCREMENTAL FROM SCN statement for this purpose.
Pop quiz – using a tape for SCN incremental backupIs it possible to use tape backups in order to close a Data Guard gap with the RMAN incremental backup method?
Fixing NOLOGGING changes on the standby databaseIt's possible to limit redo generation for specific operations on Oracle databases, which provide higher performance. These operations include bulk inserts, creation of tables as select operations, and index creations. When we work using the NOLOGGING clause, redo will not include all the changes to data on the related segments. This means if we perform a restore/recovery of the related datafile, or of the whole database after the NOLOGGING operations, it'll not be possible to recover the data created with the NOLOGGING option.
The same problem exists with Data Guard. When the NOLOGGING operation is executed in the primary database, Data Guard is not able to reflect all the data changes in the standby database. In this case, when we activate a standby database or open it in the read-only mode, we'll see the following error messages:
ORA-01578: ORACLE data block corrupted (file # 1, block # 2521)
ORA-01110: data file 1: '/u01/app/oracle2/datafile/INDIAPS/system01.dbf'
ORA-26040: Data block was loaded using the NOLOGGING option
For this reason, Data Guard installation requires putting the primary database in the FORCE LOGGING mode before starting redo transport between the primary and standby database. The FORCE LOGGING mode guarantees the writing of redo records even if the NOLOGGING clause was specified in the SQL statements. The default mode of an Oracle database is not FORCE LOGGING, so we need to put the database in this mode using the following statement:
SQL> ALTER DATABASE FORCE LOGGING;

Chapter 10
[ 323 ]
In this section, we'll assume that the primary database is not in the FORCE LOGGING mode, and some NOLOGGING changes were made in the primary database. One method to fix this situation in the standby database is restoring the affected datafiles from backups taken from the primary database after the NOLOGGING operation. However, in this method we have to work with backup files that are most likely much bigger in size than the amount of data that needs to be recovered. A method that uses the RMAN BACKUP INCREMENTAL FROM SCN statement is more efficient because the backup files will include only the changes from the beginning of the NOLOGGING operation.
We'll now see two scenarios. We'll use the BACKUP INCREMENTAL FROM SCN statement for an incremental datafile backup in the first scenario, and use the same statement for an incremental database backup in the second one. For a small number of affected datafiles and relatively less affected data, choose the first scenario. However, if the number of affected datafiles and amount of data are high, use the second scenario that takes an incremental backup of the whole database.
Time for action – fixing NOLOGGING changes on a standby database with incremental datafile backups
As a prerequisite for this exercise, first put the primary database in the no-force logging mode using the ALTER DATABASE NO FORCE LOGGING statement. Then perform some DML operations in the primary database using the NOLOGGING clause so that we can fix the issue in the standby database with the following steps:
1. Run the following query to identify the datafiles that are affected by NOLOGGING changes:SQL> SELECT FILE#, FIRST_NONLOGGED_SCN FROM V$DATAFILE WHERE FIRST_NONLOGGED_SCN > 0;
FILE# FIRST_NONLOGGED_SCN
---------- -------------------
4 20606544
2. First we need to put the affected datafiles in the OFFLINE state in the standby database. For this purpose, stop Redo Apply in the standby database, execute the ALTER DATABASE DATAFILE ... OFFLINE statement, and start Redo Apply again:SQL> ALTER DATABASE RECOVER MANAGED STANDBY DATABASE CANCEL;
SQL> ALTER DATABASE DATAFILE 4 OFFLINE FOR DROP;
SQL> ALTER DATABASE RECOVER MANAGED STANDBY DATABASE USING CURRENT LOGFILE DISCONNECT;

Common Data Guard Issues
[ 324 ]
3. Now we'll take incremental backups of the related datafiles by using the FROM SCN keyword. SCN values will be the output of the execution of the queries in the first step. Connect to the primary database as an RMAN target and execute the following RMAN BACKUP statements:RMAN> BACKUP INCREMENTAL FROM SCN 20606544 DATAFILE 4 FORMAT '/data/Dbf_inc_%U' TAG 'FOR STANDBY';
4. Copy the backup files from the primary site to the standby site with FTP or SCP:scp /data/Dbf_inc_* standbyhost:/data/
5. Connect to the physical standby database as the RMAN target and catalog the copied backup files to the control file with the RMAN CATALOG command:RMAN> CATALOG START WITH '/data/Dbf_inc_';
6. In order to put the affected datafiles in the ONLINE state, stop Redo Apply on the standby database, and run the ALTER DATABASE DATAFILE ... ONLINE statement:SQL> ALTER DATABASE RECOVER MANAGED STANDBY DATABASE CANCEL;
SQL> ALTER DATABASE DATAFILE 4 ONLINE;
7. Recover the datafiles by connecting the standby database as the RMAN target. RMAN will use the incremental backup automatically because those files were registered to the control file previously:RMAN> RECOVER DATAFILE 4 NOREDO;
8. Now run the query from the first step again to ensure that there're no more datafiles with the NOLOGGING changes:SQL> SELECT FILE#, FIRST_NONLOGGED_SCN FROM V$DATAFILE WHERE FIRST_NONLOGGED_SCN > 0;
9. Start Redo Apply on the standby database:
SQL> ALTER DATABASE RECOVER MANAGED STANDBY DATABASE USING CURRENT LOGFILE DISCONNECT;
What just happened?We've successfully recovered the standby database that didn't include the NOLOGGING changes performed in the primary database. We used the datafile incremental backup method because the number of affected datafiles was small. For a high number of affected datafiles, the method explained in the next section will be more suitable.

Chapter 10
[ 325 ]
Time for action – fixing NOLOGGING changes in the standby database with incremental database backups
1. Determine the SCN that we'll use in the RMAN incremental database backup by querying the minimum FIRST_NONLOGGED_SCN column of the V$DATAFILE view in the standby database:SQL> SELECT MIN(FIRST_NONLOGGED_SCN) FROM V$DATAFILE WHERE FIRST_NONLOGGED_SCN>0;
MIN(FIRST_NONLOGGED_SCN)
------------------------
20606544
2. Stop Redo Apply on the standby database:SQL> ALTER DATABASE RECOVER MANAGED STANDBY DATABASE CANCEL;
3. Now we'll take an incremental backup of the database using the FROM SCN keyword. The SCN value will be the output of the execution of the query in the first step. Connect to the primary database as the RMAN target and execute the following RMAN BACKUP statement:RMAN> BACKUP INCREMENTAL FROM SCN 20606344 DATABASE FORMAT '/data/DB_Inc_%U' TAG 'FOR STANDBY';
4. Copy the backup files from the primary site to the standby site with FTP or SCP:scp /data/DB_Inc_* standbyhost:/data/
5. Connect to the physical standby database as the RMAN target and catalog the copied backup files to the control file with the RMAN CATALOG command:RMAN> CATALOG START WITH '/data/DB_Inc_';
6. Recover the standby database by connecting it as the RMAN target. RMAN will use the incremental backup automatically because those files were registered to the control file previously:RMAN> RECOVER DATABASE NOREDO;
7. Run the query in the first step again to ensure that there're no more datafiles with NOLOGGING changes:SQL> SELECT FILE#, FIRST_NONLOGGED_SCN FROM V$DATAFILE WHERE FIRST_NONLOGGED_SCN > 0;

Common Data Guard Issues
[ 326 ]
8. Start Redo Apply on the standby database:SQL> ALTER DATABASE RECOVER MANAGED STANDBY DATABASE USING CURRENT LOGFILE DISCONNECT;
If the state of a tablespace that includes the affected datafiles is READ ONLY, those files will not be backed up with the RMAN BACKUP command. We need to put these tablespaces in the read-write mode before the backup operation. Change the state of a tablespace with the following statements:
SQL> ALTER TABLESPACE <TABLESPACE_NAME> READ WRITE;
SQL> ALTER TABLESPACE <TABLESPACE_NAME> READ ONLY;
9. Put the primary database in the FORCE LOGGING mode:SQL> ALTER DATABASE FORCE LOGGING;
What just happened?We've fixed the adverse affect of executing the NOLOGGING operation in the primary database in a Data Guard configuration. If this problem is not fixed in the standby database, we'll face the ORA-26040 error when we attempt to open the standby database as read-only or read-write.
Turning on Data Guard tracingWhen database administrators work on a Data Guard problem or plan an important Data Guard operation such as role transition, they generally prefer to gather comprehensive trace information about the activity of Data Guard-related processes. For this purpose, Oracle offers the LOG_ARCHIVE_TRACE parameter. By setting this parameter to an appropriate value, it's possible to have detailed information about log archiving, redo transport, and Redo Apply activities.
The default value of this initialization parameter is 0, which means the additional tracing feature is off, and Oracle will continue generating its default alert and trace entries related to error conditions. It's possible to change the value of this parameter in the primary and/or standby databases online using the ALTER SYSTEM statement. For example, look at the following statement:
SQL> ALTER SYSTEM SET LOG_ARCHIVE_TRACE=15;
In the Real Application Cluster database it's possible to set different tracing levels for different instances, if necessary.

Chapter 10
[ 327 ]
Keep in mind that additional tracing may produce more trace files with larger sizes. This will fill the diagnostic destination filesystem quickly. So if the parameter change is intended for temporary purposes, do not forget to set the LOG_ARCHIVE_TRACE parameter back to 0.
The following table shows the values and meanings of the LOG_ARCHIVE_TRACE parameter levels. It's also possible to turn on tracing for multiple levels. For this purpose, set the parameter to the sum of the intended levels. For example, if we want comprehensive tracing for real-time apply activity and LGWR redo shipping network activity, which are level 4096 and 512 respectively, we can set the LOG_ARCHIVE_TRACE parameter to 4608.
Level Meaning
0 Disables archived redo log tracing (default setting)
1 Tracks archiving of redo log files
2 Tracks archive status by each archive log file destination
4 Tracks archive operational phase
8 Tracks archive log destination activity
16 Tracks detailed archive log destination activity
32 Tracks archive log destination parameter modifications
64 Tracks ARCn process state activity
128 Tracks the FAL server process activity
256 Tracks the RFS logical client
512 Tracks the LGWR redo shipping network activity
1024 Tracks the RFS physical client
2048 Tracks the RFS/ARCn ping heartbeat
4096 Tracks the real-time apply activity
8192 Tracks the Redo Apply activity (media recovery or physical standby)
16384 Tracks archived I/O buffers
32768 Tracks the LogMiner dictionary archiving
Have a go heroTurn on Data Guard tracing with some of the given levels in the primary and standby databases, and observe the alert log and trace entries. See which extra information is given in which tracing level.

Common Data Guard Issues
[ 328 ]
Gathering diagnostic dataWe need to access diagnostic data about the Data Guard configuration, especially when there's a problem in the Redo Apply or redo transport services. After the first diagnosis of the problem, it's possible to decide whether to search for detailed information in the primary database or in the standby database. If the issue is about sending redo, it's more likely that the necessary information can be found on the primary site. However, if it's about Redo Apply, it's better to search for detailed information on the standby site.
No matter where we search for diagnostic data, we need to know where to search for the related logfiles and how to query diagnostic data in the database. The most commonly referenced files in a Data Guard issue are the primary and standby alert log files. If the Data Guard broker is used in the configuration, Data Guard Monitor (DMON) logfiles can also be helpful for troubleshooting. If necessary, we can also query Data Guard-related dynamic performance views to get information about the issue.
Now let's look at the details of using these methods to access diagnostic data in a Data Guard configuration.
Alert log and trace filesAlert log files are the first step to start investigating an Oracle Database issue. It's also the same for Data Guard. We can find the directory that contains the alert log and the trace files using the following query:
SQL> SELECT NAME,VALUE FROM V$DIAG_INFO WHERE NAME LIKE 'Diag%';
NAME VALUE
--------------- -----------------------------------------------------
Diag Enabled TRUE
Diag Trace /u01/app/oracle2/diag/rdbms/india_ps/INDIAPS/trace
Diag Alert /u01/app/oracle2/diag/rdbms/india_ps/INDIAPS/alert
Diag Incident /u01/app/oracle2/diag/rdbms/india_ps/INDIAPS/incident
Diag Cdump /u01/app/oracle2/diag/rdbms/india_ps/INDIAPS/cdump
Here, the Diag Trace directory is the location of the background process trace files, the server process trace files, the SQL trace files, and the text-formatted version of the alert log file. The Diag Alert directory keeps the XML-formatted version of the alert log. Incident logfiles are under the Diag Incident directory, and the core dump files are under the Diag Cdump directory.

Chapter 10
[ 329 ]
Let's go to the Diag Trace directory and list the alert log file; we can use the tail command to see the last lines of the file:
$ cd /u01/app/oracle2/diag/rdbms/india_ps/INDIAPS/trace
$ ls –al alert*
-rw-r----- 1 oracle dba 2533843 Dec 20 01:56 alert_INDIAPS.log
$ tail -100 alert_INDIAPS.log
.
.
.
Media Recovery Waiting for thread 1 sequence 3273 (in transit)
Recovery of Online Redo Log: Thread 1 Group 5 Seq 3273 Reading mem 0
Mem# 0: /u01/app/oracle2/datafile/ORCL/std5.log
RFS[20]: Selected log 4 for thread 1 sequence 3274 dbid 1319333016 branch 791552282
Thu Dec 20 01:48:19 2012
Archived Log entry 450 added for thread 1 sequence 3273 ID 0x4eea7a49 dest 1:
Media Recovery Waiting for thread 1 sequence 3274 (in transit)
Recovery of Online Redo Log: Thread 1 Group 4 Seq 3274 Reading mem 0
Mem# 0: /u01/app/oracle2/datafile/ORCL/std4.log
Thu Dec 20 01:56:08 2012
RFS[20]: Selected log 5 for thread 1 sequence 3275 dbid 1319333016 branch 791552282
Thu Dec 20 01:56:08 2012
Archived Log entry 451 added for thread 1 sequence 3274 ID 0x4eea7a49 dest 1:
Thu Dec 20 01:56:09 2012
Media Recovery Waiting for thread 1 sequence 3275 (in transit)
Recovery of Online Redo Log: Thread 1 Group 5 Seq 3275 Reading mem 0
Mem# 0: /u01/app/oracle2/datafile/ORCL/std5.log
Another method to monitor the alert log is the ADRCI command-line tool, which is an Oracle Database 11g feature to manage Oracle Database diagnostic data. Using ADRCI, it's possible to manage the entire alert log and trace files in the diagnostic directories (database, ASM, listener alert log files, and so on), view the health monitor reports, and zip incident and problem information into a file to send to Oracle Support.

Common Data Guard Issues
[ 330 ]
Time for action – monitoring the database alert log using ADRCILet's see an example of monitoring the database alert log using the ADRCI utility:
1. Ensure that the ORACLE_HOME and PATH environment variables are set properly. The PATH environment variable must include the ORACLE_HOME/bin directory.export ORACLE_HOME=/u01/app/oracle2/product/11.2.0/dbhome_1
export PATH=$PATH:$ORACLE_HOME/bin
2. Start the ADRCI command-line tool:$ adrci
ADRCI: Release 11.2.0.1.0 - Production on Thu Dec 20 02:06:49 2012
Copyright (c) 1982, 2009, Oracle and/or its affiliates. All rights reserved.
ADR base = "/u01/app/oracle2"
3. We can run the HELP command to get help on the usage of this utility:adrci> HELP
HELP [topic]
Available Topics:
CREATE REPORT
ECHO
EXIT
HELP
HOST
IPS
PURGE
RUN
SET BASE
SET BROWSER
SET CONTROL
SET ECHO
SET EDITOR
SET HOMES | HOME | HOMEPATH
SET TERMOUT

Chapter 10
[ 331 ]
SHOW ALERT
SHOW BASE
SHOW CONTROL
SHOW HM_RUN
SHOW HOMES | HOME | HOMEPATH
SHOW INCDIR
SHOW INCIDENT
SHOW PROBLEM
SHOW REPORT
SHOW TRACEFILE
SPOOL
There are other commands intended to be used directly by Oracle, type "HELP EXTENDED" to see the list
It's possible to get help for a specific command by specifying the topic in the HELP command:
adrci> HELP SHOW ALERT
Usage: SHOW ALERT [-p <predicate_string>] [-term]
[ [-tail [num] [-f]] | [-file <alert_file_name>]]
Purpose: Show alert messages.
Options:
[-p <predicate_string>]: The predicate string must be double-quoted.
The fields in the predicate are the fields:
ORIGINATING_TIMESTAMP timestamp
NORMALIZED_TIMESTAMP timestamp
ORGANIZATION_ID text(65)
COMPONENT_ID text(65)
HOST_ID text(65)
HOST_ADDRESS text(17)
MESSAGE_TYPE number
MESSAGE_LEVEL number
MESSAGE_ID text(65)

Common Data Guard Issues
[ 332 ]
MESSAGE_GROUP text(65)
CLIENT_ID text(65)
MODULE_ID text(65)
PROCESS_ID text(33)
THREAD_ID text(65)
USER_ID text(65)
INSTANCE_ID text(65)
DETAILED_LOCATION text(161)
UPSTREAM_COMP_ID text(101)
DOWNSTREAM_COMP_ID text(101)
EXECUTION_CONTEXT_ID text(101)
EXECUTION_CONTEXT_SEQUENCE number
ERROR_INSTANCE_ID number
ERROR_INSTANCE_SEQUENCE number
MESSAGE_TEXT text(2049)
MESSAGE_ARGUMENTS text(129)
SUPPLEMENTAL_ATTRIBUTES text(129)
SUPPLEMENTAL_DETAILS text(129)
PROBLEM_KEY text(65)
[-tail [num] [-f]]: Output last part of the alert messages and
output latest messages as the alert log grows. If num is not specified, the last 10 messages are displayed. If "-f" is specified, new data will append at the end as new alert messages are generated.
[-term]: Direct results to terminal. If this option is not specified,
the results will be open in an editor. By default, it will open in
emacs, but "set editor" can be used to set other editors.
[-file <alert_file_name>]: Allow users to specify an alert file which
may not be in ADR. <alert_file_name> must be specified with full path. Note that this option cannot be used with the -tail option

Chapter 10
[ 333 ]
Examples:
show alert
show alert -p "message_text like '%incident%'"
show alert -tail 20
4. Type the following statement to list the ADR home directories:adrci> SHOW HOMES
ADR Homes:
diag/rdbms/india_ps/INDIAPS
diag/asm/+asm/+ASM
diag/tnslsnr/india_ps/listener
5. Set the database ADR HOME to work on:adrci> SET HOME diag/rdbms/india_ps/INDIAPS
6. Monitor the last 20 lines of the database alert log file with the following statement:adrci> SHOW ALERT -TAIL 20
2012-12-20 01:46:25.303000 +02:00
Archived Log entry 445 added for thread 1 sequence 3268 ID 0x4eea7a49 dest 1:
Media Recovery Waiting for thread 1 sequence 3269 (in transit)
Recovery of Online Redo Log: Thread 1 Group 5 Seq 3269 Reading mem 0
Mem# 0: /u01/app/oracle2/datafile/ORCL/std5.log
2012-12-20 01:46:28.383000 +02:00
RFS[20]: Selected log 4 for thread 1 sequence 3270 dbid 1319333016 branch 791552282
.
.
.
Archived Log entry 451 added for thread 1 sequence 3274 ID 0x4eea7a49 dest 1:
Media Recovery Waiting for thread 1 sequence 3275 (in transit)
Recovery of Online Redo Log: Thread 1 Group 5 Seq 3275 Reading mem 0
Mem# 0: /u01/app/oracle2/datafile/ORCL/std5.log
adrci>

Common Data Guard Issues
[ 334 ]
7. Run the following statement to monitor the alert log messages that contain the string ORA-:adrci> SHOW ALERT -P "MESSAGE_TEXT LIKE '%ORA-%'"
...
Errors in file /u01/app/oracle2/diag/rdbms/india_ps/INDIAPS/trace/INDIAPS_pr05_22496.trc:
ORA-27090: Unable to reserve kernel resources for asynchronous disk I/O
Additional information: 3
Additional information: 128
Additional information: 268423168
Errors in file /u01/app/oracle2/diag/rdbms/india_ps/INDIAPS/trace/INDIAPS_pr06_22498.trc:
8. It's also possible to list the incidents with the SHOW INCIDENT command:
adrci> SHOW INCIDENT
ADR Home = /u01/app/oracle/diag/rdbms/sb2db/SB2DB1:
******************************************************************
INCIDENT_ID PROBLEM_KEY CREATE_TIME
----------- --------------- ----------------------------
320729 ORA 1578 2012-12-20 00:03:50.538000 +02:00
1 rows fetched
What just happened?We've seen an example of using the ADRCI command-line tool to monitor alert log files. In a Data Guard-related problem, the first place to check will be the alert log files of the primary and standby databases. Using ADRCI, it's easy to read alert log files of all Oracle components and also list specific problems that are recorded in the alert log files.
Data Guard broker logsFor each database of a Data Guard configuration where a Data Guard broker is being used, the DMON process writes log data into a logfile. This logfile resides in the same directory as the alert log and is named drc<$ORACLE_SID>.log. It contains important information about the Data Guard's status that can be used to troubleshoot Data Guard's failures.

Chapter 10
[ 335 ]
Let's check this file in our standby database:
$ cd /u01/app/oracle2/diag/rdbms/india_ps/INDIAPS/trace
$ tail -50 drcINDIAPS.log
...
2012-12-20 02:15:37.050 Property 'LogFileNameConvert' has inconsistent values:METADATA='', SPFILE='', DATABASE='/u01/app/oracle2/datafile/ORCL, /u01/app/oracle2/datafile/ORCL'
2012-12-20 02:15:37.050 RSM0: HEALTH CHECK WARNING: ORA-16714: the value of property LogFileNameConvert is inconsistent with the database setting
2012-12-20 02:15:37.066 RSM Warning: Property 'LogArchiveTrace' has inconsistent values:METADATA='0', SPFILE='0', DATABASE='8192'
2012-12-20 02:15:37.066 RSM0: HEALTH CHECK WARNING: ORA-16714: the value of property LogArchiveTrace is inconsistent with the database setting
2012-12-20 02:15:37.077 00000000 2049726439 Operation HEALTH_CHECK continuing with warning, status = ORA-16792
2012-12-20 02:15:37.078 00000000 2049726439 Operation HEALTH_CHECK continuing with warning, status = ORA-16792
Dynamic performance viewsDynamic performance views are special database views that are dynamically updated by the database itself and contain important information about the status and performance of database components. It's not possible to insert or update data in these views. DBAs only query them to gather information about the status of the database.
Here, we'll see some of the dynamic performance views that contain information about Data Guard's configuration or status:
� V$DATABASE: This view includes a lot of general information about the database. In a Data Guard configuration, it's possible to query the role of the database, the protection mode, and the switchover status using this view. Run the following query in the databases in your Data Guard environment:SQL> SELECT PROTECTION_MODE, PROTECTION_LEVEL, DATABASE_ROLE ROLE, SWITCHOVER_STATUS FROM V$DATABASE;

Common Data Guard Issues
[ 336 ]
PROTECTION_MODE PROTECTION_LEVEL ROLE SWITCHOVER_STATUS
-------------------- ----------------- ---------------- ----------
MAXIMUM PERFORMANCE MAXIMUM PERFORMANCE PHYSICAL STANDBY NOTALLOWED
� V$DATAGUARD_CONFIG: This view lists the DB_UNIQUE_NAME parameters of the databases existing in the Data Guard configuration. You can query this view on any of the databases:SQL> SELECT * FROM V$DATAGUARD_CONFIG;
DB_UNIQUE_NAME
------------------------------
INDIA_PS
turkey_un
INDIA_UN
� V$ARCHIVE_DEST_STATUS: This view shows the configuration information for the archived redo log destinations. By running the following query in the primary database, we can display the recovery mode at the archival destination:SQL> SELECT RECOVERY_MODE FROM V$ARCHIVE_DEST_STATUS where dest_id=2;
RECOVERY_MODE
-----------------------
MANAGED REAL TIME APPLY
� V$MANAGED_STANDBY: We query this view in a physical standby database to monitor the current status of specific Data Guard processes. Run the following query in the physical standby database and see which sequence is being applied and which sequences are being transferred from the primary database to the standby database:SQL> SELECT PROCESS, STATUS, THREAD#, SEQUENCE#,BLOCK#, BLOCKS FROM V$MANAGED_STANDBY;
PROCESS STATUS THREAD# SEQUENCE# BLOCK# BLOCKS
--------- ------------ ---------- ---------- ---------- ----------
ARCH CLOSING 1 3272 18432 2043
ARCH CLOSING 1 3274 20480 1
ARCH CONNECTED 0 0 0 0

Chapter 10
[ 337 ]
ARCH CLOSING 1 3273 18432 2034
RFS IDLE 0 0 0 0
RFS IDLE 0 0 0 0
RFS IDLE 0 0 0 0
MRP0 APPLYING_LOG 1 3275 4098 102400
RFS IDLE 1 3275 4098 1
� V$ARCHIVED_LOG: This view contains detailed information about the archived logfiles of databases. In a physical standby database, the APPLIED column shows whether the archived logfile was applied or not. The following query shows the archived log sequences that are received from the primary database but not applied:SQL> SELECT THREAD#, SEQUENCE#, FIRST_CHANGE#,NEXT_CHANGE# FROM V$ARCHIVED_LOG where APPLIED='NO';
no rows selected
� V$DATAGUARD_STATUS: This view contains messages that are recently written to the alert log or trace files, related with Data Guard services. In case of a Data Guard issue, it's a good method to check errors using this view.SQL> ALTER SESSION SET NLS_DATE_FORMAT = 'DD-MON-YYYY HH24:MI:SS';
SQL> SELECT TIMESTAMP, MESSAGE FROM V$DATAGUARD_STATUS WHERE TIMESTAMP>SYSDATE-1 ORDER BY TIMESTAMP;
TIMESTAMP MESSAGE
-------------------- -------------------------------------------
20-DEC-2012 01:48:13 Media Recovery Waiting for thread 1 sequence
3272 (in transit)
20-DEC-2012 01:48:16 ARC0: Beginning to archive thread 1 sequence
3272 (20612121-20612129)
20-DEC-2012 01:48:16 ARC0: Completed archiving thread 1 sequence 3272
(0-0)
...
20-DEC-2012 01:56:08 ARC1: Beginning to archive thread 1 sequence
3274 (20612140-20612682)
20-DEC-2012 01:56:08 ARC1: Completed archiving thread 1 sequence 3274
(0-0)
20-DEC-2012 01:56:09 Media Recovery Waiting for thread 1 sequence
3275 (in transit)

Common Data Guard Issues
[ 338 ]
� V$ARCHIVE_GAP: If there is a gap in a standby database that is blocking recovery, we can query the missing archived logfiles using this view. If there is no gap, the query will not return any rows.SQL> DESC V$ARCHIVE_GAP
Name Null? Type
--------------------------------------- -------- ---------------
THREAD# NUMBER
LOW_SEQUENCE# NUMBER
HIGH_SEQUENCE# NUMBER
SQL> SELECT * FROM V$ARCHIVE_GAP;
no rows selected
� V$LOGSTDBY_PROCESS: We can monitor SQL Apply in a logical standby database by querying this view. If SQL Apply is not running, the query will not return any rows.
SQL> SELECT SID, SERIAL#, SPID, TYPE, HIGH_SCN FROM V$LOGSTDBY_PROCESS;
SID SERIAL# SPID TYPE HIGH_SCN
----- ------- ----------- ---------------- ----------
48 6 11074 COORDINATOR 7178242899
56 56 10858 READER 7178243497
46 1 10860 BUILDER 7178242901
45 1 10862 PREPARER 7178243295
37 1 10864 ANALYZER 7178242900
36 1 10866 APPLIER 7178239467
35 3 10868 APPLIER 7178239463
34 7 10870 APPLIER 7178239461
33 1 10872 APPLIER 7178239472
SummaryIn this chapter, we have covered common Data Guard issues using diagnostic data in a Data Guard environment. As Data Guard administrators, we have to identify the underlying reason of a Data Guard issue using this diagnostic data, and resolve the issue in the correct way. We think that the information and examples that we've seen in this chapter will be helpful for this purpose. The next chapter is about Data Guard best practices.

11Data Guard Best Practices
In many Data Guard installation cases, people may think that seeing the main functions of Data Guard running is enough for a successful deployment of Data Guard. In other words, if redo is being transferred from the primary database to a standby database(s), and is being applied on the standby, it's a smooth Data Guard configuration. However, if the configuration is prepared keeping in mind best practices, which is the topic of this chapter, it will be more robust, effective, and complete.
In this chapter, we will discuss the following topics:
� Configuring connection failover
� Archived log deletion policy on a standby database
� Using flashback on a standby database
� Database rolling upgrade using a transient logical standby
� Corruption detection, prevention, and automatic repair with Oracle Data Guard
Let's start with configuring a connection failover in a Data Guard environment.
Configuring a connection failoverBuilding a configuration in which database clients are able to automatically connect to a new primary database after a role change is vital in Data Guard. If we skip this important aspect, it may be very hard to configure connections of all database users to the new primary database.
Now, let's learn about the important connection failover terms – Transparent Application Failover (TAF), Fast Connection Failover (FCF), and Fast Application Notification (FAN).

Data Guard Best Practices
[ 340 ]
Transparent Application Failover (TAF)TAF is a connection failover configuration of Oracle Call Interface (OCI) that is used for high-availability environments such as Oracle Data Guard, Oracle Real Application Clusters (RAC), and Oracle Fail Safe.
When using this configuration, clients can automatically establish a prespecified connection to the database after a failure of the database instance. In RAC, this means connecting to one of the surviving instances and in Data Guard it means connecting to the new primary database after failover.
We can configure TAF in two ways – client-side configuration and server-side configuration:
� Client-side TAF configuration: The TNS connect string is configured to specify the failover details.
� Server-side TAF configuration: The database service attributes are configured to specify the failover details. This method will be more effective when there are many client connections.
If both client- and server-side TAF configurations exist in the database environment, the server-side configuration properties will be valid regarding the order of precedence.
TAF will not only establish a new connection to the database, but also re-run a select statement and reposition the cursor if preferred. We can configure TAF only for establishing a new connection, which is called session failover, or for the recovery of the session and query, which is called select failover. With the select failover mode, the number of rows fetched by the cursor is tracked and when the connection is lost, it's recovered by TAF by repositioning the cursor. So, the client doesn't restart but resumes fetching rows. This is especially good for long-running, time-critical reports and data extractions.
TAF cannot failover inserts, updates, or deletes. The Oracle database rolls back these DML operations in case of a failure.
It's possible to monitor TAF properties of sessions using the V$SESSION dynamic performance view. The following query result will show the service name, failover type, failover method, and failover failovers, if occurred, for the clients connected to the database:
SQL> SELECT USERNAME, SERVICE, FAILOVER_TYPE, FAILOVER_METHOD, FAILED_OVER FROM V$SESSION;

Chapter 11
[ 341 ]
Configuring the client-side TAFThe client-side TAF is configured using the TNS connection string. The following string is an example of a Data-Guard-enabled client-side TAF configuration where primary and standby databases are 11gR2 RAC with Single Client Access Names (SCAN) being used:
OLTP = (DESCRIPTION = (LOAD_BALANCE=OFF) (FAILOVER=ON) (ADDRESS_LIST = (ADDRESS = (PROTOCOL = TCP)(HOST = PRIMARY_SCAN)(PORT = 1521)) (ADDRESS = (PROTOCOL = TCP)(HOST = STANDBY_SCAN)(PORT = 1521)) ) (CONNECT_DATA = (SERVICE_NAME = OLTP) (SERVER = DEDICATED) (FAILOVER_MODE = (TYPE = session) (METHOD = BASIC) (RETRIES = 15) (DELAY = 10) ))))
Configuring the server-side TAFIn 11gR2, we configure the server-side TAF using Server Control Utility (SRVCTL). The srvctl add service command adds a new service, and the srvctl modify service command changes settings for a predefined service. The following is an example of creating a TAF-enabled database service on a RAC and Data Guard configuration. We must create this service both in the primary and standby hosts with the following commands:
� For the primary cluster, use the following:srvctl add service -d ORCL_PRIM -s OLTP -r prim_node1,prim_node2 -l PRIMARY -q TRUE -e SESSION -m BASIC -w 10 -z 15
� For the standby cluster, use the following:
srvctl add service -d ORCL_STD -s OLTP -r std_node1,std_node2 -l PRIMARY -q TRUE -e SESSION -m BASIC -w 10 -z 15

Data Guard Best Practices
[ 342 ]
The following table lists the definitions of the command options:
Option Description-d This gives a unique name for the database.-s This gives the service name.-r For RAC databases, this gives the list of preferred
instances on which the service runs.-l {[primary] | [physical_standby] |
[logical_standby] | [snapshot_standby]}
This gives the service role. Service is automatically started when the database is in this role.
-q {TRUE | FALSE} This indicates whether AQ HA notifications should be enabled for this service.
-e {NONE | SESSION | SELECT}
This gives the failover type – session failover, select failover, or none.
-m {NONE | BASIC} This gives the failover method. If the session failover or select failover type is selected, you should use BASIC for this option. NONE means TAF is disabled.
-z This gives the number of failover retries.-w This gives the time delay between failover attempts.
If we're going to use the physical standby database with active Data Guard for reporting, we should create a service for this purpose on both primary and standby hosts. For example:
� For the primary cluster, create the following service:srvctl add service -d ORCL_PRIM -s REPORTING -r prim_node1,prim_node2 -l PHYSICAL_STANDBY -q TRUE -e SESSION -m BASIC -w 10 -z 15
� For the standby cluster, create the following service:srvctl add service -d ORCL_STD -s REPORTING-r std_node1,std_node2 -l PHYSICAL_STANDBY -q TRUE -e SESSION -m BASIC -w 10 -z 15
In this case, the service will be created at the cluster level but the service definition will not be applied to the standby database because it's read-only. For this reason, we run the DBMS_SERVICE.CREATE_SERVICE procedure for the REPORTING service on the primary database, and the service definition will be replicated to the standby database with Redo Apply.
EXECUTE DBMS_SERVICE.CREATE_SERVICE( service_name => 'reporting' network_name => 'reporting' goal => 'NULL' dtp => 'NULL' aq_ha_notifications => 'TRUE' failover_method => 'BASIC' failover_type => 'SESSION' failover_retries => 15 failover_delay => 10 clb_goal => 'NULL');

Chapter 11
[ 343 ]
Using the previous server-side TAF configuration (the OLTP and REPORTING services), it's not necessary to configure TAF at the client side in the tnsnames.ora file. The following TNS entry is an example that can be used to connect the OLTP service:
OLTP= (DESCRIPTION_LIST= (LOAD_BALANCE=OFF) (FAILOVER=ON) (DESCRIPTION= (CONNECT_TIMEOUT=3)(TRANSPORT_CONNECT_TIMEOUT=2)(RETRY_COUNT=3) (ADDRESS_LIST= (LOAD_BALANCE=ON) (ADDRESS=(PROTOCOL=TCP)(HOST=PRIMARY_SCAN)(PORT=1521))) (CONNECT_DATA=(SERVICE_NAME=OLTP)))(DESCRIPTION= (CONNECT_TIMEOUT=5)(TRANSPORT_CONNECT_TIMEOUT=3)(RETRY_COUNT=3) (ADDRESS_LIST= (LOAD_BALANCE=ON) (ADDRESS=(PROTOCOL=TCP)(HOST= STANDBY_SCAN)(PORT=1521))) (CONNECT_DATA=(SERVICE_NAME=OLTP))))
In this TNS entry, both the primary and standby SCAN hostnames are involved. Just below DESCRIPTION_LIST, we can see LOAD_BALANCE=OFF. This means that the client will try to connect the DESCRIPTION definitions in order. If it can't connect to the primary database, it'll try to connect to the standby database. However, below the DESCRIPTION definitions, we see LOAD_BALANCE=ON. This is about the connection to the RAC database and new connections are going to be assigned to three IP addresses of the SCAN name randomly.
For each DESCRIPTION definition, we can see some TNS string parameters set. CONNECT_TIMEOUT specifies the total time to establish an Oracle net connection to a database. It includes the TRANSPORT_CONNECT_TIMEOUT value, which is the time taken by a client to establish a TCP connection to the database server. It's possible to set the CONNECT_TIMEOUT value globally for a database instance in the sqlnet.ora file using the SQLNET.OUTBOUND_CONNECT_TIMEOUT parameter. Also, we can set the TCP.CONNECT_TIMEOUT parameter for a global TRANSPORT_CONNECT_TIMEOUT value. The last parameter, RETRY_COUNT, specifies the maximum number of connection attempts for the DESCRIPTION definition.
In this configuration, the following algorithm will be applied when clients connect to a database using the OLTP service:
1. The PRIMARY_SCAN hostname is resolved to three IP addresses.
2. One of the IP addresses is randomly selected and a connection attempt is performed.

Data Guard Best Practices
[ 344 ]
3. If the IP address doesn't respond in the time we set in TRANSPORT_CONNECT_TIMEOUT, which is two seconds, or the IP address responds but a connection can't be established in three seconds (CONNECT_TIMEOUT), it'll try the next IP address. There will be a maximum of three retry attempts because of the RETRY_COUNT setting.
4. When the client can't connect to the primary database with the first DESCRIPTION definition, it'll try to connect the second DESCRIPTION definition, which is the standby database.
5. The STANDBY_SCAN hostname will be resolved to three IP addresses.
6. One of the IP addresses is randomly selected and an attempt for a connection is performed. The same settings are defined for the standby database description.
Note that automatically controlling the startup of services by assigning a role to the service with SRVCTL is an 11gR2 feature. In earlier releases, we can create a trigger to ensure that the service is started only for the specified database role, such as the following example:
create trigger TAF_TRIGGER after startup on databasedeclare db_role varchar(30);begin select database_role into db_role from v$database; if db_role = 'PRIMARY' then DBMS_SERVICE.START_SERVICE('OLTP'); else DBMS_SERVICE.STOP_SERVICE('OLTP'); end if;end;/
Fast Connection Failover (FCF)Fast Connection Failover is the equivalent of Transparent Application Failover for Java Database Connectivity (JDBC) clients. TAF works for OCI clients and FCF works for JDBC clients.
Time for action – configuring FCF for JDBC connectionsLet's see an example of how we can configure FCF for JDBC clients.
1. In order to run FCF as we configured it, we need to create database services where TAF or aq_ha_notifications is disabled. As we discussed, in 11gR2, it's possible to create role-specific database services so that service is automatically enabled or disabled whenever there is a role change. The following statements can be run on the primary and standby clusters to create a database service for a production service OLTP:

Chapter 11
[ 345 ]
� For the primary cluster, use the following:srvctl add service -d ORCL_PRIM -s OLTP -r prim_node1,prim_node2 -l PRIMARY -q FALSE -e NONE -m NONE -w 0 -z 0
� For the standby cluster, use the following:srvctl add service -d ORCL_STD -s OLTP -r std_node1,std_node2 -l PRIMARY -q FALSE -e NONE -m NONE -w 0 -z 0
If needed, the following statements will create a read-only service for reporting on the physical standby database:
� For the primary cluster, use the following:srvctl add service -d ORCL_PRIM -s REPORTING -r prim_node1,prim_node2 -l PHYSICAL_STANDBY -q FALSE -e NONE -m NONE -w 0 -z 0
� For the standby cluster, use the following:srvctl add service -d ORCL_PRIM -s REPORTING -r std_node1,std_node2 -l PHYSICAL_STANDBY -q FALSE -e NONE -m NONE -w 0 -z 0
Create the REPORTING service with the DBMS_SERVICE.CREATE_SERVICE procedure on the primary database so that standby knows about this service through redo transmission.
2. Now we configure the JDBC clients with the proper CONNECT descriptor."jdbc:oracle:thin:@" +"(DESCRIPTION_LIST=" + "(LOAD_BALANCE=off)" + "(FAILOVER=on)" + "(DESCRIPTION=" + "(ADDRESS_LIST=" + "(LOAD_BALANCE=on)" + "(ADDRESS=(PROTOCOL=TCP)(HOST=PRIMARY_SCAN)(PORT=1521)))" + "(CONNECT_DATA=(SERVICE_NAME=OLTP)))" + "(DESCRIPTION=" + "(ADDRESS_LIST=" + "(LOAD_BALANCE=on)" + "(ADDRESS=(PROTOCOL=TCP)(HOST=STANDBY_SCAN)(PORT=1521)))" + "(CONNECT_DATA=(SERVICE_NAME=OLTP))))";

Data Guard Best Practices
[ 346 ]
3. The JDBC client should set the TCP_CONNTIMEOUT_STR property so that the connection attempt fails over to the next host in the ADDRESS_LIST list after the specified time.Properties prop = new Properties(); prop.put(oracle.net.ns.SQLnetDef.TCP_CONNTIMEOUT_STR, ""+5000); // 5000ms pds.setConnectionProperties(prop);
4. Enable FCF and configure the application to connect to all of the primary and standby ONS daemons.pds.setFastConnectionFailoverEnabled(true); pds.setONSConfiguration("nodes=prim_node1:6200,prim_node2:6200,std_node1:6200,std_node2:6200");
What just happened?We've successfully configured FCF for JDBC client connections.
Fast Application Notification (FAN)FAN is a notification mechanism in which Oracle doesn't wait for clients to detect any database status changes (such as service, instance, or if the database goes up or down), and quickly (as its name implies) informs clients about the events. If FAN is not used, clients need to wait for the TCP timeout duration to fail over to another specified connection. This duration can be very long and not suitable for our failover time target.
If the Data Guard broker is used in a failover, the FAN event is automatically sent to the clients.
In addition to up/down events, FAN also notifies clients with load-balancing advisory events. Clients use this information and connect to the instance with the best response time.
It's possible to take advantage of FAN with the following methods:
1. If an integrated Oracle client is used, the client application can use FAN without programmatic changes. The integrated clients for FAN events are Oracle database 11g JDBC, Oracle Universal Connection Pool (UCP) for Java, Oracle database 11g ODP.NET, and Oracle database 11g Oracle Call Interface (OCI).
JDBC clients subscribe to ONS daemons and receive FAN events only if FCF is configured on the clients.
2. Implement FAN server-side callouts on your Database Tier.

Chapter 11
[ 347 ]
What just happened?Connection failover methods are important pieces of the database high-availability feature, and we've gone through configuring automatic connection failover for Oracle database clients in an RAC and Data Guard environment.
The archived log deletion policy on the standby databaseThe continuously transferred redo transaction is archived at the standby database before or after being applied, depending on the configuration. At the end, we're faced with lots of files filling the log destination either on the filesystem or ASM disk group. We need to build an automatic structure on the standby site, where applied archived logs are deleted automatically based on a specific logic.
There are several methods for archived log deletion. It's possible to delete archived logs with the rm command of the operation system or ASM. However, if we use rm, the control file will not be updated about the deletion of archived logfiles. Thus, in order to update the control file with the deletion operation, we must run crosscheck and delete expired RMAN commands as follows:
RMAN> crosscheck archivelog all; RMAN> delete expired archivelog all;
Another option is scheduling an RMAN job that deletes applied archived logs on the standby database. The RMAN command's delete archivelog command updates the control file related to the delete operation. This method is easier than using the rm command; however, for both methods we have a job-maintenance issue. If the scheduled job doesn't run for some reason, the log destination will fill up and manual operation will be required.
The recommended method to keep deleting the archived logfiles on standby databases is simply leaving this task to Oracle. We use the fast recovery area for this purpose.
Time for action – the recommended configuration for archived log maintenance on a standby database
Let's see an example of configuring automatic maintenance of the archived logs on a standby database:
1. Enable the fast recovery area on the standby database by setting the DB_RECOVERY_FILE_DEST and DB_RECOVERY_FILE_DEST_SIZE parameters:SQL> ALTER SYSTEM SET DB_RECOVERY_FILE_DEST='/data/FRA';SQL> ALTER SYSTEM SET DB_RECOVERY_FILE_DEST_SIZE=500G;

Data Guard Best Practices
[ 348 ]
If we're using ASM, we can specify a disk group as DB_RECOVERY_FILE_DEST.
SQL> ALTER SYSTEM SET DB_RECOVERY_FILE_DEST='+FRA';
2. Set the LOG_ARCHIVE_DEST_1 parameter as follows so that the archived logfiles will be created at the DB_RECOVERY_FILE_DEST parameter:SQL> ALTER SYSTEM SET LOG_ARCHIVE_DEST_1='LOCATION=USE_DB_RECOVERY_ FILE_DEST';
3. Set the RMAN archived log deletion policy as follows. With this setting, the applied archived logs will be automatically deleted when there is a space constraint in FRA, depending on DB_RECOVERY_FILE_DEST_SIZE. If the archived logs are not applied, they will not be deleted.
RMAN> CONFIGURE ARCHIVELOG DELETION POLICY TO APPLIED ON STANDBY;
Automatic deletion of archived logs in a logical standby database is already covered in Chapter 3, Configuring Oracle Data Guard Logical Standby Database, in detail.
What just happened?We've mentioned methods to maintain the applied archived logfiles on the standby database. The recommended method of using FRA is described step by step. With this method, deletion of applied archived logs is maintained by Oracle and it's guaranteed that the archived logs that are not applied yet will not be deleted.
Using flashback on a standby databaseFlashback is a useful feature introduced in Oracle database version 9i and more properties were added on in the next versions, 10g and 11g. When enabled, the flashback feature helps us recover data loss, corrupted data, or logical errors easily. In the following scenarios, we can use flashback with PITR (Point-in-Time Recovery) to recover data:
� Dropped tables
� Truncated tables
� Massive changes by inserts / updates / deletes
� Logical errors

Chapter 11
[ 349 ]
If we're not using flashback, the steps to restore a table loss will be as follows:
1. Restore the full database on a separate server using a backup performed before the table's drop operation.
2. After restoring the database, perform the until time recovery.
3. Open the database with resetlogs.
4. Export the table from the restored database and import it into the production database.
If you are using flashback, you can use it to recover the table. However, if there is no standby database, this will be a disadvantage because we'll need to flash back the whole database to that particular time. So there will be loss of transactions.
Time for action – using flashback on a standby databaseNow we are going to see how to recover a dropped/truncated table if a standby database exists, and using the flashback feature. We won't make any changes to the primary database and even the flashback feature may be off on the primary database.
1. Enabling flashback: To perform recovery of an object, flashback must be enabled on the standby database. Ensure MRP is cancelled before enabling flashback.SQL> alter database recover managed standby database cancel;Database altered.SQL> alter database flashback on;Database altered.SQL> select db_unique_name,flashback_on from v$database;DB_UNIQUE_NAME FLASHBACK_ON--------------- ------------------INDIA_UN YES
On the alert log, you will get the following:
Thu Dec 20 15:22:21 2012RVWR started with pid=25, OS id=7900Thu Dec 20 15:22:24 2012Allocated 3981120 bytes in shared pool for flashback generation bufferFlashback Database Enabled at SCN 6082371Completed: alter database flashback on

Data Guard Best Practices
[ 350 ]
2. Adjusting the flashback retention period on the standby database: In order to perform recovery of an object with flashback, the object's drop/truncate time must not be more than the value specified in DB_FLASHBACK_RETENTION_TARGET and all the flashback and archive logs should be available.SQL> show parameter db_flashback_retention_targetNAME TYPE VALUE------------------------------------ ----------- --------db_flashback_retention_target integer 5760
3. Gathering table information before truncation: We can collect the following data from the primary database before truncating the table, in order to ensure that we'll recover the same number of rows after the flashback:SQL> select segment_name,sum(bytes/1024/1024) from dba_segments where segment_name='PACKT' group by segment_name;SEGMENT_NAME SUM(BYTES/1024/1024)--------------- --------------------PACKT 7738SQL> select count(*) from packt; COUNT(*)--------------- 88080384
The PACKT table's size is around 7.7 GB with 88080384 rows.
4. Truncating the table and capturing the time: From the primary database, let's truncate the table:
This truncate operation is only for testing purposes. Please do not perform this on production databases.
SQL> truncate table packt;Table truncated.SQL> select count(*) from packt;COUNT(*)--------0SQL> select sysdate from dual;SYSDATE---------20-DEC-2012 16:11:41
The table was truncated on 20-DEC-2012, at 16:11:41.

Chapter 11
[ 351 ]
5. Verifying the data on a standby database: We're using the standby database with real-time apply and active Data Guard features. So the transactions will be quickly replicated with no delay.SQL> select db_unique_name,database_role from v$database;DB_UNIQUE_NAME DATABASE_ROLE--------------- ----------------INDIA_UN PHYSICAL STANDBYSQL> select count(*) from packt; COUNT(*)---------- 0
The number of rows for the table PACKT on standby is also 0, so the truncate operations are applied on the standby database.
6. Performing a time-based flashback on a standby database: Now connect as SYSDBA, cancel recovery, shut down the standby database, and start in MOUNT status:SQL> connect / as sysdbaConnected.SQL> recover managed standby database cancel;Media recovery complete.SQL> shutdown immediateSQL> startup mountDatabase mounted.
From step 4, we have captured the time of the table's truncate operation, and now will use that time to flash back the standby database:SQL> flashback database to timestamp to_date('20-DEC-2012 16:10:00','DD-MON-YYYY HH24:MI:SS');Flashback complete.
On the alert log, you will get the following:Thu Dec 20 16:26:04 2012flashback database to timestamp to_date('20-DEC-2012 16:10:00','DD-MON-YYYY HH24:MI:SS')Flashback Restore StartFlashback Restore CompleteFlashback Media Recovery StartSerial Media Recovery startedFlashback Media Recovery Log /u02/app/oracle/flash_recovery_area/INDIA_UN/archivelog/2012_12_20/o1_mf_1_985_8f5vcxhj_.arcIncomplete Recovery applied until change 6090032 time 12/20/2012 16:10:01

Data Guard Best Practices
[ 352 ]
Flashback Media Recovery CompleteCompleted: flashback database to timestamp to_date('20-DEC-2012 16:10:00','DD-MON-YYYY HH24:MI:SS')
If there is any difference in time zones, you can use the log miner to analyze the archived redo logfiles and see at exactly what time the table was truncated.
In the previous command, we used flashback 10 minutes prior to when the drop and flashback operations were successful.
7. Verifying the data after flashback on a standby database: Now open the database and check the number of rows that have been recovered.SQL> select db_unique_name,database_role,resetlogs_change# from v$database;DB_UNIQUE_NAME DATABASE_ROLE RESETLOGS_CHANGE#--------------- ---------------- -----------------INDIA_UN PHYSICAL STANDBY 945184SQL> select count(*) from packt; COUNT(*)---------- 88080384
We can now compare the actual rows before truncating with the number of rows after the flashback operation. In steps 3 and 7, the number of rows are the same. So we've successfully recovered the data.
8. Exporting the table from a standby database: We should now export the table from the standby database. If we create a DB link in the primary database pointing to the standby database, we can use NETWORK_LINK to export the table from standby. We have already discussed this option in Chapter 7, Active Data Guard, Snapshot Standby, and Advanced Techniques. You should perform the following steps from the primary database; it will export data from standby using NETWORK_LINK.
1. Create a database link in the primary database to point to standby.SQL> create public database link exp_turkey connect to system identified by "free2go" using 'india';Database link created.
2. Export the PACKT table.[oracle@oracle-primary expdp]$expdp system/free2go directory=EXPDP_INDIA network_link=exp_turkey tables=oracle.packt dumpfile=Packt_table.dmp logfile=packt_table.log

Chapter 11
[ 353 ]
Connected to: Oracle Database 11g Enterprise Edition Release 11.2.0.3.0 - 64bit ProductionWith the Partitioning, OLAP, Data Mining and Real Application Testing optionsStarting "SYSTEM"."SYS_EXPORT_TABLE_02": system/******** directory=EXPDP_INDIA network_link=exp_turkey tables=oracle.packt dumpfile=Packt_table.dmp logfile=packt_table.logEstimate in progress using BLOCKS method...Processing object type TABLE_EXPORT/TABLE/TABLE_DATATotal estimation using BLOCKS method: 7.556 GBProcessing object type TABLE_EXPORT/TABLE/TABLEProcessing object type TABLE_EXPORT/TABLE/STATISTICS/TABLE_STATISTICS. . exported "ORACLE"."PACKT" 3.386 GB 88080384 rowsMaster table "SYSTEM"."SYS_EXPORT_TABLE_02" successfully loaded/unloaded*********************************************************************Dump file set for SYSTEM.SYS_EXPORT_TABLE_02 is: /u02/backups/expdp/Packt_table.dmpJob "SYSTEM"."SYS_EXPORT_TABLE_02" successfully completed at 17:24:18
9. Importing the table in a primary database: This process checks the status of the database and row count in the packt table.SQL> select db_unique_name,database_role,resetlogs_change# from v$database;DB_UNIQUE_NAME DATABASE_ROLE RESETLOGS_CHANGE#-------------------- ---------------- -----------------turkey_un PRIMARY 945184SQL> select count(*) from packt; COUNT(*)---------- 0
We have the table metadata in the database, so we only need to perform import of data using the parameter CONTENT=DATA_ONLY:
[oracle@oracle-primary expdp]$ impdp system/free2go directory=EXPDP_INDIA tables=scott.packt dumpfile=Packt_table.dmp logfile=packt_table_imp.log content=data_onlyImport: Release 11.2.0.3.0 - Production on Thu Dec 20 17:31:06 2012Copyright (c) 1982, 2011, Oracle and/or its affiliates. All rights reserved.

Data Guard Best Practices
[ 354 ]
Connected to: Oracle Database 11g Enterprise Edition Release 11.2.0.3.0 - 64bit ProductionWith the Partitioning, OLAP, Data Mining and Real Application Testing optionsMaster table "SYSTEM"."SYS_IMPORT_TABLE_01" successfully loaded/unloadedStarting "SYSTEM"."SYS_IMPORT_TABLE_01": system/******** directory=EXPDP_INDIA tables=scott.packt dumpfile=Packt_table.dmp logfile=packt_table_imp.log content=data_onlyProcessing object type TABLE_EXPORT/TABLE/TABLE_DATA. . imported "SCOTT"."PACKT" 3.386 GB 88080384 rowsJob "SYSTEM"."SYS_IMPORT_TABLE_01" successfully completed at 17:50:43
10. Verifying the table data after importing into a primary database: From the previous step, we successfully imported data into the primary database and the number of the rows is same as in step 3.SQL> select db_unique_name,database_role,resetlogs_change# from v$database;DB_UNIQUE_NAME DATABASE_ROLE RESETLOGS_CHANGE#-------------------- ---------------- -----------------turkey_un PRIMARY 945184SQL> select count(*) from packt; COUNT(*)---------- 88080384
11. Starting MRP on a standby database to synchronize with a primary database: Start the recovery on a standby database to synchronize it with the primary database after importing.
SQL> alter database recover managed standby database using current logfile disconnect from session;Database altered.
On the alert log, you will get the following:
Waiting for all non-current ORLs to be archived...All non-current ORLs have been archived.Media Recovery Waiting for thread 1 sequence 1036 (in transit)Recovery of Online Redo Log: Thread 1 Group 11 Seq 1036 Reading mem 0

Chapter 11
[ 355 ]
What just happened?We have seen how to recover a huge truncated table from the primary database by using the flashback technique and the Export/Import procedures.
Database rolling upgrade using the transient logical standby databaseTo perform upgrade of a production database from 11gR1 to 11gR2 or to perform any patch set upgrade (for example, from 11.2.0.1 to 11.2.0.3), we need downtime. When upgrading a production database that includes movement of the database to new binaries, database upgrade, and post upgrade tasks, we may need a few hours or more downtime depending on the database size, runtime errors, and so on. However, with the feature of Rolling Upgrade Using Transient Logical Standby, we may only need a few minutes of downtime. We can also run load tests to check the performance on the upgraded logical standby database when keeping the primary database with the old version without any upgrade. If the performance test results in a good response, we can go ahead to perform the further steps.
Time for action – performing a rolling upgrade using the transient logical standby database
We will now see a step-by-step approach to upgrade a database from 11.2.0.1 to 11.2.0.3.
1. Ensuring protection mode and compatibility: Ensure the protection mode is in either maximum performance or maximum availability.SQL> select * from v$version;BANNER--------------------------------------------------------- --Oracle Database 11g Enterprise Edition Release 11.2.0.1.0 - 64bit ProductionPL/SQL Release 11.2.0.1.0 - ProductionCORE 11.2.0.1.0 ProductionTNS for Linux: Version 11.2.0.1.0 - ProductionNLSRTL Version 11.2.0.1.0 - ProductionSQL> select protection_mode from v$database;PROTECTION_MODE--------------------MAXIMUM PERFORMANCE

Data Guard Best Practices
[ 356 ]
The COMPATIBLE initialization parameter should be same as the software release version. Once we upgrade to the new release and after all the post checks, we can change the compatible parameter value.
SQL> show parameter compatibleNAME TYPE VALUE----------------- -------- -------------compatible string 11.2.0.0.0
2. Disabling the Data Guard broker: If the database is managed with the Data Guard broker, disable it; we can enable it after the successful upgrade of the database.SQL> show parameter dg_broker_startNAME TYPE VALUE------------------ -------- -------dg_broker_start boolean FALSE
3. Enabling flashback in the primary and standby databases: Now check flashback database status and then enable it on both primary and standby databases:SQL> select db_unique_name,flashback_on from v$database;DB_UNIQUE_NAME FLASHBACK_ON--------------- ------------------INDIA_UN NOSQL> alter database flashback on;Database altered.SQL> select db_unique_name, flashback_on from v$database;DB_UNIQUE_NAME FLASHBACK_ON--------------- ------------------turkey_un YES
On the alert log, you will get the following:
Sun Dec 30 21:42:53 2012alter database flashback onStarting background process RVWRSun Dec 30 21:42:57 2012RVWR started with pid=20, OS id=21651Sun Dec 30 21:43:18 2012Allocated 3981120 bytes in shared pool for flashback generation bufferSun Dec 30 21:43:33 2012Flashback Database Enabled at SCN 955828Completed: alter database flashback on

Chapter 11
[ 357 ]
In 11gR2, we no longer need to restart database to the mount state in order to enable or disable flashback on a primary database. Therefore, we can enable/disable flashback when the database is in the read-write mode. However, we can't enable or disable flashback on a standby database when MRP is running (ORA-01153: an incompatible media recovery is active). In order to perform this on the standby database, we must stop Redo Apply.
4. Creating a guaranteed restore point on the primary and standby databases: Create a guaranteed restore point on both the primary and standby databases. We may need to flash back the database to this point in case of any failures during the upgrade.SQL> create restore point Rolling_Upgrade_Turkey guarantee flashback database;Restore point created.SQL> select name,guarantee_flashback_database,scn from v$restore_point;NAME GUA SCN------------------------------ --- ----------ROLLING_UPGRADE_TURKEY YES 972018
On the alert log, you will get the following:Sun Dec 30 22:09:19 2012Created guaranteed restore point ROLLING_UPGRADE_TURKEY
Now create a guaranteed restore point on the standby database. In order to create a restore point, we must cancel the recovery.
SQL> alter database recover managed standby database cancel;Database altered.SQL> create restore point Rolling_Upgrade_India guarantee flashback database;Restore point created.
5. Creating a log miner dictionary on a primary database: This package enables supplemental logging on the primary database, which ensures that the updates contain enough information to identify each modified row that is needed for a logical standby configuration.SQL> execute dbms_logstdby.build;PL/SQL procedure successfully completed.
In the alert log, add the following:
SUPLOG: unique = ON, foreign key = OFF, all column = OFFSUPLOG: procedural replication = OFFCompleted: alter database add supplemental log data (primary key, unique index) columns

Data Guard Best Practices
[ 358 ]
alter database add supplemental log data for procedural replicationSUPLOG: Previous supplemental logging attributes at scn = 998811
6. Converting the physical standby database into a logical standby database: Now convert the physical standby database into a logical standby database with the KEEP IDENTITY clause so that the database name and DBID remain the same as those in the primary database.SQL> alter database recover managed standby database cancel;Database altered.SQL> shutdown immediateORACLE instance shut down.SQL> startup mount exclusive;Database mounted.SQL> alter database recover to logical standby keep identity;Database altered.
On the alert log, you will get the following:
Online log /u01/app/oracle/oradata/orcl/redo03.log: Thread 1 Group 3 was previously clearedStandby became primary SCN: 1003598Mon Dec 31 00:49:04 2012Setting recovery target incarnation to 3RECOVER TO LOGICAL STANDBY: Complete - Database mounted as logical standbyCompleted: alter database recover to logical standby keep identity
7. After completing the conversion, open the database and check for the new database role.SQL> select open_mode from v$database;OPEN_MODE--------------------MOUNTEDSQL> alter database open;Database altered.SQL> select database_role from v$database;DATABASE_ROLE----------------LOGICAL STANDBY

Chapter 11
[ 359 ]
8. Starting SQL Apply and monitoring the apply status: On the new logical standby database, issue the following command to start SQL Apply:SQL> alter database start logical standby apply immediate;Database altered.
On the alert log, you will get the following:Some indexes or index [sub]partitions of table SYSTEM.LOGMNR_DICTIONARY$ have been marked unusableIndexes of table SYSTEM.LOGMNR_ATTRCOL$ have been rebuilt and are now usableIndexes of table SYSTEM.LOGMNR_ATTRIBUTE$ have been rebuilt and are now usableIndexes of table SYSTEM.LOGMNR_CCOL$ have been rebuilt and are now usableSQL> SELECT NAME, VALUE, TIME_COMPUTED FROM V$DATAGUARD_STATS WHERE NAME='transport lag';NAME VALUE TIME_COMPUTED------------- --------------- ------------------------------transport lag +00 00:00:00 12/31/2012 00:59:25
If any active DDLs/DMLs are in progress, you can monitor them using v$logstdby_state.
SQL> select state from v$logstdby_state;STATE-------------APPLYINGSQL> /STATE-------------IDLE
9. Upgrading a logical standby database: Stop sending redo on the primary database by changing the remote destination status to defer.SQL> alter system set log_archive_dest_state_2='defer';System altered.SQL> select dest_id,status from v$archive_dest where dest_id=2; DEST_ID STATUS--------------- --------- 2 DEFERRED
Stop SQL Apply from the logical standby database.SQL> alter database stop logical standby apply;Database altered.

Data Guard Best Practices
[ 360 ]
On the alert log, you will get the following:
Mon Dec 31 01:06:16 2012LOGSTDBY status: ORA-16128: User initiated stop apply successfully completedCompleted: alter database stop logical standby apply
10. Create another restore point prior to the upgrade.SQL> create restore point Rolling_Upgrade_India2 guarantee flashback database;Restore point created.SQL> select name from v$restore_point;NAME-----------------------------------ROLLING_UPGRADE_INDIAROLLING_UPGRADE_INDIA2
11. Now the database version is 11.2.0.1. Install the new ORACLE_HOME locations of 11.2.0.3 and upgrade the database after setting the environment variables to point to the new home, 11.2.0.3. Then run the upgrade scripts as shown in the following code:[oracle@oracle-stby ~]$ sqlplus / as sysdbaSQL*Plus: Release 11.2.0.3.0 Production on Mon Dec 31 01:14:12 2012Copyright (c) 1982, 2011, Oracle. All rights reserved.Connected to an idle instance.SQL> startup upgradeDatabase mounted.Database opened.SQL> @?/rdbms/admin/catupgrd.sqlDOC>##############################################################DOC>##############################################################DOC>DOC> The first time this script is run, there should be no error messagesDOC> generated; all normal upgrade error messages are suppressed..............SQL> REM END OF CATUPGRD.SQLSQL>SQL> REM bug 12337546 - Exit current sqlplus session at end of catupgrd.sql.SQL> REM This forces user to start a new sqlplus session in order

Chapter 11
[ 361 ]
SQL> REM to connect to the upgraded db.SQL> exitDisconnected from Oracle Database 11g Enterprise Edition Release 11.2.0.3.0 - 64bit ProductionWith the Partitioning, OLAP, Data Mining and Real Application
Testing options
On the alert log, you will find the following:
Database Characterset is WE8MSWIN1252
Updating 11.2.0.1.0 NLS parameters in sys.props$
-- adding 11.2.0.3.0 NLS parameters.
.............
Mon Dec 31 01:30:10 2012
SERVER COMPONENT id=CATPROC: timestamp=2012-12-31 01:30:10
SERVER COMPONENT id=RDBMS: status=VALID, version=11.2.0.3.0, timestamp=2012-12-31 01:30:15
12. Now start the upgraded logical standby and check for the registry components' status from DBA_REGISRY.SQL> select comp_name, status from dba_registry;COMP_NAME STATUS---------------------------------------- -----------OWB VALIDOracle Application Express VALIDOracle Enterprise Manager VALIDOLAP Catalog VALIDSpatial VALIDOracle Multimedia VALID
13. Starting SQL Apply: After the successful upgrade, we'll enable redo transport from the primary database and start SQL Apply on the logical standby database.
Enable redo transport by running the following statement on the primary database.
SQL> alter system set log_archive_dest_state_2='enable';System altered.
14. On the primary database, perform some DML transactions for verification.SQL> select count(*) from packt; COUNT(*)--------------- 14SQL> insert into packt select * from packt;14 rows created.

Data Guard Best Practices
[ 362 ]
SQL> commit;Commit complete.SQL> select count(*) from packt; COUNT(*)--------------- 28
15. Start SQL Apply on the standby database and check for the number of rows from packt.SQL> alter database start logical standby apply immediate;Database altered.SQL> select db_unique_name,database_role from v$database;DB_UNIQUE_NAME DATABASE_ROLE-------------------- ----------------INDIA_UN LOGICAL STANDBYSQL> select count(*) from scott.packt; COUNT(*)---------- 28
16. Switchover to upgraded 11.2.0.3: Until this step, there is no downtime on the production database. Now perform the switchover steps as shown in the following code:
First issue the switchover command from the primary database.SQL> alter database commit to switchover to logical standby;Database altered.SQL> select db_unique_name,switchover_status,open_mode from v$database;DB_UNIQUE_NAME SWITCHOVER_STATUS OPEN_MODE--------------- -------------------- --------------------turkey_un NOT ALLOWED READ WRITE
On the alert log, you will find the following:
Mon Dec 31 02:22:20 2012NSA2 started with pid=26, OS id=12227Beginning log switch checkpoint up to RBA [0x34.2.10], SCN: 1009787...........LOGSTDBY: Switchover complete (TURKEY)LOGSTDBY: enabling scheduler job queue processes.JOBQ: re-enabling CJQ0Completed: alter database commit to switchover to logical standby

Chapter 11
[ 363 ]
17. Now issue the switchover command from the upgraded logical standby database:SQL> select db_unique_name,switchover_status,open_mode from v$database;DB_UNIQUE_NAME SWITCHOVER_STATUS OPEN_MODE-------------------- -------------------- --------------------INDIA_UN TO PRIMARY READ WRITESQL> alter database commit to switchover to logical primary;Database altered.SQL> select db_unique_name,switchover_status,open_mode from v$database;DB_UNIQUE_NAME SWITCHOVER_STATUS OPEN_MODE-------------------- -------------------- --------------------INDIA_UN NOT ALLOWED READ WRITE
18. Retransforming into the physical standby database: Now the new logical standby is running under Oracle lower patch set level (11.2.0.1) as a transient logical standby database, and it cannot receive and apply redo from the new primary database. Let's convert it into the old physical standby database state.SQL> alter system set log_archive_dest_state_2='defer';System altered.
Now flash back to the restore point before the upgrade.
SQL> select db_unique_name,database_role from v$database;DB_UNIQUE_NAME DATABASE_ROLE--------------- ----------------turkey_un LOGICAL STANDBYSQL> shutdown immediateORACLE instance shut down.SQL> startup mountDatabase mounted.SQL> select name from v$restore_point;NAME------------------------------ROLLING_UPGRADE_TURKEYSQL> flashback database to restore point ROLLING_UPGRADE_TURKEY;Flashback complete.SQL> shutdown immediateORACLE instance shut down.

Data Guard Best Practices
[ 364 ]
19. Starting a logical standby database from new version binary (11.2.0.3): Copy PFILE/SPFILE, the password file, and network configuration files to the new installed ORACLE_HOME location and start the database in the MOUNT status.[oracle@oracle-primary ~]$ sqlplus / as sysdbaSQL*Plus: Release 11.2.0.3.0 Production on Mon Dec 31 02:43:45 2012Copyright (c) 1982, 2011, Oracle. All rights reserved.Connected to an idle instance.SQL> startup mountDatabase mounted.SQL> alter database convert to physical standby;Database altered.
Shut down instance and start up in the MOUNT status using the following code:
SQL> shutdown immediateORA-01507: database not mountedORACLE instance shut down.SQL> startup mountDatabase mounted.
20. Enabling redo transport from a primary database and starting to recover on a standby database: Issue the following command from the new primary database to send redo data to the new physical standby database.SQL> alter system set log_archive_dest_state_2='enable';System altered.
Now start Redo Apply on the standby database to apply all the redo of the upgrade script.SQL> alter database recover managed standby database using current logfile disconnect;Database altered.
On the alert log, you will see the following:Mon Dec 31 02:51:28 2012MRP0 started with pid=26, OS id=13970MRP0: Background Managed Standby Recovery process started (TURKEY)Serial Media Recovery startedManaged Standby Recovery starting Real Time Apply...........ORA-19906: recovery target incarnation changed during recoveryManaged Standby Recovery not using Real Time ApplyCompleted: alter database recover managed standby database using current logfile disconnect

Chapter 11
[ 365 ]
The previous errors are expected; if any archives are unable to fetch, copy the archive logs from the primary database and then catalogue them with the database using the RMAN command catalog start with 'arch location'.
Mon Dec 31 04:08:50 2012alter database recover managed standby database disconnect from sessionAttempt to start background Managed Standby Recovery process (TURKEY).................... Media Recovery Log /u01/app/oracle/flash_recovery_area/TURKEY_UN/archivelog/2012_12_31/1_55_803436544.dbfMedia Recovery Log /u01/app/oracle/flash_recovery_area/TURKEY_UN/archivelog/2012_12_31/1_56_803436544.dbfMedia Recovery Waiting for thread 1 sequence 57
21. Verifying the upgraded standby database: Now the standby database is completely synchronized with the primary database.
On the primary database, add the following:SQL> select max(sequence#) from v$archived_log;MAX(SEQUENCE#)-------------- 56
On the standby database, add the following:SQL> select max(sequence#) from v$archived_log where applied='YES';MAX(SEQUENCE#)-------------- 56
Verify once if all the components of the registry are valid.
SQL> @?/rdbms/admin/utlu112s.sqlComponent Current Version Elapsed TimeName Status Number HH:MM:SS.Oracle Database 11.2 Post-Upgrade Status Tool 12-31-2012 04:18:17.Component Current Version Elapsed TimeName Status Number HH:MM:SS.Oracle Server

Data Guard Best Practices
[ 366 ]
. VALID 11.2.0.3.0
.................Gathering Statistics. 00:03:27Total Upgrade Time: 00:46:51PL/SQL procedure successfully completed.
So far the downtime is only for the switchover. However, at this point we moved the production database to the standby server. In order to keep clients connected to the new primary database, the connection failover should be configured for the database clients.
What just happened?We have seen how to perform a rolling upgrade using the transient logical standby database with very little downtime. With this method, 96 percent of upgrade downtime can be avoided.
Have a go hero – one last switchoverIf you want to use your original primary server as the production server, you should perform a switchover again, to move the primary server into the original server.
Corruption detection, prevention, and automatic repair with Oracle Data GuardCorruption in an Oracle database block means that a block doesn't contain the data that the database expects to find. This can be caused by various failures in the hardware environment, including disks, disk controllers, memory or network components or software errors in the operating system, firmware, the volume manager, and the Oracle database software itself.
Oracle offers some initialization parameters to control the level of corruption prevention and detection. Of course, a higher level brings performance issues with it. In a Data Guard configuration, using the standby database for corruption detection and prevention will bring higher data protection and availability with less performance effect on the primary database.

Chapter 11
[ 367 ]
Let's first start with learning the three types of block corruption in Oracle databases.
� Physical block corruption: In a physically corrupted database block, the block header may be corrupted, the block may be misplaced or fractured, or the block checksum may be invalid. These types of corruptions are reported by the Oracle database as a ORA-01578 error in the alert log.
� Logical block corruption: In a logical block corruption, the block contains a valid checksum; however, the block content is corrupt. This corruption is not reported in the alert log but if db_block_checking is enabled, ORA-600 internal errors may show up.
� The third type of Oracle database corruptions are caused by stray writes, lost writes, or misdirected writes. In this case, the block may not be corrupted as described in the first two types; however, the content of the block is older, stale, or in the wrong location.
Now we'll learn about preventing and detecting these corruptions, especially in a Data Guard configuration, by studying the related initialization parameters. There are three important parameters in this study: DB_BLOCK_CHECKSUM, DB_BLOCK_ CHECKING, and DB_LOST_WRITE_PROTECT.
DB_BLOCK_CHECKSUMThis is the initialization parameter used to detect physical corruptions in a database. As we know, a checksum is the data calculated from the arbitrary data with a specific function. It can be recalculated anytime and compared with the stored result of the previous instance to ensure integrity of data. When we use DB_BLOCK_CHECKSUM, the Oracle database calculates a checksum and stores it in the header of each data block when writing to the disk. The following are the possible values of this initialization parameter:
� OFF (FALSE): Checksums are calculated only for the SYSTEM tablespace data blocks. The user's tablespace and log checksum are not performed. The FALSE value is preserved for backward compatibility, and has the same effect as OFF.
� TYPICAL (TRUE): When a block of any tablespace is read, checksum is calculated and compared. Also, at the last write of the block, the new checksum is stored. The TRUE value is preserved for backward compatibility and has the same effect as TYPICAL.
� FULL: In addition to checksum calculations in the TYPICAL mode, Oracle also verifies checksum before the update/delete statements. Also, Oracle gives every log block a checksum before writing it to the current log. Before 11g, log block checksum was performed by LGWR; however, in 11g, the database creates foreground processes for this purpose for better performance. Note that, when checksum validation fails in the FULL mode, Oracle will try to recover the block using the data version on disk and redo data.

Data Guard Best Practices
[ 368 ]
In a Data Guard environment, Oracle recommends setting this parameter to FULL on both primary and standby databases. Oracle also indicates that setting it to FULL causes 4 percent to 5 percent overhead in a primary database, whereas the TYPICAL mode causes 1 percent to 2 percent overhead. If setting FULL in the primary database has unacceptable performance degradation, consider setting it as TYPICAL on the primary database and FULL on the standby database.
DB_BLOCK_CHECKINGThis parameter specifies whether the database will perform block checking for database blocks and detect logical corruptions. Oracle controls the header and the data in the block if it's logically consistent.
The following are the possible values of this initialization parameter:
� OFF (FALSE): Only semantic block checking is performed for the blocks of the SYSTEM tablespace. No block checking is performed for the other tablespaces.
� LOW: Only block header checks are performed when the block content changes. This setting has very limited benefit for corruption detection and prevention, because there's no block checking on the data blocks itself.
� MEDIUM: Block checking is performed for all objects except indexes.
� FULL (TRUE): All the LOW and MEDIUM checks are performed for all objects. When MEDIUM or FULL is being used, block corruptions detected in memory will be automatically repaired using the data version on disk and redo data.
In a Data Guard environment, Oracle recommends setting this parameter to FULL at both the primary and standby databases for the highest level of detection and prevention against logical corruptions. However, the performance effect of using this checking can be very high. Oracle states that block checking typically causes 1 percent to 10 percent overhead on the primary database; for update- and insert-intensive applications, the performance effect may me even higher. We should test its effect on the primary database and if the FULL value is unacceptable in terms of performance effect, we should consider setting it to MEDIUM or LOW.
When we cannot set it to FULL or MEDIUM on the primary database because of performance issues, it becomes more important to enable it on the standby database. The performance effect of block checking on Redo Apply may also be high; in some cases it may halve the Redo Apply rate. So we must test and evaluate the effect. We can sum up by saying that it's good practice to set the highest degree of logical corruption detection and prevention on a standby database using the DB_BLOCK_ CHECKING parameter.

Chapter 11
[ 369 ]
DB_LOST_WRITE_PROTECTLost-write corruption is a serious type of corruption that occurs on the storage layer. The I/O subsystem acknowledges to the database that the write operation is completed, but it is actually not. The DB_LOST_WRITE_PROTECT initialization parameter can be used to detect the lost write. Lost-write detection on the standby database is an 11g feature and it's most effective when used with Data Guard.
The following are the possible values of this initialization parameter:
� NONE: Lost-write detection is disabled.
� TYPICAL: Lost-write detection is enabled for read-write tablespaces. Buffer cache reads are recorded in the redo log and this information is used to detect lost writes. When set in the physical standby database, the MRP process will check for lost writes in read-write tablespaces and stop recovery if detected. Thus, corruption will not be applied on the standby database.
� FULL: Lost-write detection for read-only tablespaces is included besides read-write tablespaces.
The recommended setting is FULL for both primary and standby databases, and for most cases its performance effect on the primary database and Redo Apply is negligible.
Automatic block media repairIn Oracle 11gR2, when Active Data Guard is being used with Real-Time Apply, if a physical corruption is detected on the primary database, Oracle will automatically try to repair the corruption using the non-corrupted block on the standby database. This operation is also valid in the opposite direction, which means standby database corruption will be repaired using the data block on the primary database. A notification will be printed in the alert log about the automatic block media repair operation in the meantime; this repair operation is completely transparent to database users.
In order to run ABMR successfully, the following initialization parameters must be configured:
� The LOG_ARCHIVE_CONFIG parameter with a DG_CONFIG list on both the primary and standby databases
� The LOG_ARCHIVE_DEST_n parameter for the primary database
� The FAL_SERVER parameter for the standby database with the Oracle Net service name pointing to the primary database

Data Guard Best Practices
[ 370 ]
We can also manually repair a corrupted data block with the RMAN command's RECOVER BLOCK command. By default, this command will try to use an Active Data Guard physical standby database if it exists. In order to exclude the standby database as a source to repair corruption, we must use the EXCLUDE STANDBY option of this command.
SummaryWe've reached the end of Chapter 11, Data Guard Best Practices. In this chapter, we've seen the most important best practices of Oracle Data Guard configurations. Using the features and methods mentioned in this chapter, it's possible to make the Data Guard environment more robust and effective.
In this book, we've started with the foundations and configuration of Data Guard and continued with learning details, features, common issues, and best practices. At this stage, you've learned everything you need in order to effectively administrate Data Guard systems. You also exercised real-world examples and hands-on tasks. We recommend you to glance over the book again to consolidate what you've learned.

Pop Quiz Answers
Chapter 1, Getting StartedPop quiz – real-time apply consideration
Q1 User-based errors on the primary database such as an inadvertent table drop will be instantly replicated to the standby database. In order to get rid of this kind of data loss risk, we must use "Flashback Database" feature on primary or standby database.
Chapter 5, Data Guard Protection ModesPop quiz – precautions for primary database availability issue in maximum protection mode
Q1 Oracle recommends using two physical standby databases on separate locations to overcome this issue. If we don't have two separate locations we can still install two standby databases on the same location or use Real Application Cluster on the standby database and use redundant network between primary and standby database.

Pop Quiz Answers
[ 372 ]
Chapter 6, Data Guard Role TransitionsPop quiz
Q1 Use the following statement to cancel switchover from the primary or standby databases:
SQL> ALTER DATABASE PREPARE TO SWITCHOVER CANCEL;
Chapter 9, Data Guard Configuration PatchingPop quiz
Q1 Terminal patch can be named as final patch and it can be either CPU or PSU. It will be the last patch to be released on a particular platform of Oracle Database release.
Chapter 10, Common Data Guard IssuesPop quiz – redo transport authentication problem in only one instance of primary database
Q1 In this case, password file is not correct for the primary instance that shows authentication error. We can simply copy password file from one of the other RAC servers to the failing server to fix this issue.
Pop quiz – using tape for SCN incremental backup
Q1 No, only disk backups can be used to resolve a gap with RMAN SCN incremental backups, because backups on tape cannot be cataloged.

IndexAactive-active GoldenGate configuration
general structure 32active-active replication 32Active Data Guard
about 204, 206benefits 204enabling 208enabling, broker used 210, 211enabling, if Redo Apply is running 208, 209enabling, if standby database is shutdown 209,
210features 204, 219licensing 207monitoring 212monitoring, from primary database 212monitoring, from standby database 213working, with EBS 216working, with Oracle BI 218working, with PeopleSoft 214-216working, with SAP 218working, with TopLink 217
Active Data Guard featuresabout 219ASH report, using from standby database 220,
222database backup, exporting from 219EXPDP, using from standby database 219Statspack, running from standby database 223
ADRCI utilityused, for monitoring alert log files 330
advanced compression, Data Guardenabling 231-233
AFFIRM attribute 49alert log files
about 328monitoring, ADRCI used 330-334
ALL Database Guard mode 103applications, working with Active Data Guard
about 213EBS 216Oracle BI 218PeopleSoft 214SAP 218TopLink 217
architecture, Data Guardbackground processes 29role transitions 23services 15user interfaces 25
archived log deletion policyabout 347automatic maintenance, configuring 347, 348
archive log mode, primary databaseenabling 38, 39
ARCH transportation modeabout 15properties 15
ASYNC attribute 48Asynchronous redo transport (ASYNC) method
17automatic block media repair, corruption 369

[ 374 ]
automatic deletion process, logical standby database
about 111foreign archived logs, deleting 111local archived logs, deleting 113
Bbest practices, Data Guard
about 339archived log deletion policy 347connection failover, configuring 339corruption detection 366corruption prevention 366database rolling upgrade, using transient logical
standby database 355flashback, using 348
best practices, RMAN 265block change tracking
about 272advantages 273using, with Data Guard 272, 273
block change tracking (BCT) feature 264block corruption
about 367logical block corruption 367physical block corruption 367
Ccascade standby databases
about 227defining 228-230diagrammatic representation 227limitations 228
centralized and simple management 117client-side components, Data Guard broker
about 121DGMGRL utility 121Enterprise Manager Cloud Control client 121
client-side TAFconfiguring 341
Cloud Control integration 117components, Data Guard broker
about 119client-side components 121server-side components 119
COMPRESSION attribute 49conflict 32connection failover
configuring 339FAN 346FCF 344TAF 340
corruptionabout 366automatic block media repair 369DB_BLOCK_CHECKING parameter 368DB_BLOCK_CHECKSUM parameter 367DB_LOST_WRITE_PROTECT parameter 369
corruption detection 366corruption prevention 366CPU/SPU patches 278Critical Patch Update (CPU) 278cross-platform Data Guard
about 233setup, creating 234-236
Ddatabase objects, logical standby database
creating 106-111materialized views, creating 107scheduler jobs, creating 106, 107tables, creating 106tables, re-creating 106
database properties, Data Guard brokerchanging 135database name, changing 135, 137state changes, performing 137, 138
database versions, Data Gaurdversion 7.3 11version 8i 11version 9i 12version 10g 12version 11g 13
database wait eventsrelated, to Data Guard 240
Data Guardabout 7, 153advanced compression, enabling 231-233architecture 14best practices 339data protection modes 153

[ 375 ]
general structure 8monitoring, Incident Manager used 259, 260patching 277-279preconfiguration 35primary database 8role transitions 173standby database 8
Data Guard administration home pageaccessing 250
Data Guard background processesabout 29DMON 29FSFP 29LSP0 29LSP1 29LSP2 29MRP0 29NSAn 29NSSn 29RFS 29
Data Guard brokerabout 115, 116basic monitoring, performing 127-131benefits 117centralized and simple management 117Cloud Control integration 117components 119connecting to 125-127fast-start failover 118features 117framework 116implementing 122initial setup 122-125Oracle Data Guard and RAC 117role transition 118troubleshooting 138used, for changing Data Guard protection mode
163, 164Data Guard broker configuration
disabling 131, 132enabling 131
Data Guard broker issuesORA-10458 140, 141ORA-12514 143ORA-16715 142ORA-16737 141, 142ORA-16797 139, 140
Data Guard broker logs 334Data Guard configuration
adding, into Cloud Control 244-249common properties tab 252, 253fast-start failover, disabling 254-257fast-start failover, enabling 254-256general tab 251modifying 251patches, applying 282standby role properties tab 252
Data Guard failoverabout 194performing 194performing, with logical standby database using
broker 199, 200performing, with physical standby database us-
ing SQL*Plus 196-198Data Guard Monitor (DMON) logfiles 328Data Guard Monitor Process (DMON) 115, 116Data Guard performance
monitoring 258, 259Data Guard services
about 15applying 18Redo Apply 19Redo Apply, monitoring 19-22redo transport services 15
Data Guard settings, logical standby databaseabout 103ALL option 103changing 104, 105database guard, disabling for session 105NONE Database Guard mode, testing 106NONE option 103STANDBY option 103
Data Guard switchoverabout 174performing 175performing, logical standby database using
broker 192, 193performing, logical standby database using
SQL*Plus 187-191performing, with physical standby database
using broker 184, 185performing, with physical standby database
using EM Cloud Control 185-187

[ 376 ]
performing, with physical standby database using SQL*Plus 176-183
primary and standby databases, verifying 176-179
Data Guard tracingturning on 326, 327
Data Guard tracing levels 139Data Guard tuning
network tuning 237redo transport and apply tuning 238
Data Guard wait eventsabout 240on primary databse, with ARCH transport 240on primary databse, with LGWR transport 240on standby database 240
data loss consideration, physical standby data-base
about 36Instance activity stats table 36Load profile section 36Per second column 36Redo size row 36zero data loss 36
data protection 36data protection modes, Data Guard
changing 157changing, Data Guard broker used 163, 164changing, DGMGRL used 165changing, Enterprise Manager Cloud Control
used 165-172changing, SQL*Plus used 157-162Maximum Availability mode 155Maximum Performance mode 155Maximum Protection mode 154selecting 156, 157
DB_BLOCK_CHECKING parameter 368DB_BLOCK_CHECKSUM parameter 367DB_FILE_NAME_CONVERT parameter 54DB_LOST_WRITE_PROTECT parameter 369DB_NAME parameter 44DB_UNIQUE_NAME 265DB_UNIQUE_NAME parameter 44DELAY attribute 51DGMGRL
about 14, 25, 121used, for changing Data Guard protection mode
165
diagnostic dataalert log files 328alert log files, monitoring using ADRCI 330-334Data Guard broker logs 334dynamic performance views 335gathering 328trace files 328
DMON (Data Guard Broker Monitor Process) 29 120
dynamic performance viewsabout 335V$ARCHIVE_DEST_STATUS 336V$ARCHIVED_LOG 337V$ARCHIVE_GAP 338V$DATABASE 335V$DATAGUARD_CONFIG 336V$DATAGUARD_STATUS 337V$LOGSTDBY_PROCESS 338V$MANAGED_STANDBY 336
EEBS
Active Data Guard, working with 216efficient systems utilization 36EMC Symmetrix Remote Data Facility (SRDF) 30End of Redo (EOR) 175Enterprise Manager 25Enterprise Manager Cloud Control
about 14used, for changing Data Guard protection mode
165-171Enterprise Manager Cloud Control client 121
Ffailover, Data Guard. See Data Guard failoverfailover, role transitions
about 24fast-start failover 24
FAL_SERVER parameter 53FAN
about 346advantages 346
Fast Application Notification. See FANFast Connection Failover. See FCF

[ 377 ]
Fast-start failoverabout 13, 24, 118, 144, 145configuring 146, 147enabling 148observer configuration, troubleshooting 149,
150observer process, bouncing 151recommendation 118
FastStartFailoverLagLimit property 147FastStartFailoverThreshold property 147FCF
about 344configuring, for JDBC connections 344, 346
flashbackabout 348data, exporting from standby database 352data, verifying after flashback 352data, verifying on standby database 351enabling 349MRP, starting on standby database 354retention period, adjusting 350table data, verifying after importing in primary
database 354table, importing in primary database 353table information, gathering before truncation
350table, truncating 350time-based flashback, performing 351, 352time, capturing 350using, on standby database 348, 349
Flash Recover Area. See FRAforce logging, primary database
enabling 40foreign archived logs, logical standby database
deleting 111files inside fast recovery area, deleting 112files outside fast recovery area, deleting 112
FRA, primary databaseabout 42enabling 43
FSFO (fast-start failover) 118FSFP (Data Guard broker fast-start failover
pinger process) 29
Ggap
closing, with RMAN incremental backup 318-321
GoldenGateabout 31features 31, 32
GoldenGate and Streamsabout 30comparison table 34differences 31
Guaranteed restore point 13
Hheterogeneous systems 31high data availability 36Hitachi Universal Replicator and TrueCopy 30HP Continuous Access 30
IIBM Global Mirror 30Incident Manager
about 259estimated failover time metric, creating 261-
263threshold, setting 261-263used, for monitoring Data Guard 259, 260
initialization parameters, primary databaseabout 44AFFIRM 49ASYNC 48COMPRESSION 49DB_NAME 44DB_UNIQUE_NAME 44DELAY 51LOCATION or SERVICE 47LOG_ARCHIVE_CONFIG 45LOG_ARCHIVE_DEST_n 46LOG_ARCHIVE_DEST_STATE_n 52LOG_ARCHIVE_MAX_POCESSES 46MAX_CONNECTIONS 49MAX_FAILURE 50

[ 378 ]
NET_TIMEOUT 51NOAFFIRM 49REOPEN 50SYNC 48VALID_FOR 47
interim/bug patchapplying, on logical standby 282-286
interim patchesabout 278custom scripts 278metadata 278payload 278
issues, Data Guardabout 305Data Guard tracing, turning on 326diagnostic data, gathering 328gap, closing with RMAN incremental backup
317NOLOGGING changes, fixing on standby
database 322redo transport authentication issues, dealing
with 311standby control file, recreating 306-311UNNAMED datafiles, dealing with 315
JJava Database Connectivity (JDBC) clients 344
LLOCATION attribute 47LOG_ARCHIVE_CONFIG parameter 45LOG_ARCHIVE_DEST_n parameter 46LOG_ARCHIVE_DEST_STATE_n parameter 52LOG_ARCHIVE_MAX_POCESSES parameter 46LOG_FILE_NAME_CONVERT parameter 55logical block corruption 367logical standby database
about 10cons 80, 81creating 82, 87interim/bug patch, applying 282-286physical standby database, converting into 90-
93physical standby database environment, making
ready for conversion 88, 89
properties 79pros 80-82unsupported data types 10
logical standby database configurationany table row uniqueness, checking 85-87primary database,preparing 82, 83unsupported data types, checking 83-85
logical standby database customizationabout 98automatic deletion process 111database objects, creating 106Data Guard settings 103DBMS_LOGSTDBY.SKIP procedure, using 99-102DML replication, disabling 99selective replication 98skip rules, creating 98
logical standby database verificationabout 94redo transport service status, checking 94-96services, checking in broken configuration 98SQL Apply service status, checking 96, 97
loop detection 32LSP0 (Logical Standby Coordinator Process) 29LSP1 (Logical Standby Dictionary Build Process)
29LSP2 (Logical Standby Set Guard Process) 29
MManaged recovery process (MRP) 9management, with Data Guard broker
broker configuration, disabling 131, 132broker configuration, enabling 131configuration, changing 134database properties, changing 135performing 131standby database, disabling 133standby database, enabling 132, 134
MAX_CONNECTIONS attribute 49MAX_FAILURE attribute 50maximum availability architecture 275Maximum Availability mode 155, 156Maximum Performance mode 155Maximum Protection mode
about 154considerations 154

[ 379 ]
Metro Mirror 30MRP0 (Managed Standby Recovery Process) 29multiplexing 306
NNET_TIMEOUT attribute 51network bandwidth consideration, physical
standby database 37network tuning, Data Guard 237, 238NOAFFIRM attribute 49NOLOGGING changes
fixing, on standby database 322fixing, with incremental database backups 325fixing, with incremental datafile backups 323,
324NONE Database Guard mode 103NSAn (Redo Transport NSA1 Process) 29NSSn (Redo Transport NSA1 Process) 29
Oobserver configuration, Fast-start failover
troubleshooting 149, 150OMF 306one-off patches 278online redo log (ORL) files 41OPatch
upgrading 279ORA-10458 error 140, 141ORA-12514 error
about 143current listener description 143
ORA-16715 error 142ORA-16737 error 141, 142ORA-16797 error 139, 140Oracle BI
Active Data Guard, working with 218Oracle Call Interface (OCI) 346 340Oracle Data Guard. See Data GuardOracle Data Guard and RAC 117Oracle Data Guard evolution
about 11versions 11
Oracle Enterprise Manager Cloud Control inte-gration
about 243, 244
administration home page, accessing 250Data Guard configuration, adding into Cloud
Control 244-249Data Guard configuration, modifying 251Data Guard performance, monitoring 258, 259Incident Manager, used, for monitoring Data
Guard 259, 260Oracle-managed files. See OMFOracle Real Application Clusters (RAC) 340Oracle Universal Connection Pool (UCP) 346
Ppatch, Data Guard configuration
interim/bug patch, applying on logical standby 282-287
patch set, applying on physical standby 296-302
PSU patch, applying on physical standby 287-296
patchesabout 277CPU/SPU patches 278interim patches 278prerequisite checks, performing 280PSU patches 278types 277
patch historycleaning 281, 282
patchingabout 277best practices 279
patch setabout 278applying, on physical standby database 296-
302Patch Set Updates (PSU) 278PeopleSoft
Active Data Guard, working with 214-216physical block corruption 367physical standby database
about 9converting, to snapshot standby database 223-
225creating 53creating, RMAN duplicate used 61

[ 380 ]
data loss consideration 36network bandwidth consideration 37patch set, applying 296-302post-installation steps 65primary database, preparing 37PSU patch, applying 288-296standby database-related initialization param-
eters 53physical standby database instance
about 55preparing, for RMAN duplicate 55-61starting 55
PITR (Point-in-Time Recovery) 348post-installation steps, physical standby data-
baseabout 65Redo Apply, managing 67standby database configuration, verifying 65-67synchronization, verifying 72, 73
primary database 8primary database, physical standby database
archive log mode, enabling 38, 39force logging, enabling 39, 40FRA, enabling 42, 43initialization parameters 44noarchive log mode 37preparing 37standby redo logs, configuring 40, 42
PSU patchesabout 278applying, on physical standby 288-296
RRAC integration
about 273primary database, creating with single instance
standby database 274primary database, creating with standby data-
base 275Real Application Cluster (RAC) 273Recovery Manager (RMAN) 264Recovery Time Objective (RTO) 251Recovery Time Objective (RTO) value 194Redo Apply
about 19benefits 19
monitoring 19-22Redo Apply, physical standby database
managing 67monitoring 69starting 67, 68starting, in real-time apply mode 71stopping 70
redo transport and apply tuning, Data Guard 238
redo transport authentication problems, trou-bleshooting
about 311redo transport user, changing 313, 314SYS password, changing 311, 313
redo transport servicesabout 15ARCH transportation mode 15ASYNC redo transport method 17protection modes 18
Remote File Server. See RFSREOPEN attribute 50RFS 40RFS (Remote File Server) 29RMAN Catalog application 264RMAN duplicate
running 62, 64used, for creating physical standby databases
61RMAN incremental backup
used, for closing gap 317-321RMAN integration
about 264best practices 265block change tracking, using with Data Guard
272, 273different DB_UNIQUE_NAME, using 265physical standby requirement 264requisites 264RMAN Catalog requirement 264
RMAN settings, for Data Guard environment about 265checking 268, 270configuring, for primary database 266, 267configuring, for standby database 268primary database, recovering using standby
database disk backup 270-272primary database, registering in catalog 266

[ 381 ]
role transitionsabout 23, 173failover 24, 194switchover 24, 174
role transitions, Data Guard brokerperforming 118
Rolling Upgrade Using Transient Logical Standbyapply status, monitoring 359compatibility, ensuring 355Data Guard broker, disabling 356flashback, enabling 356guaranteed restore point, creating 357logical standby database, starting from new ver-
sion binary 364logical standby database, upgrading 359, 361log miner dictionary, creating 357performing 355physical standby database, converting to logical
standby database 358physical standby database, retransforming 363protection mode, ensuring 355redo transport, enabling 364SQL Apply, starting 359, 361Switchover to upgraded 11.2.0.3 362, 363upgraded standby database, verifying 365
SSAP
Active Data Guard, working with 218Security Patch Update (SPU) 278select failover 340selective replication, logical standby database
98Server Control Utility (SRVCTL) 341server-side components, Data Guard broker
about 119configuration file 121DMON 120
server-side TAFconfiguring 341-344
SERVICE attribute 47Service Level Agreements (SLAs) 37session failover 340Single Client Access Names (SCAN) 341snapshot standby database
about 10, 223
converting, to physical standby database 225, 226
SQL Apply 10about 23benefits 23
SQL*Plusabout 14, 25used, for changing Data Guard protection mode
157-162SRL groups
about 41considerations 41
srvctl add service command 341srvctl modify service command 341standby control file
recreating 306-310standby database
about 8configuring 8logical standby database 10physical standby database 9snapshot standby database 10
standby database, Data Guard brokerdisabling 133enabling 133
STANDBY Database Guard mode 103standby database-related initialization param-
etersabout 53DB_FILE_NAME_CONVERT 54FAL_SERVER 53LOG_FILE_NAME_CONVERT 55STANDBY_FILE_MANAGEMENT 54
STANDBY_FILE_MANAGEMENT parameter 54storage-based replication solutions
about 30asynchronous 30synchronous 30using 31
Streams 32switchover, Data Guard. See Data Guard
switchoverswitchover, role transitions 24SYNC attribute 48synchronization, physical standby database
network latency effect, checking on real-time apply 77

[ 382 ]
real-time apply mode, testing 74-76verifying 72, 73
Synchronous redo transport (SYNC) 16
TTAF
about 340client-side TAF configuration 340server-side TAF configuration 340
TopLinkActive Data Guard, working with 217
trace files 328Transparent Application Failover. See TAFtroubleshooting
Data Guard broker 138observer configuration 149
TSPITR (Tablespace Point-in-Time Recovery) operations 55
UUNNAMED datafiles errors
resolving 315, 316user interfaces
about 25DGMGRL 25
Enterprise Manager 25SQL*Plus 25using, for monitoring Data Guard 26, 27
VV$ARCHIVE_DEST_STATUS view 336V$ARCHIVED_LOG view 337V$ARCHIVE_GAP view 338V$DATABASE view 335V$DATAGUARD_CONFIG view 336V$DATAGUARD_STATUS view 337V$LOGSTDBY_PROCESS view 338V$MANAGED_STANDBY view 336VALID_FOR attribute 47version 7.3, Data Guard 11version 8i, Data Guard
about 11features 11
version 9i, Data Guardfeatures 12
version 10g, Data GuardFast-Start Failover 13features 12Guaranteed restore point 13
version 11g, Data Guardfeatures 13, 14

Thank you for buying Oracle Data Guard 11gR2 Administration Beginner's Guide
About Packt PublishingPackt, pronounced 'packed', published its first book "Mastering phpMyAdmin for Effective MySQL Management" in April 2004 and subsequently continued to specialize in publishing highly focused books on specific technologies and solutions.
Our books and publications share the experiences of your fellow IT professionals in adapting and customizing today's systems, applications, and frameworks. Our solution-based books give you the knowledge and power to customize the software and technologies you're using to get the job done. Packt books are more specific and less general than the IT books you have seen in the past. Our unique business model allows us to bring you more focused information, giving you more of what you need to know, and less of what you don't.
Packt is a modern, yet unique publishing company, which focuses on producing quality, cutting-edge books for communities of developers, administrators, and newbies alike. For more information, please visit our website: www.PacktPub.com.
About Packt EnterpriseIn 2010, Packt launched two new brands, Packt Enterprise and Packt Open Source, in order to continue its focus on specialization. This book is part of the Packt Enterprise brand, home to books published on enterprise software – software created by major vendors, including (but not limited to) IBM, Microsoft and Oracle, often for use in other corporations. Its titles will offer information relevant to a range of users of this software, including administrators, developers, architects, and end users.
Writing for PacktWe welcome all inquiries from people who are interested in authoring. Book proposals should be sent to [email protected]. If your book idea is still at an early stage and you would like to discuss it first before writing a formal book proposal, contact us; one of our commissioning editors will get in touch with you.
We're not just looking for published authors; if you have strong technical skills but no writing experience, our experienced editors can help you develop a writing career, or simply get some additional reward for your expertise.

Oracle Database 11gR2 Performance Tuning CookbookISBN: 978-1-84968-260-2 Paperback: 542 pages
Over 80 recipes to help beginners achieve better performance from Oracle Database applications
1. Learn the right techniques to achieve best performance from the Oracle Database
2. Avoid common myths and pitfalls that slow down the database
3. Diagnose problems when they arise and employ tricks to prevent them
4. Explore various aspects that affect performance, from application design to system tuning
Oracle Database 11g – Underground Advice for Database AdministratorsISBN: 978-1-84968-000-4 Paperback: 348 pages
A real-world DBA survival guide for Oracle 11g database implementations
1. A comprehensive handbook aimed at reducing the day-to-day struggle of Oracle 11g Database newcomers
2. Real-world reflections from an experienced DBA—what novice DBAs should really know
3. Implement Oracle's Maximum Availability Architecture with expert guidance
4. Extensive information on providing high availability for Grid Control
Please check www.PacktPub.com for information on our titles

Oracle Warehouse Builder 11g R2: Getting Started 2011 ISBN: 978-1-84968-344-9 Paperback: 424 pages
Extract, Transform, and Load data to build a dynamic, operational data warehouse
1. Build a working data warehouse from scratch with Oracle Warehouse Builder
2. Cover techniques in Extracting, Transforming, and Loading data into your data warehouse
3. This second edition covers great new features of 11gR2 such as the new user interface and a whole new chapter on code templates that implement knowledge module functionality from Oracle Data Integrator
OCA Oracle Database 11g: Database Administration I: A Real-World Certification GuideISBN: 978-1-84968-730-0 Paperback: 582 pages
Learn how to become an Oracle-certified database administrator
1. Prepare for Oracle Database Administration I certification
2. Learn real world skills in database administration
3. Written in an example driven format with step-by-step real world examples
Please check www.PacktPub.com for information on our titles