Test Guides
60
Kunpeng Database Solution Test Guides Issue 01 Date 2021-01-19 HUAWEI TECHNOLOGIES CO., LTD.
-
Upload
khangminh22 -
Category
Documents
-
view
1 -
download
0
Transcript of Test Guides

Kunpeng Database Solution
Test Guides
Issue 01
Date 2021-01-19
HUAWEI TECHNOLOGIES CO., LTD.

Copyright © Huawei Technologies Co., Ltd. 2021. All rights reserved.
No part of this document may be reproduced or transmitted in any form or by any means without priorwritten consent of Huawei Technologies Co., Ltd. Trademarks and Permissions
and other Huawei trademarks are trademarks of Huawei Technologies Co., Ltd.All other trademarks and trade names mentioned in this document are the property of their respectiveholders. NoticeThe purchased products, services and features are stipulated by the contract made between Huawei andthe customer. All or part of the products, services and features described in this document may not bewithin the purchase scope or the usage scope. Unless otherwise specified in the contract, all statements,information, and recommendations in this document are provided "AS IS" without warranties, guaranteesor representations of any kind, either express or implied.
The information in this document is subject to change without notice. Every effort has been made in thepreparation of this document to ensure accuracy of the contents, but all statements, information, andrecommendations in this document do not constitute a warranty of any kind, express or implied.
Huawei Technologies Co., Ltd.Address: Huawei Industrial Base
Bantian, LonggangShenzhen 518129People's Republic of China
Website: https://www.huawei.com
Email: [email protected]
Issue 01 (2021-01-19) Copyright © Huawei Technologies Co., Ltd. i

Contents
1 BenchMarkSQL User Guide (CentOS 7.6).......................................................................... 11.1 BenchmarkSQL Introduction............................................................................................................................................... 11.2 Configuring the BenchmarkSQL Environment.............................................................................................................. 11.3 Using BenchmarkSQL............................................................................................................................................................ 21.3.1 Testing MySQL...................................................................................................................................................................... 21.3.2 Testing PostgreSQL..............................................................................................................................................................4
2 Sysbench 0.5 Porting Guide (CentOS 7.6)......................................................................... 82.1 Introduction............................................................................................................................................................................... 82.2 Environment Requirements................................................................................................................................................. 82.3 Installing Dependency Packages........................................................................................................................................ 92.4 Obtaining the Source Code............................................................................................................................................... 102.5 Compiling and Installing Sysbench................................................................................................................................. 112.6 Running and Verifying Sysbench..................................................................................................................................... 12
3 TPC-H Test Guide (for MySQL).......................................................................................... 183.1 TPC-H........................................................................................................................................................................................ 183.2 Environment Requirements............................................................................................................................................... 183.3 Using TPC-H............................................................................................................................................................................193.3.1 Obtaining the TPC-H Tool Package.............................................................................................................................193.3.2 Compiling and Installing the Tool Package.............................................................................................................. 203.3.3 Performing a TPC-H Test................................................................................................................................................ 26
4 HammerDB Test Guide.........................................................................................................284.1 Introduction to HammerDB.............................................................................................................................................. 284.2 Installing HammerDB.......................................................................................................................................................... 284.3 Testing HammerDB.............................................................................................................................................................. 294.4 Troubleshooting..................................................................................................................................................................... 35
5 YCSB Test Guide (for MongoDB)....................................................................................... 405.1 Introduction............................................................................................................................................................................ 405.2 Installing YCSB....................................................................................................................................................................... 405.3 Testing YCSB........................................................................................................................................................................... 42
6 Percona XtraBackup Test Guide......................................................................................... 476.1 Introduction............................................................................................................................................................................ 47
Kunpeng Database SolutionTest Guides Contents
Issue 01 (2021-01-19) Copyright © Huawei Technologies Co., Ltd. ii

6.2 Environment Requirements............................................................................................................................................... 476.3 Configuring the Compilation Environment.................................................................................................................. 486.3.1 Configuring the Local Yum Source.............................................................................................................................. 486.3.2 Upgrading CMake............................................................................................................................................................. 506.3.3 Upgrading GCC...................................................................................................................................................................526.4 Compilation and Installation............................................................................................................................................ 53
A Change History...................................................................................................................... 56
Kunpeng Database SolutionTest Guides Contents
Issue 01 (2021-01-19) Copyright © Huawei Technologies Co., Ltd. iii

1 BenchMarkSQL User Guide (CentOS 7.6)
1.1 BenchmarkSQL Introduction
1.2 Configuring the BenchmarkSQL Environment
1.3 Using BenchmarkSQL
1.1 BenchmarkSQL IntroductionBenchmarkSQL is an open-source database test tool with embedded TPC-C testscripts. It can be used to test PostgreSQL, MySQL, Oracle, and SQL Serverdatabases. It uses Java Database Connectivity (JDBC) to perform Online TPC-CTransaction Processing (OLTP) tests.
1.2 Configuring the BenchmarkSQL EnvironmentStep 1 Obtain the installation package.
1. Download the BenchMarkSQL.zip installation package.
2. The BenchmarkSQL requires the Java environment. Therefore, you need toinstall the Java Development Kit (JDK).
a. Configure a local YUM source and mount the OS image. For details, seethe MySQL 8.0.17 Porting Guide (CentOS 7.6).
b. Install RPM packages.#yum install java
Step 2 Upload the BenchMarkSQL.zip package to the /home directory on the clientserver.
Step 3 Go to the directory where the package is uploaded and decompress the package.
#cd /home
#unzip BenchMarkSQL.zip
----End
Kunpeng Database SolutionTest Guides 1 BenchMarkSQL User Guide (CentOS 7.6)
Issue 01 (2021-01-19) Copyright © Huawei Technologies Co., Ltd. 1

1.3 Using BenchmarkSQL
1.3.1 Testing MySQLStep 1 Log in to MySQL and create a database tpcc.
>create database tpcc;
Step 2 Modify the configuration file.
1. Go to the run directory (/home/BenchMarkSQL/run in this example) ofBenchmarkSQL and modify the configuration file according to the actualsituation.# cd /home/BenchMarkSQL/run# cp props.mysql my_mysql.properties# vi my_mysql.properties
2. Modify parameters according to the following table. You can retain thedefault values of other parameters.
Table 1-1 Database information
Parameter Description
conn 222.222.222.216
Database server address. Set the valueaccording to the actual situation.
3306 MySQL database port. Set the value accordingto the actual situation.
tpcc200 Database name (tpcc in this example). Setthe value according to the actual situation.
user/password
- Set the values to the user that creates thedatabase and its password.
warehouses - Number of data warehouses to be createdduring initialization data loading. Forexample, the value 100 indicates that 100data warehouses are created. The datavolume of each data warehouse is about76823.04 KB. The data volume may be slightlydifferent because data entries may be addedor deleted during the test.
loadworker - Number of processes submitted each timewhen data is loaded.
Kunpeng Database SolutionTest Guides 1 BenchMarkSQL User Guide (CentOS 7.6)
Issue 01 (2021-01-19) Copyright © Huawei Technologies Co., Ltd. 2

Table 1-2 Program running parameters
Parameter Description
terminals Number of concurrent terminals, which theconcurrency level.
runTxnsPerTerminal Number of transactions executed by each terminalper minute.
runMins Execution duration, in minutes.
limitTnxsPermin Total number of transactions executed per minute.
terminalWarehouse-Fixed
Binding mode of terminals and warehouses. If thisparameter is set to true, the 4.x compatibilitymode is used (each terminal has a fixedwarehouse). If this parameter is set to false, theterminals can randomly access the warehouses.
CA UTION
The runMins and runTxnsPerTerminal parameters specify two runningmodes. runMins specifies the running time, and runTxnsPerTerminalspecifies the number of transactions on each terminal. The two parameterscannot be enabled at the same time, and one of them must be set to 0.
Step 3 Initialize the data.
Kunpeng Database SolutionTest Guides 1 BenchMarkSQL User Guide (CentOS 7.6)
Issue 01 (2021-01-19) Copyright © Huawei Technologies Co., Ltd. 3

1. Run the following command in the run directory to grant the executepermission on the file:#chmod 777 *.sh
CA UTION
If the required permission has been granted, skip this step.
2. Load data.#./runDatabaseBuild.sh my_mysql.properties* Create and initialize tables. The tables include warehouse, Stock, Item,Order-Line, New-Order, History, District, Customer, Order, and a configurationtable.
Step 4 Run the BenchmarkSQL program.
#./runBenchmark.sh my_mysql.properties
After the execution is complete, pay attention to the tpmTOTAL value.
Step 5 Delete the database and data.
#./runDatabaseDestroy.sh my_mysql.properties
----End
1.3.2 Testing PostgreSQLStep 1 Create the database users tpcc and database tpcc in the PostgreSQL, and grant
the superuser permission to the tpcc user.
>create database tpcc;
Step 2 Modify the configuration file.
Kunpeng Database SolutionTest Guides 1 BenchMarkSQL User Guide (CentOS 7.6)
Issue 01 (2021-01-19) Copyright © Huawei Technologies Co., Ltd. 4

1. Access the run directory of the BenchmarkSQL and modify the configurationfile according to the actual situation.# cd /home/BenchMarkSQL/run/# cp props.pg my_postgres.properties# vi my_postgres.properties
2. Modify parameters according to the following table. You can retain thedefault values of other parameters.
Table 1-3 Database information
Parameter Description
conn localhost Database server address. Set the valueaccording to the actual situation.
5432 PostgreSQL database port. Set the valueaccording to the actual situation.
postgres Database name (tpcc in this example). Setthe value according to the actual situation.
user/password
- Set the values to the user that creates thedatabase and its password.
warehouses
- Number of data warehouses to be createdduring initialization data loading. Forexample, the value 100 indicates that 100data warehouses are created. The datavolume of each data warehouse is about76823.04 KB. The data volume may beslightly different because data entries maybe added or deleted during the test.
loadworker
- Number of processes submitted each timewhen data is loaded.
Table 1-4 Program running parameters
Parameter Description
terminals Number of concurrent terminals, which theconcurrency level.
runTxnsPerTerminal Number of transactions executed by each terminalper minute.
runMins Execution duration, in minutes.
limitTnxsPermin Total number of transactions executed per minute.
Kunpeng Database SolutionTest Guides 1 BenchMarkSQL User Guide (CentOS 7.6)
Issue 01 (2021-01-19) Copyright © Huawei Technologies Co., Ltd. 5

Parameter Description
terminalWarehouse-Fixed
Binding mode of terminals and warehouses. If thisparameter is set to true, the 4.x compatibility modeis used (each terminal has a fixed warehouse). If thisparameter is set to false, the terminals canrandomly access the warehouses.
CA UTION
The runMins and runTxnsPerTerminal parameters specify two runningmodes. runMins specifies the running time, and runTxnsPerTerminalspecifies the number of transactions on each terminal. The two parameterscannot be enabled at the same time, and one of them must be set to 0.
Step 3 Initialize the data.
1. Run the following command in the run directory to grant the executepermission on the file:#chmod 777 *.sh
Kunpeng Database SolutionTest Guides 1 BenchMarkSQL User Guide (CentOS 7.6)
Issue 01 (2021-01-19) Copyright © Huawei Technologies Co., Ltd. 6

CA UTION
If the required permission has been granted, skip this step.
2. Load data.#./runDatabaseBuild.sh my_postgres.properties* Create and initialize tables. The tables include warehouse, Stock, Item,Order-Line, New-Order, History, District, Customer, Order, and a configurationtable.
Step 4 Run the BenchmarkSQL program.
#./runBenchmark.sh my_postgres.properties
After the test is complete, the tpmC and tpmTOTAL are the test indicators.
Step 5 Delete the database and data.
#./runDatabaseDestroy.sh my_postgres.propertiess
----End
Kunpeng Database SolutionTest Guides 1 BenchMarkSQL User Guide (CentOS 7.6)
Issue 01 (2021-01-19) Copyright © Huawei Technologies Co., Ltd. 7

2 Sysbench 0.5 Porting Guide (CentOS 7.6)
2.1 Introduction
2.2 Environment Requirements
2.3 Installing Dependency Packages
2.4 Obtaining the Source Code
2.5 Compiling and Installing Sysbench
2.6 Running and Verifying Sysbench
2.1 IntroductionSysbench, an open-source, cross-platform, and multiple-thread performance testtool, is used to verify the MySQL database performance. It is one of Alibaba's toolsfor evaluating RDS performance. Sysbench provides four main test models: select,update, insert, and delete. In addition, it provides the OLTP test model to evaluatethe MySQL performance in online transactions.
2.2 Environment RequirementsThis document is based on the newly installed CentOS Linux release 7.6.1810.During the system installation, minimum installation is selected and DevelopmentTools is selected.
Kunpeng Database SolutionTest Guides 2 Sysbench 0.5 Porting Guide (CentOS 7.6)
Issue 01 (2021-01-19) Copyright © Huawei Technologies Co., Ltd. 8

2.3 Installing Dependency PackagesStep 1 Back up the original YUM repository files and write the new configuration to the
repo file.
#mv /etc/yum.repos.d/ /etc/yum.repos.d-bak
#mkdir /etc/yum.repos.d
#echo -e "[local]\nname=local\nbaseurl=file:///mnt\ngpgcheck=0\nenabled=1" > /etc/yum.repos.d/local.repo
Check whether the previous operation is successful.
Step 2 Mount the OS image.
Mount the OS image using either of the following methods:
● Mount the image using the KVM.Mount the image to the /mnt/ directory.#mount /dev/sr0 /mnt/
● Upload the OS image to the system.Upload the OS image to the /home directory and mount the image to the /mnt/ directory.
Kunpeng Database SolutionTest Guides 2 Sysbench 0.5 Porting Guide (CentOS 7.6)
Issue 01 (2021-01-19) Copyright © Huawei Technologies Co., Ltd. 9

#mount /home/CentOS-7-aarch64-Everything-1810.iso /mnt/
NO TE
The .iso file name used in this section is only an example.
Step 3 Install the dependency.
#yum install automake libtool* mysql-devel
----End
2.4 Obtaining the Source CodeStep 1 Download the Sysbench source code package.
URL: https://github.com/akopytov/sysbench/tree/0.5
Select Clone or download and click Download ZIP.
Step 2 Upload the package to the /home directory on the server and decompress it.
#cd /home
#unizp sysbench-0.5.zip
Kunpeng Database SolutionTest Guides 2 Sysbench 0.5 Porting Guide (CentOS 7.6)
Issue 01 (2021-01-19) Copyright © Huawei Technologies Co., Ltd. 10

----End
2.5 Compiling and Installing SysbenchStep 1 Go to the directory where the source code is located.
#cd /home/sysbench-0.5
Step 2 Perform compilation and installation.
#./autogen.sh
#./configure
Kunpeng Database SolutionTest Guides 2 Sysbench 0.5 Porting Guide (CentOS 7.6)
Issue 01 (2021-01-19) Copyright © Huawei Technologies Co., Ltd. 11

#make -j 64
#make install
----End
2.6 Running and Verifying SysbenchThis document uses MySQL as an example.
Step 1 Build a library.
Create the test database on the MySQL command-line interface (CLI).
mysql>create database test;
Kunpeng Database SolutionTest Guides 2 Sysbench 0.5 Porting Guide (CentOS 7.6)
Issue 01 (2021-01-19) Copyright © Huawei Technologies Co., Ltd. 12

Step 2 Load the data.
Run the following command to generate test data. The data volume is 25000 datarecords x 250 tables.
#/home/sysbench-0.5/sysbench/sysbench --db-driver=mysql --test=/home/sysbench-0.5/sysbench/tests/db/parallel_prepare.lua --oltp-test-mode=complex --mysql-host=192.168.202.152 --mysql-db=test --mysql-password=123456 --max-time=7200 --max-requests=0 --mysql-user=root --mysql-table-engine=innodb --oltp-table-size=25000 --oltp-tables-count=250 --rand-type=special --rand-spec-pct=100 --num-threads=60 prepare
Step 3 Perform a test.
Run the following command to perform the test. The test model can be changedbased on the site requirements.
#/home/sysbench-0.5/sysbench/sysbench --test=/home/sysbench-0.5/sysbench/tests/db/oltp.lua --db-driver=mysql --debug=off --mysql-db=test --mysql-password=123456 --oltp-tables-count=64 --oltp-index-updates=10 --oltp-non-index-updates=0 --oltp-table-size=25000 --num-threads=100 --max-requests=0 --max-time=60 --oltp-auto-inc=off --mysql-engine-trx=yes --oltp-test-mod=complex --mysql-host=192.168.202.152 --mysql-port=3306 --mysql-user=root --oltp-user-delay-min=10 --oltp-user-delay-max=100 --report-interval=10 run
Main parameters are described as follows:
● --mysql-db: The database to which data is loaded must be the same as thetested database. Otherwise, an error is reported indicating that the MySQLserver cannot be connected.
● --num-threads: number of threads. If the message "Too many connections" isdisplayed, decrease the value.
● --test: specifies a test model.● --oltp-tables-count: sets the number of generated tables.● --oltp-table-size: specifies the size of each generated table.● --num-threads: specifies the number of threads to be tested.● --mysql-password: specifies the password for logging in to the MySQL server.● --mysql-user: specifies the user name for logging in to the MySQL server.● --mysql-port: specifies the port number for logging in to the MySQL server.● --mysql-host: specifies the IP address of the MySQL server.
Kunpeng Database SolutionTest Guides 2 Sysbench 0.5 Porting Guide (CentOS 7.6)
Issue 01 (2021-01-19) Copyright © Huawei Technologies Co., Ltd. 13

Step 4 Check the test results.
Use transactions and read/write requests as test indicators.
● transactions: number of transactions per second
● read/write requests: number of read/write requests per second.
Step 5 Model description is as follows:
Model Remarks Example
OLTPDISTINCT
OLTP read scenario:deduplication query.
SELECT DISTINCT c FROMtable_name WHERE id BETWEENrange_start AND range_start +(oltp_range_size - 1) ORDER BY c
OLTPINDEX
OLTP write scenario: indexcolumn update.
UPDATE table_name SET k=k+1WHERE id = sb_rand(1,oltp_table_size)
OLTPNONINDEX
OLTP write scenario: noindex column update.
UPDATE table_name SET c='c_val'WHERE id=sb_rand(1, oltp_table_size)
OLTPORDER
OLTP read scenario: sortingquery.
SELECT c FROM table_name WHEREid BETWEEN range_start ANDrange_start+(oltp_range_size - 1)ORDER BY c
OLTPPOINT
OLTP read scenario: pointselection query.
SELECT c FROM table_name WHEREid=sb_rand(1, oltp_table_size)
OLTPSIMPLE
OLTP read scenario: rangequery.
SELECT c FROM table_name WHEREid BETWEEN range_start ANDrange_start+(oltp_range_size - 1)
OLTPSUM
OLTP read scenario: sumquery.
SELECT SUM(K) FROM table_nameWHERE id BETWEEN range_start ANDrange_start + (oltp_range_size - 1)
Kunpeng Database SolutionTest Guides 2 Sysbench 0.5 Porting Guide (CentOS 7.6)
Issue 01 (2021-01-19) Copyright © Huawei Technologies Co., Ltd. 14

Model Remarks Example
OLTPDELETE
OLTP write scenario: indexcolumn deletion and datainsertion.
DELETE FROM table_name WHEREid=sb_rand(1, oltp_table_size)IINSERT INTO table_name (id, k, c,pad) VALUES string.format((%d, %d,'%s', '%s'),i, sb_rand(1,oltp_table_size) , c_val, pad_val)
OLTP MIX OLTP mixed scenario: Thepreceding eight models aremixed. The defaultproportion of the pointscenario is 10, and that ofother scenarios is 1.
The preceding scenarios are mixed.
Step 6 Execute a model.
Model Test Implementation
OLTPDISTINCT
/home/sysbench-0.5/sysbench/sysbench --test=/home/sysbench-0.5/sysbench/tests/db/oltp.lua --db-driver=mysql --debug=off --mysql-db=sysbench --mysql-password=123456 --oltp-tables-count=64 --oltp-distinct-ranges=1 --oltp-index-updates=0 --oltp-non-index-updates=0 --oltp-order-ranges=0 --oltp-point-selects=0 --oltp-simple-ranges=0 --oltp-sum-ranges=0 --oltp_delete_inserts=0 --oltp-table-size=100000 --num-threads=100 --max-requests=0 --max-time=60 --oltp-auto-inc=off --mysql-engine-trx=yes --oltp-test-mod=complex --mysql-host=192.168.189.31 --mysql-port=3306--mysql-user=root --oltp-user-delay-min=10 --oltp-user-delay-max=100 --report-interval=10 run
OLTPINDEX
/home/sysbench-0.5/sysbench/sysbench --test=/home/sysbench-0.5/sysbench/tests/db/oltp.lua --db-driver=mysql --debug=off --mysql-db=sysbench --mysql-password=123456 --oltp-tables-count=64 --oltp-distinct-ranges=0 --oltp-index-updates=1 --oltp-non-index-updates=0 --oltp-order-ranges=0 --oltp-point-selects=0 --oltp-simple-ranges=0 --oltp-sum-ranges=0 --oltp_delete_inserts=0 --oltp-table-size=100000 --num-threads=100 --max-requests=0 --max-time=60 --oltp-auto-inc=off --mysql-engine-trx=yes --oltp-test-mod=complex --mysql-host=192.168.189.31 --mysql-port=3306--mysql-user=root --oltp-user-delay-min=10 --oltp-user-delay-max=100 --report-interval=10 run
Kunpeng Database SolutionTest Guides 2 Sysbench 0.5 Porting Guide (CentOS 7.6)
Issue 01 (2021-01-19) Copyright © Huawei Technologies Co., Ltd. 15

Model Test Implementation
OLTPNONINDEX
/home/sysbench-0.5/sysbench/sysbench --test=/home/sysbench-0.5/sysbench/tests/db/oltp.lua --db-driver=mysql --debug=off --mysql-db=sysbench --mysql-password=123456 --oltp-tables-count=64 --oltp-distinct-ranges=0 --oltp-index-updates=0 --oltp-non-index-updates=1 --oltp-order-ranges=0 --oltp-point-selects=0 --oltp-simple-ranges=0 --oltp-sum-ranges=0 --oltp_delete_inserts=0 --oltp-table-size=100000 --num-threads=100 --max-requests=0 --max-time=60 --oltp-auto-inc=off --mysql-engine-trx=yes --oltp-test-mod=complex --mysql-host=192.168.189.31 --mysql-port=3306--mysql-user=root --oltp-user-delay-min=10 --oltp-user-delay-max=100 --report-interval=10 run
OLTPORDER
/home/sysbench-0.5/sysbench/sysbench --test=/home/sysbench-0.5/sysbench/tests/db/oltp.lua --db-driver=mysql --debug=off --mysql-db=sysbench --mysql-password=123456 --oltp-tables-count=64 --oltp-distinct-ranges=0 --oltp-index-updates=0 --oltp-non-index-updates=0 --oltp-order-ranges=1 --oltp-point-selects=0 --oltp-simple-ranges=0 --oltp-sum-ranges=0 --oltp_delete_inserts=0 --oltp-table-size=100000 --num-threads=100 --max-requests=0 --max-time=60 --oltp-auto-inc=off --mysql-engine-trx=yes --oltp-test-mod=complex --mysql-host=192.168.189.31 --mysql-port=3306--mysql-user=root --oltp-user-delay-min=10 --oltp-user-delay-max=100 --report-interval=10 run
OLTPPOINT
/home/sysbench-0.5/sysbench/sysbench --test=/home/sysbench-0.5/sysbench/tests/db/oltp.lua --db-driver=mysql --debug=off --mysql-db=sysbench --mysql-password=123456 --oltp-tables-count=64 --oltp-distinct-ranges=0 --oltp-index-updates=0 --oltp-non-index-updates=0 --oltp-order-ranges=0 --oltp-point-selects=1 --oltp-simple-ranges=0 --oltp-sum-ranges=0 --oltp_delete_inserts=0 --oltp-table-size=100000 --num-threads=100 --max-requests=0 --max-time=60 --oltp-auto-inc=off --mysql-engine-trx=yes --oltp-test-mod=complex --mysql-host=192.168.189.31 --mysql-port=3306--mysql-user=root --oltp-user-delay-min=10 --oltp-user-delay-max=100 --report-interval=10 run
OLTPSIMPLE
/home/sysbench-0.5/sysbench/sysbench --test=/home/sysbench-0.5/sysbench/tests/db/oltp.lua --db-driver=mysql --debug=off --mysql-db=sysbench --mysql-password=123456 --oltp-tables-count=64 --oltp-distinct-ranges=0 --oltp-index-updates=0 --oltp-non-index-updates=0 --oltp-order-ranges=0 --oltp-point-selects=0 --oltp-simple-ranges=1 --oltp-sum-ranges=0 --oltp_delete_inserts=0 --oltp-table-size=100000 --num-threads=100 --max-requests=0 --max-time=60 --oltp-auto-inc=off --mysql-engine-trx=yes --oltp-test-mod=complex --mysql-host=192.168.189.31 --mysql-port=3306--mysql-user=root --oltp-user-delay-min=10 --oltp-user-delay-max=100 --report-interval=10 run
Kunpeng Database SolutionTest Guides 2 Sysbench 0.5 Porting Guide (CentOS 7.6)
Issue 01 (2021-01-19) Copyright © Huawei Technologies Co., Ltd. 16

Model Test Implementation
OLTPSUM
/home/sysbench-0.5/sysbench/sysbench --test=/home/sysbench-0.5/sysbench/tests/db/oltp.lua --db-driver=mysql --debug=off --mysql-db=sysbench --mysql-password=123456 --oltp-tables-count=64 --oltp-distinct-ranges=0 --oltp-index-updates=0 --oltp-non-index-updates=0 --oltp-order-ranges=0 --oltp-point-selects=0 --oltp-simple-ranges=0 --oltp-sum-ranges=1 --oltp_delete_inserts=0 --oltp-table-size=100000 --num-threads=100 --max-requests=0 --max-time=60 --oltp-auto-inc=off --mysql-engine-trx=yes --oltp-test-mod=complex --mysql-host=192.168.189.31 --mysql-port=3306--mysql-user=root --oltp-user-delay-min=10 --oltp-user-delay-max=100 --report-interval=10 run
OLTPDELETE
/home/sysbench-0.5/sysbench/sysbench --test=/home/sysbench-0.5/sysbench/tests/db/oltp.lua --db-driver=mysql --debug=off --mysql-db=sysbench --mysql-password=123456 --oltp-tables-count=64 --oltp-distinct-ranges=0 --oltp-index-updates=0 --oltp-non-index-updates=0 --oltp-order-ranges=0 --oltp-point-selects=0 --oltp-simple-ranges=0 --oltp-sum-ranges=0 --oltp_delete_inserts=1 --oltp-table-size=100000 --num-threads=100 --max-requests=0 --max-time=60 --oltp-auto-inc=off --mysql-engine-trx=yes --oltp-test-mod=complex --mysql-host=192.168.189.31 --mysql-port=3306--mysql-user=root --oltp-user-delay-min=10 --oltp-user-delay-max=100 --report-interval=10 run
OLTP MIX /home/sysbench-0.5/sysbench/sysbench --test=/home/sysbench-0.5/sysbench/tests/db/oltp.lua --db-driver=mysql --debug=off --mysql-db=sysbench --mysql-password=123456 --oltp-tables-count=64 --oltp-table-size=100000 --num-threads=100 --max-requests=0 --max-time=60 --oltp-auto-inc=off --mysql-engine-trx=yes --oltp-test-mod=complex --mysql-host=192.168.189.31 --mysql-port=3306--mysql-user=root --oltp-user-delay-min=10 --oltp-user-delay-max=100 --report-interval=10 run
----End
Kunpeng Database SolutionTest Guides 2 Sysbench 0.5 Porting Guide (CentOS 7.6)
Issue 01 (2021-01-19) Copyright © Huawei Technologies Co., Ltd. 17

3 TPC-H Test Guide (for MySQL)
3.1 TPC-H
3.2 Environment Requirements
3.3 Using TPC-H
3.1 TPC-HThe TPC-H benchmark test includes 22 queries (from Q1 to Q22). The key metricis the response time of each query, that is, the time required from submitting aquery to obtaining the query result.
The measurement unit of the TPCH benchmark test is the number of queriesexecuted per hour (QphH@size), where:
● H indicates the average number of complex queries executed by the systemper hour
● size indicates the size of the database
QphH@size reflects the system's capability to process queries.
3.2 Environment Requirements
Table 3-1 OS and software requirements
Software Version Description
CentOS 7.6 or later In this document,CentOS Linux release7.6.1810 is used.Minimum installationand Development Toolsare selected during theOS installation.
Kunpeng Database SolutionTest Guides 3 TPC-H Test Guide (for MySQL)
Issue 01 (2021-01-19) Copyright © Huawei Technologies Co., Ltd. 18

Software Version Description
TPC-H Tools 2.18.0 For details, see 3.1"Obtaining the TPCHTool Package."
3.3 Using TPC-H
3.3.1 Obtaining the TPC-H Tool PackageMethod Description
How toObtain
Description Tool PackageDifference
Download thetool packagefrom theofficial website
The server must be able to accessthe official website over a networkconnection.
The tool packagedownloaded from theofficial website does notsupport MySQL. Somemodifications arerequired.
Obtaining the TPC-H Test Tool
Download the tool from http://www.tpc.org/tpch/.
Kunpeng Database SolutionTest Guides 3 TPC-H Test Guide (for MySQL)
Issue 01 (2021-01-19) Copyright © Huawei Technologies Co., Ltd. 19

3.3.2 Compiling and Installing the Tool PackageStep 1 Modify the makefile file.
You can save the tool package to the /home directory or another directory. Thespace of the directory must be greater than the size of the .tbl data file generatedin Step 4.
Decompress the .zip file, go to the dbgen directory, and modify lines 103 to 112 inthe makefile.suite file.
unzip tpch-pq.zipcd /home/tpch-pq/2.18.0_rc2/dbgen/vi makefile.suiteCC = gcc# Current values for DATABASE are: INFORMIX, DB2, TDAT (Teradata)# SQLSERVER, SYBASE, ORACLE, VECTORWISE# Current values for MACHINE are: ATT, DOS, HP, IBM, ICL, MVS,# SGI, SUN, U2200, VMS, LINUX, WIN32# Current values for WORKLOAD are: TPCHDATABASE = MYSQLMACHINE = LINUXWORKLOAD = TPCH#
Save the modification, and change the file name from makefile.suite tomakefile. In this way, the file can be correctly used when you run the makecommand.
cp makefile.suite makefile
Step 2 Modify the tpcd.h file.
Open the tpcd.h file and add the following macro definition to the beginning ofthe file:
#ifdef MYSQL#define GEN_QUERY_PLAN ""#define START_TRAN "START TRANSACTION"#define END_TRAN "COMMIT"#define SET_OUTPUT ""#define SET_ROWCOUNT "limit %d;\n"#define SET_DBASE "use %s;\n"#endif
Kunpeng Database SolutionTest Guides 3 TPC-H Test Guide (for MySQL)
Issue 01 (2021-01-19) Copyright © Huawei Technologies Co., Ltd. 20

Step 3 Generate a dbgen file.
In the dbgen directory, run the make command. Then, many .o files and a dbgenfile are generated in the dbgen directory.
make
Step 4 Generate .tbl data files.
Use the dbgen file to generate data, which consists of eight .tbl tables. In thefollowing command, the value 1 indicates that 1 GB data will be generated. If youwant to generate 10 GB data, change 1 to 10.
The eight tables are supplier.tbl, region.tbl, part.tbl, partsupp.tbl, orders.tbl,nation.tbl, lineitem.tbl, and customer.tbl.
Generate data files.
./dbgen -s 1
Step 5 Modify the initialization scripts so that they can be used in the MySQL database.
The tool package contains the following scripts:
dss.ddl: used to create tables.
dss.ri: used to associate the primary key and foreign key in tables.
These scripts cannot be directly used in the MySQL database and need to bemodified.
● Modifying dss.ddl
The dss.ddl script must start with some commands that are used to establishconnections to the MySQL database. Add the following code at the beginningof the script:
DROP DATABASE tpch;CREATE DATABASE tpch;USE tpch;
The name of the table used in the TPCH test is in lower case, but the name of thetable in dss.ddl is in upper case. Therefore, it is recommended that you changethe name of the table in dss.ddl to lower case.
Use the vi editor to open the dss.ddl script.
vi dss.ddl
In the command line mode (by pressing Esc), change the table name to lowercase (by pressing Enter).
:%s/TABLE\(.*\)/TABLE\L\1
● Modifying dss.ri
Use the vi editor to open dss.ri, and then copy the following code to replacethe original code.
Kunpeng Database SolutionTest Guides 3 TPC-H Test Guide (for MySQL)
Issue 01 (2021-01-19) Copyright © Huawei Technologies Co., Ltd. 21

CA UTION
The following eight -- ALTER TABLE tpch.* DROP PRIMARY KEY; lines startwith two hyphens and a space "-- ".Format: -- ALTER TABLE tpch.* DROP PRIMARY KEY;
-- Sccsid: @(#)dss.ri 2.1.8.1-- tpch Benchmark Version 8.0
USE tpch;
-- ALTER TABLE tpch.region DROP PRIMARY KEY;-- ALTER TABLE tpch.nation DROP PRIMARY KEY;-- ALTER TABLE tpch.part DROP PRIMARY KEY;-- ALTER TABLE tpch.supplier DROP PRIMARY KEY;-- ALTER TABLE tpch.partsupp DROP PRIMARY KEY;-- ALTER TABLE tpch.orders DROP PRIMARY KEY;-- ALTER TABLE tpch.lineitem DROP PRIMARY KEY;-- ALTER TABLE tpch.customer DROP PRIMARY KEY;
-- For table regionALTER TABLE tpch.regionADD PRIMARY KEY (R_REGIONKEY);
-- For table nationALTER TABLE tpch.nationADD PRIMARY KEY (N_NATIONKEY);
ALTER TABLE tpch.nationADD FOREIGN KEY NATION_FK1 (N_REGIONKEY) referencestpch.region(R_REGIONKEY);
COMMIT WORK;
-- For table partALTER TABLE tpch.partADD PRIMARY KEY (P_PARTKEY);
COMMIT WORK;
-- For table supplierALTER TABLE tpch.supplierADD PRIMARY KEY (S_SUPPKEY);ALTER TABLE tpch.supplierADD FOREIGN KEY SUPPLIER_FK1 (S_NATIONKEY) referencestpch.nation(N_NATIONKEY);
COMMIT WORK;
-- For table partsuppALTER TABLE tpch.partsuppADD PRIMARY KEY (PS_PARTKEY,PS_SUPPKEY);
COMMIT WORK;
-- For table customerALTER TABLE tpch.customerADD PRIMARY KEY (C_CUSTKEY);
ALTER TABLE tpch.customerADD FOREIGN KEY CUSTOMER_FK1 (C_NATIONKEY) referencestpch.nation(N_NATIONKEY);
COMMIT WORK;
-- For table lineitem
Kunpeng Database SolutionTest Guides 3 TPC-H Test Guide (for MySQL)
Issue 01 (2021-01-19) Copyright © Huawei Technologies Co., Ltd. 22

ALTER TABLE tpch.lineitemADD PRIMARY KEY (L_ORDERKEY,L_LINENUMBER);
COMMIT WORK;
-- For table ordersALTER TABLE tpch.ordersADD PRIMARY KEY (O_ORDERKEY);
COMMIT WORK;
-- For table partsuppALTER TABLE tpch.partsuppADD FOREIGN KEY PARTSUPP_FK1 (PS_SUPPKEY) referencestpch.supplier(S_SUPPKEY);COMMIT WORK;
ALTER TABLE tpch.partsuppADD FOREIGN KEY PARTSUPP_FK2 (PS_PARTKEY) referencestpch.part(P_PARTKEY);
COMMIT WORK;
-- For table ordersALTER TABLE tpch.ordersADD FOREIGN KEY ORDERS_FK1 (O_CUSTKEY) referencestpch.customer(C_CUSTKEY);
COMMIT WORK;
-- For table lineitemALTER TABLE tpch.lineitemADD FOREIGN KEY LINEITEM_FK1 (L_ORDERKEY) referencestpch.orders(O_ORDERKEY);
COMMIT WORK;
ALTER TABLE tpch.lineitemADD FOREIGN KEY LINEITEM_FK2 (L_PARTKEY,L_SUPPKEY) referencestpch.partsupp(PS_PARTKEY,PS_SUPPKEY);
COMMIT WORK;
Step 6 Create the tpch database and data tables.
Import the .ddl file to the MySQL database.
In the command, replace /home/tpch-pq/2.18.0_rc2 with the actual directory onyour server. Then, check whether the database is successfully created. A databasenamed tpch is displayed.
mysql> \. /home/tpch-pq/2.18.0_rc2/dbgen/dss.ddl
Check the database.
mysql> SHOW DATABASES;
Step 7 Add the primary key and foreign key of the tpch database.
Import the dds.ri file to the MySQL database.
In the command, replace /home/tpch-pq/2.18.0_rc2 with the actual directory onyour server.
mysql> \. /home/tpch-pq/2.18.0_rc2/dbgen/dss.ri
Step 8 Import data.
Create the load.sh script file in the dbgen directory.
Kunpeng Database SolutionTest Guides 3 TPC-H Test Guide (for MySQL)
Issue 01 (2021-01-19) Copyright © Huawei Technologies Co., Ltd. 23

vi load.sh
Enter the following code and save the file. Check whether the database nametpch needs to be changed.#!/bin/bash
write_to_file(){file="loaddata.sql"
if [ ! -f "$file" ] ; thentouch "$file"fi
echo 'USE tpch;' >> $fileecho 'SET FOREIGN_KEY_CHECKS=0;' >> $file
DIR=`pwd`for tbl in `ls *.tbl`; dotable=$(echo "${tbl%.*}")echo "LOAD DATA LOCAL INFILE '$DIR/$tbl' INTO TABLE $table" >> $fileecho "FIELDS TERMINATED BY '|' LINES TERMINATED BY '|\n';" >> $filedoneecho 'SET FOREIGN_KEY_CHECKS=1;' >> $file}
write_to_file
Run the following command to execute the script:
sh load.sh
The loaddata.sql file is generated in the same directory. The file contains the SQLcommands used for importing data from the eight .tbl tables.
Run the following command to import data:
mysql -uroot -p123456 < loaddata.sql
If an error occurs during the execution, add --local-infile to the command. Youneed to log in to the MySQL database and modify the global parameter asfollows:
SET GLOBAL local_infile = 'ON';
mysql --local-infile -uroot -p123456 < loaddata.sql
Wait until all data is imported.
Log in to the database and check whether the eight tables contain data. The timefor importing data varies, depending on the size of data to be imported.
Step 9 Generate SQL statements for query.
Generate the SQL statement in the dbgen directory:
cp qgen dists.dss queries/
Copy the qgen execution file and the dists.dss script to the directory of thequeries template.
Kunpeng Database SolutionTest Guides 3 TPC-H Test Guide (for MySQL)
Issue 01 (2021-01-19) Copyright © Huawei Technologies Co., Ltd. 24

In the dbgen directory, run the following command to create the saveSql folder:
mkdir ../saveSql
Go to the queries directory.
cd queries
Run the SQL statement to be generated, for example, the 1.sql query statement.
./qgen -d 1 > ../../saveSql/1.sql
If the generated sql file does not work, do as follows:
Open the generated .sql files in the savaSql directory and modify the filesaccording to Table 3-2.
Table 3-2 Modifications on .sql files
File Name Operation
1.sql Delete (3) behind day.
Kunpeng Database SolutionTest Guides 3 TPC-H Test Guide (for MySQL)
Issue 01 (2021-01-19) Copyright © Huawei Technologies Co., Ltd. 25

File Name Operation
1.sql, 4.sql, 5.sql, 6.sql, 7.sql, 8.sql,9.sql, 11.sql, 12.sql, 13.sql, 14.sql,15.sql, 16.sql, 17.sql, 19.sql, 20.sql, and22.sql
Delete limit -1; from the last line.You can run the following command toquickly delete it in the savaSqldirectory:sed -i "s/limit\ -1;//g" *.sql
2.sql, 3.sql, 10.sql, 18.sql, and 21.sql Delete the semicolon (;) in the secondline from the bottom.
For example:
In 1.sql, delete (3) and limit - 1;.
----End
3.3.3 Performing a TPC-H TestStep 1 Log in on the MySQL client.
Step 2 Select the database used for the TPC-H test.
Kunpeng Database SolutionTest Guides 3 TPC-H Test Guide (for MySQL)
Issue 01 (2021-01-19) Copyright © Huawei Technologies Co., Ltd. 26
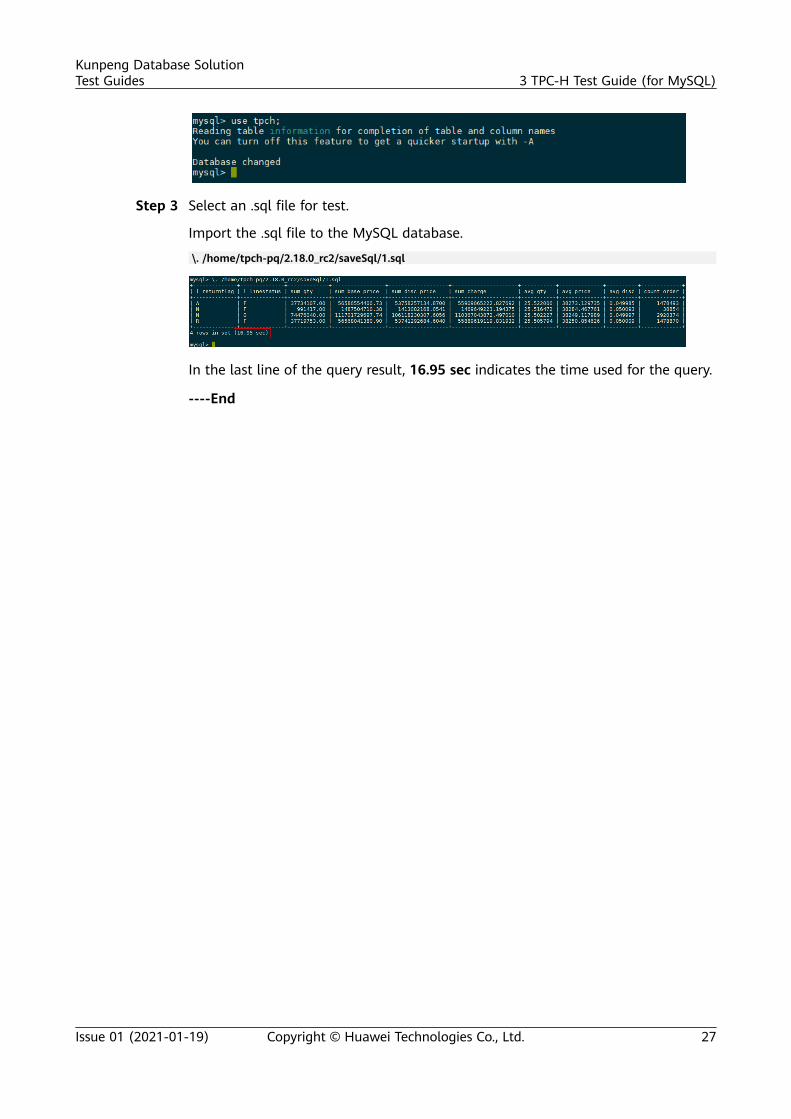
Step 3 Select an .sql file for test.
Import the .sql file to the MySQL database.
\. /home/tpch-pq/2.18.0_rc2/saveSql/1.sql
In the last line of the query result, 16.95 sec indicates the time used for the query.
----End
Kunpeng Database SolutionTest Guides 3 TPC-H Test Guide (for MySQL)
Issue 01 (2021-01-19) Copyright © Huawei Technologies Co., Ltd. 27

4 HammerDB Test Guide
4.1 Introduction to HammerDB
4.2 Installing HammerDB
4.3 Testing HammerDB
4.4 Troubleshooting
4.1 Introduction to HammerDBHammerDB is an open-source database pressure test benchmark tool thatsupports Linux and Windows operating systems. It provides GUI and commandline modes. Oracle, SQL Server, DB2, MySQL, MariaDB, PostgreSQL (Greenplum),and Redis databases are supported.
HammerDB simulates the standard TPC-C and TPC-H test models. Compared withthe standard TPC-C and TPC-H, HammerDB features low running cost and easyoperation. It is a good choice for server database pressure tests.
4.2 Installing HammerDBStep 1 Download the HammerDB-3.1.zip tool package.
Step 2 Upload the downloaded package to the /home directory on the pressure testserver and decompress the package.
# unzip HammerDB-3.1.zip
Kunpeng Database SolutionTest Guides 4 HammerDB Test Guide
Issue 01 (2021-01-19) Copyright © Huawei Technologies Co., Ltd. 28

----End
4.3 Testing HammerDBThis document uses the TPC-H model in Greenplum as an example.
Step 1 Switch to the installation directory.
# cd HammerDB-3.2
Step 2 Run the test tool.
# ./hammerdbcli (You can run the help command to view the help information.)
Kunpeng Database SolutionTest Guides 4 HammerDB Test Guide
Issue 01 (2021-01-19) Copyright © Huawei Technologies Co., Ltd. 29

Table 4-1 Common commands
Command Description
buildschema Creates a database table and import data based on theconfiguration.
datagenrun Generates data list.
dbset Configures database options, including the database type andtest model.
dgset Configures the tbl data parameters, including the number ofconcurrent data generation tasks, data volume, and data storagepath.
diset Configures table creation parameters, such as database serveraddresses and database validation information, data volume, andso on.
librarychek Performs the dependency verification.
loadscript Loads the test parameters.
print Prints the configuration information.
quit Quits the tool. The original configuration is automatically clearedwhen you quit the tool after configuring the interactive page.
vucreate Creates a task.
vudestroy Stops a task.
vurun Runs a task.
Kunpeng Database SolutionTest Guides 4 HammerDB Test Guide
Issue 01 (2021-01-19) Copyright © Huawei Technologies Co., Ltd. 30

Command Description
vuset Sets task running parameters, such as the number of concurrenttasks and log configuration.
vustatus Views the task execution status.
Step 3 Run the following commands in sequence to load data:
>dbset db pg #Configure the database type.
>dbset bm tpc-h #Configure the test model.
>diset connection pg_host 90.90.67.106 #Configure the database serviceaddress.
>diset tpch pg_tpch_superuser gpadmin #Configures the database superuser.
>diset tpch pg_tpch_superuserpass 123456 #Configures the databasesuperuser password.
>diset tpch pg_tpch_defaultdbase postgres #Configures the default superuserdatabase
>diset tpch pg_scale_fact 1 #Configure data volume. The default value is 1.
>diset tpch pg_num_tpch_threads 30 #Configure the number of concurrentthreads.
>diset tpch pg_tpch_gpcompat true #Enable Greenplum-compatibility.
>diset tpch pg_tpch_gpcompress true #Enable Greenplum parameters.
>print dict #Query the configuration information.
Kunpeng Database SolutionTest Guides 4 HammerDB Test Guide
Issue 01 (2021-01-19) Copyright © Huawei Technologies Co., Ltd. 31

pg_tpch_user, pg_tpch_pass, and pg_tpch_dbase are default test databases.Ensure that no user or database with the same name exists on the databaseserver. If such a user or database exists, delete or run the diset command tomodify related parameters.
>buildschema
Kunpeng Database SolutionTest Guides 4 HammerDB Test Guide
Issue 01 (2021-01-19) Copyright © Huawei Technologies Co., Ltd. 32

"ALL VIRTUAL USERS COMPLETE" is returned, indicating that the data is importedsuccessfully.
Step 4 Perform the test.
>vuset vu 1 #Configure the number of concurrent tasks.
>vuset showoutput 1 #Enable the log function.
>vuset logtotemp 1 #Enable the function of automatically saving logs tothe /tmp directory.
>vuset unique 1 #Configure log uniqueness, that is, logs are not overwritten.
>print vuconf ##View the task configuration.
>loadscript ##Load the configuration.
Kunpeng Database SolutionTest Guides 4 HammerDB Test Guide
Issue 01 (2021-01-19) Copyright © Huawei Technologies Co., Ltd. 33
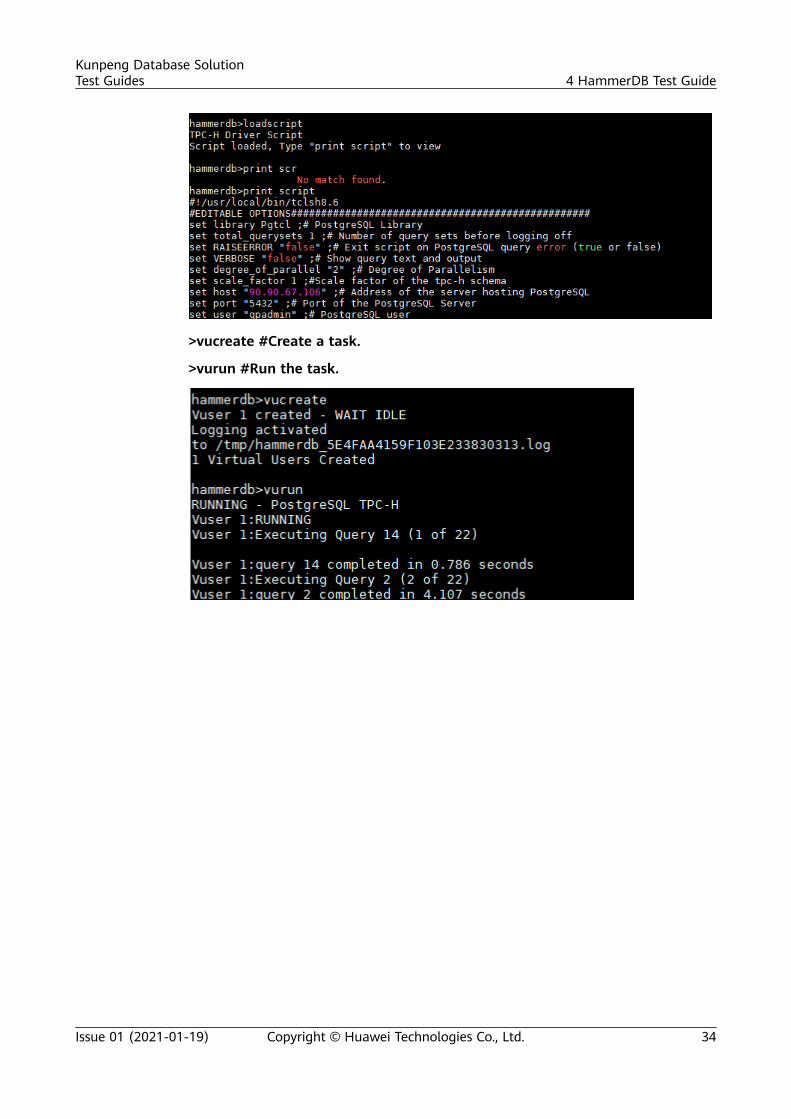
>vucreate #Create a task.
>vurun #Run the task.
Kunpeng Database SolutionTest Guides 4 HammerDB Test Guide
Issue 01 (2021-01-19) Copyright © Huawei Technologies Co., Ltd. 34
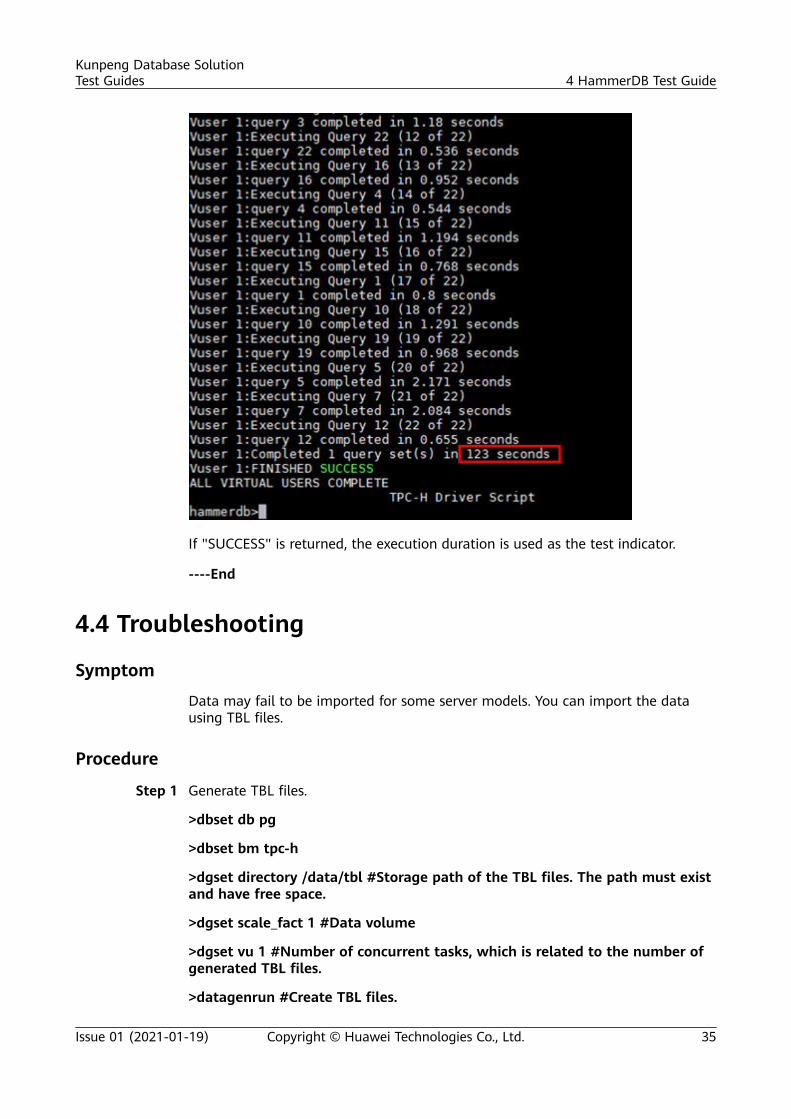
If "SUCCESS" is returned, the execution duration is used as the test indicator.
----End
4.4 Troubleshooting
Symptom
Data may fail to be imported for some server models. You can import the datausing TBL files.
Procedure
Step 1 Generate TBL files.
>dbset db pg
>dbset bm tpc-h
>dgset directory /data/tbl #Storage path of the TBL files. The path must existand have free space.
>dgset scale_fact 1 #Data volume
>dgset vu 1 #Number of concurrent tasks, which is related to the number ofgenerated TBL files.
>datagenrun #Create TBL files.
Kunpeng Database SolutionTest Guides 4 HammerDB Test Guide
Issue 01 (2021-01-19) Copyright © Huawei Technologies Co., Ltd. 35

Step 2 Copy the generated TBL files to the database server.
Kunpeng Database SolutionTest Guides 4 HammerDB Test Guide
Issue 01 (2021-01-19) Copyright © Huawei Technologies Co., Ltd. 36

# scp -r /data/tbl/ 90.90.67.106:/data/
Step 3 Create a database on the database server and create a table based on the testmodel. You can view the OLAP test script in src/postgresql/pgolap.tcl in theHammerDB installation path.
Build a table (using row-store by default):
CREATE TABLE ORDERS (O_ORDERDATE TIMESTAMP, O_ORDERKEY NUMERICNOT NULL, O_CUSTKEY NUMERIC NOT NULL, O_ORDERPRIORITY CHAR(15),O_SHIPPRIORITY NUMERIC, O_CLERK CHAR(15), O_ORDERSTATUS CHAR(1),O_TOTALPRICE NUMERIC, O_COMMENT VARCHAR(79)) DISTRIBUTED BY(O_ORDERKEY);
CREATE TABLE PARTSUPP (PS_PARTKEY NUMERIC NOT NULL, PS_SUPPKEYNUMERIC NOT NULL, PS_SUPPLYCOST NUMERIC NOT NULL, PS_AVAILQTYNUMERIC, PS_COMMENT VARCHAR(199)) DISTRIBUTED BY(PS_PARTKEY,PS_SUPPKEY);
CREATE TABLE CUSTOMER(C_CUSTKEY NUMERIC NOT NULL, C_MKTSEGMENTCHAR(10), C_NATIONKEY NUMERIC, C_NAME VARCHAR(25), C_ADDRESSVARCHAR(40), C_PHONE CHAR(15), C_ACCTBAL NUMERIC, C_COMMENTVARCHAR(118)) DISTRIBUTED BY (C_CUSTKEY);
CREATE TABLE PART(P_PARTKEY NUMERIC NOT NULL, P_TYPE VARCHAR(25),P_SIZE NUMERIC, P_BRAND CHAR(10), P_NAME VARCHAR(55), P_CONTAINERCHAR(10), P_MFGR CHAR(25), P_RETAILPRICE NUMERIC, P_COMMENTVARCHAR(23)) DISTRIBUTED BY (P_PARTKEY);
CREATE TABLE SUPPLIER(S_SUPPKEY NUMERIC NOT NULL, S_NATIONKEYNUMERIC, S_COMMENT VARCHAR(102), S_NAME CHAR(25), S_ADDRESSVARCHAR(40), S_PHONE CHAR(15), S_ACCTBAL NUMERIC) DISTRIBUTED BY(S_SUPPKEY);
CREATE TABLE NATION(N_NATIONKEY NUMERIC NOT NULL, N_NAMECHAR(25), N_REGIONKEY NUMERIC, N_COMMENT VARCHAR(152))DISTRIBUTED BY (N_NATIONKEY);
CREATE TABLE REGION(R_REGIONKEY NUMERIC, R_NAME CHAR(25),R_COMMENT VARCHAR(152)) DISTRIBUTED BY (R_REGIONKEY);
CREATE TABLE LINEITEM(L_SHIPDATE TIMESTAMP, L_ORDERKEY NUMERICNOT NULL, L_DISCOUNT NUMERIC NOT NULL, L_EXTENDEDPRICE NUMERICNOT NULL, L_SUPPKEY NUMERIC NOT NULL, L_QUANTITY NUMERIC NOTNULL, L_RETURNFLAG CHAR(1), L_PARTKEY NUMERIC NOT NULL,L_LINESTATUS CHAR(1), L_TAX NUMERIC NOT NULL, L_COMMITDATETIMESTAMP, L_RECEIPTDATE TIMESTAMP, L_SHIPMODE CHAR(10),
Kunpeng Database SolutionTest Guides 4 HammerDB Test Guide
Issue 01 (2021-01-19) Copyright © Huawei Technologies Co., Ltd. 37

L_LINENUMBER NUMERIC NOT NULL, L_SHIPINSTRUCT CHAR(25),L_COMMENT VARCHAR(44)) DISTRIBUTED BY (L_LINENUMBER,L_ORDERKEY);
Step 4 The TBL files are imported in the database on the table basis.
# copy ${table_name} from '/data/tbl/${table_name}.tbl' WITH DELIMITER AS'|';
${table_name} indicates the table name. There are eight tables in total.
Step 5 Create indexes.
CREATE INDEX REGION_PK ON REGION (R_REGIONKEY);
CREATE INDEX NATION_PK ON NATION (N_NATIONKEY);
CREATE INDEX SUPPLIER_PK ON SUPPLIER (S_SUPPKEY);
CREATE INDEX PARTSUPP_PK ON PARTSUPP (PS_PARTKEY,PS_SUPPKEY);
CREATE INDEX PART_PK ON PART (P_PARTKEY);
CREATE INDEX ORDERS_PK ON ORDERS (O_ORDERKEY,o_orderdate);
CREATE INDEX LINEITEM_PK ON LINEITEM (L_LINENUMBER,L_ORDERKEY,l_shipdate);
CREATE INDEX CUSTOMER_PK ON CUSTOMER (C_CUSTKEY);
Kunpeng Database SolutionTest Guides 4 HammerDB Test Guide
Issue 01 (2021-01-19) Copyright © Huawei Technologies Co., Ltd. 38

----End
Kunpeng Database SolutionTest Guides 4 HammerDB Test Guide
Issue 01 (2021-01-19) Copyright © Huawei Technologies Co., Ltd. 39
5 YCSB Test Guide (for MongoDB)
5.1 Introduction
5.2 Installing YCSB
5.3 Testing YCSB
5.1 IntroductionYahoo! Cloud Serving Benchmark (YCSB) is a tool developed by Yahoo to performbasic tests on cloud services. It contains common NoSQL database products, suchas Cassandra, MongoDB, HBase, and Redis. When running YCSB, you can configuredifferent workloads and databases, or specify other parameters such as thenumber of threads and the number of concurrent threads.
5.2 Installing YCSBStep 1 Download the tool package.
URL: https://mirrors.huaweicloud.com/kunpeng/archive/kunpeng_solution/native/YCSB-0.15.0.zip
Step 2 Upload the downloaded package to the /home directory on the pressure testserver and decompress the package.unzip YCSB-0.15.0.zip
Kunpeng Database SolutionTest Guides 5 YCSB Test Guide (for MongoDB)
Issue 01 (2021-01-19) Copyright © Huawei Technologies Co., Ltd. 40

Step 3 Install the dependency.
1. Back up the original Yum repository files and write the new configuration to therepo file.
mv /etc/yum.repos.d/ /etc/yum.repos.d-bakmkdir /etc/yum.repos.decho -e "[local]\nname=local\nbaseurl=file:///mnt\ngpgcheck=0\nenabled=1" > /etc/yum.repos.d/local.repo
Check whether the previous operation is successful.
2. Mount the OS image.
Mount the OS image using either of the following methods:
● Mount the OS image using the KVM.To mount the OS image to the /mnt/ directory, run the following command:mount /dev/sr0 /mnt/
● Upload the OS image to the system.To upload the OS image to the /home directory and mount the image tothe /mnt/ directory, run the following command:mount /home/CentOS-7-aarch64-Everything-1810.iso /mnt/
NO TE
The .iso file name used in this section is only an example.
3. Install the dependency.
yum install java maven -y
----End
Kunpeng Database SolutionTest Guides 5 YCSB Test Guide (for MongoDB)
Issue 01 (2021-01-19) Copyright © Huawei Technologies Co., Ltd. 41

5.3 Testing YCSBStep 1 Switch to the installation directory.
cd YCSB-0.15.0
The main directories are described as follows:
● bin: contains an executable YCSB file, which is the command line interface foruser operations. The main logic of the YCSB is as follows: Parse the commandline, set the Java environment, load java-libs, encapsulate the command intoexecutable Java commands, and execute the command.
● workloads: contains various workload templates, which can be customized.
The default six test scenarios are as follows:
● workloada: read/write balancing, 50%/50%, reads/writes● workloadb: read-intensive, 95%/5%, reads/writes● workloadc: read-only, 100%, reads● workloadd: reads the most recently written records, 95%/5%, reads/insert● workloade: inter-cell scanning, 95%/5%, scan/insert● workloadf: read/written records balancing , 50%/50%, reads/insert● workload_template: parameter list template
Step 2 Configure the pressure test.
Select a test scenario and edit the corresponding configuration file. The followinguses the read/write test as an example:
vi workloads/workloada
Kunpeng Database SolutionTest Guides 5 YCSB Test Guide (for MongoDB)
Issue 01 (2021-01-19) Copyright © Huawei Technologies Co., Ltd. 42

The parameters in the configuration file are as follows:
Table 5-1 Parameters in the configuration file
Parameter Description
recordcount Number of records loaded in the YCSB load phase.
operationcount Total number of operations performed in the YCSB runphase.
workload workload implementation class.
readallfields Indicates whether to read all fields of a record during query.
readproportion Percentage of read operations.
updateproportion Percentage of update operations.
scanproportion Percentage of insert operations.
requestdistribu-tion
Request distribution mode, which can be uniform, zipfian,or latest.
mongodb.url Link of the mongo instance to be tested. (Note: This is anadded item.)
Kunpeng Database SolutionTest Guides 5 YCSB Test Guide (for MongoDB)
Issue 01 (2021-01-19) Copyright © Huawei Technologies Co., Ltd. 43

Parameter Description
mongodb.database
Name of the database used in the test. The default value isycsb. (Note: This is an added item.)
Step 3 Load the data.bin/ycsb load mongodb -threads 100 -P workloads/workloada
Figure 5-1 Data loading command output
Figure 5-2 Data loading command output
If Return=OK is returned, the data is imported successfully.
The parameters are described as follows:
ycsb [command] [database] [options]
● command can be any of the following:load: loads the test data.run: starts the test.shell: indicates the interaction mode.
Kunpeng Database SolutionTest Guides 5 YCSB Test Guide (for MongoDB)
Issue 01 (2021-01-19) Copyright © Huawei Technologies Co., Ltd. 44

● database options: specify the database scenario for the test, such asmongodb, cassandra, and memcached.
● options can be any of the following:
-P file: specifies the workload file, which can be a relative or absolute path.
-cp path: specifies an additional Java classpath.
-jvm-args args: specifies an additional JVM parameter.
-p key=value: sets the YCSB configuration item, which will overwrite theconfiguration item in the workload file.
-s: displays the intermediate status during the running to stderr.
-target n: indicates the total number of operations in 1s.
-threads n: sets the number of concurrent test threads of the YCSB client. Thedefault value is 1, indicating a single thread.
Step 4 Perform the test.bin/ycsb run mongodb -threads 100 -P workloads/workloada
Figure 5-3 Test command output
Figure 5-4 Test command output
Kunpeng Database SolutionTest Guides 5 YCSB Test Guide (for MongoDB)
Issue 01 (2021-01-19) Copyright © Huawei Technologies Co., Ltd. 45

If Return=OK is returned, the test is complete. The value of[OVERALL],Throughput is used as the test indicator.
[OVERALL], RunTime(ms), 1123 #Duration of the test (ms)
[OVERALL], Throughput(ops/sec), 8904.719501335709 #Throughput during thetest (ops/sec)
[READ], Operations, 5020 #Total number of read operations.
[READ], AverageLatency(us), 4126.0304780876495 #Average latency of each readoperation (microsecond)
[READ], MinLatency(us), 299 #Minimum latency of each read operation(microsecond)
[READ], MaxLatency(us), 168959 #Maximum latency of each read operation(microsecond)
[READ], 95thPercentileLatency(us), 6659 #The latency of 95% read operations iswithin 6659 microseconds.
[READ], 99thPercentileLatency(us), 157311 #The latency of 99% read operationsis within 157311 microseconds.
[READ], Return=OK, 5020 #Return success. The number of operations is 5020.
[UPDATE], Operations, 4980 #Total number of update operations.
[UPDATE], AverageLatency(us), 3846.1317269076303 #Average delay of eachupdate operation (microsecond)
[UPDATE], MinLatency(us), 321 #Minimum latency of each update operation(microsecond)
[UPDATE], MaxLatency(us), 168575 #Maximum latency of each update operation(microsecond)
[UPDATE], 95thPercentileLatency(us), 6555 #The latency of 95% updateoperations is within 6555 microseconds.
[UPDATE], 99thPercentileLatency(us), 26351 #The latency of 99% updateoperations is within 26351 microseconds.
[UPDATE], Return=OK, 4980 #Return success. The number of operations is 4980.
----End
Kunpeng Database SolutionTest Guides 5 YCSB Test Guide (for MongoDB)
Issue 01 (2021-01-19) Copyright © Huawei Technologies Co., Ltd. 46

6 Percona XtraBackup Test Guide
6.1 Introduction
6.2 Environment Requirements
6.3 Configuring the Compilation Environment
6.4 Compilation and Installation
6.1 IntroductionA database server stores some of the most valuable information for an enterprise,so reliable database backup is needed to prevent data loss in the event of afailure. Percona XtraBackup provides a way to perform hot backup of MySQL datawhile the system is running. Percona XtraBackup is a free, online, open-source andcomplete database backup solution for MySQL. Percona XtraBackup performsonline, non-blocking, compact, and highly secure full backups on transactionalsystems, allowing applications keep running during planned maintenance.
6.2 Environment RequirementsThis document is based on the newly installed CentOS Linux release 7.6.1810.During the system installation, minimum installation is selected and DevelopmentTools is selected.
Kunpeng Database SolutionTest Guides 6 Percona XtraBackup Test Guide
Issue 01 (2021-01-19) Copyright © Huawei Technologies Co., Ltd. 47

6.3 Configuring the Compilation Environment
6.3.1 Configuring the Local Yum Source
Mounting the OS ImageMount the OS image using either of the following methods:
Method 1: Upload the OS image to the /home directory and mount the image tothe /mnt/ directory.
mount /home/CentOS-7-aarch64-Everything-1810.iso /mnt/
NO TE
Change the .iso file name based on actual situation. The operation takes effect only onceand becomes invalid after the restart of the OS.
Method 2: Use the KVM to mount the OS image to the /mnt/ directory.
mount /dev/sr0 /mnt/
NO TE
If the system displays a message indicating that no image is available after you run thecommand, mount the image again and then run the command.
Configuring the Local Yum SourceConfigure the local source if the server cannot obtain dependencies from theInternet using yum commands.
Kunpeng Database SolutionTest Guides 6 Percona XtraBackup Test Guide
Issue 01 (2021-01-19) Copyright © Huawei Technologies Co., Ltd. 48

Step 1 Back up the original Yum source configuration file of the system.mv /etc/yum.repos.d /etc/yum.repos.d.bak
Step 2 Add the local source file and create the /etc/yum.repos.d directory for the newYum source.mkdir /etc/yum.repos.d
Step 3 Go to the directory.cd /etc/yum.repos.d
Step 4 Create a file named local.repo.
1. Create a file named local.repo.vi local.repo
2. Add the following content to the local.repo file.[local]name=local.repobaseurl=file:///mntenabled=1gpgcheck=0
Example:
CA UTION
The file path specified by baseurl indicates the directory to which the imageis mounted, that is, the /mnt directory in Mounting the OS Image.
3. Save and exit the local.repo file.
Step 5 Make the local source take effect.yum clean allyum makecache
----End
Installing OS Dependencies
Step 1 Install dependencies.yum -y install bison ncurses ncurses-devel libaio-devel openssl openssl-devel gmp gmp-devel mpfr mpfr-devel libmpc libmpc-devel wget tar gcc gcc-c++ git rpcgen cmake
Kunpeng Database SolutionTest Guides 6 Percona XtraBackup Test Guide
Issue 01 (2021-01-19) Copyright © Huawei Technologies Co., Ltd. 49

----End
6.3.2 Upgrading CMakeNO TE
The built-in CMake software of the system cannot meet the MySQL compilationrequirements. Upgrade CMake to 3.4.3 or later. The following describes how to upgradeCMake to 3.5.2.
Step 1 Download the CMake 3.5.2 package.
URL for downloading CMake 3.5.2: https://cmake.org/files/v3.5/cmake-3.5.2.tar.gz
Step 2 Upload the package to the /home directory on the server and decompress it.cd /hometar -zxvf cmake-3.5.2.tar.gz
Step 3 Go to the directory where the source code package is decompressed.cd cmake-3.5.2
Step 4 Upgrade CMake../bootstrap
Kunpeng Database SolutionTest Guides 6 Percona XtraBackup Test Guide
Issue 01 (2021-01-19) Copyright © Huawei Technologies Co., Ltd. 50

make -j96
NO TE
In the command, -j96 can make full use of the multi-core feature of the CPUs to acceleratethe compilation. The number following -j indicates the number of CPU cores. You can runthe cat /proc/cpuinfo | grep processor | wc -l command to query the number of CPUcores. The value specified must be less than or equal to the actual number of CPU cores.
make install
Step 5 Check whether the CMake version is 3.5.2./usr/local/bin/cmake --version
----End
Kunpeng Database SolutionTest Guides 6 Percona XtraBackup Test Guide
Issue 01 (2021-01-19) Copyright © Huawei Technologies Co., Ltd. 51

6.3.3 Upgrading GCCNO TE
Upgrade the GCC version to 5.3 or later. The following describes how to upgrade GCC to7.3.
Step 1 Download GCC 7.3.0.
URL for downloading GCC 7.3: https://mirrors.tuna.tsinghua.edu.cn/gnu/gcc/gcc-7.3.0/gcc-7.3.0.tar.gz
Step 2 Upload GCC-7.3.0.tar.gz to the /home directory and decompress it.cd /hometar -xvf gcc-7.3.0.tar.gz
Step 3 Install GCC.
Go to the GCC directory decompressed.cd /home/gcc-7.3.0
1. Perform configuration../configure --prefix=/usr --mandir=/usr/share/man --infodir=/usr/share/info --enable-bootstrap
– ---prefix=path: specifies the installation directory of the GCC software.The default directory is /usr.
– --mandir=path: specifies the GCC software document directory. Thedefault directory is /usr/share/man.
– --infodir=path: specifies the directory in which the GCC log information isstored. The default directory is /usr/share/info.
– --enable-bootstrap: enables bootstrap installation.
NO TE
If error "configure: error: no acceptable C compiler found in $PATH" is reported duringthe configuration, run the yum -y reinstall gcc gcc-c++ command
Kunpeng Database SolutionTest Guides 6 Percona XtraBackup Test Guide
Issue 01 (2021-01-19) Copyright © Huawei Technologies Co., Ltd. 52

2. Compile the GCC source code.make -j96
NO TE
In the command, -j96 can make full use of the multi-core feature of the CPUs toaccelerate the compilation. The number following -j indicates the number of CPUcores. You can run the cat /proc/cpuinfo | grep processor | wc -l command to querythe number of CPU cores. The value specified must be less than or equal to the actualnumber of CPU cores.
3. Start the installation.make -j96 install
Step 4 Check whether the GCC version is 7.3.0.gcc -v
----End
6.4 Compilation and InstallationStep 1 Install system dependencies.
yum -y install cmake gcc gcc-c++ libaio libaio-devel automake autoconf bzr bison libtool zlib-devel libgcrypt-devel libcurl-devel crypt* libgcrypt* python-sphinx openssl imake libxml2-devel expat-devel ncurses5-devel ncurses-devle vim-common libgpg-error-devel libidn-devel
Step 2 Install the dependency package libev.cd /home/git config --global http.sslVerify falsegit clone https://github.com/enki/libev.gitcd /home/libev./configuremake -j96make -j96 install
Step 3 Download the Percona XtraBackup source code package and decompress it.● For MySQL 8.0.20, download Percona XtraBackup 8.0.13.
cd /home/wget https://github.com/percona/percona-xtrabackup/archive/percona-xtrabackup-8.0.13.tar.gz --no-check-certificate
Kunpeng Database SolutionTest Guides 6 Percona XtraBackup Test Guide
Issue 01 (2021-01-19) Copyright © Huawei Technologies Co., Ltd. 53

tar -zxvf percona-xtrabackup-8.0.13.tar.gzls /home/percona-xtrabackup-percona-xtrabackup-8.0.13/
● For MySQL 5.7.27, download Percona XtraBackup 2.4.20.cd /home/wget https://www.percona.com/downloads/Percona-XtraBackup-2.4/Percona-XtraBackup-2.4.20/source/tarball/percona-xtrabackup-2.4.20.tar.gz --no-check-certificatetar -zxvf percona-xtrabackup-2.4.20.tar.gzls /home/percona-xtrabackup-2.4.20/
Step 4 Download the boost source code package and decompress it.
Download the boost version corresponding to the MySQL version.
● For MySQL 8.0.20, download boost_1_70_0.cd /home/wget https://dl.bintray.com/boostorg/release/1.70.0/source/boost_1_70_0.tar.gz --no-check-certificatetar -zxvf boost_1_70_0.tar.gzls /home/boost_1_70_0/
● For MySQL 5.7.27, download boost_1_59_0.cd /home/wget http://jenkins.percona.com/downloads/boost/boost_1_59_0.tar.gz --no-check-certificatetar -zxvf boost_1_59_0.tar.gzls /home/boost_1_59_0/
Step 5 Compile and install Percona XtraBackup.● Compile and install Percona XtraBackup 8.0.13:
cd /home/percona-xtrabackup-percona-xtrabackup-8.0.13/cmake -DCMAKE_INSTALL_PREFIX=/usr/local/xtrabackup-8.0.13 -DBUILD_CONFIG=xtrabackup_release -DWITH_MAN_PAGES=OFF -DWITH_BOOST=/home/boost_1_70_0/ -DFORCE_INSOURCE_BUILD=1make -j96make -j96 install
Alternatively,cd /home/percona-xtrabackup-percona-xtrabackup-8.0.13/cmake -DCMAKE_INSTALL_PREFIX=/usr/local/xtrabackup-8.0.13 -DBUILD_CONFIG=xtrabackup_release -DWITH_MAN_PAGES=OFF -DDOWNLOAD_BOOST=1 -DWITH_BOOST=/home/boost_1_70_0/-DFORCE_INSOURCE_BUILD=1make -j96make -j96 install
● Compile and install Percona XtraBackup 2.4.20:cd /home/percona-xtrabackup-2.4.20/cmake -DCMAKE_INSTALL_PREFIX=/usr/local/xtrabackup-2.4.20 -DBUILD_CONFIG=xtrabackup_release -DWITH_MAN_PAGES=OFF -DWITH_BOOST=/home/boost_1_59_0/make -j96make -j96 install
Alternatively,cd /home/percona-xtrabackup-2.4.20/cmake -DCMAKE_INSTALL_PREFIX=/usr/local/xtrabackup-2.4.20 -DBUILD_CONFIG=xtrabackup_release -DWITH_MAN_PAGES=OFF -DDOWNLOAD_BOOST=1 -DWITH_BOOST=/home/boost_1_59_0/make -j96make -j96 install
Kunpeng Database SolutionTest Guides 6 Percona XtraBackup Test Guide
Issue 01 (2021-01-19) Copyright © Huawei Technologies Co., Ltd. 54

NO TE
Recompile and install the software, for example, Percona XtraBackup 2.4.20.cd /home/rm -rf /home/percona-xtrabackup-2.4.20/tar -zxvf percona-xtrabackup-2.4.20.tar.gzls /home/percona-xtrabackup-2.4.20/cd /home/percona-xtrabackup-2.4.20/cmake -DCMAKE_INSTALL_PREFIX=/usr/local/xtrabackup-2.4.20 -DBUILD_CONFIG=xtrabackup_release -DWITH_MAN_PAGES=OFF -DWITH_BOOST=/home/boost_1_59_0/make -j96make -j96 install
----End
Kunpeng Database SolutionTest Guides 6 Percona XtraBackup Test Guide
Issue 01 (2021-01-19) Copyright © Huawei Technologies Co., Ltd. 55

A Change History
Date Description
2020-12-30 This issue is the fourth official release.Added 4.3 Testing HammerDB.
2020-09-24 This issue is the third official release.Add the TPC-H Test Guide (for MySQL).
2020-04-27 This issue is the second official release.HammerDB Test Guide (for Greenplum):Modified the tool download path in 4.2 Installing HammerDB.YCSB Test Guide (for MongoDB):● Added the installation of dependencies in 5.2 Installing YCSB.● Changed the format of the configuration file parameter
description to a table in 5.3 Testing YCSB.
2020-03-20 This issue is the first official release.
Kunpeng Database SolutionTest Guides A Change History
Issue 01 (2021-01-19) Copyright © Huawei Technologies Co., Ltd. 56