
Tecnicas de Iluminacion
129
LIGHTING TECHNIQUES for Photographing Model Portfolios Amherst Media ® PUBLISHER OF PHOTOGRAPHY BOOKS Billy Pegram STRATEGIES FOR DIGITAL PHOTOGRAPHERS
-
Upload
independent -
Category
Documents
-
view
4 -
download
0
Transcript of Tecnicas de Iluminacion

LIGHTINGTECHNIQUESfor PhotographingModel Portfolios
Amherst Media®
PUBLISHER OF PHOTOGRAPHY BOOKS
Billy Pegram
S T R A T E G I E S F O R D I G I T A L P H O T O G R A P H E R S


Copyright © 2009 by Billy Pegram.All rights reserved.
Published by:Amherst Media, Inc.P.O. Box 586Buffalo, N.Y. 14226Fax: 716-874-4508www.AmherstMedia.com
Publisher: Craig AlesseSenior Editor/Production Manager: Michelle PerkinsAssistant Editor: Barbara A. Lynch-JohntEditorial Assistance from: John S. Loder, Carey Ann Maines, Charles Schweizer
ISBN-13: 978-1-58428-259-4Library of Congress Control Number: 2008942245Printed in Korea.10 9 8 7 6 5 4 3 2 1
No part of this publication may be reproduced, stored, or transmitted in any form or by any means, electronic, mechani-cal, photocopied, recorded or otherwise, without prior written consent from the publisher.
Notice of Disclaimer: The information contained in this book is based on the author’s experience and opinions. The au-thor and publisher will not be held liable for the use or misuse of the information in this book.
Preface . . . . . . . . . . . . . . . . . . . . . . . . . . . . . . . . . . . . . . . . . . . . . . . . . .8
Introduction . . . . . . . . . . . . . . . . . . . . . . . . . . . . . . . . . . . . . . . . . . . . . .9It’s Not About Equipment . . . . . . . . . . . . . . . . . . . . . . . . . . . . . . . . . . .11Theory and Passion . . . . . . . . . . . . . . . . . . . . . . . . . . . . . . . . . . . . . . . .11Photographing Models . . . . . . . . . . . . . . . . . . . . . . . . . . . . . . . . . . . . .13The Rewards of Model Photography . . . . . . . . . . . . . . . . . . . . . . . . . . .13Creativity . . . . . . . . . . . . . . . . . . . . . . . . . . . . . . . . . . . . . . . . . . . . . .13Travel . . . . . . . . . . . . . . . . . . . . . . . . . . . . . . . . . . . . . . . . . . . . . . . .14Financial . . . . . . . . . . . . . . . . . . . . . . . . . . . . . . . . . . . . . . . . . . . . . .14Making a Positive Change . . . . . . . . . . . . . . . . . . . . . . . . . . . . . . . . .14
The Challenges of Model Photography . . . . . . . . . . . . . . . . . . . . . . . . .14Environmental Demands . . . . . . . . . . . . . . . . . . . . . . . . . . . . . . . . . .14Technical Challenges . . . . . . . . . . . . . . . . . . . . . . . . . . . . . . . . . . . . .14What to Emphasize . . . . . . . . . . . . . . . . . . . . . . . . . . . . . . . . . . . . . .15Working with People . . . . . . . . . . . . . . . . . . . . . . . . . . . . . . . . . . . . .16
Begin with Portraiture . . . . . . . . . . . . . . . . . . . . . . . . . . . . . . . . . . . . . .16
1. Basic Principles . . . . . . . . . . . . . . . . . . . . . . . . . . . . . . . . . . . . . . . .19Previsualization . . . . . . . . . . . . . . . . . . . . . . . . . . . . . . . . . . . . . . . . . . .19
Table of Contents

Emulate the Success of Others . . . . . . . . . . . . . . . . . . . . . . . . . . . . . .19Use Your Imagination . . . . . . . . . . . . . . . . . . . . . . . . . . . . . . . . . . . .19Communicate Your Concept . . . . . . . . . . . . . . . . . . . . . . . . . . . . . . .21
Objectives . . . . . . . . . . . . . . . . . . . . . . . . . . . . . . . . . . . . . . . . . . . . . . .22Creating Flow . . . . . . . . . . . . . . . . . . . . . . . . . . . . . . . . . . . . . . . . . .22Stopping the Gaze . . . . . . . . . . . . . . . . . . . . . . . . . . . . . . . . . . . . . . .24
Your Visual Toolbox . . . . . . . . . . . . . . . . . . . . . . . . . . . . . . . . . . . . . . .24Straight Lines . . . . . . . . . . . . . . . . . . . . . . . . . . . . . . . . . . . . . . . . . .24Curves . . . . . . . . . . . . . . . . . . . . . . . . . . . . . . . . . . . . . . . . . . . . . . . .25Composition and Cropping . . . . . . . . . . . . . . . . . . . . . . . . . . . . . . . .25Perspective . . . . . . . . . . . . . . . . . . . . . . . . . . . . . . . . . . . . . . . . . . . . .26
Tone and Color . . . . . . . . . . . . . . . . . . . . . . . . . . . . . . . . . . . . . . . . . . .27Use a Tripod . . . . . . . . . . . . . . . . . . . . . . . . . . . . . . . . . . . . . . . . . . . . .28
2. The Physics of Light . . . . . . . . . . . . . . . . . . . . . . . . . . . . . . . . . . . .30What Light Is . . . . . . . . . . . . . . . . . . . . . . . . . . . . . . . . . . . . . . . . . . . .31How Light Behaves . . . . . . . . . . . . . . . . . . . . . . . . . . . . . . . . . . . . . . . .32Reflection . . . . . . . . . . . . . . . . . . . . . . . . . . . . . . . . . . . . . . . . . . . . .32Refraction . . . . . . . . . . . . . . . . . . . . . . . . . . . . . . . . . . . . . . . . . . . . .32Absorption . . . . . . . . . . . . . . . . . . . . . . . . . . . . . . . . . . . . . . . . . . . .32
Quality of the Light . . . . . . . . . . . . . . . . . . . . . . . . . . . . . . . . . . . . . . . .32Size of the Light Source . . . . . . . . . . . . . . . . . . . . . . . . . . . . . . . . . . .33Natural Light . . . . . . . . . . . . . . . . . . . . . . . . . . . . . . . . . . . . . . . . . . .33
Direction of the Light . . . . . . . . . . . . . . . . . . . . . . . . . . . . . . . . . . . . . .35Front Light . . . . . . . . . . . . . . . . . . . . . . . . . . . . . . . . . . . . . . . . . . . .35Angled or Side Light . . . . . . . . . . . . . . . . . . . . . . . . . . . . . . . . . . . . .36Backlight . . . . . . . . . . . . . . . . . . . . . . . . . . . . . . . . . . . . . . . . . . . . . .37
Light and Color . . . . . . . . . . . . . . . . . . . . . . . . . . . . . . . . . . . . . . . . . . .39Color Temperature . . . . . . . . . . . . . . . . . . . . . . . . . . . . . . . . . . . . . .39Practical Example: Adding Variety with White Balance . . . . . . . . . . . .40
Light Intensity and Metering . . . . . . . . . . . . . . . . . . . . . . . . . . . . . . . . .42
3. Light Placement . . . . . . . . . . . . . . . . . . . . . . . . . . . . . . . . . . . . . . . .44Objectives . . . . . . . . . . . . . . . . . . . . . . . . . . . . . . . . . . . . . . . . . . . . . . .44Main Light . . . . . . . . . . . . . . . . . . . . . . . . . . . . . . . . . . . . . . . . . . . . . .44Practical Example: Lighting the Mask of the Face . . . . . . . . . . . . . . . .46
Fill Light . . . . . . . . . . . . . . . . . . . . . . . . . . . . . . . . . . . . . . . . . . . . . . . .50Hair Light . . . . . . . . . . . . . . . . . . . . . . . . . . . . . . . . . . . . . . . . . . . . . . .51Background Light(s) . . . . . . . . . . . . . . . . . . . . . . . . . . . . . . . . . . . . . . .51Accent Light(s) . . . . . . . . . . . . . . . . . . . . . . . . . . . . . . . . . . . . . . . . . . .51Lighting in the Studio . . . . . . . . . . . . . . . . . . . . . . . . . . . . . . . . . . . . . .51Lighting Outdoors and On Location . . . . . . . . . . . . . . . . . . . . . . . . . . .54
4 LIGHTING TECHNIQUES FOR PHOTOGRAPHING MODEL PORTFOLIOS
4. Types of Light Sources . . . . . . . . . . . . . . . . . . . . . . . . . . . . . . . . . .55Natural vs. Artificial Light . . . . . . . . . . . . . . . . . . . . . . . . . . . . . . . . . . .55Sunlight . . . . . . . . . . . . . . . . . . . . . . . . . . . . . . . . . . . . . . . . . . . . . . . . .55Bright Sunlight . . . . . . . . . . . . . . . . . . . . . . . . . . . . . . . . . . . . . . . . .55Cloudy Skies . . . . . . . . . . . . . . . . . . . . . . . . . . . . . . . . . . . . . . . . . . .56Practical Example: Bright Sunlight . . . . . . . . . . . . . . . . . . . . . . . . . . .56Practical Example: Morning Light . . . . . . . . . . . . . . . . . . . . . . . . . . .60Practical Example: Use What You Find . . . . . . . . . . . . . . . . . . . . . . . .61
Tungsten Lighting . . . . . . . . . . . . . . . . . . . . . . . . . . . . . . . . . . . . . . . . .63Practical Example: Slow Shutter Speed, High ISO . . . . . . . . . . . . . . .63
Fluorescent Lighting . . . . . . . . . . . . . . . . . . . . . . . . . . . . . . . . . . . . . . .64Electronic Flash . . . . . . . . . . . . . . . . . . . . . . . . . . . . . . . . . . . . . . . . . . .64Practical Example: Fill Flash . . . . . . . . . . . . . . . . . . . . . . . . . . . . . . . .64
Studio Strobe . . . . . . . . . . . . . . . . . . . . . . . . . . . . . . . . . . . . . . . . . . . . .65Practical Example: Strobe for Consistent Results . . . . . . . . . . . . . . . .66
5. Light Modifiers . . . . . . . . . . . . . . . . . . . . . . . . . . . . . . . . . . . . . . . .68Reflectors . . . . . . . . . . . . . . . . . . . . . . . . . . . . . . . . . . . . . . . . . . . . . . . .68Surface . . . . . . . . . . . . . . . . . . . . . . . . . . . . . . . . . . . . . . . . . . . . . . .69Design . . . . . . . . . . . . . . . . . . . . . . . . . . . . . . . . . . . . . . . . . . . . . . . .69For Fill . . . . . . . . . . . . . . . . . . . . . . . . . . . . . . . . . . . . . . . . . . . . . . .69Practical Example: Reflected Fill on Location . . . . . . . . . . . . . . . . . . .69Practical Example: Natural Reflectors . . . . . . . . . . . . . . . . . . . . . . . . .73
Gobos . . . . . . . . . . . . . . . . . . . . . . . . . . . . . . . . . . . . . . . . . . . . . . . . . .73Practical Example: Gobos to Control Accent Lighting . . . . . . . . . . . .73Practical Example: Gobos to Control Lens Flare . . . . . . . . . . . . . . . .75
Scrims . . . . . . . . . . . . . . . . . . . . . . . . . . . . . . . . . . . . . . . . . . . . . . . . . .75Barebulb Lighting . . . . . . . . . . . . . . . . . . . . . . . . . . . . . . . . . . . . . . . . .76Parabolics . . . . . . . . . . . . . . . . . . . . . . . . . . . . . . . . . . . . . . . . . . . . . . .76Practical Example: Backlighting with Parabolics . . . . . . . . . . . . . . . . .76
Beauty Dish . . . . . . . . . . . . . . . . . . . . . . . . . . . . . . . . . . . . . . . . . . . . . .78Diffusers . . . . . . . . . . . . . . . . . . . . . . . . . . . . . . . . . . . . . . . . . . . . . . . .78Barn Doors . . . . . . . . . . . . . . . . . . . . . . . . . . . . . . . . . . . . . . . . . . . . . .78Spotlights . . . . . . . . . . . . . . . . . . . . . . . . . . . . . . . . . . . . . . . . . . . . . . .78Grid Spots . . . . . . . . . . . . . . . . . . . . . . . . . . . . . . . . . . . . . . . . . . . . . . .79Snoots . . . . . . . . . . . . . . . . . . . . . . . . . . . . . . . . . . . . . . . . . . . . . . . . . .79Umbrellas . . . . . . . . . . . . . . . . . . . . . . . . . . . . . . . . . . . . . . . . . . . . . . .79Softboxes . . . . . . . . . . . . . . . . . . . . . . . . . . . . . . . . . . . . . . . . . . . . . . . .79Practical Example: Soft and Beautiful . . . . . . . . . . . . . . . . . . . . . . . . .79Practical Example: A Fresh, Colorful Look . . . . . . . . . . . . . . . . . . . . .81
Colored Gels . . . . . . . . . . . . . . . . . . . . . . . . . . . . . . . . . . . . . . . . . . . . .83
TABLE OF CONTENTS 5

6. Matching the Light to the Image . . . . . . . . . . . . . . . . . . . . . . . . . . .84Determining the Model’s Best Market . . . . . . . . . . . . . . . . . . . . . . . . . .84Age . . . . . . . . . . . . . . . . . . . . . . . . . . . . . . . . . . . . . . . . . . . . . . . . . .84Height . . . . . . . . . . . . . . . . . . . . . . . . . . . . . . . . . . . . . . . . . . . . . . . .86Overall Appearance . . . . . . . . . . . . . . . . . . . . . . . . . . . . . . . . . . . . . .86
Commercial Images . . . . . . . . . . . . . . . . . . . . . . . . . . . . . . . . . . . . . . . .86Practical Example: Mariposa Films . . . . . . . . . . . . . . . . . . . . . . . . . . .88
Fashion Images . . . . . . . . . . . . . . . . . . . . . . . . . . . . . . . . . . . . . . . . . . .90Glamour Images . . . . . . . . . . . . . . . . . . . . . . . . . . . . . . . . . . . . . . . . . .91Lingerie Images . . . . . . . . . . . . . . . . . . . . . . . . . . . . . . . . . . . . . . . . . . .92Plus-Size Images . . . . . . . . . . . . . . . . . . . . . . . . . . . . . . . . . . . . . . . . . .94Editorial Images . . . . . . . . . . . . . . . . . . . . . . . . . . . . . . . . . . . . . . . . . . .95Athletic/Sports Images . . . . . . . . . . . . . . . . . . . . . . . . . . . . . . . . . . . . .96Catalog Images . . . . . . . . . . . . . . . . . . . . . . . . . . . . . . . . . . . . . . . . . . .98Swimwear Images . . . . . . . . . . . . . . . . . . . . . . . . . . . . . . . . . . . . . . . . .99Practical Example: Two Looks in the Desert . . . . . . . . . . . . . . . . . .100
Special Attributes . . . . . . . . . . . . . . . . . . . . . . . . . . . . . . . . . . . . . . . . .101

7. Creative Techniques . . . . . . . . . . . . . . . . . . . . . . . . . . . . . . . . . . .102Drag the Shutter for Creative Effect . . . . . . . . . . . . . . . . . . . . . . . . . . .102Control the Background with Light . . . . . . . . . . . . . . . . . . . . . . . . . . .102Look Around! . . . . . . . . . . . . . . . . . . . . . . . . . . . . . . . . . . . . . . . . . . .107Create a Storyboard . . . . . . . . . . . . . . . . . . . . . . . . . . . . . . . . . . . . . . .107Add Lens Flare . . . . . . . . . . . . . . . . . . . . . . . . . . . . . . . . . . . . . . . . . .111Do Extreme Close-Ups . . . . . . . . . . . . . . . . . . . . . . . . . . . . . . . . . . . .115Work with Performers . . . . . . . . . . . . . . . . . . . . . . . . . . . . . . . . . . . . .116Practical Example: Emerald Dream Ball . . . . . . . . . . . . . . . . . . . . . .116Practical Example: Headlights and Tailpipes . . . . . . . . . . . . . . . . . . .117
Highlight One Asset . . . . . . . . . . . . . . . . . . . . . . . . . . . . . . . . . . . . . .119Use a Prop . . . . . . . . . . . . . . . . . . . . . . . . . . . . . . . . . . . . . . . . . . . . . .120Practical Example: AK-47 . . . . . . . . . . . . . . . . . . . . . . . . . . . . . . . .120Practical Example: Newspapers . . . . . . . . . . . . . . . . . . . . . . . . . . . .120
8. Additional Tips . . . . . . . . . . . . . . . . . . . . . . . . . . . . . . . . . . . . . . .122U.S./European vs. Asian Agencies . . . . . . . . . . . . . . . . . . . . . . . . . . . .122U.S. and European Agencies . . . . . . . . . . . . . . . . . . . . . . . . . . . . . .122Asian Agencies . . . . . . . . . . . . . . . . . . . . . . . . . . . . . . . . . . . . . . . . .122
Comp Cards . . . . . . . . . . . . . . . . . . . . . . . . . . . . . . . . . . . . . . . . . . . .122The Model’s Comfort . . . . . . . . . . . . . . . . . . . . . . . . . . . . . . . . . . . . .122Clothing . . . . . . . . . . . . . . . . . . . . . . . . . . . . . . . . . . . . . . . . . . . . . . .123Men vs.Women . . . . . . . . . . . . . . . . . . . . . . . . . . . . . . . . . . . . . . . . . .123Image Quality . . . . . . . . . . . . . . . . . . . . . . . . . . . . . . . . . . . . . . . . . . .123
Conclusion . . . . . . . . . . . . . . . . . . . . . . . . . . . . . . . . . . . . . . . . . . . . .124
Index . . . . . . . . . . . . . . . . . . . . . . . . . . . . . . . . . . . . . . . . . . . . . . . . . .125
TABLE OF CONTENTS 7

Ifirst met Billy Pegram when he was shooting fashion in Seattle and I wasthe new agent on the block. We developed a synergistic relationship. Heintroduced me to clients; I had him shoot the models I represented. I havenow known him for nearly three decades. During this time, we have learnedfrom each other and become friends. I have admired his creativity, arguedwith him over what should be in a model’s portfolio, laughed at his silly jokes,and been highly impressed with his professionalism. However, it has onlybeen since becoming his typist/reader/spellchecker that I have begun to ap-preciate his vast knowledge of all the various aspects of photography. I nowcringe when I hear someone speak of a shooter as “just a photographer.”There is so much more to photography than just picking up a camera and
going at it. A good photographer must have in-depth knowledge of a multi-tude of disciplines. A photographer must be not only an artist, but also amathematician, a chemist, and a physicist—and, of course, part psychologistjust to deal with the personalities of the models, directors, clients, and sup-port staff. It also helps to have a firm knowledge of business practices.Billy Pegram is all of these things and more. His background is eclectic. He
was an award-winning photographer in ninth grade, then headed to collegeon a full athletic scholarship and an appointment to Annapolis Naval Acad-emy. He began college as a pre-med student, then joined the military whenhe lost his scholarship due to a broken leg. That led to a stint with NASA atthe Navy Aerospace Medical Research Lab, where he not only set records forrides on the rocket sled (sixty-four rides and a maximum of 16.7Gs) but alsoran the lab.Later, as a civilian, he was offered jobs as a director of a research lab, a
wilderness survival teacher, and a whitewater guide (among several othermore mundane opportunities). He still considered becoming a doctor, spe-cializing in medical research, and was offered a full scholarship to do so. How-ever, he put all offers aside to become a photographer, because, as he says, “Itwas more challenging.”Billy Pegram is a born teacher, a perfectionist, an expert in his field, a great
writer, and a creative genius. He is a friend and mentor to hundreds of hope-ful models and aspiring photographers. He is also one who enjoys a goodchallenge. In short, he is the definitive photographer.
8 LIGHTING TECHNIQUES FOR PHOTOGRAPHING MODEL PORTFOLIOS
Prefaceby Loa Andersen

When Amherst Media initially asked me to write an instructional bookon photographic lighting, I had some reservations about the idea.
After all, there are many fine books available on this subject. However, afterreviewing many of these publications, I found that very few actually put light-ing in practical, understandable terms. So I proposed creating a book that
Introduction
I-1. When the model looks great and theimage is engaging, no one will care ex-actly what kind of lighting equipmentyou used to create it.

would show not only the technical aspects of lighting, but also the thoughtprocess behind the creation of an image, emphasizing the details that need tobe considered. For the purposes of this book, these discussions will be furtherdirected toward photographing models. This will involve shooting imagesspecifically for their portfolios, but also shooting images for clients (imagesthat will also, in many cases, end up in the models’ portfolios).
10 LIGHTING TECHNIQUES FOR PHOTOGRAPHING MODEL PORTFOLIOS
I-2. To be a success in photography, youneed to pick a field for which you havea passion—something that drives yourcreativity.
This will involve
shooting images
specifically for their
portfolios, but also
shooting images for
clients . . .
It’s Not About Equipment
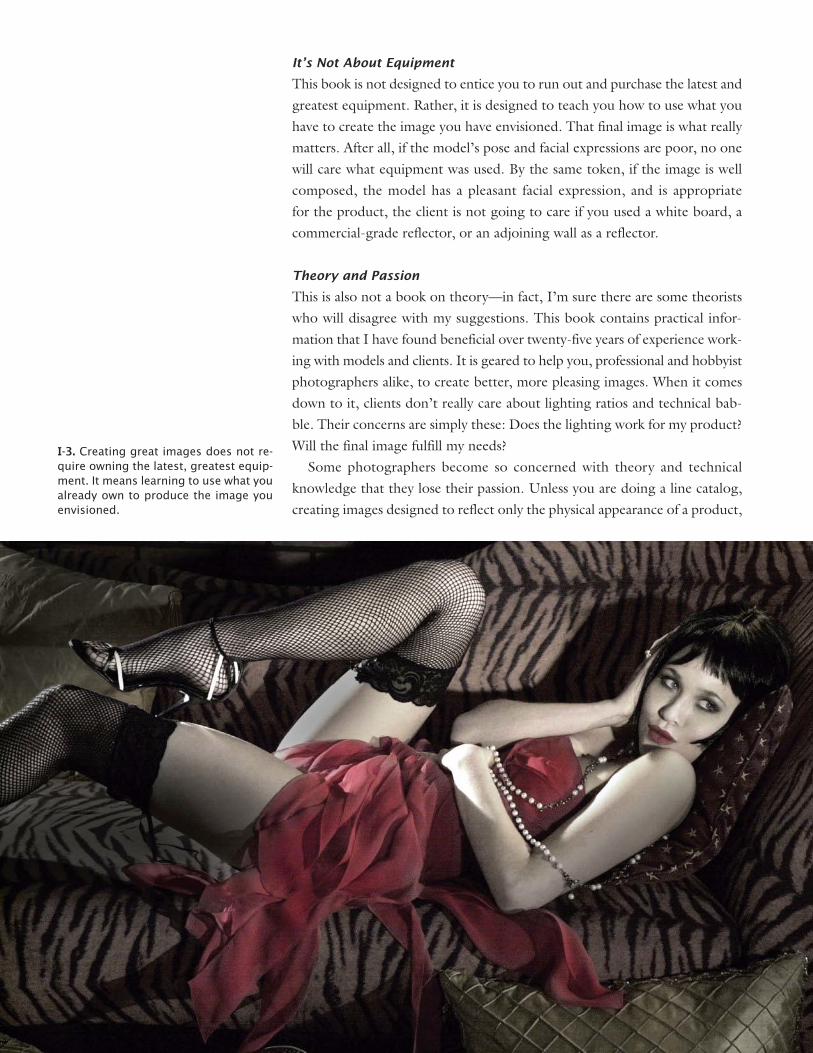
This book is not designed to entice you to run out and purchase the latest andgreatest equipment. Rather, it is designed to teach you how to use what youhave to create the image you have envisioned. That final image is what reallymatters. After all, if the model’s pose and facial expressions are poor, no onewill care what equipment was used. By the same token, if the image is wellcomposed, the model has a pleasant facial expression, and is appropriatefor the product, the client is not going to care if you used a white board, acommercial-grade reflector, or an adjoining wall as a reflector.
Theory and Passion
This is also not a book on theory—in fact, I’m sure there are some theoristswho will disagree with my suggestions. This book contains practical infor-mation that I have found beneficial over twenty-five years of experience work-ing with models and clients. It is geared to help you, professional and hobbyistphotographers alike, to create better, more pleasing images. When it comesdown to it, clients don’t really care about lighting ratios and technical bab-ble. Their concerns are simply these: Does the lighting work for my product?Will the final image fulfill my needs?Some photographers become so concerned with theory and technical
knowledge that they lose their passion. Unless you are doing a line catalog,creating images designed to reflect only the physical appearance of a product,
I-3. Creating great images does not re-quire owning the latest, greatest equip-ment. It means learning to use what youalready own to produce the image youenvisioned.

there must be passion in an image for it to be considered a success. Passion issimply a necessary ingredient for a photographer. You must love what you doand you must do it not for the money or the travel, but for the work itself. Ifyou don’t have passion for the work, it will show in your photography. If youdon’t like women, that dislike will come across in your images of models. Ifyou think fashion is stupid, boring, and phony, you would be better off get-ting into a different line of work. Photographers should not allow themselvesto be trapped in a field that they consider mundane or boring. If you are notenjoying what you are doing, it becomes just another job rather than an ex-citing, creative career.
Photographing Models
When I started out in photography, I wanted to be a landscape photogra-pher. However, with subjects that change very little from year to year and theneed to build an extensive stock collection before you begin receiving com-pensation for your efforts, I soon decided to take my career in anotherdirection.I decided to start shooting fashion, model, and talent photography be-
cause there is a constant influx of new people and creative ideas in that field.Fashion and model photography allows you to work either with a client/model separately or with a group of other creative people, like makeup artists,designers, location specialists, and agents. Their goal is to create a powerfulvisual experience: the still image. In addition to providing ample avenues forcreativity, you are paid at the time of delivery.As a fashion photographer, you are a problem solver. Your job is to show
the clothing or product in the most appealing way. You must create a moodto make the client’s product sell to a potential buyer. When shooting for amodel’s portfolio, that same idea applies—but the model herself is the prod-uct. The same procedures and thought processes are used, but now they arefocused on making the model appeal to the portfolio’s viewers: the model’spotential employers.How do you show the model’s best attributes? Creativity. As a model pho-
tographer, it’s your job to design images that will stimulate the viewer of theportfolio to hire the model. To succeed, you need to possess the precise tech-nical skills of the commercial photographer, the creative eye of an artist, andthe sensitivity to the human condition of the fine-art portrait photographer.
The Rewards of Model Photography
Creativity. The rewards of model photography are immeasurable. It is a cre-ative occupation where you are involved in every phase of the process—fromthe concept to the completion. Creativity is encouraged and rewarded, andyou are also given the opportunity to work with other creative individuals.
INTRODUCTION 13
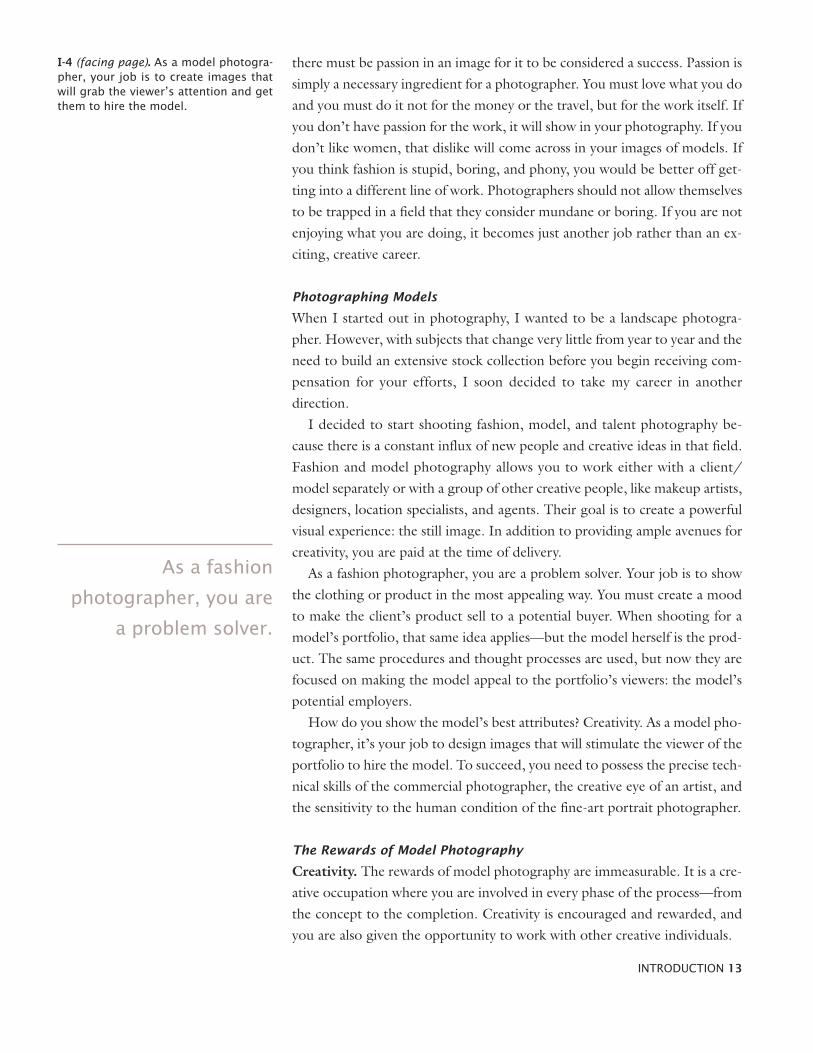
I-4 (facing page). As a model photogra-pher, your job is to create images thatwill grab the viewer’s attention and getthem to hire the model.
As a fashion
photographer, you are
a problem solver.

Travel. Also, as a model and fashion photographer, you will be given theopportunity to travel and experience new environments—not as a tourist, butas an integral part of the region. The fashion photographer will get a uniqueimpression of the location, because he will integrate the landscape and the“feel” of the area in his fashion work.
Financial. Financially, this field can be very rewarding, but it may takeyears to become known or to establish a distinctive style and a great reputa-tion. Marketing your distinctive style and reputation will, however, create ademand for your work, reward you with financial success, and elevate yourprofessional status.
Making a Positive Change. On a personal note, the aspect of this fieldthat satisfies me the most is the ability to instill confidence in a new model.Many young models lack self-esteem. They are convinced that models whoare published are perfect and lacking any personal flaws. The driving forcefor me to continue working with beginners is to see the expressions on theirfaces as they view their photographs and see that they look like the estab-lished models they see in print. The change in self-esteem and confidencethat appears as a portfolio progresses, and the praise of the parents about thechange in their daughter’s life, is, to me, an immeasurable reward. How doyou put a value on a positive change in someone’s life?
The Challenges of Model Photography
Environmental Demands. Many people envision the life of a fashion pho-tographer as one big round of parties in exotic locations, filled with beautifulmodels and fascinating celebrities. It is true that many locations are exotic,models generally are beautiful, and some celebrities actually are interesting.However, the reality is that a fashion photographer’s life is one of very hardwork with extreme pressure to “be creative” while staying within budget.When accepting a client, the photographer shoulders enormous responsi-
bility. There must be meticulous attention to detail, schedules must be main-tained, and deadlines must be met. There are crews of assistants, makeupartists, hair stylists, photo stylists, and other personnel for whom the pho-tographer is ultimately responsible. Shots must be perfect; images must suitthe client’s needs.Often, the photographer must produce excellent work under trying cir-
cumstances, working with ill-fitting garments, miscast models, and overzeal-ous on-lookers or paparazzi. Sometimes, those exotic locales may work againstthe photographer, as well. Mosquitoes, sand-fleas, high winds, unexpectedrain, and heavy cloud cover do not add up to a pleasant photo shoot—muchless a glamorous adventure!
Technical Challenges. No matter how experienced you are as a photog-rapher, there are always new techniques to learn—new equipment, new cap-
14 LIGHTING TECHNIQUES FOR PHOTOGRAPHING MODEL PORTFOLIOS
How do you put a value
on a positive change in
someone’s life?

ture methods, and new styles. Your repertoire of techniques must always bechanging and suited to the current tastes of the market.
What to Emphasize. An additional challenge in working in fashion is thatyou need to be versed in all aspects of hair, makeup, and photo styling. Build-ing a team of specialists is critical to attaining professional status as a shooter.This involves carefully evaluating the purpose of each session. Before I do afashion shoot, I ask myself some questions: What are we trying to show? Is ita particular item of clothing? Something special about the clothing (e.g., azipper, material, or a design)? What is it that will prompt the viewer of thephotos to want to purchase this product?When you are shooting images for a model’s portfolio, you should ask
yourself the same questions. What are we trying to show? What will inspirethe client to hire this model? Remember, the purpose of creating the model’sportfolio is to show a wide range of looks and to feature her best attributes.The ultimate goal is for the potential employer to see something in her bookthat he can relate to and, based on that, to want to hire her.Teamwork counts. After you decide what you need to emphasize in the
photograph, your team (makeup artist, hairdresser, and photo stylist) will allneed to work together to create the optimal image. Having specialists assist
INTRODUCTION 15
I-5. Getting to work with models andhelp them advance their careers is oneof the most rewarding aspects of thejob.

you drastically reduces your workload and enhances the creative process. Agood support team that works together frequently can even help an advancedamateur photographer begin to produce top-quality professional work.
Working with People. Fashion photography is not just about recordingan image, it’s about making a statement. When you are working with profes-sional models, it is their responsibility to bring forth the desired feeling in thephotograph. Professionals know how to pose their bodies to complement theimportant elements of the photograph, whether it’s clothing, jewelry, or an-other product.When working with beginners, however, it is absolutely necessary for the
photographer to give the new model specific and concise direction. Be patientduring the shoot, because new models will experience frustration in posingand communicating the feeling that is required. This makes providing posi-tive statements and reinforcement a necessity.The model must feel at ease to do her best work. Part of the photogra-
pher’s job is creating a safe and comfortable environment and assisting be-ginners with understanding the shooting process.
Begin with Portraiture
In this business, it takes a long time to get established, so be prepared to gothe distance if you want to achieve success. You will also need a great deal of
16 LIGHTING TECHNIQUES FOR PHOTOGRAPHING MODEL PORTFOLIOS
I-6. For the model to do her best work,you need to create a safe, comfortableenvironment. The model needs to knowwhat the objectives are and feel confi-dent in your ability to achieve them.

photographic knowledge to prepare yourself for all the demands of lighting,posing, etc. You’ll need to become knowledgeable about makeup, hair, andclothing styles, plus you’ll have to learn to work with and instruct people. Allthis knowledge needs to be gained before starting out as a fashion photogra-pher. If you start shooting as a fashion photographer before you have gainedthe expertise needed, you can easily blow an assignment and establish a poorreputation.My recommendation for getting started is that you begin as a portrait pho-
tographer, where you practice your skills in a controlled lighting environmentand learn to develop a rapport with people. In fact, the images of many fineportrait photographers cross over into what is really more of a fashion or com-mercial style, because their clients want “designer portraits”—portraits thatare creative and unique to the individual.Using lighting, composition, and design, each photographer—whether
portrait or fashion—will create their own style. The portrait specialist, how-ever, can use the same style, or combination of styles, for many sessions—oreven for years. This can be a great asset when you are getting started, since itallows you to become comfortable with the photography process and work-ing with your subjects without the constant pressure to produce a totallyunique image every time.
I-7. Models have different looks, styles,and personalities. Learning how to high-light what makes a model unique is animportant skill.

Fashion photographers, on the other hand, must constantly change their style.Fashion specialists may have shooting tendencies (e.g., use of grain, brightcolors, tilting the camera off axis, etc.), but they must be able to adapt quicklyto each client’s needs or they will eliminate many potential accounts. This iswhat allows the fashion business to rapidly change and go in entirely differ-ent directions each season. The general public, the buyers of the productsbeing sold, has a short attention span and is always looking for innovation infashion. As a result of this fast pace, the fashion industry justly rewards thosephotographers whose creativity and ability to innovate can keep pace with thechanges in this always-evolving field.As you become comfortable with the process of creating portraits, it is
important that you begin to challenge yourself to design and execute self-projects that will teach you additional lighting techniques and fashion styles.Develop your own style slowly, and don’t accept clients or jobs you are
not totally comfortable handling. As you progress, you can develop a team ofhairdressers, makeup artists, and clothing stylists to give you the best possi-ble chance of creating great images.As far as the business aspects go, it’s a full-time job to maintain the books
and deal with the paying of bills and banking, so I turn that aspect over tosomeone I can trust. This frees me up to do what I do best: shoot.
18 LIGHTING TECHNIQUES FOR PHOTOGRAPHING MODEL PORTFOLIOS
I-8. As you become more confident,challenge yourself to produce more cre-ative images with a fashion edge.

Previsualization
Over the years, I have heard many people refer to the photographer’s orartist’s “eye.” This refers to an individual’s ability to previsualize a photo-graph or a piece of art before starting the production process. Previsualizationis necessary anytime you work with models. After all, a model is not an in-animate object that can sit there all day. Her job is to communicate feelingsand add emotion to the photograph. By planning out your lighting (and pos-ing) ideas before the shoot starts, you’ll be best equipped to capitalize on themodel’s abilities.
Emulate the Success of Others. A great source of inspiration is the workof other photographers you admire. Make a resource collection of these sam-ples to help hone your own likes and dislikes. You don’t need to copy everydetail of another photographer’s images to make your photographs success-ful, just emulate the elements that mesh with your personal vision.
Use Your Imagination. When creating an image, especially when tryingto emulate another photographer’s work, be sure to look for ways to inte-grate your personal feelings—your likes and dislikes, loves and passions. Imag-ination is the most powerful tool a photographer can possess. Technicalproficiency can be learned through education, experimentation, and practice,but imagination comes from within. Studying the work of current and pastartists and photographers will assist in your imaginative process and help youto establish your own unique style.When photographing people, the photographer must exert more energy
than the model to bring life into the photograph. Ask yourself a few questionsbefore shooting:
• What are we trying to show/sell?
• How should the lighting relate to the background, thepose, the clothing, or the product?
• What lighting is appropriate for the clothing, product, orthe desired feeling of the photograph?
BASIC PRINCIPLES 19
1. Basic Principles
When creating an
image, look for ways
to integrate your
personal feelings.


Communicate Your Concept. After settling on an idea or concept, youmust communicate it to the model before you start working. This will estab-lish your credibility with those on the set and allow the whole team to workin a unified direction. Keep in mind that being in front of the camera canmake people nervous, so being clear with your instructions and making thesession professional can increase your chances of success by putting the modelat ease.One way to communicate your intent is to show sketches or sample pho-
tographs of the style, the poses, and the overall feel of the photograph youwant to create. Another trick is to have someone stand in as the subject andallow the model to look through the camera so she can see what you are see-ing and understand your objectives. Finally, you may even try having themodel pose without the camera in place—that sometimes helps to relieve anx-iety about the shoot.
BASIC PRINCIPLES 21
1-1 and 1-2. When you see an image ora style that appeals to you, look forways to incorporate it in your images.For example, these photographs havean “old Hollywood” glamour look that isvery popular.
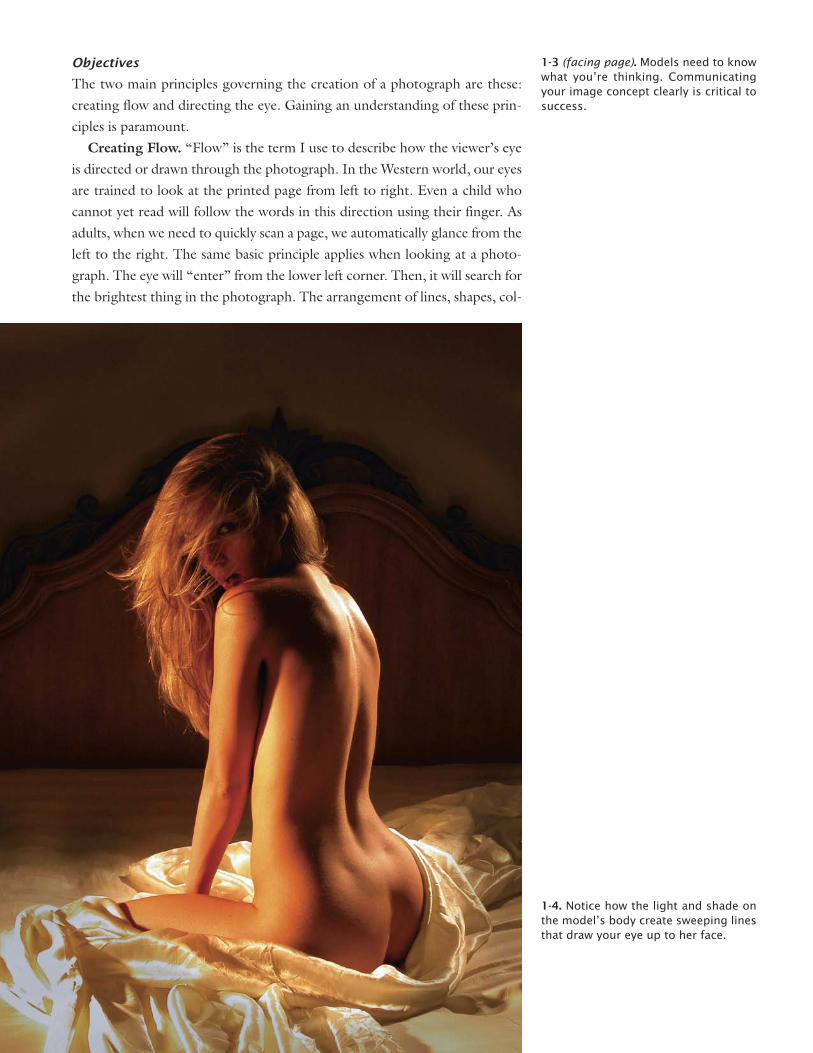
Objectives
The two main principles governing the creation of a photograph are these:creating flow and directing the eye. Gaining an understanding of these prin-ciples is paramount.
Creating Flow. “Flow” is the term I use to describe how the viewer’s eyeis directed or drawn through the photograph. In the Western world, our eyesare trained to look at the printed page from left to right. Even a child whocannot yet read will follow the words in this direction using their finger. Asadults, when we need to quickly scan a page, we automatically glance from theleft to the right. The same basic principle applies when looking at a photo-graph. The eye will “enter” from the lower left corner. Then, it will search forthe brightest thing in the photograph. The arrangement of lines, shapes, col-
1-3 (facing page). Models need to knowwhat you’re thinking. Communicatingyour image concept clearly is critical tosuccess.
1-4. Notice how the light and shade onthe model’s body create sweeping linesthat draw your eye up to her face.

ors, and tones in the frame will direct this search—and the photographer mustuse these elements to control the flow, directing the eye to the intended sub-ject of the image (the product, the garment, the model’s face, etc.). For animage to succeed, elements that block the flow of the eye to the desired areamust be eliminated.Two of the most important tools for achieving this goal are the position-
ing of the model’s body and the light upon it. For example, the viewer’s eyemay follow the edge-lit line of a leg up through the body to the face. Alter-nately, the body might be posed and lit so that the viewer’s eye is drawn upthe model’s arm to her diamond bracelet. Similarly, the whole image mightbe designed to draw your eye to the cut of the gown the model is wearing.A helpful way to practice achieving the right flow is to look at some pho-
tos or magazine ads and diagram the flow of your eye to the subject of thephoto (or to the logo in an ad shot). It may help to turn the image upsidedown. This makes it less recognizable; instead of a body, the subject is ren-dered more as a series of shapes and colors. Observing these simple shapes canhelp you to visualize the flow more easily. Analyze the flow of the photographupside down, then turn it right side up and see if it still has the same flow. Ifyou’re looking at an image on your computer screen, you can also try re-versing it from left to right and observing how this impacts the flow. This isfrequently done in editorial and advertising images to better direct the view-ers’ eyes through the image.
Stopping the Gaze. Stopping the viewer’s gaze is the objective of creat-ing flow. Where should the eye stop? It might be the client’s logo, the detailon a garment, or the eyes of the model—it all depends on the intent of theimage. If you look at an image and find that your eye is blocked (i.e., it stopsbefore it gets to the intended subject) or is directed to an unintended area,there’s a problem with the flow; your gaze is not directed to the proper placein the frame. After you have trained your eye to see the flow of a photograph(and stop it in just the right spot), you will be able to previsualize the neededcomposition, then design the lighting setup and pose to meet your creativeobjectives.
Your Visual Toolbox
To control the flow and emphasize the intended subject, the photographermust understand the basic tools used to manipulate the path of the viewer’sgaze. Some basic elements are: lines, curves, composition and cropping, per-spective, and tone/color. Of these elements, lighting has an obvious effect ontone and color, but can also be used to create or accentuate lines and curves.Let’s quickly review all of these important qualities.
Straight Lines. Straight lines give the photo a structured appearance,which is most often used when a strong, commanding aura is needed. Among
24 LIGHTING TECHNIQUES FOR PHOTOGRAPHING MODEL PORTFOLIOS
Previsualize the
needed composition,
then design the
lighting and pose to
meet your objectives.

straight lines, diagonal lines are more dynamic than vertical or horizontalones. Vertical and horizontal lines, however, can be good for grounding animage, providing contrast to curves, or lending a sense of solidity.
Curves. Curves tend to be more elegant and stylish than straight lines.They also create a considerably softer look.
Composition and Cropping. Composition is the term used to describethe placement of the subject in the frame and the overall visual interplay of allthe elements within the frame. In particular, planning your subject placementcan be critical to developing a lighting strategy—especially when workingoutdoors or on location. In these situations, subject lighting, background se-lection/control, and composition must all be delicately balanced to producethe desired image.There are many theories about how to compose the most powerful image,
but one guideline that will serve you particularly well in model photographyis the Rule of Thirds. According to this rule, the frame is divided up intothirds (imagine a tic-tac-toe grid superimposed over the frame). These linesindicate good places for a subject within that frame. The intersections areconsidered particularly ideal positions for a subject. In most portraits andbeauty images, this means that the subject’s face (in a full-length shot) or eyes(in a headshot) will be placed somewhere along the top one-third line. In
BASIC PRINCIPLES 25
1-5. Long, straight highlights run theentire length of the model’s body in thisimage. These lines give the photographa look of strength that is well suited toan athletic shot like this.

other images, the product or logo may be placed along one of these lines toemphasize it.A particularly practical aspect of applying the Rule of Thirds is that it tends
to leave you with an open area that is suitable for placing ad copy. The model’sbody can also be posed to lead the eye directly to this text. (Note: Whenshooting for a commercial client, the art director will normally give you asketch or a layout for the ad. I suggest you shoot this exact layout, then re-spectfully make any suggestions you might have for small variations to createin some additional photos. It may seem like overkill, but the client will un-derstand how hard you will work to get the right shot.)
Perspective. Perspective is another tool that can be used to direct the eye.For example, you can use a long lens (200mm or more) to help you separatethe subject from the background by reducing the depth of field. For com-
1-6. The subject of this image is the dress. Notice how the light skims across it toreveal the texture and how the model’s movement shows the cut and flow of thegarment. Additionally, notice how this image works with the Rule of Thirds. If wewanted to concentrate on the model, rather than the dress, her face would proba-bly have been placed at the upper left intersection. Instead, her face is turned awayfrom the camera and the dress’s unique neckline is situated at this intersection,drawing your eye to it.

mercial and fashion work, I find that a wide-angle lens (28mm or less) cancombine with a dramatic pose and lighting to create impressive images.
Tone and Color. Earlier, I mentioned that the eye enters a photograph atthe lower left corner, then looks for the nearest bright area. This is becausecontrast draws our eye, and a bright area is usually an area of high contrast.The exception to this would be in a high-key image, where the dark areas ofthe shot are what provide contrast with the otherwise light tones throughoutthe frame. Another element that draws our eye is color. Highly saturated, in-tense colors will draw the viewer’s eye more than pastel or subdued ones.Similarly, warm colors (like red and yellow) attract more attention than coolcolors (like blue and green).In terms of lighting, think about what this means. If you have a subject in
a black dress against a black background, the areas that attract the eye will be
BASIC PRINCIPLES 27
1-7. Here, the areas of highlight—themodel’s feet and buttocks—are whatdraw your eye in a frame that is other-wise quite dark.

the ones you allow light to fall on. It’s up to you to determine what areasthose should be. Conversely, if you have a subject in a white dress against awhite background, the areas that attract the eye will be the ones you preventlight from hitting. There are lighting decisions you can make in terms of colorcomposition, too—like adding a warm gel to your main light, a colored gelon the background, or maybe choosing a gold reflector instead of a silverone. Even changing the white-balance setting on your camera can changehow the camera “sees” the scene and how its composition is interpreted byviewers. (More on this in chapter 2.)
Use a Tripod
As a final note, I suggest that you make it a practice to use a tripod. A tripoddoes more than simply hold the camera steady. It allows you to set the hori-zon line level and to avoid having to reset it each time you shoot. It also letsyou evaluate the composition more carefully as you are setting up the shot.This leaves you free to really focus on the model’s expression when shoot-ing—a critical element in creating top-quality images.Additionally, using a tripod eliminates some of the fatigue that can be
caused by having to hold the camera all day—especially since many of the
28 LIGHTING TECHNIQUES FOR PHOTOGRAPHING MODEL PORTFOLIOS
1-8 (left). The model stands out fromthe dark blue background because sheis lighter and warmer in tone and color.
1-9 (right). The model’s shape, in darkjeans, is sharply defined against thewhite background.

longer lenses are quite heavy. You won’t be at your most creative if you’retired and fighting sore muscles. I think using a tripod or monopod also addsto the “professional” appearance of the photographer, and this can help in-spire confidence and trust in your models and clients—which is bound tomake your job easier.When shooting below 1/250 second, using a tripod is critical to ensure sharp
images. If you haven’t been using a tripod, adding one to your tool kit willdrastically improve your photographs for this reason alone. (Note:Of course,blur is not always a negative effect. It can enhance motion, create a feeling ofbeing a candid photo, and create an overall emotional image. The secret is todo it in a way that illustrates that you have total control of the photograph andthat the blur has been created intentionally to add visual impact. It shouldnever be mistaken for a technical error. There is something to be said for thestatement, “Shoot like you know what you’re doing!”)
1-10. Notice how the lighting createscontrast on the model’s head and shoul-ders, drawing your eye to those areas.Because there is much less contrast inthe lower half of the frame, it has lessvisual emphasis.
Do it in a way that
illustrates that you
have total control of
the photograph.

Light is the essence of all photography. Indeed, the very word “photog-raphy” is derived from the ancient Greek words for “writing with light.”
From the searing power of midday sun in Las Vegas, to the soft glow of a sin-gle candle, to the spectrum invisible to the human eye, it is light’s manymoods that we attempt to capture in our images. Therefore, an understand-ing of light, what it is and how it behaves (as well as how to use it to your ad-
2. The Physics of Light
2-1. Understanding light will allow youto create photographs that rise abovethe norm.
It is light’s many
moods that we
attempt to capture in
our images.

vantage) is necessary. The photographer must learn to control, manipulate,and exploit light to provide mood and interest.Understanding the lighting will enable you to create photographs that rise
above the norm. Think of moments when the effects of light in nature mayhave inspired you—sun breaking through early morning fog, water dropletsglistening on a leaf, shadows stretching down a sidewalk. Use these memo-ries to create images that will stir the viewer’s emotions. This is what makesan exceptional photograph.
What Light Is
Light is a form of electromagnetic energy that travels in waves, like the rip-ples on the surface a pond after someone has thrown a stone in it. Unlikewater waves, light waves don’t require a medium through which to travel. Infact, light travels best in a vacuum; air actually slows it down. Like all formsof electromagnetic energy, one way to measure light is in wavelengths, the dis-tance between two corresponding points on successive waves. The wave-lengths of visible light range from 400 to 700 nanometers, but the visiblespectrum is only a small part of the complete electromagnetic spectrum,which includes radio, infrared, ultraviolet, X-rays, and gamma rays—wavesthat are all differentiated by their unique wavelengths.
THE PHYSICS OF LIGHT 31
2-2. Light is the essence of photogra-phy, creating the many moods we cap-ture in our images.

As a visual artist and photographer, light is the primary resource of yourcraft. Therefore, photographers tend to speak of light in more emotionalterms such as hard or soft, warm or cool, romantic or harsh. To understandthings like color temperature, color-balancing filters, and white balance, how-ever, it’s useful to be familiar with the physics of light. This is because light iswhat produces color. In fact, when we talk about color, we are actually refer-ring to wavelengths of light that produce a particular color. For example,when we talk about something being “blue” we are really saying that the lightit reflects to our eyes is of a wavelength that elicits the sensation of blue.
How Light Behaves
Four different things can happen to light waves when they strike a surface:they can be reflected (or scattered), absorbed, refracted, or transmitted—andmore than one of these can happen simultaneously. Understanding how thisworks, and how to predict it, is key to photographic lighting.
Reflection.When light hits a flat, reflective surface (like a mirror), the re-flected waves will always come off the flat surface at the equal and oppositeangle at which the incoming wave of light struck the surface. Knowing thiscan help you eliminate or create reflections that are visible from the camera.Scattering is basically reflection off a rough surface. Because the surface is
uneven, light waves that strike it are reflected at many different angles. Whenyou use a white board (a matte white reflector) this it what happens—it scat-ters the light and makes it more diffuse (softer).Translucent surfaces, like the nylon used in photographic umbrellas and
softboxes, transmit some of the light and scatter some of it. Because some ofthe light waves are scattered they strike the subject at many different angles,which is what makes the light softer and more diffused than without a soft-box or umbrella (more on light modifiers in chapter 5).
Refraction. When light waves move from air to glass (which is moredense), the light slows down. If it strikes the glass at an angle, it will alsochange direction. This is known as refraction. Knowing how glass elementswill bend light allows optical engineers to design camera lenses. Refraction isalso used in spotlights and spots with Fresnel lenses, which focus the lightinto an intense beam.
Absorption.When light isn’t reflected or transmitted, it’s absorbed. Thisis why black velvet backdrops, which absorb virtually all of the light thatstrikes them, are often used in photography.
Quality of the Light
Lighting is generally defined as being hard or soft. Hard light creates deep,crisp shadows (the difference between highlight areas and shadow areas issharply defined). This creates a dramatic look with high contrast that tends to
32 LIGHTING TECHNIQUES FOR PHOTOGRAPHING MODEL PORTFOLIOS
As a visual artist and
photographer, light is
the primary resource
of your craft.

accentuate shape and texture. Soft light creates lighter, more gentle shadows(the transitions from highlight areas to shadow areas are more gradual). Thislower-contrast lighting tends to smooth shapes and texture. Because soft lighttends to be flattering, it is popular in all types of people photography. How-ever, great images can also be made with hard light sources—or even a com-bination of both soft and hard.
Size of the Light Source. The controlling factor in whether a light sourcewill produce hard light or soft light is its size relative to the subject. The largerthe light is in relation to the subject, the softer (less contrasty) the light willappear; the smaller the light source is in relation to the subject, the harder(more contrasty) the light will appear.What this means is that, placed at equal distances from the subject, a large
light source (like a softbox) will produce softer light, while a small light source(like a spotlight) will produce harder light. However, even the same sourcecan be made harder or softer depending on how far it is placed from the sub-ject. If it is placed close, it will be relatively large in relation to them and pro-duce softer light. If the same source is placed far from the subject, though, itwill be relatively small in relation to the subject and produce harder light.
Natural Light. To see how this works, let’s look at a source we are all fa-miliar with: the sun. The sun is a huge light source but, because it is so farfrom us, direct sunlight at noon creates very harsh contrast. In most cases, di-rect overhead sunlight should be avoided when photographing people; it
2-3 (left). Soft light creates very gentletransitions between the shadows andhighlights, for a smooth look with lesscontrast.
2-4 (right). Hard light creates sharpertransitions between the shadows andhighlights, for a more dramatic lookwith greater contrast.

causes the eyes to appear dark and lifeless and produces harsh shadows underthe nose. Models also tend to squint uncontrollably at this time, creatingmore problems. The light can also flatten the face and accentuate large noses,scars, and wrinkles. (Note: As the sun sinks below the horizon, it becomesmuch easier to work with. The rays of the sun become warmer in color, be-cause the increased atmosphere through which they travel blocks the shorterrays and allows only the warmer, red rays to penetrate. Photographers call thetime when the sun drops to the horizon and the sky is illuminated with awarm glow the “golden hour,” because these warmer rays can truly beautifya model’s face. Unfortunately, this “golden hour” passes quickly, so the pho-tographer must plan ahead and work quickly to take advantage of this mag-nificent light.)Just because the bright sunlight can be harsh doesn’t mean you can’t use
it to create nice images, though—especially if you can wait until the sun dropsa little in the sky. Image 2-5 was created for Jen, who wanted something a bit
light from sunmidway to the horizon
camera withwide-angle lenson tripod
2-5. Midday light can be used to createnice images—you just have to knowhow to work with it.

sexy to add a new dimension to her portfo-lio. Because of Jen’s schedule, the shoothad to be scheduled in the afternoon. As aresult, we were shooting in bright sunlight.This shot was taken when the sun hadstarted to drop, but was still not in the“golden hour”; the sun was still bright andthe lighting was very high in contrast.Harder, more directional light is good fortexture, such as in the jacket, but requiresthat the model close her eyes until the mo-ment of the shutter clicks. As we wereshooting, I noticed the pattern of light onthe building and moved the model into thearea, thus capturing this shot. If you areshooting a model in full sun and the em-phasis is on the model, have her turn herface toward the sun. Instruct the model toclose her eyes, then open them when youcue her for the shot. If the emphasis is onthe garments rather than the model (for ex-ample, in a catalog shoot), simply have themodel wear sunglasses or look away.So, direct sunlight is harsh. But are there
ways to find softer sunlight effects? Ab-solutely. When the sky is covered withclouds, the sun lights the clouds, and theclouds—a massive light source that, rela-tively speaking, are a lot closer to us thanthe sun—cast soft light on our subjects. Ef-
fectively, light cloud cover turns the sun into one huge softbox, softening thehard light. Colors are more vibrant, shadows recede, and the contrast be-tween shadows and highlight is much lower. This light can be beautiful andespecially flattering to a model’s face and figure.
Direction of the Light
In addition to its quality, you must also consider the direction of the light. Asnoted above, light that comes from overhead is usually not flattering, becauseit creates dark shadows on the eyes. Instead, look for light that strikes thesubject from another angle.
Front Light. Light that comes from directly in front of the subject is com-monly used in beauty photography because it tends to smooth the skin and
THE PHYSICS OF LIGHT 35
2-6. When the sun is too harsh, considermoving inside to use window light. Thiscan be a very flattering light source—especially if large windows are available.

flatter female faces. However, it can also flatten the features and create a lackof depth in your image.
Angled or Side Light. Light that strikes the subject’s face from an angleputs highlights on one side of the subject (the side closer to the light) andshadows on the other side of the subject (the side farther from the light).This adds a sense of depth and helps show the shape of the subject. As a re-sult, it is a great lighting choice for images designed to showcase the model’sbody (such as fitness shots). Because light from the side accentuates texture,it also works well for clothing shots where texture needs to be visible. Onedownfall of this lighting is that the model’s face will be shown with texture,
2-7. Light that skims across the bodyfrom the side is great for highlighting atoned physique.
This adds a sense
of depth and helps
show the shape
of the subject.
as well. This can be effective with men’s facial structure, but it is not nor-mally as flattering to a woman’s face.
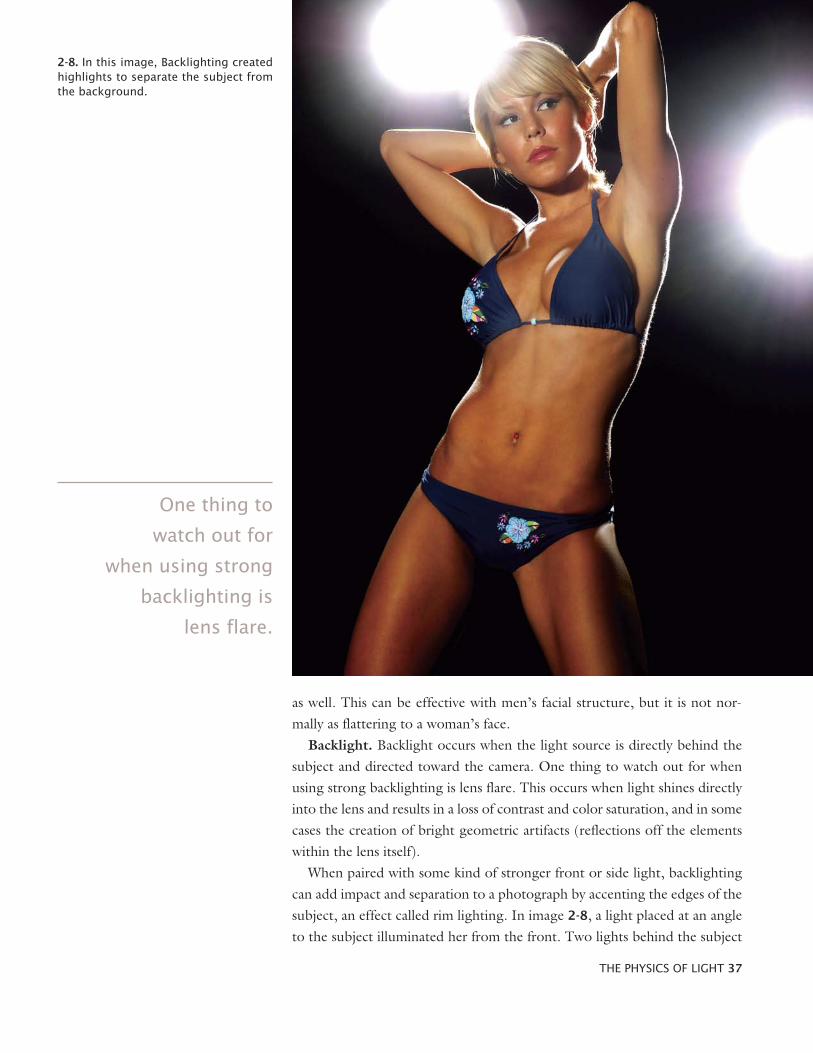
Backlight. Backlight occurs when the light source is directly behind thesubject and directed toward the camera. One thing to watch out for whenusing strong backlighting is lens flare. This occurs when light shines directlyinto the lens and results in a loss of contrast and color saturation, and in somecases the creation of bright geometric artifacts (reflections off the elementswithin the lens itself).When paired with some kind of stronger front or side light, backlighting
can add impact and separation to a photograph by accenting the edges of thesubject, an effect called rim lighting. In image 2-8, a light placed at an angleto the subject illuminated her from the front. Two lights behind the subject
THE PHYSICS OF LIGHT 37
2-8. In this image, Backlighting createdhighlights to separate the subject fromthe background.
One thing to
watch out for
when using strong
backlighting is
lens flare.

2-9, 2-10, 2-11. Different flash settingscombine with backlighting to produce avariety of effects.

created bright highlights (rim lighting) along the edges of her body, separat-ing her from the background. In this case, the lights themselves also formeda compositional element in the background.With a weaker (or nonexistent) front or side light, backlighting can also
allow you to create silhouette (or semi-silhouette) effects. Experimenting withthis technique you can achieve some amazing photographs. In the series ofphotographs on the facing page (images 2-9, 2-10, 2-11), I focused on themodel. Her body shielded my lens, and I had her move slightly to my left sothe sun would just break past her body. I varied the output of my flash foreach photograph, achieving a variety of different exposure and results. Whois to say which exposure is correct?
Light and Color
Color Temperature.When we look at a visible light source, it appears to bewhite, but it’s actually a mixture of colors that our eyes are designed to per-ceive as white. In fact, few light sources are actually neutral in their color.Most have some some color cast. This color is measured in degrees Kelvin(K). As a result, it is known as the color temperature. The higher the tem-perature, the more bluish the light is; the lower the temperature, the morereddish the light is. As shown in the table below, light sources have many dif-ferent color temperatures.
Overcast daylight . . . . . . . . . . . . . . . . . . .6500–7200KMidday sun . . . . . . . . . . . . . . . . . . . . . . .5400–5700KSunrise or sunset . . . . . . . . . . . . . . . . . . .2000–3000KFluorescent (daylight-balanced) . . . . . . . . . . . . .6500KElectronic flash . . . . . . . . . . . . . . . . . . . . .5600–6200KFluorescent (cool white) . . . . . . . . . . . . . . . . . . .4300KTungsten-halogen . . . . . . . . . . . . . . . . . . . . . . .3200KHousehold lamps (40–150W) . . . . . . . . . .2500–2900KCandle flame . . . . . . . . . . . . . . . . . . . . . . . . . . .2000K
Color temperature has a direct bearing on how colors will be recorded inyour images. In many cases, getting the desired image colors requires com-pensating for the color of the light source. This is most commonly accom-plished through film selection, filtration, or white-balance selection.Daylight films render colors accurately, as your eye sees them, when used
under light with a color temperature of 5500K (the light found in the mid-dle of the day). Later in the day (say, at the “golden hour” discussed on page34), the color temperature is lower. Shooting with daylight film, this will re-sult in colors that are warmer than they appeared to your eye. To correct forthis, you would need to add a color-compensating filter to your camera.
THE PHYSICS OF LIGHT 39
Few light sources are
actually neutral in their
color. Most have some
some color cast.

In the digital world, however, things are simpler. To control how yourcamera “sees” color, you adjust its white-balance setting to match the colortemperature of the light. Digital SLRs have white-balance presets (like day-light, incandescent, and fluorescent) or you can create a custom white-balancesettings by taking a reading off a white card illuminated by the light sourceyou’ll be using.
Practical Example: Adding Variety with White Balance. Images 2-14,2-15, and 2-16, all photographs of Brigitte, were shot to illustrate how a sim-ple change in white balance or exposure will drastically change the effects ofyour photographs. The lighting for this series was a very simple: a small softbox was pointed directly at the model from about six feet away and angled
40 LIGHTING TECHNIQUES FOR PHOTOGRAPHING MODEL PORTFOLIOS
2-12, 2-13. Without changing the light-ing, notice the huge change that adjust-ing the white-balance setting makes inthe way all of the colors on this chartare recorded.
Create a custom
white-balance settings
by taking a reading off
a white card . . .
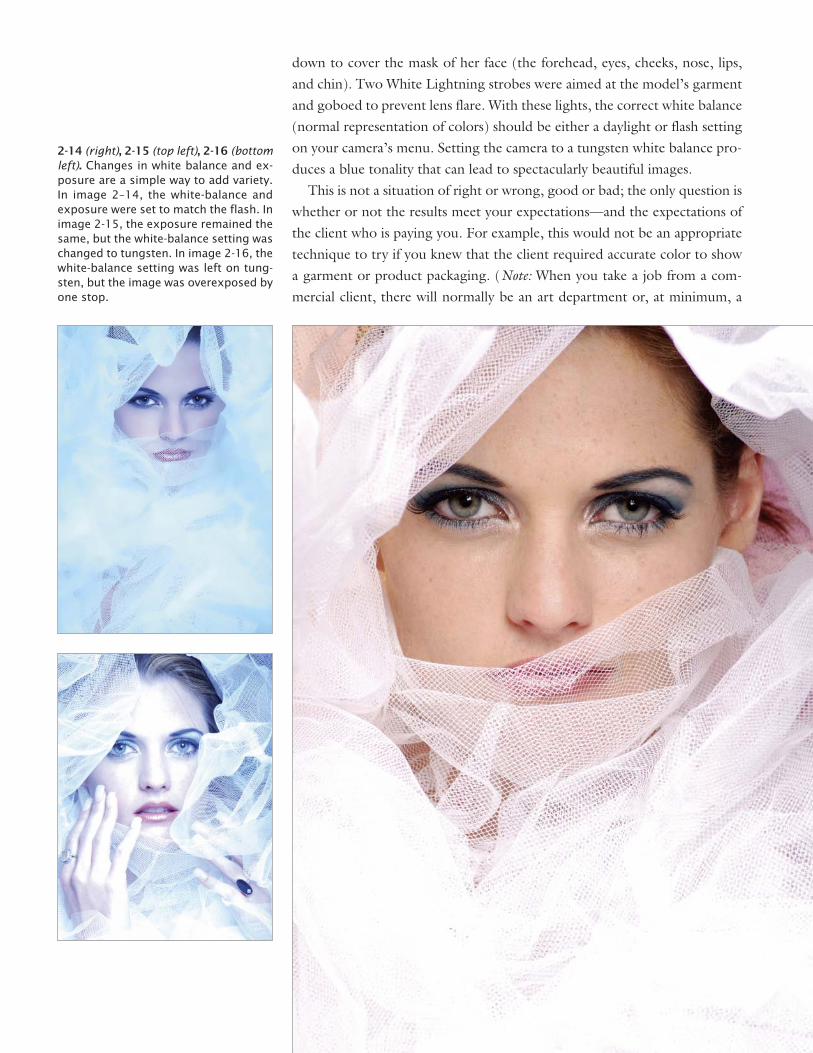
down to cover the mask of her face (the forehead, eyes, cheeks, nose, lips,and chin). Two White Lightning strobes were aimed at the model’s garmentand goboed to prevent lens flare. With these lights, the correct white balance(normal representation of colors) should be either a daylight or flash settingon your camera’s menu. Setting the camera to a tungsten white balance pro-duces a blue tonality that can lead to spectacularly beautiful images.This is not a situation of right or wrong, good or bad; the only question is
whether or not the results meet your expectations—and the expectations ofthe client who is paying you. For example, this would not be an appropriatetechnique to try if you knew that the client required accurate color to showa garment or product packaging. (Note: When you take a job from a com-mercial client, there will normally be an art department or, at minimum, a
2-14 (right), 2-15 (top left), 2-16 (bottomleft). Changes in white balance and ex-posure are a simple way to add variety.In image 2–14, the white-balance andexposure were set to match the flash. Inimage 2-15, the exposure remained thesame, but the white-balance setting waschanged to tungsten. In image 2-16, thewhite-balance setting was left on tung-sten, but the image was overexposed byone stop.
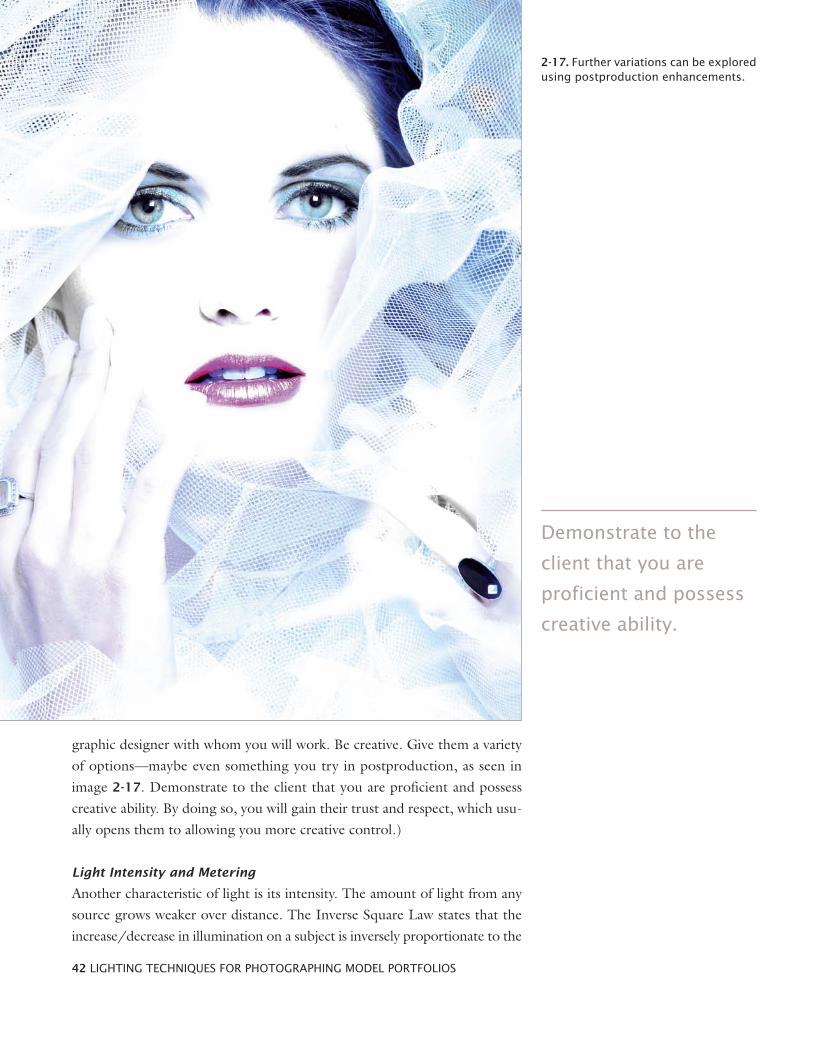
graphic designer with whom you will work. Be creative. Give them a varietyof options—maybe even something you try in postproduction, as seen inimage 2-17. Demonstrate to the client that you are proficient and possesscreative ability. By doing so, you will gain their trust and respect, which usu-ally opens them to allowing you more creative control.)
Light Intensity and Metering
Another characteristic of light is its intensity. The amount of light from anysource grows weaker over distance. The Inverse Square Law states that theincrease/decrease in illumination on a subject is inversely proportionate to the
42 LIGHTING TECHNIQUES FOR PHOTOGRAPHING MODEL PORTFOLIOS
2-17. Further variations can be exploredusing postproduction enhancements.
Demonstrate to the
client that you are
proficient and possess
creative ability.

square of the change in distance from the light to the subject. This soundsconfusing, but what it means is that if you double the distance from the lightto the subject, the amount of light on the subject will be reduced to a quar-ter of its original intensity. As you can imagine, this has obvious implicationsfor exposure—but you should also keep in mind that changing the distancebetween the light and the subject will also affect the quality of the light, as dis-cussed on page 33.Exposure is critical, and that means you must know how to meter the light
properly. If possible, you should not rely on the in-camera light meter. Thesebuilt-in meters, called reflected-light meters, measure the light that comesback to the camera from the subject. Based on this measurement, the meterrecommends an exposure setting that will produce tones that are 18-percentgray. The problem with this is that the meter doesn’t know what the the sub-ject is—whether it is a black box on a black background or a white egg on awhite background. Unless your subject actually is something with an 18-per-cent gray tonality, the suggested reading won’t be accurate. This is why peo-ple have exposure problems using the automatic feature on their camera.(Note: If you do need to use the in-camera meter, you can hold an 18-percentgray card in front of your subject, meter that, and be assured of much moreaccurate results.)A better type of meter for portraiture is the handheld incident-light meter.
This device measures the amount of light falling on the subject, so it gives anappropriate reading that is independent of the subject’s tonality. To use thiskind of meter, stand at the subject’s position and point the hemisphere of themeter at the camera lens. (Note: Flash meters are also incident-light meters.These are helpful when using multiple strobes in a studio setup.)
THE PHYSICS OF LIGHT 43
2-18. Scenes in which the tones are pri-marily very light or very dark can trickin-camera meters. A handheld incidentlight meter will provide more accurateresults.
This is why people
have exposure
problems using the
automatic feature on
their camera.

Objectives
When lighting a model, you must make many decisions. Often, your objec-tives will be dictated by the model or the client. A model may want an imagethat showcases her facial beauty, one that highlights her long legs, a shot thatshows her potential as a swimsuit model, or one that displays her edgy, high-fashion look. A client may want soft, beauty images that show the flawlesslook produced by their new line of makeup, or a harder image that displaysthe design and texture of their urban-wearcollection. Whatever the objectives, it isyour job to bring those abstract ideas tolife. A large part of how you will do this isthrough the use of lighting—through theplacement of lights (the subject of thischapter), the selection of light sources (seechapter 4), and the use of light modifiers(see chapter 5).
Main Light
When designing a lighting scheme for amodel, one must first consider the maskof the face (the frontal planes of the face,including the forehead, eyes, nose, cheeks,and lips). The light that creates the prin-cipal pattern of light and shadow on thisarea is called the main light.We’ve already looked at some of the ba-
sics of the direction of light (see pages35–39), but this is where those conceptsreally come into play. Unless you are cre-ating a silhouette, your main light will beplaced to strike the front of the subject.But should it be placed directly in front ofthe subject? Or at an angle? And if it’s atan angle, what’s the right angle?
44 LIGHTING TECHNIQUES FOR PHOTOGRAPHING MODEL PORTFOLIOS
3. Light Placement
3-1. Placing the main light more to theside of the subject creates facial con-touring and adds drama to the image.

The answers depend on the look you’re trying to create. Placing the mainlight directly in front of the model creates a smooth, almost shadowless lookthat is often seen in beauty photography. However, it can also flatten the fea-tures—and it isn’t ideal for showing the texture of the model’s clothing. Plac-ing the main light at an angle is better for revealing the contours of themodel’s face and can create a look with more dramatic impact. However,while it brings out the texture of the model’s garment (which may be a plus,depending on the image), it also brings out any imperfections in the skin(which may be a negative, depending on the model and the image). The morethe main light moves to the side of the subject, the greater the contouring itwill provide, and the more it will tend to emphasize the textures in the image.
LIGHT PLACEMENT 45
3-2. Placing the main light in front of thesubject creates almost shadowless light-ing—a style often seen in beauty pho-tography.
The answers depend on
the look you’re trying
to create.

Practical Example: Lighting the Mask of the Face. In the following ex-amples (images 3-3, 3-4, 3-5, 3-6, and 3-7), you can see that when the lightis too high or at the wrong angle, the results are very unflattering. Simply byhaving the model lift her face to the main light, notice how flawless her skinbecomes. If you flood the face with soft, even light, it beautifies the skin tone
46 LIGHTING TECHNIQUES FOR PHOTOGRAPHING MODEL PORTFOLIOS
3-3. The lighting setup for this shot. Themain light (a small softbox; see chapter5) was placed at an angle above themodel and remained in the same posi-tion throughout the series. Only the po-sition of the model’s face in relation tothis light was changed.
3-4. With the model looking at the cam-era, the main light is too high in relationto her face. It creates very unattractiveshadows.
3-5. Having the model lift her chin helps,but now the main light is a bit too far tothe side. It still creates some unattrac-tive shadows.
3-6. With the model’s face lifted directlytoward the main light, the lighting onthe mask of her face becomes moreeven and much more beautiful.
3-7 (facing page). This is the final cropped version of the image. As you can see, great lighting doesn’t require a lot of equip-ment—you can use just one light if you know how to use it effectively!


and minimizes facial flaws. The light fills in the hollows of the eyes and all thefacial creases, creating a much more desirable image. (Note: Using a drape,such as a fur hood, helps frame the face. When using a drape with texture,though, be careful not to overlight it; you will lose the detail. The challengeis to light the model’s face, but leave texture in the drape or garment. This iswhy I chose a single light source for image 3-7. The light filled in the model’sface, but did not spill over to the sides, leaving detail in the hood.)
LIGHT PLACEMENT 49
3-8 (facing page), 3-9 (right). In theseimages, the hair light adds shine on themodel’s hair and helps separate herfrom the background.
If you flood the face
with soft, even light,
it beautifies the skin
tone and minimizes
facial flaws.

Fill Light
The fill light is a secondary light source used to lighten the shadows createdby the main light. This is normally placed close to the camera to avoid creat-ing a second set of shadows on the face, which would look unnatural. Fill
50 LIGHTING TECHNIQUES FOR PHOTOGRAPHING MODEL PORTFOLIOS
3-10. Notice the highlight that runs thelength of the model’s left arm. Theseare the kinds of highlights that can becreated using accent lights.
This is normally placed
close to the camera
to avoid creating a
second set of shadows
on the face . . .

light can be be created using any light source (electronic flash, studio lights,etc.), but creating fill light with a reflector is also very popular because the re-sults are easy to control. For some examples of creating fill light with reflec-tors, see pages 70–71. To see fill light created with electronic flash, see page65. When adding a fill-light source to your setup, be aware that this sourcecan create a second catchlight in the model’s eyes. If this is objectionable toyou, you’ll need to remove it in Photoshop.
Hair Light
The hair light is a light, usually a small one, that is placed above and slightlybehind the model to add highlights on the hair and help separate her from thebackground. This light must be carefully controlled so that it does not spillonto the model’s face or shine directly into the camera lens, causing contrast-degrading flare. See images 3-8 and 3-9 (pages 48–49) for an example.
Background Light(s)
The background light, as the name implies, is used to illuminate the back-ground so that the subject will stand out from it. When using one backgroundlight, it is usually placed on a small stand directly behind the subject (blockedfrom the view of the camera). In other setups—especially when the back-ground needs to be evenly lit—a pair of flanking background lights are used,directed at the background from either side of the set.
Accent Light(s)
Accent lights, also called kickers, are extra lights used to add highlights to thesides of the face or body (see image 3-10). This helps draw the eye where youwant it and adds a greater feeling of depth in the image. These lights areplaced behind and to the side(s) of the subject, so they catch just the edge ofthe subject and create brilliant highlights. As with any backlighting source,you need to be careful not to create lens flare when adding accent lights.
Lighting in the Studio
The following image series shows both the separate and the combined effectof the individual studio lights. This is only a sample setup; you will developyour own methods and style as you shoot. If you want to learn quickly, shootyour own series of photos with the various lights firing alone. This is a greatway to learn about the qualities and purpose of each light, as well as theproper placement of each.In image 3-11(next page), a barebulb studio strobe was placed as close to
the background as possible. (Be careful: this can cause seamless paper to catchfire!) This light is difficult to meter so expect some trial and error to be in-volved in getting the correct exposure (here, a reading on the wall about two
LIGHT PLACEMENT 51
Accent lights, also
called kickers, are extra
lights used to add
highlights to the sides
of the face or body.

3-11. This image was created with onlythe background light on.
3-12. This image was created with onlythe hair light on.
3-13. This image was created with onlythe fill light on.
3-14 (above). This image was createdwith only the main light on.
3-15 (right). This image shows the com-bined effect of all the lights discussedin the previous images—plus the a goldreflector below the model’s chest foradded fill and warmth.

feet from the strobe was f/32). A gel (see page 83) was also taped around theflash tube to create a warm coloration. Because of the heat produced whenfiring the flash, you should not place anything directly in contact with theflash tube. Buy only heat-resistant gels from a camera store or theatrical sup-ply house. This method of lighting the background can be used on a flat wallor seamless paper, but I prefer a little more detail to break up the back-ground—as you can see in this image.For the next image (3-12), only the hair light was fired. This was a para-
bolic (see page 76) placed above and slightly behind the model on a boomarm. Like the background light, it had a warming filter attached. The hairlight exposure was f/16. You can see how this light adds highlights to themodel’s hair, and even to her shoulders, but does not spill down onto herface.In image 3-13, you see the effect of firing only the fill flash. This was a
softbox placed to camera left and metered at f/8.Image 3-14 shows the effect of the main light alone. This was a softbox
placed to camera right and set at f/11. I chose to place the light on this sideof the model because, in some poses, her hair covered the other side of herface.The final headshot (3-15) was shot with the coat pulled down around her
shoulders, because the model wanted to show her chest and shoulders a bit.As seen in the setup shot (3-16), a gold reflector was also placed just beneathher chest to add fill and an overall warming effect. (Note: If you are usingvariable-power light sources, you can quickly modify the effect from all thelights in a setup like this. Experiment with different ways of lighting so thatyour results are predictable. This is how you begin to create your own style.)
LIGHT PLACEMENT 53
3-16. Here, you see an overview of thefinal setup.
You can see how this
light adds highlights to
the model’s hair, and
even to her shoulders

Lighting Outdoors and On Location
Lighting outdoors and on location is similar to lighting in the studio, insofaras you will be trying to achieve the same objectives. What’s different is thatyou will be working with available light (rather than studio light)—light youfind, rather than light that you create.Because you generally cannot move available light sources (like the sun) as
you would a studio light, you will need to move your subject in relation tothe main light to create the effect you want. Then, add fill as desired (usingelectronic flash or a reflector) to re-fine the lighting pattern created bythe main light.When working outdoors and on
location, you won’t always be able toadd the little refinements you wouldin the studio (like incorporating a fewprecisely set hair lights and accentlights). If you could, there would beno reason to work in the studio at all!However, you should still keep youreyes open for ways to use naturallight to create these effects. For ex-ample, a beam of light streamingdown through an opening in theoverhead foliage might work as a nat-ural hair light.
54 LIGHTING TECHNIQUES FOR PHOTOGRAPHING MODEL PORTFOLIOS
3-17. Learning how to position yourmodel in relation to the existing light isthe key to making great images in thegreat outdoors.
Natural vs. Artificial Light
There are two sources of light: natural (which includes sunlight, moonlight,and reflected light from either the sun or moon), and artificial (which in-cludes sources like tungsten lights, fluorescent lights, electronic flash, andstudio flash). Natural light is not limited to the outdoors, nor is artificial lightexclusively indoors. Many times, I use flash to fill in shadows while shootingoutdoors. I have also effectively used filtered window light for an indoor shotwith natural light.As you’ll see in the following sections, sunlight is a great option for pho-
tography. It’s natural, often very flattering to your subjects, and widely abun-dant (and you can’t beat the price!). However, it does present certainchallenges when it comes to control—and, unless you can shoot near a win-dow, it’s not always an option for images shot indoors. In many cases, you’llalso find that you need more precise control than you can easily exercise overnatural light. That is why photographers also need to be adept at creating ef-fective lighting setups using artificial light sources.As a photographer, both of these forms of light are at your disposal. It’s up
to you to learn how to use them effectively in all their many incarnations.
Sunlight
Generally, the average photographer is most concerned with daylight. Butsaying “daylight” is just the beginning of the story—there are countless vari-ations of just this one light source.
Bright Sunlight. There are several problems inherent in working withbright sunlight. These problems intensify when shooting against a brightlylit background such as a light-colored wall, a beach, or snow. In these cases,the overall light tones in the image can trick the in-camera meter and lead toincorrect exposures. When shooting against a predominately dark back-ground, you may find that your film or image sensor can’t handle the veryhigh contrast of the scene—you’ll either have blown-out highlights (whitewith no detail) or blocked up shadows (black with no detail). Fortunately,with a digital camera, it is easy to shoot a few images and then preview them.Working in the manual mode (for total control), pay attention to the expo-sure settings as you are shooting, review your results, then adjust the aperture,
TYPES OF LIGHT SOURCES 55
4. Types of Light Sources
Natural light is not
limited to the outdoors,
nor is artificial light
exclusively indoors.

shutter speed, and ISO as needed. For the most accurate results, it’s advisableto use an incident light meter and monitor the amount of light that is actu-ally striking your subject, then set your camera accordingly. You also bracketyour exposures (shoot some above and below the meter’s recommended ex-posure setting) to ensure you capture all the critical details.
Cloudy Skies. Some beginning photographers hide when clouds cover thesun. The seasoned professional, however, realizes how beneficial this lightingcan be. It is as if the sky has become a huge softbox, softening the hard light.Film and digital imaging equipment have a difficult time recording the high-contrast scenes created by bright sunlight. When cloud cover softens thislight, however, the range of contrast between shadow and highlight is low-ered. Color is more vibrant and shadows are not as overpowering. The softerlight is also easier on the model’s eyes. If desired, the images captured on acloudy day can be warmed up either with an on-camera filter, by adjusting thewhite-balance setting, or after the shoot in Photoshop.
Practical Example: Bright Sunlight. Sunlight is the major source of lightfor photography—in fact, we’re usually only imitating it when we use studiolights. Therefore, photographers must learn to work with the variety and qual-ity of light given by the sun on any particular date and time.For this demonstration, I will address five varieties of sunlight and the ad-
vantages and disadvantages of each. The photographs in this series are
56 LIGHTING TECHNIQUES FOR PHOTOGRAPHING MODEL PORTFOLIOS
4-1 (left). The high contrast in thisscene, shot in bright sunlight, wasn’tcaptured optimally using the camera’sautoexposure mode.
4-2 (right). Switching to the manualmode allowed the scene to be recordedmore appealingly.

unedited, allowing you to fully appreciate the differences in quality betweenthem. All of the images were shot at 1/200 second at f/11—except for image4-3; because of the low intensity of the light, this image was shot at 1/60 sec-ond at f/8.For photograph 4-3, the sun was diffused by a thin layer of clouds, which
provided beautiful, even lighting that was soft and virtually shadow-free. No-tice how the exposure is consistent throughout the entire image. Also, noticehow the colors in the jeans are true to life. This is like having a huge softboxcovering the model. It is no wonder that this is the preferred light for mostphotographers. Very little modification needs to be done to create beautifulphotographs of models or landscape scenes under this light. When shootingmodels, however, it is usually best if you direct the model to turn her faceaway from the sun to prevent squinting.In photograph 4-4, the clouds had moved from the scene and the model
was in full afternoon sun. Although a silver reflector was placed next to thefence, bouncing the sunlight back to the model, the shadows are still veryprevalent. There’s a significant difference in quality between this image and
TYPES OF LIGHT SOURCES 57
4-3 (left). Sunlight through a thin layerof clouds produced soft, even lighting.
4-4 (right). When the clouds moved out,the model was left in direct sun. Evenwith the addition of a reflector, theshadows are very pronounced.

the previous one; the image sensor can no longer handle the large differencein exposure between the bright sunlight and the heavy shadows. Notice, par-ticularly, the heavy shadows on the background. There is an advantage tousing this style light, though: it allows you to enhance the curves of themodel’s body. Notice the shadowing on the model’s chest and how it accen-tuates the contours of the legs. Be careful, however, that you put sufficient filllight on the model’s face. Otherwise, you will create unwanted contours onher face, as well! Because the reflected light in a situation like this can be verybright, you may need to have the model close her eyes and open them for theexposure on a set count.Photograph 4-5 was shot without the use of a reflector. Notice how hard
the light is on the model’s face and how every little imperfection is magnified.The shirt has also lost some of the detail. Overall, it is not a very pleasingphotograph.Bright sunlight coming over your shoulder can be acceptable with land-
scapes. It can also work with models, provided that the face is not the primaryarea of interest in the image, as shown in photograph 4-6. Many high-
58 LIGHTING TECHNIQUES FOR PHOTOGRAPHING MODEL PORTFOLIOS
4-5 (left). Removing the reflector resultsin an image that is not appealing.
4-6 (right). Hard light is common infashion photography because it empha-sizes the texture of the clothing.

fashion images are actually shot this way because of the way the harder lightenhances the texture of the clothing. In this situation, it is best to have themodel look away from the sun or at least down. Generally speaking, if a pho-tograph calls for bright light with contrast, it is best to schedule the shoot forthe golden hour (see page 34).Photograph 4-7 shows what, when given the choice, is my favorite solution
to this lighting situation. This is a combination of sunlight with fill flash. It isthe most technically challenging to accomplish and make look natural, but itprovides the photographer with the most control. The principle is this: thesunlight exposes the majority of the image; therefore, you set your exposurefor the sunlight. Then, you add an auxiliary flash to fill in (lighten) the shad-ows to whatever degree you desire. You let the sunlight contour the model’sbody and use the flash to reduce the negative effects of sunlight on imper-fections. This also allows the model to look away from the sun, eliminatingsquinting.Photograph 4-8 was shot under an overcast sky with the use of a flash. This
combination gives the photographer the softness of the cloud-covered sun-
TYPES OF LIGHT SOURCES 59
4-7 (left). Adding fill flash allows you tocreate a more flattering effect.
4-8 (right). Here, cloud-covered skiespaired with flash create a good lightingscenario.

light and the control of using a flash. Notice the detail in the jeans, the vibrantcolor, and the lack of heavy shadows. Many photographers prefer this light-ing combination for shooting models, because you have the beautiful lightcovering the model’s face and figure—but, by controlling the output of theflash, you can also quickly change the look and feel of the image.
Practical Example: Morning Light. Image 4-9 was a test for the model’ssubmission to Playboy. The goal was to create a dramatic shot to accompanya series of cowgirl-themed images. This was to be an impact shot. In order toshoot the early-morning sunrise, we were in the desert, set up, and ready toshoot well before dawn. The quality of light at this time of day is warmer, asthe sun’s rays penetrate more of the atmosphere, but it is also very brief. Asa result, exacting preparation was essential—we knew there would be only abrief moment when all the ingredients came together for the perfect shot.This is just a fact of working with natural light and sun position: you must pre-
4-9. This image, a shot for the model’ssubmission to Playboy, was created out-doors at sunrise.

plan exactly what image you wish to capture and be ready the moment the sunis in the right position.The lighting was very simple for this image, because I didn’t want to
capture detail in the model’s body. Using the meter in the camera, I meteredto the right of the sun with the sun just out of the viewfinder. After you havea starting point for your exposure, then you need to bracket the shots by sev-eral f-stops; normally underexposing works the best when creating a silhou-ette like this. I also advise keeping the camera on a tripod so you can changethe shutter speed freely; you will want to set the aperture to get the maximumdepth of field. Notice how the backlight created rim lighting on the model’sbody, separating her silhouette from the dark landscape in the lower half ofthe frame.
Practical Example: Use What You Find. Image 4-10 was created forZEEN, an alternative clothing design company that needed a cover shot fortheir catalog/magazine. ZEEN had a street-smart concept that called for acast of skateboarders and a raw look borrowed from point-and-shoot snap-
TYPES OF LIGHT SOURCES 61
4-10. The challenge in this shoot forZEEN was to use natural light only tocreate images with a raw, snapshot-likefeel.
I also advise keeping
the camera on a tripod
so you can change the
shutter speed freely.

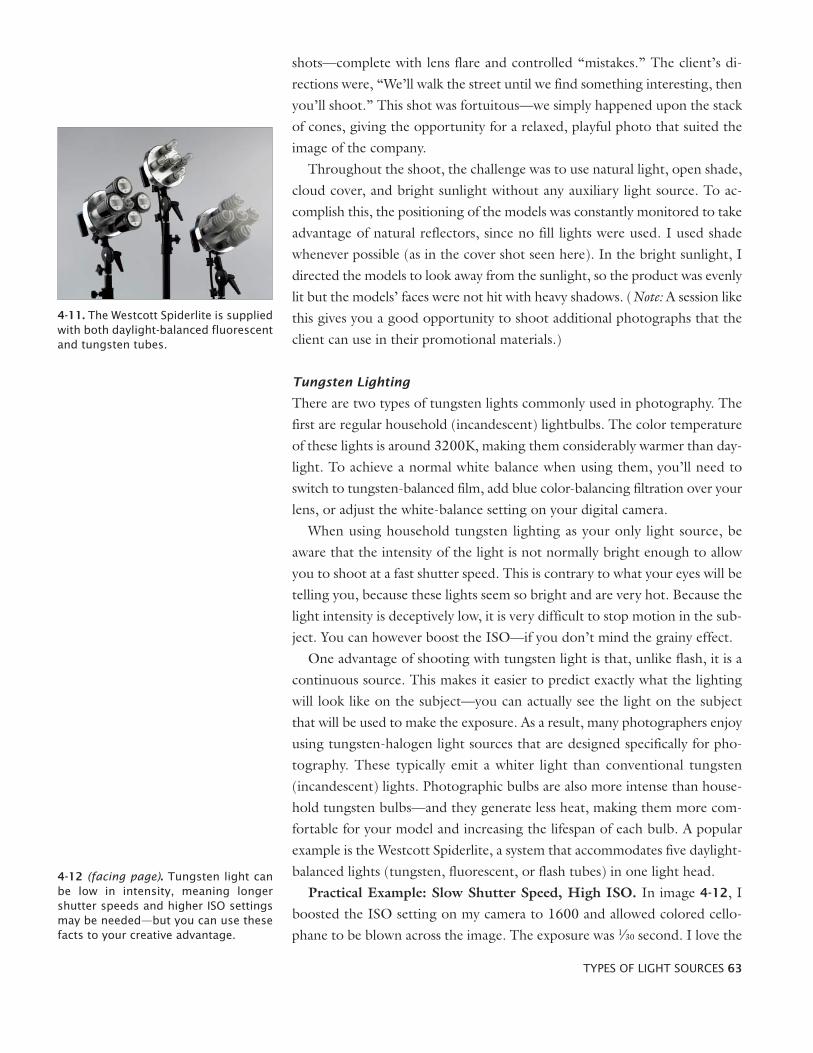
shots—complete with lens flare and controlled “mistakes.” The client’s di-rections were, “We’ll walk the street until we find something interesting, thenyou’ll shoot.” This shot was fortuitous—we simply happened upon the stackof cones, giving the opportunity for a relaxed, playful photo that suited theimage of the company.Throughout the shoot, the challenge was to use natural light, open shade,
cloud cover, and bright sunlight without any auxiliary light source. To ac-complish this, the positioning of the models was constantly monitored to takeadvantage of natural reflectors, since no fill lights were used. I used shadewhenever possible (as in the cover shot seen here). In the bright sunlight, Idirected the models to look away from the sunlight, so the product was evenlylit but the models’ faces were not hit with heavy shadows. (Note: A session likethis gives you a good opportunity to shoot additional photographs that theclient can use in their promotional materials.)
Tungsten Lighting
There are two types of tungsten lights commonly used in photography. Thefirst are regular household (incandescent) lightbulbs. The color temperatureof these lights is around 3200K, making them considerably warmer than day-light. To achieve a normal white balance when using them, you’ll need toswitch to tungsten-balanced film, add blue color-balancing filtration over yourlens, or adjust the white-balance setting on your digital camera.When using household tungsten lighting as your only light source, be
aware that the intensity of the light is not normally bright enough to allowyou to shoot at a fast shutter speed. This is contrary to what your eyes will betelling you, because these lights seem so bright and are very hot. Because thelight intensity is deceptively low, it is very difficult to stop motion in the sub-ject. You can however boost the ISO—if you don’t mind the grainy effect.One advantage of shooting with tungsten light is that, unlike flash, it is a
continuous source. This makes it easier to predict exactly what the lightingwill look like on the subject—you can actually see the light on the subjectthat will be used to make the exposure. As a result, many photographers enjoyusing tungsten-halogen light sources that are designed specifically for pho-tography. These typically emit a whiter light than conventional tungsten(incandescent) lights. Photographic bulbs are also more intense than house-hold tungsten bulbs—and they generate less heat, making them more com-fortable for your model and increasing the lifespan of each bulb. A popularexample is the Westcott Spiderlite, a system that accommodates five daylight-balanced lights (tungsten, fluorescent, or flash tubes) in one light head.
Practical Example: Slow Shutter Speed, High ISO. In image 4-12, Iboosted the ISO setting on my camera to 1600 and allowed colored cello-phane to be blown across the image. The exposure was 1/30 second. I love the
TYPES OF LIGHT SOURCES 63
4-11. The Westcott Spiderlite is suppliedwith both daylight-balanced fluorescentand tungsten tubes.
4-12 (facing page). Tungsten light canbe low in intensity, meaning longershutter speeds and higher ISO settingsmay be needed—but you can use thesefacts to your creative advantage.

unpredictability of creating an image like this—notice the shadows that werecreated by the cellophane blowing across the model’s face.
Fluorescent Lighting
The fluorescent lights used in non-photographic applications have a greenishcast that makes them less than ideal for photography. If you need to workwith them—to shoot at a store, restaurant, or some other commercial venue,for instance—you must be aware of the color effects and compensate forthem. Unfortunately, the fluorescent lighting in public areas tends to exhibita wide range of color temperatures, which makes it difficult to achieve a per-fect white balance (although creating a custom white balance will improvethings considerably).Currently, some companies are making fluorescent bulbs/tubes with ex-
acting color temperatures to balance with tungsten (3200K) or daylight(5600K). They are being used with great success in the video market. Asnoted in the section on tungsten lighting, Westcott offers a photographiclighting system that will accommodate daylight-balanced tungsten tubes, flashtubes, and fluorescents. The ease for changing the lighting sources depend-ing upon your photographic requirements with one system is something be-ginners and professionals should research. I use my Spiderlites mainly forvideo with the fluorescent tubes. When I want a tungsten light source, I canalso use the Spiderlites for still photographs.The main advantage of the fluorescent lighting over tungsten lighting is the
lack of heat. Additionally, fluorescent lighting is very even, which can makeit a good choice for smoothing textures. The disadvantage of the fluorescents,at this time at least, is that the output is nowhere near as bright as tungsten—or flash, for that matter.
Electronic Flash
Electronic flash units are portable, inexpensive, daylight-balanced, and easy touse. Because of their small size, however, flash units create light that is tooharsh and flat to be flattering. As a result, straight on-camera flash shouldusually be avoided when photographing models—unless it is used as a fill-light source. If you need to make greater use of electronic flash, consider in-vesting in one of the many portable light modifiers that are available. Theseare designed to diffuse, soften, and redirect the small light source. Most caneven be used with your flash in auto or TTL mode, making exposure calcu-lation effortless.
Practical Example: Fill Flash. Images 4-13 and 4-14 show the effect ofusing electronic flash as an auxiliary light source to fill in the shadow side ofthe model’s face, making it more pleasing. Be careful, however, not to let theflash overpower the sunlight (or other main light source). If it does, you will
64 LIGHTING TECHNIQUES FOR PHOTOGRAPHING MODEL PORTFOLIOS
Consider investing in
one of the many
portable light modifiers
that are available.

lose the contouring created by the side light and be left with only a backlightor highlighting effect.
Studio Strobe
Most professional photographers choose to do their studio work with day-light-balanced studio strobes. These are cool working, portable, and run onhousehold current—or, with the addition of a battery supply, you can usethem outside the studio, too. Selecting units equipped with modeling lights(continuous quartz-halogen bulbs that simulate the effect of the flash itself)will help you to visually gauge the effect you are creating and make it easierto focus.Studio strobes are of two varieties: monolights and power-pack kits. Mono-
lights are self-contained; they contain light triggers that fire the strobe whenthey sense the light of another strobe, so they can be used very far apart, mak-ing them good for location lighting or large rooms. Power-pack systems ac-cept multiple strobe heads—up to four heads can usually be plugged into asingle pack. This type of system is most often used in studios, though, since
TYPES OF LIGHT SOURCES 65
4-13 (left), 4-14 (right). Both imageswere shot at 1/200 second at f/7.1. Noticehow the addition of flash fill in the sec-ond image does not overpower the pat-tern created by the natural light. Itsimply makes the shadows less intense.

you cannot move the lights more than about twenty-five feet from the powerpack.Before you buy anything, define exactly what you wish to shoot (Is it mod-
els only? Or do you also need to photograph products? Or other subjects?)and what you must have to accomplish this objective. Studying the work andtypes of equipment used by other professionals can help you here. Studiostrobe systems vary widely in price—from a few hundred dollars to tens ofthousands—but you can achieve excellent results without owning top-of-the-line products. Look for equipment that suits your budget and learn to usethat equipment to produce the results you want. Don’t get caught up in the“latest and greatest” craze, buying equipment you will only use once or twice.As your requirements change, add a piece at a time. Learn to use what youalready own to produce predictable results before you acquire something else.As you see in this book, many photographs can be created with just one
light. If you wish to do actual studio work, however, I would recommend atleast three lights with variable power. The lights need to be able to acceptsoftboxes, umbrellas, or both (more on these in chapter 5). You’ll also needheavy-duty stands (one with a boom arm for hair lights) and several sandbagsto stabilize the light stands.
Practical Example: Strobe for Consistent Results. For this BillionaireMafia poster (4-15), I needed to shoot multiple individual subjects movingas if they were walking away from a tragic scene. Because the exact scene wasyet to be determined, I had to do this without knowing precisely how eachimage would be blended together to create the final design.The first challenge here was the lighting. Each subject needed to be shot
with similar lighting so the final image would be uniform, yet the look alsoneeded to be individualized sufficiently to enhance each actor’s unique lookand personality. To do this, I used a light setup that I call my basic lighting(see the accompanying diagram). This is a very versatile setup that has threemajor benefits. First, it can easily be transported to location shoots; it requiresonly three light sources, all of which can be easily carried. (Here, I’ve addedtwo lights on the background, as well, making it just slightly more complex).Second, it allows a great deal of flexibility both for the photographer and sub-ject, especially when shooting an inexperienced model; no matter which waythe model turns, he/she is well lit. Third, it is nearly foolproof. It’s pretty, it’spredictable, and it’s easy to set up.Another challenge was creating the needed feeling of movement, even
though we were shooting in a studio on a seamless backdrop. To achieve this,I placed a piece of tape on the floor and had the model stand on the tape asI pre-focused the camera at that spot. Then, I had the model move as closeto the background as possible and walk forward in an exaggerated motionpast the spot on the paper. When he/she hit the mark, I fired the camera. It
66 LIGHTING TECHNIQUES FOR PHOTOGRAPHING MODEL PORTFOLIOS
Each subject needed
to be shot with similar
lighting, so the
final image would be
uniform . . .

is critical that the model walk through the focus point in order to achieve theobjective—the feeling of movement. The photographer must also anticipateprecisely when the model will be in focus. To facilitate this, I increased theoutput on the flash so I could shoot at a higher f-stop setting. This increasedthe depth of field, making it easier to catch the subject in focus.
TYPES OF LIGHT SOURCES 67
4-15. The poster for Billionaire Mafia required consistent lighting, because the mod-els’ images were all shot individually, then composited into the final design.
camera on tripoddirectly under softbox
24x32-inch softboxesflanking set at an elevation of 4 feet12x16-inch softbox
over camera at elevation of 6 feetand angled down
umbrellasflanking setto light backdrop

Some light modifiers can be used with any light source, from sunlight tostudio strobe. These are all handy devices to have around. Best of all, they
tend to be inexpensive—and many can even be improvised with a quick tripto the hardware store. Reflectors, gobos, and scrims fall into this category.Other light modifiers, like softboxes and umbrellas, are designed specificallyfor use on studio lights. These can range widely in price, but are invaluablefor exercising complete creative control.
Reflectors
A reflector is any object used to bounce light—it could be a wall, a white t-shirt, a mirror, or a commercially purchased kit. This is an easy and effectiveway to control light. Unlike using flash for fill light, reflectors give you visualconfirmation of where the light is. With reflectors, you can also set up and
68 LIGHTING TECHNIQUES FOR PHOTOGRAPHING MODEL PORTFOLIOS
5. Light Modifiers
5-1. Collapsible reflectors, available in awide variety of finishes, are a very pop-ular (and portable) type of reflector.
These are all handy
devices to have around.
Best of all, they tend to
be inexpensive.

fine-tune your results more quickly than with flash. Additionally, you are notlimited to the flash-sync speed of your camera.
Surface. Reflectors range widely in size, color, and design. Typically, pho-tographic reflectors have either a matte white, silver foil, or gold foil surface.The metallic surfaces provide more light intensity and contrast in the bouncedlight than the matte white surface. Gold reflectors also add a warm colorationto the bounced light. Mirrors are another type of reflector to experiment with.Because they return almost all of the light that strikes them, they can actuallybe used outdoors to turn backlight into front light.
Design. Round fabric reflectors on collapsible metal frames (often calleddisc reflectors) are a very popular design option, especially for location pho-tography. They are easy to transport and simple to position—an assistant cansimply hold the reflector in position, then adjust it according to your in-structions. (Note:When I shoot on location, I typically bring a piece of whitecardboard to use as a reflector, along with a Westcott disc reflector that is sil-ver on one side and gold on the other.) For studio photography, large, whiteopaque reflectors (often called flats) are often moved into position on rollersor casters. Once in place, studio lights can be bounced into them to create alarge, soft source of light.
For Fill. Reflectors are most commonly used to provide fill light, pickingup some of the main light and wrapping it around onto the shadow side ofthe face to make the shadows less intense. To use a reflector for fill, place itslightly in front of the model’s face. Direct the reflected beam of light grad-ually toward the subject’s face until you get the desired results. Be carefulwhen doing this; the reflected light can actually be quite intense if you shineit right in the model’s eyes. You must also avoid creating unwanted shadowsof the nose on the opposite cheek. This is best accomplished by positioningthe reflector to fill in the whole mask of the face.
Practical Example: Reflected Fill on Location. Let’s look at the differ-ent effect you can create using a variety of reflectors for fill when shooting onlocation. Image 5-2 (next page) shows the subject with no reflected fill.In image 5-3 (next page), the assistant is holding a white card (which can
also be used as a gobo; see page 73). The white board reflects the same colorof light that is striking it and reflects back to the model a soft light that isusually easy on her eyes. This eliminates some of the squinting associated withshooting in bright sunlight. Even if the reflected light is not intense enoughto increase the light value much in the shadow area, the reflector still createspleasing catch lights in the eyes. The disadvantage of using a white board isthat it is rigid and doesn’t reflect a great deal of light back to the subject com-pared to a silver reflector. However, its dual function as a gobo outweighsthe disadvantages. Additionally, since it is rigid, it can easily be leaned againsta tree or a stand while the assistant is busy or holding another reflector.
LIGHT MODIFIERS 69
The reflected light
can actually be quite
intense if you shine
it right in the
model’s eyes.

Like the white board, a silver reflector bounces lightwithout changing the color balance (5-5 and 5-6). How-ever, because the surface of the reflector is metallic, it ishighly reflective. This means that, used at the same dis-tance to the subject as a white reflector, the light from asilver reflector will be more intense. To reduce the in-tensity of the fill, the reflector can be placed at a greaterdistance from the subject. The physical flexibility of thediscs makes them versatile in kicking light to a specifiedarea. They can be used to increase light levels in theshadow areas but also to create beautiful highlights onthe hair, a piece of jewelry, or even a shoulder (to helpseparate the model from the background).As seen in image 5-7 and 5-8, a gold disc reflector re-
flects warm and romantic light back to the subject. The gold color can alsocompensate for some of the blue cast that is prevalent in a heavily shadowedarea. Although I personally would not have chosen this image (because of
70 LIGHTING TECHNIQUES FOR PHOTOGRAPHING MODEL PORTFOLIOS
5-2. The subject was photographed with no added fill light.
5-3, 5-4 (top and bottom). A white board is used to add soft filllight.

LIGHT MODIFIERS 71
5-5, 5-6 (top and bottom). A silver reflector. 5-7, 5-8 (top and bottom). A gold reflector adds warm-coloredfill light.
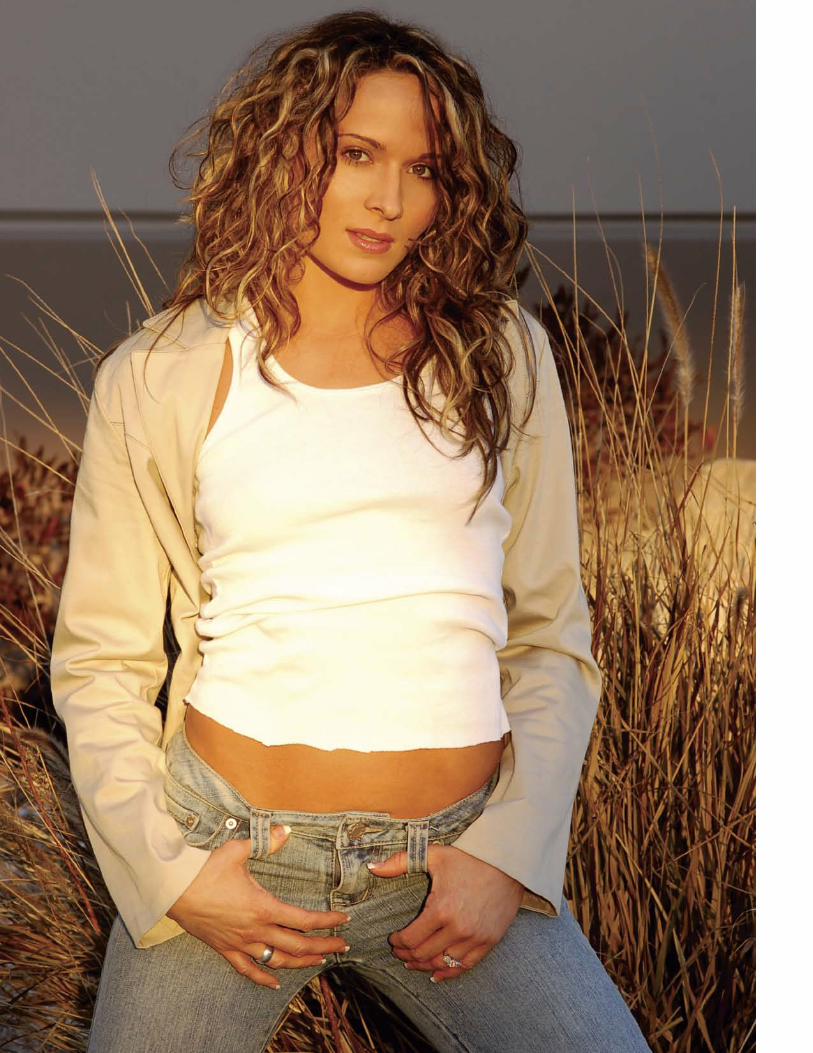

the hand positions), it was the model’s favorite image from this series. To fin-ish it, the image was cleaned up in Photoshop and the edges were darkenedslightly to direct the viewer’s eyes to the model’s face.
Practical Example: Natural Reflectors. Image 5-9 was taken with thelate afternoon sun reflecting off a building and onto the model at an indus-trial park. The gray background was another building in the complex. Be-cause I used a long lens, a 300mm Nikkor, and shot with the aperture wideopen, the building in the background went out of focus just enough to looklike the horizon line on a beach. Keep your eyes open for great natural re-flectors in your environment—and when you see them, note the time of dayto shoot there. These can be simple, beautiful light sources.
Gobos
Sometimes, instead of adding light, you’ll need to remove light from a cer-tain part of the photograph. A good solution is to use a device called a gobo(or flag), which is a light-blocking device that can be attached to a light standor held by an assistant. While gobos come in a variety of colors, I prefer solidblack because this absorbs the most light. In outdoor photography, a gobo isoften used to block overhead light from creating dark shadows on the model’seyes. Gobos can also be used to block light from a background, to createshadows on the model’s face or body, or to prevent light sources from creat-ing lens flare.For another effect, you can also direct your background light through a
gobo with a patterned cutout to cast shadows on the background. (Note: Theorigin of the term “gobo” is unknown, but most consider it short for “go-be-tween.” If you are working with a Japanese client, however, note that “gobo”is also a popular Japanese vegetable—often served steamed!)
Practical Example: Gobos to Control Accent Lighting. Image 5-10
(next page) was created as a promotional piece for a vintage clothing storecalled The Attic. It needed to be eyecatching and it had to showcase the se-lected accessories—along with the model. The client, an afficionado of 1930spinup images, wanted a photo in which the model looked like a free-spiritedperson—an image with old-fashioned charm and a modern twist. To achievethis we paired the unique setting (the store itself) and vintage props with amodel who had a current look—hence the tattoos and piercings.As you can see in the diagram, the main light was a softbox placed to cam-
era right. Strobe heads, each fitted with a 7-inch parabolic reflector (see page76), were placed to either side of the model to create accent lighting on thesides of her body, separating her from the dark background. To prevent theseparabolics from spilling unwanted light back toward the camera and the fore-ground, gobos were attached to light stands flanking the model. These blackcards ensured that light was placed only where it was wanted.
LIGHT MODIFIERS 73
5-9 (facing page). Natural reflectors, likethe late-day light reflected off a build-ing, can be very flattering light sources.
It needed to be
eyecatching and
showcase the selected
accessories . . .


The image was finished with a classic film-edge border in Photoshop, com-pleting the vintage look.
Practical Example: Gobos to Control Lens Flare. The first image (5-11)was shot outdoors using flash for fill light but without a gobo to control lensflare. Notice the loss of sharpness and the over all hazy look of the shot. Thesecond image (5-12) was shot with the same exposure and fill-in flash. In fact,there are only two differences between this and the previous shot. First, I hadthe model turn slightly so I would have her against a dark background. Sec-ond, I added a lens shade, essentially a gobo, to keep the sunlight from hit-ting the lens. These two quick steps eliminated the haze and resulted in amuch better image.
Scrims
Scrims are translucent devices used to diffuse light. As the light passes throughthe scrim, its rays are scattered (see page 32), making it softer and producingless contrast on the subject. Basically, a scrim works the same way the diffuserin a softbox works (see page 79), but it can be used with any light source.
LIGHT MODIFIERS 75
24x32-inch softboxat elevation of 3 feet
camera on tripod
7-inch parabolic
7-inch parabolic
black posterboardas gobo
black posterboardas gobo
5-10 (facing page). Gobos helped con-trol the effect created by the accentlights behind the model. A “handprinted” edge created in Photoshopadded a final touch to the vintage look.
5-11, 5-12. Adjusting the model’s position and adding a lens shade resulted in a much better image.

Large scrims can be placed between the subject and direct sunlight to softenthe look of the lighting. Scrims can also be used in window frames to softenthe sunlight. In the studio, portable scrims can also be placed between thesubject and a studio light. Commercially made scrims are available in a vari-ety of sizes, but something as simple as a white shower curtain can also beused as a scrim.
Barebulb Lighting
Moving along to devices designed to work on studio light sources, the sim-plest light modifier you can use is none at all—the bare flash head. From thisundirected source, light scatters in every direction. Some photographers usea barebulb flash as a background light directly behind the subject. Because ofits crisp quality, it also works for fill light in combination with sunlight. Ad-ditionally, barebulb heads are used inside softboxes so that the maximumspray of light fills the diffusing device.
Parabolics
Parabolics are simple metal dishes, in a variety of sizes, that are used to directthe light from a bare flash bulb. Often called “pans” because of their shape,these mount to the perimeter of the light housing. Parabolics create hardlighting that is bright in the center but loses intensity toward the edges. Ad-justing the light to use the softer edge (a practice called feathering the light)helps create a more gentle effect when using these light sources.In classic Hollywood photography, everything was lit with parabolics that
had polished silver interiors; these provided the light intensity needed to workwith very slow film. Today, some parabolics have a brushed silver surface ora faceted texture on the interior to help diffuse the light. Parabolics, espe-cially wide-angle ones, are often used to focus light into an umbrella, as wellas to shoot into flats or scrims. The farther the light is placed from the re-flector/scrim, the softer the resulting light will be.
Practical Example: Backlighting with Parabolics. This reflected image(5-14), created for the dancer, was shot in the studio. The main light was a24x32-inch softbox placed to camera left.I wanted to shoot the model with hard edge light on one side. To do this,
I placed a 7-inch parabolic (with a diffuser; see page 78) behind her to cam-era left. This was pointed at an angle back toward the camera. The strobefrom this backlight was set one stop hotter (brighter) than the main light; ifthe setting were any lower you would not notice the light. This higher settingalso separated her from the background and highlighted the translucent fab-ric around her. Additionally, it created a shadow in front of the subject thathelped to enhance the reflection effect that was later applied in Photoshop.(Note: Often I use colored gels with this style of lighting, but we knew this
76 LIGHTING TECHNIQUES FOR PHOTOGRAPHING MODEL PORTFOLIOS
5-13. Light panels feature translucentscrims and reflective panels that can beused in combination.
In classic Hollywood
photography,
everything was lit with
parabolics . . .

5-14. A 7-inch parabolic created hardedge light and a grounding shadow thatwas used in creating the reflectedimage.
24x32-inch softboxat elevation of 3 feet
camera on tripod
7-inch parabolic
black posterboardas gobo

image was going to be black & white. If you shoot with gels for black & whiteyou don’t get a clean white; every color reproduces differently in black &white.) As you can see in the accompanying diagram, a gobo was also used toprevent the backlight from hitting the camera lens.Photoshop was used to convert the photo to black & white. (Note: You can
go to Image > Adjustments > Black & White to do this, or consult a Photo-shop book for other techniques.) Then, I made a copy of the image, whichwas flipped to create the reflection. Because I used the backlight to create ashadow in front of the subject, she looked grounded. This allowed me to sim-ply blend the inverted image together with her shadows from the originalimage. Reflections are always darker than the original, so darkening the copiedreflection also made it look more real.
Beauty Dish
Beauty dishes look similar to parabolics, but they are larger (usually over 20inches in diameter) and have a white interior. Additionally, in a beauty dish thestrobe is placed behind a shield so that it does not illuminate the model di-rectly. Instead, it bounces into the white dish, which reflects the light backonto the model. This creates a smaller round catchlight and light that is softerthan from a parabolic but harder than from a softbox. It can produce a nicelook on younger models with good skin.
Diffusers
Working much like a scrim, a diffuser is frosted plastic or acetate in a frameor screen that is designed to mount onto a parabolic, usually on the perime-ter. This creates a broader, more diffused lighting pattern. Diffusers are alsoavailable to fit over beauty dishes. (Note:When using a diffuser over a light—especially a hot light, like tungsten—make sure there is room for heat to es-cape between the diffuser and the parabolic to prevent overheating.)
Barn Doors
Barn doors are black, metallic, adjustable flaps that can be opened or closed.These control the width of the beam of the light so you light only what youwant lit. They also keep light off the camera lens, helping to prevent lens flare.
Spotlights
Spotlights (sometimes just called “spots”) are hard light sources. Usually, theyare small lights with a Fresnel lens attached to focus the beam and make it staycondensed over a long distance. This makes it useful for lighting a select areaof the scene, like a corner of the room. Barn doors are usually affixed to spot-lights to control the light.
78 LIGHTING TECHNIQUES FOR PHOTOGRAPHING MODEL PORTFOLIOS
It can produce a
nice look on younger
models with good skin.
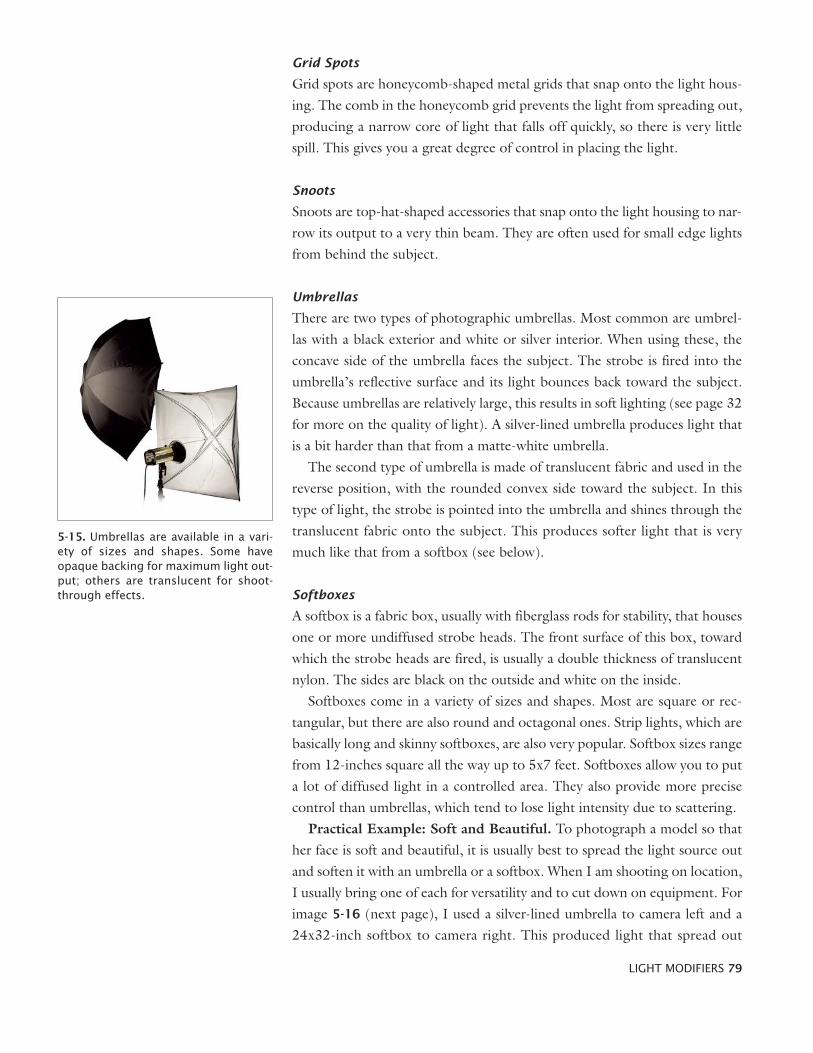
Grid Spots
Grid spots are honeycomb-shaped metal grids that snap onto the light hous-ing. The comb in the honeycomb grid prevents the light from spreading out,producing a narrow core of light that falls off quickly, so there is very littlespill. This gives you a great degree of control in placing the light.
Snoots
Snoots are top-hat-shaped accessories that snap onto the light housing to nar-row its output to a very thin beam. They are often used for small edge lightsfrom behind the subject.
Umbrellas
There are two types of photographic umbrellas. Most common are umbrel-las with a black exterior and white or silver interior. When using these, theconcave side of the umbrella faces the subject. The strobe is fired into theumbrella’s reflective surface and its light bounces back toward the subject.Because umbrellas are relatively large, this results in soft lighting (see page 32for more on the quality of light). A silver-lined umbrella produces light thatis a bit harder than that from a matte-white umbrella.The second type of umbrella is made of translucent fabric and used in the
reverse position, with the rounded convex side toward the subject. In thistype of light, the strobe is pointed into the umbrella and shines through thetranslucent fabric onto the subject. This produces softer light that is verymuch like that from a softbox (see below).
Softboxes
A softbox is a fabric box, usually with fiberglass rods for stability, that housesone or more undiffused strobe heads. The front surface of this box, towardwhich the strobe heads are fired, is usually a double thickness of translucentnylon. The sides are black on the outside and white on the inside.Softboxes come in a variety of sizes and shapes. Most are square or rec-
tangular, but there are also round and octagonal ones. Strip lights, which arebasically long and skinny softboxes, are also very popular. Softbox sizes rangefrom 12-inches square all the way up to 5x7 feet. Softboxes allow you to puta lot of diffused light in a controlled area. They also provide more precisecontrol than umbrellas, which tend to lose light intensity due to scattering.
Practical Example: Soft and Beautiful. To photograph a model so thather face is soft and beautiful, it is usually best to spread the light source outand soften it with an umbrella or a softbox. When I am shooting on location,I usually bring one of each for versatility and to cut down on equipment. Forimage 5-16 (next page), I used a silver-lined umbrella to camera left and a24x32-inch softbox to camera right. This produced light that spread out
LIGHT MODIFIERS 79
5-15. Umbrellas are available in a vari-ety of sizes and shapes. Some haveopaque backing for maximum light out-put; others are translucent for shoot-through effects.


beautifully over the whole photograph, creating the desired result: a beautyshot that emphasized the model’s eyes and delicate features.I have noticed one benefit of pairing a softbox with an umbrella: they pro-
duce two different qualities of light. They both are soft and spread out thelight, but the softbox produces a softer light while the umbrella producesslightly more contrast. There is a problem, however. Many purists do not likethe multiple catchlights in the eyes that this setup produces (5-17). Therefore,you may wish to take them out in Photoshop, as seen in the final image.Notice how nothing in the photograph distracts from her face. I decided
to frame her face with rabbit fur because it was soft and and the texture of thefur would work nicely with her smooth skin. I knew that I was going to haveto crop the image very tightly so that no distractions would appear aroundher, so I didn’t worry about the background.
Practical Example: A Fresh, Colorful Look. The client for image 5-18
(next page) was a hair, makeup, and photo stylist who wanted an image thatwas “wild with eye-catching bursts of color” to advertise her skills. The posealso needed to be high in energy to complement the fun of the accessories.With that objective in mind, I was free to concentrate on lighting that
would complement her work. With a veritable fiesta of color to shoot, light-ing was critical to maintain a fresh, festive appearance. Subtle reflections wereneeded to highlight the confections and to avoid making the face appear flat.To achieve this, the model was photographed against a white seamless
background, which was lit by umbrellas to either side of the set, ensuring itwould render as clean, bright white. A 12x16-inch softbox was placed six feetabove the model to create highlights on the hair style and accessories. Thishelped to bring out the wild colors and to reveal the detail in the shapes andtextures.To light the model’s face, 24x36-inch softboxes were placed to either side
of the model. These were positioned about four feet high, then angled downtoward the model’s face. (Note: A lighting setup where two main lights areused on opposite sides of the model’s face is called crosslighting or clamshelllighting.) For a little fill light from below, to ensure the shadows beneath her
LIGHT MODIFIERS 81
5-16 (facing page), 5-17 (top). Pairing asoftbox with an umbrella, placed on op-posite sides of the subject, creates avery soft look. It also creates multiplecatchlights, as seen in the blow-up ofher eyes only (5-17). If you like, thesecan be removed in Photoshop, as seenin the final image (5-16).
camera on tripod
umbrellaat elevationof 4 feet
24x32-inchsoftbox atelevation of4 feet andangled down


nose and chin were not too dark, a reflector was placed in front of the modelon the table at which she was seated.
Colored Gels
Another light modifier to keep in mind when photographing models is col-ored gels that can be affixed to your light sources. These can totally changethe feel of an image. In image 5-19, for example, I used a colored gel over the7-inch parabolic that lit the background, making the old warehouse lookmore interesting. In this case, the model’s outfit dictated the color of the gelI selected. I lit the model evenly with a 24x32-inch softbox and placed a goboso very little of the pink light reached her. You’ll note hints of pink on theedges of her body, but the rest of her skin tones are natural and realistic.(Hint: Keep the model as far from the background as possible. It is critical toseparate the light on the background from the light on the model. You needto maintain independent control of each. Most photographers put the modeltoo close to the background, losing control of the separation of light.)
camera on tripod
24x32-inch softboxes flanking set at an elevation of 4 feet
umbrellasflanking setto light backdrop
table withsilver reflector on top
12-x16-inchsoft box at elevation of6 feet; angleddown overmodel's head
5-18 (facing page). Crosslighting fromtwo softboxes helped create this freshand wildly colorful look.
5-19 (right). Adding a pink gel on thebackground light made the warehousesetting look much more interesting.
camera on tripod
warehouse space
bare strobe headwith colored gelat elevation of3 feet
black posterboard as gobo
softboxmain light

Determining the Model’s Best Market
When working on a model’s portfolio, there are three major criteria you needto keep in mind: age, height, and overall appearance. These will help you todetermine the markets in which she is most likely to obtain work and, there-fore, the types of images (and lighting) you should use in her portfolio.
Age. The model’s age will help you to determine whether her portfolioshould be directed toward a local, regional, or international market. Gener-ally, models under sixteen are limited to local and regional modeling becauseof school requirements, work restrictions, the need for chaperones, etc. Whileit is true that international agents accept younger models, especially in Japan,this is the exception rather than the rule. Models who are over twenty-onealso tend to be limited to local and regional work. This is because most majorhigh-fashion agencies are hesitant to invest their time, effort, and money ina model who has a “limited shelf life.” This is harsh but true. Of course, thereare commercial and talent-oriented markets in which models over the ageof twenty-five are considered very desirable. (Note: A “talent” is someonewho specializes in acting roles, such as in television commercials or as aspokesmodel for a particular company.) Be prepared to offer these marketpossibilities as an alternative for the prospective model who happens to be abit older.
6. Matching the Light to the Image
6-1, 6-2 (facing page). On advertisingshoots, the art director or ad agency willnormally have a planned concept. It’syour job to create the lighting designand mood needed to produce it. Inthese images, notice how the clothes(the products being advertised) takeprecedence over the models.
6-3 (left). Understanding the demandsof the industry will help you tailor amodel’s images toward the genreswhere she is most likely to find success.
Generally, models
under sixteen are
limited to local and
regional modeling.


Height. Height is critical. Shorter models are limited to more commer-cially oriented work and specialty modeling, such as hand work, fit (a modelthat designers hire to fit clothing on during the design process), lingerie,swimwear, hair, and beauty (modeling where the products [such as makeup,jewelry, or hair-care products] require facial beauty). Taller models have amuch broader market.
Overall Appearance. Here your own personal “eye” will determinewhether or not it is worthwhile to work with the potential model. Styles andpreferred looks change as often as hemlines. What was unacceptable two yearsago is in demand now. It is the photographer’s responsibility to stay informedof the current “looks.” However, clear skin, straight teeth, and good bonestructure are always in fashion.Once you have determined the market in which your client wants to seek
work, you can begin thinking about how to create images that will help herreach that goal. Keep in mind that these are only guidelines—generally ac-cepted standards. If a model doesn’t fit in the category she wants to work in,a great portfolio and a lot of determination can still help to make it happen.As you read through the details that follow on the different subgenres of
model photography, examine the images carefully. Think back to the lightingtechniques we have looked at in the previous chapters and consider how thesedifferent strategies are used to create a look that is harmonious with the in-tent of the image. In particular, study how all the elements in the frame—in-cluding the lighting—function in terms of composition (i.e., how your eyeflows through the frame and where it comes to rest).
Commercial Images
Commercial print work refers to photos used in magazines, newspapers, cat-alogs, point-of-purchase packaging and displays, billboards, etc. Ad agenciesor manufacturers who are trying to sell a specific product or service createthis market. This is a lucrative area of work because of the high-profile usageof the image and the availability of exclusive contracts. These ads can definea product’s reputation, so the work is also demanding. Everything must worktogether—the model, the photographer, the stylist, the advertising director,and the garments/product—if the desired image is to be realized.Because commercial print work is very product-oriented, it generally re-
quires a different type of model than normally used for fashion-oriented ads.For example, commercial print images may feature anyone from a little babycrawling on the floor for a diaper ad, to a gray-haired, little old lady adver-tising an assisted-living home. Commercial print work may also include usingbody-part models, such as those who specialize in hand modeling.In commercial print work, remember that neither the backgrounds, the
models, nor any other objects can obscure or overpower the product. The
86 LIGHTING TECHNIQUES FOR PHOTOGRAPHING MODEL PORTFOLIOS
Clear skin, straight
teeth, and good bone
structure are always
in fashion.

product is the star and the viewer’s eye must be quickly directed to it. Whenworking for a client, the art director or ad agency will usually present the pho-tographer with a storyboard or layout of the photos that are needed. Rarelydoes the photographer have the freedom to create his own shot; rather, it ishis responsibility to re-create the preconceived layout as presented. There-fore, his main responsibility is to set the lighting and create the mood di-rected by the art director.
MATCHING THE LIGHT TO THE IMAGE 87
6-4. In commercial print work, themodel is used to draw your attention tothe product—in this case, the dress.
The art director or
ad agency will
usually present the
photographer with a
storyboard . . .
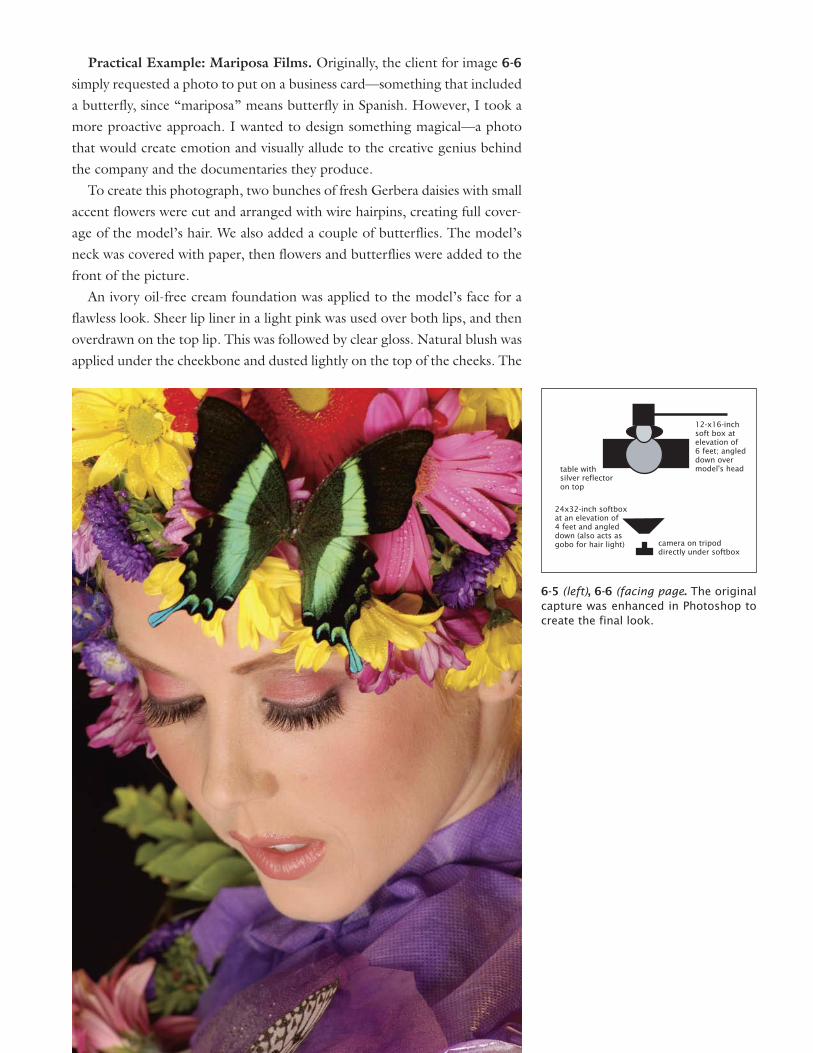
Practical Example: Mariposa Films. Originally, the client for image 6-6
simply requested a photo to put on a business card—something that includeda butterfly, since “mariposa” means butterfly in Spanish. However, I took amore proactive approach. I wanted to design something magical—a photothat would create emotion and visually allude to the creative genius behindthe company and the documentaries they produce.To create this photograph, two bunches of fresh Gerbera daisies with small
accent flowers were cut and arranged with wire hairpins, creating full cover-age of the model’s hair. We also added a couple of butterflies. The model’sneck was covered with paper, then flowers and butterflies were added to thefront of the picture.An ivory oil-free cream foundation was applied to the model’s face for a
flawless look. Sheer lip liner in a light pink was used over both lips, and thenoverdrawn on the top lip. This was followed by clear gloss. Natural blush wasapplied under the cheekbone and dusted lightly on the top of the cheeks. The
6-5 (left), 6-6 (facing page. The originalcapture was enhanced in Photoshop tocreate the final look.
camera on tripoddirectly under softbox
table withsilver reflector on top
12-x16-inchsoft box at elevation of6 feet; angleddown overmodel's head
24x32-inch softboxat an elevation of4 feet and angleddown (also acts as gobo for hair light)


model’s eyebrows were darkened slightly with brow powder, then a silver-shimmer eyeshadow was added to the entire eyelid, followed by magenta overthe lower lid and brow bone. Dark purple and black liner pencil was used atthe eyeline and black false lashes were added. The look was finished with riceset powder.Posed in front of black seamless paper, the model was lit by one 24x32-inch
softbox placed on axis with the camera (four feet high and angled down to-ward the model’s face). A 12x16-inch softbox was added about six feet overthe model, pointed down toward the top of her head to add highlights on theflowers and butterfly. A silver reflector placed on the tabletop in front of themodel created fill light on her face.To complete the look, the image was cropped tightly. It was then cleaned
up slightly, removing any creases andblemishes on the model’s skin and elim-inating any unwanted hair. Next, themodel’s left ear was removed, alongwith the hair showing near her ear. Thewing of the black & white butterflynear the bottom of the frame was re-moved. Then, colors were sampledfrom the flowers and additional makeupwas applied. The main butterfly was se-lected and its contrast was boosted. Thelower black & white butterfly and a sec-tion of flowers were then importedfrom another photograph.
Fashion Images
The fashion photography genre in-cludes images of anything that can beworn—garments, hair-care products,perfumes, makeup, jewelry, etc. Thereare several types of fashion print work,including editorial, catalog, athletic/sports, swimwear, and lingerie. Fashionprint generally utilizes the typical fash-ion model—a tall, thin, beautiful per-son. However, there is a trend towardusing “real” people, including plus-sizemodels, in mainstream fashion print. Inimages where clothing is the featuredproduct, the lighting is often from
90 LIGHTING TECHNIQUES FOR PHOTOGRAPHING MODEL PORTFOLIOS
6-7. Fashion images typically featuretall, thin, beautiful models.

more of an angle, skimming across the clothing to accentuate its texture anddesign. In beauty images—ones designed to showcase makeup, for instance—more frontal lighting may be desired to nearly eliminate any shadows andmake the model’s skin look as flawless as possible.
Glamour Images
To the general public, the term “glamour photography” brings to mind clas-sic photos of Marilyn Monroe, Elizabeth Taylor, or the current crop of Hol-lywood superstars. For the commercial photographer, however, the term isused to describe any work that emphasizes the beauty of the human body.While it can include nude photography, it is not limited to nudes; it may alsoinclude the use of lingerie, swimwear, and other clothing. Some glamour shots
MATCHING THE LIGHT TO THE IMAGE 91
6-8, 6-9. 6-10. Glamour photography isthe term used to describe tasteful de-pictions of the beauty of the humanbody.

may be useful in the beauty industry for the promotion of commercial prod-ucts. Another opportunity for the publication of glamour photography is inthe finer adult magazines; on selected web sites; and for calendars, posters,and other retail products. Tasteful nudity has become acceptable, as long asit is subtle and sexy, rather than tacky or risque.As a result, the typical subject used in glamour photography has shifted
from the busty, blatantly sexy, bottle-blond to the beautiful, perfectly pro-portioned woman with a sexy, girl-next-door look. Proof of this is the factthat the more sophisticated men’s magazines have become very celebrity-driven, featuring tastefully glamorous images of many of today’s supermod-els and Hollywood stars. (Note: Again, the key here is “tasteful.” The morehardcore men’s publications are called “top-shelf” magazines, and most com-mercial clients will not be interested in a model who has done top-shelf work.)The look of the lighting in these images can vary widely, from soft and sul-
try to very dramatic and edgy. The goal will be to accent your model’s bestfeatures—her physical beauty. In this kind of image, the model is the prod-uct, so it’s all about lighting her to look her very best and most alluring.
Lingerie Images
Lingerie photos can be created either in the studio or on location but should,of course, be shot with good taste and sensibility. Commercial lingerie pho-tography must be exquisite and beautiful but not sexual. If the shot becomessexual, you are no longer selling the lingerie—you have crossed over intoglamour and are showcasing the beauty of the model.The advertisers will determine the focus of the shoot. Sometimes, they
want each photo to detail a particular garment. For example, a client may re-quest that the photograph concentrate on the strap of a bra, the underwire,or an especially beautiful strip of lace. Sometimes, they simply want to invokea feeling of romance, excitement, or glamour. Some clients request morecatalog-type photos; some allow the photographer more of an outlet for hispersonal creativity. As with swimwear models (see page 99), models for lin-gerie shoots are generally shorter with more curves than the typical high-fash-ion model.The lighting styles used for lingerie images will vary depending on the look
you are trying to achieve. For catalog-style images, the light will be one ofyour tools for revealing the cut and texture of the model’s garments. Be sureto note any special details on the garment, and try to accentuate them. Inmore glamous-style looks, the lingerie still needs to be accentuated, but therewill also be a secondary emphasis on the model’s physical beauty in those gar-ments. When shooting portfolio images for a model seeking work in lingeriephotography, you’ll want to employ lighting that accentuates the model’scurves.
92 LIGHTING TECHNIQUES FOR PHOTOGRAPHING MODEL PORTFOLIOS
6-11 (below), 6-12 (facing page). Lin-gerie images can range widely in stylefrom catalog-type images to shots thatverge on glamour-style.
The look of the lighting
in these images can
vary widely . . .


Plus-Size Images
In the fashion business, a model who wears size 10, 12, 14, and up is termeda plus-size model. The highest-paid plus-size models are normally sizes 12,14, or 16. When working with plus-size models, there are two ways to ap-proach the session. The first approach is to use every technique in the bookto visually slim the model. This could include exaggerated posing and spe-cialized lighting—usually high-contrast lighting from the side to leave a por-tion of the body in shadow. Reducing the separation between the subject andthe background can also produce a slimming effect.These exaggerated techniques are normally used only when photograph-
ing portfolio images for a model who is concerned about her appearance, orwhen a client books a particular model because they see something special inher but still want to reduce her size visually.The second approach is used when a plus-size model is booked by the
client as a plus-size model—perhaps to advertise plus-size clothing or to ap-peal to customers with more average builds than the typical fashion model. Inthis case, the model should be photographed using the same lighting andposing methods as you would use with any other model. No special tech-
94 LIGHTING TECHNIQUES FOR PHOTOGRAPHING MODEL PORTFOLIOS
6-13. 6-14. Many agencies are expand-ing the use of “real people” as modelsin their advertisements.

niques are necessary. Today, clients and advertising agencies are expandingthe use of “real people” in their advertisements, so this is often the scenarioyou encounter.
Editorial Images
Editorial work is the part of the magazine created by editors, not advertisers.These pages promote a general trend or idea rather than a specific product.When creating this type of work, the editors and photographers are respon-sible to the style and outlook of the magazine rather than to the manufacturer
6-15, 6-16, 6-17. The poses and modelsused in editorial images can be ex-tremely varied. It all depends on thetrends the magazine wants to showcaseor explore.

of a garment or product. They try to create a look that will become the nexttrend. Use inventive lighting, composition, posing, and every other tool atyour disposal to produce the most creative work you can. This is the time topush your boundaries (while, of course, working in concert with the editors).This is the most prestigious and glamorous work for a fashion photogra-
pher, but not the most lucrative. This is because editorial work is wonderfulfor building a photographer’s reputation and for gathering more of those all-important tear sheets. Since magazines know that editorial tear sheets arecareer-builders, they pay less money.
Athletic/Sports Images
Shooting advertisements for athletic equipment or garments involves a dif-ferent approach than most fashion-oriented shots. These ads generally requireless structured, more active shots that generate excitement for the productand for the sport.When shooting for these kinds of clients, I usually prefer to go on location,
rather than shooting in the studio. A local gym, basketball or tennis court, or
6-18. In athletic images, light skimmingacross the model’s body reveals the def-inition in her physique.

high-school football field will give the photographer opportunities for actionshots not available in most studios. If the model whose portfolio you areshooting seems particularly muscular or otherwise well-suited for this kind ofwork, take a field trip with some sports gear and athletic wear, then experi-ment with active, high-energy poses.Because you’ll be working on location, your approach to great lighting will
be to find it, rather than to create it. Working later in the day or looking foroverhead light-blockers will help ensure more directional light (i.e., less over-head light, which creates unflattering shadows). Having a reflector availablewill also be useful for controlling contrast. Additionally, keep in mind that
MATCHING THE LIGHT TO THE IMAGE 97
6-19, 6-20, 6-21. Going outdoors is agood approach to creating athletic im-ages. Look for great lighting that allowsyou to create more active poses.
Your approach
to great lighting will
be to find it, rather
than to create it.

positioning the model so that the main light strikes her body from an anglewill help to define the contours of her athletic physique.
Catalog Images
Catalog work refers to the images used in a retailer’s catalog, mail-orderbrochures, flyers, and other materials that are used to sell specific merchan-dise. The main objective of these images is to present garments or other mer-
6-22, 6-23. In catalog images, the em-phasis is on showing the style of theclothing being sold—usually in a verystraightforward, detailed way.
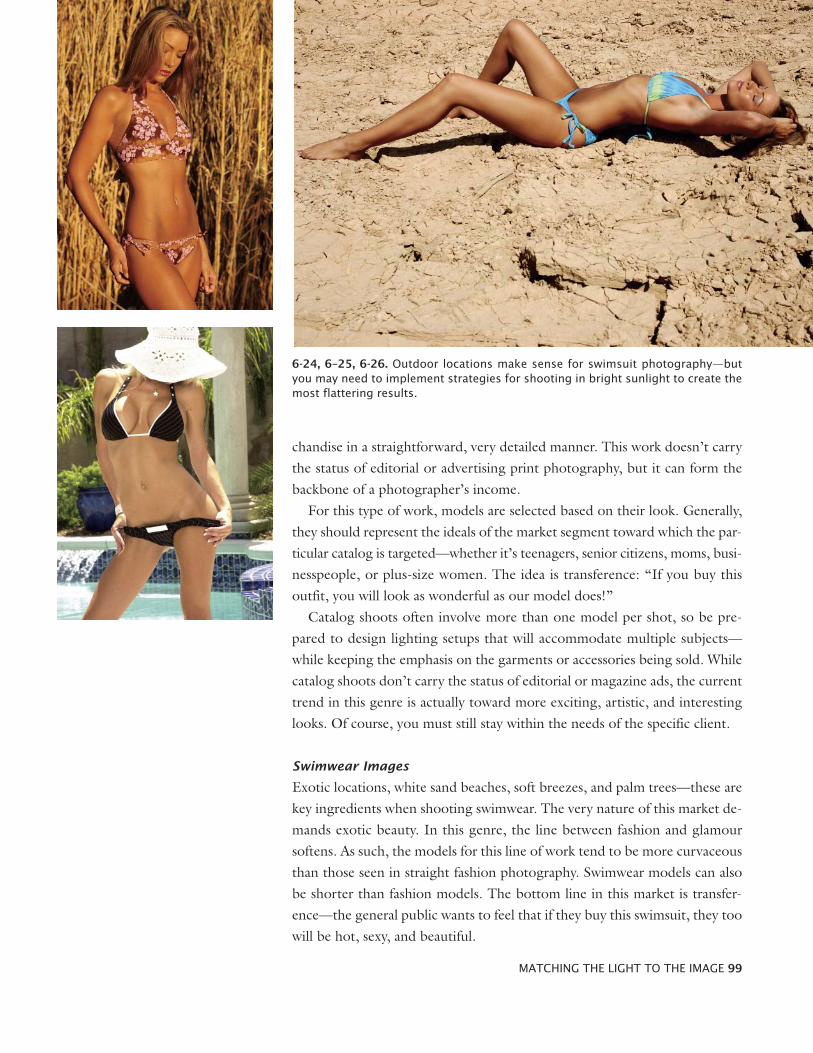
chandise in a straightforward, very detailed manner. This work doesn’t carrythe status of editorial or advertising print photography, but it can form thebackbone of a photographer’s income.For this type of work, models are selected based on their look. Generally,
they should represent the ideals of the market segment toward which the par-ticular catalog is targeted—whether it’s teenagers, senior citizens, moms, busi-nesspeople, or plus-size women. The idea is transference: “If you buy thisoutfit, you will look as wonderful as our model does!”Catalog shoots often involve more than one model per shot, so be pre-
pared to design lighting setups that will accommodate multiple subjects—while keeping the emphasis on the garments or accessories being sold. Whilecatalog shoots don’t carry the status of editorial or magazine ads, the currenttrend in this genre is actually toward more exciting, artistic, and interestinglooks. Of course, you must still stay within the needs of the specific client.
Swimwear Images
Exotic locations, white sand beaches, soft breezes, and palm trees—these arekey ingredients when shooting swimwear. The very nature of this market de-mands exotic beauty. In this genre, the line between fashion and glamoursoftens. As such, the models for this line of work tend to be more curvaceousthan those seen in straight fashion photography. Swimwear models can alsobe shorter than fashion models. The bottom line in this market is transfer-ence—the general public wants to feel that if they buy this swimsuit, they toowill be hot, sexy, and beautiful.
MATCHING THE LIGHT TO THE IMAGE 99
6-24, 6–25, 6-26. Outdoor locations make sense for swimsuit photography—butyou may need to implement strategies for shooting in bright sunlight to create themost flattering results.

Practical Example: Two Looks in the Desert. These two swimsuit im-ages were shot in the desert, where I employed a mirror to highlight the mod-els’ legs or hair. The first shot (6-27) is a poster-style photograph for aprofessional volleyball player. Fill flash and a mirror were used to separate the
100 LIGHTING TECHNIQUES FOR PHOTOGRAPHING MODEL PORTFOLIOS
6-27, 6–28, 6-29. Simple changes inlighting can result in swimwear imagesthat are dramatically different. One hasa pinup feel, while the other is morefashion-oriented.

model from background. For this image and the setup shot (6-29), the whitebalance was set to daylight. In the second image (6-28), we have a swimwearphotograph created for a professional model. The highlights from the mirrorwere to used to draw attention to her figure. Here, the camera’s white bal-ance was also shifted to tungsten and a warming filter was placed on the soft-box to turn it into a tungsten-colored light source. The result is warm lightingon the subject and cool tones in the background.
Special Attributes
When working with a model on her portfolio, pay particular attention to herspecial attributes. Many models find ample work in fields where they are calledon for their beautiful hands, legs, feet, hair, or other remarkable features. Ifyou spot something unique about your model, consider designing an imageto showcase it. (See page 119 for a shoot designed to highlight the model’slegs.)
MATCHING THE LIGHT TO THE IMAGE 101
6–30. If you notice that a model hasgreat legs, design an image to show-case them. Use side lighting to showmusculature and accent lighting to cre-ate long highlights that emphasize thelength of the model’s legs.

Drag the Shutter for Creative Effect
Dragging the shutter is a technique that allows you to combine the effects offlash with ambient light. To do this, you will select a shutter speed that islonger than your camera’s flash-sync speed. During the exposure, the flash willfire to illuminate the subject. Then, the shutter will remain open, allowing theambient light in the scene to record. How long the shutter remains open willdetermine how much ambient light is recorded. Let’s look at this techniquein practice.The light for this shot (7-1) was simple: I used a White Lighting strobe
with a 7-inch parabolic that had diffusion material taped over it. The onlyother source of light was the scene of city lights behind the model. To makemy exposure, I determined the correct aperture for the optimal exposure onthe model. Then, I set the camera at series of slow shutter speeds, from 1/2
second up to 2 seconds. This process requires some experimentation, and youmust bracket the shutter speeds until you arrive at a result that provides thebalance you’re looking for.After you determine the correct combination of shutter speed and aper-
ture, try handholding the camera, so you can move it from side to side or upand down during the exposure. Camera movement was what created theswirling lines of light around the model. Note that the model, however, is al-most completely sharp behind these lines of light. This is because she was litonly by the very quick flash source, which froze her in place.
Control the Background with Light
Now that you know how to drag the shutter, keep in mind that this sametechnique can be used on location to control backgrounds that are lit by am-bient light. This can help you to adjust the visual effect of a background whilekeeping the model’s exposure constant. Let’s look at this whole shoot—startto finish (images 7-2 to 7-9).To elevate your work as a photographer, you can’t go wrong by teaming
up with professional hair and makeup stylists. Regardless of how stimulating,creative, or well-lit your images may be, without the finishing touches of goodmakeup and hair styling, you will not be viewed as a top professional. (Note:Always instruct the model to arrive at the shoot with clean, natural hair—no
102 LIGHTING TECHNIQUES FOR PHOTOGRAPHING MODEL PORTFOLIOS
7. Creative Techniques
7-1 (facing page). Dragging the shutterallows you to create some dramaticlighting effects.
camera on tripod
7-inch parabolic with diffusion materialtaped over frontat elevation of 6 feet
city lights in background


styling products should be added, and no straightening or curling should bedone. The occasional exception occurs when a hair stylist will ask the modelto arrive with “dirty” hair. This is sometimes the case when the stylist knowshe or she will be creating an updo or some other style that requires a lot ofhold.)Compare the first two for this session (7-2 and 7-3). In the second image
the base makeup (called foundation) has been applied to the model’s fore-head. This eliminated her freckles and gave a smooth surface on which themakeup artist could work. If we had been shooting for a natural look, themakeup artist might have allowed the freckles to show through. However,for this fashion shot, we did not want the freckles to draw the viewer’s eyefrom the focus of the shotNow, let’s get back to the purpose of this series of photographs: control-
ling the look of backgrounds. The first step in this process was creating anoverview of the scene (7-4) without the flash on. In this case, my exposure wasdetermined by a light meter to be 1/15 second at f/8.I determined I needed to change my view slightly so as not to see the stop
sign outside. I also needed to crop the image more tightly. After making theseadjustments, the flash then was turned on and adjusted to give an outputvalue of f/8 at the spot where I was planning to place the model. Then, Itook another test shot at 1/15 second (7-5). Note that these two scenes (7-4
and 7-5) are virtually identical. The second shot is every-so-slightly more litat the door due to the flash, but not sufficiently lit to affect the overall feel ofthe image.For the third shot (7-6), the flash output was left at f/8, but the shutter
speed was dropped to 1/4 second. Notice the drastic change in the scene—es-pecially outside the window. For image 7-7, the flash output was still f/8, butthe shutter speed was dropped even further to 1/2 second, resulting in evenmore ambient light recording on the background. I usually run a series of
104 LIGHTING TECHNIQUES FOR PHOTOGRAPHING MODEL PORTFOLIOS
7-2, 7-3. Great styling sets the stage fora successful shoot.
7-4. An overview of the whole scene was shot with the ambi-ent light only.
7-5. A second overview was shot with the flash reading f/8 atthe spot where the model would be. Note that the flash hasvery little effect on the background.

test exposures like this while the model is preparing so I can determine my de-sired exposure and decide how much I can change the shutter speed toachieve acceptable differences.Notice that when the model is in place, she is still correctly exposed—but
the background light changes drastically with the shutter speed. For image 7-
8, I chose to shoot at 1/4 second at f/8. This exposure added enough lightfrom the windows to see detail in the house while the exposure from the flash
CREATIVE TECHNIQUES 105
7-6. A third overview was shot using a longer shutter speed,resulting in a lighter background.
7-7. A third overview was shot using an even longer shutterspeed, resulting in a much lighter background.
7-8 (above). Shot at f/8 and 1/4 second,the model has nice skin tones and thereis good detail in the background.
7-9 (right). Shot at f/8 and 1/30 second,the model still has nice skin tones, butthe background is much darker.

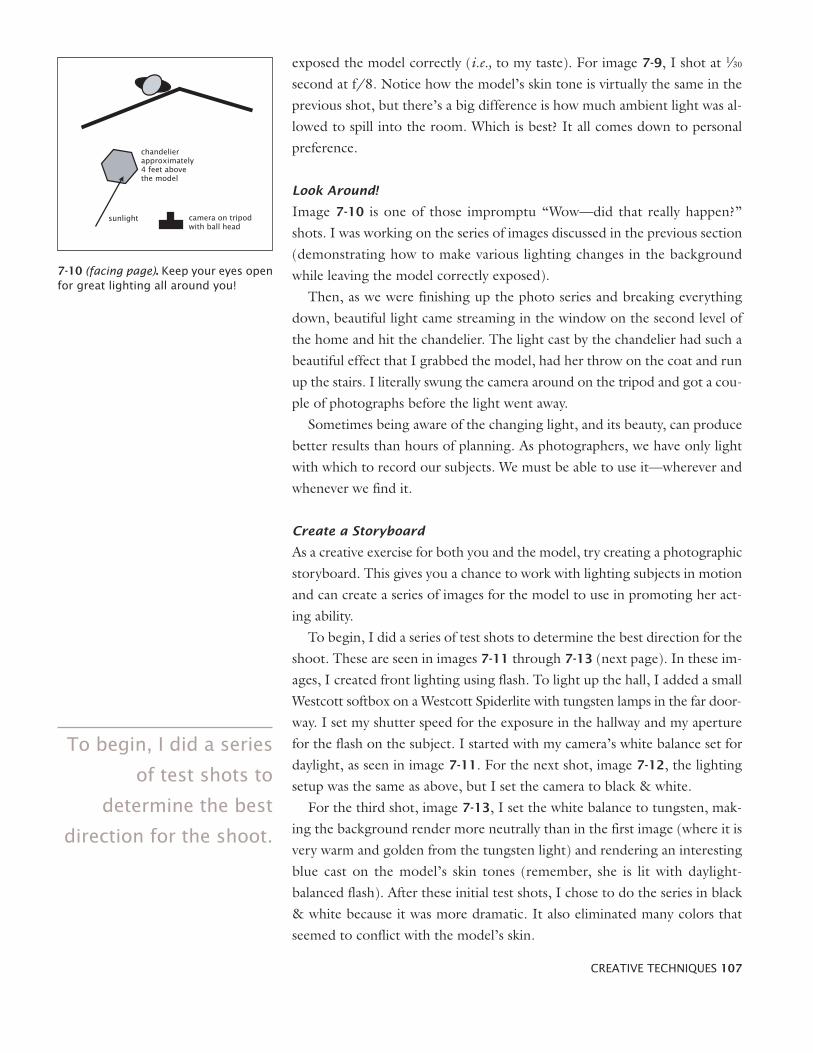
exposed the model correctly (i.e., to my taste). For image 7-9, I shot at 1/30second at f/8. Notice how the model’s skin tone is virtually the same in theprevious shot, but there’s a big difference is how much ambient light was al-lowed to spill into the room. Which is best? It all comes down to personalpreference.
Look Around!
Image 7-10 is one of those impromptu “Wow—did that really happen?”shots. I was working on the series of images discussed in the previous section(demonstrating how to make various lighting changes in the backgroundwhile leaving the model correctly exposed).Then, as we were finishing up the photo series and breaking everything
down, beautiful light came streaming in the window on the second level ofthe home and hit the chandelier. The light cast by the chandelier had such abeautiful effect that I grabbed the model, had her throw on the coat and runup the stairs. I literally swung the camera around on the tripod and got a cou-ple of photographs before the light went away.Sometimes being aware of the changing light, and its beauty, can produce
better results than hours of planning. As photographers, we have only lightwith which to record our subjects. We must be able to use it—wherever andwhenever we find it.
Create a Storyboard
As a creative exercise for both you and the model, try creating a photographicstoryboard. This gives you a chance to work with lighting subjects in motionand can create a series of images for the model to use in promoting her act-ing ability.To begin, I did a series of test shots to determine the best direction for the
shoot. These are seen in images 7-11 through 7-13 (next page). In these im-ages, I created front lighting using flash. To light up the hall, I added a smallWestcott softbox on a Westcott Spiderlite with tungsten lamps in the far door-way. I set my shutter speed for the exposure in the hallway and my aperturefor the flash on the subject. I started with my camera’s white balance set fordaylight, as seen in image 7-11. For the next shot, image 7-12, the lightingsetup was the same as above, but I set the camera to black & white.For the third shot, image 7-13, I set the white balance to tungsten, mak-
ing the background render more neutrally than in the first image (where it isvery warm and golden from the tungsten light) and rendering an interestingblue cast on the model’s skin tones (remember, she is lit with daylight-balanced flash). After these initial test shots, I chose to do the series in black& white because it was more dramatic. It also eliminated many colors thatseemed to conflict with the model’s skin.
CREATIVE TECHNIQUES 107
7-10 (facing page). Keep your eyes openfor great lighting all around you!
camera on tripod with ball head
sunlight
chandelierapproximately4 feet abovethe model
To begin, I did a series
of test shots to
determine the best
direction for the shoot.

108 LIGHTING TECHNIQUES FOR PHOTOGRAPHING MODEL PORTFOLIOS
7-11, 7-12, 7-13. A series of test shotshelped me determine the right directionfor the storyboard shoot.

To create the storyboard effect seen in images 7-14
to 7-19 (above) and 7-19 to 7-23 (next page), motion ina variety of shots was required. This required either a highshutter speed or flash to stop the action. I chose to useflash. You have to be careful when combining instanta-neous flash lighting with continuous lighting. Because
you will need a slower shutter speed for the tungsten exposure, you will getsome blur whenever the ambient light bleeds over onto your subject. In theimages in this series where the model is flinging the shirt over her shoulder,notice the blurred edges of the garment (such as at the top of the next page).With a scene like this, you also have an additional problem in that the
model is moving both toward and away from the camera. Because of this,your depth of field is critical. You may need to use a narrow aperture, such asf/8 or f/11. Fortunately, with today’s digital cameras, you can boost yourISO without much difference in quality of the image. This will help preventhaving to drop your shutter speed too low.Throughout these images, notice how the flash intensity falls off quickly—
it has a pronounced effect on the walls of the hallway walls, particularly in
CREATIVE TECHNIQUES 109
7-14, 7-15, 7-16, 7-17, 7-18. Creating a visual storyboard letsyou practice lighting active subjects while your model showsoff her acting abilities.


the longer body shots. Additionally, look at the shot of the finger (facingpage, bottom right) and notice how much brighter the model’s hand is thanher face—even though it is only about 18 inches closer to the flash. Whenworking with models and flash, the model must not vary her distance fromthe flash source; if she does, your exposures will be inconsistent. The impor-tant factor is the distance from the flash to subject, not the camera location.For the last photo in this sequence (7-24), I used a single flash source over
the model’s head and as tight to the wall as possible. This light was fitted witha 7-inch parabolic, which had a diffusion gel on it. Small barn doors on theparabolic kept the light from spreading out too far. It’s a dramatic lightinglook that fits the emotion the model is portraying.
Add Lens Flare
Lens flare generally appears as bright circles, shimmering lines, or smears oflight across a photograph. It can also appear as a film covering the entirephoto. Unfortunately, most commercial clients dislike lens flare passionately;they consider it the mark of an amateur. However, some editorial fashion
CREATIVE TECHNIQUES 111
7-19, 7-20, 7-21, 7-22, 7-23 (facingpage). Notice how the flash falls off andhow the subject’s distance to the cam-era affects the exposure of her skintones.
7-24 (above). A single light was used di-rectly over the model’s head to producea dramatic conclusion for this series ofstoryboard images.

gurus feel that occasional, deliberate lens flare adds drama and passion to theimage. Either way, it is critical that the photographer understands the phe-nomenon and knows how to either use it or eliminate it, depending upon thedesired effect.Technically speaking, lens flare is created when non-imaging forming light
enters the lens at just the right angle, bounces around the interior of thecamera/lens, and eventually ends up being recorded in the image. It canlower the image contrast significantly by increasing the exposure withoutadding any image content. It also can cause a loss of color saturation and re-duce the sharpness of the image.Lens flare normally occurs because the lens was pointed in the general di-
rection of the sun or a direct artificial light source. If you can stop direct lightfrom hitting the front of the lens, you can reduce or eliminate most lens flare.There are several methods of doing this. At times, I have used my hand to
112 LIGHTING TECHNIQUES FOR PHOTOGRAPHING MODEL PORTFOLIOS
7-25 (left). This is the same bathing suit as in the followingimages—but notice the lack of color. Note, too, the unflatter-ing shadows that the direct light created on the model’s face.
7-26 (right). The model was turned so that her back was tothe sun. Notice the lack of sharpness and contrast created bythe resulting lens flare.

shield the lens—although this is difficult, since I normally need both handsto work the camera. I have directed assistants to hold a reflector as a shield,or you can use a commercial lens hood. I prefer, in most instances, to use agobo to make sure no extraneous light hits the lens.Some types of flare, however, can actually enhance the photo, adding a
creative, innovative touch. It can add a little something extra to your imageswhen used judiciously. When working with a fashion client that you thinkmight appreciate this, shoot with correct exposures first, then remove thegobo and experiment with lens flare to create a bit of drama. Sometimes theclient will really enjoy this unexpected option.Lens flare can also be produced in the studio for creative effect—or even
added in postproduction. The model in image 7-29 (next page) wanted ahigh-impact photo for his portfolio. His session was originally scheduled as a
CREATIVE TECHNIQUES 113
7-27 (left). The lighting was improved simply by adding agobo to block stray light from hitting the lens, thus prevent-ing flare.
7-28 (right). This is the final image after Photoshop enhance-ment. With backlight on the model, a gobo and reflector wereused to finesse the lighting. Notice the rim lighting that sep-arates her from the background.
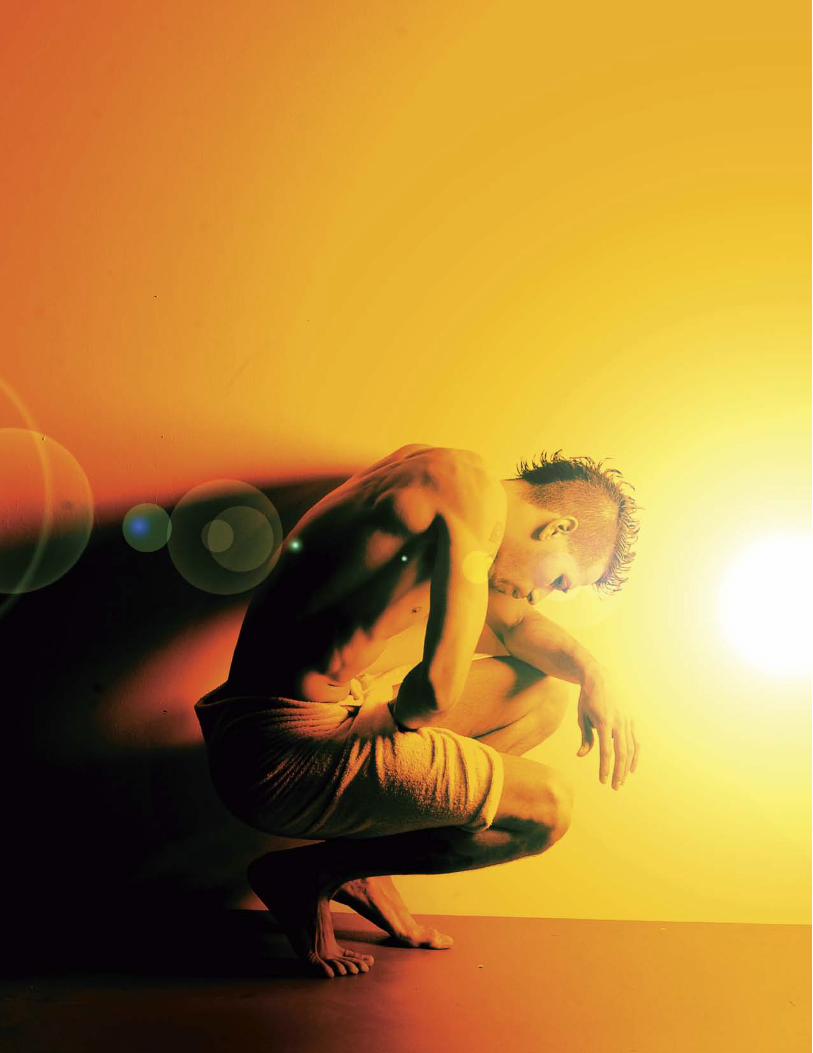

location shoot, but the weather forced us into the studio. So, I was seeking aunique, high-impact look to produce with studio lighting.I originally set up two background lights and directed the model into po-
sition. In the test shots, however, I saw that one light was out—and it createdan interesting pattern on the wall that was similar to natural sunlight. I de-cided not to replace the failed light; I wanted to see what the backlightingwould do on the model’s body.The model posed as if in direct sunlight (facing the light source). Then, I
moved to intentionally show some lens flare. Later, I intensified the yellowcolor in Photoshop and added additional lens flare, since the natural lens flarewasn’t sufficiently dramatic.
Do Extreme Close-Ups
The model for image 7-30 wanted to create an eyecatching photo for herportfolio—with bursts of color for extra impact. The original plan was to
7-29 (facing page). Lens flare and boldcolor combine for great drama in thisstudio image.
7-30 (right). Creating extreme closeupshelped us make use of a small shootingarea and salvage a rained-out shoot.
camera on tripod
table withsilver reflector on top
umbella angled down
umbella angled down
refridgeratoras whitebackground

shoot headshots on location near the model’s home, but nature intervenedand a thunderstorm sent us hurrying indoors. Rained out, the only option wasto shoot in the model’s small kitchen, using the refrigerator as a white back-drop. This meant only extreme close-ups could be shot.Although we had a very limited space in which to shoot, the lighting prin-
ciples were the same as most model shoots. I placed the lights close to themodel’s face, spreading the light over the wide area of the face known as themask. A silver umbrella was used in front of the model, placed as low andclose to the model as possible. The camera was placed just under the um-brella. A second umbrella was positioned just above the model’s head andaimed at the refrigerator so the illumination was even.By drenching her face in warm acrylic colors, a whimsical image was ob-
tained. The paint gives the exciting color that the client required.
Work with Performers
If you’re itching to try some truly challenging photography, try working withperformers whose images need to be captured live on stage. You’ll need to doyour homework, really know your equipment, and work quickly to capturethe right moments.
Practical Example: Emerald Dream Ball. Image 7-31 was created as partof an advertising campaign for the New Year’s Eve gala at the Rio Hotel and
7-31. Flash froze the subject, while alonger shutter speed allowed the stagelighting to record.

Casino in Las Vegas. The goal was tocapture the beauty, power, and grace ofthe aerialist’s performance.Although there were many other acts
performing simultaneously, I wanted toseparate the aerialist to emphasize thecontrol and concentration needed forher performance. There also needed tobe space in the frame for ad copy.When shooting a performance dress
rehearsal, you are normally not allowedto set up studio strobes or extra tungstenlighting. This is because the lights cancause the performer to miss their timingor overpower the lighting director’ssetup. Therefore, I used a simple off-camera auxiliary flash. By using a mono-pod, I was able to shoot at 1/15 second torecord the background while the flashfroze the performer.
Because the performer was in con-stant movement and there was a pre-dominately black background, I couldnot use the TTL feature. After shootingthe first few images, I noticed that theflash was blowing out the lighting fromthe stage, overexposing the performer.
Rather than recalculating the output, which would take too much time,I placed two fingers over the flash and continued shooting. Using theviewfinder, I was able to see that the reduction in output was exactly what wasrequired.
Practical Example: Headlights and Tailpipes. For this promo piece (7-
32), which was created for a Las Vegas show, I wanted to show a Romeo andJuliet–style confrontation in a contemporary setting. The photo was takenon stage during a performance. Hence, there were several limiting factors.First, there was an extremely limited opportunity to shoot and then only fromthe audience at a pre-determined place (not of my choosing). Second, theshot required the use of ambient lighting that was not under my control.Third, the shot had to be taken quickly as I couldn’t ask the actors to “do thatagain.”I was given three days to produce frames suitable for the show’s promo-
tional purposes. The first step was to go to several rehearsals and get an un-
CREATIVE TECHNIQUES 117
7-32. Preparation was the key to captur-ing this fleeting moment using only thestage lighting.


derstanding of the flow of the show. At the last dress rehearsal, I was able toshoot many images using tungsten settings and daylight settings to dial in thecolor temperature of the lighting. I noted which scenes I’d photograph usinga tungsten white balance, which to photograph using a daylight white balance,and when I’d need to boost up the camera’s ISO. Based on my notes, I shotthe first two shows and was able to present the client with a full range of pho-tos from each scene.For this image, I shot with my camera’s white balance at the tungsten set-
ting and a shutter speed of 1/125 second. From my research, I knew therewould be brief moments during this scene when the actors were stationary.The result was a correct exposure. However, the art department decided toadd a rain effect and purple coloring because this scene was performed to thesong Purple Rain.
Highlight One Asset
Another nice challenge you can set for yourself when working on your light-ing skills is to photograph an image designed to show off one particular as-pect of the model’s appearance—and to do this without dramatically com-promising the lighting on the rest of her body.Many photographers use frontal lighting when photographing models, be-
cause it gives a beautiful look on the face. However, it can also compromisethe model’s body by making it look very flat. To accentuate the legs in thisshot for the model’s portfolio (7-33), I used one light source (a 22-inchWhite Lightning parabolic) and placed it farther to the side than is normal ina beauty image. This was to accentuate the model’s legs and body shape bycreating the shadows needed to show depth and form. Note, however, thatwhen you use a side-lighting technique to accentuate the body, it can castshadows on the face that may not be attractive—especially for women.To overcome this, you can direct the model to look toward the light so that
it fills in the mask of her face. This works as long as it doesn’t create an ex-aggerated shadow of her nose on the cheek. If the strong side lighting stillpicks up a few facial imperfections, they can be cleaned up in Photoshop. Inthis case, however, the lighting was used to create a split effect on her face.One side of her face is smoothly lit with almost no shadows (the beauty look),the other side is almost completely in shadow. There’s so little detail visibleon the shadow side, that we don’t see unflattering shadows—it’s virtually allshadows.To keep just a bit of detail on the shadow side of the model’s body, keep-
ing it from going totally black, I positioned a white reflector to pick up straylight and provide a low level of fill light. Taking a few test shots and review-ing them helped me determine the best position for this reflector, ensuring I’dget the tonal values I wanted.
CREATIVE TECHNIQUES 119
camera on tripod
22-inch parabolic
white discreflector
7-33 (facing page). Dramatic lightingcan be used to highlight one part of thebody—but you have to pay attention toavoid creating problems in other areas.
To accentuate
the legs in this shot
for the model’s
portfolio, I used one
light source . . .

Use a Prop
Designing an image around a prop is another useful strategy to explore.Practical Example: AK-47. For this shoot (7-34), my assignment was to
create a high-impact photo for use in an upcoming movie. The plan was toshoot a model with a prop AK-47, using a low camera angle and dramaticshadows. Since this model has great legs, we decided to add sex appeal to theimage by making her legs a secondary focus.The most important lighting technique used here was patience—waiting
for the right time of day to shoot. As the sun approaches the horizon, thelight becomes warm and beautiful. The length of the shadows increases andthey become more dramatic. In this case, I wanted the model’s shadow topoint down the road to draw the viewer's eye off into the distance. If you areworking in the manual mode for a late-evening shot like this, be aware thatthe light will change rapidly and needs to be constantly metered.
Practical Example: Newspapers. The next image (7-35) was created as apromotional poster piece for makeup artist Wendalynn Nelson. In this case,the whole shot was designed around the prop: newspapers.We used a rubber skull cap with strips of newspaper glued to it as hair. The
background was also a wall of newspaper. Originally, the model was to havebare shoulders, but after a couple of tests shots it was obvious that the bareshoulders drew too much attention. Therefore, her shoulders were also cov-ered with newspapers.To light the image, I used a White Lighting strobe in a 7-inch parabolic
covered with a diffusion gel. By using a hard light with diffusion gel, I wasable to get the extreme contrast I desired. It was important that the viewer
120 LIGHTING TECHNIQUES FOR PHOTOGRAPHING MODEL PORTFOLIOS
7-34. Explore ways to incorporate propsin your images.
The length of the
shadows increases
and they become
more dramatic.

see shadows on the newsprint to add depth and dimension. Note that themodel is also leaning up tight against the background. This eliminated the po-tential for hard shadows on the background.To create a totally different look, some enhancements were made in Pho-
toshop (7-36). First, the image was cropped and the contrast boosted. Thebackground was duplicated and converted to black & white. The opacity ofthis layer was then reduced to allow the colors from the underlying layer toshow through. After flattening the two layers, the model’s eyebrows were re-moved using the Clone Stamp tool. To give her skin a porcelain look, a newlayer was created (at 50-percent opacity) and white was painted over her face(avoiding the eyes, nose, and lips). On another layer, wide black lines weredrawn around the eyes. These were then dramatically blurred to create theheavy shadowing effect. The same technique was used to create the verticallines of shadow, making her face stand out dramatically.
7-35, 7-36. Newspapers were the gene-sis for this image, which is shown in itsoriginal captured form and after somepostproduction enhancements.
camera on tripod
7-inch parabolic with diffusion materialtaped over frontat elevation of 4 feet
wall covered with newspapers

U.S./European vs. Asian Modeling Agencies
U.S. and European Agencies. For the major agencies in the U.S. marketsand most of Europe, your photos in a model’s original portfolio may be re-placed. Agencies often have new models do shoots with established photog-raphers in their area—both for the experience this gives the models and inorder to introduce the new model to the photographers. The goal of the shotsyou will create for the model is to capture the attention of a major agency, andhopefully to obtain a contract for the model. As an added bonus, if your shotsinterest the agency, sometimes they will later use your services to test aprospective model found by their scouts as they tour the country.
Asian Agencies. For the Asian market, such as Japan and Taiwan, the port-folio will stand “as is.” The photos must be sent to Asia, where the model’scomp cards will be printed and distributed to clients as part of a marketing ef-fort that begins well before the model leaves the United States. Immediatelyupon arrival in Asia, the model must be ready to work. Time is of the essence,as a typical model’s contract in Asia in normally limited to just two shortmonths (although some models stay three months). Because of this timeline,a working portfolio is an absolutely necessity.
Comp Cards
In addition to a portfolio, models will need comp cards to get started in thebusiness. This is a promotional piece, featuring photos and contact informa-tion, that she uses to attract potential clients. Usually, the model’s agent keepsa good supply on hand, and the model has a few with her at all times. Thesecards are usually 6x9 inches in size, but can also be made the size of a post-card to be mailed as promotional pieces. There is usually one photo on thefront and three or four on the back.
The Model’s Comfort
When photographing models (especially inexperienced ones), it’s importantto make the shoot comfortable for them—after all, being in front of a cam-era and surrounded by lights can be intimidating for anyone. I love makingmodels feel the confidence they need to be at their best on camera. I do thisby focusing on their strengths and getting them pumped up about the shoot.
122 LIGHTING TECHNIQUES FOR PHOTOGRAPHING MODEL PORTFOLIOS
8. Additional Tips
Agencies often have
new models do shoots
with established
photographers in
their area.

I also use stories to make it clear to them that being in front of a camerain the studio isn’t like being in front of Mom’s camera at a picnic. One of myfavorite stories is about a Sports Illustrated swimsuit photographer who shot40,000 pictures on location to get 60 for print—and that was with a fullmakeup and hair crew, photographic assistants, and professional models! Thelesson is that not every photo has to be perfect.In a portfolio shoot, it helps to remind your models that no one will see
the photo before them. If they hate an image, they can choose not to use it.
Clothing
When shooting images for a model’s portfolio, I have her bring a lot ofclothes to the studio. The clothes you finally decide on should be ones thatare not too trendy. These will look dated quickly and require more photo-graphs be taken. Once a model is established, she can add more trendy itemsto her portfolio. For the amateur model, try to accomplish a few basic shots:a basic head shot, a glamour head shot, a basic full-body shot, etc. Show themodel’s beauty with a clean and fresh look instead of a highly stylized one.When the clothes are an important part of the image, make sure that they
fit right—or at least appear to fit right. You can use clips behind the model topull clothes tighter if they are too big, or you can pose the model in some waythat disguises the poor fit, but you have to do something. Otherwise, neitherthe clothes nor the model will look as good as they could.Clothes can also be the source of inspiration for an image, so don’t think
of them only in terms of an accessory. When a unique or appealing or veryflattering garment catches your eye, think of ways you could build an imagearound it.
Men vs. Women
When compared with those used by female models, male models’ portfoliosdo not need to show as wide a range of looks or emotions. Men should bephotographed looking very casual. A little powder will suffice for makeup.Thephotos should show the shape of the model’s jaw; if he is shirtless, side light-ing is also desirable to create harder lines and show off the chest physique. Theidea is to convey a sense of power, almost treating the model like a sculpture.
Image Quality
The quality of photos in a model’s promotional materials must be excep-tional—even test shots must be carefully planned with a purpose in mind. Befair to the models. Many agencies would rather see snapshots than poor-qual-ity professional photos. Before every shoot, ask yourself what part of themodel’s “product” you are showing—her physical beauty, legs, lips, sensual-ity, etc.
ADDITIONAL TIPS 123
The clothes you
finally decide on
should be ones that
are not too trendy.

Photography is an art that requires continual attention. Continually shootpersonal projects to hone your skills. Those of you who put away your
camera and don’t shoot personal projects will soon lose the creative edge. Afriend who is also a noted art director once said to me, “The next time youare wondering why you have chosen a career as an artist, think about this:The one thing that people with money will always pay for is creativity. I wouldlike to add to that comment, “Don’t ever lose your creative edge.”People are always telling me they wish they had my job. Well, no one gave
me this job. I had to create my own niche, earn my reputation, and continu-ally refresh my thinking, thereby refreshing my creativity. I didn’t set out tobe famous or to be rich. I shoot because I love to shoot. There are no ruleson how to be a successful photographer. You too must do it because you loveit. Don’t give up, don’t give in. Never stop learning and experimenting. Al-ways keep creating.
124 LIGHTING TECHNIQUES FOR PHOTOGRAPHING MODEL PORTFOLIOS
Conclusion

A
Accent light, 51, 73–75Angled light, 36–37Asian modeling agencies, 122Athletic images, see Sports images
B
Background, controlling with light,102–7
Background light, 51Backlighting, 37–39, 76–78with parabolic reflectors, 76–78
Barebulb lighting, 76Barn doors, 78Beauty dishes, 78
C
Catalog images, 98–99Closeups, 115–17Clothing selection, 123Color, 27–28Color temperature, 39–42, 63, 64Commercial images, 86–90Communication, 14–16, 21Comp cards, 122Composition, 22–28color, 27–28cropping, 25–26curves, 25objectives, 22–24perspective, 26–27Rule of Thirds, 25–26straight lines, 24–25tonality, 27–28
Creativity, importance of,13–18, 19–21
Cropping, 25–26Curves, 25
D
Diffusers, 78Dragging the shutter, 102
E
Editorial images, 95–96Electronic flash, 64–65Equipment, 11, 28–29, 43light meter, 43requirements, 11studio strobes, 65–67tripod, 28–29
F
Fashion images, 90–91Fill light, 50–51, 64–65, 69Filters, 39Finances, 14Flags, see GobosFlare, see Lens flareFlow, creating, 22–28Fluorescent lighting, 64Front light, 35–36
G
Gels, colored, 83Glamour images, 91–92Gobos, 73–75controlling accent lighting,73–75
(Gobos, cont’d)controlling lens flare, 75
Golden hour, 35, 39Gray card, 43Grid spots, 79
H
Hair light, 48–49, 51
I
Image quality, 123Inspiration, seeking, 19Inverse Square Law, 42–43ISO setting, 63–64
L
Lens flare, 37, 75, 111–15Light, 30–43absorption, 32behavior, 32color temperature, 39–42direction, 35–39hard, 32–35intensity, 42–43Inverse Square Law, 42–43natural, 31–35physics of, 30–43quality, 32–35reflection, 32refraction, 32size of the source, 31soft, 32–35wavelengths, 31–32what light is, 31–32
INDEX 125
Index

Lighting, 11–13, 44–54, 64–65, 69accent light, 51background light, 51fill light, 50–51, 64–65, 69hair light, 48–49, 51light placement, 44–45main light, 44–49objectives, 44studio, 51–54theory of, 11–13
Light modifiers, 31, 68–83barn doors, 78beauty dishes, 78diffusers, 78gels, colored, 83gobos, 73–75grid spots, 79light panels, 76parabolic reflectors, 76–78reflectors, 68–73scrims, 75–76snoots, 79softboxes, 31, 79–83spotlights, 31, 78umbrellas, 79
Light panels, 76Light sources, types of, 55–67, 76barebulb, 76electronic flash, 64–65fluorescent lighting, 64natural light, 54–63natural vs. artificial, 55studio strobe, 65–67tungsten, 63–64
Lines, 24–25Lingerie images, 92–93
M
Main light, 44–49Male models, 123
Market for model, 84–86age of model, 84appearance, 86height, 86
Metering, 42–43Modeling lights, 65Model photography, 13–18challenges of, 14–16getting started, 16–18objectives of, 13–18rewards of, 13–14
Model’s comfort, 122–23Modifiers, see Light modifiersMonolights, 65–66
N
Natural light, 31–35, 39, 54–63bright sunlight, 55–56, 57–60cloudy skies, 56finding good light, 61–63golden hour, 35, 39light placement, 54morning light, 60–61time of day, 33–35vs. artificial light, 55window light, 35
O
Outdoor lighting, see Natural light
P
Parabolic reflectors, 76–78Passion, importance of, 11–13People skills, 14–16, 21Performers, working with, 116–19Plus-size images, 94–95Power-pack strobe kits, 65–66Previsualization, 19–21Props, 120–21
R
Reflectors, 68–73design, 69for fill light, 69natural, 73on location, 69–73surface, 69
Rim lighting, 37–39Rule of Thirds, 25–26
S
Scrims, 75–76Side light, 36–37Silhouettes, 39, 60–61Snoots, 79Softboxes, 31, 79–83Special attributes, highlighting, 101,
119Sports images, 96–98Spotlights, 31, 78Storyboard images, 107–11Studio lighting, 51–54, 65–67Sunlight, see Natural lightSwimwear images, 99–101
T
Teamwork, 14–16Tonality, 27–28Travel, 14Tripod, 28–29Tungsten lighting, 63–64
U
Umbrellas, 79U.S. modeling agencies, 122
W
White balance, 39–42, 63, 64Window light, 35
126 LIGHTING TECHNIQUES FOR PHOTOGRAPHING MODEL PORTFOLIOS

PROFESSIONALMODEL PORTFOLIOSA STEP-BY-STEP GUIDE FORPHOTOGRAPHERS
Billy PegramLearn to create portfolios that will get your clientsnoticed—and hired! $34.95 list, 8.5x11, 128p,100 color images, index, order no. 1789.
POSINGTECHNIQUESFOR PHOTOGRAPHINGMODEL PORTFOLIOS
Billy PegramLearn to evaluate your model and create flatteringposes for fashion photos, catalog and editorialimages, and more. $34.95 list, 8.5x11, 128p, 200color images, index, order no. 1848.
500 POSES FORPHOTOGRAPHING WOMEN
Michelle PerkinsA vast assortment of inspiring images, from head-and-shoulders to full-length portrsits, and classic tocontemporary styles—perfect for when you need alittle shot of inspiration to create a new pose.$34.95 list, 8.5x11, 128p, 500 color images,index, order no. 1879.
POWER MARKETING, SELLING,AND PRICINGA BUSINESS GUIDE FOR WEDDING ANDPORTRAIT PHOTOGRAPHERS, 2ND ED.
Mitche GrafMaster the skills you need to take control of yourbusiness, boost your bottom line, and build the lifeyou want. $34.95 list, 8.5x11, 144p, 90 colorimages, index, order no. 1876.
DOUG BOX’SGUIDETO POSINGFOR PORTRAIT PHOTOGRAPHERS
Based on Doug Box’s popular workshops forprofessional photographers, this visually intensivebook allows you to quickly master the skills neededto pose men, women, children, and groups.$34.95 list, 8.5x11, 128p, 200 color images,index, order no. 1878.
50 LIGHTING SETUP FORPORTRAIT PHOTOGRAPHERS
Steven H. BegleiterFilled with unique portraits and lighting diagrams,plus the “recipe” for creating each one, this book isan indispensible resource you’ll rely on for a widerange of portrait situations and subjects. $34.95list, 8.5x11, 128p, 150 color images and diagrams,index, order no. 1872.
DIGITAL PHOTOGRAPHYBOOT CAMP, 2nd Ed.
Kevin KubotaThis popular book based on Kevin Kubota’s sell-out workshop series is now fully updated withtechniques for Adobe Photoshop and Lightroom.It’s a down-and-dirty, step-by-step course forprofessionals! $34.95 list, 8.5x11, 128p, 220 colorimages, index, order no. 1873.
SCULPTING WITH LIGHT
Allison EarnestLearn how to design the lighting effect that willbest flatter your subject. Studio and locationlighting setups are covered in detail with anassortment of helpful variations provided for eachshot. $34.95 list, 8.5x11, 128p, 175 color images,diagrams, index, order no. 1867.
STEP-BY-STEP WEDDINGPHOTOGRAPHY
DamonTucciDeliver the the top-quality images your clientsdemand with the tips in this essential book. Tuccishows you how to become more creative, moreefficient, and more successful. $34.95 list, 8.5x11,128p, 175 color images, index, order no. 1868.
ROLANDO GOMEZ’SPOSINGTECHNIQUES FORGLAMOUR PHOTOGRAPHYLearn everything you need to pose a subject—from head to toe. Gomez covers each area of thebody in detail, showing you how to addresscommon problems and create a flattering look.$34.95 list, 8.5x11, 128p, 110 color images,index, order no. 1869.
OTHER BOOKS FROM
Amherst Media®

Amherst MediaPUBLISHER OF PHOTOGRAPHY BOOKS
PO Box 586Buffalo, NY 14226
www.AmherstMedia.com
$34.95 USA$38.95 Canada
#1889
MASTER THE TECHNICAL AND CREATIVE ASPECTS OF LIGHTING MODELS
Billy Pegram provides the knowledge you need to showcasea model’s best attributes, conceal any problem areas, reveal
her personality, and appeal to her target market. Also includedare start-to-finish analyses of real-life sessions, each with a dif-ferent model and a different objective. Packed with eye-catchingimages, this book takes you through the process of creating mas-terfully lit images that will get your model (and you!) noticed.
FEATURES:
Understanding the challenges of model photography—andwhy it
requires a different approach than other types of photography
Previsualizing your results and determining what equipment you’ll
need to achieve them
Evaluating models and using light to help accentuate their best and
most marketable features
Designing creative lighting effects in the studio and on location
Matching the type of lighting to the market the model is trying to
reach—including advertising, catalogs, swimwear, fashion, hand
modeling, and much more
Working as part of a creative team and communicating your ideas to
ensure a productive shoot
Practical examples showing the creation of portfolio images for real
models
Tips for working with models and ensuring your images help them
meet their goals