A Review of C4 Plants in Southwest Asia - Archive ouverte HAL
Upload
khangminh22Category
view
0download
0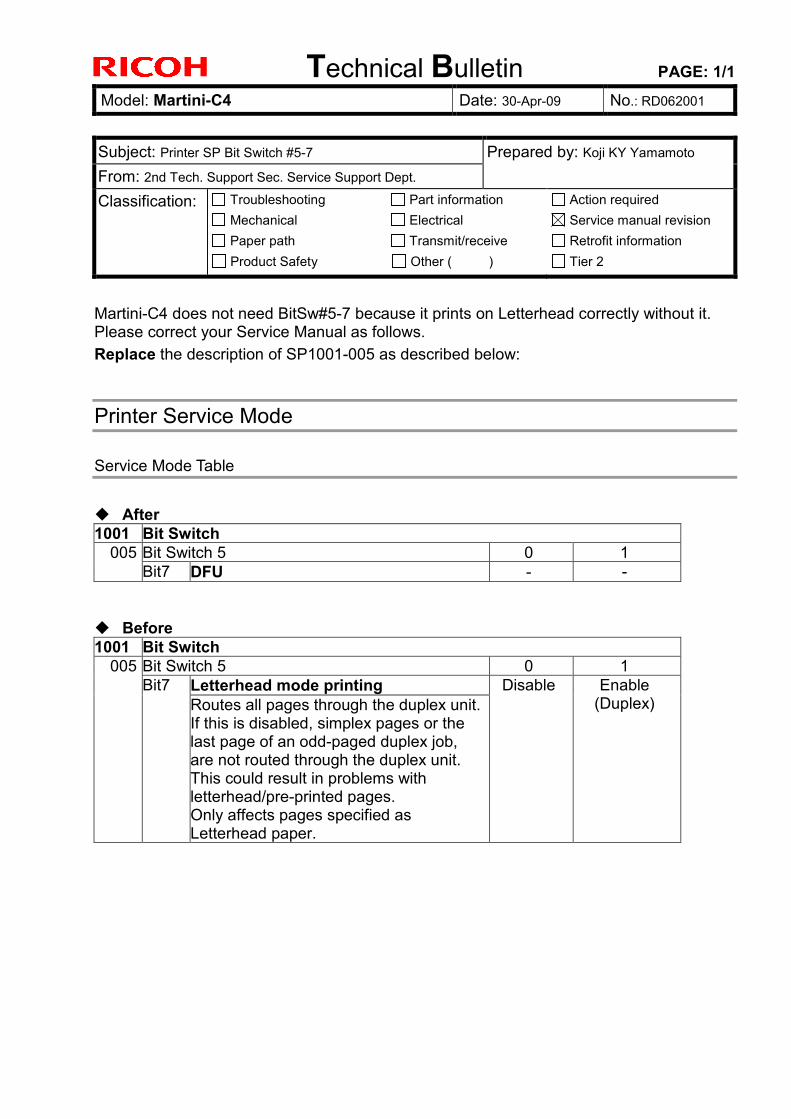
Technical Bulletin PAGE: 1/1
Model: Martini-C4 Date: 30-Apr-09 No.: RD062001
Subject: Printer SP Bit Switch #5-7 Prepared by: Koji KY Yamamoto From: 2nd Tech. Support Sec. Service Support Dept. Classification: Troubleshooting
Mechanical Paper path
Part information Electrical Transmit/receive
Action required Service manual revision Retrofit information
Product Safety Other ( ) Tier 2
Martini-C4 does not need BitSw#5-7 because it prints on Letterhead correctly without it. Please correct your Service Manual as follows. Replace the description of SP1001-005 as described below:
Printer Service Mode
Service Mode Table
After
1001 Bit Switch Bit Switch 5 0 1 005 Bit7 DFU - -
Before 1001 Bit Switch
Bit Switch 5 0 1 Letterhead mode printing
005 Bit7
Routes all pages through the duplex unit.If this is disabled, simplex pages or the last page of an odd-paged duplex job, are not routed through the duplex unit. This could result in problems with letterhead/pre-printed pages. Only affects pages specified as Letterhead paper.
Disable Enable (Duplex)

Technical Bulletin PAGE: 1/2
Reissued: 19-Oct-10 Model: MT-C4 Date: 28-May-09 No.: RD062002c
RTB Reissue The items in bold italics have been changed. Subject: Firmware Release Note: Web Support Prepared by: K. Yamamoto From: 1st Overseas Tech Support Sec., 1st PQM Dept. Classification: Troubleshooting
Mechanical Paper path
Part information Electrical Transmit/receive
Action required Service manual revision Retrofit information
Product Safety Other ( ) Tier 2
This RTB has been issued to announce the firmware release information for the Web Support.
Version Program No. Effective Date 1.13.1 D0625574C September 2010 production 1.09 D0625574B March 2010 production 1.08 D0625574A July 2009 production 1.07 D0625574 1st Mass production
Version Modified Points or Symptom Corrected 1.13.1 Other changes:
SSL-related changes: Note: The new fields will only appear if Network Support firmware version 8.69.1 or later has also been applied to the device. 1. When the device creates a certificate request, it is now able to specify
which algorithm (SHA1 or MD5) it wants used to sign the certificate. This has been implemented by adding a field "Algorithm Signature" to the certificate request form.
2. Web Image Monitor now shows the certificate's key length in:
- Configuration > Security > Device Certificate > Details 3. Specific versions of SSL or TLS (SSLv2, SSLv3, or TLSv1) can now be
enabled/disabled using Web Image Monitor. The setting can be configured from either of the following locations: - Configuration > Security > Network Security - Configuration > Security > SSL/TLS
4. The encryption strength used for SSL can now be configured. This can
be done using either of the following settings in Web Image Monitor: - Configuration > Security > Network Security - Configuration > Security > SSL/TLS
1.09 Symptom corrected: Custom paper sizes cannot be used for duplex printing.
Technical Bulletin PAGE: 2/2
Reissued: 19-Oct-10 Model: MT-C4 Date: 28-May-09 No.: RD062002c
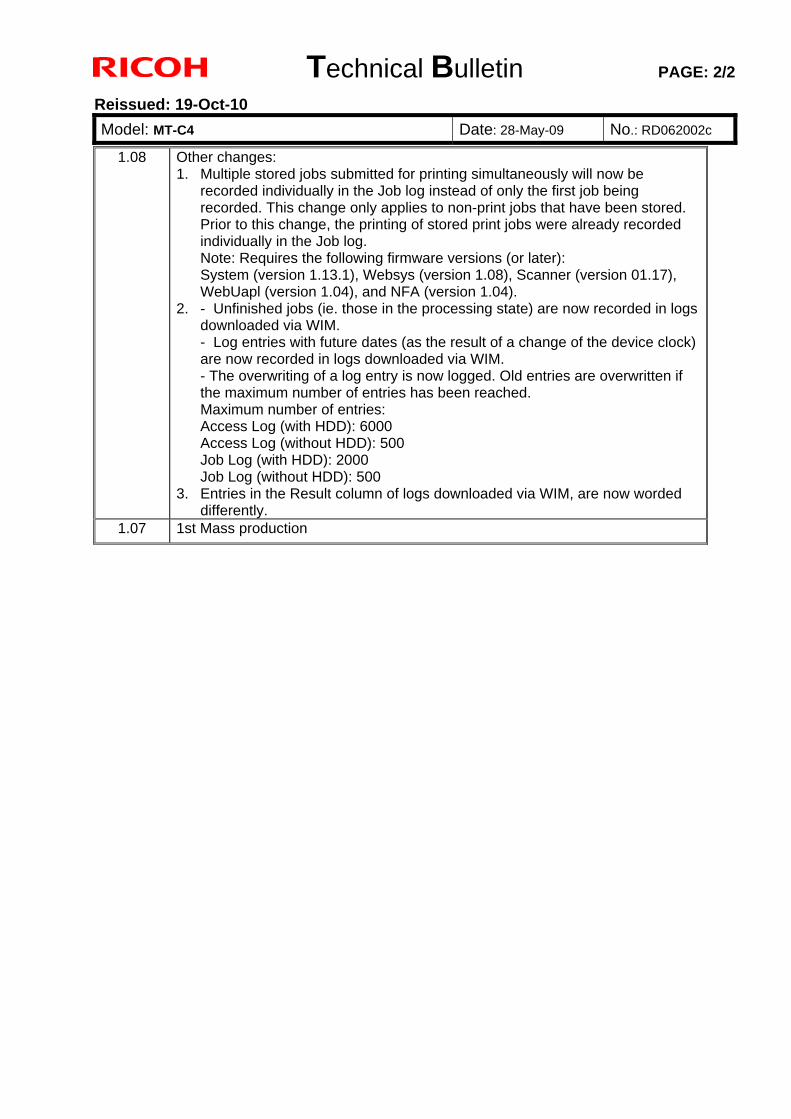
1.08 Other changes: 1. Multiple stored jobs submitted for printing simultaneously will now be
recorded individually in the Job log instead of only the first job being recorded. This change only applies to non-print jobs that have been stored. Prior to this change, the printing of stored print jobs were already recorded individually in the Job log. Note: Requires the following firmware versions (or later): System (version 1.13.1), Websys (version 1.08), Scanner (version 01.17), WebUapl (version 1.04), and NFA (version 1.04).
2. - Unfinished jobs (ie. those in the processing state) are now recorded in logs downloaded via WIM. - Log entries with future dates (as the result of a change of the device clock) are now recorded in logs downloaded via WIM. - The overwriting of a log entry is now logged. Old entries are overwritten if the maximum number of entries has been reached. Maximum number of entries: Access Log (with HDD): 6000 Access Log (without HDD): 500 Job Log (with HDD): 2000 Job Log (without HDD): 500
3. Entries in the Result column of logs downloaded via WIM, are now worded differently.
1.07 1st Mass production
Technical Bulletin PAGE: 1/2
Reissued: 24-Mar-10 Model: MT-C4 Date: 04-Jun-09 No.: RD062003b
RTB Reissue The items in bold italics have been corrected. Subject: Firmware Release Note: LCDC Prepared by: K. Yamamoto From: 1st Overseas Tech Support Sec., 1st PQM Dept. Classification: Troubleshooting
Mechanical Paper path
Part information Electrical Transmit/receive
Action required Service manual revision Retrofit information
Product Safety Other ( ) Tier 2
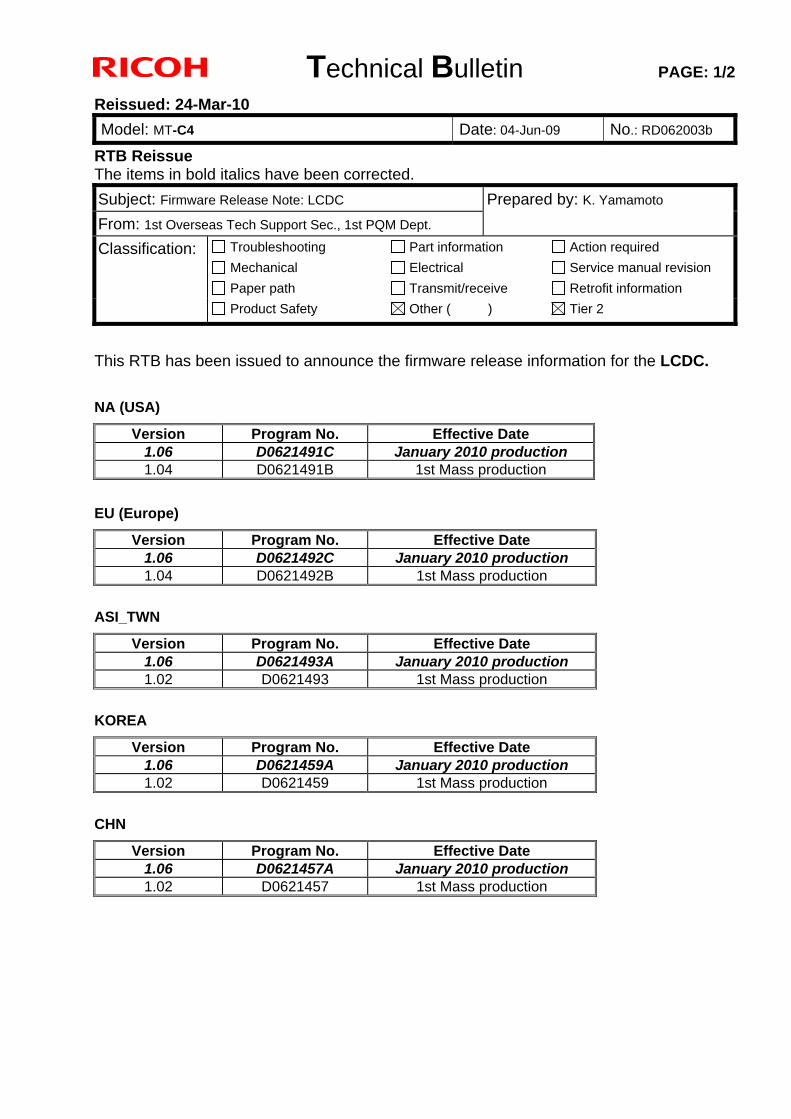
This RTB has been issued to announce the firmware release information for the LCDC.
NA (USA)
Version Program No. Effective Date 1.06 D0621491C January 2010 production 1.04 D0621491B 1st Mass production
EU (Europe)
Version Program No. Effective Date 1.06 D0621492C January 2010 production 1.04 D0621492B 1st Mass production
ASI_TWN
Version Program No. Effective Date 1.06 D0621493A January 2010 production 1.02 D0621493 1st Mass production
KOREA
Version Program No. Effective Date 1.06 D0621459A January 2010 production 1.02 D0621459 1st Mass production
CHN
Version Program No. Effective Date 1.06 D0621457A January 2010 production 1.02 D0621457 1st Mass production

Technical Bulletin PAGE: 2/2
Reissued: 24-Mar-10 Model: MT-C4 Date: 04-Jun-09 No.: RD062003b
NA (USA)
Version Modified Points or Symptom Corrected 1.06 Symptom corrected:
When the machine recovers from energy saver or Off/sleep mode, the LCD may not display any more.
1.04 1st Mass production
EU (Europe)
Version Modified Points or Symptom Corrected 1.06 Symptom corrected:
When the machine recovers from energy saver or Off/sleep mode, the LCD may not display any more.
1.04 1st Mass production
ASI_TWN
Version Modified Points or Symptom Corrected 1.06 Symptom corrected:
When the machine recovers from energy saver or Off/sleep mode, the LCD may not display any more.
1.02 1st Mass production
KOREA
Version Modified Points or Symptom Corrected 1.06 Symptom corrected:
When the machine recovers from energy saver or Off/sleep mode, the LCD may not display any more.
1.02 1st Mass production
CHN
Version Modified Points or Symptom Corrected 1.06 Symptom corrected:
When the machine recovers from energy saver or Off/sleep mode, the LCD may not display any more.
1.02 1st Mass production

Technical Bulletin PAGE: 1/4
Reissued: 01-Nov-12 Model: MT-C4 Date: 28-May-09 No.: RD062004h
RTB Reissue The items in bold italics have been changed. Subject: Firmware Release Note: Printer Prepared by: T. Hirakawa From: 1st Tech Service Sect., MFP/Printer Tech Service Dept Classification: Troubleshooting
Mechanical Paper path
Part information Electrical Transmit/receive
Action required Service manual revision Retrofit information
Product Safety Other ( ) Tier 2
This RTB has been issued to announce the firmware release information for the Printer.
Version Program No. Effective Date Availability of RFU 1.18e D4625521L December 2012 production Available 1.17e D4625521K April 2011 production Available 1.16e D4625521J July 2010 production Available 1.15e D4625521H March 2010 production Available 1.14.3 D4625521G December 2009 production Available 1.14.2 D4625521F October 2009 production Available 1.14.1 D4625521E October 2009 production Available 1.14 D4625521D July 2009 production Available 1.11 D4625521C 1st Mass production Available
Note: Definition of Availability of RFU via @Remote “Available”: The firmware can be updated via RFU or SD card. “Not available”: The firmware can only be updated via SD card.
Version Modified Points or Symptom Corrected 1.18e Symptom corrected:
Remote configuration of the device using tools such as Web ImageMonitor to "Reset Current Job" when there is no current job, results in the printer stalling.
1.17e Symptom corrected: 1. Multiple jobs that are released (printed from the hard disk) by the same user
might result in some of the jobs being recorded in the device's Job History as being printed by "---". This only affects the use of the following Job Types and only occurs if User Authentication is enabled: - Sample Print - Hold Print - Locked Print - Stored Print
2. If "User Tools/Counter > System Settings > Administrator Tools > Capture
Priority" is enabled and one of the below listed Job Types is used, any of the following might happen: - Jobs that should be deleted will be retained on the MFP hard disk. - Jobs stored on the hard disk might be inadvertently deleted. - Printing of jobs stored on the hard disk might result in an SC997.

Technical Bulletin PAGE: 2/4
Reissued: 01-Nov-12 Model: MT-C4 Date: 28-May-09 No.: RD062004h
Version Modified Points or Symptom Corrected Job Types:
- Sample Print - Hold Print - Locked Print - Stored Print - Store and Print
3. PS jobs with a large number of images might be unexpectedly reset. 4. Jobs not containing any PJL commands are held by the device and not printed
until another job is submitted or a button is pressed on the device. This occurred if the device entered in energy saver mode immediately after printing a diagnostics page (List/Test Print, etc.).
5. The Bypass Tray can be set to unsupported paper sizes using IPDS Form
Allocation. 6. The unsupported paper sizes are: 8 1/4 x 13, 8 x 10 1/2, 8 x 10, 11x15, 10x15,
10x14 7. If a job is submitted while the Printer application is still in the process of starting
up, the Printer application might stall with "Processing..." displayed on the operation panel.
Other changes: A new BitSwitch#6-7 has been added. When set to '1', if multiple collated copies are printed, the device no longer responds to PJL USTATUS with the number of pages in the current copy. Instead the device will return the total number of pages for all copies.
1.16e Symptom corrected: 1. Any job (compressed or not compressed) will cause the printer application to
stall if "Menu > System > Print Compressed Data" = ON. 2. If IPDS fonts are reset (Menu button > Maintenance > HD Management > Reset
IPDS Fonts), users might not be able to logout from the operation panel. 3. An IPDS Form can be created with an unsupported "Media Orientation" (ie. A3
LEF). 4. Resetting IPDS fonts (Web Image Monitor > Configuration > Printer > Reset
IPDS Fonts) twice in a row or printing the IPDS Font List (Menu button > List/Test Print > IPDS Font List) twice in a row might result in the device stalling.
1.15e Other changes: Firmware modified for CC (Common Criteria) certification.
1.14.3 Symptom corrected: 1. The device becomes unresponsive displaying "Waiting for Print data..." if any of
the following settings are changed while the device has an active IPDS session. - Printer Features - System Settings - Tray Paper Settings - Adjustment Settings for Operators

Technical Bulletin PAGE: 3/4
Reissued: 01-Nov-12 Model: MT-C4 Date: 28-May-09 No.: RD062004h
Version Modified Points or Symptom Corrected Note: The printer status returned to Ready after the IPDS session timed out.
1.14.2 Other Changes: 1. The processing of N-up jobs has been made more efficient by preventing some
unnecessary function calls. Symptom corrected: 1. If all of the following conditions are met, the MFP stalls, displaying "Resetting
Job...": - The job currently being printed is not IPDS. - There is an IPDS job in the queue. - A paper out or paper misfeed occurs. - The user tries to cancel all jobs.
It is not possible to cancel jobs via WIM or SmartDeviceMonitor for Client/Admin during printing of an IPDS job.
1.14.1 Symptom corrected: 1. Printing multiple jobs of differing PDLs to Virtual Printers of differing priorities
might result in the device stalling. 1.14 Symptom corrected:
1. If printing of the IPDS Font List encounters certain recoverable errors (paper out, no paper, paper mismatch) and then the Clear/Stop button is pressed, the device will lockup. If this happened, printing was not possible until the device was rebooted.
2. Correctly registered IPDS forms of size B6 or Postcard are missing from WIM's "IPDS Form Allocation > Bypass Tray" menu.
3. The use of any of the unsupported IPDS forms (below) from the Cover Interposer Tray will result in an unrecoverable paper mismatch.
NA ・A5 SEF ・A5 LEF ・B4 SEF ・B5 SEF ・B5 LEF ・Folio SEF ・F/GL SEF EU/ASIA ・Leagal SEF ・EngQuatro SEF ・Executive SEF ・Executive LEF ・Half Letter SEF ・Half Letter LEF ・10x14 SEF 4. If printing of an IPDS job is interrupted by an error requiring operator attention
(paper jam, cover open, etc.), an alert is sent to the host after the error state has been recovered, instead of when the device first enters the error state.
5. If any non-IPDS job in the print queue is deleted while receiving an IPDS job, the
Technical Bulletin PAGE: 4/4
Reissued: 01-Nov-12 Model: MT-C4 Date: 28-May-09 No.: RD062004h
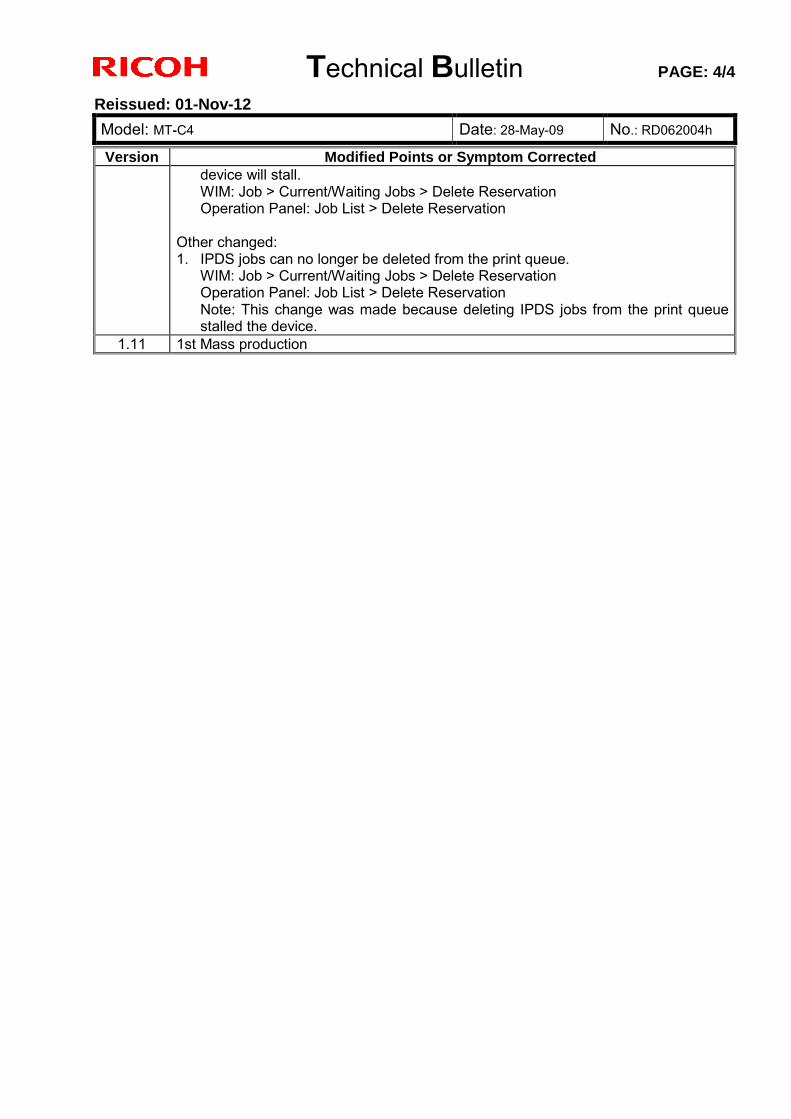
Version Modified Points or Symptom Corrected device will stall. WIM: Job > Current/Waiting Jobs > Delete Reservation Operation Panel: Job List > Delete Reservation
Other changed: 1. IPDS jobs can no longer be deleted from the print queue.
WIM: Job > Current/Waiting Jobs > Delete Reservation Operation Panel: Job List > Delete Reservation Note: This change was made because deleting IPDS jobs from the print queue stalled the device.
1.11 1st Mass production

Technical Bulletin PAGE: 1/2
Reissued: 21-Sep-12 Model: MT-C4 Date: 28-May-09 No.: RD062005b
RTB Reissue The items in bold italics have been corrected or added. Subject: Firmware Release Note: Network DocBox Prepared by: T. Hirakawa From: 1st Tech Service Sect., MFP/Printer Tech Service Dept Classification: Troubleshooting
Mechanical Paper path
Part information Electrical Transmit/receive
Action required Service manual revision Retrofit information
Product Safety Other ( ) Tier 2
This RTB has been issued to announce the firmware release information for the Network DocBox.
Version Program No. Effective Date Availability of RFU2.00 D0625557D October 2012 production Available 1.04 D0625557C July 2009 production Available
1.03.1 D0625557B 1st Mass production Available Note: Definition of Availability of RFU via @Remote “Available” The firmware can be updated via RFU or SD card. “Not available”: The firmware can only be updated via SD card.
Version Modified Points or Symptom Corrected 2.00 Symptom corrected:
1. The device fails to transfer the job log or the access log to the Web SmartDeviceMonitor server or Remote communication Gate S Pro. It affected if a control character was included in the log.
2. If the Capture Priority setting is enabled (User Tools/Counter > System Settings > Administrator Tools > Capture Priority), repeated use of the MLB (Media Link Board) might result in the device stalling.
3. The captured user name might be garbled. This occurs if User Administrator Authentication is enabled and if the user's "Key Display" setting is 16 byte in length.

Technical Bulletin PAGE: 2/2
Reissued: 21-Sep-12 Model: MT-C4 Date: 28-May-09 No.: RD062005b
Version Modified Points or Symptom Corrected 1.04 Symptom corrected:
1. Either of the following problems might occur if the transfering of logs from the device using Web SmartDeviceMonitor ver 2.x without the powercycle. - The 404 Not Found error will be shown if the WIM document server is
accessed. - The device will stall if captured data is transfered to a delivery server
such as ScanRouter. 2. Duplicate logs might be transfered to Web SmartDeviceMonitor ver 2.x. Other Changes: 1. Multiple stored jobs submitted for printing simultaneously will now be
recorded individually in the Job log instead of only the first job being recorded. This change only applies to non-print jobs that have been stored. Prior to this change, the printing of stored print jobs were already recorded individually in the Job log.
Note: Requires the following firmware versions (or later): System (version 1.13.1), Websys (version 1.08), Scanner (version 01.17), WebUapl (version 1.04 ), and NFA (version 1.04 ).
2. Result column in the "Scanner: Stored File Sending" log is blank when viewed as CSV file downloaded via WebImageMonitor.
3. Result column in the "Scanner: Stored File Sending" log is blank when viewed in the Web SmartDeviceMonitor Access Log List.
1.03.1 1st Mass production

Technical Bulletin PAGE: 1/5
Reissued: 18-Sep-14 Model: MT-C4 Date: 28-May-09 No.: RD062006i
RTB Reissue The items in bold italics have been corrected. Subject: Firmware Release Note: Network Support Prepared by: M. Yoneda From: 2nd Tech Service Sect., MFP/Printer Tech Service Dept Classification: Troubleshooting
Mechanical Paper path
Part information Electrical Transmit/receive
Action required Service manual revision Retrofit information
Product Safety Other ( ) Tier 2
This RTB has been issued to announce the firmware release information for the Network Support.
Version Program No. Effective Date Availability of RFU 8.75 D0625553K March 2013 production Not Available 8.74 D0625553J October 2012 production Not Available 8.72 D0625553H August 2011 production Not Available
8.69.1 D0625553G September 2010 production Not Available 8.66 D0625553F April 2010 production Not Available 8.65 D0625553E March 2010 production Not Available 8.62 D0625553D December 2009 production Not Available
8.61.1 D0625553C July 2009 production Not Available 8.58 D0625553B 1st Mass production Not Available
Note: Definition of Availability of RFU via @Remote “Available” The firmware can be updated via RFU or SD card. “Not available”: The firmware can only be updated via SD card.
Version Modified Points or Symptom Corrected 8.75 Symptom corrected:
1. If "CNAME" is specified as the destination folder, ScanTo Folder will abort. (GFPR#RC12090001)
2. When NBT is "OFF", Browse list is not shown if touch the Browse Network button on destination folder of Scan to folder.
3. Cannot scan to shared folders in Windows 8 and Windows Server 2012. 4. Cannot scan to shared folders in Mac OS X 10.7 or Mac OS X 10.8.
This firmware is dependent on the following firmware modules. Please be sure to update all of them:
System/Copy firmware v1.22 or later. 8.74 Symptom corrected:
1. Scan to SMB fails if the both of the following conditions are met. - Either the device has NBT disabled or it is enabled but the device is unable to
resolve the destination's NetBIOS name. - One or more octets in the destination's IPv4 address contain leading zeros.
2. If the device's IPP Authentication setting is enabled, the driver cannot be installed

Technical Bulletin PAGE: 2/5
Reissued: 18-Sep-14 Model: MT-C4 Date: 28-May-09 No.: RD062006i
Version Modified Points or Symptom Corrected on Windows 2008 R2 SP1 or 7 SP1 using an IPP port.
3. SC991 might occur and network functions could not be used. This occurs if DHCP and DDNS are both enabled in the device and if the DHCP server distributes to the device an FQDN that is more than 127 byte in length.
4. Device applications or services that use any of port 80, 443, 7443 or 7444 could not be used. This occurs if the illegal packet is sent after SSL negotiation handshake to any of the device's TCP ports 443, 7443 or 7444. Affected applications include Web Image Monitor, IPP Printing and @Remote.
8.72 Symptom corrected: 1. An httpd timeout has been implemented to prevent Web Image Monitor lockups
that sometimes occurred when applications accessed the MFP by http. 2. Scan to SMB fails if the file submitted to the DFS folder in the destination and the
file of the same name exist in the DFS folder. 3. If Windows Authentication is enabled, printing a large number of copies of a job
might take longer than might typically be expected. 4. Chunk Transfer Encoding over an IPP port might results in print jobs being reset. 5. If SSDP = Active (Web Image Monitor > Configuration > Network Security), a high
load on the CPU might result in Web Image Monitor locking up. 6. MFP with an external controller will lose network connectivity. This only occurred if
the network settings were changed repeatedly and the MFP's "NetWare" setting was already "Active" (before the network settings were changed).
7. The MFP icon might not be shown in the Windows "Network" dialogue if SSDP is enabled. This affected Windows Vista, 2008/R2, and 7.
8. The device might lose network connectivity if SSDP is enabled. Network connectivity could be temporarily restored after a power cycle.
9. Under very specific combinations of IP address, Subnet Mask, and Gateway address, some of the MFP's network configuration settings might revert to defaults.
10. Use of an IP address to send a Scan to SMB might result in the scanned document not being sent.
8.69.1 Symptom corrected: 1. If the MFP/LP has a statically configured IP address and domain, it always sends
a HELO using just its hostname. SMTP servers that require client HELOs to include the client's FQDN will close the connection. The result of this was that the MFP/LP was unable to send emails.
2. Unable to Scan to SMB to Windows 7 or Windows Server 2008 R2 destinations that have Windows Live ID Sign-in assistant installed.
3. Trying and failing to login to a Scan destination three times might result in the Scanner application stalling.
4. Unable to Scan to SMB to Windows 98/98SE/Me/NT 4.0 destinations specified using an IP address.
5. The SMB retry function fails to retry the sending of failed SMB transfers (Scan to SMB or Fax delivery).
6. Unable to retrieve the Windows group name from a Windows 2008 R2 server during Windows Authentication. Because of this, logged in users will only be granted the "Available Functions" specified for them in the Addressbook.
7. The device is unable to assign group privileges to a logged in user if that group has a name consisting of more than 20 bytes. To address this issue, the supported group name length will be increased to 40 bytes.
8. The MFP's Windows Authentication function is unable to use Kerberos when

Technical Bulletin PAGE: 3/5
Reissued: 18-Sep-14 Model: MT-C4 Date: 28-May-09 No.: RD062006i
Version Modified Points or Symptom Corrected being authenticated on a Windows 2008 or Windows 2008 R2 server. The MFP will still be successfully authenticated because it is able to fail back to NTLMv2.
9. After changing the MFP's DNS server address or Domain name, Scan to SMB destinations specified using a hostname might not be found.
10. The Scan to SMB "Connection Test" fails if performed on directory located directly below a DFS root. Only the "Connection Test" failed, scanning was successful and even the "Connection Test" worked if performed on any sub-directory.
11. The device might return an SC 819 error when browsing the network using SMB. This only occurred if SMB was browsed frequently and the device was not rebooted.
12. If the MFP's IP address is changed to an IP address of another subnet, users will not be able to browse the network (using Scan to SMB) until the MFP is rebooted.
Other changes: ----------------------- SSL-related changes: Note: The new field will only appear if Web Support firmware version 1.13.1 or later has also been applied to the device. 1. When the device creates a certificate request, it is now able to specify which
algorithm (SHA1 or MD5) it wants used to sign the certificate. This has been implemented by adding a field "Algorithm Signature" to the certificate request form.
2. Web Image Monitor now shows the certificate's key length in:
- Configuration > Security > Device Certificate > Details 3. Specific versions of SSL or TLS (SSLv2, SSLv3, or TLSv1) can now be
enabled/disabled using Web Image Monitor. The setting can be configured from either of the following locations: - Configuration > Security > Network Security - Configuration > Security > SSL/TLS
4. The encryption strength used for SSL can now be configured. This can be done
using either of the following settings in Web Image Monitor: - Configuration > Security > Network Security - Configuration > Security > SSL/TLS
----------------------- 5. For security reasons, the device will no longer accept SSL incoming, or establish
outgoing, connections that use NULL or ADH ciphers. 6. Unable to Scan to SMB to a destination that is not specified using an FQDN. 7. Unable to Scan to SMB to destinations that are using both LM Authentication and
Samba v2.x. 8. Windows Authentication fails if the username or password includes lower-case
European characters. 9. The device's SMB timeout was too short (1sec). This caused problems when
being used across subnets. For this reason, it has been increased to 10 sec. 8.66 Symptom corrected:
1. Unable to Scan to SMB to Windows 7 or Windows Server 2008 R2 destinations

Technical Bulletin PAGE: 4/5
Reissued: 18-Sep-14 Model: MT-C4 Date: 28-May-09 No.: RD062006i
Version Modified Points or Symptom Corrected that have Windows Live ID Sign-in assistant installed.
2. Unable to Scan to SMB to Windows 98/98SE/Me/NT 4.0 destinations specified using an IP address.
3. Trying and failing to login to a Scan destination three times might result in the MFP stalling with an SC899 error.
4. Unable to Scan to SMB to a destination that is not specified using an FQDN. 5. The SMB retry function fails to retry the sending of failed SMB transfers (Scan to
SMB or Fax delivery). 6. Unable to Scan to SMB to destinations that are using both LM Authentication and
Samba v2.x. Limitations: - Scan to Folder destinations located on Windows 7 or Windows Server 2008 R2
cannot be selected by browsing. - The MFP does not support CIFS, DFS or NTLMv2. These limitations will not apply to the next version of this firmware.
8.65 Symptom corrected: 1. Scan to SMB is unable to send documents to a hostname containing 2byte
characters. 2. Windows authentication might fail on a domain controller whose hostname
contains 2 byte characters. 3. SDK/J applications might not be able to recognize some supported USB devices. 4. When the device IP address and DNS server location are obtained from DHCP,
the domain specified by the device setting "IPv4 > Domain Name > Specify" will be overwritten by the domain obtained from DHCP.
Other changes: 1. Scan to Folder destinations located on Windows 7 or Windows Server 2008 R2
can now be selected by browsing. 2. The MFP now supports CIFS, DFS and NTLM v2. 3. For security reasons, the device will no longer accept SSL connections that use
the NULL or Anonymous Diffie-Hellman ciphers. 8.62 Symptom corrected:
1. The MFP's IP address lease renewal request is incorrectly formatted and rejected by DHCP relay agents. This will result in a loss of connectivity that lasts until the MFP reinitializes the network connection (10 seconds).
2. If either of the WSD Printer or Netware functions are enabled, the following problems might occur. If these problems occur, they typically last for about 2.5 hours. 1) The network might become unresponsive. 2) User Tools can be accessed but configuration changes will not be applied. 3) Application buttons on the operation panel might become unresponsive.
8.61.1 Symptom corrected: 1. If a User Paper Type is changed from a paper type that doesn't support duplex to
one that supports duplex, then duplex jobs that use that User Paper Type will be printed in simplex. Note: To fix this problem, NCS firmware (version 8.60 or later) and Websys firmware (version 1.03 or later) need to be applied to the device.
2. When jobs are submitted to the device's lpr port repeatedly, some of the jobs

Technical Bulletin PAGE: 5/5
Reissued: 18-Sep-14 Model: MT-C4 Date: 28-May-09 No.: RD062006i
Version Modified Points or Symptom Corrected might not be printed.
3. If IPP authentication is enabled, printing through an IPP port from a Windows Vista/Server 2008 client might result in printing failure.
4. Multiple Windows Vista/Server 2008 PCs might not be able to access the device through IPSec.
5. If IPDS is enabled, the device controller will not be able to enter STR mode (aka "Off/Sleep Mode", "Off Mode" or "Sleep Mode")
8.58 1st Mass production

Technical Bulletin PAGE: 1/1
Reissued: 30-Mar-10 Model: MT-C4 Date: 28-May-09 No.: RD062007b
RTB Reissue The items in bold italics have been changed. Subject: Firmware Release Note: Web Uapl Prepared by: K. Yamamoto From: 1st Overseas Tech Support Sec., 1st PQM Dept. Classification: Troubleshooting
Mechanical Paper path
Part information Electrical Transmit/receive
Action required Service manual revision Retrofit information
Product Safety Other ( ) Tier 2
This RTB has been issued to announce the firmware release information for the Web Uapl.
Version Program No. Effective Date 1.05 D0625556D March 2010 production 1.04 D0625556C July 2009 production 1.03 D0625556B 1st Mass production
Version Modified Points or Symptom Corrected
1.05 Symptom corrected: Custom paper sizes cannot be used for duplex printing.
1.04 Other changes: 1. Multiple stored jobs submitted for printing simultaneously will now be
recorded individually in the Job log instead of only the first job being recorded. This change only applies to non-print jobs that have been stored. Prior to this change, the printing of stored print jobs were already recorded individually in the Job log. Note: Requires the following firmware versions (or later): System (version 1.13.1), Websys (version 1.08), Scanner (version 01.17), WebUapl (version 1.04), and NFA (version 1.04).
1.03 1st Mass production

Technical Bulletin PAGE: 1/1
Reissued: 05-Apr-12 Model: MT-C4 Date: 28-May-09 No.: RD062008c
RTB Reissue The items in bold italics have been corrected. Subject: Firmware Release Note: RPCS Prepared by: T. Hirakawa From: 1st Tech Service Sect., MFP/Printer Tech Service Dept Classification: Troubleshooting
Mechanical Paper path
Part information Electrical Transmit/receive
Action required Service manual revision Retrofit information
Product Safety Other ( ) Tier 2
This RTB has been issued to announce the firmware release information for the RPCS.
Version Program No. Effective Date Availability of RFU3.8.5.4.2 D4625531B May 2012 production Available 3.8.5.4.1 D4625531A 1st Mass production Available
Note: Definition of Availability of RFU via @Remote “Available”: The firmware can be updated via RFU or SD card. “Not available”: The firmware can only be updated via SD card.
Version Modified Points or Symptom Corrected 3.8.5.4.2 Symptom corrected
- The image might be blacked out or black and white colors might be inverted when printing jobs that contain consecutive ROP commands.
3.8.5.4.1 1st Mass production
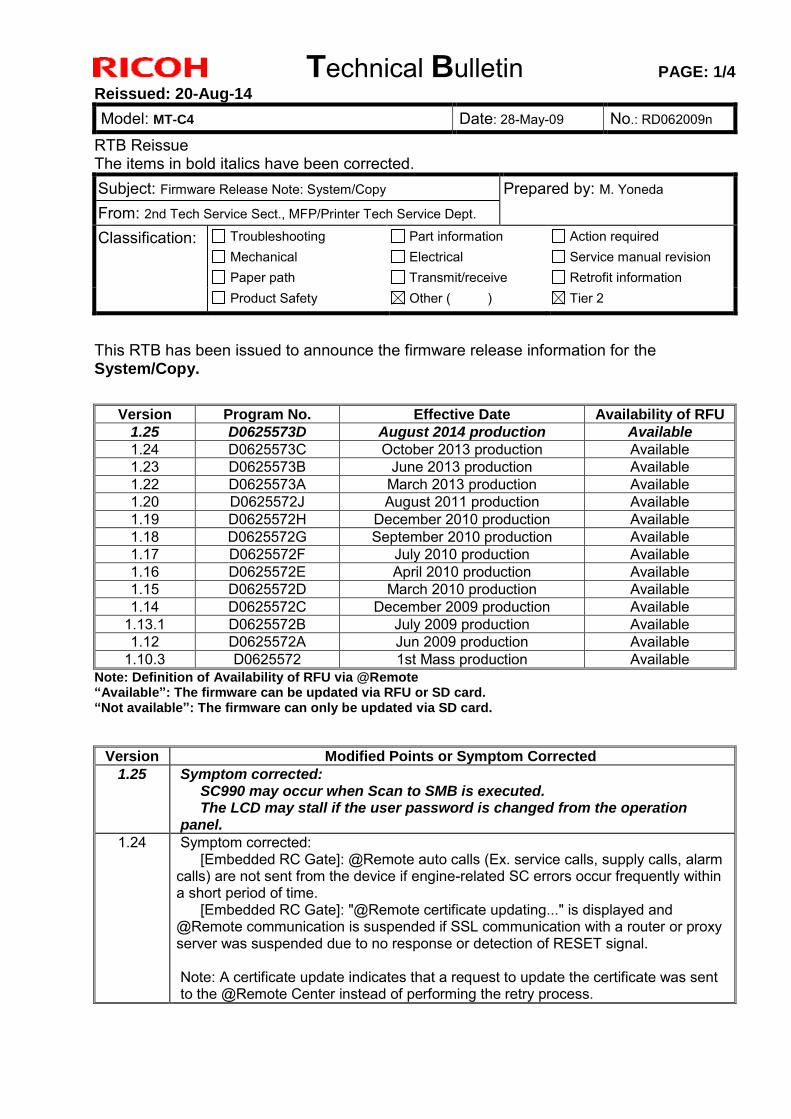
Technical Bulletin PAGE: 1/4 Reissued: 20-Aug-14 Model: MT-C4 Date: 28-May-09 No.: RD062009n
RTB Reissue The items in bold italics have been corrected. Subject: Firmware Release Note: System/Copy Prepared by: M. Yoneda From: 2nd Tech Service Sect., MFP/Printer Tech Service Dept. Classification: Troubleshooting
Mechanical Paper path
Part information Electrical Transmit/receive
Action required Service manual revision Retrofit information
Product Safety Other ( ) Tier 2
This RTB has been issued to announce the firmware release information for the System/Copy.
Version Program No. Effective Date Availability of RFU 1.25 D0625573D August 2014 production Available
1.24 D0625573C October 2013 production Available 1.23 D0625573B June 2013 production Available 1.22 D0625573A March 2013 production Available 1.20 D0625572J August 2011 production Available 1.19 D0625572H December 2010 production Available 1.18 D0625572G September 2010 production Available 1.17 D0625572F July 2010 production Available 1.16 D0625572E April 2010 production Available 1.15 D0625572D March 2010 production Available 1.14 D0625572C December 2009 production Available
1.13.1 D0625572B July 2009 production Available 1.12 D0625572A Jun 2009 production Available
1.10.3 D0625572 1st Mass production Available Note: Definition of Availability of RFU via @Remote “Available”: The firmware can be updated via RFU or SD card. “Not available”: The firmware can only be updated via SD card.
Version Modified Points or Symptom Corrected 1.25 Symptom corrected:
SC990 may occur when Scan to SMB is executed. The LCD may stall if the user password is changed from the operation panel.
1.24 Symptom corrected: [Embedded RC Gate]: @Remote auto calls (Ex. service calls, supply calls, alarm calls) are not sent from the device if engine-related SC errors occur frequently within a short period of time. [Embedded RC Gate]: "@Remote certificate updating..." is displayed and @Remote communication is suspended if SSL communication with a router or proxy server was suspended due to no response or detection of RESET signal. Note: A certificate update indicates that a request to update the certificate was sent to the @Remote Center instead of performing the retry process.

Technical Bulletin PAGE: 2/4 Reissued: 20-Aug-14 Model: MT-C4 Date: 28-May-09 No.: RD062009n
Version Modified Points or Symptom Corrected 1.23 Other changes:
The scanning speed for multi-sized original scanning has been increased. A new SP mode was added: SP3-990-001 (fan rotation speed) 0: Slow (same as previous firmware) 1: Fast Note: This SP is effective for correcting light images, by cooling the inside of the machine and minimizing toner deterioration. IMPORTANT: To apply the above changes, make sure to also install Engine ver.1.71:04 or later.
1.22 Symptom corrected: Cannot logout if the card is removed with specific timing. One of the following occurs before the developer reaches its replacement cycle: Light copies Dirty background Toner dusting inside the machine Important: To apply the above changes, you also need to install Engine firmware ver1.70:04 or later. Note: After the firmware has been updated, SP2-978-001 (time of fan rotation) should change to 255 minutes (default: 0)
1.20 Symptom corrected: The display cannot be returned to the SP mode screen during a copy job. Abnormal image results after storing a Printer storage document. The machine stalls when the password for a Printer storage document is changed. SC860, SC819, SC672, or SC816 occurs. Signal (pthread) is not received. Cannot merge encryption option. Printing speed is reduced when the inserter is used for a Print job.
1.19 Symptom Corrected: The HDD will be slow.
1.18 Other change: Address Book access is controlled. The maximum number of FAX documents that can be stored in memory was increased from 30 to 31 documents. Symptom corrected: The operation panel display may shut off.
1.17 Firmware modified to support the new model in Korea. 1.16 Symptom corrected:
The print job may stop when the machine is handling several jobs at once. 1.15 Symptom corrected:
The machine cannot print customer paper size in duplex 1.14 Symptom corrected:
If the following operation sequence is performed on the operation panel, any next

Technical Bulletin PAGE: 3/4 Reissued: 20-Aug-14 Model: MT-C4 Date: 28-May-09 No.: RD062009n
Version Modified Points or Symptom Corrected operation from that moment on to the panel might be incorrectly recorded as a password policy failure in the access log. The operator configures "Password Policy", selects "Complexity Setting" other than "Off" or "Minimum Character No." other than "0". The operator selects "Program/Change Administrator", presses "Change" for Administrator2 (or later) and is configuring the settings there. The administrator's login name is entered. Stored jobs (Locked Print, Sample Print, etc.) might not be shown in the operation panel if the DataOverwriteSecurity Unit is installed. Other changes: The MAC address for the RICOH vendor code was changed.
1.13.1 Symptom corrected: SC816 occurs when the machine enters Sleep Mode. Firmware versions of the FAX and Finisher options are not recorded in Web Image Monitor > Access Log > "Firmware: Structure". The Access Log records a password change if the Program/Change Administrator screen is opened via WIM and the OK button is pressed. Other changes: Multiple stored jobs submitted for printing simultaneously will now be recorded individually in the Job log instead of only the first job being recorded. This change only applies to non-print jobs that have been stored. Prior to this change, the printing of stored print jobs were already recorded individually in the Job log.
Note: Requires the following firmware versions (or later): System (version 1.13.1), Websys (version 1.08), Scanner (version 01.17), WebUapl (version 1.04), and NFA (version 1.04).
1.12 Symptom corrected: Scan to NCP fails if all of the following conditions met: The destination is specified using the IP address. The Novell server and the device are in different subnets. The subnet routers filter SLP multicasts. Note: Requires System firmware (version 1.12 or later) and Scanner firmware (version 01.06 or later). Scan to NCP fails or takes long time to complete if the IPX protocol is used and there are more than 2 Novell Directory Services (NDS) servers in the netwok hierarchy. Note: Requires System firmware (version 1.12 or later) and Scanner firmware (version 01.06 or later). Jobs of more than 100 pages cannot be stored on the MFP (Locked Print, Stored Print, etc.) if another job is being stored from another source (Copier, Scanner, Fax) at the same time. The printer application will stall if any of the following situations are encountered: A print job is submitted while another print job is already being processed by the device. A print job is submitted while the TWAIN driver is scanning. A scan initiated by TWAIN might fail if a print job is already being processed by the device.

Technical Bulletin PAGE: 4/4 Reissued: 20-Aug-14 Model: MT-C4 Date: 28-May-09 No.: RD062009n
Version Modified Points or Symptom Corrected 1.10.3 1st Mass production
Technical Bulletin PAGE: 1/2
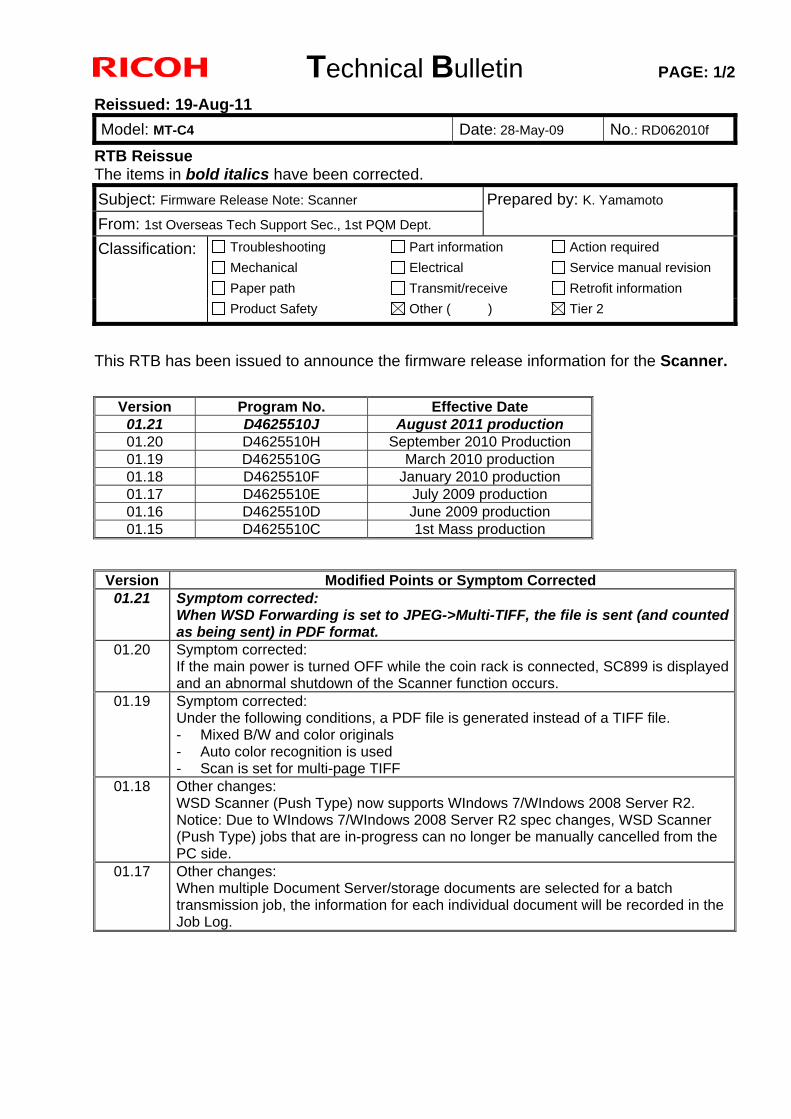
Reissued: 19-Aug-11 Model: MT-C4 Date: 28-May-09 No.: RD062010f
RTB Reissue The items in bold italics have been corrected. Subject: Firmware Release Note: Scanner Prepared by: K. Yamamoto From: 1st Overseas Tech Support Sec., 1st PQM Dept. Classification: Troubleshooting
Mechanical Paper path
Part information Electrical Transmit/receive
Action required Service manual revision Retrofit information
Product Safety Other ( ) Tier 2
This RTB has been issued to announce the firmware release information for the Scanner.
Version Program No. Effective Date 01.21 D4625510J August 2011 production 01.20 D4625510H September 2010 Production 01.19 D4625510G March 2010 production 01.18 D4625510F January 2010 production 01.17 D4625510E July 2009 production 01.16 D4625510D June 2009 production 01.15 D4625510C 1st Mass production
Version Modified Points or Symptom Corrected
01.21 Symptom corrected: When WSD Forwarding is set to JPEG->Multi-TIFF, the file is sent (and counted as being sent) in PDF format.
01.20 Symptom corrected: If the main power is turned OFF while the coin rack is connected, SC899 is displayed and an abnormal shutdown of the Scanner function occurs.
01.19 Symptom corrected: Under the following conditions, a PDF file is generated instead of a TIFF file. - Mixed B/W and color originals - Auto color recognition is used - Scan is set for multi-page TIFF
01.18 Other changes: WSD Scanner (Push Type) now supports WIndows 7/WIndows 2008 Server R2. Notice: Due to WIndows 7/WIndows 2008 Server R2 spec changes, WSD Scanner (Push Type) jobs that are in-progress can no longer be manually cancelled from the PC side.
01.17 Other changes: When multiple Document Server/storage documents are selected for a batch transmission job, the information for each individual document will be recorded in the Job Log.

Technical Bulletin PAGE: 2/2
Reissued: 19-Aug-11 Model: MT-C4 Date: 28-May-09 No.: RD062010f
01.16 Symptom corrected: 1. Scan to NCP fails if all of the following conditions met:
- The destination is specified using the IP address. - The Novell server and the device are in different subnets. - The subnet routers filter SLP multicasts.
Note: Requires System firmware (version 1.12 or later) and Scanner firmware (version 01.16 or later). 2. Scan to NCP fails or takes long time to complete if the IPX protocol is used and
there are more than 2 Novell Directory Services (NDS) servers in the network hierarchy.
Note: Requires System firmware (version 1.12 or later) and Scanner firmware (version 01.16 or later). 3. "8528: Scanner is not available. Check the scanner connection status." might be
displayed when scanning duplex jobs from the ADF via TWAIN driver. 01.15 1st Mass production

Technical Bulletin PAGE: 1/3 Reissued: 29-Oct-15 Model: MT-C4 Date: 28-May-09 No.: RD062011q
RTB Reissue The items in bold italics have been corrected. Subject: Firmware Release Note: Engine Prepared by: Y. Taniguchi From: 1st Tech Service Sect., MFP/Printer Tech Service Dept. Classification: Troubleshooting
Mechanical Paper path
Part information Electrical Transmit/receive
Action required Service manual revision Retrofit information
Product Safety Other ( ) Tier 2
This RTB has been issued to announce the firmware release information for the Engine.
Version Program No. Effective Date Availability of RFU 1.73:04 D0625137 November 2015 production Available
1.71:04 D0625127Y July 2013 production Available 1.70:04 D0625127X April 2013 production Available 1.67:04 D0625127W May 2012 production Available 1.64:04 D0625127T January 2011 production Available 1.63:04 D0625127S November 2010 production Available 1.62:04 D0625127R October 2010 production Available 1.61:04 D0625127Q April 2010 production Available 1.60:04 D0625127P February 2010 production Available 1.59:04 D0625127N November 2009 production Available 1.58:04 D0625127M October 2009 production Available 1.57:04 D0625127L September 2009 production Available 1.56:04 D0625127K August 2009 production Available 1.55:04 D0625127J July 2009 production Available 1.54:04 D0625127H Jun 2009 production Available 1.53:04 D0625127G 1st Mass production Available
Note: Definition of Availability of RFU via @Remote “Available”: The firmware can be updated via RFU or SD card. “Not available”: The firmware can only be updated via SD card.
Version Modified Points or Symptom Corrected 1.73:04 Symptom corrected:
- A jam occurs at the duplex entrance area. - Black solid images appear on the printouts when outputting a large volume
of copies.
1.71:04 Other changes: 1. The scanning speed for multi-sized original scanning has been increased. 2. A new SP mode was added: SP3-990-001 (fan rotation speed) 0: Slow (same as previous firmware) 1: Fast Note: This SP is effective for correcting light images, by cooling the inside of the machine and minimizing toner deterioration.

Technical Bulletin PAGE: 2/3 Reissued: 29-Oct-15 Model: MT-C4 Date: 28-May-09 No.: RD062011q
IMPORTANT: To apply the above changes, make sure to also install System/Copy firmware ver.1.23 or later.
1.70:04 Symptom corrected: One of the following occurs before the developer reaches its replacement cycle: - Light copies - Dirty background - Toner dusting inside the machine *Need to update the firmware with System/Copy ver.1.22 or later to effect the change *After version up firmware, SP2-978-001 (time of fun rotation) should change to 255 minutes (default value:0) Important: To apply the above changes, you also need to install System/Copy ver.1.22 or later. Note: After the firmware has been updated, SP2-978-001 (time of fan rotation) should change to 255 minutes (default: 0)
1.67:04 Symptom corrected: One of the following occurs before the developer reaches its replacement cycle: - Light copies - Dirty background - Toner dusting inside the machine
1.64:04 Symptom corrected: SC991/990 may occur when an ADF jam occurs.
1.63:04 Symptom Corrected: Jam13 occurs when B5 paper is fed from tray 1.
1.62:04 Symptom corrected: A paper jam occurs when the GBC and Victoria-G finisher are connected.
1.61:04 Symptoms corrected: 1. A jam occurs and the Victoria-G finisher does not stop if 3 or more sheets are fed
through the cover feeder. 2. Sometimes, charger cleaning is not performed in cases where a finisher is
installed. 1.60:04 Symptom corrected:
1. SC555 occurs if the machine is booted up with the ADF open. 2. JAM103 or 123 occurs if a Scan to Folder job is initiated during a print job.
1.59:04 Symptom corrected: 1. Sometimes, the position adjustment performed using SP6-301-008 is not applied
correctly. 2. Sometimes, the web turns when the machine is turned on or when it recovers
from Off mode (it normally should not turn). 1.58:04 Symptom corrected:
1. The "Toner Near End" alert may not be displayed. 1.57:04 Symptom corrected:
1. When the machine recovers from Energy Saver mode to print out a job, the machine just displays "Printing...", which does not clear.
2. Punched paper is not exited to the Mailbox CS391. Other changes: A lock detection mechanism was added for the exhaust fan.

Technical Bulletin PAGE: 3/3 Reissued: 29-Oct-15 Model: MT-C4 Date: 28-May-09 No.: RD062011q
1.56:04 Symptom corrected: Auto Supply Replenishment for @Remote does not work Other Changed: Supported the Plockmatic
1.55:04 Symptom Corrected: Jam53 when A3 tray is attached Machine attached Z-folding unit might not recover from “please wait” when the machine recover from Power save mode
1.54:04 Symptom corrected: In cases where SP2506 is ON (an ID pattern is made during a job), SC990 occurs if the ID sensor pattern is made during cover feed.
1.53:04 1st Mass production

Technical Bulletin PAGE: 1/1
Reissued: 16-Nov-11 Model: ADF Date: 28-May-09 No.: RD062012d
RTB Reissue The items in bold italics have been added. Subject: Firmware Release Note: ADF Prepared by: K. Yamamoto From: 1st Tech Service Sect., MFP/Printer Tech Service Dept Classification: Troubleshooting
Mechanical Paper path
Part information Electrical Transmit/receive
Action required Service manual revision Retrofit information
Product Safety Other ( ) Tier 2
This RTB has been issued to announce the firmware release information for the ADF.
Version Program No. Effective Date 01.620:05 D4125531H November 2009 production 01.610:05 D4125531G July 2009 production 01.600:05 D4125531F March 2009 production 01.590 :05 D4125531E 1st Mass production
Version Modified Points or Symptom Corrected
01.620:05 Symptom corrected: SP:GB Adjust Confirmation does not function correctly. Other changes: Firmware modified to support V-C3. Do not install this firmware on a board which has anewer version of firmware (the newer version of the firmware starts with a “9” e.g. v.90.***:***).If you install the old firmware on the new engine board by mistake, the new engine board will be damaged, and there is no way to repair except replace it.
01.610:05 Symptom Corrected: Following a bottom plate motor jam, the motor heats up slightly if the ADF is opened with the bottom plate HP sensor activated (ON). Other changes: Improved the accuracy of original size detection.
01.600:05 Other changes: The reliability of image data transmission was increased (transmission errors were minimized).
01.590:05 1st Mass production

Technical Bulletin PAGE: 1/1
Reissued: 03-Dec-14 Model: MT-C4 Date: 28-May-09 No.: RD062013c
RTB Reissue The items in bold italics have been added. Subject: Firmware Release Note: Fax Prepared by: M. Yoneda From: 2nd Tech Service Sect., MFP/Printer Tech Service Dept. Classification: Troubleshooting
Mechanical Paper path
Part information Electrical Transmit/receive
Action required Service manual revision Retrofit information
Product Safety Other ( ) Tier 2
This RTB has been issued to announce the firmware release information for the Fax.
Version Program No. Effective Date Availability of RFU 04.00.00 D0625559F December 2014 production Not available
03.00.00 D0625559E September 2010 production Not available 02.00.00 D0625559D June 2009 production Available 01.00.01 D0625559C 1st Mass production Available
Version Modified Points or Symptom Corrected 04.00.00 Symptom corrected
1. SC899 may occur. 2. Stored fax data may be deleted.
03.00.00 Other changes: 1. Stored documents can now be accessed from the operation panel. 2. Access restrictions can now be placed on stored documents (USRSW10 bit0). Symptom corrected: 3. When many documents are forwarded, some parameters of the job log data for
the first and second documents do not match. 02.00.00 Symptom corrected:
An incoming FAX job cannot be printed if the paper size auotmatically selected by the machine is loaded in the cover feeder, but not in any of the standard paper trays.
01.00.01 1st Mass production
Technical Bulletin PAGE: 1/1
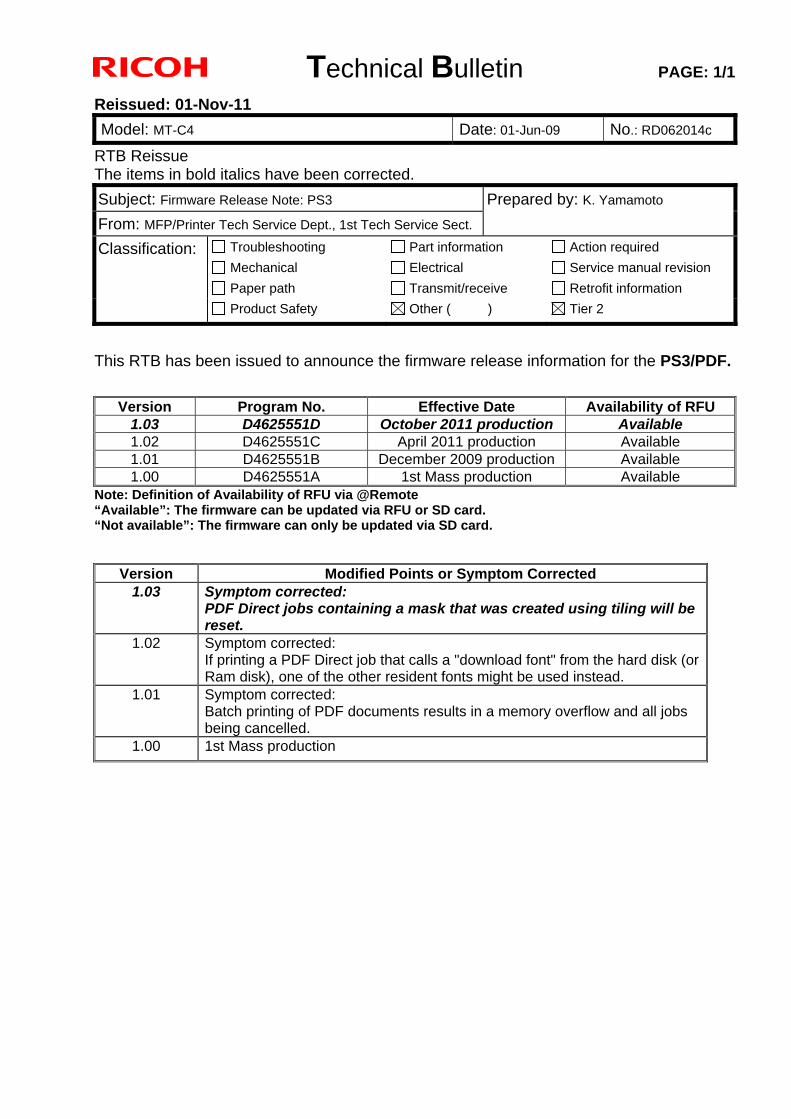
Reissued: 01-Nov-11 Model: MT-C4 Date: 01-Jun-09 No.: RD062014c
RTB Reissue The items in bold italics have been corrected. Subject: Firmware Release Note: PS3 Prepared by: K. Yamamoto From: MFP/Printer Tech Service Dept., 1st Tech Service Sect. Classification: Troubleshooting
Mechanical Paper path
Part information Electrical Transmit/receive
Action required Service manual revision Retrofit information
Product Safety Other ( ) Tier 2
This RTB has been issued to announce the firmware release information for the PS3/PDF.
Version Program No. Effective Date Availability of RFU 1.03 D4625551D October 2011 production Available 1.02 D4625551C April 2011 production Available 1.01 D4625551B December 2009 production Available 1.00 D4625551A 1st Mass production Available
Note: Definition of Availability of RFU via @Remote “Available”: The firmware can be updated via RFU or SD card. “Not available”: The firmware can only be updated via SD card.
Version Modified Points or Symptom Corrected 1.03 Symptom corrected:
PDF Direct jobs containing a mask that was created using tiling will be reset.
1.02 Symptom corrected: If printing a PDF Direct job that calls a "download font" from the hard disk (or Ram disk), one of the other resident fonts might be used instead.
1.01 Symptom corrected: Batch printing of PDF documents results in a memory overflow and all jobs being cancelled.
1.00 1st Mass production
Technical Bulletin PAGE: 1/1
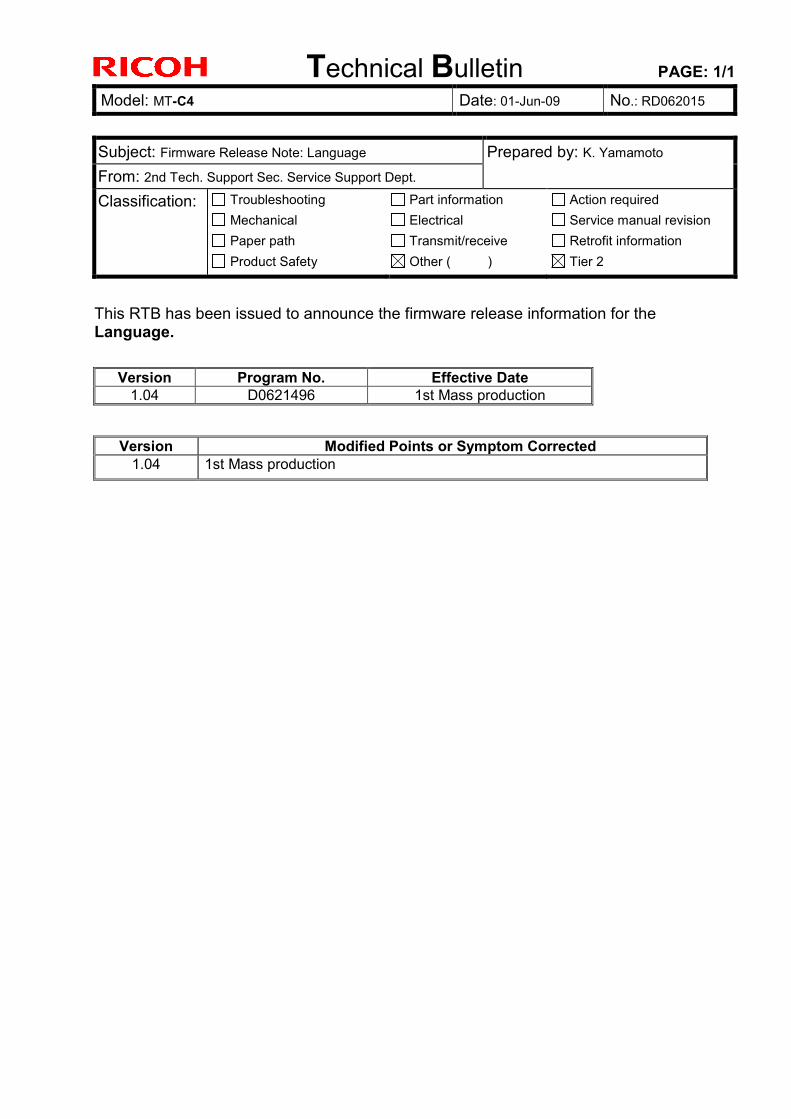
Model: MT-C4 Date: 01-Jun-09 No.: RD062015
Subject: Firmware Release Note: Language Prepared by: K. Yamamoto From: 2nd Tech. Support Sec. Service Support Dept. Classification: Troubleshooting
Mechanical Paper path
Part information Electrical Transmit/receive
Action required Service manual revision Retrofit information
Product Safety Other ( ) Tier 2
This RTB has been issued to announce the firmware release information for the Language.
Version Program No. Effective Date 1.04 D0621496 1st Mass production
Version Modified Points or Symptom Corrected
1.04 1st Mass production

Technical Bulletin PAGE: 1/1 Reissued: 06-Apr-16 Model: MT-C4 Date: 02-Jun-09 No.: RD062016e
RTB Reissue The items in bold italics have been added. Subject: Firmware Release Note:FCU Prepared by: Y. Taniguchi From: 1st Tech Service Sect., MFP/Printer Tech Service Dept Classification: Troubleshooting
Mechanical Paper path
Part information Electrical Transmit/receive
Action required Service manual revision Retrofit information
Product Safety Other ( ) Tier 2
This RTB has been issued to announce the firmware release information for the FCU.
Version Program No. Effective Date Availability of RFU 07.00.00 D4185570G April 2016 production Not available
06.00.00 D4185570F June 2012 production Not available 05.00.00 D4185570E April 2011 production Not available 04.00.00 D4185570D October 2010 production Not available 03.00.00 D4185570C February 2010 production Available 02.00.00 D4185570B 1st Mass production Available
Note: Definition of Availability of RFU via @Remote “Available”: The firmware can be updated via RFU or SD card. “Not available”: The firmware can only be updated via SD card.
Version Modified Points or Symptom Corrected 07.00.00 Symptom corrected:
If an error, for example, 14-30 occurs while sending folders, the machine may not recover from the error nor report the error.
06.00.00 Symptom corrected. 1. An NMI error may occur (triggered by a watchdog reset error) if a large
amount of electrical noise occurs when sending a PDF image to a folder using the G3 line.
2. Minor bug corrections were applied. 05.00.00 Symptom corrected:
A line interrupt error occurs when receiving a FAX from a specific FAX server due to an RTC misdetection.
04.00.00 Other changes: 1. If the memory allocated for stored documents is full, an error message
will be sent to the sender when a user tries to store a document. 2. The name of the document that the user selects for storage will be
recorded in the job log. 03.00.00 Symptom corrected:
Incoming FAXes are not printed out when the LS reception, LS reception e-mail notification, and print out at LS reception settings are all enabled.
02.00.00 1st Mass production

Technical Bulletin PAGE: 1/1
Reissued: 29-Oct-10 Model: MT-C4 Date: 02-Jun-09 No.: RD062017b
RTB Reissue The items in bold italics have been corrected. Subject: Firmware Release Note: RemoteFAX Prepared by: K. Yamamoto From: 1st Overseas Tech Support Sec., 1st PQM Dept. Classification: Troubleshooting
Mechanical Paper path
Part information Electrical Transmit/receive
Action required Service manual revision Retrofit information
Product Safety Other ( ) Tier 2
This RTB has been issued to announce the firmware release information for the RemoteFAX.
Version Program No. Effective Date 03.00.00 D0625560D September 2010 production 02.00.00 D0625560C December 2009 production 01.00.00 D0625560B 1st Mass production
Version Modified Points or Symptom Corrected 03.00.00 Symptom Corrected:
"Not transmitted" is displayed when trying to send an IP-FAX, after which the IP-FAX feature cannot be used.
02.00.00 Symptom corrected: SC991 occurs if the Key Card is removed while the machine is printout out a PC Fax.
01.00.00 1st Mass production

Technical Bulletin PAGE: 1/2
Model: Katana-C2 (Bellini-C4) Date: 22-Jun-09 No.: RD059032
Subject: Multi-Folding Unit - Docking Bracket Screws Prepared by: K. Tsutsui From: PPMC Service Planning Department 1G Classification: Troubleshooting
Mechanical Paper path
Part information Electrical Transmit/receive
Action required Service manual revision Retrofit information
Product Safety Other ( ) Tier2
PROBLEM When installing the Multi-Folding Unit, the bracket screws applied to the upstream of the Multi-Folding Unit interfere with the upstream Katana-C2 mainframe or peripherals (Decurl Unit, Cover Interposer Tray, or Perfect Binder), and 3 of the 4 screws do not reach the Martini-C4 mainframe.
TEMPORARY SOLUTION To avoid the problem, please replace (exchange) the screws for the upstream docking bracket and the downstream docking bracket as shown in the diagram below.
Screw Combination
MultiFolding
UnitFD5000
Bellini-C4Mainframe
Martini-C4Mainframe
DecurlerDU5000
CoverInterposer
TrayCI5010
PerfectBinderGB5000
StackerSK5010
BookletFinisherSR5020
FinisherSR5000
RingBinderRB5000
Downstream UpstreamDocking Bracket Docking Bracket
FRONTREAR FRONTREAR
: M4x14 mm : M4x20 mm
M4x14mm (x1)M4x20mm (x3)
M4x14 mm (x3)M4x20 mm (x1)
* When the Martini-C4 mainframe is installed, please apply all four M4x20 mm. Hence, the downstream peripheral will be attached with four M4x14 mm.
*See below.

Technical Bulletin PAGE: 2/2
Model: Katana-C2 (Bellini-C4) Date: 22-Jun-09 No.: RD059032
PERMANENT SOLUTION Upon design change, Multi Folding Unit will be attached with total of 8 screws (4 each of M4x14 & M4x20).
Upstream Bracket : M4x14 (x3) & M4x20 (x1) Downstream Bracket : M4x14 (x1) & M4x20 (x3)
The installation guide and service manual will be revised accordingly.

Technical Bulletin PAGE: 1/2 Reissued: 25-Aug-14 Model: MT-C4 Date: 22-Jun-09 No.: RD062018g
RTB Reissue The items in bold italics were corrected or added.
This RTB has been issued to announce the firmware release information for the PCL.
Version Program No. Effective Date Availability of RFU 1.06 D4625541J September 2014 production Available
1.05 D4625541H May 2012 production Available 1.04 D4625541G August 2011 production Available 1.03 D4625541F April 2011 production Available 1.02 D4625541E March 2010 production Available 1.01 D4625541D October 2009 production Available 1.00 D4625541C 1st Mass production Available
Note: Definition of Availability of RFU via @Remote “Available”: The firmware can be updated via RFU or SD card. “Not available”: The firmware can only be updated via SD card.
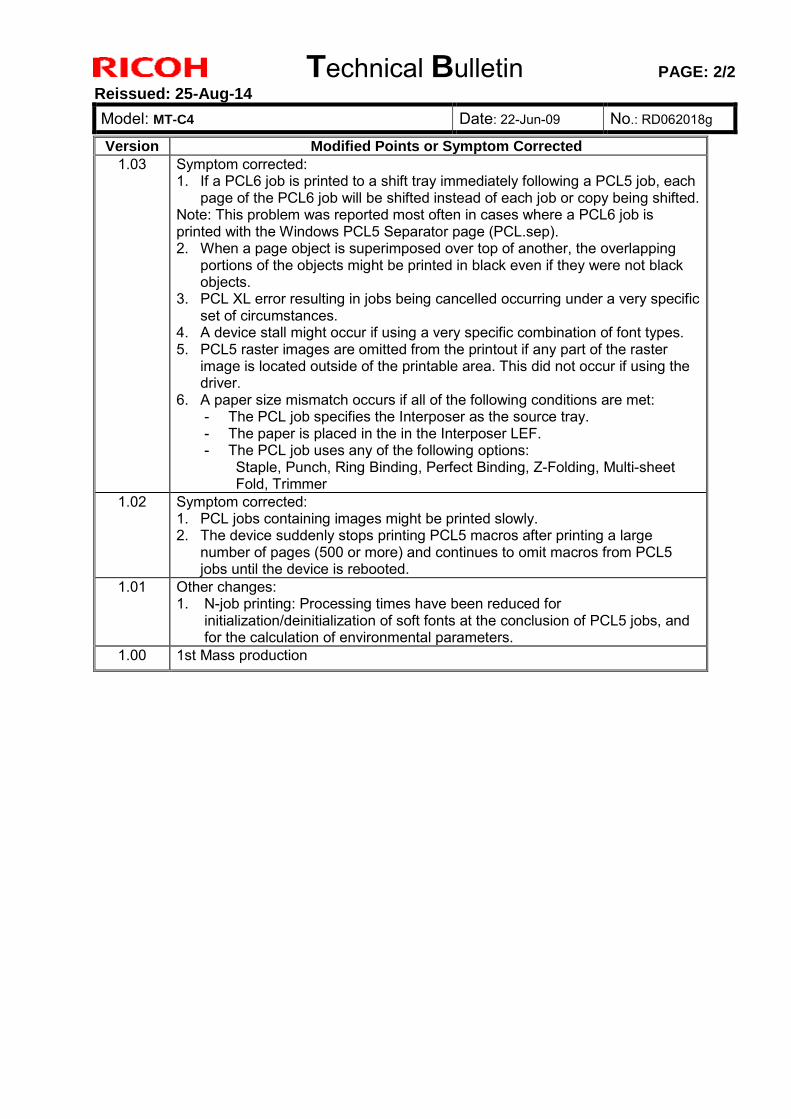
Version Modified Points or Symptom Corrected 1.06 Symptom corrected:
1. If a PCL5 job contains a picture frame that is drawn by HP/GL2, unexpected lines might be printed or some lines might be missing. (GFPR#RA09020002, GFPR#RA10050003, GFPR#RE13090003)
1.05 Symptom corrected: 1. Multiple-glyph fonts are not printed at all if any of the glyphs are missing. An
example of a multiple-glyph font is a letter with 2 dots over it such as 'A'. The 2 dots and the letter might be separate glyphs. If for example the 2 dots are missing, the 'A' should still be printed. (GFPR#RE11040007)
2. Image rotation might result in parts of a page being blacked out. (GFPR#RA11030001)
3. HP-GL/2 jobs might be missing objects or fail to print completely. (GFPR#RE11040006, GFPR#RE11090002, GFPR#RE12010005)
1.04 Other changes: 1. Characters or symbols missing from the printouts of jobs containing HP-
GL/2. 2. Objects out of position in PCL5 jobs containing HP-GL/2 and macro.
Subject: Firmware Release History: PCL Prepared by: M. Yoneda From: 1st Tech Service Sect., MFP/Printer Tech Service Dept
Classification: Troubleshooting Mechanical Paper path
Part information Electrical Transmit/receive
Action required Service manual revision Retrofit information
Product Safety Other ( ) Tier 2
Technical Bulletin PAGE: 2/2 Reissued: 25-Aug-14 Model: MT-C4 Date: 22-Jun-09 No.: RD062018g
Version Modified Points or Symptom Corrected 1.03 Symptom corrected:
1. If a PCL6 job is printed to a shift tray immediately following a PCL5 job, each page of the PCL6 job will be shifted instead of each job or copy being shifted.
Note: This problem was reported most often in cases where a PCL6 job is printed with the Windows PCL5 Separator page (PCL.sep). 2. When a page object is superimposed over top of another, the overlapping
portions of the objects might be printed in black even if they were not black objects.
3. PCL XL error resulting in jobs being cancelled occurring under a very specific set of circumstances.
4. A device stall might occur if using a very specific combination of font types. 5. PCL5 raster images are omitted from the printout if any part of the raster
image is located outside of the printable area. This did not occur if using the driver.
6. A paper size mismatch occurs if all of the following conditions are met: - The PCL job specifies the Interposer as the source tray. - The paper is placed in the in the Interposer LEF. - The PCL job uses any of the following options:
Staple, Punch, Ring Binding, Perfect Binding, Z-Folding, Multi-sheet Fold, Trimmer
1.02 Symptom corrected: 1. PCL jobs containing images might be printed slowly. 2. The device suddenly stops printing PCL5 macros after printing a large
number of pages (500 or more) and continues to omit macros from PCL5 jobs until the device is rebooted.
1.01 Other changes: 1. N-job printing: Processing times have been reduced for
initialization/deinitialization of soft fonts at the conclusion of PCL5 jobs, and for the calculation of environmental parameters.
1.00 1st Mass production

Technical Bulletin PAGE: 1/1
Reissued: 01-Nov-12 Model: MT-C4 Date: 22-Jun-09 No.: RD062019c
RTB Reissue The items in bold italics have been corrected.
Subject: Firmware Release Note: PowerSaving Sys Prepared by: T. Hirakawa From: 1st Tech Service Sect., MFP/Printer Tech Service Dept
Classification: Troubleshooting Mechanical Paper path
Part information Electrical Transmit/receive
Action required Service manual revision Retrofit information
Product Safety Other ( ) Tier 2
This RTB has been issued to announce the firmware release information for the PowerSaving Sys.
Version Program No. Effective Date Availability of RFU 1.16 D0625550F October 2012 production Available 1.15 D0625550E March 2010 production Available 1.14 D0625550D July 2009 production Available 1.13 D0625550C 1st Mass production Available
Note: Definition of Availability of RFU via @Remote “Available”: The firmware can be updated via RFU or SD card. “Not available”: The firmware can only be updated via SD card.
Version Modified Points or Symptom Corrected 1.16 Symptom corrected:
1. SC816 may occur after system start-up, depending on the timing of the PSU reboot.
2. The following may occur, depending on the timing of recovery from Energy Saver mode: - Cannot detect original size - Machine does not recover from Energy Saver mode when an
original is placed on the exposure glass or the ADF is opened - SC816-90/-49 occurs at system start-up - SC816-38 occurs when an original is placed on the exposure glass
or the ADF is opened 1.15 Version change only 1.14 Version change only 1.13 1st Mass production

Technical Bulletin PAGE: 1/2
Reissued: 16-Nov-11 Model: Finisher SR4030/40 Date: 22-Jun-09 No.: RD062020g
RTB Reissue The items in bold italics have been added. Subject: Firmware Release Note: Finisher SR4030/40 Prepared by: T. Toriumi From: 1st Tech Service Sect., MFP/Printer Tech Service Dept Classification: Troubleshooting
Mechanical Paper path
Part information Electrical Transmit/receive
Action required Service manual revision Retrofit information
Product Safety Other ( ) Tier 2
This RTB has been issued to announce the firmware release information for the Finisher SR4030/40.
Version Program No. Effective Date 01.100:27 D3735112F November 2010 production
1.90:26 D3735112E September 2010 production 1.08:25 D3735112D May 2010 production 1.06:22 D3735112C December 2009 production 1.04:20 D3735112B August 2009 production 1.03:19 D3735112A 1st Mass production
Version Modified Points or Symptom Corrected
01.100:27 Symptom Corrected: Standardization with other models. Do not install this firmware on a board which has a newer version of firmware (the newer version of the firmware starts with a “9” e.g. v.90.***:***). If you install the old firmware on the new engine board by mistake, the new engine board will be damaged, and there is no way to repair except replace it.
1.90:26 Symptom Corrected: After the main switch is turned on, SC725 (Finisher exit guide plate motor error) occurs.
1.08:25 Symptoms corrected: 1. A jam occurs due to the shift motor not returning to its home position
properly. 2. The joggers shift farther apart little by little with each print job if there is
only one sheet being printed and Staple is selected. 3. The edge of the paper in the exit tray is dirty at about 2500 sheets, due to
contact with the belt of the roller. 1.06:22 Symptom corrected:
Jam 111 or Jam131 occurs due to a shift motor control issue. 1.04:20 Symptom corrected:
A paper jam occurs with two-spot stapling on one sheet of paper.

Technical Bulletin PAGE: 2/2
Reissued: 16-Nov-11 Model: Finisher SR4030/40 Date: 22-Jun-09 No.: RD062020g
Version Modified Points or Symptom Corrected 1.03:19 -

Technical Bulletin PAGE: 1/2 Reissued: 24-Jun-11 Model: MT-C4 Date: 22-Jun-09 No.: RD062021b
RTB Reissue The items in bold italics have been corrected. Subject: Firmware Release Note: Option IPDS Prepared by: K.Yamamoto From: 1st Overseas Tech Support Sec., 1st PQM Dept. Classification: Troubleshooting
Mechanical Paper path
Part information Electrical Transmit/receive
Action required Service manual revision Retrofit information
Product Safety Other ( ) Tier 2
This RTB has been issued to announce the firmware release information for the Option IPDS.
Note: Definition of Availability of RFU via @Remote “Available”: The firmware can be updated via RFU or SD card. “Not available”: The firmware can only be updated via SD card.
Version Modified Points or Symptom Corrected 7.073 Symptom corrected:
1. If the cover is opened and then closed while the device is warming up, printing might not start.
2. Barcode "CODE 128" might be printed with the wrong dimensions. 3. If a job contains 2 different fonts of the same name, characters might be
unexpectedly printed in bold or italics, or in some cases might be garbled.4. Jobs that contain large images and use soft fonts might be cancelled.
7.033 Other changes: Object Containers can now be used for sending images (gif, tiff, jpg) to the printer. Note: 1. A new manual is available (P/N: D4625810) for machines whose firmware is
updated to this version. 2. To activate the new function, need to update the following firmware together System V1.16 or later D0625572E Printer V1.14.2 or later D4625521F Engine V1.57:04 or later D0625127L Net File V1.04 or later D0625557C Websys V1.08 or later D0625574A NIB V8.61.1 or later D0625553C WebUapl V1.04 or later D0625556C Symptom corrected: 1. If the machine jams while printing the IPDS font list, it can be made to stall by
either of the following operations: - Try to print the IPDS font list again.
Version Program No. Effective Date Availability of RFU 7.073 D4625580B May 2011 production Not available 7.033 D4625580A May 2010 production Not available 6.042 D4625580 1st Mass production Available

Technical Bulletin PAGE: 2/2 Reissued: 24-Jun-11 Model: MT-C4 Date: 22-Jun-09 No.: RD062021b
Version Modified Points or Symptom Corrected - Try to print any IPDS job.
2. Cancelling a job from the operation panel might cause the MFP to stall displaying "Printing ...". This only occurred if immediately after the job was cancelled from the operation panel, the host terminated the IPDS session.
3. Duplex IPDS jobs are printed simplex if the MFP is powered up while a tray is open. Specifically, the tray that is open during power up must be the one specified in the Duplex IPDS job.
4. IPDS jobs containing images might cause the device to stall with the error "Internal Error 0x3414" displayed on the operation panel.
5. Gray patterns consisting of hatching might not be shown in the printout. Instead the gray pattern was just a black box.
6. If a host prematurely terminates an IPDS session with the MFP, subsequent IPDS jobs cannot be printed. The data-in LED will just blink. Though any pre-mature termination of an IPDS session could cause the problem, testing has shown that the problem was most likely to occur if the IPDS session was terminated mid-job.
6.042 1st Mass production

Technical Bulletin PAGE: 1/4
Model: MT-C4 Date: 17-Jul-09 No.: RD062022
Subject: Installation procedure of Key Counter Interface Prepared by: Koji KY Yamamoto From: 2nd Tech. Support Sec. Service Support Dept. Classification: Troubleshooting
Mechanical Paper path
Part information Electrical Transmit/receive
Action required Service manual revision Retrofit information
Product Safety Other ( ) Tier 2
Service Manual Revision Add the following procedure for the installation of the key counter interface.
Installation Procedure for the 20-pin Key Counter Interface Unit (B870) 1. Attach the connection board [A] (locking support [B] x 4). 2. Connect the harness [C] to CN003. 3. Connect the harness [D] to CN004.
[A]
[B]
[D]
[C]

Technical Bulletin PAGE: 2/4
Model: MT-C4 Date: 17-Jul-09 No.: RD062022
4. Connect the harness [C] to CN218 on the BCU. 5. Clamp the harness at two points [E].
6. Pass the harness through the edge saddle [F].
[D] [E]
[F]
[C]

Technical Bulletin PAGE: 3/4
Model: MT-C4 Date: 17-Jul-09 No.: RD062022
7. Clamp the harness at two points [G].
8. Pass the harness through the opening [H].
[G]

Technical Bulletin PAGE: 4/4
Model: MT-C4 Date: 17-Jul-09 No.: RD062022
[H]

Technical Bulletin PAGE: 1/2
Reissued:30-Sep-09 Model: Model MT-C4 Date: 23-Jul-09 No.: RD062023a
RTB Reissued: The items in bold italics were added. Subject: SC555, SC542 Prepared by: K. Yamamoto From: 2nd Tech. Support Sec. Service Support Dept. Classification: Troubleshooting
Mechanical Paper path
Part information Electrical Transmit/receive
Action required Service manual revision Retrofit information
Other ( )
This RTB applies to the MT-C2, MT-C3, MT-C3.5, and MT-C4.
SYMPTOM: SC555 or SC542 occurs
CAUSE: When using paper with a high paper dust content, the amount of toner that sticks to the surface of the fusing roller increases. In addition, the toner is mixed together with paper dust, and then tends to stick to the temperature-detecting elements of the thermistors. As a result, the thermistors are unable to detect the temperature of the fusing roller correctly.
SOLUTION: If the symptom occurs: 1. Clean the middle and rear thermistors. 2. If the SC still occurs even after cleaning the thermistors, replace the thermistor
brackets with the new parts in the table below. Note: This will secure the thermistors in the correct position, ensuring that they can
detect the roller temperature correctly.
Old part number
New part number
Description Q’ty Int Page Index Note
B1404197 D0624197 BRACKET:THERMISTOR:MIDDLE
1 99 18
B1404196 D0624196 BRACKET:THERMISTOR:INNER BACK
1
X/O As a set 99 21

Technical Bulletin PAGE: 2/2
Reissued:30-Sep-09 Model: Model MT-C4 Date: 23-Jul-09 No.: RD062023a
The distance [A] is different between the new and old brackets . B1404196/7: 14.8mm D0624196/7: 15.3mm

Technical Bulletin PAGE: 1/2
Model: MT-C4 Date: 29-Jul-09 No.: RD062024
Subject: Key top of Printer/Scanner unit Prepared by: Koji KY Yamamoto From: 2nd Tech. Support Sec. Service Support Dept. Classification: Troubleshooting
Mechanical Paper path
Part information Electrical Transmit/receive
Action required Service manual revision Retrofit information
Product Safety Other ( ) Tier 2
Symptom The key top included in Printer/Scanner Units produced up through June 30, 2009 cannot be attached to the operation panel.
Cause The wrong key top was inserted in the unit.
Solution If you install a Printer/Scanner Units produced up through June 30, 2009, attach the correct key top instead of the one inside the kit.
Note: Printer/Scanner Units produced from July 1, 2009, which contain the correct key top, are marked by a green circular label on the box. (See the photo on the next page).
Correct Key tops
Printer Scanner

Technical Bulletin PAGE: 2/2
Model: MT-C4 Date: 29-Jul-09 No.: RD062024
Only RAC and RA Printer/Scanner Units produced from July 1, 2009, which contain the correct key top, are marked as shown in the photo:

Technical Bulletin PAGE: 1/1
Model: MT-C4 Date: 7-Aug-09 No.: RD062025
This RTB applies to the MT-C2, MT-C3, MT-C3.5, and MT-C4.
Old part number
New part number
Description Q’ty Int Page Index Note
B1404172 D0544172 RETAINING RINGS-C:HOT ROLLER
2 101 5
AE032026 AE032033 Thermal Insulating Bushing 2
X/O as a set 101 3
Change: The shape and material for these parts were changed (vendor change). Reason: To further ensure the retaining rings stay properly fixed in place.
Important: - If you need to replace either of the old parts, replace both of them with the new
parts together as a set. - The unit quantity is 2pcs for these parts, but you do not have to replace the left
and right sides at the same time (only replace the side that is broken).
Subject: Retaining ring Prepared by: K.Yamamoto From: 2nd Tech. Support Sec. Service Support Dept. Classification: Troubleshooting
Mechanical Paper path
Part information Electrical Transmit/receive
Action required Service manual revision Retrofit information
Product Safety Other ( ) Tier 2

Technical Bulletin PAGE: 1/1
Model: MT-C4 Date: 7-Aug-09 No.: RD062026
Subject: @Remote – Auto Supply Replenishment Prepared by: Koji KY Yamamoto From: 2nd Tech. Support Sec. Service Support Dept. Classification: Troubleshooting
Mechanical Paper path
Part information Electrical Transmit/receive
Action required Service manual revision Retrofit information
Product Safety Other ( ) Tier 2
Note: This RTB applies to @Remote-connected machines that use the “Auto Supply Replenishment” function.
Symptom “Auto Supply Replenishment” for @Remote does not work. As the result, the toner runs out and the user cannot use the machine until the new toner is ordered and delivered.
Cause Firmware bug
Solution On @Remote-connected machines that use the “Auto Supply Replenishment” function, update the Engine firmware (D0625127) to version 1.56:04 or later.

Technical Bulletin PAGE: 1/1
Model: MT-C4 Date: 06-Oct-09 No.: RD062028
Replace the description for SP5985 with the following. pg. 259
Subject: Service manual revision – SP5985 Prepared by: K.Yamamoto From: 2nd Tech. Support Sec. Service Support Dept. Classification: Troubleshooting
Mechanical Paper path
Part information Electrical Transmit/receive
Action required Service manual revision Retrofit information
Product Safety Other ( ) Tier 2

Technical Bulletin PAGE: 1/1
Model: MT-C4 Date: 09-Oct-09 No.: RD062029
Less than 90cpm (D062/D063/D064) Power source
Code Part number Cable MachineRAC NA 17/57 B0655672 120V 20A 20A RE EU 27/67 B2465677 220-240V 10A 10A RA Asia 29 B2465677 220-240V 10A 10A Taiwan 19 B0655672 110V 20A 20A RCN China 21 B0655673 220-240V 10A 10A
90cpm (D066) Power source
Code Part number Cable MachineRAC NA 17/57 D0665672 208-240V 20A 12A RE EU 27/67 D0665677 220-240V 16A 10A RA Asia 29 D0665677 220-240V 16A 10A Taiwan 19 D0665674 220V 20A 12A RCN China 21 D0665683 220-240V 16A 10A
Change/Reason: The part numbers for the power cords were missing from the Parts
Catalog (pg. 143, index 4).
Subject: Part number of Power cable Prepared by: K.Yamamoto From: 2nd Tech. Support Sec. Service Support Dept. Classification: Troubleshooting
Mechanical Paper path
Part information Electrical Transmit/receive
Action required Service manual revision Retrofit information
Product Safety Other ( ) Tier 2

Technical Bulletin PAGE: 1/19 Reissued: 13-Oct-09 Model: MT-C4 Date: 03-Sept-09 No.: RD062027a
RTB Reissue The chapter “Installation of Card Authentication Package ” and “Updating Enhanced Locked Print NX Application and Filter” have been modified.
This RTB has been issued to announce the Card Authentication Package V1.3 Installation / Activation Guide release information.
Subject: Card Authentication Package V1.3 Installation / Activation Guide
Prepared by: K. Yamamoto
From: 2nd Tech Support Sec. Service Support Dept. Classification: Troubleshooting
Mechanical Paper path
Part information Electrical Transmit/receive
Action required Service manual revision Retrofit information
Product Safety Other ( ) Tier 2
PAGE: 2/19
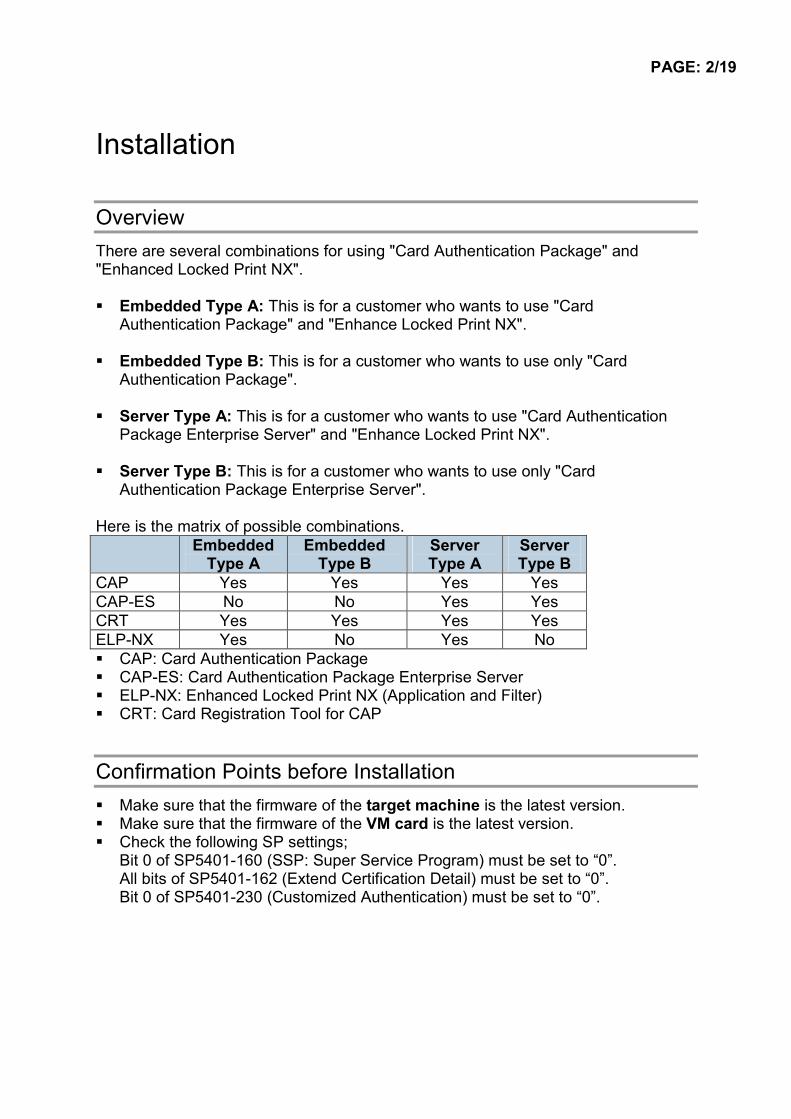
Installation
Overview There are several combinations for using "Card Authentication Package" and "Enhanced Locked Print NX". Embedded Type A: This is for a customer who wants to use "Card
Authentication Package" and "Enhance Locked Print NX". Embedded Type B: This is for a customer who wants to use only "Card
Authentication Package". Server Type A: This is for a customer who wants to use "Card Authentication
Package Enterprise Server" and "Enhance Locked Print NX". Server Type B: This is for a customer who wants to use only "Card
Authentication Package Enterprise Server". Here is the matrix of possible combinations.
Embedded Type A
Embedded Type B
Server Type A
Server Type B
CAP Yes Yes Yes Yes CAP-ES No No Yes Yes CRT Yes Yes Yes Yes ELP-NX Yes No Yes No CAP: Card Authentication Package CAP-ES: Card Authentication Package Enterprise Server ELP-NX: Enhanced Locked Print NX (Application and Filter) CRT: Card Registration Tool for CAP
Confirmation Points before Installation Make sure that the firmware of the target machine is the latest version. Make sure that the firmware of the VM card is the latest version. Check the following SP settings;
Bit 0 of SP5401-160 (SSP: Super Service Program) must be set to “0”. All bits of SP5401-162 (Extend Certification Detail) must be set to “0”. Bit 0 of SP5401-230 (Customized Authentication) must be set to “0”.
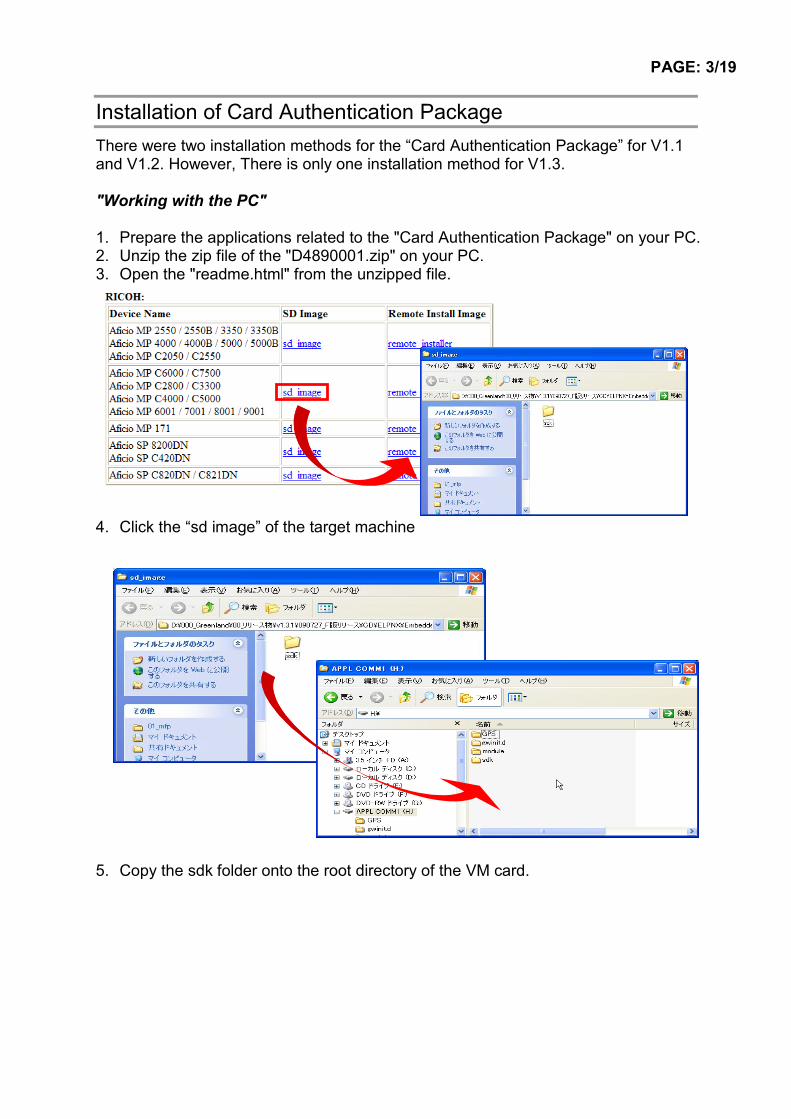
PAGE: 3/19
Installation of Card Authentication Package There were two installation methods for the “Card Authentication Package” for V1.1 and V1.2. However, There is only one installation method for V1.3. "Working with the PC" 1. Prepare the applications related to the "Card Authentication Package" on your PC. 2. Unzip the zip file of the "D4890001.zip" on your PC. 3. Open the "readme.html" from the unzipped file.
4. Click the “sd image” of the target machine
5. Copy the sdk folder onto the root directory of the VM card.

PAGE: 4/19
Please refer to the following for the location of the application folder Model Name Product Code Application Folder Model MT-C4 D062/D063/D065/D066 /01_mfp/sd_image/
The above folders include “/sdk” folder that is application image for copying to VM card.
6. Unzip the zip file of the "D49000001.zip" on your PC. 7. Open the "readme.html" from the unzipped file.
8. Click the “sd image” of the target machine

PAGE: 5/19
9. Copy the sdk folder onto the root directory of the VM card.
Please refer to the following for the location of the application folder. Model Name Product Code Application Folder Model MT-C4 D062/D063/D065/D066 /02_x86/01_mfp/sd_image/
The above folders include “/sdk” folder that is application image for copying to VM card.

PAGE: 6/19
"Working with the Machine" 10. Install a card reader device in a suitable location. 11. Connect the USB cable from the card reader device to the USB slot of the target
machine.
・ The position of the USB slot may vary depending on the machine. 12. Secure the cable clamp to the USB slot.
The procedure for the card reader installation depends on the machine. For details, see “USB Connection of the Card Reader” in the “Appendix” section.
13. Install the VM card in the service slot of the target machine. 14. Turn on the target machine. 15. Ask a machine administrator to login to the target machine with the login name
and password of the machine’s administrator.
16. Enter the "User Tools", and then press "Extended Feature Settings" on the LCD.
17. Press "Extended Feature Settings" on the LCD.
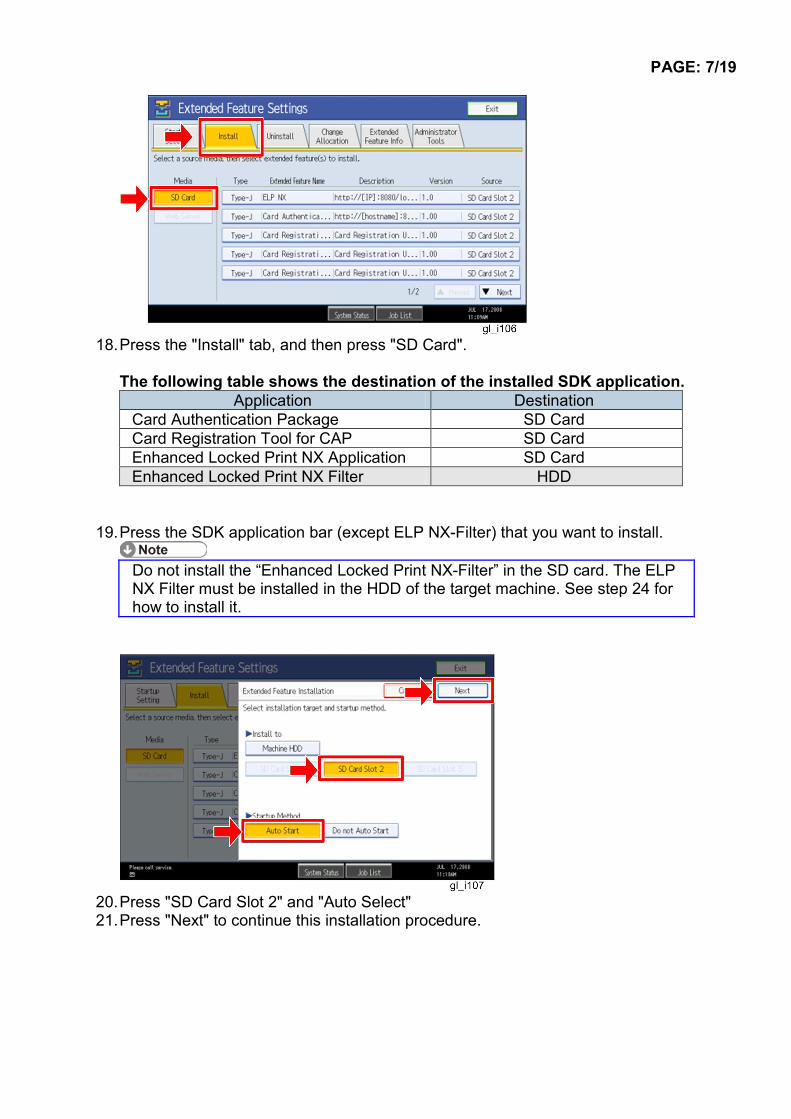
PAGE: 7/19
18. Press the "Install" tab, and then press "SD Card".
The following table shows the destination of the installed SDK application.
Application Destination Card Authentication Package SD Card Card Registration Tool for CAP SD Card Enhanced Locked Print NX Application SD Card Enhanced Locked Print NX Filter HDD
19. Press the SDK application bar (except ELP NX-Filter) that you want to install.
Do not install the “Enhanced Locked Print NX-Filter” in the SD card. The ELP NX Filter must be installed in the HDD of the target machine. See step 24 for how to install it.
20. Press "SD Card Slot 2" and "Auto Select" 21. Press "Next" to continue this installation procedure.

PAGE: 8/19
22. Check if the displayed SDK application name is correct.
If the displayed SDK application is not what you want to install, check the contents of the VM card and retry this installation.
23. Press "OK" to complete this installation.
Note Install the following applications from the SD card in the service slot with the operation panel; exactly which applications to install will depend on the customer's circumstances. Card Authentication Package Enhanced Locked Print NX Application Card Registration Tool for CAP
24. Press the "Enhanced Locked Print NX Filter" bar in the display shown above.

PAGE: 9/19
25. Press "Machine HDD", and then press "Next".
26. Check if the displayed SDK application name is correct and "Machine HDD" is
selected as the installation target.
If the displayed SDK application is not what you want to install, check the contents of the VM card and retry this installation.
27. Press "OK" to complete this installation.

PAGE: 10/19
28. Allocate the Function key (on the operation panel) for the Java VM applications if the customer wants to use a key other than "Other Functions" (default).
29. Enter the "Extended Features Settings". "User Tools/Counter" > "Extended Features Settings" > "Extended Features
Settings"
30. Press the "Administrator Tools" tab, and then press the "Heap/ Stack Size
Settings" button.
31. Press the "Change" button.

PAGE: 11/19
32. Input an appropriate value (see the table below) with the numeric keys on the operation panel, and then press the "# (Enter)" key. Required heap size for the "Copy Extended Feature" depends on a combination of installed applications. For details, refer to the table below.
CAP ELP-NX GlobalScan NX Required Heap Size Yes - - 8 MB Yes Yes - 16 MB Yes Yes Yes 16 MB Yes - Yes 16 MB
33. Press the "OK" button to return to the previous screen. 34. Press the "User Tools/Counter" key to exit the UP mode. 35. Turn the target machine off and on.
"Working with the PC" 36. Activate the "Card Authentication Package" and "Enhanced Locked Print" (if it is
installed) with the Remote Manager.
・ For details, see "DSDK Application Installation" in the "Embedded Software Remote Manager Installation/Activation Guide".
The following steps from 37 to 40 should be done by a machine administrator.
37. Configure the card reader settings with the Card Authentication Package Web UI. 38. Turn the target machine off and on.
"Working with the Machine" 39. Enable "Java TM Platform" for each user with the Address Book Manager.
"User Tools/Setting" > "System Settings" > Administrator Tools" > Address Book Management" > select a user icon > "Auth. Info" > "Other Functions" on the 4th page
PAGE: 12/19
40. Check if the card reader works normally. Press the "Other Function" key for "SDK application" on the operation panel. Select "Card Registration Tool for CAP" Press "Obtain Card ID" on the LCD. After the "Set the card to register"
message appears, hold the card over the card reader. Check to see that the card ID is displayed on the LCD of the target machine.
(If the card ID is not displayed, the card may not be available. In that case, register the card ID.)
For details about steps from 37 to 40, see the operation instructions for "Setting Up the Card Reader".
The following step 41 should be done by a field service representative. 41. Uninstall the "Card Registration Tool" with the operation panel if the customer
wants to delete it.

PAGE: 13/19
Uninstallation
Uninstalling Card Authentication Package 1. Turn on the target machine. 2. Deactivate "Card Authentication Package" and "Enhanced Locked Print-NX
Application" with the Remote Manager. For details, see "Deactivation" in the "Embedded Software Remote Manager Installation/Activation Guide".
Before uninstalling activated SDK applications, deactivation must be done. Otherwise, the product key will be wasted.
3. Enter the User Tools, and then select "Off" in the "Enhanced Authentication Management" (Administrator Tools > Enhanced Authentication).
If the SDK applications are uninstalled from the target machine with "Enhanced Authentication" turned on, SC636 is issued. In that case, enter the SP mode and change the bit 0 setting of SP5401-160 (SSP: Super Service Program) to "0".
4. Uninstall the SDK applications which you want to remove, except for the Java
VM application, with the operation panel or Web Image Monitor. 5. Turn the target machine off and on. 6. Uninstall the Java VM application with the operation panel or Web Image
Monitor.. 7. Change the following SP settings.
• Bit 0 of SP5401-160 (SSP: Super Service Program) must be set to “0”. • All bits of SP5401-162 (Extend Certification Detail) must be set to “0”. • Bit 0 of SP5401-230 (Customized Authentication) must be set to “0”.
8. Turn off the target machine, and then remove the VM card from the target machine.

PAGE: 14/19
Remote Updating Procedure
Updating Card Authentication Package
First update the Java VM Platform if the Java VM Platform and Card Authentication Package are supposed to be updated at the same time.
1. Ask a machine administrator to disable the Card Authentication Package with the
operation panel.
• Disable other Card Authentication Packages if they have been installed in the machine.
• You can also disable the Card Authentication Package with the web image monitor.
2. Launch the Remote Manager. 3. Add a Card Authentication Package for updating in the Remote Manager
See the "Adding a Card Authentication Package in the "Remote Manager" sub section of the "Card Authentication Package Installation" section of the Remote Manager Operation Guide.
4. Install the Card Authentication Package for updating in the target machine
See the "Installing the Card Authentication Package in the Target Machine" sub section of the "Card Authentication Package Installation" section of the Remote Manager Operation Guide.
5. Turn off and on the target machine. 6. Ask a machine administrator to check if the version of the Card Authentication
Package is updated and if the installed Card Authentication Package is "Starting Up"
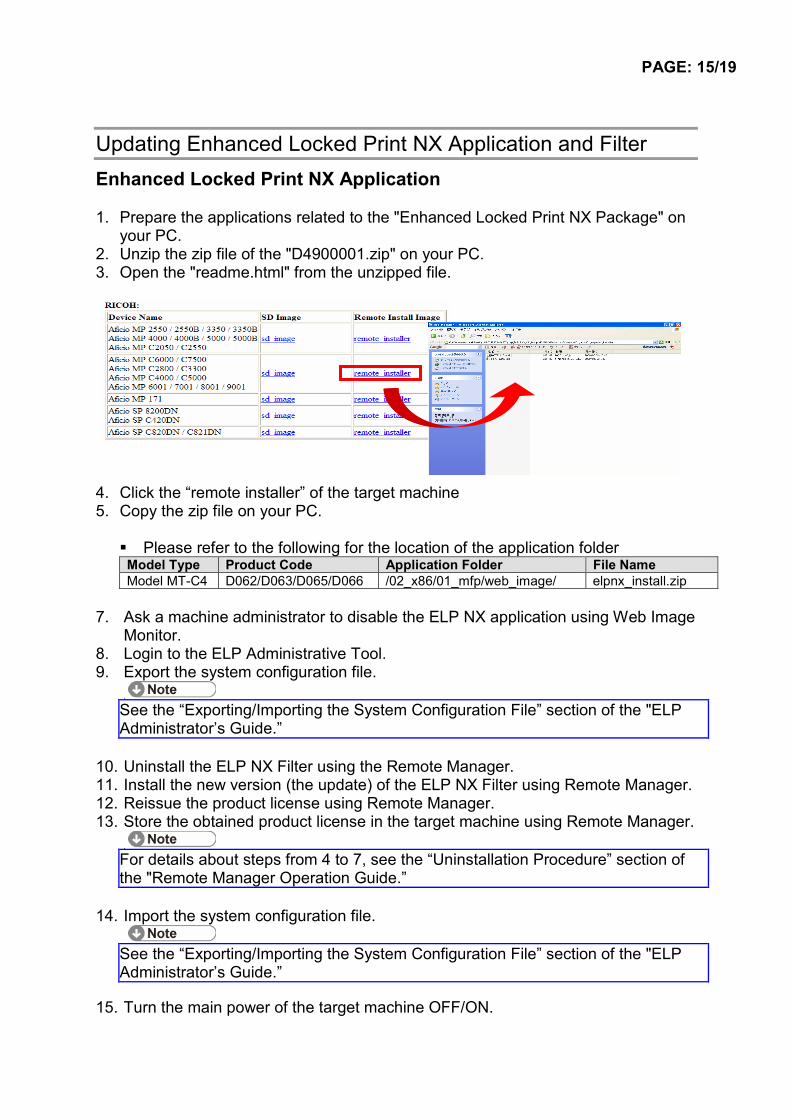
PAGE: 15/19
Updating Enhanced Locked Print NX Application and Filter Enhanced Locked Print NX Application 1. Prepare the applications related to the "Enhanced Locked Print NX Package" on
your PC. 2. Unzip the zip file of the "D4900001.zip" on your PC. 3. Open the "readme.html" from the unzipped file. 4. Click the “remote installer” of the target machine 5. Copy the zip file on your PC.
Please refer to the following for the location of the application folder Model Type Product Code Application Folder File Name Model MT-C4 D062/D063/D065/D066 /02_x86/01_mfp/web_image/ elpnx_install.zip
7. Ask a machine administrator to disable the ELP NX application using Web Image
Monitor. 8. Login to the ELP Administrative Tool. 9. Export the system configuration file.
See the “Exporting/Importing the System Configuration File” section of the "ELP Administrator’s Guide.”
10. Uninstall the ELP NX Filter using the Remote Manager. 11. Install the new version (the update) of the ELP NX Filter using Remote Manager. 12. Reissue the product license using Remote Manager. 13. Store the obtained product license in the target machine using Remote Manager.
For details about steps from 4 to 7, see the “Uninstallation Procedure” section of the "Remote Manager Operation Guide.”
14. Import the system configuration file.
See the “Exporting/Importing the System Configuration File” section of the "ELP Administrator’s Guide.”
15. Turn the main power of the target machine OFF/ON.

PAGE: 16/19
16. Ask a machine administrator to confirm that the ELP NX application has been successfully updated to the target version, and that this application is operating normally.

PAGE: 17/19
Enhanced Locked Print NX Filter 1. From the machine operation panel, uninstall the ELP NX Filter from the target
machine. 2. Remove the VM card from the target machine. 3. Delete the “336724752” folder from the VM card as shown below.
4. Do the following in order to copy Enhanced Locked Print NX from the PC to the
VM card: • Unzip the “Enhanced Locked Print NX" zip file on the PC. • Select the folder according to the device list on page 4 of this document. • Overwrite the “sdk” folder on the VM card by copying the folder from the PC
to the root directory of the VM card (see page 4 of this document). 5. Do Step 4 of the “Installation of the Card Authentication Package, which is on
page 5 of this document.
Make sure that the Heap Size setting.
PAGE: 18/19
Appendix
Matrix of Available Installation/Activation Tools
Installation Destination Action WIM Remote
Manager SD Card
Installation Yes Yes Yes Activation No Yes No
Version Up Yes Yes Yes CAP Target
Machine Activation - - - Installation No No No CAP-ES Server Activation No No No Installation Yes Yes Yes Activation No Yes No
Version Up Yes Yes Yes ELP-NX APP
Target Machine
Activation No Yes No Installation Yes No Yes Activation - - -
Version Up Yes No Yes
ELP-NX Filter
Target Machine
Activation - - - Installation Yes No Yes CRT Target
Machine Activation - - - CAP: Card Authentication Package Embedded Type CAP-ES: Card Authentication Package Server Type ELP-NX APP: Enhanced Locked Print - NX Application ELP-NX Filter: Enhanced Locked Print - NX Filter CRT: Card Registration Tool WIM: Web Image Monitor -: Not necessary
Installation File Types
SD Card
Unzipped folder of each application
Remote Manager
Zip file of each application
Web Image Monitor
All applications except ELP-NX Filter: Zip file (same as RM) ELP-NX Filter: Unzipped folder in the /sdk/webinstaller folder.

Technical Bulletin PAGE: 1/2
Model: MT-C4 Date: 13-October-09 No.: RD062030
Subject: IPDS option release Prepared by: K. Yamamoto From: 2nd Tech Support Sec. Service Support Dept. Classification: Troubleshooting
Mechanical Paper path
Part information Electrical Transmit/receive
Action required Service manual revision Retrofit information
Product Safety Other ( )
Procedure for Installing the IPDS Option on the MT-C4 This RTB contains the installation procedure for the IPDS Option, which was released in July 2009, when used on the MT-C4.
IPDS OPTION
Accessories Description Q’ty
1. IPDS Emulation SD Card ...................................................... 1 2. Decal ..................................................................................... 1
Installation Procedure 1. Make sure that the following firmware versions (or newer) are installed. If necessary,
update the firmware. Module NameModule NameModule NameModule Name Parts NumberParts NumberParts NumberParts Number Version NumberVersion NumberVersion NumberVersion Number
System D0625572A 1.12IPO1
Engine D0625127G 1.53:04
RPCS D4625531A 3.8.5.4.1
PS D4625551A 1.00
PCL D4625541C 1.00
Net File D0625557B 1.03.1
Printer D4625521C 1.11.2
Web System D0625574 1.07
NIB D0625553C 8.61
Web System D0625556B 1.03

Technical Bulletin PAGE: 2/2
Model: MT-C4 Date: 13-October-09 No.: RD062030
2. Install the IPDS Option (see the Service Manual for the procedure). 3. Enable the IPDS Option using one of the following methods:
Enabling IPDS via Telnet: 1) Connect the machine to Telnet. 2) Execute the “msh> set ipds up” command.
Note: To disable IPDS, execute the “msh> set ipds down“ command.
Enabling IPDS via WebImageMonitor: Log in to WebImageMonitor and enable the appropriate setting.
4. Attach the decal as show in the photo below.
Important: The attachment position shown below (10mm from the left edge and 10mm from the horizontal ridge in the cover) is required by IBM.

Technical Bulletin PAGE: 1/1
Model: MT-C4 Date: 16-Nov-09 No.: RD062031
Old part number
New part number
Description Q’ty Int Page Index Note
D0596692 D0626692 SLIDE RAIL:PAPER TRAY:LEFT:SUB-ASS'Y
1 161 2
D0626612 - SHEET:POSITIONING:PAPER TRAY
1
X/O as a set 161 1
Change:
1) The shape of the side rail (D0596692) was changed. 2) In accordance with this change, the spacer (D0626612) was deleted.
Reason: The shape change eliminates the need for the spacer.
Subject: Eliminated spacer Prepared by: K.Yamamoto From: 2nd Tech. Support Sec. Service Support Dept. Classification: Troubleshooting
Mechanical Paper path
Part information Electrical Transmit/receive
Action required Service manual revision Retrofit information
Product Safety Other ( ) Tier 2

Technical Bulletin PAGE: 1/2 Reissued:24-Feb-10 Model: Model MT-C4 Date: 21-Jan-10 No.: RD062032a
RTB Reissue The items in bold italics were corrected or added.
SYMPTOM The tandem tray does not stay locked in.
CAUSE Broken tandem tray stopper (D0626702)
Subject: Tandem tray will not stay locked in Prepared by: K. Yamamoto From: 1st Overseas Tech Support Sec., 1st PQM Dept. Classification: Troubleshooting
Mechanical Paper path
Part information Electrical Transmit/receive
Action required Service manual revision Retrofit information
Other ( )
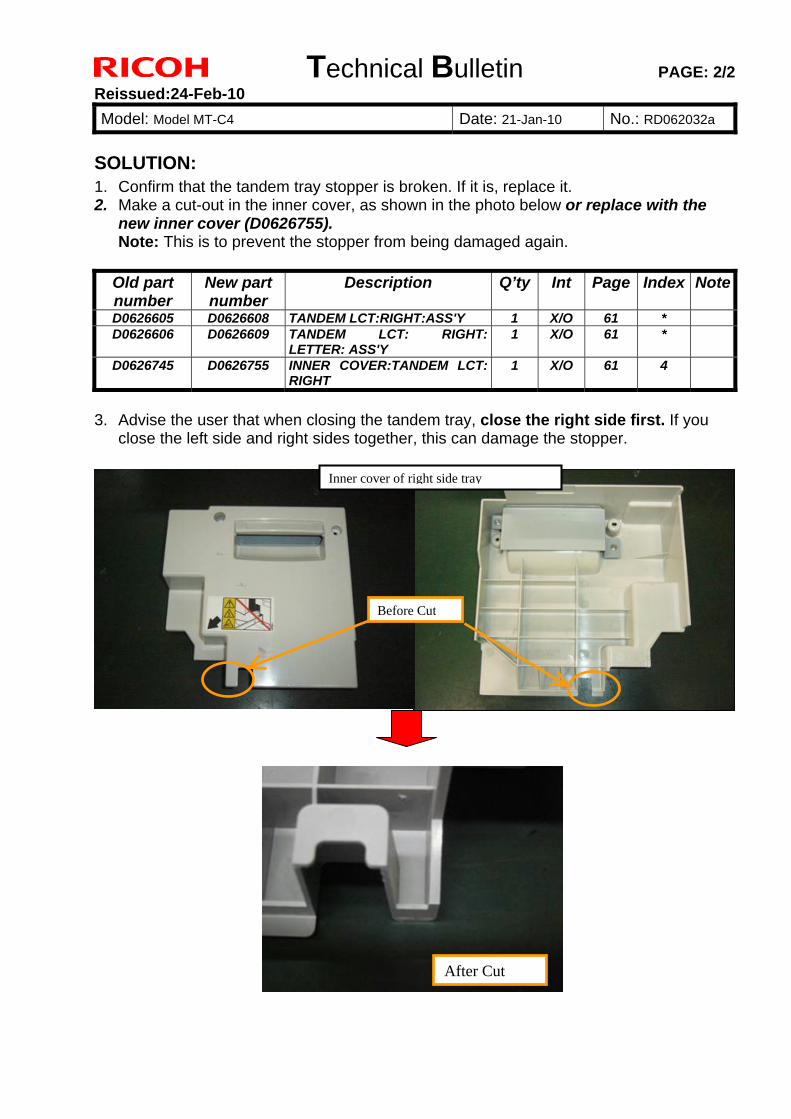
Technical Bulletin PAGE: 2/2 Reissued:24-Feb-10 Model: Model MT-C4 Date: 21-Jan-10 No.: RD062032a
SOLUTION: 1. Confirm that the tandem tray stopper is broken. If it is, replace it. 2. Make a cut-out in the inner cover, as shown in the photo below or replace with the
new inner cover (D0626755). Note: This is to prevent the stopper from being damaged again.
Old part number
New part number
Description Q’ty Int Page Index Note
D0626605 D0626608 TANDEM LCT:RIGHT:ASS'Y 1 X/O 61 * D0626606 D0626609 TANDEM LCT: RIGHT:
LETTER: ASS'Y 1 X/O 61 *
D0626745 D0626755 INNER COVER:TANDEM LCT:RIGHT
1 X/O 61 4
3. Advise the user that when closing the tandem tray, close the right side first. If you
close the left side and right sides together, this can damage the stopper.
Inner cover of right side tray
Before Cut
After Cut

Technical Bulletin PAGE: 1/1
Model: MT-C4 Date: 23-Feb-10 No.: RD062033
Replace the description for SC625 with the following. Appendix: Service Call Condition pg. 70 SC625: BICU/Finisher communication / timeout error Explanation: After 1 data frame is sent to the Finisher MBX, and an ACK signal is not received within 100ms, and is not received after 3 retries. - Serial line connection unstable - External noise on the line
Subject: Service manual revision – SC625 Prepared by: K.Yamamoto From: 1st Overseas Tech Support Sec., 1st PQM Dept. Classification: Troubleshooting
Mechanical Paper path
Part information Electrical Transmit/receive
Action required Service manual revision Retrofit information
Product Safety Other ( ) Tier 2
Technical Bulletin PAGE: 1/1
Model: MT-C4 Date: 24-Feb-10 No.: RD062034
This RTB is for the reissue of MB473012
Old part number
New part number
Description Q’ty Int Page Index Note
B4735110 B4735142 PCB:MAUI:ASS'Y 1 X/O 17 * B4735153 B4735155 PROM: PCB: Maui 1 X/O 17 1
Change/ Reason: Firmware modified to support the Martini-C4 series.
Subject: EPROM: PCB: Maui Prepared by: K.Yamamoto From: 1st Overseas Tech Support Sec., 1st PQM Dept. Classification: Troubleshooting
Mechanical Paper path
Part information Electrical Transmit/receive
Action required Service manual revision Retrofit information
Product Safety Other ( ) Tier 2

Technical Bulletin PAGE: 1/1
Model: MT-C4 Date: 24-Feb-10 No.: RD062035
Service manual revision SP6016: Original Size Determination Priority To ensure the machine can correctly detect the paper size, the machine can be set to detect only one size per standard size/feed direction. Japan North America EU/Asia/China bit 7 6 5 4 3 2 1 0
0 0 0 0 0 0 0 0 Default DLT
SEF DLT SEF LT LEF LT SEF LG
SEF DLT SEF LT SEF LT LEF
1 1 1 1 1 1 1 1 Change
11"x15" 11"x15" US EXE LEF 8"x10"SEF F4
SEF 8K SEF 16K SEF
16K LEF
Setting procedure: 1. Enter SP6016. 2. Select the bit you would like to change and push the number key.
There are 8 bits from bit 7 to bit 0. Change 1 0 by pushing
For example, if you would like the Chinese model to detect Chinese paper sizes 8K and 16K, the setting would be as follows: Bit 7 6 5 4 3 2 1 0 0 0 0 0 0 1 1 1 Push 2, 1, and 0 once.
Subject: Explanation of the SP6016 Prepared by: K.Yamamoto From: 1st Overseas Tech Support Sec., 1st PQM Dept. Classification: Troubleshooting
Mechanical Paper path
Part information Electrical Transmit/receive
Action required Service manual revision Retrofit information
Product Safety Other ( ) Tier 2

Technical Bulletin PAGE: 1/1
Model: MT-C4 Date: 29-Mar-10 No.: RD062036
This RTB applies to the MT-C3, MT-C3.5, and MT-C4. New parts numbers for units are added
Old part number
New part number
Description Q’ty Int Page Index Note
- B2473552 TONER OUTLET SUB-UNIT:TRANSFER:ASS'Y
1 - 129 41*
- B2473554 TONER OUTLET SUB-UNIT:CLASSIFICATION:ASS'Y
1 - 129 42*
Subject: Tonner collection units Prepared by: K.Yamamoto From: 1st Overseas Tech Support Sec., 1st PQM Dept. Classification: Troubleshooting
Mechanical Paper path
Part information Electrical Transmit/receive
Action required Service manual revision Retrofit information
Product Safety Other ( ) Tier 2

Technical Bulletin PAGE: 1/1
Model: MT-C4 Date: 21-Apr-10 No.: RD062037
Old part number
New part number
Description Q’ty Int Page Index Note
D4123111 HOUSING:TRANSPORT BELT:SCANNING
1 - 37 32*
Change/Reason: The part numbers for the housing bracket was missing from the Parts
Catalog (pg. 37, index 32*).
[32]
Subject: Housing bracket Prepared by: K.Yamamoto From: 1st Overseas Tech Support Sec., 1st PQM Dept. Classification: Troubleshooting
Mechanical Paper path
Part information Electrical Transmit/receive
Action required Service manual revision Retrofit information
Product Safety Other ( ) Tier 2
Technical Bulletin PAGE: 1/1
Model: MT-C4 Date: 22-Apr-10 No.: RD062038
Subject: Harness Prepared by: K. Yamamoto From: 1st Overseas Tech Support Sec., 1st PQM Dept. Classification: Troubleshooting
Mechanical Paper path
Part information Electrical Transmit/receive
Action required Service manual revision Retrofit information
Other ( )
Old part number
New part number
Description Q’ty Int Page Index Note
D0625466 D0625467 HARNESS:SIOB:BCU:CONNECTING:FANLAMP
1 51 12
D0625471 D0625472 HARNESS:SIOB:BCU 1
X/O As a set 137 7
Change: The shapes of the connectors were changed. Reason: To improve the reliability of connectors for the harness
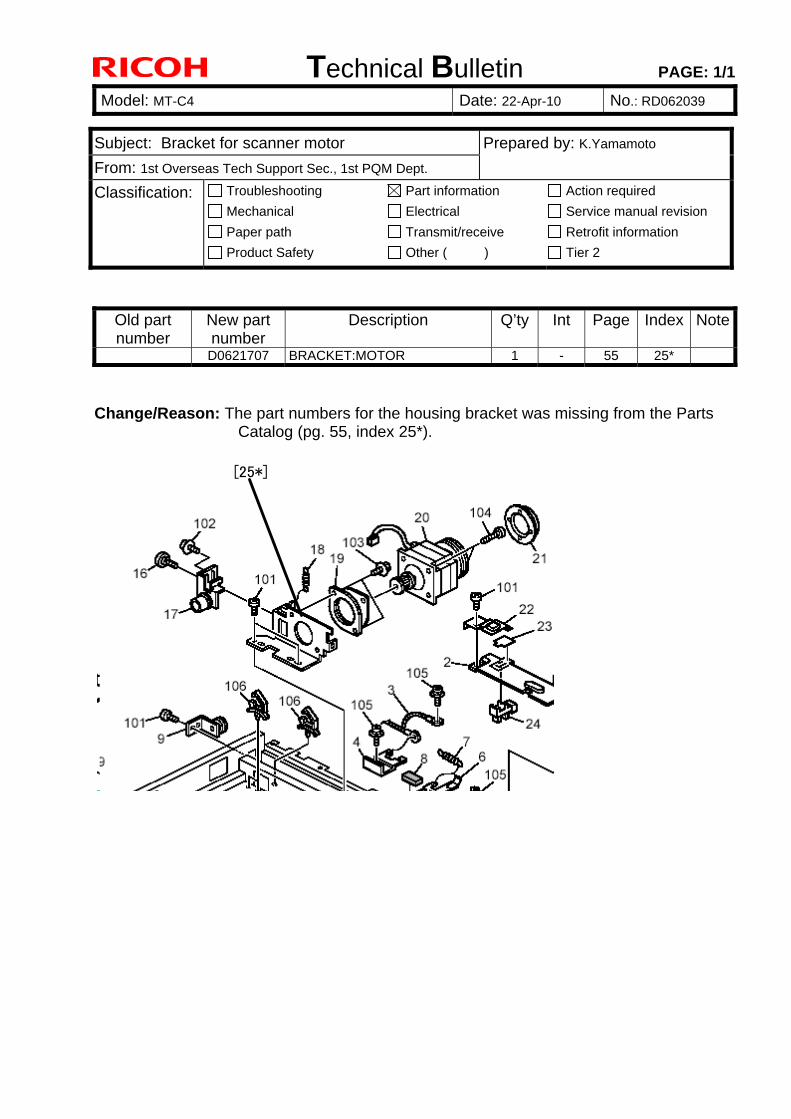
Technical Bulletin PAGE: 1/1
Model: MT-C4 Date: 22-Apr-10 No.: RD062039
Old part number
New part number
Description Q’ty Int Page Index Note
D0621707 BRACKET:MOTOR 1 - 55 25* Change/Reason: The part numbers for the housing bracket was missing from the Parts
Catalog (pg. 55, index 25*).
[25*]
Subject: Bracket for scanner motor Prepared by: K.Yamamoto From: 1st Overseas Tech Support Sec., 1st PQM Dept. Classification: Troubleshooting
Mechanical Paper path
Part information Electrical Transmit/receive
Action required Service manual revision Retrofit information
Product Safety Other ( ) Tier 2

Technical Bulletin PAGE: 1/2 Reissued:16-Aug-10 Model: Model MT-C4 Date: 24-May-10 No.: RD062040a
RTB Reissue The items in bold italics were corrected or added.
This RTB applies to the MT-C2, MT-C3, MT-C3.5, and MT-C4.
SYMPTOM SC542 occurs
CAUSE Temperature misdetection by the thermistors When using paper that contains a lot of dust, toner and paper dust tends to stick to the fusing roller and temperature-sensing elements of the thermistors.
SOLUTION 1. Clean or replace the fusing roller
Note: If the fusing roller is dirty, the toner and paper dust tends to stick to the thermistor more easily.
2. Replace the middle and rear thermistor brackets.
Note: This will secure the thermistors in the correct position, which ensures that they can detect the roller temperature correctly.
Old part number
New part number
Description Q’ty Int Page Index Note
B1404197 D0624197 BRACKET:THERMISTOR:MIDDLE
1 99 18
B1404196 D0624196 BRACKET:THERMISTOR:INNER BACK
1
X/O As a set 99 21
Cut in Serial Numbers From 2009/08 production
Subject: SC542 Prepared by: K. Yamamoto From: 1st Overseas Tech Support Sec., 1st PQM Dept. Classification: Troubleshooting
Mechanical Paper path
Part information Electrical Transmit/receive
Action required Service manual revision Retrofit information
Other ( )

Technical Bulletin PAGE: 2/2 Reissued:16-Aug-10 Model: Model MT-C4 Date: 24-May-10 No.: RD062040a
3. Replace the middle and rear thermistors.
Note: The new thermistor is resistant to toner buildup on its surface.
Changes: 1) The material of the Teflon tape was changed. 2) The width of the Teflon tape was decreased. 3) The thickness of the Teflon sheet was increased.
Reasons:
1) To make the surface smoother. 2), 3) To make it more difficult for toner to stick to the surface.
Old part number
New part number
Description Q’ty Int Page Index Note
AW100108 AW100131 THERMISTOR:FUSING:MIDDLE 1 99 20 AW100109 AW100132 THERMISTOR:FUSING:INNER
BACK
1 X/O As a set
99 19
Old New Correct position of the thermistor
Cut in Serial Numbers From 2010/02 production

Technical Bulletin PAGE: 1/2
Model: MT-C4 Date: 31-May-10 No.: RD062041
Subject: MAC Address Change Notification Prepared by: K. Yamamoto From: 1st Overseas Tech Support Sec., 1st PQM Dept. Classification: Troubleshooting
Mechanical Paper path
Part information Electrical Transmit/receive
Action required Service manual revision Retrofit information
Product Safety Other ( )
MAC Address Change Notification Overview: The number of available MAC address codes used on Ricoh MFP/LPs has been
depleted. Therefore, a new vendor code has been assigned to all affected models. The part number of the PCB used on the Martini-C4 was changed as follows:
Old Mac address Part Number
New Mac address Part Number
Description I/C
D0625607 D0625507 PCB: M-C4A: SERVICE: DOM/EXP: ASS’Y
O/O
D0635607 D0635507 PCB: M-C4B: SERVICE: DOM/EXP: ASS’Y
O/O
D0655607 D0655507 PCB: M-C4D: SERVICE: DOM/EXP: ASS’Y
O/O
D0665607 D0665507 PCB: M-C4E: SERVICE: DOM/EXP: ASS’Y
O/O
New Mac address affected: Produced after January 2010
Connection issues and solutions: MFP/LPs that use the new MAC address have connection issues with the following
Ricoh software products:
SmartDeviceMonitor for Admin/SmartDeviceMonitor for Admin V8/Accounting Report Package 1. The User Management Tool and the Addressbook Management Tool do not
work. 2. Printing jobs and machine status cannot be reset. 3. The MFP/LP's NIB password cannot be changed. 4. The NIB Setting Tool does not work.
SmartDeviceMonitor for Client / DeskTopBinder SmartDeviceMonitor for Client Automatic protocol/port number specification does not work when adding the SmartDeviceMonitor port.
Technical Bulletin PAGE: 2/2
Model: MT-C4 Date: 31-May-10 No.: RD062041
Web Smart DeviceMonitor The device is detected as another vendor's product.
RC Gate S The device is detected as another vendor's product.
The issues described above have been resolved by the following update versions,
which have already been released to the field. If any of these issues occur, update to the following version(s) or newer:
Product Name Version Web Release date *
SmartDeviceMonitor for Admin V7 V7.4.3.0 Oct. 23, 2009 DeskTopBinder SmartDeviceMonitor for Client V8.7.5.0 Oct. 23, 2009 DeskTopBinder lite V5.4.1.1 Nov. 06, 2009 Web SmartDeviceMonitor V02.07.00-04 Dec. 25, 2009 RC Gate S V01.01.03 Dec. 10, 2009 SmartDeviceMonitor for Admin V8 V8.1.1.0 Nov. 06, 2009 SmartDeviceMonitor Accounting Report Package V1.1.1.0 Nov. 06, 2009 Other important notes: The controller firmware was also modified in order to support both the old and new
MAC addresses. Firmware version 1.14 and newer support the MAC addresses, but an SC error may occur if the old firmware is installed on a PCB with the new MAC address.
PCBs that contain the old MAC address will still be available under the following
P/N, but the quantities are very limited. Therefore, only order this board if the customer needs to continue using the old firmware (such as a customized version of firmware) when the PCB breaks.
Old MAC address part number
Description
D0625607 PCB: M-C4A: SERVICE: DOM/EXP: ASS’Y D0635607 PCB: M-C4B: SERVICE: DOM/EXP: ASS’Y D0655607 PCB: M-C4D: SERVICE: DOM/EXP: ASS’Y D0665607 PCB: M-C4E: SERVICE: DOM/EXP: ASS’Y
For regular parts replacement, please order the board containing the new MAC address, and advise the customer to update the utility as necessary.

Technical Bulletin PAGE: 1/1
Model: MT-C4 Date: 16-Jul-10 No.: RD062042
Subject: Part Catalog correction Prepared by: K. Hamada From: 1st Overseas Tech Support Sec., 1st PQM Dept. Classification: Troubleshooting
Mechanical Paper path
Part information Electrical Transmit/receive
Action required Service manual revision Retrofit information
Product Safety Other ( ) Tier 2
Part number
Description Q’ty Page Incorrect Index
Correct Index
Note
D0666738 Bracket: Lift Motor: Tandem LCT 1 147 8 9 B1326760 DC Motor 24V 19.6W 1 147 9 8
Change/Reason: The index was corrected.
Technical Bulletin PAGE: 1/2
Model: Model MT-C4 Date: 24-Aug-10 No.: RD062043
SYMPTOM The machine does not detect the fax.
Note: When this occurs, an SC error may be displayed. If there is still data (received faxes) in the MBU, this data may be erased.
CAUSE One of the harness clamps attached to the bracket of the fax unit causes the bracket to bend. As a result, the fax unit is also bent, and the MBU connector detaches from the fax unit.
Subject: MBU come off from Fax unit Prepared by: K. Yamamoto From: 1st Overseas Tech Support Sec., 1st PQM Dept. Classification:
Troubleshooting Mechanical Paper path
Part information Electrical Transmit/receive
Action required Service manual revision Retrofit information
Other ( )

Technical Bulletin PAGE: 2/2
Model: Model MT-C4 Date: 24-Aug-10 No.: RD062043
SOLUTION: Do the following to ensure that the MBU connector stays firmly in place. 1. Remove the fax unit (3 screws). 2. Remove the clamp shown in the photo.
3. Wire the two harnesses as shown in the photo.

16 Technical Bulletin PAGE: 1/16
Model: MT-C4 Date: No.: RD062044
Important Information on Installing the Mt-C4 as a CC-CERTIFIED Machine Do the following if you want to install the Mt-C4 as a CC-CERTIFIED MACHINE.
Note: Machines in production are CC-certified beginning in September 2010.
1. Make sure the customer has received the English language Operating Instructions (O/I)
shown in the page 14-16. Important: For installations in the EU market, make sure this is the Ricoh-genuine O/I.
2. Tell the customer to read the “Notes for Administrators: Using this Machine in a CC-Certified Environment”.
3. Make sure that the HDD Encryption Unit Type A is installed.
Subject: CC-CERTIFIED IN SEPTEMBER, 2010 Machine Prepared by: K. Hamada From: 1st Overseas Tech Support Sec., 1st PQM Dept. Classification: Troubleshooting
Mechanical Paper path
Part information Electrical Transmit/receive
Action required Service manual revision Retrofit information
Product Safety Other ( ) Tier 2

16 Technical Bulletin PAGE: 2/16
Model: MT-C4 Date: No.: RD062044
Installation Procedure for HDD Encryption Unit Type A 3.1 Confirm that “Admin. Authentication” is on:
[User Tools] > “System Settings” > “Administrator Tools” > “Administrator Authentication Management” > “Admin. Authentication” > “On” If this setting is “Off” tell the customer that this setting must be “On” before you can do the installation procedure.
3.2 Confirm that “Administrator Tools” is selected and enabled:
[User Tools] > “System Settings” > “Administrator Tools” > “Administrator Authentication Management” > “Available settings” Note ・ ”Available Settings” is not displayed until “Admin. Authentication” is switch on. If this setting is not selected tell the customer that this setting must be selected before you can do the installation procedure.
3.3 Remove the SD card slot cover 3.4 Insert the SD card in SD Slot 1 3.5 Turn on the main power switch. 3.6 Enter the SP mode. 3.7 Select SP5878-002 (Option Setup – Encryption Option), and then touch [Execute]. 3.8 Turn off the main power switch. 3.9 Remove the SD card. 3.10 Attach the slot cover 3.11 Switch the machine on.
Enabling the Encryption Settings Use the following procedure to enable the encryption settings at initial set up, or after encryption settings have been canceled and settings must be made again. Important ・ The encryption key is required for data recovery if the machine
malfunctions. Be sure to store the encryption key safely for retrieving backup data.

16 Technical Bulletin PAGE: 3/16
Model: MT-C4 Date: No.: RD062044
3.12 Press the [User Tools/Counter] key 3.13 Press [System settings]
3.14 Press [Administrator Tools].
3.15 Press [Machine Data Encryption Settings].
If the setting to be specified does not appear, press [next].

16 Technical Bulletin PAGE: 4/16
Model: MT-C4 Date: No.: RD062044
3.16 Press [Encrypt].
3.17 Select the [Format All Data] to reset all of the data.
Note: It takes about five minutes to complete this operation.
3.18 Press the [Start] key.
The encryption key for backup data is printed.
3.19 Press [OK]. 3.20 Press [Exit]. 3.21 Press [Exit]. 3.22 Press the [User Tools/Counter] key. 3.23 Turn off the power and the main power switch, and then turn the main power
switch back on.

16 Technical Bulletin PAGE: 5/16
Model: MT-C4 Date: No.: RD062044
Printing the Encryption Key Use the following procedure to print the key again if it has been lost or misplaced.
Important ・ The encryption key is required for data recovery if the machine
malfunctions. Be sure to store the encryption key safely for retrieving backup data.
3.24 Press the [User Tools/Counter] key. 3.25 Press [System settings] 3.26 Press [Administrator Tools]. 3.27 Press [Machine Data Encryption Settings].
3.28 Press [Print Encryption Key].
The encryption key for retrieving backup data is printed.
3.29 Press the [Start] key. 3.30 Press [Exit]. 3.31 Give the printed encryption key to the customer.
16 Technical Bulletin PAGE: 6/16
Model: MT-C4 Date: No.: RD062044
4. Make sure that the FAX Option Type 9001 is installed.
Installation Procedure for FAX Option Type 9001 Before Install the FAX option; - Confirm that the FAX Option is correct for the machine. The correct type for this machine is “FAX Option Type 9001” - Check the box seal on the box. The surfaces of the tapes must be blank. If you see “VOID” on the tapes, do not install the components in the box and order the new one.
4.1 Remove the rear upper cover [A] - Slide the rear upper cover up, and then remove it. 4.2 Remove the rear lower cover [B]. - First slide up the rear lower cover, then slide it down.
4.3 Controller box cover [A]

16 Technical Bulletin PAGE: 7/16
Model: MT-C4 Date: No.: RD062044
4.4 Attach the interface board [A] to the controller board securely
4.5 Remove the jumper [A] on the MBU [B] and set it to the ON position.
Important; If the jumper remains at the OFF position, this will cause SC672 to appear.

16 Technical Bulletin PAGE: 8/16
Model: MT-C4 Date: No.: RD062044
4.6 Disconnect three harness [A] on the IPU
4.7 Install the FCU [A] in the interface board.

16 Technical Bulletin PAGE: 9/16
Model: MT-C4 Date: No.: RD062044
4.8 Connect three harness [A] to the IPU.
4.9 Remove the two cut-outs[A] from the controller box with a flat-headed screwdriver.
4.10 Attach the ferrite core [A] to the cables[B] on the speaker unit, and then clamp the
cables. Note;
The required ferrite core is different depending on the area. For EU/ASIA/China, use the ferrite core (ZCAT1730-730A) [C]. For NA/Taiwan, use the ferrite core(TFC-25-15-12A)[D]

16 Technical Bulletin PAGE: 10/16
Model: MT-C4 Date: No.: RD062044
4.11 Attach the speaker unit [A] to the controller box. 4.12 Attach two clamps[B] and fasten the speaker harness[C]. 4.13 Reattach the controller box cover 4.14 Reattach the rear lower cover 4.15 Reattach the rear upper cover.
4.16 Remove the blank keytop [A] (3rd from the top) and replace it with one of the provided
keytop[B] (either the “Facsimile” keytop or the fax symbol keytop) 4.17 Attach the multi-language decal[C] (EU only)

16 Technical Bulletin PAGE: 11/16
Model: MT-C4 Date: No.: RD062044
4.18 Attach the decal [A] (SUPER G3) to the front door 4.19 Attach the serial number decal under the copier serial number decal on the rear cover
of the machine. 4.20 Attach FCC decal on the rear cover of the machine (NA only) 4.21 Put the power plug into the outlet and turn on the main power of the machine.
Note: - Make sure that the outlet is grounded. - “SRAM formatted” shows on the operation panel after you have turned the
main switch on. Turn the main switch off and on again for normal use. 4.22 Make sure that the date and time are correctly set.

16 Technical Bulletin PAGE: 12/16
Model: MT-C4 Date: No.: RD062044
5. Make sure the machine contains the correct firmware. If the customer wants to install the machine in the same condition as when CC
Certification was first attained (same as the September 2010 machines), install the exact versions shown in the table below.
If the customer want to install the machine as an equivalent of the September 2010 machines, install the versions shown in the table below or later.
If you are not sure which one the customer is requesting, contact your sales department.
Firmware versions with which the Mt-C4 first achieved CC-CERTIFICATION: (September 2010)
Firmware Name: Version: Firmware Number:
System/Copy
V1.15 D0625572D
FAX
V02.00.00 D0625559D
Scanner
V01.19 D4625510G
Web support V1.09 D0625574B Printer V1.15e D4625521H Network Doc Box
V1.04
D0625557C
Web Uapl
V1.05 D0625556D
Network Support V8.65 D0625553E GW FCU V02.00.00 D4185570B

16 Technical Bulletin PAGE: 13/16
Model: MT-C4 Date: No.: RD062044
IC key and Ic Hdd versions with which the Mt-C4 first achieved CC-CERTIFICATION: (September 2010)
Hardware: Version: Ic Ctlr
03
Ic Key
1100
Note: You can check the Ic key and Ic Ctlr versions in the following screen.
(User Tools/Counter System settings Administrator Tools Firmware Version)
16 Technical Bulletin PAGE: 14/16
Model: MT-C4 Date: No.: RD062044
The list of Operating Instructions (O/I) <For NA> Paper Documents ・D062-7133 9060/9070/9080/9090
MP 6001/MP 7001/MP 8001/MP 9001 LD360/LD370/LD380/LD390 Aficio MP 6001/7001/8001/9001 Operating Instructions About This Machine
・D062-7143 9060/9070/9080/9090
MP 6001/MP 7001/MP 8001/MP 9001 LD360/LD370/LD380/LD390 Aficio MP 6001/7001/8001/9001 Operating Instructions Troubleshooting
・D062-7114 9060/9070/9080/9090
MP 6001/MP 7001/MP 8001/MP 9001 LD360/LD370/LD380/LD390 Aficio MP 6001/7001/8001/9001 Operating Instructions Copy and Document Server Reference
・D062-7116 Quick Reference Copy Guide
・D418-7105 Quick Reference Fax Guide
・D462-7104 Quick Reference Printer Guide
・D462-7124 Quick Reference Scanner Guide
・D062-7156 Notes for Security Functions
・D062-7108 Notes for Administrators: Using this Machine in a CC-Certified Environment

16 Technical Bulletin PAGE: 15/16
Model: MT-C4 Date: No.: RD062044
CD-ROMs ・D066-7317 Manuals for Users
9060/9060sp/9070/9070sp/9080/9080sp/9090/9090sp MP 6001/MP 6001 SP/MP 7001/MP 7001 SP/MP 8001/MP 8001
SP/MP 9001/MP 9001 SP LD360/LD360sp/LD370/LD370sp/LD380/LD380sp/LD390/LD390sp Aficio MP 6001/MP 6001 SP/MP 7001/MP 7001 SP/MP 8001/MP
8001 SP/MP 9001/MP 9001 SP
・D066-7318 Manuals for Administrators
9060/9060sp/9070/9070sp/9080/9080sp/9090/9090sp MP 6001/MP 6001 SP/MP 7001/MP 7001 SP/MP 8001/MP 8001
SP/MP 9001/MP 9001 SP LD360/LD360sp/LD370/LD370sp/LD380/LD380sp/LD390/LD390sp Aficio MP 6001/MP 6001 SP/MP 7001/MP 7001 SP/MP 8001/MP
8001 SP/MP 9001/MP 9001 SP <For EU> Paper Documents ・D062-7113 Quick Reference Copy Guide
・D418-7103 Quick Reference Fax Guide
・D462-7102 Quick Reference Printer Guide
・D462-7122 Quick Reference Scanner Guide
・D062-7102 Manuals for This Machine
・D029-7415 Notes for Security Functions
・D062-7156 Notes for Security Functions
・D062-7109 Notes for Administrators: Using this Machine in a CC-Certified Environment
CD-ROMs ・D062-7000 Manuals for Users
MP 6001/MP 6001 SP/MP 7001/MP 7001 SP/MP 8001/MP 8001 SP/MP 9001/MP 9001 SP
Aficio MP 6001/MP 6001 SP/MP 7001/MP 7001 SP/MP 8001/MP 8001 SP/MP 9001/MP 9001 SP
A

16 Technical Bulletin PAGE: 16/16
Model: MT-C4 Date: No.: RD062044
・D062-7002 Manuals for Administrators
Security Reference MP 6001/MP 6001 SP/MP 7001/MP 7001 SP/MP 8001/MP 8001
SP/MP 9001/MP 9001 SP Aficio MP 6001/MP 6001 SP/MP 7001/MP 7001 SP/MP 8001/MP
8001 SP/MP 9001/MP 9001 SP

Technical Bulletin PAGE: 1/1
Model: MT-C4 Date: 22-Sept-10 No.: RD062045
Subject: Part Catalog correction - HDD bracket Prepared by: K. Yamamoto From: 1st Overseas Tech Support Sec., 1st PQM Dept. Classification: Troubleshooting
Mechanical Paper path
Part information Electrical Transmit/receive
Action required Service manual revision Retrofit information
Product Safety Other ( ) Tier 2
Part number
Description Q’ty Page Index Note
D0625841* BRACKET:HDD:FIX 1 153 19 D0625842* BRACKET:HDD:BUSHING 1 153 20
Change/Reason: The part numbers were missing

Technical Bulletin PAGE: 1/4
Model: Model MT-C4 Date: 05-Oct-10 No.: RD062046
This RTB has been issued as the permanent solution to the temporary solution announced in RTB #RD062043.
SYMPTOM The machine does not detect the fax unit.
Note: When this occurs, an SC error may be displayed. If there is still data (received faxes) in the MBU, this data may be erased.
CAUSE The fax unit bracket bends, which causes the MBU connector to detach from the fax unit.
SOLUTION Attach the following bracket and related parts (D0629451: MBU kit).
See the attachment procedure below
Subject: MBU come off from Fax unit 2 Prepared by: K. Yamamoto From: 1st Overseas Tech Support Sec., 1st PQM Dept. Classification: Troubleshooting
Mechanical Paper path
Part information Electrical Transmit/receive
Action required Service manual revision Retrofit information
Other ( )

Technical Bulletin PAGE: 2/4
Model: Model MT-C4 Date: 05-Oct-10 No.: RD062046
Note: The MBU kit includes the following parts.
Attachment Procedure 1. Attach the sponge rubber to the MBU holding bracket.
2. Open the rear covers and cover for the controller box (screw x 12).

Technical Bulletin PAGE: 3/4
Model: Model MT-C4 Date: 05-Oct-10 No.: RD062046
3. Remove the fax unit.
4. Attach the MBU holding bracket (screw x 1).
Important: Hold the bracket down while you tighten the screw, as shown in the photo below. Use the two holes circled in pink in the photo above (Step 3), inserting the screw in
the side hole.

Technical Bulletin PAGE: 4/4
Model: Model MT-C4 Date: 05-Oct-10 No.: RD062046
5. Make sure that the bracket is attached to the fax unit correctly.
Important: The sponge rubber should not touch any of the elements of the MPU board.

Technical Bulletin PAGE: 1/1
Model: MT-C4 Date: 15-Oct-10 No.: RD062047
Subject: Part Catalog correction – PCU1 Prepared by: K. Yamamoto From: 1st Overseas Tech Support Sec., 1st PQM Dept. Classification: Troubleshooting
Mechanical Paper path
Part information Electrical Transmit/receive
Action required Service manual revision Retrofit information
Product Safety Other ( ) Tier 2
Change/Reason: The picture was wrong.

Technical Bulletin PAGE: 1/1
Model: MT-C4 Date: 08-Nov-10 No.: RD062048
Subject: Improve Rollers - ADF Prepared by: K. Yamamoto From: 1st Overseas Tech Support Sec., 1st PQM Dept. Classification: Troubleshooting
Mechanical Paper path
Part information Electrical Transmit/receive
Action required Service manual revision Retrofit information
Product Safety Other ( ) Tier 2
Old part number
New part number
Description Q’ty Int Page Index
D4123124 D4123125 DRIVEN ROLLER:SCANNING 1 37 3 D4123155 D4123156 ROLLER:DRIVE
ROLLER:TRANSPORT BELT UNIT
2 X/O as a set 37 11
Change: The material of the rollers was changed. Reason: To further improve the reliability of the rollers.

Technical Bulletin PAGE: 1/1
Model: MT-C4 Date: 22-Nov-10 No.: RD062049
Subject: Part Catalog correction – Operation panel Prepared by: K. Yamamoto From: 1st Overseas Tech Support Sec., 1st PQM Dept. Classification: Troubleshooting
Mechanical Paper path
Part information Electrical Transmit/receive
Action required Service manual revision Retrofit information
Product Safety Other ( ) Tier 2
Part number
Description Q’ty Page Index Note
D0621431 COVER:CLIP 1 25 37 Change/Reason: The pats numbers were missed.
Technical Bulletin PAGE: 1/1
Model: MT-C4 Date: 30-Nov-10 No.: RD062050
Subject: Tandem LCT: Left : Ass'y for A4 size Prepared by: K. Yamamoto From: 1st Overseas Tech Support Sec., 1st PQM Dept. Classification: Troubleshooting
Mechanical Paper path
Part information Electrical Transmit/receive
Action required Service manual revision Retrofit information
Product Safety Other ( ) Tier 2
22. Tandem Tray 1 (D062/D063/D065/D066)
Part number
Description Q’ty Page Index Note
D0626625 Tandem LCT: Left: Letter: Ass'y 1 59 * - D0626603 Tandem LCT: Left : Ass'y 1 59 * -
Change/Reason:.Tandem LCT: Left :Ass’y for A4 size (P/N:D0626603) was added to the parts catalog.

Technical Bulletin PAGE: 1/1
Model: MT-C4 Date: 01-Dec-10 No.: RD062051
Subject: BASE:TANDEM LCT:RIGHT:ASS'Y Prepared by: K. Yamamoto From: 1st Overseas Tech Support Sec., 1st PQM Dept. Classification: Troubleshooting
Mechanical Paper path
Part information Electrical Transmit/receive
Action required Service manual revision Retrofit information
Product Safety Other ( ) Tier 2
24. Tandem Tray 3 (D062/D063/D065/D066)
Part number
Description Q’ty Page Index Note
D0626852 BASE:TANDEM LCT: RIGHT: ASS'Y 1 63 39 New Index
Change: This part was newly registered as a service part. Reason: To meet a request from the field.
39

Technical Bulletin PAGE: 1/1
Model: Model MT-C4 Date: 08-Feb-11 No.: RD062052
Subject:: Service Manual Revision(SP 2901) Prepared by: Koji Yamamoto From: 1st Overseas Tech Support Sec, 1 st PQM Dept Classification: Troubleshooting
Mechanical Paper path
Part information Electrical Transmit/receive
Action required Service manual revision Retrofit information
Other ( )
Service Manual Revision D062/D063/D065/D066 Delete SP2901 (Humidity Control), as this SP is not used. . 4. Appendix: Service Program Mode Tables pg. 143

Technical Bulletin PAGE: 1/1
Model: MT-C4 Date: 08-Feb-11 No.: RD062053
Subject: Paper Feed Unit: Paper Bank Prepared by: K. Yamamoto From: 1st Overseas Tech Support Sec., 1st PQM Dept. Classification: Troubleshooting
Mechanical Paper path
Part information Electrical Transmit/receive
Action required Service manual revision Retrofit information
Product Safety Other ( ) Tier 2
27. Paper Feed Unit 1 (D062/D063/D065/D066)
Old part number
New part number
Description Q’ty Int Page Index Note
B1326621 D0626641 Paper Feed Unit: Paper Bank 1-1 X/O 69 * - D0666621 D0666641 Paper Feed Unit: Paper Bank:
Ass'y 1-1 X/O 69 * -
Change: The strength of the spring in the PFU was increased. Reason: To further minimize occurrences of SC50x.
Note: - D0626641 is used on the D062/D063 (MP 6001/6001SP, MP 7001/7001SP). - D0666641 is used on the D065/D066 (MP 8001/8001SP, MP 9001/9001SP).
Technical Bulletin PAGE: 1/19 Reissued:19-Apr-11 Model: MT-C4 Date: 24-Feb-11 No.: RD062054a
RTB Reissue The items in bold italics have been added.
Important Information on Installing the Mt-C4 as a CC-CERTIFIED Machine compliant with IEEE Std. 2600.1TM-2009 Do the following if you want to install the Mt-C4 as a CC-CERTIFIED MACHINE compliant with IEEE Std. 2600.1TM-2009.
Note: Machines in production are CC-certified beginning in June 2011. Important: If the customer requests maintenance on the machine, please perform the
maintenance without accessing SP mode.
1. Make sure the customer has received the English language Operating Instructions (O/I) shown in the page 16-19. Important: For installations in the EU market, make sure this is the Ricoh-genuine O/I.
2. Tell the customer to read the “Notes for Administrators: Using this Machine in a Network Environment Compliant with IEEE Std. 2600.1TM-2009”.
See the following pages for Steps 3 thru 6.
Subject: CC-CERTIFIED IN JUNE 2011 Machine Prepared by: K. Hamada From: 1st Overseas Tech Support Sec., 1st PQM Dept. Classification: Troubleshooting
Mechanical Paper path Product Safety
Part information Electrical Transmit/receive Other ( )
Action required Service manual revision Retrofit information Tier 2

Technical Bulletin PAGE: 2/19 Reissued:19-Apr-11 Model: MT-C4 Date: 24-Feb-11 No.: RD062054a
3. Install the HDD Encryption Unit Type A
Installation Procedure for HDD Encryption Unit Type A 3.1 Confirm that “Admin. Authentication” is on:
[User Tools] > “System Settings” > “Administrator Tools” > “Administrator Authentication Management” > “Admin. Authentication” > “On” If this setting is “Off” tell the customer that this setting must be “On” before you can do the installation procedure.
3.2 Confirm that “Administrator Tools” is selected and enabled:
[User Tools] > “System Settings” > “Administrator Tools” > “Administrator Authentication Management” > “Available settings” Note ・ ”Available Settings” is not displayed until “Admin. Authentication” is switch on. If this setting is not selected tell the customer that this setting must be selected before you can do the installation procedure.
3.3 Remove the SD card slot cover 3.4 Insert the SD card in SD Slot 1 3.5 Turn on the main power switch. 3.6 Enter the SP mode. 3.7 Select SP5878-002 (Option Setup – Encryption Option), and then touch [Execute]. 3.8 Turn off the main power switch. 3.9 Remove the SD card. 3.10 Attach the slot cover 3.11 Switch the machine on.
Enabling the Encryption Settings Use the following procedure to enable the encryption settings at initial set up, or after encryption settings have been canceled and settings must be made again. Important ・ The encryption key is required for data recovery if the machine
malfunctions. Be sure to store the encryption key safely for retrieving backup data.

Technical Bulletin PAGE: 3/19 Reissued:19-Apr-11 Model: MT-C4 Date: 24-Feb-11 No.: RD062054a
3.12 Press the [User Tools/Counter] key 3.13 Press [System settings]
3.14 Press [Administrator Tools].
3.15 Press [Machine Data Encryption Settings].
If the setting to be specified does not appear, press [next].

Technical Bulletin PAGE: 4/19 Reissued:19-Apr-11 Model: MT-C4 Date: 24-Feb-11 No.: RD062054a
3.16 Press [Encrypt].
3.17 Select the [Format All Data] to reset all of the data.
Note: It takes about five minutes to complete this operation.
3.18 Press the [Start] key.
The encryption key for backup data is printed.
3.19 Press [OK]. 3.20 Press [Exit]. 3.21 Press [Exit]. 3.22 Press the [User Tools/Counter] key. 3.23 Turn off the power and the main power switch, and then turn the main power
switch back on.

Technical Bulletin PAGE: 5/19 Reissued:19-Apr-11 Model: MT-C4 Date: 24-Feb-11 No.: RD062054a
4. Install the Data Overwrite Security Unit Type H
Note If the customer purchase the Basic model, install the Printer Scanner unit (D462).
For details, see the Service manual on Page142 – 144.
Installation Procedure for Data Overwrite Security Unit Type H Before you begin.. 4.1 Confirm that the Data Overwrite Security unit SD card is the correct type for the
machine. The correct type for this machine is type “H”. 4.2 Make sure that the following settings are not at the factory default settings:
Supervisor login password Administrator login name Administrator login password
Important These settings must be set up by the customer before the Data Overwrite Security
unit can be installed. 4.3 Confirm that “Admin. Authentication” is on: [User Tools]>”System Settings”>”Administrator Tools”>”Administrator Authentication
Management”>”Admin. Authentication”>”On” If this settings is “Off”, tell the customer that this setting must be “On” before you can
do the installation procedure. 4.4 Confirm that “Administrator Tools” is selected and enabled: [User Tools]>”System Settings”>”Administrator Tools”>”Administrator Authentication
Management”>”Available Settings” Note
“Available Settings” is not displayed until Step4.2 is done If this setting is not selected, tell the customer that this setting must be selected before
you can do the installation procedure. 4.5 Merge the Data Overwrite Security Unit and Printer Scanner Unit onto one SD card.
See the Service Manual (pg. 139-141) for the procedure.

Technical Bulletin PAGE: 6/19 Reissued:19-Apr-11 Model: MT-C4 Date: 24-Feb-11 No.: RD062054a
Seal Check and Removal
CAUTION
Turn off the main power switch and disconnect the power supply cord. 4.6 Check the two box seals[A] on the corners of the box.
Make sure that the seals are attached at both corners. The surfaces of the tapes must be blank. If you see “VOID” on the tapes, do not
install the components in the box. Contact your sales division. 4.7 If the surfaces of the tapes do not show “VOID”, remove them from the corners of the
box. 4.8 After you remove each seal, the “ VOID” marks[B] become visible. This prevents them
from being reattached to the box. Installation Important
The DOS SD card must be inserted in SD card Slot 1. If the PostScript3 option is also installed, you must move the DOS application to the
PostScript3 SD card with SP5873-1. 4.9 If the machine is on, turn off the main power switch. 4.10 Disconnect the network cable. 4.11 Turn the main power switch on. 4.12 Turn the operation switch and main power switch off. 4.13 Remove the SD card slot cover 4.14 Insert the SD card into SD card Slot 1. 4.15 Reconnect the network cable. 4.16 Turn the main power switch on. 4.17 Do SP5878-001 and push [EXECUTE] 4.18 Go out of the SP mode. 4.19 Turn the operation switch off, then turn the main power switch off. 4.20 Do SP5990-5 to print an SMC report. 4.21 Make sure the ROM number and firmware version in area [a] of the diagnostic report
are the same as those in area[b].

Technical Bulletin PAGE: 7/19 Reissued:19-Apr-11 Model: MT-C4 Date: 24-Feb-11 No.: RD062054a
Area[a]: “ROM Number/Firmware Version”-“HDD Format Option” Area[b]: “Loading Program”-“GW4a_zoffyx”
Diagnostic Report: “ROM No./Firmware Version” [a]
“Loading Program”[b]
DataOverwriteSecurity Unit HDD Format Option: D3775902A/1.01x
GW4a_zoffyx: D3775902A/1.01x
Important The same two numbers must be listed in both sections of the SMC report.
If the numbers are not identical, this means the option was not installed correctly. Confirm that the label on the box of the DOS option says “H” Do the Data Overwrite Security unit installation again.
4.22 Turn “Auto Erase Memory Setting” on: [User Tools]>”System Settings”>”Administrator Tools”>” Auto Erase Memory
Setting”>”On” 4.23 Exit User Tools.
4.24 Check the display and make sure that the overwrite erase icon[A] is displayed. 4.25 Make a Sample Copy 4.26 Check the overwrite erase icon[A]
The icon[B]: This icon is lit when there is temporary data to be overwrite, and blinks during overwriting. The icon[C]: This icon lit when there is no temporary data to be overwritten.

Technical Bulletin PAGE: 8/19 Reissued:19-Apr-11 Model: MT-C4 Date: 24-Feb-11 No.: RD062054a
5. Install the FAX Option Type 9001
Installation Procedure for FAX Option Type 9001 Before Install the FAX option; - Confirm that the FAX Option is correct for the machine. The correct type for this machine is “FAX Option Type 9001” - Check the box seal on the box. The surfaces of the tapes must be blank. If you see “VOID” on the tapes, do not install the components in the box and order the new one.
5.1Remove the rear upper cover [A] - Slide the rear upper cover up, and then remove it. 5.2Remove the rear lower cover [B]. - First slide up the rear lower cover, then slide it down.
5.3Controller box cover [A]

Technical Bulletin PAGE: 9/19 Reissued:19-Apr-11 Model: MT-C4 Date: 24-Feb-11 No.: RD062054a
5.4Attach the interface board [A] to the controller board securely
5.5Remove the jumper [A] on the MBU [B] and set it to the ON position.
Important;

Technical Bulletin PAGE: 10/19 Reissued:19-Apr-11 Model: MT-C4 Date: 24-Feb-11 No.: RD062054a
If the jumper remains at the OFF position, this will cause SC672 to appear.
5.6Disconnect three harness [A] on the IPU
5.7Install the FCU [A] in the interface board.

Technical Bulletin PAGE: 11/19 Reissued:19-Apr-11 Model: MT-C4 Date: 24-Feb-11 No.: RD062054a
5.8Connect three harness [A] to the IPU.
5.9Remove the two cut-outs[A] from the controller box with a flat-headed screwdriver.
5.10 Attach the ferrite core [A] to the cables[B] on the speaker unit, and then clamp the
cables. Note;

Technical Bulletin PAGE: 12/19 Reissued:19-Apr-11 Model: MT-C4 Date: 24-Feb-11 No.: RD062054a
The required ferrite core is different depending on the area. For EU/ASIA/China, use the ferrite core (ZCAT1730-730A) [C]. For NA/Taiwan, use the ferrite core(TFC-25-15-12A)[D]
5.11 Attach the speaker unit [A] to the controller box. 5.12 Attach two clamps[B] and fasten the speaker harness[C]. 5.13 Reattach the controller box cover 5.14 Reattach the rear lower cover 5.15 Reattach the rear upper cover.
5.16 Remove the blank keytop [A] (3rd from the top) and replace it with one of the provided
keytop[B] (either the “Facsimile” keytop or the fax symbol keytop)

Technical Bulletin PAGE: 13/19 Reissued:19-Apr-11 Model: MT-C4 Date: 24-Feb-11 No.: RD062054a
5.17 Attach the multi-language decal[C] (EU only)
5.18 Attach the decal [A] (SUPER G3) to the front door 5.19 Attach the serial number decal under the copier serial number decal on the rear cover
of the machine. 5.20 Attach FCC decal on the rear cover of the machine (NA only) 5.21 Put the power plug into the outlet and turn on the main power of the machine.
Note: - Make sure that the outlet is grounded. - “SRAM formatted” shows on the operation panel after you have turned the
main switch on. Turn the main switch off and on again for normal use. 5.22 Make sure that the date and time are correctly set.

Technical Bulletin PAGE: 14/19 Reissued:19-Apr-11 Model: MT-C4 Date: 24-Feb-11 No.: RD062054a
6. Make sure the machine contains the correct firmware. If the customer wants to install the machine in the same condition as when CC
Certification was first attained (same as the June 2011 machines), install the exact versions shown in the table below.
If the customer want to install the machine as an equivalent of the June 2011 machines, install the versions shown in the table below or later.
If you are not sure which one the customer is requesting, contact your sales department.
Firmware versions with which the Mt-C4 first achieved CC-CERTIFICATION: (June 2011)
Firmware Name: Version: Firmware Number:
System/Copy
V1.18 D0625572G
Fax
V03.00.00 D0625559E
Scanner
V01.20 D4625510H
Web Support V1.13.1 D0625574C Printer V1.16e D4625521J Network DocBox
V1.04
D0625557C
Web Uapl
V1.05 D0625556D
Network Support V8.69.1 D0625553G GWFCU3-16(WW) V04.00.00 D4185570D RemoteFax V03.00.00 D0625560D animation V1.2.1 D0625558B Option PCL V1.02 D4625541E OptionPCLFont V1.02 D0255589 Engine V1.61:04 D0625127Q OpePanel V1.04 D0621491B(NA)
D0621492B(EU) LANG0 V1.03 D0621496 LANG1 V1.03 D0621496 Data Erase Opt V1.01x D3775902A

Technical Bulletin PAGE: 15/19 Reissued:19-Apr-11 Model: MT-C4 Date: 24-Feb-11 No.: RD062054a
Ic Key and Ic Ctlr versions with which the Mt-C4 first achieved CC-CERTIFICATION: (June 2011)
Hardware: Version: Ic Ctlr
03
Ic Key
1100
Note: You can check the Ic key and Ic Ctlr versions in the following screen.
(User Tools/Counter System settings Administrator Tools Firmware Version)

Technical Bulletin PAGE: 16/19 Reissued:19-Apr-11 Model: MT-C4 Date: 24-Feb-11 No.: RD062054a
The list of Operating Instructions (O/I) <For NA> Paper Documents ・D062-7133 9060/9070/9080/9090
MP 6001/MP 7001/MP 8001/MP 9001 LD360/LD370/LD380/LD390 Aficio MP 6001/7001/8001/9001 Operating Instructions About This Machine
・D062-7143 9060/9070/9080/9090
MP 6001/MP 7001/MP 8001/MP 9001 LD360/LD370/LD380/LD390 Aficio MP 6001/7001/8001/9001 Operating Instructions Troubleshooting
・D062-7114 9060/9070/9080/9090
MP 6001/MP 7001/MP 8001/MP 9001 LD360/LD370/LD380/LD390 Aficio MP 6001/7001/8001/9001 Operating Instructions Copy and Document Server Reference
・D062-7116 Quick Reference Copy Guide
・D418-7105 Quick Reference Fax Guide
・D462-7104 Quick Reference Printer Guide
・D462-7124 Quick Reference Scanner Guide
・D062-7171 Notes for Administrators: Using this Machine in a Network Environment Compliant with IEEE Std. 2600.1TM-2009
・D065-7174 Operating Instructions Notes on Security Functions
・D060-7789A Notes for Users
・D029-7908 To Users of This Machine
・D062-7181 Notes On Energy Saving Functions
・D062-7183 Notes for Users

Technical Bulletin PAGE: 17/19 Reissued:19-Apr-11 Model: MT-C4 Date: 24-Feb-11 No.: RD062054a
CD-ROMs ・D066-7317 Manuals for Users
9060/9060sp/9070/9070sp/9080/9080sp/9090/9090sp MP 6001/MP 6001 SP/MP 7001/MP 7001 SP/MP 8001/MP 8001
SP/MP 9001/MP 9001 SP LD360/LD360sp/LD370/LD370sp/LD380/LD380sp/LD390/LD390sp Aficio MP 6001/MP 6001 SP/MP 7001/MP 7001 SP/MP 8001/MP
8001 SP/MP 9001/MP 9001 SP
・D066-7318 Manuals for Administrators
9060/9060sp/9070/9070sp/9080/9080sp/9090/9090sp MP 6001/MP 6001 SP/MP 7001/MP 7001 SP/MP 8001/MP 8001
SP/MP 9001/MP 9001 SP LD360/LD360sp/LD370/LD370sp/LD380/LD380sp/LD390/LD390sp Aficio MP 6001/MP 6001 SP/MP 7001/MP 7001 SP/MP 8001/MP
8001 SP/MP 9001/MP 9001 SP
・D377-7900A Manuals DataOverwriteSecurity Unit Type H/I
・D066-8710 Manuals for Administrators Security Reference Supplement
<For EU> Paper Documents ・D062-7113 Quick Reference Copy Guide
・D418-7103 Quick Reference Fax Guide
・D462-7102 Quick Reference Printer Guide
・D462-7122 Quick Reference Scanner Guide
・D062-7102 Manuals for This Machine
・D062-7170 Notes for Administrators: Using this Machine in a Network Environment Compliant with IEEE Std. 2600.1TM-2009
・D065-7173 Operating Instructions Notes on Security Functions
・D062-7100 Safety Information for Aficio MP 6001/Aficio MP 7001/Aficio MP 8001/Aficio MP 9001
or D062-7101 Safety Information for MP 6001/MP 7001/MP 8001/MP 9001 ・D060-7782 Notes for Users
Technical Bulletin PAGE: 18/19 Reissued:19-Apr-11 Model: MT-C4 Date: 24-Feb-11 No.: RD062054a
・D062-7155 Notes for Users
・D029-7907 To Users of This Machine
CD-ROMs ・D062-7000 Manuals for Users
MP 6001/MP 6001 SP/MP 7001/MP 7001 SP/MP 8001/MP 8001 SP/MP 9001/MP 9001 SP
Aficio MP 6001/MP 6001 SP/MP 7001/MP 7001 SP/MP 8001/MP 8001 SP/MP 9001/MP 9001 SP
A
・D062-7002 Manuals for Administrators
Security Reference MP 6001/MP 6001 SP/MP 7001/MP 7001 SP/MP 8001/MP 8001
SP/MP 9001/MP 9001 SP Aficio MP 6001/MP 6001 SP/MP 7001/MP 7001 SP/MP 8001/MP
8001 SP/MP 9001/MP 9001 SP
・D377-7900A Manuals DataOverwriteSecurity Unit Type H/I
・D066-8710 Manuals for Administrators Security Reference Supplement
<For Asia> Paper Documents ・D062-7135 MP 6001/MP 7001/MP 8001/MP 9001
MP 6001/MP 7001/MP 8001/MP 9001 Aficio MP 6001/7001/8001/9001 Operating Instructions About This Machine
・D062-7145 MP 6001/MP 7001/MP 8001/MP 9001
MP 6001/MP 7001/MP 8001/MP 9001 Aficio MP 6001/7001/8001/9001 Operating Instructions Troubleshooting
・D062-7117 MP 6001/MP 7001/MP 8001/MP 9001

Technical Bulletin PAGE: 19/19 Reissued:19-Apr-11 Model: MT-C4 Date: 24-Feb-11 No.: RD062054a
MP 6001/MP 7001/MP 8001/MP 9001 Aficio MP 6001/7001/8001/9001 Operating Instructions Copy and Document Server Reference
・D062-7119 Quick Reference Copy Guide
・D418-7107 Quick Reference Fax Guide
・D462-7106 Quick Reference Printer Guide
・D462-7126 Quick Reference Scanner Guide
・D062-7172 Notes for Administrators: Using this Machine in a Network Environment Compliant with IEEE Std. 2600.1TM-2009
・D065-7175 Operating Instructions Notes on Security Functions
・D060-7782 Notes for Users
・D029-7903 To Users of This Machine
・D062-7105 Notes On Energy Saving Functions
・D062-7155 Notes for Users
CD-ROMs ・D066-7319 Manuals for Users
MP 6001/MP 7001/MP 8001/MP 9001 Aficio MP 6001/MP 7001/MP 8001/MP 9001
・D066-7320 Manuals for Administrators
MP 6001/MP 7001/MP 8001/MP 9001 Aficio MP 6001//MP 7001//MP 8001/MP 9001
・D377-7900A Manuals DataOverwriteSecurity Unit Type H/I
・D066-8710 Manuals for Administrators Security Reference Supplement

Technical Bulletin PAGE: 1/1
Model: MT-C4 Date: 25-Mar-11 No.: RD062055
Subject: Part number change Counter Prepared by: K. Yamamoto From: 1st Overseas Tech Support Sec., 1st PQM Dept. Classification: Troubleshooting
Mechanical Paper path Product Safety
Part information Electrical Transmit/receive Other ( )
Action required Service manual revision Retrofit information Tier 2
This RTB is for MT-C3, C3.5, C4 MT-C4 Old part number
New part number
Description Q’ty Int Page Index
AX310047 AX310045 TOTAL COUNTER:7FIG:24V 1 157 23 B2475890 D0625918 BRACKET:TOTAL COUNTER 1
X/O as a set 157 4
MT-C3, 3.5 Old part number
New part number
Description Q’ty Int Page Index
AX310047 AX310045 TOTAL COUNTER:7FIG:24V 1 143 7 B2475890 D0625918 BRACKET:TOTAL COUNTER 1
X/O as a set 143 8
Change/Reason: Vender change
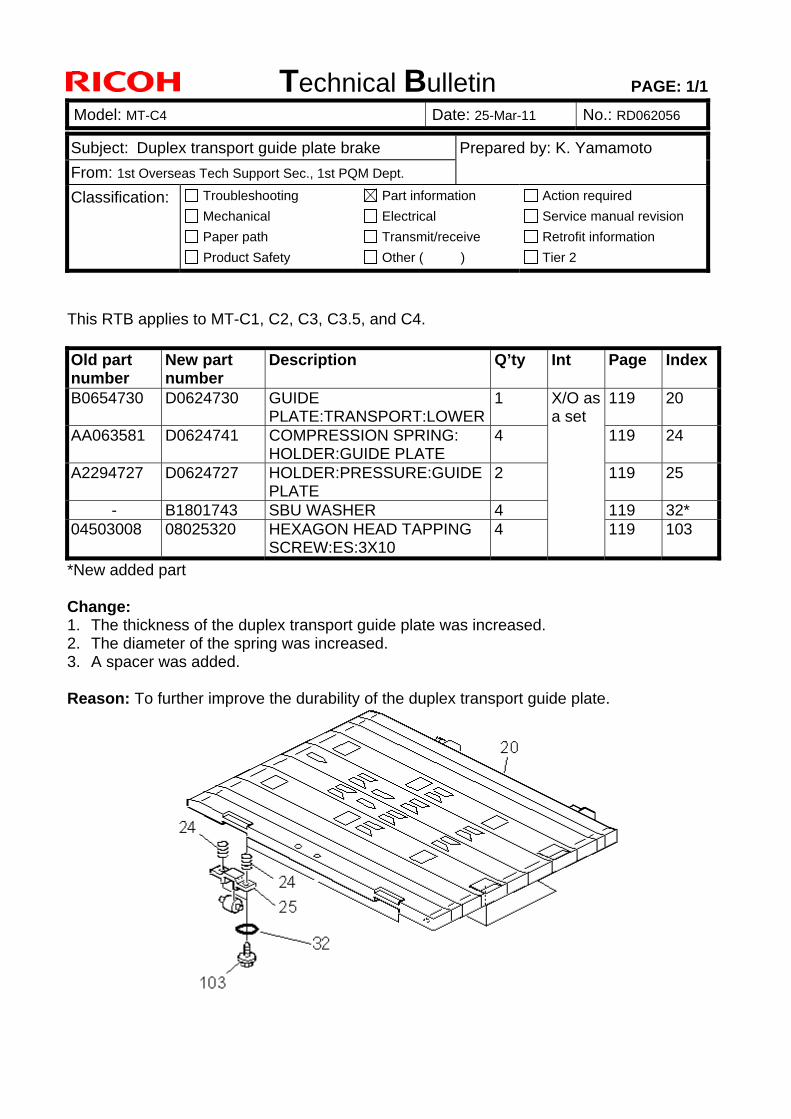
Technical Bulletin PAGE: 1/1
Model: MT-C4 Date: 25-Mar-11 No.: RD062056
Subject: Duplex transport guide plate brake Prepared by: K. Yamamoto From: 1st Overseas Tech Support Sec., 1st PQM Dept. Classification: Troubleshooting
Mechanical Paper path Product Safety
Part information Electrical Transmit/receive Other ( )
Action required Service manual revision Retrofit information Tier 2
This RTB applies to MT-C1, C2, C3, C3.5, and C4. Old part number
New part number
Description Q’ty Int Page Index
B0654730 D0624730 GUIDE PLATE:TRANSPORT:LOWER
1 119 20
AA063581 D0624741 COMPRESSION SPRING: HOLDER:GUIDE PLATE
4 119 24
A2294727 D0624727 HOLDER:PRESSURE:GUIDE PLATE
2 119 25
- B1801743 SBU WASHER 4 119 32* 04503008 08025320 HEXAGON HEAD TAPPING
SCREW:ES:3X10 4
X/O as a set
119 103
*New added part Change: 1. The thickness of the duplex transport guide plate was increased. 2. The diameter of the spring was increased. 3. A spacer was added. Reason: To further improve the durability of the duplex transport guide plate.

Technical Bulletin PAGE: 1/1
Model: MT-C4 Date: 25-Mar-11 No.: RD062057
Subject: Parts Catalog Correction Tandem tray From: 1st Overseas Tech Support Sec., 1st PQM Dept.
Prepared by: K. Yamamoto
Classification: Troubleshooting Mechanical Paper path Product Safety
Part information Electrical Transmit/receive Other ( )
Action required Service manual revision Retrofit information Tier 2
24. Tandem Tray 3 (D062/D063/D065/D066)
Part number
Description Q’ty Page Index Note
D0626707 BASE:STOPPER:TANDEM LCT:PEEN
1 22 12 New Index
D0626716 BRACKET:GRIP:TANDEM LCT:LEFT 1 22 14 New Index
D0626717 BRACKET:GRIP:TANDEM LCT:RIGHT
1 22 13 New Index
Change: These parts were newly registered as service parts. Reason: To meet a request from the field.

Technical Bulletin PAGE: 1/1
Model: MT-C4 Date: 25-Mar-11 No.: RD062058
Subject: PM counters for Paper trays From: 1st Overseas Tech Support Sec., 1st PQM Dept.
Prepared by: K. Yamamoto
Classification: Troubleshooting Mechanical Paper path Product Safety
Part information Electrical Transmit/receive Other ( )
Action required Service manual revision Retrofit information Tier 2
Important Information about the PM Counters for Paper Trays 1-4 This RTB contains descriptions for each counter that appears on the sheet included with the machine. No. Item (counter): PM part to which the counter corresponds: 26 #Feed roller-tray1 Tray 1 feed roller 27 #Pick-up Roller-Tray1 Tray 1 pick-up roller 28 #Separation Roller-Tray1 Tray 1 separation roller 29 #Feed roller-tray2 NOT USED (value is always “0”)
30 #Pick-up Roller-Tray2 NOT USED (value is always “0”)
31 #Separation Roller-Tray2 NOT USED (value is always “0”)
32 #Feed roller-tray3 Tray 2 feed roller 33 #Pick-up Roller-Tray3 Tray 2 pick-up roller 34 #Separation Roller-Tray3 Tray 2 separation roller 35 #Feed roller-tray4 Tray 3 feed roller 36 #Pick-up Roller-Tray4 Tray 3 pick-up roller 37 #Separation Roller-Tray4 Tray 3 separation roller

Technical Bulletin PAGE: 1/1
Model: MT-C4 Date: 13-May-11 No.: RD062059
Subject: New discharge brush From: 1st Overseas Tech Support Sec., 1st PQM Dept.
Prepared by: K. Yamamoto
Classification: Troubleshooting Mechanical Paper path Product Safety
Part information Electrical Transmit/receive Other ( )
Action required Service manual revision Retrofit information Tier 2
Old part number
New part number
Description Q’ty Int Page Index
- B6522516 DISCHARGE BRUSH:EXIT: L45
1 - 33 28*
Change: A static discharge brush was added to the bracket (index12 page 33). Reason: To further ensure that dust from the paper does not stick to the ADF exposure
glass (which can cause a black line to appear on the image).

Technical Bulletin PAGE: 1/1
Model: Model MT-C4 Date: 02-Nov-11 No.: RD062061
Subject: Service Manual Revision (Recovery Methods)
Prepared by: Koji Yamamoto
From: 1st Tech Service Sect., MFP/P Tech Service Dept. Classification: Troubleshooting
Mechanical Paper path
Part information Electrical Transmit/receive
Action required Service manual revision Retrofit information
Other ( )
Service Manual Revision D062/D063/D065/D066 Replace the sentences crossed out in red with the sentence shown below.
Note: This is because there is no DIP SW. 6. Troubleshooting: Recovery Methods pg. 366
If the download procedure cannot be downloaded for the GW controller, power the machine off and on to start the downloading program.
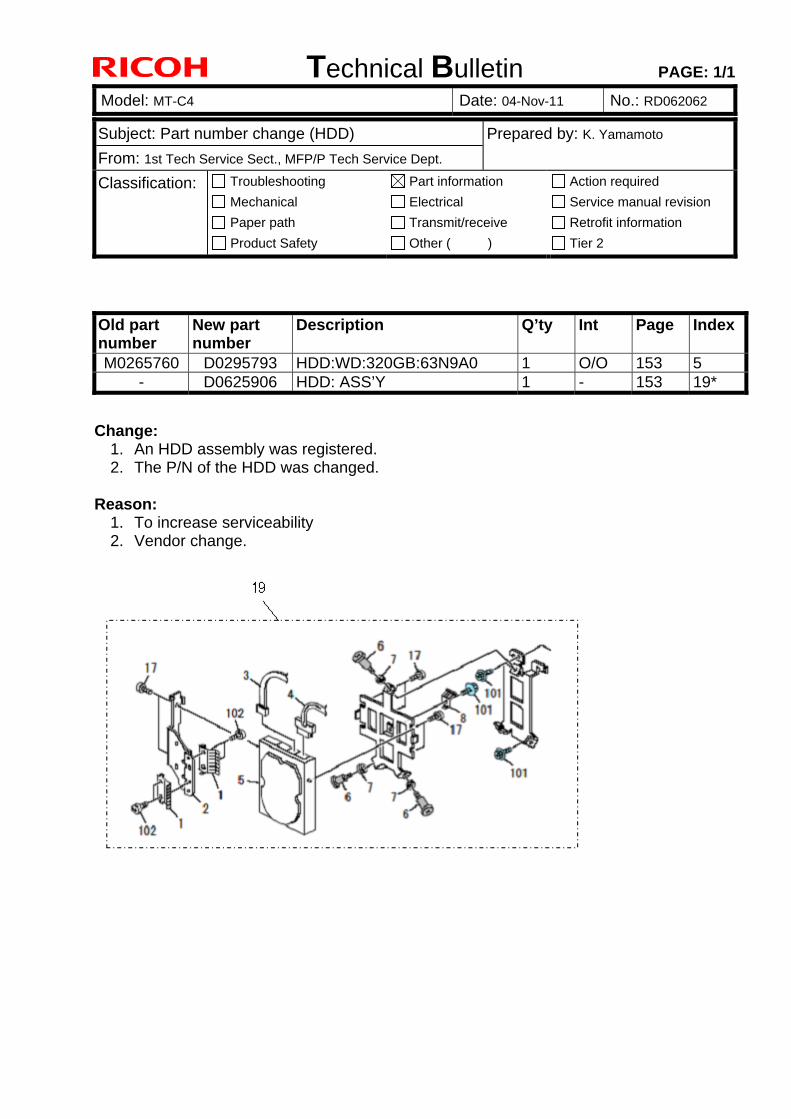
Technical Bulletin PAGE: 1/1
Model: MT-C4 Date: 04-Nov-11 No.: RD062062
Subject: Part number change (HDD) From: 1st Tech Service Sect., MFP/P Tech Service Dept.
Prepared by: K. Yamamoto
Classification: Troubleshooting Mechanical Paper path Product Safety
Part information Electrical Transmit/receive Other ( )
Action required Service manual revision Retrofit information Tier 2
Old part number
New part number
Description Q’ty Int Page Index
M0265760 D0295793 HDD:WD:320GB:63N9A0 1 O/O 153 5 - D0625906 HDD: ASS’Y 1 - 153 19*
Change:
1. An HDD assembly was registered. 2. The P/N of the HDD was changed.
Reason:
1. To increase serviceability 2. Vendor change.

Technical Bulletin PAGE: 1/1
Model: MT-C4 Date: 24-Nov-11 No.: RD062064
Subject:: ADF (PCB:MAIN CONTROL:ASS'Y) Prepared by: K. Yamamoto From: 1st Tech Service Sect., MFP/P Tech Service Dept. Classification: Troubleshooting
Mechanical Paper path
Part information Electrical Transmit/receive
Action required Service manual revision Retrofit information
Other ()
Old part number
New part number
Description Q’ty Int Page Index
D4125500 D4125505 PCB:MAIN CONTROL:ASS'Y 1-1 X/O 45 9 Change: The insertion slot for CN113 is attached with the pins parallel to the PCB (see
the photo below). Reason: To further minimize the stress to the insertion slot when the connector is inserted. Note: The latest part number has already changed to D4125506.
Old Part: D4125500 New Part: D4125505

Technical Bulletin PAGE: 1/2
Model: MT-C4 Date: 24-Nov-11 No.: RD062063
Subject: CPU and firmware Change Notification Prepared by: K. Yamamoto From: 1st Tech Service Sect., MFP/P Tech Service Dept. Classification: Troubleshooting
Mechanical Paper path
Part information Electrical Transmit/receive
Action required Service manual revision Retrofit information
Product Safety Other ( )
Important Information About ADF PCB Replacement Background Due to the March 11 earthquake and tsunami disaster in the Tohoku region of Japan, many production facilities in the area suffered extensive damage. This has caused an interruption in the supply of electrical parts for PCBs used on Ricoh products. To continue machine production, a different type of CPU had to be used on PCBs, beginning from July production. Service parts changes 1) As a result, a modified version of the ADF firmware is preloaded on boards that use the
new CPU. This change is shown in the first line in the table below. Note:
There is no difference in machine function or performance. This is why the interchangeability of boards with the old and new CPUs is O/O.
However, the compatibility of the old/new PCB and old/new firmware is as follows:
Firmware Old: New:
Old: Supported NOT supported (see Important Notes below)
PCB
New: NOT supported (see Important Notes below) Supported
2) The board containing the old CPU (and old firmware) is still available to order, under a
new part number. This is shown in the second line in the table below. Note: This is because some machines in the field still require the old firmware version (e.g.
customized machines, locally tested/approved machines). Old Part Number New Part Number Description I/C
D4125505 D4125506 PCB:MAIN CONTROL:ASS'Y O/O - D4125507 PCB:MAIN CONTROL:ASS'Y

Technical Bulletin PAGE: 2/2
Model: MT-C4 Date: 24-Nov-11 No.: RD062063
Important Notes Make sure to keep the following in mind:
Do not install the old firmware (v. 01.620:05 and older) on the new ADF board. This is because the old firmware cannot be used on the new board, and the new firmware (v.90.000:01; The new version starts with a “9”) cannot be used on the old board. If you install the old firmware on the new engine board by mistake, the new engine board will be damaged, and there is no way to repair except replace it. For this reason, the new firmware will not be released to the field.
If you replace the ADF board on a machine that still requires the old firmware version,
as mentioned above, please order the board using P/N D D4125507.

Technical Bulletin PAGE: 1/1
Model: MT-C4 Date: 14-Dec-11 No.: RD062065
Subject: Service Manual Correction Prepared by: T.Hirakwa From: 1st Tech Service Sect., MFP/P Tech Service Dept. Classification: Troubleshooting
Mechanical Paper path
Part information Electrical Transmit/receive
Action required Service manual revision Retrofit information
Other ()
Service Manual Revision D062/D063/D065/D066 The areas crossed out was corrected.
3. Appendix : Service call condition pg.141 2507* ID Sensor Patterning During Job 001 Operation Setting Determines whether an ID sensor pattern is
created during copy jobs. [0 to 1/1 0 ] 0: Off 1: On
002 No. of Copies Selects the interval (number of copies)
between ID sensor patterns when 1 is selected for SP2507-001 [0 to 10,000/100/1]
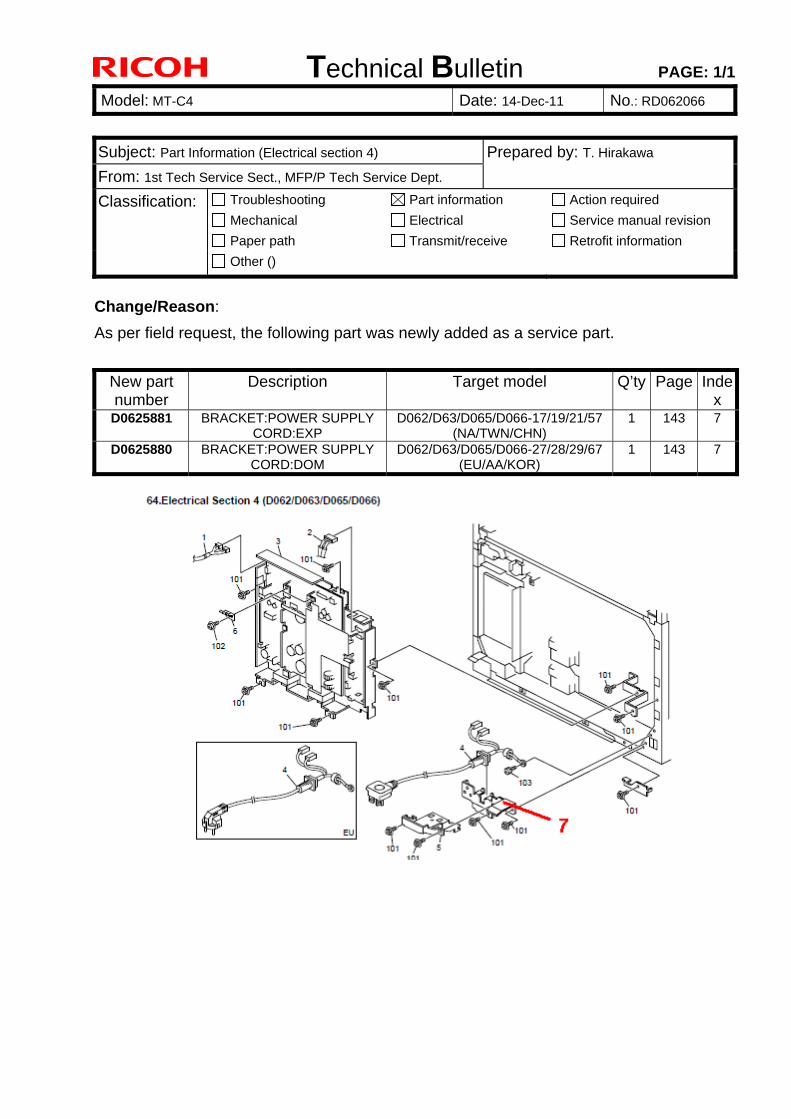
Technical Bulletin PAGE: 1/1
Model: MT-C4 Date: 14-Dec-11 No.: RD062066
Subject: Part Information (Electrical section 4) Prepared by: T. Hirakawa From: 1st Tech Service Sect., MFP/P Tech Service Dept. Classification: Troubleshooting
Mechanical Paper path
Part information Electrical Transmit/receive
Action required Service manual revision Retrofit information
Other ()
Change/Reason: As per field request, the following part was newly added as a service part.
New part number
Description Target model Q’ty Page Index
D0625881 BRACKET:POWER SUPPLY CORD:EXP
D062/D63/D065/D066-17/19/21/57 (NA/TWN/CHN)
1 143 7
D0625880 BRACKET:POWER SUPPLY CORD:DOM
D062/D63/D065/D066-27/28/29/67 (EU/AA/KOR)
1 143 7

Technical Bulletin PAGE: 1/1
Model: MT-C4 Date: 20-Feb-12 No.: RD062067
Subject: Firmware Release Note: SiG4A Prepared by: K. Yamamoto From: 1st Tech Service Sect., MFP/Printer Tech Service Dept. Classification: Troubleshooting
Mechanical Paper path
Part information Electrical Transmit/receive
Action required Service manual revision Retrofit information
Product Safety Other (Firmware) Tier 2
This RTB has been issued to announce the firmware release information for the SiG4A.
Version Program No. Effective Date Availability of RFU 48 B7135580B 1st Mass production Available
Note: Definition of Availability of RFU via @Remote “Available”: The firmware can be updated via RFU or SD card. “Not available”: The firmware can only be updated via SD card.
Version Modified Points or Symptom Corrected 48 1st Mass production

Technical Bulletin PAGE: 1/6 Reissued:28-Jun-12 Model: Model MT-C4 Date: 21-Sept-11 No.: RD062060c
RTB Reissue The items in bold italics have been added.
This RTB applies to the MT-C2, MT-C3, MT-C3.5, and MT-C4.
SYMPTOM One of the following occurs before the developer reaches its replacement cycle: - Light copies - Dirty background - Toner dusting inside the machine
CAUSE Toner is caught in the development sleeve gap, which decreases the amount of toner supplied. The machine then tries to supply more toner to compensate.
SOLUTION Do the following. 1. Change/check the following SP settings, and then check the image quality.
Set SP2201-004 (Development Bias Adjustment ID Sensor Pattern Dev. Potential) to its default value of 240V. Note: This SP adjusts the amount of the toner supplied.
Set SP2-967-001 (Developer Density Adjustment Mode) to its default value of 0.
Note: This SP is only for special (ammonia) paper.
SP3-902-008 (Drum Condition Display VI) If the VL value is more then +380 (positive), replace the drum.
2. Check/do the following
Replace any PM parts whose counter values are higher then target yield. If the following SC(s) are mentioned often on the SMC report, do the action recommended
in the Service Manual: SC317, SC340, SC345, SC350, SC352, SC401, SC402
Subject: Background / Overtoning / light image Prepared by: K. Yamamoto From: 1st Overseas Tech Support Sec., 1st PQM Dept. Classification: Troubleshooting
Mechanical Paper path Product Safety
Part information Electrical Transmit/receive Other ( )
Action required Service manual revision Retrofit information Tier 2

Technical Bulletin PAGE: 2/6 Reissued:28-Jun-12 Model: Model MT-C4 Date: 21-Sept-11 No.: RD062060c
For filming: Check the values of SP8851-11 (No. sheets printed at 0-2% coverage) and SP8851-21 (No. sheets printed at 3-4% coverage).
If the total of these two values is 80% or more of the total counter, change the following SP settings.
Note: This means that the overall coverage rate is low for this machine. The SP settings shown below will force the machine to use more toner.
Set SP2940 (Reface Pattern Count) to a value of 5. Set SP2210 (ID Sensor Pattern Interval) to a value of 1. Set SP2506-02 (Cont. OP. Time Cleaning Setting Time Setting) to a value of 1.
3. If the symptom still occurs, clean the development sleeve as follows: Cleaning the development sleeve 1. Remove the Mylar shown in the photo below.
2. Remove the developer from the development unit through the development roller
sleeve.
3. Clean the development roller sleeve by sliding the brush shown in the photo firmly
along the entire length of the sleeve. Important: Do not press the brush too hard, since this may scratch the sleeve.
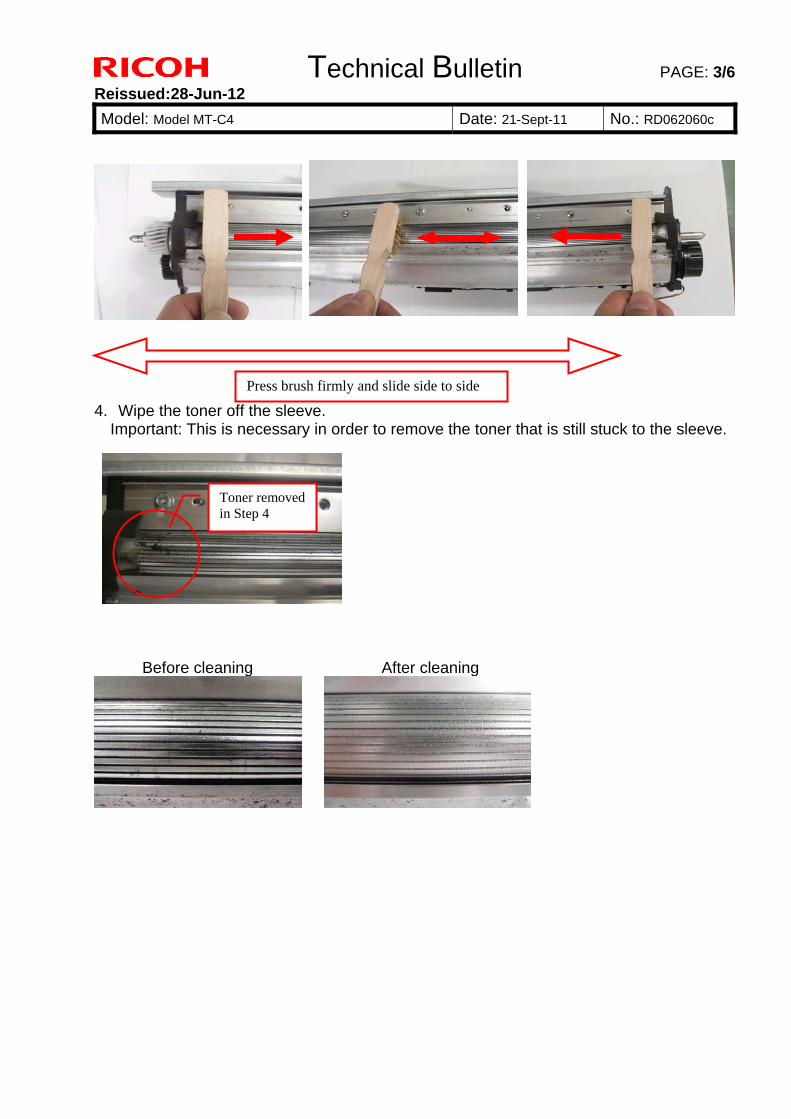
Technical Bulletin PAGE: 3/6 Reissued:28-Jun-12 Model: Model MT-C4 Date: 21-Sept-11 No.: RD062060c
4. Wipe the toner off the sleeve. Important: This is necessary in order to remove the toner that is still stuck to the sleeve.
Before cleaning After cleaning
Press brush firmly and slide side to side
Toner removed in Step 4

Technical Bulletin PAGE: 4/6 Reissued:28-Jun-12 Model: Model MT-C4 Date: 21-Sept-11 No.: RD062060c
5. Make sure that the sponge and both entrance Mylars are attached correctly. CORRECT:
Incorrect:
6. Reattach the Mylar and install new developer. 4. If the symptom still occurs, do the following
Note: If the symptom still occurs, the cause may be that the machine’s internal temperature is high, causing the wax to separate from the toner. This can reduce the toner’s charge performance.
Turned up
Sticks out

Technical Bulletin PAGE: 5/6 Reissued:28-Jun-12 Model: Model MT-C4 Date: 21-Sept-11 No.: RD062060c
1. Update the Engine firmware MT-C4: Update the Engine firmware (D0625127) to ver1.67:04 or later. If there is no finisher installed, set SP6-118-001 (default: 0) to a value of “1”.
Note: This setting will allow the exhaust fan to cool down the machine. If there is already a
finisher installed, you do not need to set this SP to “1”, because the exhaust fan will automatically turn on.
MT-C3.5: Update the Engine firmware (D0545127) to ver1.06c:00. MT-C3: Update the Engine firmware (B2475127) to ver1.13:60. MT-C2: Do other than updating firmware. Firmware for this symptom is not available. Note: After the new firmware is installed, the fan will be turned on for one minute at job end, even if the timer for the energy saver setting is less than one minute. 2. Clean the following filter (B0654255).
Note: This will improve ventilation inside the machine.

Technical Bulletin PAGE: 6/6 Reissued:28-Jun-12 Model: Model MT-C4 Date: 21-Sept-11 No.: RD062060c
3. Attach the extra insulation pad (B0654255).
Note: This will prevent heat from being transferred from the fusing unit to the toner bottle.
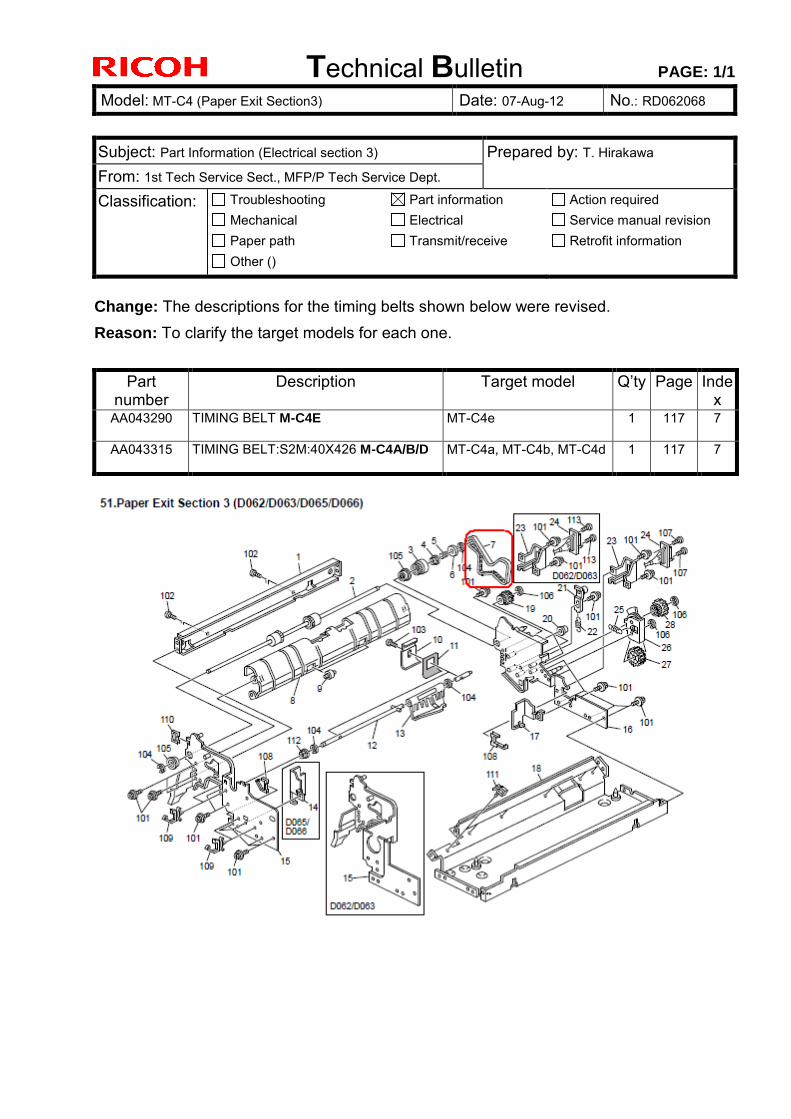
Technical Bulletin PAGE: 1/1
Model: MT-C4 (Paper Exit Section3) Date: 07-Aug-12 No.: RD062068
Subject: Part Information (Electrical section 3) Prepared by: T. Hirakawa From: 1st Tech Service Sect., MFP/P Tech Service Dept. Classification: Troubleshooting
Mechanical Paper path
Part information Electrical Transmit/receive
Action required Service manual revision Retrofit information
Other ()
Change: The descriptions for the timing belts shown below were revised. Reason: To clarify the target models for each one.
Part number
Description Target model Q’ty Page Index
AA043290
TIMING BELT M-C4E
MT-C4e
1 117 7
AA043315
TIMING BELT:S2M:40X426 M-C4A/B/D
MT-C4a, MT-C4b, MT-C4d
1 117 7

Technical Bulletin PAGE: 1/1
Model: MT-C4 Date: 20-Aug-12 No.: RD062069
Subject: Parts catalog correction Prepared by: T. Takahashi From: 1st Tech Service Sect., MFP/P Tech Service Dept. Classification: Troubleshooting
Mechanical Paper path
Part information Electrical Transmit/receive
Action required Service manual revision Retrofit information
Product Safety Other ( ) Tier 2
Part number Description Q’ty Int Page Index Note
AX400122 ANTICONDENSATION HEATER -120V 15W
1 - 49 1
Change/Reason: The description for this part was corrected (“120V 9W” to “120V 15W”).

Technical Bulletin PAGE: 1/1
Model: MT-C4 Date: 11-Sep-12 No.: RD062070
Subject: Parts Catalog Correction From: 1st Tech Service Sect., MFP/P Tech Service Dept.
Prepared by: T.Hirakawa
Classification: Troubleshooting Mechanical Paper path Product Safety
Part information Electrical Transmit/receive Other ( )
Action required Service manual revision Retrofit information Tier 2
50. Paper Exit Section 2 (D062/D063/D065/D066)
Part number
Description Q’ty Page Index Note
AF020579 EXITDECURA ROLLER M-C4E
1 115 9 -
B2474439 Roller:Decura:Exit M-C4A/B/D
1 115 9 -
AF020578 ENTRANCEDECURA ROLLER M-C4E
1 115 10 -
B2474438 Roller:Decura:Entrance M-C4A/B/D
1 115 10 -
51.Paper Exit Section 3 (D062/D063/D065/D066)
Part number
Description Q’ty Page Index Note
AA043290 TIMING BELT M-C4E 1 117 7 - AA043315 TIMING BELT:S2M:40X426
M-C4A/B/D 1 117 7 -
Change: The target models in bold were added to the descriptions for these parts. Reason: To meet a request from the field.

Technical Bulletin PAGE: 1/1
Model: MT-C4 Date: 19-Nov-12 No.: RD062071
Subject: Parts information Prepared by: T.Hirakawa From: 1st Tech Service Sect., MFP/P Tech Service Dept. Classification: Troubleshooting
Mechanical Paper path
Part information Electrical Transmit/receive
Action required Service manual revision Retrofit information
Product Safety Other ( ) Tier 2
Old parts number
New parts number
Description Q’ty
Int Page Index
B2476958 D0626958 SHAFT:DRIVE:TRAY BOTTOM
PLATE:RIGHT:PRESS FIT
1/1 63 18
- D0622850 SPACER:SHAFT:RISE 0/1 63 41 - AA132233 SPACER:SLIDE RAIL:0.4MM 0/1
X/X As a Set
63 40
Change: A spacer was added between the gear and pulley. Reason: To ensure that the pulley and gear do not rotate simultaneously when the bottom
plate is lowered.
Important: Make sure to attach this spacer whenever you replace the drive shaft.

Technical Bulletin PAGE: 1/1
Model: MT-C4 Date: 25-Jan-13 No.: RD062072
Subject: Part Catalog Correction Prepared by: T.Hirakawa From: 1st Tech Service Sect., MFP/P Tech Service Dept. Classification: Troubleshooting
Mechanical Paper path
Part information Electrical Transmit/receive
Action required Service manual revision Retrofit information
Product Safety Other ( ) Tier 2
Old part number
New part number
Description Q’ty Int Page Index Note
- D0666469 GEAR:IDLER:19Z 0-1 134 9 Change/Reason: As per field request, the following part was newly added as a service part.

Technical Bulletin PAGE: 1/1
Model: MT-C4 Date: 02-Sep-13 No.: RD062073
Subject: Parts change information. Prepared by: Y.Saitoh
From: 2nd Tech Service Sect., MFP/P Tech Service Dept.
Classification: Troubleshooting
Mechanical
Paper path
Product Safety
Part information
Electrical
Transmit/receive
Other ( )
Action required
Service manual revision
Retrofit information
Tier 2
Change/Reason: The following was missing from the Parts Catalog.
New part number
Description Q’ty Int Page Index Note
D0626640 BRACKET:SENSOR:PAPER SIZE SENSOR 1 160 24*
*New Index

Technical Bulletin PAGE: 1/3 Reissued:11-Mar-14 Model: Model MT-C5 Date: 30-Jan-2013 No.: RD131033a
RTB Reissue The items in red were corrected or added.
This RTB is for MT-C4 and C5
SYMPTOM Fusing SC (SC555 etc,) occurs
CAUSE 1. Fusing temperature control error
The fusing lamps have a tolerance in the temperature distribution. Because of the variation in the parts on this characteristic and some other conditions described below, the fusing temperature could not reach the target level within the programmed time. Other conditions:
Room temperature is relatively low Power from the outlet is lower than the related voltage
2. Temperature misdetection by thermistor(s)
If paper contains a lot of calcium carbonate and/or generates paper dust, those materials and toner tends to be mixed and stick onto the hot roller. The thermistor(s) surface becomes dirty with those materials as well, causing the thermistor(s) to misdetect the fusing temperature.
NOTE: Based on the information from the field, most of cases are not caused by “temperature misdetection”, but “fusing temperature control error”.
Subject: SC555 Prepared by: K. Yamamoto From: 1st Overseas Tech Support Sec., 1st PQM Dept. Classification: Troubleshooting
Mechanical Paper path Product Safety
Part information Electrical Transmit/receive Other ( )
Action required Service manual revision Retrofit information Tier 2

Technical Bulletin PAGE: 2/3 Reissued:11-Mar-14 Model: Model MT-C5 Date: 30-Jan-2013 No.: RD131033a
SOLUTION 1. Check whether the thermistors are clean or dirty.
2. If the thermistors are clean, move to #3.
If the thermistors and/or hot roller are expected to reach PM yield before the next service visit (or have already reached yield), replace them.
If yield will not be reached before the next visit, but the surface of the thermistors and/or hot roller is dirty, clean the toner/dust off the surface.
If the surface of the thermistors and/or hot roller often become dirty before reaching yield, replace the cleaning web with the new type.
Change: The amount of oil in the cleaning web was increased. Reason: To improve the cleaning of the hot roller and thermistors.
Old part number
New part number
Description Q’ty Int Page Index Note
AE045067 AE045069 Roller: Cleaning Felt:32: ASS’Y 1 X/O 103 36 NOTE: The new and old webs can be distinguished as follows. The lot number for the new web is printed in black ink, and for the old web in blue ink. New (AE045069) Old (AE045067)
Workflow in the field

Technical Bulletin PAGE: 3/3 Reissued:11-Mar-14 Model: Model MT-C5 Date: 30-Jan-2013 No.: RD131033a
The new web (AE045069) is marked with a circle as shown below.
Cut-in Serial Numbers From May 2013 production 3. Change the setting of SP1105-002 (Fusing temperature adjustment Normal Time (End
thermistor)) to 180 seconds (default: 190 seconds). Note:
Please make sure that the following SP settings are set to the default values, otherwise, SP mode adjustment may not effect to resolve the problem. SP1105-001, SP1105-003~14, SP1107-1~24
Changing SP1105-002 from the default to 180 degrees may affect the print image (poor fusing image) especially thick paper right after recovery from the machine ready condition. In this case, please change the SP1907 (Pre-Fusing idling time) to 1 (default: 0). Depending on the kind of paper, select SP1907-1~10.

Technical Bulletin PAGE: 1/1
Model: MT-C4 Date: 23-May-14 No.: RD062074
Subject: Parts Information D0666753 BRACKET:PAPER FEED:DC STEPPER MOTOR:THREE WAY:ASS'Y
Prepared by: M. Yoneda
From: 2nd Tech Service Sect., MFP/P Tech Service Dept.
Classification: Troubleshooting Mechanical Paper path Product Safety
Part information Electrical Transmit/receive Other ( )
Action required Service manual revision Retrofit information Tier 2
Change/Reason: The following was missing from the Parts Catalog.
New part number
Description Q’ty Int Page Index Note
D0666753 BRACKET:PAPER FEED:DC STEPPER MOTOR:THREE WAY:ASS’Y
1 135 10*
*New Index

Technical Bulletin PAGE: 1/1
Model: MT-C4 Date: 28-May-14 No.: RD062076
Subject: Parts Information AX040187 DC MOTOR:CLEANING D0624232 BRACKET:GUARD:FEELER
Prepared by: M.Yoneda
From: 2nd Tech Service Sect. MFP/P Tech Service Dept. Classification: Troubleshooting
Mechanical Paper path Product Safety
Part information Electrical Transmit/receive Other ( )
Action required Service manual revision Retrofit information Tier 2
Following parts are changed.
Old part number
New part number
Description Q’ty Int Page Index Note
AX040180 AX040187 DC MOTOR:CLEANING 1 O/X as a set 101 11 B0654232 D0624232 BRACKET:GUARD:FEELER 1 O/X as a set 101 8
Change: A tube was added to both parts in the table. Reason: To ensure that the web motor harness does not touch the edge of the bracket.

Technical Bulletin PAGE: 1/1
Model: MT-C4 Date: 28-May-14 No.: RD062075
Subject: Part Information D1311190 DUCT:EXHAUST:ADHESION
Prepared by: M. Yoneda
From: 2nd Tech Service Sect. MFP/P Tech Service Dept. Classification: Troubleshooting
Mechanical Paper path Product Safety
Part information Electrical Transmit/receive Other ( )
Action required Service manual revision Retrofit information Tier 2
Old part number
New part number
Description Q’ty Int Page Index
D0621192 D1311190 DUCT:EXHAUST:ADHESION 1 X/O as a set
139 23*
D0621193
*New Parts Number Change: The two parts in the table were registered together as a duct assembly. Reason: To further ensure the proper performance of the exhaust system.

Technical Bulletin PAGE: 1/2
Model:MT-C4,C5 Date: 6-Nov-14 No.: RD062077
Subject: Service Manual Correction: ADF Scanning adjustments
Prepared by: M. Yoneda
From: 2nd Tech Service Sec. MFP/P Tech Service Dept. Classification: Troubleshooting
Mechanical Paper path Product Safety
Part information Electrical Transmit/receive Other ( )
Action required Service manual revision Retrofit information Tier 2
Service Manual Revision D062/D063/D065/D066 D131/D132/D133 Replace the sentences crossed out in red with the sentence shown below. 4. Replacement and Adjustment pg. 343

Technical Bulletin PAGE: 2/2
Model:MT-C4,C5 Date: 6-Nov-14 No.: RD062077
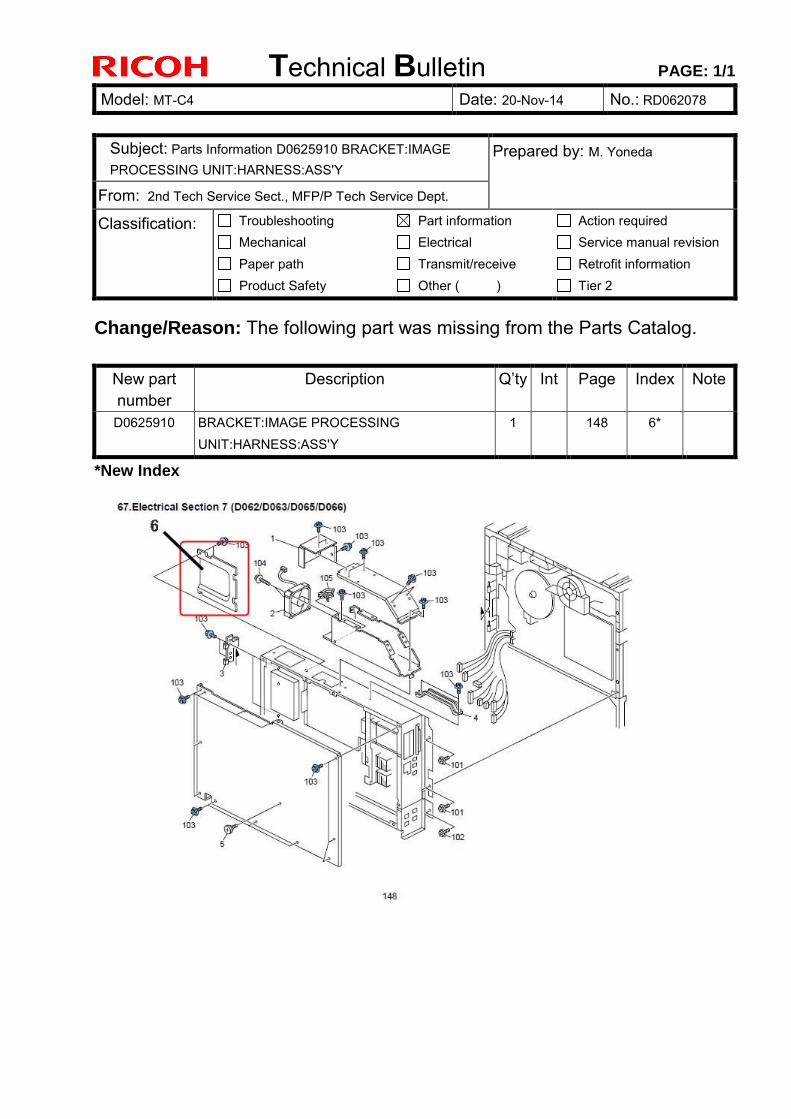
Technical Bulletin PAGE: 1/1
Model: MT-C4 Date: 20-Nov-14 No.: RD062078
Subject: Parts Information D0625910 BRACKET:IMAGE PROCESSING UNIT:HARNESS:ASS'Y
Prepared by: M. Yoneda
From: 2nd Tech Service Sect., MFP/P Tech Service Dept.
Classification: Troubleshooting Mechanical Paper path Product Safety
Part information Electrical Transmit/receive Other ( )
Action required Service manual revision Retrofit information Tier 2
Change/Reason: The following part was missing from the Parts Catalog.
New part number
Description Q’ty Int Page Index Note
D0625910 BRACKET:IMAGE PROCESSING UNIT:HARNESS:ASS'Y
1 148 6*
*New Index
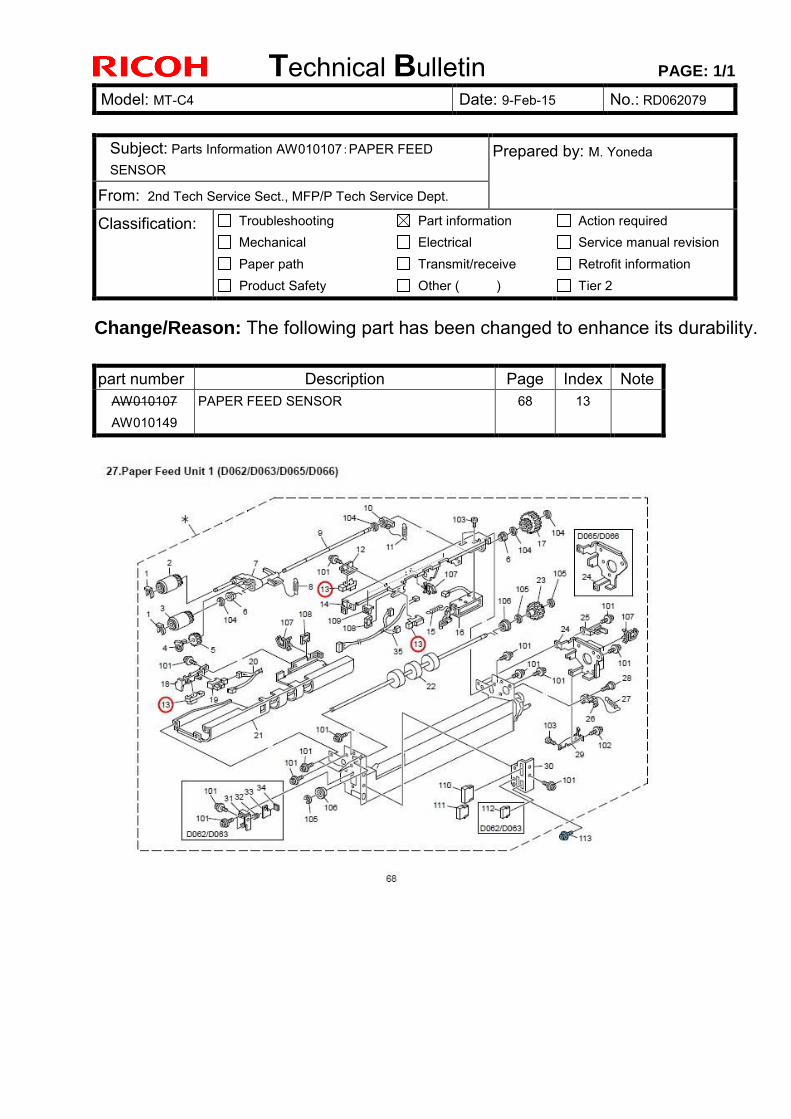
Technical Bulletin PAGE: 1/1
Model: MT-C4 Date: 9-Feb-15 No.: RD062079
Subject: Parts Information AW010107:PAPER FEED SENSOR
Prepared by: M. Yoneda
From: 2nd Tech Service Sect., MFP/P Tech Service Dept.
Classification: Troubleshooting Mechanical Paper path Product Safety
Part information Electrical Transmit/receive Other ( )
Action required Service manual revision Retrofit information Tier 2
Change/Reason: The following part has been changed to enhance its durability. part number Description Page Index Note
AW010107 AW010149
PAPER FEED SENSOR 68 13
Technical Bulletin PAGE: 1/2R
Reissued: 12-Dec-16 Model: MT-C4/C5 Date: 27-Mar-15 No.: RD131039b
RTB Reissue The items in bold italics were added.
Symptom: SC540 or cleaning web alert occur
Cause: Abrasion powder which accumulated in the gap of commutator cause short circuits.
Solution: The components of the DC MOTOR: CLEANING were changed to further improve durability and prevent short circuits inside the motor.
Type A, C:
Old part number
New part number
Description Q’ty Int Page Index Note
D1314091 DRIVE SUB-UNIT:CLEANING UNIT:ASS'Y
AX040187 AX040190 DC MOTOR:CLEANING 1
X/X as a set
103 11
B2474188 D1314188 BRACKET:DRIVE:ASS'Y 1 103 13
B1404190 D1314190 BRAKE SPRING PLATE 1 103 10
D0624232 D1314218 BRACKET:GUARD:FEELER 1 103 8
B0654225 D1314225 MOTOR PLATE BRACKET 1 103 12
Type E:
Old part number
New part number
Description Q’ty Int Page Index Note
D1334243 DRIVE SUB-UNIT:CLEANING UNIT:ASS'Y
AX040187 AX040190 DC MOTOR:CLEANING 1
X/X as a set
103 11
G1484226 D1334226 BRACKET:DRIVE:ASS'Y 1 103 13
B0654246 D1334246 BRAKE SPRING PLATE 1 103 10
D0624232 D1314218 BRACKET:GUARD:FEELER 1 103 8
B0654225 D1314225 MOTOR PLATE BRACKET 1 103 12
Subject: SC540 or cleaning web alert Prepared by: M. Yoneda
From: 2nd Tech Service Sect., MFP/P Tech Service Dept.
Classification: Troubleshooting Mechanical Paper path Product Safety
Part information Electrical Transmit/receive Other ( )
Action required Service manual revision Retrofit information Tier 2

Technical Bulletin PAGE: 2/2R
Reissued: 12-Dec-16 Model: MT-C4/C5 Date: 27-Mar-15 No.: RD131039b
IMPORTANT:
When you install any of the new motors, make sure to install all the new parts listed in the tables together as a set.
The assemblies listed at the top of each tables (D1314091 and D1334243) contain all of the individual parts listed in that table.
When you install the new DC MOTOR:CLEANING, make sure to set SP 1902-005 as follows:
Default Set to: Type A 9 18 Type C 9 18 Type E 15 18
Cut in serial number:
From November 2014 production
D131: W864CB10001~
D132: W874CB10001~
D133: W884CB10001~

Technical Bulletin PAGE: 1/1
Model: MT-C4 Date: 28-May-15 No.: RD062081
Subject: Parts Information D0621440: COVER:OPERATION PANEL:NA
Prepared by: M. Yoneda
From: 2nd Tech Service Sect., MFP/P Tech Service Dept.
Classification: Troubleshooting Mechanical Paper path Product Safety
Part information Electrical Transmit/receive Other ( )
Action required Service manual revision Retrofit information Tier 2
Change/Reason: The following part was missing from the Parts Catalog.
New part number
Description Q’ty Int Page Index Note
D0621440 COVER:OPERATION PANEL:NA 1 24 37*
*New Index

Technical Bulletin PAGE: 1/1
Model: MT-C4 Date: 17-Aug-15 No.: RD062082
Subject: Parts Information D0626857/D0626859 (Tandem Tray Positioning Bracket)
Prepared by: Y.Taniguchi
From: 1st Tech Service Sect., MFP/P Tech Service Dept. Classification: Troubleshooting
Mechanical Paper path
Part information Electrical Transmit/receive
Action required Service manual revision Retrofit information
Product Safety Other ( ) Tier 2
Part number Description Q’ty Int Page Index Note D0626857 BRACKET:HOLDER:STOPPER:
TANDEM LCT 1 - 162 - -
D0626859 HOLDER:STOPPER:TANDEM LCT 1 - 162 - -
Change/Reason:
The following parts were missing from the Parts Catalog.
Note: The holder (p/n: D0626859) needs to be adjusted when performing side-to-side registration. See "Tandem Tray Side Registration" in the FSM for details.
Copyright © 2022 FDOKUMEN