Teacher: Janine Breen Lesson: Math - Symmetry Grade: 2 Time
18
Teacher: Janine Breen Lesson: Math - Symmetry Grade: 2 Time: 80 minutes Lesson Overview The purpose of this lesson is to teach students the geometric concept of symmetry. The students will learn how to create shapes with symmetry and how to recognize symmetry in the world around them. Since this lesson involves teaching a basic mathematical concept, the Behavioral Model and the Direct Instruction Strategy will be used. National Standards National Mathematics Standards Geometry 3 - Apply transformations and use symmetry to analyze mathematical situations. Students recognize and create shapes that have symmetry. National Standards for English Language Arts 12 –Applying Language Skills Students use spoken, written, and visual language to accomplish their own purposes (e.g., for learning, enjoyment, persuasion, and the exchange of information). New York State Standards NYS Science Education Standards MST Standard 3 – Math Students will understand mathematics and become mathematically confident by communicating and reasoning mathematically, by applying mathematics in real-world settings, and by solving problems through the integrated study of number systems, geometry, algebra, data analysis, probability, and trigonometry. Key Idea 4: Students use mathematical modeling/multiple representation to provide a means of presenting, interpreting, communicating and connecting mathematical information and relationships. Performance Indicator: Use physical materials, pictures, and diagrams to explain mathematical ideas and processes and to demonstrate geometric concepts. Geometry Strand Students will apply transformations and symmetry to analyze problem solving situations. 2.G.6 Explore line symmetry.
-
Upload
khangminh22 -
Category
Documents
-
view
0 -
download
0
Transcript of Teacher: Janine Breen Lesson: Math - Symmetry Grade: 2 Time

Teacher: Janine Breen Lesson: Math - Symmetry Grade: 2 Time: 80 minutes Lesson Overview The purpose of this lesson is to teach students the geometric concept of symmetry. The students will learn how to create shapes with symmetry and how to recognize symmetry in the world around them. Since this lesson involves teaching a basic mathematical concept, the Behavioral Model and the Direct Instruction Strategy will be used. National Standards National Mathematics Standards Geometry 3 - Apply transformations and use symmetry to analyze mathematical situations. Students recognize and create shapes that have symmetry. National Standards for English Language Arts 12 –Applying Language Skills Students use spoken, written, and visual language to accomplish their own purposes (e.g., for learning, enjoyment, persuasion, and the exchange of information). New York State Standards NYS Science Education Standards MST Standard 3 – Math Students will understand mathematics and become mathematically confident by communicating and reasoning mathematically, by applying mathematics in real-world settings, and by solving problems through the integrated study of number systems, geometry, algebra, data analysis, probability, and trigonometry. Key Idea 4: Students use mathematical modeling/multiple representation to provide a means of presenting, interpreting, communicating and connecting mathematical information and relationships. Performance Indicator: Use physical materials, pictures, and diagrams to explain mathematical ideas and processes and to demonstrate geometric concepts. Geometry Strand Students will apply transformations and symmetry to analyze problem solving situations.
2.G.6 Explore line symmetry.

NYS English Language Arts Standards ELA Standard 1: Students will read, write, listen and speak for information and understanding. Key Idea #1: Listening and reading to acquire information and understanding involves collecting data, facts, and ideas; discovering relationships, concepts, and generalizations; and using knowledge from oral, written, and electronic sources. Performance Indicator(s): Gather and interpret information from children’s reference books, magazines, textbooks, electronic bulletin boards, audio and media presentations, oral interviews, and from such forms as charts, graphs, maps, and diagrams. Select information appropriate to the purpose of their investigation and relate ideas from one text to another.
Goal Students will understand and apply the mathematical concept of symmetry. Objectives
1) Given an “Am I Symmetrical?” worksheet with 10 pictures, the student will indicate which are symmetrical and which are not by circling either YES or NO next to the picture, with at least 8 out of 10 correct.
2) Given a “Where’s My Other Half?” worksheet, the student will complete the missing half of a ladybug picture by drawing its mirror image, with no mistakes.
Materials Mirror Whiteboard and markers Paint/paint brushes Pattern blocks Triangle, square and parallelogram cutouts Leaves (with symmetry) Sea shells (with symmetry) Construction paper cut in the shape of a butterfly (25) Clipboards “Symmetry in My Classroom” worksheet “Am I Symmetrical?” worksheet “Where is My Other Half?” worksheet Technology PowerPoint presentation – “Symmetry: It’s All Around You!” SmartBoard Computer with Internet access for educational activities online The Butterfly Website Saxon Math’s Line Symmetry Symmetry Game Symmetry (interactive lesson)

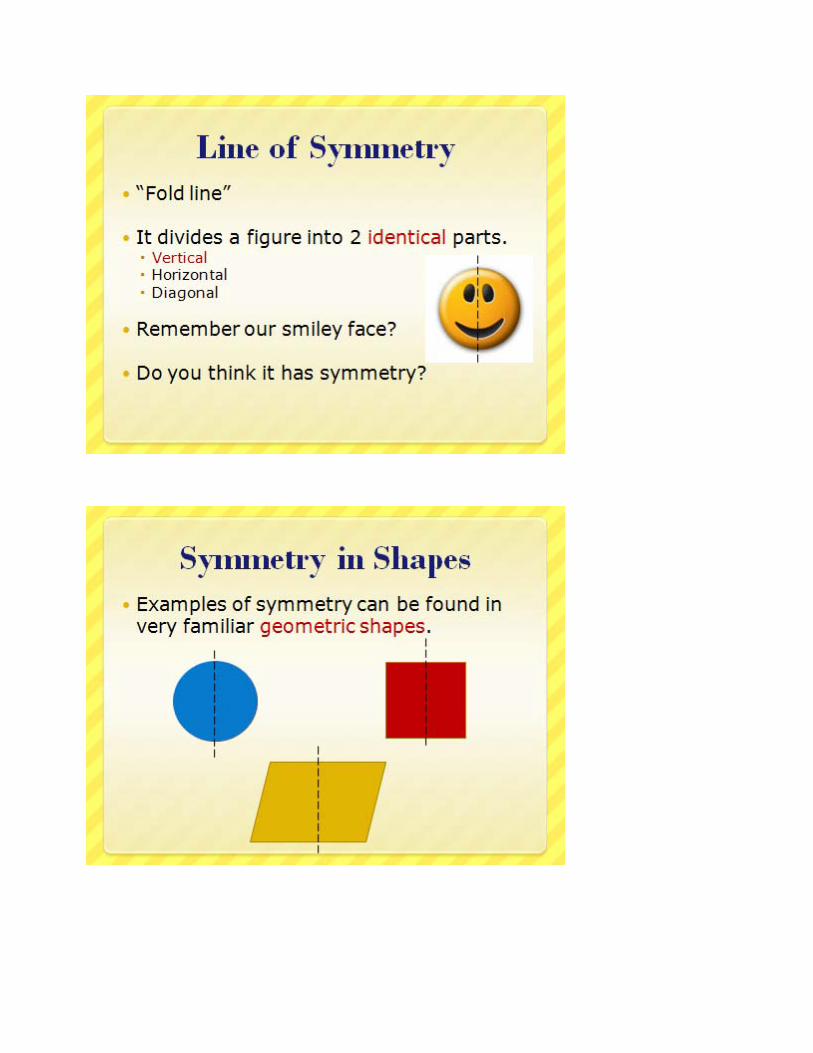
Anticipatory Set I will ask students to sit in a circle on the rug and then count backwards from 5 to focus their attention. I will hold up a picture of a smiley face ☺ and ask students to describe it for me. I will write their answers on the whiteboard. (I expect them to say “happy” then eventually “circle” or “round”.) Then I will ask: “Can anyone tell me what a circle is an example of?” (I expect them to say a “shape”.) I will then ask students for examples of more shapes. I will tell them that there is a branch of mathematics that involves the study of shapes; it’s called geometry. “OK, let’s get back to our smiley friend here.” I will ask students to describe what happens when I fold the paper back (length-wise) so only half of the face is shown. I will open up the smiling face once again and make sure the crease from top to bottom is visible. I will point out the line separating each half of the picture. Then I will ask students: “Would you say the left side of the smiley face matches the right side?” (I expect them to say it does.) “Would you say they are in balance?” I will ask them to explain why they think so. (I am looking for answers like there is an eye on both sides, they both have half a smile, they both have a half circle head, etc.) Next I will place the smiley face on the floor in the center of the circle and ask for a student volunteer. I will give the student a mirror, and show him/her how to place it on the crease of the smiley face picture. I will make sure the mirror is tilted properly and a reflection is clearly visible. I will ask students to come closer one by one to get a good look in the mirror. I will ask students to describe what they see in the mirror. (I expect them to say it’s the other half, it makes the face whole, it looks like the original picture, it matches, etc.) I will write their descriptive answers on the whiteboard. All of this brainstorming will help me assess students’ prior knowledge of shapes and the ideas underlying the concept of symmetry. I will tell students: “Great job! You are very observant!” I will say “Everything in our world has a shape of its own. Many of those shapes have matching sides. “Balance” in artwork, architecture and nature is often viewed as a thing of beauty. Today, we are going to talk about the geometric concept called symmetry. There are examples of symmetry all around us. At the end of this lesson, you will use your newly-trained eyes to discover examples of symmetry, and you will even create your own symmetrical figures. Now, I will teach you how to do that.” Development The lesson reflects the Behaviorist Model of instruction. It will be taught using the Direct Instruction Strategy, plus lecture and modeling methods. (“I Do”) I will say “1-2-3 eyes on me” to signal to students that it is time to pay attention. (I expect them to respond “1-2 eyes on you.”) I will show the title slide in the “Symmetry: It’s All Around You!” PowerPoint presentation and then I will move on to Slides 2 and 3 to define the concept. I will explain that a figure has symmetry if, when folded, its two halves match. The fold line is called the line of symmetry. A line of symmetry, or line of reflection, divides a figure into two identical parts. (Although a figure can have horizontal, vertical and diagonal lines of symmetry, we will only focus on vertical lines of symmetry for this lesson.) I will say: “So what do you think, did the smiley
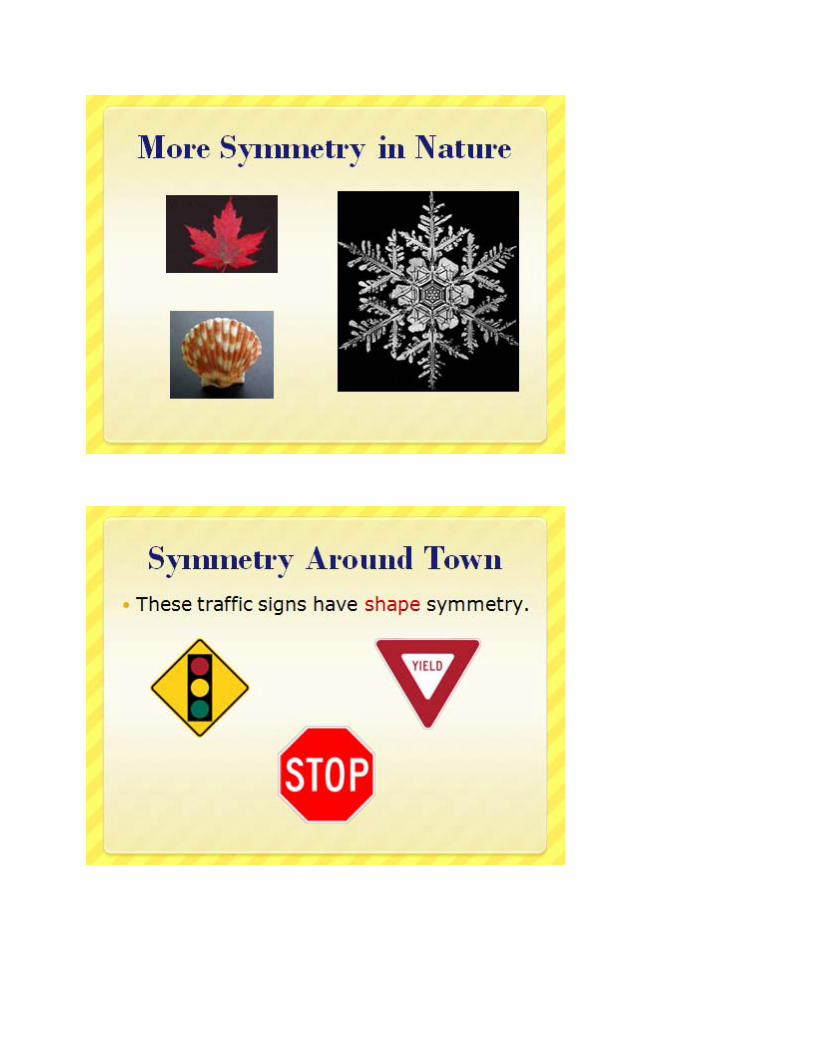
face we looked at before have symmetry?” (I expect them to say yes.) “You are correct! When folded, the halves matched. And when viewed in the mirror, the mirror image was identical.” Next I will display Slide 4, and say: “Examples of symmetry can be found in some very familiar geometric shapes. I will hold up a cut-out of a circle, and show how when folded down the middle, no overlap results. One half of the shape lies neatly over the other half. I will then draw the same line of symmetry down the center of the circle displayed on the SmartBoard. I will conclude: “This circle certainly has symmetry.” I will hold up a square cut-out and ask students if they think a square is symmetrical. I will ask for a student volunteer to come up and fold the square and give me an answer. (I expect them to say yes.) I will ask another student to come up and draw the line of symmetry on the square on the SmartBoard. I will ask the class if they agree by a show of hands. Lastly, I will hold up a cut-out of a parallelogram and ask students if they think it is symmetrical. (I expect some to say “yes” and “some to say “no”.) I will ask for a student volunteer to come up and fold it. (No matter how hard the student tries, he/she will not be able to fold it neatly.) I will say: “This shape is different from the others, isn’t it? When folded down the middle, the parallelogram’s halves do not match up.” “Therefore, we can conclude that a parallelogram does not have……” (I expect a choral response of “symmetry”.) Throughout the presentation, I will pay close attention as to whether students are “getting” the concept of symmetry. I will keep track of how well they respond to didactic questions. Next I will display Slide 5, and say: “Examples of symmetry can also be found in letters of the alphabet. I will point to the letters “A”, “H” and “W” on the SmartBoard. I will draw a line of symmetry through each and explain that one side is a mirror image of the other. Then I will ask: “Can you think of any other capital letters that have symmetry?” (I expect them to say I, M, O, U, V, W, X or Y). I will have a few students come up to the SmartBoard, write their letter, and prove it has symmetry by correctly drawing a line of symmetry through it. I will ask the class for a choral response to: “In order for a figure to have symmetry, its halves must….” (I expect them to say “match” or “be identical”.) “Yes, its halves must match, just like we saw with each of these letters. One side must always “balance” the other.” Next I will display Slide 6 and say: “If you just look around, you will see many examples of symmetry in nature.” “Many living creatures have symmetry.” I will point to the pictures of the butterfly and the ladybug on the slide. I tell students that all insects, not only those pictured in the slide, have a right side of their body that matches their left side. I will draw lines of symmetry through each of the insects on the SmartBoard, and point out how each side is a reflection of the other, in design and in color.
I will display Slide 7 and show students more examples of symmetry in nature. I will draw students’ attention to how detailed a snowflake’s pattern is, and how it is a beautiful example of perfect symmetry. Leaves and shells are other examples of symmetry in nature. I will pass real shells and leaves around the classroom and invite students to study them. I will ask them to use their finger and put an imaginary line of symmetry down their middles, and see how each half is the mirror image of the other. While students are passing the objects around, I will show Slides 8 and 9, which have examples of symmetry in traffic signs and in architecture. After all students have had

a chance to look at the objects, I will collect them, and tell the class they did a great job. I will say to the class: “I’m done with my presentation. Now it’s time to see how much you’ve learned about symmetry!”
Guided Practice (“We Do”) I will check for understanding by interspersing questions throughout Guided Practice activities. I will monitor students as they work and evaluate how well they display and apply their newly acquired knowledge. Activity 1. I will introduce the activity by saying that some living things possess shape, color and size symmetry. A butterfly’s wings are a great example. I will put a few examples of butterfly images from The Butterfly Website on the SmartBoard for reference. Next, I will hand out construction paper cut in the shape of a butterfly to each student. Each table grouping will be given a set of paints and paintbrushes. I will tell students that they are going to design their butterflies’ wings. I will give them these directions: 1) Fold your butterfly in half vertically and then open it up again. (Make sure the crease goes up and down). 2) Find your line of symmetry. 3) Paint only 1 side of the butterfly, using any colors and any design you wish. Once all students are done painting, I will have them fold their butterfly in half once again and gently rub the paper. I will make sure they reach all of the edges so the painted image transfers completely. I will walk among students and when they open up their folded paper, I will ask: “What can you tell me about your butterflies?” (I expect them to say that the same pattern appears on both halves, that the colors match, or that one side is a mirror image of the other.) I will prompt students as needed and make sure they understand why their butterfly’s wings have shape, size and color symmetry. Once dry, the butterflies can be displayed on the class bulletin board. Activity 2. I will break students up into groups of 4, and have them arrange their desks in a circle. Each student will be given a sheet of white paper and each group will be given a container of pattern blocks. I will give the students these directions: 1) Fold your paper in half vertically and then open it up again. (Make sure the crease goes up and down). 2) Use the pattern blocks to make a unique design on the left side of your paper. After students finish their design, I will have them all stand up and take the seat of the person on their left. Their new task will be to finish the design on the desk in front of them and make it symmetrical. They must think carefully about what is on the left side so they can add pattern blocks correctly to the right side. I will monitor student work, and randomly ask questions like “Where is the line of symmetry?” and “Is the design the same on both sides?” I will make sure they are positioning blocks to create an accurate mirror image. Once everyone has completed their designs, students will go back to their original seats. At that time, they will look at their design and decide if it is indeed symmetrical. Each student will have a chance to tell group members why their design is, or is not, symmetrical. If it is not symmetrical, the student must say what needs to be fixed in order to make it symmetrical, and then fix it. Activity 3. I will ask students to find a partner. Each pair of students will be given a “Symmetry in My Classroom” worksheet on a clipboard. I will ask students to write both of their names on the

worksheet. The worksheet contains a list of items that can be found in the classroom (star, desk, American flag, stapler, chair, globe, plus 2 blank lines at the end). Students will work in pairs and locate each of the items in the classroom. As they find each, they must study the object and decide together if its shape has symmetry. Based on their conclusion, they should circle either YES or NO beside the item. I will model the first one (star) for them. I will look around the classroom and say: “There’s a star, right on the bulletin board. Now I will draw an invisible line of symmetry through it with my finger. Hmmm….does the left side match the right side? Yes! The star’s left half is identical to its right half. Therefore, I conclude the star is symmetrical. I will now circle YES on the worksheet.” I will tell students that if they finish early, they can add 2 items of their own to the bottom on the list. I will observe pairs as they work and provide corrective feedback as needed. Activity 4. This online activity will be incorporated into a daily learning center rotation to reinforce lesson concepts. During “computer center time,” students will work one at a time on a classroom computer. They will be given access to Saxon Math’s Line Symmetry exercise so they can practice sorting shapes with and without symmetry. I will provide instructions for students, and give assistance as needed. I will monitor student work, and ask them to explain their actions to ensure correct understanding of the concept. To transition I will say “You sure have learned a lot about the concept of symmetry. Now it’s time for our review.” Closure I will ask students to sit down and to respond to these questions chorally:
1. When a figure has symmetry, its right half and its left half are ….. (I expect them to say “identical”).
2. In other words, the right side and the left side…..(I expect them to say “match”.) 3. We can also say the right side is the mirror image of the …(I expect them to say “left side”.) 4. What do we call the fold that divides a shape into 2 identical parts? (I expect them to say the
“line of symmetry”). 5. Where can we find examples of symmetry? (I expect them to say “everywhere!”)
“To wrap things up, let’s do a fun SmartBoard activity as a class. I will display the Symmetry Game on the SmartBoard. One by one, I will have students come up and “color” a part of the picture. Together, students will create a work of art with symmetry. When they are done I will say: “You all did great work today. It is clear to me that you understand the geometric concept of symmetry. With your newly-trained eyes, I bet you will find many examples of symmetry all around you!” Evaluation Diagnostic: Brainstorming and class discussion in Anticipatory Set. Formative: Observation, monitoring, didactic questions and checking for understanding in Development and Guided Practice. Q & A in Closure.

Summative: “Where is My Other Half?” worksheet (homework) and “Am I Symmetrical?” worksheet (in-class) in Independent Practice. Independent Practice (“You Do”) Activity 1. Time permitting, students will work at their seats on an “Am I Symmetrical?” worksheet. Students will study the pictures and decide which are symmetrical and which are not. When everyone is done, I will collect the worksheets for evaluation. I will assess whether or not students were able to apply the concept of symmetry and answer the questions correctly. Activity 2. For homework, I will give students a worksheet to take home called “Where Is My Other Half?” Students will apply their knowledge of symmetry to complete the missing half of the ladybug drawing. I will ask students to return their homework the following day for evaluation. I will assess whether or not students drew mirror images correctly. Accommodations/Modifications *Students with Reading problems: Will be paired up with non-disabled students who can read directions and worksheets with them. Teacher will also make sure to read all directions aloud. *Students with Writing problems: Will be paired up with non-disabled students for group work. Will still provide valuable input and direction when another student is writing/drawing for them. *Students with Behavior problems: Will be seated at the front of the class to keep them focused on the lesson. Will be asked to be my helper whenever possible to promote positive involvement. *Students with Disabilities: Will receive modifications specified on their IEPs. *Visually-Impaired Students: Will be given front-row seating, and worksheets/handouts with have larger sized font. *Hearing-Impaired Students: Will be given front-row seating, and a hard copy of the PowerPoint presentation. *English Language Learners: Will be given a modified version of the worksheets that include more graphics. Teacher will pronounce the word “symmetry” slowly and clearly. *Less-Advanced Students (who have difficulty learning): Will be paired up with more advanced students who can provide assistance during Guided Practice activities. *More-Advanced Students (who complete assignments quickly): Will be allowed to extend their learning by accessing an interactive lesson on Symmetry on the classroom computer. Students will learn about vertical, horizontal, and diagonal symmetry and complete exercises online. (Since the

lesson has audio, headphones are recommended.) Students will also be allowed to look at clip art in Microsoft Word to find and print pictures of objects with symmetry. Reflection 1) Were my standards, goals and objectives aligned? 2) Did I provide a good “grabber” for Anticipatory Set? 3) Did brainstorming techniques provide a good framework for introducing the lesson? 4) Did my PowerPoint slides enhance the presentation of material? 5) Did I provide clear directions and sufficient guidance for my Guided Practice activities? 6) Did my Closure reiterate most important points of the lesson? 7) Did my Independent Practice activities allow students to show mastery of the topic? 8) Were my Accommodations and Modifications appropriate and detailed enough? 9) Did my methods of Evaluation allow me to accurately assess student proficiency? 10) Were my CFUs well-worded and easily understood?

Name ________________________ Date ______________
Directions: Look at the 10 pictures below. Study each one and decide if it is symmetrical. If it is, circle YES. If it is not, circle NO.
1.
YES NO
2.
YES NO
3.
YES NO
4.
YES NO

5.
YES NO
6.
YES NO
7.
YES NO
8.
YES NO
9.
YES NO
10.
YES NO
F

Name(s) ________________________ Date ______________
________________________
Directions: Work with your partner to find the items below in your classroom. Study each object together, and decide if it has symmetry. If it does, circle YES, if it does not, circle NO. If you have extra time, add some items of your own.
Object Does it have symmetry?
1. star YES NO
2. desk YES NO
3. American flag YES NO
4. stapler YES NO
5. chair
YES NO
6. globe YES NO
7. YES NO
8. YES NO


(for Anticipatory Set)