Lesson Plans on Math 14
56
COMPILATION OF MANIPULATIVE-INTEGRATED LESSON PLANS IN MATHEMATICS KHARELLE MAE M. NADUMA BSED-MATH 3 MATH 14 AUGUST 2014
-
Upload
independent -
Category
Documents
-
view
0 -
download
0
Transcript of Lesson Plans on Math 14

COMPILATION OF
MANIPULATIVE-INTEGRATED
LESSON PLANS IN MATHEMATICS
KHARELLE MAE M. NADUMA
BSED-MATH 3
MATH 14
AUGUST 2014

Table of Contents
First Exam
Squares and Square Roots ……………………………………………………………….….. 2
Attachment 1 …………………………………………………………………………….….. 5
Attachment 2 …………………………………………………………………………….….. 7
Multiplication and Division of Integers ………………………………………………….…. 8
Attachment 3 …………………………………………………….………………….……… 11
Attachment 4 …………………………………………………….…………………..……... 13
Second Exam
The Sum and Difference of Two Terms ……………………….………………….………... 15
Attachment 5 …………………………………………………….………………….……… 19
Attachment 6 ………………………………………………….……………………….…… 21
Third Exam
Perpendicularity ……………………………………………………………………….….... 24
Attachment 7 …………………………………………………………………….…………. 30
Attachment 8 …………………………………………………………………….…………. 32
Fourth Exam
Special Right Triangles ………………………………………………………….………… 35
Attachment 9 …………………………………………………………………….………… 41
Attachment 10 ………………………………………………………………….………….. 43
Attachment 11 ………………………………………………………………….………….. 45
Experimental and Theoretical Probability ……………………………………….………... 46
Attachment 12 …………………………………………………………………….……….. 50
Attachment 13 …………………………………………………………………….……….. 51
FIRST EXAM

2
GRADE 7
Lesson Plan in Numbers: Squares and Square Roots
Content Standards
Performance Standards
Learning Competencies
The learner demonstrates
understanding of…
estimation/approximation
of a square of a number
and the measures of
quantities
The learner is able to…
apply various
procedures and
manipulations on the
different subsets of the
set of real numbers,
particularly on squares
and square roots
The learner…
determines what two
integers the square
root of a number is
*K to 12 Curriculum Guide – version as of January 31, 2012
I. Objective
At the end of the 60-minute lesson, the students will be able to determine the
squares of numbers and the square root of perfect squares.
II. Learning Task
A. Subject Matter: Squares and Square Roots
B. References:
Math is Fun: http://www.mathsisfun.com/square-root.html
Math.com: http://www.math.com/school/subject3/lessons/S3U3L3GL.html
C. Materials:
a. LCD Projector
b. Laptop
c. Virtual Manipulative – Geoboard
d. Whiteboard and marker
e. Worksheets for Activity and Quiz (see attachment)
III. Procedure
A. Preliminary Activities
a.Opening Prayer (2 min.)
The teacher will ask a student to lead the prayer.
b. Greetings (3 min.)
The teacher will greet the students a good morning/afternoon and check the
attendance.

3
B. Lesson Proper
a. Class Activity (15 min.)
In this activity, the students will determine the squares of numbers and the
square root of perfect squares with the help of Geoboard.
Guidelines:
1. Group the students by pairs. Each pair should have a laptop/tablet/iphone
with the Geoboard App. Note that a day before the lesson the students
have already downloaded the app on their laptop/tablet/iphone.
2. The teacher will then introduce the virtual Geoboard to the students. The
teacher will also review the following terms:
o Square (shape), its area and side length
o Exponents, radicals
3. After the introductionof the Geoboard and the short review, the students
will be left working with their pairs as they answer the activity sheet (see
attachment 1) given by the teacher. The teacher will roam around the class
to monitor the performance of each student.
b. Discussion (25 min.)
After the allotted time for the activity, the teacher will collect the activity
sheets and will start to ask about the students’ answers and observations in the
activity. He/she will then probe questions until the students arrive to the
concept of squares and square roots.
Given the side length, how did you get the area of the square?
Given the area, how did you get the side length of the square?
What can you say about the square’s area in relation to its side length?
What can you say about the side length in relation to its area?
What rules can you come up with these observations? (squares and
square roots)
What if we square a negative number, say -3, what do we get? (9)
Can we consider -3 as a square root of 9?
From this, how many square roots do you think a number has?
How will you define squares (not the shape) and square roots now?
C. Generalization (5 min.)
The teacher will give a brief generalization or summary of the lesson.
IV. Rationale
It is important that students know and understand squares and square roots because
they are used in practical application, especially when we talk about areas. Through
square roots also, it becomes easier for us to represent some of the irrational numbers.

4
IV. Evaluation (8 min.)
The teacher will give the students a quiz as their individual assessment (see
attachment 2).
V. Homework: Non-Perfect Squares
The teacher will project the homework on the board.
Copy and answer the following on a ¼ sheet of paper.
1. √12 = 3. √45 = 5. √2 =
2. √80 = 4. √150 =
5
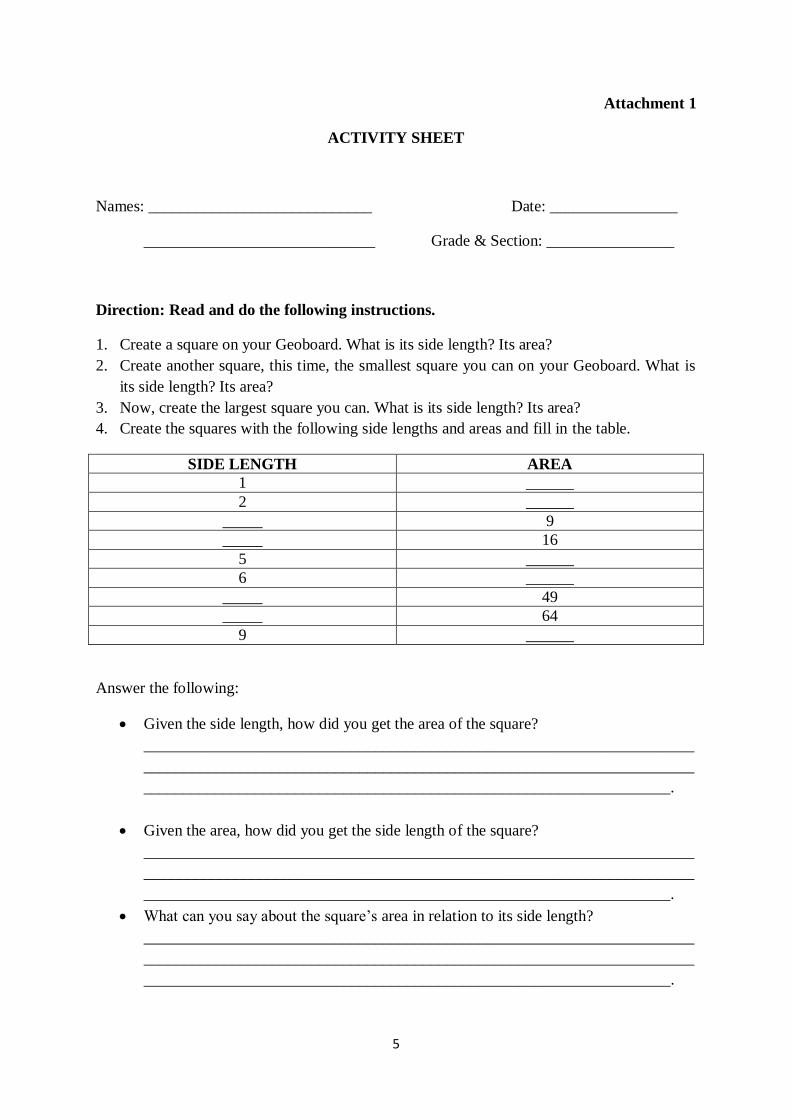
Attachment 1
ACTIVITY SHEET
Names: ____________________________ Date: ________________
_____________________________ Grade & Section: ________________
Direction: Read and do the following instructions.
1. Create a square on your Geoboard. What is its side length? Its area?
2. Create another square, this time, the smallest square you can on your Geoboard. What is
its side length? Its area?
3. Now, create the largest square you can. What is its side length? Its area?
4. Create the squares with the following side lengths and areas and fill in the table.
SIDE LENGTH AREA
1 ______
2 ______
_____ 9
_____ 16
5 ______
6 ______
_____ 49
_____ 64
9 ______
Answer the following:
Given the side length, how did you get the area of the square?
_____________________________________________________________________
_____________________________________________________________________
__________________________________________________________________.
Given the area, how did you get the side length of the square?
_____________________________________________________________________
_____________________________________________________________________
__________________________________________________________________.
What can you say about the square’s area in relation to its side length?
_____________________________________________________________________
_____________________________________________________________________
__________________________________________________________________.

6
What can you say about the side length in relation to its area?
_____________________________________________________________________
_____________________________________________________________________
____________________________________________________________________.
With your observations, what pattern/s can you create? Write it below or draw a table.

7
Attachment 2
QUIZ
Name: ________________________________ Date:________________
Grade & Section: _______________________
A. Square the following numbers.
1. 11 =
2. 13 =
3. 15 =
4. 17 =
5. 19 =
To square a number means to
__________________________________________________________________________.
B. Find the square root of the following perfect squares.
6. 196 =
7. 256 =
8. 324 =
9. 484 =
10. 625 =
To find the square root of a number means to
__________________________________________________________________________.
8
GRADE 7
Lesson Plan in Numbers: Multiplication and Division of Integers
Content Standards
Performance Standards
Learning Competencies
The learner demonstrates
understanding of…
estimation/approximati
on of a square of a
number and the
measures of quantities
The learner is able to…
apply various
procedures and
manipulations on the
different subsets of the
set of real numbers,
particularly on squares
and square roots
The learner…
performs fundamental
operations on integers
*K to 12 Curriculum Guide – version as of January 31, 2012
I. Objective
At the end of the lesson, the students will be able to multiply and divide integers.
II. Learning Task
A. Subject Matter: Multiplication and Division of Integers
B. Reference/s:
Benigno, G. D. (2006). Basic Mathematics. Quezon City: Rex Printing Company,
Inc.
C. Materials:
a. Traditional Manipulative – Integer Tiles
b. Whiteboard and marker
c. Worksheets for Activity and Quiz (see attachment)
d. LCD Projector
III. Procedure
A. Preliminaries
a.Opening Prayer (2 min.)
The teacher will ask a student to lead the prayer.
b. Greetings (3 min.)
The teacher will greet the students a good morning/afternoon and check
the attendance.

9
B. Lesson Proper
a.Class Activity (15 min.)
In this activity, the students will be able to multiply and divide integers wit the
help of Integer Tiles.
Guidelines:
1. Before the activity starts, the teacher will review the following terms:
Multiplication
Division
Integers
2. The teacher will then group the students through counting. Each group has
3 members.
3. After that, the teacher will give each group a bag of “Integer Tiles” and
introduce it to them.
- represents one positive
- represents one negative
-
How will you represent (+5)? (-4)?
+5 =
-4 =
What about zero? How will you represent it using these tiles?
- represents zero; also referred to as a “zero-pair”
4. Once the students know how to represent integers using the tiles, the
teacher will give each group an activity sheet (see attachment 3) and leave
them work on it. The teacher will roam around the classroom to monitor
each group, making sure that each member cooperates and each has the
chance to manipulate the tiles.
b. Discussion (20 min.)
After the time allotted for the activity, the teacher will start to ask each
group about their answers. He/she will project on the board the charts that
the group have answered in the activity as an aid, collect the answers of
the students and write it on the charts, and will ask the class to check if the
answers are right. He/she will then probe questions until the students arrive
to the concept of multiplication and division of integers.

10
Have you observed patterns?
On multiplication, what is the result if we multiply both positive
integers? Both negative integers? A positive and a negative integer?
What rule can you make on the multiplication of integers based on your
observations?
On division, what do we get if we divide a positive integer by another
positive integer? A negative integer by another negative integer? A
positive integer by a negative integer? A negative integer by a positive
integer?
What rule can you make on the division of integers based on your
observations?
C. Generalization (5 min.)
The teacher will give a brief generalization or summary of the lesson.
IV. Rationale (3 min.)
It is important that students know and understand operations like multiplication and
division of integers because this lesson does not just allow students to use their
knowledge about addition and subtraction but it also prepares them for the next years
where they will have to solve problems involving money, distance, movement, and
measurement, among others.
V. Evaluation (10 min.)
The teacher will give the students a quiz (see attachment 4) which they will answer
for 5 minutes. After that, they will exchange papers with their seatmates and check it.
VI. Homework
Answer the following on a ¼ sheet of paper.
Direction: Determine whether the product/quotient of the following is positive or
negative. No need to perform actual multiplication/division.
1. (-x)(y)(-z) __________________
2. (1)(-2)(-3)(-4) __________________
3. 48 ÷ (-4) __________________
4. (-120) ÷ (-60) __________________
5. (6)(3)(a)(-b)(9) __________________

11
Attachment 3
ACTIVITY SHEET
Group No. _____
Names: ________________________________ Date: ________________
________________________________ Year & Section: ________________
________________________________
Direction: Using the Integer Tiles, fill in the table:
A. Multiplication
Note:
The sign of the multiplicand tells us if we are adding (+) or taking away (-) groups.
The sign of the multiplier tell us what tiles the group consists of.
If you “take away” groups of tiles you don’t have, you could add as many zero-pairs
as needed until you have enough tiles.
Student 1 Student 2 Student 3
(+3) • (+2) = ____ (+4) • (+5) = ____ (+6) • (+3) = ____
(+3) • (-2) = ____ (+4) • (-5) = ____ (+6) • (-3) = ____
(-3) • (+2) = ____ (-4) • (+5) = ____ (-6) • (+3) = ____
(-3) • (-2) = ____ (-4) • (-5) = ____ (-6) • (-3) = ____
B. Division
Note:
Rewrite into a multiplication problem, then identify the number of groups you have to
add/take away.
Student 1 Student 2 Student 3
(+8) ÷ (+2) = ____ (+16) ÷ (+4) = ____ (+12) ÷ (+6) = ____
(+8) ÷ (-2) = ____ (+16) ÷ (-4) = ____ (+12) ÷ (-6) = ____
(-8) ÷ (+2) = ____ (-16) ÷ (+4) = ____ (-12) ÷ (+6) = ____
(-8) ÷ (-2) = ____ (-16) ÷ (-4) = ____ (-12) ÷ (-6) = ____

12
C. Observation
What patterns have you noticed?
With the result
_____________________________________________________________________
____________________________________________________________________.
With the sign
_____________________________________________________________________
____________________________________________________________________.
On Multiplication
When does the product become positive?
_____________________________________________________________________
_____________________________________________________________________
____________________________________________________________________.
When does the product become negative?
_____________________________________________________________________
_____________________________________________________________________
____________________________________________________________________.
On Division
When does the quotient become positive?
_____________________________________________________________________
_____________________________________________________________________
____________________________________________________________________.
When does the quotient become negative?
_____________________________________________________________________
_____________________________________________________________________
____________________________________________________________________.

13
Attachment 4
QUIZ
Name: ____________________________________ Date: _______________
Year & Section:_____________________________
Answer the following:
1. -3 • 5 =
2. -2 • -7 =
3. 18 • -3 =
4. -13 • 4 =
5. 7 • 12 =
6. 108 ÷ -27 =
7. -98 ÷ 14 =
8. -135 ÷ -9 =
9. 136 ÷ -17 =
10. 341 ÷ 11 =
Fill in the blanks.
11. Multiplying both positive integers yields ____________________.
12. Dividing both negative integers yields ____________________.
13. Multiplying a positive integer and a ____________________ yields a negative integer.
14. Dividing a ___________________ and a positive integer yields a negative integer.
15. Multiplying both negative integers yields _____________________.

SECOND EXAM

15
GRADE 8
Lesson Plan in Algebra: Special Products – The Product of the Sum and
Difference of Two Terms
Content Standards
Performance Standards
Learning Competencies
The learner demonstrates
understanding of…
special products and
factors of polynomials
and operations on
rational expressions
The learner is able to…
recognize special
products and factor
polynomials
The learner…
finds special products
of certain
polynomials (e.g.
square of a binomial,
product of sum and
difference of two
terms)
*K to 12 Curriculum Guide – version as of January 31, 2012
I. Objective
At the end of the 60-minute lesson, the students will be able to find the special
product of the sum and difference of two terms.
II. Learning Task
A. Subject Matter: Special Products – The Product of the Sum and Difference of
Two Terms
B. Reference/s:
Abuzo, E. P., et. al. (2013). Mathematics – Grade 8 Learner’s Module. Quezon
City: Book Media Press, Inc.
http://www.mathsisfun.com/algebra/polynomials.html
http://mathworld.wolfram.com/Polynomial.html
http://www.intmath.com/factoring-fractions/1-special-products.php
C. Materials:
a. Paper and scissors
b. Activity sheet
c. Whiteboard and marker/Chalkboard
d. LCD Projector
e. Flash Quiz (PPT)
III. Procedure
A. Preliminaries
a. Opening Prayer (2 min.)
The teacher will ask a student to lead the prayer.

16
b. Greetings (3 min.)
The teacher will greet the students a good morning/afternoon and check the
attendance.
B. Lesson Proper
a. Review (5 min.)
Teacher: What is a polynomial?
Student: A polynomial is a mathematical expression involving a sum of
powers in one or more variables multiplied by coefficients. It means “many
terms”. It can have constants, variables and exponents, but never division by a
variable.
Teacher: What are special products?
Student: Special products are products of certain polynomials that can be
easily found through patterns than by multiplying all of the terms of the
polynomials. They are "special" because they are very common, and they're
worth knowing.
Teacher: What special products have we already discussed?
Student: Square of a binomial and square of a trinomial
Teacher: Okay. Today, we will have an activity to discover another type of
special products.
b. Class Activity: Transformers (10 min.)
In this activity, the students will model the product of the sum and difference
of two terms. The teacher will group the students by pairs base on who their
seatmates are. Note that a day before the activity the students were asked to bring
scissors and a piece of paper, with an ideal size of 8”x11” in any color. The
teacher will ask the students to bring out the said materials and will give each pair
an activity sheet (see attachment 5) having the instructions and guide questions for
their discovery. Each student must perform the instructions in the activity sheet
individually but must answer the guide questions collaboratively with their pair.
The teacher will roam around the class to monitor the performance of each
student.
c. Discussion (25 min.)
After the time allotted for the activity, the class will discuss what they did and
what they have observed. The teacher will ask the following questions and each
pair will be given a chance to answer.
TEACHER STUDENT/S
How’s the activity? What did you
observed? Who among you here saw a pattern? For those who raised their hands, I
want you to come here in front and write
the pattern/s you’ve observed on the board.
Expected Pattern: (x + y)(x – y) = x2 – y
2

17
Okay, thank you. Good observations, but
we’ll get back to that later and see if those are related patterns. For now let’s go back
to the activity that you did. What was the
first thing that you did?
We made a square, named it as square
ABCD, and labeled its side as x.
And…? We cut a small square from it, named it as QRCS, and labeled its side as y.
Okay. So now we have two squares, square
ABCD and QRCS. What are the areas of
those squares?
The area of square ABCD is x2 while the
area of square QRCS is y2.
x2 and y
2, correct. Now you formed a new
figure, right? What is the area of that new figure?
x2 – y
2.
How did you get that answer? Since the new figure was formed when we
cut square QRCS from square ABCD, we
just subtracted the areas of the two squares to get the area of the new figure.
Very good. Now what did you do next? We cut the new figure as instructed and
rearranged the pieces to form a rectangle.
Okay. So what is now the length and width of that rectangle? How did you represent
the dimensions in terms of x and y?
Length = (x + y), width = (x – y)
How about its area? Can you show on the
board how you got the area of the rectangle?
We used the formula on getting the area of
a rectangle. Area = length x width
A = (x + y)(x – y)
A = x2 – y
2
Okay, very good. Now let’s go back to the
patterns you’ve written on the board earlier.
The last question on your activity sheet is
“Do you see any pattern in the product of the sum and difference of two terms? What
is it?” The sum of the two terms is the
length of the rectangle while the difference is the width. When we multiplied the length
and width we got x2 – y
2.Most of you seem
to observe the same pattern, only it was expressed in different ways. Now how will
synthesize the patterns you’ve written into
one?
(x + y)(x – y) = x2 – y
2
Do you think this pattern applies to any polynomial that is in this form? Try to
solve the following on your notebook and
observe their product.
1. (2m + n)(2m – n) 2. (xy + 8)(xy – 8)
3. (x + 3y)(x – 3y)
Yes, it applies to any polynomial in this form
Does the order matter? What if it’s (x – y)(x + y), will we still get the same answer?
Yes, we’ll still get the same answer. The order does not matter. It’s commutative.
What do you notice with its product? How
many terms does it have?
Two.
What do we call a polynomial that has two terms?
A binomial.

18
Is the product always a binomial? Yes.
Do you have to do the FOIL method to get
the product of polynomials in this form?
No.
Alright. And because this pattern makes
our solving easier, this means that this is
another type of a special product - the product of the sum and difference of two
terms.
C. Generalization (5 min.)
The teacher will ask the students to summarize what they have learned.
Expected Generalization: One type of special products is the product of the
sum and difference of two terms, which is the difference of the squares of
the terms. In symbols,
(x + y)(x – y) = (x – y)(x + y) = x2 – y
2.
Notice that the product is always a binomial and the order does not matter.
IV. Rationale
It is important that students know how to identify special products because their
patterns can be used to easily find the product of algebraic expressions and is very
essential in factoring. More than that, special products can be applied in real-life
situations. A specific example is the Punnet square.
V. Evaluation (8 min.)
The class will have a “Flash Quiz”. Using the pattern that the students have learned,
they must find the product of the sum and difference of two terms that the teacher will
flash on the projector. They will write their answers to the 10-item quiz on a ¼ sheet
of paper. They will only be given 15 seconds to answer each item. After 15 seconds,
the slide will automatically flash another problem and it will not flash the previous
problems again. After the 10th
item, they will exchange papers with their seatmates
and check it. (See attachment 6 for the print screen of the Flash Quiz in ppt.)
VI. Assignment
The teacher will give the students a research assignment:
Research at least two real-life applications of the special products we have discussed
so far – square of a binomial, square of a trinomial, and the product of the sum and
difference of two terms. Write it on a one whole sheet of paper.

19
Attachment 5
TRANSFORMERS
ACTIVITY SHEET
Names: ________________________________ Date: ________________
________________________________ Year & Section: ________________
Direction: Do the following instructions individually and answer the guide questions
with your pair.
Materials: Paper and scissors
1. Make a square out of the paper you have. Name it as square ABCD and label its side as x.
2. Cut a small square from any of the corners of square ABCD. Name it as QRCS and label
its side as y, like the figure below.
In terms of x and y…
What is the area of square ABCD?
What is the area of square QRCS?
How will you represent the area of the new figure (ABRQSD)?
3. Cut the new figure (ABRQSD) on the broken line shown below.
S
R Q
D
B A
C
Q R
S
y
x

20
4. Rearrange the pieces to form a rectangle.
In terms of x and y…
How will you represent the length and width of the rectangle?
What is its area? Show how you get it.
Do you see any pattern in the product of the sum and difference of two terms? What is
it?

21
Attachment 6
Print Screen of Flash Quiz

22

THIRD EXAM

24
GRADE 8
Lesson Plan in Geometry: Perpendicularity
Content Standards
Performance Standards
Learning Competencies
The learner demonstrates
understanding of…
parallel and
perpendicular lines
The learner is able to…
prove results involving
parallel and
perpendicular lines
The learner…
defines perpendicular
lines
determines and
proves the conditions
under which lines and
segments are
perpendicular
*K to 12 Curriculum Guide – version as of January 31, 2012
I. Objective
At the end of the 60-minute lesson, the students will be able to:
illustrate perpendicular lines
determine the conditions under which lines and segments are perpendicular
II. Learning Task
A. Subject Matter: Perpendicularity
B. Reference/s:
Abuzo, E. P., et. al. (2013). Mathematics – Grade 8 Learner’s Module. Quezon
City: Book Media Press, Inc.
C. Materials:
a. The Geometer’s Sketchpad
b. Worksheets for Activity and Quiz
c. Whiteboard and marker/Chalkboard
d. LCD Projector
e. Protractor
III. Procedure
A. Preliminaries
a. Opening Prayer (2 min.)
The teacher will ask a student to lead the prayer.
b. Greetings (3 min.)
The teacher will greet the students a good morning/afternoon and check the
attendance.

25
B. Lesson Proper
a. Review: Am I Perpendicular? (7 min.)
The teacher will test if the students can still recall what perpendicular lines are and
how they look like. The teacher will project four different figures on the
whiteboard and ask the following questions:
Figure 1 Figure 2
Figure 3 Figure 4
1. What is common in the four given figures?
The lines in each figure intersect.
2. What makes figure 3 and figure 4 different from the first two figures?
They form a right angle.
3. Let’s measure the angles formed by these intersecting lines. (The teacher
will call four students to come in front and measure the angles using
their protractor and write the measurements on the board.) Which among
the four figures show perpendicularity?
Figures 3 and 4.
4. When are lines said to be perpendicular?
When the lines intersect each other at right angles.
5. Does perpendicularity apply only to lines?
No, segments and rays can also be perpendicular.
b. Class Activity (20 min.)
In the class activity, the students will determine the conditions under which lines
and segments are perpendicular with the help of a virtual manipulative – The
Geometer’s Sketchpad. It is assumed that the students already know how to use
the said manipulative before the activity.
Guidelines:
1. The teacher will group the students into 10 groups through counting. Each
group will have 3 members (assuming that the class size is 30).

26
2. There are 5 tasks and two groups will work on the same task, as shown
below:
Groups 1 & 2 – Task 1
Groups 3 & 4 – Task 2
Groups 5 & 6 – Task 3
Groups 7 & 8 – Task 4
Groups 9 & 10 – Task 5
3. On the first part of the activity, each group will do the task assigned to them
using The Geometer’s Sketchpad (see attachment 7 for the Tasks). The teacher
must remind the students that each should have the chance to manipulate and
everyone should cooperate in doing the task.
4. After 15 minutes, the groups that have the same assigned task will merge and
will be given 5 minutes to compare their observations. They must write their
observations on a ½ sheet of paper with their names and task number.
c. Discussion/Sharing (15 min.)
After the allotted time for the class activity, a member from each group (the new
formed group) will share to the class what their task is and what they have
observed. The member that will share will be picked randomly so each student
must prepare.
TEACHER STUDENT
Let’s have groups 1 and 2 to share about their task, Task #1. (random calling of name)
(The chosen student will share to the class what their task is. Please refer to Task 1 in attachment
1.)
What can you say about 𝐴𝐵 and 𝐷𝐸 in terms of the angles formed?
When we measured the angles, it formed right
angles so we can say that 𝐴𝐵 and 𝐷𝐸 are perpendicular to each other.
Very good. 𝐷𝐸 is the bisector, right? And it is
perpendicular to 𝐴𝐵 , the given line segment. For
this reason, we call 𝐷𝐸 the “perpendicular
bisector” of 𝐴𝐵 . A perpendicular bisector of a line segment is a line or a ray or another line
segment that is perpendicular to the line segment
and intersects it at its midpoint.
Now, have you identified other lines, segments,
or rays that bisect 𝐴𝐵 the same way that 𝐷𝐸
bisects it? Does 𝐴𝐵 have other perpendicular bisector?
No, ma’am. We haven’t identified other
perpendicular bisector of 𝐴𝐵 other than 𝐷𝐸 .
Oh, only 𝐷𝐸 is the perpendicular bisector of 𝐴𝐵 . What does this mean?
This means that a line segment has only one
perpendicular bisector.
Very good! Remember this class: A line segment
has a unique perpendicular bisector.
Let’s go to the next, groups 3 and 4, with Task #2. (random calling of name)
(sharing)
How many lines that passes through A are
perpendicular to 𝐵𝐶 ?
One.

27
What does this mean?
Given a line and a point not on the line, there is, … what?
This means that there is only one line/segment
perpendicular to the given line that passes through the given point.
Okay, very good! Take note of this class: Given
a line and a point not on the line, there is exactly
one line perpendicular to the given line that passes through the given point.
(continuation of sharing)
So, what can you say about the distance in terms
of the angles between the distance and the given
line?
The angles formed between the distance and the
given line are right angles so we can say that the
distance is perpendicular to the given line.
Okay, nice observation. And for that reason, we
call that distance as the “perpendicular distance”
between the given point and line.
The next groups are groups 5 and 6, with Task #3. (random calling of name)
(sharing)
What can you say about the angles formed by the
perpendicular lines? Compare the measures of the angles formed by
the perpendicular lines to the measures of the
angles formed by the non-perpendicular lines.
The angles formed by the perpendicular lines are
all congruent, 90°. However, on the non-perpendicular lines, not all
are equal. Only the two opposite or vertical
angles are congruent.
What angles did the perpendicular lines formed again?
Right angles.
How many? Four.
Therefore,…? What conclusion can we make out
of these observations?
Perpendicular lines form four right angles.
Very good! If two lines are perpendicular, then
they form four right angles. Take note of that.
Now let’s proceed to Task #4 by groups 7 and 8. (sharing)
Tell us about your observations in the linear pair whose angles are congruent.
We have observed that 𝑂𝐵 , the adjacent side, is
perpendicular to 𝑂𝐴 , 𝑂𝐶 , and 𝐴𝐶 .
Are your observations with the linear pair whose
angles are congruent (Figure 1) the same with the linear pair whose angles are not congruent
(Figure 2)?
No, ma’am. It’s different. The adjacent side in
Figure 2 is not perpendicular to any of the other sides in the linear pair.
Does this mean that, among the two figures, only Figure 1 shows perpendicularity?
Yes, ma’am.
What can you say about the sides of a linear pair
whose angles are congruent?
The adjacent side of a linear pair whose angles
are congruent is perpendicular to the other sides
(sides that are not adjacent).
Very good! Remember this: If the angles in a
linear pair are congruent, then the lines
containing their sides are perpendicular.
Let’s have the last, Task #5 by groups 9 and 10. (sharing)
Tell us about your observations in the 3 figures
in terms of the non-common sides.
In Figure 1, the non-common sides formed a
right angle.
In Figure 2, the non-common sides formed an
angle of (any angle not equal to 90°). Among the two figures, of course, Figure 1
shows perpendicularity because the non-common
sides intersect at right angle. Figure 3 does not show perpendicularity because
there is no right angle in the figure.
Okay, only Figure 1 shows perpendicularity.
What is in Figure 1 or what characteristics do the
The angles are complementary and adjacent.

28
angles have that showed perpendicularity?
Does this mean that if two angles are adjacent and complementary, the non-common sides are
perpendicular?
Yes, ma’am.
Yes, that’s right. Remember that, okay? If two angles are adjacent and complementary, the non-
common sides are perpendicular.
Alright, let’s give a big hand for everybody. You
all did a great job. Actually, what you have discovered in Task 4 and 5 are the conditions
under which lines and segments are
perpendicular.
C. Closure/Generalization (5 min.)
The teacher will ask the students to summarize what they have learned.
Expected Generalization:
Perpendicular lines are lines that intersect each other at right angles.
A perpendicular bisector of a line segment is a line or a ray or another line
segment that is perpendicular to the line segment and intersects it at its
midpoint. This follows that, in a plane, a segment has a unique perpendicular
bisector.
The distance between a line and a point not on the line is the length of the
segment perpendicular to the line from the point, called the perpendicular
distance.
Given a line and a point not on the line, there is exactly one line perpendicular
to the given line that passes through the given point.
If two lines are perpendicular, then they form four right angles.
If the angles in a linear pair are congruent, then the lines containing their sides
are perpendicular.
If two angles are adjacent and complementary, the non-common sides are
perpendicular.
The teacher will then ask the students to cite a specific example of the use of
perpendicularity in real life.
IV. Rationale
It is important that students know what perpendicularity is and determine the
conditions under which lines and segments are perpendicular because these are
needed for the next lessons: quadrilaterals and proving of geometric relationships.
Moreover, perpendicular lines, together with parallel lines, are very useful in real life.
We can see them almost everywhere. These two are crucial elements in construction,
such as the windows and walls of a room, roads and rails, building of a flagpole, and
many more.

29
V. Evaluation (8 min.)
The students will be assessed individually through the assessment task (see
attachment 8).

30
Attachment 7
Task 1:
1. On the Geometer’s Sketchpad, make a line segment using the Straightedge Tool and label its endpoints as A and B
using the Text Tool.
2. Bisect the line segment using the Compass Tool.
3. Using the Point Tool, place a point on the intersection of the line segment and the bisector, and label it as C.
4. Label the endpoints of the bisector as D and E.
5. Measure the angles formed - ∠𝐴𝐶𝐷, ∠𝐵𝐶𝐷, ∠𝐴𝐶𝐸, ∠𝐵𝐶𝐸.
What can you say about 𝐴𝐵 and 𝐷𝐸 in terms of the angles formed?
_______________________________________________________________________________________________
_______________________________________________________________________________________________
Can you identify other lines, segments, or rays that bisects 𝐴𝐵 the same way 𝐷𝐸 bisects it?
_______________________________________________________________________________________________
---------------------------------------------------------------------------------------------------------------------------------------------
Task 2:
1. On the Geometer’s Sketchpad, construct a line and a point not on the line. Label the point as A and the line as 𝐵𝐶 .
2. Make a line perpendicular to 𝐵𝐶 that passes through A using the Compass Tool.
3. Identify how many line/s that passes through A is/are perpendicular to 𝐵𝐶.
___________________________________________________________
4. On a new sketch, construct another line and a point not on the line.
5. Name the line as 𝑃𝑅 and the point as S.
6. Find the distance between 𝑃𝑅 and S. (Hint: To find the distance, do the same procedure you did in Step 2.)
7. Measure the angles formed between the distance and the given line (𝑃𝑅 )
What can you say about the distance in terms of the angles formed?
_______________________________________________________________________________________________
_______________________________________________________________________________________________
----------------------------------------------------------------------------------------------------------------------------------------------
Task 3:
1. On the Geometer’s Sketchpad, construct two lines that are perpendicular.
2. Name the lines as 𝐴𝐵 and 𝐷𝐸 , and the point of intersection as C.
3. Measure the angles formed - ∠𝐴𝐶𝐷, ∠𝐵𝐶𝐷, ∠𝐴𝐶𝐸, ∠𝐵𝐶𝐸.
4. Construct another pair of lines that intersect but are not perpendicular.
5. Name the lines as 𝐹𝐺 and 𝐼𝐽 , and the point of intersection as H.
6. Measure the angles formed - ∠𝐹𝐻𝐼, ∠𝐹𝐻𝐽, ∠𝐺𝐻𝐼, ∠𝐺𝐻𝐽.
What can you say about the angles formed by the perpendicular lines?
Compare the measures of the angles formed by the perpendicular lines to the measures of the angles formed by the
non-perpendicular lines.
_______________________________________________________________________________________________
_______________________________________________________________________________________________

31
Task 4:
1. In the Geometer’s Sketchpad, construct a linear pair* whose angles are congruent. Consider this as your Figure 1.
2. Name the angles as ∠𝐴𝑂𝐵 and ∠𝐶𝑂𝐵, with 𝑂𝐵 as the adjacent side of the two angles.
3. Measure and compare ∠𝐴𝑂𝐵 and ∠𝐶𝑂𝐵.
What do you observe with 𝑂𝐵 in relation to 𝑂𝐴 ?
___________________________________________________________________________________________
What do you observe with 𝑂𝐵 in relation to 𝑂𝐶 ?
___________________________________________________________________________________________
What do you observe with 𝑂𝐵 in relation to 𝐴𝐶 ?
___________________________________________________________________________________________
4. Construct a linear pair whose angles are not congruent. Consider this as your Figure 2.
5. Do steps 2 and 3 but change the name of the angles, and answer the questions in bullet.
Are your observations with the linear pair whose angles are congruent (Figure 1) the same with the linear pair
whose angles are not congruent (Figure 2)?
___________________________________________________________________________________________
* two angles that are adjacent (share a leg) and supplementary (add up to 180°)
----------------------------------------------------------------------------------------------------------------------------------------------
Task 5:
1. Construct any two angles that are complementary and adjacent. Consider this as your Figure 1.
What do you observe with the non-common sides of the angles? Measure the angle it forms.
___________________________________________________________________________________________
___________________________________________________________________________________________
2. Construct any two angles that are adjacent but are not complementary. Consider this as your Figure 2.
What do you observe with the non-common sides of the angles? Measure the angle it forms.
___________________________________________________________________________________________
___________________________________________________________________________________________
Which among Figure 1 and Figure 2 shows perpendicularity?
________________________________________________
3. Construct any two angles that are complementary but are not adjacent. Consider this as your Figure 3.
Does this figure show perpendicularity? Measure the angle it forms.
________________________________

32
Attachment 8
Assessment Task
Name: ________________________________ Date: ________________
Year & Section: ________________________
Directions:
For numbers 1-5, draw a segment that is perpendicular to the given side. The desired segment
should have an endpoint given below. You can use either a protractor or a compass.
1. Endpoint: B 2. Endpoint: R 3. Endpoint: L
Side: 𝐴𝐶 Side: 𝑇𝑆 Side: 𝑁𝐺
4. Endpoint: A 5. Endpoint: E
Side: 𝑀𝐻 Side: 𝑅𝐴
A
R
O
G
N
E H
T A
M
L
E
G
N
A T S
R Q
C
B
A

33
For numbers 6-10:
On Column B, write the condition of perpendicularity that makes the statement in Column A
true based on the given.
Given Column A Column B
6. x⊥y.
∠1, ∠2, ∠3, and ∠4 are
right angles.
7.
𝐼𝑆 ⊥ 𝐼𝑁 .
8. ∠1 ≅ ∠3.
q ⊥ p.
9. B – midpoint
Line m is the only
perpendicular bisector of
𝐴𝐶.
10.
Line k is the only line
perpendicular to line a
through B.
E
S
k
N I
4 3
2 1
y
x
1 2
3
A
4
q
p
m
C B A

FOURTH EXAM

35
GRADE 9
Lesson Plan in Trigonometry: Special Right Triangles
Content Standards
Performance Standards
Learning Competencies
The learner demonstrates
understanding of…
basic concepts of
trigonometry
The learner is able to…
explore the concept of
trigonometric ratios and
use these to solve
problems on angles of
elevation and depression
and navigation
The learner…
finds the
trigonometric ratios
of special angles
*K to 12 Curriculum Guide – version as of January 31, 2012
I. Objectives
At the end of the 60-minute lesson, the students will be able to:
determine the characteristics of the two special right triangles, namely 45°-
45°-90° and 30°-60°-90°
find the trigonometric ratios of special angles
II. Learning Task
A. Subject Matter: Special Right Triangles
B. Reference/s:
http://www.regentsprep.org/Regents/math/algtrig/ATT2/Ltri30.htm
http://www.regentsprep.org/Regents/math/algtrig/ATT2/Ltri45.htm\
http://www.wyzant.com/resources/lessons/math/geometry/triangles
C. Materials:
a. Laptop
b. GeoGebra
c. Worksheets for Activity and Quiz
d. Whiteboard and marker
e. LCD Projector
III. Procedure
A. Preliminaries
a. Opening Prayer (2 min.)
The teacher will ask a student to lead the prayer.
b. Greetings (3 min.)
The teacher will greet the students a good morning/afternoon and check the
attendance.
B. Lesson Proper

36
a. Review (7 min.)
The teacher will ask the students to recall what trigonometric ratios are from
their discussion yesterday.
Student: Trigonometric ratios are the ratios of the sides in a right triangle with
respect to its acute angles.
Teacher: Yes, very good. And the three basic trigonometric ratios are…?
(Note that in this lesson we limit the discussion of trigonometric ratios to sine,
cosine, and tangent since the other trigonometric ratios are just the reciprocals
of the three.)
Student: Sine, cosine, and tangent, which are given by
sinθ =length of leg opposite the angle
length of hypotenuse
cosθ =length of leg adjacent to the angle
length of hypotenuse
tanθ =length of leg opposite the angle
length of leg adjacent to the angle
Exercise. Given the lengths of two sides of a right angled triangle, find the
length of the third side using the Pythagorean Theorem. Then find the values of
the three basic trigonometric ratios coreesponding to the angle θ.
b. Class Activity (20 min.)
In this activity, the students will discover the characteristics of special
triangles with the help of GeoGebra, a virtual manipulative, and find the
trigonometric ratios of special angles. Note that before this activity the
students were already oriented on how to use the said manipulative. The
students will be grouped into groups of four. The teacher will assign each
group a group number. After that, the teacher will ask each group to get their
laptops and prepare the GeoGebra. He/she will then give each group the
activity sheet. The “odd groups” (1, 3, 5, etc.) will be do the Task 1 (see
attachment 9), and the “even groups” (2, 4, 6, etc.) will do the Task 2 (see
attachment 10). Each student in the group must cooperate in the activity. The
teacher will roam around the class to facilitate and monitor the performance of
each student.
x
9
5
B A
G
θ

37
c. Discussion (15 min.)
After the allotted time for the activity, the teacher will now ask the students
questions which will lead to the concept of special triangles and angles.
TEACHER STUDENT
On Task 1
What polygon is formed?
Triangle.
Okay, ∆ABC. What type of triangle is ∆ABC in terms of its sides and angles?
∆ABC is an equilateral and equiangular triangle.
Very good. When you drew a segment connecting
C and D, what happened?
∆ABC was divided into two.
Okay. You measured the sides and angles of the two triangles formed, right? What have you
observed with the corresponding sides and angles
of the two triangles?
The corresponding sides and angles of the two triangles are congruent.
Yes. This means that they are congruent triangles. And since they are congruent, let’s focus on one
triangle. Let’s take ⊿BDC. What angles are formed
in ⊿BDC?
30°, 60°, and 90°.
So what type of triangle is ⊿BDC in terms of its angles?
Right triangle.
That’s right. And because it’s a right triangle this
means that it has trigonometric ratios, let’s first talk about its sides. What are the measurements of its
sides?
The hypotenuse is 2, the shorter leg is 1,
and the longer leg is √3.
Okay, let’s consider that as Triangle 1. How about
the other triangles that you’ve made based on the given table, the Triangle 2 whose vertices are on
(0,0) and (4,0), and the Triangle 3 whose vertices
are on (0,0) and (5,0), what are the measurements of their sides?
Triangle 1 Triangle 2
Shorter leg 2 5
2
Longer leg 2√3 5√3
2
Hypotenuse 4 5
What have you observed with the values of the
shorter leg and the hypotenuse?
Shorter leg Hypotenuse
Triangle 1 1 2
Triangle 2 2 4
Triangle 3 5
2
5
What pattern do you see?
The hypotenuse is twice the shorter leg.
Yes, very good. The hypotenuse is twice the shorter
leg or c = 2a, where c is the hypotenuse and a is the
shorter leg. This follows that the shorter leg is half the
hypotenuse or 𝑎 =𝑐
2.
How about in the values of the shorter leg and the
longer leg? What pattern do you see?
Shorter leg Longer leg
Triangle 1 1 √3
Triangle 2 2 2√3
The longer leg is √3 times the shorter leg.

38
Triangle 3 5
2
5√3
2
Yes, that’s right. The longer leg is √3 times the
shorter leg or b = a√3, where b is the longer leg
and a is the shorter leg. This follows that 𝑎 = 𝑏
√3=
𝑏√3
3.
Alright, with these patterns we can now easily find the other sides of this kind of triangle given only
one side. And because of this, this 30°-60°-
90°triangle is considered as a “special triangle”. But
that is not the only reason why it is considered as special. Let’s look at its angles. What are the
trigonometric ratios of angles 30° and 60°?
sin30° =1
2
cos30° =√3
2
tan30° =√3
3
sin60° =1
2
cos60° =1
2
tan60° = √3
Observe their values. Are they approximate values? No, they’re exact.
Yes. Usually, when we look for the trigonometric ratios of other angles like 10°, 65°, 83°, etc. the
values are expressed in approximate values but in
these two angles the trigonometric values are exact and easy to remember, right?
For this reason, angles 30° and 60° are referred to
as “special angles”, and this is another reason why
30°-60°-90° triangle is considered special.
On Task 2
What polygon is formed?
Square.
When you drew a segment connecting A and C,
what happened?
It formed to triangles.
What type of triangles are they in terms of their
sides and in terms of their angles?
They are both isosceles and right triangles.
Are they congruent? Yes.
Okay, so now let’s focus on one triangle like we did
earlier. Let’s take ⊿ABC. What angles are formed
in ⊿ABC aside from 90°
45°
Okay. Now, just like in Task 1, you also made three
⊿ABC that have different side lengths, right? What are the measurements of the sides of the three
triangles.
Leg 1 Leg 2 Hypotenuse
Triangle 1
2 2 2√2
Triangle
2
3 3 3√2
Triangle 3
4 4 4√2
Alright. Since it’s an isosceles triangle, the two legs
are just equal. Now, what have you observed with
the leg (leg 1 or leg 2) and the hypotenuse? What pattern do you see?
The hypotenuse is √2 times the leg.
Correct! The hypotenuse is √2 times the leg or
c = a√2, where c is the hypotenuse and a is the leg. From this pattern, how will you create a pattern for
finding a in terms of c?
c = a√2 𝑐
√2=
𝑎√2
√2
𝑎 =𝑐
√2=
𝑐√2
2
Okay, very good. Because of these patterns, 45°-
45°-90° triangle is also considered a “special
triangle” together with 30°-60°-90° triangle.
Now let’s look at its angles and see if those are also
sin45°√2
2
cos45°√2
2
tan45° = 1

39
special. What are the trigonometric ratios of 45°?
Can we consider 45° as a “special angle”? Yes, because just like 30° and 60°, it’s
trigonometric ratios are exact and easy to remember.
Very good. Now, let’s remember that not all
triangles have these kinds of characteristics where a side can be easily found given the other sides
without using the Pythagorean Theorem, and not all
angles have an exact and easy to remember
trigonometric values. For this reason, these right triangles and angles are called “special”.
C. Closure/Generalization (5 min.)
The teacher will ask the students to summarize what they have learned and cite
situations when and where they can use what they’ve learned.
Expected Generalization:
The 30°-60°-90° and 45°-45°-90° triangles are special right triangles. The special
nature of these triangles is that they consist of sides that can be easily found without
using the Pythagorean Theorem. The patterns are as follows.
30°-60°-90° Triangle 45°-45°-90°
Shorter Leg/Leg 1 𝑎 =𝑐
2 or 𝑎 =
𝑏 √3
3 𝑎 =
𝑐 √2
2
Longer Leg/Leg 2 b = a√3 𝑏 =
𝑐 √2
2
Hypotenuse c = 2a c = a√2
These special right triangles also consist of special angles, 30°, 45°, and 60°that yield
exact answers instead of decimal approximations when dealing with trigonometric
functions. Their numerical values are easy to remember.
sin30° =1
2 sin60° =
1
2 sin45°
√2
2
cos30° =√3
2 cos60° =
1
2 cos45°
√2
2
tan30° =√3
3 tan60° = √3 tan45° = 1
IV. Rationale
The importance of the triangle to mathematics and the world around us is absolutely
tremendous. And the trigonometry behind triangles has advanced some of the latest
developments in construction and in technology including GPS systems, satellite
imagery, and cell phone frequencies so it is really important that students know the
trigonometric ratios of angles in triangles, especially those of the special triangles
which are commonly used not just in trigonometry but also in mechanics and other
branches of mathematics.

40
V. Evaluation (8 min.)
The students will be assessed individually through the assessment task (see
attachment 11).

41
Attachment 9
ACTIVITY SHEET
Names: ________________________________ Date: ___________________________
________________________________ Year & Section: __________________
________________________________
________________________________
TASK 1
Directions:
1. On GeoGebra, click “Regular Polygon” then click the coordinates (0,0) and (2,0), respectively. A
box will appear. On that box change the vertices into “3”and click “OK”.
What polygon is formed?
The polygon formed is automatically labeled as ABC. Measure its sides and angles. What type
of triangle is ABC in terms of its sides and angles?
2. Click the “Midpoint or Center” then click the vertices A and B. A point will appear between A and
B and is automatically labeled as D. Click the “Segment” then click C and D.
How many triangles are there now?
3. Measure the following angles and sides.
⊿ADC ⊿BDC
𝐴𝐷 ______ ∠𝐴𝐶𝐷 ______
𝐶𝐷 ______ ∠𝐷𝐴𝐶 ______
𝐴𝐶 ______ ∠𝐶𝐷𝐴 ______
𝐵𝐷 ______ ∠𝐷𝐶𝐵 ______
𝐶𝐷 ______ ∠𝐶𝐵𝐷 ______
𝐵𝐶 ______ ∠𝐵𝐷𝐶 ______
How to measure a side: Click “Distance or Length” then click the endpoints of the side.
How to measure an angle: Click “Angle” then, click the points that form the angle. Example,
∠𝐴𝐵𝐶 , click “Angle”, “A”, “B”, “C”.
What have you observed with the corresponding angles and sides of the two triangles,
⊿ADC and ⊿BDC?
4. Complete the table on the next page using the same steps above.
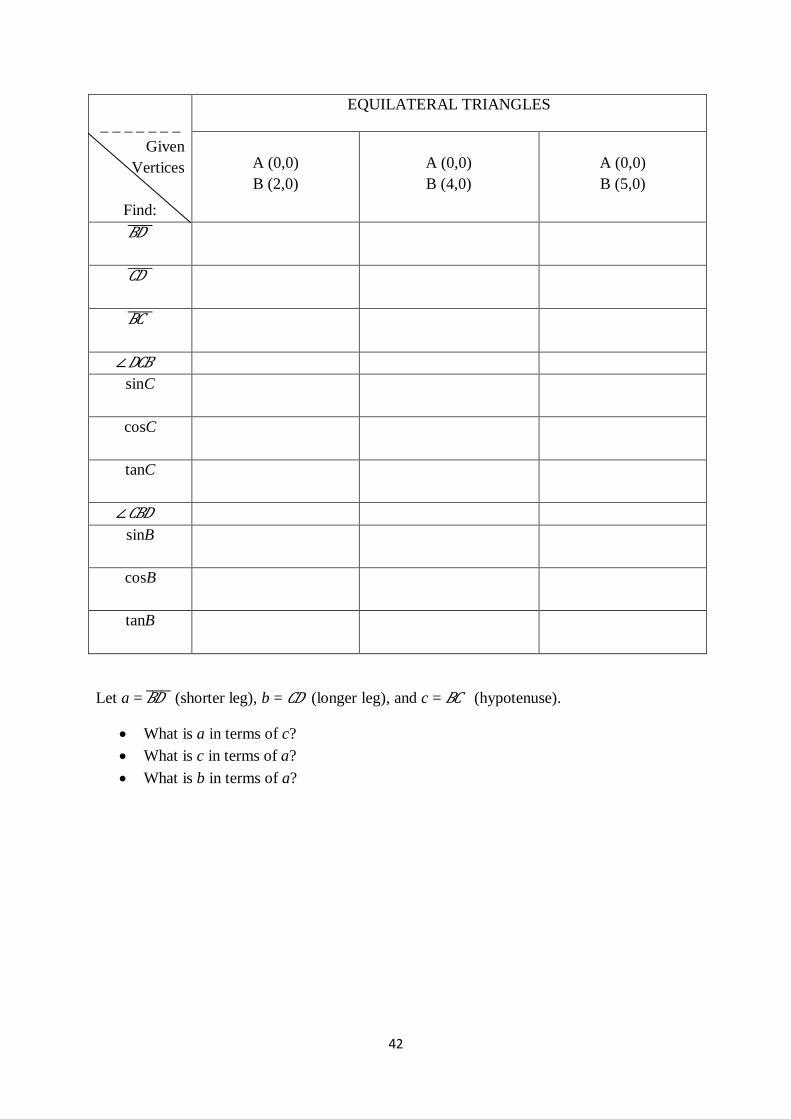
42
_ _ _ _ _ _ _
Given
Vertices
Find:
EQUILATERAL TRIANGLES
A (0,0)
B (2,0)
A (0,0)
B (4,0)
A (0,0)
B (5,0)
𝐵𝐷
𝐶𝐷
𝐵𝐶
∠𝐷𝐶𝐵
sinC
cosC
tanC
∠𝐶𝐵𝐷
sinB
cosB
tanB
Let a = 𝐵𝐷 (shorter leg), b = 𝐶𝐷 (longer leg), and c = 𝐵𝐶 (hypotenuse).
What is a in terms of c?
What is c in terms of a?
What is b in terms of a?

43
Attachment 10
ACTIVITY SHEET
Names: ________________________________ Date: ___________________________
________________________________ Year & Section: __________________
________________________________
________________________________
TASK 2
Directions:
1. On GeoGebra, click “Regular Polygon” then click the coordinates (0,0) and (2,0), respectively. A
box will appear, click “OK”. The polygon formed is automatically labeled as ABCD. Measure its
sides and angles.
What polygon is formed?
2. Click the “Segment” then click the vertices A and C.
How many triangles are there now?
3. Measure the following angles and sides.
⊿ADC ⊿ABC
𝐴𝐷 ______ ∠𝐷𝐶𝐴 ______
𝐶𝐷 ______ ∠𝐶𝐴𝐷 ______
𝐴𝐶 ______ ∠𝐴𝐷𝐶 ______
𝐴𝐵 ______ ∠𝐵𝐴𝐶 ______
𝐶𝐵 ______ ∠𝐴𝐶𝐵 ______
𝐴𝐶 ______ ∠𝐶𝐵𝐴 ______
How to measure a side: Click “Distance or Length” then click the endpoints of the side.
How to measure an angle: Click “Angle” then click the points that form the angle. Example,
∠𝐴𝐵𝐶 , click “Angle”, “A”, “B”, “C”.
What have you observed with the corresponding angles and sides of the two triangles,
∆ADC and ∆ABC?
4. Complete the table on the next page using the same steps above.

44
_ _ _ _ _ _ _
Given
Vertices
Find:
ISOSCELES TRIANGLES
A (0,0)
B (2,0)
A (0,0)
B (3,0)
A (0,0)
B (4,0)
𝐴𝐵
𝐶𝐵
𝐴𝐶
∠𝐵𝐴𝐶
∠𝐴𝐶𝐵
sinA
cosA
tanA
Let a = 𝐴𝐵 (leg 1), b =𝐶𝐵 (leg 2), and c = 𝐴𝐶 (hypotenuse)
What is a in terms of b?
What is a in terms of c?
What is c in terms of a?

45
Attachment 11
ASSESSMENT TASK
Name: ________________________________ Date: ________________
Year & Section: ________________________
Answer the following and show your solution.
1. Given: In ⊿BAD, ∠B = 60°, 𝐵𝐷 = 26.
Find: ∠𝐷, 𝐵𝐴 , 𝐴𝐷 , and the three trigonometric ratios of ∠B and ∠𝐷.
2. Given: In ⊿ABC,∠𝐴= ∠𝐶 , and 𝐴𝐵 = 5.
Find 𝐵𝐶 , 𝐴𝐶 , and the three trigonometric ratios of ∠𝐴 .

46
GRADE 8 MATHEMATICS
Lesson Plan in Probability: Experimental and Theoretical Probability
Content Standards
Performance Standards
Learning Competencies
The learner demonstrates
understanding of…
measures of variability
of data and basic
concepts of probability
The learner is able to…
discuss the basic
concepts of probability
and solve simple
problems involving
probabilities of events
The learner…
explain and interpret
the probability of an
event
differentiate between
an experimental
probability and a
theoretical probability
*K to 12 Curriculum Guide – version as of January 31, 2012
I. Objectives
At the end of the 60-minute lesson, the students will be able to:
determine the experimental and theoretical probability of an event/s
differentiate experimental and theoretical probability
II. Learning Task
A. Subject Matter: Experimental and Theoretical Probability
B. Reference/s:
Abuzo, E. P., et. al. (2013). Mathematics – Grade 8 Learner’s Module. Quezon
City: Book Media Press, Inc.
C. Materials:
a. Worksheets for Activity and Quiz
b. Whiteboard and marker/Chalkboard
c. LCD Projector
d. Number cube or dice
III. Procedure
A. Preliminaries
a. Opening Prayer (2 min.)
The teacher will ask a student to lead the prayer.
b. Greetings (3 min.)
The teacher will greet the students a good morning/afternoon and check the
attendance.

47
B. Lesson Proper
a. Review (5 min.)
TEACHER STUDENT
Yesterday, we talked about probability.
What is probability again?
Probability is a measure of the
likeliness that an event will occur.
Yes, that’s right. If I tossed a coin, what is
the probability that it will land on head?
½.
Why? Because probability is the ratio of the
number of favorable outcomes to the
total number of outcomes. The number
of favorable outcome is 1, the head,
and the total number of outcome is 2,
the head and tail, that’s why its ½.
Very good!
b. Class Activity: It’s Probably Probability (20 min.)
In this activity, the students will discover the difference between experimental
and theoretical probability through an experiment that uses a number cube. The
students will be grouped into groups of three and the teacher will give each
group a number cube (dice) and an activity sheet (see attachment 12). Each
student in the group must cooperate in the activity/experiment. The teacher will
roam around the class to facilitate and monitor the performance of each student.
c. Discussion (15 min.)
After the allotted time for the activity, the teacher will now ask the students
questions which will lead to the concept of experimental and theoretical
probability.
TEACHER STUDENT
In the activity, you used a number cube or
dice and in (a) you were asked to
calculate the number of times you expect
to obtain each possible number when it is
to be rolled 60 times. What is your
answer here?
10 times or 6%.
How did you get that? Please show it on
the board.
p(1)= p(2) =p(3)= p(4)= p(5)= p(6) =
1
6
Expected number of
times each number
will be obtained =
1
6
× 60 = 10

48
Okay, very good. You first took the
probability that the number cube will land
on each number which is 1/6 and
multiplied it to the times you’ll roll the
dice, that is 60. Now what you just found
out is the theoretical probability of a
number cube landing on each possible
number (1, 2, 3, 4, 5, and 6).
Okay, now let’s go to what you did on
(b). What did you found out? Is the
probability of getting each number really
10 times?
No ma’am. And that is what’s
confusing us. Each number has
different probabilities unlike the
expected number of times each number
will be obtained. Why do our results
from rolling the number cube aren’t the
same as the theoretical probability of
rolling the number cube?
Theoretical probability is a way of
estimating what could happen based on
the information that you have, it is a
calculation. It cannot predict what the
actual results will be but it does give you
an idea of what is likely to happen in a
situation.
So the results of rolling the number
cube should be somewhere around 6%
1, 6% 2, 6% 3, 6% 4, 6% 5, and 6% 6,
since that is the theoretical probability.
Now what were the results you got on
your experiment?
When you rolled the number cube 60
times, what is the probability that the
number cube landed on…
o 1 =
o 2 =
o 3 =
o 4 =
o 5 =
o 6 =
(Each group has different answers
because they have different results
though they did the same experiments.)
Sample result:
o 1 = 1/5 or 20%
o 2 = 2/15 13.33%
o 3 = ¼ or 25%
o 4 = 13/60 or 21.67%
o 5 = 7/60 or 11.67%
o 6 = 1/12 or 8.33%
Alright, what you just found is another
form of probability, the experimental
probability. Experimental probability is
the ratio of the number of trials with a
certain outcome to the total number of
trials. Let’s take for example the case of
1. The number cube landed on 1 twelve
times. The number of outcomes is 12 and
the number of trials is 60, so the
probability is 12
60=
1
5 or 20%.
Each number has different probabilities.
Two or three numbers could have the
same probabilities but not all have the
same probabilities. And these
probabilities do not precisely match with

49
the theoretical probability you’ve
calculated earlier. However, they are not
too far off.
Now you rolled the 180 times more right?
What are now the experimental
probabilities of each number?
(This depends on the results of the
experiment of each group.)
Did the probabilities increased or
decreased?
The probabilities of each number
increased.
What educated guess can you make out of
this observation?
With more number of rolls, the
resulting experimental probabilities
increase and are closer to the
theoretical probabilities.
That’s right! As the amount of trials
increases, the experimental probability
gets closer to the theoretical probability.
C. Closure/ Generalization (5 min.)
The teacher will ask the students to summarize what they have learned.
Expected Generalization:
Theoretical probability is the probability that is calculated using math formulas. This
is the probability based on math theory. It is the ratio of the number of favorable
outcomes to the total number of outcomes. On the other hand, experimental
probability is calculated when the actual situation or problem is performed as an
experiment. In this case, you would perform the experiment, and use the actual results
to determine the probability. It is the ratio of the number of times an event occurred to
the number of times tested (trials). And as the number of trials increases, the
experimental probability gets closer to the theoretical probability.
IV. Rationale
Probability is one of the important mathematics concepts to understand as it is
applicable and useful to our day to day living like in weather forecasts, lotteries, and
even human behavior. It is important that students know and understand the
difference between experimental and theoretical probability as likely events
sometimes do not occur and unlikely ones do.
V. Evaluation (8 min.)
The students will be assessed individually through the assessment task (see
attachment 13).

50
Attachment 12
Activity
It’s Probably Probability!
Names: ________________________________ Date: ____________________________
________________________________ Year & Section: ___________________
________________________________
Material: A number cube
Directions:
1.A number cube is to be rolled 60 times.
(a) Calculate the number of times you expect to obtain each possible number. Show your solution.
(b) Roll the number cube 60 times and record how many times (frequency) each number came up on
the second column of the table below. Then, try to roll the dice 60 times more and record the results
on the third column of the same table. After that, add the two frequencies.
Numbers on
the cube
Frequency Frequency Total
Frequencies
1
2
3
4
5
6
Total 60 180 240
When you rolled the number cube 60
times, what is the probability that the
number cube landed on…
1 =
2 =
3 =
4 =
5 =
6 =
When you rolled the number cube 180
times, what is the probability that the
number cube landed on…
1 =
2 =
3 =
4 =
5 =
6 =
51
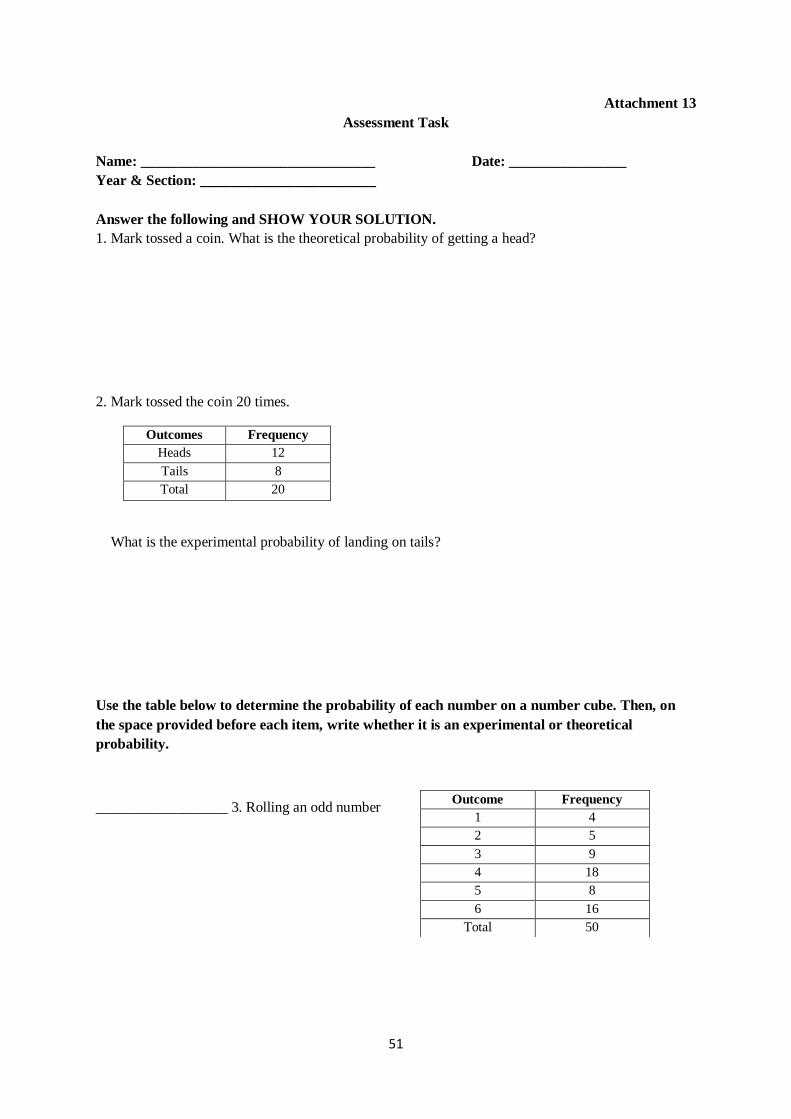
Attachment 13
Assessment Task
Name: ________________________________ Date: ________________
Year & Section: ________________________
Answer the following and SHOW YOUR SOLUTION.
1. Mark tossed a coin. What is the theoretical probability of getting a head?
2. Mark tossed the coin 20 times.
Outcomes Frequency
Heads 12
Tails 8
Total 20
What is the experimental probability of landing on tails?
Use the table below to determine the probability of each number on a number cube. Then, on
the space provided before each item, write whether it is an experimental or theoretical
probability.
__________________ 3. Rolling an odd numberOutcome Frequency
1 4
2 5
3 9
4 18
5 8
6 16
Total 50

52
__________________ 4.Rolling a 6
__________________ 5.Rolling a 2 or 4
How does experimental differ from theoretical probability? (5 pts)
__________________________________________________________________________________
__________________________________________________________________________________
__________________________________________________________________________________
__________________________________________________________________________________
__________________________________________________________________________________
__________________________________________________________________________________