TANDBERG LCS Integration V2.4 - DEKOM
52
This document is not to be reproduce in whole or in part without written permission from TANDBERG ASA TANDBERG LCS Integration V2.4 Installation Manual Getting Started D13828 Rev.10
-
Upload
khangminh22 -
Category
Documents
-
view
2 -
download
0
Transcript of TANDBERG LCS Integration V2.4 - DEKOM

This document is not to be reproduce in whole or in part without written permission from TANDBERG ASA
TANDBERG LCS Integration V2.4
Installation Manual
Getting Started
D13828 Rev.10

2
Contents
Introduction ............................................................................................................................................................3 TANDBERG LCS Integration consists of two main parts. ...........................................................................3
Requirements..........................................................................................................................................................4 The TANDBERG Communicator Integration Requirements ........................................................................4 Live Communication Server:.........................................................................................................................4 TMS Server:...................................................................................................................................................4 Office Communicator Client .........................................................................................................................4 Limitations.....................................................................................................................................................4
The TANDBERG SIP-CX Gateway Requirements...........................................................................................4 SIP-CX Gateway Server: ...............................................................................................................................4 Live Communication Server:.........................................................................................................................4 TMS Server:...................................................................................................................................................5 Office Communicator Client: ........................................................................................................................5 MCU ..............................................................................................................................................................5 Gatekeeper .....................................................................................................................................................5
Installing the TANDBERG SIP-CX Gateway .......................................................................................................6 Upgrading TANDBERG SIP-CX Gateway.......................................................................................................6 Installation .........................................................................................................................................................7 Configuring valid conference URIs ...................................................................................................................9
Configuring LCS to use the SIP-CX gateway......................................................................................................11 Configure Authorized Host..............................................................................................................................11 Configure Static Route.....................................................................................................................................12 Using SIP-CX with Multiple LCS Servers ......................................................................................................14
Configuring Office Communicator Client for SIP-CX Conferencing..................................................................15 Configuring Contact Information ................................................................................................................15 Configuring Conferencing Information .......................................................................................................16 Configure MCU usage .................................................................................................................................18 Logging........................................................................................................................................................19
Starting a SIP-CX Conference..............................................................................................................................20
Installing the point-to-point integration (TANDBERG Communicator Integration)...........................................25 Upgrading TANDBERG Communicator Integration ......................................................................................25 Create/configure user accounts ........................................................................................................................26 Installing the TANDBERG Communicator Integration ..................................................................................27
Configuring TANDBERG Communicator Integration ........................................................................................30
Starting a point-to-point conference.....................................................................................................................34 Starting a conference from the TANDBERG Tab ...........................................................................................35 Starting a Web Conference ..............................................................................................................................38
Q&A .....................................................................................................................................................................40
Troubleshooting....................................................................................................................................................42
Appendix 1 – Disabling the IM Filter ..................................................................................................................44
Appendix 2 – Editing the IM Filter ......................................................................................................................45
Appendix 3 – Manually enabling “Log on as service” privilege for a user .........................................................47
Appendix 4 – Adding a trusted site to a client machine.......................................................................................49
Appendix 5 – Licensing .......................................................................................................................................51 Scenario #1 ......................................................................................................................................................51 Scenario #2 ......................................................................................................................................................51 What happens if the licenses are exceeded? ....................................................................................................51
Appendix 6 – Configuring TMS to use AD lookup .............................................................................................52

3
Introduction With TANDBERG LCS Integration it is now possible control and call videoconferencing endpoints from
Microsoft Office Communicator. Both point-to-point and multipart conferences may be created through the
built-in SIP-CX protocol of Office Communicator using SIP, H.323 and H.320 based videoconferencing
systems.
TANDBERG Communicator Integration uses TMS to integrate the enterprises’ videoconferencing
infrastructure with Microsoft’s most powerful instant messenger application.
The TANDBERG LCS Integration requires some software components to be installed directly on the Microsoft
LCS server and the installation of the TANDBERG SIP-CX Gateway software which may reside the TMS
server or on an entirely separate server. For the Office Communicator clients, some registry updates are
required. A tool to produce .reg and .adm files is included with the installation. This tool can help an
organization to minimize any per-client configuration that may be required.
Please see www.microsoft.com for more information about Microsoft Live Communication Server (LCS).
TANDBERG LCS Integration consists of two main parts1.
TANDBERG Communicator Integration
! Supports direct dialing (point-to-point)
! Tightly integrated with Office Communicator
! Does not require an MCU
! Ability to fully monitor and control conferences from TMS
! Ability to view conference details, such as bandwidth, video protocol, audio protocol
! Ability to search TMS phonebooks and dial any entry with a simple click on the dial button
! Centralized deployment
! No need to decide what protocol to use when dialing, simply choose from the phonebook and let TMS find
the best possible route automatically
TANDBERG SIP-CX Gateway
! Supports multi-participant conferences
! Ability to control endpoints using standard Office Communicator interface.
! Seamlessly integrated with Office Communicator.
! Ability to fully monitor and control conferences from TMS
! Levers the power of the TANDBERG MPS to realize true video-conferencing in the personal space.
! Scalable – supports multiple MPS’s.
! Supports conference scheduling with Microsoft Outlook
! Ability to password protect personal conferences. Each type of integration may be installed independently of
one another but to get the full benefit we recommend that both integrations are installed.
1 One part is for ‘point to point’ dialing, and one part is for multipart conferencing. The multipart conferencing part
requires a TANDBERG MPS.

4
Requirements
The TANDBERG Communicator Integration Requirements
Live Communication Server:
LCS 2005 SP1 running on Microsoft Windows 2003 SP1 with Microsoft .NET SP1 framework installed. The
OS must be completely updated with all available updates from Microsoft.
TMS Server:
A TMS server with Client Solution Package enabled. The TMS server and the LCS server must be in the same
Active Directory forest.
Office Communicator Client
If the TMS server is in a different domain than the one users log into, they will need to add the address of the
TMS server to their list of trusted sites in Internet Explorer (see Appendix 4). A symptom of this scenario is
when no additional tabs are shown in Microsoft Office Communicator after installing the registry update, and
signing in.
Limitations
The current version of TANDBERG Communicator Integration only supports direct dialing from systems
registered on one TMS server when using H.323 or H.320 dialing from the point-point dialing. This means that
to use the ‘Start TANDBERG Video Conference’ and ‘Start TANDBERG Web Conference’ from the main
Communicator window, the buddy you want to connect to needs to have his/her system registered on the same
TMS server as yours. This limitation does not exist for the SIP-CX Gateway software.
The TANDBERG SIP-CX Gateway Requirements
SIP-CX Gateway Server:
The SIP-CX gateway can be installed on the TMS up to a limit of 30 users. A TMS appliance server can be
used, but make sure that the preconfigured firewall does not block SIP traffic. Blocking SIP traffic is the default
configuration of the TMS appliance server. If installations are to support a number of users greater than 30 it is
recommended that the gateway be installed on a separate server in a production environment. This server must
be running Windows 2003 SP 1, with at least a 550-Mhz processor and 512 MB of RAM. If choosing to install
the SIP-CX gateway on the TMS, the hardware requirements specified for a TMS installation will also suffice
for the SIP-CX gateway.
Do not install the SIP-CX gateway on the LCS server, as this will lead to problems with LCS setting up trusted
sites.
Do not install Microsoft Office Communicator on the same machine as the SIP-CX gateway and use the
standard port 5060 for the gateway. This will lead to a port conflict with Communicator.
Do not install the SIP-CX gateway on a DNS server. This can lead to name SIP Uri resolution problems.
Live Communication Server:
LCS 2005 SP1 running on Microsoft Windows 2003 SP1 with Microsoft .NET V1.1 with SP1 installed. The
OS must be up to date and all available updates from Microsoft should have already been applied prior to
installation. Note: A DNS server should not run on the same server as the LCS server, as this violates
Microsoft recommendations for LCS installations.

5
TMS Server:
A TMS server with Client Solution Package enabled.
Office Communicator Client:
Microsoft Office Communicator client must be installed on each client machine that will use the TANDBERG
SIP-CX Gateway.
MCU
The TANDBERG MPS must be running J3 software release or later. Please refer to the document ‘Configuring
LCS and MPS J3 for SIP.pdf’ available on the CD on how to configure the MPS.
Gatekeeper
In order for the SIP-CX gateway to be able to call H.323 endpoints, both the endpoints and the TANDBERG
MPS need to be registered on a gatekeeper. The Office Communicator client only allows E164 and ISDN
numbers because format restrictions, hence only e.164 aliases are supported for H.323 dialing2. If you plan to
use SIP and/or ISDN, but no H.323, no gatekeeper is required.
2 Please note that this is a limitation in Office Communicator itself.

Installing the TANDBERG SIP-CX Gateway The SIP-CX gateway can be installed on the TMS server or a dedicated server. If planning to run this in an
environment with more than 30 endpoints or web cameras, we recommend installing the gateway on a separate
server.
Upgrading TANDBERG SIP-CX Gateway If upgrading from a previous version of TANDBERG SIP-CX Gateway, the installer will detect and alert the
user to this by displaying the following window.
To remove the previous installation Go to ‘Add/Remove Programs’ on the server’s Control Panel, and remove
the application called ‘TANDBERG SIP-CX Gateway’. Now start the installation again.
When prompted for the information described later in this section, the information from the previous
installation will be shown in the dialog box. Usually administrators will want to preserve these settings, and so,
should just click ‘OK’.
6

Installation Execute the TANDBERGSIPCXGatewaySetup.msi setup file by clicking on it, and following the on screen
instructions as well as reading and accepting the license agreement.
Please select the destination folder of the TANDBERG SIP-CX Gateway, and decide whether to install the
gateway for the current user or all users logging into this server. The only difference between the ‘Everyone’
and the ‘Just me’ selection is where the shortcut to the configuration tool of the gateway will be placed in the
Start menu. If ‘Just me’ is selected only the current user will see the shortcut in the Start menu. By selecting
‘Everyone’ all users logged into the server will see this entry in the Start menu.
When the installation has completed, the gateway will launch and a configuration dialog for the gateway
software will appear.
7

If the bandwidth between the gateway and at least one of the LCS servers is low, and/or an open internet
connection is used thus requiring an encrypted link between the gateway and the LCS server, compression
MTLS3 should be implemented. For this, an X.509 certificate is required and must be specified in the “X.509
Certificate File Name”.
If installing the gateway on a separate server or the TMS server, the default port 5060 may be used. For the
“Local Server Host Name”
with
in the “Local Server Binding” section, either use the IP address or the DNS name of
erver must be configured in
a
NOTE: The gateway software executes under the NT AUTHORITY\NETWORK SERVICE account. In order for
logging to function correctly the NT AUTHORITY\NETWORK SERVICE requires write privileges for the target
directory for logging. Make sure that the NT AUTHORITY\NETWORK SERVICE has write permissions to this
directory.
The Conferences Configuration file is the location of the “conferences.xml” file. This file will define which
conference URIs are legal and the leader and participant codes associated with these URI’s. The default
installation directory is shown in the configuration dialog; however, if necessary, this can be changed to point
to an existing “conferences.xml” file at a different location. If opting to change the location of the
has read
The ‘Number of Dial In participants’ controls the allocation of dial in participants. When a participant dials into
the conference, the gateway tries to allocate a new dial in port, so more people can dial in. However, this takes
some time, so if more people try to dial in before the allocation process is finished, they will not be able to join.
Select fewer dial in participants to limit MCU resource allocation.
When upgrading the SIP-CX gateway from an earlier version the configuration dialog will detect if there
already exists a “conferences.xml” file in the directory defined. If an older file
the machine the gateway is running on. Note that when setting up the static route in LCS, this field must match
the authenticated host in LCS, so it is important to use either DNS names or IP addresses and not mix and
match the two.
In the “TMS Connection” section the DNS name or the IP address of the TMS s
addition to the Active Directory user account and password that the integration will use. This user must be
member of a TMS group that has “Book on behalf of” permissions in TMS.
In the “Logging” section, the level of logging may be set in addition to the directory where the logs are to be
written.
“conferences.xml” file, make sure that the NT AUTHORITY\NETWORK SERVICE account
privileges to the directory.
3 Mutual Transport Layer Security
8

Here you have the option to use the existing file or install a new default “conferences.xml” file. In most case
is recommended that the existing “conferences.xml” file be preserved, to do this click on the “yes” button.
After configuring the gateway, if not already enabled in the “conferences.xml” file, a dialog
9
s it
By answering ‘Yes’ to the dialog above, no restrictions will be placed on the types of conference URIs, nor
ver this
lid
red
will
p file
conferences.xml and click
itted, it will
for each Conference Id
being configured, the “Default SIP domain” field may include the domain name. If a SIP URI is entered
without the domain name extension (e.g. meet.*), the default domain name will be appended to the conference
URI (seen below).
Wildcards are denoted by the asterisk symbol (‘*’). Wildcards maybe used to create more generalized
restriction patterns and avoid the need to specify every user and domain allowed to initiate SIP-CX calls.
Wildcards maybe used in Conference Id’s, Leader Codes and Participant Codes.
their associated participant and leader codes. This is fine for testing in a limited environment, howe
configuration is not recommended for a production environment. Please refer to the section ‘Configuring va
conference URIs’ for information on how to setup restrictions.
Configuring valid conference URIs Under the installation directory for the TANDBERG SIP-CX Gateway, there is a file called “conferences.xml”.
This file defines which conference URIs are legal and valid. The “conferences.xml” file allows a number of
restrictions to be configured:
1. Ability to restrict which users/domains are allowed to initiate SIP-CX conferences
2. Ability to control legal leader codes, supporting strong password policies of leader codes.
3. Ability to control legal participant codes, supporting strong password policies of participant codes.
Every SIP-CX conference is associated with a conference URI, a leader code and a participant code. The
conference information listed in the Office Communicator clients must correspond with the information ente
into the “conferences.xml” file. If it does not correspond to this file, users initiating a SIP-CX conference
be confronted with a dialog window prompting them to enter the correct information before each and every
conference.
It is possible to update this file manually or alternatively to do it using the LCS configuration tool. The
configuration tool can be found on the TMS CD in the same location as the other LCS setup files. The setu
for this utility is TLCSConfigTool.exe. A screenshot of the installed application appears below. To begin
editing the Conferences.xml file, simply use the import button to navigate to the
Open. Similarly save any changes made, back to the same file.
All conference URI’s must start with “sip:” and end with a domain name. If the “sip:” part is om
automatically be added to the input text. To avoid inputting the same domain name

10
Participant and Leader codes must be either a natural number (max 7 digits) or a *, where a * indicates that any
participant or leader code is allowed (i.e. no password checking is done).
When wildcards are used in Conference Id’s, they require that the name part before the ‘@’ consists only of a
‘*’ and not in context with a start text like ‘meet.*’. The same rule applies for the domain. Either it has to be a
full domain, or a ‘*’
Note: Again, it must be stressed that the settings which each user’s Office Communicator is configured with
MUST map to the “conferences.xml” file. For if this is not configured correctly and the user’s conference Id
does not match a pattern in the “conferences.xml” file, the conference will not be created.
When the conferencing restrictions have been configured correctly, click on the “Save…” button and save the
conferences.xml. If prompted to replace the existing conferences.xml file, choose “Yes”. It is not necessary to
restart the TANDBERG SIP-CX service for the changes to take effect.

Configuring LCS to use the SIP-CX gateway
Configure Authorized Host In order to function properly the SIP-CX gateway must first be configured as an authorized host, this sets up a
trust between the LCS server and the SIP-CX gateway software. This is also needed for the MCU.
To do this, open the LCS console tree, right click on the node that displays the LCS server being used (in the
Enterprise version of LCS this will be a pool), and select “Properties”. Click on the “Host Authorization” tab,
and click ‘Add…’.
Next, set the IP address to the address of the SIP-CX gateway, and make sure the “Throttle As Server” and
“Treat As Authenticated” checkboxes are checked while ensuring that the ‘Outbound Only’ checkbox remains
unchecked.
After configuring the LCS server, it may take up to 5 minutes for these new settings to become active. To
avoid this waiting time, it is possible to restart the LCS server from the Windows services panel as seen below.
11
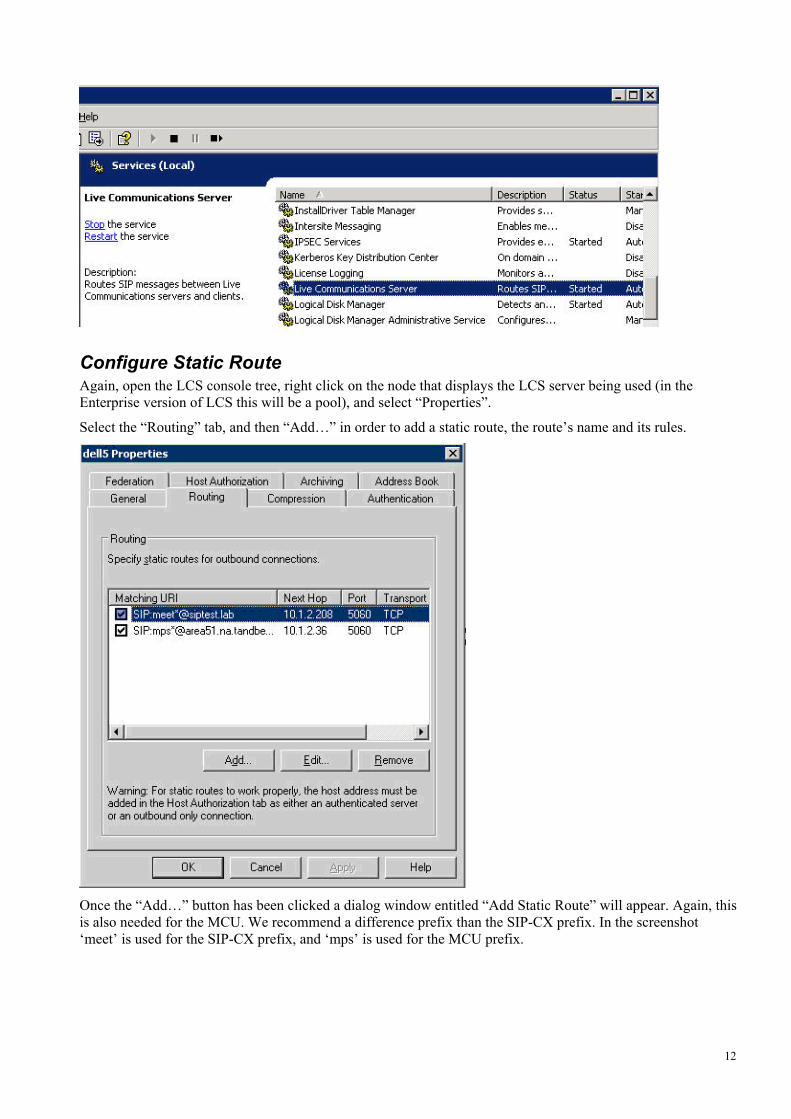
Configure Static Route Again, open the LCS console tree, right click on the node that displays the LCS server being used (in the
Enterprise version of LCS this will be a pool), and select “Properties”.
Select the “Routing” tab, and then “Add…” in order to add a static route, the route’s name and its rules.
Once the “Add…” button has been clicked a dialog window entitled “Add Static Route” will appear. Again, this
is also needed for the MCU. We recommend a difference prefix than the SIP-CX prefix. In the screenshot
‘meet’ is used for the SIP-CX prefix, and ‘mps’ is used for the MCU prefix.
12

By configuring the User field we can restrict which users are allowed to use this static route. By entering the
wildcard “*”, we can allow any user. If we enter “meet.*”, only users with a SIP URI starting with “meet.” will
be allowed to use this static route. For more information about this see the Microsoft LCS documentation on
how to filter SIP URIs.
When restricting the range of valid conference URIs, the ‘User’ field must be set according to the rules defined
in the “conferences.xml” file (for more about this see the section ‘Configuring valid conference URIs’). For
example, in order to require that all valid conference URIs begin with “meet.” (i.e.
[email protected]), the conference URI should be set to “meet.*” in the
conferences.xml file, and the User field when creating a static route should also be set to “meet.*”.
The domain discussed here is the SIP domain of the SIP-CX server, and is not related to the Active Directory
(AD) domain of the servers themselves. It is recommended to pick a domain name unique for your
infrastructure. Choose a domain name that is not associated with AD or LCS, e.g. ‘yourdomain.sip’.
In fact in the current implementation using the same SIP domain as the AD domain will prevent the integration
from working properly.
Next, make sure that “Phone URI” checkbox is unchecked. Type the IP address of the SIPCX server into the IP
address field as seen above. Transport should be set to “TCP”. The
“Port” field should, by default, be set to 5060. This may need to be configured differently depending on what
port the SIP-CX Gateway software was configured to use. It is vital that the port number configured here
matches the port configured for the SIP-CX Gateway. Finally, the ‘Replace host in request URI’ must be
checked. When you have made the necessary changes click “OK” to complete the adding of a static route to the
LCS.
This completes the server-side installation and configuration of the TANDBERG SIP-CX Gateway. The next
step is to configure the Office Communicator client.
13

After configuring the LCS server, it may take up to 5 minutes for these new settings to become active. To
avoid this waiting time, it is possible to restart the LCS server from the Windows services panel as seen below.
Using SIP-CX with Multiple LCS Servers When deploying the SIP-CX Gateway in an environment with multiple LCS servers. Each LCS server must be
configured with the Host Authentication and Routing entries described above.
14

Configuring Office Communicator Client for SIP-CX Conferencing All Office Communicator clients must be updated with the registry entries defined in the .reg key or .adm file
generated by the TANDBERG Communicator Integration Configuration Tool. This tool is located on the same
CD as the TANDBERG SIP-CX Gateway and TANDBERG Communicator Integration.
Verify that SIP-CX has been activated in Communicator by looking under the Actions->More menu, and locate
the ‘Start a New Conference…’ option as seen in the figure below.
If you can not see it, exit and restart Office Communicator and then try and locate “Start a New Conference”
again.
Configuring Contact Information
For the SIP-CX integration to work correctly, each client must provide callback numbers. When a user
participates in a conference, they will be asked which number they wish to be called back at. The list of
numbers they are presented with are the numbers which have been configured in their Office Communicator
client. These numbers will generally be the user’s external videoconferencing system, their cell phone or office
phone.
To configure a user’s call-back numbers, go to the main menu of the Office Communicator client and choose
“Actions”. Under the “Actions” menu choose “Options…”.
Select the “Personal” tab and enter any H.323 alias or ISDN number into the 4 different phone entries.
15

Note: All ISDN numbers must be written in fully qualified number format, starting with the + symbol. The
TANDBERG SIP-CX Gateway uses the + symbol to distinguish between H.323 and H.320 type numbers. This
limitation is due to the fact that Microsoft’s current implementation of SIP-CX does not support protocol
information and Communicator itself only allows numeric digits to be entered into these fields, meaning that
H.323 URIs, IP addresses and H.323 Ids are not an option. Without support for protocol information it is
impossible to determine if a number is an H.323 URI or a SIP address.
Configuring Conferencing Information
The final configuration step on the Office Communicator client is to configure the conferencing information.
To configure the conferencing information, go to the main menu of the Office Communicator client and choose
“Actions”. Under the “Actions” menu choose “Options…”, now select the “Accounts” tab.
In the Conferencing Information configure the following properties:
Conference ID This will be the user’s unique SIP URI and will be used as the conferencing ID whenever
the user initiates a SIP-CX conference from within Office Communicator. In the example
seen below, the user’s SIP URI will be “[email protected]”.
Leader Code The leader code will be the leader password to any SIP-CX conference created by this user.
The Participant Code may be any numeric value up to7 digits. The leader code grants some
addition privileges as compared with the participant code. This includes the ability to mute
other participants4 . This code is not used when invited to a conference, but when selecting
‘Join an existing conference…’ from the main menu, entering the leader or participant
code distinguishes the level of privileges granted when you have successfully joined the
conference.
Participant Code The participant code will be the password to any SIP-CX conference created by this user.
16

The Participant Code may be any numeric value up to 7 digits.
Domain Enter the same SIP domain being used for the TANDBERG SIP-CX Gateway.
Toll This number need not be filled in and is not currently used by the TANDBERG SIP-CX
Gateway software.
Toll free This number need not be filled in and is not currently used by the TANDBERG SIP-CX
Gateway software.
Note: This information must match the configuration of the “conferences.xml” file. If the values configured
here do not match, the user will be prompted with the following dialog window every time they start a SIP-CX
conference. The user will not be allowed to continue until they have entered the correct values for the
conference address, participant code and the leader code defined in the “conferences.xml” file.
4 The creator of the conference will always be the conference leader.
17

Once the conferencing information on each Office Communicator client has been configured correctly, they
will be able to create and join SIP-CX conferences.
Configure MCU usage
For best MCU utilization, location information for each user needs to be configured in the TANDBERG Tab.
Press the arrow next to ‘Location’ text, and select the location that is geographically closest to the user. If the
selection is ‘No Location’, an arbitrary MCU will be used.
By setting the Location the SIP-CX conferences will be hosted on a MCU as close to the user as possible.
Please note that if your organization only has one MCU, or all users are located in the same area, setting the
location will not be needed.
18
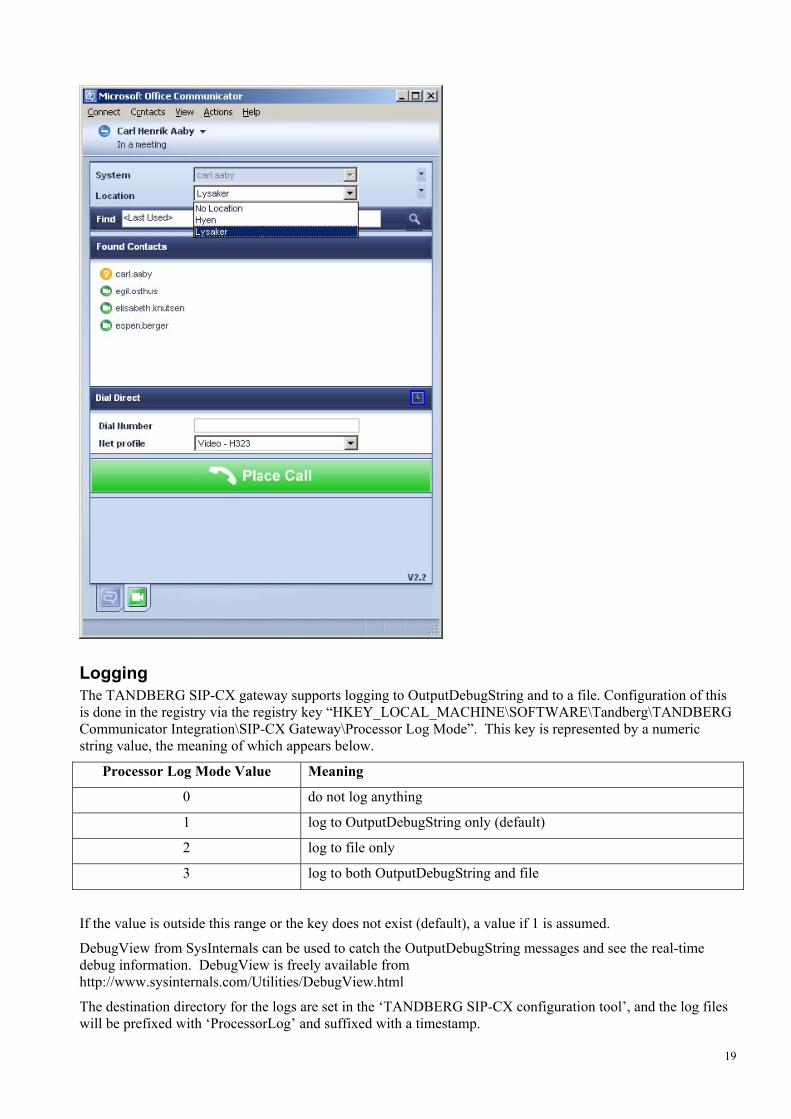
Logging
The TANDBERG SIP-CX gateway supports logging to OutputDebugString and to a file. Configuration of this
is done in the registry via the registry key “HKEY_LOCAL_MACHINE\SOFTWARE\Tandberg\TANDBERG
Communicator Integration\SIP-CX Gateway\Processor Log Mode”. This key is represented by a numeric
string value, the meaning of which appears below.
Processor Log Mode Value Meaning
0 do not log anything
1 log to OutputDebugString only (default)
2 log to file only
3 log to both OutputDebugString and file
If the value is outside this range or the key does not exist (default), a value if 1 is assumed.
DebugView from SysInternals can be used to catch the OutputDebugString messages and see the real-time
debug information. DebugView is freely available from
http://www.sysinternals.com/Utilities/DebugView.html
The destination directory for the logs are set in the ‘TANDBERG SIP-CX configuration tool’, and the log files
will be prefixed with ‘ProcessorLog’ and suffixed with a timestamp.
19

Starting a SIP-CX Conference To start a conference select ‘Start a new Conference..’ from the “Actions”->”More” menu. It is also possible to
start a conference from an existing chat window. On the button toolbar, the button at the far right (encircled in
red) starts a SIP-CX conference the same way as the menu choice from the main window menu.
If the dialog window seen below appears immediately after the “Start Conference” button is clicked, the
conference information that was entered into the Office Communicator client does not match the
“conferences.xml” file being used by the TANDBERG SIP-CX Gateway software. In order to precede the user
must manually enter the correct values based on the definitions in the “conferences.xml” file.
20

Once the conference is started, the following dialog window will appear asking the user to select the number
they wish to be called back on.
Alternatively the user may choose to call into the conference. It is strongly recommend that users select a
number from the dropdown list. The user will notice that the dropdown list contains the same numbers which
were configured earlier in the Communicator client. If the user wishes to use a web camera attached to their
computer, they must choose “Computer” from the dropdown list. The MPS will then dial the user back at their
SIP URI.
Once a number as been selected by the user, they simply have to press “Go”. This action sends the call-back
number to the SIP-CX Gateway which schedules a conference, via TMS, using the TANDBERG MPS. The
MPS then dials the callback number that was selected by the user and their endpoint joins the newly created
conference.
Note: The entries in the dropdown are populated from the phone numbers entered when configuring
Communicator, they are NOT fetched from Active Directory. If the dropdown list is not populated with the
entries that were configured, please refer to the Troubleshooting section.
Once the conference has been created, the user who initiated it will be able to add participants to the same
conference.
They simply click on the “Invite someone to join this conversation” button, choose a participant and click
“OK”.
Once invited to the conference, a chat window will pop up on the invited participant’s screen. In this chat
window the participant will be provided with a link which will allow them to connect their video system to the
other sites in the conference.
21

When the participant clicks on the link, they will be provided with the dialog window that asks them which
number they wish to be called back on. In the same way as before, they simply select their preferred callback
number from the list and press the “Go” button. Moments later the MPS will dial their video system and they
will be connected to the conference.
Below is a screenshot of several users participating in a SIP-CX conference.
Note: The conference participants will only be visible on the right-hand side of the Office Communicator
window if the user has elected to be called back on a web camera attached to their computer.
22

As well as connecting invited participants, the TANDBERG SIP-CX Gateway will also add four additional
dial-in participants to the conference, two IP and two ISDN. These participants are reserved for people who
chose the ‘I will call in’ option from the dropdown list. When people dial into the conference, more dial-in
resources will be allocated dynamically, so the number of dial-in participants is not limited to four.
If the person you invite to the conference does not respond to your invitation, e.g. because of being away, you
can right click the person’s name, and select ‘Call Via Conferencing Service’. This will prompt you with all the
telephone numbers registered in the Accounts tab of the person, and lets you dial these numbers directly
without the user having to respond to your invitation in Communicator.
23

24

Installing the point-to-point integration (TANDBERG Communicator Integration) Before you begin installing the TANDBERG Communicator Integration on your LCS server, make sure you are
logged in as a user with local, domain and full LCS administrator rights. Close all other applications running
on the server.
Download or copy the TANDBERG Communicator Integration package to the LCS server. Start the installation
program for the Install TANDBERG Communicator Integration PreRequirements from the menu
(TANDBERGCommunicatorIntegrationPreRequirements.msi).
After the PreRequirements package has been installed, it is good practice to verify the installation of the LCS
server. To do this, set the LCS to use NTLM only. Log on to two different Microsoft Office Communicator
clients using different accounts, making sure they can communicate with each other.
Upgrading TANDBERG Communicator Integration If upgrading from a previous version of TANDBERG Communicator Integration, the installer will detect and
alert the user to this by displaying the following window.
To remove the previous installation Go to ‘Add/Remove Programs’ on the server’s Control Panel, and remove
the application called ‘TMS Integration with Live Communication Server’. Now start the installation again.
25

When prompted for the information described in ‘Create/configure user accounts’ later in this section, the
information from the previous installation will be shown in the dialog boxes. Usually administrators will want
to preserve these settings, and so, should just click ‘OK’.
If you reinstall on top of the same version or are upgrading from a beta release of the same version, a window
asking you if you want to keep your settings will be presented to you. By pressing ‘Yes’ the old settings will be
preserved and shown in the dialog boxes for the account information during installation.
Create/configure user accounts Three types of user accounts are required by the TANDBERG Communicator Integration. The function of each
of these accounts is outlined below. It is possible to create a separate user account to carry out each function;
however it is also possible to simplify maintenance and just use a single user account to take care of all the
operations.
1. Windows Service User Account
The user account defined here will be the account that the LCS integration service executes under. This account
must have the “Log on as a Service” privilege (see Appendix 3) and be a
member of the ”RTC Server Applications” group. The RTC Server Applications group is a local group and not
an Active Directory group. Make sure you are logged in locally to the LCS server when adding this user to the
RTC Applications Group.
Also check that no security policies overwrite the “Log on as service” privilege. The error message “The
configured identity is incorrect” when starting the integration service may indicate that the local polices have
been overridden. 26

2. TMS User
The TANDBERG Communicator Integration requires a user to connect to the TMS server and book systems on
behalf of others. It is recommended that this user has Site Administrator or Video Unit Administrator privileges
in TMS.
3. SIP Enabled User
A user with a SIP address that is LCS Enabled is required for a user assistant bot. This bot will be used to notify
users of any connection difficulties that may occur during a conference call. It is good practice too make sure
this user can communicate with all other Office Commmunicator clients on the network. To check this, simply
log on to an Office Communicator client with the bot’s credentials using TCP and try to communicate with
other users. This user account must be dedicated to the bot and may not be used by any other account on the
network.
Again, it is possible to create a user account that does the functions off all of the above user accounts. This user
will have “Log on as a Service” privileges and be a member of the RTC Applications group on the local
machine. This user will have Site Administrator or Video Unit Administrator privileges in TMS, while also
having a valid SIP address and being SIP enabled on LCS.
If opting for a single account, a modification of the standard LCService account that LCS, by default, runs
under can be used. Make sure that this account is member of the RTC server applications group and can
connect to the TMS server while having, at minimum, book on “behalf of privileges”.
The IMFilter application is there to protect your Live Communications Server deployment against the spread of
the most common forms of viruses without degrading the user experience. To allow the bot user to send
messages and not have LCS filter out these messages either disable the IMFilter or edit it to allow these
message through.
For more information on disabling or editing the IMFilter.am file, see Appendix 1 and Appendix 2 respectively.
Installing the TANDBERG Communicator Integration The TANDBERG Communicator Integration needs to be installed on the Live Communication Server. Execute
the TANDBERGCommunicatorIntegration.msi by clicking on it, and following the on screen instructions as
well as reading and accepting the license agreement.
27

Please select the destination folder of TANDBERG Communicator Integration, and choose if you want to
install the software for the current user, or all users logging into this server. The only difference between the
‘Everyone’ and the ‘Just me’ selection, is where the shortcut to the configuration tool of the software is located
in the Start menu. If ‘Just me’ is selected only the current user will see the shortcut in the Start menu. By
selecting ‘Everyone’ all users logged into the server will see this entry in the Start menu.
Note: The installation of TANDBERG Communicator Integration may require a reboot of the server after the
installation.
1. Start the installation by selecting ‘Install TANDBERG Communicator Integration’ from the CD menu,
or execute the ‘TANDBERGCommunicatorIntegration.msi’ file.
2. You will be prompted for names and passwords for accounts described under ‘Create/configure user
accounts’. The username and password of the account which the integration will execute as must be
entered first.
3. The account that is used to connect to the TMS server to book on behalf of the other users must be
entered in the screen below (See section Create/configure user accounts part 2).
28
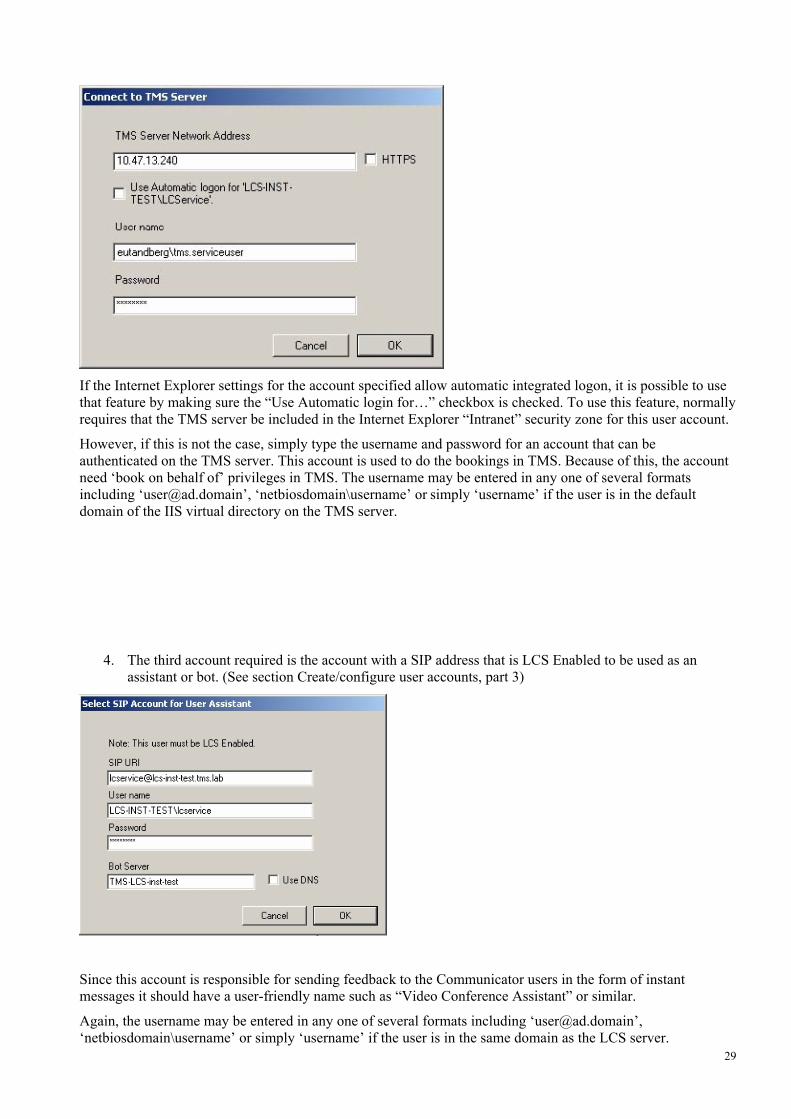
If the Internet Explorer settings for the account specified allow automatic integrated logon, it is possible to use
that feature by making sure the “Use Automatic login for…” checkbox is checked. To use this feature, normally
requires that the TMS server be included in the Internet Explorer “Intranet” security zone for this user account.
However, if this is not the case, simply type the username and password for an account that can be
authenticated on the TMS server. This account is used to do the bookings in TMS. Because of this, the account
need ‘book on behalf of’ privileges in TMS. The username may be entered in any one of several formats
including ‘[email protected]’, ‘netbiosdomain\username’ or simply ‘username’ if the user is in the default
domain of the IIS virtual directory on the TMS server.
4. The third account required is the account with a SIP address that is LCS Enabled to be used as an
assistant or bot. (See section Create/configure user accounts, part 3)
Since this account is responsible for sending feedback to the Communicator users in the form of instant
messages it should have a user-friendly name such as “Video Conference Assistant” or similar.
Again, the username may be entered in any one of several formats including ‘[email protected]’,
‘netbiosdomain\username’ or simply ‘username’ if the user is in the same domain as the LCS server.
29
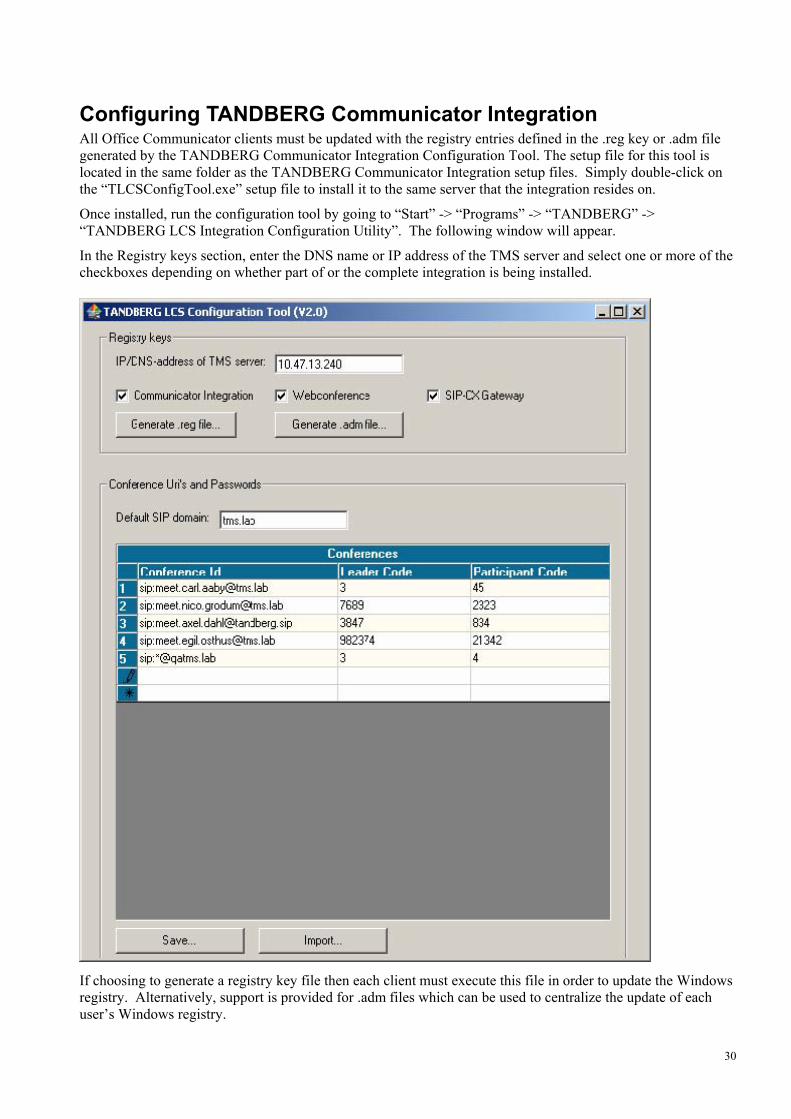
Configuring TANDBERG Communicator Integration All Office Communicator clients must be updated with the registry entries defined in the .reg key or .adm file
generated by the TANDBERG Communicator Integration Configuration Tool. The setup file for this tool is
located in the same folder as the TANDBERG Communicator Integration setup files. Simply double-click on
the “TLCSConfigTool.exe” setup file to install it to the same server that the integration resides on.
Once installed, run the configuration tool by going to “Start” -> “Programs” -> “TANDBERG” ->
“TANDBERG LCS Integration Configuration Utility”. The following window will appear.
In the Registry keys section, enter the DNS name or IP address of the TMS server and select one or more of the
checkboxes depending on whether part of or the complete integration is being installed.
If choosing to generate a registry key file then each client must execute this file in order to update the Windows
registry. Alternatively, support is provided for .adm files which can be used to centralize the update of each
user’s Windows registry.
30

The “Conference Uri’s and Passwords” section of the configuration utility is only required for SIP-CX
installations and can thus be ignored.
Once the registry keys have been applied to the client machines, they must restart Office Communicator and log
back in again.
When the user logs back in again, they should see two tabs close to the bottom of the client. The first is the
Office Communicator tab; the second is the green TANDBERG Tab. If the green tab is not visible please refer
to the “Troubleshooting” chapter later in this document.
By clicking on the green tab a screen similar to the one seen below will appear. If the tab is not shown, please
refer to Appendix 4 – Adding a trusted site to a client machine. From the dropdown list entitled “System”, users
may choose to associate themselves with a videoconferencing system registered to TMS or a web camera. If
‘Web Camera’ is selected, TMS must be configured Active Directory lookup. More information about this can
be found in Appendix 6 – Configuring TMS to use AD lookup.
31

Note: If the user’s “Video” setting for their user profile has already been configured in TMS, they will not need
to set their system using the method described above. In this case, their system will already be configured.
To set the system in TMS, log into TMS, click the user name in the bottom left corner to open the user
configuration popup. Select the system by choosing the system from the drop down labeled ‘Primary System’
Once the user’s system has been selected, the window will show a “Place Call” button and the user is now
ready to make point-to-point calls from their Office Communicator client.
The SIP URI shown in this screenshot is the users SIP URI in Live Communication Server (LCS). It is
automatically fetched from LCS, and should not be altered.
32

33

Starting a point-to-point conference There are two ways of starting a point-to-point conference from the main (Office Communicator) tab.
The first method is by highlighting a buddy from the “Contacts” list and right-clicking. A context menu similar
to the one seen below will appear. Navigate to “More” and another submenu will appear; from here the user
can select either ‘Start TANDBERG Videoconference’ or ‘Start TANDBERG Webconference’.
Depending on the selection made by the user, a video conference or a web conference will be created and
automatically include the highlighted buddy.
The second method of initiating a conference is by first starting a chat session with a buddy. It is then quite
simple for the user to create a point-to-point call with this buddy by selecting either ‘Start TANDBERG Video
conference’ or ‘Start TANDBERG Web Conference’ from the Actions menu.
34

Starting a conference from the TANDBERG Tab Users may wish to dial someone from their video system, but may not have that person registered as a buddy in
their “Contacts” list.
In this scenario, users should click on the green TANDBERG tab. A window similar to the one shown below
will appear.
35

This tab allows the user to search for TMS systems, TMS phonebooks or enter any number to be dialled from
their video endpoint. Searching is performed by entering the search text into the “Find” input textbox and
pressing the Enter. The search function will find records containing any occurrence of the search text and not
just records that begin with the search text specified.
In the screenshot below, a user has entered the search text ‘ca’. Notice that all the records (pulled from the
TMS system names and phonebooks) that were returned contained the string “ca” somewhere in their name.
36

To place a call from here, the user may either double-click on the system/phonebook entry or select the entry
and press the ‘Place Call’ button. Alternatively the user may type a number into the “Dial Number” field,
choose the correct “Net profile” for the type of number and click “Place Call”. Moments later their video
endpoint will place the call.
When the call has been connected the TANDBERG Tab window will change and show the status of the call.
Users will be able to see the conference bandwidth, network profile, video protocol and audio protocol.
The user may disconnect the call at anytime by clicking the “End Call” button. Once pressed the user’s video
endpoint will disconnect and the TANDBERG Tab will be ready for the user to place their next call. The
Connection information contains dial-in information for different protocols to the running conference.
37

Starting a Web Conference If the TANDBERG point-to-point integration has been configured for web conferencing then starting a web
conference is done in exactly the same way as was described for starting a point-to-point video conference. The
only exception being that the option ‘Start TANDBERG Web Conference’ is selected instead of ‘Start
TANDBERG Video Conference’.
When the remote participant has accepted the invitation to start a web conference, a new chat session with the
user assistant/bot user is established. This session informs the user of the conference details for the newly
created conference. Details include the URL and password of the conference.
Note: The bot user is controlled by the server and hence cannot be expected to respond meaningfully to any text
that is sent to it.
38

39

40
Q&A This section provides answers to some commonly asked questions with regard to the installation of the
TANDBERG LCS Integrations.
We have installed the Intelligent IM Filter for Live Communication Server SP1. What changes, if any,
do we need to make to it?
The Intelligent IM Filter is a graphical interface for configuring the IMFilter.am file. It has support for
adding new functionality/restrictions to the IMFilter.am file. The Intelligent IM Filter is only available
LCS SP1 servers. Therefore changes must still be made to the IMFilter.am file if it is enabled. Even if
the necessary changes are made to the IM Filter file, URLs sent to a user’s chat window by the Video
Assistant bot, will be visible but not clickable (This is due to Micorsoft’s default security policy). To
enable clickable URLs in the chat window, refer to Appendix 2. For more information on
disabling/editing the IMFilter file, see Appendix 1 & 2.
Is the user that is created for the TANDBERG Communicator Integration service required to be a
domain user if this same user is being used for all the functions of the integration?
This depends on whether the account used can log into the TMS server remotely or not. To verify this
create the user, and try to log onto the TMS server from the installation machine. If it does not work
(Depends on the network), then the user must be a domain user. Also make sure that the user is a
member of a group with the “book on behalf of” permission in TMS. These permissions can be set
under Group Permissions in the Administrative Tools section.
Does the user created for the TANDBERG Communicator Integration service need to be a domain user
if using a separate user for each function of the integration?
No, it only needs to be part of the local RTC Server Applications group, and have
‘Log on as Service’ privileges (see Appendix 3).
Will the user created for the integrations require an Exchange mailbox?
Neither of the TANDBERG LCS integrations requires an Exchange mailbox. However depending on
how the server is configured, it may not be possible to enable the user for LCS unless an exchange
mailbox is created. Suffice to say, this mailbox is never used.
What does the PreRequirements.msi file actually do?
It installs the Microsoft RTC API V1.3.
Will the integration work in an environment that uses both Kerberos and NTLM or must it be NTLM
only?
The TANDBERG LCS Integrations will both function in an environment where both Kerberos and
NTLM supported or where only NTLM is supported.
What steps need to be taken if the IP address of the TMS server changes?
Firstly it should be noted that by using DNS names instead of IP addresses where possible greatly
reduces the amount of work required to reconfigure the integrations when the TMS server IP changes.
TANDBERG Communicator Integration:
! Install and Execute the TANDBERG Communicator Integration configuration tool and make the
appropriate changes to the TMS server address.
! Restart the TANDBERG Communicator Integration service.
! If the client registry keys were using IP Addresses instead of DNS names, these will need to be
updated for each client machine.
! Once the registry keys have been updated, restart the Office Communicator client on each machine.

41
TANDBERG SIP-CX Gateway:
! Install and Execute the TANDBERG SIP-CX Gateway configuration tool and make the appropriate
changes to the TMS server address.
! Restart the SIP-CX Gateway service.
! If the client registry keys were using IP Addresses instead of DNS names, these will need to be
updated for each client machine.
! Once the registry keys have been updated, restart the Office Communicator client on each machine.
Is it necessary solely dedicate one or more TANDBERG MPS’s to these ad-hoc Office Communicator
initiated conferences?
Not at all, since the TANDBERG SIP-CX Gateway schedules SIP-CX conferences via TMS, it is able
to lever TMS’s powerful routing engine to use ANY registered MPS (with J3 software or better) which
has enough available resources. For this reason the TANDBERG SIP-CX Gateway is extremely
scalable in large site deployments.

42
Troubleshooting If any problems are encountered during the installation or running of the software, DebugView from
SysInternals can be used to see real-time debug information. DebugView is freely downloadable from
http://www.sysinternals.com/Utilities/DebugView.html
When trying to start the SIP-CX gateway service, the service stops right after it is started.
Make that logging has been enabled. If it is enabled, ensure that the NT AUTHORITY\NETWORK
SERVICE account has write privileges on the defined directory. For further information about this
windows user account see http://msdn.microsoft.com/library/default.asp?url=/library/en-
us/dllproc/base/networkservice_account.asp
I want to start a multi participant conference using SIP-CX, but cannot find the ‘Start new conference..’
menu item.
After installing the registry keys on the user’s client machine the user must sign out of Office
Communicator and sign back in again to enable the integration. If this has already been tried and the
user still cannot see the option it is likely that the specific registry entry to enable this function is
missing. Execute the TANDBERG Communicator Integration Configuration Tool to generate the .reg
file and install it on the user’s machine in order to enable the integration features.
It is possible to verify that this key has been added to the registry by verifying that the key
HKLM/SOFTWARE/Policies/Microsoft/Communicator/ EnableConferencingService exists and
contains the value DWORD 0x00000001. If this key does exist and has the correct value then close the
Communicator client completely and check the Windows TaskManager for a process named
“communicator.exe”. If this process exists, select it and click the “End Task…” button. Then restart
Office Communicator.
When I start a new conference from the ‘Start new conference..’ option, the dropdown list never gets
activated nor populated with my number entries.
! Is the TANDBERG SIP-CX Gateway software executing on the same server as Communicator
o Make sure that the default port 5060 is not used.
! Verify the port that is in use
o Make sure that the port defined for the Gateway software is the same port defined in LCS under
its list of static routes.
o Make sure no firewall is blocking traffic to this port.
! Verify the static route being used
! Verify that the log directory in TANDBERG SIP-CX Gateway Configuration has write permissions
for the NT AUTHORITY\NETWORK SERVICE account.
Make sure that the static route is pointing to the correct IP address/DNS name of the SIPCX gateway
and that the routes are trusted.
I can start a new conference, but the dropdown list does not let me choose anything except for ‘Call me
back at Computer’.
The most likely reason for this is that no call-back numbers have been configured in the user’s Office
Communicator client. See the sections “Configuring Contact Information” in the TANDBERG SIP-
CX Gateway installation guide.
I applied the correct registry keys to my computer and restarted my Office Communicator client, but I
still cannot see the green “TANDBERG Tab”.

43
In all likelihood this is due a lack of trust between the client machine and the TMS server. This may
happen if user’s logged into their pc are not automatically authenticated with the TMS server. See
Appendix 4 for information on setting up a server as a trusted site on a client machine. Once the trust
has been configured, restart the Office Communicator client.
If this does not work, make sure no firewall is blocking outgoing http requests from the client machine.
Note that the http requests will be done by the communicator.exe process, so this process needs to have
access to outgoing http requests.
What is the default conference rate (bandwidth) of a conference initiated using either of the TANDBERG
LCS Integrations?
Whenever a conference is created via the LCS integrations, the bandwidth to be used is read directly
from the “Default Bandwidth” in TMS. This can be configured under Administrative Tools ->
Configuration -> Conference Settings in TMS.

Appendix 1 – Disabling the IM Filter To disable the IMFilter, right-click on the Application Properties from within the LCS Administrator Interface
as illustrated in the figure below:
Having right-clicked on Properties a dialog window will appear. Simply select the IMFilter from the list box
and make sure the checkbox titled “Enabled” is unchecked. Click “OK” when you have made the necessary
changes. An example of this is provided below.
If you have followed the previous steps you will now have successfully disabled the IMFilter.
44

45
Appendix 2 – Editing the IM Filter The default location for the IMFilter.am file on the LCS server is:
C:\Program Files\Microsoft LC 2005\Server\IMFilter.am
In order to edit the IMFilter let the bot user send messages we have to add a line of code to the script that
includes the bot user’s SIP URI. The IMFilter.am file may be edited in any simple plaintext editor, such as
Microsoft Windows Notepad. Avoid editing the file in application such as Microsoft Word as these programs
may add extraneous characters and formatting information that could interfere with the execution of the script.
For example if my bot’s URI is [email protected] then the line of code I need to add to the
IMFilter.am script is:
if (EqualString(GetUserAtHost(sipRequest.From),"[email protected]",true)) return;
This line must be placed above the line
“schemesToLookFor = Split( "http,https,ftp,gopher,nntp,news,file,mailto,sip,sips,tel,callto,ldap,telnet", "," );”.
This is shown in the example below.
In the example below comments have been added above the line. It is recommended that all changes to the
IMFilter.am script be documented by way of comments.
Example IMFilter Text Before Editing: else { return false; } } Log( "Debug", false, "IMFilter application has a request - ", sipRequest.Method ); schemesToLookFor = Split( "http,https,ftp,gopher,nntp,news,file,mailto,sip,sips,tel,callto,ldap,telnet", "," ); rejectRequest = false; if (sipRequest.StandardMethod == StandardMethod.Invite) { // // For INVITE requests we scan ms-body parameter of any MS-Text-Format // headers. This parameter is Base64 encoded. //
Example IMFilter Text After Editing:
else { return false; } } Log( "Debug", false, "IMFilter application has a request - ", sipRequest.Method ); // 01-Jan-2006 // Inserting bot SIP URI for TANDBERG Communicator Integration // if (EqualString(GetUserAtHost(sipRequest.From),"[email protected]",true)) return;

46
schemesToLookFor = Split( "http,https,ftp,gopher,nntp,news,file,mailto,sip,sips,tel,callto,ldap,telnet", "," ); rejectRequest = false; if (sipRequest.StandardMethod == StandardMethod.Invite) { // // For INVITE requests we scan ms-body parameter of any MS-Text-Format // headers. This parameter is Base64 encoded. //
Once you have made the necessary changes and saved the IMFilter file, the Windows process “Live
Communications Server” must be restarted.
Once the IMFilter file has been edited, the bot user will be able to send hyperlinks to the Office Communicator
clients. Please note however that, by default, users will not be able to click on these links, they must copy and
paste them into a browser.
In order to make links clickable in the Office Communicator client, each client machine must apply the
following registry entry. This is disabled by default in the Office Communicator client for security reasons.
Contents of Registry Key File to Enable “Clickable” Links in the OC
Client:
Windows Registry Editor Version 5.00 HKEY_LOCAL_MACHINE\SOFTWARE\Policies\Microsoft\Communicator] "EnableURL"=dword:00000001

Appendix 3 – Manually enabling “Log on as service” privilege for a user Before a user account maybe used by a windows service, it must have the “Log on as Service” privilege
enabled.
To do this on the local machine, first log into the local machine as an administrator, then go to “Start” ->
“Administrative Tools” -> “Local Security Policy”. A window similar to the one seen below will appear.
Navigate to “Local Policies” -> “User Rights Assignment”. In the right-hand pane, you will see a list of
various privileges that can be assigned to users or groups. Find the the “Log on as service” privilege and right-
click on it, then choose “Properties” as seen in the screenshot above.
When you have clicked on the properties for this privilege, you will see the following window. Press the “Add
User or Group…” button.
47

Now enter the user account you wish to grant this privilege too and click “OK”.
Click “OK” again, the user or group you selected has now been granted the “Log on as service” privilege and
you are ready to continue with the TANDBERG point-to-point integration.
48

Appendix 4 – Adding a trusted site to a client machine Sometimes it is necessary to create a trust between to machines. In the case of the TANDBERG point-to-point
Communicator integration, it may be necessary to add the TMS server to the client machine’s list of trusted
sites.
On the client machine, open up Internet Explorer and enter the IP address or DNS name of the TMS server.
Which ever type of address is used it must be the same address as was used when generating the registry key.
When the TMS portal page has finished downloading, go “Tools” -> “Options…”.
Now, navigate to the Security tab and click the “Sites…” button.
Type the address of the TMS server into the “Add this Web site to the zone” field and click “Add”. Make sure
that the “Require server verification (https:) for all sites in this zone” checkbox remains unchecked. Click “OK”
49

to complete adding the trust between the client and the TMS server. Click “OK” again to close the “Internet
Options” window.
At the bottom of the browser, it should be possible to see the green icon that indicates that the TMS server is a
trusted site.
50

Appendix 5 – Licensing This appendix describes a few licensing examples of TANDBERG LCS Integration.
Scenario #1 Question: An enterprise has 700 hundred employees all use web-cameras and Office Communicator and would
like to deploy the TANDBERG SIP-CX Gateway. Do they need to buy a client solution for 700 seats?
Answer: No, They will need a client solution package only for the number of users that are connected to one or
more SIP-CX conferences at the same time. For example, if they have 4 SIP-CX conferences, each with 8 users,
you would need a license for 32 (4*8) users. So the enterprise must gauge the average numbers of users who
will use the SIP-CX Gateway at any one time and then plan their licensing around that figure.
Scenario #2 Question: A company has 100 users, they use a mix of endpoints and web-cameras and wish to use SIP-CX.
Do they need to buy a client solution for 100 seats? Do they need to but 100 seats in TMS as well?
Answer: This is the same as in Scenario #1, they will only need a client solution license capable of handling
the maximum number of clients (endpoint or webcam) using the SIP-CX Gateway at any one time. For TMS
they will need one license per endpoint. Web-cameras are not registered in TMS, and therefore do not require a
TMS license.
What happens if the licenses are exceeded? If the SIP-CX Gateway detects that the number of clients using the SIP-CX Gateway simultaneously has
exceeded the number of licensed seats, the following window will be shown in the Office Communicator
clients.
51

Appendix 6 – Configuring TMS to use AD lookup In order for TMS to be able to resolve the SIP URI of users, TMS must be able to query Active Directory for
information.
Go to ‘Administrative Tools – Configuration – Network settings’ enter the needed information. To configure
the AD lookup, TMS needs the username, password and domain of an Active Directory account that has
permissions to query information about other users in Active Directory.
52