Systematic Review and Bibliometrics: A Step-by-step Guide
48
Systematic Review and Bibliometrics: A Step-by-step Guide Using the EndNote® tool. Authors: Helio Aisenberg Ferenhof Roberto Fabiano Fernandes Version: 02.03 EN
Transcript of Systematic Review and Bibliometrics: A Step-by-step Guide

Systematic Review and Bibliometrics: A Step-by-step Guide
Using the EndNote® tool.
Authors: Helio Aisenberg Ferenhof
Roberto Fabiano Fernandes
Version: 02.03 -‐ EN

All rights reserved 2/48
INTRODUCTION: .............................................................................................................................. 3 STEP ZERO: ........................................................................................................................................ 4 STEP 1 -‐ SEARCH IN DATABASES ................................................................................................ 6 1.1 SCOPUS. ........................................................................................................................................................ 6 1.2 WEB OF KNOWLEDGE® (ISI) ................................................................................................................. 9 1.3 EBSCO® .................................................................................................................................................... 11 1.4 SCIELO® ................................................................................................................................................... 15 1.5 WILEY® .................................................................................................................................................... 18 1.6 COMPENDEX® – ENGINEERING VILLAGE ........................................................................................... 25 1.7 EMERALD® .............................................................................................................................................. 28 1.8 SCHOLAR GOOGLE® ............................................................................................................................... 34
STEP 2 -‐ HOW TO PERFORM IMPORT DATA OBTAINED IN SEARCHES ...................... 36 STEP 3 -‐ FILTERS GROUP ........................................................................................................... 41 STEP 4 -‐ EXPORT THE DATA FOR ANALYSIS ....................................................................... 42 STEP 5 -‐ BIBLIOMETRICS IN EXCEL® ..................................................................................... 44 FINAL THOUGHTS: ....................................................................................................................... 48 COURSES & LECTURES: .................................................................................................................................. 48 HOW TO REFERENCE THIS GUIDE: ............................................................................................................... 48 ABNT: .............................................................................................................................................................. 48 APA: .................................................................................................................................................................. 48 CHICAGO: ....................................................................................................................................................... 48 VANCOUVER: ................................................................................................................................................ 48

All rights reserved 3/48
Introduction: The purpose of this guide is to assist the development of a portfolio of major bibliographic concepts, constructs, authors, and other relevant issues on a topic to be researched. As a methodological procedure, has established three phases: 1 Research Protocol Definition 2 Data Analysis and 3. Synthesis. These, decomposed into activities: 1.1 Search strategy, 1.2 Query in the database, 1.3 Organize Bibliographies, 1.4 Standardize the selection of articles 1.5 Portfolio of articles composition 2.1 Data consolidation and 3.1Synthesis and reporting. For each activity, a sequence This step-‐by-‐step directive has the model the graph below.
1) Chart Model of the Process of Systematics Review and Bibliometrics
Figure 1 -‐ Description of the Steps of Systematic Review and Bibliometrics
Source: Authors.

All rights reserved 4/48
Step ZERO: There are many scientific databases which one should I choose to my research? It’s a question that many new researches make or our students made for us. Each database has its style, area of concentration and focus. We recommend learning more about the profile of the databases that you have access. PS: Check the access with your university library. To learn more: Access CAPES portal and choose databases to search. http://periodicos.capes.gov.br/?option=com_pcollection&mn=70&smn=79 Read the description of the databases and choose the most relevant to your research as shown in Figure 2
Figure 2 -‐ CAPES Portal: List of Databases.
Source: Authors. Once the databases are chosen, passes to the definition of the search strategy. Defines the keywords of your research topic and the use of logical operators for the junction of words and / or sentences. For this example we will use the search terms “innovation” and “organization”. Looking each of the two sentences respectively (which is represented by the quotes) and containing the two sentences, logical operator (and). Normally we use the Scopus database because it has a “intelligence” in indexing articles and also for being interdisciplinary. It is a good option to start with this database to check if the keywords are aligned with your search.

All rights reserved 5/48
After returning of the files and a brief reading of the abstracts and keywords it’s possible to: certify if the keywords of the research are aligned and capture new keywords, including them in the search by adding the logical operator (or). Once certified that the search conforms, can be passed to other databases. Always maintaining the same, query, search of all databases in order to ensure consistency.

All rights reserved 6/48
Step 1 -‐ Search in Databases At this step we are going to show how to make the search in some databases. (Do you have any doubts on how-‐to proceed at other databases not listed? Please contact us, and request to add the database on this guide)
1.1 Scopus. Enter the search query defined previously. Select the type of document you want. Normally we choose articles and review articles (Document Type) You can choose the areas of research. For example in the area of engineering, if not biomedical engineering, that is no need to have marked the area of life sciences and health. The areas chosen will depend on the subject being researched. In this example we chose to keep all areas. After the selections click search, as shown in Figure 3.
Figure 3-‐ Search at Scopus® database
Source: Authors. The database will return the search results as Figure 4

All rights reserved 7/48
Figure 4-‐ Research results from Scopus®
Source: Authors. To export to EndNote®, click at the All option to select all documents found in the search. Then export ... that will go next Figure. The All and Export options are just below the result of the number of documents. For this example only a few documents were selected. See Figure 5.
Figure 5-‐ Scopus® -‐ Exporting to EndNote®
Source: Authors. Choose the RIS format that is accepted by EndNote® and the Output complete format then export… save the file, as shown in Figure 6.

All rights reserved 8/48
Figure 6 -‐ Scopus®, Output select and export
Source: Authors. Then import into EndNote®. (We shall see at Figure 10 below) As we show how to conduct the search in the data Scopus®, will do the same for the databases Web of Knowledge®, Ebsco®, Scielo®, Wiley®, Copendex® and Emerald®. REMEMBER: To use the same strategy and query for the other bases.

All rights reserved 9/48
1.2 Web Of Knowledge® (ISI) Paste the same query in the search field by setting the other fields for compatibility with other databases if you have modified the default and click on SEARCH, resulting in Figure 7.
Figure 7 -‐ Search result from ISI -‐ Web of Knowledge® database
Source: Authors. To export the results, go to the bottom of the page click records and enter the range of 1 to xxx where xxx is the total number of documents found in this case 1-‐11. In Step 2 click plus Abstract. Step 3 Then click on save to EndNote®, as Figure 8.
Figure 8 -‐ ISI® Export Steps
Source: Authors. Save the file accept by the EndNote®, as Figure 9.

All rights reserved 10/48
Figure 9-‐ Saving the references
Source: Authors.

All rights reserved 11/48
1.3 Ebsco® Paste the same query in the search field by adjusting the other fields for compatibility with other bases if you have modified the default and click on Search, According to Figure 10, resulting in Figure 11. Usually mark up the options as: full-‐text only, also search the full text of articles. Other options may also be used, such as time interval, language, and other filters. Stick to maintain compatibility of the filters used in other bases.
Figure 10 -‐ Seach at Ebsco® database
Source: Authors.
Figure 11 -‐ Search results from Ebsco®
Source: Authors. To export the articles of Ebsco® it is necessary to save them in a folder, for this, click share, and then add in the folder. As Figure 12.

All rights reserved 12/48
Figure 12 -‐ Saving documents at a folder to export
Source: Authors. To enter the folder, click on the top tab folder, as Figure 13 . Figura 1 – Localizando a pasta
Figure 13 -‐ Entering at the folder
Source: Authors. Then click select all items, as shown in Figure 14, then export button in the right corner as shown in Figure 15.

All rights reserved 13/48
Figure 14 -‐ Selecting the files to EXPORT
Source: Authors.
Figure 15 -‐ Exporting the references from Ebsco®
Source: Authors. Appeared on the screen the opting to export. Mark RIS format (first save option) Figure 16, than click on save, which will make the download screen to popup or be at the bottom of the browser Figure 17.

All rights reserved 14/48
Figure 16 -‐ Selecting how to export
Source: Authors.
Figure 17 – Saving the export file
Source: Authors. Choose the option to save then import the software to organize your references or already import into EndNote®.

All rights reserved 15/48
1.4 Scielo® Enter the search query defined previously. Normally, it is chosen by all indexes and the regional area. After the selections click Search, as shown in Figure 18.
Figure 18 -‐ Searching at Scielo®
Source: Authors. After the submission of the search, Scielo® will return what was found. Click at select all and then click Send results. As can be seen in Figure 19.

All rights reserved 16/48
Figure 19 -‐ Scielo® search results
Source: Authors. Will open a screen to choose the option, click the Export tab, and select the "your selection" then click the gray button “export option”. As can be best seen in Figure 20.
Figure 20 -‐ Scielo® Export
Source: Authors.

All rights reserved 17/48
Choose the option to save then import the software to your references organizer software or already import into EndNote®, as shown in Figure 21 below.
Figure 21 -‐ Save / Import references from Scielo®
Source: Authors.

All rights reserved 18/48
1.5 Wiley® Visit the website of Wiley®, http://onlinelibrary.wiley.com/, Figure 22. To be able to save the search and receive new articles warning is required to have a login at the site. To do this, click NOT REGISTRED? In the upper right corner. Resulting in Figure 23 Fill out and submit the data to the site. If you have already joined or did not want to receive alerts, skip to the next step Login, Figure 24.
Figure 22 -‐ Wiley®
Source: Authors.
All rights reserved 19/48
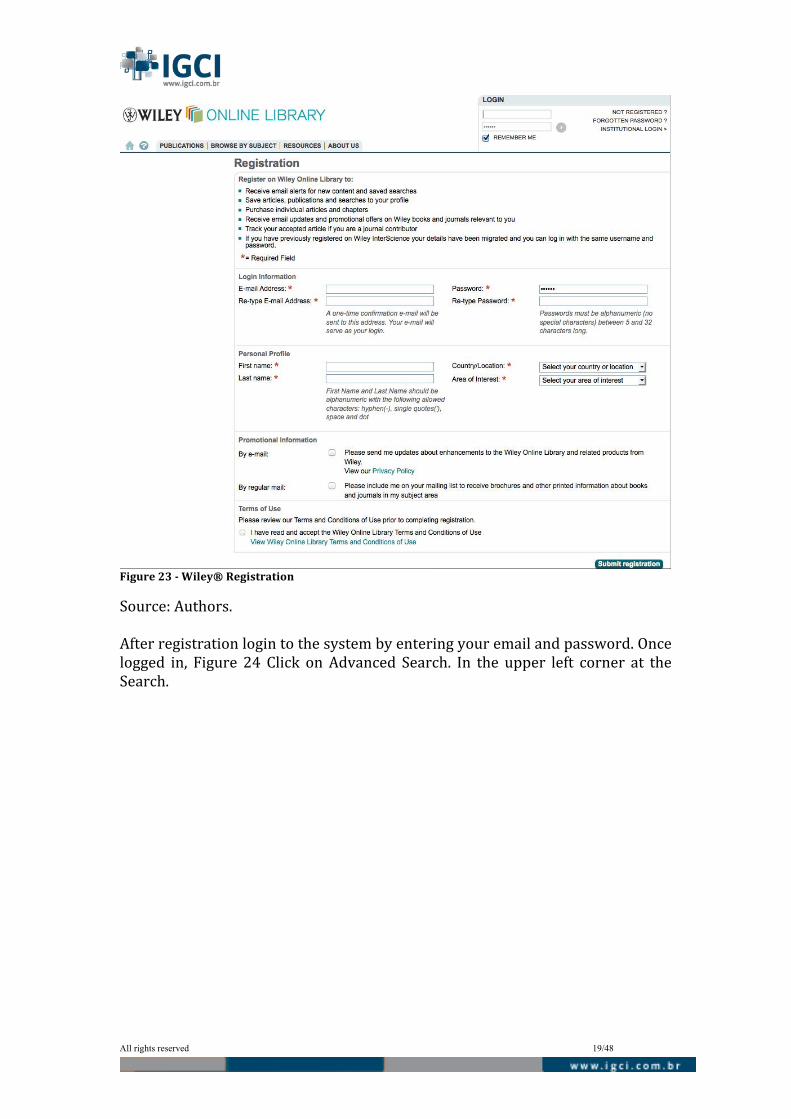
Figure 23 -‐ Wiley® Registration
Source: Authors. After registration login to the system by entering your email and password. Once logged in, Figure 24 Click on Advanced Search. In the upper left corner at the Search.

All rights reserved 20/48
Figure 24 -‐ Logedin at Wiley®
Source: Authors. When you click on Advanced Search, will be able to do research Figure 25, Paste the same query in the search field by adjusting the other fields for compatibility with other databases if you have modified the default and click on Search. Note that there is a choice of dates and date range.
Figure 25 -‐ Wiley® Advanced Search
Source: Articles.

All rights reserved 21/48
By clicking Search will return to the screen with the search results as Figure 26. To export the items, click Select All, resulting in Figure 28.
Figure 26 -‐ Wiley® results
Source: Authors. Click on the Export Citation tab to export. Unfortunately, it exports Wiley® per page, or from 20 to 20 items. Soon, you will have an extra job to select them by page. According to Figure 29, resulting in Figure 30. At this point, you have the option to create an alert with this research. For this, you must be logged in and click Save search in the upper right corner, near the GO, Figure 27. By clicking Activate search alert, you will start receiving at the registered email alerts of new articles published in this search, Figure 2.

All rights reserved 22/48
Figure 27 -‐ Wiley® Alerts
Source: Authors.
Figure 28 -‐ Selected Documents
Source: Authors. Select the type EndNote® and Export format citation and abstract, As Figure 29 and click Submit.

All rights reserved 23/48
Figure 29 -‐ Exporting from Wiley®
Source: Authors

All rights reserved 24/48
Save the file, Figure 30 and import in your Manager References. In this case the EndNote®. More information on how to import, in Step 2 of this guide.
Figure 30 -‐ Saving the references from Wiley®
Source: Authors.

All rights reserved 25/48
1.6 Compendex® – Engineering Village Paste the same query in the search field by setting the other fields for compatibility with other databases if you have modified the default and click on SEARCH, resulting in Figure 31.
Figure 31 -‐ Compendex®
Source: Authors. Results will be displayed as Figure 32.
Figure 32 -‐ Results from Compendex®
Source: Authors. Click the green arrow from the Select as shown in Figure 33, 34 and select Maximum. If your search has returned up to 500 articles. All items will be

All rights reserved 26/48
contained in a single file export contrary case, after exporting go to next page next in the top corner and repeat the procedure for selection and export.
Figure 33 -‐ Selecting upto 500
Source: Authors.
Figure 34 -‐ Confirming the selection
Source: Authors. After selecting the items, click download (1) to export. Will appear on a new screen (2) select detail record and the RIS format and click download, as shown in Figure 35.

All rights reserved 27/48
Figure 35 -‐ Compendex® Download
Source: Authors. After downloading, do the import, as described in Step 2 of this guide.

All rights reserved 28/48
1.7 Emerald® To be able to do the export in Emerald® with over 10 references, you need to register on the site and be logged. To do this, click the + Login in the upper left corner and enter your access data, if not, fill out the registration (Figure 36). Please note that your name will appear as shown in Figure 37, indicating that you are logged into the site.
Figure 36 -‐ Emerald® site
Source: Authors.
Figure 37 -‐ Logedin
Source: Authors.

All rights reserved 29/48
Once logged in click on the upper right on Your Profile as shown in Figure 38.
Figure 38 -‐ Setting up your profile at Emerald®
Source: Authors. At this point we will create a folder to save the search click marked list edit page, as shown in Figure 39.
Figure 39 -‐ Creating a Folder
Source: Authors.

All rights reserved 30/48
Enter the name of the folder to save your search and click Add, Figure 40.
Figure 40 -‐ Creating a list
Source: Authors. Now we have a place to save the search, lets go for it! Click at Advanced Search, as shown in Figure 41, resulting in Figure 42.
Figure 41 -‐ Search
Source: Authors. Paste the same query in the search field, it is recommended to click on the Journals tab to avoid books, websites and other sources of information. Then click SEARCH, resulting in Figure 43.

All rights reserved 31/48
Figure 42 -‐ Emerald® Advanced Search
Search: Authors. Click Select All to select then in Marked list and select your folder created in our example pesquisa_guia and click GO, as shown in Figure 43.
Figure 43 -‐ Selecting the resulto and moving it to the folder
Source: Author. Click again on your profile, upper right corner, as shown in Figure 38 and select the list you created in our example “pesquisa_guia” (Figure 44).

All rights reserved 32/48
Figure 44 -‐ Selecting the list
Source: Authors. Select all by clicking the select all (1), then click export options (2), as shown in Figure 45.

All rights reserved 33/48
Figure 45 -‐ Export setup
Source: Authors. Click Export to Endnote and download the references in RIS format as Figure 46 then go to Step 2 to import in your referrer (EndNote®).
Figure 46 -‐ Exporting from Emerald®
Source: Authors.

All rights reserved 34/48
1.8 Scholar Google® Scholar Google® does not provide a friendly way to import all the documents found in the search. It also does not provide search filters such as: Document Type (Articles, Books, Review, etc.), Language, Year, among others. Therefore, it is advisable not to use it in the search strategy along with other databases to ensure the uniformity of the research, ie using the same filters on all databases. It can be used to expose the quantity of citations contained in your literature portfolio. For this, we seek to exactly title of each of the articles contained in the bibliographic portfolio, writing down the amount of exposed by Scholar Google®. But why use it if other bases as Scopus®, Web of Science, Compendex® already exhibit? Because each database has its own way of measure and when we join these three bases in one research, there may be discrepancies in the numbers of citations, in addition to the fact that articles contained in a base may not be in another. Scholar Google® will have all the articles, using the same metric. If your research use only basis, for example Scopus® directly use the metric of the database. Scholar Google® has a way to export references. Thus, it is necessary to configure it. To do this, click Settings as shown in Figure 47.
Figure 47 -‐ Configuring Google
Source: Authors. Click on Show links to import citations for EndNote® to enable it then to save as Figure 48.

All rights reserved 35/48
Figure 48 -‐ Setting up Scholar Google®
Source: Authors. This setting will cause to appear in the search results the option to export the citation called "Import to EndNote", as illustrated in Figure 49 Just click to import. It is noteworthy that unfortunately the import is allowed only article in article.
Figure 49 -‐ Import from Scholar Google®
Source: Authors.

All rights reserved 36/48
Step 2 -‐ How To Perform Import data obtained in searches Before performing the import of files from bases Scopus®, Web of Knowlwdge®, Ebsco®, Scielo®, Wiley®, Copendex® and Emerald® to Endnote®, we organize it, creating a group structure, divided into folders. In our example there are two groups (Bases and Filters) with your folders. The pastes were numbered from 1 to 12 to make up an order. To create a group, click with the right mouse button on My groups items (Rename Group Set) My Library tab to rename the Group Bases -‐ See Figure 45 After that do the same procedure but the procedure is to create groups -‐ create Group Set and name it Filters. In short, when you have a group and want to rename it the option is Rename Group Set, is to create the option Create Group Set.
Figure 50 -‐ Create Group Set
Source: Authors. After create the following folder structure: Bases (1 – Scopus; 2 – Web of Knowledge; 3 – Ebsco; 4 – Scielo; 5 – Wiley; 6 – Copendex; 7 – Emerald; 8 -‐ ALL; 9 – NOT Duplicated) Filters (10 – Title / Key / Abstract; 11 – NOT Available; 12 – Available) As Figure 51. If you use least two bases for example: Scopus® and Web of Knowledge® Create only:Bases (1 – Scopus; 2 – Web of Knowledge; 3-‐ All; 4 – NOT Duplicated) Filtros (5 – Title / Key / Abstract; 6 – NOT Available; 7 – Available)

All rights reserved 37/48
Figure 51 -‐ Logical Structure
Source: Authors. To create a folder Create Group is the procedure, as shown in Figure 52.
Figure 52 -‐ Create Group
Source: Authors. Now, to import the files from databases, ie Scopus and Web of Knowledge do the following: Figure 53 -‐ To import the file from the search performed on the Scopus® click file -‐> import -‐ > file

All rights reserved 38/48
Figure 53 -‐ Import file to Endnote®
Source: Authors. Then choose the file that was exported from the Scopus database (Figure 54)
Figure 54 -‐ Choose the file
Source: Authors. Remembering: Format RIS, Import All, No Translation Click at import. All imported references will go to the folder All references and should be copied to their appropriate folders to be created. Both the base files Scopus®, as files of Web of Knowledge®, Ebsco®, Scielo®, Wiley®, Compendex® and Emerald®. After copying the files to their proper folders "bases", you should join them in the folder 8 – All The folder Scopus® this practical example is 32 files, the Web is of Knowledge® folder with 11 Thus joining the files of two folders mentioned, the folder will be 8-‐All with 43 files.

All rights reserved 39/48
Figure 55 -‐ Importing references and putting on the write place
Source: Authors. To add documents from the databases (Scopus®, Web of Knowledge®, Ebsco®, Scielo®, Wiley®, Compendex® and Emerald®) at Group 8 -‐ ALL should perform the following procedure: Click to select all items ... PC: Control-‐A Mac: Command-‐A then copy control c -‐-‐-‐ Command-‐C
Figure 56 -‐ Selecting the documents
Source: Authors. Click the group 01 -‐ Scopus® and control v / command v and also at the group 8-‐ All To copy items to the Web Knowledge® and other databases, the procedure is the same. The next step is to verify if at the folder 08-‐All exist duplicate files, for that you must copy all files from folder ALL to the not duplicate folder and then execute the function finding duplicates at EndNote®. Select all files in the folder 09 -‐ No duplicate and click the menu

All rights reserved 40/48
References -‐> Find Duplicates, as Figure 57
Figure 57 -‐ Finding duplicates
Source: Authors. If EndNote® find duplicates, it will conduct the questioning which of the references you want to keep. You should choose the most complete, click on it to "KEEP THIS RECORD" in the case of this example the left, because the criterion of choice is the name of the journal is correct.
Figure 58 -‐ Keep this Record
Source: Authors. The EndNote® do not automatically find all duplicates. So you will have to perform a manual filtering after this procedure. Thus, visually look for duplicates and delete them by pressing the delete key on your keyboard. Sorting by author or by title helps in searches for duplicate.

All rights reserved 41/48
Step 3 -‐ FILTERS Group Copy to Folder 10 -‐ Title / Keywords / Abstract files in the folder NOT duplicated Then read the Title / Keywords / Abstract and delete those who are not aligned with the subject of your search. This is the first filter. To the folder 11 -‐ Not available, copy all files left in the folder 10 -‐ Title / Keywords / Abstract In EndNote® select all items in the folder 11 -‐ not available \ ... right click and find full text. As Figure 59.
Figure 59 -‐ Find PDF
Source: Authors Available will appear with an icon the clips format . Sort by clicking on the clip ... select the available, ie, those with the and move them to the folder 12 -‐ Available. For not available it is recommended to do an aftermath thereof ie click on the URL if available and try to download, or search for the article in Scholar Google®, Microsoft Academic Search®, Google®, Bing®, your library portal, or by portal CAPES portal. After the end of the searches you perform the analysis only those articles that are in the folder 12 -‐ Available. In our example remaining 12 articles.

All rights reserved 42/48
Step 4 -‐ Export the data for analysis Time to export the data to be computed in a spreadsheet, in our case we use the Excel® spreadsheet. In EndNote® -‐ Choose what to compute, in this example (Authors) Click at menu Tools -‐> Subject Bibliography, as Figure 60.
Figure 60 -‐ Subject Lib
Source: Authors. Select Author -‐> OK
Figure 61 -‐ Author
Source: Authors.

All rights reserved 43/48
Select All à OK
Figure 62 -‐ Select All
Source: Authors. Select all and paste into Excel®. Because it is in parentheses, it will appear in negative... remove the brackets that will be a positive number. You can also export data from author, year, title of article via command export to CSV format. Download this style for EndNote®, or follow the same step above quoted to do it for the other fields. As Journals, Keywords, Year, etc.

All rights reserved 44/48
Step 5 -‐ BIBLIOMETRICS in Excel® At Excel® creates a set of tabs. The first will be called Matrix Synthesis. It will be analyzed and all articles that will be read in its entirety.
Figure 63 -‐ Synthesis Matrix
Source: Authors. Other Tabs will be created as well as the analyzes that will be made. Here are some:
• Keywords • Year • Author • Journal • Database • Type of research (Empirical, Theoretical, Theoretical/Empirical) • References (Documents to be read, refereed at this document) • Construct/ Definition – However many are
Now with the exported data from EndNote®, we will perform Bibliometrics. Let see a few examples:
Figure 64 -‐ Keywords most cited
Source: Authors. Years in which there were publications:
0 2 4 6 8 10 Innovation
Performance
Environment
Information
Keywords most cited

All rights reserved 45/48
The data for this graph were obtained from Matrix Synthesis folder:
Figure 65 -‐ Frequency vs. Year
Source: Authors.
Figure 66 -‐ Authors at bibliographic portfolio frequency
Source: Authors.

All rights reserved 46/48
Chart frequency of articles by Journal with data exported from EndNote®:
Figure 67 -‐ Frequency of the Journals
Source: Authors. Figure 68 impact factor and H index was manually assembled, performing site search at http://www.scimagojr.com/journalsearch.php?q=11700154321&tip=sid&clean=0
Figure 68 -‐ Impact factor and H index
Source: Authors.
0 0.5 1
1.5 2
2.5 3
Frequency of the Journals

All rights reserved 47/48
Using the site http://www.scimagojr.com/ to collect information regarding the impact of Journals and index H factor belonging to the portfolio bibliographic
Figure 69 -‐ Source of information of index H and impact factor
Source: Authors. Based on these data, which makes the synthesis of the portfolio literature, leading the researcher to extract the principal reference on a particular subject. Further analysis and synthesis can be made; all depends on the needs and creativity of each researcher.

All rights reserved 48/48
Final Thoughts: We know that this guide does not exhaust the various forms and facets of doing research. However we don’t delude ourselves to state that is the only method to do. We were inspired by the questions, inquiries and requests for help, from our students, colleagues, researchers and commercial partners to provide a way to guide a possible path. We hope this guide helps elaborate research to promote the progress of our country and of science as a whole.
Courses & Lectures: If you are interested in courses and / or lectures on this topic, please contact with by e-‐mail [email protected] or [email protected]
How to reference this guide:
ABNT: FERENHOF, H. A; FERNANDES, R.F,. Systematic Review and Bibliometrics: A Step-‐by-‐step Guide. V. 2.03 Available at: <http://www.igci.com.br/artigos/steps_srb.pdf> Accessed at: dd/mm/yyyy, 2014.
APA: FERENHOF, H. A., & FERNANDES, R. F. (2014). Systematic Review and Bibliometrics: A Step-‐by-‐step Guide. V.2.03. Retrieved mm/dd, yyyy, from http://www.igci.com.br/artigos/steps_srb.pdf
CHICAGO: FERENHOF, H. A., and R. F. FERNANDES. 2014. "Systematic Review and Bibliometrics: A Step-‐by-‐step Guide." Accessed mm/dd/yyyy. http://www.igci.com.br/artigos/steps_srb.pdf.
VANCOUVER: FERENHOF HA, FERNANDES RF. Systematic Review and Bibliometrics: A Step-‐by-‐step Guide 2014 [cited yyyy mm/dd]. V.2.03: [Available from: http://www.igci.com.br/artigos/steps_srb.pdf]