Step-by-Step Guide for Creating a Course Section
35
Step-by-Step Guide for Creating a Course Section Prepared by The Office of the Registrar July 2019
-
Upload
khangminh22 -
Category
Documents
-
view
0 -
download
0
Transcript of Step-by-Step Guide for Creating a Course Section

Step-by-Step Guide forCreating a Course Section
Prepared by The Office of the Registrar
July 2019

1. Before you Start
2. Resources
3. Building a New Section• SSASECT – Schedule Form• Course Section Information• Exception for Dual Enrollment Sections• Section Enrollment Information• Meeting Times • Meeting Location and Credits• Instructor Information• How to Look up Instructor Information• SSAOVRR – Schedule Override Form• SSATEXT – Section Comment Form
4. Changing Section Information
5. Cancelling a Class
6. Rules for Section & Instructional Method Designations
6. Directed Study Sections
7. How to determine course instructional times
8. Cross Listing Sections
9. Self-Audits
If you have questions about building the schedule, or would like to request training, contact the Office of the Registrar at [email protected]
2

Before You Start
• Schedule must be rolled or parameters built by Office of the Registrar (O/R)• You will receive an email from the O/R indicating that the schedule is ready.
Read the email for important information, including due dates, updates, etc.
• New courses must be built in Banner before sections can be created (forms SCACRSE, SCADETL)
• Run reports from previous terms to view your schedule as it was• Clean up what rolled, e.g. activate or delete cancelled classes• Check for updated information in the shared folder: \\Cocoasrv2\campus reports\ File: BUILDING THE CLASS SCHEDULE
Back to Table of Contents 3

Resources
• The Campus Reports shared folder has this tutorial, Access reports, and documents that will provide helpful information for building the schedule: \\Cocoasrv2\campus reports\
• Documents specific to building the schedule are housed in the folder “Building the Class Schedule”
• If you do not have access to the shared folder, submit an IT request indicating that you need access to the campus reports shared folder on cocoasrv2
• The Office of the Registrar can provide training or answer any questions you have. Email [email protected]
Back to Table of Contents
4

Building a new section1. Type CLAS into the search field
This starts a “quick flow” that will take you to every form you need to build a section
2. Select STUDENT Build Class Schedule (CLAS) from the dropdown menu or hit Enter to get to the next page
Back to Table of Contents 5

3. Enter the Term for which you are creating the class (must be six digits, format: YEAR10 spring, YEAR20 summer, YEAR40 fall)
4. In the CRN field, type the word ADD5. Click
Back to Table of Contents 6

A. Enter Subject (course prefix) e.g., ENC. Then, click to go to next field
B. Enter course number, e.g., 1101. Then, click to go to next field
C. Title defaults. DO NOT CHANGE COURSE TITLE! click to go to next the field
D. Enter Section.Refer to the “Rules for Section Designations” document
E. Cross List – LEAVE BLANK.(or see supplemental information for instructions)
F. Enter Campus where course will be taught
G. Enter Status:A = Active or C= Cancelledclick to go to next field
6. Enter Course Section Information
C
Back to Table of Contents
H. Schedule Type: Use the down arrow to select what defaults. click to go to next field
I. Instructional Method: Use the down arrow to select the appropriate code. click to go to next fieldRefer to the “Rules for Section Designations” document
J. Integration Partner: LEAVE BLANKK. Grade Mode: LEAVE BLANK. Exception:Enter “D” if course is a Dual Enrollment section taught at the high school. L. Session: Leave BlankM. Special Approval:Use for registration override requirements
A
B
D
E
F
G
C H
I
J
K
L
M
DO NOT CHANGE COURSE TITLE!
N. Duration: LEAVE BLANK
N
7

7. Enter Course Section Information cont’d
Back to Table of Contents
F KP
P. Part of Term (POT):Enter the part of term for the class. Full Term is “1”. The dates will default. Clock hour terms has 12 POTs, C01 – C12.
Q. SAVE: A CRN will be generated for this new section. The Course Section Information is complete, but you must click on remaining tabs to finish the section.
IMPORTANT: If you build a class under a POT with variable dates, like an “S” or C01-C12 terms, you must enter the exact start and end date and number of weeks the course will be taught.
Q
8

8. Enter Course Section Information cont’d
Back to Table of Contents
R. Credit Hours: Credit/Clock hours will default in the first field. You must enter the credit/clock hours in the adjacent field. NOTE: If the course has variable hours then enter the hours for that section.
S. Billing Hours: Billing hours will default. You must enter the billing hours in the adjacent field; they should be the same as the credit/clock hours.
T. This entire section LEAVE BLANK. If information defaults it is okay; leave.
T
R
S
9

9. Enter Course Section Information cont’d
Back to Table of Contents
U. This entire section – LEAVE BLANK. If information defaults it is okay; leave.V. Print & Gradable leave as checked. Voice Response and Self Service – leave checked
if you want students to see this course on the web. If not, uncheck. W. Long Title, Comments and Syllabus are defaults. They cannot be check or uncheck.X. SAVE
UV
W
X
10

Exception for Dual Enrollment Sections
Back to Table of Contents
When building a section for a dual enrollment class taught at the high school, use the same parameters as previously explained, with the following exceptions:
Section: always 3xxGrade Mode: DSession: HPart of Term: always Z or Z%Voice Response…: uncheckTuition and Fee Waiver: check
11

10. Go to Section Enrollment Information Tab
Back to Table of Contents
ST
A. Enter the Maximum number of students who can be registered in this section.Do NOT populate the Waitlist or Projected fields.
A
12

11. Go to Meeting Times and Instructor Tab
Back to Table of Contents
A. Meeting Dates: Tab over until the Start Date and End Date default with the term dates. NOTE: if the course has different start and end dates or times, you will have to manually enter them.
B. Mon – Sun: Click on each day the class meets. If you are manually entering the start and end dates, the day of the week will automatically default; make sure the days are correct. eLearning classes have no meeting days.
C. Scroll to Start Time – End Time: Place cursor and enter using military time. eLearning time: 0000 – 0001.D. Save
A B
C
D
13

12. Click the Meeting Locations and Credits Tab
A B
C
A
B C
D
A. Click on Meeting Location and Credits TabB. Building: Enter building number, example: PB-001. Offsite is designated by OS-119.C. Room: Enter room number in which the class meets. Note: If the room is already in use but you will use it anyway, you will need to enter an override code:
T=Override Time Conflict; R=Override Room Conflict; O = Override both. No building or room information required for online courses.
Information will default for the remaining fields.
D. SAVE
14
Back to Table of Contents

13. Enter Instructor Information
Back to Table of Contents
C DB
A. Instructor: Enter Instructor’s ID manually or Query on ID.B. Instructional Work Load – LEAVE BLANK.C. Percent of Responsibility:
100% defaults. Other persons who are attached to the class for contract/payment purposes must be entered with > 0%. Total percent of Responsibility must equal 100%.Percent of Session: Can be the same as Percent of Responsibility. Total Percent of Session must equal 100%
D. Primary Indicator: Only one instructor can be primary. Only they may enter information for grades or census
A
15

14. Enter Instructor Information cont’d
Back to Table of Contents
E. Override Indicator: If instructor is teaching multiple sections at the same time, enter override code “O”
F. Save. Do not enter information in any remaining blocks of SSASECT.G. EXIT
E
F
G
16

15. How to Look up Instructor’s Information
Back to Table of Contents
E
A. Click on ID button this will take you to the SIAIQRY form. OR
B. Tab over to the Name field and type in instructor name. Enter.
A
Next
B
17
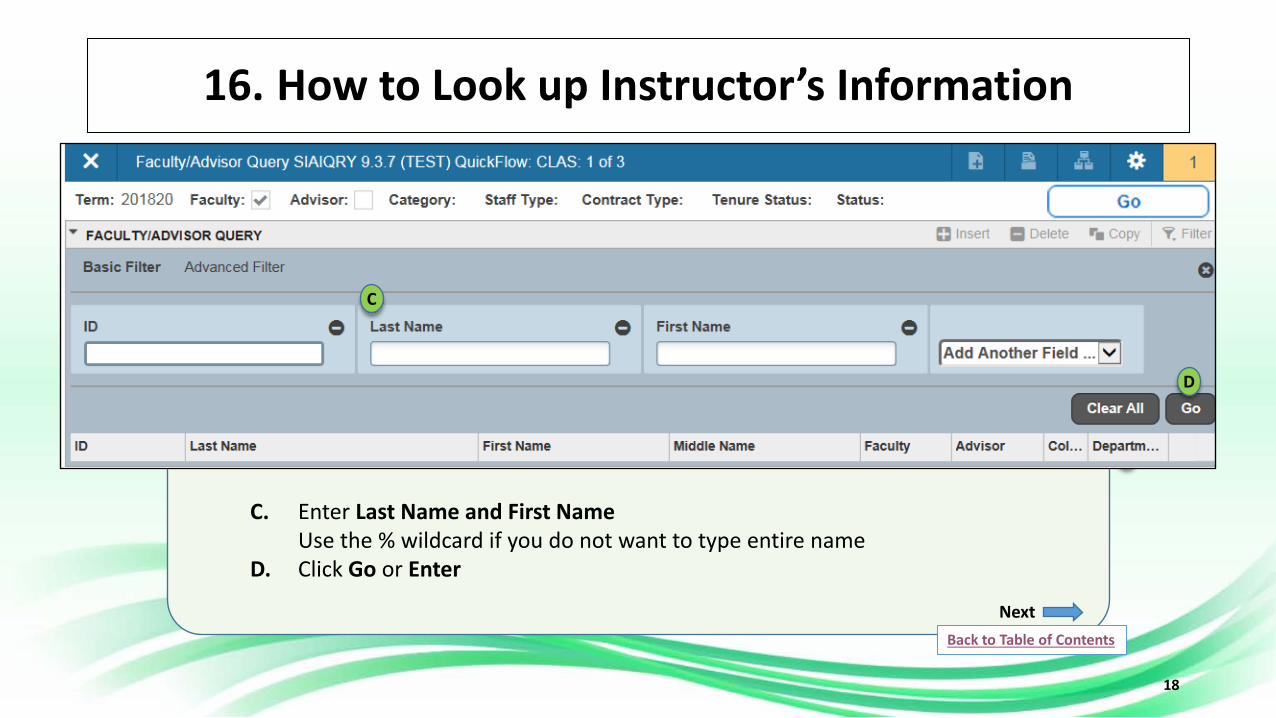
16. How to Look up Instructor’s Information
Back to Table of Contents
F
C. Enter Last Name and First NameUse the % wildcard if you do not want to type entire name
D. Click Go or Enter
D
C
Next
18

17. How to Look up Instructor’s Information
Back to Table of Contents
E. Select the appropriate Instructor Information
F. Click Select
E
F
Next
19

18. How to Look up Instructor’s Information
Back to Table of Contents
G. Click SaveH. Exit
D
G
H
20

19. SSAOVRR – Schedule Override Form
Back to Table of Contents
D
A. TERM, CRN, Subj, Course & Title will default from SSASECT
B. College – LEAVE BLANKC. DIVISION: Division Code is MANDATORY.
Enter the code for the division responsible for the course.
D. Department – Leave BlankE. Taxonomy – Leave Blank
SAVEEXIT
A
B
C
D
E
G
F
21

20. SSATEXT – Section Comment Form
A. TERM, CRN, Subj, Course & Title will default from SSASECT
B. College – LEAVE BLANK
C. DIVISION: Division Code is MANDATORY. Enter the code for the division responsible for the course.
D. Department – Leave Blank
E. Taxonomy – Leave Blank
F. SAVE
G. EXIT
A
B
C
E
D
A. TERM, CRN, Subj, Course & Title will default from SSASECTB. Section Text – DO NOT USEC. Section Long Text:
Enter information related to this section. Use sentence case text and date format DD-MON-YR through DD-MON-YR.
D. SAVENOTE: It is important to remember that this text is viewed by students on the web. Do NOT put anything here that should not be seen by students.
E. EXIT. If you need to build another section, enter CLAS on the main page and begin again.Back to Table of Contents
22

Changing Section Information• Most importantly, notify students who are registered in the class if the
changes may impact their schedule, specifically time or location changes.• Before registration begins you can make changes to any field.• After registration has begun, if course information changes that could
affect a student’s schedule, you must notify the students registered in the class. This may be done by phone or email, and should be done immediately. Instruct the students that if they need to make a change, they may do so online, or they should contact their student advisor for assistance.
• Course changes that may impact a student’s schedule include time change or location change
• Notify the campus advising coordinator that the course was changed in case they get questions.
Back to Table of Contents
23

Changing Section Information cont.If there has been no registration• On SSASECT, enter term and CRN• Remove Instructor Name• Remove meeting days and times and room information• Make applicable changes SAVE• Re-attach the meeting and instructor information
If there has been registration• Fields such as section number can be changed when enrollment exists. • Instructional Method, Part of Term, Dates and/or number of Weeks cannot be
changed if enrollment exists.• Option 1: drop all the students and process as above, or• Option 2: send an email to IT to make the change(s).
Back to Table of Contents
24

Cancelling a Class
Before cancelling a class that has registered students, print a classroster with telephone numbers or e-mail addresses. You must do thisbefore cancelling the class, as a class roster cannot be printed forcancelled class. You will need the list to contact the students.Refer the student to advising if they are unsure how to register for adifferent course.
Back to Table of Contents
Next
25

Cancelling a Class: SSASECT – Schedule Form
Back to Table of Contents
A. Enter the Term and Course Reference Number (CRN). B. Click Go.
A
Next
26
B

Go to the Section Enrollment Information Tab
A
B
C
A. Go to the Section Enrollment Information Tab.B. Click the Enrollment Details Tab.C. In the Maximum field, change number to 0.D. Save. Next
D
27
Back to Table of Contents

Go to the Section Enrollment Information Tab
A
B
A. Go to the Section Enrollment Information Tab.B. In the Status field change “A” to “C”. C. SAVE
Next
C
Don’t forget to let students know the course has been cancelled!
28
Back to Table of Contents

Go to the Meeting Times and Instructor Tab
A
B
A. Click Meeting Times and Instructor tab.B. Go to Instructor, Session Indicator. C. Click to remove instructor(s) names. If more than one instructor, remove the
Primary Instructor last. D. SAVE Next
C
D
29

Go to the Meeting Location and Credits Tab
AB
A. Click the Meeting Location and Credits tab.B. Click to remove the building and room numbers. You do not need to remove
the days and times, but you must remove the building and room to free the room for other use.
C. SAVE
C
Back to Table of Contents
30

Check the shared folder for the most current guidelines: “Rules for Section Designations xxxx”
Rules for 3-Character Section and Instructional Method
Designations
Back to Table of Contents
31

Directed Study Sections• Upon administrative approval, it may be determined to offer a section as a “Directed
Study.” Previously identified as “Independent Study,” these sections are designated as section 80_.
• These sections should not open for viewing to all students. Uncheck Voice Response and Self-Service Available.
• Unless the section is offered through eLearning, meeting days, times and location must be included.
• Sections should have “Special Approval” required. See SSASECT example below.
Back to Table of Contents
32

How to Determine Course Instructional Times
• Refer to the document “Meeting Times – How to Determine Course Instructional Times” in the shared folder \\Cocoasrv2\campus reports\
• Documents specific to building the schedule are housed in the folder “Building the Class Schedule”
• This document includes the meeting time matrices for face-to-face college credit courses, online, Hybrid and Directed Study.
• When scheduling classes, adhere to the campus standards of start and end times to allow students to create a schedule that maximizes their time. Back to Table of Contents
33

Cross Listing Sections
• It may be determined that an instructor will teach multiple sections at the same time and location. Examples are art classes, honors and non-honors, etc.
• Refer to the document “Creating Cross List Sections” in the shared folder.
• Note: you cannot cross list sections offered in different terms or parts of term.
Back to Table of Contents
34

Self-Audit• Once you have completed your class schedule, run a self-audit to
determine if everything is correct. You should check for things like: cancelled classes that you don’t plan to run, missing division codes, wrong or missing section numbers, wrong or missing hybrid codes
• Use the Access database “Schedule Extract Self Audit” in the Campus Reports shared folder
\\Cocoasrv2\campus reports\ File: BUILDING THE CLASS SCHEDULE
Remember: If you have questions about building the schedule, or would like to request training, contact the Office of the Registrar at [email protected]
Back to Table of Contents
35