lta tickets app step by step user guide & faqs
10
LTA TICKETS APP STEP BY STEP USER GUIDE
-
Upload
khangminh22 -
Category
Documents
-
view
1 -
download
0
Transcript of lta tickets app step by step user guide & faqs
LTA TICKETS APP
STEP BY STEP USER GUIDE

1
Contents
Download & Register 2 Navigate the App 3 The Digital Ticket 4 Sending Tickets 5 Assigning a Sent Ticket to Yourself 6 Cancelling a Ticket Transfer 7 Accepting a Transferred Ticket 8 Returning a Transferred Ticket 9

2
Download & Register
The below steps will show you how to download the LTA Tickets app and register. Please remember to register with the email address you used to purchase your tickets with. You will be emailed directly when all your tickets are ready in the app. If you already have an LTA tickets account under the correct email address, simply log in.
1. Download the LTA Tickets app from your app store (there will be a direct link in your invite email). Once downloaded, open the LTA Tickets app and click ‘Create new LTA Tickets account’.
2. Enter your email address, create your password and agree to the T&C’s and Privacy Policy.
3. You will now be sent a verification code to your email address. Put the verification code in and click ‘Confirm my account’.
4. Enter your name and click ‘Save Details’. You have now registered on the LTA Tickets app.
3
Navigating the App
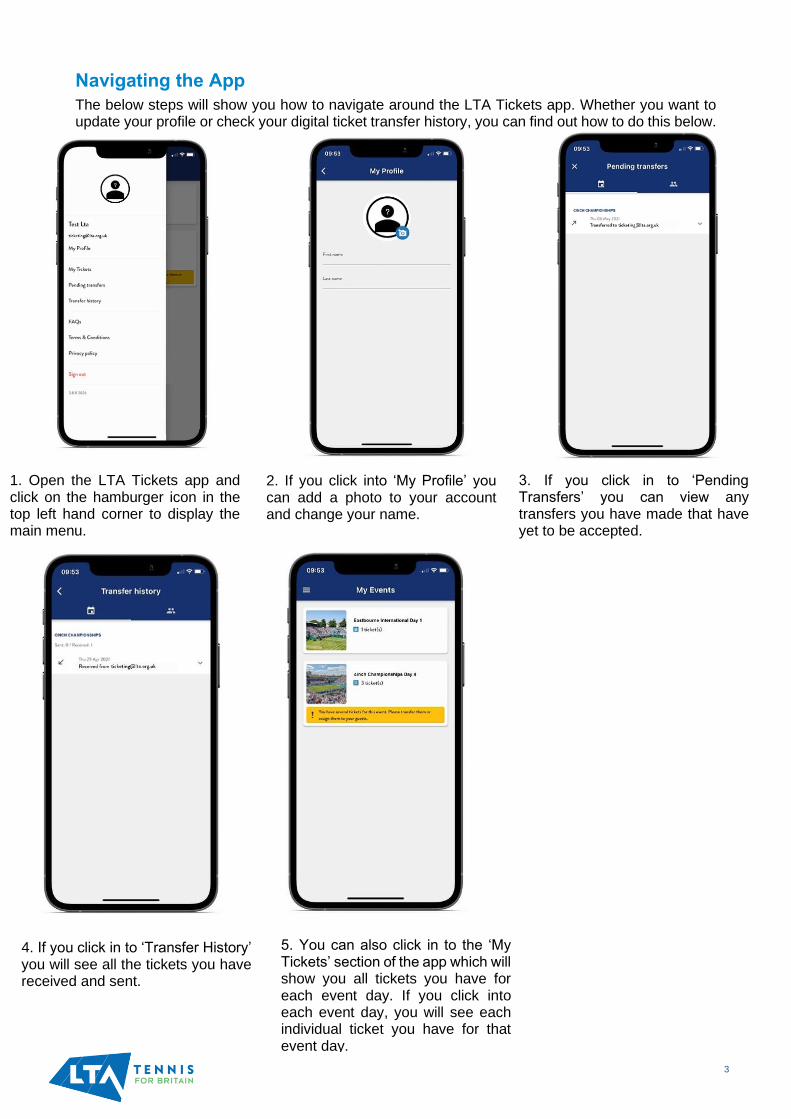
The below steps will show you how to navigate around the LTA Tickets app. Whether you want to update your profile or check your digital ticket transfer history, you can find out how to do this below.
1. Open the LTA Tickets app and click on the hamburger icon in the top left hand corner to display the main menu.
2. If you click into ‘My Profile’ you can add a photo to your account and change your name.
3. If you click in to ‘Pending Transfers’ you can view any transfers you have made that have yet to be accepted.
4. If you click in to ‘Transfer History’ you will see all the tickets you have received and sent.
5. You can also click in to the ‘My Tickets’ section of the app which will show you all tickets you have for each event day. If you click into each event day, you will see each individual ticket you have for that event day.
4
The Digital Ticket
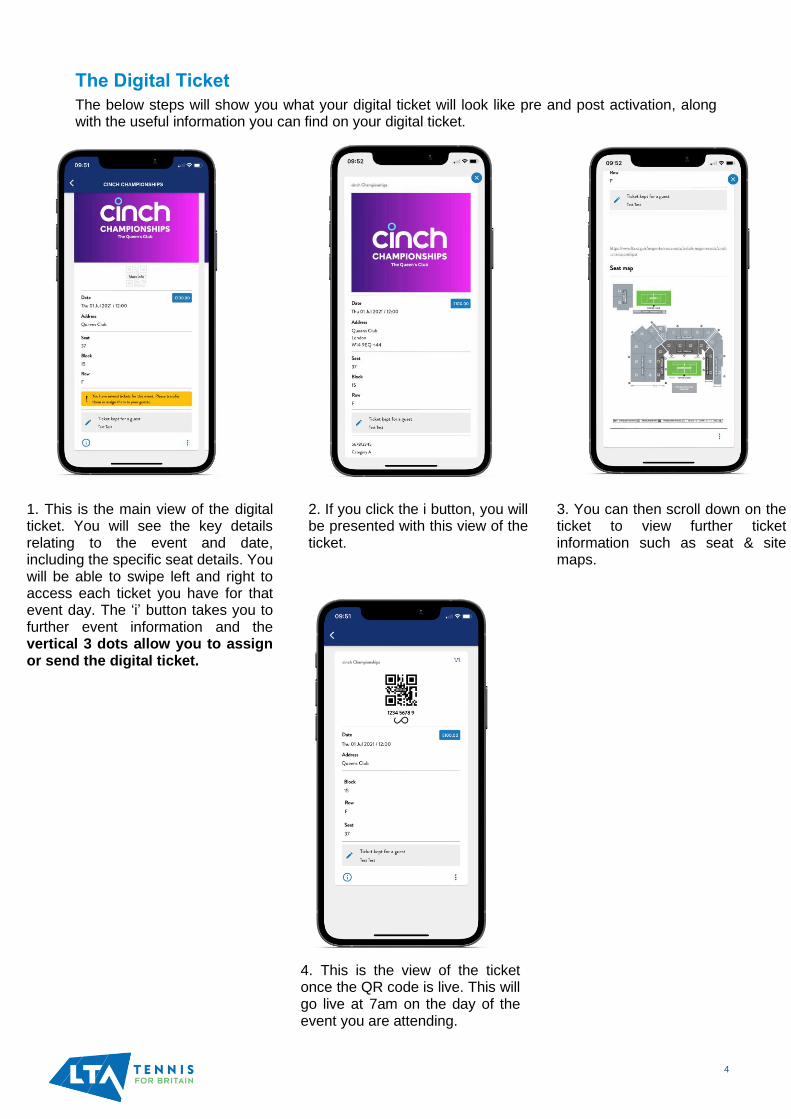
The below steps will show you what your digital ticket will look like pre and post activation, along with the useful information you can find on your digital ticket.
1. This is the main view of the digital ticket. You will see the key details relating to the event and date, including the specific seat details. You will be able to swipe left and right to access each ticket you have for that event day. The ‘i’ button takes you to further event information and the vertical 3 dots allow you to assign or send the digital ticket.
2. If you click the i button, you will be presented with this view of the ticket.
3. You can then scroll down on the ticket to view further ticket information such as seat & site maps.
4. This is the view of the ticket once the QR code is live. This will go live at 7am on the day of the event you are attending.

5
Sending Tickets
The below steps will show you how to send a ticket to your guest(s). Once you send a ticket to your guest(s), they will be emailed with a link to download and register on the LTA Tickets app.
1. Open the LTA Tickets app where you will be presented with the My Events screen. Select the event day and then find the ticket you want to send to a guest.
2. Once on the ticket, click the three vertical dots in the bottom right-hand corner.
3. On the menu that appears, click on the send option.
4. Enter the guests email address and then click the arrow.
5. Check the details are correct and click Send.
6. You will be given a confirmation screen which states that your transfer is in progress. Your guest will be notified via email that they have a ticket ready for them.

6
Assigning a Sent Ticket to Yourself
The below steps will show your guests how to assign tickets for themselves. If your guests have more than one ticket, we do advise that they send these tickets on to attendees. However, they can use this process to assign the ticket to them and keep the ticket on their device. They will all need to arrive together, as the digital tickets will stay on the one device.
1. Open the LTA Tickets app to show the ‘My Events’ page. Click into the event day to display your ticket(s) for that event day.
2. Once you are on the ticket that you want to keep for yourself, click the three vertical dots in the bottom right-hand corner of the ticket.
3. In the menu that appears, click the ‘Keep or Assign’ option.
4. On the next screen, click the ‘Keep for Myself’ button which will add your name to the ticket.
5. If you have sent more than one ticket to a guest and they do not send their tickets on, they can assign them to their guest by clicking on the ‘Assign to a new guest’ button and enter their name.

7
Cancelling a Ticket Transfer
The below steps will show you how to cancel a transfer to a guest. Please note, you can only cancel a transfer if the guest has not yet accepted the ticket. If your guest has already accepted the ticket, they will need to return the ticket to you, see Returning a Transferred Ticket further in the guide.
1. Open the LTA Tickets app and navigate to the menu by clicking on the hamburger in the top left-hand corner.
2. In the menu select ‘Pending Transfers’, which will show what and who you have a pending transfer for. Click on the down arrow to display all of the ticket.
3. This will now show the full ticket for which you have a pending transfer. At the bottom of this ticket, you will see a red button to cancel transfer. To cancel the transfer, click this button.
4. On the confirmation message that pops up, click Yes to cancel the transfer of this ticket.

8
Accepting a Transferred Ticket
The below steps will show you how your guest can accept (or reject) a ticket that has been transferred to them.
1. Your guest will need to open the LTA Tickets app. Once opened, they will be presented with the option to accept or reject tickets. If they reject tickets, they will stay with you. If you have sent a guest more than one ticket it will state how many they are accepting.
2. Once they have accepted their tickets, they will need to click on the hamburger in the top-left corner of the app. When the menu displays, they need to click in to ‘My Tickets’.
3. Your guest will now see the tickets you have sent them. Click into the event day to see their digital ticket.

9
Returning a Transferred Ticket
The below steps will show your guest how to return a ticket to you if they have accepted the ticket.
1. Your guest will need to open the LTA Tickets app, click into the event day and find the ticket they want to return to you.
2. Once they have found the ticket they want to return to you, they will need to click on the three vertical dots in the bottom right-hand corner.
3. In the menu that appears, they will need to click on the ‘Return transferred ticket’ option.
4. On the confirmation page that appears, they will need to click Yes to return the ticket to you.