State and County Offices Financial Service
47
UNITED STATES DEPARTMENT OF AGRICULTURE Farm Service Agency Washington, DC 20250 For: State and County Offices Financial Services (FS) Web Application Approved by: Associate Administrator for Operations and Management 1 Overview A Background OMB Circular A-123, Appendix-A reviews conducted for FSA’s County Office operations require corrective actions for deficiencies. Recommendations included new automated system controls and associated accounting initiatives designed to strengthen internal controls within the agency and mitigate the risk for erroneous payments. County Release No. 655 contains a new release of the FS web application. The updated FS web-based application has been created to: • enhance FS functionality through role-based security, automated profile change notices, and management of customer’s information external to payment or receipt processing • incorporate Financial Systems Integration Office (FSIO) standards to ease transition to Financial Management Modernization Initiative (FMMI) • meet OMB Circular A-123 requirements through improved internal controls over bank account information by automated monitoring and monthly spot checks. FS will interface with the National Payment Service (NPS) to provide real time financial information related to payment disbursements. B Purpose This notice provides instructions for using the enhanced version of the FS web application. Disposal Date September 1, 2009 Distribution State Offices; State Offices relay to County Offices 12-10-08 Page 1 Notice FI-2878
-
Upload
khangminh22 -
Category
Documents
-
view
3 -
download
0
Transcript of State and County Offices Financial Service

UNITED STATES DEPARTMENT OF AGRICULTURE Farm Service Agency Washington, DC 20250 For: State and County Offices
Financial Services (FS) Web Application Approved by: Associate Administrator for Operations and Management
1 Overview
A Background OMB Circular A-123, Appendix-A reviews conducted for FSA’s County Office operations require corrective actions for deficiencies. Recommendations included new automated system controls and associated accounting initiatives designed to strengthen internal controls within the agency and mitigate the risk for erroneous payments. County Release No. 655 contains a new release of the FS web application. The updated FS web-based application has been created to: • enhance FS functionality through role-based security, automated profile change notices,
and management of customer’s information external to payment or receipt processing • incorporate Financial Systems Integration Office (FSIO) standards to ease transition to
Financial Management Modernization Initiative (FMMI) • meet OMB Circular A-123 requirements through improved internal controls over bank
account information by automated monitoring and monthly spot checks. FS will interface with the National Payment Service (NPS) to provide real time financial information related to payment disbursements.
B Purpose This notice provides instructions for using the enhanced version of the FS web application.
Disposal Date September 1, 2009
Distribution State Offices; State Offices relay to County Offices
12-10-08 Page 1
Notice FI-2878

Notice FI-2878 1 Overview (Continued)
C Contact
If there are questions about this notice, State Offices shall contact the appropriate office according to the following.
Issue Contact Software-related problems National Help Desk at 800-255-2434 or 816-926-1552.
Note: Select option 1 for web application problems. Select
option 3 for hardware and application software. Policies in this notice Denise Glover by:
• e-mail at [email protected] • telephone at 816-926-6590 Yanira Sanabria by: • e-mail at [email protected] • telephone at 703-305-0969 Debbie Simmons by: • e-mail at [email protected] • telephone at 703-305-1309.
2 Customer Election of Assignments, Joint Payments, and Direct Deposit
A Options for Customer Election The customer can elect to make an assignment, joint payment, or direct deposit using either of the following methods: • customer self-entered election through the FS application, if the customer has a valid
level II eAuthentication ID and password • submitting the following form, as applicable, to an FSA County Office:
• CCC-36 for an assignment • CCC-37 for a joint payment • SF-1199A or SF-3881 for a direct deposit.
12-10-08 Page 2

Notice FI-2878 2 Customer Election of Assignments, Joint Payments, and Direct Deposit (Continued)
B Customer Entered Election in FS If the customer enters the election using their level II eAuthentication, the election will be updated immediately. Note: See Exhibit 1 for options that the customer may change.
C Form Submitted to County Office A customer may submit a properly completed form to any FSA County Office. A County Office user will enter the election for the customer by selecting the County Office that the form is applicable to. A County Office user-entered form requires a second user verification of the data entered. The second user will select the previously entered election, and enter a limited amount of information to validate that the election was properly entered.
3 Using FS in the State or County Office
A When to Use FS FS shall be used when a customer’s direct deposit, assignment, joint payment, or customer profile must be created, updated, approved, or deleted. FS is a public facing application and can be used by the customer to create, accept, update, or delete assignments, joint payments, and direct deposits. All available actions are listed in Exhibit 1. Note: Screen layout and function will be the same for customers as the State or County
Office employee’s screens. The actions allowed are different as detailed in Exhibit 1. Additionally, the customer will not have access to all functionality available to the State and County Offices.
12-10-08 Page 3

Notice FI-2878 3 Using FS in the State or County Office (Continued)
B Login to Web Site State or County Office employees must have a valid eAuthentication user ID and password to login. To login to the web site from the FSA Intranet Home Page, CLICK “FSA Applications under the “Links” section. The FSA Applications Home Page will be displayed. CLICK “Financial Applications” under “Financial Services”, and the FSA Financial Applications Home Page will be displayed. Click the link for “Financial Services”. The following screen will be displayed.
CLICK “Continue” and the eAuthentication Login Screen will be displayed.
12-10-08 Page 4

Notice FI-2878 3 Using FS in the State or County Office (Continued)
B Login to Web Site (Continued) The following is an example of the eAuthentication Login Screen.
Enter a valid eAuthentication user ID and password, and CLICK “Login”. The Financial Services Select County Screen will be displayed.
C Standard Links in FS The following links are standard through the FS application’s top banner to assist users with common functions.
Menu Option Function Home Returns to the Financial Services Home Page What’s New Opens a web session at the FSA Internet Home Page E-Forms Link to Government electronic forms. Local Offices Opens a web session at the USDA Internet Home Page. Help Opens a web session at the FSA Intranet Help Home Page. Contact Us Allow user to send an e-mail to the National Help Desk. Logoff Allows the user to log off of FS.
12-10-08 Page 5

Notice FI-2878 3 Using FS in the State or County Office (Continued)
D Online Help Online help will be available throughout the application. Click on the circle with a question mark on the right top portion of the screen to access online help.
E Example of FS Entry Page The following is an example of the initial FS entry page. This screen will only be displayed the first time a user enters the FS application or when the user has not saved a State/county to their “Organize Favorites” list.
To initially establish a State/county for frequent use (that is, the county of employment): • CLICK “Organize Favorites” • CLICK “Add” • use the State drop-down menu to select the applicable State • CLICK “Load Counties” • use the county drop-down menu to select the applicable county • CLICK “Add County” to add to the “Organize Favorites” list.
12-10-08 Page 6

Notice FI-2878 3 Using FS in the State or County Office (Continued)
F Initial Setup of Frequently Used Counties The Organize Favorites Screen will be displayed when the user selects the “Organize Favorites” option from the Select County Screen.
To manage frequently used counties the user may CLICK: • “Set As Default” to set the State/county that will be displayed when accessing the FS
application • “Add” to allow the user to add additional State/county combinations to their favorites list • “Remove” to allow the user to remove State/county combinations no longer needed in
their favorites list • “Exit” to return the user to the initial Select County Screen. Notes: Up to 10 favorites may be added to the “Organize Favorites” list.
The user must select a default State/county (see subparagraph 4 B). If the user does not select a default, the system will automatically set the default to the first State/county combination on the list. Each time the user enters the FS application; the session will start in the default State/county.
12-10-08 Page 7

Notice FI-2878 3 Using FS in the State or County Office (Continued)
G Example of FS Change Request Welcome Page This is an example of the FS Change Request Welcome Screen that will be displayed when entering the FS application once a State/county combination has been saved to the “Organize Favorites” list.
Click on the option of the function to be performed. For instructions to: • select a county not on the favorites list, see paragraph 4 • use “Change Request – Work List”, see paragraph 5 • use “Change Request – My Changes”, see paragraph 6 • select a customer, see paragraph 7.
12-10-08 Page 8

Notice FI-2878 4 Selecting a State/County Not on Favorites List for One-Time Data Entry
A Initial Entry Screen The following screen will be displayed upon initial entry into the FS application.
To select a county that is not on the frequently used list, CLICK “Select County”.
12-10-08 Page 9

Notice FI-2878 4 Selecting a State/County Not on Favorites List for One-Time Data Entry (Continued)
B Selecting and Saving State/County Environment in FS The Select County Screen will be displayed.
To select a State or county not included in the favorites list: • use the State drop-down menu to select the applicable State • CLICK “Load Counties” • use the county drop-down menu to select the applicable county • CLICK “Select” to access State or county environment.
12-10-08 Page 10

Notice FI-2878 5 Approving Pending Transaction Requests Using FS Work List Screen
A Accessing Work List Screen The Work List Screen will display transactions entered by a different user ID that are awaiting secondary approval from another authorized user. If the user created the original transaction, it will not be displayed on the Work List Screen. The Work List Screen will be displayed when the user clicks “Work List” under “Change Requests”.
To begin using the Work List Screen, click on the appropriate transaction number. Note: Transactions are listed in reverse date order to give higher priority to aging
transactions. 12-10-08 Page 11

Notice FI-2878 5 Approving Pending Transaction Request Using FS Work List Screen (Continued)
B Approving Transaction Requests Using Work List Screen The Create Assignment Change Request Screen will be displayed when the user selects a transaction number from the Work List Screen. Note: The screen will vary depending on the type of transaction selected, such as
assignment, joint payment, or direct deposit.
To begin the approval process: • enter the data requested for approval verification
Note: Data requested for:
• assignments is the assignee tax ID and tax ID type • joint payments is the joint payee name • direct deposits is the account number, account type, and owner type.
12-10-08 Page 12

Notice FI-2878 5 Approving Pending Transaction Request Using FS Work List Screen (Continued)
B Approving Transaction Requests Using Work List Screen (Continued) • CLICK:
• “Approve Request” to complete the transaction and place it in active status • “Delete Request” to cancel the transaction request and place a delete notification on
the originating users My Changes Screen • “Exit” to return user to the Work List Screen without taking action.
6 Managing Transaction Requests Using FS My Changes Screen
A Accessing My Changes Screen The Work List Screen will display only the transactions or information about the transactions that the user originally created. The My Changes Screen will be displayed when the user clicks “My Changes” under “Change Requests”.
12-10-08 Page 13

Notice FI-2878 6 Managing Transaction Requests Using FS My Changes Screen (Continued)
A Accessing My Changes Screen (Continued) Click on the appropriate transaction number to begin using the Work List Screen. The first column is an icon that identifies the status of the request, as follows: • the “Deleted” icon identifies canceled transactions • the “Completed” icon identifies transactions that have secondary approval and are active • the “Awaiting Approval” icon identifies transaction requests requiring the secondary
approval process to be performed.
B Managing Transaction Requests Using Work List Screen The Review Request Details Screen will be displayed when the user selects a transaction number from the My Changes Screen. Note: The screen will vary depending on the type of transaction selected, such as
assignment, joint payment, or direct deposit.
12-10-08 Page 14

Notice FI-2878 6 Managing Transaction Requests Using FS My Changes Screen (Continued)
B Managing Transaction Requests Using Work List Screen (Continued) To modify a pending transaction, CLICK: • “Edit Request” to modify the original transaction entry
Notes: The transaction will remain in pending status on the My Changes Screen. A transaction request can only be updated once. If further modification is necessary, the transaction request must be deleted and re-entered.
• “Delete Request” to cancel the transaction request and place it in deleted status on the My Changes Screen
• “Exit” to return the user to the Work List Screen without making changes.
7 Selecting a Customer in FS
A Selecting a Customer The Select Customer Screen will be displayed when the user clicks “Select Customer”.
To select a customer: • enter the appropriate tax ID number in the “Tax ID” field • select the tax ID type from the drop-down menu • CLICK “Submit”.
12-10-08 Page 15

Notice FI-2878 7 Selecting a Customer in FS (Continued)
B Action That Can Be Performed for a Customer The Financial Services Welcome Screen will be displayed upon clicking “Submit”.
Click on the option of the function to be performed. For instructions to: • create an assignment, see paragraph 8 • access and view assignor, see paragraph 9 • access and view assignee, see paragraph 10 • create joint payments, see paragraph 11 • view joint payments, see paragraph 12 • create direct deposits, see paragraph 13 • create direct deposit sub-accounts, see paragraph 14 • create direct deposit waivers, see paragraph 15 • view direct deposits, see paragraph 16 • see pending changes, see paragraph 17 • see customer profiles, see paragraph 18.
Note: The customer profile allows the user to set the indicator for either of the following: • “Bankruptcy” • “Other Agency Claims”.
12-10-08 Page 16

Notice FI-2878 8 Creating Assignments
A Begin Entering Information for an Assignment Request The Create Assignment Screen will be displayed once the user selects the customer and clicks “Create” under “Assignments”.
Create an assignment according to the following. • “Program Category” and “Program/Contract Year” or “Program Alpha Code” must be
selected. If the program appears in the drop-down list, click on the appropriate program and enter the program or contract year. If the program is not in the drop-down list, click the “Program Alpha Code” radio button and enter the alpha program codes used for the program. Note: For programs with multi-year contracts, such as CRP, enter the contract year. For
the Tobacco Transition Payment Program (TTPP), ENTER “05” in the “Program/Contract Year” field.
• Select the radio button to apply payments as follows:
• to apply all payments for the selected program code, click the “Apply All Payments for the Program” radio button
• to only apply payments for a specific reference type; for example, farm number or
contract number, click the “Only Apply Payment for” radio button and select the reference type and enter the reference number.
• Enter the assignee tax ID in the “Assignee Tax ID” field. The assignee must be in the
Service Center Information Management System (SCIMS). • Enter the assignee tax ID type in the “Tax ID Type” field. See 1-CM for tax ID types.
12-10-08 Page 17

Notice FI-2878 8 Creating Assignments (Continued)
A Begin Entering Information for an Assignment Request (Continued) • Enter the amount of the assignment in the “Amount” field.
Note: For programs with multi-year contracts, enter the total amount of the assignment. The yearly amounts will be broken down later.
• Enter the date the assignee signed CCC-36 in the “Signature Date” field. • “Create Assignment” will:
• update all applicable work lists and place the assignment transaction request in pending status awaiting secondary approval process
• take the user to the Create Multi-Year Assignment Screen, if the program is eligible for multiple year assignment (CRP Annual Rental or TTPP).
• “Exit” will return the user to the My Changes Screen where they will have the option to
select a new customer. CLICK: • “Create Assignment” to update all applicable work lists and place the assignment
transaction request in pending status awaiting secondary approval process
Note: The Create Multi-Year Assignment Screen will be displayed if the program is eligible for multi-year assignments.
• “Exit” to return to the My Changes Screen without updating the assignment.
12-10-08 Page 18

Notice FI-2878 8 Creating Assignments (Continued)
B Additional Entry for Multiple Year Assignment The Create Multi-Year Assignment Screen will be displayed when the assignment request is for a program eligible for multiple year assignment.
To complete the assignment request: • enter dollar amounts for all applicable years
Notes: “Recalculate” will calculate the amount remaining to be assigned. The remaining amount must be zero before creating the assignment.
• “Create Assignment” will update all applicable work lists and place the assignment
transaction request in pending status awaiting secondary approval process • “Back” will redisplay the Create Assignment Screen allowing the user to make
modifications to the original entry information • “Exit” will return the user to the My Changes Screen without making any changes.
12-10-08 Page 19

Notice FI-2878 8 Creating Assignments (Continued)
C Confirmation of Single or Multiple Year Assignment Request Information The following is an example of the Pending Changes Screen.
The FS application will display an informational message that the assignment request was submitted and requires secondary approval for completion. The assignment request will remain on the My Changes Screen as pending until the secondary approval process is completed.
12-10-08 Page 20

Notice FI-2878 9 Assignments – Assignor View
A Accessing Assignor View in FS The Assignor View Screen will be displayed when user clicks “Assignor View” from the Assignments Screen.
On the Assignor View Screen: • the status of all active assignments will be displayed as an icon
• pending status identifies all assignments awaiting approval or acceptance process
Note:A user may accept or cancel an assignment in a pending status. • accepted status identifies all active assignments and this is a view only status
• CLICK “Show All Assignments” to access all assignments whether active or inactive and the following 2 additional icons will be displayed: • completed status, indicated by a lockbox icon, identifies assignments that have been
paid in full and this is a view only status • canceled status, indicated by a gray “X” icon, identifies assignments that have been
inactivated; either partially paid, or prior to any assignee payments and this is a view only status
12-10-08 Page 21

Notice FI-2878
9 Assignments – Assignor View (Continued)
A Accessing Assignor View in FS (Continued) • click on appropriate transaction number to view, update, or cancel as appropriate • CLICK “Refresh” to synchronize transaction status with actions being performed by
other users.
Note: The Assignor View Screen will only display the transactions or information about the transactions that pertain to selected customer. Cancellations of accepted assignments shall only be performed by County Offices with written consent from an assignee. The assignee may cancel an assignment if the assignee has a level 2 eAuthentication ID.
12-10-08 Page 22

Notice FI-2878
9 Assignments – Assignor View (Continued)
B Updating a Pending Assignment The Assignment Details Screen will be displayed when the user selects a pending transaction from the Assignor View Screen.
The user may CLICK: • “Cancel Assignment” to remove the pending transaction and to:
• complete the cancellation process • display the Pending Changes Screen with confirmation notification • place transaction in pending status and update appropriate work lists
• “Edit Assignment” to make changes to the pending transaction • “Exit” without making any changes.
12-10-08 Page 23

Notice FI-2878
9 Assignments – Assignor View (Continued)
B Updating a Pending Assignment (Continued) The Update Assignment Screen will be displayed when user clicks “Edit Request” on the Assignment Details Screen.
Edit the request to modify fields as appropriate. CLICK: • “Next” to continue update process • “Exit” to return to the Assignor View Screen without making changes.
12-10-08 Page 24

Notice FI-2878
9 Assignments – Assignor View (Continued)
B Updating a Pending Assignment (Continued) The Update Assignment Screen will be displayed when user clicks “Next” on the Update Assignment Screen.
To complete the edit request, CLICK: • “Update Assignment” to:
• complete the update process • access the Pending Changes Screen and update confirmation • place transaction in pending status and update appropriate work lists
Note: A pending transaction may only be updated once. If additional updates are
required, the transaction must be deleted and re-entered. • “Back” to return to the Update Assignment Screen to modify data entered for update • “Exit” to return to the Assignor View Screen without making changes.
12-10-08 Page 25

Notice FI-2878 10 Assignments – Assignee View
A Accessing Assignee View in FS The Assignee View Screen will be displayed when user clicks “Assignee View” from the Assignments Menu.
On the Assignee View Screen: • the status of all active assignments for the selected customer will be displayed as an icon:
• pending status identifies all assignments awaiting acceptance process
Note:A user may accept or cancel an assignment in a pending status. • accepted status identifies all active assignments and this is a view only status
• CLICK “Show All Assignments” to display all assignments whether active or inactive and the following 2 additional icons will be displayed: • completed status, indicated by a lockbox icon, identifies assignments that have been
paid in full; this is a view only status • canceled status, indicated by a gray “X” icon, identifies assignments that have been
inactivated; either partially paid, or prior to any assignee payments and this is a view only status
12-10-08 Page 26
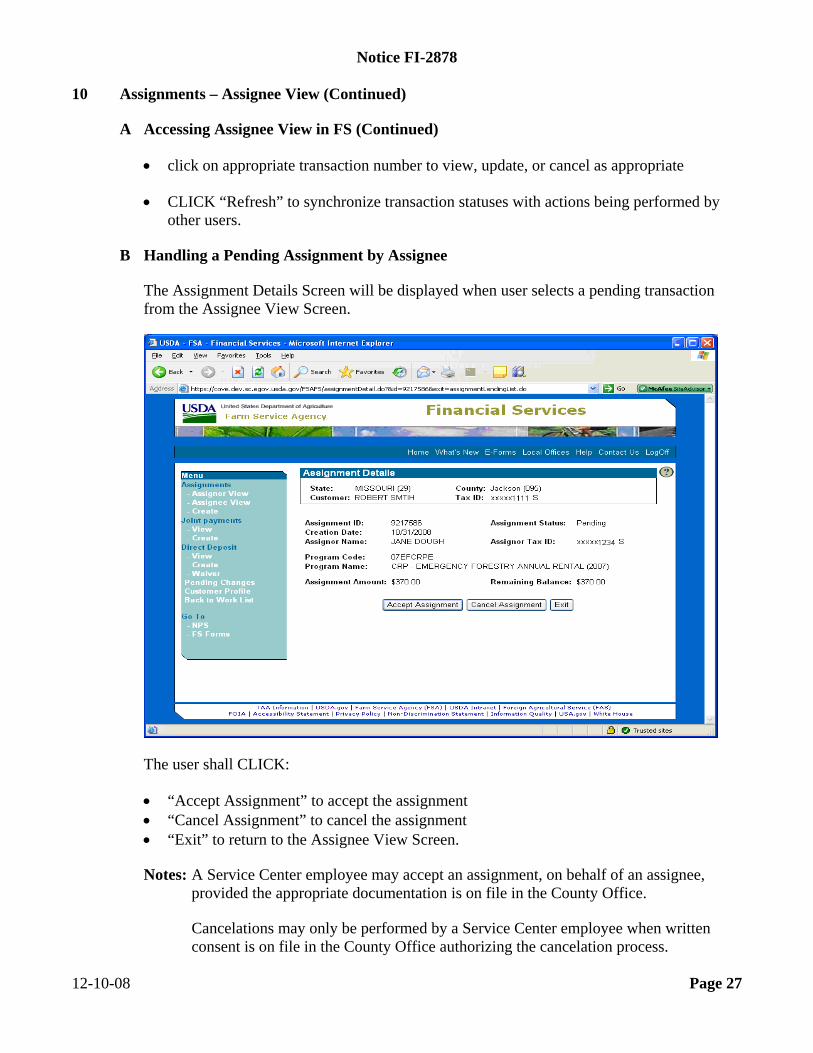
Notice FI-2878 10 Assignments – Assignee View (Continued)
A Accessing Assignee View in FS (Continued) • click on appropriate transaction number to view, update, or cancel as appropriate • CLICK “Refresh” to synchronize transaction statuses with actions being performed by
other users.
B Handling a Pending Assignment by Assignee The Assignment Details Screen will be displayed when user selects a pending transaction from the Assignee View Screen.
The user shall CLICK: • “Accept Assignment” to accept the assignment • “Cancel Assignment” to cancel the assignment • “Exit” to return to the Assignee View Screen. Notes: A Service Center employee may accept an assignment, on behalf of an assignee,
provided the appropriate documentation is on file in the County Office. Cancelations may only be performed by a Service Center employee when written consent is on file in the County Office authorizing the cancelation process.
12-10-08 Page 27

Notice FI-2878 11 Creating Joint Payments
A Entering Information for Joint Payments When users select a customer, and under Joint payments CLICK “Create”, the following Create Joint Payment Screen will be displayed.
Create a joint payment according to the following.
Step Action Program Category and Program/Contract Year or Program Alpha Code fields must be filled. IF the program category… THEN… is displayed in the drop-down menu
click the appropriate program category and enter the program/contract year.
1
is not displayed in the drop-down menu
CLICK “Program Alpha Code” radio button and enter the alpha program code used for the program.
2 Click the radio button to apply payments as follows: • “Apply All Joint Payments for the Program”, to apply all payments for the
selected program code • “Only Apply Joint Payment to Reference:” and select the reference type and
enter the reference number from the drop-down menu, to only apply payments for a specific reference type (for example: farm number or contract number).
12-10-08 Page 28

Notice FI-2878 11 Creating Joint Payments (Continued)
A Entering Information for Joint Payments (Continued)
Step Action 3 Enter joint payee name. 4 Enter date the customer signed CCC-37 as the Signature Date. 5 CLICK either of the following:
• “Next”, the “Confirm Create Joint Payment” option will be displayed • “Exit”, the My Changes Screen will be displayed without saving the data.
B Create Joint Payment Confirmation
On the Create Joint Payment Screen, when users CLICK “Next”, the “Confirm Create Joint Payment” option will be displayed.
IF users CLICK… THEN the… “Confirm Create Joint Payment”
create process will be completed and transactions will be placed on the appropriate work list for the secondary approval process.
“Back” Create Joint Payment Screen will be displayed so users can update request information.
“Exit” My Changes Screen will be displayed and the joint payment will not be created.
12-10-08 Page 29

Notice FI-2878 12 Joint Payments View
A Accessing FS Joint Payments View Screen When users select a customer, and under Joint payments CLICK “View”, the following Joint Payments Screen will be displayed.
If users CLICK… THEN users can… “Create Joint Payment” create a new transaction request. “Update Joint Payment” modify an existing joint payment. “Cancel Joint Payment” delete an existing joint payment.
Notes: Cancelations shall only be performed if County Office has written consent from the
joint payee. If under ID users CLICK “transaction ID” link, joint payment details will be displayed. From the Details Screen, users can update or cancel joint payments.
12-10-08 Page 30

Notice FI-2878 12 Joint Payments View (Continued)
B Updating Joint Payments From the Joint Payments View Screen From the Joint Payments Screen, when the users CLICK “Update Joint Payment”, the following Update Joint Payment Screen will be displayed.
To modify displayed data, CLICK either of the following: • “Next”, the Confirm Joint Payment Screen will be displayed • “Exit”, the Joint Payments View Screen will be displayed with no updates. Notes: Once a transaction has been updated, no additional updates will be permitted until
secondary approval process is complete. The transaction will be marked as pending; however, no update notation will be provided. If users try to perform a second update, the system will display a message indicating the transaction is not available for additional updates. Joint payments can be updated indefinitely. A joint payment does not need to be deleted after the acceptance process, it may be over written.
12-10-08 Page 31

Notice FI-2878 12 Joint Payments View (Continued)
B Updating Joint Payments From the Joint Payments View Screen (Continued) From the Update Joint Payment Screen, when the users CLICK “Next”, the “Confirm Update Joint Payment” option will be displayed.
IF users CLICK… THEN the … “Confirm Update Joint Payment”
• system will complete the update process • Pending Changes Screen will be displayed with the update
confirmation • system will place the transaction in pending status for
secondary approval and update appropriate work lists. “Back” Update Joint Payment Screen will be displayed so users can
modify data entered. “Exit” Joint Payment View Screen will be displayed without updating
transactions. 12-10-08 Page 32

Notice FI-2878 12 Joint Payments View (Continued)
C Canceling Joint Payments From the Joint Payments View Screen From the Joint Payments Screen, when the users CLICK “Cancel Joint Payment”, the following Update Joint Payment Screen will be displayed.
IF users CLICK… THEN the … “Confirm Cancel Joint Payment”
• system will complete the cancelation process • Pending Changes Screen will be displayed with the
confirmation • system will place the transaction in pending status for
secondary approval and update appropriate work lists. “Exit” Joint Payment View Screen will be displayed without canceling
transactions. 12-10-08 Page 33

Notice FI-2878 13 Creating Direct Deposit Main Accounts
A Entering Information for Direct Deposit Main Accounts When users select a customer, and under Direct Deposit CLICK “Create”, the following Create Main Direct Deposit Account will be displayed, if a Main Account does not exist. See 1-FI, Part 3 for information about Direct Deposit Accounts.
Create a main account according to the following.
Step Action 1 Enter routing number. 2 Enter account number. 3 Enter account type to identify whether the direct deposit is for a checking or
savings account. 4 Enter owner type to identify whether the direct deposit is for a personal or
business/corporate account. 5 CLICK either of the following:
• “Next”, the “Confirm Create Direct Deposit” option will be displayed • “Exit”, the My Changes Screen will be displayed without saving the data.
12-10-08 Page 34

Notice FI-2878 13 Creating Direct Deposit Main Accounts (Continued)
A Entering Information for Direct Deposit Main Accounts (Continued) A customer can have more than 1 direct deposit on file. The main account will be the default account. Sub-accounts require a specific reference type and reference number. A customer may have multiple sub-accounts, but only 1 main account. If a main account is deleted, all sub-accounts will be deleted. To avoid deleting all sub-accounts, the main account may be over-written with new account information. If the bank routing number is active, but is not a valid selection in FS, contact the National Help Desk for assistance. The Other Name and Address file will no longer be used. A financial institution will no longer have to be entered into the Other Name and Address file before establishing a direct deposit. FS will validate bank routing numbers based on a database provided by Treasury Department. Note: Financial institutions must continue to be loaded in SCIMS with a proper tax ID if
the financial institution is receiving a payment as an assignment. 12-10-08 Page 35

Notice FI-2878 13 Creating Direct Deposit Main Accounts (Continued)
B Create Direct Deposit Main Account Confirmation On the Create Main Direct Deposit Screen, when users CLICK “Next”, the following Create Main Direct Deposit Account Screen will be displayed. Note: The financial institution information displayed may correspond to a central banking
location, not the local branch.
IF users CLICK… THEN the… “Create Account” • Pending Changes Screen will be displayed with the
secondary approval notification notice • appropriate FS lists will be updated.
“Back” Create Direct Deposit Screen will be displayed so users can update request information.
“Exit” My Changes Screen will be displayed without saving the data. 12-10-08 Page 36

Notice FI-2878 14 Creating Direct Deposit Sub-Accounts
A Entering Information for Direct Deposit Sub-Accounts When users select a customer, and under Direct Deposit CLICK “Create”, the following Create Main Direct Deposit Sub-Account will be displayed, if a Main Account exists.
Create a sub-account according to the following.
Step Action 1 Enter routing number. 2 Enter account number. 3 Enter account type to identify whether the direct deposit is for a checking or
savings account. 4 Enter owner type to identify whether the direct deposit is for a personal or
business/corporate account. 5 Complete:
• “This account will be used if” field by selecting a reference type; such as farm,
contract, etc., from the drop-down menu • “is” field with the applicable reference number based on the selected reference
type; such as farm number or contract number. 5 CLICK either of the following:
• “Next”, the “Confirm Create Direct Deposit” option will be displayed • “Exit”, the My Changes Screen will be displayed without saving the data.
12-10-08 Page 37

Notice FI-2878 14 Creating Direct Deposit Sub-Accounts (Continued)
B Create Direct Deposit Sub-Account Confirmation On the Create Direct Deposit Sub Account Screen when users CLICK “Next”, the following Create Direct Deposit Sub-Account Screen will be displayed.
IF users CLICK… THEN the… “Create Account” • Pending Changes Screen will be displayed with the
secondary approval notification notice • appropriate FS lists will be updated.
“Back” Create Direct Deposit Sub-Account Screen will be displayed so users can update request information.
“Exit” My Changes Screen will be displayed without saving the data. 12-10-08 Page 38

Notice FI-2878 15 Direct Deposit Waiver
A Electing a Direct Deposit Hardship Waiver The user shall select a customer, CLICK “Waiver” under the “Direct Deposit” menu, and the Create Direct Deposit Hardship Waiver Screen will be displayed.
On the Create Direct Deposit Hardship Waiver Screen, CLICK: • “Create Hardship Waiver” to:
• display the pending changes list with secondary approval notification notice • update the appropriate FS lists
• “Exit” to display the “My Changes List” and the direct deposit hardship waiver will not
be created. Note: See 1-FI, Part 2 for information on direct deposit hardship waivers.
12-10-08 Page 39

Notice FI-2878 16 Direct Deposit View
A Accessing Direct Deposit View in FS
The user shall select a customer, CLICK “View” under the “Direct Deposit” menu, and the Direct Deposit Accounts Screen will be displayed.
The Direct Deposit Accounts Screen will display the direct deposit elections for the selected customer. To display the detail account information for editing or canceling, click on the appropriate direct deposit ID. All: • active accounts will be marked with a check ( ) • invalid accounts will be marked with an exclamation point (!). Click the “Refresh” button to synchronize list with all updates system-wide.
12-10-08 Page 40

Notice FI-2878 16 Direct Deposit View (Continued)
B Updating or Canceling a Direct Deposit Account from the Direct Deposit Accounts Screen The user shall select the appropriate direct deposit ID number on the Direct Deposit Accounts Screen and the Account Details Screen will be displayed.
On the Account Details Screen, CLICK: • “Edit Account” to make changes to account information • “Cancel Account” to inactivate the selected direct deposit account
Note: Future disbursements will be routed to the main account. • “Exit” to return to the Direct Deposit Accounts Screen without changing the data.
12-10-08 Page 41
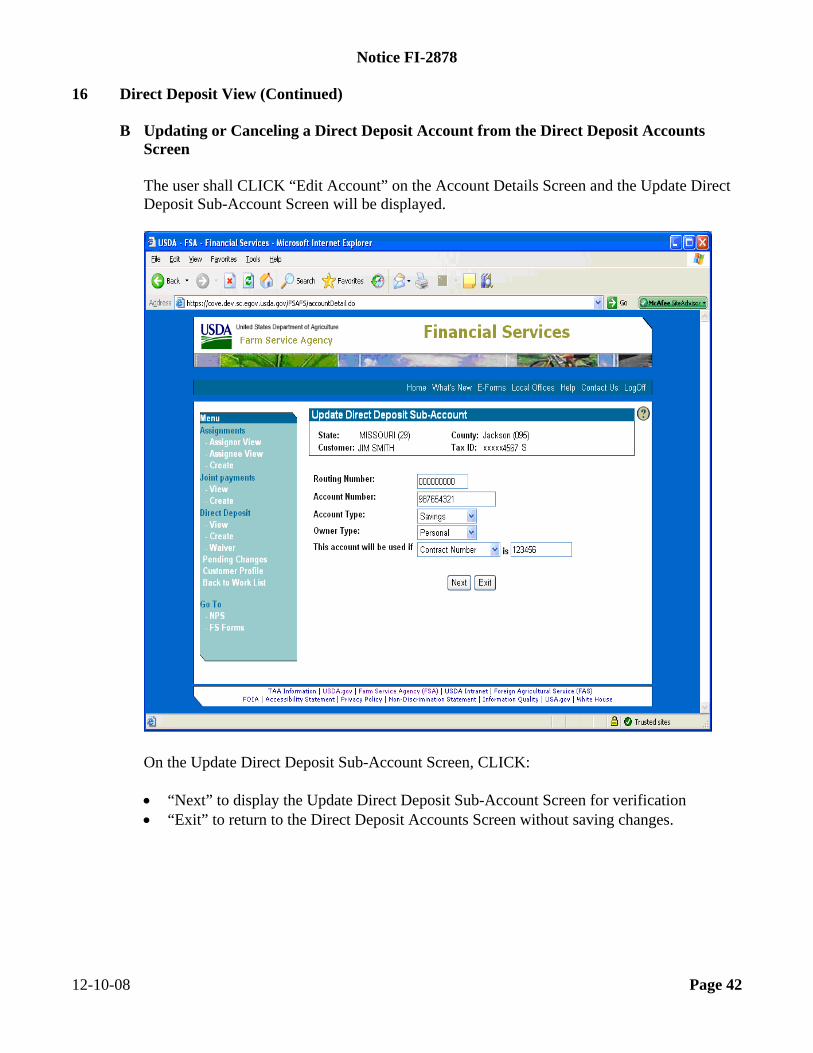
Notice FI-2878 16 Direct Deposit View (Continued)
B Updating or Canceling a Direct Deposit Account from the Direct Deposit Accounts Screen The user shall CLICK “Edit Account” on the Account Details Screen and the Update Direct Deposit Sub-Account Screen will be displayed.
On the Update Direct Deposit Sub-Account Screen, CLICK: • “Next” to display the Update Direct Deposit Sub-Account Screen for verification • “Exit” to return to the Direct Deposit Accounts Screen without saving changes.
12-10-08 Page 42

Notice FI-2878 16 Direct Deposit View (Continued)
B Updating or Canceling a Direct Deposit Account from the Direct Deposit Accounts Screen (Continued) The user shall CLICK “Next” on the Update Direct Deposit Sub-Account Screen and the Update Direct Deposit Sub-Account Screen will be displayed with the “Update Account” option.
On the Update Direct Deposit Sub-Account Screen: • CLICK “Update Account” to:
• complete the update process
• display the Pending Changes Screen with update confirmation message
• place transaction in pending status for secondary approval and update appropriate work lists
• CLICK “Back” to return to the Update Direct Deposit Sub-Account Screen to modify
data entered for update • CLICK “Exit” to return to the Direct Deposit Accounts Screen without saving changes.
12-10-08 Page 43

Notice FI-2878 17 Pending Changes
A Accessing the FS Pending Changes Screen On the FS Welcome Screen, under “Menu”, CLICK “Pending Changes”, and the user shall select a customer. The Pending Changes Screen will be displayed with a list displaying transactions by customer.
The Pending Changes Screen will display only the transactions associated with the customer selected and only actions based on user entry. If the user created the original transaction, it will not be available for approval on the pending changes list. To begin using the FS pending changes list, click the appropriate transaction number.
12-10-08 Page 44

Notice FI-2878 17 Pending Changes (Continued)
B Approving Transaction Requests Using the FS Pending Changes List The user shall select a transaction number from the Pending Changes Screen and the Accept Assignment Change Request Screen will be displayed. Note: The screen will vary depending on the type of transaction that is selected (such as
assignment, joint payment, or direct deposit).
To begin the approval process, enter the data requested for approval verification as follows: • assignments – assignee tax ID and tax ID type • joint payments – joint payee name • direct deposits – account number, account type, and owner type. CLICK: • “Approve Request” to complete transaction and place in active status • “Delete Request” to cancel transaction request and a delete notification on originating
users “My Changes List” • “Exit” to return to work list without approving transaction.
12-10-08 Page 45

Notice FI-2878 18 Customer Profile
A Setting Financial Flags in FS On the FS Welcome Screen, under “Menu”, CLICK “Customer Profile”, select a customer, and the Customer Profile Screen will be displayed.
To set profile flags, check ( ): • “Bankruptcy Status” to set bankruptcy flag • “Other Agency Debt” to set other agency flag. Note: A check ( ) will appear when flag is set. To unset the flag, click to remove
check ( ). CLICK: • “Update Profile” to complete flag setting process • “Exit” to return to FS Welcome Screen without changing the indicators.
12-10-08 Page 46

Notice FI-2878 Exhibit 1 FS Producer/Customer Actions
The following actions can be performed by FS customers using the FS public facing application. Customers must have a valid eAuthentication user ID and password to login. To login to the web site from FSA Internet Home Page, CLICK “Online Services” located in the top banner, then CLICK “Financial Services” from the “Related Topics” banner on the right side of the page. See subparagraph 2 B.
Menu Option Function Create Assignment Customer may create an assignment from this link. The assignment
may be accepted by: • assignee with level II eAuthentication • Service Center employee with appropriate documentation on file.
Assignor View Customer (Assignor) may: • update or cancel assignments from this link before completing
acceptance process • view accepted, completed, deleted, and pending assignments.
Assignee View Customer (Assignee) may: • accept pending or cancel pending and accepted assignments from
this link before completing acceptance process • view accepted, completed, and pending assignments.
Create Joint Payment Customer may create a joint payment from this link. No approval/acceptance process needed.
Joint Payment View Customer may cancel, update, or view a joint payment from this link. Create Direct Deposit
Customer may create a direct deposit from this link. No approval/acceptance process needed.
Direct Deposit Waiver
Customer may create a waiver from this link. No approval/acceptance process needed.
Direct Deposit View Customer may: • update or view a main direct deposit from this link • cancel, update, or view a sub-account from this link.
Pending Changes Customer may view any pending transaction from this link. No action may be performed by producer from pending transaction list.
12-10-08 Page 1