STAFF REMOTE ACCESS GUIDE eSolutions - Monash ...
35
STAFF REMOTE ACCESS GUIDE eSolutions V2.2 March 2020
-
Upload
khangminh22 -
Category
Documents
-
view
4 -
download
0
Transcript of STAFF REMOTE ACCESS GUIDE eSolutions - Monash ...

STAFF REMOTE ACCESS GUIDE
eSolutions V2.2 March 2020

INTRODUCTION
Using this document
This document has been created to help you remotely access key Monash University platforms and tools. If you’re familiar with which applications and systems you’ll be using, and their purpose, you can quickly find the information you need using the table of contents on page 3. However, if you’re unsure about the applications and systems to use, the “What would you like to do?” section of this document will guide you to the right system. If you’re still having problems accessing the applications and services you need after reviewing this document, please contact us
STAFF REMOTE ACCESS GUIDE 27032020 | 1

CYBER SECURITY
CYBER SECURITY CONSIDERATIONS
● Phishing - Be cautious. Scammers are sending mass phishing emails. Report these emails to [email protected] and Stay Smart Online.
● Unsecure home and public WiFi networks - Ensure your home wireless connection is secured with a strong password, that is not the default. Avoid using public WiFi networks when dealing with sensitive University information. Refer to Choose a strong password and keep it safe.
● Physical Security - With more remote working arrangements, be mindful about the physical
protection of your IT equipment and who can see your screen. Devices should never be left unattended where others can see them e.g. inside a car.
● Keeping up to date - Make sure your devices are set to auto-update the operating system
and applications (to replace outdated software), and you are allowing them to be installed and restarted if required. This will protect your devices from known risks and provide a safer online working environment.
● Don’t share computers - If you are working remotely, avoid sharing your Monash devices
amongst family members. This can introduce unnecessary risks to your account and University data.
● Using a personal computer - Ensure any personal device you are using to access Monash University IT systems has up to date anti-virus software, internet browsers, other essential applications and avoid saving passwords. Refer to Cyber security and your family.
STAFF REMOTE ACCESS GUIDE 27032020 | 2

TABLE OF CONTENTS
INTRODUCTION 1 Using this Guide 1
CYBER SECURITY 2 CYBER SECURITY CONSIDERATIONS 2
TABLE OF CONTENTS 3
WHAT WOULD YOU LIKE TO DO? 5
Multi-factor authentication (MFA) 7 How to use MFA 7 Changing your SIM card, provider, number, or phone 7 Changing your method of MFA 7 FURTHER RESOURCES 7
MONASH VPN 8 INSTALL MONASH VPN ON YOUR PERSONAL LAPTOP OR DESKTOP 8 CONNECT TO THE MONASH VPN SERVICE 11 FURTHER RESOURCES 12
MoVE 13 SIGN INTO MoVE ON YOUR COMPUTER 13 SIGN INTO MoVE LIGHT ON A PUBLIC COMPUTER 15 FURTHER RESOURCES 16
ZOOM 17 INSTALL ZOOM ON YOUR LAPTOP OR DESKTOP 17 SIGN INTO ZOOM 18 DASHBOARD INTERFACE GUIDE 21 FURTHER RESOURCES 22
TELEPHONE EXTENSION MOBILITY 23 USING EXTENSION MOBILITY ON A DESK PHONE 23 CHANGE YOUR PIN 23 ACTIVATE EXTENSION MOBILITY 23 LOG OUT OF EXTENSION MOBILITY 23 FURTHER RESOURCES 23
CISCO SOFTPHONE 24 LOG IN USING SOFTPHONE 24 SET UP BLUETOOTH (WINDOWS) 27 SET UP BLUETOOTH (MAC) 28 CONNECT HEADSET TO USB PORT 29 FURTHER RESOURCES 30
STAFF REMOTE ACCESS GUIDE 27032020 | 3

INSTALL SOFTWARE ONTO MONASH COMPUTER 31 SOFTWARE CENTER (Windows) 31 SELF SERVICE (Mac) 32 FURTHER RESOURCES 32
INSTALL OTHER APPLICATIONS 33 SOFTWARE CATALOGUE 33
INTERNET ACCESS VIA MOBILE DEVICE 34 MOBILE TETHERING 34 APPLE MOBILE DEVICES 34 SAMSUNG OR ANDROID MOBILE DEVICES 34 FURTHER RESOURCES 34
STAFF REMOTE ACCESS GUIDE 27032020 | 4
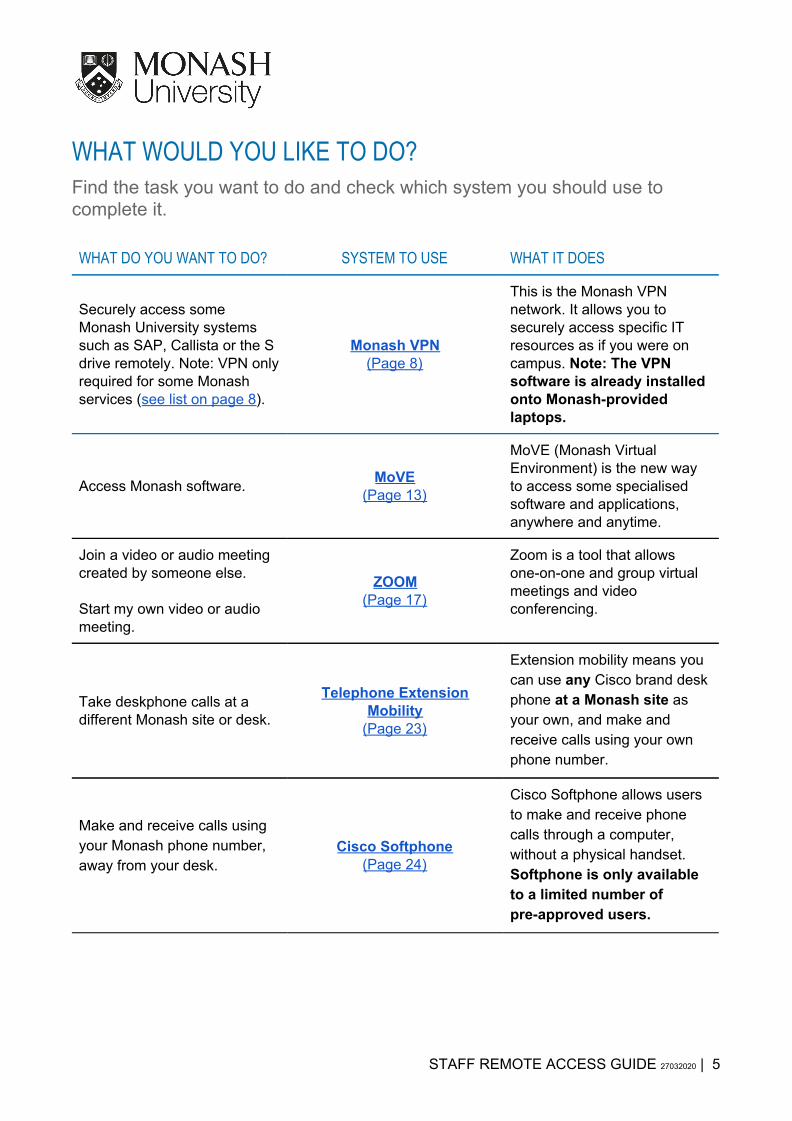
WHAT WOULD YOU LIKE TO DO?
Find the task you want to do and check which system you should use to complete it.
WHAT DO YOU WANT TO DO? SYSTEM TO USE WHAT IT DOES
Securely access some Monash University systems such as SAP, Callista or the S drive remotely. Note: VPN only required for some Monash services (see list on page 8).
Monash VPN (Page 8)
This is the Monash VPN network. It allows you to securely access specific IT resources as if you were on campus. Note: The VPN software is already installed onto Monash-provided laptops.
Access Monash software. MoVE (Page 13)
MoVE (Monash Virtual Environment) is the new way to access some specialised software and applications, anywhere and anytime.
Join a video or audio meeting created by someone else. Start my own video or audio meeting.
ZOOM (Page 17)
Zoom is a tool that allows one-on-one and group virtual meetings and video conferencing.
Take deskphone calls at a different Monash site or desk.
Telephone Extension Mobility
(Page 23)
Extension mobility means you can use any Cisco brand desk phone at a Monash site as your own, and make and receive calls using your own phone number.
Make and receive calls using your Monash phone number, away from your desk.
Cisco Softphone (Page 24)
Cisco Softphone allows users to make and receive phone calls through a computer, without a physical handset. Softphone is only available to a limited number of pre-approved users.
STAFF REMOTE ACCESS GUIDE 27032020 | 5

WHAT DO YOU WANT TO DO? SYSTEM TO USE WHAT IT DOES
Install additional software onto my Monash computer.
Software Center (Windows) (Page 31)
or Self Service (Mac)
(Page 32)
Software Center (Windows) and Self Service (Mac) provides a catalogue of applications available for automatic install. Just choose what you need, and click “Install”.
Install additional software onto my Monash or personal computer.
Software Catalogue (Page 33)
Software Catalogue hosts information and download links for all the additional software we can supply.
Connect my computer to the internet via my mobile device.
Mobile Tethering (Page 34)
You can share the internet connection from your mobile device if you don’t have access to a fixed internet connection.
STAFF REMOTE ACCESS GUIDE 27032020 | 6

Multi-factor authentication (MFA)
MFA helps keep your personal information private and secure by requiring both a password and another means (factor) to verify your identity when you log in. For more information, including guidance on logging in while travelling, see using multi-factor authentication (MFA).
Changing your SIM card, provider, number, or phone
The Okta Verify and Google Authenticator apps will continue to work even if you change your SIM card, mobile provider, or phone number.
However, if you change your phone, you’ll need to transfer your MFA. See new phone or device: setting up MFA for Okta. The same steps can be used to set up Google Authenticator on a new phone. If you no longer have access to your old phone, contact your local Service Desk.
Changing your method of MFA
You should never delete or uninstall your Okta Verify app while your account is active – this could stop you from being able to log into your account. If you’d like to change your method of authentication, contact the Service Desk.
If you’ve uninstalled the Okta Verify app, and you don’t have Google Authenticator as a backup, you’ll need to contact your local Service Desk.
FURTHER RESOURCES
Multi-factor authentication (MFA)https://monash.edu/esolutions/accounts-passwords/multi-factor-authentication Using multi-factor authentication (MFA) https://monash.edu/esolutions/accounts-passwords/using-multi-factor-authentication-mfa New phone or device: Set up Okta Verify (MFA) https://monash.edu/esolutions/phones/change-device-multi-factor-authentication
STAFF REMOTE ACCESS GUIDE 27032020 | 7

MONASH VPN
This is the Monash VPN network. It allows you access to certain Monash services that require additional security. You should only use the VPN if the specific service you would like to access requires it. The VPN software is already installed onto Monash-provided laptops. You don't need VPN to access my.monash, ESS, Moodle, Google Suite, Workplace and intranet sites. But you do need VPN for these systems and services:
● Shared Drive (S: Drive) ● SAP (Note: SAP ESS does not require VPN) ● Callista ● Mapping personal folders documents/desktop ● Groupadmin ● Monash Intranet ● Finesse ● OneStop ● Qflow ● Some installed applications like SPSS
INSTALL MONASH VPN ON YOUR PERSONAL LAPTOP OR DESKTOP
1.
Monash-provided computers : The VPN software is already installed onto Monash-provided laptops. Skip forward to CONNECT TO THE MONASH VPN. Personal computers : Go to the URL: http://vpn.monash.edu Sign in using your Monash username and password. Use your username, not your email. Select Login to continue.
STAFF REMOTE ACCESS GUIDE 27032020 | 8

2.
You will now have to authenticate your login. If you’re using Okta Verify, type “2” and select Continue. Then approve the sign in on your mobile phone. If you’re using Google Authenticator, enter your authentication passcode, then select Continue to continue.
3.
When the window with terms and conditions appears, select Continue to accept the VPN conditions.
4.
On Windows computers, the Download & Install page will appear. Select the Download for Windows button. On MAC OS computers - Select AnyConnect VPN and it will install. You can skip the remaining steps in this section.
STAFF REMOTE ACCESS GUIDE 27032020 | 9

5.
Your browser may prompt you that the file you are downloading may be harmful to your computer. If this happens, select Keep to continue. Once the file has downloaded, run the installation file.
6. Follow the instructions in the Setup Wizard.
7.
Once the installation is complete, you will find the application Cisco AnyConnect Secure Mobility Client in your applications menu.
STAFF REMOTE ACCESS GUIDE 27032020 | 10

CONNECT TO THE MONASH VPN SERVICE
1. Find and launch the Cisco AnyConnect Secure Mobility Client application.
2.
When the application starts, type “vpn.monash.edu” into the textbox, then select the Connect button. Next time you launch the application, the textbox will be pre-populated with the address above.
3.
Sign in using your Monash username and password. Use your username, not your email. Select OK to continue.
4.
You will now have to authenticate your login. If you’re using Okta Verify, type “2” to and select Continue. Then approve the sign in on your mobile phone. If you’re using Google Authenticator, enter your authentication passcode, then select Continue to continue.
STAFF REMOTE ACCESS GUIDE 27032020 | 11

5. When the window with terms and conditions appears, select Accept to accept the VPN conditions.
6.
When you have successfully connected, you will see a message that says “Connected to vpn.monash.edu.” in the application popup. When you have finished using the Monash VPN, select the Disconnect button.
FURTHER RESOURCES
For more information on how to use this system, visit: https://www.monash.edu/esolutions/network/vpn
STAFF REMOTE ACCESS GUIDE 27032020 | 12

MoVE
MoVE (Monash Virtual Environment) is the way for staff and students to access the specialised software and applications they need. This section will give you information on how to access the system. If you are accessing MoVE from a public computer, it’s recommended that you use MoVE Light as it does not require an app installation and can be accessed via your web browser. For information on using the system, visit the URLs at the end of this section.
SIGN INTO MoVE ON YOUR COMPUTER
1.
Go to this URL: https://move.monash.edu Sign in using your Monash email address and password. Select Sign In to continue.
2.
You will now have to authenticate your login. If you are using Okta Verify, select Send Push and then approve the sign in on your mobile phone. If you are using Google Authenticator, enter your authentication passcode, then select Verify to continue.
STAFF REMOTE ACCESS GUIDE 27032020 | 13

3.
Once you have logged on to the MoVE website, you will see the Welcome screen. Click Detect Receiver. The detection will take a few seconds to complete – don't click the button again. If the Receiver is not detected after a few seconds, select the I agree with the Citrix license agreement tick box and proceed to Download and install the Receiver manually.
4.
Once the Receiver has been detected successfully, the MoVE home page will launch providing access to applications. Click on an application icon to launch the application.
STAFF REMOTE ACCESS GUIDE 27032020 | 14

SIGN INTO MoVE LIGHT ON A PUBLIC COMPUTER
1.
Go to this URL: https://move.monash.edu Sign in using your Monash email address and password. Select Sign In to continue.
2.
You will now have to authenticate your login. If you are using Okta Verify, select Send Push and then approve the sign in on your mobile phone. If you are using Google Authenticator, enter your authentication passcode, then select Verify to continue.
STAFF REMOTE ACCESS GUIDE 27032020 | 15

3.
Once you have logged on to the MoVE website, you will see the Welcome screen. Select Use light version.
4.
The MoVE homepage will now display with a shortlist of applications that you have access to. Double-click the applications to launch them.
5. For a complete list of available apps, select the Apps button on the menu at the top.
FURTHER RESOURCES
For more information on how to use this system, visit: https://www.monash.edu/learning-teaching/innovation/user-guides/move-user-guide https://www.monash.edu/__data/assets/pdf_file/0003/1480665/MoVE-student-and-staff-access-guide-2019.pdf
STAFF REMOTE ACCESS GUIDE 27032020 | 16

ZOOM
You can use Zoom to attend video and audio meetings, as well as individual virtual calls. You can use Zoom as an application on your computer or as an app on a mobile device. We recommend that you install Zoom on your computer. For information on using the system, visit the URL at the end of this section.
INSTALL ZOOM ON YOUR LAPTOP OR DESKTOP
1.
Monash-provided Computers : Install Zoom via Software Center or Self Service: https://www.monash.edu/esolutions/software/install-software-on-monash-devices Personal Computers : Go to the URL: https://zoom.us/support/download The download will automatically start.
2.
Your browser may prompt you that the file you are downloading may be harmful to your computer. If this happens, select Keep to continue. Once the file has downloaded, select it to launch the installer.
3.
Monash-provided Computers : Launch the Zoom application once you have installed it. Personal Computers : Once the application has been installed, the sign-in window will appear.
STAFF REMOTE ACCESS GUIDE 27032020 | 17
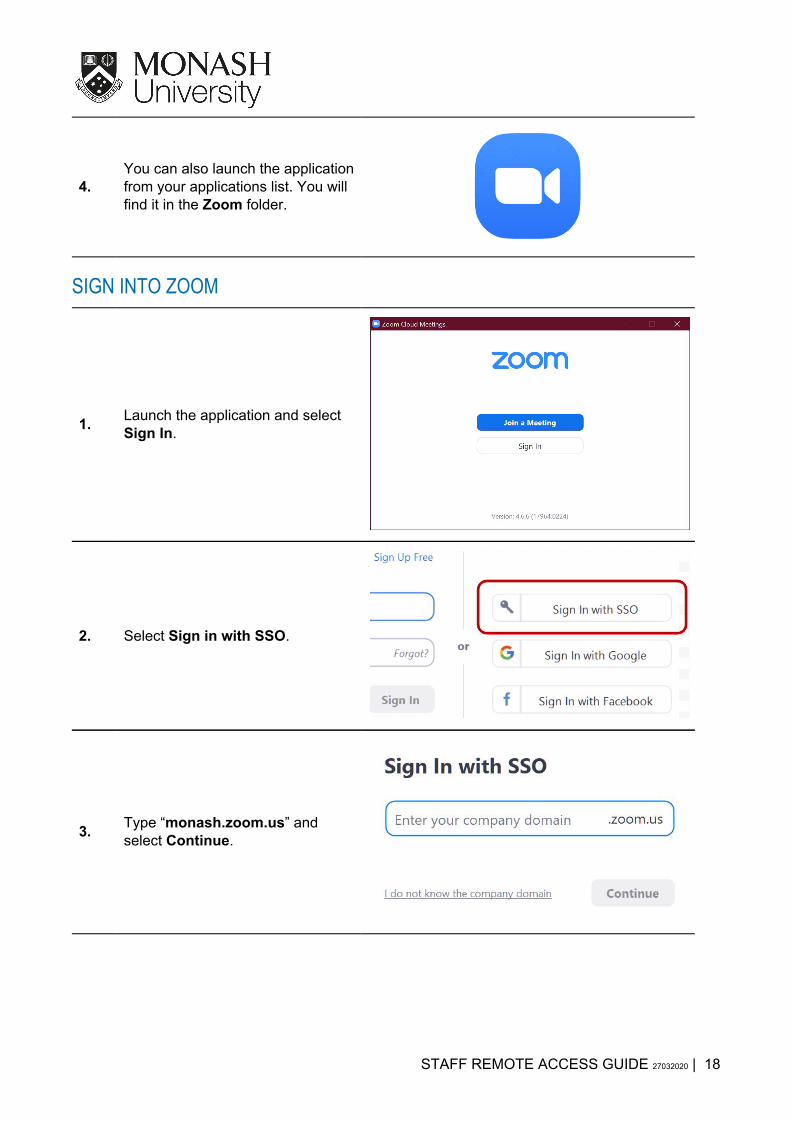
4. You can also launch the application from your applications list. You will find it in the Zoom folder.
SIGN INTO ZOOM
1. Launch the application and select Sign In.
2. Select Sign in with SSO.
3. Type “monash.zoom.us” and select Continue.
STAFF REMOTE ACCESS GUIDE 27032020 | 18

4.
Sign in using your Monash email address and password. Select Sign In to continue.
5.
You will now have to authenticate your login. If you are using Okta Verify, select Send Push and then approve the sign in on your mobile phone. If you are using Google Authenticator, enter your authentication passcode, then select Verify to continue.
STAFF REMOTE ACCESS GUIDE 27032020 | 19

6. Your internet browser will open and the Open Zoom? Prompt will appear. Select Open Zoom.
7. The Zoom application will launch and you will be signed in.
8. When joining a meeting, make sure you select Join with Computer Audio.
STAFF REMOTE ACCESS GUIDE 27032020 | 20

DASHBOARD INTERFACE GUIDE
The guide below will help you navigate through the Zoom interface.
1. New Meeting This will start a new meeting now.
2. Join This will allow you to join a meeting by manually entering the meeting ID.
3. Schedule This is where you can schedule a meeting in the future and invite people to attend.
4. Share screen This will allow you to share your screen with a meeting.
5. Schedule Here you will see a list of all of your upcoming meetings.
6. Chat This will allow you to start an instant chat with a contact.
7. Meetings Here you will see a list of all of your upcoming meetings.
8. Contacts This is where you can find a contact to meet with.
STAFF REMOTE ACCESS GUIDE 27032020 | 21

FURTHER RESOURCES
For more information on how to use this system, visit: https://guides.lib.monash.edu/learning-tools/zoom
STAFF REMOTE ACCESS GUIDE 27032020 | 22

TELEPHONE EXTENSION MOBILITY
Extension mobility means you can use any Cisco brand desk phone at Monash as your own. Simply login with your extension number and PIN.
USING EXTENSION MOBILITY ON A DESK PHONE
Your desk phone actually has two PINs. ● one is for your voicemail ● the other is for additional phone functionality under extension mobility.
You can choose to make both of these numbers the same, but you'll need to set them up individually.
CHANGE YOUR PIN
PDF - How to change your desk phone PIN Video - https://youtu.be/fY8wNY_KaBk
ACTIVATE EXTENSION MOBILITY
1. Press the Services button. 2. Arrow down to Extension Mobility and press Select 3. Enter your UserID (your own extension number) and PIN (this is your extension mobility PIN,
not your voicemail PIN). Press Submit. 4. The message login successful will appear, after a brief delay you'll be logged in.
You can only be logged onto one additional phone other than your normal desk phone at a time. When you're logged into two phones, both will ring when you receive a call. After 8–10 hours the phone will revert back to its original state.
LOG OUT OF EXTENSION MOBILITY
1. Press the Services button. 2. Arrow down to Extension Mobility and press Select. 3. Confirm your logout by pressing Yes. 4. The message logout successful will appear. After a brief delay the original owner’s details
will be displayed.
FURTHER RESOURCES
For more information on how to use this system, visit: https://monash.edu/esolutions/phones/desk-extension-mobility
STAFF REMOTE ACCESS GUIDE 27032020 | 23

CISCO SOFTPHONE
Cisco Softphone allows users to make and receive phone calls without a physical handset. Softphone is only available to a limited number of pre-approved users. Engage with your local Incident Response Coordinator if softphone is a requirement for you - these requests are being prioritised at a University level by the crisis management group.
LOG IN USING SOFTPHONE
These instructions are for existing softphone users only. Your extension must already be enabled for softphone prior to installation. 1. Download Cisco Softphone - IP Communicator from Software Center
(https://www.monash.edu/esolutions/software/install-software-on-monash-devices)
Note: Consult the Getting Started Checklist: (https://www.cisco.com/c/en/us/td/docs/voice_ip_comm/cipc/7_0/english/user/guide/CIPCUG70/ipcuggs.html#wp1005826)
2. When the Jabra headphones are plugged in, you will be presented with an Audio Tuning Wizard. Click Next
STAFF REMOTE ACCESS GUIDE 27032020 | 24

3. Change the default Audio Devices to ‘Jabra’ from the available options:
4. Launch Cisco IP Communicator from the Start Menu (Note: VPN connection required from home) 5. Click Log In from the top right corner of the window
STAFF REMOTE ACCESS GUIDE 27032020 | 25

6. Please enter the required field listed in the site.
- Use ID: extension number - PIN: extension pin number
7. Enter the desired number and click Dial
STAFF REMOTE ACCESS GUIDE 27032020 | 26

Helpful Tip: Set IP Communicator to ‘Always on Top’ so it does not get hidden behind other Windows.
SET UP BLUETOOTH (WINDOWS)
1. Turn on Bluetooth on your PC if it's not on already. To do this, select the Start button, then select Settings > Devices > Bluetooth & other devices and turn on Bluetooth
STAFF REMOTE ACCESS GUIDE 27032020 | 27

SET UP BLUETOOTH (MAC)
1. Make sure the device is turned on and discoverable (see the device’s manual for details).
2. On your Mac, choose Apple menu > System Preferences, then click Bluetooth. 3. Select the device in the list, then click Connect.
If asked, click Accept (or enter a series of numbers, then press Enter).
STAFF REMOTE ACCESS GUIDE 27032020 | 28

CONNECT HEADSET TO USB PORT
STAFF REMOTE ACCESS GUIDE 27032020 | 29

FURTHER RESOURCES
For more information on how to use this system, visit: https://monash.edu/__data/assets/pdf_file/0003/1165521/Softphone-FAQ.pdf
STAFF REMOTE ACCESS GUIDE 27032020 | 30

INSTALL SOFTWARE ONTO MONASH COMPUTER
Many applications are available for automated installation on Monash-provided machines
SOFTWARE CENTER (Windows)
In the search field on the Windows taskbar, type "software", then choose Software Center from the list of results. Note that you must be connected to VPN to use this service.
STAFF REMOTE ACCESS GUIDE 27032020 | 31

Select the application you'd like to install (you can use the search function for quick results). Click Install.
SELF SERVICE (Mac)
In the Mac search field, launch Self Service and log in (if prompted). Note that you must be connected to VPN to use this service.
Select the application you'd like to install (you can use the search function for quick results). Click Install.
FURTHER RESOURCES
For more information on how to use this system, visit: https://monash.edu/esolutions/software/install-software-on-monash-devices
STAFF REMOTE ACCESS GUIDE 27032020 | 32

INSTALL OTHER APPLICATIONS
Monash has a variety of software available for use on Monash devices and personal devices for both students and staff.
SOFTWARE CATALOGUE
The Software Catalogue hosts download links and licence availability information. Note that some software applications require a VPN connection to run.
STAFF REMOTE ACCESS GUIDE 27032020 | 33

INTERNET ACCESS VIA MOBILE DEVICE
Mobile tethering or Personal Hotspot is simply sharing your mobile phone's internet connection with other devices like your laptop or tablet. The connection with most modern handsets can be made wirelessly through bluetooth or wi-fi.
MOBILE TETHERING
If you have a Monash supplied smart phone with a suitable data pack, tethering can also be cost effective, as you won't have to pay for separate mobile broadband service or buy additional hardware just to get your laptop connected. If you plan on purchasing a 3G/4G USB dongle for your laptop or a sim for your tablet, yet you have a smart phone with a suitable data pack there is no benefit in purchasing the additional device/service. Tethering without a sufficient Mobile data pack or while overseas can be very costly. You can discuss your requirements with our mobile provider Solve communications on 1800 630 022.
APPLE MOBILE DEVICES
Share your internet connection with Personal Hotspot (Apple iPhone or iPad).
SAMSUNG OR ANDROID MOBILE DEVICES
Setting up the mobile Wi-Fi hotspot for sharing internet (Samsung or Android).
FURTHER RESOURCES
For more information on how to use this system, visit: https://monash.edu/esolutions/phones/set-up-mobile-tethering-or-hotspot
STAFF REMOTE ACCESS GUIDE 27032020 | 34