
SL-C510-AIS Compact 5-9NM Solar Marine Lantern - Sealite
84
SL-C510-AIS Compact 5-9NM Solar Marine Lantern V1-0 INSTALLATION & SERVICE MANUAL
-
Upload
khangminh22 -
Category
Documents
-
view
1 -
download
0
Transcript of SL-C510-AIS Compact 5-9NM Solar Marine Lantern - Sealite

SL-C510-AISCompact 5-9NM Solar Marine Lantern
V1-0
INSTALLATION & SERVICE MANUAL

2
Version No. Description Date Author Approved1.0 Manual Launch June 2019 J.Ohle / M.Nicholson M.Nicholson

SL-C510-AISCompact 5-9NM Solar Marine Lantern
Latest products and information available at www.sealite.com 3
Table of ContentsIntroduction............................................................................................................................................................... Page 4
Operating Principle ............................................................................................................................................. Page 4
Technology ............................................................................................................................................................... Page 4
SL-C510-AIS Model ............................................................................................................................................. Page 5
Installation ............................................................................................................................................................... Page 7
Viewing Lantern Settings .............................................................................................................................. Page 9
Summary of Lantern Status .................................................................................................................. Page 10
Programming the Lantern ............................................................................................................................ Page 11
SealitePro® Bluetooth Guide ................................................................................................................... Page 11
SealitePro® Bluetooth Controller Functions ................................................................................... Page 12
Accessing the SealitePro® App for the fi rst time ....................................................................... Page 14
SealitePro® Password Reset Procedure .......................................................................................... Page 17
Lantern Status ................................................................................................................................................ Page 19
Solar Calculations ........................................................................................................................................ Page 20
Programming Options .............................................................................................................................. Page 23
Manufacturing Data ........................................................................................................................................ Page 32
SealitePro® Troubleshooting ..................................................................................................................... Page 36
Optional IR Remote Control ....................................................................................................................... Page 38
Optional GPS Synchronisation ................................................................................................................ Page 47
Optional GSM Monitoring & Control System ................................................................................ Page 48
Lantern Status...................................................................................................................................................... Page 49
Lantern Thermal Management ............................................................................................................... Page 50
Lantern Data.................................................................................................................................................... Page 50
Thermal Limit Operation........................................................................................................................... Page 51
AIS System............................................................................................................................................................. Page 52
Appendix.................................................................................................................................................................. Page 74
Flash Codes.................................................................................................................................................... Page 74
Maintenance & Servicing............................................................................................................................. Page 81
Trouble Shooting............................................................................................................................................... Page 84
Sealite LED Light Warranty........................................................................................................................ Page 84
4
IntroductionCongratulations! By choosing to purchase a Sealite lantern you have become the owner of one of the most advanced LED marine lanterns in the world.
Sealite Pty Ltd has been manufacturing lanterns for over 25 years, and particular care has been taken to ensure your lantern gives years of service.
As a commitment to producing the highest quality products for our customers, Sealite has been independently certifi ed as complying with the requirements of ISO9001:2015 quality management system.
Sealite lanterns comply with requirements of the US Coast Guard in 33 CFR part 66 for Private Aids to Navigation.
By taking a few moments to browse through this booklet, you will become familiar with the versatility of your lantern, and be able to maximize its operating function.
Operating PrincipleThe solar module of the lantern converts sunlight to an electrical current that is used to charge the battery. The battery provides power to operate the lantern at night.
The fl asher unit has very low current requirements. A microprocessor drives multiple ultra-bright LED’s (Light Emitting Diodes) through a DC/DC converter, which enables the LED’s to operate within the manufacturer’s specifi cations. The battery is protected from over-charging within the circuit to ensure maximum battery life.
On darkness, the microprocessor will initiate a program check and after approximately 1 minute begin fl ashing to the set Flash Code.
TechnologySealite is the world’s fastest growing manufacturer of marine aids to navigation. We employ leading mechanical, optical, hardware & software engineers to create innovative products to service the needs of our customers worldwide and offer the widest range of solar-powered LED lanterns in the marketplace.
Electronics
Sealite employs leading in-house electronic engineers in the design and development of software and related circuitry. All individual electronic components are sourced directly by Sealite procurement staff ensuring that only the highest quality components are used in our products.
LED Technology
All marine lanterns use the latest advancements in LED technology as a light source. The major advantage of LED’s over traditional light sources is well established in that they typically have an operational life in excess of 100,000 hours, resulting in substantial savings to maintenance and servicing costs.
Precision Construction
Commitment to investing in the design and construction of injection-moulded parts including optic lenses, light bases and a range of other components ensures that all Sealite products are of consistent and superior quality.
Optical Performance
Sealite manufactures a range of marine LED lenses moulded from multi-cavity dies. The company has superior in-house lens manufacturing capabilities to support outstanding optical performance.
Award-winning, Patented Technology
Several United States and Australian patent registrations are held on Sealite’s range of innovative designs, with other regional patents pending in Canada, United Kingdom and Europe.

SL-C510-AISCompact 5-9NM Solar Marine Lantern
Latest products and information available at www.sealite.com 5
SL-C510-AISCompact 5-9NM Solar Marine Lantern
The SL-C510-AIS is a robust, completely self-contained 5-9NM Solar LED Lantern specifi cally designed to withstand the tough marine environment to provide years of reliable, low maintenance service. The 3 & 4 hole bolt pattern base fi ts directly onto existing 200mm bolt pattern industry standard mounts for ease of installation.
The four (4) premium-grade solar modules are integrated into the assembly, and mounted to collect sunlight at all angles. The SL-C510-AIS has a large power supply consisting of four 8.4-watt panels (33.6 watt total) making this model perfect for use in lower sunlight areas or where more demanding duty cycles are required.
The base and top of the lanterns are made from composite moulded polymer with UV-stabilised rubber corners and gaskets providing a superior IP68 – the best in the industry. A handle is incorporated into the chassis for safe lifting.
The tough, polycarbonate lens is specifi cally designed for use with LEDs and incorporates an environment-friendly spike to deter unwelcome bird life. The lens design also ensures that vessel operators clearly see the light from above when passing the AtoN. The design incorporates a conveniently located OLED (Organic Light-Emitting Diode) screen with touchpad allowing maintenance personnel to check the diagnostics of the lantern with the touch of a button.
Completely programmable via the new Bluetooth® connected SealitePro® mobile application, the SL-C510-AIS can be confi gured and monitored from a distance up to 50 metres. An in-built solar calculator confi rms the lanterns ability to operate at the set location, ensuring optimal operating performance.
The SL-C510-AIS is available with GPS Synchronisation as standard. Two (2) or more lights can be synchronised to fl ash in unison via an internal GPS module.
The SL-C510-AIS may also be fi tted with Satellite Communications Module or GSM Module – enabling users to access real-time diagnostic data and change lantern settings. The system can also be confi gured to send out alarm messages to designated phone numbers. Users can also have alarms and reports sent to designated email addresses.
All this is backed by Sealite’s industry leading 3-year warranty.
OLED Display for Lantern Status check
LED Optic
Robust composite moulded base and top
with handle, Aluminium chassis with rubber
extruded corners
3 & 4 hole 200mm bolt pattern base for ease of installation
Internal 24Ah Battery
4 x monocrystalline solar modules,
ensuring maximum light collection
to charge the battery

6
The following components come as standard with each lantern:
• SL-LA510 lantern
• SL-SBA 510 Chassis
• Installation & service manual
Optional
• IR programmer remote
These components are securely packaged within protective wrap in a carton and shipped to you.
Please check that ALL of these components are included with your order and contact your
Sealite representative as soon as possible if anything is missing.
Product Components

SL-C510-AISCompact 5-9NM Solar Marine Lantern
Latest products and information available at www.sealite.com 7
InstallationCharging the BatteryNew lanterns should be left in the sun for 1-2 days to ensure battery is charged before placing in service.
Preferred Installation LocationFor best lantern performance, ensure solar modules are not covered and are in clear view of the sky with no shadows.
Lantern Installations SettingsThe lantern can be programmed via 2 methods,1. Bluetooth connectivity via the SealitePro® App (recommended);2. Via the optional Sealite IR Controller (optional);The SealitePro® and Sealite IR Controller Instructions are included in this manual.
Lantern OperationThe lantern is activated by connecting the 4-Pin Connector between the battery and the regulator. Flash Codes and Intensity settings need to be set via the SealitePro® App or the Sealite IR Controller.
1. Remove the four socket-head screws on the top of the lens assembly and lift the SL-C510-AIS (light head) assembly from the solar chassis.
2. Join the 4-Pin connector together to join the battery and the solar panels to the light head. The battery is disconnected to reduce discharge during transportation and for long term storage.
3. Feed all wiring back inside the solar chassis and make sure the O-ring is properly placed.
4. Replace the SL-C510-AIS (light head) assembly and the four (4) socket head screws. Sealite recommends that the light head be tightened onto the solar chassis base using a general purpose “grip tool”, similar in shape to a screwdriver, however with the appropriate hex key head fi tted. The torque setting applied to each of the four (4) hex bolts, be applied suffi cient enough, to ensure that the light head base is secured fi rmly, but not over tightened with excessive force.
To achieve a satisfactory seal, it is recommended that a torque of 3Nm is applied to the bolts used for holding down the Light Head to the Solar Base and that only the supplied bolts are used.
Applying a higher torque setting is not recommended and may void warranty. If in doubt, please contact your local Sealite representative.
9. To test, place a dark cover (towel or jacket) on top of the light to activate sensor. The light will come on within thirty seconds.
10. Ensure that the unit is bolted to an even, fl at surface.

8
201
120°
Slot 12.6 x 21.756 Locations

SL-C510-AISCompact 5-9NM Solar Marine Lantern
Latest products and information available at www.sealite.com 9
Viewing Lantern Settings
The SL-C510-AIS models are equipped with a very low power consumption OLED display, providing a quick and easy lantern status and diagnostic checks by maintenance staff.
To activate the OLED display simply touch the indicated location. Once activated, the OLED will display in sequence the following information:
• Product Version;
• Product Model;
• Lantern Operational Mode;
• Lantern Flash Character;
• Lantern Intensity;
• Battery Voltage;
• Lantern Status;
• Lantern Hibernation Status and settings;
• Lantern last accessed date;
The OLED system will continue to display the lantern settings/status in a sequential manner unless the Touch Pad is activated for a second time, this action will allow the OLED display to stop on the information showing at the Touch Action. To visualise the remaining information simply “Tap” the Pad again then the system will display the next set of information.
When the Touch Pad device is inactive for more than three minutes the OLED display will enter in sleep mode and can only display the lantern settings/status if the Pad device is activated again.
NOTE – The OLED display and Touch Pad components are designed to provide lantern settings/status readings only, the lantern programming can be achieved by one of the Sealite lantern programming methods, the information is available in this product manual.

10
Info TabThe following summary indicates the data that can be visualized on the Lantern OLED Display.
Display Description
Displays the manufacture revision number
Indicates the lantern current operation mode:Standby - The lantern is confi gured in a minimum current state;Always on – The daylight sensor is disabled and lantern set to operate day/night time;Dusk till Dawn – The daylight sensor is monitored and the lantern will only operate at night time.
Indicates the lantern current Flash Code.This information provides Sealite’s Flash Code in Hex decimal and the on/off fl ash duration. Please refer to the provided list of Flash Codes included in the appendix.
Displays the lantern operating intensity in percentage. The SL-C510 can provide four different intensity levels in percentage or with a step size of 3.125% (or 1/32%) nautical miles when set by range.• Low (25%)• Medium (50%)• Medium High (75%)• High (100%)
Indicates the lantern real-time battery voltage level.
Displays the lantern current operating status. This include the information for:• Battery health conditions;• LED fault
Indicates if the Hibernation Mode is enabled or disabled. In the case of enabled the unit will indicate the hibernation start and fi nish dates (day/month).
Indicates the last time the light has been accessed either via touch pad or SealitePro®
App.
On fi rst touch test on, or when screen off, the screen will go into Test Mode for 5 seconds.
Sealite
V1.08
Standby
0.2 1.3
High (100%)
12V
OK
Disabled
10 JUL 2018
Test Off
Operation Mode
Flash Code:0F4
Range / Intensity
Battery Voltage
Status
Hibernation
Last Visit
Test LED

SL-C510-AISCompact 5-9NM Solar Marine Lantern
Latest products and information available at www.sealite.com 11
Programming the Lantern
SealitePro® Bluetooth GuideThe SealitePro® application is used to communicate with Sealite lighting products that have Bluetooth technology fi tted. The Bluetooth control offers the following main functionality:
• Lantern Information
• Lantern Status
• Solar Calculations
• Programming Options
• Power Monitoring
• Manufacturing Data
• Advanced Operations
The SealitePro® Application is available on both Android and iOS devices. Most functions between platforms are identical and the majority of the screenshots in this manual where taken showing an iOS device screen. Where the Android device differs, both visual options have been provided.

12
Bluetooth® Controller FunctionsThe Sealite SL-C510-AIS Bluetooth® Control System accessible via the SealitePro® App is divided into seven simple sections as outlined below and displayed on the App home screen;
• Lantern Identifi cation • Lantern Type • Lantern Name• Bluetooth Authentication• Lantern Colour• Lantern Peak Intensity• Lantern Battery Option
• Battery Voltage• Status Flags• Lantern Geolocation
• Solar Calculator Options• Solar Charge• Autonomy
• Operating Mode• Flash Code• Intensity• Sync Offset• GPS Mode• Hibernation• Lux Level• GSM Power

SL-C510-AISCompact 5-9NM Solar Marine Lantern
Latest products and information available at www.sealite.com 13
• Load Current• Load Current – Last Hour• Load Current – Yesterday• Charge Current• Charge Current – Last Hour• Charge Current - Yesterday
• Hardware• Board Serial Number• Manufacture Date• Software Version
• Test LED• Perform Factory Reset

14
Accessing the SealitePro® App for the fi rst time
Start Menu
• Connect via Bluetooth - connect to a lantern.
• Support Tools - Solar Calculator to conduct simulations based on lantern settings and locations.
NOTE – This feature provides lantern simulations only in regard to battery autonomy on solar radiation.
Changes may be applied through “Connect via Bluetooth” option only.
• User Guides – Quick Start Guide and User Manual
Contact Sealite / Us – Provide product feedback and contact Sealite
Scan for Lanterns
When the “Connect via Bluetooth” option is selected, the App will automatically scan for lanterns equipped with Bluetooth within range.
• Select the lantern which requires setting or verifi cation.
Opening the SealitePro® App on an Android or iOS Device
Download the SealitePro® App from Google Play (search for “Sealite” in the store) on an Android Tablet or Smartphone or via the App store on an iOS tablet or phone. Open the App to prompt the Sealite Bluetooth control system.

SL-C510-AISCompact 5-9NM Solar Marine Lantern
Latest products and information available at www.sealite.com 15
Expand the “Lantern Information” section if collapsed.
Identify Bluetooth Radio ID
When “Identify” on the Tablet or phone is selected, the connected lantern will fl ash quickly (10 times). For iOS, identify is represented by a fl ash / burst icon.
Set the Lantern Name
1. Press “Name” to change the lantern name. A user defi ned name, comprising up to 16 alpha- numeric characters (and -, $, # @) can be typed into the dialogue box. It is recommended that the lantern be programmed with a unique name. 2. Press apply and then Set to confi rm.
5

16
Create Security Access PIN
The factory default does not set the lantern with a Security PIN.
1. To set a PIN, select “Authentication Level” (“Bluetooth Authentication for iOS”) then enter a New PIN and press
“OK”. A confi rmation of the PIN will be prompted.
2. Re-enter the same PIN and press “OK”.
Modify Current Security Access PIN
1. To set a new Security Access PIN select “Authentication Level” (“Bluetooth Authentication for iOS”) and
type the current Security PIN.
2. After validation the App will request for the current PIN to be re-entered. After confi rmation enter the new
Security PIN then confi rm the new PIN.
Note - If the Security PIN is lost, see Password Reset Procedure. Also note that PIN ‘0000’ is reserved and will result in the lantern having no PIN.

SL-C510-AISCompact 5-9NM Solar Marine Lantern
Latest products and information available at www.sealite.com 17
SealitePro® Password Reset Procedure
In the event where the password set is unknown the procedure below should be followed:
Step 1 – Disconnect the power supply from the light head:
(a). Remove the four socket-head screws on the top of the lens assembly and lift the SL-C510 (lantern
head) assembly from the solar chassis.
(b). Disconnect the 4-Pin connector that joins the battery to the light head, then immediately re-connect
the battery and the lantern again.
Step 2 – Connect to the lantern using the SealitePro®:
Once the light head and battery are re-connected ensure the following procedure is conducted within one minute. Otherwise the process at step 1 will need to be completed.
(a). Connect to a lantern by pressing “Connect via Bluetooth®”
(b). Select a lantern displayed on the “Connect via Bluetooth” screen.
Where examples are identifi ed side by side, the left is applicable to Android devices and the right image to iOS devices.

18
(c). Expand the “Lantern Information” drop down menu then press select “Authentication Level” (“Bluetooth
Authentication for iOS”).
NOTE – If “User Authenticated” under “Authentication Level” or Bluetooth Authentication appears the
limited time that allows to modify the PIN has expired.
Therefore, start the process again at Step 1;
(d). If “No PIN Set” appears under Authentication Level, please press Change PIN;
(e). Enter a New PIN and press “OK”. A prompt to confi rm PIN will appear. Re-enter the same PIN and
press “OK”.
(f). One the procedure is complete, ensure the 4 socket head screws are replaced to secure the light head
and solar chassis.
• Colour Menu
Displays the lantern colour (White, Red, Green, Blue or Yellow)
• Peak Intensity Menu
Displays the Lantern Maximum Intensity in candelas (cd) based on the LED Colour.
• Battery Option
This section displays the battery size capacity in Ampere hour (Ah) and is confi gurable.
Authenticated
5
5

SL-C510-AISCompact 5-9NM Solar Marine Lantern
Latest products and information available at www.sealite.com 19
Lantern Status
From the “Lantern Status” section the user can verify the current lantern status
• Voltage
The battery health status.
• Status
Displays the battery health status, the current light sensor state and if the GPS is enabled, synchronised or off
station. Any warning states will cause the status to be shown in amber or red.
• Lantern Geolocation
Displays the lantern coordinates and allows the location to be plotted on a map.

20
Solar Calculations
This function estimates the lantern autonomy based on the lanterns current settings and geolocation.
• Solar Calculator Options The SL-C510-AIS has options to be fi tted with Satcoms and GSM modules to allow multiple lanterns synchronisation and monitoring. The SealitePro® App offers the user the option to modify the GPS and GSM by enabling or disabling the operation. In addition, it offers different levels of transmissivity conditions for accurate solar calculations.
• Solar Charge This function estimates whether the collected solar charge is suffi cient to replenish battery consumption and will indicate if the unit is viable for the selected location.

SL-C510-AISCompact 5-9NM Solar Marine Lantern
Latest products and information available at www.sealite.com 21
• Autonomy This function estimates the lantern autonomy based on the lantern settings and geolocation.
• Option 1 Use the current GPS location to establish the lantern autonomy.
• Option 2 An alternate method for setting the calculator is by using the “Solar calculator” function. Select your product from the option(s) available, then select “Simulation Geolocation”.

22
Set Autonomy Location - Select a location globally to estimate the lantern autonomy if installed at that location
The autonomy will be shown in amber or red if the confi guration is not recommended.

SL-C510-AISCompact 5-9NM Solar Marine Lantern
Latest products and information available at www.sealite.com 23
Programming OptionsOperating Mode:To change the Operating Mode, press the Operating Mode fi eld and then select one of three available options:Standby - The lantern is confi gured in a minimum current state in which the LEDs are always off and the internal GPS is disabled.Always on – The daylight sensor is disabled, and the lantern operates according to the set fl ash character and intensity levels.Dusk till Dawn – The daylight sensor is monitored, and the lantern will only operate at night time.
Once the Operating Mode is selected press “Set / Apply“ to confi rm the change. As factory default the lantern is always set to Dusk till Dawn mode.

24
Flash CodeSealite marine lanterns may be set to any of the 256 IALA recommended fl ash characters which are user-adjustable on site.
SEALITE® code reference is listed by the number of fl ashes. For the latest version of this document visit www.sealite.com or email [email protected]
SymbolsFL Flash followed by number Eg. Fl 1 S, one fl ash every secondF FixedQ Quick FlashVQ Very Quick FlashOC Occulting; greater period on than offISO Isophase; equal period on and offLFL Long Flash LongMO Morse code ( ) contains letter
To start the Flash Code settings press on the Flash Code fi eld:There are three ways to modify the lantern Flash Code:
1. Description: Modify the Flash Code by selecting the type and length (on/off) of the fl ash. Once the Flash Code is established press “Set / Apply” to confi rm the change.
Please Note – The number of fl ashing combinations are limited, for more information please check the Sealite Flash Code table provided in the Appendix Section.
SL-C510-AISCompact 5-9NM Solar Marine Lantern
Latest products and information available at www.sealite.com 25
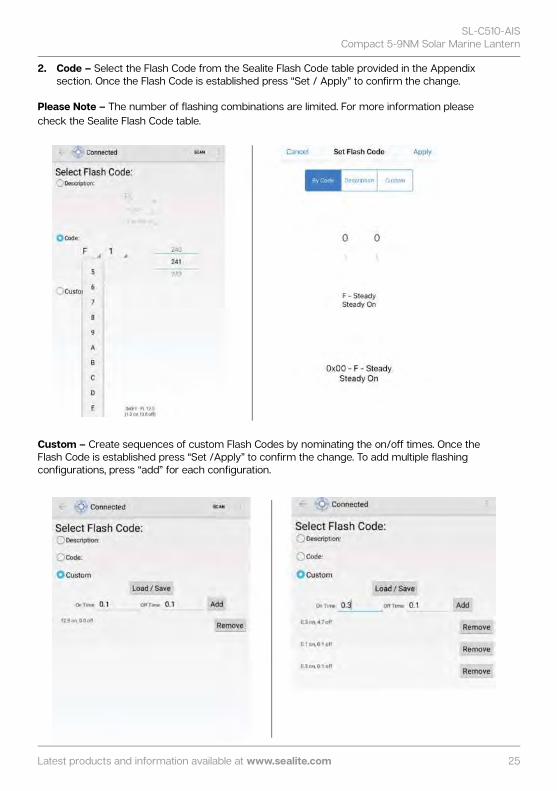
2. Code – Select the Flash Code from the Sealite Flash Code table provided in the Appendix section. Once the Flash Code is established press “Set / Apply” to confi rm the change.
Please Note – The number of fl ashing combinations are limited. For more information please check the Sealite Flash Code table.
Custom – Create sequences of custom Flash Codes by nominating the on/off times. Once the Flash Code is established press “Set /Apply” to confi rm the change. To add multiple fl ashing confi gurations, press “add” for each confi guration.

26

SL-C510-AISCompact 5-9NM Solar Marine Lantern
Latest products and information available at www.sealite.com 27
IntensityThe lantern intensity level can be set by either defi ning the operating range of the lantern (in nautical miles) or by entering the available percentage intensity level.When Schmidt Clausen is applied, the lantern will automatically adjust the intensity level based on the entered range and Flash Code setting. The intensity level is automatically adjusted each time a new range is set. NOTE: This does not apply for changing Flash Code - the user must re-set the intensity.
Select Intensity – Choose one of four intensity values - 25%, 50%, 75% or 100%.
Select Intensity – Choose one of Nautical Miles ranges available.

28
NOTE – If an intensity level is selected that is beyond the specifi cation of the lantern, the entered fi gure will be displayed in red, with the lantern automatically confi guring to the maximum possible of 100%.
In addition, once the intensity is selected the winter autonomy will be recalculated.

SL-C510-AISCompact 5-9NM Solar Marine Lantern
Latest products and information available at www.sealite.com 29
Sync OffsetThis panel is used to set a Flash Code delay. The built-in GPS receiver and advanced software of the Sealite synchronised lanterns allow for the adoption of Sync Offset channel marking – a unique system that cascades the fl ash synchronisation of channel lanterns in a uni or bi-directional fl ash pattern. By default, this fi gure is set to zero.
Press Sync Offset type a value in seconds and then press “Set / Apply” to confi rm the change.

30
GPS ModeThe lanterns come fi tted with a GPS module, and provide the user with the ability to install independently operating lanterns that all fl ash in Synchronisation. No additional power supplies, aerials or control systems are required and with its microprocessor-based system, the GPS is specifi cally designed to provide maximum reliability and performance over a wide range of environmental conditions.
On the SealitePro® App the user has the option to modify the GPS mode by selecting to enable or disable the GPS operation.

SL-C510-AISCompact 5-9NM Solar Marine Lantern
Latest products and information available at www.sealite.com 31
Hibernation
Hibernation Mode maximizes conservation of the battery power by disabling the light (will not activate at night) and shutting off the GPS receiver to rely on the internal clock for date checking.
Hibernation Mode can be set by programming a start date and end date via the SealitePro® To enable the Hibernation Mode, tick on the top left box then select the Hibernation start date and Reawaken date. Press “Set / Apply” to confi rm the settings.

32
Manufacturing DataWhen connected via Bluetooth, data about the lantern hardware will appear on the “Manufacturing Data” tab. From this drop-down tab the user will be able to verify the information that identifi es the lantern’s internal electronic hardware and fi rmware versions. Moreover, the Lantern Printed Circuit Board Serial number is identifi ed.

SL-C510-AISCompact 5-9NM Solar Marine Lantern
Latest products and information available at www.sealite.com 33
Let’s try a practical example
Quick Access Tab
If Bluetooth connection is established, data about the lantern battery charge and load current will appear on the “Power Monitoring” tab. From this drop-down tab the user will be able to verify the amount of battery charge that the lantern was able to capture in the previous 24 hours. In addition, the information of load current through the system can be monitored.
The SealitePro® App also allows a quick access tab offering the user access to the main setting functions of the lantern, applicable to Android devices only.
By touching the menu button, a drop down menu will pop showing the setting functions available.
In addition, the quick access tab offers other additional functions:
• Disconnect:
By touching “Disconnect” it will automatically disconnect the control device from the lantern.
• Email Lantern Data:
This function allows to send the lantern confi guration and status via email.
• Email Lantern Data:
This function allows to send the lantern confi guration and status via email.

34
• Set Default Email* Note Android only
This option allows to search for an existing contact on the device to use as the default recipient of
confi guration and status emails.

SL-C510-AISCompact 5-9NM Solar Marine Lantern
Latest products and information available at www.sealite.com 35
• Factory Reset:
This feature will reset automatically all previously lantern settings to a Factory Reset. If the option is selected, a confi rmation message will display to confi rm. Select “Perform Reset” to confi rm the reset.
Please Note – Applying the Factory Reset will also reset the Security Pin if one was set by the user.
SL-C510

36
Questions AnswerI purchased a lantern fi tted with a GPS for synchronisation. However, it ap-pears not to work.
If the GPS is not functioning ensure the GPS is enabled. Select “Programming Options” then check under GPS mode. If “off” ap-pears, the GPS is disabled. Tap on “Set”, then select “Normal” to enable the GPS.
Can you use the Solar Calculator under “Support Tool” to verify a Lantern Au-tonomy then set the lantern confi gura-tion from there?
No. The actual lantern settings can only be performed through “Connect via Bluetooth”. Any solar calculation simulation performed under support tools, can be refl ected on the actual lantern settings.
Do I need to create a PIN when I fi rst start using the lantern?
No. The lantern will operate without setting a Security PIN. How-ever, it is highly recommended by Sealite for customers to set a unique PIN from the moment the lantern starts to operate.
When I try to download SealitePro® from Google Play, I see the message “Device not compatible”.
SealitePro® may not be installed on an Android device running Ice Cream Sandwich (version 4.0.4) or lower. The Google Play store will stop you from attempting to install SealitePro® if your device is incompatible. SealitePro® requires a device running Android Kit-Kat (version 4.4) to communicate with Sealite Bluetooth lanterns. SealitePro® may be installed on devices running Android Jelly Bean (version 4.1-4.3) however, the ‘Connect via Bluetooth’ option will not be available.
I have installed SealitePro®, but the ‘Connect via Bluetooth’ option is disabled.
SealitePro® requires a device equipped with Bluetooth 4.0 or above. If no Bluetooth device is detected, the ‘Connect via Blue-tooth’ option will be disabled. SealitePro® also requires a device running Android KitKat (version 4.4) to communicate with Sealite Bluetooth lanterns. If SealitePro® is installed on a device running Android Jelly Bean (version 4.1-4.3) then the ‘Connect via Blue-tooth’ option will not be available.
When I start SealitePro® , I see the message “Bluetooth Permissions Denied. Please enable all permissions. Go to Settings?’
SealitePro® requires permission from Android to access vari-ous features of the mobile device, such as use of the Bluetooth module. Some versions of Android enforce these permissions to be granted when SealitePro® is installed. Later versions require the user to manually grant these permissions. If the message above is shown, then the latter scenario has occurred. Please answer ‘Yes’ to the prompt and SealitePro® will attempt to open the ‘Settings’ page. A list of installed Apps should appear. Find SealitePro® in the list and press it. At the bottom of the screen should be an ‘App permissions’ section. Click on this and enable all permissions presented. Then press the ‘Back’ button until SealitePro® reappears.If the above process does not open the ‘Permissions’ settings correctly, this will have to be performed manually. Return to the device home screen, then open the ‘Settings’ App and select ‘Installed Apps’. Select SealitePro® from the list and follow the instructions above.Please consult your device user guide to fi nd out how to access and grant App permissions if the settings cannot be found.
SealitePro® Troubleshooting

SL-C510-AISCompact 5-9NM Solar Marine Lantern
Latest products and information available at www.sealite.com 37
Questions AnswerWhen I press ‘Connect via Bluetooth’, I see the message ‘An App/ SealitePro® wants to turn on Bluetooth’.
When I select ‘Connect via Bluetooth’, the device performs a scan but tells me that no lanterns were found.
Connecting to a lantern via Bluetooth requires that the mobile device has Bluetooth turned on. If this message appears it is because the device’s Bluetooth module is turned off. Press ‘Allow’ and SealitePro® will attempt to turn the Bluetooth device on. If required, you may turn Bluetooth off when fi nished through the device’s ‘Settings’ App. If you press ‘Deny’ then connection will be cancelled.
Several conditions may occur that will prevent lanterns from being discovered.1. Verify that a Bluetooth-equipped Sealite lantern is nearby and powered on.2. Verify that no other mobile device is connected to the lantern via Bluetooth. Bluetooth supports only one connection at a time, therefore if another device is connected it must be disconnected before the lantern appears in a scan result.3. Turn the Bluetooth feature of the mobile device off and on again. This may be performed through the Android Notifi ca-tion Bar of some devices or through the Settings App. See your device user manual for full instructions.4. Some Android devices require Location Services to be enabled before they will ‘see’ Bluetooth lanterns. Location Services may be enabled through the Android Notifi cation Bar of some devices or through the Settings App. See your device user manual for full instructions.5. Turn the lantern off and then on again.6. Ensure your device is within its Bluetooth range.If the problem persists, please contact Sealite for assistance.
I have connected to a lantern via Bluetooth, but the message “Lantern Comms Failure. Retrying…” keeps ap-pearing.
Try disconnecting from the lantern, then rescanning and connecting. It is possible that the lantern is at the edge of the Bluetooth range, or maybe the data connection is unreliable. If the problem persists, please contact Sealite for assistance.

38
Optional IR Remote ControlThe IR programmer is used to communicate with Sealite lighting products that have an IR sensor fi tted. The remote control is used for the following functions:
• Flash Code: Read the current fl ash code, confi gure a new fl ash code.
• Lamp Intensity: Read the current lamp intensity, confi gure a new intensity level.
• Ambient Light Thresholds: Read the current light thresholds, confi gure new ambient light thresholds.
• Perform a battery health check.
On receiving a valid key signal from the IR Programmer, the light will fl ash once.
The user should wait until the light responds to each keypress before pressing another key. If there is no response to the keypress after 3 seconds, it has not been detected by the light and the key can be pressed again.
If an invalid key is detected, the light will fl ash quickly 5 times. In this case, the command will have to be restarted.

SL-C510-AISCompact 5-9NM Solar Marine Lantern
Latest products and information available at www.sealite.com 39
IR Controller FunctionsTest Mode / Confi gure
Pressing the T/C button up to 5 seconds places the light in Test Mode. The light will fl ash once in response to the T/C button being pressed and then turn off.
Normal OperationThe light will return to normal operation once it has not detected a valid key press for 30 seconds. The light will fl ash once to indicate it is returning to normal operation.
ReadPressing the Read followed by one of the confi guration keys shall cause the light to fl ash the confi gured value.
Example Key Sequences:
The light fl ashes the ‘IR Remote’ number belonging to the currently set Flash Code. Refer to the Flash Code tables to match the ‘IR Remote’ fl ash number to the Flash Code.
The light fl ashes the current intensity setting: 1 fl ash for 25%, 2 for 50%, 3 for 75% and 4 for 100%.
The light fl ashes the current battery status.
The light fl ashes the sunset level in Lux, followed by a 2 second gap, followed by the sunrise level. Levels are in the range of 1 to 5.
Flash Code
This key sets the Flash Code on the light.
Example Key sequence:This sets the Flash Code to value 123. The light responds by fl ashing the Flash Code value.

40
Intensity
This function sets the light intensity. Valid intensity values are 1 for 25%, 2 for 50%, 3 for 75% and 4 for 100%.
Example Key sequence:
This sets the light intensity to 25%.
Battery Status
This function reads the battery status. The response from the light is High Voltage: 4 fl ashes, Good Voltage: 3 fl ashes, Low Voltage 2 fl ashes, Cutoff Voltage or below: 1 fl ash.
Flash Code Numbers
The lamp fl ashes numbers as follows: Hundreds, Tens, Ones. A value of 125 will be fl ashed as: 1 fl ash, followed by a delay, 2 fl ashes, followed by a delay, 5 fl ashes.
The fl ash for number 0 is one long fl ash.
For example if the current Flash Code is set to 51 via the AB switches, the lamp will fl ash number 081. For a Flash Code set to 01, the lamp will fl ash 001.

SL-C510-AISCompact 5-9NM Solar Marine Lantern
Latest products and information available at www.sealite.com 41
Lux
This key sets the ambient light threshold levels.
The format is where ‘x’ is the desired setting from the table below.
There are 5 programmable lux levels which are set together for the sunset and sunrise transitions.
Example key sequence:
Assume the current Lux settings are at the factory preset values of 2.
This sets the ambient light level to be lower than the default 100 lux. The light will turn on when its surroundings are darker.
The light responds by acknowledgement with a long fl ash.
LevelSunset (Dusk)
Sunrise (Dawn)
1 65 100
2* 100 150
3 150 240
4 240 370
5 370 600
6 250 320
* Default / Factory Preset
X

42
Error / Acknowledge Indication
If the key sequence is invalid, or an out of bounds value is attempted to be set, the light fl ashes 5 times for 1 second. (The command then needs to be sent from the start.)
Example key sequence: (Set the intensity level to 5 – undefi ned.)
The light fl ashes 5 times for 1 second.
When a key sequence has been entered successfully the light will respond acknowledgement with a long 1 second fl ash.
Confi guration SettingsThe intensity and Flash Codes can be changed using the switches on the lamp circuit board or with the IR Remote Control. The lamp intensity and Flash Code settings are set to the last detected change, carried out with the IR Remote Control or by changing the switch positions.• Example #1: If the intensity is set at 100% with the intensity switches and is then set to 50% using the IR Remote Control, the intensity setting will change to 50%. If the intensity is then set to 75% using the switches, the new intensity value will be 75%.
In order to change intensity settings using the IR Remoter Control, the lamp must be powered. The lamp can detect a change in switch settings if they are changed while the light is powered down.
• Example #2: The Flash Code is set according to the switch settings: A=5, B = 1. The operator changes the Flash Code to 65 (A=4, B=1) using the IR Remote Control. The new fl ash code is now confi gured to A=4, B=1. The lamp is powered down and the operator changes the Flash Code switches to A=3, B=1 and powers on the light. The new Flash Code is now A=3, B=1.
If the Flash Code is read from the light using the IR Remote Control, the lamp will fl ash 49 which is the corresponding number for switches A=3, B=1.
Use the IR Remote Control to read the current lamp intensity setting and Flash Code.

SL-C510-AISCompact 5-9NM Solar Marine Lantern
Latest products and information available at www.sealite.com 43
Operational Mode (Advanced users) The lantern has three modes of operation: Always on, Standby Mode and Dusk-to-Dawn mode. These modes can be selected either via the IR Remote Control or via the GSM module (if fi tted).• In Always On mode, the daylight sensor is disabled, and the lantern will remain ON.• In Standby mode, the lantern is turned off and the daylight sensor is disabled. This mode does not aff ect the operation of the GSM module.
• In Dusk-to-Dawn, the daylight sensor is enabled.
Always on mode
Standby mode
Dusk-to Dawn mode
Hibernation Mode (Advanced users) – only available for lanterns fi tted with GPS
For situations where the lantern is put into storage for a known period, the IR Remote Control can be used to confi gure the lantern into Hibernation Mode for a user programmable date range.
Hibernation Mode maximises conservation of the battery power by disabling the light (will not activate at night) and shutting off the GPS receiver to rely on the internal clock for date checking. The IR sensor is still monitored in Hibernation Mode. Power consumption is only improved by physically disconnecting the battery supply.
Hibernation Mode is defi ned by a start date and end date that are programmed into the lantern via the IR Remote Control.
Using the IR Remote Control
The lantern must be in Test Mode prior to pressing any of the following key sequences. However, the lantern will return to Normal Operation if it has not detected a valid key press for a period of 15 seconds. When the lantern exits from Test Mode it will either enter Dusk to Dawn mode, Hibernation Mode, or Storage Mode, if enabled.

44
Store Hibernation Mode Date Range
The following details the key press sequence that defi nes the start and end dates of Hibernation Mode:
where ddmm is the numerical representation of the month (01=January, 08=August) of the start date, and DDMM is the numerical representation of the end date.E.g 9th of December is represented by the number sequence 0912. The lantern will acknowledge and respond by fl ashing a long fl ash. This operation only stores the start & end dates into the lantern’s memory and Hibernation Mode still must be enabled to commence its operation.
Enable Hibernation Mode
Pressing the following key sequence will enable (turn on) Hibernation Mode:
The lantern will respond with a single fl ash.
The lantern will take a new GPS reading, determine the calendar month, and then enter Hibernation Mode and depending on the current calendar month setting, will either Hibernate or enter Dusk-to Dawn mode.
By default, Hibernation mode is disabled. Note you can only use this command once a valid hibernation start & end date has been stored in the lantern.
Disable Hibernation / Mode
Pressing the following key sequence will disable (turn off ) both Hibernation Mode and Seasonal Hibernation:
The lantern will respond with a single long fl ash.
Momentarily Wake Up from Hibernation Mode
Pressing the T/C button will wake up the lantern, at which point the lantern will remain awake for a further 15 seconds to process other commands from the IR Controller. If no IR commands are received for a period of 15 seconds, the lantern will return to Hibernation Mode.
Read Stored Hibernation Dates
By pressing the following key sequence the lantern will respond with the stored start and end dates for Hibernation:

SL-C510-AISCompact 5-9NM Solar Marine Lantern
Latest products and information available at www.sealite.com 45
Read Hibernation
By pressing the following key sequence the lantern will respond with status of Hibernation Mode.
Where:
• A single long fl ash = Hibernation Mode is Enabled
• Two quick fl ashes = Hibernation Mode is Disabled.
User Case Example: Confi guring the lantern for HibernationIn this example, we want the lantern to hibernate each year from Dec 10th, through to February 15th, and the lantern is located inside a storage warehouse.
The required key sequence is:
Command IR Controller Key Press
Store the Hibernation Date Range
Enable Hibernation
Storage Mode (Advanced users)For situations where the lantern is put into storage but with access to daylight, the IR Remote Control can be used to confi gure the lantern into Storage Mode.
This mode manually forces the lantern to turn off, but with access to daylight it will still charge battery pack. However the lantern will not keep track of the date.
In Storage Mode, the GPS is disabled however the lantern will still respond to IR commands.
The lantern will automatically enter Storage Mode, if it is hibernating and it has not detected any light for 20 hours.
Enter Storage Mode
By pressing the following key sequence the lantern will enter Storage Mode:
The lantern will leave storage mode when exposed to daylight or if the power switch is turned OFF and ON again.

46
IR Controller Security PINThe IR Controller allows to create a four-digit numbers security access PIN, this will prevent accessing or modifying the SL-C510 settings. Once the Security PIN is set this it will lock the lantern immediately.
In order to access the light settings, the Unlock PIN command needs to be used, this will allow access to the light settings for 30 minutes then the light will re-lock again. If the entered Security PIN does not match, the lantern will respond with 5 quick fl ashes indicating the PIN is incorrect.
Pressing the following key sequence will set the light Security PIN:
Where: X = 0 to 9-digit numbers
Pressing the following key sequence will unlock the light for 30 minutes:
Where: X = 0 to 9-digit numbers
Clear or set a new IR Security PIN
To clear the security access PIN the light requires to be switched off then on. The action will allow to enter the following key commands to clear the existing Security PIN:
Once the security access PIN is cleared a new PIN can be entered using the Security PIN set command.
NOTE: The above key command requires to be entered within four minutes, once the time elapses the light will PIN lock again.
X X X X
X X X X

SL-C510-AISCompact 5-9NM Solar Marine Lantern
Latest products and information available at www.sealite.com 47
GPS SynchronisationThe SL-C510-AIS lanterns are fi tted with GPS and provide the user with the ability to install independently operating lanterns that all fl ash in synchronisation.
No additional power supplies, aerials or control systems are required, and with its microprocessor-based system, the GPS option is specifi cally designed to provide maximum reliability and performance over a wide range of environmental conditions.
Operating Principle
Each light operates independently and requires no operator intervention. A minimum of 4 satellites need to be in view for the built-in GPS receiver to collect time data. At dusk, the light sensor will turn the light on. If time data is available, the light will come on synchronised to every other light with the same selected fl ash code.
Synchronisation is achieved using an internal algorithm based on the highly accurate time base and time data received from the satellites. The satellite data is provided from several earth stations using atomic clocks as the time base. Continuous self-checking ensures that the light will continue to run in synchronisation.
Light Activation
At power-up the microprocessor checks that the internal GPS module is programmed correctly and can provide valid time base and time data.
Once outside with a clear view of the sky, valid data should become available within 20 minutes.
Daylight Operation
During daylight hours the microprocessor is in idle mode to reduce power consumption. Time data continues to be updated once per second. The microprocessor will automatically exit the idle mode as soon as dark conditions are detected.
Dark Operation
When dark conditions are detected the light:
• Checks for valid time data and is turned on after a delay based on the current time and the length of the selected fl ash code;
• If valid time data is not detected the light will turn on after approximately 10 seconds. This light will not be synchronised;
• If the light turns on unsynchronised it will continually check for valid time data. Once valid data is found the light will automatically synchronise.
Note: Lights will not synchronise if different fl ash codes are selected.

48
Optional GSM Monitoring & Control SystemThe SL-C510-AIS may also be fi tted with GSM Cell-Phone Monitoring and Control – enabling users to access real-time diagnostics data and change lantern settings via cell-phone. The system can also be confi gured to send out alarm SMS text messages to designated cellular telephone numbers. The user can also have alarms and reports sent to designated email addresses. Please contact Sealite for further information and instructions.
FEATURES
• Monitor lantern status using any cell-phone, email address or Sealite’s secure web portal;
• Reports alarm conditions to designated cell-phone numbers (SMS text) & email addresses;
• View daily/monthly/yearly lantern diagnostics or receive the information via email;
• Enables proactive maintenance scheduling;
• Lantern only responds to authorised users;
• Low cost monitoring;
• Worldwide functionality.
SL-C510 model with Optional GSM Module
Internal GSM Module

SL-C510-AISCompact 5-9NM Solar Marine Lantern
Latest products and information available at www.sealite.com 49
Lantern StatusTwo status LED’s on the main printed circuit board provide the operator with an indication of the lantern status. There is one red and one yellow status LED. The red status LED is used to indicate the health of the lantern’s power system. The yellow status LED is used to indicate the operational status of the lantern. These indicator LED’s can be viewed at the base of the lens.
All Sealite boards are fi tted with two Indicator LED’s. Use the table below to help determine operational status.
Yellow LED Lantern Status Lantern Comment
OFF Normal OFF Lantern is in Daylight and in Dusk till Dawn mode or in Standby Mode
Flashing ON 0.15 secondsOFF 0.15 seconds
Normal OFF Light is activating and will turn on after detecting 30 seconds of continuous darkness.
Flashing2 x quick fl ashes every 2 seconds (Heartbeat)
Normal ON Lantern is in Normal operating condition. It is not connected to any GPS synchronisation.
Flashing ON 1.5 secondsOFF 1.5 seconds
Normal ON Normal operating condition. Lantern is synchronised to GPS-enabled lanterns.
Flashing1 x quick fl ashevery 2 seconds
Normal ONLantern is ‘re-syncing’ with GPS. The lantern re-sync’s with the GPS every 15 minutes.
Flashing2 x quick fl ashes every 11 seconds
Normal ON Lantern is a Hard Wire Synchronisation Slave.
Red LED Lantern Status Lantern Comment
OFF Normal ON Normal Battery Voltage
Flashing once every 1.6 seconds
Battery Voltage is 12 – 12.5V ON Battery Voltage is between 12 – 12.5V
Flashing twice every 2 seconds
Battery Voltage is 11.5 – 12V ON Battery Voltage is between 11.5 – 12V
Flashing 3 x times every 2 seconds
Battery Voltage is 10.0 – 11.5V ON Battery Voltage is between 10.0 – 11.5V
Flashing 4 x times every 2.5 seconds
Battery Voltage is less than 10.0V ON Battery Voltage is at less than 10.0V
Fixed-on Flat Battery (<10V) OFF
Flat Battery cut-off is now operational and the lantern will be off. Battery must receive charge (above 12V) and lantern must see daylight for at least 1 minute before resuming normal operation.
Flashing ON 1.5 secondsOFF 1.5 seconds
Battery Voltage is above 13.5V ON Battery Voltage is above 13.5V. This may indicate a
problem with the solar regulator.

50
Lantern Thermal Management
The lantern incorporates a dynamic intensity module as part of the thermal management system that ensures it operates within the thermal design window. In practice the thermal management system limits the lanterns average power consumption by automatically adjusting the intensity to prevent overheating.
The Thermal Management system does so by multiplying the fl ash character duty cycle with the lantern intensity and compares this fi gure to the Thermal Limit. All the SL-C510 models have the same Thermal limits for all colours. If the fi gure (called the “multiplier”) is greater than the Thermal Limit the intensity is then adjusted to ensure the Thermal Limit is not exceeded.
This Thermal Limit will come into effect if you select a fl ash characteristic with a heavy-duty cycle and set a very high intensity. Under these conditions the lantern will automatically reduce its intensity so that it is operating within the thermal design window. Note, this intensity limit will not be reached for the clear majority of applications.
The following tables detail the electrical power consumption of the SL-C510-5D and 10D lanterns:.
Lantern Data
Red Green White Yellow Blue
Peak Power (W) 10 10 10 10 10
Max power at Thermal Limit (%) 40.6 40.6 40.6 40.6 40.6
Max power at Thermal Limit (W) 3.8 4.3 4.1 4.1 4.2
Peak Intensity (cd) 624 694 1155 572 313
Red Green White Yellow Blue
Peak Power (W) 10 10 10 10 10
Max power at Thermal Limit (%) 40.6 40.6 40.6 40.6 40.6
Max power at Thermal Limit (W) 3.8 4.3 4.1 4.1 4.2
Peak Intensity (cd) 466 442 653 326 203
SL-C510-5D
SL-C510-10D

SL-C510-AISCompact 5-9NM Solar Marine Lantern
Latest products and information available at www.sealite.com 51
Thermal Limit Operation
Automatically the lantern calculates the MULTIPLIER and compares it to the maximum power Thermal Limit. If the calculated value exceeds maximum power thermal limit, then the intensity is reduced to the highest intensity step to ensure that it is not exceeded.
a) Power is a measure of the rate in which electrical energy is transferred within an electrical circuit and is measured in Watts (W). For DC (Direct Current) electrical circuits it is expressed as:
Power (Watts) = Voltage (Volts, V) x Current (Amps, A) where volts & current are instantaneous values.
b) Peak Power is the maximum power rating of a lantern. In an instant of time, this is the maximum power the lantern will consume. It is determined when all a lantern’s features are on and the LEDs intensity is at 100%.
c) Average Power is a measure of Power over a period of time. In raw terms, it expressed as
Average Power (Watts) = Peak power (Watts) x MULTIPLIER (%),
Where the:
MULTIPLIER (%) = Flash Character duty cycle (%) x Intensity level (%)
d) The SL-C510 lantern intensity setting are available in 32 steps from 0% to 100% with a step size of 3.125% (or 1/32%)

52
Automatic Identifi cation System
AIS AtoN Type 1
AIS AtoN Type 3
The SL-C510-AIS AtoN is a self contained device supporting both Type 1 (transmit only) and Type 3 (transmit and receive) operations. It is designed for installation in exposed locations on physical AtoN structures. The AIS AtoN can be supplied with an optional sensor interface platform which interfaces to sensors (such as weather instruments) and transmits measured data via AIS messages to surrounding vessels and shore stations.
The AIS AtoN module has an exceptionally low power consumption making it suitable for installation on fl oating Aids to Navigation with solar charged power systems. The lowest power consumption is achieved when operating as a Type 1 AIS AtoN, transmitting only position information. Further description of Type 1 and Type 3 operations are provided below.
A Type 1 AIS AtoN is a transmit only device using the FATDMA (Fixed Access Time Division Multiple Access) access scheme. This requires that the AIS AtoN is confi gured with fi xed AIS time slots in which it will transmit AIS messages. Mobile AIS stations operating in the area where a Type 1 AIS AtoN is installed need to be aware of the time slots allocated to the AIS AtoN. The slots allocated to the AIS AtoN are ‘reserved’ by AIS Base Station transmissions covering the area in which the AIS AtoN is installed.
This mode of operation therefore requires that an AIS base station is operating in the same area as the AIS AtoN and is confi gured to make the necessary slot reservations.
Type 3 AIS AtoN has transmit and receive capability and can therefore use either the FATDMA or RATDMA (Random Access Time Division Multiple Access) access schemes. The RATDMA scheme allows the AIS AtoN to internally allocate slots for transmission of AIS messages without reservation from an AIS Base Station.
AIS receiving capability also allows a Type 3 AIS AtoN to be confi gured and queried for it’s status via AIS messages sent from a shore station (known as VDL confi guration). An extension of VDL confi guration is ‘Chaining’ where confi guration and query commands are passed along a ‘chain’ of AIS AtoN stations to a distant station beyond the range of direct communication with a shore station.

SL-C510-AISCompact 5-9NM Solar Marine Lantern
Latest products and information available at www.sealite.com 53
Supported AIS MessagesThe transceiver supports the following AIS message types.
ITU-R M.1371-4Message number
Description Transmitted / Received by AtoN Transceiver
Application
6 Binary addressed message
Transmitted and received
The transceiver uses message 6 to send binary data (relating to connected sensors and systems) to a specifi c shore station. The transceiver can also receive addressed binary messages for the purpose of confi guration and control.
7 Binary acknowledge message
Transmitted and received
This message is transmitted to acknowledge receipt of a binary message. The transceiver can also receive acknowledgements relating to its own addressed binary transmissions.
8 Binary broadcast message
Transmitted The transceiver uses message 8 to broadcast binary data (relating to connected sensors and systems) to all other AIS stations in range.
12 Addressed safety related message
Transmitted The transceiver can be confi gured to transmit an addressed safety related message to a specifi c shore station to alert the operator to an off position, vessel proximity or built in test failure condition.
13 Acknowledgement of received addressed safety related message
Received The transceiver receives message 13 in acknowledgement of its transmission of message 12.
14 Safety related broadcast message
Transmitted The transceiver can be confi gured to transmit a broadcast safety related message to all AIS stations in range, to warn of an off position, vessel proximity or built in test failure condition.
20 Data link management message
Received When operating as a Type 3 transceiver slot reservations made by a shore station using message 20 will be observed by the transceiver.
21 Aids to Navigation report Transmitted This is the primary message transmitted by the transceiver. It contains the position, identifi cation and status of the transceiver.
25 Single slot binary message
Transmitted and received
This message can be used for remote (over the air) confi guration of the transceiver and confi guration of a ‘chain’ of transceivers.

54
Description of the proAtoN Programming Software Tool
Installing the proAtoN PC Software Tool
The proAtoN PC application is supplied on the CD packaged with the transceiver. The application provides features for confi guration of the transceiver and advises correct operation before deployment.
The main features of the application are:• Confi guration of essential transceiver parameters such as MMSI, name and dimensions• Confi guration of reporting schedules• Confi guration of virtual and/or synthetic AtoN reporting schedules• Confi guration of other messaging features• GNSS diagnostics• System diagnostics and alarm display• Confi guration of the source for external equipment status information
The SL-C510-AIS AtoN supports VDL confi guration and chaining. For further information please contact Sealite for support.
The proAtoN should be installed from the CD supplied (or USB stick) with the transceiver. The steps to complete the installation are as follows:
1. Insert the CD into your PC2. Navigate to the proAtoN folder on the CD3. Double click the ‘setup.exe’ item to start the installation process4. Follow on screen instructions to complete the installation
Following successful installation, the application can be launched from the proAtoN folder in the Windows start menu.
USB device drivers for the transceiver are installed automatically during installation of proAtoN.Note: The transceiver model is powered from the USB Port while connected to the computer.
CAUTION
Do not connect Lantern power when confi guring the AIS Module.The VHF transmission may damage your computer as a result

SL-C510-AISCompact 5-9NM Solar Marine Lantern
Latest products and information available at www.sealite.com 55
Application layoutThe basic layout of the proAtoN application is illustrated in the following fi gure:
COM Port SelectionWhen connected via USB the COM port associated with the transceiver will be listed in the selection drop down. To connect to the transceiver select the ‘AIS AtoN Port’ option from the drop down and click the ‘Connect’ button.
Read / Write Confi gurationClicking the left hand button will transfer current confi guration information from the transceiver to proAtoN. Clicking the right hand button will confi gure the transceiver with the information currently displayed in proAtoN. It is possible to select transfer of confi guration information relating only to the currently selected tab, or to all tabs by clicking the drop down arrow to the right of each button. The default operation for each button is to read or write data relating to the selected tab only. It is highly recommended that prior to deploying the AtoN the “Send all Confi guration” option is used on the write button.

56
Transceiver Confi guration
Confi guration TabsThe confi guration and status of the transceiver is displayed through a number of tabs:• Real AtoN tab
Confi guration of AtoN MMSI, name, type, dimensions, position and radio parameters.• Message schedule tab
Confi guration of FATDMA or RATDMA message schedules.• Virtual AtoN tab
Confi guration of virtual and/or synthetic AtoN transmissions.• Status input tab
Confi guration of the source for AtoN status information
When connected to a transceiver a synchronisation status icon is displayed alongside the title of each tab. This icon indicates the current synchronisation status of the information displayed in that tab with the internal confi guration of the transceiver. The synchronisation status icons are illustrated as:
Synchronisation is achieved by either writing the confi guration displayed in proAtoN to the transceiver (click the write confi guration button), or reading the current confi guration from the transceiver for display in proAtoN (click the read confi guration button).
Status BarThe status bar displays the current connection status of the application (bottom left) and the current GPS time (if available, bottom right).
The following sections describe the confi guration options available and their effect on the behaviour of the transceiver. Confi guration of an AIS AtoN transceiver requires knowledge of the local AIS environment and may require interaction with shore infrastructure. Familiarity with the current IALA guidelines on the use of AIS Aids to Navigation (IALA A-126) is assumed.

SL-C510-AISCompact 5-9NM Solar Marine Lantern
Latest products and information available at www.sealite.com 57
Confi guration of ‘Real’ AtoN Parameters
The following parameters associated with the ‘real’ AIS AtoN transceiver should be confi gured via the ‘Real AtoN’ tab:
MMSI
The MMSI number associated with the ‘real’ AtoN. Typically the MMSI number for a ‘real’ AtoN station follows the format 99MID1XXX where MID is the appropriate national MID and XXX is a number unique to this station.
Name
The name of the AtoN station as broadcast to other AIS users. Up to 34 characters are available for the name.
Type of AtoN
Select from a list of possible types of AtoN. The types are as defi ned by IALA in IALA A-126.
Type of EPFS
Select the type of EPFS (Electronic Position Fixing System) used by the transceiver. Note this selection does not affect the hardware confi guration, only the contents of the ‘Type of EPFS’ fi eld transmitted AtoN position reports. The transceiver is equipped with a GPS module by default.
Alternatively, for a fi xed or shore based transceiver a surveyed position type can be selected. Note that when the surveyed position is selected, the surveyed position is broadcast to other AIS users and GNSS position information is ignored.
Nominal Position
Enter the nominal or charted position of the AtoN. This is the position transmitted to other AIS users for a fi xed AtoN when the ‘Surveyed’ EPFS type is selected. For all other confi gurations this position is used to perform ‘off position’ calculations only; the actual GNSS position is broadcast to other users.
• The application can average the current GNSS position over 5 minutes and use this value for the nominal position. Click the ‘Get GNSS position’ button to the right of the latitude and longitude fi elds to begin this process.• The position accuracy can only be entered when the type of EPFS is set to ‘Surveyed’. The accuracy should be set in accordance with the accuracy of the surveyed position.
Off Position Alternate Message Enable
The current GNSS position is compared to the nominal position according to the algorithm defi ned in IALA A-126 Annex A, Example 1. The off position threshold distance is specifi ed in metres. If the transceiver determines that it is ‘off position’ then the alternate reporting schedule for message #21 (index 2) is enabled. For example, the alternate reporting schedule could be confi gured to decrease the reporting interval if the AtoN has drifted off position. The off position fl ag in message #21 is set when off position regardless of this setting.
The transceiver off position algorithm is always operational and compares the current GPS position to the nominal position of the transceiver.

58
AIS Message Schedule Confi guration
MMSI For Addressed Messages
This is the destination MMSI used for all addressed message types generated by the transceiver. This is usually the MMSI of a shore station collecting status information from the transceiver. It is also possible to enable the acknowledgement of received binary messages (via message #7 or #13).
Dimensions
The dimensions of the AtoN should be entered to the nearest metre. Guidance on the appropriate confi guration of dimensions for various types of AtoN can be found in IALA A-126.
Radio Channels
Selection of alternative radio channels for AIS transmission and reception is possible, however in most cases the default channels (AIS1 and AIS2) should be used.
Transmitter Power Level
The transmitter power level for the transceiver can be selected as 1W, 2W, 5W or 12.5W. The default value of 12.5W is appropriate for most scenarios.
CAUTION
It is essential that valid nominal position is entered and that a reasonable off position threshold is entered. If the default nominal position 00° 00’ 00.00”N / 000° 00’ 00.00”E is left unchanged, then the transceiver will always be ‘off posi-tion’ resulting in the GPS receiver being permanently enabled. This will lead to signifi cantly increased power consumption and the ‘off position’ fl ag in the Aids to Navigation report will be set.
The layout of the message schedule tab is illustrated below:
Default Messages
An AIS AtoN position report is made using AIS message #21. This message occupies two AIS slots. The default confi guration shown in proAtoN includes two message #21 schedule confi gurations. The fi rst confi guration, Index 1, is the primary position reporting schedule for the transceiver. The second, Index 2, is the alternate position reporting schedule selected when the ‘off position’ monitor is enabled and the AtoN is determined to be off position (see section 7.3.1). If the alternate ‘off position’ schedule is not required it can be deactivated by selecting the associated row in the message schedule table and clicking the ‘Deactivate’ button. When deactivated the alternate schedule will be greyed out.

SL-C510-AISCompact 5-9NM Solar Marine Lantern
Latest products and information available at www.sealite.com 59
Additional binary data messages can be added to the schedule table by selecting the required message type from the drop down at the top of this tab, then clicking the ‘Add’ button. The available message types are:
• Message #8 - For broadcast of binary data to all other stations in range. The binary data may be provided by the extended sensor interface (if present) or third party equipment connected to the transceiver. See section 8 for further information.• Message #6 - For transmission of binary data to an individual destination MMSI. The destination MMSI is set on the ‘Real AtoN’ tab. The binary data may be provided by the extended sensor interface (if present) or third party equipment connected to the transceiver.• Message #12 - For transmission of text messages to an individual destination MMSI. The destination MMSI is set on the ‘Real AtoN’ tab. This schedule is used for transmission of alert messages.• Message #14 - For broadcast of text messages to all other stations in range. This schedule is used for transmission of alert messages.
Up to four separate schedules are available for each binary message type. Each individual schedule has an index from 1 to 4 which is used to identify that schedule (for example, message #8 index 2).
Access Scheme Selection
The access scheme for each message must be selected as either FATDMA or RATDMA. The selection is made by selecting the required row in the schedule table, then clicking on the current access scheme in that row. A drop down menu will then appear in that location allowing selection of the required access scheme.
Adding Additional Messages to the Schedule

60
Using the FATDMA (Fixed Access TDMA) access scheme the actual slot for each transmission made by the transceiver is specifi ed. There are 2250 slots per minute (or frame) on each AIS channel. The scheduled slots must be reserved for the transceiver by an AIS base station operating in the same area using AIS message #20. Further information on FATDMA reservations and slot allocation schemes can be found in IALA A-124, Appendix 14.
The parameters required for an FATDMA schedule are as follows:
• Channel 1 Start UTC
This is the hour and minute for transmission on Channel 1. This specifi es the AIS frame (minute) within a day in which the start slot for Channel 1 resides.
• Channel 1 Start Slot
This is the slot number for the fi rst transmission on Channel 1. The slot number can range from -1 (transmission disabled on this channel) to 2249. Note that each message #21 transmission occupies two slots and associated base station slot reservations must therefore reserve two slots.
• Channel 1 Interval
This is the interval in slots between transmissions on Channel 1. The interval can range from 0 to 3240000 slots, which equates to an interval of one day. Typically, the interval is set to 13500 slots (6 minutes) on each channel which results in an overall interval of 3 minutes.
• Channel 2 Start UTC
This is the hour and minute for transmission on Channel 2. This specifi es the AIS frame (minute) within a day in which the start slot for Channel 2 resides. Typically the Channel 2 start time is offset by 3 minutes from the start time used for Channel 1. With a 6 minute reporting interval on each channel this results in a transmission every 3 minutes on alternating channels.
FATDMA Schedule Confi guration

SL-C510-AISCompact 5-9NM Solar Marine Lantern
Latest products and information available at www.sealite.com 61
• Channel 2 Start Slot
This is the slot number for the fi rst transmission on Channel 2. The slot number can range from -1 (transmission disabled on this channel) to 2249. Note that each message #21 transmission occupies two slots and associated base station slot reservations must therefore reserve two slots.• Channel 2 Interval
This is the interval in slots between transmissions on Channel 2. The interval can range from 0 to 3240000 slots, which equates to an interval of one day. Typically the interval is set to 13500 slots (6 minutes) on each channel which results in an overall interval of 3 minutes.Example FATDMA Schedule
A typical transmission schedule requires that the AIS AtoN transceiver transmits AIS message #21 every three minutes on alternating channels. The transmission schedule is presented diagrammatically in the following fi gure:
This schedule can be confi gured using the following values:
• Channel 1 start UTC = 00:00 (the fi rst frame of every hour)• Channel 1 start slot = 0 (the fi rst slot in the frame, so slots 0 and 1 are used by the message #21 transmission)• Channel 1 interval = 13500 slots (this equates to a 6 minute interval as there are 2250 slots per minute)• Channel 2 start UTC = 00:03 (the third frame of every hour)• Channel 2 start slot = 0 (the fi rst slot in the frame, so slots 0 and 1 are used by the message #21 transmission)• Channel 2 interval = 13500 slots (this equates to a 6 minute interval as there are 2250 slots per minute)
The transceiver is now confi gured to report message #21 on channel 1 every 6th minute, and on channel 2 every 6th minute, but offset by three minutes from channel 1. This results in a transmission of message #21 every three minutes on alternating channels. The actual start slot selected for each channel will depend on the FATDMA allocations in the area of operation.

62
RATDMA Schedule Confi gurationUsing the RATDMA (Random Access TDMA) access scheme the time for each transmission made by the transceiver is specifi ed. The transceiver will determine the actual slots used for transmission based on internal knowledge of the AIS environment gained from the AIS receivers.
The parameters required for an RATDMA schedule are as follows.
• Channel 1 Start UTC
This is the hour and minute of the frame in which transmission will occur on Channel 1. The slot used within this frame will be determined by the transceiver.• Channel 1 Interval
This is the interval in minutes between transmissions on Channel 1. A typical value is 6 minutes.
• Channel 2 Start UTC
This is the hour and minute of the frame in which transmission will occur on Channel 2. The slot used within this frame will be determined by the transceiver.• Channel 2 Interval
This is the interval in minutes between transmissions on Channel 1. A typical value is 6 minutes.
Example RATDMA Schedule
A typical transmission schedule requires that the AIS AtoN transceiver transmits AIS message #21 every three minutes on alternating channels. The transmission schedule is presented diagrammatically in the following fi gure:
The transceiver is now confi gured to report message #21 on Channel 1 every 6th minute and on Channel 2 every 6th minute, but offset by three minutes from Channel 1. This results in a transmission of message #21 every three minutes on alternating channels. The exact timings of the transmissions within the selected minute will vary as the transceiver selects available slots using RATDMA.
This schedule can be confi gured using the following values:
• Channel 1 Start UTC = 00:00 (the fi rst minute of every hour)
• Channel 1 Interval = 6 minutes
• Channel 2 Start UTC = 00:03 (the third minute of every hour)
• Channel 2 Interval = 6 minutes

SL-C510-AISCompact 5-9NM Solar Marine Lantern
Latest products and information available at www.sealite.com 63
Virtual AtoN Confi guration
Virtual AIS AtoN Confi guration
The transceiver can be confi gured to transmit position reports for up to ten virtual or synthetic Aids to Navigation. This confi guration is carried out using the Virtual AtoN(s) tab in proAtoN. Within this tab there are sub-tabs relating to each of the ten virtual or synthetic AtoNs. The sub-tabs are visible at the left hand edge of the window. The layout of the virtual AtoN confi guration tab is provided in the following illustration:
Each virtual AtoN required must be separately enabled by checking the ‘Enable’ check box. The type of virtual AtoN can then be selected.
• Virtual AtoN
A virtual AtoN is transmission of message #21 for an Aid to Navigation that does not physically exist. A virtual AtoN may be used to mark a temporary hazard to navigation, for example, a wreck. For further information on the use of virtual AtoNs please refer to IALA A-126, IALA O-143 and IALA guideline 1081.
• Synthetic AtoN
A synthetic AtoN is transmission of message #21 from an AIS station located remotely from the physical Aid to Navigation. An example of use is to provide an AIS AtoN target for a buoy or mark that is not capable of supporting AIS AtoN hardware.

64
Virtual AIS AtoN Schedule
Status Input Confi guration Tab
The transmission schedule for a virtual or synthetic AtoN must be confi gured in the same way as that for the ‘real’ AtoN. The TDMA access scheme, start times and intervals must be confi gured in the virtual AtoN tab.
When an FATDMA schedule is used it is important to ensure the slot allocations used for the virtual and real AtoNs are different in every case. Also note that two consecutive slots are used for each virtual AtoN report.
AIS AtoN position reports (message #21) contain status information encoded as a bit sequence.
CAUTION
Do not modify these settings as the AIS AtoN does not support these settings.
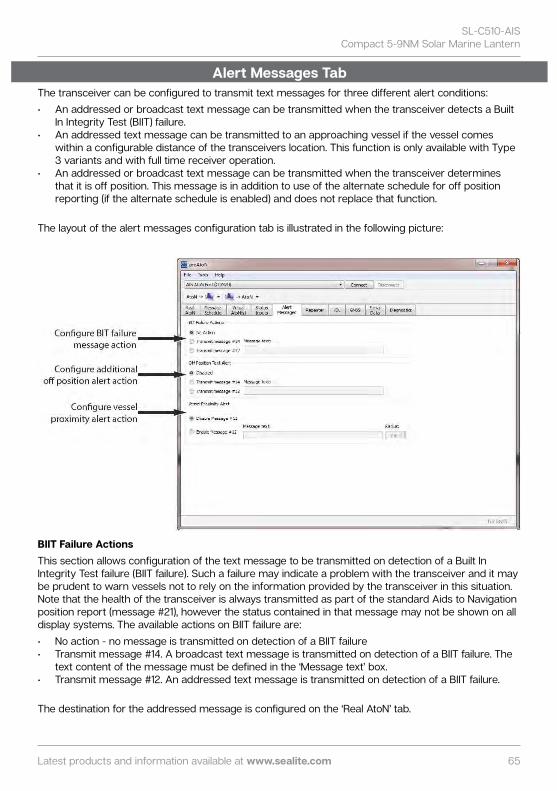
SL-C510-AISCompact 5-9NM Solar Marine Lantern
Latest products and information available at www.sealite.com 65
Alert Messages TabThe transceiver can be confi gured to transmit text messages for three different alert conditions:
• An addressed or broadcast text message can be transmitted when the transceiver detects a Built In Integrity Test (BIIT) failure.• An addressed text message can be transmitted to an approaching vessel if the vessel comes within a confi gurable distance of the transceivers location. This function is only available with Type 3 variants and with full time receiver operation.• An addressed or broadcast text message can be transmitted when the transceiver determines that it is off position. This message is in addition to use of the alternate schedule for off position reporting (if the alternate schedule is enabled) and does not replace that function.
The layout of the alert messages confi guration tab is illustrated in the following picture:
BIIT Failure Actions
This section allows confi guration of the text message to be transmitted on detection of a Built In Integrity Test failure (BIIT failure). Such a failure may indicate a problem with the transceiver and it may be prudent to warn vessels not to rely on the information provided by the transceiver in this situation. Note that the health of the transceiver is always transmitted as part of the standard Aids to Navigation position report (message #21), however the status contained in that message may not be shown on all display systems. The available actions on BIIT failure are:
• No action - no message is transmitted on detection of a BIIT failure• Transmit message #14. A broadcast text message is transmitted on detection of a BIIT failure. The text content of the message must be defi ned in the ‘Message text’ box.• Transmit message #12. An addressed text message is transmitted on detection of a BIIT failure.
The destination for the addressed message is confi gured on the ‘Real AtoN’ tab.

66
In addition to confi guration of the BIIT failure action, a schedule for the associated message must be confi gured in the ‘Message schedule’ tab:
• Message #14 Index 1 must be confi gured if the message #14 action is selected.• Message #12 Index 1 must be confi gured if the message #12 action is selected.
Vessel Proximity Alert
This section allows confi guration of the text message to be transmitted on detection of a vessel breaching a defi ned radius (or guard ring) around the transceiver. This message can be used to warn approaching vessels of potential collision with the AtoN. The addressed message is automatically sent to all vessels that breach the guard ring radius.
The available vessel proximity alert actions are:
• Disable message #12 - The vessel proximity alert function is disabled• Enable message #12 - The function is enabled and the text content of the message to be transmitted must be defi ned in the ‘Message text’ box. The guard ring radius for the proximity alert must also be confi gured in the ‘Radius’ box; note that the value is set in metres.
In addition to confi guration of the vessel proximity alert a schedule for the associated message must be confi gured in the ‘Message schedule’ tab.
• Message #12 Index 2 must be confi gured if the message #12 action is selected.

SL-C510-AISCompact 5-9NM Solar Marine Lantern
Latest products and information available at www.sealite.com 67
This section allows confi guration of the text message to be transmitted when the transceiver detects that it is off position. The settings for off position detection are made on the ‘Real AtoN’ tab. The confi guration of an alternative off position message #21 reporting schedule is independent of the confi guration of this text alert.
The available off position alert actions are:
• Disabled - no text message is transmitted when the transceiver determines that it is off position• Transmit message #14. A text message is broadcast when the transceiver detects that is off position. The text content of the message must be defi ned in the ‘Message text’ box.• Transmit message #12. An addressed text message is transmitted on detection of an off position condition. The destination for the addressed message is confi gured on the ‘Real AtoN’ tab.
In addition to confi guration of the off position alert a schedule for the associated message must be confi gured in the ‘Message schedule’ tab.
• Message #14 index 2 must be confi gured if the message #14 action is selected• Message #12 index 3 must be confi gured if the message #12 action is selected
Off Position Alert

68
Message Repeater Function The transceiver can be confi gured to repeat, or re-transmit, certain messages it receives. Note: messages from virtual AtoN’s are not repeated. This feature applies to messages #6, #8, #21 and to SART (Search And Rescue Transponder) specifi c messages #1 and #14. This feature is turned off by default for all message types but can be enabled and confi gured using the Repeater tab. The number of messages that are repeated is limited by the number of messages waiting to be repeated and the total number of transmissions made per UTC minute.
For each message type, the repeat function can be disabled - Off - or enabled to repeat received messages with a Repeat Indicator (RI) value equal to or less than 0, 1 or 2. The RI value states how many times the message has already been repeated where 0 means it was transmitted by the source.
For messages #6, #8 and #21, a Guard Time can be applied. This creates a period after a message is repeated, during which the same message type from the source MMSI will not be repeated again, regardless of the message’s RI value.
For example, if a message #6 from MMSI A is repeated then a second message #6 is received from MMSI A within the Guard Time, the second message shall be interpreted and acted upon as necessary but it will not be repeated; however, if a third message #6 from MMSI A is received after the Guard Time has expired, it will be repeated so long as its RI value is less than or equal to that confi gured for the AtoN. For message #21, a Range constraint can also be applied. Any message #21 that meets the other criteria for repeating, shall be transmitted if the position reported is within the distance specifi ed by the Range value of the receiving AtoN. A Range value of 0 indicates the restriction is disabled.
CAUTION
It is not recommended to use this feature as it signifi cantly drains the internal battery. Contact Sealite for additional advice.

SL-C510-AISCompact 5-9NM Solar Marine Lantern
Latest products and information available at www.sealite.com 69
Transceiver Diagnostics
GNSS Tab
The proAtoN application provides a number of features to assist with installation of an AIS AtoN and diagnosis of fault conditions. These features are available through the GNSS, Serial Data and Diagnostics tabs in proAtoN. Confi guration using proAtoN.
The GNSS tab shows the status of the GNSS receiver built into the transceiver. This provides an indication of the quality of the GNSS satellite signals being received along with the current position of the transceiver. At least four satellites with a carrier to noise ratio in excess of 40 dBHz are required for an acceptable position fi x. Relocating the transceiver or connecting an external GNSS antenna can help improve the signal quality and resulting position accuracy.
The internal GNSS receiver supports SBAS (Satellite Based Augmentation Service) to enable improved accuracy and integrity of GNSS position fi xes. The availability of SBAS depends on the installation location of the transceiver (the WAAS SBAS service covers most of the US and the EGNOS service covers Europe).

70
Serial Data Tab
The serial data page shows all data output from the transceiver in NMEA0183 / IEC61162-1 format. It is also possible to send NMEA0183 / IEC61162-1 commands to transceiver if required for technical support or custom confi guration. A facility to record the data to a fi le is provided by clicking the ‘Log to File’ button.
Certain sentence types can be fi ltered out of the output window by checking the relevant sentence type in the ‘Filters’ section of this tab.

SL-C510-AISCompact 5-9NM Solar Marine Lantern
Latest products and information available at www.sealite.com 71
Diagnostics Tab
Report Generation
The Diagnostics tab provides system version and status information. This information may be required when requesting technical support for the product.
AtoN Details
• The connected AtoN Type is displayed as Type 1 or Type 3• The application and boot loader software versions for the connected AtoN are displayed• The serial number of the connected AtoN and Power status is displayed• The VHF antenna VSWR (Voltage Standing Wave Ratio) as measured at the last AIS transmission is displayed. This value is for indication only. A value better than 3:1 is expected for a good antenna system. The alarm limit for antenna VSWR is set to 5:1. A perfect antenna would give a VSWR of 1:1.• The system supply voltage is displayed in volts. The supply voltage must be between 9.6V and 32.6V for correct operation. The supply voltage alarm will activate outside of this supply voltage range.
Clicking the ‘Generate’ button will produce a full report of the transceiver status. This report may be requested by technical support personnel. After clicking the button select a suitable fi le name and location for the report fi le before clicking save.

72
Reported MessagesDuring operation the transceiver will output a variety of status messages relating to the current operating state. These messages are for information only and do not represent a fault condition.
Message text Description / Resolution
TX attempt failed(msg #6 no payload re-broadcast data)
A transmission of message #6 has failed as the payload data required for this message was not provided (by either the extended sensor interface, or an external system). The likely cause is a confi guration error relating to data capture.
TX attempt failed(msg #8 no payload re-broadcast data)
A transmission of message #8 has failed as the payload data required for this message was not provided (by either the extended sensor interface, or an external system). The likely cause is a confi guration error relating to data capture.
TX attempt failed(msg #12 no payload re-broadcast data)
A transmission of message #12 has failed as the payload data required for this message was not provided (by either the extended sensor interface, or an external system). The likely cause is a confi guration error relating to data capture.
TX attempt failed(msg #14 no payload re-broadcast data)
A transmission of message #14 has failed as the payload data required for this message was not provided (by either the extended sensor interface, or an external system). The likely cause is a confi guration error relating to data capture.
Standby blocked: Off position algorithm The transceiver can’t enter standby (low power) mode because the ‘off position’ algorithm has detected an off-position condition. Moving the transceiver within the confi gured operating radius will resolve this.
Standby Blocked: Acquiring GPS The transceiver can’t enter standby (low power) mode because it is currently acquiring a GNSS position fi x. Standby operation will resume when a fi x is acquired.
Standby disabled Standby mode (low power operation) is disabled by confi guration.
Standby Blocked: USB connected The transceiver will not enter standby (low power) mode whilst the USB interface is connected to a PC.
Standby Blocked: Shell running The transceiver will not enter standby (low power) mode whilst the confi guration shell is active.
Standby Blocked: Receivers enabled The transceiver can’t enter standby mode if the current confi guration requires that the receivers are active.
Standby Blocked: Repeater enabled The transceiver cannot enter standby mode if the current confi guration has the message repeater function enabled.
Exiting standby Information only on exit of standby mode.
Entering standby for xx seconds Information only on entry to standby mode.

SL-C510-AISCompact 5-9NM Solar Marine Lantern
Latest products and information available at www.sealite.com 73
Active AlarmThe transceiver incorporates BIIT (Built In Integrity Test) routines which continuously monitor key operating parameters. Should an integrity test fail, the failure will be indicated in the active alarms area.
Alarm text Description / Resolution
Tx Malfunction A transmitter malfunction has been detected - please
Antenna VSWR exceeds limits Contact your supplier.
Rx Channel 1 malfunction The VHF antenna VSWR is above the permitted limit. Check the VHF antenna, cable and connections are sound. The VSWR measured at the last transmission is displayed on the proAtoN diagnostics tab.
Rx Channel 2 malfunction A receiver malfunction has been detected – please contact your supplier.
EPFS failure A receiver malfunction has been detected – please contact your supplier.
DGNSS input failed No position is available from the internal GNSS receiver – please contact your supplier.
Supply voltage No data is available from the external source of differential GNSS correction data. Please check connections, baud rate and equipment confi guration.
Low forward power The transceiver power supply voltage is outside of the permitted range. The measured supply voltage is displayed on the proAtoN diagnostics tab.
Synchronisation lost The transmitter forward power is below a preset limit - please contact your supplier.

74
Flash Codes
Appendix
The Sealite SL-C510 may be set to any of 256 IALA recommended fl ash settings which are user adjustable onsite without the need for external devices.
SEALITE® code reference is listed by number of fl ashes
For the latest version of this document visit www.sealite.com,
or email [email protected]
Symbols
FL Flash followed by number Eg. FL 1 S, one fl ash every second
F Fixed
Q Quick Flash
VQ Very Quick Flash
OC Occulting; greater period on than off
ISO Isophase; equal period on and off
LFL Long Flash Long
MO Morse code ( ) contains letter
For example, VQ (6) + LFL 10 S means 6 very quick fl ashes followed by a long fl ash, during a 10-second interval.
The amount of power your lantern draws through the night depends on the duty cycle, i.e. the amount of time on as a proportion to the timing cycle. For example, 0.5 seconds on and 4.5 seconds off equals a 10% duty cycle.
It is best to operate at the lowest duty cycle appropriate to the actual needs of the application.

SL-C510-AISCompact 5-9NM Solar Marine Lantern
Latest products and information available at www.sealite.com 75
MARK DESCRIPTION RHYTHMPort Hand & Starboard Marks: Any, other than Composite Group Flashing (2+1)Preferred Channel Starboard: Composite Group Flashing (2+1)Preferred Channel Port: Composite Group Flashing (2+1)North Cardinal Mark: Very quick or quickEast Cardinal Mark: Very quick (3) every 5 seconds or quick (3) every 10 secondsSouth Cardinal Mark: Very quick (6) + long fl ash every 10 seconds or quick (6) + long fl ash every 15 secondsWest Cardinal Mark: Very quick (9) every 10 seconds or quick (9) every 15 secondsIsolated Danger Mark: Group fl ashing (2)Safe Water Mark: Isophase, occulting, one long fl ash every 10 seconds or Morse Code “A”Special Marks: Any, other than those described for Cardinal, Isolated Danger or Safe Water Marks
HEX CODE IR Controller FLASH CODE ON OFFA B
0 0 000 F (Steady light)D 3 211 VQ 0.5 S 0.2 0.3- - 274 VQ 0.5 S 0.25 0.25E 3 227 VQ 0.6 S 0.2 0.4F 3 243 VQ 0.6 S 0.3 0.37 3 115 Q 1 S 0.2 0.88 3 131 Q 1 S 0.3 0.79 3 147 Q 1 S 0.4 0.6A 3 163 Q 1 S 0.5 0.58 4 132 Q 1 S 0.8 0.2B 3 179 Q 1.2 S 0.3 0.9- - 293 FL 1.2 S 0.4 0.89 4 148 Q 1.2 S 0.5 0.7C 3 195 Q 1.2 S 0.6 0.6F 4 244 FL 1.5 S 0.2 1.31 0 16 FL 1.5 S 0.3 1.20 5 5 FL 1.5 S 0.4 1.10 4 4 FL 1.5 S 0.5 1.02 0 32 FL 2 S 0.2 1.83 0 48 FL 2 S 0.3 1.74 0 64 FL 2 S 0.4 1.65 0 80 FL 2 S 0.5 1.56 0 96 FL 2 S 0.7 1.37 0 112 FL 2 S 0.8 1.21 2 18 ISO 2 S 1.0 1.08 0 128 FL 2.5 S 0.3 2.29 0 144 FL 2.5 S 0.5 2.0D 6 214 FL 2.5 S 1.0 1.51 5 21 FL 3 S 0.2 2.8
HEX CODE IR Controller FLASH CODE ON OFFA B
A 0 160 FL 3 S 0.3 2.72 5 37 FL 3 S 0.4 2.6B 0 176 FL 3 S 0.5 2.53 5 53 FL 3 S 0.6 2.4C 0 192 FL 3 S 0.7 2.3D 0 208 FL 3 S 1.0 2.02 2 34 ISO 3 S 1.5 1.55 4 84 OC 3 S 2.0 1.0E 2 226 OC 3 S 2.5 0.54 6 70 OC 3.5 S 2.5 1.04 5 69 FL 4 S 0.2 3.85 5 85 FL 4 S 0.3 3.7E 0 224 FL 4 S 0.4 3.6F 0 240 FL 4 S 0.5 3.56 5 101 FL 4 S 0.6 3.40 1 1 FL 4 S 0.8 3.21 1 17 FL 4 S 1.0 3.02 1 33 FL 4 S 1.5 2.53 2 50 ISO 4 S 2.0 2.03 6 54 OC 4 S 2.5 1.5F 2 242 OC 4 S 3.0 1.03 1 49 FL 4.3 S 1.3 3.08 5 133 FL 5 S 0.2 4.84 1 65 FL 5 S 0.3 4.7- - 279 FL 5 S 0.4 4.65 1 81 FL 5 S 0.5 4.59 5 149 FL 5 S 0.9 4.16 1 97 FL 5 S 1.0 4.07 1 113 FL 5 S 1.5 3.5

76
HEX CODE IR Controller FLASH CODE ON OFFA B
4 2 66 ISO 5 S 2.5 2.58 2 130 LFL 5 S 2.0 3.00 3 3 OC 5 S 3.0 2.01 3 19 OC 5 S 4.0 1.02 3 35 OC 5 S 4.5 0.5C 6 198 FL 6 S 0.2 5.8B 5 181 FL 6 S 0.3 5.7C 5 197 FL 6 S 0.4 5.68 1 129 FL 6 S 0.5 5.59 1 145 FL 6 S 0.6 5.4A 1 161 FL 6 S 1.0 5.07 5 117 FL 6 S 1.2 4.8B 1 177 FL 6 S 1.5 4.55 2 82 ISO 6 S 3.0 3.09 2 146 LFL 6 S 2.0 4.06 4 100 OC 6 S 4.0 2.03 3 51 OC 6 S 4.5 1.54 3 67 OC 6 S 5.0 1.0- - 280 FL 7 S 0.4 6.6A 4 164 FL 7 S 1.0 6.09 6 150 FL 7 S 2.0 5.05 6 86 OC 7 S 4.5 2.5D 5 213 FL 7.5 S 0.5 7.0C 1 193 FL 7.5 S 0.8 6.7E 5 229 FL 8 S 0.5 7.5B 4 180 FL 8 S 1.0 7.06 2 98 ISO 8 S 4.0 4.0A 2 162 LFL 8 S 2.0 6.06 6 102 OC 8 S 5.0 3.0
HEX CODE IR Controller FLASH CODE ON OFFA B
- - 294 OC 8 S 6.0 2.0B 2 178 LFL 8 S 3.0 5.0F 5 245 FL 9 S 0.9 8.1C 4 196 FL 9 S 1.0 8.07 6 118 OC 9 S 6.0 3.00 6 6 FL 10 S 0.2 9.81 6 22 FL 10 S 0.3 9.7- - 281 FL 10 S 0.4 9.6D 1 209 FL 10 S 0.5 9.52 6 38 FL 10 S 0.8 9.2E 1 225 FL 10 S 1.0 9.01 4 20 FL 10 S 1.5 8.5C 2 194 LFL 10 S 2.0 8.0D 2 210 LFL 10 S 3.0 7.07 2 114 ISO 10 S 5.0 5.02 4 36 LFL 10 S 4.0 6.08 6 134 OC 10 S 6.0 4.05 3 83 OC 10 S 7.0 3.06 3 99 OC 10 S 7.5 2.5- - 303 FL 11 S 1.0 10.0- - 302 FL 12 S 1.0 11.0F 1 241 FL 12 S 1.2 10.8D 4 212 FL 12 S 2.5 9.53 4 52 LFL 12 S 2.0 10.00 2 2 FL 15 S 1.0 14.04 4 68 LFL 15 S 4.0 11.07 4 116 OC 15 S 10 5.0A 6 166 LFL 20 S 2.0 18.0E 4 228 FL 26 S 1.0 25.0

SL-C510-AISCompact 5-9NM Solar Marine Lantern
Latest products and information available at www.sealite.com 77
HEX CODE IR Controller FLASH CODE ON OFF ON OFF
A B0 A 10 FL (2) 4 S 0.5 1.0 0.5 2.0E B 235 VQ (2) 4 S 0.2 1.0 0.2 2.61 A 26 FL (2) 4.5 S 0.3 1.0 0.3 2.92 A 42 FL (2) 4.5 S 0.4 1.0 0.4 2.73 A 58 FL (2) 4.5 S 0.5 1.0 0.5 2.5- - 277 FL (2) 4.6 S 0.3 0.3 0.3 3.7F 9 249 FL (2) 5 S 0.2 0.8 0.2 3.82 C 44 FL (2) 5 S 0.2 1.2 0.2 3.44 A 74 FL (2) 5 S 0.4 0.6 0.4 3.6- - 282 FL (2) 5 S 0.4 1.1 0.4 3.10 7 7 FL (2) 5 S 0.5 1.0 0.5 3.01 7 23 FL (2) 5 S 1.0 1.0 1.0 2.0- - 257 FL (2) 5 S 0.3 1.0 0.3 3.49 B 155 Q (2) 5 S 0.3 0.7 0.3 3.72 9 41 Q (2) 5 S 0.5 0.5 0.5 3.5- - 305 FL (2) 5 S 0.5 0.7 0.5 3.35 A 90 FL (2) 5.5 S 0.4 1.4 0.4 3.37 8 120 FL (2) 6 S 0.3 0.6 1.0 4.1A A 170 FL (2) 6 S 0.3 0.9 0.3 4.56 A 106 FL (2) 6 S 0.3 1.0 0.3 4.47 A 122 FL (2) 6 S 0.4 1.0 0.4 4.2- - 283 FL (2) 6 S 0.4 1.2 0.4 4.09 9 153 FL (2) 6 S 0.5 1.0 0.5 4.02 8 40 FL (2) 6 S 0.8 1.2 0.8 3.2- - 256 FL (2) 6 S 0.8 0.8 0.8 3.63 7 55 FL (2) 6 S 1.0 1.0 1.0 3.03 9 57 Q (2) 6 S 0.3 0.7 0.3 4.7- - 295 LFL + FL 6 S 3.0 1.0 1.0 1.0- - 273 FL (2) 6.5 S 0.5 1.0 0.5 4.5- - 283 FL (2) 7 S 0.4 1.2 0.4 5.0- - 311 FL (2) 7 S 0.5 1.5 0.5 4.5A 9 169 FL (2) 7 S 1.0 1.0 1.0 4.07 B 123 FL (2) 8 S 0.4 0.6 2.0 5.08 A 138 FL (2) 8 S 0.4 1.0 0.4 6.2- - 285 FL (2) 8 S 0.4 1.7 0.4 5.54 7 71 FL (2) 8 S 0.5 1.0 0.5 6.0- - 297 FL (2) 8 S 0.5 0.5 1.5 5.58 8 136 FL (2) 8 S 0.8 1.2 2.4 3.65 7 87 FL (2) 8 S 1.0 1.0 1.0 5.04 C 76 OC (2) 8 S 3.0 2.0 1.0 2.05 C 92 OC (2) 8 S 5.0 1.0 1.0 1.0F B 251 VQ (2) 8 S 0.2 1.0 0.2 6.6- - 286 FL (2) 9 S 0.4 1.7 0.4 6.59 A 154 FL (2) 10 S 0.4 1.6 0.4 7.6- - 287 FL (2) 10 S 0.4 2.2 0.4 7.06 7 103 FL (2) 10 S 0.5 1.0 0.5 8.07 7 119 FL (2) 10 S 0.5 1.5 0.5 7.56 9 105 FL (2) 10 S 0.5 2.0 0.5 7.0- - 298 FL (2) 10 S 0.5 0.5 1.5 7.58 7 135 FL (2) 10 S 0.8 1.2 0.8 7.2B 9 185 FL (2) 10 S 1.0 1.0 1.0 7.09 7 151 FL (2) 10 S 1.0 1.5 1.0 6.54 9 73 Q (2) 10 S 0.6 0.4 0.6 8.4B A 186 FL (2) 12 S 0.4 1.0 0.4 10.2C 9 201 FL (2) 12 S 0.5 1.0 0.5 10.0D 9 217 FL (2) 12 S 1.5 2.0 1.5 7.0A 8 168 FL (2) 15 S 0.5 1.5 2.0 11.0

78
HEX CODE IR Controller FLASH CODE ON OFF ON OFF ON OFFA B7 9 121 Q (3) 5 S 0.5 0.5 0.5 0.5 0.5 2.55 9 89 VQ (3) 5 S 0.2 0.3 0.2 0.3 0.2 3.80 C 12 VQ (3) 5 S 0.3 0.2 0.3 0.2 0.3 3.7E 9 233 VQ (3) 5 S 0.3 0.3 0.3 0.3 0.3 3.5- - 308 FL (3) 5 S 0.3 0.7 0.3 0.7 0.3 3.7
0.3 3.7 60 FL (3) 6 S 0.5 1.0 0.5 1.0 0.5 2.52 B 43 FL (2+1) 6 S 0.3 0.4 0.3 1.2 0.3 3.5
HEX CODE IR Controller FLASH CODE ON OFF ON OFF ON OFFA BA B 171 Q (3) 6 S 0.3 0.7 0.3 0.7 0.3 3.7F A 250 FL (3) 8 S 0.5 1.0 0.5 1.0 0.5 4.5- - 301 FL (3) 8 S 1.5 0.5 0.5 0.5 0.5 4.5- - 266 Q (3) 9 S 0.5 0.5 0.5 1.0 0.5 6.00 B 11 FL (3) 9 S 0.3 1.0 0.3 1.0 0.3 6.1- - 306 FL (3) 9 S 0.5 1.5 0.5 1.5 0.5 4.5B 7 183 FL (3) 9 S 0.8 1.2 0.8 1.2 0.8 4.2B 8 184 FL (3) 10 S 0.3 0.7 0.3 0.7 0.9 7.1C 8 200 FL (3) 10 S 0.4 0.6 0.4 0.6 1.2 6.8- - 290 FL (3) 10 S 0.4 0.8 0.4 0.8 0.4 7.2C B 203 FL (3) 10 S 0.5 0.5 0.5 0.5 0.5 7.5C 7 199 FL (3) 10 S 0.5 1.5 0.5 1.5 0.5 5.5D B 219 FL (3) 10 S 0.6 0.6 0.6 0.6 0.6 7.0- - 278 FL (3) 10 S 0.9 1.1 0.9 1.1 0.9 5.1D 7 215 FL (3) 10 S 1.0 1.0 1.0 1.0 1.0 5.0- - 261 FL (3) 10 S 0.35 0.65 0.35 0.65 0.35 7.653 8 56 FL (2+1) 10 S 0.5 0.7 0.5 2.1 0.5 5.78 9 137 OC (3) 10 S 5.0 1.0 1.0 1.0 1.0 1.0B B 187 Q (3) 10 S 0.3 0.7 0.3 0.7 0.3 7.7D 8 216 FL (2 + 1) 10 S 0.5 0.5 0.5 0.5 1.5 6.5- - 288 FL (3) 12 S 0.4 2.1 0.4 2.1 0.4 6.61 B 27 FL (3) 12 S 0.5 1.5 0.5 1.5 0.5 7.5E A 234 FL (3) 12 S 0.5 2.0 0.5 2.0 0.5 6.5E 7 231 FL (3) 12 S 0.8 1.2 0.8 1.2 0.8 7.2B 6 182 FL (3) 12 S 1.0 1.0 1.0 3.0 1.0 5.04 8 72 FL (2+1) 12 S 0.8 1.2 0.8 2.4 0.8 6.05 8 88 FL (2+1) 12 S 1.0 1.0 1.0 4.0 1.0 4.0- - 272 FL (3) 12.5 S 0.5 1.0 0.5 1.0 0.5 9.0- - 289 FL (3) 13 S 0.4 2.1 0.4 2.1 0.4 7.6- - 296 LFL + FL(2) 13 S 6.0 1.0 2.0 1.0 2.0 1.01 8 24 FL (2+1) 13.5 S 1.0 1.0 1.0 4.0 1.0 5.5- - 307 FL (3) 14.5 S 0.5 1.0 1.5 3.0 0.5 9.0F 7 247 FL (3) 15 S 0.3 1.7 0.3 1.7 0.3 10.79 D 157 FL (3) 15 S 0.4 1.0 0.4 1.0 0.4 11.80 8 8 FL (3) 15 S 0.5 1.5 0.5 1.5 0.5 10.5- - 259 FL (3) 15 S 0.5 2.0 0.5 2.0 0.5 9.5- - 260 FL (3) 15 S 1.0 1.0 1.30 1.0 1.0 10.0F 8 248 FL (2+1) 15 S 0.6 0.3 0.6 0.3 1.4 11.80 9 9 FL (2+1) 15 S 0.7 0.5 0.7 0.5 1.9 10.71 9 25 FL (2+1) 15 S 0.7 0.7 0.7 0.7 2.1 10.16 8 104 FL (2+1) 15 S 1.0 2.0 1.0 5.0 1.0 5.0- - 265 FL (2+1) 15 S 1.3 0.7 1.3 0.7 3.3 7.7- - 264 FL (2+1) 15.75 S 0.55 0.35 0.55 0.35 1.45 12.51 C 28 VQ (3) 15 S 0.1 0.5 0.1 0.5 0.1 13.7- - 313 FL (2) + LFL 16 S 2.0 2.0 2.0 2.0 6.0 2.04 B 75 FL (3) 20 S 0.5 3.0 0.5 3.0 0.5 12.53 B 59 FL (3) 20 S 0.5 1.5 0.5 1.5 0.5 15.5- - 263 FL (3) 20 S 0.5 2.0 0.5 2.0 0.5 12.05 B 91 FL (3) 20 S 0.8 1.2 0.8 1.2 0.8 15.26 B 107 FL (3) 20 S 1.0 1.0 1.0 1.0 1.0 15.0

SL-C510-AISCompact 5-9NM Solar Marine Lantern
Latest products and information available at www.sealite.com 79
HEX CODE
IR Controller FLASH CODE ON OFF ON OFF ON OFF ON OFF ON OFF
A BD D 221 Q (5) 7 S 0.3 0.7 0.3 0.7 0.3 0.7 0.3 0.7 0.3 2.7- - 310 Q (5) 9 S 0.5 0.5 0.5 0.5 0.5 0.5 0.5 0.5 0.5 4.5E D 237 Q (5) 10 S 0.3 0.7 0.3 0.7 0.3 0.7 0.3 0.7 0.3 5.7E 8 232 FL (5) 12 S 0.5 1.5 0.5 1.5 0.5 1.5 0.5 1.5 0.5 3.5- - 276 FL (5) 16 S 0.5 1.5 0.5 1.5 0.5 1.5 0.5 1.5 0.5 7.55 F 95 FL (5) 20 S 0.5 0.5 0.5 0.5 0.5 0.5 0.5 0.5 0.5 15.59 F 159 FL (5) 20 S 0.8 1.2 0.8 1.2 0.8 1.2 0.8 1.2 0.8 11.29 E 158 FL (5) 20 S 1.0 1.0 1.0 1.0 1.0 1.0 1.0 1.0 1.0 11.0
HEX CODE
IR Controller FLASH CODE ON OFF ON OFF ON OFF ON OFF ON OFF ON OFF
A BF D 253 Q (6) 10 S 0.3 0.7 0.3 0.7 0.3 0.7 0.3 0.7 0.3 0.7 0.3 4.7A F 175 FL (6) 15 S 0.3 0.7 0.3 0.7 0.3 0.7 0.3 0.7 0.3 0.7 0.3 9.77 F 127 FL (6) 15 S 0.5 1.0 0.5 1.0 0.5 1.0 0.5 1.0 0.5 1.0 0.5 7.0
HEX CODEIR
Controller FLASH CODE ON OFF ON OFF ON OFF ON OFFA B- - 271 VQ (4) 2 S 0.10 0.13 0.10 0.13 0.10 0.13 0.10 1.21B F 191 VQ (4) 4 S 0.3 0.3 0.3 0.3 0.3 0.3 0.3 2.3B D 189 Q (4) 6 S 0.3 0.7 0.3 0.7 0.3 0.7 0.3 2.78 D 141 Q (4) 6 S 0.4 0.6 0.4 0.6 0.4 0.6 0.4 2.6- - 299 FL (1+3) 8 S 1.5 0.5 0.5 0.5 0.5 0.5 0.5 3.5- - 309 FL (4) 7 S 0.3 0.7 0.3 0.7 0.3 0.7 0.3 3.71 D 29 FL (4) 10 S 0.5 1.0 0.5 1.0 0.5 1.0 0.5 5.02 D 45 FL (4) 10 S 0.8 1.2 0.8 1.2 0.8 1.2 0.8 3.2F E 254 Q (4) 10 S 0.3 0.7 0.3 0.7 0.3 0.7 0.3 6.7- - 300 FL (4) 10 S 1.5 0.5 0.5 0.5 0.5 0.5 0.5 4.5- - 312 FL (4) 11 S 0.5 1.5 0.5 1.5 0.5 1.5 0.5 4.5B E 190 FL (4) 12 S 0.3 1.7 0.3 1.7 0.3 1.7 0.3 5.74 F 79 FL (4) 12 S 0.5 0.5 0.5 0.5 0.5 0.5 0.5 8.5C E 206 FL (4) 12 S 0.5 1.5 0.5 1.5 0.5 1.5 0.5 5.53 D 61 FL (4) 12 S 0.8 1.2 0.8 1.2 0.8 1.2 0.8 5.2A D 173 Q (4) 12 S 0.3 0.7 0.3 0.7 0.3 0.7 0.3 8.74 D 77 FL (4) 15 S 0.5 1.5 0.5 1.5 0.5 1.5 0.5 8.58 E 142 FL (4) 15 S 1.0 1.0 1.0 1.0 1.0 1.0 1.0 8.07 D 125 FL (4) 15 S 1.5 0.5 0.5 0.5 0.5 0.5 0.5 10.5D E 222 FL (4) 16 S 0.5 1.5 0.5 1.5 0.5 1.5 0.5 9.5- - 314 FL (3+1) 18 S 1.5 1.5 1.5 1.5 1.5 4.5 1.5 4.5- - 304 FL (4) 19 S 0.3 0.7 0.3 0.7 0.3 0.7 0.3 15.7C D 205 FL (4) 20 S 0.3 3.0 0.3 3.0 0.3 3.0 0.3 9.85 D 93 FL (4) 20 S 0.5 1.5 0.5 1.5 0.5 1.5 0.5 13.50 D 13 FL (4) 20 S 0.5 1.5 0.5 1.5 0.5 4.5 0.5 10.53 F 63 FL (4) 20 S 1.5 1.5 1.5 1.5 1.5 1.5 1.5 9.50 F 15 Q (4) 20 S 0.5 0.5 0.5 0.5 0.5 0.5 0.5 16.5- - 263 FL (4) 20 S 0.5 2.0 0.5 2.0 0.5 2.0 0.5 12.0E E 238 Q (4) 28 S 0.5 0.5 0.5 0.5 0.5 0.5 0.5 24.56 F 111 FL (4) 30 S 0.5 0.5 0.5 0.5 0.5 0.5 0.5 26.5

80
HEX CODE
IR Controller FLASH CODE ON OFF ON OFF ON OFF ON OFF ON OFF ON OFF ON OFF ON OFF ON OFF
A B- - 275 FL (3+5) 12.2 S 0.9 0.3 0.9 1.0 0.9 0.3 0.3 0.3 0.3 1.0 0.3 0.3 0.3 0.3 0.3 4.5 - -4 E 78 VQ (9) 10 S 0.2 0.3 0.2 0.3 0.2 0.3 0.2 0.3 0.2 0.3 0.2 0.3 0.2 0.3 0.2 0.3 0.2 5.85 E 94 VQ (9) 10 S 0.3 0.3 0.3 0.3 0.3 0.3 0.3 0.3 0.3 0.3 0.3 0.3 0.3 0.3 0.3 0.3 0.3 4.91 F 31 Q (9) 15 S 0.2 0.8 0.2 0.8 0.2 0.8 0.2 0.8 0.2 0.8 0.2 0.8 0.2 0.8 0.2 0.8 0.2 6.80 E 14 Q (9) 15 S 0.3 0.7 0.3 0.7 0.3 0.7 0.3 0.7 0.3 0.7 0.3 0.7 0.3 0.7 0.3 0.7 0.3 6.7- - 267 Q (9) 15 S 0.5 0.5 0.5 0.5 0.5 0.5 0.5 0.5 0.5 0.5 0.5 0.5 0.5 0.5 0.5 0.5 0.5 6.51 E 30 Q (9) 15 S 0.6 0.6 0.6 0.6 0.6 0.6 0.6 0.6 0.6 0.6 0.6 0.6 0.6 0.6 0.6 0.6 0.6 4.8- - 291 FL (9) 32.92 S 0.4 0.8 0.4 0.8 0.4 0.8 0.4 0.8 0.4 0.8 0.4 0.8 0.4 0.8 0.4 0.8 0.4 22.9
HEX CODE IR Controller FLASH CODE ON OFF ON OFF ON OFF ON OFFA BMORSE CODE ( ) INDICATES LETTER7 8 120 MO (A) 6 S 0.3 0.6 1.0 4.17 B 123 MO (A) 8 S 0.4 0.6 2.0 5.08 8 136 MO (A) 8 S 0.8 1.2 2.4 3.6B 8 184 MO (U) 10 S 0.3 0.7 0.3 0.7 0.9 7.1C 8 200 MO (U) 10 S 0.4 0.6 0.4 0.6 1.2 6.8
D 8 216 MO (U) 10 S 0.5 0.5 0.5 0.5 1.5 6.59 8 152 MO (A) 10 S 0.5 0.5 1.5 7.58 9 137 MO (D) 10 S 5.0 1.0 1.0 1.0 1.0 1.0A 8 168 MO (A) 15 S 0.5 1.5 2.0 11.0F 8 248 MO (U) 15 S 0.6 0.3 0.6 0.3 1.4 11.80 9 9 MO (U) 15 S 0.7 0.5 0.7 0.5 1.9 10.71 9 25 MO (U) 15 S 0.7 0.7 0.7 0.7 2.1 10.17 D 125 MO (B) 15 S 1.5 0.5 0.5 0.5 0.5 0.5 0.5 10.5
HEX CODE
IR Controller FLASH CODE ON OFF ON OFF ON OFF ON OFF ON OFF ON OFF ON OFF
A B6 E 110 VQ (6) + LFL 10 S 0.2 0.3 0.2 0.3 0.2 0.3 0.2 0.3 0.2 0.3 0.2 0.3 2.0 5.07 E 126 VQ (6) + LFL 10 S 0.3 0.3 0.3 0.3 0.3 0.3 0.3 0.3 0.3 0.3 0.3 0.3 2.0 4.42 F 47 Q (6) + LFL 15 S 0.2 0.8 0.2 0.8 0.2 0.8 0.2 0.8 0.2 0.8 0.2 0.8 2.0 7.02 E 46 Q (6) + LFL 15 S 0.3 0.7 0.3 0.7 0.3 0.7 0.3 0.7 0.3 0.7 0.3 0.7 2.0 7.03 E 62 Q (6) + LFL 15 S 0.6 0.6 0.6 0.6 0.6 0.6 0.6 0.6 0.6 0.6 0.6 0.6 2.0 5.8- - 258 FL (6 + 1) 15 S 0.35 0.65 0.35 0.65 0.35 0.65 0.35 0.65 0.35 0.65 0.35 0.65 1.05 7.95- - 292 FL (6) + LFL 15 S 0.4 0.8 0.4 0.8 0.4 0.8 0.4 0.8 0.4 0.8 0.4 0.8 2.0 5.8- - 262 FL (6) + LFL 15 S 0.5 0.5 0.5 0.5 0.5 0.5 0.5 0.5 0.5 0.5 0.5 0.5 2.0 7.08 F 143 VQ (6) + LFL 15 S 0.3 0.3 0.3 0.3 0.3 0.3 0.3 0.3 0.3 0.3 0.3 0.3 2.0 9.4

SL-C510-AISCompact 5-9NM Solar Marine Lantern
Latest products and information available at www.sealite.com 81
Maintenance & ServicingDesigned to be almost maintenance-free, the SL-C510-AIS requires minimal attention, though the following maintenance and servicing information is provided to help ensure the life of your Sealite product.
1. Cleaning Solar Panels- Occasional cleaning of the solar panels may be required. Using a cloth and warm soapy water, wipe off any foreign matter before rinsing the panels with fresh water.
2. Battery Check- Inspection of batteries should be performed every three years (minimum) to ensure that the charger, battery and ancillary electronics are functioning correctly. Using a voltage meter, check that the battery voltage is at least 12 volts under 100mA load and ensure all terminals are clear of foreign matter.
3. O-Ring Check- Inspect the condition of the O-ring for damage, wear or if it is brittle. Replace if necessary. The O-ring should be a rubber texture to ensure a complete and even seal.
Replacing the BatteryThe SL-C510-AIS have an internal battery compartment, which provides the user with the ability to change the battery after years of operation. Contact Sealite should a replacement battery required.
1. Remove the four socket-head screws on the top lens assembly and separate the SL-C510-AIS lens
assembly from the body/base section.
2. Remove 2 x M4 cap screws & washers from the top of the chassis.
3. Disconnect the light head and battery cables connecting the light head and battery.
4. Lift the upper battery bracket out of the SL-C510-AIS, taking care to avoid the VHF antenna connector.
5. Remove the old battery from the chassis.
6. Discard old battery in a safe manner.
7. Reconnect the new battery.
8. Place battery back inside lantern body, and position the upper battery bracket in the top of the chassis.
9. Secure using 2 x M4 cap screws & washers.
10. Feed all wiring back inside lantern body, and make sure the O-ring is properly placed at the top of the lantern body. Reconnect the cables connecting the light head and battery.
11. Place the top lens assembly back onto the lantern body and replace 4 socket head screws. Half tighten all 4 socket head screws, and then fully tighten each socket head screw to ensure an even seal. To achieve a satisfactory seal, it is recommended that a torque of 3Nm is applied to the bolts used for holding down the Light Head to the Solar Base and that only the supplied bolts are used. Applying a higher Torque setting is not recommended and may void warranty. If in doubt, please contact your local Sealite representative.
12. To test, place dark cover (towel or jacket) on top of light to activate sensor, light will come on. Care must be taken to observe the polarity of each wire before they are connected. To ensure waterproofi ng of the unit, make sure that there is an even seal.

82
Long Term Battery Storage
If the SL-C510 is to be placed in storage for an extended period please follow the below information. The sealed lead acid batteries inside the lights must always be stored in a fully charged state. Always make sure to disconnect the light head from the solar unit. All batteries will discharge over time and the rate of discharge is dependent on temperature. If the light is being stored in temperatures greater than 40ºC the battery will dis-charge faster. Please check battery regularly and recharge if necessary. Re-connect the light head and battery and place unit in the sun for 2-4 days.
Solar Panel Replacement
The SL-C510 is built around an internal aluminium chassis. The solar pan-els can be by the user replaced in the unlikely event that one is broken or damaged during the product’s life.
Follow the steps below or contact [email protected] for more details:
1. Remove 4 x M6 x 20 socket head cap screws and 4 x M6 nylon washers and disconnect the light head from the chassis.
2. Remove the 2 x M4 x 20 socket head cap screws, 2 x M4 spring washers and 2 x M4 penny washers. Remove the upper battery bracket containing regulator.
3. Disconnect the battery.
4. Remove 4 x M6 x 35 socket head cap screws, to remove the top casting from the chassis.
Note: Be careful not to damage the O-rings on each of these screws. If replacements are required please use standard 6.0x1.0mm O-ring.
5. Slide the rubber corner out of the chassis, it may be necessary to lubricate the edges of the solar panels with grease or oil based lubricant if this is diffi cult to remove.
6. Unscrew the affected panel wires from the regulator and remove the solar panel from the chassis.
7. Clean any silicon off the chassis from the solar panel junction box hole and add a new seal to ensure the solar panel is watertight when assembled.
8. Repeat the process in the reverse order to replace a new pane.
Note:
Make sure the O-rings on the top casting and 4 x M6 x 35 socket head cap screws are coated in silicon grease before re-assembling. To achieve a satisfac-tory seal, it is recommended that a torque of 3Nm is applied to the bolts used for holding down the Light Head to the Solar Base and that only the supplied bolts are used.
Applying a higher Torque setting is not recommended and may void warranty. If in doubt, please contact your local Sealite representative.
The replacement of a solar panel should only be performed by a confi dent technician.
Sealite cannot guarantee the chassis will remain waterproof, if service is not per-formed by Sealite staff. To test for any leaks remove the gore vent and pressurise the assembled light to 1.5psi.

SL-C510-AISCompact 5-9NM Solar Marine Lantern
Latest products and information available at www.sealite.com 83
How to Change the Regulator1. Remove the 4 x M6 x 20 socket head cap screws and 4 x M6 nylon washers, then disconnect the light
head from the chassis.2. Remove the 2 x M4 x 20 socket head cap screws, 2 x M4 spring washers and 2 x M4 penny washers then
remove the upper battery bracket containing the regulator.3. Disconnect the battery.4. Take note of the wire colours and location in the regulator.5. Disconnect the wires from the regulator.6. Remove the 2 x M4 CSK screws, 2 x M4 nyloc nuts and 2 x M4 penny washers that retain the regulator to
the top battery bracket and remove the regulator.7. Fit the new regulator using the 2 x M4 CSK screws, 2 x M4 penny washers and 2 x M4 nyloc nuts.8. Connect the solar positive wires to the S points on the regulator.9. Connect the solar negative wires to the S points on the regulator.10. Connect the battery positive wires to the B point on the regulator.11. Connect the battery negative wire to the B point on the regulator.12. Reconnect the battery.13. Refi t the battery top bracket into the solar unit using the 2 x M4 x 20 socket head cap screws.14. Ensure the top O-ring is sitting correctly into the top casting. Refi t the light head and tighten the M6 x 20
socket head cap screws with the 4 x M6 nylon washers evenly.
DO NOT OVERTIGHTEN.
Note:
Make sure the O-rings on the top casting and 4 x M6 x 35 socket head cap screws are coated in silicon grease before re-assembling. To achieve a satisfactory seal, it is recommended that a torque of 3Nm is applied to the bolts used for holding down the Light Head to the Solar Base and that only the supplied bolts are used.
Applying a higher Torque setting is not recommended and may void warranty. If in doubt, please contact your local Sealite representative.
The replacement of a solar panel should only be performed by a confi dent technician.
Sealite cannot guarantee the chassis will remain waterproof, if service is not performed by Sealite staff. To test for any leaks remove the gore vent and pressurise the assembled Light to 1.5psi.

84
Trouble Shooting
Sealite LED Light WarrantyRefer to Sealite website: www.sealite.com
Problem Remedy
Lantern will not activate. • Ensure Lantern is in darkness;• Wait at least 60 seconds for the program to initialise in darkness;• Ensure battery terminals are properly connected;• Ensure battery voltage is above 12volts;• Check the status of the LED’s on the base of the PCB to determine
what type of fault the light is acting (see Lantern Status section of this manual).
Lantern will not operate for the entire night.
• Expose the lantern to direct sunlight and monitor operation for several days.
• Sealite products typically require 1.5hours of direct sunlight per day to retain full autonomy. From a discharged state, the lantern may require several days of operational conditions to ‘cycle’ up to full autonomy;
• Reducing the light output intensity or duty cycle (fl ash code) will reduce current draw on the battery;
• Ensure solar module is clean and not covered by shading during the day.
Sealite Pty LtdAustralia+61 (0)3 5977 6128
Sealite Asia Pte LtdSingapore+65 6908 2917
Sealite United Kingdom LtdUK+44 (0) 1502 588026
Sealite USA LLCUSA+1 (603) 737 1311
We believe technology improves navigationTM
sealite.com [email protected]