SIMPLEX - User Manual - PLOS
31
SIMPLEX User Manual Version 1.0 May 3, 2012 Andreas Dander Maria Fischer Stephan Pabinger Rene Snajder Gernot Stocker Innsbruck Medical University Division for Bioinformatics Innrain 80 6020 Innsbruck, Austria http://www.icbi.at
-
Upload
khangminh22 -
Category
Documents
-
view
0 -
download
0
Transcript of SIMPLEX - User Manual - PLOS

SIMPLEX
User Manual
Version 1.0
May 3, 2012
Andreas DanderMaria Fischer
Stephan PabingerRene Snajder
Gernot Stocker
Innsbruck Medical UniversityDivision for Bioinformatics
Innrain 806020 Innsbruck, Austria
http://www.icbi.at
Contents
1. Introduction 41.1. SIMPLEX . . . . . . . . . . . . . . . . . . . . . . . . . . . . . . . . . . . 4
2. Download and installation 52.1. SIMPLEX Server . . . . . . . . . . . . . . . . . . . . . . . . . . . . . . . 5
2.1.1. Virtualization image (Virtual machine image) . . . . . . . . . . . 52.1.2. Cloud image . . . . . . . . . . . . . . . . . . . . . . . . . . . . . . 52.1.3. Passwords . . . . . . . . . . . . . . . . . . . . . . . . . . . . . . . 6
2.2. SIMPLEX Client . . . . . . . . . . . . . . . . . . . . . . . . . . . . . . . 62.2.1. Java 6 Support . . . . . . . . . . . . . . . . . . . . . . . . . . . . 6
3. EC2 Cloud Usage 73.1. Prerequisites . . . . . . . . . . . . . . . . . . . . . . . . . . . . . . . . . . 73.2. Preparations . . . . . . . . . . . . . . . . . . . . . . . . . . . . . . . . . . 73.3. Starting the SIMPLEX AMI . . . . . . . . . . . . . . . . . . . . . . . . . 83.4. Initializing the SIMPLEX Cluster . . . . . . . . . . . . . . . . . . . . . . 9
4. Usage 104.1. Input files . . . . . . . . . . . . . . . . . . . . . . . . . . . . . . . . . . . 10
4.1.1. Illumina reads . . . . . . . . . . . . . . . . . . . . . . . . . . . . . 104.1.2. SOLiD reads . . . . . . . . . . . . . . . . . . . . . . . . . . . . . 104.1.3. Naming convention for sequence read files . . . . . . . . . . . . . 104.1.4. Exome definition . . . . . . . . . . . . . . . . . . . . . . . . . . . 114.1.5. Server connection properties file . . . . . . . . . . . . . . . . . . . 11
4.2. Calling SIMPLEX . . . . . . . . . . . . . . . . . . . . . . . . . . . . . . . 124.2.1. Illumina Single End . . . . . . . . . . . . . . . . . . . . . . . . . . 124.2.2. Illumina Single End with prepocessing and quality report . . . . . 134.2.3. Illumina Paired End . . . . . . . . . . . . . . . . . . . . . . . . . 134.2.4. SOLiD Single End . . . . . . . . . . . . . . . . . . . . . . . . . . 134.2.5. SOLiD Paired End . . . . . . . . . . . . . . . . . . . . . . . . . . 144.2.6. Results . . . . . . . . . . . . . . . . . . . . . . . . . . . . . . . . . 154.2.7. Output . . . . . . . . . . . . . . . . . . . . . . . . . . . . . . . . . 16
5. Software development 185.1. Clusterservice definition . . . . . . . . . . . . . . . . . . . . . . . . . . . 185.2. Clusterresource definition . . . . . . . . . . . . . . . . . . . . . . . . . . . 205.3. Java classes . . . . . . . . . . . . . . . . . . . . . . . . . . . . . . . . . . 21
5.3.1. CSCommand and PipelineJobFactory . . . . . . . . . . . . . . . . 215.3.2. Splicing . . . . . . . . . . . . . . . . . . . . . . . . . . . . . . . . 24
2

5.3.3. Pipeline . . . . . . . . . . . . . . . . . . . . . . . . . . . . . . . . 265.4. Integrate new species . . . . . . . . . . . . . . . . . . . . . . . . . . . . . 27
5.4.1. Server side adaptations . . . . . . . . . . . . . . . . . . . . . . . . 275.4.2. Adaptations to the source code . . . . . . . . . . . . . . . . . . . 29
A. FAQ 30A.1. Change password . . . . . . . . . . . . . . . . . . . . . . . . . . . . . . . 30A.2. What can I do if simplex prints “Unable to connect to JClusterService.” 30A.3. ToDo . . . . . . . . . . . . . . . . . . . . . . . . . . . . . . . . . . . . . . 30
3
1. Introduction
This document is the user manual describing the automatic analysis pipeline for exomesequencing data called SIMPLEX. The pipeline can be downloaded from http://simplex.i-med.ac.at and is distributed under the GPL.
1.1. SIMPLEX
SIMPLEX is an autonomous analysis pipeline, which comprises the complete exomesequencing analysis workflow, including the following steps: (1) initial quality control,intelligent data filtering and pre-processing, (2) sequence alignment to a reference genomeand refinement, (3) alignment statistics; (4) SNP and DIP detection, (5) functionalannotation of variants using different approaches, and report generation during variousstages of the workflow (see figure 1.1).
Figure 1.1.: SIMPLEX analysis pipeline overview: Mandatory components are de-picted in black, optional in gray.
SIMPLEX connects the selected analysis steps, exposes all available parameters for cus-tomized usage, performs required data handling, and distributes computationally ex-pensive tasks either on a dedicated high-performance computing infrastructure or on theAmazon cloud environment (EC2).
4

2. Download and installation
2.1. SIMPLEX Server
To run SIMPLEX you need both an instance of the server, which performs the analysis,and the client, which transfers data from and to the server and handles the flow of thepipeline. Since setting up the SIMPLEX server would be time consuming and compli-cated, we provide both a fully configured virtual machine image (in OVA format) as wellas a Amazon EC2 cloud image.
2.1.1. Virtualization image (Virtual machine image)
The following steps should be performed to get a running instance of SIMPLEX.
1. Download the image at http://simplex.i-med.ac.at
2. Start your virtualization software (every software supporting Open VirtualizationFormat should work)1
3. Load the downloaded image into the virtualization software
4. Start the image
5. Configure networking between host and guest system using user:Username:vagrant; Password:vagrant
6. You can get your ip-adress using command ifconfig (e.g. 10.0.0.2)
7. Open a browser with https://your ip/JClusterService. If you get a confusing xmlpage you’re done!
2.1.2. Cloud image
The Cloud image of SIMPLEX is based on the CloudMan image of Galaxy2. It can beinstantiated from the Amazon AWS Console. The AMI name is ”Simplex 1.02 Ubuntu10.04 LTS based on CBL”.
Detailed instructions on how to use SIMPLEX within the cloud are given in section 3.
1We tested it on Oracle VM VirtualBox version 4.1.8 http://www.virtualbox.org2For more information please visit http://wiki.g2.bx.psu.edu/Admin/Cloud.
5

2.1.3. Passwords
As explained in section 4.1.5 you need a username & password to access the SIMPLEXcluster (Whether it is the VirtualBox image or the cloud image..).
For both, the VirtualBox and the cloud image, the following default is used:
Username: simplex
Password: simplexdemo
2.2. SIMPLEX Client
The SIMPLEX Client can run on any office computer. Please perform the followingsteps to install SIMPLEX:
1. Download the SIMPLEX Client at http://simplex.i-med.ac.at
2. Install Oracle Java Runtime 7 (recommended) or 6 from http://www.oracle.com
3. See section 4 on how to use SIMPLEX
4. See subsection 4.1.5 on how to gernerate the properties file, which specifies theconnection to the server
2.2.1. Java 6 Support
SIMPLEX works best with Java 7 installed. If you want to use it on Java 6, you needto perform a few more steps:
1. Download the Java 6 support libraries for Simplex from http://simplex.i-med.ac.at
2. Create a directory in your JAVA HOME directory with the following path:JAVA HOME/jre/lib/endorsed/
3. Unpack the tgz file into the directory you just created
4. When calling Simplex, make sure you use the same Java version you just extended.
6
3. EC2 Cloud Usage
We created an AMI (Amazon Machine Image) containing SIMPLEX. This AMI is basedon CloudBioLinux1 and therefore uses CloudMan [1] for resource management.
3.1. Prerequisites
The only thing you need to start SIMPLEX in the Cloud is an EC2 Account. Youcan get one at http://aws.amazon.com/console/. Basic understanding of how to use theAWS Management Console is recommended. But as we will be giving a step-by-stepinstruction on how to use it, it is not entirely necessary. For easy registration withoutwaiting times a credit card is required. Otherwise, if you intend to use it more often,you can also contact a sales representative and ask for them to send you a monthly billinstead.
3.2. Preparations
You will only have to perform these steps if you are using SIMPLEX for the first time. Ifyou have used the CloudBioLinux or Galaxy in the Cloud before, you’ll already have allrequired settings. Therefore, you could skip this step. What you have to do is to createa security group for our Instances and assign the proper rules. The following steps arethe same as described in ”Step 1” in the CloudMan Manual 2 with the addition of onerule (HTTPS):
� Create an EC2 account and log-in to the AWS management Console
� In the EC2 Tab, click ”Security Groups” (on the left hand side in ”Network andSecurity”).
� Click ”Create Security Group”.
� Enter a name and description (for example ”SIMPLEX”).
� After the Group has been created, select the Group in the list and click the ”In-bound” tab in the lower panel.
� Create new rules using the following values in the fields on the left side (Create anew rule, Port range, Source) and click ”Add Rule”:
1http://cloudbiolinux.org/2http://wiki.g2.bx.psu.edu/Admin/Cloud#Detailed steps
7
– Type: HTTP; Source: 0.0.0.0/0 (or you can enter your public IP address hereif you want to limit access)
– Type: HTTPS; Source: 0.0.0.0/0 (or you can enter your public IP addresshere if you want to limit access)
– Type: SSH; Source: 0.0.0.0/0 (or you can enter your public IP address hereif you want to limit access)
– Type: Custom TCP Rule; Port range: 42284; Source: 0.0.0.0/0
– Type: Custom TCP Rule; Port range: 20-21; Source: 0.0.0.0/0
– Type: Custom TCP Rule; Port range: 30000-30100; Source: 0.0.0.0/0
– Type: All TCP; Source: the name of the security group, e.g. ”SIMPLEX”
� Click ”Apply Rule Changes”
3.3. Starting the SIMPLEX AMI
� Login to the AWS Management Console and click the EC2 tab.
� Click ”AMIs” in the Navigation panel on the left side
� Search for ”SIMPLEX” in ”All Images”. If there is more than one result, pleasechoose the one from Owner ”372123314130”, which is us.
� Click ”Launch” to start the instance.
– Select Instance Type ”Extra Large” (8 ECUs) or higher (But NOT High-Memory Extra Large). Basically, the instance you start must have at least 4CPU cores, otherwise some jobs will be queued forever. Click Continue.
– On the next page, in the ”User Data” field you must provide the followinginformation:
cluster_name: <a name for the SIMPLEX cluster>
password: <a password for the CloudMan webinterface>
access_key: <your AWS access key>
secret_key: <your AWS secret key>
You got the AWS access key and AWS secret key when you created yourAmazon Account. You can also retrieve it by clicking your username in theupper right corner and then ”Security credentials” (must be logged in to apower user. For example it might look like this:
cluster_name: mysimplexcluster
password: supersecurepw
access_key: AEIQEJ5RUZDHNWS69IJZ
secret_key: DsopjdJSOdjqShkqhkw+DJQJKL+JD781Auo8D7Aj
8
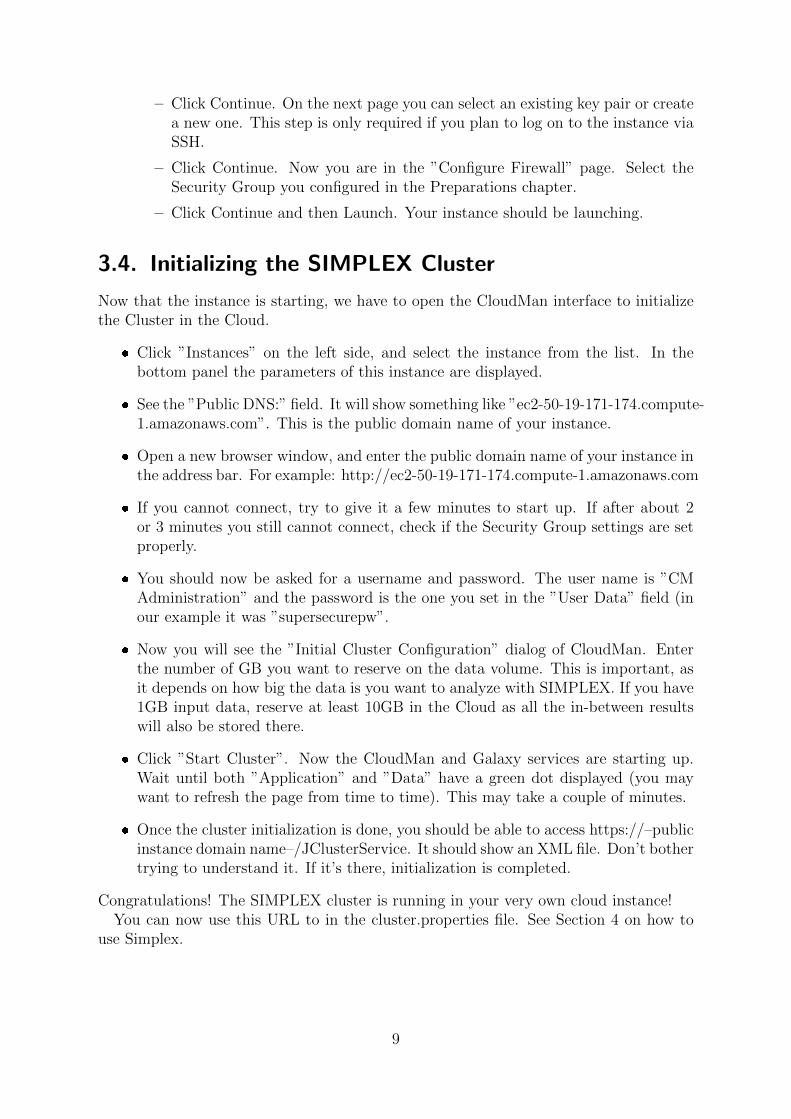
– Click Continue. On the next page you can select an existing key pair or createa new one. This step is only required if you plan to log on to the instance viaSSH.
– Click Continue. Now you are in the ”Configure Firewall” page. Select theSecurity Group you configured in the Preparations chapter.
– Click Continue and then Launch. Your instance should be launching.
3.4. Initializing the SIMPLEX Cluster
Now that the instance is starting, we have to open the CloudMan interface to initializethe Cluster in the Cloud.
� Click ”Instances” on the left side, and select the instance from the list. In thebottom panel the parameters of this instance are displayed.
� See the ”Public DNS:” field. It will show something like ”ec2-50-19-171-174.compute-1.amazonaws.com”. This is the public domain name of your instance.
� Open a new browser window, and enter the public domain name of your instance inthe address bar. For example: http://ec2-50-19-171-174.compute-1.amazonaws.com
� If you cannot connect, try to give it a few minutes to start up. If after about 2or 3 minutes you still cannot connect, check if the Security Group settings are setproperly.
� You should now be asked for a username and password. The user name is ”CMAdministration” and the password is the one you set in the ”User Data” field (inour example it was ”supersecurepw”.
� Now you will see the ”Initial Cluster Configuration” dialog of CloudMan. Enterthe number of GB you want to reserve on the data volume. This is important, asit depends on how big the data is you want to analyze with SIMPLEX. If you have1GB input data, reserve at least 10GB in the Cloud as all the in-between resultswill also be stored there.
� Click ”Start Cluster”. Now the CloudMan and Galaxy services are starting up.Wait until both ”Application” and ”Data” have a green dot displayed (you maywant to refresh the page from time to time). This may take a couple of minutes.
� Once the cluster initialization is done, you should be able to access https://–publicinstance domain name–/JClusterService. It should show an XML file. Don’t bothertrying to understand it. If it’s there, initialization is completed.
Congratulations! The SIMPLEX cluster is running in your very own cloud instance!You can now use this URL to in the cluster.properties file. See Section 4 on how to
use Simplex.
9

4. Usage
SIMPLEX is designed as an intuitive, easy to use, and highly customizable command-lineprogram to provide analyses for single end (SE) and paired end (PE) as well as Illumina(NS) and SOLiD (CS) experiments. All available parameters are listed in a documentwhich can be downloaded at http://www.icbi.at/exome.
4.1. Input files
To analyze exome sequencing data with SIMPLEX, sequence read files, the exome (ortarget region) definition file, and server connection properties are needed. An examplehow to pass these files is given in section 4.2.
4.1.1. Illumina reads
Illumina raw reads (provided by parameter -I) are expected to be in FASTQ format. Allthree types, Sanger, Solexa (aka. Illumina 1.3-), and Illumina 1.3+ FASTQ, are sup-ported by the pipeline. A detailed description of the differences between these formattypes is given in [2] and on http://en.wikipedia.org/wiki/FASTQ format.
CAVEAT: to avoid interferance with downstream analyses, enable FASTQ conversion(parameters -fqc and -cf [solexa | illumina]) if Solexa or Illumina FASTQ formatis used. This will trigger the conversion into Sanger FASTQ format before any otheranalysis steps are performed.
4.1.2. SOLiD reads
SOLiD data is provided to the pipeline by two (SE) or four (PE) files: csfasta forsequence information (parameter -I) and qual files (parameter -Q) containing each read’scorresponding quality scores.
4.1.3. Naming convention for sequence read files
In order to generate reasonable output file names, SIMPLEX requires read input files tobe named according to the following patterns:
NS/SE
runname.fq[.gz] - read data in FASTQ format
NS/PE
10

runname R1.fq[.gz] - first reads of pairs in FASTQ format
runname R2.fq[.gz] - second reads of pairs in FASTQ format
CS/SE
runname.csfasta[.gz] - read sequences in FASTA format
runname QV.qual[.gz] - read quality values in FASTA format
CS/PE
runname F3.csfasta[.gz] - sequence of first reads of pairs in FASTA format
runname F3 QV.qual[.gz] - quality values of first reads of pairs in FASTA format
runname F5.csfasta[.gz] - sequence of second reads of pairs in FASTA format
runname F5 QV.qual[.gz] - quality values of second reads of pairs in FASTA format
4.1.4. Exome definition
This file (provided by parameter -sfeb) is needed to determin fold coverage measurments(e.g. overall fold coverage, identification of not/low captured regions) and to filter non-exonic/not targetted reads. It defines all exons/target regions by their positions withinthe genome (chromosome, start, and end position) in BED file format1. Idealy, the exon’sname should include further description about corresponding gene name, exon number,and ccds id, e.g.:
track name=CCDS description="chrom start end name score strand"
chr1 69090 70008 OR4F5;Exon1;CCDS30547.1 850 +
chr1 367658 368597 OR4F29;Exon1;CCDS41220.1 850 +
chr1 621095 622034 OR4F16;Exon1;CCDS41221.1 850 -
chr1 861321 861393 SAMD11;Exon1;CCDS2.2 850 +
We do provide an exome definition files based on the released CCDS update for humanbuild HsGRCh37.3 (September 7, 2011) which can be downloaded from the SIMPLEXwebpage http://simplex.i-med.ac.at.
4.1.5. Server connection properties file
The server connection properties file (provided by parameter -k or –clusterpropsfile)is required to tell SIMPLEX where to contact the server instance. This could be eitherthe VirtualBox image, or the AMI Cloud Image or - if you chose to set one up by yourself- your own server running JClusterService.
The format of the file looks like this:
url=https://URL_TO_YOUR_CLUSTER/JClusterService
user=username
password=password
1 http://genome.ucsc.edu/FAQ/FAQformat.html#format1
11

For example: if you run the SIMPLEX Amazon Cloud Image, it would look likethis (replace ”ec2-50-19-171-174.compute-1.amazonaws.com” with your instance’s publicDNS):
url=https://ec2-50-19-171-174.compute-1.amazonaws.com/JClusterService
user=simplex
password=simplexdemo
4.2. Calling SIMPLEX
Depending on library preparation and sequencing technology used, different minimumparameter sets are required to start the pipeline. The following examples describe aminimal testdata pipeline call to test SIMPLEX with the provided testdata availableon http://simplex.i-med.ac.at. We suggest to put the actual pipeline call into a scriptas it simplifies reproducing results.
As the following examples should run fast, a subset of the genome is integrated intoSIMPLEX. This subset of hg19 (hg19.test) contains just the human chromosomes 1and 21. To specify this small genome the user can start SIMPLEX using hg19.test asIllumina reference hg19.color.test as SOLiD reference and CCDS.20110907.test.bed
as the exome specification, for a real run use hg19, hg19.color and CCDS.20110907.bed
respectively.
4.2.1. Illumina Single End
java -jar simplex.jar -c exomeSE -genP hg19.test -I testdata_R1.fq.gz \
-od path_to_output_directory -sfeb CCDS.20110907.test.bed -fqc\
-dsP 80 -k connection.properties
Parameter description:
-c exomeSE ... use SE pipeline
-genP hg19.test ... prefix of the test reference genome
-I testdata R1.fq.gz ... input file in FASTQ format
-od path to outputdirectory ... output directory
-sfeb CCDS.20110907.test.bed ... bed file specifying the test exome
-fqc ... conversion to standard SANGER fastq
-dsP 80 ... percentage to distinguish between homo- and heterozygous DIPs
-k connection.properties ... server connection properties of the service
12
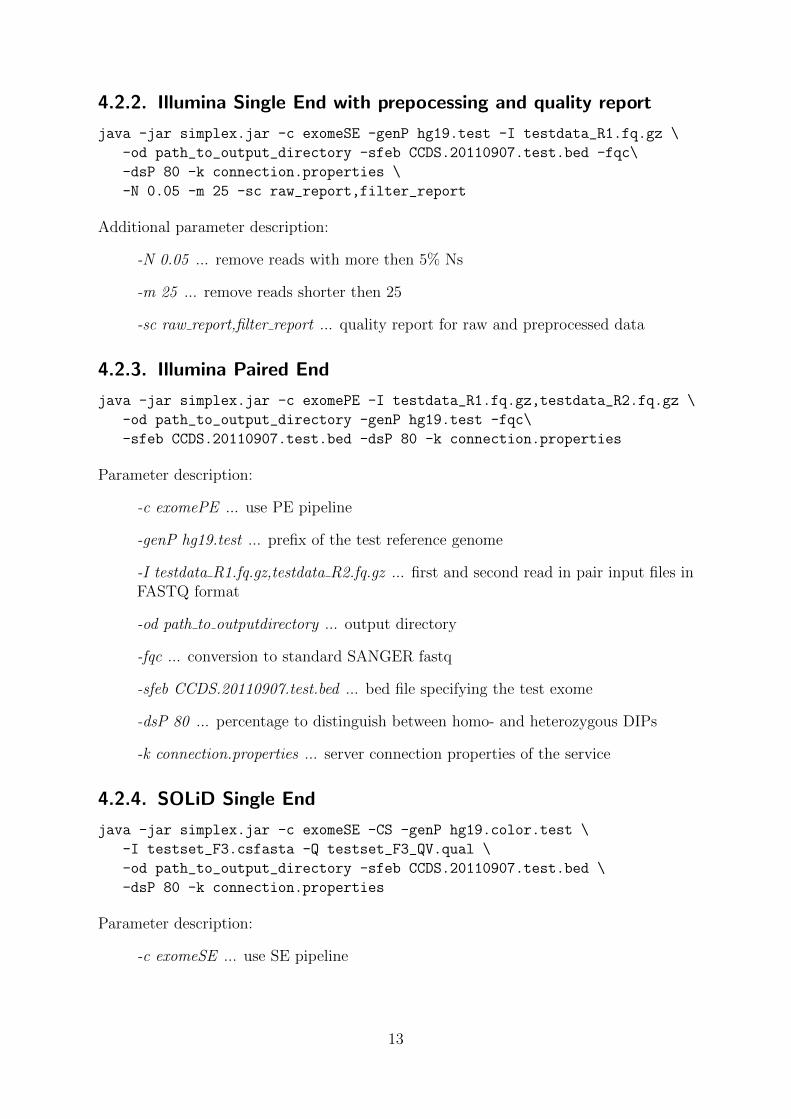
4.2.2. Illumina Single End with prepocessing and quality report
java -jar simplex.jar -c exomeSE -genP hg19.test -I testdata_R1.fq.gz \
-od path_to_output_directory -sfeb CCDS.20110907.test.bed -fqc\
-dsP 80 -k connection.properties \
-N 0.05 -m 25 -sc raw_report,filter_report
Additional parameter description:
-N 0.05 ... remove reads with more then 5% Ns
-m 25 ... remove reads shorter then 25
-sc raw report,filter report ... quality report for raw and preprocessed data
4.2.3. Illumina Paired End
java -jar simplex.jar -c exomePE -I testdata_R1.fq.gz,testdata_R2.fq.gz \
-od path_to_output_directory -genP hg19.test -fqc\
-sfeb CCDS.20110907.test.bed -dsP 80 -k connection.properties
Parameter description:
-c exomePE ... use PE pipeline
-genP hg19.test ... prefix of the test reference genome
-I testdata R1.fq.gz,testdata R2.fq.gz ... first and second read in pair input files inFASTQ format
-od path to outputdirectory ... output directory
-fqc ... conversion to standard SANGER fastq
-sfeb CCDS.20110907.test.bed ... bed file specifying the test exome
-dsP 80 ... percentage to distinguish between homo- and heterozygous DIPs
-k connection.properties ... server connection properties of the service
4.2.4. SOLiD Single End
java -jar simplex.jar -c exomeSE -CS -genP hg19.color.test \
-I testset_F3.csfasta -Q testset_F3_QV.qual \
-od path_to_output_directory -sfeb CCDS.20110907.test.bed \
-dsP 80 -k connection.properties
Parameter description:
-c exomeSE ... use SE pipeline
13
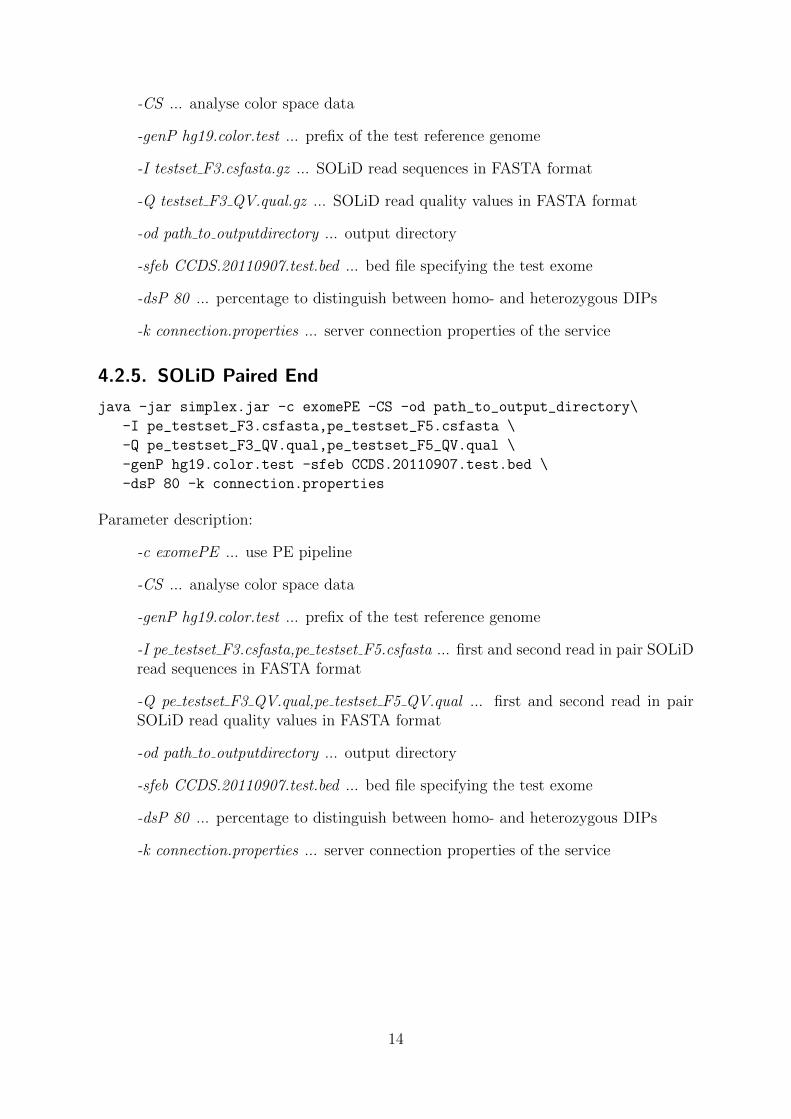
-CS ... analyse color space data
-genP hg19.color.test ... prefix of the test reference genome
-I testset F3.csfasta.gz ... SOLiD read sequences in FASTA format
-Q testset F3 QV.qual.gz ... SOLiD read quality values in FASTA format
-od path to outputdirectory ... output directory
-sfeb CCDS.20110907.test.bed ... bed file specifying the test exome
-dsP 80 ... percentage to distinguish between homo- and heterozygous DIPs
-k connection.properties ... server connection properties of the service
4.2.5. SOLiD Paired End
java -jar simplex.jar -c exomePE -CS -od path_to_output_directory\
-I pe_testset_F3.csfasta,pe_testset_F5.csfasta \
-Q pe_testset_F3_QV.qual,pe_testset_F5_QV.qual \
-genP hg19.color.test -sfeb CCDS.20110907.test.bed \
-dsP 80 -k connection.properties
Parameter description:
-c exomePE ... use PE pipeline
-CS ... analyse color space data
-genP hg19.color.test ... prefix of the test reference genome
-I pe testset F3.csfasta,pe testset F5.csfasta ... first and second read in pair SOLiDread sequences in FASTA format
-Q pe testset F3 QV.qual,pe testset F5 QV.qual ... first and second read in pairSOLiD read quality values in FASTA format
-od path to outputdirectory ... output directory
-sfeb CCDS.20110907.test.bed ... bed file specifying the test exome
-dsP 80 ... percentage to distinguish between homo- and heterozygous DIPs
-k connection.properties ... server connection properties of the service
14
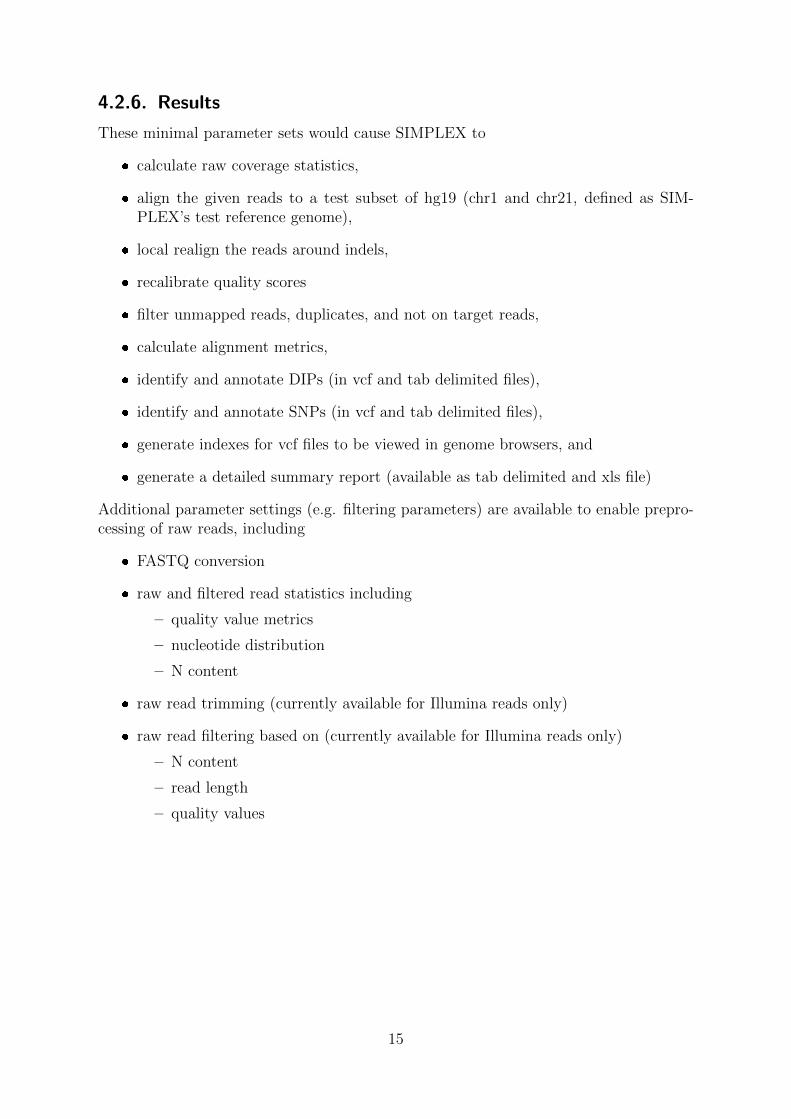
4.2.6. Results
These minimal parameter sets would cause SIMPLEX to
� calculate raw coverage statistics,
� align the given reads to a test subset of hg19 (chr1 and chr21, defined as SIM-PLEX’s test reference genome),
� local realign the reads around indels,
� recalibrate quality scores
� filter unmapped reads, duplicates, and not on target reads,
� calculate alignment metrics,
� identify and annotate DIPs (in vcf and tab delimited files),
� identify and annotate SNPs (in vcf and tab delimited files),
� generate indexes for vcf files to be viewed in genome browsers, and
� generate a detailed summary report (available as tab delimited and xls file)
Additional parameter settings (e.g. filtering parameters) are available to enable prepro-cessing of raw reads, including
� FASTQ conversion
� raw and filtered read statistics including
– quality value metrics
– nucleotide distribution
– N content
� raw read trimming (currently available for Illumina reads only)
� raw read filtering based on (currently available for Illumina reads only)
– N content
– read length
– quality values
15
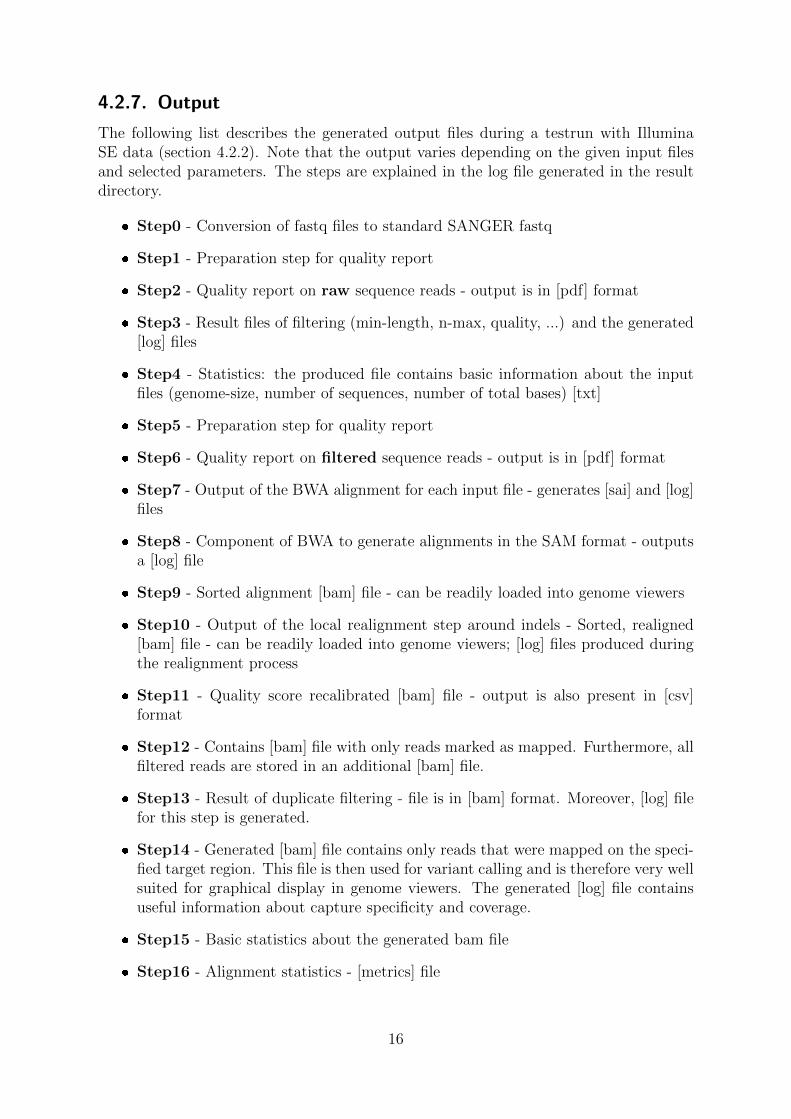
4.2.7. Output
The following list describes the generated output files during a testrun with IlluminaSE data (section 4.2.2). Note that the output varies depending on the given input filesand selected parameters. The steps are explained in the log file generated in the resultdirectory.
� Step0 - Conversion of fastq files to standard SANGER fastq
� Step1 - Preparation step for quality report
� Step2 - Quality report on raw sequence reads - output is in [pdf] format
� Step3 - Result files of filtering (min-length, n-max, quality, ...) and the generated[log] files
� Step4 - Statistics: the produced file contains basic information about the inputfiles (genome-size, number of sequences, number of total bases) [txt]
� Step5 - Preparation step for quality report
� Step6 - Quality report on filtered sequence reads - output is in [pdf] format
� Step7 - Output of the BWA alignment for each input file - generates [sai] and [log]files
� Step8 - Component of BWA to generate alignments in the SAM format - outputsa [log] file
� Step9 - Sorted alignment [bam] file - can be readily loaded into genome viewers
� Step10 - Output of the local realignment step around indels - Sorted, realigned[bam] file - can be readily loaded into genome viewers; [log] files produced duringthe realignment process
� Step11 - Quality score recalibrated [bam] file - output is also present in [csv]format
� Step12 - Contains [bam] file with only reads marked as mapped. Furthermore, allfiltered reads are stored in an additional [bam] file.
� Step13 - Result of duplicate filtering - file is in [bam] format. Moreover, [log] filefor this step is generated.
� Step14 - Generated [bam] file contains only reads that were mapped on the speci-fied target region. This file is then used for variant calling and is therefore very wellsuited for graphical display in genome viewers. The generated [log] file containsuseful information about capture specificity and coverage.
� Step15 - Basic statistics about the generated bam file
� Step16 - Alignment statistics - [metrics] file
16
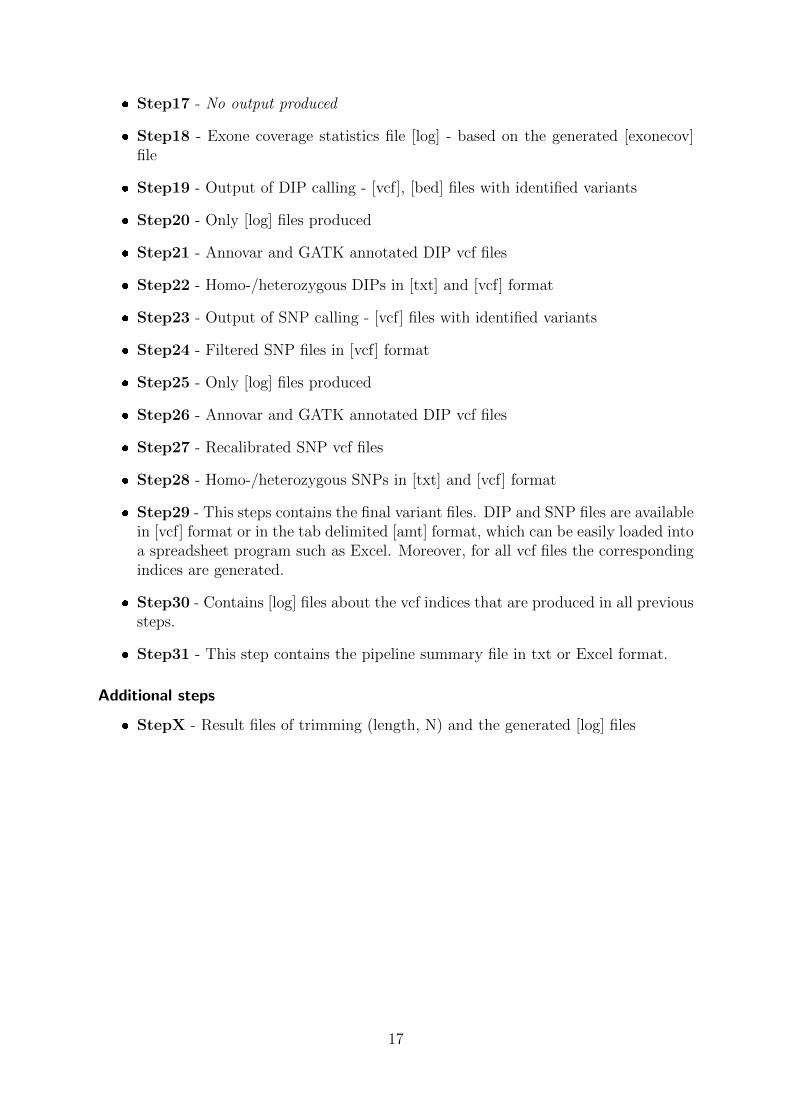
� Step17 - No output produced
� Step18 - Exone coverage statistics file [log] - based on the generated [exonecov]file
� Step19 - Output of DIP calling - [vcf], [bed] files with identified variants
� Step20 - Only [log] files produced
� Step21 - Annovar and GATK annotated DIP vcf files
� Step22 - Homo-/heterozygous DIPs in [txt] and [vcf] format
� Step23 - Output of SNP calling - [vcf] files with identified variants
� Step24 - Filtered SNP files in [vcf] format
� Step25 - Only [log] files produced
� Step26 - Annovar and GATK annotated DIP vcf files
� Step27 - Recalibrated SNP vcf files
� Step28 - Homo-/heterozygous SNPs in [txt] and [vcf] format
� Step29 - This steps contains the final variant files. DIP and SNP files are availablein [vcf] format or in the tab delimited [amt] format, which can be easily loaded intoa spreadsheet program such as Excel. Moreover, for all vcf files the correspondingindices are generated.
� Step30 - Contains [log] files about the vcf indices that are produced in all previoussteps.
� Step31 - This step contains the pipeline summary file in txt or Excel format.
Additional steps
� StepX - Result files of trimming (length, N) and the generated [log] files
17

5. Software development
In order to integrate additional command-line analysis tools into SIMPLEX the followingsteps are required:
1. Install the selected command-line tool on the server.
2. Checkout SIMPLEX source code (subversion links are provided at http://simplex.i-med.ac.at).
3. Extend clusterservice definition.xml to reflect the tool’s parameter settings, input,and output files (see section 5.1).
4. If needed, define path to additionally downloaded resource files/databases (e.g.bwa index) on the server in clusterresource-definition.properties. This will allowyou to link to the resources in clusterservice definition.xml (see section 5.2).
5. Create Java class ToolNameCSCommand which checks and sets all parameters andtransfers input/output files to/from the server.
6. Update method getInstance(int, Object) in Java class PipelineJobFactory to returnan instance of ToolNameCSCommand.
7. Write Java class ToolNameSplicing which acts as a wrapper between the pipeline’sand the tool’s parameters.
8. Integrate tool in ExomeBwaSEPipeline and/or ExomeBwaPEPipeline which arethe Java pipeline classes for SE and PE data, respectively.
5.1. Clusterservice definition
The XML file clusterservice definition.xml acts as a link between command line tools in-stalled on the server and SIMPLEX Java classes. It represents the available applicationsincluding their parameters, input-, and outputfiles. In order to add another applica-tion, an XML clusterservice element needs to be specified which contains the followingattributes and child elements:
� clusterservice attributes
– name - program name used by Java classes (e.g. PipelineJobFactory) to ref-erence the command line tool
– program-path - path to program on server
– nodes - defines how many nodes are booked by the queueing system to executethe program call
18

– validate - check parameters
� clusterservice elements
– description - simple description
– parameterlist - list of used/set parameter child elements with the followingattributes
* name - parameter name used in Java CSCommand class
* switch - defines switch (parameter) used in command line
* position - defines at which position the switch should be placed
* mandatory - true for required parameters
– inputfilelist - list of inputfiles transferred to the server
– resultfilelist - list of resultfiles which can be downloaded by the client
The following XML snippet demonstrates how a clusterservice element is defined inSIMPLEX (in this case the program ’bwa aln’ is described which is called by bwa aln[options] <prefix> <in.fq>).
clusterservice definition.xml: example clusterservice element
1 <clusterservice name=”BWA ALN” program−path=”/usr/local/bioinf/bwa/bwa−0.5.10/bwa aln” nodes=”5” validate=”false”>
2 <description>bwa aln v0.5.10</description>3 <parameterlist>4 <parameter name=”bwaan” switch=”−n” position=”0” mandatory=”false” />5 <parameter name=”bwaao” switch=”−o” position=”1” mandatory=”false” />6 <!−− use 5 nodes for computation −−>7 <parameter name=”bwaat” switch=”−t” position=”2” mandatory=”true”>8 <parameter−value isdefault=”true”>5</parameter−value>9 </parameter>
10 ...11 <!−− resulting sai index file −−>12 <parameter name=”bwaaR” switch=”−f” position=”21” mandatory=”true”>13 <parameter−value type=”resultfile” name=”saifile” isdefault=”true” />14 </parameter>15 <!−− link to prefix −−>16 <parameter name=”bwaaP” position=”22” mandatory=”true” resource−namespace=”
bwa reference” />17 <!−− input file −−>18 <parameter name=”bwaaI” position=”23” mandatory=”true”>19 <parameter−value name=”bwaaI” type=”inputfile” isdefault=”true” />20 <parameter−value name=”outputfile” type=”resultfile” externalservice=”
FASTQ CONVERTER” />21 </parameter>22 </parameterlist>23 < inputfilelist >24 <inputfile name=”bwaaI”>##−STD INPUTFILE−##.fq</inputfile>25 </ inputfilelist >
19
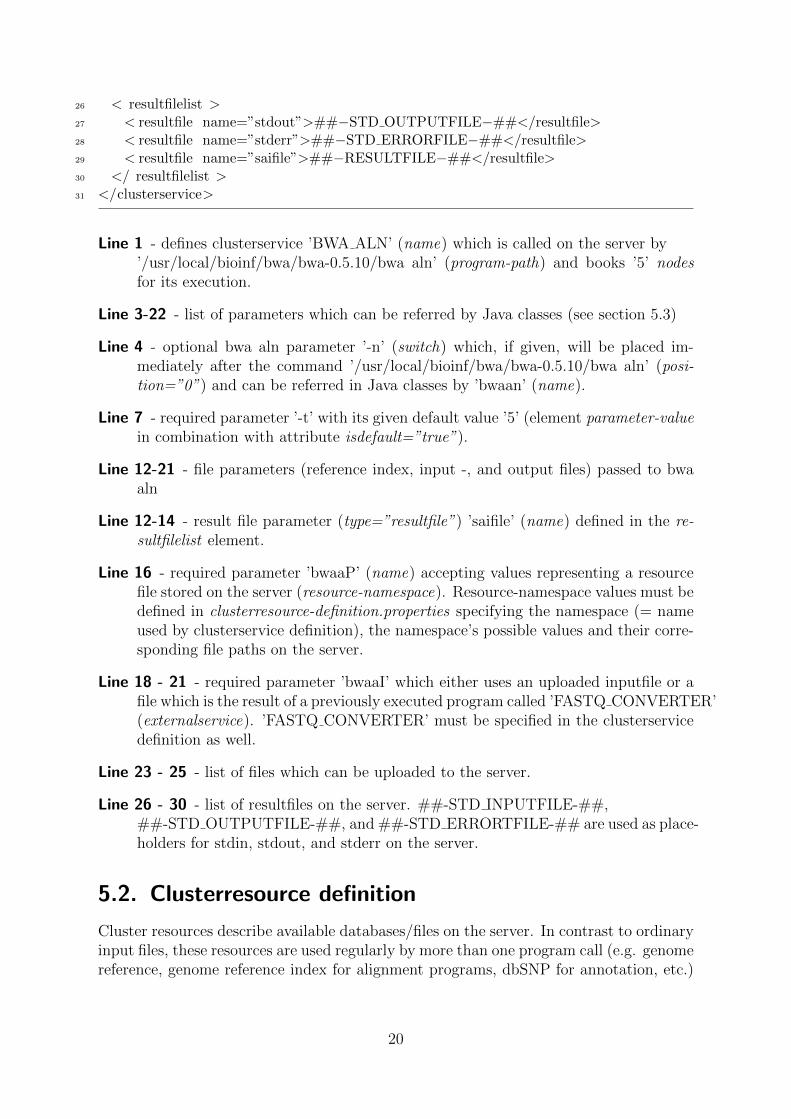
26 < resultfilelist >27 < resultfile name=”stdout”>##−STD OUTPUTFILE−##</resultfile>28 < resultfile name=”stderr”>##−STD ERRORFILE−##</resultfile>29 < resultfile name=”saifile”>##−RESULTFILE−##</resultfile>30 </ resultfilelist >31 </clusterservice>
Line 1 - defines clusterservice ’BWA ALN’ (name) which is called on the server by’/usr/local/bioinf/bwa/bwa-0.5.10/bwa aln’ (program-path) and books ’5’ nodesfor its execution.
Line 3-22 - list of parameters which can be referred by Java classes (see section 5.3)
Line 4 - optional bwa aln parameter ’-n’ (switch) which, if given, will be placed im-mediately after the command ’/usr/local/bioinf/bwa/bwa-0.5.10/bwa aln’ (posi-tion=”0”) and can be referred in Java classes by ’bwaan’ (name).
Line 7 - required parameter ’-t’ with its given default value ’5’ (element parameter-valuein combination with attribute isdefault=”true”).
Line 12-21 - file parameters (reference index, input -, and output files) passed to bwaaln
Line 12-14 - result file parameter (type=”resultfile”) ’saifile’ (name) defined in the re-sultfilelist element.
Line 16 - required parameter ’bwaaP’ (name) accepting values representing a resourcefile stored on the server (resource-namespace). Resource-namespace values must bedefined in clusterresource-definition.properties specifying the namespace (= nameused by clusterservice definition), the namespace’s possible values and their corre-sponding file paths on the server.
Line 18 - 21 - required parameter ’bwaaI’ which either uses an uploaded inputfile or afile which is the result of a previously executed program called ’FASTQ CONVERTER’(externalservice). ’FASTQ CONVERTER’ must be specified in the clusterservicedefinition as well.
Line 23 - 25 - list of files which can be uploaded to the server.
Line 26 - 30 - list of resultfiles on the server. ##-STD INPUTFILE-##,##-STD OUTPUTFILE-##, and ##-STD ERRORTFILE-## are used as place-holders for stdin, stdout, and stderr on the server.
5.2. Clusterresource definition
Cluster resources describe available databases/files on the server. In contrast to ordinaryinput files, these resources are used regularly by more than one program call (e.g. genomereference, genome reference index for alignment programs, dbSNP for annotation, etc.)
20
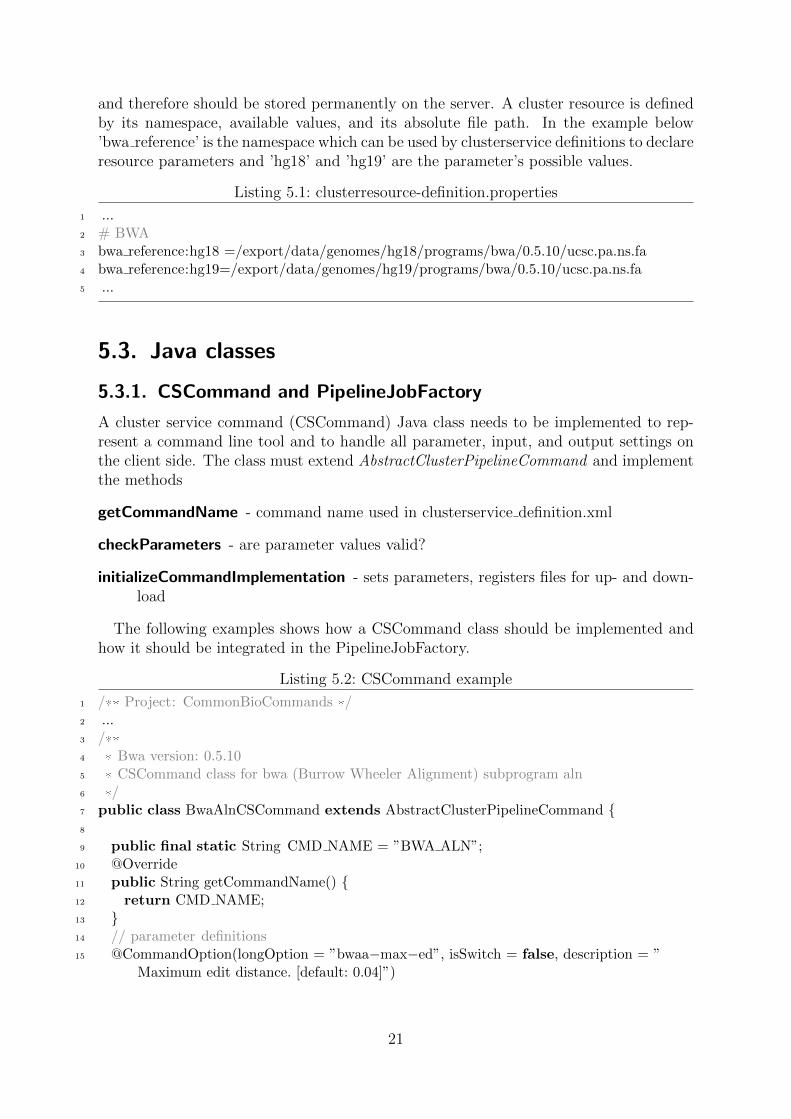
and therefore should be stored permanently on the server. A cluster resource is definedby its namespace, available values, and its absolute file path. In the example below’bwa reference’ is the namespace which can be used by clusterservice definitions to declareresource parameters and ’hg18’ and ’hg19’ are the parameter’s possible values.
Listing 5.1: clusterresource-definition.properties
1 ...2 # BWA3 bwa reference:hg18 =/export/data/genomes/hg18/programs/bwa/0.5.10/ucsc.pa.ns.fa4 bwa reference:hg19=/export/data/genomes/hg19/programs/bwa/0.5.10/ucsc.pa.ns.fa5 ...
5.3. Java classes
5.3.1. CSCommand and PipelineJobFactory
A cluster service command (CSCommand) Java class needs to be implemented to rep-resent a command line tool and to handle all parameter, input, and output settings onthe client side. The class must extend AbstractClusterPipelineCommand and implementthe methods
getCommandName - command name used in clusterservice definition.xml
checkParameters - are parameter values valid?
initializeCommandImplementation - sets parameters, registers files for up- and down-load
The following examples shows how a CSCommand class should be implemented andhow it should be integrated in the PipelineJobFactory.
Listing 5.2: CSCommand example
1 /** Project: CommonBioCommands */2 ...3 /**4 * Bwa version: 0.5.105 * CSCommand class for bwa (Burrow Wheeler Alignment) subprogram aln6 */7 public class BwaAlnCSCommand extends AbstractClusterPipelineCommand {8
9 public final static String CMD NAME = ”BWA ALN”;10 @Override11 public String getCommandName() {12 return CMD NAME;13 }14 // parameter definitions15 @CommandOption(longOption = ”bwaa−max−ed”, isSwitch = false, description = ”
Maximum edit distance. [default: 0.04]”)
21
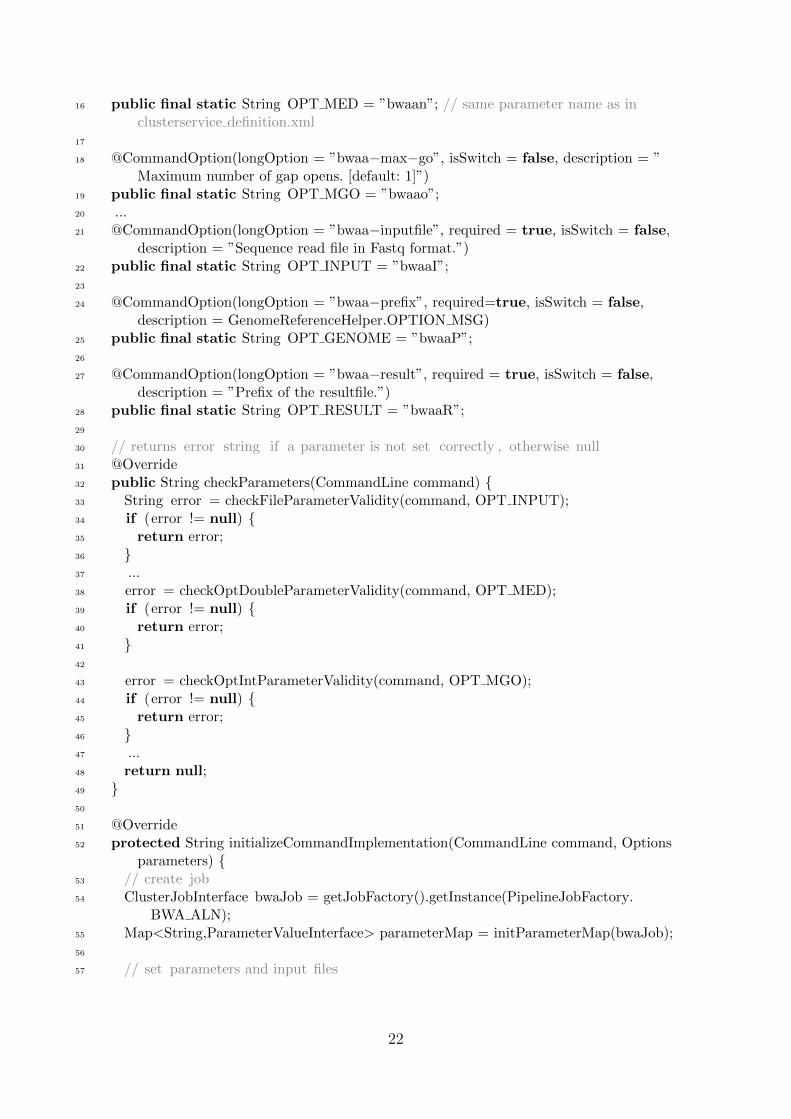
16 public final static String OPT MED = ”bwaan”; // same parameter name as inclusterservice definition.xml
17
18 @CommandOption(longOption = ”bwaa−max−go”, isSwitch = false, description = ”Maximum number of gap opens. [default: 1]”)
19 public final static String OPT MGO = ”bwaao”;20 ...21 @CommandOption(longOption = ”bwaa−inputfile”, required = true, isSwitch = false,
description = ”Sequence read file in Fastq format.”)22 public final static String OPT INPUT = ”bwaaI”;23
24 @CommandOption(longOption = ”bwaa−prefix”, required=true, isSwitch = false,description = GenomeReferenceHelper.OPTION MSG)
25 public final static String OPT GENOME = ”bwaaP”;26
27 @CommandOption(longOption = ”bwaa−result”, required = true, isSwitch = false,description = ”Prefix of the resultfile.”)
28 public final static String OPT RESULT = ”bwaaR”;29
30 // returns error string if a parameter is not set correctly , otherwise null31 @Override32 public String checkParameters(CommandLine command) {33 String error = checkFileParameterValidity(command, OPT INPUT);34 if (error != null) {35 return error;36 }37 ...38 error = checkOptDoubleParameterValidity(command, OPT MED);39 if (error != null) {40 return error;41 }42
43 error = checkOptIntParameterValidity(command, OPT MGO);44 if (error != null) {45 return error;46 }47 ...48 return null;49 }50
51 @Override52 protected String initializeCommandImplementation(CommandLine command, Options
parameters) {53 // create job54 ClusterJobInterface bwaJob = getJobFactory().getInstance(PipelineJobFactory.
BWA ALN);55 Map<String,ParameterValueInterface> parameterMap = initParameterMap(bwaJob);56
57 // set parameters and input files
22
58 try {59 setInputFileByName(command, parameterMap, bwaJob, OPT INPUT);60 // add clusterservice resource61 if (command.hasOption(OPT GENOME)) addResourceValueToParameterMap(
command, parameterMap, OPT GENOME);62 // add ordinary parameters if given63 if (command.hasOption(OPT MED)) addToParameterMap(command, parameterMap
, OPT MED);64 if (command.hasOption(OPT MGO)) addToParameterMap(command, parameterMap
, OPT MGO);65 ...66 bwaJob.setParameters(parameterMap);67 } catch (IOException e) {68 return e.getMessage();69 } catch (ClusterJobException e) {70 return e.getMessage();71 }72 // register job on server73 registerClusterJob(getCommandName(), bwaJob);74 // register result files ( saifile and stderr, as named in clusterservice definition )
for download75 String resultPrefix = command.getOptionValue(OPT RESULT);76 registerClusterJobFile (getCommandName(), ”saifile”, resultPrefix+”.sai”, JobFileType.
RESULT FILE);77 registerClusterJobFile (getCommandName(), ”stderr”, resultPrefix+”.log”, JobFileType.
RESULT FILE);78
79 return null;80 }81
82 }
Listing 5.3: PipelineJobFactory
1 /** Project: CommonBioJava */2 ...3 public class PipelineJobFactory4 {5 // bwa6 public static final int BWA ALN = 360;7 ...8 public ClusterJobInterface getInstance(int job task , Object object)9 {
10 ...11 switch(job task)12 {13 ...14 case BWA ALN:15 new job=createJob(BwaAlnCSCommand.CMD NAME);
23

16 break;17 ...18 }19 ...20 return new job;21 }22 ...23 }
5.3.2. Splicing
Splicings wire pipeline parameters, input -, and output files for a command. There-fore, the method ’splice’ must be implemented. Several methods (e.g. addArgument,handOverArgument) facilitate the setting of command line parameters, whereas read-JobsFromStep returns links to previously finished pipeline jobs which are used by Clus-terClientHelper.createClusterOutputFileURLByName to provide a reference to the oldjob’s result file on the server (e.g. for setting the result as input for the new tool).
Listing 5.4: Splicing
1 /** Project: IGB−TranscriptomePipeline */2 ...3 public class BwaAlnSESplicing extends AbstractPreprocPipelineSplicing {4 ...5 /**6 * Parses pipeline sequence input files and starts parallel BwaAln commands.7 * Maps pipeline arguments to BwaAlnCSCommand arguments and registers commands.8 */9 @Override
10 public Map<String, List<String>> splice(PipelineInterface pipeline) throwsPipelineExecutionException {
11 String [] inputfiles = getPipelineOptionValue(pipeline, PreprocPipeline.OPTL INPUTFILES).split(”,”);
12 switch (fqIs) {13 case FQRAW: // upload fastq files from client to server14 return rawInputAlignment(pipeline, inputfiles);15 case FQCONVERTED: // use already processed (converted) files on server16 return convertedInputAlignment(pipeline);17 ...18 }19 throw new PipelineExecutionException(”Unknown input data type given.”);20 }21
22 private Map<String, List<String>> rawInputAlignment(PipelineInterface pipeline,String[] inputfiles) {
23 Map<String, List<String>> returnValueMap = new HashMap<String, List<String>>();
24 // no conversion − take raw input25 for (String inputfile : inputfiles ) {
24

26 List<String> arguments = initializeDefaultClusterArguments(pipeline, false);27 addArgument(arguments, BwaAlnCSCommand.OPT INPUT, inputfile);28 String jobKey = setCommonArguments(pipeline, arguments, new File(inputfile).
getName());29 returnValueMap.put(jobKey, arguments);30 }31 return returnValueMap;32 }33
34 private Map<String, List<String>> convertedInputAlignment(PipelineInterface pipeline)throws PipelineExecutionException {
35 Map<String, List<String>> returnValueMap = new HashMap<String, List<String>>();
36 // get input files from FastqConverterCSCommand37 Map<String, ClusterJobInterface> converterJobs = readJobsFromStep(pipeline, pipeline
.getCommandPosition(FastqConverterCSCommand.CMD NAME));38
39 for (String converterJobKey : converterJobs.keySet()) {40 List<String> arguments = initializeDefaultClusterArguments(pipeline, false);41 ClusterJobInterface job = converterJobs.get(converterJobKey);42 try {43 addArgument(arguments, BwaAlnCSCommand.OPT INPUT, ClusterClientHelper.
createClusterOutputFileURLByName(”outputfile”, job));44 } catch (ClusterJobException e) {45 throw new PipelineExecutionException(e);46 }47
48 String newJobKey = setCommonArguments(pipeline, arguments,extractCommandSpecificName(converterJobKey));
49 returnValueMap.put(newJobKey, arguments);50 }51 return returnValueMap;52 }53
54 private String setCommonArguments(PipelineInterface pipeline, List<String> arguments,String inputfilename) {
55 if (hasPipelineOption(pipeline, PreprocPipeline.OPTL PREFIX))56 addArgument(arguments, BwaAlnCSCommand.OPT GENOME,
getPipelineOptionValue(pipeline, PreprocPipeline.OPTL GENOME));57
58 // pass through arguments59 handOverArgument(arguments, BwaAlnCSCommand.OPT MED, pipeline);60 handOverArgument(arguments, BwaAlnCSCommand.OPT MGO, pipeline);61 ...62 // don’t cleanup − this is done after the pipeline finished63 setNoCleanupArgument(arguments);64
65 // set output directory and outputnames66 addArgument(arguments, AbstractPipelineCommand.OUTPUTDIRECTORY LONG,
25

67 getOutputDirectory(getPipelineOptionValue(pipeline, AbstractPipelineCommand.OUTPUTDIRECTORY LONG), inputfilename, pipeline));
68 addArgument(arguments, BwaAlnCSCommand.OPT RESULT, getFastxUtils().getPrefix(inputfilename));
69
70 // register arguments71 // FIELD DELIMITER are not allowed in ClusterClientHelper72 return inputfilename.replaceAll(ClusterClientHelper.FIELD DELIMITER, ” ”);73 }74
75 }
5.3.3. Pipeline
In order to integrate a new command line tool into SIMPLEX the classes ExomeB-waSEPipeline (SE data) and ExomeBwaPEPipeline (PE data) need to be updated.CSCommand parameters which should be available to the user must be added to thepipeline by extending the method getPipelineOptions. Parameter validity checks mustbe included in the method checkParameters. SetupPipelineImplementation defines theorder of command line tools called on the server. This method must integrate the newCSCommand and its Splicing (see section 5.3.2) to call the application. Additionallyan integer variable storing the application call’s position within the pipeline must becreated to be used in the method getCommandPosition.
Listing 5.5: Splicing
1 /** Project: IGB−TranscriptomePipeline */2 ...3 public class ExomeBwaSEPipeline extends PreprocSEPipeline {4 ...5 private int bwaAlnPos = −1;6 ...7 @Override8 public Options getPipelineOptions() throws CommandIntegrityException {9 ...
10 makeSubcommandOptionsPublic(pipelineOptions, new BwaAlnCSCommand(),11 new String[]{BwaAlnCSCommand.OPT MED, BwaAlnCSCommand.OPT MGO});12 ...13 return pipelineOptions;14 }15
16 @Override17 public String setupPipelineImplementation(CommandLine command, Options options) {18 ...19 try {20 // bwa aln21 addPipelineComponentAtPosition(pos, new BwaAlnSESplicing(isCs, dataType), new
BwaAlnCSCommand());22 bwaAlnPos = pos++;
26

23 ...24 }25 ...26 }27
28 @Override29 public int getCommandPosition(String cmdName) throws PipelineExecutionException {30 ...31 // bwa aln32 if (BwaAlnCSCommand.CMD NAME.equalsIgnoreCase(cmdName)) {33 return bwaAlnPos;34 }35 ...36 return position;37 }38
39 @Override40 public String checkParameters(CommandLine command) {41 ...42 error = checkParameter(command, PreprocPipeline.OPTS INPUTFILES);43 if (error != null)44 return error;45 ...46 }47 ...48 }
5.4. Integrate new species
SIMPLEX was primarily designed to analyze human exome sequencing data. However,it is possible to extend SIMPLEX to include other species. Therefore, the following stepsmust be done:
5.4.1. Server side adaptations
1. Create the following folder structure on the server in folder /export/data/genomes.
1 /export/data/genomes/2 |−− species name/3 |−− annotations/4 |−− |−− annovar/5 |−− |−− gatk/6 |−− programs/7 |−− |−− bwa/8 |−− |−− gatk/
2. Prepare the reference genome:
27

a) On the server, change to directory /export/data/genomes/species name/ anddownload the species’ reference in fasta format. The whole reference must bestored in one file and be named as species name.fasta.
b) Call picard’s CreateSequenceDictionary to generate the fastq sequence dictio-nary file (see picards’s man page and GATK’s info page for further details).The resulting dictionary should be stored as species name.dict.
c) Generate fasta index using samtools.
d) Create file species name.size containing the number of bases in the referencegenome in the format ’Size: #bases’.
e) Generate bwa reference index for nucleotide and color space in folder /ex-port/data/genomes/species name/programs/bwa/ as described in bwa’s manpage (use option -c to enable color-space indexing).
3. Prepare annotations for GATK tools:
a) Change to directory /export/data/genomes/species name/annotations/gatk/.
b) Download dbSNP and refSeq files and rename them to annotation.dbSNP.txtand annotation.refSeq.txt, respectively.
c) For both databases, call GATK’s sortByRef.pl to generate reference orderedfiles. The files must be named dbSNP.rod and refSeq.rod and must be storedin /export/data/genomes/species name/programs/gatk/.
4. Prepare annotations for annovar:
a) Change to directory /export/data/genomes/species name/annotations/annovar/.
b) Follow instructions on annovar’s FAQ site on how to download and preparefiles for using annovar to annotate other species.
5. Update /home/jclusterservice/jclusterservice/config/clusterresource definition.propertiesto include
1 # Picard2 picard 124:species name=/export/data/genomes/species name/species name.fasta3 picard 124:species name.color=/export/data/genomes/species name/species name.
fasta4
5 # BWA6 bwa 0510 reference:species name=/export/data/genomes/species name/programs/bwa
/species name.ns.fasta7 bwa 0510 reference:species name.color=/export/data/genomes/species name/programs
/bwa/species name.cs.fasta8
9 #Fold coverage10 foldcoverage−genomesizefile:species name=/export/data/genomes/species name/
programs/gatk/latest/species name.size11 foldcoverage−genomesizefile:species name.color=/export/data/genomes/species name/
programs/gatk/latest/species name.size
28

12
13 #GATK14 gatk reference :species name=/export/data/genomes/species name/species name.fasta15 gatk reference :species name.color=/export/data/genomes/species name/species name.
fasta16
17 gatk refseq :species name=/export/data/genomes/species name/programs/gatk/refSeq.pa.rod
18 gatk refseq :species name.color=/export/data/genomes/species name/programs/gatk/refSeq.pa.rod
19
20 gatk dbsnp:species name=/export/data/genomes/species name/programs/gatk/dbSNP.pa.rod
21 gatk dbsnp:species name.color=/export/data/genomes/species name/programs/gatk/dbSNP.pa.rod
22
23 gatk annotations:species name=/export/data/genomes/species name/annotations/gatk/
24 gatk annotations:species name.color=/export/data/genomes/species name/annotations/gatk/
25
26 #Annovar27 annovar referencedb:species name=/export/data/genomes/species name/annotations/
annovar/
5.4.2. Adaptations to the source code
1. Checkout SIMPLEX source code (subversion links are provided at http://simplex.i-med.ac.at).
2. Integrate new species to class GenomeReferenceHelper by updating methods check-Parameters and getGenomedefinition.
3. Create class SpeciesName which implements interface GenomeDefinition (classHG19Genome can be used for guidance).
4. Rebuild exomePipeline.jar (ant task available exomeClpJar-Slim in file Transcrip-tomePipeline/systemcommands/build.xml), rename it to simplex.jar and updatethe client.
29

A. FAQ
A.1. Change password
Use the Linux command passwd
A.2. What can I do if simplex prints “Unable to connectto JClusterService.”
� Configure the ip-address. If your network has a dhcp server you can use sudo dhcp
ethX
� Stop and start JClusterservice sudo service jclusterservice stop|start
A.3. ToDo
� how to stop the cloud image
� link to Sun Grid Engine
30
Bibliography
[1] E Afgan, D Baker, N Coraor, B Chapman, A Nekrutenko, and J Taylor. Galaxycloudman: delivering cloud compute clusters. BMC Bioinformatics, 11 Suppl 12:S4–S4, 2010.
[2] P J Cock, C J Fields, N Goto, M L Heuer, and P M Rice. The sanger fastq fileformat for sequences with quality scores, and the solexa/illumina fastq variants.Nucleic Acids Res, pages –, 2009.
31