SHUTTER OPERATING INSTRUCTIONS - Pacific Rim Camera
16
SHUTTER OPERATING INSTRUCTIONS
-
Upload
khangminh22 -
Category
Documents
-
view
0 -
download
0
Transcript of SHUTTER OPERATING INSTRUCTIONS - Pacific Rim Camera

GRAFLE~
SHUTTER OPERATING
INSTRUCTIONS

2
The instructions within this m.anllal
describe the operation of most shutters
available for use on Graphic Cameras.
USING LENSES ON SUPER GRAPHIC LENSBOARD ASSEMBLIES ON
PACEMAKER GRAPHIC 45 CAMERAS Pacemaker Graphic cameras will accept Super Graphic lensboard assemblies. To attach connecting cords to shutter synchronizer contact posts, loosen the knurled nut or nuts on the back of the Super Gra phic lens board assembly . Turn the fittings away from the contact post or posts and retighten the nuts to make the lens board assembly light-tight. Connecting cords can then be attached directly to the shutter contact flash fittings.

o
GRAPHEX (X) SHUTTER • Graphex Full Sync • All Sizes Cock: Move lever 4 to the right for all speeds including B & T. Trip: P ress lever 1 down. Shutter Speeds: Revolve knurled ring 2 until desired shutter speed number is over the index arrow head . Extra effort is required at I j400th sec. to overcome resistance of booster springs. n. Shutter wi ll stay open as long as lever 1 is held down. T. Press lever 1 to open shutter, press aga in to close.
Press Focus: Cock s hutter (any speed sett ing) To OPEN: Pull down and in on lever 5. To CLOSE: Lift lever 5 up. Diaphragm Settings: Set lever 8 opposite f- number desired. Cable Release: Attach at 3. Use straight tip or Kodak All-Metal. Flash Connection: ASA Bi-Post at 6. Use Grafl ite cords 2701,2702 , and 2810.
SYNCHRONIZAHON • GRAPHEX (Xl Electronic Flash: Int erna l contact.:; operate every time s hu tter is cocked and released. Bulbs: External synchron ized solenoid required for type M bulbs.
SYNCHRONIZATION. GRAPHEX FULL SYNC. Electronic Flash: Set lever 7 at F-X. Cock and release. Use any shutter speed. SM and SF Bulbs: Set lever 7 at F-X. Cock and release. Use red shutter speeds on ly.
Type M Bulbs: Set lever 7 at hlack M. Cock and release. Use black s hu tter speeds only.
Set lever 7 at red M. Cock and release. Use red sh utter speeds . This permits use o f s lightly higher guide numbers because of more comrlete use of bulb output at these lower sreeds. Graphex fully synchronized shutter can be synchron ized with solenoid . When so used, lever 7 must be at "Of{."
3
4
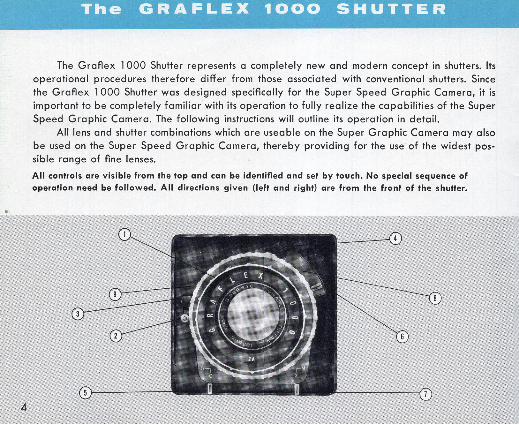
The Graflex 1000 Shutter represents a completely new and modern concept in shutters. Its operational procedures therefore differ from those associated with conventional shutters. Since the Graflex 1000 Shutter was designed specifically for the Super Speed Graphic Camera, it is important to be completely familiar with its operation to fully realize the capabilities of the Super Speed Graphic Camera. The following instructions will outline its operation in detail.
All lens and shutter combinations which are useable on the Super Graphic Camera may also be used on the Super Speed Graphic Camera, thereby providing for the use of the widest possible range of fine lenses.
All controls are visible from the top and can be identified and set by touch. No special sequence of operation need be followed. All directions given (left and right) are from the front of the shutler.
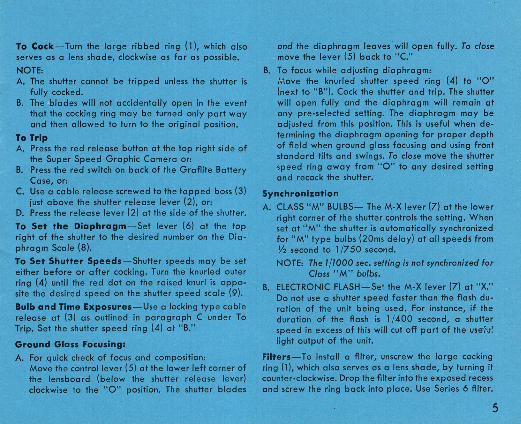
To Cock-Turn the large ribbed ring (1), which also serves as a lens shade, clockwise as for as possible.
NOTE: A. The shutter cannot be tripped unless the shutter is
fully cocked. B. The blades will not accidentally open in the event
that the cocking ring may be turned only part way and then allowed to turn to the original position.
To Trip A. Press the red release button at the top right side of
the Super Speed Graphic Camera or: B. Press the red switch on back of the Graflite Battery
Case, or: C. Use a cable release screwed to the tapped boss (3)
just above the shutter release lever (2), or: D. Press the release lever (2) at the side of the shutter.
To Set the Diaphragm-Set lever (6) at the top right of the shutter to the desired number on the Diaphragm Scale (8).
To Set Shutter Speeds-Shutter speeds may be set either before or after cocking. Turn the knurled outer ring (4) until the red dot on the raised knurl is opposite the desired speed on the shutter speed scale (9) .
Bulb and Time Exposures-Use a locking type cable release at (3) as outlined in paragraph C under To Trip. Set the shutter speed ring (4) at "B."
Ground Glass Focusing:
A. For quick check of focus and composition: Move the control lever (5) at the lower left corner of the lens board (below the shutter release lever) clockwise to the "0" position. The shutter blades
and the diaphragm leaves will open fully. To close move the lever (5) back to "c."
B. To focus while adjusting diaphragm: Move the knurled shutter speed ring (4) to "0" (next to "B"). Cock the shutter and trip. The shutter will open fully and the diaphragm will remain at any pre-selected setting. The diaphragm may be adjusted from this position. This is useful when determining the diaphragm opening for proper depth of field when ground glass focusing and using front standard tilts and swings. To close move the shutter speed ring away from "0" to any desired setting and recock the shutter.
Synchroni%ation
A. CLASS "M" BULBS- The M-X lever (7) at the lower right corner of the shutter controls the setting. When set at "M" the shutter is automatically synchronized for" M" type bulbs (20ms delay) at all speeds from Y2 second to 1/750 second.
NOTE: The 1/1000 sec. setting is not synchronized for Closs" M" bulbs.
B. ELECTRONIC FLASH-Set the M-X lever (7) at "X." Do not use a shutter speed faster than the flash duration of the unit being used. For instance, if the duration of the flash is 1/ 400 second, a shutter speed in excess of this will cut off part of the us,,:,,! light output of the unit.
Filters-To install a filter, unscrew the large cocking ring (1), which also serves as a lens shade, by turning it counter-clockwise. Drop the filter into the exposed recess and screw the ring back into place. Use Series 6 filter.
5

6
GRAPHIC SVNCHRO and other
COMPUR SHUTTERS
Some Compur shutters (other than E) Graphic Compur) may not be solenoid synchronized unless the shutter is first 0 converted to "X" sync only. This con-version may be accomplished at a Graflex Service Center.
See page 8 and 9 for Compur MXCRO Shutter used on CF -904 Crown Graphic Special Camera.

Cock: Move lever 6 to the right for all speeds including B & T. Trip: Press lever 1 down. Shutter Speeds: Revolve knurled ring 5 until desired shutter speed number is over the index line. -B: Shutter will stay open as long as lever 1 is held down. T: Press lever 1 to open shutter, press again to close. Press Focus: Graphic Compur-Cock shutter (any speed setting). To OPEN : Press down and in on lever 7. To CLOSE: Lift lever 7 up. Compur (other types)-Cock shutter (any speed setting). To OPEN: Press back on lever 7 while tripping shutte r. * To CLOSE : Recock shutter (shutter blades will have to close before it can be fully recocked). Diaphragm Setting: Set lever 8 opposite f-number desired. Cable Release: Attach at 2. Use tapered tip type or Kodak All-Metal. Flash Connection: ASA Bayonet at 4. Use Cat. No. 2808 Cord. DIN or PC Connector at 4. Use Cat. No. 2821 or 2721 Cord.
SYNCHRONIZATION:
Electronic Flash-Set lever 3 at X. Cock and release. -5M and SF Bulbs-Set lever 3 at X . Use shutter speed 1/100 or slower. Cock and release. Type M Bulbs-Set lever 3 at M. Cock and release. *SELF-TIMER: Compur (except Graphic Compur): Some of these shutters will not have the Press Focus lever described but will have a self-timer. When lever 7 is pressed back, lever 6 can be moved .over farther to the right. When lever 1 is pressed , shutter blades will open in about 8-12 seconds. For ground glass focusing, set shutter at B and use locking type cable release to hold shutter open.
7

8
• Special Instructions for 135mm Schneider Xen
Cock: Move lever 6 to the right for all speeds including B. Trip: Press lever 1 down.
Shutter Speeds: Revolve knurled ring 5 until desired shutter speed number is over the index line.
B: Shutter will stay open as long as lever 1 is held down. PRESS FOCUS:
To Open: Press back on lever 7 and press lever 1 down. Recock. To Close: Pull lever 7 forward.
Diaphragm Setting: Set lever 8 opposite f·number desired. Cable Release: Attach at 2. Use tapered tip type or Kodak All · Metal.
Flash Connection: DIN or PC Connector at 4 . Use Cat. No. 2821 or 2721 Cord.
SYNCHRON IZATION" : Electronic Flash-Set lever 3 at X. Cock and release.
SM and SF Bulbs-Set lever 3 at X. Use shutter speed 1/ 100 or slower. Cock and release.
Ty p'e , M Bulbs-Set lever 3 at M. Cock and release. ~' Solenoid Synchronization: The MX·CRO Synchro·Compur Shutter may not be solenoid synchronized unless the shutter is first converted to "X" synchroni· zation only. It is necessary to remove the " M" synchronization gear train from the shUtter since the gear train would otherwise introduce a double delay pre· venting proper synchronization with solenoid. (Continued Next Page.)
j l
@
o
I

ar F /4.7 lens in MX-CRO Synchro-Compur Shutter However, solenoid may be used for tripping only if desired without shutter modification .. A stud must be mounted on the release arm to attach a solenoid. The convenience of reo mote tripping with solenoid may be enjoyed with Graflite by setting the selector switch at # 1. Connect a shutter cord (Cat. No. 2821 or 2721) to the shutter flash connections (4) and the shutter outlet of the Graflite Battery Case. Connect a solenoid cord (Cat. No. 2809 or 2704) to the solenoi"d outlet of the Grafl ite Battery Case and the solenoid. When the red button at the back of the Graflite is pressed, the shutter will be tripped by the solenoid and flash synchronization will be determined by the shutter.
Graflex Service Centers are equipped to modify shutters as 'described above: Cat. No. 9462 Fit stud to shutter release ' arm
,< Ii(
Cat. No. 9463 Remove internal "M"synchro· nization delay train to ,permit solenoid synchro· nization . Convert to " X" sync
9
10
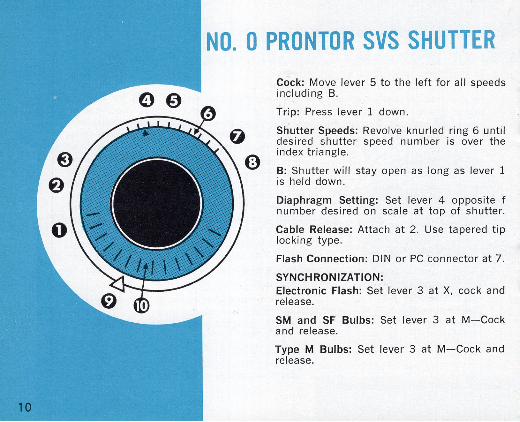
NO. 0 PRONTOR SVS SHUTTER Cock: Move lever 5 to the left for all speeds including B.
Trip: Press lever 1 down.
Shutter Speeds: Revolve knurled ring 6 until desired shutter speed number is over the index triangle.
B: Shutter will stay open as long as lever 1 is held down.
Diaphragm Setting: Set lever 4 opposite f number desired on scale at top of shutter.
Cable Release: Attach at 2. Use tapered tip locking type.
Flash Connection: DIN or PC connector at 7 .
SYNCHRONIZATION: Electronic Flash: Set lever 3 at X, cock and release.
SM and SF Bulbs: Set lever 3 at M-Cock and release.
Type M Bulbs: Set lever 3 at M-Cock and release.

Self Timer: Set lever 3 to V-Cock and release. Synchronization will be the same as X.
EV Scale Setting: Set lever 9 opposite EV number desired on scale 10.
Coupled EV Setting: (Cross couple shutter speed and diaphragm.) Press in and set lever 8 to the white dot. Set lever 9 opposite EV number on scale 10.
To Operate Shutter and Diaphragm Independently: Press in and set lever 8 to the circle and operate lever 4 or ring 6 as desired.
Solenoid Synchronization: The No. 0 Prontor SVS Shutter may be solenoid synchronized. This requires modification of the shutter and install ation of an additional part. Contact your Graflex Service Department for details.

SUPERMATIC (Xl SHUTTER· FLASH SUPERMATIC SHUTTER Cock: Move lever 3 to right for all speeds including Band T. Trip: Press lever 1 down . Shutter Speed s: Revolve knurled ring until index arrow is over desired shutter speed number. Black arrow over black speeds. Red arrow over red speeds. B: Shutter will stay open as long as lever 1 is held down. T: Press lever 1 to open shutter. Press again to close. Press Focus: Cock shutter (any speed) To OPEN: Press in on button 4 while pulling down
lever 1. To CLOSE: Recock shutter. Diaphragm Setting: Set lever 7 opposite f- number desired. Cable Release: Attach in cable release socket behind lever 1. Generally filled with a small dust plug which can be removed. Flash Connect ion: ASA Bi-Post at 5 on #2 shutlers. 0 At 6 on #3 shutters . Use Graftite cords 2701, 2702, 2810.
SYNCHRONIZATION. SUPERMATIC (X)
Elect ron ic Flash: Internal contacts operate every time shutter is cocked and released. Bulbs: External synchronized solenoid requi red for type M bulbs.
SYNCHRONIZATION. FLASH SUPERMATIC SH UTTER Electronic Flash: Internal contacts operate every time s hutter is cocked and released. SM and SF Bulbs: Set lever 8 at F . Cock shutler with lever 3. Additionally pull down cocking lever 9. Release with lever 1. Type M Bulbs: Set lever 8 at M. Cock with lever 3. Additionally pull down cocking lever 9 and trip with lever 1. Flash Supermatic Shutler must not be used with solenoid.
12
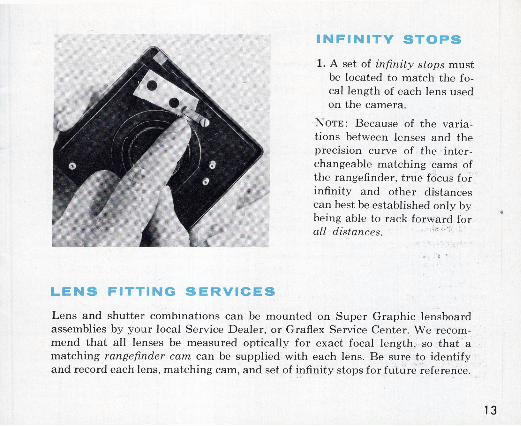
LENS FITTING SERVICES
INFINITV STOPS
1. A set of infinity stops must be located to match the focal length of each lens used on the camera.
NOTE: Because of the variations between lenses and the precision curve of the interchangeable matching cams of the rangefinder, true focus for infinity and other distances can best be established on ly by being able to rack forward for all distances. ." .' ..
. .
Lens and shutter combinations can be mounted on Super Graphic lens board assemblies by your local Service Dealer, or Graflex Service Center. We recommend that all lenses be measured optically for exact focal length, · so that a matching rangefinder cam can be supplied with each lens. Be sure to identify and record each lens, matching cam, and set of infinity stops for future reference.
13

"
I
CI -
14
USE THESE ACCESSORIES FOR
GRAPHIC®- ROLL FILM HOLDER Features a new film flattening device for critical black and white or color work. Uses inexpensive 120 size roll film. Allows easy daylight loading.
GRAPHIC® POLAROID BACK Eliminates costly retakes by providing "picture-in~ a-minute" record oflighting and composition before shooting. Fits 4 x 5 Graphics with Graflok back.
GRAFMATIC® FILM HOLDER Holds six sheet films for ligh tning-fast film changing. Ideal for action and sequence shots. Most convenient method of han dling sheet film ever developed .
RITEW AY ® FILM HOLDER Provides most accurate film positioning of any holder on the market. Unconditionally guaranteed for two years. Stronger t han wood, less liable to damage than metal.

GREATER CAMERA VERSATILITY!
GRAFLEX® SPEED-PRO TRIPOD A heavy duty, 2-section tripod for 4 x 5 Graphic cameras. Pneumatic device on center column brings camera tocushioned,shockfree rest. Extends to 68".
~I
GRAFlITE® FLASH UNITS
STROBOFLASH® IV 1m A flash bulb unit
with unlimited versatility to meet any flash requirement. Full line of components for any application.
Features 4-way power selector for 50, 100, 150 or 200 watt-second energy storage. Flash duration from 1/400 to 1/1200 sec.
TELEFLASH® A complete, self-contained flash unit with built-in B-C power supply. Triggeo:ed by light sensitive photo-tube for "Slave" operation. Uses BayonetBase Flash Lamps.
OPTICAL VIEWFINDER Indicates the exact area of subject matter that will appear on the film. A rear dial compensates for parallax and various masks indicate the field of view.
15

A SUBSIDIARY OF GENERAL PRECISION EQUIPMENT CORPORATION ~
HOME OFFICE
3750 Monroe Avenue Rochester 3, New York
MIDWEST SERVICE
DEPARTMENT
1345 Diversey Parkway Chicago 14, Illinois
WESTERN DIVISION
800 North Cole Avenue H ollywood 38, California
Form No. 373/560
NEW YORK SERVICE
DEPARTMENT
96 Gold Street New York 38, New York
GRAFLEX OF
CANADA LIMITED
47 Simcoe St. Toronto 1, Ontario, Canada
Printed USA