Shop-Script PRO User Guide
101
Page 1 of 101 Shop-Script PRO Copyright © WebAsyst LLC Shop-Script PRO User Guide Software Version: Shop-Script PRO 2.12 (covers both Shop-Script PRO and its Free Trial editions) Last Revised: December 5, 2006
-
Upload
khangminh22 -
Category
Documents
-
view
0 -
download
0
Transcript of Shop-Script PRO User Guide
Page 1 of 101
Shop-Script PRO Copyright © WebAsyst LLC
Shop-Script PRO User Guide
Software Version: Shop-Script PRO 2.12
(covers both Shop-Script PRO and its Free Trial editions) Last Revised: December 5, 2006

Page 2 of 101
Shop-Script PRO Copyright © WebAsyst LLC
Table of Contents Introduction & Overview............................................................................................................4 Installation and configuration ................................................................................................5
System requirements ...............................................................................................................5 Available versions.......................................................................................................................7 Installing Windows Executable Version........................................................................8
Installation to your local computer .............................................................................8 Installation to a remote server ....................................................................................14
Installing Zip Version .............................................................................................................19 Installation to your local computer ...........................................................................19 Installation to a remote server ....................................................................................25
Installing Zend Optimizer and ionCube Loader ......................................................28 Upgrading Shop-Script...........................................................................................................29 Protecting your store..............................................................................................................31 Transferring your store from one server to another ...........................................33
Front end (customer storefront) .........................................................................................34 Products Catalog .......................................................................................................................34 Customer registration and account ...............................................................................36
Customer registration ........................................................................................................36 Customer account .................................................................................................................36 Price list ......................................................................................................................................39 News .............................................................................................................................................39 Feedback ....................................................................................................................................39 Checking out ............................................................................................................................41
Back end (administrative resources) ...............................................................................43 Catalog.............................................................................................................................................43
Managing products catalog .............................................................................................43 Adding new categories/subcategories ....................................................................43 Editing existing categories..............................................................................................44 Adding new products ..........................................................................................................44 Table of products ..................................................................................................................46 Editing product entry..........................................................................................................47 Product images.......................................................................................................................48 Importing products from a CSV file (Excel) .........................................................49 Export products......................................................................................................................52 Synchronization tools .........................................................................................................52 Product custom options ....................................................................................................53 Special offers ...........................................................................................................................53 Discussions ...............................................................................................................................53
Customers & Orders ................................................................................................................54 Orders ..........................................................................................................................................54 Customers..................................................................................................................................55 Newsletter subscribers......................................................................................................56 Customer groups ...................................................................................................................56 Registration form ..................................................................................................................57 Order states..............................................................................................................................58 Discounts ...................................................................................................................................59

Page 3 of 101
Shop-Script PRO Copyright © WebAsyst LLC
Configuration ...............................................................................................................................60 General configuration.........................................................................................................60 Appearance ...............................................................................................................................62 Catalog.........................................................................................................................................63 Customers..................................................................................................................................64 Shopping cart & ordering .................................................................................................65 Currency types........................................................................................................................67 Shipping ......................................................................................................................................68 Payment......................................................................................................................................69 Countries ....................................................................................................................................70 States ...........................................................................................................................................71 Information pages................................................................................................................72 Taxes ............................................................................................................................................74
Modules ...........................................................................................................................................75 News module ...........................................................................................................................75 Poll module (customer survey) ....................................................................................75 Shipping modules .................................................................................................................76 Real-time quotes with UPS .............................................................................................78 Real-time quotes with USPS...........................................................................................79 Real-time quotes with FedEx .........................................................................................80 Real-time quotes with DHL .............................................................................................81 Payment modules .................................................................................................................82 Google Checkout....................................................................................................................83 PayPal integrations..............................................................................................................85 PayPal Payflow Pro ..............................................................Error! Bookmark not defined. LinkPoint / YourPay ............................................................................................................87 HSBC .............................................................................................................................................88 Chronopay .................................................................................................................................90 ePDQ .............................................................................................................................................91
Reports ............................................................................................................................................92 Designing your shopping cart ...............................................................................................93
Languages .....................................................................................................................................93 Templates ......................................................................................................................................94 Editing templates in HTML-editor ...................................................................................96
Update Log ........................................................................................................................................97 Troubleshooting .............................................................................................................................98

Page 4 of 101
Shop-Script PRO Copyright © WebAsyst LLC
Introduction & Overview
Shop-Script PRO is cost-effective feature rich shopping cart software
Shop-Script PRO benefits:
- Full open source (PHP / MySQL) - No programming skills are required to install and manage Shop-Script - Easy design integration in any HTML editor (Smarty templates) - Search Engine Optimized (SEO) - Integrated with major payment processors - Hundreds of ecommerce features - Free customer support More information on this software can be found at Shop-Script website: http://www.shop-script.com.
Licensing To use Shop-Script PRO software you must accept terms and conditions of Shop-Script PRO End User License Agreement. For the full text of Shop-Script PRO End User License Agreement please refer to Shop-Script website: www.shop-script.com/license.html Authors
Shop-Script is product of WebAsyst LLC, a privately owned international company.
Our international team of software experts has more than 13 years experience in developing custom software solutions for business and other large enterprises. Drawing upon this vast knowledge base, the company’s team now specializes in the development and hosting of web-based solutions for business and organizations.
For more information about WebAsyst LLC please refer to www.shop-script.com/contacts.html
Support Customers of Shop-Script PRO software package obtain free technical support. If you have any questions about the software and/or WebAsyst’s services please refer to “Support” section at Shop-Script website: www.shop-script.com/support.html. Please note that we do not provide support on questions regarding modification of PHP/HTML source files (e.g. How can I add a feature? How can I integrate Shop-Script with my custom PHP script?). More information regarding WebAsyst products and services can be found in Terms Of Service section of Shop-Script website: http://www.shop-script.com/terms-of-service.html Free trial This User Guide covers both Shop-Script PRO and its limited Free Trial edition. The installation and store management for both versions are performed the same. The only difference is that Free Trial edition is encrypted using either Zend Guard or ionCube technology and limited for up to 10 orders, 10 customers, 50 categories and 100 products. Installing Free Trial edition requires Zend Optimizer or ionCube Loader software to be installed on your web server. Please refer to “Installing Zend Optimizer or ionCube Loader” section of this user guide for more information.

Page 5 of 101
Shop-Script PRO Copyright © WebAsyst LLC
Installation and configuration System requirements
Shop-Script PRO software works on Windows, UNIX, Linux, FreeBSD, MacOS platforms. Shop-Script products require following software to be installed on your web server (in assumption that you already have HTTP-server software installed, e.g. Apache, IIS):
• PHP 4.3.0 or higher
Required PHP settings (php.ini): file_uploads = On magic_quotes_gpc = On
• MySQL database
• cURL PHP library is required for:
o Payment modules: Google Checkout, Authorize.Net AIM, PayPal Website Payments Pro, PayPal Payflow Pro, NetRegistry, eProcessingNetwork, LinkPoint/YourPay API, SkipJack, TrustCommerce, Streamline eSolutions, USA ePay
o All real-time shipping modules: UPS, USPS, FedEx, DHL
If you are going to use any of these modules, please make sure your web server supports cURL, else these modules will not work.
• GD PHP library is required to make registration and checkout forms protected by “security image” with a Confirmation Code. See “Front end” –> “Customer registration” and “Back end” -> “Configuration” sections of this User Guide for details.
• A valid SSL certificate is required for using following payment modules: Google Checkout, HSBC
• We strongly recommend having SSL certificate if you are going to utilize any of the following payment modules: Authorize.Net AIM, PayPal Website Payments Pro Direct Payment, PayPal Payflow Pro, NetRegistry, eProcessingNetwork, LinkPoint/YourPay API, SkipJack, TrustCommerce, Streamline eSolutions, USA ePay Though all these modules can work without SSL certificate, all of them work such that customers input their credit card data on your online store side and then this data is sent to payment gateway in real-time. If you don’t have SSL certificate, customers may simply go away (abandon the cart) when they see that they are requested to provide credit card information on insecure website without SSL connection.
• HSBC payment module requires that your hosting environment allows utilizing exec() function for running third-party compiled software. Please see “Modules” – “HSBC” section of this User Guide for more details.
• Installing Free Trial edition requires either Zend Optimizer or ionCube Loader PHP extension to be installed on your web server. Each of these extensions is used for running encoded PHP files using Zend and ionCube

Page 6 of 101
Shop-Script PRO Copyright © WebAsyst LLC
technologies accordingly. Zend Optimizer is more popular extension and is installed on the majority of hosting providers worldwide, thus we recommend you downloading Zend version of Free Trial. You may contact your hosting provider for details on support for Zend Optimizer and/or ionCube Loader in your account. If you install Trial edition on you local machine you can download and install either Zend Optimizer or ionCube Loader for free: Zend Optimizer: http://www.zend.com/products/zend_optimizer ionCube Loader: http://www.ioncube.com/loaders.php Please refer to support resources on Zend and ionCube websites to learn how to install these PHP extensions.
If you are going to install Shop-Script to a remote server, please contact your hosting provider to verify server specifications.

Page 7 of 101
Shop-Script PRO Copyright © WebAsyst LLC
Available versions
Shop-Script PRO software is available in two versions:
• Windows Executable (.exe) This version of Shop-Script PRO is an installation wizard which will install Shop-Script to your local machine or to a remote server. Recommended for all Windows users. Installation wizard makes installation process of Shop-Script as easy as installation of a regular Windows application.
• Zip Version (.zip) This version is a zip archive containing all Shop-Script files. No express installation wizard is included in this version. Installation is performed according to instructions given below in the “Installing Zip Version” section of this User Guide.
Both versions of Shop-Script PRO can be downloaded from your WebAsyst Customer Center account.
Please note that these are just different versions of the same product. Features of both versions are absolutely the same. The only difference is in the installation process.
We urge you to download Windows Executable since this is much easier and more convenient to install. Zip version is suitable for Linux/FreeBSD/MacOS X users.
Page 8 of 101
Shop-Script PRO Copyright © WebAsyst LLC
Installing Windows Executable Version
The easiest way to install Shop-Script PRO!
In this section you will find instructions on how to install Windows Executable Version of Shop-Script PRO to your local machine or to a remote server. Recommended for all Windows users. Installation wizard makes installation process of Shop-Script as easy as installation of a regular Windows application.
Installation to your local computer
1. Make sure your system complies with the system requirements listed in the ‘System requirements’ section above. If you are familiar with such terms as PHP, MySQL and already have all required software installed please proceed to Step 2. Otherwise, if your computer does not have required software installed (Apache or IIS, PHP and MySQL), you can install all required software at once using EasyPHP. Please do the following:
a. Download EasyPHP package from www.easyphp.org. EasyPHP is a complete software package allowing to use all the power and the flexibility that offers the dynamic language PHP and the efficient use of databases under Windows. Package includes an Apache server, a MySQL database, a fully PHP execution, as well as easy development tools for your website or your applications. After download is complete, run the EasyPHP executable file and follow the instructions provided by EasyPHP installation wizard. In the installation options please change Install Folder to “C:\EasyPHP” because a shorter directory name is easier to remember.
b. Run EasyPHP on your computer after you finish its installation.
c. Create a new MySQL database that will be used for your shopping cart system. To do this you need to create an empty folder named shop_data in the “C:/EasyPHP/MySQL/Data” directory. After you create this folder you should have an empty folder “C:/EasyPHP/MySQL/Data/shop_data”, where MySQL database files will be stored. By creating this folder you will create a new database named shop_data.
Having installed EasyPHP, you have made your computer compatible with Shop-Script’s system requirements.
2. After you have verified that system requirements are met, run Shop-Script PRO installation wizard (.exe file):
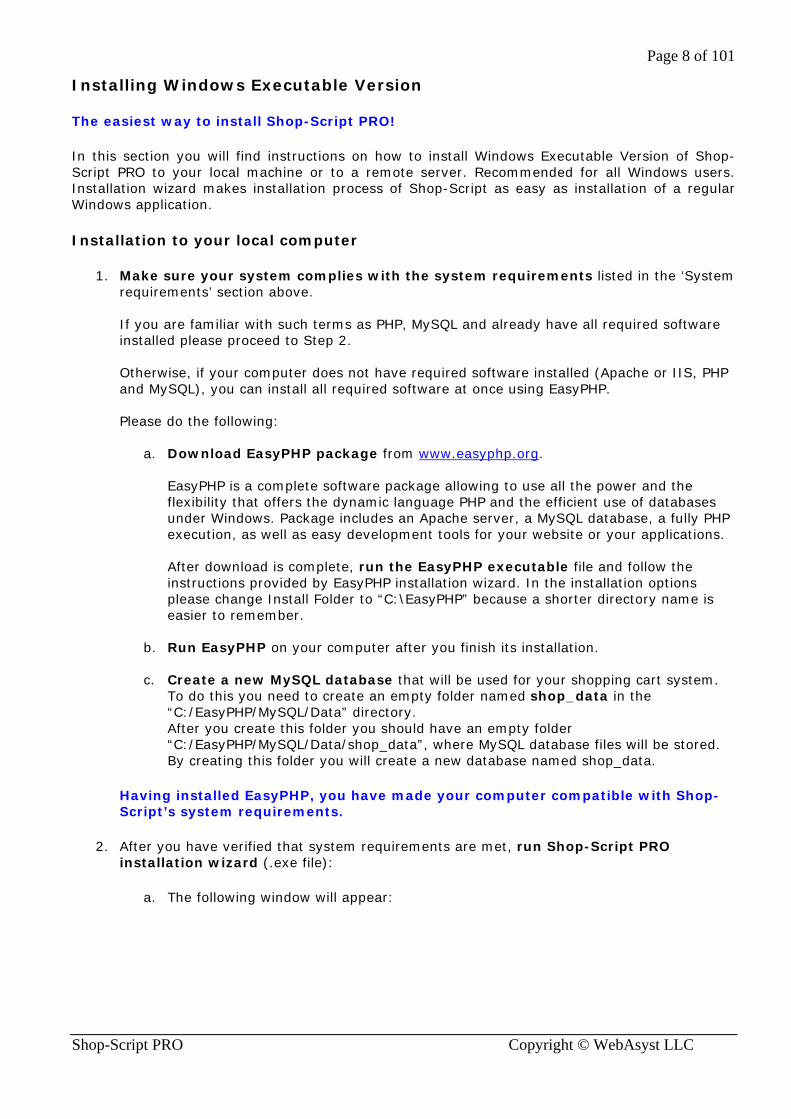
a. The following window will appear:
Page 9 of 101
Shop-Script PRO Copyright © WebAsyst LLC
Click Next to begin installation.
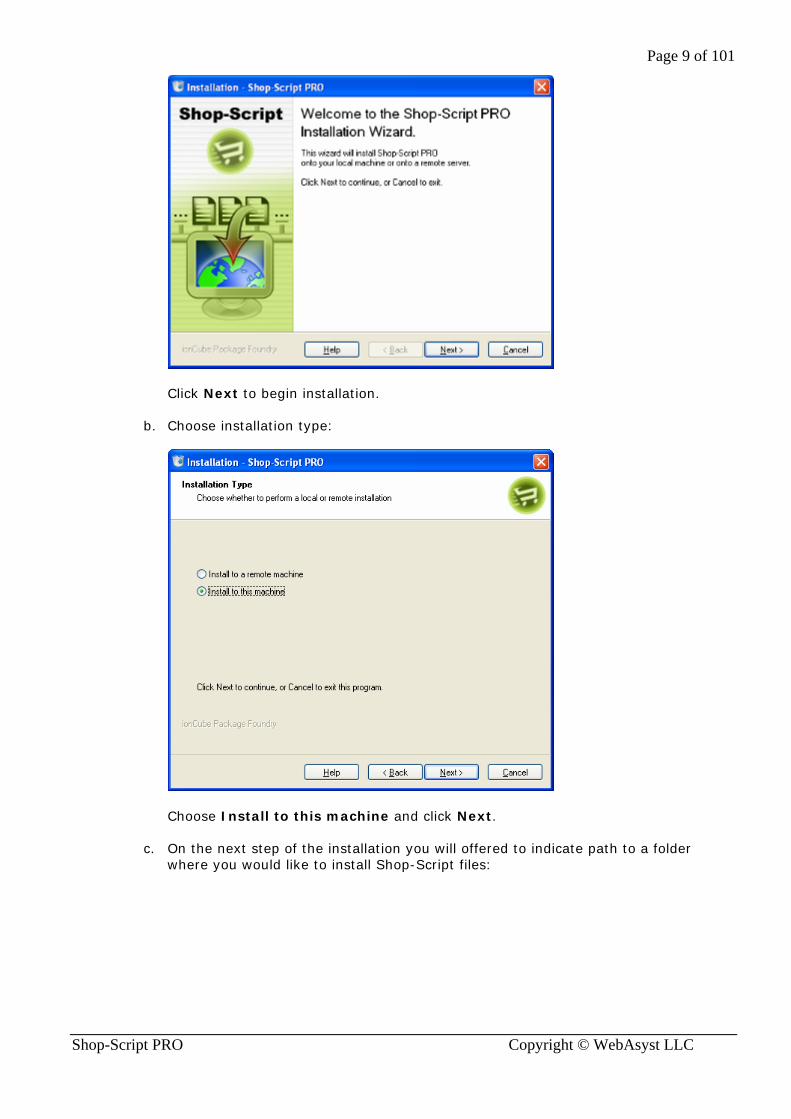
b. Choose installation type:
Choose Install to this machine and click Next.
c. On the next step of the installation you will offered to indicate path to a folder where you would like to install Shop-Script files:

Page 10 of 101
Shop-Script PRO Copyright © WebAsyst LLC
Enter “C:\EasyPHP\www\” as it is shown on the screenshot above and click Next. In case you install Shop-Script not with EasyPHP, indicate your custom folder.
d. On the next step you will be offered to input URL of the installation folder which you have specified (C:\EasyPHP\www\):
Enter http://localhost/ as it is shown on the screenshot above and click Next. In case you install Shop-Script not with EasyPHP, indicate URL of your custom folder.
e. If you specified Install location URL correctly, files will be copied to the specified folder and installation wizard will automatically run post-install script install.php: http://localhost/install.php

Page 11 of 101
Shop-Script PRO Copyright © WebAsyst LLC
If this does not happen automatically, please point your web browser (e.g. IE, Firefox) to the URL mentioned above. In case you install Shop-Script not with EasyPHP, this URL may vary. Install.php script should appear in your web browser as follows:
* If you install Free Trial edition and see “Zend Optimizer is not installed” or “The file .../install.php has been encoded with the ionCube PHP Encoder and requires the free ioncube_loader_win_X.X.dll ionCube PHP Loader” error message, please refer to “Installing Zend Optimizer or ionCube Loader” section of this User Guide. Choose “Install Shop-Script PRO” and click Next. If this page does not appear as presented on the screenshot above, please refer to ‘Troubleshooting’ section of this User Guide. If you install Shop-Script on IIS, this page may be presented incorrectly. Note that for IIS you may need to specify file access permissions for certain files and folders. For more information regarding setting up file access permissions please refer to “Installing Zip Version” -> “Installation to your local computer” -> “Manual installation (advanced)” section of this User Guide.
f. You will be offered to input database connection settings:
Page 12 of 101
Shop-Script PRO Copyright © WebAsyst LLC
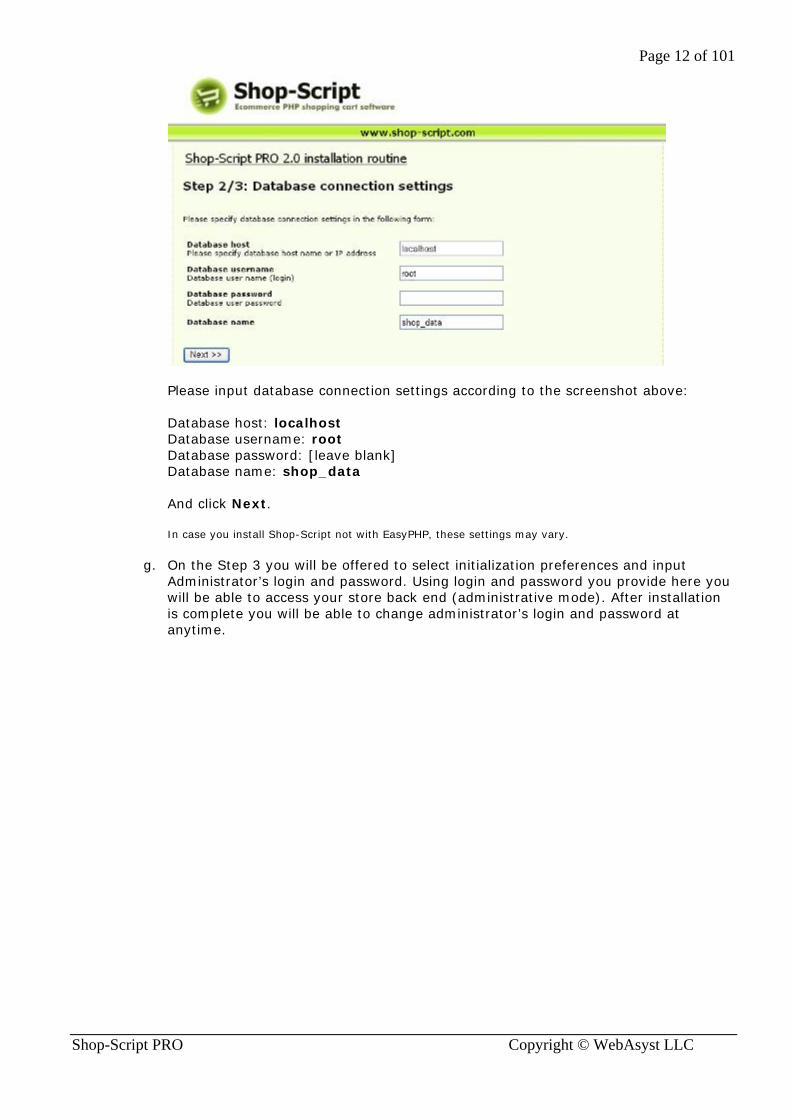
Please input database connection settings according to the screenshot above: Database host: localhost Database username: root Database password: [leave blank] Database name: shop_data And click Next. In case you install Shop-Script not with EasyPHP, these settings may vary.
g. On the Step 3 you will be offered to select initialization preferences and input Administrator’s login and password. Using login and password you provide here you will be able to access your store back end (administrative mode). After installation is complete you will be able to change administrator’s login and password at anytime.

Page 13 of 101
Shop-Script PRO Copyright © WebAsyst LLC
Click Install!
h. Congratulations! Shop-Script has been successfully installed. You will be shown a screen with "Installation successful" message and a link to Shop-Script PRO front end (customer storefront):
If this page does not appear as presented on the screenshot above, please refer to ‘Troubleshooting’ section of this User Guide.

Page 14 of 101
Shop-Script PRO Copyright © WebAsyst LLC
Installation to a remote server
Make sure your system complies with system requirements listed in the ‘System requirements’ section above. Please contact your hosting provider regarding this issue.
After you have verified that system requirements are met, run Shop-Script PRO installation wizard (.exe file):
a. The following window will appear:
Click Next to begin installation.
b. Choose installation type:
Choose Install to a remote machine and click Next.
c. On the next step of the installation you will offered to indicate remote FTP server connection details:

Page 15 of 101
Shop-Script PRO Copyright © WebAsyst LLC
Please indicate FTP settings obtained from your hosting provider and specify a folder where you would like to install Shop-Script. You may select folder to upload Shop-Script files by clicking “Browse” button. Installation wizard will connect to FTP server using details provided and will allow you to select a folder from the list. Click Next. If you are not sure which folder to select, please contact your hosting provider to obtain information about folders structure on the server.
d. On the next step you will be offered to input URL of the installation folder which you have specified. Please provide a valid URL of the installation folder (Shop-Script installation URL), e.g. http://www.yourdomain.com/:

Page 16 of 101
Shop-Script PRO Copyright © WebAsyst LLC
Install location URL depends on the installation folder you have specified.
e. If you specified Install location URL correctly, Shop-Script files will be uploaded to the specified folder on the server, and installation wizard will automatically configure file access permissions on the server. Please note that this is applicable only for UNIX/FreeBSD/Linux/MacOSX servers. Installation wizard automatically executes chmod commands for certain files and folders. In case you install Shop-Script on Windows hosting, please set file access permissions manually according to instructions given in the “Installing Zip Version” -> “Installation to a remote server” section of this User Guide. Then installation wizard will automatically run post-install script install.php in your web browser. If this does not happen automatically, please point your web browser to the install.php manually: simply point your browser to the Installation URL + install.php, e.g. e.g. http://www.yourdomain.com/install.php. Install.php script should appear in your web browser as follows:
* If you install Free Trial edition and see “Zend Optimizer is not installed” or “The file .../install.php has been encoded with the ionCube PHP Encoder and requires the free ioncube_loader_win_X.X.dll ionCube PHP Loader” error message, please refer to “Installing Zend Optimizer or ionCube Loader” section of this User Guide. Choose “Install Shop-Script PRO” and click Next. If this page does not appear as presented on the screenshot above, please refer to ‘Troubleshooting’ section of this User Guide.
f. You will be offered to input database connection settings:

Page 17 of 101
Shop-Script PRO Copyright © WebAsyst LLC
Database connection details can be obtained from your hosting provider.
g. On the Step 3 you will be offered to select initialization preferences and input Administrator’s login and password. Using login and password you provide here you will be able to access your store back end (administrative mode). After installation is complete you will be able to change administrator’s login and password at anytime.
Click Install!
h. Congratulations! Shop-Script has been successfully installed. You will be shown a screen with "Installation successful" message and a link to Shop-Script PRO front end (customer storefront):

Page 18 of 101
Shop-Script PRO Copyright © WebAsyst LLC
If this page does not appear as presented on the screenshot above, please refer to ‘Troubleshooting’ section of this User Guide.
After the installation is complete, please carefully read instructions in the “Protecting your shopping cart” section of this User Guide!

Page 19 of 101
Shop-Script PRO Copyright © WebAsyst LLC
Installing Zip Version
Installation to your local computer
In this section you will find instructions on how to install Zip Version of Shop-Script PRO on your computer.
At first you have to make sure that you have required software installed on your computer (HTTP server, PHP, MySQL) - see ‘System requirements’ section for details.
If you are familiar with such terms as PHP, MySQL and already have all required software installed please refer to ‘Manual installation (advanced)’ paragraph under this section.
If you are not quite sure regarding what software is already installed on your machine, please refer to the instructions under ‘Installation with EasyPHP’ paragraph below.

Page 20 of 101
Shop-Script PRO Copyright © WebAsyst LLC
Installation with EasyPHP (recommended)
Following instructions are recommended for users who are not familiar with web technologies and for those who do not have required software installed on their computers (see ‘System requirements’ section for details).
Installation instructions:
1. Download the latest version of EasyPHP from www.easyphp.org. EasyPHP is a complete software package allowing to use all the power and the flexibility that offers the dynamic language PHP and the efficient use of databases under Windows. Package includes an Apache server, a MySQL database, a fully PHP execution, as well as easy development tools for your website or your applications. After download is complete, run the EasyPHP executable file and follow the instructions provided by the installation wizard. In the installation options we recommend changing Install Folder to “C:/EasyPHP” because a shorter directory name is easier to remember.
2. Run EasyPHP on your computer after you finish its installation.
3. Create a new database that will be used for your shopping cart system. To do this you need to create an empty shop_data folder in the “C:/EasyPHP/MySQL/Data” directory. After you create this folder you should have an empty folder C:/EasyPHP/MySQL/Data/shop_data, where MySQL database files will be stored. By creating this folder you will create a new database named shop_data.
4. Unpack Shop-Script PRO archive into an EasyPHP home folder - “C:/EasyPHP/www”. If you do not have compression software installed, we suggest you to download WinZip software from www.winzip.com and unpack Shop-Script PRO archive using this software. Please make sure to unpack and copy all content of Shop-Script PRO archive (if it is not done you will not be able to install the software).
5. Run install.php To do this simply point your browser to http://localhost/install.php. Install.php script should appear in your web browser as follows:

Page 21 of 101
Shop-Script PRO Copyright © WebAsyst LLC
* If you install Free Trial edition and see “Zend Optimizer is not installed” or “The file .../install.php has been encoded with the ionCube PHP Encoder and requires the free ioncube_loader_win_X.X.dll ionCube PHP Loader” error message, please refer to “Installing Zend Optimizer or ionCube Loader” section of this User Guide. Choose “Install Shop-Script PRO” and click Next.
6. You will be offered to input database connection settings:
Please input database connection settings according to the screenshot above: Database host: localhost Database username: root

Page 22 of 101
Shop-Script PRO Copyright © WebAsyst LLC
Database password: [leave blank] Database name: shop_data And click Next.
7. On the Step 3 you will be offered to select initialization preferences and input Administrator’s login and password. Using login and password you provide here you will be able to access your store back end (administrative mode). After installation is complete you will be able to change administrator’s login and password at anytime.
Click Install!
8. Congratulations! Shop-Script has been successfully installed. You will be shown a screen with "Installation successful" message and a link to Shop-Script PRO front end (customer storefront):

Page 23 of 101
Shop-Script PRO Copyright © WebAsyst LLC
Manual installation (advanced)
Please follow instructions provided below only if you already have:
• HTTP server installed (e.g. Apache, IIS); • your system meets system requirements provided in ‘System requirements’ section of
this document.
Shop-Script Zip Version installation procedure:
1. Create a separate folder or a virtual server where all Shop-Script PRO files will be stored (Shop-Script root folder).
2. Unpack Shop-Script PRO archive to this folder. Please make sure to unpack all content of the archive. Otherwise Shop-Script may function improperly.
3. Create a new database that will be used for your shopping cart system (if you already have an empty database, you may use it as well).
4. Enable write permissions for following files and folders:
o all files inside cfg/ folder (e.g. connect.inc.php, tables.inc.php and others) o products_files/ folder o products_pictures/ folder o temp/ folder o templates_c/ folder
How to enable write permissions?
• Windows Apache users: Please skip this step. You do not need to enable write permissions since they are already enabled.
• Windows IIS users: IIS runs as the IUSER_[machine name] local user, thus to enable write permissions on folders and files specified above please grant IUSER_[machine name] rights to rewrite these files and folders. You will not be able to continue with the installation until permissions are not properly set.
• UNIX/Linux/FreeBSD/Mac OS users: File permissions are defined using chmod command. Please set chmod 666 for the files listed above (i.e. all files in the cfg/ folder), and chmod 777 for the listed folders (i.e. products_files, products_pictures, temp, templates_c). * See “Protecting your shopping cart” section of this User Guide for more information about file permissions. You will not be able to continue with the installation until permissions are set properly.

Page 24 of 101
Shop-Script PRO Copyright © WebAsyst LLC
5. Run install.php Simply point your browser to http://<Shop-Script URL including folder>/install.php e.g. http://localhost/shop/install.php Install.php script should appear in your web browser as follows:
* If you install Free Trial edition and see “Zend Optimizer is not installed” or “The file .../install.php has been encoded with the ionCube PHP Encoder and requires the free ioncube_loader_win_X.X.dll ionCube PHP Loader” error message, please refer to “Installing Zend Optimizer or ionCube Loader” section of this User Guide.
6. Provide installation details:
1. Provide MySQL database connection settings (database host, username, password and database name)..
2. Input administrator login and password. Using these login and password you will access your shopping cart administrative mode (back end). These login and password are up to your choice. Later you will be able to change them both.
7. If the installation went well you will be shown a screen with "Installation successful" message and a link to Shop-Script PRO front end (customer storefront). If "Installation successful" message does not appear or when clicking a link to front end it will not be shown correctly, please refer to ‘Troubleshooting’ section of this document.

Page 25 of 101
Shop-Script PRO Copyright © WebAsyst LLC
Installation to a remote server
In this section you will find instructions on how to install Zip Version of Shop-Script PRO on a remote server.
At first you have to make sure that a remote server meets system requirements listed in the ‘System requirements’ section of this document. Please contact your hosting provider to verify server configuration.
Installation instructions:
1. Unpack Shop-Script PRO zip archive into a separate folder on your computer.
2. Upload all unpacked files to the remote server into a separate folder. Files can be uploaded with your FTP manager (e.g. CuteFTP, ftpzilla). FTP connection settings can be obtained from your hosting provider. It is highly recommended to install Shop-Script PRO (upload files) into an empty directory on the remote server! Please make sure to upload ALL files. Otherwise Shop-Script PRO may function improperly.
3. Create a new database that will be used for Shop-Script PRO. However, if you already have an empty database you may use it as well.
4. Enable write permissions for the following files and folders:
• all files inside cfg/ folder (e.g. connect.inc.php, tables.inc.php and all other files) • products_files/ folder • products_pictures/ folder • temp/ folder • templates_c/ folder
How to enable write permissions?
• Windows IIS servers (Windows hosting): IIS runs as the IUSER_[machine name] local user, thus to enable write permissions on folders and files specified above please grant IUSER_[machine name] rights to rewrite these files and folders. Please contact your hosting provider to learn how to change files and folders permissions on the remote server.
• UNIX/Linux/FreeBSD/Mac OS servers: File permissions are defined using chmod command. Please set chmod 666 for the files listed above (i.e. all files in the cfg/ folder), and chmod 777 for the listed folders (i.e. products_files, products_pictures, temp, templates_c). * See “Protecting your shopping cart” section of this User Guide for more information about file permissions.
You will not be able to continue with the installation until permissions are not properly set.
5. Run install.php Simply point your browser to

Page 26 of 101
Shop-Script PRO Copyright © WebAsyst LLC
http://<Shop-Script URL including folder>/install.php (e.g. http://www.mywebsite.com/shop/install.php) Install.php script should appear in your web browser as follows:
* If you install Free Trial edition and see “Zend Optimizer is not installed” or “The file .../install.php has been encoded with the ionCube PHP Encoder and requires the free ioncube_loader_win_X.X.dll ionCube PHP Loader” error message, please refer to “Installing Zend Optimizer or ionCube Loader” section of this User Guide. In case file access permissions are set correctly on step 3, you will be able to continue installation. Otherwise you will be shown an error message or a blank page (depending on server settings), which means you have to return to step 3.
6. Input database connection settings:
Provide MySQL database connection settings (database host, username, password and database name). Please contact your hosting provider to obtain this information.
Input administrator login and password. Using these login and password you will access your shopping cart administrative mode (back end). These login and password are up to your choice. Later you’ll be able to change them both.
7. If the installation was successful you will be shown a screen with "Installation successful" message and a link to Shop-Script PRO front end (customer storefront). If "Installation successful" message does not appear or when clicking a link “go to front end” front end will not be represented correctly, please refer to ‘Troubleshooting’ section of this document.

Page 27 of 101
Shop-Script PRO Copyright © WebAsyst LLC
After the installation is complete, please carefully read instructions in the “Protecting your shopping cart” section of this User Guide!
Page 28 of 101
Shop-Script PRO Copyright © WebAsyst LLC
Installing Zend Optimizer and ionCube Loader
Installation of either Zend Optimizer or ionCube Loader is required to run Shop-Script PREMIUM Trial edition.
Zend Optimizer
To download Zend Optimizer please visit Zend official website: http://www.zend.com/products/zend_optimizer Click “Buy now” and apply for the registration – after you do it you will be granted the access to download Zend Optimizer for your operating system. If you install Free Trial edition on your local machine with Windows OS, Zend Optimizer installation application will automatically install it and introduce changes to PHP settings for you. You will only have to enter path to php.ini file and point installer to the root folder of your web server application (Apache/IIS). If you install Free Trial to a remote server, most probably Zend Optimizer is already installed on the server. However, if it is not, contact your hosting provider support regarding Zend Optimizer installation (only they can have server permissions to install it).
ionCube Loader
To install ionCube Loader whether download it from ionCube website (http://www.ioncube.com/loaders.php), or (if you install Shop-Script Free Trial using Windows Installer you don't have to download Loader manually) find ionCube Loader files in the loaders/ subfolder of Shop-Script installation directory. What you need here is PHP extension for running encoded files - .DLL file for Windows servers, .SO file for Unix. Write down the file name and a full path to it. Open your php.ini file and enable ionCube Loader inclusion by adding a line (for Windows servers): zend_extension_ts = <drive>:\<path>\ioncube_loader_win_<php version>.dll (e.g. zend_extension_ts = C:\EasyPHP\www\loaders\ioncube_loader_win_4.4.dll for PHP 4.4.x) and then restart your web server. For more information please refer to detailed instructions at ionCube website: http://www.ioncube.com/loader_installation.php.

Page 29 of 101
Shop-Script PRO Copyright © WebAsyst LLC
Upgrading Shop-Script
Please follow instructions below if you already use Shop-Script FREE or Shop-Script PRO software and would like to upgrade it to the latest version of Shop-Script PRO.
NOTE: Downgrade from Shop-Script PREMIUM to Shop-Script PRO is not available.
NOTE: Following these instructions will upgrade your database to the newest version’s structure and will “transfer” all data (e.g. products, categories, users) into the newer installation.
If you had made any changes in PHP source files and/or template files of your current installation, these changes will be lost during upgrade. This is inevitable. However, if you would like to extend your changes to the newer installation, please read suggestions given below the upgrade steps.
Following steps should be performed in order to upgrade your installation (the processes of upgrading installations on a remote server or on your local machine are similar):
1. Backup your current Shop-Script installation: both – database and source files. This step is compulsory! Do not skip this step; otherwise any malfunction during upgrade can entail the loss of data. We recommend making backup in a separate folder on your computer. Make sure to backup all files of your current installation (including templates, PHP source files, images, etc.). Database can be backed up using phpMyAdmin utility (http://www.phpmyadmin.net). Please contact your hosting provider to obtain information whether phpMyAdmin is installed on the remote server or not.
2. Only if you are upgrading from Shop-Script PRO: Save file cfg/survey.inc.php on your hard disk drive. This file contains main customer survey configuration (survey questions and results).
3. Delete all files of your current Shop-Script installation, except for folders products_pictures/ and products_files/. You may delete these folders, but in case you do it you will have to re-copy/re-upload them once again after installation of the update; thus we recommend you leave these folders as is. All other folders and files should be deleted (e.g. index.php, includes/ folder, templates/ folder, templates_c/, etc.). (!) Please make sure to delete templates_c folder. If you do not do this, errors may occur when running newer Shop-Script PRO installation.
4. Copy/upload all files of the new Shop-Script PRO package (all files from the archive), except for the folders products_pictures/, products_files/ (do not copy these folders from the archive if you left them as is on step 3 of these instructions), to the directory where your previous installation was installed. If you are doing manual installation (using Zip version of the package) you need to upload new files to your server with the help of your FTP manager. In case you upgrade from a Windows Executable Version of Shop-Script PRO, simply run installation wizard and follow instructions given in the “Installing Windows Executable” section of this User Guide (see above).

Page 30 of 101
Shop-Script PRO Copyright © WebAsyst LLC
5. Only if you are upgrading from Shop-Script PRO: Replace file cfg/survey.inc.php of the newer Shop-Script PRO installation with the file saved on the step 2 of these instructions.
6. Set files access permissions. If you are upgrading your installation on the remote UNIX/Apache or Windows/IIS server, please set file access permissions according to step 4 of “Installation on a remote server” section of this document.
7. Run install.php Set toggle to “Upgrade my Shop-Script installation”, select your older Shop-Script’s version and follow instructions provided by install.php routine.
Congratulations! Your store has been upgraded. If you had made changes in PHP source files and/or template files of your older installation, these changes will be lost during upgrade. Unfortunately, this is inevitable. However, if changes you had made are local (e.g. only few files were modified), we believe you can apply changes such as you did previously. Since files structure and style remains the same from version to version, you may even copy and paste fragments from previously modified files to the newer installation’s files. Sometimes you may even replace files from the newer installation with your modified files, and they will work correctly. Please keep in mind that this is just a suggestion. Be careful when changing PHP and template files.

Page 31 of 101
Shop-Script PRO Copyright © WebAsyst LLC
Protecting your store
Please carefully read information below if your installation of Shop-Script PRO is available for 3rd parties, i.e. if you have installed Shop-Script PRO to a remote server and/or your shopping cart is accessible in the Internet or a Local Area Network.
Once Shop-Script PRO is installed, first thing you need to do is properly configure and protect your installation (and information).
At first,
Make sure you have deleted install.php file in the Shop-Script installation folder. You have to do it manually with your FTP manager (e.g. CuteFTP, ftpzilla).
Second,
Make sure that HTTP access (i.e. access through a web browser) to following folders is prohibited:
• cfg • core_functions • includes • modules • product_files • temp • templates_c
These folders contain secure and sensitive information, which should not be available for 3rd parties.
If you are using Apache HTTP server, these folders are already protected by .htaccess files (they are included in the package). For other web servers (e.g. IIS) please refer to your operating system manual and support resources.
To make sure you properly protected folders mentioned above, please try to point your browser to these folders, e.g. http://www.mywebsite.com/shop/cfg/, http://www.mywebsite.com/shop/cfg/connect.inc.php, http://www.mywebsite.com/shop/modules/. Pointing your browser to any of these folders or files inside these folders should bring up “Forbidden” error message.
Do not protect products_pictures/ folder from public HTTP access. Otherwise product images will not be displayed.
Third (UNIX/FreeBSD/Linux/MacOSX users only),
Verify proper access permissions for the certain folders and files (chmod):
In the installation guide you were told to set:
• chmod 777 for the following folders:
o products_files/ folder o products_pictures/ folder

Page 32 of 101
Shop-Script PRO Copyright © WebAsyst LLC
o temp/ folder o templates_c/ folder
• chmod 666 for all files in the cfg/ folder (i.e. connect.inc.php, tables.inc.php and
others).
By specifying such access permissions you will enable (re)write permissions for these files/folders. Shop-Script should be able to create new files inside products_pictures, products_files, temp, templates_c folders (e.g. upload product picture files) and rewrite existing files inside cfg folder (e.g. save database settings). Depending on server configuration proper chmod value may differ – for example, this depends on the user group to which Apache HTTP server (and PHP) belongs.
Recommended chmod values -777 for folders and 666 for the files - will work on all systems. However, on some systems setting chmod 777 for the listed folders may be insecure! To get to know which chmod value should be set on your server please contact your hosting provider - simply ask them such a question: “Which access permissions value (chmod) should I set for the folder to make my PHP scripts be able to create files in this folder? Will setting chmod 777 for the folder be insecure? What chmod value would you suggest to set?”. After your hosting provider suggests you a proper chmod value, please set it for the folders listed above.
Forth,
Finally, please go to ‘Settings’ section of Shop-Script PRO administrative mode to configure your shopping cart settings (e.g. define email address, shopping cart URL, name and other information).

Page 33 of 101
Shop-Script PRO Copyright © WebAsyst LLC
Transferring your store from one server to another
Please following instructions below if you would like to move your online store from one server to another (e.g. from your local machine to a remote server, from one remote server to another one). Let us assume that you have an online store installed on server A, and would like to move it to server B.
Follow these steps:
1. Perform installation of a new online store on server B on a regular basis (follow instructions given above in the “Installation” section of this User Guide).
2. If you have introduced changes to any files of your store on server A (this could be language file, templates, PHP sources, etc.), simply overwrite store B’s files with the files which you have modified.
3. Copy (upload) following files/folders from server A to server B (choose “Overwrite files” in case of collisions):
• all content of products_pictures/ folder • all content of images/ folder • file cfg/survey.inc.php (it contains customer survey settings) – do not copy any
other file from cfg/ folder
4. Now you have to transfer server A’s store database content to server B. This can be done by exporting all database tables content to a file and importing it on server B. The easiest way to do it is using phpMyAdmin application (http://www.phpmyadmin.net/), which provides MySQL database management tools. phpMyAdmin is free and very popular application, and it is installed on almost any web server that has MySQL installed. Run phpMyAdmin (if you don’t have it, you can download it from official website for free, and install on your web servers A and B), select your store A database and click “Export”. Save exported database to a file on your hard drive.
5. Now run phpMyAdmin on server B, select store B’s database and click “SQL” tab (or “Import” tab for newer phpMyAdmin versions). Now simply browse for the file which you have saved on the previous step and click “OK”.
That is all. Your store has been successfully transferred.

Page 34 of 101
Shop-Script PRO Copyright © WebAsyst LLC
Front end (customer storefront)
Products Catalog Shop-Script PRO front end home page looks similar to what is presented on the following screenshot:
Front end represents products catalog of your store and gives your customers ability to navigate through product offers and place orders. Products in Shop-Script are grouped into categories. There are two ways users can access categories: - clicking the big links located in the center of the page; - navigating through the list of categories located in the left part of the page, under the “Search” field. Category nesting is unlimited, i.e. categories can be broken into subcategories, in their turn subcategories can be also broken into subcategories and so on. For example, you can create category “Electronics”, then add subcategory “Audio & Video” into “Electronics”, then add subcategory “Cameras” into “Audio & Video”, then add subcategory “Digital cameras” into “Cameras” and so on.
By clicking a category title customer will be shown a list of products located inside clicked category. Categories list to the left will always reflect customer’s current position (with the asterisk) at the categories tree. Once user goes deeper into a category there

Page 35 of 101
Shop-Script PRO Copyright © WebAsyst LLC
appear search fields to help him/her quickly find products. By default, there are three fields allowing you to specify product’s name and price limitations. In administrative mode you can add an unlimited number of custom options, e.g. color, size, weight, etc. When viewing a list of products (in category, in search results, etc.), customer can click on product name and it will bring him/her to product detailed description page. Apart from adding the product to your shopping cart detailed product page allows customer to view product image, rate products and discuss it with other users.
“Add to cart” button is displayed for a product only if:
• product price is positive (greater than zero) • depending on Stock Level Control setting, which is configured in administrative mode
(‘Settings’ screen): o if Stock Level Control is switched on, “Add to cart” button is shown only if product is
in stock (in stock value is greater than zero); o if Stock Level Control is switched off, “Add to cart” button is shown not depending
on product stock value.
If product price is zero (0) or negative (<0), “Add to cart” button will not be displayed.
These conditions of displaying an “Add to cart” button give you an ability to disable ordering facility for individual products. And if you would like to disable ordering system at all, please refer to ‘Back end’ -> ‘General configuration’ section of this document.
Using “Rate this item” form visitors have abilities to affect product rating. Rating varies from 0 to 5 and is displayed to visitors below the product name – 0 colored stars means the lowest rating and 5 stars means the highest rating. All visitors have ability to vote for products (not depending on whether they are registered or not and whether they purchased this product or not). A single visitor is allowed to vote for a product only once per visit. If visitor pushes “Rate!” button more than one time, only the first vote will be accounted, and all other votes will be ignored.
Product detailed information page also displays:
• related products. For more information about related products and cross selling please refer to ‘Back end’ -> ‘Editing product entries’ section of this document.
Page 36 of 101
Shop-Script PRO Copyright © WebAsyst LLC
Customer registration and account
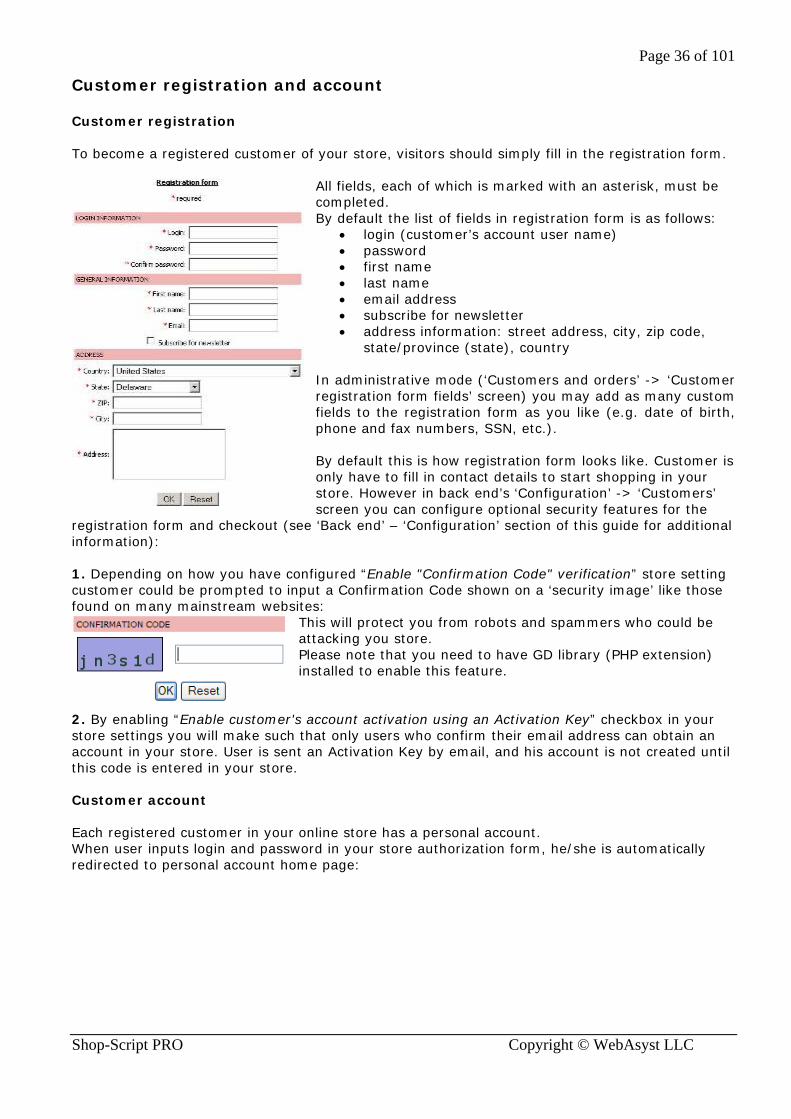
Customer registration To become a registered customer of your store, visitors should simply fill in the registration form.
All fields, each of which is marked with an asterisk, must be completed. By default the list of fields in registration form is as follows:
• login (customer’s account user name) • password • first name • last name • email address • subscribe for newsletter • address information: street address, city, zip code,
state/province (state), country In administrative mode (‘Customers and orders’ -> ‘Customer registration form fields’ screen) you may add as many custom fields to the registration form as you like (e.g. date of birth, phone and fax numbers, SSN, etc.). By default this is how registration form looks like. Customer is only have to fill in contact details to start shopping in your store. However in back end’s ‘Configuration’ -> ‘Customers’ screen you can configure optional security features for the
registration form and checkout (see ‘Back end’ – ‘Configuration’ section of this guide for additional information): 1. Depending on how you have configured “Enable "Confirmation Code" verification” store setting customer could be prompted to input a Confirmation Code shown on a ‘security image’ like those found on many mainstream websites:
This will protect you from robots and spammers who could be attacking you store. Please note that you need to have GD library (PHP extension) installed to enable this feature.
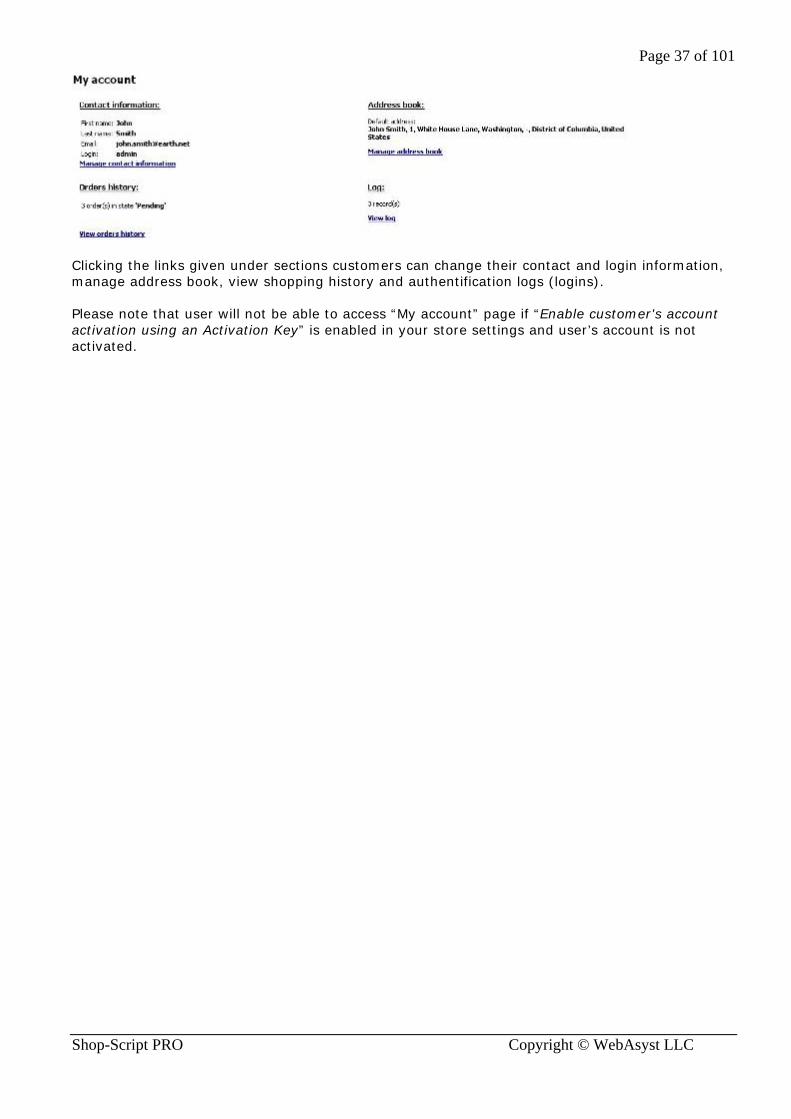
2. By enabling “Enable customer's account activation using an Activation Key” checkbox in your store settings you will make such that only users who confirm their email address can obtain an account in your store. User is sent an Activation Key by email, and his account is not created until this code is entered in your store. Customer account Each registered customer in your online store has a personal account. When user inputs login and password in your store authorization form, he/she is automatically redirected to personal account home page:
Page 37 of 101
Shop-Script PRO Copyright © WebAsyst LLC
Clicking the links given under sections customers can change their contact and login information, manage address book, view shopping history and authentification logs (logins). Please note that user will not be able to access “My account” page if “Enable customer's account activation using an Activation Key” is enabled in your store settings and user’s account is not activated.

Page 38 of 101
Shop-Script PRO Copyright © WebAsyst LLC
Manage contact information
Here users can change their login and password, first and last names, change email address, subscribe/unsubscribe for newsletter. If you have defined custom registration fields in administrative mode, customers will also be prompted to fill this information (e.g. phone and fax numbers, DOB, etc.).
Note the left-hand column - it contains links to other sections of My account, so user can browse straight to those sections without having to get back to My account’s home page. Manage address book
This page has the tools allowing customers to edit (Edit button) and delete (red cross) their address book entries. Address book may contain an unlimited number of entries. Shopping history
This tool allows customer to see the orders he/she has already placed. Customer can search orders by IDs and states.
Once search criteria are defined, orders are shown to customer:
Customers cannot modify the orders; they can only see what was ordered, when it was ordered, what is the state of the order and order amount. By clicking ‘order ID’ customer will be shown detailed order information including shipping and billing addresses, ordered products, taxes, discounts and order execution history. If some of ordered products are downloadable and the order is marked by administrator as “Completed” (i.e. paid and confirmed) customer will be given a link to download purchased product(s). Plus, on order’s information page customer has the ability to print an invoice for the order.

Page 39 of 101
Shop-Script PRO Copyright © WebAsyst LLC
Log Log section reveals dates and time when user logged in your store. The table shown to user looks like this:
Price list Price list contains all the products you have in the store. Categories and subcategories are also presented here. Price list may look like this:
News Apart from the ways available while registering or editing account information users can also subscribe to receive newsletters using this form:
The routine is as simple as specifying a valid email address in the field.
Feedback Feedback department allows your store visitors to send you requests online without using an email client. User fills in the form and request is automatically sent to store administrator by email on the email address mentioned in store settings (general email address). Requests can be sent from ‘Feedback’ department of your store and from every product information page (you may notice that there is a feedback form below each product’s description).

Page 40 of 101
Shop-Script PRO Copyright © WebAsyst LLC
Shopping cart Adding products to the shopping cart is as simple as clicking the “add to cart” button. This button is seen opposite any item in the list of products. It is also present on the product’s personal page that contains its description and pictures and gives customer a chance to rate it and discuss the item with other customers. Once customer clicks the “add to cart” button, he/she is shown a shopping cart page. Depending on store configuration, shopping cart page is opened in a popup window or in core store window (customer is simply redirected to shopping cart page).
At this stage customer can view order amount, review the choice and remove items he/she no longer wants from the cart or empty it blank. The cart status is shown each time customer adds an item to the cart. From here he/she can either proceed to checkout or get back to shopping. By default, “Back to shopping” takes the customer to the store homepage. If “Stock level control” is enabled in store settings (please refer to “Back end” -> “Configuration” section of this document for more information), the number of items of a single product customer adds to shopping cart is limited to product in stock count (for more information about managing “In stock” value refer to “Back end” -> “Adding new products” section).
Page 41 of 101
Shop-Script PRO Copyright © WebAsyst LLC
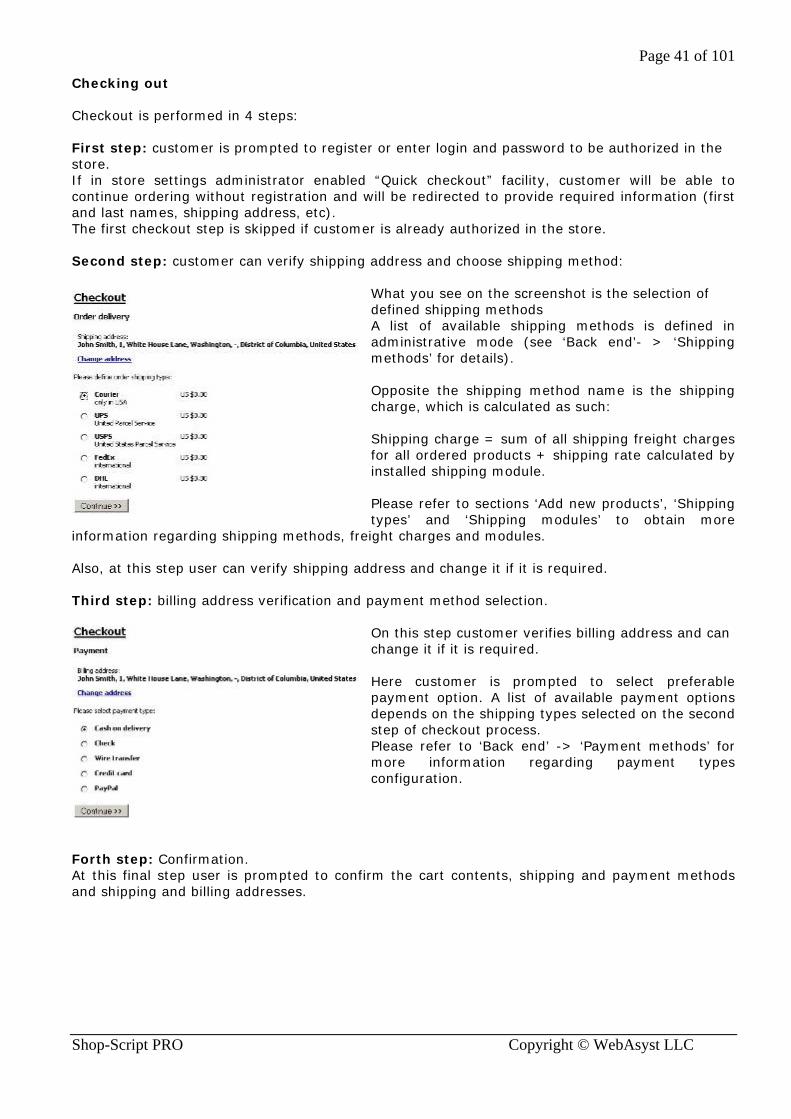
Checking out Checkout is performed in 4 steps: First step: customer is prompted to register or enter login and password to be authorized in the store. If in store settings administrator enabled “Quick checkout” facility, customer will be able to continue ordering without registration and will be redirected to provide required information (first and last names, shipping address, etc). The first checkout step is skipped if customer is already authorized in the store. Second step: customer can verify shipping address and choose shipping method:
What you see on the screenshot is the selection of defined shipping methods A list of available shipping methods is defined in administrative mode (see ‘Back end’- > ‘Shipping methods’ for details). Opposite the shipping method name is the shipping charge, which is calculated as such: Shipping charge = sum of all shipping freight charges for all ordered products + shipping rate calculated by installed shipping module. Please refer to sections ‘Add new products’, ‘Shipping types’ and ‘Shipping modules’ to obtain more
information regarding shipping methods, freight charges and modules. Also, at this step user can verify shipping address and change it if it is required. Third step: billing address verification and payment method selection.
On this step customer verifies billing address and can change it if it is required. Here customer is prompted to select preferable payment option. A list of available payment options depends on the shipping types selected on the second step of checkout process. Please refer to ‘Back end’ -> ‘Payment methods’ for more information regarding payment types configuration.
Forth step: Confirmation. At this final step user is prompted to confirm the cart contents, shipping and payment methods and shipping and billing addresses.

Page 42 of 101
Shop-Script PRO Copyright © WebAsyst LLC
On this step shipping and billing addresses are finally defined, and this gives the ability to calculate tax rates for ordered products and final order amount. There is a field for comments here, so customer can provide some additional information about the purchase, share his/her impressions about the store etc. If customer selected a payment type which is associated with a payment module, which requires specific information (payment details) for making a payment, customer may be shown a form to provide all the required information (e.g. credit card information, bank routing numbers, etc.). Among such payment modules is Authorize.Net AIM module – it shows customer a form with a request to provide credit card or eCheck information, and then sends this data to Auhtorize.Net payment gateway server. Clicking “Place order!” button sends two email notifications:
• a message with order information to customer; • order notification for store administrator. This email is sent to the email address provided
in store settings (‘General settings’ screen at back end). If “Stock level control” is enabled in store settings, ordered products ‘in stock’ values are subtracted by the number of items customer ordered (in other words, order product quantities are reserved). This gives the ability to effectively control stock balances and prevent ordering of products which are out of stock. If “Stock level control” is disabled, product in stock information is not updated. After the order is saved into database and email notifications are sent, customer is shown “Thank you for your order” page. On this page customer may receive additional payment instructions if required by payment type selected. For example, if customer selected PayPal payment option, a link “Pay by PayPal now!” will be shown (clicking this link will redirect customer to PayPal server).

Page 43 of 101
Shop-Script PRO Copyright © WebAsyst LLC
Back end (administrative resources)
Catalog
Managing products catalog In the back end you will find a navigation menu to access administrative departments. To configure products catalog simply click the “Catalog” tab. You should get the following picture:
Most things about bringing your products to customers are done here. The first section is called “Categories and products”. Here you can add new categories/subcategories, edit existing categories and manage products. Adding new categories/subcategories To add a new category/subcategory to the list click “Add new category” button. A window with options for the category/subcategory you are about to create will pop up:
Parent: defines the parent category where the category will be placed to. If you choose parent other than Root (e.g. an already existing category), you will create a subcategory. For example, if you have a category “Electronics” and would like to add subcategory “Audio & Video” inside “Electronics”, simply specify Parent = “Electronics” for “Audio & Video” category. Category name: type in the name you wish the category to bear. Sort order: input a positive or negative number or zero in this box. The number
you input defines the order in which categories are presented in both back end and front end. Categories are sorted according to sort order values in ascending order - the higher the value is the lower the category will appear in the list. Play with it to see how it works. Always show subcategory products among current category products: if this box is checked products stored in subcategories will be brought to the page together with the parent category products once the buyer clicks the category name. Sort order of the products depends on the values you provided in the Sort order field in the product’s table.

Page 44 of 101
Shop-Script PRO Copyright © WebAsyst LLC
Logo: you can upload any image you think will be best to describe products of the category. Note that only picture files can be uploaded using this form: .jpg, .jpeg, .gif, .bmp, .pcx. No other extensions are allowed. Such restrictions apply due to security issues. Description (HTML): type some words about the category you are creating here, and they will come up as its description. This description appears under the category’s name once buyer enters the category page. Description is provided in HTML. Editing existing categories To introduce some changes to an already existing category/subcategory click [edit] button seen opposite the category’s name. The steps you can take are similar to those described in Adding new categories/subcategories section. Adding new products
To add a new product click “Add new product” button. A window with options for the product being added will pop up: Parent: defines the category/subcategory to which the product will be placed. Root category can act as a storage bin: its contents are not brought to the front end and your visitors don’t see them. Product name: specify name of the product you are adding here. Product code: if you mark you products with codes (e.g. SKU, ISBN), you can input one here. Tax class: define which tax class is applied to the product. If Tax class is set to “Not defined”, product will be assumed as nontaxable. For information regarding tax classes definition please refer to “Configuration” -> ‘Taxes’ section of this document. Sort order: input a positive or negative number or zero in this box. The number you input defines the order in which products are presented in both back end and front end. Products are sorted according to sort order values in ascending order - the higher the value is the lower the product will appear in the list. Play with it to see how it works. Price, in conventional units (number only): evaluate the product here. Conventional units here stand for the currency you mainly deal with. For example, if you mainly deal with US dollars, state the US dollar price here, and if some buyer would prefer to pay GB pounds for the

Page 45 of 101
Shop-Script PRO Copyright © WebAsyst LLC
merchandise the system will automatically convert the price. You can provide currencies exchange rates in Configuration - Currency types screen in back end. See ‘Currency types’ section of this document for details. If you specify negative or zero price for a product, it will disable “Add to cart” button for this product in front end and customers will not have the ability to order this product. List price, in conventional units, (number only): list price is often referred to as “Manufacturer's Suggested Retail Price” (MSRP), and often is subject to discounts. Actually, the primary purpose of stating the list price is to show customers that the product is sold for less in your shop. For example, you can survey the market and see how much the product costs in other shops, provide this figure in list price field and then give a lower value in price field; thus a discount is emphasized. The system automatically calculates amount of money a customer saves:
Shipping freight: you can set a fixed shipping cost for one product unit (e.g. handling and freight charges). Shipping charges for a single order are calculated as a sum of shipping freight charges for all products and shipping charges calculated based on customer address, which depend on a shipping module you are using – please refer to ‘Shipping modules’ section of this document for more details. In stock: provide the amount of product you have in stock, or leave it blank if you currently lack the product. Depending on Stock Level Control setting (which is configured in administrative mode in ‘Settings’ screen):
o if Stock Level Control is switched on, “Add to cart” button is shown only if product is in stock (in stock value is greater than zero); The number of items of a single product customer can add to shopping cart is limited to the number provided in this box;
o if Stock Level Control is switched off, “Add to cart” button is shown not depending on product stock value.
Description (HTML): type some words about the product you are adding here, and they will come up as its description. This description appears on the product’s detailed information page (as opposed to Brief description). Pay attention to HTML in parentheses - this means you need to accompany the description with HTML tags to make it look the way you want. Brief description (HTML): the words you will enter here will come up under the product’s name in the list of products (i.e. when customer views a list of category products, search results, etc.). Weight: state the weight of the product unit here (please indicate only positive numbers under this field or zero, e.g. 1, 4.56, 0). Weight is defined in conventional units. You may decide in which units to provide product weights (e.g. lbs, kilograms, grams). META description: this description is meant for search engines. It is not brought to the front end (only visible while viewing source code of the page). META keywords: enter some keywords for search engines to favor the product you sell in your shop. The words are not brought to the front-end (only visible while viewing source code of the page). Free shipping (not applied to shipping freight): This indicates whether to calculate shipping charges for this product or not. This checkbox value is taken into account only when you are using shipping modules, i.e. in real-time shipping rate calculations (see ‘Shipping modules’ section for more details).

Page 46 of 101
Shop-Script PRO Copyright © WebAsyst LLC
If you specify positive shipping freight charge for the product, it will be added to order total shipping cost not depending on “Free shipping” checkbox value. It is recommended to enable this checkbox for non tangible (downloadable) products. Minimum order quantity: provide the minimal amount of units a buyer can buy (f.e. setting to 10 will allow customer to order at least 10 units of this product, not less). Table of products Clicking the name of category summons a table of products this category contains:
Products search within category: using this form, you can search for products by their names or product codes. Enabled: this checkbox defines presence of the product on the front end page. Uncheck it and the buyer will not see it in your store. Product code: if you tag goods with special codes (e.g. SKUs, ISBNs), they will be shown here. Product name: that is the name of the product as buyers see it.
Rating: this field depicts rating of the products you offer. In the front end, buyers can rate the product using this form: Note that you can manually increase or decrease product rating. See the ‘Editing product entry’ paragraph below.
Price, in conventional units: this field shows price of the product. Conventional units here stand for the currency you mainly deal with. The figure in this field is editable; you can change the price right here, without opening product modification window.

Page 47 of 101
Shop-Script PRO Copyright © WebAsyst LLC
In stock: shows how many pieces of the product you still have in stock. The figure in this field is editable; you can change it right here, without opening product modification window. Picture (Thumbnail, Enlarged picture): shows the number of pictures files you have uploaded for a product. Adding pictures is covered in ‘Product images’ paragraph of this section. Sold: shows the number of sold product unit. Add to special offers list: clicking the thumb-up icon allows you to bring the product to the “special offers” section of the shore home page. Sort order: provide numbers in the fields to define sort order for your products. Input positive or negative numbers or zeros in this boxes. The numbers you input define the order in which products are presented in both back end and front end. Products are sorted according to sort order values in ascending order - the higher the value is the lower the product will appear in the list. Play with it to see how it works. The grey arrow icons ( or ) allow you to sort products in the table by this or that attribute. To delete a product, simply click the red cross ( ) located opposite product’s name in the right part of the screen. Editing product entry To edit a product entry you need to click the product name or product code link in the table of products. The click summons a window that is very similar to ‘Add new product’ window save for several fields - Date created, Date modified, Rating - and Related products form. Date created: reveals the date the entry was made. Date modified: lets you see when the product entry was edited last time. Rating: this field shows current rating of the product. You can actually adjust the value provided here. This opportunity is given to administrators for they could oppose buyers purposefully increasing or decreasing product’s rating and keep it fair. It is recommended to define product rating from 0 to 5 (it could be a float value, e.g. 1.345). Related products: click [Edit] button to summon the ‘Related items’ window, where you can select
products which you feel are related to the item you are editing (cross selling tool). Links to related products will appear at the bottom of the product’s page. For example, when selling mobile phones, you can suggest your customers a hands-free device or a calling plan. Cross selling has proven itself as a very powerful marketing tool.

Page 48 of 101
Shop-Script PRO Copyright © WebAsyst LLC
Product images
In Shop-Script PRO you can assign each product an image (picture/photo). Each product image can be uploaded in three different sizes:
• regular: this image is shown to user when viewing product detailed information page;
• thumbnail: shown to user when viewing products inside a category or search results;
• enlarged: shown in popup window.
If product misses thumbnail image (i.e. the image is not uploaded), then regular image will be shown to visitors in front end. When adding a product (see ‘Adding new products’ paragraph), you can define a default product image using a radio-button toggle. The image you select as default will be shown in products catalog (when viewing products inside a category, in search results, etc.). Other product images (if there are any) can be viewed from product detailed information page (see screenshot). Note that only picture files can be uploaded using this form: .jpg, .jpeg, .gif, .bmp, .pcx. No other extensions are allowed. Such restrictions apply due to security issues.

Page 49 of 101
Shop-Script PRO Copyright © WebAsyst LLC
Importing products from a CSV file (Excel) Preparing CSV file CSV stands for Comma Separated Values. CSV file is a text file which can be created using different software, e.g. Microsoft Excel. In Excel you can save any document in CSV format using ‘Save as…’ option in ‘File’ menu. Importing CSV files (here we shall use the terms ‘price list’, ‘products list’, ‘CSV spreadsheet’ to refer to a CSV file) might seem a bit tricky, but if you stick to certain guidelines given below, it should work out fine. It is very easy! Please read the following carefully – we shall describe how to create a price list (or products list if you prefer) using Microsoft Excel. To make CSV files import procedure more understandable, we included an example CSV file into Shop-Script PRO package. This file is located into the package in examples directory: examples/example_excel_import.csv Or you can downloaded this file here: http://www.shop-script.com/example_excel_import.csv Please open this file using Microsoft Excel – this will help you to clearly understand how it works. Cells of the first row of your products table (A1 - Z1 - ...) are supposed to contain names of parameters products have. Shop-Script offers you to set the following parameters for the products (predefined fields): - Product code; - Product name; - Price; - List price; - In stock; - Sold; - Description; - Brief description; - Pictures; - Sort order; - META keywords; - META description; - Shipping freight; - Weight; - Free shipping; - Minimum order quantity; - Filename; - Download is available for (days); - Maximum download times (leave empty if unlimited). All these parameters are described in ’Adding new products‘ and ’Table of products‘ sections. ‘Product name’ and ‘Price’ columns are required to be defined in your CSV file. All other columns are optional - absence of a field emphasizes that field in the database corresponding to the absent field will not be changed (e.g. if ‘In stock’ column is absent in your CSV file, product in stock information in your store will not be changed). If either ‘Product name’ or ‘Price’ is absent in your CSV file, you will not be able to properly upload it into your shopping cart. The order of columns is not significant. Feel free to order columns as you like. In addition to predefined columns you can add custom columns to your CSV file – this will add custom product options into your store database (see ‘Products custom options’ section for details) . For example, you want to state color of this or that product. In this case you need to add a column called “Color” (in the cell of the first line – amount columns ‘Price’, ‘Product name’ and

Page 50 of 101
Shop-Script PRO Copyright © WebAsyst LLC
others), and then fill product color value in the intersection (cell) of product line and ‘Color’ column. Adding such custom parameters is covered below. Making categories/subcategories Categories/subcategories in Shop-Script have the following parameters (as opposed to checkboxes and options activated with their help): Parent category, Name, Logo (picture/thumbnail), Description. In your CSV file you can define Name, Description and Logo of the category. Name is mandatory, Description and Logo are optional. Name of the category should be stated in the same column with names of products. To make Shop-Script feel that this or that row defines a category and not a product you need to provide only Name of the category (fill in Name column) and its Description (optional). Cells of all other columns should be left empty. Price column for categories should be empty, otherwise your category line will be assumed as product. To move a category one level down (turn it into a subcategory) you need to put an exclamation mark before its name in the cell. For example, you have a category “Automobiles”, and need to have all BMWs you sell in a separate subcategory. In the CSV file name of the BMWs subcategory should look like “!BMW”. Further, if you want to create subcategories for different series of BMWs, and make them appear as subcategories of !BMW subcategory, you need to add two exclamation marks before the subcategories’ names: “!!Series 3”, “!!Series 5”. Summing up: the lower you want to send a subcategory the more exclamation marks you need to put before its name in the cell. Positioning products in CSV file As it was said above, the first line of CSV file is ‘reserved’ for names of parameters inherent to products. Second line should contain name (and description, if there is any) of the first category of products. Right below the second line you can place the immediate products that you want to appear in the category. If this category has a subcategory, put its name and description under the products. Next, enter the products to appear in the subcategory. Here is an approximate example of how it should look:
Summing up: first come names of categories/subcategories, next come products to appear in categories/subcategories. IMPORTANT: Do not forget to define categories in your price list. In case you add only products to your file (without categories), they will be automatically imported to the root category, thus will not be presented in customer store front. Pictures In your CSV make a column headed “Pictures”; cells of this column will contain filenames of product images, which come in three sizes (see ‘Product images’ section for details). The order of placing names in a cell is as follows: regular image filename, thumbnail filename, enlarged image filename. All names should be complete - this means that you need to specify file extensions. Filenames are separated with comma (,). Example: “bmw_regular.jpg,bmw_thumb.jpg,bmw_enlarged.jpg”. If you specify such value in ‘Picture’ column for a single product, this will append your product following images:
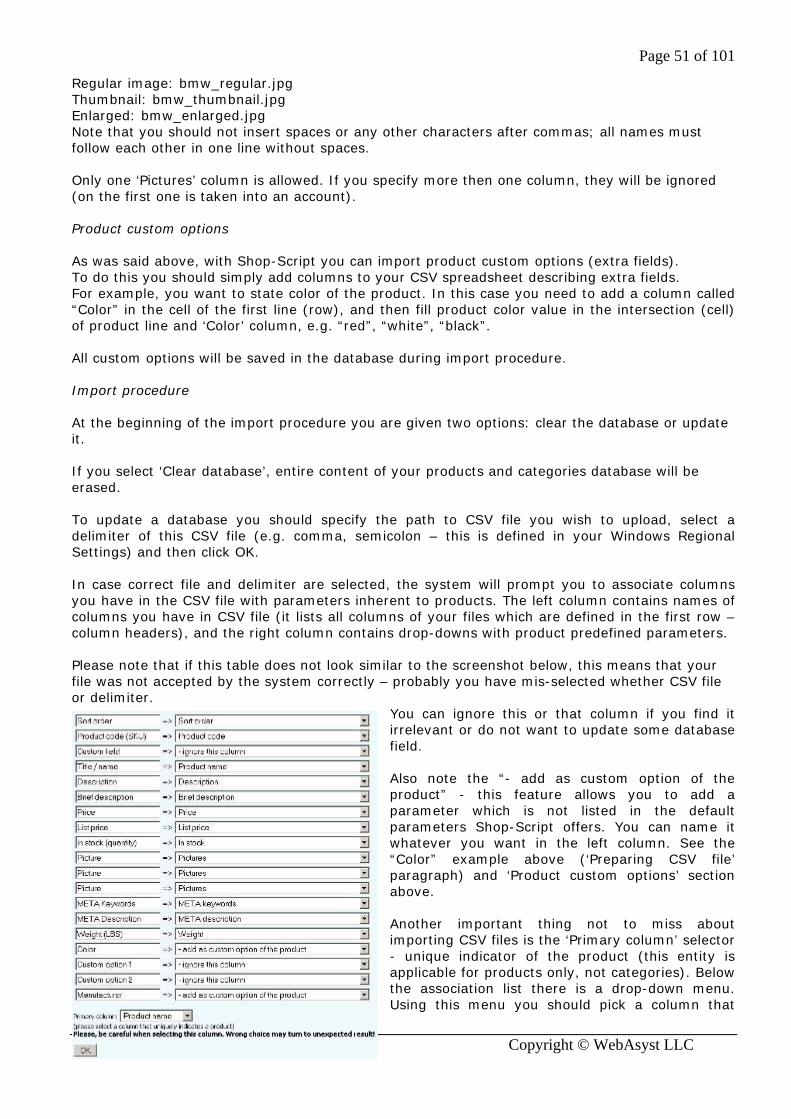
Page 51 of 101
Shop-Script PRO Copyright © WebAsyst LLC
Regular image: bmw_regular.jpg Thumbnail: bmw_thumbnail.jpg Enlarged: bmw_enlarged.jpg Note that you should not insert spaces or any other characters after commas; all names must follow each other in one line without spaces. Only one ‘Pictures’ column is allowed. If you specify more then one column, they will be ignored (on the first one is taken into an account). Product custom options As was said above, with Shop-Script you can import product custom options (extra fields). To do this you should simply add columns to your CSV spreadsheet describing extra fields. For example, you want to state color of the product. In this case you need to add a column called “Color” in the cell of the first line (row), and then fill product color value in the intersection (cell) of product line and ‘Color’ column, e.g. “red”, “white”, “black”. All custom options will be saved in the database during import procedure. Import procedure At the beginning of the import procedure you are given two options: clear the database or update it. If you select ‘Clear database’, entire content of your products and categories database will be erased. To update a database you should specify the path to CSV file you wish to upload, select a delimiter of this CSV file (e.g. comma, semicolon – this is defined in your Windows Regional Settings) and then click OK. In case correct file and delimiter are selected, the system will prompt you to associate columns you have in the CSV file with parameters inherent to products. The left column contains names of columns you have in CSV file (it lists all columns of your files which are defined in the first row – column headers), and the right column contains drop-downs with product predefined parameters. Please note that if this table does not look similar to the screenshot below, this means that your file was not accepted by the system correctly – probably you have mis-selected whether CSV file or delimiter.
You can ignore this or that column if you find it irrelevant or do not want to update some database field. Also note the “- add as custom option of the product” - this feature allows you to add a parameter which is not listed in the default parameters Shop-Script offers. You can name it whatever you want in the left column. See the “Color” example above (‘Preparing CSV file’ paragraph) and ‘Product custom options’ section above. Another important thing not to miss about importing CSV files is the ‘Primary column’ selector - unique indicator of the product (this entity is applicable for products only, not categories). Below the association list there is a drop-down menu. Using this menu you should pick a column that

Page 52 of 101
Shop-Script PRO Copyright © WebAsyst LLC
contains unique information about each product you sell. You can choose between Product code, Product name, Price, Description, Brief description and Sort order. A value in the primary column should be unique for each product you sell, since products should be unambiguously referenced by this column. Please be careful when selecting primary column. Wrong choice may turn to unexpected results!
When you click “OK”, Shop-Script starts to import data from your file and processes all lines of the file as such. The file is processed from top to bottom line by line. There two options how a single line is processed:
1. If only "Name" and "Description" (optional) columns are defined in the line (not empty), and a value in “Price” column is empty, then current line is considered as a category. Shop-Script searches for category with the same name in the database. In case category is found, its description is updated and category is marked as selected (else a new category is inserted and also marked as selected). Categories are added from Excel file to your store according to hierarchy you set using ‘!’ symbol (please refer to ‘Preparing CSV file’ paragraph above for more information).
2. If at least "Name" and "Price" columns are defined, current line is considered as a product. Shop-Script searches for a product with the same primary column value in the database. In case product is found, it's information is updated, else a new product is added. All products are placed to the currently selected category.
IMPORTANT: To make CSV files import procedure more understandable, we included an example CSV file into Shop-Script PRO package. This file is located into the package in examples directory: examples/example_excel_import.csv Please open this file using Microsoft Excel to see basic file structure. We encourage you to play with import facility using this sample file to see how it works. Export products This department allows to export your products and categories to a CSV file with a structure described above in the “Import products” section on this User Guide. Synchronization tools Synchronization allows you to create backups of the products catalog database and transfer it to other Shop-Script PRO-based stores. To create a backup, simply click “Export database to a SQL file”. Once the process is complete the system will tell you that the database has been successfully exported to a SQL file. Click the “database.sql” link to download this file to your computer. To import a database, use “Browse” button to define the path to it and click OK. Two points not to miss about importing .sql databases:
1. Your current database will be erased and replaced with data from the file you are importing;
2. Import will go well only if you import a database created with Shop-Script (version sensitive: backups created in Shop-Script PRO version will not be accepted by Shop-Script PRO). Please be careful when selecting files!
Note that synchronization tools do not affect store settings, customers and orders databases – only products catalog (products and categories, custom options, etc.) can be exported/imported using this facility.

Page 53 of 101
Shop-Script PRO Copyright © WebAsyst LLC
Product custom options This feature allows you greater flexibility in describing the products you sell. Here you can define various custom options that may be applicable to your products. This is the initial table you should see when clicking “Product custom options” in back end:
There are two fields to be filled here: left one for the option title and the right one for the sort order (please input negative or positive numbers here, or zero). Sort order indicates the order of options appearance in the list (in both front end and back end) – options are sorted by sort order values in ascending order. If sort order is not indicated, options are sorted in alphabetical order.
For example, you need to add Color option for the products. Type “Color” in the left field and click “Save”. The table will change into this: Number of product custom options is unlimited. Special offers Bottom part of the front end home page is reserved for special offers. You can showcase new products, bestsellers, discounted items or whatever you think fits there. To add a product to special offers list you need to click the thumb-up icon ( ) in the table of products (located in the column named Add to special offers list). Only products that are accompanied with pictures can be added to special offers list. Picture brought to the front end special offers section is the one you uploaded as regular sized picture (but not thumbnails or enlarged pictures). Discussions Here you will see all the discussions occurred or occurring on your store territory. First of all you will be offered to choose the discussion you want to see, and then a table with user posts will load up. The table reveals Post time, Product name, Nickname of the author, Subject and the Post itself. You can reply to posts and delete them here.

Page 54 of 101
Shop-Script PRO Copyright © WebAsyst LLC
Customers & Orders Orders In this section you can perform orders search either by ID or by the order state.
A list of orders states is fully customizable (refer to “Order states” paragraph of this document for more details). “Cancelled” state is predefined and can not be deleted.
Specify search criteria and press “Show” button. Orders search will be performed, and results will be shown as a table. Clicking “Order ID” link on a certain order in this table will redirect you to this order detailed information page.
This page represents all order information available: billing and shipping addresses, order content, order state, customer comments, etc. On this page you can change the status of the order and print invoice for the order.

Page 55 of 101
Shop-Script PRO Copyright © WebAsyst LLC
To delete a specific order you should change its current status to “Cancelled”, and only then you will be able to delete it (a new button “Delete” will appear). When changing order status you can submit a short comment to the status update event and email customer a notification that his/her order status has been updated. If “Stock level control” is enabled in store settings, then when order is moved from any state defined in ‘Order states’ screen of back end to “Cancelled” state, in stock information is increased by the ordered products quantity (i.e. products are returned to stock / products reservation is cancelled). If later order is moved from “Cancelled” state back to any custom order state defined by administrator, products in stock information is decreased as at the moment when order was placed by customer (ordered products ‘in stock’ values are subtracted by the numbers of product items ordered). If “Stock level control” is disabled in store settings, product ‘in stock’ information is not updated. Ordered product prices are actual for the moment when the order has been placed. Customers
Customers search is performed using a form presented on the screenshot above. Fields left empty are ignored. To view all registered customers leave all the fields empty. When search is done you get to the screen with a list of registered customers:
Clicking “Export users to Excel file” will export all found records to Microsoft Excel CSV file. Clicking customer login link (e.g. “john”, “admin” on the screenshot above) will bring you to the customer information page:
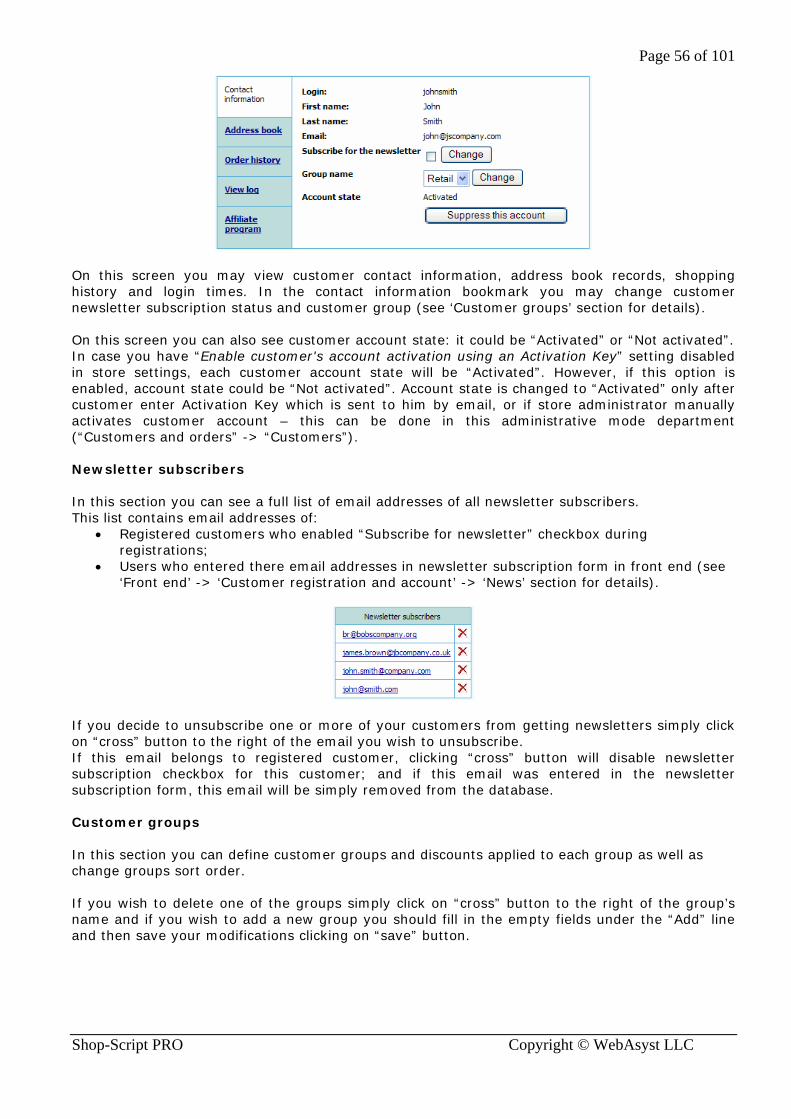
Page 56 of 101
Shop-Script PRO Copyright © WebAsyst LLC
On this screen you may view customer contact information, address book records, shopping history and login times. In the contact information bookmark you may change customer newsletter subscription status and customer group (see ‘Customer groups’ section for details). On this screen you can also see customer account state: it could be “Activated” or “Not activated”. In case you have “Enable customer's account activation using an Activation Key” setting disabled in store settings, each customer account state will be “Activated”. However, if this option is enabled, account state could be “Not activated”. Account state is changed to “Activated” only after customer enter Activation Key which is sent to him by email, or if store administrator manually activates customer account – this can be done in this administrative mode department (“Customers and orders” -> “Customers”). Newsletter subscribers In this section you can see a full list of email addresses of all newsletter subscribers. This list contains email addresses of:
• Registered customers who enabled “Subscribe for newsletter” checkbox during registrations;
• Users who entered there email addresses in newsletter subscription form in front end (see ‘Front end’ -> ‘Customer registration and account’ -> ‘News’ section for details).
If you decide to unsubscribe one or more of your customers from getting newsletters simply click on “cross” button to the right of the email you wish to unsubscribe. If this email belongs to registered customer, clicking “cross” button will disable newsletter subscription checkbox for this customer; and if this email was entered in the newsletter subscription form, this email will be simply removed from the database. Customer groups In this section you can define customer groups and discounts applied to each group as well as change groups sort order. If you wish to delete one of the groups simply click on “cross” button to the right of the group’s name and if you wish to add a new group you should fill in the empty fields under the “Add” line and then save your modifications clicking on “save” button.

Page 57 of 101
Shop-Script PRO Copyright © WebAsyst LLC
Please, note that discounts will not be calculated until it is configured in the "Customers and orders" -> "Discounts" section of the administrative mode. Registration form In this section you can configure customer registration form:
• define custom fields in the customers registration form (e.g. phone/fax number, birthday). • define which fields are required and which are optional.
In the following example (see a screenshot below) customer will be prompted to enter phone number and date of birth (DOB). Phone number field is marked as ‘required’; DOB field is ‘optional’. Sort order indicates the order of appearance of a custom field in the list.
Below “Custom registration form fields” there is an address configuration form:
Using this form you can set which fields in the registration and address forms will be required (set toggle to “Required”), which will be optional (set toggle to “Optional”) and which will not be shown in the forms at all (set toggle to “Not requested”). The fields in the forms which are always mandatory are:

Page 58 of 101
Shop-Script PRO Copyright © WebAsyst LLC
• login (registration form), • password (registration form), • first name, • last name, • email address
Address forms: presence of a ‘Country’ field depends upon countries list you define in the ‘Configuration’ -> ‘Countries’ screen of back end. If countries list is not empty, then "Country" is the mandatory field in the address form. In case countries list is empty, country field will not be shown in the address form at all. Order states In this section you can define order states as well as change its sort order. If you wish to delete one of the states simply click on “cross” button to the right of the state’s name and if you wish to add a new state you should fill in the empty fields under the “Add” line and then save your modifications clicking on “Save” button.
Order states are fully customizable. You can define an unlimited number of order states, and then append states to customer orders. After you finish setting up order states list, please go to back end ‘Configuration’ screen and define which order state will be used for new orders, and which order state will be associated with completed orders. All new orders made by customers will automatically go to ‘new order state’ which you define in store configuration. After order is paid and delivered to customer you should append it a ‘completed order state’ (which is also defined in store configuration). If you sell non tangible products, i.e. downloadable products, customers will have access to download ordered products only if the order is in completed state. Note that among order states you define, there is a predefined order state “cancelled”. Please refer to “Orders” paragraph above for more information regarding this state.

Page 59 of 101
Shop-Script PRO Copyright © WebAsyst LLC
Discounts In this section you can define discount rates calculation method.
Discount system is disabled – no discount is applied. Discount rate = customer group discount rate – this discount method is defined by customer group discount rate which is defined in “Customer groups” section. Discount rate is calculated based on order amount – discount rate is defined in the following table:
Here you should add "pairs" of (order_amount, discount_rate). Each pair indicates applicable discount_rate (%) when order total amount exceeds order_amount. In example presented on the screenshot above, discount rate will be: 0% if order amount is less than 100 conventional units 2% if order amount is between 100 and 200 conventional units 5% if order amount is between 200 and 500 conventional units 10% if order amount is greater than 500 conventional units. Discount rate is calculated as customer group discount rate plus rate based on order amount – final discount results from summing up customer group discount rate and rate based on order amount. For example, your customer group discount is 5% and your discount based on order amount is 10%. The final discount utilizing this discount rate will be 15%.
Discount rate is calculated as maximum from customer group discount rate and rate based on order amount – this discount rate results from comparing customer group discount rate to rate based on order amount and the higher value of these two will be used as a final discount. For example, your customer group discount is 5% and your discount based on order amount is 10%. The final discount utilizing this discount rate will be 10%.

Page 60 of 101
Shop-Script PRO Copyright © WebAsyst LLC
Configuration
General configuration In this section you can define a number of core settings of your store.
Complete URL of your store – specify valid URL of your store. URL should contain http prefix and a slash as suffix. Do not include index.php in the URL. For example, http://www.yourshop.com/shop/. If URL is specified incorrectly, SSL checkout feature and export products to Froogle may work unproperly. Date format – please specify preferable date format. Default pages’ title – please input a string which will appear as a title of your store pages such as registration page, shopping cart page, etc. Force Smarty templates recompilation – Smarty templates engine work such that it compiles HTML template files (.tpl.html files located inside templates/ folder) each time you run your store (both front end and back end). Compiled templates are saved as templates_c/ folder (as temporary .php-files, e.g. %%F6^F62^F62CC513%%index.tpl.html.php). To enhance compilation performance you can disable this checkbox, thus you will make Smarty automatically check whether template files had been already compiled or not. If yes, they will not be recompiled each time, and scripts performance will be significantly increased. However, if this checkbox is disabled, modifying .tpl.html template files (e.g. in HTML or text editor) will not make Smarty recompile templates.If you are working on redesigning your store, this checkbox is highly recommended to be enabled.

Page 61 of 101
Shop-Script PRO Copyright © WebAsyst LLC
And once your store goes live and you finish performing modification of template files, we recommend to disable this checkbox, to increase store performance. Homepage META Description & Homepage META Description – please input META Description and Keywords which you wish to be published in storefront homepage. Maximum number of news posts represented on the shopping cart front-end – enter here a number of news that you would like to appear on the shopping cart front end. The number of news posts (latest) displayed in store front end pages will be limited to the number specified here. If number of news posts exceeds the number specified, they will be available if user clicks “All news…” in front end. Store name – enter here the name of your shopping cart. It will appear in the title bar of your browser (in the top left corner) and will be included in email messages (e.g. order notifications, password reminders) sent to your customers from the store. Store URL – this URL will be included in the email messages sent to customers. Default currency – select from the drop-down menu what currency type will be used in your shopping cart by default. Currency types are defined in ‘Configuration’ -> ‘Currency types’ screen of back end. Store general email – this email address will be used as reply address in email messages sent to your customers from the store. Orders notification email – please indicate an email address here where order notification messages will be sent.

Page 62 of 101
Shop-Script PRO Copyright © WebAsyst LLC
Appearance In this section you can set different colors for drawing tables in front end (e.g. shopping cart tables, price list, etc.).
Color 1 – This is the color of outlines of tables you have in your shop. Color 2 – This is the background color for cells that contain headings. Color 3 – This is the background color Total field in My shopping cart table.
Play with it to see how it works. Note that changing these colors does not change core color appearance of your store (e.g. the background color of header and right and left columns in Template #1).
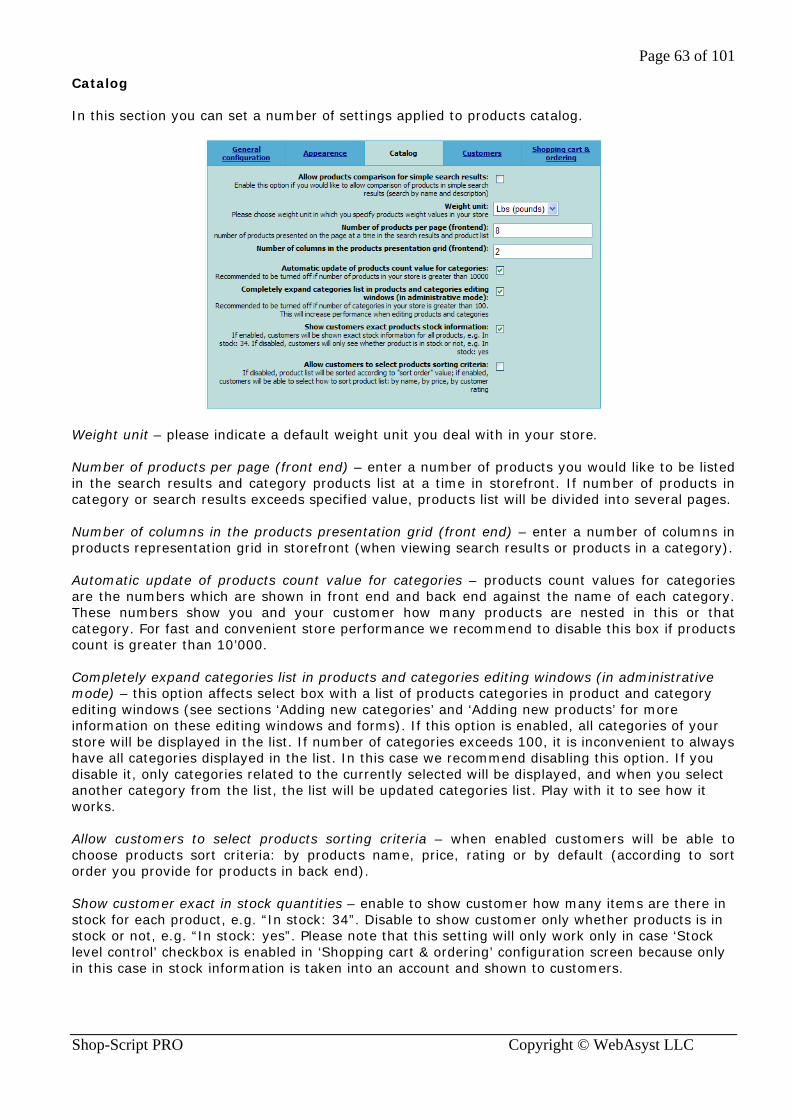
Page 63 of 101
Shop-Script PRO Copyright © WebAsyst LLC
Catalog In this section you can set a number of settings applied to products catalog.
Weight unit – please indicate a default weight unit you deal with in your store. Number of products per page (front end) – enter a number of products you would like to be listed in the search results and category products list at a time in storefront. If number of products in category or search results exceeds specified value, products list will be divided into several pages. Number of columns in the products presentation grid (front end) – enter a number of columns in products representation grid in storefront (when viewing search results or products in a category). Automatic update of products count value for categories – products count values for categories are the numbers which are shown in front end and back end against the name of each category. These numbers show you and your customer how many products are nested in this or that category. For fast and convenient store performance we recommend to disable this box if products count is greater than 10’000. Completely expand categories list in products and categories editing windows (in administrative mode) – this option affects select box with a list of products categories in product and category editing windows (see sections ‘Adding new categories’ and ‘Adding new products’ for more information on these editing windows and forms). If this option is enabled, all categories of your store will be displayed in the list. If number of categories exceeds 100, it is inconvenient to always have all categories displayed in the list. In this case we recommend disabling this option. If you disable it, only categories related to the currently selected will be displayed, and when you select another category from the list, the list will be updated categories list. Play with it to see how it works. Allow customers to select products sorting criteria – when enabled customers will be able to choose products sort criteria: by products name, price, rating or by default (according to sort order you provide for products in back end). Show customer exact in stock quantities – enable to show customer how many items are there in stock for each product, e.g. “In stock: 34”. Disable to show customer only whether products is in stock or not, e.g. “In stock: yes”. Please note that this setting will only work only in case ‘Stock level control’ checkbox is enabled in ‘Shopping cart & ordering’ configuration screen because only in this case in stock information is taken into an account and shown to customers.

Page 64 of 101
Shop-Script PRO Copyright © WebAsyst LLC
Customers In this section you can define default country and default customer group settings.
Default country – select from the drop-down menu what country will be shown in the customer registration form by default. Default customer group - select from the drop-down menu to what group you wish to assign newly registered customers. Enable "Confirmation Code" verification – if you enable this option, all customers will be prompted to input a Confirmation Code shown on ‘security image’. This protects your store from unwanted customers and orders records that could be submitted by robots. GD PHP library should be supported by the server for this feature to work. Enable customer's account activation using an Activation Key – this feature allows you to validate customer email addresses. New customer account is opened only after he inputs an Activation Key which is sent to him by email; this ensures that customer provided valid email address and have successfully received an automated email sent to him from your store. In back end’s ‘Customers & Orders’ -> ‘Customers’ screen you can search for both activated and non-activated accounts.

Page 65 of 101
Shop-Script PRO Copyright © WebAsyst LLC
Shopping cart & ordering In this section you can define a number of settings applied to checkout function.
Calculate tax on shipping – select from the drop-down menu tax class for shipping cost calculation. Tax classes are defined in the Configuration -> Taxes section (see below). Default tax class – select from the drop-down menu what tax class will be appended for newly added products by default (whether added in administrative mode or imported from a CSV file). Tax classes are defined in the Configuration -> Taxes section (see below). Please note that changing ‘Default tax class’ setting will not append newly selected tax class to your existing products. Open shopping cart page in popup window – if this box is enabled, then pushing “Add to cart” button in storefront will bring up shopping cart page in a small popup window, and core storefront window will not be reloaded. If box is disabled, shopping cart page will be always shown in core storefront window. Request billing address – enable this option to request customer’s billing information in addition to shipping information which is requested by default. Secure checkout – enable this checkbox if you would like checkout in your store to be performed in secure mode (SSL). To make this feature work, please make sure that:
6. Your server supports SSL protocol (Secure Socket Layer). 7. You have an SSL certificate for the domain name where you store is installed.

Page 66 of 101
Shop-Script PRO Copyright © WebAsyst LLC
8. Your store is accessed through HTTP and HTTPS (SSL) “through” the same domain name (e.g. http://www.mystore.com and https://www.mystore.com; and not http://www.mystore.com and https://ssl.myhostingprovider.com/~mystore/).
9. Your have specified your store URL correctly (back end ‘General configuration’ screen – “Full shop URL” setting).
Enable shopping cart & ordering feature – when enabled, customers will be able to add products to the shopping cart and place orders. Otherwise “Add to cart” button will not be shown to customers. Disable this checkbox if you would like to run products catalog without checkout ability. Stock level control – if enabled, products “In stock” value will be taken into an account when visitors add products to shopping cart and place order. When order is placed, products ordered are ‘written off’ from a stock - the value “In stock” is decreased accordingly to a number of products sold. Please refer to sections ‘Front end’ -> ‘Checking out’, ‘Back end’ -> ‘Orders’ for more information. If this option is disabled, product “In stock” values will not be taken into an account and will not be changed at all. Country – select country where your store is located (required for correct shipping rate calculation by some shipping modules). State – select state/province/area of the country where your store is located (required for correct shipping rate calculation by some shipping modules). Minimal order amount – if you do not wish to accept orders with amount less than a certain value (e.g. $10), please indicate this value here. Customers will not be able to checkout if order amount is lesser than provided value. Enter 0 (zero) to disable minimal order amount limitation. Quick checkout – enable this option to allow customers placing orders without being registered (without having an account in your store). If disabled, registration procedure is mandatory. Status of the new order – select from the drop-down menu what order status will be assigned to all newly placed orders (e.g. Pending). Status of the completed order – select from the drop-down menu what order status is associated with “Completed” state (e.g. Delivered, Closed).

Page 67 of 101
Shop-Script PRO Copyright © WebAsyst LLC
Currency types In this section you can define currency types that will be used in your shopping cart as well as the ability to add other currencies.
Currency name – here you can specify the name of the currency. Currency ID – here you can specify the ID of the currency and whether this ID will be shown before or after a number. Currency ISO 3 – ISO currency designation. Exchange rate – exchange rates between the currencies used in your store. In example on the screenshot ‘US Dollar’ is set 1 as exchange rate. This means that 1 USD = 1 conventional unit. Euro is 0.85 – this means that 0.85 EUR = 1 conentional unit. We recommend you to define exchange rate = 1 for the currency type you mainly deal with, and then adjust exchange rates for all other available currency types. Sort order – here you can change currencies sort order (order of appearance in both back end and front end). To add a new currency type to your shopping cart simply fill in all the required fields under the “Add” line and press “Save” button.

Page 68 of 101
Shop-Script PRO Copyright © WebAsyst LLC
Shipping In this section you can define shipping settings.
Name – the name of the delivery service. Description – enter here a short description of the delivery service. Shipping info – this information will be sent to customers in order notification email. Module – you can assign a certain shipping type an installed shipping module. Shipping modules are installed in back end “Modules” -> “Shipping modules” screen. Shipping modules are used for real-time shipping rates calculations (see ‘Shipping modules’ section of this document for details). For information on how shipping charges are calculated please refer to “Front end” -> “Checking out” section of this document. Sort order – here you can change shipping methods sort order. Disable checkbox in the leftmost column if you would like to temporarily disable a shipping type. To add new shipping method to your shopping cart simply fill in all the required fields under the “Add” line and press “Save” button.

Page 69 of 101
Shop-Script PRO Copyright © WebAsyst LLC
Payment In this section you can define payment settings.
Name – the name of the payment method. Description – enter here a short description of the payment method (shown to customer during checkout). Payment type – here you may restrict payment options availability by shipping types. Please enable checkboxes for those shipping types, which allow a certain payment option, and disable for those which should restrict selection of the payment option. For example, you may allow payment option ‘Cash to courier’ for ‘Courier’ shipping type, however restrict it for ‘UPS’ and ‘DHL’ shipping methods. Payment instructions – this information will be sent to customers in order notification email. Module – you can associate specific payment method with an installed payment module. Payment modules are installed and configured in back end ‘Modules’ -> ‘Payment modules’ screen (see ‘Payment modules’ paragraph below for more detils). Sort order - here you can change payment method’s sort order. Disable checkbox in the leftmost column if you would like to temporarily disable a payment option. To add new payment method to your shopping cart simply fill in all the required fields under the “Add” line and press “Save” button.

Page 70 of 101
Shop-Script PRO Copyright © WebAsyst LLC
Countries In this section you can define countries that will be used in your store. We recommend you define only those countries where you sell to.
Name – the name of the country. ISO2 – country acronym according to ISO2. ISO3 – country acronym according to ISO3. To add new countries to the list simply fill in all the required fields under the “Add” line and press “Save” button.

Page 71 of 101
Shop-Script PRO Copyright © WebAsyst LLC
States In this section you can define country states (provinces, regions is you prefer) and its ISO codes. We recommend you define only those states where you sell to.
Select country from the drop-down menu you wish to change or add states of: State name – the name of the country state. State code – ISO code of the state (e.g. CA, NY, AL for US states). Required for correct shipping rate calculations. To add new states simply fill in all the required fields under the “Add” line and press “Save” button.

Page 72 of 101
Shop-Script PRO Copyright © WebAsyst LLC
Information pages In this section you can add new information pages and edit existing ones.
Page title – the title of the page that will appear in the front end. Page body type – there are 2 types of page body (HTML and Text) which can be set when editing a page. A link to paste into template file – to add a new page to your shopping cart front end you should copy a link from this field and insert it into template file. Edit – clicking on this button gets you to the page where you can apply different modifications.
Page title – input the name of the page. HTML – tick this box if you wish to use HTML tags in the page body field. For example, to make your text bold etc.

Page 73 of 101
Shop-Script PRO Copyright © WebAsyst LLC
Page body – enter here a text you wish to appear in the page body. You can use HTML tags to make your text look better but do not forget to tick HTML box in the first place. META keywords – information for search engines. META description – information for search engines. Adding new page works the same way as editing existing page but this time you should fill in all the fields from the very beginning. When new page is added you should insert a link to this page into your template file so this page will become accessible from front end. Note that links are not added to templates automatically. If you do not add a link to your page, it will not be accessible by visitors of your store.

Page 74 of 101
Shop-Script PRO Copyright © WebAsyst LLC
Taxes In this section you can define different tax classes.
Tax class name – the name of the tax class. Address type – indicate address type, which will be used for sales tax rate calculation (shipping and billing).
Click this button to get to “Define tax rates” page:
Here you can define tax rates for countries, states and counties available in your shopping cart. Select a country from the drop-down menu, enter a tax rate for this country and press “Save” button. If country is divided into states (there are states defined for this country in ‘States’ screen of back end), you will be able to define tax rates for states and counties of this country. Tax rates are defined for states similar to tax rates definition by countries. ‘By counties’ tax rates definition is handled by zip code masks. Detailed information on counties tax rates definition is provided in administrative mode ‘Configuration’ -> ‘Taxes’ screen.

Page 75 of 101
Shop-Script PRO Copyright © WebAsyst LLC
Modules
News module Using this module you can post news in front end. Date: the script automatically inputs the present date. However, you can change it at your own discretion. Title/annotation (not HTML): type the header of the news here. Do not HTML tags here. Picture: upload a picture to accompany the news post. Text for publication: provide the full text of the news post here (in HTML). Text to mail: what you type here will be emailed to newsletter subscribers. Plain text, no HTML. Send this newsletter to subscribers checkbox: check it if you want to mail the newsletter to your customers. Click “OK” button and a news post will appear on store pages. Newsletter will be sent to subscribers only in case “Send this newsletter to subscribers” checkbox is enabled.
To delete a news post click the red cross located in the rightmost column of the news’ table. Poll module (customer survey) This module will help you get a better knowledge of customers’ demands and make marketing officers of your team happy.
Poll question: type in the question you want customers to answer. Answer options (each in a separate line): provide the answers to the question here. Each answer must occupy a separate line, as each line means a radio-button on the front-page. Now click Save. You have a poll running on your site. Poll is shown on every page of your store.
An individual customer has ability to vote only once per session.

Page 76 of 101
Shop-Script PRO Copyright © WebAsyst LLC
Shipping modules Shipping modules are used for shipping rates calculations. Using shipping modules you can configure your shopping cart to calculate shipping charges based on customer shipping address, define fixed shipping rates, etc. Shop-Script was designed to make shipping modules very easy to install and configure. We are constantly working on Shop-Script software improvement and periodically releasing new modules to fit customers’ demands. All available shipping modules are shown in this back end department:
By default no modules are installed. To install an individual module simply click “Install” link. Module will be installed and you will be offered to configure it. Each module can be installed multiple times – this is useful when you wish to provide different fixed shipping rate options, or have several accounts in UPS, etc. Each module has a small description which describes how the module works. And there are following shipping modules which way of work should be covered: By countries/states shipping rates module
Allows restricting shipping by location and defining fixed shipping rates by countries and states. Countries and states lists are defined in the ’Configuration’ -> ‘Countries’ and ’States’ back end screens. Note that you can entirely forbid delivery to this or that country or state by inputting a negative number into the rate field. Once you are done, click “Save” button.
By countries/states shipping rates module (percent of order amount) Acts just like ‘By countries/states shipping rates module’, but here you define shipping rate as a percent (%) of order amount instead of a fixed price. Real-time shipping modules
Page 77 of 101
Shop-Script PRO Copyright © WebAsyst LLC
Installation and usage of real-time shipping modules such as UPS and USPS are covered below. IMPORTANT: Once you have installed and configured a module, it will not begin to work automatically! To enable it you have to go to ‘Configuration’ -> ‘Shipping’ screen of back end and assign this module for a certain shipping type. Thus you will indicate that for that shipping type this module should calculate shipping charges. Otherwise module simply will not be executed (it will be installed but will not have any effect).

Page 78 of 101
Shop-Script PRO Copyright © WebAsyst LLC
Real-time quotes with UPS Shop-Script PRO is integrated with UPS OnLine® Tools (UPS Rates & Services).
To enable UPS real-time shipping quotes you should register an account with UPS. Please visit UPS sign up page https://www.ups.com/myups/registration. Review terms and conditions, and if you accept, proceed with the registration. Once you have a My UPS account, register with them as an end-user of their online tools. Log onto your My UPS account and then visit www.ec.ups.com/ecommerce/gettools/gtools_intro.html; select the Register link in the End-User section of the page. This will lead you to another service agreement you must accept to continue. After you've registered with their online tools division, you'll receive an e-mail with a developer's key. The developer's key has two purposes: first, it gives you access to all the UPS documentation for implementing their online tools and second, it is needed to retrieve a UPS Access Key which, in turn, is required to actually communicate with the UPS web services. Go to My UPS account and request XML Access Key using developer key you have already received. Now go to Shop-Script PRO administrative mode and click “Install” against UPS module. This will install UPS OnLine® Tools module and will ask you to input your UPS account information (e.g. XML Access Key, login, etc.) and your origin location details. We recommend you enabling “Enable UPS error log” checkbox. This will allow you to track all errors in communication with UPS (if there are any). Assign newly installed UPS module to some shipping method in ‘Configuration’ -> ‘Shipping’ screen of back end, and you are ready to go live! Create a test order and go to checkout. If UPS module is setup correctly, on the second step you will be shown shipping charges for different delivery methods. For example:
If such combo-box does not appear, then UPS shipping quotes does not work properly. Please ensure that:
• cURL PHP extension is configured properly on your server (contact your hosting provider) • you have entered your UPS account details properly • you have entered customer address properly during checking out
If all conditions above are met, please go to UPS error log – temp/ups_errors.log – in the folder where you have installed Shop-Script (if this file does not exist make sure “Enable UPS error log” checkbox is enabled in UPS module configuration). This file will indicate the source of the problem. If you still have questions, contact us at [email protected]. Please indicate your order ID and UPS error log file and server specifications description in your request. The more information you provide, the faster we can resolve your question.

Page 79 of 101
Shop-Script PRO Copyright © WebAsyst LLC
Real-time quotes with USPS Shop-Script PRO is integrated with USPS WebTools™.
To enable USPS real-time shipping quotes you should register an account with USPS. Please visit USPS sign up page http://www.uspsprioritymail.com/et_regcert.html. Review terms and conditions, and if you accept, proceed with the registration. You will receive an email confirmation with your ID and password, but only for testing. Since testing has been already performed by Shop-Script developers, you should skip this testing phase. Reply to the message indicating you want to go live. Here is a sample reply: “Please enable my store for production ASAP. We are using a platform that has already tested the API." Then USPS (usually in 24 hours) will send you a message that your account has been confirmed for production. Now go to Shop-Script PRO administrative mode and click “Install” against USPS module. This will install USPS module and will ask you to input your USPS account information (e.g. User ID), your origin location details and available services configuration. We recommend you enabling “Enable USPS error log” checkbox. This will allow you to track all errors in communication with USPS (if there are any). Assign newly installed USPS module to some shipping method in ‘Configuration’ -> ‘Shipping’ screen of back end, and you are ready to go live! Create a test order and go to checkout. If USPS module is setup correctly, on the second step of checkout you will be shown shipping charges for different delivery methods with USPS. For example:
If such combo-box does not appear, this means USPS shipping quotes does not work properly. Please ensure that:
• cURL PHP extension is configured properly on your server (contact your hosting provider) • you have entered your USPS account details properly • you have entered customer address properly during checking out
If all conditions above are met, please go to USPS error log – temp/usps_errors.log – in the folder where you have installed Shop-Script (if this file does not exist make sure “Enable USPS error log” checkbox is enabled in USPS module configuration). This file will indicate the source of the problem and will represent the error message returned by USPS server. If you still have questions, contact us at [email protected]. Please indicate your order ID and USPS error log file and server specifications description in your request. The more information you provide, the faster we can resolve your question.

Page 80 of 101
Shop-Script PRO Copyright © WebAsyst LLC
Real-time quotes with FedEx
Shop-Script PRO is integrated with both FedEx Ground and FedEx Express services (FedEx Ship Manager Direct).
To enable FedEx real-time shipping quotes you should register an account with FedEx. Please visit FedEx sign up page https://www.fedex.com/us/OADR/index.html?link=4. Review terms and conditions, and if you accept, proceed with the registration. You will be issued an account number. Now go to Shop-Script PRO administrative mode and click “Install” against FedEx module. This will install FedEx module and will ask you to input your FedEx account information, your origin location details and services configuration. Here you will be requested to input a Meter Number. This is a unique number which is required for FedEx real-time shipping quotes. If you do not have this number please leave this field empty. Shop-Script will automatically send a subscription request to FedEx server and save Meter Number information returned by FedEx web server. Please note that FedEx Test and Production servers require different Meter Number values. Thus if you are using a Test server and would like to move to Production you should erase your current Meter Number value when disabling “Test environment” checkbox. In this case Shop-Script will send subscription request to Production server and generate a new Meter Number for you. The same is applicable if you are moving from Production to Test environment. We recommend you enabling “Enable FedEx error log” checkbox. This will allow you to track all errors in communication with FedEx servers (if there are any). Assign newly installed FedEx module to some shipping method in ‘Configuration’ -> ‘Shipping’ screen of back end, and you are ready to go live! Create a test order and go to checkout. If FedEx module is setup correctly, on the second step of checkout you will be shown shipping charges for different delivery methods with FedEx. For example:
If such combo-box or a fixed shipping rate (e.g. for FedEx Ground service) does not appear, this means FedEx shipping quotes does not work properly. Please ensure that:
• cURL PHP extension is configured properly on your server (contact your hosting provider) • you have entered your FedEx account details properly • you have entered customer address properly during checking out
If all conditions above are met, please go to FedEx error log – temp/fedex _errors.log – in the folder where you have installed Shop-Script (if this file does not exist make sure “Enable FedEx error log” checkbox is enabled in FedEx module configuration). This file will indicate the source of the problem and will represent the error message returned by FedEx server. If you still have questions, contact us at [email protected]. Please indicate your order ID and FedEx error log file and server specifications description in your request. The more information you provide, the faster we can resolve your question.

Page 81 of 101
Shop-Script PRO Copyright © WebAsyst LLC
Real-time quotes with DHL
Shop-Script PRO is integrated with both DHL (Airborne ShipIt).
To enable DHL real-time shipping quotes you should register an account with DHL. Please visit DHL sign up page https://sso.dhl-usa.com/sso/register.asp?nav=Reg. Review terms and conditions, and if you accept, proceed with the registration. You will be issued an Account Number. Once you obtain an account number, download DHL API Signup Form from http://www.shop-script.com/downloads/APISignupForm.doc, fill it and email to [email protected]. You will be issued an ID, password and a Shipping Key. Now go to Shop-Script PRO administrative mode and click “Install” against DHL module. This will install DHL module and will ask you to input your DHL account information, your origin location details and services configuration. We recommend you enabling “Enable DHL error log” checkbox. This will allow you to track all errors in communication with DHL servers (if there are any). Assign newly installed DHL module to some shipping method in ‘Configuration’ -> ‘Shipping’ screen of back end, and you are ready to go live! Create a test order and go to checkout. If DHL module is setup correctly, on the second step of checkout you will be shown shipping charges for different delivery methods with DHL. For example:
If such combo-box or a fixed shipping rate does not appear, this means DHL shipping quotes does not work properly. Please ensure that:
• cURL PHP extension is configured properly on your server (contact your hosting provider) • you have entered your DHL account details and shipping keys properly • you have entered customer address properly during checking out
If all conditions above are met, please go to DHL error log – temp/dhl_errors.log – in the folder where you have installed Shop-Script (if this file does not exist make sure “Enable DHL error log” checkbox is enabled in DHL module configuration). This file will indicate the source of the problem and will represent the error message returned by DHL server. If you still have questions, contact us at [email protected]. Please indicate your order ID and DHL error log file and server specifications description in your request. The more information you provide, the faster we can resolve your question.

Page 82 of 101
Shop-Script PRO Copyright © WebAsyst LLC
Payment modules Shop-Script offers a variety of modules to connect you store with the most popular payment gateways. Using payment modules you may configure your shopping cart to work with different payment gateways (e.g. Authorize.Net, PayPal, VeriSign), or to request customer specific information (e.g. credit card information for ‘Manual credit card processing’ module), etc. Shop-Script was designed to make payment modules very easy to install and configure. We are constantly working on Shop-Script software improvement and periodically releasing new modules to fit customers’ demands. All available payment modules are shown in this back end department:
By default no modules are installed. To install an individual module simply click “Install” link. Module will be installed and you will be offered to configure it. Each mode has a small description that describes what exactly does it do. Each module can be installed multiple times – this is useful when you have several accounts ina certain payment system, for example. IMPORTANT: Once you have installed and configured a module, it will not begin to work automatically! To enable it you have to go to ‘Configuration’ -> ‘Payment’ screen of back end and assign this module for a certain payment type. Thus you will indicate that for that payment type, instructions from this module should be implemented. Otherwise module simply will not be executed (it will be installed but will not have any effect).

Page 83 of 101
Shop-Script PRO Copyright © WebAsyst LLC
Google Checkout
Shop-Script provides module for integration with Google Checkout (Level 2 integration method: http://code.google.com/apis/checkout/developer/index.html#level_2_integration).
To start accepting Google Checkout orders you need to have Google Checkout seller account (https://checkout.google.com/sell). If you already have Google seller account, follow these two steps to enabled Google Checkout payments:
1. Login to your store backend, go to “Modules” - “Payment modules” screen to install Google Checkout payment module and provide your Google seller account credentials.
2. Login to your seller account, go to “Settings” – “Integration” screen and specify secure API callback URL: https://[your domain name]/googlecheckout_handler.php Example: https://www.myonlinestore.com/googlecheckout_handler.php Google will use this URL to notify your Shop-Script store about new orders, order state change and shipping/tax calculations. Leave Callback Method set to XML (default). Please note that the URL you specify here should be secure (https)! This requirement is put by Google (“You must provide the URL of a server running 128-bit SSLv3 or TLS.”), thus you must have a valid SSL certificate installed for the domain name where your online store is hosted.
That’s it – the module is now installed and your customers can checkout through Google Checkout. Note that you don’t even have to attach Google Checkout payment module to a certain payment type (as described in the ‘Payment modules’ section of this User Guide). When Google Checkout payment module is enabled, a Google Checkout button is displayed on the shopping cart details page:
If customer pushes this button, shopping cart information will be passed to Google and customer will be redirected to Google website to pay for the order. If payment comes through successfully, Google will send a request (order notification) to your online store, and the order will be saved into your store database. If customer does not complete Google Checkout payment (e.g. occasionally closes browser window), Google will not send order notification to your store and the order will not be saved. Please find more information about buyer experience at Google website: http://code.google.com/apis/checkout/developer/index.html#buyer_experience One important issue about Google Checkout that requires clarification is shipping and tax issue. Please read if you utilize shipping rate and/or tax calculations in your store (especially, real-time shipping quotes with UPS, USPS, DHL and FedEx).

Page 84 of 101
Shop-Script PRO Copyright © WebAsyst LLC
At the time customer clicks Google Checkout button on the shopping cart details page, your store does not know customer shipping address, so it can not perform shipping rate and sales tax calculations. That is why information about all available shipping types and sales tax values is sent to Google at the time customer clicks Google Checkout button. Then, on Google Checkout side customer sings in, and at this time Google sends request to your store to calculate shipping and tax rates for all addresses defined in customer’s Google account. Shop-Script performs calculations on a regular basis and then sends result to Google. As described in Google Checkout API (http://code.google.com/apis/checkout/developer/index.html#merchant_calculations_api), Google allows only three seconds for shipping rates and taxes calculation. If your store does not respond within this time, Google will set rates for every passed shipping type and tax to zero ($0.00). If you only utilize Shop-Script shipping modules that calculate rates locally (without requesting rates from third-party servers), e.g. fixed shipping rate, ground shipping, rates by countries/states, then Shop-Script will process Google request and reply quickly within three seconds. However, if you utilize some of Shop-Script real-time shipping modules that require requesting information from third-party servers – among these modules are UPS, USPS, DHL, FedEx – three seconds could be not enough to process Google request because Shop-Script could simply not receive response from the third-party servers. For example, requesting shipping quotes for a certain address from UPS takes about 1-1.5 seconds (in average). If you have several real-time modules installed, e.g. FedEx, UPS and USPS, every module will require time for shipping calculation, and it is hardly to expect that servers of these shipping carriers will respond within less than 1 seconds. More than this – since customer can have many addresses defined in her Google account, shipping rate calculation can take even more time – definitely more than 3 seconds. Summarizing: if you utilize real-time shipping modules in your store, you should understand that Google Checkout can return zero shipping and tax charges for orders, and that this fully depends on the fact that shipping calculation is not performed within the time allowed by Google (3 seconds). In Shop-Script Google Checkout payment module you can disable passing information about taxes and available shipping types to Google by disabling “Enable shipping costs and tax calculation for Google Checkout orders” checkbox. In this case Shop-Script will not send any information about shipping types and taxes to Google. When checking out with Google, customer will see a single shipping option “Call” rated $0.00. Current version of Shop-Script does not provide shipping rate calculation with InterShipper when you use Google Checkout. For InterShipper shipping method customer will always see $0.00 shipping charges for all available InterShipper services. Before you go live with Google Checkout we encourage you try how all this works using Google Checkout Sandbox account. You can apply for sandbox account for free at http://sandbox.google.com/sell. NOTE: If you have installed Google Checkout module, but nothing happens when your customers click Google Checkout button in storefront, this means that you have entered your Google account settings incorrectly. Please check module settings.

Page 85 of 101
Shop-Script PRO Copyright © WebAsyst LLC
PayPal integrations Shop-Script PREMIUM is integrated with PayPal. Following methods of integration are implemented:
• PayPal Website Payments Standard The easiest way to integrate your store with PayPal!
Detailed description of this solution can be found on PayPal website: https://www.paypal.com/cgi-bin/webscr?cmd=_wp-standard-overview-outside
• PayPal Website Payments Pro (Direct Payment and Express Checkout)
On the picture above “Credit cars” payment method represents PayPal Direct Payment module; ”PayPal” payment method represents PayPal Express Checkout payment module. Detailed description of this solution can be found on PayPal website: https://www.paypal.com/cgi-bin/webscr?cmd=_wp-pro-overview-outside To learn how to subscribe for PayPal Website Payments Pro please refer to: https://www.paypal.com/cgi-bin/webscr?cmd=_onboarding-list-pro cURL module is required for PayPal Website Payments Pro module. There are two versions of PayPal Pro Express Checkout integration in Shop-Script. We recommend using “version 2” which is more complex and advanced version.

Page 86 of 101
Shop-Script PRO Copyright © WebAsyst LLC
PayPal Payflow Pro Following information is for users of PayPal Payflow Pro payment gateway (www.paypal.com) formerly known as VeriSign. The first thing you need to know is that you need to have a valid SSL certificate installed for the domain name where your online store is hosted. This is required because Payflow Pro module prompts customers to enter credit card data on your website during checkout. The second thing, Payflow Pro card processing is performed using PayPay Payflow Pro software supplied by PayPal. This puts some additional system requirements:
• You should be able to use PHP exec() function (http://www.php.net/exec). Some hosting providers restrict usage of exec(). If your provider restricts it as well, you will not be able to use Payflow Pro module.
• Shop-Script software archive by default includes Payflow Pro software compiled for Linux and Windows. If your host provider server utilizes other operating systems, you will have to contact PayPal and request software for your operating system.
• Payflow Pro software included in Shop-Script archive is stored in modules/payment/payflow_pro/ folder. Shop-Script will try to run the software in this folder, however this may not work in case your host provider server is configured such that it restricts running compiled software in this folder. In this case you should request information about using exec() function for running third-party programs from your host provider. If host provider allows executing custom software programs only in certain folders on the server, you will have to move Payflow Pro program files from modules/payment/ payflow_pro/ to one of these folders, and then make minor changes in modules/payment/class.payflowpro.php file (set correct path to this folder).
In order to install and use Payflow Pro payment module:
• Install it on a regular basis (just like any other Shop-Script payment module) • Login to your PayPal account at https://manager.paypal.com • Click on "Service Settings" in the Main Menu Bar, then click “Allowed IP Addresses” • Enter IP address(es) of the server where your online store is hosted. You can get this
information from your hosting provider or by using various utilities in the Internet allowing to get IP address by domain name (e.g. try searching Google “get ip address by domain name”).
Once you have installed Payflow Pro module as described above, test it by performing a couple of test orders. If you receive errors when performing test orders, please contact us. Include all available information about your server configuration (with FTP access, if possible) and describe what you have already done when installing Payflow Pro module and what error messages you receive. If you see “Failed executing Payflow software provided by PayPal” error message, this means exec() function has failed executing Payflow Pro program. Please check that Shop-Script has permissions to run the program. You may try setting chmod 0755 (enable ‘execute’ permissions value) for the pfpro file in the modules/payment/payflow_pro/ folder. If you see “Result code: 1. Response message: User authentication failed.” error message, please verify Payflow Pro module settings (merchant login ID, password, etc.) and the IP address you have entered in your PayPal account settings.

Page 87 of 101
Shop-Script PRO Copyright © WebAsyst LLC
LinkPoint / YourPay Shop-Script provides modules for integrating with LinkPoint (www.linkpoint.com) and YourPay (www.yourpay.com) payment gateways. Both gateways are projects of the same company (YourPay is a sister website of LinkPoint), and methods of integration with both gateways are similar – the same Shop-Script payment module can be used for integrating with both LinkPoint and YourPay. Shop-Script supports two integration methods with this gateways:
• LinkPoint Connect / YourPay Connect http://www.linkpoint.com/product_solutions/internet/linkpointbasic/lpb_index.htm This is a simple integration method that works in a such way: customer places an order in your store, and after that is redirected to secure LinkPoint website to enter credit card data and submit a payment. This method of integration does not put any requirements on your system, and does not require that you have a SSL certificate for your domain name. In order to install and use LinkPoint/YourPay Connect payment module:
o Install it on a regular basis (just like any other Shop-Script payment module) o Login to your LinkPoint/YourPay account (www.linkpointcentral.com or
www.yourpay.com) o Click on "Customization" in the Main Menu Bar, then click “Settings” o Enter following values for “Connect Settings”:
Order Submission Form: {YOUR_STORE_URL}/linkpoint.php Example: http://www.myonlinestore.com/linkpoint.php
Confirmation Page: {YOUR_STORE_URL}/index.php?transaction_result=success Example: http://www.myonlinestore.com/ index.php?transaction_result=success
Failure Page: {YOUR_STORE_URL}/index.php?transaction_result=failure Example: http://www.myonlinestore.com/ index.php?transaction_result=failure
IMPORTANT: Providing these URLs is required by LinkPoint. If you do not perform this, you will not be able to accept payments (customers will always see error page when they are redirected to LinkPoint/YourPay website).
• LinkPoint API / YourPay API http://www.linkpoint.com/product_solutions/internet/linkpointselectapi/lpa_index.htm LinkPoint/YourPay API is a bit more complex and tight integration method than LinkPoint/YourPay Connect. It allows accepting credit card payments from customers without redirecting them to LinkPoint website for making payments. Credit card data is entered during checkout in your store. This is more convenient for customers, though puts additional requirements on your system: it requires that you have a valid SSL certificate for the domain name where Shop-Script is installed, and your server should support cURL (see ‘System requirements’ section for details). LinkPoint/YourPay API module is installed just like any other Shop-Script payment module, and does not require any additional settings in your LinkPoint account.

Page 88 of 101
Shop-Script PRO Copyright © WebAsyst LLC
HSBC Following information is for users of payment gateway of the famous HSBC bank. Please read carefully. Shop-Script provides module for integrating with HSBC e-Secure payment gateway (CPI Integration method). In order to process credit card payments with HSBC payment you need to have an e-Secure account with HSBC. To get this account you need to have been banking with HSBC for at least six months or have a reference from the bank you are currently banking with. The second thing you need to know is that you need to have a valid SSL certificate installed for the domain name where your online store is hosted. And the last but not least. HSBC card processing is performed by integrating with CPI (Cardholder Payment Interface) which requires using HSBC software supplied with the CPI Integration Guide. This puts some additional system requirements (unfortunately, currently HSBC does not provide the possibility of integration without the usage of their custom programs):
• You should be able to use PHP exec() function (http://www.php.net/exec). Some hosting providers restrict usage of exec(). If your provider restricts it as well, you will not be able to use HSBC module.
• Shop-Script software archive by default includes HSBC CPI software compiled for Linux and Windows. If your host provider server utilizes other operating systems, you will have to contact HSBC and request software for your operating system. It could also happen that HSBC will provide you with the source code of their software only – in this case you will have to forward this source code to your host provider with the request to compile it on your web server.
• HSBC software included in Shop-Script archive is stored in modules/payment/hsbc/ folder. HSBC will try to run the software in this folder, however this may not work in case your host provider server is configured such that it restricts running compiled software in this folder. In this case you should request information about using exec() function for running third-party programs from your host provider. If host provider allows executing custom software programs only in certain folders on the server, you will have to move HSBC program files from modules/payment/hsbc/ to one of these folders, and then make minor changes in modules/payment/class.hsbc.php file (set correct path to this folder).
If all above conditions are met, but HSBC software does not work, you may request information directly from HSBC e-Secure support at [email protected] and your hosting provider. If you have installed HSBC software successfully and it works but you still experience problems with HSBC module, our support team would be glad to assist you. Please include all available information about your server configuration (with FTP access, if possible) and describe what you have already done when installing HSBC software. When you install HSBC module we suggest you start simply by installing HSBC payment module in your store backend, and then performing a test order in storefront. If on the last step of checkout (“Thank you for your order!” page) you see “Proceed to HSBC website” button and no error message, this means that HSBC software has been successfully executed, and the module should be working properly. If you see “Failed executing HSBC software” error message, this means exec() function has failed executing HSBC program. Please check the error message:
• If it says “Permission denied”, this means that you do not have permissions to run the program. You may try setting chmod 0755 (enable ‘execute’ permissions value) for TestHash.e file in the modules/payment/hsbc/ folder.

Page 89 of 101
Shop-Script PRO Copyright © WebAsyst LLC
• If you receive following error message - “modules/payment/hsbc/TestHash.e: error while loading shared libraries: libstdc++-libc6.2-2.so.3: cannot open shared object file: No such file or directory” - contact your hosting provider and request installing libstdc++-libc6.2-2.so.3 library (extension). This extension is used for compatibility with some versions of C compiler on UNIX systems.
• If you see other error message, please send it to us and we will help you sort out where the problem is and whom should be contacted for resolving HSBC software issue.

Page 90 of 101
Shop-Script PRO Copyright © WebAsyst LLC
Chronopay Shop-Script provides module for integrating with Chronopay payment gateway. Please read through if you are going to utilize Chronopay for payment processing. Setting up Chronopay payment module is easy, though requires clarification on some issues. When you click “Install” link for Chronopay module you are prompted to enter Product ID. This Product ID is Chronopay internal information and it can be obtained from your Chronopay account. Following guideline explains how to get it from your account:
3. Once you have received login and password from Chronopay go to https://cliens.chronopay.com and login to your account
4. Go to Setup -> List Your Sites and click “Add New Site”. Here you will be offered to input website information where your online store (Shop-Script based) is installed (URL, Website name, FTP information, etc). These are requirements of Chronopay payment gateway. After you click “Save” a new Site ID will be generated for you.
5. Now go to Setup -> List Your Products and click “Add New Product”. When filling in the form, input USD 1.00 for product price, select Site ID which has been generated on the step 2 of this guideline, and indicate any name for this product which will describe orders from your online store, e.g. “My online store order”.
6. When you submit this form, a new Product ID will be generated. Now go to your Shop-Script online store backend, and enter this Product ID in the settings of Chronopay payment module.

Page 91 of 101
Shop-Script PRO Copyright © WebAsyst LLC
ePDQ Shop-Script provides module for integrating with ePDQ Barclaycard Business (http://www.barclaycardbusiness.co.uk/accepting_cards/phone_mail_internet/index.html) payment gateway. Please read through if you are going to utilize ePDQ for payment processing. Setting up ePDQ payment module is easy, though requires clarification on some issues. Before you install ePDQ module in your Shop-Script back end please read an email that ePDQ sent you when your account had been activated. This message should contain your account credentials (username, password, etc.) and some URLs for configuring your account. One of these URLs is ePDQ Configuration Page (most likely it will be https://secure2.mde.epdq.co.uk/cgi-bin/CcxBarclaysEpdqAdminTool.e). Go to this page and sign in by entering your Client ID, User name and password. Once logged in you will be offered to input two essential settings:
• Pass-Phrase: enter any string you like and write it down somewhere since you will require it to install ePDQ module in Shop-Script back end
• Allowed URL: enter http://<Your Store URL>/epdq.php Example: http://www.myonlineshop.com/epdq.php
For information about other settings you can define here please see ePDQ CPI Integration Guide Page 15 (you can get it from ePDQ). Now go Shop-Script back end and install ePDQ module. In module settings enter Pass-Phrase that you have defined in ePDQ configuration settings.

Page 92 of 101
Shop-Script PRO Copyright © WebAsyst LLC
Reports
This section provides reports of different nature:

Page 93 of 101
Shop-Script PRO Copyright © WebAsyst LLC
Designing your shopping cart
Languages
Shop-Script PRO is designed to support multilingual interface.
All available language file(s) included in the package are placed in the languages/ folder. If you would like to add a new language to you shopping cart you need to create a new .php-file and place it in this folder (languages). Your file should be of the same structure as existing ones (e.g. english.php).
Once you have prepared a language file, you should point Shop-Script to load it (by creating a language file, it is not loaded automatically to your store available languages list). A list of available languages is set in the .php-file cfg/language_list.php. Open it in your text editor.
Here is an example of adding an English language.
$lang_list[] = new Language(); $tlang = &$lang_list[count($lang_list)-1]; $tlang->description = "English"; $tlang->filename = "english.php"; $tlang->template_path = "tmpl1"; $tlang->iso2 = "en";
If you decide to add a German and French languages (f.e.), you should add such strings:
$lang_list[] = new Language(); $tlang = &$lang_list[count($lang_list)-1]; $tlang->description = "German"; $tlang->filename = "german.php"; $tlang->template_path = "tmpl1"; $tlang->iso2 = "de";
$lang_list[] = new Language(); $tlang = &$lang_list[count($lang_list)-1]; $tlang->description = "French"; $tlang->filename = "french.php"; $tlang->template_path = "tmpl1"; $tlang->iso2 = "fr";
For each language you should set:
• description: name of the language, that will be shown to your customers • filename: a filename of a PHP language file (do not include path to a file – only filename!) • template_path: name of the folder with storefront templates (e.g. tmpl1, tmpl2, tmpl3)

Page 94 of 101
Shop-Script PRO Copyright © WebAsyst LLC
Templates
Shop-Script software uses Smarty templates engine (http://smarty.php.net). Smarty is a very popular template engine which is used by the big number of PHP web solutions. Smarty allows you to change look & feel of your shopping cart as you like.
Design is defined in templates which are located in the templates/ subfolder of the directory where you installed Shop-Script.
If you browse templates/ folder, you will find following subfolders in it:
• backend/ subfolder contains administrative mode template files • email/ subfolder contains email messages templates which are sent to your customers
and to store administrator • tmpl*/ subfolders, where * is a template number, e.g. tmpl1, tmpl2, tmpl3, etc.
In Shop-Script PRO there are five demo templates included which you can use as a base layout for your storefront.
Please do not modify backend template files not to break the functionality of the administrative tools. If you would like to redesign only storefront (front end) templates, you will only require to edit some of the files located in templates/tmpl*/ folder, where * is a number of template you are going to use.
Templates are HTML files which can be edited in any text or WYSIWYG HTML editor (e.g. Macromedia DreamWeaver, Microsoft FrontPage, Adobe GoLive). Design is fully separated from PHP source files.
The main customer storefront (front end) template is index.tpl.html - this template defines the layout of your store’s front end design. Please open this file with your text or WYSIWYG HTML editor and make necessary changes in it (change colors, logos or anything else on your liking).
To redesign your storefront you should have basic HTML knowledge and/or experience of using WYSIWYG HTML editor.
Template of your Shop-Script PRO shopping cart system is binded to the interface language. A list of available languages and templates is set in the PHP file cfg/language_list.php. Open it in your text editor.
Here is an example of adding an English language.
$lang_list[] = new Language(); $tlang = &$lang_list[count($lang_list)-1]; $tlang->description = "English"; $tlang->filename = "english.php"; $tlang->template_path = "tmpl1"; $tlang->iso2 = "en";
As you can see in this sample, $lang_list[]->template_path sets template, that will be used. You can simply change its value to a new one, e.g. changing it to "tmpl3" will make your store use tmpl3 template. Do not set template_path to folders backend, email or any non-existing folder, since this will make Shop-Script run into errors.

Page 95 of 101
Shop-Script PRO Copyright © WebAsyst LLC
Each language can be combined with a separate template as well as a single template can be used with many languages.
Folder templates_c is used by Smarty to parse templates and compile PHP files. Make sure that Shop-Script scripts are allowed to write in this folder (if they are not, corresponding warnings will appear). This folder should be protected from public access. Please refer to “Protecting your store” section of this User Guide for more details.

Page 96 of 101
Shop-Script PRO Copyright © WebAsyst LLC
Editing templates in HTML-editor
Storefront design is defined in templates located in the templates/tmpl*/ subfolder of the directory where you have installed Shop-Script (here * indicates a template number and can be from 1 to 5). Design is fully separated from PHP source files.
The main front end template is index.tpl.html (this template defines layout of your shopping cart design). Please open this file in your text or WYSIWYG HTML editor (e.g. Macromedia Dreamweaver, Microsoft FrontPage, Adobe GoLive) and make necessary changes in it (change colors, logos or anything you like).
Here is how opening index.tpl.html of ‘Template #1’ may look in Macromedia Dreamweaver:
Note: When modifying template files we urge you to keep track on which files were modified and which were not - it will be much easier for you to upgrade your Shop-Script installation to the latest version of the software in this case. When upgrading to the newer version you have to overwrite all existing files with the files from the updated package archive. In case you know which files were modified, you will be able to easily apply changes to the files from updated package.

Page 97 of 101
Shop-Script PRO Copyright © WebAsyst LLC
Update Log
What’s new in Shop-Script PRO 2.0?
12/28/2005 - We proudly introduce you a brand new version of Shop-Script PRO!
In this new release we have completely reconsidered product's features and facilities. New Shop-Script PRO obtained many Shop-Script PREMIUM advantages, including:
• Updated source files and database structures allowing to customize templates and PHP sources easier
• Easy to configure registration form and customer account: address book, shopping history, orders statuses, etc.
• Shop-Script PREMIUM's shipping and payment modules and checkout process • Integration with all major payment gateways • Improved customer and order management engines • Flexible sales tax configuration • Online feedback forms • Discounts system • And many more!
New Shop-Script PRO release offers all necessary ecommerce features for pushing up your online sales. It does not provide exclusive Shop-Script PREMIUM features such as support for complex products and affiliate program module, however, with Shop-Script PRO you can quickly establish professionally looking and manageable online store.
For more information about updates please refer to www.shop-script.com (“News” section).

Page 98 of 101
Shop-Script PRO Copyright © WebAsyst LLC
Troubleshooting
Zend-encoded Free Trial: When I run install.php I get the message saying that Zend Optimizer is not installed.
This error message indicates that Zend Optimizer PHP extension is not installed on the web server where you are trying to install Shop-Script Free Trial. Thus encoded PHP source code files could not be executed.
Please visit Zend Optimizer website: http://www.zend.com/products/zend_optimizer Download Zend Optimizer by clicking “Buy now” button and applying for the registration. Download is free. After you download Zend Optimizer installer simply run it, and it will be installed on your local machine and will automatically introduce changes to PHP settings (php.ini file).
If you install Free Trial on remote server, please contact your hosting provider regarding Zend Optimizer installation.
Zend-encoded Free Trial: After installaton I receive error message Fatal error: Unable to read 8371 bytes in …/install.php on line 0.
This error message means that files were uploaded in TEXT (ASCII mode). You should force your FTP client to use BINARY mode for files upload, and re-upload all files from Shop-Script Free Trial archive.
ionCube-encoded Free Trial: When I run install.php I get the following error: "The file .../install.php has been encoded with the ionCube PHP Encoder and requires the free ioncube_loader_win_X.X.dll ionCube PHP Loader"
This error message indicates that ionCube Loader PHP extension is not installed on the web server where you are trying to install Shop-Script Free Trial. Thus encoded PHP files could not be executed.
To install ionCube Loader whether download it directly from ionCube website (it is free - http://www.ioncube.com/loaders.php), or (if you install Shop-Script Free Trial using Windows Installer you don't have to download Loader manually) please find ionCube Loader files in the loaders/ subfolder of Shop-Script installation directory. What you need here is PHP extension for running encoded files - .DLL file for Windows servers, .SO file for Unix. Write down the file name and a full path to it. Open your php.ini file and enable ionCube Loader inclusion by adding a line (for Windows servers): zend_extension_ts = <drive>:\<path>\ioncube_loader_win_<php version>.dll (e.g. zend_extension_ts = C:\EasyPHP\www\loaders\ioncube_loader_win_4.4.dll for PHP 4.4.x) and then restart your web server.

Page 99 of 101
Shop-Script PRO Copyright © WebAsyst LLC
For more information please refer to detailed instructions at ionCube website: http://www.ioncube.com/loader_installation.php. If you experience problems with ionCube version of Free Trial, we urge you to download Zend-encoded version from www.shop-script.com. Zend is more popular source code encoding technology, and it could be already installed on your server, so you would have to install no additional extensions for your web server, and Free Trial edition would run without any problems.
During installation an error message appears: "File cfg/connect.inc.php is not writable". How can I fix it?
Make sure you set (enabled) write permissions for the folders products_files, products_pictures, temp, templates_c and all files inside cfg/ folder. Please refer to “Installing Zip Version” -> “Installation to a remote server” section of this User Guide for more information.
What is CHMOD? How do I change access permissions on files and folders?
CHMOD is a contraction of "change mode". CHMOD is a command to change files/folders access permissions in UNIX-based operating systems (e.g. Linux, FreeBSD, MacOS X). Please refer to more information on how to perform chmod in the World Wide Web (f.e. you may try to search for this information on Google using keywords "what is chmod", "how to chmod").
Fatal error: Call to undefined function mysql_connect() in .../includes/database/mysql.php on line 13
This could be due to the fact that MySQL is not installed on your server or not supported in your PHP installation. If you run PHP5, by default MySQL support is turned off, and you need to enable it manually. To do such please open your php.ini file (PHP settings file) and uncomment MySQL inclusion line:
;extension=php_mysql.dll
Simply remove semicolon (;) at the beginning of the line:
extension=php_mysql.dll
Then save the file, restart HTTP server (Apache/IIS) and rerun Shop-Script.
Installation failed: "Couldn't connect to the database server" / "Couldn't connect to the database"
At first, check your database connection settings. If settings are correct, make sure you have enabled file access permissions as it is described in the installation instructions.
Installation completed successfully. But I can not login as administrator / can not add items to my shopping cart. Why?
Make sure sessions are supported by PHP installation on your server. If you run Shop-Script PRO on your local server with Windows operating system, please open your PHP settings file (php.ini) in any text editor. Find a line where session.save_path settings variable is defined. This line should look like this:

Page 100 of 101
Shop-Script PRO Copyright © WebAsyst LLC
session.save_path = [folder] Here you should input valid existing [folder], then save php.ini and restart Apache/IIS server. For example, you may set session.save_path = c:\temp_sessions and then create temp_sessions folder on your c:\drive.
If you run Shop-Script PRO on a remote server please contact your hosting provider support team.
Installation completed successfully. But when I run my shopping cart I get "Warning: Smarty error: unable to read resource: "./templates/tmpl1/index.tpl" in /home/.../smarty/Smarty.class.php on line ..."?
Please make sure you uploaded ALL Shop-Script PRO package (archive) content to your web server (including files from templates/tmpl1/ folder).
As administrator I can not upload files (product pictures, files, etc.) or change system settings. Why?
Make sure that in PHP settings on the server where Shop-Script is installed it is set:
file_uploads = On
Also, make sure you set (enabled) write permissions for the folders products_files, products_pictures, temp, templates_c and all files inside cfg/ folder. Please refer to “Installing Zip Version” -> “Installation to a remote server” section of this User Guide for more information regarding setting file access permissions.
I'm trying to vote for the product, but customer's rating is not updated. Why?
Probably you have already made a vote for the product. You may vote for a single product only once per session.
How do I change "Hello and welcome to Shop-Script!" greetings line/phrase?
This line/phrase (as well as all other shopping cart interface phrases) is defined in language file: languages/english.php. Simply open this file with your text editor (e.g. notepad) and make necessary changes in the greetings line and/or other phrases.
I get following errors. What can I do? Warning: Illegal offset type in .../smarty/smarty.class.php on line 602 Warning: Smarty error: unable to read resource: "./install/step1.tpl.html" in .../smarty/smarty.class.php on line 1144
For information about it please refer to: http://www.webhostingtalk.com/archive/thread/354694-1.html http://forum.cerberusweb.com/archive/thread/3799-1.html http://bugs.php.net/bug.php?id=30l http://bugs.php.net/bug.php?id=30914 The problem is that Zend Optimizer version is not compatible with the PHP version on the server. This causes inability to initialize Smarty templates library.

Page 101 of 101
Shop-Script PRO Copyright © WebAsyst LLC
Please consider upgrading Zend Optimizer version. Contact your hosting provider regarding this issue.