SHAREBOT VOYAGER
31
NE HANDBOOK SHAREBOT VOYAGER VER.0.2 30/01/2015 Sharebot VOYAGER handbook HANDBOOK pag 1 di 31
-
Upload
khangminh22 -
Category
Documents
-
view
1 -
download
0
Transcript of SHAREBOT VOYAGER

NE
HANDBOOK
SHAREBOT VOYAGER
VER.0.2 30/01/2015
Sharebot VOYAGER handbook HANDBOOK pag 1 di 31

Indice generale PAY ATTENTION!.............................................................................................................................................................................................3 ...............................................................................................................................................................................................................................3TECHNICAL FEATURES...................................................................................................................................................................................4ANATOMY OF SHAREOT VOYAGER............................................................................................................................................................5QUICK START.....................................................................................................................................................................................................7
OPEN THE PACKAGE........................................................................................................................................................................................................7PRELIMINARY OPERATIONS.........................................................................................................................................................................................7
PRINTING PROCESS......................................................................................................................................................................................10CONNECTION AND CONFIGURATION.....................................................................................................................................................................10
STANDALONE........................................................................................................................................................................................................................................ 10NETWORK.............................................................................................................................................................................................................................................. 11
INSTALLATION OF THE SLICING SOFTWARE .....................................................................................................................................................12HOW TO USE THE SLICING SW...................................................................................................................................................................................................... 12HOW TO LOAD AN OBJECT...............................................................................................................................................................................................................13Removing a model.............................................................................................................................................................................................................................. 14Working with support generation tools ....................................................................................................................................................................................14Moving supports................................................................................................................................................................................................................................. 15Operation on the selected object.................................................................................................................................................................................................15Position .................................................................................................................................................................................................................................................. 15Scaling model...................................................................................................................................................................................................................................... 16Rotating model.................................................................................................................................................................................................................................... 16Saving a scene..................................................................................................................................................................................................................................... 16Creation of the printing file............................................................................................................................................................................................................16
PRINTING DETAILS........................................................................................................................................................................................................17CONSIDERATION ABOUT THE MODEL ORIENTATION .....................................................................................................................................17SUPPORTS.........................................................................................................................................................................................................................18EMPTYING OF THE OBJECTS......................................................................................................................................................................................19
EXAMPLE OF A FILE WHICH DOESN'T NEED EMPTYING ....................................................................................................................................................19EXAMPLE OF A FILE WHICH REQUIRES EMPTYING ..............................................................................................................................................................19EXAMPLE OF EMPTY MODEL WITH DRAIN CANALS..............................................................................................................................................................20
HOW TO USE PRINTER INTERFACE.........................................................................................................................................................................21DASHBOARD ........................................................................................................................................................................................................................................ 21TO MANAGE FILES..............................................................................................................................................................................................................................22
FIRST PRINTING..............................................................................................................................................................................................................23START A PRINTING..............................................................................................................................................................................................................................23AT THE END OF A PRINTING...........................................................................................................................................................................................................24TAKE OUT AND FINISH THE OBJECT............................................................................................................................................................................................24CLEANING.............................................................................................................................................................................................................................................. 25HOW TO USE THE RESIN VAT IN A CORRECT WAY..................................................................................................................................................................25LUBRIFICATION................................................................................................................................................................................................................................... 25VERIFY THE CORRECT VENTILATION..........................................................................................................................................................................................25
WHAT TO VERIFY IF.......................................................................................................................................................................................................26The resin comes out from the resin vat......................................................................................................................................................................................26The object isn't attached to the printing plate........................................................................................................................................................................26The resin isn't close to the end during a printing process..................................................................................................................................................26The resin presents remains and impurities on the bottom of the vat............................................................................................................................26
PRINTER CALIBRATION...............................................................................................................................................................................27PRINTING PLATE PLANARITY....................................................................................................................................................................................27PRINTING PLATE HEIGHT...........................................................................................................................................................................................29FOCUSING OF THE OPTICAL HEAD.........................................................................................................................................................................29Dimensional calibration..............................................................................................................................................................................................30
Sharebot VOYAGER handbook HANDBOOK pag 2 di 31
PAY ATTENTION!Sharebot Voyager is a 3d printer based on DLP technology which is certified CE. It is aprofessional tool with high precision and it must be used in a correct way to achieveexcellent results
As all the professional tools, you have to use Sharebot Voyager printer, its accessoriesand its consumer products with care and respect to ensure a safe work environment anda long life to the machine. For these reasons:
Tampering of the printer involves a loss of warranty
Malfunctioning caused by a inadequate use of the printer leads to a loss of warranty.Don't open the 3d printer top cover when the machine is working.
Don't look directly at the projected light and use safety glasses during the printingprocess.
The DLP projector which is inside the 3d printer has been modified to increase the qualityand quantity of the projected light radiation.
Resin vat is a part subject to usury and it is considered a consumer product no coveredby warranty
Printing plate is a part subject to usury and it is considered a consumer product nocovered by warranty
Projector lamp is a part subject to usury and it is considered a consumer product nocovered by warranty. You must go to authorized resellers to replace it.
Resins must be handle following the safety instructions which are found on the packagesand they are not approved for food, medical and body applications. Don't ingest them.
We recommend to clean printed objects with isopropyl alcohol which is a flammable andexplosive material not supplied with the machine.Use it following the safety instruction or manufacturer data sheet and handle it with care.Isopropyl alcohol must be kept away from heat source.
We recommend to use safety glasses and gloves to handle isopropyl alcohol and resinsand use them in a well-ventilated environment.
For further details about the safety use of the printer, please see the technical data sheetand the manufacturer' specifications about alcohol and resins.
In the accessory kit you can find scissors,cutter, other sharp tools. Use them withattention.
Sharebot VOYAGER handbook HANDBOOK pag 3 di 31

TECHNICAL FEATURES
Printing area : 54 x 96 x 100 mm Max printer speed in z : 15 - 75 min/cm Max printer speed in volume : 40 - 200 cm3/hPrecision XY : 50 micronPrecision Z : 20-100 micron based on the resins usedProjector led uv full HD: 1.920x1.080 PixelBrightness : 3.000 ANSI LumenContrast: 10.000:1Lamp life: 5.000 hoursType of resin: Design, Elastic, Castable,Rubber moldingSteel Frame 3mmBody methacrylate 5mmMachine size: 65x25x40 cm Weight : 25 kg circa
These information could change because of technical reasons.
Sharebot VOYAGER handbook HANDBOOK pag 4 di 31
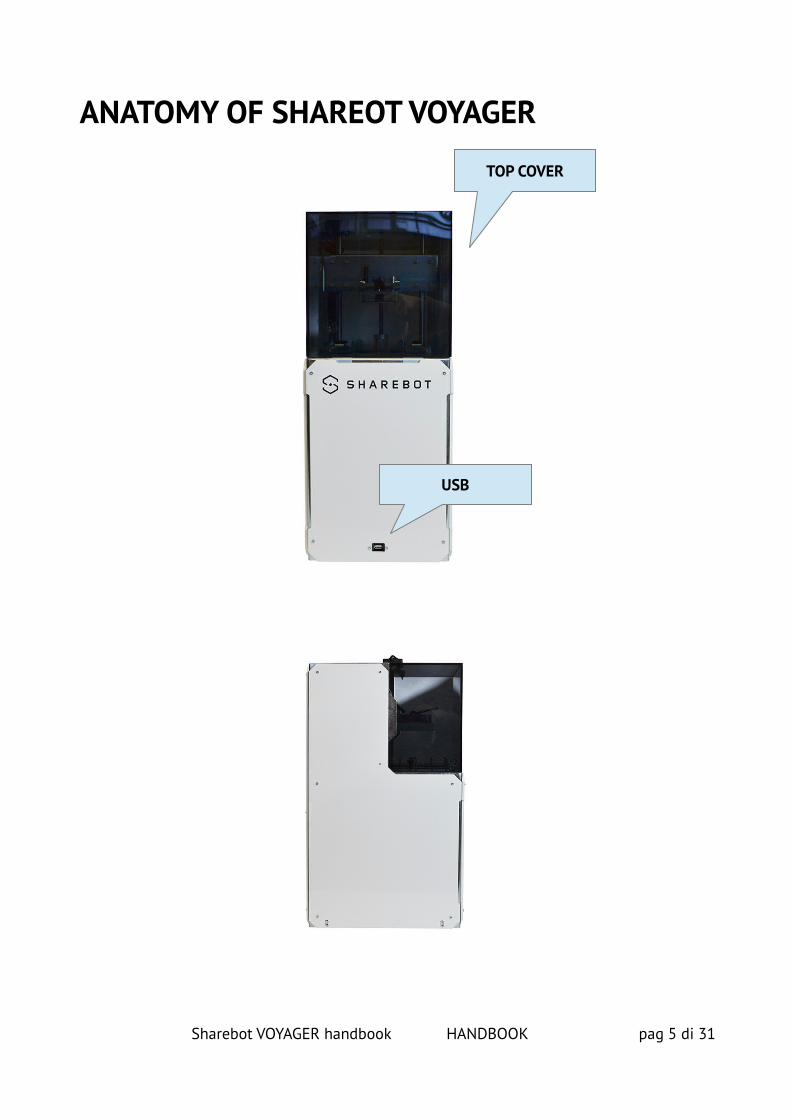
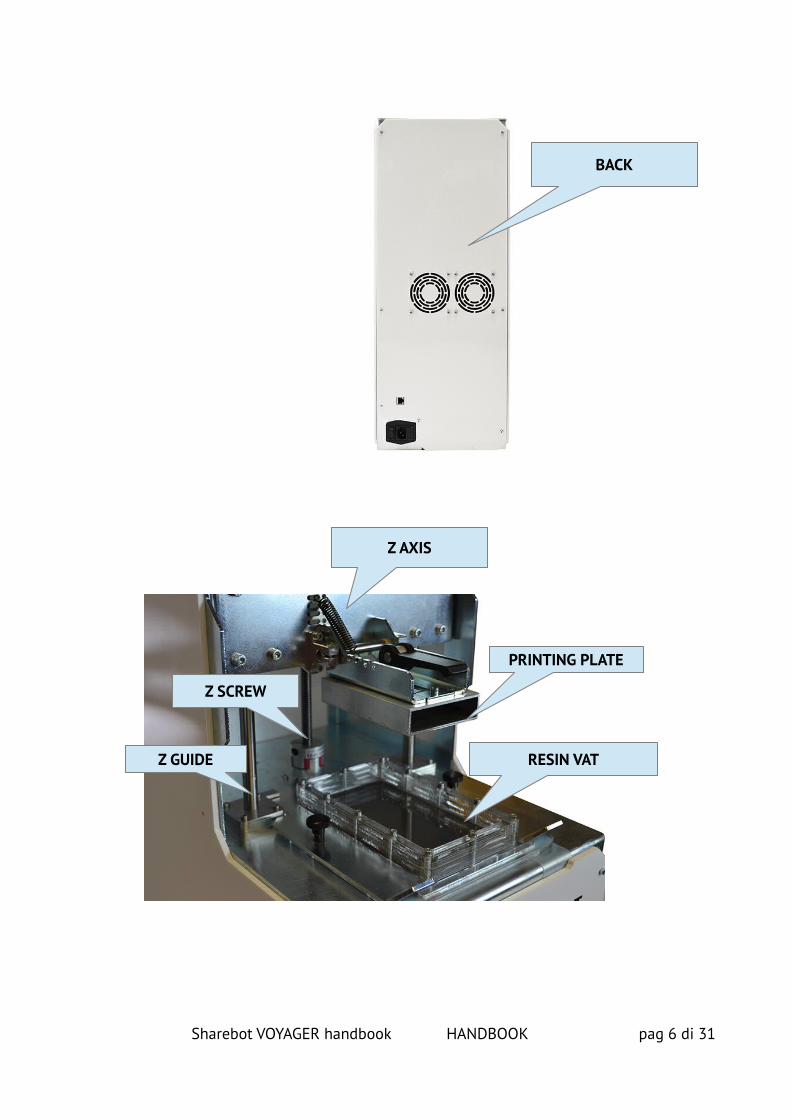
ANATOMY OF SHAREOT VOYAGER
Sharebot VOYAGER handbook HANDBOOK pag 5 di 31
TOP COVER
USB
Sharebot VOYAGER handbook HANDBOOK pag 6 di 31
BACK
Z AXIS
Z SCREW
Z GUIDE RESIN VAT
PRINTING PLATE
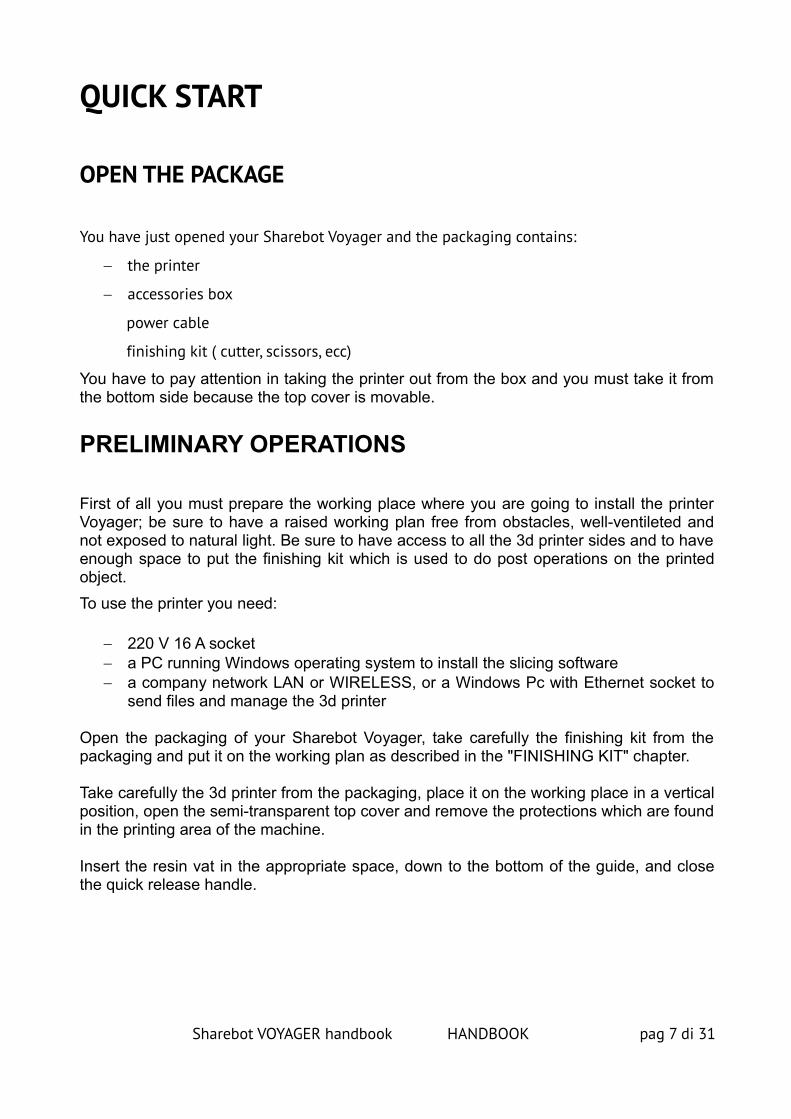
QUICK START
OPEN THE PACKAGE
You have just opened your Sharebot Voyager and the packaging contains:
the printer
accessories box
power cable
finishing kit ( cutter, scissors, ecc)
You have to pay attention in taking the printer out from the box and you must take it fromthe bottom side because the top cover is movable.
PRELIMINARY OPERATIONS
First of all you must prepare the working place where you are going to install the printerVoyager; be sure to have a raised working plan free from obstacles, well-ventileted andnot exposed to natural light. Be sure to have access to all the 3d printer sides and to haveenough space to put the finishing kit which is used to do post operations on the printedobject.
To use the printer you need:
220 V 16 A socket a PC running Windows operating system to install the slicing software a company network LAN or WIRELESS, or a Windows Pc with Ethernet socket to
send files and manage the 3d printer
Open the packaging of your Sharebot Voyager, take carefully the finishing kit from thepackaging and put it on the working plan as described in the "FINISHING KIT" chapter.
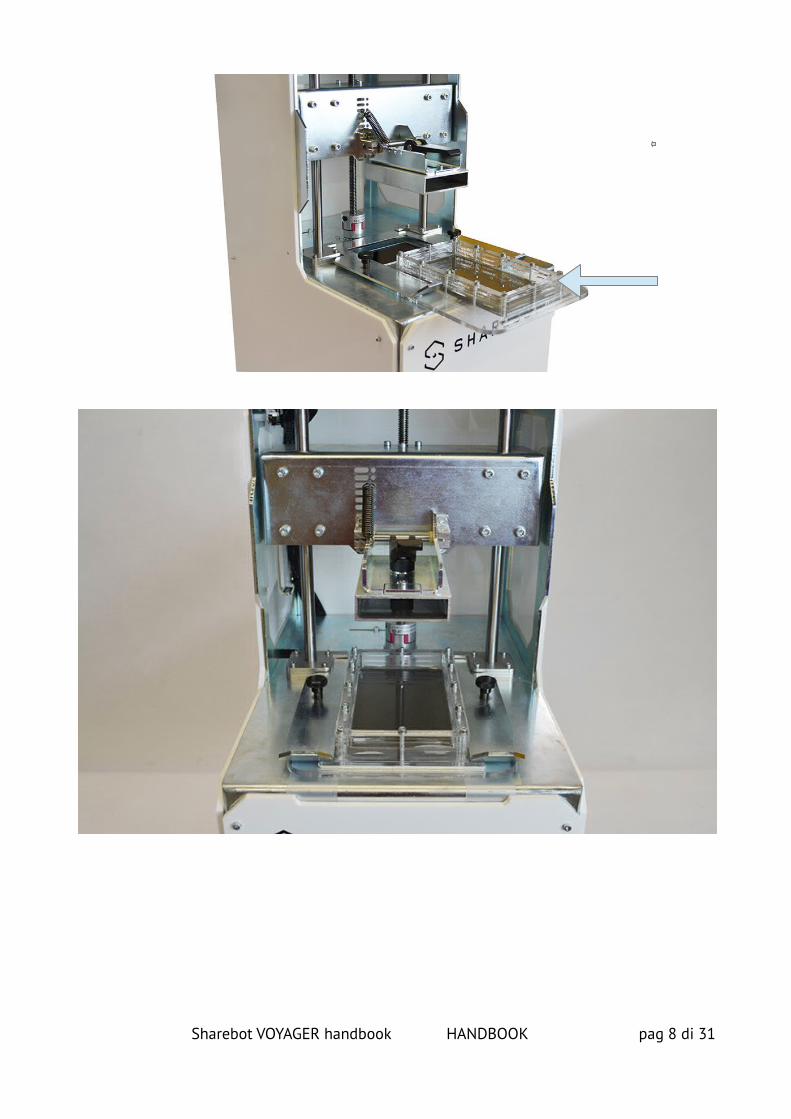
Take carefully the 3d printer from the packaging, place it on the working place in a verticalposition, open the semi-transparent top cover and remove the protections which are foundin the printing area of the machine.
Insert the resin vat in the appropriate space, down to the bottom of the guide, and closethe quick release handle.
Sharebot VOYAGER handbook HANDBOOK pag 7 di 31
Sharebot VOYAGER handbook HANDBOOK pag 8 di 31

Connect the printer to the electricity grid using the specific power cable
Sharebot VOYAGER handbook HANDBOOK pag 9 di 31
Unlocking lever
PRINTING PROCESS
CONNECTION AND CONFIGURATION
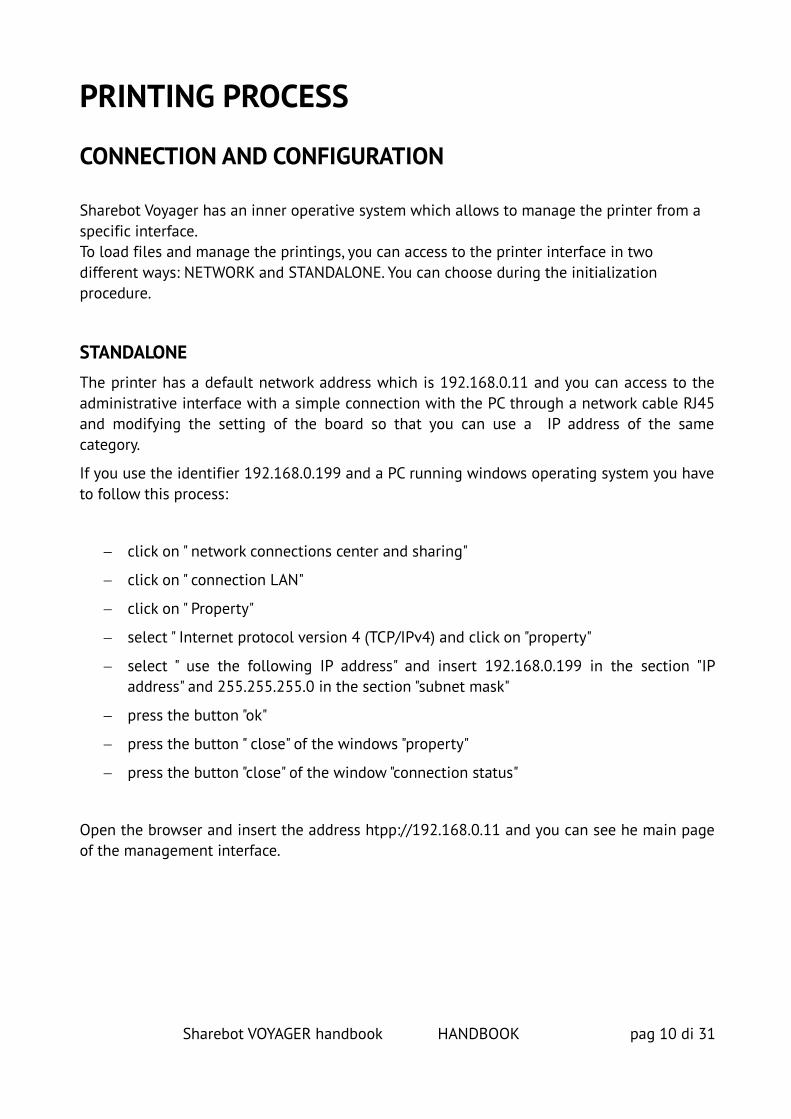
Sharebot Voyager has an inner operative system which allows to manage the printer from a specific interface.To load files and manage the printings, you can access to the printer interface in two different ways: NETWORK and STANDALONE. You can choose during the initialization procedure.
STANDALONEThe printer has a default network address which is 192.168.0.11 and you can access to theadministrative interface with a simple connection with the PC through a network cable RJ45and modifying the setting of the board so that you can use a IP address of the samecategory.
If you use the identifier 192.168.0.199 and a PC running windows operating system you haveto follow this process:
click on " network connections center and sharing"
click on " connection LAN"
click on " Property"
select " Internet protocol version 4 (TCP/IPv4) and click on "property"
select " use the following IP address" and insert 192.168.0.199 in the section "IPaddress" and 255.255.255.0 in the section "subnet mask"
press the button "ok"
press the button " close" of the windows "property"
press the button "close" of the window "connection status"
Open the browser and insert the address htpp://192.168.0.11 and you can see he main pageof the management interface.
Sharebot VOYAGER handbook HANDBOOK pag 10 di 31
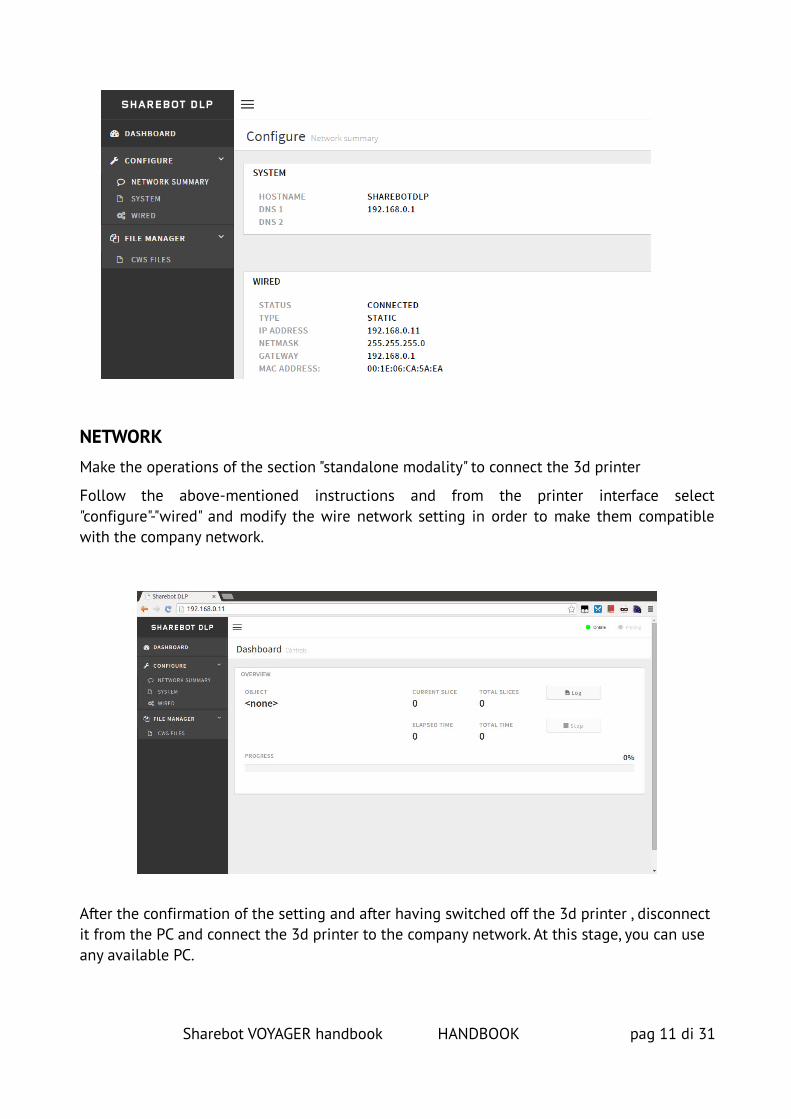
NETWORKMake the operations of the section "standalone modality" to connect the 3d printer
Follow the above-mentioned instructions and from the printer interface select"configure"-"wired" and modify the wire network setting in order to make them compatiblewith the company network.
After the confirmation of the setting and after having switched off the 3d printer , disconnect it from the PC and connect the 3d printer to the company network. At this stage, you can use any available PC.
Sharebot VOYAGER handbook HANDBOOK pag 11 di 31
INSTALLATION OF THE SLICING SOFTWARE Required system : pc with s.o. Win 7 or more, Processor: intel i5 or moreRAM: 4gb or moreHard disk capacity
Insert the USB disk in the PC and copy the file of the slicing software on the desktop.As an alternative to this, you can go to the website www.sharebot.it and from the section "download" you can download the software called DlpSoftwareSetup. Open the file and start the guided procedure for the installation of it.
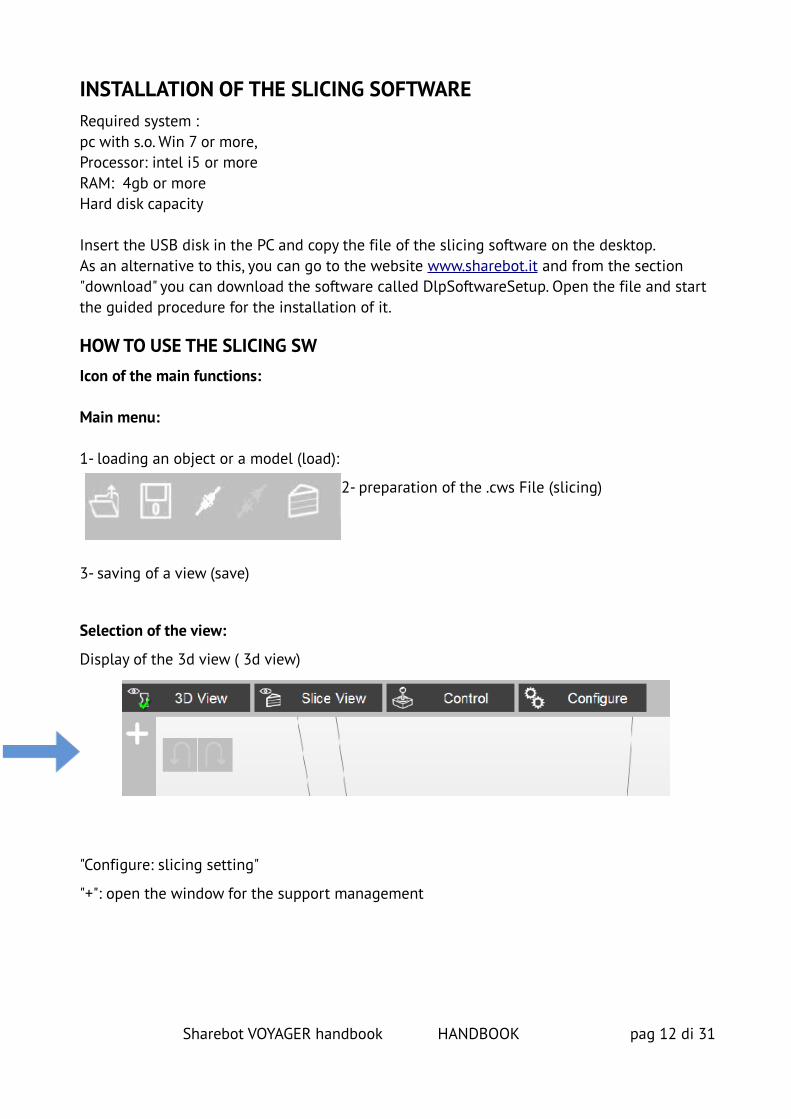
HOW TO USE THE SLICING SWIcon of the main functions:
Main menu:
1- loading an object or a model (load):
2- preparation of the .cws File (slicing)
3- saving of a view (save)
Selection of the view:
Display of the 3d view ( 3d view)
"Configure: slicing setting"
"+": open the window for the support management
Sharebot VOYAGER handbook HANDBOOK pag 12 di 31
HOW TO LOAD AN OBJECT
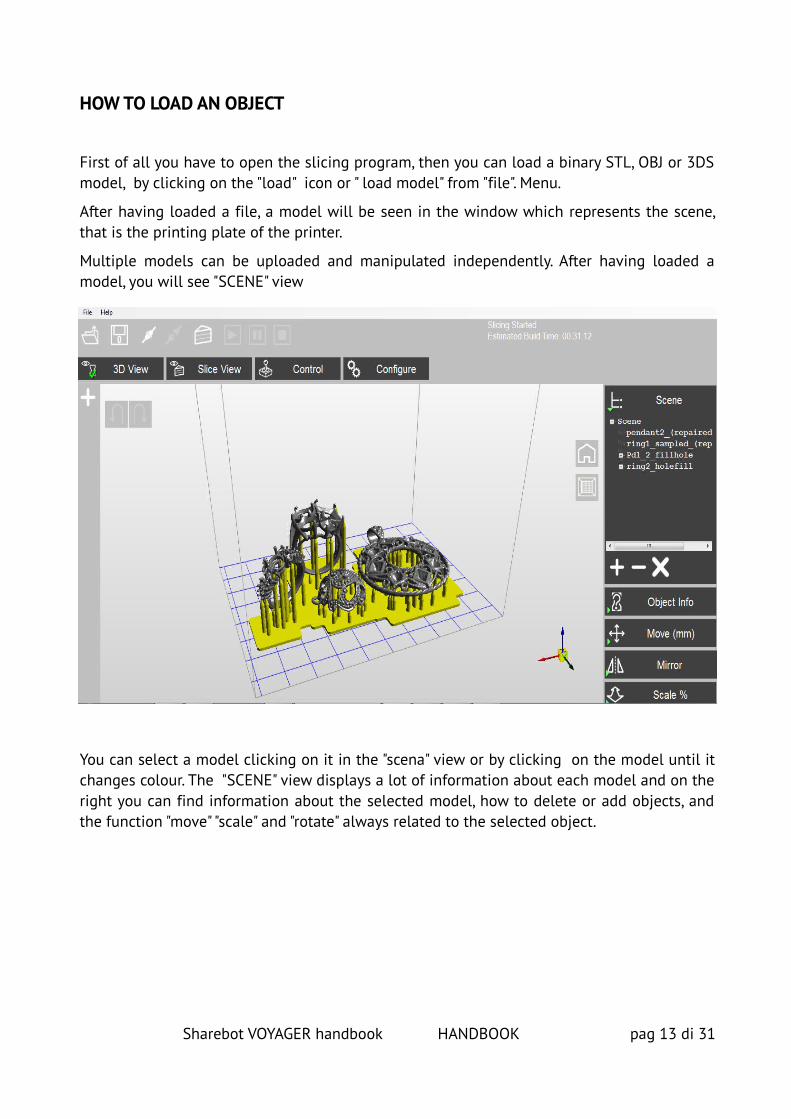
First of all you have to open the slicing program, then you can load a binary STL, OBJ or 3DSmodel, by clicking on the "load" icon or " load model" from "file". Menu.
After having loaded a file, a model will be seen in the window which represents the scene,that is the printing plate of the printer.
Multiple models can be uploaded and manipulated independently. After having loaded amodel, you will see "SCENE" view
You can select a model clicking on it in the "scena" view or by clicking on the model until itchanges colour. The "SCENE" view displays a lot of information about each model and on theright you can find information about the selected model, how to delete or add objects, andthe function "move" "scale" and "rotate" always related to the selected object.
Sharebot VOYAGER handbook HANDBOOK pag 13 di 31
Removing a modelYou can remove the object in two different ways:
1- You can select the name of the object in the scene graph and click on "-" button or you canselect the key "remove" from the menu which appears clicking with the mouse on the nameof the model.
2- You can also delete a model by selecting it and then pressing the "delete" key on yourkeyboard
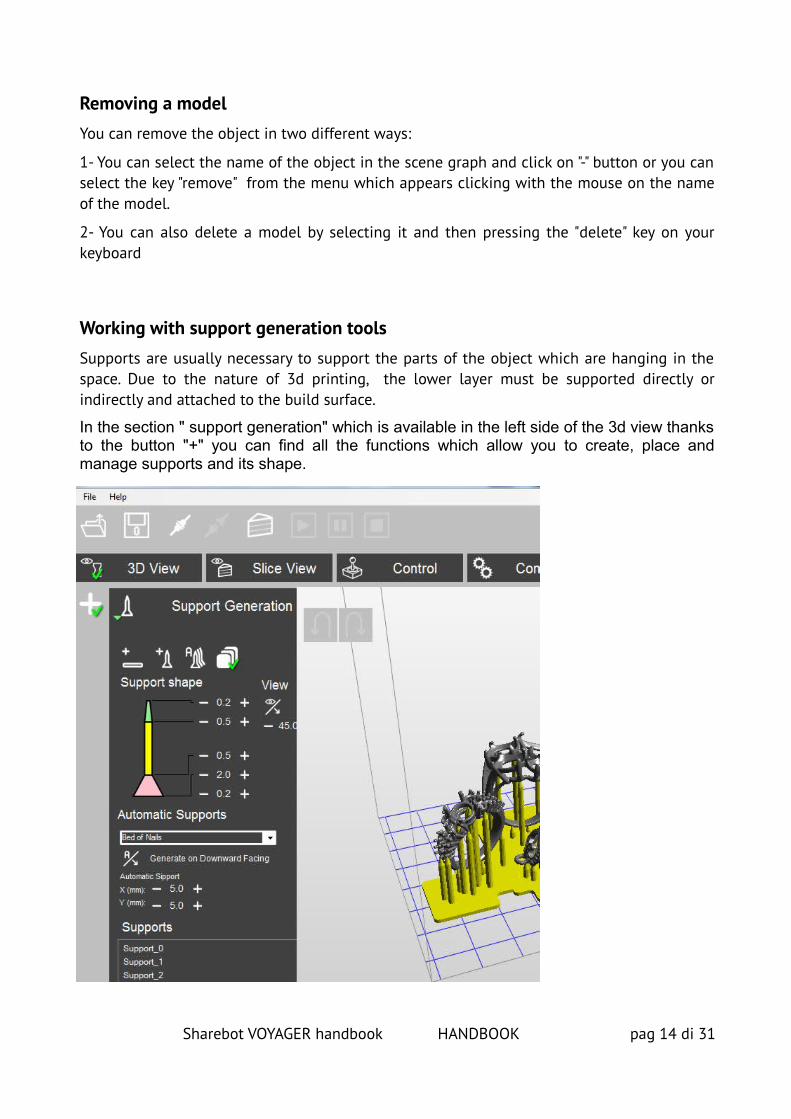
Working with support generation tools Supports are usually necessary to support the parts of the object which are hanging in thespace. Due to the nature of 3d printing, the lower layer must be supported directly orindirectly and attached to the build surface.
In the section " support generation" which is available in the left side of the 3d view thanksto the button "+" you can find all the functions which allow you to create, place andmanage supports and its shape.
Sharebot VOYAGER handbook HANDBOOK pag 14 di 31
Moving supportsAfter the creation of a manual or automatic support, you can move them around the X/Yplane. Select the support by double clicking on it, hold down "Shift" key and move the mouse.Supports will automatically scale vertically under the model they support.
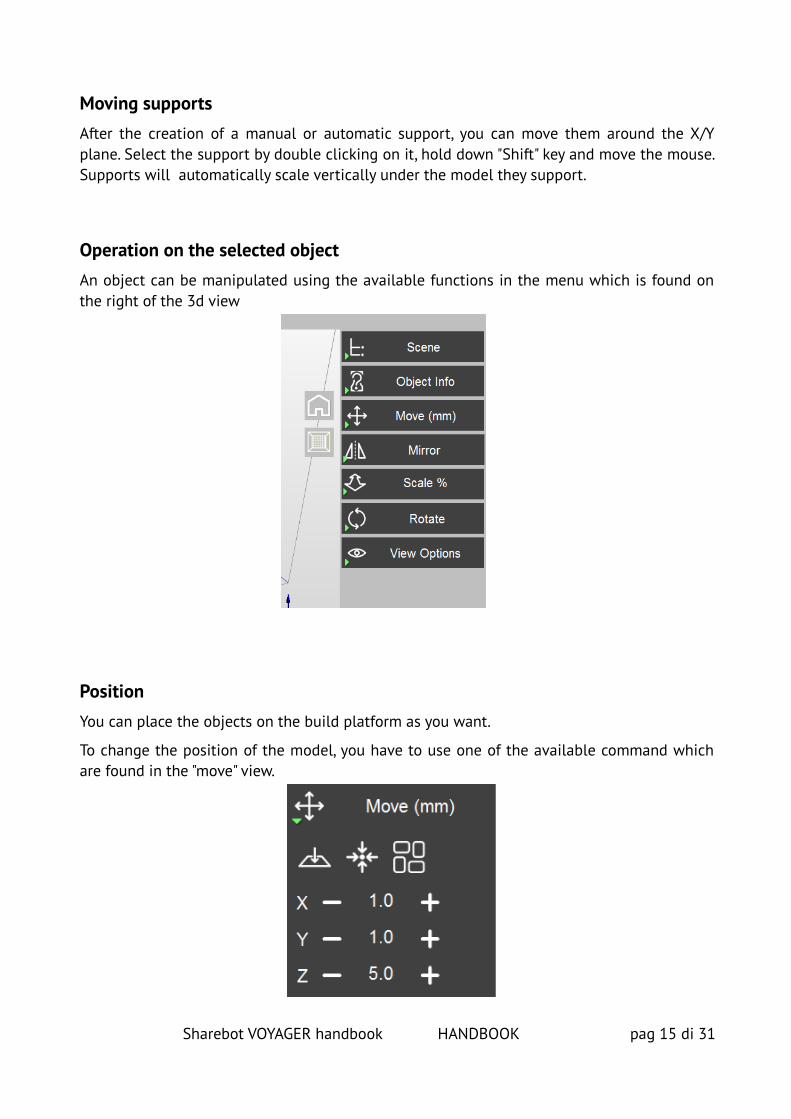
Operation on the selected objectAn object can be manipulated using the available functions in the menu which is found onthe right of the 3d view
Position You can place the objects on the build platform as you want.
To change the position of the model, you have to use one of the available command whichare found in the "move" view.
Sharebot VOYAGER handbook HANDBOOK pag 15 di 31

Available functions are ( from left to right):
1- place the object on the build platform
2- move the object in the position (0;0)
3- put all the loaded objects on the build platform
The following lines allow you to move the model along X,Y,Z axis. It is also possible to decidethe length of the movement modifying the number in the correspondent line and clickingthe buttons "-" "+"
Scaling modelA model can be scaled by selecting it and using the "scale" view.
The available functions allow you to scale all the axis of the same factor, "all" option, or toscale each axis.
Rotating modelTo rotate a model along axis, you have to use the functions available in the section "rotate".Rotating a model works in a similar way to moving a model. Simply select the model youwant to work with and use the "-" "+" buttons to rotate the model by the specified degrees.
Saving a sceneAfter having loaded one or more models on the build platform and after having created thesupports, the entire scene can be saved as an STL model. Simply click on the File-> SaveScene as STL' to save the scene model.
Creation of the printing fileOnce the scene is created, you can go on with the slicing and the creation of the file whichwill be used to realize the objects.
Before starting the creation of the file, select the resin which will be used.
Go on the section "configure", open the tab "configure slicing profile" and select the resin fromthe menu.
Click Apply and came back on the first page "3D VIEW"
Save the scene and click on the slicing button.
So select the slicing function
Sharebot VOYAGER handbook HANDBOOK pag 16 di 31
You will see a window in which you can click the "slice" key. In this way the process will startand it will bring to the creation of a cws file which can be loaded on the printer.
PRINTING DETAILSWhen you want to print an object, it is important to define the thickness of the single layer.
This value affects the resolution, in particular for all the surfaces which are developing inhight and with a bland inclination.
Imagine a sloping surface and try to slice it: the dimension of the slices can be differentand if the slices are identical there could be spaces between a layer and the followingone. If the slices are thinner, the form of the object will be more defined.
For this reason, the resolution of Z axis is one of the main element to understand thequality of a 3d printer.
However, using a thinner layer has a negative aspect because the printing time willincrease.
The resolution on Z axis is related to the result which can be judged both in qualitativeterms and realization time of the desired object.
The resolution on X,Y axis, is 0,05 mm which is the same measure of a single pixel usedfor the polymerization.
Type of resin and exposition time can affect the final resolution of the printed object.
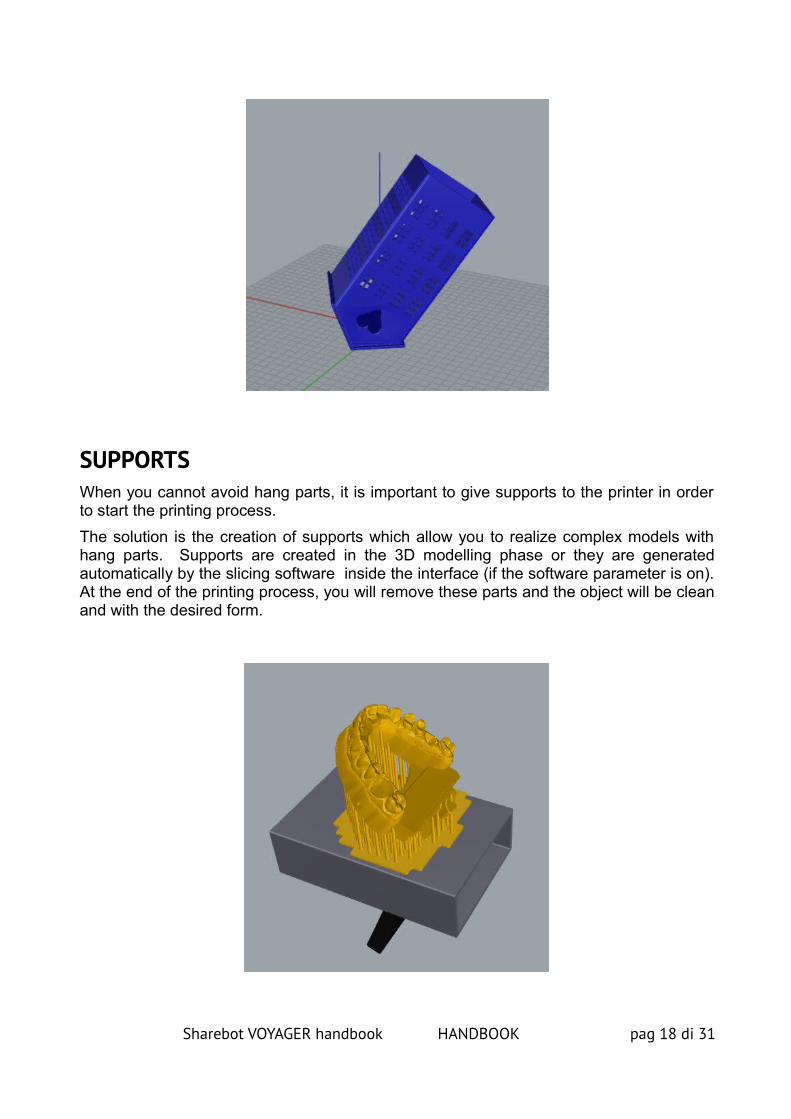
CONSIDERATION ABOUT THE MODEL ORIENTATION First of all, we have to consider the orientation of the models in respect to the printing areabecause the creation of an object is based on layers and each layer is created on the previousone.
Generally, you should rotate the object so that a quite large surface is in contact with theprinting plate which guarantees a good cohesion during the printing process.
When a surface is inclined more then 45 degree or some parts don't have a base (it meansthat they are hanging in space), the model requires some specific precautions.
First of all you have to verify if you can modify the rotation of the object so that it lies on theprinting plate and there are no parts hanging in space.
Example: it is better to print a door not in a vertical position but with a side lying on theprinting surface.
We suggest to visit this site in order to better orient your files:
http://www.thingiverse.com/thing:37978.
Sharebot VOYAGER handbook HANDBOOK pag 17 di 31
SUPPORTSWhen you cannot avoid hang parts, it is important to give supports to the printer in orderto start the printing process.
The solution is the creation of supports which allow you to realize complex models withhang parts. Supports are created in the 3D modelling phase or they are generatedautomatically by the slicing software inside the interface (if the software parameter is on).At the end of the printing process, you will remove these parts and the object will be cleanand with the desired form.
Sharebot VOYAGER handbook HANDBOOK pag 18 di 31

EMPTYING OF THE OBJECTS
You can print an object empty or full. Usually, objects with a large volume are printedempty in order to avoid deformation and wastefulness of resin. In this case, you have tocreate supports and specific drain canals for non-polymerized resin which is found insidethem.You can make this expedient during the modelling of the object or later thanks todedicated software. A good free ware software which allows these operations isMESHMIXER.
EXAMPLE OF A FILE WHICH DOESN'T NEED EMPTYING
EXAMPLE OF A FILE WHICH REQUIRES EMPTYING
Sharebot VOYAGER handbook HANDBOOK pag 19 di 31
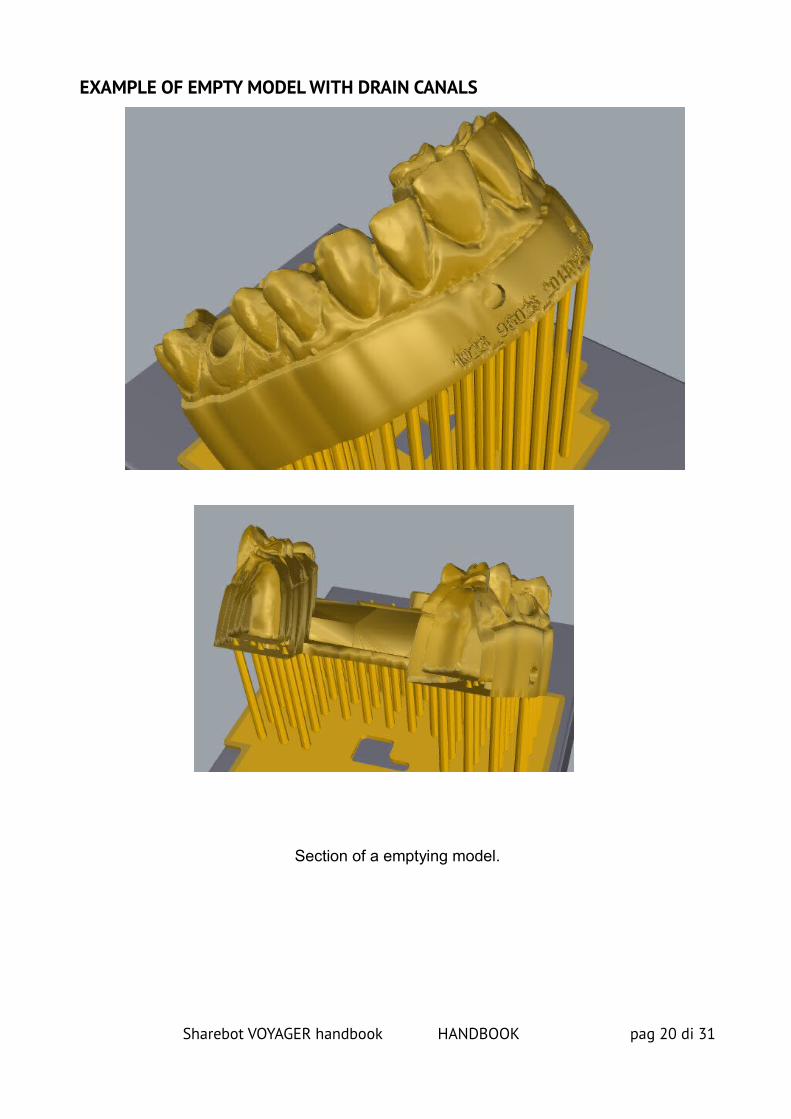
EXAMPLE OF EMPTY MODEL WITH DRAIN CANALS
Section of a emptying model.
Sharebot VOYAGER handbook HANDBOOK pag 20 di 31

HOW TO USE PRINTER INTERFACEAfter setting up the desired access modality, you can enter the management interface ofthe printer.
There are two main functions:
The first one "DASHBOARD" allows you to view the status of the printer and to interruptthe working machine.
The second one "FILE MANAGER\CWS file" allows you to manage files, which meansloading models and starting the printing process.
DASHBOARD
Dashboard is the first page which is visualized when you connect the printer or it ispossible to enter this page clicking on "DASHBOARD" icon from the main menu. In thispage you can see the status of the printer.
In the section "OVERVIEW", you can see the status of the printing and clicking on"STOP" key, it is possible to interrupt the working machine.
The meaning of the visualized field are:OBJECT: name of the objectCURRENT SLICE: number of layers currently in the printing processTOTAL SLICES: number of total layers
Sharebot VOYAGER handbook HANDBOOK pag 21 di 31
ELAPSED TIME: how long the printer is working TOTAL TIME: expected time for the whole printingPROGRESS: percentage of the printing process
On the top right, you can see two indicators:
the green one with the lettering "ONLINE" shows that the printer is operative the second one with the lettering "PRINTING" is functioning when a printing is
going on and it is visualized in red.
PAY ATTENTION: if the first indicator is disabled, which means that it is visualized in grey,you have to call a technician because the software of the printer has a problem and itdoesn't work correctly.
TO MANAGE FILES
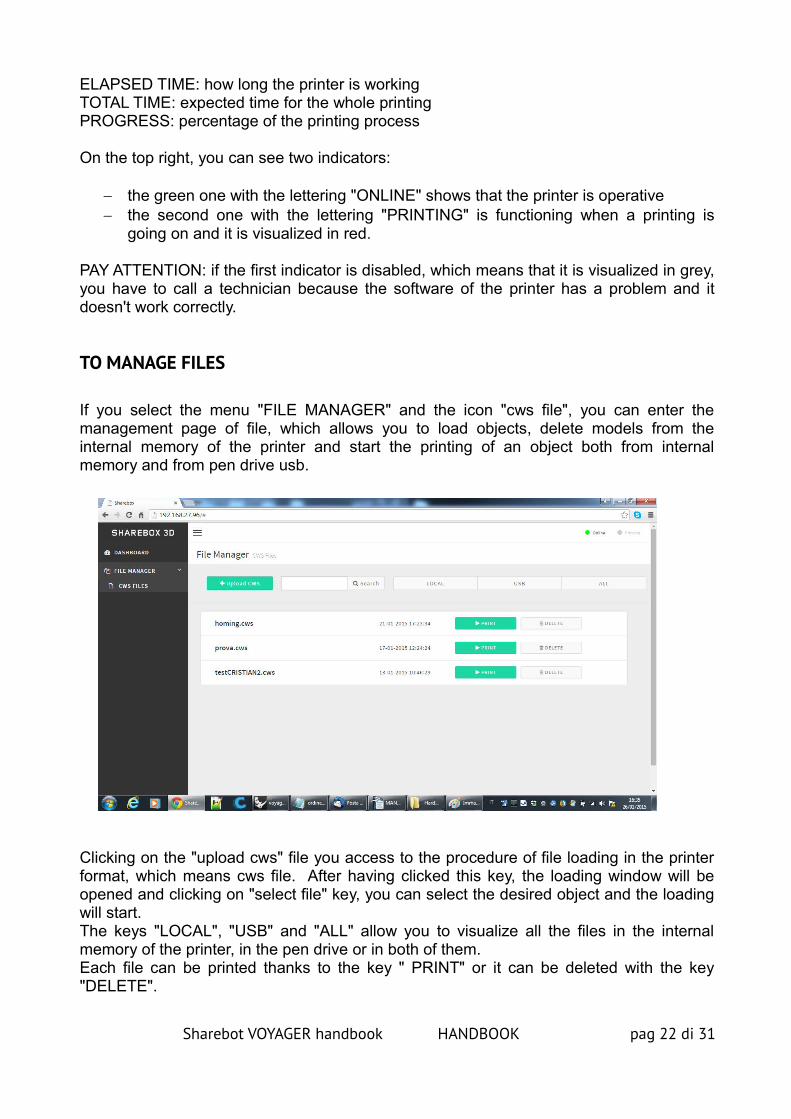
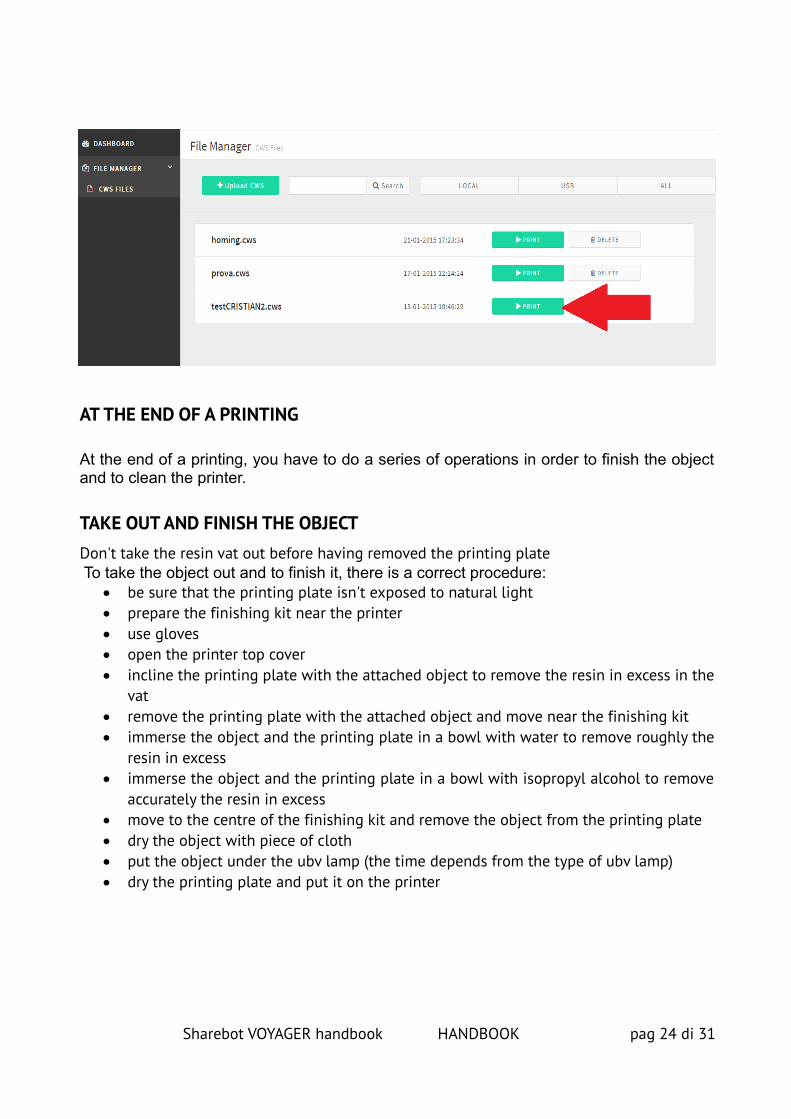
If you select the menu "FILE MANAGER" and the icon "cws file", you can enter themanagement page of file, which allows you to load objects, delete models from theinternal memory of the printer and start the printing of an object both from internalmemory and from pen drive usb.
Clicking on the "upload cws" file you access to the procedure of file loading in the printerformat, which means cws file. After having clicked this key, the loading window will beopened and clicking on "select file" key, you can select the desired object and the loadingwill start.The keys "LOCAL", "USB" and "ALL" allow you to visualize all the files in the internalmemory of the printer, in the pen drive or in both of them.Each file can be printed thanks to the key " PRINT" or it can be deleted with the key"DELETE".
Sharebot VOYAGER handbook HANDBOOK pag 22 di 31
Selecting the icon "Utility", which is always present and not modifiable, you access to theutility functions. They are used to:
- Z Homing, which means to move the printing plate to the top - vat cleaning- Make a cycle of polymerization of the resin
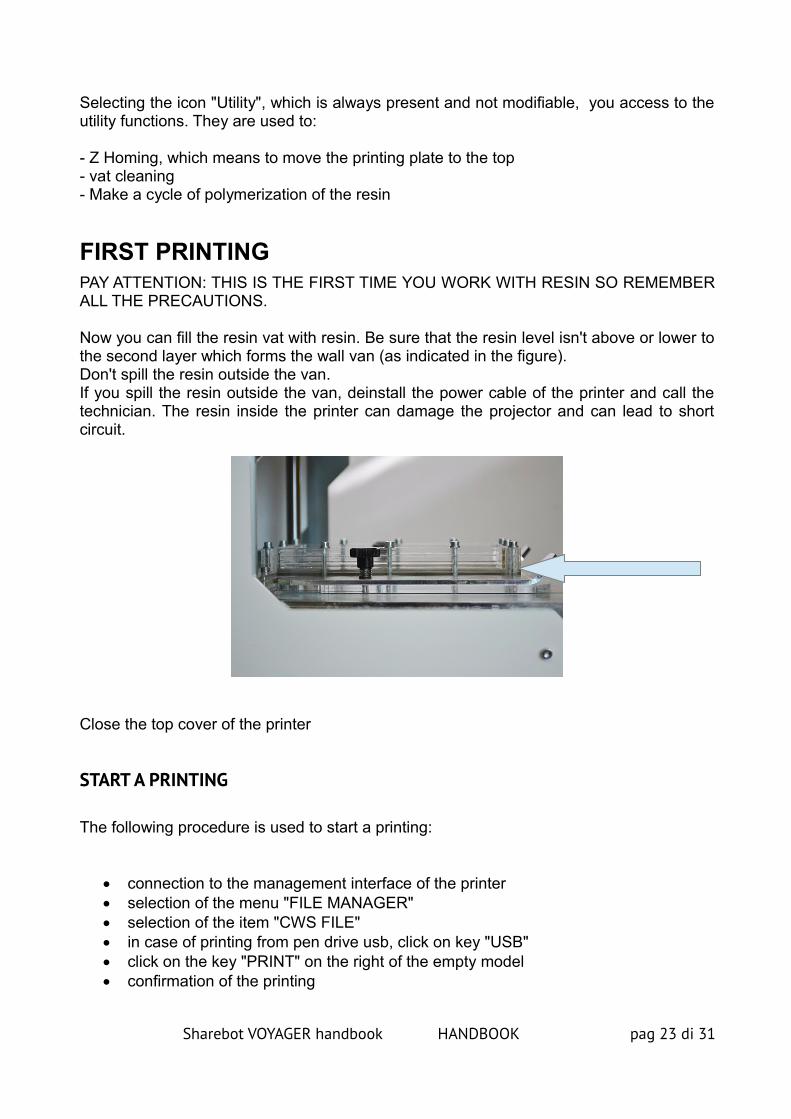
FIRST PRINTINGPAY ATTENTION: THIS IS THE FIRST TIME YOU WORK WITH RESIN SO REMEMBERALL THE PRECAUTIONS.
Now you can fill the resin vat with resin. Be sure that the resin level isn't above or lower tothe second layer which forms the wall van (as indicated in the figure).Don't spill the resin outside the van.If you spill the resin outside the van, deinstall the power cable of the printer and call thetechnician. The resin inside the printer can damage the projector and can lead to shortcircuit.
Close the top cover of the printer
START A PRINTING
The following procedure is used to start a printing:
connection to the management interface of the printer selection of the menu "FILE MANAGER" selection of the item "CWS FILE" in case of printing from pen drive usb, click on key "USB" click on the key "PRINT" on the right of the empty model confirmation of the printing
Sharebot VOYAGER handbook HANDBOOK pag 23 di 31
AT THE END OF A PRINTING
At the end of a printing, you have to do a series of operations in order to finish the objectand to clean the printer.
TAKE OUT AND FINISH THE OBJECTDon't take the resin vat out before having removed the printing plate To take the object out and to finish it, there is a correct procedure:
be sure that the printing plate isn't exposed to natural light prepare the finishing kit near the printer use gloves open the printer top cover incline the printing plate with the attached object to remove the resin in excess in the
vat remove the printing plate with the attached object and move near the finishing kit immerse the object and the printing plate in a bowl with water to remove roughly the
resin in excess immerse the object and the printing plate in a bowl with isopropyl alcohol to remove
accurately the resin in excess move to the centre of the finishing kit and remove the object from the printing plate dry the object with piece of cloth put the object under the ubv lamp (the time depends from the type of ubv lamp) dry the printing plate and put it on the printer
Sharebot VOYAGER handbook HANDBOOK pag 24 di 31

CLEANINGWhen the printing process is finished, you have to clean the printer:
Take out the vat with the resin left from the printer Pour the resin left in a can Clean the resin vat with isopropyl alcohol and a piece of paper Place the vat in the printer again Clean the printing plate and put it in the printer Conserve the resin left in a close bin away from natural light in order to use it again in
the next print
HOW TO USE THE RESIN VAT IN A CORRECT WAY
You have to pay attention in using the resin vat in order to ensure long life to it and to obtain a high quality objects:
-As soon as you finish the printing process, empty the resin vat and clean the bottom with isopropyl alcohol and a a piece of cloth.
-Be sure to not cut the bottom of the vat when you are removing the object.
LUBRIFICATION
Put a drop of oil for sewing machine containing Vaseline on the top of the screw of Z axis and on Z guides.
VERIFY THE CORRECT VENTILATION
The printer Sharebot Voyager has cooling-off fans which are found on the back of the printer.
Be sure that dust or other powders not block the forced ventilation.
Sharebot VOYAGER handbook HANDBOOK pag 25 di 31
WHAT TO VERIFY IF..
The resin comes out from the resin vat
If this happens, you will stop the printing process, clean the resin outside the vat before it goes inside the printer or on the projector and then start again the work.
The object isn't attached to the printing plate
The printing has been lost. You have to stop the printing process, go on with homing of the Z axis (select from utility of the internal memory), remove the printing plate, take out the vat and clean it.
Before starting again the printing process you have to verify if: the bottom of the vat is clean the distance between the printing plate/bottom of the vat hasn't changed (if the
distance is different contact the support) the object has an adequate foothold support are enough
The resin isn't close to the end during a printing process
You can add some resins during the printing process, you can add it up to the indicated level.
The resin presents remains and impurities on the bottom of the vat
In this case it is possible to launch the automatic cleaning cycle of the vat bottom which is available in the directory "utility" of the internal memory. It will make a polymerization of allthe resin which is found on the bottom of the vat. At the end of the cycle, you have to remove manually the polymerized layer of resin paying attention to not damage the bottom of the vat.
Sharebot VOYAGER handbook HANDBOOK pag 26 di 31

PRINTER CALIBRATIONPAY ATTENTION: THESE OPERATIONS WILL BE DONE DURING THEINSTALLATION CARRIED OUT BY A PROFESSIONAL TECHNICIAN , CERTIFIEDBY SHAREBOT.
PAY ATTENTION: DISCONNECT THE POWER CABLE BEFORE OPENING THELATERAL PANEL
PRINTING PLATE PLANARITYThe aim of this operation is to have the printing plate perfectly in parallel to the vat planwhich contains resin along right\left axis or Y. Loosen the 4 screws shown in the figure.
Through the software, move Z axis to 0 with the resin vat inserted.Look at the bottom of the vat from inside the printer and be sure that the printing plate isexactly planar on left/right axis and tighten the screws, blocking the plate.
Sharebot VOYAGER handbook HANDBOOK pag 27 di 31
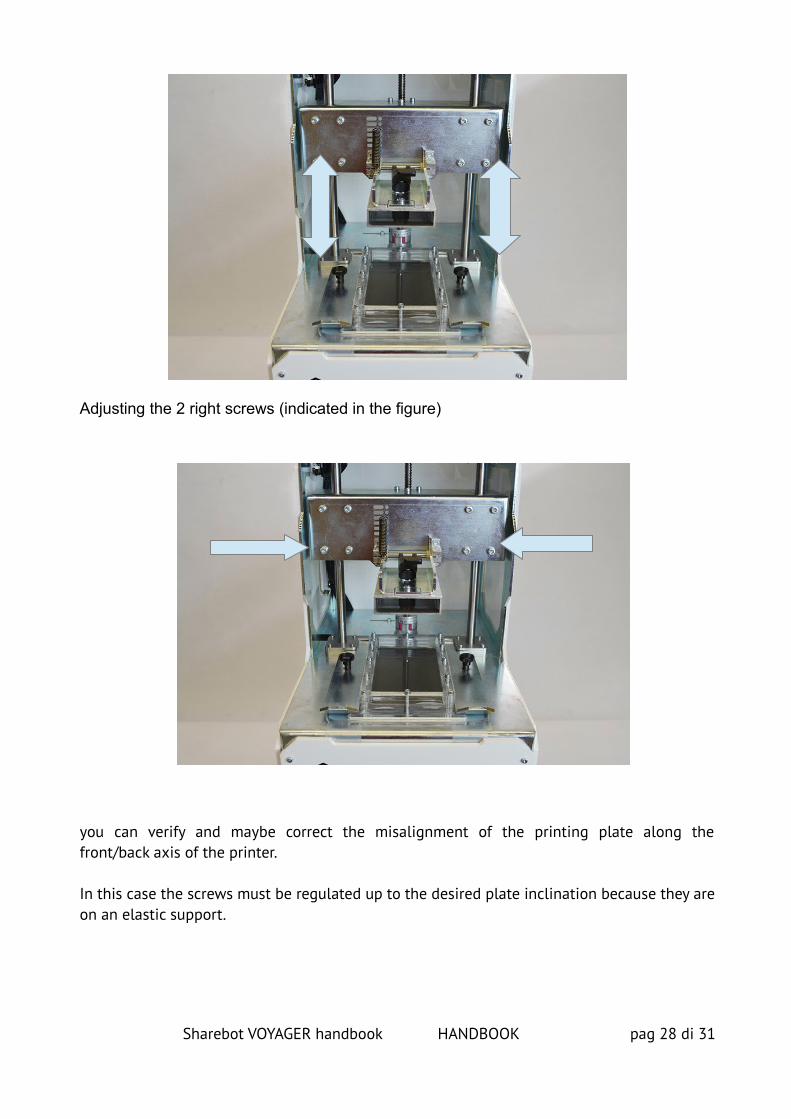
Adjusting the 2 right screws (indicated in the figure)
you can verify and maybe correct the misalignment of the printing plate along thefront/back axis of the printer.
In this case the screws must be regulated up to the desired plate inclination because they areon an elastic support.
Sharebot VOYAGER handbook HANDBOOK pag 28 di 31

PRINTING PLATE HEIGHTYou have to connect the motherboard to the slicing software.To regulate the distance between the build surface and the bottom of the vat you can actin this way by software:
realize a homing of Z axisMove the build surface to 0use the movement command of Z axisUsing the cursor up and down of hundredths of mm of JOG command of the interfacesoftware, get exactly to the level and write down the difference distance.From the serial command of the interface, send to the printer the command M206 Zwhere the Z value will include the compensation.
Realize another homing of the Z axis and move it back to 0 in order to verify the measure.
Save the new setting through M500 command.
FOCUSING OF THE OPTICAL HEADTo regulate the focusing of the projector optical unit, you have to download the fileshowcalibration.cws. from website sharebot.it.The file projects a squared of graph paper on the build surface.Insert a graph paper in the vat and cover it with the specific transparent methalcrylateplate, then launch the file of the calibration.
The projector has two regulation ferrules, ZOOM and FOCUS. Bring the ferrule ZOOM onthe right till the end.Regulate the ferrule FOCUS till the cubes encircled in red in the lower image will beidentical
Sharebot VOYAGER handbook HANDBOOK pag 29 di 31
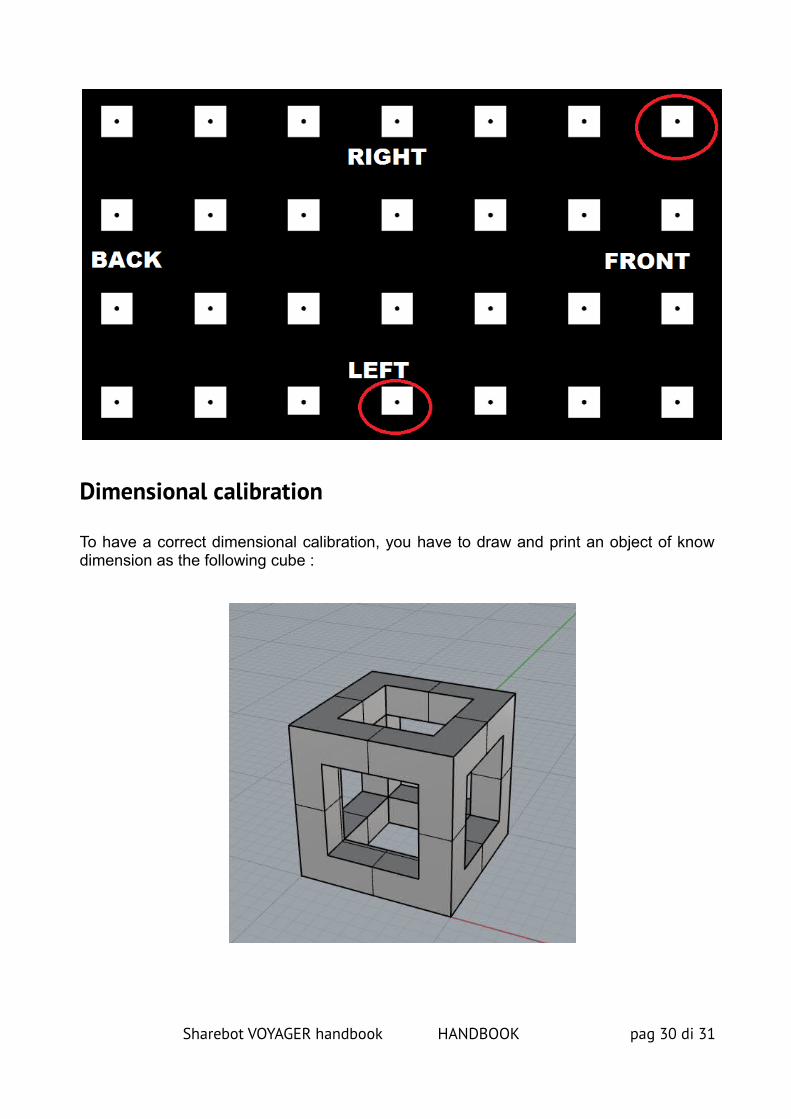
Dimensional calibration
To have a correct dimensional calibration, you have to draw and print an object of knowdimension as the following cube :
Sharebot VOYAGER handbook HANDBOOK pag 30 di 31
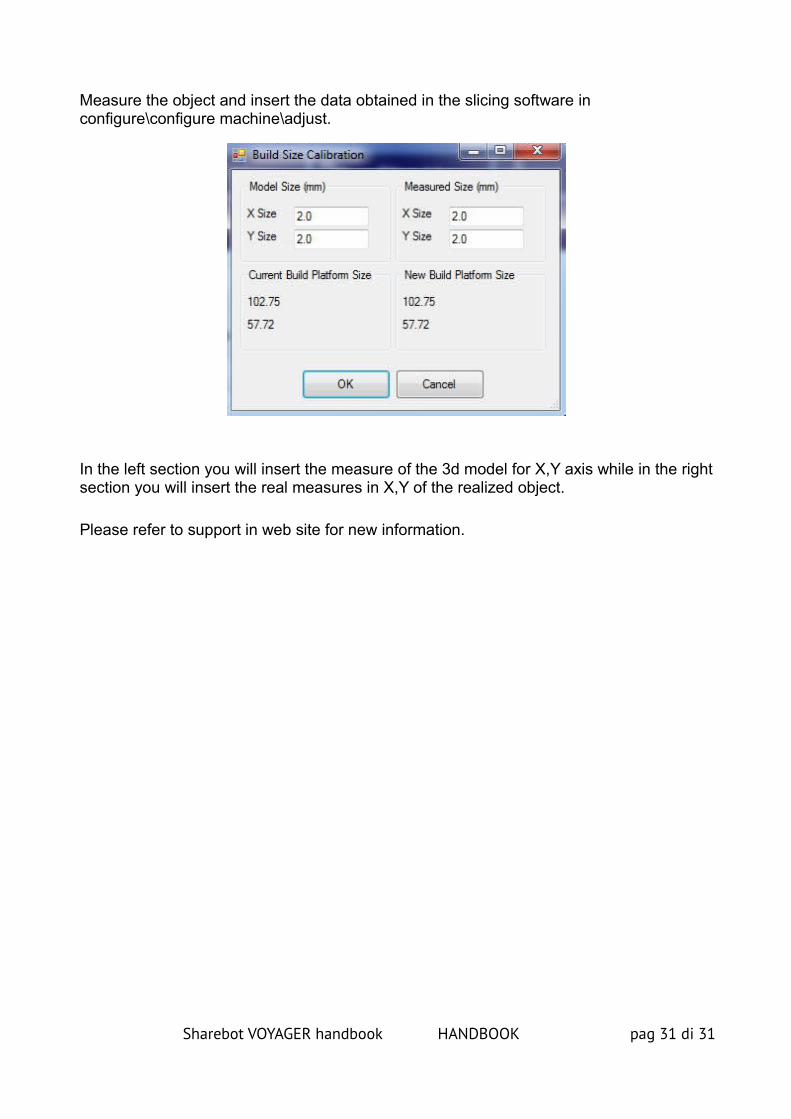
Measure the object and insert the data obtained in the slicing software in configure\configure machine\adjust.
In the left section you will insert the measure of the 3d model for X,Y axis while in the rightsection you will insert the real measures in X,Y of the realized object.
Please refer to support in web site for new information.
Sharebot VOYAGER handbook HANDBOOK pag 31 di 31