ServiceNow CMDB Synchronization PowerPack (Version 3.1.0)
186
Integration Service: ServiceNow CMDB Synchronization PowerPack Version 3.1.0
-
Upload
khangminh22 -
Category
Documents
-
view
1 -
download
0
Transcript of ServiceNow CMDB Synchronization PowerPack (Version 3.1.0)

Integration Service: ServiceNow CMDBSynchronization PowerPackVersion 3.1.0

Table of Contents
Introduction to the ServiceNow CMDB Synchronization PowerPack 8Architecture Overview for ServiceNow Synchronization PowerPacks 9SL1 and ServiceNow Terminology 10Dependency Map for ServiceNow Synchronization PowerPacks 10Prerequisites for ServiceNow Synchronization PowerPacks 10Integration Applications Included in the ServiceNow CMDB Synchronization PowerPack 12Integration Applications 12Integration Applications (Internal) 13
Installing and Configuring the CMDB Synchronization PowerPack 15Downloading, Importing, and Installing the ServiceNow CMDB Synchronization PowerPack 16Downloading the Synchronization PowerPack 16Importing the Synchronization PowerPack 17Installing the Synchronization PowerPack 17
Allowing Cross-Scoped Access in ServiceNow 18Installing the ScienceLogic SL1: CMDB & Incident Automation Application in ServiceNow 20Installing and Activating the CMDB Plugin in ServiceNow 21Enabling the ServiceNow Identification and Reconciliation Module 22Configuring Service Rules for Device Sync 22Containment Rules 23Hosting Rules 24Creating a ServiceNow Update Set 25Adding Service Rules to an Update Set 26Exporting an Update Set 27
Configuring Customer CI Relation Overrides 29Installing the ScienceLogic Domain Separation (Global) Update Set in ServiceNow 31Overview of the Update Set 32Limitations of the Identification Engine 32Installing the Update Set 33
Using ServiceNow Domain Separation with the Integration Service 34User Setup 34Example 1 34Example 2 35Workflow 36
Configuring Integrations for the CMDB Synchronization PowerPack 37Creating and Aligning a Configuration Object 38Creating a Configuration Object 38Aligning a Configuration Object 41
Syncing Organizations 42For Domain-separated ServiceNow Environments Only 42Configuring Organization Sync 43
Syncing Devices from SL1 to ServiceNow 45Common Fields Used by Device Sync 46Running a Device Sync 47Using a Jinja2 Template 53Example Template 53
Adding Device Mappings with Postman 55Persistently Saving Device Mappings with the API 56Device Attribute Mappings 57Default Device Attribute Mappings 58SL1 Device Attributes Available for Syncing 59

Adding New Device Attributes to ServiceNow 61Syncing CI Attributes from ServiceNow to SL1 62Syncing Advanced Topology Data from SL1 to ServiceNow 65Syncing Network Interfaces from SL1 to ServiceNow 67Syncing File Systems from SL1 to ServiceNow 70Syncing Business Services from SL1 to ServiceNow 71Syncing Installed Software between SL1 and ServiceNow 73Discovery Sync 75Configuring a ServiceNow Service Request for Discovery Sync 76Discovery Sync Workflow 77Running a Discovery Sync in ServiceNow 80Discovering One or More Devices from ServiceNow to SL1 85Decommissioning Devices 87Activating the ServiceNow Service Request for Monitoring Removal 88Removing Devices from Monitoring 88
Deleting Devices 90Scheduling Integration Applications 91Log Messages for the "Generate Required CI Relations for ServiceNow" Application Integration 94
Troubleshooting the CMDB Synchronization PowerPack 96Initial Troubleshooting Steps 98Integration Service 98ServiceNow 98
Resources for Troubleshooting 98Useful Integration Service Ports 98Helpful Docker Commands 99Viewing Container Versions and Status 99Restarting a Service 99Stopping all Integration Service Services 99Restarting Docker 99Viewing Logs for a Specific Service 100Clearing RabbitMQ Volume 100Viewing the Process Status of All Services 101Deploying Services from a Defined Docker Compose File 101Dynamically Scaling for More Workers 101Completely Removing Services from Running 101
Diagnosis Tools 101Retrieving Additional Debug Information (Debug Mode) 102
Troubleshooting CMDB Sync 103Issues Creating CIs in ServiceNow 103Enabling Debugging of the Configuration Item Payload 105Enabling Logs in ServiceNow 106
Locating Missing Device Data after Device Sync 106Situations Where Device Data Might be Missing 107Example: Missing Serial Number for a vCenter Device 107Step 1: In ServiceNow, identify the attribute that did not sync properly 108Step 2: In SL1, locate the SL1 device and review the device details 109Step 3: In SL1, review the PowerPacks that collect data for that device 110Step 4: In the SL1 Integration Service, check the Device Sync configuration 113
Checklists for Deployment 116CMDB-Only ServiceNow Integration with Single SL1, no Domain Separation in ServiceNow 117
Sync Devices from SL1 to ServiceNow 117Discover Devices from ServiceNow in SL1 118

Sync Business Services from SL1 to ServiceNow 118Sync File Systems from SL1 to ServiceNow 118Sync Network Interfaces from SL1 to ServiceNow 118Sync Installed Software from SL1 to ServiceNow 119Sync Maintenance Schedules from ServiceNow to SL1 119Sync Advanced Topology from SL1 to ServiceNow 119
CMDB-Only ServiceNow Integration with Single SL1 and Domain-Separated ServiceNow 120Sync Devices from SL1 to ServiceNow 120Discover Devices from ServiceNow in SL1 121Sync Business Services from SL1 to ServiceNow 121Sync File Systems from SL1 to ServiceNow 122Sync Network Interfaces from SL1 to ServiceNow 122Sync Installed Software from SL1 to ServiceNow 122Sync Maintenance Schedules from ServiceNow to SL1 122Sync Advanced Topology from SL1 to ServiceNow 123
CMDB-Only ServiceNow Integration with Multiple SL1 Systems, no Domain-Separated ServiceNow 124Sync Devices from SL1 to ServiceNow 125Discover Devices from ServiceNow in SL1 125Sync Business Services from SL1 to ServiceNow 126Sync File Systems from SL1 to ServiceNow 126Sync Network Interfaces from SL1 to ServiceNow 126Sync Installed Software from SL1 to ServiceNow 127Sync Maintenance Schedules from ServiceNow to SL1 127Sync Advanced Topology from SL1 to ServiceNow 127
Incident-Only ServiceNow Integration with Single SL1, no Domain Separation in ServiceNow 128Certified Application Objects 129Roles 130Tables 131Table Columns (cmdb_ci) 131Table Columns (core_company) 132Table Columns (cmdb_group) 132Script Includes 132Event Registry 132Scripted Actions 133Data Lookup Definitions 133System Properties 133Catalog Item 134Catalog UI Policies 134Variable Sets 134Catalog Client Scripts 135Workflows 135Scripted REST Resources 136Transform Maps 138Transform Scripts 138
ServiceNow API Endpoints 139Business Services 141
HTTP Method 141Pagination 141Resource Path 141Default Resource Path 141Example (Request URL) 141Example (Response) 142

Change Requests 143HTTP Method 143Resource Path 143Default Resource Path 143Fixed Internal Query 144Example 144Example (Response) 144
Classification version 1 145HTTP Method 145Pagination 145Resource Path 145Default Resource Path 145Fixed Internal Query 146Example 146Example (Response) 146
Classification version 2 148HTTP Method 148Pagination 148Resource Path 148Default Resource Path 148Fixed Internal Query 149Example 149Example (Response) 149
CMDB Group 151HTTP Method 151Pagination 151Resource Path 151Default Resource Path 151Example (Request URL 151Example (Body) 151Example (Response) 152
Companies 153HTTP Method 153Pagination 153Resource Path 153Default Resource Path 153Fixed Internal Query 154Example 154Example (Response) 154
Device Identification Engine 156HTTP Method 156Pagination 156Resource Path 156Default Resource Path 156Example (Request URL) 156Example (Body) 156Example Business Service (Body) 157Example (Response) 158
Discovery Dependents 159HTTP Method 159Pagination 159Resource Path 159

Default Resource Path 159Fixed Internal Query 160Example 160Example (Response) 160
File Systems 161HTTP Method 161Pagination 161Resource Path 161Default Resource Path 161Fixed Internal Query 162Example 162Example (Response) 162
Import Set 163HTTP Method 163Resource Path 163Default Resource Path 163Example (Request URL) 163Example (Body) 163
Incidents 165HTTP Method 165Pagination 165Resource Path 165Default Resource Path 165Fixed Internal Query 166Example 166Example (Response) 166
Installed Software 168HTTP Method 168Pagination 168Resource Path 168Default Resource Path 168Fixed Internal Query 169Example (Request URL) 169
Manufacturer 171HTTP Method 171Pagination 171Resource Path 171Default Resource Path 171Example (Request URL) 171Example (Body) 171Example (Response) 172
Model 173HTTP Method 173Resource Path 173Default Resource Path 173Example (Request URL) 173Example (Body) 173Example (Response) 174
Network Adapters 175HTTP Method 175Pagination 175Resource Path 175

Default Resource Path 175Fixed Internal Query 176Example (Request URL) 176Example (Response) 176
Service Requests 177HTTP Method 177Pagination 177Resource Path 177Default Resource Path 177Fixed Internal Query 178Example 178Example (Response) 178
ServiceNow Registered Events 180Catalog Item Events 181x_sclo_scilogic.device_monitoring 181Trigger 181Command 181Event Fields 181
Example 181x_sclo_scilogic.remove_monitoring 182Trigger 182Command 182Event Fields 182Example 182
Maintenance Mode Events 183x_sclo_scilogic.device_maintenance 183Trigger 183Command 183Event Fields 183Example 183
Maintenance Schedule Events 184x_sclo_scilogic.device_maintenance_skd 184Trigger 184Command 184Event Fields 184Example 184

Chapter
1Introduction to the ServiceNow CMDB
Synchronization PowerPack
Overview
This chapter describes the ServiceNow CMDB Synchronization PowerPack, which lets you integrate SL1 with theServiceNow Configuration Management Database (CMDB).
This Synchronization PowerPack maintains and enhances the ServiceNow CMDB by sharing discovered deviceinformation, importing and exporting data bi-directionally between SL1 and ServiceNow, and by automaticallymaintaining ServiceNow Configuration Item (CI) relationships.
NOTE: The label "SyncPack" is used in place of "Synchronization PowerPack" in the Integration Service userinterface.
This chapter covers the following topics:
Architecture Overview for ServiceNow Synchronization PowerPacks 9
SL1 and ServiceNow Terminology 10
Dependency Map for ServiceNow Synchronization PowerPacks 10
Prerequisites for ServiceNow Synchronization PowerPacks 10
Integration Applications Included in the ServiceNow CMDB Synchronization PowerPack 12
Architecture Overview for ServiceNow SynchronizationPowerPacks
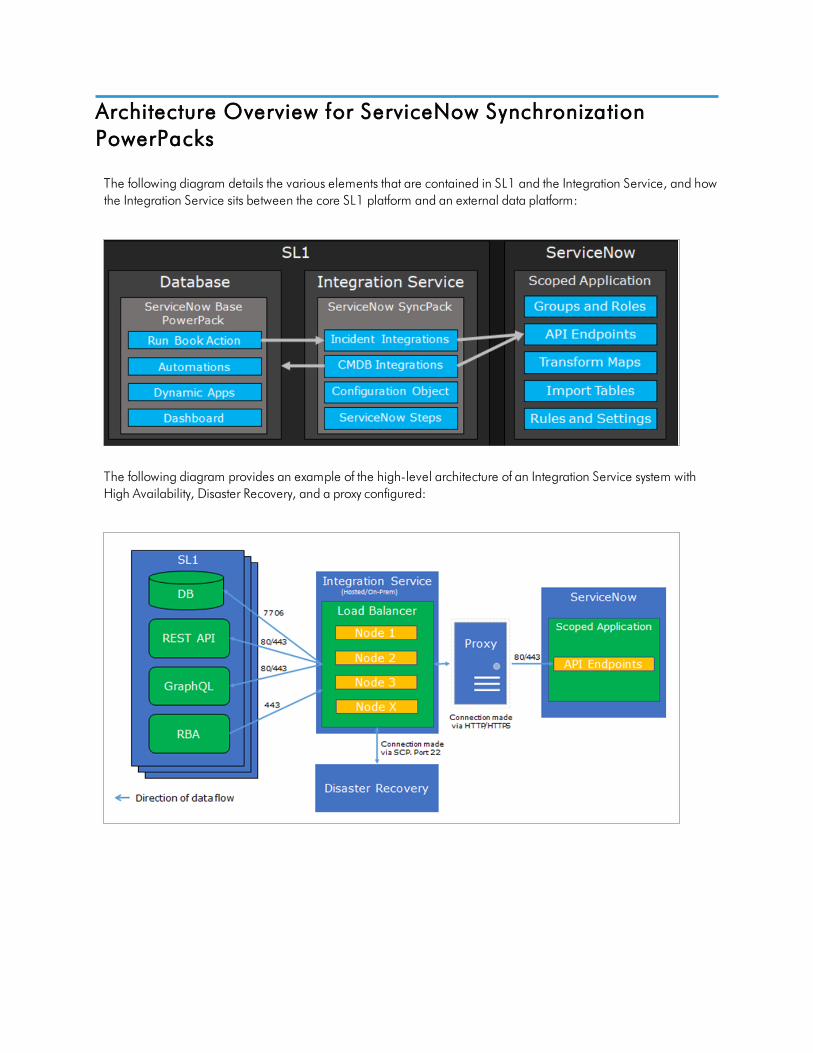
The following diagram details the various elements that are contained in SL1 and the Integration Service, and howthe Integration Service sits between the core SL1 platform and an external data platform:
The following diagram provides an example of the high-level architecture of an Integration Service system withHigh Availability, Disaster Recovery, and a proxy configured:

SL1 and ServiceNow Terminology
The following table lists the different names for the shared elements in SL1 and ServiceNow:
SL1 ServiceNow
Device CI (Configuration Item)
Discovery Session Service Catalog Request
Event Incident
Organization Company/Domain
Schedule Maintenance Schedule
Topology Dependency
Dependency Map for ServiceNow SynchronizationPowerPacks
The following graphic describes which Synchronization PowerPacks depend on other Synchronization PowerPacks:
TIP: For more information about the Standard Base Steps Synchronization PowerPack, see the IntegrationService Platformmanual.
Prerequisites for ServiceNow Synchronization PowerPacks
This section describes the prerequisites for the ServiceNow Synchronization PowerPacks. For more informationabout the specific software versions required by a ServiceNow Synchronization PowerPack, see the release notesfor that Synchronization PowerPack.

To install any of the ScienceLogic ServiceNow Synchronization PowerPacks, you must have administrator access toboth SL1 and ServiceNow. Specifically, you will need:
l ScienceLogic root SSH access
l SSH access to the Integration Service
l ScienceLogic administrator access to the Administration Portal
l ServiceNow administrator access
Additional information related to uploading, installing, and upgrading the ServiceNow SynchronizationPowerPacks:
l If you want to upload and install multiple ServiceNow Synchronization PowerPacks at the same time, youshould upload all of the Synchronization PowerPacks first, and then install them to address any dependenciesbetween the Synchronization PowerPacks.
l If you are upgrading from version 1.8.4 of the Integration Service, you can first move to version 2.5.0 of theServiceNow Synchronization PowerPack, then upgrade to version 2.0 of the Integration Service, and finallymove to version 3.0.0 or later of the relevant ServiceNow Synchronization PowerPacks.
l If you made customizations to version 2.5.0 or earlier of the ServiceNow Synchronization PowerPack, youmust make a copy of that Synchronization PowerPack and save it as a new Synchronization PowerPack tokeep your customizations. For more information, see the Integration Service for Developersmanual.
l If you are starting out with version 2.0.0 of the Integration Service platform, you should skip version 2.5.0 ofthe ServiceNow Synchronization PowerPack and instead install version 3.0.0 of the relevant ServiceNowSynchronization PowerPacks.
l There is no backwards compatibility after you upgrade a ServiceNow Synchronization PowerPack fromversion 2.5.0 to 3.0.0.
NOTE: ScienceLogic highly recommends that you disable all firewall session-limiting policies. Firewalls willdrop HTTPS requests, which results in data loss.
The following table lists the port access required by the Integration Service and this Synchronization PowerPack:
Source IP Integration ServiceDestination
Integration ServiceSource Port
Destination Port Requirement
Integration Service SL1 API Any TCP 443 SL1 API Access
Integration Service ServiceNow API Any TCP 443 ServiceNowAPI Access
Integration Service SL1 Database Any TCP 7706 SL1Database Access

Integration Applications Included in the ServiceNowCMDB Synchronization PowerPack
This section lists the integration applications that are in the ServiceNow CMDB Synchronization PowerPack.
Integrat ion Applicat ions
The following integration applications are included with the ServiceNow Synchronization PowerPack:
l Cache ServiceNow CIs and SL1 Device Classes. Reads all existing SL1 Device Classes and ServiceNowCIs and writes them to a cache. To perform a Device Sync, run this integration application before you run the"Sync Devices from SL1 to ServiceNow" integration application. For more information, see Syncing Devicesfrom SL1 to ServiceNow.
l Delete Devices from SL1. Lets you delete devices in a specific SL1 Virtual Collector Group (VCUG) if thosedevices have not been modified in SL1 for a specified amount of time that is set in the application. For moreinformation, see Deleting Devices.
l Generate Required CI Relations for ServiceNow. Pulls device class mappings from the "Sync Devicesfrom SL1 to ServiceNow" and the "Sync CI Attributes from ServiceNow to SL1" integration applications toprevent you from having to add a separate set of class mappings. The application also lists any missingrelationships in the Step Log in the Integration Service user interface. For more information about the logmessages, see Log Messages for the "Generate Required CI Relations for ServiceNow" ApplicationIntegration.
l Sync Advanced Topology from SL1 to ServiceNow. Reads Dynamic Component Mapping relationshipsfrom SL1 and syncs those relationships with ServiceNow. You must run both the "Sync Devices from SL1 toServiceNow" application and the "Sync Interfaces from SL1 to ServiceNow" application at least twice on newIntegration Service systems to populate the cache for this integration application. For more information, seeSyncing Advanced Topologies from SL1 to ServiceNow.
l Sync Business Services from SL1 to ServiceNow. Reads Business Services, IT Services, and DeviceServices in SL1 and syncs them with business services in ServiceNow. This integration application createsand updates services, but it does not delete services. For more information, see Syncing Business Servicesfrom SL1 to ServiceNow.
l Sync CI Attributes from ServiceNow to SL1. Reads CI attributes from ServiceNow and maps thoseattributes to asset and attribute fields in SL1. This application uses the mappings and additional attributesoptions from the "Sync Devices from SL1 to ServiceNow" application. This integration application can alsosync the location and production state attributes from ServiceNow to SL1. For more information, see SyncingCI Attributes from ServiceNow to SL1.
l Sync Device Groups from SL1 to ServiceNow. Collects all device groups and group IDs from SL1 andposts device group data to ServiceNow. To prevent errors when running this application or a device sync,make sure that the device group names are not already being used by existing groups in ServiceNow. Formore information about Device Sync, see Syncing Devices from SL1 to ServiceNow.
l Sync Devices from SL1 to ServiceNow. Syncs devices and their properties and relationships from SL1 toServiceNow. For more information, see Syncing Devices from SL1 to ServiceNow.

l Sync Discovery Requirements. Processes credentials from SL1, processes collector groups, devicetemplates, virtual device classes, and collectors, and then syncs organizations and device groups. For moreinformation, see Discovery Sync.
l Sync Discovery Session Status from SL1 to ServiceNow. Collects and processes Discovery sessions fromSL1, and collects Discovery session logs. For more information, see Discovery Sync.
l Sync Discovery Templates from SL1 to ServiceNow. Syncs SL1 discovery sessions that contain aconfigured string to ServiceNow and creates Service Catalog templates in ServiceNow. You can use thosetemplates for discovering or monitoring CIs. For more information, see Discovery Sync.
l Sync File Systems from SL1 to ServiceNow. Reads file systems discovered in SL1 and then maps them to aparent CI record in ServiceNow. For more information, see Syncing File Systems from SL1 to ServiceNow.
l Sync Installed Software from SL1 to ServiceNow. Reads all available software packages fromServiceNow and the devices aligned to that software by region and syncs them with SL1. For moreinformation, see Syncing Installed Software between SL1 and ServiceNow.
l Sync Interfaces from SL1 to ServiceNow. Collects network interface data from ServiceNow and SL1, andthen runs multiple CI syncs for each interface to be synced. For more information, see Syncing NetworkInterfaces from SL1 to ServiceNow.
l Sync Organizations from SL1 to ServiceNow. Pulls organizations from SL1 and syncs to ServiceNow. Formore information, see Syncing Organizations from SL1 to ServiceNow.
l Sync Service Requests from ServiceNow to SL1. Processes Discovery sessions and posts Discovery sessionsand new virtual devices to SL1. Also enables device decommissioning for devices you no longer want tomonitor. This application was formerly named "Sync Discovery Session Requests from ServiceNow to SL1".For more information, see Configuring a ServiceNow Service Request for Discovery Sync.
l Sync Software Packages from SL1 to ServiceNow. Reads all software packages from and creates new CIsin ServiceNow. Run this integration before running the "Sync Installed Software" integration application. Formore information, see Syncing Installed Software between SL1 and ServiceNow.
Integrat ion Applicat ions (Internal)
To view the internal integration applications, click the Filter icon ( ) on the Integrations page and selectShow Hidden Integrations. Internal integration applications are hidden by default. The following integrationapplications are "internal" applications that should not be run directly, but are automatically run by applicationsfrom the previous list:
l Bulk Delete Devices. Deletes devices from SL1.
l Create Discovery Session in SL1. Creates and starts a Discovery session in SL1 and updates theServiceNow service request.
l Create ServiceNow CI. Creates a new ServiceNow CI with a mappings dictionary, but does not attempt tolook up new CIs.
l Create Virtual Device in SL1. Creates a virtual device in SL1 and updates the Requested Item (RITM) value.
l Post Attribute DB Calls to SL1. Posts attribute database calls to SL1.
l Post Attribute Rest Calls to SL1. Posts attribute REST calls to SL1.

l Post Company and Organization Updates. Posts company and organization updates to ServiceNow orSL1.
l Post Discovery-dependent Data to ServiceNow. Posts data used by a Discovery session to ServiceNow.
l Post Installed Software to ServiceNow. Posts installed software data to ServiceNow.
l Post New Companies to ServiceNow. Posts new companies to ServiceNow.
l Post NewOrganization to SL1. Posts a new organization to SL1.
l Process Remove Device Requests from ServiceNow to SL1. Pulls requested device information form SL1and validates the requests to remove a device from monitoring. Removed devices are placed in an SL1Virtual Collector Group.
l Pull and Post Discovery Logs. Pulls Discovery session logs from SL1 and posts updates to ServiceNow.

Chapter
2Installing and Configuring the CMDB
Synchronization PowerPack
Overview
The following workflow covers how to install and configure this Synchronization PowerPack:
1. In the Integration Service, download, import, and install the ServiceNow CMDB Synchronization PowerPack.
2. In ServiceNow, enable cross-scoped access and install the "ScienceLogic SL1: CMDB & IncidentAutomation" application (also called the "Scoped Application").
3. In ServiceNow, install and activate the "ServiceNow Configuration Management for Scoped Apps (CMDB)"Plugin.
4. In ServiceNow, enable the "ServiceNow Identification and Reconciliation Module".
5. For domain-separated ServiceNow instances only, install the "ScienceLogic Domain Separation (Global)"update set in ServiceNow.
6. In ServiceNow, create an update set with containment rules and hosting rules for Device Sync.
These installation and configuration steps are covered in the following topics:
Downloading, Importing, and Installing the ServiceNow CMDB Synchronization PowerPack 16
Allowing Cross-Scoped Access in ServiceNow 18
Installing the ScienceLogic SL1: CMDB & Incident Automation Application in ServiceNow 20
Installing and Activating the CMDB Plugin in ServiceNow 21
Enabling the ServiceNow Identification and Reconciliation Module 22
Configuring Customer CI Relation Overrides 29
Installing the ScienceLogic Domain Separation (Global) Update Set in ServiceNow 31
Using ServiceNow Domain Separation with the Integration Service 34

Downloading, Importing, and Installing the ServiceNowCMDB Synchronization PowerPack
A Synchronization PowerPack file has the .whl file extension type. You can download the SynchronizationPowerPack file from the ScienceLogic Support site.
WARNING: If you are upgrading to this version of the Synchronization PowerPack from a previous version,make a note of any settings you made on the Configuration pane of the various integrationapplications in this Synchronization PowerPack, as these settings are not retained when youupgrade. However, any mappings you added to the attribute_mappings section forthe "Sync Devices from SL1 to ServiceNow" integration application are retained when youupgrade.
Downloading the Synchronizat ion PowerPack
To locate and download the Synchronization PowerPack:
1. Go to the ScienceLogic Support site at https://support.sciencelogic.com/s/.
2. Click the Product Downloads tab, select PowerPacks, and then click the "Synchronization" link. TheSynchronization PowerPack Downloads page appears.
3. Click the name of the Synchronization PowerPack you want to install. The PowerPack page appears.
4. In the Files list, locate the Synchronization PowerPack .whl file, click the down arrow button, and selectDownload.
NOTE: Synchronization PowerPacks do not require a specific license. After you download a SynchronizationPowerPack, you can import it to your Integration Service using the Integration Service user interface.
NOTE: If you are installing or upgrading to the latest version of this Synchronization PowerPack in an offlinedeployment, see "Installing or Upgrading in an Offline Environment" in the release notes for thisSynchronization PowerPack to ensure you install any external dependencies.

Import ing the Synchronizat ion PowerPack
NOTE: You must import and install the ServiceNow Base Synchronization PowerPack before uploading andinstalling any of the other ServiceNow Synchronization PowerPacks.
To import a Synchronization PowerPack in the Integration Service user interface:
1. On the SyncPacks page of the Integration Service user interface, click [Import SyncPack]. The ImportSyncPack page appears.
2. Click [Browse] and select the .whl file for the Synchronization PowerPack you want to install.
TIP: You can also drag and drop a .whl file to the SyncPacks page.
3. Click [Import]. The Integration Service registers and uploads the Synchronization PowerPack. TheSynchronization PowerPack is added to the SyncPacks page.
NOTE: You cannot edit the content package in a Synchronization PowerPack published by ScienceLogic. Youmust make a copy of a ScienceLogic Synchronization PowerPack and save your changes to the newSynchronization PowerPack to prevent overwriting any information in the original SynchronizationPowerPack when upgrading.
Installing the Synchronizat ion PowerPack
To install a Synchronization PowerPack in the Integration Service user interface:
1. On the SyncPacks page of the Integration Service user interface, click the [Actions] button ( ) for theSynchronization PowerPack you want to install and select Activate & Install. The Activate & Install SyncPackmodal appears.
TIP: By default, the SyncPacks page displays only activated and installed PowerPacks. If you do not see
the PowerPack that you want to install, click the toggle icon ( ) on the SyncPacks page andselect Show All SyncPacks to see a list of the uninstalled PowerPacks.
2. Click [Yes] to confirm the activation and installation. When the Synchronization PowerPack is activated, the
SyncPacks page displays a green check mark icon ( ) for that Synchronization PowerPack. If the activation
or installation failed, then a red exclamation mark icon ( ) appears.

TIP:While the Synchronization PowerPack is installing, you cannot click any of the options that appear
when you click the [Actions] button ( ).
3. For more information about the activation and installation process, click the check mark icon ( ) or the
exclamation mark icon ( ) in the Activated column for that Synchronization PowerPack. For a successfulinstallation, the "Activate & Install SyncPack" integration application appears, and you can view the Step Logfor the steps. For a failed installation, the Error Logs window appears.
Allowing Cross-Scoped Access in ServiceNow
When using custom tables that are extended from the cmdb_ci table, you must configure cross-scope access forany custom tables created outside of the base ServiceNow deployment.
The following examples contain errors that might occur when cross-scope access is required.
Example of an API response:
{"results":[{"error":{"message":"com.glide.script.fencing.access.ScopeAccessNotGrantedException: readaccess to ui_test_hardware not granted","detail":""},"status":"failure"}
Example of navigating to a URL directly from a web browser when cross-scope access is required:
In this example, the table requires that you grant access to the ScienceLogic Scope to allow the API call to runcorrectly. In the above example, the target table is u_test_hardware.
NOTE: A ServiceNow account with System Administrator is required.
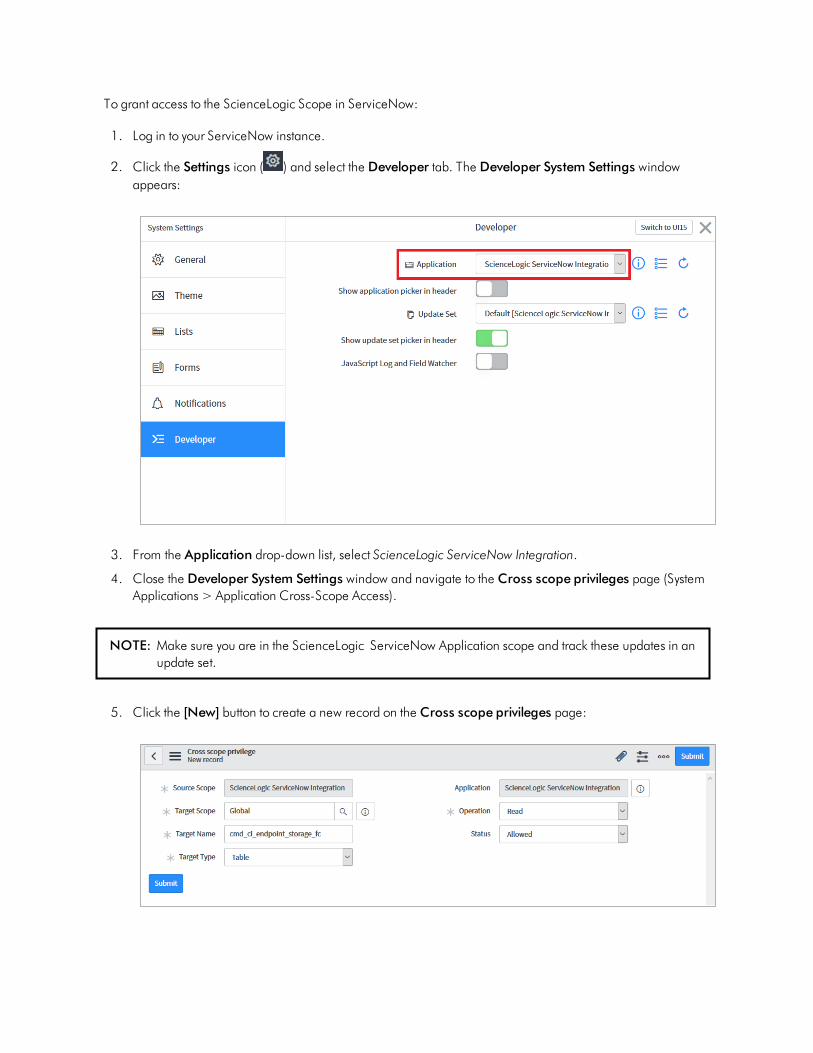
To grant access to the ScienceLogic Scope in ServiceNow:
1. Log in to your ServiceNow instance.
2. Click the Settings icon ( ) and select the Developer tab. The Developer System Settings windowappears:
3. From the Application drop-down list, select ScienceLogic ServiceNow Integration.
4. Close the Developer System Settings window and navigate to the Cross scope privileges page (SystemApplications > Application Cross-Scope Access).
NOTE: Make sure you are in the ScienceLogic ServiceNow Application scope and track these updates in anupdate set.
5. Click the [New] button to create a new record on the Cross scope privileges page:
6. Verify that the Source Scope and Application fields are set to ScienceLogic ServiceNow Integration. If theyare not, repeats steps 2-3.
7. Complete the following fields:
l Target Scope. Specify the scope of the target table, such asGlobal.
l Operation. Select Read.
l Target Name. Specify the name of the target table.
l Status. Select Allowed.
l Target Type. Select Table.
8. Click the [Submit] button.
For more information, see https://docs.servicenow.com/bundle/madrid-application-development/page/build/applications/reference/c_CrossScopePrivilegeRecord.html.
Installing the ScienceLogic SL1: CMDB & Incident AutomationApplication in ServiceNow
You must install the "ScienceLogic SL1: CMDB & Incident Automation" application on your ServiceNow instance toenable this Synchronization PowerPack. The "ScienceLogic SL1: CMDB & Incident Automation" application is alsoknown as the "Certified Application" or the "Scoped Application".
NOTE: You must have a ServiceNow HI Service Account to request this application and download it onto yourServiceNow instance.
WARNING: Integration Service instances running version 2.0.0 or later of the ServiceNow integrationapplications are not backwards-compatible with the previous ServiceNow update sets or withSyncServer. After you install the "ScienceLogic SL1: CMDB & Incident Automation" applicationon your ServiceNow instance, you need to upgrade your ServiceNow integration applications toversion 2.0.0 or later on all Integration Service instances. The "ScienceLogic SL1: CMDB &Incident Automation" application is also not backwards-compatible with SyncServer. This changecannot be reverted.
You must first request the "ScienceLogic SL1: CMDB & Incident Automation" application from the ServiceNowStore, and then you can install it.
To request and install the Certified Application:
1. Go to the ServiceNow Store at https://store.servicenow.com and search for "ScienceLogic SL1".
2. Select the "ScienceLogic SL1: CMDB & Incident Automation" application. The detail page for the applicationappears.
3. Click the [Get] button and log in with your HI credentials.

4. After the request is approved, log in to ServiceNow as an administrator and navigate to ApplicationManager (System Applications > Applications or My Company Applications).
5. Click [Downloads] in the menu header or search for "ScienceLogic".
6. Click the version drop-down for the "ScienceLogic ServiceNow Integration" application listing to make sureyou are using the correct version of the application that is compatible with your version of this SynchronizationPowerPack.
7. Click the [Install] button for the "ScienceLogic ServiceNow Integration" application. The installation iscomplete when the button changes to [Installed].
8. In the filter navigator, search for "ScienceLogic" and locate the application in the left-hand navigation menuto verify that the application was installed.
Installing and Activating the CMDB Plugin in ServiceNow
Installing the "ServiceNow Configuration Management for Scoped Apps (CMDB) Plugin" is required to manageyour Configuration Items. This involves activating the "Configuration Management For Scoped Apps (CMDB)Plugin" on your ServiceNow instance.
To activate the "Configuration Management for Scoped Apps (CMDB) Plugin":
1. In ServiceNow, log in as an administrator and navigate to Plugins (System Definition > Plugins).
2. Search forConfiguration Management For Scoped Apps (CMDB) and select it.
3. Click Activate/Upgrade in the Related Links section.
4. In the Activate Plugin notification, click [Activate].
Enabling the ServiceNow Identif ication and ReconciliationModule
This Synchronization PowerPack uses the " ServiceNow Identification and Reconciliation" module to create and de-duplicate CI records. The Integration Service builds a JSON-formatted string that is sent to the "ServiceNowIdentification and Reconciliation" module. The following link provides additional detail about the formatting of theJSON-formatted string: IdentificationEngineScriptableApi.
The JSON-formatted string is sent directly to a custom-scripted API endpoint and run through theIdentificationEngineScriptable API. Identification (Insert or Update) of Configuration Items (CIs) is handled by theServiceNow Identification and Reconciliation module.
For more information about the "ServiceNow Identification and Reconciliation" module, see CMDB Identify andReconcile. See also Reconciliation Rules, CMDB Identification Rules, and Identification engine error messages.
Configuring Service Rules for Device Sync
The ServiceNow CMDB Synchronization PowerPack utilizes class hierarchies to build relationships in ServiceNow.This requires building service rules (containment rules and hosting rules) in ServiceNow to correctly identifydependent CIs during the business discovery process and service mapping. Containment rules describe whichCIs are contained by a given CI. Hosting rules describe the environment on which a CI runs.
ScienceLogic recommends packaging all of the service rules into a ServiceNow update set so that you can beeasily package and deploy these changes across environments. For more information, see Creatinga ServiceNow Update Set.
These rules or "mappings" are defined in the "Sync Devices from SL1 to ServiceNow" integration application in theIntegration Service user interface. These mappings connect an SL1 device class to a ServiceNow CI class,which determines the CI class that ServiceNow uses when creating the CI in ServiceNow.
For more information about the "ServiceNow Identification and Reconciliation" module, see CMDB dependentrelationship rules and CMDB Identification Rules at the ServiceNow website.
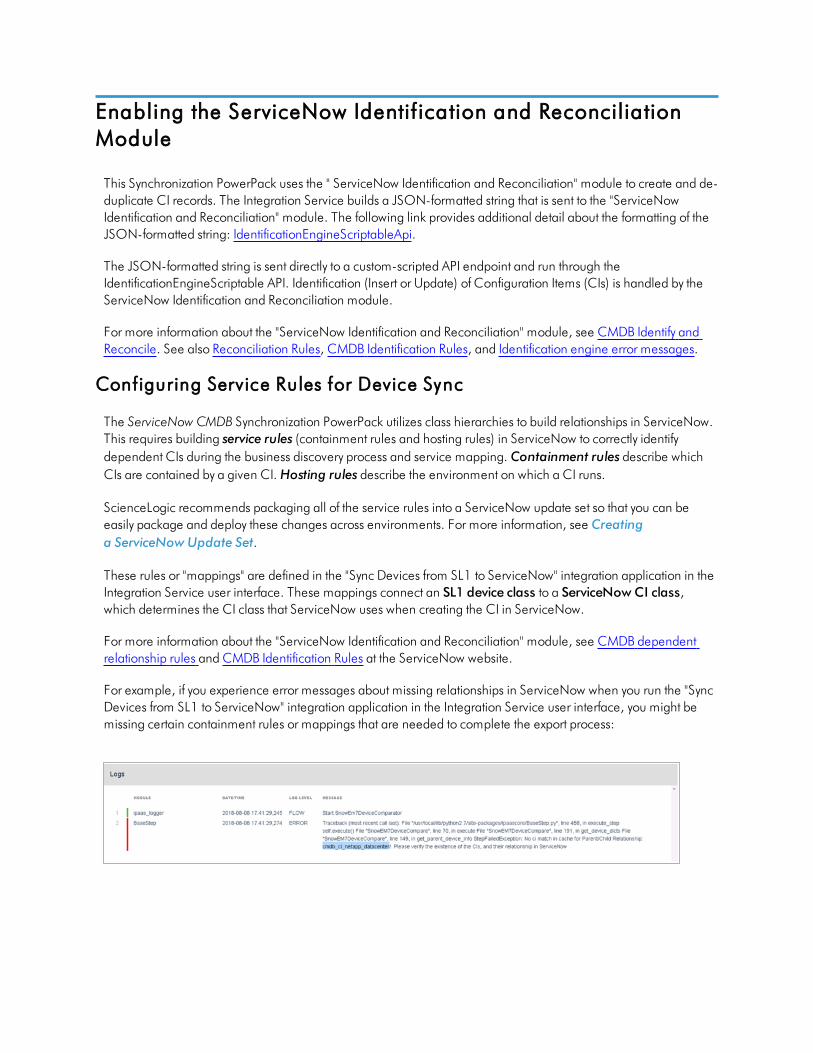
For example, if you experience error messages about missing relationships in ServiceNow when you run the "SyncDevices from SL1 to ServiceNow" integration application in the Integration Service user interface, you might bemissing certain containment rules or mappings that are needed to complete the export process:

Containment Rules
Containment rules are chained to each other in a group, with a CI type that is the top-level (root) parent of thegroup.
To create containment rules:
1. In ServiceNow, type "cmdb_metadata_containment.list" n the filter navigator to access the CMDBMetadata Containment Rules page:
2. Click [New]. A new CMDB Metadata Containment Rules record appears:
3. Complete the following fields:
l Configuration item class. Specify the child CI class.
l Parent. Specify the parent CI class.
l Relation type. Specify the relationship type. The common relationship types used by the ServiceNowintegration are "contained" or "contained by", depending on your CMDB. Click the magnifying glassicon to select the correct value.

4. Click [Submit].
5. In the Integration Service user interface, go to the Integrations page and manually run the "CacheServiceNow CIs and SL1 Device Classes" integration application.
6. Run the "Sync Devices from SL1 to ServiceNow" integration application and make sure that no errors existdue to missing CI relationships.
Host ing Rules
Hosting rules can only be one level, and they always involve resources such as physical or virtual hardware.
1. In the ServiceNow filter navigator, type "cmdb_metadata_hosting.list" to view the CMDB MetadataHosting Rules page.
2. Click [New]. A new CMDBMetadata Hosting Rules record appears:
3. In the New Metadata Hosting Rules record, complete the following fields:
l Child type. Specify the child CI class.
l Parent type. Specify the parent CI class.
l Relation type. Specify the relationship type. The common relationship types used by the ServiceNowintegration are "Hosts" or "Hosted on", depending on your CMDB. Click the magnifying glass icon toselect the correct value.
4. Click [Submit].
5. Add any additional containment and hosting rules that are needed to build the CI relationships inServiceNow.
6. In the Integration Service user interface, go to the Integrations page and manually run the "CacheServiceNow CIs and SL1 Device Classes" integration application.
7. Run the "Sync Devices from SL1 to ServiceNow" integration application and make sure that no errors existdue to missing CI relationships.

Creating a ServiceNow Update Set
ScienceLogic recommends packaging the service rules into a standalone ServiceNow update set that you canexport if needed. An update set is an XML file containing a group of customizations that can be moved from oneServiceNow instance to another. This update set should include any changes or configurations to the service rulesfor the ServiceNow Identification and Reconciliation Module.
To create a standalone update set in ServiceNow:
1. In ServiceNow, enable the Developer Update set picker by clicking the Settings icon ( ) and selecting theDeveloper tab.
2. Select the Show update set picker in header toggle to enable it, and then close the System Settingspage.
3. In the filter navigator, search for local update sets.
4. Under System Update Sets, select Local Update Sets and click [New]. A new Update Set record appears:

5. Complete the following fields:
l Name. Specify a name that describes the rules of this update set.
l Application. Set the application scope toGlobal.
l State. Set to In Progress.
l Complete the remaining fields as needed.
6. Click [Submit] or [Submit and Make Current]. If you selected [Submit and Make Current], go to step 8.
7. If you clicked [Submit], you can select the update set in the picker in the header or navigate to the update setand selectMake This My Current Set in the Related links section. You are now ready to make changes inyour ServiceNow Instances.
8. When you are done with all updates in the update set, change the update set State field toComplete.
Adding Service Rules to an Update Set
If you submitted your new update set and made it "Current" in Creating a ServiceNow Update Set, skip this stepand go to Exporting an Update Set.
If you did not make your update set current, you will need to identify your current update set and move all of theservice rules you need into your update set. You can find this information in a dropdown located in the ServiceNownavigation bar:
All of the service rules that you defined are tracked in the update set record under the [Customer Updates] tab.
To add all created service rules to your update set:
1. In the ServiceNow filter navigator, type "local update sets" to view a list of update sets on the ServiceNowinstance.
2. Identify your current update set, which should have all of the created service rules tracked.
3. Identify the self-created update set that you want to contain all the service rules. This is the update set that youwant to export.
4. Select the current update set that has all of the already-created service rules.

5. On the [Customer Updates] tab, identify all of the records with a Type of either CMDBMetadataContainment Rules or CMDBMetadata Hosting Rules:
6. Select each of the relevant service rule records and set the Update set field to match the update set you wantto export. Click the magnifying glass icon to select the correct value:
7. Click [Update].
8. Repeat steps 6-7 until all relevant containment and hosting rules are in the new update set, and then go toExporting an Update Set.
Export ing an Update Set
After you have created your update set and defined the service rules, mark your update set as Complete and exportit to an XML file.

To export an update set:
1. In the ServiceNow filter navigator, type “Local Update Sets” to view a list of update sets in ServiceNow:
2. Select your update set from the list.
3. Set the State toComplete and click [Update].
4. From the Update Sets page, select your completed update set from the list.
5. Under the Related Links section, click Export to XML.
6. Save the downloaded XML file.

Configuring Customer CI Relation Overrides
When you are mapping Device Classes and attributes, you might find that the relationship mapping between SL1and ServiceNow might be complex, or both applications construct device relationships in very different ways. In the"Sync Devices from SL1 to ServiceNow" integration application, you can use the customer_ci_relation_overridesfield on the Configuration pane to override the relationship linking and directly control the link between DeviceClasses and attributes.
WARNING: This process is intended for advanced users that are familiar with how SL1 and ServiceNowconstruct device relationships.
In the following example, the relationship structure in SL1 is linear :

In ServiceNow, however, the structure is not as linear, and it requires an override (a manual link) between classesto make the relationship link required:
The following image shows the JSON structure formatting that is required for the customer_ci_relation_overrides field:

The values in the customer_ci_relation_overrides field supersede any of the values configured in themappingssection in the Configuration pane for the "Sync Device Classes from SL1 to ServiceNow" integration application.
In the customer_ci_relation_overrides field, you can string together multiple relationships as in the followingexample:
{"cmdb_ci_db_mssql_instance": {
"relations": [{
"parent": "cmdb_ci_win_server","rel_type": "Runs on::Runs","reverse": true
}],"values": {"sys_class_name": "snow_ci", "instance_name": "name"}
},"cmdb_ci_db_mssql_database": {
"relations": [{
"parent": "cmdb_ci_db_mssql_instance","rel_type": "Contains::Contained by","reverse": false
}],"values": {"sys_class_name": "snow_ci", "database": "name"}
},"cmdb_ci_db_mssql_server": {
"relations": [{
"parent": "cmdb_ci_win_server","rel_type": "Runs on::Runs","reverse": true
}],"values": {"sys_class_name": "snow_ci", "instance_name": "name"}
}}
Installing the ScienceLogic Domain Separation (Global)Update Set in ServiceNow
If your ServiceNow environment is domain-separated, where the data, processes, and administrative tasks havebeen organized into logical groupings called domains, you will need to install the latest version of the"ScienceLogic Domain Separation (Global)" update set in ServiceNow. This update set is not included in the"ScienceLogic SL1: CMDB & Incident Automation" application (also called the Certified application).
If your ServiceNow environment does not use domain separation, you can skip this topic.
TIP: For more information about ServiceNow domain separation, see Using ServiceNowDomain Separation with the Integration Service.
Overview of the Update Set
The "ScienceLogic Domain Separation (Global)" update set contains the following items:
l Scripted REST API
l Scripted REST Resource
l Scripted REST Query Parameter
l Scripted REST Query Parameter Association
l Script Include
This update set completely separates the ServiceNow Identification Engine REST resource that is used in the"ScienceLogic ServiceNow Integration" application and all of the required resources and duplicates it in the Globalscope.
A Scripted REST Service in the Global application is a direct copy of the application endpoint with a new name:api/10693/sciencelogic_domain_separation. This REST Service includes only one Resource: DeviceIdentificationEngine POST. This resource works exactly like the application version, but it points to the newScript Include "SciLoDomainSepUtil". This version of the REST resource takes the same formatted JSON as theCertified application.
The Script Include "SciLoDomainSepUtil" includes all of the functionality needed to run the ServiceNowIdentification Engine API.
Additional resources for the ServiceNow API:
l CMDB Identification and Reconciliation
l identifyCI(String jsonString)
l createOrUpdateCI(String source, String input)
l Identification engine error messages
NOTE: The only resource shared with this update set and the Certified application is the Device Propertiespage. These properties are located in the Certified application at ScienceLogic > Device > DeviceProperties.
Limitat ions of the Ident if icat ion Engine
For more information about how the Identification Engine handles incoming payloads in domain-separatedsystems, see the following ServiceNow Knowledge Base article: KB0695949.
The payload and the user domain must match, or the ServiceNow Identification Engine (IDE) will by default insertthe CMDB record. Safeguards within the Integration Service Device Sync integration application were put in placefor payloads that have relationships. The integration application will drop the payload if all Configuration Items donot share the same domain.
Installing the Update Set
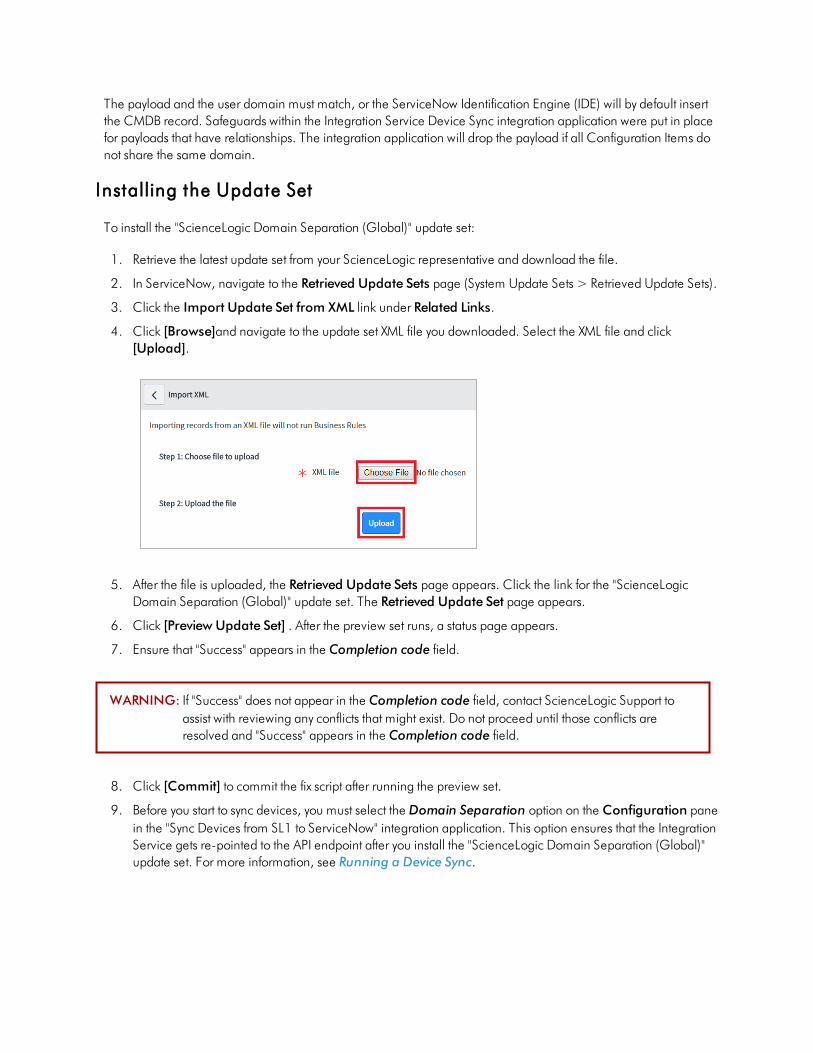
To install the "ScienceLogic Domain Separation (Global)" update set:
1. Retrieve the latest update set from your ScienceLogic representative and download the file.
2. In ServiceNow, navigate to the Retrieved Update Sets page (System Update Sets > Retrieved Update Sets).
3. Click the Import Update Set from XML link under Related Links.
4. Click [Browse]and navigate to the update set XML file you downloaded. Select the XML file and click[Upload].
5. After the file is uploaded, the Retrieved Update Sets page appears. Click the link for the "ScienceLogicDomain Separation (Global)" update set. The Retrieved Update Set page appears.
6. Click [Preview Update Set] . After the preview set runs, a status page appears.
7. Ensure that "Success" appears in the Completion code field.
WARNING: If "Success" does not appear in the Completion code field, contact ScienceLogic Support toassist with reviewing any conflicts that might exist. Do not proceed until those conflicts areresolved and "Success" appears in the Completion code field.
8. Click [Commit] to commit the fix script after running the preview set.
9. Before you start to sync devices, you must select the Domain Separation option on the Configuration panein the "Sync Devices from SL1 to ServiceNow" integration application. This option ensures that the IntegrationService gets re-pointed to the API endpoint after you install the "ScienceLogic Domain Separation (Global)"update set. For more information, see Running a Device Sync.

Using ServiceNow Domain Separation with the IntegrationService
The following topics provide more information about ServiceNow domain separation and how it relates to theIntegration Service. For more information, see Domain separation in the ServiceNow Documentation.
User Setup
Company and domain setup is critical for the domain separation integration to work using the Identification Engineprovided by ServiceNow. This solution requires only one user and will require proper setup depending on wherethe user is located within the domain tree.
Example 1
In the following example, ScienceLogic (1) is both the domain and the company. The ScienceLogic user serviceaccount is associated with ScienceLogic (2) company, and it will have access to all child domains. You do notneed to set visibility to any domain. This is the best way to set up this user, because placing it in the top domainensures that it always has access to all children:

Example 2
In the following example, Delos Inc. (1) is the company within the Delos Inc. domain. The Integration Serviceservice account is associated with the Delos Inc. (1) company. The Delos Inc. domain has no children domains,and if domain visibility is not assigned, the Integration Service will not properly update the CMDB. This setupworks, but it requires that proper domain visibility is set up for the service account to work correctly.
NOTE: Assigning visibility toMSP (3) will grant the service account access to all child domains. Assigningvisibility toWeyland Corporation (4) will only allow access to the Delos Inc. domain and theWeyland domain; all other domains will not work.

Workflow
The API endpoint is based on the API query parameter “test” being true or not, which determines whichIdentification Engine API resource should be used. There are two primary avenues supplied with this RESTresource: "createOrUpdateCI" or "identifyCI", and the only difference is that "identifyCI" does not commit theresults:
The "getCreateOrUpdateCI" function uses the following workflow:
1. Retrieves the current session Domain ID (sys_id).
2. Sets the user Domain ID by creating an array of domain sys_id values and returning only the uniquedomains, or setting the domain if the array has only one unique domain.
3. Submits the JSON formatted string to "createOrUpdateCI()" or "identifyCI()" API.
4. Sets the user's Domain ID back to the original session ID.
The following image shows this workflow:

Chapter
3Configuring Integrations for the CMDB
Synchronization PowerPack
Overview
This chapter describes the how to configure and run the various Integration Service integration applicationscontained in the ServiceNow CMDB Synchronization PowerPack.
An integration application is a JSON object that includes all the information required for executing anintegration on the Integration Service platform. An integration application combines a set of steps that execute aworkflow. You can configure the parameters in the integration application to customize the sync process.
TIP:While an integration application is running on the Integrations page, you will see a dark green,horizontal line at the top of the page until the process completes.
This chapter covers the following topics:
Creating and Aligning a Configuration Object 38
Syncing Organizations 42
Syncing Devices from SL1 to ServiceNow 45
Syncing CI Attributes from ServiceNow to SL1 62
Syncing Advanced Topology Data from SL1 to ServiceNow 65
Syncing Network Interfaces from SL1 to ServiceNow 67
Syncing File Systems from SL1 to ServiceNow 70
Syncing Business Services from SL1 to ServiceNow 71
Syncing Installed Software between SL1 and ServiceNow 73
Discovery Sync 75
Scheduling Integration Applications 91
Log Messages for the "Generate Required CI Relations for ServiceNow" Application Integration 94
Creating and Aligning a Configuration Object
A configuration object supplies the login credentials and other required information needed to execute the steps
for an integration application in the Integration Service. The Configurations page ( ) of the Integration Serviceuser interface lists all available configuration objects for that system.
You can create as many configuration objects as you need. An integration can only use one configuration object ata time, but you can use (or "align") the same configuration object with multiple integration applications.
To use the ServiceNow CMDB Synchronization PowerPack, you will need to create one or more configurationobjects in the Integration Service user interface and align that configuration object to the integration applicationsthat let you sync data between SL1 and ServiceNow.
NOTE: Depending on your SL1 and ServiceNow environments, you might be able to use the sameconfiguration object with other Integration Service: ServiceNow Synchronization PowerPacks.
Creating a Configurat ion Object
For this Synchronization PowerPack, you can make a copy of the "ServiceNow SyncPack" configuration object,which is the sample configuration file that was installed with the ServiceNow Base Synchronization PowerPack.
To create a configuration object based on the "ServiceNow SyncPack" configuration object:

1. In the Integration Service user interface, go to the Configurations page ( ).
2. Click the [Actions] button ( ) for the "ServiceNow SyncPack" configuration object and select Edit.The Configuration pane appears:
3. Click [Copy as]. The Create Configuration pane appears:

4. Complete the following fields:
l Friendly Name. Name of the configuration object that will display on the Configurations page.
l Description. A brief description of the configuration object.
l Author. User or organization that created the configuration object.
l Version. Version of the configuration object.
5. Click [Toggle JSON Editor] to show the JSON code.
6. In the Configuration Data field, be sure to include the required block of code to ensure that the integrationapplications aligned to this configuration object do not fail:
{"encrypted": false,"name": "sl1_db_host","value": "${config.sl1_host}"
}
For example:
{"encrypted": false,"name": "sl1_db_host","value": "10.2.11.42"
}
NOTE: If you are using SL1 with an External Database (SL1 Extended architecture or a cloud-basedarchitecture), update the "value" of that block of code to be the host of your database. This fieldaccepts IP addresses. For example: "value": "db.sciencelogic.com". If you are not using theSL1 Extended architecture or a cloud-based architecture, you do not need to make any changes tothe block of code other than pasting the code into the configuration object.
7. In the Configuration Data field, update the default variable definitions to match your Integration Serviceconfiguration.
TIP: The "ServiceNow SyncPack" configuration object contains all of the required variables. Simply update thevariables from that object to match your SL1 and ServiceNow settings.
NOTE: The region value is a user-defined variable that will identifies your SL1 instance within ServiceNow.
8. To create a configuration variable, define the following keys:
l encrypted. Specifies whether the value will appear in plain text or encrypted in this JSON file. If youset this to "true", when the value is uploaded, the Integration Service encrypts the value of the variable.The plain text value cannot be retrieved again by an end user. The encryption key is unique to eachIntegration Service system. The value is followed by a comma.

l name. Specifies the name of the configuration file, without the JSON suffix. This value appears in theuser interface. The value is surrounded by double-quotes and followed by a comma.
l value. Specifies the value to assign to the variable. The value is surrounded by double-quotes andfollowed by a comma.
9. Click [Save]. You can now align this configuration object with one or more integration applications.
Aligning a Configurat ion Object
Before you can run the integration applications in this Synchronization PowerPack, you must first "align" aconfiguration object with the integration application you want to use.
To align a configuration object with an integration application:
1. From the Integrations page of the Integration Service user interface, open the relevant integration
application and click [Configure] ( ). The Configurations pane for that application appears:
2. From the Configurations drop-down, select the configuration object you want to use.
3. Click [Save] to align that configuration with the integration application.
4. Wait for the "App & Config modifications saved" pop-up message to appear. The Configurationautomatically closes after this message appears.
5. Repeat this process for every other integration application you want to use.

NOTE: The values for eventDetails and the other parameters that appear in the Configuration pane with a
padlock icon ( ) are populated by the configuration object. Do not modify these values.
Syncing Organizations
If your ServiceNow configuration uses domain separation, the first sync you should run on a new IntegrationService system is anOrganization Sync. This sync uses the "Sync Organizations from SL1 to ServiceNow"integration application to sync organizations from SL1 with ServiceNow companies. Be sure to select the DomainSeparation option on the Configuration pane in the "Sync Organizations from SL1 to ServiceNow" integrationapplication. You must also select ServiceNow from the Source of Truth field.
If your ServiceNow configuration does not use domain separation, ScienceLogic recommends that your first syncon a new Integration Service system is anOrganization Sync as well, but you should not select the DomainSeparation option on the Configuration pane in the "Sync Organizations from SL1 to ServiceNow" integrationapplication.
Organization Sync uses the "Sync Organizations from SL1 to ServiceNow" integration application to pullorganizations from SL1 and sync them with ServiceNow companies.
For Domain-separated ServiceNow Environments Only
If your ServiceNow environment is domain-separated, where the data, processes, and administrative tasks havebeen organized into logical groupings called domains, then the first sync you should run on a new IntegrationService system is anOrganization Sync. .
For a domain-separated ServiceNow environment, you must update three fields in ServiceNow for the companiesyou want to sync. Because these fields do not display by default on the Companies page in ServiceNow, navigate
to the Companies page, click the Update Personalized List icon ( ), and add the SL1 Monitored and SL1Region columns to that page.
In ServiceNow, update the following fields:
l SL1 Monitored. Set to true.
l SL1 Region. Set to match the region value in the configuration object aligned with the "Sync Organizationsfrom SL1 to ServiceNow" integration application in the Integration Service user interface. See step 3, below.
l SL1 ID. Set to match theOrganization ID in SL1.
You must also configure and successfully run the "Sync Organizations from SL1 to ServiceNow" integrationapplication before you can sync any additional CI items or devices.

Configuring Organizat ion Sync
If your ServiceNow configuration does not use domain separation, ScienceLogic recommends that your first syncon a new Integration Service system is an Organization Sync as well, but you should not select the DomainSeparation option on the Configuration pane in the "Sync Organizations from SL1 to ServiceNow" integrationapplication.
To sync SL1 organizations with ServiceNow companies:
1. In the Integration Service user interface, go to the Integrations page and select the "Sync Organizationsfrom SL1 to ServiceNow" integration application. The Integration Application page for that applicationappears.
2. Click [Configure] ( ). The Configuration pane appears:
3. Complete the following fields, as needed:
l Configuration. Select the configuration object with the relevant SL1 and ServiceNow credentials toalign with this integration application. You cannot edit fields that are populated by the configurationobject. Required.
NOTE: The region field is populated by the configuration object you aligned with thisintegration application. The region value must match the value in the SL1 Region fieldin ServiceNow. If you need to update this value, you will need to define the regionvariable in the configuration object that is aligned with this integration application, oralign a different configuration object that has the correct region value.
l read_timeout. Specify the maximum amount of time in seconds that the integration applicationshould wait for a response before timing out. The default is 20 seconds.
l Domain_Separation. Select this option only if your ServiceNow environment is domain-separated,where the data, processes, and administrative tasks have been organized into logical groupings calleddomains. If your ServiceNow instance is domain-separated, the user listed in the snow_user fieldmust be a member of the top domain and have access to all of the domains you intend to integrate.Also, ServiceNow should be the "source of truth" for organizations if your environment is domain-separated. By default, this option is not selected.
l chunk_size. Specify the number of organizations to include in each chunk sent to ServiceNow whenyou run this integration application. The default is 500.
l Source_of_Truth. Select whether you want to use data from ServiceNow or ScienceLogic as the"source of truth" when this integration application encounters duplicate data or data collisions.
o If you select ServiceNow, you must specify the values in the SL1 Monitored and SL1 Regionfields in ServiceNow. Because these fields do not display by default on the Companies page in
ServiceNow, navigate to the Companies page, click the Update Personalized List icon ( ),and add the SL1 Monitored and SL1 Region columns to that page. If your ServiceNowconfiguration uses domain separation, you must select ServiceNow as the source of truth.
o If you select ScienceLogic, you do not need to do anything else related to this field.
l Create_Missing. Select this option if you want the Integration Service to create a new organization orcompany if that record is missing, based on your selection in the Source_of_Truth field. By default, thisoption is not selected.
l Update_Name. This option addresses the situation where the Integration Service finds a match withan organization and a company, but the names do not match. This option updates a company ororganization name based on your selection in the Source_of_Truth field, below. For example, if youselected ScienceLogic as the source of truth, the Integration Service uses the company name fromScienceLogic as the updated name. By default, this option is not selected.
4. In the attribute_mappings section, you can edit or create a mapping for any other company attributes, suchas address and contact information, that you want to sync between SL1 (the first column) and ServiceNow (the second column). A set of company attributes are already mapped by default.

NOTE: You can use Jinja2 Templates in fields that are aligned with the "Source of Truth" you selected (the left column is for SL1, and the right column is for ServiceNow). For more information, seeUsing a Jinja2 Template.
5. To edit an existing company attribute in the attribute_mappings section, click the attribute name and eitherselect an attribute from the list or type a new name for the attribute. Press [Enter] after editing the attribute tomake sure your changes are saved.
TIP: Use the [Tab] button to move down through the list of options in a dropdown list, press [Shift]+[Tab] to move up, and press [Enter] to select a highlighted option.
6. To create a company attribute in the attribute_mappings section, click the [Add Mapping] button at thebottom of the section, type a name for the attribute in the first field, and select one or more ServiceNowattributes to which the SL1 attribute should sync in themaps to field. Press [Enter] after editing the attribute tomake sure your changes are saved.
NOTE: When an attribute value is "0" in SL1, the corresponding field in ServiceNow might display asempty.
7. Click [Save] and wait for the "App & Config modifications saved" pop-up message to appear. TheConfiguration pane automatically closes after this message appears.
8. Click [Run] ( ) to run the integration application.
9. When the integration application completes, open the Step Log and review the log messages for the"Process Organizations" step to see if any Company or Organization records were created. As needed, selectthe other steps to review the logs on the Step Log for those steps.
TIP: SL1 Organizations that are synced to a ServiceNow Company will have the crm_id field on the[Properties] tab for that organization populated with the ServiceNow Company sys_id variable.
Syncing Devices from SL1 to ServiceNow
The "Sync Devices from SL1 to ServiceNow" integration application syncs devices and virtual device relationshipsfrom SL1 to ServiceNow. You can also sync devices based on organization and collector group.
The Device Sync process use rules or "mappings" that you can define in the "Sync Devices from SL1 toServiceNow" integration application. These mappings connect an SL1 device class to a ServiceNow CI class,which determines the CI class that ServiceNow uses when creating the CI in ServiceNow.

NOTE: For more information about building service rules (containment rules and hosting rules) for devicesand CIs, see Configuring Service Rules for Device Sync.
The "Sync Devices from SL1 to ServiceNow" integration application can also collect manufacturer and modelattributes from asset records aligned with devices in SL1 and sync that information with ServiceNow. TheIntegration Service only populates the manufacturer and model attributes if the values exist in ServiceNow CIs; theIntegration Service does not create new manufacturer values in ServiceNow. The "Sync Devices from SL1 toServiceNow" integration application uses the sys_id field as a reference when syncing manufacturer and modelinformation between SL1 and ServiceNow. For more information, see Default Device Attribute Mappings.
NOTE: If you have merged devices in SL1, the "Sync Devices from SL1 to ServiceNow" integrationapplication syncs the physical device record from SL1 to ServiceNow. However, if you have other datasources syncing into the ServiceNow CMDB, ScienceLogic recommends not merging devices in SL1as this could cause issues when the other data sources insert/update into the CMDB.
Common Fields Used by Device Sync
The "Sync Devices from SL1 to ServiceNow" integration application uses the following ServiceNow fields todetermine which devices to sync from SL1 to ServiceNow:
l SL1 Monitored. This field displays a Boolean (true or false) value that is impacted by whether the device is inSL1 or not. The device being found in ServiceNow depends on the SL1 Monitored field. The device beingfound in SL1 depends on the class mappings defined in the "Sync Devices from SL1 to ServiceNow"integration application.
o If the CI is in ServiceNow and the device is in SL1 , the SL1 Monitored flag is set to true.
o If the CI is in ServiceNow but the device is not in SL1, the SL1 Monitored field is set to false.
l SL1 Region. This field represents an ID for the SL1 instance or instances being synced to the ServiceNowinstance. The SL1 Region field is determined by the user when configuring the IS applications. In a multi-SL1environment, ScienceLogic recommends that you make the SL1 Region field descriptive so the ServiceNowuser knows from which SL1 stack the CI originated.
o If the SL1 Region field is defined as an identifier by the CI class, ServiceNow will create new CIrecords with the new SL1 Region value, and the user must manually delete the duplicate CIs in theold SL1 Region field.
o If the SL1 Region field is not defined as an identifier by the CI class, ServiceNow will not treat thesedevices as new CIs, and the SL1 Region field will be automatically updated.
NOTE: Changing the SL1 Region value after an initial run of the "Sync Devices from SL1 to ServiceNow"application will have differing results depending on the service rules defined in ServiceNow thatdictate reconciliation of the CI. If you change the SL1 Region value, you will ll need to run "SyncDevices from SL1 to ServiceNow" twice: once to align the CIs with the new region, and a second timeto enable the Integration Service to re-cache the newly updated CIs in the region.
Running a Device Sync
To perform a Device Sync between SL1 and ServiceNow, run the following integration applications in theIntegration Service user interface:
l Cache ServiceNow CIs and SL1 Device Classes. Reads all existing SL1 device classes and ServiceNow CIclasses and caches them for the Device Sync. This application uses this data to populate themappings drop-down values in the "Sync Devices from SL1 to ServiceNow" integration application.
l Generate Required CI Relations for ServiceNow. Determines if you are missing any class mappings orservice rules that might be required in ServiceNow.
l Sync Devices from SL1 to ServiceNow. Syncs devices and virtual device relationships from SL1 toServiceNow. In previous versions, this integration application was named "ScienceLogic To ServiceNowDevice Sync using GraphQL".

To sync SL1 devices with ServiceNow:
1. In the Integration Service user interface, select the "Cache ServiceNow CIs and SL1 Device Classes"
integration application from the Integrations page, click [Configure] ( ), align a configuration object,
and then click [Run] ( ).
NOTE: If you change any of the containment rules or hosting rules in ServiceNow, you will need to run"Cache ServiceNow CIs and SL1 Device Classes" again. For more information, seeConfiguring Service Rules for Device Sync.
2. Select the "Generate Required CI Relations for ServiceNow" integration application from the Integrations
page, click [Configure] ( ), align a configuration object, and then click [Run] ( ).
NOTE: The Integration Service uses the Device Class mappings you are going to configure in step 6,so you do not need to set up any mappings on the Configuration pane for the "GenerateRequired CI Relations for ServiceNow" integration application. Any mappings you add to thisintegration application will overwrite mappings in the "Sync Devices from SL1 to ServiceNow"application.
3. When the "Generate Required CI Relations for ServiceNow" application completes, review the loginformation in the Step Log for the "Pull and Process Relations" step. You should see a log message statingthat nomissing relations were found. For more information, see Log Messages for the "GenerateRequired CI Relations for ServiceNow" Application Integration.
NOTE: If needed, address any missing class mappings or service rules . For more information onservice rules, see Creating a ServiceNow Update Set.

4. Select the "Sync Devices from SL1 to ServiceNow" integration application from the Integrations page and
click [Configure] ( ). The Configuration pane appears:
5. Complete the following fields, as needed:
l Configuration. Select the configuration object with the relevant SL1 and ServiceNow credentials toalign with this integration application. You cannot edit fields that are populated by the configurationobject. Required.
NOTE: The region field is populated by the configuration object you aligned with thisintegration application. The region value must match the value in the SL1 Region fieldin ServiceNow. If you need to update this value, you will need to define the regionvariable in the configuration object that is aligned with this integration application, oralign a different configuration object that has the correct region value.

l read_timeout. Specify the maximum amount of time in seconds that the integration applicationshould wait for a response before timing out. The default is 20 seconds. If the Device Sync continuallytimes out, you might want to increase the timeout to 120 seconds, as this sync can be data-intensive.
TIP: Scroll past themappings section to access the next set of fields. For more information aboutthemappings section, go to step 6.
l Include_Orgs. If you want to include SL1 Organizations in the device sync, add the Organization IDsfrom SL1 in this field, separated by commas. Leave this field empty to sync all SL1 Organizations.
l Include_CUGs. If you want to include SL1 Collector Groups (CUGs) in the device sync, addthe Collector Group IDs from SL1 in this field, separated by commas. Leave this field empty to sync allSL1 Collector Groups.
l exclude_inactive. Select this option to prevent syncing devices to ServiceNow that are disabled,unavailable, or in maintenance. By default, this field is not selected.
l enable_device_active. Select this option to enable the Device Active block in the device GraphQLquery, which contains information about the active state of the SL1 device. By default, this field is notselected. Accessing this data in the attribute mappings requires a Jinja2 Template. For moreinformation, see Using a Jinja2 Template.
l enable_asset_networks. Select this option to enables the assetNetworks block in the deviceGraphQL query, which returns a list of asset networks. By default, this field is not selected. Accessingthis data in the attribute mappings requires a Jinja2 Template. For more information, see Using aJinja2 Template.
WARNING: Please note that enabling this option might cause performance issues on the SL1side.
l chunk_size. Specify the number of devices to include in each chunk sent to ServiceNow when yourun this integration application. The default chunk size is 500 devices.
l selected_devices. If you want to sync a sub-set of all discovered devices, type a comma-separated listof the Device IDs from SL1 for only the devices that you want to sync. Leave this field empty to sync allSL1 devices.
l Domain_Separation. Select this option if your ServiceNow environment is domain-separated, wherethe data, processes, and administrative tasks have been organized into logical groupings calleddomains. If your ServiceNow instance is domain-separated, the user listed in the snow_user fieldmust be a member of the top domain and have access to all of the domains you intend to integrate.Also, ServiceNow should be the "source of truth" for organizations if your environment is domain-separated. If this option is selected, the Integration Service syncs the ServiceNow Company sys_id towith the corresponding SL1 Organization.
l sl1_url_override. Update this field if you want to use an URL that is different from the standard SL1URL that gets sent to the ServiceNow CI record. Optional.
l excluded_devices. Type a list of comma-separated device names or device IDs for any devices thatyou want to exclude from the device sync. Optional.

l lookup_chunk_size. Specify the number of devices in each chunk when pulling the device cachefrom Couchbase. The default is 1000 devices.
l drop_sys_id. Select this option if you want to remove the sys_id in existing CIs from the sync. If you setdrop_sys_id to true, make sure that ServiceNow can correctly identify and correlate your existing CIswith the properties that are available.
l drop_company. Select this option if you want to remove the sys_id in existing Companies from thesync. Selecting this option has no effect if you selected the Domain_Separation option for thisintegration application.
TIP: Scroll to the bottom of the Configuration pane to access the following fields.
l customer_ci_relation_overrides. To override existing relationship linking and directly control the linkbetween Device Classes and attributes, add JSON code to this field. The JSON for this field includesdefault relationship overrides for VMware instead of direct parent/child relations. For moreinformation, see Configuring Customer CI Relation Overrides.
NOTE: You can also install the "ScienceLogic_Identification_Engine_VMware.xml" update setfor ServiceNow to get access to additional relationships and overrides that you mightneed to be able to sync VMware trees. Depending on the plug-ins and customconfigurations in your environment, you might need additional relationships. Thesemapping do not handle making classes independent, as that is based on the specificuser environment. Identifier rules are not defined in this update set because theydepend on the data in the SL1 environment. For more information about VMwarerelationships in ServiceNow, see https://docs.servicenow.com/bundle/orlando-it-operations-management/page/product/discovery/reference/r_VCenterDataCollected.html.
l Simulation_Mode. Select this option if you want to perform a simulated run of this integrationapplication to show you the potential results of that run.
6. Scroll to themappings section to view the mappings between SL1 Device Classes and ServiceNow CIclasses. This section is pre-loaded with a large number of default device mappings. For a complete list of thedefault mappings and a list of available mappings, see Device Attribute Mappings.
NOTE: The "Sync Devices from SL1 to ServiceNow" integration application will only sync a devicefrom SL1 if the Device Class for that device is mapped to a ServiceNow CI class inmappingssection. The default mappings in this section do not cover all technologies, however, andsyncing additional technologies from SL1 to ServiceNow might require additional research tounderstand the class structure.
7. To create a custom mapping for the device sync, click [Add Mapping] at the bottom of the section.ServiceNow CI classes display on the left, and SL1 device classes display on the right. You can map a singleServiceNow CI class with multiple SL1 devices classes.

8. Scroll to the attribute_mappings section, which in previous versions was named the additional_attributes section. In this section, you can create a mapping for any other custom device attributes you wantto sync between SL1 (the first column) and ServiceNow (the second column):
NOTE: All custom attributes for each SL1 device are automatically synced.
TIP: You can use a Jinja2 Template for device attribute fields on the SL1 side (the left column). Formore information, see Using a Jinja2 Template.
9. To edit an existing device attribute in the attribute_mappings section, click the attribute name and eitherselect an attribute from the list or type a new name for the attribute. Press [Enter] after editing the attribute tomake sure your changes are saved.

10. To create a custom device attribute in the attribute_mappings section, click the [Add Mapping] button atthe bottom of the section, type a name for the attribute in the first field, and select one or more ServiceNowattributes to which the SL1 attribute should sync in themaps to field. Press [Enter] after editing the attribute tomake sure your changes are saved.
NOTE: When an attribute value is "0" in SL1, the corresponding field in ServiceNow might display asempty.
11. Click [Save] and wait for the "App & Config modifications saved" pop-up message to appear. TheConfiguration pane automatically closes after this message appears.
12. Run the "Sync Devices from SL1 to ServiceNow" integration application. If this is the first time you are runningthis integration application, run it a second time to build the internal cache.
13. When the integration application completes, open the Step Log and review the log messages for the"Compare SL1 Devices and ServiceNow CIs" step to see if any Device or CI records were added, updated,or disconnected from the sync. As needed, select the other steps to review the logs on the Step Log for thosesteps.
NOTE: Depending on the number of devices you are syncing to ServiceNow, it might take a few minutes forall devices to get fully synced to the CMDB. You might notice after running device sync that thenumber of SL1 Monitored CIs continues to increase after each refresh. This is expected behavior dueto payload chunking in ServiceNow. ServiceNow processes each payload as an individual chunk.
Using a Jinja2 Template
The attribute mappings in both the "Sync Devices from SL1 to ServiceNow" and the "Sync CI Attributes fromServiceNow to SL1" integration applications now support Jinja2 Templates, which let you sync complex,concatenated (linked) fields from SL1 to ServiceNow. For example, you can add these complex values in the SL1side of the attribute_mappings section of the Configuration pane for the "Sync Devices from SL1 toServiceNow"application, and that value is mapped to one or many fields in ServiceNow. For more informationabout Jinja2 Templates, see the Template Designer Documentation.
In the "Sync Devices from SL1 to ServiceNow" integration application, the SL1 side can be a Template. In the"Sync CI Attributes from ServiceNow to SL1" integration application, the ServiceNow side can be a Template.
Example Template
This example is included in the "Sync Devices from SL1 to ServiceNow" integration application as the first defaultvalue in the attribute_mappings section of the Configuration pane:

This Template, when used on the SL1 side of the attribute_mappings section, populates the short_descriptionfield in ServiceNow:
"Description: {{device.device_category}}, Device Class: {{device.device_class}}": ["short_description"
]
In the above example, for a device with a category: Testing and a Device Class of Testing | Testing, the endresult would be Description: Testing, Device Class: Testing | Testing, which will be posted to the short_description field in ServiceNow.
The Jinja2 Templates will have access to all properties on the Device.

Adding Device Mappings with Postman
You can dynamically set the device mappings on a per-run basis using the API. You can also persistently savedevice mappings with the API.
The following image displays an example of using Postman to send the mapping data to Integration Service:
To add device mappings using Postman:
1. In Postman, POST the following JSON file to trigger the required integration applications in the IntegrationService user interface to model SL1 devices to ServiceNow:
NOTE: This example only maps device classes to ServiceNow for VMware, SL1 devices, and a few Ciscodevices. If the your environment contains other device classes, you must manually create themappings.
{"name": "device_sync_sciencelogic_to_servicenow","params": {
"mappings": {"cmdb_ci_ip_switch":[
"Cisco Systems | Catalyst 3850-48P","Cisco Systems | Nexus 9372PX"
],"cmdb_ci_linux_server": [
"ScienceLogic, Inc. | EM7 Message Collector","ScienceLogic, Inc. | EM7 Customer Portal","ScienceLogic, Inc. | EM7 All-In-One","ScienceLogic, Inc. | EM7 Integration Server","ScienceLogic, Inc. | EM7 Admin Portal","ScienceLogic, Inc. | EM7 Database","ScienceLogic, Inc. | OEM","ScienceLogic, Inc. | EM7 Data Collector","NET-SNMP | Linux","RHEL | Redhat 5.5"

],"cmdb_ci_esx_resource_pool": ["VMware | Resource Pool"],"cmdb_ci_esx_server": [
"VMware | ESXi 5.1 w/HR","VMware | Host Server","VMware | ESX(i) 4.0","VMware | ESX(i) w/HR","VMware | ESX(i) 4.0 w/HR","VMware | ESX(i)","VMware | ESX(i) 4.1 w/HR","VMware | ESXi 5.1 w/HR","VMware | ESXi 5.0 w/HR","VMware | ESX(i) 4.1","VMware | ESXi 5.1","VMware | ESXi 5.0"
],"cmdb_ci_vcenter_datacenter": ["VMware | Datacenter"],"cmdb_ci_vcenter_datastore": ["VMware | Datastore", "VMware | DatastoreCluser"],"cmdb_ci_vcenter_dv_port_group": ["VMware | Distributed Virtual Portgroup"],"cmdb_ci_vcenter_dvs": ["VMware | Distributed Virtual Switch"],"cmdb_ci_vcenter_folder": ["VMware | Folder"],"cmdb_ci_vcenter_network": ["VMware | Network"],"cmdb_ci_vmware_instance": ["VMware | Virtual Machine"],"cmdb_ci_vcenter": ["VMware | vCenter", "Virtual Device | Windows Services"],"cmdb_ci_vcenter_cluster": ["VMware | Cluster"]
},"configuration": "template_snow_integration" #name your configuration file}
}
Persistent ly Saving Device Mappings with the API
You can persistently save device mappings using the API.
1. Use Postman or cURL to do a GET to load the "Sync Devices from SL1 to ServiceNow" integrationapplication:
GET Integration_Service_hostname/api/v1/applications/device_sync_sciencelogic_to_servicenow
where Integration_Service_hostname is the IP address or URL for your Integration Service system.
NOTE: The response should contain the entire JSON output for the integration application.
2. Copy the entire JSON code and save it to a file named: "device_sync_sciencelogic_to_servicenow".

3. Open the file you created and locate the object with the "name":"mappings" property in the "app_variables" list. The "value" property in this object specifies the mappings to use throughout the integrations:
4. Modify the "value" property of the object to use the mappings you want to use.
5. Ensure that the mappings follow the same JSON data structure, or else the sync will not work:
{"cmdb_ci_class": [
"ScienceLogic Dev Class| ScienceLogic subclass","Another Silo Dev Class | Another Silo subclass"
]}
6. After you update the mappings, use the iscli tool to upload the updated integration application with your newsettings. Type the following command at the command line:
iscli –uaf device_sync_sciencelogic_to_servicenow –H Integration_Service_hostname-p password
where:
l Integration_Service_hostename is the hostname or IP address of the Integration Service system.
l password is password you use to log in to the Integration Service system.
Device Attribute Mappings
The "Sync Devices from SL1 to ServiceNow" integration application can also collect manufacturer and modelattributes from asset records aligned with devices in SL1 and sync that information with ServiceNow.

The Integration Service only populates the manufacturer and model attributes if the values exist in ServiceNow CIs;the Integration Service does not create new manufacturer values in ServiceNow. "Sync Devices from SL1 toServiceNow" integration application uses the sys_id field as a reference when syncing manufacturer and modelinformation between SL1 and ServiceNow.
Defaul t Device Attribute Mappings
The "Sync Devices from SL1 to ServiceNow" integration application contains a set of default device attributemappings between SL1 and ServiceNow. You can find these mappings in the attribute_mappings section of theConfiguration pane for that integration application.
The following table describes the default device attribute mappings:
SL1 Device Attribute ServiceNow CI Attribute
Description "Description: {{device.device_category}}, Device Class:{{device.device_class}}": [ "short_description"
NOTE: This field requires a Jinja2 Template. For more information, see Using aJinja2 Template.
assetTag asset_tag
cpuCount cpu_count
cpuMake cpu_type
cpuSpeed cpu_speed
dateAdded first_discovered
diskSize disk_space
dnsDomain dns_domain
function justification
hostname fqdn, host_name
ip ip_address
manufacturer_sys_id manufacturer
memory ram
model_sys_id model_id
name name
operatingSystem os
purchaseDate order_date
serial serial_number

SL1 Device Attribute ServiceNow CI Attribute
status hardware_substatus
warrantyCost cost
warrantyExpirationDate warranty_expiration
SL1 Device Attr ibutes Avai lable for Syncing
In the attribute_mappings section of the Configuration pane for the "Sync Devices from SL1 to ServiceNow"integration application, you can use the following SL1 device attributes from SL1 when syncing attributes withServiceNow:
l arraySize
l assetTag
l asset_id
l company_sys_id
l component_unique_id
l cpuCount
l cpuMake
l cpuSpeed
l dateAdded
l depreciationMethod
l depreciationSchedule
l device_category
l device_class
l diskCount
l diskSize
l dnsDomain
l dnsName
l domain_sys_id
l firmwareVersion
l floor
l function
l hostId
l hostname
l ip
l location

l make
l manufacturer_sys_id
l memory
l model
l model_sys_id
l name
l operatingSystem
l org_id
l org_name
l owner
l panel
l parent_device
l parent_did
l plate
l punch
l purchaseCheck
l purchaseCost
l purchaseDate
l purchaseOrderNumber
l rack
l region
l rfid
l room
l serial
l serviceCheck
l serviceCost
l serviceDate
l serviceDescription
l serviceExpirationDate
l serviceOrderNumber
l servicePolicyNumber
l shelf
l sl1_id
l sl1_url
l snow_ci_class

l snow_sys_id
l status
l vitalAssetInformation
l vitalServiceInformation
l warrantyCheck
l warrantyCost
l warrantyDate
l warrantyDescription
l warrantyExpirationDate
l warrantyOrderNumber
l warrantyPolicyNumber
l zone
Adding New Device Attributes to ServiceNow
You can also add one or more new attributes to ServiceNow that you can then sync with SL1.
To add an attribute in ServiceNow:
1. In ServiceNow, search for "Tables" in the filter navigator and select System Definition > Tables.
2. From the Tables page, search for and select the table to which you want to add a field for a new attribute.
3. From the Table page, click the [New] button to add a new field on the table. A new record appears:

4. From the Type drop-down list, select the data type you want to store, such as String. Depending on yourselection, additional required fields display:
NOTE: In the String example, above, Column label contains the text you want to display in ServiceNow, andColumn name is the exact column name used by the Integration Service or the API.
5. Complete the required fields and any other fields as needed, and then click the Submit button. The field isadded to ServiceNow.
Syncing CI Attributes from ServiceNow to SL1
The "Sync CI Attributes from ServiceNow to SL1" integration application imports CI attributes from ServiceNow tothe relevant asset and attribute fields in SL1. The CI Sync supports assets, asset configuration, asset maintenance,location, production statuses, and custom attributes.
The "Sync CI Attributes from ServiceNow to SL1" integration application can sync the display value and sys_id ofReference fields, such as location, as well as the value and label ofChoice List fields, such as operational_status.These values can be accessed by appending _label to the desired field name.
Reference Example:
"location": "240f6630db993300dc44f00fbf96196f""location_label": "Corporate Headquarters"
Choice List Example:
"operational_status": "1","operational_status_label": "Operational",

The following image shows the Location table, and the Display column shows the Namemarked as true. Onlyone field on the table can be marked as true, and that is the field that will be returned to the Integration Service :
NOTE: When this integration application runs, if no mappings are provided, the Integration Service queriesthe "Sync Devices from SL1 to ServiceNow" integration application and uses the mappings from thatapplication.
To sync CI attributes from ServiceNow to SL1:
1. Because this integration application uses the mappings and additional attribute options from Device Sync, goto the Integrations page of the Integration Service user interface and run the "Sync Devices from SL1 toServiceNow" integration application.
2. When that application completes, select the "Sync CI Attributes from ServiceNow to SL1" integrationapplication from the Integrations page.

3. Click [Configure] ( ). The Configuration pane appears:
4. From the Configuration drop-down list, select the configuration object to align with this integrationapplication. You cannot edit fields that are populated by the configuration object. Required.
NOTE: The region field is populated by the configuration object you aligned with this integration application.The region value must match the value in the SL1 Region field in ServiceNow. If you need to updatethis value, you will need to define the region variable in the configuration object that is aligned withthis integration application, or align a different configuration object that has the correct region value.
5. Scroll down to the attribute_mappings section, which in previous versions was named the additional_attributes section. In this section you can edit an existing attribute, or you can click the [Add Mapping]button at the bottom of the section to create a new attribute. Press [Enter] after editing the attribute to makesure your changes are saved.

TIP: You can use a Jinja2 Template for attribute fields on the ServiceNow side (the right column). For moreinformation, see Using a Jinja2 Template.
6. Click [Save] and wait for the "App & Config modifications saved" pop-up message to appear. TheConfiguration pane automatically closes after this message appears.
7. Click [Run] ( ) to run the "Sync CI Attributes from ServiceNow to SL1" integration application.
Syncing Advanced Topology Data from SL1 to ServiceNow
The "Sync Advanced Topology from SL1 to ServiceNow" integration application reads Dynamic ComponentMapping relationships from SL1 and syncs those relationships with ServiceNow.
If this is a new Integration Service system, you must run both the "Sync Devices from SL1 to ServiceNow"application and the "Sync Interfaces from SL1 to ServiceNow" application at least twice on new Integration Servicesystems to populate the cache for this integration application.
WARNING: The Integration Service only syncs topology data for devices and network interfaces that havealready been synced with ServiceNow. Before setting up advanced topology sync, you must firstsync devices or sync network interfaces, depending on your environment.
To sync advanced topology data and relationships from SL1 to ServiceNow:
1. On the Integrations page of the Integration Service user interface, click [Run] ( ) for the "Sync Devicesfrom SL1 to ServiceNow" integration application. Run the application a second time if this is a new IntegrationService system.
2. Click [Run] ( ) for the "Sync Interfaces from SL1 to ServiceNow" integration application. Run theapplication a second time if this is a new Integration Service system.
3. Select the "Sync Advanced Topology from SL1 to ServiceNow" integration application and click [Configure]
( ). The Configuration page appears:

4. Complete the following fields, as needed:
l Configuration. Select the configuration object with the relevant SL1 and ServiceNow credentials toalign with this integration application. You cannot edit fields that are populated by the configurationobject. Required.
NOTE: The region field is populated by the configuration object you aligned with thisintegration application. The region value must match the value in the SL1 Region fieldin ServiceNow. If you need to update this value, you will need to define the regionvariable in the configuration object that is aligned with this integration application, oralign a different configuration object that has the correct region value.
l Domain_Separation. Select this option if your ServiceNow environment is domain-separated, wherethe data, processes, and administrative tasks have been organized into logical groupings calleddomains. If your ServiceNow instance is domain-separated, the user listed in the snow_user fieldmust be a member of the top domain and have access to all of the domains you intend to integrate.Also, ServiceNow should be the "source of truth" for organizations if your environment is domain-separated. This application does not support relationships for devices across domains; all devices in arelation payload must be in the same domain.

l chunk_size. Specify the number of topologies to include in each chunk sent to ServiceNow when yourun this integration application. The default chunk size is 500.
l read_timeout. Specify the maximum amount of time in seconds the integration application shouldwait for a response before timing out. The default is 20 seconds.
l customer_ci_relation_overrides. To override existing relationship linking and directly control the linkbetween Device Classes and attributes, add JSON code to this field. The JSON for this field includesdefault relationship overrides for VMware instead of direct parent/child relations. For moreinformation, see Configuring Customer CI Relation Overrides.
l Simulation_Mode. Select this option if you want to perform a simulated run of this integrationapplication to show you the potential results of that run.
5. Click [Save] and wait for the "App & Config modifications saved" pop-up message to appear. TheConfiguration pane automatically closes after this message appears.
6. Click [Run] ( ) to run the integration application.
Syncing Network Interfaces from SL1 to ServiceNow
You can map and sync network interfaces in much the same way you sync devices between SL1 and ServiceNow.You run the "Sync Interfaces from SL1 to ServiceNow" integration application, which collects interface data fromServiceNow and SL1 and runs multiple CI syncs for each interface to be synced.
WARNING: The Integration Service only syncs network interfaces that are aligned with devices that arealready synced with ServiceNow. Before setting up network interface sync, you must first syncdevices between SL1 and ServiceNow.
To sync SL1 network interfaces with ServiceNow:
1. In the Integration Service user interface, go to the Integrations page and select the "Sync Interfaces fromSL1 to ServiceNow" integration application.

2. Click [Configure] ( ) to open the Configuration pane:
3. Complete the following fields, as needed:
l Configuration. Select the relevant configuration object to align with this integration application. Youcannot edit fields that are populated by the configuration object. Required.
l region. The region value is populated by the configuration object you selected. The region value mustmatch the value in the SL_Region field in ServiceNow. If you need to update this value, you will needto define the region variable in the configuration object that is aligned with this integrationapplication, or align a different configuration object that has the correct region value.
l read_timeout. Specify the maximum amount of time in seconds the integration application shouldwait for a response before timing out. The default is 20 seconds.
l Domain_Separation. Select this option if your ServiceNow environment is domain-separated, wherethe data, processes, and administrative tasks have been organized into logical groupings calleddomains. If your ServiceNow instance is domain-separated, the user listed in the snow_user fieldmust be a member of the top domain and have access to all of the domains you intend to integrate.Also, ServiceNow should be the "source of truth" for organizations if your environment is domain-separated.
l chunk_size. Specify the number of devices to include in each chunk sent to ServiceNow when yourun this integration application. The default chunk size is 500 devices.
l adapter_sync. Select one of the following settings:

o off. Disables interface sync.
o all. Syncs every interface, regardless of its state.
o enabled. Syncs only the interfaces that have a state of "admin up". This is the default setting.
l Simulation_Mode. Select this option if you want to perform a simulated run of this integrationapplication to show you the potential results of that run.
4. Click [Save] and wait for the "App & Config modifications saved" pop-up message to appear. TheConfiguration pane automatically closes after this message appears.
5. Click [Run] ( ) to run the integration application.
6. When the application completes, go to ServiceNow and type "cmdb_ci_network_adapter.list". The NetworkAdapters page appears, with a list of synced interfaces:
6. Select a network interface from the list and scroll down to the Network Adapters tab to see moreinformation about the interface, such as theOperational status value, which is synced from SL1.
NOTE: TheOperational status value is different from the SL1 Monitored value, but the Integration Servicetracks both values.

Syncing File Systems from SL1 to ServiceNow
You can map and sync file systems in much the same way you sync devices between SL1 and ServiceNow. The"Sync File Systems from SL1 to ServiceNow" integration application reads file systems discovered in SL1 and thenmaps them to a parent CI record in ServiceNow.
WARNING: The Integration Service only syncs file systems that are aligned with devices that are alreadysynced with ServiceNow. Before setting up file system sync, you must first sync devices betweenSL1 and ServiceNow.
To sync SL1 file systems with ServiceNow:
1. In the Integration Service user interface, go to the Integrations page and select the "Sync File Systems fromSL1 to ServiceNow" integration application.
2. Click the [Configure] button to open the Configuration pane:
3. Complete the following fields, as needed:
l Configuration. Select the relevant configuration object to align with this integration application. Youcannot edit fields that are populated by the configuration object. Required.
l region. The region value is populated by the configuration object you selected. The region value mustmatch the value in the SL_Region field in ServiceNow. If you need to update this value, you will needto define the region variable in the configuration that is aligned with this integration application, oralign a different configuration that has the correct region value.
l read_timeout. Specify the maximum amount of time in seconds the integration application shouldwait for a response before timing out. The default is 20 seconds.

l Domain_Separation. Select this option if your ServiceNow environment is domain-separated, wherethe data, processes, and administrative tasks have been organized into logical groupings calleddomains. If your ServiceNow instance is domain-separated, the user listed in the snow_user fieldmust be a member of the top domain and have access to all of the domains you intend to integrate.Also, ServiceNow should be the "source of truth" for organizations if your environment is domain-separated.
l chunk_size. Specify the number of file systems to include in each chunk sent to ServiceNow when yourun this integration application. The default chunk size is 500.
l Simulation_Mode. Select this option if you want to perform a simulated run of this integrationapplication to show you the potential results of that run.
4. Click [Save] and wait for the "App & Config modifications saved" pop-up message to appear. TheConfiguration pane automatically closes after this message appears.
5. Click [Run] ( ) to run the integration application.
Syncing Business Services from SL1 to ServiceNow
The Sync Business Services from SL1 to ServiceNow integration application reads Business Services, ITServices, and Device Services from SL1 and syncs them with business services in ServiceNow. This integrationapplication creates and updates services, but it does not delete services.
NOTE: Applications and Application Components from SL1 are not synced by the Integration Service fromSL1 to ServiceNow.
WARNING: The Integration Service only syncs business services that are aligned with devices that are alreadysynced with ServiceNow. Before setting up business service sync, you must first sync devicesbetween SL1 and ServiceNow.

To sync SL1 business services with ServiceNow:
1. In ServiceNow, create an identifier rule for syncing services by typing "CI Identifiers" in the filter navigator andclicking [New] on the Identifiers page:
2. Complete the following fields:
l Name. Type a relevant name for this rule, such as "Business Service".
l Applies to. Select cmdb_ci_service.
l Independent. Select this option.
3. Right-click the gray header and click Save to save the record.
4. On the [Identifier Entries] tab, click [New] and add the relevant values from the Criterion attributes fieldfor this business service, such as name, service_classification and correlation_id.
5. Click [Submit].
6. Repeat steps 4-5 for each identifier you want to add.
7. In the Integration Service user interface, go to the Integrations page and select the "Sync Business Servicesfrom SL1 to ServiceNow" integration application.
8. Click [Configure] ( ). The Configuration pane appears:
9. Complete the following fields, as needed:
l Configuration. Select the relevant configuration object to align with this integration application. Youcannot edit fields that are populated by the configuration object. Required.

l region. The region value is populated by the configuration object you selected. The region value mustmatch the value in the SL_Region field in ServiceNow. If you need to update this value, you will needto define the region variable in the configuration that is aligned with this integration application, oralign a different configuration that has the correct region value.
l read_timeout. Specify the maximum amount of time in seconds the integration application shouldwait for a response before timing out. The default is 20 seconds.
l Domain_Separation. Select this option if your ServiceNow environment is domain-separated, wherethe data, processes, and administrative tasks have been organized into logical groupings calleddomains. If your ServiceNow instance is domain-separated, the user listed in the snow_user fieldmust be a member of the top domain and have access to all of the domains you intend to integrate.Also, ServiceNow should be the "source of truth" for organizations if your environment is domain-separated.
l business_service_classification, it_service_classification, and device_service_classification. Usethese fields to update the default service classifications. Optional.
l chunk_size. Specify the number of services to include in each chunk sent to ServiceNow when yourun this integration application. The default chunk size is 500.
l sl1_url_override. Specify a URL that is different from the standard SL1 URL that gets sent to theServiceNow CI record. Optional.
10. Click [Save] and wait for the "App & Config modifications saved" pop-up message to appear. TheConfiguration pane automatically closes after this message appears.
11. Click [Run] ( ) to run the integration application.
Syncing Installed Software between SL1 and ServiceNow
You can use the following integration applications to sync your installed software assets between and ServiceNow:
l "Sync Software Packages from SL1 to ServiceNow". Reads all software packages from SL1 and creates newCIs in ServiceNow. Run this integration before running the "Sync Installed Software" integration application.
l "Sync Installed Software from SL1 to ServiceNow". Reads all available software packages from ServiceNowand the devices aligned to that software by region and syncs them with SL1.
The integration applications do not currently support domain separation.
NOTE: The Software Asset Management (SAM) application in ServiceNow is not supported with the currentlevel of installed software data acquired with SL1. As a result, syncing installed software data withServiceNow Discovery and other Software Asset Management software is not currently supported.

To sync installed software between SL1 and ServiceNow:
1. Make sure that you have recently run the "Sync Devices from SL1 to ServiceNow" integration application topopulate the device cache.
2. In the Integration Service user interface, go to the Integrations page and select the "Sync Software Packagesfrom SL1 to ServiceNow" integration application.
3. Click [Configure] ( ). The Configuration pane appears:
4. Complete the following fields, as needed:
l Configuration. Select the relevant configuration object to align with this integration application. Youcannot edit fields that are populated by the configuration object. Required.
l chunk_size. Specify the number of services to include in each chunk sent to ServiceNow when yourun this integration application. The default chunk size is 500.
l read_timeout. Specify the maximum amount of time in seconds the integration application shouldwait for a response before timing out. The default is 20 seconds.
5. Click [Save] and wait for the "App & Config modifications saved" pop-up message to appear. TheConfiguration pane automatically closes after this message appears.
6. Click [Run] ( ) to run the integration application.
7. After the "Sync Software Packages from SL1 to ServiceNow" integration application finishes running, go to theIntegrations page and select the "Sync Installed Software from SL1 to ServiceNow" integration application.
8. Click [Configure] ( ). The Configuration pane appears:

9. Complete the following fields, as needed:
l Configuration. Select the relevant configuration object to align with this integration application. Youcannot edit fields that are populated by the configuration object. Required.
l region. The region value is populated by the configuration object you selected. The region value mustmatch the value in the SL_Region field in ServiceNow. If you need to update this value, you will needto define the region variable in the configuration that is aligned with this integration application, oralign a different configuration that has the correct region value.
l chunk_size. Specify the number of services to include in each chunk sent to ServiceNow when yourun this integration application. The default chunk size is 500.
l read_timeout. Specify the maximum amount of time in seconds the integration application shouldwait for a response before timing out. The default is 20 seconds.
10. Click [Save] and wait for the "App & Config modifications saved" pop-up message to appear. TheConfiguration pane automatically closes after this message appears.
11. Click [Run] ( ) to run the integration application.
Discovery Sync
The Discovery Sync integration lets you use SL1 for discovering and syncing ServiceNow devices. WithDiscovery Sync, you start an SL1 discovery session from ServiceNow and then sync the newly discovered SL1devices or virtual devices and their data with ServiceNow.

Before running a Discovery Sync session, you must complete the following steps first:
1. For domain-separated ServiceNow instances, perform a company sync by running the "Sync Organizationsfrom SL1 to ServiceNow" integration application in the Integration Service user interface. For moreinformation, see Syncing Organizations from SL1 to ServiceNow.
2. In ServiceNow, configure a service request for Discovery Sync. For more information, see Configuring aServiceNow Service Request for Discovery Sync.
3. In the Integration Service user interface, run the integration applications listed in the Discovery SyncWorkflow.
Configuring a ServiceNow Service Request for Discovery Sync
Before you can run a Discovery Sync, you need to configure the catalog and category values in the ServiceNowservice request forms. You also need to activate the "Device Discovery" service request in ServiceNow.
NOTE: Because some of the fields in the service request form will only populate if you have completed theprevious fields in the form, you need to complete the fields in the service request form in sequentialorder.
To configure the ServiceNow service requests for Discovery Sync:
1. In ServiceNow, search for "Maintain Items" in the filter navigator.
2. Go to Service Catalog > Catalog Definitions >Maintain Items and type "ScienceLogic" in the Categoryfield. The Device Discovery andMonitoring Removal service requests appear:

3. Open the Device Discovery service request and ensure that the Catalogs andCategory fields areaccurate. For example:
NOTE: Do not set the Category to a Change Request.
4. If you need to update these fields, click the "To edit this record click here" link at the top of the detail page.
5. Update the fields and click the [Update] button to save your changes.
6. From the Catalog Items page, click the check box for the Device Discovery service request and click[Activate].
NOTE: This service request is instance-specific, which means that the service request will appear in the samelocation as the catalogs you specified for that request. In the example, above, the Catalog was set toService Catalog.
7. Navigate to the relevant catalog for the service request. For example, if you selected Service Catalog for oneor both requests, then type "Service Catalog" in the filter navigator, or select Self-Service > Service Catalogto view the new service requests. Type "device discovery" in the Search catalog field to quickly locate therequest.
8. Run the integration applications listed in the Discovery SyncWorkflow before creating the Device Discoveryservice request in ServiceNow.
Discovery Sync Workflow
To prepare SL1 and ServiceNow for a Discovery Sync, run the following integration applications in the IntegrationService user interface, in the following order:
1. Sync Discovery Requirements. This application exports information from SL1 to populate the information inthe ServiceNow request form. You must run this application before you can create the discovery sync session

in ServiceNow. This application uses one or more of the following options from the Configuration pane:
l Configuration. Select the relevant configuration object to align with this integration application. Youcannot edit fields that are populated by the configuration object. Required.
NOTE: The region field is populated by the configuration object you aligned with thisintegration application. The region value must match the value in the SL1 Region fieldin ServiceNow. If you need to update this value, you will need to define the regionvariable in the configuration object that is aligned with this integration application, oralign a different configuration object that has the correct region value.
l read_timeout. Specify the maximum amount of time in seconds the integration application shouldwait for a response before timing out. The default is 20 seconds.
l Chunk_Size. Specify the number of devices to include in each chunk sent to ServiceNow when yourun this integration application. The default is 500.
l Domain_Separation. Select this option if your ServiceNow environment is domain-separated, wherethe data, processes, and administrative tasks have been organized into logical groupings calleddomains. If your ServiceNow instance is domain-separated, the user listed in the snow_user fieldmust be a member of the top domain and have access to all of the domains you intend to integrate.Also, ServiceNow should be the "source of truth" for organizations if your environment is domain-separated.
l Update_Name. This option addresses the situation where the Integration Service finds a match witha device or CI, but the names do not match. This option updates a device or CI name based on yourselection in the Source_of_Truth field, below. For example, if you selected ScienceLogic as the sourceof truth, the Integration Service uses the device name from ScienceLogic as the updated name.
l Source_of_Truth. Select whether you want to use data from ServiceNow or ScienceLogic as the"source of truth" when this integration application encounters duplicate data or data collisions.
l Create_Missing. Select this option if you want the Integration Service to create a new device or CI ifthat record is missing, based on your selection in the Source_of_Truth field.
l Sync_Empty_Groups. Select this option if you want to sync device groups that have no devices, ordevice groups that have devices but nomatching CIs.
2. Sync Service Requests from ServiceNow to SL1. This application sends the request forms to SL1. Thisapplication was called "Sync Discovery Session Requests from ServiceNow to SL1" in previous versions of theSynchronization PowerPack. This application uses one or more of the following options from theConfiguration pane:
l Configuration. Select the relevant configuration object to align with this integration application. Youcannot edit fields that are populated by the configuration object. Required.
l Open_State. The State ID from ServiceNow that specifies which Requested Items (RITMs) to pull andprocess. The default is 1.
l read_timeout. Specify the maximum amount of time in seconds the integration application shouldwait for a response before timing out. The default is 20 seconds.

l Closed_Success_State. The State ID for a successfully created virtual device. The State ID for asuccessful run changes from 1 to 2 and then ends with 4. The default is 3.
l Closed_Failed_State. The State ID for failed discoveries or failed virtual device creation, usuallycaused by invalid payloads. The State ID for a failed run changes from 1 to 2 and then ends with 4.The default is 4.
l In_Progress_State. The State ID for RITMs for a running discovery. The default is 2.
l recursively_disable_children. Leave this field blank.
l target_vcug. Leave this field blank.
3. Sync Discovery Session Status from SL1 to ServiceNow. This application populates the discovery sessionlogs back to ServiceNow. This application uses the following options from the Configuration pane:
l Configuration. Select the relevant configuration object to align with this integration application. Youcannot edit fields that are populated by the configuration object. Required.
l read_timeout. Specify the maximum amount of time in seconds the integration application shouldwait for a response before timing out. The default is 20 seconds.
l Closed_Success_State. The State ID for a successfully created discovery. The State ID for a successfulrun changes from 1 to 2 and then ends with 4. The default is 3.
l sys_id_target. Takes the sys_id value from the CI in the ServiceNow Service Request and populates itin the relevant field in SL1, such as c-sys_id.
l ci_class_target. Takes the ci_class value from the CI in the ServiceNow Service Request andpopulates it in the relevant field in SL1, such as c-ci_class.
NOTE: If the sys_id_target field and the ci_class_target field are not populated, theIntegration Service will skip the process of consuming cached data and populatingcustom attribute fields in SL1 with the sys_id and ci_class values of newly discovereddevices.
4. Sync Discovery Templates from SL1 to ServiceNow. This application creates Service Catalog templates inServiceNow based on Discovery Sessions that were created in SL1. This option lets you use any existing SL1Discovery Sessions as a template for discovering or monitoring a CI with SL1. This application uses thefollowing options from the Configuration pane:
l Configuration. Select the relevant configuration object to align with this integration application. Youcannot edit fields that are populated by the configuration object. Required.
l chunk_size. Specify the number of devices to include in each chunk sent to ServiceNow when yourun this integration application. The default is 500.
l template_prefix. Specify the prefix string that the Integration Service will search for in SL1. AnyDiscovery Sessions that contain that string will be used in ServiceNow to create a service catalogtemplate. The default string is ServiceNow Template:, but you can configure this as needed.
l read_timeout. Specify the maximum amount of time in seconds the integration application shouldwait for a response before timing out. The default is 20 seconds.
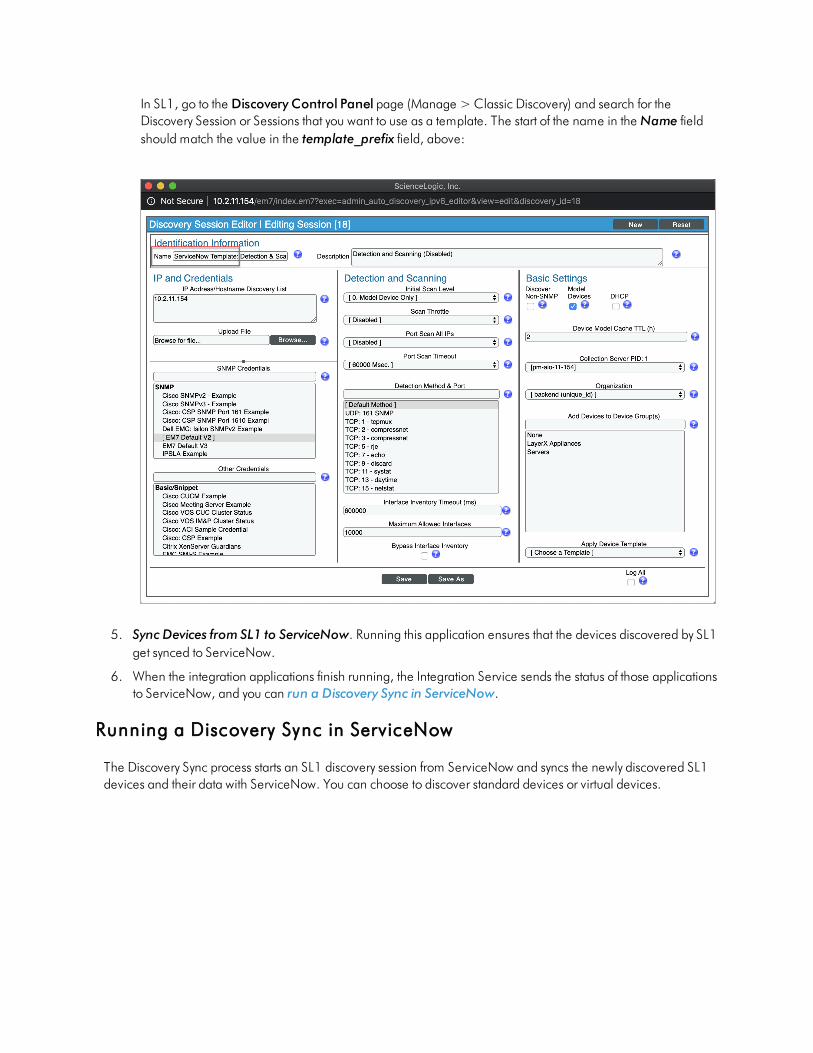
In SL1, go to the Discovery Control Panel page (Manage > Classic Discovery) and search for theDiscovery Session or Sessions that you want to use as a template. The start of the name in the Name fieldshould match the value in the template_prefix field, above:
5. Sync Devices from SL1 to ServiceNow. Running this application ensures that the devices discovered by SL1get synced to ServiceNow.
6. When the integration applications finish running, the Integration Service sends the status of those applicationsto ServiceNow, and you can run a Discovery Sync in ServiceNow.
Running a Discovery Sync in ServiceNow
The Discovery Sync process starts an SL1 discovery session from ServiceNow and syncs the newly discovered SL1devices and their data with ServiceNow. You can choose to discover standard devices or virtual devices.

To run a Discovery Sync from the Service Catalog page:
1. In ServiceNow, search for "service catalog" in the filter navigator.
2. Navigate to the Service Catalog page (Self-Service > Service Catalog), type "device discovery" in theSearch catalog field at the top right, and press [Enter]. The Device Discovery catalog entry appears:
NOTE: Previous versions of the "ScienceLogic SL1: CMDB & Incident Automation Application" (also called theCertified or Scoped Application) created two separate service requests: Create Virtual Device andDevice Discovery. Both features have been combined into the Device Discovery service request.
3. ClickDevice Discovery. The Device Discovery service request appears:

4. In theWhat company is this for? field, specify the company. The Region field updates automatically basedon the company you select.
5. In the Request Type field, selectDiscover Device(s) or Create Virtual Device, depending on the type ofdevice you want to discover.
o If you selected Discover Device(s), go to step 6.
o If you selected Create Virtual Device, go to step 7.
6. If you selected Discover Device(s) in the Request Type field, complete the following fields:
l Log All. Select this option if you want the discovery session to use verbose logging. When you selectthis option, SL1 logs details about each IP address or hostname specified in the IPAddress/Hostname Discovery List field, even if the results are "No device found at this address."
l Select Template. To use a template that contains your device discovery information, select thetemplate from the dropdown.
TIP: You can save the current device discovery as a template by checking Save as Template. A templatesaves all of the discovery settings except for the IP addresses. You can access existing templates on theCatalog Template page in ServiceNow (ScienceLogic > Automations > Catalog Templates).
l IP Address/Hostname Discovery List. Provide a list of IP addresses, hostnames, or fully-qualifieddomain names for SL1 to scan during discovery:

n One or more single IPv4 addresses separated by commas and a new line. Each IP addressmust be in standard IP notation and cannot exceed 15 characters. For example, "10.20.30.1,10.20.30.2, 10.20."
n One or more ranges of IPv4 addresses with "-" (dash) characters between the beginning of therange and the end of the range. Separate each range with a comma. For example,"10.20.30.1 – 10.20.30.254".
n One or more IP address ranges in IPv4 CIDR notation. Separate each item in the list with acomma. For example, "192.168.168.0/24".
n One or more hostnames (fully-qualified domain names). Separate each item in the list with acomma.
l Credentials. Select one or more SNMP credentials to allow SL1 to access a device's SNMP data.
l Discover Non-SNMP. Specifies whether or not SL1 should discover devices that don't respond toSNMP requests.
l Model Devices. Determines whether or not the devices that are discovered with this discovery sessioncan be managed through SL1.
l DHCP. Specifies whether or not the specified range of IPs and hostnames use DHCP. If you select thisoption, SL1 performs a DNS lookup for the device during discovery and each time SL1 retrievesinformation from the device.
l Device Model Cache TTL (h). Amount of time, in hours, that SL1 stores information about devicesthat are discovered but not modeled, either because theModel Devices option is not enabled orbecause SL1 cannot determine whether a duplicate device already exists. The cached data can beused to manually model the device from the Discovery Session window.
l Collection Server. Select an existing collector to monitor the discovered devices. Required.
l What company is this for?. Specify the company that will use this discovery data. Click themagnifying glass icon to locate a company.
l Add Devices to Device Groups. Select one or more existing device groups to which you want to addthe discovered devices.
l Apply Device Template . Select an existing device template if needed. As SL1 discovers a device inthe IP discovery list, that device is configured with the selected device template.
l Initial Scan Level. For this discovery session only, specifies the data to be gathered during the initialdiscovery session.
l Scan Throttle. Specifies the amount of time a discovery process should pause between eachspecified IP address (specified in the IP Address/Hostname Discovery List field). Pausing discoveryprocesses between IP addresses spreads the amount of network traffic generated by discovery over alonger period of time.
l Scan Default Ports. Select this option to scan the default ports: 21,22,23,25,80. If you de-select thisoption, you can specify a different list of ports in the Custom Port Scan field that appears.
l Port Scan All IPs. For the initial discovery session only, specifies whether SL1 should scan all IPaddresses on a device for open ports.

l Port Scan Timeout. For the initial discovery session only, specifies the length of time, in milliseconds,after which SL1 should stop trying to scan an IP address for open ports and begin scanning the next IPaddress (if applicable).
l Interface Inventory Timeout (ms). Specifies the maximum amount of time that the discoveryprocesses will spend polling a device for the list of interfaces. After the specified time, SL1 will stoppolling the device, will not model the device, and will continue with discovery. The default value is600,000 ms (10 minutes).
l MaximumAllowed Interfaces. Specifies the maximum number of interfaces per devices. If a deviceexceeds this number of interfaces, SL1 stops scanning the device, will not model the device, and willcontinue with discovery. The default value is 10,000.
l Bypass Interface Inventory. Select this option if you do not want SL1 to attempt to discover interfacesfor each device in the discovery session.
7. If you selected Create Virtual Device in the Request Type field, complete the following fields:
o Name. Type a name for the virtual device.
o Virtual Device Class. Specify the device class of the virtual device. Click the magnifying glass icon tolocate any classes aligned with your organization.
o Collector Group. Specify the SL1 collector group to use for the Discovery Sync. Click the magnifyingglass icon to locate any collector groups aligned with your organization.
8. Click [Order Now]. On theOrder Status page that appears, make a note of value in the RequestNumber field:
9. In the Integration Service user interface, go to the Integrations page and run the "Sync Service Requestsfrom ServiceNow to SL1" integration application.
10. When the application completes, go to Self-Service> My Requests in ServiceNow.
11. Click the RITM record link to go to the Requested Item page. The State field should update toClosedComplete and the request should be assigned to itself.
12. In the Integration Service user interface, go to the Integrations page and run the "Sync Devices from SL1 to
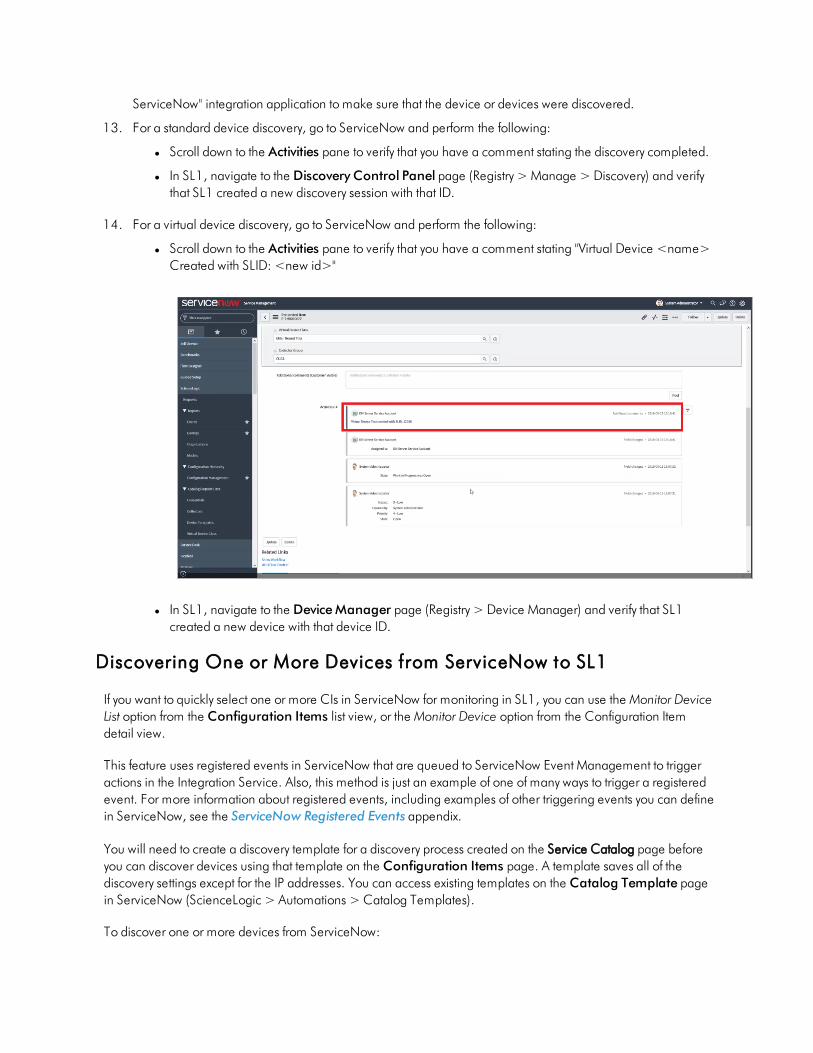
ServiceNow" integration application to make sure that the device or devices were discovered.
13. For a standard device discovery, go to ServiceNow and perform the following:
l Scroll down to the Activities pane to verify that you have a comment stating the discovery completed.
l In SL1, navigate to the Discovery Control Panel page (Registry > Manage > Discovery) and verifythat SL1 created a new discovery session with that ID.
14. For a virtual device discovery, go to ServiceNow and perform the following:
l Scroll down to the Activities pane to verify that you have a comment stating "Virtual Device <name>Created with SLID: <new id>"
l In SL1, navigate to the DeviceManager page (Registry > Device Manager) and verify that SL1created a new device with that device ID.
Discovering One or More Devices from ServiceNow to SL1
If you want to quickly select one or more CIs in ServiceNow for monitoring in SL1, you can use the Monitor DeviceList option from the Configuration Items list view, or the Monitor Device option from the Configuration Itemdetail view.
This feature uses registered events in ServiceNow that are queued to ServiceNow Event Management to triggeractions in the Integration Service. Also, this method is just an example of one of many ways to trigger a registeredevent. For more information about registered events, including examples of other triggering events you can definein ServiceNow, see the ServiceNow Registered Events appendix.
You will need to create a discovery template for a discovery process created on the Service Catalog page beforeyou can discover devices using that template on the Configuration Items page. A template saves all of thediscovery settings except for the IP addresses. You can access existing templates on the Catalog Template pagein ServiceNow (ScienceLogic > Automations > Catalog Templates).
To discover one or more devices from ServiceNow:

1. In ServiceNow, navigate to the Configuration Items page.
2. From the list view, select the CI or CIs (devices) that you want to discover.
NOTE: A CI in ServiceNow must be aligned with a company in ServiceNow, or the service request will becanceled. Also, that company must be associated with a ScienceLogic Region.
3. Right-click anywhere in the window and selectMonitor Device List from the pop-up menu. A SelectDiscovery Template dialog box appears.
TIP: You can also select a specific CI from the list view and click the Monitor Device option from theConfiguration Item detail view. You will also need to use an existing template for this process.
4. Select a discovery template to use for the current discovery.
5. Click [OK] to use the template. ServiceNow generates a new service request forDevice Discovery for eachCI.
6. In the Integration Service user interface, select the "Sync Service Requests from ServiceNow to SL1"
integration application from the Integrations page and click [Configure] ( ) on the Application detailpage. The Configuration pane appears:
7. Complete the following fields, as needed:
l Configuration. Select the relevant configuration object to align with this integration application. Youcannot edit fields that are populated by the configuration object. Required.

l Open_State. The State ID from ServiceNow that specifies which Requested Items (RITMs) to pull andprocess. The default is 1.
l read_timeout. Specify the maximum amount of time in seconds the integration application shouldwait for a response before timing out. The default is 20 seconds.
l Closed_Success_State. The State ID for a successfully created virtual device. The State ID for asuccessful run changes from 1 to 2 and then ends with 4. The default is 3.
l Closed_Failed_State The State ID for failed discoveries or failed virtual device creation, usuallycaused by invalid payloads. The State ID for a failed run changes from 1 to 2 and then ends with 4.The default is 4.
l In_Progress_State. The State ID for RITMs for a running discovery. The default is 2.
l recursively_disable_children. Leave this field blank.
l target_vcug. Leave this field blank.
8. Click [Save] and wait for the "App & Config modifications saved" pop-up message to appear. TheConfiguration pane automatically closes after this message appears.
9. Click [Run] ( ) to run the integration application.
10. Go to the Integrations page and run the "Sync Devices from SL1 to ServiceNow" integration application tomake sure that the device or devices were discovered.
Decommissioning Devices
If you want to quickly select one or more CIs in ServiceNow for to remove from monitoring (or "decommission") inSL1, you can use the Device Monitoring Removal list option from the Configuration Items list view, or theMonitoring Removal option from the Configuration Item detail view.
You then use the "Sync Service Requests from ServiceNow to SL1" integration application to decommission thedevices that you no longer want to monitor. Running this integration application takes the list of synced devices inthe service request and moves them to an SL1 Virtual Collector Group (VCUG). The "Sync Service Requests fromServiceNow to SL1" integration application was formerly named "Sync Discovery Session Requests fromServiceNow to SL1".
WARNING: If you move a parent device to a new VCUG, then all of its children move as well. If you move achild directly, only the child moves.
This feature uses registered events in ServiceNow that are queued to ServiceNow Event Management to triggeractions in the Integration Service. Also, this method is just an example of one of many ways to trigger a registeredevent. For more information about registered events, including examples of other triggering events you can definein ServiceNow, see the ServiceNow Registered Events appendix.

Activating the ServiceNow Service Request for Moni toring Removal
To activate the ServiceNow service request for Device Decommission:
1. In ServiceNow, search for "Maintain Items" in the filter navigator.
2. Go to Service Catalog > Catalog Definitions >Maintain Items and type "ScienceLogic" in the Categoryfield.
3. Open the "Monitoring Removal" service request and ensure that the Catalogs andCategory fields arecomplete. Add the relevant information if the fields are blank. For example:
NOTE: Do not set the Category to a Change Request.
4. If you need to update these fields, click the "To edit this record click here" link at the top of the detail page.
5. Update the fields and click the [Update] button to save your changes.
6. From the Catalog Items page, click the check box for theMonitoring Removal service request and clickthe [Activate] button at the bottom of the Catalog Items window.
7. Navigate to the relevant catalog for the service request. For example, if you selected Service Catalog, thentype "Service Catalog" in the filter navigator, or select Self-Service > Service Catalog to view the newservice requests.
Removing Devices from Moni toring
To decommission Configuration Items (devices) in ServiceNow that you no longer want to monitor:
1. In ServiceNow, navigate to the Configuration Items window.
2. From the list view, select the CI or CIs (devices) that you want to decommission.

NOTE: A CI in ServiceNow must be aligned with a company in ServiceNow, or the service request will becanceled. Also, a company must be associated with a ScienceLogic Region.
3. Right-click anywhere on the window and selectDevice Monitoring Removal list from the pop-up menu. Adialog box appears.
4. Click [OK] to remove the CI or CIs from monitoring. ServiceNow generates a new service request forMonitoring Removal for each CI.
TIP: You can also select a specific CI from the list view and click the Monitoring Removal option from theConfiguration Item detail view.
5. In the Integration Service user interface, select the "Sync Service Requests from ServiceNow to SL1"
integration application from the Integrations page and click [Configure] ( ) on the application detailpage. The Configuration pane appears:

6. Complete the following field:
l Configuration. Select the relevant configuration object to align with this integration application. Youcannot edit fields that are populated by the configuration object. Required.
l read_timeout. Specify the maximum amount of time in seconds the integration application shouldwait for a response before timing out. The default is 20 seconds.
l recursively_disable_children. Check this option to move all child devices of the devices you aredecommissioning to the VCUG. If this option is not checked and a parent device is in the disablerequest, the parent device will be skipped with a warning message.
l target_vcug. Specify the ID of the SL1 Virtual Collection Group (VCUG) you created to hold thedevices on the Collector Group Settings page (System > Settings > Collector Groups). If this valueis null, the integration application will attempt to pull the value from the target_vcug field in the"Delete Devices from SL1" integration application.
7. Click [Save] and wait for the "App & Config modifications saved" pop-up message to appear. TheConfiguration pane automatically closes after this message appears.
8. Click [Run] ( ) to run the integration application.
Delet ing Devices
The "Delete Devices from SL1" integration application lets you delete devices in a specific Virtual Collector Group(VCUG) if those devices have not been modified in SL1 for a specified time, such as one day or five days. You canupdate this time in themax_age configuration value, which is described below.
To delete devices from a VCUG:
1. In the Integration Service user interface, run the "Sync Service Requests from ServiceNow to SL1" integrationapplication to pull a list of decommissioned devices that you no longer want to monitor. For moreinformation, see Decommissioning Devices.
2. On the Integrations page, select the "Delete Devices from SL1" integration application and click
[Configure] ( ) on the application detail page. The Configuration page appears:

3. Complete the following fields, as needed:
l Configuration. Select the relevant configuration object to align with this integration application. Youcannot edit fields that are populated by the configuration object. Required.
l max_age. Specify how long (in days) that you want to keep the devices in the VCUG before deletingthe devices. The default is 0 days. If this setting is 0, all devices in the VCUG will be deleted as soon asthis application runs. If this setting is null, the application will fail. If all device children are in the sameVCUG, the application will delete the target device and all of its children.
l target_vcug. Specify the ID of the SL1 Virtual Collection Group (VCUG) you created to hold thedevices on the Collector Group Settings page (System > Settings > Collector Groups). Set thisvalue to -1 if you want this integration applications to use the target_vcug value from the "SyncService Requests from ServiceNow to SL1" integration application.
WARNING: If you specify a value to target_vcug here, the "Delete Devices from SL1" application will usethat value instead of the target_vcug value from the "Sync Service Requests from ServiceNow toSL1" application.
l read_timeout. Specify the maximum amount of time in seconds the integration application shouldwait for a response before timing out. The default is 20 seconds.
4. Click [Save] and wait for the "App & Config modifications saved" pop-up message to appear. TheConfiguration pane automatically closes after this message appears.
5. Click [Run] ( ) to run the integration application.
Scheduling Integration Applications
Using the Integration Service user interface, you can configure integration applications to run on a scheduleinstead of manually running the applications. As a best practice, if you use any of these applications, ScienceLogicrecommends that you schedule those applications, in the following order:
l "Cache ServiceNow CIs and SL1 Device Classes"
l "Sync Devices from SL1 to ServiceNow"
l "Sync Interfaces from SL1 to ServiceNow"
TIP: ScienceLogic recommends that you schedule these integration applications to run at least every 23 hours.You can also schedule additional applications as needed.
You can create one or more schedules for a single integration application in the Integration Service user interface.When creating each schedule, you can specify the queue and the configuration file for that integration application.

To schedule an integration application:
1. On the Integrations page ( ), click [Schedule] for the integration application you want to schedule. TheSchedule window appears, displaying any existing schedules for that application:
NOTE: If you set up a schedule using a cron expression, the details of that schedule display in a morereadable format in this list. For example, if you set up a cron expression of */4 * * * *, the schedule onthis window includes the cron expression along with an explanation of that expression: "Every 0, 4, 8,12, 16, 20, 24, 28, 32, 36, 40, 44, 48, 52, and 56th minute past every hour".

2. Select a schedule from the list to view the details for that schedule.
3. Click the + icon to create a schedule. A blank Schedule window appears:
4. In the Schedule window, complete the following fields:
l Schedule Name. Type a name for the schedule.
l Switch to. Use this toggle to switch between a cron expression and setting the frequency in seconds.
o Cron expression. Select this option to schedule the integration using a cron expression. If youselect this option, you can create complicated schedules based on minutes, hours, the day of themonth, the month, and the day of the week. As you update the cron expression, the Schedulewindow displays the results of the expression in more readable language, such as Expression:"Every 0 and 30th minute past every hour on the 1 and 31st of every month", based on */30 * */30 * *.
o Frequency in seconds. Type the number of seconds per interval that you want to run theintegration.
l Custom Parameters. Type any JSON parameters you want to use for this schedule, such asinformation about a configuration file or mappings.
5. Click [Save Schedule]. The schedule is added to the list of schedules on the initial Schedule window. Also,on the Integrations page, the word "Scheduled" appears in the Scheduled column for this integrationapplication, and the [Schedule] button contains a check mark:

NOTE: After you create a schedule, it continues to run until you delete it. Also, you cannot edit an existingschedule, but you can delete it and create a similar schedule if needed.
To view or delete an existing schedule:
1. On the Integrations page , click [Schedule] for the integration application that contains a schedule youwant to delete. The Schedule window appears.
2. Click the down arrow icon ( ) to view the details of an existing schedule:
3. To delete the selected schedule, click [Delete]. The schedule is removed.
Log Messages for the "Generate Required CI Relations forServiceNow" Application Integration
This section describes the different types of log messages you might see in the Step Log when you run the"Generate Required CI Relations for ServiceNow" integration application.
The following message displays if there are devices in a device tree that do not currently have a CI class mappingassigned.
Warning: 2751 Relations with missing mappings detected. Please re-run app with log
level 10 to troubleshoot.

In this situation, the device tree cannot be built in ServiceNow. To address this issue, make sure that you have yourentire technology tree mapped out in themappings section of the "Sync Devices from SL1 to ServiceNow"integration application or in themappings section of the "Generate Required CI Relations for ServiceNow"integration.
If you run the "Generate Required CI Relations for ServiceNow" integration application in Debug mode (log level10), the application will create a log that displays the parent and child class, CI, and device ID. For example:
Debug: Missing Mapping for Device. Parent: {"class": "VMware | Cluster", "ci": None,"id": 76}, Child: {"class": "VMware | Host Server", ci: "cmdb_ci_esx_server", id:363 }
The following message appears if the GQL payloads had bad data for parent and or child devices:
Warning: 10 bad payloads received from SL1. Re-run app in debug to troubleshoot.
If you run the application in Debug mode, the application will create a log that displays these payloads.
The following message appears if all relations are mapped:
Flow: No missing relations found!
The following message appears if there is a parent/child relation between ServiceNow CI classes that does notcurrently exist in ServiceNow and is required to sync those devices:
Flow: Missing Relations: [{"parent": "cmdb_ci_vcenter_folder", "child": "cmdb_ci_esx_server"}, {"parent": "cmdb_ci_vcenter", "child": "cmdb_ci_vcenter_datacenter"}]
Refer to the labels in the log (above) to determine which CI class is the parent type and which is the child type. Toaddress this issue, navigate to your ServiceNow instance and create the required service rules based on therecommendations in the Step Log.
The following message appears if the application encounters a list of relations that are required, but weresuccessfully found in ServiceNow:
Info: Found Relations: [{"parent": "cmdb_ci_vcenter_folder", "child": "cmdb_ci_esx_server"}, {"parent": "cmdb_ci_vcenter", "child": "cmdb_ci_vcenter_datacenter"}]
This message lets you verify that your mappings and relations are configured correctly.

Chapter
4Troubleshooting the CMDB Synchronization
PowerPack
Overview
This chapter includes troubleshooting resources and procedures to use with the ServiceNow CMDBSynchronization PowerPack.
This chapter covers the following topics:
Initial Troubleshooting Steps 98
Integration Service 98
ServiceNow 98
Resources for Troubleshooting 98
Useful Integration Service Ports 98
Helpful Docker Commands 99
Diagnosis Tools 101
Retrieving Additional Debug Information (Debug Mode) 102
Troubleshooting CMDB Sync 103
Issues Creating CIs in ServiceNow 103
Enabling Debugging of the Configuration Item Payload 105
Enabling Logs in ServiceNow 106
Locating Missing Device Data after Device Sync 106
SituationsWhere Device Data Might be Missing 107
Example: Missing Serial Number for a vCenter Device 107

Step 1: In ServiceNow, identify the attribute that did not sync properly 108
Step 2: In SL1, locate the SL1 device and review the device details 109
Step 3: In SL1, review the PowerPacks that collect data for that device 110
Step 4: In the SL1 Integration Service, check the Device Sync configuration 113

Initial Troubleshooting Steps
The Integration Service acts as a middle server between data platforms. For this reason, the first steps shouldalways be to ensure that there are no issues with the data platforms with which the Integration Service is talking.There might be additional configurations or actions enabled on ServiceNow or SL1 that result in unexpectedbehavior. For detailed information about how to perform the steps below, see Resources for Troubleshooting.
Integrat ion Service
1. Run the following command:
docker service ls
2. Note the Docker container version, and verify that the Docker services are running.
3. If a certain service is failing, make a note the service name and version.
4. If a certain service is failing, run docker service ps <service_name> to see the historical state of theservice and make a note of this information. For example: docker service ps iservices_contentapi.
5. Make a note of any logs impacting the service by running docker service logs <service_name>. Forexample: docker service logs iservices_couchbase.
ServiceNow
1. Make a note of the ServiceNow version and Synchronization PowerPack version, if applicable.
2. Make a note of whether the user is running an update set or the Certified Application (also called the"ScienceLogic SL1: CMDB & Incident Automation" application).
3. Make a note of the ServiceNow integration application that is failing on the Integration Service.
4. Make a note of what step is failing in the integration application, try running the application in debug mode,and capture any traceback or error messages that occur in the step log.
Resources for Troubleshooting
This section contains port information for the Integration Service and troubleshooting commands for Docker,Couchbase, and the Integration Service API.
Useful Integrat ion Service Ports
l http://<IP of Integration Service>:8081. Provides access to Docker Visualizer, a visualizer for DockerSwarm.
l https://<IP of Integration Service>:8091. Provides access to Couchbase, a NoSQL database for storageand data retrieval.
l https://<IP of Integration Service>:15672. Provides access to the RabbitMQ Dashboard, which you canuse to monitor the service that distributes tasks to be executed by Integration Service workers.

l https://<IP of Integration Service>/flower. Provides access to Flower, a tool for monitoring andadministrating Celery clusters.
Helpful Docker Commands
The Integration Service is a set of services that are containerized using Docker. For more information aboutDocker, see the Docker tutorial.
Use the following Docker commands for troubleshooting and diagnosing issues with the Integration Service:
Viewing Container Versions and Status
To view the Integration Service version, SSH to your Integration Service instance and run the following command:
docker service ls
In the results, you can see the container ID, name, mode, status (see the replicas column), and version (see theimage column) for all the services that make up the Integration Service:
Restart ing a Service
Run the following command to restart a single service:
docker service update --force <service_name>
Stopping al l Integration Service Services
Run the following command to stop all Integration Service services:
docker stack rm iservices
Restart ing Docker
Run the following command to restart Docker:
systemctl restart docker
NOTE: Restarting Docker does not clear the queue.

Viewing Logs for a Speci fic Service
You can use the Docker command line to view the logs of any current running service in the Integration Servicecluster. To view the logs of any service, run the following command:
docker service logs -f iservices_<service_name>
Some common examples include the following:
docker service logs –f iservices_couchbase
docker service logs –f iservices_steprunner
docker service logs –f iservices_contentapi
NOTE: Application logs are stored on the central database as well as on all of the Docker hosts in a clusteredenvironment. These logs are stored at /var/log/iservices for both single-node or clusteredenvironments. However, the logs on each Docker host only relate to the services running on that host.For this reason, using the Docker service logs is the best way to get logs from all hosts at once.
Clearing Rabbi tMQ Volume
RabbitMQ is a service that distributes tasks to be executed by Integration Service workers. This section covers howto handle potential issues with RabbitMQ.
The following error message might appear if you try to run an integration application via the API:
Internal error occurred: Traceback (most recent call last):\n File \"./content_api.py\", line 199, in kickoff_application\n task_status = ... line 623, in _on_close\n (class_id, method_id), ConnectionError)\nInternalError: Connection.open: (541)INTERNAL_ERROR - access to vhost '/' refused for user 'guest': vhost '/' is down
First, verify that your services are up. If there is an issue with your RabbitMQ volume, you can clear the volume withthe following commands:
docker service rm iservices_rabbitmqdocker volume rm iservices_rabbitdb
If you get a message stating that the volume is in use, run the following command:
docker rm <id of container using volume>
Re-deploy the Integration Service by running the following command:
docker stack deploy -c /opt/iservices/scripts/docker-compose.yml iservices
NOTE: Restarting Docker does not clear the queue, because the queue is persistent. However, clearing thequeue with the commands above might result in data loss due to the tasks being removed from thequeue.
Viewing the Process Sta tus of A l l Serv ices
Run the following command:
docker ps
Deploying Services from a Defined Docker Compose Fi le
Run the following command:
docker stack deploy -c <compose-file> iservices
Dynamical ly Scal ing for More Workers
Run the following command:
docker service scale iservices_steprunner=10
Completely Removing Services from Running
Run the following command:
docker stack rm iservices
Diagnosis Tools
Multiple diagnosis tools exist to assist in troubleshooting issues with the Integration Service platform:
l Docker PowerPack. This PowerPack monitors your Linux-based Integration Service server with SSH (theIntegration Service ISO is built on top of an Oracle Linux Operating System). This PowerPack provides keyperformance indicators about how your Integration Service server is performing. For more information on theDocker PowerPack and other PowerPacks that you can use to monitor the Integration Service, see the "UsingSL1 toMonitor the Integration Service" chapter in the Integration Service Platformmanual.
l Flower. This web interface tool can be found at the /flower endpoint. It provides a dashboard displaying thenumber of tasks in various states as well as an overview of the state of each worker. This tool shows thecurrent number of active, processed, failed, succeeded, and retried tasks on the Integration Service platform.This tool also shows detailed information about each of the tasks that have been executed on the platform.This data includes the UUID, the state, the arguments that were passed to it, as well as the worker and thetime of execution. Flower also provides a performance chart that shows the number of tasks running on eachindividual worker.
l Debug Mode. All applications can be run in "debug" mode via the Integration Service API. Runningapplications in debug mode may slow down the platform, but they will result in much more detailed logginginformation that is helpful for troubleshooting issues. For more information on running applications in DebugMode, see Retrieving Additional Debug Information.
l Application Logs. All applications generate a log file specific to that application. These log files can be foundat /var/log/iservices and each log file will match the ID of the application. These log files combine all the logmessages of all previous runs of an application up to a certain point. These log files roll over and will getauto-cleared after a certain point.

l Step Logs. Step logs display the log output for a specific step in the application. These step logs can beaccessed via the Integration Service user interface by clicking on a step in an integration application andbringing up the Step Log tab. These step logs display just the log output for the latest run of that step.
l Service Logs. Each Docker service has its own log. These can be accessed via SSH by running the followingcommand:
docker service logs -f <service_name>
Retrieving Addit ional Debug Information (Debug Mode)
The logs in the Integration Service use the following loglevel settings, from most verbose to least verbose:
l 10. Debug Mode.
l 20. Informational.
l 30. Warning. This is the default settings if you do not specify a loglevel.
l 40. Error.
WARNING: If you run integration applications with "loglevel": 10, those integration applications will takelonger to run because of increased I/O requirements. Enabling debug logging using thefollowing process is the only recommended method. ScienceLogic does not recommend setting"loglevel": 10 for the whole stack with the docker-compose file.
To run an application in Debug Mode, POST the following to the API endpoint:
https://<integration_service>/api/v1/applications/run
Request body:
{"name": "<application_name>","params": {
"loglevel": 10}
}
After running the integration application in Debug Mode, go back to the Integration Service user interface andreview the step logs to see detailed debug output for each step in the integration application. When run in DebugMode, the step log output shows additional debug statements such as "Saved data for next step", which displays thedata being sent from one step to the next.
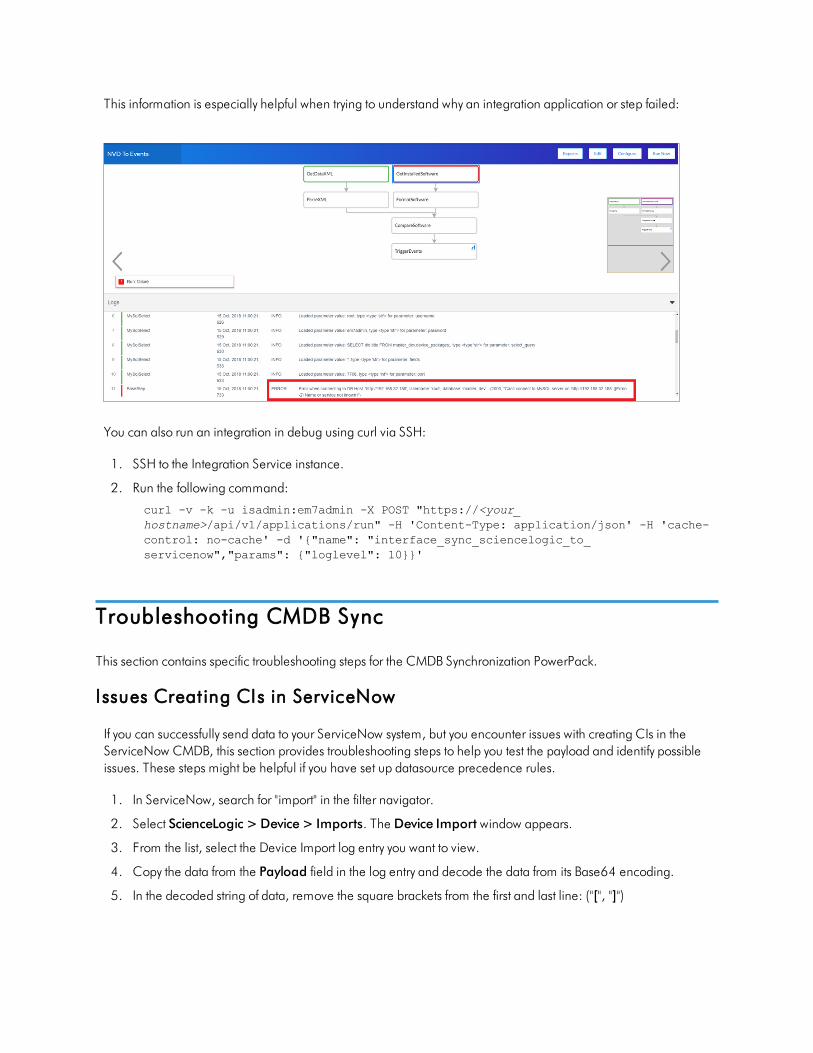
This information is especially helpful when trying to understand why an integration application or step failed:
You can also run an integration in debug using curl via SSH:
1. SSH to the Integration Service instance.
2. Run the following command:
curl -v -k -u isadmin:em7admin -X POST "https://<your_hostname>/api/v1/applications/run" -H 'Content-Type: application/json' -H 'cache-control: no-cache' -d '{"name": "interface_sync_sciencelogic_to_servicenow","params": {"loglevel": 10}}'
Troubleshooting CMDB Sync
This section contains specific troubleshooting steps for the CMDB Synchronization PowerPack.
I ssues Creat ing CIs in ServiceNow
If you can successfully send data to your ServiceNow system, but you encounter issues with creating CIs in theServiceNow CMDB, this section provides troubleshooting steps to help you test the payload and identify possibleissues. These steps might be helpful if you have set up datasource precedence rules.
1. In ServiceNow, search for "import" in the filter navigator.
2. Select ScienceLogic > Device> Imports. The Device Import window appears.
3. From the list, select the Device Import log entry you want to view.
4. Copy the data from the Payload field in the log entry and decode the data from its Base64 encoding.
5. In the decoded string of data, remove the square brackets from the first and last line: ("[", "]")

6. Copy this modified JSON payload, and then use the filter navigator to search for "Identification Simulation" orselectConfiguration > Identification Simulation.
7. On the Identification Simulation page, click the [Start] button in the Start with Existing Payload section.The Insert JSON Payload page appears:

8. In the Source field, select ScienceLogic as the data source.
9. In the Please insert payload below field, paste the JSON payload you edited in step 5.
10. Click the [Execute] button and review the payload to identify any potential issues.
Enabling Debugging of the Configurat ion I tem Payload
You must have administrator-level permissions in ServiceNow to access the system properties and enabledebugging of the Configuration Item payload in the ServiceNow Identification and Reconciliation module.
To enable debugging of the Configuration Item payload in ServiceNow:
1. On the ServiceNow system, check to see if the glide.cmdb.logger.source.identification_enginerecord exists in sys_properties.list.
l If the record exists, set this value to (* or debugVerbose)
l If the record does not exist, you will need to create the record.
2. To create the record, complete the following fields:
l Name. glide.cmdb.logger.source.identification_engine
l Description. Enable and configure the type of details the system logs when using the Identificationand Reconciliation module outside the scope of identification simulation, such as when using an API,an ECC queue, or scheduled jobs (info, warn, error, debug, or debugVerbose).
l Type. String.
l Value: * or debugVerbose
NOTE: Set the system property of Value back to error when troubleshooting is complete.
3. Run the "Sync Devices from SL1 to ServiceNow" integration application. The system logs will have“identfication_engine” as the source, and the log messages will contain identification_engine :Input.
4. Copy the payload beginning from {“items” to the end of the message. For example:
Message: {"items":[{"className":"","values":{"discovery_source":"ScienceLogic","mac_address":"9E:0F:04:0A:12:C7","name":"Postman TestServer 1","x_sclo_scilogic_id":"1","serial_number":"gJ3Bwkzc8r","model_id":"","ip_address":"10.10.10.102","manufacturer":"ScienceLogic, Inc.","ram":"16000","x_sclo_scilogic_region":"Postman"},"lookup":[],"related":[]}],"relations":[]}
5. You can run this message through the ScienceLogic endpoint by putting the {“items”} bracket within [].For example, send the following message to the endpoint/api/x_sclo_scilogic/v1/sciencelogic/IdentificationEngine:
Message: [{"items":[{"className":"","values":{"discovery_source":"ScienceLogic","mac_address":"9E:0F:04:0A:12:C7","name":"Postman Test

Server 1","x_sclo_scilogic_id":"1","serial_number":"gJ3Bwkzc8r","model_id":"","ip_address":"10.10.10.102","manufacturer":"ScienceLogic, Inc.","ram":"16000","x_sclo_scilogic_region":"Postman"},"lookup":[],"related":[]}],"relations":[]}]
NOTE: The endpoint is different in a domain-separated environment.
After the identification run is complete, the ServiceNow logs contain additional data about the run.
Enabling Logs in ServiceNow
You can enable device logging in ServiceNow to post errors to the logs in ServiceNow.
To enable ServiceNow device logging:
1. In ServiceNow, search for "device properties" in the filter navigator.
2. Select ScienceLogic > Device Properties. A CMDB record appears:
3. Select Yes in the Application Device Logging section and click [Save].
Locating Missing Device Data after Device Sync
After you run a Device Sync for SL1 Devices and ServiceNow CIs, you might encounter data attributes that did notget synced between SL1 and ServiceNow, or that data might not be accurate.
To address these situations, you should always start by reviewing your device settings in SL1, your configurationsettings in the Integration Service, and your CI settings in ServiceNow.
NOTE: The Device Sync settings are contained in the "Sync Devices from SL1 to ServiceNow" integrationapplication in the Integration Service user interface.

Situations Where Device Data Might be Missing
After configuring and running a Device Sync in the Integration Service, you might find incidents where deviceattributes in SL1 or ServiceNow are incomplete or missing.
This topic covers the following situations where device data might be incomplete:
l In SL1, you might be using an older version of a PowerPack that does not gather the device data you wereexpecting.
l In SL1, one of more of the fields on yourDevice Investigator pages were not populated or updated properly.
l ServiceNow might not have received the required device data from SL1 due to configuration issues with the"Sync Devices from SL1 to ServiceNow" integration application in the Integration Service.
Example: Missing Serial Number for a vCenter Device
In this example, the Serial Number device attributes for VMware ESXi hosts in the "IS_System" Company are notgetting properly synced between SL1 and ServiceNow.
The typical workflow for addressing this issue is the following:
1. In ServiceNow, identify the device attribute that did not sync properly with the corresponding CI record.
2. In SL1, locate the device and review the device details.
3. In SL1, review the Dynamic Application that collects data for the missing device attribute.
4. In the Integration Service, check the Configuration pane for the "Sync Devices from SL1 toServiceNow" integration application.

Step 1: In ServiceNow, ident ify the attribute that did not sync properly
In ServiceNow, go to the Configuration Items page and select the CI record for one of the VMware ESXi hoststhat you are syncing with SL1:
In the above image, the Serial Number field for the ServiceNow CI (SL1 device) named "10-64-171-130-CDB"is empty. Make a note of that missing information and go to Step 2.
TIP: If you know the serial number for the synced device, you can type the serial number into the filter navigatorin ServiceNow. If the serial number does not show up in your search, then you know that it has not beensynced with Device Sync.

Step 2: In SL1, locate the SL1 device and review the device details
Now that you know what data is missing, go to the Devices page in SL1 and make sure that the device you aretrying to sync exists in SL1. In this example, you are looking for VMware ESXi hosts, so filter for VMware on theDevices page:
You find a device named "10-64-171-130-CDB" from the "IS_System" Company, so you know that the deviceexists in SL1. Click the name of the device from your search results.
On the Device Investigator page for that device, click the Info drop-down to view the Device Class and otherrelated information about the device:
If the fields on the Info drop-down are accurate, go to Step 3.

Step 3: In SL1, review the PowerPacks that collect data for that device
Because the device you are syncing is a VMware ESXi host, you should look for the "VMware: HostSystemConfiguration"Dynamic Application from the VMware: vSphere Base Pack PowerPack. This Dynamic Applicationis responsible for capturing the Serial Number data for VMware devices.
Go to the [Collections] tab of the Device Investigator page for that device and search for the "VMware:HostSystem Configuration" Dynamic Application:
Select the "VMware: HostSystem Configuration" Dynamic Application and make sure that it is aligned with thedevice. If needed, click the Actions button ( ) and select Enable Collection. Also, make sure that the "SerialNumber" collection object from the list at the right has been found and is collecting data:

You should also check the version of the PowerPack you are using. In this example, versions of the VMware:vSphere Base Pack PowerPack before version 213 did not collect Serial Number information.
You can find the relevant PowerPack information by searching for the "VMware" PowerPack on the PowerPackspage (System > Manage > PowerPacks):
Select the VMware: vSphere Base Pack PowerPack to view additional details:

You can also view the Dynamic Application information on the Device Manager page (Devices > DeviceManager) by searching for "10-64-171-130-CDB" device and selecting its wrench icon ( ) to open the DeviceProperties page.
On the [Collections] tab, expand the "VMware: HostSystem Configuration" Dynamic Application in the lowerpane and scroll down to the "Serial Number" collection object:
Make sure that the collection object for "Serial Number" is enabled and collecting data. If either the Collectingcolumn displays a "no", as it does in the above image, click the empty check box to enable the collection objectand click [Save].

Step 4: In the SL1 Integrat ion Service, check the Device Syncconfigurat ion
Finally, if you have not found any issues in SL1, check to make sure you have properly configured the values andmappings on the Configuration pane for the "Sync Devices from SL1 to ServiceNow" integration application.
In the Integration Service, go to the Integrations page, select the "Sync Devices from SL1 to
ServiceNow" integration application, and click Configure ( ). The Configuration pane appears:

Scroll down to the attribute_mappings section on the Configuration page. In this section you can add customdevice attribute mappings:

If you have not addressed the issue with the missing serial number data in the previous steps, you can click [AddMapping] in this section and create a mapping for Serial Number. The SL1 values are on the left, and theServiceNow values are on the right:
However, you find that the "serial" value from SL1 is already mapped to the "serial_number" value for ServiceNow,so you do not need to do any additional editing on the Configuration pane. The Serial Number value should syncproperly the next time you run the "Sync Devices from SL1 to ServiceNow" integration application.

Appendix
AChecklists for Deployment
Overview
This appendix describes the checklists for deploying the Integration Service and the ServiceNow SynchronizationPowerPacks, based on your environment and configuration.
This appendix includes the following topics:
CMDB-Only ServiceNow Integration with Single SL1, no Domain Separation in ServiceNow 117
CMDB-Only ServiceNow Integration with Single SL1 and Domain-Separated ServiceNow 120
CMDB-Only ServiceNow Integration with Multiple SL1 Systems, no Domain-Separated ServiceNow124
Incident-Only ServiceNow Integration with Single SL1, no Domain Separation in ServiceNow 128

CMDB-Only ServiceNow Integration with Single SL1, noDomain Separation in ServiceNow
1. Deploy the Integration Service ISO:
o IP address, Netmask, Gateway, DNS, Hostname provided
o Root password provided (this is the root user for the OS)
o Start Docker services after installation:
/opt/iservices/scripts/pull_start_iservices.sh
o Validate that iservices are running:
docker service ls
2. Activate the Configuration Management For Scoped Apps (CMDB) Plugin.
3. Install the ScienceLogic Certified Application and create a ServiceNow group and user account:
o Username
o Password
o Web Service Access Only
o GMT Time Zone
o x_sclo_scilogic.Admin role assigned
4. Install the ServiceNow Synchronization PowerPacks on the Integration Service.
5. Create the Integration Service configuration object using the "ServiceNow SyncPack" configuration object asa template.
Sync Devices from SL1 to ServiceNow
1. Align the configuration object to the following integration applications:
o Cache ServiceNow CIs and SL1 Device Classes
o Sync Devices from SL1 to ServiceNow
2. Run "Cache ServiceNow CIs and SL1 Device Classes" to retrieve all device class information from SL1 andServiceNow. This will populate the device class mapping in the following step. This integration should be runat least every 23 hours.
3. Configure class and attribute mappings in "Sync Devices from SL1 to ServiceNow".
4. Run "Generate Required CI Relations for ServiceNow" to see if you are missing any service rules or classmappings and create any required maps, containment rules, and hosting rules.
5. Run "Sync Devices from SL1 to ServiceNow" either manually or on a schedule. This integration should be runat least every 23 hours. See documentation for more information.

Discover Devices from ServiceNow in SL1
1. Align the configuration object to the following integration applications:
o Sync Discovery Requirements
o Sync Discovery Session Requests from ServiceNow to SL1
o Sync Discovery Session Status from SL1 to ServiceNow
2. Set additional configuration variables for each of the integrations applications above in the respectiveConfiguration pane.
3. Run "Sync Discovery Requirements" to sync all discovery-dependent information from SL1 to ServiceNow.
4. Make sure that the Discovery request RITM is successfully created and approved in ServiceNow using theprovided Service Catalogs.
5. Run "Sync Discovery Session Requests from ServiceNow to SL1" either manually or on a schedule to createand execute the discovery session in SL1.
6. After the discovery session has completed in SL1, run "Sync Discovery Session Status from SL1 toServiceNow" either manually or on a schedule to update the status of the RITM in ServiceNow.
NOTE: The following integration applications only sync CIs that are aligned with the devices that are alreadysynced with ServiceNow. Before syncing any of the CIs below, you must first sync devices betweenSL1 and ServiceNow.
Sync Business Services from SL1 to ServiceNow
1. Align the configuration object to the following integration application:
o Sync Business Services from SL1 to ServiceNow
2. Configure the service classification mappings in "Sync Business Services from SL1 to ServiceNow". These aredefined in the Configuration pane.
3. Run "Sync Business Services from SL1 to ServiceNow" either manually or on a schedule.
Sync Fi le Systems from SL1 to ServiceNow
1. Align the configuration object to the following integration application:
o Sync File Systems from SL1 to ServiceNow
2. The parent CI must be synced in order to see these related CIs.
3. Run "Sync File Systems from SL1 to ServiceNow" either manually or on a schedule.
Sync Network Interfaces from SL1 to ServiceNow
1. Align the configuration object to the following integration application:

o Sync Network Interfaces from SL1 to ServiceNow
2. Determine additional filters for syncing network interfaces using the adapter_sync variable defined in theConfiguration pane.
3. The parent CI must be synced in order to see these related CIs.
4. Run "Sync Network Interfaces from SL1 to ServiceNow" either manually or on a schedule. This integrationapplication should be run at least every 23 hours if you would like to sync interface-level relationships with"Sync Advanced Topology from SL1 to ServiceNow".
Sync Insta l led Software from SL1 to ServiceNow
1. Align the configuration object to the following integration application:
o Sync Software Packages from SL1 to ServiceNow
o Sync Installed Software from SL1 to ServiceNow
2. The parent CI must be synced in order to see these related CIs.
3. First, run "Sync Software Packages from SL1 to ServiceNow". Verify that the integration has run successfully.
4. Run "Sync Installed Software from SL1 to ServiceNow" either manually or on a schedule.
Sync Maintenance Schedules from ServiceNow to SL1
1. Align the configuration object to the following integration application:
o Sync Maintenance Schedules from ServiceNow to SL1
2. The parent CI must be synced in order to see these related CIs. The affected CI must have SL1 Monitoredset to True.
3. If needed, configure the Request and Task state IDs in the Configuration pane. This is needed if thecustomer has custom IDs for certain change request or change task states.
4. Run "Sync Maintenance Schedules from ServiceNow to SL1" either manually or on a schedule.
Sync Advanced Topology from SL1 to ServiceNow
1. Align the configuration object to the following integration application:
o Sync Advanced Topology from SL1 to ServiceNow
2. The parent CI must be synced in order to see these related CIs. Syncing Interface-level relationships (Layer 2,LLDP, and CDP) will require that "Sync Network Interfaces from SL1 to ServiceNow" is set to run at least every23 hours.
3. Run "Sync Advanced Topology from SL1 to ServiceNow" either manually or on a schedule.

CMDB-Only ServiceNow Integration with Single SL1 andDomain-Separated ServiceNow
1. Deploy the Integration Service ISO:
o IP address, Netmask, Gateway, DNS, Hostname provided
o Root password provided (this is the root user for the OS)
o Start Docker services after installation:
/opt/iservices/scripts/pull_start_iservices.sh
o Validate that iservices are running:
docker service ls
2. Activate the Configuration Management For Scoped Apps (CMDB) Plugin.
3. Install the ScienceLogic Certified Application and create a ServiceNow group and user account:
o Username
o Password
o Web Service Access Only
o GMT Time Zone
o x_sclo_scilogic.Admin role assigned
4. Install the ServiceNow Synchronization PowerPacks on the Integration Service.
5. Create the Integration Service configuration object using the "ServiceNow SyncPack" configuration object asa template.
Sync Devices from SL1 to ServiceNow
1. Align the configuration object to following integration applications:
o Sync Organizations from SL1 to ServiceNow Companies
o Cache ServiceNow CIs and SL1 Device Classes
o Sync Devices from SL1 to ServiceNow
2. In "Sync Organizations from SL1 to ServiceNow Companies" Configuration pane, set the Source_of_Truth to ServiceNow and set the Domain_Separation flag to True.
3. Run "Sync Organizations from SL1 to ServiceNow Companies".
4. Run "Cache ServiceNow CIs and SL1 Device Classes" to retrieve all device class information from SL1 andServiceNow. This will populate the device class mapping in the following step. This integration applicationshould be run at least every 23 hours.

5. Configure class and attribute mappings in "Sync Devices from SL1 to ServiceNow". SetDomain_Separation to True.
6. Run "Generate Required CI Relations for ServiceNow" to see if you are missing any service rules or classmappings, and then create any required maps, containment rules, and hosting rules.
7. Run "Sync Devices from SL1 to ServiceNow" either manually or on a schedule. This integration applicationshould be run at least every 23 hours.
Discover Devices from ServiceNow in SL1
1. Align Configuration Object to following integration applications:
o Sync Discovery Requirements
o Sync Discovery Session Requests from ServiceNow to SL1
o Sync Discovery Session Status from SL1 to ServiceNow
2. In "Sync Discovery Requirements" Configuration pane, set the Source_of_Truth to ServiceNow. SetDomain_Separation to True.
3. Run "Sync Discovery Requirements" to sync all discovery-dependent information from SL1 to ServiceNow andback to SL1.
4. Set additional configuration variables for each of the other integration applications above in the respectiveConfiguration pane.
5. Discovery request RITM is successfully created and approved in ServiceNow using the provided ServiceCatalogs.
6. Run "Sync Discovery Session Requests from ServiceNow to SL1" either manually or on a schedule to createand execute the discovery session in SL1.
7. After the discovery session completes in SL1, run "Sync Discovery Session Status from SL1 to ServiceNow"either manually or on a schedule to update the status of the RITM in ServiceNow.
NOTE: Domain separation requires that "Sync Organizations from SL1 to ServiceNow Companies" isconfigured with Domain_Separation enabled and Source_of_Truth set to ServiceNow. In adomain-separated ServiceNow environment, this integration application must be properly configuredand run successfully before syncing any additional CI items. SL1 organizations that are linked to aServiceNow company will have the crm_id populated with the ServiceNow Company sys_id.
NOTE: The following integrations only sync CIs that are aligned with the devices that are already synced withServiceNow. Before syncing any of the CIs below, you must first sync devices between SL1 andServiceNow.
Sync Business Services from SL1 to ServiceNow
1. Align the configuration object to the following integration application:

o Sync Business Services from SL1 to ServiceNow
2. Configure the service classification mappings in "Sync Business Services from SL1 to ServiceNow". These aredefined in the Configuration pane.
3. Ensure thatDomain_Separation is set to True in the Configuration pane.
4. Run "Sync Business Services from SL1 to ServiceNow" either manually or on a schedule.
Sync Fi le Systems from SL1 to ServiceNow
1. Align the configuration object to the following integration application:
o Sync File Systems from SL1 to ServiceNow
2. Ensure thatDomain_Separation is set to True in the Configuration pane.
3. The parent CI must be synced in order to see these related CIs.
4. Run "Sync File Systems from SL1 to ServiceNow" either manually or on a schedule.
Sync Network Interfaces from SL1 to ServiceNow
1. Align the configuration object to the following integration application:
o Sync Network Interfaces from SL1 to ServiceNow
2. Determine additional filters for syncing network interfaces using the adapter_sync variable defined in theConfiguration pane.
3. Ensure thatDomain_Separation is set to True in the Configuration pane.
4. The parent CI must be synced in order to see these related CIs.
5. Run "Sync Network Interfaces from SL1 to ServiceNow" either manually or on a schedule. This integrationapplication should be run at least every 23 hours if you would like to sync interface-level relationships with"Sync Advanced Topology from SL1 to ServiceNow".
Sync Insta l led Software from SL1 to ServiceNow
1. Align the configuration object to the following integration application:
o Sync Software Packages from SL1 to ServiceNow
o Sync Installed Software from SL1 to ServiceNow
2. The parent CI must be synced in order to see these related CIs.
3. First, run "Sync Software Packages from SL1 to ServiceNow". Verify that the integration has run successfully.
4. Run "Sync Installed Software from SL1 to ServiceNow" either manually or on a schedule.
Sync Maintenance Schedules from ServiceNow to SL1
1. Align the configuration object to the following integration application:

o Sync Maintenance Schedules from ServiceNow to SL1
2. The parent CI must be synced in order to see these related CIs. The affected CI must have SL1 Monitoredset to True.
3. If needed, configure the Request and Task state IDs in the Configuration pane. This is needed if thecustomer has custom IDs for certain change request or change task states.
4. Run "Sync Maintenance Schedules from ServiceNow to SL1" either manually or on a schedule.
Sync Advanced Topology from SL1 to ServiceNow
1. Align the configuration object to the following integration application:
o Sync Advanced Topology from SL1 to ServiceNow
2. Ensure thatDomain_Separation is set to True in the Configuration pane.
3. The parent CI must be synced in order to see these related CIs. Syncing Interface-level relationships (Layer 2,LLDP, and CDP) will require that "Sync Network Interfaces from SL1 to ServiceNow" is set to run at least every23 hours.
4. Run "Sync Advanced Topology from SL1 to ServiceNow" either manually or on a schedule.

CMDB-Only ServiceNow Integration with Multiple SL1Systems, no Domain-Separated ServiceNow
NOTE: Depending on the size of your SL1 stacks and the number of SL1 stacks you have, you may need toconsider a “multi-tenant” configured IS. This is a more advanced deployment model. Please contacta ScienceLogic representative for more information.
1. Deploy the Integration Service ISO:
o IP address, Netmask, Gateway, DNS, Hostname provided
o Root password provided (this is the root user for the OS)
o Start Docker services after installation:
/opt/iservices/scripts/pull_start_iservices.sh
o Validate that iservices are running:
docker service ls
2. Activate the Configuration Management For Scoped Apps (CMDB) Plugin.
3. Install the ScienceLogic Certified Application and create a ServiceNow group and user account:
o Username
o Password
o Web Service Access Only
o GMT Time Zone
o x_sclo_scilogic.Admin role assigned
4. Install the ServiceNow Synchronization PowerPacks on the Integration Service.
5. Create the Integration Service configuration object using the "ServiceNow SyncPack" configuration object asa template.
NOTE: The key difference between integrating a single SL1 stack on the Integration Service and integratingmultiple SL1 stacks on the Integration Service is how you run the integration application. Running theintegration application with multiple SL1 stacks involves creating an individual configuration object foreach SL1 stack. Then, create an individual schedule for each configuration object. Each scheduleshould use a configuration object that is specific to a single SL1 stack.

When creating the schedule, populate the custom parameters with the configuration object ID. Forexample:
Sync Devices from SL1 to ServiceNow
1. Create a schedule for each SL1 stack for the following Integrations following the note above:
o Cache ServiceNow CIs and SL1 Device Classes
o Sync Devices from SL1 to ServiceNow
2. Wait for the "Cache ServiceNow CIs and SL1 Device Classes" to retrieve all device class information fromSL1 and ServiceNow. This will populate the device class mapping in the following step. This integrationshould be run at least every 23 hours.
3. Configure class and attribute mappings in "Sync Devices from SL1 to ServiceNow". If each SL1 stack hasdifferent class and attribute mapping requirements, you will need to specify the mappings in each schedule’scustom parameters for this application.
4. Run "Generate Required CI Relations for ServiceNow" to see if you are missing any service rules or classmappings and create any required maps, containment rules, and hosting rules. By default, these will pullfrom the mappings set in "Sync Devices from SL1 to ServiceNow". If you have defined different mappings foreach SL1 stack, you will need to also specify these mappings in each schedule’s custom parameters for thisapplication.
5. Run "Sync Devices from SL1 to ServiceNow" with a schedule where each schedule uses the configurationobject for a SL1 stack. This integration application should be run at least every 23 hours.
Discover Devices from ServiceNow in SL1
1. Create a schedule for each SL1 stack for the following integration applications:
o Sync Discovery Requirements
o Sync Discovery Session Requests from ServiceNow to SL1

o Sync Discovery Session Status from SL1 to ServiceNow
2. If any additional configuration variables are needed, these will need to be set in the custom parameterssection for each schedule
3. Run "Sync Discovery Requirements" on a schedule to sync all discovery-dependent information from SL1 toServiceNow.
4. Verify that the discovery request RITM is successfully created and approved in ServiceNow using the providedService Catalogs.
5. Run "Sync Discovery Session Requests from ServiceNow to SL1"on a schedule where each schedule uses theconfiguration object for a SL1 stack to create and execute the discovery session in SL1.
6. Once the discovery session has completed in SL1, run "Sync Discovery Session Status from SL1 toServiceNow" via schedule where each schedule uses the configuration object for a SL1 stack to update thestatus of the RITM in ServiceNow.
The following integration applications only sync CIs that are aligned with the devices that are already syncedwith ServiceNow. Before syncing any of the CIs below, you must first sync devices between SL1 andServiceNow.
Sync Business Services from SL1 to ServiceNow
1. Create a schedule for each SL1 stack for the following integration application:
o Sync Business Services from SL1 to ServiceNow
2. Configure service classification mappings in "Sync Business Services from SL1 to ServiceNow" application.These are defined in the Configuration pane.
3. Run "Sync Business Services from SL1 to ServiceNow" on a schedule where each schedule uses theconfiguration object for a SL1 stack.
Sync Fi le Systems from SL1 to ServiceNow
1. Create a schedule for each SL1 stack for the following integration application:
o Sync File Systems from SL1 to ServiceNow
2. The parent CI must be synced in order to see these related CIs.
3. Run "Sync File Systems from SL1 to ServiceNow" on a schedule where each schedule uses the configurationobject for a SL1 stack.
Sync Network Interfaces from SL1 to ServiceNow
1. Create a schedule for each SL1 stack for the following integration application:
o Sync Network Interfaces from SL1 to ServiceNow

2. Determine additional filters for syncing network interfaces using the adapter_sync variable defined in theConfiguration pane.
3. The parent CI must be synced in order to see these related CIs.
4. Run "Sync Network Interfaces from SL1 to ServiceNow" on a schedule where each schedule uses theconfiguration object for a SL1 stack. This integration application should be run at least every 23 hours if youwould like to sync interface-level relationships with "Sync Advanced Topology from SL1 to ServiceNow".
Sync Insta l led Software from SL1 to ServiceNow
1. Create a schedule for each SL1 stack for the following integration application:
o Sync Software Packages from SL1 to ServiceNow
o Sync Installed Software from SL1 to ServiceNow
2. The parent CI must be synced in order to see these related CIs.
3. "Sync Software Packages from SL1 to ServiceNow" must run on a schedule before "Sync Installed Softwarefrom SL1 to ServiceNow". Verify that the software packages have been synced before continuing.
4. After the software packages have been synced, run "Sync Installed Software from SL1 to ServiceNow" on aschedule where each schedule uses the configuration object for a SL1 stack.
Sync Maintenance Schedules from ServiceNow to SL1
1. Create a schedule for each SL1 stack for the following integration application:
o Sync Maintenance Schedules from ServiceNow to SL1
2. The parent CI must be synced in order to see these related CIs. The affected CI must have the SL1Monitored field set to True.
3. If needed, configure the Request and Task state IDs in the Configuration pane. This is needed if thecustomer has custom IDs for certain change request or change task states.
4. Run "Sync Maintenance Schedules from ServiceNow to SL1" on a schedule where each schedule uses theconfiguration object for a SL1 stack.
Sync Advanced Topology from SL1 to ServiceNow
1. Create a schedule for each SL1 stack for the following integration application:
o Sync Advanced Topology from SL1 to ServiceNow
2. The parent CI must be synced in order to see these related CIs. Syncing Interface-level relationships (Layer 2,LLDP, and CDP) will require that you set "Sync Network Interfaces from SL1 to ServiceNow" to run at leastevery 23 hours.
3. Run "Sync Advanced Topology from SL1 to ServiceNow" on a schedule where each schedule uses theconfiguration object for a SL1 stack.
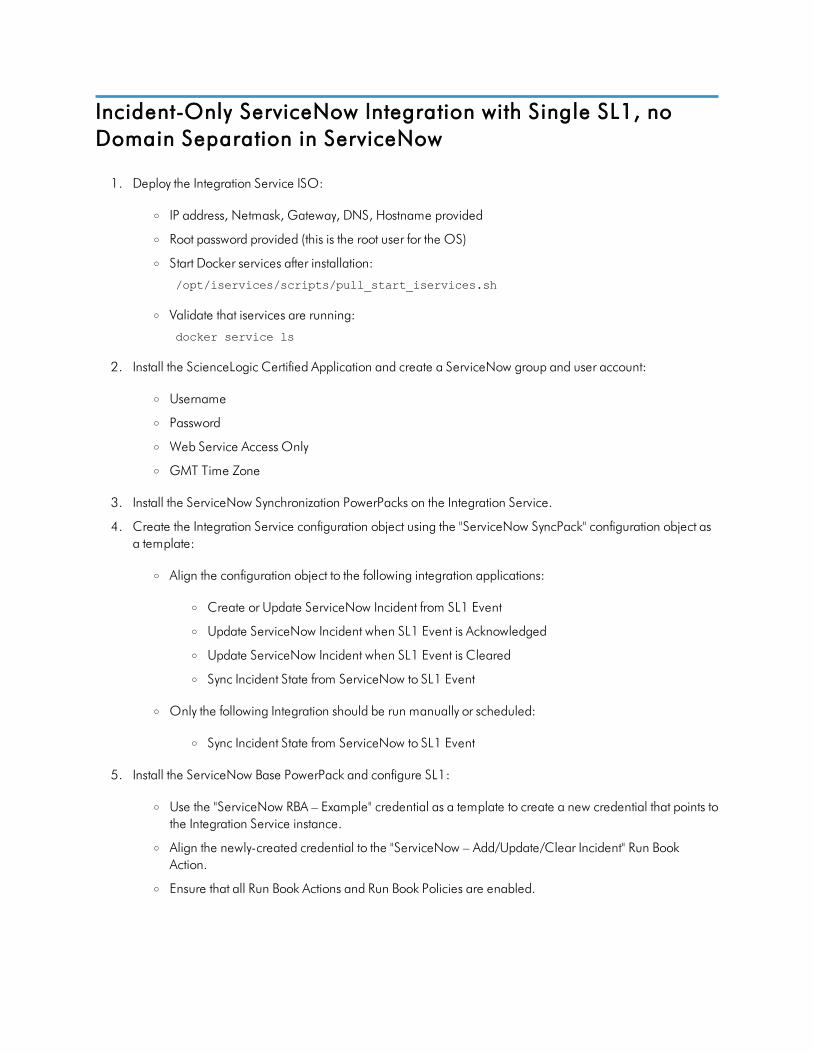
Incident-Only ServiceNow Integration with Single SL1, noDomain Separation in ServiceNow
1. Deploy the Integration Service ISO:
o IP address, Netmask, Gateway, DNS, Hostname provided
o Root password provided (this is the root user for the OS)
o Start Docker services after installation:
/opt/iservices/scripts/pull_start_iservices.sh
o Validate that iservices are running:
docker service ls
2. Install the ScienceLogic Certified Application and create a ServiceNow group and user account:
o Username
o Password
o Web Service Access Only
o GMT Time Zone
3. Install the ServiceNow Synchronization PowerPacks on the Integration Service.
4. Create the Integration Service configuration object using the "ServiceNow SyncPack" configuration object asa template:
o Align the configuration object to the following integration applications:
o Create or Update ServiceNow Incident from SL1 Event
o Update ServiceNow Incident when SL1 Event is Acknowledged
o Update ServiceNow Incident when SL1 Event is Cleared
o Sync Incident State from ServiceNow to SL1 Event
o Only the following Integration should be run manually or scheduled:
o Sync Incident State from ServiceNow to SL1 Event
5. Install the ServiceNow Base PowerPack and configure SL1:
o Use the "ServiceNow RBA – Example" credential as a template to create a new credential that points tothe Integration Service instance.
o Align the newly-created credential to the "ServiceNow – Add/Update/Clear Incident" Run BookAction.
o Ensure that all Run Book Actions and Run Book Policies are enabled.

Appendix
BCertified Application Objects
Overview
This appendix describes the tables, endpoints, and roles that were created in ServiceNow as part of the"ScienceLogic SL1: CMDB & Incident Automation" application. This application is also known as the "CertifiedApplication" or the "Scoped Application".
This appendix includes the following topics:
Roles 130
Tables 131
Table Columns (cmdb_ci) 131
Table Columns (core_company) 132
Table Columns (cmdb_group) 132
Script Includes 132
Event Registry 132
Scripted Actions 133
Data Lookup Definitions 133
System Properties 133
Catalog Item 134
Catalog UI Policies 134
Variable Sets 134
Catalog Client Scripts 135
Workflows 135
Scripted REST Resources 136

TransformMaps 138
Transform Scripts 138
Roles
Two Roles were added with the ScienceLogic update set, Admin (x_sclo_scilogic.Admin) and User (x_sclo_scilogic.User). Both give access to SL1.
Role Inherited Roles Other Inherited Roles Role Definition
x_sclo_scilogic.Admin Role for ScienceLogic Service Accounts.
itil Can perform standard actions for an ITILhelp desk technician. This is the default''Technician'' role.Can open, update, close incidents,problems, changes, config managementitems. By default, only users with the itil rolecan have tasks assigned to them
Dependency_view A special role to be applied both on the$ngbsm UI page and on theBSMProcessor. This role is required toaccess the dependency views module. Bydefault, ITIL includes this role to avoidregressions.
cmdb_query_builder Can access the CMDBQuery Builderapplication to create, run, and save querieson the CMDB.
template_editor
view_changer Can switch active views.
app_service_user Can view and retrieve information usingAPI from application service maps(cmdb_ci_service_discovered).
certification Can work on Certification tasks.
import_transformer
Can manage Import Set Transform Mapsand run transforms.
x_sclo_scilogic.User General user account that allows read-only access to SL1.

Tables
Name Label Extends Comments
x_sclo_scilogic_event Event (empty) Event information
x_sclo_scilogic_event_severity
Event SeverityLook Rules
Data LookupMatcher Rules
Look up table for event Severity
x_sclo_scilogic_incident Import Incident Import Set Row Import / staging events before transform toEvent and Incident
x_sclo_scilogic_import_installed_software
Import InstalledSoftware
Import Set Row Import / staging events before transform toSoftware Instance
x_sclo_scilogic_org_ven_mfg
Import ORG VENMFG
Import Set Row Import / staging events before transform tocore_company
x_sclo_scilogic_import_discovery_dependent
Import DiscoveryDependent
Import Set Row Import / staging events before transform toDiscovery Dependent table
x_sclo_scilogic_discovery_dependent
DiscoveryDependent
(empty) Discovery Dependent Information
x_sclo_scilogic_catalog_item_templates
Catalog itemTemplates
(empty) Templates use to fill out catalog items
x_sclo_scilogic_import_service_request
Import ServiceRequest
Import Set Row Import / staging events before transform toService Requests
Table Columns (cmdb_ci)
Name Label Type Comments
x_sclo_scilogic_id SL1 ID Integer Unique ID
x_sclo_scilogic_region SL1 Region String Unique String of SL1 Platform
x_sclo_scilogic_url SL1 URL URL URL to SL1 Platform
x_sclo_scilogic_monitored SL1 Monitored True/False Device currently synced with SL1 Platform

Table Columns (core_company)
Name Label Type Comments
x_sclo_scilogic_id SL1 ID String Unique ID
x_sclo_scilogic_region SL1 Region String Unique String of SL1 Platform
x_sclo_scilogic_monitored SL1 Monitored True/False Organization currently synced with SL1 Platform
Table Columns (cmdb_group)
Name Label Type Comments
x_sclo_scilogic_id SL1 ID String Unique ID
x_sclo_scilogic_region SL1 Region String Unique String of SL1 Platform
Script Includes
Name API Name Comments
CatalogUtils x_sclo_scilogic.catalogUtils Catalog Script include scripts
ChangeUtils x_sclo_scilogic.changeUtils Change Script include scripts
DeviceUtils x_sclo_scilogic.DeviceUtils Device Script include scripts
EventUtils x_sclo_scilogic.EventUtils Event Script include scripts
GeneralUtils x_sclo_scilogic.GeneralUtils General Script include scripts
Event Registry
Suffix Event name Table Comments
device_monitoring x_sclo_scilogic.device_monitoring
Configuration Item [cmdb_ci]
Event for DeviceMonitoring
Remove_monitoring
x_sclo_scilogic.remove_monitoring
Configuration Item [cmdb_ci]
Event for RemoveMonitoring

Scripted Actions
Name Event name Comments
Device Monitoring Catalogitem
x_sclo_scilogic.device_monitoring
Action used to submit Catalog item viaEvent.
Device Removal Catalog item x_sclo_scilogic.remove_monitoring
Action used to submit Catalog item viaEvent.
Data Lookup Definitions
Name Source Table Matcher Table Comments
EventSeverity
Import Incident [x_sclo_scilogic_incident]
Event Severity Lookup Rules [x_sclo_scilogic_event_severity]
Lookup for ScienceLogic Severity toImpact and Urgency
System Properties
Suffix Name Comments
CatalogItemDiscovery x_sclo_scilogic.CatalogItemDiscovery
Unique value (sys_id)
CatalogItemRemove x_sclo_scilogic.CatalogItemRemove Unique value (sys_id)
closeCode x_sclo_scilogic.closeCode Value to use for Close Code for IncidentTransform
Contact type x_sclo_scilogic.Contact Type Value to use for Contact type for IncidentTransform
deviceLogging x_sclo_scilogic.deviceLogging Turn on Logging
deviceLoggingParam x_sclo_scilogic.deviceLoggingParm Add additional parameters beyond the defaulterrors
discoverySource x_sclo_scilogic.discoverySource Discovery Source to be used by Integration Service
notResolved x_sclo_scilogic.notResolved Value of Reopened Incident
stateNew x_sclo_scilogic.stateNew Value of New Incident
StateResolved x_sclo_scilogic.stateResolved Value of Resolved Incident

Catalog Item
Name Comments
Device Discovery Role for ScienceLogic Service Accounts.
Monitoring Removal General user account that allows read only access to ScienceLogic Application.
Catalog UI Policies
Catalog item Short description Comments
Device Discovery Catalog Template Updates form based on Select template
Device Discovery Create Virtual Device Updates form based on Request type
Device Discovery Create Virtual Device (Retired)
Device Discovery Device Discovery Updates form based on Request type
Device Discovery Device Discovery (Retired)
MonitoringRemoval
Hide Overview variables notrequired
Hide variables not required for the Monitoring Removalrequest
Device Discovery Port Scan Hide scan ports that are not default
Device Discovery Port Scan (Retired)
Device Discovery Region Updates form based on Organization
Device Discovery Region (Retired)
MonitoringRemoval
Region via Organization Updates form based on Organization
Device Discovery Save as Template Updates form based on Save as template
Variable Sets
Title Internal name Comments
Create_virtual_device create_virtual_device
Discovery Overview discovery_overview

Title Internal name Comments
Discovery Sesion - Basic Settings discovery_sesion_basic_settings
Discovery Session - Detection and Scanning discovery_session_detection_and_scanning
Discovery Session - IP & Credentials discovery_session_ip_credentials
Monitoring Removal monitoring _removal
Service Catalog item Template service_catalog_item_template
Catalog Client Scripts
Name Catalog item Type Comments
Hide Request Type Options Monitoring Removal onLoad Shared variable hide options that don’t apply
Hide Request Type Options Device Discovery onLoad Shared variable hide options that don’t apply
Region Monitoring Removal onChange Update Region field based on Company Region
Region Monitoring Removal onChange Update Region field based on Company Region
Workflows
Name Table Comments
SL1 Monitoring Removal Requested Item [sc_req_item] Workflow for Removal of devices from SL1 process
SL1 Discovery Session Requested Item [sc_req_item] Workflow for Discovery session process

Scripted REST Resources
Name Comments
Business Services /api/x_sclo_scilogic/v1/sciencelogic/business_service
GET This GET api will pull allScienceLogic monitoredConfiguration items specific toBusiness Services class from theCMDB. It will be ordered via thesys_id field to ensure the same orderevery time.
CMDBGroup /api/x_sclo_scilogic/v1/sciencelogic/cmdb_group
POST Use this API to create cmdb_groups& add a CI to them.
Change Requests /api/x_sclo_scilogic/v1/sciencelogic/change_requests
GET This GET api will pull ActiveChange Requests or Change Tasksbased on the record_type suppliedthat have ScienceLogic monitoredCI attached. It will be ordered viathe sys_id field to ensure the sameorder every time.
Classification /api/x_sclo_scilogic/v1/sciencelogic/classification
GET This GET api will pull all requiredCMDB information to build JSONpayloads.
Companies /api/x_sclo_scilogic/v1/sciencelogic/companies
GET This GET api will pull all ActiveCompanies that are ScienceLogicmonitored. It will be ordered via thesys_id field to ensure the same orderevery time.
Configuration Items /api/x_sclo_scilogic/v1/sciencelogic/configuration_Items
GET This GET api will pull allScienceLogic monitoredConfiguration items from theCMDB. It will be ordered via thesys_id field to ensure the same orderevery time.
DeviceIdentificationEngine
/api/x_sclo_scilogic/v1/sciencelogic/IdentificationEngine
POST Use this API to create or updateconfiguration items within theCMDB via ScienceLogic.
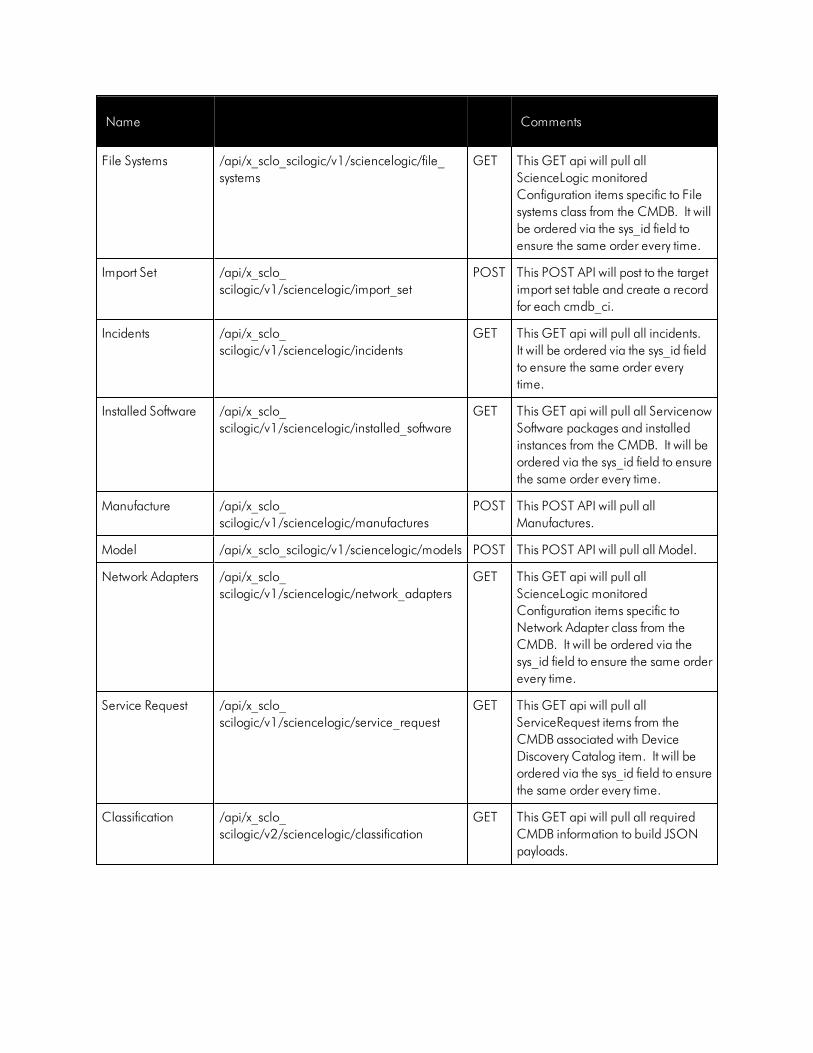
Name Comments
File Systems /api/x_sclo_scilogic/v1/sciencelogic/file_systems
GET This GET api will pull allScienceLogic monitoredConfiguration items specific to Filesystems class from the CMDB. It willbe ordered via the sys_id field toensure the same order every time.
Import Set /api/x_sclo_scilogic/v1/sciencelogic/import_set
POST This POST API will post to the targetimport set table and create a recordfor each cmdb_ci.
Incidents /api/x_sclo_scilogic/v1/sciencelogic/incidents
GET This GET api will pull all incidents. It will be ordered via the sys_id fieldto ensure the same order everytime.
Installed Software /api/x_sclo_scilogic/v1/sciencelogic/installed_software
GET This GET api will pull all ServicenowSoftware packages and installedinstances from the CMDB. It will beordered via the sys_id field to ensurethe same order every time.
Manufacture /api/x_sclo_scilogic/v1/sciencelogic/manufactures
POST This POST API will pull allManufactures.
Model /api/x_sclo_scilogic/v1/sciencelogic/models POST This POST API will pull all Model.
Network Adapters /api/x_sclo_scilogic/v1/sciencelogic/network_adapters
GET This GET api will pull allScienceLogic monitoredConfiguration items specific toNetwork Adapter class from theCMDB. It will be ordered via thesys_id field to ensure the same orderevery time.
Service Request /api/x_sclo_scilogic/v1/sciencelogic/service_request
GET This GET api will pull allServiceRequest items from theCMDB associated with DeviceDiscovery Catalog item. It will beordered via the sys_id field to ensurethe same order every time.
Classification /api/x_sclo_scilogic/v2/sciencelogic/classification
GET This GET api will pull all requiredCMDB information to build JSONpayloads.
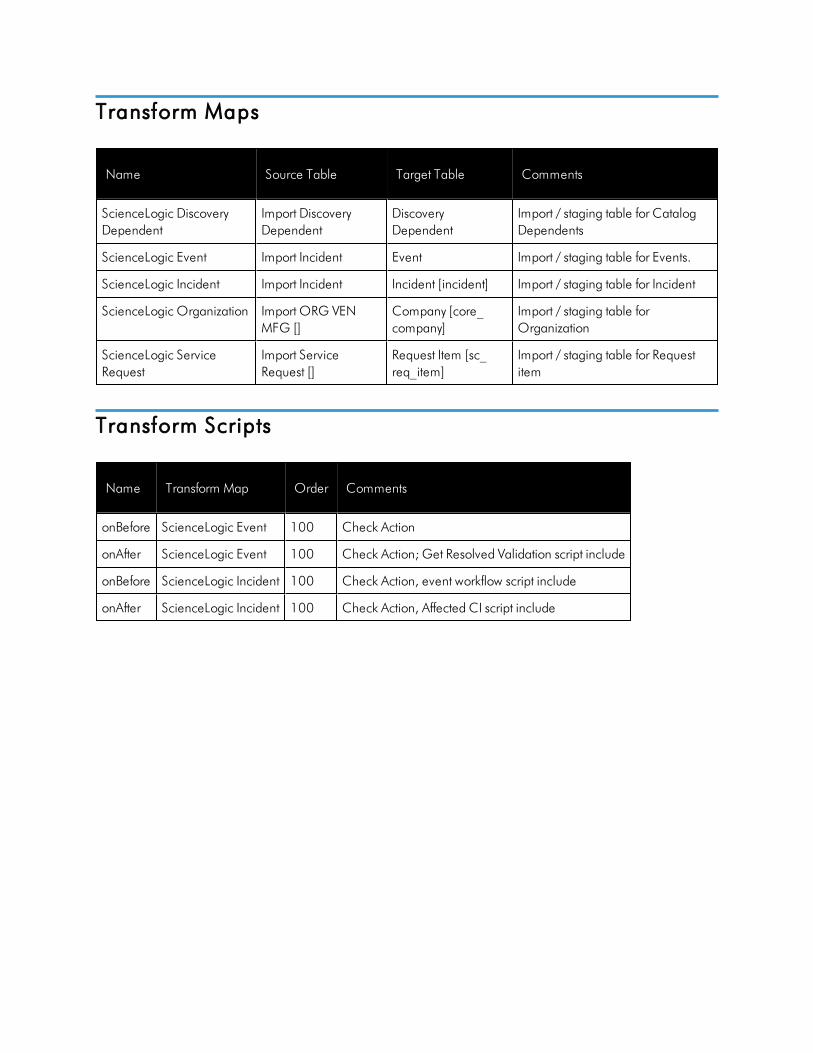
Transform Maps
Name Source Table Target Table Comments
ScienceLogic DiscoveryDependent
Import DiscoveryDependent
DiscoveryDependent
Import / staging table for CatalogDependents
ScienceLogic Event Import Incident Event Import / staging table for Events.
ScienceLogic Incident Import Incident Incident [incident] Import / staging table for Incident
ScienceLogic Organization Import ORG VENMFG []
Company [core_company]
Import / staging table forOrganization
ScienceLogic ServiceRequest
Import ServiceRequest []
Request Item [sc_req_item]
Import / staging table for Requestitem
Transform Scripts
Name Transform Map Order Comments
onBefore ScienceLogic Event 100 Check Action
onAfter ScienceLogic Event 100 Check Action; Get Resolved Validation script include
onBefore ScienceLogic Incident 100 Check Action, event workflow script include
onAfter ScienceLogic Incident 100 Check Action, Affected CI script include

Appendix
CServiceNow API Endpoints
Overview
This appendix describes the customized ServiceNow API Endpoints that were created for the Integration ServiceServiceNow Synchronization PowerPacks. These scripted endpoints reduce the amount of REST calls that theIntegration Service makes to ServiceNow.
Please note that for pagination, the following Query parameters are not required: sysparm_offset andsysparm_limit. The default settings are:
l sysparm_offset=0
l sysparm_limit = ServiceNow defines the default upper limits for data export. It will check the followingproperties at System Properties > Import Export: glide.json.export.limit, glide.ui.export.limit,and then glide.ui.export.war.threshold.
For example, if you have 200 total records and you want to pull the records in 100-record chunks, then the firstpull would be sysparm_offset=0 & sysparm_limit=100 and the second pull would be sysparm_offset=100 & sysparm_limit=100. For more information, see the ServiceNow documentation for ExportLimits.
This appendix includes the following topics:
Business Services 141
Change Requests 143
Classification version 1 145
Classification version 2 148
CMDB Group 151
Companies 153
Device Identification Engine 156

Discovery Dependents 159
File Systems 161
Import Set 163
Incidents 165
Installed Software 168
Manufacturer 171
Model 173
Network Adapters 175
Service Requests 177

Business Services
HTTP Method
GET
Pagination
Enabled
Resource Path
/api/x_sclo_scilogic/v1/sciencelogic/business_service
Defaul t Resource Path
/api/x_sclo_scilogic/sciencelogic/business_service
This operation pulls all the fields from just the Business Service (cmdb_ci_service) table. The return is ordered bysys_id, so the results display in the same order every time. The results are filtered by the SL1 monitored and SL1ID field on the ServiceNow side. This operation requires the region to be supplied by the requester, and it will onlyreturn region-supplied configuration items.
Headers
Key Value
Content-Type application/json
Accept application/json
Parameters
Key Value
region (required) ScienceLogic
sysparm_offset 0
sysparm_limitglide.json.export.limit, glide.ui.export.limit,glide.ui.export.war.threshold
Example (Request URL)
https://<your Instance>.service-now.com/api/x_sclo_scilogic/v1/ sciencelogic/business_service

Example (Response)
{"results": [
{"operational_status": "1","sys_updated_on": "2019-02-06 19:32:34","discovery_source": "Other Automated","first_discovered": "2019-02-06 19:31:19","sys_updated_by": "admin","sys_created_on": "2019-02-06 19:31:19","sys_domain": "global","used_for": "Production","sys_created_by": "is4user1","sys_domain_path": "/","install_status": "1","name": "One Service to rule them","subcategory": "Service","busines_criticality": "1 - most critical","last_discovered": "2019-02-06 19:31:19","sys_class_name": "cmdb_ci_service","sys_id": "52da95dcdb6323009f7dd7a0cf961918","sys_class_path": "/!!/#C","comments": "Postman","sys_mod_count": "1","x_sclo_scilogic_id": "1570","model_id": "e8aaeb3f3763100044e0bfc8bcbe5d20","cost_cc": "USD","x_sclo_scilogic_monitored": "true","category": "Business Service","service_classification": "Technical Service","x_sclo_scilogic_region": "ScienceLogic"
}],"sysparm_offset": 0,"sysparm_limit": 100,"return_count": 1,"total_count": 1
}

Change Requests
HTTP Method
GET
Resource Path
/api/x_sclo_scilogic/v1/sciencelogic/change_requests?record_type=change_request&state=1®ion=ScienceLogic
Defaul t Resource Path
/api/x_sclo_scilogic/v1/sciencelogic/change_requests?record_type=change_request&state=1®ion=ScienceLogic
This scripted API was built for pulling Change Requests or Change Tasks and formatting a JSON object responsewith the required information to create a maintenance schedule in SL1. The GET queries the task_ci table to findconfiguration items that are monitored by SL1 and are the correct record type. The GET operation returns allrecords with their configuration items in formatted JSON strings that include planned start and end time.
Headers
Key Value
Content-Type application/json
Accept application/json
Parameters
Key Value
record_type (required) change_request
state -5
region (required) ScienceLogic
sysparm_offset 0
sysparm_limitglide.json.export.limit, glide.ui.export.limit,glide.ui.export.war.threshold
HTTP Status

Code Value
200 OK
400 Query parameter \'region\' is not defined and is required.
Fixed Internal Query
State:‘task.sys_class_name=’ + recordType + ‘task.state=’ + state + ‘^ci_item.x_sclo_scilogic_monitored=true^ci_item.x_sclo_scilogic_region=’ + region
Non-State:‘task.active=true^task.sys_class_name=’ + recordType + ‘ci_item.x_sclo_scilogic_monitored=true^ci_item.x_sclo_scilogic_region=’ + region
Example
https://<your Instance>.service-now.com/api/x_sclo_scilogic/v1/sciencelogic/change_requests?record_type=change_request&state=-5®ion=ScienceLogic
Example (Response)
{"results": [
{"sys_id": "48ebaba0db962f00dc44f00fbf961961","number": "CHG0030001","state_value": "-5","state": "New","short_description": "Test Change","planned_start_date": "2019-01-01 06:00:01","planned_end_date": "2019-01-01 18:00:01","device": [
{"sys_id": "d83dac0adb4dab00dc44f00fbf961919","name": "Postman Test Server 11","id": "11","region": "ScienceLogic"
}]
}]
}

Classif ication version 1
NOTE: This API Endpoint has been deprecated. The last version of the "ScienceLogic SL1: CMDB & IncidentAutomation" application" (also called the Certified or Scoped application), that used this endpoint wasversion 1.0.18.
HTTP Method
GET
Pagination
Enabled
Resource Path
/api/x_sclo_scilogic/v1/sciencelogic/classification
Defaul t Resource Path
/api/x_sclo_scilogic/sciencelogic/classification
To support the identification and reconciliation framework, SL1 requires a large amount of information to knowhow to correctly fill out the JSON formatted string defined by the Identification Engine documentation. Thisoperation uses the getTableExtension() function to find all the tables extended from the cmdb_ci table and thengoes through each table one by one. This operation collects information about each class, such as which fields arerequired to identify and if it is considers another class to help find uniqueness. This operation then finds all theassociated metadata. Finally, the operation pulls a list of all field names from the table. By default the criterion_attributes and attributes are not included and require "action=attributes" as a parameter in the API call to bepassed.
Headers
Key Value
Content-Type application/json
Accept application/json
Parameters
Key Value
action attributes

Attributes require x_sclo_scilogic.Admin be added to sys_dictionary.* (read) ACL to allow the API to access fieldnames on each class table.
Fixed Internal Query
Example
https://<your Instance>.service-now.com/api/x_sclo_scilogic/sciencelogic/classification
Example (Response)
{"results": [{"class_label": "Storage Area Network","class_table": "cmdb_ci_san","criterion_attributes": [""
],"independent": "false","containment_rule": [
],"hosting_rule": [
],"reference_rule": [
],"attributes": ["asset","asset_tag","assigned","assigned_to","assignment_group","attributes","can_print","category","change_control","checked_in","checked_out","comments","company","correlation_id","cost","cost_cc","cost_center","delivery_date","department","discovery_source","dns_domain","due","due_in","fault_count",

"first_discovered","fqdn","gl_account","install_date","install_status","invoice_number","ip_address","justification","last_discovered","lease_id","location","mac_address","maintenance_schedule","managed_by","manufacturer","model_id","model_number","monitor","name","operational_status","order_date","owned_by","po_number","purchase_date","san_id","schedule","serial_number","short_description","skip_sync","start_date","subcategory","supported_by","support_group","sys_class_name","sys_class_path","sys_created_by","sys_created_on","sys_domain","sys_domain_path","sys_id","sys_mod_count","sys_updated_by","sys_updated_on","unverified","vendor","warranty_expiration","x_sclo_scilogic_id","x_sclo_scilogic_monitored","x_sclo_scilogic_region","x_sclo_scilogic_url"
]}
]}

Classif ication version 2
HTTP Method
GET
Pagination
Enabled
Resource Path
/api/x_sclo_scilogic/v2/sciencelogic/classification
Defaul t Resource Path
/api/x_sclo_scilogic/sciencelogic/classification
To support the identification and reconciliation framework, SL1 requires a large amount of information to knowhow to correctly fill out the JSON formatted string defined by the Identification Engine documentation. Thisoperation uses the getTableExtension() function to find all the tables extended from the cmdb_ci table and thengoes through each table one by one. This operation collects information about each class, such as which fields arerequired to identify and if it is considers another class to help find uniqueness. This operation then finds all theassociated metadata. Finally, the operation pulls a list of all field names from the table. By default the criterion_attributes and attributes are not included and require "action=attributes" as a parameter in the API call to bepassed.
Headers
Key Value
Content-Type application/json
Accept application/json
Parameters
Key Value
action attributes
sysparm_offset 0
sysparm_limitglide.json.export.limit, glide.ui.export.limit,glide.ui.export.war.threshold
Attributes require x_sclo_scilogic.Admin be added to sys_dictionary.* (read) ACL to allow the API to access fieldnames on each class table.

Fixed Internal Query
Example
https://<your Instance>.service-now.com/api/x_sclo_scilogic/v2/sciencelogic/classification
Example (Response)
{"results": [{"class_label": "Storage Area Network","class_table": "cmdb_ci_san","criterion_attributes": [""
],"independent": "false","containment_rule": [
],"hosting_rule": [
],"reference_rule": [
],"attributes": ["asset","asset_tag","assigned","assigned_to","assignment_group","attributes","can_print","category","change_control","checked_in","checked_out","comments","company","correlation_id","cost","cost_cc","cost_center","delivery_date","department","discovery_source","dns_domain","due","due_in","fault_count","first_discovered","fqdn","gl_account",

"install_date","install_status","invoice_number","ip_address","justification","last_discovered","lease_id","location","mac_address","maintenance_schedule","managed_by","manufacturer","model_id","model_number","monitor","name","operational_status","order_date","owned_by","po_number","purchase_date","san_id","schedule","serial_number","short_description","skip_sync","start_date","subcategory","supported_by","support_group","sys_class_name","sys_class_path","sys_created_by","sys_created_on","sys_domain","sys_domain_path","sys_id","sys_mod_count","sys_updated_by","sys_updated_on","unverified","vendor","warranty_expiration","x_sclo_scilogic_id","x_sclo_scilogic_monitored","x_sclo_scilogic_region","x_sclo_scilogic_url"
]}
]}

CMDB Group
HTTP Method
POST
Pagination
Enabled
Resource Path
/api/x_sclo_scilogic/v1/sciencelogic/cmdb_group
Defaul t Resource Path
/api/x_sclo_scilogic/sciencelogic/cmdb_group
This operation handles the intake of groups of devices from SL1 and converts the device groups to CMDB groups.This operation uses a standard formatted JSON string, and it checks for a sys_id of the group first by searching for amatching group. This process creates a group if a group is not supplied or found, and then it passes the JSONobject to the ServiceNow CMDBGroupAPI, which sets the manual CI list of the group.
Headers
Key Value
Content-Type application/json
Accept application/json
Example (Request URL
https://<your Instance>.service-now.com/api/x_sclo_scilogic/v1/sciencelogic/cmdb_group
Example (Body)
[{"items": [{"name": "test","description": "","group": "","manualCIList": "d83dac0adb4dab00dc44f00fbf961919,2e6b7046db8dab00dc44f00fbf961929,7fb39667dba12380dc44f00fbf961901,77b39667dba12380dc44f00fbf961917,7bb39667dba12380dc44f00fbf96191c","region": "Cisco","id": "1"
}

]}
]
Example (Response)
{"result": [{"idList": [
],"partialCIListDueToACLFlag": false,"nextBatchStart": 0,"result": true
},{"idList": [
],"partialCIListDueToACLFlag": false,"nextBatchStart": 0,"result": true
}]
}

Companies
HTTP Method
GET
Pagination
Enabled
Resource Path
/api/x_sclo_scilogic/v1/sciencelogic/companies
Defaul t Resource Path
/api/x_sclo_scilogic/sciencelogic/companies
This operation supports Domain Separation enabled or not enabled. This operation pulls all the fields for from thecompany table that are not NULL values. The return is ordered by sys_id, so the results display in the same orderevery time. The results are filtered by the SL1 Monitored and region values. The region mus be supplied by therequester, and it will only return region-specific companies.
Headers
Key Value
Content-Type application/json
Accept application/json
Parameters
Key Value
region (required) ScienceLogic
domainSep false
sysparm_offset 0
sysparm_limitglide.json.export.limit, glide.ui.export.limit,glide.ui.export.war.threshold
HTTP Status
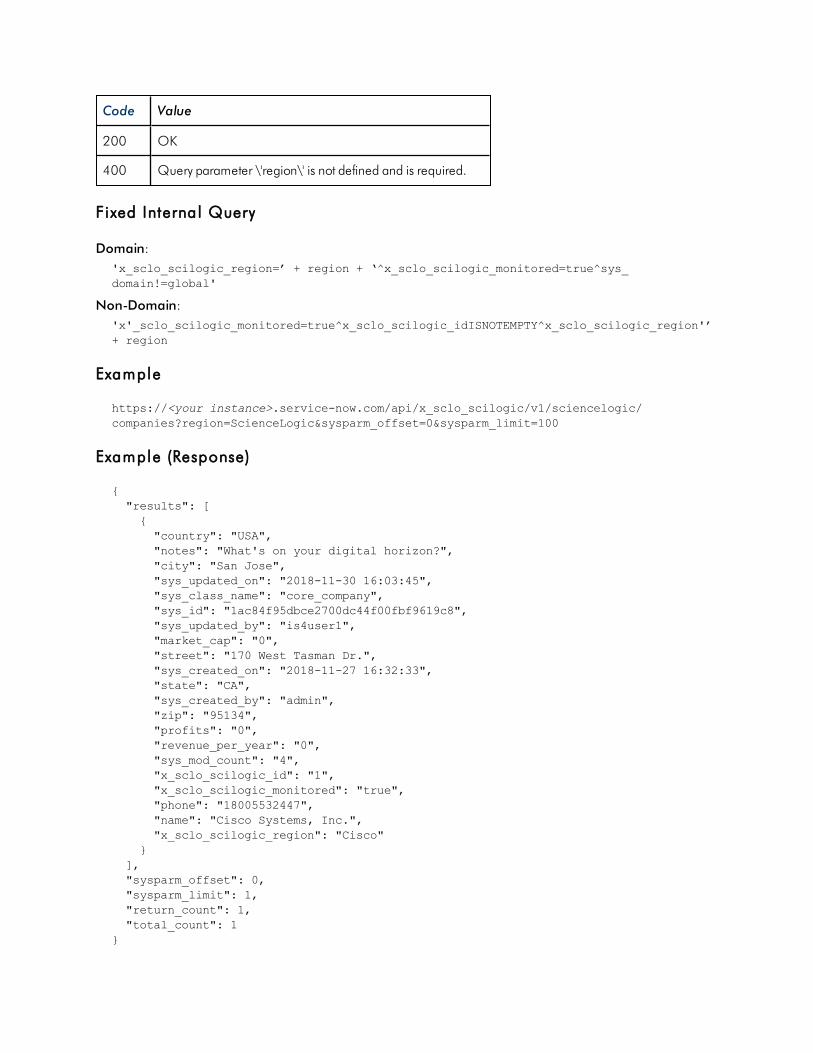
Code Value
200 OK
400 Query parameter \'region\' is not defined and is required.
Fixed Internal Query
Domain:'x_sclo_scilogic_region=’ + region + ‘^x_sclo_scilogic_monitored=true^sys_domain!=global'
Non-Domain:'x'_sclo_scilogic_monitored=true^x_sclo_scilogic_idISNOTEMPTY^x_sclo_scilogic_region'’+ region
Example
https://<your instance>.service-now.com/api/x_sclo_scilogic/v1/sciencelogic/companies?region=ScienceLogic&sysparm_offset=0&sysparm_limit=100
Example (Response)
{"results": [{"country": "USA","notes": "What's on your digital horizon?","city": "San Jose","sys_updated_on": "2018-11-30 16:03:45","sys_class_name": "core_company","sys_id": "1ac84f95dbce2700dc44f00fbf9619c8","sys_updated_by": "is4user1","market_cap": "0","street": "170 West Tasman Dr.","sys_created_on": "2018-11-27 16:32:33","state": "CA","sys_created_by": "admin","zip": "95134","profits": "0","revenue_per_year": "0","sys_mod_count": "4","x_sclo_scilogic_id": "1","x_sclo_scilogic_monitored": "true","phone": "18005532447","name": "Cisco Systems, Inc.","x_sclo_scilogic_region": "Cisco"
}],"sysparm_offset": 0,"sysparm_limit": 1,"return_count": 1,"total_count": 1
}


Device Identif ication Engine
HTTP Method
POST
Pagination
Enabled
Resource Path
/api/x_sclo_scilogic/v1/sciencelogic/IdentificationEngine
Defaul t Resource Path
/api/x_sclo_scilogic/sciencelogic/IdentificationEngine
This operation handles all creates and updates to the CMDB. This operation incorporates Identification Engineand uses the Identification and Reconciliation framework to properly import devices into the CMDB as aconfigurable discovery source. SL1 uses the classification GET to populate the JSON object.
Headers
Key Value
Content-Type application/json
Accept application/json
Parameters
Key Value
test true
Example (Request URL)
https://<your Instance>.service-now.com/api/x_sclo_scilogic/v1/sciencelogic/IdentificationEngine?test=true
Example (Body)
[{"items": [{"className": "cmdb_ci_linux_server",

"values": {"name": "Postman Test Server 1","serial_number": "9876EFGH","mac_address": "BF:D4:D6:6E:56:F1","ip_address": "10.10.10.4","ram": "16000","x_sclo_scilogic_region": "ScienceLogic","x_sclo_scilogic_id": "1"
}}
]},{"items": [{"className": "cmdb_ci_linux_server","values": {"name": "Postman Test Server 2","serial_number": "HGFE6789","mac_address": "87:54:3C:8C:2A:A3","ip_address": "10.10.10.5","ram": "16000","x_sclo_scilogic_region": "ScienceLogic","x_sclo_scilogic_id": "2"
}}
]}
]
Example Business Service (Body)
[{"items": [{"className": "cmdb_ci_service","values": {"name": "Integration Service","busines_criticality": "1 - most critical","used_for": "Production","operational_status": "1","service_classification": "Technical Service","comments": "Postman","x_sclo_scilogic_region": "ScienceLogic","x_sclo_scilogic_id": "1570"}},{"className": "cmdb_ci_linux_server","values": {"name": "Postman Test Server","serial_number": "7MDvqrSNyd","manufacturer": "ScienceLogic, Inc.","model_id": "","mac_address": "EE:D6:0B:79:32:C7",

"ip_address": "10.10.10.224","ram": "16000","x_sclo_scilogic_region": "ScienceLogic","x_sclo_scilogic_id": "10"}}],"relations": [{"type": "Depends on::Used by","parent": 0,"child": 1}]}]
Example (Response)
{"result": [{"items": [{"className": "cmdb_ci_linux_server","operation": "NO_CHANGE","sysId": "7fb39667dba12380dc44f00fbf961936","identifierEntrySysId": "fb27f69cc3000200d8d4bea192d3ae67","identificationAttempts": [{"identifierName": "Hardware Rule","attemptResult": "SKIPPED","attributes": ["serial_number","serial_number_type"
],"searchOnTable": "cmdb_serial_number"
},{"identifierName": "Hardware Rule","attemptResult": "MATCHED","attributes": ["serial_number"
],"searchOnTable": "cmdb_ci_hardware"
}]
}],"relations": [
]}
]}

Discovery Dependents
HTTP Method
GET
Pagination
Enabled
Resource Path
/api/x_sclo_scilogic/v1/sciencelogic/discovery_dependent
Defaul t Resource Path
/api/x_sclo_scilogic/sciencelogic/discovery_dependent
This operation pulls all Discovery-dependent records that are tied to the region value, which is used for thecatalog request process. Based on the request type, this operation returns a formatted JSON object. This operationpulls all the required information for both SL1 processes: Discovery Session and Create Virtual Device. Bothrequests require different information and are formatted accordingly.
The basic catalog item Device Discovery is set up as information collection to support the process within SL1. TheService Catalog has been simplified to its most basic form. The Service Catalog moves the request into the correctstate to be picked up by the GET Request and then waits for its return before completing the workflow.
Headers
Key Value
Content-Type application/json
Accept application/json
Parameters
Key Value
region (required) ScienceLogic
sysparm_offset 0
sysparm_limitglide.json.export.limit, glide.ui.export.limit,glide.ui.export.war.threshold
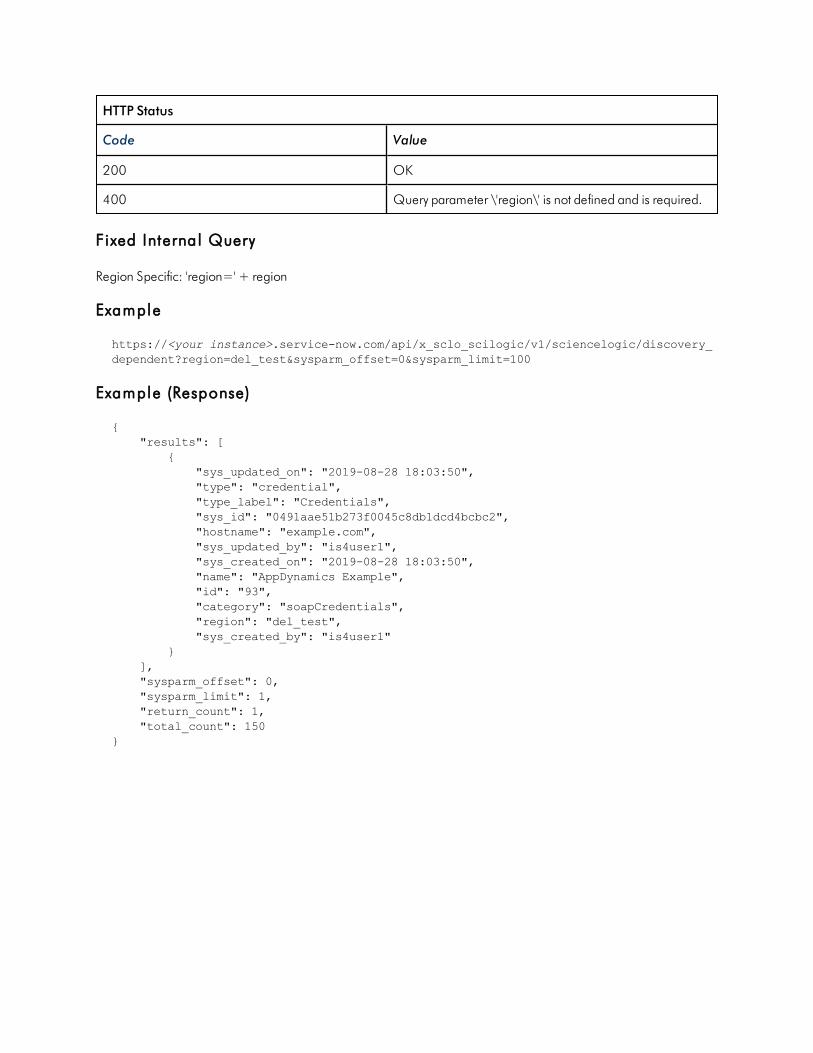
HTTP Status
Code Value
200 OK
400 Query parameter \'region\' is not defined and is required.
Fixed Internal Query
Region Specific: 'region=' + region
Example
https://<your instance>.service-now.com/api/x_sclo_scilogic/v1/sciencelogic/discovery_dependent?region=del_test&sysparm_offset=0&sysparm_limit=100
Example (Response)
{"results": [
{"sys_updated_on": "2019-08-28 18:03:50","type": "credential","type_label": "Credentials","sys_id": "0491aae51b273f0045c8db1dcd4bcbc2","hostname": "example.com","sys_updated_by": "is4user1","sys_created_on": "2019-08-28 18:03:50","name": "AppDynamics Example","id": "93","category": "soapCredentials","region": "del_test","sys_created_by": "is4user1"
}],"sysparm_offset": 0,"sysparm_limit": 1,"return_count": 1,"total_count": 150
}

File Systems
HTTP Method
GET
Pagination
Enabled
Resource Path
/api/x_sclo_scilogic/v1/sciencelogic/file_systems
Defaul t Resource Path
/api/x_sclo_scilogic/sciencelogic/file_systems
This operation pulls all the fields from the File System table. The return is ordered by sys_id, so the results displayin the same order every time. The results are filtered by the SL1 monitored and SL1 ID field on the ServiceNowside. This operation requires the region to be supplied by the requester, it returns only region-suppliedconfiguration items.
Headers
Key Value
Content-Type application/json
Accept application/json
Parameters
Key Value
region (required) ScienceLogic
sysparm_offset 0
sysparm_limitglide.json.export.limit, glide.ui.export.limit,glide.ui.export.war.threshold
HTTP Status
Code Value

200 OK
400 Query Parameter \'region\' is not defined and is required.
Fixed Internal Query
‘x_sclo_scilogic_monitored=true^x_sclo_scilogic_idISNOTEMPTY^x_sclo_scilogic_region=’+ region
Example
https://<your Instance>.service-now.com/api/x_sclo_scilogic/v1/sciencelogic/file_systems?region=ScienceLogic&sysparm_offset=0&sysparm_limit=100
Example (Response)
{"results": [{"operational_status": "1","sys_updated_on": "2018-11-12 21:59:52","media_type": "fixed","sys_created_by": "admin","sys_domain_path": "/","sys_class_name": "cmdb_ci_file_system","computer": "d83dac0adb4dab00dc44f00fbf961919","x_sclo_scilogic_monitored": "true","x_sclo_scilogic_region": "ScienceLogic","sys_updated_by": "admin","sys_created_on": "2018-11-12 21:59:06","sys_domain": "global","install_status": "1","name": "/root","subcategory": "File Share","sys_id": "afd30ba0dbf5a380dc44f00fbf961951","file_system": "ntfs","sys_class_path": "/!!/!K/!!","mount_point": "/root","sys_mod_count": "3","x_sclo_scilogic_id": "31","label": "/root","cost_cc": "USD","category": "Resource"
}],"sysparm_offset": 0,"sysparm_limit": 100,"return_count": 1,"total_count": 1
}
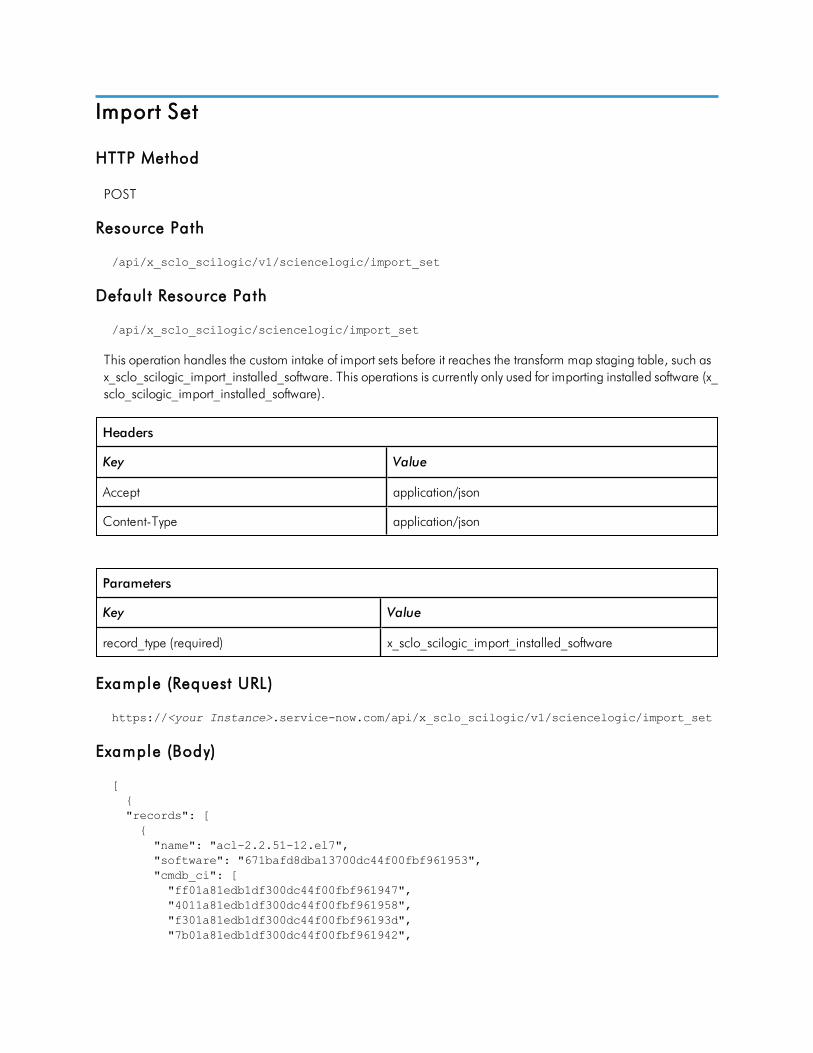
Import Set
HTTP Method
POST
Resource Path
/api/x_sclo_scilogic/v1/sciencelogic/import_set
Defaul t Resource Path
/api/x_sclo_scilogic/sciencelogic/import_set
This operation handles the custom intake of import sets before it reaches the transform map staging table, such asx_sclo_scilogic_import_installed_software. This operations is currently only used for importing installed software (x_sclo_scilogic_import_installed_software).
Headers
Key Value
Accept application/json
Content-Type application/json
Parameters
Key Value
record_type (required) x_sclo_scilogic_import_installed_software
Example (Request URL)
https://<your Instance>.service-now.com/api/x_sclo_scilogic/v1/sciencelogic/import_set
Example (Body)
[{"records": [{"name": "acl-2.2.51-12.el7","software": "671bafd8dba13700dc44f00fbf961953","cmdb_ci": ["ff01a81edb1df300dc44f00fbf961947","4011a81edb1df300dc44f00fbf961958","f301a81edb1df300dc44f00fbf96193d","7b01a81edb1df300dc44f00fbf961942",

"c411a81edb1df300dc44f00fbf96195d","7701a81edb1df300dc44f00fbf961922","7b01681edb1df300dc44f00fbf9619e7","fb01a81edb1df300dc44f00fbf961927"
],"active": true
}]
}]

Incidents
HTTP Method
GET
Pagination
Enabled
Resource Path
/api/x_sclo_scilogic/v1/sciencelogic/incidents
Defaul t Resource Path
/api/x_sclo_scilogic/sciencelogic/incidents
This operation pulls all records from the incident table that are created by a specific user_id and its related events.The results are ordered by the sys_id of the incident, so the results display in the same order every time. Thisoperation is also based on the incident being in an active state. This operation returns a pre-set of data and doesnot return everything on the Incident and Event (x_sclo_scilogic_event) tables.
Headers
Key Value
Content-Type application/json
Accept application/json
Parameters
Key Value
user_id (required) is4user1
sysparm_offset 0
sysparm_limitglide.json.export.limit, glide.ui.export.limit,glide.ui.export.war.threshold
HTTP Status
Code Value

200 OK
400 Query Parameter \'user_id\' is not defined and is required.
Fixed Internal Query
‘sys_created_by=’ + user_id + ‘active=true’
Example
https://<your Instance>.service-now.com/api/x_sclo_scilogic/v1/sciencelogic/incidents?user_id=is4user1&sysparm_offset=0&sysparm_limit=100
Example (Response)
{"results": [{"sys_id": "0141807bdbb16300dc44f00fbf9619fc","number": "INC0010135","state": "2","state_label": "In Progress","events": [{"event_id": "16908","device": {"sys_id": {
}}
},{"event_id": "16874","device": {"sys_id": {
}}
},{"event_id": "16865","device": {"sys_id": {
}}
}]
}],"sysparm_offset": 0,"sysparm_limit": 1,"return_count": 1,

"total_count": 44}

Installed Software
HTTP Method
GET
Pagination
Enabled
Resource Path
/api/x_sclo_scilogic/v1/sciencelogic/installed_software
Defaul t Resource Path
/api/x_sclo_scilogic/sciencelogic/installed_software
This operation pulls all the fields from the software (cmdb_ci_spkg) table. The return is ordered by sys_id, so theresults display in the same order every time. The results are filtered by the SL1 monitored field on the ServiceNowside. This operation requires the region to filter the installed software on devices.
Headers
Key Value
Content-Type application/json
Accept application/json
Parameters
Key Value
region ScienceLogic
sysparm_offset 0
sysparm_limitglide.json.export.limit, glide.ui.export.limit,glide.ui.export.war.threshold
HTTP Status
Code Value
200 OK

400Query parameter \'region\' is not defined and arerequired.
Fixed Internal Query
'x_sclo_scilogic_monitored=true'
Example (Request URL)
https://<your Instance>.service-now.com/api/x_sclo_scilogic/v1/sciencelogic/installed_software?sysparm_offset=0&sysparm_limit=100®ion=ScienceLogic
Example (Response){"results": [{"operational_status": "1","operational_status_label": "Operational","sys_updated_on": "2019-05-01 06:00:09","install_count": "2","sys_updated_by": "system","sys_created_on": "2019-03-29 19:42:58","sys_domain": "global","sys_created_by": "admin","sys_domain_path": "/","install_status": "1","install_status_label": "Installed","name": "Test_31","subcategory": "Package","sys_class_name": "cmdb_ci_spkg","sys_class_name_label": "Software","sys_id": "1e9608fcdb2cb740dc44f00fbf961949","sys_class_path": "/!!/#$","key": "Test_31_:::_NULL","license_available": "-2","sys_mod_count": "1","x_sclo_scilogic_id": "31","model_id": "2c146728dbe8b740dc44f00fbf9619c6","model_id_label": "Unknown","cost_cc": "USD","cost_cc_label": "USD","x_sclo_scilogic_monitored": "true","package_name": "Test_31","category": "Software","x_sclo_scilogic_region": "AutoGenerateClass","installed_on": [{"sys_id": "5a271407dbfe6300dc44f00fbf96190f","id": "10","region": "ScienceLogic","monitored": "true"},{"sys_id": "5a271407dbfe6300dc44f00fbf96190f",

"id": "10","region": "ScienceLogic","monitored": "true"}]}],"sysparm_offset": 0,"sysparm_limit": 100,"return_count": 4,"total_count": 4}
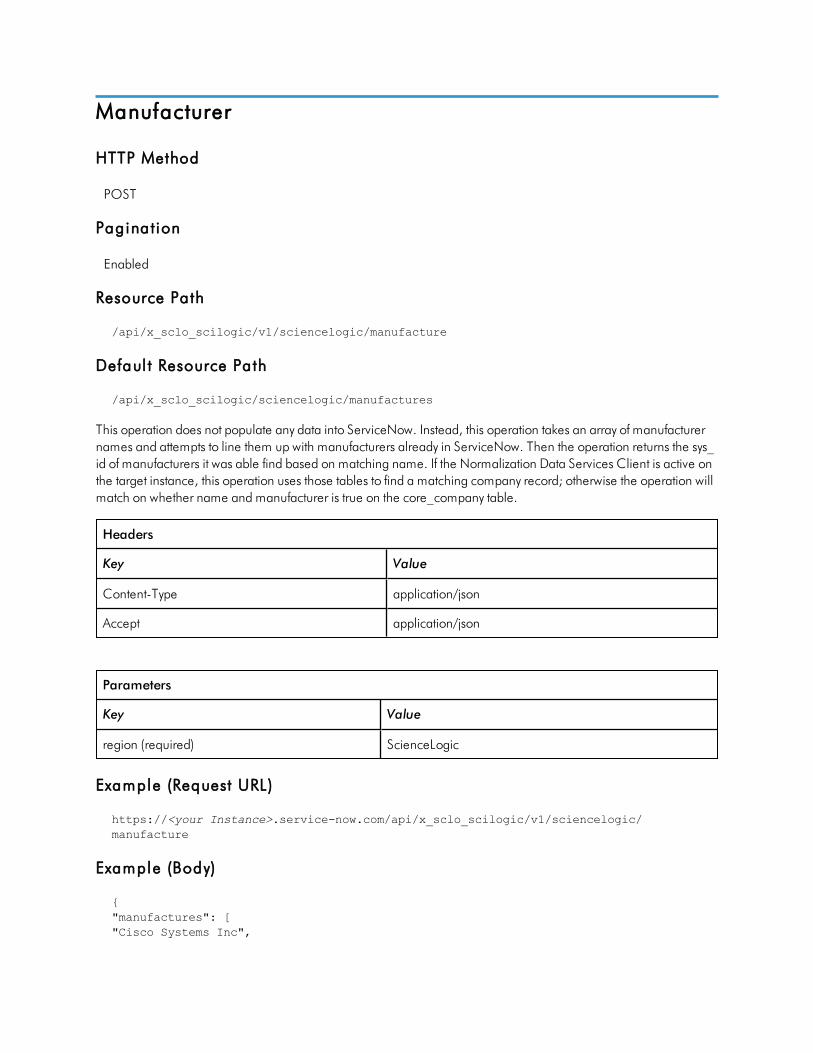
Manufacturer
HTTP Method
POST
Pagination
Enabled
Resource Path
/api/x_sclo_scilogic/v1/sciencelogic/manufacture
Defaul t Resource Path
/api/x_sclo_scilogic/sciencelogic/manufactures
This operation does not populate any data into ServiceNow. Instead, this operation takes an array of manufacturernames and attempts to line them up with manufacturers already in ServiceNow. Then the operation returns the sys_id of manufacturers it was able find based on matching name. If the Normalization Data Services Client is active onthe target instance, this operation uses those tables to find a matching company record; otherwise the operation willmatch on whether name and manufacturer is true on the core_company table.
Headers
Key Value
Content-Type application/json
Accept application/json
Parameters
Key Value
region (required) ScienceLogic
Example (Request URL)
https://<your Instance>.service-now.com/api/x_sclo_scilogic/v1/sciencelogic/manufacture
Example (Body)
{"manufactures": ["Cisco Systems Inc",

"Cisco Systems, Incorporated","CiscoSystems","American Power Conversion Inc.","APC Corp","Apc","IBM","IBM CORP","International Business Machines","Juniper Systems","Juniper Networks,Inc","Juniper Solutions"
]}
Example (Response)
{"result": {"Cisco Systems Inc": "","Cisco Systems, Incorporated": "","CiscoSystems": "","American Power Conversion Inc.": "","APC Corp": "","Apc": "","IBM": "","IBM CORP": "","International Business Machines": "","Juniper Systems": "","Juniper Networks,Inc": "","Juniper Solutions": ""}}

Model
HTTP Method
POST
Resource Path
/api/x_sclo_scilogic/v1/sciencelogic/model
Defaul t Resource Path
/api/x_sclo_scilogic/sciencelogic/models
This operation does not populate any data into ServiceNow. Instead, this operation takes an array of model namesand attempts to line them up with models already in ServiceNow and returns the sys_id of models it was able tofind based on matching name.
Headers
Key Value
Content-Type application/json
Accept application/json
Parameters
Key Value
region (required) ScienceLogic
Example (Request URL)
https://<your Instance>.service-now.com/api/x_sclo_scilogic/v1/sciencelogic/models
Example (Body)
{"models": ["4331 ISR","7206VXR","7609S","AS5300","ASR5000","Catalyst 3560G-24TS","Catalyst 4948","Catalyst 6509-CatOS","BIG-IP Viprion B4300",

"F5 BIG-IP DNS","BIG-IP Wide IP Container","BIG-IP Data Center Container"]}
Example (Response)
{"result": {"4331 ISR": "","7206VXR": "","7609S": "","AS5300": "","ASR5000": "","Catalyst 3560G-24TS": "","Catalyst 4948": "","Catalyst 6509-CatOS": "","BIG-IP Viprion B4300": "","F5 BIG-IP DNS": "","BIG-IP Wide IP Container": "","BIG-IP Data Center Container": ""}}

Network Adapters
HTTP Method
GET
Pagination
Enabled
Resource Path
/api/x_sclo_scilogic/v1/sciencelogic/network_adapters
Defaul t Resource Path
/api/x_sclo_scilogic/sciencelogic/network_adapters
This operation pulls all the fields from the network adapter table. The return is ordered by sys_id, so the resultsdisplay in the same order every time. The results are filtered by the SL1 monitored and SL1 ID field on theServiceNow side. This operation requires the region to be supplied by the requester, and it only returns region-supplied configuration items.
Headers
Key Value
Content-Type application/json
Accept application/json
Parameters
Key Value
region (required) ScienceLogic
sysparm_offset 0
sysparm_limitglide.json.export.limit, glide.ui.export.limit,glide.ui.export.war.threshold
HTTP Status
Code Value
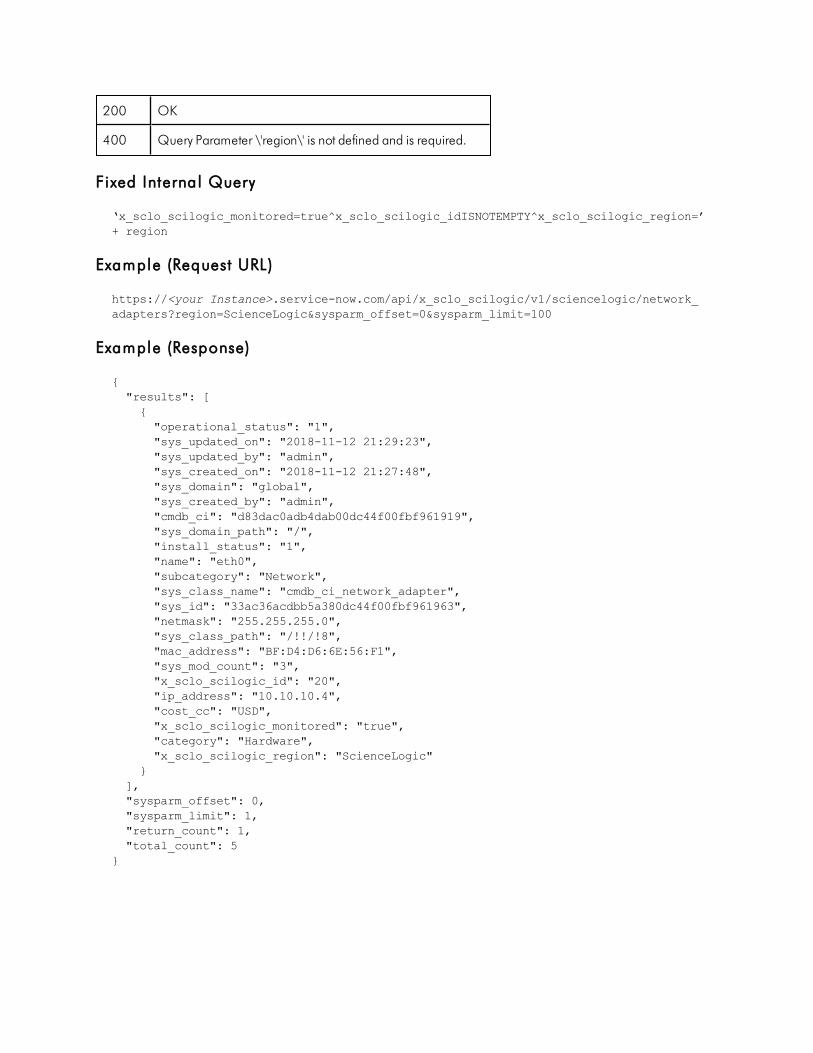
200 OK
400 Query Parameter \'region\' is not defined and is required.
Fixed Internal Query
‘x_sclo_scilogic_monitored=true^x_sclo_scilogic_idISNOTEMPTY^x_sclo_scilogic_region=’+ region
Example (Request URL)
https://<your Instance>.service-now.com/api/x_sclo_scilogic/v1/sciencelogic/network_adapters?region=ScienceLogic&sysparm_offset=0&sysparm_limit=100
Example (Response)
{"results": [{"operational_status": "1","sys_updated_on": "2018-11-12 21:29:23","sys_updated_by": "admin","sys_created_on": "2018-11-12 21:27:48","sys_domain": "global","sys_created_by": "admin","cmdb_ci": "d83dac0adb4dab00dc44f00fbf961919","sys_domain_path": "/","install_status": "1","name": "eth0","subcategory": "Network","sys_class_name": "cmdb_ci_network_adapter","sys_id": "33ac36acdbb5a380dc44f00fbf961963","netmask": "255.255.255.0","sys_class_path": "/!!/!8","mac_address": "BF:D4:D6:6E:56:F1","sys_mod_count": "3","x_sclo_scilogic_id": "20","ip_address": "10.10.10.4","cost_cc": "USD","x_sclo_scilogic_monitored": "true","category": "Hardware","x_sclo_scilogic_region": "ScienceLogic"
}],"sysparm_offset": 0,"sysparm_limit": 1,"return_count": 1,"total_count": 5
}

Service Requests
HTTP Method
GET
Pagination
Enabled
Resource Path
/api/x_sclo_scilogic/v1/sciencelogic/service_request
Defaul t Resource Path
/api/x_sclo_scilogic/sciencelogic/service_request
This operation pulls all service requests that are tied to specific catalog item. Based on the request type it returns aformatted JSON object. It pulls all the required information for an SL1 Discovery session and creating a virtualdevice in SL1. Both requests require different information and are formatted accordingly.
The basic catalog item Device Discovery is set up as information collection to support the process within SL1. TheService Catalog has been simplified to its most basic form. The workflow moves the request into the correct state tobe picked up by the GET request and then waits for its return before completing the workflow.
Headers
Key Value
Content-Type application/json
Accept application/json
Parameters
Key Value
region (required) ScienceLogic
state 2
sysparm_offset 0
sysparm_limitglide.json.export.limit, glide.ui.export.limit,glide.ui.export.war.threshold

HTTP Status
Code Value
200 OK
400 Query Parameter \'region\' is not defined and is required.
Fixed Internal Query
State:‘request_item.active=true^request_item.cat_item=’ + catalog + ‘^sc_item_option.item_option_new.name=Region^sc_item_option.value=’ + region
Non-State:‘request_item.active=true^request_item.cat_item=’ + catalog + ‘^sc_item_option.item_option_new.name=Region^sc_item_option.value=’ + region + ‘^request_item.state=’ +state
Example
https://<your Instance>.service-now.com/api/x_sclo_scilogic/v1/sciencelogic/ service_request?region=Cisco
Example (Response)
{"results": [{"number": "RITM0010018","sysid": "00365de2db1a2340dc44f00fbf961941","state": "2","request_type": "Discover Device","region": "Cisco","log_all": "false","ip_hostname_list": "167.132.14.15","credentials": [{"Category": "Linux","ID": "1"
}],"discover_non_snmp": "false","model_devices": "true","dhcp": "false","device_model_cache_ttl_h": "2","collection_server": "1","organization": "1","add_devices_to_device_groups": ["test"
],"device_template": "1","initial_scan_level": "System Default (Recommended)",

"scan_throttle": "System Default (Recommended)","scan_ports": "21,22,23,25,80","port_scan_all": "System Default (Recommended)","port_scan_timeout": "System Default (Recommended)","interface_inventory_timeout": "600000","maximum_allowed_interfaces": "10000","bypass_interface_inventory": "false"
},{"number": "RITM0010016","sysid": "194447e8db162f00dc44f00fbf96195b","state": "2","request_type": "Discover Device","region": "Cisco","log_all": "false","ip_hostname_list": "192.168.1.1","credentials": [{"Category": "Linux","ID": "1"
}],"discover_non_snmp": "false","model_devices": "false","dhcp": "false","device_model_cache_ttl_h": "2","collection_server": "1","organization": "1","add_devices_to_device_groups": [
],"device_template": "1","initial_scan_level": "System Default (Recommended)","scan_throttle": "System Default (Recommended)","scan_ports": "21,22,23,25,80","port_scan_all": "System Default (Recommended)","port_scan_timeout": "System Default (Recommended)","interface_inventory_timeout": "600000","maximum_allowed_interfaces": "10000","bypass_interface_inventory": "false"
},{"number": "RITM0010014","sysid": "250dae2cdbd22f00dc44f00fbf961954","state": "2","request_type": "create_virtual_device","region": "Cisco","collection_server": "1","virtual_device_class": "1"
}]
}

Appendix
DServiceNow Registered Events
Overview
This appendix describes the commands and data you can use to generate registered events in ServiceNow thatare queued to ServiceNow Event Management. These events can trigger actions in the Integration Service, suchas specifying one or more CIs for monitoring, or putting a CI into maintenance.
These events use the gs.eventQueue command, using the following format:
eventQueue(String name, Object instance, String parm1, String parm2)
You can use examples found in the following ServiceNow update sets to help you customize the gs.eventQueuecommand to specify which ServiceNow events can trigger Integration Service actions:
l ScienceLogic ServiceNow Integration (Catalog UI)
l ScienceLogic ServiceNow Integration (Maintenance Mode)
l ScienceLogic ServiceNow Integration (Maintenance Schedule) Example
You will need to install these update sets in ServiceNow.
NOTE: This appendix is recommended for advanced ServiceNow administrators.
This appendix includes the following topics:
Catalog Item Events 181
Maintenance Mode Events 183
Maintenance Schedule Events 184

Catalog Item Events
The following events are available through the "ScienceLogic ServiceNow Integration (Catalog UI)" update set inServiceNow.
x_sclo_scilogic.device_monitoring
This event takes the selected Configuration Items in ServiceNow, files a catalog request using the templateselected by the user, and submits the catalog request.
Trigger
Custom requirement supplied by ScienceLogic implementation or the Customer directly.
Command
gs.eventQueue('x_sclo_scilogic.device_monitoring', region, ip_list.toString(),region.getUniqueValue() + "," + region.x_sclo_scilogic_region + "," + silo_template);
Event Fields
Field Description
x_sclo_scilogic.device_monitoring Unique name of the event.
region The table to which the event applies.
ip_list.toString() Parm1: The IP, or a comma-separated list of IPaddresses, that is pulled from the ip_address field onthe cmdb_ci table.
getCompany.getUniqueValue(), silo_template Parm2: List of three requirements that the sys_id of thecompany associated with the Configuration Item and thecatalog template selected through the user interfaceaction.
Example
The UI action / UI page is available through the "ScienceLogic ServiceNow Integration (Catalog UI Action)" updateset.

x_sclo_scilogic.remove_monitoring
This action takes the selected Configuration Item or Items and submits a request through the ServiceNow servicecatalog for each Configuration Item.
Trigger
Custom requirement supplied by ScienceLogic implementation or the Customer directly.
Command
gs.eventQueue('x_sclo_scilogic.remove_monitoring',current, current.getUniqueValue(),current.company);
Event Fields
Field Description
x_sclo_scilogic.remove_monitoring Unique name of the event.
current The table to which the event applies.
current.getUniqueValue() Parm1: The sys_id of the Configuration Item thatneeds to be removed
current.company); Parm2: The sys_id of the company that is associatedwith the Configuration Item.
Example
The UI action / UI page is available through the "ScienceLogic ServiceNow Integration (Catalog UI Action)" updateset.

Maintenance Mode Events
The following event is available through the "ScienceLogic ServiceNow Integration (Maintenance Mode)" updateset in ServiceNow.
x_sclo_scilogic.device_maintenance
This event submits a list of devices to be put in to Maintenance via the Mid Server.
Trigger
Custom requirement supplied by ScienceLogic implementation or the Customer directly.
Command
gs.eventQueue('x_sclo_scilogic.device_maintenance',current, action, affected_ci);
Event Fields
Field Description
x_sclo_scilogic.device_maintenance Unique name of the event.
current The table to which the event applies.
action Parm1: An array that includes action to be performed(enable_maintenance or disable_maintenance) and thesys_id of the task. Task is not required, but the actionis.
affected_ci Parm2: An array of device sys_ids that need to beenable or disabled maintenance mode.
Example
Business rule (ScienceLogic ServiceNow Integration (Maintenance Mode Business rule)).

Maintenance Schedule Events
The following event is available through the "ScienceLogic ServiceNow Integration (Maintenance Schedule)Example" update set in ServiceNow.
x_sclo_scilogic.device_maintenance_skd
This event submits a list of devices and creates or cancels scheduled maintenance via the Mid Server.
Trigger
Custom requirement supplied by ScienceLogic implementation or the Customer directly.
Command
gs.eventQueue('x_sclo_scilogic.device_maintenance_skd',current, 'schedule',current.getUniqueValue());
Event Fields
Field Description
x_sclo_scilogic.device_maintenance_skd Unique name of the event.
current The table to which the event applies.
'schedule' Parm1: Accepts two variables: schedule or cancel.- [schedule]. Creates a schedule in SL1.- cancel: Deletes any currently scheduled maintenance.
current.getUniqueValue()) Parm2: An array of device sys_id values that need tobe enabled or disabled for maintenance mode.
Example
The UI action / UI page is available via the "ScienceLogic ServiceNow Integration (Maintenance Schedule)Example" update set.

© 2003 - 2020, ScienceLogic, Inc.
All rights reserved.
LIMITATION OF LIABILITY ANDGENERAL DISCLAIMER
ALL INFORMATION AVAILABLE IN THIS GUIDE IS PROVIDED "AS IS," WITHOUT WARRANTY OF ANYKIND, EITHER EXPRESS OR IMPLIED. SCIENCELOGIC™ AND ITS SUPPLIERS DISCLAIM ALL WARRANTIES,EXPRESS OR IMPLIED, INCLUDING, BUT NOT LIMITED TO, THE IMPLIED WARRANTIES OFMERCHANTABILITY, FITNESS FOR A PARTICULAR PURPOSE OR NON-INFRINGEMENT.
Although ScienceLogic™ has attempted to provide accurate information on this Site, information on this Sitemay contain inadvertent technical inaccuracies or typographical errors, and ScienceLogic™ assumes noresponsibility for the accuracy of the information. Information may be changed or updated without notice.ScienceLogic™ may also make improvements and / or changes in the products or services described in thisSite at any time without notice.
Copyrights and Trademarks
ScienceLogic, the ScienceLogic logo, and EM7 are trademarks of ScienceLogic, Inc. in the United States,other countries, or both.
Below is a list of trademarks and service marks that should be credited to ScienceLogic, Inc. The ® and ™symbols reflect the trademark registration status in the U.S. Patent and Trademark Office and may not beappropriate for materials to be distributed outside the United States.
l ScienceLogic™l EM7™ and em7™l Simplify IT™l Dynamic Application™l Relational Infrastructure Management™
The absence of a product or service name, slogan or logo from this list does not constitute a waiver ofScienceLogic’s trademark or other intellectual property rights concerning that name, slogan, or logo.
Please note that laws concerning use of trademarks or product names vary by country. Always consult alocal attorney for additional guidance.
Other
If any provision of this agreement shall be unlawful, void, or for any reason unenforceable, then thatprovision shall be deemed severable from this agreement and shall not affect the validity and enforceabilityof any remaining provisions. This is the entire agreement between the parties relating to the matterscontained herein.
In the U.S. and other jurisdictions, trademark owners have a duty to police the use of their marks. Therefore,if you become aware of any improper use of ScienceLogic Trademarks, including infringement orcounterfeiting by third parties, report them to Science Logic’s legal department immediately. Report as muchdetail as possible about the misuse, including the name of the party, contact information, and copies orphotographs of the potential misuse to: [email protected]

800-SCI-LOGIC (1-800-724-5644)
International: +1-703-354-1010