
ServiceNow Change Management Synchronization PowerPack
42
ServiceNow Change Management Synchronization PowerPack Version 3.2.1
-
Upload
khangminh22 -
Category
Documents
-
view
0 -
download
0
Transcript of ServiceNow Change Management Synchronization PowerPack

ServiceNow Change ManagementSynchronization PowerPackVersion 3.2.1

Table of Contents
Introduction to the ServiceNow Change Management Synchronization PowerPack 4Architecture Overview for ServiceNow Synchronization PowerPacks 5SL1 and ServiceNow Terminology 6Dependency Map for ServiceNow Synchronization PowerPacks 6Prerequisites for ServiceNow Synchronization PowerPacks 7Contents of the Synchronization PowerPack 7PowerFlow Applications 7PowerFlow Applications (Internal) 8
Installing and Configuring the Change Management Synchronization PowerPack 9Downloading the Synchronization PowerPack 10Importing the Synchronization PowerPack 10Installing the Synchronization PowerPack 11
Configuring Applications for the Change Management Synchronization PowerPack 12Creating and Aligning a Configuration Object 13Creating a Configuration Object 13Aligning a Configuration Object 16
Syncing Device Maintenance from ServiceNow to SL1 16Viewing SL1 Events for Change Requests 17Viewing Change Events for SL1 Business Services 18
Scheduling Device Maintenance (No MID Server) 18Using a MID Server to Place a Device Directly in Maintenance or Schedule a Maintenance Window 23Configuring and Running the "Sync Change Management Requirements" Application in PowerFlow 23Creating a ServiceNow Credential and Credential Affinity 24
ServiceNow Registered Events 25Change Request Events 25Direct to Device: x_sclo_scilogic.device_maintenance 25Command 25Event Fields 25Scheduled Device Maintenance: x_sclo_scilogic.device_maintenance_skd 26Command 26Event Fields 26
Change Request Events Example 26Troubleshooting the Change Management Synchronization PowerPack 29Initial Troubleshooting Steps 30SL1 PowerFlow 30ServiceNow 30
Resources for Troubleshooting 30Useful PowerFlow Ports 30Helpful Docker Commands 31Viewing Container Versions and Status 31Restarting a Service 31Stopping all PowerFlow Services 31Restarting Docker 31Viewing Logs for a Specific Service 32Clearing RabbitMQ Volume 32Viewing the Process Status of All Services 33Deploying Services from a Defined Docker Compose File 33Dynamically Scaling for More Workers 33Completely Removing Services from Running 33
Diagnosis Tools 33

Retrieving Additional Debug Information (Debug Mode) 34Allowing Cross-Scoped Access in ServiceNow 35
ServiceNow Change Management API Endpoints 38Change Requests 39
HTTP Method 39Resource Path 39Default Resource Path 39Fixed Internal Query 40Example 40Example (Response) 40

Chapter
1Introduction to the ServiceNow Change
Management Synchronization PowerPack
Overview
This chapter describes the ServiceNow Change Management Synchronization PowerPack, which is theScienceLogic integration with the ServiceNow Change Management Module.
You can use this Synchronization PowerPack to place SL1 devices into and out of maintenance mode. You willneed to install the ServiceNow CMDB Synchronization PowerPack to use this Synchronization PowerPack.
You can configure PowerFlow to generate an SL1 Event when a maintenance-related change occurs. The SL1Event contains data about the change request from ServiceNow, including a hyperlink to the ServiceNow changerecord. The event is aligned with a Device in SL1, and if the Device is part of a Business Service in SL1 version11.1.0 or later, the event displays on the [Change Events] tab for that Business Service. This sync of proposedServiceNow change requests to SL1 events requires the ServiceNow MID Server.
NOTE: You do not need the ServiceNow Events Module to use this Synchronization PowerPack. However,you will need to install and run the ServiceNow CMDB Synchronization PowerPack on the samePowerFlow system as this Synchronization PowerPack.
This chapter covers the following topics:
Architecture Overview for ServiceNow Synchronization PowerPacks 5
SL1 and ServiceNow Terminology 6
Dependency Map for ServiceNow Synchronization PowerPacks 6
Prerequisites for ServiceNow Synchronization PowerPacks 7
Contents of the Synchronization PowerPack 7
4

5
Architecture Overview for ServiceNow SynchronizationPowerPacks
The following diagram details the various elements that are contained in SL1 and the PowerFlow system, and howPowerFlow sits between the core SL1 platform and an external data platform:
The following diagram provides an example of the high-level architecture of a PowerFlow system with HighAvailability, Disaster Recovery, and a proxy configured:
Architecture Overview for ServiceNow Synchronization PowerPacks

SL1 and ServiceNow Terminology
SL1 and ServiceNow Terminology
The following table lists the different names for the shared elements in SL1 and ServiceNow:
SL1 ServiceNow
Asset, Custom Attribute Asset (ITAM)
Device CI (Configuration Item)
Discovery Session Service Request, Catalog Request
Event Incident, Event, or Case (depending on theSynchronization PowerPack you are using)
Alert Event
Organization Company, Domain
Schedule, Maintenance Schedule Change Request, Change Schedule
Topology, Relationships, DynamicComponent Mapping and Relationships(DCM+R)
Dependency View, Affected CIs
Dependency Map for ServiceNow Synchronization PowerPacks
The following graphic describes which Synchronization PowerPacks depend on other SynchronizationPowerPacks:
TIP: For more information about the Standard Base Steps Synchronization PowerPack, see theSL1 PowerFlow Platform manual.
6

7
Prerequisites for ServiceNow Synchronization PowerPacks
This section describes the prerequisites for the ServiceNow Synchronization PowerPacks. For more informationabout the specific software versions required by a ServiceNow Synchronization PowerPack, see the release notesfor that Synchronization PowerPack.
To install any of the ScienceLogic ServiceNow Synchronization PowerPacks, you must have administrator accessto both SL1 and ServiceNow. Specifically, you will need:
l ScienceLogic administrator access to the Administration Portal
l ServiceNow administrator access
If you want to upload and install multiple ServiceNow Synchronization PowerPacks at the same time, you shouldupload all of the Synchronization PowerPacks first, and then install them to address any dependencies betweenthe Synchronization PowerPacks.
WARNING: ScienceLogic does not support any deployment that attempts to sync one SL1 instance tomultiple ServiceNow instances. A deployment of this type will be incredibly fragile and wouldrequire the customer to strictly control their environments. This is not something that can becontrolled programmatically. If this type of deployment is done without the endorsement ofScienceLogic, all escalations relating to this deployment will be rejected.
The following table lists the port access required by PowerFlow and this Synchronization PowerPack:
Source IP PowerFlowDestination
PowerFlowSource Port
Destination Port Requirement
PowerFlow SL1 API Any TCP 443 SL1 API Access
PowerFlow ServiceNow API Any TCP 443 ServiceNowAPI Access
PowerFlow SL1 Database Any TCP 7706 SL1 Database Access
NOTE: ScienceLogic highly recommends that you disable all firewall session-limiting policies. Firewalls willdrop HTTPS requests, which results in data loss.
Contents of the Synchronization PowerPack
This section lists the contents of the ServiceNow Change Management Synchronization PowerPack.
PowerFlow Applications
The following PowerFlow applications are included with the ServiceNow Change Management SynchronizationPowerPack:
Prerequisites for ServiceNow Synchronization PowerPacks

Contents of the Synchronization PowerPack
l Create or Update Maintenance Schedule from ServiceNow Trigger. Handles scheduling and cancelingmaintenance schedules in SL1 using a trigger from a ServiceNow Management, Instrumentation, andDiscovery (MID) Server. When triggered, the application gathers data about the change request inServiceNow and generates an SL1 Event with a severity of Notice. For more information, see Creating orUpdating Device Maintenance from a ServiceNow Trigger.
l Sync Change Management Requirements. Sends configuration data from PowerFlow to ServiceNow touse with change management and other processes. For more information, see Directly Enabling orDisabling Device Maintenance from ServiceNow.
l Sync Maintenance Schedules from ServiceNow to SL1. Syncs maintenance windows from ServiceNowchange requests (CHG)s to SL1 devices to place the synced devices into maintenance mode for thescheduled change window. If you are scheduling this application, ScienceLogic recommends that youschedule it to run every hour or so, depending on your environment. This process does not require the use ofa ServiceNow MID Server. For more information, see Scheduling Device Maintenance.
l Trigger Device Maintenance Updates via MID Server. Lets you sync maintenance windows fromServiceNow to SL1 using a ServiceNow Management, Instrumentation, and Discovery (MID) Server. Formore information, see Directly Enabling or Disabling Device Maintenance from ServiceNow.
PowerFlow Applications (Internal)
To view the internal PowerFlow applications, click the Filter icon ( ) on the Applications page and selectShow Hidden Applications. Internal applications are hidden by default. The following applications are "internal"applications that should not be run directly, but are automatically run by applications from the previous list:
l Cancel Maintenance. Cancels a scheduled maintenance in SL1.
l Create Maintenance. Creates a scheduled maintenance in SL1.
l Modify Maintenance. Updates a scheduled maintenance in SL1.
l Process Create Schedule Requests. Schedules and posts maintenance tasks in ServiceNow.
l Remove Maintenance. Removes a scheduled maintenance in SL1.
l Schedule Maintenance. Creates a scheduled maintenance in SL1.
8

Chapter
2Installing and Configuring the
Change Management SynchronizationPowerPack
Overview
This chapter describes how to install the ServiceNow Change Management Synchronization PowerPack.
This chapter covers the following topics:
Downloading the Synchronization PowerPack 10
Importing the Synchronization PowerPack 10
Installing the Synchronization PowerPack 11
9

10
Downloading the Synchronization PowerPack
A Synchronization PowerPack file has the .whl file extension type. You can download the SynchronizationPowerPack file from the ScienceLogic Support site.
WARNING: If you are upgrading to this version of the Synchronization PowerPack from a previous version,make a note of any settings you made on the Configuration pane of the various PowerFlowapplications in this Synchronization PowerPack, as these settings are not retained when youupgrade.
To locate and download the Synchronization PowerPack:
1. Go to the ScienceLogic Support Site.
2. Click the [Product Downloads] tab and select PowerPack.
3. In the Search PowerPacks field, search for the Synchronization PowerPack and select it from the searchresults. The Release Version page appears.
4. On the [PowerPack Versions] tab, click the name of the Synchronization PowerPack version that you wantto install. The Release File Details page appears.
5. Click the [Download File] button or click the name of the .zip file containing the .whl file for thisSynchronization PowerPack to start downloading the file.
NOTE: Synchronization PowerPacks do not require a specific license. After you download a SynchronizationPowerPack, you can import it to your PowerFlow system using the PowerFlow user interface.
NOTE: If you are installing or upgrading to the latest version of this Synchronization PowerPack in an offlinedeployment, see "Installing or Upgrading in an Offline Environment" in the SynchronizationPowerPack release notes to ensure you install any external dependencies.
Importing the Synchronization PowerPack
To import a Synchronization PowerPack in the PowerFlow user interface:
1. On the SyncPacks page of the PowerFlow user interface, click [Import SyncPack]. The Import SyncPackpage appears.
2. Click [Browse] and select the .whl file for the Synchronization PowerPack you want to install.
TIP: You can also drag and drop a .whl file to the Import SyncPack page.
Downloading the Synchronization PowerPack

Installing the Synchronization PowerPack
3. Click [Import]. PowerFlow registers and uploads the Synchronization PowerPack. The SynchronizationPowerPack is added to the SyncPacks page.
NOTE: You cannot edit the content package in a Synchronization PowerPack published by ScienceLogic.You must make a copy of a ScienceLogic Synchronization PowerPack and save your changes to thenew Synchronization PowerPack to prevent overwriting any information in the originalSynchronization PowerPack when upgrading.
Installing the Synchronization PowerPack
NOTE: You must import and install the ServiceNow Base Synchronization PowerPack before uploading andinstalling any of the other ServiceNow Synchronization PowerPacks.
To activate and install a Synchronization PowerPack in the PowerFlow user interface:
1. On the SyncPacks page of the PowerFlow user interface, click the [Actions] button ( ) for theSynchronization PowerPack you want to install and select Activate & Install. The Activate & InstallSyncPackmodal appears.
NOTE: If you try to activate and install a Synchronization PowerPack that is already activated andinstalled, you can choose to "force" installation across all the nodes in the PowerFlow system.
TIP: If you do not see the PowerPack that you want to install, click the Filter icon ( ) on theSyncPacks page and select Toggle Inactive SyncPacks to see a list of the imported PowerPacks.
2. Click [Yes] to confirm the activation and installation. When the Synchronization PowerPack is activated, theSyncPacks page displays a green check mark icon ( ) for that Synchronization PowerPack. If the
activation or installation failed, then a red exclamation mark icon ( ) appears.
3. For more information about the activation and installation process, click the check mark icon ( ) or the
exclamation mark icon ( ) in the Activated column for that Synchronization PowerPack. For a successful
installation, the "Activate & Install SyncPack" application appears, and you can view the Step Log for thesteps. For a failed installation, the Error Logs window appears.
4. If you have other versions of the same Synchronization PowerPack on your PowerFlow system, you can clickthe [Actions] button ( ) for that Synchronization PowerPack and select Change active version to activate a
different version other than the version that is currently running.
11

Chapter
3Configuring Applications for the ChangeManagement Synchronization PowerPack
Overview
This chapter describes how to configure PowerFlow application for the ServiceNow Change ManagementSynchronization PowerPack. You can use this Synchronization PowerPack to place SL1 devices into and out ofmaintenance mode.
This chapter covers the following topics:
Creating and Aligning a Configuration Object 13
Syncing Device Maintenance from ServiceNow to SL1 16
Scheduling Device Maintenance (No MID Server) 18
Using a MID Server to Place a Device Directly in Maintenance or Schedule a Maintenance Window 23
ServiceNow Registered Events 25
12

13
Creating and Aligning a Configuration Object
A configuration object supplies the login credentials and other required information needed to execute the stepsfor an application in PowerFlow. The Configurations page ( ) of the PowerFlow user interface lists all
available configuration objects for that system.
You can create as many configuration objects as you need. A PowerFlow application can only use oneconfiguration object at a time, but you can use (or "align") the same configuration object with multipleapplications.
To use this Synchronization PowerPack, you will need to create one or more configuration objects in thePowerFlow user interface and align that configuration object to the applications that let you sync data betweenSL1 and ServiceNow.
NOTE: Depending on your SL1 and ServiceNow environments, you might be able to use the sameconfiguration object with other ServiceNow Synchronization PowerPacks.
NOTE: When either multiple SL1 stacks or multiple ServiceNow systems are involved with PowerFlow, youshould create an individual configuration object for each SL1 stack or ServiceNow system. Next,create an individual schedule for each configuration object. Each schedule should use aconfiguration object that is specific to that single SL1 stack or ServiceNow system. Creating copies ofa PowerFlow application from a Synchronization PowerPack for the purpose of distinguishingbetween domains is not supported, and will result in issues on upgrades.
Creating a Configuration Object
For this Synchronization PowerPack, you can make a copy of the "ServiceNow SyncPack" configuration object,which is the sample configuration file that was installed with the ServiceNow Base Synchronization PowerPack.
TIP: The "ServiceNow SyncPack" configuration object contains all of the required variables. Make a copy ofthe configuration object and update the variables from that object to match your SL1 and ServiceNowsettings.
Creating and Aligning a Configuration Object

Creating and Aligning a Configuration Object
To create a configuration object based on the "ServiceNow SyncPack" configuration object:
1. In the PowerFlow user interface, go to the Configurations page ( ).
2. Click the [Actions] button ( ) for the "ServiceNow SyncPack" configuration object and select Edit.
The Configuration pane appears:
TIP: Click [Toggle JSON Editor] to show the JSON code. Click the button again to see the fields.
3. Click [Copy as]. The Create Configuration pane appears.
TIP: This step is required. Do not use the original configuration object to run PowerFlow applications.
4. Complete the following fields:
l Friendly Name. Name of the configuration object that will display on the Configurations page.
l Description. A brief description of the configuration object.
l Author. User or organization that created the configuration object.
l Version. Version of the configuration object.
14

15
5. In the Configuration Data field, include the required block of code to ensure that the applications alignedto this configuration object do not fail:
{"encrypted": false,"name": "sl1_db_host","value": "${config.sl1_host}"
}For example:
{"encrypted": false,"name": "sl1_db_host","value": "10.2.11.42"
}
TIP: Click [Toggle JSON Editor] to show the JSON code. Click the button again to see the fields. Youcan also click [Add Value] and add a new name-value pair in the Configuration Data Valuessection.
NOTE: If you are using SL1 with an External Database (SL1 Extended architecture or a cloud-basedarchitecture), update the "value" of that block of code to be the host of your database. Thisfield accepts IP addresses. For example: "value": "db.sciencelogic.com". If you arenot using the SL1 Extended architecture or a cloud-based architecture, you do not need tomake any changes to the block of code other than pasting the code into the configurationobject.
6. In the Configuration Data Values field, update the default variable definitions to match your PowerFlowconfiguration.
NOTE: The region value is a user-defined variable that identifies your SL1 instancewithin ServiceNow.
7. To create a configuration variable in the JSON Editor, define the following keys:
l encrypted. Specifies whether the value will appear in plain text or encrypted in this JSON file. If youset this to "true", when the value is uploaded, PowerFlow encrypts the value of the variable. The plaintext value cannot be retrieved again by an end user. The encryption key is unique to each PowerFlowsystem. The value is followed by a comma.
l name. Specifies the name of the configuration file, without the JSON suffix. This value appears in theuser interface. The value is surrounded by double-quotes and followed by a comma.
l value. Specifies the value to assign to the variable. The value is surrounded by double-quotes andfollowed by a comma.
8. Click [Save]. You can now align this configuration object with one or more applications.
Creating and Aligning a Configuration Object

Syncing Device Maintenance from ServiceNow to SL1
Aligning a Configuration Object
Before you can run the applications in this Synchronization PowerPack, you must first "align" a configurationobject with the application you want to use.
To align a configuration object with an application:
1. From the Applications page of the PowerFlow user interface, open the relevant application and click[Configure] ( ). The Configurations pane for that application appears:
2. From the Configurations drop-down, select the configuration object you want to use.
3. Click [Save] to align that configuration with the application.
4. Repeat this process for every other application you want to use.
NOTE: The values for eventDetails and the other parameters that appear in the Configuration pane with apadlock icon ( ) are populated by the configuration object. Do not modify these values.
Syncing Device Maintenance from ServiceNow to SL1
You can use the following methods to put one or more devices into maintenance mode from ServiceNow to SL1:
16
17
l Use the "Sync Maintenance Schedules from ServiceNow to SL1" PowerFlow application if you are not using aMID Server, and you want to create a change request in ServiceNow to perform scheduledmaintenancethrough a maintenance window in ServiceNow. For more information, see SchedulingDevice Maintenance (No MID Server).
l If you are looking to leverage a ServiceNow Management, Instrumentation, and Discovery (MID) Server,there are two separate ways of placing a Device in maintenance:
o Use the "Create or Update Maintenance Schedule from ServiceNow Trigger" application to createand cancel maintenance schedules in SL1 from a ServiceNow MID Server trigger. When triggered,the application gathers data about the change request in ServiceNow and generates an SL1 Eventwith a severity of Notice.
o Use the "Trigger Device Maintenance Updates via MID Server" application if you are using aServiceNow MID Server and you want to immediately enable or disable maintenance on a device.
For more information, see Using a MID Server to Place a Device Directly in Maintenance orSchedule a Maintenance Window.
Viewing SL1 Events for Change Requests
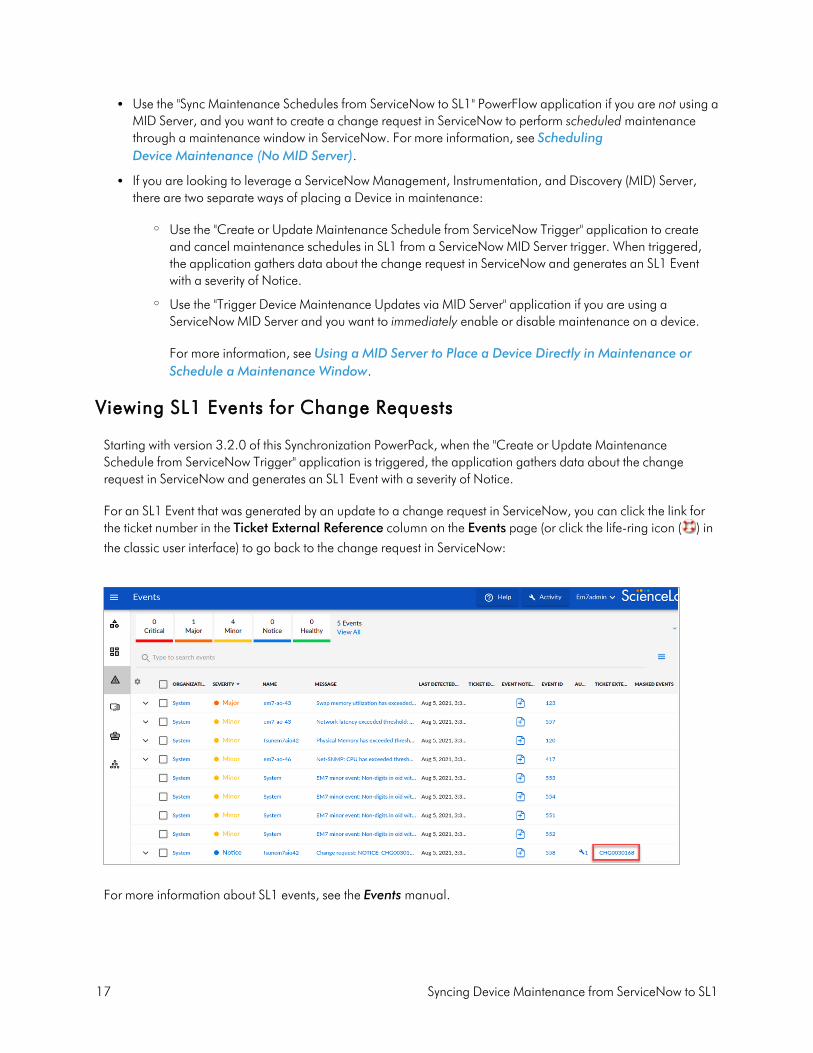
Starting with version 3.2.0 of this Synchronization PowerPack, when the "Create or Update MaintenanceSchedule from ServiceNow Trigger" application is triggered, the application gathers data about the changerequest in ServiceNow and generates an SL1 Event with a severity of Notice.
For an SL1 Event that was generated by an update to a change request in ServiceNow, you can click the link forthe ticket number in the Ticket External Reference column on the Events page (or click the life-ring icon ( ) in
the classic user interface) to go back to the change request in ServiceNow:
For more information about SL1 events, see the Events manual.
Syncing Device Maintenance from ServiceNow to SL1

Scheduling Device Maintenance (No MID Server)
Viewing Change Events for SL1 Business Services
If you are using SL1 version 11.1.0 or later with the Change Events feature enabled, and the device aligned withthe event is in an SL1 Business Service, the event will display on the [Change Events] tab for that Business Servicein SL1:
The Change Events tab displays a list of events that are created when PowerFlow pulls change data fromServiceNow, including both active and cleared change events.
For more information about SL1 Business Services, see the Business Servicesmanual.
Scheduling Device Maintenance (No MID Server)
You can create a change request in ServiceNow to perform scheduledmaintenance through a maintenancewindow in ServiceNow. You use the "Sync Maintenance Schedules from ServiceNow to SL1" PowerFlowapplication to sync maintenance windows from ServiceNow change requests (CHG)s to SL1 devices to place thesynced devices into maintenance mode for the scheduled change window.
This process does not require the use of a ServiceNow MID Server.
WARNING: PowerFlow only syncs maintenance schedules that are aligned with devices that are alreadysynced with ServiceNow. Before setting up maintenance schedule sync, you must first syncdevices between SL1 and ServiceNow using the ServiceNow CMDB SynchronizationPowerPack.
When you create a change request (CHG) in ServiceNow and sync it to SL1, the scheduled maintenance that SL1creates has collections disabled by default. This is not configurable.
The SL1 Scheduler supports maintenance windows of at least one minute or more.
18

19
NOTE: If you update the scheduled times in a ServiceNow change request, you will need to cancel thechange request, which also cancels the maintenance window in SL1. You will then need to create anew change request with the new time window and sync that change request to SL1.
To set up maintenance sync:
1. In ServiceNow, type "change" in the filter navigator and navigate to Change > Create New.
2. Click [New] to create a new change request of type "Normal". A new Change Request record appears:
3. Make a note of the change request number in theNumber field. You will use this later to verify that themaintenance sync was created. In this example, the value is CHG0030004.
4. Update the following fields in the record:
l Configuration Item. Select the CI you want to configure for maintenance sync.
l Assignment group. Select the group for the CI.
NOTE: The aligned CI must have the SL1 Monitored field selected before the PowerFlow canuse the maintenance schedule for that CI.
Scheduling Device Maintenance (No MID Server)
Scheduling Device Maintenance (No MID Server)
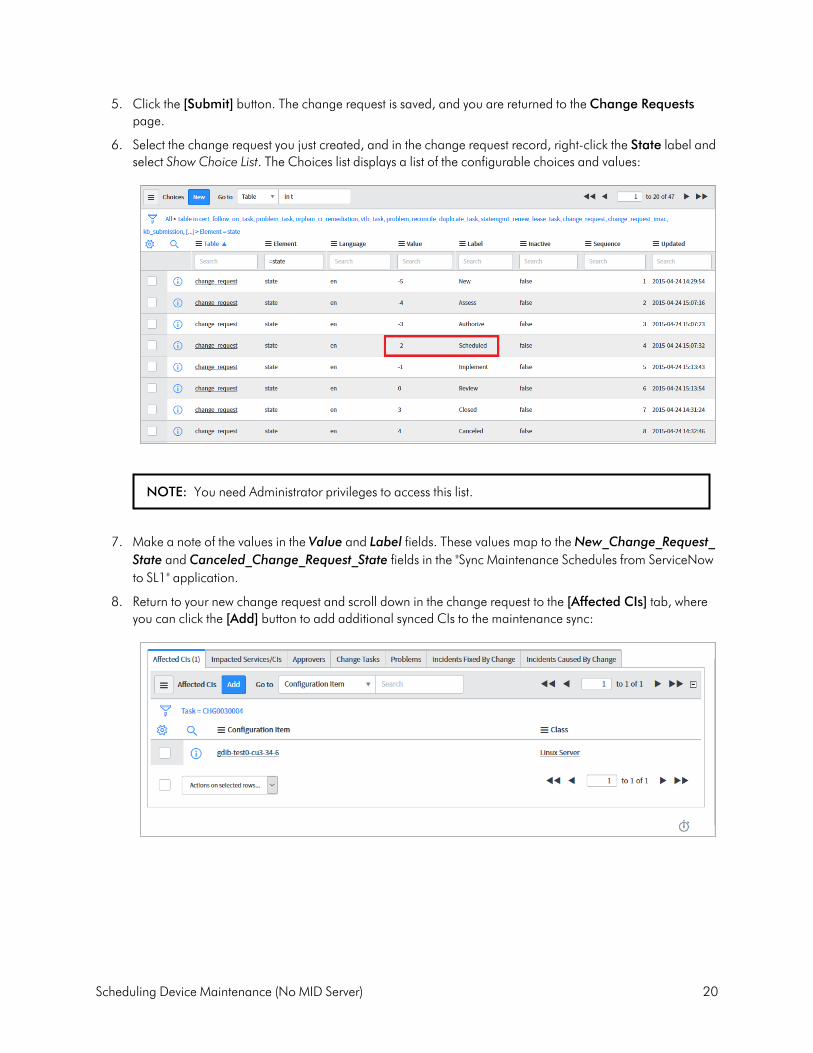
5. Click the [Submit] button. The change request is saved, and you are returned to the Change Requestspage.
6. Select the change request you just created, and in the change request record, right-click the State label andselect Show Choice List. The Choices list displays a list of the configurable choices and values:
NOTE: You need Administrator privileges to access this list.
7. Make a note of the values in the Value and Label fields. These values map to theNew_Change_Request_State and Canceled_Change_Request_State fields in the "Sync Maintenance Schedules from ServiceNowto SL1" application.
8. Return to your new change request and scroll down in the change request to the [Affected CIs] tab, whereyou can click the [Add] button to add additional synced CIs to the maintenance sync:
20

21
9. In the PowerFlow user interface, go to the Applications page and select the "Sync Maintenance Schedulesfrom ServiceNow to SL1" application.
10. Click [Configure] ( ). The Configuration pane appears:
11. As needed, update the following options from the Configuration pane:
l Configuration. Select the relevant configuration object to align with this application. You cannot editfields that are populated by the configuration object. Required.
l New_Change_Request_State. The State ID from ServiceNow of the scheduled change request thatthis application accesses to pull to schedule maintenance windows in SL1.The default is -2.
l read_timeout. Specify the maximum amount of time in seconds the application should wait for aresponse before timing out. The default is 20 seconds.
l Canceled_Change_Request_State: The State ID for a canceled change request that thisapplication accesses to pull to schedule maintenance windows in SL1. The default is 4.
l New_Change_Task_State: The State ID of the scheduled change task that this application accessesto pull to cancel maintenance windows in SL1. The default is 1.
l Canceled_Change_Task_State: The State ID for a canceled change task that this applicationaccesses to pull to cancel maintenance windows in SL1. The default is 4.
Scheduling Device Maintenance (No MID Server)
Scheduling Device Maintenance (No MID Server)
l Process_Change_Tasks: Select this option to enable change task processing, which allows therequest to be broken down into Change Tasks, which results in two extra pulls of the data. The defaultis unselected.
l collection_polling. When selected, leaves synced devices in a collection enabled state after asynced schedule completes. The devices will be put in maintenance but the devices will remainenabled for polling. By default, the devices are left in a collection disabled state.
l patch_window. Specifies a patch window from 0 to 60 minutes.
12. Verify that the value from theNew_Change_Request_State field matches the value in the Value field fromServiceNow, and the value from the Canceled_Change_Request_State field matches the value from theLabel field from ServiceNow. These values must match for the maintenance sync to work.
13. Click [Save]. The Configuration pane automatically closes after this message appears.
14. Click [Run] ( ) to run the application.
15. While the "Sync Maintenance Schedules from ServiceNow to SL1" application runs, you can monitor thestatus of the maintenance process by clicking the branch icon ( ) on the "Schedule Maintenance" step.Click the triggered application's run ID in the pop-up window, and then click the branch icon on the"Create SL Maintenance" or "Modify Maintenance" steps for more information.
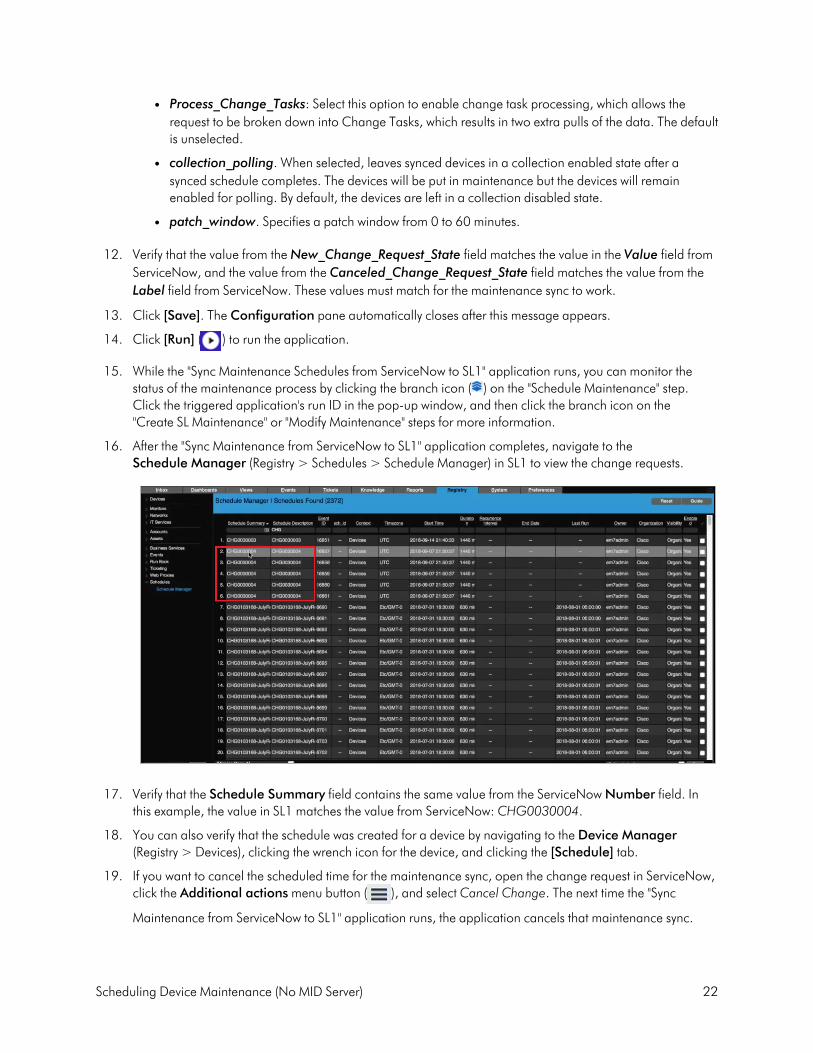
16. After the "Sync Maintenance from ServiceNow to SL1" application completes, navigate to theSchedule Manager (Registry > Schedules > Schedule Manager) in SL1 to view the change requests.
17. Verify that the Schedule Summary field contains the same value from the ServiceNow Number field. Inthis example, the value in SL1 matches the value from ServiceNow: CHG0030004.
18. You can also verify that the schedule was created for a device by navigating to the Device Manager(Registry > Devices), clicking the wrench icon for the device, and clicking the [Schedule] tab.
19. If you want to cancel the scheduled time for the maintenance sync, open the change request in ServiceNow,click the Additional actionsmenu button ( ), and select Cancel Change. The next time the "Sync
Maintenance from ServiceNow to SL1" application runs, the application cancels that maintenance sync.
22
23
TIP: As a best practice, schedule the "Sync Maintenance from ServiceNow to SL1" application to run everyhour or so, depending on your environment.
Using a MID Server to Place a Device Directly in Maintenanceor Schedule a Maintenance Window
You can use this Synchronization PowerPack with a ServiceNow MID Server for the following scenarios:
l Placing a device directly in maintenance.
l Scheduling a maintenance window
To set up either scenario, perform the following:
1. Configure and run the "Sync Change Management Requirements" application in PowerFlow.
2. Create a ServiceNow Credential and Credential Affinity in ServiceNow
Configuring and Running the "Sync Change ManagementRequirements" Application in PowerFlow
Prerequisites for the MID Server workflow:
1. In PowerFlow, open the "Sync Change Management Requirements" application and click the [Configure]button ( ). The Configuration pane appears.
2. Update the following fields:
l Configuration. Select the configuration object with the saved credentials for ServiceNow and SL1.
l is_host. Specify the IP of the cluster VIP
3. Click [Save].
4. Click the [Run] button. The application syncs the configuration objects from PowerFlow to ServiceNow sothat ServiceNow can tell PowerFlow to which SL1 system it needs to send the change request.
5. In ServiceNow, create a credential and set up credential affinity for the MID Server. For more information,see Creating a ServiceNow Credential and Credential Affinity.
NOTE: You do not need to run or schedule the "Create or Update Maintenance Schedule from ServiceNowTrigger" application or the "Trigger Device Maintenance Updates via MID Server" application inPowerFlow. Those applications are triggered by the MID Server, which is triggered first by aregistered event in ServiceNow Event Management. For more information about registered events,including examples of other triggering events you can define in ServiceNow, see ServiceNowRegistered Events.
Using a MID Server to Place a Device Directly in Maintenance or Schedule a

Using a MID Server to Place a Device Directly in Maintenance or Schedule a
Creating a ServiceNow Credential and Credential Affinity
Before you can set up maintenance sync with the MID Server in ServiceNow, you need to create a credential forthe MID Server. You should have access to the "Integration Services" section of the Discovery Dependents pagein ServiceNow.
To create a credential to connect to PowerFlow:
1. In ServiceNow, go to Connections & Credentials > Connection & Credential Aliases.
2. From the Connection & Credential Aliases list, select ScienceLogic. This record is provided by theIntegration Service Certified Application. The Connection & Credential Aliases page appears:
3. Click [New] to create a new credential. The Credentials page appears.
4. From the list of credentials, select Basic Auth Credentials. This is currently the only type of credential that issupported. The Basic Auth Credentials page appears.
5. Complete the fields related to the PowerFlow on the Basic Auth Credentials page. Make sure that theCredential alias field is set to x_sclo_scilogic.Sciencelogic.
5. Click [Submit]. The credential is added to the Connection & Credential Aliases page.
6. Select the new credential. The Basic Auth Credentials page for that credential appears.
7. Click [New] to create a Discovery IP Affinity record. A new Credential Affinity page appears.
8. Complete the following fields:
l MID server. The name of the Mid Server you want to use.
l IP address. Use the PowerFlow IP address that was listed in the IP field on the relevant record on theDiscovery Dependents page in ServiceNow. To quickly find the relevant record on the DiscoveryDependents page, right-click the Type column and selectGroup By Type, and then expand Type:Integration Services. Use the IP value from the record that matches the Region for the devices youwant to use.
l Credential ID. This field should be completed for you.
24

25
9. Click [Submit].
ServiceNow Registered Events
This section describes the commands that you can use to generate registered events in ServiceNow. These eventscan trigger actions in PowerFlow, such as specifying one or more CIs for monitoring, or putting a CI intomaintenance.
WARNING: This section is recommended for advanced ServiceNow administrators.
These events use the gs.eventQueue command, using the following format:
eventQueue(String name, Object instance, String parm1, String parm2)
For more information about registered events, see the ServiceNow documentation:https://developer.servicenow.com/dev.do#!/learn/learning-plans/quebec/new_to_servicenow/app_store_learnv2_automatingapps_quebec_what_are_events.
NOTE: You can access the update set from the additional_materials.zip file included in the main .zip filefor the ServiceNow CMDB Synchronization PowerPack, which you can find on the SynchronizationPowerPack page at the ScienceLogic Support Site.
Change Request Events
The following events can be triggered to queue to the event manager. The actual trigger for the following events isnot included in the application, but you can configure a custom trigger. An example is provided in the ChangeRequest Events Example, below.
Direct to Device: x_sclo_scilogic.device_maintenance
The "Trigger Device Maintenance Updates via MID Server" application receives a group of one or more synceddevices from the ServiceNow MID Server and checks for the enable_maintenance and disable_maintenanceactions on those devices. If the application encounters devices with one of those actions, it will enable or disablethe user maintenance status of those devices as needed.
Command
gs.eventQueue('x_sclo_scilogic.device_maintenance',current, action, affected_ci);
Event Fields
Field Description
x_sclo_scilogic.device_maintenance Unique name of the event.
ServiceNow Registered Events
ServiceNow Registered Events
current The table to which the event applies.
action Parm1: An array that includes the action to beperformed (enable_maintenance or disable_maintenance) and the sys_id of the task. The task isnot required; the action is required.
affected_ci Parm2: An array of device sys_ids that need to beenable or disabled for maintenance mode.
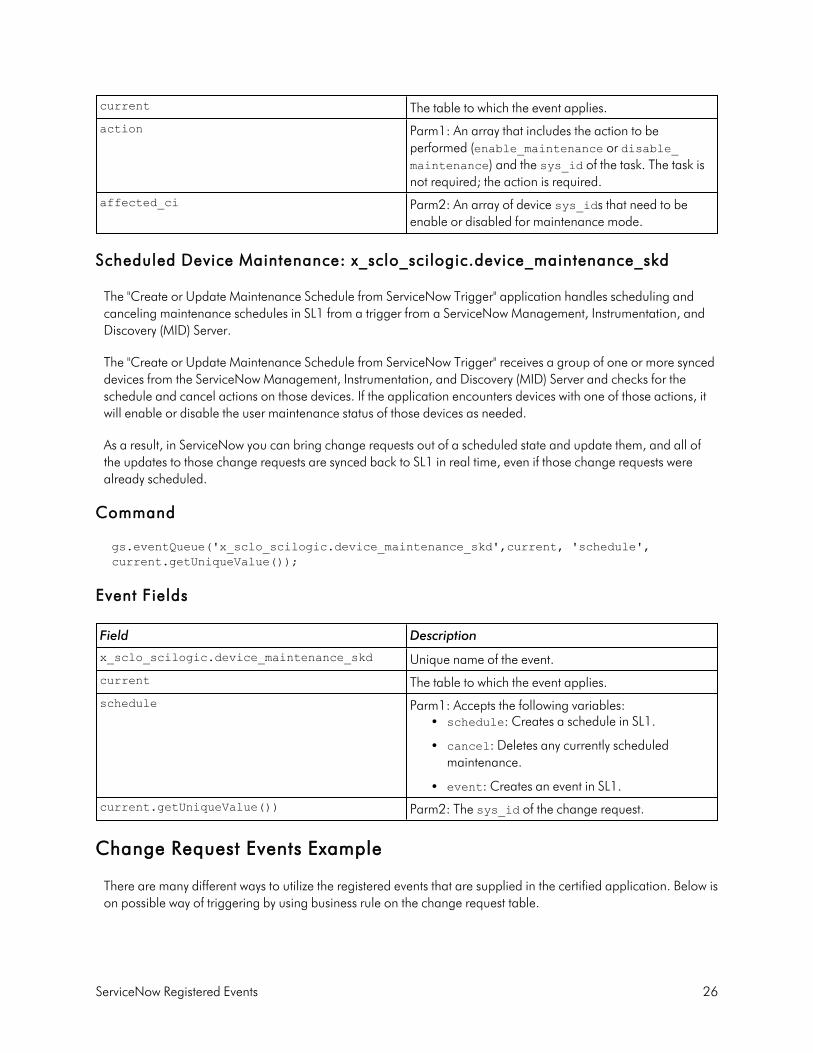
Scheduled Device Maintenance: x_sclo_scilogic.device_maintenance_skd
The "Create or Update Maintenance Schedule from ServiceNow Trigger" application handles scheduling andcanceling maintenance schedules in SL1 from a trigger from a ServiceNow Management, Instrumentation, andDiscovery (MID) Server.
The "Create or Update Maintenance Schedule from ServiceNow Trigger" receives a group of one or more synceddevices from the ServiceNow Management, Instrumentation, and Discovery (MID) Server and checks for theschedule and cancel actions on those devices. If the application encounters devices with one of those actions, itwill enable or disable the user maintenance status of those devices as needed.
As a result, in ServiceNow you can bring change requests out of a scheduled state and update them, and all ofthe updates to those change requests are synced back to SL1 in real time, even if those change requests werealready scheduled.
Command
gs.eventQueue('x_sclo_scilogic.device_maintenance_skd',current, 'schedule',current.getUniqueValue());
Event Fields
Field Description
x_sclo_scilogic.device_maintenance_skd Unique name of the event.
current The table to which the event applies.
schedule Parm1: Accepts the following variables:l schedule: Creates a schedule in SL1.
l cancel: Deletes any currently scheduledmaintenance.
l event: Creates an event in SL1.
current.getUniqueValue()) Parm2: The sys_id of the change request.
Change Request Events Example
There are many different ways to utilize the registered events that are supplied in the certified application. Below ison possible way of triggering by using business rule on the change request table.
26

27
1. Navigate to change request table and create a business rule:
2. Configure the Business Rule to trigger when the state of the change request changes to Scheduled orCanceled:
ServiceNow Registered Events

ServiceNow Registered Events
3. Click the [Advanced] tab, where you can configure the trigger for the event queue:
This script block is set up to trigger three different times, depending on the state change:
(function executeRule(current, previous /*null when async*/) {var scheduled = -2, //value of the state choice for the scheduled choice
(default is -2)cancelled = 4, //value of the stae choice for the cancelled choice (default is
4)implement = -1; //value of the state choice for the implement choice (default
is -1)gs.info("State change for change " + current.state);if(current.state.changesTo(scheduled)){
gs.eventQueue('x_sclo_scilogic.device_maintenance_skd',current, 'schedule',current.getUniqueValue());
}else if(current.state.changesTo(implement)){gs.eventQueue('x_sclo_scilogic.device_maintenance_skd',current, 'event',
current.getUniqueValue());}else if(current.state.changesTo(cancelled)){
gs.eventQueue('x_sclo_scilogic.device_maintenance_skd',current, 'cancel',current.getUniqueValue());
}else{return;
}
})(current, previous);
28

Chapter
4Troubleshooting the Change Management
Synchronization PowerPack
Overview
This chapter includes troubleshooting resources and procedures to use with the ServiceNow ChangeManagement Synchronization PowerPack.
This chapter covers the following topics:
Initial Troubleshooting Steps 30
Resources for Troubleshooting 30
Allowing Cross-Scoped Access in ServiceNow 35
29

30
Initial Troubleshooting Steps
PowerFlow acts as a middle server between data platforms. For this reason, the first steps should always be toensure that there are no issues with the data platforms with which PowerFlow is talking. There might be additionalconfigurations or actions enabled on ServiceNow or SL1 that result in unexpected behavior. For detailedinformation about how to perform the steps below, see Resources for Troubleshooting.
SL1 PowerFlow
1. Run docker service ls on the PowerFlow server.
2. Note the Docker container version, and verify that the Docker services are running.
3. If a certain service is failing, make a note the service name and version.
4. If a certain service is failing, run docker service ps <service_name> to see the historical state of theservice and make a note of this information. For example: docker service ps iservices_contentapi.
5. Make a note of any logs impacting the service by running docker service logs <service_name>. Forexample: docker service logs iservices_couchbase.
ServiceNow
1. Make a note of the ServiceNow version and Synchronization PowerPack version, if applicable.
2. Make a note of the Synchronization PowerPack application that is failing on PowerFlow.
3. Make a note of what step is failing in the application, try running the application in debug mode, andcapture any traceback or error messages that occur in the step log.
Resources for Troubleshooting
This section contains port information for PowerFlow and troubleshooting commands for Docker, Couchbase,and the PowerFlow API.
Useful PowerFlow Ports
l https://<IP of PowerFlow>:8091. Provides access to Couchbase, a NoSQL database for storage anddata retrieval.
l https://<IP of PowerFlow>:15672. Provides access to the RabbitMQ Dashboard, which you can use tomonitor the service that distributes tasks to be executed by PowerFlow workers. Use guest/guest for thelogin.
l https://<IP of PowerFlow>/flower. Provides access to Flower, a tool for monitoring and administratingCelery clusters.
Initial Troubleshooting Steps
Resources for Troubleshooting
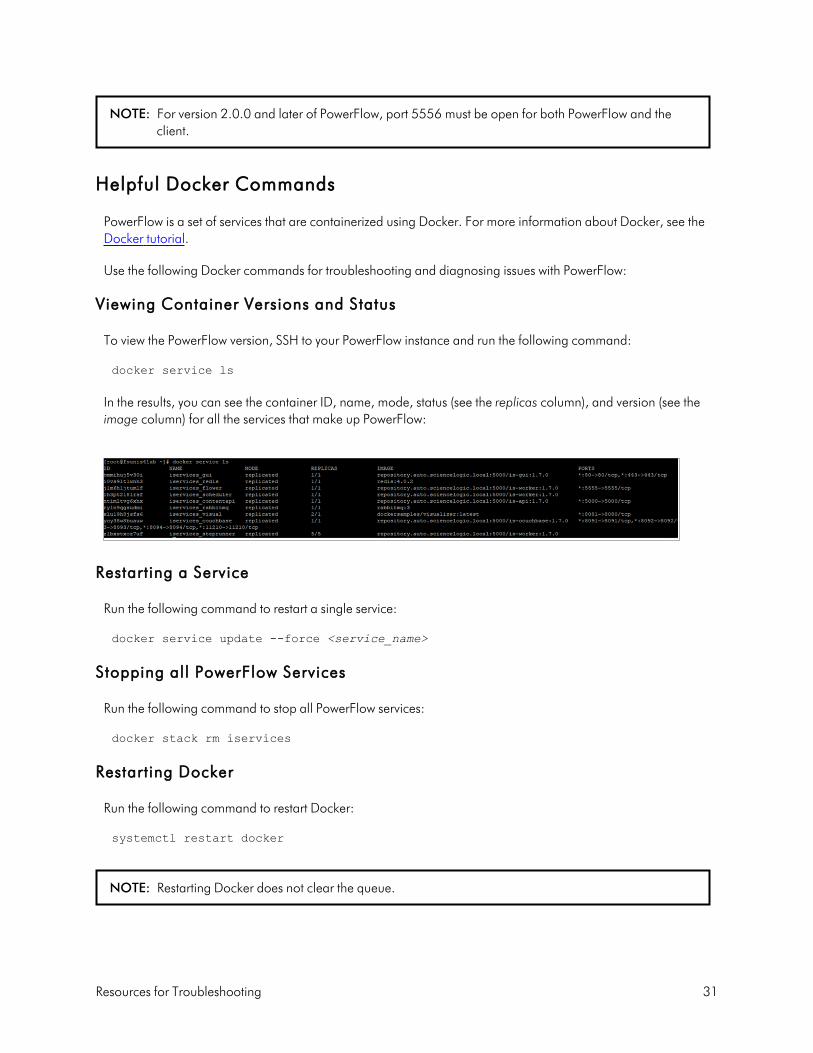
NOTE: For version 2.0.0 and later of PowerFlow, port 5556 must be open for both PowerFlow and theclient.
Helpful Docker Commands
PowerFlow is a set of services that are containerized using Docker. For more information about Docker, see theDocker tutorial.
Use the following Docker commands for troubleshooting and diagnosing issues with PowerFlow:
Viewing Container Versions and Status
To view the PowerFlow version, SSH to your PowerFlow instance and run the following command:
docker service ls
In the results, you can see the container ID, name, mode, status (see the replicas column), and version (see theimage column) for all the services that make up PowerFlow:
Restart ing a Service
Run the following command to restart a single service:
docker service update --force <service_name>
Stopping all PowerFlow Services
Run the following command to stop all PowerFlow services:
docker stack rm iservices
Restart ing Docker
Run the following command to restart Docker:
systemctl restart docker
NOTE: Restarting Docker does not clear the queue.
31

32
Viewing Logs for a Specif ic Service
You can use the Docker command line to view the logs of any current running service in the PowerFlow cluster.To view the logs of any service, run the following command:
docker service logs -f iservices_<service_name>Some common examples include the following:
docker service logs –f iservices_couchbase
docker service logs –f iservices_steprunner
docker service logs –f iservices_contentapi
NOTE: Application logs are stored on the central database as well as on all of the Docker hosts in aclustered environment. These logs are stored at /var/log/iservices for both single-node or clusteredenvironments. However, the logs on each Docker host only relate to the services running on thathost. For this reason, using the Docker service logs is the best way to get logs from all hosts at once.
Clearing RabbitMQ Volume
RabbitMQ is a service that distributes tasks to be executed by PowerFlow workers. This section covers how tohandle potential issues with RabbitMQ.
The following error message might appear if you try to run a PowerFlow application via the API:
Internal error occurred: Traceback (most recent call last):\n File \"./content_api.py\", line 199, in kickoff_application\n task_status = ... line 623, in _on_close\n (class_id, method_id), ConnectionError)\nInternalError: Connection.open:(541) INTERNAL_ERROR - access to vhost '/' refused for user 'guest': vhost '/' isdown
First, verify that your services are up. If there is an issue with your RabbitMQ volume, you can clear the volumewith the following commands:
docker service rm iservices_rabbitmq
docker volume rm iservices_rabbitdb
If you get a message stating that the volume is in use, run the following command:
docker rm <id of container using volume>
Re-deploy PowerFlow by running the following command:
docker stack deploy -c /opt/iservices/scripts/docker-compose.yml iservices
NOTE: Restarting Docker does not clear the queue, because the queue is persistent. However, clearing thequeue with the commands above might result in data loss due to the tasks being removed from thequeue.
Resources for Troubleshooting
Resources for Troubleshooting
Viewing the Process Status of All Services
Run the following command:
docker ps
Deploying Services from a Defined Docker Compose File
Run the following command:
docker stack deploy -c <compose-file> iservices
Dynamically Scaling for More Workers
Run the following command:
docker service scale iservices_steprunner=10
Completely Removing Services from Running
Run the following command:
docker stack rm iservices
Diagnosis Tools
Multiple diagnosis tools exist to assist in troubleshooting issues with the PowerFlow platform:
l Docker PowerPack. This PowerPack monitors your Linux-based PowerFlow server with SSH (thePowerFlow ISO is built on top of an Oracle Linux Operating System). This PowerPack provides keyperformance indicators about how your PowerFlow server is performing. For more information on theDocker PowerPack and other PowerPacks that you can use to monitor PowerFlow, see the "Using SL1 toMonitor SL1 PowerFlow" chapter in the SL1 PowerFlow Platformmanual.
l Flower. This web interface tool can be found at the /flower endpoint. It provides a dashboard displayingthe number of tasks in various states as well as an overview of the state of each worker. This tool shows thecurrent number of active, processed, failed, succeeded, and retried tasks on the PowerFlow platform. Thistool also shows detailed information about each of the tasks that have been executed on the platform. Thisdata includes the UUID, the state, the arguments that were passed to it, as well as the worker and the timeof execution. Flower also provides a performance chart that shows the number of tasks running on eachindividual worker.
l Debug Mode. All applications can be run in "debug" mode via the PowerFlow API. Running applicationsin debug mode may slow down the platform, but they will result in much more detailed logginginformation that is helpful for troubleshooting issues. For more information on running applications inDebug Mode, see Retrieving Additional Debug Information.
33

34
l Application Logs. All applications generate a log file specific to that application. These log files can befound at /var/log/iservices and each log file will match the ID of the application. These log files combineall the log messages of all previous runs of an application up to a certain point. These log files roll overand will get auto-cleared after a certain point.
l Step Logs. Step logs display the log output for a specific step in the application. These step logs can beaccessed via the PowerFlow user interface by clicking on a step in an application and bringing up the StepLog tab. These step logs display just the log output for the latest run of that step.
l Service Logs. Each Docker service has its own log. These can be accessed via SSH by running thefollowing command:
docker service logs -f <service_name>
Retrieving Additional Debug Information (Debug Mode)
The logs in PowerFlow use the following loglevel settings, from most verbose to least verbose:
l 10. Debug Mode.
l 20. Informational.
l 30. Warning. This is the default settings if you do not specify a loglevel.
l 40. Error.
WARNING: If you run applications with "loglevel": 10, those applications will take longer to run because ofincreased I/O requirements. Enabling debug logging using the following process is the onlyrecommended method. ScienceLogic does not recommend setting "loglevel": 10 for the wholestack with the docker-compose file.
To run an application in Debug Mode using the PowerFlow user interface:
1. Select the PowerFlow application from the Applications page.
2. Hover over the [Run] ( ) from and select Debug Run from the pop-up menu. PowerFlow executes the
application in Debug Mode with a log level of 10.
To run an application in Debug Mode using the API:
1. POST the following to the API endpoint:
https://<PowerFlow>/api/v1/applications/run
Resources for Troubleshooting

Allowing Cross-Scoped Access in ServiceNow
2. Include the following in the request body:
{"name": "<application_name>","params": {
"loglevel": 10}
}
After running the application in Debug Mode, review the step logs in the PowerFlow user interface to see detaileddebug output for each step in the application. This information is especially helpful when trying to understandwhy an application or step failed:
You can also run an application in debug using curl via SSH:
1. SSH to the PowerFlow instance.
2. Run the following command:
curl -v -k -u isadmin:em7admin -X POST "https://<your_hostname>/api/v1/applications/run" -H 'Content-Type: application/json' -H'cache-control: no-cache' -d '{"name": "interface_sync_sciencelogic_to_servicenow","params": {"loglevel": 10}}'
Allowing Cross-Scoped Access in ServiceNow
When using custom tables, you might need to configure cross-scope access for the ScienceLogic plugin. Thefollowing examples contain errors that might occur when cross-scope access is required.
35

36
Example of an API response:
{"results":[{"error":{"message":"com.glide.script.fencing.access.ScopeAccessNotGrantedException: readaccess to ui_test_hardware not granted","detail":""},"status":"failure"}
Example of navigating to a URL directly from a web browser when cross-scope access is required:
In this example, the table requires that you grant access to the ScienceLogic Scope to allow the API call to runcorrectly. In the above example, the target table is u_test_hardware.
NOTE: A ServiceNow account with System Administrator is required.
To grant access to the ScienceLogic Scope in ServiceNow:
1. Log in to your ServiceNow instance.
2. Click the Settings icon ( ) and select the Developer tab. The Developer System Settings window
appears:
Allowing Cross-Scoped Access in ServiceNow

Allowing Cross-Scoped Access in ServiceNow
3. From the Application drop-down list, select ScienceLogic ServiceNow Integration.
4. Close the Developer System Settings window and navigate to the Cross scope privileges page (SystemApplications > Application Cross-Scope Access).
NOTE: Make sure you are in the "ScienceLogic ServiceNow Application" scope and track theseupdates in an update set.
5. Click the [New] button to create a new record on the Cross scope privileges page:
6. Verify that the Source Scope and Application fields are set to ScienceLogic ServiceNow Integration. If theyare not, repeats steps 2-3.
7. Complete the following fields:
l Target Scope. Specify the scope of the target table, such asGlobal. Be sure to verify the applicationto which the table belongs, and use that value as the target scope in this field.
l Operation. Select Read.
l Target Name. Specify the name of the target table.
l Status. Select Allowed.
l Target Type. Select Table.
8. Click the [Submit] button.
For more information, see the Cross-scope privilege record topic in the ServiceNow documentation.
37

Appendix
AServiceNow Change Management API
Endpoints
Overview
This appendix describes the customized ServiceNow API Endpoints that were created for the ServiceNow ChangeManagement Synchronization PowerPack. These scripted endpoints reduce the amount of REST calls thatPowerFlow makes to ServiceNow.
Please note that for pagination, the following Query parameters are not required: sysparm_offset andsysparm_limit. The default settings are:
l sysparm_offset=0
l sysparm_limit = ServiceNow defines the default upper limits for data export. It will check the followingproperties at System Properties > Import Export: glide.json.export.limit,glide.ui.export.limit, and then glide.ui.export.war.threshold.
For example, if you have 200 total records and you want to pull the records in 100-record chunks, then the firstpull would be sysparm_offset=0 & sysparm_limit=100 and the second pull would be sysparm_offset=100 & sysparm_limit=100. For more information, see the ServiceNow documentation for ExportLimits.
This appendix includes the following topics:
Change Requests 39
38

39
Change Requests
HTTP Method
GET
Resource Path
/api/x_sclo_scilogic/v1/sciencelogic/change_requests?record_type=change_request&state=1®ion=ScienceLogic
Default Resource Path
/api/x_sclo_scilogic/v1/sciencelogic/change_requests?record_type=change_request&state=1®ion=ScienceLogic
This scripted API was built for pulling Change Requests or Change Tasks and formatting a JSON object responsewith the required information to create a maintenance schedule in SL1. The GET queries the task_ci table to findconfiguration items that are monitored by SL1 and are the correct record type. The GET operation returns allrecords with their configuration items in formatted JSON strings that include planned start and end time.
Headers
Key Value
Content-Type application/json
Accept application/json
Parameters
Key Value
record_type (required) change_request
state -5
region (required) ScienceLogic
sysparm_offset 0
sysparm_limitglide.json.export.limit, glide.ui.export.limit,glide.ui.export.war.threshold
HTTP Status
Code Value
Change Requests

Change Requests
200 OK
400 Query parameter \'region\' is not defined and is required.
Fixed Internal Query
State:
‘task.sys_class_name=’ + recordType + ‘task.state=’ + state + ‘^ci_item.x_sclo_scilogic_monitored=true^ci_item.x_sclo_scilogic_region=’ + region
Non-State:
‘task.active=true^task.sys_class_name=’ + recordType + ‘ci_item.x_sclo_scilogic_monitored=true^ci_item.x_sclo_scilogic_region=’ + region
Example
https://<your Instance>.service-now.com/api/x_sclo_scilogic/v1/sciencelogic/change_requests?record_type=change_request&state=-5®ion=ScienceLogic
Example (Response)
{"results": [
{"sys_id": "48ebaba0db962f00dc44f00fbf961961","number": "CHG0030001","state_value": "-5","state": "New","short_description": "Test Change","planned_start_date": "2019-01-01 06:00:01","planned_end_date": "2019-01-01 18:00:01","device": [
{"sys_id": "d83dac0adb4dab00dc44f00fbf961919","name": "Postman Test Server 11","id": "11","region": "ScienceLogic"
}]
}]
}
40

© 2003 - 2022, ScienceLogic, Inc.
All rights reserved.
LIMITATIONOF LIABILITY AND GENERAL DISCLAIMER
ALL INFORMATION AVAILABLE IN THIS GUIDE IS PROVIDED "AS IS," WITHOUT WARRANTY OF ANYKIND, EITHER EXPRESS OR IMPLIED. SCIENCELOGIC™ AND ITS SUPPLIERS DISCLAIM ALL WARRANTIES,EXPRESS OR IMPLIED, INCLUDING, BUT NOT LIMITED TO, THE IMPLIED WARRANTIES OFMERCHANTABILITY, FITNESS FOR A PARTICULAR PURPOSE OR NON-INFRINGEMENT.
Although ScienceLogic™ has attempted to provide accurate information on this Site, information on this Sitemay contain inadvertent technical inaccuracies or typographical errors, and ScienceLogic™ assumes noresponsibility for the accuracy of the information. Information may be changed or updated without notice.ScienceLogic™ may also make improvements and / or changes in the products or services described in thisSite at any time without notice.
Copyrights and Trademarks
ScienceLogic, the ScienceLogic logo, and EM7 are trademarks of ScienceLogic, Inc. in the United States,other countries, or both.
Below is a list of trademarks and service marks that should be credited to ScienceLogic, Inc. The ® and ™symbols reflect the trademark registration status in the U.S. Patent and Trademark Office and may not beappropriate for materials to be distributed outside the United States.
l ScienceLogic™l EM7™ and em7™l Simplify IT™l Dynamic Application™l Relational Infrastructure Management™
The absence of a product or service name, slogan or logo from this list does not constitute a waiver ofScienceLogic’s trademark or other intellectual property rights concerning that name, slogan, or logo.
Please note that laws concerning use of trademarks or product names vary by country. Always consult alocal attorney for additional guidance.
Other
If any provision of this agreement shall be unlawful, void, or for any reason unenforceable, then thatprovision shall be deemed severable from this agreement and shall not affect the validity and enforceabilityof any remaining provisions. This is the entire agreement between the parties relating to the matterscontained herein.
In the U.S. and other jurisdictions, trademark owners have a duty to police the use of their marks. Therefore,if you become aware of any improper use of ScienceLogic Trademarks, including infringement orcounterfeiting by third parties, report them to Science Logic’s legal department immediately. Report as muchdetail as possible about the misuse, including the name of the party, contact information, and copies orphotographs of the potential misuse to: [email protected]

800-SCI-LOGIC (1-800-724-5644)
International: +1-703-354-1010