Second Grade Second Quarter Physical Science
66
Model Curriculum Framework Second Grade Second Quarter Physical Science Grade Band Theme: Observations of the Environment This theme focuses on helping students develop the skills for systematic discovery to understand the science of the physical world around them in greater depth by using scientific inquiry. Topic: Changes In Motion This topic focuses on observing the relationship between forces and motion.. Condensed Content Statements: Forces change the motion of an object. • I can describe how motion can increase, change direction, or stop, depending on the force applied. • I can explain how the change in motion of an object is related to the size of the force. • I can observe and describe how some forces act without touching, such as using a magnet to move an object or objects falling to the ground. Science Inquiry and Application During the years of PreK-4 all students must become proficient in the use of the following scientific processes, with appropriate laboratory safety techniques, to construct their knowledge and understanding in all science content areas: • I can plan and conduct simple investigations. • I can employ simple equipment and tools to gather data and extend the senses. • I can use appropriate mathematics with data to construct reasonable explanations. • I can communicate about observations, investigations, and explanations. • I can review and ask questions about the observations and explanations of others. Time Frame: 5 weeks
-
Upload
khangminh22 -
Category
Documents
-
view
0 -
download
0
Transcript of Second Grade Second Quarter Physical Science

Model Curriculum
Framework
Second Grade
Second Quarter Physical Science
Grade Band Theme: Observations of the Environment
This theme focuses on helping students develop the skills for systematic discovery to understand the science of the physical
world around them in greater depth by using scientific inquiry.
Topic: Changes In Motion
This topic focuses on observing the relationship between forces and motion..
Condensed Content Statements:
Forces change the motion of an object.
• I can describe how motion can increase,
change direction, or stop, depending on the
force applied.
• I can explain how the change in motion of an
object is related to the size of the force.
• I can observe and describe how some forces
act without touching, such as using a magnet
to move an object or objects falling to the
ground.
Science Inquiry and Application
During the years of PreK-4 all students must become proficient in
the use of the following scientific processes, with appropriate
laboratory safety techniques, to construct their knowledge and
understanding in all science content areas:
• I can plan and conduct simple investigations.
• I can employ simple equipment and tools to gather data
and extend the senses.
• I can use appropriate mathematics with data to construct
reasonable explanations.
• I can communicate about observations, investigations, and
explanations.
• I can review and ask questions about the observations and
explanations of others.
Time Frame: 5 weeks
Model Curriculum
Framework
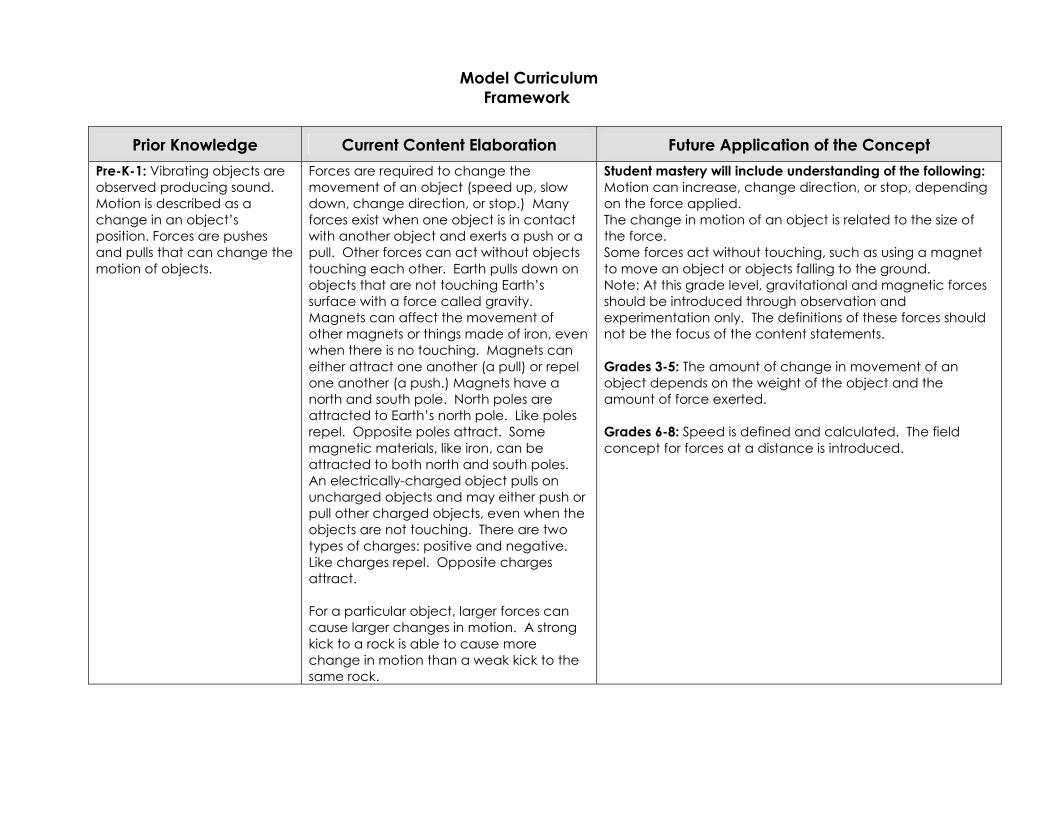
Prior Knowledge Current Content Elaboration Future Application of the Concept
Pre-K-1: Vibrating objects are
observed producing sound.
Motion is described as a
change in an object’s
position. Forces are pushes
and pulls that can change the
motion of objects.
Forces are required to change the
movement of an object (speed up, slow
down, change direction, or stop.) Many
forces exist when one object is in contact
with another object and exerts a push or a
pull. Other forces can act without objects
touching each other. Earth pulls down on
objects that are not touching Earth’s
surface with a force called gravity.
Magnets can affect the movement of
other magnets or things made of iron, even
when there is no touching. Magnets can
either attract one another (a pull) or repel
one another (a push.) Magnets have a
north and south pole. North poles are
attracted to Earth’s north pole. Like poles
repel. Opposite poles attract. Some
magnetic materials, like iron, can be
attracted to both north and south poles.
An electrically-charged object pulls on
uncharged objects and may either push or
pull other charged objects, even when the
objects are not touching. There are two
types of charges: positive and negative.
Like charges repel. Opposite charges
attract.
For a particular object, larger forces can
cause larger changes in motion. A strong
kick to a rock is able to cause more
change in motion than a weak kick to the
same rock.
Student mastery will include understanding of the following:
Motion can increase, change direction, or stop, depending
on the force applied.
The change in motion of an object is related to the size of
the force.
Some forces act without touching, such as using a magnet
to move an object or objects falling to the ground.
Note: At this grade level, gravitational and magnetic forces
should be introduced through observation and
experimentation only. The definitions of these forces should
not be the focus of the content statements.
Grades 3-5: The amount of change in movement of an
object depends on the weight of the object and the
amount of force exerted.
Grades 6-8: Speed is defined and calculated. The field
concept for forces at a distance is introduced.

Model Curriculum
Framework
Note 1: Introducing fields, protons,
electrons, or mathematical manipulatives
of positive and negative to explain
observed phenomena are not appropriate
at this grade.
Note 2: There is often confusion between
the concepts of force and energy. Force
can be thought of as a push or pull
between two objects and energy as the
property of an object that can cause
change. Energy is required to exert a
force. The differences between force and
energy will be developed over time and is
not appropriate at this grade.
Common Misconceptions:
Gravity only acts on things when they are falling. (“I’m not falling, so gravity is not affecting me.”)
Only animate things (people, animals) exert forces; passive ones (tables, floors) do not exert forces. (“I push down
on the floor, but it does not push back at me.”)
Only animate objects can exert a force. (“The lamp on the table is resting there, so no forces are acting on it.”)
Model Curriculum
Framework
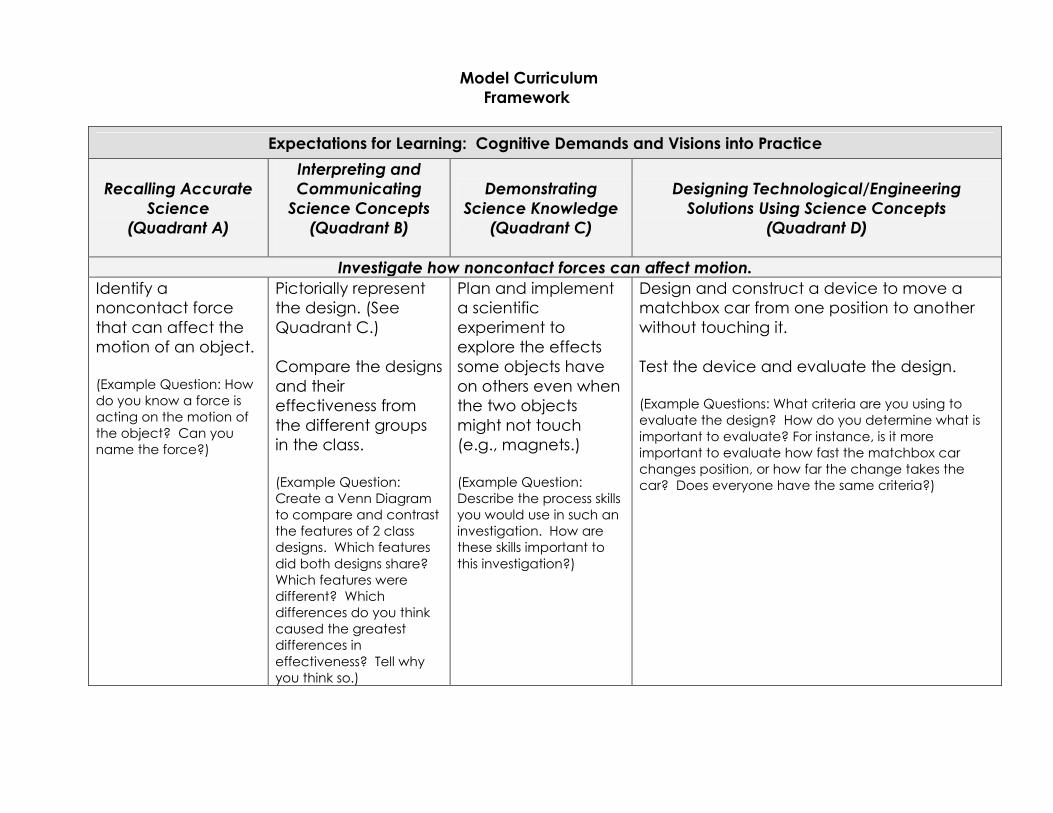
Expectations for Learning: Cognitive Demands and Visions into Practice
Recalling Accurate
Science
(Quadrant A)
Interpreting and
Communicating
Science Concepts
(Quadrant B)
Demonstrating
Science Knowledge
(Quadrant C)
Designing Technological/Engineering
Solutions Using Science Concepts
(Quadrant D)
Investigate how noncontact forces can affect motion.
Identify a
noncontact force
that can affect the
motion of an object.
(Example Question: How
do you know a force is
acting on the motion of
the object? Can you
name the force?)
Pictorially represent
the design. (See
Quadrant C.)
Compare the designs
and their
effectiveness from
the different groups
in the class.
(Example Question:
Create a Venn Diagram
to compare and contrast
the features of 2 class
designs. Which features
did both designs share?
Which features were
different? Which
differences do you think
caused the greatest
differences in
effectiveness? Tell why
you think so.)
Plan and implement
a scientific
experiment to
explore the effects
some objects have
on others even when
the two objects
might not touch
(e.g., magnets.)
(Example Question:
Describe the process skills
you would use in such an
investigation. How are
these skills important to
this investigation?)
Design and construct a device to move a
matchbox car from one position to another
without touching it.
Test the device and evaluate the design.
(Example Questions: What criteria are you using to
evaluate the design? How do you determine what is
important to evaluate? For instance, is it more
important to evaluate how fast the matchbox car
changes position, or how far the change takes the
car? Does everyone have the same criteria?)
Model Curriculum
Framework
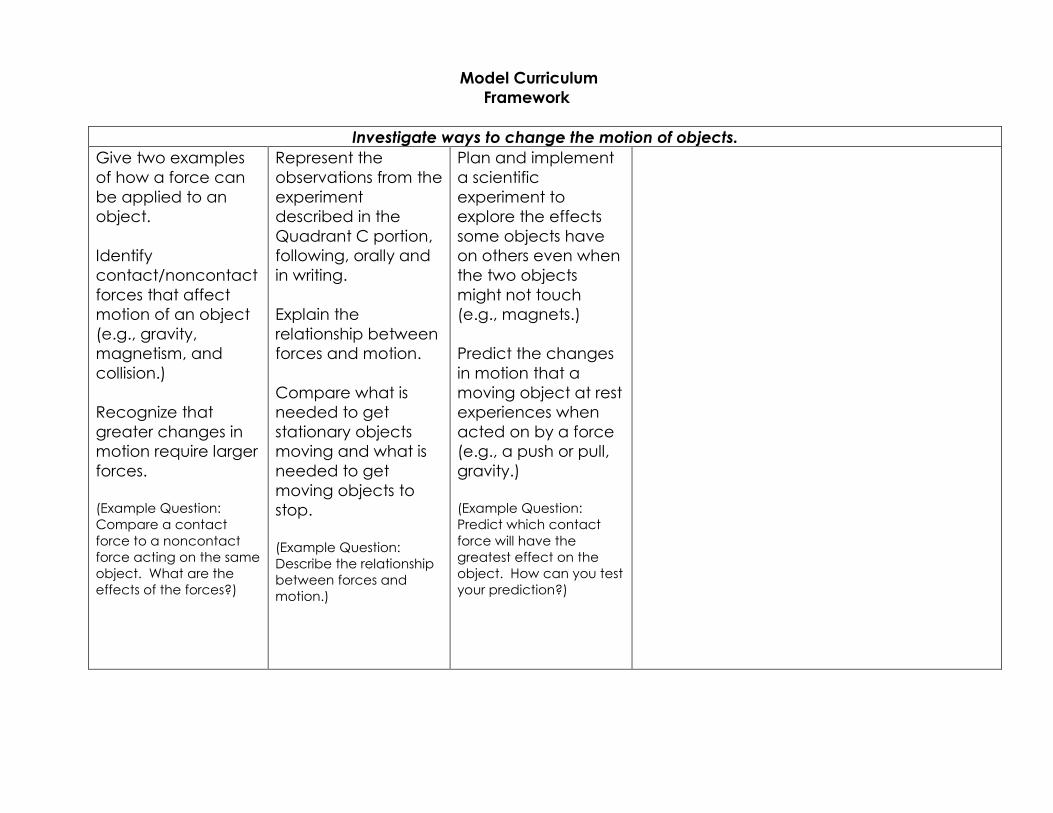
Investigate ways to change the motion of objects.
Give two examples
of how a force can
be applied to an
object.
Identify
contact/noncontact
forces that affect
motion of an object
(e.g., gravity,
magnetism, and
collision.)
Recognize that
greater changes in
motion require larger
forces.
(Example Question:
Compare a contact
force to a noncontact
force acting on the same
object. What are the
effects of the forces?)
Represent the
observations from the
experiment
described in the
Quadrant C portion,
following, orally and
in writing.
Explain the
relationship between
forces and motion.
Compare what is
needed to get
stationary objects
moving and what is
needed to get
moving objects to
stop.
(Example Question:
Describe the relationship
between forces and
motion.)
Plan and implement
a scientific
experiment to
explore the effects
some objects have
on others even when
the two objects
might not touch
(e.g., magnets.)
Predict the changes
in motion that a
moving object at rest
experiences when
acted on by a force
(e.g., a push or pull,
gravity.)
(Example Question:
Predict which contact
force will have the
greatest effect on the
object. How can you test
your prediction?)

Model Curriculum
Framework
Resources:
Lessons
• Force and Motion
• Third’s The Charm
• Egg Drop
• Attract and Repel
IMS Lessons
• On The Trail
http://www.hpscience.com
Go to eproducts
Log in
Username: scienceteacher1
Password: scienceteacher1
• How Do Things Move?
• How Can We Change the Way Things Move?
• How Does Gravity Make Things Move?
• How Do Magnets Make Things Move?
Literature:
• Eyewitness: Force and Motion by Peter
Lafferty
• Forces and Motion (Hands-On Science) by
John Graham
• Motion: Push and Pull, Fast and Slow by
Darlene R. Boyd Stille
• And Everyone Shouted, “Pull!” by Clair and
Abel Llewellyn
• Awesome Experiments in Force and Motion
• Check It Out! Force and Motion by Clint
Twist
Science In Storytown Connections:
• Lesson 6 (Q1)
• Lesson 12 (Q2)
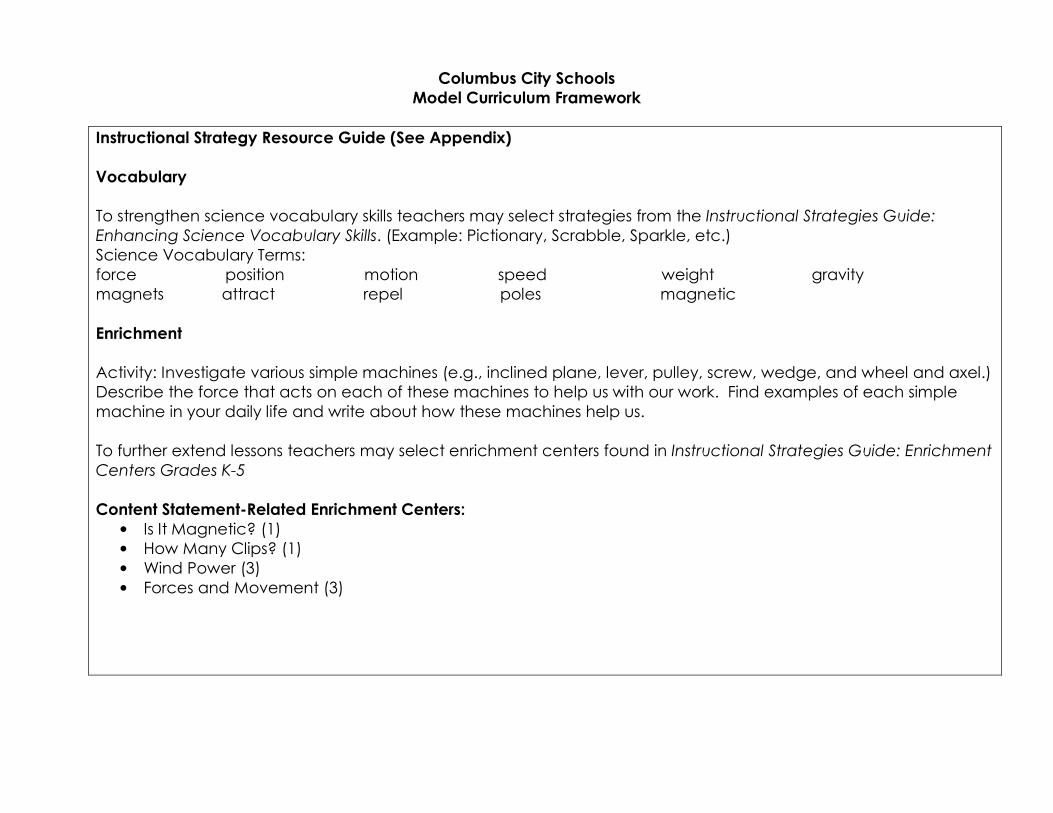
Columbus City Schools
Model Curriculum Framework
Instructional Strategy Resource Guide (See Appendix)
Vocabulary
To strengthen science vocabulary skills teachers may select strategies from the Instructional Strategies Guide:
Enhancing Science Vocabulary Skills. (Example: Pictionary, Scrabble, Sparkle, etc.)
Science Vocabulary Terms:
force position motion speed weight gravity
magnets attract repel poles magnetic
Enrichment
Activity: Investigate various simple machines (e.g., inclined plane, lever, pulley, screw, wedge, and wheel and axel.)
Describe the force that acts on each of these machines to help us with our work. Find examples of each simple
machine in your daily life and write about how these machines help us.
To further extend lessons teachers may select enrichment centers found in Instructional Strategies Guide: Enrichment
Centers Grades K-5
Content Statement-Related Enrichment Centers:
• Is It Magnetic? (1)
• How Many Clips? (1)
• Wind Power (3)
• Forces and Movement (3)
Model Curriculum
Framework
Classroom Portals/Technology
Streaming: (http://streaming.discoveryeducation.com/)
• “The Blue Dragon:
Slipping and Sliding”
• “A First Look: Magnets”
• “Physical Science”
• “Force and Motion”
• “TLC Elementary School:
Rules of Motion and
Forces”
SMART: (Search the Smart Exchange site
(http://exchange.smarttech.com)
for these specific titles:)
• “Force and Gravity”
(SMART Notebook
Lesson, developed by
SMART Technologies)
• “May the Forces of Push
and Pull Be With You”
(SMART Notebook
Lesson, authored by
Terry Rogers)
• “On The Move” (SMART
Notebook Lesson,
authored by Vicky
English)
• “Energy and Motion”
(SMART Notebook
Lesson)
Websites:
“Forces And Motion” (http://www.mhschool.com/science/2002/student/2/sims/sim4.html)
“Forces and Movement Interactive”
(http://www.bbc.co.uk/schools/scienceclips/ages/6_7/forces_movement.shtml)
“Pushes and Pulls Interactive”
(http://www.bbc.co.uk/schools/scienceclips/ages/5_6/pushes_pulls.shtml)
“Gravity Launch”
(http://www.sciencenetlinks.com/interactives/gravity.html)

Force and Motion
Grade 2
1
Condensed Content Statements
Forces change the motion of an object.
Motion can increase, change direction or stop
depending on the force applied.
The change in motion of an object is related to
the size of the force.
Some forces act without touching, such as using
a magnet to move an object or objects falling to
the ground.
Lesson Summary:
The following lessons are for the force and motion
unit. These lessons are deeply aligned to the
physical science unit for third grade. This unit
also involves formal, informal and performance
assessment with each lesson.
Suggested Time Frame:
2-3 days
Vocabulary:
Force
Position
Motion
Speed
Weight
Gravity
Magnets
Attract
Repel
Focus Process Skills:
Control Variable
Communicate
Experiment
Predict
Measure
Compare
Hypothesize
Representation
Materials:
� Tennis balls, 10
� Golf balls, 10
� Marbles, 10
� Ping pong balls, 10
� Measuring tapes, 10
� Rulers, 10
� Stopwatch
� Masking tape
� Towel
� Sandpaper
� Wax paper
� Paper cups
� Matching toy cars
� Large space
Force and Motion
Grade 2
2
Teacher Background
� When students observe force they may use terms like pushing, pulling, throwing,
dropping and rolling. These are words to describe how each student uses a contact
force to move an object. Students should also learn that there are noncontact
forces that can also move an object: gravity and magnets. In addition to this force,
students may also focus on the position and movement of the object. Students may
describe the position of an object as up, down, in front or behind. By experimenting
with different materials, students can begin to understand that the motion of an
object can be described by tracking its position over time. This position can be
changed by a pushing or pulling force.
� Through the exploration in this unit students should discover the following force and
motion concepts:
• Force is a push or a pull.
• Position is the location of an object.
• To describe an objects position, you compare it to the position of
• other objects.
• An object is in motion if it changes position.
• Motion happens over a period of time.
• Speed is how fast an object moves over a certain distance.
• Friction occurs when objects rub against another object and creates heat.
• The pull of gravity on an object is that object’s weight.
• Gravity is a force that pulls everything towards the center of the Earth.
• Magnets create a push or pull force without contact.
• Attract is to bring together.
• Repel is to go in opposite directions.
� This lesson is broken into 4 simple activities. In the first activity, students discover a variety of
ways to describe an object’s position by locating it relative to another object or the
background. The term “position” will be introduced. In the second activity, students will be
challenged to discover a variety of ways a ball will change position from the top of a ramp
to the bottom of a ramp. Students will measure the distance the ball rolled and the time it
takes to move that distance. Students should discover that a heavier ball will not travel as
far and would take less time, whereas, a lighter ball will travel a greater distance and take
more time. Students will also learn that when you measure the distance an object has
moved and the time it traveled, you are measuring the speed the object traveled (how fast
it is moving). In the third activity, students will compare differences in surfaces on the ramp.
The term “friction” will be introduced. Students should discover that a rougher surface (more
friction) will make it more difficult for a car to travel a greater distance. Surfaces that are
smoother (less friction) will allow the car to move a greater distance.
Teacher Notes
� Allowing them to brainstorm various balls at school and bring in different balls will lengthen
the unit but may lead to more genuine experiences.
Force and Motion
Grade 2
3
� These activities have all students using the same materials. Allowing students to bring in toy
cars from home can open up further discussions and observations. Since not all cars are
equal, variables can be discussed and charted.
Engage (Warm-up)
Activity 1:
1. In a journal or on the “Position in the Classroom” Journal, ask students to write about their
current position within the classroom. The students may state that they are sitting in the room
at a desk. Have students share their entry. Review the definition of “position.” Position is the
location of an object. Position is usually compared to another object. (Pre-Assessment)
2. Discuss students’ responses and how they may have used another object in the room to
describe their position.
3. Give each student the “Position” Lab Sheet to be completed.
Explore (Instructional Strategies)
Activity 2:
1. In a journal or on the “Motion” Journal, ask students to write about how they know something
has moved. Have students share their entry. (Pre-Assessment)
2. Discuss students’ responses and how they may have used another object in the room to
describe how something has moved.
3. Show students the tennis ball, golf ball, ping pong ball, and marble. Have each student
hypothesize which ball would travel the furthest distance and explain why.
4. Place students into groups of 3, 4 or 5, depending on availability of materials.
5. Pass out the “Position and Motion” Lab Sheet.
6. Show the students the materials they will use and demonstrate how to make the ramp. Be
certain that the students release the objects at the exact same location. To accomplish this,
you should have them place a line of masking tape 2 inches from the top of the ramp.
7. Read the hypothesis. Have students discuss their hypothesis and write it down on the lab
sheet.
8. Go over each role for the lab. Have students rotate their roles after each experiment.
Students should complete the Lab Sheet.

Force and Motion
Grade 2
4
9. Review the outcome of the Lab Sheet. Which ball traveled the farthest? Which ball did not
go as far? Why do the students think this occurred?
10. Review that “speed” is how fast an object moves over a certain distance. In this
experiment you will not be able to get an actual speed for each ball. You can have your
students place a piece of tape on the floor and stop the timer when the ball passes over the
piece of tape. They can then compare times to discuss which ball traveled the fastest.
Activity 3:
1. Write on the chalkboard, chart paper or overhead “Motion stops because . . .” then circle it.
Create branches off the circle to create a web with their responses. Prompts:
What makes a car stop? What makes a bike stop? A roller skate or roller blade stop? A
basketball stop? (Pre-Assessment)
2. Identify and discuss the branches of the web that focus on friction, or the force which
slows the objects. Highlight or underline those branches/responses that focus on the
concept of friction (one object rubs against another).
3. Place students in groups of four to five students. Explain to students that the activity they
are going to do will help them understand how friction can increase or decrease, which
can make doing a job harder or easier. Give each group: a piece of wax paper, plain
paper, sand paper, a towel and a car
4. Give each group the “Friction in Our Lives” Lab Sheet and have the group place a check
mark in the box that they predict will allow a car to travel the furthest distance.
5. Show the students the materials they will use and how to construct the ramp. (This is the
same ramp as in lesson 2). Show students how to secure the different surfaces with
masking tape. Make sure the tape is on back of the ramp so that it will not interfere with
the activity.
6. Have the students complete the activity.
7. Gather the students together and discuss what they discovered. (Less friction to more
friction: wax paper, plain paper, sand paper, towel.)
Interdisciplinary Connections
Writing: Positions, Positions
Supply each student with a picture of a setting. These pictures can be found in books or cut
from magazines. Have the students choose one object from their picture. Once the object is
chosen, the students can write 4 sentences about the positioning of their “chosen object.” Each
sentence will contain a word that explains the object’s position in relation to another object on
the paper. (Ex. The object is above the tree. The object is on the right side of the blue house

Force and Motion
Grade 2
5
with the white door.) The students will then share their paper with a partner. As the partner
reads the paper, he or she will attempt to identify the chosen object.
Assessment
Activity 1:
1. How do you know if an object has moved? (The object’s position has changed.)
2. What would happen if there was no object to help you know the change of position? (It
would be difficult to know if the object moved.)
Activity 2:
1. How does an object change its position? (The object must have a force act on it to place it
in motion.)
2. What determines how fast an object moves? (Its speed or how fast an object moves over a
certain distance.)
Activity 3:
1. Name materials that have more friction (rough surfaces). (Students may indicate sand
paper, carpet, gravel, sand and concrete.)
2. Name materials that have less friction (smooth surfaces). (Students may indicate wax
paper, ice, table top, window, and mirror.)
3. Can you predict what would happen to a ball/car if you lowered the ramp? (The ball or car
would have a slower time and less distance.)
Reteach Ideas
1. Students can “Think, Pair, Share” in small groups to review key concepts.
2. Read Kids Take Flight .
Closure
Activity 1: “Position and Motion” Lab Sheet.
Activity 2: “Friction in Our Lives” Lab Sheet.
Activity 3: Using what you have learned, answer the following questions:
a. Will it be easier to move one or two textbooks across you desk with a pinky?
b. Will you need to use more force or less force to push two text books?
c. What could you add to the bottom of the text books to make it easier (use less force)
to move the text books?
Force and Motion
Grade 2
6
Extensions/Additional Resources
Classroom Portals/Technology:
UnitedStreaming:
TLC Elementary School: Rules of Motion and Forces (24:33)
Forces and Gravity
Website:
Push Me, Pull Me
Literature: Force and Motion Unit – Annotated Booklist
Experiments With Motion by Salvatore Tocci. This is an easy to read and informative book
about motion with activities to do that are inexpensive to create.
Force, Of Course! 20 Thematic Science Experiments for Home and School by M.
Leontovich and James Cloutier. The Explore Science series provides thought-provoking
scientific questions, investigations, and activities that cross subject area boundaries.
Experiments with Motion by Robert Gardner. This book has great information for the
teacher and wonderful experiments for the student. Teachers can get a good
explanation on why things occur with motion.
The Science Book of Motion by Neil Ardley. This easy to read book has wonderful
illustrations on how to complete experiments on motion and simple explanations.
Force and Motion by Simon de Inna. This is a very informative book on all aspects of
force and motion, which include: gravity, magnetism, flight, pressure, and collisions. This
book is easy to follow, and experiments and explanations are to the point.
Force and Movement by Barbara Taylor. The contents of the book include: push and
pull, stick and slip, pressure, and simple machines. Each concept has an explanation,
experiment, and real life application.
Experiment with Motion by Bryan Murphy. Simple experiments help children test and
observe basic scientific principles. Filled with fascinating information that kids want to
know about the world they live in. Offers fun and facts for the entire family. Colorful
photography and clear explanatory texts.

Name ___________________Date _______________________
Position within the Classroom
What is your current position within the classroom?
___________________________________________________________________________________________________________________________________________________________________________________________________________________________________________________________________________________________________________________________________________________________________________________________________________________________________________________________________________________________________________________________________________________________________________________________________________________________________________________________________________________________________________________________________________________________________________________________________________________________________________________

Name:____________________ Date _____________________
Position
1 2
Explain how you know that the bicyclist moved.
__________________________________
__________________________________
__________________________________
__________________________________
__________________________________Using the above picture; what helped you determined
that the bicyclist moved?
__________________________________
__________________________________
__________________________________
__________________________________

Name ___________________Date _______________________
Motion
How do you know an object has moved?
___________________________________________________________________________________________________________________________________________________________________________________________________________________________________________________________________________________________________________________________________________________________________________________________________________________________________________________________________________________________________________________________________________________________________________________________________________________________________________________________________________________________________________________________________________________________________________________________________________________________________________________
Name _____________________ Date ____________________
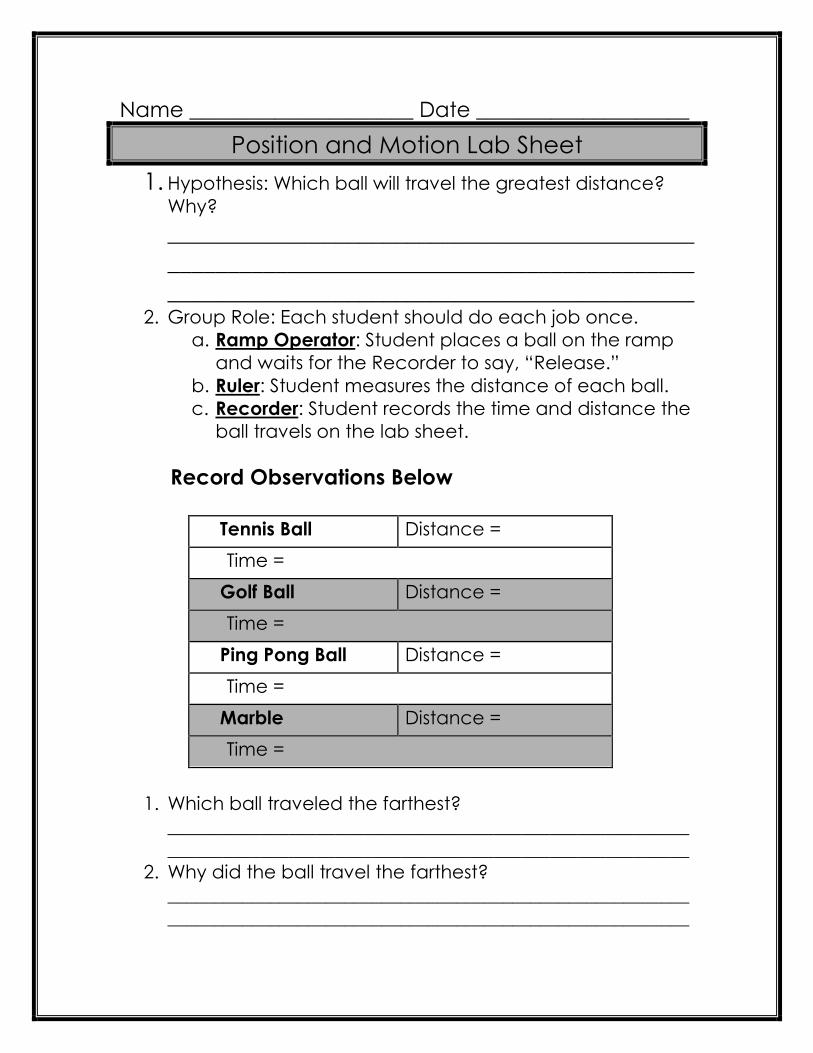
Position and Motion Lab Sheet
1. Hypothesis: Which ball will travel the greatest distance?Why?
____________________________________________
____________________________________________
____________________________________________2. Group Role: Each student should do each job once.
a. Ramp Operator: Student places a ball on the ramp
and waits for the Recorder to say, “Release.”
b. Ruler: Student measures the distance of each ball.
c. Recorder: Student records the time and distance the
ball travels on the lab sheet.
Record Observations Below
Tennis Ball Distance =
Time =
Golf Ball Distance =
Time =
Ping Pong Ball Distance =
Time =
Marble Distance =
Time =
1. Which ball traveled the farthest?
________________________________________________________
________________________________________________________
2. Why did the ball travel the farthest?
________________________________________________________
________________________________________________________
Name _____________________ Date ____________________
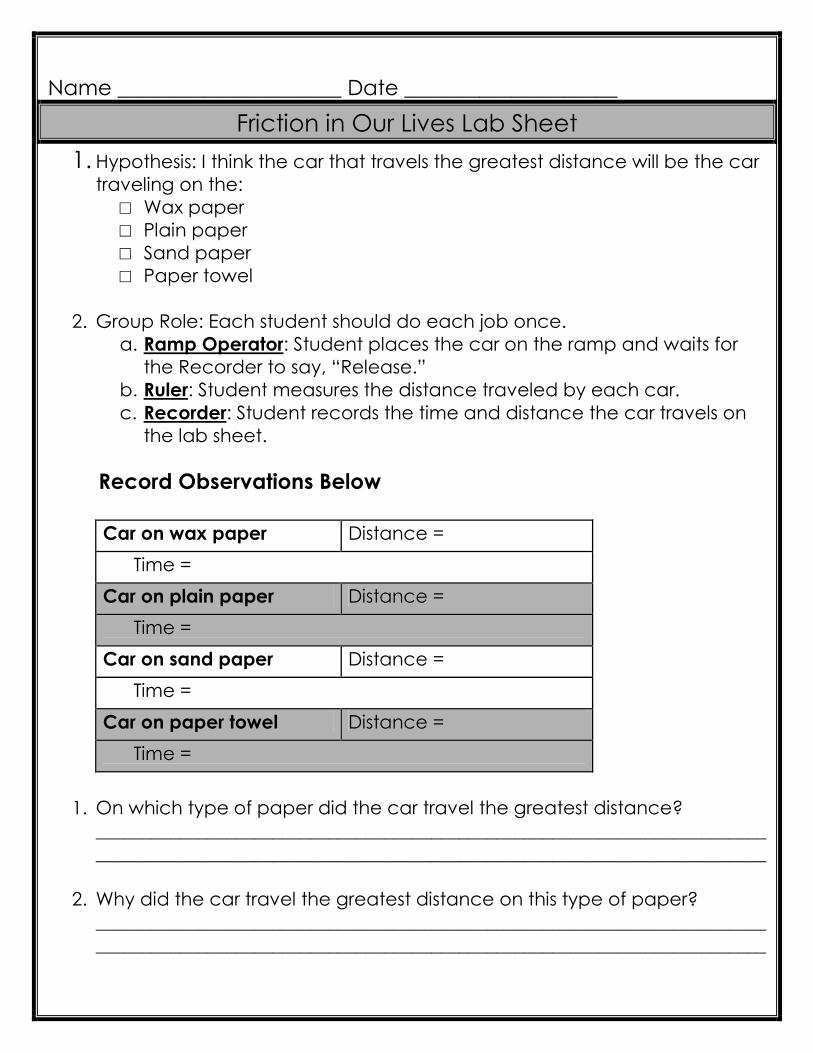
Friction in Our Lives Lab Sheet
1. Hypothesis: I think the car that travels the greatest distance will be the cartraveling on the:
□ Wax paper □ Plain paper □ Sand paper □ Paper towel
2. Group Role: Each student should do each job once.
a. Ramp Operator: Student places the car on the ramp and waits for
the Recorder to say, “Release.”
b. Ruler: Student measures the distance traveled by each car.
c. Recorder: Student records the time and distance the car travels on
the lab sheet.
Record Observations Below
Car on wax paper Distance =
Time =
Car on plain paper Distance =
Time =
Car on sand paper Distance =
Time =
Car on paper towel Distance =
Time =
1. On which type of paper did the car travel the greatest distance?
________________________________________________________________________
________________________________________________________________________
2. Why did the car travel the greatest distance on this type of paper?
________________________________________________________________________
________________________________________________________________________
Third’s the Charm
Grade 2
1
Condensed Content Statements
Forces change the motion of an object.
Motion can increase, change direction or stop
depending on the force applied.
The change in motion of an object is related to
the size of the force.
Some forces act without touching, such as using
a magnet to move an object or objects falling to
the ground.
Lesson Summary:
Participants will explore ways to demonstrate
Newton’s Third Law through various hands-on
experiences. They will measure the relationship
between actions applied when two people exert
forces on each other using two spring scales.
Using film canisters and Alka Seltzer tablets,
learners will observe that when an object is
pushed, it pushes back in the exact opposite
direction from the original push.
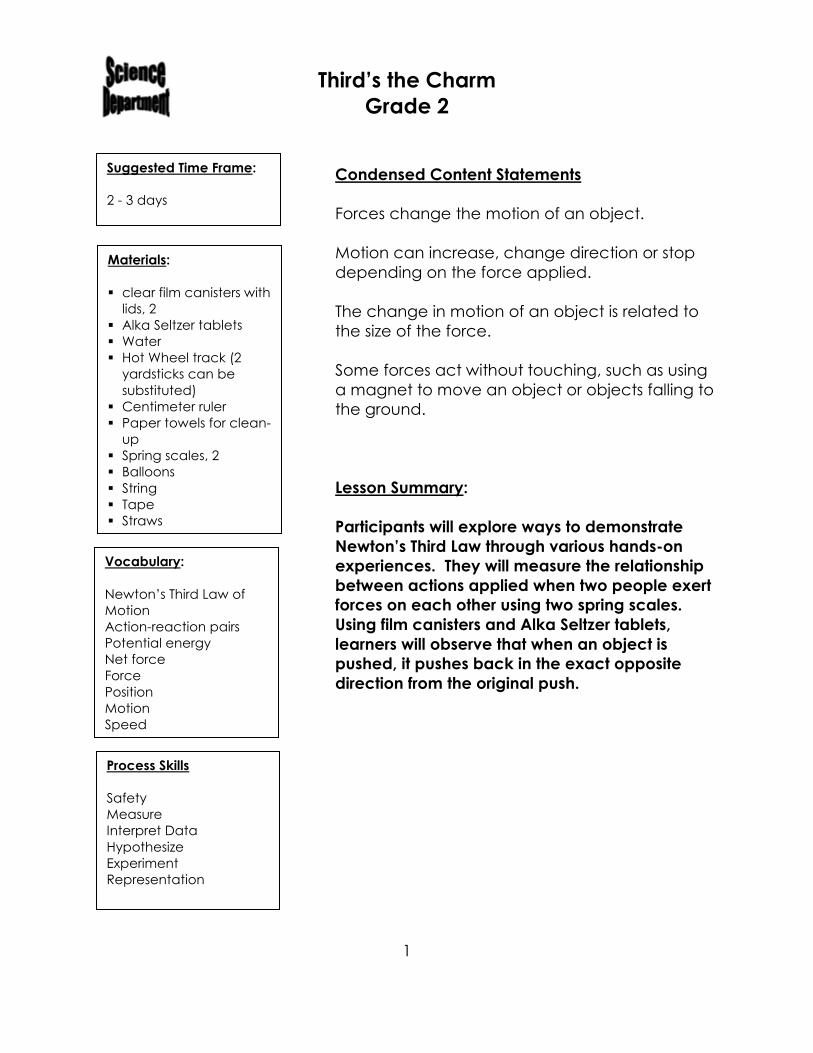
Suggested Time Frame:
2 - 3 days
Materials:
� clear film canisters with
lids, 2
� Alka Seltzer tablets
� Water
� Hot Wheel track (2
yardsticks can be
substituted)
� Centimeter ruler
� Paper towels for clean-
up
� Spring scales, 2
� Balloons
� String
� Tape
� Straws
Vocabulary:
Newton’s Third Law of
Motion
Action-reaction pairs
Potential energy
Net force
Force
Position
Motion
Speed
Process Skills
Safety
Measure
Interpret Data
Hypothesize
Experiment
Representation
Third’s the Charm
Grade 2
2
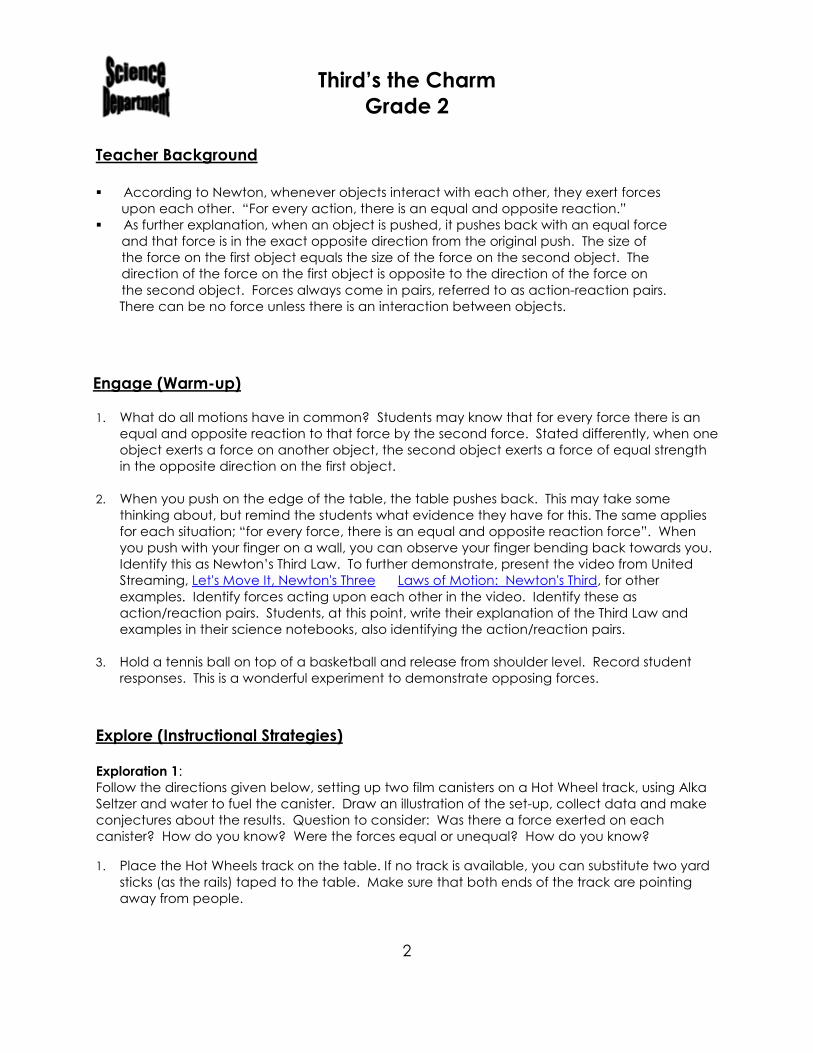
Teacher Background
� According to Newton, whenever objects interact with each other, they exert forces
upon each other. “For every action, there is an equal and opposite reaction.”
� As further explanation, when an object is pushed, it pushes back with an equal force
and that force is in the exact opposite direction from the original push. The size of
the force on the first object equals the size of the force on the second object. The
direction of the force on the first object is opposite to the direction of the force on
the second object. Forces always come in pairs, referred to as action-reaction pairs.
There can be no force unless there is an interaction between objects.
Engage (Warm-up)
1. What do all motions have in common? Students may know that for every force there is an
equal and opposite reaction to that force by the second force. Stated differently, when one
object exerts a force on another object, the second object exerts a force of equal strength
in the opposite direction on the first object.
2. When you push on the edge of the table, the table pushes back. This may take some
thinking about, but remind the students what evidence they have for this. The same applies
for each situation; “for every force, there is an equal and opposite reaction force”. When
you push with your finger on a wall, you can observe your finger bending back towards you.
Identify this as Newton’s Third Law. To further demonstrate, present the video from United
Streaming, Let's Move It, Newton's Three Laws of Motion: Newton's Third, for other
examples. Identify forces acting upon each other in the video. Identify these as
action/reaction pairs. Students, at this point, write their explanation of the Third Law and
examples in their science notebooks, also identifying the action/reaction pairs.
3. Hold a tennis ball on top of a basketball and release from shoulder level. Record student
responses. This is a wonderful experiment to demonstrate opposing forces.
Explore (Instructional Strategies)
Exploration 1:
Follow the directions given below, setting up two film canisters on a Hot Wheel track, using Alka
Seltzer and water to fuel the canister. Draw an illustration of the set-up, collect data and make
conjectures about the results. Question to consider: Was there a force exerted on each
canister? How do you know? Were the forces equal or unequal? How do you know?
1. Place the Hot Wheels track on the table. If no track is available, you can substitute two yard
sticks (as the rails) taped to the table. Make sure that both ends of the track are pointing
away from people.

Third’s the Charm
Grade 2
3
2. Place an empty film canister, with its cap on, between the two rails of the track, lying on its
side. The experiment will not cause enough force to shoot straight up into the air. Placing
the canister on its side will allow it to move along the track and create measurable
observations.
3. Pour approximately .5 cm water in another canister.
4. Place 1/3 tablet of Alka Seltzer into the canister, replace the lid quickly.
5. Place the canister on the track so that the caps of the two canisters are touching. Step
away and watch to see what happens. (In the classroom, students should use goggles.)
6. Measure the distance traveled by the empty and the full canister. In which direction did the
canisters move? Why do you think this happened? Record in a data table in your science
notebook.
7. You may want to fill the empty canister with water or with a weight. Predict what will
happen, then test your hypothesis.
8. Measure results and record in the science journal.
Exploration 2: Using two spring scales, stand facing your partner with the spring scales hooked together. Each
person pulls on the spring scale trying to pull with differing forces. What happens? What
happens when each person pulls with different force? Students record results, either by
illustration or description in their science journals.
Interdisciplinary Connections
1. Students can create nonfiction pages related to force and motion. These pages can
then be combined into a class book. Each student page should include a heading,
diagram, caption, and main idea with supporting details.
2. Have students create a vocabulary flip book.
3. Students can create a graph that compares the distance traveled by their canisters.
Assessment
1. Summarize in your notebook how to identify a force and how forces react to one another.
2. Label at least one drawing for reference.
3. What questions do you now have?
4. How might you investigate your questions?
Possible answer: Forces always come in pairs. A force may be a push or a pull upon an object
as a result of its interaction with another object. What has been pushed or pulled? What is it

Third’s the Charm
Grade 2
4
pushing or pulling against? As an example, if I lean against the wall, I am pushing (with force)
against it. It, in turn, is pushing back with an equal and opposite force.
Extensions/Additional Resources
Classroom Portals/Technology:
Streaming:
Let's Move It, Newton's Three Laws of Motion: Newton's Third
Website:
Utah Schools Teacher Resources
Literature:
See “Force and Motion” Lesson for Force and Motion Annotated Booklist
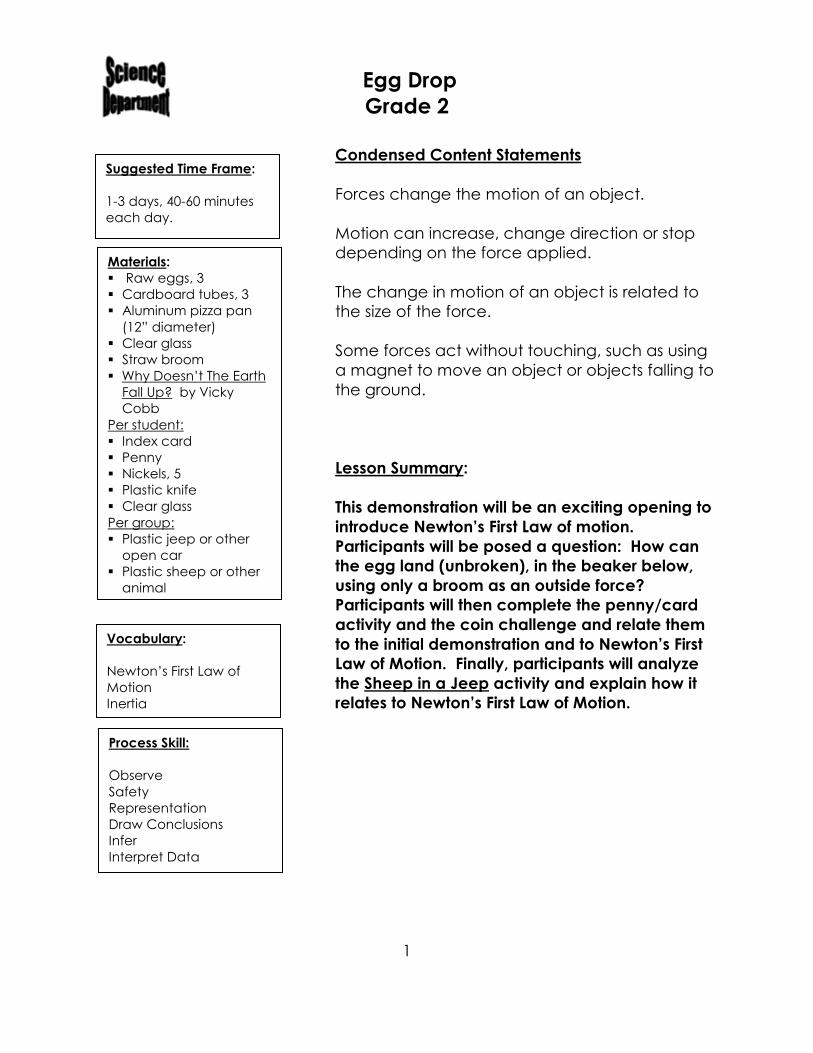
Egg Drop
Grade 2
1
Condensed Content Statements
Forces change the motion of an object.
Motion can increase, change direction or stop
depending on the force applied.
The change in motion of an object is related to
the size of the force.
Some forces act without touching, such as using
a magnet to move an object or objects falling to
the ground.
Lesson Summary:
This demonstration will be an exciting opening to
introduce Newton’s First Law of motion.
Participants will be posed a question: How can
the egg land (unbroken), in the beaker below,
using only a broom as an outside force?
Participants will then complete the penny/card
activity and the coin challenge and relate them
to the initial demonstration and to Newton’s First
Law of Motion. Finally, participants will analyze
the Sheep in a Jeep activity and explain how it
relates to Newton’s First Law of Motion.
Suggested Time Frame:
1-3 days, 40-60 minutes
each day.
Materials:
� Raw eggs, 3
� Cardboard tubes, 3
� Aluminum pizza pan
(12” diameter)
� Clear glass
� Straw broom
� Why Doesn’t The Earth
Fall Up? by Vicky
Cobb
Per student:
� Index card
� Penny
� Nickels, 5
� Plastic knife
� Clear glass
Per group:
� Plastic jeep or other
open car
� Plastic sheep or other
animal
Vocabulary:
Newton’s First Law of
Motion
Inertia
Process Skill:
Observe
Safety
Representation
Draw Conclusions
Infer
Interpret Data
Egg Drop
Grade 2
2
Teacher Background
When students observe force, they may use terms like pushing, pulling, throwing, dropping and
rolling. These are words to describe how each student uses a contact force to move an object.
Students should also learn that there are non-contact forces that can also move an object:
gravity and magnets. In addition to this force, students may also focus on the position and
movement of the object. Students may describe the position of an object as up, down, in front,
or behind. By experimenting with different materials, students can begin to understand that the
motion of an object can be described by tracking its position over time. This position can be
changed by a pushing or pulling force.
Through the exploration in this unit, students should discover the following force and motion
concepts:
o Speed is how fast an object moves over a certain distance.
o Friction occurs when objects rub against another object and creates heat.
o The pull of gravity on an object is that object’s weight.
o Gravity is a force that pulls everything toward the center of the Earth.
o Magnets create a push or pull force without contact.
o Attract is to bring together.
o Repel is to go in opposite directions.
o Force is a push or a pull.
o Position is the location of an object.
o To describe an object’s position, you compare it to the position of other objects.
o An object is in motion if it changes position.
o Motion happens over a period of time.
Teacher Notes
This lesson is broken up into three different sections. All three sections are connected and should
be completed in order. This lesson can take up to 75 minutes to be completed. The egg drop
video at the end can be used to complete the lesson and sum up all of the key points of the unit.
You should complete a trial of the egg drop demonstration prior to doing it in front of your
students.
Engage (Warm-up)
1. Begin a short book talk on Why Doesn’t the Earth Fall Up? It is a good way to introduce the
physical properties of motion to students and to get them thinking about why everyday
objects behave the way they do. The book also does a great job introducing the historical
contributions of Isaac Newton, Ptolemy, Copernicus and Galileo. Read two to three sections
of the book out loud to students. Some good sections to include are: “Why Can’t You
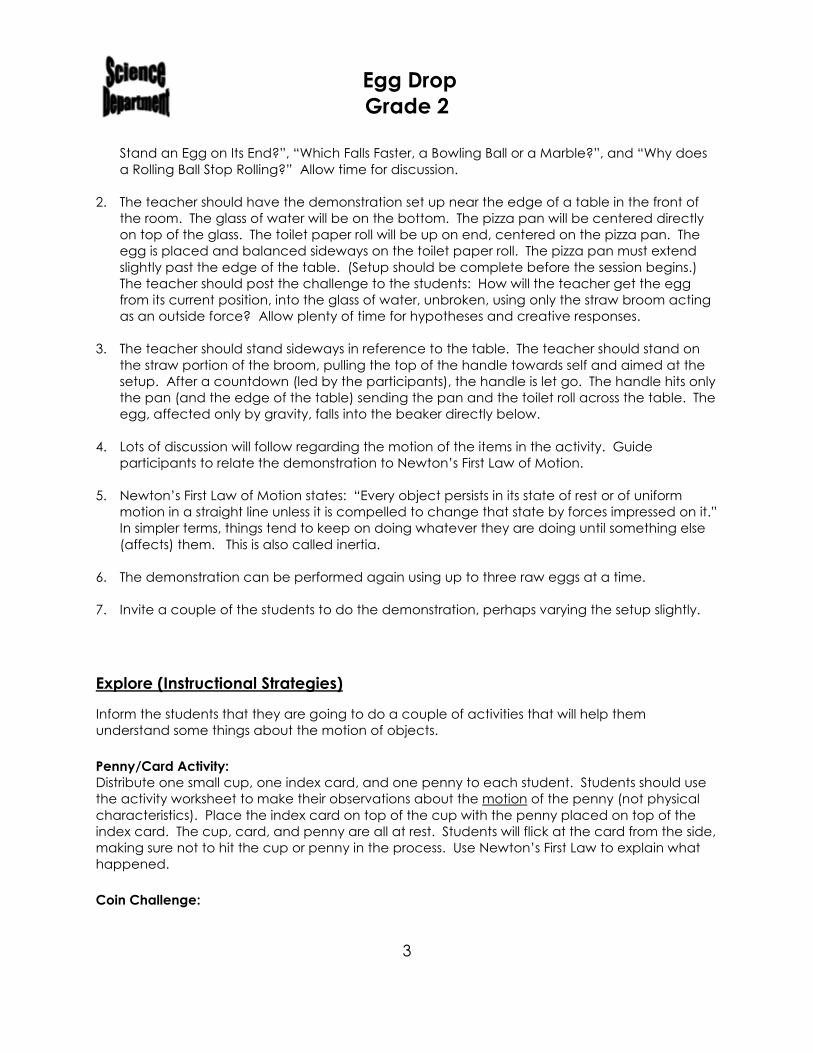
Egg Drop
Grade 2
3
Stand an Egg on Its End?”, “Which Falls Faster, a Bowling Ball or a Marble?”, and “Why does
a Rolling Ball Stop Rolling?” Allow time for discussion.
2. The teacher should have the demonstration set up near the edge of a table in the front of
the room. The glass of water will be on the bottom. The pizza pan will be centered directly
on top of the glass. The toilet paper roll will be up on end, centered on the pizza pan. The
egg is placed and balanced sideways on the toilet paper roll. The pizza pan must extend
slightly past the edge of the table. (Setup should be complete before the session begins.)
The teacher should post the challenge to the students: How will the teacher get the egg
from its current position, into the glass of water, unbroken, using only the straw broom acting
as an outside force? Allow plenty of time for hypotheses and creative responses.
3. The teacher should stand sideways in reference to the table. The teacher should stand on
the straw portion of the broom, pulling the top of the handle towards self and aimed at the
setup. After a countdown (led by the participants), the handle is let go. The handle hits only
the pan (and the edge of the table) sending the pan and the toilet roll across the table. The
egg, affected only by gravity, falls into the beaker directly below.
4. Lots of discussion will follow regarding the motion of the items in the activity. Guide
participants to relate the demonstration to Newton’s First Law of Motion.
5. Newton’s First Law of Motion states: “Every object persists in its state of rest or of uniform
motion in a straight line unless it is compelled to change that state by forces impressed on it.”
In simpler terms, things tend to keep on doing whatever they are doing until something else
(affects) them. This is also called inertia.
6. The demonstration can be performed again using up to three raw eggs at a time.
7. Invite a couple of the students to do the demonstration, perhaps varying the setup slightly.
Explore (Instructional Strategies)
Inform the students that they are going to do a couple of activities that will help them
understand some things about the motion of objects.
Penny/Card Activity:
Distribute one small cup, one index card, and one penny to each student. Students should use
the activity worksheet to make their observations about the motion of the penny (not physical
characteristics). Place the index card on top of the cup with the penny placed on top of the
index card. The cup, card, and penny are all at rest. Students will flick at the card from the side,
making sure not to hit the cup or penny in the process. Use Newton’s First Law to explain what
happened.
Coin Challenge:
Egg Drop
Grade 2
4
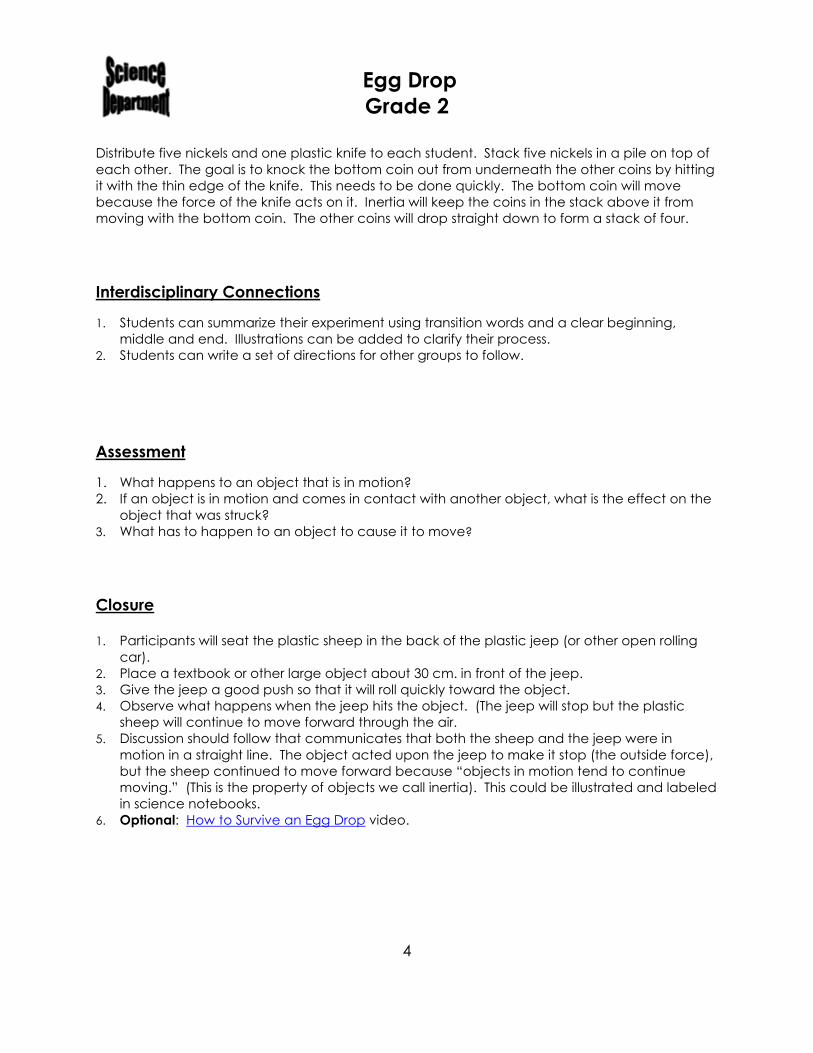
Distribute five nickels and one plastic knife to each student. Stack five nickels in a pile on top of
each other. The goal is to knock the bottom coin out from underneath the other coins by hitting
it with the thin edge of the knife. This needs to be done quickly. The bottom coin will move
because the force of the knife acts on it. Inertia will keep the coins in the stack above it from
moving with the bottom coin. The other coins will drop straight down to form a stack of four.
Interdisciplinary Connections
1. Students can summarize their experiment using transition words and a clear beginning,
middle and end. Illustrations can be added to clarify their process.
2. Students can write a set of directions for other groups to follow.
Assessment
1. What happens to an object that is in motion?
2. If an object is in motion and comes in contact with another object, what is the effect on the
object that was struck?
3. What has to happen to an object to cause it to move?
Closure
1. Participants will seat the plastic sheep in the back of the plastic jeep (or other open rolling
car).
2. Place a textbook or other large object about 30 cm. in front of the jeep.
3. Give the jeep a good push so that it will roll quickly toward the object.
4. Observe what happens when the jeep hits the object. (The jeep will stop but the plastic
sheep will continue to move forward through the air.
5. Discussion should follow that communicates that both the sheep and the jeep were in
motion in a straight line. The object acted upon the jeep to make it stop (the outside force),
but the sheep continued to move forward because “objects in motion tend to continue
moving.” (This is the property of objects we call inertia). This could be illustrated and labeled
in science notebooks.
6. Optional: How to Survive an Egg Drop video.
Egg Drop
Grade 2
5
Extensions/Additional Resources
Classroom Portals/Technology:
Streaming:
Exploring: Laws of Motion
Website:
Google Search: How to Survive an Egg Drop
Literature:
See “Force and Motion” Lesson for Force and Motion Annotated Booklist
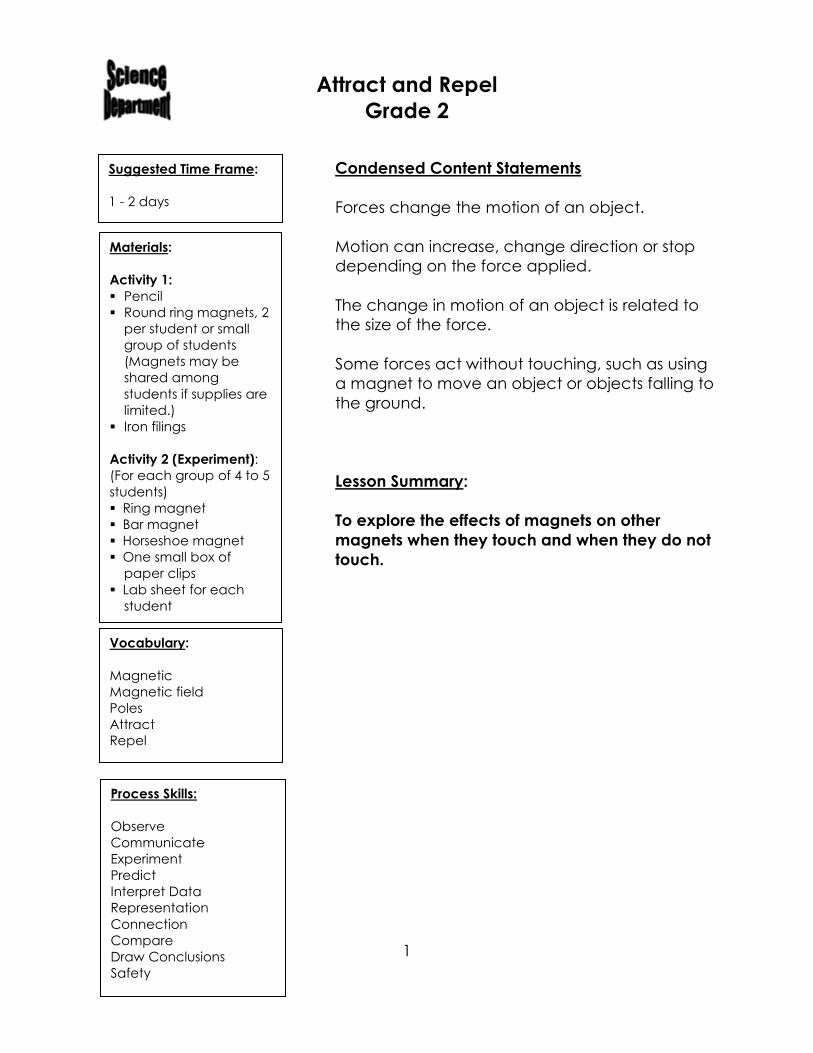
Attract and Repel
Grade 2
1
Condensed Content Statements
Forces change the motion of an object.
Motion can increase, change direction or stop
depending on the force applied.
The change in motion of an object is related to
the size of the force.
Some forces act without touching, such as using
a magnet to move an object or objects falling to
the ground.
Lesson Summary:
To explore the effects of magnets on other
magnets when they touch and when they do not
touch.
Suggested Time Frame:
1 - 2 days
Materials:
Activity 1:
� Pencil
� Round ring magnets, 2
per student or small
group of students
(Magnets may be
shared among
students if supplies are
limited.)
� Iron filings
Activity 2 (Experiment):
(For each group of 4 to 5
students)
� Ring magnet
� Bar magnet
� Horseshoe magnet
� One small box of
paper clips
� Lab sheet for each
student
Vocabulary:
Magnetic
Magnetic field
Poles
Attract
Repel
Process Skills:
Observe
Communicate
Experiment
Predict
Interpret Data
Representation
Connection
Compare
Draw Conclusions
Safety
Attract and Repel
Grade 2
2
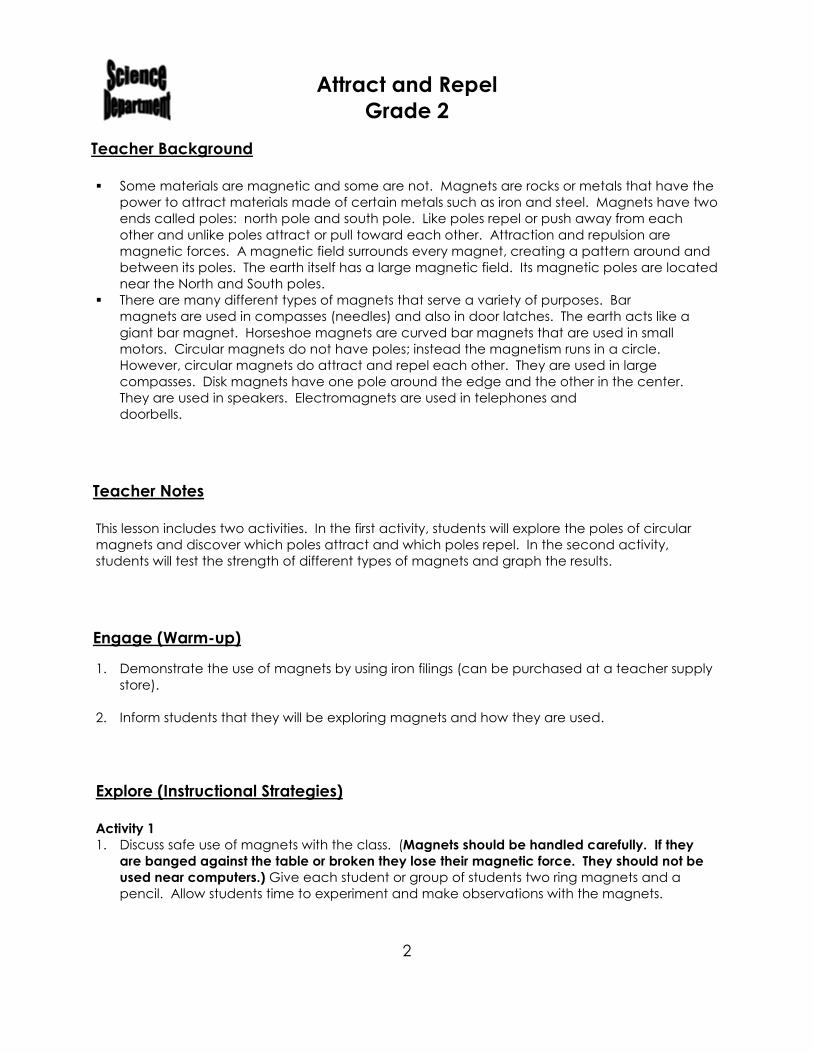
Teacher Background
� Some materials are magnetic and some are not. Magnets are rocks or metals that have the
power to attract materials made of certain metals such as iron and steel. Magnets have two
ends called poles: north pole and south pole. Like poles repel or push away from each
other and unlike poles attract or pull toward each other. Attraction and repulsion are
magnetic forces. A magnetic field surrounds every magnet, creating a pattern around and
between its poles. The earth itself has a large magnetic field. Its magnetic poles are located
near the North and South poles.
� There are many different types of magnets that serve a variety of purposes. Bar
magnets are used in compasses (needles) and also in door latches. The earth acts like a
giant bar magnet. Horseshoe magnets are curved bar magnets that are used in small
motors. Circular magnets do not have poles; instead the magnetism runs in a circle.
However, circular magnets do attract and repel each other. They are used in large
compasses. Disk magnets have one pole around the edge and the other in the center.
They are used in speakers. Electromagnets are used in telephones and
doorbells.
Teacher Notes
This lesson includes two activities. In the first activity, students will explore the poles of circular
magnets and discover which poles attract and which poles repel. In the second activity,
students will test the strength of different types of magnets and graph the results.
Engage (Warm-up)
1. Demonstrate the use of magnets by using iron filings (can be purchased at a teacher supply
store).
2. Inform students that they will be exploring magnets and how they are used.
Explore (Instructional Strategies)
Activity 1
1. Discuss safe use of magnets with the class. (Magnets should be handled carefully. If they
are banged against the table or broken they lose their magnetic force. They should not be
used near computers.) Give each student or group of students two ring magnets and a
pencil. Allow students time to experiment and make observations with the magnets.

Attract and Repel
Grade 2
3
2. Instruct students to hold the pencil vertically and put both magnets on the pencil in a
touching position (attraction). Then have students position magnets on the pencil in a non-
touching position (repulsion). One magnet may appear to float! Discuss student
observations. Identify the poles of the magnets as North and South. Explain that like poles
repel each other and unlike poles attract each other.
3. Do this same activity with other magnets on the table, moving them slowly toward each
other, observing whether the poles near each other are the same (magnets will repel) or
different (magnets will attract).
Activity 2
1. Provide each group of students with the experiment materials (ring magnet, bar magnet,
horseshoe magnet and paper clips). Explain that, in using the materials, students will test the
strength of different types of magnets.
2. Instruct students to use each magnet to pick up a pile of paper clips. Discuss with students
how to conduct a fair test (place same number of clips in pile each time, place magnet the
same height above the paperclip pile, move magnet up and away from paperclip pile, pull
paper clips from magnet and count).
3. Students should predict which magnet will pick up the most paper clips.
4. As each group tests each type of magnet, they should record the number of paper clips
picked up on the lab sheet in the chart. After testing all three magnets, the information from
the chart should then be used to complete the graph at the bottom of the page. Groups
should share their data and compare to the results of the other groups.
5. As an additional activity, the students could develop more questions to test with the
magnets. (Students may want to see what happens when a wet magnet is used to conduct
the same experiment; What happens when different materials are placed between the test
magnet and the paperclip pile?; What happens when different sizes of magnets are used?;
What happens when several magnets are stacked together?) This is a good time to review
which questions are testable and which are not.
Assessment
1. What happened to the magnets on the pencil when opposite poles were facing each
other? (Opposite poles attract, or pull, so the magnets were together.)
2. What happened to the magnets on the pencils when like poles were facing each other?
(Poles that are like repel, or push away from, each other.)
3. During the experiment, which magnet did you predict would pick up the most paper clips?
Was your prediction correct?
4. What did you do during the experiment to make it a fair test? (Used the same number of
paper clips each time, placed the magnets at the same place to pick up the paper clips).

Attract and Repel
Grade 2
4
5. How do non-touching magnets affect each other? (They push away or against each other.)
Reteach Ideas
1. Use the UnitedStreaming video: A First Look at Magnets to reinforce how magnets are used.
2. The video allows time for discussion between segments.
Closure
1. Have students complete the “Magnet Review” sheet.
Extensions/Additional Resources
Classroom Portals/Technology:
Streaming:
A First Look at Magnets (All Segments)
Literature:
What makes a Magnet by Franklyn Branley
Magnets by Karen Bryant-Mole
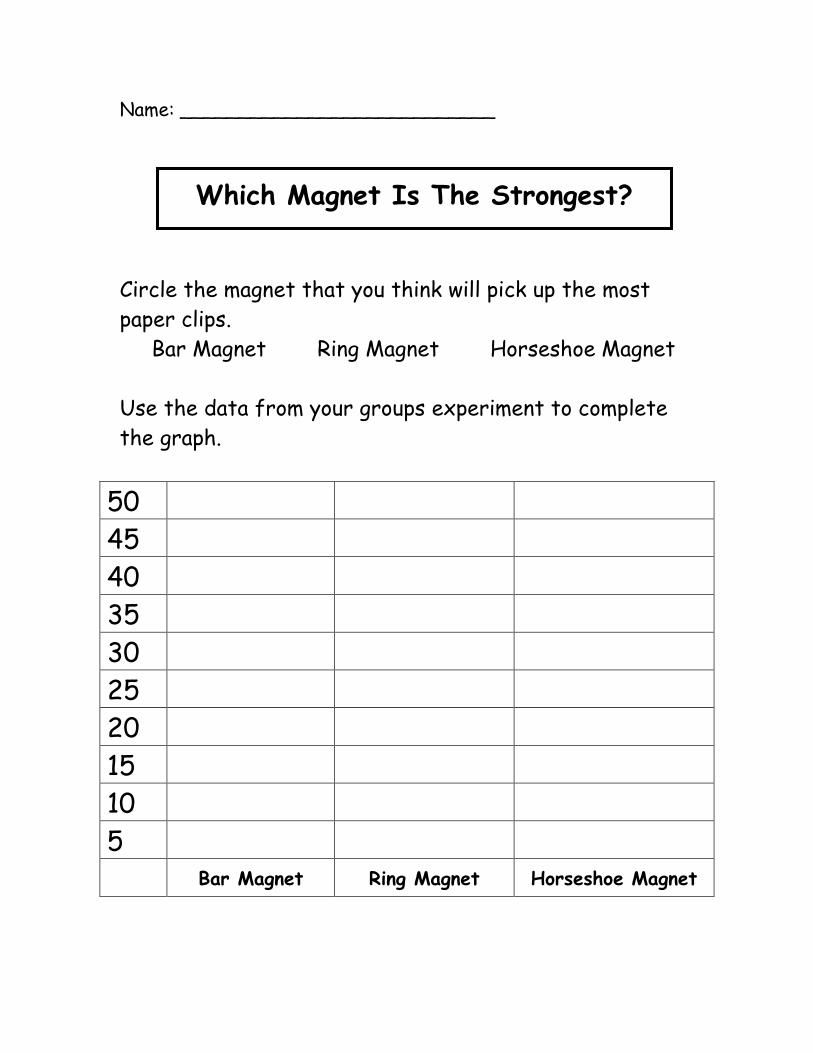
Name: ___________________________
Circle the magnet that you think will pick up the most
paper clips.
Bar Magnet Ring Magnet Horseshoe Magnet
Use the data from your groups experiment to complete
the graph.
50
45
40
35
30
25
20
15
10
5 Bar Magnet Ring Magnet Horseshoe Magnet
Which Magnet Is The Strongest?
Name:
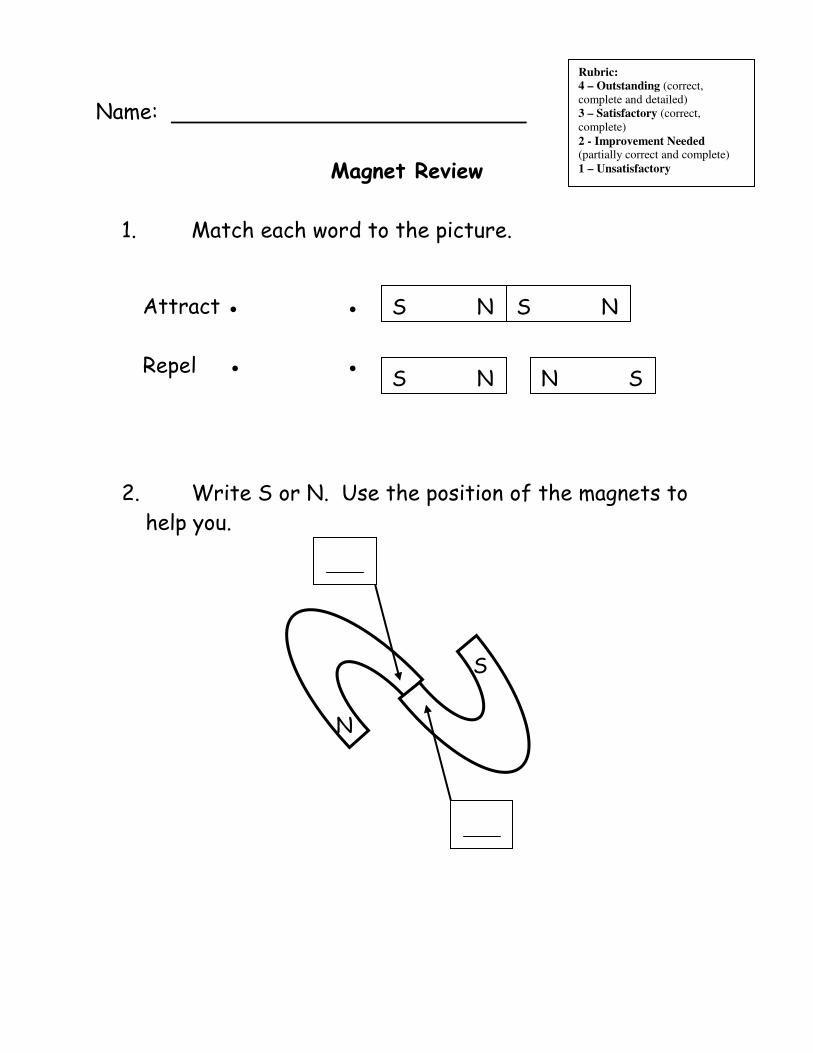
Magnet Review
1. Match each word to the picture.
2. Write S or N. Use the position of the magnets to
help you.
N
S
S N S N
S N N S
Attract ●
Repel ●
●
●
Rubric:
4 – Outstanding (correct, complete and detailed) 3 – Satisfactory (correct, complete) 2 - Improvement Needed (partially correct and complete) 1 – Unsatisfactory
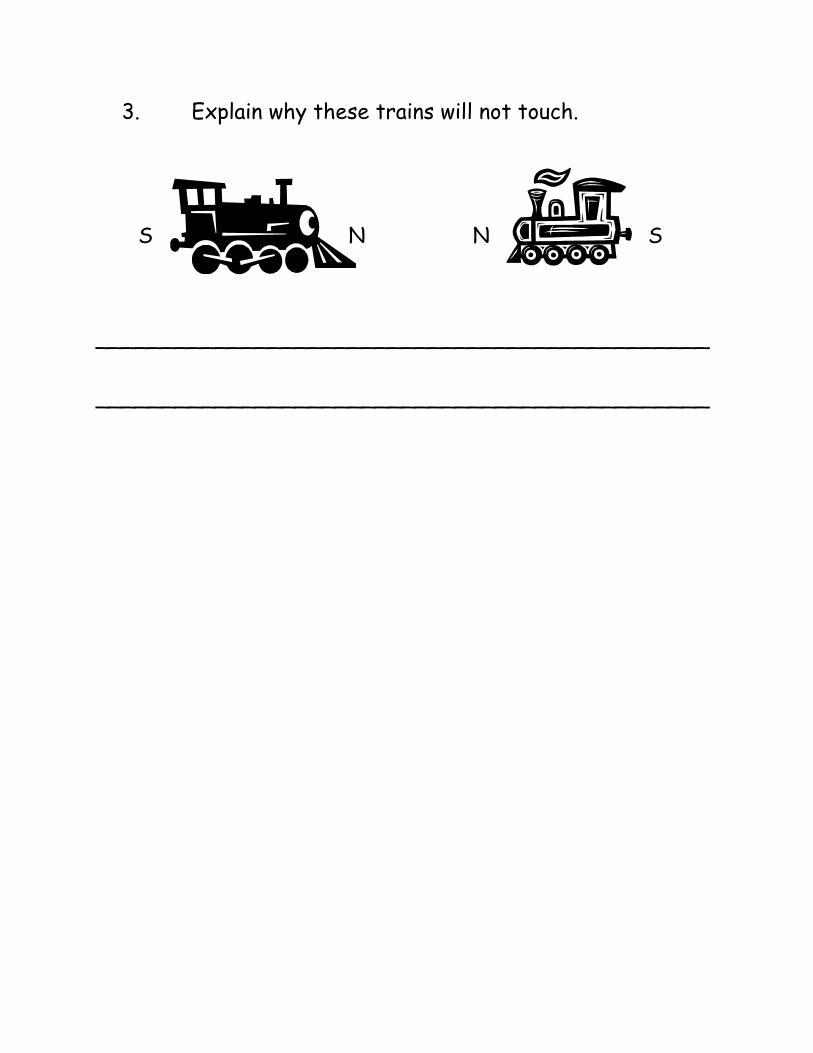
3. Explain why these trains will not touch.
______________________________________________
______________________________________________
N N S S
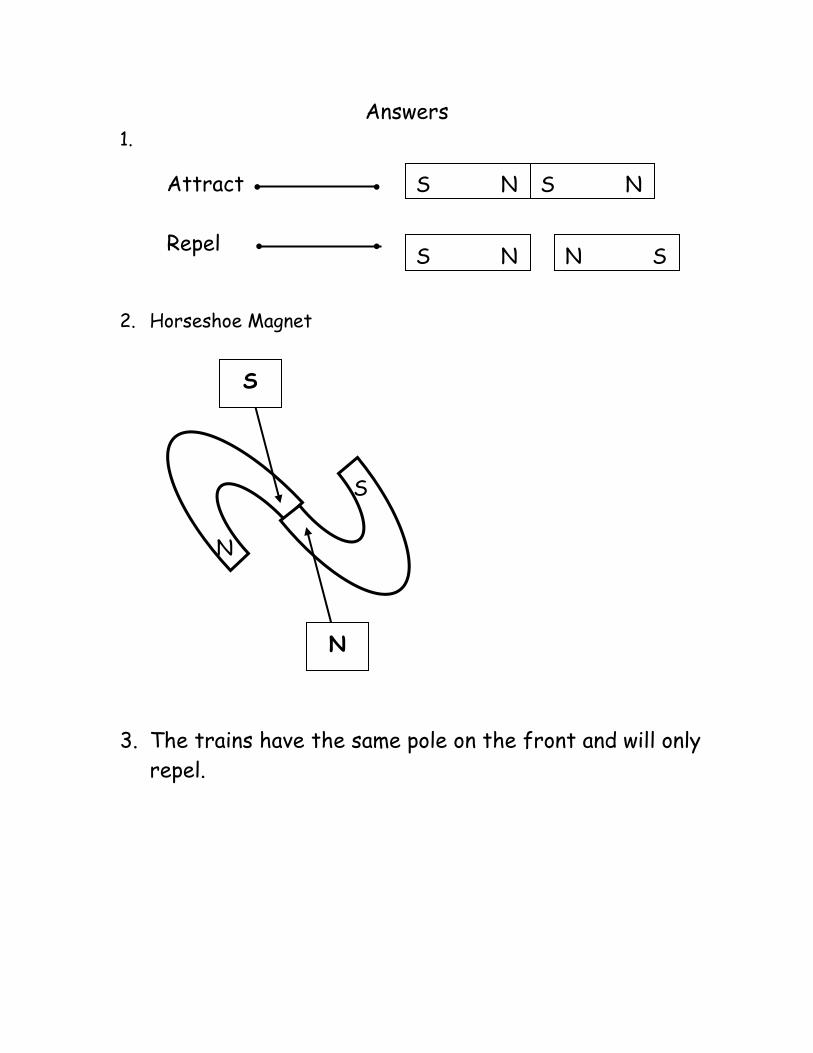
Answers 1.
2. Horseshoe Magnet
3. The trains have the same pole on the front and will only
repel.
N
S
S
N
S N S N
S N N S
Attract ●
Repel ●
●
●
On The Trail – Grade 2
1
Condensed Content
Statements
Forces change the motion of an object.
Motion can increase, change direction or stop depending on the force applied.
The change in motion of an object is related to the size of the force.
Some forces act without touching, such as using a magnet to move an object or objects falling to the ground.
Lesson Summary:
The purpose of this lesson is to allow students to practice
recording and describing the movement of an object relative
to the background. Students will use guided inquiry to try a
variety of ways to record the movement of a small ball.
They will also explore how changing the background makes
it more/less difficult to report movement, using a paint-
covered ball in an aluminum pan. The students will
practice measuring distance traveled as well as the distance
from start to finish. The students will demonstrate their
ability to trace and measure an object’s motion over time by
throwing a paper airplane and recording its movement with
a drawing and a measurement. The lesson combines
experience with the science concept of recording motion
with the math skills of measurement. It is a very experiential
lesson and students are encouraged to explore and
question.
Estimated Duration: 80 minutes
Commentary:
Movement on the Earth is measured in relative terms. The movement is related to time, such as miles/hour, or kilometers/second. Speed is a relative idea. A horse is fast when compared to a turtle, but slow when compared to a cheetah. The Earth is moving rapidly, but it is not noticeable and we only know because of recorded observations. A record made of a motion is one type of model. It shows something that happened when it is not visible. Students in grade three have an egocentric view of the world and tend to conceptualize measurement in comparison to themselves. Someone who runs faster than them is fast. Someone who runs more slowly is slow. This indicator begins to ask students to make their observations more objectively. This lesson was field tested by teachers across the state of Ohio. Some of the teacher comments about this lesson follow:
On The Trail – Grade 2
2
Pre-Assessment:
• Ask students to respond to the following questions. Each student should write his/herown response in a science journal.a. What is motion?b. How do you know when something has moved?
• They should discuss the questions with one or two other students.
Scoring Guidelines: Look for the students’ levels of sophistication in understanding that movement is always relative to another object or to a fixed point in space. For example, “I can see a car drive down the street”, or “When I walk I start at one place and go to another place” relates the object to its background. Without a background, it’s difficult to tell that a car is moving. These comments demonstrate that understanding. “I can see it move” does not. “Cars move because they go really fast” does not.
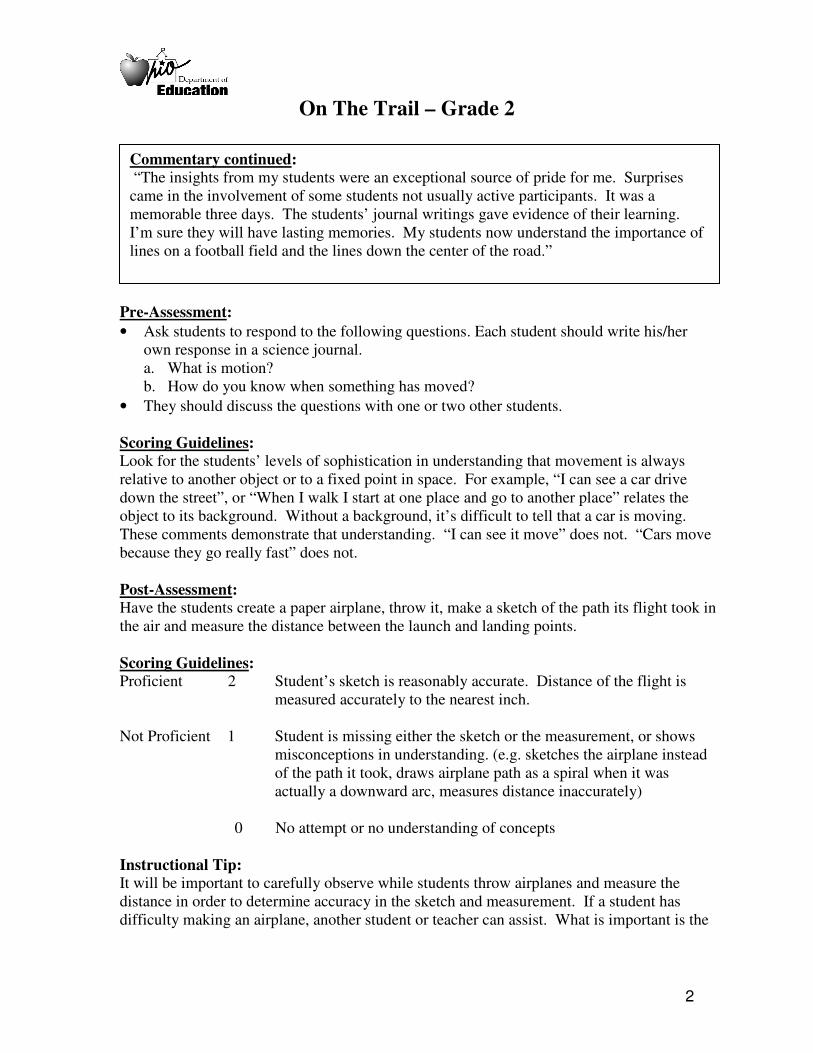
Post-Assessment:
Have the students create a paper airplane, throw it, make a sketch of the path its flight took in the air and measure the distance between the launch and landing points.
Scoring Guidelines:
Proficient 2 Student’s sketch is reasonably accurate. Distance of the flight is measured accurately to the nearest inch.
Not Proficient 1 Student is missing either the sketch or the measurement, or shows misconceptions in understanding. (e.g. sketches the airplane instead of the path it took, draws airplane path as a spiral when it was actually a downward arc, measures distance inaccurately)
0 No attempt or no understanding of concepts
Instructional Tip:
It will be important to carefully observe while students throw airplanes and measure the distance in order to determine accuracy in the sketch and measurement. If a student has difficulty making an airplane, another student or teacher can assist. What is important is the
Commentary continued:
“The insights from my students were an exceptional source of pride for me. Surprises came in the involvement of some students not usually active participants. It was a memorable three days. The students’ journal writings gave evidence of their learning. I’m sure they will have lasting memories. My students now understand the importance of lines on a football field and the lines down the center of the road.”

On The Trail – Grade 2
3
recording. If a poorly made airplane does not fly well, it doesn’t matter. The recording should reflect the actual flight, however brief or erratic.
Instructional Procedures:
Day One
1. Discuss the responses to the two questions in the pre-assessment. Allow students togenerate many examples of movement. Ask students to consider when it might beimportant to keep a record of the movement of something (weather patterns, a footballduring a game, air traffic control). Show students a ping pong ball or other small ball.Tell them that you are going to make the ball move and you would like to keep a recordof how it moved so that you will be able to show the movement to someone else later.Ask the students to discuss with a partner how it could be recorded. How the studentsdecide to move the ball (rolling, bouncing, tossing) is unimportant. What is important ishow they record it.
2. Have students share their ideas and write all of the ideas in a list. It is not necessary thatthis be a long list. It may only include a few ideas, such as “draw a picture” and“videotape it,” or it may include more inventive ones such as “dip it in paint and it leavesa trail.” There also may be suggestions for vertical movement.
3. Give each pair of students a different sized ball and allow them to choose one of the ideasfrom the list to try. Each pair will then report to the class how their ball moved and howwell their recording worked. Discourage reenactments using the ball and encouragestudents to focus on the record of the movement.
4. If measurement was not on the list generated by the students, suggest that measuring thedistance the ball traveled is a way to report its movement. Provide measuring tools andallow the students to push the ball and measure the distance it traveled.
5. Summarize the activity by having a short discussion around questions such as:a. What are some things that make recording movement difficult?b. How can you tell when something has moved?c. How could you keep a record of your movements for a whole day?
Day Two
6. Briefly review the activities from the previous day.7. Show the students an aluminum pan. Explain that you are going to cause a marble to
move inside the pan by tilting the pan. Ask the students to predict what the movementmay look like. Some students may want to make a sketch on the board.
8. Tilt the pan (only once or twice) and ask the students to make a sketch of what they sawin their science journals. Allow the students to share some of their sketches. Ask thestudents why there may be some variety in the sketches (It moved quickly; they watchedfrom different angles; it was confusing because the pan was moving too; etc).
9. Use a permanent marker to divide the inside of the pan into four equal parts, and labeleach part 1, 2, 3 or 4.
10. Tell the students that you are going to tilt the pan again and let them observe the marble’smovement. Ask them to predict orally how it may be different with the markings in the

On The Trail – Grade 2
4
pan. “Do you think the markings will make it easier to follow the marble’s movement and report it?”
11. Tilt the pan once or twice and ask students to make a sketch in their journals. Have themshare their sketches with a partner and discuss any differences. Share the observationsand discussions as a whole class. The class may find that having the background dividedinto sections helped them focus on where the marble went and gave them references touse in describing the movement. But it is not imperative that they do. If they do not,discuss why it wasn’t helpful and ask for other suggestions. Discuss other places thatpeople mark backgrounds in order to make movement easier to follow (e.g., as footballfields, basketball courts, lines on roads, etc).
12. Ask students to dip a marble in some tempera paint. Place it in the pan, and cause it tomake a brief random movement. The marble should leave behind a paint trail. Ask thestudents, “What if we wanted to measure the distance the marble moved in the pan?”Student may suggest that you deliberately make the marble move in a straight line, butmove them beyond this to think about measuring random movement. Some students mayalready have ideas about how to do this. If they are different than the one mentioned inthis lesson, the students should be allowed to try them as extensions.
13. Demonstrate how to lay a string on the paint after it has dried, carefully following thetrail. Show students how to pinch the string at the beginning and end of the trail andtransfer the string to a meter stick or ruler to find a measurement. This will show thedistance the ball traveled.
Instructional Tip: Some students may worry about the string losing the shape of the trail as it is moved to the ruler; remind them that the ruler is used to report distance from beginning to end, not shape.Also show the students that they can measure the straight line from the starting point to the stopping point, to report the distance from start to finish. Help students make the distinction that the distance from start to stop doesn’t always mean the distance traveled.
14. Have the students work in pairs or small groups to move a painted marble in a pan, andmeasure the trail and the distance from start to stop.
15. Have them make a sketch in their science journal of the paint trail and record themeasurements.
16. Have a summary discussion about successes and difficulties with measuring the marble’strail. Ask students to respond in their science journals to the following prompt:“If you were going to share information about your marble’s movement in the pan withsomeone who wasn’t here, how would you do it, and why?”
Differentiated Instructional Support: Instruction is differentiated according to learner needs to help all learners either meet the intent of the specified indicator(s) or, if the indicator is already met, to advance beyond the specified indicator(s).
On The Trail – Grade 2
5
• Tape a long piece of thread to the back of the paper airplanes in the post assessment to aidstudents in visualizing the flight pattern.
Extensions: • Ask the class to select three of the ideas for recording movement that were generated for
the teacher to try as a demonstration. Demonstrate the movement recording ideas for theclass, then discuss how successful each was.
• Repeat the ball exploration using different surfaces or different types of balls. Discussthe effects that these changes have on your recording methods.
• Ask students to draw a representation of the way they traveled to school or from anotherpart of the school building.
• If you have a sand table or sandy/dusty area on the playground, explore making trailswith wind-up toys or toy cars and then measuring the trails or recording them in sciencejournals.
Homework Options and Home Connections:
• Have students observe and document the movement of an object (animate or inanimate)they saw outside. This may be in the form of a drawing, a videotape, a writtendescription, physical evidence (such as a snail’s slime trail) or measurements. Studentsmay share observations with the class.
• Ask students to notice contrails left by airplanes in the sky (contrail is a shortened versionof condensation trail, sometimes called vapor trails).
Interdisciplinary Connections:
Mathematics
• MeasurementBenchmark C: Develop common referents for units of measure for length, weight,volume (capacity) and time to make comparisons and estimates.Indicator 5: Estimate and measure length, weight and volume (capacity), using metricand U.S. customary units, accurate to the nearest 1/2 or 1/4 unit as appropriate.
• Data Analysis and ProbabilityBenchmark A: Gather and organize data from surveys and classroom experiments,including data collected over a period of time.Indicator 1: Collect and organize data from an experiment, such as recording andclassifying observations or measurements, in response to a question posed.
Materials and Resources: The inclusion of a specific resource in any lesson formulated by the Ohio Department of
Education should not be interpreted as an endorsement of that particular resource, or any of
its contents, by the Ohio Department of Education. The Ohio Department of Education does
not endorse any particular resource. The Web addresses listed are for a given site’s main
On The Trail – Grade 2
6
page, therefore, it may be necessary to search within that site to find the specific information
required for a given lesson. Please note that information published on the Internet changes
over time, therefore the links provided may no longer contain the specific information related
to a given lesson. Teachers are advised to preview all sites before using them with students.
For the teacher: aluminum pans, balls (golf balls or ping pong balls), tempera paint, marbles.
Day One
For the students: Several small balls (golf balls or ping pong balls), one per pair of students, meter sticks, rulers or trundle wheels, one per pair of students.
Day Two
For the students: Aluminum pans (size and shape are unimportant), one per pair of students, large marbles, one per pair of students, string, metersticks, rulers or trundle wheels, one per pair of students, tempera paint.
Vocabulary:
• movement• motion• change• recording• trace• measurement• distance• background
Technology Connections: • Use a video camera to record the motion of things like students walking in the classroom,
raindrops running down a window pane, a ball bouncing, a bird flying. Play these inslow motion and have students practice describing the movement and how it changes, andrecording it in their science journals.
• Use a camera to take still pictures of things, such as those mentioned above, and have thestudents predict what the movement will be like after the moment captured in the picture.Ask them to give reasons for their predictions.
Research Connections: Marzano, R. et al. Classroom Instruction that Works: Research-Based Strategies for
Increasing Student Achievement, Alexandria, Va: Association for Supervision and Curriculum Development, 2001.
Nonlinguistic representations help students think about and recall knowledge. This includes the following:

On The Trail – Grade 2
7
• Creating graphic representations (organizers); • Making physical models; • Generating mental pictures; • Drawing pictures and pictographs; • Engaging in kinesthetic activity.
National Research Council, Inquiry and the National Science Education Standards, A Guide
for Teaching and Learning, Washington, DC: National Academy Press, 2000. In order for students to learn how scientists expand our understanding of our world, it is important for them to practice many of the same processes scientists use. Some of these are exhibiting curiosity, gathering evidence using technology and mathematics, and publishing an explanation based on evidence. (National Research Council, 2000). The guided inquiry in this lesson allows students to practice these processes. General Tips:
The focus of this lesson should remain on the recording of the motion, not on the motion itself. The students may need help with this, as they may be interested in creating a desired motion with their balls. Even if the ball moves only a small amount or in a way that was unexpected, there is an opportunity for recording. If materials or logistics are a problem, this could be done at a learning center.

Model Curriculum Framework
Second Grade
Second Quarter Earth and Space Science Grade Band Theme: Observations of the Environment
This theme focuses on helping students develop the skills for systematic discovery to understand the science of the physical
world around them in greater depth by using scientific inquiry.
Topic: The Atmosphere
This topic focuses on air and water as they relate to weather and weather changes that can be observed and
measured.
Condensed Content Statements:
The atmosphere is made up of air.
• I can identify the properties of air (has weight
[mass] and takes up space [volume]).
• I can observe and measure the properties of
air.
• I can measure the speed and direction of
wind.
• I can describe how the transfer of energy in
the atmosphere causes air movement, which
is felt as wind.
Science Inquiry and Application
During the years of PreK-4 all students must become proficient in
the use of the following scientific processes, with appropriate
laboratory safety techniques, to construct their knowledge and
understanding in all science content areas:
• I can plan and conduct simple investigations.
• I can employ simple equipment and tools to gather data
and extend the senses.
• I can use appropriate mathematics with data to construct
reasonable explanations.
• I can communicate about observations, investigations, and
explanations.
• I can review and ask questions about the observations and
explanations of others.
Time Frame: 4 weeks

Model Curriculum
Framework
Prior Knowledge Current Content Elaboration Future Application of the Concept
PreK-1: Wind is moving air; air
in a nonliving substance that
surrounds Earth; wind can be
measured; sunlight warms the
air.
In the earlier grades, wind is measured but
not with a numerical value or directional
data (for example, wind may be moving
faster/slower than yesterday and is coming
from a different direction.) In 2nd grade,
wind can be measured with numeric value
and direction (for example, wind speed is 6
mph, wind direction is W -> E.)
Air takes up space (has volume) and has
weight (mass.) The introduction of “mass”
is not appropriate at this grade level. The
direction and speed of the wind and air
temperature can be measured using a
variety of instruments, such as windsocks,
weather vanes, thermometers, or simple
anemometers. Weather events that are
related to wind (such as tornadoes and
hurricanes) are included in this content.
Experiments, models (including
digital/virtual), and investigations must be
conducted to demonstrate the properties
of air, wind, and wind-related weather
events.
Student mastery will include understanding of the following:
Air has properties that can be observed and measured.
The transfer of energy in the atmosphere causes air
movement, which is felt as wind.
Wind speed and direction can be measured.
Grades 3-5: Renewable energy; air pollution; wind can
weather and erode Earth’s surface
Grades 6-8: Thermal energy transfers in the atmosphere; air
currents; global climate patterns.
Common Misconceptions:
Air has negative weight or no weight. (“A balloon is lighter than air.”)
Wind speed is related to the temperature of air. (“High speed wind means cold air. Gentle or slow wind is warm.”)
Air takes up no space. (“You can’t see it, so it’s not there.”)
Model Curriculum
Framework
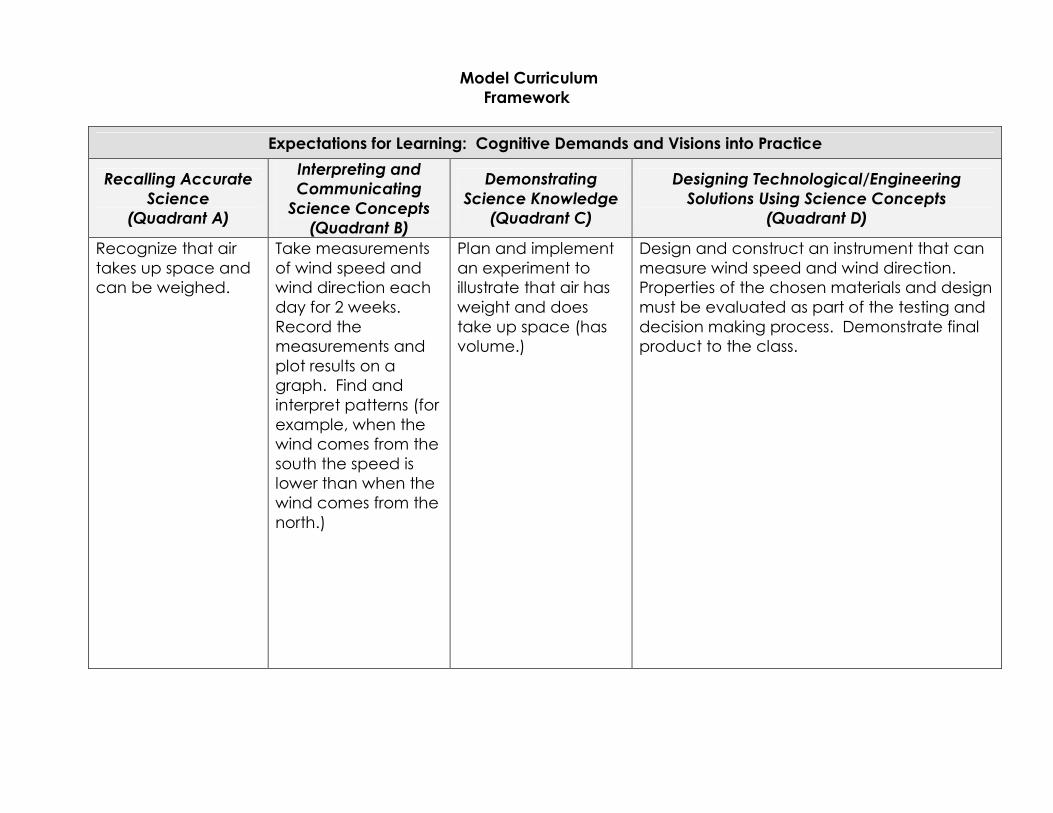
Expectations for Learning: Cognitive Demands and Visions into Practice
Recalling Accurate
Science
(Quadrant A)
Interpreting and
Communicating
Science Concepts
(Quadrant B)
Demonstrating
Science Knowledge
(Quadrant C)
Designing Technological/Engineering
Solutions Using Science Concepts
(Quadrant D)
Recognize that air
takes up space and
can be weighed.
Take measurements
of wind speed and
wind direction each
day for 2 weeks.
Record the
measurements and
plot results on a
graph. Find and
interpret patterns (for
example, when the
wind comes from the
south the speed is
lower than when the
wind comes from the
north.)
Plan and implement
an experiment to
illustrate that air has
weight and does
take up space (has
volume.)
Design and construct an instrument that can
measure wind speed and wind direction.
Properties of the chosen materials and design
must be evaluated as part of the testing and
decision making process. Demonstrate final
product to the class.
Model Curriculum
Framework
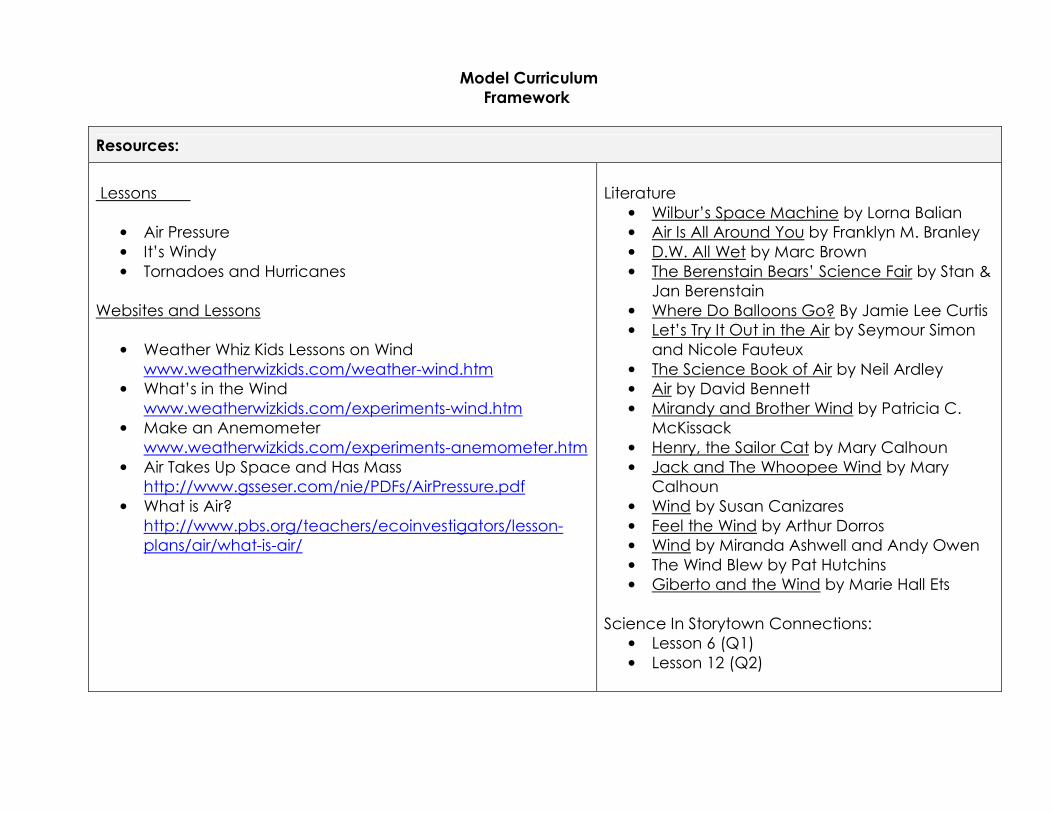
Resources:
Lessons
• Air Pressure
• It’s Windy
• Tornadoes and Hurricanes
Websites and Lessons
• Weather Whiz Kids Lessons on Wind
www.weatherwizkids.com/weather-wind.htm
• What’s in the Wind
www.weatherwizkids.com/experiments-wind.htm
• Make an Anemometer
www.weatherwizkids.com/experiments-anemometer.htm
• Air Takes Up Space and Has Mass
http://www.gsseser.com/nie/PDFs/AirPressure.pdf
• What is Air?
http://www.pbs.org/teachers/ecoinvestigators/lesson-
plans/air/what-is-air/
Literature
• Wilbur’s Space Machine by Lorna Balian
• Air Is All Around You by Franklyn M. Branley
• D.W. All Wet by Marc Brown
• The Berenstain Bears’ Science Fair by Stan &
Jan Berenstain
• Where Do Balloons Go? By Jamie Lee Curtis
• Let’s Try It Out in the Air by Seymour Simon
and Nicole Fauteux
• The Science Book of Air by Neil Ardley
• Air by David Bennett
• Mirandy and Brother Wind by Patricia C.
McKissack
• Henry, the Sailor Cat by Mary Calhoun
• Jack and The Whoopee Wind by Mary
Calhoun
• Wind by Susan Canizares
• Feel the Wind by Arthur Dorros
• Wind by Miranda Ashwell and Andy Owen
• The Wind Blew by Pat Hutchins
• Giberto and the Wind by Marie Hall Ets
Science In Storytown Connections:
• Lesson 6 (Q1)
• Lesson 12 (Q2)
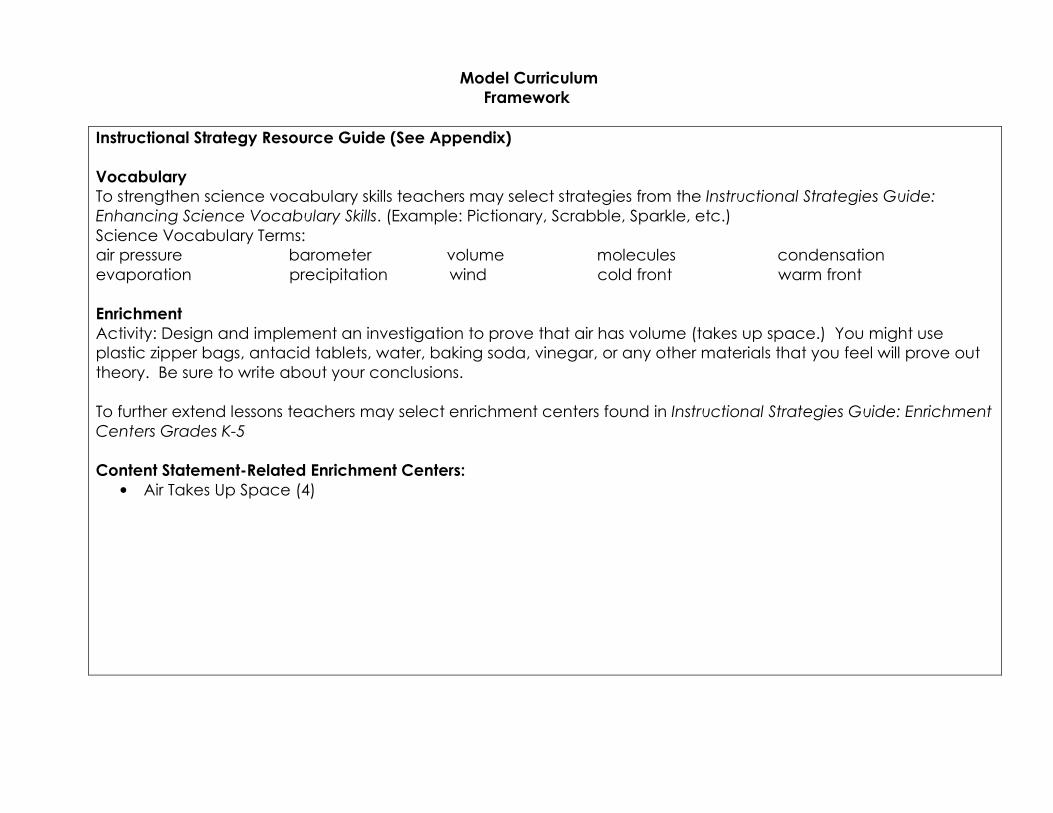
Model Curriculum
Framework
Instructional Strategy Resource Guide (See Appendix)
Vocabulary
To strengthen science vocabulary skills teachers may select strategies from the Instructional Strategies Guide:
Enhancing Science Vocabulary Skills. (Example: Pictionary, Scrabble, Sparkle, etc.)
Science Vocabulary Terms:
air pressure barometer volume molecules condensation
evaporation precipitation wind cold front warm front
Enrichment
Activity: Design and implement an investigation to prove that air has volume (takes up space.) You might use
plastic zipper bags, antacid tablets, water, baking soda, vinegar, or any other materials that you feel will prove out
theory. Be sure to write about your conclusions.
To further extend lessons teachers may select enrichment centers found in Instructional Strategies Guide: Enrichment
Centers Grades K-5
Content Statement-Related Enrichment Centers:
• Air Takes Up Space (4)

Model Curriculum
Framework
Classroom Portals/Technology
Streaming: (http://streaming.discoveryeducation.com/)
• A First Look: Weather
(only the “How Wind
Affects Weather”
segment [2:05])
• Weather: Changes and
Measurement (only the
“Wind” segment [1:57])
• Hands-On Weather: Part
02 (only the “A Look at
Air Pressure” [2:00] and
the “A Look at Wind”
[1:26] segments
SMART: (Search the Smart Exchange site
(http://exchange.smarttech.com)
for these specific titles:)
Websites:
“Weather Wiz Kids” www.weatherwizkids.com
“Weather for Kids” www.sciencekids.co.nz/weather.html
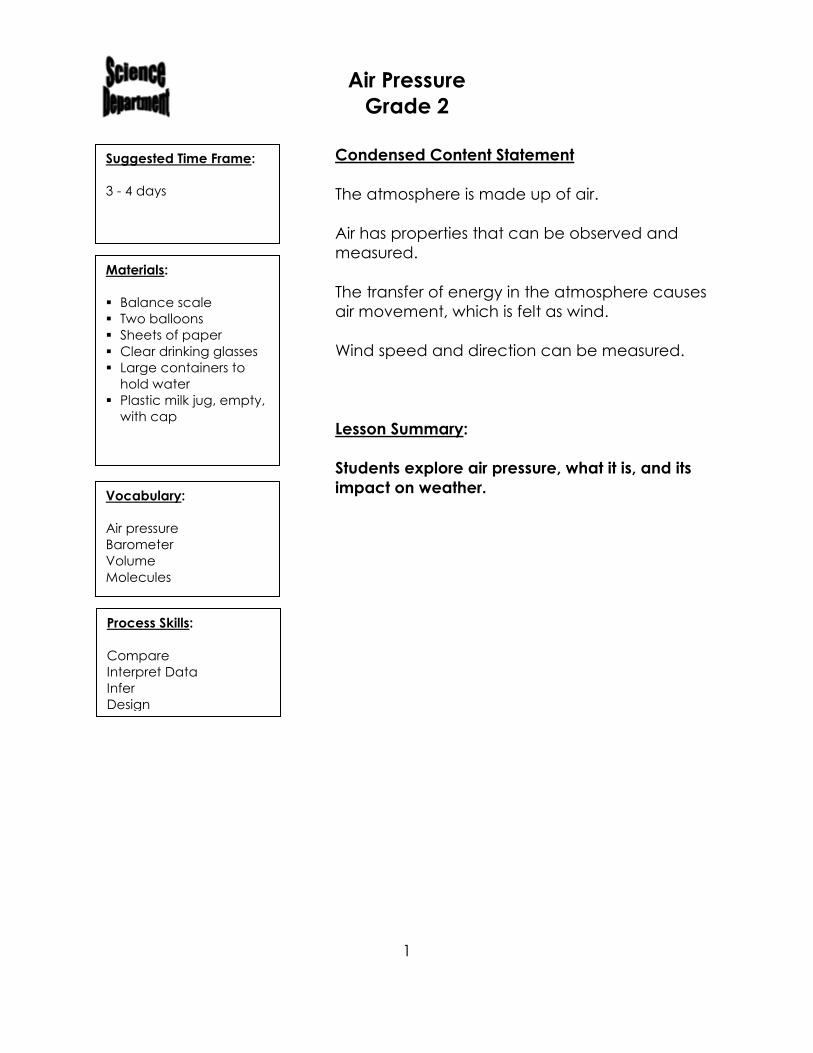
Air Pressure
Grade 2
1
Condensed Content Statement
The atmosphere is made up of air.
Air has properties that can be observed and
measured.
The transfer of energy in the atmosphere causes
air movement, which is felt as wind.
Wind speed and direction can be measured.
Lesson Summary:
Students explore air pressure, what it is, and its
impact on weather.
Suggested Time Frame:
3 - 4 days
Materials:
� Balance scale � Two balloons � Sheets of paper � Clear drinking glasses � Large containers to hold water
� Plastic milk jug, empty, with cap
Vocabulary:
Air pressure
Barometer
Volume
Molecules
Process Skills:
Compare
Interpret Data
Infer
Design
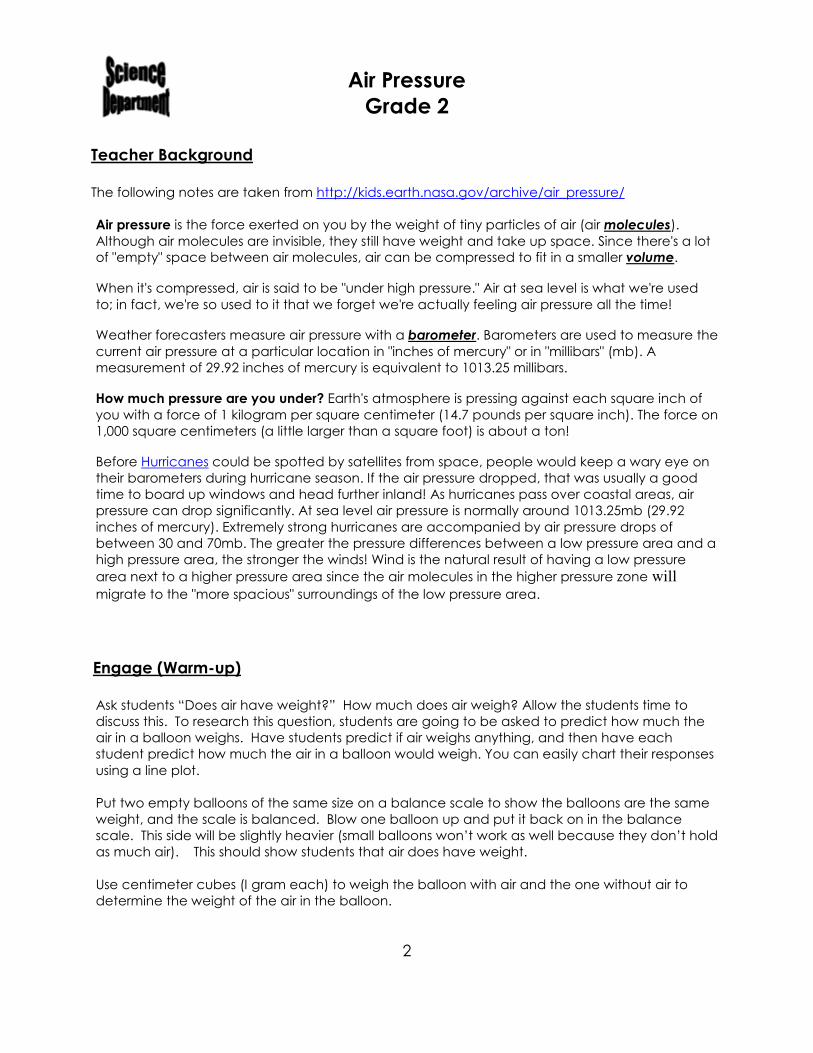
Air Pressure
Grade 2
2
Teacher Background
The following notes are taken from http://kids.earth.nasa.gov/archive/air_pressure/
Air pressure is the force exerted on you by the weight of tiny particles of air (air molecules).
Although air molecules are invisible, they still have weight and take up space. Since there's a lot
of "empty" space between air molecules, air can be compressed to fit in a smaller volume.
When it's compressed, air is said to be "under high pressure." Air at sea level is what we're used
to; in fact, we're so used to it that we forget we're actually feeling air pressure all the time!
Weather forecasters measure air pressure with a barometer. Barometers are used to measure the
current air pressure at a particular location in "inches of mercury" or in "millibars" (mb). A
measurement of 29.92 inches of mercury is equivalent to 1013.25 millibars.
How much pressure are you under? Earth's atmosphere is pressing against each square inch of
you with a force of 1 kilogram per square centimeter (14.7 pounds per square inch). The force on
1,000 square centimeters (a little larger than a square foot) is about a ton!
Before Hurricanes could be spotted by satellites from space, people would keep a wary eye on
their barometers during hurricane season. If the air pressure dropped, that was usually a good
time to board up windows and head further inland! As hurricanes pass over coastal areas, air
pressure can drop significantly. At sea level air pressure is normally around 1013.25mb (29.92
inches of mercury). Extremely strong hurricanes are accompanied by air pressure drops of
between 30 and 70mb. The greater the pressure differences between a low pressure area and a
high pressure area, the stronger the winds! Wind is the natural result of having a low pressure
area next to a higher pressure area since the air molecules in the higher pressure zone will migrate to the "more spacious" surroundings of the low pressure area.
Engage (Warm-up)
Ask students “Does air have weight?” How much does air weigh? Allow the students time to
discuss this. To research this question, students are going to be asked to predict how much the
air in a balloon weighs. Have students predict if air weighs anything, and then have each
student predict how much the air in a balloon would weigh. You can easily chart their responses
using a line plot.
Put two empty balloons of the same size on a balance scale to show the balloons are the same
weight, and the scale is balanced. Blow one balloon up and put it back on in the balance
scale. This side will be slightly heavier (small balloons won’t work as well because they don’t hold
as much air). This should show students that air does have weight.
Use centimeter cubes (I gram each) to weigh the balloon with air and the one without air to
determine the weight of the air in the balloon.
Air Pressure
Grade 2
3
Explore (Instructional Strategies)
Following are several short experiments to demonstrate that air takes up space. These can be
done whole group or in small groups, depending upon time and the amount of materials you
have.
1. Crumple up a piece of paper and jam it into the bottom of a drinking glass. Hold the glass
upside down and, keeping it straight, push it completely under the water. Does the paper
get wet? Why not? What happens if you put the cup in the water mouth up? You can do
this as a demonstration to the whole class, or allow students to work in groups to do this.
When you turn the cup upside down and put it in the water, the air is still in the cup and has
no way to get out because of the water pressure.
2. While holding your hand on your ribs, take a deep breath and observe what happens to
your chest. Did you feel it expand? Did you see it expand? How would you explain what
happened?
Your chest expands because, like blowing up a balloon, you are increasing the number of air
molecules inside your lungs. This causes your lungs to expand in order to provide space for
the increased number of air molecules.
3. You will need an empty plastic gallon milk jug with a screw top. Fill it about a quarter of the
way full with very hot water. Cap it tightly and let it stand for about an hour. Have your
students record what they think will happen in their science journals. After about an hour,
have students record what actually happens.
The milk jug will crumple in on itself. When you added the hot water, it caused the air
temperature inside the jug to rise while the container was sealed no air could get into or out
of the jug. When the water inside the jug cooled, the air cooled and caused the pressure
inside the jug to decrease. As the pressure on the inside walls of the jug decreased, the walls
of the jug collapsed. There wasn't enough air pressure inside the jug to offset the air pressure
on the outside of the jug!
Assessment
1. Compare air to water. How are they alike? How are they different? (Both take up space,
both are matter, both have weight; air is invisible, water is not.)
2. How would you demonstrate to someone that air pressure exists?

Air Pressure
Grade 2
4
Closure
1. Have students answer the essential questions in their science journal.
2. Have students design an experiment that demonstrates the properties of weight and
matter of air.
Extensions/Additional Resources
Classroom Portals/Technology:
Websites:
http://kids.earth.nasa.gov/archive/air_pressure/ It’s a Breeze – How Air Pressure
Effects You
http://www.hurricanehunters.com/ This is the official site of the U.S. Air Force
hurricane hunters.
http://www.nhc.noaa.gov/
http://www.srh.noaa.gov/jetstream//nws/careers.htm
http://www.nhc.noaa.gov/
httpw://www.fema.gov/kids/hurr.htm
http://www.miamisci.org/hurricane/index.html
Literature:
Weather Words and What They Mean by Gail Gibbons
Wind and Air Pressure, Alad Rodgers by Angella Streluk
Air, Darlene Lauw by Cheng Puay Lim
Air, Maria Rius by Jose Maria Parramon
Experiments with Air by Bryan Murphy
It’s Windy
Grade 2
1
Condensed Content Statement
The atmosphere is made up of air.
Air has properties that can be observed and
measured.
The transfer of energy in the atmosphere causes
air movement, which is felt as wind.
Wind speed and direction can be measured.
Lesson Summary:
Students will identify that the direction and speed
of the wind and air temperature can be
measured.
Suggested Time Frame:
1 - 2 days
Materials:
� Thermometers � Directions for making a Windsock
Vocabulary:
Direction
Speed
Wind
Temperature
Weather vane
Windsock
Process Skills:
Communicate
Design
Observe
It’s Windy
Grade 2
2
Teacher Background
The transfer of energy in the atmosphere causes air movement. Wind can be measured in
numeric value and direction. The direction and speed of the wind and temperature of the air
can be measured using a variety of instruments including weather vanes, windsocks,
thermometers and simple anemometers.
Teacher Notes
Directions for making a windsock, weather vane, and anemometer are attached. Wind is
measured with an anemometer. The speed can be determined by how many times it goes
around in one minute, for example; 10 times = 1 mph.
Engage (Warm-up)
1. Read Willa and the Wind by Janice M. Del Negro or I Face the Wind by Vicki Cobb
2. Discuss why the wind moves and how we know the wind is moving
Explore (Instructional Strategies)
1. Take the students outside. Discuss how hot or cold it is and how we know. Use the
thermometers to measure the temperature. Discuss the results.
2. Ask the students, “Is the air moving? How do we know?” Explain that the movement of air is
called wind. Ask “Is it windy today? How do we know? Can we measure how fast or slow
(speed) the wind is moving? Discuss.
3. Have students make a weather vane, windsock or anemometer.
4. Take the students outside with their created instruments. Have the students measure the wind
speed and/or direction. (This works better on a windy day.)
5. Journal results using the template from the beginning of the year that was used for “Thinking
Like a Scientist”.
It’s Windy
Grade 2
3
Assessment
1. What causes the movement of air?
2. How do we know the air is moving?
3. How can air movement (wind) be measured?
4. How can wind speed be measured?
5. How can temperature in the air be measured?
Reteach
Go outside and measure the temperature of the air and the wind direction daily over a period
of time. Journal results and discuss with the class.
Enrichment
Have each student take the role of a daily meteorologist. Students take turns measuring
temperature, wind direction, and/or wind speed using their instruments and report to the class.
Compare results with local weather websites such as www.10tv.com.
Extensions/Additional Resources
Classroom Portals/Technology:
UnitedStreaming:
Water Smart: Water in the Air
Literature:
Willa and the Wind by Janice M. Del Negro
I Face the Wind by Vicki Cobb

Water Cycle Handout

Water Cycle Cut-Outs

Water Cycle Arrows


How to Make a Windsock
Materials:
*different colors of construction
paper
*crayons
*glue
*stapler
*different colors of tissue paper
*yarn, string or wire
*hole punch
*stickers(optional)
Procedure:
1. Choose the color construction paper, and tissue
paper they want.
2. Allow children to draw, color, and add stickers to
their sheet of paper.
3. Roll the paper up end to end, then tape, glue or
staple them together.
4. Cut tissue paper in long strips, and glue around the
bottom inside of the windsock.
5. Punch two holes in the top of the windsock,
directly across from each other.
6. Feed yarn, wire or string through the punched
holes and tie a knot at the end.
7. Hang outside and enjoy!
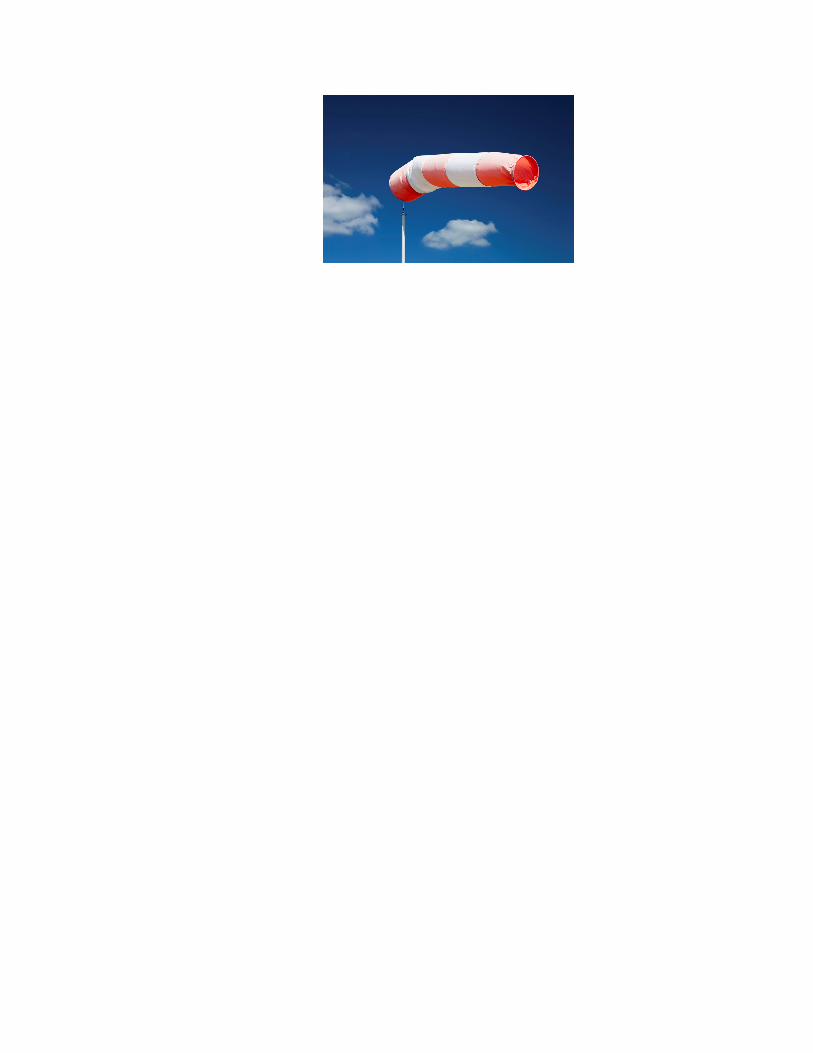
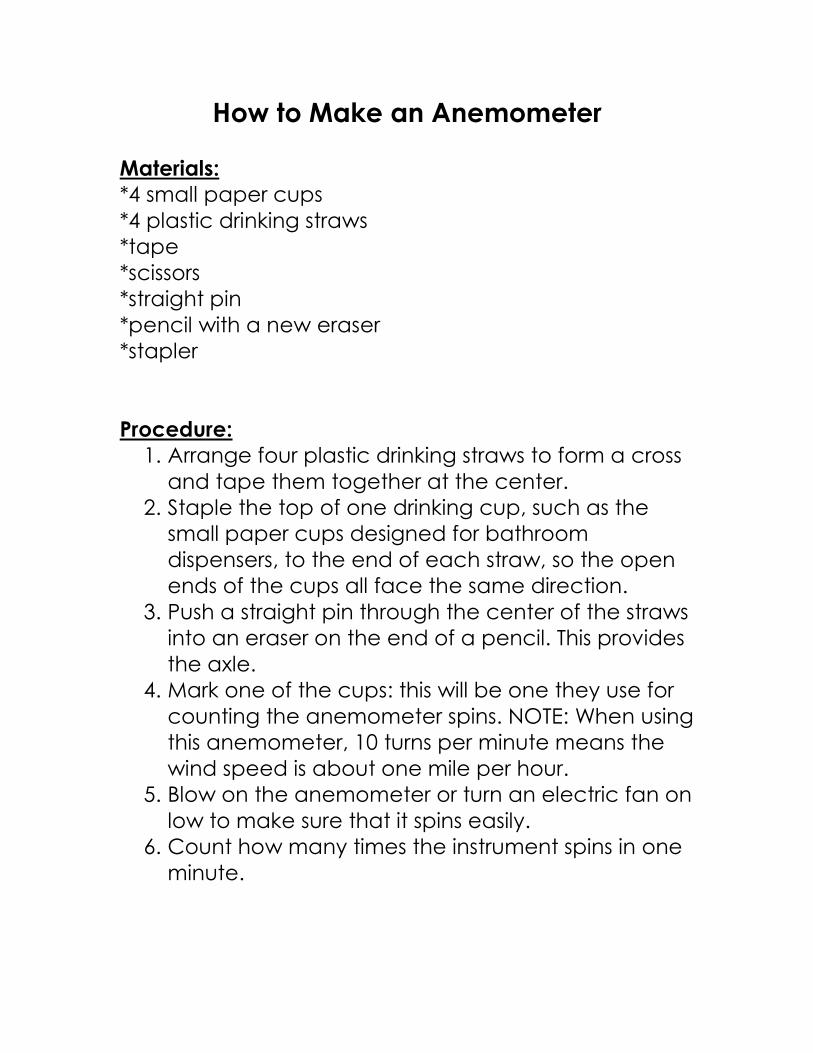
How to Make an Anemometer
Materials:
*4 small paper cups
*4 plastic drinking straws
*tape
*scissors
*straight pin
*pencil with a new eraser
*stapler
Procedure:
1. Arrange four plastic drinking straws to form a cross
and tape them together at the center.
2. Staple the top of one drinking cup, such as the
small paper cups designed for bathroom
dispensers, to the end of each straw, so the open
ends of the cups all face the same direction.
3. Push a straight pin through the center of the straws
into an eraser on the end of a pencil. This provides
the axle.
4. Mark one of the cups: this will be one they use for
counting the anemometer spins. NOTE: When using
this anemometer, 10 turns per minute means the
wind speed is about one mile per hour.
5. Blow on the anemometer or turn an electric fan on
low to make sure that it spins easily.
6. Count how many times the instrument spins in one
minute.
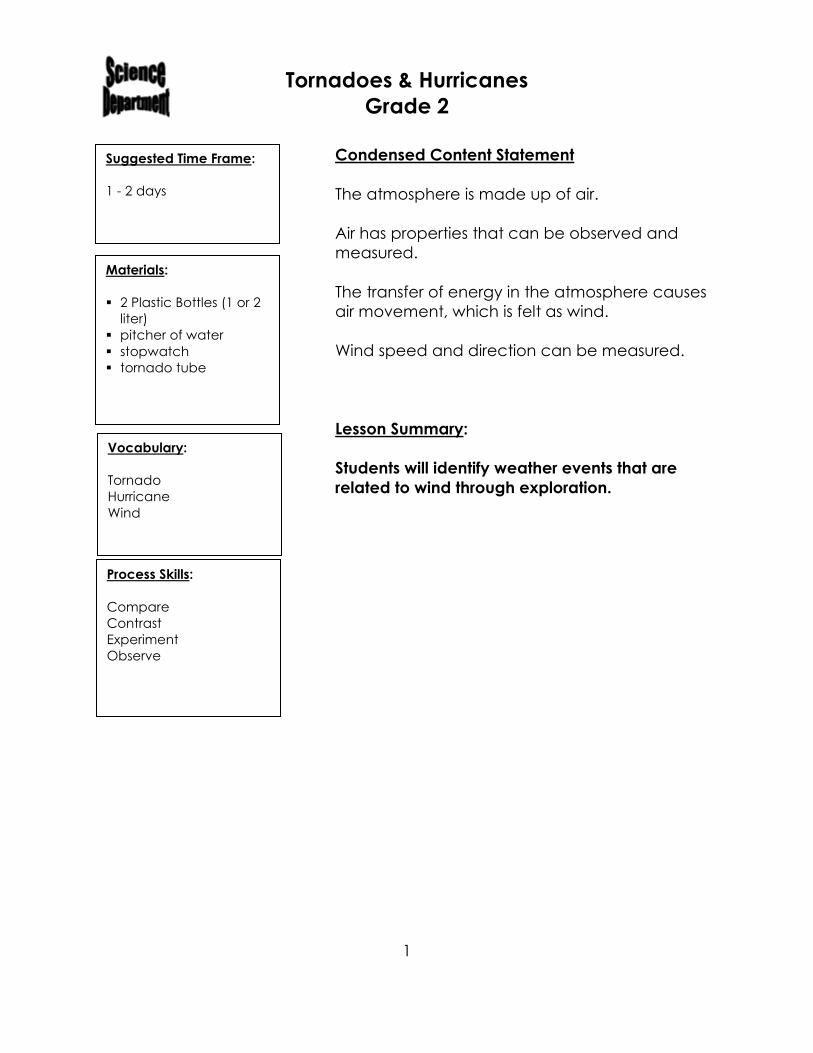
Tornadoes & Hurricanes
Grade 2
1
Condensed Content Statement
The atmosphere is made up of air.
Air has properties that can be observed and
measured.
The transfer of energy in the atmosphere causes
air movement, which is felt as wind.
Wind speed and direction can be measured.
Lesson Summary:
Students will identify weather events that are
related to wind through exploration.
Suggested Time Frame:
1 - 2 days
Materials:
� 2 Plastic Bottles (1 or 2 liter)
� pitcher of water � stopwatch � tornado tube
Vocabulary:
Tornado
Hurricane
Wind
Process Skills:
Compare
Contrast
Experiment
Observe
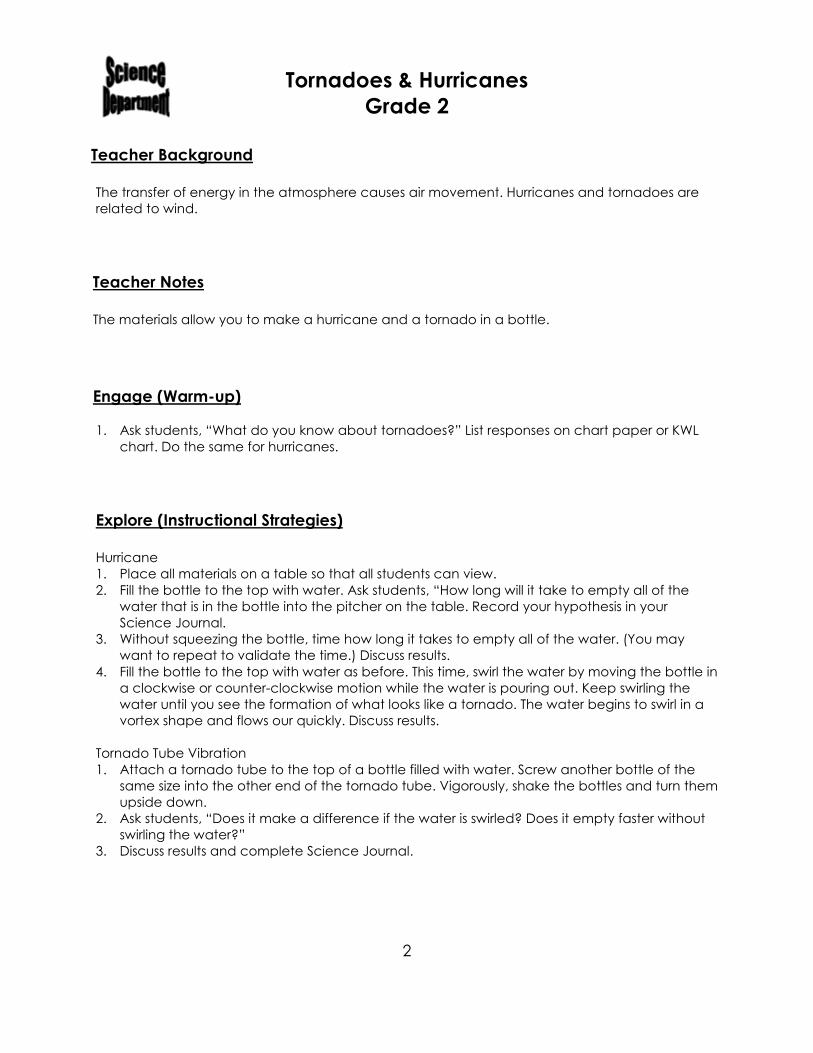
Tornadoes & Hurricanes
Grade 2
2
Teacher Background
The transfer of energy in the atmosphere causes air movement. Hurricanes and tornadoes are
related to wind.
Teacher Notes
The materials allow you to make a hurricane and a tornado in a bottle.
Engage (Warm-up)
1. Ask students, “What do you know about tornadoes?” List responses on chart paper or KWL
chart. Do the same for hurricanes.
Explore (Instructional Strategies)
Hurricane
1. Place all materials on a table so that all students can view.
2. Fill the bottle to the top with water. Ask students, “How long will it take to empty all of the
water that is in the bottle into the pitcher on the table. Record your hypothesis in your
Science Journal.
3. Without squeezing the bottle, time how long it takes to empty all of the water. (You may
want to repeat to validate the time.) Discuss results.
4. Fill the bottle to the top with water as before. This time, swirl the water by moving the bottle in
a clockwise or counter-clockwise motion while the water is pouring out. Keep swirling the
water until you see the formation of what looks like a tornado. The water begins to swirl in a
vortex shape and flows our quickly. Discuss results.
Tornado Tube Vibration
1. Attach a tornado tube to the top of a bottle filled with water. Screw another bottle of the
same size into the other end of the tornado tube. Vigorously, shake the bottles and turn them
upside down.
2. Ask students, “Does it make a difference if the water is swirled? Does it empty faster without
swirling the water?”
3. Discuss results and complete Science Journal.

Tornadoes & Hurricanes
Grade 2
3
Assessment
Illustrate or write answers to the following questions
1. Explain the results of the experiment.
2. Why does the water pour out more quickly when it is swirled?
3. How does this experiment related to wind?
4. Compare and contrast the water not swirled and swirled as it pours out?
Reteach
Repeat experiment and illustrate results.
Enrichment
Create a pamphlet explaining how wind is related to both tornadoes and hurricanes.
Extensions/Additional Resources
Classroom Portals/Technology:
Streaming:
Weather: Changes and Measurement
Literature:
Hurricanes by Gail Gibbons
Do Tornadoes Really Twist? by Carolyn Wilhelm