Scion 2004-2015* * (including xA, xB, tC and xD Models)
8
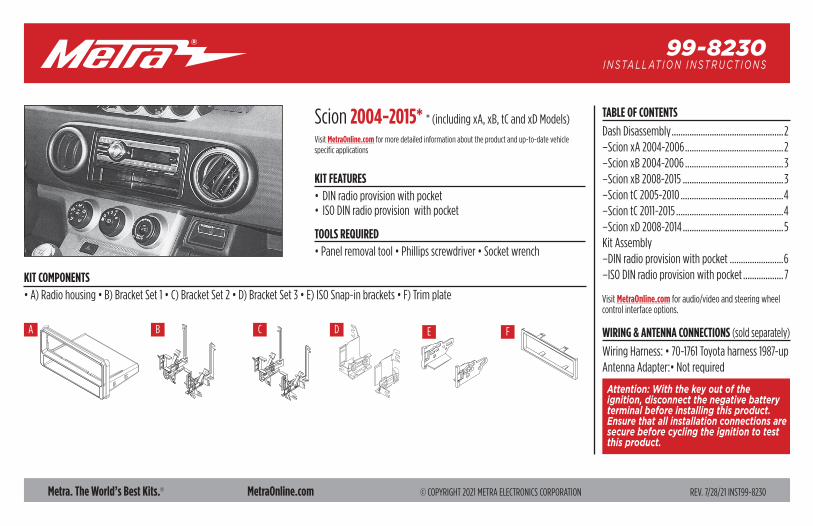
Metra. The World’s Best Kits. ® MetraOnline.com © COPYRIGHT 2021 METRA ELECTRONICS CORPORATION REV. 7/28/21 INST99-8230 INSTALLATION INSTRUCTIONS 99-8230 Attention: With the key out of the ignition, disconnect the negative battery terminal before installing this product. Ensure that all installation connections are secure before cycling the ignition to test this product. KIT FEATURES • DIN radio provision with pocket • ISO DIN radio provision with pocket KIT COMPONENTS • A) Radio housing • B) Bracket Set 1 • C) Bracket Set 2 • D) Bracket Set 3 • E) ISO Snap-in brackets • F) Trim plate TOOLS REQUIRED • Panel removal tool • Phillips screwdriver • Socket wrench TABLE OF CONTENTS Dash Disassembly .................................................. 2 –Scion xA 2004-2006 ............................................ 2 –Scion xB 2004-2006 ............................................ 3 –Scion xB 2008-2015 ............................................. 3 –Scion tC 2005-2010 .............................................. 4 –Scion tC 2011-2015 ................................................ 4 –Scion xD 2008-2014 ............................................. 5 Kit Assembly –DIN radio provision with pocket ........................ 6 –ISO DIN radio provision with pocket .................. 7 WIRING & ANTENNA CONNECTIONS (sold separately) Wiring Harness: • 70-1761 Toyota harness 1987-up Antenna Adapter:• Not required A B C F D E Scion 2004-2015* * (including xA, xB, tC and xD Models) Visit MetraOnline.com for more detailed information about the product and up-to-date vehicle specific applications Visit MetraOnline.com for audio/video and steering wheel control interface options.
-
Upload
khangminh22 -
Category
Documents
-
view
1 -
download
0
Transcript of Scion 2004-2015* * (including xA, xB, tC and xD Models)
Metra. The World’s Best Kits.® MetraOnline.com ©COPYRIGHT2021METRAELECTRONICSCORPORATION REV.7/28/21INST99-8230
I N S TA L L AT I O N I N S T R U C T I O N S99-8230
Attention: With the key out of the ignition, disconnect the negative battery terminal before installing this product. Ensure that all installation connections are secure before cycling the ignition to test this product.
KIT FEATURES• DINradioprovisionwithpocket•ISODINradioprovisionwithpocket
KIT COMPONENTS•A)Radiohousing•B)BracketSet1•C)BracketSet2•D)BracketSet3•E)ISOSnap-inbrackets•F)Trimplate
TOOLS REQUIRED•Panelremovaltool•Phillipsscrewdriver•Socketwrench
TABLE OF CONTENTS
DashDisassembly..................................................2–ScionxA2004-2006............................................2–ScionxB2004-2006............................................ 3–ScionxB2008-2015............................................. 3–SciontC2005-2010..............................................4–SciontC2011-2015................................................4–ScionxD2008-2014.............................................5KitAssembly–DINradioprovisionwithpocket........................6–ISODINradioprovisionwithpocket.................. 7
WIRING & ANTENNA CONNECTIONS(soldseparately)
WiringHarness:•70-1761Toyotaharness1987-upAntennaAdapter:•Notrequired
A B C FD E
Scion2004-2015* *(includingxA,xB,tCandxDModels)
VisitMetraOnline.comformoredetailedinformationabouttheproductandup-to-datevehiclespecificapplications
VisitMetraOnline.comforaudio/videoandsteeringwheelcontrolinterfaceoptions.

386.257.1187 | MetraOnline.com2
Scion xA 2004-2006
1. Unclipandremovetheclimatecontroltrimpanel.
2. Unclipandremovetheradiotrimpanelincludingtheclimatecontrolvents.(FigureA)
3. Remove(4)10mmhexheadscrewssecuringthefactoryradio.Unplugwiringandremoveradio.(FigureB)
ContinuetoKitAssembly
(FigureB)(FigureA)
DASH DISASSEMBLY
REV. 7/28/2021 INST99-8230 3
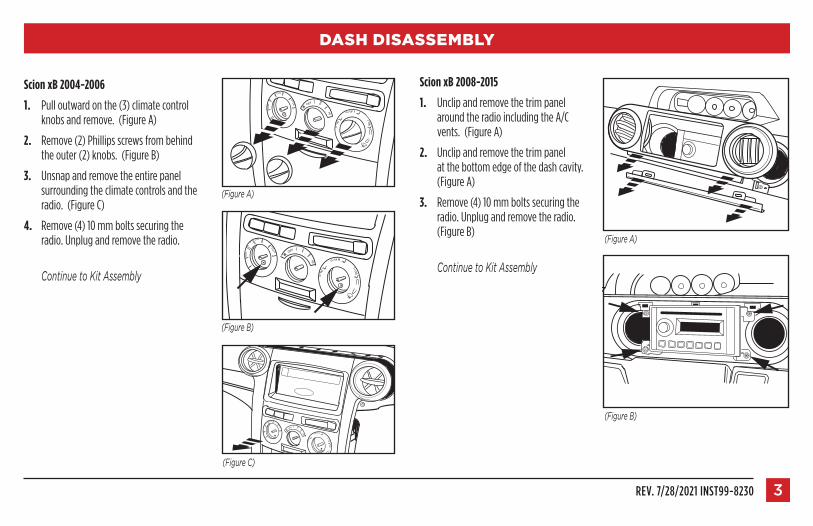
Scion xB 2004-2006
1. Pulloutwardonthe(3)climatecontrolknobsandremove.(FigureA)
2. Remove(2)Phillipsscrewsfrombehindtheouter(2)knobs.(FigureB)
3. Unsnapandremovetheentirepanelsurroundingtheclimatecontrolsandtheradio.(FigureC)
4. Remove(4)10mmboltssecuringtheradio.Unplugandremovetheradio.
ContinuetoKitAssembly
(FigureA)
(FigureB)
DASH DISASSEMBLY
(FigureC)
OFF
HI
OFF
HI
(FigureA)
(FigureB)
OFF
HI
Scion xB 2008-2015
1. UnclipandremovethetrimpanelaroundtheradioincludingtheA/Cvents.(FigureA)
2. Unclipandremovethetrimpanelatthebottomedgeofthedashcavity.(FigureA)
3. Remove(4)10mmboltssecuringtheradio.Unplugandremovetheradio.(FigureB)
ContinuetoKitAssembly

386.257.1187 | MetraOnline.com4
Scion tC 2005-2010
1. Unsnaptrimfromaroundshifter,notnecessarytocompletelyremove.(FigureA)
2. Unsnapandremovepanelfromaroundradio,includingclimatecontrolsandradiodoor.(FigureB)
3. Remove(2)10mmboltsfromthetopmountinglocationsand(2)Phillipsscrewsfromthebottommountinglocationstoremovetheradio.(FigureC)
ContinuetoKitAssembly
Scion tC 2011-2015
1. Unsnapandremovethepanelfromaroundtheradio.(FigureA)
2. Removefour10mmboltsandremovefactoryradio.(FigureB)
ContinuetoKitAssembly
DASH DISASSEMBLY
(FigureA)
(FigureB)
(FigureC)
(FigureA)
(FigureB)
REV. 7/28/2021 INST99-8230 5
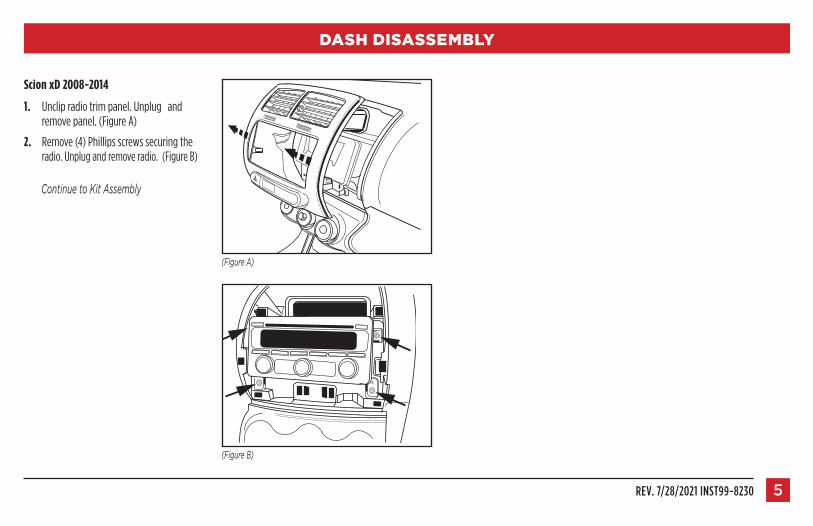
Scion xD 2008-2014
1. Unclipradiotrimpanel.Unplug and removepanel.(FigureA)
2. Remove(4)Phillipsscrewssecuringthe radio.Unplugandremoveradio.(FigureB)
ContinuetoKitAssembly
(FigureA)
(FigureB)
DASH DISASSEMBLY

386.257.1187 | MetraOnline.com6
KIT ASSEMBLY
DIN radio provision with pocket
1. Slidethemountingbracketsontothesidesoftheradiohousinguntilthesideclipsengage.(FigureA)
Note: UseBracketSet1forxA,xB2004-2006,andtC2005-2010.UseBracketSet2forthe2008-upxBandxD.UseBracketSet3forthetC2011-up.
2. ForBracketSet1cutandremoveallmountingtabsexceptthetabsbeingusedforyourapplication.(FigureB)
Note: TabsaremarkedxA,xBandtC.ForBracketSets2and3skiptostep3.
3. SlidetheDINcageintotheradiohousingandsecurebybendingthemetallockingtabsoutward.(FigureC)
4. Slidetheaftermarketradiointothecageuntilitsnapsintoplace.(FigureD)
5. Locatethefactorywiringharnessinthedash.MetrarecommendsusingthepropermatingadapterfromMetraorAXXESS.
6. Reconnectthenegativebatteryterminalandtesttheradioforproperoperation.
7. Reassemblethedashinreverseorderofdisassemblytocompletetheinstallation.
(FigureC)
(FigureD)
(FigureA)
(FigureB)
Sideclips
BracketSet1

REV. 7/28/2021 INST99-8230 7
ISO DIN radio provision with pocket
1. Slidethemountingbracketsontothesidesoftheradiohousinguntilthesideclipsengage.(FigureA)
Note: UseBracketSet1forxA,xB2004-2006,andtC2005-2010.UseBracketSet2forthe2008-upxBandxD.UseBracketSet3forthetC2011-up.
2. ForBracketSet1cutandremoveallmountingtabsexceptthetabsbeingusedforyourapplication.(FigureB)
Note: TabsaremarkedxA,xBandtC.ForBracketSets2and3skiptostep3.
3. MounttheISObracketstotheradiousingthescrewssuppliedwiththeradio.(FigureC)
4. Slidetheaftermarketradiointothecageuntilitsnapsintoplace.(FigureD)
5. Snapthetrimplateontothefrontoftheradiohousing.(FigureD)
6. Locatethefactorywiringharnessinthedash.MetrarecommendsusingthepropermatingadapterfromMetraorAXXESS.
7. Reconnectthenegativebatteryterminalandtesttheradioforproperoperation.
8. Reassemblethedashinreverseorderofdisassemblytocompletetheinstallation.
(FigureC)
(FigureD)
(FigureA)
(FigureB)
BracketSet1
Sideclips
KIT ASSEMBLY
KNOWLEDGE IS POWEREnhance your installation and fabrication skills by enrolling in the most recognized and respected mobile electronics school in our industry.Log onto www.installerinstitute.edu or call 386-672-5771 for more information and take steps toward a better tomorrow.
®
Metra recommends MECP certified technicians
Metra. The World’s Best Kits.® MetraOnline.com ©COPYRIGHT2021METRAELECTRONICSCORPORATION REV.7/28/21INST99-8230
I N S TA L L AT I O N I N S T R U C T I O N S99-8230
Havingdifficulties?We’reheretohelp.
ContactourTechSupportlineat: 386-257-1187 Orviaemailat: [email protected]
Tech Support Hours (Eastern Standard Time)Monday-Friday:9:00AM-7:00PMSaturday:10:00AM-7:00PMSunday:10:00AM-4:00PM