roadstar transformer - User Manual - Daymak
32
roadstar transformer User Manual
-
Upload
khangminh22 -
Category
Documents
-
view
2 -
download
0
Transcript of roadstar transformer - User Manual - Daymak
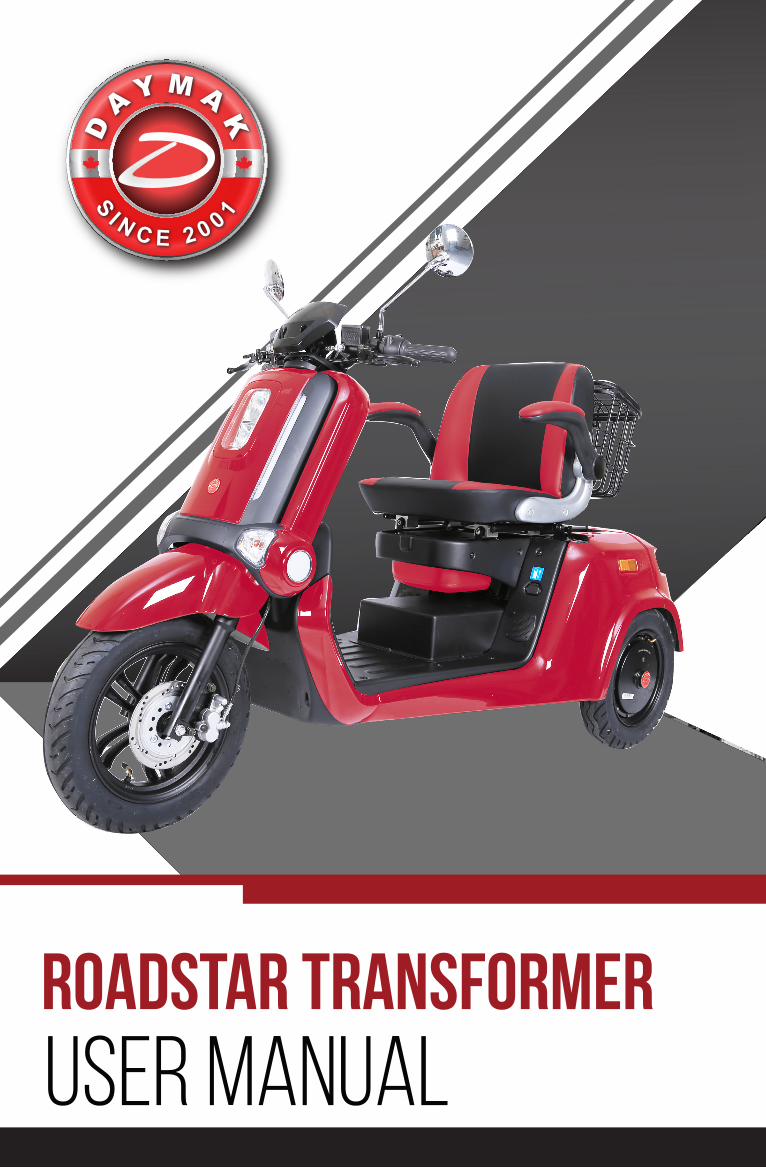
roadstar transformerUser Manual

2
Safety
For your safety, please ensure the following:
• Check both right and left brake levers, and that the brake sensors shut off power to the motor
• Check the air pressure of both front and rear tires. The correct P.S.I. is listed on each tire
• Check both left and right turn signals and taillights work properly before riding
• Check and make sure that your mirrors are tightened and allow for maximum visibility
• Observe all traffic rules, and do not operate in areas where motorized vehicles are not allowed.
• Make sure that your battery power is sufficient before you go out to ride
• If you bring your charger avoid shaking / rattling charger while riding.
• Do not over charge the battery by leaving the charger in the charging port. Once the battery is fully charged remove the charger immediately.
• Do not try to operate the unit while charging.
• Do not let anyone uner the age of 16 years old operate this vehicle.
• Do not make sharp / abrupt turns at high speeds to avoid tipping.
• Do not operate under the influence of any use of drugs or alcohol
• Do not completely submerge the unit in water
• Do not operate in harsh weather conditions.
For any questions or concerns please call 1-800-649-9320 or visit www.daymak.com

3
About Daymak
Daymak is one of Canada’s largest Alternative Vehicle providers. We design, engineer, manufacture, import and repair everything from recreational dirt Mobility Scooters, go-karts and electric golf cars to alternative transportation solutions such as Mobility Scooters electric scooters.
Our electric bicycles represent an energy-efficient and eco-friendly alternative for people who need to get around the city. They greatly increase the practicality of bicycle transportation in urban centres. Costing only a few cents to charge, an Mobility Scooter can make city life more convenient and much less expensive.
While there are many new Green technologies that are still in their infancy, electric bicycles have been developing over the last 40 years or more. Mobility Scooter technology has been dramatically refined since the introduction of the first custom-conversion bicycles. Today, electric bicycles are a supremely reliable and affordable means of transportation.
Daymak is constantly developing new eco-friendly alternative transportation strategies, led by its own Research and Development department in Toronto, Canada. We are always improving our products. Our innovative in-house engineering and quality testing provide customers with many new kinds of reliable, eco-friendly vehicles, designed to help change the lives of our customers and the world.
Daymak warranties, services, and stocks parts for everything it sells. We support our products. Please feel free to visit our website. You’ll find the latest in cool transportation solutions, support for the products you’ve purchased and contact information.

4
Introduction
Mobility ScootersUsing an electric bicycle is a great way to ride around town conveniently and economically. Mobility Scooters represent a natural progression in the development of urban transportation. Using only small amounts of electricity, Mobility Scooters have the potential to radically reduce the amount of pollution in our cities. They are also very quiet, so they do not add to the high levels of noise pollution which we often take for granted. They are easy, and usually free to park. They are unobtrusive and highly practical additions to the urban landscape.
Mobility Scooters are also inexpensive. They (currently) require no registration, no insurance, no licence and do not incur parking charges. Compared to internal combustion engines, the engines in electric vehicles have fewer moving parts and require far less maintenance. Your Daymak Mobility Scooter is the result of Daymak’s years of experience, the highly trained technical skills of our staff, and careful ongoing design work by our engineers. We hope you enjoy using this product and welcome any feedback that you may have.
New LawsMost provinces in Canada, most states in the U.S.A, the United Kingdom and many European countries have new laws that permit cyclists to use electric motors to assist the regular operation. Please check with your provincial or state government to learn about your local laws.
LiabilityDaymak does not assume any liability for damages, loss of profits, or claims from third parties due to improper use of this product. Daymak does not assume any liability for damages due to problems with the product resulting from service by a third party that is not certified by Daymak.
The information in this guide may be subject to change without notice. For the latest information available, please contact your local Daymak dealer or visit our website. We have taken all possible measures to ensure the accuracy and completeness of the information in this guide. However, if you do find anything missing, incomplete or wrong, do not hesitate to contact us.

5
Table of Contents
• SAFETY 2
• ABOUT DAYMAK 3
• INTRODUCTION 4
• PART DIAGRAMS 6
• RIDING INSTRUCTIONS 7
• THE BATTERY 12
• CHARGING YOUR MOBILITY SCOOTER 13
• UNDERSTANDING YOUR VOLTAGE 14
• CHARGING THE ROADSTAR TRANSFORMER 15
• OPERATION 17
• BASKET 18
• BRAKES 21
• BRAKE LOCK 21
• DISPLAY 22
• REMOTE 22
• TRANSFORMING THE TRANSFORMER 23
• TRANSFORMING THE TRANSFORMER CONT’D 24
• TECHNICAL DATA 25
• VEHICLE IDENTIFICATION NUMBER (VIN) 26
• MAINTENANCE AND TROUBLESHOOTING 27
• SPECIFICATIONS 31

6
Part Diagrams
Diagram 1: Roadstar TransformerThis diagram illustrates the various parts of your mobility scooter. Please note that many of these parts are not user-serviceable and should be repaired only by trained professionals. This is especially true of the electrical systems and the mechanical components.
1. Display2. Headlight3. Brakes 4. Extra Seat5. Arm Rest
6. Seat7. Basket8. Motor9. Transform Lever10. Charge Port
11. Ignition12. Tires13. Headlights

7
Riding Instructions
This guide assumes that you already know have operated a mobility scooter. If you have never used a mobility scooter before, we strongly recommend that you read throught this guide entirely before beginning to operate.
CautionAlways make sure to be properly situated on the unit before turning it on and engaging the throttle. Failing to do so can potentially lead to injuries or damage of the vehicle.
Important Notes
• Mobility scooters are Fast! Mobility scooters are capable of traveling at higher speeds than many people are accustomed to. Use caution at all times, especially when travelling in mixed traffic. Always take into account driving and traveling conditions.
• Obey the Law. Be sure to follow all provincial and city traffic laws. This includes obeying stop signs, checking carefully when turning, and riding defensively. A mobility scooter is a motorized vehicle, and thus you must follow the law.
• Stay Sober. Never ride your mobility scooter while intoxicated. Mobility scooters can cause harm to the rider and others if not operated properly and require full attention during operation.
• Mobility scooters are to be rode on the sidewalk unless there is no sidewalk present. Please be mindful of all pedestrians on the sidewalk and give ample notice when passing by.
8
Items to Carry with the Electric Mobility Scooter
It is a good idea to carry the following items with you at all times when you ride your Mobility Scooter.
• The charger, to charge the mobility scooter in case the battery power runs out.
• 30 Amp Fuse, spares for the batteries, in case the fuses blow (if applicable).
• A lock, to secure your Mobility Scooter when you park it.
Inspecting your Mobility scooterAlways inspect your mobility scooter before you ride it, to make sure its safety features are operating properly. Many accidents can be avoided with routine inspections. Once you are comfortable with your mobility scooter, you will be able to detect small changes in the way it feels. If anything changes between uses, make sure to have it properly examined. Also, be sure to listen for changes in the sounds your mobility scooter makes over time. Any mechanical or power issues may have effects on the sounds the mobility scooter makes.
Holding the HandlebarsAs you would with a bicycle, place your fingers over the brake levers (if your scooter has disc/drum brakes), using the palms of your hand and your thumbs to wrap around and under the handlegrips. Doing this allows you to activate the brakes easily, by squeezing your hand, in case you have to stop quickly. Otherwise hold onto the handle bar in a manner where you can easily push the brake mechanism. This is the safe way to control your mobility scooter.
Turning your Mobility scooter On and OffTo turn on your mobility scooter, insert the key into the “ignition”, you can find more detailed information in the operation section of this manual.
WarningWhen you activate the Mobility Scooter, the electrical system becomes live. Do not try to affect changes to the Mobility Scooter (such as removing the battery or repairing electrical components) while the Mobility Scooter is activated. Turn the Mobility Scooter off and remove the key before you attempt to access any of the electrical components. Also, the battery carries a significant electric charge and can injure people if not treated properly and with respect.

9
Accelerating and DeceleratingThe throttle is typically found on the right handlebar (see operation for more information. Use this carefully when situated on the mobility scooter to go forward and release to decelerate.
WarningDo not activate the accelerator until you are seated on the mobility scooter and are ready to accelerate. The mobility scooter can easily escape from your control, possibly injuring you or others, and the mobility may be damage.
StoppingYour Mobility Scooter has two sets of brakes, at the front and at the rear. The levers attached to the handlebars, on the left and right, activate the brakes. Pull the levers toward you to activate the brakes.
You can use both brakes to come to a stop more quickly, or you can use one of the brakes to come to a gentle stop, depending on your riding needs at the moment. When the brakes are activated, the power to the engine is automatically turned off, until you release the brakes. This allows you to stop safely.
Safety Tips
• When you are traveling in wet weather, water may cause your brakes to function less efficiently because it reduces friction between the brake pads and the wheels.
• Take care to slow down and give yourself more room to stop or slow if necessary.
• It is a good idea to have your brakes and brake pads checked regularly. The brake pads will eventually wear down through friction, and after significant use will have to be replaced.
• Engage the rear brakes first before the front brakes to avoid flipping the unit.

10
Signalling
The HornThe mobility scooter has a horn. Use this when coming close to pedestrians to warn of your passing. See the operation section for where to find your horn and how to use it.
Turning Signal LightsYour mobility scooter has turn signal lights. Push it left or right to activate it to indicate that you are turning in the appropriate direction. See the operation section for more info.
LightsThe headlight and tail light are useful features when you are riding at night or in dark areas. They radically improve your safety on the sidewalk or road. The lights on your mobility consume some electricity. Keeping them on may reduce the maximum distance you can travel on one charge by about 5 %.
Riding in Wet WeatherYour mobility scooter is designed to function in wet conditions, such as when it is raining. However, it is easy to slip when moving at high speeds. If it is very wet, be sure to avoid high speeds. When you are traveling in wet weather, water may cause your brakes to function less effectively because it reduces friction between the brake pads and the wheels. Take care to slow down and give yourself more room to stop or slow if necessary.
The Motor and WaterYour mobility scooter is not designed to be immersed in water. Always ensure that the water level does not go above the motor, to prevent water from getting inside of it. Water in the motor can cause short-circuits and may damage the electrical systems in your Mobility Scooter.

11
Riding in Cold WeatherYour mobility scooter is designed to operate year-round. However, in very cold conditions or when there is a lot of snow or slush on the ground, it is possible for the motor in the mobility scooter to get wet or for the brakes to function less effectively, just as it can happen in wet weather. Below 10 degrees Celsius, the battery will not work as well as it would in warmer temperatures. While Lithium-Ion batteries perform better than Lead-Acid batteries in temperature extremes, both will experience reduced performance in cold temperatures.
Also, riding the mobility scooter in cold temperatures may require you to replace the battery sooner rather than later.
Maximum LoadDo not exceed the maximum load capabilities of your mobility scooter. You can find the exact loading capacity listed in the technical specifications in this guide.
If you exceed the maximum load, the performance of the scooter will suffer.
Exceeding the maximum load of your Mobility Scooter could cause damage to the shocks, to the mechanism and, ultimately, even to the frame. It could also cause your motor to work too aggressively, and may cause it to burn out.
Long-Term Storage of your MOBILITY SCOOTERIf you are storing your Mobility Scooter for a long period, disconnect the circuit breaker (if applicable). This is a safer way to store the electric bicycle, as it prevents accidental activation of the mobility scooter and makes it impossible to activate it even with the key.
Please see the section titled “The Battery” for instructions on battery maintenance while your mobility scooter is being stored.

12
The Battery
This section details what you need to know about the battery that powers your mobility scooter. Always remember to treat your mobility scooters electrical systems with respect.
Battery PowerThe dashboard has a battery charge indicator. When the mobility scooter is activated, the guage will jump and indicate the currently available battery power. If the power has dropped significantly, you should charge your scooter.
Distance and PowerYour battery has the capacity to carry you anywhere from 20+ km before it must be recharged. The ability of your battery to power your bicycle depends on many variables. These variables include the weight of the rider, the prevailing wind resistance, the rider’s driving habits, the presence of steep hills and inclines, and other issues such as proper air pressure in the tires.
Saving PowerIf you are traveling long distances, you can save a lot of electricity by using better driving habits:
• Coasting: When going downhill or over long, flat road surfaces, try using your e- Mobility Scooter’s momentum and allow it to coast, without drawing power from the motor.
• Stopping and Starting: Try to avoid stop and go movements. The motor draws more power when starting from a full stop.
• Weight: Remove unnecessary weight from the scooter. This reduces the amount of power the motor must draw.
• Air Pressure: Make sure your tires have the proper air pressure. Proper pressure reduces drag on the tires and radically increases the efficiency of any vehicle.
• Head and Tail Lights: Turn off the lights to conserve power, if it is safe to do so. The lights will reduce the distance you can travel by about 5%.

13
Charging your Mobility Scooter
Charging your scooter is a simple process. You require the following:
• The charger that came with your Mobility Scooter.
• A 110V household electrical outlet.
Charger WarningOnly use the chargers that were supplied with your mobility scooter. Using chargers that do not have specifications identical to those which came with the mobility scooter could irreparably damage your scooter’s battery and electrical systems, and may cause injury.
To charge your scooter, follow these steps:
1. Turn off the mobility and remove the key from the ignition (if applicable).
2. Plug the female end of the charger cable into the charging slot on the mobility scooter.
3. Plug the male end of the charger power cable into your wall socket. This should be a 110v household electricity supply. You can also use a portable generator, if necessary, but make sure it provides 110V current.
4. Allow the mobility scooter battery to charge for the appropriate amount of time (6-12 hours).
5. Disconnect the charger when the LED light on the charger is green. The batteries have been fully charged.
If your charger’s LED status light does not change from red to green over an extended period of time, for perhaps more than 14 hours, and the battery is very hot, the battery or charger may need replacing. Stop charging and bring both to your Daymak dealer immediately. Do not overcharge the battery.

14
Understanding your voltage
Electric scooters primary power is understood as voltage. This number in short is how powerful your unit is, and as it dips down when the unit will no longer be able to perform. Depending on your unit’s voltage and battery type (Lithium vs Lead Acid) will effect the range of voltage between what is fully charged and when it exceeds the low voltage threshold.
Low Voltage ThresholdYour unit will try to protect the battery by preventing the motor from drawing power below the Low Voltage Threshold. By doing this it will significantly increase the life expectancy of your unit. If you find that your motor starts cutting off at a certain speed or not engaging at all it may be because your voltage is dropping past the threshold point and needs to be charged. To see what your voltage threshold you can check on it via the bluetooth APP (if applicable) and you can check it out using this chart.
Voltage Chart
LITHIUM Full/Low Voltage ReadingDepending on the way your lithium battery’s composition will impact what the low voltage and full charge reading should be. Underneath each reading on the above chart shows a number and a “S” this represents how many series are in your battery pack. To know the exact series of your battery contact your local Daymak dealer.
Lead Acid Lithium ion
Full charge Low Voltage Full charge Low Voltage
48V 53V 42V
60V 67V 53V
24V 27V 21V
36V 40V 32V
54.6V / 58.8V 37V / 40V
67.2 / 71.4V 45V / 48V
29.4V 20V
42V 28V
7 S 7S
16 S 17 S 16 S 21 S
20 S 21 S 20 S 21 S
Voltage
10S 10 S

15
Charging the Roadstar Transformer
The Roadstar Transformer comes with a lead acid battery pack that can be charged together or individually. These can be done both in and out of the Mobility Scooter. To charge the Roadstar Transformer directly in the unit look for the charge port underneath the seat. It will be covered with a flap that you must lift up and then plug the female end into that port.
Once the Mobility Scooter is charging the charger will glow red. When the unit is fully charged the charger will glow green and then your Mobility Scooter is ready to go.
WarningDo not leave the Roadstar Transformer charging for long periods of time after it is fully charged. Once the Mobility Scooter is charged unplug it ASAP.
Accessing your Circuit BreakerTo prevent surges, we have installed a circuit breaker. If you are unable to get power to your Mobility Scooter more than likely your circuit breaker has been triggered and needs to be switched to the on position.
This is located on the opposite side of the charge port.

16
Battery CareFollow these suggestions to maintain your battery’s optimal performance. If you do not follow these suggestions, your battery may lose its ability to maintain a charge and might have to be replaced sooner than would otherwise be necessary.
• Charge it: Charge your battery immediately after riding it.
• Full Charge: Do not allow the battery to run down completely and lie in storage without a charge. This significantly reduces the battery’s lifespan and may cause damage.
• Keep it Charged: When being stored, charge the battery occasionally to make sure its power supply does not run down. Charging it once every 21 days should be sufficient.
• Storage Conditions: Store the battery on a flat, cool, dry surface. Do not allow the battery temperature to drop below 10 degrees Celsius for extended periods of time.
WarningDO NOT place your Lead-Acid battery on concrete. Concrete drains the battery’s power and will neutralize the lead-acid. Placing the battery on concrete for any length of time will likely result in the battery being drained of power and possibly losing its ability to store electricity.
Cold Weather and your BatteryBelow 10 degrees Celsius, the battery will not work as well as it would in warmer temperatures. While Lithium-Ion batteries perform better than Lead-Acid batteries in temperature extremes, both will experience reduced performance in cold temperatures.
Also, repeatedly riding the Mobility Scooter in cold temperatures may cause your battery to have to be replaced sooner.
Replacement and DisposalAfter approximately 300 charges, a lead-acid battery will need to be replaced. A lithium-ion battery will last approximately 1000 charges. When the battery has to be replaced, you will notice that your battery cannot carry as much of a charge as it could initially.
Contact your local Daymak dealer to purchase a new battery.
When replacing your battery, dispose of it at a proper municipal battery recycling facility. If none is available, please contact your local Daymak dealer.

17
OperationCongratulations on your new Roadstar Transformer mobility scooter. To begin, you will need to take the keys that came with your scooter and insert them into your ignition. This is located on the main steering colum infront of you when you are sitting on the machine.
1) Key Ignition - Put the key in here and turn it clockwise to turn the machine on. Turn in counter clockwise to turn it off.
2) Ignition Lock - Press this button to prevent the ignition from being accessed.
3) Ignition Unlock. Put the back of the key in here and turn it clockwise to release the igition lock
Push the ignition lock button to close igntion
Take the back of the key. And put it in the ignition lock Turn the key to unlock the ignition

18
Engaging the Wheel Lock
To lock the wheels perpendicular to the machine to prevent someone pushing it away to steal it the Roadstar Transformer has a wheel lock.
To engage the wheel lock:
1) Turn the handlebars to the left
2) With the key in the off position (2) push into the key hole further and turn counterclokwise to the left most position (3)
*Please note there are 3 positions for the ignition and you must push into the key to get it past the wheel lock*
Basket
On the back of the unit you will find a basket that you can use for storage. To open it simply lift up by the clamp of the basket.

19
Right handle bar
1. Horn - Press this to honk the horn
2. D / N / R - Put this in Drive (D) to move the unit forward when turning the throttle, Neutral (N) to disengage the throttle, or Reverse (R) to go in Reverse.
3. 3 Speed Switch - Set it to position 1 for slowest speed but furthest range. Set it to position 3 for fastest speed and shortest range.
4. Throttle - Turn this towards you to engage the motor and to go forward / backward.
Left handle bar
1. High Beam / Low Beam - Angle the headlights up or down
2. Turn Signals - Press this to the left to set the left turn signal and vice versa. Put it in the middle to turn it off.
3. Horn - Press this to honk the horn
4. Hazard Lights - Press this to flash the hazard lights and press again to turn them off.
5. MP3 Player - See next page for more details.

20
Mp3 / BluetoothTo use the MP3 you must can either load your songs onto a USB Drive or a Micro SD card and insert it into the panel.
You can also connect to it via bluetooth by looking for GB_Bluetooth while the lights are flashing under bluetooth mode.
MP3 / Radio / MPEG ControlsThe Roadstar Transformer comes with a MP3 / Radio / Video player and handsfree calling!
1. Power - Press this button once to turn on the sound system and set it to MP3, once more to set it to radio and once more to turn it off.
2. Volume Down - Press this button to turn down the volume.
3. Seek / Previous Song - In Radio mode, press this to seek a lower frequency station. In MP3 mode it will play the previous song.
4. Volume Up - Press this button to turn up the volume.
5. Seek / Next Song - In Radio mode, press this to seek a higher frequency station. In MP3 mode it will play the next song.
6. Play / Pause - Press once to either play music, or pause the music that is currently playing
7. Indicates whether it is in FM mode (FM lights up) / MP3 mode (MP3 and FM lights up) or the radio is off (nothing lights up)
21
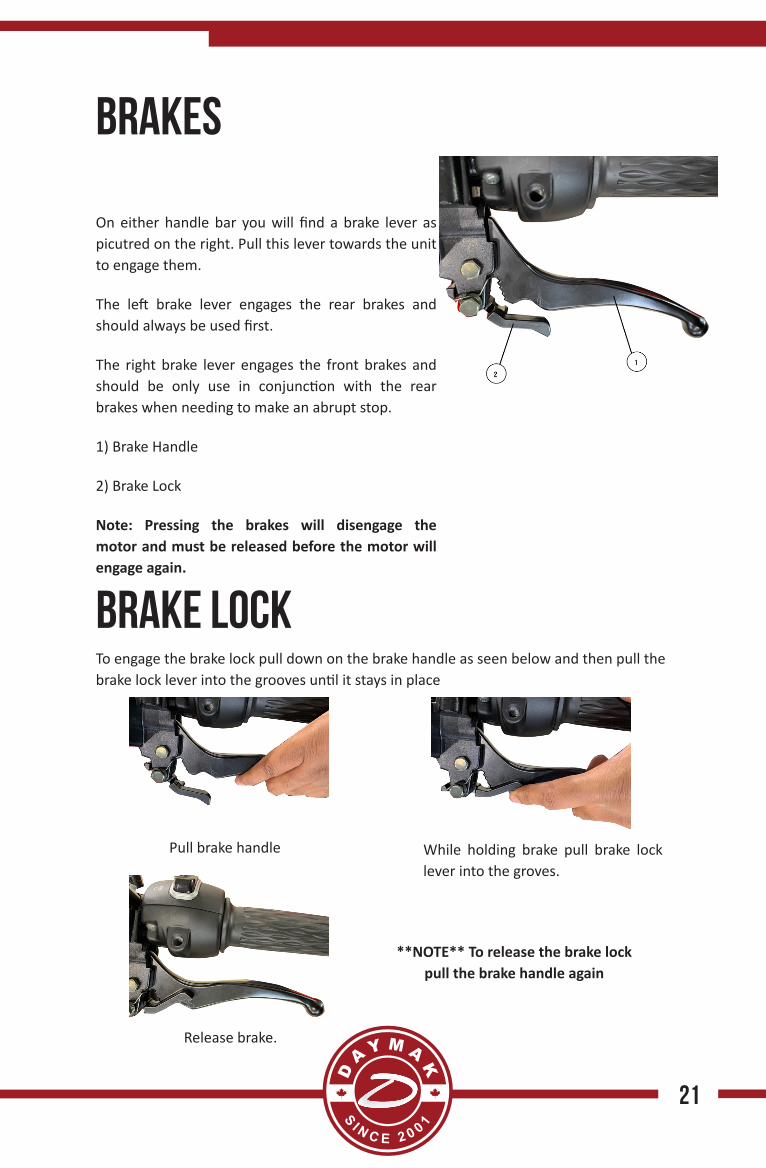
Brakes
On either handle bar you will find a brake lever as picutred on the right. Pull this lever towards the unit to engage them.
The left brake lever engages the rear brakes and should always be used first.
The right brake lever engages the front brakes and should be only use in conjunction with the rear brakes when needing to make an abrupt stop.
1) Brake Handle
2) Brake Lock
Note: Pressing the brakes will disengage the motor and must be released before the motor will engage again.
Brake LockTo engage the brake lock pull down on the brake handle as seen below and then pull the brake lock lever into the grooves until it stays in place
Pull brake handle While holding brake pull brake lock lever into the groves.
Release brake.
**NOTE** To release the brake lock pull the brake handle again

22
Display
The Roadstar display shows all the metrics you need when riding.
1. Speedometer - Shows the current speed
2. Turn Signal - Indicates the right or left turn signal is on respectively.
3. Battery Meter - This gauge shows how much power your Mobility Scooter has left and will decrease as you ride. 4 Bars is full charge and 1 bar is empty.
4. Volume - Shows the current volume
5. High Beam Light - Indicates the the high beam is on
Remote
The Roadstar Transformer also comes with a remote that has these functions.
1. Set Alarm - is button will set the alarm. After pressing it wait for 5 seconds. Afterwards if someone moves the bike the alarm will sound.
2. Remove alarm - is will disengage the alarm. Use this before riding your bike. **Also disengeages remote start*
3. Panic Button - is will automatically set the alarm off
4. Remote Start - Press this twice to start the bike without using the keys. Press the remove alarm button (2) to disengage the remote start
23
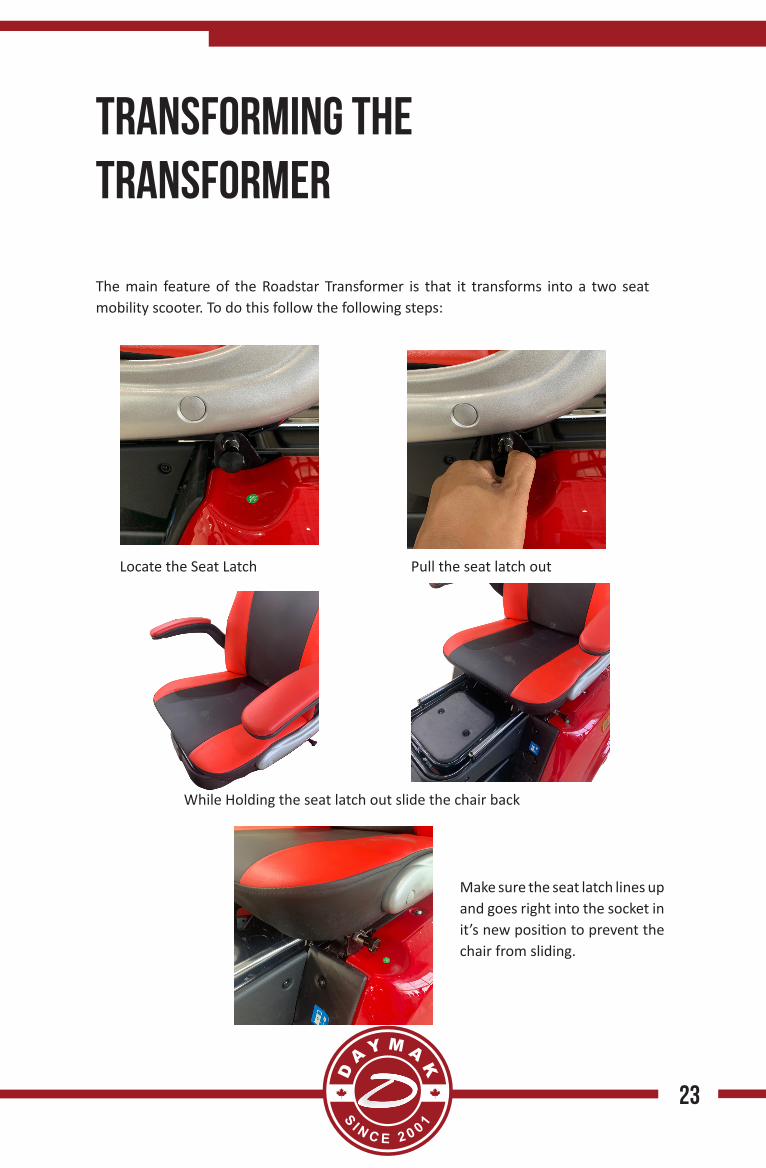
transforming the transformer
The main feature of the Roadstar Transformer is that it transforms into a two seat mobility scooter. To do this follow the following steps:
Locate the Seat Latch Pull the seat latch out
While Holding the seat latch out slide the chair back
Make sure the seat latch lines up and goes right into the socket in it’s new position to prevent the chair from sliding.
24
transforming the transformer cont’d
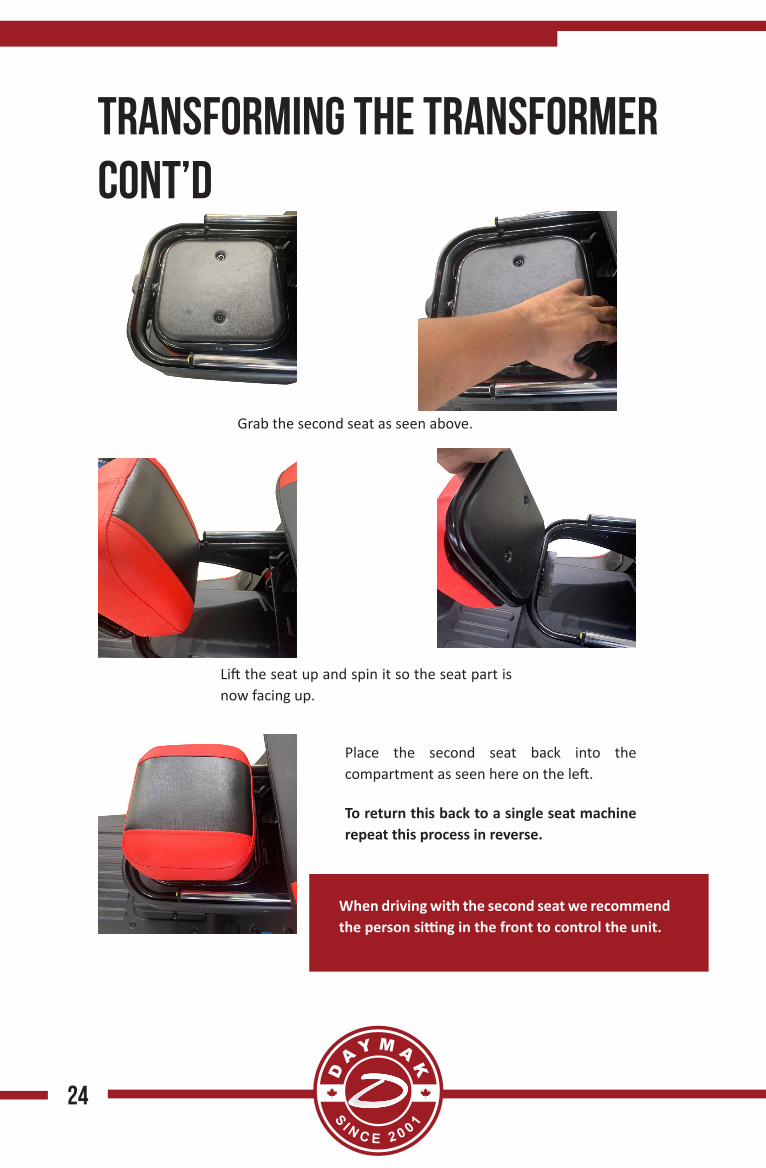
Grab the second seat as seen above.
Lift the seat up and spin it so the seat part is now facing up.
Place the second seat back into the compartment as seen here on the left.
To return this back to a single seat machine repeat this process in reverse.
When driving with the second seat we recommend the person sitting in the front to control the unit.

25
Technical Data
This section provides you with the technical specifications for your Mobility Scooter.
The Motor and Wheel AssemblyThe Roadstar Transformer has a magnetic DC brushless motor on the rear wheel hub. This type of motor has excellent low-end torque and high efficiency when working within its range. Note that while the motor is very quiet, it does produce some noise. Also attached to the rear hub are speed reduction gear and the speed free clutch..
The ControllerDaymak pioneered the development of intelligent component control in Mobility Scooters. The Daymak Drive technology developed by Daymak is the brain of your Mobility Scooter. It allows your Mobility Scooter to achieve faster acceleration, to climb steeper hills, and to save energy.
The electronic controller is located under the seat assembly. This controller efficiently regulates the speed and electronic functions of the bicycle. It allows for stepless speed adjustment, shuts off the motor when the brakes are activated, has low voltage protection and has fuses to prevent excess current from damaging the Mobility Scooter’s systems. This can all be regulated by Bluetooth app.
The Brakes
Front Brakes The brakes on your mobility scooter are hydraulic disc-brakes, like those found on gas scooters and motorcycles. They generally provide for very fine stopping and control. This is a very tested and well-designed technology, but even so, the brakes will require servicing from time to time, and may have to be adjusted for tension.
The brakes are contained within a sealed unit, and are very finely adjusted and fitted.
Rear BrakesThe rear brakes on your mobility scooter are hydraulic disc brakes. These provide a good friction-grip when they are activated and should be used first before the front brakes.

26
VeHICLE IDENTIFICATION NUMBER (VIN)Your unit comes with a Vehicle Identifiation Number. You should write this down and keep it somewhere safe in case of theft of your unit. This is also required for registering your warranty on the warranty section of Daymak.com. To find the VIN on your Roadstar Trnasformer look for a the metal plate that is shown below. You can find this on the opposite side of the charging port.

27
Maintenance and Troubleshooting
This section outlines problems you may have and solutions you may be able to use.
Many of the parts in this product are not user-serviceable and should be repaired by trained professionals. This is especially true of the electrical systems and the mechanical components. Alteration of these components voids the warranty.
Tire PressureMaintain the air pressure in your tires at the appropriate level. If the air pressure is too low, your mobility scooters performance will suffer and it will become damaged more easily.
Cold weather and lower temperatures will cause the air pressure in your tires to drop, and warmer weather will cause it to increase, even if there are no leaks in the tire tube. To replace the air in your tires, follow this procedure:
1. Identify the required pressure by examining the text along the side of the tire rim. This text should indicate the recommended pressure for your tire.
2. Locate the air valve on the inner surface of the tire rim.
3. Remove the valve cap and place in a secure location.
4. Place the nozzle end of an air pump (hand-power or mechanical) over the valve.
5. Pump up the air in the tire, being careful not to let the pressure go above the level prescribed on the side of the tire wall.
6. Remove the pump nozzle from the air valve without allowing much air to escape from the tire.
7. Replace the valve cap on the air valve.
Maintaining the proper air pressure will allow you to travel much further on a single charge, because the motor will not have to work as hard to move the Mobility Scooter.

28
Replacing Flat TiresReplacing flat tire tubes is a more complicated and labour-intensive process with Mobility Scooters than it is with regular bicycles. It requires proper tools, more skill and more patience.The front wheel is easier to service when changing a flat tire than the rear wheel, as the rear wheel is connected to the hub motor and other mechanical parts.
Unless you are very familiar with the mechanical components of the rear motor, attempting to change a flat rear tire may cause serious problems. Please contact your Daymak dealer for specific instructions on how to remove your wheel and tires safely, and how to replace the tubes. It may be easier – and safer - to have the tubes replaced by your Daymak dealer.
The MotorDo not service the motor yourself. Bring the mobility scooter to your Daymak dealer for service. The motor in your mobility scooter is a highly complex and fine-tuned mechanism. Repairing it requires significant expertise. We suggest maintenance every 100 running hours or so.
Shock Absorbers and ComfortIf your riding experience feels bumpier than usual, and you suspect that your shock absorbers are experiencing difficulties, check the air pressure in your tires. If the air pressure is too low, this may be the reason you feel less comfortable. It may have nothing to do with your shock absorbers. If the problem persists, take your Mobility Scooter to your Daymak dealer for servicing.
Bringing in your Mobility scooter for ServiceDo not attempt to service the electronic or mechanical parts of your mobility scooter unless you are absolutely sure of what you are doing and have a solid understanding of electrical and mechanical equipment. If your mobility scooter is not performing properly, disconnect the circuit breaker (if applicable) and bring themobility scooter to your local Daymak dealer.
LiabilityDaymak will not be held responsible for damage or injuries resulting from errors resulting from improperly serviced parts.
29
CleaningCleaning is extremely important this will ensure your mobility scooter will serve you for a long time. In the long run, it will save you money and a lot of time waiting for the Mobility Scooter to be repaired. You should clean your mobility scooter weekly.
Do not use aggressive power jets or water sprays when washing the mobility scooter and keep water off the battery as much as you can. Clean gently but thoroughly and make sure that all the outer casing of the electric parts are dry and clean.
Remove any dirt, debris, sand, mud, grit, grime that got caught on the Mobility Scooter and dry it off.
While cleaning, it is a good opportunity to look closely for a worn, loose, cracked, rust, teared or damaged parts. Buckled paint can also be a hint for some parts that need closer inspection.
LubricatingIt is also recommended to lubricate, levers, cables, etc. A clean, lubricated mobility scooter tends to be faster, smoother and quieter. It’s like having a little extra push for free.
Apply the lubricant to the different parts and let it sit a few minutes and then wipe off the excess lubricant with a rag. After a while, clean the different parts with a degreaser to remove any excess dirt that has been collected.
WeatherDon’t leave the mobility scooter out in the rain or snow.
Store it somewhere dry and out of direct sunlight. Overheating the batteries, for example, can cause problems.
Do not open up casings, chargers, etc as you are unlikely to be able to reseal them effectively afterward, making them more susceptible to water damage and other extreme weather conditions.
Batteries should be removed from the mobility scooter if not used and charged once a month regardless of usage if possible.

30
ScheduleThe frequency of maintenance depends on how much you ride and under which conditions. Recreational riders needs far less maintenance then off-road riders. The harder you ride, the more you have to take care of your Mobility Scooter if you want it to last. There are various time intervals for proper maintenance. Quick maintenance should be done before & after every ride.
Time after Purchase Action Suggested
Everytime before you ride (The 60 Second Check)
Check tire pressure, check brakes that they work, check lights, check bolts (make sure everything is tight), check battery gauge. Do not ride the unit unless everything is functional and proper
30 Days (every month) Completely clean the unit, including the dust on the motor and under the seat. Check for any abnormal wear and tear or alignment problems.
90 Days (every 3 months) Inspect frame and fork for paint crack or bulgest that may indicate frame or part damage; pay particular attention to all frame joints. Check wear and tear on tires. Check range of battery.
180 Days Inspect all components on the unit. Check that connections are nice and tight. Look inside where your controller is and clean in detail. Check that all plugs are clean. Go over every bolt and nut in your unit.
360 Day (every 12 months) Bring the unit for a complete tune-up. Varying on the unit the shop should complete a battery discharge, tires should be changed depending on wear and tear. All connections should be checked for rust and loosness. All components should be checked including charged, ignition, and gauges.

31
Specifications
Name Roadstar TransformerMotor 2 x 350WVoltage 60VAmp Hour 20AHWatt Hours 1200WHBattery Life 300 cyclesBattery Lead AcidRemovable Battery Only During ReplacementCharger 60V 2.75ACharge Time 4 - 6 HoursLights LEDMax Load 265 lbs.Assembled Weight 350 lbs.Assembled Length 76"Assembled Width 30"Assembled Height 44"Seat Height 29" (Seat 1) / 28" (Seat 2)Seat Width 18" (Seat 1) / 10" (Seat 2)Seat Length 13" (Seat 1) / 8" (Seat 2)Boxed Weight 285 lbs.Boxed Length 73"Boxed Width 34"Box Height 44"Range Up to 40 kmSpeed 24 km/hClimbing Incline 20 degreesFront Wheel 3.0 - 10Rear Wheel 3.0 - 10Gauges Battery Level / Speedometer / Odome-
terGround ClearanceWheel Base 49"Battery Weight 75 lbs.

32
Name Roadstar TransformerRear Brakes Hydraulic Disc BrakesFront Brakes Hydraulic Disc BrakesIgnition YesFront Shocks YesRear Shocks Dual Suspension CoilController StandardPedal Assist NoSpeed Levels 3 SpeedsThrottle Full TwistCruise Control NoDisplay RGB LEDFrame Size N/ARear / Basket Storage YesUnder Seat Storage NoRear / Basket Storage Volume 1520 cubic inchUnder Seat / Glove Storage YesMP3 YesOccupancy 2Alarm YesSteering Lock YesCenter Kickstand NoFoldable NoFolded Dimenison N/A
Thank you for choosing Daymak