north dakota vision zero plan strategic highway safety plan ...
Upload
khangminh22Category
view
1download
0
Recruiting Solutions
User Guide PeopleSoft 9.2

DISCLAIMER
Written by the North Dakota University System, February 2020.
This user guide is considered to be proprietary and confidential and may not be reproduced for any reason other than stated below without prior written consent.
EXCLUSION
This user guide has been prepared exclusively for North Dakota University System end-user training. The North
Dakota University System may use information contained within this document for the sole purpose of personnel
training. Additional manuals may be reproduced and edited as needed for training purposes ONLY. All other uses
are prohibited without prior written consent.
Copyright ã 2020 North Dakota University System. All Rights Reserved.

TABLE OF CONTENTS Introduction .................................................................................................................................................. 4
Recruiting Process Overview ........................................................................................................................ 5
Users Involved in the Recruiting Process ...................................................................................................... 6
Basics ............................................................................................................................................................. 7
Using Recruiting Solutions ............................................................................................................................ 8
Recruiting Homepage ................................................................................................................................... 8
Create Job Openings ................................................................................................................................... 17
Search Job Openings ................................................................................................................................... 59
Search Applicants ........................................................................................................................................ 66
Manage Job Opening .................................................................................................................................. 78
Screening ................................................................................................................................................... 101
Routing ...................................................................................................................................................... 116
Interview Scheduling ................................................................................................................................. 125
Send Correspondence ............................................................................................................................... 148
Sterling Background Check ....................................................................................................................... 159
Making an Offer ........................................................................................................................................ 163
Preparing to Hire ....................................................................................................................................... 173
Verify status updates ................................................................................................................................ 177
Recruiting Table Maintenance .................................................................................................................. 177
Recruiting Alerts Tile ................................................................................................................................. 195
Recruiting Insights ..................................................................................................................................... 203
Appendix ................................................................................................................................................... 214
NDUS CTS 4 | P a g e
INTRODUCTION
This user guide is intended for training Recruiters on the use of PeopleSoft HCM Recruiting Solutions
v9.2 functionality in the NDUS environment.
The training conducted will cover the major processes involved in the recruiting processes. This user
guide contains detailed information on other areas related to the recruiting process that may not be
covered in the training. Users are encouraged to refer to this user guide to understand these additional
processes.

NDUS CTS 5 | P a g e
RECRUITING PROCESS OVERVIEW
This graphic represents the high-level Recruiting Solutions processes in PeopleSoft.
Create Job Openings
Users create job openings; defining qualifications, creating questionnaires, establishing screening rules, creating posting content, and identifying the hiring team.
Post Job Openings
Users post jobs to Candidate Gateway, Campus websites, external job boards, and social media sites.
Enter Applicant Data
Applicants apply for job openings through Candidate Gateway
Screen Applicants
Users run screening processes to calculate applicants’ qualification scores.
Route Applicants
Users send applicant information to interested parties and solicit feedback on next steps.
Interview Applicants
Users schedule interviews and solicit feedback from interviewers.
Make Offer
Users prepare offers for the selected candidates.
Hire Applicants
Users finalize the hiring of the selected candidates.
NDUS CTS 6 | P a g e
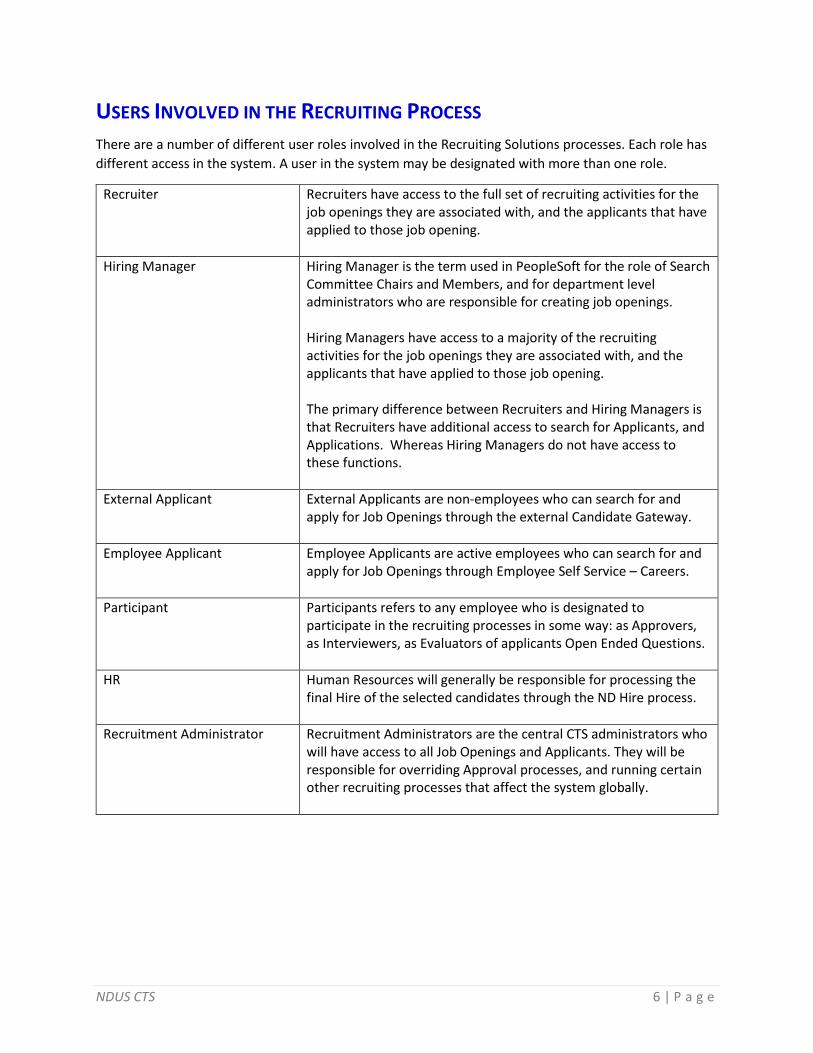
USERS INVOLVED IN THE RECRUITING PROCESS
There are a number of different user roles involved in the Recruiting Solutions processes. Each role has
different access in the system. A user in the system may be designated with more than one role.
Recruiter
Recruiters have access to the full set of recruiting activities for the job openings they are associated with, and the applicants that have applied to those job opening.
Hiring Manager
Hiring Manager is the term used in PeopleSoft for the role of Search Committee Chairs and Members, and for department level administrators who are responsible for creating job openings. Hiring Managers have access to a majority of the recruiting activities for the job openings they are associated with, and the applicants that have applied to those job opening. The primary difference between Recruiters and Hiring Managers is that Recruiters have additional access to search for Applicants, and Applications. Whereas Hiring Managers do not have access to these functions.
External Applicant
External Applicants are non-employees who can search for and apply for Job Openings through the external Candidate Gateway.
Employee Applicant
Employee Applicants are active employees who can search for and apply for Job Openings through Employee Self Service – Careers.
Participant
Participants refers to any employee who is designated to participate in the recruiting processes in some way: as Approvers, as Interviewers, as Evaluators of applicants Open Ended Questions.
HR
Human Resources will generally be responsible for processing the final Hire of the selected candidates through the ND Hire process.
Recruitment Administrator
Recruitment Administrators are the central CTS administrators who will have access to all Job Openings and Applicants. They will be responsible for overriding Approval processes, and running certain other recruiting processes that affect the system globally.

NDUS CTS 7 | P a g e
BASICS
Here are some basic FAQs regarding Recruiting Solutions.
• Users will only see Job Openings they are associated with.
• Users will only see Applicants who applied to Job Openings they are associated with.
• All Applicants must apply for Jobs through Candidate Gateway / Careers. Applicants will not be
added manually.
• External applicants will apply through the external Candidate Gateway / Careers.
• Employees will apply through the Careers tile on their Employee Self Service homepage.
• Student applicants must apply through external Candidate Gateway / Careers, even if they have
an existing Job record in HCM.

NDUS CTS 8 | P a g e
USING RECRUITING SOLUTIONS
Recruiters access the pages to perform their activities through the Recruiting Homepage.
RECRUITING HOMEPAGE
The Recruiting Homepage contains various tiles which enable Recruiters to access commonly used recruiting activities.

NDUS CTS 9 | P a g e
My Job Openings View the count of open jobs associated with the recruiting user, and access information about the job openings using the My Job Openings Page.
Use the My Job Openings page to view a list of job openings for the recruiting user.

NDUS CTS 10 | P a g e
My Applicants View the count of applicants the recruiting user has and access information about the applicants on the My Applicants Page.
Use the My Applicants page to view applicants associated with the recruiting user’s job openings and to review key information about each applicant.

NDUS CTS 11 | P a g e
Recruiting Activities Access the Recruiting Activities Page to view a navigation collection of commonly used recruiting activities.
Recruiters use the Recruiting Activities page to view a navigation collection of commonly used recruiting pages, such as: Search, Create, Applicant Lists, Interview Calendar, and Configuration.
NDUS CTS 12 | P a g e
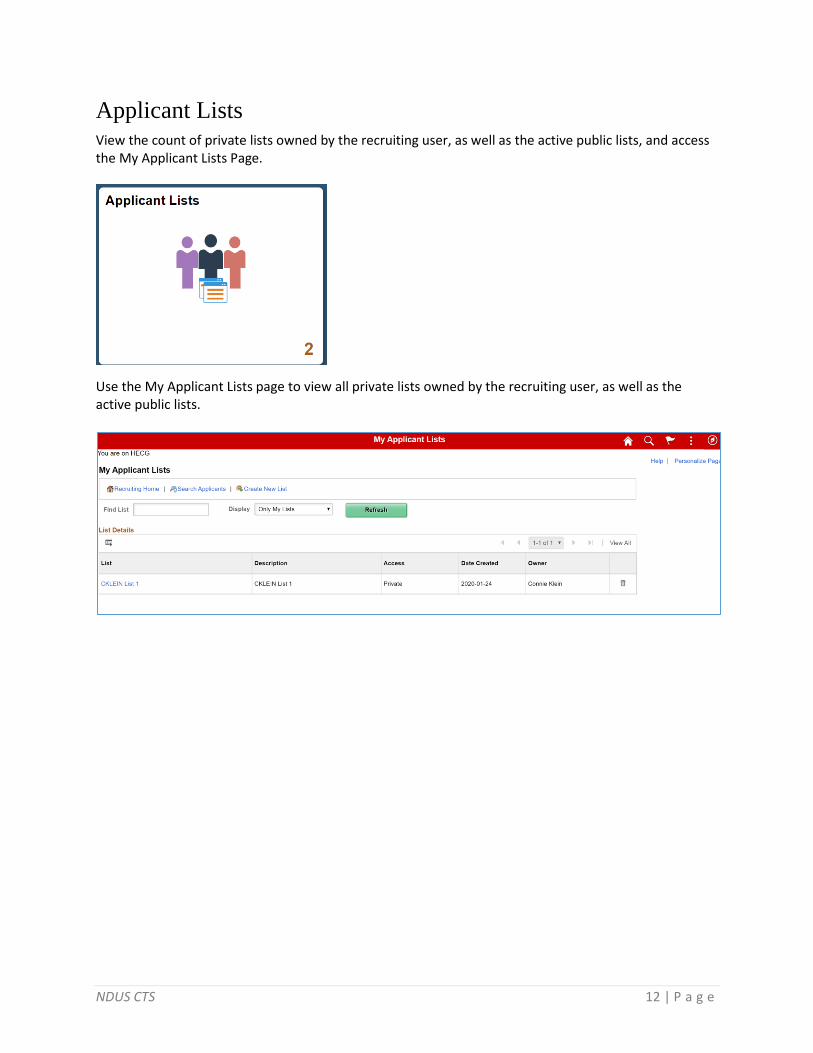
Applicant Lists View the count of private lists owned by the recruiting user, as well as the active public lists, and access the My Applicant Lists Page.
Use the My Applicant Lists page to view all private lists owned by the recruiting user, as well as the active public lists.

NDUS CTS 13 | P a g e
Today’s Interviews View the number of interviews the recruiting user has scheduled for the current day and access the My Interviews Page.
Use the My Interviews page to view a list of interviews the recruiting user scheduled for the current day.

NDUS CTS 14 | P a g e
Recruiting Alerts View the total count of alerts associated with the recruiting user’s job openings and access the Recruiting Alerts Page.
Use the Recruiting Alerts page to view summary information for the user’s own job openings and to access pages with more detailed information.

NDUS CTS 15 | P a g e
Approvals Access the Approvals pages: Pending Approvals – Job Offer Page and Pending Approvals – Job Opening Page, and take action on pending approvals related to recruiting activities, like job offer, job openings, using Fluid Approvals.
Use the Pending Approvals page to view and access the pending items for approval associated with the Job Opening and Job Offer Category.

NDUS CTS 16 | P a g e
Recruiting Insights Access the Recruiting Insight dashboard and various pivot grids that provide graphic views of important performance measures.
The Recruiting Insight dashboard displays various dynamic tiles showing different analytic charts.

NDUS CTS 17 | P a g e
CREATE JOB OPENINGS
The first step in Recruiting Solutions is to create a job opening. Two types of job openings are available: “continuous job openings” or “standard requisitions”.
Create Job Opening Access the Recruiting Activities tile.
From the menu, select Create, then Create Job Opening.

NDUS CTS 18 | P a g e
Primary Job Opening Information
The Primary Job Opening page appears. You have the option of creating two types of job openings: Standard and Continuous
• Standard Requisitions are specific positions that you want to fill. This requires specific information for related to the position. For positions with an unlimited number of headcount (e.g. “9999”) use the Standard Requisition option.
• Continuous job openings only require a job posting title. They do not require a position number at posting. A position number is assigned at hire.
Job Opening Type: Select Standard Requisition or Continuous Job Opening Business Unit: Defaults to the Business Unit for the person creating the job opening. Position Number: Enter Position Number you are filling. The system is designed to allow you to enter only the Position Number, the other fields will default in based on the Position Number Job Family: Defaults from position number entered. Department: Defaults from position number entered. Job Code: Defaults from position number entered. Recruiting Location: Defaults from position number entered. This is the location that will show up for applicants searching for jobs on Candidate Gateway. Posting Title: Defaults from position number entered. If you would like the job posting title to be more descriptive of the position, you can make the change here. For Continuous Job Openings, this field is required when a Position or Job Code are not entered.
Click

NDUS CTS 19 | P a g e
Job Opening
The Job Opening page appears populated with data from the position selected on the Primary Job Opening Information page. The Job Opening page always displays the header information that was setup on the Primary Job Opening Information page. *For Staff and Faculty positions, the Create Job Opening component is organized across five tabs or pages: Job Information, Qualifications, Screening, Job Posting, and Hiring Team.
Job Information
Within Job Information, the page is organized into sections: Opening Information, Locations, Recruiting Locations, Employees Being Replaced, Staffing Information, and Salary Information.
NOTE: You should not need to change any default information. If the default information is not correct you need to see if you agree that it should not be correct based on what is set up in position data.

NDUS CTS 20 | P a g e
Opening Information
Job Opening Type: Displays the type selected on Primary Job Opening Information. Created by: Defaults in the user’s name. Created: Defaults in today’s date. You can enter the date the position is “officially posted”. Openings to Fill: Select “Limited Number of Openings” or “Unlimited Number of Openings”.
• Limited: Enables the Target Openings and Available Openings fields to appear. The system closes the job opening when all openings are filled.
• Unlimited: Hides the Target Openings and Available Openings fields and the job opening stays open until it is manually closed.
Target Openings: Enter the number of openings that will be filled for this position. (If selected “Unlimited” this field will not appear.) Available Openings: Generally, use the same number as Target Openings. As you hire applicants for this opening, this number will reduce. Once all available openings are filled, the opening will automatically close. (If selected “Unlimited” this field will not appear.) Establishment ID: Defaults in from position. Business Unit: Defaults in from position. Position Number: Displays the position number selected on Primary Job Opening Information. Company: Defaults in from position.

NDUS CTS 21 | P a g e
Job Code: Defaults in from position. Department: Defaults in from position. Status Code: Defaults to “005 Draft”. This will change to “010 Open” once the Job Opening has been Approved. Status Reason: Select the appropriate reason:
• Job/Position Vacated
• New Authorization
• New Job/Position
• Re-opened
• Temporary Assignment Status Date: Displays the effective date of the status. Desired Start Date: Can be left blank, otherwise enter the date you want to complete the job opening. Encumbrance Date: Leave blank. Projected Fill Date: Leave blank. Date Authorized: Enter the date the job opening was approved. If approvals are being used,
NDUS CTS 22 | P a g e
use the date that the job opening reaches final approval. Referral ID Program: Leave Blank. Recruitment Contact: Leave Blank.
Locations
Location: Defaults in from position. This is the location code on the position.
Recruiting Locations
Recruiting Area: Defaults in from location setup. This is the location that will show up for applicants searching for jobs on Candidate Gateway. Target Openings: Enter the target openings for each separate recruiting location. Generally, there will be only one recruiting location.
Employees Being Replaced
Employee ID: Enter appropriate employee through the look up. If this is a new position, leave blank.

NDUS CTS 23 | P a g e
Additional Job Specifications
Some fields in this area can be used to match against applicant preferences in the screening process. For example, if the Job is defined a Full-Time and the applicant is asking for Part-Time
Staffing Information
This information defaults from Position Data or Job Code Table. Region: Defaults USA Schedule Type: Defaults to Full-time or Part-time. Regular/Temporary: Defaults to Regular or Temporary. Begin Date: Leave Blank. End Date: Leave Blank. Shift: Defaults to “Not Applicable”, “Any”, “Day”, “Evening”, “Night”, “Compressed,” or “Rotating”. Hours: Defaults Work Period: Defaults to Weekly.

NDUS CTS 24 | P a g e
Travel Percentage: Defaults to “Never or rarely”. You can select: “Up to 100% of the time”, “Up to 75% of the time”, “Up to 50% of the time”, or “Up to 25% of the time”.
Salary Information
This information defaults from Workforce Administration. Salary Admin Plan: Defaults in from position. “SLEX”, “SLNE”, “HRNE”, “ADEX”, “GCEX”, “UALL”, or “HINV”. From Grade: Defaults in from position. “000”, “100”, “200”, “300”, “400”, ‘500”, “600”, “700”, or “900”. From Step: Leave Blank. To Grade: Leave Blank. To Step: Leave Blank. Salary Range From: Enter the Salary Range from value. This is a required field. Salary Range To: Enter the Salary Range to value. This is a required field. Pay Frequency: Enter the Pay Frequency: “Annual”, “Bi-weekly”, “Hour”, “Month”, or “Year”. Currency: Defaults to US Dollars.
After completing the Job Information page, click on the tab.

NDUS CTS 25 | P a g e
Qualifications
Within Qualifications, the page is organized into sections: Work Experience & Education, and Screening Questions. On the Qualifications page, define requirements that will be compared against the applicant’s application in the Screening process. The Work Experience levels will be compared against the applicant’s Work Experience dates. The Education level will be compared against the applicant’s stated Education level. The Questionnaire will list the questions that the applicant must answer in their application. In the subsequent Screening page, you will define which qualifications will be evaluated in which Screening Levels, and the scores assigned for meeting each qualification.

NDUS CTS 26 | P a g e
Work Experience & Education
Education and experience requirements indicate the number of years of experience required for applicants with various levels of education. To meet education and experience screening criteria, the applicant must have both the education level and the minimum amount of experience required for that level.
Highest Education Level: Select the Education Level that qualifies and applicant for the job.
• Not Indicated
• Less than HS Graduate
• HS Graduate or Equivalent
• Some College
• Technical School
• 2-Year College Degree
• Bachelor’s Level Degree
• Some Graduate School
• Master’s Level Degree
• Doctorate (Academic)
• Doctorate (Professional)
• Post-Doctorate Years of Work Experience: Enter the associated number of years of work experience required for the applicant to qualify for the job. These requirements indicate the number of years of experience required for applicants with various levels of education. Each set of values—a degree and the years of experience required of applicants with that degree—is processed separately. To prevent the system from penalizing someone with the correct amount of experience but a higher degree, the job opening should include rows for every degree above the minimum requirement. To indicate that any amount of experience is acceptable for applicants with a given degree, enter 0 as the experience requirement for that degree.
Screening Questions
Screening questions enable you to ask multiple-choice or open-ended (essay) questions to applicants who apply online. Note: Unlike the other types of screening criteria, screening questions are useful only if applicants can submit applications online. Answers to screening questions cannot be entered in by the Recruiter for the applicant. Question: Select a screening question. When searching for questions you can use the Description field and select the “Contains” criteria with a keyword. Question Order: Leave blank. The system is set up to randomize the order that the questions are presented on the application. Action: For multiple-choice questions, a View Answers link appears. For open-ended questions, an Enter Evaluators link appears.
NDUS CTS 27 | P a g e
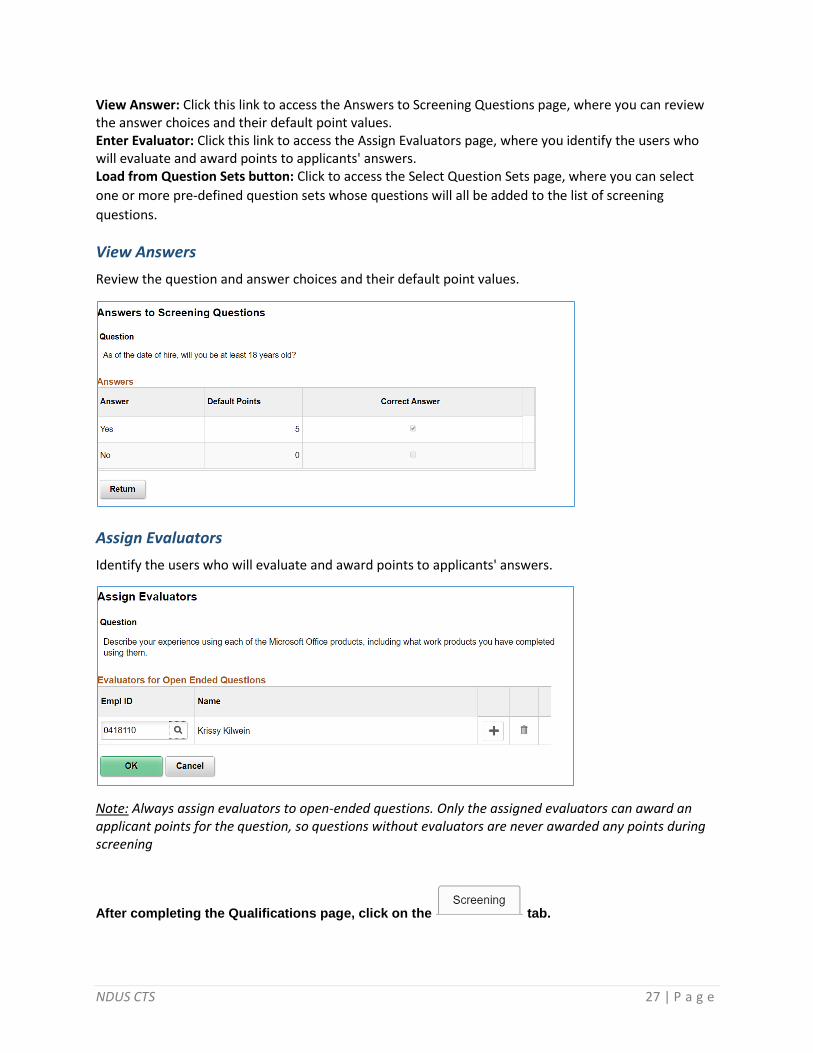
View Answer: Click this link to access the Answers to Screening Questions page, where you can review the answer choices and their default point values. Enter Evaluator: Click this link to access the Assign Evaluators page, where you identify the users who will evaluate and award points to applicants' answers. Load from Question Sets button: Click to access the Select Question Sets page, where you can select
one or more pre-defined question sets whose questions will all be added to the list of screening
questions.
View Answers
Review the question and answer choices and their default point values.
Assign Evaluators
Identify the users who will evaluate and award points to applicants' answers.
Note: Always assign evaluators to open-ended questions. Only the assigned evaluators can award an applicant points for the question, so questions without evaluators are never awarded any points during screening
After completing the Qualifications page, click on the tab.

NDUS CTS 28 | P a g e
Screening
A job opening can include multiple screening levels, each with its own set of screening criteria and its own processing rules. Within a job opening, screening levels are assigned an order so that recruiters can process each level in its logical sequence. NDUS uses a Pre-Screening level to determine eligibility to apply, a Minimum Qualifications screening level to select candidates who meet basic job qualifications, then a Preferred Qualifications screening level to assess the applicants preferred qualifications. Use of any screening level is optional on a Job Opening.
About Pre-Screening
Pre-Screening occurs at the very beginning of the application process. Typically, you use pre-screening to ensure that applicants meet basic requirements such as being able to legally to work in your country. If pre-screening is active, then the guided application process includes a Prequalify step that appears before any other step other than the optional Start step. The Prequalify step displays multiple-choice questions that the applicant must answer before continuing. When the applicant continues to the next step, the system evaluates the answers immediately. Applicants who pass are permitted to continue with the job application. Applicants who fail are informed that they do not meet your qualifications and that they may not continue with the application. Regardless of whether the applicant passes pre-screening, the system creates an application record. If the applicant failed pre-screening, the system assigns the fail disposition that you chose in the screening level definition.
About Minimum Qualifications and Preferred Qualifications
For Minimum Qualifications and Preferred Qualifications screening levels, Recruiters run a process that evaluates potential candidates and assigns scores to narrow the list to the most qualified applicants, using criteria established for the screening level on the Job Opening.

NDUS CTS 29 | P a g e
Screening Levels
Max Total Points: Enter the maximum number of points that an applicant can accumulate across all screening levels combined. The default for this value is 100. Must Pass Previous Level: Select this checkbox to enforce the rule that an applicant must have passed a level to be included in the calculation for the next level. The default for this field is checked for “Yes”. Screening Levels: Lists the default screening levels established for the system. You may choose to delete a screening level if it will not be used for the Job Opening. Click on a screening level link to go to the Screening Criteria page for that screening level. Add Screening Option button: Click the button to select an additional screening level to add. There should be no additional screening levels available to add.
Click on the Pre Screening screening level link to go to the Screening Criteria page.

NDUS CTS 30 | P a g e
Screening Criteria
Use the Screening Criteria page to add screening criteria to screening levels.
For Pre-Screening level
Screening Options Description
Pass Status, Pass Reason: Select the disposition (and, if desired, an associated reason) to assign when an application passes this screening level. For Pre-Screening we use “010 Applied”. The Pass Status is not applied until the application is submitted. Fail Status, Fail Reason: Select the disposition (and, if desired, an associated reason) to assign applicants who fail this screening level. This setting is required for Pre-Screening. We use “112 Failed Prescreening”. For Pre-Screening, the fail status is applied as soon as the applicant fails, they are not allowed to continue and submit their application. Explain Text ID: For Pre-Screening, explanatory text is required. The text appears under the Prequalification Terms heading on the application process Start step. This information will not default in, so you must enter a code on each job opening for Pre-Screening. Select the ID “HRAM_FLONLEMSG_02”. Click on the View Explanatory Message link to view the text. Pass Text ID: Select the IDs for the messages that Candidate Gateway presents to applicants who pass the Pre-Screening level. In Fluid Candidate Gateway, applicants who pass prescreening do not see any messages. Accept the default of “HRAM_FLONLPASS_01”. Click on the View Pass Message link to the view the text.

NDUS CTS 31 | P a g e
Fail Text ID: Select the IDs for the messages that Candidate Gateway presents to applicants who fail the Pre-Screening level. Accept the default of “HRAM_FLONLFAIL_02”. Click on the View Fail Message link to view the text. Pass Email, Fail Email: Select these check boxes to make the system send screened applicants an email containing the pass message or fail message, depending on the screening results.
Scoring Definition
Percent Needed to Pass: Enter the minimum percentage amount of the total possible points that an applicant must have to pass the screening level. If you leave this field blank, the pass threshold is 0%, and all applicants will pass. For Pre-Screening, always use 100. Use Raw Points: Select this check box if you want scores for the screening level to be the sum of the actual points that the applicant earned for the screening level. Always select this checkbox. If you select this check box, do not enter values in the Maximum Points to Assign, Points Assigned for Pass, or Points Assigned for Fail fields. Maximum Points to Assign: Leave blank. Points Assigned for Pass and Points Assigned for Fail: Leave blank Manually Assign Status: Select this check box to allow recruiters to manually override an applicant's pass/fail status for a screening level. Do not select for Pre-Screening.
Screening Requirements
This grid displays all available screening criteria so that you can select which items to use in the screening level. For Pre-Screening, this section lists only multiple-choice questions that were setup on the Qualifications page.
Screening Type: Displays the type of screening criteria. General Requirements items appear first, then Education & Experience items, then Screening Question items. For Pre-Screening, only Screening Questions are used. Item: For screening questions, text in the Item column concatenates “Question:” with the simplified question content. The adjacent Description column is blank. Description: This will be blank for screening question types.

NDUS CTS 32 | P a g e
Edit Details: Click on this link to access the Define Screening Points page to enter the point values assigned for the question answers. Use in Screening: Select this checkbox to include the question in Pre-Screening. Generally, for Pre-Screening we would select questions for age and eligibility to work in the US. Required: Select this check box if the applicant must have this criteria to pass the screening level. If the system determines that the applicant does not have this criteria (or incorrectly answers this question), the applicant fails the screening level even if the overall point total meets the passing threshold. For Pre-Screening this is not used. Points: Displays the total point available for the question. Total Screening Points: Displays the total points available for the screening level. Click on the Edit Details link to enter point values for the question answers.
Define Screening Points
Points: For multiple-choice questions, review and optionally override the default point value for both correct and incorrect answers. Each answer can be associated with a different number of points, and those points can be added together when there is more than one correct answer. You can enter a negative point value for an answer that reduces the overall points.
Click the button to return to the Screening Criteria page.
Note: All qualifications that you use for a screening level should be associated with points. The system ignores any selected items which do not have points, and if you leave the page and come back, you will see that the Use in Screening check box has been deselected for any criteria that does not have points.
On the Screening Criteria page for Pre-Screening, click the button to return to the Screening page.

NDUS CTS 33 | P a g e
Click on the Minimum Qualifications screening level link to go to the Screening Criteria page.
Screening Criteria
The Screening Criteria page for Standard Screening level – Minimum Qualifications and Preferred Qualifications – will have some different fields.
For Standard Screening levels
Screening Options Description
Pass Status, Pass Reason: Select the disposition (and, if desired, an associated reason) to assign when an application passes this screening level. For Standard Screening levels, we use “030 Screen”. This disposition will be applied when the screening process is run and results are applied. Fail Status, Fail Reason: Select the disposition (and, if desired, an associated reason) to assign applicants who fail this screening level. For Standard Screening we use “110 Reject”. For Minimum Qualifications we used the Fail Reason of “Lack Other Min Qualifications”. Letter: Select a letter to send to applicants who fail this screening level. Send Letter as Email When Results Are Applied: Select this check box to have the system send failed applicants an email with the text of the selected rejection letter. The system sends the email (and creates a contact note) after the results for the screening level are applied.
Scoring Definition
Percent Needed to Pass: Enter the minimum percentage amount of the total possible points that an applicant must have to pass the screening level. If you leave this field blank, the pass threshold is 0%, and all applicants will pass. For Standard Screening, chose a value that will allow for a sufficient number of applicants to pass based on the criteria and points you establish for the screening level. Note: You can adjust this value, and the points assigned for the individual items during the running of the screening process. Use Raw Points: Select this check box if you want scores for the screening level to be the sum of the actual points that the applicant earned for the screening level. Always select this checkbox. If you select

NDUS CTS 34 | P a g e
this check box, do not enter values in the Maximum Points to Assign, Points Assigned for Pass, or Points Assigned for Fail fields. Maximum Points to Assign: Leave blank. Points Assigned for Pass and Points Assigned for Fail: Leave blank Manually Assign Status: Select this check box to allow recruiters to manually override an applicant's pass/fail status for a screening level.
Screening Requirements
This grid displays all available screening criteria so that you can select which items to use in the screening level. For Standard Screening levels, this section lists General Requirements, Education & Experience and all Screening Questions.
• General requirements come from fields that you populate in the Job Information and Salary Information sections of the Job Information page.
• Education and experience requirements come from the Education and Experience section of the Qualifications page
• Screening questions come from the Screening Questions section of the Qualifications page.
Screening Type: Displays the type of screening criteria. General Requirements items appear first, then Education & Experience items, then Screening Question items. Item: For general requirements, screening questions, and education & experience requirements, text in the Item column concatenates the name of the requirement (for example, Full/Part Time) and the value to be matched (for example, Full-Time). The adjacent Description column is blank. Description: This will be blank. Edit Details: Displays a link that varies depending on context:
• The link text is Edit Details for multiple choice questions and for content types such as competencies that provide a rating scale. Click the link to access the Define Screening Points page, where you can assign different scores to different ratings or question answers.

NDUS CTS 35 | P a g e
• The link text is Open Ended for open-ended questions. Clicking this link also opens the Define Screening Points page, but in this mode, the page displays the text of the open-ended question and enables you to override the default maximum point value for the question.
This column is blank for other types of qualifications. Use in Screening: Select this check box if you want the screening process to evaluate whether applicants meet the criteria for this item. Required: Select this check box if the applicant must have this criteria to pass the screening level. If the system determines that the applicant does not have this criteria (or incorrectly answers this question), the applicant fails the screening level even if the overall point total meets the passing threshold. It is recommended that this not be used. Points: For criteria that is either met or not met, the points field is editable so you can directly enter a point value. Use this method of assigning point values for general requirements, and education and experience requirements, that an applicant either has or does not have. For questions, this displays the total point available for the question. Total Screening Points: Displays the total points available for the screening level. Note: Because an applicant can have only one highest level of education, applicants can receive points for only one of the Education & Experience rows. If you screen based on more than one row of Education & Experience criteria, applicants will never be able to earn 100% of the points that can be awarded for the screening level. Click on the Edit Details link to enter point values for the question answers.

NDUS CTS 36 | P a g e
Points: For multiple-choice questions, review and optionally override the default point value for both correct and incorrect answers. Each answer can be associated with a different number of points, and those points can be added together when there is more than one correct answer. You can enter a negative point value for an answer that reduces the overall points.
Click the button to return to the Screening Criteria page.
Click on the Open Ended link to enter the maximum points that can be awarded for and open ended question answer.
Points: For open-ended questions, review and optionally override the maximum point value for the question.
Click the button to return to the Screening Criteria page.
On the Screening Criteria page for Minimum Qualifications, click the button to return to the Screening page. Repeat the Screening Criteria setup steps for the Preferred Qualifications screening level.
After completing the Screening levels, click on the tab.
NDUS CTS 37 | P a g e
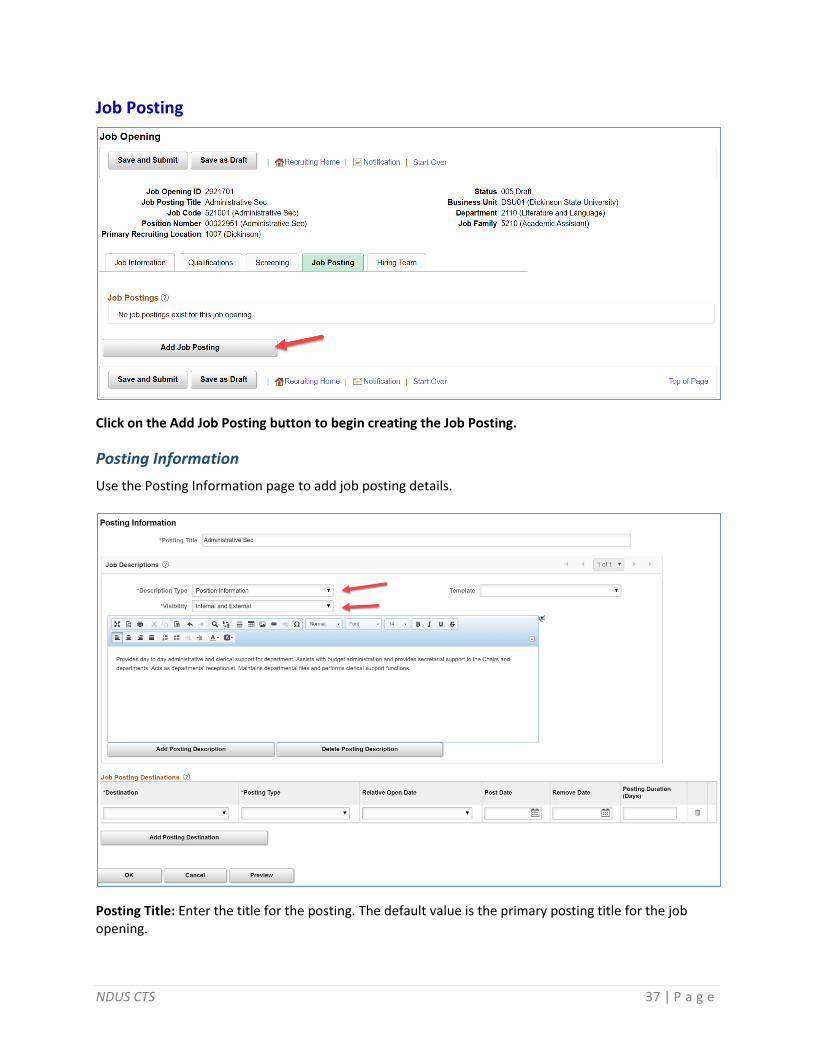
Job Posting
Click on the Add Job Posting button to begin creating the Job Posting.
Posting Information
Use the Posting Information page to add job posting details.
Posting Title: Enter the title for the posting. The default value is the primary posting title for the job opening.

NDUS CTS 38 | P a g e
Description Type: Select a job posting description type. These are predefined categories of information to include in posting descriptions. Based the Description Types chosen, the categories appear on the job posting in a predefined order. The available description types are:
• Position Information
• Benefits
• Position Description & Details
• Required Competencies
• Minimum Requirements
• Preferred Qualifications
• Screening
• Applicant Materials Required
• How To Apply
• About Us
• Additional Information Visibility: Specify whether to include this section of the posting description in Internal postings, External postings, or both Internal and External postings. Template: If a campus has provided standard text for a section, it will be set up as a template. Select a template to populate the standard text for the specified description type. Posting Content: Enter content for this section of the posting description. If you selected a template, the text appears here, but you can modify it as needed. Use the associated formatting, image, and spell-check tools to enhance the design of your posting description. Add Posting Description button: Click on the Add Posting Description button to add another section. Preview button: Click on the Preview button to view how the posting will look for the applicant on Candidate Gate.
Using a Template
Select a Template to populate the content with predefined text.
Using Formatting
Use the formatting toolbar to format the content, insert images, and insert links

NDUS CTS 39 | P a g e
Preview button
Click the Preview button to view the Job Posting.

NDUS CTS 40 | P a g e
Job Posting Destinations
Destination: Select the recruitment source where you are sending this posting. This selection will control if the posting appears on Candidate Gateway for external and/or internal applicants. If integration is set up, this selection would control if the posting appears on an external site. In addition, you can record if a posting is advertised externally to a publication, website, or physical posting, for information purposes. Posting Type: To make postings available on Candidate Gateway sites, you must select one of these values:
• External In PeopleSoft Candidate Gateway, these are the only job postings that external applicants can see. The posting description does not include any sections marked as internal.
• Internal In PeopleSoft Candidate Gateway, these are the only job postings that internal applicants can see. The posting description does not include any sections marked as external.
Postings to third-party job boards are identified by the destination without regard for the posting type, but you still use the External and Internal posting types to determine which sections of the posting description apply to the posting. Note: For posting to Candidate Gateway, we use the combinations of “Internet – External Posting” and “Job Board – Internal Posting”. Relative Open Date: Choose how far in the future you want the job posting posted to this destination, relative to the date of final approval. If you select a value in this field, the system calculates the posting date and displays it in the Post Date field, which becomes unavailable for entry. Post Date: Enter the date on which you want the job posting posted to this destination. Remove Date: Either enter a specific date on which you want to remove the posting from this destination. This would be the Job Closing Date, or Screening Date. Posting Duration (Days): As an alternative to entering the Remove Date, enter the number of days that the posting is to remain active. If you enter a posting duration, the system calculates the removal date and displays it in the Remove Date field, which becomes unavailable for entry. Sub-Source: When you select “Ad” (Advertisement) as a destination, the Sub-Source link appears to allow for adding additional detailed sub-source information. Click on the Sub-Source link to open the Destination Subsource popup page.

NDUS CTS 41 | P a g e
Sub-Source
Sub-Source ID: Select a Sub-Source ID of the specific publication that the posting is advertised in. If you select “Other”, the Subsource Description field appears. Source Type: Select the type of either “Online” or “Paper” to distinguish the posting advertisement type. Subsource Description: For the SubSource ID of “Other”, enter the name of the publication in the Subsource Description field.
Click on the button to close the popup page.
On the Posting Information page click on the button to return to the Job Postings page.
After completing the Job Posting, click on the tab.

NDUS CTS 42 | P a g e
Hiring Team
Use the sections in the Assignments group box on the Hiring Team page to select recruiters, hiring managers, and other members of the hiring team. In the context of Recruiting Solutions, hiring managers refers to Search Committee chairs and members, and department administrators who are responsible to creating Job Openings and processing.
Recruiters: Use this group box to identify recruiters for this job opening. Only users who are provisioned with the Recruiter recruiting role type, and are in the users Business Unit, can be added to the hiring team as recruiters. Select the Primary check box to identify the primary recruiter for this job opening. When searching for job openings based on your association with the job, you are considered to be "assigned to" the job opening if you are the primary recruiter; non-primary recruiters are considered to be "associated with" the job opening. The primary recruiter receives any offer-related notifications that an applicant submits through Candidate Gateway. Add Recruiter Team button: Click to access the Add Team page, where you select a pre-set team whose members are added to the grid. When you add a team to the Recruiters grid, only team members who are provisioned with the Recruiter recruiting role type are added. Hiring Managers: Use this group box to identify hiring managers for this job opening. Only users who are in the same Business Unit as the user creating the Job Opening can be added to the hiring team as hiring managers. When searching for job openings based on your association with the job, you are considered to be "assigned to" the job opening if you are the primary hiring manager; non-primary hiring managers are considered to be "associated with" the job opening.
NDUS CTS 43 | P a g e
Interviewers: Use this group box to identify interviewers for this job opening. The system uses this list of interviewers to provide default interviewers when you set up an interview schedule for this job opening.
After completing the Hiring Team assignments, you can click the button if you require more information before finalizing the Job Opening. The Job Opening will be saved with a Status of “010 Draft” and the Job Opening ID will be assigned.

NDUS CTS 44 | P a g e
Approvals
If you are complete with the Job Opening, click on the button to begin the approval process. The Job Opening Status will update to “006 Pending Approval” and the Approvals tab will appear.
Click on the tab to view and update the approval information.

NDUS CTS 45 | P a g e
The Approval workflow chain will appear displaying the steps that are defined on the Approval Setup for the Institution and Job Type. Here the user can add Ad Hoc approvers into the workflow by clicking the green plus-sign icon. In the Comments Text, enter the Funding information for the Job Opening Position. This will be visible to the approvers to verify that the funding is in place.

NDUS CTS 46 | P a g e
Create Student Job Opening *For Student positions, the Create Job Opening component is organized across three tabs or pages: Job Information, Job Posting, and Hiring Team. The Qualifications and Screening steps are not used for Student Job Openings.

NDUS CTS 47 | P a g e
Job Information
For Student positions, within Job Information, the page is organized into sections: Opening Information, Locations, Recruiting Locations, Employees Being Replaced. The sections for Staffing Information and Salary Information are not used.
Openings to Fill: For Student positions, select “Unlimited Number of Openings”.
• Unlimited: Hides the Target Openings and Available Openings fields and the job opening stays open until it is manually closed.

NDUS CTS 48 | P a g e
View Job Opening Details Once you exit the Create Job Opening process for an opening that is not in 005 Draft status, when you access the Job Opening again, the display of the tabs changes. The original tabs used in creating the Job Opening are not displayed as sub-tab links under the Details tab.

NDUS CTS 49 | P a g e
Clone Job Opening When creating a job opening that is similar to an existing one, you can avoid tedious data entry by cloning the existing job. You can clone existing job openings that have any status except Draft.
To clone a job opening, access the job opening that you want to clone and click the Clone toolbar button. Before you complete the clone action, verify the number of new clones to be created (the default is 1) and the job posting description to be used for the new clones (the default is the same description as the original job opening).
Click on the Clone button to Clone the Job Opening. The message appears Job Opening successfully
cloned.

NDUS CTS 50 | P a g e
Click on the new Job Opening ID link to enter the pertinent information for the cloned Job Opening, and
to save and submit for approval. You must enter data that was not copied over in the cloning in order to
save and submit
Statuses of New Clones
If approvals are required, the system puts the new job openings in Draft status. This is the same status that is applied if you created a new job opening manually and click the Save as Draft button.
Data That Is Not Copied During Cloning
When you clone a job opening most of the data is copied from the existing job opening to the new one, including qualifications and screening criteria. However, some data will be left blank or adjusted, as detailed in this table:
Original Job Opening
Adjusted Data in the New Job Opening
Created By The person who created the new job opening using the cloning process.
Created (the created date)
The date that the new job opening is created.
Status Code Draft if approvals are required. Otherwise, the user who creates the new job opening chooses whether to put it in Draft status or Open status.
Status Reason The first reason associated with the new status code.
Status Date The date that the new job opening is created.

NDUS CTS 51 | P a g e
Original Job Opening
Adjusted Data in the New Job Opening
Desired Start Date Blank
Projected Fill Date Blank
Date Authorized Blank if the new job opening is created in Draft status.
Begin Date and End Date
Blank
Posting dates Not copied.
Hiring team Active team members copied. If the primary recruiter or hiring manager is no longer active, but other recruiters or hiring managers are, the new job opening will have only non-primary recruiters or hiring managers. When you access the new job opening and attempt to save it, the system will display a message that one recruiter or hiring manager must be designated primary.
Approval process, if one exists
Not copied.
Notes and attachments
The notes and attachments are copied, but the dates for both are the date that the new job opening is created.
Applicants and all applicant-related data
Not copied.

NDUS CTS 52 | P a g e
Activity & Attachments From the Activity & Attachments tab you can view the history of the Job Opening status, add and view Notes, Attachments, and Expenses related to the Job Opening.

NDUS CTS 53 | P a g e
Job History
This grid provides a status history of the job opening.
Date: Displays the date the status was assigned. Subject: Displays the status description. Reason: Displays the status reason, if one was supplied when the status was assigned. Action Taken By: Displays the name of the person whose action updated the status.
Add Note
Click on the Add Note button, the Job Opening Notes popup window appears.
Note Date: Enter the date for the note. Audience: Select the audience for the note. Valid options are:
• Public: Public notes can be viewed and edited by anyone who has access to the job opening.
• Interview: Interview notes can be viewed by anyone who has access to the job opening, but only the note author or an administrator can modify the note. Interview notes don't automatically appear in on the Interview Schedule page, but the Interview Schedule page provides links that enable you to copy Interview notes from the job opening to the interview.
• Private: The subject of a private note can be viewed by anyone who has access to the job opening, but only the note author or an administrator can view or modify the note details.
Subject: Enter the note subject. The subject is visible to everyone with access to the job opening. Details: Enter the note details. Details for private notes are visible only to the creator of the note.

NDUS CTS 54 | P a g e
The note appears in the Notes grid.
Add Attachment
Click on the Add Attachment button to upload a file attachment.
The uploaded file appears in the Attachments grid.

NDUS CTS 55 | P a g e
Add Expenses
Click on the Add Expenses button to open the Add Expenses popup window.
Added expenses appear in the Expenses grid.

NDUS CTS 56 | P a g e
Print Job Opening Click on the Print Job Opening icon on the top button bar to generate the Job Opening report after selecting which data to include in the report.
The Select Job Opening Sections page appears where you indicate which sections to include in the report.

NDUS CTS 57 | P a g e
Select: Select the check box for the sections that you want to include in your job opening report. The Job Information section is always selected, even if you click the Deselect All link. This ensures that identifying information about the job opening always appears in your report. All sections from the job opening are always included in the list, regardless of whether there is data to print. However, sections that do not contain any data do not appear in the final report. The Notes, Applicants, and Expenses sections do not appear in the section list unless there is data to print. Create Report button: Click this button to create the Job Opening report, which opens in a new browser window. To print the report, use your browser’s print command.

NDUS CTS 58 | P a g e

NDUS CTS 59 | P a g e
SEARCH JOB OPENINGS
There are a variety of methods for finding Job Opening in the system. Each method operates differently and displays Job Openings search results differently.
Find Job Openings From the Recruiting Activities tile, select Find Job Openings.
Job Posting Title: Enter the Job Posting Title.

NDUS CTS 60 | P a g e
Job Opening ID: Enter job opening ID. Status: Enter the status of opening(s) you are searching for.
• Canceled
• Closed
• Denied
• Draft
• Hold
• Open
• Pending Category: Select the job categorization. Most Recent Activity: Select:
• Active within last 2 weeks
• Active within last 3 days
• Active within Last Month
• Active within Last Week
• Active within Last Year
• Active within Today
• Active within View All
• Active within Yesterday Job Opening Type: Select “Continuous Job Opening” or “Standard Requisition”. Hot Jobs: Select Hot Job designation, “Yes” or “No”. (This is not used.) My Association: Select, “Jobs Assigned to Me” or “Job Created by Me”. Hiring Manager: Select Hiring Manager. Recruiter: Select Recruiter. Created By: Select originator. This is the person who created the job opening. Business Unit: Select business unit. Department: Select department. Position Number: Select position number. Recruitment Contact: Select recruitment contact. (This is not used.)
Enter search criteria and click

NDUS CTS 61 | P a g e
Search Results
The search results will return only Job Openings that are associated with the user.
Click on the link to re-open the search criteria fields.
Click on a Job Opening link (e.g. ) to access the Manage Job Opening page for the selected Job Opening.
Select one or more Job Openings and click on the menu link to perform actions on the selected Job Openings. This feature is discussed in a later chapter.

NDUS CTS 62 | P a g e
Browse Job Openings From the Search Job Opening page, select Browse Job Opening in the top button bar.
The search results will return only Job Openings that are associated with the user. Use the Browse Job Openings page to search for job openings using a combination of keyword searching and faceted filtering.
On Browse Job Openings search within the results using the keyword search field. Narrow your results by using Faceted Filters.
Click on a Job Opening link (e.g. ) to access the Manage Job Opening page for the selected Job Opening.
NDUS CTS 63 | P a g e
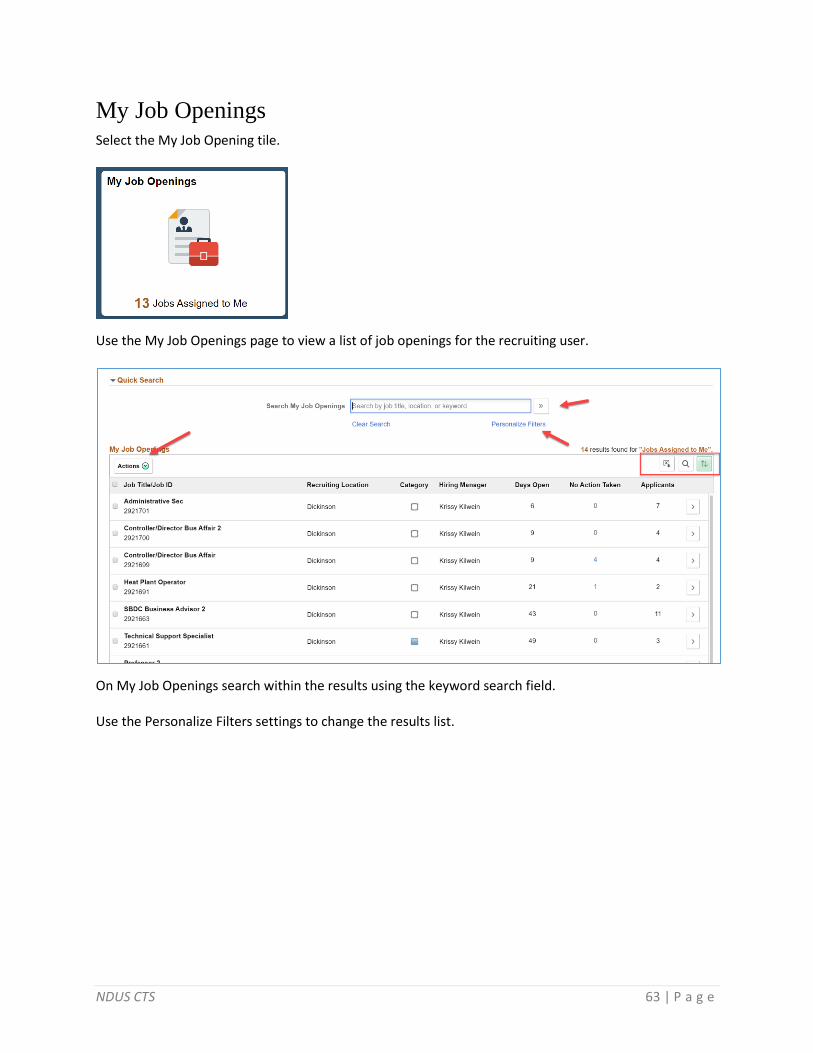
My Job Openings Select the My Job Opening tile.
Use the My Job Openings page to view a list of job openings for the recruiting user.
On My Job Openings search within the results using the keyword search field. Use the Personalize Filters settings to change the results list.

NDUS CTS 64 | P a g e
Display: Select a value to filter page data according to your relationship with the job opening. “Jobs Associated with Me” are job openings that you created or where you are part of the hiring team. “Jobs Assigned to Me” (the default value) is a subset of the jobs associated with you; it includes only job openings where you are either the primary recruiter or the primary hiring manager. The other filtering option is “Jobs Created by Me”. Status: Select a value to filter page data based on the job openings status. The default value is Open. Created Within: Select a value to filter page data based on how recently the job opening was created. Options include Today Yesterday, Last 3 Days, Last Week, Last 2 Weeks (the default value), Last Month, Last Year and View All.
Select one or more Job Openings and click on the menu link to perform actions on the Job Openings. This feature is discussed in a later chapter.
Download the Job Openings list using the icon.
Find Job Openings within the list using the icon.
Sort the Job Opening list using the icon. The Sort control menu with appear allowing you to select a different sort key.

NDUS CTS 65 | P a g e
To access a Job Opening, click on the icon on the selected Job Opening row.

NDUS CTS 66 | P a g e
SEARCH APPLICANTS
There are a variety of methods for finding Applicants and Applications in the system. Each method operates differently and displays Applicant and Application search results differently.
Search Applicants From the Recruiting Activities tile, select Search Applicants.
Search My Applicants: Select this check box if you want to see only the applicants that are attached to job openings where you are either the originator or part of the hiring team. With the security in the system these are the only applicants that you should see. First Name: Enter applicant’s First Name.

NDUS CTS 67 | P a g e
Last Name: Enter applicant’s Last name. Alternate Character Name: Not used. Applicant Status: Select:
• 010 Active
• 020 Hired
• 030 Inactive
• 040 Queued (not used) Applicant Type: Select:
• Employee
• External Applicant
• Non-employee Applied Within: Select:
• 010 – Today
• 020 – Yesterday
• 030 - Last 3 Days
• 040 - Last Week
• 050 - Last 2 weeks
• 060 - Last Month
• 070 – Last Year
• 080 – View All Applied Between / And: Enter a date range. Job Opening ID: Select Job Opening ID. Applicant ID: Enter applicant ID if known.
Enter search criteria and click .

NDUS CTS 68 | P a g e
Search Results
The search results return only Applicants that are attached to job openings where you are either the originator or part of the hiring team.
Click on the link to re-open the search criteria fields.
Click on an Applicant name link (e.g. ) to access the Manage Applicant page for the selected Applicant.
Click on the menu link to perform actions on a selected Applicant. This feature is discussed in a later chapter
Select one or more Applicants and click on the menu link to perform actions on the selected Applicants. This feature is discussed in a later chapter.

NDUS CTS 69 | P a g e
Search Applicants - Keyword Search / Advanced Search
From the Search Applicants page, use the Keyword Search and Advanced Search tabs for other search methods.

NDUS CTS 70 | P a g e
Browse Applicants From the Search Applicants page, select Browse Applicants
The search results return only Applicants that are attached to job openings where you are either the originator or part of the hiring team.
On Browse Applicants search within the results using the keyword search field. Narrow your results by using Faceted Filters.
Click on an Applicant name link (e.g. ) to access the Manage Applicant page for the selected Applicant.
Click on a Last Job Applied To link (e.g. ) to access the Manage Job Opening page for the selected Job Opening.
Click on the Email icon to initiate an email to the Applicant
Click on the Application icon to access the Manage Application page for the selected Application.
Click on the Print icon to access the Applicant Report Options page and generate an Application report.

NDUS CTS 71 | P a g e
Search Applications From the Recruiting Activities tile, select Find Job Openings.
Use the Search Applications page to search recruiting records based on a combination of applicant and job opening criteria.
Include Applications Not Linked to a Job Opening: Select this check box if you want the search results to include applications that are not associated with any job opening in addition to applications that meet any job opening criteria you supply. First Name: Enter applicant’s First Name. Last Name: Enter applicant’s Last name. Applicant Status: Select:

NDUS CTS 72 | P a g e
• 010 Active
• 020 Hired
• 030 Inactive
• 040 Queued (not used) Applied Within: Select:
• 010 – Today
• 020 – Yesterday
• 030 - Last 3 Days
• 040 - Last Week
• 050 - Last 2 weeks
• 060 - Last Month
• 070 – Last Year
• 080 – View All Applicant ID: Enter applicant ID if known. Disposition: Select:
005 Draft 076 Preliminary Offer Accepted
010 Review 077 Preliminary Offer Rejected
015 Linked 078 Hire Decided
019 Linked Questionnaire 080 Ready to Hire
020 Applied 090 Hired
030 Screen 100 Hold
050 Route 110 Reject
060 Interview 112 Failed Prescreening
069 Preliminary Offer Decided 115 Reject Online Screening
070 Offer 120 Withdrawn
071 Offer Accepted 130 Withdrawn Application
075 Preliminary Offer Notified 140 Inactive
Job Posting Title: Enter a full or partial job posting title to use as search criteria. Job Opening ID: Select Job Opening ID. Job Opening Status: Choose a job opening status to use as search criteria. Category: Select the job categorization. Hiring Manager: Select Hiring Manager. Recruiter: Select Recruiter.

NDUS CTS 73 | P a g e
Search Results
The search results return Applications for job openings where you are either the originator or part of the hiring team. Within the search results, you can perform recruiting actions or applicant actions.
Click on the link to re-open the search criteria fields.
Click on the Application icon to access the Manage Application page for the selected Application.
Click on an Applicant name link (e.g. ) to access the Manage Applicant page for the selected Applicant.
Click on a Last Job Applied To link (e.g. ) to access the Manage Job Opening page for the selected Job Opening.
Click on the Resume icon to view the resume submitted with the application .
The Action icons are used to perform recruiting actions on the Application. These will be discussed in a later chapter.
Click on the Print icon to access the Applicant Report Options page and generate an Application report.
Click on the menu link to perform actions on a selected Applicant. This feature is discussed in a later chapter
Select one or more Applicants and click on the menu link to perform actions on the selected Applicants. This feature is discussed in a later chapter.

NDUS CTS 74 | P a g e
Search Applications - Advanced Search
From the Search Applications page, use the Advanced Search tabs for other search methods.

NDUS CTS 75 | P a g e
My Applicants Select the My Applicants tile.
Use the My Applicants page to view a list of applicants for job openings for the recruiting user.
On My Applicants search withing the results using the keyword search field. Use the Personalize Filters settings to change the results list.

NDUS CTS 76 | P a g e
Applied Within: Select:
• Today
• Yesterday
• Last 3 Days
• Last Week
• Last 2 weeks
• Last Month
• Last Year
• View All
Select one or more Applicants and click on the menu link to perform actions on the Applicants. This feature is discussed in a later chapter.
Download the Appicants list using the icon.
Find Applicants within the list using the icon.
Sort the Applicants using the icon. The Sort control menu with appear allowing you to select a different sort key.

NDUS CTS 77 | P a g e
From the My Applicants list, using the icons and links, you can also:
• Initiate an Email to the Applicant.
• Access the Manage Job Opening page for the Job Opening.
• View the Application Resume.
• Access the Manage Application page for the selected Application.
• Access the Applicant Report Options page and generate an Application report.
To access an Applicant, click on the icon on the selected Applicant row.

NDUS CTS 78 | P a g e
MANAGE JOB OPENING
From your My Job Openings list, select a Job Opening with Applicants applied. In the Applicants column you will see the number of Applicants who have applied. The Manager Job Opening page will appear. The page is organized across five tabs or pages: Applicants, Applicant Search, Applicant Screening, Activity & Attachments, and Details.
Applicants Use the Manage Job Opening page: Applicants tab to review applicants for a job opening and perform various applicant-related activities. This grid displays applicants who are linked to the current job opening with a non-draft disposition.

NDUS CTS 79 | P a g e
Phase Filters
Across the top of the Applicants tab, a horizontal bar provides a graphical representation of the phases of the recruiting process, with labels indicating both the phase name and the number of applicants currently in dispositions that belong to that phase. Normally, the page initially shows All phases. However, if you access the page by clicking the number in the No Action Taken column on the My Job Openings pagelet, the system automatically uses the Applied phase as the filter. (The term “No Action Taken” refers to applicant who are still in the first phase of the application process.)
As an application is processed and their disposition is updates, the a applicant will be accessible on the
corresponding phase filter page, as well as the All phase filter page.
View Applicant From the Manage Job Opening – Applicants grid you can access the Applicant information.
Click on an Applicant name link to access the Manage Applicant page for the selected Applicant.
NDUS CTS 80 | P a g e
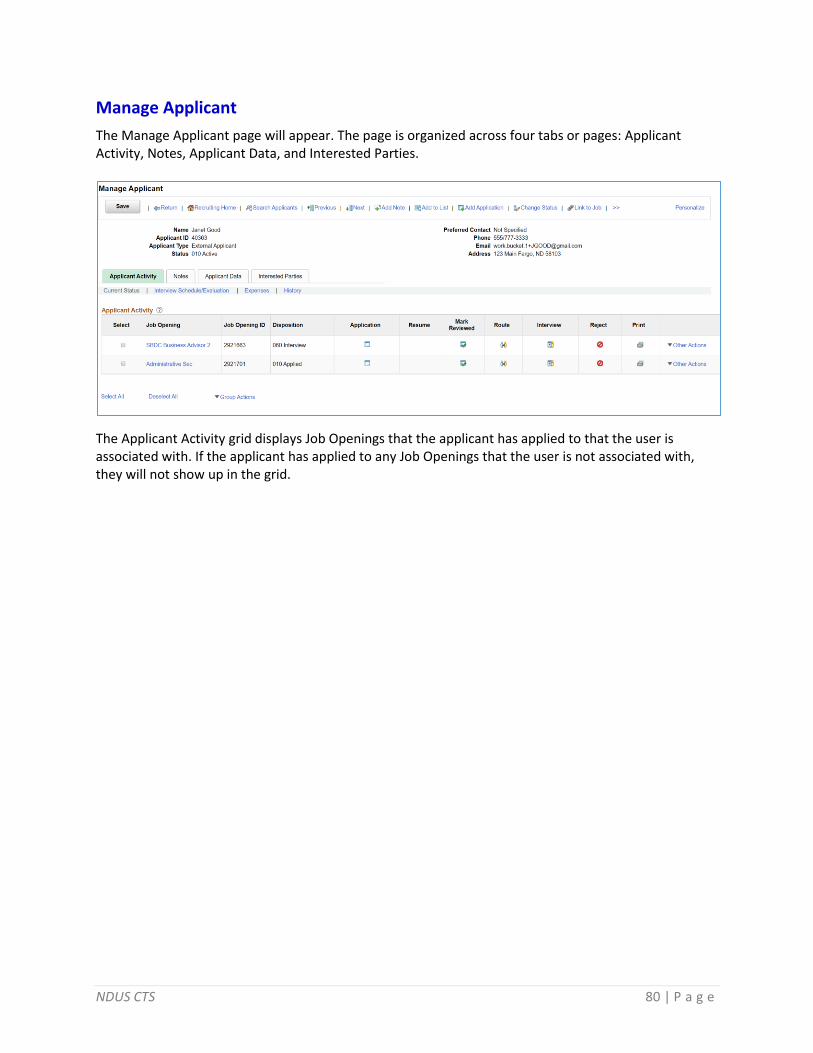
Manage Applicant
The Manage Applicant page will appear. The page is organized across four tabs or pages: Applicant Activity, Notes, Applicant Data, and Interested Parties.
The Applicant Activity grid displays Job Openings that the applicant has applied to that the user is associated with. If the applicant has applied to any Job Openings that the user is not associated with, they will not show up in the grid.

NDUS CTS 81 | P a g e
Applicant Data
Use the Manage Applicant page: Applicant Data tab to view or modify an applicant's personal information and references. This tab is organized into two pages: Personal Information, and References.
Personal Information
This information is provided by the Applicant when they register on Candidate Gateway. A recruiter can edit the information, if needed.
References

NDUS CTS 82 | P a g e
This information is provided by the Applicant when they apply for a job on Candidate Gateway. A recruiter can Add References or edit the information, if needed. By clicking the Request References button, a message will be sent to the applicant directing them to enter references in Candidate Gateway.
Notes
Use the Manage Applicant page: Notes tab to review, edit, and create notes for applicants, as well as view attachments to notes.
Users can manually create applicant notes and optionally add attachments to the notes. Additionally, the system automatically creates applicant notes during recruiting process such as:
• Forwarding an applicant.
• Sending correspondence.
• Generating a letter. Users can generate interview letters, offer letters, and generic applicant letters. When letter generation creates a note, the letter itself becomes an attachment to the note.
• Linking an applicant to a job opening with a questionnaire. The note is created only if the system sends the applicant an invitation to apply. The invitation is sent if the applicant has an email address and the job opening with the questionnaire is currently posted to Candidate Gateway.
• Scheduling an interview. The note is created only if the Notify Applicant option is selected when the user submits the interview schedule.
• Posting an offer to Candidate Gateway.

NDUS CTS 83 | P a g e
• Using Candidate Gateway to accept or reject an offer (this action is performed by the applicant).
• Using Candidate Gateway to send documents to a recruiter (this action is performed by the applicant).
Documents that the applicant sends become attachments to the note. Click on the Add Applicant Note button to add a note.
Applicant Note
Use the Applicant Notes page to enter applicant-related notes and attachments.
Author: Displays the name of the person who created the note. If the note is system-generated, the author is the person who performed the action that generated the note. Contact Method: Select how the contact was made between the user and the applicant. Date: Displays the note creation date.
Audience: Select Public or Private to control who can see the note. Private notes are only visible
to the author. Public notes are visible to users that are associated with job openings.

NDUS CTS 84 | P a g e
Job Opening ID: Use this grid to associate the note to one or more job openings. You can only select job openings to which you have access. If you do not select a job opening and the audience is “public”, then the note is visible to anyone who can access the applicant. Subject and Details: Enter the content of the note. Attachments: Use this group box for attachments that pertain to the note. Click the Add Attachment button to upload a file attachment.
Expenses
Use the Applicant Activity – Expenses sub-tab to view and manage applicant expenses.
Click on the Add New Expense button to add an expense.
Expenses
Use the Expenses page to enter details about an applicant-related expense.

NDUS CTS 85 | P a g e
History
Use the Applicant Activity – History sub-tab to view a history of applicant activity.

NDUS CTS 86 | P a g e
View Application From the Manage Job Opening – Applicants grid you can access the Application information.
Click on an Application icon to access the Manage Application page for the selected Applicant.
Manage Application
The Manage Application page will appear. Here you can view and edit the application.
The page has a Process Application section where you can perform actions with the Application.

NDUS CTS 87 | P a g e
The page is organized across tabs. The Application and Resume tab always appears. Additional tabs will appear as the application moves through the recruiting processes. A tab is visible only if the relevant data exists.
Tabs
• Application and Resume: This tab displays data from the Application Details Page. This is the only tab that is always visible. (If no other tabs are visible, the data appears without a tab.)
• Questionnaire: If the job opening includes a questionnaire, the Questionnaire tab displays the questions and the applicant’s answers.
• Notes: If any contact notes exist for the applicant, they appear on the Notes tab.
• Route: If the applicant has been routed, the routing details appear on the Route tab.
• Interview: If the applicant has any scheduled interviews or any interview evaluations, these appear on the Interview tab.
• Offer: If the applicant has any offers, they appear on the Offer tab.
• Hire: If the applicant has been prepared for hire, information from this process appears on the Hire tab.
• Other: The Other tab displays summary information about Pre-employment checks. The Application and Resume tab contains sections for information that was entered by the application on their Application, including: Personal Information, Preferences, Referral Source, Attachments (Resume, Cover Letter, and Attachments), Work Experience, and Education Level. Additional sections appear even though the data for the section is not captured in the application.
You can edit the application information by selecting Other Actions > Recruiting Actions > Edit Application Details.

NDUS CTS 88 | P a g e
Edit Application Details
The Edit Application Details page allows you to edit the information in the Application.
Questionnaire Tab
From the Manage Application page, click on the Questionnaire tab.
On this page you can see the Questions and Answers provided by the applicant in the Application.

NDUS CTS 89 | P a g e
Print Application
Click on the Print icon on the top button bar to generate the Application report after selecting which data to include in the report.
The Application Report Options page appears where you indicate which sections to include in the report.

NDUS CTS 90 | P a g e
Select: Select this check box to include the specified content in the printed applications. Below each grid, Select All and Deselect All links enable you to quickly select or deselect all items in the grid. Content Available: A check mark in the Content Available column indicates that the current application includes the specified type of information. Exclude sections with no content available: Select this check box to suppress empty sections from the printed output. If this check box is not selected, the report prints headers and an explanatory message for all of the empty sections. Use this check box in conjunction with the Select All links to efficiently exclude empty sections without having to manually select the individual sections with data.

NDUS CTS 91 | P a g e
Save My Selections: Select this check box to save your current settings as the default settings for this page. This page does not have a Save button, so the settings are saved when you click the Generate Report button. Generate Report button: Click this button to create the Application report, which opens in a new browser window. To print the report, use your browser’s print command.

NDUS CTS 92 | P a g e
View Resume From the Manage Job Opening – Applicants grid you can view the applicants Resume.
Click on the Resume icon, the Resume will open in a new window.
Note: You can also access the Resume, as well as Cover Letter, and other Attachment documents from the Manage Application page.

NDUS CTS 93 | P a g e
Actions To help you process applicants, Recruiting Solutions provides a wide variety of predefined actions.
Applicant Actions and Recruiting Actions
The actions that you perform in Recruiting Solutions fall into two categories:
• Applicant actions affect the overall applicant record rather than a specific application. o Examples include Forward Applicant, Send Correspondence, and Link Applicant to Job.
• Recruiting actions relate to an application for a specific job opening (or an application without a job opening).
o Examples include Edit Disposition, Reject Applicant, and Prepare Job Offer.
Invoking Actions
The following table describes the types of page controls that can be used to invoke actions:
Toolbar Buttons Toolbar buttons on the page provide one-click access to certain actions.
Icon buttons These provide one-click access to the most commonly used actions for a specific context.
Related action menus Click these related Action menus to access context-specific lists of additional actions.
The Actions menu or Other Actions menu
Use these menus to perform actions on a single applicant or application. When both recruiting actions and application actions are available, these menus have Recruiting Actions and Applicant Actions submenus. The menu is called “Other Actions” in contexts where some actions are accessed using icon buttons and other actions are accessed in the menu.

NDUS CTS 94 | P a g e
The Group Actions menu
This menu appears below grids and lists the actions that you can perform on multiple grid rows. If the
context supports both recruiting actions and applicant actions, the Group Actions menu has
corresponding submenus.
Refer to the Appendix in this document for a complete list of Actions.
NDUS CTS 95 | P a g e
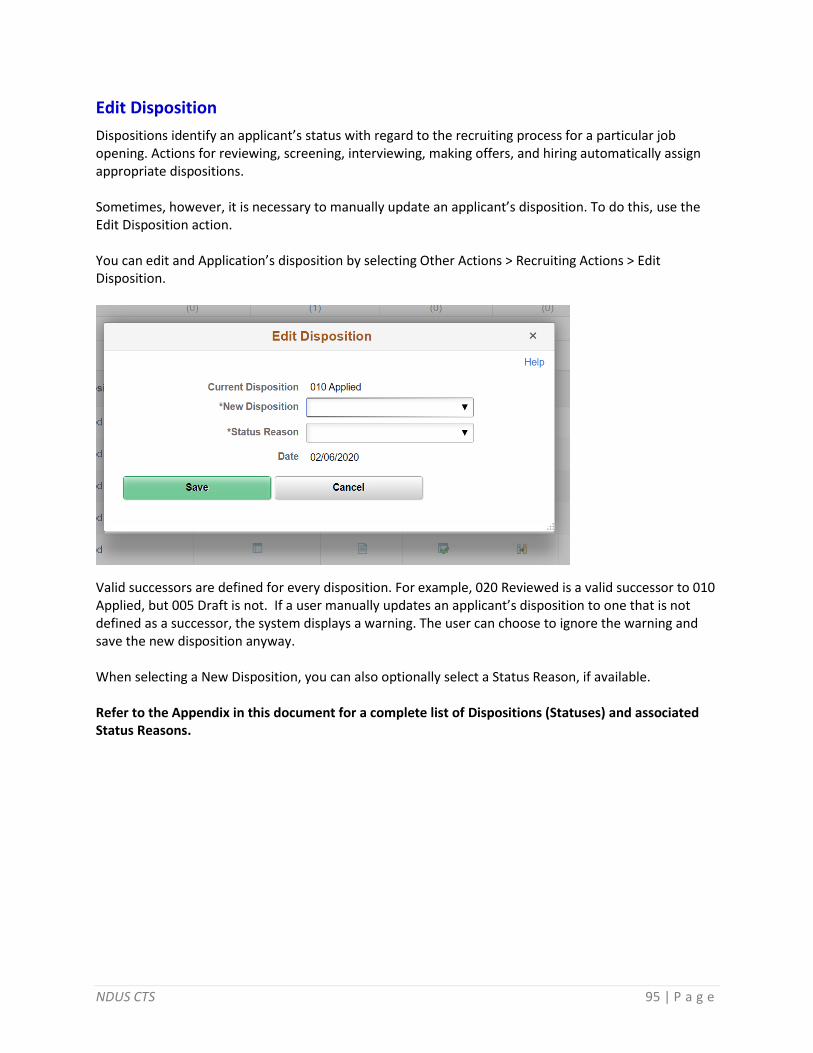
Edit Disposition
Dispositions identify an applicant’s status with regard to the recruiting process for a particular job opening. Actions for reviewing, screening, interviewing, making offers, and hiring automatically assign appropriate dispositions. Sometimes, however, it is necessary to manually update an applicant’s disposition. To do this, use the Edit Disposition action. You can edit and Application’s disposition by selecting Other Actions > Recruiting Actions > Edit Disposition.
Valid successors are defined for every disposition. For example, 020 Reviewed is a valid successor to 010 Applied, but 005 Draft is not. If a user manually updates an applicant’s disposition to one that is not defined as a successor, the system displays a warning. The user can choose to ignore the warning and save the new disposition anyway. When selecting a New Disposition, you can also optionally select a Status Reason, if available. Refer to the Appendix in this document for a complete list of Dispositions (Statuses) and associated Status Reasons.

NDUS CTS 96 | P a g e
Veterans Preference For Staff and Faculty jobs, a Vets Pref column will appear in the Applicants grid on Manage Job Openings. When an applicant has claimed Veterans Preference on their application, their record will display a US flag icon in this column. For an applicant who has claimed Veterans Preference, you must verify their claim.
Click on the US flag icon to view the Veterans Preference status. The Verification of Veterans Preference popup window will appear.
Based on the Veterans Preference status, the applicant will have been instructed to supply appropriate documentation as application attachments. Click on the Application icon to view the attachments.

NDUS CTS 97 | P a g e
Verify that the applicant has provided the appropriate documentation as attachments. Back on the Verification of Veterans Preference popup window, indicate a Military Service Verified.
Military Service Verified: If the documentation provided is accurate, select “Accurate”. If the documentation is not sufficient, select “Ineligible”, and provide an explanation. If you contact the applicant and they provide the documentation at a later point, you may update the selection to “Recruiter Corrected”. Once you have entered a verification selection, the US Flag icon will display a colored checkmark to indicate the selection.
In the screening process, points will be awarded for verified Veterans Preference statuses.

NDUS CTS 98 | P a g e
Student Work Study Verification For Student jobs, a Work Study Verification column will appear in the Applicants grid on Manage Job Openings. A Work Study Verification icon appears for all student applicant.
Click on the Work Study Verification icon to view the student’s enrollment and work study status. The Work Study Verification popup window appears.
The Work Study Verification information displayed is pulled in real-time from the Campus Solutions system.

NDUS CTS 99 | P a g e
Mark Reviewed On the Manage Job Openings – Applicants grid, use the Mark Reviewed action icon to indicate that you have reviewed the application information.
Click on the Mark Reviewed icon. A message appears to indicate that you have marked the applicant as reviewed.
The action will update the application disposition to Reviewed.

NDUS CTS 100 | P a g e
The application will now be visible in the Reviewed phase filter grid, and no longer be visible in the Applied phase filter grid.

NDUS CTS 101 | P a g e
SCREENING
Screening is the process used by recruiters to evaluate a list of potential candidates and narrow the list to the most qualified applicants. Screening uses automated process to award points to applicants based on their Application as compared to the criteria set up on the Job Opening. Screening looks at 3 areas for comparison and awarding points:
• General requirements come from fields that you populate in the Job Information and Salary Information sections of the Job Opening page. These requirements are compared to the preferences entered on the application.
• Education and experience requirements come from the Education and Experience section of the Job Opening page. These are compared to the highest education level in combination with the work experience entered on the application.
• Questions are setup on the Questions section of the Job Opening page. These are evaluated against the answers provided by the applicant on their application.
Only items that are established as Use In Screening on the Job Opening - Screening Criteria pages are included in screening calculations. Note: Pre-Screening occurs automatically during the application process. For screening Minimum Qualifications and Preferred Qualifications, the recruiter must run the screening processes.
Applicants Included in Screening
If the screening settings on the Job Opening Page: Applicant Screening Section indicate that applicants must pass the previous level, the system filters out applicants who have not passed the previous screening level. For example, applicants who did not pass Minimum Qualifications will not be included in processing screening for Preferred Qualifications. The system also filters out applicants based on their dispositions. Specifically, the system processes only applicants whose dispositions are either the 1-Applied phase, the 2-Reviewed phase. This prevents applicants in the later phases of the recruiting process (3-Screen, 4–Route, 5-Interview, 6-Offer, 7-Hire, 8-Hold, or 9-Reject) from being processed.
About the Screening Process
When you run screening for a screening level, the process performs the following tasks for each included applicant.
1. Evaluates whether the applicant has the attributes that you have selected as screening criteria. 2. Awards the specified number of points for each screening criterion that the applicant meets. 3. Adds the points earned for individual items to produce a cumulative point total.
This value represents the applicant's raw points for the screening level. 4. Evaluates whether the applicant passes or fails the screening level.
Applicant can fail a screening level if they have not earned enough points or if they do not meet criteria that was designated as required.

NDUS CTS 102 | P a g e
Screening levels can be configured to allow users with access to the screening pages to manually override the pass/fail status that the system assigns.
5. Assigns the applicant a final overall score for the screening levels.
Applicant Screening Use the Manage Job Opening Page: Applicant Screening tab: Screening Level section to review screening levels and run screening processes.
The Screening Levels section lists the screening levels that were established on the Job Opening. Click on a screening level to view and edit the Screening Criteria.
Screening Levels Use the Screening Criteria page to make any adjustments to the screening rules before running the screening process.

NDUS CTS 103 | P a g e
Open Ended Questions
IMPORTANT! Open Ended Question scoring must be completed by the designated evaluator in order for the score to be included in the screening score. Use the Recruiting Alerts – Unevaluated Answers page to view pending evaluations and send a reminder notification to the evaluators.

NDUS CTS 104 | P a g e
Run Screening Run the screening process from the Applicant Screening – Screening Levels page.
Run: Select a screening level to run. Go button: Click to run the screening level that you selected in the Run field. Process Monitor: Click to access the Process Monitor page, where you can monitor the progress of the screening process. Screening uses the HRS_JO_SCR Application Engine process.
: Click the Refresh icon to show the latest screening results after you run a screening process. The results are not available until the screening process finishes.

NDUS CTS 105 | P a g e
After refreshing, check the date and time in the Last Run Date field of the Screening Levels grid to see whether the process is complete.
Screening Results To view the results of a screening process , click the Screening Results link and review the Applicants grid for the process.

NDUS CTS 106 | P a g e
Screening Levels and Applicants
The Screening Levels grid will show each screening level that has been processed. Select: Select a screening level whose details results you want to see. The page updates the Applicants grid to show results for the selected screening level. Job Code and Job Code Name: These fields identify the job code for the screening level. If the job opening has only one job code, the values are the same for all screening levels. But if the job opening has multiple job codes, each job code can have different screening settings.
Primary Job: Displays the Primary Job icon if the job code is the primary one for the job opening. If the job opening has only one job code, the icon appears in all rows. Screening Level: Displays the screening level name. Click the screening level name link to access the Job Opening - Screening Criteria Page, where you can review and optionally update the screening level configuration. Last Run Date: For standard screening levels, this column displays the date and time that the screening level last ran. This column is blank for prescreening. Applicants Screened: Displays the total number of applicants who have been screened using this screening level. Applicants Passed: Displays the total number of applicants who passed this screening level. Applicants Failed: Displays the total number of applicants who failed this screening level. Unapplied Results: Displays the number of applicants who were processed but whose results have not been applied. Submitted By: Displays the name of the person who most recently ran this screening level. The Applicants grid will show results for the screening level selected in the screening levels grid. Select: Select applicants to include when you use the Route or Merge buttons on this page. Score: Displays the percent of the maximum possible score that the applicant earned. Click the link to access the Screening Details Page, where you can see how many points the applicant earned for various types of screening criteria.

NDUS CTS 107 | P a g e
Points: Displays the overall screening points that the applicant earned for the screening level. Applicant Name and Applicant ID : These fields display identifying information about the applicant. Click an applicant’s name to access the Manage Applicant Page. Disposition: Displays the disposition that will be assigned when results are applied (not the applicant’s current disposition). This disposition is based on the screening settings and whether the applicant passed or failed the screening level. Screening Result: Displays Passed or Failed. If the Manually Assign Status check box is selected on the Job Opening - Screening Criteria page, then you can change the status. Otherwise, this field is read-only. Results Applied: Displays Yes if results have been applied to all screened applicants, No if results have not been applied to any applicants, or Partial if results have been applied to some (but not all) applicants. Keep in mind that when you apply results, the results are applied to all applicants who have been screened. Therefore, a value of Partial appears only if additional applicants have been screened since results were last applied. Note: After you apply results, you cannot reprocess the same applicants. Status Date: Displays the date that the applicant’s pass or fail status was determined. Applicant Type: Displays the applicant type: External Applicant, Employee, or Non Employee.
Route: Click to route the applicant. The Route Applicant Page appears.
View Rating: Click to access the Rate Applicant Page, where you can review an applicant’s points for profile-related screening criteria. NDUS is not using profile related criteria. Click on the Score link for an applicant to view the details of the score.
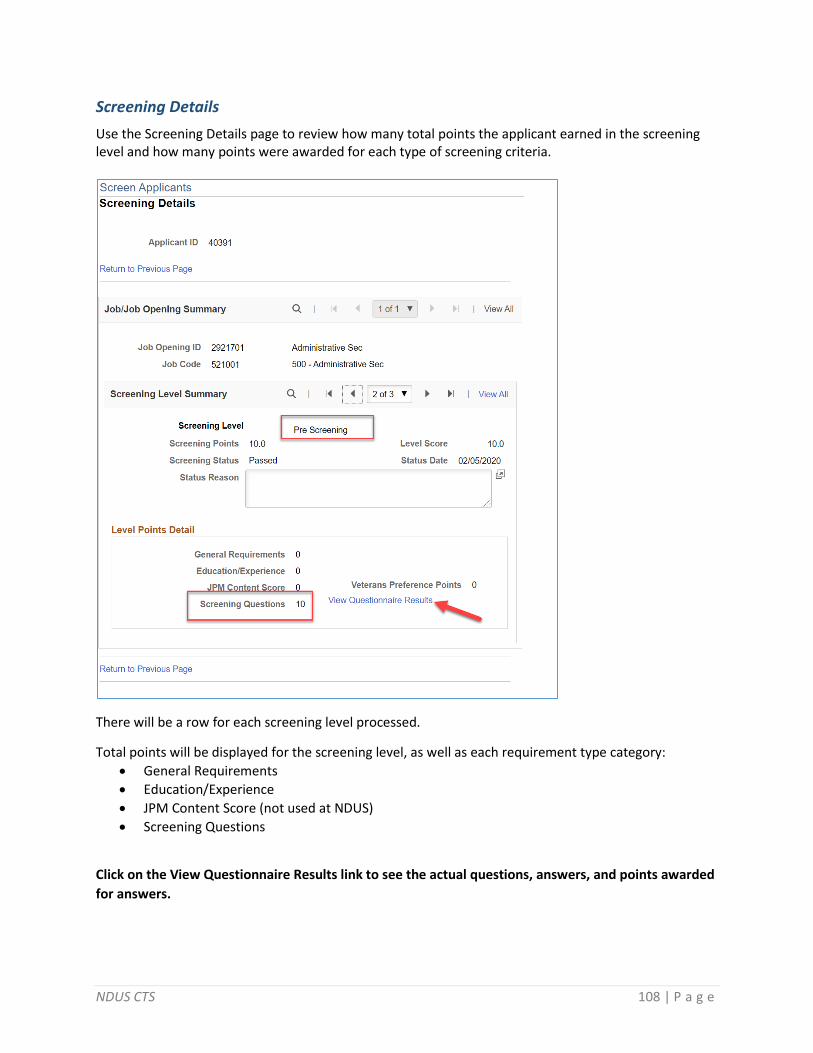
NDUS CTS 108 | P a g e
Screening Details
Use the Screening Details page to review how many total points the applicant earned in the screening level and how many points were awarded for each type of screening criteria.
There will be a row for each screening level processed.
Total points will be displayed for the screening level, as well as each requirement type category:
• General Requirements
• Education/Experience
• JPM Content Score (not used at NDUS)
• Screening Questions
Click on the View Questionnaire Results link to see the actual questions, answers, and points awarded
for answers.

NDUS CTS 109 | P a g e
Questionnaire Results
Use the Questionnaire Results page to review the applicant's answers to the questionnaire that was completed during the online application process.

NDUS CTS 110 | P a g e
Screening Results - Multiple Levels
Note: After you run the screening process for a screening level, and view results, if you feel you do not have an appropriate number of applicants who passed, you may adjust the screening criteria and run the screening process again multiple times until you have a sufficient pool of candidates.
The usual steps in the process are: 1. Run screening process for Minimum Qualifications.
a. Review results. b. Edit screening criteria for Minimum Qualifications. c. Run screening process. d. Review results. e. Repeat as necessary until satisfied with results for Minimum Qualifications.
2. Run screening process for Preferred Qualifications. a. Review results. b. Edit screening criteria for Preferred Qualifications. c. Run screening process. d. Review results. e. Repeat as necessary until satisfied with results for Preferred Qualifications.
3. Apply Results.

NDUS CTS 111 | P a g e
Apply Results From the Screening Results page, Apply Results to close out the screening processing for the current pool of applicants.
Click on the Apply Results button to apply the most recent screening results. The message appears verifying that you want to apply results
When you apply results, the system performs the following actions:
• Updates the applicants' dispositions according to the settings in the screening level definition.
• Sends a notification to the Hiring Manager that they have applicants that they can view who have met Minimum Qualifications.
When you review screening results, you can see the disposition that will be applied. There are separate settings for applicants who pass and who fail the screening level. Results are applied for every applicant who has screening results. If an applicant has results for multiple screening levels, the system uses the disposition settings and rejection letter settings from the last screening level. Note: If you have multiple screening levels, e.g. Minimum Qualifications and Preferred Qualifications, make sure to complete screening for both levels before applying results! If you apply results after only

NDUS CTS 112 | P a g e
running Minimum Qualifications, you will be prevented from running Preferred Qualifications screening for the pool of applicants.
On the Screening Levels page you can see that the results have been applied for a screening level.
On the Manage Job Opening – Applicants grid you can see that disposition has been updated for the applicants.

NDUS CTS 113 | P a g e
Rank Applicants From the Screening Results page, Rank Applicants to view and adjust applicant rankings.
Click on the Rank Applicants button to access the Rank Applicants page.

NDUS CTS 114 | P a g e
On the Rank Applicants page, click on the Save button first to save the scoring results to the page. On this page you may enter Adjusted Points, and comments, to override the system calculated points. Click on the Screening Summary Report button to generate the report.

NDUS CTS 115 | P a g e
Screening Summary Report
The Screening Summary Report generates in a new window.

NDUS CTS 116 | P a g e
ROUTING
Routing is the action of sending applicant information to recipients who are asked to provide input on the next step to take for the applicant.
The Route Applicant action is available for individual applicants using the Route action icon.

NDUS CTS 117 | P a g e
Route
The Route Applicant action is also available as a group action. Select applicants and then select Group Actions – Recruiting Actions – Route Applicants.
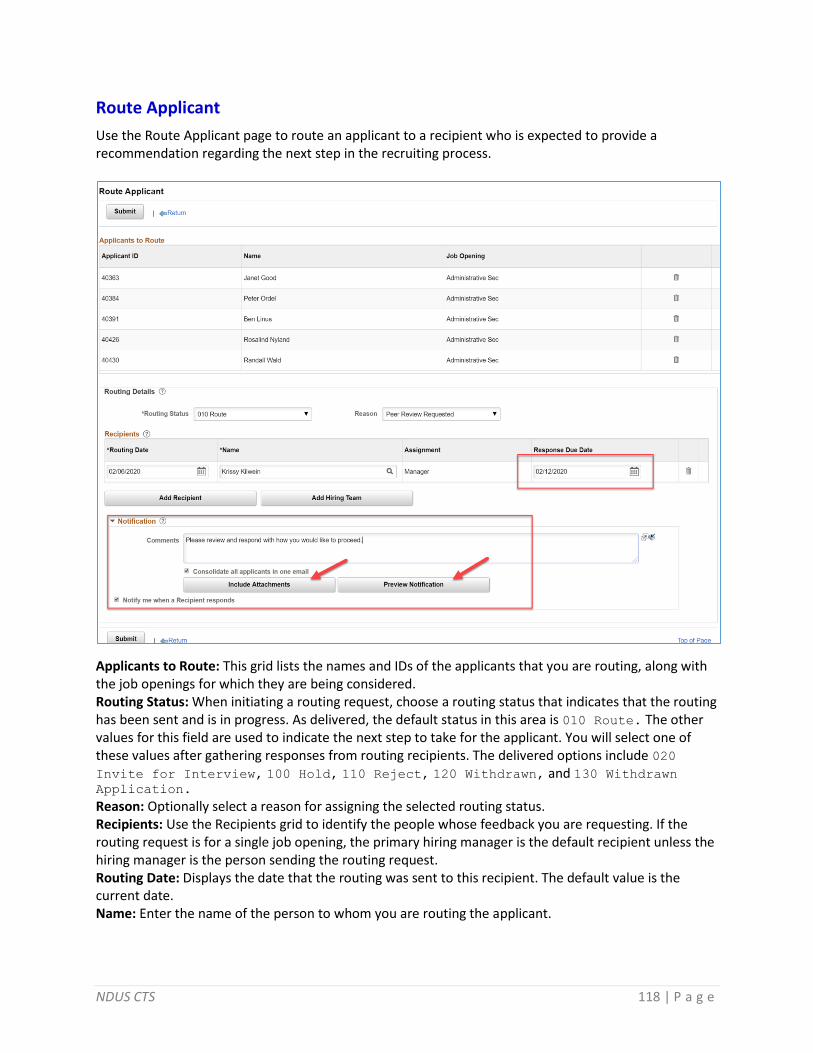
NDUS CTS 118 | P a g e
Route Applicant
Use the Route Applicant page to route an applicant to a recipient who is expected to provide a recommendation regarding the next step in the recruiting process.
Applicants to Route: This grid lists the names and IDs of the applicants that you are routing, along with the job openings for which they are being considered. Routing Status: When initiating a routing request, choose a routing status that indicates that the routing has been sent and is in progress. As delivered, the default status in this area is 010 Route. The other values for this field are used to indicate the next step to take for the applicant. You will select one of these values after gathering responses from routing recipients. The delivered options include 020 Invite for Interview, 100 Hold, 110 Reject, 120 Withdrawn, and 130 Withdrawn Application. Reason: Optionally select a reason for assigning the selected routing status. Recipients: Use the Recipients grid to identify the people whose feedback you are requesting. If the routing request is for a single job opening, the primary hiring manager is the default recipient unless the hiring manager is the person sending the routing request. Routing Date: Displays the date that the routing was sent to this recipient. The default value is the current date. Name: Enter the name of the person to whom you are routing the applicant.

NDUS CTS 119 | P a g e
Assignment: If the routing request is for a single job opening, this field displays the recipient’s association to the job opening. Approver/Reviewer, Interviewer, Interested Party, Manager, Originator, Recruiter, or Screening Team. Response Due Date: Enter a date by which the recipient should respond with a recommendation regarding the applicant. Add Recipient: Click to add another recipient to the routing. Add Hiring Team: This button is visible only if the routing request is for a single job opening. Click the button to add all of the hiring team members as routing recipients. Comments: Enter comments to be included in the routing request email notification. Consolidate all applicants in one email: This check box is visible only if the routing includes multiple applicants. Select this check box to send a single email to each recipient. That email will list all of the applicants who are being routed. If the check box is not selected, the recipient receives a separate email notification for each applicant in the routing. Include Attachments: Click to access the Include Attachments Page, where you choose which applicant attachments types to associated with the routing. Associated attachments are always visible on the self-service routing response page, and you can optionally attach them to the notification email as well. By default, resumes and cover letters are included with the routing, but other attachment types are not. Preview Notification: Click to access the Preview Notification Page page, where you can preview the email notification that will be sent to the recipient. You can also modify the default notification subject on the Preview Notification page. Notify me when a Recipient responds: Select this check box if you want to receive notifications when recipients submit their responses using the self-service routing response page.
Click on the Include Attachments button to select attachments.

NDUS CTS 120 | P a g e
Include Attachments
Attachments: Select the types of attachments to include in the routing. Send via Email: Select this check box to include the selected attachments in the email notifications that the routing process sends. The self-service Routing Response page always provides recipients with access to the selected attachments, regardless of whether you also include the attachments in the email notification. Click on the Preview Notification button to view the notification that will be sent.

NDUS CTS 121 | P a g e
Preview Notification

NDUS CTS 122 | P a g e
Routing Status
When routing has been initiated, the applicant Disposition status will update to Route.

NDUS CTS 123 | P a g e
Routing Responses
Manage Routing Responses by clicking on the Route action icon to return to the Manage Routing page for an applicant.
Manage Routing
Use the Manage Routings page to review and manage existing routings, including sending reminder notifications to routing recipients.

NDUS CTS 124 | P a g e
Routing Summary: This grid lists all of the applicant’s routings for the specified job opening. Select: Select the routing to be displayed in the Routing Details section of the page. Status Date: Displays the date that the overall Route Status was last updated. Route Status: Displays the current overall Route Status. Responses Received: Displays the number of recipients who have supplied a response. Responses Remaining: Displays the number of recipients who have not supplied a response.
Edit: Click to access the Edit Routing page to make changes to the routing. Route Status: Displays an overall status of the routing. The delivered default status for a new routing is Routed, indicating that a request for feedback has been sent. When all responses have been received, update this status to indicate the next step for the applicant. Reason: Displays the reason for the current routing status. Edit Routing: Click to access the Edit Routing page to make changes to the routing. Send Reminder: Click to send a notification to the recipients who have not yet supplied a response. The system sends the notification immediately (regardless of the response due date). This link is disabled if all recipients have supplied responses. Recipients: This grid displays summary information about the routing recipients, including their responses. To access any response comments, click the Comments icon. Information in this grid is read-only. To enter response information on behalf of a recipient, or otherwise modify recipient information, click either the Edit Routing link (in the Routing Details section) or the Edit icon (in the Routing Summary grid). Add New Routing: Click to add an additional routing for the same applicants that are listed in the current routing. If you simply want to add new recipients to an in-progress routing, you can add the recipients to the existing routing instead. However creating a new routing is appropriate if the previous routing is finalized, or if you want to enter different comment text for the new recipients. Response: This field shows the recommendation from the routing recipient. If the recipient has not submitted a response, you can enter a response on the applicant’s behalf. The response remains editable unless the applicant subsequently saves the response (changed or unchanged) on the self-service Routing Response page. Response Date: Displays the date that the response was supplied.
Comments: Click to access the Routing Response Comments Page. The icon appearance changes if comments are present. When there are no comments, the icon is a solid color. When comments exist, the icon has dots representing text on a page.

NDUS CTS 125 | P a g e
INTERVIEW SCHEDULING
Interview Scheduling provides a tool for Recruiters and Applicants to manage the scheduling of interviews, and for Recruiters to manage Interview Evaluations. Recruiters can:
• Identify Interviewers.
• Create Interview Series’, which are sets of Interview Sessions.
• Create individual Interview Sessions.
• Identify Applicants to Invite to select from the available Interview Sessions.
• Manually Assign an Applicant to and Interview Session.
• View and manage scheduled interviews.
• Manage Interview Evaluations Applicants can:
• Select from available Interview Sessions.
• Notify the Recruiter is they are not available for the available Interview Sessions.
• View their scheduled interviews.
Job Opening – Hiring Team
On the Job Opening – Hiring Team page, identify the Interviewers who will be responsible for interviewing the applicants.

NDUS CTS 126 | P a g e
Interviewers: Use this group box to identify interviewers for this job opening. The system uses this list of interviewers to provide default interviewers when you set up an interview schedule for this job opening.
Schedule Interview Begin the Schedule Interview process from the Manage Job Opening page by selecting applicants and
using the Group Action – Schedule Interview option.
The Schedule Interview option takes you to the Create Series & Session page. If you select applicants, they will be included in the Unscheduled Applicants grid on the Sessions page. If you do not select applicants at the start of the process, you can add them later. The Manage Job Openings grid also includes the Interview action icon. From this icon, you can bypass the Schedule Interview process and manually schedule an interview for the applicant. Once an interview has been scheduled using any method, this page will display the scheduled interview details, and allow for managing Interview Evaluations.

NDUS CTS 127 | P a g e
Create Series & Sessions
Create new interview series: Use this option to begin creating a new series of sessions for this job opening. Edit existing interview series: Use this option to view and continue working with an existing series of sessions. When you select this option, a field will appear allowing you to select which existing series you want to view. Click on the Next button to move to the New Series Details page.

NDUS CTS 128 | P a g e
New Series
How would you like to refer to this interview series?: The system defaults in the Job ID and Job Posting title. You can change this information or add identifying details. Where will these interviews be held?: Select a venue code. The venues are set up on the Interview Facilities table. The venue will default in to the Interview Session details. You can override the venue code in the sessions details. When do sessions become unavailable?: Select a value for when the invitation to select a session becomes unavailable to the applicant. Typically, you would want to prevent the applicant from selecting an interview session a few days before the day it is scheduled. Click on the Next button to move to the Sessions page.

NDUS CTS 129 | P a g e
Sessions
On the Sessions page, manage the selected applicants, and manage sessions. The Unscheduled Applicants grid displays the applicants that were selected from the Manage Job Openings page at the beginning of the process. Until sessions are created, the Invite and Assign to Session links are inactive. Invite: Click on the Invite link to send an Invitation to Select Session notification to the applicant. Until sessions are created, the Invite and Assign to Session links are inactive. Assign to Session: Click on the Assign to Session link to select a specific interview session to manually assign the applicant to. Until sessions are created, the Invite and Assign to Session links are inactive.

NDUS CTS 130 | P a g e
Add to Unscheduled Applicants: Click on this button to select additional applicants that were not already included. Invite All: Click on this button to send an Invitation to Select Session notification to the all applicants. Until sessions are created, the Invite and Assign to Session links are inactive. The Sessions grid displays sessions that have been created, along with any applicants who have selected the session. Interview Date: Displays the date for the interview session. Interview Start Time / End Time: Displays the start time and end time for the interview session. Venue: Displays the venue description for the selected interview facility. Display Name: Displays the name of the applicant who has selected the session or who has been manually assigned to the session. Add New Session: Click on this button to open the Create Session window and enter session details. Delete Session: Click on this button to delete a session. If a session has been selected or assigned, you will not be able to delete it. Deleting a session will remove it from the available sessions that an applicant sees. Edit Session: Click on this button to edit the session details for an existing session. Click on the Add New Session button to open the Create Session page.
Create Session

NDUS CTS 131 | P a g e
Interview Date: Enter the date of the interview. Interview Start Time / End Time / Time Zone: Enter the start time, end time, and time zone of the interview. Location: The venue selected on the series setup defaults in. You can select a different venue code. Address: The address associated with the venue will populate this field. You can override the information. Additional Instructions: Enter any additional information that you want to communicate to the applicant about locating the interview, or materials they should bring. Click on the OK button to return to the Sessions page.

NDUS CTS 132 | P a g e
Invite Applicants
Once you have created a sufficient number of sessions for the series, you can invite the applicants to
select a session. Typically, the recommendation is to create a greater number of sessions than
applicants. This gives all applicants multiple session options to choose from.
Invite All: Click on this button to send an Invitation to Select Session notification to the all applicants. Until sessions are created, the Invite and Assign to Session links are inactive.

NDUS CTS 133 | P a g e
Click on the Invite All button. The Send Invitation window appears.
To: If an individual applicant is invited, their name will appear. If multiple applicants are invited, “All Unscheduled Applicants” will display. Subject: The subject of the email that the invited applicants will receive is the text “Invitation to participate in an upcoming interview – Job ID xxxxx – (Series title)” Additional message to include in invitation: Enter any additional information that you want to communicate to the applicants in the invitation email. Click on the Send Invitation button to send the email notification to the applicants. This message will appear.
A notification will also appear for the applicant in Candidate Gateway where they can select a session.

NDUS CTS 134 | P a g e
Once an applicant has been invited the link in the Unscheduled Applicants grid will update to “Re-
Invite”. Using this link you can send an additional invitation to the applicant.

NDUS CTS 135 | P a g e
Add to UnScheduled Applicants
From the Sessions page, click on the Add to Unscheduled Applicants button to select additional applicants that were not already included. The Add to Unscheduled Applicants page will appear listing applicants who are not already scheduled.
Select applicants and click the Add to UnScheduled Applicants button. The applicants will be added to the Unscheduled Applicants grid on the Sessions page.

NDUS CTS 136 | P a g e
Assign to Session
You can manually assign an applicant to an open interview session. Assign to Session: Click on the Assign to Session link to select a specific interview session to manually assign the applicant to. Until sessions are created, the Invite and Assign to Session links are inactive. For an applicant, click on the Assign to Session link. The Assign Applicant window appears.

NDUS CTS 137 | P a g e
Assign Applicant: Displays the selected applicant’s name. To Session: Select the interview session to assign the applicant to. Additional message to include in notification: Enter any additional information that you want to communicate to the applicants in the notification email. Click on the Assign to Session button to send the email notification to the applicants. This message will appear.

NDUS CTS 138 | P a g e
Once an applicant has selected an interview session through Candidate Gateway, or has been assigned to an interview session manually, their name will appear in the Display Name column for the session on the Sessions page. In addition, the applicant’s disposition status will be updated to Interview, and scheduled interview record will be created. The applicant will receive a notification confirming their scheduled interview, and a notification will appear for the applicant in Candidate Gateway. The designated interviewers will also be notified of the interview session, and their Interview Calendar page will display the interview. From the Interview Calendar page they can view the applicant, view the scheduled interview, and view the Job Opening. The designated interviewers will see a pending row on their Interview Evaluations page.
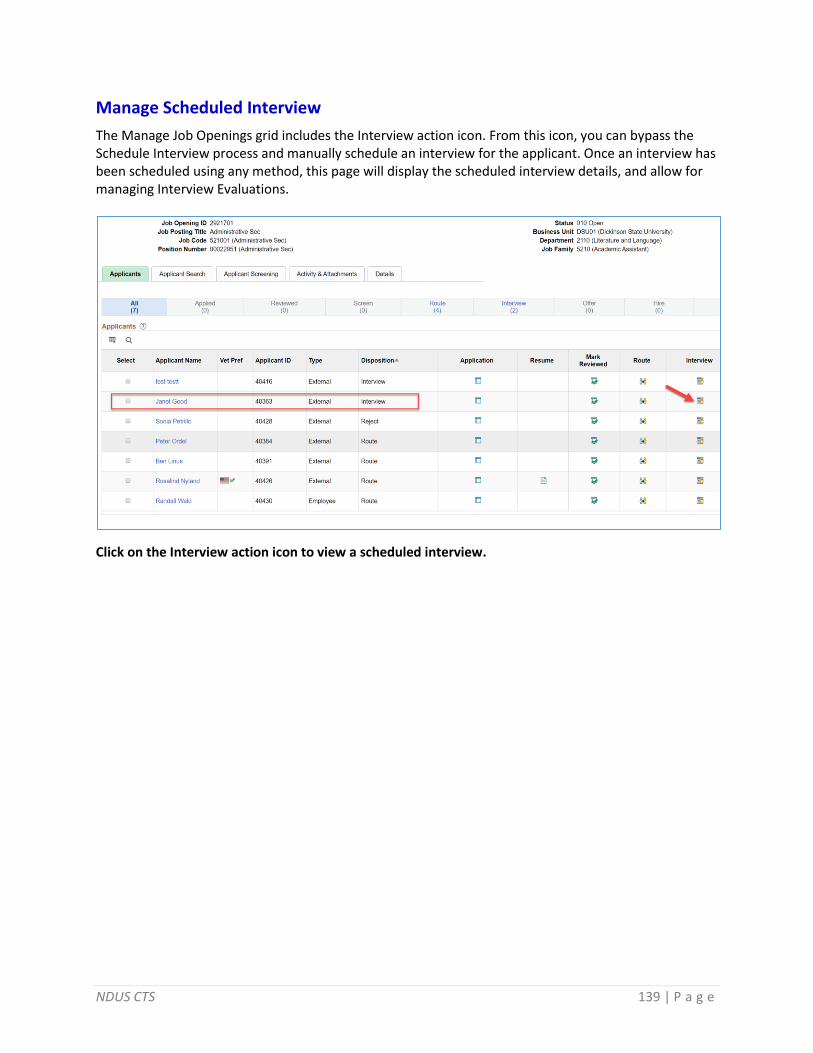
NDUS CTS 139 | P a g e
Manage Scheduled Interview
The Manage Job Openings grid includes the Interview action icon. From this icon, you can bypass the Schedule Interview process and manually schedule an interview for the applicant. Once an interview has been scheduled using any method, this page will display the scheduled interview details, and allow for managing Interview Evaluations.
Click on the Interview action icon to view a scheduled interview.
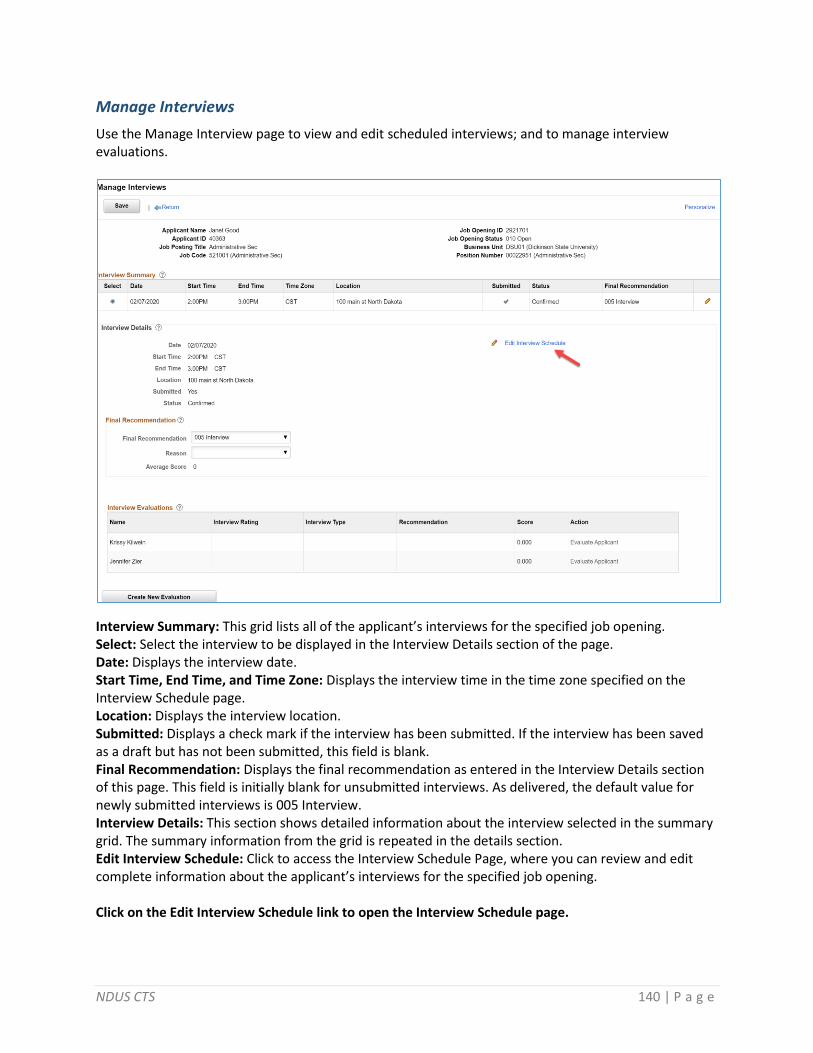
NDUS CTS 140 | P a g e
Manage Interviews
Use the Manage Interview page to view and edit scheduled interviews; and to manage interview evaluations.
Interview Summary: This grid lists all of the applicant’s interviews for the specified job opening. Select: Select the interview to be displayed in the Interview Details section of the page. Date: Displays the interview date. Start Time, End Time, and Time Zone: Displays the interview time in the time zone specified on the Interview Schedule page. Location: Displays the interview location. Submitted: Displays a check mark if the interview has been submitted. If the interview has been saved as a draft but has not been submitted, this field is blank. Final Recommendation: Displays the final recommendation as entered in the Interview Details section of this page. This field is initially blank for unsubmitted interviews. As delivered, the default value for newly submitted interviews is 005 Interview. Interview Details: This section shows detailed information about the interview selected in the summary grid. The summary information from the grid is repeated in the details section. Edit Interview Schedule: Click to access the Interview Schedule Page, where you can review and edit complete information about the applicant’s interviews for the specified job opening. Click on the Edit Interview Schedule link to open the Interview Schedule page.

NDUS CTS 141 | P a g e
Interview Schedule
The Interview Schedule page can be used to view an interview that was scheduled by the applicant selecting a session, or by the recruiter assigning a session to the applicant. When an interview is scheduled using one of these methods, the page is pre-populated with the interview schedule details. As an alternative, the Interview Schedule page can be used to set up an interview manually.
Interview Schedule page (1 of 2)
The page has collapsible sections for each applicant. Within the applicant sections, there are collapsible sections for each interview.
• If the page is accessed from the applicant’s Interview icon or link, it will show interviews for an individual applicant.
• If the page was accessed from the Job Opening top button bar Interviews icon, it will show interviews or for all applicants associated with the Job Opening.
Date: Enter the date on which the interview is to take place. Start Time, End Time, and Time Zone: Enter the start and end times for the applicant's interview. This time applies to all interviewers. To schedule different interviewers at different times, create multiple interviews for the applicant. Interview Status: Values in this status field represent the stages of the interview process. These are the possible statuses:
• Unconfirmed is the initial status for new and reinstated interviews.
• Scheduled indicates that the meeting invitation has been sent.

NDUS CTS 142 | P a g e
• Confirmed indicates that all participants have accepted the invitation.
• Completed indicates that the interview has occurred and all interview evaluations are done. The Interview Evaluation Reminder automated process changes the interview status to Completed when all interview evaluations are complete for an interview in the past. Users can also manually put interviews in Completed status.
• Cancelled indicates that the interview was cancelled. All interview data for a cancelled interview is read-only. Users can cancel interviews by updating the status directly (though the change does not take effect until the changes are submitted), or they can click the Cancel button that appears at the end of each interview section.
For a scheduled interview, this value will be Confirmed. Interview Type: Select one of the interview types that your organization has defined. Applicant Response: Users can manually set the appointment status to Accepted, Declined, None (no response), or Tentative (tentatively accepted). For a scheduled interview, this value will be None.
Applicant Comments: Click to access the Interview Schedule Comments page where you can enter applicant-specific comments. These comments appear on the interview details page that the applicant sees in Candidate Gateway.
Applicant Availability: Click to access the Interview Schedule page, which displays all interview dates and times for the applicant for any scheduled interviews. Initiator: Displays the name of the user who originally created the interview. Notify Applicant: By default, this check box is initially deselected. Select this check box to have an email notification sent to the applicant when the interview is submitted. If the applicant is a registered user of Candidate Gateway, the system also creates a Candidate Gateway notification. Notify Interview Team: Select this check box to make the system select all of the Notify check boxes for individual interviewers. This check box is simply a data entry shortcut: the system does not use this setting to determine who should receive a notification. If you select the Notify Interview Team check box and then deselect the Notify check box for an individual interviewer, the Notify Interview Team check box remains selected, but the system does not send a notification the deselected interviewer. Interviewers: Use the Interviewers grid to identify the interviewers who will participate in the interview. This grid is populated with the interviewers from the job opening hiring team. Interviewer ID and Interviewer Name: Identify interviewers by entering their employee IDs; the system then displays the interviewers' name. Date, Start Time, End Time, and Time Zone: These fields display the date and time for the interview in the interviewer's own time zone. Response: Set the appointment status to Accepted, Declined, None (no response), or Tentative (tentatively accepted). For a scheduled interview, this value will be None.
Comments (interviewer comments): Click to access the Interview Schedule Comments page and enter interviewer-specific comments. If interviewer-specific comments exist, the interviewer sees a comments icon alongside the interview on the Interview Calendar page.
Availability (interviewer availability): Click the icon to access the Interview Schedule page, which displays all interview dates and times for the interviewer for any scheduled interviews. Notify: Select this check box to have an email notification sent to an individual interviewer when the interview is submitted, resubmitted, or cancelled. The system uses the email addresses from the interviewers' Personal Data records. Add Interviewer: Click this link to add another row to the Interview Schedule grid. Venue: In the Venue field, select a physical location for the interview. For a scheduled interview, this value will be venue that was set up on the interview session.

NDUS CTS 143 | P a g e
<Venue Email Address> When you select a venue, its email address appears. Response: This field will be blank. Location: If there is location information in the venue definition, the system enters that location information here, replacing any existing location text. You can modify the location text, and any changes that you make are saved to the venue definition. You can also enter location text without selecting a venue. Add/Edit Venue: Click to access the Interview Facilities Page, where you can modify venue details for the currently selected venue; or add a new venue.
Interview Schedule page (2 of 2)
Notes: Use the Notes grid to add notes related to the interview. You can also add attachments to individual notes. These notes are specific to the interview; they are not associated directly to either the job opening or the applicant. The notes are visible to an interviewer, or user who has access to the Job Opening. Attachments: Use the Attachments grid to attach external documents, such as interview scripts, to the interview schedule. Click the Add Attachment link to add file attachments to the grid; the system prompts you to identify the file to be uploaded. When a file is uploaded, the default description is the file name. You can modify this description until you save or submit the interview, at which point it becomes read-only. The attachments are visible to an interviewer, or user who has access to the Job Opening. Load Job Opening Attachment and Load Job Opening Notes: Click these links to copy selected attachments and notes from the job opening to the interview. Job opening attachments and notes appear on the Manage Job Opening Page: Activity & Attachments Tab. Job opening attachments and notes are associated with specific audiences (Private, Public, or Interview), and when you load job opening attachments or notes into the interview, the system copies only the notes and attachments where the audience is Interview. Interviewer Meeting Request and Applicant Meeting Request: Click the appropriate link to review and optionally modify the text of notifications that the system sends to interviewers or applicants. For scheduled interviews, these notifications will have already been sent.

NDUS CTS 144 | P a g e
Letter / Consolidated Interview Letter: Individual scheduled interview letters, and consolidated interview letters (containing all scheduled interviews) can be generated by the system. Because the schedule interview process notifies the applicant and interviewers through email, there are no plans to use interview letters at this time. Add Interview: Click this button, which appears once per applicant (at the bottom of the Interview Schedule page) to add an additional interview section for the applicant. View All Interviews: Click to access the Interview List Page, which displays a read-only summary of the information on the Interview Schedule page.

NDUS CTS 145 | P a g e
Interview Evaluations After you have gathered feedback using interview evaluations, use the Final Recommendation field to enter a recommendation for the next step in the recruiting process. Until you make a final recommendation, the value in the Final Recommendation field is "Interview."
Final Recommendation: This field is initially blank for unsubmitted interviews. When the interview is submitted, the default status of 005 Interview is applied. When entering a final recommendation for a completed interview, choose a status that indicates the recommended next step in the recruiting process. Delivered options include 020 Make Offer, 100 Hold, 110 Reject, 120 Withdrawn, and 130 Withdrawn Application. Saving changes to this field may trigger additional changes to the applicant's disposition, depending on status change effects configuration. Reason: Optionally, select a reason for assigning the selected final recommendation, if available. Average Score: Displays the average score from all submitted interview evaluations for this interview. Unsubmitted evaluations do not affect this calculation. Interview Evaluations: After an interview’s date and time have passed, the system automatically adds all scheduled interviewers to this grid. Name: Displays the name of the evaluator. Interview Rating: Displays the overall rating given by the evaluator. Interview Type: Displays the interview type as entered on the Interview Evaluation page. Recommendation: Displays the evaluator’s recommendation. The values are the same as those available for the Final Recommendation field.

NDUS CTS 146 | P a g e
Score: Displays the total score for the evaluation. This is the sum of the scores for each evaluation category. Action: Displays text that indicates the status of the evaluation. When appropriate, the Action column text is a link that the user clicks to access the Interview Evaluation page. Values in this column include:
• Evaluate Applicant: This appears when the evaluation has not yet been started. This is an active link only for an evaluator's own evaluation. Clicking the link displays the Interview Evaluation page, where the evaluator can begin the evaluation.
• Complete Evaluation: This appears when the evaluation has been saved, but not yet submitted.
This is an active link only for an evaluator's own evaluation. Clicking the link displays the Interview Evaluation page, where the evaluator can continue to work on the evaluation.
• View Evaluation: This appears when the evaluation has been submitted. This link is active regardless of who created the evaluation. Clicking the link displays the Interview Evaluation page in read-only mode.
• Edit Evaluation: Administrators see this instead of View Evaluation. Clicking this link displays the Interview Evaluation page, but in this mode, the Save and Submit Evaluation buttons are replaced by buttons that the administrator can use to edit, delete, or send back the completed evaluation.
Create New Evaluation: Click this link to access the Interview Evaluation page to create a new evaluation. Create New Interview Schedule: Click to access the Interview Schedule page. The system adds a new blank interview section to the schedule when it opens the page. Click on the View Evaluation link to open the Interview Evaluation page.

NDUS CTS 147 | P a g e
Interview Evaluation
This page displays information about the applicant, the job opening, the interview, and the evaluator. It then shows the ratings for individual evaluation categories and the overall recommendation. Comments for specific evaluation categories are not shown on this page. Instead, you can click the Comments icon for a category to see the comments.

NDUS CTS 148 | P a g e
SEND CORRESPONDENCE
Throughout the recruiting process you have the ability to communicate with applicants through the Send Correspondence action. Correspondences can be initiated in three different forms:
• Email - An email with message text that you manually enter.
• Email with Letter Template - An email with message text that the system generates based on a template that you select.
• Letter - A letter that the system generates based on a template that you select. Note: When you send a correspondence, the system automatically creates an Applicant Note recording the correspondence. The Send Correspondence action can be used for a single applicant, or as a group action for multiple applicants.
Use the Other Action menu for a single applicant correspondence.
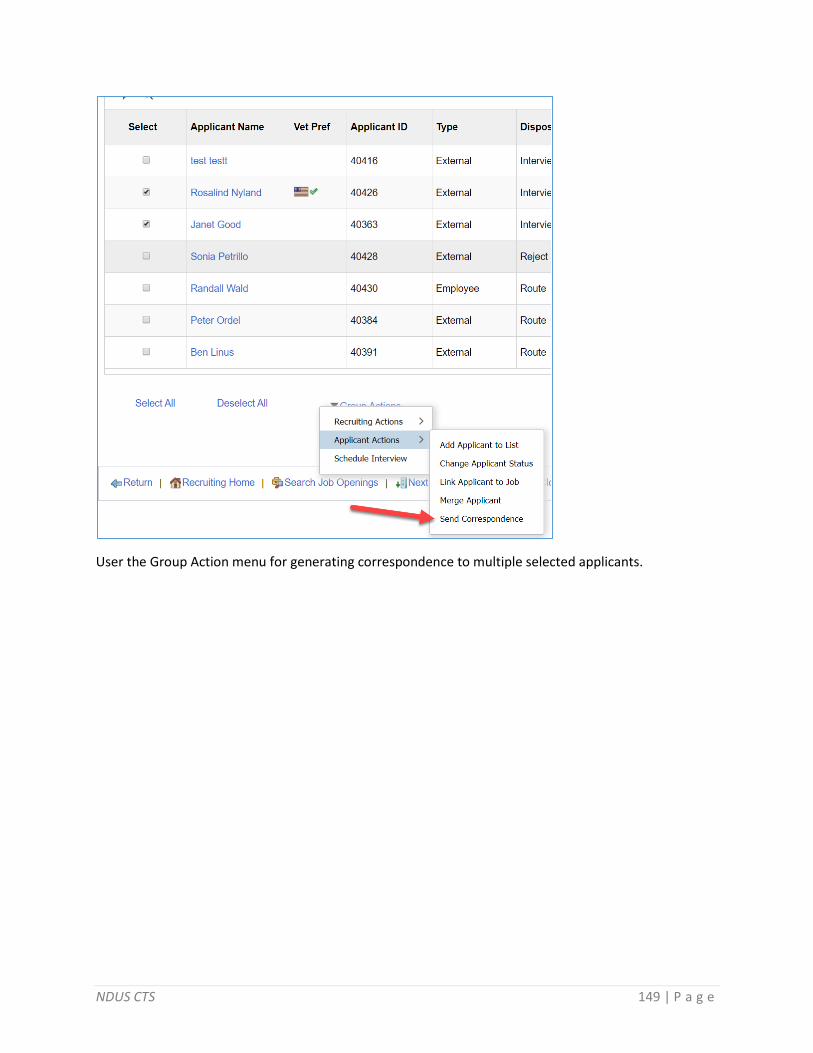
NDUS CTS 149 | P a g e
User the Group Action menu for generating correspondence to multiple selected applicants.

NDUS CTS 150 | P a g e
Use the Send Correspondence page to send ad hoc letters and emails to applicants. For free-form emails, use the Contact Method of Email.
Instructional Text: Instructional text at the top of the page explains how the combination of the transaction’s job openings and its public/private setting affects which users can see the note. Recipients: These fields identify the applicants to whom you are sending correspondence. Contact Method: Select Email. Letter: For a free-form created email, do not select a Letter template.

NDUS CTS 151 | P a g e
To: This field displays the names of the applicants to whom you are sending correspondence and is not editable. If you are sending the correspondence to multiple applicants, all names appear together. However, the system sends separate correspondence to each applicant: the applicants do not see each other's names in the To field of the email they receive. Cc, Bcc, and Find: By default, the sender's preferred email address appears in the Cc field, and the Bcc field is empty. You can edit these fields directly to add or remove recipients, or you can look up recipients who are employees by clicking the Find link to access the Find Email Address page. Include Interested Parties: Select this check box if you want the people listed as interested parties for the applicant to receive a copy of this email. An applicant's interested parties are listed on the Manage Applicant page: Interested Parties tab. The system sends the interested parties copies of the correspondence, but does not display their names or email addressed on this page. From: If the Contact Method is Email, this field displays the sender's name.
Subject: Enter the email subject. This field is required for email correspondence (whether freeform or template-based). Access: Select a value to indicate whether the note that is created is public or private.
• Select Private to limit access to the note’s author.
• Select Public to allow other users to see the note. Users can see public notes as long as they have access to one of the associated job openings. Message: For freeform email, enter the text of the email message. Attachments: Use this section to add attachments to and remove attachments from the email. Preview: Click to preview the email.

NDUS CTS 152 | P a g e
Send: Click to send email correspondence, create the associated applicant note, and return to the page from which you invoked the Send Correspondence action. Cancel: Click this button to return to the previous page without sending the correspondence.
Click on the Preview button to preview the email correspondence.
Send Correspondence Preview – Free-form Email
When you preview a free-form email, the message text appears on the Send Correspondence Preview page. As delivered, this email message format places a salutation before your message text and a signature after your message text. You can return to the Send Correspondence page without sending. Click on the Return button to return to the Send Correspondence page. Click on the Send button to deliver the email correspondence.
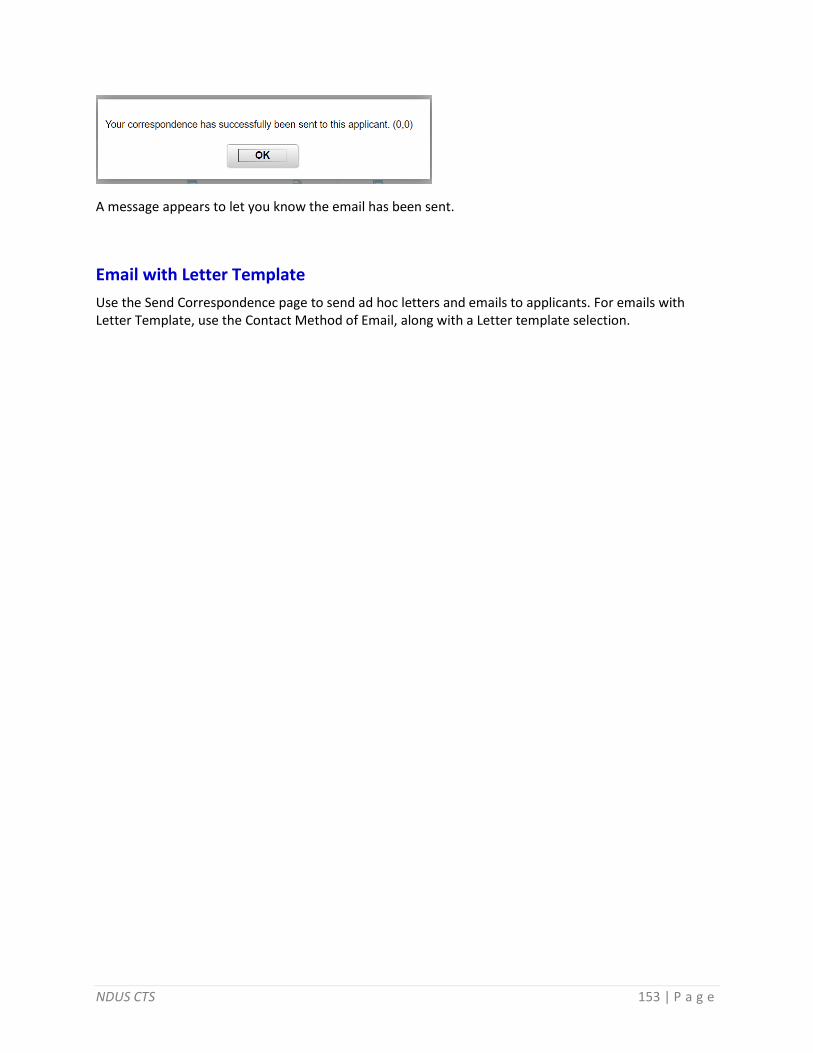
NDUS CTS 153 | P a g e
A message appears to let you know the email has been sent.
Email with Letter Template
Use the Send Correspondence page to send ad hoc letters and emails to applicants. For emails with Letter Template, use the Contact Method of Email, along with a Letter template selection.

NDUS CTS 154 | P a g e
Contact Method: Select Email. Letter: Select a letter template to use. The letter templates that have been created use the Campus code in naming for ease of locating the correct template. To: This field displays the names of the applicants to whom you are sending correspondence and is not editable. If you are sending the correspondence to multiple applicants, all names appear together. However, the system sends separate correspondence to each applicant: the applicants do not see each other's names in the To field of the email they receive.

NDUS CTS 155 | P a g e
Cc, Bcc, and Find: By default, the sender's preferred email address appears in the Cc field, and the Bcc field is empty. You can edit these fields directly to add or remove recipients, or you can look up recipients who are employees by clicking the Find link to access the Find Email Address page. Include Interested Parties: Select this check box if you want the people listed as interested parties for the applicant to receive a copy of this email. An applicant's interested parties are listed on the Manage Applicant page: Interested Parties tab. The system sends the interested parties copies of the correspondence, but does not display their names or email addressed on this page. From: If the Contact Method is Email, this field displays the sender's name. Subject: Enter the email subject. This field is required for email correspondence (whether freeform or template-based). Access: Select a value to indicate whether the note that is created is public or private.
• Select Private to limit access to the note’s author.
• Select Public to allow other users to see the note. Users can see public notes as long as they have access to one of the associated job openings. Attachments: Use this section to add attachments to and remove attachments from the email. Preview: Click to preview the email. Send: Click to send email correspondence, create the associated applicant note, and return to the page from which you invoked the Send Correspondence action. Cancel: Click this button to return to the previous page without sending the correspondence.
When you preview a template-based email, the message text appears directly on the Send Correspondence page. The message is generated by merging data from the applicants application into the pre-defined template fields. Click on the Send button to deliver the email correspondence.

NDUS CTS 156 | P a g e
Letter Use the Send Correspondence page to send ad hoc letters and emails to applicants. For Letters, use the Contact Method of Letter, along with a Letter template selection.
Contact Method: Select Letter. Letter: Select a letter template to use. This field is required when you send a letter. The letter templates that have been created use the Campus code in naming for ease of locating the correct template.

NDUS CTS 157 | P a g e
To: This field displays the names of the applicants to whom you are sending correspondence and is not editable. If you are sending the correspondence to multiple applicants, all names appear together. However, the system sends separate correspondence to each applicant: template-based messages are generated separately for each recipient. Access: Select a value to indicate whether the note that the transaction creates is public or private.
• Select Private to limit access to the note’s author.
• Select Public to allow other users to see the note. Users can see public notes as long as they have access to one of the associated job openings (or if there are no associated job openings). Notes: Enter any comments that should be saved in the applicant note that the system creates when it generates the letter. Preview: Click to preview the letter. When you preview a letter, the message text appears directly on the Send Correspondence page. If you are not satisfied with what you see, select a different letter to make changes. Generate: Click to generate letter correspondence, create the associated applicant note, and return to the page from which you invoked the Send Correspondence action. Letters are generated in real-time a new browser window opens for each letter. Cancel: Click this button to return to the previous page without sending the correspondence.
Letters are generated in real-time a new browser window opens for each letter. If multiple applicants were included, separate windows will appear for each applicant. The letter is generated by merging data from the applicant’s application into the pre-defined template fields. From the letter window, you can save the letter locally, edit the letter, and print the letter for mailing.

NDUS CTS 158 | P a g e
Applicant Notes - Correspondence When you send email or generate a letter using the Send Correspondence action, the system records the transaction in an applicant note. You can view the note on the Manage Applicant Page: Notes Tab.
The note is designated as public or private based on the setting you choose when you create the correspondence. The original sender is the only one who can view private notes. For other users, note visibility depends on the public/private setting and on whether the user has access to any of the job openings (if any) that are associated with the transaction. For email correspondence, the email subject becomes the note subject. When you click the subject to view the note details, the correspondence appears on the Send Correspondence page. You can modify the correspondence (though you cannot change the contact method) and then resend the correspondence. For template-based email, you can change the subject, the attachments, and the Cc and Bcc recipients, but you cannot change the template selection, nor can you modify the message. For letter correspondence, the default note subject is Application Letter. When you click the subject to view the note details, the Applicant Notes page appears, and the letter appears as an attachment to the note. You can edit the note as necessary, including replacing the attachment if you modified the generated letter before printing and sending it.

NDUS CTS 159 | P a g e
STERLING BACKGROUND CHECK
Initiate and monitor Sterling Background Checks for an Applicant from within PeopleSoft. To initiate or view an existing Background Check, use the Applicant Action of Sterling Background Check.
The overall process for using PeopleSoft for Background Checks is as follows:
1. Authorized user in PeopleSoft initiates the Background Check request. 2. Through integration, Sterling receives the request. 3. Sterling sends status update to PeopleSoft, indicating “PreDraft/Pending”. 4. Sterling sends email to Applicant, requesting that they provide information on the Sterling
website. 5. Upon receipt of requested Applicant information, Sterling begins the background check. 6. Sterling sends status update to PeopleSoft, indicating “Pending/Pending”. 7. Sterling completes background check. 8. Sterling sends status update to PeopleSoft, indicating “Complete/Clear” for a successful
background check, or “Complete/Consider” for a background check requiring further review by the user.
9. Authorized user in PeopleSoft uses the link to access Sterling to view the background check report.

NDUS CTS 160 | P a g e
Initiate PreEmployment Check
Sterling Package: Select from the available Sterling background check Package types. Sterling Account ID: This code will pre-populate based on the users Business Unit. Generally, there will be one Sterling Account ID for a campus. For NDSU, there are multiple codes available. NDSU users must make sure to select the correct Sterling Account ID. Request New Inquiry button: Click on this button to send the background check inquiry to Sterling.
Only authorized user will have this button active. For other users the button will be inactivated.
PreDraft Status
Once the initial background check inquiry is sent, Sterling will immediately send a status update back into PeopleSoft. This information will appear on the page in the Background Check Request grid. Screening ID: This ID is created by Sterling to track the screening. Package ID: This ID is created by Sterling to track the package type. Package Title: This is the package type of the background check request. Screening Status: At the beginning of the process, this will display “PreDraft”. Screening Results: At the beginning of the process, this will display “Pending”. Created By: Displays the user ID of the background check requester. Created DTTM: Displays the date & time of the request.

NDUS CTS 161 | P a g e
Last Updated By: Displays the user ID of who provided the last update. Last Update Date/Time: Displays the date & time of the last update. Report: This link goes to the Sterling website login page. Users can log in to Sterling to view the background check report. Sterling security access to reports applies to the user logging in to the Sterling website.
Review Results Users can return to this page to view progress of the background check.
Upon receipt of requested Applicant information, Sterling begins the background check and sends a status update to PeopleSoft, indicating “Pending/Pending”. Once Sterling completes background check, they send a status update to PeopleSoft, indicating “Complete/Clear” for a successful background check, or “Complete/Consider” for a background check requiring further review by the user.
Screening Statuses
PreDraft - Email sent; Information from candidate is required Draft - Client information gathered; Ready to begin processing Pending - Processing; At least 1 report item within this package has a status of pending Cancelled - The candidate did not submit their data by the expiration date Complete - All report items are set to complete within the package
Screening Results
Pending - Processing; At least 1 report item within this package has a status of pending Clear - Everything good, the screening passes. Consider - Something found. The screening needs review.
At any point, a user can click on the Report link to access the Sterling website and log in to view the report.

NDUS CTS 162 | P a g e
On the Comments tab, you can view the Audit Comments that indicate the integration messages that went back and forth between PeopleSoft and Sterling. Note: The Sterling background checks that have been previously run remain with the Applicant record. The rows of results information will be viewable to any user who has access to the Applicant through subsequent applications.

NDUS CTS 163 | P a g e
MAKING AN OFFER
Create and manage job offers on the Prepare Job Offer page. To access this page, use the Prepare Job Offer action.
For an applicant, select the Other Actions menu, Recruiting Actions, Prepare Job Offer. The Prepare Job Offer page will appear.
Prepare Job Offer Use the Prepare Job Offer page to create and manage a job offer. The steps for preparing a Job Offer include:
1. Create the initial Offer Details and submit for Approval. 2. Once Approvals are complete, create the Offer Letter, and add Offer Attachments. 3. Post the Job Offer to the Applicant’s Candidate Gateway notifications.

NDUS CTS 164 | P a g e
Job Opening: Displays the job opening ID and posting title. Position Number: Displays the position number that is associated with the job opening. If the job opening is associated with multiple positions, you can select any of the associated positions. If the offer is not associated with a job opening, or if it is associated with a continuous job opening that doesn't have position data, you can manually enter a value. Job Code: Displays the job code that is associated with the job opening. If the job opening is associated with multiple jobs, you can select any one of the associated job codes. If the offer includes a position number, the system enters the associated job code. If the offer is not associated with a job opening, then you must manually enter either a job code or position number. If the job opening is a continuous job opening without job code data, then the job code is optional. However, a job code will be required before you can prepare the applicant for hire. Hiring Manager: The default value is the primary hiring manager for the job opening. Recruiter: The default value is the primary recruiter for the job opening. Status: Generally, you can let the system set the value based on the actions you perform. The delivered statuses are:
• Draft: the offer has been saved but not yet submitted.
• Pending Approval: the offer was submitted for approval and is still in the approval process.
• Denied: offer approval was denied.
• Extend: the offer is open and awaiting the applicant’s reply. When the offer goes into this status, the delivered status change effects also change the applicant’s disposition to 070 Offer.
• Accept: the applicant accepted the offer. When the offer goes into this status, the delivered status change effects also change the applicant’s disposition to 071 Offer Accepted.
• Acceptance Withdrawn: When the offer goes into this status, the delivered status change effects also change the applicant’s disposition back to 070 Offer.
• Hold: the offer is on hold.

NDUS CTS 165 | P a g e
• Offer Rejected: the applicant rejected the offer. When the offer goes into this status, the delivered status change effects also change the applicant’s disposition to 110 Reject.
• Offer Withdrawn: the offer has been withdrawn. When the offer goes into this status, the delivered status change effects also change the application disposition to 120 Withdrawn.
Reason: If your organization has set up reasons for a particular status, you can select a reason for putting the offer in a status. Created By: Displays the name of the person who created the job offer. Business Unit: Displays the business unit that is associated with the job opening. Offer Date: Enter the date the offer is effective. The default is the current date. Start Date: Enter the date that the applicant is to report for work. This date cannot be before the offer date. Offer Expiration Date: The default value is date based on the system-wide setting for the default number of days that an online job offer remains active. Applicant Type: Displays Employee, External Applicant, or Non-Employee. External applicants and non-employees can access Candidate Gateway only if they are registered Candidate Gateway users. Refer to the Registered Online field to see if these types of applicants are registered users. Registered Online: This field is visible only if the applicant type is External Applicant or Non-Employee. This field displays Yes if the applicant is a registered user of Candidate Gateway. This indicates that the applicant is able to view online job offers. A value of No prevents you from posting the offer to Candidate Gateway. Preferred Contact: Displays the applicant’s preferred contact method. Notify Applicant: This check box must be selected before you post a job offer online. Selecting the check box indicates that the system will send an email notification when the job offer is posted. Component: Select an offer component. The available values are Base Salary and Moving Expense. Offer Amount: Enter an amount. If the offer component is configured as base compensation, the system warns you if the amount is above or below the recommended salary range. Payment Mode: Displays the payment mode of Cash. Currency: Select the currency. The default value is USD. Frequency: Select a pay frequency. The default value comes from the job offer component. Add Offer Component: Click to add a new row to the Job Offer Components grid. Comments: Enter any comments related to the job offer. Offer comments are not shown on any other page. Comments would be visible to Approvers who view this page.
Actions

NDUS CTS 166 | P a g e
Save as Draft: Saves the job offer and puts it in the status configured as the draft status for offers. You must have at least one row in the Job Offer Components grid before you can save the offer. Submit for Approval: This link replaces the Submit Offer link if offers require approval. Click to submit the offer, start the approval process, and set the status to Pending Approval Post: Click this link to access the Post Online Job Offer page, where you complete the process of posting the job offer to Candidate Gateway. Unpost: Click this link to remove a posted offer from Candidate Gateway. To post offer revisions, it is necessary to unpost and then re-post the offer. Add Revised Offer: This link is available if the offer has a status of Rejected. Click to add a new job offer. Clicking this link creates a new row in the Offer Details scroll area. Delete Offer: This link is active only for recruiting administrators. An administrator clicks this link to delete the offer. A new, blank offer replaces the deleted offer on the Prepare Job Offer page. If the deleted job offer was posted to Candidate Gateway, deleting the offer also removes the posted offer. Deleting an offer does not remove any associated contact notes, nor does it update the applicant’s disposition. Edit Offer: When you save or submit an offer, or when you initially access an existing offer, the offer is not editable. Click the Edit Offer link to make the fields on the page editable. When you modify a posted job offer, changes other than attachment-related changes are not reflected in Candidate Gateway until you unpost the offer and then re-post it. However, if you change the attachments in a posted offer, the changes are immediately visible in Candidate Gateway. For example, if you edit an offer and generate a new offer letter, the new offer letter is immediately visible in Candidate Gateway. The original offer letter also remains visible unless you remove it from the offer. To avoid deleting old offer letters, unpost the old offer, then create and post a revised offer.
Approvals When the Job Offer is submitted for approval, the Approvals tab appears. On the Approvals tab you can view the Approval chain.
Once the Job Offer is approved, you can create the Offer Letter, add Attachments, and Post the Job Offer to Candidate Gateway.

NDUS CTS 167 | P a g e
Offer Letter
Letter: Select a template to use for the applicant’s offer letter. Date Printed: Displays the date that you printed the offer letter. The system populates the field when you click the Generate Letter button. You cannot generate a new offer letter if there is a date in this field, but you can manually clear the date to reactivate the Generate Letter button. Generate Letter: This button is available only if the offer is in an open status, a template is selected in the Letter field, and the Date Printed field is clear. The button is not available when the offer is in an editable state. Click this button to immediately generate a letter based on the selected template. The system opens the generated letter in a new browser window, where you can print it or save it locally. If you make changes, save the modified letter to your local disk so that you can upload the revised version. When you generate the letter, the system enters the current date in the Date Printed. The Generate Letter button becomes inactive; to make it available again, clear the date in the Date Printed field. If, after generating a letter, you subsequently click the Email Applicant button, the system automatically attaches the generated letter to the email. When you generate a letter, the system creates an applicant contact note. The letter is an attachment to the note. Upload Letter: Click this button to upload a saved letter as an attachment. Most commonly, you use this button to upload a modified version of the original generated letter. However, it is not necessary to generate a letter before uploading one. Uploading a letter does not remove the original generated letter from the attachments grid, but you can remove the original letter manually if necessary. When you upload a letter, the system creates a contact note for the applicant. The letter is an attachment to the note. If you subsequently click the Email Applicant button, the system automatically attaches the modified letter (rather than the original) to the email. Email Applicant: Click this button to display the Send Correspondence page. If you generated or uploaded an offer letter, the Attachments grid on the Send Correspondence page includes the offer letter, but you can remove or replace it if you wish. After accessing the Send Correspondence page, enter the email subject and message, then send it to the applicant. When you send the email, the system creates an applicant contact note; the email attachments are saved as note attachments.

NDUS CTS 168 | P a g e
Job Offer Attachments
Attachments: Before you add attachments, you must save the offer. Because saving the offer puts the offer into read-only mode, use the Edit Offer link to make the offer editable again so that you can add attachments. You can add and remove attachments only when the offer is editable. Type: Identifies the attachment as one of these: Attachment: a standard file attachment. URL: a link that was added as an attachment using either the Add Organizational Attachment button. Description: Enter identifying information for the document. The default description for offer letters is Offer Letter. Details: Click to display the attachment. The link text is the file name for file attachments and the URL for URL attachments. Action Required: Select this check box for any items that the applicant must complete and return if the offer is accepted. In Candidate Gateway, an icon appears next to these documents, along with instructions to review the marked documents.
Click this icon to delete an attachment. Deleting an offer letter attachment does not remove the applicant note that was automatically created when the letter was generated. The note continues to display the offer letter as a note attachment. However, the attachment cannot be opened from the note. A warning message that appears when an offer letter is deleted recommends that the user manually modify the related applicant note. Add Applicant Attachment: Click to display a Choose File dialog box, where you select a local file to upload. This button is active only when the offer is editable. Add Organizational Attachment: Click to display the Organizational Attachments page, where you can select existing attachments (file attachments or URLs) to add to the offer. The attachments that appear on the Organizational Level Document page are context-dependent. For example, if an attachment is valid only for a particular business unit, then it is available only for job offers in that business unit. This button is active only when the offer is editable.

NDUS CTS 169 | P a g e
Post Job Offer
To Post the Job Offer to Candidate Gateway, select Notify Applicant, and click on the Post action icon. The Post Online Job Offer page appears.
Post Online Job Offer
Use the Post Online Job Offer page to post a job offer to Candidate Gateway.

NDUS CTS 170 | P a g e
Review the offer details on this page, then click the Submit button to post the offer. When the offer is posted, the system generates a Candidate Gateway notification, sends an email to notify the applicant of the job offer, and creates a contact note.

NDUS CTS 171 | P a g e
When a Job Offer has been initiated, the applicant’s Disposition status is updated to Offer.
Job Offer Acceptance There are a number of methods to record Job Offer acceptance:
• In Candidate Gateway, the Applicant reviews and accepts the Job Offer.
• From the Other Action menu, the Recruiter can select Accept Offer.
• From the Prepare Job Offer page, the Recruiter can select the Accept Offer action icon.

NDUS CTS 172 | P a g e
When a Job Offer is Accepted, the applicant’s Disposition status updates to Accepted. For Job Openings
where the applicant will fill the remaining opening, the other applicants are updated to Hold.

NDUS CTS 173 | P a g e
PREPARING TO HIRE
Prepare the applicant for hiring using the Prepare for Hire page. To access this page, use the Prepare for Hire action.
For an applicant, select the Other Actions menu, Recruiting Actions, Prepare for Hire. The applicant must be in the disposition status of Accepted for this menu option to be available. The Prepare for Hire page will appear.
Prepare for Hire Use the Prepare for Hire page to review and complete job information and submit the hire request to the HR system.
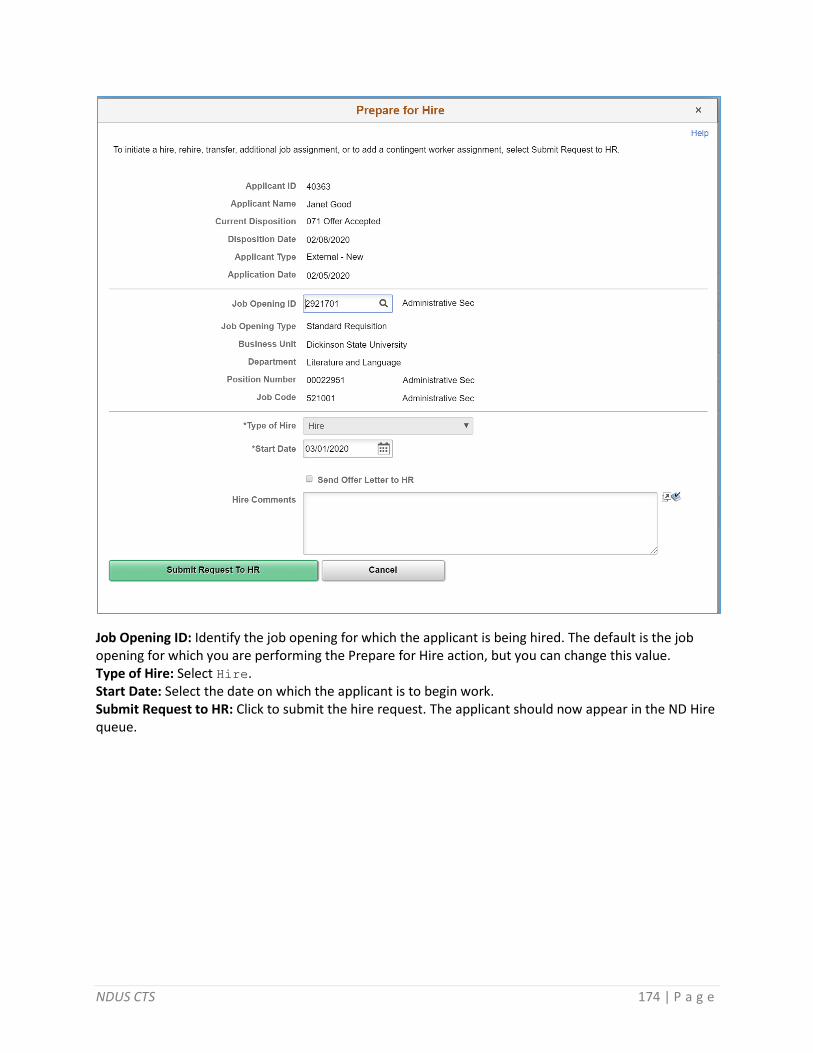
NDUS CTS 174 | P a g e
Job Opening ID: Identify the job opening for which the applicant is being hired. The default is the job opening for which you are performing the Prepare for Hire action, but you can change this value. Type of Hire: Select Hire. Start Date: Select the date on which the applicant is to begin work. Submit Request to HR: Click to submit the hire request. The applicant should now appear in the ND Hire queue.

NDUS CTS 175 | P a g e
When a Hire is Prepared, the applicant’s Disposition status updates to Ready.

NDUS CTS 176 | P a g e
ND Hire The applicant will appear in the ND Hire queue. From ND Hire, process the new hire as you would
normally.

NDUS CTS 177 | P a g e
VERIFY STATUS UPDATES
Upon completion of the ND Hire, the applicant will be saved to Job as an active employee. Their
applicant record will be updated to a Disposition status of Hired. For a Job Opening where the applicant
will fill the remaining opening, the other applicants are updated to Reject, and the Job Opening is
updated to a status of Closed.
RECRUITING TABLE MAINTENANCE
Questions and Answers and Question Sets Questionnaires can be added to Job Openings so that applicants must answer the questions in order to complete their applications. The answers given in the applications can be scored in the screening processing. To set up questions, you create reusable question definitions containing the text of the question. Question definitions can be single choice, multiple choice, or open-ended. Multiple-choice questions allow for one or more answers to be selected. Open-ended questions are not associated with answer definitions; applicants enter free-form text answers. Question sets are groups of questions that can be added to a resume template or job opening all at once. Questions sets exist only to simplify the process of adding the questions. To set up questions:
1. Create an answer definition for each answer. 2. Create a question definition for each question and, if the question is not open-ended, then link
answers to the question. During this step, you also assign default points for each of the possible answers to the question. Note: The answers and the default points to the answers can be overridden at the Job Opening level.
3. (Optional) Create question set definitions and link questions to the question set. Note: NDUS has pre-loaded a large number of Questions and Answers that were created in the ND State system. To view and add Questions, Answers, and Questions Sets, start from the Recruiting Activities tile.

NDUS CTS 178 | P a g e
Answers
Select Answer Definition to view and add Answers.

NDUS CTS 179 | P a g e
Answer Definition
Use the Answer Definition page to set up answer definitions.
Search for existing answers using Description – Contains.

NDUS CTS 180 | P a g e
Answers can be simple “Yes” or “No” or a number.
Answers can be full statements. Description: Enter an identifying name for this answer. A descriptive name helps you when you reference the answer definition from within a question definition. Other pages that display answers, however, use the full text of the answer rather than these shorter identifiers. Long Description: Enter the complete text of this answer. This is what the applicant sees in the application questionnaire.

NDUS CTS 181 | P a g e
Questions
Select Question Definition to view and add Questions.
Question Definition
Use the Question Definition page to set up question definitions.

NDUS CTS 182 | P a g e
Search for existing questions using Description – Contains.

NDUS CTS 183 | P a g e
This example illustrates the Question Definition page for Single Choice question.

NDUS CTS 184 | P a g e
Question Definition page for Multiple Choice question. Description: Enter an identifying name for this question. A descriptive name helps recruiters identify the question when they manage the list of questions in a job opening or question set. Long Description: Enter the complete text of this question. This is what the applicant sees in the application questionnaire. Answer ID: Select an answer to link to the question. Long Description: After you enter an answer ID, the text of the answer (the long description on the Answer Definition page) appears in this column. Correct Answer: Select the check box next to any answer that is correct answer for the question. There can be more than one correct answer. There must be at least one correct answer. Default Points: Enter the default number of points that an applicant who selects this answer receives during screening. You can assign points to both correct and incorrect answers, depending on your business processes. When applicants can choose more than one answer, the screening process adds the points for all chosen answers to calculate the total points that the applicant is awarded for the question. It is possible to assign negative points to incorrect answers. Recruiters can override the correct answer and default point value of an answer when configuring criteria for a specific screening level in a specific job opening.

NDUS CTS 185 | P a g e
Answer Order: Optionally enter numbers to set the order of the answers. This order is used wherever questions and answers appear in Candidate Gateway and Talent Acquisition Manager. If you enter an order for some answers but not others, the answers without orders appear first, followed by the ordered answers. If multiple answers have the same value (or with no value) in this field, the system uses the Answer ID to order those answers.
Question Definition page for open ended question. Open Ended Question: Use this question type if there is no predefined answer for the question. Because open ended questions do not have predefined answer sets, selecting this removes the Answers grid from the page and replaces it with the Maximum Points field. Maximum Points: Enter the maximum number of points (up to 100) that an applicant can receive for answering this question. The actual number of points that the applicant receives is determined by averaging scores that evaluators manually assign. Evaluators who have not yet evaluated the answer are not included in the calculation.

NDUS CTS 186 | P a g e
Question Sets
Select Question Set Definition to view and add Question Sets.
Question Set Definition
Use the Question Set Definition page to set up question set definitions.

NDUS CTS 187 | P a g e
Create Question Sets for commonly used sets of questions.
Description: Enter an identifying name for this question set. A descriptive name helps recruiters identify the question set when prompting for a question set to add to a job opening. Competency: Not used. Explanation: Enter details about the purpose or contents of the question set. This is helpful to anyone who needs to update the question set. It is not visible to users who add the question set to a job opening. Question ID: Enter the ID of each question that you want to add to the question set. Long Description: After you enter a question ID, the text of the question (the long description on the Question Definition page) appears in this column. Order Number: Enter numbers to control the default order of the questions in the set. When you load the question set into a job opening, these become the default order numbers in the Screening Questions grid. Users can then modify the order numbers for the individual job opening. Action: Displays a link to the Question Answers page.
• For open-ended questions, the link text is Open Ended. When you click this link, the Question Answers page displays the text and the maximum point value of the open-ended question.
• For other questions, the link text is View Answers. When you click this link, the Question Answers page displays the question, its correct and incorrect answers, and the default point value of each answer.

NDUS CTS 188 | P a g e
Teams When you create a job opening, you identify the recruiters for the job opening. You can set up predefined teams whose members can be added to the job opening all at once. If groups of people typically work together on the same job openings, creating and adding teams can be faster than adding each team member individually to each job opening. When a team is added to the job opening, the system does not add the actual team ID to the job opening. Instead, users who currently belong to the team are added individually to the job opening. When you add a team to the Recruiters grid, only team members who are associated with the Recruiter recruiting role type are added. Navigation: Navigator Menu > Recruiting > Administration > Teams
Description: Enter the name of the team. Use a Campus code designator to distinguish your teams from any other Campus teams. Empl ID: Select the employee IDs for the members of this team.

NDUS CTS 189 | P a g e
Applicant Lists Applicant lists are manually-constructed groups of applicants that recruiters can use to facilitate the recruiting process. Recruiters can add applicants to a list and then perform tasks for one, several, or all applicants on the list at the same time. Lists can be public or private. The creator of an applicant list is the owner of the list. The list owner is the only user with access to private lists. Anyone with access to the applicant list pages has access to public lists. Anyone with access to a list can view the list, take actions on the applicants, add applicants to the list, and view primary list information (the list name, its active/inactive status, and whether the list is public). However, only the list owner can update the primary list information. To view and add Applicant Lists, start from the Applicant Lists tile.
Use the My Applicant Lists page to view all private lists owned by the recruiting user, as well as the active public lists.
Select Create New List to add a list.
Create New List
Use the Create New List page to create an applicant list.

NDUS CTS 190 | P a g e
List Name and Description: Enter identifying information about the new list. Both the name and description appear on the Applicant Lists page. Only the name appears on the Manage Applicant List page. Status: Select Active or Inactive. When a list is inactive, only the list owner can view the list, even if it is a public list. You cannot add applicants to inactive lists. Public: Select this check box to make the list a public list. Deselect this check box to make the list private. Private lists are visible only to the creator.
Add Applicant to List
From the My Applicants tile, select applicants to add to your list.

NDUS CTS 191 | P a g e
Select the applicants by checking the select checkbox. Use the Actions menu, Add Applicant to List option.
Add to Applicant List
Select the list that you would like to add the applicants to.

NDUS CTS 192 | P a g e
The applicant will appear in the list.

NDUS CTS 193 | P a g e
Interview Facilities Interview facilities are specific locations such as meeting rooms where interviews take place. In the
context of an applicant's interview schedule, the facility is referred to as the venue. Interview facilities
are referenced in the Interview Scheduling process. When defining an interview session, the information
that is set up on the interview facility selected provides details to the applicants and interviewers as to
where the interview will take place.
Navigation: Navigator Menu > Recruiting > Administration > Interview Facilities
Description: Enter the description that users see when selecting this venue to use for an interview. Email: This is the email address of the venue for scheduling in Outlook, if the interview scheduling process is connected to Outlook. NDUS does currently utilize a connection to Outlook. Location: Enter the specific location of the venue. When a recruiter adds a venue to an interview, the system copies the location information to the interview schedule. Interviewers can see the location information on the Interview Calendar page. Applicants can see the location information on the Interview Detail page in Candidate Gateway. Directions: Enter directions to the venue. Applicants can see the directions on the Interview Detail page in Candidate Gateway.

NDUS CTS 194 | P a g e
Notes: Enter any additional notes about the venue. Information in this field does not appear on the Interview Schedule page. However, users can access the Interview Facilities page from the Interview Schedule page if they want to review this information. Room Details: Enter any additional room details about the venue. Information in this field does not appear on the Interview Schedule page. However, users can access the Interview Facilities page from the Interview Schedule page if they want to review this information.
Attachments: Upload any useful attachments such as maps or room-specific instructions. The
attachments grid includes a link to the document along with information about who uploaded the file and when it was uploaded. Attachments do not appear on the Interview Schedule page. However, users can access the Interview Facilities page from the Interview Schedule page if they want to review this information.

NDUS CTS 195 | P a g e
RECRUITING ALERTS TILE
View the total count of alerts associated with the recruiting user’s job openings and access the Recruiting Alerts Page.
Use the Recruiting Alerts page to view summary information for the user’s own job openings and to access pages with more detailed information.
The left panel displays the alert type and the number of alerts. Click any alert type, to access the corresponding page for more details.
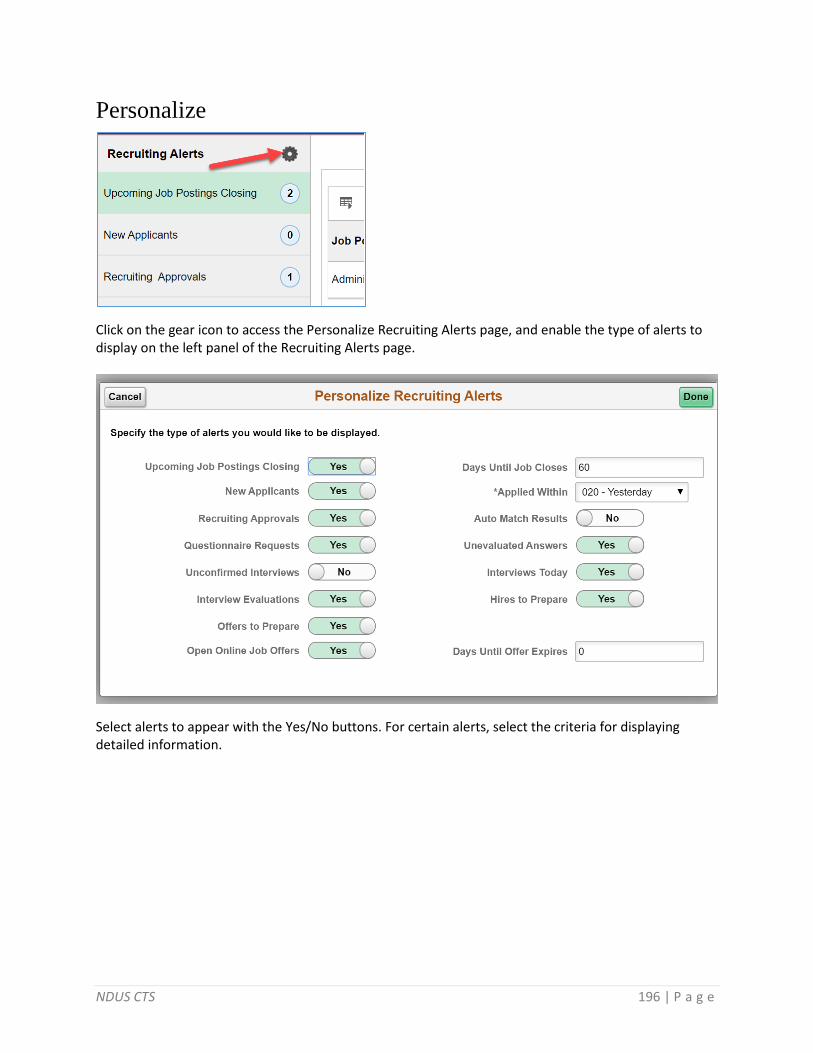
NDUS CTS 196 | P a g e
Personalize
Click on the gear icon to access the Personalize Recruiting Alerts page, and enable the type of alerts to display on the left panel of the Recruiting Alerts page.
Select alerts to appear with the Yes/No buttons. For certain alerts, select the criteria for displaying detailed information.
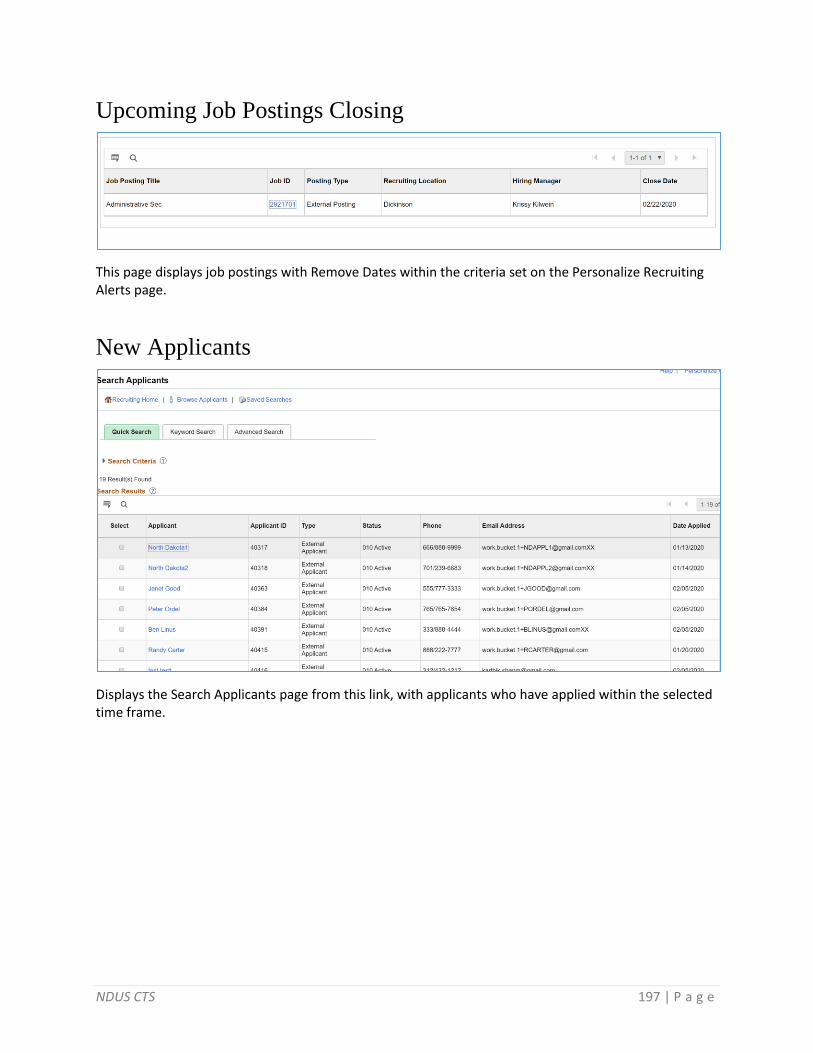
NDUS CTS 197 | P a g e
Upcoming Job Postings Closing
This page displays job postings with Remove Dates within the criteria set on the Personalize Recruiting Alerts page.
New Applicants
Displays the Search Applicants page from this link, with applicants who have applied within the selected time frame.

NDUS CTS 198 | P a g e
Recruiting Approvals
Displays the job offers and job openings waiting for the recruiting user’s approval. Use this page to review and act on the job offers and openings that require the recruiting user’s approval.
Questionnaire Requests
Displays the applicants who have not yet submitted updated applications for job openings with questionnaires after being invited to do so. Use this page to review open questionnaire requests and to send email reminders to selected applicants.

NDUS CTS 199 | P a g e
Unevaluated Answers
Displays the open-ended screening question evaluations that have not been completed for the user’s job openings. Use this page to see the applicants, job openings, and evaluators for the incomplete evaluations. Use the “Send Reminder” button to send a reminder notification to the evaluators.
Interviews Today

NDUS CTS 200 | P a g e
Displays the interviews scheduled for the user on that specific day. Use this page to review the recruiting user’s weekly interview schedule.
Interview Evaluations
Displays the incomplete interview evaluations where the user is the evaluator. Two types of evaluations are included in the count: Evaluations that were saved as draft but not submitted, and Evaluations that have not been started for an interview that has already occurred (based on the interview date).
Offers to Prepare

NDUS CTS 201 | P a g e
Displays the applications that:
• Have a draft (unsubmitted) offer.
• Are in the Interview phase with an Interview status that is the designated “Complete” status. As delivered, the complete status for interviews is 020 Make Offer.
• Are in the Offer phase, but no offer record exists. This occurs only when a user manually changes an applicant’s disposition using the Edit Disposition action.
Use this page to review applicants who are waiting for offers and to access the applicant or job opening so that the recruiting user can begin to prepare the offer.
Open Online Job Offers
Displays the expired or soon-to-expire open online job offers for your job openings. This includes offers that will expire within the number of days that you specify on the Personalize Recruiting Alerts page. Open online job offers are offers that you posted to Candidate Gateway that have not been accepted or rejected. The offer status must be Extend. Use this page to review the applicants and job openings associated with the open online job offers.

NDUS CTS 202 | P a g e
Hires to Prepare
Displays the applicants with an Offer Accepted disposition for the user's job openings. When the
recruiting user accesses this page, it displays applications with the disposition Offer Accepted.

NDUS CTS 203 | P a g e
RECRUITING INSIGHTS
Access the Recruiting Insight dashboard and various pivot grids that provide graphic views of important performance measures.
The Recruiting Insight dashboard displays various dynamic tiles showing different analytic charts.
Click on an analytics tile to expand the view of the chart.

NDUS CTS 204 | P a g e
Time to Fill Jobs The Time to Fill Jobs chart shows the monthly average Time to Fill data, helping users to see trends in their ability to fill job openings.
The Time to Fill pivot grid displays the average days taken to fill the job openings that are closed in a particular month. The chart represents data for job openings to which the user has security access.

NDUS CTS 205 | P a g e
Job Opening Aging The Job Opening Aging Analysis chart shows the number of open job openings in various pre-defined age bands, providing vital information about an organization’s recruiting backlog.
Use the Job Opening Aging pivot grid to view the number of open job openings of various ages.

NDUS CTS 206 | P a g e
In Process Applicants The In Process Applicants chart shows the distribution of dispositions for applicants who are being considered for job openings, offering a view of the applicant pipeline.
Use the In Process Applicants pivot grid to view a bar graph showing the user’s average number of days to fill a job opening for a specified time period.

NDUS CTS 207 | P a g e
Jobs Opened/Closed Job Opened/Closed chart shows data related to the number of openings that are opened and closed on a monthly basis, giving users a picture of hiring activity across time, departments and locations.
The Job Opened/Closed pivot grid displays monthly job opening data. By default, the data appears as a bar chart. For each month, one bar represents the number of job openings that were opened, and a second bar represent the number of job openings that were filled. The opening date for a job opening is considered to be the earliest posting date or, if there are no postings defined, the actual job opening date. The closing date is the date that the job opening status changed to Filled/Closed. The chart represents data for job openings to which the user has security access.

NDUS CTS 208 | P a g e
Working with Analytics The Pivot Grid Viewer component enables varied features. You can:
• View the pivot grid in the browser.
• Change the layout of the grid and the chart to view the data differently.
• Drill down on the grid and chart to get detailed views of the data.
• If the display option is Chart Only, drill-down can be performed by clicking the chart. If the display option is Pivot Grid and Chart, drill-down is performed based on the All members that were defined for the axis type columns.
• Export the original PSQuery data to Microsoft Excel.
• Change the PSQuery runtime prompt values.
• Change the chart types to either bar, line, pie, or horizontal bar.
• Change the chart options—chart axes, chart title, axis labels, and so on—using the User Charting Options dialog box.
• Save user preferences in addition to the initial options set for the Pivot Grid View. You can save the grid and chart layouts based on the filtering and dicing done on the grid and chart. When rendering the Pivot Grid display, these user preferences have a higher priority than the default view options.
Prompts
Pivot Grid prompts appear on the left panel of the fluid viewer. All types of prompts — including prompt table with edits, prompt table with no edits, translate prompts, and date prompts — can be displayed. The right panel and facet area are not refreshed on each prompt change, which happens only after you select the prompt and click the Search button.

NDUS CTS 209 | P a g e
Facet Filters
Pivot Grid filter dimensions appear as facets in the left panel of the viewer. The facets:
• Show the corresponding results with the total number of results or the facet value between brackets.
• Include the chart X-axis, series, and the grid rows by default.
• Apply progressive filtering.
• Allow to filter data which reflects on the chart and the grid.

NDUS CTS 210 | P a g e
Options Menu
: Click to open the Options Menu, then select from these menu items:
• View Grid: Opens an modal window that displays the data in a grid format rather than a chart format.
• Update Filters: Opens the Update Filters modal window, from where you can add or remove filters. When a filter is added, it is displayed as a facet in the left panel. The available facets include: Recruiter, Business Unit, Job Family, Department, etc.
• Chart Options: Opens the Chart Options modal window, where you can change the chart labels, layout, axes, and filters.
• Export Data: Exports the underlying PSQuery data to a spreadsheet.
• Reset: Deletes all saved personalizations and resets to a default layout.
• Save: Saves the current grid and chart layout as the default view.
• Save As: Saves the current grid and chart layout with the name and title that you specify.
• Sort Option: Enables you to sort data with some available parameters.

NDUS CTS 211 | P a g e
Drilldown Menu
<Drilldown Menu>: When you click a data element (for example, a bar on a bar chart), the Actions menu provides these options:
• Detailed View: Displays a grid with the detailed data. For example, if a bar on a bar chart represents the number of job openings that were filled in a particular month, clicking Detailed View displays a grid with information about each of the included job openings.
• Drilldown To: Displays the drilldown options defined for the chart. Clicking a drilldown option redraws the chart based on the selected type of data.

NDUS CTS 212 | P a g e
Select Drilldown To – Department to view the details by Department.
Remove the Drilldown selections by clicking the items at the top of the chart.

NDUS CTS 213 | P a g e
Export Data
Export Data: Exports the underlying PSQuery data to a spreadsheet using the Options Menu item.

NDUS CTS 214 | P a g e
APPENDIX
List of Actions
Action Name Description
Accept Offer Access the <Accept/Reject> Offer Page to record that an offer has been accepted and to enter an optional reason. Note: This action is available only if an offer in the default (extended) or pending status exists.
Add Applicant Note
Access the Applicant Notes Page to enter applicant-related notes and attachments. Note: This action is not available to users with the Hiring Manager role.
Add Applicant to List
Access the Add to Applicant List Page to select the applicant list to which you want to add an applicant.
Add POI (add Person of Interest)
Access the Add Person of Interest Page to create an HR person of interest record for an applicant. Note: The Applicant must be an external applicant who is not already associated with a person of interest (POI) record.
Change Applicant Status
Access the Change Applicant Status Page to change an applicant's overall status (not the status specific to a job opening).
Create Interview Evaluation
Access the Interview Evaluation Page to create, update, or review interview evaluations.
Edit Application Details
Access the Application Details Page to review or update an applicant's complete job application details.
Edit Disposition Access the Edit Disposition Page to manually change an applicant’s disposition for a specific job opening (or for an application with no job opening). Note: If, under a flexible recruiting process, an applicant’s current disposition does not have any valid transitions for a particular recruiting role type, then users with that role type do not see the Edit Disposition action for that applicant.
Forward Applicant Access the Forward Applicant Page to forward applicant information (including the applicant’s resume) to another person.
Invite Application Send an employee an email invitation to apply for a job opening. Note: This action is available from a profile search that matches employees to job openings.
Link Applicant to Job
Access the Link Applicant to Job Opening Page to link an applicant to one or more job openings.
Manage Interviews If you invoke the action for a single applicant who has at least one existing interview, this action displays the Manage Interviews Page, where you can view and manage existing interviews or add an additional interview. If you invoke the action for multiple applicants or for an applicant who does not yet have any interviews, this action displays the Interview Schedule Page so that you can schedule interviews.
Mark Reviewed Update the application disposition to Reviewed. The change happens immediately, and you remain on the page where you invoked the action.

NDUS CTS 215 | P a g e
Action Name Description
Merge Applicant If you invoke the action for a single applicant (using the toolbar on the Manage Applicant page), this action displays the Merge Applicant Page, where you can merge the selected applicant record with one or more other applicants that you identify. If you invoke this action as a group action on the Manage Job Opening page (using the Group Actions menu on the Applicants tab, or using the Merge button on the Screening Results section of the Applicant Screening tab), this action displays the Review Duplicate Applicants Page where you can identify the source and target applicant records and perform the merge. Note: This action is not available to users with the Hiring Manager role.
Pre-Employment Check
Access the Pre-Employment Check Page to submit a request for a pre-employment check for an applicant.
Prepare for Hire Access the Prepare For Hire Page to submit a hire request to the HR system. Note: Available only when the disposition is Offer Accepted, Ready to Hire, Hired, or Withdrawn.
Prepare Job Offer Access the Prepare Job Offer Page to create and manage a job offer.
Print Application Details
If you click the Print icon or toolbar button for a single application, the action displays the Application Report Options Page. If you use the Group Action menu to invoke the Print Application Details action, the action displays the Print Applications Page. Both pages enable you to generate the Application Details report and to choose what content to include in the report.
Reject Applicant Access the Reject Applicant Page to update an applicant's disposition to show that the applicant has been rejected.
Reject Offer Access the <Accept/Reject> Offer Page to record that an offer has been rejected and to enter an optional reason. Note: This action is available only if an offer in the default (extended) or pending status exists.
Route Applicant If you invoke the action for an application that has at least one existing routing, this action displays the Manage Routings Page, where you can view and manage existing routings or add an additional routing. If you invoke the action for multiple applicants, or for an applicant who does not yet have any routings, this action displays the Route Applicant Page so that you can route the applicant.
Schedule Interview Access the Schedule Interviews page to create an Interview Series, Sessions, and invite applicants to select sessions, or to assign applicants to sessions.
Send Correspondence
Access the Send Correspondence Page to send ad hoc letters and emails to applicants.
Withdraw Application
Access the Withdraw Application Page to update an applicant’s disposition to show that the application has been withdrawn from consideration.

NDUS CTS 216 | P a g e
List of Applicant Dispositions (Statuses) and Reasons
Status Available Status Reasons
005 Draft
010 Applied
015 Linked
019 Linked Questionnaire
020 Reviewed
030 Screen
050 Route
060 Interview
069 Preliminary Offer Decided
070 Offer
071 Offer Accepted
075 Preliminary Offer Notified
076 Preliminary Offer Accepted
077 Preliminary Offer Rejected
078 Hire Decided
080 Ready to Hire
090 Hired
100 Hold
110 Reject 010 Another Applicant was Hired
020 Unable to Contact
030 Poor Interview
040 No Skills Match
060 No Show for Interview
080 Selected for Other Position
090 Lacks Required Education
130 Lacks Other Min Qualifications
140 Lacks Required Credentials
150 Not Selected
160 Lacks Required Experience
170 Requisition Cancelled
190 Another Job
200 Offer Rejected
240 Preliminary Screen
250 After Interview
112 Failed Prescreening 010 Less than 100% for questions
020 Minimum score not attained
030 No Basic Eligibility
115 Reject Online Screening 010 Failed Online Screening
020 Less than 100% for Questions
030 Minimum Score Not Met
120 Withdrawn 030 Voluntary

NDUS CTS 217 | P a g e
Status Available Status Reasons
130 Withdrawn Application 010 Candidate Withdrawn
020 Recruiter Withdrawn
140 Inactive
Copyright © 2022 FDOKUMEN