RadarFX First Experience - MAK Technologies
14
First Experience RadarFX Version 1.4
-
Upload
khangminh22 -
Category
Documents
-
view
0 -
download
0
Transcript of RadarFX First Experience - MAK Technologies

RadarFX
First Experience
Version 1.4
Copyright © 2019 VT MAKAll rights Reserved. Printed in the United States.
Under copyright laws, no part of this document may be copied or reproduced inany form without prior written consent of VT MAK.
VR-Exchange™, VR-Vantage™, DI-Guy™, and DI-Guy Scenario™ are trade-marks of VT MAK. MÄK Technologies®, VR-Forces®, RTIspy®, B-HAVE®,
and VR-Link® are registered trademarks of VT MAK.
GL Studio® is a registered trademark of The DiSTI® Corporation.
Portions of this software use SpeedTree® RT technology (©2008 Interactive Data Visualization, Inc.). SpeedTree® is a registered trademark of Interactive
Data Visualization, Inc. All rights reserved.
SilverLining™ is a trademark of Sundog Software.
All other trademarks are owned by their respective companies.
VT MAK150 Cambridge Park Drive, 3rd Floor
Cambridge, MA 02140 USA
Voice: 617-876-8085Fax: 617-876-9208
www.mak.com
Revision RFX-1.4-4-190918

Rada
1. RadarFX First Experience
Thank you for deciding to try out RadarFX. RadarFX is a client-server applica-tion that can simulates synthetic-aperture radar (SAR), strip SAR, and inverse synthetic aperture radar (ISAR). RadarFX was created using technology from JRM Technologies. The server application, which is based on VR-Vantage and SensorFX, loads a terrain database and, optionally, connects to simulations. A client application requests SAR images from the server. RadarFX includes a sample client application.
This first experience guide provides a quick guided tour of RadarFX. RadarFX includes the documentation for VR-Vantage and SensorFX, which completely explain how to use those products. This guide provides only enough information about those applications to allow you to use RadarFX. It assumes that you are running on Microsoft Windows. If you have not used VR-Vantage, please review VR-Vantage Stealth First Experience Guide before trying this guide.
1-1rFX First Experience

RadarFX First Experience — Start RadarFX Server
1.1. Start RadarFX ServerThe RadarFX Server graphical user interface (GUI) lets you load terrains and navigate through them. If it is connected to a simulation, you can select and view the simulation objects it discovers over the network. These capabilities let you set up views of the terrain that can then be served as SAR images to client applications.
1. On Windows 7, on the Start menu, choose MAK Technologies → RadarFX 1.2.1 → RadarFX Server. On Windows 10, choose MAK Technologies → RadarFX Server. RadarFX Server starts up. The Load Terrain dialog box opens.
2. Select the Load Terrain option.
3. In the Load Terrain list, select MAK Earth mcod (online).mtf.4. Click OK. The map displays the Hawaii terrain (Figure 1-1).
Figure 1-1. Ala Moana terrain
5. Hold down the left mouse button and drag the terrain so that the Hawaiian islands are centered (Figure 1-2).
! The VC 12 version of RadarFX uses a batch file to start. If you decide to start it from the command line or a file explorer, you must run radarFX.bat, not radarFX.exe.
Hawaii
1-2 VT MAK

RadarFX First Experience — Start RadarFX Server
Figure 1-2. Hawaii
6. Press the e key to zoom in and drag the terrain to center on Honolulu (Figure 1-3).
Figure 1-3. Honolulu
7. Zoom in to the high resolution Ala Moana inset outlined in Figure 1-3 and shown in Figure 1-4.
RadarFX First Experience 1-3

RadarFX First Experience — Start RadarFX Server
Figure 1-4. Ala Moana inset
8. Use the mouse and keyboard to change the eyepoint so that you have a view of the buildings (Figure 1-5). (Hold down the right mouse button to change the orientation and the e key to change altitude.)
Figure 1-5. Ala Moana buildings
1-4 VT MAK

RadarFX First Experience — Request a SAR Image
1.2. Start RadarFX Simple ClientRadarFX comes with a client application that you can use to request images from the server.
1. On Windows 7, on the Start menu, choose MAK Technologies → RadarFX 1.2.1 → RadarFX Simple Client. (On Windows 10, choose MAK Technologies → RadarFX Simple Client.) RadarFX Simple Client starts up. RadarFX Simple Client opens and the Connect to RadarFX Server dialog box opens with default values.
2. Click OK. RadarFX Simple Client is ready to use (Figure 1-6).
Figure 1-6. RadarFX Simple Client
1.3. Request a SAR ImageThe client lets you request SAR images based on the eyepoint in the server, the location of a simulated entity, or a specific latitude, longitude, and altitude. We will use the eyepoint that we set up in the first part of this tutorial. We will also accept all the default values.
To request an image, on the SAR/ISAR tab click Send Image Request.
The status area of the client indicates that you have sent a request and then indicates that the client is waiting for a response. This process can take several minutes.
As the server builds the image, it changes its observer view to SAR and displays portions of the image it is building (Figure 1-7).
RadarFX First Experience 1-5

RadarFX First Experience — Learn More
Figure 1-7. RadarFX Server building a SAR image
When the image is returned, it is displayed in the client window (Figure 1-8).
Figure 1-8. RadarFX Simple Client with image
1.4. Learn MoreFor more information, please see RadarFX Users Guide.
1-6 VT MAK

Rada
2. Installation and Licensing
Your VT MAK salesperson has given you a link to the RadarFX installer as well as links to other MAK applications and data to support your first user experi-ence. Download the files. Before you install the applications, note the following possible issues:
When you install RadarFX on Windows, there may be a delay of up to several minutes from the time you try to run the setup program to the time that an installation dialog box is displayed. If you experience this problem, turning off User Access Control can reduce or eliminate this delay.
These instructions assume you are familiar with installing Windows appli-cations that use a wizard-style installer.
2-1rFX First Experience

Installation and Licensing — Install RadarFX
2.1. Install RadarFXRadarFX has an application installer and a data package. The application installer can automatically install the data.
To install RadarFX:
1. Run the application installer.
2. When you are prompted to choose an option for installing the data package (Figure 2-9), select the default - “Install the recommended data package automatically”.
Figure 2-1. Data installer selection page
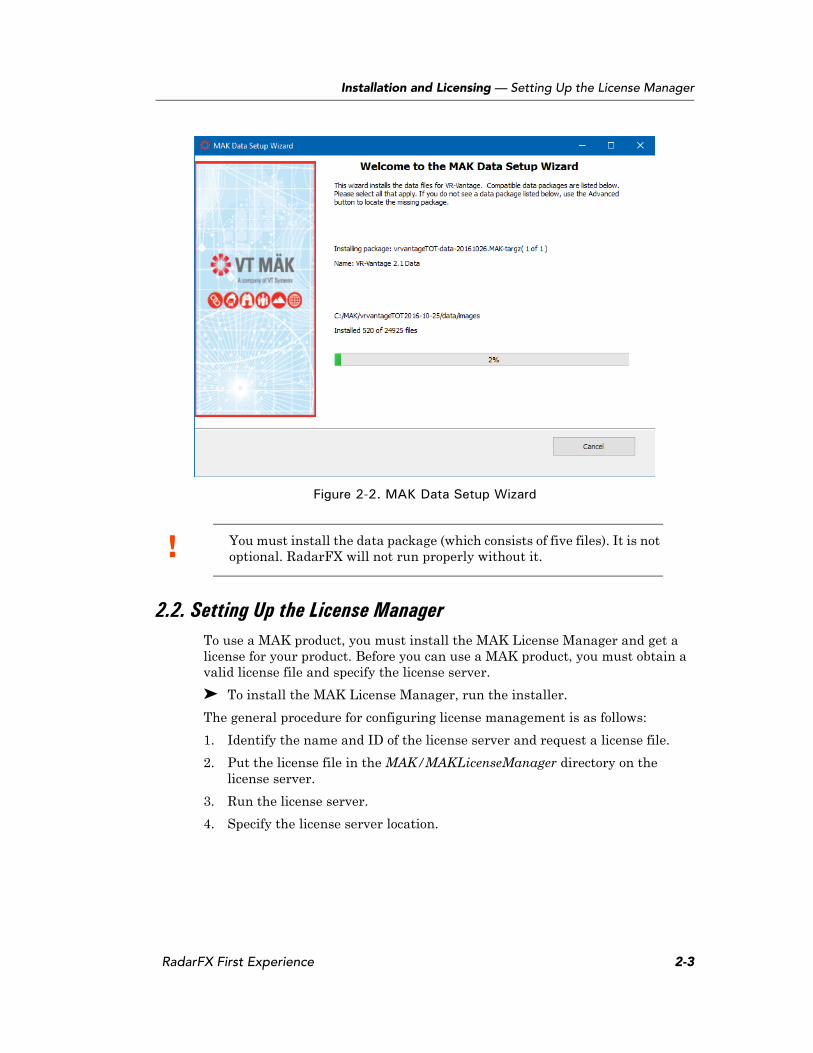
3. Continue with the installation wizard. When the application installer finishes, the MAK Data Setup Wizard (Figure 2-10) opens automatically and installs the data.
2-2 VT MAK
Installation and Licensing — Setting Up the License Manager
Figure 2-2. MAK Data Setup Wizard
2.2. Setting Up the License ManagerTo use a MAK product, you must install the MAK License Manager and get a license for your product. Before you can use a MAK product, you must obtain a valid license file and specify the license server.
To install the MAK License Manager, run the installer.
The general procedure for configuring license management is as follows:
1. Identify the name and ID of the license server and request a license file.
2. Put the license file in the MAK/MAKLicenseManager directory on the license server.
3. Run the license server.
4. Specify the license server location.
! You must install the data package (which consists of five files). It is not optional. RadarFX will not run properly without it.
RadarFX First Experience 2-3

Installation and Licensing — Setting Up the License Manager
2.2.1. Identify the Host ID and License Server NameFor simplicity, use the computer on which you installed RadarFX as the license server. To find out the host ID and license server name:
1. On the Start menu, choose MAK Technologies → MAK License Manager. The MAK License Manager utility opens (Figure 2-11).
Figure 2-3. License Manager
2. Select the Request License tab. It displays the server name and the IDs for your network cards.
3. If you have more than one network card, select the one that you want to use as Host ID.
4. Send the host ID and hostname to your MAK salesperson. MAK will e-mail you a license file.
2.2.2. Put the License File in the MAKLicenseManager DirectoryWhen you receive your license file, put it in the MAKLicenseManager directory on the license server. The file should have the extension .lic. If it does not, please contact [email protected] to clarify why it did not follow this convention.
2-4 VT MAK

Installation and Licensing — Setting Up the License Manager
2.2.3. Run the License ServerTo start the license server daemon, on the server machine only, execute runLm from the MAKLicenseManager directory.
Shutting Down the License Server
To force all applications to check in their licenses and shut down the license server daemon, run lmdown.
2.2.4. Specify the License ServerThe first time you run a MAK application on a computer, the License Setup dialog box opens (Figure 2-12). It prompts you to enter the hostname of the license server and optionally, a port number.
Figure 2-4. License Setup dialog box
1. Type the hostname in the Hostname box.
2. Click Add License Server. The application will start.
RadarFX First Experience 2-5

Installation and Licensing — Setting Up the License Manager
2-6 VT MAK