pywws Documentation - Read the Docs
130
pywws Documentation Release 18.04.1.dev1389 Jim Easterbrook Apr 11, 2018
-
Upload
khangminh22 -
Category
Documents
-
view
6 -
download
0
Transcript of pywws Documentation - Read the Docs
pywws DocumentationRelease 18.04.1.dev1389
Jim Easterbrook
Apr 11, 2018


Contents
1 Requirements 3
2 Installing and upgrading pywws 5
3 Documentation 73.1 Contents . . . . . . . . . . . . . . . . . . . . . . . . . . . . . . . . . . . . . . . . . . . . . . . . . 73.2 Indices and tables . . . . . . . . . . . . . . . . . . . . . . . . . . . . . . . . . . . . . . . . . . . . 115
4 Credits 117
5 Legalese 119
Python Module Index 121
i

ii

pywws Documentation, Release 18.04.1.dev1389
Python software for USB Wireless WeatherStations.
pywws is a collection of Python modules to read, store and process data from popular USB wireless weather stationssuch as Elecsa AstroTouch 6975, Watson W-8681, WH-1080PC, WH1080, WH1081, WH3080 etc. I assume anymodel that is supplied with the EasyWeather Windows software is compatible, but cannot guarantee this.
The software has been developed to run in a low power, low memory environment such as a router or Raspberry Pi. Itcan be used to create graphs and web pages showing recent weather readings, typically updated every hour. It can alsosend “live” data to services such as Weather Underground and post messages to Twitter.
The development version of pywws is hosted on GitHub.
• https://github.com/jim-easterbrook/pywws
“Snapshot” releases of pywws are available from the Python Package Index (PyPI).
• https://pypi.python.org/pypi/pywws
Documentation is hosted on Read the Docs.
• http://pywws.readthedocs.org/
Documentation is available in the following languages (non-English versions may not be complete or up to date):
Contents 1

pywws Documentation, Release 18.04.1.dev1389
• English
• Français – translated by Jacques Desroches
• Italiano – translated by Edoardo
I have written this software to meet my needs, but have tried to make it adaptable to other people’s requirements. Youmay want to edit some or all of the modules, or write some new ones, to get it to do exactly what you want. One of thereasons for using Python is that it makes such alterations so easy. Don’t be afraid, just jump in and have a go.
2 Contents

CHAPTER 1
Requirements
The software you’ll need to run pywws depends on what you plan to do with it. You’ll need Python 2.5 or later –Python 3 is partially supported, some functionality depends on libraries that have not yet been ported to Python 3.
For more detail, see Dependencies.
3

pywws Documentation, Release 18.04.1.dev1389
4 Chapter 1. Requirements

CHAPTER 2
Installing and upgrading pywws
pywws can be installed directly from the Python Package Index (PyPI) using the pip command. See How to get startedwith pywws for full instructions.
Some new versions of pywws change what’s stored in the hourly, daily or monthly summary data files. These newversions are incompatible with processed data from earlier versions. The pywws.Reprocess script regenerates allthe summary data. It should be run after any major upgrade.
5

pywws Documentation, Release 18.04.1.dev1389
6 Chapter 2. Installing and upgrading pywws

CHAPTER 3
Documentation
Documentation is included with pywws downloads, and is also available online. A good starting place is How to getstarted with pywws which describes in more detail how to install pywws.
If you have questions not answered in the documentation, please join the pywws Google mailing list / discussion groupand ask there. Note that your first message to the group will not appear immediately – new posters have to be approvedby a moderator, to prevent spam messages.
3.1 Contents
3.1.1 GNU General Public License
GNU GENERAL PUBLIC LICENSEVersion 2, June 1991
Copyright (C) 1989, 1991 Free Software Foundation, Inc.51 Franklin Street, Fifth Floor, Boston, MA 02110-1301 USA
Everyone is permitted to copy and distribute verbatim copiesof this license document, but changing it is not allowed.
Preamble
The licenses for most software are designed to take away yourfreedom to share and change it. By contrast, the GNU General PublicLicense is intended to guarantee your freedom to share and change freesoftware--to make sure the software is free for all its users. ThisGeneral Public License applies to most of the Free SoftwareFoundation's software and to any other program whose authors commit tousing it. (Some other Free Software Foundation software is covered bythe GNU Library General Public License instead.) You can apply it toyour programs, too.
When we speak of free software, we are referring to freedom, not
7

pywws Documentation, Release 18.04.1.dev1389
price. Our General Public Licenses are designed to make sure that youhave the freedom to distribute copies of free software (and charge forthis service if you wish), that you receive source code or can get itif you want it, that you can change the software or use pieces of itin new free programs; and that you know you can do these things.
To protect your rights, we need to make restrictions that forbidanyone to deny you these rights or to ask you to surrender the rights.These restrictions translate to certain responsibilities for you if youdistribute copies of the software, or if you modify it.
For example, if you distribute copies of such a program, whethergratis or for a fee, you must give the recipients all the rights thatyou have. You must make sure that they, too, receive or can get thesource code. And you must show them these terms so they know theirrights.
We protect your rights with two steps: (1) copyright the software, and(2) offer you this license which gives you legal permission to copy,distribute and/or modify the software.
Also, for each author's protection and ours, we want to make certainthat everyone understands that there is no warranty for this freesoftware. If the software is modified by someone else and passed on, wewant its recipients to know that what they have is not the original, sothat any problems introduced by others will not reflect on the originalauthors' reputations.
Finally, any free program is threatened constantly by softwarepatents. We wish to avoid the danger that redistributors of a freeprogram will individually obtain patent licenses, in effect making theprogram proprietary. To prevent this, we have made it clear that anypatent must be licensed for everyone's free use or not licensed at all.
The precise terms and conditions for copying, distribution and
GNU GENERAL PUBLIC LICENSETERMS AND CONDITIONS FOR COPYING, DISTRIBUTION AND MODIFICATION0. This License applies to any program or other work which contains
a notice placed by the copyright holder saying it may be distributedunder the terms of this General Public License. The "Program", below,refers to any such program or work, and a "work based on the Program"means either the Program or any derivative work under copyright law:that is to say, a work containing the Program or a portion of it,either verbatim or with modifications and/or translated into anotherlanguage. (Hereinafter, translation is included without limitation inthe term "modification".) Each licensee is addressed as "you".Activities other than copying, distribution and modification are notcovered by this License; they are outside its scope. The act ofrunning the Program is not restricted, and the output from the Programis covered only if its contents constitute a work based on theProgram (independent of having been made by running the Program).Whether that is true depends on what the Program does.
1. You may copy and distribute verbatim copies of the Program'ssource code as you receive it, in any medium, provided that youconspicuously and appropriately publish on each copy an appropriatecopyright notice and disclaimer of warranty; keep intact all the
8 Chapter 3. Documentation

pywws Documentation, Release 18.04.1.dev1389
notices that refer to this License and to the absence of any warranty;and give any other recipients of the Program a copy of this Licensealong with the Program.You may charge a fee for the physical act of transferring a copy, andyou may at your option offer warranty protection in exchange for a fee.
2. You may modify your copy or copies of the Program or any portionof it, thus forming a work based on the Program, and copy anddistribute such modifications or work under the terms of Section 1above, provided that you also meet all of these conditions:
a) You must cause the modified files to carry prominent noticesstating that you changed the files and the date of any change.b) You must cause any work that you distribute or publish, that inwhole or in part contains or is derived from the Program or anypart thereof, to be licensed as a whole at no charge to all thirdparties under the terms of this License.c) If the modified program normally reads commands interactivelywhen run, you must cause it, when started running for suchinteractive use in the most ordinary way, to print or display anannouncement including an appropriate copyright notice and anotice that there is no warranty (or else, saying that you providea warranty) and that users may redistribute the program underthese conditions, and telling the user how to view a copy of thisLicense. (Exception: if the Program itself is interactive butdoes not normally print such an announcement, your work based onthe Program is not required to print an announcement.)
These requirements apply to the modified work as a whole. Ifidentifiable sections of that work are not derived from the Program,and can be reasonably considered independent and separate works inthemselves, then this License, and its terms, do not apply to thosesections when you distribute them as separate works. But when youdistribute the same sections as part of a whole which is a work basedon the Program, the distribution of the whole must be on the terms ofthis License, whose permissions for other licensees extend to theentire whole, and thus to each and every part regardless of who wrote it.Thus, it is not the intent of this section to claim rights or contestyour rights to work written entirely by you; rather, the intent is toexercise the right to control the distribution of derivative orcollective works based on the Program.In addition, mere aggregation of another work not based on the Programwith the Program (or with a work based on the Program) on a volume ofa storage or distribution medium does not bring the other work underthe scope of this License.
3. You may copy and distribute the Program (or a work based on it,under Section 2) in object code or executable form under the terms of
3.1. Contents 9

pywws Documentation, Release 18.04.1.dev1389
Sections 1 and 2 above provided that you also do one of the following:a) Accompany it with the complete corresponding machine-readablesource code, which must be distributed under the terms of Sections1 and 2 above on a medium customarily used for software interchange; or,b) Accompany it with a written offer, valid for at least threeyears, to give any third party, for a charge no more than yourcost of physically performing source distribution, a completemachine-readable copy of the corresponding source code, to bedistributed under the terms of Sections 1 and 2 above on a mediumcustomarily used for software interchange; or,c) Accompany it with the information you received as to the offerto distribute corresponding source code. (This alternative isallowed only for noncommercial distribution and only if youreceived the program in object code or executable form with suchan offer, in accord with Subsection b above.)
The source code for a work means the preferred form of the work formaking modifications to it. For an executable work, complete sourcecode means all the source code for all modules it contains, plus anyassociated interface definition files, plus the scripts used tocontrol compilation and installation of the executable. However, as aspecial exception, the source code distributed need not includeanything that is normally distributed (in either source or binaryform) with the major components (compiler, kernel, and so on) of theoperating system on which the executable runs, unless that componentitself accompanies the executable.If distribution of executable or object code is made by offeringaccess to copy from a designated place, then offering equivalentaccess to copy the source code from the same place counts asdistribution of the source code, even though third parties are notcompelled to copy the source along with the object code.
4. You may not copy, modify, sublicense, or distribute the Programexcept as expressly provided under this License. Any attemptotherwise to copy, modify, sublicense or distribute the Program isvoid, and will automatically terminate your rights under this License.However, parties who have received copies, or rights, from you underthis License will not have their licenses terminated so long as suchparties remain in full compliance.
5. You are not required to accept this License, since you have notsigned it. However, nothing else grants you permission to modify ordistribute the Program or its derivative works. These actions areprohibited by law if you do not accept this License. Therefore, bymodifying or distributing the Program (or any work based on theProgram), you indicate your acceptance of this License to do so, andall its terms and conditions for copying, distributing or modifyingthe Program or works based on it.
6. Each time you redistribute the Program (or any work based on theProgram), the recipient automatically receives a license from theoriginal licensor to copy, distribute or modify the Program subject tothese terms and conditions. You may not impose any furtherrestrictions on the recipients' exercise of the rights granted herein.You are not responsible for enforcing compliance by third parties tothis License.
7. If, as a consequence of a court judgment or allegation of patentinfringement or for any other reason (not limited to patent issues),conditions are imposed on you (whether by court order, agreement orotherwise) that contradict the conditions of this License, they do notexcuse you from the conditions of this License. If you cannotdistribute so as to satisfy simultaneously your obligations under this
10 Chapter 3. Documentation

pywws Documentation, Release 18.04.1.dev1389
License and any other pertinent obligations, then as a consequence youmay not distribute the Program at all. For example, if a patentlicense would not permit royalty-free redistribution of the Program byall those who receive copies directly or indirectly through you, thenthe only way you could satisfy both it and this License would be torefrain entirely from distribution of the Program.If any portion of this section is held invalid or unenforceable underany particular circumstance, the balance of the section is intended toapply and the section as a whole is intended to apply in othercircumstances.It is not the purpose of this section to induce you to infringe anypatents or other property right claims or to contest validity of anysuch claims; this section has the sole purpose of protecting theintegrity of the free software distribution system, which isimplemented by public license practices. Many people have madegenerous contributions to the wide range of software distributedthrough that system in reliance on consistent application of thatsystem; it is up to the author/donor to decide if he or she is willingto distribute software through any other system and a licensee cannotimpose that choice.This section is intended to make thoroughly clear what is believed tobe a consequence of the rest of this License.
8. If the distribution and/or use of the Program is restricted incertain countries either by patents or by copyrighted interfaces, theoriginal copyright holder who places the Program under this Licensemay add an explicit geographical distribution limitation excludingthose countries, so that distribution is permitted only in or amongcountries not thus excluded. In such case, this License incorporatesthe limitation as if written in the body of this License.
9. The Free Software Foundation may publish revised and/or new versionsof the General Public License from time to time. Such new versions willbe similar in spirit to the present version, but may differ in detail toaddress new problems or concerns.Each version is given a distinguishing version number. If the Programspecifies a version number of this License which applies to it and "anylater version", you have the option of following the terms and conditionseither of that version or of any later version published by the FreeSoftware Foundation. If the Program does not specify a version number ofthis License, you may choose any version ever published by the Free SoftwareFoundation.
10. If you wish to incorporate parts of the Program into other freeprograms whose distribution conditions are different, write to the authorto ask for permission. For software which is copyrighted by the FreeSoftware Foundation, write to the Free Software Foundation; we sometimesmake exceptions for this. Our decision will be guided by the two goalsof preserving the free status of all derivatives of our free software andof promoting the sharing and reuse of software generally.
NO WARRANTY11. BECAUSE THE PROGRAM IS LICENSED FREE OF CHARGE, THERE IS NO WARRANTY
FOR THE PROGRAM, TO THE EXTENT PERMITTED BY APPLICABLE LAW. EXCEPT WHENOTHERWISE STATED IN WRITING THE COPYRIGHT HOLDERS AND/OR OTHER PARTIESPROVIDE THE PROGRAM "AS IS" WITHOUT WARRANTY OF ANY KIND, EITHER EXPRESSEDOR IMPLIED, INCLUDING, BUT NOT LIMITED TO, THE IMPLIED WARRANTIES OFMERCHANTABILITY AND FITNESS FOR A PARTICULAR PURPOSE. THE ENTIRE RISK ASTO THE QUALITY AND PERFORMANCE OF THE PROGRAM IS WITH YOU. SHOULD THE
3.1. Contents 11

pywws Documentation, Release 18.04.1.dev1389
PROGRAM PROVE DEFECTIVE, YOU ASSUME THE COST OF ALL NECESSARY SERVICING,REPAIR OR CORRECTION.
12. IN NO EVENT UNLESS REQUIRED BY APPLICABLE LAW OR AGREED TO IN WRITINGWILL ANY COPYRIGHT HOLDER, OR ANY OTHER PARTY WHO MAY MODIFY AND/ORREDISTRIBUTE THE PROGRAM AS PERMITTED ABOVE, BE LIABLE TO YOU FOR DAMAGES,INCLUDING ANY GENERAL, SPECIAL, INCIDENTAL OR CONSEQUENTIAL DAMAGES ARISINGOUT OF THE USE OR INABILITY TO USE THE PROGRAM (INCLUDING BUT NOT LIMITEDTO LOSS OF DATA OR DATA BEING RENDERED INACCURATE OR LOSSES SUSTAINED BYYOU OR THIRD PARTIES OR A FAILURE OF THE PROGRAM TO OPERATE WITH ANY OTHERPROGRAMS), EVEN IF SUCH HOLDER OR OTHER PARTY HAS BEEN ADVISED OF THEPOSSIBILITY OF SUCH DAMAGES.
END OF TERMS AND CONDITIONS
How to Apply These Terms to Your New ProgramsIf you develop a new program, and you want it to be of the greatest
possible use to the public, the best way to achieve this is to make itfree software which everyone can redistribute and change under these terms.
To do so, attach the following notices to the program. It is safestto attach them to the start of each source file to most effectivelyconvey the exclusion of warranty; and each file should have at leastthe "copyright" line and a pointer to where the full notice is found.
<one line to give the program's name and a brief idea of what it does.>Copyright (C) <year> <name of author>This program is free software; you can redistribute it and/or modifyit under the terms of the GNU General Public License as published bythe Free Software Foundation; either version 2 of the License, or(at your option) any later version.This program is distributed in the hope that it will be useful,but WITHOUT ANY WARRANTY; without even the implied warranty ofMERCHANTABILITY or FITNESS FOR A PARTICULAR PURPOSE. See theGNU General Public License for more details.You should have received a copy of the GNU General Public Licensealong with this program; if not, write to the Free SoftwareFoundation, Inc., 51 Franklin Street, Fifth Floor, Boston, MA 02110-1301 USA
Also add information on how to contact you by electronic and paper mail.If the program is interactive, make it output a short notice like thiswhen it starts in an interactive mode:
Gnomovision version 69, Copyright (C) year name of authorGnomovision comes with ABSOLUTELY NO WARRANTY; for details type `show w'.This is free software, and you are welcome to redistribute itunder certain conditions; type `show c' for details.
The hypothetical commands `show w' and `show c' should show the appropriateparts of the General Public License. Of course, the commands you use maybe called something other than `show w' and `show c'; they could even bemouse-clicks or menu items--whatever suits your program.You should also get your employer (if you work as a programmer) or yourschool, if any, to sign a "copyright disclaimer" for the program, ifnecessary. Here is a sample; alter the names:
Yoyodyne, Inc., hereby disclaims all copyright interest in the program`Gnomovision' (which makes passes at compilers) written by James Hacker.<signature of Ty Coon>, 1 April 1989Ty Coon, President of Vice
This General Public License does not permit incorporating your program intoproprietary programs. If your program is a subroutine library, you mayconsider it more useful to permit linking proprietary applications with thelibrary. If this is what you want to do, use the GNU Library General
12 Chapter 3. Documentation

pywws Documentation, Release 18.04.1.dev1389
Public License instead of this License.modification follow.
Comments or questions? Please subscribe to the pywws mailing list http://groups.google.com/group/pywws and let usknow.
3.1.2 pywws Contributors
The copywright to pywws and its documentation is jointly held by the following contributors.
Developers----------
Jim Easterbrook [email protected] Kearney [email protected] PerskyMorten Høybye Frederiksen [email protected] Josefsson [email protected] Hilton [email protected] Tobolka [email protected] Birth [email protected] Ramsay [email protected] Benke [email protected] Wilkinson [email protected]
Translators-----------
Edoardo [email protected] Desroches [email protected] [email protected] [email protected]
[email protected] Gordon [email protected]>Π𝜏𝜌o [email protected] [email protected] Sulman [email protected] [email protected] [email protected] Vera [email protected]
Contributing to pywws
If you would like to add a feature to pywws (or fix a problem with it) then please do. Open source software thriveswhen its users become active contributors. The process is quite simple:
1. Join GitHub - it’s free.
2. Fork the pywws repo - see Fork a Repo for help.
3. Clone your fork to a computer you can use to develop your new feature.
3.1. Contents 13

pywws Documentation, Release 18.04.1.dev1389
4. Use git to commit changes as you make them and push the changes to your fork of pywws.
Please add a signed-off-by line to your commits which certify your developer certificate of origin (see below).For example, if your name is “John Smith”, and your email address is “[email protected]”, just include thefollowing line at the bottom of your commit messages:
Signed-off-by: John Smith <[email protected]>
You should be able to do this automatically by using the -s option on your git commit commands.
5. Add your name and email to the src/contributors/contributors.txt file. Don’t forget the -soption when you commit this change.
6. Test your changes!
7. When everything’s working as you expect, submit a Pull Request.
Developer Certificate of Origin
Including a signed-off-by line in your commits indicates that you certify the following:
Developer Certificate of OriginVersion 1.1
Copyright (C) 2004, 2006 The Linux Foundation and its contributors.660 York Street, Suite 102,San Francisco, CA 94110 USA
Everyone is permitted to copy and distribute verbatim copies of thislicense document, but changing it is not allowed.
Developer's Certificate of Origin 1.1
By making a contribution to this project, I certify that:
(a) The contribution was created in whole or in part by me and Ihave the right to submit it under the open source licenseindicated in the file; or
(b) The contribution is based upon previous work that, to the bestof my knowledge, is covered under an appropriate open sourcelicense and I have the right under that license to submit thatwork with modifications, whether created in whole or in partby me, under the same open source license (unless I ampermitted to submit under a different license), as indicatedin the file; or
(c) The contribution was provided directly to me by some otherperson who certified (a), (b) or (c) and I have not modifiedit.
(d) I understand and agree that this project and the contributionare public and that a record of the contribution (including allpersonal information I submit with it, including my sign-off) ismaintained indefinitely and may be redistributed consistent withthis project or the open source license(s) involved.
14 Chapter 3. Documentation

pywws Documentation, Release 18.04.1.dev1389
Clauses (a), (b) and (c) reassure pywws users that the project will remain open source well in to the future. Clause(d) reminds you that your contributions will be publicly available, and you do not have the right to withdraw them infuture.
Comments or questions? Please subscribe to the pywws mailing list http://groups.google.com/group/pywws and let usknow.
3.1.3 Dependencies
The list of other software that pywws depends on looks frighteningly long at first glance. However, many of thesepackages won’t be needed by most users. What you need depends on what you want to do with pywws. Remember,it’s a “kit of parts” rather than a monolithic application.
Some of the requirements are Python packages that can be downloaded from the Python Package Index (PyPI). Irecommend using pip to install these.
You should be able to install the remaining dependencies using your operating system’s package manager. This is alot easier than downloading and compiling source files from the project websites. Note that some Linux distributionsuse different names for some of the packages, e.g. in Ubuntu, pyusb is called python-usb.
Note: some of these libraries may have their own dependencies that you may need to install. Follow the links to readmore about each library’s requirements.
Essential
• Python version 2.5 or higher
Python 3 is supported, but some things might not work properly. If you find a problem with Python 3, please send amessage to the mailing list or submit a bug report on GitHub.
• pip
You will probably be able to install pip with your system’s package manager, where it may be called python-pip orpython3-pip or something similar. If not, download and run the get-pip.py file from the pip web site. In eithercase you should immediately use pip to install the latest version of itself:
sudo pip install --upgrade pip
Make sure you install the correct Python version’s pip. If you want to install pywws for both Python 2 and Python 3you will need pip2 and pip3.
• tzlocal
This is a handy little module that provides information on your local time zone. It’s best installed with pip:
sudo pip install tzlocal
USB library
To retrieve data from a weather station pywws needs a python library that allows it to communicate via USB. Thereis a variety of USB libraries that can be used. Not all of them are available on all computing platforms, which mayrestrict your choice.
3.1. Contents 15

pywws Documentation, Release 18.04.1.dev1389
Mac OS X
On MacOS X the operating system’s generic hid driver “claims” the weather station, which makes it very difficult touse any other USB interface. Unfortunately, you will need to download and compile hidapi yourself.
• hidapi
• ctypes (your package manager may know it as python-ctypes)
If you can’t install ctypes then you can try the Cython interface to hidapi instead:
• cython-hidapi
• cython (your package manager may know it as python-Cython)
Other systems
Other systems use a Python interface to the libusb system library. There is a choice of interface and library version -install the latest that is available for your computer.
• libusb version 1.x (should be available from the package manager)
• python-libusb1 version 1.3
pip install libusb1
or
• libusb version 1.x or version 0.1 (should be available from the package manager)
• PyUSB version 1.0
pip install pyusb --pre
The --pre flag enables the installation of “pre release” versions, such as the current beta release (1.0.0b2) of pyusb.
If neither of these options works for you then you can use hidapi – see the Mac OS X instructions above.
Changed in version 15.01.0.dev1265: added ability to use python-libusb1 interface.
Flexible timed tasks
The pywws.Tasks module can do tasks at particular times and/or dates. This requires the croniter library. (Simplehourly, daily or ‘live’ tasks don’t need this library.)
• croniter
pip install croniter
Running as a daemon
The pywws.livelogdaemon program runs pywws live logging as a proper UNIX daemon process. It requires thepython-daemon library:
• python-daemon
pip install python-daemon
16 Chapter 3. Documentation

pywws Documentation, Release 18.04.1.dev1389
Graph drawing
The pywws.Plotmodule uses gnuplot to draw graphs. If you want to produce graphs of weather data, e.g. to includein a web page, you need to install the gnuplot application:
• gnuplot v4.2 or higher (should be available from the package manager)
After installing gnuplot you should edit weather.ini (see weather.ini - configuration file format) and set the gnuplotversion config item. Finding out the installed gnuplot version is easy:
gnuplot -V
Secure website uploading (sftp)
The pywws.Upload module can use “ftp over ssh” (sftp) to upload files to your web-site. Normal uploading justuses Python’s standard modules, but if you want to use sftp you need to install these two modules:
• paramiko
• pycrypto
sudo pip install pycrypto paramiko
Twitter updates
The pywws.ToTwitter module can be used to send weather status messages to Twitter. Posting to Twitter requiresthese modules:
• python-twitter v3.0 or higher
• python-oauth2
sudo pip install python-twitter oauth2
or
• tweepy v2.0 or higher
• python-oauth2
sudo pip install tweepy oauth2
Note that tweepy appears to be the less reliable of the two. If you have problems, e.g. with character encoding, tryinstalling python-twitter instead.
Changed in version 13.10_r1086: reenabled use of tweepy library as an alternative to python-twitter.python-oauth2 is still required by pywws.TwitterAuth.
Changed in version 13.06_r1023: pywws previously used the tweepy library instead of python-twitter andpython-oauth2.
MQTT
New in version 14.12.0.dev1260.
The pywws.toservice module can be used to send weather data to an MQTT broker. This requires the paho-mqttmodule:
3.1. Contents 17

pywws Documentation, Release 18.04.1.dev1389
• paho-mqtt
sudo pip install paho-mqtt
To create new language translations
pywws can be configured to use languages other than English, as described in How to use pywws in another language.The Babel package is required to extract the strings to be translated and to compile the translation files.
• babel
sudo pip install babel
Copying files to or from Transifex requires the transifex-client package.
• transifex-client
sudo pip install transifex-client
Translating the documentation using local files needs the sphinx-intl package.
• sphinx-intl
sudo pip install sphinx-intl
Changed in version 14.05.dev1209: pywws previously used the gettext package.
To ‘compile’ the documentation
The documentation of pywws is written in “ReStructured text”. A program called Sphinx is used to convert this easyto write format into HTML for use with a web browser. If you’d like to create a local copy of the documentation (soyou don’t have to rely on the online version, or to test a translation you’re working on) you need to install Sphinx,version 1.3 or later.
• Sphinx
sudo pip install sphinx
Comments or questions? Please subscribe to the pywws mailing list http://groups.google.com/group/pywws and let usknow.
3.1.4 Change Log
pywws - Python software for USB Wireless Weather Stationshttp://github.com/jim-easterbrook/pywwsCopyright (C) 2008-18 pywws contributors
This program is free software; you can redistribute it and/ormodify it under the terms of the GNU General Public Licenseas published by the Free Software Foundation; either version 2of the License, or (at your option) any later version.
This program is distributed in the hope that it will be useful,
18 Chapter 3. Documentation

pywws Documentation, Release 18.04.1.dev1389
but WITHOUT ANY WARRANTY; without even the implied warranty ofMERCHANTABILITY or FITNESS FOR A PARTICULAR PURPOSE. See theGNU General Public License for more details.
You should have received a copy of the GNU General Public Licensealong with this program; if not, write to the Free SoftwareFoundation, Inc., 51 Franklin Street, Fifth Floor, Boston, MA 02110-1301, USA.
Changes in v18.04.1:1/ Fix bug in utc <-> local time conversions.
Changes in v18.04.0:1/ Now works with broken weather stations that have stopped logging data.
(Although there may be more gaps in the data.)2/ Cope better with missing wind direction data.3/ Use HTTPS for Weather Underground uploads.4/ Other minor bug fixes.
Changes in v17.11.0:1/ Allow MQTT service without password.2/ Allow SFTP uploads with public key.3/ Increase Twitter character limit from 140 to 280.4/ Various other bug fixes and minor improvements.
Changes in v16.12.0:1/ Added "candlestick" plot type.2/ Added cloud base calculation function.3/ Various other bug fixes and minor improvements.
Changes in v16.08.0:1/ Fix Python 2.5 incompatibilities.2/ Fix python-twitter v3 tweet length problem.
Changes in v16.07.1:1/ Further changes to handle UK Met Office server quirks.
Changes in v16.07.0:1/ Fix bug with UK Met Office uploads server change.2/ Allow user commands in wind roses.3/ Various other bug fixes and minor improvements.
Changes in v15.12.0:1/ Fix bug with Twitter messages being excessively truncated.2/ Improve handling of utf-8 encoded templates.3/ Improved plots and wind roses with 'pngcairo' "terminal".4/ Various bug fixes and minor improvements.
Changes in v15.11.0:1/ Add Russian translation of program text.2/ Improved documentation.3/ Various bug fixes and minor improvements.
Changes in v15.07.0:1/ Can include multiple media in Twitter messages.2/ Attempt to fix bug in wind rose axes labels.3/ Enable inclusion of time & date in wind rose title.4/ Various bug fixes and minor improvements.
3.1. Contents 19

pywws Documentation, Release 18.04.1.dev1389
Changes in v15.01.0:1/ Added 'MQTT' service.2/ Added another USB library option.3/ Improved Python 3 compatibility.4/ Various bug fixes and minor improvements.
Changes in v14.12.0:1/ Updated temperatur.nu and wetterarchiv.de service details to suit new
APIs.
Changes in v14.06.1:1/ Revised version numbering scheme.2/ Compiled documentation no longer included in releases.3/ Can partially specify start & stop date/time in graphs, e.g. to start a
plot at midnight, no matter when it is plotted.
Changes in v14.06:1/ Can now send images to Twitter.2/ Periodic tasks can be specified with a cron style syntax.3/ Added wind direction filter for use in graphs or user calibration
modules.4/ Wind direction is now stored as a float. Old templates that use the
wind_dir_text array will need updating, probably to use thewinddir_text() function.
5/ Started using "Transifex" to host translations. Changed tools andprocedures to create new translations.
6/ Improved USB hangup avoidance strategy for stations with large clockdrift figures.
7/ Various bug fixes and minor improvements.
Changes in v14.05:1/ Rearranged package layout, moving examples and documentation.2/ Added 'entry point' auto-generated commands for some modules.3/ Added verbose output option to pywws-version command.4/ Various bug fixes and minor improvements.
Changes in v14.03:1/ Extracts additional status from 'wind_dir' byte. You must run
pywws-reprocess.py with the -u option after upgrading from any previousversion.
2/ Added Citizen Weather Observer Program to available 'services'.3/ Improved asynchronous upload task queuing.4/ Various bug fixes and minor improvements.
Changes in v14.02:1/ Improved time zone handling, including non whole hour time zones.2/ New 'frequent writes' config option.3/ Improved 'live log' sync, particularly with 3080 type stations.4/ Record recent memory pointer to improve detection of gaps in data.5/ Various bug fixes and minor improvements.
Changes in v13.12:1/ Changed API of user calibration module.2/ Can use python-twitter *or* tweepy library.3/ Added a script to run live logging as a UNIX daemon process.4/ Changed data store to use separate read and write caches.5/ Various bug fixes and minor improvements.
20 Chapter 3. Documentation

pywws Documentation, Release 18.04.1.dev1389
Changes in v13.10:1/ Changed Twitter library from tweepy to python-twitter.2/ Added ability to do uploads asynchronously.3/ Rearranged and improved documentation.4/ Various bug fixes and minor improvements.
Changes in v13.06:1/ Substantially rearranged directories, getting rid of 'code' and 'code3'.2/ Removed 'makefile' - everything is now done via 'setup.py'.3/ Removed 'RunModule.py' - use 'python -m pywws.module' now.4/ Separated storage of config (weather.ini) and status (status.ini).5/ Replaced toservice.py "rapid fire" mode with a separate config file for
Weather Underground rapid fire.6/ Added 2 more low-level USB access modules.7/ Various bug fixes and minor improvements.
Changes in v13.03:1/ Added 'rain days' to monthly data. (Reprocess required when upgrading.)2/ Extended template syntax to include comments.3/ Added 'humidity index' function.4/ Added French translation of documentation.5/ Reduced frequency of saving data files.6/ Various bug fixes.
Changes in v12.12:1/ Added support for Python 3.2/ Added French documentation translation.3/ Used 'binary search' to speed up data access.4/ Various bug fixes.
Changes in v12.11:1/ Moved development from Google code to GitHub.2/ Made software attempt to avoid USB activity at times when it is assumed
the weather station might be writing to its memory. This might solvethe USB lockup problem, but it's too early to tell.
Changes in v12.10:1/ Added a 'winddir_text' function for use in templates.2/ Added <ytics> and <y2tics> options to graph plots.3/ Various bug fixes.
Changes in v12.07:1/ Added Open Weather Map to the services.2/ Fixed problem with Weather Underground uploads that started on 1st June.3/ Various bug fixes and software structure improvements.
Changes in v12.05:1/ Made 'fixed block' data available to template calculations.2/ Fixed buggy auto-detection of 3080 weather stations.3/ Added a function to generate the Zambretti forecast code letter.4/ Added a program to test USB communication reliablility.5/ Various bug fixes and software structure improvements.
Changes in v12.02:1/ Separated out low level USB communications to enable use of different
libraries. Now works on recent versions of Mac OS.2/ Added humidity, pressure & wind data to summary data.3/ Merged Weather Underground and UK Met Office uploaders into one combined
3.1. Contents 21

pywws Documentation, Release 18.04.1.dev1389
module. Added more 'service' uploaders.4/ Various bug fixes and software structure improvements.
Changes in v11.10:1/ Complete restructuring of documentation.2/ Added a user defined 'calibration' process.3/ Sets 'locale' according to language setting.4/ Added ability to upload to UK Met Office 'WOW'.5/ Various bug fixes and software structure improvements.6/ New language files: French, Danish.
Changes in v11.05:1/ Added support for '3080' family stations that have illuminance and
UV sensors.2/ Broadened the range of tasks that can be done with 'live' data.3/ Various bug fixes and software structure improvements.
Changes in v11.02:1/ Various bug fixes and software structure improvements.2/ Improved wind direction averaging.3/ Added conversion functions for common things such as C to F.4/ Added a YoWindow module.5/ Improved Zambretti forecaster.
Changes in v10.12:1/ Various bug fixes and software structure improvements.2/ Added a 'goto' instruction to Template.py.3/ Added a 'Zambretti' forecast function to Template.py. This should
be treated as an experiment, and not relied upon for accuracy.
Changes in v10.10:1/ Added 'catchup' mode to ToUnderground.py.2/ Created 'Tasks.py' to handle common tasks.3/ Made better use of Python's logger for info and error
messages.4/ Changed over from 'python-twitter' to 'tweepy' for Twitter
access. Twitter authorisation using OAuth now works.5/ Added 'LiveLog.py' live logging program.6/ Added 'SetWeatherStation.py' to do some configuration of weather
station. No longer need EasyWeather to set logging interval!7/ Added 'Rapid Fire' ability to ToUnderground.py.8/ Added plain text versions of HTML documentation.9/ Many bug fixes and minor improvements.
Changes in v10.08:1/ Added internal temperature to daily and monthly summaries.
Run Reprocess.py when upgrading from earlier versions.2/ Added 'prevdata' to Template.py. Allows calculations that
compare values from different times.3/ Made 'pressure_offset' available to calculations in Plot.py
and Template.py. This is only useful when using 'raw' data.4/ Improved synchronisation to weather station's clock when
fetching stored data.
Changes in v10.06:1/ Improved localisation code.2/ Minor bug fixes.3/ Added Y axis label angle control to plots.
22 Chapter 3. Documentation

pywws Documentation, Release 18.04.1.dev1389
Changes in v10.04:1/ Changed version numbering to year.month.2/ Allowed "upload" to a local directory instead of ftp site.3/ Added "calc" option to text templates (Template.py).4/ Added -v / --verbose option to Hourly.py to allow silent operation.5/ Added internationalisation / localisation of some strings.6/ Made 'raw' data available to text templates.7/ Added ability to upload to Weather Underground.8/ Added dual axis and cumulative graph capability.
Changes in v0.9:1/ Added lowest daytime max and highest nighttime min temperatures
to monthly data.2/ Added average temperature to daily and monthly data.3/ Added 'terminal' element to Plot.py templates for greater control
over output appearance.4/ Added 'command' element to Plot.py templates for even more
control, for advanced users.5/ Added secure upload option.6/ Minor speed improvements.
Changes in v0.8:1/ Added meteorological day end hour user preference2/ Attempts at Windows compatibility3/ Corrected decoding of wind data at speeds over 25.5 m/s4/ Improved speed with new data caching strategy
Changes in v0.7:1/ Several bug fixes, mostly around new weather stations with not
much data2/ Added min & max temperature extremes to monthly data3/ Added template and workspace directory locations to weather.ini4/ Increased versatility of Plot.py with layout and title elements
Changes in v0.6:1/ Added monthly data2/ Changed 'pressure' to 'abs_pressure' or 'rel_pressure'
Changes in v0.5:1/ Small bug fixes.2/ Added start time to daily data3/ Replaced individual plot programs with XML "recipe" system
Changes in v0.4:1/ Can post brief messages to Twitter.2/ Now time zone aware. Uses UTC for data indexing and local time
for graphs and text data files.
Changes in v0.3:1/ Now uses templates to generate text data2/ Added 28 day plot3/ Minor efficiency improvements4/ Improved documentation
Changes in v0.2:1/ Now uses Python csv library to read and write data2/ Creates hourly and daily summary files
3.1. Contents 23

pywws Documentation, Release 18.04.1.dev1389
3/ Includes rain data in graphs
Comments or questions? Please subscribe to the pywws mailing list http://groups.google.com/group/pywws and let usknow.
3.1.5 User guides
Contents:
How to get started with pywws
Installation
First of all you need to install Python and a USB library (to allow Python to access the weather station). See Depen-dencies for more detail.
Create a directory for all your weather related files and change to it. For example (on a Linux or similar operatingsystem):
mkdir ~/weathercd ~/weather
Easy installation
The easiest way to install pywws is with the pip command:
sudo pip install pywws
Upgrading pywws is also a one line command:
sudo pip install -U pywws
Now you are ready to Test the weather station connection.
Download and extract
If you prefer not to use pip, or you want easy access to the pywws source files (e.g. to translate the documentation –see How to use pywws in another language), you can download and extract the files into your weather directory.
Visit http://pypi.python.org/pypi/pywws/ and download one of the .tar.gz or .zip files. Put it in your weather directory,then extract all the files, for example:
cd ~/weathertar zxvf pywws-14.03.dev1178.tar.gz
or:
cd ~/weatherunzip pywws-14.03.dev1178.zip
24 Chapter 3. Documentation

pywws Documentation, Release 18.04.1.dev1389
This should create a directory (called pywws-14.03.dev1178 in this example) containing all the pywws sourcefiles. It is convenient to create a soft link to this awkwardly named directory:
cd ~/weatherln -s pywws-14.03.dev1178 pywws
Upgrading a downloaded snapshot is the same process as the first installation. Download the .tar.gz or .zip file, extractits contents, then delete the soft link pointing to the old download and create one pointing to the new download. Onceyou are satisfied the new version is working OK you can delete the old download entirely.
Clone the repository
The PyPI files contain a snapshot release of the software - a new one is issued every few months. If you want to usethe very latest version of pywws, e.g. to work on fixing a bug, you can get all the files you need from the GitHubrepository. Install git and use it to clone the repos:
cd ~/weathergit clone https://github.com/jim-easterbrook/pywws.git
To upgrade you use git to pull any changes:
cd ~/weather/pywwsgit pull
Install pywws
If you have downloaded or cloned the pywws source files, you need to use setup.py to install it:
cd ~/weather/pywwspython setup.py compile_catalogpython setup.py buildsudo python setup.py install
The python setup.py compile_catalog step is only needed if you want to use pywws in a language otherthan English. See Test the pywws translations for more detail.
Note to Python 3 users: this will generate and use Python 3 versions of the pywws software in ~/weather/pywws/build/lib.
Compile documentation (optional)
If you’d like to have a local copy of the pywws documentation (and have downloaded the source or cloned the repo)you can “compile” the English documentation. This requires the sphinx package:
cd ~/weather/pywwspython setup.py build_sphinx
Compiling the documentation in another language requires the additional step of compiling the translation files, whichrequires the sphinx-intl package. For example, to compile the French documentation:
cd ~/weather/pywwssphinx-intl build --locale-dir src/pywws/lang -l frLANG=fr python setup.py build_sphinx
3.1. Contents 25

pywws Documentation, Release 18.04.1.dev1389
The compiled documentation should then be found at ~/weather/pywws/doc/html/index.html. See Howto use pywws in another language for more detail.
Test the weather station connection
Now you’re ready to test your pywws installation. Connect the weather station (if not already connected) then run thepywws.TestWeatherStation module:
pywws-testweatherstation
If everything is working correctly, this should dump a load of numbers to the screen, for example:
0000 55 aa ff ff ff ff ff ff ff ff ff ff ff ff ff ff 05 20 01 51 11 00 00 00 81 00 00→˓0f 00 00 60 550020 ea 27 a0 27 00 00 00 00 00 00 00 10 10 12 13 45 41 23 c8 00 32 80 47 2d 2c 01 2c→˓81 5e 01 1e 800040 96 00 c8 80 a0 28 80 25 a0 28 80 25 03 36 00 05 6b 00 00 0a 00 f4 01 18 03 00 00→˓00 00 00 00 000060 00 00 4e 1c 63 0d 2f 01 73 00 7a 01 47 80 7a 01 47 80 e4 00 00 00 71 28 7f 25 bb→˓28 bd 25 eb 000080 0c 02 84 00 0e 01 e3 01 ab 03 dc 17 00 10 08 21 08 54 10 03 07 22 18 10 08 11 08→˓30 10 04 21 1600a0 26 08 07 24 17 17 08 11 01 06 10 09 06 30 14 29 09 01 06 07 46 09 06 30 14 29 09→˓01 06 07 46 0800c0 08 31 14 30 10 05 14 15 27 10 01 26 20 47 09 01 23 05 13 10 01 26 20 47 09 01 23→˓05 13 10 02 2200e0 11 06 10 02 22 11 06 08 07 07 19 32 08 12 13 22 32 08 09 07 08 48 01 12 05 04 43→˓10 02 22 14 43
There are several reasons why this might not work. Most likely is a ‘permissions’ problem. This can be tested byrunning the command as root:
sudo pywws-testweatherstation
If this works then you may be able to allow your normal user account to access the weather station by setting upa ‘udev’ rule. The exact method may depend on your Linux version, but this is typically done by creating a file/etc/udev/rules.d/39-weather-station.rules containing the following:
ACTION!="add|change", GOTO="weatherstation_end"SUBSYSTEM=="usb", ATTRS{idVendor}=="1941", ATTRS{idProduct}=="8021", GROUP=→˓"weatherstation"LABEL="weatherstation_end"
Unplug and replug the station’s USB connection to force udev to apply the new rule. This allows any user in thegroup weatherstation to access the weather station. You need to create this group and add your normal useraccount to it – many Linux systems have a GUI for user and group management.
If you have any other problem, please ask for help on the pywws mailing list: http://groups.google.com/group/pywws
Set up your weather station
If you haven’t already done so, you should set your weather station to display the correct relative atmospheric pressure.(See the manual for details of how to do this.) pywws gets the offset between relative and absolute pressure from thestation, so this should be set before using pywws.
26 Chapter 3. Documentation

pywws Documentation, Release 18.04.1.dev1389
You can get the correct relative pressure from your location by looking on the internet for weather reports from anearby station, ideally an official one such as an airport. This is best done during calm weather when the pressure isalmost constant over a large area.
Set the weather station logging interval
Your weather station probably left the factory with a 30 minute logging interval. This enables the station to store about11 weeks of data. Most pywws users set up their computers to read data from the station every hour, or more often,and only need the station to store enough data to cover computer failures. The recommended interval is 5 minutes,which still allows 2 weeks of storage. Use pywws.SetWeatherStation to set the interval:
pywws-setweatherstation -r 5
Note that the weather station will not start using the new interval until the current 30 minute logging period is finished.This may cause “station is not logging data” errors when running pywws logging. If this happens you need to waituntil the 30 minute logging period ends.
Log your weather station data
First, choose a directory to store all your weather station data. This will be written to quite frequently, so a disk drive ispreferable to a flash memory stick or card, as these have a limited number of writes. In most cases your home directoryis suitable, for example:
mkdir ~/weather/data
This directory is referred to elsewhere in the pywws documentation as your data directory.
Make sure your computer has the right date & time, and time zone, as these are used to label the weather station data.If you haven’t already done so, it’s worth setting up NTP to synchronise your computer to a ‘time server’.
The first time you run pywws.LogData it will create a configuration file in your data directory called ‘weather.ini’and then stop. You need to edit the configuration file and change the line ws type = Unknown to ws type =1080 or ws type = 3080. (If your weather station console displays solar illuminance you have a 3080 type, allothers are 1080.) Then run pywws.LogData again. This may take several minutes, as it will copy all the datastored in your station’s memory. The pywws.LogData program has a ‘verbose’ option that increases the amount ofmessages it displays while running. This is useful when running it manually, for example:
python -m pywws.LogData -vvv ~/weather/data
(Replace ~/weather/data with your data directory, if it’s different.)
You should now have some data files you can look at. For example:
more ~/weather/data/raw/2012/2012-12/2012-12-16.txt
(Replace the year, month and day with ones that you have data for.)
Convert old EasyWeather data (optional)
If you had been running EasyWeather before deciding to use pywws, you can convert the data EasyWeather had loggedto the pywws format. Find your EasyWeather.dat file and then convert it:
python -m pywws.EWtoPy EasyWeather.dat ~/weather/data
3.1. Contents 27

pywws Documentation, Release 18.04.1.dev1389
Set some configuration options
After running pywws.LogData there should be a configuration file in your data directory called ‘weather.ini’. Openthis with a text editor. You should find something like the following:
[config]ws type = 1080logdata sync = 1pressure offset = 9.4
You need to add a new entry in the [config] section called day end hour. This tells pywws what conventionyou want to use when calculating daily summary data. In the UK, the ‘meteorological day’ is usually from 09:00 to09:00 GMT (10:00 to 10:00 BST during summer), so I use a day end hour value of 9. In other countries a value of 24(or 0) might be more suitable. Note that the value is set in local winter time. You should not need to change it whendaylight savings time is in effect.
After editing, your weather.ini file should look something like this:
[config]ws type = 1080logdata sync = 1pressure offset = 9.4day end hour = 9
You can also edit the pressure offset value to adjust how pywws calculates the relative (sea level) air pressurefrom the absolute value that the station measures. If you change the pressure offset or day end hour in future, you mustupdate all your stored data by running pywws.Reprocess.
For more detail on the configuration file options, see weather.ini - configuration file format.
Changed in version 13.10_r1082: made pressure offset a config item. Previously it was always read from theweather station.
Process the raw data
pywws.LogData just copies the raw data from the weather station. To do something useful with that data youprobably need hourly, daily and monthly summaries. These are created by pywws.Process. For example:
python -m pywws.Process ~/weather/data
You should now have some processed files to look at:
more ~/weather/data/daily/2012/2012-12-16.txt
If you ever change your day end hour configuration setting, you will need to reprocess all your weather data. Youcan do this by running pywws.Reprocess:
python -m pywws.Reprocess ~/weather/data
You are now ready to set up regular or continuous logging, as described in How to set up ‘hourly’ logging with pywwsor How to set up ‘live’ logging with pywws.
Read the documentation
You’re looking at it right now! The User guides section is probably the most useful bit to read first, but the Pythonprograms and modules section has a lot more detail on the various pywws modules and commands.
28 Chapter 3. Documentation

pywws Documentation, Release 18.04.1.dev1389
Comments or questions? Please subscribe to the pywws mailing list http://groups.google.com/group/pywws and let usknow.
How to set up ‘hourly’ logging with pywws
Introduction
There are two quite different modes of operation with pywws. Traditionally pywws.Hourly would be run at regularintervals (usually an hour) from cron. This is suitable for fairly static websites, but more frequent updates can be usefulfor sites such as Weather Underground (http://www.wunderground.com/). The newer pywws.LiveLog programruns continuously and can upload data every 48 seconds.
Note that although this document (and the program name) refers to ‘hourly’ logging, you can run pywws.Hourly asoften or as infrequently as you like, but don’t try to run it more often than double your logging interval. For example,if your logging interval is 10 minutes, don’t run pywws.Hourly more often than every 20 minutes.
Getting started
First of all, you need to install pywws and make sure it can get data from your weather station. See How to get startedwith pywws for details.
Try running pywws.Hourly from the command line, with a high level of verbosity so you can see what’s happening.Use the pywws-hourly command to run pywws.Hourly:
pywws-hourly -vvv ~/weather/data
Within five minutes (assuming you have set a 5 minute logging interval) you should see a ‘live_data new ptr’ message,followed by fetching any new data from the weather station and processing it.
Changed in version 14.04.dev1194: the pywws-hourly command replaced scripts/pywws-hourly.py.
Configuring file locations
Open your weather.ini file with a text editor. You should have a [paths] section similar to the following (wherexxx is your user name):
[paths]work = /tmp/weathertemplates = /home/xxx/weather/templates/graph_templates = /home/xxx/weather/graph_templates/local_files = /home/xxx/weather/results/
Edit these to suit your installation and preferences. work is an existing temporary directory used to store intermediatefiles, templates is the directory where you keep your text template files, graph_templates is the directorywhere you keep your graph template files and local_files is a directory where template output that is not uploadedto your web site is put. Don’t use the pywws example directories for your templates, as they will get over-written whenyou upgrade pywws.
Copy your text and graph templates to the appropriate directories. You may find some of the examples provided withpywws useful to get started. The pywws-version -v command should show you where the examples are on yourcomputer.
New in version 14.04.dev1194: the pywws-version command.
3.1. Contents 29

pywws Documentation, Release 18.04.1.dev1389
Configuring periodic tasks
In weather.ini you should have [logged], [hourly], [12 hourly] and [daily] sections similar to the fol-lowing:
[logged]services = []plot = []text = []
[hourly]...
These specify what pywws.Hourly should do when it is run. Tasks in the [logged] section are done every timethere is new logged data, tasks in the [hourly] section are done every hour, tasks in the [12 hourly] section aredone twice daily and tasks in the [daily] section are done once per day.
The services entry is a list of online weather services to upload data to. The plot and text entries are lists oftemplate files for plots and text files to be processed and, optionally, uploaded to your web site. Add the names of yourtemplate files and weather services to the appropriate entries, for example:
[logged]services = ['underground', 'metoffice']plot = []text = []
[hourly]services = []plot = ['7days.png.xml', '24hrs.png.xml', 'rose_24hrs.png.xml']text = [('tweet.txt', 'T'), '24hrs.txt', '6hrs.txt', '7days.txt']
[12 hourly]services = []plot = []text = []
[daily]services = []plot = ['28days.png.xml']text = [('forecast.txt', 'T'), 'allmonths.txt']
Note the use of the 'T' flag – this tells pywws to send the template result to Twitter instead of uploading it to your ftpsite.
You can test that all these are working by removing the [last update] section from status.ini, then runningpywws.Hourly again:
pywws-hourly -v ~/weather/data
New in version 14.05.dev1211: [cron name] sections. If you need more flexibility in when tasks are done you canuse [cron name] sections. See weather.ini - configuration file format for more detail.
Changed in version 13.06_r1015: added the 'T' flag. Previously Twitter templates were listed separately in twitterentries in the [hourly] and other sections. The older syntax still works, but is deprecated.
Changed in version 13.05_r1009: the last update information was previously stored in weather.ini, with lastupdate entries in several sections.
30 Chapter 3. Documentation

pywws Documentation, Release 18.04.1.dev1389
Run as a cron job
Most UNIX/Linux systems have a ‘cron’ daemon that can run programs at certain times, even if you are not loggedin to the computer. You edit a ‘crontab’ file to specify what to run and when to run it. For example, to run pywws.Hourly every hour, at zero minutes past the hour:
0 * * * * pywws-hourly /home/xxx/weather/data
This might work, but if it didn’t you probably won’t get any error messages to tell you what went wrong. It’s muchbetter to run a script that runs pywws.Hourly and then emails you any output it produces. Here’s the script I use:
#!/bin/sh## weather station logger calling script
export PATH=$PATH:/usr/local/bin
if [ ! -d ~/weather/data/ ]; thenexitfi
log=/var/log/log-weather
pywws-hourly -v ~/weather/data >$log 2>&1
# mail the log file/home/jim/scripts/email-log.sh $log "weather log"
You’ll need to edit this quite a lot to suit your file locations and so on, but it gives some idea of what to do.
Comments or questions? Please subscribe to the pywws mailing list http://groups.google.com/group/pywws and let usknow.
How to set up ‘live’ logging with pywws
Introduction
There are two quite different modes of operation with pywws. Traditionally pywws.Hourly would be run at regularintervals (usually an hour) from cron. This is suitable for fairly static websites, but more frequent updates can be usefulfor sites such as Weather Underground (http://www.wunderground.com/). The newer pywws.LiveLog programruns continuously and can upload data every 48 seconds.
Getting started
First of all, you need to install pywws and make sure it can get data from your weather station. See How to get startedwith pywws for details.
If you have previously been using pywws.Hourly then disable your ‘cron’ job (or whatever else you use to run it)so it no longer runs. You should not run pywws.Hourly and pywws.LiveLog at the same time.
Try running pywws.LiveLog from the command line, with a high level of verbosity so you can see what’s happen-ing. Use the pywws-livelog command to run pywws.LiveLog:
3.1. Contents 31

pywws Documentation, Release 18.04.1.dev1389
pywws-livelog -vvv ~/weather/data
Within five minutes (assuming you have set a 5 minute logging interval) you should see a ‘live_data new ptr’ message,followed by fetching any new data from the weather station and processing it. Let pywws.LiveLog run for a minuteor two longer, then kill the process by typing ‘<Ctrl>C’.
Changed in version 14.04.dev1194: the pywws-livelog command replaced scripts/pywws-livelog.py.
Configuring file locations
Open your weather.ini file with a text editor. You should have a [paths] section similar to the following (wherexxx is your user name):
[paths]work = /tmp/weathertemplates = /home/xxx/weather/templates/graph_templates = /home/xxx/weather/graph_templates/local_files = /home/xxx/weather/results/
Edit these to suit your installation and preferences. work is an existing temporary directory used to store intermediatefiles, templates is the directory where you keep your text template files, graph_templates is the directorywhere you keep your graph template files and local_files is a directory where template output that is not uploadedto your web site is put. Don’t use the pywws example directories for your templates, as they will get over-written whenyou upgrade pywws.
Copy your text and graph templates to the appropriate directories. You may find some of the examples provided withpywws useful to get started. The pywws-version -v command should show you where the examples are on yourcomputer.
New in version 14.04.dev1194: the pywws-version command.
Configuring periodic tasks
In weather.ini you should have a [live] section similar to the following:
[live]services = []plot = []text = []
This section specifies what pywws should do every time it gets a new reading from the weather station, i.e. every 48seconds. The services entry is a list of online weather services to upload data to, e.g. ['underground_rf'].The plot and text entries are lists of template files for plots and text files to be processed and, optionally, uploadedto your web site. You should probably leave all of these blank except for services.
If you use YoWindow (http://yowindow.com/) you can add an entry to the [live] section to specify your YoWindowfile, e.g.:
[live]services = ['underground_rf']text = [('yowindow.xml', 'L')]...
Note the use of the 'L' flag – this tells pywws to copy the template result to your “local files” directory instead ofuploading it to your ftp site.
32 Chapter 3. Documentation

pywws Documentation, Release 18.04.1.dev1389
If you don’t already have them, create four more sections in your weather.ini file: [logged], [hourly], [12hourly] and [daily]. These sections should have similar entries to the [live] section, and specify what to doevery time data is logged (5 to 30 minutes, depending on your logging interval), every hour, twice daily and once perday. Add the names of your template files to the appropriate entries, for example:
[logged]services = ['underground', 'metoffice']plot = []text = []
[hourly]services = []plot = ['7days.png.xml', '24hrs.png.xml', 'rose_24hrs.png.xml']text = [('tweet.txt', 'T'), '24hrs.txt', '6hrs.txt', '7days.txt']
[12 hourly]services = []plot = []text = []
[daily]services = []plot = ['28days.png.xml']text = [('forecast.txt', 'T'), 'allmonths.txt']
Note the use of the 'T' flag – this tells pywws to send the template result to Twitter instead of uploading it to your ftpsite.
New in version 14.05.dev1211: [cron name] sections. If you need more flexibility in when tasks are done you canuse [cron name] sections. See weather.ini - configuration file format for more detail.
Changed in version 13.06_r1015: added the 'T' flag. Previously Twitter templates were listed separately in twitterentries in the [hourly] and other sections. The older syntax still works, but is deprecated.
Changed in version 13.05_r1013: added a 'yowindow.xml' template. Previously yowindow files were generatedby a separate module, invoked by a yowindow entry in the [live] section. This older syntax still works, but isdeprecated.
Asynchronous uploads
New in version 13.09_r1057.
Uploading data to web sites or ‘services’ can sometimes take a long time, particularly if a site has gone off line and theupload times out. In normal operation pywws waits until all uploads have been processed before fetching any moredata from the weather station. This can lead to data sometimes being missed.
The asynchronous item in the [config] section of weather.ini can be set to True to tell pywws.LiveLog todo these uploads in a separate thread.
Run in the background
New in version 13.12.dev1118.
In order to have pywws.LiveLog carry on running after you finish using your computer it needs to be run as a“background job”. On most Linux / UNIX systems you can do this by putting an ampersand (‘&’) at the end of thecommand line. Running a job in the background like this doesn’t always work as expected: the job may suspend whenyou log out. It’s much better to run as a proper UNIX ‘daemon’ process.
3.1. Contents 33

pywws Documentation, Release 18.04.1.dev1389
The pywws.livelogdaemon program does this, if you have the python-daemon library installed:
pywws-livelog-daemon -v ~/weather/data ~/weather/data/pywws.log start
Note that the log file is a required parameter, not an option.
Automatic restarting
There are various ways of configuring a Linux system to start a program when the machine boots up. Typically theseinvolve putting a file in /etc/init.d/, which requires root privileges. A slightly harder problem is ensuring aprogram restarts if it crashes. My solution to both problems is to run the following script from cron, several times anhour.
#!/bin/sh
export PATH=$PATH:/usr/local/bin
# exit if NTP hasn't set computer clock[ `ntpdc -c sysinfo | awk '/stratum:/ {print $2}'` -ge 10 ] && exit
pidfile=/var/run/pywws.piddatadir=/home/jim/weather/datalogfile=$datadir/live_logger.log
# exit if process is running[ -f $pidfile ] && kill -0 `cat $pidfile` && exit
# email last few lines of the logfile to see why it diedif [ -f $logfile ]; then
log=/tmp/log-weathertail -40 $logfile >$log/home/jim/scripts/email-log.sh $log "weather log"rm $logfi
# restart processpywws-livelog-daemon -v -p $pidfile $datadir $logfile start
The process id of the daemon is stored in pidfile. If the process is running, the script does nothing. If the processhas crashed, it emails the last 40 lines of the log file to me (using a script that creates a message and passes it tosendmail) and then restarts pywws.livelogdaemon. You’ll need to edit this quite a lot to suit your file locationsand so on, but it gives some idea of what to do.
Comments or questions? Please subscribe to the pywws mailing list http://groups.google.com/group/pywws and let usknow.
How to integrate pywws with various weather services
This guide gives brief instructions on how to use pywws with some other weather services and software. It is notcomprehensive, and some services (such as Twitter) are covered in more detail elsewhere.
34 Chapter 3. Documentation

pywws Documentation, Release 18.04.1.dev1389
YoWindow
YoWindow is a weather display widget that can display data from an internet source, or from your weather station.To display data from your station pywws needs to write to a local file, typically every 48 seconds when new data isreceived. This is easy to do:
1. Stop all pywws software
2. Copy the yowindow.xml example template to your text template directory.
3. If you haven’t already done so, edit weather.ini and set the local_files entry in the [paths] sectionto a suitable directory for your yowindow file.
4. Add the yowindow template to the [live] tasks in weather.ini. Set its flags to 'L' so the result is copiedto your local directory instead of being uploaded to an ftp site:
[live]text = [('yowindow.xml', 'L')]
5. Restart pywws live logging.
You can check the file is being updated every 48 seconds by using more or cat to dump it to the screen.
Finally configure yowindow to use this file. See http://yowindow.com/pws_setup.php for instructions on how to dothis.
See How to configure pywws to post messages to Twitter for full instructions.
Other “services”
The remaining weather service uploads are handled by the pywws.toservice module. See the module’s docu-mentation for general configuration options. The following subsections give further information about some of theavailable services.
Citizen Weather Observer Program
New in version 14.02.dev1156.
• Web site: http://www.wxqa.com/
• Create account: http://www.wxqa.com/SIGN-UP.html
• API: http://www.wxqa.com/faq.html
• Example weather.ini section:
[cwop]designator = EW9999latitude = 5130.06Nlongitude = 00008.52Etemplate = default
[logged]services = ['cwop', 'underground']
3.1. Contents 35

pywws Documentation, Release 18.04.1.dev1389
[live]services = ['cwop', 'underground_rf']
or, for radio hams:
[cwop]designator = G4XXXpasscode = xxxxxxlatitude = 5130.06Nlongitude = 00008.52Etemplate = default
[logged]services = ['cwop_ham', 'underground']
[live]services = ['cwop_ham', 'underground_rf']
Note that the latitude and longitude must be in “LORAN” format and leading zeros are required. See question 3 in theCWOP FAQ for more information.
Licensed radio hams use their callsign as the designator and need a passcode. They should use the service namecwop_ham instead of cwop when running pywws.toservice directly and in the weather.ini servicesentries. (The same [cwop] config section is used for both.)
CWOP uploads are rate-limited by pywws, so you can safely add it to both the [live] and [logged] sections inweather.ini.
The CWOP/APRS uploader is based on code by Marco Trevisan <[email protected]>.
MQTT
New in version 14.12.0.dev1260.
MQTT is a “message broker” system, typically running on localhost or another computer in your home network.Use of MQTT with pywws requires an additional library. See Dependencies - MQTT for details.
• MQTT: http://mqtt.org/
• Mosquitto (a lightweight broker): http://mosquitto.org/
• Example weather.ini section:
[mqtt]topic = /weather/pywwshostname = localhostport = 1883client_id = pywwsretain = Trueauth = Falseuser = unknownpassword = unknowntemplate = defaultmulti_topic = False
[logged]services = ['mqtt', 'underground']
36 Chapter 3. Documentation

pywws Documentation, Release 18.04.1.dev1389
pywws will publish a JSON string of the data specified in the mqtt_template_1080.txt file. This data will bepublished to the broker running on hostname, with the port number specified. (An IP address can be used instead of ahost name.) client_id is a note of who published the data to the topic. topic can be any string value, this needsto be the topic that a subscriber is aware of.
retain is a boolean and should be set to True or False (or left at the default unknown). If set to True this willflag the message sent to the broker to be retained. Otherwise the broker discards the message if no client is subscribingto this topic. This allows clients to get an immediate response when they subscribe to a topic, without having to waituntil the next message is published.
auth, user and password can be used for MQTT authentication.
multi_topic is a boolean and should be set to True or False. If set to True pywws will also publish all thedata each as separate subtopics of the configured topic; i.e., with the topic set to /weather/pywws pywws willalso publish the outside temperature to /weather/pywws/temp_out and the inside temperature to /weather/pywws/temp_in.
If these aren’t obvious to you it’s worth doing a bit of reading around MQTT. It’s a great lightweight messaging systemfrom IBM, recently made more popular when Facebook published information on their use of it.
This has been tested with the Mosquitto Open Source MQTT broker, running on a Raspberry Pi (Raspian OS). TLS(mqtt data encryption) is not yet implemented.
Thanks to Matt Thompson for writing the MQTT code and to Robin Kearney for adding the retain and auth options.
UK Met Office
• Web site: http://wow.metoffice.gov.uk/
• Create account: https://register.metoffice.gov.uk/WaveRegistrationClient/public/newaccount.do?service=weatherobservations
• API: http://wow.metoffice.gov.uk/support/dataformats#automatic
• Example weather.ini section:
[metoffice]site id = 12345678aws pin = 987654template = default
[logged]services = ['metoffice', 'underground']
Open Weather Map
• Web site: http://openweathermap.org/
• Create account: http://home.openweathermap.org/users/sign_up
• API: http://openweathermap.org/stations#trans
• Example weather.ini section:
[openweathermap]lat = 51.501long = -0.142alt = 10user = ElizabethWindsor
3.1. Contents 37

pywws Documentation, Release 18.04.1.dev1389
password = corgiid = Buck Housetemplate = default
[logged]services = ['openweathermap', 'underground']
When choosing a user name you should avoid spaces (and probably non-ascii characters as well). Having a space inyour user name causes strange “internal server error” responses from the server.
The default behaviour is to use your user name to identify the weather station. However, it’s possible for a user tohave more than one weather station, so there is an optional name parameter in the API that can be used to identify thestation. This appears as id in weather.ini. Make sure you choose a name that is not already in use.
PWS Weather
• Web site: http://www.pwsweather.com/
• Create account: http://www.pwsweather.com/register.php
• API based on WU protocol: http://wiki.wunderground.com/index.php/PWS_-_Upload_Protocol
• Example weather.ini section:
[pwsweather]station = ABCDEFGH1password = xxxxxxxtemplate = default
[logged]services = ['pwsweather', 'underground']
temperatur.nu
• Web site: http://www.temperatur.nu/
• Example weather.ini section:
[temperaturnu]hash = ???template = default
[logged]services = ['temperaturnu', 'underground']
You receive the hash value from the temperatur.nu admins during sign up. It looks like“d3b07384d113edec49eaa6238ad5ff00”.
Weather Underground
• Create account: http://www.wunderground.com/members/signup.asp
• API: http://wiki.wunderground.com/index.php/PWS_-_Upload_Protocol
• Example weather.ini section:
38 Chapter 3. Documentation

pywws Documentation, Release 18.04.1.dev1389
[underground]station = ABCDEFGH1password = xxxxxxxtemplate = default
[logged]services = ['underground', 'metoffice']
Weather Underground “RapidFire” updates
Weather Underground has a second upload URL for real time updates as little as 2.5 seconds apart. If you run pywwsin ‘live logging’ mode (see How to set up ‘live’ logging with pywws) you can use this to send updates every 48 seconds,by adding ‘underground_rf’ to the [live] tasks section in weather.ini:
[underground]station = ABCDEFGH1password = xxxxxxxtemplate = default
[live]services = ['underground_rf']
[logged]services = ['underground', 'metoffice']
Make sure you still have an ‘underground’ service in [logged] or [hourly]. This will ensure that ‘catchup’records are sent to fill in any gaps if your station goes offline for some reason.
wetter.com
• Web site: http://www.wetter.com/wetter_aktuell/wetternetzwerk/
• Register station: http://www.wetter.com/mein_wetter/wetterstation/willkommen/
• Example weather.ini section:
[wetterarchivde]user_id = 12345kennwort = ab1d3456i8template = default
[logged]services = ['wetterarchivde', 'underground']
[live]services = ['wetterarchivde', 'underground_rf']
Custom Request Headers
The pywws.toservice module does support the injection of one or more custom request headers for special caseswhere you want to integrate with a service that, for example, requires you to pass an authentication key header alongwith each request, such as x-api-key.
These headers can be added to your a_service.ini file in the format of key value pairs:
3.1. Contents 39

pywws Documentation, Release 18.04.1.dev1389
[config]url = https://my-aws-api-gw.execute-api.eu-west-1.amazonaws.com/test/stationcatchup = 100interval = 0use get = Trueresult = []auth_type = Nonehttp_headers = [('x-api-key', 'my-api-key'), ('x-some-header', 'value')]
Comments or questions? Please subscribe to the pywws mailing list http://groups.google.com/group/pywws and let usknow.
How to configure pywws to post messages to Twitter
Install dependencies
Posting to Twitter requires some extra software. See Dependencies - Twitter updates.
Create a Twitter account
You could post weather updates to your ‘normal’ Twitter account, but I think it’s better to have a separate account justfor weather reports. This could be useful to someone who lives in your area, but doesn’t want to know what you hadfor breakfast.
Authorise pywws to post to your Twitter account
If you run pywws on a low power device such as a router, you may find it easier to run this authorisation step onanother computer, as long as it has python-oauth2 installed. Use an empty ‘data’ directory – a weather.inifile will be created whose contents can be copied into your real weather.ini file using any text editor.
Make sure no other pywws software is running, then run TwitterAuth:
python -m pywws.TwitterAuth ~/weather/data
(Replace ~/weather/data with your data directory.)
This will open a web browser window (or give you a URL to copy to your web browser) where you can log in to yourTwitter account and authorise pywws to post. Your web browser will then show a 7 digit number which you need tocopy to the TwitterAuth program. If successful, your weather.ini file will now have a [twitter] sectionwith secret and key entries. (Don’t disclose these to anyone else.)
Add location data (optional)
Edit your weather.ini file and add latitude and longitude entries to the [twitter] section. For exam-ple:
[twitter]secret = xxxxxxxxxxxxxxxxxxxxxxxxxxxxxxxxxxxxxxxxxxxkey = xxxxxxxxxxxxxxxxxxxxxxxxxxxxxxxxxxxxxxxxxxxxxxxxxxlatitude = 51.501longitude = -0.142
40 Chapter 3. Documentation

pywws Documentation, Release 18.04.1.dev1389
Create a template
Twitter messages are generated using a template, just like creating files to upload to a website. Copy the exampletemplate ‘tweet.txt’ to your template directory, then test it:
python -m pywws.Template ~/weather/data ~/weather/templates/tweet.txt tweet.txtcat tweet.txt
(Replace ~/weather/data and ~/weather/templates with your data and template directories.) If you needto change the template (e.g. to change the units or language used) you can edit it now or later.
Post your first weather Tweet
Now everything is prepared for ToTwitter to be run:
python -m pywws.ToTwitter ~/weather/data tweet.txt
If this works, your new Twitter account will have posted its first weather report. (You should delete the tweet.txt filenow.)
Add Twitter updates to your hourly tasks
Edit your weather.ini file and edit the [hourly] section. For example:
[hourly]services = []plot = ['7days.png.xml', '24hrs.png.xml', 'rose_12hrs.png.xml']text = [('tweet.txt', 'T'), '24hrs.txt', '6hrs.txt', '7days.txt']
Note the use of the 'T' flag – this tells pywws to tweet the template result instead of uploading it to your ftp site.
You could change the [logged], [12 hourly] or [daily] sections instead, but I think [hourly] is mostappropriate for Twitter updates.
Changed in version 13.06_r1015: added the 'T' flag. Previously Twitter templates were listed separately in twitterentries in the [hourly] and other sections. The older syntax still works, but is deprecated.
Include an image in your tweet
New in version 14.05.dev1216.
You can add up to four images to your tweets by specifying the image file locations in the tweet template. Make thefirst line of the tweet media path where path is the absolute location of the file. Repeat for any additional imagefiles. The “tweet_media.txt” example template shows how to do this.
The image could be from a web cam, or for a weather forecast it could be an icon representing the forecast. To add aweather graph you need to make sure the graph is drawn before the tweet is sent. I do this by using two [cron xxx]sections in weather.ini:
[cron prehourly]format = 59 * * * *services = []plot = [('tweet.png.xml', 'L')]text = []
3.1. Contents 41

pywws Documentation, Release 18.04.1.dev1389
[cron hourly]format = 0 * * * *services = []plot = ['7days.png.xml', '24hrs.png.xml', 'rose_12hrs.png.xml']text = [('tweet_media.txt', 'T'), '24hrs.txt', '6hrs.txt', '7days.txt']
Comments or questions? Please subscribe to the pywws mailing list http://groups.google.com/group/pywws and let usknow.
How to use pywws in another language
Introduction
Some parts of pywws can be configured to use your local language instead of British English. This requires anappropriate language file which contains translations of the various strings used in pywws. The pywws project relieson users to provide these translations.
The pywws documentation can also be translated into other languages. This is a lot more work, but could be veryuseful to potential users who do not read English very well.
Using existing language files
Program strings
There may already be a pywws translation for your preferred language. First you need to choose the appropriate two-letter code from the list at http://www.w3schools.com/tags/ref_language_codes.asp. For example, fr is the code forFrench. Now use the pywws.Localisation module to do a quick test:
python -m pywws.Localisation -t fr
This should produce output something like this:
Locale changed from (None, None) to ('fr_FR', 'UTF-8')Translation set OKLocale
decimal point: 23,2date & time: lundi, 17 décembre (17/12/2012 16:00:48)
Translations'NNW' => 'NNO''rising very rapidly' => 'en hausse très rapide''Rain at times, very unsettled' => 'Quelques précipitations, très perturbé'
This shows that pywws is already able to generate French output, and that your installation is correctly configured.Now you can edit the language entry in your weather.ini file to use your language code.
If the above test shows no translations into your language then you need to create a new language file, as describedbelow.
42 Chapter 3. Documentation

pywws Documentation, Release 18.04.1.dev1389
Text encodings
The pywws default text encoding is ISO-8859-1, also known as Latin-1. This is suitable for several western Europeanlanguages but not for some others. If you encounter problems you may need to use a different encoding. See thedocumentation of pywws.Template and pywws.Plot for more details.
Documentation
If you have downloaded the pywws source files, or cloned the GitHub repository (see how to get started with pywws),you can compile a non-English copy of the documentation. This requires the Sphinx package, see dependencies.
First delete the old documentation (if it exists) and then recompile using your language:
cd ~/weather/pywwsrm -rf docLANG=fr python setup.py build_sphinx
Note that the build_sphinx command doesn’t have a --locale (or -l) option, so the language is set by atemporary environment variable.
You can view the translated documentation by using a web browser to read the file ~/weather/pywws/doc/html/index.html.
Writing new language files
There are two ways to write new language files (or update existing ones) – use the Transifex online system or use localfiles. Transifex is preferred as it allows several people to work on the same language, and makes your work instantlyavailable to others.
To test your translation you will need to have downloaded the pywws source files, or cloned the GitHub repository(see how to get started with pywws). You will also need to install the Babel package, see dependencies.
Using Transifex
If you’d like to use Transifex, please go to the pywws Transifex project, click on “help translate pywws” and create afree account.
Visit the pywws project page on Transifex and click on your language, then click on the “resource” you want totranslate. (pywws contains the program strings used when running pywws, the others contain strings from the pywwsdocumentation.) This opens a dialog where you can choose to translate the strings online. Please read Notes fortranslators before you start.
When you have finished translating you should use the transifex-client program (see dependencies) to down-load files for testing. For example, this command downloads any updated files for the French language:
cd ~/weather/pywwstx pull -l fr
Now you are ready to Test the pywws translations.
3.1. Contents 43

pywws Documentation, Release 18.04.1.dev1389
Using local files
If you prefer not to use the Transifex web site you can edit language files on your own computer. This is done in twostages, as follows.
Extract source strings
Program messages are extracted using the Babel package:
cd ~/weather/pywwsmkdir -p build/gettextpython setup.py extract_messages
This creates the file build/gettext/pywws.pot. This is a “portable object template” file that contains theEnglish language strings to be translated.
The documentation strings are extracted using the Sphinx package:
cd ~/weather/pywwspython setup.py extract_messages_doc
This creates several .pot files in the build/gettext/ directory.
Create language files
The sphinx-intl command is used to convert the .pot files to language specific .po files:
cd ~/weather/pywwssphinx-intl update --locale-dir src/pywws/lang -p build/gettext -l fr
Now you can open the .po files in src/pywws/lang/fr/LC_MESSAGES/ with your favourite text editor andstart filling in the empty msgstr strings with your translation of the corresponding msgid string. Please read Notesfor translators before you start.
Test the pywws translations
The Babel package is used to compile program strings:
python setup.py compile_catalog --locale fr
(Replace fr with the code for the language you are testing.)
After compilation you can test the translation:
python setup.py buildsudo python setup.py installpython -m pywws.Localisation -t fr
Sphinx is used to build the translated documentation:
cd ~/weather/pywwsrm -rf docLANG=fr python setup.py build_sphinx
44 Chapter 3. Documentation

pywws Documentation, Release 18.04.1.dev1389
You can view the translated documentation by using a web browser to read the file ~/weather/pywws/doc/html/index.html.
Notes for translators
The pywws program strings (pywws.po) are quite simple. They comprise simple weather forecasts (“Fine weather”),air pressure changes (“rising quickly”) and the 16 points of the compass (“NNE”). Leave the “(%Z)” in “Time (%Z)”unchanged and make sure your translation’s punctuation matches the original.
The other files contain strings from the pywws documentation. These are in reStructuredText. This is mostly plaintext, but uses characters such as backquotes (‘), colons (:) and asterisks (*) for special purposes. You need to take careto preserve this special punctuation. Do not translate program source, computer instructions and cross-references likethese:
`pip <http://www.pip-installer.org/>`_:py:class:`datetime.datetime`:obj:`ParamStore <pywws.DataStore.ParamStore>`\\ (root_dir, file_name)pywws.Forecast``pywws-livelog``
Translating all of the pywws documentation is a lot of work. However, when the documentation is “compiled” anyuntranslated strings revert to their English original. This means that a partial translation could still be useful – I suggeststarting with the documentation front page, index.po.
Send Jim the translation
I’m sure you would like others to benefit from the work you’ve done in translating pywws. If you’ve been using Tran-sifex then please send me an email ([email protected]) to let me know there’s a new translation available.Otherwise, please email me any .po files you create.
Comments or questions? Please subscribe to the pywws mailing list http://groups.google.com/group/pywws and let usknow.
weather.ini - configuration file format
Nearly all configuration of pywws is via a single file in the data directory: weather.ini. This file has a structure similarto that of Microsoft Windows INI files. It is divided into “sections”, each of which has a number of “name = value”entries. The order in which sections appear is not important.
Any plain text editor can be used to do edit the file. (Don’t try to edit it while any other pywws software is running.)In many cases pywws will initialise the entries to sensible values.
Another file, status.ini, is used to store some information that pywws uses internally. It is described at the end of thisdocument. In normal use you should not need to edit it.
The following sections are currently in use:
• config: miscellaneous system configuration.
• paths: directories in which templates etc. are stored.
• live: tasks to be done every 48 seconds.
• logged: tasks to be done every time the station logs a data record.
3.1. Contents 45

pywws Documentation, Release 18.04.1.dev1389
• cron: tasks to be done at a particular time or date.
• hourly: tasks to be done every hour.
• 12 hourly: tasks to be done every 12 hours.
• daily: tasks to be done every day.
• ftp: configuration of uploading to a website.
• twitter: configuration of posting to Twitter.
• underground, metoffice, temperaturnu etc: configuration of posting to ‘services’.
config: miscellaneous system configuration
[config]ws type = 1080day end hour = 21pressure offset = 9.4gnuplot encoding = iso_8859_1template encoding = iso-8859-1language = enlogdata sync = 1rain day threshold = 0.2asynchronous = Falseusb activity margin = 3.0gnuplot version = 4.2frequent writes = False
ws type is the “class” of weather station. It should be set to 1080 for most weather stations, or 3080 if your stationconsole displays solar illuminance.
day end hour is the end of the “meteorological day”, in local time without daylight savings time. Typical valuesare 21, 9, or 24. You must update all your stored data by running pywws.Reprocess after you change this value.
pressure offset is the difference between absolute and relative (sea level) air pressure. The initial value is copiedfrom the weather station, assuming you have set it up to display the correct relative pressure, but you can adjust thevalue in weather.ini to calibrate your station. You must update all your stored data by running pywws.Reprocessafter you change this value.
Changed in version 13.10_r1082: made pressure offset a config item. Previously it was always read from theweather station.
gnuplot encoding is the text encoding used when plotting graphs. The default value of iso_8859_1 allowsthe degree symbol, which is useful in a weather application! Other values might be needed if your language includesaccented characters. The possible values depend on your gnuplot installation so some experimentation may be needed.
template encoding is the text encoding used for templates. The default value is iso-8859-1, which is theencoding used in the example templates. If you create templates with a different character set, you should change thisvalue to match your templates.
language is used to localise pywws. It’s optional, as pywws usually uses the computer’s default language as setby the LANG environment variable. The available languages are those in the translations subdirectory of yourpywws installation. If you set any other language, pywws will fall back to using English.
logdata sync sets the quality of synchronisation used by pywws.LogData. Set it to 0 for fast & inaccurate or 1 forslower but precise.
46 Chapter 3. Documentation

pywws Documentation, Release 18.04.1.dev1389
rain day threshold is the amount of rain (in mm) that has to fall in one day for it to qualify as a rainy day inthe monthly summary data. You must update all your stored data by running pywws.Reprocess after you changethis value.
New in version 13.09_r1057: asynchrouous controls the use of a separate upload thread in pywws.LiveLog.
New in version 13.10_r1094: usb activity margin controls the algorithm that avoids the “USB lockup” prob-lem that affects some stations. It sets the number of seconds either side of expected station activity (receiving a readingfrom outside or logging a reading) that pywws does not get data from the station. If your station is not affected by theUSB lockup problem you can set usb activity margin to 0.0.
New in version 13.11_r1102: gnuplot version tells pywws.Plot and pywws.WindRose what version ofgnuplot is installed on your computer. This allows them to use version-specific features to give improved plot quality.
New in version 14.01_r1133: frequent writes tells pywws.Tasks to save weather data and status to file everytime there is new logged data. The default is to save the files every hour, to reduce “wear” on solid state memory suchas the SD cards used with Raspberry Pi computers. If your weather data directory is stored on a conventional discdrive you can set frequent writes to True.
paths: directories in which templates etc. are stored
[paths]templates = /home/$USER/weather/templates/graph_templates = /home/$USER/weather/graph_templates/user_calib = /home/$USER/weather/modules/usercalibwork = /tmp/weatherlocal_files = /home/$USER/weather/results/
These entries specify where your text templates and graph templates are stored, where temporary files should be cre-ated, where template output (that is not uploaded) should be put, and (if you have one) the location of your calibrationmodule.
live: tasks to be done every 48 seconds
[live]services = ['underground_rf']text = [('yowindow.xml', 'L')]plot = []
This section specifies tasks that are to be carried out for every data sample during ‘live logging’, i.e. every 48 seconds.
services is a list of ‘services’ to upload data to. Each one listed must have a configuration file in pywws/services/. See pywws.toservice for more detail. pywws will automatically limit the frequency of service uploadsaccording to each service’s specification.
text and plot are lists of text and plot templates to be processed and, optionally, uploaded to your website.
Changed in version 13.05_r1013: added a 'yowindow.xml' template. Previously yowindow files were generatedby a separate module, invoked by a yowindow entry in the [live] section. This older syntax still works, but isdeprecated.
3.1. Contents 47

pywws Documentation, Release 18.04.1.dev1389
logged: tasks to be done every time the station logs a data record
[logged]services = ['underground', 'metoffice']text = []plot = []
This section specifies tasks that are to be carried out every time a data record is logged when ‘live logging’ or everytime an hourly cron job is run.
services is a list of ‘services’ to upload data to. Each one listed must have a configuration file in pywws/services/. See pywws.toservice for more detail.
text and plot are lists of text and plot templates to be processed and, optionally, uploaded to your website.
cron: tasks to be done at a particular time or date
New in version 14.05.dev1211.
[cron prehourly]format = 59 * * * *plot = [('tweet.png.xml', 'L')]services = []text = []
[cron hourly]format = 0 * * * *plot = ['7days.png.xml', '2014.png.xml', '24hrs.png.xml', 'rose_12hrs.png.xml']text = [('tweet.txt', 'T'), '24hrs.txt', '6hrs.txt', '7days.txt', '2014.txt']services = []
[cron daily 9]format = 0 9 * * *plot = ['28days.png.xml']text = [('forecast.txt', 'T'), 'forecast_9am.txt', 'forecast_week.txt']services = []
[cron daily 21]format = 0 21 * * *text = ['forecast_9am.txt']services = []plot = []
[cron weekly]format = 0 9 * * 6plot = ['2008.png.xml', '2009.png.xml', '2010.png.xml', '2011.png.xml',
'2012.png.xml', '2013.png.xml']text = ['2008.txt', '2009.txt', '2010.txt', '2011.txt', '2012.txt', '2013.txt']services = []
[cron name] sections provide a very flexible way to specify tasks to be done at a particular time and/or date. namecan be anything you like, but each [cron name] section must have a unique name.
To use [cron name] sections you need to install the “croniter” package. See Dependencies for more detail.
format specifies when the tasks should be done (in local time), in the usual crontab format. (See man 5 crontabon any Linux computer.) Processing is not done exactly on the minute, but when the next live or logged data arrives.
48 Chapter 3. Documentation
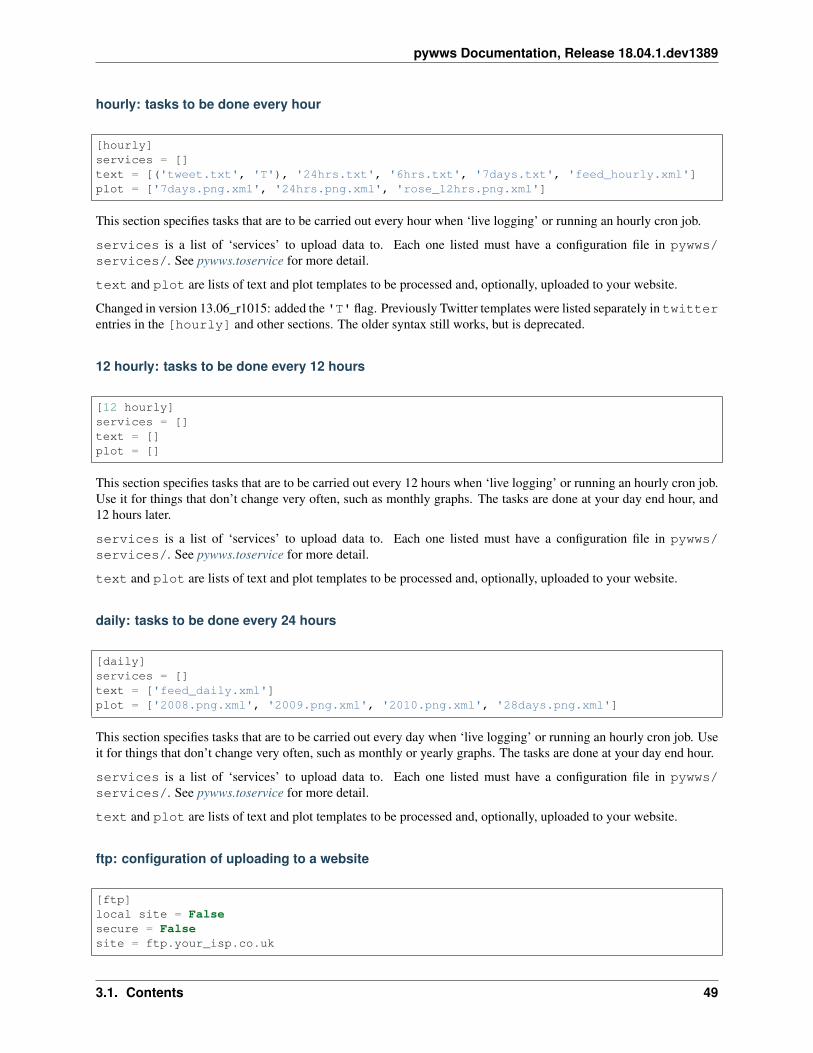
pywws Documentation, Release 18.04.1.dev1389
hourly: tasks to be done every hour
[hourly]services = []text = [('tweet.txt', 'T'), '24hrs.txt', '6hrs.txt', '7days.txt', 'feed_hourly.xml']plot = ['7days.png.xml', '24hrs.png.xml', 'rose_12hrs.png.xml']
This section specifies tasks that are to be carried out every hour when ‘live logging’ or running an hourly cron job.
services is a list of ‘services’ to upload data to. Each one listed must have a configuration file in pywws/services/. See pywws.toservice for more detail.
text and plot are lists of text and plot templates to be processed and, optionally, uploaded to your website.
Changed in version 13.06_r1015: added the 'T' flag. Previously Twitter templates were listed separately in twitterentries in the [hourly] and other sections. The older syntax still works, but is deprecated.
12 hourly: tasks to be done every 12 hours
[12 hourly]services = []text = []plot = []
This section specifies tasks that are to be carried out every 12 hours when ‘live logging’ or running an hourly cron job.Use it for things that don’t change very often, such as monthly graphs. The tasks are done at your day end hour, and12 hours later.
services is a list of ‘services’ to upload data to. Each one listed must have a configuration file in pywws/services/. See pywws.toservice for more detail.
text and plot are lists of text and plot templates to be processed and, optionally, uploaded to your website.
daily: tasks to be done every 24 hours
[daily]services = []text = ['feed_daily.xml']plot = ['2008.png.xml', '2009.png.xml', '2010.png.xml', '28days.png.xml']
This section specifies tasks that are to be carried out every day when ‘live logging’ or running an hourly cron job. Useit for things that don’t change very often, such as monthly or yearly graphs. The tasks are done at your day end hour.
services is a list of ‘services’ to upload data to. Each one listed must have a configuration file in pywws/services/. See pywws.toservice for more detail.
text and plot are lists of text and plot templates to be processed and, optionally, uploaded to your website.
ftp: configuration of uploading to a website
[ftp]local site = Falsesecure = Falsesite = ftp.your_isp.co.uk
3.1. Contents 49

pywws Documentation, Release 18.04.1.dev1389
user = usernamepassword = userpassworddirectory = public_html/weather/data/port = 21
These entries provide details of your website (or local directory) where processed text files and graph images shouldbe transferred to.
local site specifies whether the files should be copied to a local directory or sent to a remote site. You may wantto set this if you run your web server on the same machine as you are running pywws on.
secure specifies whether to transfer files using SFTP (secure FTP) instead of the more common FTP. Your web siteprovider should be able to tell you if you can use SFTP. Note that you may need to change the port value when youchange to or from secure mode.
site is the web address of the FTP site to transfer files to.
user and password are the FTP site login details. Your web site provider should have provided them to you.
privkey is the path to a private SSH-key. For SFTP (secure FTP) this can be used for authentication instead of apassword, which offers additional benefits in terms of security. When this is used the password-parameter can be leftempty.
directory specifies where on the FTP site (or local file system) the files should be stored. Note that you may haveto experiment with this a bit - you might need a ‘/’ character at the start of the path.
New in version 13.12.dev1120: port specifies the port number to use. Default value is 21 for FTP, 22 for SFTP. Yourweb site provider may tell you to use a different port number.
twitter: configuration of posting to Twitter
[twitter]secret = longstringofrandomcharacterskey = evenlongerstringofrandomcharacterslatitude = 51.365longitude = -0.251
secret and key are authentication data provided by Twitter. To set them, run pywws.TwitterAuth.
latitude and longitude are optional location data. If you include them then your weather station tweets willhave location information so users can see where your weather station is. It might also enable people to find yourweather station tweets if they search by location.
underground, metoffice, temperaturnu etc: configuration of posting to ‘services’
[underground]station = IXYZABA5password = secret
These sections contain information such as passwords and station IDs needed to upload data to weather services. Thenames of the data entries depend on the service. The example shown is for Weather Underground.
station is the PWS ID allocated to your weather station by Weather Underground.
password is your Weather Underground password.
50 Chapter 3. Documentation

pywws Documentation, Release 18.04.1.dev1389
status.ini - status file format
This file is written by pywws and should not (usually) be edited. The following sections are currently in use:
• fixed: values copied from the weather station’s “fixed block”.
• clock: synchronisation information.
• last update: date and time of most recent task completions.
fixed: values copied from the weather station’s “fixed block”
[fixed]fixed block = {...}
fixed block is all the data stored in the first 256 bytes of the station’s memory. This includes maximum andminimum values, alarm threshold settings, display units and so on.
clock: synchronisation information
[clock]station = 1360322930.02sensor = 1360322743.69
These values record the measured times when the station’s clock logged some data and when the outside sensorstransmitted a new set of data. They are used to try and prevent the USB interface crashing if the computer accessesthe weather station at the same time as either of these events, a common problem with many EasyWeather compatiblestations. The times are measured every 24 hours to allow for drift in the clocks.
last update: date and time of most recent task completions
[last update]hourly = 2013-05-30 19:04:15logged = 2013-05-30 19:04:15daily = 2013-05-30 09:04:15openweathermap = 2013-05-30 18:59:15underground = 2013-05-30 18:58:34metoffice = 2013-05-30 18:59:1512 hourly = 2013-05-30 09:04:15
These record date & time of the last successful completion of various tasks. They are used to allow unsuccessful tasks(e.g. network failure preventing uploads) to be retried after a few minutes.
Comments or questions? Please subscribe to the pywws mailing list http://groups.google.com/group/pywws and let usknow.
Understanding pywws log files
The pywws software uses Python’s logging system to report errors, warnings and information that may be useful indiagnosing problems. When you run the software interactively these messages are sent to your terminal window, whenrunning a daemon process or cron job they should be written to a log file.
3.1. Contents 51

pywws Documentation, Release 18.04.1.dev1389
This document explains some of the pywws logging messages. It’s not a complete guide, and the messages you seewill depend on your weather station and configuration, but it should help you understand some of the more commonones.
Many pywws commands have a -v or --verbose option to increase the verbosity of the logging messages. Thisoption can be repeated for even more verbosity, which may be useful when trying to diagnose a particular fault.
Here are some typical logging outputs. The first shows pywws being run interactively:
1 jim@firefly ~ $ pywws-livelog -v ~/weather/data/2 08:50:43:pywws.Logger:pywws version 15.07.1.dev13083 08:50:43:pywws.Logger:Python version 2.7.3 (default, Mar 18 2014, 05:13:23) [GCC 4.6.
→˓3]4 08:50:44:pywws.WeatherStation.CUSBDrive:using pywws.device_libusb15 08:50:49:pywws.Calib:Using user calibration6 08:50:49:pywws.Tasks.RegularTasks:Starting asynchronous thread7 08:51:05:pywws.ToService(wetterarchivde):1 records sent8 08:51:06:pywws.ToService(underground_rf):1 records sent9 08:51:06:pywws.ToService(cwop):1 records sent
10 08:51:52:pywws.ToService(wetterarchivde):1 records sent11 08:51:52:pywws.ToService(underground_rf):1 records sent12 08:52:40:pywws.ToService(wetterarchivde):1 records sent13 08:52:40:pywws.ToService(underground_rf):1 records sent14 08:53:28:pywws.ToService(wetterarchivde):1 records sent15 08:53:28:pywws.ToService(underground_rf):1 records sent
Note that each line begins with a time stamp, in local time. Line 1 is the command used to start pywws. Line 2 showsthe pywws version. Line 3 shows the Python version. Line 4 shows which Python USB library is being used. Line5 shows that a "user calibration" routine is being used. Line 6 shows that a separate thread is being startedto handle uploads (see config: miscellaneous system configuration). The remaining lines show uploads to variousweather “services” (see How to integrate pywws with various weather services). You can see from the time stampsthat they happen at 48 second intervals.
When running pywws as a daemon process the logging is less verbose:
1 2015-07-20 10:46:00:pywws.Logger:pywws version 15.07.1.dev13082 2015-07-20 10:50:06:pywws.weather_station:live_data log extended3 2015-07-20 16:25:59:pywws.weather_station:setting station clock 59.6374 2015-07-20 16:25:59:pywws.weather_station:station clock drift -0.461377 -0.2963645 2015-07-20 16:30:24:pywws.ToService(wetterarchivde):<urlopen error [Errno -2] Name or
→˓service not known>6 2015-07-20 16:30:24:pywws.ToService(underground_rf):<urlopen error [Errno -2] Name or
→˓service not known>7 2015-07-20 23:01:16:pywws.ToService(openweathermap):<urlopen error [Errno -2] Name or
→˓service not known>8 2015-07-21 01:14:18:pywws.weather_station:setting sensor clock 42.66789 2015-07-21 01:14:18:pywws.weather_station:sensor clock drift -2.03116 -1.98475
10 2015-07-21 09:00:47:pywws.ToTwitter:('Connection aborted.', gaierror(-2, 'Name or→˓service not known'))
11 2015-07-21 09:00:55:pywws.Upload:[Errno -2] Name or service not known12 2015-07-21 09:01:05:pywws.ToService(cwop):[Errno -3] Temporary failure in name
→˓resolution13 2015-07-21 09:06:05:pywws.ToService(underground):<urlopen error [Errno -2] Name or
→˓service not known>14 2015-07-21 09:06:05:pywws.ToService(metoffice):<urlopen error [Errno -2] Name or
→˓service not known>15 2015-07-21 16:30:59:pywws.weather_station:setting station clock 59.477116 2015-07-21 16:30:59:pywws.weather_station:station clock drift -0.159373 -0.262116
52 Chapter 3. Documentation

pywws Documentation, Release 18.04.1.dev1389
Each line begins with a date and time stamp, in local time. Line 1 shows the pywws version. The remaining linesshow normal status messages that are described below.
Clock drift
2015-08-31 20:10:45:pywws.weather_station:setting station clock 45.71372015-08-31 20:10:45:pywws.weather_station:station clock drift -0.0171086 -0.3136992015-09-01 01:54:59:pywws.weather_station:setting sensor clock 35.27552015-09-01 01:54:59:pywws.weather_station:sensor clock drift -1.12118 -1.37694
These lines report how the weather station’s internal (“station”) and external (“sensor”) clocks are drifting with respectto the computer’s clock. These measurements are used to avoid accessing the station’s USB port at the same time as itis receiving data or logging data, as this is known to cause some station’s USB ports to become inaccessible. The two“drift” figures are the current value (only accurate to about 1 second) and the long term average. You should ensurethat the usb activity margin value in your weather.ini file is at least 0.5 seconds greater than the absolute valueof the long term drift of each clock. Note that these drift values change with temperature.
The clock drifts are measured at approximately 24 hour intervals. If pywws loses synchronisation with your station itwill measure them again. Doing this measurement increases the risk of causing a USB lockup, so if pywws often losessynchronisation you should try and find out why it’s happening.
Network problems
Occasionally one or more of the services and web sites you upload data to may become unavailable. This leads toerror messages like these:
2015-08-03 04:19:49:pywws.ToService(underground_rf):[Errno 104] Connection reset by→˓peer2015-08-03 04:49:27:pywws.ToService(underground_rf):<urlopen error [Errno -2] Name or→˓service not known>2015-08-03 05:19:41:pywws.ToService(wetterarchivde):<urlopen error [Errno 101]→˓Network is unreachable>2015-08-03 05:19:46:pywws.ToService(underground_rf):<urlopen error [Errno 101]→˓Network is unreachable>2015-08-03 05:50:52:pywws.ToService(wetterarchivde):<urlopen error [Errno -2] Name or→˓service not known>2015-08-03 05:50:52:pywws.ToService(underground_rf):<urlopen error [Errno -2] Name or→˓service not known>
To avoid swamping the log files duplicate messages are not logged, so you cannot tell how long the network outagelasted from the log files.
Status
2015-09-01 21:50:21:pywws.weather_station:status {'unknown': 0, 'invalid_wind_dir':→˓2048, 'lost_connection': 64, 'rain_overflow': 0}
The raw weather station data includes some “status” bits. If any of these bits is non-zero when pywws starts,or the status changes value when pywws is running, the status value is logged. The most common problem islost_connection: the weather station console is not receiving data from the outside sensors. Contact is often re-stored a few minutes later, but if not you may need to reset your weather station console by taking its batteries out. Theinvalid_wind_dir bit indicates that the wind direction sensor value is missing or invalid. The rain_overflowbit is set when the rain gauge counter has reached its maximum value and gone back to zero.
3.1. Contents 53

pywws Documentation, Release 18.04.1.dev1389
Please let me know if you ever get a non-zero value for unknown, particularly if you are able to correlate it with someother event. There are 6 bits of data in the status byte whose function is not yet known.
Log extended
2015-08-10 08:25:59:pywws.weather_station:live_data log extended2015-08-10 08:41:59:pywws.weather_station:live_data log extended2015-08-10 08:57:59:pywws.weather_station:live_data log extended
This shows a curiosity in the weather station’s internal processing. As the internal and external sensors drift therecomes a time when an external reading is expected at the same time as the station is due to log some data. To avoida clash the station delays logging by one minute. As the external readings are at 48 second intervals this avoids theproblem until 16 minutes later (with the normal 5 minute logging interval) when another one minute delay is needed.Eventually the clocks drift apart and normal operation is resumed.
Rain reset
2015-08-25 13:30:51:pywws.Process.HourAcc:2015-08-25 12:30:48 rain reset 1048.4 ->→˓1047.12015-08-25 13:35:51:pywws.Process.HourAcc:2015-08-25 12:30:48 rain reset 1048.4 ->→˓1047.12015-08-25 13:40:51:pywws.Process.HourAcc:2015-08-25 12:30:48 rain reset 1048.4 ->→˓1047.1
The raw rainfall data from the outside sensors is the total number of times the “see saw” has tipped since the externalsensors were last reset (by a battery change, unless you do it quickly). This number should only ever increase, so thepywws.Process module warns of any decrease in the value as it may indicate corrupted data that needs manuallycorrecting. The logging message includes the UTC time stamp of the problem data to help you find it.
Live data missed
1 2015-10-30 04:48:19:pywws.ToService(underground_rf):1 records sent2 2015-10-30 04:49:07:pywws.ToService(underground_rf):1 records sent3 2015-10-30 04:49:56:pywws.weather_station:live_data missed4 2015-10-30 04:50:44:pywws.ToService(underground_rf):1 records sent5 2015-10-30 04:51:31:pywws.ToService(underground_rf):1 records sent
Line 3 indicate that pywws failed to capture live data.
There are two possible causes. One is that a new data record is identical to the previous one so pywws doesn’t detecta change. This is unlikely to happen if you are receiving wind data properly.
The more likely reason is that processing the previous record took so long that the next one arrived when pywwswasn’t ready for it. “Processing” can include uploading to the Internet which is often prone to delays. A solution tothis is to set “asynchronous” to True in weather.ini. This uses a separate thread to do the uploading.
You may run with higher verbosity to get more information. The “pause” values should indicate how soon it’s readyfor the next data.
Note that this is just an occasional missing “live” record though, so if it does not happen often you shouldn’t worrytoo much about it.
54 Chapter 3. Documentation

pywws Documentation, Release 18.04.1.dev1389
“Live log” synchronisation
If you run pywws at a high verbosity you may see messages like the following:
1 10:26:05:pywws.Logger:pywws version 15.07.0.dev13072 10:26:05:pywws.Logger:Python version 2.7.8 (default, Sep 30 2014, 15:34:38) [GCC]3 10:26:05:pywws.WeatherStation.CUSBDrive:using pywws.device_libusb14 10:26:06:pywws.Calib:Using user calibration5 10:26:06:pywws.Tasks.RegularTasks:Starting asynchronous thread6 10:26:06:pywws.weather_station:read period 57 10:26:06:pywws.weather_station:delay 2, pause 0.58 10:26:07:pywws.weather_station:delay 2, pause 0.59 10:26:08:pywws.weather_station:delay 2, pause 0.5
10 10:26:08:pywws.weather_station:delay 2, pause 0.511 10:26:09:pywws.weather_station:delay 2, pause 0.512 10:26:10:pywws.weather_station:delay 2, pause 0.513 10:26:10:pywws.weather_station:delay 2, pause 0.514 10:26:11:pywws.weather_station:delay 2, pause 0.515 10:26:12:pywws.weather_station:delay 2, pause 0.516 10:26:12:pywws.weather_station:delay 2, pause 0.517 10:26:13:pywws.weather_station:delay 2, pause 0.518 10:26:14:pywws.weather_station:delay 2, pause 0.519 10:26:14:pywws.weather_station:live_data new data20 10:26:14:pywws.weather_station:setting sensor clock 38.739821 10:26:14:pywws.weather_station:delay 3, pause 45.499322 10:26:16:pywws.Tasks.RegularTasks:Doing asynchronous tasks23 10:27:00:pywws.weather_station:delay 3, pause 0.524 10:27:00:pywws.weather_station:avoid 3.8353861424525 10:27:04:pywws.weather_station:live_data new data26 10:27:04:pywws.weather_station:delay 3, pause 43.331627 10:27:06:pywws.Tasks.RegularTasks:Doing asynchronous tasks28 10:27:48:pywws.weather_station:delay 3, pause 0.529 10:27:48:pywws.weather_station:avoid 3.7958962625630 10:27:52:pywws.weather_station:live_data new data31 10:27:52:pywws.weather_station:delay 4, pause 0.532 10:27:53:pywws.weather_station:delay 4, pause 0.533 10:27:54:pywws.weather_station:delay 4, pause 0.534 10:27:54:pywws.weather_station:delay 4, pause 0.535 10:27:54:pywws.Tasks.RegularTasks:Doing asynchronous tasks36 10:27:55:pywws.weather_station:delay 4, pause 0.537 10:27:56:pywws.weather_station:delay 4, pause 0.538 10:27:56:pywws.weather_station:delay 4, pause 0.539 10:27:57:pywws.weather_station:delay 4, pause 0.540 10:27:58:pywws.weather_station:delay 4, pause 0.541 10:27:58:pywws.weather_station:delay 4, pause 0.542 10:27:59:pywws.weather_station:delay 4, pause 0.543 10:28:00:pywws.weather_station:delay 4, pause 0.544 10:28:00:pywws.weather_station:delay 4, pause 0.545 10:28:01:pywws.weather_station:delay 4, pause 0.546 10:28:02:pywws.weather_station:delay 4, pause 0.547 10:28:02:pywws.weather_station:delay 4, pause 0.548 10:28:03:pywws.weather_station:delay 4, pause 0.549 10:28:04:pywws.weather_station:delay 4, pause 0.550 10:28:04:pywws.weather_station:delay 4, pause 0.551 10:28:05:pywws.weather_station:delay 4, pause 0.552 10:28:06:pywws.weather_station:delay 4, pause 0.553 10:28:06:pywws.weather_station:delay 4, pause 0.554 10:28:07:pywws.weather_station:live_data new ptr: 007320
3.1. Contents 55

pywws Documentation, Release 18.04.1.dev1389
55 10:28:07:pywws.weather_station:setting station clock 7.4339556 10:28:07:pywws.weather_station:avoid 1.9195470809957 10:28:10:pywws.DataLogger:1 catchup records58 10:28:10:pywws.Process:Generating summary data59 10:28:10:pywws.Process:daily: 2015-08-31 21:00:0060 10:28:10:pywws.Process:monthly: 2015-07-31 21:00:0061 10:28:10:pywws.Process:monthly: 2015-08-31 21:00:0062 10:28:10:pywws.weather_station:delay 0, pause 26.12163 10:28:12:pywws.Tasks.RegularTasks:Doing asynchronous tasks
Line 6 shows that the weather station has the usual 5 minute logging interval. Lines 7 to 18 show pywws waitingfor the station to receive data from the outside sensors. The delay value is the number of minutes since the stationlast logged some data. The pause value is how many seconds pywws will wait before fetching data from the stationagain. Lines 19 & 20 show new data being received and the “sensor” clock being set. Line 21 shows that pywws nowknows when data is next expected, so it can sleep for 43 seconds. Line 22 shows the separate “upload” thread doing itsprocessing while the main thread is sleeping. Line 24 shows pywws avoiding USB activity around the time the stationshould receive external data. Lines 31 to 53 show pywws waiting for the station to log data. Lines 54 & 55 show thestation logging some data and pywws using this to set the “station” clock. The 6 digit number at the end of line 54 isthe hexadecimal address where “live” data will now be written to, leaving data at the previous address as a “logged”value. Lines 57 to 61 show pywws fetching logged data from the station and then processing it to produce the varioussummaries.
Crash with traceback
Sometimes pywws software crashes. When it does, the log file will often contain a traceback like this:
1 18:50:57:pywws.LiveLog:error sending control message: Device or resource busy2 Traceback (most recent call last):3 File "/usr/local/lib/python2.7/dist-packages/pywws/LiveLog.py", line 80, in LiveLog4 logged_only=(not tasks.has_live_tasks())):5 File "/usr/local/lib/python2.7/dist-packages/pywws/LogData.py", line 256, in live_
→˓data6 for data, ptr, logged in self.ws.live_data(logged_only=logged_only):7 File "/usr/local/lib/python2.7/dist-packages/pywws/WeatherStation.py", line 446, in
→˓live_data8 new_ptr = self.current_pos()9 File "/usr/local/lib/python2.7/dist-packages/pywws/WeatherStation.py", line 585, in
→˓current_pos10 self._read_fixed_block(0x0020), self.lo_fix_format['current_pos'])11 File "/usr/local/lib/python2.7/dist-packages/pywws/WeatherStation.py", line 641, in
→˓_read_fixed_block12 result += self._read_block(mempos)13 File "/usr/local/lib/python2.7/dist-packages/pywws/WeatherStation.py", line 629, in
→˓_read_block14 new_block = self.cusb.read_block(ptr)15 File "/usr/local/lib/python2.7/dist-packages/pywws/WeatherStation.py", line 265, in
→˓read_block16 if not self.dev.write_data(buf):17 File "/usr/local/lib/python2.7/dist-packages/pywws/device_pyusb.py", line 152, in
→˓write_data18 usb.REQ_SET_CONFIGURATION, buf, value=0x200, timeout=50)19 USBError: error sending control message: Device or resource busy
Line 1 shows the exception that caused the crash. Lines 3 to 18 show where in the program the problem happened.Usually the last one is of interest, but the other function calls show how we got there. Line 19 shows the full exception.In this case it’s a USBError raised by the pyusb library.
56 Chapter 3. Documentation

pywws Documentation, Release 18.04.1.dev1389
Comments or questions? Please subscribe to the pywws mailing list http://groups.google.com/group/pywws and let usknow.
Humidity Index (Humidex)
Section author: Rodney Persky
Background
Using your weather station can be fun, and reporting daily to various weather data sites can be very useful for yourneighbours to check out the weather. However, at some point you may want to know how the weather effects yourbody, and if there is a way to tell when it’s good or not to work outdoors.
Here enters a whole realm of calculations based on energy transferring though walls, and the resistance offered bythem. It can be a great learning adventure, and can save you a great deal of money, finding out how energy movesaround.
Introduction
Humidex is a tool to determine how an individuals body will react to the combination of Wind, Humidity and Tem-perature. The background of which is a heat balance across from your midriff to your skin, and is complimentary toISO 7243 “Hot Environments - Estimation of the heat stress on working man”. A few important notes,
• These indices are based off a number of assumptions which may result in over or under-estimation of yourbodies internal state
• A personal weather station may not show the correct conditions, and may have an over or under estimation ofthe humidity, wind or temperature
• Clothing choices effect the personal fatigue and the bodies ability to reject heat, a low Humidity Index doesn’tmean you can wear anything
• An individuals fitness will effect their bodies response to changing temperature, and experience will aid inknowing when to stop working
• The duration of activities that can be performed requires knowledge on the intensity, which cannot be representedthough this index
Assumptions
There are a number of assumptions that have been made to make this work which will directly affect its useability.These assumptions however have not been made available from Environment Canada, who are the original developersof the Humidex used in the PYWWS function cadhumidex. It is safe enough however to say that the following wouldhave been some assumptions:
• Clothing type, thickness
• Skin area exposed to free air
• Sun exposure
However, there are a number of assumptions pywws needs to make in calculating the Humidex:
• The humidity, wind and temperature readings are correct
3.1. Contents 57
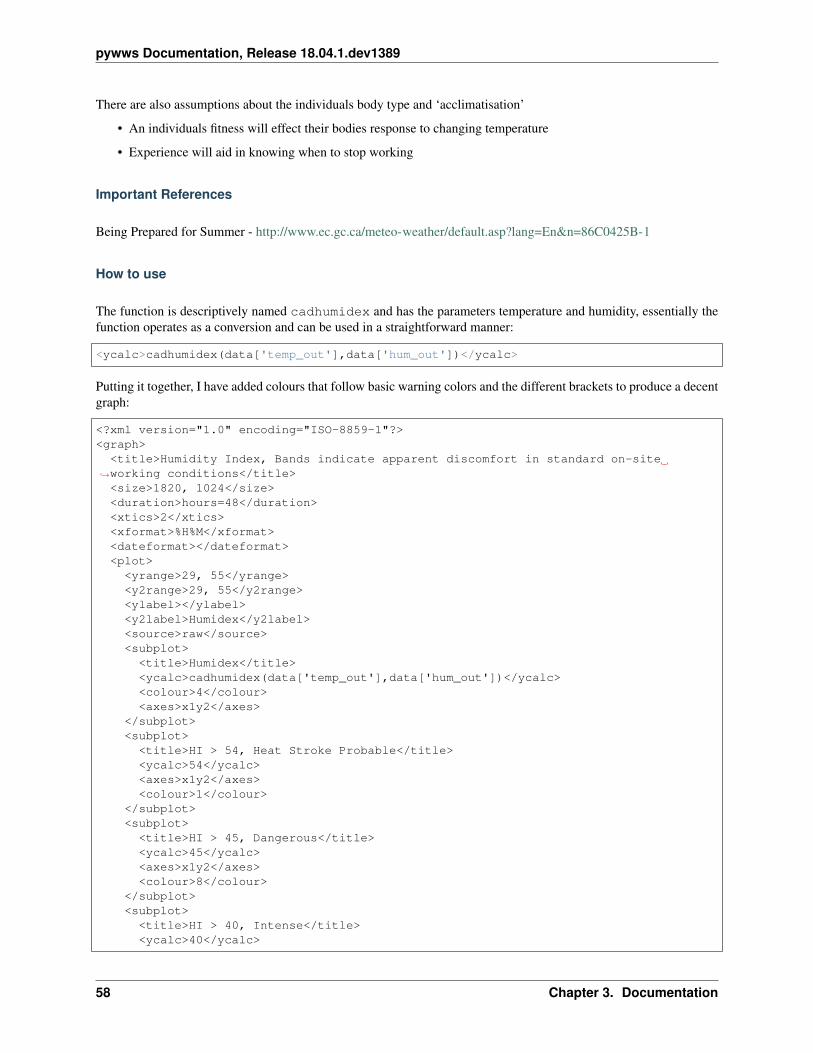
pywws Documentation, Release 18.04.1.dev1389
There are also assumptions about the individuals body type and ‘acclimatisation’
• An individuals fitness will effect their bodies response to changing temperature
• Experience will aid in knowing when to stop working
Important References
Being Prepared for Summer - http://www.ec.gc.ca/meteo-weather/default.asp?lang=En&n=86C0425B-1
How to use
The function is descriptively named cadhumidex and has the parameters temperature and humidity, essentially thefunction operates as a conversion and can be used in a straightforward manner:
<ycalc>cadhumidex(data['temp_out'],data['hum_out'])</ycalc>
Putting it together, I have added colours that follow basic warning colors and the different brackets to produce a decentgraph:
<?xml version="1.0" encoding="ISO-8859-1"?><graph>
<title>Humidity Index, Bands indicate apparent discomfort in standard on-site→˓working conditions</title><size>1820, 1024</size><duration>hours=48</duration><xtics>2</xtics><xformat>%H%M</xformat><dateformat></dateformat><plot><yrange>29, 55</yrange><y2range>29, 55</y2range><ylabel></ylabel><y2label>Humidex</y2label><source>raw</source><subplot>
<title>Humidex</title><ycalc>cadhumidex(data['temp_out'],data['hum_out'])</ycalc><colour>4</colour><axes>x1y2</axes>
</subplot><subplot>
<title>HI > 54, Heat Stroke Probable</title><ycalc>54</ycalc><axes>x1y2</axes><colour>1</colour>
</subplot><subplot>
<title>HI > 45, Dangerous</title><ycalc>45</ycalc><axes>x1y2</axes><colour>8</colour>
</subplot><subplot>
<title>HI > 40, Intense</title><ycalc>40</ycalc>
58 Chapter 3. Documentation

pywws Documentation, Release 18.04.1.dev1389
<axes>x1y2</axes><colour>6</colour>
</subplot><subplot>
<title>HI > 35, Evident</title><ycalc>35</ycalc><axes>x1y2</axes><colour>2</colour>
</subplot><subplot>
<title>HI > 30, Noticeable</title><ycalc>30</ycalc><axes>x1y2</axes><colour>3</colour>
</subplot></plot>
</graph>
Not running the latest update?
If you are not running the latest update / do not want to, then this can be implemented using a longer <ycalc> asfollows:
<ycalc>data['temp_out']+0.555*(6.112*10**(7.5*data['temp_out']/(237.7+data['temp_out→˓']))*data['hum_out']/100-10)</ycalc>
Comments or questions? Please subscribe to the pywws mailing list http://groups.google.com/group/pywws and let usknow.
Comments or questions? Please subscribe to the pywws mailing list http://groups.google.com/group/pywws and let usknow.
3.1.6 Python programs and modules
Set up and configure pywws
pywws.TestWeatherStation Test connection to weather station.pywws.SetWeatherStation Set some weather station parameters.pywws.version Display pywws version information.pywws.Reprocess Regenerate hourly and daily summary data.pywws.TwitterAuth Authorise pywws to post to your Twitter accountpywws.USBQualityTest Test quality of USB connection to weather stationpywws.EWtoPy Convert EasyWeather.dat data to pywws format
pywws.TestWeatherStation
Test connection to weather station.
This script can also be run with the pywws-testweatherstation command.
3.1. Contents 59

pywws Documentation, Release 18.04.1.dev1389
usage: python -m pywws.TestWeatherStation [options]options are:
--help display this help-c | --change display any changes in "fixed block" data-d | --decode display meaningful values instead of raw data-h n | --history n display the last "n" readings-l | --live display 'live' data-m | --logged display 'logged' data-u | --unknown display unknown fixed block values-v | --verbose increase amount of reassuring messages
(repeat for even more messages e.g. -vvv)
This is a simple utility to test communication with the weather station. If this doesn’t work, then there’s a problemthat needs to be sorted out before trying any of the other programs. Likely problems include not properly installing theUSB libraries, or a permissions problem. The most unlikely problem is that you forgot to connect the weather stationto your computer!
Functions
main([argv])raw_dump(pos, data)
pywws.TestWeatherStation.raw_dump(pos, data)
pywws.TestWeatherStation.main(argv=None)
Comments or questions? Please subscribe to the pywws mailing list http://groups.google.com/group/pywws and let usknow.
pywws.SetWeatherStation
Set some weather station parameters.
This script can also be run with the pywws-setweatherstation command.
usage: python -m pywws.SetWeatherStation [options]options are:-h | --help display this help-c | --clock set weather station clock to computer time
(unlikely to work)-p f | --pressure f set relative pressure to f hPa-r n | --read_period n set logging interval to n minutes-v | --verbose increase error message verbosity-z | --zero_memory clear the weather station logged reading count
Functions
bcd_encode(value)main([argv])
60 Chapter 3. Documentation

pywws Documentation, Release 18.04.1.dev1389
pywws.SetWeatherStation.bcd_encode(value)
pywws.SetWeatherStation.main(argv=None)
Comments or questions? Please subscribe to the pywws mailing list http://groups.google.com/group/pywws and let usknow.
pywws.version
Display pywws version information.
This script can also be run with the pywws-version command.
usage: python -m pywws.version [options]options are:-h or --help display this help-v or --verbose show verbose version information
Functions
main([argv])
pywws.version.main(argv=None)
Comments or questions? Please subscribe to the pywws mailing list http://groups.google.com/group/pywws and let usknow.
pywws.Reprocess
Regenerate hourly and daily summary data.
This script can also be run with the pywws-reprocess command.
usage: python -m pywws.Reprocess [options] data_diroptions are:-h | --help display this help-u | --update update status on old data to include bits from wind_dir byte-v | --verbose increase number of informative messages
data_dir is the root directory of the weather data
This program recreates the calibrated, hourly, daily and monthly summary data that is created by the pywws.Process module. It should be run whenever you upgrade to a newer version of pywws (if the summary data formathas changed), change your calibration module or alter your pressure offset.
The -u (or --update) option is a special case. It should be used when upgrading from any pywws version earlierthan 14.02.dev1143. Unlike normal reprocessing, the -u option changes your raw data. You are advised to backupyour data before using the -u option.
3.1. Contents 61

pywws Documentation, Release 18.04.1.dev1389
Functions
Reprocess(data_dir, update)main([argv])
pywws.Reprocess.Reprocess(data_dir, update)
pywws.Reprocess.main(argv=None)
Comments or questions? Please subscribe to the pywws mailing list http://groups.google.com/group/pywws and let usknow.
pywws.TwitterAuth
Authorise pywws to post to your Twitter account
usage: python -m pywws.TwitterAuth [options] data_diroptions are:-h or --help display this help
data_dir is the root directory of the weather data
This program authorises pywws.ToTwitter to post to a Twitter account. You need to create an account beforerunning TwitterAuth. It opens a web browser window (or gives you a URL to copy to your web browser) whereyou log in to your Twitter account. If the login is successful the browser will display a 7 digit number which you thencopy to TwitterAuth.
See How to configure pywws to post messages to Twitter for more detail on using Twitter with pywws.
Functions
TwitterAuth(params)main([argv])
pywws.TwitterAuth.TwitterAuth(params)
pywws.TwitterAuth.main(argv=None)
Comments or questions? Please subscribe to the pywws mailing list http://groups.google.com/group/pywws and let usknow.
pywws.USBQualityTest
Test quality of USB connection to weather station
usage: python -m pywws.USBQualityTest [options]options are:-h | --help display this help-v | --verbose increase amount of reassuring messages
(repeat for even more messages e.g. -vvv)
62 Chapter 3. Documentation

pywws Documentation, Release 18.04.1.dev1389
The USB link to my weather station is not 100% reliable. The data read from the station by the computer is occasion-ally corrupted, perhaps by interference. I’ve been trying to solve this by putting ferrite beads around the USB cableand relocating possible interference sources such as external hard drives. All without any success so far.
This program tests the USB connection for errors by continuously reading the entire weather station memory (exceptfor those parts that may be changing) looking for errors. Each 32-byte block is read twice, and if the two readingsdiffer a warning message is displayed. Also displayed are the number of blocks read, and the number of errors found.
I typically get one or two errors per hour, so the test needs to be run for several hours to produce a useful measurement.Note that other software that accesses the weather station (such as pywws.Hourly or pywws.LiveLog) must notbe run while the test is in progress.
If you run this test and get no errors at all, please let me know. There is something good about your setup and I’d loveto know what it is!
Functions
main([argv])
pywws.USBQualityTest.main(argv=None)
Comments or questions? Please subscribe to the pywws mailing list http://groups.google.com/group/pywws and let usknow.
pywws.EWtoPy
Convert EasyWeather.dat data to pywws format
usage: python -m pywws.EWtoPy [options] EasyWeather_file data_diroptions are:-h or --help display this help
EasyWeather_file is the input data file, e.g. EasyWeather.datdata_dir is the root directory of the weather data
Introduction
This program converts data from the format used by the EasyWeather program supplied with the weather station to theformat used by pywws. It is useful if you’ve been using EasyWeather for a while before discovering pywws.
The EasyWeather.dat file is only used to provide data from before the start of the pywws data. As your weatherstation has its own memory, you should run pywws.LogData before pywws.EWtoPy to minimise use of theEasyWeather.dat file.
pywws.EWtoPy converts the time stamps in EasyWeather.dat from local time to UTC. This can cause problemswhen daylight savings time ends, as local time appears to jump back one hour. The program attempts to detect thisand correct the affected time stamps, but I have not been able to test this on a variety of time zones.
3.1. Contents 63

pywws Documentation, Release 18.04.1.dev1389
Detailed API
Functions
main([argv])
pywws.EWtoPy.main(argv=None)
Comments or questions? Please subscribe to the pywws mailing list http://groups.google.com/group/pywws and let usknow.
Get data and process it
pywws.Hourly Get weather data, process it, prepare graphs & text files andupload to a web site.
pywws.LiveLog Get weather data, store it, and process it.pywws.livelogdaemon Run ‘live logging’ as a UNIX daemon.
pywws.Hourly
Get weather data, process it, prepare graphs & text files and upload to a web site.
Typically run every hour from cron.
usage: python -m pywws.Hourly [options] data_diroptions are:-h or --help display this help-v or --verbose increase amount of reassuring messages
data_dir is the root directory of the weather data (e.g. $(HOME)/weather/data)
This script does little more than call other modules in sequence to get data from the weather station, process it, plotsome graphs, generate some text files and upload the results to a web site.
For more information on using Hourly.py, see How to set up ‘hourly’ logging with pywws.
Functions
Hourly(data_dir)main([argv])
pywws.Hourly.Hourly(data_dir)
pywws.Hourly.main(argv=None)
Comments or questions? Please subscribe to the pywws mailing list http://groups.google.com/group/pywws and let usknow.
64 Chapter 3. Documentation

pywws Documentation, Release 18.04.1.dev1389
pywws.LiveLog
Get weather data, store it, and process it.
Run this continuously, having set what tasks are to be done. This script can also be run with the pywws-livelogcommand.
usage: python -m pywws.LiveLog [options] data_diroptions are:-h or --help display this help-l file or --log file write log information to file-v or --verbose increase amount of reassuring messages
data_dir is the root directory of the weather data (e.g. ~/weather/data)
For more information on using LiveLog.py, see How to set up ‘live’ logging with pywws.
Functions
LiveLog(data_dir)main([argv])
pywws.LiveLog.LiveLog(data_dir)
pywws.LiveLog.main(argv=None)
Comments or questions? Please subscribe to the pywws mailing list http://groups.google.com/group/pywws and let usknow.
pywws.livelogdaemon
Run ‘live logging’ as a UNIX daemon.
This script can also be run with the pywws-livelog-daemon command.
usage: python -m pywws.livelogdaemon [options] data_dir log_file start|stop|restartoptions are:-h or --help display this help-p file or --pid file store pid in 'file' (default /run/lock/pywws.pid)-v or --verbose increase amount of logging messages
data_dir is the root directory of the weather data (e.g. ~/weather/data)log_file is a file to write logging to, e.g. /var/log/pywws.log
Requires the python-daemon library.
If you get a “function() argument 1 must be code, not str” error, try installing python-daemon from PyPI instead ofyour Linux repos.
For more information on ‘live logging’ see How to set up ‘live’ logging with pywws.
Functions
3.1. Contents 65

pywws Documentation, Release 18.04.1.dev1389
main([argv])
Classes
Runner(data_dir, action, files_preserve, . . . )
class pywws.livelogdaemon.Runner(data_dir, action, files_preserve, pid_file)
parse_args(argv=None)
run()
pywws.livelogdaemon.main(argv=None)
Comments or questions? Please subscribe to the pywws mailing list http://groups.google.com/group/pywws and let usknow.
“Internal” modules
pywws.Tasks Routines to perform common tasks such as plotting gaphsor uploading files.
pywws.LogData Save weather station history to filepywws.Process Generate hourly, daily & monthly summaries of raw
weather stationpywws.calib Calibrate raw weather station datapywws.Plot Plot graphs of weather data according to an XML recipepywws.WindRose Plot a “wind rose”pywws.Template Create text data file based on a templatepywws.Forecast Predict future weather using recent datapywws.ZambrettiCorepywws.Upload Upload files to a web server by ftp or copy them to a local
directorypywws.ToTwitter Post a message to Twitterpywws.toservice Post weather update to services such as Weather Under-
groundpywws.YoWindow Generate YoWindow XML filepywws.WeatherStation Get data from WH1080/WH3080 compatible weather sta-
tions.pywws.device_libusb1 Low level USB interface to weather station, using python-
libusb1.pywws.device_pyusb1 Low level USB interface to weather station, using PyUSB
v1.0.pywws.device_pyusb Low level USB interface to weather station, using PyUSB
v0.4.pywws.device_ctypes_hidapi Low level USB interface to weather station, using ctypes to
access hidapi.pywws.device_cython_hidapi Low level USB interface to weather station, using cython-
hidapi.Continued on next page
66 Chapter 3. Documentation

pywws Documentation, Release 18.04.1.dev1389
Table 3.14 – continued from previous pagepywws.DataStore DataStore.py - stores readings in easy to access filespywws.TimeZone Provide a couple of datetime.tzinfo compatible ob-
jects representing local time and UTC.pywws.Localisation Localisation.py - provide translations of strings into localpywws.conversions conversions.py - a set of functions to convert pywws native
unitspywws.Logger Common code for logging info and errors.pywws.constants Bits of data used in several places.
pywws.Tasks
Routines to perform common tasks such as plotting gaphs or uploading files.
Classes
RegularTasks(params, status, raw_data, . . . )
class pywws.Tasks.RegularTasks(params, status, raw_data, calib_data, hourly_data, daily_data,monthly_data, asynch=False)
stop_thread()
has_live_tasks()
do_live(data)
do_tasks()
do_twitter(template, data=None)
do_plot(template)
do_template(template, data=None)
Comments or questions? Please subscribe to the pywws mailing list http://groups.google.com/group/pywws and let usknow.
pywws.LogData
Save weather station history to file
usage: python -m pywws.LogData [options] data_diroptions are:-h | --help display this help-c | --clear clear weather station's memory full indicator-s n | --sync n set quality of synchronisation to weather station (0 or 1)-v | --verbose increase number of informative messages
data_dir is the root directory of the weather data
This module gets data from the weather station’s memory and stores it to file. Each time it is run it fetches all data thatis newer than the last stored data, so it only needs to be run every hour or so. As the weather station typically stores
3.1. Contents 67

pywws Documentation, Release 18.04.1.dev1389
two weeks’ readings (depending on the logging interval), pywws.LogData could be run quite infrequently if youdon’t need up-to-date data.
There is no date or time information in the raw weather station data, so pywws.LogData creates a time stamp foreach reading. It uses the computer’s clock, rather than the weather station clock which can not be read accurately bythe computer. A networked computer should have its clock set accurately by ntp.
Synchronisation with the weather station is achieved by waiting for a change in the current data. There are two levelsof synchronisation, set by the config file or a command line option. Level 0 is quicker, but is only accurate to aroundtwelve seconds. Level 1 waits until the weather station stores a new logged record, and gets time stamps accurate to acouple of seconds. Note that this could take a long time, if the logging interval is greater than the recommended fiveminutes.
Detailed API
Functions
main([argv])
Classes
DataLogger(params, status, raw_data)
class pywws.LogData.DataLogger(params, status, raw_data)
check_fixed_block()
catchup(last_date, last_ptr)
log_data(sync=None, clear=False)
live_data(logged_only=False)
pywws.LogData.main(argv=None)
Comments or questions? Please subscribe to the pywws mailing list http://groups.google.com/group/pywws and let usknow.
pywws.Process
Generate hourly, daily & monthly summaries of raw weather station data
usage: python -m pywws.Process [options] data_diroptions are:-h or --help display this help-v or --verbose increase number of informative messages
data_dir is the root directory of the weather data
This module takes raw weather station data (typically sampled every five or ten minutes) and generates hourly, dailyand monthly summary data, which is useful when creating tables and graphs.
68 Chapter 3. Documentation

pywws Documentation, Release 18.04.1.dev1389
Before computing the data summaries, raw data is “calibrated” using a user-programmable function. See pywws.calibfor details.
The hourly data is derived from all the records in one hour, e.g. from 18:00:00 to 18:59:59, and is given the index ofthe last complete record in that hour.
The daily data summarises the weather over a 24 hour period typically ending at 2100 or 0900 hours, local (non DST)time, though midnight is another popular convention. It is also indexed by the last complete record in the period.Daytime and nightime, as used when computing maximum and minimum temperatures, are assumed to start at 0900and 2100 local time, or 1000 and 2200 when DST is in effect, regardless of the meteorological day.
To adjust the meteorological day to your preference, or that used by your local official weather station, edit the “dayend hour” line in your weather.ini file, then run Reprocess.py to regenerate the summaries.
Monthly summary data is computed from the daily summary data. If the meteorological day does not end at midnight,then each month may begin and end up to 12 hours before or after midnight.
Wind speed data is averaged over the hour (or day) and the maximum gust speed during the hour (or day) is recorded.The predominant wind direction is calculated using vector arithmetic.
Rainfall is converted from the raw “total since last reset” figure to a more useful total in the last hour, day or month.
Functions
Process(params, raw_data, calib_data, . . . ) Generate summaries from raw weather station data.calibrate_data(logger, params, raw_data, . . . ) ‘Calibrate’ raw data, using a user-supplied function.generate_daily(logger, day_end_hour, . . . ) Generate daily summaries from calibrated and hourly data.generate_hourly(logger, calib_data, . . . ) Generate hourly summaries from calibrated data.generate_monthly(logger, rain_day_threshold, . . . ) Generate monthly summaries from daily data.main([argv])
Classes
Average() Compute average of multiple data values.DayAcc() ‘Accumulate’ weather data to produce daily summary.HourAcc(last_rain) ‘Accumulate’ raw weather data to produce hourly sum-
mary.Maximum() Compute maximum value and timestamp of multiple data
values.Minimum() Compute minimum value and timestamp of multiple data
values.MonthAcc(rain_day_threshold) ‘Accumulate’ daily weather data to produce monthly sum-
mary.WindFilter([decay]) Compute average wind speed and direction.
class pywws.Process.AverageCompute average of multiple data values.
add(value)
result()
class pywws.Process.MinimumCompute minimum value and timestamp of multiple data values.
3.1. Contents 69

pywws Documentation, Release 18.04.1.dev1389
add(value, time)
result()
class pywws.Process.MaximumCompute maximum value and timestamp of multiple data values.
add(value, time)
result()
class pywws.Process.WindFilter(decay=1.0)Compute average wind speed and direction.
The wind speed and direction of each data item is converted to a vector before averaging, so the result reflectsthe dominant wind direction during the time period covered by the data.
Setting the decay parameter converts the filter from a simple averager to one where the most recent samplecarries the highest weight, and earlier samples have a lower weight according to how long ago they were.
This process is an approximation of “exponential smoothing”. See Wikipedia for a detailed discussion.
The parameter decay corresponds to the value (1 - alpha) in the Wikipedia description. Because theweather data being smoothed may not be at regular intervals this parameter is the decay over 5 minutes. Weatherdata at other intervals will have its weight scaled accordingly.
The return value is a (speed, direction) tuple.
Parameters decay (float) – filter coefficient decay rate.
Return type (float, float)
add(data)
result()
class pywws.Process.HourAcc(last_rain)‘Accumulate’ raw weather data to produce hourly summary.
Compute average wind speed and maximum wind gust, find dominant wind direction and compute total rainfall.
reset()
add_raw(data)
result()
class pywws.Process.DayAcc‘Accumulate’ weather data to produce daily summary.
Compute average wind speed, maximum wind gust and daytime max & nighttime min temperatures, find dom-inant wind direction and compute total rainfall.
Daytime is assumed to be 0900-2100 and nighttime to be 2100-0900, local time (1000-2200 and 2200-1000during DST), regardless of the “day end hour” setting.
reset()
add_raw(data)
add_hourly(data)
result()
70 Chapter 3. Documentation

pywws Documentation, Release 18.04.1.dev1389
class pywws.Process.MonthAcc(rain_day_threshold)‘Accumulate’ daily weather data to produce monthly summary.
Compute daytime max & nighttime min temperatures.
reset()
add_daily(data)
result()
pywws.Process.calibrate_data(logger, params, raw_data, calib_data)‘Calibrate’ raw data, using a user-supplied function.
pywws.Process.generate_hourly(logger, calib_data, hourly_data, process_from)Generate hourly summaries from calibrated data.
pywws.Process.generate_daily(logger, day_end_hour, calib_data, hourly_data, daily_data, pro-cess_from)
Generate daily summaries from calibrated and hourly data.
pywws.Process.generate_monthly(logger, rain_day_threshold, day_end_hour, daily_data,monthly_data, process_from)
Generate monthly summaries from daily data.
pywws.Process.Process(params, raw_data, calib_data, hourly_data, daily_data, monthly_data)Generate summaries from raw weather station data.
The meteorological day end (typically 2100 or 0900 local time) is set in the preferences file weather.ini.The default value is 2100 (2200 during DST), following the historical convention for weather station readings.
pywws.Process.main(argv=None)
Comments or questions? Please subscribe to the pywws mailing list http://groups.google.com/group/pywws and let usknow.
pywws.calib
Calibrate raw weather station data
This module allows adjustment of raw data from the weather station as part of the ‘processing’ step (see py-wws.Process). For example, if you have fitted a funnel to double your rain gauge’s collection area, you can writea calibration routine to double the rain value.
The default calibration generates the relative atmospheric pressure. Any user calibration you write must also do this.
Writing your calibration module
Firstly, decide where you want to keep your module. Like your text and graph templates, it’s best to keep it separatefrom the pywws code, so it isn’t affected by pywws upgrades. I suggest creating a modules directory in the sameplace as your templates directory.
You could start by copying one of the example calibration modules, or you can create a plain text file in your modulesdirectory, e.g. calib.py and copy the following text into it:
3.1. Contents 71

pywws Documentation, Release 18.04.1.dev1389
class Calib(object):def __init__(self, params, stored_data):
self.pressure_offset = eval(params.get('config', 'pressure offset'))
def calib(self, raw):result = dict(raw)# calculate relative pressureresult['rel_pressure'] = result['abs_pressure'] + self.pressure_offsetreturn result
The Calib class has two methods. Calib.__init__() is the constructor and is a good place to set any constantsyou need. It is passed a reference to the raw data storage which can be useful for advanced tasks such as spike removal.Calib.calib() generates a single set of ‘calibrated’ data from a single set of ‘raw’ data. There are a few rules tofollow when writing this method:
• Make sure you include the line result = dict(raw), which copies all the raw data to your result value, atthe start.
• Don’t modify any of the raw data.
• Make sure you set result['rel_pressure'].
• Don’t forget to return the result at the end.
When you’ve finished writing your calibration module you can get pywws to use it by putting its location in yourweather.ini file. It goes in the [paths] section, as shown in the example below:
[paths]work = /tmp/weathertemplates = /home/jim/weather/templates/graph_templates = /home/jim/weather/graph_templates/user_calib = /home/jim/weather/modules/usercalib
Note that the user_calib value need not include the .py at the end of the file name.
Classes
Calib(params, stored_data) Calibration class that implements default or user calibra-tion.
DefaultCalib(params, stored_data) Default calibration class.
class pywws.calib.DefaultCalib(params, stored_data)Default calibration class.
This class sets the relative pressure, using a pressure offset originally read from the weather station. This is thebare minimum ‘calibration’ required.
calib(raw)
class pywws.calib.Calib(params, stored_data)Calibration class that implements default or user calibration.
Other pywws modules use this method to create a calibration object. The constructor creates either a defaultcalibration object or a user calibration object, depending on the user_calib value in the [paths] sectionof the params parameter. It then adopts the calibration object’s calib() method as its own.
calibrator = None
72 Chapter 3. Documentation

pywws Documentation, Release 18.04.1.dev1389
Comments or questions? Please subscribe to the pywws mailing list http://groups.google.com/group/pywws and let usknow.
pywws.Plot
Plot graphs of weather data according to an XML recipe
usage: python -m pywws.Plot [options] data_dir temp_dir xml_file output_fileoptions are:-h or --help display this help
data_dir is the root directory of the weather datatemp_dir is a workspace for temporary files e.g. /tmpxml_file is the name of the source file that describes the plotoutput_file is the name of the image file to be created e.g. 24hrs.png
Introduction
Like pywws.Template this is one of the more difficult to use modules in the weather station software collection.It plots a graph (or set of graphs) of weather data. Almost everything about the graph is controlled by an XML file. Irefer to these files as templates, but they aren’t templates in the same sense as pywws.Template uses to create textfiles.
Before writing your own graph template files, it might be useful to look at some of the examples in the exam-ple_graph_templates directory. If (like I was) you are unfamiliar with XML, I suggest reading the W3 Schools XMLtutorial.
Text encoding
The [config] section of weather.ini has a gnuplot encoding entry that sets the text encoding pywws uses towrite a gnuplot command file. The default value, iso_8859_1, is suitable for most western European languages,but may need changing if you use another language. It can be set to any text encoding recognised by both the Pythoncodecs module and the gnuplot set encoding command. If Python and gnuplot have different names for thesame encoding, give both names separated by a space, Python name first. For example:
[config]gnuplot encoding = koi8_r koi8r
Note that you need to choose an encoding for which gnuplot has a suitable font. You may need to set the font witha terminal element. Note also that this encoding is unrelated to the encoding of your XML graph file, which is set inthe XML header.
XML graph file syntax
Here is the simplest useful graph template. It plots the external temperature for the last 24 hours.
<?xml version="1.0" encoding="ISO-8859-1"?><graph>
<plot><subplot>
<title>Temperature (°C)</title><ycalc>data['temp_out']</ycalc>
</subplot>
3.1. Contents 73

pywws Documentation, Release 18.04.1.dev1389
</plot></graph>
In this example, the root element graph has one plot element, which has one subplot element. The subplot elementcontains a title element and a ycalc element. To plot more data on the same graph (for example dew point andtemperature), we can add more subplot elements. To plot more than one graph (for example wind speed is measuredin different units from temperature) in the same file we can add more plot elements.
The complete element hierarchy is shown below.
graphplot
subplotxcalcycalcaxesstylecolourtitle
bmarginyrangey2rangeyticsy2ticsylabelylabelangley2labely2labelanglegridsourceboxwidthtitlecommand
startstopdurationlayoutsizefileformatterminallmarginrmarginxformatxlabeldateformatxticstitle
74 Chapter 3. Documentation
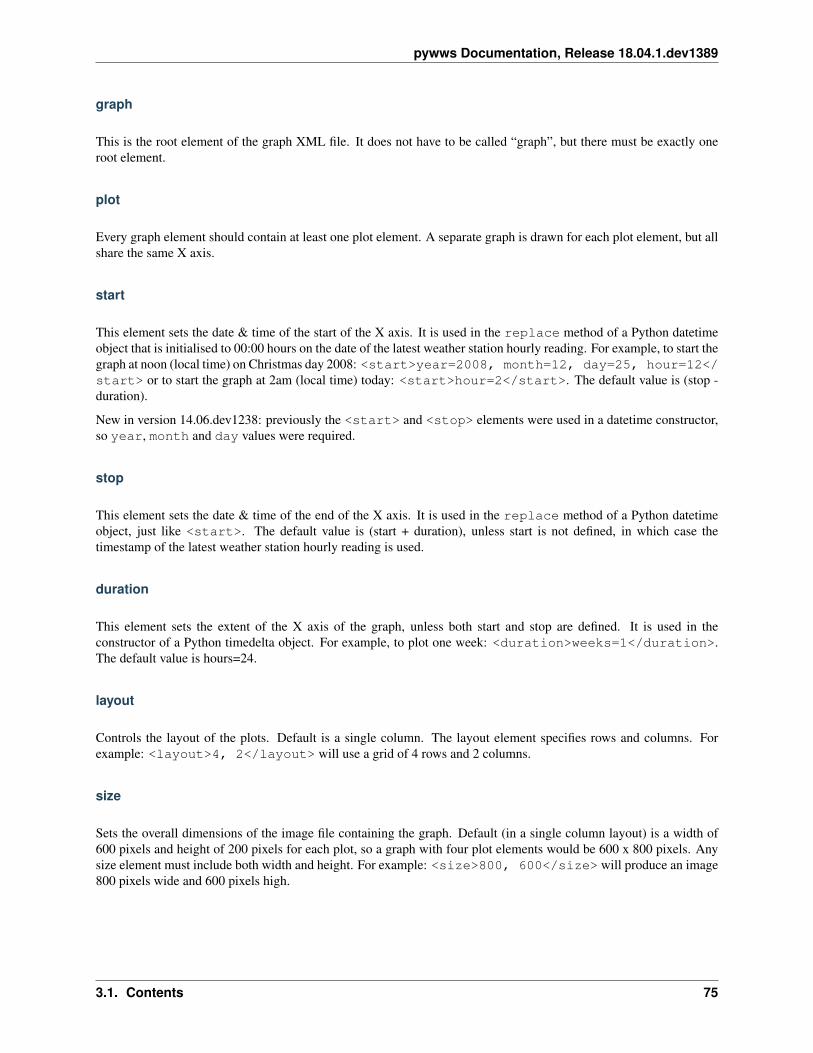
pywws Documentation, Release 18.04.1.dev1389
graph
This is the root element of the graph XML file. It does not have to be called “graph”, but there must be exactly oneroot element.
plot
Every graph element should contain at least one plot element. A separate graph is drawn for each plot element, but allshare the same X axis.
start
This element sets the date & time of the start of the X axis. It is used in the replace method of a Python datetimeobject that is initialised to 00:00 hours on the date of the latest weather station hourly reading. For example, to start thegraph at noon (local time) on Christmas day 2008: <start>year=2008, month=12, day=25, hour=12</start> or to start the graph at 2am (local time) today: <start>hour=2</start>. The default value is (stop -duration).
New in version 14.06.dev1238: previously the <start> and <stop> elements were used in a datetime constructor,so year, month and day values were required.
stop
This element sets the date & time of the end of the X axis. It is used in the replace method of a Python datetimeobject, just like <start>. The default value is (start + duration), unless start is not defined, in which case thetimestamp of the latest weather station hourly reading is used.
duration
This element sets the extent of the X axis of the graph, unless both start and stop are defined. It is used in theconstructor of a Python timedelta object. For example, to plot one week: <duration>weeks=1</duration>.The default value is hours=24.
layout
Controls the layout of the plots. Default is a single column. The layout element specifies rows and columns. Forexample: <layout>4, 2</layout> will use a grid of 4 rows and 2 columns.
size
Sets the overall dimensions of the image file containing the graph. Default (in a single column layout) is a width of600 pixels and height of 200 pixels for each plot, so a graph with four plot elements would be 600 x 800 pixels. Anysize element must include both width and height. For example: <size>800, 600</size> will produce an image800 pixels wide and 600 pixels high.
3.1. Contents 75

pywws Documentation, Release 18.04.1.dev1389
fileformat
Sets the image format of the file containing the graph. Default is png. Any string recognised by your installation ofgnuplot should do. For example: <fileformat>gif</fileformat> will produce a GIF image.
If your installation of gnuplot supports it, pngcairo is an alternative to png that can yield much better lookingresults.
New in version 15.11.0.dev1331: You can also set terminal options in this string, for example:<fileformat>pngcairo font "arial,8" rounded</fileformat> will use a small “Arial” font andround the ends of line segments.
terminal
Allows complete control of gnuplot’s “terminal” settings. You may want to use this if you are plotting to an un-usual image format. Any string recognised by your installation of gnuplot’s ‘set terminal’ command should do.For example: <terminal>svg enhanced font "arial,9" dynamic rounded size 600,800</terminal>. This setting overwrites both size and fileformat.
Changed in version 15.11.0.dev1331: The size and fileformat elements are now the preferred way to set the gnuplot“terminal”.
lmargin
Sets the left margin of the plots, i.e. the distance from the left hand axis to the left hand edge of the image area.According to the gnuplot documentation the units of lmargin are character widths. The default value is 5, whichshould look OK in most circumstances.
rmargin
Sets the right margin of the plots, i.e. the distance from the right hand axis to the right hand edge of the image area.According to the gnuplot documentation the units of rmargin are character widths. The default value is -1, which setsautomatic adjustment.
xformat
Sets the format of the time / date xtic labels. The value is a strftime style format string. Default depends on the graphduration: 24 hours or less is “%H%M”, 24 hours to 7 days is “%a %d” and 7 days or more is “%Y/%m/%d”.
xlabel
Sets the X axis label. The value is a strftime style format string. Default depends on the graph duration: 24 hours orless is “Time (%Z)”, 24 hours to 7 days is “Day” and 7 days or more is “Date”. The datetime used to compute this isstart, which may produce unexpected results when a graph spans DST start or end.
76 Chapter 3. Documentation

pywws Documentation, Release 18.04.1.dev1389
dateformat
Sets the format of the date labels at each end of X axis. The value is a strftime style format string. Default is“%Y/%m/%d”. The right hand label is only drawn if it differs from the left. To have no labels, set an empty format:<dateformat></dateformat>
xtics
Sets the spacing of the “tic” marks on the X axis. The value is an integer number of hours. The default is to allowgnuplot to set an appropriate interval.
title
Sets the title of the graph. A single line of text, for example: <title>Today's weather</title>. This titleappears at the very top of the graph, outside any plot area.
New in version 15.06.0.dev1301: If the title contains any “%” characters it will be used as a strftime style format stringfor the datetime of the stop value. This allows you to include the graph’s date or time in the title.
subplot
Every plot element should contain at least one subplot element. A separate trace is drawn for each subplot element,but all share the same X and Y axes.
bmargin
Sets the bottom margin, i.e. the spacing between the lower X axis and the edge of the graph (or the next plot). Thedefault is to let gnuplot adjust this automatically, which works OK most of the time but you may wish to fine tune thevalue to suit your installation.
The permitted value is any non-negative real number. On my setup 0.9 is a good value, set as follows: <bmargin>0.9</bmargin>.
yrange
Sets the lower and upper limits of the (left hand) Y axis. The value is anything understood by gnuplot, typically apair of numbers. The default is to allow gnuplot to set appropriate values, which is unlikely to be what you want.For example, to plot typical UK temperatures with no value going off the graph: <yrange>-10, 30</yrange>.Note that commas are converted to colons, so <yrange>-10:30</yrange> would be equivalent.
You can use an asterisk to have gnuplot choose a suitable value. For example, to have the upper value auto scale whilstfixing the lower value at zero, use <yrange>0:*</yrange>.
Since gnuplot version 4.6 you can set lower and/or upper bounds of the auto scaled range. The gnuplot syntax forthis is lo < * < hi, but as the plot template is an XML file we need to replace the < characters with <. Forexample, if we want the upper value to always be 20 or more we can use <yrange>0:20 < *</yrange>.
3.1. Contents 77

pywws Documentation, Release 18.04.1.dev1389
y2range
Sets the lower and upper limits of the right hand Y axis. Default is for the right hand Y axis to be the same as the left,but setting a different range is useful in dual axis plotting.
ytics
Controls the “tic” marks on the left hand Y axis. The value can be anything that’s understood by gnuplot. Forexample, to set the tic spacing to 45 use <ytics>45</ytics>. More complex things are also possible, e.g. tolabel a wind direction graph with compass points, use <y2tics>('N' 0, 'E' 90, 'S' 180, 'W' 270,'N' 360)</y2tics>.
y2tics
Controls the “tic” marks on the right hand axis. The format is the same as that for ytics. Default behaviour is to copythe left hand tic marks, but without labels.
ylabel
Adds a label to the (left hand) Y axis. For example, when plotting temperature: <ylabel>°C</ylabel>. If youuse ylabel you will probably want to adjust lmargin.
ylabelangle
Adjust the angle of the (left hand) Y axis label, if your version of gnuplot supports it. For example, to write the labelhorizontally: <ylabelangle>90</ylabelangle>.
y2label
Adds a label to the right hand Y axis. For example, when plotting humidity: <y2label>%</y2label>. This ismostly used when plotting dual axis graphs. If you use y2label you will probably want to adjust rmargin.
y2labelangle
Adjust the angle of the right hand Y axis label, if your version of gnuplot supports it. For example, to write the labelhorizontally: <y2labelangle>90</y2labelangle>.
grid
Adds a grid to the plot. In most situations gnuplot’s default grid is suitable, so no value is needed: <grid></grid>.More control is possible using any of the options understood by gnuplot’s set grid command. For example, to havehorizontal grid lines only: <grid>ytics</grid>.
78 Chapter 3. Documentation

pywws Documentation, Release 18.04.1.dev1389
source
Select the weather data to be plotted. Permitted values are <source>raw</source>, <source>hourly</source>, <source>daily</source> and <source>monthly</source>. Default is raw. Note that thedifferent sources have different data dictionaries, so this choice affects ycalc.
boxwidth
Sets the width of the “boxes” used when drawing bar graphs. The value is an integer expression yielding a number ofseconds. Default depends on source: raw is 240, hourly is 2800 and daily is 2800 * 24.
title
Sets the title of the plot. A single line of text, for example: <title>Temperature (°C)</title>. This titleappears within the plot area, above any subplot titles.
command
Execute any gnuplot command, just before the main “plot” command. This option allows advanced users to havegreater control over the graph appearance. The value is any valid gnuplot command, typically beginning withthe word set. For example: <command>set key tmargin center horizontal width 1 noreverseenhanced autotitles box linetype -1 linewidth 1</command>. (Don’t ask me what this exam-ple does — I’m not an advanced user).
New in version 15.11.0.dev1333: This element can be repeated to allow several things to be set.
xcalc
Controls the X axis positioning of plotted data values. The default value of data[‘idx’] is correct for most data, butthere are some exceptions. For example, when plotting bar charts of hourly rainfall, it’s nice to centre the bars on 30minutes past the hour: <xcalc>data['idx'].replace(minute=30, second=0)</xcalc>.
ycalc
Selects the data to be plotted. Any one line Python expression that returns a single float value can be used. At its sim-plest this just selects one value from the “data” dictionary, for example: <ycalc>data['temp_out']</ycalc>plots the external temperature. More complex expressions are possible, and some helper functions are provided. Forexample: <ycalc>dew_point(data['temp_out'], data['hum_out'])</ycalc> plots the externaldew point, and <ycalc>wind_mph(data['wind_ave'])</ycalc> plots the average wind speed in milesper hour.
Cumulative plots are also possible. The result of each ycalc computation is stored and made available to thenext computation in the variable last_ycalc. This can be used with any data, but is most useful with rainfall:<ycalc>data['rain'] + last_ycalc</ycalc>.
A special case are plots with <style>candlesticks</style> or <style>candlesticksw</style> which need 4 values in a specific order: <ycalc>(data['temp_out_min_ave'],data['temp_out_min_lo'], data['temp_out_max_hi'], data['temp_out_max_ave'])</ycalc>. To add a median bar, use another candlesticks plot with data['temp_out_ave'] in all 4 fields.
3.1. Contents 79

pywws Documentation, Release 18.04.1.dev1389
axes
Selects which Y axis the data is plotted against. Default is the left hand axis, but the right hand axis can be chosenwith: <axes>x1y2</axes>. This can be used in conjunction with y2range to plot two unrelated quantities on onegraph, for example temperature and humidity.
style
Sets the line style for the graph. Default is a smooth continuous line, thickness 1. To select a bar graph use:<style>box</style>. To select points without a connecting line use: <style>+</style> or <style>x</style>. To select a line thickness 3 (for example) use: <style>line 3</style>. The thickness of points canbe set in a similar fashion. For complete control (for advanced users) a full gnuplot style can be set: <style>smoothunique lc 5 lw 3</style>.
For candlesticks plots you can specify line thickness as well, e.g. <style>candlesticks 1.5</style>. If you add whiskerbars, you can change the width of the whiskerbars with a second parameter, e.g.<style>candlesticksw 2 0.5</style> would plot the whiskerbars with 50% width of the candlesticks.
colour
Sets the colour of the subplot line or boxes. This can be in any form that gnuplot accepts, typically a single integer oran rgb specification such as rgb "cyan" or rgb "FF00FF". The mapping of integer values to colours is set bygnuplot. Default value is an ever incrementing integer.
title
Sets the title of the subplot. A single line of text, for example: <title>Temperature (°C)</title>. Thistitle appears within the plot area, next to a short segment of the line colour used for the subplot.
Detailed API
Functions
main([argv])
Classes
BasePlotter(params, status, raw_data, . . . )GraphFileReader(input_file)GraphNode(node)GraphPlotter(params, status, raw_data, . . . )Record
class pywws.Plot.GraphNode(node)
get_children(name)
80 Chapter 3. Documentation

pywws Documentation, Release 18.04.1.dev1389
get_value(name, default)
get_values(name)
class pywws.Plot.GraphFileReader(input_file)
close()
class pywws.Plot.BasePlotter(params, status, raw_data, hourly_data, daily_data, monthly_data,work_dir)
DoPlot(input_file, output_file)
class pywws.Plot.Record
class pywws.Plot.GraphPlotter(params, status, raw_data, hourly_data, daily_data, monthly_data,work_dir)
plot_name = 'plot'
GetDefaultRows()
GetDefaultPlotSize()
GetPreamble()
PlotData(plot_no, plot, source)
pywws.Plot.main(argv=None)
Comments or questions? Please subscribe to the pywws mailing list http://groups.google.com/group/pywws and let usknow.
pywws.WindRose
Plot a “wind rose”
usage: python -m pywws.WindRose [options] data_dir temp_dir xml_file output_fileoptions are:-h or --help display this help
data_dir is the root directory of the weather datatemp_dir is a workspace for temporary files e.g. /tmpxml_file is the name of the source file that describes the plotoutput_file is the name of the image file to be created e.g. 24hrs.png
Introduction
This routine plots one or more “wind roses” (see Wikipedia for a description). Like pywws.Plot almost everythingis controlled by an XML “recipe” / template file.
Before writing your own template files, it might be useful to look at some of the examples in the exam-ple_graph_templates directory. If (like I was) you are unfamiliar with XML, I suggest reading the W3 Schools XMLtutorial.
3.1. Contents 81

pywws Documentation, Release 18.04.1.dev1389
XML graph file syntax
Here is the simplest useful wind rose template. It plots wind over the last 24 hours.
<?xml version="1.0" encoding="ISO-8859-1"?><graph>
<windrose><ycalc>data['wind_ave']</ycalc>
</windrose></graph>
In this example, the root element graph has one windrose element which contains nothing more than a ycalc element.
The complete element hierarchy is shown below.
graphwindrose
xcalcycalcthresholdcolouryrangepointssourcetitlecommand
startstopdurationlayoutsizefileformatlmargin, rmargin, tmargin, bmargintitle
graph
This is the root element of the graph XML file. It does not have to be called “graph”, but there must be exactly oneroot element.
start
This element sets the date & time of the wind roses. It is used in the constructor of a Python datetime object. Forexample, to start at noon (local time) on Christmas day 2008: <start>year=2008, month=12, day=25,hour=12</start>. The default value is (stop - duration).
82 Chapter 3. Documentation
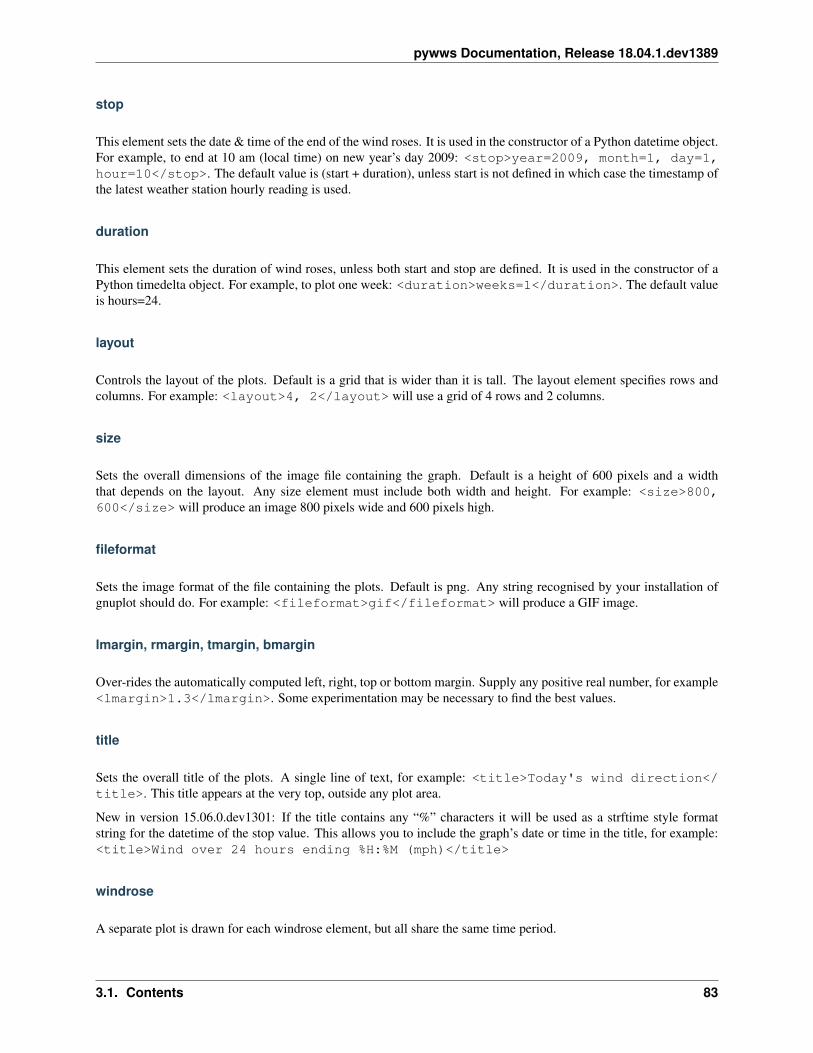
pywws Documentation, Release 18.04.1.dev1389
stop
This element sets the date & time of the end of the wind roses. It is used in the constructor of a Python datetime object.For example, to end at 10 am (local time) on new year’s day 2009: <stop>year=2009, month=1, day=1,hour=10</stop>. The default value is (start + duration), unless start is not defined in which case the timestamp ofthe latest weather station hourly reading is used.
duration
This element sets the duration of wind roses, unless both start and stop are defined. It is used in the constructor of aPython timedelta object. For example, to plot one week: <duration>weeks=1</duration>. The default valueis hours=24.
layout
Controls the layout of the plots. Default is a grid that is wider than it is tall. The layout element specifies rows andcolumns. For example: <layout>4, 2</layout> will use a grid of 4 rows and 2 columns.
size
Sets the overall dimensions of the image file containing the graph. Default is a height of 600 pixels and a widththat depends on the layout. Any size element must include both width and height. For example: <size>800,600</size> will produce an image 800 pixels wide and 600 pixels high.
fileformat
Sets the image format of the file containing the plots. Default is png. Any string recognised by your installation ofgnuplot should do. For example: <fileformat>gif</fileformat> will produce a GIF image.
lmargin, rmargin, tmargin, bmargin
Over-rides the automatically computed left, right, top or bottom margin. Supply any positive real number, for example<lmargin>1.3</lmargin>. Some experimentation may be necessary to find the best values.
title
Sets the overall title of the plots. A single line of text, for example: <title>Today's wind direction</title>. This title appears at the very top, outside any plot area.
New in version 15.06.0.dev1301: If the title contains any “%” characters it will be used as a strftime style formatstring for the datetime of the stop value. This allows you to include the graph’s date or time in the title, for example:<title>Wind over 24 hours ending %H:%M (mph)</title>
windrose
A separate plot is drawn for each windrose element, but all share the same time period.
3.1. Contents 83

pywws Documentation, Release 18.04.1.dev1389
xcalc
Selects if data is included in the wind rose. The value should be a valid Python logical expression. For example, to plota rose for afternoon winds only: <xcalc>data['idx'].hour >= 12</xcalc>. This allows aggregationof afternoon wind data over several days. Remember that data is indexed in UTC, so you need to use an expressionthat takes account of your time zone. The default value is ‘True’.
ycalc
Selects the data to be plotted. Any one line Python expression that returns a single float value can be used. At itssimplest this just selects one value from the “data” dictionary, for example: <ycalc>data['wind_ave']</ycalc>. To convert to mph use: <ycalc>data['wind_ave'] * 3.6 / 1.609344</ycalc>. You areunlikely to want to use anything other than ‘wind_ave’ here.
threshold
Sets the thresholds for each colour on the rose petals. Defaults are based on the Wikipedia example. The valuesshould be a correctly ordered list of real numbers, for example: <threshold>0.5, 3.5, 7.5, 12.5, 18.5, 24.5, 31.5</threshold> approximates to the Beaufort scale, if ycalc has been set to convert windspeedsto mph.
colour
Sets the colours of the threshold petal segments. Can be any sequence of values accepted by gnuplot. Default value isa sequence of integer colour indexes, which is probably not what you want. You may need to experiment with morecomplicated values such as
<colour>'rgb "grey"','rgb "#0000FF"','rgb "#00A080"','rgb "#00FF00"','rgb "#A0FF00"',→˓'rgb "#FFFF00"'</colour>
yrange
Sets the upper limits of the axes. The rose shows what percentage of the time the wind came from a particular direction.For example, if you live somewhere with a very steady wind you might want to allow higher percentages than normal:<yrange>91</yrange>. Auto-scaling is also possible, using an asterisk: <yrange>*</yrange>
points
Sets the text of the compass points. The defaults are ‘N’, ‘S’, ‘E’ & ‘W’. For graphs in another language you canover-ride this, for example: <points>'No', 'Zu', 'Oo', 'We'</points>. (The preferred way to do thisis to create a language file, see pywws.Localisation.)
source
Select the weather data to be plotted. Permitted values are <source>raw</source>, <source>hourly</source>, <source>daily</source> and <source>monthly</source>. Default is raw. Note that thedifferent sources have different data dictionaries, so this choice affects ycalc.
84 Chapter 3. Documentation

pywws Documentation, Release 18.04.1.dev1389
title
Sets the title of the plot. A single line of text, for example: <title>Morning winds</title>. This titleappears within the plot area, above the threshold colour key.
command
New in version 16.06.0.
Execute any gnuplot command, just before the main “plot” command. This option allows advanced users to havegreater control over the graph appearance. The value is any valid gnuplot command, typically beginning with the wordset.
For example, <command>set grid front</command> will stop the grid being hidden by the colouredwedges, and <command>set key outside above right maxrows 1</command> will place the keyoutside the plot area.
Detailed API
Functions
main([argv])
Classes
RosePlotter(params, status, raw_data, . . . )
class pywws.WindRose.RosePlotter(params, status, raw_data, hourly_data, daily_data,monthly_data, work_dir)
plot_name = 'windrose'
GetDefaultRows()
GetDefaultPlotSize()
GetPreamble()
PlotData(plot_no, plot, source)
pywws.WindRose.main(argv=None)
Comments or questions? Please subscribe to the pywws mailing list http://groups.google.com/group/pywws and let usknow.
pywws.Template
Create text data file based on a template
3.1. Contents 85

pywws Documentation, Release 18.04.1.dev1389
usage: python -m pywws.Template [options] data_dir template_file output_fileoptions are:--help display this help
data_dir is the root directory of the weather datatemplate_file is the template text source fileoutput_file is the name of the text file to be created
Introduction
This is probably the most difficult to use module in the weather station software collection. It generates text files basedon a “template” file plus the raw, hourly, daily & monthly weather station data. The template processing goes beyondsimple substitution of values to include loops, jumps forwards or backwards in the data, processing of the data andsubstitution of missing values.
A template file can be any sort of text file (plain text, xml, html, etc.) to which “processing instructions” have beenadded. These processing instructions are delimited by hash (‘#’) characters. They are not copied to the output, butcause something else to happen: either a data value is inserted or one of a limited number of other actions is carriedout.
Before writing your own template files, it might be useful to look at some of the examples in the example_templatesdirectory.
Text encoding
The [config] section of weather.ini has a template encoding entry that tells pywws what text encoding mostof your template files use. The default value, iso-8859-1, is suitable for most western European languages, butmay need changing if you use another language. It can be set to any text encoding recognised by the Python codecsmodule.
Make sure your templates use the text encoding you set. The iconv program can be used to transcode files.
New in version 16.04.0: the #encoding# processing instruction can be used to set the text encoding of a templatefile.
Processing instructions
Note that if the closing ‘#’ of a processing instruction is the last character on a line then the following line break is notoutputted. This makes templates easier to edit as you can have a separate line for each processing instruction and stillproduce output with no line breaks. If you want to output a line break after a processing instruction, put a blank lineimmediately after it.
##
output a single ‘#’ character.
#! comment text#
a comment, no output generated. comment text can be any text without a line break.
86 Chapter 3. Documentation

pywws Documentation, Release 18.04.1.dev1389
#monthly#
switch to “monthly” summary data. The index is reset to the most recent value.
#daily#
switch to “daily” summary data. The index is reset to the most recent value.
#hourly#
switch to “hourly” summary data. The index is reset to the most recent value.
#raw#
switch to “raw” data. The index is reset to the most recent value.
Changed in version 11.09: This now selects “calibrated” data. The directive name remains unchanged for backwardscompatibility.
#live#
switch to “live” data. If the template is processed in the [live] section of weather.ini this will select the mostup-to-date weather data, otherwise it will have the same effect as #raw#. Any #jump# will go to “raw” data.
#timezone name#
convert all datetime values to time zone name before output. Permitted values for name are utc or local.
#locale expr#
switch use of ‘locale’ on or off, according to expr. When locale is on floating point numbers may use a comma asthe decimal separator instead of a point, depending on your localisation settings. Use "True" or "False" for expr.
#encoding expr#
New in version 16.04.0.
set the template text encoding to expr, e.g. ascii, utf8 or html. The html encoding is a special case. It writesascii files but with non ASCII characters converted to HTML entities.
Any #encoding# directive should be placed near the beginning of the template file, before any non-ASCII charactersare used.
#roundtime expr#
switch time rounding on or off, according to expr. When time rounding is on, 30 seconds is added to each time valueused. This is useful if you are only printing out hours and minutes, e.g. with a “%H:%M” format, and want timevalues such as 10:23:58 to appear as “10:24”. Use "True" or "False" for expr.
3.1. Contents 87

pywws Documentation, Release 18.04.1.dev1389
#jump count#
jump count values. The data index is adjusted by count hours or days. Negative values jump back in time.
It is a good idea to put jumps within a loop at the end, just before the #endloop# instruction. The loop can thenterminate cleanly if it has run out of data.
#goto date-time#
go to date-time. The data index is adjusted to the record immediately after date-time. This can be in UTC oryour local time zone, according to the setting of timezone, and must exactly match the ISO date format, for example"2010-11-01 12:00:00" is noon on 1st November 2010.
Parts of date-time can be replaced with strftime style % format characters to specify the current loop index. Forexample, "%Y-%m-01 12:00:00" is noon on 1st of this month.
#loop count#
start a loop that will repeat count times. count must be one or more.
#endloop#
end a loop started by #loop count#. The template processing will go back to the line containing the #loopcount# instruction. Don’t try to nest loops.
#key fmt_string no_value_string conversion#
output a data value. key is the data key, e.g. temp_out for outdoor temperature. fmt_string is a printf-likeformat string (actually Python’s % operator) except for datetime values, when it is input to datetime’s strftime()method. no_value_string is output instead of fmt_string when the data value is absent, e.g. if the sta-tion lost contact with the outside sensor. conversion is a Python expression to convert the data, e.g. to convertwind speed from m/s to mph you could use "x * 3.6 / 1.609344", or the more convenient provided function"wind_mph(x)". See the pywws.conversions module for details of the available functions.
All these values need double quotes ” if they contain spaces or other potentially difficult characters. All exceptkey are optional, but note that if you want to specify a conversion, you also need to specify fmt_string andno_value_string.
#calc expression fmt_string no_value_string conversion#
output a value computed from one or more data items. expression is any valid Python expression,e.g. "dew_point(data['temp_out'], data['hum_out'])" to compute the outdoor dew point.fmt_string, no_value_string and conversion are as described above. Note that it is probably moreefficient to incorporate any conversion into expression.
In addition to the functions in the pywws.conversions module there are three more useful functions:rain_hour(data) returns the amount of rain in the last hour, rain_day(data) returns the amount of rainsince midnight (local time) and hour_diff(data, key) returns the change in data item key over the last hour.
88 Chapter 3. Documentation

pywws Documentation, Release 18.04.1.dev1389
Example
Here is an example snippet showing basic and advanced use of the template features. It is part of the 6hrs.txt exampletemplate file, which generates an HTML table of 7 hourly readings (which should span 6 hours).
#hourly##jump -6##loop 7#
<tr><td>#idx "%Y/%m/%d" "" "[None, x][x.hour == 0 or loop_count == 7]"#</td><td>#idx "%H%M %Z"#</td><td>#temp_out "%.1f °C"#</td><td>#hum_out "%d%%"#</td><td>#wind_dir "%s" "-" "winddir_text(x)"#</td><td>#wind_ave "%.0f mph" "" "wind_mph(x)"#</td><td>#wind_gust "%.0f mph" "" "wind_mph(x)"#</td><td>#rain "%0.1f mm"#</td><td>#rel_pressure "%.0f hPa"#, #pressure_trend "%s" "" "pressure_trend_text(x)"#</
→˓td></tr>
#jump 1##endloop#
The first three lines of this snippet do the following: select hourly data, jump back 6 hours, start a loop with a countof 7. A jump forward of one hour appears just before the end of the repeated segment. As this last jump (of one hour)happens each time round the loop, a sequence of 7 data readings will be output. The last line marks the end of the loop— everything between the #loop 7# and #endloop# lines is output 7 times.
The #temp_out ...#, #hum_out ...#, #rain ...# and #rel_pressure ...# instructions show ba-sic data output. They each use a fmt_string to format the data appropriately. The #wind_ave ...# and#wind_gust ...# instructions show how to use a conversion expression to convert m/s to mph.
The #wind_dir ...# and #pressure_trend ...# instructions show use of the built-in functionswinddir_text and pressure_trend_text to convert numerical values into text.
Finally we get to datetime values. The #idx "%H%M"# instruction simply outputs the time (in HHMM format) ofthe data’s index. The #idx "%Y/%m/%d" "" "[None, x][x.hour == 0 or loop_count == 7]"#instruction is a bit more complicated. It outputs the date, but only on the first line or if the date has changed. It doesthis by indexing the array [None, x] with a boolean expression that is true when loop_count is 7 (i.e. on thefirst pass through the loop) or x.hour is zero (i.e. this is the first hour of the day).
Detailed API
Functions
main([argv])
Classes
Template(params, status, calib_data, . . . [, . . . ])
class pywws.Template.Template(params, status, calib_data, hourly_data, daily_data,monthly_data, use_locale=True)
3.1. Contents 89

pywws Documentation, Release 18.04.1.dev1389
process(live_data, template_file)
make_text(template_file, live_data=None)
make_file(template_file, output_file, live_data=None)
pywws.Template.main(argv=None)
Comments or questions? Please subscribe to the pywws mailing list http://groups.google.com/group/pywws and let usknow.
pywws.Forecast
Predict future weather using recent data
usage: python -m pywws.Forecast [options] data_diroptions are:-h | --help display this help
data_dir is the root directory of the weather data
Functions
Zambretti(params, hourly_data)ZambrettiCode(params, hourly_data)main([argv])
pywws.Forecast.ZambrettiCode(params, hourly_data)
pywws.Forecast.Zambretti(params, hourly_data)
pywws.Forecast.main(argv=None)
Comments or questions? Please subscribe to the pywws mailing list http://groups.google.com/group/pywws and let usknow.
pywws.ZambrettiCore
Functions
ZambrettiCode(pressure, month, wind, trend) Simple implementation of Zambretti forecaster algorithm.ZambrettiText(letter)main([argv])
pywws.ZambrettiCore.ZambrettiCode(pressure, month, wind, trend, north=True,baro_top=1050.0, baro_bottom=950.0)
Simple implementation of Zambretti forecaster algorithm. Inspired by beteljuice.com Java algorithm, as con-verted to Python by honeysucklecottage.me.uk, and further information from http://www.meteormetrics.com/zambretti.htm
90 Chapter 3. Documentation

pywws Documentation, Release 18.04.1.dev1389
pywws.ZambrettiCore.ZambrettiText(letter)
pywws.ZambrettiCore.main(argv=None)
Comments or questions? Please subscribe to the pywws mailing list http://groups.google.com/group/pywws and let usknow.
pywws.Upload
Upload files to a web server by ftp or copy them to a local directory
usage: python -m pywws.Upload [options] data_dir file [file...]options are:-h or --help display this help
data_dir is the root directory of the weather datafile is a file to be uploaded
Login and ftp site details are read from the weather.ini file in data_dir.
Introduction
This module uploads files to (typically) a website via ftp/sftp or copies files to a local directory (e.g. if you are runningpywws on the your web server). Details of the upload destination are stored in the file weather.ini in your datadirectory. The only way to set these details is to edit the file. Run pywws.Upload once to set the default values,which you can then change. Here is what you’re likely to find when you edit weather.ini:
[ftp]secure = Falsedirectory = public_html/weather/data/local site = Falsepassword = secretsite = ftp.username.your_isp.co.ukuser = username
These are, I hope, fairly obvious. The local site option lets you switch from uploading to a remote site to copyingto a local site. If you set local site = True then you can delete the secure, site, user and passwordlines.
directory is the name of a directory in which all the uploaded files will be put. This will depend on the structureof your web site and the sort of host you use. Your hosting provider should be able to tell you what site and userdetails to use. You should have already chosen a password.
The secure option lets you switch from normal ftp to sftp (ftp over ssh). Some hosting providers offer this as a moresecure upload mechanism, so you should probably use it if available.
Detailed API
Functions
main([argv])
3.1. Contents 91

pywws Documentation, Release 18.04.1.dev1389
Classes
Upload(params)
class pywws.Upload.Upload(params)
connect()
upload_file(file)
disconnect()
upload(files)
pywws.Upload.main(argv=None)
Comments or questions? Please subscribe to the pywws mailing list http://groups.google.com/group/pywws and let usknow.
pywws.ToTwitter
Post a message to Twitter
usage: python -m pywws.ToTwitter [options] data_dir fileoptions are:-h | --help display this help
data_dir is the root directory of the weather datafile is the text file to be uploaded
This module posts a brief message to Twitter. Before posting to Twitter you need to set up an account and thenauthorise pywws by running the TwitterAuth program. See How to configure pywws to post messages to Twitterfor detailed instructions.
Functions
main([argv])
Classes
PythonTwitterHandler(key, secret, latitude, . . . )ToTwitter(params)TweepyHandler(key, secret, latitude, longitude)
class pywws.ToTwitter.TweepyHandler(key, secret, latitude, longitude)
post(status, media)
class pywws.ToTwitter.PythonTwitterHandler(key, secret, latitude, longitude, timeout)
92 Chapter 3. Documentation

pywws Documentation, Release 18.04.1.dev1389
post(status, media)
class pywws.ToTwitter.ToTwitter(params)
Upload(tweet)
UploadFile(file)
pywws.ToTwitter.main(argv=None)
Comments or questions? Please subscribe to the pywws mailing list http://groups.google.com/group/pywws and let usknow.
pywws.toservice
Post weather update to services such as Weather Underground
usage: python -m pywws.toservice [options] data_dir service_nameoptions are:-h or --help display this help-c or --catchup upload all data since last upload-v or --verbose increase amount of reassuring messages
data_dir is the root directory of the weather dataservice_name is the service to upload to, e.g. underground
Introduction
There are an increasing number of web sites around the world that encourage amateur weather station owners to uploaddata over the internet.
This module enables pywws to upload readings to these organisations. It is highly customisable using configurationfiles. Each ‘service’ requires a configuration file and one or two templates in pywws/services (that should notneed to be edited by the user) and a section in weather.ini containing user specific data such as your site ID andpassword.
See How to integrate pywws with various weather services for details of the available services.
Configuration
If you haven’t already done so, visit the organisation’s web site and create an account for your weather station. Makea note of any site ID and password details you are given.
Stop any pywws software that is running and then run toservice to create a section in weather.ini:
python -m pywws.toservice data_dir service_name
service_name is the single word service name used by pywws, such as metoffice, data_dir is your weatherdata directory, as usual.
Edit weather.ini and find the section corresponding to the service name, e.g. [underground]. Copy your sitedetails into this section, for example:
3.1. Contents 93

pywws Documentation, Release 18.04.1.dev1389
[underground]password = secretstation = ABCDEFG1A
Now you can test your configuration:
python -m pywws.toservice -vvv data_dir service_name
This should show you the data string that is uploaded. Any failure should generate an error message.
Upload old data
Now you can upload your last 7 days’ data, if the service supports it. Run toservice with the catchup option:
python -m pywws.toservice -cvv data_dir service_name
This may take 20 minutes or more, depending on how much data you have.
Add service(s) upload to regular tasks
Edit your weather.ini again, and add a list of services to the [live], [logged], [hourly], [12 hourly]or [daily] section, depending on how often you want to send data. For example:
[live]twitter = []plot = []text = []services = ['underground_rf', 'cwop']
[logged]twitter = []plot = []text = []services = ['metoffice', 'cwop']
[hourly]twitter = []plot = []text = []services = ['underground']
Note that the [live] section is only used when running pywws.LiveLog. It is a good idea to repeat any serviceselected in [live] in the [logged] or [hourly] section in case you switch to running pywws.Hourly .
Restart your regular pywws program (pywws.Hourly or pywws.LiveLog) and visit the appropriate web site tosee regular updates from your weather station.
Using a different template
For some services (mainly MQTT) you might want to write your own template to give greater control over the uploadeddata. Copy the default template file from pywws/services to your template directory and then edit it to do whatyou want. Now edit weather.ini and change the template value from default to the name of your customtemplate.
94 Chapter 3. Documentation

pywws Documentation, Release 18.04.1.dev1389
API
Functions
main([argv])
Classes
ToService(params, status, calib_data, . . . ) Upload weather data to weather services such as WeatherUnderground.
class pywws.toservice.ToService(params, status, calib_data, service_name)Upload weather data to weather services such as Weather Underground.
Parameters
• params (pywws.DataStore.params) – pywws configuration.
• status (pywws.DataStore.status) – pywws status store.
• calib_data (pywws.DataStore.calib_store) – ‘calibrated’ data.
• service_name (string) – name of service to upload to.
prepare_data(data)Prepare a weather data record.
The data parameter contains the data to be encoded. It should be a ‘calibrated’ data record, as storedin pywws.DataStore.calib_store. The relevant data items are extracted and converted to stringsusing a template, then merged with the station’s “fixed” data.
Parameters data (dict) – the weather data record.
Returns dict.
Return type string
mqtt_send_data(timestamp, prepared_data, ignore_last_update=False)
aprs_send_data(timestamp, prepared_data, ignore_last_update=False)Upload a weather data record using APRS.
The prepared_data parameter contains the data to be uploaded. It should be a dictionary of stringkeys and string values.
Parameters
• timestamp (datetime) – the timestamp of the data to upload.
• prepared_data (dict) – the data to upload.
• ignore_last_update (bool) – don’t get or set the ‘last update’ status.ini entry.
Returns success status
Return type bool
http_send_data(timestamp, prepared_data, ignore_last_update=False)Upload a weather data record using HTTP.
3.1. Contents 95

pywws Documentation, Release 18.04.1.dev1389
The prepared_data parameter contains the data to be uploaded. It should be a dictionary of stringkeys and string values.
Parameters
• timestamp (datetime) – the timestamp of the data to upload.
• prepared_data (dict) – the data to upload.
• ignore_last_update (bool) – don’t get or set the ‘last update’ status.ini entry.
Returns success status
Return type bool
next_data(catchup, live_data, ignore_last_update=False)Get weather data records to upload.
This method returns either the most recent weather data record, or all records since the last upload, accord-ing to the value of catchup.
Parameters
• catchup (boolean) – True to get all records since last upload, or False to get mostrecent data only.
• live_data (dict) – a current ‘live’ data record, or None.
• ignore_last_update (bool) – don’t get the ‘last update’ status.ini entry.
Returns yields weather data records.
Return type dict
set_last_update(timestamp)
Upload(catchup=True, live_data=None, ignore_last_update=False)Upload one or more weather data records.
This method uploads either the most recent weather data record, or all records since the last upload (up to7 days), according to the value of catchup.
It sets the last update configuration value to the time stamp of the most recent record successfullyuploaded.
Parameters
• catchup (bool) – upload all data since last upload.
• live_data (dict) – current ‘live’ data. If not present the most recent logged data isuploaded.
• ignore_last_update (bool) – don’t get or set the ‘last update’ status.ini entry.
Returns success status
Return type bool
pywws.toservice.main(argv=None)
Comments or questions? Please subscribe to the pywws mailing list http://groups.google.com/group/pywws and let usknow.
96 Chapter 3. Documentation

pywws Documentation, Release 18.04.1.dev1389
pywws.YoWindow
Generate YoWindow XML file
usage: python -m pywws.YoWindow [options] data_dir output_fileoptions are:-h or --help display this help-v or --verbose increase amount of reassuring messages
data_dir is the root directory of the weather dataoutput_file is the YoWindow XML file to be written
Functions
main([argv])
Classes
YoWindow(calib_data) Class to write YoWindow XML file.
class pywws.YoWindow.YoWindow(calib_data)Class to write YoWindow XML file. For file spec see http://yowindow.com/doc/yowindow_pws_format.xml
write_file(file_name, data=None)
pywws.YoWindow.main(argv=None)
Comments or questions? Please subscribe to the pywws mailing list http://groups.google.com/group/pywws and let usknow.
pywws.WeatherStation
Get data from WH1080/WH3080 compatible weather stations.
Derived from wwsr.c by Michael Pendec ([email protected]), wwsrdump.c by Svend Skafte([email protected]), modified by Dave Wells, and other sources.
Introduction
This is the module that actually talks to the weather station base unit. I don’t have much understanding of USB, socopied a lot from Michael Pendec’s C program wwsr.
The weather station memory has two parts: a “fixed block” of 256 bytes and a circular buffer of 65280 bytes. As eachweather reading takes 16 bytes the station can store 4080 readings, or 14 days of 5-minute interval readings. (The3080 type stations store 20 bytes per reading, so store a maximum of 3264.) As data is read in 32-byte chunks, buteach weather reading is 16 or 20 bytes, a small cache is used to reduce USB traffic. The caching behaviour can beover-ridden with the unbuffered parameter to get_data and get_raw_data.
Decoding the data is controlled by the static dictionaries _reading_format, lo_fix_format andfixed_format. The keys are names of data items and the values can be an (offset, type, multiplier)
3.1. Contents 97

pywws Documentation, Release 18.04.1.dev1389
tuple or another dictionary. So, for example, the _reading_format dictionary entry 'rain' : (13, 'us', 0.3) means that the rain value is an unsigned short (two bytes), 13 bytes from the start of the block, and should bemultiplied by 0.3 to get a useful value.
The use of nested dictionaries in the fixed_format dictionary allows useful subsets of data to be decoded. Forexample, to decode the entire block get_fixed_block is called with no parameters:
ws = WeatherStation.weather_station()print ws.get_fixed_block()
To get the stored minimum external temperature, get_fixed_block is called with a sequence of keys:
ws = WeatherStation.weather_station()print ws.get_fixed_block(['min', 'temp_out', 'val'])
Often there is no requirement to read and decode the entire fixed block, as its first 64 bytes contain the most usefuldata: the interval between stored readings, the buffer address where the current reading is stored, and the current date& time. The get_lo_fix_block method provides easy access to these.
For more examples of using the WeatherStation module, see the TestWeatherStation program.
Detailed API
Functions
decode_status(status)
Classes
CUSBDrive() Low level interface to weather station via USB.DriftingClock(logger, name, status, period, . . . )weather_station([ws_type, status, avoid]) Class that represents the weather station to user program.
pywws.WeatherStation.decode_status(status)
class pywws.WeatherStation.CUSBDriveLow level interface to weather station via USB.
Loosely modeled on a C++ class obtained from http://site.ambientweatherstore.com/easyweather/ws_1080_2080_protocol.zip. I don’t know the provenance of this, but it looks as if it may have come from the manu-facturer.
EndMark = 32
ReadCommand = 161
WriteCommand = 160
WriteCommandWord = 162
read_block(address)Read 32 bytes from the weather station.
If the read fails for any reason, None is returned.
Parameters address (int) – address to read from.
98 Chapter 3. Documentation

pywws Documentation, Release 18.04.1.dev1389
Returns the data from the weather station.
Return type list(int)
write_byte(address, data)Write a single byte to the weather station.
Parameters
• address (int) – address to write to.
• data (int) – the value to write.
Returns success status.
Return type bool
class pywws.WeatherStation.DriftingClock(logger, name, status, period, margin)
before(now)
avoid()
set_clock(now)
invalidate()
class pywws.WeatherStation.weather_station(ws_type=’1080’, status=None, avoid=3.0)Class that represents the weather station to user program.
Connect to weather station and prepare to read data.
min_pause = 0.5
margin = 0.9
live_data(logged_only=False)
inc_ptr(ptr)Get next circular buffer data pointer.
dec_ptr(ptr)Get previous circular buffer data pointer.
get_raw_data(ptr, unbuffered=False)Get raw data from circular buffer.
If unbuffered is false then a cached value that was obtained earlier may be returned.
get_data(ptr, unbuffered=False)Get decoded data from circular buffer.
If unbuffered is false then a cached value that was obtained earlier may be returned.
current_pos()Get circular buffer location where current data is being written.
get_raw_fixed_block(unbuffered=False)Get the raw “fixed block” of settings and min/max data.
get_fixed_block(keys=[], unbuffered=False)Get the decoded “fixed block” of settings and min/max data.
A subset of the entire block can be selected by keys.
write_data(data)Write a set of single bytes to the weather station. Data must be an array of (ptr, value) pairs.
3.1. Contents 99

pywws Documentation, Release 18.04.1.dev1389
lo_fix_format = {'alarm_1': (21, 'bf', ('bit0', 'time', 'wind_dir', 'bit3', 'hum_in_lo', 'hum_in_hi', 'hum_out_lo', 'hum_out_hi')), 'alarm_3': (23, 'bf', ('temp_in_lo', 'temp_in_hi', 'temp_out_lo', 'temp_out_hi', 'wind_chill_lo', 'wind_chill_hi', 'dew_point_lo', 'dew_point_hi')), 'alarm_2': (22, 'bf', ('wind_ave', 'wind_gust', 'rain_hour', 'rain_day', 'pressure_abs_lo', 'pressure_abs_hi', 'pressure_rel_lo', 'pressure_rel_hi')), 'data_changed': (26, 'ub', None), 'settings_1': (17, 'bf', ('temp_in_F', 'temp_out_F', 'rain_in', 'bit3', 'bit4', 'pressure_hPa', 'pressure_inHg', 'pressure_mmHg')), 'settings_2': (18, 'bf', ('wind_mps', 'wind_kmph', 'wind_knot', 'wind_mph', 'wind_bft', 'bit5', 'bit6', 'bit7')), 'read_period': (16, 'ub', None), 'unknown_01': (25, 'pb', None), 'timezone': (24, 'sb', None), 'data_count': (27, 'us', None), 'current_pos': (30, 'us', None), 'display_2': (20, 'bf', ('temp_out_temp', 'temp_out_chill', 'temp_out_dew', 'rain_hour', 'rain_day', 'rain_week', 'rain_month', 'rain_total')), 'display_3': (29, 'bf', ('illuminance_fc', 'bit1', 'bit2', 'bit3', 'bit4', 'bit5', 'bit6', 'bit7')), 'display_1': (19, 'bf', ('pressure_rel', 'wind_gust', 'clock_12hr', 'date_mdy', 'time_scale_24', 'show_year', 'show_day_name', 'alarm_time'))}
fixed_format = {'alarm_1': (21, 'bf', ('bit0', 'time', 'wind_dir', 'bit3', 'hum_in_lo', 'hum_in_hi', 'hum_out_lo', 'hum_out_hi')), 'magic_1': (1, 'pb', None), 'magic_0': (0, 'pb', None), 'data_changed': (26, 'ub', None), 'max': {'windchill': {'date': (181, 'dt', None), 'val': (110, 'ss', 0.1)}, 'dewpoint': {'date': (191, 'dt', None), 'val': (114, 'ss', 0.1)}, 'wind_ave': {'date': (221, 'dt', None), 'val': (126, 'us', 0.1)}, 'rain': {'week': {'date': (241, 'dt', None), 'val': (134, 'us', 0.3)}, 'total': {'date': (251, 'dt', None), 'val': (138, 'us', 0.3)}, 'day': {'date': (236, 'dt', None), 'val': (132, 'us', 0.3)}, 'hour': {'date': (231, 'dt', None), 'val': (130, 'us', 0.3)}, 'month': {'date': (246, 'dt', None), 'val': (136, 'us', 0.3)}}, 'rel_pressure': {'date': (211, 'dt', None), 'val': (122, 'us', 0.1)}, 'hum_in': {'date': (141, 'dt', None), 'val': (98, 'ub', None)}, 'temp_out': {'date': (171, 'dt', None), 'val': (106, 'ss', 0.1)}, 'hum_out': {'date': (151, 'dt', None), 'val': (100, 'ub', None)}, 'wind_gust': {'date': (226, 'dt', None), 'val': (128, 'us', 0.1)}, 'uv': {'val': (93, 'ub', None)}, 'temp_in': {'date': (161, 'dt', None), 'val': (102, 'ss', 0.1)}, 'illuminance': {'val': (94, 'u3', 0.1)}, 'abs_pressure': {'date': (201, 'dt', None), 'val': (118, 'us', 0.1)}}, 'alarm_3': (23, 'bf', ('temp_in_lo', 'temp_in_hi', 'temp_out_lo', 'temp_out_hi', 'wind_chill_lo', 'wind_chill_hi', 'dew_point_lo', 'dew_point_hi')), 'settings_2': (18, 'bf', ('wind_mps', 'wind_kmph', 'wind_knot', 'wind_mph', 'wind_bft', 'bit5', 'bit6', 'bit7')), 'settings_1': (17, 'bf', ('temp_in_F', 'temp_out_F', 'rain_in', 'bit3', 'bit4', 'pressure_hPa', 'pressure_inHg', 'pressure_mmHg')), 'alarm_2': (22, 'bf', ('wind_ave', 'wind_gust', 'rain_hour', 'rain_day', 'pressure_abs_lo', 'pressure_abs_hi', 'pressure_rel_lo', 'pressure_rel_hi')), 'rel_pressure': (32, 'us', 0.1), 'unknown_01': (25, 'pb', None), 'unknown_18': (97, 'pb', None), 'timezone': (24, 'sb', None), 'display_1': (19, 'bf', ('pressure_rel', 'wind_gust', 'clock_12hr', 'date_mdy', 'time_scale_24', 'show_year', 'show_day_name', 'alarm_time')), 'date_time': (43, 'dt', None), 'data_count': (27, 'us', None), 'min': {'hum_out': {'date': (156, 'dt', None), 'val': (101, 'ub', None)}, 'dewpoint': {'date': (196, 'dt', None), 'val': (116, 'ss', 0.1)}, 'abs_pressure': {'date': (206, 'dt', None), 'val': (120, 'us', 0.1)}, 'windchill': {'date': (186, 'dt', None), 'val': (112, 'ss', 0.1)}, 'hum_in': {'date': (146, 'dt', None), 'val': (99, 'ub', None)}, 'temp_out': {'date': (176, 'dt', None), 'val': (108, 'ss', 0.1)}, 'rel_pressure': {'date': (216, 'dt', None), 'val': (124, 'us', 0.1)}, 'temp_in': {'date': (166, 'dt', None), 'val': (104, 'ss', 0.1)}}, 'display_2': (20, 'bf', ('temp_out_temp', 'temp_out_chill', 'temp_out_dew', 'rain_hour', 'rain_day', 'rain_week', 'rain_month', 'rain_total')), 'display_3': (29, 'bf', ('illuminance_fc', 'bit1', 'bit2', 'bit3', 'bit4', 'bit5', 'bit6', 'bit7')), 'alarm': {'windchill': {'lo': (62, 'ss', 0.1), 'hi': (60, 'ss', 0.1)}, 'dewpoint': {'lo': (66, 'ss', 0.1), 'hi': (64, 'ss', 0.1)}, 'wind_ave': {'ms': (77, 'ub', 0.1), 'bft': (76, 'ub', None)}, 'rain': {'day': (85, 'us', 0.3), 'hour': (83, 'us', 0.3)}, 'rel_pressure': {'lo': (74, 'us', 0.1), 'hi': (72, 'us', 0.1)}, 'hum_in': {'lo': (49, 'ub', None), 'hi': (48, 'ub', None)}, 'temp_out': {'lo': (58, 'ss', 0.1), 'hi': (56, 'ss', 0.1)}, 'wind_dir': (82, 'ub', None), 'hum_out': {'lo': (55, 'ub', None), 'hi': (54, 'ub', None)}, 'wind_gust': {'ms': (80, 'ub', 0.1), 'bft': (79, 'ub', None)}, 'uv': (92, 'ub', None), 'temp_in': {'lo': (52, 'ss', 0.1), 'hi': (50, 'ss', 0.1)}, 'illuminance': (89, 'u3', 0.1), 'abs_pressure': {'lo': (70, 'us', 0.1), 'hi': (68, 'us', 0.1)}, 'time': (87, 'tt', None)}, 'current_pos': (30, 'us', None), 'lux_wm2_coeff': (36, 'us', 0.1), 'abs_pressure': (34, 'us', 0.1), 'read_period': (16, 'ub', None)}
data_start = 256
reading_len = {'3080': 20, '1080': 16}
Comments or questions? Please subscribe to the pywws mailing list http://groups.google.com/group/pywws and let usknow.
pywws.device_libusb1
Low level USB interface to weather station, using python-libusb1.
Introduction
This module handles low level communication with the weather station via the python-libusb1 library. It is one ofseveral USB device modules, each of which uses a different USB library interface. See Installation - USB library fordetails.
Testing
Run pywws-testweatherstation with increased verbosity so it reports which USB device access module isbeing used:
pywws-testweatherstation -vv11:30:35:pywws.Logger:pywws version 15.01.011:30:35:pywws.Logger:Python version 3.3.5 (default, Mar 27 2014, 17:16:46) [GCC]11:30:35:pywws.WeatherStation.CUSBDrive:using pywws.device_libusb10000 55 aa ff ff ff ff ff ff ff ff ff ff ff ff ff ff 05 20 01 41 11 00 00 00 81 7f 00→˓f0 0f 00 50 040020 f9 25 74 26 00 00 00 00 00 00 00 15 01 15 11 31 41 23 c8 00 00 00 46 2d 2c 01 64→˓80 c8 00 00 000040 64 00 64 80 a0 28 80 25 a0 28 80 25 03 36 00 05 6b 00 00 0a 00 f4 01 12 00 00 00→˓00 00 00 00 000060 00 00 5a 0a 63 0a 41 01 70 00 dc 01 08 81 dc 01 c5 81 68 01 75 81 95 28 e0 25 24→˓29 d9 25 fd 020080 b9 02 f4 ff fd ff 85 ff 91 ff 6c 09 00 14 10 19 06 29 12 02 01 19 32 11 09 09 05→˓18 12 03 28 1300a0 00 13 07 19 18 28 13 01 18 23 21 13 09 24 13 02 13 09 24 13 33 13 09 24 13 02 12→˓07 28 12 50 1300c0 09 24 13 02 13 10 14 16 18 12 02 07 19 00 14 02 14 22 39 13 01 04 10 28 15 01 15→˓03 48 12 03 1000e0 22 02 13 01 30 21 24 12 07 28 11 59 13 03 06 06 43 12 04 13 00 04 12 04 13 00 04→˓12 07 31 03 34
API
Classes
100 Chapter 3. Documentation

pywws Documentation, Release 18.04.1.dev1389
USBDevice(idVendor, idProduct) Low level USB device access via python-libusb1 library.
class pywws.device_libusb1.USBDevice(idVendor, idProduct)Low level USB device access via python-libusb1 library.
Parameters
• idVendor (int) – the USB “vendor ID” number, for example 0x1941.
• idProduct (int) – the USB “product ID” number, for example 0x8021.
read_data(size)Receive data from the device.
If the read fails for any reason, an IOError exception is raised.
Parameters size (int) – the number of bytes to read.
Returns the data received.
Return type list(int)
write_data(buf)Send data to the device.
If the write fails for any reason, an IOError exception is raised.
Parameters buf (list(int)) – the data to send.
Returns success status.
Return type bool
Comments or questions? Please subscribe to the pywws mailing list http://groups.google.com/group/pywws and let usknow.
pywws.device_pyusb1
Low level USB interface to weather station, using PyUSB v1.0.
Introduction
This module handles low level communication with the weather station via the PyUSB library (version 1.0). It is oneof several USB device modules, each of which uses a different USB library interface. See Installation - USB libraryfor details.
Testing
Run pywws.TestWeatherStation with increased verbosity so it reports which USB device access module isbeing used:
python -m pywws.TestWeatherStation -vv18:28:09:pywws.WeatherStation.CUSBDrive:using pywws.device_pyusb10000 55 aa ff ff ff ff ff ff ff ff ff ff ff ff ff ff 05 20 01 41 11 00 00 00 81 00 00→˓0f 05 00 e0 510020 03 27 ce 27 00 00 00 00 00 00 00 12 02 14 18 27 41 23 c8 00 00 00 46 2d 2c 01 64→˓80 c8 00 00 00
3.1. Contents 101

pywws Documentation, Release 18.04.1.dev1389
0040 64 00 64 80 a0 28 80 25 a0 28 80 25 03 36 00 05 6b 00 00 0a 00 f4 01 12 00 00 00→˓00 00 00 00 000060 00 00 49 0a 63 12 05 01 7f 00 36 01 60 80 36 01 60 80 bc 00 7b 80 95 28 12 26 6c→˓28 25 26 c8 010080 1d 02 d8 00 de 00 ff 00 ff 00 ff 00 00 11 10 06 01 29 12 02 01 19 32 11 09 09 05→˓18 12 01 22 1300a0 14 11 11 04 15 04 11 12 17 05 12 11 09 02 15 26 12 02 11 07 05 11 09 02 15 26 12→˓02 11 07 05 1100c0 09 10 09 12 12 02 02 12 38 12 02 07 19 00 11 12 16 03 27 12 02 03 11 00 11 12 16→˓03 27 11 12 2600e0 21 32 11 12 26 21 32 12 02 06 19 57 12 02 06 19 57 12 02 06 19 57 12 02 06 19 57→˓12 02 06 19 57
API
Classes
USBDevice(idVendor, idProduct) Low level USB device access via PyUSB 1.0 library.
class pywws.device_pyusb1.USBDevice(idVendor, idProduct)Low level USB device access via PyUSB 1.0 library.
Parameters
• idVendor (int) – the USB “vendor ID” number, for example 0x1941.
• idProduct (int) – the USB “product ID” number, for example 0x8021.
read_data(size)Receive data from the device.
If the read fails for any reason, an IOError exception is raised.
Parameters size (int) – the number of bytes to read.
Returns the data received.
Return type list(int)
write_data(buf)Send data to the device.
If the write fails for any reason, an IOError exception is raised.
Parameters buf (list(int)) – the data to send.
Returns success status.
Return type bool
Comments or questions? Please subscribe to the pywws mailing list http://groups.google.com/group/pywws and let usknow.
pywws.device_pyusb
Low level USB interface to weather station, using PyUSB v0.4.
102 Chapter 3. Documentation

pywws Documentation, Release 18.04.1.dev1389
Introduction
This module handles low level communication with the weather station via the PyUSB library. It is one of severalUSB device modules, each of which uses a different USB library interface. See Installation - USB library for details.
Testing
Run pywws.TestWeatherStation with increased verbosity so it reports which USB device access module isbeing used:
python -m pywws.TestWeatherStation -vv18:28:09:pywws.WeatherStation.CUSBDrive:using pywws.device_pyusb0000 55 aa ff ff ff ff ff ff ff ff ff ff ff ff ff ff 05 20 01 41 11 00 00 00 81 00 00→˓0f 05 00 e0 510020 03 27 ce 27 00 00 00 00 00 00 00 12 02 14 18 27 41 23 c8 00 00 00 46 2d 2c 01 64→˓80 c8 00 00 000040 64 00 64 80 a0 28 80 25 a0 28 80 25 03 36 00 05 6b 00 00 0a 00 f4 01 12 00 00 00→˓00 00 00 00 000060 00 00 49 0a 63 12 05 01 7f 00 36 01 60 80 36 01 60 80 bc 00 7b 80 95 28 12 26 6c→˓28 25 26 c8 010080 1d 02 d8 00 de 00 ff 00 ff 00 ff 00 00 11 10 06 01 29 12 02 01 19 32 11 09 09 05→˓18 12 01 22 1300a0 14 11 11 04 15 04 11 12 17 05 12 11 09 02 15 26 12 02 11 07 05 11 09 02 15 26 12→˓02 11 07 05 1100c0 09 10 09 12 12 02 02 12 38 12 02 07 19 00 11 12 16 03 27 12 02 03 11 00 11 12 16→˓03 27 11 12 2600e0 21 32 11 12 26 21 32 12 02 06 19 57 12 02 06 19 57 12 02 06 19 57 12 02 06 19 57→˓12 02 06 19 57
API
Classes
USBDevice(idVendor, idProduct) Low level USB device access via PyUSB library.
class pywws.device_pyusb.USBDevice(idVendor, idProduct)Low level USB device access via PyUSB library.
Parameters
• idVendor (int) – the USB “vendor ID” number, for example 0x1941.
• idProduct (int) – the USB “product ID” number, for example 0x8021.
read_data(size)Receive data from the device.
If the read fails for any reason, an IOError exception is raised.
Parameters size (int) – the number of bytes to read.
Returns the data received.
Return type list(int)
3.1. Contents 103

pywws Documentation, Release 18.04.1.dev1389
write_data(buf)Send data to the device.
If the write fails for any reason, an IOError exception is raised.
Parameters buf (list(int)) – the data to send.
Returns success status.
Return type bool
Comments or questions? Please subscribe to the pywws mailing list http://groups.google.com/group/pywws and let usknow.
pywws.device_ctypes_hidapi
Low level USB interface to weather station, using ctypes to access hidapi.
Introduction
This module handles low level communication with the weather station via ctypes and the hidapi library. It is one ofseveral USB device modules, each of which uses a different USB library interface. See Installation - USB library fordetails.
Testing
Run pywws.TestWeatherStation with increased verbosity so it reports which USB device access module isbeing used:
python -m pywws.TestWeatherStation -vv18:10:27:pywws.WeatherStation.CUSBDrive:using pywws.device_ctypes_hidapi0000 55 aa ff ff ff ff ff ff ff ff ff ff ff ff ff ff 05 20 01 51 11 00 00 00 81 00 00→˓07 01 00 d0 560020 61 1c 61 1c 00 00 00 00 00 00 00 12 02 14 18 09 41 23 c8 00 32 80 47 2d 2c 01 2c→˓81 5e 01 1e 800040 a0 00 c8 80 a0 28 80 25 a0 28 80 25 03 36 00 05 6b 00 00 0a 00 f4 01 18 00 00 00→˓00 00 00 00 000060 00 00 54 1c 63 0a 2f 01 71 00 7a 01 59 80 7a 01 59 80 e4 00 f5 ff 69 54 00 00 fe→˓ff 00 00 b3 010080 0c 02 d0 ff d3 ff 5a 24 d2 24 dc 17 00 11 09 06 15 40 10 03 07 22 18 10 08 11 08→˓30 11 03 07 1200a0 36 08 07 24 17 17 11 02 28 10 10 09 06 30 14 29 12 02 11 06 57 09 06 30 14 29 12→˓02 11 06 57 0800c0 08 31 14 30 12 02 14 18 04 12 02 01 10 12 11 09 13 17 19 11 08 21 16 53 11 09 13→˓17 19 12 01 1800e0 07 17 10 02 22 11 06 11 11 06 13 12 11 11 06 13 12 11 11 10 11 38 11 11 10 11 38→˓10 02 22 14 43
104 Chapter 3. Documentation

pywws Documentation, Release 18.04.1.dev1389
API
Classes
USBDevice(vendor_id, product_id) Low level USB device access via hidapi library.
class pywws.device_ctypes_hidapi.USBDevice(vendor_id, product_id)Low level USB device access via hidapi library.
Parameters
• idVendor (int) – the USB “vendor ID” number, for example 0x1941.
• idProduct (int) – the USB “product ID” number, for example 0x8021.
read_data(size)Receive data from the device.
If the read fails for any reason, an IOError exception is raised.
Parameters size (int) – the number of bytes to read.
Returns the data received.
Return type list(int)
write_data(buf)Send data to the device.
Parameters buf (list(int)) – the data to send.
Returns success status.
Return type bool
Comments or questions? Please subscribe to the pywws mailing list http://groups.google.com/group/pywws and let usknow.
pywws.device_cython_hidapi
Low level USB interface to weather station, using cython-hidapi.
Introduction
This module handles low level communication with the weather station via the cython-hidapi library. It is one ofseveral USB device modules, each of which uses a different USB library interface. See Installation - USB library fordetails.
Testing
Run pywws.TestWeatherStation with increased verbosity so it reports which USB device access module isbeing used:
3.1. Contents 105

pywws Documentation, Release 18.04.1.dev1389
python -m pywws.TestWeatherStation -vv18:10:27:pywws.WeatherStation.CUSBDrive:using pywws.device_cython_hidapi0000 55 aa ff ff ff ff ff ff ff ff ff ff ff ff ff ff 05 20 01 51 11 00 00 00 81 00 00→˓07 01 00 d0 560020 61 1c 61 1c 00 00 00 00 00 00 00 12 02 14 18 09 41 23 c8 00 32 80 47 2d 2c 01 2c→˓81 5e 01 1e 800040 a0 00 c8 80 a0 28 80 25 a0 28 80 25 03 36 00 05 6b 00 00 0a 00 f4 01 18 00 00 00→˓00 00 00 00 000060 00 00 54 1c 63 0a 2f 01 71 00 7a 01 59 80 7a 01 59 80 e4 00 f5 ff 69 54 00 00 fe→˓ff 00 00 b3 010080 0c 02 d0 ff d3 ff 5a 24 d2 24 dc 17 00 11 09 06 15 40 10 03 07 22 18 10 08 11 08→˓30 11 03 07 1200a0 36 08 07 24 17 17 11 02 28 10 10 09 06 30 14 29 12 02 11 06 57 09 06 30 14 29 12→˓02 11 06 57 0800c0 08 31 14 30 12 02 14 18 04 12 02 01 10 12 11 09 13 17 19 11 08 21 16 53 11 09 13→˓17 19 12 01 1800e0 07 17 10 02 22 11 06 11 11 06 13 12 11 11 06 13 12 11 11 10 11 38 11 11 10 11 38→˓10 02 22 14 43
API
Classes
USBDevice(idVendor, idProduct) Low level USB device access via cython-hidapi library.
class pywws.device_cython_hidapi.USBDevice(idVendor, idProduct)Low level USB device access via cython-hidapi library.
Parameters
• idVendor (int) – the USB “vendor ID” number, for example 0x1941.
• idProduct (int) – the USB “product ID” number, for example 0x8021.
read_data(size)Receive data from the device.
If the read fails for any reason, an IOError exception is raised.
Parameters size (int) – the number of bytes to read.
Returns the data received.
Return type list(int)
write_data(buf)Send data to the device.
Parameters buf (list(int)) – the data to send.
Returns success status.
Return type bool
Comments or questions? Please subscribe to the pywws mailing list http://groups.google.com/group/pywws and let usknow.
106 Chapter 3. Documentation

pywws Documentation, Release 18.04.1.dev1389
pywws.DataStore
DataStore.py - stores readings in easy to access files
Introduction
This module is at the core of pywws. It stores data on disc, but without the overhead of a full scale database system. Ihave designed it to run on a small memory machine such as my Asus router. To minimise memory usage it only loadsone day’s worth of raw data at a time into memory.
From a “user” point of view, the data is accessed as a cross between a list and a dictionary. Each data record is indexedby a datetime.datetime object (dictionary behaviour), but records are stored in order and can be accessed asslices (list behaviour).
For example, to access the hourly data for Christmas day 2009, one might do the following:
from datetime import datetimefrom pywws import DataStorehourly = DataStore.hourly_store('weather_data')for data in hourly[datetime(2009, 12, 25):datetime(2009, 12, 26)]:
print data['idx'], data['temp_out']
Some more examples of data access:
# get value nearest 9:30 on Christmas day 2008data[data.nearest(datetime(2008, 12, 25, 9, 30))]# get entire array, equivalent to data[:]data[datetime.min:datetime.max]# get last 12 hours worth of datadata[datetime.utcnow() - timedelta(hours=12):]
Note that the datetime.datetime index is in UTC. You may need to apply an offset to convert to local time.
The module provides five classes to store different data. data_store takes “raw” data from the weather sta-tion; calib_store, hourly_store, daily_store and monthly_store store processed data (see pywws.Process). All three are derived from the same core_store class, they only differ in the keys and types of datastored in each record.
Detailed API
Functions
safestrptime(date_string[, format])
Classes
ParamStore(root_dir, file_name)calib_store(root_dir) Stores ‘calibrated’ weather station data.core_store(root_dir)daily_store(root_dir) Stores daily summary weather station data.data_store(root_dir) Stores raw weather station data.
Continued on next page
3.1. Contents 107

pywws Documentation, Release 18.04.1.dev1389
Table 3.45 – continued from previous pagehourly_store(root_dir) Stores hourly summary weather station data.monthly_store(root_dir) Stores monthly summary weather station data.params(root_dir) Parameters are stored in a file “weather.ini” in root_dir.status(root_dir) Status is stored in a file “status.ini” in root_dir.
pywws.DataStore.safestrptime(date_string, format=None)
class pywws.DataStore.ParamStore(root_dir, file_name)
flush()
get(section, option, default=None)Get a parameter value and return a string.
If default is specified and section or option are not defined in the file, they are created and set to default,which is then the return value.
get_datetime(section, option, default=None)
set(section, option, value)Set option in section to string value.
unset(section, option)Remove option from section.
class pywws.DataStore.params(root_dir)Parameters are stored in a file “weather.ini” in root_dir.
class pywws.DataStore.status(root_dir)Status is stored in a file “status.ini” in root_dir.
class pywws.DataStore.core_store(root_dir)
before(idx)Return datetime of newest existing data record whose datetime is < idx.
Might not even be in the same year! If no such record exists, return None.
after(idx)Return datetime of oldest existing data record whose datetime is >= idx.
Might not even be in the same year! If no such record exists, return None.
nearest(idx)Return datetime of record whose datetime is nearest idx.
flush()
class pywws.DataStore.data_store(root_dir)Stores raw weather station data.
key_list = ['idx', 'delay', 'hum_in', 'temp_in', 'hum_out', 'temp_out', 'abs_pressure', 'wind_ave', 'wind_gust', 'wind_dir', 'rain', 'status', 'illuminance', 'uv']
conv = {'status': <type 'int'>, 'wind_ave': <type 'float'>, 'rain': <type 'float'>, 'hum_in': <type 'int'>, 'temp_out': <type 'float'>, 'wind_dir': <type 'int'>, 'hum_out': <type 'int'>, 'illuminance': <type 'float'>, 'wind_gust': <type 'float'>, 'idx': <function safestrptime>, 'uv': <type 'int'>, 'temp_in': <type 'float'>, 'delay': <type 'int'>, 'abs_pressure': <type 'float'>}
class pywws.DataStore.calib_store(root_dir)Stores ‘calibrated’ weather station data.
key_list = ['idx', 'delay', 'hum_in', 'temp_in', 'hum_out', 'temp_out', 'abs_pressure', 'rel_pressure', 'wind_ave', 'wind_gust', 'wind_dir', 'rain', 'status', 'illuminance', 'uv']
conv = {'status': <type 'int'>, 'wind_ave': <type 'float'>, 'rain': <type 'float'>, 'rel_pressure': <type 'float'>, 'hum_in': <type 'int'>, 'temp_out': <type 'float'>, 'wind_dir': <type 'float'>, 'hum_out': <type 'int'>, 'illuminance': <type 'float'>, 'wind_gust': <type 'float'>, 'idx': <function safestrptime>, 'uv': <type 'int'>, 'temp_in': <type 'float'>, 'delay': <type 'int'>, 'abs_pressure': <type 'float'>}
108 Chapter 3. Documentation

pywws Documentation, Release 18.04.1.dev1389
class pywws.DataStore.hourly_store(root_dir)Stores hourly summary weather station data.
key_list = ['idx', 'hum_in', 'temp_in', 'hum_out', 'temp_out', 'abs_pressure', 'rel_pressure', 'pressure_trend', 'wind_ave', 'wind_gust', 'wind_dir', 'rain', 'illuminance', 'uv']
conv = {'pressure_trend': <type 'float'>, 'wind_ave': <type 'float'>, 'rain': <type 'float'>, 'rel_pressure': <type 'float'>, 'hum_in': <type 'int'>, 'temp_out': <type 'float'>, 'wind_dir': <type 'float'>, 'hum_out': <type 'int'>, 'wind_gust': <type 'float'>, 'idx': <function safestrptime>, 'uv': <type 'int'>, 'temp_in': <type 'float'>, 'illuminance': <type 'float'>, 'abs_pressure': <type 'float'>}
class pywws.DataStore.daily_store(root_dir)Stores daily summary weather station data.
key_list = ['idx', 'start', 'hum_out_ave', 'hum_out_min', 'hum_out_min_t', 'hum_out_max', 'hum_out_max_t', 'temp_out_ave', 'temp_out_min', 'temp_out_min_t', 'temp_out_max', 'temp_out_max_t', 'hum_in_ave', 'hum_in_min', 'hum_in_min_t', 'hum_in_max', 'hum_in_max_t', 'temp_in_ave', 'temp_in_min', 'temp_in_min_t', 'temp_in_max', 'temp_in_max_t', 'abs_pressure_ave', 'abs_pressure_min', 'abs_pressure_min_t', 'abs_pressure_max', 'abs_pressure_max_t', 'rel_pressure_ave', 'rel_pressure_min', 'rel_pressure_min_t', 'rel_pressure_max', 'rel_pressure_max_t', 'wind_ave', 'wind_gust', 'wind_gust_t', 'wind_dir', 'rain', 'illuminance_ave', 'illuminance_max', 'illuminance_max_t', 'uv_ave', 'uv_max', 'uv_max_t']
conv = {'temp_in_min': <type 'float'>, 'temp_in_max': <type 'float'>, 'uv_ave': <type 'float'>, 'temp_out_max': <type 'float'>, 'temp_out_min': <type 'float'>, 'abs_pressure_max': <type 'float'>, 'start': <function safestrptime>, 'hum_in_max_t': <function safestrptime>, 'uv_max_t': <function safestrptime>, 'temp_in_max_t': <function safestrptime>, 'abs_pressure_min_t': <function safestrptime>, 'illuminance_ave': <type 'float'>, 'rel_pressure_ave': <type 'float'>, 'rain': <type 'float'>, 'rel_pressure_min_t': <function safestrptime>, 'wind_gust': <type 'float'>, 'temp_out_min_t': <function safestrptime>, 'wind_gust_t': <function safestrptime>, 'hum_out_ave': <type 'float'>, 'rel_pressure_min': <type 'float'>, 'hum_out_min_t': <function safestrptime>, 'temp_out_max_t': <function safestrptime>, 'uv_max': <type 'int'>, 'illuminance_max_t': <function safestrptime>, 'rel_pressure_max': <type 'float'>, 'temp_in_ave': <type 'float'>, 'hum_in_min_t': <function safestrptime>, 'hum_out_max': <type 'int'>, 'illuminance_max': <type 'float'>, 'wind_ave': <type 'float'>, 'abs_pressure_max_t': <function safestrptime>, 'temp_in_min_t': <function safestrptime>, 'hum_out_max_t': <function safestrptime>, 'hum_out_min': <type 'int'>, 'rel_pressure_max_t': <function safestrptime>, 'wind_dir': <type 'float'>, 'temp_out_ave': <type 'float'>, 'abs_pressure_ave': <type 'float'>, 'idx': <function safestrptime>, 'hum_in_max': <type 'int'>, 'abs_pressure_min': <type 'float'>, 'hum_in_ave': <type 'float'>, 'hum_in_min': <type 'int'>}
class pywws.DataStore.monthly_store(root_dir)Stores monthly summary weather station data.
key_list = ['idx', 'start', 'hum_out_ave', 'hum_out_min', 'hum_out_min_t', 'hum_out_max', 'hum_out_max_t', 'temp_out_ave', 'temp_out_min_lo', 'temp_out_min_lo_t', 'temp_out_min_hi', 'temp_out_min_hi_t', 'temp_out_min_ave', 'temp_out_max_lo', 'temp_out_max_lo_t', 'temp_out_max_hi', 'temp_out_max_hi_t', 'temp_out_max_ave', 'hum_in_ave', 'hum_in_min', 'hum_in_min_t', 'hum_in_max', 'hum_in_max_t', 'temp_in_ave', 'temp_in_min_lo', 'temp_in_min_lo_t', 'temp_in_min_hi', 'temp_in_min_hi_t', 'temp_in_min_ave', 'temp_in_max_lo', 'temp_in_max_lo_t', 'temp_in_max_hi', 'temp_in_max_hi_t', 'temp_in_max_ave', 'abs_pressure_ave', 'abs_pressure_min', 'abs_pressure_min_t', 'abs_pressure_max', 'abs_pressure_max_t', 'rel_pressure_ave', 'rel_pressure_min', 'rel_pressure_min_t', 'rel_pressure_max', 'rel_pressure_max_t', 'wind_ave', 'wind_gust', 'wind_gust_t', 'wind_dir', 'rain', 'rain_days', 'illuminance_ave', 'illuminance_max_lo', 'illuminance_max_lo_t', 'illuminance_max_hi', 'illuminance_max_hi_t', 'illuminance_max_ave', 'uv_ave', 'uv_max_lo', 'uv_max_lo_t', 'uv_max_hi', 'uv_max_hi_t', 'uv_max_ave']
conv = {'uv_ave': <type 'float'>, 'illuminance_max_hi_t': <function safestrptime>, 'uv_max_lo_t': <function safestrptime>, 'temp_out_max_hi_t': <function safestrptime>, 'temp_out_max_lo': <type 'float'>, 'abs_pressure_max': <type 'float'>, 'rel_pressure_min_t': <function safestrptime>, 'temp_in_min_hi': <type 'float'>, 'temp_in_min_lo': <type 'float'>, 'start': <function safestrptime>, 'hum_in_max_t': <function safestrptime>, 'rain_days': <type 'int'>, 'abs_pressure_min_t': <function safestrptime>, 'temp_out_max_hi': <type 'float'>, 'illuminance_ave': <type 'float'>, 'temp_out_min_lo': <type 'float'>, 'illuminance_max_ave': <type 'float'>, 'uv_max_hi': <type 'int'>, 'rel_pressure_ave': <type 'float'>, 'rain': <type 'float'>, 'temp_out_min_hi': <type 'float'>, 'wind_gust': <type 'float'>, 'temp_in_max_hi_t': <function safestrptime>, 'temp_in_max_lo': <type 'float'>, 'temp_in_min_ave': <type 'float'>, 'wind_gust_t': <function safestrptime>, 'hum_out_ave': <type 'float'>, 'rel_pressure_min': <type 'float'>, 'hum_out_min_t': <function safestrptime>, 'illuminance_max_lo': <type 'float'>, 'temp_in_min_lo_t': <function safestrptime>, 'illuminance_max_hi': <type 'float'>, 'temp_out_max_lo_t': <function safestrptime>, 'temp_in_max_hi': <type 'float'>, 'rel_pressure_max': <type 'float'>, 'uv_max_hi_t': <function safestrptime>, 'temp_in_ave': <type 'float'>, 'uv_max_ave': <type 'float'>, 'temp_in_max_ave': <type 'float'>, 'hum_in_min_t': <function safestrptime>, 'hum_out_max': <type 'int'>, 'temp_in_min_hi_t': <function safestrptime>, 'temp_out_min_ave': <type 'float'>, 'temp_out_min_hi_t': <function safestrptime>, 'wind_ave': <type 'float'>, 'abs_pressure_max_t': <function safestrptime>, 'hum_out_max_t': <function safestrptime>, 'hum_out_min': <type 'int'>, 'rel_pressure_max_t': <function safestrptime>, 'uv_max_lo': <type 'int'>, 'wind_dir': <type 'float'>, 'temp_out_ave': <type 'float'>, 'abs_pressure_ave': <type 'float'>, 'idx': <function safestrptime>, 'temp_out_min_lo_t': <function safestrptime>, 'illuminance_max_lo_t': <function safestrptime>, 'hum_in_max': <type 'int'>, 'abs_pressure_min': <type 'float'>, 'temp_in_max_lo_t': <function safestrptime>, 'hum_in_ave': <type 'float'>, 'temp_out_max_ave': <type 'float'>, 'hum_in_min': <type 'int'>}
Comments or questions? Please subscribe to the pywws mailing list http://groups.google.com/group/pywws and let usknow.
pywws.TimeZone
Provide a couple of datetime.tzinfo compatible objects representing local time and UTC.
Introduction
This module provides two datetime.tzinfo compatible objects representing UTC and local time zones. Theseare used to convert timestamps to and from UTC and local time. The weather station software stores data with UTCtimestamps, to avoid problems with daylight savings time, but the template and plot programs output data with localtimes.
Detailed API
Functions
local_utc_offset(time)main()
pywws.TimeZone.local_utc_offset(time)
pywws.TimeZone.main()
Comments or questions? Please subscribe to the pywws mailing list http://groups.google.com/group/pywws and let usknow.
3.1. Contents 109

pywws Documentation, Release 18.04.1.dev1389
pywws.Localisation
Localisation.py - provide translations of strings into local language
usage: python -m pywws.Localisation [options]options are:-h or --help display this help-t code or --test code test use of a language code
Introduction
Some of the pywws modules, such as WindRose.py, can automatically use your local language for such things as winddirections. The Localisation.py module, mostly copied from examples in the Python documentation, enables this.
Localisation of pywws is done in two parts - translating strings such as ‘rising very rapidly’, and changing the ‘locale’which controls things like month names and number representation (e.g. ‘23,2’ instead of ‘23.2’). On some computersit may not be possible to set the locale, but translated strings can still be used.
Using a different language
The language used by pywws is set in the [config] section of the weather.ini file. This can be a two-letterlanguage code, such as en (English), or can specify a national variant, such as fr_CA (Canadian French). It couldalso include a character set, for example de_DE.UTF-8.
The choice of language is very system dependant, so Localisation.py can be run as a standalone program to testlanguage codes. A good starting point might be your system’s LANG environment variable, for example:
jim@brains:~/Documents/weather/pywws/code$ echo $LANGen_GB.UTF-8jim@brains:~/Documents/weather/pywws/code$ python -m pywws.Localisation -t en_GB.UTF-8Locale changed from (None, None) to ('en_GB', 'UTF8')Translation set OKLocale
decimal point: 23.2date & time: Friday, 14 October (14/10/11 13:02:00)
Translations'NNW' => 'NNW''rising very rapidly' => 'rising very rapidly''Rain at times, very unsettled' => 'Rain at times, very unsettled'
jim@brains:~/Documents/weather/pywws/code$
In most cases no more than a two-letter code is required:
jim@brains:~/Documents/weather/pywws/code$ python -m pywws.Localisation -t frLocale changed from (None, None) to ('fr_FR', 'UTF8')Translation set OKLocale
decimal point: 23,2date & time: vendredi, 14 octobre (14/10/2011 13:04:44)
Translations'NNW' => 'NNO''rising very rapidly' => 'en hausse très rapide''Rain at times, very unsettled' => 'Quelques précipitations, très perturbé'
jim@brains:~/Documents/weather/pywws/code$
110 Chapter 3. Documentation

pywws Documentation, Release 18.04.1.dev1389
If you try an unsupported language, pywws falls back to English:
jim@brains:~/Documents/weather/pywws/code$ python -m pywws.Localisation -t jaFailed to set locale: jaNo translation file found for: jaLocale
decimal point: 23.2date & time: Friday, 14 October (10/14/11 13:08:49)
Translations'NNW' => 'NNW''rising very rapidly' => 'rising very rapidly''Rain at times, very unsettled' => 'Rain at times, very unsettled'
jim@brains:~/Documents/weather/pywws/code$
Once you’ve found a suitable language code that works, you can configure pywws to use it by editing your weather.ini file:
[config]language = fr
Creating a new translation
If there is no translation file for your preferred language then you need to create one. See How to use pywws in anotherlanguage for detailed instructions.
Functions
SetApplicationLanguage(params) Set the locale and translation for a pywws program.SetLocale(lang) Set the ‘locale’ used by a program.SetTranslation(lang) Set the translation used by (some) pywws modules.main([argv])
pywws.Localisation.SetLocale(lang)Set the ‘locale’ used by a program.
This affects the entire application, changing the way dates, currencies and numbers are represented. It shouldnot be called from a library routine that may be used in another program.
The lang parameter can be any string that is recognised by locale.setlocale(), for example en, en_GBor en_GB.UTF-8.
Parameters lang (string) – language code.
Returns success status.
Return type bool
pywws.Localisation.SetTranslation(lang)Set the translation used by (some) pywws modules.
This sets the translation object Localisation.translation to use a particular language.
The lang parameter can be any string of the form en, en_GB or en_GB.UTF-8. Anything after a . characteris ignored. In the case of a string such as en_GB, the routine will search for an en_GB language file beforesearching for an en one.
3.1. Contents 111

pywws Documentation, Release 18.04.1.dev1389
Parameters lang (string) – language code.
Returns success status.
Return type bool
pywws.Localisation.SetApplicationLanguage(params)Set the locale and translation for a pywws program.
This function reads the language from the configuration file, then calls SetLocale() andSetTranslation().
Parameters params (object) – a pywws.DataStore.params object.
pywws.Localisation.main(argv=None)
Comments or questions? Please subscribe to the pywws mailing list http://groups.google.com/group/pywws and let usknow.
pywws.conversions
conversions.py - a set of functions to convert pywws native units (Centigrade, mm, m/s, hPa) to other popular units
Functions
apparent_temp(temp, rh, wind) Compute apparent temperature (real feel), using formulafrom
cadhumidex(temp, humidity) Calculate Humidity Index as per Canadian Weather Stan-dards
cloud_base(temp, hum) Calculate cumulus cloud base in metres, using formulafrom
cloud_ft(m) Convert cloud base from metres to feet.dew_point(temp, hum) Compute dew point, using formula from http://en.
wikipedia.org/wiki/Dew_point.illuminance_wm2(lux) Approximate conversion of illuminance in lux to solar ra-
diation in W/m2pressure_inhg(hPa) Convert pressure from hectopascals/millibar to inches of
mercurypressure_trend_text(trend) Convert pressure trend to a string, as used by the UK met
office.rain_inch(mm) Convert rainfall from millimetres to inchestemp_f(c) Convert temperature from Celsius to Fahrenheitusaheatindex(temp, humidity, dew) Calculate Heat Index as per USA National Weather Service
Standardswind_bft(ms) Convert wind from metres per second to Beaufort scalewind_chill(temp, wind) Compute wind chill, using formula fromwind_kmph(ms) Convert wind from metres per second to kilometres per
hourwind_kn(ms) Convert wind from metres per second to knotswind_mph(ms) Convert wind from metres per second to miles per hourwinddir_average(data, threshold, min_count) Compute average wind direction (in degrees) for a slice of
data.Continued on next page
112 Chapter 3. Documentation

pywws Documentation, Release 18.04.1.dev1389
Table 3.48 – continued from previous pagewinddir_degrees(pts) Convert wind direction from 0..15 to degreeswinddir_text(pts) Convert wind direction from 0..15 to compass point text
pywws.conversions.illuminance_wm2(lux)Approximate conversion of illuminance in lux to solar radiation in W/m2
pywws.conversions.pressure_inhg(hPa)Convert pressure from hectopascals/millibar to inches of mercury
pywws.conversions.pressure_trend_text(trend)Convert pressure trend to a string, as used by the UK met office.
pywws.conversions.rain_inch(mm)Convert rainfall from millimetres to inches
pywws.conversions.temp_f(c)Convert temperature from Celsius to Fahrenheit
pywws.conversions.winddir_average(data, threshold, min_count, decay=1.0)Compute average wind direction (in degrees) for a slice of data.
The wind speed and direction of each data item is converted to a vector before averaging, so the result reflectsthe dominant wind direction during the time period covered by the data.
Setting the decay parameter converts the filter from a simple averager to one where the most recent samplecarries the highest weight, and earlier samples have a lower weight according to how long ago they were.
This process is an approximation of “exponential smoothing”. See Wikipedia for a detailed discussion.
The parameter decay corresponds to the value (1 - alpha) in the Wikipedia description. Because theweather data being smoothed may not be at regular intervals this parameter is the decay over 5 minutes. Weatherdata at other intervals will have its weight scaled accordingly.
Note The return value is in degrees, not the 0..15 range used elsewhere in pywws.
Parameters
• data (pywws.DataStore.core_store) – a slice of pywws raw/calib or hourly data.
• threshold (float) – minimum average windspeed for there to be a valid wind direction.
• min_count (int) – minimum number of data items for there to be a valid wind direction.
• decay (float) – filter coefficient decay rate.
Return type float
pywws.conversions.winddir_degrees(pts)Convert wind direction from 0..15 to degrees
pywws.conversions.winddir_text(pts)Convert wind direction from 0..15 to compass point text
pywws.conversions.wind_kmph(ms)Convert wind from metres per second to kilometres per hour
pywws.conversions.wind_mph(ms)Convert wind from metres per second to miles per hour
pywws.conversions.wind_kn(ms)Convert wind from metres per second to knots
pywws.conversions.wind_bft(ms)Convert wind from metres per second to Beaufort scale
3.1. Contents 113

pywws Documentation, Release 18.04.1.dev1389
pywws.conversions.dew_point(temp, hum)Compute dew point, using formula from http://en.wikipedia.org/wiki/Dew_point.
pywws.conversions.cadhumidex(temp, humidity)Calculate Humidity Index as per Canadian Weather Standards
pywws.conversions.usaheatindex(temp, humidity, dew)Calculate Heat Index as per USA National Weather Service Standards
See http://en.wikipedia.org/wiki/Heat_index, formula 1. The formula is not valid for T < 26.7C, Dew Point <12C, or RH < 40%
pywws.conversions.wind_chill(temp, wind)Compute wind chill, using formula from http://en.wikipedia.org/wiki/wind_chill
pywws.conversions.apparent_temp(temp, rh, wind)Compute apparent temperature (real feel), using formula from http://www.bom.gov.au/info/thermal_stress/
pywws.conversions.cloud_base(temp, hum)Calculate cumulus cloud base in metres, using formula from https://en.wikipedia.org/wiki/Cloud_base or https://de.wikipedia.org/wiki/Kondensationsniveau#Konvektionskondensationsniveau
pywws.conversions.cloud_ft(m)Convert cloud base from metres to feet.
Comments or questions? Please subscribe to the pywws mailing list http://groups.google.com/group/pywws and let usknow.
pywws.Logger
Common code for logging info and errors.
Functions
ApplicationLogger(verbose[, logfile])
pywws.Logger.ApplicationLogger(verbose, logfile=None)
Comments or questions? Please subscribe to the pywws mailing list http://groups.google.com/group/pywws and let usknow.
pywws.constants
Bits of data used in several places.
This module collects together some ‘constants’ that are used in other pywws modules.
Classes
114 Chapter 3. Documentation

pywws Documentation, Release 18.04.1.dev1389
class pywws.constants.Twitter
consumer_key = '62moSmU9ERTs0LK0g2xHAg'
consumer_secret = 'ygdXpjr0rDagU3dqULPqXF8GFgUOD6zYDapoHAH9ck'
Comments or questions? Please subscribe to the pywws mailing list http://groups.google.com/group/pywws and let usknow.
Comments or questions? Please subscribe to the pywws mailing list http://groups.google.com/group/pywws and let usknow.
3.2 Indices and tables
• genindex
• modindex
• search
3.2. Indices and tables 115

pywws Documentation, Release 18.04.1.dev1389
116 Chapter 3. Documentation

CHAPTER 4
Credits
I would not have been able to get any information from the weather station without access to the source of MichaelPendec’s “wwsr” program. I am also indebted to Dave Wells for decoding the weather station’s “fixed block” data.
Last of all, a big thank you to all the pywws users who have helped with questions and suggestions, and especially tothose who have translated pywws and its documentation into other languages.
117

pywws Documentation, Release 18.04.1.dev1389
118 Chapter 4. Credits

CHAPTER 5
Legalese
pywws - Python software for USB Wireless WeatherStations.http://github.com/jim-easterbrook/pywwsCopyright (C) 2008-15 pywws contributors
This program is free software; you can redistribute it and/or modify it under the terms of the GNU General PublicLicense as published by the Free Software Foundation; either version 2 of the License, or (at your option) any laterversion.
This program is distributed in the hope that it will be useful, but WITHOUT ANY WARRANTY; without even theimplied warranty of MERCHANTABILITY or FITNESS FOR A PARTICULAR PURPOSE. See the GNU GeneralPublic License for more details.
You should have received a copy of the GNU General Public License along with this program; if not, write to the FreeSoftware Foundation, Inc., 51 Franklin Street, Fifth Floor, Boston, MA 02110-1301 USA
Comments or questions? Please subscribe to the pywws mailing list http://groups.google.com/group/pywws and let usknow.
119

pywws Documentation, Release 18.04.1.dev1389
120 Chapter 5. Legalese

Python Module Index
ppywws.calib, 71pywws.constants, 114pywws.conversions, 112pywws.DataStore, 107pywws.device_ctypes_hidapi, 104pywws.device_cython_hidapi, 105pywws.device_libusb1, 100pywws.device_pyusb, 102pywws.device_pyusb1, 101pywws.EWtoPy, 63pywws.Forecast, 90pywws.Hourly, 64pywws.LiveLog, 65pywws.livelogdaemon, 65pywws.Localisation, 110pywws.LogData, 67pywws.Logger, 114pywws.Plot, 73pywws.Process, 68pywws.Reprocess, 61pywws.SetWeatherStation, 60pywws.Tasks, 67pywws.Template, 85pywws.TestWeatherStation, 59pywws.TimeZone, 109pywws.toservice, 93pywws.ToTwitter, 92pywws.TwitterAuth, 62pywws.Upload, 91pywws.USBQualityTest, 62pywws.version, 61pywws.WeatherStation, 97pywws.WindRose, 81pywws.YoWindow, 97pywws.ZambrettiCore, 90
121

pywws Documentation, Release 18.04.1.dev1389
122 Python Module Index

Index
Aadd() (pywws.Process.Average method), 69add() (pywws.Process.Maximum method), 70add() (pywws.Process.Minimum method), 69add() (pywws.Process.WindFilter method), 70add_daily() (pywws.Process.MonthAcc method), 71add_hourly() (pywws.Process.DayAcc method), 70add_raw() (pywws.Process.DayAcc method), 70add_raw() (pywws.Process.HourAcc method), 70after() (pywws.DataStore.core_store method), 108apparent_temp() (in module pywws.conversions), 114ApplicationLogger() (in module pywws.Logger), 114aprs_send_data() (pywws.toservice.ToService method),
95Average (class in pywws.Process), 69avoid() (pywws.WeatherStation.DriftingClock method),
99
BBasePlotter (class in pywws.Plot), 81bcd_encode() (in module pywws.SetWeatherStation), 61before() (pywws.DataStore.core_store method), 108before() (pywws.WeatherStation.DriftingClock method),
99
Ccadhumidex() (in module pywws.conversions), 114Calib (class in pywws.calib), 72calib() (pywws.calib.DefaultCalib method), 72calib_store (class in pywws.DataStore), 108calibrate_data() (in module pywws.Process), 71calibrator (pywws.calib.Calib attribute), 72catchup() (pywws.LogData.DataLogger method), 68check_fixed_block() (pywws.LogData.DataLogger
method), 68close() (pywws.Plot.GraphFileReader method), 81cloud_base() (in module pywws.conversions), 114cloud_ft() (in module pywws.conversions), 114connect() (pywws.Upload.Upload method), 92
consumer_key (pywws.constants.Twitter attribute), 115consumer_secret (pywws.constants.Twitter attribute), 115conv (pywws.DataStore.calib_store attribute), 108conv (pywws.DataStore.daily_store attribute), 109conv (pywws.DataStore.data_store attribute), 108conv (pywws.DataStore.hourly_store attribute), 109conv (pywws.DataStore.monthly_store attribute), 109core_store (class in pywws.DataStore), 108current_pos() (pywws.WeatherStation.weather_station
method), 99CUSBDrive (class in pywws.WeatherStation), 98
Ddaily_store (class in pywws.DataStore), 109data_start (pywws.WeatherStation.weather_station
attribute), 100data_store (class in pywws.DataStore), 108DataLogger (class in pywws.LogData), 68DayAcc (class in pywws.Process), 70dec_ptr() (pywws.WeatherStation.weather_station
method), 99decode_status() (in module pywws.WeatherStation), 98DefaultCalib (class in pywws.calib), 72dew_point() (in module pywws.conversions), 114disconnect() (pywws.Upload.Upload method), 92do_live() (pywws.Tasks.RegularTasks method), 67do_plot() (pywws.Tasks.RegularTasks method), 67do_tasks() (pywws.Tasks.RegularTasks method), 67do_template() (pywws.Tasks.RegularTasks method), 67do_twitter() (pywws.Tasks.RegularTasks method), 67DoPlot() (pywws.Plot.BasePlotter method), 81DriftingClock (class in pywws.WeatherStation), 99
EEndMark (pywws.WeatherStation.CUSBDrive attribute),
98
Ffixed_format (pywws.WeatherStation.weather_station at-
tribute), 100
123

pywws Documentation, Release 18.04.1.dev1389
flush() (pywws.DataStore.core_store method), 108flush() (pywws.DataStore.ParamStore method), 108
Ggenerate_daily() (in module pywws.Process), 71generate_hourly() (in module pywws.Process), 71generate_monthly() (in module pywws.Process), 71get() (pywws.DataStore.ParamStore method), 108get_children() (pywws.Plot.GraphNode method), 80get_data() (pywws.WeatherStation.weather_station
method), 99get_datetime() (pywws.DataStore.ParamStore method),
108get_fixed_block() (pywws.WeatherStation.weather_station
method), 99get_raw_data() (pywws.WeatherStation.weather_station
method), 99get_raw_fixed_block() (py-
wws.WeatherStation.weather_station method),99
get_value() (pywws.Plot.GraphNode method), 80get_values() (pywws.Plot.GraphNode method), 81GetDefaultPlotSize() (pywws.Plot.GraphPlotter method),
81GetDefaultPlotSize() (pywws.WindRose.RosePlotter
method), 85GetDefaultRows() (pywws.Plot.GraphPlotter method), 81GetDefaultRows() (pywws.WindRose.RosePlotter
method), 85GetPreamble() (pywws.Plot.GraphPlotter method), 81GetPreamble() (pywws.WindRose.RosePlotter method),
85GraphFileReader (class in pywws.Plot), 81GraphNode (class in pywws.Plot), 80GraphPlotter (class in pywws.Plot), 81
Hhas_live_tasks() (pywws.Tasks.RegularTasks method), 67HourAcc (class in pywws.Process), 70Hourly() (in module pywws.Hourly), 64hourly_store (class in pywws.DataStore), 108http_send_data() (pywws.toservice.ToService method),
95
Iilluminance_wm2() (in module pywws.conversions), 113inc_ptr() (pywws.WeatherStation.weather_station
method), 99invalidate() (pywws.WeatherStation.DriftingClock
method), 99
Kkey_list (pywws.DataStore.calib_store attribute), 108key_list (pywws.DataStore.daily_store attribute), 109
key_list (pywws.DataStore.data_store attribute), 108key_list (pywws.DataStore.hourly_store attribute), 109key_list (pywws.DataStore.monthly_store attribute), 109
Llive_data() (pywws.LogData.DataLogger method), 68live_data() (pywws.WeatherStation.weather_station
method), 99LiveLog() (in module pywws.LiveLog), 65lo_fix_format (pywws.WeatherStation.weather_station
attribute), 99local_utc_offset() (in module pywws.TimeZone), 109log_data() (pywws.LogData.DataLogger method), 68
Mmain() (in module pywws.EWtoPy), 64main() (in module pywws.Forecast), 90main() (in module pywws.Hourly), 64main() (in module pywws.LiveLog), 65main() (in module pywws.livelogdaemon), 66main() (in module pywws.Localisation), 112main() (in module pywws.LogData), 68main() (in module pywws.Plot), 81main() (in module pywws.Process), 71main() (in module pywws.Reprocess), 62main() (in module pywws.SetWeatherStation), 61main() (in module pywws.Template), 90main() (in module pywws.TestWeatherStation), 60main() (in module pywws.TimeZone), 109main() (in module pywws.toservice), 96main() (in module pywws.ToTwitter), 93main() (in module pywws.TwitterAuth), 62main() (in module pywws.Upload), 92main() (in module pywws.USBQualityTest), 63main() (in module pywws.version), 61main() (in module pywws.WindRose), 85main() (in module pywws.YoWindow), 97main() (in module pywws.ZambrettiCore), 91make_file() (pywws.Template.Template method), 90make_text() (pywws.Template.Template method), 90margin (pywws.WeatherStation.weather_station at-
tribute), 99Maximum (class in pywws.Process), 70min_pause (pywws.WeatherStation.weather_station at-
tribute), 99Minimum (class in pywws.Process), 69MonthAcc (class in pywws.Process), 70monthly_store (class in pywws.DataStore), 109mqtt_send_data() (pywws.toservice.ToService method),
95
Nnearest() (pywws.DataStore.core_store method), 108next_data() (pywws.toservice.ToService method), 96
124 Index

pywws Documentation, Release 18.04.1.dev1389
Pparams (class in pywws.DataStore), 108ParamStore (class in pywws.DataStore), 108parse_args() (pywws.livelogdaemon.Runner method), 66plot_name (pywws.Plot.GraphPlotter attribute), 81plot_name (pywws.WindRose.RosePlotter attribute), 85PlotData() (pywws.Plot.GraphPlotter method), 81PlotData() (pywws.WindRose.RosePlotter method), 85post() (pywws.ToTwitter.PythonTwitterHandler method),
92post() (pywws.ToTwitter.TweepyHandler method), 92prepare_data() (pywws.toservice.ToService method), 95pressure_inhg() (in module pywws.conversions), 113pressure_trend_text() (in module pywws.conversions),
113Process() (in module pywws.Process), 71process() (pywws.Template.Template method), 89PythonTwitterHandler (class in pywws.ToTwitter), 92pywws.calib (module), 71pywws.constants (module), 114pywws.conversions (module), 112pywws.DataStore (module), 107pywws.device_ctypes_hidapi (module), 104pywws.device_cython_hidapi (module), 105pywws.device_libusb1 (module), 100pywws.device_pyusb (module), 102pywws.device_pyusb1 (module), 101pywws.EWtoPy (module), 63pywws.Forecast (module), 90pywws.Hourly (module), 64pywws.LiveLog (module), 65pywws.livelogdaemon (module), 65pywws.Localisation (module), 110pywws.LogData (module), 67pywws.Logger (module), 114pywws.Plot (module), 73pywws.Process (module), 68pywws.Reprocess (module), 61pywws.SetWeatherStation (module), 60pywws.Tasks (module), 67pywws.Template (module), 85pywws.TestWeatherStation (module), 59pywws.TimeZone (module), 109pywws.toservice (module), 93pywws.ToTwitter (module), 92pywws.TwitterAuth (module), 62pywws.Upload (module), 91pywws.USBQualityTest (module), 62pywws.version (module), 61pywws.WeatherStation (module), 97pywws.WindRose (module), 81pywws.YoWindow (module), 97pywws.ZambrettiCore (module), 90
Rrain_inch() (in module pywws.conversions), 113raw_dump() (in module pywws.TestWeatherStation), 60read_block() (pywws.WeatherStation.CUSBDrive
method), 98read_data() (pywws.device_ctypes_hidapi.USBDevice
method), 105read_data() (pywws.device_cython_hidapi.USBDevice
method), 106read_data() (pywws.device_libusb1.USBDevice method),
101read_data() (pywws.device_pyusb.USBDevice method),
103read_data() (pywws.device_pyusb1.USBDevice method),
102ReadCommand (pywws.WeatherStation.CUSBDrive at-
tribute), 98reading_len (pywws.WeatherStation.weather_station at-
tribute), 100Record (class in pywws.Plot), 81RegularTasks (class in pywws.Tasks), 67Reprocess() (in module pywws.Reprocess), 62reset() (pywws.Process.DayAcc method), 70reset() (pywws.Process.HourAcc method), 70reset() (pywws.Process.MonthAcc method), 71result() (pywws.Process.Average method), 69result() (pywws.Process.DayAcc method), 70result() (pywws.Process.HourAcc method), 70result() (pywws.Process.Maximum method), 70result() (pywws.Process.Minimum method), 70result() (pywws.Process.MonthAcc method), 71result() (pywws.Process.WindFilter method), 70RosePlotter (class in pywws.WindRose), 85run() (pywws.livelogdaemon.Runner method), 66Runner (class in pywws.livelogdaemon), 66
Ssafestrptime() (in module pywws.DataStore), 108set() (pywws.DataStore.ParamStore method), 108set_clock() (pywws.WeatherStation.DriftingClock
method), 99set_last_update() (pywws.toservice.ToService method),
96SetApplicationLanguage() (in module py-
wws.Localisation), 112SetLocale() (in module pywws.Localisation), 111SetTranslation() (in module pywws.Localisation), 111status (class in pywws.DataStore), 108stop_thread() (pywws.Tasks.RegularTasks method), 67
Ttemp_f() (in module pywws.conversions), 113Template (class in pywws.Template), 89
Index 125

pywws Documentation, Release 18.04.1.dev1389
ToService (class in pywws.toservice), 95ToTwitter (class in pywws.ToTwitter), 93TweepyHandler (class in pywws.ToTwitter), 92Twitter (class in pywws.constants), 115TwitterAuth() (in module pywws.TwitterAuth), 62
Uunset() (pywws.DataStore.ParamStore method), 108Upload (class in pywws.Upload), 92Upload() (pywws.toservice.ToService method), 96Upload() (pywws.ToTwitter.ToTwitter method), 93upload() (pywws.Upload.Upload method), 92upload_file() (pywws.Upload.Upload method), 92UploadFile() (pywws.ToTwitter.ToTwitter method), 93usaheatindex() (in module pywws.conversions), 114USBDevice (class in pywws.device_ctypes_hidapi), 105USBDevice (class in pywws.device_cython_hidapi), 106USBDevice (class in pywws.device_libusb1), 101USBDevice (class in pywws.device_pyusb), 103USBDevice (class in pywws.device_pyusb1), 102
Wweather_station (class in pywws.WeatherStation), 99wind_bft() (in module pywws.conversions), 113wind_chill() (in module pywws.conversions), 114wind_kmph() (in module pywws.conversions), 113wind_kn() (in module pywws.conversions), 113wind_mph() (in module pywws.conversions), 113winddir_average() (in module pywws.conversions), 113winddir_degrees() (in module pywws.conversions), 113winddir_text() (in module pywws.conversions), 113WindFilter (class in pywws.Process), 70write_byte() (pywws.WeatherStation.CUSBDrive
method), 99write_data() (pywws.device_ctypes_hidapi.USBDevice
method), 105write_data() (pywws.device_cython_hidapi.USBDevice
method), 106write_data() (pywws.device_libusb1.USBDevice
method), 101write_data() (pywws.device_pyusb.USBDevice method),
103write_data() (pywws.device_pyusb1.USBDevice
method), 102write_data() (pywws.WeatherStation.weather_station
method), 99write_file() (pywws.YoWindow.YoWindow method), 97WriteCommand (pywws.WeatherStation.CUSBDrive at-
tribute), 98WriteCommandWord (py-
wws.WeatherStation.CUSBDrive attribute),98
YYoWindow (class in pywws.YoWindow), 97
ZZambretti() (in module pywws.Forecast), 90ZambrettiCode() (in module pywws.Forecast), 90ZambrettiCode() (in module pywws.ZambrettiCore), 90ZambrettiText() (in module pywws.ZambrettiCore), 90
126 Index