PSD to HTML5 - Export Kit
121
Pg. 01 PSD to HTML5 PSD to HTML5 www.exportkit.com CSS3 and JavaScript
-
Upload
khangminh22 -
Category
Documents
-
view
2 -
download
0
Transcript of PSD to HTML5 - Export Kit
Pg. 01
PSD to HTML5
PSD to HTML5 www.exportkit.com CSS3 and JavaScript
Pg. 02
PSD to HTML5
PSD to HTML5 www.exportkit.com CSS3 and JavaScript
Contents
PSD to HTML5 ______________________________________________________________ 3
Your PSD Design ____________________________________________________________ 4
Importing from Illustrator ______________________________________________________ 10
Using Free Online PSD Templates ______________________________________________ 11
Organize Folders and Layers __________________________________________________ 12
Working with Layers _________________________________________________________ 16
Working with Layer Effects ____________________________________________________ 27
Using Layer Tags____________________________________________________________ 30
Your First Export ____________________________________________________________ 47
The Export Process __________________________________________________________ 58
External CSS and JavaScript Files ______________________________________________ 67
Using Margins and Fix _______________________________________________________ 69
Full Screen Backgrounds _____________________________________________________ 71
Media Elements (Audio, Video)_________________________________________________ 73
Building Web Forms _________________________________________________________ 74
PHP Form Handlers _________________________________________________________ 77
Custom CSS Class Styles _____________________________________________________ 79
CSS Rollover / Hover Effects __________________________________________________ 81
CSS Dropdown Menus _______________________________________________________ 83
Bootstrap 3x Child Themes ____________________________________________________ 88
JavaScript and jQuery Slideshows ______________________________________________ 93
Navigation Menus ___________________________________________________________ 97
Multiple Pages and Files ______________________________________________________ 99
Pages with Dynamic Height __________________________________________________ 103
Connect Pages to Links _____________________________________________________ 110
Responsive CSS Screens ____________________________________________________ 111
Update your Website or Blog _________________________________________________ 117
Output Folders and Code ____________________________________________________ 120

Pg. 03
PSD to HTML5
PSD to HTML5 www.exportkit.com CSS3 and JavaScript
PSD to HTML5 This manual will outline all the steps required to convert your PSD to HTML5 in a few clicks.
Export Kit makes PSD to HTML5 and CSS websites quick, easy and painless. In minutes you
can have clean and valid PSD to HTML5 conversion from Photoshop using Export Kit.
Fast PSD Conversion Process
By hand, the export process can take a couple days for a simple design, and up to several
months for a complex PSD to HTML5 design – who wants to work that hard, when you can
work smart with Export Kit!
Unlimited Output Content
PSD to HTML5 exports have full CSS support for with layer effects with both text and shape
elements. You can directly convert your Photoshop PSD to HTML and CSS using Export Kit in
a few minutes. Advanced users can also add JavaScript and PHP support directly inside
Photoshop using our Layer Tags.
On your marks, get set… Export!
After reading this manual, you will have all the tools you require to become a Webmaster in the
next 24 hours.
Pg. 04
Your PSD Design
PSD to HTML5 www.exportkit.com CSS3 and JavaScript
Your PSD Design Considering you want to convert your PSD to HTML5 we can assume you have your
Photoshop design handy. Normally the task of converting a PSD to HTML5 can be a difficult
one, requiring a basic level of knowledge for clean and valid code. Export Kit takes the
headache out of the export process and will save you lots of time and budget with your web
projects.
Design Rules
It is important to test your design as you go – do not make changes to the entire PSD – then
export and wonder "what went wrong". This is no different than a developer who codes an
entire website (without testing and compiling), then opens the browser and wonders… "What
went wrong?" YOU MUST TEST, TEST, TEST!
Considering you want to convert your PSD, we can assume you have your Photoshop design
handy, otherwise we recommend you download our PSD Templates for testing.
No Empty Layers
You cannot have empty layers in Export Kit, otherwise the export will stop on that layer. Here is
a list of empty layers:
A layer with no name
A layer with no image/shape
A text layer with no text content
A folder with no child layers
Use as many Layers as Possible
We encourage you to use as many layers to design your PSD as possible. The more layers the
better. The Export Process will translate each individual layer to its native type, so the more
layers you use – the more control you have over the output.
Organize Layers into Folders
You should always group your layers into folders if they are related, E.G. If you have layers
that belong to a menu, then you should group those layers and name the group “menu
container”.
Pg. 05
Your PSD Design
PSD to HTML5 www.exportkit.com CSS3 and JavaScript
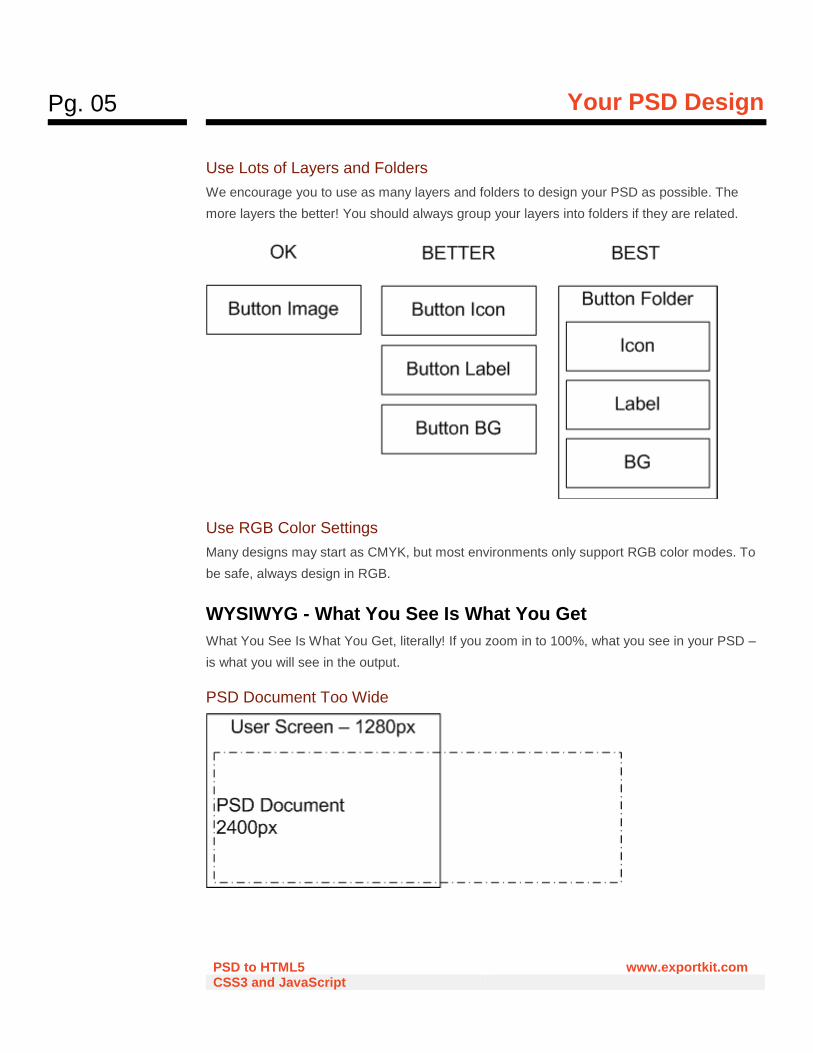
Use Lots of Layers and Folders
We encourage you to use as many layers and folders to design your PSD as possible. The
more layers the better! You should always group your layers into folders if they are related.
Use RGB Color Settings
Many designs may start as CMYK, but most environments only support RGB color modes. To
be safe, always design in RGB.
WYSIWYG - What You See Is What You Get
What You See Is What You Get, literally! If you zoom in to 100%, what you see in your PSD –
is what you will see in the output.
PSD Document Too Wide
Pg. 06
Your PSD Design
PSD to HTML5 www.exportkit.com CSS3 and JavaScript
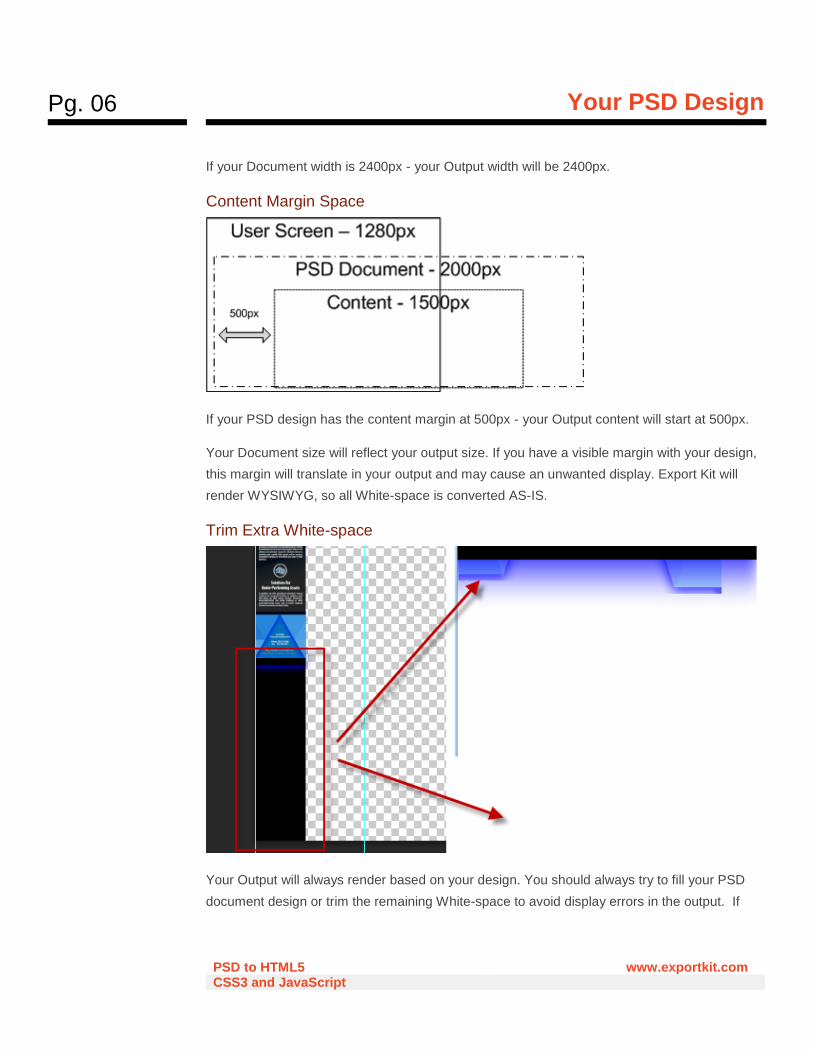
If your Document width is 2400px - your Output width will be 2400px.
Content Margin Space
If your PSD design has the content margin at 500px - your Output content will start at 500px.
Your Document size will reflect your output size. If you have a visible margin with your design,
this margin will translate in your output and may cause an unwanted display. Export Kit will
render WYSIWYG, so all White-space is converted AS-IS.
Trim Extra White-space
Your Output will always render based on your design. You should always try to fill your PSD
document design or trim the remaining White-space to avoid display errors in the output. If
Pg. 07
Your PSD Design
PSD to HTML5 www.exportkit.com CSS3 and JavaScript
your Photoshop background layer is still visible then your output may contain unwanted White-
space.
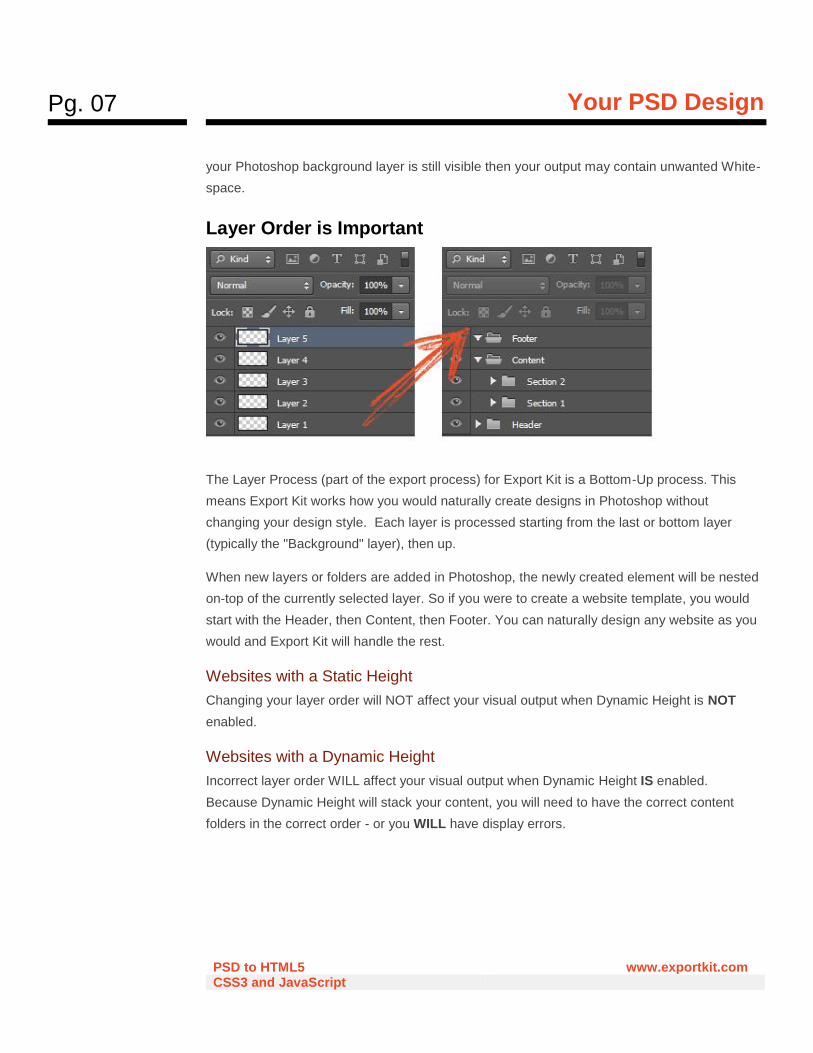
Layer Order is Important
The Layer Process (part of the export process) for Export Kit is a Bottom-Up process. This
means Export Kit works how you would naturally create designs in Photoshop without
changing your design style. Each layer is processed starting from the last or bottom layer
(typically the "Background" layer), then up.
When new layers or folders are added in Photoshop, the newly created element will be nested
on-top of the currently selected layer. So if you were to create a website template, you would
start with the Header, then Content, then Footer. You can naturally design any website as you
would and Export Kit will handle the rest.
Websites with a Static Height
Changing your layer order will NOT affect your visual output when Dynamic Height is NOT
enabled.
Websites with a Dynamic Height
Incorrect layer order WILL affect your visual output when Dynamic Height IS enabled.
Because Dynamic Height will stack your content, you will need to have the correct content
folders in the correct order - or you WILL have display errors.

Pg. 08
Your PSD Design
PSD to HTML5 www.exportkit.com CSS3 and JavaScript
Layer Naming Rules
Your layer names will be reflective in your Output environment. Because Export Kit will render
WYSIWYG, you will need clear layer names to further customize your Output after the export.
The export process will convert layers regardless of their names, but having clear layer names
will optimize the time it takes you to find your layer in your Output after the export.
Use Common Names for Elements
We recommend using common names for elements to both keep consistency with coding
practices, and to make it easier on yourself to find elements in the code output. When
elements are clearly labeled, you can easily add scripts to manipulate objects in the output.
This allows you to create fully functional websites in a single export.
Use Valid Layer Names
You should always use valid and common layer names with your content to ensure readable
output. When you use incorrect layer names, most environments will throw errors as not all
naming conventions are valid.
Pg. 09
Your PSD Design
PSD to HTML5 www.exportkit.com CSS3 and JavaScript
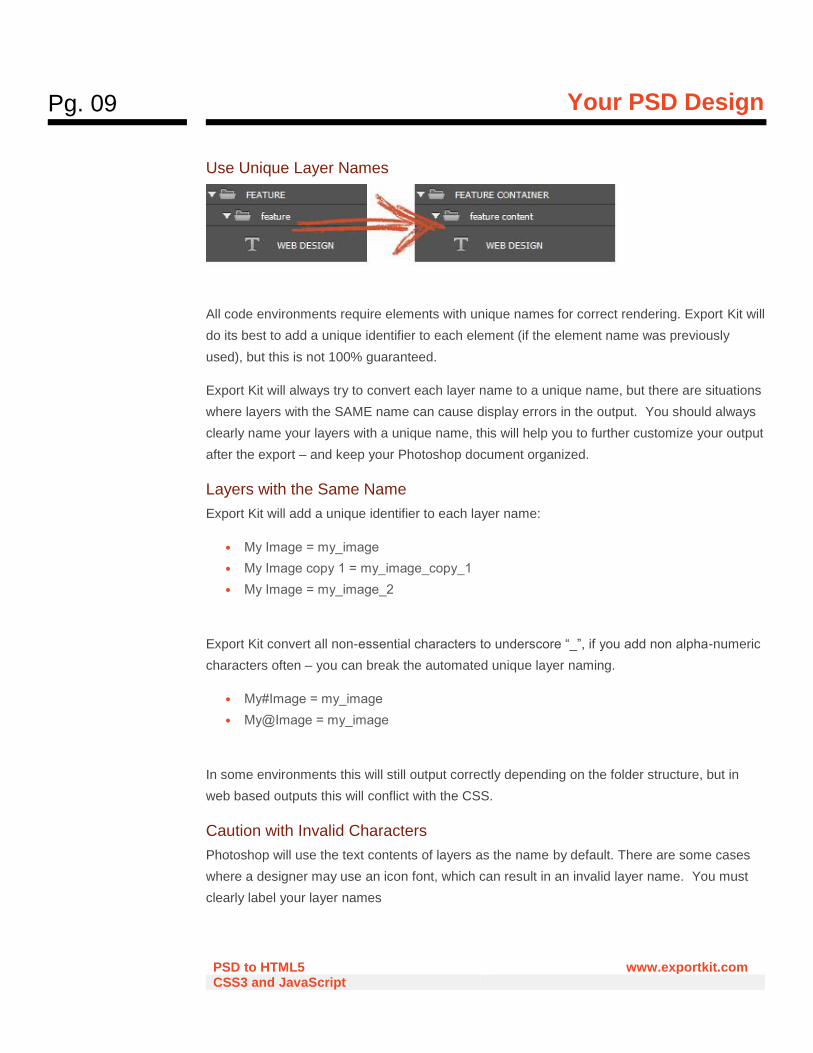
Use Unique Layer Names
All code environments require elements with unique names for correct rendering. Export Kit will
do its best to add a unique identifier to each element (if the element name was previously
used), but this is not 100% guaranteed.
Export Kit will always try to convert each layer name to a unique name, but there are situations
where layers with the SAME name can cause display errors in the output. You should always
clearly name your layers with a unique name, this will help you to further customize your output
after the export – and keep your Photoshop document organized.
Layers with the Same Name
Export Kit will add a unique identifier to each layer name:
• My Image = my_image
• My Image copy 1 = my_image_copy_1
• My Image = my_image_2
Export Kit convert all non-essential characters to underscore “_”, if you add non alpha-numeric
characters often – you can break the automated unique layer naming.
• My#Image = my_image
• My@Image = my_image
In some environments this will still output correctly depending on the folder structure, but in
web based outputs this will conflict with the CSS.
Caution with Invalid Characters
Photoshop will use the text contents of layers as the name by default. There are some cases
where a designer may use an icon font, which can result in an invalid layer name. You must
clearly label your layer names
Pg. 10
Importing from Illustrator
PSD to HTML5 www.exportkit.com CSS3 and JavaScript
Importing from Illustrator You can easily cut-and-paste any Illustrator object into Photoshop and it will convert into a
smart-object. Smart-objects will then render in the output as Smart Object Images.
Illustrator Objects
You can easily cut-and-paste any Illustrator object into Photoshop and it will convert into a
smart-object. Smart-objects will then render in the output as Smart Object Images.
Illustrator .AI Document
If you convert your .AI document to a .PSD using a script, it is likely that your document will
have a lot of layers named Clip, Group or Path. These are common Illustrator layers which you
will need to convert to ensure you document renders as expected. Once you convert these
layers to a respected smart object, image or folder – your export will render 100% as expected.
Quick Tip
You can (a) remove the link mask of elements, or (b) create a new folder and drag the contents
of the Group to the new folder - then delete the old Group.
<Group>
<Group> will have to rasterize or convert to a folder.
<Clip Group>
<Clip Group> will have to rasterize or convert to a folder – without the mask.
<Path>
<Path> will have to rasterize or convert to a folder.
Break Objects Apart
If you combine/group simple paths in illustrator to create a complex path, E.G. a navigation
menu - you will have to cut-and-paste each simple path (E.G. a button) into your PSD. It is
important to use individual objects in your PSD as you will want to control each element in the
output. If you create a single element in Illustrator, you will get a single element in Photoshop.
Pg. 11
Using Free Online PSD Templates
PSD to HTML5 www.exportkit.com CSS3 and JavaScript
Using Free Online PSD Templates With Export Kit you can use any Free PSD Template you find online to generate your HTML5
and CSS3 website. Free online PSD templates will require some changes to ensure a correct
HTML5 web export that visually maintains its consistency with Photoshop. You will likely also
want to include Layer Tags to make your PSD design responsive, multi-page and dynamic in
size.
Free is not always Easy
Be aware that many Free PSD Templates are DESIGNS ONLY, and are not structured or
organized for web exports. It is impossible to tell how another Designer may design their
layout but there are some common things you can do to ensure the PSD is usable.
1. Get the Output working first if you find Warnings and Errors during the export
2. Remove empty folders and empty layers
3. Do not get “complex” with a free PSD until you have it visually stable
4. Group similar content, if the template has many layers in a single folder then reorganize
them as required
5. Re-draw bad text layers with the type tool, do not duplicate the text
Use Smart Objects Often
Use Smart Object Images a lot, if you find an area in the PSD template causes errors, convert
the parent folder to a Smart Object – avoid the headache. Once your element is a Smart
Object, you can reference the contents later in your export using ${obj} tag.
• You can also use ${img} tag to render an image of the layer directly.
Pg. 12
Organize Folders and Layers
PSD to HTML5 www.exportkit.com CSS3 and JavaScript
Organize Folders and Layers You Photoshop folder and layer structure is key to all designs as different environments have
different requirements. There are situations where incorrect folders or layers can cause
unwanted display errors in the output. Organized designs also provide organized output, which
is what your client wants!
It is important to plan your design and follow our guides related to your target environment.
Single Page View
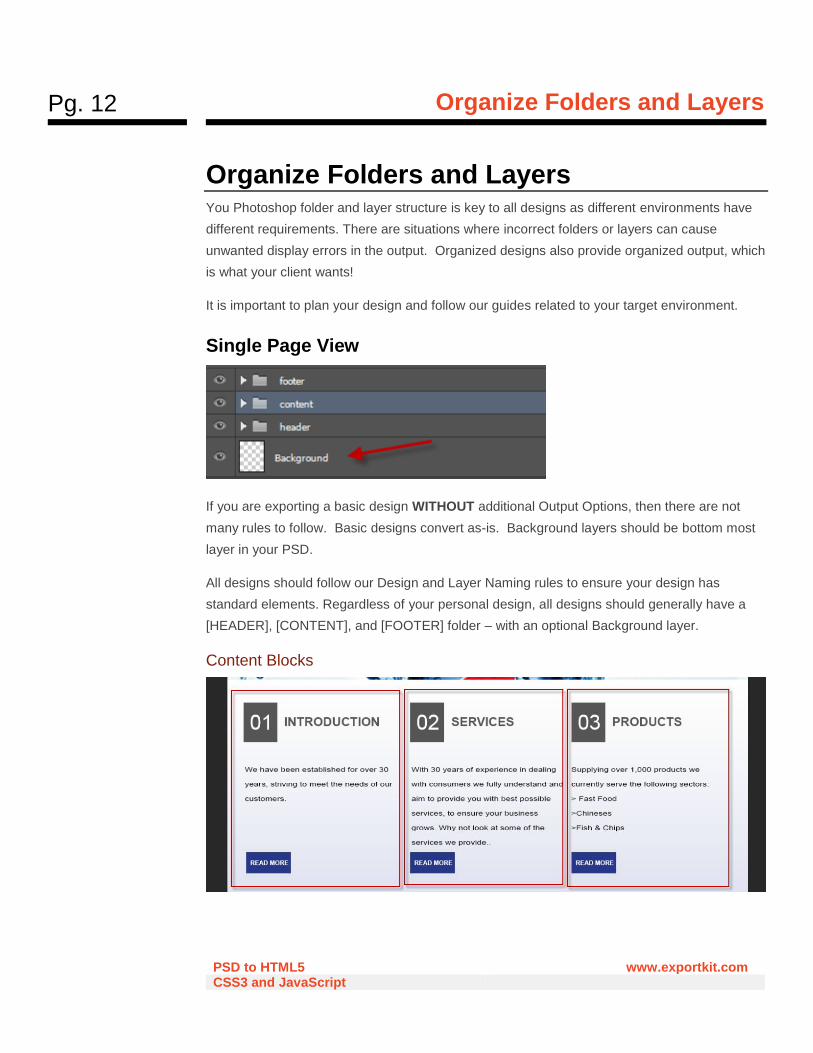
If you are exporting a basic design WITHOUT additional Output Options, then there are not
many rules to follow. Basic designs convert as-is. Background layers should be bottom most
layer in your PSD.
All designs should follow our Design and Layer Naming rules to ensure your design has
standard elements. Regardless of your personal design, all designs should generally have a
[HEADER], [CONTENT], and [FOOTER] folder – with an optional Background layer.
Content Blocks
Pg. 13
Organize Folders and Layers
PSD to HTML5 www.exportkit.com CSS3 and JavaScript
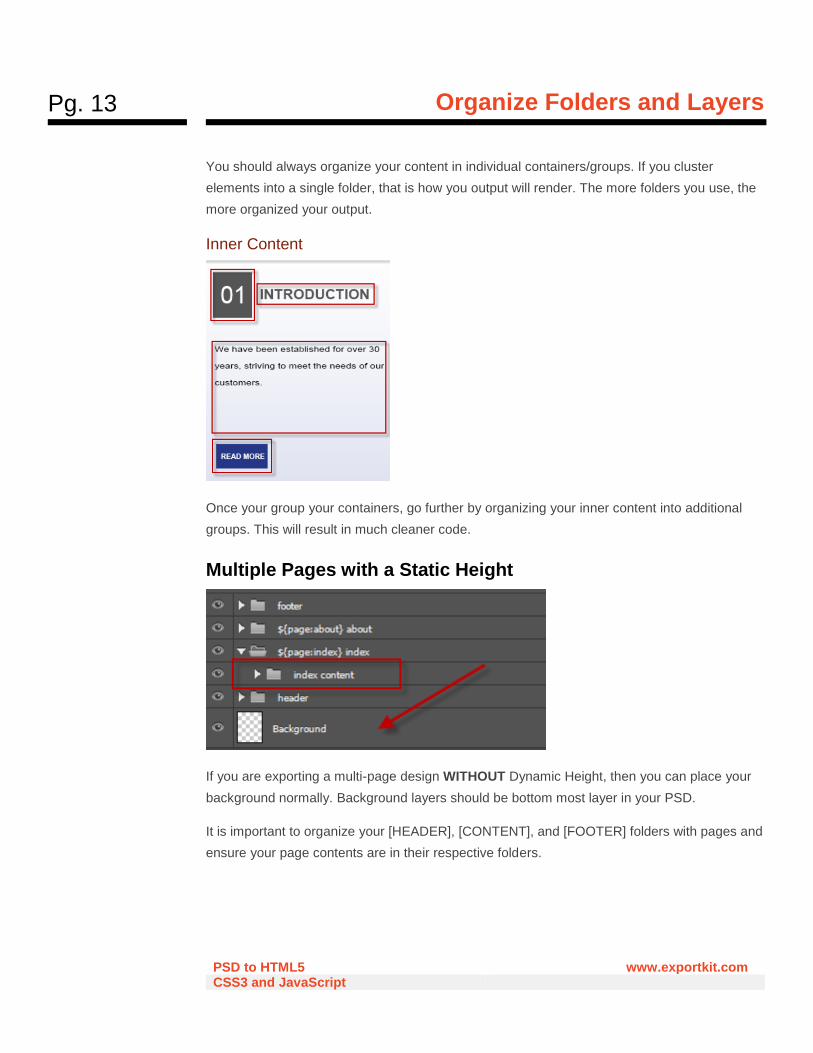
You should always organize your content in individual containers/groups. If you cluster
elements into a single folder, that is how you output will render. The more folders you use, the
more organized your output.
Inner Content
Once your group your containers, go further by organizing your inner content into additional
groups. This will result in much cleaner code.
Multiple Pages with a Static Height
If you are exporting a multi-page design WITHOUT Dynamic Height, then you can place your
background normally. Background layers should be bottom most layer in your PSD.
It is important to organize your [HEADER], [CONTENT], and [FOOTER] folders with pages and
ensure your page contents are in their respective folders.
Pg. 14
Organize Folders and Layers
PSD to HTML5 www.exportkit.com CSS3 and JavaScript
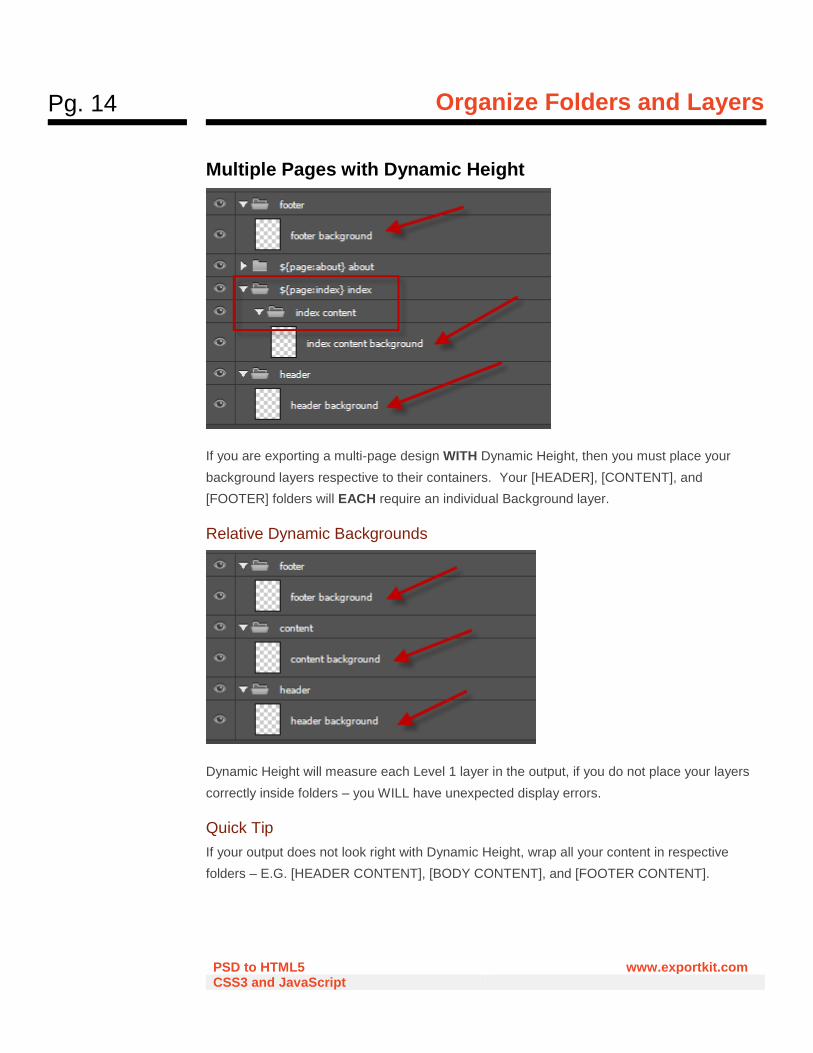
Multiple Pages with Dynamic Height
If you are exporting a multi-page design WITH Dynamic Height, then you must place your
background layers respective to their containers. Your [HEADER], [CONTENT], and
[FOOTER] folders will EACH require an individual Background layer.
Relative Dynamic Backgrounds
Dynamic Height will measure each Level 1 layer in the output, if you do not place your layers
correctly inside folders – you WILL have unexpected display errors.
Quick Tip
If your output does not look right with Dynamic Height, wrap all your content in respective
folders – E.G. [HEADER CONTENT], [BODY CONTENT], and [FOOTER CONTENT].
Pg. 15
Organize Folders and Layers
PSD to HTML5 www.exportkit.com CSS3 and JavaScript
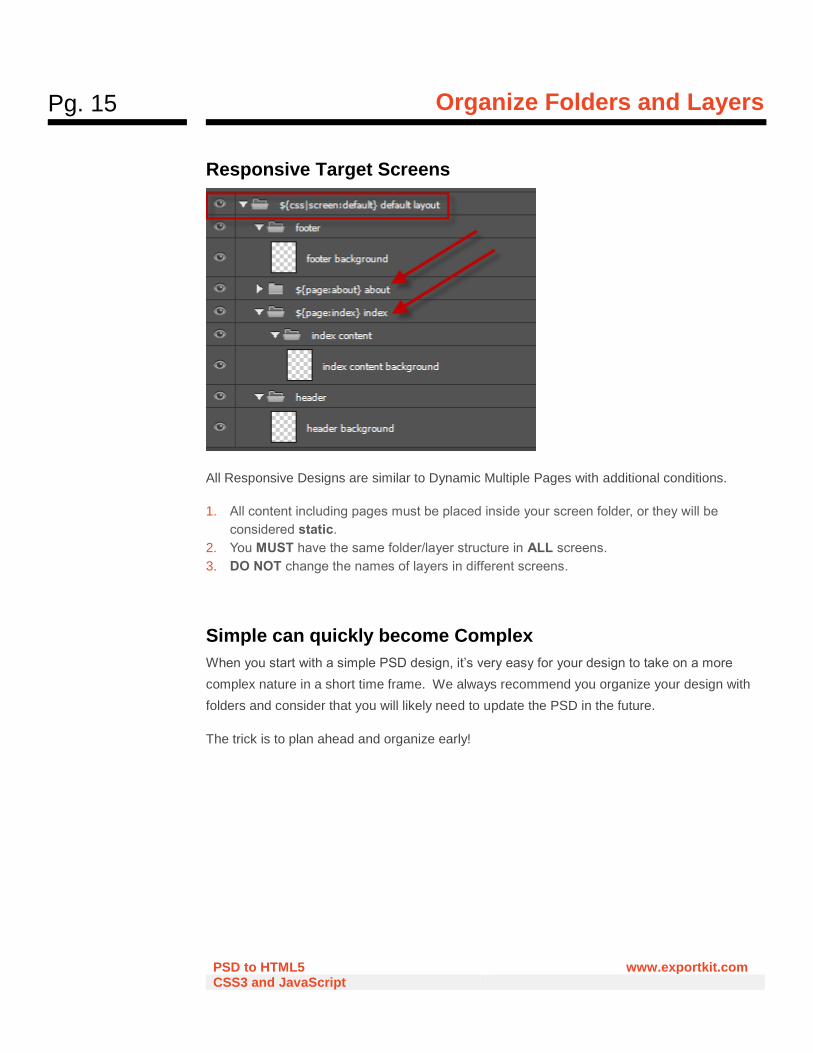
Responsive Target Screens
All Responsive Designs are similar to Dynamic Multiple Pages with additional conditions.
1. All content including pages must be placed inside your screen folder, or they will be
considered static.
2. You MUST have the same folder/layer structure in ALL screens.
3. DO NOT change the names of layers in different screens.
Simple can quickly become Complex
When you start with a simple PSD design, it’s very easy for your design to take on a more
complex nature in a short time frame. We always recommend you organize your design with
folders and consider that you will likely need to update the PSD in the future.
The trick is to plan ahead and organize early!

Pg. 16
Working with Layers
PSD to HTML5 www.exportkit.com CSS3 and JavaScript
Working with Layers HTML5 goes hand-in-hand with CSS3 allowing for full Layer Support with web shapes and text
in your Output. With web-based content, you may not always want to use an image for a
background with a solid color; as this will cause unnecessary longer page-load times. You
may not require a text image, considering new web-based font support for CSS3. These are
examples where shapes and text will come in handy as it "draws" on the webpage rather than
loading external content; such as a large image.
Export Kit has full support for images, text, shapes, folders and layer effects in Photoshop
without Layer Tags. All functionality is built-in to Export Kit so… just be the creative you! All
layers and effects supported work in most common environments.
Double Edge Sword
It is impossible to create a webpage without using both shapes and text in a modern website,
on the other hand HTML5 CANNOT process shapes or styles without CSS or SVG.
Images
All image layers are rasterized and rendered as shown in your PSD. In reality, an image is an
image! You don’t save much by applying a drop shadow to an image at runtime vs. loading a
PNG.
Images with Layer Effects
• Layer becomes rasterized/flattened
All layer effects and styles are rasterized and rendered with the image in the Output.
External and Rasterized Images
• No change, rendered as is
Any image file you open or rasterize in your PSD (jpg, png, or gif) will render as is in the
Output.
Failsafe Image
If your output does not render just the way you like, quick solutions to get a perfect render or to
test your output and to get the layer(s) to 100% look the way you expect:
• Rasterize the desired layer(s), or add ${img} tag to the layer(s)
Pg. 17
Working with Layers
PSD to HTML5 www.exportkit.com CSS3 and JavaScript
Smart Object Image
All smart objects are rasterized and rendered as images in your Output. Smart Objects provide
both additional features for linking dynamic PSD content, and also a means to access your
content in your output when required.
There are a few situations where “image clipping” can happen, and it’s mostly related to scaling
images rather than resizing them or complex vectors and shapes. In situations like this, the
fastest way to deal with the issue is to use a Smart Object Image.
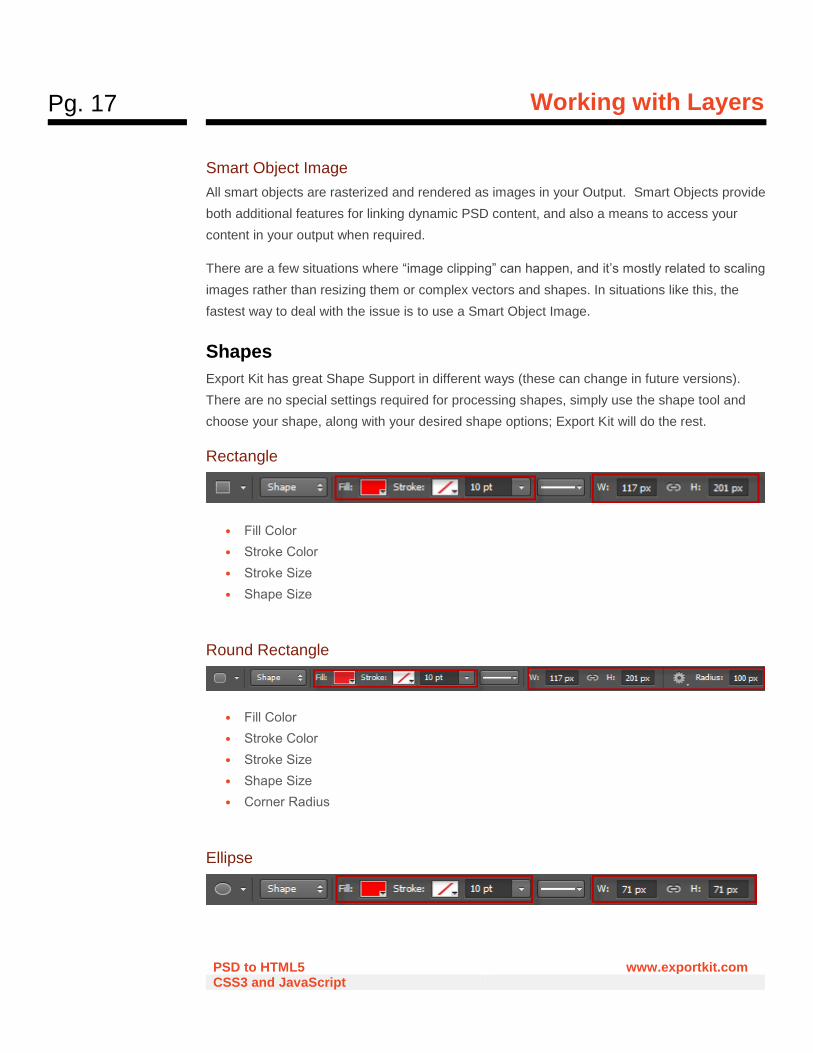
Shapes
Export Kit has great Shape Support in different ways (these can change in future versions).
There are no special settings required for processing shapes, simply use the shape tool and
choose your shape, along with your desired shape options; Export Kit will do the rest.
Rectangle
• Fill Color
• Stroke Color
• Stroke Size
• Shape Size
Round Rectangle
• Fill Color
• Stroke Color
• Stroke Size
• Shape Size
• Corner Radius
Ellipse
Pg. 18
Working with Layers
PSD to HTML5 www.exportkit.com CSS3 and JavaScript
• Fill Color
• Stroke Color
• Stroke Size
• Shape Size
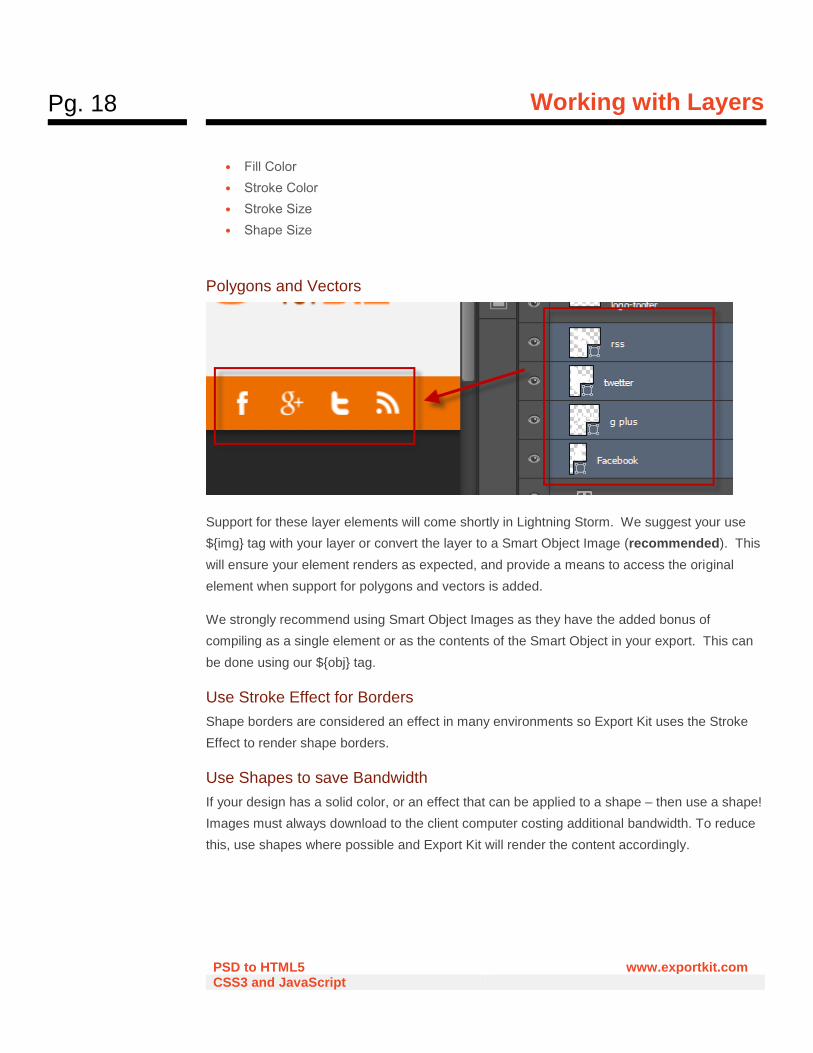
Polygons and Vectors
Support for these layer elements will come shortly in Lightning Storm. We suggest your use
${img} tag with your layer or convert the layer to a Smart Object Image (recommended). This
will ensure your element renders as expected, and provide a means to access the original
element when support for polygons and vectors is added.
We strongly recommend using Smart Object Images as they have the added bonus of
compiling as a single element or as the contents of the Smart Object in your export. This can
be done using our ${obj} tag.
Use Stroke Effect for Borders
Shape borders are considered an effect in many environments so Export Kit uses the Stroke
Effect to render shape borders.
Use Shapes to save Bandwidth
If your design has a solid color, or an effect that can be applied to a shape – then use a shape!
Images must always download to the client computer costing additional bandwidth. To reduce
this, use shapes where possible and Export Kit will render the content accordingly.
Pg. 19
Working with Layers
PSD to HTML5 www.exportkit.com CSS3 and JavaScript
Consider the Shape Area
It’s very common to mistake a complex shape’s visual design as its measured area. Always
remember elements in all programming languages are treated as a rectangle area – regardless
of the inner shape. Although shape patterns may contain many points, all elements have a
standard x, y, width, height pattern – with 3D elements also containing z and depth.
If you are using Dynamic Height with complex shapes that cut-off or bleed into another section
block – we recommend you rasterize the element to note its size and position. This is
important because visually your element may have a current size.
Text
Export Kit has great Text Support for justification for left, center and right; including various
character styles and paragraphs.
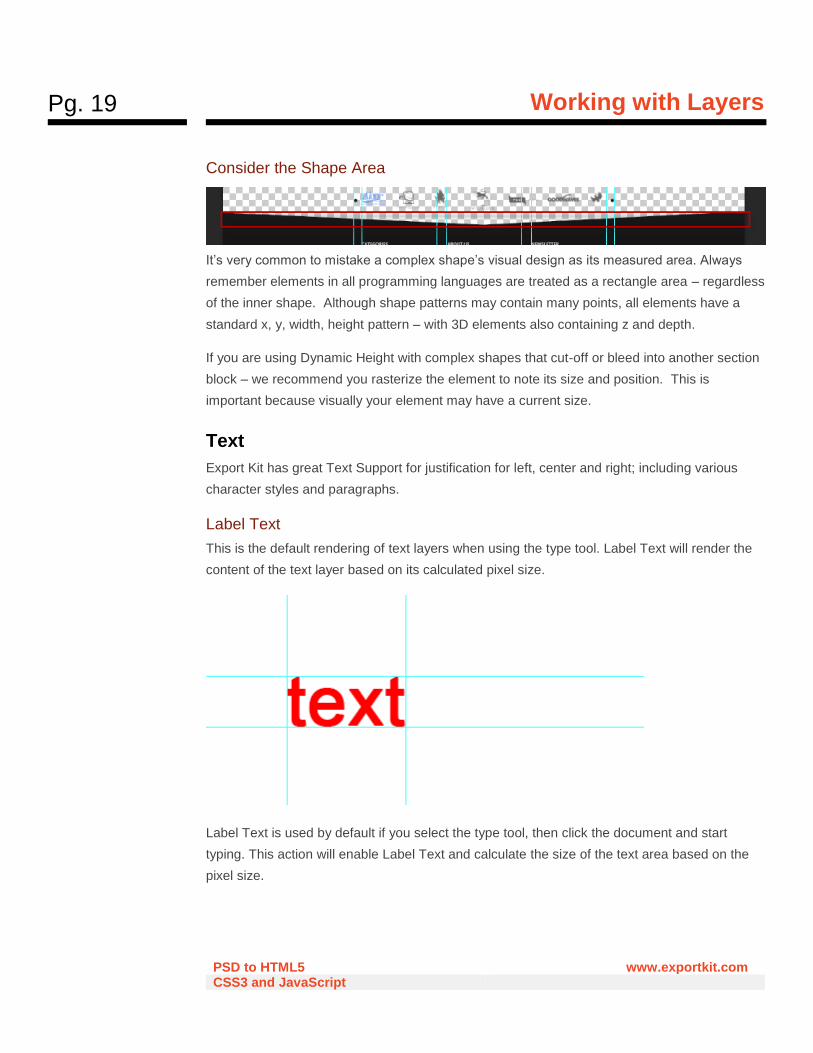
Label Text
This is the default rendering of text layers when using the type tool. Label Text will render the
content of the text layer based on its calculated pixel size.
Label Text is used by default if you select the type tool, then click the document and start
typing. This action will enable Label Text and calculate the size of the text area based on the
pixel size.
Pg. 20
Working with Layers
PSD to HTML5 www.exportkit.com CSS3 and JavaScript
You should always avoid using text alignment properties with label text. Label text is calculated
based on the pixel position and size, so you will have unexpected output results. To correct
this, use Paragraph Text instead.
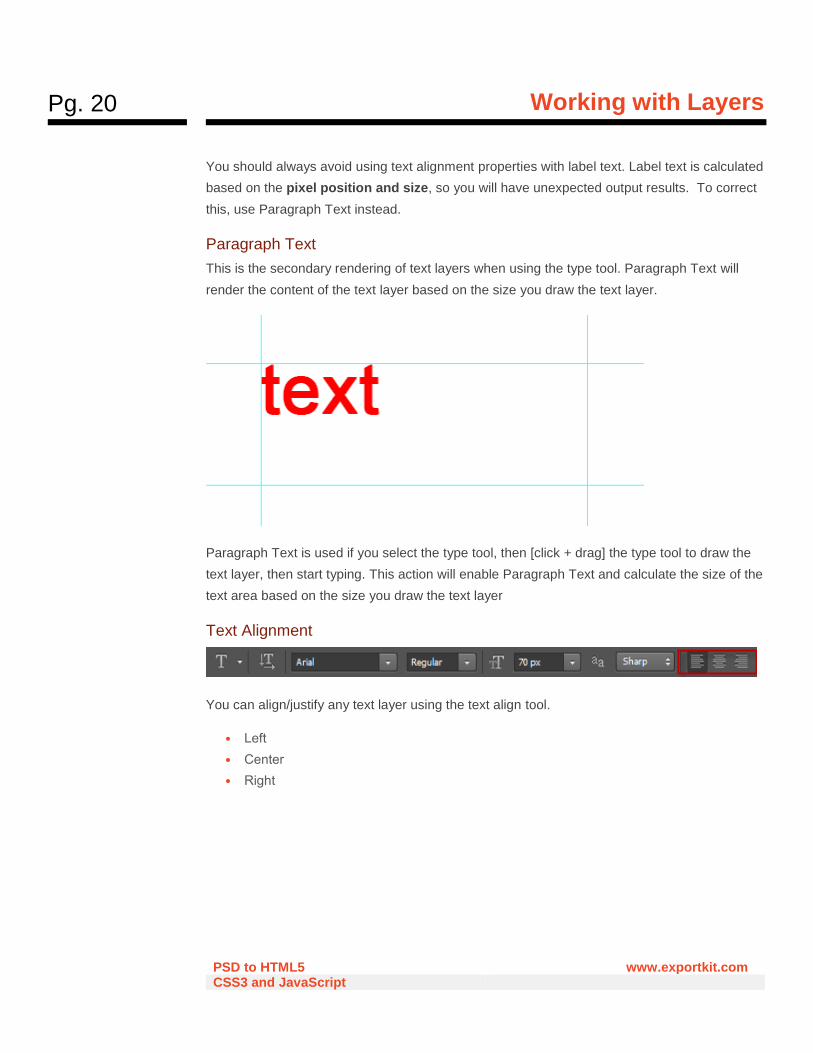
Paragraph Text
This is the secondary rendering of text layers when using the type tool. Paragraph Text will
render the content of the text layer based on the size you draw the text layer.
Paragraph Text is used if you select the type tool, then [click + drag] the type tool to draw the
text layer, then start typing. This action will enable Paragraph Text and calculate the size of the
text area based on the size you draw the text layer
Text Alignment
You can align/justify any text layer using the text align tool.
• Left
• Center
• Right
Pg. 21
Working with Layers
PSD to HTML5 www.exportkit.com CSS3 and JavaScript
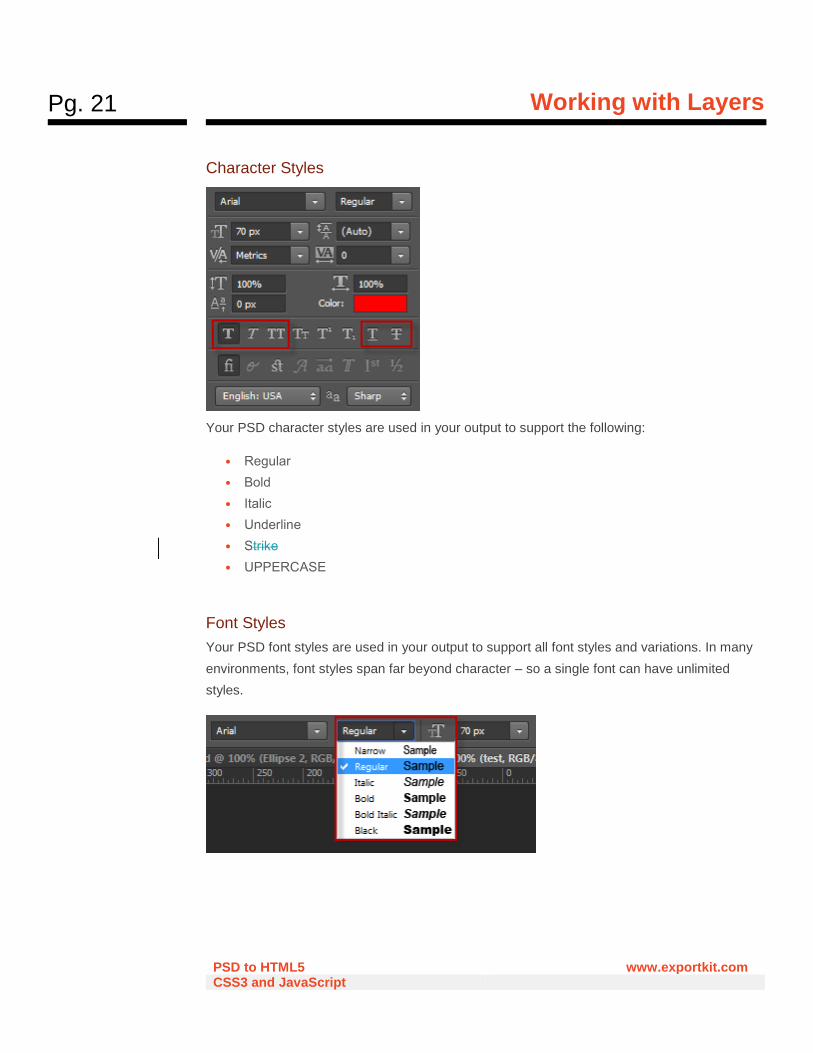
Character Styles
Your PSD character styles are used in your output to support the following:
• Regular
• Bold
• Italic
• Underline
• Strike
• UPPERCASE
Font Styles
Your PSD font styles are used in your output to support all font styles and variations. In many
environments, font styles span far beyond character – so a single font can have unlimited
styles.
Pg. 22
Working with Layers
PSD to HTML5 www.exportkit.com CSS3 and JavaScript
When using Font Styles with web based outputs, be aware that each browser will render fonts
differently. Using “Arial” font (a very common font), your output will still look different when
using IE, Chrome and Firefox.
You can disable CSS Fonts in the Output if you want the full Font Style Name.
Use Valid Text Characters
Not all environment support all characters. If you are using special characters in your output,
it’s always safer to use the ASCII value – then convert the ASCII to your project encoding.
Many environments have specific character encoding settings, which may not match with your
current Photoshop settings.
Change Your Text Layer Name
Photoshop will use the text contents of layers as the name. There are some cases where a
designer may use a price, phone number or address – which can result in an invalid layer
name.
Use Valid Text Layers
When text layers do not render correctly, the first thing to check is the size of the element in
Layers View. If you notice the size is 0, your element may not be a valid Photoshop text layer.
Redraw Fix
Redraw the text layer and copy the contents of the element. This will give Photoshop fresh text
properties, then remove the previous layer. You can use this method to fix any text layer
causing an issue.
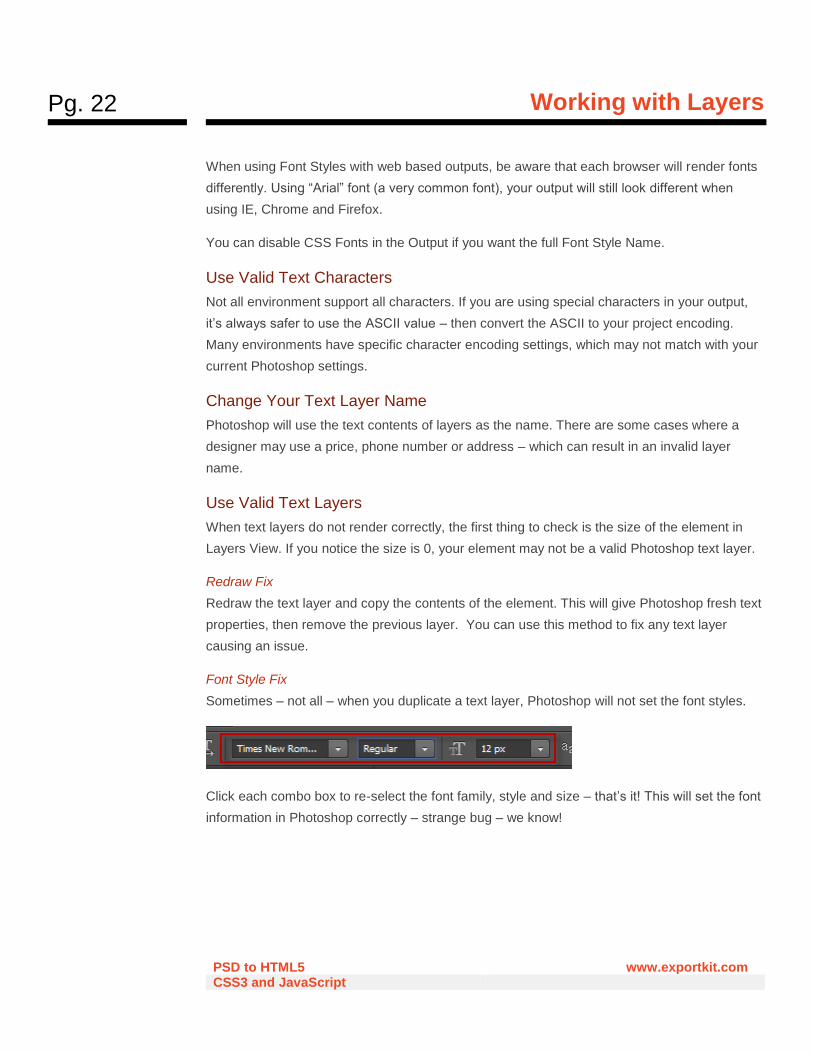
Font Style Fix
Sometimes – not all – when you duplicate a text layer, Photoshop will not set the font styles.
Click each combo box to re-select the font family, style and size – that’s it! This will set the font
information in Photoshop correctly – strange bug – we know!
Pg. 23
Working with Layers
PSD to HTML5 www.exportkit.com CSS3 and JavaScript
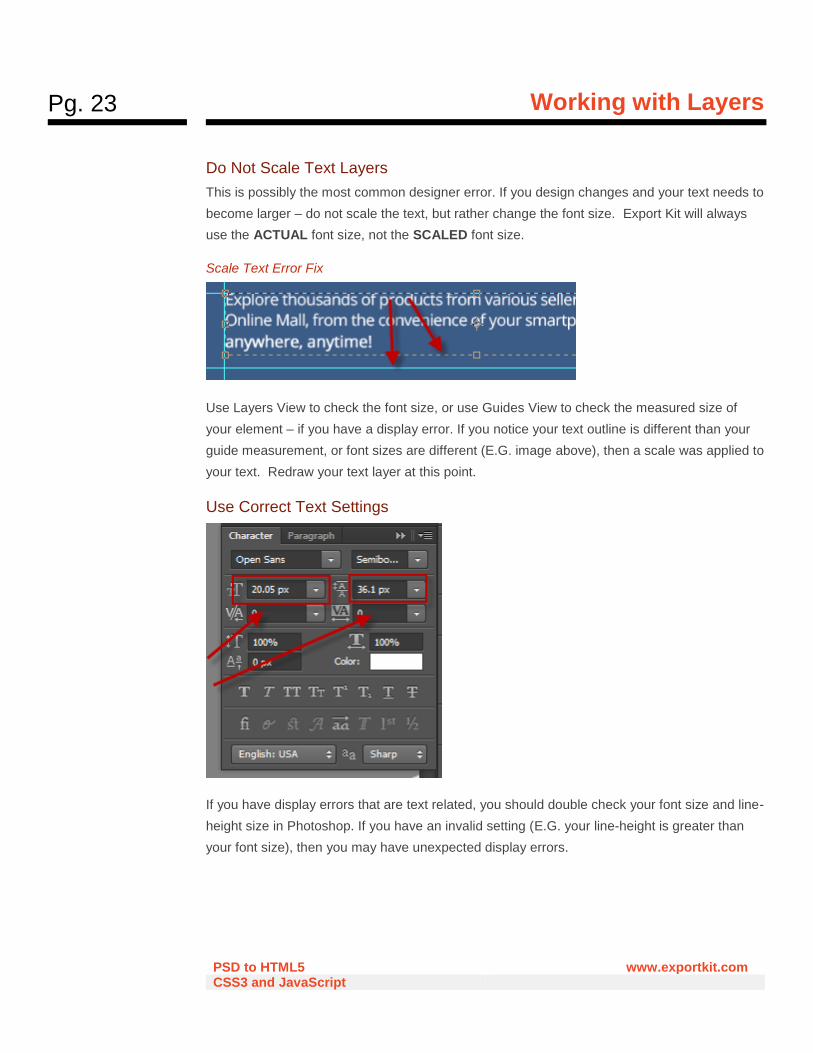
Do Not Scale Text Layers
This is possibly the most common designer error. If you design changes and your text needs to
become larger – do not scale the text, but rather change the font size. Export Kit will always
use the ACTUAL font size, not the SCALED font size.
Scale Text Error Fix
Use Layers View to check the font size, or use Guides View to check the measured size of
your element – if you have a display error. If you notice your text outline is different than your
guide measurement, or font sizes are different (E.G. image above), then a scale was applied to
your text. Redraw your text layer at this point.
Use Correct Text Settings
If you have display errors that are text related, you should double check your font size and line-
height size in Photoshop. If you have an invalid setting (E.G. your line-height is greater than
your font size), then you may have unexpected display errors.
Pg. 24
Working with Layers
PSD to HTML5 www.exportkit.com CSS3 and JavaScript
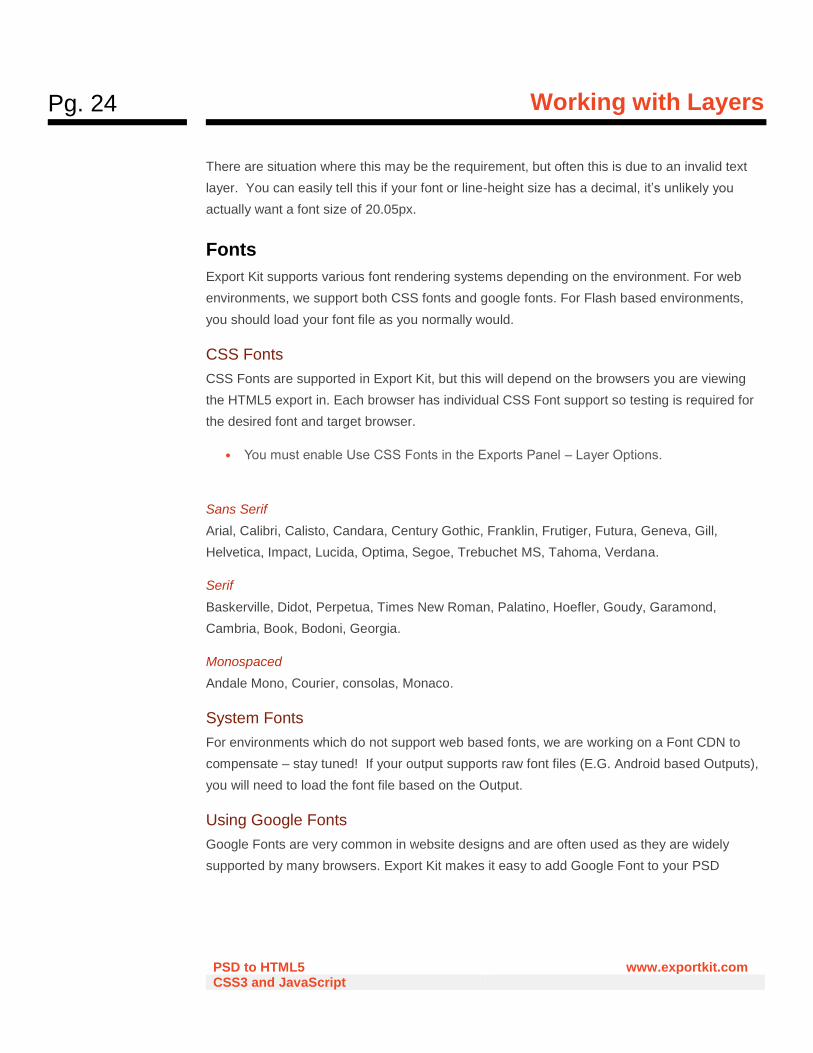
There are situation where this may be the requirement, but often this is due to an invalid text
layer. You can easily tell this if your font or line-height size has a decimal, it’s unlikely you
actually want a font size of 20.05px.
Fonts
Export Kit supports various font rendering systems depending on the environment. For web
environments, we support both CSS fonts and google fonts. For Flash based environments,
you should load your font file as you normally would.
CSS Fonts
CSS Fonts are supported in Export Kit, but this will depend on the browsers you are viewing
the HTML5 export in. Each browser has individual CSS Font support so testing is required for
the desired font and target browser.
• You must enable Use CSS Fonts in the Exports Panel – Layer Options.
Sans Serif
Arial, Calibri, Calisto, Candara, Century Gothic, Franklin, Frutiger, Futura, Geneva, Gill,
Helvetica, Impact, Lucida, Optima, Segoe, Trebuchet MS, Tahoma, Verdana.
Serif
Baskerville, Didot, Perpetua, Times New Roman, Palatino, Hoefler, Goudy, Garamond,
Cambria, Book, Bodoni, Georgia.
Monospaced
Andale Mono, Courier, consolas, Monaco.
System Fonts
For environments which do not support web based fonts, we are working on a Font CDN to
compensate – stay tuned! If your output supports raw font files (E.G. Android based Outputs),
you will need to load the font file based on the Output.
Using Google Fonts
Google Fonts are very common in website designs and are often used as they are widely
supported by many browsers. Export Kit makes it easy to add Google Font to your PSD
Pg. 25
Working with Layers
PSD to HTML5 www.exportkit.com CSS3 and JavaScript
design. You can use Google Fonts with any web-based export including HTML5, CSS3,
JavaScript, jQuery and WordPress.
Google Fonts Auto-loader Script
<!-- Required jQuery libs -->
<script src="http://code.jquery.com/jquery-1.11.0.min.js"></script>
<!-- Export Kit - Google Fonts Auto-loader -->
<script src="http://exportkit.com/cdn/jquery/ek-googlefont-autoloader-min.js"></script>
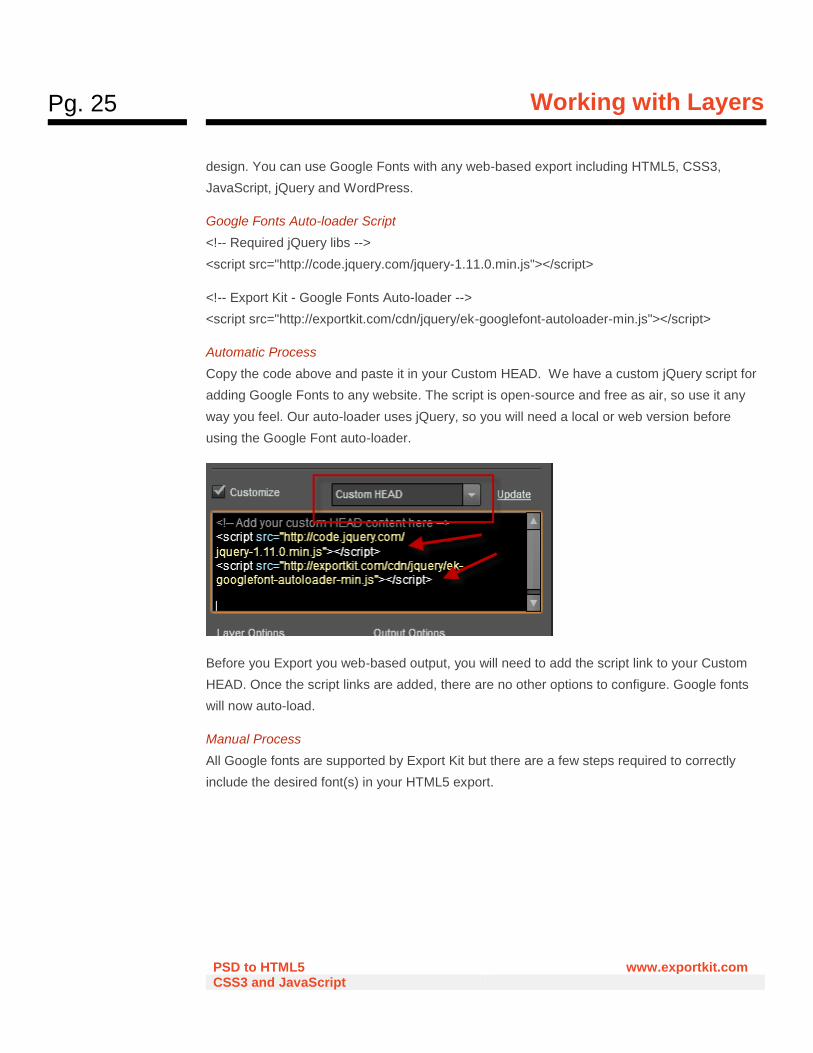
Automatic Process
Copy the code above and paste it in your Custom HEAD. We have a custom jQuery script for
adding Google Fonts to any website. The script is open-source and free as air, so use it any
way you feel. Our auto-loader uses jQuery, so you will need a local or web version before
using the Google Font auto-loader.
Before you Export you web-based output, you will need to add the script link to your Custom
HEAD. Once the script links are added, there are no other options to configure. Google fonts
will now auto-load.
Manual Process
All Google fonts are supported by Export Kit but there are a few steps required to correctly
include the desired font(s) in your HTML5 export.
Pg. 26
Working with Layers
PSD to HTML5 www.exportkit.com CSS3 and JavaScript
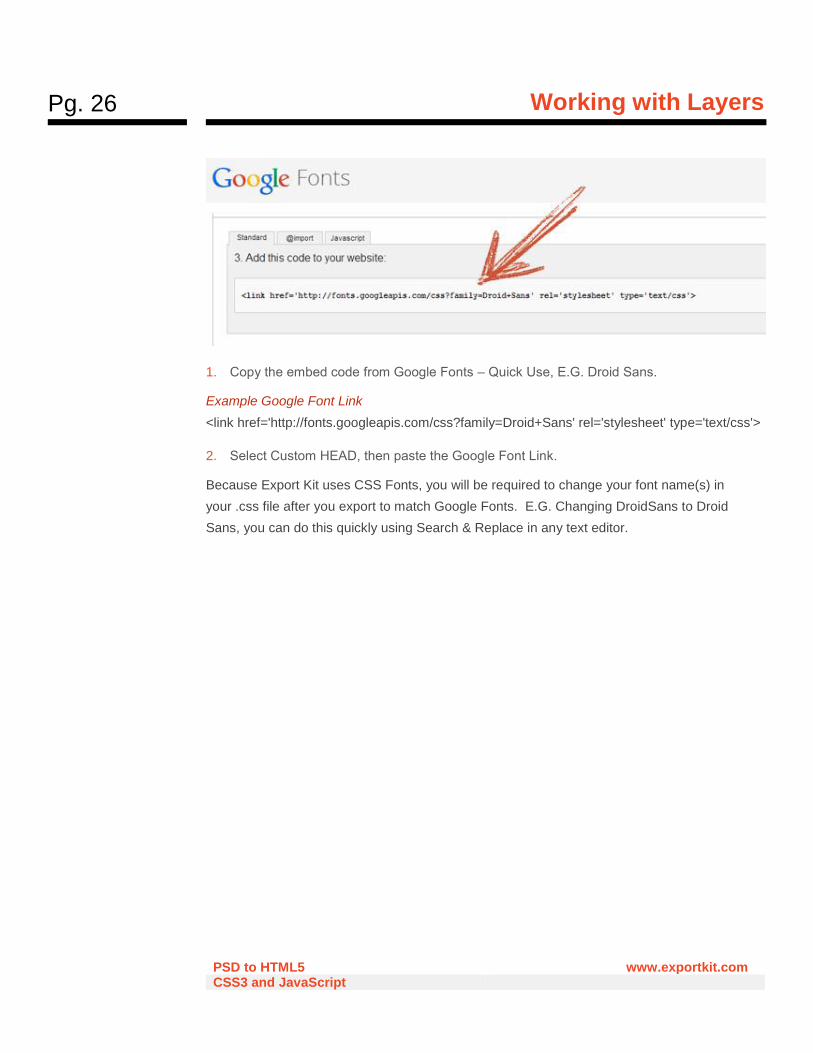
1. Copy the embed code from Google Fonts – Quick Use, E.G. Droid Sans.
Example Google Font Link
<link href='http://fonts.googleapis.com/css?family=Droid+Sans' rel='stylesheet' type='text/css'>
2. Select Custom HEAD, then paste the Google Font Link.
Because Export Kit uses CSS Fonts, you will be required to change your font name(s) in
your .css file after you export to match Google Fonts. E.G. Changing DroidSans to Droid
Sans, you can do this quickly using Search & Replace in any text editor.
Pg. 27
Working with Layer Effects
PSD to HTML5 www.exportkit.com CSS3 and JavaScript
Working with Layer Effects Layer Effects will enhance your Output with additional rendering features for use with PSD to
CSS3. You can add layer effects to any Photoshop layer element and Export Kit will render the
effect directly in HTML5 and CSS3.
HTML5 and CSS3 DOES NOT support all Photoshop layer effects. Additionally, HTML5 and
CSS3 have poor text effects support for glow, stroke, and gradient fill.
• You must enable Layer Effects in the Exports Panel – Layer Options.
Drop and Inner Shadow
Export Kit supports the Drop and Inner Shadow structure of your layers in your PSD, you will
need to test your output as all environments render effects differently:
• Shadow Color
• Opacity
• Angle
• Distance
• Choke/Spread
• Size
Outer and Inner Glow
Export Kit supports the Outer and Inner Glow structure of your layers in your PSD, you will
need to test your output as all environments render effects differently:
• Glow Color
• Opacity
Color Overlay
Export Kit supports the Color Overlay color of your layers in your PSD:
• Fill Color
• Opacity
Pg. 28
Working with Layer Effects
PSD to HTML5 www.exportkit.com CSS3 and JavaScript
Gradient Overlay
Export Kit supports the Gradient Overlay structure of your layers in your PSD, you will need to
test your output as all environments render effects differently:
• Gradient Colors
• Opacity
• Angle
• Style
Stroke
Export Kit supports the Stroke structure of your layers in your PSD, you will need to test your
output as all environments render effects differently:
• Stroke Color
• Size
• Opacity
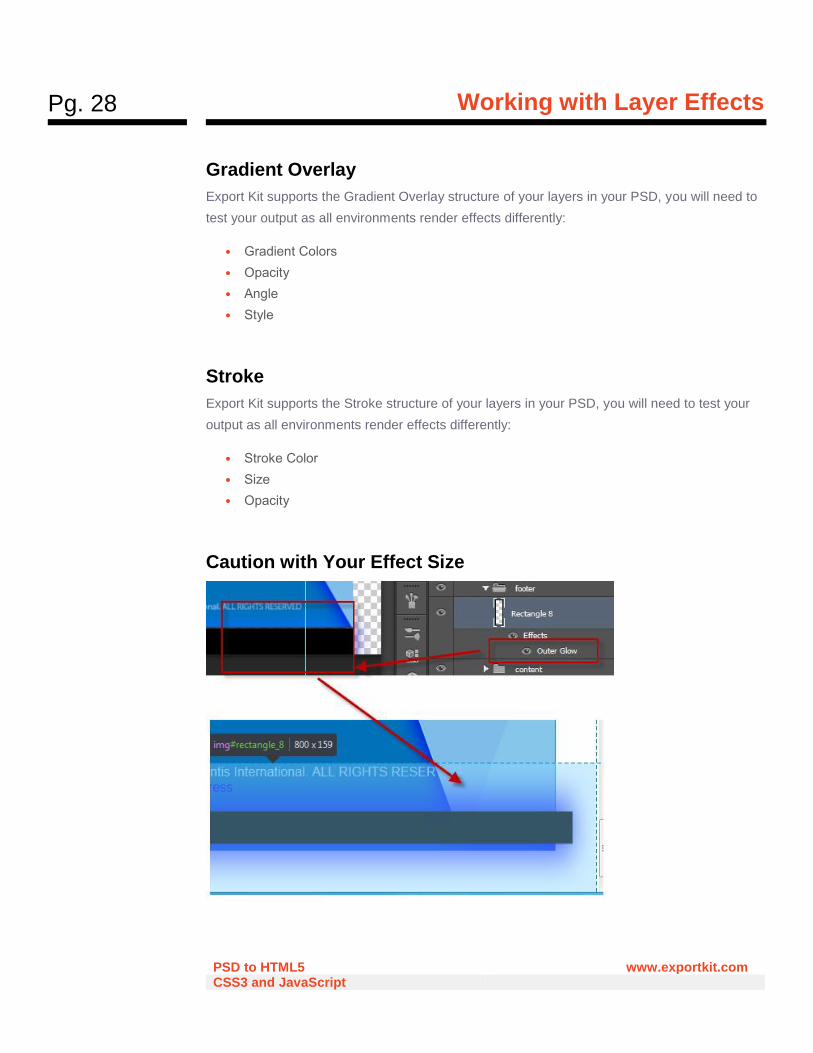
Caution with Your Effect Size
Pg. 29
Working with Layer Effects
PSD to HTML5 www.exportkit.com CSS3 and JavaScript
Depending on your effect and the angle, your element size may change to reflect the effect
applied to the element. Web-based environments such as HTML and CSS, do not use run-time
filters – but rather element filters. Element filters apply directly to an element and cause the all
coordinate properties of the element to change.
An example of this is the Glow Effect. In HTML (and other environments), the size of the glow
must reflect the size of the element. If you have a rectangle 100x100, with a 5px glow = actual
HTML size 110x110.
No Overflow your Layer Effects
Convert the element to a Smart Object, then mask the unnecessary area. Or you can use CSS
and add a custom class to your Custom HEAD.
Example No Overflow CSS Style
.nooverflow{ overflow:hidden; }
Then add ${css|style:nooverflow} to your parent folder, this will prevent the effect from
bleeding.
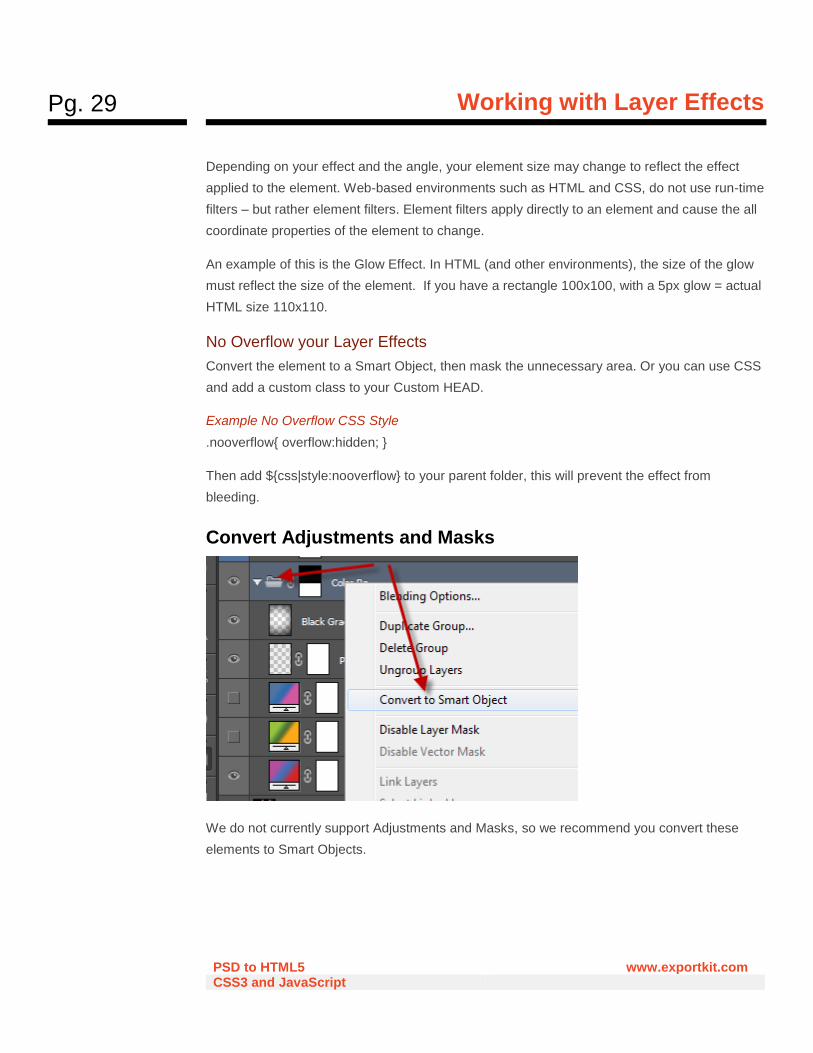
Convert Adjustments and Masks
We do not currently support Adjustments and Masks, so we recommend you convert these
elements to Smart Objects.
Pg. 30
Using Layer Tags
PSD to HTML5 www.exportkit.com CSS3 and JavaScript
Using Layer Tags Layer Tags are custom names you can apply to elements in your document to convert them to
respective objects in each environment. Layer Tags are very powerful and allow you to
enhance your interactive output with common environment elements out-of-the-box.
Not all environments support all Layer Tags, but we are working towards making all Layer Tags
universal in all supported environments.
Syntax Markup
Layer Tags are specific in their markup:
• ${ tag } - Layer Tag Template
In detail:
• ${ - start the tag
• tag - the layer tag content
• } - end the tag
Tag Content
Export Kit will process Layer Tag Content with a specific syntax structure:
• ${ name |type :args }
In detail:
• name - name of the layer tag
• |type - optional, a tag type
• :args - optional, tag arguments
Pg. 31
Using Layer Tags
PSD to HTML5 www.exportkit.com CSS3 and JavaScript
Add Layer Tags before Names
When using Layer Tags, we suggest you add the Layer Tag before the layer name to avoid
confusion. You should always make your Layer Tags easy to read, adding the tag before the
layer name makes this possible.
E.G. Assume we are adding a link tag, with the layer name “my contact link”:
• ${link:contact.html} my contact link - CORRECT
• my contact link ${link:contact.html} - INCORRECT
• my contact ${link:contact.html} link - INCORRECT
Although all 3 examples above will work, you should add the Layer Tag before the name for
easy viewing.
Tag List
Layer Tags offer additional support with your Output to make your design responsive, multi-
page and dynamic in size. Layer Tags are custom names you can apply to layers in your PSD
document to convert Photoshop layer elements into native HTML5 and CSS3 objects.
Skip Tag
This tag can be used on both layers and folders to skip the element from processing during the
export. This tag is great for keeping notes or custom elements within your document, used for
reference rather than output.
This will allow you to do as it says, skip either a layer or folder from processing in the output.
Add developer notes, comments, etc.
• ${skip} - ALL LAYERS
Image Tag
This tag will rasterize the contents of both layers and folders, converting the element to an
image in the output. This will both save the image as the default image type and render the
native environment image element.
• ${img} or ${image} - ALL LAYERS
Pg. 32
Using Layer Tags
PSD to HTML5 www.exportkit.com CSS3 and JavaScript
Link Tag
This tag will create a web link element, respective to the environment, to open a new browser
page or tab – using the web address in the args. This tag is individually processed by each
environment to open a web link only. The args must be a valid url, anchor or web script.
• ${link:[URL_ADDRESS]} - TEXT LAYERS ONLY
Example Absolute Link
Create a web link to “http://google.com”:
• ${link:http://google.com}
Example Relative Link
Create a web link to “/path/to/server”:
• ${link:/path/to/server}
Example Anchor Link
Create a web anchor to the HTML element with the name “elementName”.
• ${link:#elementName}
Paragraph Tag
This tag will allow you to render text ranges in your Label or Paragraph text layers.
• ${p} - TEXT LAYERS ONLY
Text Range Styles
When using ${p} tag, all layer effects are rendered with each range of the text element as a
<span /> element in the output. The text ranges are converted to inline HTML styles and not in
the CSS.
Pg. 33
Using Layer Tags
PSD to HTML5 www.exportkit.com CSS3 and JavaScript
Styles within a text block are just that - inline. Adding span styles to the CSS file is pointless,
as you will likely use the style for that span only once.
Line Height
This tag will also calculate the line height but ONLY for the text element as a whole, and NOT
each span.
HTML5 and CSS3 do not calculate the line-height of a span within a div - to work around this,
change the font size of " " (space) character and HTML will remap that line using the "line
height" of the font.
Media Object Tag
Object Tags will allow you to create media elements in the export. All supported object tags will
use native HTML5 controls for rendering media. The args must be a valid url.
When you draw a shape and add the Object Tag, the media element will use the size and
position of the shape layer.
• ${object|[TYPE]:[URL_ADDRESS]} - SHAPE LAYERS ONLY
Object Type Support
Object types will render with the default styles used by the device or browser. You will have to
tweak the output to get a full customized media element.
• youtube
• wav
• mp4
• oog-video
• oog-audio
• webm
• swf
• wmv
Example WAV
• ${object|wav:http://localhost/path/to/music.wav}
Pg. 34
Using Layer Tags
PSD to HTML5 www.exportkit.com CSS3 and JavaScript
Example MP4
• ${object|mp4:/path/to/video.mp4}
Form Tag
This will allow you to wrap the document folder contents into a Form element respective of the
output environment. The Form element will enhance your interactive outputs adding the ability
to build data-driven interactive applications from a single PSD file.
Most forms will require minimal tweaking as all web browsers render forms and input elements
differently.
• ${form|[TYPE]:[URL_ADDRESS]} - FOLDERS ONLY
GET and POST Support
Form supports two tag types: get and post, along with args for the action url address of the
form. The args must be a valid url address.
Example using GET
• ${form|get:http://localhost/get-script.php}
Example using POST
• ${form|post:http://localhost/post-script.php}
Form Handling
Form Tags will allow you to build data driven HTML5 web forms which will directly export with
the required settings usage. Web forms will take the user input and send data to server-side
script, so you will need a server-side script to process the form.
Input Tag
This will allow you to define many data elements and export them directly in your HTML5
webpage. The contents of the text layer will be used as the value of the input element when
processing the form.
• ${input:[TYPE]} - TEXT LAYERS ONLY
Pg. 35
Using Layer Tags
PSD to HTML5 www.exportkit.com CSS3 and JavaScript
Using Input Tags
You should only use Input Tags with Paragraph Text layers, otherwise your output will have
unexpected results.
Input Types Support
Input Tags work with Form Tags to provide customization support for web forms. Input Tags
will allow you to define many input elements and export them directly in your HTML5 webpage.
Most input elements will require minimal tweaking as all web browsers render forms and input
elements differently.
• checkbox
• file
• hidden
• password
• radio
• reset
• text
• textarea
• submit
Example Submit Input
• ${input:submit}
Example Text Input
• ${input:text}
• ${input:textarea}
Example Hidden Input
• ${input:hidden}

Pg. 36
Using Layer Tags
PSD to HTML5 www.exportkit.com CSS3 and JavaScript
Smart Object Tag
This tag will copy and parse the FIRST FOLDER LAYER in the Smart Object. This allows you
to have modular designs and reuse object groups in multiple pages and .psd files.
• ${obj} – SMART OBJECTS ONLY
Layer Style Tag
This tag adds custom CSS class styles to your PSD element. You can add any CSS class
style, or customized PSD styles included in your ${css|styles} folder.
• ${css|style:[name]} - ALL LAYERS
Mapping your Styles
All styles in your ${css|styles} folder can be reused an unlimited number of times with any PSD
layer. Each class will follow the nesting structure of your ${css|styles} layers to fully personalize
your output.
You must have a similar layer structure (parent-child relationship) in your design matching your
${css|styles} layers to ensure your output is correct. Export Kit works naturally with HTML5 and
CSS3 to follow the design rules of each.
Multiple Layer Styles
You can assign multiple CSS classes to your layer by adding a " " (space) between each CSS
class name.
• ${css|style:style1 style_2 my_style3}
Class Styles Tag
This tag will group all your custom CSS classes created with your PSD elements. All child
layers and folders are converted to CSS classes in the output using our Layer Naming Rules.
• ${css|styles} - FOLDERS ONLY
CSS Styles require Relative Positions to be enabled in your output to process folders.
Pg. 37
Using Layer Tags
PSD to HTML5 www.exportkit.com CSS3 and JavaScript
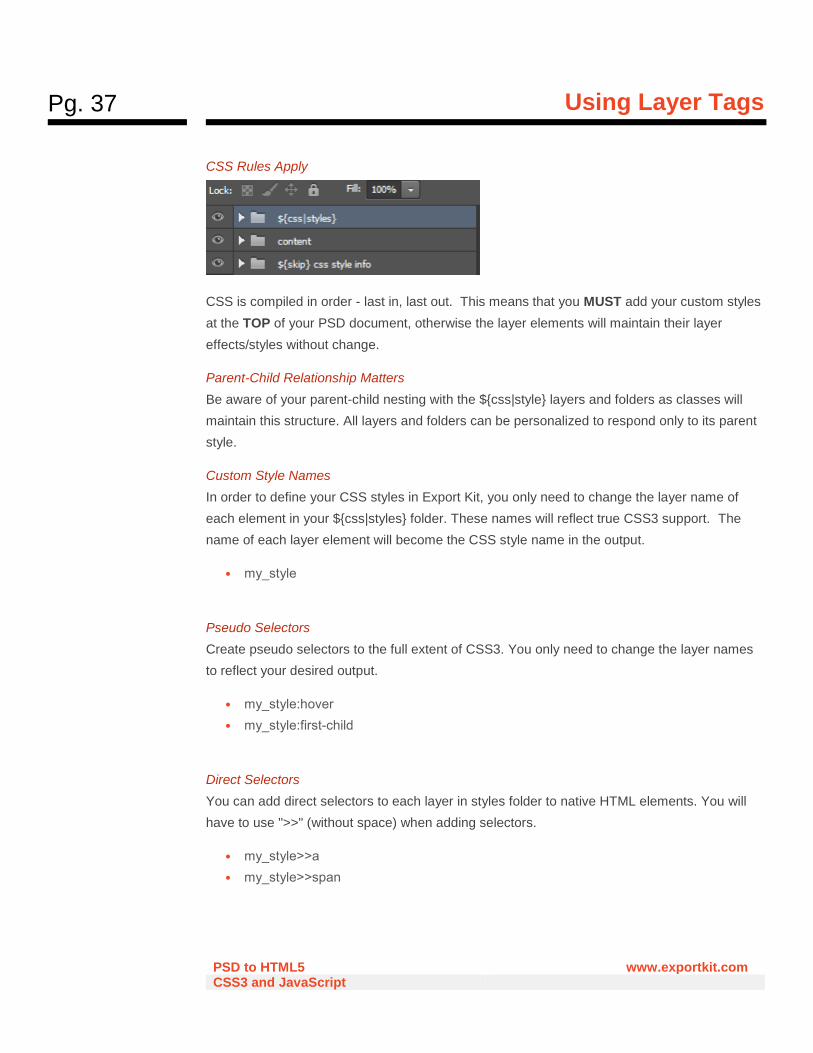
CSS Rules Apply
CSS is compiled in order - last in, last out. This means that you MUST add your custom styles
at the TOP of your PSD document, otherwise the layer elements will maintain their layer
effects/styles without change.
Parent-Child Relationship Matters
Be aware of your parent-child nesting with the ${css|style} layers and folders as classes will
maintain this structure. All layers and folders can be personalized to respond only to its parent
style.
Custom Style Names
In order to define your CSS styles in Export Kit, you only need to change the layer name of
each element in your ${css|styles} folder. These names will reflect true CSS3 support. The
name of each layer element will become the CSS style name in the output.
• my_style
Pseudo Selectors
Create pseudo selectors to the full extent of CSS3. You only need to change the layer names
to reflect your desired output.
• my_style:hover
• my_style:first-child
Direct Selectors
You can add direct selectors to each layer in styles folder to native HTML elements. You will
have to use ">>" (without space) when adding selectors.
• my_style>>a
• my_style>>span
Pg. 38
Using Layer Tags
PSD to HTML5 www.exportkit.com CSS3 and JavaScript
Advanced Selectors
You can use any valid CSS3 selector with Export Kit to define your custom classes.
• my_style>>a[href$=".pdf"]
• my_style>>input[type="submit"]
• my_style>>div+p
Mix and Match Selectors
You can mix and match both pseudo and selectors with your layer names to create fully
customized CSS classes.
• my_style>>a:nth-child(2)
Only Styles and Effects Matter
When you create your custom CSS classes, don’t worry about the size, position or content of
the layer. Only the styles and effects will convert in your output.
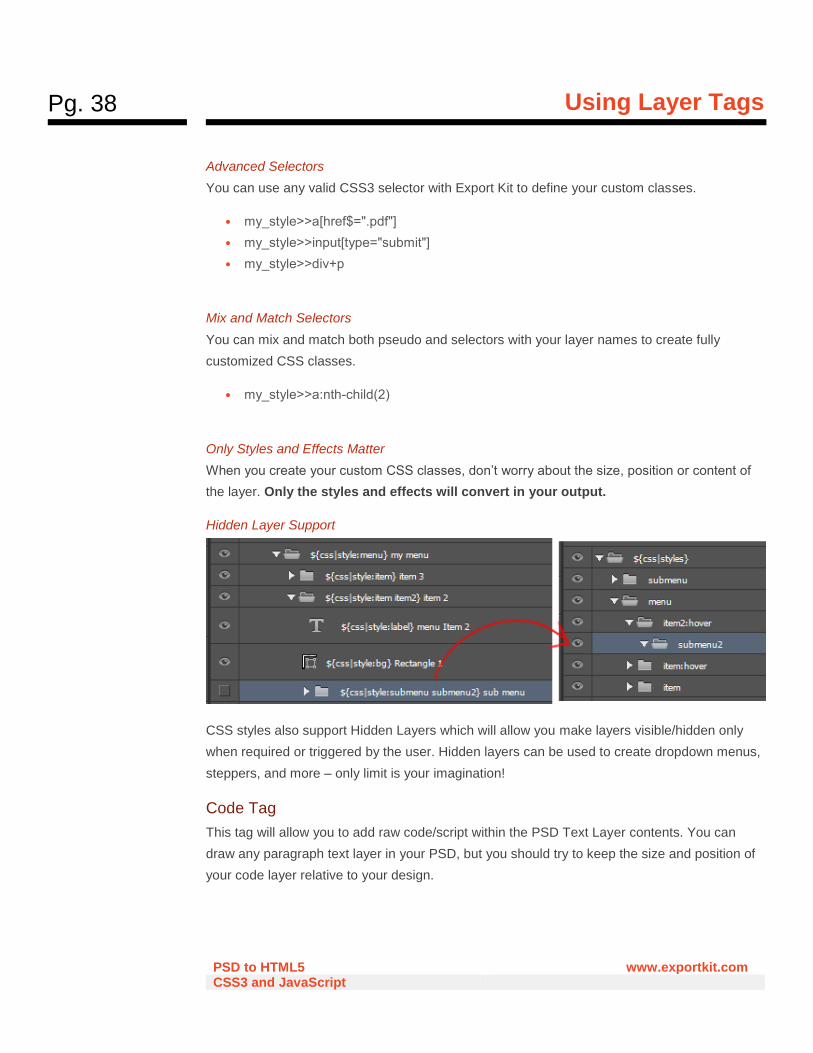
Hidden Layer Support
CSS styles also support Hidden Layers which will allow you make layers visible/hidden only
when required or triggered by the user. Hidden layers can be used to create dropdown menus,
steppers, and more – only limit is your imagination!
Code Tag
This tag will allow you to add raw code/script within the PSD Text Layer contents. You can
draw any paragraph text layer in your PSD, but you should try to keep the size and position of
your code layer relative to your design.
Pg. 39
Using Layer Tags
PSD to HTML5 www.exportkit.com CSS3 and JavaScript
Add inline CSS, JavaScript or PHP (PHP requires a server) - as text contents in the layer. You
must draw the size and position of your code layer inside your PSD, all raw elements will
render INSIDE YOUR CODE LAYER.
• ${code} – PARAGRAPH TEXT LAYERS ONLY
Code Rendering
Photoshop takes longer than expected to process text layers with many characters, you should
try to keep your code layers minimal or link external files. Remember you can also Link
External Files if required, or add external links inside your code layers.
Raw HTML
You can add raw HTML code to your text layer and it will convert as is. You will likely require
an external style sheet, or styles applied to the elements for them to render correctly.
Example Raw HTML
<p style="text-align:center;"> <a href="http://exportkit.com">Click here</a> to return home. </p>
Raw CSS
You can add raw CSS styles to your text layer inside an additional <style /> element, or you
can use <link />. We recommend that you use external links for large CSS files.
Example Internal CSS Style
<style> #contacts_link { float:right; padding-right:10px; } </style>
Example External CSS Link (Recommended)
<link rel="StyleSheet" href="your_style_sheet.css" />
Raw JavaScript
You can add raw JavaScript to your text layer inside an additional <script /> element, or link an
external .js file. We recommend that you use external scripts to link large JavaScript files.
Pg. 40
Using Layer Tags
PSD to HTML5 www.exportkit.com CSS3 and JavaScript
Example Internal JavaScript
<script> jQuery('<img/>', { id: 'contact_icon' }).appendTo('#details') .css('left','3px') .css('top','0px') .css('width','163px') .css('height','162px') .attr('src','../your/path/your_image.png'); </script>
Example External JavaScript Link (Recommended)
<script type="text/javascript" src="your_script.js"></script>
Raw PHP
You can add raw PHP to your text layer as is, but Industry Standard rules apply, you must
enclose your PHP code correctly: eg. <?php //your code here ?>. We recommend that you use
include or require to link large PHP files.
Example Internal PHP
<?php $version = "1.2.8"; echo "Current version: ".$version; ?>
Example External PHP Link (Recommended)
<?php include "your_code.php"; ?>
Class Tag
This tag allows you to add dynamic elements to your output. You can add any raw element, eg.
H1 – along with properties. These elements will ONLY use the properties you assign in the
Arguments. Elements added with this tag DO NOT store position, size or layer styles. These
are RAW elements, you must link external files for scripts and styles.
There is no limit to the number of classes/elements you can add, but you must add these on
folders.
• ${class|[CLASS_NAME]:[PROPERTIES]} – FOLDERS ONLY
Pg. 41
Using Layer Tags
PSD to HTML5 www.exportkit.com CSS3 and JavaScript
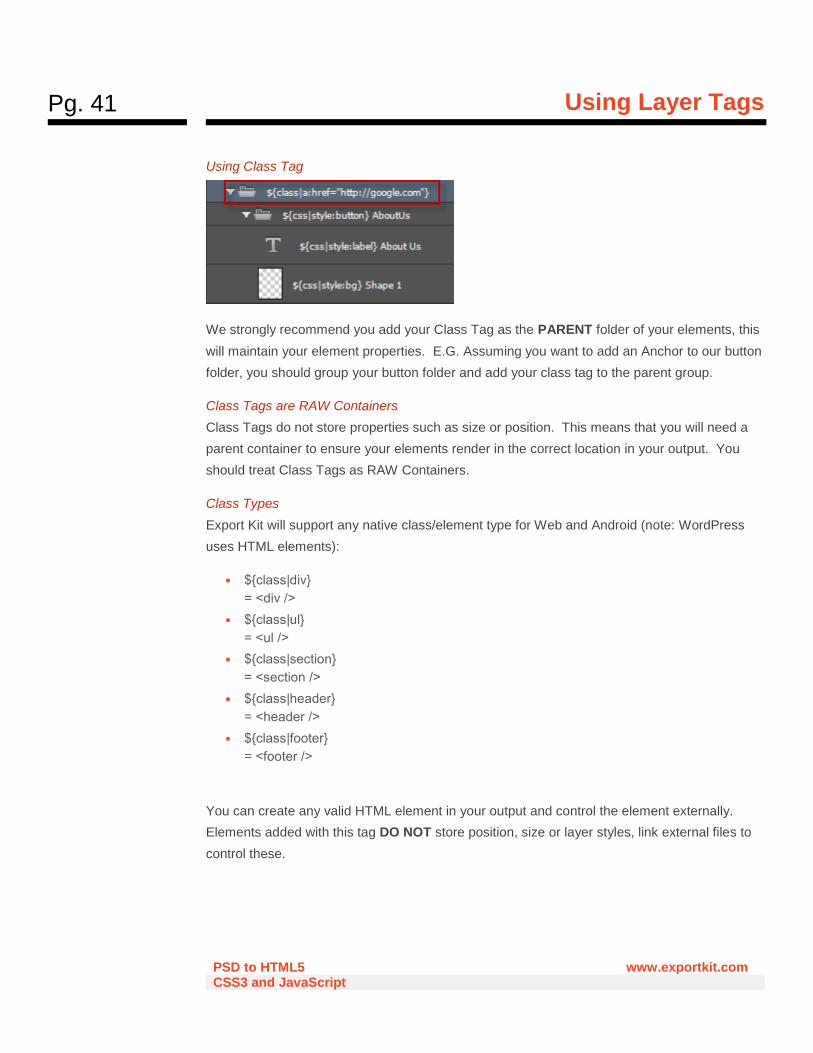
Using Class Tag
We strongly recommend you add your Class Tag as the PARENT folder of your elements, this
will maintain your element properties. E.G. Assuming you want to add an Anchor to our button
folder, you should group your button folder and add your class tag to the parent group.
Class Tags are RAW Containers
Class Tags do not store properties such as size or position. This means that you will need a
parent container to ensure your elements render in the correct location in your output. You
should treat Class Tags as RAW Containers.
Class Types
Export Kit will support any native class/element type for Web and Android (note: WordPress
uses HTML elements):
• ${class|div}
= <div />
• ${class|ul}
= <ul />
• ${class|section}
= <section />
• ${class|header}
= <header />
• ${class|footer}
= <footer />
You can create any valid HTML element in your output and control the element externally.
Elements added with this tag DO NOT store position, size or layer styles, link external files to
control these.
Pg. 42
Using Layer Tags
PSD to HTML5 www.exportkit.com CSS3 and JavaScript
Class Args
Arguments are passed as direct attributes to the element. This allows you to add any type of
dynamic content to your custom class elements.
You must include your required position and styles inside the Class Args, or link to external
files.
• ${class|div:onclick="alert(window.location)"}
= <div onclick="alert(window.location)" />
• ${class|ul:class="menu" role="nav"}
= <ul class="menu" role="nav" />
• ${class|p:style="margin-top:10px;text-align:center;"}
= <p style="margin-top:10px;text-align:center;" />
• ${class|p:class="my-external css_class"}
= <p class="my-external css_class" />
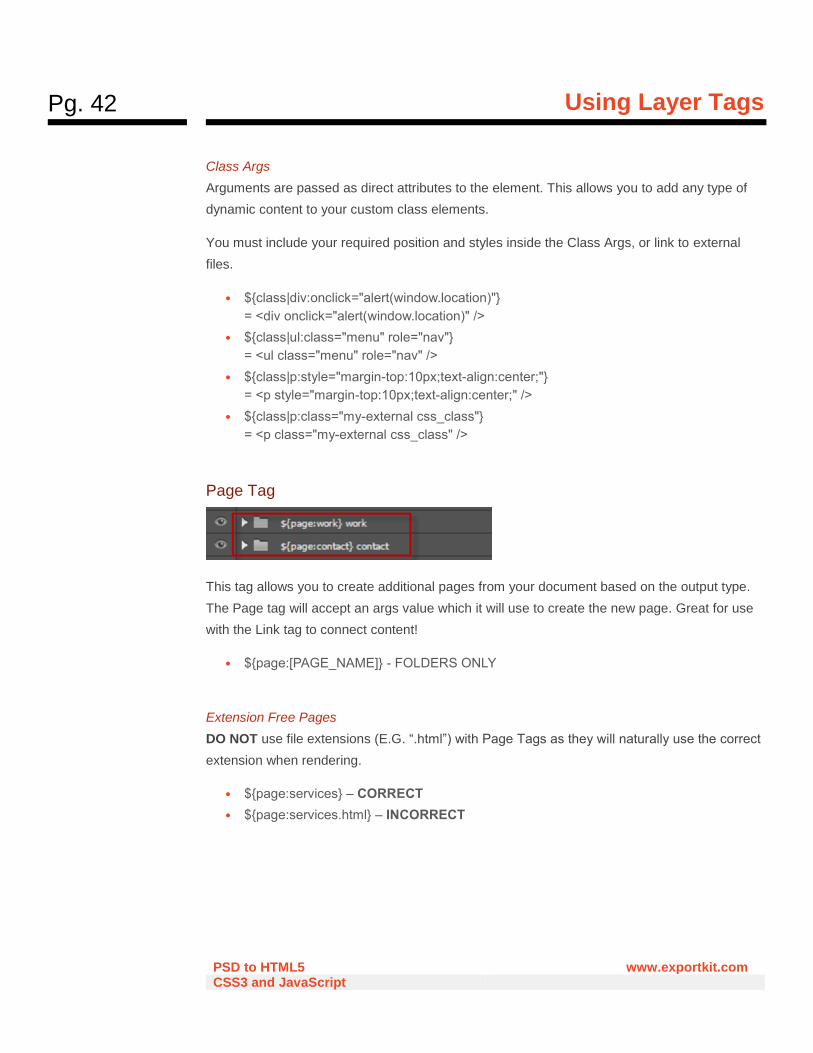
Page Tag
This tag allows you to create additional pages from your document based on the output type.
The Page tag will accept an args value which it will use to create the new page. Great for use
with the Link tag to connect content!
• ${page:[PAGE_NAME]} - FOLDERS ONLY
Extension Free Pages
DO NOT use file extensions (E.G. “.html”) with Page Tags as they will naturally use the correct
extension when rendering.
• ${page:services} – CORRECT
• ${page:services.html} – INCORRECT
Pg. 43
Using Layer Tags
PSD to HTML5 www.exportkit.com CSS3 and JavaScript
Enable Page Tags
Consider that 1 page will reflect 1 folder in Photoshop – DO NOT create 100 page folders in
one PSD file, it will take forever to export!
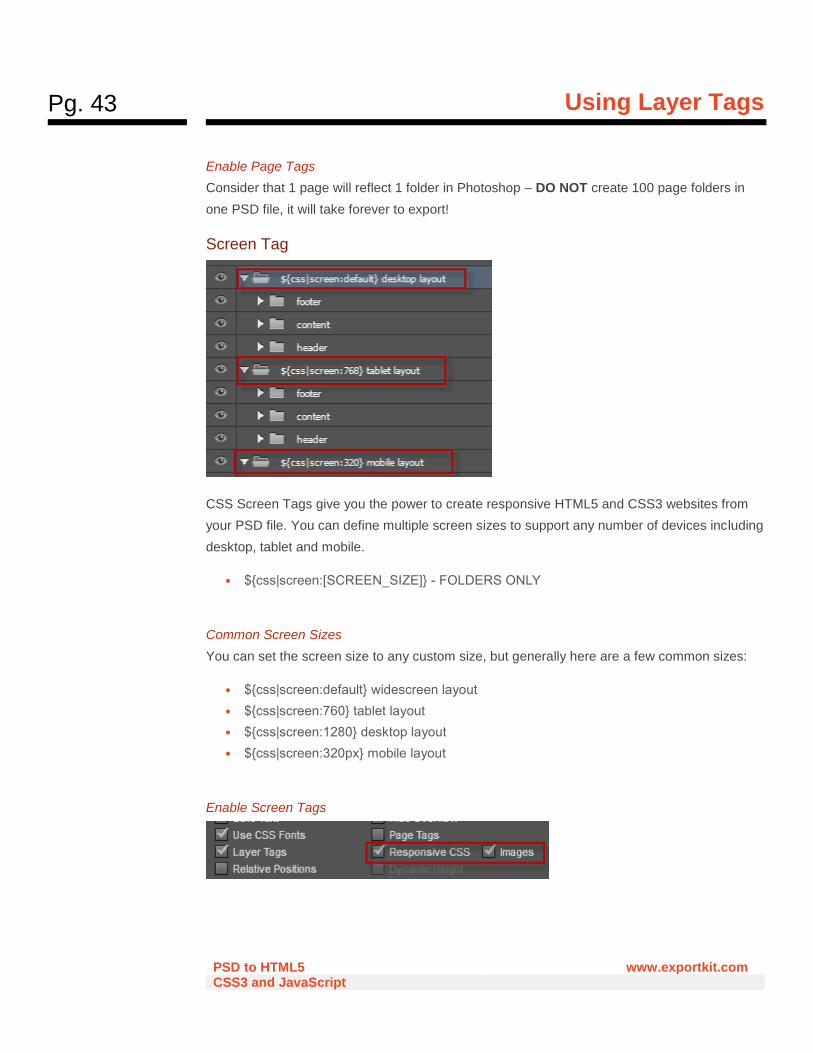
Screen Tag
CSS Screen Tags give you the power to create responsive HTML5 and CSS3 websites from
your PSD file. You can define multiple screen sizes to support any number of devices including
desktop, tablet and mobile.
• ${css|screen:[SCREEN_SIZE]} - FOLDERS ONLY
Common Screen Sizes
You can set the screen size to any custom size, but generally here are a few common sizes:
• ${css|screen:default} widescreen layout
• ${css|screen:760} tablet layout
• ${css|screen:1280} desktop layout
• ${css|screen:320px} mobile layout
Enable Screen Tags
Pg. 44
Using Layer Tags
PSD to HTML5 www.exportkit.com CSS3 and JavaScript
To enable Responsive CSS layouts, you must enable Customize and Responsive CSS in
exports view. You can also include responsive image assets to reduce the bandwidth on
smaller devices such as mobiles.
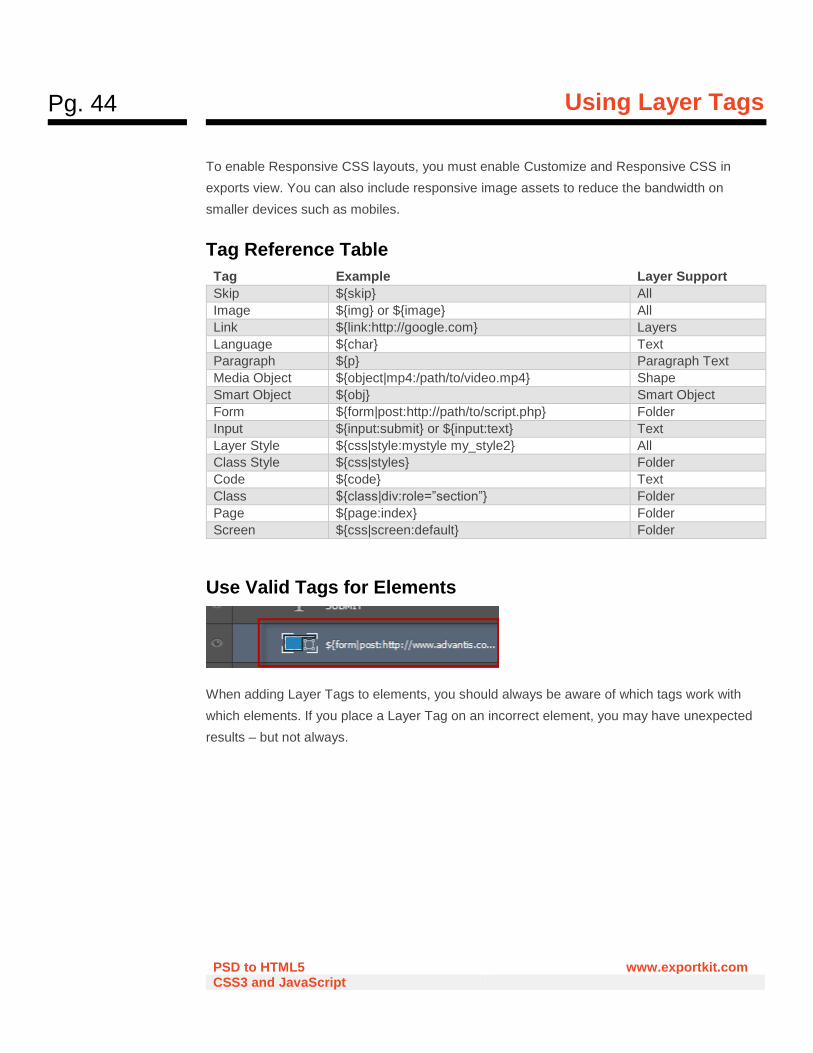
Tag Reference Table
Tag Example Layer Support
Skip ${skip} All
Image ${img} or ${image} All
Link ${link:http://google.com} Layers
Language ${char} Text
Paragraph ${p} Paragraph Text
Media Object ${object|mp4:/path/to/video.mp4} Shape
Smart Object ${obj} Smart Object
Form ${form|post:http://path/to/script.php} Folder
Input ${input:submit} or ${input:text} Text
Layer Style ${css|style:mystyle my_style2} All
Class Style ${css|styles} Folder
Code ${code} Text
Class ${class|div:role=”section”} Folder
Page ${page:index} Folder
Screen ${css|screen:default} Folder
Use Valid Tags for Elements
When adding Layer Tags to elements, you should always be aware of which tags work with
which elements. If you place a Layer Tag on an incorrect element, you may have unexpected
results – but not always.
Pg. 45
Using Layer Tags
PSD to HTML5 www.exportkit.com CSS3 and JavaScript
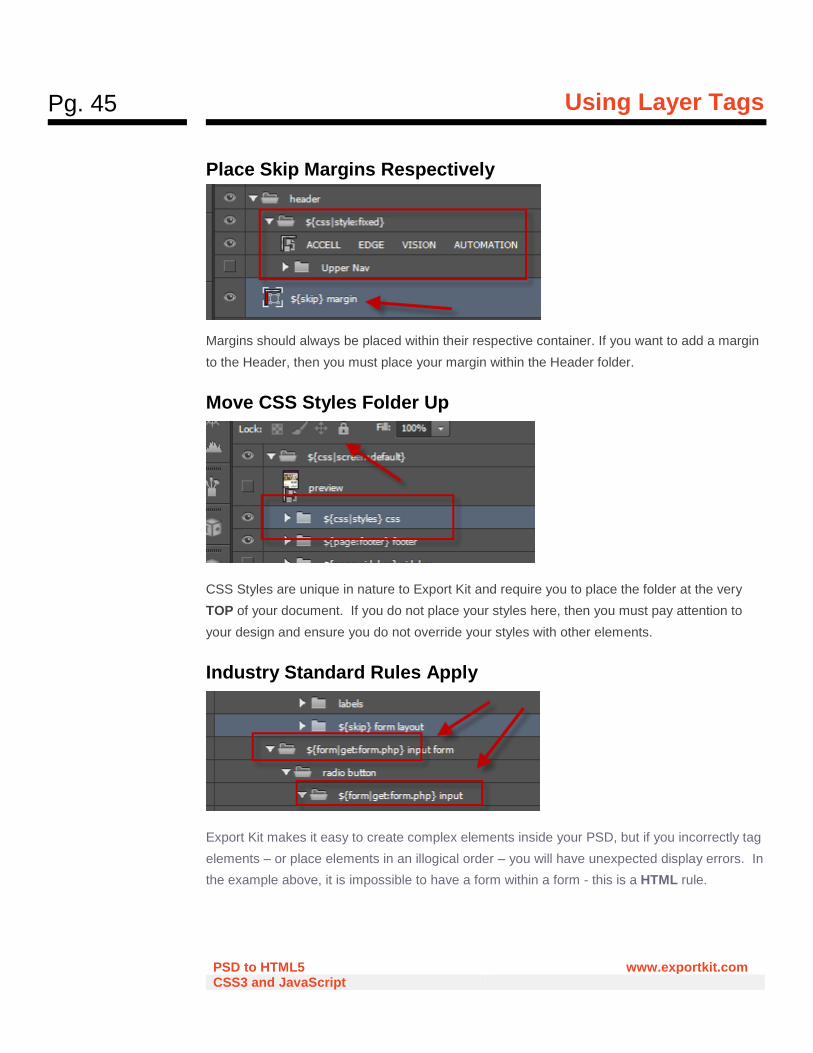
Place Skip Margins Respectively
Margins should always be placed within their respective container. If you want to add a margin
to the Header, then you must place your margin within the Header folder.
Move CSS Styles Folder Up
CSS Styles are unique in nature to Export Kit and require you to place the folder at the very
TOP of your document. If you do not place your styles here, then you must pay attention to
your design and ensure you do not override your styles with other elements.
Industry Standard Rules Apply
Export Kit makes it easy to create complex elements inside your PSD, but if you incorrectly tag
elements – or place elements in an illogical order – you will have unexpected display errors. In
the example above, it is impossible to have a form within a form - this is a HTML rule.
Pg. 46
Using Layer Tags
PSD to HTML5 www.exportkit.com CSS3 and JavaScript
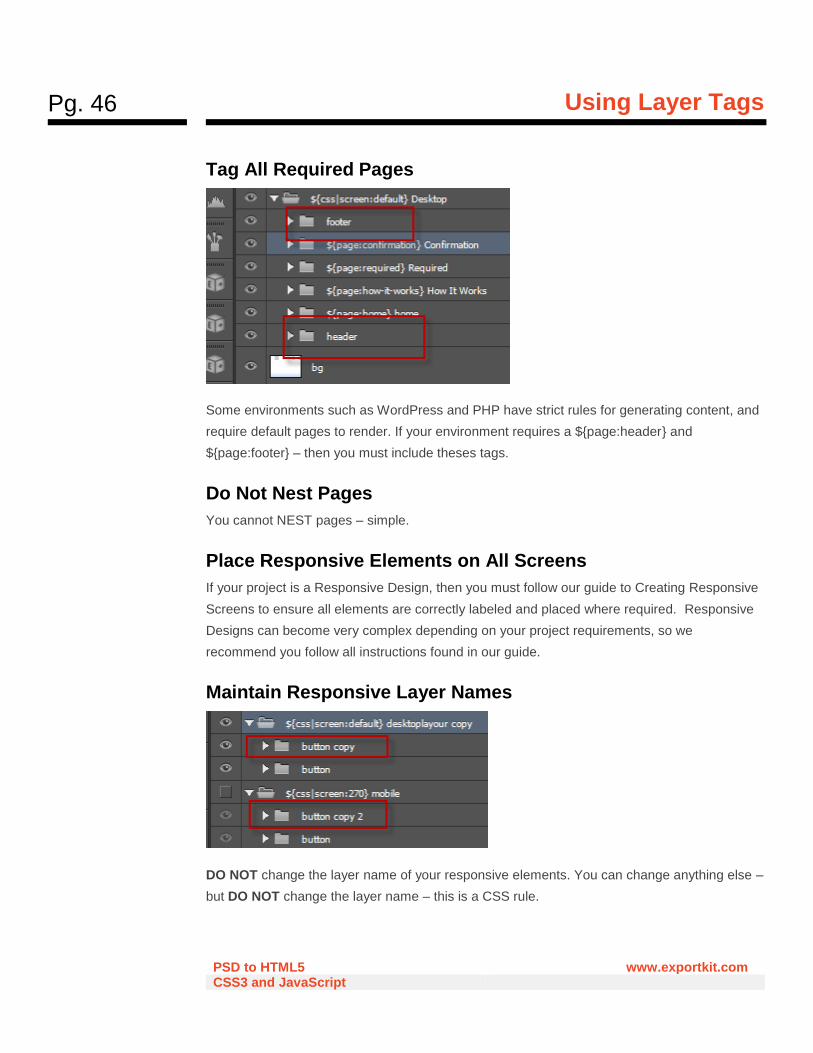
Tag All Required Pages
Some environments such as WordPress and PHP have strict rules for generating content, and
require default pages to render. If your environment requires a ${page:header} and
${page:footer} – then you must include theses tags.
Do Not Nest Pages
You cannot NEST pages – simple.
Place Responsive Elements on All Screens
If your project is a Responsive Design, then you must follow our guide to Creating Responsive
Screens to ensure all elements are correctly labeled and placed where required. Responsive
Designs can become very complex depending on your project requirements, so we
recommend you follow all instructions found in our guide.
Maintain Responsive Layer Names
DO NOT change the layer name of your responsive elements. You can change anything else –
but DO NOT change the layer name – this is a CSS rule.
Pg. 47
Your First Export
PSD to HTML5 www.exportkit.com CSS3 and JavaScript
Your First Export PSD to HTML conversion translates layers in your PSD to HTML elements with CSS support. If
you export a basic PSD to HTML website, there very few options required to get a pixel-perfect
translation. Most modern websites require common features such as CSS3 effects, responsive
CSS and scripting support – Export Kit does it all!
Before You Export
There are a few things to look for before you export your Output to ensure you get a pixel-
perfect render that looks 100% like your PSD. Remember, all browsers and devices render
fonts, sizes and effects differently!
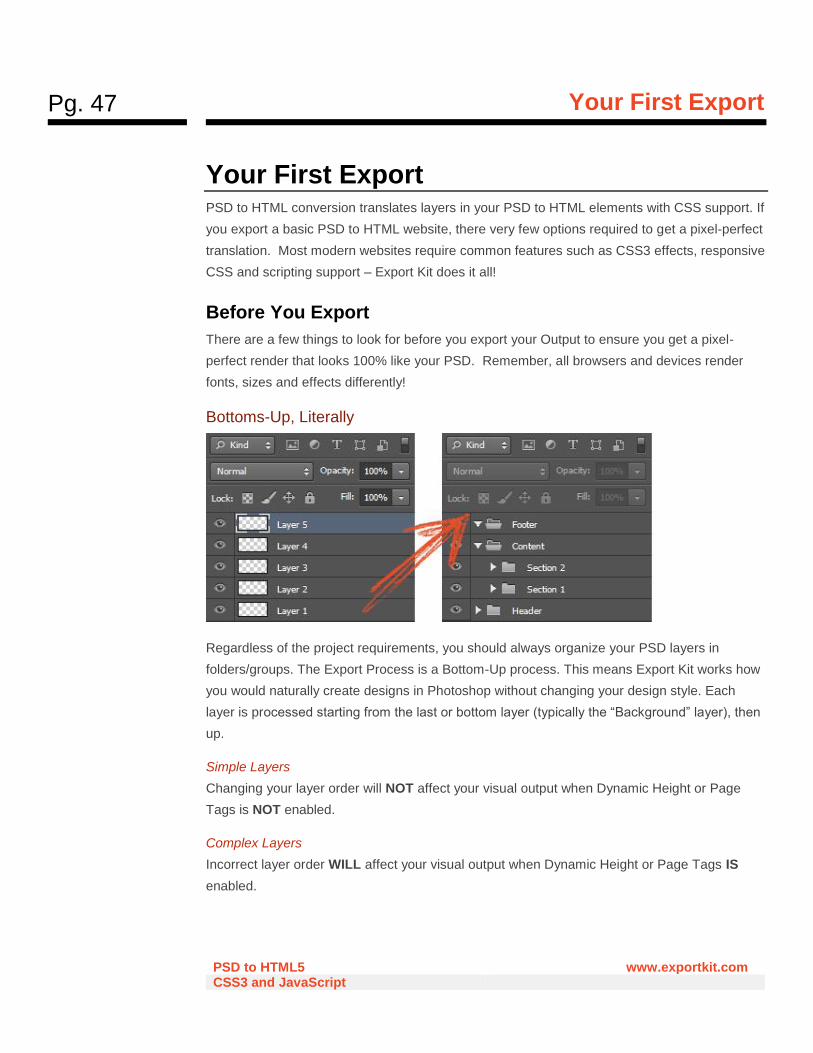
Bottoms-Up, Literally
Regardless of the project requirements, you should always organize your PSD layers in
folders/groups. The Export Process is a Bottom-Up process. This means Export Kit works how
you would naturally create designs in Photoshop without changing your design style. Each
layer is processed starting from the last or bottom layer (typically the “Background” layer), then
up.
Simple Layers
Changing your layer order will NOT affect your visual output when Dynamic Height or Page
Tags is NOT enabled.
Complex Layers
Incorrect layer order WILL affect your visual output when Dynamic Height or Page Tags IS
enabled.
Pg. 48
Your First Export
PSD to HTML5 www.exportkit.com CSS3 and JavaScript
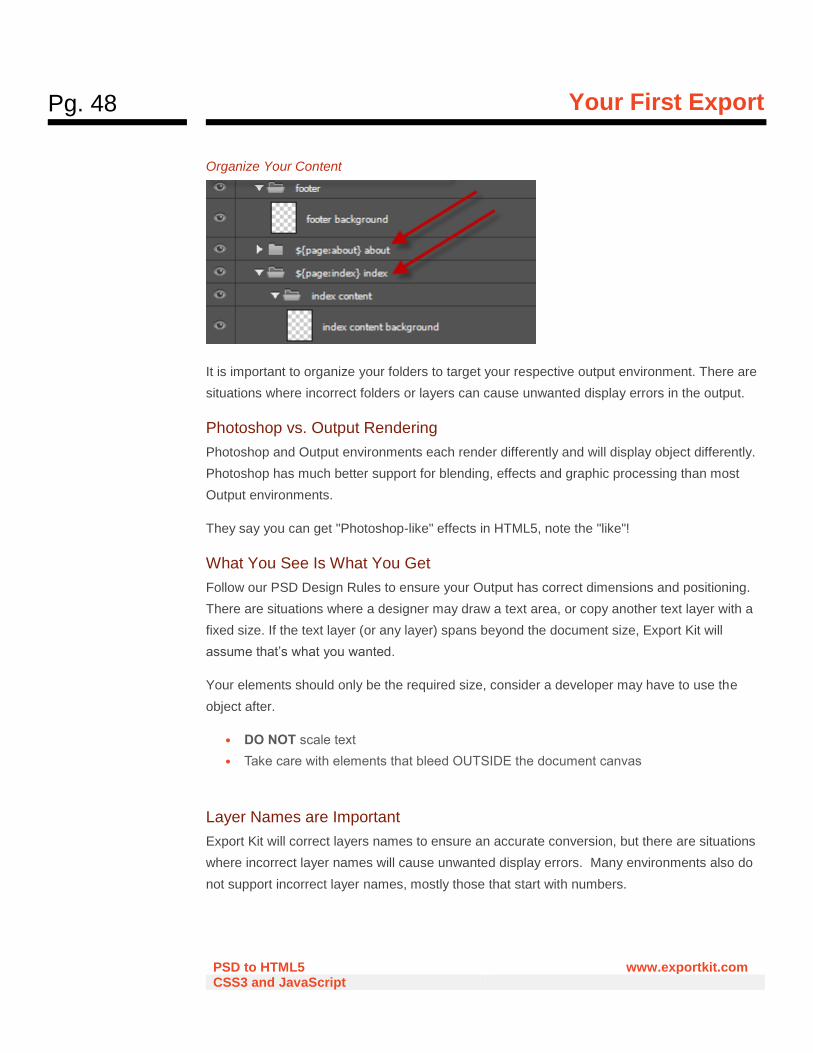
Organize Your Content
It is important to organize your folders to target your respective output environment. There are
situations where incorrect folders or layers can cause unwanted display errors in the output.
Photoshop vs. Output Rendering
Photoshop and Output environments each render differently and will display object differently.
Photoshop has much better support for blending, effects and graphic processing than most
Output environments.
They say you can get "Photoshop-like" effects in HTML5, note the "like"!
What You See Is What You Get
Follow our PSD Design Rules to ensure your Output has correct dimensions and positioning.
There are situations where a designer may draw a text area, or copy another text layer with a
fixed size. If the text layer (or any layer) spans beyond the document size, Export Kit will
assume that’s what you wanted.
Your elements should only be the required size, consider a developer may have to use the
object after.
• DO NOT scale text
• Take care with elements that bleed OUTSIDE the document canvas
Layer Names are Important
Export Kit will correct layers names to ensure an accurate conversion, but there are situations
where incorrect layer names will cause unwanted display errors. Many environments also do
not support incorrect layer names, mostly those that start with numbers.
Pg. 49
Your First Export
PSD to HTML5 www.exportkit.com CSS3 and JavaScript
• tablet 780 – CORRECT
• 780 tablet – INVALID
Use Unique Names
Export Kit will do its best to convert each layer to a unique name to prevent visual errors in the
output, but you should also note your layer names and do your best not to duplicate names.
Common Bugs Due to Non-Unique Names
• Incorrect images in the output
• Elements in the wrong place
• Elements not visible
• IDEs complain elements "already exist"
Pg. 50
Your First Export
PSD to HTML5 www.exportkit.com CSS3 and JavaScript
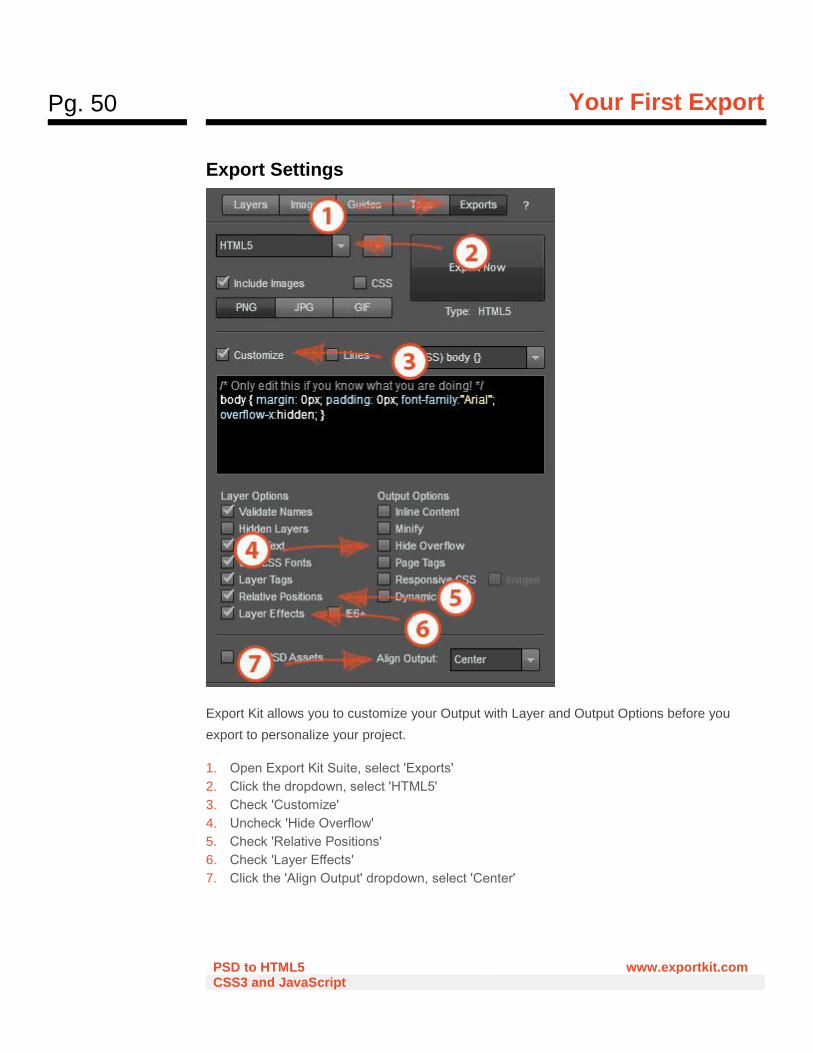
Export Settings
Export Kit allows you to customize your Output with Layer and Output Options before you
export to personalize your project.
1. Open Export Kit Suite, select 'Exports'
2. Click the dropdown, select 'HTML5'
3. Check 'Customize'
4. Uncheck 'Hide Overflow'
5. Check 'Relative Positions'
6. Check 'Layer Effects'
7. Click the 'Align Output' dropdown, select 'Center'
Pg. 51
Your First Export
PSD to HTML5 www.exportkit.com CSS3 and JavaScript
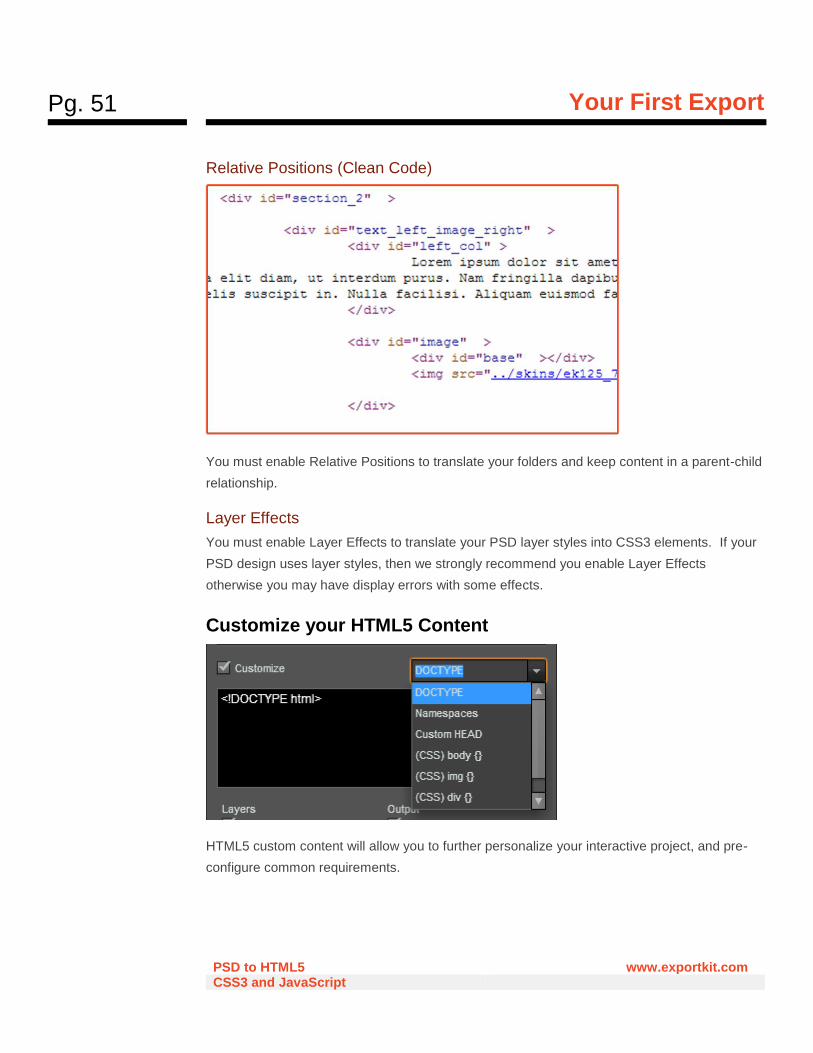
Relative Positions (Clean Code)
You must enable Relative Positions to translate your folders and keep content in a parent-child
relationship.
Layer Effects
You must enable Layer Effects to translate your PSD layer styles into CSS3 elements. If your
PSD design uses layer styles, then we strongly recommend you enable Layer Effects
otherwise you may have display errors with some effects.
Customize your HTML5 Content
HTML5 custom content will allow you to further personalize your interactive project, and pre-
configure common requirements.
Pg. 52
Your First Export
PSD to HTML5 www.exportkit.com CSS3 and JavaScript
DOCTYPE
This is the HTML5 doctype for rendering web pages. If you need support for older browsers,
you can change this value to the standard HTML doctype. By default this value is set to:
• <!DOCTYPE html>
Namespaces
This defines the default namespaces used by the markup. By default this value is set to:
• xmlns=http://www.w3.org/1999/xhtml
Custom HEAD
This is the HEAD content of the HTML page. You can add custom <meta/>, <link/> and
<script/> tags here.
(CSS) body {}
This will allow you to define the global [body] style. By default this value is set to:
• body { margin: 0px; padding: 0px; font-family:"Arial" }
(CSS) img {}
This will allow you to define the global <img/> style. By default this value is set to:
• img { position: absolute; display: block; margin: 0px; border: none; padding: 0px; }
(CSS) div {}
This will allow you to define the global [div] style. By default this value is set to:
• div { position: absolute; }
Custom CSS
This is your personal custom content of the style sheet, anything goes!
Pg. 53
Your First Export
PSD to HTML5 www.exportkit.com CSS3 and JavaScript
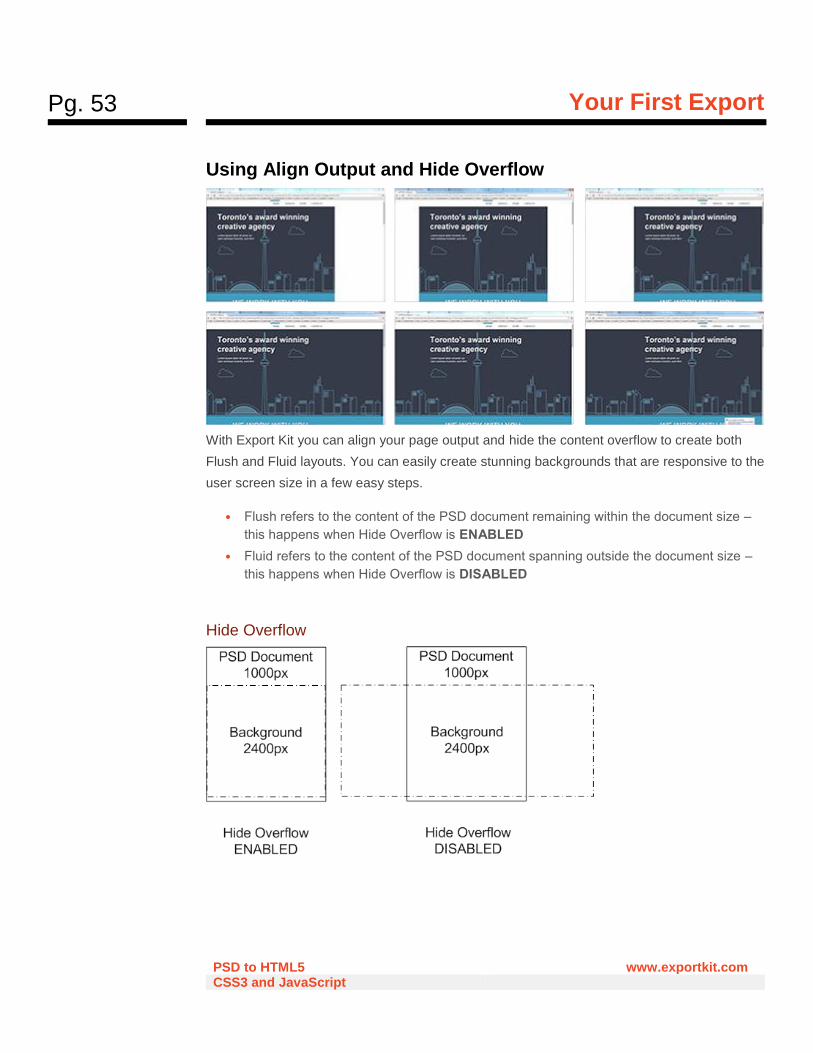
Using Align Output and Hide Overflow
With Export Kit you can align your page output and hide the content overflow to create both
Flush and Fluid layouts. You can easily create stunning backgrounds that are responsive to the
user screen size in a few easy steps.
• Flush refers to the content of the PSD document remaining within the document size –
this happens when Hide Overflow is ENABLED
• Fluid refers to the content of the PSD document spanning outside the document size –
this happens when Hide Overflow is DISABLED
Hide Overflow
Pg. 54
Your First Export
PSD to HTML5 www.exportkit.com CSS3 and JavaScript
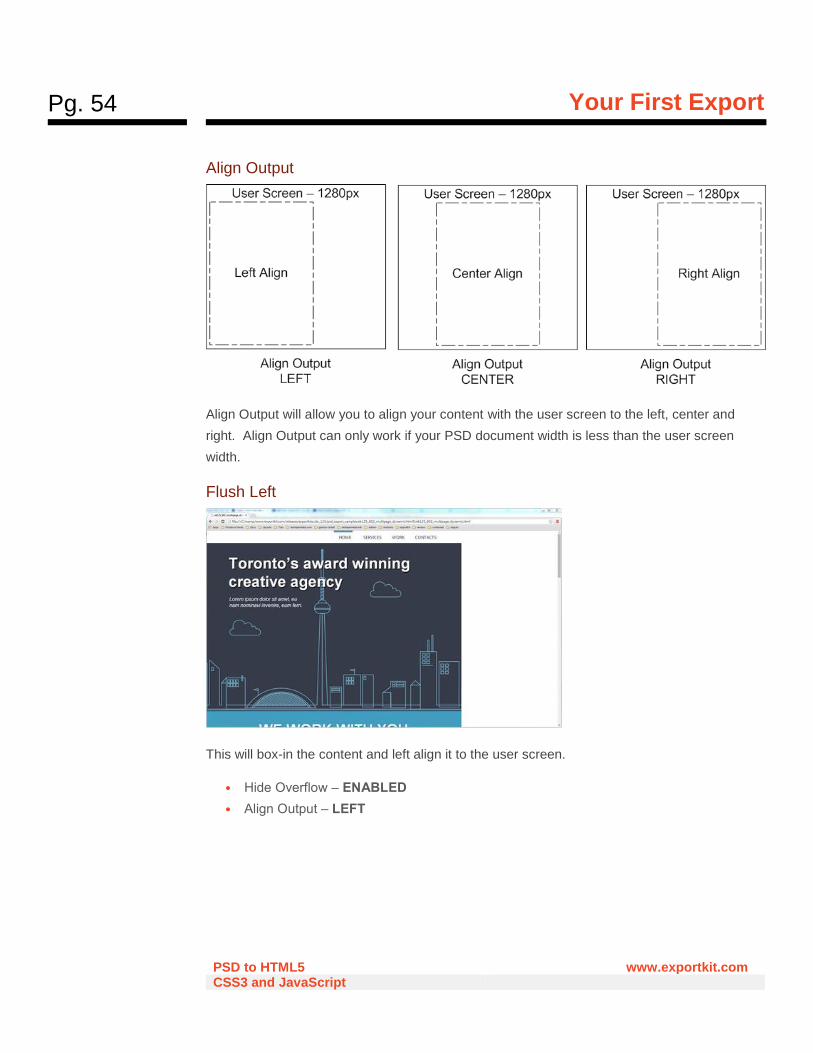
Align Output
Align Output will allow you to align your content with the user screen to the left, center and
right. Align Output can only work if your PSD document width is less than the user screen
width.
Flush Left
This will box-in the content and left align it to the user screen.
• Hide Overflow – ENABLED
• Align Output – LEFT
Pg. 55
Your First Export
PSD to HTML5 www.exportkit.com CSS3 and JavaScript
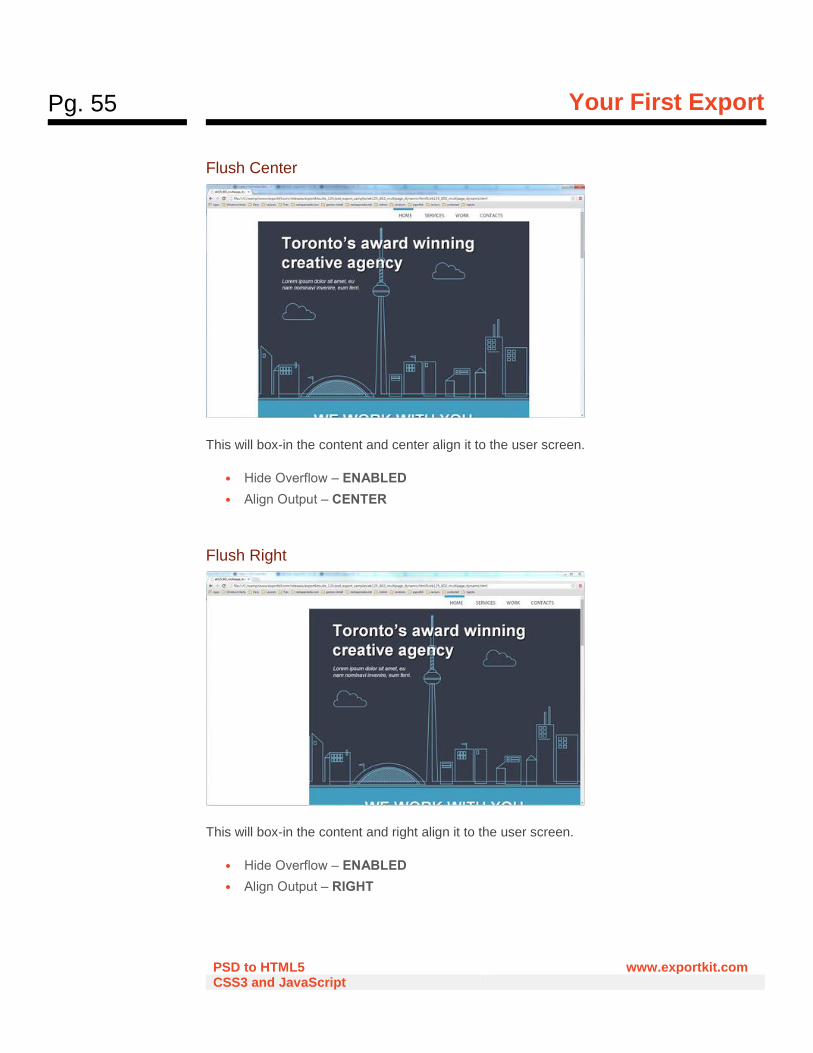
Flush Center
This will box-in the content and center align it to the user screen.
• Hide Overflow – ENABLED
• Align Output – CENTER
Flush Right
This will box-in the content and right align it to the user screen.
• Hide Overflow – ENABLED
• Align Output – RIGHT
Pg. 56
Your First Export
PSD to HTML5 www.exportkit.com CSS3 and JavaScript
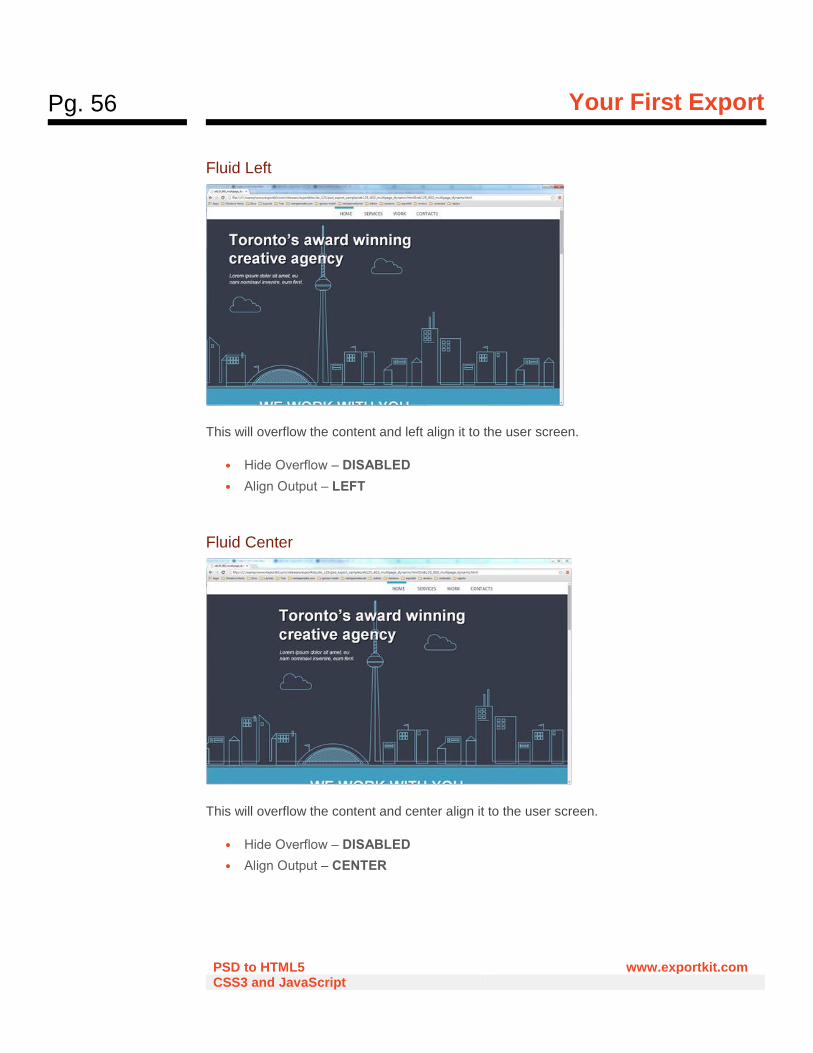
Fluid Left
This will overflow the content and left align it to the user screen.
• Hide Overflow – DISABLED
• Align Output – LEFT
Fluid Center
This will overflow the content and center align it to the user screen.
• Hide Overflow – DISABLED
• Align Output – CENTER
Pg. 57
Your First Export
PSD to HTML5 www.exportkit.com CSS3 and JavaScript
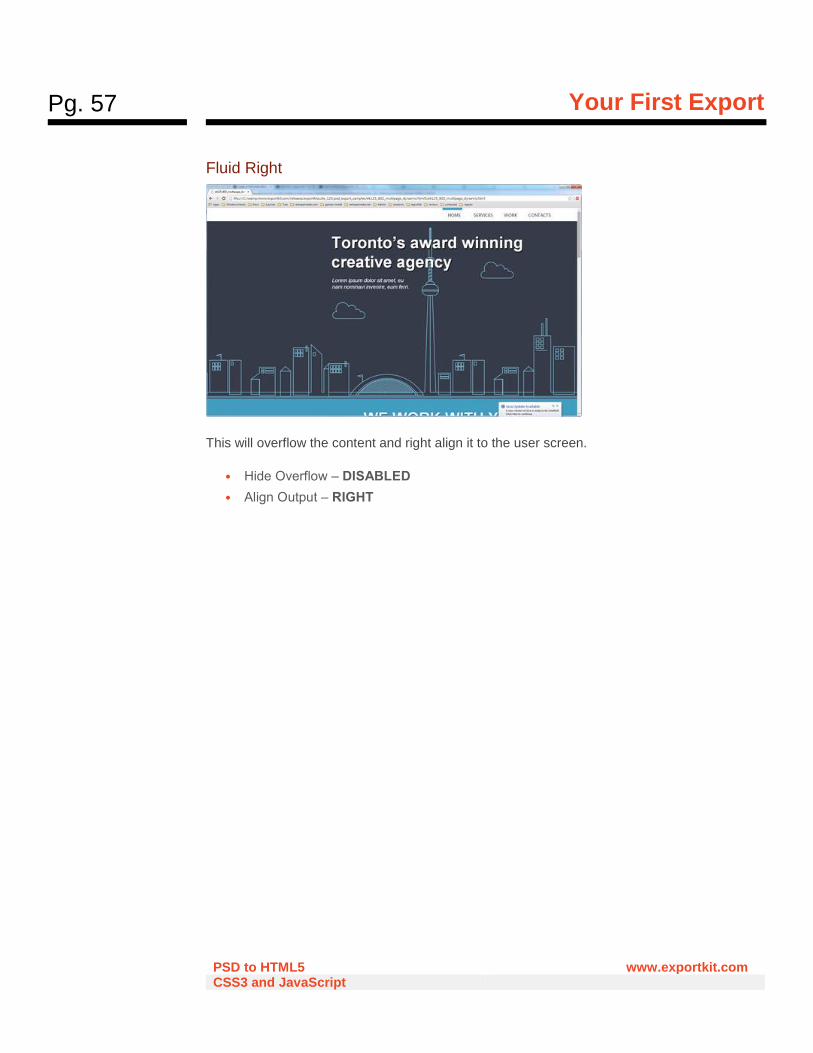
Fluid Right
This will overflow the content and right align it to the user screen.
• Hide Overflow – DISABLED
• Align Output – RIGHT
Pg. 58
The Export Process
PSD to HTML5 www.exportkit.com CSS3 and JavaScript
The Export Process Once you have your settings ready, click Export Now - then watch the magic!
The Export Process, although different for each Environment, is similar in its architecture.
There are two main process methods which occur depending on if you are exporting a
Photoshop document or layer.
Layer Process
This process involves translating each Photoshop layer into individual into its respective code
environment. Each layer name will validate to ensure it uses common coding practices, then
images related to layers will save and the layer will process depending on its environment.
Layer Names
Export Kit will remove all characters which are not required by the output environment. In most
code environments and servers, many character ranges are not accepted, and can cause
unwanted display and code errors in the output. Export Kit ensures your output will works by
validating your layer names.
Images
Each layer will process the related image and render as the selected image type if available.
The layer element will be captured and rasterized, then saved to the Export Folder.
Reusable Images with Additional Image Assets
For single images, you need to both enable CSS Images and use our CSS Style Tag. You can
then reuse the CSS class for the image anywhere, this will sill create additional assets per
layer, but only use one file link.
Reusable Images with One Image Asset
For single image assets, you need to use advanced CSS Styles with shapes rather than
another image. Export Kit will use your custom class with the shape element to render your
image. Because it’s a shape, no additional assets will be used, this also allows you to create
your designs from Wireframes and basically add classes at runtime to render your content
Pg. 59
The Export Process
PSD to HTML5 www.exportkit.com CSS3 and JavaScript
Layer Elements
Layers are processed to check for native Photoshop layer types such as shapes, smart objects
and folders. Each layer type will render differently depending on the selected output
environment.
Layer Effects
Layers are then rendered as the selected environment output element. There are default
reflections for rendering Photoshop layers in each environment e.g. an Image is an Image, but
also specific requirements in some environments, e.g. HTML has poor gradient support for
Text effects.
All environments process elements and effects differently!
Layer Tags
Custom layer object, relevant to the selected environment are processed using our native
Layer Tags to provide additional functionality to Photoshop layer elements. Layer Tags require
a specific naming convention of layers in your Photoshop document.
Document Process
This process translates your complete PSD into your selected environment including the Layer
Process (mentioned above) and additional processing to ensure your output is pixel-perfect.
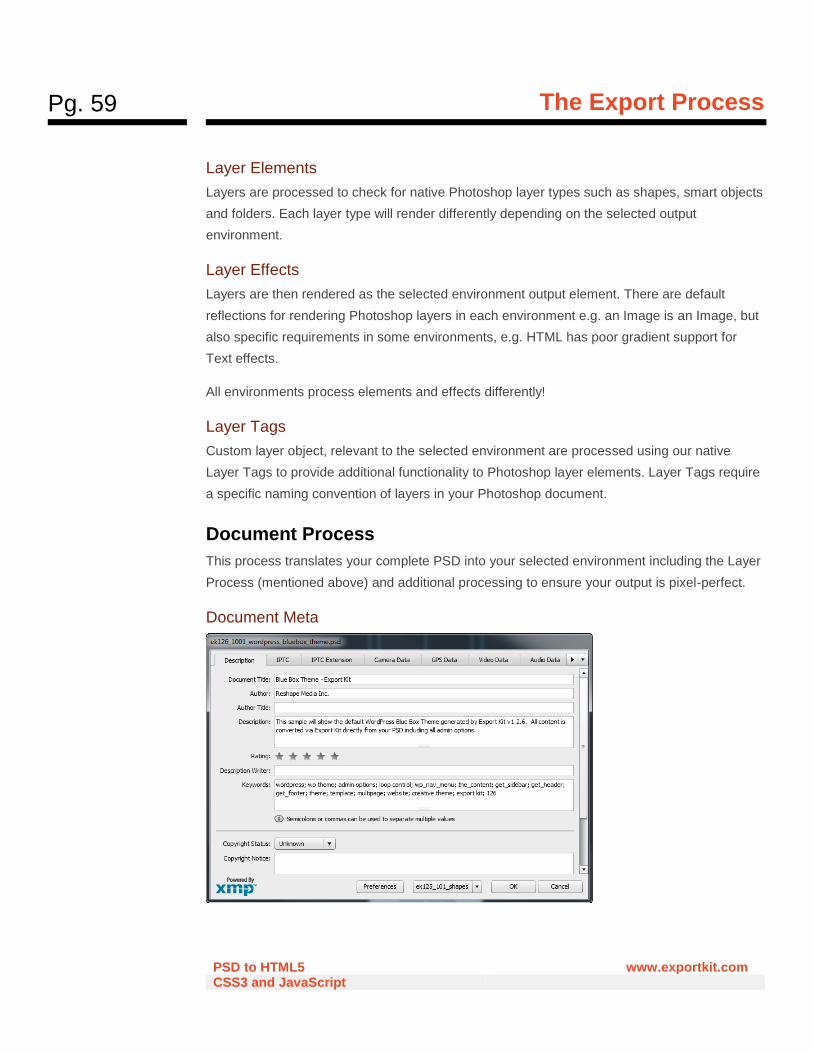
Document Meta
Pg. 60
The Export Process
PSD to HTML5 www.exportkit.com CSS3 and JavaScript
All Meta Information is collected from your PSD document to be used in the output; mainly as
comments but some environments provide additional usage for Meta Info. Meta info is used by
Photoshop to describe the contents of the PSD file, including information such as Title, Author,
Keywords, Description and more.
Environment Output
Export Kit customizes the output for each individual environment selected providing you with a
pixel-perfect translation of your PSD document. Each environment has variations on how and
where it can render, along with what objects the individual environment supports. Export Kit
takes the worry out of this process and make it automatic.
Process Each Layer
This is a layer-by-layer action, running the Layer Process on each element in your document.
Custom Environment Objects
This will create custom Class objects for the selected environment. Different environments
have rules to process both display and data for elements. Some environments require different
settings for objects to be displayed and are mapped in this process.
Export Project Files
Your document will render and save as an environment-ready project into your ftml-www
folder RELATIVE to your Photoshop PSD file. All required assets and code files are saved to
the respective output folder and is ready for use once complete.
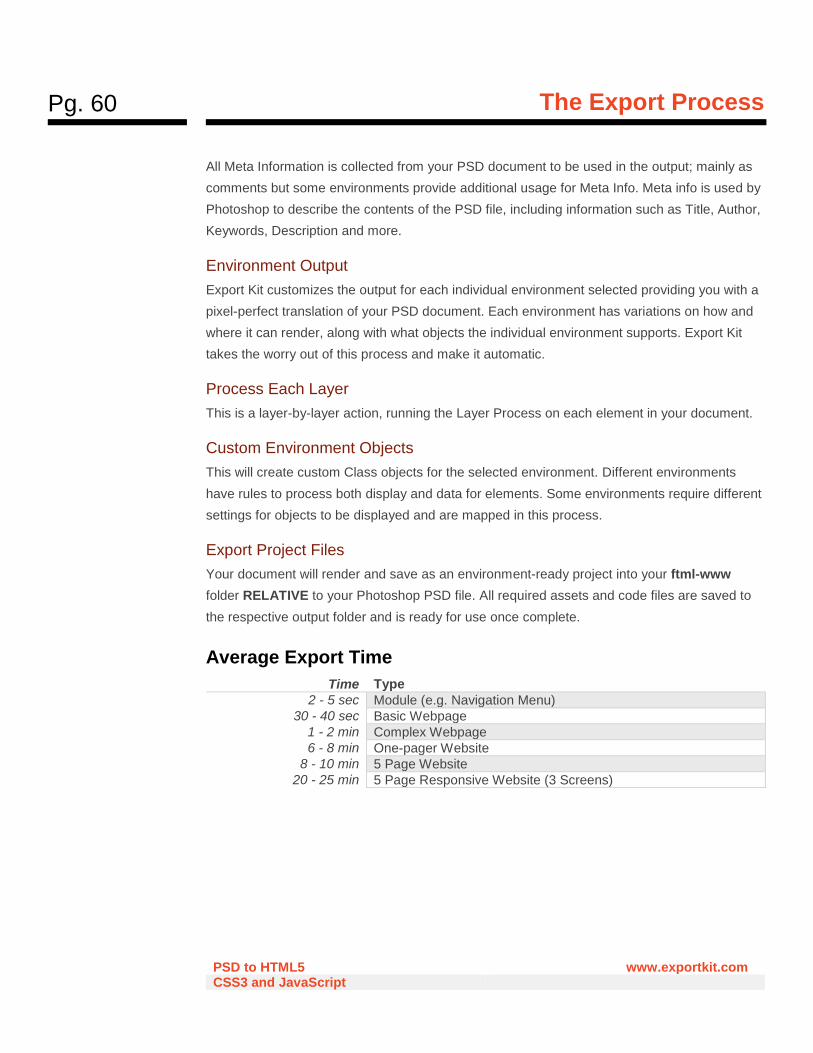
Average Export Time
Time Type
2 - 5 sec Module (e.g. Navigation Menu)
30 - 40 sec Basic Webpage
1 - 2 min Complex Webpage
6 - 8 min One-pager Website
8 - 10 min 5 Page Website
20 - 25 min 5 Page Responsive Website (3 Screens)
Pg. 61
The Export Process
PSD to HTML5 www.exportkit.com CSS3 and JavaScript
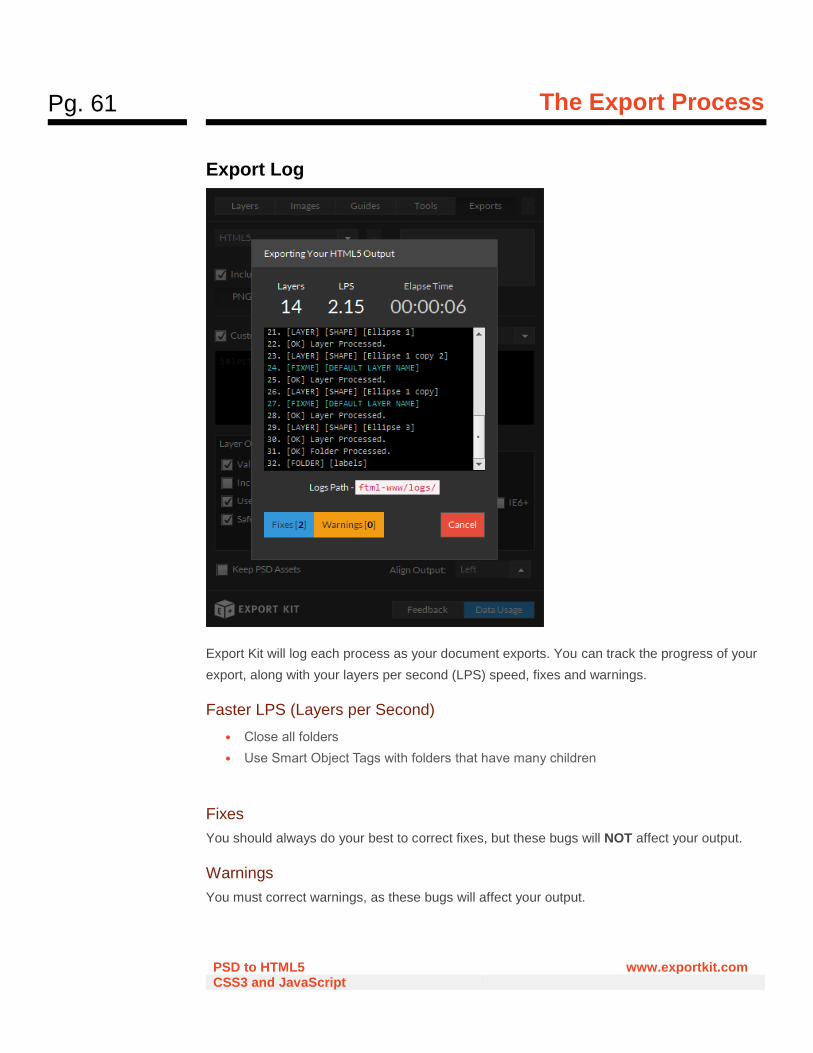
Export Log
Export Kit will log each process as your document exports. You can track the progress of your
export, along with your layers per second (LPS) speed, fixes and warnings.
Faster LPS (Layers per Second)
• Close all folders
• Use Smart Object Tags with folders that have many children
Fixes
You should always do your best to correct fixes, but these bugs will NOT affect your output.
Warnings
You must correct warnings, as these bugs will affect your output.
Pg. 62
The Export Process
PSD to HTML5 www.exportkit.com CSS3 and JavaScript
Errors
Export Kit will cancel an Output if it finds an error in the Photoshop layer. If Export Kit cancels /
stops the Output, what you should do is:
• Note the layer the Output canceled on
• This is the layer causing the issue (check the logs)
• DO NOT save the document, CLOSE the document and REOPEN it
• Fix the problem, SAVE and re-export
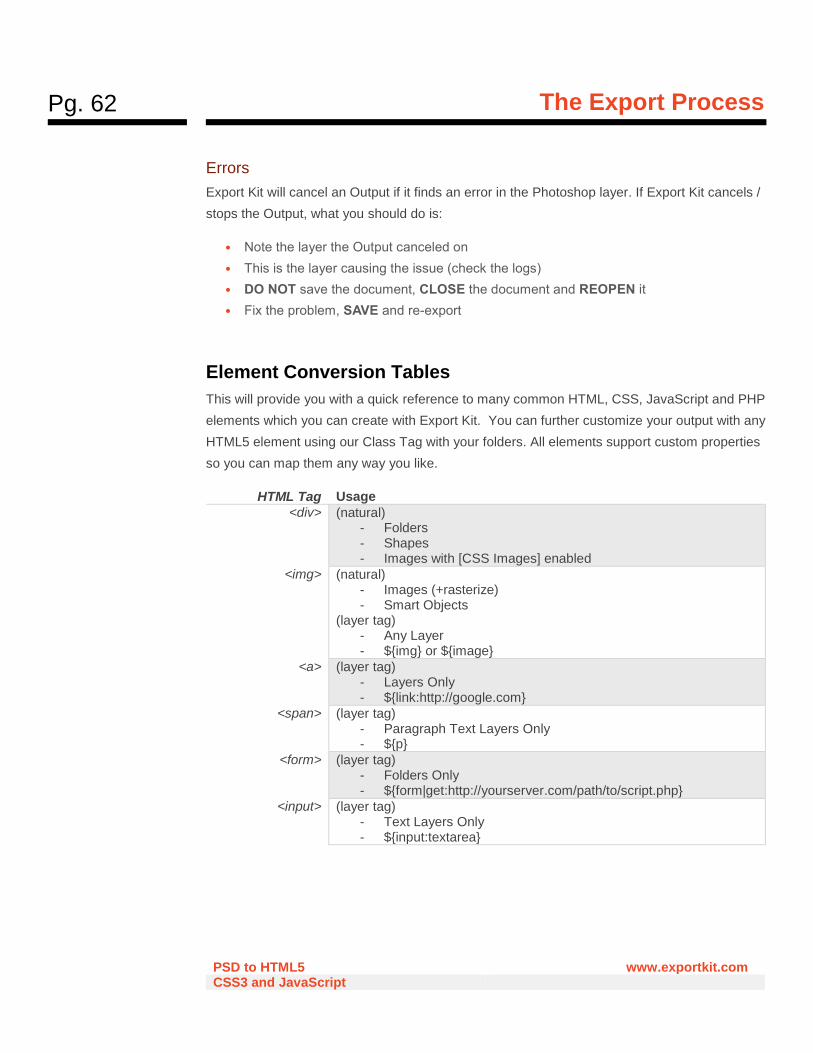
Element Conversion Tables
This will provide you with a quick reference to many common HTML, CSS, JavaScript and PHP
elements which you can create with Export Kit. You can further customize your output with any
HTML5 element using our Class Tag with your folders. All elements support custom properties
so you can map them any way you like.
HTML Tag Usage
<div> (natural) - Folders - Shapes - Images with [CSS Images] enabled
<img> (natural) - Images (+rasterize) - Smart Objects
(layer tag) - Any Layer - ${img} or ${image}
<a> (layer tag) - Layers Only - ${link:http://google.com}
<span> (layer tag) - Paragraph Text Layers Only - ${p}
<form> (layer tag) - Folders Only - ${form|get:http://yourserver.com/path/to/script.php}
<input> (layer tag) - Text Layers Only - ${input:textarea}
Pg. 63
The Export Process
PSD to HTML5 www.exportkit.com CSS3 and JavaScript
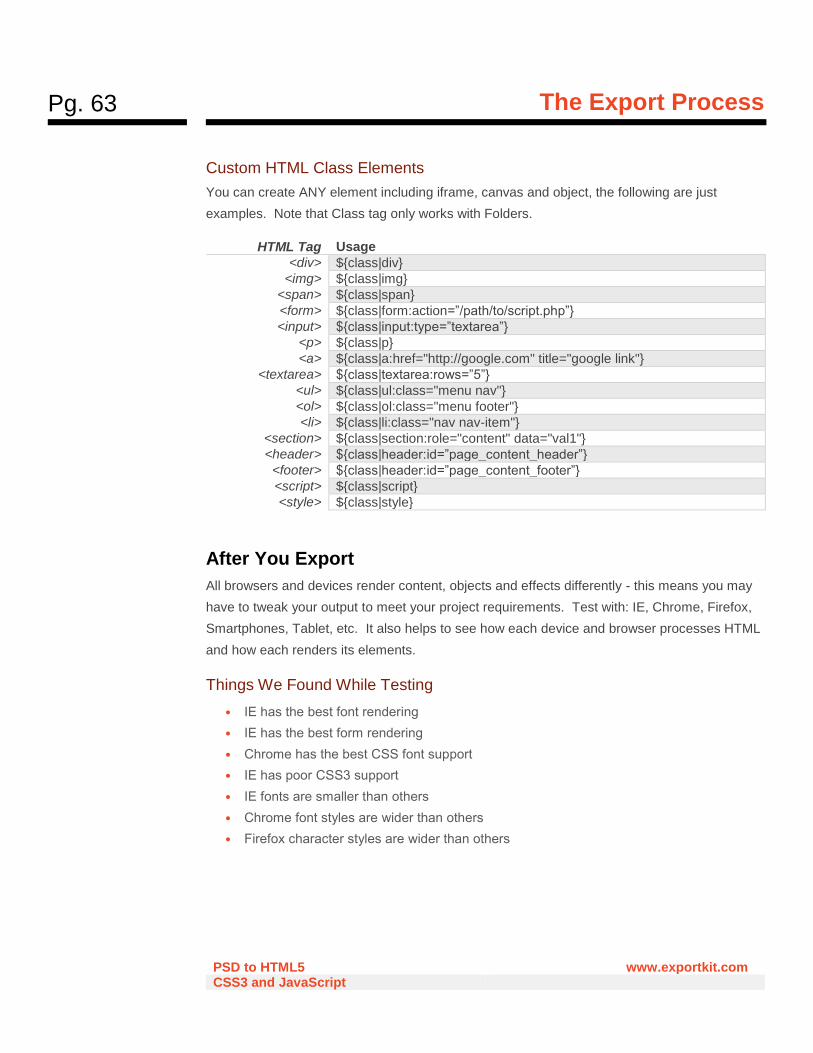
Custom HTML Class Elements
You can create ANY element including iframe, canvas and object, the following are just
examples. Note that Class tag only works with Folders.
HTML Tag Usage
<div> ${class|div}
<img> ${class|img}
<span> ${class|span}
<form> ${class|form:action=”/path/to/script.php”}
<input> ${class|input:type=”textarea”}
<p> ${class|p}
<a> ${class|a:href="http://google.com" title="google link"}
<textarea> ${class|textarea:rows=”5”}
<ul> ${class|ul:class="menu nav"}
<ol> ${class|ol:class="menu footer"}
<li> ${class|li:class="nav nav-item"}
<section> ${class|section:role="content" data="val1"}
<header> ${class|header:id=”page_content_header”}
<footer> ${class|header:id=”page_content_footer”}
<script> ${class|script}
<style> ${class|style}
After You Export
All browsers and devices render content, objects and effects differently - this means you may
have to tweak your output to meet your project requirements. Test with: IE, Chrome, Firefox,
Smartphones, Tablet, etc. It also helps to see how each device and browser processes HTML
and how each renders its elements.
Things We Found While Testing
• IE has the best font rendering
• IE has the best form rendering
• Chrome has the best CSS font support
• IE has poor CSS3 support
• IE fonts are smaller than others
• Chrome font styles are wider than others
• Firefox character styles are wider than others
Pg. 64
The Export Process
PSD to HTML5 www.exportkit.com CSS3 and JavaScript
Common Errors
• Bug: Your export stops on the first Layer
Fix: Use LOWERCASE file extensions such as my_file.psd when you name your files
• Bug: You export stops on a Shape Layer
Fix: You must use RGB color mode when exporting
• Bug: Your webpage has text and NO images at all
Fix: Rename your PSD file with ".psd" (lowercase)
Fix: Remove “ “ (space) characters from your PSD name
• Bug: Your HTML5 element did not render 100% like the PSD layer
Fix: Add ${img} to the layer name to render the layer as an image
Fix: (Text Only): Add Google Fonts for additional font support
• Bug: Your Text is not the same font size as the PSD layer
Fix: Redraw the text layer with the type tool, do not duplicate or scale
• Bug: Elements do not render correctly with Dynamic Height enabled
Fix: Group all your content inside a container folder
Bug Fixing
You're stuck, and you have a question, you're human, so are we! Check our FAQ:
http://exportkit.com/answers for general answers, or contact us: [email protected] and
we are happy to help.
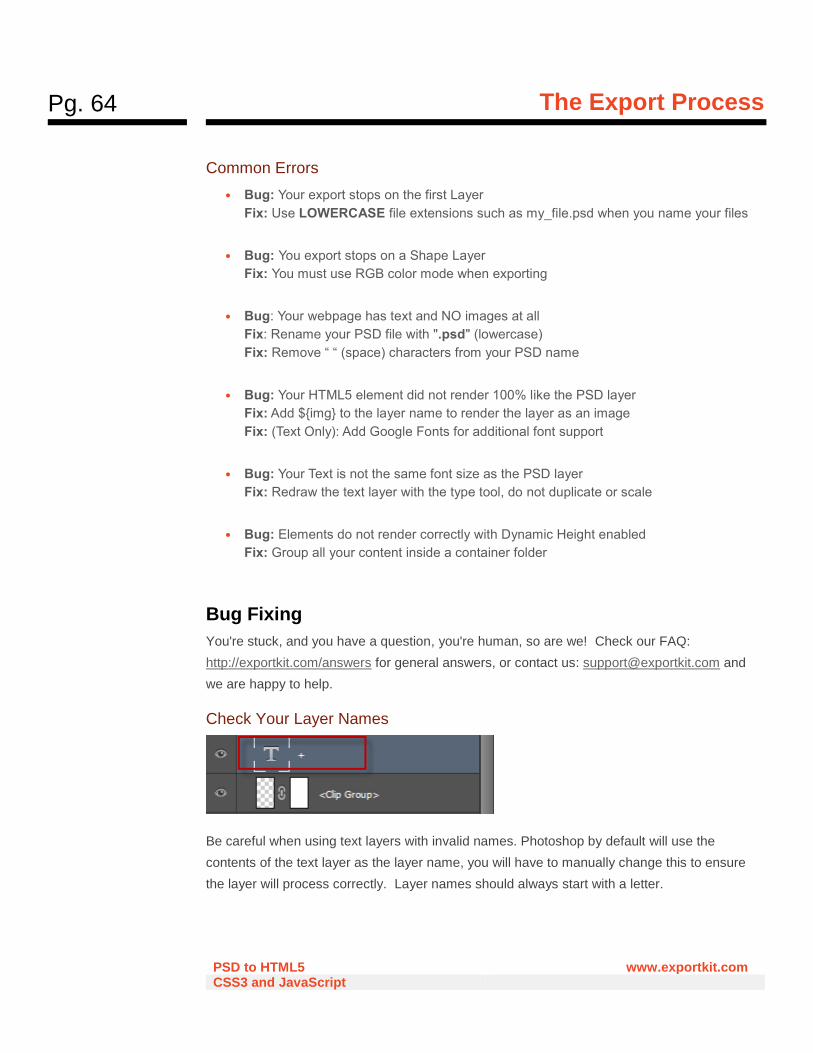
Check Your Layer Names
Be careful when using text layers with invalid names. Photoshop by default will use the
contents of the text layer as the layer name, you will have to manually change this to ensure
the layer will process correctly. Layer names should always start with a letter.
Pg. 65
The Export Process
PSD to HTML5 www.exportkit.com CSS3 and JavaScript
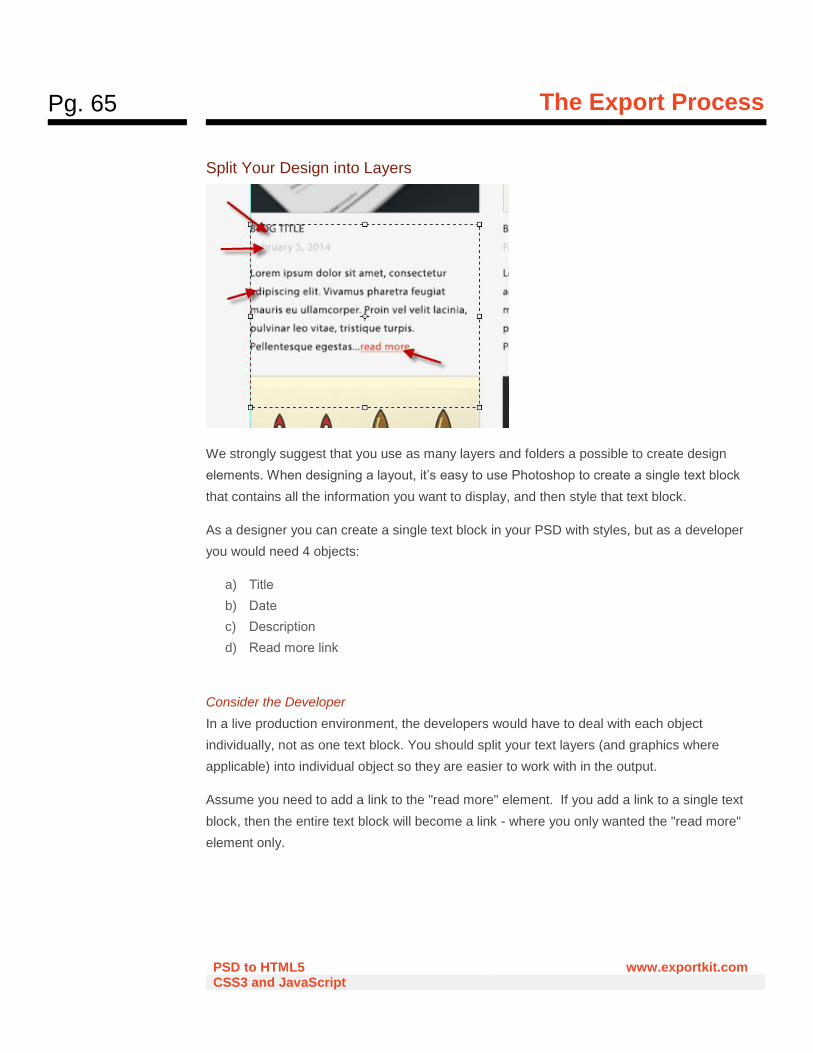
Split Your Design into Layers
We strongly suggest that you use as many layers and folders a possible to create design
elements. When designing a layout, it’s easy to use Photoshop to create a single text block
that contains all the information you want to display, and then style that text block.
As a designer you can create a single text block in your PSD with styles, but as a developer
you would need 4 objects:
a) Title
b) Date
c) Description
d) Read more link
Consider the Developer
In a live production environment, the developers would have to deal with each object
individually, not as one text block. You should split your text layers (and graphics where
applicable) into individual object so they are easier to work with in the output.
Assume you need to add a link to the "read more" element. If you add a link to a single text
block, then the entire text block will become a link - where you only wanted the "read more"
element only.
Pg. 66
The Export Process
PSD to HTML5 www.exportkit.com CSS3 and JavaScript
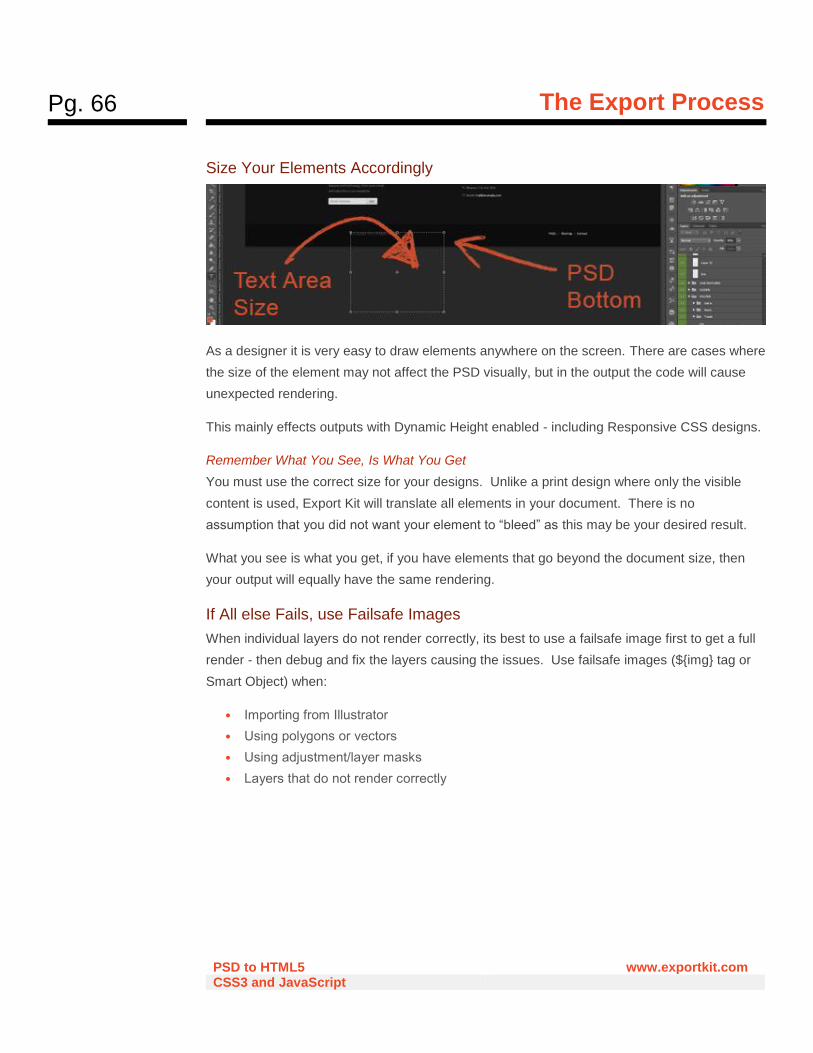
Size Your Elements Accordingly
As a designer it is very easy to draw elements anywhere on the screen. There are cases where
the size of the element may not affect the PSD visually, but in the output the code will cause
unexpected rendering.
This mainly effects outputs with Dynamic Height enabled - including Responsive CSS designs.
Remember What You See, Is What You Get
You must use the correct size for your designs. Unlike a print design where only the visible
content is used, Export Kit will translate all elements in your document. There is no
assumption that you did not want your element to “bleed” as this may be your desired result.
What you see is what you get, if you have elements that go beyond the document size, then
your output will equally have the same rendering.
If All else Fails, use Failsafe Images
When individual layers do not render correctly, its best to use a failsafe image first to get a full
render - then debug and fix the layers causing the issues. Use failsafe images (${img} tag or
Smart Object) when:
• Importing from Illustrator
• Using polygons or vectors
• Using adjustment/layer masks
• Layers that do not render correctly
Pg. 67
External CSS and JavaScript Files
PSD to HTML5 www.exportkit.com CSS3 and JavaScript
External CSS and JavaScript Files Because Export Kit allows you to customize your HTML5 Content before export, you can add
both custom CSS and JavaScript. This can further enhance your Output to incorporate your
existing code.
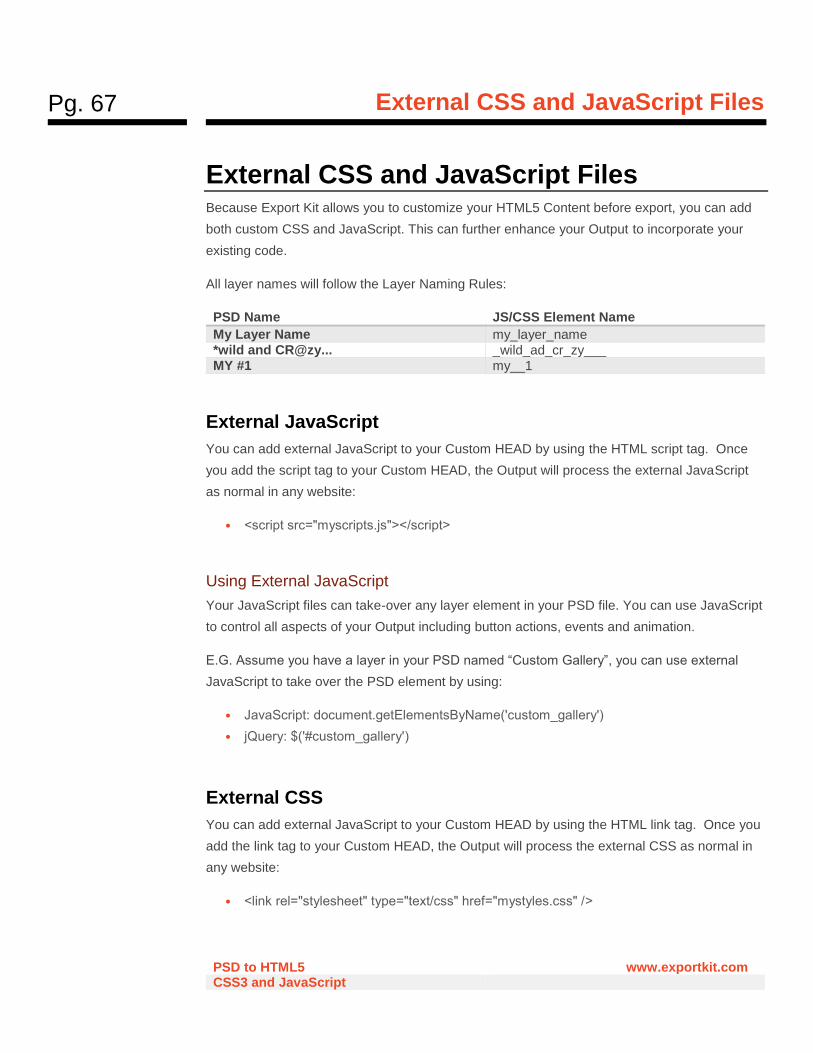
All layer names will follow the Layer Naming Rules:
PSD Name JS/CSS Element Name
My Layer Name my_layer_name *wild and CR@zy... _wild_ad_cr_zy___ MY #1 my__1
External JavaScript
You can add external JavaScript to your Custom HEAD by using the HTML script tag. Once
you add the script tag to your Custom HEAD, the Output will process the external JavaScript
as normal in any website:
• <script src="myscripts.js"></script>
Using External JavaScript
Your JavaScript files can take-over any layer element in your PSD file. You can use JavaScript
to control all aspects of your Output including button actions, events and animation.
E.G. Assume you have a layer in your PSD named “Custom Gallery”, you can use external
JavaScript to take over the PSD element by using:
• JavaScript: document.getElementsByName('custom_gallery')
• jQuery: $('#custom_gallery')
External CSS
You can add external JavaScript to your Custom HEAD by using the HTML link tag. Once you
add the link tag to your Custom HEAD, the Output will process the external CSS as normal in
any website:
• <link rel="stylesheet" type="text/css" href="mystyles.css" />
Pg. 68
External CSS and JavaScript Files
PSD to HTML5 www.exportkit.com CSS3 and JavaScript
Using External CSS
Your CSS files can take-over any layer element in your PSD file. You can use CSS to control
all visual aspects of your Output.
E.G. Assume you have a layer in your PSD named “Home Button”, you can use external CSS
to take over the PSD element by using:
• #home_button{}
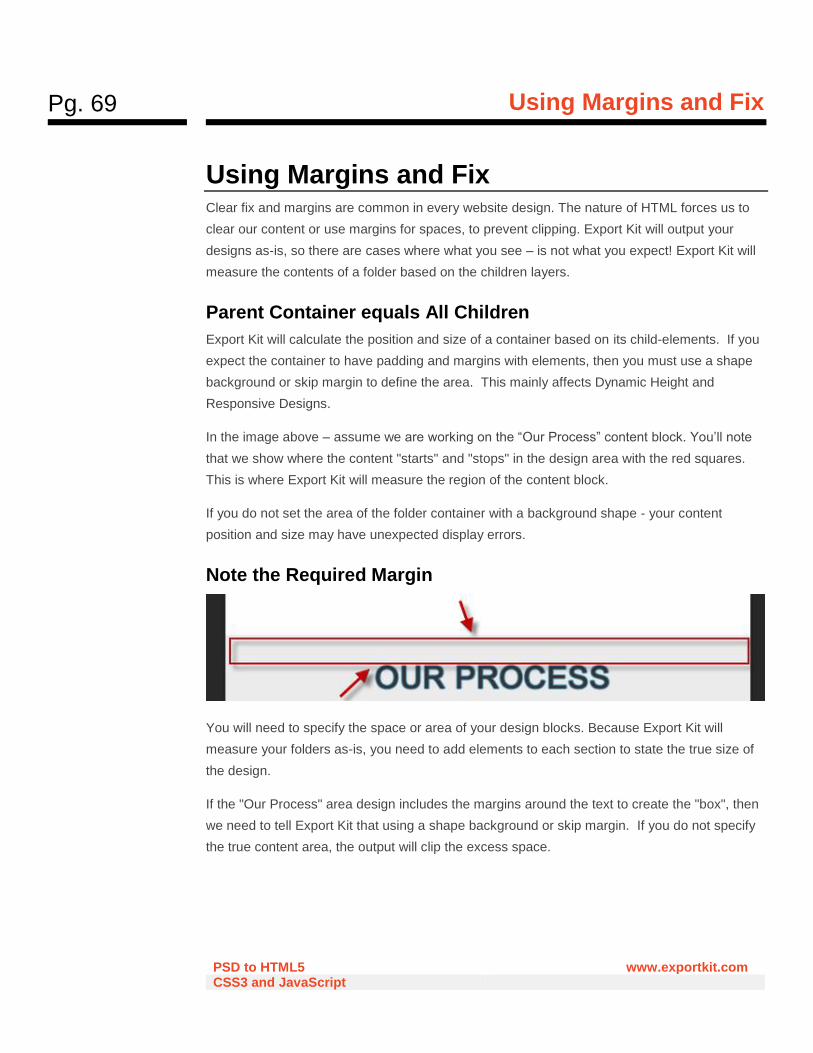
Pg. 69
Using Margins and Fix
PSD to HTML5 www.exportkit.com CSS3 and JavaScript
Using Margins and Fix Clear fix and margins are common in every website design. The nature of HTML forces us to
clear our content or use margins for spaces, to prevent clipping. Export Kit will output your
designs as-is, so there are cases where what you see – is not what you expect! Export Kit will
measure the contents of a folder based on the children layers.
Parent Container equals All Children
Export Kit will calculate the position and size of a container based on its child-elements. If you
expect the container to have padding and margins with elements, then you must use a shape
background or skip margin to define the area. This mainly affects Dynamic Height and
Responsive Designs.
In the image above – assume we are working on the “Our Process” content block. You’ll note
that we show where the content "starts" and "stops" in the design area with the red squares.
This is where Export Kit will measure the region of the content block.
If you do not set the area of the folder container with a background shape - your content
position and size may have unexpected display errors.
Note the Required Margin
You will need to specify the space or area of your design blocks. Because Export Kit will
measure your folders as-is, you need to add elements to each section to state the true size of
the design.
If the "Our Process" area design includes the margins around the text to create the "box", then
we need to tell Export Kit that using a shape background or skip margin. If you do not specify
the true content area, the output will clip the excess space.
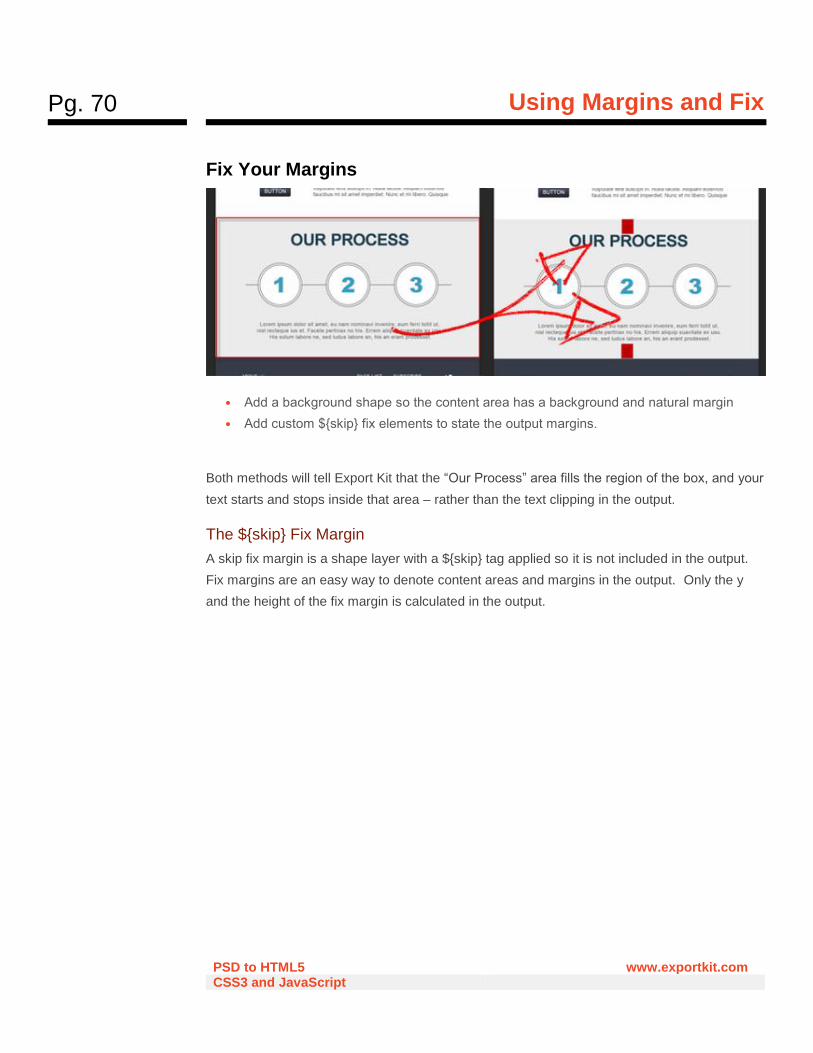
Pg. 70
Using Margins and Fix
PSD to HTML5 www.exportkit.com CSS3 and JavaScript
Fix Your Margins
• Add a background shape so the content area has a background and natural margin
• Add custom ${skip} fix elements to state the output margins.
Both methods will tell Export Kit that the “Our Process” area fills the region of the box, and your
text starts and stops inside that area – rather than the text clipping in the output.
The ${skip} Fix Margin
A skip fix margin is a shape layer with a ${skip} tag applied so it is not included in the output.
Fix margins are an easy way to denote content areas and margins in the output. Only the y
and the height of the fix margin is calculated in the output.
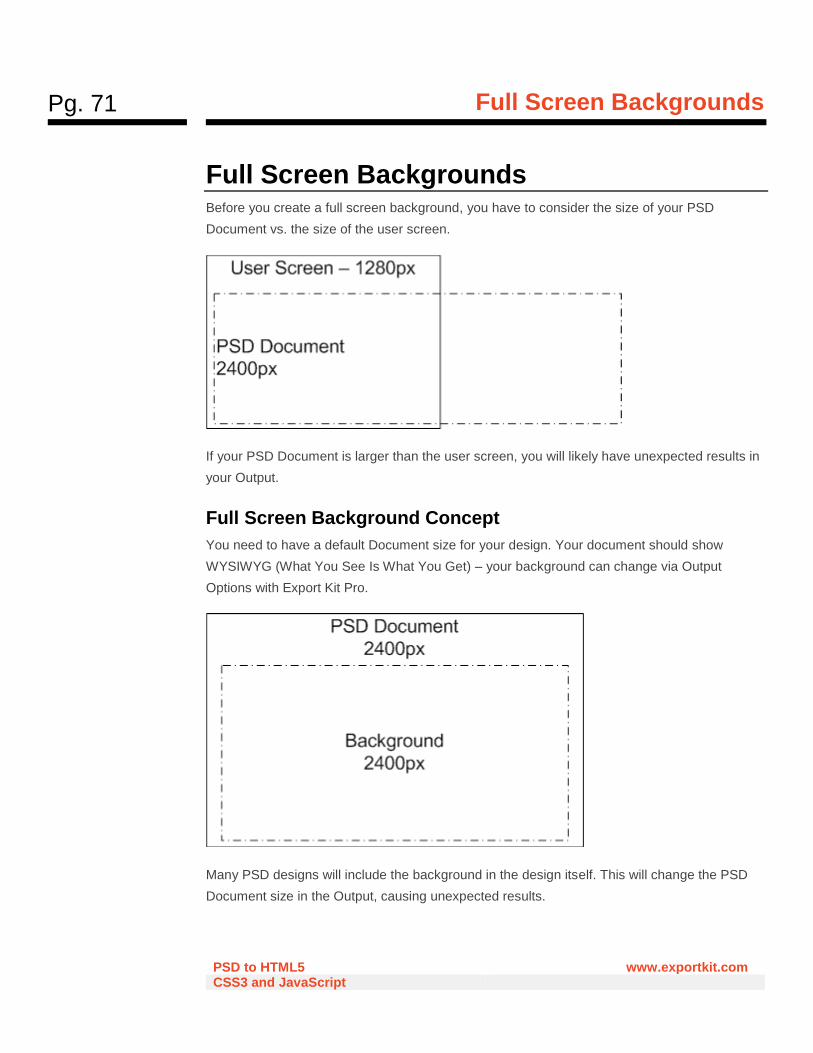
Pg. 71
Full Screen Backgrounds
PSD to HTML5 www.exportkit.com CSS3 and JavaScript
Full Screen Backgrounds Before you create a full screen background, you have to consider the size of your PSD
Document vs. the size of the user screen.
If your PSD Document is larger than the user screen, you will likely have unexpected results in
your Output.
Full Screen Background Concept
You need to have a default Document size for your design. Your document should show
WYSIWYG (What You See Is What You Get) – your background can change via Output
Options with Export Kit Pro.
Many PSD designs will include the background in the design itself. This will change the PSD
Document size in the Output, causing unexpected results.
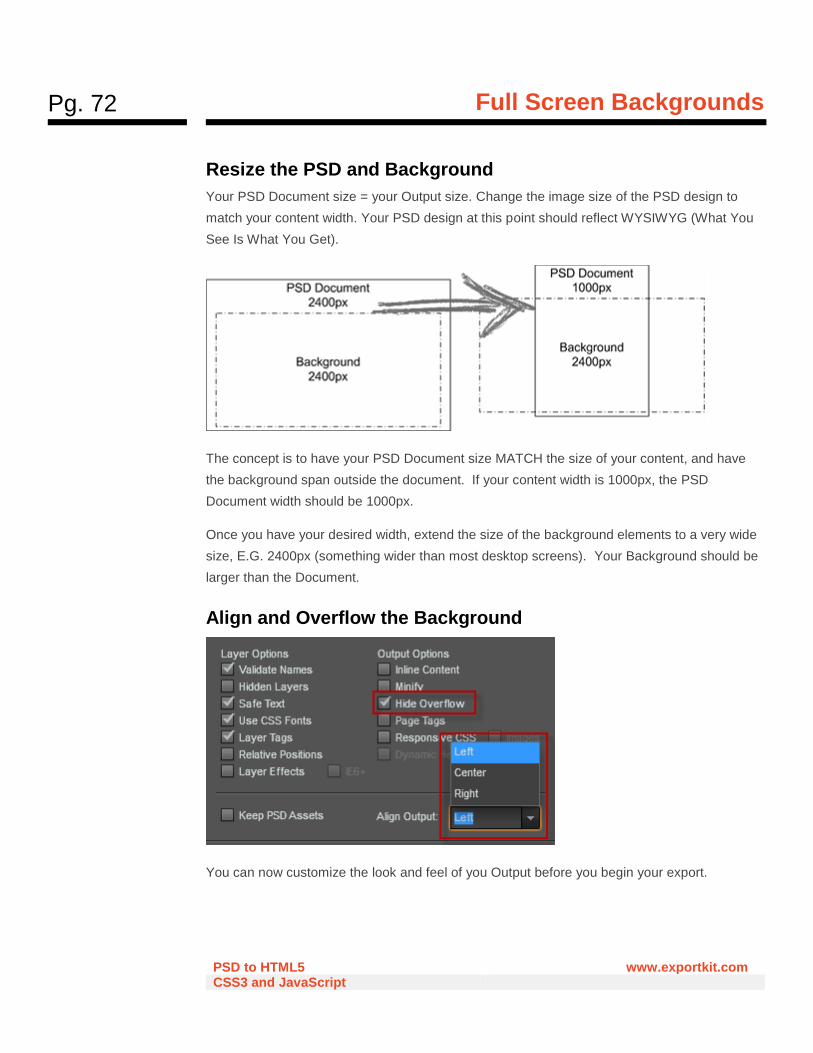
Pg. 72
Full Screen Backgrounds
PSD to HTML5 www.exportkit.com CSS3 and JavaScript
Resize the PSD and Background
Your PSD Document size = your Output size. Change the image size of the PSD design to
match your content width. Your PSD design at this point should reflect WYSIWYG (What You
See Is What You Get).
The concept is to have your PSD Document size MATCH the size of your content, and have
the background span outside the document. If your content width is 1000px, the PSD
Document width should be 1000px.
Once you have your desired width, extend the size of the background elements to a very wide
size, E.G. 2400px (something wider than most desktop screens). Your Background should be
larger than the Document.
Align and Overflow the Background
You can now customize the look and feel of you Output before you begin your export.
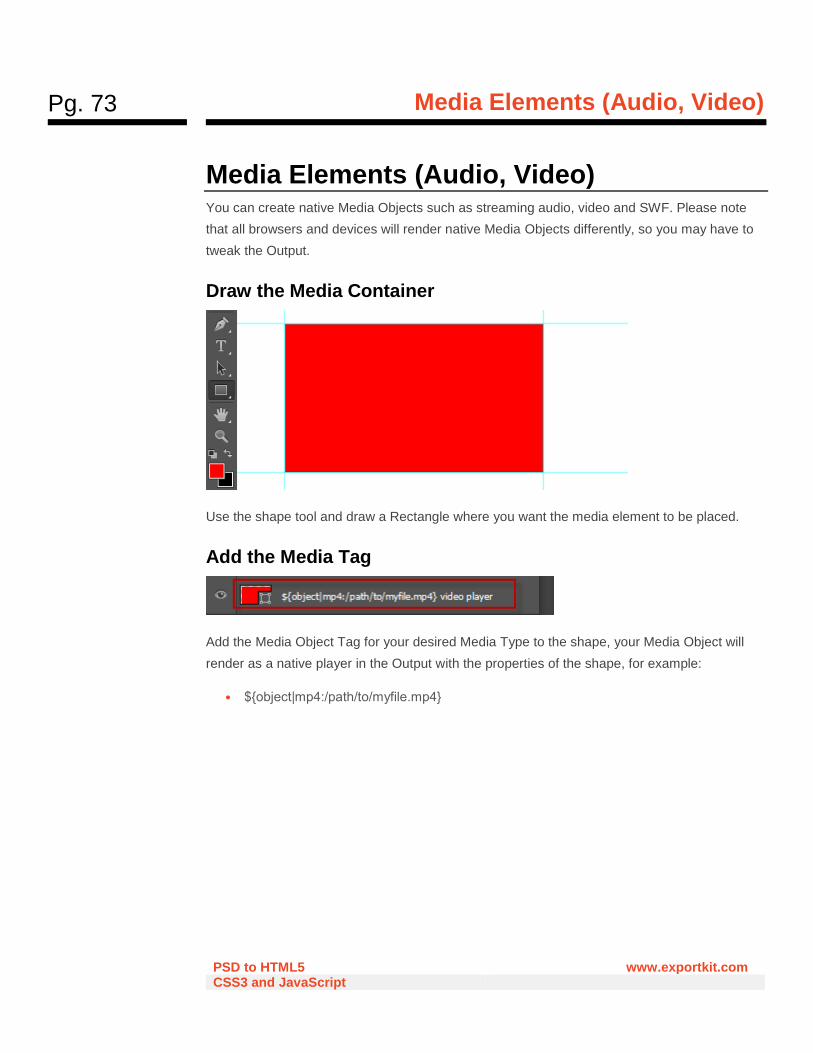
Pg. 73
Media Elements (Audio, Video)
PSD to HTML5 www.exportkit.com CSS3 and JavaScript
Media Elements (Audio, Video) You can create native Media Objects such as streaming audio, video and SWF. Please note
that all browsers and devices will render native Media Objects differently, so you may have to
tweak the Output.
Draw the Media Container
Use the shape tool and draw a Rectangle where you want the media element to be placed.
Add the Media Tag
Add the Media Object Tag for your desired Media Type to the shape, your Media Object will
render as a native player in the Output with the properties of the shape, for example:
• ${object|mp4:/path/to/myfile.mp4}
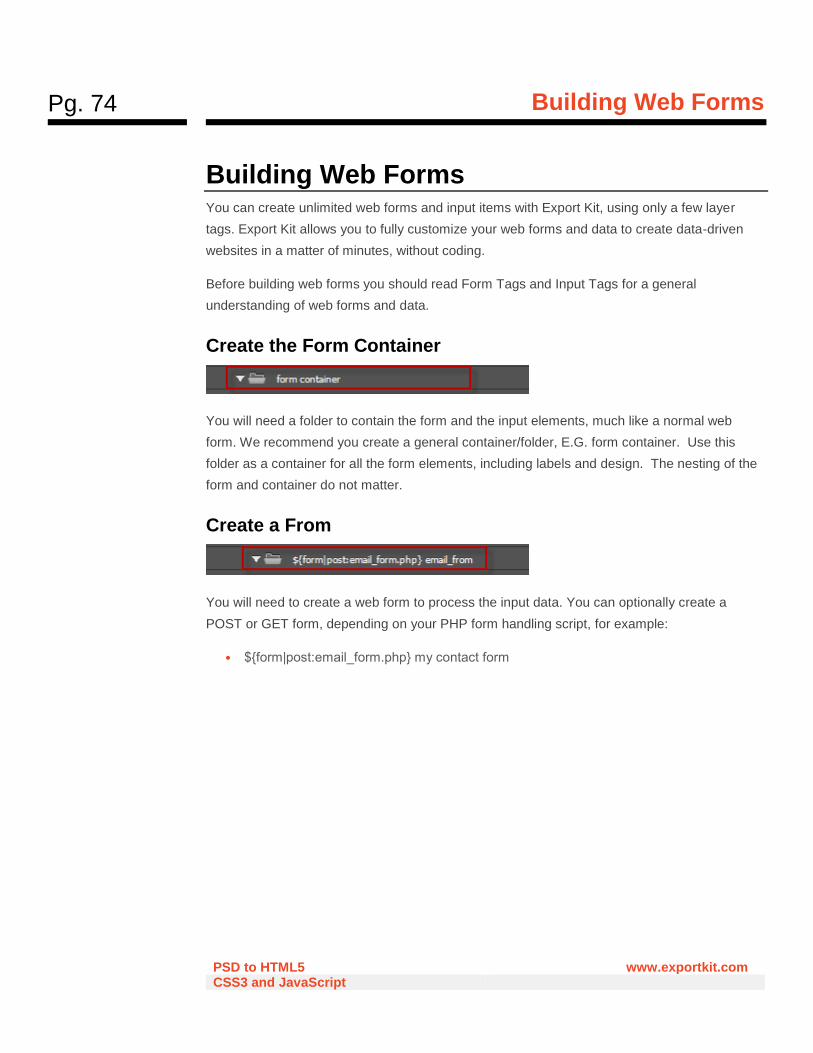
Pg. 74
Building Web Forms
PSD to HTML5 www.exportkit.com CSS3 and JavaScript
Building Web Forms You can create unlimited web forms and input items with Export Kit, using only a few layer
tags. Export Kit allows you to fully customize your web forms and data to create data-driven
websites in a matter of minutes, without coding.
Before building web forms you should read Form Tags and Input Tags for a general
understanding of web forms and data.
Create the Form Container
You will need a folder to contain the form and the input elements, much like a normal web
form. We recommend you create a general container/folder, E.G. form container. Use this
folder as a container for all the form elements, including labels and design. The nesting of the
form and container do not matter.
Create a From
You will need to create a web form to process the input data. You can optionally create a
POST or GET form, depending on your PHP form handling script, for example:
• ${form|post:email_form.php} my contact form
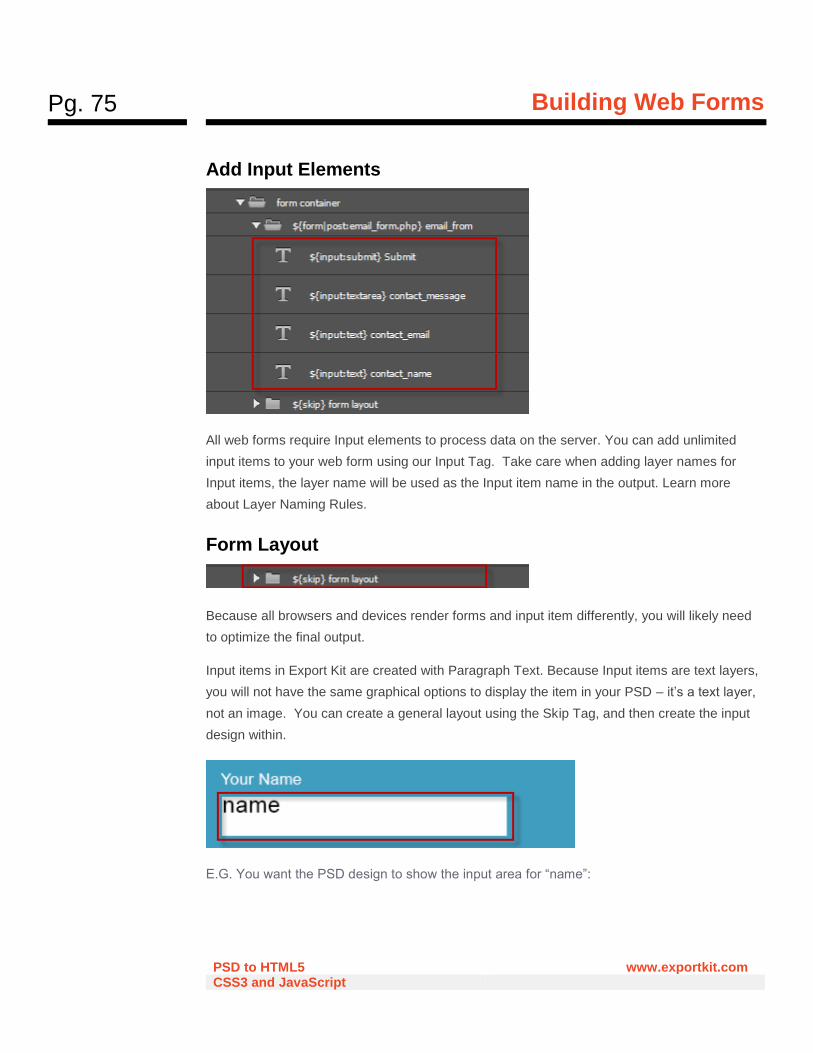
Pg. 75
Building Web Forms
PSD to HTML5 www.exportkit.com CSS3 and JavaScript
Add Input Elements
All web forms require Input elements to process data on the server. You can add unlimited
input items to your web form using our Input Tag. Take care when adding layer names for
Input items, the layer name will be used as the Input item name in the output. Learn more
about Layer Naming Rules.
Form Layout
Because all browsers and devices render forms and input item differently, you will likely need
to optimize the final output.
Input items in Export Kit are created with Paragraph Text. Because Input items are text layers,
you will not have the same graphical options to display the item in your PSD – it’s a text layer,
not an image. You can create a general layout using the Skip Tag, and then create the input
design within.
E.G. You want the PSD design to show the input area for “name”:
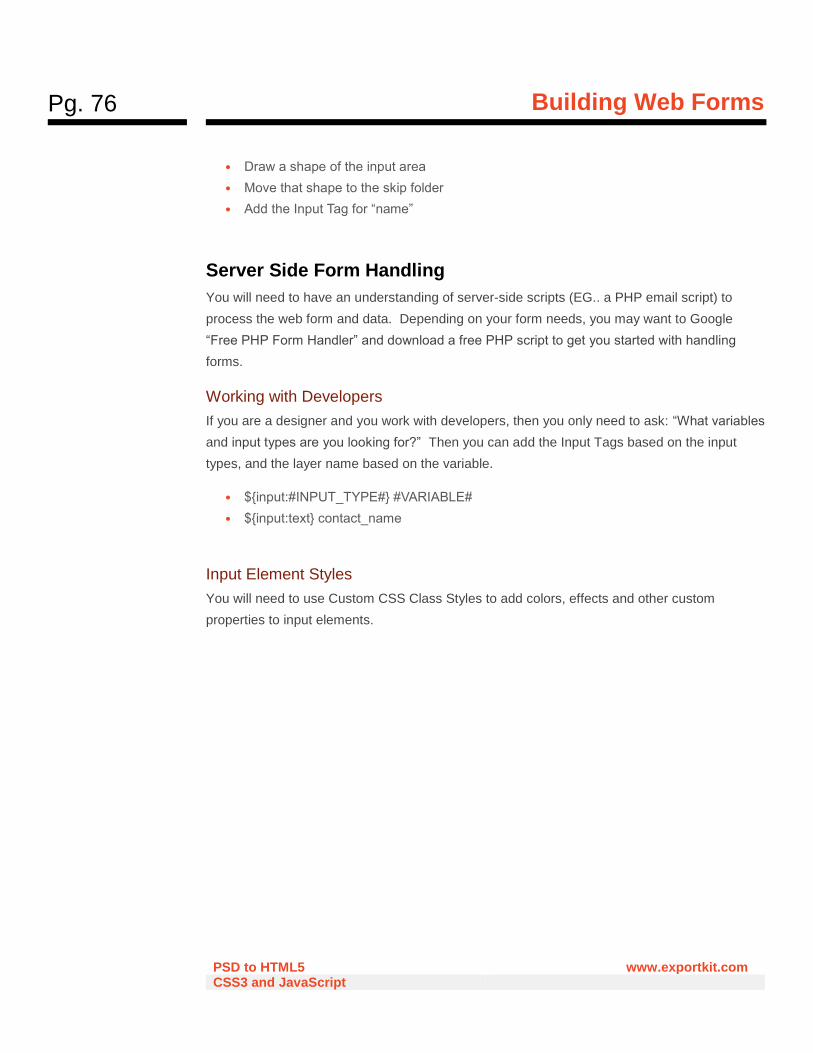
Pg. 76
Building Web Forms
PSD to HTML5 www.exportkit.com CSS3 and JavaScript
• Draw a shape of the input area
• Move that shape to the skip folder
• Add the Input Tag for “name”
Server Side Form Handling
You will need to have an understanding of server-side scripts (EG.. a PHP email script) to
process the web form and data. Depending on your form needs, you may want to Google
“Free PHP Form Handler” and download a free PHP script to get you started with handling
forms.
Working with Developers
If you are a designer and you work with developers, then you only need to ask: “What variables
and input types are you looking for?” Then you can add the Input Tags based on the input
types, and the layer name based on the variable.
• ${input:#INPUT_TYPE#} #VARIABLE#
• ${input:text} contact_name
Input Element Styles
You will need to use Custom CSS Class Styles to add colors, effects and other custom
properties to input elements.
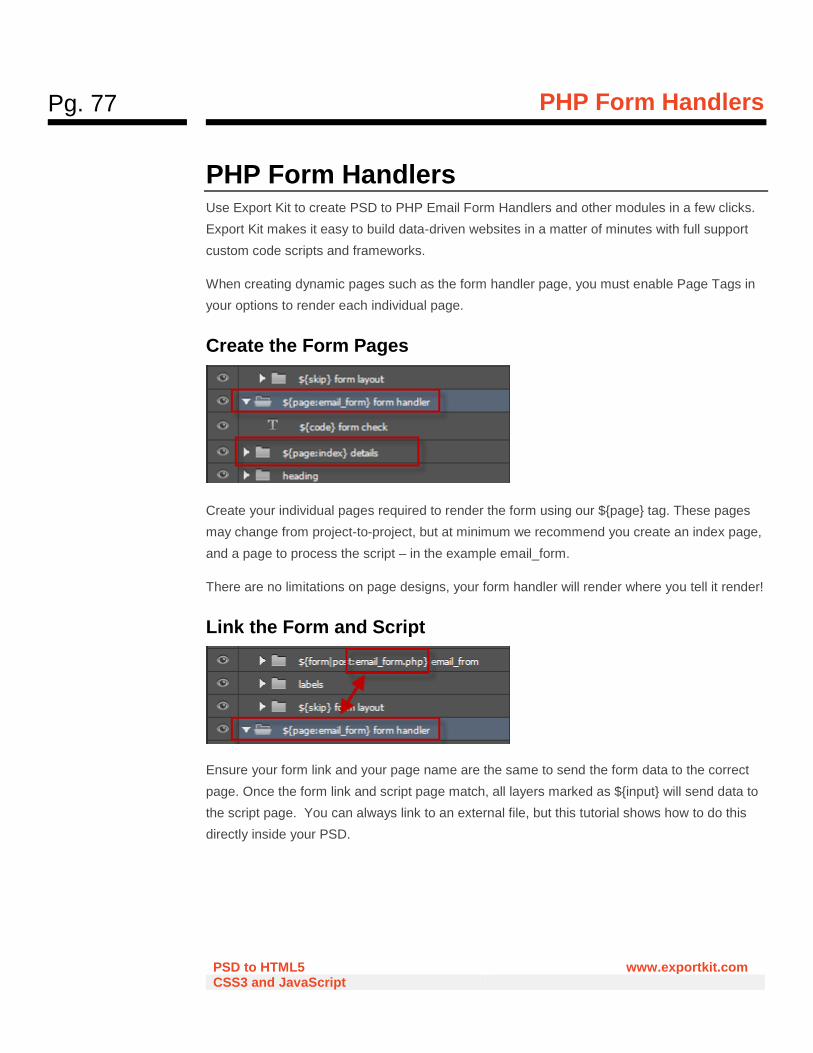
Pg. 77
PHP Form Handlers
PSD to HTML5 www.exportkit.com CSS3 and JavaScript
PHP Form Handlers Use Export Kit to create PSD to PHP Email Form Handlers and other modules in a few clicks.
Export Kit makes it easy to build data-driven websites in a matter of minutes with full support
custom code scripts and frameworks.
When creating dynamic pages such as the form handler page, you must enable Page Tags in
your options to render each individual page.
Create the Form Pages
Create your individual pages required to render the form using our ${page} tag. These pages
may change from project-to-project, but at minimum we recommend you create an index page,
and a page to process the script – in the example email_form.
There are no limitations on page designs, your form handler will render where you tell it render!
Link the Form and Script
Ensure your form link and your page name are the same to send the form data to the correct
page. Once the form link and script page match, all layers marked as ${input} will send data to
the script page. You can always link to an external file, but this tutorial shows how to do this
directly inside your PSD.
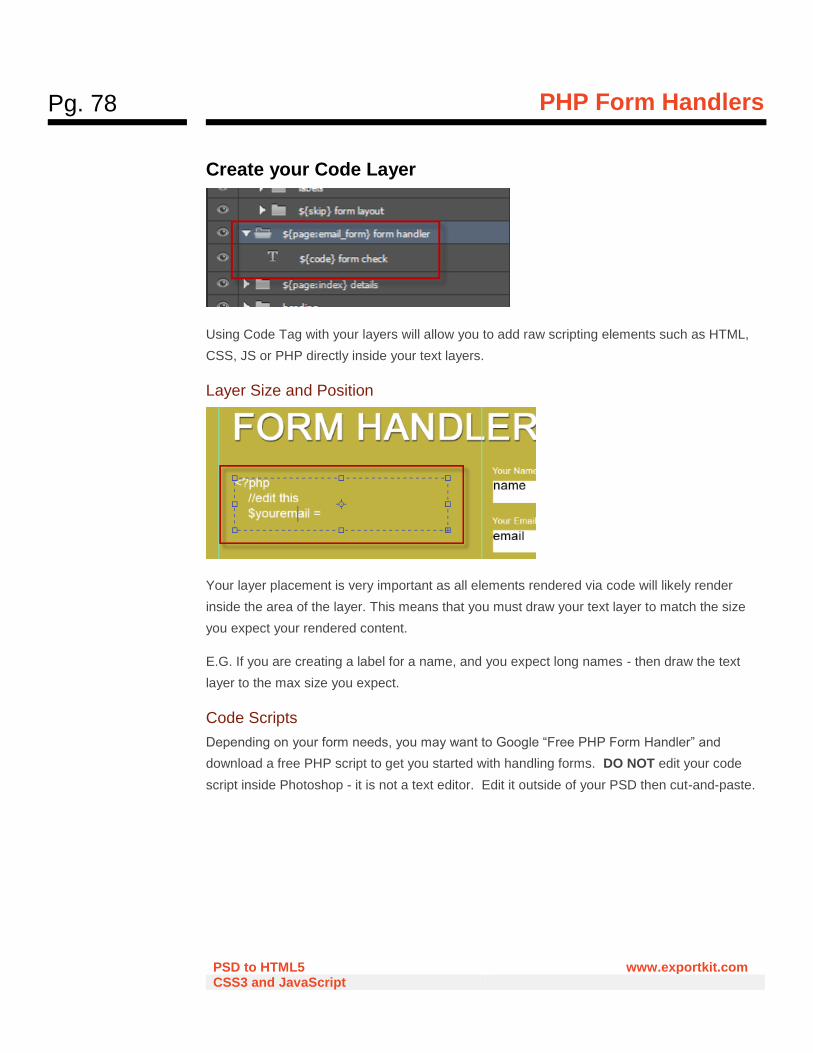
Pg. 78
PHP Form Handlers
PSD to HTML5 www.exportkit.com CSS3 and JavaScript
Create your Code Layer
Using Code Tag with your layers will allow you to add raw scripting elements such as HTML,
CSS, JS or PHP directly inside your text layers.
Layer Size and Position
Your layer placement is very important as all elements rendered via code will likely render
inside the area of the layer. This means that you must draw your text layer to match the size
you expect your rendered content.
E.G. If you are creating a label for a name, and you expect long names - then draw the text
layer to the max size you expect.
Code Scripts
Depending on your form needs, you may want to Google “Free PHP Form Handler” and
download a free PHP script to get you started with handling forms. DO NOT edit your code
script inside Photoshop - it is not a text editor. Edit it outside of your PSD then cut-and-paste.
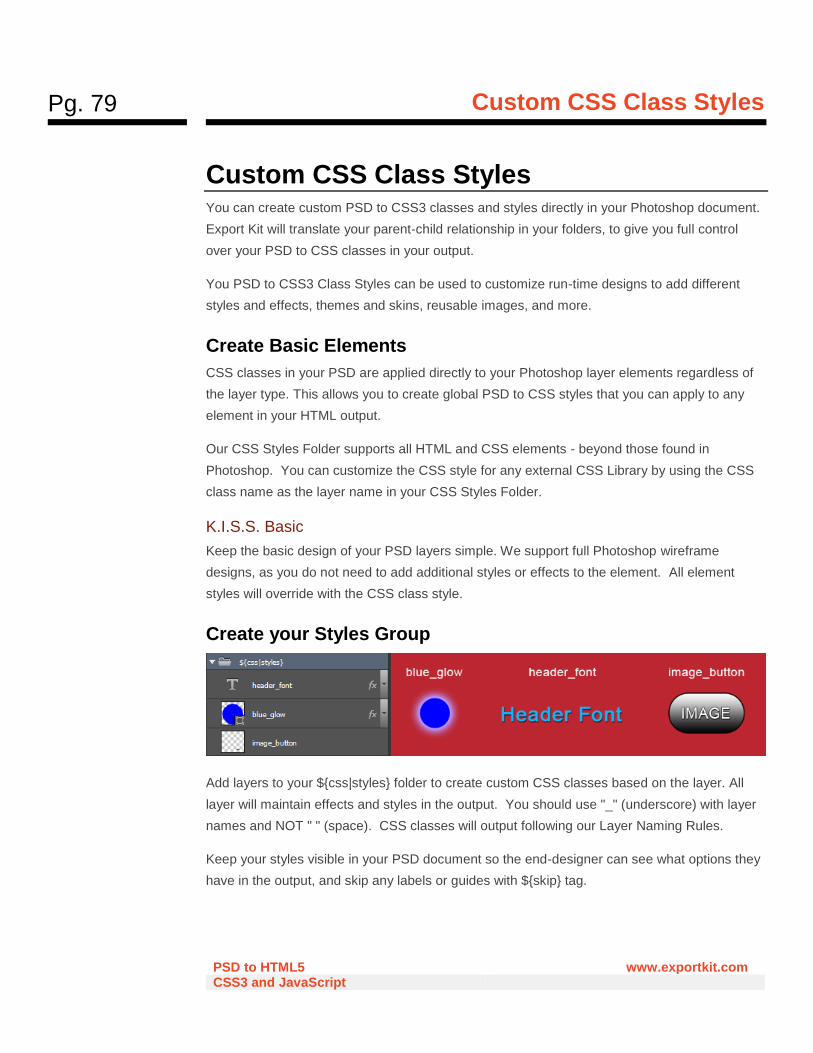
Pg. 79
Custom CSS Class Styles
PSD to HTML5 www.exportkit.com CSS3 and JavaScript
Custom CSS Class Styles You can create custom PSD to CSS3 classes and styles directly in your Photoshop document.
Export Kit will translate your parent-child relationship in your folders, to give you full control
over your PSD to CSS classes in your output.
You PSD to CSS3 Class Styles can be used to customize run-time designs to add different
styles and effects, themes and skins, reusable images, and more.
Create Basic Elements
CSS classes in your PSD are applied directly to your Photoshop layer elements regardless of
the layer type. This allows you to create global PSD to CSS styles that you can apply to any
element in your HTML output.
Our CSS Styles Folder supports all HTML and CSS elements - beyond those found in
Photoshop. You can customize the CSS style for any external CSS Library by using the CSS
class name as the layer name in your CSS Styles Folder.
K.I.S.S. Basic
Keep the basic design of your PSD layers simple. We support full Photoshop wireframe
designs, as you do not need to add additional styles or effects to the element. All element
styles will override with the CSS class style.
Create your Styles Group
Add layers to your ${css|styles} folder to create custom CSS classes based on the layer. All
layer will maintain effects and styles in the output. You should use "_" (underscore) with layer
names and NOT " " (space). CSS classes will output following our Layer Naming Rules.
Keep your styles visible in your PSD document so the end-designer can see what options they
have in the output, and skip any labels or guides with ${skip} tag.
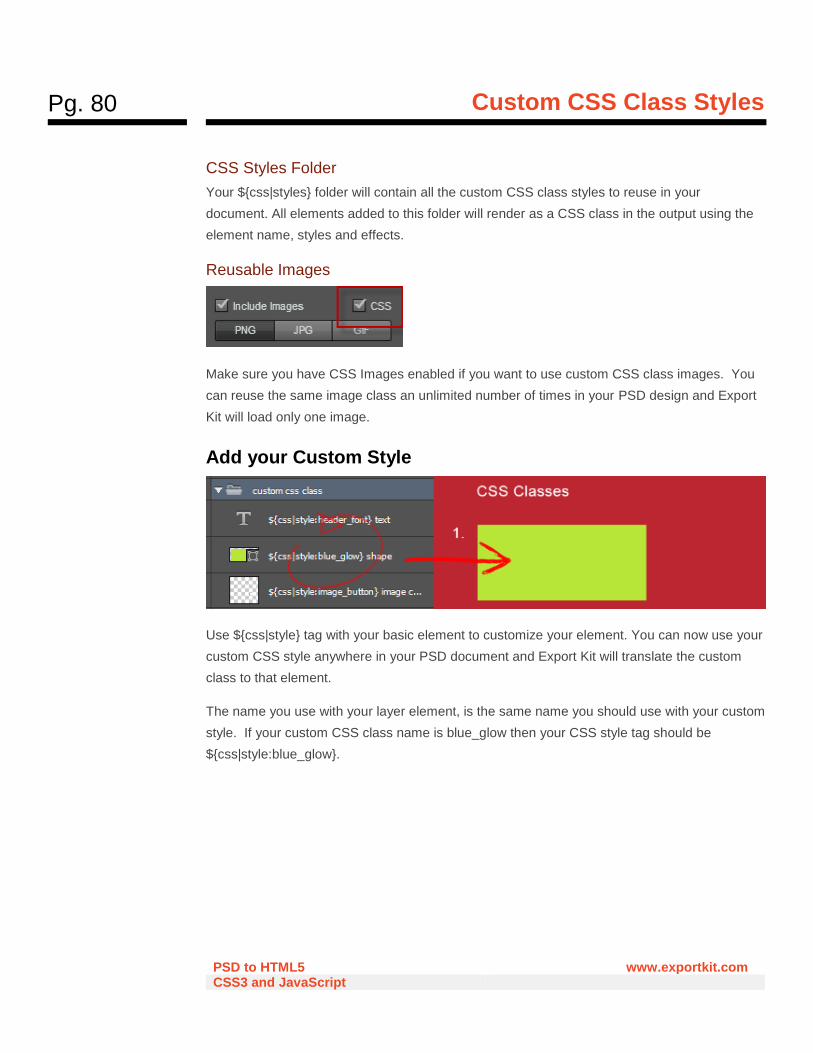
Pg. 80
Custom CSS Class Styles
PSD to HTML5 www.exportkit.com CSS3 and JavaScript
CSS Styles Folder
Your ${css|styles} folder will contain all the custom CSS class styles to reuse in your
document. All elements added to this folder will render as a CSS class in the output using the
element name, styles and effects.
Reusable Images
Make sure you have CSS Images enabled if you want to use custom CSS class images. You
can reuse the same image class an unlimited number of times in your PSD design and Export
Kit will load only one image.
Add your Custom Style
Use ${css|style} tag with your basic element to customize your element. You can now use your
custom CSS style anywhere in your PSD document and Export Kit will translate the custom
class to that element.
The name you use with your layer element, is the same name you should use with your custom
style. If your custom CSS class name is blue_glow then your CSS style tag should be
${css|style:blue_glow}.
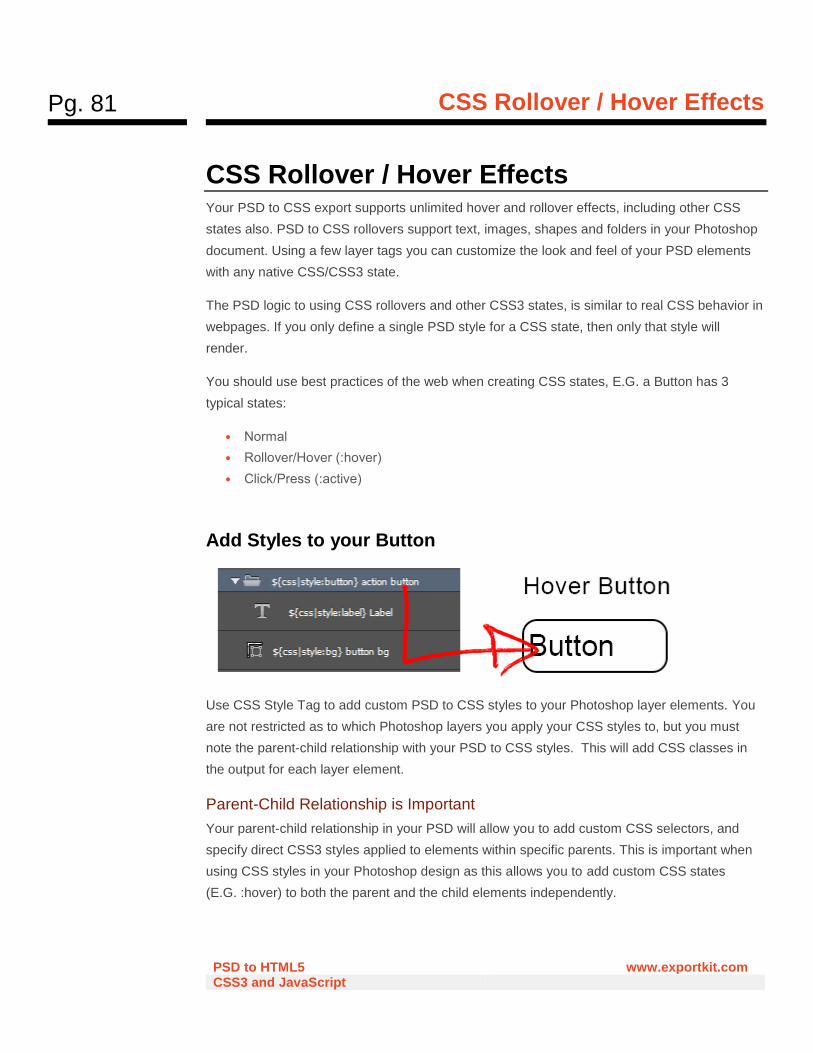
Pg. 81
CSS Rollover / Hover Effects
PSD to HTML5 www.exportkit.com CSS3 and JavaScript
CSS Rollover / Hover Effects Your PSD to CSS export supports unlimited hover and rollover effects, including other CSS
states also. PSD to CSS rollovers support text, images, shapes and folders in your Photoshop
document. Using a few layer tags you can customize the look and feel of your PSD elements
with any native CSS/CSS3 state.
The PSD logic to using CSS rollovers and other CSS3 states, is similar to real CSS behavior in
webpages. If you only define a single PSD style for a CSS state, then only that style will
render.
You should use best practices of the web when creating CSS states, E.G. a Button has 3
typical states:
• Normal
• Rollover/Hover (:hover)
• Click/Press (:active)
Add Styles to your Button
Use CSS Style Tag to add custom PSD to CSS styles to your Photoshop layer elements. You
are not restricted as to which Photoshop layers you apply your CSS styles to, but you must
note the parent-child relationship with your PSD to CSS styles. This will add CSS classes in
the output for each layer element.
Parent-Child Relationship is Important
Your parent-child relationship in your PSD will allow you to add custom CSS selectors, and
specify direct CSS3 styles applied to elements within specific parents. This is important when
using CSS styles in your Photoshop design as this allows you to add custom CSS states
(E.G. :hover) to both the parent and the child elements independently.
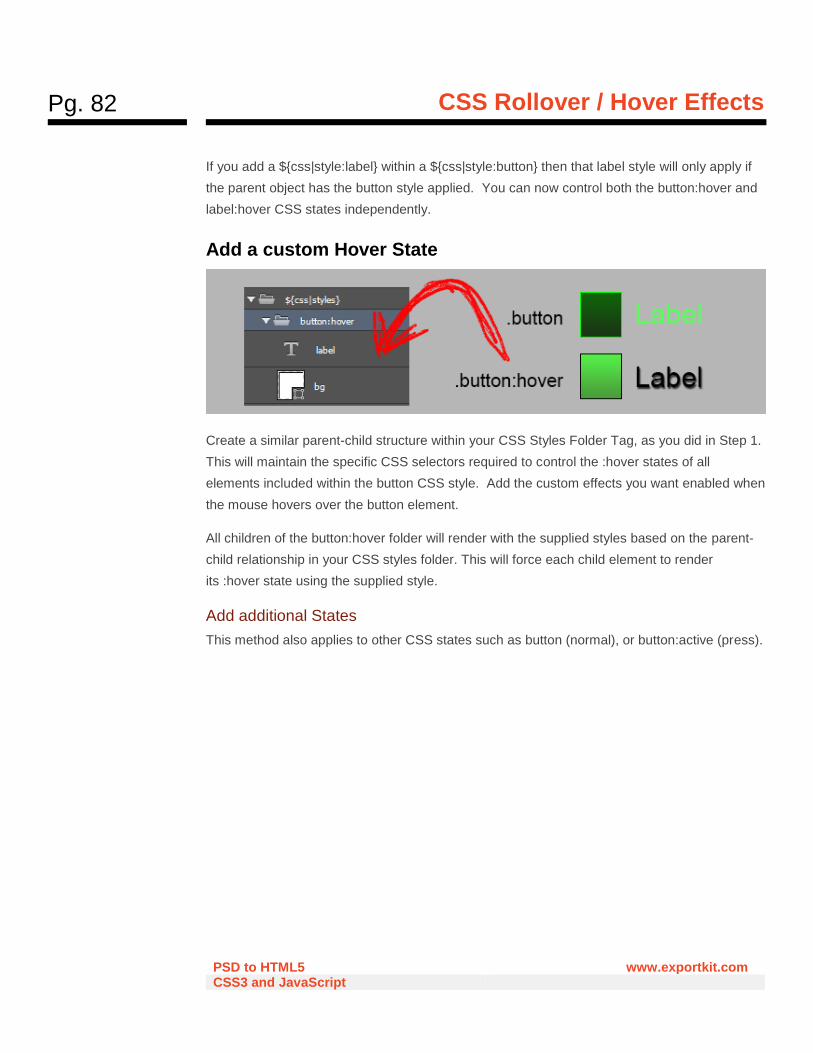
Pg. 82
CSS Rollover / Hover Effects
PSD to HTML5 www.exportkit.com CSS3 and JavaScript
If you add a ${css|style:label} within a ${css|style:button} then that label style will only apply if
the parent object has the button style applied. You can now control both the button:hover and
label:hover CSS states independently.
Add a custom Hover State
Create a similar parent-child structure within your CSS Styles Folder Tag, as you did in Step 1.
This will maintain the specific CSS selectors required to control the :hover states of all
elements included within the button CSS style. Add the custom effects you want enabled when
the mouse hovers over the button element.
All children of the button:hover folder will render with the supplied styles based on the parent-
child relationship in your CSS styles folder. This will force each child element to render
its :hover state using the supplied style.
Add additional States
This method also applies to other CSS states such as button (normal), or button:active (press).
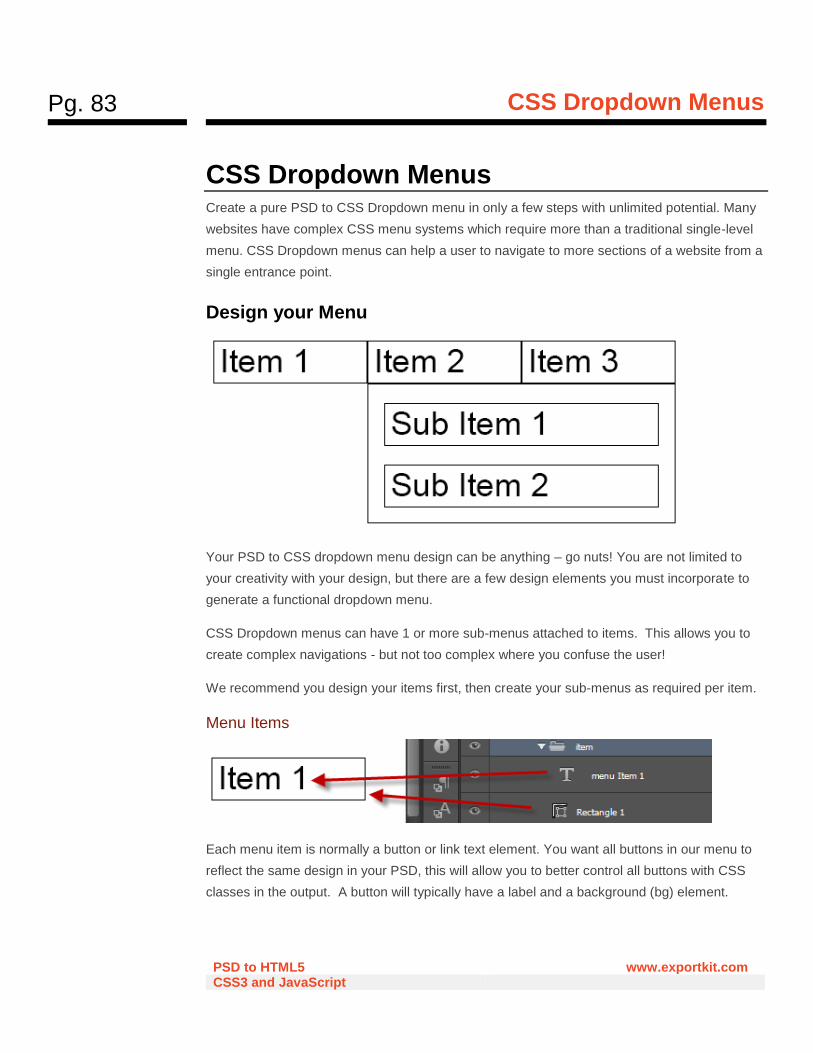
Pg. 83
CSS Dropdown Menus
PSD to HTML5 www.exportkit.com CSS3 and JavaScript
CSS Dropdown Menus Create a pure PSD to CSS Dropdown menu in only a few steps with unlimited potential. Many
websites have complex CSS menu systems which require more than a traditional single-level
menu. CSS Dropdown menus can help a user to navigate to more sections of a website from a
single entrance point.
Design your Menu
Your PSD to CSS dropdown menu design can be anything – go nuts! You are not limited to
your creativity with your design, but there are a few design elements you must incorporate to
generate a functional dropdown menu.
CSS Dropdown menus can have 1 or more sub-menus attached to items. This allows you to
create complex navigations - but not too complex where you confuse the user!
We recommend you design your items first, then create your sub-menus as required per item.
Menu Items
Each menu item is normally a button or link text element. You want all buttons in our menu to
reflect the same design in your PSD, this will allow you to better control all buttons with CSS
classes in the output. A button will typically have a label and a background (bg) element.
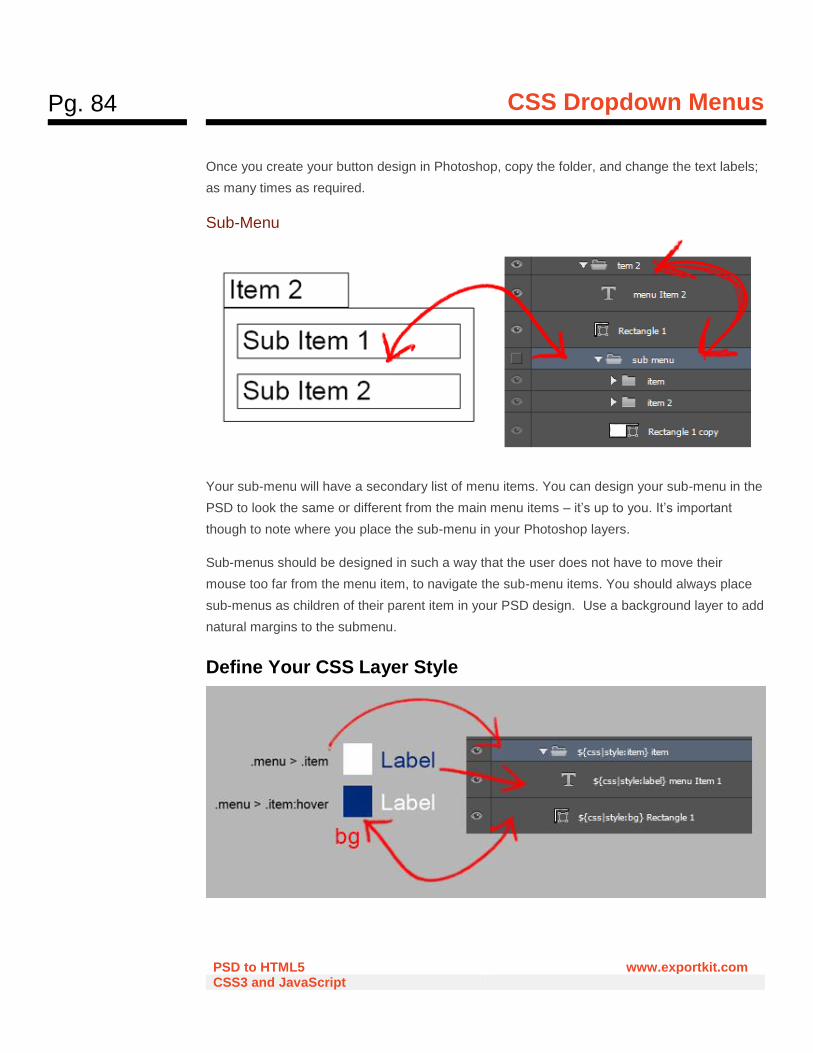
Pg. 84
CSS Dropdown Menus
PSD to HTML5 www.exportkit.com CSS3 and JavaScript
Once you create your button design in Photoshop, copy the folder, and change the text labels;
as many times as required.
Sub-Menu
Your sub-menu will have a secondary list of menu items. You can design your sub-menu in the
PSD to look the same or different from the main menu items – it’s up to you. It’s important
though to note where you place the sub-menu in your Photoshop layers.
Sub-menus should be designed in such a way that the user does not have to move their
mouse too far from the menu item, to navigate the sub-menu items. You should always place
sub-menus as children of their parent item in your PSD design. Use a background layer to add
natural margins to the submenu.
Define Your CSS Layer Style
Pg. 85
CSS Dropdown Menus
PSD to HTML5 www.exportkit.com CSS3 and JavaScript
Next we want to customize the look and feel of our menu. To do this we Create Custom CSS
Styles to use with our menu items. The PSD to CSS styles we create will “tell” our element (eg.
button) how to display, and what to display based on view states; eg. hover or active.
We suggest you create your CSS Style for each layer in your design first.
Sub Styles
Export Kit has a very powerful PSD to CSS engine so you can create unlimited PSD to CSS
targeted styles which can apply to any or specific elements in your output. You should always
create sub styles for your classes to keep them organized.
Assume we have 3 menu items:
• ${css|style:item} item1
• ${css|style:item} item2
• ${css|style:item} item3
The very first style you would naturally apply is an item style. To create sub styles, you go in
more detail with your nesting, E.G.:
• ${css|style:item item1} item1
• ${css|style:item item2} item2
• ${css|style:item item3} item3
Doing this will allow you to have greater control with your CSS Styles Folder elements. You
can then render CSS styles for item as a group, or individually to each; item1, item2, item3.
Because each item also has children (label and bg), you can now directly target children
element also; eg. item2>>label.
Create Custom CSS Classes
Your CSS Styles Folder in your PSD may end up with a lot of styles defined – this is normal.
The more you define your PSD to CSS classes, the more you can personalize your output to
meet your creative requirements.
We suggest you use as many styles as possible to control the elements you require.

Pg. 86
CSS Dropdown Menus
PSD to HTML5 www.exportkit.com CSS3 and JavaScript
Menu Item CSS Style
You can control the children element of item with our CSS class nesting. Because your
elements for label and bg are within the item folder, these styles will now target directly child
elements; E.G. item>>label. Using CSS selectors, you can also add styles for states such
as :hover or :active. Child layers you add in any selector folder will only apply to that CSS layer
query.
E.G. We want the menu item background to be white, but change to dark blue when the user
hovers.
Sub-menu Item CSS Styles
Because you added an individual style to the submenu in the PSD, you can now control each
child element independently, but also have a parent child CSS relationship. This means that
submenu styles will inherit item styles when rendering.
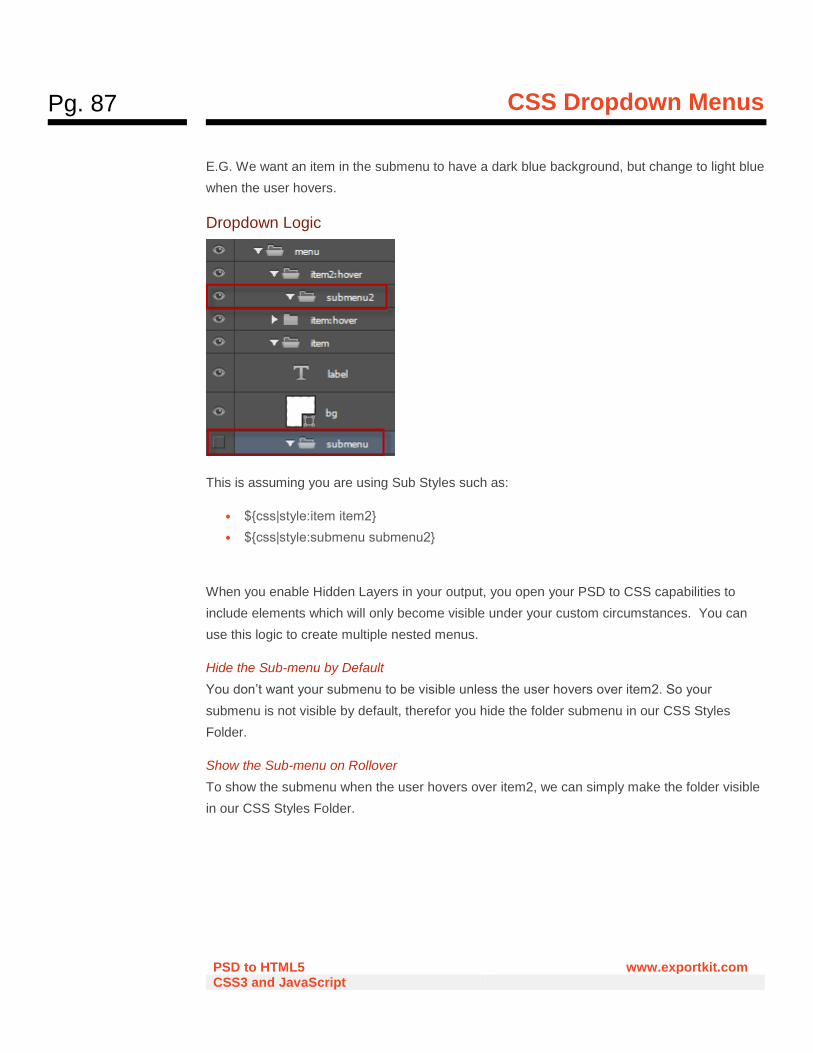
Pg. 87
CSS Dropdown Menus
PSD to HTML5 www.exportkit.com CSS3 and JavaScript
E.G. We want an item in the submenu to have a dark blue background, but change to light blue
when the user hovers.
Dropdown Logic
This is assuming you are using Sub Styles such as:
• ${css|style:item item2}
• ${css|style:submenu submenu2}
When you enable Hidden Layers in your output, you open your PSD to CSS capabilities to
include elements which will only become visible under your custom circumstances. You can
use this logic to create multiple nested menus.
Hide the Sub-menu by Default
You don’t want your submenu to be visible unless the user hovers over item2. So your
submenu is not visible by default, therefor you hide the folder submenu in our CSS Styles
Folder.
Show the Sub-menu on Rollover
To show the submenu when the user hovers over item2, we can simply make the folder visible
in our CSS Styles Folder.
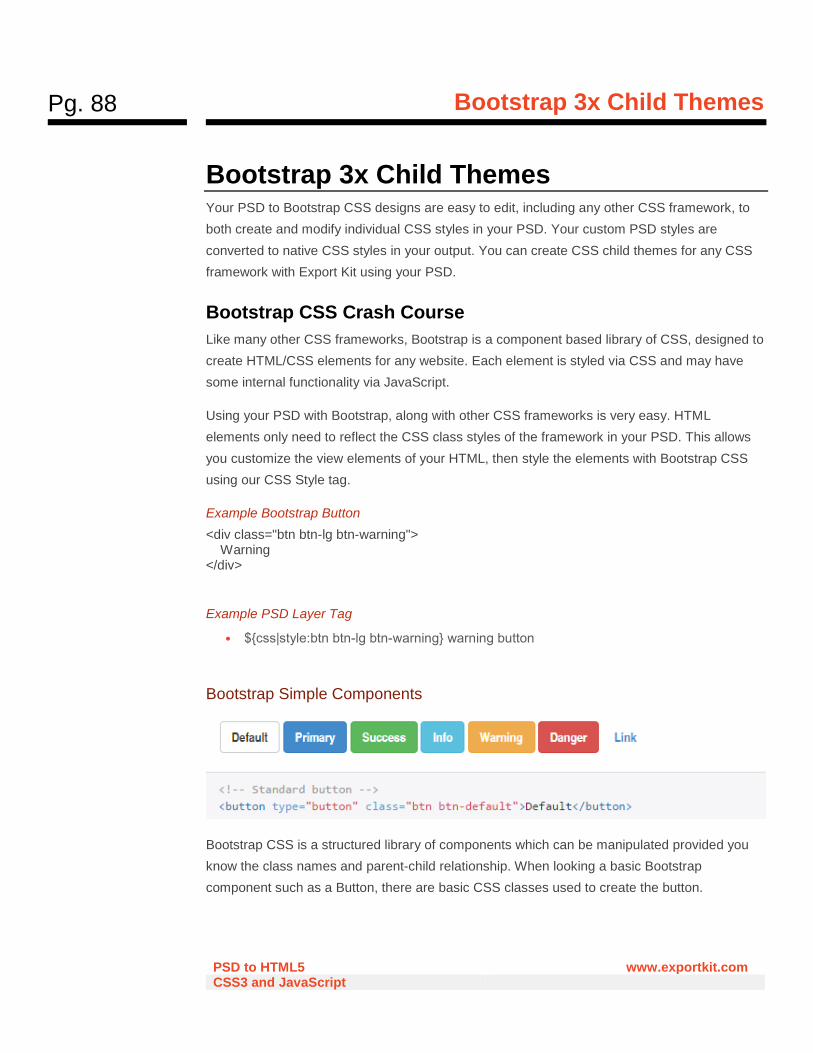
Pg. 88
Bootstrap 3x Child Themes
PSD to HTML5 www.exportkit.com CSS3 and JavaScript
Bootstrap 3x Child Themes Your PSD to Bootstrap CSS designs are easy to edit, including any other CSS framework, to
both create and modify individual CSS styles in your PSD. Your custom PSD styles are
converted to native CSS styles in your output. You can create CSS child themes for any CSS
framework with Export Kit using your PSD.
Bootstrap CSS Crash Course
Like many other CSS frameworks, Bootstrap is a component based library of CSS, designed to
create HTML/CSS elements for any website. Each element is styled via CSS and may have
some internal functionality via JavaScript.
Using your PSD with Bootstrap, along with other CSS frameworks is very easy. HTML
elements only need to reflect the CSS class styles of the framework in your PSD. This allows
you customize the view elements of your HTML, then style the elements with Bootstrap CSS
using our CSS Style tag.
Example Bootstrap Button
<div class="btn btn-lg btn-warning"> Warning </div>
Example PSD Layer Tag
• ${css|style:btn btn-lg btn-warning} warning button
Bootstrap Simple Components
Bootstrap CSS is a structured library of components which can be manipulated provided you
know the class names and parent-child relationship. When looking a basic Bootstrap
component such as a Button, there are basic CSS classes used to create the button.
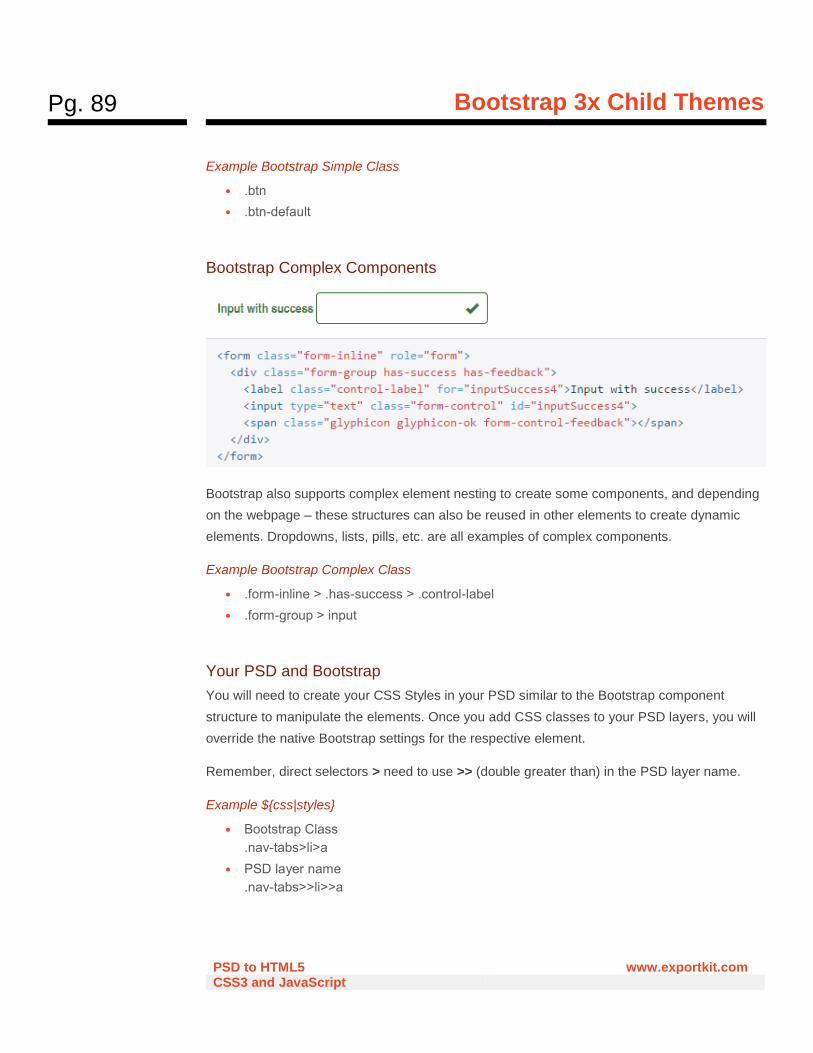
Pg. 89
Bootstrap 3x Child Themes
PSD to HTML5 www.exportkit.com CSS3 and JavaScript
Example Bootstrap Simple Class
• .btn
• .btn-default
Bootstrap Complex Components
Bootstrap also supports complex element nesting to create some components, and depending
on the webpage – these structures can also be reused in other elements to create dynamic
elements. Dropdowns, lists, pills, etc. are all examples of complex components.
Example Bootstrap Complex Class
• .form-inline > .has-success > .control-label
• .form-group > input
Your PSD and Bootstrap
You will need to create your CSS Styles in your PSD similar to the Bootstrap component
structure to manipulate the elements. Once you add CSS classes to your PSD layers, you will
override the native Bootstrap settings for the respective element.
Remember, direct selectors > need to use >> (double greater than) in the PSD layer name.
Example ${css|styles}
• Bootstrap Class
.nav-tabs>li>a
• PSD layer name
.nav-tabs>>li>>a
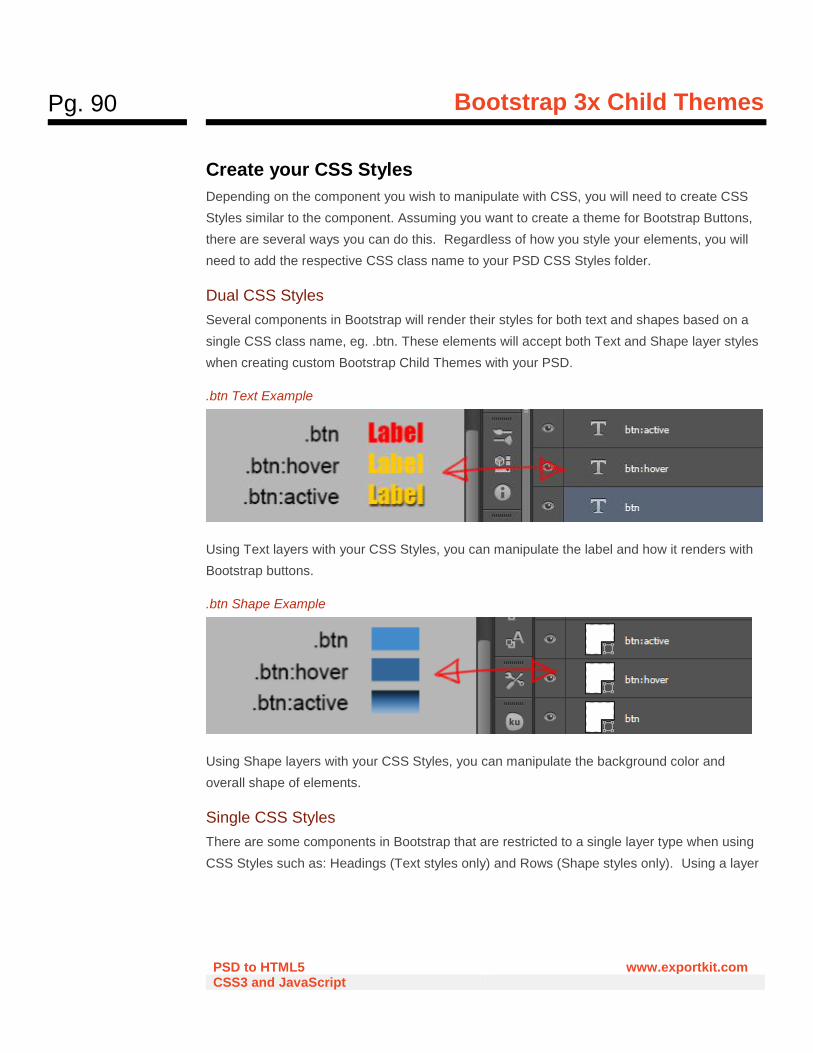
Pg. 90
Bootstrap 3x Child Themes
PSD to HTML5 www.exportkit.com CSS3 and JavaScript
Create your CSS Styles
Depending on the component you wish to manipulate with CSS, you will need to create CSS
Styles similar to the component. Assuming you want to create a theme for Bootstrap Buttons,
there are several ways you can do this. Regardless of how you style your elements, you will
need to add the respective CSS class name to your PSD CSS Styles folder.
Dual CSS Styles
Several components in Bootstrap will render their styles for both text and shapes based on a
single CSS class name, eg. .btn. These elements will accept both Text and Shape layer styles
when creating custom Bootstrap Child Themes with your PSD.
.btn Text Example
Using Text layers with your CSS Styles, you can manipulate the label and how it renders with
Bootstrap buttons.
.btn Shape Example
Using Shape layers with your CSS Styles, you can manipulate the background color and
overall shape of elements.
Single CSS Styles
There are some components in Bootstrap that are restricted to a single layer type when using
CSS Styles such as: Headings (Text styles only) and Rows (Shape styles only). Using a layer
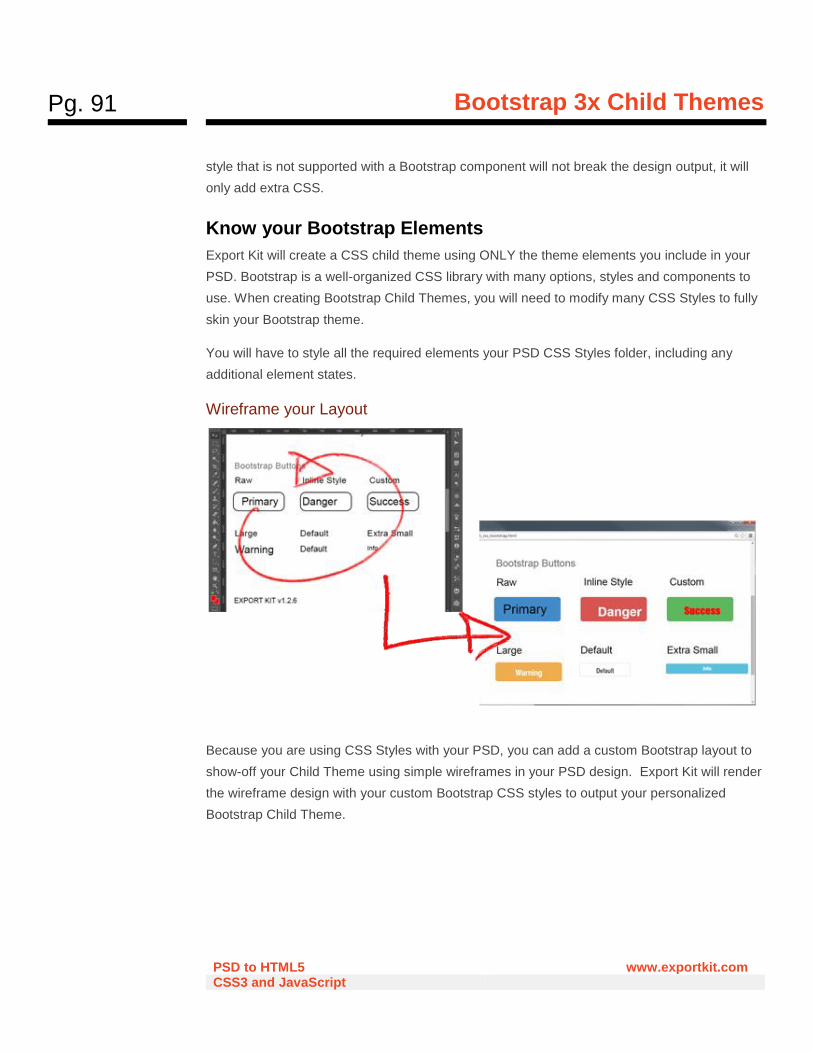
Pg. 91
Bootstrap 3x Child Themes
PSD to HTML5 www.exportkit.com CSS3 and JavaScript
style that is not supported with a Bootstrap component will not break the design output, it will
only add extra CSS.
Know your Bootstrap Elements
Export Kit will create a CSS child theme using ONLY the theme elements you include in your
PSD. Bootstrap is a well-organized CSS library with many options, styles and components to
use. When creating Bootstrap Child Themes, you will need to modify many CSS Styles to fully
skin your Bootstrap theme.
You will have to style all the required elements your PSD CSS Styles folder, including any
additional element states.
Wireframe your Layout
Because you are using CSS Styles with your PSD, you can add a custom Bootstrap layout to
show-off your Child Theme using simple wireframes in your PSD design. Export Kit will render
the wireframe design with your custom Bootstrap CSS styles to output your personalized
Bootstrap Child Theme.

Pg. 92
Bootstrap 3x Child Themes
PSD to HTML5 www.exportkit.com CSS3 and JavaScript
Include Bootstrap with your Export
You have the option of downloading Bootstrap or using the official CDN found on
getbootstrap.com. This will allow you to use Bootstrap with your export or any HTML project.
Before you export your custom Bootstrap Child Theme you will need to add a link to your local
Bootstrap CSS file, or the official CDN to your Custom HEAD.
Bootstrap CDN
<!-- Required --> <link rel="stylesheet" href="https://maxcdn.bootstrapcdn.com/bootstrap/3.2.0/css/bootstrap.min.css"> <!-- Optional --> <link rel="stylesheet" href="https://maxcdn.bootstrapcdn.com/bootstrap/3.2.0/css/bootstrap-theme.min.css"> <script src="https://maxcdn.bootstrapcdn.com/bootstrap/3.2.0/js/bootstrap.min.js"></script>
Pg. 93
JavaScript and jQuery Slideshows
PSD to HTML5 www.exportkit.com CSS3 and JavaScript
JavaScript and jQuery Slideshows Convert your Photoshop PSD to a JavaScript or jQuery slideshow in a snap. JavaScript
slideshows with jQuery support is made simple and easy from any PSD in Photoshop with
Export Kit. There are a few simple requirements to build your PSD to JavaScript or jQuery
slideshow – once these are met, you can export unlimited JavaScript slideshows from any PSD
file.
Requirements
1. JavaScript slideshow script
2. Matching PSD layout
Your Slideshow Script
Depending on your slideshow needs, you may want to Google “free javascript slideshow script”
and download a free JavaScript slideshow script to get you started with your slideshow. You
will need to have a general understanding of HTML and JavaScript to create your own custom
slideshow or modify an existing one. If you do not understand JavaScript, ask us a question or
hire a developer!
The setup of your JavaScript file is important because the HTML elements the script looks for,
are the same PSD layer elements you are required to create. Export Kit makes it easy to map
your JavaScript elements to any Photoshop layer element, you only need to know the name, or
the class to include in your PSD.
Example JavaScript using HTML elements
//HTML element with the id: #ekslider_nav_left //Previous Nav function ekslider_nav_left(){ return document.getElementById('ekslider_nav_left'); } //HTML element with the id: #ekslider_nav_right //Next Nav function ekslider_nav_left(){ return document.getElementById('ekslider_nav_right'); }
Pg. 94
JavaScript and jQuery Slideshows
PSD to HTML5 www.exportkit.com CSS3 and JavaScript
Pure JavaScript Slideshows
Using document.getElementById is very common in JavaScript and requires a PSD layer with
the name of element_id. If your JavaScript slideshow is looking for a layer called slide_images
then you will need to create that layer/folder in your PSD.
Pure jQuery Slideshows
Using both queries for id and class are very common in jQuery, so you will need to check the
actual script file to see which is used. If your jQuery slideshow is looking for a class
called .slider-nav-next then you will need to add a ${css|style} tag to a layer in your PSD.
Know your Slideshow Elements
Regardless of a free or custom JavaScript slideshow script, each slideshow will require its own
HTML elements to render correctly. Your JavaScript will add functionality to your PSD layer
elements in your slideshow output. This will require you to have a related layer names so your
JavaScript file will reference the correct PSD layers.
If you download a JavaScript slideshow script then you will also likely receive instructions on
including that script with your website, you will need to mimic the slideshow install instructions
in your PSD file. This process will mostly involve making sure your PSD layer names match
the names/classes of the elements in your JavaScript file.
Custom Slideshows
If you created your own custom slideshow script then you will only have to ensure correct id or
class references. You will need to have all JavaScript slideshow elements in your PSD file - or
the script may cause an error.
Both your JavaScript and PSD file must contain the same elements:
1. images_container
2. view_more_icon
3. nav_next
4. nav_previous
5. nav_pause
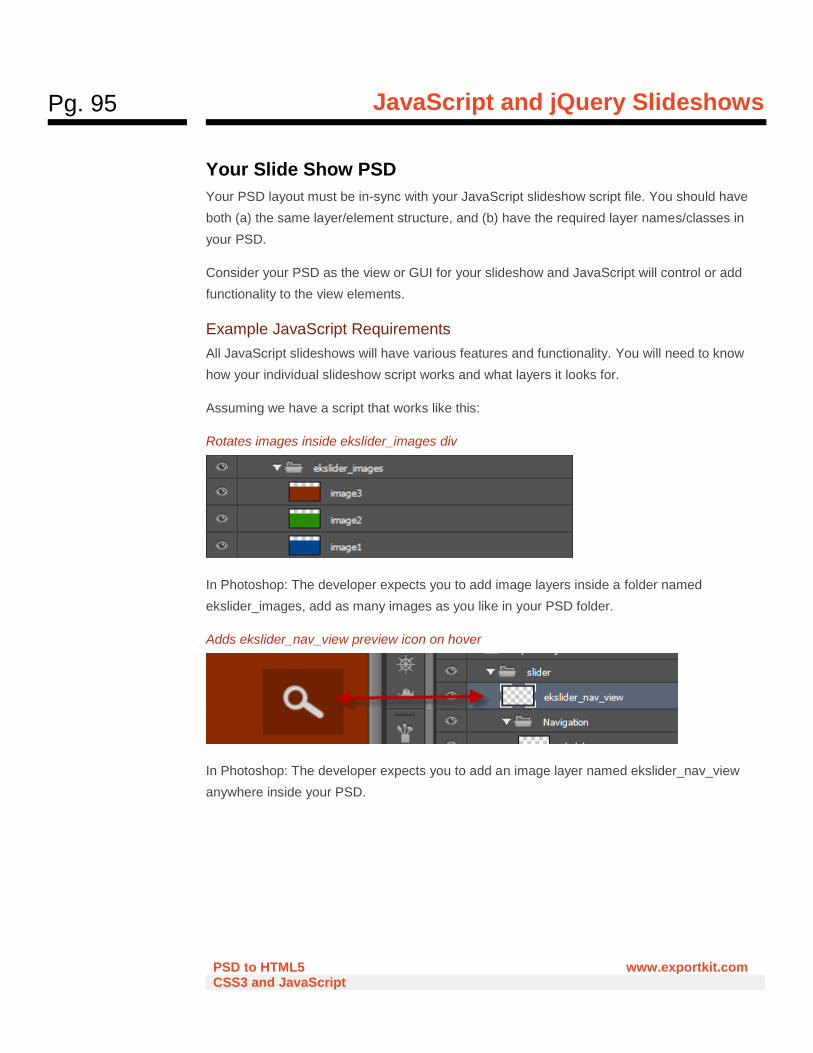
Pg. 95
JavaScript and jQuery Slideshows
PSD to HTML5 www.exportkit.com CSS3 and JavaScript
Your Slide Show PSD
Your PSD layout must be in-sync with your JavaScript slideshow script file. You should have
both (a) the same layer/element structure, and (b) have the required layer names/classes in
your PSD.
Consider your PSD as the view or GUI for your slideshow and JavaScript will control or add
functionality to the view elements.
Example JavaScript Requirements
All JavaScript slideshows will have various features and functionality. You will need to know
how your individual slideshow script works and what layers it looks for.
Assuming we have a script that works like this:
Rotates images inside ekslider_images div
In Photoshop: The developer expects you to add image layers inside a folder named
ekslider_images, add as many images as you like in your PSD folder.
Adds ekslider_nav_view preview icon on hover
In Photoshop: The developer expects you to add an image layer named ekslider_nav_view
anywhere inside your PSD.
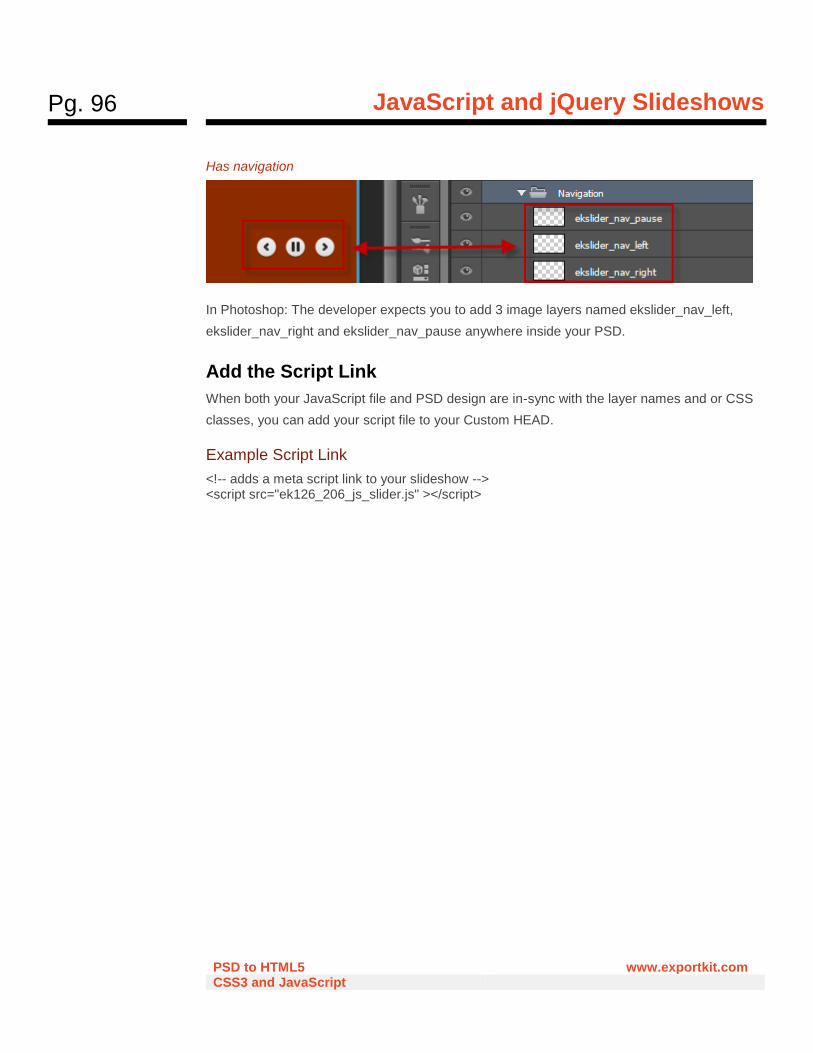
Pg. 96
JavaScript and jQuery Slideshows
PSD to HTML5 www.exportkit.com CSS3 and JavaScript
Has navigation
In Photoshop: The developer expects you to add 3 image layers named ekslider_nav_left,
ekslider_nav_right and ekslider_nav_pause anywhere inside your PSD.
Add the Script Link
When both your JavaScript file and PSD design are in-sync with the layer names and or CSS
classes, you can add your script file to your Custom HEAD.
Example Script Link
<!-- adds a meta script link to your slideshow --> <script src="ek126_206_js_slider.js" ></script>
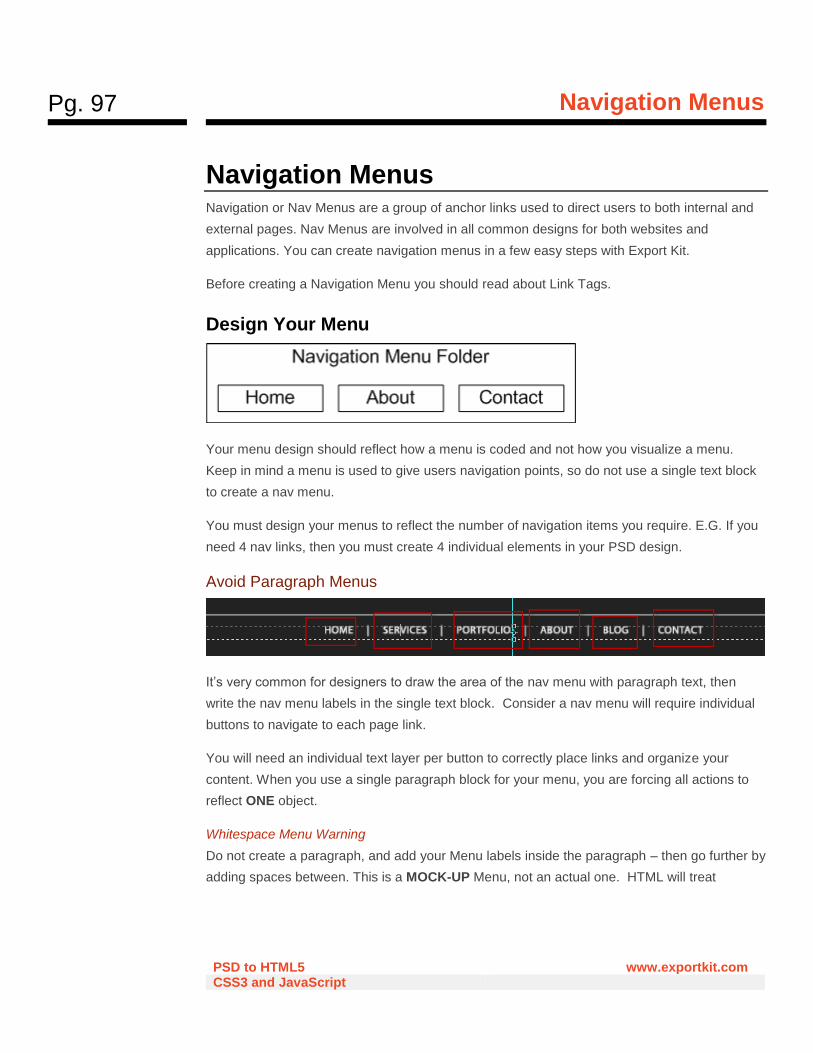
Pg. 97
Navigation Menus
PSD to HTML5 www.exportkit.com CSS3 and JavaScript
Navigation Menus Navigation or Nav Menus are a group of anchor links used to direct users to both internal and
external pages. Nav Menus are involved in all common designs for both websites and
applications. You can create navigation menus in a few easy steps with Export Kit.
Before creating a Navigation Menu you should read about Link Tags.
Design Your Menu
Your menu design should reflect how a menu is coded and not how you visualize a menu.
Keep in mind a menu is used to give users navigation points, so do not use a single text block
to create a nav menu.
You must design your menus to reflect the number of navigation items you require. E.G. If you
need 4 nav links, then you must create 4 individual elements in your PSD design.
Avoid Paragraph Menus
It’s very common for designers to draw the area of the nav menu with paragraph text, then
write the nav menu labels in the single text block. Consider a nav menu will require individual
buttons to navigate to each page link.
You will need an individual text layer per button to correctly place links and organize your
content. When you use a single paragraph block for your menu, you are forcing all actions to
reflect ONE object.
Whitespace Menu Warning
Do not create a paragraph, and add your Menu labels inside the paragraph – then go further by
adding spaces between. This is a MOCK-UP Menu, not an actual one. HTML will treat
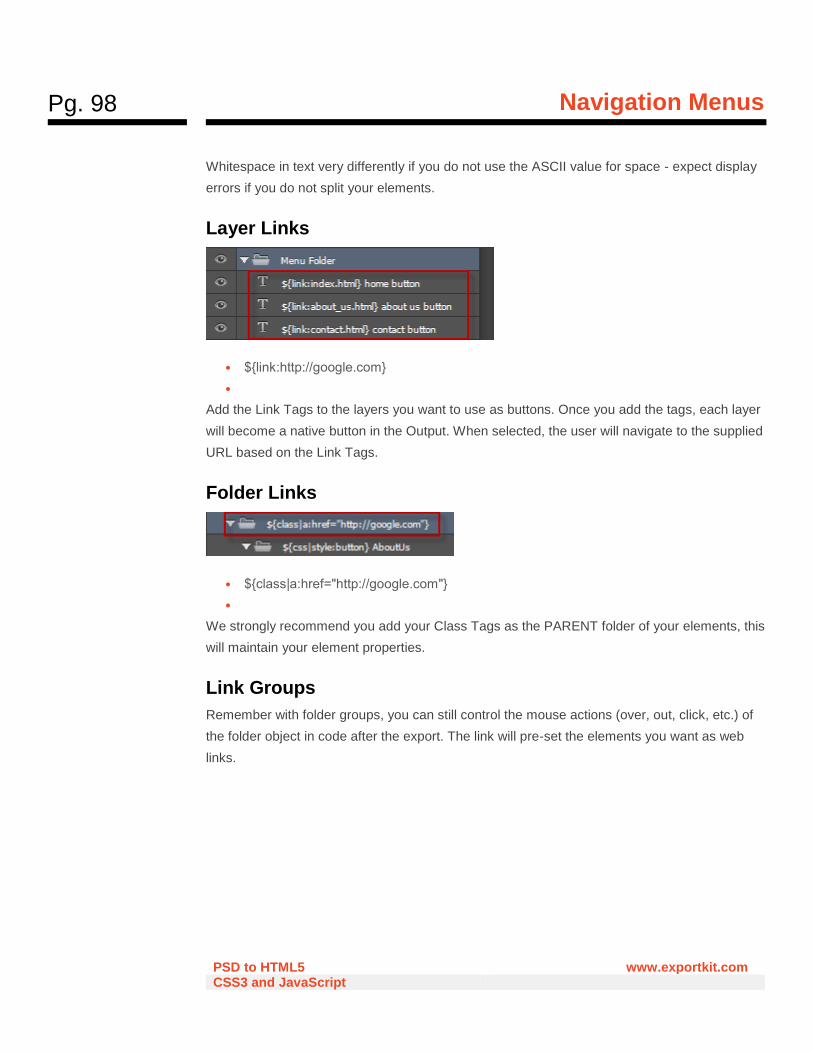
Pg. 98
Navigation Menus
PSD to HTML5 www.exportkit.com CSS3 and JavaScript
Whitespace in text very differently if you do not use the ASCII value for space - expect display
errors if you do not split your elements.
Layer Links
• ${link:http://google.com}
•
Add the Link Tags to the layers you want to use as buttons. Once you add the tags, each layer
will become a native button in the Output. When selected, the user will navigate to the supplied
URL based on the Link Tags.
Folder Links
• ${class|a:href="http://google.com"}
•
We strongly recommend you add your Class Tags as the PARENT folder of your elements, this
will maintain your element properties.
Link Groups
Remember with folder groups, you can still control the mouse actions (over, out, click, etc.) of
the folder object in code after the export. The link will pre-set the elements you want as web
links.
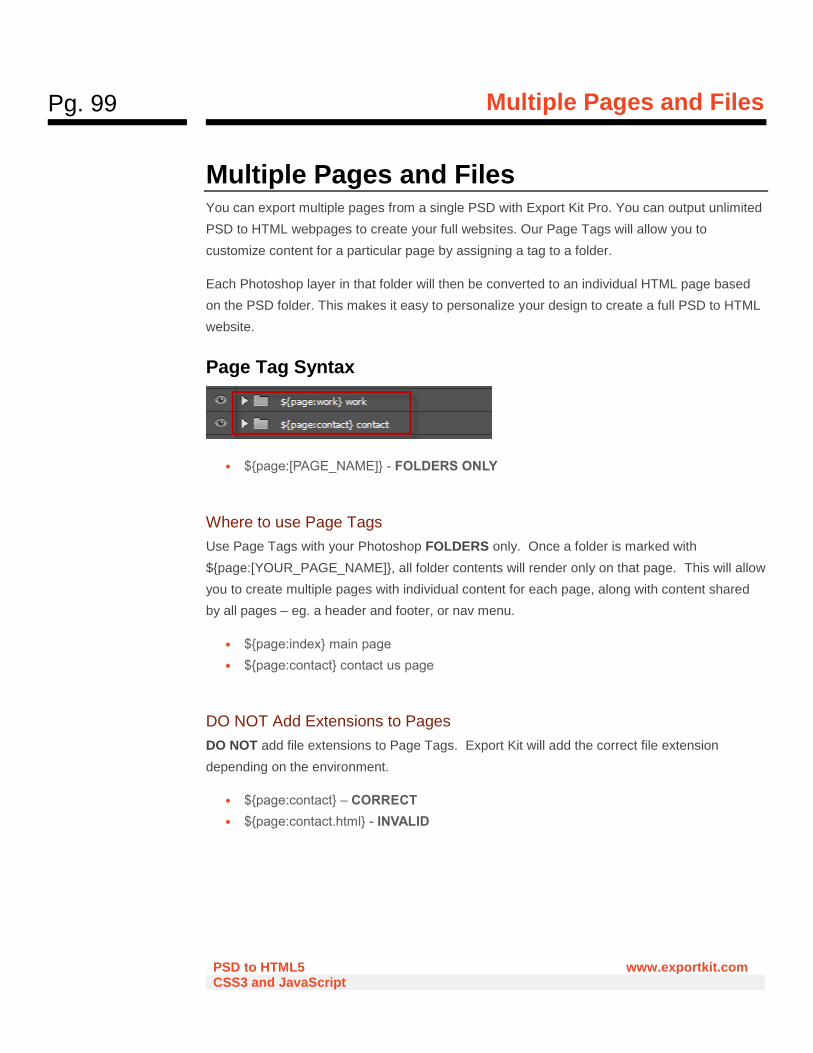
Pg. 99
Multiple Pages and Files
PSD to HTML5 www.exportkit.com CSS3 and JavaScript
Multiple Pages and Files You can export multiple pages from a single PSD with Export Kit Pro. You can output unlimited
PSD to HTML webpages to create your full websites. Our Page Tags will allow you to
customize content for a particular page by assigning a tag to a folder.
Each Photoshop layer in that folder will then be converted to an individual HTML page based
on the PSD folder. This makes it easy to personalize your design to create a full PSD to HTML
website.
Page Tag Syntax
• ${page:[PAGE_NAME]} - FOLDERS ONLY
Where to use Page Tags
Use Page Tags with your Photoshop FOLDERS only. Once a folder is marked with
${page:[YOUR_PAGE_NAME]}, all folder contents will render only on that page. This will allow
you to create multiple pages with individual content for each page, along with content shared
by all pages – eg. a header and footer, or nav menu.
• ${page:index} main page
• ${page:contact} contact us page
DO NOT Add Extensions to Pages
DO NOT add file extensions to Page Tags. Export Kit will add the correct file extension
depending on the environment.
• ${page:contact} – CORRECT
• ${page:contact.html} - INVALID
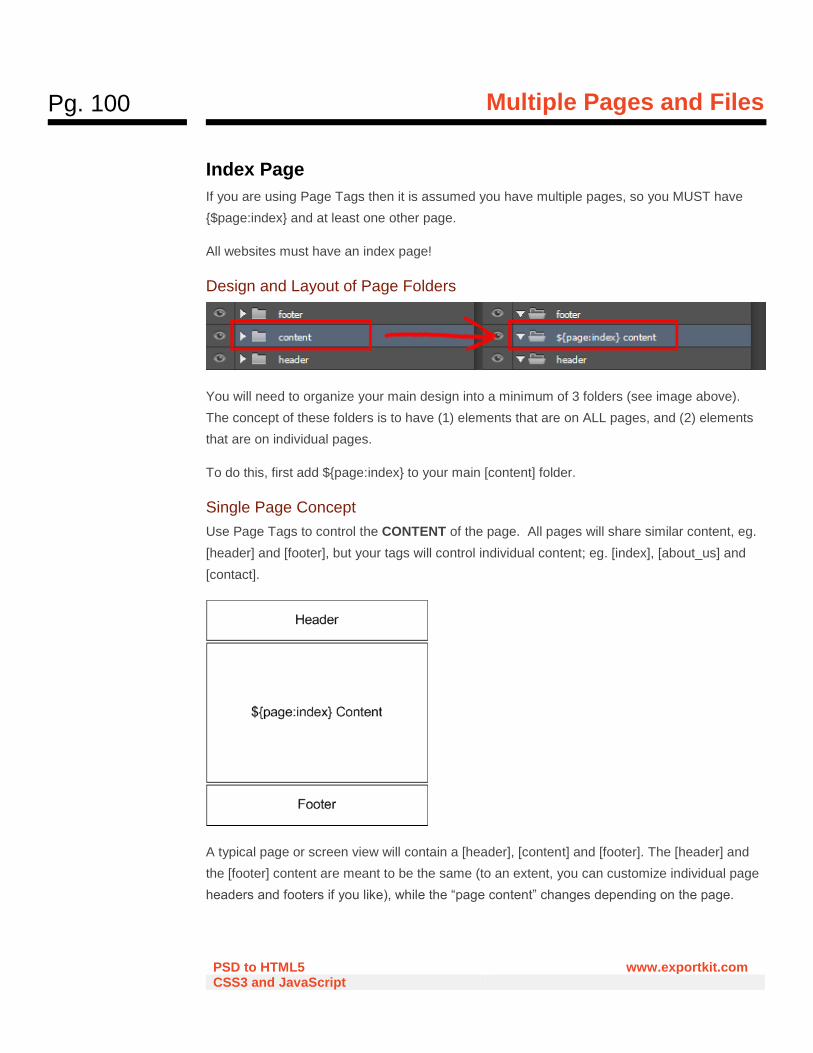
Pg. 100
Multiple Pages and Files
PSD to HTML5 www.exportkit.com CSS3 and JavaScript
Index Page
If you are using Page Tags then it is assumed you have multiple pages, so you MUST have
{$page:index} and at least one other page.
All websites must have an index page!
Design and Layout of Page Folders
You will need to organize your main design into a minimum of 3 folders (see image above).
The concept of these folders is to have (1) elements that are on ALL pages, and (2) elements
that are on individual pages.
To do this, first add ${page:index} to your main [content] folder.
Single Page Concept
Use Page Tags to control the CONTENT of the page. All pages will share similar content, eg.
[header] and [footer], but your tags will control individual content; eg. [index], [about_us] and
[contact].
A typical page or screen view will contain a [header], [content] and [footer]. The [header] and
the [footer] content are meant to be the same (to an extent, you can customize individual page
headers and footers if you like), while the “page content” changes depending on the page.

Pg. 101
Multiple Pages and Files
PSD to HTML5 www.exportkit.com CSS3 and JavaScript
Page Setup
Before creating pages, first think about the content you want to include in each page. Each
Page Tag folder will render as an individual page containing both (1) the contents NOT
included in pages, and (2) the content ONLY included in the current page.
Layout of Multiple Page Folders
Assuming you want to create 3 web pages, you will only need Page Tags for the content of the
pages – not the header and footer.
Multiple Pages Concept
In most designs the [header] and [footer] portions of the website are reused on each page –
although you have the option of creating a custom header or footer for each page.
Dynamic Pages Concept
You can add Page Tags anywhere in your PSD document, eg. [header] or [footer] to have
custom content rendered on that page.
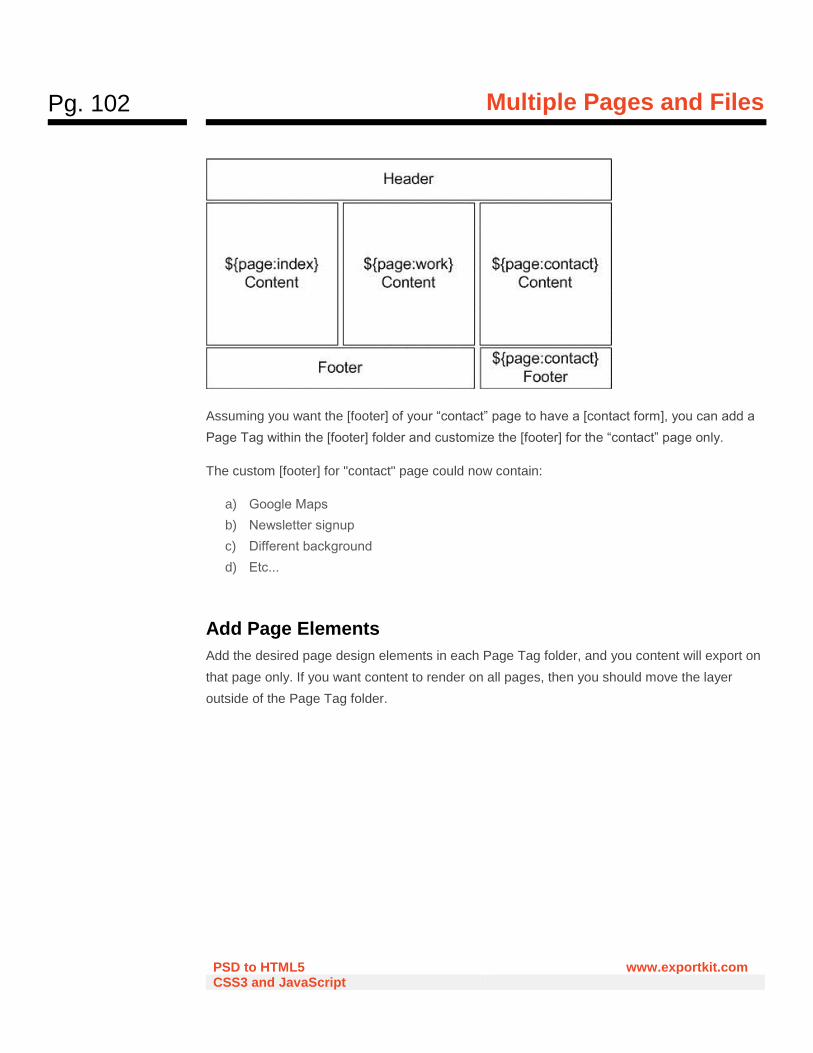
Pg. 102
Multiple Pages and Files
PSD to HTML5 www.exportkit.com CSS3 and JavaScript
Assuming you want the [footer] of your “contact” page to have a [contact form], you can add a
Page Tag within the [footer] folder and customize the [footer] for the “contact” page only.
The custom [footer] for "contact" page could now contain:
a) Google Maps
b) Newsletter signup
c) Different background
d) Etc...
Add Page Elements
Add the desired page design elements in each Page Tag folder, and you content will export on
that page only. If you want content to render on all pages, then you should move the layer
outside of the Page Tag folder.
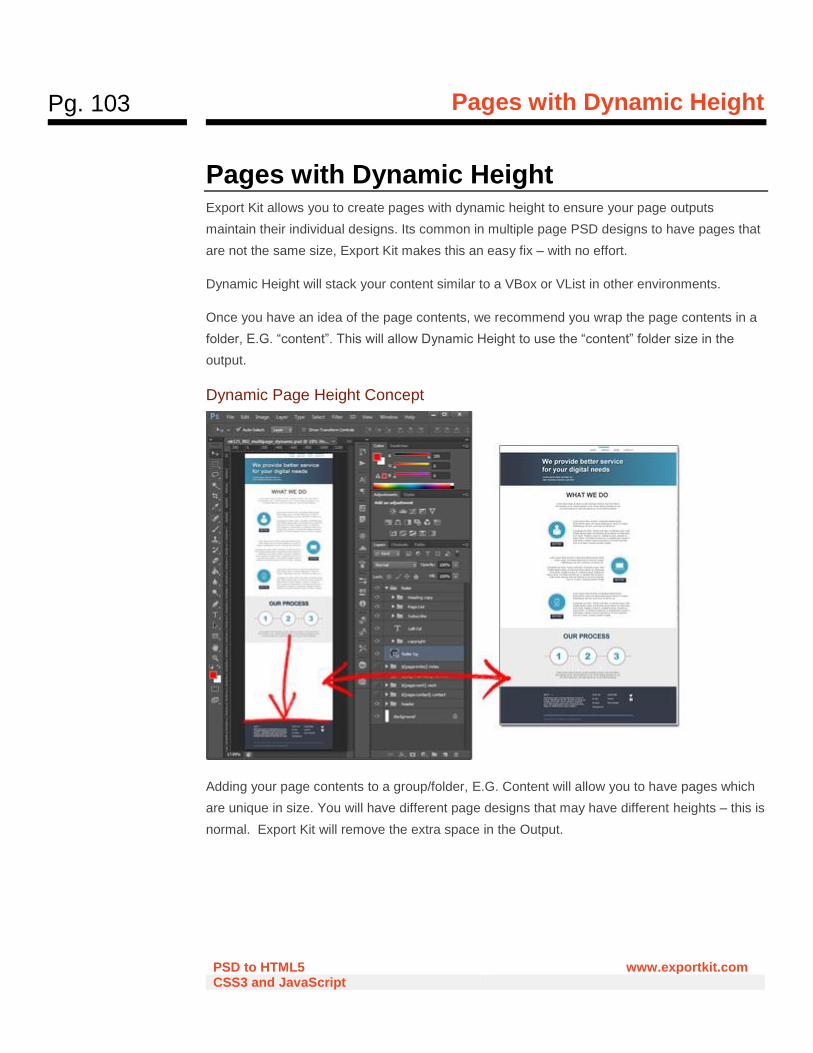
Pg. 103
Pages with Dynamic Height
PSD to HTML5 www.exportkit.com CSS3 and JavaScript
Pages with Dynamic Height Export Kit allows you to create pages with dynamic height to ensure your page outputs
maintain their individual designs. Its common in multiple page PSD designs to have pages that
are not the same size, Export Kit makes this an easy fix – with no effort.
Dynamic Height will stack your content similar to a VBox or VList in other environments.
Once you have an idea of the page contents, we recommend you wrap the page contents in a
folder, E.G. “content”. This will allow Dynamic Height to use the “content” folder size in the
output.
Dynamic Page Height Concept
Adding your page contents to a group/folder, E.G. Content will allow you to have pages which
are unique in size. You will have different page designs that may have different heights – this is
normal. Export Kit will remove the extra space in the Output.
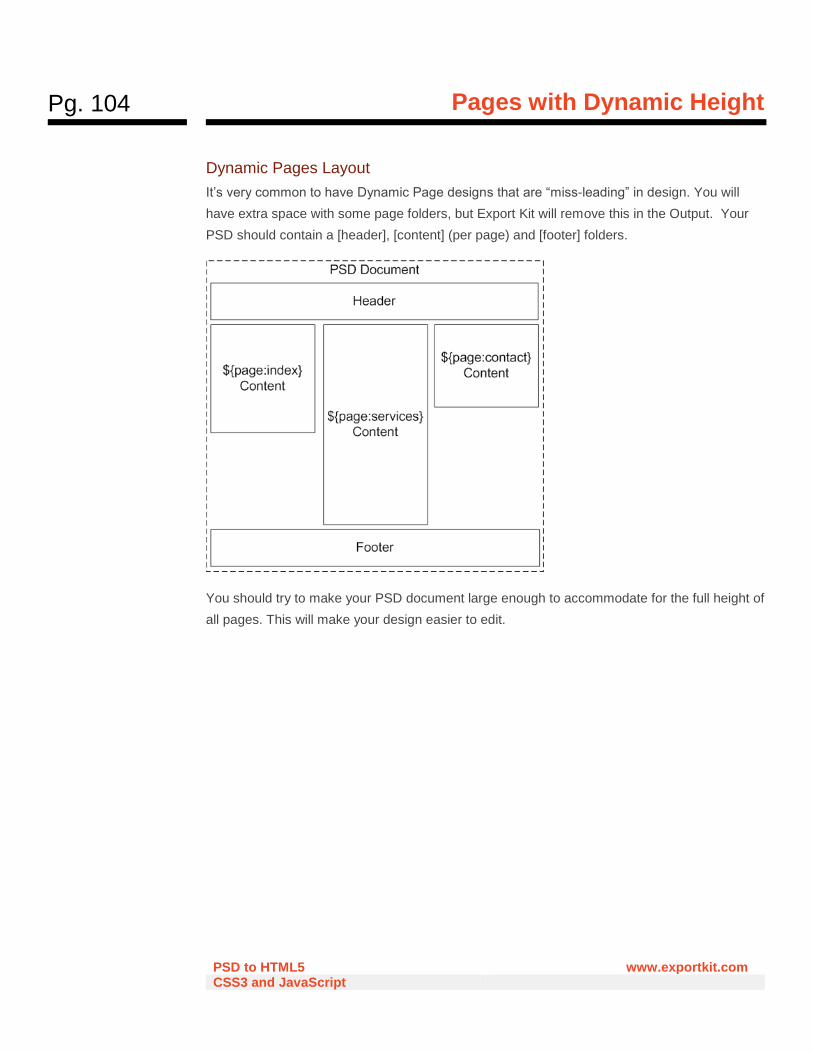
Pg. 104
Pages with Dynamic Height
PSD to HTML5 www.exportkit.com CSS3 and JavaScript
Dynamic Pages Layout
It’s very common to have Dynamic Page designs that are “miss-leading” in design. You will
have extra space with some page folders, but Export Kit will remove this in the Output. Your
PSD should contain a [header], [content] (per page) and [footer] folders.
You should try to make your PSD document large enough to accommodate for the full height of
all pages. This will make your design easier to edit.
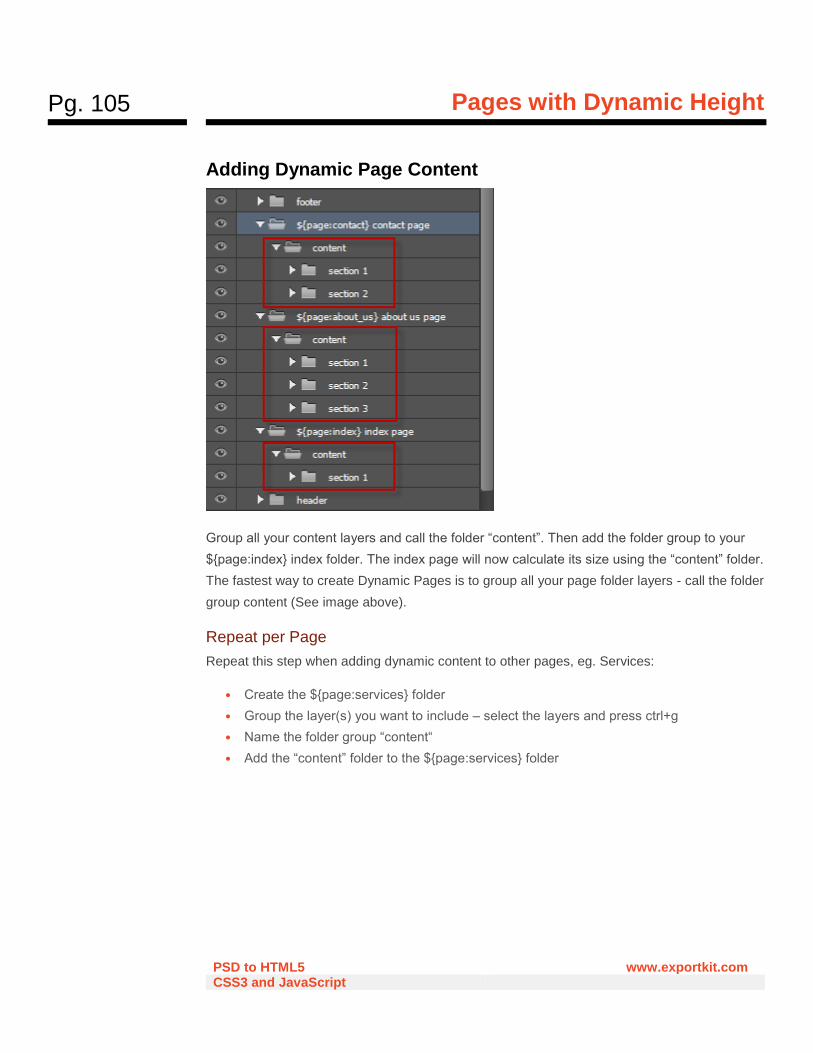
Pg. 105
Pages with Dynamic Height
PSD to HTML5 www.exportkit.com CSS3 and JavaScript
Adding Dynamic Page Content
Group all your content layers and call the folder “content”. Then add the folder group to your
${page:index} index folder. The index page will now calculate its size using the “content” folder.
The fastest way to create Dynamic Pages is to group all your page folder layers - call the folder
group content (See image above).
Repeat per Page
Repeat this step when adding dynamic content to other pages, eg. Services:
• Create the ${page:services} folder
• Group the layer(s) you want to include – select the layers and press ctrl+g
• Name the folder group “content“
• Add the “content” folder to the ${page:services} folder
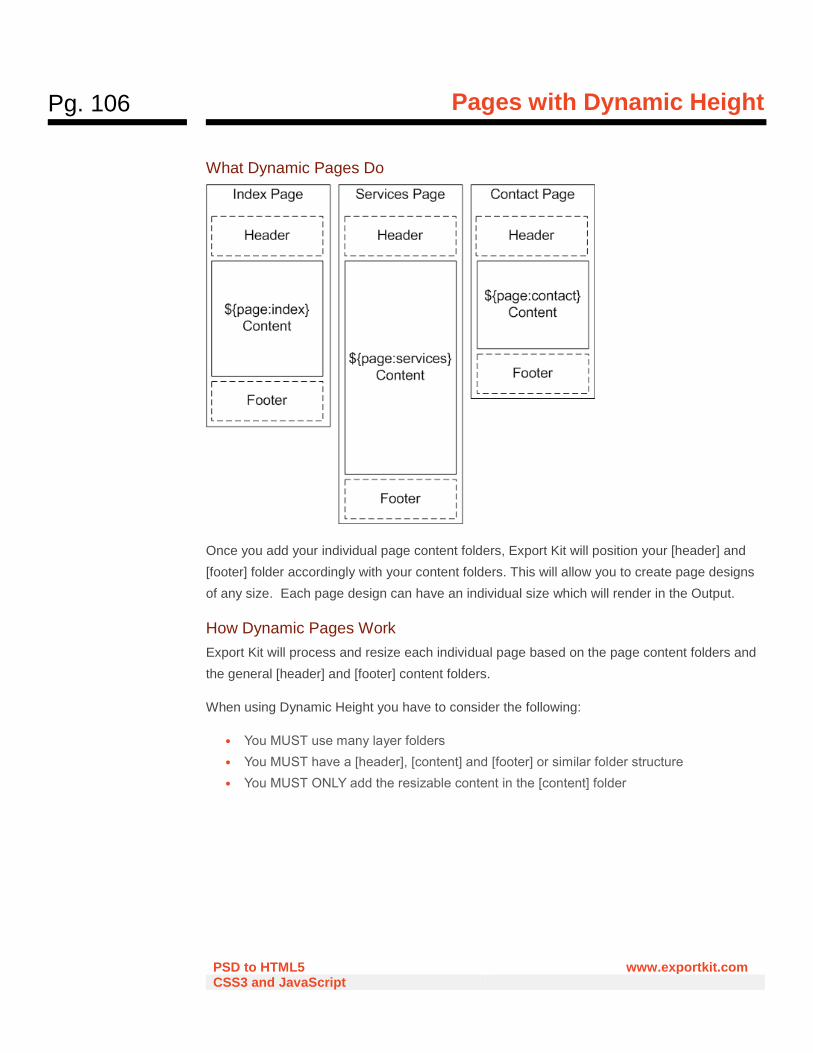
Pg. 106
Pages with Dynamic Height
PSD to HTML5 www.exportkit.com CSS3 and JavaScript
What Dynamic Pages Do
Once you add your individual page content folders, Export Kit will position your [header] and
[footer] folder accordingly with your content folders. This will allow you to create page designs
of any size. Each page design can have an individual size which will render in the Output.
How Dynamic Pages Work
Export Kit will process and resize each individual page based on the page content folders and
the general [header] and [footer] content folders.
When using Dynamic Height you have to consider the following:
• You MUST use many layer folders
• You MUST have a [header], [content] and [footer] or similar folder structure
• You MUST ONLY add the resizable content in the [content] folder
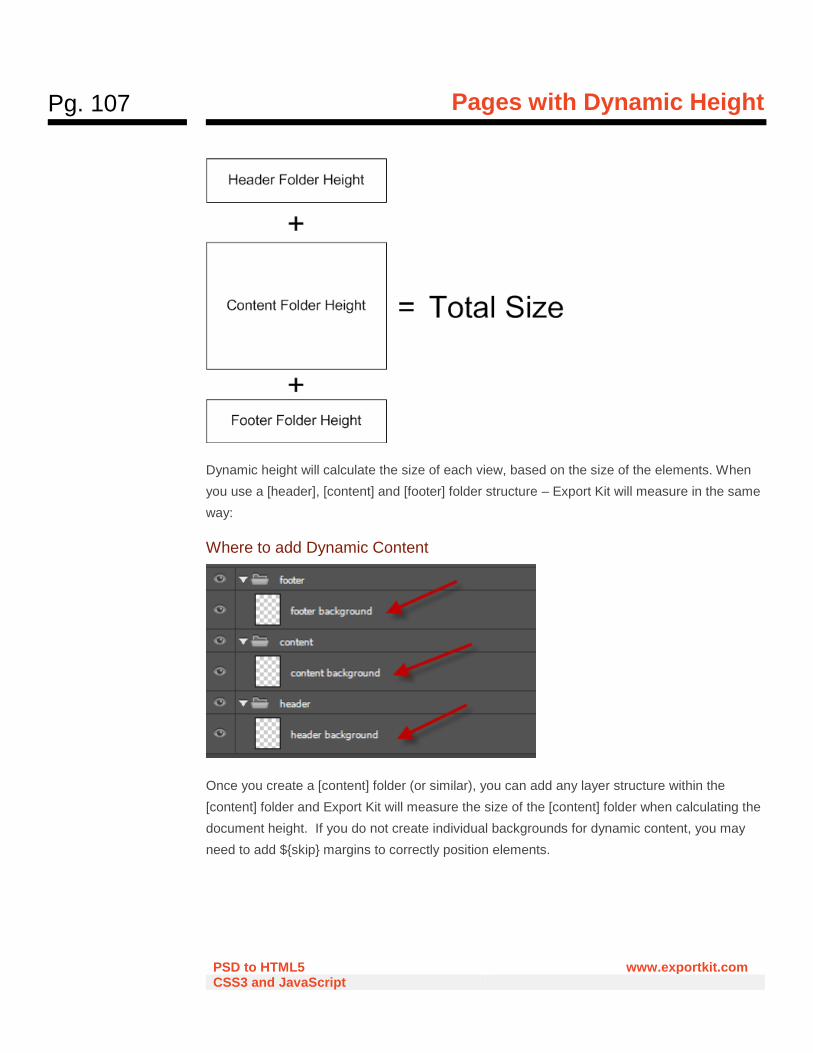
Pg. 107
Pages with Dynamic Height
PSD to HTML5 www.exportkit.com CSS3 and JavaScript
Dynamic height will calculate the size of each view, based on the size of the elements. When
you use a [header], [content] and [footer] folder structure – Export Kit will measure in the same
way:
Where to add Dynamic Content
Once you create a [content] folder (or similar), you can add any layer structure within the
[content] folder and Export Kit will measure the size of the [content] folder when calculating the
document height. If you do not create individual backgrounds for dynamic content, you may
need to add ${skip} margins to correctly position elements.
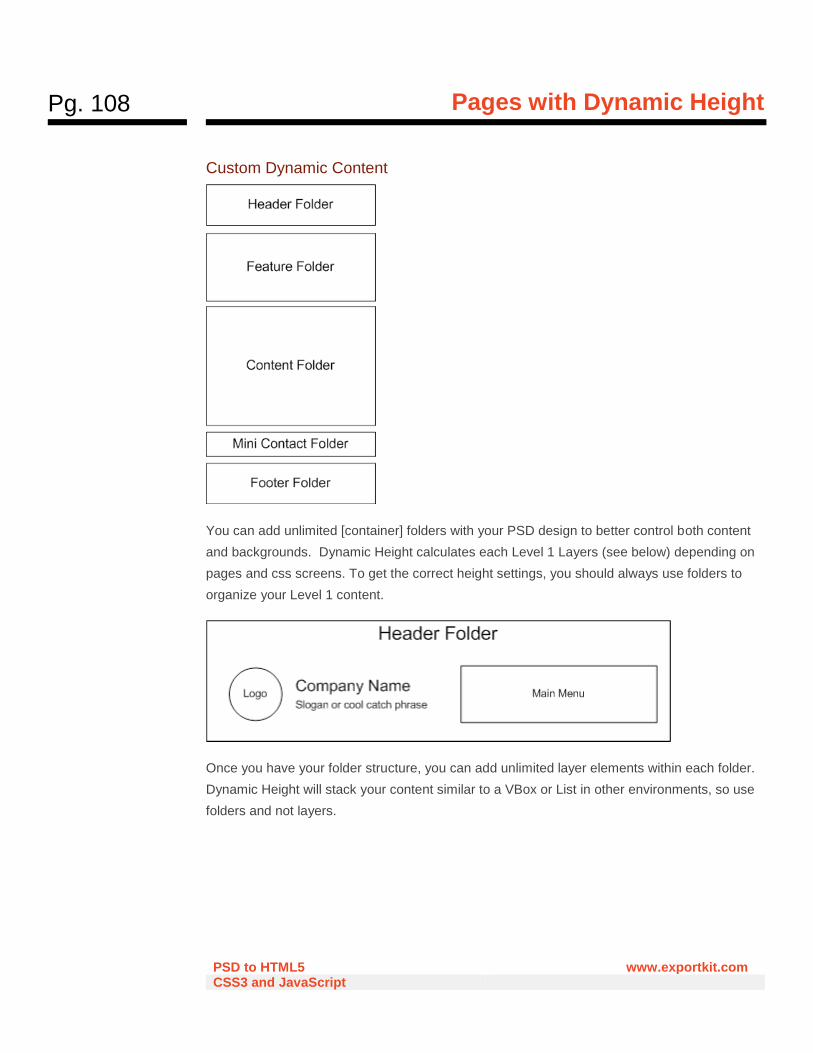
Pg. 108
Pages with Dynamic Height
PSD to HTML5 www.exportkit.com CSS3 and JavaScript
Custom Dynamic Content
You can add unlimited [container] folders with your PSD design to better control both content
and backgrounds. Dynamic Height calculates each Level 1 Layers (see below) depending on
pages and css screens. To get the correct height settings, you should always use folders to
organize your Level 1 content.
Once you have your folder structure, you can add unlimited layer elements within each folder.
Dynamic Height will stack your content similar to a VBox or List in other environments, so use
folders and not layers.
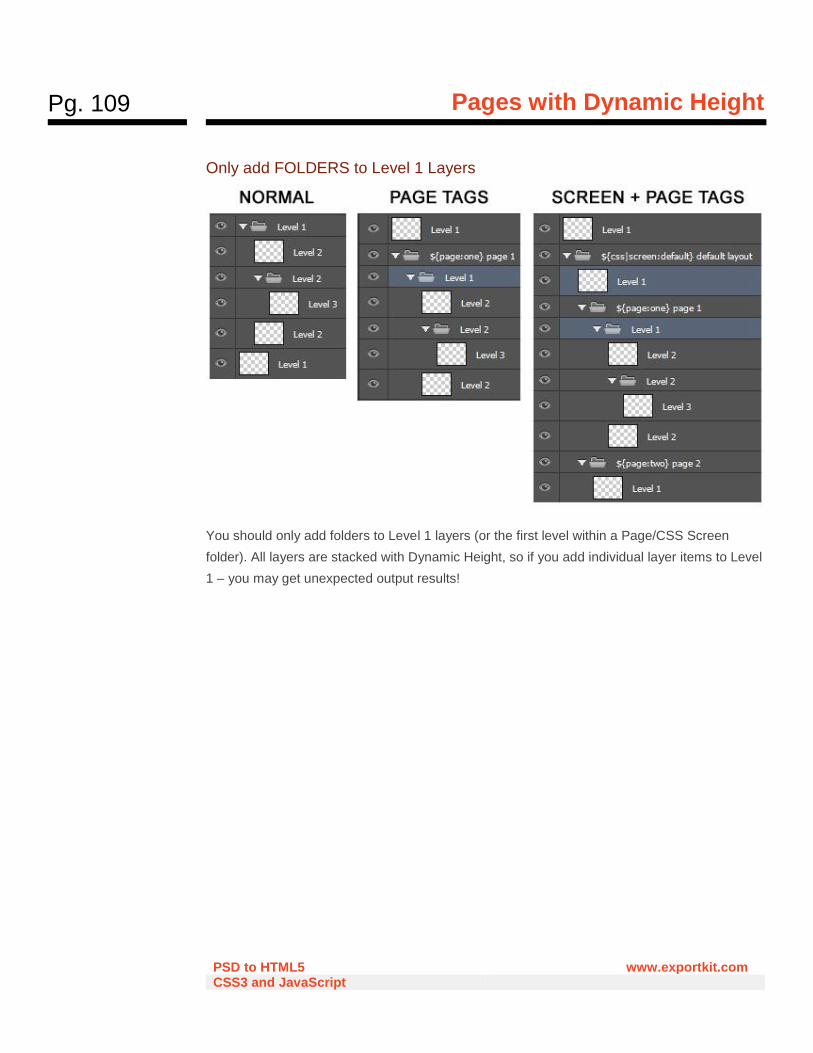
Pg. 109
Pages with Dynamic Height
PSD to HTML5 www.exportkit.com CSS3 and JavaScript
Only add FOLDERS to Level 1 Layers
You should only add folders to Level 1 layers (or the first level within a Page/CSS Screen
folder). All layers are stacked with Dynamic Height, so if you add individual layer items to Level
1 – you may get unexpected output results!
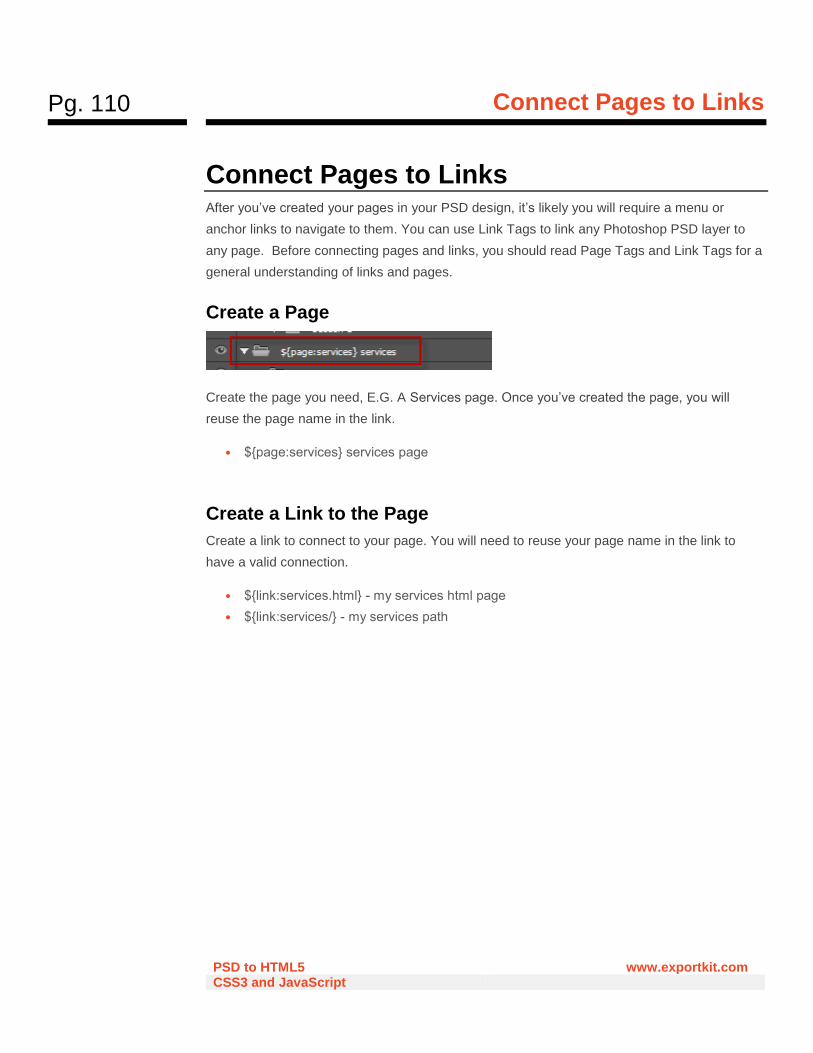
Pg. 110
Connect Pages to Links
PSD to HTML5 www.exportkit.com CSS3 and JavaScript
Connect Pages to Links After you’ve created your pages in your PSD design, it’s likely you will require a menu or
anchor links to navigate to them. You can use Link Tags to link any Photoshop PSD layer to
any page. Before connecting pages and links, you should read Page Tags and Link Tags for a
general understanding of links and pages.
Create a Page
Create the page you need, E.G. A Services page. Once you’ve created the page, you will
reuse the page name in the link.
• ${page:services} services page
Create a Link to the Page
Create a link to connect to your page. You will need to reuse your page name in the link to
have a valid connection.
• ${link:services.html} - my services html page
• ${link:services/} - my services path
Pg. 111
Responsive CSS Screens
PSD to HTML5 www.exportkit.com CSS3 and JavaScript
Responsive CSS Screens Customize your PSD to HTML and responsive CSS output for any device and browser using
custom CSS target screens. Use unlimited PSD to responsive CSS target screens to
personalize your responsive export.
Before you Begin
DO NOT create CSS screen folders BEFORE you have approved the overall design of ALL
pages included in the Output. This will save you lots of editing time.
At this point you should save a copy of your current [.psd] file, this is just a backup.
You design the responsive CSS screen, not us!
Export Kit will not assume you want an element in a particular position or size when you output
your responsive CSS screen. Your design is just that – your design! Export Kit allows you to
customize each target screen so you can personalize your Output for that screen. Your
responsive design should look the way you want it to look, not the way we think it should!
We recommend using a Default screen
You will need a default responsive CSS screen when using CSS Screen Tags. You can do
this quickly by grouping your entire PSD document and naming the folder group
“${css|screen:default}“.
You need 1 screen folder per Target screen
If you have 3 target screens – E.G. Desktop, Mobile and Tablet, then you will need 3 CSS
screen folders to support the design.
You CAN change the Size, Position, and Effects of Layers
Each responsive CSS screen folder allows you to change the look and feel of your Output to
target the user screen size. You can customize the element size, position and effects for each
individual CSS screen folder.
You CANNOT change the Layer name
This is a CSS3 rule, where media screens must reflect the same element in the HTML page.
DO NOT change the layer names in CSS screen folders!
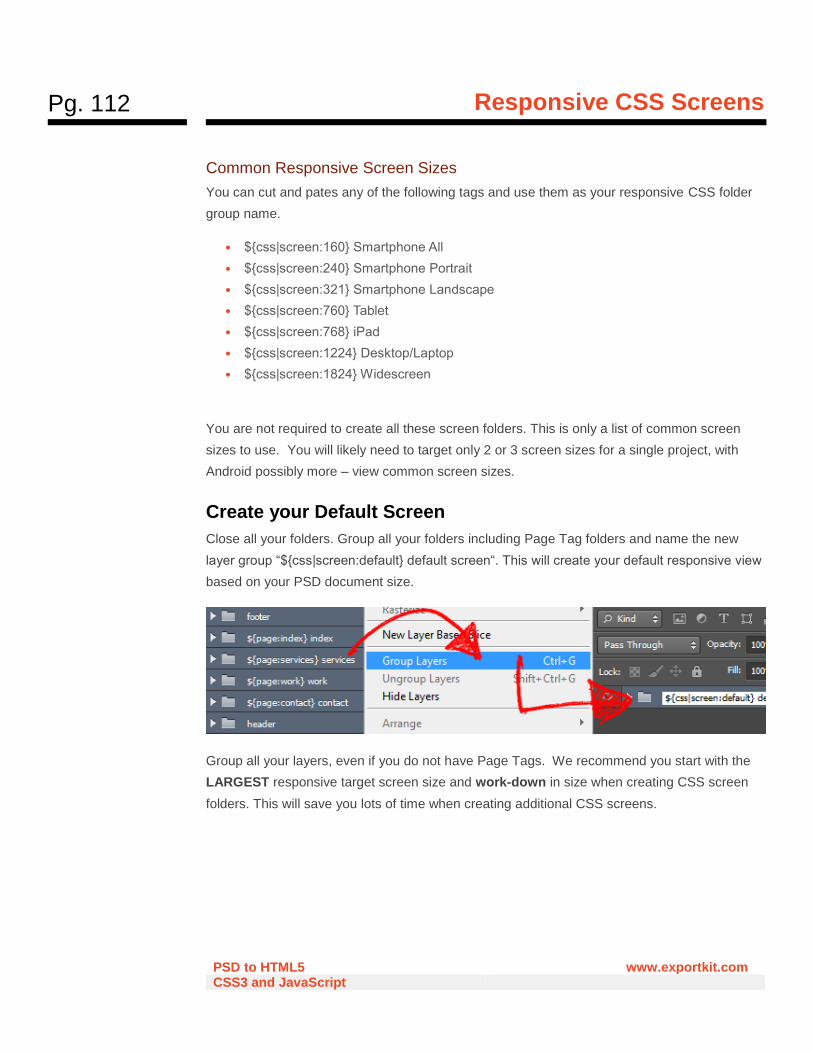
Pg. 112
Responsive CSS Screens
PSD to HTML5 www.exportkit.com CSS3 and JavaScript
Common Responsive Screen Sizes
You can cut and pates any of the following tags and use them as your responsive CSS folder
group name.
• ${css|screen:160} Smartphone All
• ${css|screen:240} Smartphone Portrait
• ${css|screen:321} Smartphone Landscape
• ${css|screen:760} Tablet
• ${css|screen:768} iPad
• ${css|screen:1224} Desktop/Laptop
• ${css|screen:1824} Widescreen
You are not required to create all these screen folders. This is only a list of common screen
sizes to use. You will likely need to target only 2 or 3 screen sizes for a single project, with
Android possibly more – view common screen sizes.
Create your Default Screen
Close all your folders. Group all your folders including Page Tag folders and name the new
layer group “${css|screen:default} default screen“. This will create your default responsive view
based on your PSD document size.
Group all your layers, even if you do not have Page Tags. We recommend you start with the
LARGEST responsive target screen size and work-down in size when creating CSS screen
folders. This will save you lots of time when creating additional CSS screens.
Pg. 113
Responsive CSS Screens
PSD to HTML5 www.exportkit.com CSS3 and JavaScript
Adding Elements After you Export
You should always finalize your design BEFORE you create responsive CSS screen folders.
There are situations where you may want to add elements to your responsive design that are
NOT included in your default screen.
First add the Element to the Default screen folder
You MUST add the element to the ${css|screen:default} folder first. You can control elements
in any CSS screen folder, but you MUST add the element to the ${css|screen:default} folder
first. This will register the element for the output.
Add the Element to ALL other screen folders
You MUST copy the element to ALL CSS screen folders. If you have multiple target screens
you want to include the new element in, you will have to copy the element to ALL CSS screen
folders, then hide the layer inside CSS screen folder that you are not targeting.
This will give you access to the element for that target screen, and make the element invisible
on other screens. Once you copy your new element layer, Photoshop will add “Copy X” to the
layer name; where X is the number of times the layer has been copied. E.G. “New Responsive
Layer Copy 2” - Delete “Copy X” from your layer name.
All layers copied to CSS screen folders MUST have the SAME layer name.
Single Screen Elements
If you DO NOT want the element visible in a target screens then:
• Hide the element and enable Include Hidden Layers
• Or, set the element alpha to 0
Create a Target Screen
Copy a CSS screen size from the list above, E.G. ${css|screen:760} Tablet. Select your default
screen folder, ${css|screen:defulat} and duplicate the folder group.
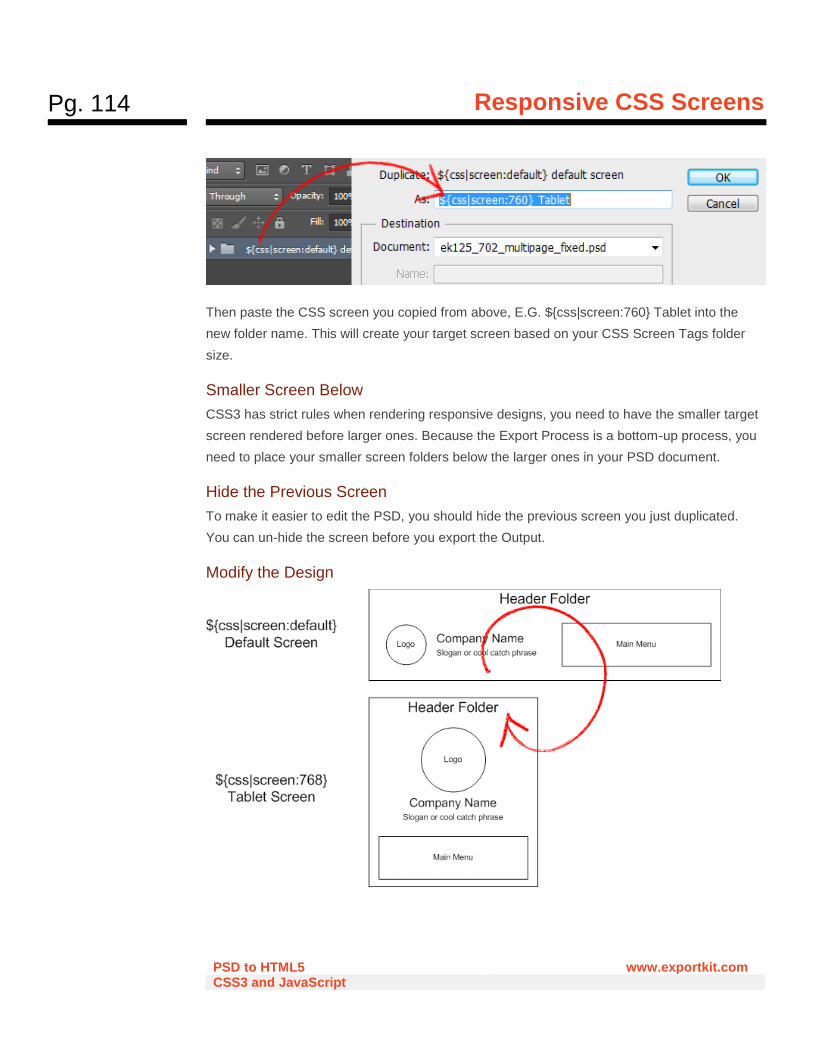
Pg. 114
Responsive CSS Screens
PSD to HTML5 www.exportkit.com CSS3 and JavaScript
Then paste the CSS screen you copied from above, E.G. ${css|screen:760} Tablet into the
new folder name. This will create your target screen based on your CSS Screen Tags folder
size.
Smaller Screen Below
CSS3 has strict rules when rendering responsive designs, you need to have the smaller target
screen rendered before larger ones. Because the Export Process is a bottom-up process, you
need to place your smaller screen folders below the larger ones in your PSD document.
Hide the Previous Screen
To make it easier to edit the PSD, you should hide the previous screen you just duplicated.
You can un-hide the screen before you export the Output.
Modify the Design
Pg. 115
Responsive CSS Screens
PSD to HTML5 www.exportkit.com CSS3 and JavaScript
You can now modify your new CSS screen folder and its contents to match your target screen
design. You can resize any or all content, change layer effects and positions of all elements in
the new CSS screen folder. You can change ANY layer property including color, size, and
effects; but DO NOT change the layer names in CSS screen folders!
Adding Additional Target Screens
Repeat this step for each target screen you require in your project. You can add unlimited CSS
screen folders to personalize your Output. Try to add as many screens as you can to target the
devices your project requires.
There are many ways to handle additional target screens when Using Align Output and Hide
Overflow with your export. This will allow you to use fewer target screens to support multiple
sizes.
CSS3 Rule
You MUST place your smaller CSS target screens BELOW the larger ones or you will have
unexpected results in your output.
Add a Minimum Target Size
You should always add a base or minimum target screen along with your default to prevent
display errors. When using Responsive Screens, each screen you create in Photoshop will
ONLY render if that target size is met.
Export Kit does not limit the number of CSS screen folders you use, but the more layers and
folders in your PSD - the longer the export time.
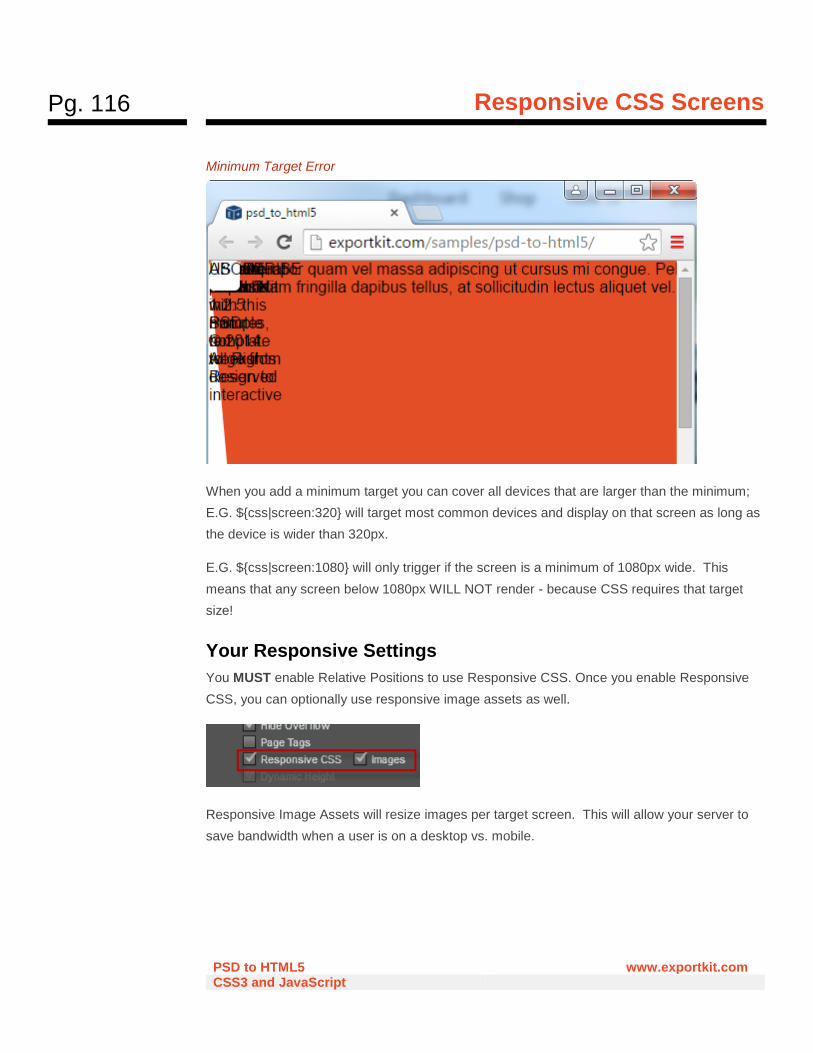
Pg. 116
Responsive CSS Screens
PSD to HTML5 www.exportkit.com CSS3 and JavaScript
Minimum Target Error
When you add a minimum target you can cover all devices that are larger than the minimum;
E.G. ${css|screen:320} will target most common devices and display on that screen as long as
the device is wider than 320px.
E.G. ${css|screen:1080} will only trigger if the screen is a minimum of 1080px wide. This
means that any screen below 1080px WILL NOT render - because CSS requires that target
size!
Your Responsive Settings
You MUST enable Relative Positions to use Responsive CSS. Once you enable Responsive
CSS, you can optionally use responsive image assets as well.
Responsive Image Assets will resize images per target screen. This will allow your server to
save bandwidth when a user is on a desktop vs. mobile.
Pg. 117
Update your Website or Blog
PSD to HTML5 www.exportkit.com CSS3 and JavaScript
Update your Website or Blog You can update any existing website or blog using Export Kit, with accurate conversion of your
PSD design to match your custom project or framework. Learn the steps required to convert
your PSD to your website or blog update. This works for any custom website, CMS
(WordPress, Magneto, Blogger, etc.), or HTML based application.
Take a Modular Approach
You may want to take a more modular approach to your concept and build smaller components
– rather than the entire site. If you take each section of your design and export it individually,
then you can easily add new components to any website or blog.
Export Kit Default CSS
Export Kit uses specific CSS content to allow your PSD design to convert pixel-perfect. In most
situations, a current website will not use the same base CSS settings, and will likely have a
custom CSS framework.
Example Export Kit Base CSS
body { margin: 0px; padding: 0px; font-family:"Arial"; overflow-x:hidden; } img { position: absolute; display: block; margin: 0px; border: none; padding: 0px; } div { position: absolute; }
Remove the Tags
Remove the html, head, and body tags from your Output file. Export Kit will render your Output
for drop-and-go usage. Due to the nature of PSD designs, our CSS content will need to change
to accommodate other HTML environments.
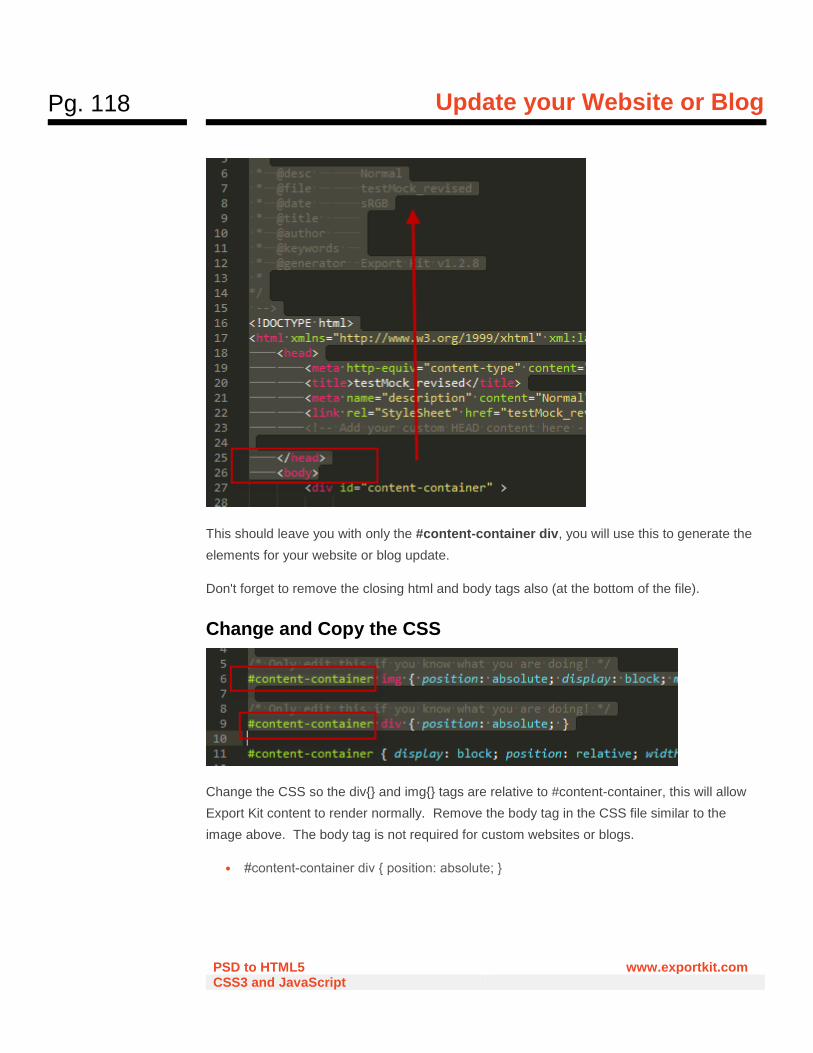
Pg. 118
Update your Website or Blog
PSD to HTML5 www.exportkit.com CSS3 and JavaScript
This should leave you with only the #content-container div, you will use this to generate the
elements for your website or blog update.
Don't forget to remove the closing html and body tags also (at the bottom of the file).
Change and Copy the CSS
Change the CSS so the div{} and img{} tags are relative to #content-container, this will allow
Export Kit content to render normally. Remove the body tag in the CSS file similar to the
image above. The body tag is not required for custom websites or blogs.
• #content-container div { position: absolute; }

Pg. 119
Update your Website or Blog
PSD to HTML5 www.exportkit.com CSS3 and JavaScript
Add the CSS Inline
Copy and paste the CSS inside a style tag. This will give you all the markup required to update
your content.
Final Image Check
Ensure you also have the correct image path on your server. Export Kit will output content
RELATIVE to the files… in other websites and CMS blogs, you will likely have an images
folder that is relative to your server-path, and not the current page. You will need to change
the image paths in the HTML file so they reflect your server/upload path.
Copy and Paste
Copy and paste the contents of the file you created including the CSS style and the #content-
container div tags. Then refresh your page and presto – that’s all you need to do!
What you are doing is creating a single-page HTML render – you can now copy the full page
contents and paste them ANYWHERE!
• WordPress
• Blogger
• Intranet
• Wix
• Square
• GoDaddy
• etc…
Pg. 120
Output Folders and Code
PSD to HTML5 www.exportkit.com CSS3 and JavaScript
Output Folders and Code All exports using will output to the [ftml-www] folder RELATIVE to your Photoshop PSD file.
You can easily find your output by looking in the same directory your PSD is located in.
ftml-www Folder Structure
All exports are contained within their respective folders. You can delete these folders at any
time to re-export a fresh copy. Each environments has its own folder tree for easy project
reference.
• your_project.psd
• ftml-www
• html5
• skins
Skins Folder
All web-based outputs render image assets in a general [skins] folder. Each PSD will have its
own sub-folder which will contain all relevant image assets for the Output.
Packaging for Clients
If your PSD design is for a client, we have a few features which can make your client very
happy with the project package you deliver. Export Kit can generate all the assets your client
will need to feel empowered when using/modifying your Output files.
Image Assets
Use Image Kit +Pro to save your layer images, and take a Snapshot or Watermark of your
work as-you-go. Plus Web Icons for your HTML pages.
Keep PSD Assets
Enable Keep PSD Assets to generate project related PSD templates. Each folder in your
document will be saved as a [.psd] file for easy reference and modification.
Responsive Image Assets
Enable Responsive Images to generate responsive image assets. Each image in your CSS
screen folders will be saved as a new resized image.
Pg. 121
Output Folders and Code
PSD to HTML5 www.exportkit.com CSS3 and JavaScript
Modifying the Code after the Export
Export Kit has custom HTML and CSS settings to render your PSD content correctly. When
using standard HTML you will want to reset the HTML elements. This is quick and easy.
Reset CSS Class
Using "position:initial;" with any CSS element will reset that element for standard HTML use.
Add the Reset CSS Class to any custom element in your HTML file AFTER your output to
correct display errors.
• reset div, .reset img { position: initial; }
Reset PSD Layers
If your PSD layer name is "My Custom Container", your CSS element is
"#my_custom_container":
• #my_custom_container div, #my_custom_container img { position: initial; }
Testing the Export Kit PSD Templates
We strongly recommend you test our PSD Templates to both see how you design should be
organized, and to test how your design renders in your respective environment.
We have a large collection of PSD Templates and cover many different features and aspects of
Export Kit. Our PSD Templates will demonstrate all aspects of converting your design, from
basic fundamentals to high-level concepts.
Visit our www.exportkit.com/psd-templates to download all PSD Templates and get started.