Print Preview - operator's guide brp
148
-
Upload
khangminh22 -
Category
Documents
-
view
3 -
download
0
Transcript of Print Preview - operator's guide brp
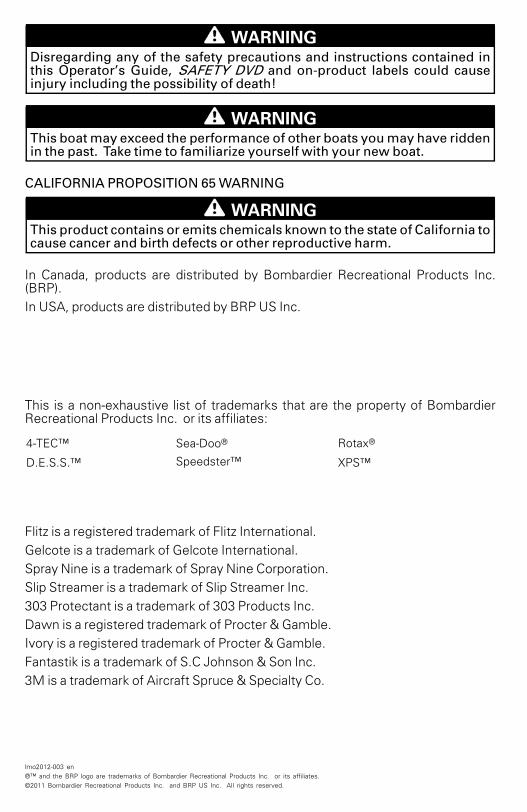
WARNINGDisregarding any of the safety precautions and instructions contained inthis Operator’s Guide, SAFETY DVD and on-product labels could causeinjury including the possibility of death!
WARNINGThis boat may exceed the performance of other boats you may have riddenin the past. Take time to familiarize yourself with your new boat.
CALIFORNIA PROPOSITION 65 WARNING
WARNINGThis product contains or emits chemicals known to the state of California tocause cancer and birth defects or other reproductive harm.
In Canada, products are distributed by Bombardier Recreational Products Inc.(BRP).In USA, products are distributed by BRP US Inc.
This is a non-exhaustive list of trademarks that are the property of BombardierRecreational Products Inc. or its affiliates:
4-TEC™ Sea-Doo® Rotax®
D.E.S.S.™ Speedster™ XPS™
Flitz is a registered trademark of Flitz International.Gelcote is a trademark of Gelcote International.Spray Nine is a trademark of Spray Nine Corporation.Slip Streamer is a trademark of Slip Streamer Inc.303 Protectant is a trademark of 303 Products Inc.Dawn is a registered trademark of Procter & Gamble.Ivory is a registered trademark of Procter & Gamble.Fantastik is a trademark of S.C Johnson & Son Inc.3M is a trademark of Aircraft Spruce & Specialty Co.
lmo2012-003 en®™ and the BRP logo are trademarks of Bombardier Recreational Products Inc. or its affiliates.©2011 Bombardier Recreational Products Inc. and BRP US Inc. All rights reserved.
FOREWORD
Congratulations on your purchase ofa new Sea-Doo® Boat. It is backed bythe BRP limited warranty and a net-work of authorized Sea-Doo Boatsdealers ready to provide the parts, ser-vice or accessories you may require.At delivery, you were informed of thewarranty coverage and signed thePREDELIVERY CHECK LIST to ensureyour new boat was prepared to yourentire satisfaction.Your dealer is committed to your sat-isfaction. If you need more completeservicing information, please ask yourdealer.
Know Before you GoTo learn how to reduce the risk of ac-cident, read the following sections ofthis guide before you operate the boat:– SAFETY INFORMATION– BOAT INFORMATION.Also, read all safety labels on your boatand watch your SAFETY DVD.We highly recommend that you takea safe boating course. Please checkyour dealer or local authorities for avail-ability in your area.In certain areas, an operator compe-tency card is mandatory to operate apleasure craft.Failure to follow the warnings con-tained in this Operator's Guide canresult in SERIOUS INJURY or DEATH.
Safety MessagesThe types of safety messages, whatthey look like and how they are used inthis guide are explained as follows:
DANGER
Indicates a hazardous situationwhich, if not avoided, will resultin serious injury or death.
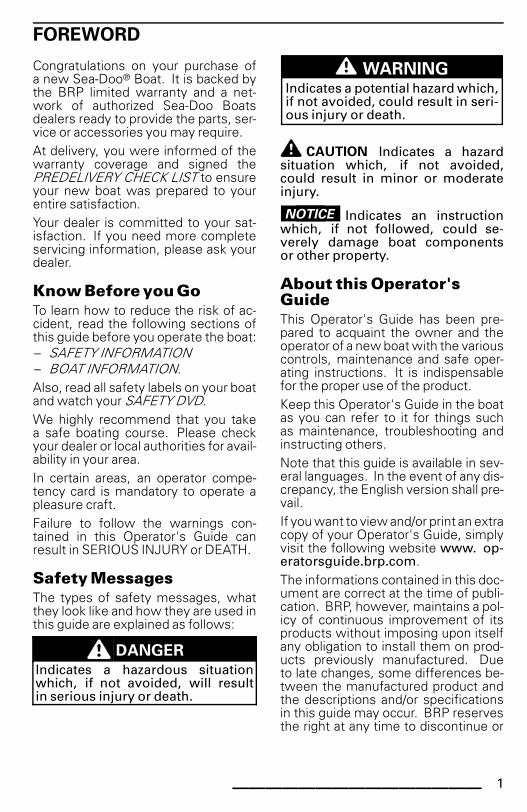
WARNINGIndicates a potential hazard which,if not avoided, could result in seri-ous injury or death.
CAUTION Indicates a hazardsituation which, if not avoided,could result in minor or moderateinjury.
NOTICE Indicates an instructionwhich, if not followed, could se-verely damage boat componentsor other property.
About this Operator'sGuideThis Operator's Guide has been pre-pared to acquaint the owner and theoperator of a new boat with the variouscontrols, maintenance and safe oper-ating instructions. It is indispensablefor the proper use of the product.Keep this Operator's Guide in the boatas you can refer to it for things suchas maintenance, troubleshooting andinstructing others.Note that this guide is available in sev-eral languages. In the event of any dis-crepancy, the English version shall pre-vail.If you want to view and/or print an extracopy of your Operator's Guide, simplyvisit the following website www. op-eratorsguide.brp.com.The informations contained in this doc-ument are correct at the time of publi-cation. BRP, however, maintains a pol-icy of continuous improvement of itsproducts without imposing upon itselfany obligation to install them on prod-ucts previously manufactured. Dueto late changes, some differences be-tween the manufactured product andthe descriptions and/or specificationsin this guide may occur. BRP reservesthe right at any time to discontinue or
_______________ 1

FOREWORD
change specifications, designs, fea-tures, models or equipment withoutincurring any obligation upon itself.This Operator's Guide and the SAFETYDVD should remain with the boat whenit's sold.
2 _______________
TABLE OF CONTENTS
FOREWORD .. . . . . . . . . . . . . . . . . . . . . . . . . . . . . . . . . . . . . . . . . . . . . . . . . . . . . . . . . . . . . . . . . . . . . . . . . 1Know Before you Go.. . . . . . . . . . . . . . . . . . . . . . . . . . . . . . . . . . . . . . . . . . . . . . . . . . . . . . . . . . . . 1Safety Messages. . . . . . . . . . . . . . . . . . . . . . . . . . . . . . . . . . . . . . . . . . . . . . . . . . . . . . . . . . . . . . . . . 1About this Operator's Guide . . . . . . . . . . . . . . . . . . . . . . . . . . . . . . . . . . . . . . . . . . . . . . . . . . . . 1
SAFETY INFORMATION
SPECIAL SAFETY MESSAGES .. . . . . . . . . . . . . . . . . . . . . . . . . . . . . . . . . . . . . . . . . . . . . . . . . . 10Reminders Regarding Operation . . . . . . . . . . . . . . . . . . . . . . . . . . . . . . . . . . . . . . . . . . . . . . 10Carbon Monoxide and Boating. . . . . . . . . . . . . . . . . . . . . . . . . . . . . . . . . . . . . . . . . . . . . . . . . 12Water Sports . . . . . . . . . . . . . . . . . . . . . . . . . . . . . . . . . . . . . . . . . . . . . . . . . . . . . . . . . . . . . . . . . . . . 15Hypothermia. . . . . . . . . . . . . . . . . . . . . . . . . . . . . . . . . . . . . . . . . . . . . . . . . . . . . . . . . . . . . . . . . . . . . 18Voluntary Inspections . . . . . . . . . . . . . . . . . . . . . . . . . . . . . . . . . . . . . . . . . . . . . . . . . . . . . . . . . . . 18Safe Boating Courses. . . . . . . . . . . . . . . . . . . . . . . . . . . . . . . . . . . . . . . . . . . . . . . . . . . . . . . . . . . 18
SAFETY EQUIPMENT .. . . . . . . . . . . . . . . . . . . . . . . . . . . . . . . . . . . . . . . . . . . . . . . . . . . . . . . . . . . . . 19Mandatory Safety Equipment. . . . . . . . . . . . . . . . . . . . . . . . . . . . . . . . . . . . . . . . . . . . . . . . . . 19Additional Recommended Equipment . . . . . . . . . . . . . . . . . . . . . . . . . . . . . . . . . . . . . . . . 22
PRACTICE EXERCISES.. . . . . . . . . . . . . . . . . . . . . . . . . . . . . . . . . . . . . . . . . . . . . . . . . . . . . . . . . . . . 23Where to Practice Exercises . . . . . . . . . . . . . . . . . . . . . . . . . . . . . . . . . . . . . . . . . . . . . . . . . . . 23Practice Exercises . . . . . . . . . . . . . . . . . . . . . . . . . . . . . . . . . . . . . . . . . . . . . . . . . . . . . . . . . . . . . . 23Important Factors Not to Neglect. . . . . . . . . . . . . . . . . . . . . . . . . . . . . . . . . . . . . . . . . . . . . . 23
SAFE BOATING PRACTICES .. . . . . . . . . . . . . . . . . . . . . . . . . . . . . . . . . . . . . . . . . . . . . . . . . . . . . 25Drugs and Alcohol. . . . . . . . . . . . . . . . . . . . . . . . . . . . . . . . . . . . . . . . . . . . . . . . . . . . . . . . . . . . . . . 25Safe Operation . . . . . . . . . . . . . . . . . . . . . . . . . . . . . . . . . . . . . . . . . . . . . . . . . . . . . . . . . . . . . . . . . . 25
NAVIGATION RULES.. . . . . . . . . . . . . . . . . . . . . . . . . . . . . . . . . . . . . . . . . . . . . . . . . . . . . . . . . . . . . . 27Operating Rules . . . . . . . . . . . . . . . . . . . . . . . . . . . . . . . . . . . . . . . . . . . . . . . . . . . . . . . . . . . . . . . . . 27
FUELING .. . . . . . . . . . . . . . . . . . . . . . . . . . . . . . . . . . . . . . . . . . . . . . . . . . . . . . . . . . . . . . . . . . . . . . . . . . . . 29Recommended Fuel . . . . . . . . . . . . . . . . . . . . . . . . . . . . . . . . . . . . . . . . . . . . . . . . . . . . . . . . . . . . 29Fueling Procedure. . . . . . . . . . . . . . . . . . . . . . . . . . . . . . . . . . . . . . . . . . . . . . . . . . . . . . . . . . . . . . . 29
TRAILERING INFORMATION .. . . . . . . . . . . . . . . . . . . . . . . . . . . . . . . . . . . . . . . . . . . . . . . . . . . . 31
LOCATION OF IMPORTANT ON-PRODUCT LABELS .. . . . . . . . . . . . . . . . . . . . . . . . . 32Hang Tag . . . . . . . . . . . . . . . . . . . . . . . . . . . . . . . . . . . . . . . . . . . . . . . . . . . . . . . . . . . . . . . . . . . . . . . . . 32Safety Labels . . . . . . . . . . . . . . . . . . . . . . . . . . . . . . . . . . . . . . . . . . . . . . . . . . . . . . . . . . . . . . . . . . . . 33Compliance Labels. . . . . . . . . . . . . . . . . . . . . . . . . . . . . . . . . . . . . . . . . . . . . . . . . . . . . . . . . . . . . . 37
Technical Information Labels. . . . . . . . . . . . . . . . . . . . . . . . . . . . . . . . . . . . . . . . . . . . . . . . . . . . . . . . . . . . . . . . . . . . . . . . . . . . . . . . . . . . 37
PRE-RIDE INSPECTION .. . . . . . . . . . . . . . . . . . . . . . . . . . . . . . . . . . . . . . . . . . . . . . . . . . . . . . . . . . . 39Pre-Ride Check List When Boat is Trailered to Waterway . . . . . . . . . . . . . . . . . . . 40Pre-Ride Check List When Boat is Moored to a Dock . . . . . . . . . . . . . . . . . . . . . . . . 41Fuel. . . . . . . . . . . . . . . . . . . . . . . . . . . . . . . . . . . . . . . . . . . . . . . . . . . . . . . . . . . . . . . . . . . . . . . . . . . . . . . 42Hull . . . . . . . . . . . . . . . . . . . . . . . . . . . . . . . . . . . . . . . . . . . . . . . . . . . . . . . . . . . . . . . . . . . . . . . . . . . . . . . 42Jet Pump Water Intakes . . . . . . . . . . . . . . . . . . . . . . . . . . . . . . . . . . . . . . . . . . . . . . . . . . . . . . . . 42Bilge . . . . . . . . . . . . . . . . . . . . . . . . . . . . . . . . . . . . . . . . . . . . . . . . . . . . . . . . . . . . . . . . . . . . . . . . . . . . . . 42Engine Compartment . . . . . . . . . . . . . . . . . . . . . . . . . . . . . . . . . . . . . . . . . . . . . . . . . . . . . . . . . . . 42Main Battery Cut-Off Switch . . . . . . . . . . . . . . . . . . . . . . . . . . . . . . . . . . . . . . . . . . . . . . . . . . . 42
_______________ 3

TABLE OF CONTENTS
PRE-RIDE INSPECTION (cont’d)Throttle/Shifter System.. . . . . . . . . . . . . . . . . . . . . . . . . . . . . . . . . . . . . . . . . . . . . . . . . . . . . . . . 42Steering System .. . . . . . . . . . . . . . . . . . . . . . . . . . . . . . . . . . . . . . . . . . . . . . . . . . . . . . . . . . . . . . . 43Bilge Blower . . . . . . . . . . . . . . . . . . . . . . . . . . . . . . . . . . . . . . . . . . . . . . . . . . . . . . . . . . . . . . . . . . . . . 43Tower (Optional). . . . . . . . . . . . . . . . . . . . . . . . . . . . . . . . . . . . . . . . . . . . . . . . . . . . . . . . . . . . . . . . . 43Bimini Top (Optional) . . . . . . . . . . . . . . . . . . . . . . . . . . . . . . . . . . . . . . . . . . . . . . . . . . . . . . . . . . . . 43Mandatory Safety Boating Equipment . . . . . . . . . . . . . . . . . . . . . . . . . . . . . . . . . . . . . . . . 43Storage Compartment Covers . . . . . . . . . . . . . . . . . . . . . . . . . . . . . . . . . . . . . . . . . . . . . . . . . 43Navigation Lights. . . . . . . . . . . . . . . . . . . . . . . . . . . . . . . . . . . . . . . . . . . . . . . . . . . . . . . . . . . . . . . . 43Engine START/STOP Switches . . . . . . . . . . . . . . . . . . . . . . . . . . . . . . . . . . . . . . . . . . . . . . . . 43Engine Cut-off Switch . . . . . . . . . . . . . . . . . . . . . . . . . . . . . . . . . . . . . . . . . . . . . . . . . . . . . . . . . . 43
BOAT INFORMATION
CONTROLS .. . . . . . . . . . . . . . . . . . . . . . . . . . . . . . . . . . . . . . . . . . . . . . . . . . . . . . . . . . . . . . . . . . . . . . . . . 461) Steering Wheel . . . . . . . . . . . . . . . . . . . . . . . . . . . . . . . . . . . . . . . . . . . . . . . . . . . . . . . . . . . . . . . 462) Throttle/Shift Control. . . . . . . . . . . . . . . . . . . . . . . . . . . . . . . . . . . . . . . . . . . . . . . . . . . . . . . . . 463) Engine Cut-Off Switch . . . . . . . . . . . . . . . . . . . . . . . . . . . . . . . . . . . . . . . . . . . . . . . . . . . . . . . 474) Deck Lights Switch. . . . . . . . . . . . . . . . . . . . . . . . . . . . . . . . . . . . . . . . . . . . . . . . . . . . . . . . . . . 485) Navigation Lights Switch . . . . . . . . . . . . . . . . . . . . . . . . . . . . . . . . . . . . . . . . . . . . . . . . . . . . 486) Bilge Pump Switch . . . . . . . . . . . . . . . . . . . . . . . . . . . . . . . . . . . . . . . . . . . . . . . . . . . . . . . . . . . 497) Horn Switch. . . . . . . . . . . . . . . . . . . . . . . . . . . . . . . . . . . . . . . . . . . . . . . . . . . . . . . . . . . . . . . . . . . 508) Bilge Blower Switch. . . . . . . . . . . . . . . . . . . . . . . . . . . . . . . . . . . . . . . . . . . . . . . . . . . . . . . . . . 509) Start/Stop Switches . . . . . . . . . . . . . . . . . . . . . . . . . . . . . . . . . . . . . . . . . . . . . . . . . . . . . . . . . . 51
GAUGES .. . . . . . . . . . . . . . . . . . . . . . . . . . . . . . . . . . . . . . . . . . . . . . . . . . . . . . . . . . . . . . . . . . . . . . . . . . . . 521) Fuel Gauge .. . . . . . . . . . . . . . . . . . . . . . . . . . . . . . . . . . . . . . . . . . . . . . . . . . . . . . . . . . . . . . . . . . . 522) Tachometers . . . . . . . . . . . . . . . . . . . . . . . . . . . . . . . . . . . . . . . . . . . . . . . . . . . . . . . . . . . . . . . . . . 523) Speedometer . . . . . . . . . . . . . . . . . . . . . . . . . . . . . . . . . . . . . . . . . . . . . . . . . . . . . . . . . . . . . . . . . 524) Monitoring Gauges. . . . . . . . . . . . . . . . . . . . . . . . . . . . . . . . . . . . . . . . . . . . . . . . . . . . . . . . . . . 535) Depth Finder . . . . . . . . . . . . . . . . . . . . . . . . . . . . . . . . . . . . . . . . . . . . . . . . . . . . . . . . . . . . . . . . . . 53
EQUIPMENT.. . . . . . . . . . . . . . . . . . . . . . . . . . . . . . . . . . . . . . . . . . . . . . . . . . . . . . . . . . . . . . . . . . . . . . . . 551) Bilge Drain Plug. . . . . . . . . . . . . . . . . . . . . . . . . . . . . . . . . . . . . . . . . . . . . . . . . . . . . . . . . . . . . . . 562) Grab Handles . . . . . . . . . . . . . . . . . . . . . . . . . . . . . . . . . . . . . . . . . . . . . . . . . . . . . . . . . . . . . . . . . 563) Rear Grab Handles . . . . . . . . . . . . . . . . . . . . . . . . . . . . . . . . . . . . . . . . . . . . . . . . . . . . . . . . . . . 564) Ladder . . . . . . . . . . . . . . . . . . . . . . . . . . . . . . . . . . . . . . . . . . . . . . . . . . . . . . . . . . . . . . . . . . . . . . . . . 575) Swim Platform.. . . . . . . . . . . . . . . . . . . . . . . . . . . . . . . . . . . . . . . . . . . . . . . . . . . . . . . . . . . . . . . 576) Driver's Seat . . . . . . . . . . . . . . . . . . . . . . . . . . . . . . . . . . . . . . . . . . . . . . . . . . . . . . . . . . . . . . . . . . 577) Passenger/Spotter Seat . . . . . . . . . . . . . . . . . . . . . . . . . . . . . . . . . . . . . . . . . . . . . . . . . . . . . 588) Bow Seats . . . . . . . . . . . . . . . . . . . . . . . . . . . . . . . . . . . . . . . . . . . . . . . . . . . . . . . . . . . . . . . . . . . . 589) Rear Seats . . . . . . . . . . . . . . . . . . . . . . . . . . . . . . . . . . . . . . . . . . . . . . . . . . . . . . . . . . . . . . . . . . . . 5910) Sun Deck . . . . . . . . . . . . . . . . . . . . . . . . . . . . . . . . . . . . . . . . . . . . . . . . . . . . . . . . . . . . . . . . . . . . 5911) Cup Holders . . . . . . . . . . . . . . . . . . . . . . . . . . . . . . . . . . . . . . . . . . . . . . . . . . . . . . . . . . . . . . . . . 6012) Port/Starboard Console Storage Compartments. . . . . . . . . . . . . . . . . . . . . . . . . 6013) Glove Box. . . . . . . . . . . . . . . . . . . . . . . . . . . . . . . . . . . . . . . . . . . . . . . . . . . . . . . . . . . . . . . . . . . . 6014) Radio . . . . . . . . . . . . . . . . . . . . . . . . . . . . . . . . . . . . . . . . . . . . . . . . . . . . . . . . . . . . . . . . . . . . . . . . . 6115) 23) Radio AUX Output . . . . . . . . . . . . . . . . . . . . . . . . . . . . . . . . . . . . . . . . . . . . . . . . . . . . . . 6116) 12-Volt Power Outlet . . . . . . . . . . . . . . . . . . . . . . . . . . . . . . . . . . . . . . . . . . . . . . . . . . . . . . . 61
4 _______________

TABLE OF CONTENTS
EQUIPMENT (cont’d)17) Bow Storage Compartment. . . . . . . . . . . . . . . . . . . . . . . . . . . . . . . . . . . . . . . . . . . . . . . . 6118) Deck Storage Compartment . . . . . . . . . . . . . . . . . . . . . . . . . . . . . . . . . . . . . . . . . . . . . . . 6219) Rear Storage Compartment (Engine Cover) . . . . . . . . . . . . . . . . . . . . . . . . . . . . . . 6220) Bow Lights . . . . . . . . . . . . . . . . . . . . . . . . . . . . . . . . . . . . . . . . . . . . . . . . . . . . . . . . . . . . . . . . . . 6421) Stern Light Socket . . . . . . . . . . . . . . . . . . . . . . . . . . . . . . . . . . . . . . . . . . . . . . . . . . . . . . . . . . 6422) Mooring Cleats . . . . . . . . . . . . . . . . . . . . . . . . . . . . . . . . . . . . . . . . . . . . . . . . . . . . . . . . . . . . . . 6523) Bow and Stern Eyelets . . . . . . . . . . . . . . . . . . . . . . . . . . . . . . . . . . . . . . . . . . . . . . . . . . . . . 6624) Water Sport Towing Attachments . . . . . . . . . . . . . . . . . . . . . . . . . . . . . . . . . . . . . . . . . 6625) Main Battery Cut-Off Switch. . . . . . . . . . . . . . . . . . . . . . . . . . . . . . . . . . . . . . . . . . . . . . . 6726) Radio Remote Control . . . . . . . . . . . . . . . . . . . . . . . . . . . . . . . . . . . . . . . . . . . . . . . . . . . . . . 6827) Built-In Ice Chest . . . . . . . . . . . . . . . . . . . . . . . . . . . . . . . . . . . . . . . . . . . . . . . . . . . . . . . . . . . . 6828) Automatic Fire Extinguisher . . . . . . . . . . . . . . . . . . . . . . . . . . . . . . . . . . . . . . . . . . . . . . . 68
BREAK-IN PERIOD.. . . . . . . . . . . . . . . . . . . . . . . . . . . . . . . . . . . . . . . . . . . . . . . . . . . . . . . . . . . . . . . . . 69Operating During Break-In. . . . . . . . . . . . . . . . . . . . . . . . . . . . . . . . . . . . . . . . . . . . . . . . . . . . . . 69
OPERATING INSTRUCTIONS.. . . . . . . . . . . . . . . . . . . . . . . . . . . . . . . . . . . . . . . . . . . . . . . . . . . . 70Launching/Loading. . . . . . . . . . . . . . . . . . . . . . . . . . . . . . . . . . . . . . . . . . . . . . . . . . . . . . . . . . . . . . 70Boarding the Boat . . . . . . . . . . . . . . . . . . . . . . . . . . . . . . . . . . . . . . . . . . . . . . . . . . . . . . . . . . . . . . . 70Starting the Engines . . . . . . . . . . . . . . . . . . . . . . . . . . . . . . . . . . . . . . . . . . . . . . . . . . . . . . . . . . . . 72Steering Operation. . . . . . . . . . . . . . . . . . . . . . . . . . . . . . . . . . . . . . . . . . . . . . . . . . . . . . . . . . . . . . 73Throttle/Shift Control Operation . . . . . . . . . . . . . . . . . . . . . . . . . . . . . . . . . . . . . . . . . . . . . . . 73Leaving the Shore . . . . . . . . . . . . . . . . . . . . . . . . . . . . . . . . . . . . . . . . . . . . . . . . . . . . . . . . . . . . . . . 74Shutting Off the Engines . . . . . . . . . . . . . . . . . . . . . . . . . . . . . . . . . . . . . . . . . . . . . . . . . . . . . . . 74General Operating Recommendations. . . . . . . . . . . . . . . . . . . . . . . . . . . . . . . . . . . . . . . . 75
SPECIAL PROCEDURES .. . . . . . . . . . . . . . . . . . . . . . . . . . . . . . . . . . . . . . . . . . . . . . . . . . . . . . . . . . 77Jet Pump Water Intake and Impeller Cleaning. . . . . . . . . . . . . . . . . . . . . . . . . . . . . . . . 77Towing the Boat in Water. . . . . . . . . . . . . . . . . . . . . . . . . . . . . . . . . . . . . . . . . . . . . . . . . . . . . . . 77Capsized Boat . . . . . . . . . . . . . . . . . . . . . . . . . . . . . . . . . . . . . . . . . . . . . . . . . . . . . . . . . . . . . . . . . . . 78Submerged Boat and Water-Flooded Engine . . . . . . . . . . . . . . . . . . . . . . . . . . . . . . . . . 78
MAINTENANCE
BREAK-IN INSPECTION .. . . . . . . . . . . . . . . . . . . . . . . . . . . . . . . . . . . . . . . . . . . . . . . . . . . . . . . . . . 80
MAINTENANCE SCHEDULE .. . . . . . . . . . . . . . . . . . . . . . . . . . . . . . . . . . . . . . . . . . . . . . . . . . . . . 82
MAINTENANCE PROCEDURES .. . . . . . . . . . . . . . . . . . . . . . . . . . . . . . . . . . . . . . . . . . . . . . . . . 85Engine Oil . . . . . . . . . . . . . . . . . . . . . . . . . . . . . . . . . . . . . . . . . . . . . . . . . . . . . . . . . . . . . . . . . . . . . . . . 85Engine Coolant . . . . . . . . . . . . . . . . . . . . . . . . . . . . . . . . . . . . . . . . . . . . . . . . . . . . . . . . . . . . . . . . . . 87Throttle Body . . . . . . . . . . . . . . . . . . . . . . . . . . . . . . . . . . . . . . . . . . . . . . . . . . . . . . . . . . . . . . . . . . . . 87Ignition Coils . . . . . . . . . . . . . . . . . . . . . . . . . . . . . . . . . . . . . . . . . . . . . . . . . . . . . . . . . . . . . . . . . . . . . 88Exhaust System.. . . . . . . . . . . . . . . . . . . . . . . . . . . . . . . . . . . . . . . . . . . . . . . . . . . . . . . . . . . . . . . . 89Fuses. . . . . . . . . . . . . . . . . . . . . . . . . . . . . . . . . . . . . . . . . . . . . . . . . . . . . . . . . . . . . . . . . . . . . . . . . . . . . 90Bilge Blower . . . . . . . . . . . . . . . . . . . . . . . . . . . . . . . . . . . . . . . . . . . . . . . . . . . . . . . . . . . . . . . . . . . . . 92Navigation Lights. . . . . . . . . . . . . . . . . . . . . . . . . . . . . . . . . . . . . . . . . . . . . . . . . . . . . . . . . . . . . . . . 93Deck Drain and Scupper Valve . . . . . . . . . . . . . . . . . . . . . . . . . . . . . . . . . . . . . . . . . . . . . . . . . 94Latches and Hinges . . . . . . . . . . . . . . . . . . . . . . . . . . . . . . . . . . . . . . . . . . . . . . . . . . . . . . . . . . . . . 94Reverse Gates. . . . . . . . . . . . . . . . . . . . . . . . . . . . . . . . . . . . . . . . . . . . . . . . . . . . . . . . . . . . . . . . . . . 94
_______________ 5

TABLE OF CONTENTS
MAINTENANCE PROCEDURES (cont’d)Ski Post . . . . . . . . . . . . . . . . . . . . . . . . . . . . . . . . . . . . . . . . . . . . . . . . . . . . . . . . . . . . . . . . . . . . . . . . . . 94Sacrificial Anodes . . . . . . . . . . . . . . . . . . . . . . . . . . . . . . . . . . . . . . . . . . . . . . . . . . . . . . . . . . . . . . . 95
BOAT CARE.. . . . . . . . . . . . . . . . . . . . . . . . . . . . . . . . . . . . . . . . . . . . . . . . . . . . . . . . . . . . . . . . . . . . . . . . . 96Post-Operation Care . . . . . . . . . . . . . . . . . . . . . . . . . . . . . . . . . . . . . . . . . . . . . . . . . . . . . . . . . . . . 96Boat Protection. . . . . . . . . . . . . . . . . . . . . . . . . . . . . . . . . . . . . . . . . . . . . . . . . . . . . . . . . . . . . . . . . . 96Boat Cleaning. . . . . . . . . . . . . . . . . . . . . . . . . . . . . . . . . . . . . . . . . . . . . . . . . . . . . . . . . . . . . . . . . . . . 96
STORAGE.. . . . . . . . . . . . . . . . . . . . . . . . . . . . . . . . . . . . . . . . . . . . . . . . . . . . . . . . . . . . . . . . . . . . . . . . . . . 99Jet Pump Cleaning . . . . . . . . . . . . . . . . . . . . . . . . . . . . . . . . . . . . . . . . . . . . . . . . . . . . . . . . . . . . . . 99Fuel System Protection. . . . . . . . . . . . . . . . . . . . . . . . . . . . . . . . . . . . . . . . . . . . . . . . . . . . . . . . . 99Throttle Body Lubrication. . . . . . . . . . . . . . . . . . . . . . . . . . . . . . . . . . . . . . . . . . . . . . . . . . . . . . . 99Engine Oil and Filter Replacement. . . . . . . . . . . . . . . . . . . . . . . . . . . . . . . . . . . . . . . . . . . . . 99Intercooler Draining . . . . . . . . . . . . . . . . . . . . . . . . . . . . . . . . . . . . . . . . . . . . . . . . . . . . . . . . . . . . . 99Exhaust System Flushing . . . . . . . . . . . . . . . . . . . . . . . . . . . . . . . . . . . . . . . . . . . . . . . . . . . . 100Exhaust System Protection . . . . . . . . . . . . . . . . . . . . . . . . . . . . . . . . . . . . . . . . . . . . . . . . . . 100Engine Internal Lubrication . . . . . . . . . . . . . . . . . . . . . . . . . . . . . . . . . . . . . . . . . . . . . . . . . . . 100Engine Coolant Test. . . . . . . . . . . . . . . . . . . . . . . . . . . . . . . . . . . . . . . . . . . . . . . . . . . . . . . . . . . 101Battery Removal and Storage . . . . . . . . . . . . . . . . . . . . . . . . . . . . . . . . . . . . . . . . . . . . . . . . 101Boat Cleaning/Repair . . . . . . . . . . . . . . . . . . . . . . . . . . . . . . . . . . . . . . . . . . . . . . . . . . . . . . . . . 101Boat Protection. . . . . . . . . . . . . . . . . . . . . . . . . . . . . . . . . . . . . . . . . . . . . . . . . . . . . . . . . . . . . . . . 101
PRESEASON PREPARATION.. . . . . . . . . . . . . . . . . . . . . . . . . . . . . . . . . . . . . . . . . . . . . . . . . . . 103
TECHNICAL INFORMATION
BOAT IDENTIFICATION .. . . . . . . . . . . . . . . . . . . . . . . . . . . . . . . . . . . . . . . . . . . . . . . . . . . . . . . . . 106Hull Identification Number . . . . . . . . . . . . . . . . . . . . . . . . . . . . . . . . . . . . . . . . . . . . . . . . . . . 106Engine Identification Number . . . . . . . . . . . . . . . . . . . . . . . . . . . . . . . . . . . . . . . . . . . . . . . . 106
ENGINE EMISSIONS INFORMATION.. . . . . . . . . . . . . . . . . . . . . . . . . . . . . . . . . . . . . . . . . 107Manufacturer's Responsibility . . . . . . . . . . . . . . . . . . . . . . . . . . . . . . . . . . . . . . . . . . . . . . . 107Dealer's Responsibility . . . . . . . . . . . . . . . . . . . . . . . . . . . . . . . . . . . . . . . . . . . . . . . . . . . . . . . 107Owner Responsibility . . . . . . . . . . . . . . . . . . . . . . . . . . . . . . . . . . . . . . . . . . . . . . . . . . . . . . . . . 107EPA Emission Regulations . . . . . . . . . . . . . . . . . . . . . . . . . . . . . . . . . . . . . . . . . . . . . . . . . . . 107
SPECIFICATIONS .. . . . . . . . . . . . . . . . . . . . . . . . . . . . . . . . . . . . . . . . . . . . . . . . . . . . . . . . . . . . . . . . 108
TROUBLESHOOTING
TROUBLESHOOTING GUIDELINES .. . . . . . . . . . . . . . . . . . . . . . . . . . . . . . . . . . . . . . . . . . 112
MONITORING SYSTEM .. . . . . . . . . . . . . . . . . . . . . . . . . . . . . . . . . . . . . . . . . . . . . . . . . . . . . . . . 116Beeper Code Information . . . . . . . . . . . . . . . . . . . . . . . . . . . . . . . . . . . . . . . . . . . . . . . . . . . . 117
6 _______________

TABLE OF CONTENTS
WARRANTY
BRP LIMITED WARRANTY FOR MODEL YEAR 2012 SEA-DOO® BOATS SOLDIN THE UNITED STATES AND CANADA.. . . . . . . . . . . . . . . . . . . . . . . . . . . . . . . . . . . . . . 120
CALIFORNIA EMISSION CONTROL WARRANTY STATEMENT FOR MODEL-YEAR 2012 SEA-DOO® BOATS WITH 4-TEC® ENGINES OR 4-TEC® ICENGINES.. . . . . . . . . . . . . . . . . . . . . . . . . . . . . . . . . . . . . . . . . . . . . . . . . . . . . . . . . . . . . . . . . . . . . . . . . . 124
BRP INTERNATIONAL LIMITED WARRANTY FOR MODEL YEAR 2012SEA-DOO® BOATS .. . . . . . . . . . . . . . . . . . . . . . . . . . . . . . . . . . . . . . . . . . . . . . . . . . . . . . . . . . . . . . 128
BRP LIMITED WARRANTY FOR THE EUROPEAN AND THE RUSSIANECONOMIC AREA AND TURKEY: MODEL YEAR 2012 SEA-DOO®
BOATS.. . . . . . . . . . . . . . . . . . . . . . . . . . . . . . . . . . . . . . . . . . . . . . . . . . . . . . . . . . . . . . . . . . . . . . . . . . . . . 132
CUSTOMER INFORMATION
PRIVACY INFORMATION .. . . . . . . . . . . . . . . . . . . . . . . . . . . . . . . . . . . . . . . . . . . . . . . . . . . . . . . 138
CHANGE OF ADDRESS/OWNERSHIP. . . . . . . . . . . . . . . . . . . . . . . . . . . . . . . . . . . . . . . . . 139
_______________ 7

TABLE OF CONTENTS
8 _______________

SAFETYINFORMATION
________ SAFETY INFORMATION ________ 9

SPECIAL SAFETY MESSAGES
Reminders RegardingOperation– Engine exhaust contains carbon
monoxide (CO), which can causeinjury or death if inhaled in sufficientquantities. Educate all occupantsabout the risks and symptoms ofCO accumulation and CO poison-ing. For more information, refer toCARBON MONOXIDE AND BOAT-ING section.
– Gasoline vapors can explode, result-ing in injury or death. Always useblower for a minimum of 5 minutesbefore starting engine, then turn itOFF above idle speed. Use of thebilge blower should never replace“smelling” for gasoline vapor odors.
– If at any time, gasoline leaks/odorsare found, do not start the engine.Have the boat serviced by an autho-rized Sea-Doo Boats dealer.
– Always keep in mind that as thethrottle lever is returned to the idleposition, less directional control isavailable. To turn the boat, bothsteering and throttle are necessary.
– This boat has no brake. Stoppingdistance will vary depending on ini-tial speed, load, wind, and waterconditions. Practice stopping anddocking in a safe, traffic-free area tohave an idea of how long it will taketo stop the boat under varying con-ditions. Do not release the throttlewhen trying to steer away from ob-jects. You need throttle to steer. Donot use the boat's reverse to stop.
– Do not start or operate the boat ifany person is not properly seatedin a seat intended for use when un-derway (not the sun deck or swimplatform or transat seat) or if a per-son is nearby in the water.
– The boat's jet thrust can cause in-jury. Always accelerate slowly, anddecelerate in a controlled fashion.
– Observe the instructions on allsafety labels. They are there to helpassure that you have a safe and en-joyable outing.
– Riding with passenger(s) or pullingother boats, tubes, a skier or a wakeboarder makes the boat handle dif-ferently and requires greater skill.
– Certain boats may come equippedwith tow eyelets, a ski pole or awakeboard tower which can beused to attach a tow rope for a skier,tube or wakeboarder. Do not usethese attachment points or anyother portion of the boat to tow aparasail or another craft. Personalinjury or severe damage may occur.
– In shallow water, proceed withcaution and at very low speeds.Grounding or abrupt stops may re-sult in injury to you, your passengersor others. The jet pump may pick updebris and throw it rearward causinga risk of injuring people or damagingthe jet pump or other property.
– Combustion engines need air tooperate; consequently this boatcan not be totally watertight. Anymaneuvers such as figure eightsthat cause the upper deck to be un-der water may cause severe en-gine problems due to water inges-tion. Refer to the SPECIAL PROCE-DURES and WARRANTY sectionscontained in this Operator's Guide.
– Respect no wake zones, the rightsof other water users and the en-vironment. As the “skipper” andowner of a boat, you are responsiblefor damage to other boats causedby the wake of your boat. Do not letanyone throw refuse overboard.
– Between sunset and sunrise, usethe boat's navigation lights and re-duce speed. Do not operate theboat in reduced visibility.
10 _______ SAFETY INFORMATION ________

SPECIAL SAFETY MESSAGES
– Do not add accessories or equip-ment that may adversely affect visi-bility or alter control of the boat.
– The skipper should personally takethe helm during storms.
Before Getting Underway
– Always perform the pre-ride inspec-tion as specified in this Operator'sGuide.
– Do not exceed the payload or pas-senger capacities for this boat,which are listed on the capacityplate located directly beside thedriver and in the specifications.Overloading can affect maneuver-ability, stability and performance.Also, heavy seas reduce capacity. Apayload or person capacity plate isnot an excuse for failure to use com-mon sense or good judgment.
– Regularly inspect the boat, the hull,engine, safety equipment, and allother boating gear and keep them insafe operating condition.
– Be sure you have at least theminimum required safety equip-ment, PFDs and any additional gearneeded for your cruise.
– Check that all lifesaving equipment,including fire extinguisher (not in-cluded in boat), is in safe operat-ing condition and easily accessible.Show all passengers where thisequipment is, and make sure theyknow how to use it.
– Keep an eye on the weather. Checklocal weather broadcasts before de-parture. Be alert to changing condi-tions.
– Keep accurate and up-to-date chartsof the boating area on board. Beforegetting underway, check water con-ditions in the planned boating area.
– Before departure, file a Float Planwith a responsible person ashore.
– Keep enough fuel on board for theplanned trip. Always verify fuel levelbefore use and during the ride. Ap-ply the principle of 1/3 of the fuel toreach your destination, 1/3 to return,and keep 1/3 in reserve. Allow forchanges due to adverse weather orother delays.
Operators and PassengersAwareness
– Each boat operator has a responsi-bility to ensure the safety of his/herpassenger(s) and of other waterusers. Please follow all safety in-structions and operate your boatwith care.
– Never operate a boat while underthe influence of drugs or alcohol.It is a Federal offense. Allow onlyqualified drivers to operate yourboat.
– Remember that sun, wind, fatigueor illness may impair your judge-ment and reaction time.
– At least one passenger should beable to operate the boat in case theoperator is unexpectedly unable todo so.
– Operation of this boat by a personunder 16 years of age or a personwith a disability that impairs vision,reaction time, judgment, or opera-tion of the controls is NOT recom-mended.
– Always use the tether cord whenoperating the boat and ensure thatall passengers are familiar with itsuse.
– Ensure that any operator and allpassengers know how to swimand how to re-board the boat fromthe water. If a passenger does notknow how to swim, ensure that pas-senger wears a PFD at all times andtake extra precautions when boat-ing.
________ SAFETY INFORMATION ________ 11

SPECIAL SAFETY MESSAGES
Carbon Monoxide andBoatingBurning a material containing carbonproduces carbon monoxide (CO), anodorless and colorless gas. BecauseCO has a similar density as air, it canspread throughout an enclosed spaceunnoticed because you cannot see it orsmell it. Any device used to burn car-bon-based materials on a boat can be asource of CO. Common sources of COinclude internal combustion engines.CO reacts with the blood to reducethe ability of the blood to carry oxygen.The reduced oxygen supply to bodytissues results in death of the tissue.Prolonged exposure can cause braindamage or death. In high concentra-tions, CO can be fatal within minutes.The effects of CO in lower concentra-tions are cumulative and can be just aslethal over long periods of time.Symptoms of CO poisoning include:Itchy and watering eyes, flushedappearance, throbbing temples, in-ability to think coherently, ringing inthe ears, tightness across the chest,headaches, drowsiness, nausea, dizzi-ness, fatigue, vomiting, collapse, andconvulsions. If any of these symptomsare evident, begin treatment immedi-ately. Prompt action can make thedifference between life and death.– Evacuate the area and move the vic-
tim to fresh air.
– Administer oxygen if available andget medical help.
– Open all canvas enclosures to venti-late the area.
– Investigate the source of CO andtake immediate corrective action.
– Be especially aware of other COsources which may be near boat.
Carbon Monoxide Accumulation
Following are examples of possiblesituations where CO may accumu-late within your boat while docked,anchored, or underway. Become fa-miliar with these examples and theirprecautions to prevent personal injuryor death.
WARNINGExhaust fumes! Generator or hullexhaust from other vessels whileeither docked or anchored canemit poisonous CO gas and causeexcessive accumulation withincabin and cockpit areas. Be alertfor generator exhaust from yourvessel or other vessels alongside.Exhaust outlets near a pier, dock,seawall or outlets blocked by anyother means can cause excessiveaccumulation of poisonous CO gaswithin cockpit area.
�������
VESSEL ALONGSIDE
12 _______ SAFETY INFORMATION ________

SPECIAL SAFETY MESSAGES
WARNINGEngine exhaust fumes contain carbon monoxide (CO) which can accumu-late in and around the boat (under bimini top, in cockpit, etc.). CO can beharmful or fatal if inhaled. Assure there is adequate ventilation wheneverrunning engine.
Boat houses, seawalls, and other boats in close proximity or confined areas cancontribute to increased CO levels. Operators must be aware that operation,mooring, and anchoring in an area with other boats puts them in jeopardy of COaccumulation from other sources. Likewise, a boat operator must be awareof how exhaust from his boat will affect others. Operation of the engine whilemoored may cause CO accumulation in your boat and those around you.
�������
CONFINED AREAS
Be sure to provide adequate ventilation. If the windshield has vents, open thembefore getting underway to increase positive air flow and decrease the chancesof CO accumulation.
WARNINGBackdrafting! Under certain conditions, moving air currents can directpoisonous CO fumes into boat. These fumes can accumulate to dangerouslevels without proper airflow. Provide adequate ventilation, redistributethe load or bring boat out of high bow angle.
While underway, CO concentrations can increase by backdrafting or “the stationwagon effect”. Backdrafting is caused by factors such as relative wind direction,speed, or the bow being too high. To prevent this, open canvas whenever possi-ble to provide positive airflow through the hull.
________ SAFETY INFORMATION ________ 13

SPECIAL SAFETY MESSAGES
������
WHILE UNDERWAY (BACKDRAFTING)
Even with the best boat design andconstruction, CO may still accumulatein enclosed or confined areas undercertain conditions. Continually ob-serve passengers for symptoms ofCO poisoning.
CO DetectorIt is strongly recommended that youhave CO detectors installed in boatswith canvas enclosures. Monitors areavailable from your dealer. Monitorsshould be professionally installed andcalibrated.NOTE: A CO detector is not a gas fuelvapor detector. Gas fuel vapor detec-tors do not monitor the buildup of COin an enclosed area.
Do NOT Operate your Boat withoutPerforming the Following Checklist
Each Boating Day
OPERATION ✔
Make sure you and your passengersknow where exhaust outlets arelocated on the vessel.
Educate all passengers about thesymptoms of CO poisoning andwhere CO may accumulate.
When docked or rafting with anotherboat, be aware of exhaust emissionsfrom the other boat.
Listen for any change in exhaustsound, which could indicate anexhaust component failure.
Test the operation of each COalarm by pressing the test button (ifapplicable).
14 _______ SAFETY INFORMATION ________
SPECIAL SAFETY MESSAGES
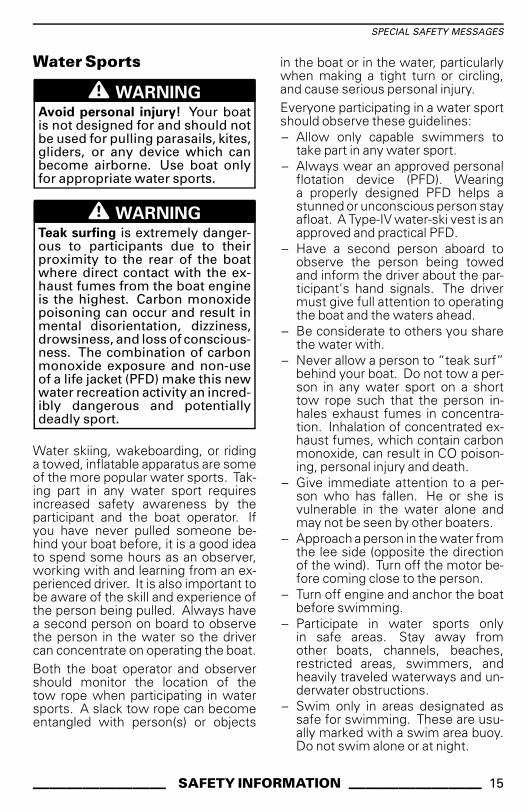
Water Sports
WARNINGAvoid personal injury! Your boatis not designed for and should notbe used for pulling parasails, kites,gliders, or any device which canbecome airborne. Use boat onlyfor appropriate water sports.
WARNINGTeak surfing is extremely danger-ous to participants due to theirproximity to the rear of the boatwhere direct contact with the ex-haust fumes from the boat engineis the highest. Carbon monoxidepoisoning can occur and result inmental disorientation, dizziness,drowsiness, and loss of conscious-ness. The combination of carbonmonoxide exposure and non-useof a life jacket (PFD) make this newwater recreation activity an incred-ibly dangerous and potentiallydeadly sport.
Water skiing, wakeboarding, or ridinga towed, inflatable apparatus are someof the more popular water sports. Tak-ing part in any water sport requiresincreased safety awareness by theparticipant and the boat operator. Ifyou have never pulled someone be-hind your boat before, it is a good ideato spend some hours as an observer,working with and learning from an ex-perienced driver. It is also important tobe aware of the skill and experience ofthe person being pulled. Always havea second person on board to observethe person in the water so the drivercan concentrate on operating the boat.Both the boat operator and observershould monitor the location of thetow rope when participating in watersports. A slack tow rope can becomeentangled with person(s) or objects
in the boat or in the water, particularlywhen making a tight turn or circling,and cause serious personal injury.Everyone participating in a water sportshould observe these guidelines:– Allow only capable swimmers to
take part in any water sport.– Always wear an approved personal
flotation device (PFD). Wearinga properly designed PFD helps astunned or unconscious person stayafloat. A Type-IV water-ski vest is anapproved and practical PFD.
– Have a second person aboard toobserve the person being towedand inform the driver about the par-ticipant's hand signals. The drivermust give full attention to operatingthe boat and the waters ahead.
– Be considerate to others you sharethe water with.
– Never allow a person to “teak surf”behind your boat. Do not tow a per-son in any water sport on a shorttow rope such that the person in-hales exhaust fumes in concentra-tion. Inhalation of concentrated ex-haust fumes, which contain carbonmonoxide, can result in CO poison-ing, personal injury and death.
– Give immediate attention to a per-son who has fallen. He or she isvulnerable in the water alone andmay not be seen by other boaters.
– Approach a person in the water fromthe lee side (opposite the directionof the wind). Turn off the motor be-fore coming close to the person.
– Turn off engine and anchor the boatbefore swimming.
– Participate in water sports onlyin safe areas. Stay away fromother boats, channels, beaches,restricted areas, swimmers, andheavily traveled waterways and un-derwater obstructions.
– Swim only in areas designated assafe for swimming. These are usu-ally marked with a swim area buoy.Do not swim alone or at night.
________ SAFETY INFORMATION ________ 15

SPECIAL SAFETY MESSAGES
������
SWIM AREA BUOY
1. Do not water ski between sunsetand sunrise. It is illegal in moststates.
2. Do not drive the boat directly behinda water skier, tuber or wakeboarder.Do not drive the boat directly behinda water skier, tuber or wakeboarderas the boat may overtake a personwho falls in the water.
3. Shut engine off and remove ignitionkey when anyone is in the waternearby.
4. Stay at least 45 m (150 ft) awayfrom areas marked by a diver downfloat.
������
DIVER DOWN FLOAT
WARNINGAvoid personal injury! Do not al-low anyone near the jet pump orintake grate, even when the en-gine is off. Items such as long hair,loose clothing or personal flota-tion device straps can become en-tangled in moving parts resultingin serious injury or drowning. Inshallow water, shells, sand, peb-bles or other objects could bedrawn up by the jet pump and bethrown rearward.
For more information about water ski-ing, please contact your local water skiassociation.
16 _______ SAFETY INFORMATION ________

SPECIAL SAFETY MESSAGES
�������
��������� ����������������������������
��������� ���������������
������ ��� ������!����������� "�����������#������������ �$��$���
�%&'���(�)��� ����!����$�������������������������
������(�)��� ����!����$������������������������
���(�)������������������ ����*+����������� �"��,��������������������������!��������
-(��.�������������������$��!!�������
����'������/���� ��������/����$� ���!�,���
� %���� ��������'�������'���!�$���$�������������0�������
%- �.��(��������)�� %��/���-'��(������!1���2������0����$���,��������������
SKIING SIGNALS
________ SAFETY INFORMATION ________ 17

SPECIAL SAFETY MESSAGES
HypothermiaHypothermia, the loss of body heatto the water, is a significant cause ofdeaths in boating accidents. Afteran individual has been overcome byhypothermia, he or she will lose con-sciousness and then drown.PFDs can increase survival time be-cause of the insulation they provide.Naturally, the warmer the water, theless insulation one will require. Whenoperating in cold water (below 4.4°C(40°F)) consideration should be givento using a coat or jacket style PFD asthey cover more of the body than thevest style PFDs.Some points to remember about hy-pothermia protection:1. While afloat in the water, do not
attempt to swim unless it is toreach a nearby boat, fellow sur-vivor, or a floating object on whichyou can lean or climb. Unneces-sary swimming increases the rateof body heat loss. In cold water,drown-proof methods that requireputting your head in the water arenot recommended. Keep yourhead out of the water. This willgreatly lessen heat loss and in-crease your survival time.
2. Keep a positive attitude about yoursurvival and rescue. This will im-prove your chances of extendingyour survival time until rescued.Your will to live does make a differ-ence!
3. If there is more than one personin the water, huddling is recom-mended while waiting to be res-cued. This action tends to reducethe rate of heat loss and thus in-crease the survival time.
4. Always wear your PFD. It won'thelp you fight off the effects of hy-pothermia if you don't have it onwhen you go into the water.
Voluntary InspectionsBoating officials in many countries ortheir auxiliaries offer courtesy inspec-tions to check out your boat. They willcheck for compliance with safety stan-dards and required safety equipment.You may voluntarily consent to one ofthese inspections, and you are allowedtime to make corrections without pros-ecution. Check with the competentauthorities for details.
Safe Boating CoursesMany countries recommend or requirea boating safety course. Check withyour local competent authorities.
18 _______ SAFETY INFORMATION ________

SAFETY EQUIPMENT
Mandatory SafetyEquipmentOperator and passenger(s) shouldhave ready access to shatterproofglasses should riding conditions orpersonal preference warrant.Wind, water spray and speed maycause blurred vision.As the owner of the boat, you are re-sponsible for assuring that all manda-tory safety equipment is aboard.Safety equipment required by regula-tions is mandatory. Check state andlocal regulations for information aboutrequired safety equipment. Manda-tory safety equipment must be ap-proved by a recognized authority of theCountry where the boat is used.
Personal Flotation Devices (PFDs)
In many countries, regulations requirethat you have at least one approvedpersonal flotation device (PFD) of thecorrect size for each person in a recre-ational boat and require that all childrenunder 13 years of age wear a PFD atall times when the boat is underway,except when below deck or in an en-closed cabin. You may not use yourboat unless all PFDs are in service-able condition, readily accessible, legi-bly marked with the approval number,and of an appropriate size (within theweight range and chest size markedon the PFD) for each person on board.A PFD provides buoyancy to help keepyour head above the water and to helpyou remain in a satisfactory positionwhile in the water. Body weight andage should be considered when se-lecting a PFD. The buoyancy providedby the PFD should support your weightin water. The size of the PFD shouldbe appropriate for the wearer. Bodyweight and chest size are commonmethods used to size PFDs. It is yourresponsibility to ensure that you havethe proper number and types of PFDson board to comply with federal and
local regulations and that your passen-gers know where they are and how touse them.
PFD TypesPFD Type I, Wearable has the greatestrequired buoyancy. Its design allowsfor turning most unconscious personsin the water from face down position toa vertical or slightly backward, face-upposition. It can greatly increase thechances of survival. Type I is mosteffective for all waters, especially off-shore when rescue may be delayed. Itis also the most effective in rough wa-ters.
�����
TYPE I — WEARABLE
PFD Type II, Wearable turns its wearerin the same way as Type I, but not aseffectively. The Type Il does not turn asmany persons under the same condi-tions as a Type I. You may prefer to usethis PFD where there is a probability ofquick rescue such as in areas whereother people are commonly involved inwater activities.
________ SAFETY INFORMATION ________ 19

SAFETY EQUIPMENT
������
TYPE II — WEARABLE
PFD Type III, Wearable allows wear-ers to place themselves in a verticalor slightly backward position. It doesnot turn the wearer. It maintains thewearer in a vertical or slightly back-ward position and has no tendencyto turn the wearer face down. It hasthe same buoyancy as a Type Il PFDand may be appropriate in areas whereother people are commonly involved inwater activities.
������
TYPE III — WEARABLE
PFD Type IV, Throwable is requiredin addition to the PFDs previously dis-cussed. The most common Type IVPFD is a buoyant cushion or ring buoy.It is designed to be thrown to a per-son in the water, grasped and held bythe user until he or she is rescued. AType IV PFD should always be in ser-viceable condition and immediatelyavailable for use. Grasping this PFDmay be difficult if the rescue is delayedor if the user is overcome by hypother-mia (loss of body heat).
������
TYPE IV — THROWABLE
PFD Type V, Wearable must be worn.When inflated, it provides buoyancyequivalent to Type I, Il or III PFDs.When it is deflated, however, it maynot support some people.
������
TYPE V — WEARABLE
PFD PointersThe purpose of a PFD is to help saveyour life. If you want it to support youwhen you are in the water, it needs tofit, float, and be in good condition.– Try the PFD on and adjust it until it
fits comfortably in and out of thewater. Mark your PFD if you are theonly wearer.
– To make sure the PFD works, wearit in the water. This will show youhow it works and give you confi-dence when you use it.
20 _______ SAFETY INFORMATION ________

SAFETY EQUIPMENT
– Teach children how to put a PFD onand allow them to try it in the water.That way, they know what the PFDis for and how it works. They willfeel more comfortable with it if theysuddenly find themselves in the wa-ter.
– If the PFD is wet, allow it to drythoroughly before storing it. Do notdry it in front of a radiator or heater.Store it in a well-ventilated area.
– Keep PFDs away from sharp objectswhich can tear the fabric or puncturethe flotation pads.
– For their own safety and the safetyof others, all non-swimmers, poorswimmers, and small childrenshould wear PFD's at all timeswhether the boat is stationary ormoving.
– Check the PFD frequently to makesure that it is not torn, that flota-tion pads have no leaks, and that allseams and joints are securely sewn.
– If a PFD contains a material whichmay become waterlogged and loseits buoyancy after the vinyl insertsare punctured, replace it immedi-ately if it becomes hard or soakedwith water. It may not work whenyou need it.
Fire Extinguishers
As the owner of the boat, you are re-sponsible for supplying an approvedfire extinguisher. Check with localcompetent authorities.Boats (less than 7.9 m (26 ft)) are re-quired to carry one (1) B-1 type handportable fire extinguisher unless theboat is equipped with a fixed fire ex-tinguishing system in the engine com-partment.Hand-held portable fire extinguishersshould be mounted in readily accessi-ble locations away from the enginecompartment. All persons aboardshould know the location and properoperation of the fire extinguisher(s).
NOTE: Don't test fire extinguishers bysquirting small amounts of the extin-guishing compound. The extinguishermight not work when you really needit!
WARNINGIn case of fire, do not open en-gine compartment. Turn off en-gine. Using portable C02 fire extin-guisher, continuously dischargeentire contents at base of fire.
Visual Distress Signal Devices
Visual distress signal equipmentmay be of the pyrotechnic ornon-pyrotechnic type. Regulationsprohibit display of visual distresssignals on the water under any cir-cumstances except when assistanceis required to prevent immediate orpotential danger to persons on board avessel. Check with the local authorityto have proper equipment.The equipment must be approved bythe competent authorities, be in ser-viceable condition, and be stowed ina readily accessible location. Equip-ment having a date for serviceable lifemust be within the specified usagedate shown.Careful selection and proper stowageof visual distress equipment is very im-portant if children are aboard.
DAY USE ONLY
Three orange smoke signals (one handheld and two floating) or one orange flagwith black square and disk.
NIGHT USE ONLY
One S-O-S electric distress light.
DAY AND NIGHT USE
Three flares of the hand held, meteor orparachute type.
________ SAFETY INFORMATION ________ 21

SAFETY EQUIPMENT
Sound Signaling Devices
NOTE: No single signaling device isappropriate for all purposes. Considerkeeping various types of equipment onboard.Boats less than 7.9 m (26 ft) in lengthare required to carry a hand, mouth,or power operated horn or whistle. Itmust produce a blast of two secondduration and audible at a distance of atleast 800 m (1/2 mi).Following are standard whistle signals:– One prolonged blast (warning sig-
nal)– One short blast (pass on my port
side)– Two short blasts (pass on my star-
board side)– Three short blasts (engines in re-
verse)– Five or more blasts (danger signal).
Navigation Lights
Navigation lights are intended to keepother vessels informed of your pres-ence and course. If you are out on thewater between sunset and sunrise,you are required to display appropriatenavigation lights.
Additional RecommendedEquipmentIt is recommended that you acquire ad-ditional equipment for safe, enjoyablecruising (some could be mandatory bylegislation). This list, which is not all in-clusive, includes items you should con-sider acquiring.
BASIC EQUIPMENT
Flashlight Oar or paddle
Compass First aid kit
Distress signals VHF radio
Dock fenders Boat hook
BASIC EQUIPMENT
Electronic PositionIndicating RadioBacon (EPIRB)
Local map
Anchor Tow line
Mooring linesDewatering
device (pump orbailer)
TOOLS
Screwdrivers Pocket knife
Pliers Electrician's tape
Adjustable wrench Duct tape
RECOMMENDED PERSONALGEAR AND FOOD
Extra warmclothing Cellular phone 1
SunblockEmergency supplyof drinking water
and food
A cellular telephone in a waterproofbag or container has also been foundto be beneficial to boaters when in dis-tress or just for contacting someoneon shore.
SPARE PARTS
Extra bulbs Extra fuses
22 _______ SAFETY INFORMATION ________
PRACTICE EXERCISES
It is always a good idea to practice andget familiar with all controls, functionsand handling characteristics of yourboat before venturing on the water.Always secure the tether cord to theengine cut-off switch and the clip toyour PFD or a wrist strap.
Where to PracticeExercisesFind a suitable area to practice the ex-ercises. Ensure the area meet the fol-lowing requirements:– No traffic– No obstacles– No swimmers– No current– Ample space to maneuver– Water depth is adequate.
Practice ExercisesPractice alone the following exercises.
Turning
Practice turning in circles in both di-rections at slow speed. When com-fortable with the exercise, increasedifficulty by making some figure 8.When this is mastered, repeat theabove exercises but at increasedspeed.
Stopping Distances
Practice stopping the boat in a straightline at different speeds.Remember, water drag is the main fac-tor which reduces the boat speed andthus the stopping distance.NOTE: The boat speed, load, currentand wind also play an important role inaffecting stopping distances.
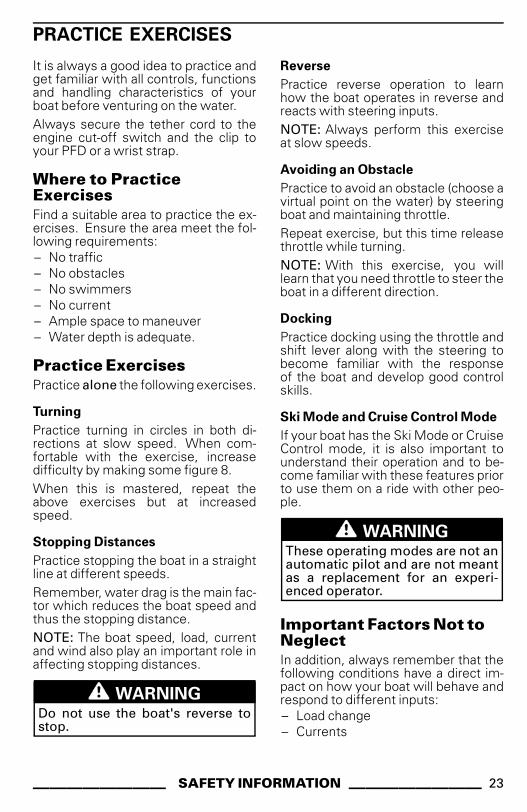
WARNINGDo not use the boat's reverse tostop.
Reverse
Practice reverse operation to learnhow the boat operates in reverse andreacts with steering inputs.NOTE: Always perform this exerciseat slow speeds.
Avoiding an Obstacle
Practice to avoid an obstacle (choose avirtual point on the water) by steeringboat and maintaining throttle.Repeat exercise, but this time releasethrottle while turning.NOTE: With this exercise, you willlearn that you need throttle to steer theboat in a different direction.
Docking
Practice docking using the throttle andshift lever along with the steering tobecome familiar with the responseof the boat and develop good controlskills.
Ski Mode and Cruise Control Mode
If your boat has the Ski Mode or CruiseControl mode, it is also important tounderstand their operation and to be-come familiar with these features priorto use them on a ride with other peo-ple.
WARNINGThese operating modes are not anautomatic pilot and are not meantas a replacement for an experi-enced operator.
Important Factors Not toNeglectIn addition, always remember that thefollowing conditions have a direct im-pact on how your boat will behave andrespond to different inputs:– Load change– Currents
________ SAFETY INFORMATION ________ 23
PRACTICE EXERCISES
– Wind– Water conditions.Make sure to be alert to these condi-tions, and adapt accordingly. If pos-sible, practice further in these condi-tions.For delicate maneuvers, the best ad-vice is always to reduce your speed toa minimum.
24 _______ SAFETY INFORMATION ________

SAFE BOATING PRACTICES
YOU are responsible for your ownsafety, the safety of your passengers,and the safety of fellow boaters.
Drugs and AlcoholDo not use drugs or drink alcohol whileoperating a boat. Like driving a car,driving a boat requires sober, attentivecare. Operating a boat while intoxi-cated or under the influence of drugsis not only dangerous, but it is also aFederal offense carrying a significantpenalty. These laws are vigorously en-forced. The use of drugs and alcohol,singly or in combination, decreasesreaction time, impedes judgment, im-pairs vision, and inhibits your ability tosafely operate a boat.
WARNINGAlcohol consumption and boat-ing do not mix! Operating un-der the influence endangers thelives of your passengers and otherboaters. Federal laws prohibit op-erating a boat under the influenceof alcohol or drugs.
Safe OperationFor safety reasons and proper care, al-ways perform PRE-RIDE INSPECTIONas specified in your Operator's Guidebefore operating your boat. Safe op-eration means that you do not mis-use your boat nor do you allow yourpassengers to do so. Safe operationmeans using good judgment at alltimes. It includes, without limitation,the following actions:– Load the boat within the limits listed
on the capacity plate. Balance loadsbow to stern and port to starboard.
– Maintain boat speed at or below thelocal legal limit. Avoid excessivespeed or speeds not appropriate foroperating conditions.
– Do not use the boat in weather orwaterway conditions beyond theskill or experience of the operator orthe capability of the boat and com-fort of passengers.
– Be sure at least one other passen-ger is familiar with the operation andsafety aspects of the boat in case ofan emergency.
– Make sure that passengers and geardo not obstruct the operator's viewor ability to move.
– Do not exceed the maximum enginepower rating stated on the certifica-tion plate attached to the boat.
– Observe all safety signs and warn-ings both inside the boat and in theimmediate boating area.
– While your boat has the capacityof operating at high speeds, it isstrongly recommended that highspeed operation only be appliedwhen ideal conditions exist and arepermitted. Higher speed operationrequires a higher degree of skill andincreases the risk of severe injuries.
– In shallow water, proceed withcaution and at very low speeds.Grounding or abrupt stops may re-sult in injury. Debris may also bepicked up and be thrown rearwardby the jet pump onto people or prop-erty.
– Do not use the boat's reverse tostop. You or your passenger(s)could be violently ejected forwardor even off the boat onto the hazard.
Maneuverability of the Boat andTowing
– Always keep in mind that as thethrottle lever is returned to idle posi-tion, less directional control is avail-able, and when the engine is off,directional control is lost. You needthrottle to steer.
________ SAFETY INFORMATION ________ 25

SAFE BOATING PRACTICES
– Do not overload the boat or take onmore passengers than designatedfor the particular boat. Overloadingcan affect maneuverability, stabilityand performance.
– Avoid adding on accessories orequipment which may alter yourcontrol of the boat.
– Riding with a passenger(s) or pullinga tube, skier or wakeboarder makesthe boat handle differently and re-quires greater skill.
– Always respect the safety and com-fort of your passenger(s) and personbeing towed on skis, wakeboard orother towables.
– Always carry an observer whenpulling a tube, skier or wakeboarder,proceed with only as much speed asrequired and follow the observer'sinstructions. Unless absolutely nec-essary, do not make tight, sharpturns. Keep a safe distance fromthe docks, other swimmers, craft orobjects.
– Use a tow rope of sufficient lengthand size and make sure it is ade-quately secured to your boat. Someboats are equipped or can be fittedwith a specially designed towingmechanism. It can become a haz-ard should someone fall on it.
Passenger Safety
Before getting underway, show allpassengers where emergency andsafety equipment is stowed, and ex-plain how to use it. Everyone aboardshould wear rubber-soled shoes whichresist slipping on wet surfaces. Whileunderway, passengers should remainseated inside the deck rails. Don't al-low passengers to drag their feet orhands in the water. Always use hand-holds and other safety hardware toprevent falls. All non-swimmers, poorswimmers, and children should weara PFD at all times. Federal regulationsrequire that children under 13 years of
age wear a PFD when the boat is un-derway unless they are in an enclosedcabin or below deck.– Do not start or operate the boat if
anyone is seated on the sun deck orswim platform, or is nearby in thewater. Water and/or debris exitingjet thrust nozzle can cause severeinjury.
– The operator and passenger(s)should be properly seated beforestarting or moving the boat. All pas-senger(s) should be instructed touse the handholds or seat strapsprovided.
– When accelerating a boat with apassenger(s), whether from a com-plete stop or while underway, al-ways do so progressively. Fast ac-celeration may cause your passen-ger(s) to loose their balance or gripand strike something in the boat orfall out of the boat. Make sure thatyour passenger(s) know of, or antic-ipate, any rapid acceleration.
First AidAs a boat operator, you should be fa-miliar with basic first aid proceduresthat may be needed while you arefar from help. Fish hook accidents orminor cuts and abrasions may be themost serious mishaps on board a boat,but you should also learn the properprocedures and be ready to deal withthe truly serious problems like exces-sive bleeding, hypothermia, and burns.First aid literature and courses are avail-able through most Red Cross chapters.
Operation by Minors
Minors should always be supervisedby an adult whenever operating a boat.Many countries have laws regard-ing the minimum age and licensingrequirements of minors. Be sure tocontact the competent authorities forinformation. BRP recommends a min-imum operator age of 16 years old.
26 _______ SAFETY INFORMATION ________

NAVIGATION RULES
Operating RulesOperating a boat can be comparedwith driving unmarked highways androads. To prevent collisions or avoidother boaters, a system of operatingrules must be followed. It's not onlycommon sense... it's the law!Check local and federal boating lawsapplicable to the waterways whereyou intend to use your boat. Learn thelocal rules of the waterways. Knowand understand the applicable naviga-tion system (such as buoys and signs).Know the waters in which the boat isto be operated. Current, tides, rapids,hidden obstacles, wakes and wavesetc. can affect safe operation. It is notadvisable to operate the boat in roughor inclement weather.Generally keep to your right and safelyavoid other craft by keeping a safe dis-tance from other craft, people and ob-jects.The following illustration identifies dif-ferent parts of the boat that are usedas directional reference points, thebow being the front of the boat. Theport side of boat (left side) is visuallyidentifiable by a RED light off the bow,and the starboard side (right side) by aGREEN light.
������
�������������
�����
���
��
TYPICAL1. RED light2. GREEN light (yield zone)
Crossing
Give right of way to craft ahead and toyour right. Never cross in front of an-other craft.RED light (give way to the other craft).GREEN light (you have the right ofway).
������
TYPICAL
Meeting Head-On
Keep right.
�����
TYPICAL
Passing
Give right of way to other craft andkeep clear.
�����!�
TYPICAL
________ SAFETY INFORMATION ________ 27

NAVIGATION RULES
Navigation System
Navigational aids, such as signs orbuoys, can help you identify safe wa-ters. Buoys will indicate whether youshould keep to the right (starboard) orto the left (port) of the buoy or to whichchannel you can continue. They mayalso indicate whether you are enteringa restricted or controlled area such as ano wake or speed zone. They may alsoindicate hazards or pertinent boatinginformation. Markers may be locatedon shore or on the water. They can alsoindicate speed limits, no power craft orboating, anchorage and other usefulinformation. (The shape of each typeof marker will provide assistance.)Make sure you know and understandthe navigation system applicable tothe waterways where you intend touse the boat.
Collision Avoidance
– Do not decrease throttle when try-ing to steer away from objects. Youneed throttle to steer.
– Always keep a constant lookout forother water users, other craft or ob-jects, especially when turning. Bealert for conditions that may limityour visibility or block your vision ofothers.
– Respect the rights of other recre-ationists and/or bystanders and al-ways keep a safe distance from allother craft, people and objects.
– Do not wake or wave jump, ridethe surf line or attempt to spray orsplash others with your boat. Youmay misjudge the ability of the boator your own driving skills and strikea boat or person.
– This boat has the capability of turn-ing more sharply than other boats.However, unless in an emergency,do not negotiate sharp, high speedturns. Such maneuvers make ithard for others to avoid you or under-stand where you are going. Also,you and/or your passenger(s) couldbe ejected from the boat.
– This boat has no brake. Stoppingdistance will vary depending on ini-tial speed, load, wind, and waterconditions. Practice stopping anddocking in a safe, traffic free area tohave an idea of how long it will taketo stop the boat under varying con-ditions.
– Maintaining or increasing speedmay be necessary to avoid a colli-sion.
28 _______ SAFETY INFORMATION ________
FUELING
Recommended FuelUse unleaded gasoline or oxygenatedfuel containing a maximum total of10% of ethanol or methanol. The gaso-line used must have the following rec-ommended octane rating.
NOTICE Never experiment withother fuels. The use of inadequatefuel can result in boat performancedeterioration and damage to criticalparts in the fuel system and enginecomponents.
Inside North America
MINIMUM OCTANE RATING
87 (RON + MON)/2
91 (RON + MON)/2
ENGINE 91 87
Twin 255 engines X (1) X
(1) For optimum engine performance.
Outside North America
MINIMUM OCTANE RATING
92 RON
95 RON
ENGINE 95 92
Twin 255 engines X (1) X
(1) For optimum engine performance.
Fueling Procedure
WARNINGFuel is flammable and explosiveunder certain conditions. Do notsmoke or allow open flames orsparks in the vicinity. Always havean extinguisher close at hand dur-ing fueling procedure.
Be very careful when fueling and ad-here to the fueling procedures de-scribed below in this Operator's Guideand those given to you by the marina.Know the capacity of the fuel tank.Avoid fueling at night except underwell-lighted conditions. Gas spills arenot noticeable in the dark. Do not carryspare fuel or flammable liquids in any ofthe storage or engine compartments.
WARNINGFollow these safe boating fuelinginstructions explicitly.
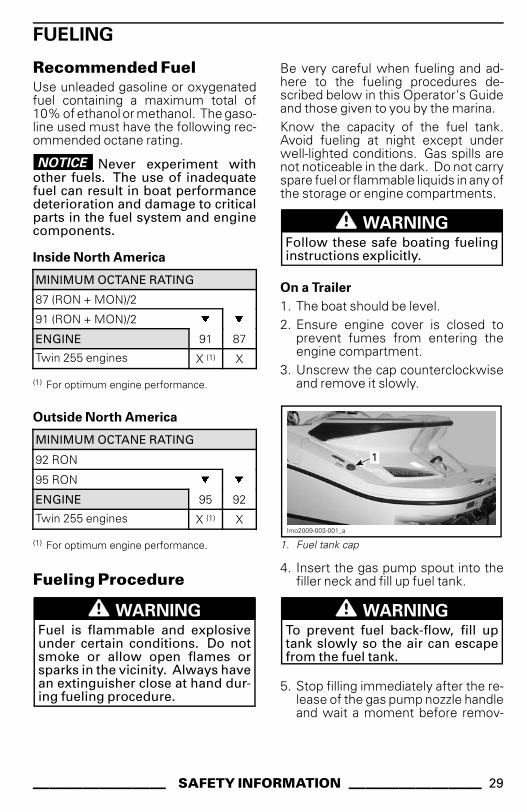
On a Trailer
1. The boat should be level.2. Ensure engine cover is closed to
prevent fumes from entering theengine compartment.
3. Unscrew the cap counterclockwiseand remove it slowly.
lmo2009-003-001_a
1. Fuel tank cap
4. Insert the gas pump spout into thefiller neck and fill up fuel tank.
WARNINGTo prevent fuel back-flow, fill uptank slowly so the air can escapefrom the fuel tank.
5. Stop filling immediately after the re-lease of the gas pump nozzle handleand wait a moment before remov-
________ SAFETY INFORMATION ________ 29

FUELING
ing the spout. Do not retract the gaspump nozzle to put more fuel in fueltank.
WARNINGDo not overfill or top off the fueltank and leave the boat in the sun.As temperature increases, fuel ex-pands and may overflow.
6. Install and fully tighten the fuel tankcap.
WARNINGAlways wipe off any fuel spillagefrom the boat.
In Water
1. Turn off engines.2. Tie boat securely to the fueling pier.3. Do not allow anyone to remain in or
on the boat.4. Ensure engine cover is closed to
prevent fumes from entering theengine compartment.
5. Unscrew the cap counterclockwiseand remove it slowly.
lmo2009-003-001_a
1. Fuel tank cap
6. Insert the gas pump spout into thefiller neck and fill up fuel tank.
WARNINGTo prevent fuel back-flow, fill uptank slowly so the air can escapefrom the fuel tank.
7. Stop filling immediately after the re-lease of the gas pump nozzle handleand wait a moment before remov-ing the spout. Do not retract the gaspump nozzle to put more fuel in fueltank.
WARNINGDo not overfill or top off the fueltank and leave boat in the sun. Astemperature increases, fuel ex-pands and might overflow.
8. Install and fully tighten the fuel tankcap.
WARNINGAlways wipe off any spillage fromthe boat.
30 _______ SAFETY INFORMATION ________
TRAILERING INFORMATION
Refer to the trailer owner's manualfor proper capacity, operation, mainte-nance, accessories and warranty.Check the regulations in your area con-cerning towing a trailer, especially thefollowing rules:– Brake system– Tow vehicle weight– Mirrors.NOTE: An optional brake system isavailable for your trailer (if not standardequipment), contact Karavan Trailersat:www.karavantrailers.com.Take the following precautions whentrailering the boat:1. Tie the boat to both bow and stern
(front/rear) eyelets so that it is firmlyretained on the trailer.
2. Remove stern light (if installed).3. Ensure that ski post is pushed down
(if applicable).4. Ensure all storage compartment
covers are properly latched.5. Empty the ballast tank (if so
equipped).6. Close bimini top (if so equipped).7. A Sea-Doo cover can protect the
boat, particularly before driving ondirt roads, to prevent dirt enteringthrough the air intake openings.
Observe trailering safety precautions.
NOTICE Always close and se-curely fasten rear storage compart-ment lid before trailering.
________ SAFETY INFORMATION ________ 31

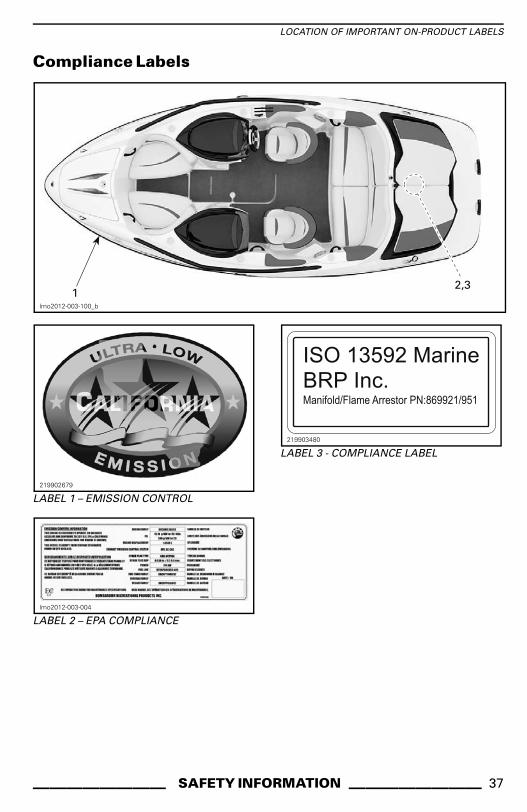
LOCATION OF IMPORTANT ON-PRODUCT LABELS
The following labels are on your boat. If missing or damaged, they can be replacedfree of charge. See an authorized Sea-Doo Boats dealer.Please read the following labels carefully before operating your boat.NOTE: The illustration of the boat indicates the approximate locations of the vari-ous labels. A dotted line indicates that the label is not on the outer surface, and thatthe seat or a cover of some type must be opened to see the label.
Hang Tag
219902678
32 _______ SAFETY INFORMATION ________

LOCATION OF IMPORTANT ON-PRODUCT LABELS
Safety Labels
�"#"$"��"��
��
� �% � �"��
��%lmo2012-003-100_a
��"��"��
lmo2012-003-101_a
204901330
LABEL 1204902065
LABEL 2
________ SAFETY INFORMATION ________ 33

LOCATION OF IMPORTANT ON-PRODUCT LABELS
219903992
LABEL 3
�������
204901347
LABEL 4
204900359
LABEL 5
219904003
LABEL 6
mmo2008-003-007
LABEL 7
�����������
�������
������������� �������������������������������������������������������������������������������������������������������������������������������������������������������������������������������������������������� �!����"�������������#������������������������������"��������������!!�����������"��������������������������������������������������������������������������$������"������������������������������������������������������������������������������������������������%���������������������������������������&���������������������!���������������������'(�����!!�������!���!�!����������������)*��������������"�����������������'������������������"�����������������������������������
���������������� ��������������� ������������������� ����������������������� ���������� ������������������������������������� ������� �� ������������������� ������� ��� �������������� ��������� �� ��� ������ ����������������� ���
204902067
LABEL 8
34 _______ SAFETY INFORMATION ________
LOCATION OF IMPORTANT ON-PRODUCT LABELS
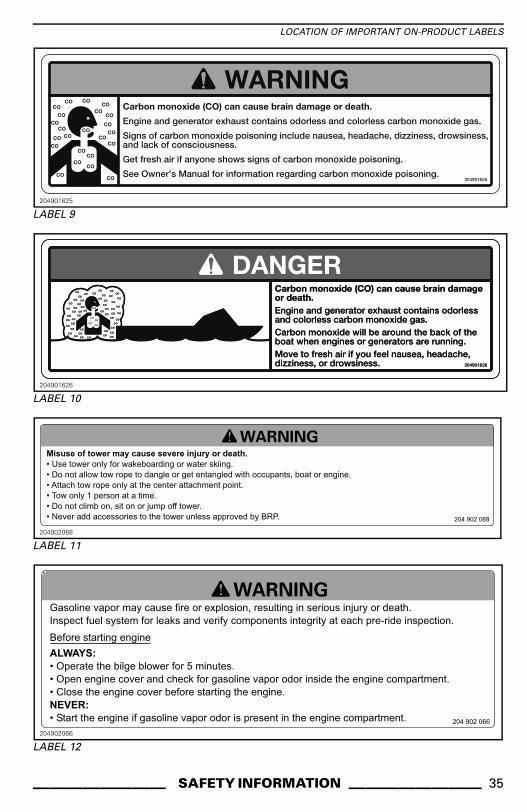
204901625
LABEL 9
204901626
LABEL 10
�������
����������
�������������� ���������������������������������� ���� �������������� ��������������� ������������������������������ ��������� ����� �� ������ �������� !�����"��������� ���� ��#��� ��������� ����������� � �� ������ �$ ��������� %��������&�� ������������$ ��������� ��$����"�����������'!$��������� ���( ) ������� ����� ������� ���� ��!�� ��������) �����*+,�
204902068
LABEL 11
�������-������ �)�����$��� �!� ���� ���� .�������"�� �!���������� ���!����'!������� ����/��� ���! ������ $������ ��������) ����� �$��� ������� ��������� � ���� 0��� ����� �����
* ��� ���������� ����
��������1� ��� ��� ����� ����� ������2�$��!� ���1� �� ���� � �) ������ � ������������� �)��������������� ��� � ���� � �$����$ ����3��� ��� � ���� � �) ��� ��� ������������ � ���� ����� ��4������� � ���� ����������� �)��������������� � �������� � ���� � �$����$ ��� �����������
204902066
LABEL 12
________ SAFETY INFORMATION ________ 35

LOCATION OF IMPORTANT ON-PRODUCT LABELS
lmo2007-001-003_a
LABEL 13 - TOWER (IF SO EQUIPPED)
204902064
LABEL 14 – SEATING POSITION
219903408E
LABEL 15 – CAPACITY
lmo2011-001-014_a
LABEL 16 - IF EQUIPPED WITH "BIMINI TOP
lmo2011-001-015_a
LABEL 17 - IF EQUIPPED WITH "BIMINI TOP
36 _______ SAFETY INFORMATION ________
LOCATION OF IMPORTANT ON-PRODUCT LABELS
Compliance Labels
��"�
lmo2012-003-100_b
219902679
LABEL 1 – EMISSION CONTROL
lmo2012-003-004
LABEL 2 – EPA COMPLIANCE
219903480
LABEL 3 - COMPLIANCE LABEL
________ SAFETY INFORMATION ________ 37

LOCATION OF IMPORTANT ON-PRODUCT LABELS
Technical Information Labels
� �
lmo2012-003-100_c
219903608
LABEL 1 - MAXIMUM ENGINE POWER
219903993
LABEL 2 - PATENT
38 _______ SAFETY INFORMATION ________
PRE-RIDE INSPECTION
WARNINGThe pre-ride inspection is very important before operating the boat. Per-form a pre-ride inspection before each ride to detect potential problemsduring operation. The pre-ride inspection can help you monitor wear anddeterioration before they become a problem. Correct any problems thatyou discover to reduce the risk of a breakdown or crash. See an authorizedSea-Doo Boat dealer if necessary. Bring all safety equipment required bylocal laws.
For more detailed information on these items, refer to the applicable sections.
WARNINGEngines should be off and the tether cord must always be removed fromengine cut-off switch before verifying any of the following. Only start boatonce all items have been checked and operate properly.
________ SAFETY INFORMATION ________ 39

PRE-RIDE INSPECTION
Pre-Ride Check List When Boat is Trailered to WaterwaySUMMARY
ITEM OPERATION ✔
Fuel tank Refill.
Hull Inspect for damage.
Jet pump water intake Inspect/clean.
Bilge Ensure drain plug is properly secured.
Engine compartment Verify for leaks or gasoline vapor odor. Verify fuelsystem components integrity.
Bilge Check for abnormal water presence in bilge.
Throttle levers Check operation.
Shift lever Check operation.
Steering Check operation.
Bilge blower Turn ON bilge blower for 5 minutes to ventilatebilge.
Tower (optional) Check tightness of mounting points fasteners.
Bimini top (optional) Check tightness of mounting points fasteners.Check for canvas damages.
Mandatory safety boatingequipment Ensure all required safety equipment is on board.
Storage compartment covers Ensure they are closed and latched.
Navigation lights Check operation.
Engines start/stop switches Check operation for starting and stopping engines.
Engine cut-off switch Check if engines can be stopped by pulling off thetether cord from the engine cut-off switch.
BOATON
TRAILER
Removable cushions Removable cushions securely fastened or stowed.
Throttle lever Check operation.
Shift lever Check operation.
BOAT INWATER(enginestarted) Steering Check operation.
40 _______ SAFETY INFORMATION ________

PRE-RIDE INSPECTION
Pre-Ride Check List When Boat is Moored to a DockSUMMARY
ITEM OPERATION ✔
Fuel tank Refill.
Bilge Check for abnormal water presence in bilge.
Engine compartment Verify for leaks or gasoline vapor odor. Verify fuelsystem components integrity.
Throttle levers Check operation.
Shift lever Check operation.
Steering Check operation.
Bilge blower Turn ON bilge blower for 5 minutes to ventilate bilge.
Tower (optional) Check tightness of mounting points fasteners.
Bimini top (optional) Check tightness of mounting points fasteners.Check for canvas damages.
Mandatory safety boatingequipment Ensure all required safety equipment is on board.
Storage compartment covers Ensure they are closed and latched.
Navigation lights Check operation.
Engines start/stop switches Check operation for starting and stopping engines.
Engine cut-off switch Check if engine can be stopped by pulling off thetether cord from the engine cut-off switch.
DOCKEDBOAT
Removable cushions Removable cushions securely fastened or stowed.
________ SAFETY INFORMATION ________ 41

PRE-RIDE INSPECTION
FuelFill the fuel tank.
WARNINGStrictly adhere to instructions inthe FUELING PROCEDURE.
HullWalk around your boat inspecting thehull for cracks or other damages.
Jet Pump Water IntakesRemove weeds, shells, debris or any-thing else that could restrict the flowof water and damage the cooling sys-tems or propulsion units. Clean asnecessary. If any obstruction cannotbe removed, refer to an authorizedSea-Doo Boats dealer for servicing.
��� � �
TYPICAL1. Inspect this area
Inspect leading edges of the impellers,for nicks or bends, which greatly re-duce performance of the boat.
Bilge
WARNINGCheck for abnormal water pres-ence in bilge. Make sure drain plugis properly secured before launch-ing the boat in water.
Engine CompartmentEnsure that the engine compartmentis free of gasoline vapor odors and vi-sually, inspect fuel lines for deteriora-tion and the condition of the fuel tankstraps and theirs fasteners.
WARNINGIf any leaks or gasoline vaporodors are present, DO NOT startengine or use electrical acces-sories. Consult an authorizedSea-Doo Boats dealer.
Main Battery Cut-OffSwitchTurn switch in the ON position to allowstarting engine and use accessories.
Throttle/Shifter System
Throttle Levers
Check throttle levers for free andsmooth operation.
WARNINGCheck operation of throttle leversbefore starting the engines.
Shift Lever
Check that reverse gates moves freely.With shift lever in forward position, thegates must be in upward position andlocked. With the shift lever in neu-tral position, gates must be in middleposition. With shift lever in reverseposition, gates must be in downwardposition.
WARNINGVerify the reverse gates lock.
To verify the reverse gates lock, moveshift lever to the FORWARD position.Pull backwards on the starboard re-verse gate.
42 _______ SAFETY INFORMATION ________

PRE-RIDE INSPECTION
The reverse gates lock is working if thereverse gates stays in the up position.
NOTICE If the reverse gates do notstay in the up position when the shiftlever is at FORWARD, do not operatethe boat further, see an authorizedSea-Doo Boats dealer.
Steering SystemCheck steering for free and smoothoperation. Have another person helpcheck the jet pump nozzle pivots ac-cordingly.
WARNINGCheck operation of steering andcorresponding steering nozzlesbefore starting engines.
Bilge BlowerTurn ON the bilge blower and makesure it is operational. Leave it on for5 minutes to ventilate the bilge frompotential gasoline vapor hazard.
Tower (Optional)Check that all retaining bolts are inplace and tight.
lmo2011-005-008_a
1. Front attachment bolts2. Rear mounting bolt (knobs)
Bimini Top (Optional)Check bimini top, if so equipped.Check for tightness of mounting pointsfasteners and the integrity of the struc-ture. Check for canvas damages.
Mandatory Safety BoatingEquipmentMake sure to have on board all safetyequipment required by the local regu-lations (fire extinguisher, PFDs, visualdistress signal devices, etc.) and theyare in good condition. Check with alocal competent authority for the re-quired equipment.Periodically check the straps bucklesand fasteners of your personal flota-tion device to make sure that there areno rips or tears and that the buckles arefunctioning properly.
Storage CompartmentCoversEnsure they are closed and latched.
Navigation LightsEnsure all navigation lights are opera-tional and replace any defective lightbefore using the boat.
Engine START/STOPSwitchesEnsure switches operate properly.Start and stop each engine using eachswitch individually.
WARNINGIf engines do not shut-off whenpushing engine START/STOPswitches, shut engine off usingtether cord or key. Do not operatethe boat further, see an authorizedSea-Doo Boats dealer.
Engine Cut-off SwitchVerify when pulling off the tether cordfrom the engine cut-off switch that en-gines can be stopped.
WARNINGDo not use boat if engines can notbe stopped by pulling off the tethercord.
________ SAFETY INFORMATION ________ 43

PRE-RIDE INSPECTION
This page is
intentionally blank
44 _______ SAFETY INFORMATION ________
BOATINFORMATION
_______________ 45

CONTROLS
lmo2011-005-001_a
COCKPIT VIEW
1) Steering WheelThe steering wheel controls the direc-tion of the boat. Turning the steeringwheel clockwise steers the boat to theright and inversely.
2) Throttle/Shift Control
Shift Lever
A 3-position lever:– Forward– Neutral– Reverse.In order to shift:– Throttle levers must be fully pulled
back (idle speed position)– Neutral lock detent button must be
pressed (when in neutral).
lmo2011-005-009_b
TYPICAL1. Throttle levers must be fully pulled back to
shift (idle speed)2. Push neutral lock detent button3. Forward4. Neutral5. Reverse
NOTICE Do not force lever, insurethrottle levers are in idle position be-fore shifting and the neutral lock but-ton is pressed (i.e. disengaged).
WARNINGShift lever should only be usedwhen boat is completely stopped.
46 ______________

CONTROLS
WARNINGAlways ensure the path behind isclear of people and objects.
NOTICE Never rev the engine athigh RPM in reverse.
Throttle Levers
When pushed forward, the boat ac-celerates. When fully pulled back, en-gines return to idle speed and the boatis gradually stopped by water drag.
lmo2011-005-009_c
TYPICAL1. Port and starboard engine levers in idle
speed position2. To increase speed3. To decrease speed
The port throttle lever controls theRPM of the port engine and the star-board lever controls the RPM of thestarboard engine. Although each en-gine RPM can be controlled individ-ually, we recommend moving bothlevers at the same time.
3) Engine Cut-Off Switch
WARNINGKeep engine cut-off switch freefrom obstructions that could inter-fere with its operation. The properuse of the tether cord can preventa runaway boat situation. Removethe tether cord when stopped tohelp prevent accidental starting.
The tether cord should be securelysnapped onto the engine cut-offswitch to allow engine starting.Two short beeps should sound indi-cating the system is ready to allowengines starting. Otherwise, refer tothe MONITORING SYSTEM section.Pulling the key from the engine cut-offswitch stops engines.
WARNINGShould the tether cord becomeloose or fail to remain on enginecut-off switch, replace it immedi-ately.
Always attach the tether cord to the op-erator using its Personal Flotation De-vice or a wrist strap and snap the key tothe engine cut-off switch to be able tostart each engine.
����! � ��
TYPICAL1. Tether cord2. Secure tether cord clip to PFD3. Snap key to engine cut-off switch
WARNINGDirectional control is reducedwhen throttle is decreased andlost when engine is off. Always re-move tether cord when boat is notin operation.
_______________ 47
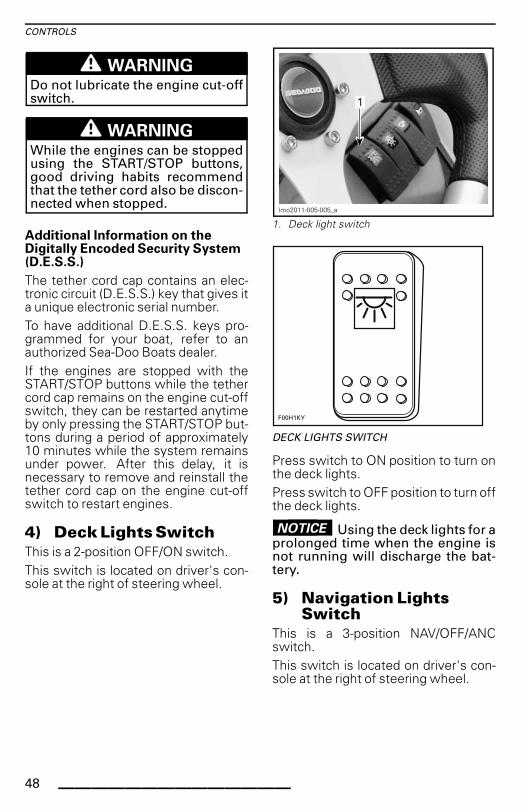
CONTROLS
WARNINGDo not lubricate the engine cut-offswitch.
WARNINGWhile the engines can be stoppedusing the START/STOP buttons,good driving habits recommendthat the tether cord also be discon-nected when stopped.
Additional Information on theDigitally Encoded Security System(D.E.S.S.)
The tether cord cap contains an elec-tronic circuit (D.E.S.S.) key that gives ita unique electronic serial number.To have additional D.E.S.S. keys pro-grammed for your boat, refer to anauthorized Sea-Doo Boats dealer.If the engines are stopped with theSTART/STOP buttons while the tethercord cap remains on the engine cut-offswitch, they can be restarted anytimeby only pressing the START/STOP but-tons during a period of approximately10 minutes while the system remainsunder power. After this delay, it isnecessary to remove and reinstall thetether cord cap on the engine cut-offswitch to restart engines.
4) Deck Lights SwitchThis is a 2-position OFF/ON switch.This switch is located on driver's con-sole at the right of steering wheel.
lmo2011-005-005_a
1. Deck light switch
�����&
DECK LIGHTS SWITCH
Press switch to ON position to turn onthe deck lights.Press switch to OFF position to turn offthe deck lights.
NOTICE Using the deck lights for aprolonged time when the engine isnot running will discharge the bat-tery.
5) Navigation LightsSwitch
This is a 3-position NAV/OFF/ANCswitch.This switch is located on driver's con-sole at the right of steering wheel.
48 ______________

CONTROLS
lmo2011-005-005_b
1. Navigation lights switch
������
NAVIGATION LIGHTS SWITCH
ANC: Turns on the anchorage lightwhen the boat is anchored.Only the stern light is lit.
OFF: Turns off all lights.
NAV: Turns on both bow and sternlights and illuminates thegauges.
6) Bilge Pump SwitchThis is a 2-position OFF/ON switch.This switch is located on driver's con-sole at the right of steering wheel.
lmo2011-005-005_c
1. Bilge pump switch
������
BILGE PUMP SWITCH
Turn to ON position when a manual op-eration of the bilge pump is required(after cleaning, storage, etc.).Turn switch to OFF when finished.
NOTICE Do not operate for a pro-longed time if the bilge is dry: bat-tery drainage will occur and pumpwill be damaged.
The bilge pump may be operated with-out the tether cord installed on the en-gine cut-off switch.
NOTICE Always turn pump OFFafter water is evacuated or beforeoperating the engines above idle.Bilge pump will then switch to auto-matic mode.
_______________ 49

CONTROLS
Bilge Pump Automatic Mode
The bilge pump will automatically evac-uate water from the bilge. A watersensor detects the water, activatingthe pump. After the water is pumpedout, the pump shuts-off automatically.NOTE: The automatic mode can notbe deactivated, even if the main bat-tery cut-off switch is turned OFF.
NOTICE Prolonged operation ofthe bilge pump when the boat ismoored will lead to battery dis-charge and the bilge pump will quitworking.
NOTICE Install boat cover when-ever leaving boat unattended forprolonged periods of time to avoidunnecessary water accumulationand battery drainage.
7) Horn SwitchThis is a 2-position push type switch.This switch is located on driver's con-sole at the right of steering wheel.
lmo2011-005-005_d
1. Horn switch
������
HORN SWITCH
Press and hold the switch to activatethe horn.Release the switch to stop horn.
8) Bilge Blower SwitchThis is a 2-position OFF/ON switch.This switch is located on driver's con-sole at the left of steering wheel.
lmo2011-005-006_b
1. Bilge blower switch
�����
BILGE BLOWER SWITCH
50 ______________
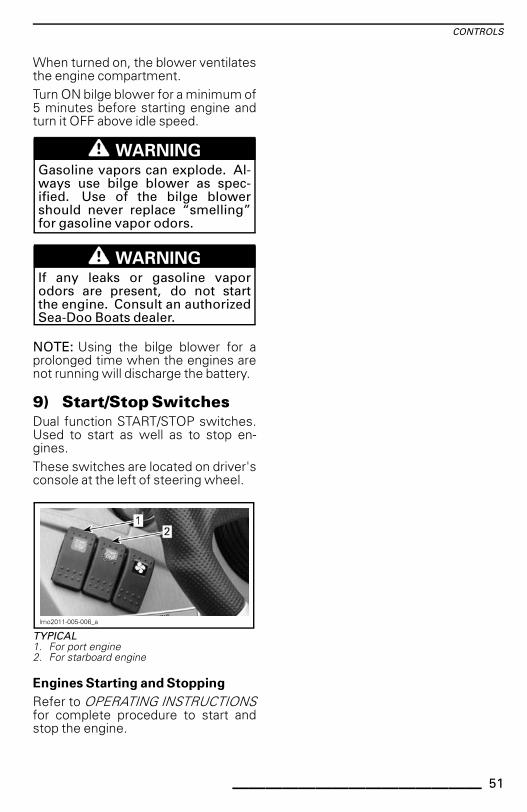
CONTROLS
When turned on, the blower ventilatesthe engine compartment.Turn ON bilge blower for a minimum of5 minutes before starting engine andturn it OFF above idle speed.
WARNINGGasoline vapors can explode. Al-ways use bilge blower as spec-ified. Use of the bilge blowershould never replace “smelling”for gasoline vapor odors.
WARNINGIf any leaks or gasoline vaporodors are present, do not startthe engine. Consult an authorizedSea-Doo Boats dealer.
NOTE: Using the bilge blower for aprolonged time when the engines arenot running will discharge the battery.
9) Start/Stop SwitchesDual function START/STOP switches.Used to start as well as to stop en-gines.These switches are located on driver'sconsole at the left of steering wheel.
lmo2011-005-006_a
TYPICAL1. For port engine2. For starboard engine
Engines Starting and Stopping
Refer to OPERATING INSTRUCTIONSfor complete procedure to start andstop the engine.
_______________ 51

GAUGES
lmo2011-005-002_a
1) Fuel GaugeLocated in dashboard, this gauge con-tinuously indicates the amount of fuelleft in fuel tank when engines are run-ning.
lmo2009-003-010
TYPICAL - FUEL GAUGE
The gauge is illuminated whenever thenavigation lights are used.The fuel level can also be verified with-out having engines running. Withthe tether cord removed from theengine cut-off switch, push eitherSTART/STOP switch; the gauge willbe activated for approximately 30 sec-onds.
2) TachometersThe tachometers indicate the revolu-tions per minute (RPM) of the engines.Multiply reading by 1000 to obtain ac-tual RPM.
lmo2009-003-011
TYPICAL - TACHOMETER
The gauges are illuminated wheneverthe navigation lights are used.
3) SpeedometerThe speedometer indicates the speedof the boat in miles per hour (MPH) andkilometers per hour (km/h).
52 ______________

GAUGES
lmo2009-003-012
TYPICAL - SPEEDOMETER
The gauge is illuminated whenever thenavigation lights are used.
4) Monitoring GaugesThe monitoring gauges inform the op-erator of malfunctions for each engine.
�����
�
��
�
TYPICAL1. Battery2. Engine3. Temperature4. Oil
Low Battery Warning Light
Before the battery becomes too dis-charged to start the engines, the voltsindicator light will come on.When the indicator light is on, youshould discontinue all use of electri-cal accessories immediately and startthe engine(s) in order to recharge thebattery.
Check Engine Light
When the ECM detects a fault code,the check engine light will come onand a beep may sound.Turn engine off. Wait one (1) minute.Restart engine. If light remains lit, takeboat to nearest authorized Sea-DooBoats dealer for servicing.
Engine Temperature Light
NOTICE If the temperature indica-tor light comes on, stop engine assoon as possible.
Turn off engine as soon as possible.Check engine oil level and refill.
NOTICE Running engine with lowoil pressure may severely damagethe engine.
Check engine coolant level. Refer toENGINE COOLANT in MAINTENANCEPROCEDURES. If engine still over-heats, continue the following proce-dure.Perform JET PUMP WATER INTAKEAND IMPELLER CLEANING proce-dure described in SPECIAL PROCE-DURES.When back to shore, flush exhaustcooling system. Refer to PRE-RIDEINSPECTION.Restart the engine. If this does notcorrect the situation, do not run theengine further. Refer to an authorizedSea-Doo Boats dealer for servicing.
Oil Pressure Light
The oil light turns on when the engineoil pressure is low or high in the en-gine(s). Check engine oil as soon aspossible. If lamp remains ON contactan authorized Sea-Doo Boats dealer.
NOTICE Never run engines whileout of engine oil. Serious enginedamage will occur.
5) Depth FinderA depth finder is included as standardequipment and is located on the dash-board.It displays the water depth under thehull within 0 m to 50 m (0 ft to 170 ft).
_______________ 53
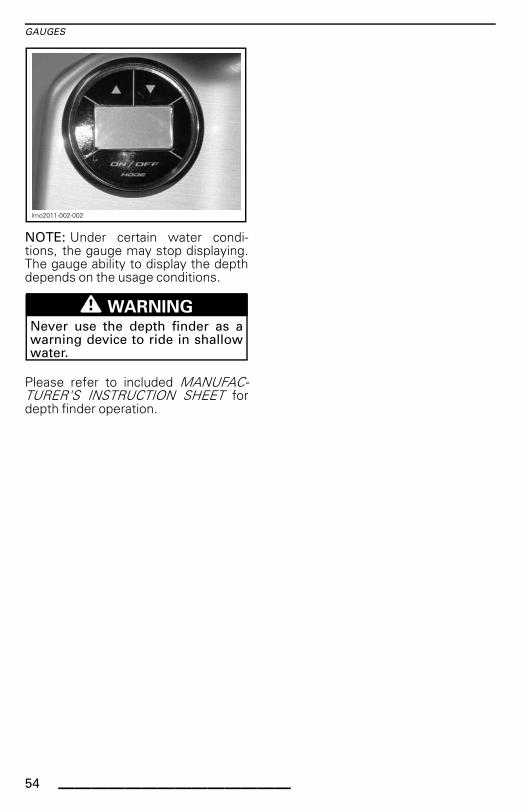
GAUGES
lmo2011-002-002
NOTE: Under certain water condi-tions, the gauge may stop displaying.The gauge ability to display the depthdepends on the usage conditions.
WARNINGNever use the depth finder as awarning device to ride in shallowwater.
Please refer to included MANUFAC-TURER'S INSTRUCTION SHEET fordepth finder operation.
54 ______________

EQUIPMENT
NOTE: Some equipments do not apply or could be optional. In these cases theirreference numbers are deliberately missing in the illustrations.
� �� �� $ � �� %
��"'��"'��
� �� �� #��
�� �$
�#
�� �� ���
��� ��
�� �% # �� � �$
�� ��
�
��
��
�
lmo2011-005-003_a
TYPICAL
_______________ 55

EQUIPMENT
����
��
��
��
�
lmo2011-005-004_a
TYPICAL — REAR VIEW
1) Bilge Drain PlugA drain plug is provided to expel waterfrom the bilge.
����� �
� �
TYPICAL1. Drain plug2. Loosen3. Tighten
2) Grab HandlesGrab handles provide a handhold forthe passengers.
Although grab handles are provided,never perform maneuvers that place apassenger or the driver at risk for beingejected or thrown out of their seat.
NOTICE Never use the grab han-dles to pull anything or to lift theboat.
Refer to components location illustra-tions at the beginning of this sectionfor grab handle locations.
3) Rear Grab HandlesProvide a handhold for boarding whenneeded.
NOTICE Never use the grab han-dle to tow anything or to lift the boat.
56 ______________

EQUIPMENT
4) Ladder
WARNINGEngines should be OFF when us-ing ladder. Keep limbs away fromjets or intake grates. Only one per-son at a time on the ladder. Neveruse the ladder for pulling, towing,diving or jumping, boarding a boatthat is out of the water or any otherpurpose other than a ladder.
Located under the swim platform, theladder conveniently helps in reboard-ing the boat.Pull rubber latch to release the ladder.
lmo2009-003-002_a
TYPICAL1. Latch
Slide ladder toward rear, then pushdown.
lmo2009-003-003
TYPICAL — LADDER LOWERED
To store ladder, lift horizontally, slide to-ward front and secure rubber latch.
NOTICE In order to avoid dam-age to the ladder, they should notbe used when the boat is out of thewater.
5) Swim PlatformProvides an anti-skid surface for easyboarding from the rear of boat.
WARNINGEngines must be off when usingswim platform. Keep away fromjets or intake grates.
6) Driver's SeatEach occupant should be seated whileunderway.
WARNINGAllow no one to sit on edge of theboat or to stand up while in op-eration. Seat and grab handlesshould be used in rough waters.
Swivel Adjustment
The seat can swivel.Pull and hold lever to swivel seat.Release lever after adjustment is com-pleted.
lmo2008-003-004_a
TYPICAL — PULL AND HOLD LEVER1. Lever
_______________ 57

EQUIPMENT
lmo2008-003-004_c
TYPICAL — SWIVEL SEAT
WARNINGAlways ensure driver's seat swivelis locked so that seat faces steeringwheel before riding.
Forward and Backward Adjustment
Driver's seat is adjustable forward andbackward.Push and hold lever down to unlockseat.
lmo2008-003-004_b
TYPICAL — PUSH AND HOLD LEVER1. Lever
Move seat at the desired position.
lmo2008-003-004_d
TYPICAL — ADJUST SEAT
Release lever after adjustment is com-pleted.
7) Passenger/SpotterSeat
Located on starboard side, besidedriver's seat, this seat is provided tobe used by the observer when towinga skier, a tube or a wakeboarder. Ro-tate seat to rear facing position for use.
WARNINGAlways have an observer whiletowing a skier, a tube or a wake-boarder, proceed with only asmuch speed as required, and fol-low observer's instructions.
To adjust this seat, use the driver's seatprocedure.
8) Bow Seats
WARNINGNo one should use the boardingstep as a seat except when the boatis stopped.
WARNINGAvoid serious or fatal injury. Nopassenger should be seated on themost forward seat in the bow areaif it faces backwards when speedexceeds 8 km/h (5 MPH).
58 ______________
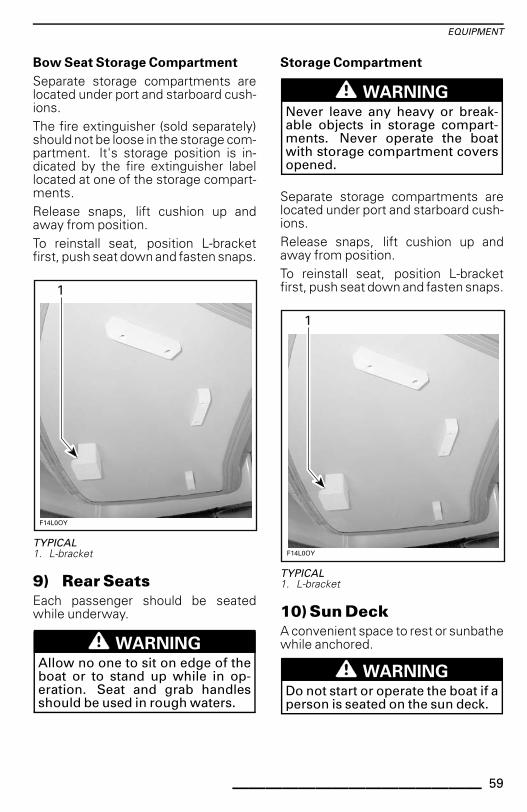
EQUIPMENT
Bow Seat Storage Compartment
Separate storage compartments arelocated under port and starboard cush-ions.The fire extinguisher (sold separately)should not be loose in the storage com-partment. It's storage position is in-dicated by the fire extinguisher labellocated at one of the storage compart-ments.Release snaps, lift cushion up andaway from position.To reinstall seat, position L-bracketfirst, push seat down and fasten snaps.
�����(
�
TYPICAL1. L-bracket
9) Rear SeatsEach passenger should be seatedwhile underway.
WARNINGAllow no one to sit on edge of theboat or to stand up while in op-eration. Seat and grab handlesshould be used in rough waters.
Storage Compartment
WARNINGNever leave any heavy or break-able objects in storage compart-ments. Never operate the boatwith storage compartment coversopened.
Separate storage compartments arelocated under port and starboard cush-ions.Release snaps, lift cushion up andaway from position.To reinstall seat, position L-bracketfirst, push seat down and fasten snaps.
�����(
�
TYPICAL1. L-bracket
10) Sun DeckA convenient space to rest or sunbathewhile anchored.
WARNINGDo not start or operate the boat if aperson is seated on the sun deck.
_______________ 59
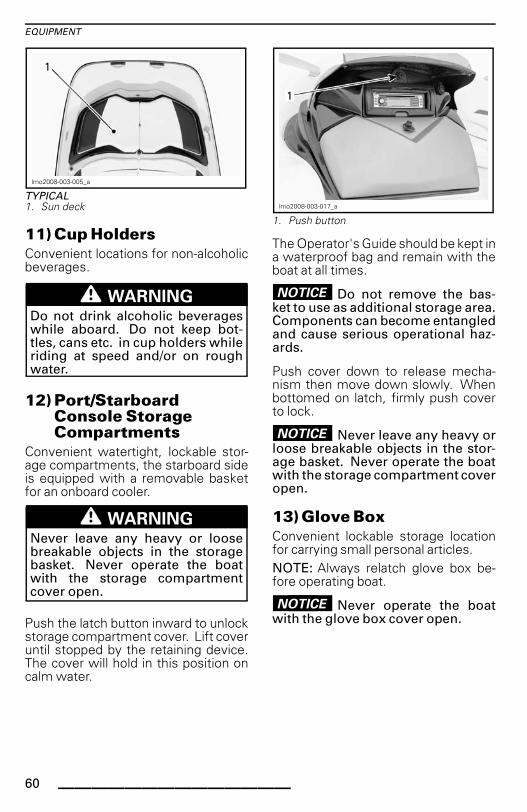
EQUIPMENT
lmo2008-003-005_a
TYPICAL1. Sun deck
11) Cup HoldersConvenient locations for non-alcoholicbeverages.
WARNINGDo not drink alcoholic beverageswhile aboard. Do not keep bot-tles, cans etc. in cup holders whileriding at speed and/or on roughwater.
12) Port/StarboardConsole StorageCompartments
Convenient watertight, lockable stor-age compartments, the starboard sideis equipped with a removable basketfor an onboard cooler.
WARNINGNever leave any heavy or loosebreakable objects in the storagebasket. Never operate the boatwith the storage compartmentcover open.
Push the latch button inward to unlockstorage compartment cover. Lift coveruntil stopped by the retaining device.The cover will hold in this position oncalm water.
lmo2008-003-017_a
1. Push button
The Operator's Guide should be kept ina waterproof bag and remain with theboat at all times.
NOTICE Do not remove the bas-ket to use as additional storage area.Components can become entangledand cause serious operational haz-ards.
Push cover down to release mecha-nism then move down slowly. Whenbottomed on latch, firmly push coverto lock.
NOTICE Never leave any heavy orloose breakable objects in the stor-age basket. Never operate the boatwith the storage compartment coveropen.
13) Glove BoxConvenient lockable storage locationfor carrying small personal articles.NOTE: Always relatch glove box be-fore operating boat.
NOTICE Never operate the boatwith the glove box cover open.
60 ______________

EQUIPMENT
lmo2008-003-017_b
1. Glove box latch
14) RadioRefer to manufacturer's guide for com-plete explanation of features and con-trols.
NOTICE Using the radio for a pro-longed time without engines run-ning may discharge the battery.
lmo2012-003-001
TYPICAL - RADIO
15) 23) Radio AUX OutputThis socket is used to connect portableaudio devices.
lmo2012-003-001_a
INSIDE GLOVE BOX1. Portable audio device socket
Refer to radio owner manual for operat-ing instruction.
16) 12-Volt Power OutletA 12-volt power outlet is provided topower temporary accessories suchas a cellular phone or other 12-voltportable devices.
lmo2008-003-017_c
1. 12-volt power outlet
NOTICE Close protective capwhen the 12-volt power outlet is notin use to protect against weather.
NOTICE Using 12-volt portabledevices for a prolonged time with-out engine running may dischargethe battery.
17) Bow StorageCompartment
lmo2008-003-006
TYPICAL — BOW STORAGE COMPARTMENT
_______________ 61

EQUIPMENT
NOTICE Never leave breakableobjects in the bow storage compart-ment. Never operate the boat withthe bow storage compartment coveropen.
A large, convenient storage compart-ment for PFD's, towels, etc.To open, lift T-handle and turn in eitherdirection and lift. To close, lower coverand turn handle so it will lay flush in itsrecess.NOTE: Always relatch compartmentlid.
18) Deck StorageCompartment
The deck storage compartment is aconvenient lockable location for waterskis, paddles, anchor and rope, etc.Use the provided key to unlock thecompartment if needed.
lmo2009-001-005_a
1. Lock
NOTICE Never leave any heavy orloose breakable objects in the deckstorage compartment. Never oper-ate the boat with the deck storagecompartment cover open.
����)
�
TYPICALStep 1: Pull latch and lift cover
Lift the latch ring and open cover gen-tly until gas assist cylinder is fully ex-tended.When completely opened, the coverremains in that position on calm water.To close, gently lower the cover.Lock if desired.
19) Rear StorageCompartment(Engine Cover)
Convenient rear storage location forcarrying large personal articles. Ideallocation for spare Personal FlotationDevice (PFD), towels, lunch etc.The rear storage compartment releasehandle is located in the passenger con-sole storage compartment. Pull the re-lease handle upward and open enginecover gently until stopped.The gas assist cylinder will completethe opening and hold cover open.
NOTICE Never leave any heavyor breakable objects in the storagecompartment. Never operate theboat with the rear storage compart-ment cover open.
62 ______________

EQUIPMENT
WARNINGWhen engine cover is lifted, nevertouch any electrical part whenstarting engine or while in oper-ation. Never leave any object, ragor tool in the engine compartmentor in the bilge.
NOTICE Always ensure rear stor-age compartment lid is closed andsecurely fastened before trailering.
Additional access to the rear storagecompartment is available by pulling theloop located between the sun deckcushions.
�
�����*
1. Pull this loop
This will open the starboard-side lid.The port side may then be opened.
lmo2008-003-007
TYPICAL — REAR STORAGECOMPARTMENT
A manual lock is provided to securethe rear storage compartment. Ensuresundeck cushions are properly closedand open rear storage compartment lidby lifting release handle in passengerconsole storage compartment.Slide bolt into latch to secure.
������
SLIDE THIS DIRECTION TO SECURE
Storage Tray
NOTICE In order to avoid damage,MAXIMUM LOAD on storage traymust not exceed 22.5 kg (50 lb).
The storage tray is removable, allow-ing access to the engine compartment.Grab the handle and lift in a rearwardmovement until opposite holders re-lease.
WARNINGWhen storage tray is lifted or re-moved, never touch any electri-cal part when starting engines orwhile in operation. Never leaveany object, rag, tool, etc., in the en-gine compartment or in the bilge.
When reinstalling storage tray, prop-erly locate it just below holders, gentlylower tray then push it downward tolock.
_______________ 63
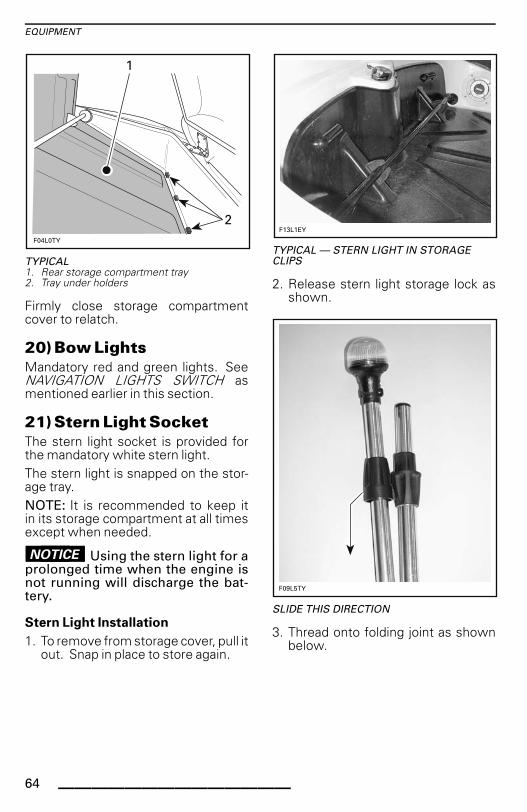
EQUIPMENT
�����+
�
�
TYPICAL1. Rear storage compartment tray2. Tray under holders
Firmly close storage compartmentcover to relatch.
20) Bow LightsMandatory red and green lights. SeeNAVIGATION LIGHTS SWITCH asmentioned earlier in this section.
21) Stern Light SocketThe stern light socket is provided forthe mandatory white stern light.The stern light is snapped on the stor-age tray.NOTE: It is recommended to keep itin its storage compartment at all timesexcept when needed.
NOTICE Using the stern light for aprolonged time when the engine isnot running will discharge the bat-tery.
Stern Light Installation
1. To remove from storage cover, pull itout. Snap in place to store again.
������
TYPICAL — STERN LIGHT IN STORAGECLIPS
2. Release stern light storage lock asshown.
��� +
SLIDE THIS DIRECTION
3. Thread onto folding joint as shownbelow.
64 ______________

EQUIPMENT
��� ,
4. Lift connector cap.
lmo2010-006-004_a
1. Connector cap
5. Insert post in connector hole. En-sure to align hole keyway with postscrew head.
��
�lmo2010-002-003_a
1. Stern light post2. Post screw head3. Hole keyway
6. Firmly push downward to engageterminals.
7. Push lock ring downward. Turn un-til locked. It may be necessary toslightly turn it to allow its insertion inthe hole.
� �
lmo2010-002-004_a
Step 1: Push lock ringStep 2: Turn lock ring to lock it
8. Check light operation. See NAVIGA-TION LIGHT SWITCH as mentionedearlier in this section.
Removal and storage of light is the re-verse of installation.
22) Mooring CleatsWhen mooring to a dock, it is recom-mended to secure with both front andrear cleats. The use of dock lines withsealed air fenders is recommended toprotect your boat.
NOTICE Never use mooring cleatsto pull anything or to lift the boat.
_______________ 65

EQUIPMENT
23) Bow and Stern Eyelets
Bow Eyelet
Eyelets can be used for mooring, tow-ing and as a tie-down point for trans-portation.
lmo2008-003-009_a
1. Bow eyelet
Stern Eyelets
Eyelets can be used for mooring, tow-ing and as a tie-down point for trans-portation.
lmo2008-003-003_c
TYPICAL1. Stern eyelet
24) Water Sport TowingAttachments
Please read and often refer to WATERSPORTS information in the SAFETYINFORMATION section at the front ofthis guide.
WARNING“Teak Surfing” is extremely dan-gerous to participants due to theirproximity to the rear of the boatwhere direct contact with the ex-haust fumes from the boat engineis the highest. Carbon monoxidepoisoning can occur and result inmental disorientation, dizziness,drowsiness, and loss of conscious-ness. The combination of carbonmonoxide exposure and non-useof a life jacket (PDF) make this newwater recreation activity an incred-ibly dangerous and potentiallydeadly sport.
WARNINGWhen pulling a tube, skier or wake-boarder, always have an observer,proceed with only as much speedas required, and follow the ob-server's instructions.
WARNINGPulling a tube, skier or wake-boarder makes the boat handle dif-ferently and requires greater skill.Unless absolutely necessary, donot make tight, sharp turns. Keepa safe distance from the docks,swimmers, other craft or objects.Be advised that serious injury canresult if the tow rope becomesslack during a tight turn or whencircling. The rope could becomewrapped around the neck or limbsof a person.
Ski Post
This boat comes equipped with a skipost. Use this post to pull a tube, wa-ter skier or wakeboarder.Pull up the post to allow hooking a skirope or other towables.
66 ______________

EQUIPMENT
WARNINGAlways have observer watch skier.Ensure ski post is fully extendedand locked before use. Com-pletely retract when not used.
NOTICE Never use the ski post totow any other craft.
������
�
1. Lift ski post to use
Push down when finished.
����� - �
1. Ski post position when not in use
Tower
WARNINGPulling a tube, skier or wake-boarder makes the boat handle dif-ferently and requires greater skill.Unless absolutely necessary, donot make tight, sharp turns. Keepa safe distance from docks, swim-mers, other craft or objects. Be ad-vised that serious injury can resultif the tow rope becomes slack dur-ing a tight turn or when circling.The rope could become wrappedaround the neck or limbs of a per-son.
The towing tower is for skiing/wakeboarding.
NOTICE Towing tower MUST befastened in the upright position toavoid damage to the boat and tow-ing vehicle while in transport or wa-ter operation.
25) Main Battery Cut-OffSwitch
This switch allows a complete powercut-out of the electrical system.This switch is located on the verticalwall of the starboard side of the rearbench seat, behind the passenger'slegs.When in OFF position, ALL electricalequipment and electronics will be OFFexcept bilge pump. The bilge pumpwill operate automatically with the bat-tery switch on the OFF position.Switch must be in the ON position to al-low the use of other accessories and tostart the engines.
NOTICE Stop engines beforeswitching to the OFF position.
_______________ 67

EQUIPMENT
lmo2009-003-013_a
MAIN BATTERY CUT-OFF SWITCH1. ON position2. OFF position
It is recommended to set this switch tothe OFF position whenever perform-ing maintenance in the engine com-partment, on the electrical system,for transportation or during short termstorage.
NOTICE When the main batterycut-off switch is turned OFF whileboat is moored, the automatic bilgepump will start if water comes up inthe bilge.
26) Radio Remote ControlA remote control for the radio/CDplayer is included as standard equip-ment and is located on the dashboard.
lmo2008-003-012
TYPICAL — RADIO REMOTE CONTROL
Please refer to included MANUFAC-TURER'S INSTRUCTION SHEET forremote control operation.
27) Built-In Ice ChestConvenient location that could be usedas a cooler to keep non-alcoholic bever-ages cold.
lmo2008-003-016_a
BUILT-IN ICE CHEST
28) Automatic FireExtinguisher
For CE Models OnlyThis boat is equipped with an auto-matic fire extinguisher in case a firestarts in the engine compartment.NOTE: There is an indicator light onthe side of the deck.NOTE: Do not test fire extinguishersby squirting small amounts of the extin-guishing compound. The extinguishermight not work when you really needit!
WARNINGIn case of fire, do not open en-gine compartment. Turn off en-gine. Activate automatic fire ex-tinguisher continuously, and dis-charge entire contents at base offire.
Refer to MANUFACTURER'S IN-STRUCTION MANUAL additional in-formation.
68 ______________

BREAK-IN PERIOD
Operating During Break-InNOTICE Carefully follow the in-
structions of this section. Failure todo so may reduce the engine's lifeand/or performance.
A break-in period of 10 hours is re-quired before continuous operationat full throttle.To achieve a good break-in, throttlelever should not be advanced morethan 3/4 opening, however, brief accel-eration and speed variations contributeto a good break-in.
NOTICE Continued wide openthrottle runs and prolonged cruis-ing without speed variations shouldbe avoided. This can cause enginedamage during the break-in period.
_______________ 69

OPERATING INSTRUCTIONS
WARNINGAlways perform PRE-RIDE IN-SPECTION before operating theboat. Become thoroughly familiarwith all controls and the functionof each. Should any control or in-struction be not fully understood,refer to an authorized Sea-DooBoats dealer.
Launching/LoadingNOTICE Before launching the
boat, ensure the main battery cut-offswitch is turned ON and the bilgeplug is fully screwed into place.
NOTICE Attach eyelets to trailerand ensure boat is positioned prop-erly on trailer before pulling it out ofwater.
When finished loading the boat ontrailer, turn the main battery cut-offswitch to OFF.Remove bilge plug to drain bilge whenboat is on trailer.
Boarding the BoatAs with any boat, boarding should bedone carefully and engines must notbe running.
WARNINGEngines must be OFF when board-ing the boat or when using theswim platform.
NOTICE Never use propulsionsystem as a supporting point toboard the boat.
Boarding from a Dock
When boarding from a dock, use theswim platform to climb aboard.
lmo2010-003-100
TYPICAL
NOTICE Although the boat re-quires only 30 cm (1 ft) of water tofloat, the engines should be startedwith at least 90 cm (3 ft) of water be-low the hull. If the depth of the wa-ter is less than 90 cm (3 ft) and theengines are running, the impelleris turning and debris can be drawnfrom the bottom and damage thepropulsion system.
lmo2010-005-001_a
TYPICALA. 90 cm (3 ft)
Boarding from Shallow Water
In shallow water, board the boat fromeither the front or the rear using lad-ders.Ensure there is at least 90 cm (3 ft) ofwater underneath the lowest rear por-tion of the hull.Take into account that the hull will belower in the water when all passen-gers are aboard. Be certain to maintainthe specified depth so sand, pebblesand rocks will not be drawn up in thejet pump.
70 ______________

OPERATING INSTRUCTIONS
lmo2010-005-001_a
TYPICALA. 90 cm (3 ft)
NOTICE Starting the engine or rid-ing the boat in shallower water maydamage the impeller or other jetpump components.
Boarding from Deep Water
WARNINGInexperienced riders should prac-tice how to get aboard close toshore first before venturing intodeep water.
WARNINGEngines should not be runningwhile boarding. Never use propul-sion components as a supportingpoint to board the boat.
Swim to the rear of the boat.Release the retractable ladder, pullingladder out and down into boarding po-sition.Climb the ladder and pull yourself up-ward using the swim platform grabhandles.
lmo2010-003-101
TYPICAL
When you can reach the engine covergrab handle, grip it and continue to pullyourself upward to place your knee onthe swim platform.
lmo2010-003-102
TYPICAL
Continue to climb on engine cover toreach the deck.
lmo2010-003-103
TYPICAL
NOTE: The last boarded person mustsecure the ladder using the retaininglatch prior to reach its seat.
NOTICE Do not leave ladder hang-ing when operating the boat. Beforeoperating the boat, always fastenthe ladder in place using the latch.
_______________ 71
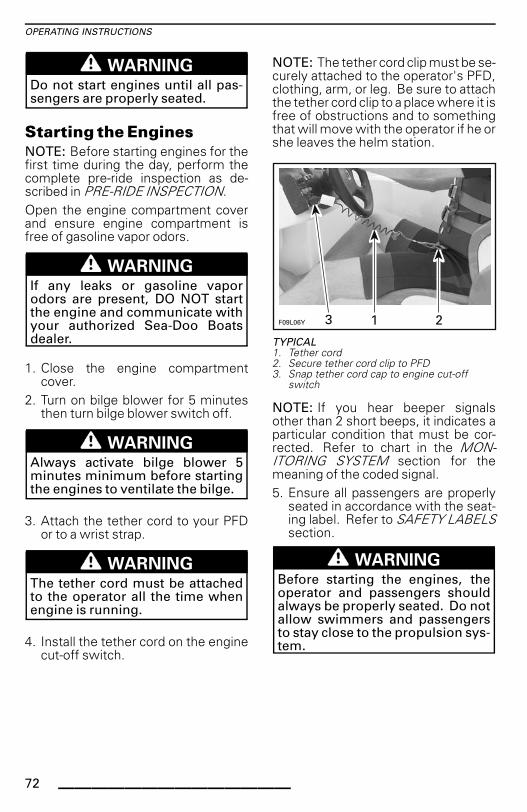
OPERATING INSTRUCTIONS
WARNINGDo not start engines until all pas-sengers are properly seated.
Starting the EnginesNOTE: Before starting engines for thefirst time during the day, perform thecomplete pre-ride inspection as de-scribed in PRE-RIDE INSPECTION.Open the engine compartment coverand ensure engine compartment isfree of gasoline vapor odors.
WARNINGIf any leaks or gasoline vaporodors are present, DO NOT startthe engine and communicate withyour authorized Sea-Doo Boatsdealer.
1. Close the engine compartmentcover.
2. Turn on bilge blower for 5 minutesthen turn bilge blower switch off.
WARNINGAlways activate bilge blower 5minutes minimum before startingthe engines to ventilate the bilge.
3. Attach the tether cord to your PFDor to a wrist strap.
WARNINGThe tether cord must be attachedto the operator all the time whenengine is running.
4. Install the tether cord on the enginecut-off switch.
NOTE: The tether cord clip must be se-curely attached to the operator's PFD,clothing, arm, or leg. Be sure to attachthe tether cord clip to a place where it isfree of obstructions and to somethingthat will move with the operator if he orshe leaves the helm station.
����! � ��
TYPICAL1. Tether cord2. Secure tether cord clip to PFD3. Snap tether cord cap to engine cut-off
switch
NOTE: If you hear beeper signalsother than 2 short beeps, it indicates aparticular condition that must be cor-rected. Refer to chart in the MON-ITORING SYSTEM section for themeaning of the coded signal.5. Ensure all passengers are properly
seated in accordance with the seat-ing label. Refer to SAFETY LABELSsection.
WARNINGBefore starting the engines, theoperator and passengers shouldalways be properly seated. Do notallow swimmers and passengersto stay close to the propulsion sys-tem.
72 ______________

OPERATING INSTRUCTIONS
NOTICE Ensure there is at least90 cm (3 ft) of water under the low-est rear portion of the hull when allpassengers are aboard prior to start-ing the engine. Otherwise damageto the propulsion system may occur.Do not accelerate abruptly.
6. Ensure shift lever is in neutral posi-tion and throttle levers are in idle po-sition.
7. Press and hold a START/STOPswitch. Release immediately afterengine is started. Start one engineat a time.
NOTICE To avoid starter motoroverheating, the cranking periodshould not exceed 5 - 10 secondsand a rest period of 30 secondsshould be observed between crank-ing cycles to let the starter cool downand its mechanism disengage. Payattention not to discharge battery.
8. Check tachometers to monitor en-gines.
Steering OperationTurning the steering pivots the jetpump nozzles which control the boatdirection. Turning the steering clock-wise will turn the boat to the right andinversely.
��$���
TYPICAL — RIGHT-HAND TURN
Above idle speed, the throttles mustbe applied to turn the boat.
WARNINGThrottle must be applied and steer-ing turned to change the directionof the boat at speed. Steering effi-ciency will differ depending on thenumber of passengers, load andwater conditions.
A jet propelled boat needs some throt-tle applied in order to turn. Practice ina safe area applying the throttle andturning away from an imaginary object.This is a good collision avoidance prac-tice.
Throttle/Shift ControlOperationWhen selecting the neutral or reverseposition with the shift lever, the re-verse gates move up or down to thedesired position.
Forward
To obtain forward:1. Press the neutral lock detent button
and push shift lever in the forwardposition.
lmo2011-005-010_a
TYPICAL1. Throttle levers must be fully pulled back (idle
speed) to shift2. Neutral lock detent button pressed3. Forward4. Neutral5. Reverse
2. Push the throttle levers forward toincrease speed.
_______________ 73

OPERATING INSTRUCTIONS
lmo2011-005-011_a
1. Starboard throttle lever in full forwardposition
2. Port throttle lever in full forward position
Neutral
To obtain neutral, pull shift lever to theupright position until it locks in neutralposition. Reverse gates will be in themiddle position, directing half of thethrust toward the front of the boat tominimize movement.
WARNINGWhen the shift lever is in neutralposition, the impellers are turning.
lmo2011-005-012 _a
TYPICAL1. Shift lever in neutral position2. Port throttle lever in idle position3. Starboard throttle lever in idle position
Reverse
To obtain reverse, press the neutrallock detent button and pull shift levercompletely to the rear. Reverse gateswill be in downward position, directingall the thrust toward the front of theboat.
lmo2011-005-013_a
TYPICAL1. Shift lever in reverse position2. Throttle levers in idle position
NOTE: To obtain maximum efficiencyand control from the reverse, increaseengine speed to slightly above idle.Too much RPM will create water turbu-lence and reduce reverse efficiency.The boat behaves differently when us-ing reverse. At first outing, carefullypractice this maneuver away from any-thing with which you might collide.
WARNINGBecome fully familiar with the re-verse operation during your firstride and before carrying passen-gers.
Leaving the ShoreWith throttle lever(s) at idle position,move shift lever to the desired posi-tion.Slowly accelerate to reach deeperwater. Do not apply full throttle untilengines are warm.
WARNINGIn shallow water, shells, sand,pebbles or other objects could bedrawn up by the jet pumps andthrown rearward.
Shutting Off the EnginesTo shut off the engines, completelypull back throttle lever(s) then removethe tether cord or press the engineSTART/STOP buttons.
74 ______________

OPERATING INSTRUCTIONS
Always remove the tether cord fromthe engine cut-off switch.
WARNINGIf engines are shut off, directionalcontrol is not available. Neverleave the tether cord connectedon the engine cut-off switch whenboat is not in operation to avoidunauthorized use by children, theftor others.
General OperatingRecommendations
Rough Water or Poor VisibilityOperation
Avoid operation in these conditions. Ifyou must do so, proceed with cautionand prudence using minimum speed.Turn on navigation lights if necessary.
Night Operation
Between sunset and sunrise, use thenavigation lights and reduce speed.
WARNINGNavigation lights should alwaysbe used between sunset andsunrise. Ensure the stern lightis installed. See STERN LIGHTSOCKET in this section for loca-tion and installation.
Crossing Waves
Reduce speed when crossing waves.Always be prepared to steer and bal-ance as necessary.When crossing wakes, always keep asafe distance from boat ahead.
WARNINGWhen crossing wakes, slow down.Operator and passenger(s) canbrace themselves by posting. Donot jump waves or wakes.
Stopping/Docking
The boat is slowed by water drag. Thestopping distance will vary dependingon the boat's size, speed, water sur-face condition, presence and directionof wind and current.The operator should become familiarwith the stopping distance under dif-ferent conditions.Reduce throttle speed to idle. Shift toneutral, reverse or forward as requiredwhen approaching a dock then shut offthe engines just before coming along-side.
WARNINGDirectional control is reducedwhen throttle is decreased and lostwhen engines are off.
When close to the dock, shut off theengines.
WARNINGWhile engines can be stopped bypressing the START/STOP but-tons, we strongly recommend theengines be stopped by removingthe tether cord. This will installgood habits.
Beaching
NOTICE It is not recommended torun the boat onto the beach.
Slowly approach the beach and shutoff the engines using the tether cordwhen water depth is 90 cm (3 ft) underthe hull, then pull the boat to the beach.Ensure that all accessories are OFF.
_______________ 75

OPERATING INSTRUCTIONS
lmo2010-005-001_a
A. 90 cm (3 ft) of water under the hull
WARNINGIn shallow water, shells, sand,pebbles or other objects could bedrawn up by the jet pumps and bethrown rearward.
76 ______________

SPECIAL PROCEDURES
Jet Pump Water Intake andImpeller CleaningWater is drawn up by the impellersthrough these openings. The gratesminimize entry of foreign objects intothe propulsion systems.
lmo2008-003-008_a
TYPICAL1. Inlet grate
WARNINGKeep away from intake grateswhile engines are running. Itemssuch as long hair, loose clothingor personal flotation device strapscan become entangled in movingparts resulting in severe injury ordrowning.
Weeds, shells or debris can get caughton the intake grates, drive shaftsand/or impellers. A clogged water in-take may cause troubles such as:1. Cavitation: Engine speed is high
but boat moves slowly due to re-duced jet thrust; jet pump compo-nents may be damaged.
2. Overheating: Since the jet pumpoperation controls the flow of wa-ter to cool the exhaust system, aclogged intake will cause the en-gine to overheat and damage inter-nal engine components.
The clogged area can be cleaned as fol-lows:In-water cleaning: Pull the tethercord from engine cut-off switch to stopengine(s). Let the boat stop by itself.Wait a while to allow weeds or otherdebris to escape from grate(s). It maybe necessary to repeat the procedure.
In severe conditions if the abovemethod does not work, the followingcan be performed:1. With engine(s) running, put shift
lever in reverse position and varythrottle setting quickly severaltimes.
2. Try accelerating again.Most of the time, debris will escapefrom the propulsion system.Out of water cleaning: If the systemis still clogged, shut off the engine(s) byremoving the tether cord.
WARNINGAlways remove the tether cordfrom the engine cut-off switch toprevent accidental engines start-ing before cleaning the jet pumpsarea.
From underneath boat, manually cleanwater intakes area. If the system isstill clogged, refer to an authorizedSea-Doo Boats dealer for servicing.
NOTICE Avoid operation inweeded areas. If unavoidable, varyspeed. Weeds tend to entanglemore at steady and slow speeds.Inspect water intake grates for dam-age. Refer to an authorized Sea-DooBoats dealer for repair as necessary.
Towing the Boat in WaterSpecial precautions should be takenwhen towing a Sea-Doo Boat in water.Maximum recommended towingspeed is 24 km/h (15 MPH).Install the hose pinchers on the ex-haust manifold water outlet hoses asshown for each engine.
_______________ 77
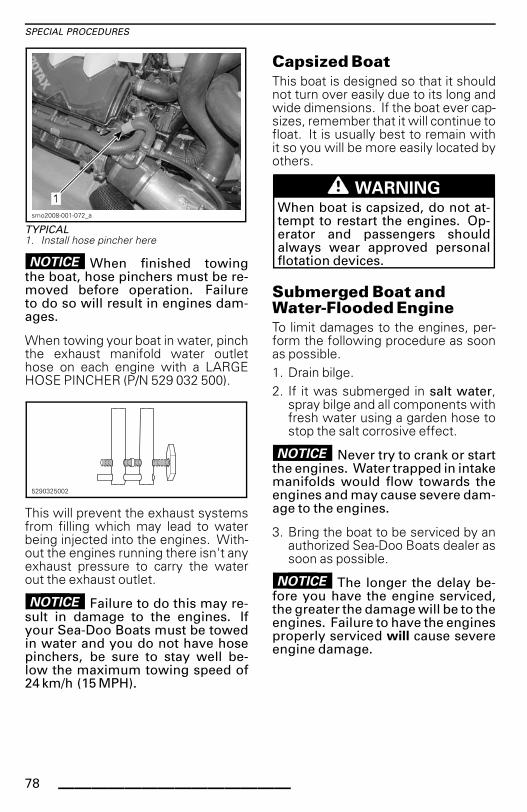
SPECIAL PROCEDURES
smo2008-001-072_a
TYPICAL1. Install hose pincher here
NOTICE When finished towingthe boat, hose pinchers must be re-moved before operation. Failureto do so will result in engines dam-ages.
When towing your boat in water, pinchthe exhaust manifold water outlethose on each engine with a LARGEHOSE PINCHER (P/N 529 032 500).
5290325002
This will prevent the exhaust systemsfrom filling which may lead to waterbeing injected into the engines. With-out the engines running there isn't anyexhaust pressure to carry the waterout the exhaust outlet.
NOTICE Failure to do this may re-sult in damage to the engines. Ifyour Sea-Doo Boats must be towedin water and you do not have hosepinchers, be sure to stay well be-low the maximum towing speed of24 km/h (15 MPH).
Capsized BoatThis boat is designed so that it shouldnot turn over easily due to its long andwide dimensions. If the boat ever cap-sizes, remember that it will continue tofloat. It is usually best to remain withit so you will be more easily located byothers.
WARNINGWhen boat is capsized, do not at-tempt to restart the engines. Op-erator and passengers shouldalways wear approved personalflotation devices.
Submerged Boat andWater-Flooded EngineTo limit damages to the engines, per-form the following procedure as soonas possible.1. Drain bilge.2. If it was submerged in salt water,
spray bilge and all components withfresh water using a garden hose tostop the salt corrosive effect.
NOTICE Never try to crank or startthe engines. Water trapped in intakemanifolds would flow towards theengines and may cause severe dam-age to the engines.
3. Bring the boat to be serviced by anauthorized Sea-Doo Boats dealer assoon as possible.
NOTICE The longer the delay be-fore you have the engine serviced,the greater the damage will be to theengines. Failure to have the enginesproperly serviced will cause severeengine damage.
78 ______________

MAINTENANCE
_______________ 79

BREAK-IN INSPECTION
We suggest that after the first 10 hours of operation, the boat be checked by an au-thorized Sea-Doo Boats dealer. The break-in inspection is very important and mustnot be neglected.NOTE: The break-in inspection is at the expense of the boat owner.We recommend that this inspection be signed by an authorized Sea-Doo Boatsdealer.
Date of inspection Authorized dealer signature
Dealer name
REPLACE
ADJUST
LUBRICATE
CLEAN
BREAK-IN INSPECTION CHART
INSPECT
ENGINE
Engine oil and filter X
Rubber mounts X
Corrosion protection X
Supercharger clutch X
EXHAUST SYSTEM
Exhaust system fasteners, hoses and components condition. Also inspect forleaks X
COOLING SYSTEM
Hose and fasteners X
Coolant X
80 ______________

BREAK-IN INSPECTION
REPLACE
ADJUST
LUBRICATE
CLEAN
BREAK-IN INSPECTION CHART
INSPECT
FUEL SYSTEM
Fuel lines, connections and pressure relief valve X
Fuel system leak test X
Throttle body X
Throttle cable X
Fuel tank straps X
ELECTRICAL SYSTEM
Spark plugs X
Electrical connections and fastening (ignition system, starting system, fuelinjectors, fuse boxes etc.) X
Engine cut-off switch X
Main battery cut-off switch X
Battery support X
STEERING SYSTEM
Steering cable and connections X
Steering nozzle bushings X
PROPULSION SYSTEM
Shift lever, cable and connections X
Carbon ring and rubber boot (drive shaft) X
Impeller boot X
Impeller and impeller wear ring clearance X
HULL and BODY
Storage compartment cover(s), locks, latch(es) and hinge(s) X X
Windscreen and fasteners X
Drain plug (inside bilge). Check for obstruction X
Bilge pump. Check for debris around bilge pump area. X X
Ski/wakeboard attachment (tower, ski pole or tow hook) and fasteners X
_______________ 81

MAINTENANCE SCHEDULE
Maintenance is very important for keeping your boat in safe operating condition.Proper maintenance is the owner's responsibility. The boat should be serviced asper the maintenance schedule.The maintenance schedule does not exempt the pre-ride inspection.
WARNINGFailure to properly maintain the boat according to the maintenance sched-ule can make it unsafe to operate.
The schedule should be adjusted according to operating conditions and use. Inten-sive use of boat will require greater frequency of inspection and maintenance.We encourage you to have an Annual Safety Inspection of your boat.
EVERY 25 HOURS
EVERY 50 HOURS
EVERY 100 HOURS OR Preseason
EVERY 200 HOURS OR 2 YEARS
A: ADJUSTC: CLEANI: INSPECTL: LUBRICATER: REPLACED: DEALERO: OPERATOR TO BE PERFORMED BY
PART/TASK LEGEND
ENGINE
Engine oil and filter R(1) D
Rubber mounts I D
Supercharger clutch I(2) D
Corrosion protection L(3) O
(1) At storage period or after 100hours of use whichever comes first.(2) Inspect slipping moment.(3) Every 10 hours in salt water use.
AIR INTAKE SYSTEM
Air filter I(6) D (6) Replace if required
EXHAUST SYSTEM
Exhaust system fasteners, hoses andcomponents condition I I
(4) D
Exhaust system flushing (1) (5) O
(1) At storage period or after 100hours of use whichever comes first.(4) Also inspect for leaks.(5) Daily flushing in salt water or foulwater use.
COOLING SYSTEM
Hose and fasteners I D
Coolant R D—
82 ______________
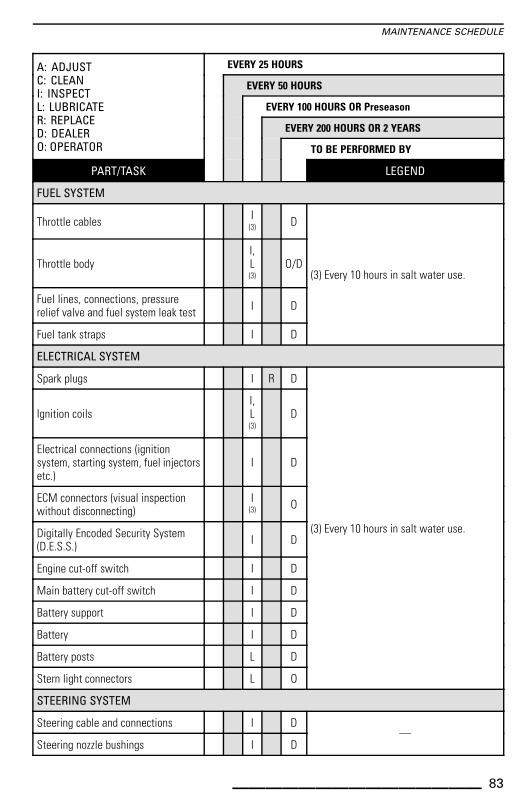
MAINTENANCE SCHEDULE
EVERY 25 HOURS
EVERY 50 HOURS
EVERY 100 HOURS OR Preseason
EVERY 200 HOURS OR 2 YEARS
A: ADJUSTC: CLEANI: INSPECTL: LUBRICATER: REPLACED: DEALERO: OPERATOR TO BE PERFORMED BY
PART/TASK LEGEND
FUEL SYSTEM
Throttle cables I(3) D
Throttle bodyI,L(3)
O/D
Fuel lines, connections, pressurerelief valve and fuel system leak test I D
Fuel tank straps I D
(3) Every 10 hours in salt water use.
ELECTRICAL SYSTEM
Spark plugs I R D
Ignition coilsI,L(3)
D
Electrical connections (ignitionsystem, starting system, fuel injectorsetc.)
I D
ECM connectors (visual inspectionwithout disconnecting)
I(3) O
Digitally Encoded Security System(D.E.S.S.) I D
Engine cut-off switch I D
Main battery cut-off switch I D
Battery support I D
Battery I D
Battery posts L D
Stern light connectors L O
(3) Every 10 hours in salt water use.
STEERING SYSTEM
Steering cable and connections I D
Steering nozzle bushings I D—
_______________ 83

MAINTENANCE SCHEDULE
EVERY 25 HOURS
EVERY 50 HOURS
EVERY 100 HOURS OR Preseason
EVERY 200 HOURS OR 2 YEARS
A: ADJUSTC: CLEANI: INSPECTL: LUBRICATER: REPLACED: DEALERO: OPERATOR TO BE PERFORMED BY
PART/TASK LEGEND
PROPULSION SYSTEM
Drive shaftL(3)
(7)D
Carbon ring and rubber boot (driveshaft) I D
Shifter system, cable and connections I D
Reverse gate L(3) O
Drive shaft/impeller splines I,L D
Impeller boot I D
Impeller shaft seal, sleeve and O-ring I(3) D
Impeller and wear ring clearance I D
Sacrificial anode (8) O
(3) Every 10 hours in salt water use.(7) Lubricate for corrosion protection(8) Inspect each month (every two weeks insalt water) and change when necessary.
HULL/BODY
Storage compartment(s) cover lock(s),latch(es) and hinge(s)
I,L(3)
O
Deck drains/scupper valve I O
Drain plug (inside bilge) I(9) O
Ski/wakeboard attachment (tower,ski pole or tow hook) and fasteners
I,L(3)
O
(3) Every 10 hours in salt water use.(9) Check for obstructions.
84 ______________

MAINTENANCE PROCEDURES
This section includes instructions forbasic maintenance procedures. If youhave the necessary mechanical skillsand the required tools, you can per-form these procedures. If not, seeyour authorized Sea-Doo Boats dealer.Other important items in the mainte-nance schedule that are more difficultand require special tools are best per-formed by your authorized Sea-DooBoats dealer.
WARNINGTurn off the engines and followthese maintenance procedureswhen performing maintenance.If you do not follow proper main-tenance procedures you can beinjured by hot parts, moving parts,electricity, chemicals or other haz-ards.
WARNINGShould removal of a locking de-vice be required (e.g. lock tabs,self-locking fasteners, etc.), al-ways replace it with a new one.
CAUTION Some componentsin the engine compartment may bevery hot.
Engine Oil
Recommended Engine Oil
Use XPS 4-STROKE SYNTH. BLENDOIL (SUMMER) (P/N 293 600 121).This engine has been developed andvalidated using the XPS™ Syntheticblend oil. BRP strongly recommendsthe use of its XPS Synthetic blend oil atall times.If XPS™ engine oil is not available, usea 10W40 mineral engine oil compati-ble with wet clutches.
NOTICE NEVER use synthetic oil.This would impair the proper opera-tion of the supercharger clutch. Donot add any additives to the recom-mended oil. Mineral oils (API ser-vice SM or SL) may also contain ad-ditives (friction modifiers) that maycause inappropriate slippage of thesupercharger clutch and eventuallylead to premature wear. Damagescaused by oil which is not suitablefor the engine will not be covered bythe BRP limited warranty.
Engine Oil Level
NOTICE Check level frequentlyand refill if necessary. Operatingthe engines with improper oil levelsmay severely damage engines.
lmo2011-005-007_a
TYPICAL1. Dipstick2. Oil cap
Boat must be leveled.Oil level can be checked either withboat in water or out of water.
If Boat is Out of the WaterIf the boat is out of the water and on atrailer, block the wheels and raise thebow slightly with the trailer jack (if soequipped) until the bumper rail is level.Install a garden hose to the flushingconnector. Refer to EXHAUST SYS-TEM FLUSHING in MAINTENANCEPROCEDURES and follow the proce-dure.
_______________ 85
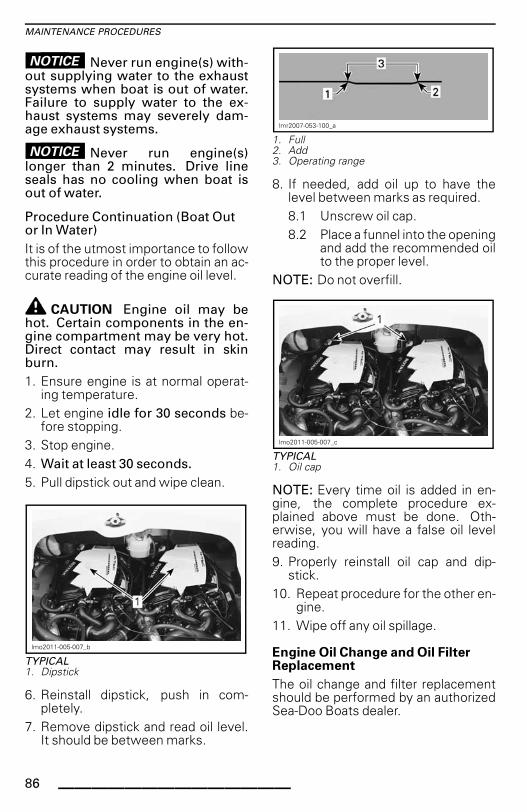
MAINTENANCE PROCEDURES
NOTICE Never run engine(s) with-out supplying water to the exhaustsystems when boat is out of water.Failure to supply water to the ex-haust systems may severely dam-age exhaust systems.
NOTICE Never run engine(s)longer than 2 minutes. Drive lineseals has no cooling when boat isout of water.
Procedure Continuation (Boat Outor In Water)It is of the utmost importance to followthis procedure in order to obtain an ac-curate reading of the engine oil level.
CAUTION Engine oil may behot. Certain components in the en-gine compartment may be very hot.Direct contact may result in skinburn.1. Ensure engine is at normal operat-
ing temperature.2. Let engine idle for 30 seconds be-
fore stopping.3. Stop engine.4. Wait at least 30 seconds.5. Pull dipstick out and wipe clean.
lmo2011-005-007_b
TYPICAL1. Dipstick
6. Reinstall dipstick, push in com-pletely.
7. Remove dipstick and read oil level.It should be between marks.
lmr2007-053-100_a
1. Full2. Add3. Operating range
8. If needed, add oil up to have thelevel between marks as required.8.1 Unscrew oil cap.8.2 Place a funnel into the opening
and add the recommended oilto the proper level.
NOTE: Do not overfill.
lmo2011-005-007_c
TYPICAL1. Oil cap
NOTE: Every time oil is added in en-gine, the complete procedure ex-plained above must be done. Oth-erwise, you will have a false oil levelreading.9. Properly reinstall oil cap and dip-
stick.10. Repeat procedure for the other en-
gine.11. Wipe off any oil spillage.
Engine Oil Change and Oil FilterReplacement
The oil change and filter replacementshould be performed by an authorizedSea-Doo Boats dealer.
86 ______________

MAINTENANCE PROCEDURES
Engine Coolant
Recommended Engine Coolant
Always use ethylene-glycol antifreezecontaining corrosion inhibitors specifi-cally for internal combustion aluminumengines.NOTE: When available, it is recom-mended to use biodegradable an-tifreeze compatible with internal com-bustion aluminum engines. This willcontribute to protecting the environ-ment.Cooling system must be filled withBRP PREMIXED COOLANT (P/N 219700 362) or with a water and antifreezesolution (50% distilled water, 50% an-tifreeze).To prevent antifreeze deterioration, al-ways use the same brand. Never mixdifferent brands unless cooling sys-tem is completely flushed and refilled.Refer to an authorized Sea-Doo Boatsdealer.
Engine Coolant Level
With boat on a level surface, coolantshould be between MIN. and MAX.level marks for each coolant reservoirwhen each engine is cold.
�����
�
1. Level between marks when engine is cold
WARNINGCheck coolant level with cold en-gines. Never add coolant in cool-ing system when engines are hot.
NOTE: The boat is considered levelwhen it is in water. When boat is on atrailer, block the wheels and raise thebow slightly with the trailer jack (if soequipped) until the bumper rail is level.Add coolant to have the level betweenmarks as required. Use a funnel toavoid spillage. Do not overfill.Properly reinstall and tighten filler cap.NOTE: A cooling system that fre-quently requires coolant indicatesleaks or engine problems. See an au-thorized Sea-Doo Boats dealer.
Engine Coolant Replacement
The coolant replacement should beperformed by an authorized Sea-DooBoats dealer.
Throttle Body
Throttle Body Lubrication
Lubricate throttle body of each enginewith XPS LUBE (P/N 293 600 016) or anequivalent.Use the lubrication fitting located onthe top of engine.
lmo2009-003-006_a
REMOVE CAP1. Lubrication fitting
_______________ 87

MAINTENANCE PROCEDURES
With the engine not running, makesure to spray lubricant at least 3 to 5seconds for proper lubrication.
lmo2009-003-007_a
1. Can needle into lubrication fitting
Ignition Coils
Ignition Coil Removal
1. Disconnect ignition coil connector.
NOTICE Do not remove the igni-tion coil before disconnecting theinput connector or the wires may bedamaged. Do not pry up ignition coilwith a screwdriver to avoid damage.
NOTE: Twist ignition coil in both direc-tions as you pull it up to ease removal.Remove ignition coil from spark plug.
Ignition Coil Lubrication
1. Pull rubber seal down.
sbs2009-011-002_a
1. Rubber seal pulled down
2. Apply DOW CORNING 111 (P/N 413707 000) to rubber seal seat asshown.
sbs2009-011-001_a
1. Apply product here
3. Pull rubber seal back on its seatmaking sure the tabs on the ignitioncoil and the slots in the seal properlymatch together.
4. Leave a ring of grease on top of theseal as shown to act as a water bar-rier. Wipe off the excess.
sbs2009-011-003_a
1. Correctly shaped excess of product
5. Apply DOW CORNING 111 (P/N 413707 000) on rubber seal contactarea.
smr05-015-002_d
1. Apply product here
88 ______________

MAINTENANCE PROCEDURES
Ignition Coil Installation
NOTE: Prior to inserting the ignitioncoil on its spark plug, apply sealant asdescribed in IGNITION COIL LUBRI-CATION.1. Install coil in cylinder head hole.2. Push the ignition coil down to se-
curely install it on the spark plug tip.3. Ensure the seal seats properly with
top surface of engine valve cover.
smr2009-032-004_a
TYPICAL1. Seal properly seated
Exhaust System
Exhaust System Flushing
Flushing the exhaust system and in-tercooler of each engines with freshwater is essential to neutralize corrod-ing effects of salt or other chemicalproducts present in water. It will helpto remove sand, salt, shells or otherparticles in water jackets and/or hoses.
WARNINGPerform this operation in a wellventilated area.
Proceed as follows:1. Clean jet pump by spraying water in
its inlet and outlet and then apply acoating of XPS LUBE (P/N 293 600016) or equivalent.
WARNINGWhen operating the engine whilethe boat is out of the water, theheat exchanger in the ride platemay become very hot. Avoid anycontact with ride plate as burnsmay occur.
2. Connect a garden hose to the con-nector located at the rear of boat onjet pump support. Do not open wa-ter tap at this time.
������
�
TYPICAL1. Flushing connectors
NOTE: An optional FLUSHING CON-NECTOR ADAPTER (P/N 295 500 473)with a quick connect adapter to easegarden hose installation. No hosepincher is required to flush engine.
������ � �
1. Quick connect adapter2. Flushing connector adapter
_______________ 89

MAINTENANCE PROCEDURES
������ � � �TYPICAL1. Flushing connector2. Quick connect adapter and flushing
connector adapter (optional, not mandatory)3. Garden hose
3. To flush, start engine then immedi-ately open the water tap.
CAUTION Certain compo-nents in the engine compartmentmay be very hot. Direct contact mayresult in skin burn. Do not touchany electrical parts or jet pump areawhen engine is running.
NOTICE Never flush a hot en-gine. Always start the engine beforeopening the water tap. Open wa-ter tap immediately after engine isstarted to prevent overheating.
4. Run the engine about 20 sec-onds at a fast idle between 4000 -5000 RPM.
NOTICE Never run engine withoutsupplying water to the exhaust sys-tem when boat is out of water.
5. Ensure water flows out of jet pumpwhile flushing. Otherwise, refer toan authorized Sea-Doo Boats dealerfor servicing.
NOTICE Never run engine longerthan 2 minutes. Drive line seal hasno cooling when boat is out of water.
6. Close the water tap, then stop theengine.
NOTICE Always close the watertap before stopping the engine.
NOTICE Remove quick connectadapter after flushing operation (ifused).
Fuses
Fuse Inspection and Replacement
The electrical system is protected withfuses.To remove fuse from box or holder, pullfuse out. Check if filament is melted.
�
�
�� ��&�
1. Fuse2. Check if melted
If a fuse is defective, replace by one ofthe same rating.NOTE: If the entire electrical systemis down, make sure the main batterycut-off switch is properly turned on,refer to MAIN BATTERY CUT-OFFSWITCH in this section. If the batteryswitch is ON, check the main breaker.See MAIN BREAKER below.
NOTICE Do not use a higher ratedfuse as this can cause a fire or severedamage. If a fuse has blown, thesource of the malfunction shouldbe determined and corrected be-fore restarting. See an authorizedSea-Doo Boats dealer for servicing.
Main Fuses
If nothing at all is working, check thatmain battery cut-off switch is in ON po-sition.
90 ______________
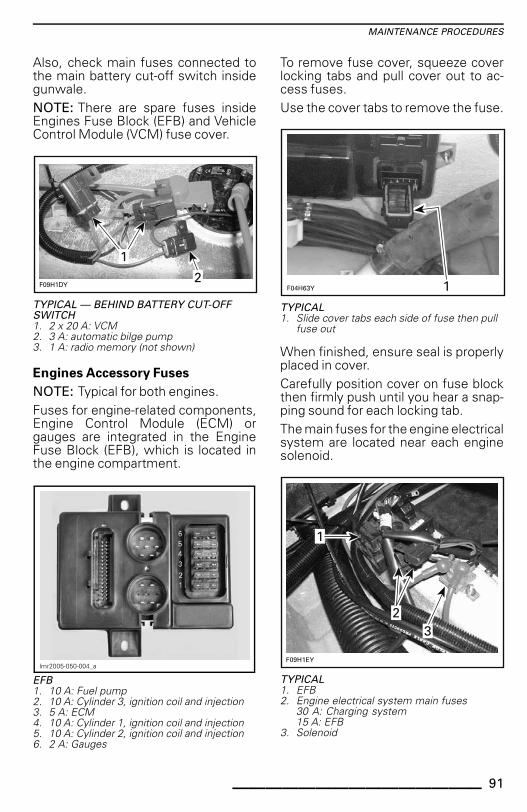
MAINTENANCE PROCEDURES
Also, check main fuses connected tothe main battery cut-off switch insidegunwale.NOTE: There are spare fuses insideEngines Fuse Block (EFB) and VehicleControl Module (VCM) fuse cover.
�����
�
�
TYPICAL — BEHIND BATTERY CUT-OFFSWITCH1. 2 x 20 A: VCM2. 3 A: automatic bilge pump3. 1 A: radio memory (not shown)
Engines Accessory Fuses
NOTE: Typical for both engines.Fuses for engine-related components,Engine Control Module (ECM) orgauges are integrated in the EngineFuse Block (EFB), which is located inthe engine compartment.
lmr2005-050-004_a
EFB1. 10 A: Fuel pump2. 10 A: Cylinder 3, ignition coil and injection3. 5 A: ECM4. 10 A: Cylinder 1, ignition coil and injection5. 10 A: Cylinder 2, ignition coil and injection6. 2 A: Gauges
To remove fuse cover, squeeze coverlocking tabs and pull cover out to ac-cess fuses.Use the cover tabs to remove the fuse.
F04H63Y 1
TYPICAL1. Slide cover tabs each side of fuse then pull
fuse out
When finished, ensure seal is properlyplaced in cover.Carefully position cover on fuse blockthen firmly push until you hear a snap-ping sound for each locking tab.The main fuses for the engine electricalsystem are located near each enginesolenoid.
�����
�
��
TYPICAL1. EFB2. Engine electrical system main fuses
30 A: Charging system15 A: EFB
3. Solenoid
_______________ 91

MAINTENANCE PROCEDURES
Boat Accessory Fuses
Fuses for the boat electrical system areintegrated in the Vehicle Control Mod-ule (VCM), which is located in the driverconsole ahead of the dash.
lmr2005-050-004_a
VCM1. 10 A: Accessories2. 10 A: Radio3. 7.5 A: Blower4. 3 A: Bilge pump5. 3 A: NAV lights6. 5 A: Courtesy lights
To remove fuse cover, squeeze coverlocking tabs and pull cover out to ac-cess fuses.Use the cover tabs to remove the fuse.
F04H63Y 1
TYPICAL1. Slide cover tabs each side of fuse then pull
fuse out
When finished, ensure seal is properlyplaced in cover.
Carefully position cover on fuse blockthen firmly push until you hear a snap-ping sound for each locking tab.
Automatic Bilge Pump Fuse
The automatic bilge pump fuse is lo-cated on the positive battery cablenear the post.
lmo2009-001-011_a
1. Battery in line fuse
Bilge Blower
Bilge Blower Operation Check
Verify each bilge blower for proper op-eration.Make sure that the ventilation ductsare not obstructed.
�������-
TYPICAL1. Blower duct
WARNINGIf bilge blower does not operateproperly, refer to an authorizedSea-Doo Boats dealer before start-ing the boat.
92 ______________

MAINTENANCE PROCEDURES
Navigation Lights
Bow Light Bulb Replacement
������ �
TYPICAL1. Remove this screw
������
�
TYPICAL1. Lift up to remove bulb
Assembly is essentially the reverse ofremoval procedures. However, payparticular attention to the following:Apply DIELECTRIC GREASE (P/N 293550 004) on new bulb contact surface.
Stern Light Bulb Replacement
Unscrew lens counterclockwise andpull it out.
�����, �
TYPICAL1. Unscrew then pull
Pull bulb to remove it.
�����.
�
TYPICAL1. Pull bulb out
Apply DIELECTRIC GREASE (P/N 293550 004) on new bulb contact surface.Assembly is the reverse of removalprocedure.
Stern Light Connector Lubrication
Apply DIELECTRIC GREASE (P/N 293550 004) on stern light connectors asneeded.
Deck Light
lmo2007-003-012_a
1. Gently pry here with a screwdriver
_______________ 93

MAINTENANCE PROCEDURES
lmo2007-003-063_a
1. Pull and remove bulb
Deck Drain and ScupperValve
Deck Drain Cleaning
The purpose of this drain is to evacuatewater from the deck.Remove any obstructions from deckdrain outlet.Water drains out though the scuppervalve located near the jet pump nozzle.
lmo2008-003-018_a
TYPICAL1. Scupper valve
Keep it clean to avoid clogging.
Latches and HingesThe application of XPS LUBE (P/N 293600 016) will help to prevent corrosionand keep proper operation of movingmechanisms.
Latch and Hinges Lubrication
����!
TYPICAL
Reverse Gates
Reverse Gate Lubrication
Lubricate pivot points and mechanismon both sides of each reverse gate withXPS LUBE (P/N 293 600 016) or equiva-lent.
Ski Post
Ski Post Lubrication
Lubricate ski post through all its lengthwith XPS LUBE (P/N 293 600 016) orequivalent. Pull out then push in sev-eral times to distribute the lubricant.
94 ______________
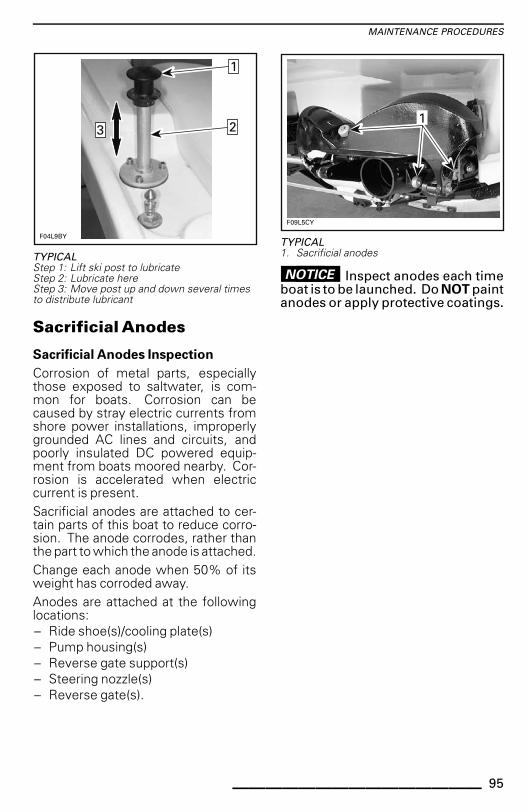
MAINTENANCE PROCEDURES
F04L9BY
1
23
TYPICALStep 1: Lift ski post to lubricateStep 2: Lubricate hereStep 3: Move post up and down several timesto distribute lubricant
Sacrificial Anodes
Sacrificial Anodes Inspection
Corrosion of metal parts, especiallythose exposed to saltwater, is com-mon for boats. Corrosion can becaused by stray electric currents fromshore power installations, improperlygrounded AC lines and circuits, andpoorly insulated DC powered equip-ment from boats moored nearby. Cor-rosion is accelerated when electriccurrent is present.Sacrificial anodes are attached to cer-tain parts of this boat to reduce corro-sion. The anode corrodes, rather thanthe part to which the anode is attached.Change each anode when 50% of itsweight has corroded away.Anodes are attached at the followinglocations:– Ride shoe(s)/cooling plate(s)– Pump housing(s)– Reverse gate support(s)– Steering nozzle(s)– Reverse gate(s).
���
�
TYPICAL1. Sacrificial anodes
NOTICE Inspect anodes each timeboat is to be launched. Do NOT paintanodes or apply protective coatings.
_______________ 95

BOAT CARE
Post-Operation CareRemove the boat from the water everyday to prevent growth of marine organ-isms.
NOTICE Failure to perform propercare such as: boat rinsing, exhaustsystem flushing and anticorrosiontreatment, when used in salt water,will result in damage to the boat andits components.
WARNINGAllow engine to cool before per-forming any maintenance.
Exhaust System Flushing
The exhaust system should be flusheddaily when boat is used in salt or foulwater.Refer to MAINTENANCE PROCE-DURES.NOTE: On supercharged models, theintercooler is flushed at the same time.
Anticorrosion Treatment
To prevent corrosion, spray a corrosioninhibitor (salt water resistant) such asXPS LUBE (P/N 293 600 016) or equiv-alent over metallic components in en-gine compartment.NOTE: Engine fogging should be donewith XPS LUBE (P/N 293 600 016)whenever the boat is to be stored foran extended period of time.Apply DIELECTRIC GREASE (P/N 293550 004) (salt water resistant) on bat-tery posts and cable connectors.
NOTICE Never leave rags or toolsin the engine compartment or in thebilge.
Additional Care for Foul Water orSalt Water Use
When the boat is operated in foul waterand particularly in salt water, additionalcare must be taken to protect the boatand its components.Rinse trailer and boat's hull/bilge areawith fresh water.Never use a high pressure washer toclean the bilge. USE LOW PRESSUREONLY (such as a garden hose). Highpressure can cause damages to elec-trical or mechanical systems.In coastal areas, special care shouldalso be taken on stainless steel orchrome parts like grab handles, moor-ing cleats, fuel cap and navigationlights. Refer to BOAT CLEANING forproper care.
Boat ProtectionProtect boat with cover when not inuse.
NOTICE If boat is exposed to pro-longed rain without a cover, batterywill discharge and bilge pump willstop working. Boat may sink if inwater.
Boat Cleaning
Engine Compartment Cleaning
The engine compartment should becleaned with warm water and BRPHEAVY DUTY CLEANER (P/N 293 110001), as required.Unscrew the drain plug, block thewheels and raise the bow slightly withthe trailer jack (if so equipped) to al-low water to drain. Rinse thoroughly.Leave all compartments open to airdry.
Corrosion Protection
Protect engine compartment metallicparts from corrosion using XPS LUBE(P/N 293 600 016) or an equivalent.
96 ______________

BOAT CARE
Body Cleaning
First rinse with fresh water to removedried salt water.Wash the body with water and soap(only use mild detergent). Removeany marine organisms.
NOTICE Never clean fiberglassand plastic parts with strong deter-gent, degreasing agent, paint thin-ner, acetone, etc.
Apply a marine wax to protect the fin-ish.
Carpet Cleaning
To clean the carpets, use 3M™ CitrusBase Cleaner or an equivalent. See themanufacturer's instructions.
Windshield Cleaning
Wash with BRP HEAVY DUTYCLEANER (P/N 293 110 001).Clean only with flannel clothes.
NOTICE It is necessary to use flan-nel cloths on windshield to avoiddamaging surface.
To remove scratches on windshield:Start with “Slip Streamer® Scratch Re-mover”. Finish with “Slip Streamer®Cleaner and Polish”.NOTE: The later product may be usedalone if only light scratches are notice-able.
NOTICE Never clean windshieldwith strong detergent, degreasingagent, paint thinner, acetone, prod-ucts containing chlorine, etc.
Stains may be removed from seats andfiberglass with Spray Nine or an equiva-lent.
Stainless Steel and ChromeTo clean or polish stainless steel orchrome parts, always use a productspecially developed for marine envi-ronment such as the Flitz StainlessSteel & Chrome Cleaner.
Vinyl Cleaning
Use XPS MULTI-PURPOSE CLEANER(P/N 219 701 709).For dirt build up, let cleaner soak forapproximately 10 minutes, then gentlyscrub with a soft bristle brush.Refer to next table for other productsthat can also be used for cleaning vinyl.Do not use any silicone-based protec-tants. They will extract the plasticiz-ers, leaving the vinyl hard and brittle,and eventually cracking will occur.
CLEANING PRODUCTS
1. XPS MULTI-PURPOSE CLEANER(P/N 219 701 709)
2. Dish Soap (Dawn or Ivory) and water
3. Fantastik
4. Spray Nine
5. 3M Citrus Cleaner
6. 303 Protectant
NOTE: Always follow manufacturer'srecommendations and instructions.
_______________ 97
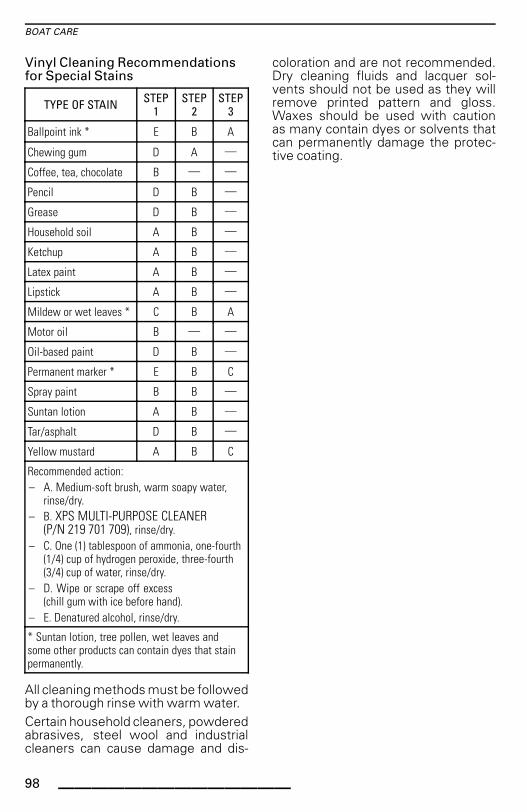
BOAT CARE
Vinyl Cleaning Recommendationsfor Special Stains
TYPE OF STAIN STEP1
STEP2
STEP3
Ballpoint ink * E B A
Chewing gum D A —
Coffee, tea, chocolate B — —
Pencil D B —
Grease D B —
Household soil A B —
Ketchup A B —
Latex paint A B —
Lipstick A B —
Mildew or wet leaves * C B A
Motor oil B — —
Oil-based paint D B —
Permanent marker * E B C
Spray paint B B —
Suntan lotion A B —
Tar/asphalt D B —
Yellow mustard A B C
Recommended action:– A. Medium-soft brush, warm soapy water,
rinse/dry.– B. XPS MULTI-PURPOSE CLEANER
(P/N 219 701 709), rinse/dry.– C. One (1) tablespoon of ammonia, one-fourth
(1/4) cup of hydrogen peroxide, three-fourth(3/4) cup of water, rinse/dry.
– D. Wipe or scrape off excess(chill gum with ice before hand).
– E. Denatured alcohol, rinse/dry.
* Suntan lotion, tree pollen, wet leaves andsome other products can contain dyes that stainpermanently.
All cleaning methods must be followedby a thorough rinse with warm water.Certain household cleaners, powderedabrasives, steel wool and industrialcleaners can cause damage and dis-
coloration and are not recommended.Dry cleaning fluids and lacquer sol-vents should not be used as they willremove printed pattern and gloss.Waxes should be used with cautionas many contain dyes or solvents thatcan permanently damage the protec-tive coating.
98 ______________

STORAGE
It is recommended that the boat betaken to an authorized Sea-Doo Boatsdealer for proper storage, however youcan perform the following operationswith a minimum of tools.NOTE: Leave drain plug out duringstorage period.
NOTICE Do not run the engine dur-ing the storage period.
WARNINGBecause fuel and oil areflammable, have an authorizedSea-Doo Boats dealer inspect thefuel and oil systems integrity asspecified in the MAINTENANCESCHEDULE.
Jet Pump CleaningClean jet pump by spraying water in itsinlet and outlet and then apply a coat-ing of XPS LUBE (P/N 293 600 016) orequivalent.
WARNINGAlways remove tether cord capfrom engine cut-off switch to pre-vent unexpected engine startingbefore cleaning the jet pump area.Engine must not be running forthis operation.
Fuel System ProtectionThe (P/N 413 408 600) (or equivalent)can be added in fuel tank to preventfuel deterioration and fuel systemgumming. Follow stabilizer manufac-turer's instructions for proper use.
NOTICE It is highly recommendedto add fuel stabilizer at storage in or-der to maintain fuel system in goodcondition.
Throttle Body LubricationLubricate throttle body. Refer toMAINTENANCE PROCEDURES fordetails.
Engine Oil and FilterReplacementThe oil change and filter should beperformed by an authorized Sea-DooBoats dealer.
Intercooler DrainingIt is important to expel any trapped wa-ter that may have accumulated fromcondensation in the intercooler of eachengine.Proceed as follows:1. Open the engine cover.2. Ensure there is an alignment line
drawn on the intercooler outlethose. This will ensure the hose isnot twisted or kinked on reinstalla-tion.
3. Loosen the clamp retaining the in-tercooler outlet hose.
4. Remove the intercooler outlet hosefrom the intercooler.
NOTE: This hose feeds the inlet of thesupercharger.
lmo2010-001-004_a
1. Intercooler outlet hose
5. Start and rev the engine up to4000 RPM several times.
_______________ 99

STORAGE
NOTE: Prevent air intake system fromaspirating foreign objects which maycause severe engine or damage.6. Stop engine.7. Reinstall the intercooler air outlet
hose, ensure it is properly alignedas prior to removal to ensure properengine operation.
Exhaust System FlushingPerform procedure as described inMAINTENANCE PROCEDURES sec-tion.
Exhaust SystemProtectionThe exhaust system is self draining,but the intercooler and exhaust mani-fold on each engine need to be properlydrained to avoid damage.Using the flushing connector on jetpump support, inject pressurized air(around 689 kPa (100 PSI)) into systemuntil there is no more water flowingfrom the jet pump.
smo2008-001-054_a
1. Flushing connector — location may differ
To ease the procedure, a custom hosecan be assembled. See the followingillustration.
smo2008-001-053_a
TYPICAL1. Flushing adapter (P/N 295 500 473)2. Hose 13 mm (1/2 in)3. Air hose male adapter
NOTICE Failure to drain the ex-haust system may cause severedamage to intercooler and exhaustmanifold.
Engine InternalLubricationNOTE: Both engines must be inter-nally lubricated for the storage period.1. Open the engine compartment lid.2. Remove storage tray.3. Remove dipstick.4. Remove engine cover.5. Reinstall dipstick.6. Expel water from the exhaust sys-
tem and intercooler as follows:7. Remove ignition coils. Refer to
MAINTENANCE PROCEDURE.8. Remove spark plugs.
NOTICE Ensure there is no dirt incoil holes before removing the sparkplugs. Otherwise, dirt would fallinto cylinder and will damage the in-ternal components.
NOTE: After loosening the sparkplugs, a coil may be used to removethe spark plugs. Simply bring the coildown to spark plug and “hook” it tothen extract spark plug.
100 ______________

STORAGE
smr2006-016-030_a
1. Ignition coil2. Spark plug
9. Spray XPS LUBE (P/N 293 600 016)or equivalent, into spark plug holes.
10. To prevent fuel to be injected andalso cut the ignition at the enginecranking, proceed as follows.
11. From the engine compartment,have a second person hold throttlebell crank in fully opened position.
������ �
TYPICAL1. Fully-opened position
12. Crank each engine a few turns todistribute the oil on cylinder wall.
13. Apply LOCTITE 767 (ANTISEIZELUBRICANT) (P/N 293 800 070) onspark plug threads then reinstallthem.
14. Lubricate and reinstall ignitioncoils. Refer to MAINTENANCEPROCEDURES.
15. To reinstall engine cover, removedipstick, push engine cover down-ward until it snaps.
16. Reinstall dipstick.NOTE: It is recommended to fog theengine valves with XPS LUBE (P/N 293600 016). Contact your authorizedSea-Doo Boats dealer.
Engine Coolant TestIf antifreeze is not replaced, test itsdensity.The antifreeze replacement and a den-sity test should be performed by an au-thorized Sea-Doo Boats dealer.NOTE: Antifreeze of each engineshould be replaced every 200 hoursor every 2 years to prevent antifreezedeterioration.
NOTICE Improper antifreeze den-sity may allow freezing of the liquidin the cooling system if the boat isstored in an area where the freezingpoint is attained. This would seri-ously damage the engine.
Battery Removal andStorageFor battery removal, cleaning and stor-age, contact your authorized Sea-DooBoats dealer.
Boat Cleaning/RepairClean boat, refer to BOAT CARE.If repairs are needed to the body orto the hull contact your authorizedSea-Doo Boats dealer. For paint touchup to mechanical parts use BRP spraypaint. For minor gelcoat repairs, a Gel-cote repair kit is available from GelcoteInternational at www.gelcote. com.Replace damaged labels or decals.
Boat ProtectionRemove storage tray. Place it on deck.
______________ 101

STORAGE
Using a flat screwdriver, lift tab asshown below.
������
TYPICAL — LIFT TAB
Detach cylinder end. Detach otherside.Block and leave engine cover lid openslightly.This will avoid engine compartmentcondensation and possible corrosion.Reattach cylinder ends to engine coverlid before operating boat.If the boat is to be stored outside, coverit with a vented opaque tarpaulin toprevent UV (ultraviolet) rays and grimefrom affecting the plastic components,boat finish, as well as preventing dustaccumulation.
NOTICE Never leave the boatstored in direct sunlight. UV radia-tion will dull finishes. The boat mustnever be left in water for storage.
For the storage period, block thewheels and raise the bow slightlywith the trailer jack (if so equipped)so drainage can take place. Ensurethe drain plug is unscrewed and unob-structed.
102 ______________

PRESEASON PREPARATION
Maintenance preparation must be per-formed in conjunction with MAINTE-NANCE SCHEDULE.Ensure to perform all tasks included inthe 100 HOURS OR 1 YEAR column.Since technical skills and specialtools are required, some operationsshould be performed by an authorizedSea-Doo Boats dealer.NOTE: It is highly recommended thatan authorized Sea-Doo Boats dealerperform factory campaigns in additionto the preseason preparation at thesame time.
WARNINGOnly perform procedures as de-tailed in the MAINTENANCESCHEDULE. It is recommendedthat the assistance of an autho-rized Sea-Doo Boats dealer be pe-riodically obtained on other com-ponents and systems not coveredin this guide.
NOTICE When component condi-tions seem less than satisfactory, re-place using only genuine BRP parts,or approved equivalents.
______________ 103

PRESEASON PREPARATION
This page is
intentionally blank
104 ______________

TECHNICALINFORMATION
______________ 105

BOAT IDENTIFICATION
The main components of the boat (hulland engines) are identified by differentserial numbers. It may sometimes be-come necessary to locate these num-bers for warranty purposes or to tracethe boat in the event of theft.
Hull Identification NumberThe Hull Identification Number (HIN)is located on the right side of the tran-som.
lmo2008-003-003_a
TYPICAL1. Hull Identification Number (HIN)
Engine IdentificationNumberThe Engine Identification Number(EIN) is located on the upper crankcaseon MAGNETO side of each engine.
����/ �
1. Engine Identification Number (EIN)
106 ______________

ENGINE EMISSIONS INFORMATION
Maintenance, replacement, or repair ofthe emission control devices and sys-tems may be performed by any marineSI (Spark Ignition) engine repair estab-lishment or individual.
Manufacturer'sResponsibilityBeginning with 1999 model year en-gines, manufacturers of marine en-gines must determine the exhaustemission levels for each engine horse-power family and certify these engineswith the United States of America En-vironmental Protection Agency (EPA).An emissions control information la-bel, showing emission levels and en-gine specifications, must be placed oneach boat at the time of manufacture.
Dealer's ResponsibilityWhen performing service on all 1999and more recent Sea-Doo Boats carry-ing an emissions control informationlabel, adjustments must be kept withinpublished factory specifications.Replacement or repair of any emissionrelated component must be executedin a manner that maintains emissionlevels within the prescribed certifica-tion standards.Dealers are not to modify the engine inany manner that would alter the horse-power or allow emission levels to ex-ceed their predetermined factory spec-ifications.Exceptions include manufacturer'sprescribed changes, such as altitudeadjustments for example.
Owner ResponsibilityThe owner/operator is required to haveengine maintenance performed tomaintain emission levels within pre-scribed certification standards.The owner/operator is not to, andshould not allow anyone to modify anyengine in a manner that would alter the
horsepower or allow emission levelsto exceed predetermined factory spec-ifications.
EPA Emission RegulationsAll new 1999 and more recent Sea-DooBoats manufactured by BRP are certi-fied to the EPA as conforming to therequirements of the regulations for thecontrol of air pollution from new boatengines. This certification is contin-gent on certain adjustments being setto factory standards. For this reason,the factory procedure for servicing theproduct must be strictly followed and,whenever practicable, returned to theoriginal intent of the design.The responsibilities listed above aregeneral and in no way a complete list-ing of the rules and regulations per-taining to the EPA requirements on ex-haust emissions for marine products.For more detailed information on thissubject, you may contact the followinglocations:
MAIL:
U.S. Environmental Protection AgencyOffice of Transportation and Air Quality1200 Pennsylvania Ave. NWMail Code 6403JWashington D.C. 20460
INTERNET WEB SITE:
http://www.epa.gov/otaq/
______________ 107
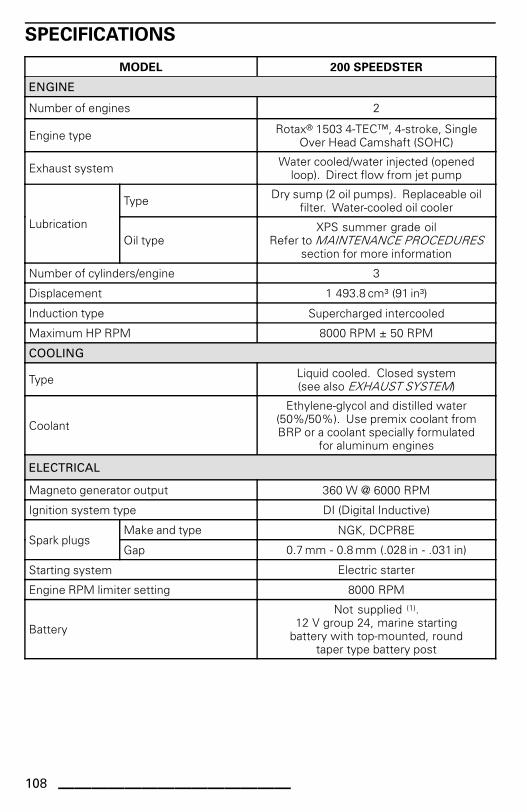
SPECIFICATIONS
MODEL 200 SPEEDSTER
ENGINE
Number of engines 2
Engine type Rotax® 1503 4-TEC™, 4-stroke, SingleOver Head Camshaft (SOHC)
Exhaust system Water cooled/water injected (openedloop). Direct flow from jet pump
Type Dry sump (2 oil pumps). Replaceable oilfilter. Water-cooled oil cooler
LubricationOil type
XPS summer grade oilRefer to MAINTENANCE PROCEDURES
section for more information
Number of cylinders/engine 3
Displacement 1 493.8 cm³ (91 in³)
Induction type Supercharged intercooled
Maximum HP RPM 8000 RPM ± 50 RPM
COOLING
Type Liquid cooled. Closed system(see also EXHAUST SYSTEM)
Coolant
Ethylene-glycol and distilled water(50%/50%). Use premix coolant fromBRP or a coolant specially formulated
for aluminum engines
ELECTRICAL
Magneto generator output 360 W @ 6000 RPM
Ignition system type DI (Digital Inductive)
Make and type NGK, DCPR8ESpark plugs
Gap 0.7 mm - 0.8 mm (.028 in - .031 in)
Starting system Electric starter
Engine RPM limiter setting 8000 RPM
Battery
Not supplied (1).12 V group 24, marine starting
battery with top-mounted, roundtaper type battery post
108 ______________
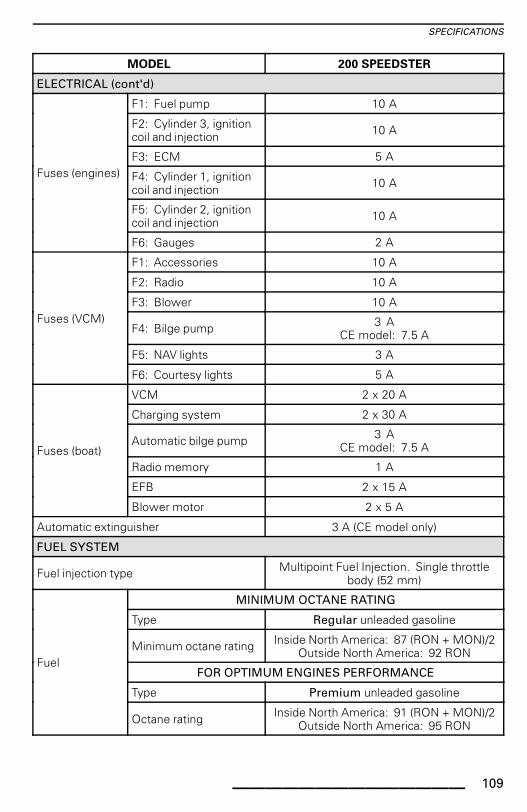
SPECIFICATIONS
MODEL 200 SPEEDSTER
ELECTRICAL (cont'd)
F1: Fuel pump 10 A
F2: Cylinder 3, ignitioncoil and injection 10 A
F3: ECM 5 A
F4: Cylinder 1, ignitioncoil and injection 10 A
F5: Cylinder 2, ignitioncoil and injection 10 A
Fuses (engines)
F6: Gauges 2 A
F1: Accessories 10 A
F2: Radio 10 A
F3: Blower 10 A
F4: Bilge pump 3 ACE model: 7.5 A
F5: NAV lights 3 A
Fuses (VCM)
F6: Courtesy lights 5 A
VCM 2 x 20 A
Charging system 2 x 30 A
Automatic bilge pump 3 ACE model: 7.5 A
Radio memory 1 A
EFB 2 x 15 A
Fuses (boat)
Blower motor 2 x 5 A
Automatic extinguisher 3 A (CE model only)
FUEL SYSTEM
Fuel injection type Multipoint Fuel Injection. Single throttlebody (52 mm)
MINIMUM OCTANE RATING
Type Regular unleaded gasoline
Minimum octane rating Inside North America: 87 (RON + MON)/2Outside North America: 92 RON
FOR OPTIMUM ENGINES PERFORMANCE
Type Premium unleaded gasoline
Fuel
Octane rating Inside North America: 91 (RON + MON)/2Outside North America: 95 RON
______________ 109

SPECIFICATIONS
MODEL 200 SPEEDSTER
PROPULSION
Jet pump type Axial flow single stage
Jet pump grease Jet pump bearing grease(P/N 293 550 032) sold by BRP
Transmission Crowned splines, direct drive
Pivoting angle of direction (nozzle) 20°
Minimum required water level for jetpump(s)
90 cm (3 ft) underneath the lowestrear portion of hull
DIMENSIONS
Overall length 6.02 m (19.9 ft)
Beam 2.44 m (8 ft)
Draft 30.5 cm (1 ft)
Dead rise 21°
DIMENSIONS (ON TRAILER)
Length (with swing-away tongue folded) 6.25 m (20.5 ft)
Width 2.59 m (8.5 ft)
No tower 1.98 m (6.5 ft)
Tower down 2.16 m (7.1 ft)Height
Tower up 3.02 m (9.9 ft)
WEIGHT AND LOADING CAPACITY
No tower 1 256 kg (2,769 lb)Weight
With tower 1 284 kg (2,831 lb)
Seating capacity 7
Load limit (passengers + luggage)(based on calm water operation)
7 passengers OR619 kg (1,365 lb)
No tower 1 857.5 kg (4,095 lb)Gross weight(on trailer) With tower 1 885 kg (4,156 lb)
CAPACITIES
Engine oil/engine 3 L (3.2 qt (U.S. liq.))oil change with filter
Engine cooling system 5.5 L (5.8 qt (U.S. liq.)) total
Fuel tank (including reserve) 166 L (44 U.S. gal.)
(1) Recommended: Exide R-24-130, 12 V, 25 A•h (130 minutes reserve) or R-24-160(160 minutes) or equivalent.
110 ______________

TROUBLESHOOTING
______________ 111

TROUBLESHOOTING GUIDELINES
The following information is provided to help in diagnosing the probable source ofsimple troubles. You may be able to solve many of these problems rather quickly,but others may require the skills of a mechanical technician. In such a case, consultan authorized Sea-Doo Boats dealer for servicing.
BATTERY IS REGULARLY DISCHARGED
1. Check battery condition.– Have the battery charged or replaced by an authorized Sea-Doo Boats dealer.
2. Loose battery cable connection.– Check/clean/tighten
3. Check charging system fuse.– Replace fuse if necessary and have charging system checked by an autho-
rized Sea-Doo Boats dealer.
WARNINGSee your authorized Sea-Doo Boats dealer to have the battery charged orreplaced. Do not charge or boost the battery while installed in the enginecompartment. Electrolyte is poisonous and capable of causing severeburns.
NO BEEPS ARE HEARD WHEN INSTALLING THE TETHER CORD ON ENGINE CUT-OFFSWITCH
1. Main battery cut-off switch is turned OFF.– Verify and turn ON.
2. Battery discharged.– Have the battery charged or replaced by authorized Sea-Doo Boats dealer.
ENGINE DOES NOT TURN OVER AND THE MONITORING BEEPER SOUNDS
1. Refer to MONITORING SYSTEM below.
ENGINE WILL NOT START
1. Tether cord removed.– Install tether cord over engine cut-off switch.
2. Engine management system does not recognize the D.E.S.S. key (2 beepsare not heard when installing the tether cord).– Refer to an authorized Sea-Doo Boats dealer.
3. Burnt fuse.– Check fuse(s). See an authorized Sea-Doo Boats dealer if problem is repeti-
tive.4. Discharged battery.
– Have the battery charged or replaced by an authorized Sea-Doo Boats dealer.5. Battery connections, corroded or loose.
– Contact an authorized Sea-Doo Boats dealer.
112 ______________

TROUBLESHOOTING GUIDELINES
ENGINE WILL NOT START (cont’d)
6. Water flooded engine.– Contact an authorized Sea-Doo Boats dealer.
7. Obstructed jet pump.– Try to clean. Otherwise, refer to an authorized Sea-Doo Boats dealer.
8. Faulty engine management system.– Refer to an authorized Sea-Doo Boats dealer.
ENGINE TURNS SLOWLY
1. Loose battery cable connections.– Check/clean/tighten.
2. Discharged or weak battery.– Have the battery charged or replaced by an authorized Sea-Doo Boats dealer.
3. Bad ground(s).– Refer to an authorized Sea-Doo Boats dealer.
4. Worn starter or related parts.– Refer to an authorized Sea-Doo Boats dealer.
ENGINE TURNS NORMALLY BUT WILL NOT START
1. Fuel tank empty or water contaminated.– Refill or siphon and fill with fresh fuel.
2. Fouled/defective spark plugs.– Replace.
3. Burnt fuse.– Check fuse(s). See an authorized Sea-Doo Boats dealer if problem is repeti-
tive.4. Water-flooded engine.
– Refer to WATER-FLOODED ENGINE in SPECIAL PROCEDURES.5. Engine management system fault detected (check if engine pilot lamp is
ON).– Refer to an authorized Sea-Doo Boats dealer.
6. Faulty fuel pump.– Refer to an authorized Sea-Doo Boats dealer.
ENGINE MISFIRES, RUNS IRREGULARLY
1. Fouled/defective/worn spark plugs.– Replace.
2. Faulty ignition coil(s).– Contact an authorized Sea-Doo Boats dealer.
3. Fuel: Level too low, stale or water contaminated.– Siphon and/or refill.
______________ 113

TROUBLESHOOTING GUIDELINES
ENGINE MISFIRES, RUNS IRREGULARLY (cont’d)
4. Clogged injectors.– Refer to an authorized Sea-Doo Boats dealer.
5. Engine management system fault detected (check if engine pilot lamp isON).– Refer to an authorized Sea-Doo Boats dealer.
ENGINE SMOKE
1. Oil level too high.– Refer to an authorized Sea-Doo Boats dealer.
2. Water ingestion, coolant leak or damaged cylinder head gasket.– Refer to an authorized Sea-Doo Boats dealer.
3. Internal engine damage.– Refer to an authorized Sea-Doo Boats dealer.
ENGINE OVERHEATING OR IMPROPER OIL PRESSURE (MONITORING BEEPEREMITS A CONTINUOUS BEEP)
NOTICE If beeper emits a continuous beep, stop engine as soon as possi-ble.1. Check oil and coolant levels.
– Refer to MAINTENANCE PROCEDURES. Refill if necessary.2. Clogged jet pump water intake.
– Perform the JET PUMP WATER INTAKE AND IMPELLER CLEANING PRO-CEDURE in SPECIAL PROCEDURES.
3. Clogged exhaust system.– Flush exhaust system.
NOTICE If these actions do not correct the problem, discontinue use an con-tact an authorized Sea-Doo Boats dealer.
ENGINE LACKS ACCELERATION OR POWER
1. Jet pump water intake clogged.– Clean. Refer to JET PUMP WATER INTAKE AND IMPELLER CLEANING in
SPECIAL PROCEDURES section.2. Damaged impeller or worn-out wear ring.
– Replace. Refer to an authorized Sea-Doo Boats dealer.3. Faulty supercharger or intercooler (255 engine).
– Refer to an authorized Sea-Doo Boats dealer.4. Supercharger clutch slipping.
– Refer to an authorized Sea-Doo Boats dealer.5. Weak spark.
– Refer to ENGINE MISFIRES, RUNS IRREGULARLY in this section.
114 ______________

TROUBLESHOOTING GUIDELINES
ENGINE LACKS ACCELERATION OR POWER (cont’d)
6. Engine management system fault detected (check if engine pilot lamp isON).– Refer to an authorized Sea-Doo Boats dealer.
7. Clogged injectors.– Refer to an authorized Sea-Doo Boats dealer.
8. Low fuel pressure.– Refer to an authorized Sea-Doo Boats dealer.
9. Water in fuel.– Siphon and replace.
BOAT CANNOT REACH TOP SPEED
1. Jet pump water intake clogged.– Perform the JET PUMP WATER INTAKE AND IMPELLER CLEANING PRO-
CEDURE in SPECIAL PROCEDURES.2. Damaged impeller or worn-out wear ring.
– Contact an authorized Sea-Doo Boats dealer.3. Faulty supercharger or intercooler (255 engine).
– Refer to an authorized Sea-Doo Boats dealer.4. Engine management system fault detected (check if engine pilot lamp is
ON).– Refer to an authorized Sea-Doo Boats dealer.
ABNORMAL NOISE FROM PROPULSION SYSTEM
1. Weeds or debris jammed around impeller.– Perform the JET PUMP WATER INTAKE AND IMPELLER CLEANING PRO-
CEDURE in SPECIAL PROCEDURES.2. Damaged impeller shaft or drive shaft.
– Contact an authorized Sea-Doo Boats dealer.
WATER FOUND IN BILGE
1. Drain plug(s) not tighten.– Tighten drain plugs.
2. Defective scupper valve.– Refer to an authorized Sea-Doo Boats dealer.
3. Exhaust system leak.– Refer to an authorized Sea-Doo Boats dealer.
4. Carbon ring at drive shaft worn out.– Refer to an authorized Sea-Doo Boats dealer.
______________ 115

MONITORING SYSTEM
A system monitors the electronic components of the EMS (engine managementsystem) and other components of the electrical system. When a fault occurs,it sends visual messages through the information center and/or audible signalsthrough a beeper to inform you of a particular condition.A fault code may also be recorded.When a minor or transient fault occurs, the fault message and beeper will cease au-tomatically if the condition that caused the fault does not exist anymore.Releasing the throttle and letting the engine return to idle speed may allow normaloperation to come back. If this does not work, try removing and reinstalling thetether cord on its post.The electronic system will react differently depending on the fault type. In severefailure, the engine may not be allowed to be started. In other cases, the engine willoperate in limp home mode (reduced speed).When a fault occurs, see an authorized Sea-Doo Boats dealer as soon as possiblefor inspection.
116 ______________

MONITORING SYSTEM
Beeper Code InformationBEEPER CODE (1) DESCRIPTION
2 short beeps while installingtether cord on engine cut-offswitch
Normal condition of D.E.S.S. Right key installedcorrectly.
Shift lever not in Neutral position. Move shift leverto Neutral.
Unable to read key (wrong installation or dirty key).Remove tether cord, make sure it's clean andreinstall.
1 long beep while installingtether cord on engine cut-offswitch or when pressingSTART/STOP switch
Invalid key or D.E.S.S. fault. Make sure to use theproper key for the boat. If it does not work, Contactan authorized Sea-Doo Boats dealer.
4 short beeps while pressingSTART/STOP switch with tethercord installed
Shift lever is not in Neutral. Move shift lever toNeutral.
1 short beep while moving shiftlever to neutral Confirms that shift lever is now in Neutral.
4 short beeps at differentinterval
Tether cord has been left on the engine cut-offswitch without the engine running. Remove tethercord to prevent battery discharge.
High engine coolant temperature. Refer toENGINE OVERHEATING in TROUBLESHOOTINGGUIDELINES.
High exhaust temperature. Refer to ENGINEOVERHEATING in TROUBLESHOOTINGGUIDELINES.
Continuous beep
Low or high engine oil pressure. Check oil level assoon as possible. If level good, discontinue use ancontact an authorized Sea-Doo Boats dealer.
(1) Some beeper codes go with messages on the information display, refer toCONTROLS, INSTRUMENTS AND EQUIPMENT for details.
NOTICE If the monitoring beeper emits a continuous beep, stop engine assoon as possible.
______________ 117

MONITORING SYSTEM
This page is
intentionally blank
118 ______________

WARRANTY
______________ 119

BRP LIMITED WARRANTY FOR MODEL YEAR 2012SEA-DOO® BOATS SOLD IN THE UNITED STATESAND CANADA
1) SCOPEBRP US Inc.* (“BRP”) warrants its new and unused Model Year 2012 Sea-Doo®
boats (“boat”) sold by authorized BRP dealers (as hereinafter defined) in the fiftyUnited States and Canada (“dealer”) from defects in material and workmanshipfor the period and under the conditions described below. This limited warranty willbecome null and void if: (1) the boat was used for racing or any other competitiveactivity, at any point, even by a previous owner; or (2) the boat has been alteredor modified in such a way so as to adversely affect its operation, performance ordurability, or has been altered or modified to change its intended use.All genuine BRP parts and accessories, installed by an authorized BRP dealer at thetime of delivery of the 2012 Sea-Doo® boat, carry the same warranty as that of theboat.
2) LIMITATIONS OF LIABILITYTHIS WARRANTY IS EXPRESSLY GIVEN AND ACCEPTED IN LIEU OF ANYAND ALL OTHER WARRANTIES, EXPRESSED OR IMPLIED, INCLUDINGWITHOUT LIMITATION ANY WARRANTY OF MERCHANTABILITY OR FIT-NESS FOR A PARTICULAR PURPOSE. TO THE EXTENT THAT THEY CANNOTBE DISCLAIMED, THE IMPLIED WARRANTIES ARE LIMITED IN DURATIONTO THE LIFE OF THE EXPRESS WARRANTY. INCIDENTAL AND CONSE-QUENTIAL DAMAGES ARE EXCLUDED FROM COVERAGE UNDER THISWARRANTY. SOME STATES/PROVINCES DO NOT ALLOW FOR THE DIS-CLAIMERS, LIMITATIONS AND EXCLUSIONS IDENTIFIED ABOVE, AS ARESULT, THEY MAY NOT APPLY TO YOU. THIS WARRANTY GIVES YOUSPECIFIC RIGHTS, AND YOU MAY ALSO HAVE OTHER LEGAL RIGHTSWHICH MAY VARY FROM STATE TO STATE, OR PROVINCE TO PROVINCE.NEITHER THE DISTRIBUTOR, ANY BRP DEALER NOR ANY OTHER PERSONHAS BEEN AUTHORIZED TO MAKE ANY AFFIRMATION, REPRESENTA-TION OR WARRANTY REGARDING THE PRODUCT, OTHER THAN THOSECONTAINED IN THIS LIMITED WARRANTY, AND IF MADE, SHALL NOT BEENFORCEABLE AGAINST BRP. BRP RESERVES THE RIGHT TO MODIFY THISWARRANTY AT ANY TIME, BEING UNDERSTOOD THAT SUCH MODIFICA-TION WILL NOT ALTER THE WARRANTY CONDITIONS APPLICABLE TO THEPRODUCTS SOLD WHILE THIS WARRANTY IS IN EFFECT.
3) EXCLUSIONS – ARE NOT WARRANTEDThe following are not warranted under any circumstances:– Normal wear and tear;– Routine maintenance items, tune-ups, adjustments;– Damage caused by failure to provide proper maintenance and/or storage, as de-
scribed in the Operator's Guide;– Damage resulting from removal of parts, improper repairs, service, mainte-
nance, modifications or use of parts not manufactured or approved by BRP orresulting from repairs done by a person that is not an authorized servicing BRPdealer;
120 ______________

– Damage caused by abuse, misuse, abnormal use, neglect, racing, improper op-eration or operation of the boat in a manner inconsistent with the recommendedoperation described in the Operator's Guide;
– Damage resulting from external damage, submersion, water or foreign objectingestion, accident, fire, theft, vandalism or any act of God;
– Operation with fuels, oils or lubricants which are not suitable for the boat (seeOperator’s Guide);
– Damage from rust, corrosion or exposure to the elements;– Damage from cooling system or jet pump blockage by foreign material;– Damage to gel coat finish including but not limited to cosmetic gel coat finish de-
fects, blisters, starring, crazing; and fiberglass delaminating caused by blisters,crazing, spyder or hairline cracks or exposure to the elements; and
– Incidental or consequential damages, or damages of any kind including withoutlimitation towing, storage, telephone, rental, taxi, inconvenience, insurancecoverage, loan payments, loss of time, loss of income.
4) WARRANTY COVERAGE DURATIONThis limited warranty will be in effect from the date of delivery to the first retail con-sumer or the date the boat is first put into use, whichever occurs first and for a pe-riod of:1. TWELVE (12) CONSECUTIVE MONTHS for private, recreational use, except
that the deck and hull fiberglass structure are covered for SIXTY (60) CONSEC-UTIVE MONTHS.
2. FOUR (4) CONSECUTIVE MONTHS for commercial use, except that thedeck and hull fiberglass structure is covered for TWELVE (12) CONSECUTIVEMONTHS. A boat is used commercially when it is used in connection withgenerating income or any work or employment during any part of the warrantyperiod. A boat is also used commercially when, at any point during the war-ranty period, it has commercial tags or is licensed for commercial use.
3. For Sea-Doo® Boats equipped with engine(s) meeting the Sterndrive/InboardStandards (Include, but without limitation: models 98CA, 98CB, 98CC, 98CD,85CA, 85CB, 85CC, 85CD, 85CE, 85CF, 85CG, 85CH); the following emissionrelated warranty period applies:Emission-related components that are installed on EPA certified boats reg-istered in the USA are covered for thirty-six (36) consecutive months or 480hours of engine use whichever occurs first; and evaporative emission relatedcomponents are warranted for twenty-four (24) consecutive months. If the480 hours of engine use are reached during the regular warranty coverageperiod, the emission-related components are still covered by BRP’s standardwarranty until the end of regular coverage period.For all other Sea-Doo® Boats; the following emission related warranty periodapplies: Emission-related components that are installed on EPA certified boatsregistered in the USA are covered for thirty (30) consecutive months or 175hours of engine use whichever occurs first; and evaporative emission relatedcomponents are warranted for twenty-four (24) consecutive months. If the175 hours of engine use are reached during the regular warranty coverageperiod, the emission-related components are still covered by BRP’s standardwarranty until the end of regular coverage period.
______________ 121

4. The list of the current warranted emission-related components is known byyour authorized BRP dealer.
5. For boats produced by BRP for sale in the state of California, that are originallysold to a resident or subsequently warranty registered to a resident in the stateof California, please also refer to the applicable California Emissions ControlWarranty Statement.
The repair or replacement of parts or the performance of service under this war-ranty does not extend the life of this warranty beyond its original expiration date.For boats produced by BRP for sale in the states of California, that are originallysold to a resident or subsequently warranty registered to a resident in the stateof California, please also refer to the applicable California Emissions ControlWarranty Statement.
5) CONDITIONS TO HAVE WARRANTY COVERAGEThis warranty coverage is available only if each of the following conditions hasbeen fulfilled:– The 2012 Sea-Doo® boat must be purchased as new and unused by its first
owner from a BRP dealer authorized to distribute Sea-Doo® boats products inthe country in which the sale occurred (“BRP dealer”);
– The BRP specified pre-delivery inspection process must be completed and doc-umented and signed by the purchaser;
– The product must have undergone proper registration by an authorized BRPdealer;
– The 2012 Sea-Doo® boat must be purchased in the country in which the pur-chaser resides;
– Routine maintenance outlined in the Operator’s Guide must be timely per-formed in order to maintain warranty coverage. BRP reserves the right to makewarranty coverage contingent upon proof of proper maintenance.
BRP will not honor this limited warranty to any private use owner or commercialuse owner if one of the preceding conditions has not been met. Such limitationsare necessary in order to allow BRP to preserve both the safety of its products,and also that of its consumers and the general public.
6) WHAT TO DO TO OBTAIN WARRANTY COVERAGEThe customer must cease using the boat upon the appearance of an anomaly. Thecustomer must notify a servicing BRP dealer within two (2) days of the appearanceof a defect, and provide it with reasonable access to the product and reasonableopportunity to repair it. The customer must also present to the authorized BRPdealer, proof of purchase of the product and must sign the repair/work order priorto starting the repair in order to validate the warranty repair. All parts replacedunder this limited warranty become the property of BRP.
122 ______________

7) WHAT BRP WILL DOBRP’s obligations under this warranty are limited to, at its sole discretion, repairingparts found defective under normal use, maintenance and service, or replacingsuch parts with new genuine BRP parts without charge for parts and labor, at anyauthorized BRP dealer during the warranty coverage period under the conditionsdescribed herein. BRP's responsibility is limited to making the required repairs orreplacements of parts. No claim of breach of warranty shall be cause for cancella-tion or rescission of the sale of the boat to the owner.In the event that service is required outside of the country of original sale, theowner will bear responsibility for any additional charges due to local practicesand conditions, such as, but not limited to, freight, insurance, taxes, license fees,import duties, and any and all other financial charges, including those levied bygovernments, states, territories and their respective agencies.BRP reserves the right to improve or modify products from time to time without as-suming any obligation to modify products previously manufactured.
8) TRANSFERIf the ownership of a product is transferred during the warranty coverage period,this warranty shall also be transferred and be valid for the remaining coverageperiod provided that BRP is notified of such transfer of ownership in the followingway:1. The former owner contacts BRP (at the phone number provided below) or an
authorized BRP dealer and gives the coordinates of the new owner; or2. BRP or an authorized BRP dealer receives a proof that the former owner agreed
to the transfer of ownership, in addition to the coordinates of the new owner.
9) CONSUMER ASSISTANCEIn the event of a controversy or a dispute in connection with this limited warranty,BRP suggests that you try to resolve the issue at the dealership level. We recom-mend discussing the issue with the authorized BRP dealer's service manager orowner.If the issue has not yet been resolved, please submit your complaint in writing orcall the appropriate number below:
In Canada In USA
BOMBARDIER RECREATIONAL PRODUCTS INC.SEA-DOOCustomer Assistance Center75 J.A. Bombardier streetSherbrooke QC J1L 1W3Tel.: 819 566-3366
BRP US INC.SEA-DOOCustomer Assistance Center7575 Bombardier COURTWausau WI 54401Tel.: 715 848-4957
*In Canada, products are distributed and serviced by Bombardier Recreational Products Inc© 2011 Bombardier Recreational Products Inc. All rights reserved.® Registered trademark of Bombardier Recreational Products Inc. or its subsidiaries.‡ is the trademark of its owner.
______________ 123

CALIFORNIA EMISSION CONTROL WARRANTYSTATEMENT FOR MODEL-YEAR 2012 SEA-DOO®
BOATS WITH 4-TEC® ENGINES OR 4-TEC® ICENGINES
For California, your 2012 Sea-Doo® boat (“boat”) has a special environmental labelrequired by the California Air Resources Board. The label has 1, 2, 3 or 4 stars. Ahangtag, provided with your boat, describes the meaning of the star rating system.
The Star Label Means Cleaner Marine EnginesThe Symbol for Cleaner Marine Engines:
���� 0
Cleaner Air and WaterFor a healthier lifestyle and environment.Better Fuel EconomyBurns up to 30 - 40 percent less gas and oil than conventional carburetedtwo-stroke engines, saving money and resources.Longer Emission WarrantyProtects consumer for worry free operation.
One Star – Low Emission
The one-star label identifies personal watercraft, outboard, stern drive and inboardengines that meet the Air Resources Board’s Personal Watercraft and Out-board marine engine 2001 exhaust emission standards. Engines meeting thesestandards have 75% lower emissions than conventional carbureted two-strokeengines. These engines are equivalent to the U.S. EPA’s 2006 standards formarine engines.
Two Stars - Very Low Emission
The two-star label identifies personal watercraft, outboard, stern drive and inboardengines that meet the Air Resources Board’s Personal Watercraft and Outboardmarine engine 2004 exhaust emission standards. Engines meeting these stan-dards have 20% lower emissions than One Star - Low-Emission engines.
Three Stars - Ultra Low Emission
The three-star label identifies engines that meet the Air Resources Board’s Per-sonal Watercraft and Outboard marine engine 2008 exhaust emission standardsor the Stern drive and Inboard marine engine 2003 exhaust emission standards.Engines meeting these standards have 65% lower emissions than One Star –Low Emission engines.
124 ______________

Four Stars - Super Ultra Low Emission
The four-star label identifies engines that meet the Air Resources Board’sStern-drive and Inboard marine engine 2009 exhaust emission standards. Per-sonal Watercraft and Outboard marine engines may also comply with thesestandards. Engines meeting these standards have 90% lower emissions thanOne Star – Low Emission engines.For more information: Cleaner Watercraft – Get the Facts1 800 END-SMOGwww.arb.ca.gov
Your Emission Control Warranty Rights and ObligationsThe California Air Resources Board and BRP US Inc. (“BRP”) are pleased toexplain the emission control system warranty on your Model Year 2012 Sea-Doo®
boat. In California, new boat engines must be designed, built and equipped tomeet the State’s stringent anti-smog standards. BRP must warrant the emissioncontrol system on your boat engine for the period of time listed below providedthere has been no abuse, neglect or improper maintenance of your boat engine.Your emission control system may include parts such as the fuel injection system,the ignition system and catalytic converter. Also included may be hoses, belts,connectors and other emission related assemblies.Where a warrantable condition exists, BRP will repair your boat engine at no costto you including diagnosis, parts and labor provided that such work is performed byan authorized BRP dealer.
Manufacturer’s Limited Warranty CoverageFor Sea-Doo® Boats equipped with engine(s) meeting the 3-Star Standards (Allmodels except units equipped with engine(s) meeting the 4-Star Standards); thefollowing emission related warranty period applies:This emission limited warranty covers Model Year 2012 Sea-Doo® Boats certifiedand produced by BRP for sale in California, that are originally sold in California toa California resident or subsequently warranty registered to a California resident.The BRP limited warranty conditions for Sea-Doo® boats are still applicable tothese models with the necessary modifications. Select emission control partsof your 2012 Sea-Doo® Boat are warranted from the date of delivery to the firstretail consumer for a period of 4 years, or for 250 hours of use, whichever occursfirst. However, warranty coverage based on the hourly period is only permittedfor boats equipped with the appropriate hour meters or their equivalent. If anyemission-related part on your engine is defective under warranty, the part will berepaired or replaced by BRP.
______________ 125

For Sea-Doo® Boats equipped with engine(s) meeting the 4-Star Standards;(Include, but without limitation: models 98CA, 98CB, 98CC, 98CD, 85CA, 85CB,85CC, 85CD, 85CE, 85CF, 85CG, 85CH); the following emission related warrantyperiod applies: This emission limited warranty covers Model Year 2012 Sea-Doo®
Boats certified and produced by BRP for sale in California, that are originally soldin California to a California resident or subsequently warranty registered to aCalifornia resident. The BRP limited warranty conditions for Sea-Doo® boatsare still applicable to these models with the necessary modifications. Selectemission control parts of your 2012 Sea-Doo® Boat are warranted from the dateof delivery to the first retail consumer for a period of 36 months, or for 480 hoursof use, whichever occurs first. However, warranty coverage based on the hourlyperiod is only permitted for boats equipped with the appropriate hour meters ortheir equivalent. If any emission-related part on your engine is defective underwarranty, the part will be repaired or replaced by BRP.
Parts Covered for Model Year 2012 Sea-Doo® Boat Equipped with 4-TEC®
Engines:
Idle Bypass Valve Air Intake Adapter
Throttle Position Sensor Spark Plugs
Intake Manifold Air Pressure Sensor Ignition Coils
Intake Manifold Air Temperature Sensor Air Box
Engine Temperature Sensor Intake and Exhaust Valve and Seals
Knock Sensor Crankcase Ventilation Valve
Emission Control Module ECM Throttle Body Seal
Throttle Body Wire Harness and Connectors
Fuel Rail Intake Manifold
Fuel Injectors Intake Manifold Seal
Fuel Pressure Regulator Fuel Filter
Fuel Pump Supercharger
Oxygen Sensor Catalytic Converter
The emission warranty covers damage to other engine components that is causedby the failure of a warranted part. The BRP Operator’s Guide provided containswritten instructions for the proper maintenance and use of your boat. All emissionwarranty parts are warranted by BRP for the entire warranty period of the boat,unless the part is scheduled for replacement as required maintenance in theOperator’s Guide.Emission warranty parts that are scheduled for replacement, as required main-tenance, are warranted by BRP for the period of time before the first scheduledreplacement date for that part. Emission warranty parts that are scheduled forregular inspection, but not regular replacement, are warranted by BRP for the en-tire warranty period of the boat. Any emission warranty part repaired or replacedunder the terms of this warranty statement is warranted by BRP for the remainderof the warranty period of the original part. All parts replaced under this limitedwarranty become the property of BRP. Maintenance receipts and records shouldbe transferred to each subsequent owner of the boat.
126 ______________
Owner’s Warranty ResponsibilitiesAs the owner of a 2012 Sea-Doo® boat, you are responsible for the performanceof the required maintenance listed in your Operator’s Guide. BRP recommendsthat you retain all receipts covering maintenance your boat engine, but BRPcannot deny warranty solely for the lack of receipts or your failure to ensure theperformance of all scheduled maintenance. As the owner of a Sea-Doo® boat,you should however be aware that BRP may deny you warranty coverage if yourengine(s) or a part has failed due to abuse, neglect, improper maintenance orunapproved modifications. You are responsible for presenting your engine to anauthorized BRP Dealer as soon as a problem exists. The warranty repairs will becompleted in a reasonable amount of time, not to exceed 30 days. If you have anyquestions regarding your warranty rights and responsibilities or for the name andlocation of the nearest authorized BRP Dealer you should contact the CustomerAssistance Center at 1-715-848-4957.
© 2011 Bombardier Recreational Products Inc. All rights reserved.® Registered trademark of Bombardier Recreational Products Inc. or its subsidiaries.
______________ 127
BRP INTERNATIONAL LIMITED WARRANTY FORMODEL YEAR 2012 SEA-DOO® BOATS
1) SCOPEBRP US Inc. (“BRP”)* warrants its new and unused Model Year 2012 Sea-Doo®
Boats (“Boat”) sold by authorized BRP Distributors/Dealers (“Distributor/Dealer”)outside of the United States, Canada and states members of the European Eco-nomic Area (which is comprised of the states member of the European Unionplus Norway, Iceland and Liechtenstein) Turkey, and states members of the Com-monwealth of the Independent States (''CIS'') (which is comprised of the RussianFederation and ex-members states of the USSR), will be free from defects inmaterial and workmanship for the period and under the conditions below. Thislimited warranty will become null and void if: (1) the Boat was used for racingor any other competitive activity, at any point, even by a previous owner; or (2)the Boat has been altered or modified in such a way so as to adversely affect itsoperation, performance or durability, or has been altered or modified to change itsintended use.All genuine BRP parts and accessories, installed by an authorized BRP Distribu-tor/Dealer (as hereinafter defined) at the time of delivery of the 2012 Sea-Doo®
Boat, carry the same warranty as that of the Boat.
2) LIMITATIONS OF LIABILITYTHIS WARRANTY IS EXPRESSLY GIVEN AND ACCEPTED IN LIEU OF ANYAND ALL OTHER WARRANTIES, EXPRESSED OR IMPLIED, INCLUDINGWITHOUT LIMITATION ANY WARRANTY OF MERCHANTABILITY OR FIT-NESS FOR A PARTICULAR PURPOSE. TO THE EXTENT THAT THEY CANNOTBE DISCLAIMED, THE IMPLIED WARRANTIES ARE LIMITED IN DURATIONTO THE LIFE OF THE EXPRESS WARRANTIES. INCIDENTAL AND CONSE-QUENTIAL DAMAGES ARE EXCLUDED FROM COVERAGE UNDER THISWARRANTY. SOME STATES/PROVINCES DO NOT ALLOW FOR THE DIS-CLAIMERS, LIMITATIONS AND EXCLUSIONS IDENTIFIED ABOVE, AS ARESULT, THEY MAY NOT APPLY TO YOU. THIS WARRANTY GIVES YOUSPECIFIC RIGHTS, AND YOU MAY ALSO HAVE OTHER LEGAL RIGHTSWHICH MAY VARY FROM COUNTRY TO COUNTRY.Neither the authorized BRP Distributor/Dealer, nor any other person has beenauthorized to make any affirmation, representation or warranty regarding theproduct, other than those contained in this limited warranty, and if made, shallnot be enforceable against BRP. BRP reserves the right to modify this warrantyat any time, being understood that such modification will not alter the warrantyconditions applicable to the products sold while this warranty is in effect.
3) EXCLUSIONS – ARE NOT WARRANTEDThe following are not warranted under any circumstances:– Replacement of parts due to normal wear and tear;– Routine maintenance parts and services, including but not limited to adjust-
ments, oil, lubricant and coolant changes, spark plug replacement, waterpumps and the like;
– Damage caused by improper or lack of maintenance or storage, or failure to fol-low the procedures and recommendations in the Operator’s Guide;
128 ______________

– Damage resulting from removal of parts, improper repairs, service, mainte-nance, or modification, or use of parts or accessories not manufactured or ap-proved by BRP, which in its reasonable judgment, are either incompatible withBoats or adversely affect its operation, performance, or durability, or resultingfrom repairs done by a person that is not an authorized BRP Distributor/Dealer;
– Damage caused by abuse, misuse, abnormal use, neglect, racing, improperoperation or operation of the Boat in a manner inconsistent with the recom-mended operation described in the Operator's Guide;
– Damages resulting from external damage, submersion, water or foreign objectingestion, accident, fire, theft, vandalism or any act of God;
– Operation with fuel, oils or lubricants that are not suitable for the Boat (see Op-erator’s Guide);
– Damage from rust, corrosion or exposure to the elements;– Damage from cooling system or jet pump blockage by foreign material;– Incidental or consequential damages, or damages of any kind including without
limitation towing, storage, telephone, rental, taxi, inconvenience, insurancecoverage, loan payments, loss of time, loss of income; and,
– Damage to gel coat finish including but not limited to cosmetic gel coat finish de-fects, blisters, starring, crazing; and fiberglass delaminating caused by blisters,crazing, spider or hairline cracks or exposure to the elements.
4) WARRANTY COVERAGE DURATIONThis limited warranty will be in effect from the date of delivery to the first retail con-sumer or the date the Boat is first put to use, whichever occurs first, for a period of:– TWELVE (12) CONSECUTIVE MONTHS for private, recreational use, except for
the deck and hull fiberglass structure that are covered for SIXTY (60) CONSEC-UTIVE MONTHS;
– FOUR (4) CONSECUTIVE MONTHS for commercial use, except for the deckand hull fiberglass structure that are covered for TWELVE (12) CONSECUTIVEMONTHS. A Boat is used commercially when it is used in connection withgenerating income or any work or employment during any part of the warrantyperiod. A Boat is also used commercially when, at any point during the warrantyperiod, it has commercial tags or is licensed for commercial use.
The repair or replacement of parts or the performance of service to a Boat underthis warranty does not extend the life of this limited warranty beyond its original ex-piration date.
FOR PRODUCTS SOLD IN AUSTRALIA ONLY
"Our goods come with guarantees that cannot be excluded under the AustralianConsumer Law. You are entitled to a replacement or refund for a major failureand for compensation for any other reasonably foreseeable loss or damage. Youare also entitled to have the goods repaired or replaced if the goods fail to be ofacceptable quality and the failure does not amount to a major failure."
______________ 129

5) CONDITIONS TO HAVE WARRANTY COVERAGEThis warranty coverage is available only if each of the following conditions hasbeen fulfilled:– The 2012 Sea-Doo® Boats must be purchased as new and unused by its first
owner from a BRP Distributor/Dealer authorized to distribute SEA-DOO® BOATproducts in the country in which the sale occurred;
– The BRP specified pre-delivery inspection process must be completed and doc-umented;
– The product must have undergone proper registration by an authorized BRPDistributor/Dealer;
– The 2012 Sea-Doo® Boats must be purchased in the country in which the pur-chaser resides; and,
– Routine maintenance outlined in the Operator’s Guide must be timely per-formed in order to maintain warranty coverage. BRP reserves the right to makewarranty coverage contingent upon proof of proper maintenance.
BRP will not honor this limited warranty to any private use owner or commercialuse owner if one of the preceding conditions has not been met. Such limitationsare necessary in order to allow BRP to preserve both the safety of its products,and that of its consumers and the general public.
6) WHAT TO DO TO OBTAIN WARRANTY COVERAGEThe customer must notify a servicing BRP Distributor/Dealer within two (2) daysof the appearance of a defect, and provide it with reasonable access to the productand reasonable opportunity to repair it. The customer must also present to theauthorized BRP Distributor/Dealer, proof of purchase of the product and must signthe repair/work order prior to starting the repair in order to validate the warrantyrepair. All parts replaced under this limited warranty become the property of BRP.
7) WHAT BRP WILL DOBRP’s obligations under this warranty are limited to, at its sole discretion, repairingparts found defective under normal use, maintenance and service, or replacingsuch parts with new genuine BRP parts without charge for parts and labor, at anyauthorized BRP Distributor/Dealer during the warranty coverage period under theconditions described herein. BRP's responsibility is limited to making the requiredrepairs or replacements of parts. No claim of breach of warranty shall be cause forcancellation or rescission of the sale of the Boat to the owner.In the event that service is required outside of the country of original sale, theowner will bear responsibility for any additional charges due to local practicesand conditions, such as, but not limited to, freight, insurance, taxes, license fees,import duties, and any and all other financial charges, including those levied bygovernments, states, territories and their respective agencies.BRP reserves the right to improve or modify products from time to time without as-suming any obligation to modify products previously manufactured.
130 ______________

8) TRANSFERIf the ownership of a Product is transferred during the warranty coverage period,this warranty shall also be transferred and be valid for the remaining coverageperiod provided that BRP is notified of such transfer of ownership in the followingway:1. The former owner contacts BRP (at the phone number provided below) or an au-
thorized Distributor/Dealer and gives the coordinates of the new owner; or2. BRP or an authorized Distributor/Dealer receives a proof that the former owner
agreed to the transfer of ownership, in addition to the coordinates of the newowner.
9) CONSUMER ASSISTANCEIn the event of a controversy or a dispute in connection with this limited warranty,BRP suggests that you try to resolve the issue at the dealership level.If further assistance is required, the Distributor's service department should becontacted in order to resolve the matter. You will find your distributor's coordi-nates on www.brp.com.If the matter still remains unresolved then contact BRP by writing to us at the ad-dress listed below.
For countries within Europe, Middle East and Africa, please contact our Europeanoffice
BRP EUROPE N.V.
Customer Assistance CenterSkaldenstraat 1259042 GentBelgiqueTel.: +32-9-218-26-00
For all other countries, please contact your local distributor or our North Americaoffice
BOMBARDIER RECREATIONAL PRODUCTS INC.
Customer Assistance Center75 J.A. Bombardier StreetSherbrooke QC J1L 1W3Tel.: 1 819 566-3366
© 2011 Bombardier Recreational Products Inc. All rights reserved.® Registered trademark of Bombardier Recreational Products Inc.
* For the territory covered by this limited warranty, products are distributed and serviced byBombardier Recreational Products Inc. or its affiliates.© 2011 Bombardier Recreational Products Inc. All rights reserved.® Registered trademark of Bombardier Recreational Products Inc. or its affiliates.
______________ 131
BRP LIMITED WARRANTY FOR THE EUROPEANAND THE RUSSIAN ECONOMIC AREA ANDTURKEY: MODEL YEAR 2012 SEA-DOO® BOATS
1) SCOPE OF THE LIMITED WARRANTYBRP US Inc. (“BRP”)* warrants its new and unused model-year 2012 Sea-Doo®
Boats sold by authorized BRP distributors/dealers ("Distributors/Dealers") inmember states of the European Economic Area ("EEA") (which is comprised of thestate members of the European Union plus Norway, Iceland and Liechtenstein), inmember states of the Commonwealth of the Independent States (''CIS'') (whichis comprised of the Russian Federation and ex-members states of the USSR),and Turkey from defects in material or workmanship for the period and under theconditions described below. This limited warranty will become null and void if: (1)the Boat was used for racing or any other competitive activity, at any point, evenby a previous owner; or (2) the Boat has been altered or modified in such a way soas to adversely affect its operation, performance or durability, or has been alteredor modified to change its intended use.All genuine SEA-DOO® BOAT parts and accessories, installed by an authorizedBRP Distributors/Dealers at the time of delivery of the 2012 Sea-Doo® Boats, carrythe same warranty as that of the Boats.
2) LIMITATIONS OF LIABILITYTHIS WARRANTY IS EXPRESSLY GIVEN AND ACCEPTED IN LIEU OF ANYAND ALL OTHER WARRANTIES, EXPRESSED OR IMPLIED, INCLUDINGWITHOUT LIMITATION ANY WARRANTY OF MERCHANTABILITY ORFITNESS FOR A PARTICULAR PURPOSE. TO THE EXTENT THAT THEYCANNOT BE DISCLAIMED, THE IMPLIED WARRANTIES ARE LIMITED INDURATION TO THE LIFE OF THE EXPRESS WARRANTY. INCIDENTAL ANDCONSEQUENTIAL DAMAGES ARE EXCLUDED FROM COVERAGE UNDERTHIS WARRANTY. SOME JURISDICTIONS DO NOT ALLOW FOR THE DIS-CLAIMERS, LIMITATIONS AND EXCLUSIONS IDENTIFIED ABOVE, AS ARESULT, THEY MAY NOT APPLY TO YOU. THIS WARRANTY GIVES YOUSPECIFIC RIGHTS, AND YOU MAY ALSO HAVE OTHER LEGAL RIGHTSWHICH MAY VARY FROM COUNTRY TO COUNTRY.Neither the BRP Distributor/Dealer nor any other person has been authorized tomake any affirmation, representation or warranty regarding the product, otherthan those contained in this limited warranty, and if made, shall not be enforceableagainst BRP.BRP reserves the right to modify this warranty at any time, being understood thatsuch modification will not alter the warranty conditions applicable to the productssold while this warranty is in effect.
3) EXCLUSIONS – ARE NOT WARRANTEDThe following are not warranted under any circumstances:– Replacement of parts due to normal wear and tear;– Routine maintenance parts and services, including but not limited to adjust-
ments, oil, lubricant and coolant changes, spark plug replacement, waterpumps and the like;
– Damage caused by improper or lack of maintenance or storage, or failure to fol-low the procedures and recommendations in the Operator’s Guide;
132 ______________

– Damage resulting from removal of parts, improper repairs, service, mainte-nance, or modification, or use of parts or accessories not manufactured or ap-proved by BRP, which in its reasonable judgment, are either incompatible withBoats or adversely affect its operation, performance, or durability, or resultingfrom repairs done by a person that is not an authorized BRP Distributor/Dealer;
– Damage caused by abuse, misuse, abnormal use, neglect, racing, improperoperation or operation of the Boat in a manner inconsistent with the recom-mended operation described in the Operator's Guide;
– Damages resulting from external damage, submersion, water or foreign objectingestion, accident, fire, theft, vandalism or any act of God;
– Operation with fuel, oils or lubricants that are not suitable for the Boat (see Op-erator’s Guide);
– Damage from rust, corrosion or exposure to the elements;– Damage from cooling system or jet pump blockage by foreign material;– Incidental or consequential damages, or damages of any kind including without
limitation towing, storage, telephone, rental, taxi, inconvenience, insurancecoverage, loan payments, loss of time, loss of income; and,
– Damage to gel coat finish including but not limited to cosmetic gel coat finish de-fects, blisters, starring, crazing; and fiberglass delaminating caused by blisters,crazing, spider or hairline cracks or exposure to the elements.
4) WARRANTY COVERAGE PERIODThis limited warranty will be in effect from the date of delivery to the first retail con-sumer or the date the product is first put into use, whichever occurs first and for aperiod of:TWENTY-FOUR (24) CONSECUTIVE MONTHS for private use owners except forthe deck and hull fiberglass structure that are covered for SIXTY (60) CONSECU-TIVE MONTHS;FOUR (4) CONSECUTIVE MONTHS for commercial use owners except for thedeck and hull fiberglass structure that are covered for TWELVE (12) CONSECU-TIVE MONTHS.A Boat is used commercially when it is used in connection with generating incomeor any work or employment during any part of the warranty period. A Boat is alsoused commercially when, at any point during the warranty period, it has commer-cial tags or is licensed for commercial use.The repair or replacement of parts or the performance of service under this war-ranty does not extend the life of this warranty beyond its original expiration date.Note that the duration and any other modalities of the warranty coverage are sub-ject to the applicable national or local legislation in your country.
5) CONDITIONS TO HAVE WARRANTY COVERAGEThis warranty coverage is available only if each of the following conditions hasbeen fulfilled:– The 2012 Sea-Doo® Boats must be purchased as new and unused by its first
owner from a BRP Distributor/Dealer authorized to distribute SEA-DOO® BOATproducts in the country in which the sale occurred;
______________ 133

– The BRP specified pre-delivery inspection process must be completed and doc-umented;
– The product must have undergone proper registration by an authorized BRPDistributor/Dealer;
– The 2012 Sea-Doo® Boats must be purchased within the EEA by an EEA res-ident, in the CIS for residents of the countries comprised in such area and inTurkey for residents of Turkey; and
– Routine maintenance outlined in the Operator’s Guide must be timely per-formed in order to maintain warranty coverage. BRP reserves the right to makewarranty coverage contingent upon proof of proper maintenance.
BRP will not honor this limited warranty to any private use owner or commercialuse owner if one of the preceding conditions has not been met. Such limitationsare necessary in order to allow BRP to preserve both the safety of its products,and also that of its consumers and the general public.
6) WHAT TO DO TO OBTAIN WARRANTY COVERAGEThe customer must notify a servicing BRP Distributor/Dealer within two (2)months of the appearance of a defect, and provide it with reasonable accessto the product and reasonable opportunity to repair it. The customer must alsopresent to the authorized BRP Distributor/Dealer, proof of purchase of the productand must sign the repair/work order prior to starting the repair in order to validatethe warranty repair. All parts replaced under this limited warranty become theproperty of BRP.Note that the notification period is subject to the applicable national or local legisla-tion in your country.
7) WHAT BRP WILL DOBRP’s obligations under this warranty are limited to, at its sole discretion, repairingparts found defective under normal use, maintenance and service, or replacingsuch parts with new genuine Boat parts without charge for parts and labor, at anyauthorized BRP Distributor/Dealer during the warranty coverage period under theconditions described herein. BRP's responsibility is limited to making the requiredrepairs or replacements of parts. No claim of breach of warranty shall be cause forcancellation or rescission of the sale of the Boat to the owner.In the event that service is required outside of the country of original sale, theowner will bear responsibility for any additional charges due to local practicesand conditions, such as, but not limited to, freight, insurance, taxes, license fees,import duties, and any and all other financial charges, including those levied bygovernments, states, territories and their respective agencies.BRP reserves the right to improve or modify products from time to time without as-suming any obligation to modify products previously manufactured.
8) TRANSFERIf the ownership of a Product is transferred during the warranty coverage period,this warranty shall also be transferred and be valid for the remaining coverageperiod provided that BRP is notified of such transfer of ownership in the followingway:
134 ______________

The former owner contacts BRP (at the phone number provided below) or anauthorized Distributor/Dealer and gives the coordinates of the new owner; or BRPor an authorized Distributor/Dealer receives proof that the former owner agreedto the transfer of ownership, in addition to the coordinates of the new owner.
9) CONSUMER ASSISTANCEIn the event of a controversy or a dispute in connection with this limited warranty,BRP suggests that you try to resolve the issue at the dealership level. We rec-ommend discussing the issue with the authorized Distributor/Dealer's servicemanager or owner.– If further assistance is required, the distributor's service department should be
contacted in order to resolve the matter. You will find your distributor's coordi-nates on www.brp.com.
– If the matter still remains unresolved then contact BRP at the address listed be-low.
For countries within Europe, to the exception of the Scandinavian countries, and forcountries within the CIS and Turkey, please contact our European office at:
BRP EUROPE N.V.
Customer Assistance CenterSkaldenstraat 1259042 GentBelgiumTel.: +32-9-218-26-00
For Scandinavian countries, please contact our office in Finland at:
BRP FINLAND OY
Service DepartmentIsoaavantie 7FIN-96320 RovaniemiFinlandTel.: +358163208111
For all other countries, please contact your local distributor or our North Americaoffice:
BOMBARDIER RECREATIONAL PRODUCTS INC.
Customer Assistance Center75 J.A. Bombardier StreetSherbrooke QC J1L 1W3Tel.: 1 819 566-3366
* For the territory covered by this limited warranty, products are distributed and serviced byBombardier Recreational Products Inc. or its affiliates.© 2011 Bombardier Recreational Products Inc. All rights reserved.® Registered trademark of Bombardier Recreational Products Inc.
______________ 135

This page is
intentionally blank
136 ______________

CUSTOMERINFORMATION
______________ 137

PRIVACY INFORMATION
BRP wishes to inform you that your coordinates will be used for safety and war-ranty related purposes. Furthermore, BRP and its affiliates may use its customerlist to distribute marketing and promotional information about BRP and relatedproducts.To exercise your right to consult or correct your data, or to be removed from the ad-dressee-list for direct marketing, please contact BRP.
By E-mail: [email protected]
By mail: BRPSenior Legal Counsel-Privacy Officer726 St-JosephValcourt QCCanadaJ0E 2L0
138 ______________

CHANGE OF ADDRESS/OWNERSHIP
If your address has changed or if you are the new owner of the boat, be sure to no-tify BRP by either:– Mailing one of the following card below;– North America only: calling at 715 848-4957 (USA) or 819 566-3366 (Canada);– Contacting an authorized BRP dealer.In case of change of ownership, please join a proof that the former owner agreedto the transfer.Notifying BRP, even after the expiration of the limited warranty, is very importantas it enables BRP to reach the boat owner if necessary, like when safety recalls areinitiated. It is the owner’s responsibility to notify BRP.STOLEN UNITS: In the event that your boat is stolen, you should notify your area’sdistributor warranty department of such. We will ask you to provide your name, ad-dress, phone number, Hull Identification Number and date it was stolen.
In North AmericaOther areas in the world exceptScandinavian countries
BOMBARDIER RECREATIONALPRODUCTS INC.Warranty Department75 J.-A. Bombardier StreetSherbrooke QC J1L 1W3Canada
BRP EUROPEAN DISTRIBUTIONWarranty DepartmentChemin de Messidor 5-71006 LausanneSwitzerland
Scandinavian countries
BRP FINLAND OYService DepartmentIsoaavantie 7FIN-96320 RovaniemiFinlandTel.: +358 16 3208 111
______________ 139

CHANGE OF ADDRESS/OWNERSHIP
This page is
intentionally blank
140 ______________

CHANGE OF ADDRESS/OWNERSHIP
______________ 141

CHANGE OF ADDRESS/OWNERSHIP
142 ______________
CHANGE OF ADDRESS/OWNERSHIP
______________ 143

CHANGE OF ADDRESS/OWNERSHIP
144 ______________