![u[sonic] Modbus - Lambrecht meteo](https://static.fdokumen.com/doc/165x107/6334bd04a6138719eb0b33dc/usonic-modbus-lambrecht-meteo.jpg)
prima's official strategy guide - Sonic Retro
176
PRIMA’S OFFICIAL STRATEGY GUIDE Mario De Govia Tri Pham Jeff Barton Michael Littlefield Brandon Smith Damien Waples primagames.com ®
-
Upload
khangminh22 -
Category
Documents
-
view
6 -
download
0
Transcript of prima's official strategy guide - Sonic Retro

PRIMA’S OFFICIAL STRATEGY GUIDE
Mario De GoviaTri PhamJeff BartonMichael LittlefieldBrandon SmithDamien Waples
primagames.com®

Mario De Govia, Tri Pham, Jeff Barton, Michael Littlefield, Brandon Smith, Donato Tica, Damien Waples
Prima GamesA Division of Prima Communications, Inc.
3000 Lava Ridge CourtRoseville, CA 95661
(800) 733-3000www.primagames.com
Mario De Govia, Tri Pham, Jeff Barton, Michael Littlefield, Brandon Smith, Donato Tica, Damien Waples
Prima GamesA Division of Prima Communications, Inc.
3000 Lava Ridge CourtRoseville, CA 95661
(800) 733-3000www.primagames.com
The Prima Games logo is a registered trademark ofPrima Communications, Inc., registered in theUnited States and other countries.Primagames.com is a registered trademark ofPrima Communications, Inc. in the United States.
© 2001-2004 by Prima Games. All rights reserved. No part ofthis book may be reproduced or transmitted in any form or byany means, electronic or mechanical, including photo-copying, recording, or by any information storage or retrievalsystem without written permission from Prima Publishing.Project Editor: Jill Hinckley Editorial Assistant: Michelle PritchardProduct Manager: Sara E. WilsonDesign Team: Melissa Francis, Marc Riegel, James KnightSega is registered in the U.S. Patent and Trademark Office. Sega,Dreamcast, the Dreamcast logo, Sonic The Hedgehog and SonicAdventure are either registered trademarks or trademarks of SegaCorporation. ©SEGA CORPORATION, 2000, 2001 SEGA /SONICTEAM. All Rights Reserved. Sega of America Dreamcast, Inc., P.O.Box 7639, San Francisco, CA 94120-7639. www.sega.comAll products and characters mentioned in this book aretrademarks of their respective companies.Important: Prima Games has made every effort to determine that theinformation contained in this book is accurate. However, thepublisher makes no warranty, either expressed or implied, as to theaccuracy, effectiveness, or completeness of the material in this book;nor does the publisher assume liability for damages, either incidentalor consequential, that may result from using the information in thisbook. The publisher cannot provide information regarding game play,hints and strategies, or problems with hardware or software.Questions should be directed to the support numbers provided by thegame and device manufacturers in their documentation. Some gametricks require precise timing and may require repeated attemptsbefore the desired result is achieved.
ISBN: 7615-3614-0Library of Congress Catalog Card Number: 001089934
The Beginning . . . . . . . . . . . . . . . . .2Moves and Permanent Power-Ups . .4Game Basics . . . . . . . . . . . . . . . . . . .8Items . . . . . . . . . . . . . . . . . . . . . . .10Interactive Objects . . . . . . . . . . . . .12Enemies . . . . . . . . . . . . . . . . . . . . .16Using This Book . . . . . . . . . . . . . . .18Hero Stage 1: City Escape . . . . . . .22Hero Stage 2: Wild Canyon . . . . . .27Hero Stage 3: Prison Lane . . . . . . .31Hero Stage 4: Metal Harbor . . . . .35Hero Stage 5: Green Forest . . . . . .40Hero Stage 6: Pumpkin Hill . . . . . .46Hero Stage 7: Mission Street . . . . .50Hero Stage 8: Aquatic Mine . . . . . .55Hero Stage 9: Route 101 . . . . . . . .59Hero Stage 10: Hidden Base . . . . .61Hero Stage 11: Pyramid Cave . . . .65Hero Stage 12: Death Chamber . . .69Hero Stage 13: Eternal Engine . . . .74Hero Stage 14: Meteor Herd . . . . .79
Hero Stage 15: Crazy Gadget . . . . .83Hero Stage 16: Final Rush . . . . . . .90Dark Stage 1: Iron Gate . . . . . . . . .97Dark Stage 2: Dry Lagoon . . . . . .102Dark Stage 3: Sand Ocean . . . . . .105Dark Stage 4: Radical Highway . .109Dark Stage 5: Egg Quarters . . . . .113Dark Stage 6: Lost Colony . . . . . .117Dark Stage 7: Weapons Bed . . . . .121Dark Stage 8: Security Hall . . . . .125Dark Stage 9: White Jungle . . . . .130Dark Stage 10: Route 280 . . . . . .135Dark Stage 11: Sky Rail . . . . . . . .137Dark Stage 12: Mad Space . . . . . .143Dark Stage 13: Cosmic Wall . . . . .149Dark Stage 14: Final Chase . . . . .154Cannon's Core . . . . . . . . . . . . . . .160Kart Race . . . . . . . . . . . . . . . . . . .167The Chao Primer . . . . . . . . . . . . .168Two-Player Mode . . . . . . . . . . . . .174Secrets . . . . . . . . . . . . . . . . . . . . .175
What’s InsideWhat’s Inside
The authors would like to thank their families, the Prima team, and Steve Peck atSega for his expert advice. Prima thanks Takashi Iizuka, Jane Thompson, RobertLeffler, Keith Palmer, and the rest of the Sonic Team for their assistance.

Prima’s Official Strategy Guide
Our story starts 50 years ago. The world-renowned scientist, Professor Gerald, hadjust completed a revolutionary space colony called “ARK.” Professor Gerald was asupergenius, having mastered many areas of study, including architecture, science,and astrology. However, he was most noted for his achievements in the field ofbiology. While aboard ARK, he was secretly working on a dangerous experiment,where he attempted to unlock the mysteries of life. He wanted to discover the secret ofimmortality by creating the ultimate life form. This secret project was called “Shadow.”
Professor Gerald enjoyed the solitude of ARK as it allowed him the peace to workand care for his granddaughter Maria, who needed constant attention due to herillness. She was very weak and frail, but Maria meant the world to the professor. Hisresearch was conducted in part to help her weakening condition. After years of research,Professor Gerald succeeded in creating the first prototype of the ultimate life form, Shadow. But the experiments turned outto be a very dangerous and costly endeavor. Somehow, the military discovered what the professor had been working onand tried to take possession of the prototype. Before the professor was captured, he attempted to get Maria and Shadow outsafely. Both were to board a space capsule and escape to earth. But something went terribly wrong…Maria managed to getShadow into the capsule, but before she could board, she was killed. Shadow’s last memories were with Maria….
The professor was taken to Prison Island, where he was forced to continue his experiments under military control. Hewas content knowing that both Maria and Shadow had safely escaped, although such was not the case. The militarymanaged to retrieve the capsule containing Shadow and bring it back to Prison Island for the professor to continue hisresearch. Discovering that Maria had been killed, the professor went into a rage. He vowed to avenge his granddaughter’sdeath with a fury that this world had never known.
His rage drove the professor completely insane. While it was thought that he was continuing his research with Shadow,he was secretly plotting his revenge on the world. Unbeknownst to the military, ARK contained within its core super-structure, a very powerful laser called the Eclipse Cannon. The professor had quietly reprogrammed it to harness thepower of the Chaos Emeralds and unleash a powerful laser blast at earth. He then biologically implanted his own will forrevenge into Shadow to ensure that nothing would be able to stop him from avenging the death of his granddaughter.Soon afterward, the military incarcerated Professor Gerald for fear of what he might do in retaliation. Knowing only of thedangers of project Shadow, the military sealed the island and abandoned the professor's research.
After Professor Gerald’s death, his grandson, Dr. Robotnik, discovered a laboratory notebook containing informationon his grandfather's research: the experiments with Shadow and his plans to destroy the earth. Armed with this lethalknowledge, Robotnik, also known as Eggman, soon became obsessed with finding Shadow to help him carry out his ownevil plan of world domination. And so the adventure continues….
The BeginningThe Beginning
CharactersMiles “Tails” ProwerTails is a young fox with a knack forbuilding things. He’s as talented asEggman but has yet to discover the truepotential of what he can accomplish.Sonic has taken Tails under his wing andtreats him like a younger brother. Tailswants to prove to Sonic that he’ssomeone Sonic can count on.
Besides his ability to fly using his tails, he has become an experiencedpilot of his newly designed plane, the “Tornado.” Tails’s natural talent forbuilding things helps Sonic more than ever this time around.
Sonic the HedgehogSonic is always on the move. When facedby his formidable enemy, Eggman, Sonicwins every time. He thinks that saving theworld is no big feat, and he always helps theunderdog. Sonic hates boredom and isconsistently looking for his next adventure.
Sonic lives by his own rules, neverthinking twice about what others perceive ofhim, and driven by his own desires. He was bornto run, and he loves to cover as much ground asfast as he can. His demeanor is always cool andcalm. When he finds himself in a pinch, he acts as though nothing can stophim. Cool all the way. When faced with a serious situation, he bears downand becomes intensely focused on the challenge.
2

THE BEGINNING
primagames.com
Professor Gerald RobotnikAlso known as Alchemist Gerald, he isDr. Eggman’s grandfather. Of all thegenius scientists, Professor Gerald isthe most intelligent. He has masteredmany areas of study, from genetics toastrophysics to robotics, and is amodern day scientific Da Vinci. He looksvery similar to Eggman, but is far moreserious about his work. He invented thefirst space colony, ARK, and created various machines that can harnessthe power of the Chaos Emerald.
At the peak of his career fifty years ago, he was working on asecret project in the colony when there was a terrible accident, causingARK to shut down. He took full responsibility and was incarcerated bythe government. As a result, he went insane and died a broken man.
Maria RobotnikFrail in appearance but strong in spirit,Maria is the granddaughter of ProfessorGerald and one of Eggman’s cousins. Shewas the jewel of the professor’s eye.
Maria was born and raised on ARKalong with Shadow, whom she considereda brother of sorts. She was physically veryweak and couldn’t leave the hospital. Looking down on Earth from ARK, shedeveloped an interest in it and longed to go there. To cure her illness, theProfessor began his research on the ultimate life-form. Ultimately, though,this research led to the terrible accident that ended her life. The results ofhis experiments and data were not enough to save her.
3
Knuckles the EchidnaKnuckles was born on Angel Island andbrought into this world to defend theMaster Emerald. This is his destiny. If Sonicexemplifies the wind, then Knuckles is themountain, stern and unmovable.
Wild and tough, his determination isunshakable. Knuckles thinks of Sonicas a rival, but is often envious of the adven-turous lifestyle he lives and the fame that follows. Heis a well-known treasure hunter versed in the martial arts.
Dr. Robotnik, a.k.a. EggmanHis nickname says it all. He’s ascientist with a body shaped likean egg. With an IQ of 300, he's acertifiable genius, but his childishdemeanor makes him believe that taking overthe world is easy. Although he seems to thinkhe has a master plan, he’s never quite sure howhe’s going to pull it off.
Sonic and his friends make fun of Dr.Robotnik by calling him Eggman. In turn,Eggman views Sonic as his archenemy whoalways seems to spoil his plans of world conquest. Somewhere deep inhis heart, though, he may have a certain fondness for Sonic.
Shadow the HedgehogShadow is the spitting image of Sonic, exceptfor his black body. Created by the world's mostintelligent scientist, Professor Gerald, Shadow isageless and immortal. He has the special ability toharness the power of the Chaos Emerald, whichenables him to warp time and space.
Sharp-witted and willing to do whatever ittakes to get what he wants, he always seems to be onthe edge. The little girl he grew up with, and who hewas very fond of, was violently killed in front of his eyes,gasping her final wish for him to save the world. Traumatized by the griefof her death, Shadow is determined to keep the promise he made to her.
Rouge the BatRouge is a world-famous treasure hunter who lovesjewels. The president hired Rouge to uncover infor-mation about the mysterious project “Shadow.” Thisfearless female bat is full of sex appeal and knowshow to get what she wants.
Although she looks innocent and carefree,she’s always scheming. Once she makes a decision,her motives are always mercenary in nature.
Amy RoseAmy has a one-track mind. She’s infatuated withSonic and his lifestyle of adventure and fun. A girlwith little patience, she’s very stubborn once hermind is set. Even though Sonic desperately triesto avoid her, she is relentless in her pursuit.
She is often the initiator, always pushingothers to act on her every whim. Amy is hard todiscourage and very strong-willed. Amy believesshe must save Sonic, who has been captured by thearmy and sent to Prison Island. Her senses aresharp and she has a pure heart. Sonic feels Amy issometimes more trouble than she’s worth, but deepdown he may actually have some feelings for her.
OmochaoThese are the cutemechanical toy Chao thathelp you navigate Sonic’ssecond adventure. Theyhave been programmedto give you a tutorial ofmany new features in thegame. Use their advice wisely, andyou’ll find that they will be yourbest Chao friend!

Prima’s Official Strategy Guide
4
Walk and RunThe most basic moves are walk and run. Pressthe analog thumb pad in any direction to moveyour character that way. The farther you push,the faster they run. For controlled, precisemovement, use walk.
JumpGet used to jumping because you’ll be doing ita lot. Press U to initiate the jump. Holdingdown the button increases jump height.
WhistleHow do you call an animal? Why, whistle, ofcourse! When you’re near a pipe, press I orO to whistle. Before long, a cuddly littleanimal should be at your feet.
Mystic MelodyEach Stage has at least one Ancient Ruin. Tobring these dormant ruins to life, eachcharacter must first find and then play his orher specific Mystic Melody. When you havedone so, stand on or near an Ancient Ruin andpress I or O. Upon doing so, new areasbecome available, revealing something veryspecial—normally a lost Chao, but sometimesanother power-up.
All CharactersAlthough each character has his or her own special moves,all characters have a few moves in common. These commonmoves are described here.
Sonic and ShadowDust off your twitch reflexes, because speed is what Sonicand Shadow are all about. Undoubtedly the two fastestcharacters in the game, these hedgehogs will put yournerves to the test in the blink of an eye. Be ready to use anyof these attacks at a moment's notice.
Moves and permanent power-upsMoves and permanent power-ups
JumpingSonic and Shadow can both use their simplejump as an attack. Position them over an enemyafter pressing U and watch them smash thebaddies. It’s slow but precise.
Homing AttackPress U to perform a regular jump. Then, inmid-air, tap U again to zero in on and strike anearby enemy. This quick attack is a great wayto dispose of dangerous enemies while coveringgood distance. Link multiple Homing Attacks tocross areas where jumping alone doesn’t reach.
SomersaultTap I or O while standing or running toperform the Somersault. More than just a fancymove, the Somersault is a powerful weapon.Use it to break through Wooden Containers ormow down enemies. This is one of the moreversatile moves in your arsenal.
Need to get through a tight spot? TheSomersault will squeeze you through.
Spin DashHold I or O while standing or running tocharge up your spin. Release the button andwatch Sonic or Shadow take off in a burst ofcolorful speed. In this state, you can defeatenemies as well. The drawback to all this speedis imprecise control. Watch yourself aroundcliffs or high edges. You wouldn't want to falloff, would you?
You can break only Wooden Containersuntil you find the Flame Ring.With the Flame Ring, MetalBoxes can be broken.

MOVES AND PERMANENT POWER-UPS
Light DashWhen near a string of rings, tap I or O toperform the Light Dash. Sonic and Shadow will besent soaring through the rings at lightning speeds.This move maximizes the number of rings you pickup. To perform this attack, Sonic must first find hisLight Shoes, and Shadow his Air Shoes.
Light Speed AttackOnce you find theirAncient Light, Sonicand Shadow are ableto home in on anddestroy multipleenemies withinrange. Hold down Ior O until you stopspinning, then release.
Bounce Attack (Sonic Only)For some high-flying, destructiveaction, find Sonic’s BounceBracelet. To use the BounceAttack, press I or O inmidjump. Continuebouncing to increaseheight. You can destroyenemies and reach higherledges.
Magic Gloves (Sonic Only)Find Sonic's Magic Gloves and youcan throw an enemy at hisbuddy. How? Approach anenemy and call up theAction Window bypressing P until yousee Magic Gloves. HitI or O to suck yourenemy right into your grubby little hands. Not onlyhave you eliminated one enemy, but you can now throw your newly-eliminated foe at another one.
ShootPress I or O to fire a shot at an enemy orcontainers. Use the analog thumb pad to aim.
The Volkan Cannon—the basic projectileweapon for both characters—can only destroyWooden Containers until you find Tails’ Bazooka or Dr. Eggman’s LargeCannon. Once you find those, even Steel Containers will shatter underyour firepower. If you think that’s impressive, wait until you find theirLaser Blasters.
Lock-on MissileHold I or O to lock on to your enemy with thetargeting laser. Use the analog thumb pad to aim.Once locked on, release the button to fire ahoming Lock-on Missile. The Missile seeks andeffortlessly destroys your enemy. You can lock onto multiple targets before releasing the button forbonus points. Once you get the Laser Blasterpower-up, your rate of fire increases. Nowyour Lock-on Missileswill fire faster.
HoveringFind Tails’ Booster and Dr. Eggman’s Jet Engine toupgrade your walkers. Press U to perform aregular jump. While in mid-air, press and hold Uagain to hover. You’ll stay in the air longer, butyou’ll slowly sink as you hover. Use this tocover distancesthat a normaljump won’t reach.
Tails andDr. EggmanTails and Dr. Eggman are the slowest of the characters, butwho needs speed when you have the firepower that thesetwo have? Destroying enemies from a distance is only thebeginning. Their specialty is to target multiple enemies anddestroy them without further thought.
primagames.com
5

Prima’s Official Strategy Guide
6
Propeller Punch or PunchThese attacks are funand effective. Themain drawback is thatyou have to be rightnext to an enemy touse it. When you'reup close, press Iand a battering ramwill pop out. For Tails it’sa propeller and for Dr. Eggman it’s a boxing glove.
Protection Armor(Dr. Eggman Only)The Protection Armor increases Dr.Eggman’s health.
Punch or Kick AttackKnuckles’ Punch and Rouge’s Kick Attack areperformed by pressing I or O. Use thispowerful attack to dispose of enemies andobstacles. Press twice to double the fun with aone-two Punch or Kick.
When I or O is pressed a third time ina row, Knuckles and Rouge add a Jump Punchor Kick to their one-two move. This is perfectfor indiscriminately clearing an area of enemiesor obstacles.
Grab Knuckles’sHammer Gloves andRouge’s Iron Boots for added “punch” (or kick).Steel Containers don’t stand a chance.
Knucklesand RougeKnuckles and Rouge are the most agile of the bunch,and with their ability to glide and climb walls,perhaps the most versatile. They’re both after thesame thing in their stages: Emerald pieces orKeys. Their skills are honed accordingly.
Sliding AttackThe Sliding Attacks are the same as the Punchor Kick attacks except that they are performedwhile running. The single and one-two Punch orKick combos cover some good distance whilerunning. The third button press is a littledifferent, however. Pressing I or O a thirdtime while running shoots you directly forwardinstead of up.
GlidingIn midjump, hold U to begin Gliding. Use theanalog thumb pad to control your direction.Aim your fists at an enemy or obstacle toattack them. Be careful not to touch the enemyor obstacle with any other part of your body oryou’ll take damage. Release U to drop down.Press U again before hitting the ground if youwish to continue Gliding.
DigTo find some of the more wellhidden items, you must Dig.Find Knuckles’s Shovel Claw andRouge’s Pick Nails beforeattempting to Dig. To Dig forpossibly valuable treasure, press p,select Dig, then press I or O. Youcan also Dig by pressing I or O in midjump. Whenclimbing walls, try I or O. Most walls are soft enough to Dig into.
Climb WallBoth Knuckles and Rouge have the ability toClimb most walls. They will automatically grabonto nearby walls during Jumps or Glides. Notethat while climbing, you can Dig into most walls.
Air Necklace(Knuckles Only)The Air Necklace literally gives Knuckles airto breathe. Once you find it, Knuckles canstay underwater indefinitely. No need forany special button presses; the AirNecklace works automatically.
Spiral Upper or Screw KickRotate the analog thumb pad in a circle and then press the i or obutton. Rouge or Knuckles will perform an uppercut, enabling them toget containers above them in midair.

primagames.com
Sunglasses and Treasure ScopeHidden in their respective Stages are Knuckles’sSunglasses and Rouge’s Treasure Scope. Whenfound and accessed through the Action Window,these power-ups give their owners specialsight. With these on, you can see items andtreasure that weren’t visible before. In HardMode, more Hint Boxes are also available. Totake off the Sunglasses or Scope,simply Jump.
SwimmingBoth of the treasure hunters need to take a dipevery now and then. Jump in the water andpress and hold I to dive. As soon as you let goof I, you’ll begin to rise. To rise quickly, pressand hold U.
7
MOVES AND PERMANENT POWER-UPS
Character Power-Up Stage Special Requirements ActionSonic Magic Gloves 1: City Escape Bounce Attack, Flame Ring Captures enemies in hand-held bubbleSonic Light Shoes 4: Metal Harbor — Enables Light Dash abilitySonic Ancient Light 5: Green Forest — Attacks multiple enemiesSonic Bounce Bracelet 11: Pyramid Cave — Allows greater height in attacksSonic Flame Ring 15: Crazy Gadget — Breaks Steel ContainersSonic Mystic Melody 16: Final Rush — Plays Mystic Melody to activate Ancient RuinShadow Flame Ring 4: Radical Highway Air Shoes Breaks Steel ContainersShadow Air Shoes 9: White Jungle — Enables Light Dash abilityShadow Ancient Light 11: Sky Rail — Attacks multiple enemiesShadow Mystic Melody 14: Final Chase — Plays Mystic Melody to activate Ancient RuinKnuckles Mystic Melody 2: Wild Canyon Shovel Claw Plays Mystic Melody to activate Ancient RuinKnuckles Shovel Claw 6: Pumpkin Hill — Enables DiggingKnuckles Air Necklace 8: Aquatic Mine — Allows Knuckles to breathe underwaterKnuckles Hammer Gloves 12: Death Chamber — Breaks Steel ContainersKnuckles Sunglasses 14: Meteor Herd Hammer Gloves Enables special visionRouge Mystic Melody 2: Dry Lagoon Pick Nails Plays Mystic Melody to activate Ancient RuinRouge Pick Nails 5: Egg Quarters — Enables DiggingRouge Treasure Scope 8: Security Hall Mystic Melody, Iron Boots Enables special visionRouge Iron Boots 12: Mad Space — Breaks Steel ContainersTails Laser Blaster 3: Prison Lane Bazooka Increased rate of fireTails Booster 7: Mission Street — Travel longer distances in the airTails Mystic Melody 10: Hidden Base Bazooka Plays Mystic Melody to activate Ancient RuinTails Bazooka 13: Eternal Engine — Breaks Steel ContainersDr. Eggman Jet Engine 6: Lost Colony — Enables HoveringDr. Eggman Large Cannon 7: Weapons Bed — Breaks Steel ContainersDr. Eggman Laser Blaster 1: Iron Gate Bazooka Increased rate of fireDr. Eggman Mystic Melody 3: Sand Ocean Jet Engine Plays Mystic Melody to activate Ancient RuinDr. Eggman Protection Armor 13: Cosmic Wall — Increases Health
Permanent Power-Up Effects and Locations

Prima’s Official Strategy Guide
8
Every game has a learning curve. Sonic Adventure 2 is a big game, so the curve can be a little steep. Don’t worry,though; we’re here to help. This chapter goes over some of the important information that will help you understand thegame better. Read this section to get an idea of what’s going on around you as you play.
Game BasicsGame Basics
OmochaoThese little wind-up Chao are full ofgood advice. Bump into them and they’llactivate. If you see one around, it maymean that you’re about to encountersomething new. Similarily, if youencounter something new and baffling,look for an Omochao to explain it to you.
RingsRings can be found in just about everyStage of Sonic Adventure 2. They actas a buffer against attacks from enemies.When you are hit by a foe, you’ll bounceback and lose your rings, but you won’tlose a life. If you are hit when you don’thave any rings, you will lose a life and besent back to the last Point Marker you hit.
So, when you get thumped andyour rings scatter, make sure you pick upat least one. Also note that you can onlyrecover a maximum of 20 rings whenthey’ve been scattered, so even if youhad 150 rings, you may recover only 20of them if you get bonked.
Finally, for every 100 rings youcollect you’ll receive an extra life. Make aneffort to grab them as you go through the levels.
CamerasThe camera views are ever changing togive you a view of the area and yourcharacter. You have some limited controlby using the R and L triggers toswing it around. Use the triggers to getaround any obstruction.
Game ConventionsSaves and RestartingPoint Markers save your progress up to that point in the Stage. If you lose a life—and still have lives left—you’ll reappear at the last Point Marker you hit with no rings. If youhave no lives left and are hit, you'll exit the Stage.
The Action WindowWhen your character has skills and power-ups, you can perform manydifferent actions. When you want to scroll through the actions you canperform, press P to make the Action Window appear in the upper-rightcorner. When it shows the action you want, press I or o to do it.
EmblemsThe Sonic Emblems are tokens youcollect for finishing various tasks. Youcan earn 180 Emblems. The bulk of themare awarded for completing thedifferent missions for each of theStages. You can also earn them for ChaoRaces.
Mission RanksWhen you start playing the differentmissions in the Stage Select area (seefarther along in this section), you’ll beable to earn ranks for each mission.Various criteria—time, number ofpoints gained, etc.—determine thegrade of performance, from A (highest) toE (lowest).
Earning all 180 Emblems is a difficult task, but thereward is worth it. You’ll be able to access a new area.

GAME BASICS
primagames.com
9
StoryWhen you first start the game you have a choice of playing the Hero side of thestory or the Dark side. You can choose either to start. Once you complete bothsides, who knows what may happen?
Stage SelectWhen you’ve finished a Stage in Story Mode you can replay it in Stage Select, where you earn ranks and Emblemsby playing the missions. Each Stage has five missions. Defeating one will open the next one. You can replay themas many times as it takes.
Notice that there’s an entrance to the Chao Gardens as well as a mysterious island on the Stage Select map.Interesting, isn’t it?
ModesWe’ll cover two modes here—the two that likely will consume most of your time.
1 City Escape Sonic 18000 14000 11000 9000 1:20 1:40 2:00 2:30 2:30 2:50 3:10 4:00 18000 16000 14000 12000 3:00 19000 15000 12000 10000
2 Wild Canyon Knuckles 16000 14000 10000 8000 1:30 2:00 3:00 4:30 0:40 1:00 2:00 2:30 16000 14000 10000 8000 2:00 17000 15000 10000 8000
3 Prison Lane Tails 26000 23000 17000 13000 2:30 3:00 3:30 4:00 2:00 2:30 3:00 4:00 26000 23000 17000 13000 3:00 26000 23000 17000 13000
4 Metal Harbor Sonic 20000 18000 16000 14000 1:10 1:20 1:30 1:50 0:50 1:00 1:10 1:20 18000 16000 14000 12000 2:00 18000 16000 14000 12000
5 Green Forest Sonic 15000 13000 12000 9000 2:30 3:00 3:30 4:00 1:30 2:00 2:30 3:00 12000 10000 9000 7000 4:00 12000 10000 9000 8000
6 Pumpkin Hill Knuckles 12000 10000 8000 6000 3:00 3:30 4:00 5:00 1:00 1:30 2:00 3:00 13000 11000 9000 7000 3:00 16000 14000 12000 10000
7 Mission Street Tails 25000 22000 17000 13000 3:30 4:00 4:30 5:00 3:20 3:40 4:00 5:00 22000 20000 18000 15000 3:30 30000 26000 22000 18000
8 Aquatic Mine Knuckles 14000 11000 10000 9000 1:50 2:30 3:00 4:00 1:00 1:30 2:30 4:00 14000 12000 10000 8000 3:30 15000 13000 10000 9000
10 Hidden Base Tails 14000 12000 11000 10000 3:15 3:30 4:00 4:30 2:50 3:15 4:00 4:30 12000 11000 10000 8000 3:30 13000 11000 9000 8000
11 Pyramid Cave Sonic 15000 13000 11000 10000 1:30 1:45 2:00 3:00 3:45 4:00 4:15 4:30 13000 11000 9000 8000 4:00 14000 13000 11000 9000
12 Death Chamber Knuckles 12000 10000 8000 6000 2:30 3:00 3:30 4:30 2:00 2:30 3:00 4:00 12000 10000 8000 6000 5:00 12000 11000 10000 8000
13 Eternal Engine Tails 35000 30000 25000 20000 3:30 4:00 5:00 6:00 2:45 3:00 3:30 4:00 30000 28000 25000 20000 5:00 35000 30000 25000 20000
14 Meteor Herd Knuckles 13000 12000 11000 8000 2:00 3:00 4:00 5:00 1:30 2:30 3:30 5:00 14000 13000 11000 9000 4:30 13000 11000 10000 7000
15 Crazy Gadget Sonic 17000 15000 12000 10000 3:00 3:30 4:00 4:30 5:00 5:30 6:00 7:00 16000 15000 14000 12000 5:00 15000 13000 11000 9000
16 Final Rush Sonic 13000 11000 10000 9000 1:30 1:45 2:30 3:00 4:30 4:45 5:00 5:30 13000 12000 10000 8000 5:00 13000 12000 10000 9000
Stage No. and Name Character Mission 1 Ranks Mission 2 Ranks (Rings) Mission 3 Ranks (Chao) Mission 4 Ranks (Time) Mission 5 Ranks
A B C D A B C D A B C D A B C D Limit A B C D
Hero Rank Requirements
Stage Ranks
Here’s a table of the requirements necessary to earn thedifferent ranks in the missions. It shows the minimum scoresyou need to get an A, B, C, or D rank. Any score below D levelwill get you an E ranking.
Tails and Rouge’sdriving Stages arelisted at the bottom, sincethe ranks are all based ontime for each mission.

Prima’s Official Strategy Guide
BalloonsBalloons contain hidden Items. Break them to receiveyour prize. You may need a boost to grab them, so lookaround for a Spring or a Swing Bar to help you reach it.
Bombs
Found in Item Boxes, the Bomb immediately destroys allsurrounding enemies. It’s a good item to run into whenthe area is crawling with robots.
Chaos DrivesThe shards found in vials are Chaos Drives. Theycome in several colors and can be used in theraising of your Chao. See the section on Chaolater in this guide for more information.
Extra LivesA staple of video gaming since the early days, this pick-up has remained relatively unchanged to this very day. Itis the Holy Grail of pick-ups; finding one gives you thatmuch-needed extra chance to make a crucial jump ordestroy a difficult opponent. Viva la Extra Life!
HealthAs Tails and Dr. Eggman take damage, their health metersfall. When the meter hits zero the character is destroyed.Finding Health will fully restore their health meters.
Item BoxesDestroying Item Boxes gives you the Item inside. Theyare all over the Stages, some obvious, some hidden. Youcan get several different Items from the Item Boxes:everything from rings to Shields.
1 Iron Gate Eggman 20000 18000 16000 14000 1:35 1:45 2:00 2:30 2:00 2:15 2:30 3:00 20000 18000 16000 14000 4:00 19000 17000 15000 12000
2 Dry Lagoon Rouge 15000 12000 10000 8000 2:00 2:30 3:30 4:30 0:40 0:50 1:30 2:30 14000 12000 10000 8000 3:30 17000 15000 12000 10000
3 Sand Ocean Eggman 25000 23000 20000 18000 3:30 4:00 4:30 5:00 3:00 3:30 4:00 4:30 25000 23000 20000 18000 4:00 23000 20000 18000 13000
4 Radical Highway Shadow 14000 11000 8000 6000 1:20 1:40 2:00 2:30 2:30 2:45 3:00 3:30 14000 12000 10000 8000 3:00 16000 14000 12000 10000
5 Egg Quarters Rouge 12000 10000 8000 6000 2:00 2:30 3:00 4:00 1:00 1:30 2:00 3:00 13000 12000 10000 8000 3:00 13000 12000 10000 8000
6 Lost Colony Eggman 34000 30000 26000 22000 2:00 2:30 3:00 4:00 2:30 2:45 3:00 3:30 34000 30000 26000 22000 3:30 44000 40000 35000 30000
7 Weapons Bed Eggman 30000 28000 25000 20000 2:00 2:15 2:45 3:30 2:15 2:30 3:00 3:30 30000 28000 25000 20000 2:45 30000 28000 24000 15000
8 Security Hall Rouge 12000 10000 8000 6000 4:00 4:30 5:00 5:30 0:30 1:00 2:00 3:00 13000 12000 10000 8000 3:30 16000 15000 13000 10000
9 White Jungle Shadow 14000 12000 10000 8000 1:30 2:00 2:30 3:00 3:20 3:40 4:00 5:00 14000 13000 12000 10000 3:00 13000 12000 10000 8000
11 Sky Rail Shadow 14000 13000 11000 9000 1:15 1:45 2:15 2:30 1:10 1:30 1:45 2:00 14000 12000 10000 8000 2:00 10000 9000 8000 7000
12 Mad Space Rouge 14000 12000 10000 8000 2:30 3:00 4:30 5:00 1:30 2:00 4:00 5:00 14000 12000 10000 8000 4:30 12000 10000 8000 6000
13 Cosmic Wall Eggman 53000 45000 30000 15000 1:30 1:45 2:00 3:00 1:30 1:45 2:00 2:30 45000 40000 35000 30000 8:00 50000 45000 40000 30000
14 Final Chase Shadow 12000 11000 10000 8000 1:30 1:45 2:00 2:30 5:15 5:30 6:00 6:30 11000 10000 9000 8000 5:30 10000 9000 8000 7000
Stage No. and Name Character Mission 1 Ranks Mission 2 Ranks (Rings) Mission 3 Ranks (Chao) Mission 4 Ranks (Time) Mission 5 Ranks
A B C D A B C D A B C D A B C D Limit A B C D
DARK Rank Requirements
Stage No. and Name Character Mission 1 Ranks Mission 2 Ranks (Rings) Mission 3 Ranks (Chao) Mission 4 Ranks (Time) Mission 5 Ranks
A B C D A B C D A B C D A B C D Limit A B C D
DRIVING STAGE Rank Requirements
1 Route 101 Tails 2:45 2:55 3:15 3:30 1:30 2:00 2:30 3:00 3:00 3:10 3:20 3:30 3:00 3:10 3:20 3:30 — 2:50 3:00 3:10 3:20
2 Route 280 Rouge 3:20 3:30 3:40 3:50 2:00 2:30 3:00 3:30 3:30 3:40 3:50 4:00 3:45 3:50 3:55 4:00 — 3:20 3:30 3:40 3:50
Cannon’s Core All 29000 27000 25000 20000 3:30 4:00 4:30 5:30 7:30 8:00 8:30 9:00 29000 27000 25000 20000 7:00 29000 27000 25000 20000
Stage No. and Name Character Mission 1 Ranks Mission 2 Ranks (Rings) Mission 3 Ranks (Chao) Mission 4 Ranks (Time) Mission 5 Ranks
A B C D A B C D A B C D A B C D Limit A B C D
CANNON’S CORE RANK Requirements
Many things in Sonic Adventure 2 can help you through the Stages. Some are interactive—that is, you have to actuallyuse them (see the Interactive Objects section)—while others activate automatically when encountered. This section dealswith the non-interactive Items that benefit you within the levels.
ITEMSItems
10
ITEMS
primagames.com
11
Power-up PlatformsMove within the green aura for a character power-up. These areworth every effort to find. The power-ups in the circle arepermanent.
RingsAll characters benefit from collecting rings. Doing so adds to their Stage
score, but more importantly, awards an Extra Life for every 100 ringscollected. Collecting rings also slowly refills Tails’s and Dr. Eggman’s
health meters. Furthermore, collecting a ring from an Item Boxadds a multiple number of rings to your total (the number added isshown below the ring).
Shields
All Shields bestow a limited amount of protection upon the wearer. Be aware that Shield effects are not compounded. For example, if you pick up the Magnetic Shield andthen immediately pick up the Invincibility Shield, the magnetic effect is replaced by theinvincibility effect.
InvincibilityAs you may have guessed, this Shield grants your character invincibilityfor a short time. Being hit throughout the duration of this power-up willnot deprive you of rings, nor will it remove any health from your healthmeter. Plus, if you so much as touch an enemy, it will be destroyed.
MagneticA sphere of magnetic energy engulfs your character when possessingthis Shield. The sphere attracts nearby rings, so you can collect themwithout actually moving through them. It also acts as a shield, allowingyour character to take an enemy hit without any loss of rings. The spheredisappears if you are hit or if you pick up a different Shield.
ProtectiveThe most basic Shield, this one grants your character one opportunity toabsorb an enemy hit without losing rings or health. It will remain in effect until a hit is taken.
Small Animals
These little creatures can be found throughout the Stages. Pick them up and bring them to the ChaoGarden to give to your Chao. Collecting all the small animals in a Stage will earn you an Extra Life.
Speed ShoesThese grant the wearer extra speed. Speed Shoes can help you outrace pesky enemies, or just getacross the goal faster.
Prima’s Official Strategy Guide
Ancient RuinAncient Ruins hold many ancient secrets. Whenyou find one, something is probably hiddennearby. You must play your Mystic Melody toactivate the Ancient Ruin.
Dash PanelsDash Panels give you a little boost when you needit most. Just touch the panels and you'll high-tailit along the path with more speed in your step.
Goal RingsWhat better way to end a Stage than to find agiant gold ring? Just touch the Goal Ring to endthe Stage.
HourglassesFound in Sonic’s Pyramid Cave Stage and DeathChamber, Hourglasses can be used to open doors.Flip an Hourglass by jumping on it or hitting it.After it flips over, a door will open. Hurry throughthe doorway; as the sand falls through theHourglass, the door slowly closes.
Jump PlatesJump Plates let you leap over large gaps. Justtouch it and away you go.
MissilesMissiles are great for breaking objects that blockyour path. Find the Missile and step on the greenbutton behind it. This launches the Missile andclears the way for you.
PipesAs you play through the game keep an eye out forPipes. Stand in front of the bent white Pipes andwhistle by pressing I. A cuddly little animal popsout for you to collect. If you collect all the hiddenanimals on a mission you get an extra life.
Point MarkersPoint Markers can be your best friends. Just walkthrough the marker to activate it. If you happen tobite the dust somewhere in the Stage—and haveExtra Lives—you’ll restart at the last PointMarker you activated rather than at the beginningof the Stage.
PulleysUse the Pulley to access high areas. Stand beneaththe red handle and jump straight up. Look on theground for a small, circular shadow to make sureyou’re underneath the handle. Stand on theshadow and jump. You'll be pulled up (hence thename “Pulley,” get it?).
RocketsPlan on a long journey after you find a Rocket.Touch the Rocket and your character will grab thehandle and blast off. You automatically let go whenyou reach the intended destination. Enjoy the ride,but don't expect any peanuts on this flight.
SpringsSprings work just like a trampoline. Touch them tobounce high in the air. Springs may help youaccess some hard-to-reach areas or other inter-active objects. You’ll find both individual pads androws of pads.
Throughout the game, you’ll find several types of interactive objects to help you in your mission. Some objects arespecific to certain characters and can be found only in certain Stages. Other, more general, objects appear on multipleStages and can be used by a number of different characters. Keep an eye out for all of the interactive objects;sometimes they are crucial to passing a Stage.
General Objects
INTERACTIVE OBJECTSINTERACTIVE OBJECTS
You can only whistle into the Pipe after the option todo so appears at the top right-hand corner of yourscreen. You won’t be able to whistle into the Pipe again afteryou’ve collected the hidden animal.
12

primagames.com
13
SwitchesThese Switches look like little balloons. Bumpinto the Switch to activate it and it’ll turn brightwhite. Now look around to see what it activated,such as opening a locked door or making aRocket available.
Time SwitchesWalk over or shoot these switches and timestops for a short period of time.
WeightsThese Weights can hurt a lot. Don’t be caughtunder them when they come crashing down.Sometimes you can stop Weights by activating aswitch. Other times you can climb atop them andride to higher areas.
Do not attempt tochange Rails while crouchingor while you’re on a sharpcurve. You could end upflinging your hedgehog offinto space.
High-Speed Warp TubesThese tubes take you to faraway places. JumpDash to break the glass covering the entrance,then jump in. Away you go!
RailsRails are everywhere for Sonic and Shadow. Justjump on the Rail to start sliding. Crouch using Ito go faster. To go up vertical Rails, use yourHoming Attack. To move to a Rail that’s next to theone you’re on, push in the direction you want togo and tap U. Sonic and Shadow will hop overwithout slowing down.
Ramps Use the Ramp to catch some major air. Raceforward as fast as you can and press U whenyou near the end of the Ramp. If you hit the Rampwith the right amount of speed and press U atthe right time, you’ll flip and spin through the air,earning a better rating.
Rubber VinesRubber Vines help you reach distant areas. Runup and touch the handle to slingshot yourself toyour destination. Who knew vines were soelastic?
Swing BarsJump up and grab the Swing Bar to startswinging around and around. Watch for the redstreak as you spin. Press U when the streak ispresent and you’ll go flying off. If you don’t pressU at the right time, you’ll let go of the Swing Barand fall straight down.
Swing VinesYou hedgehog, but where Jane? After you grabthe vine, just relax. You’ll swing around and bedropped off at the place you want to go.
Specific Objects forSonic or Shadow
It may not be obvious what the Switch actually activates.Sometimes the Switch is out of sight of the thing it affects.
Bungie VinePress and hold down the u button and you’llbungie farther and flip off for a better rating.
Gate Key DoorsSome doors require a special key to open. Toopen the Gate Key Door, you need a…Gate Key.This Key is always handily located near a GateKey Door. Find the Key and place it on thepedestal near the door to open it.
Gravity ControlSwitchesHave you ever wanted to walk on the ceiling? TheGravity Control Switches change the gravity ofthe Stage. Stand on the triangle and press I toactivate it.
INTERACTIVE OBJECTS

Prima’s Official Strategy Guide
14
Hint BoxesHaving problems finding the missing pieces of theMaster Emerald or some missing Keys? Check outthe Hint Boxes to learn some helpful clues. Standin front of the Boxes and press I to get theinformation you need. These are crucial to findingthe treasure quickly.
MeteorechThose Meteorech are huge! Get behind them andpush them by using I. Push the Meteorech intoboxes or doors to destroy either.
The Hint Boxes give three clues for each piece of Emerald. In otherwords, after you get three clues, the Boxes shut down until you findthe Emerald piece they lead you to. After you’ve found that piece, theyreactivate and give three more clues leading to the next piece.
SafesSafes can contain hidden treasures. First find aswitch to unlock the Safes. Then climb to theflashing symbol on the middle of the Safe youwant to open. Press I and you’re in.
Stone HeadsThose Stone Heads look heavy, but don't worry,they’re not too heavy for you. Grab them bypressing O and then push or pull them along thetracks so you can dig under them. You might findShards of the Master Emerald.
TurtlesTurtles might be slow, but they can get you whereyou need to go. Press I to ride them or grab onto them. It’s a shell of a way to travel!
Warp WallsSome Walls have hidden items behind them. Jumpon the Wall and climb over to the oval shape. Digby pressing I, and you can go through the wall.
Specific Objects for Knuckles or Rouge
Dynamite PacksIs the path ahead too high for you to reach? Not a problem. Shoot the Dynamite packs attached towalls to bring the path down to your level.
ElevatorsElevators take you where you want to go. Hop on and enjoy the ride. Don’t get too comfortable,though; there may be enemies to shoot along the way.
LocksDon’t have Keys to those huge doors? No problem.Just shoot the four red door Locks to blow themwide open. Who needs a Key anyway?
Mini-LiftsTails and Dr. Eggman can’t jump very high. Luckily,there are Mini-lifts around to give you a boost.Just jump on them and away you go. You don’teven have to listen to elevator music.
TanksDon’t be afraid of the Tanks. They might make abig explosion after you fire at them, but theywon't hurt you. After they’ve blown up, you canjump on the remaining scrap metal to reachhigher places.
Specific Objects for Tails or Dr. EGGMAN
15
INTERACTIVE OBJECTS
primagames.com
Boxes and Containers
CagesCages usually contain imprisoned animals thatneed to be freed. One way to do so is to locate anearby Missile and fire it at the Cage. Thisdestroys the Cage while leaving the animalunharmed. The Cages can also be broken with aBomb thrown by a Kiki.
Chao Containers Three of these exist in every Stage. The first youfind and destroy will contain the Chao Key. Theother two will contain animals.
Steel ContainersHarder to destroy than their wooden counterparts,Steel Containers require a specific power-up to doso. (For a list of all power-ups, including thoserequired to destroy Steel Containers, see thepower-up information in the Moves section).
Unbreakable ContainersThese dark gray Containers are indestructible butcan be used as stepping stones to help you moveto otherwise unreachable areas.
Wooden ContainersThe standard Wooden Container. All charactershave enough strength to break these from thebeginning of the game.
MiscellaneousContainersYou’ll find other types of boxesthroughout your adventure.Destroy them all to uncover any
objects they may contain.
Items to DestroyDestroying certain items can uncover hidden objects or reveal hidden pathways. Most of theseitems can be destroyed by any of the characters from the very beginning of the game.Sometimes, Stage-ending objects are hidden underneath these items; destroy them if you can'tproceed any farther on a Stage to see what you might find.
Destructible ItemsThere are many destructible items scattered throughout the game.These items are easily destroyed and may contain hidden objects. Hit,kick, or shoot these items to find out what they hide.
• Barrels • Pots• Canisters • Strange-looking cubes• Chests • Strange-looking walls• Cylinders • Tanks• Overturned mine carts • Towers
Items to Pick UpCertain small items can be lifted to reveal hidden animalsand/or used as weapons. Press I to lift the item and revealany hidden animals underneath. When you have the Itemin your hands, you can use it as a weapon. Jump bypressing U and then throw by pressing I. The Item willdestroy almost any enemy it hits.
• Cubes • Mushrooms• Golden Masks • Pyramids • Hard Hats • Skulls

Prima’s Official Strategy Guide
16
Sonic, Shadow, Knuckles, and Rouge can attack them when the shield isup. Use the Somersault if you’re Sonic or Shadow, and get behind themto attack if you’re either of the treasure hunters.
All Beetle Series robots can be used as stepping stones bySonic and Shadow. As long as there’s a line of them, youcan use the Homing Attack to get from one to the next.
Beetle SeriesThese ‘bots seem to be everywhere. Many of the Beetleseries robots can help you along your journey by gettingyou to otherwise unreachable areas. Just Homing Attackfrom one to the next.
Not all of the robots are so friendly, though. Several ofthe Beetles have guns aimed in your direction. Take themout quickly before they can damage you and rob you ofyour rings. Some even drop Bombs on your head. Watch theskies and stay clear of any Bombs that land at your feet.
In addition, the Spark Beetles have electric shields. Aftera few seconds, the shield disappears, giving you a windowof opportunity to attack. Beware though, the shield willreturn shortly.
ENEMIESENEMIES
Gold BeetleWhat's the deal with these Gold robots? They appearout of thin air and disappear just as quickly. The goodnews is that they don't shoot at you and you can destroythem just by hitting them. You better take them out justto be on the safe side…and to earn 1,000 points towardyour rank.
Mono Beetle, 100 pts.
Gun Beetle, 100 pts.
Bomb Beetle, 100 pts.
Gun Wing, 500 pts.
Bomb Wing, 500 pts.
Spark Beetle, 100 pts.
Spring Beetle, 100 pts.
Gold Beetle, 1000 pts
Hunter SeriesHunters are common enemies throughout the game. Theyhave only one gun and are fairly easy to destroy. Just besure to get to them before they get to you and be aware ofthe protective shields that they carry to guard against yourattacks. While playing Tails or Dr. Eggman, use your Lock-onMissle and hold I until the ‘bot moves the shield to take a shotat you, then attack before they can bring their guns to bear.
Gun Hunter, 100 pts.
Laser Hunter, 100 pts.
Shield Hunter, 200 pts.
Rhino SeriesThe Rhinos are tank-like vehicles. For the most part they moveslowly. After they see you, though, expect a burst of speed.
The Rhino Spike, with it’s protective spikes on top, demandsthat you hit it low. If you don’t, you’ll lose your rings for sure.
Rhino Jet, 100 pts.
Rhino Cannon, 100 pts.
Rhino Spike, 100 pts.
Rhino Metal, 100 pts.
Fighter SeriesKeep an eye on the horizon for low-flying Blue Eagle jetsthat like to drop Missiles on your head. Avoid running intothe small blast radius of the Bombs, and you should be justfine. Jump Attack when a Blue Eagle is overhead and youcan mark another downed bogey on your belt.
It can be hazardous to attack the Blue Eagles. They areworth a good deal of points, but if you use a Homing Attack, youcould end up dunking in the water and losing a life.
Blue Eagle, 500 pts.

ENEMIES
17
primagames.com
Hawk SeriesAnother common enemy, the Hawks are flying robots withguns. The Sky Hawks in particular like to drop out of the skyand crush you with their spikes. Plus, when they’re not tryingto poke you, they’re shooting at you. Destroy them beforethey cause any serious damage.
Laser Hawk robots swoop down and strafe you. Dodgeout of their path and you’ll survive.
Gun Hawk, 200 pts.
Laser Hawk, 200 pts.
Gun Hawk, 200 pts.
Sky Hawk, 500 pts.
Hornet SeriesThere are also flying robots with Homing Missiles, the Hornetseries. If you don’t destroy them quickly, they launch abarrage of flying Bombs. Hit the center of the robot todestroy it and any Missiles that it might have launched. Onceit has fired, it’s helpless, so use that time to attack it.
If you’re playing Tails or Dr. Eggman, make sure youLock-on to the central body of the Hornet. If you just hit oneof the Bombs, the others will still be able to get you.
ArtificialChaos SeriesThese watery ‘bots are GUN’s attempt to make their ownChaos monsters (like the one in Sonic Adventure). Some ofthe toughest enemies you’ll face, you can’t hurt the guardtypes when they’re crouched down. Wait until they poptheir heads up, then aim for their noggin to take them out.
The most dangerous attacks are when the Chaos robotsreach out to hit you with tendril-like arms. They’ll home inon you first and then take a whack.
The floating type are fairly easy to destroy. When yousee their big, hulking forms approaching, go on theoffense. They’ll pop after a hit to the head. Beware, though,some of them use the tendril attack as well.
Hornet-3, 100 pts.
Hornet-6, 200 pts.
Hornet-9, 300 pts.
Laser Hornet, 100 pts.
Phoenix, 100 pts.
It’s easiest to go for the headwith a Homing Attack whenplaying as Sonic or Shadow. Tails andDr. Eggman can target the headeasily. Knuckles and Rouge, however,should try to Glide into the creatures.
Ghost SeriesBe careful when you enter haunted areas. These places arecrawling with Ghosts. Some Ghosts try to scare you, some tryto grab you, and some try to hurt you. Overall it's just goodsense to avoid any Ghosts you see.
Boo (normal), 0 pts.
Boo (attack), 100 pts.
Boom Boo, 300 pts.
Ghosts may try to grab you when there’s a robot nearby thatwants to shoot you. If the phantom grabs hold, you’ll be asitting duck. Go after the robot first.
Artificial Chaos P-100During the adventure, you’ll also find the Artificial ChaosP-100. It looks like a floating type, but releases a ton oflittle Cells that can hurt you. You can Jump Attack on theCells to destroy them, but your best bet is to go straightfor the original robot’s head, floating above. When thehead is destroyed, the Cells explode.
Cell, 10 pts.
Artificial Chaos P-100, 200 pts.
Artificial Chaos P-1, 200 pts.
Float Type, 200 pts.
Guard Type, 200 pts.

Prima’s Official Strategy Guide
18
Where do you want to begin?With the Hero side or the Darkside of the story?
On this Stage, Missions 1 and 2have been completed, soMission 3 is available.
After you choose, you’ll begin playing. You’ll controlvarious characters as they clear the Stages, and the story willunfold in the cutscenes between Stages.
After you’ve finished a Stage in Story Mode, it becomesavailable in Stage Select Mode. Go to Stage Select, andyou’ll see character icons on a map. Highlight an icon andpress U to select it. Five slots appear under the name of theStage. Each slot represents a mission. You cannot play amission until you have completed the one before it.
To use this book effectively, you must first understand a fewthings about the game. When you start playing a brand-newgame, begin with the Story section. Choose Story from the1P Play menu, then select Story Mode.
You’ll be given two choices: Hero or Dark. While you’lleventually have to play both, you are initially given a choiceof where to start.
When you play amission in Stage Select,you’ll be ranked based onpoints. Points are earnedthrough collecting rings,defeating enemies,completing the objectivequickly, pulling off tricks,and various other factors.
Some missions only award ranks based on one criteria,such as time.
Eggman’sRobot SeriesThe Dr. Eggman robots, some of which look awfully familiar,all have animals in them instead of Chaos Drives like theGUN robots.
E-1000Have you seen these robots someplace before? Whenthe E-1000 robot starts shooting, be sure to get out ofthe way. They have double cannons that can do majordamage. Destroy them quickly.
E-1000, 200 pts.
UnidusBe careful when you’re close to Unidus. Smaller spikeballs circle a larger spike ball and will hurt you (surprise)if you touch them. You can’t hurt the circling spike balls,so attack the central one as it moves around on theground. Hit its center, and the Unidus is history.
GolaGola are similar to Unidus but have flames instead ofspikes. Hit the center of the ‘bot to destroy it.
KikiBad monkey! The Kiki are monkey-like robots that flingBombs at you. The Bombs detonate as soon as they hityou or after a short amount of time. So, you can pickthem up. As soon as you do, the timer stops and you cantransport them safely. This will be important to Knucklesand Rouge.
Unidus, 100 pts.
Gola, 100 pts.
Kiki, 100 pts.
BossesThere are many bosses scatteredthroughout the game. Consult thewalkthrough to find the best wayto defeat each boss.
USING THIS BOOKUSING THIS BOOK
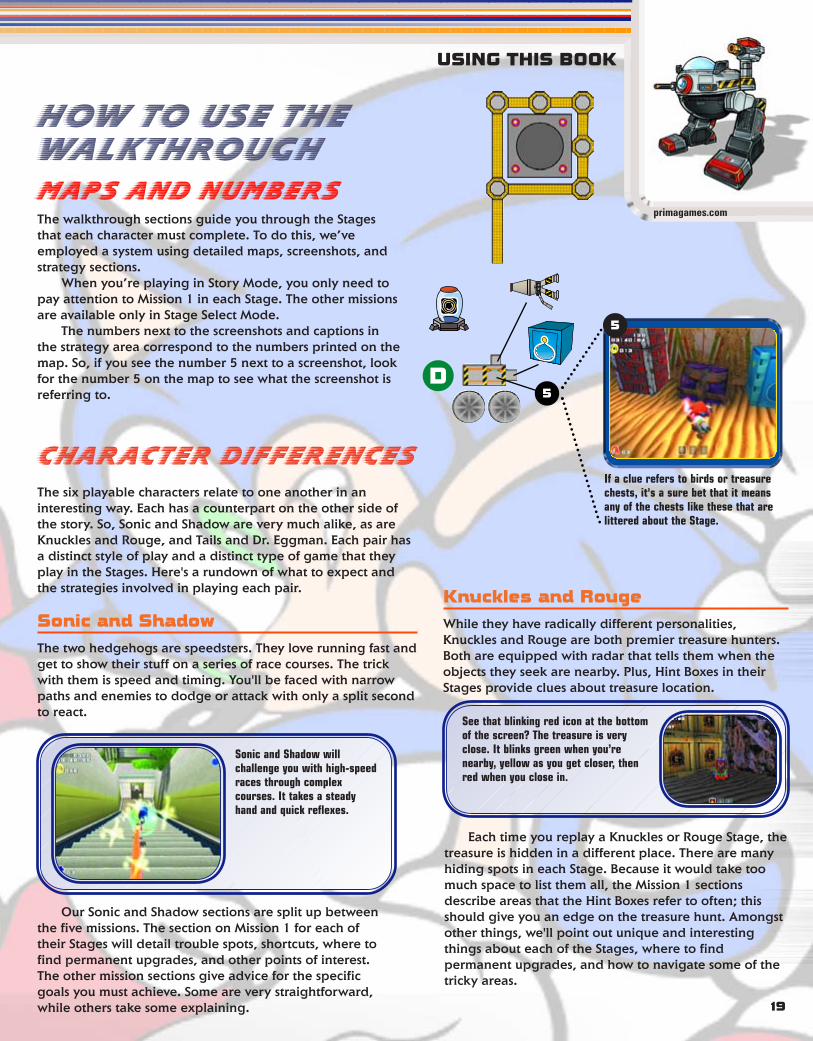
USING THIS BOOK
primagames.com
How to Use theWalkthroughMaps and NumbersThe walkthrough sections guide you through the Stagesthat each character must complete. To do this, we’veemployed a system using detailed maps, screenshots, andstrategy sections.
When you’re playing in Story Mode, you only need topay attention to Mission 1 in each Stage. The other missionsare available only in Stage Select Mode.
The numbers next to the screenshots and captions inthe strategy area correspond to the numbers printed on themap. So, if you see the number 5 next to a screenshot, lookfor the number 5 on the map to see what the screenshot isreferring to.
If a clue refers to birds or treasurechests, it's a sure bet that it meansany of the chests like these that arelittered about the Stage.
5
Character DifferencesThe six playable characters relate to one another in aninteresting way. Each has a counterpart on the other side ofthe story. So, Sonic and Shadow are very much alike, as areKnuckles and Rouge, and Tails and Dr. Eggman. Each pair hasa distinct style of play and a distinct type of game that theyplay in the Stages. Here's a rundown of what to expect andthe strategies involved in playing each pair.
Sonic and Shadow
The two hedgehogs are speedsters. They love running fast andget to show their stuff on a series of race courses. The trickwith them is speed and timing. You'll be faced with narrowpaths and enemies to dodge or attack with only a split secondto react.
Sonic and Shadow willchallenge you with high-speedraces through complexcourses. It takes a steadyhand and quick reflexes.
Our Sonic and Shadow sections are split up betweenthe five missions. The section on Mission 1 for each oftheir Stages will detail trouble spots, shortcuts, where tofind permanent upgrades, and other points of interest.The other mission sections give advice for the specificgoals you must achieve. Some are very straightforward,while others take some explaining. 19
See that blinking red icon at the bottomof the screen? The treasure is veryclose. It blinks green when you’renearby, yellow as you get closer, thenred when you close in.
Knuckles and Rouge
While they have radically different personalities,Knuckles and Rouge are both premier treasure hunters.Both are equipped with radar that tells them when theobjects they seek are nearby. Plus, Hint Boxes in theirStages provide clues about treasure location.
Each time you replay a Knuckles or Rouge Stage, thetreasure is hidden in a different place. There are manyhiding spots in each Stage. Because it would take toomuch space to list them all, the Mission 1 sectionsdescribe areas that the Hint Boxes refer to often; thisshould give you an edge on the treasure hunt. Amongstother things, we'll point out unique and interestingthings about each of the Stages, where to findpermanent upgrades, and how to navigate some of thetricky areas.
D5

Prima’s Official Strategy Guide
20
The walkthrough sections for the Tails and EggmanStages point out the main tricks and traps you can fall into.They will also show the locations of permanent upgradesand other places of interest. The other mission sections giveadvice on how to achieve the goals and pass the missions.
A Note AboutHard ModeEach Stage has a fifthmission that asks you toClear Hard Mode. Often theplacement of items,enemies, platforms, andother architecture is verydifferent from the othermissions. Our strategiesgive you the lowdown onseveral of the moredrastic and dangerouschanges that havebeen made, but be onyour toes throughoutthe mission; surprises lurkaround every corner.
Tails and Dr. Eggman
These two are the brains of their groups. Both are accom-plished inventors, have outfitted themselves with heavily-armed vehicles, and have adventures that involve a greatdeal of shooting. With their targeted blasts and powerfulcannons, Tails and Dr. Eggman bring destruction to thosefoolish enough to stand before them.
Dr. Eggman is the nickname given to Dr. Robotnik.So don’t get confused if you see both names; theyrefer to the same character.
The walkers are set for any challengethrown at them. You’ll learn to love them.

USING THIS BOOK
primagames.com
21
EXTRA LIFE
SMALLANIMAL
BALLOON
BOMB
CHAO
CHAO BOX
GOAL RING
GRAVITYCONTROLSWITCH
HEALTH
HINT BOX
HOURGLASS
INVINCIBILITY
MAGNET
MISSILE
OMOCHAO
POWER UP
RING
ROCKET
ANCIENTRUIN
SHIELD
SHOES
SWITCH
TIMESWITCH
Map KeyRefer to this key to find out where items are on the maps

Prima’s Official Strategy Guide
22
Looks like Sonic can’t be held for long. The brash, blue hedgehog has madehis escape from the military and landed in the city’s steep hills, perfect for alittle street surfing. You’ll tour the strange areas of this metropolis, fightingrobots and collecting Items along the way.
City EscapeCity Escape
A
B
A
START
10
20
20
(under car)
(under car)
(in Pipe)(in Pipe)
1. Escape from the military pursuit!2. Collect 100 rings!3. Find the lost Chao!4. Reach the goal within
3 minutes 0 seconds!5. Clear Hard Mode!
POWER-UP:
MAGIC HANDS
x 19
x 11
x 9
x 6
x 6
x 5x 5
x 7
x 4
x 3
x 4
x 22
x 3
12
1 2
10
14
3

primagames.com
23
C
B
C
or
(in bush)
(top oflightpost)
20
(in tree)
(in newspaper rack)
(in Pipe)
20
(in garbage)
(in Pipe)
x 10
x 7
x 3
x 30
x 28
x 16
x 4
x 6
x 5
x 5
x 5
x 100
x 6
x 6
(in garbage)
HERO STAGE 1: SONIC
9
8
11
15 7
5
4
6
13

Prima’s Official Strategy Guide
24
You meet your first Omochao here,and he gives a quick introduction.Find the Pipe in the boxes and theRaccoon behind the hedge, thenhead out.
1
When you have the Light Shoes (foundin Hero Stage 4: Metal Harbor) andthe Flame Ring (which you can pick upin Hero Stage 15: Crazy Gadget), Soniccan bust this Steel Container, flip theswitch, and Light Dash along the pathof rings.
2
After more street action, you findthe first Chao Container on theledges next to the set of brickstairs. As the Omochao can tell you,there are three Chao Containers inevery level. Bust it open to get theChao Key.
3
The second Chao Container is at the topof the Ramp right after the long Rail.Stand Sonic at the bottom and use hisSpin Attack to launch up the Ramp.
4
If you hit either Ramp in the park,you can flip up to the short bridge.There’s a line of rings you can pickup with a quick Light Dash.
5
Use the Swing Bars to flip up to thethird Chao Container.
6
When you have the Bounce Bracelet(found in Hero Stage 11: Pyramid Cave)and Flame Ring you can Bounce. Attackthe metal floor here. Inside you’ll find theMagic Hands power-up, a useful gadget.
7
It seems that Sonic has madesomeone mad enough to send a bigrig after him. Keep the analog thumbpad pulled 2. If you don’t, Sonic willslow down and become roadkill.
8
After your harrowing truck chase,you shoot over a gate and find theGoal Ring. Congratulations! You’vejust finished the first mission of thefirst Stage.
9
As you’re running down thestreet, you find two Rampslined up. Bust tricks off both ofthem to be launched through a groupof floating rings.
Reach the Swing Bars byjumping from the stairs or byusing the Springs and pushingforward on the analog thumb pad.Also, check the trashcan at the topof the stairs. You should be able towhistle for an animal.
Mission 2: Collect100 RingsThis mission is almost impossible to fail. Rings are strewnaround the Stage with wild abandon. Check the map andtake care not to smack into any robots.
Pick up speed and run along this wall topick up 20 rings in an Item Box. Youshouldn’t have any trouble finding 80 more.
10
Mission 1: Escape from the Military Pursuit
Toward the end of the Stage,you‘ll be mostly preoccupiedwith the big rig that‘s chasing you,so we suggest collecting your 100rings prior to reaching that point.

HERO STAGE 1: SONIC
primagames.com
25
Mission 3: Find the Lost ChaoYou must find Sonic's Mystic Melody before you take a shot at Mission 3. Find theAncient Ruin near the bottom of the building Sonic runs down.
Mission 4: Reach the Goal within3 Minutes 0 SecondsDespite this being the first Stage of the game, the fourth mission is pretty hard. You must bevery, very good at negotiating this Stage to finish it in under three minutes. So, learn thepath well enough that you can hit all the Ramps and land on all the Rails on the first try. Thekey to shaving time off is in the Ramps and Rails. Nail them and you’ll be in good shape.
In the first section, you can missonly one Ramp. If you miss more,restart.
12
Jump into the Spring above thedoorway. It will shoot you onto theRail and get you going quickly.
13
While on the Rail, crouch onthe straightaways and don’ttouch anything on the curves. You’remore likely to slow yourself downrather than help your speed if youmonkey with the controls too much.
If you reach the truck chase sectionwith 35 seconds left on the clock,you might make it. Run like crazy.
8
Mission 5: Clear Hard ModeHard Mode will show up as the fifth mission of every Stage.The architecture will be mainly the same although there willbe minor changes to make things more difficult. There alsomay be more enemies dropping in on you at inopportunemoments. The City Escape Hard Mode has both designchanges and more enemies. A lot more enemies. We’ll showyou some of the more surprising changes and ambushes.Stay on your toes.
You can’t reach the upper level becausea Swing Bar has been removed. So,jump and use your Homing Attack onthe Beetle robot, then use Light Dash to zip along the row of rings tothe other side of the gap.
15
You need Sonic’s Flame Ring (found in Hero Stage 15:Crazy Gadget) and his Light Shoes (on Hero Stage 4: MetalHarbor) to get through this level.
Stand by the Ruin and play the MysticMelody to make a Spring appear. Useit to reach the first Pulley. Jump tothe next Pulley and you'll be facing aBeetle robot.
11
Use the Homing Attack, but hold downU to get a high bounce off the robot.It's hard and, unfortunately, you must doit three times. The third robot is a SparkBeetle and has a force field, so waituntil it’s lowered before jumping at it.
Grab the Swing Bar and flip into theair, directing Sonic into the alcove.The unhappy Chao will be glad to seeyou. Mission accomplished.
The stairs are blocked off, so youmust use the Elevator to cross thegap. There’s only one this time andan enemy, so your aim must bedead on.
14
You must direct Sonicinto the Goal Ring tofinish. He doesn’t fly into iton his own after the truckchase. There’s nothing morefrustrating then losing at thelast second because you missthe Goal Ring.

Prima’s Official Strategy Guide
26
The military is bent on getting Sonic back. They’ve sent out a state-of-the-art battlerobot to try to take down our little blue friend. Sonic’s not worried, though. He’s gotthe shoes, he’s got the skills. This military marvel is going down.
Boss AttacksBig Foot has two attacks. Because it’s the first boss, it’s attacks aren’t too challenging toavoid. Follow our advice and you should be fine. First order of business: Collect a fewrings. Without rings, you’ll lose a life in one hit.
Sonic vs Big FootSonic vs Big Foot
The area where you battle BigFoot is a smallish circle withWooden Containers in it. TheseContainers are very handybecause Sonic can stand on themto attack Big Foot with hisHoming Attack. Try not tobreak them.
Not being too imaginative, Big Foot repeatsthe pattern of machine-gun fire and Missilebarrage, only firing more Missiles with eachrepetition.
Watch the “Enemy” health meter in theupper-right corner. It charts how much energyyour foe has. Big Foot requires four hits todefeat.
After a few passes with themachine guns, Big Foot will land andthe Missile bays will open.Predictably, Missiles shoot out atyou. Again, run around the edge of the circle until the barrage stops.
Try to time it so that you’re closeto Big Foot when the bay doorsclose. As soon as they do, leaphigh in the air and Homing Attack on Big Foot’s cockpit.
After the fourth hit, Big Footcollapses. You’ve won! But justwait until you see who showsup….
Big Foot begins by flying up andstrafing the ground with machine-gun fire. It’s easily seen and he’snot moving very fast. Run in a wide circle to avoid it.

27
A
A
2nd Floor
1st Floor
Start(bottom level)
Warp WallWarp Wall
or
10
10
20
(underbreakable
chest)
20
(in Pipe)
(in Pipe)
(in Pipe)
Warp Wall (underneathoverhang)
Warp Walls
Warp Walls
primagames.com
x 8
x 4
x 6
x 3
x 3
x 2
x 3
x 3x 6 x 6
x 6
x 8
x 8
POWER-UP:
MYSTIC MELODY
20
12
2
1
3
6
7
9
5
4
10
11
8
8
Wild CanyonWild CanyonHERO STAGE 2: KNUCKLES

Prima’s Official Strategy Guide
28
The first Hint Box is immediately toKnuckles’s right. Grab a few rings,then check it out. The nearestOmochao is there, too. See what ithas to say.
1
That big blowing column of wind willcatch Knuckles and fling him to theupper area. Ride the air stream uphigh and Glide from the top.
2
Mission 1: Find 3 pieces of the Master Emerald
In the underground area, this upperledge is the “Wild Canyon Track.” It’sreferred to in several Hint Boxes.
3
On the upper level are two valleys.Down one valley you'll find the“Lonely Statue,” which will appear inclues, as will the “armored car pool”and the “square buildings,” both ofwhich are found in the same valley.
4
When you have the Shovel Claw—found in Hero Stage 6: Pumpkin Hill—you can Dig through thepainting above the Lonely Statue’shead. It leads you to this room withthe Mystic Melody.
5
Go down the valley facing theLonely Statue to find the giantSphinx Head, which is mentioned inthe Hint Boxes.
6
If a clue refers to birds or treasurechests, it’s a sure bet that it meansany of the chests (like the ones inthis screenshot) that are litteredabout the Stage.
These tiles are called “swirl tiles” inthe Hint Boxes. They are sometimesarranged in patterns: arrows, Xshapes, etc.
These Stone Heads on tracks can bemoved back and forth. Stand nearone, press I to catch hold, then usethe analog thumb pad to drag it alongthe tracks.
As explained in the Howto Use This Booksection, these first sections ofthe Knuckles and RougeStages give you an overview ofthe most prominent featuresand dangers of the area.Because it would beimpossible to list all theplaces Emerald pieces couldbe hidden, we'll give you abroad overview of each Stage.
Remember that the Hint Boxesare critical for finding theEmerald pieces. You are given threehints for each piece, so find threeHint Boxes and check them out rightaway. The Omochao give you adviceabout special features of the Stages.
The platform above the armoredcar pool is referred to as the“suspended ceiling” in some clues.
The Mystic Melody isessential to finding thelost Chao in each Stage. Findthe Ancient Ruin in any Stage,and you'll most likely be closeto finding the lost Chao.
1. Find 3 pieces of the Master Emerald!
2. Collect 100 rings!3. Find the lost Chao!4. Collect the Emerald
pieces in 2 minutes 0 seconds!
5. Clear Hard Mode!
Your first Knuckles Stage is a straightforward treasure hunt. You mustpick up pieces of the Master Emerald in the dry sands of Wild Canyon.The work of an Emerald-guarding echidna is never finished.
Wild CanyonWild Canyon

29
primagames.com
HERO STAGE 2: KNUCKLES
Mission 2: Collect 100 RingsBecause it’s early in the game, it won’t be too tough to hunt down 100 rings. Infact, you can find over 80 of them on the lower level alone. Clear out that lowerlevel first, because there are no enemies to make you dump your rings.
When faced with a line of rings, jumpand wait until Knuckles is on his waydown before Gliding. If you Glideright away, you’ll be too high andmiss many of the rings.
When you have cleared the lowerchamber, ride the wind and Glide tothe high cliff with two ring-filledItem Boxes on it. Grab those to hit100 rings.
Mission 3: Find the Lost ChaoYou’ll need the Shovel Claw (found in Hero Stage 6: Pumpkin Hill), the Hammer Gloves (found in Hero Stage 12: DeathChamber), and Knuckles’ Mystic Melody (which you pick up in this stage after you get the Shovel Claw). When you'reproperly outfitted, go to the upper level of the underground area and find the four Steel Containers.
Smash these Steel Containers, thenDig through the wall painting you findbehind them, which takes you intoanother room.
8
Play the Mystic Melody here to openthe big door, then play it again at theother Ancient Ruin to create a warp.Jump into the warp.
8
You’ll be taken to the room with the lostChao in it. Pick it up to end the mission.
8
Mission 4: Collect the Emeraldpieces in 2 Minutes 0 SecondsThe key to quickly finding Emerald pieces is to make use of the Hint Boxes.Once you have the layout of Wild Canyon in your head—and it’s not a verybig Stage—you’ll have little trouble deciphering the clues and finding thepieces. Make sure to visit three Hint Boxes for every piece.
Refer to the Mission 1 sectionfor this Stage to see some ofthe areas where the Hints maydirect you.
For a quick ride to the top of the lower area,catch the edge of the column of wind, thenmaneuver out of it before you are blown outside.It can shave some seconds off your travel time.
2
Prima’s Official Strategy Guide
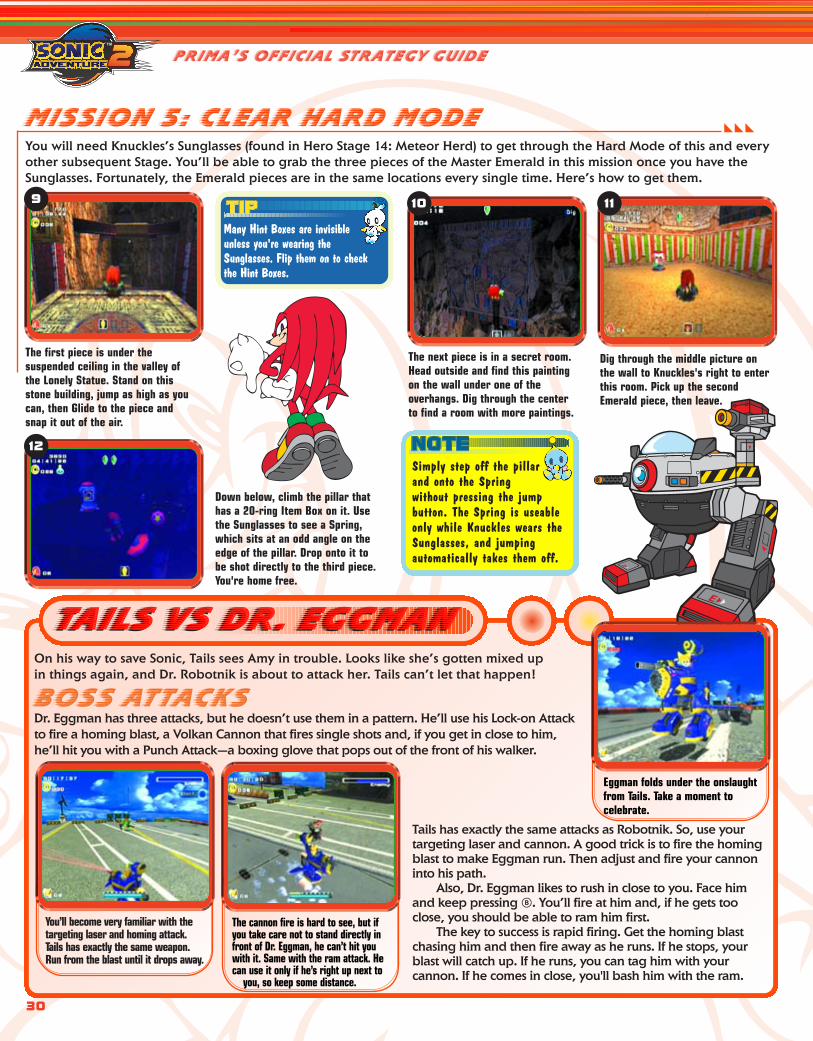
Mission 5: Clear Hard ModeYou will need Knuckles’s Sunglasses (found in Hero Stage 14: Meteor Herd) to get through the Hard Mode of this and everyother subsequent Stage. You’ll be able to grab the three pieces of the Master Emerald in this mission once you have theSunglasses. Fortunately, the Emerald pieces are in the same locations every single time. Here’s how to get them.
The first piece is under thesuspended ceiling in the valley ofthe Lonely Statue. Stand on thisstone building, jump as high as youcan, then Glide to the piece andsnap it out of the air.
9
The next piece is in a secret room.Head outside and find this paintingon the wall under one of theoverhangs. Dig through the centerto find a room with more paintings.
10
Dig through the middle picture onthe wall to Knuckles's right to enterthis room. Pick up the secondEmerald piece, then leave.
11
Many Hint Boxes are invisibleunless you're wearing theSunglasses. Flip them on to checkthe Hint Boxes.
Down below, climb the pillar thathas a 20-ring Item Box on it. Usethe Sunglasses to see a Spring,which sits at an odd angle on theedge of the pillar. Drop onto it tobe shot directly to the third piece.You're home free.
12
Simply step off the pillarand onto the Springwithout pressing the jumpbutton. The Spring is useableonly while Knuckles wears theSunglasses, and jumpingautomatically takes them off.
On his way to save Sonic, Tails sees Amy in trouble. Looks like she’s gotten mixed upin things again, and Dr. Robotnik is about to attack her. Tails can’t let that happen!
Boss AttacksDr. Eggman has three attacks, but he doesn’t use them in a pattern. He’ll use his Lock-on Attackto fire a homing blast, a Volkan Cannon that fires single shots and, if you get in close to him,he’ll hit you with a Punch Attack—a boxing glove that pops out of the front of his walker.
Tails has exactly the same attacks as Robotnik. So, use yourtargeting laser and cannon. A good trick is to fire the homingblast to make Eggman run. Then adjust and fire your cannoninto his path.
Also, Dr. Eggman likes to rush in close to you. Face himand keep pressing I. You’ll fire at him and, if he gets tooclose, you should be able to ram him first.
The key to success is rapid firing. Get the homing blastchasing him and then fire away as he runs. If he stops, yourblast will catch up. If he runs, you can tag him with yourcannon. If he comes in close, you'll bash him with the ram.
TAILS VS DR. EGGmanTAILS VS DR. EGGMAN
30
You’ll become very familiar with thetargeting laser and homing attack.Tails has exactly the same weapon.Run from the blast until it drops away.
The cannon fire is hard to see, but ifyou take care not to stand directly infront of Dr. Eggman, he can’t hit youwith it. Same with the ram attack. Hecan use it only if he’s right up next to
you, so keep some distance.
Eggman folds under the onslaughtfrom Tails. Take a moment tocelebrate.

primagames.com
31
HERO STAGE 3: TAILS
Mission 1: Find theCore of the Prison
The first Chao Box is actually in thefirst room. However, you can’t blastthe Metal Boxes blocking it until youhave the Bazooka power-up found inHero Stage 13: Eternal Engine.
1
In the first room, ride the Mini-lift inthe back corner. From there, shootthe Beetle robot to open anothergate. In the short hall you find a Pipe.
1
From the Mini-lift, turn and jumponto the roof of the hall you justwandered through. Don’t fall off thesides. Hit the Spring at the other endto reach the Extra Life. Don’t forgetto grab the animal farther along onthe roof.
2
Use the Mini-lift to reach the roofand hop over the gate. Thecamera will face the hall acrossthe way. Blast the robots to openthe gates, then boost over andinto the hall to grab the loot.The second Chao Container ishere, too.
3
Health is just off the mainpath. Creep to the edge anddrop onto its platform.
Hop off the Mini-lift over the gate toget at the third Chao Container. Blastthe robot to drop the gate and get out.
4
While riding the big Mini-lift, keep spinning the Laser around totarget all the enemies around you. Target as many as you can beforefiring for maximum points. Also, keep moving to avoid enemy fire.
5
Blast the Gas Tanks to findhidden animals.
For the moment, ignore theAncient Ruin. They won’t helpyou until you have Tails’Mystic Melody.
Make a blind jump from the Mini-liftand boost over to the roof of thelower covered hall. Step on the greenbutton to fire the Rocket and free thecaged animal. Make your way backand pick it up.
6
You must ride this second Mini-liftto get a shot at the last robot inthis room. Once it's scrap, the gatewill open.
7
A group of robots waits for you inthis room. When they’re gone, stepinside and check the upper cornersof the room; you should find a lurkingrobot. Jump up and shoot him.
8
If you have the Bazooka you canbust the Steel Containers blockingthe hall. Bust up the two robotsin the hall and snag theLaser Blaster.
9
Tails is on a quest to find his friend Sonic in the middle of this prison. Will he make it?
Prison LanePrison Lane

Prima’s Official Strategy Guide
A
A
B
START
(in cannister)
5
10
10
(in control panelon wall)
(extra life)
(in Pipe)
(in cannister)
(in Pipe)32
x 3
x 6
x 4
x 3
x 4
x 4
x 6
x 6
x 34
12
3
2
1
5
Prison LanePrison Lane

primagames.com
33
HERO STAGE 3: TAILS
B
CC(in control panel
on wall)
(in cage)
20
(behind flourescent lights)
(in Pipe)
1. Find the core of the prison!2. Collect 100 Rings!3. Find the lost Chao!4. Reach the goal within
3 minutes 0 seconds!5. Clear Hard mode!
POWER-UP:
LASER BLASTER
x 3
x 4
x 5
x 4
x 4
x 3
6
11
10
87
9

Prima’s Official Strategy Guide
34
Mission 2:Collect 100 RingsThe key to gathering 100 rings in this Stage is to avoid beinghit. It seems obvious, but Tails is slow and does not changedirection well, so enemies can bang into him rather easily.Play through the Stage enough to know when the robotsare going to show up so you can blast them quickly.
The Item Box with 20 rings in it willhelp out, but you must scrap therobots quickly to hang onto the hoops.
10
Mission 3: Find theLost ChaoYou’ll need Tails’ Mystic Melody (which you can find in HeroStage 10: Hidden Base) to grab the lost Chao. Make yourway to the Mystic Ruins and play the tune, then use theSpring to reach the hall with the Chao.
Bounce up to the hall and shoot therobots to unlock the gates. The littleblue Chao is waiting to be taken away.
11
Mission 4: Reach the Goal within3 Minutes 0 SecondsYou can complete this mission using much less finesse than the others. Because speed isyour goal, don't spend time collecting the loot. Also, you can simply blow by some of theenemies. Bull through the robots. If you take a hit, just pick up a few rings as you run by.
To shave time, leap off of Mini-liftsbefore they’ve reached the top. Itmay be a small thing, but everysecond counts.
Mission 5:Clear Hard ModeHard Mode is, believe it or not, harder then you're used to.More robots and more guns are pitted against our hero,Tails. They drop from the sky and clog the hallways, but bythe time you reach the fifth mission, you should be able tohandle the pressure.
You must blast this robot to get thegate to drop a little farther along.
10
Where there was a Health item you’llfind a switch that stops the smashingWeight trap in the hall.
12

HERO STAGE 4: SONIC
primagames.com
35
A
A
B
B
C
START
(under hard hatunder ledge)
or
(under hardhat)
(under hardhat)
x2
(under hardhat)
(in Pipe)
Metal HarborMetal Harbor
x 4
x 19
x 26
x 20
1
2
8
3
4
7

Prima’s Official Strategy Guide
36
So you’ve been plopped into a little jail cell. You’ve got to get out of here so you can get on with business. Luckily foryou, Amy Rose is here to bail you out. After refusing Amy’s proposals, you find out that Dr. Eggman is behind all of this.No time for chit chat; let’s get moving.
Metal HarborMetal Harbor
C
D1. Escape from the military base!
2. Collect 100 rings!3. Find the lost Chao!4. Reach the Goal in 5
minutes 0 seconds!5. Clear Hard Mode!
POWER-UP:
LIGHT SHOES
x 10
x 1
(underhardhat)
(underhardhat)

HERO STAGE 4: SONIC
primagames.com
37
E
E
D
10
20
10
5
5
(underhardhat)
x 6
x 18
5
6

Prima’s Official Strategy Guide
38
If you already have the Light Shoes,Light Dashing automatically puts youon the Rail. Don’t overshoot the Rail,or you’ll be in for a swim.
1
From this high vantage point, you cansee the first Chao Container up toyour right. Use the Homing Attack toreach it.
2
If you don’t already have the LightShoes, hitch a ride on the Pulleyhere. At the top, your Light Shoesare just a hop and skip away. Withthese kicks, you can Light Dash toyour heart’s content.
3
You’ll find your second ChaoContainer in one of these storagealcoves.
4
Mission 1: Escape fromthe Military Base
Combine strings of rings with Sonic’sLight Dash, and this mission is in thebag. Line up the Light Dash so youdon’t shoot off the edge.
At this point, you should havereached 100 rings. Do it faster toget the A rank.
5
Mission 2: Collect 100 RingsSnagging 100 rings on this Stage is a cinch if you make use of the Light Shoes.
Not so fast, fur ball. Before yougo screaming through this pointmarker, look to your right for thelast Chao Container.
5
Run, Sonic, run! After you get offthe Rocket, you have 15 secondsto grab onto the big rocket. Usethe dash panels around thecorners for a little boost.
6
Make your way to the aircraft carrierand look above where you found thesecond Chao Container. Bounce your wayup there and play your Mystic Melody.
Platforms will slowly pop out, one byone, allowing you to hop over to theChao on this lonely structure.Another lost Chao is saved!
Mission 3: Find the Lost ChaoHow do these Chao manageto get lost on each Stage?Have you found Sonic’sMystic Melody yet? It’s inHero Stage 16: Final Rush.The Bounce Bracelet (foundin Hero Stage 11: PyramidCave) is also needed to reachthe poor Chao.
74

HERO STAGE 4: SONIC
primagames.com
39
There isn’t much to this. Five minutesis plenty of time to complete thisStage. Try not to hurry, simplemistakes will hurt you more than alittle caution will.
Mission 4:Reach the Goal in5 minutes 0 secondsFeel the need for some speed? Try your hand at this mission.You’re only given five minutes to reach the Goal. Easy as pie….
These Beetle robots are set updifferently. If you expect to go flyingthrough them like before, you haveanother thing coming. Use caution.
8
Mission 5:Clear Hard ModeUh oh. Hard Mode, eh? They think they can stop you bychanging a few things in the course? Ha!
Sonic runs into his Dark Story doppelganger in the forest. Some harsh wordsare exchanged, and then the two decide it’s time to fight. It's a hedgehog throw down.
Boss AttacksShadow has only one attack in this first encounter. He can do the Homing Attack thatyou know so well. Plus, the little creep picks up rings. So, make sure that you grab someright off. Shadow isn’t very aggressive in this battle. If you leave him alone, he doesn'tdo much. However, if you attack and miss—or he blocks you—he will retaliateimmediately.
If you're in the middle of a jump when Shadowcomes at you, you'll be fine. However, being hit willbounce you around. Try to stay in the middle of thegrassy platform, or you risk being knocked off into thewater.
You must wait until Shadow has his back to you inorder to get a hit on him. The quickest way is to movearound. Shadow will run about and then stop, backturned, for a second. That's when you strike.
Sonic VS ShadowSonic VS Shadow
When the gold glow surroundsShadow, he’s going to come atyou. Hit U and you’ll be protectedfrom his attack.
Stay in the middle. Even whenmoving around, you should keepaway from the Rails. Keep asharp eye on Shadow and nail him when his back is turned.
Knock out Shadow and then getthe heck off that island. Thingsare going from bad to worse.

40
Prima’s Official Strategy Guide
START
A
B
C
B(in mushroom)
Rope Swing
(in brush)
(downshaft)
20
10
10
5
x 8
x 8
x 16
x 11x 2
x 8
(lightdash)
x 20
x 7
13
4
5
1
(in brush)
10

HERO STAGE 5: SONIC
41
A
(in mushroom)
(in mushroom)
(in Pipe)
What a sore loser. After defeating Shadow, you realize that the island is goingto explode. Time to blow this taco stand.
Green ForestGreen Forest
1. Escape from the islandin 8 minutes!
2. Collect 100 rings!3. Find the lost Chao!4. Reach the Goal
within 4 minutes 0 seconds!5. Clear Hard Mode!
POWER-UP:
ANCIENT LIGHT
x 26
x 5x 10
2
3
9
primagames.com

Prima’s Official Strategy Guide
C
E
E
or
20
20
5
10
10
(in brush)
(in pipe)
42
D
D x 8
x 5
x 4
x 1
x 8
x 5
x 8
x 8
x 21
x 5
1410
6
12
11
7
8
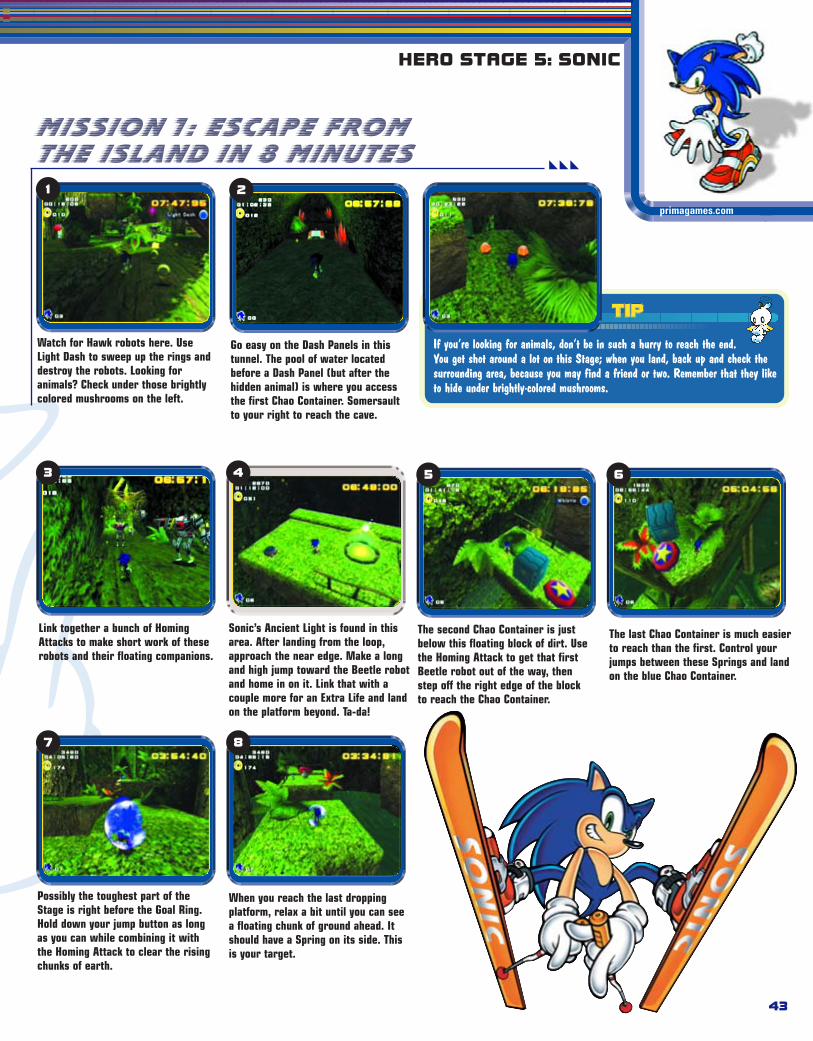
HERO STAGE 5: SONIC
43
Watch for Hawk robots here. UseLight Dash to sweep up the rings anddestroy the robots. Looking foranimals? Check under those brightlycolored mushrooms on the left.
1
Link together a bunch of HomingAttacks to make short work of theserobots and their floating companions.
3
If you’re looking for animals, don’t be in such a hurry to reach the end.You get shot around a lot on this Stage; when you land, back up and check thesurrounding area, because you may find a friend or two. Remember that they liketo hide under brightly-colored mushrooms.
Mission 1: Escape Fromthe Island in 8 Minutes
Go easy on the Dash Panels in thistunnel. The pool of water locatedbefore a Dash Panel (but after thehidden animal) is where you accessthe first Chao Container. Somersaultto your right to reach the cave.
2
Sonic’s Ancient Light is found in thisarea. After landing from the loop,approach the near edge. Make a longand high jump toward the Beetle robotand home in on it. Link that with acouple more for an Extra Life and landon the platform beyond. Ta-da!
4
The second Chao Container is justbelow this floating block of dirt. Usethe Homing Attack to get that firstBeetle robot out of the way, thenstep off the right edge of the blockto reach the Chao Container.
5
The last Chao Container is much easierto reach than the first. Control yourjumps between these Springs and landon the blue Chao Container.
6
primagames.com
Possibly the toughest part of theStage is right before the Goal Ring.Hold down your jump button as longas you can while combining it withthe Homing Attack to clear the risingchunks of earth.
7
When you reach the last droppingplatform, relax a bit until you can seea floating chunk of ground ahead. Itshould have a Spring on its side. Thisis your target.
8

Prima’s Official Strategy Guide
Avoid the robots on the upper levelhere by dropping down below, whichalso gives you access to 10 rings.
91
Mission 2: Collect 100 RingsAgain with the 100 rings! How fast can you collect them?
To aid in your search for rings, grabthis Magnetic Shield Item Box. Withthis handy-dandy item, you’ll be hard-pressed to miss any nearby rings.You’re practically finished.
10
Screech to a halt at the top of thisplatform. The Ancient Ruin is to theleft, beyond the ledge.
11
When you play your Mystic Melody,platforms appear beside you. Usethe Bounce Attack to reachthe high ones and the HomingAttack to reach the Chaoon the far end. Speed isthe key to achievingA rank.
12
Mission 3:Find the Lost ChaoIf you were lost in this forest, wouldn't you be scared? So whatare you waiting for? Imagine how the poor lost Chao feels. Doyou have the Mystic Melody yet? What about the BounceAttack? Find them in Hero Stages 16 and 11, respectively.
44
Remember these Hawk robots thatdrop down on you? If you’re notready for them, they’ll knock therings right from your grasp. Whileyou’re here, take the Spring to theupper level for more rings.

On straightaways like this, charge upyour Spin Attack to barrel throughsafe areas at lightning speed.
Mission 4:Reach the Goal within4 Minutes 0 SecondsIf you keep your nose to the grindstone, four minutes isplenty of time to complete this Stage. The Goal Ring isn’t faraway, just don’t make any mistakes.
Mission 5: Clear Hard ModeYou must have ticked off someone by getting this far. The Stage has beenaltered to make your Goal Ring harder to reach. Not a problem: Mommadidn’t raise this hedgehog to quit in the face of adversity.
The robots here are more aggressive,and the log in your way prevents youfrom simply cruising by them. Beyond,the robot in the tunnel is nowindestructible. Don’t waste your timewith it; cruise on through.
1
Uh-oh. The dash panels here havebeen removed. Charge up a SpinAttack, or you won’t make it to theDash Panels above.
13
We’re missing a floating platformhere. Thankfully, the Beetle robot isstill there. Use the Homing Attack.
14
HERO STAGE 5: SONIC
primagames.com
45
It’s tempting to destroy enemies, but doing so takes up valuable time. Bynow, you should know when they’ll drop down and where they’ll be. Do yourgood deed for the day and pass them by, staying focused on the Goal Ring.

Prima’s Official Strategy Guide
46
A
B
5
(in pumpkin)
(in cage)
(in Pipe)
10
(abovespring)
x 5
x 5
x 6
x 4
x 4
x 6
x 6
x 3
1. Find 3 pieces of the Master Emerald!2. Collect 100 rings!3. Find the lost Chao!4. Collect the Emerald Shards in
3 minutes 0 seconds!5. Clear Hard Mode!
Pumpkin HillPumpkin Hill
PumpkinMountain
ChurchMountain
5
7
8

HERO STAGE 6: KNUCKLES
47
A
B
C
START
or
5
rings x 5rings x 5
rings x 5rings x 5
(in pumpkin)
(in crate) (break hut,under skull)
rings x 10
rings x 10
rings x 10
x 6
x 6
x 5
x 5
x 7
x 7
x 4
C
POWER-UP:
SHOVEL CLAW
primagames.com
PumpkinMountain
Ghost TrainMountain
Ghost TrainMountain
ChurchMountain
3
6
3
23
31
4
3

Prima’s Official Strategy Guide
48
The first thing to do here is grab theShovel Claw. Use them to Dig into theground or walls to find those EmeraldShards or goodies.
The first Hint Box is right behind you.Use it immediately and save theothers throughout the Stage for whenyou’re closer to them.
From the starting point and facing theisland that contained the Shovel Claw,the Church Mountain is to your left.The Ghost Train Mountain is to theright. To get to the Pumpkin Mountain,take the Rockets from either GhostTrain or Church Mountain.
Church Mountain is relatively smallwith some tombstones and grass atthe top. Ledges around the sidessometimes hold Emerald Shards.
B
Mission 1: Find 3 pieces of the Master Emerald
For faster retrieval of theEmerald Shards, know thenames and locations of the threemountains as well as the differentcharacteristics of each.
The Hint Boxes disappear afteryou use them. If you can findan Emerald without using themaximum of three Hint Boxes, do so.Save the others in case you’re nearthem again later.
The Ghost Train Mountain has a bunch of traintracks and a couple of trains that run on them.You can control the circular platform herewith the different Switches along the edges.Changing the path of the tracks allows thetrain to retrieve any possible Emerald Shardsfrom the corresponding tunnel.
C
Pumpkin Mountain has different areaswith pumpkins growing on it. Along itsside, as well as on top, are patcheswhere you can find Emerald Shards.
A
Along the edge of the map are tallpillars with jack-o-lantern headson top. These also house EmeraldShards and goodies.
3
Mission 2: Collect 100 RingsGood observation skills go a long way in this Stage. Rings are dispersed throughout the Stage; you just have to find them.
Look for rings on narrow beams.There are some in, and leading to,each mountain.
Did you miss these Balloons floatingup top?
4
As usual, be careful in areas withenemies. In this Stage, your enemiescan include Ghosts as well as trains.They’ll knock the rings right out of you.
The search for the Master Emerald Shards continues. Knuckles must find three of them here in creepy Pumpkin Hill.The sunset is pretty, but there’s no time to enjoy the view; you’ve got a job to do.
Pumpkin HillPumpkin Hill
1 2

HERO STAGE 6: KNUCKLES
primagames.com
49
Mission 3:Find the Lost ChaoThis is a very creepy area for a little Chao. With all thegrinning faces around, it's no surprise that the Chao iswell hidden. You should have the Mystic Melody by now.
The Ancient Ruin is located at the very top of Pumpkin Mountain. Use theMystic Melody to awaken the platforms you can use to reach the lost Chao.Finding all the lost Chao should be this easy!
5
Mission 4: Collect the3 Emerald SHARDS in 3Minutes 0 SecondsThe random locations of the pieces of the Master Emeraldmake it a tricky task to complete this mission. With onlythree minutes to work with, you should be familiar with thisStage and where the Hint Boxes are. Good luck!
Don’t forget to use the two HintBoxes near the start position. Usethese first to get a good bead on thefirst Emerald Shard. You don’t wantto waste a Hint Box at the top anddiscover that you can’t find one later.
2
Use the Rockets. They take you frommountain to mountain much morequickly than climbing the walls.
Mission 5: Clear Hard ModeSo you need a little more of a challenge? Hard Mode was made for you. Make sure you havethe Sunglasses from Hero Stage 14: Meteor Herd, before you attempt this.
If you remember where the Hint Boxes are, you’ll notice some of themare missing. Put on your Sunglasses to find them again.
These Ghosts don’t go away unlessyou destroy their smaller form.Each time you punch them, they getsmaller. But if you leave thesmallest Ghost running around, itregains its larger form.
The first Shard floats beneath thismountain but above the rotatingspikes. Get a grip on the wall justabove the bottom of the mountainand Glide on over to it.
6
The second Emerald Shard is nearthe bottom of the pumpkin mountain.Find the two heads shooting fire atthe wall. Wait for the flames to stop,and Dig where the flame hits thewall. You dig?
7
Climb to the top of the church on thechurch mountain. “The top” heremeans the very tippy-top, the pointyend of the church. While standing upthere, put on your Sunglasses andenjoy the view. Before you know it,you're sprung straight up into the airby a Spring. At the peak of yourascent, Glide on over to thatshimmering Emerald Shard up ahead.
8
To use the Sunglasses, you must actually be standing. If you’re in Climb Mode, theSunglasses are inaccessible. Standing on top of the church takes careful attention. As younear the peak, make sure you are centered as pictured here. Adjust accordingly as you climb tothe peak or you will fall off the edge. Small movements of the control stick push you up and intoa standing position.

Prima’s Official Strategy Guide
A
START
10
10
(in barrel)
(in lamppost)
(in newspaper box)
(in Pipeunder trap)
(in Pipe)
(in box)
Dr. Eggman has gone and blown up half the moon. Will the mad doctor ever stop? It’s up to you, to find a way out ofhere and find Eggman!
Mission StreetMission Street
50
x 6
x 4
x 4
x 6
x 4
4
5
18
6
21
17
16
2
1
3
x 4
20
11
x 6x 8

HERO STAGE 7: TAILS
51
A
B
B
or
(in metal crate)
(in box)
(in cage)
(blow updynamite)
(in Pipe)
(whistle by lampost)
primagames.com
1. Elude enemy pursuit!2. Collect 100 rings!3. Find the lost Chao!4. Reach the Goal within
5 minutes 0 seconds!5. Clear Hard Mode!
POWER-UP:
BOOSTER
10
15
14
198
22
7
9
12
13
x 3
x 6
x 5
x 3
x 3
x 4
x 4
x 5
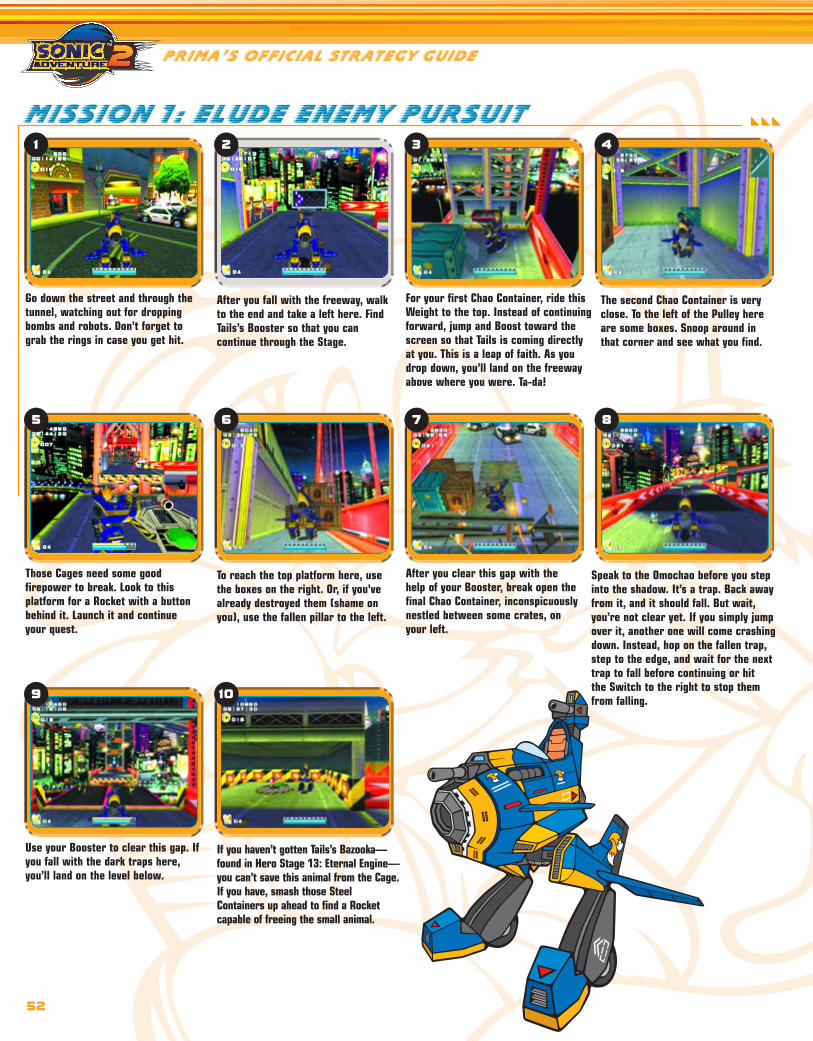
Prima’s Official Strategy Guide
52
Go down the street and through thetunnel, watching out for droppingbombs and robots. Don’t forget tograb the rings in case you get hit.
1
After you fall with the freeway, walkto the end and take a left here. FindTails’s Booster so that you cancontinue through the Stage.
2
For your first Chao Container, ride thisWeight to the top. Instead of continuingforward, jump and Boost toward thescreen so that Tails is coming directlyat you. This is a leap of faith. As youdrop down, you’ll land on the freewayabove where you were. Ta-da!
3
The second Chao Container is veryclose. To the left of the Pulley hereare some boxes. Snoop around inthat corner and see what you find.
4
Mission 1: Elude Enemy Pursuit
Those Cages need some goodfirepower to break. Look to thisplatform for a Rocket with a buttonbehind it. Launch it and continueyour quest.
5
To reach the top platform here, usethe boxes on the right. Or, if you’vealready destroyed them (shame onyou), use the fallen pillar to the left.
6
After you clear this gap with thehelp of your Booster, break open thefinal Chao Container, inconspicuouslynestled between some crates, onyour left.
7
Speak to the Omochao before you stepinto the shadow. It’s a trap. Back awayfrom it, and it should fall. But wait,you’re not clear yet. If you simply jumpover it, another one will come crashingdown. Instead, hop on the fallen trap,step to the edge, and wait for the nexttrap to fall before continuing or hitthe Switch to the right to stop themfrom falling.
8
Use your Booster to clear this gap. Ifyou fall with the dark traps here,you’ll land on the level below.
9
If you haven’t gotten Tails’s Bazooka—found in Hero Stage 13: Eternal Engine—you can’t save this animal from the Cage.If you have, smash those SteelContainers up ahead to find a Rocketcapable of freeing the small animal.
10

HERO STAGE 7: TAILS
53
Mission 2: Collect 100 RingsWith so many enemies and surprises on this Stage, caution must be carefully observed toachieve the 100 rings goal. There’s nothing worse than coming close only to be hit by anunexpected bomb. You have been warned.
This stage is full of harmful baddies. The more quickly you grab100 rings, the better. Snag every ring that you pass to avoid facingunnecessary enemies. This includes ring Item Boxes and out-of-the-way caches.
Whether or not the first ChaoContainer interests you, makeyour way to it. There are a bunchof rings you can safely collect onthe way there.
11
When you see Jets circling above asthey do here, beware. Walk on theedge of the walkway to avoid theirbombs. One hit will knock your ringsout. Because you can recover only 20rings at best if hit, it’ll set you backquite a bit.
A Switch is hidden in a box directlyto the right of the traps. Throw thisSwitch to disable them. Besidesallowing you to walk throughunharmed, throwing the Switchmakes it possible for you to collect afew extra rings when you make itaround to the top.
As long as you watch yourself andavoid being hit by enemy fire, you cancollect 100 rings by the time youreach this point.
13
Mission 3: Find the Lost ChaoHow did a Chao manage to get this far into the city? No wonder it’s lost. With all the danger around, finding him couldprove tricky. Again, to find the lost Chao, you need Tails’s Mystic Melody—found in Hero Stage 10: Hidden Base.
The process of rescuing this Chao islong, and it starts right here. It’seasy to miss the bouncing column onthe far left, because it almost blendsin with the bunch of columns.
14
Wait at this ledge to get yourbearings in relation to the bouncingcolumn. Keep your eyes open andstep onto it. It takes you down towhere you can jump to an AncientRuin. Play the Mystic Melody to opena Warp Hole. This Warp Hole is thedoorway to your Chao, so hop on theRuin and warp on through.
The Warp Hole drops you here,above the highway. Instead ofdropping back to the road, note thebouncing columns in front of you andahead. Hop from one to another untilyou reach the end. Destroy therobots on your path, and anotherlost Chao is saved.
15
12
primagames.com

Prima’s Official Strategy Guide
54
Mission 4: Reach the Goal in3 Minutes 30 SecondsHurry, the place is gonna blow! Three minutes and thirty seconds is a challenge, even for a crafty fox like you.Ingenuity plays a big part here. It’s essential that you find and take all shortcuts to shave time off the clock.
Make your way to this point as fast aspossible, avoiding the delay caused bytrying to kill every enemy. Line yoursights straight down the middle andtake out the center robot that dropsfrom above. Do not pause to shoot theother two. Instead, run straightacross the crumbling walkway to justbefore the halfway point. From here,jump and use your Booster to reachthe other side. Land to the left or rightof center to avoid the Jets’ missiles.
16
These crumbling walkways areshort enough that you can simplyrun across them without using theBooster. However, stay to the rightor left of center as you do so.Crumbling walkways usuallyindicate Missile-firing Jets.
17
At the break in this bridge here,jump off the right side and floatdown and ahead to reach the JumpPlate below. This shoots you straightahead and up, cutting your time.Make sure to shoot while airborne;the fencing can make you drop toyour demise.
18
After you’ve been shot to just beforethe traps, you can continue ahead,making use of your momentum. Thetraps won’t get you if you keeprunning. Alternatively, if you activatedthe Ancient Ruin below, floatingplatforms appear to the left of thestop sign, just before the traps.
19
From here on out, it’s a mad dash tothe Goal Ring. Do not stop foranything; time is running short. Shootanything in your way, but don’t botherwith any side projects.
13
Mission 5: Clear Hard ModeMore robots, fewer landing areas. These catwalks are falling apart faster than before. Bewary of new robots in new places. Platforms and moving columns have also been removed.Let’s see what you’ve got.
Right away you notice many morerobots on a mission to ruin your day.In the tunnel, more obstacles such asunbreakable Cages and Containersline your path. Keep calm and take itone step at a time.
These bouncing columns are fewerand farther between. Hop to themwith caution.
20
These spinning spikes float up anddown. Wait for it to get low enoughfor you to clear with your Booster.
21A whole section of this walkway ismissing, leaving a teetering sectionup ahead. It’s a little too far tosimply jump to. Timing is everythinghere. Stand on this fallen columnand wait for the left side (thenearest side) to begin dropping. Asit does, jump with all your might andBoost over to the lower end.
22
From this point on, your chances offalling are gone. Step on the gas andget to the Goal Ring as fast as you can.
13

HERO STAGE 8: KNUCKLES
55
In his never-ending quest for the Master Emerald Shards, Knuckles findshimself in a mine that is a bit leaky. You must get wet to find all theShards, so hold your breath.
Aquatic MineAquatic Mine
POWER-UP:
AIR NECKLACE
AB
C
D
(in Pipe)
(behind pillar)
(flying)
10
E
(behind pillar)
(on wall abovesecond level)
(on wall abovetop floor)
2
primagames.com
1
3
15
4
12
x 8
x 3
x 3

Prima’s Official Strategy Guide
A
D
C
B
E
(flying)
or
2020
20
5
5
(in Pipe)
(under pail)
(in Pipe)
56
1. Find 3 pieces of theMaster Emerald!
2. Collect 100 rings!3. Find the lost Chao!4. Collect the Emerald pieces
in 3 minutes 30 seconds5. Clear Hard Mode!
13
6
14
10
11
8
9
7
x 11
x 10
x 5
x 7
5

HERO STAGE 8: KNUCKLES
primagames.com
57
The first Hint Box is to Knuckles’s leftas soon as you start.
1
The two Omochao teach you aboutthe water level Switches. The signsnext to each Switch show whatwater level each one gives you.Level 1 is the highest water level.
1
You can reach the top room onlywhen the water is at Level 1. Climbthe central pillar and jump to thePulley to get up there. You find thisSwitch, which drops the water to itslowest level.
2
Three shafts are accessible when thewater level is low. You can get intothis one when the water is at Level 2or 3. The room below is full of Ghosts.
3
Mission 1: Find 3 pieces ofthe Master Emerald To swim, jump in the water and
press I to submerge. Until youget the Air Necklace, you’re vulnerable todrowning. Numbers, starting with 5 andcounting down, will flash on the screenwhen Knuckles is running out of air.
You can explore this mine shaft onlywhen the water is at Level 3. Dropinto the watery part and press I toswim down. Hold I as you go throughthe tunnels. It’s a long stretch.
Go up this shaft. It brings you up tothe Air Necklace. Now drowning won’tbe a worry. Climb the walls and pickup the Baby Dragon for your Chao.
5 64
These are referred to as woodenwindows. They can be differentiatedfrom other windows by the Skullswithin some of them. Dig into thedirt to check for Master Emeraldpieces or loot.
Skulls in the walls, such as this lineof three Skulls in the Ghost cavern,are also used by the Hint Boxes todescribe locations.
7 Mission 2:Collect 100 RingsThis mine isn’t very full of treasure. It’s easiest to clear themission if you already have the Air Necklace. See Mission 1of this Stage to learn how to get this permanent upgrade.
Return to the tunnel whereyou found the Air Necklace.You’ll find several loose ringsand a couple of 20-ring ItemBoxes. Not a bad haul.
9
Use the appropriate Switch to set the waterat Level 1, then go to the uppermost level.Grab the rings up there and play Knuckles’sMystic Melody near the Ancient Ruin, thenfollow the revealed path. Swim down intothe room with the falling Weight and findthe ring Item Box there. It should put youover the top.
10
This series of tunnels holds the ChaoContainer shown here. Also, severalfloating platforms block off areas oropen them up depending on thewater level. Become familiar withthese tunnels, as they often hold apiece of the Master Emerald.

Prima’s Official Strategy Guide
58
Mission 3: Find the Lost ChaoYou must grab the Air Necklace—found on this Stage in Mission 1—before hunting down the lost Chao. Play the MysticMelody near the Ancient Ruin in the uppermost area, then go down the revealed path.
Swim into the room with the Weightand Ghosts. Notice the line of ringsfloating in front of the heavy trap.Follow it up.
9
Swim down the tunnel and grabthe Pulley you find there (avoidthe Iron Ball). The poor little fellais waiting for you.
10
Mission 4: Collect theEmerald PIECES in 3Minutes 30 SecondsThe key to doing this quickly is to find the hints quickly.Study the map and go to the Hint Boxes immediately.They'll give you a target area. Also, make sure you'refamiliar with the Switches and how they raise and lowerwater. You don't want to spend precious time muckingabout with the water levels.
This is the Hint Box closest toKnuckles when he starts themission. It’s just to his left.Look at it immediately.
1
Mission 5: Clear Hard ModeAs with all the Hard Modes, you need the Sunglasses—found in Stage 14: Meteor Herd.You’ll also need the Air Necklace, which you’ll get in this Stage in Mission 1. All the MasterEmerald pieces are in the same place every time in this Mission, so here's how to get them.
Remember that HintBoxes are found byusing the Sunglasses, too.Without them, many areinvisible to you.
The first Emerald piece is back whereyou found the lost Chao. Play the MysticMelody at the Ancient Ruin—with thewater at Level 1—and go through thedoor it opens. Find this line of rings nearthe falling Weight and follow them up.
9
The Emerald piece is at the end of thetunnel, behind an Iron Ball. Swimpast the ball and snap it up.
11
The second piece is in the networkof cart track tunnels. Keep thewater at Level 1 and dive in. Enterthis gate and swim down the tunnel.
12
When you arrive at the shaft, divedown to the closest opening and headdown it. You’ll find these three Skullsarranged in a triangle pattern at theend of the new tunnel.
13
Now just follow the shaft down as faras you can, avoiding the Iron Balls, ofcourse. Voilà! The second piece of theMaster Emerald.
14
The third Master Emerald piece is onthe roof. You can’t Glide to it, soclimb the waterwheel and get ontothis arm of it. Put on the Sunglasses,and you’ll see the Spring. Walk ontoit to be catapulted into the Emeraldpiece. You’re done.
15

HERO STAGE 9: TAILS
primagames.com
59
1. Chase the President’s limousine!2. Collect 100 rings!3. Don’t hit other cars!4. Don’t hit the walls!5. Clear Hard Mode!
Something shady is happening between the President and Eggman. If we catch up to the President's limousine, maybewe can trace the call back to Eggman.
Route 101Route 101
To catch the President’s limousine,hold down U to keep the pedal to themetal. Rings are important here too.For every 20 rings you collect, youare equipped with a Boost. Press Pduring the straightaways for a littleextra zip.
These Balloons each hold a cacheof rings. Bust right through themto collect. Don’t pass up theseopportunities; Balloons requiremuch less skill than a row of rings.
Watch yourself on these turns. Youlose valuable seconds if you bang intothe walls. Know where the sharpcorners are and be prepared. As youenter the corner, release the gas fora split second and crank the wheelleft or right. This gives your vehiclethe ability to slide around corners.
Mission 1: Chase the President’s Limousine
Make use of the boost beforeyou reach another 20 rings.You can’t hold more than one boostat a time. If you don’t use it beforeyou get another 20 rings, you willwaste a boost and precious time.
Sliding aroundcorners is effective only withpractice. At first, you mayfeel out of control, but beingable to turn tight cornerswithout slowing down pays offin the end.
At the top of this ramp is anotherBalloon. Geronimo!
This narrow tunnel can be a tightsqueeze when other cars are present.Drive around them and avoid hittingthem or the walls. Slowing down isnot an option.
As soon as you defeateither this Stage orRouge’s Route 280 level inStory Mode, you’ll unlock theKart Race Mode.

Prima’s Official Strategy Guide
60
Make sure no other cars are around you when using theboost. You could accidentally boost yourself right intoanother car’s rear end.
Mission 2: Collect 100 RingsWith no chance of losing rings after you collect them, 100 is an easy goal in this stage. Don’t forget to snag the Balloons aswell as the rows of rings. Just keep decent time to complete Mission 2.
Mission 3: Don’t Hit Other CarsTo complete this mission, catch up to the President’s limousine without touching any other cars. An expert driver like youshould have no problems with this. Regardless, here are a few trouble points to watch for.
Sharp corners are where other cars liketo get in your way. If you like to slidearound the corners, use extra cautionwhen other cars are present. Kiss evenone car and the mission is failed.
This narrow tunnel is usually jammedwith a few cars. Either slow down orgo around them.
Mission 4:Don’t Hit the WallsDrive fast. Don’t hit the walls.
Mission 5:Clear Hard ModeFor this Mission, the course stays the same, but each timeyou pass through a Point Marker, you get less time added toyour total. It’s tough, but not impossible.
Turns are your worst enemy in thismission. Slow down around the turns.Unlike the other missions, you won’tbe able to recover from a harmlessscrape into the guardrail.
This narrow tunnel is also dangerous,especially with the other cars in it. Ifyou’re bold and skilled enough, zoomon by between the cars and walls. Ifnot, slow down.
To catch the President’s limousine inHard Mode, you need all the boostsyou can get. Collect as many rings asyou can, including all the ringBalloons. Don’t forget to use theboost before your next 20 rings soyou don’t waste it.
As you turn onto this finalstraightaway, you need about 25seconds on the clock and an availableboost. With less time and/or no boost,you won't reach the limousine in time.
The time limit here is pretty tight. You can afford to hitthe walls, but not if doing so spins you out. Keep on thegas, but know when to slow down.

HERO STAGE 10: TAILS
primagames.com
61
A
START
10
(in vase)
(in Pipe)
(in crate)
Tails has heroically volunteered to find the entrance to Eggman’s Hidden Base. It’ssomewhere in the maze of stones and ruins outside the pyramid. But where?
Hidden BaseHidden Base
1. Find the entrance to Hidden Base!2. Collect 100 rings!3. Find the lost Chao!4. Reach the Goal within 5 minutes
0 seconds!5. Clear Hard Mode!
POWER-UP:
MYSTIC MELODY
2
1
3
4
x 6
x 6
x 6
x 6

Prima’s Official Strategy Guide
62
A
or
10
10
(in Pipe)
(in Pipe)(in Pipe)
(in vase)
(in vase)
(in Pipe)
11
9
8
14
13
12
7
16 10
15
5
x 12
x 8
x 12
x 4
(in vase)
x 1
6

HERO STAGE 10: TAILS
primagames.com
63
Targeting and shooting the Dynamitepacks lowers platforms so Tails canleap up to them.
1
Walls and blocks of stone with theEggman mark on them can bebroken with a few shots from theVolkan Cannon.
2
Mission 1:Find the Entrance to Hidden Base
Break the wall and the block of stonehere to get at the first Chao Container.
4
This hallway has two hidden roomsbehind breakable walls. Pound them torubble and collect the animals inside.
When you have the ability to smashSteel Containers, blast this set of fourto pick up Tails’s Mystic Melody. Playthe tune at the Ancient Ruin, then youcan move on.
5
You can take the high road and justdrop down to the second ChaoContainer. Or you can take the lowroad—the path you took to find theMystic Melody.
6
The maze is not very difficult. Continueshooting the breakable walls andblocks to clear a path. Make sure youfind the ring Item Boxes near the end.
7
Target the bomb-throwing Kiki fromthe first block here. Take them outbefore you jump from block to block.
8
After another round of Pulleys, blastthrough a door to find the waitingGoal Ring.
9 Mission 2: Collect 100 RingsThe pickings are a bit slim in the Hidden Base Stage, and the robots are fierce. It's hard just tofind 100 rings, and harder still to hang on to them. Once again, it helps to know what theenemy will do. If you’re familiar with the Stage and know when robots will pop up, then you’llhave an easier time keeping the rings you collect. Here are a few hidden caches of rings.
On the path leading to the four SteelContainers, take Tails to the right anddrop down onto the platform withseveral rings arranged neatly in rows.
10
Ride the Pulleys to the top, but pass by the door anddrop down to the other side of the room. There’s astash of rings guarded by a bomb-throwing Kiki.Blast the chimp before he can tag you.
11
3

Prima’s Official Strategy Guide
64
Mission 3: Find the Lost ChaoYou’ll need Tails’s Mystic Melody to find the lost Chao. Luckily, the Mystic Melody is in the Hidden Base Stage, but you needthe Bazooka to blast the Steel Containers to get the Mystic Melody. It’s a vicious circle. When you have the Mystic Melody….
Play the Melody next to the AncientRuin to open the door. Leap off theledge and Hover, firing as you go toblast the robot waiting for you.
12
Float to the bottom and land on ablock. Hover over to the door andtrash the foe there. You can Hoverfrom the door to the Pulley in onejump, but jump high.
13
Fire as the Pulley draws you higher.You can jump straight to the ledgewith the Chao, but to play it safe,Hover over to a Spring and pop up tothe little guy.
14
Mission 4: Reach the Goalwithin 5 Minutes 0 SecondsThe more permanent upgrade gear you have, the easierthis time trial will be. Specifically, grab the Laser Blasterbefore you make the rush through this Stage. Thepumped-up weapon will take out enemies faster and,most importantly, blast Dynamite packs more quickly.Plus, if an enemy is not directly in front of you, run on by.Don’t take time to fight robots if you can avoid them.Finally, take long Hover leaps when you can, and shootbreakable walls as you run toward them. For example:
Continue shooting as you run downthe hall. You’ll break the wall at theend before you get there, so Tailswon’t have to slow down.
3
Leap from this pillar and Hover to thePulley to the right. You must shootwhile Hovering—a useful skill—because a couple of robots show up.
15
Mission 5: Clear Hard ModeHidden Base has several changes for Hard Mode. A subtle change is that all the Rails have beenremoved. Your jumps must be precise or you’ll fall into the muck. The number of enemies ismostly unchanged. The challenges lay mostly in the design changes of certain areas.
This spinning Iron Ball wasn’t therebefore. You can hop from pillar topillar to Tails’s right and work yourway around the trap.
16
This room has several Pulleys movedaround. Nothing too fancy—just aimfor the next Pulley before you jump.
11
Time the spinning blocks, then Hoverjump to them one at a time. Makegood use of the Hover, land, and thenjump to the next one quickly.
8
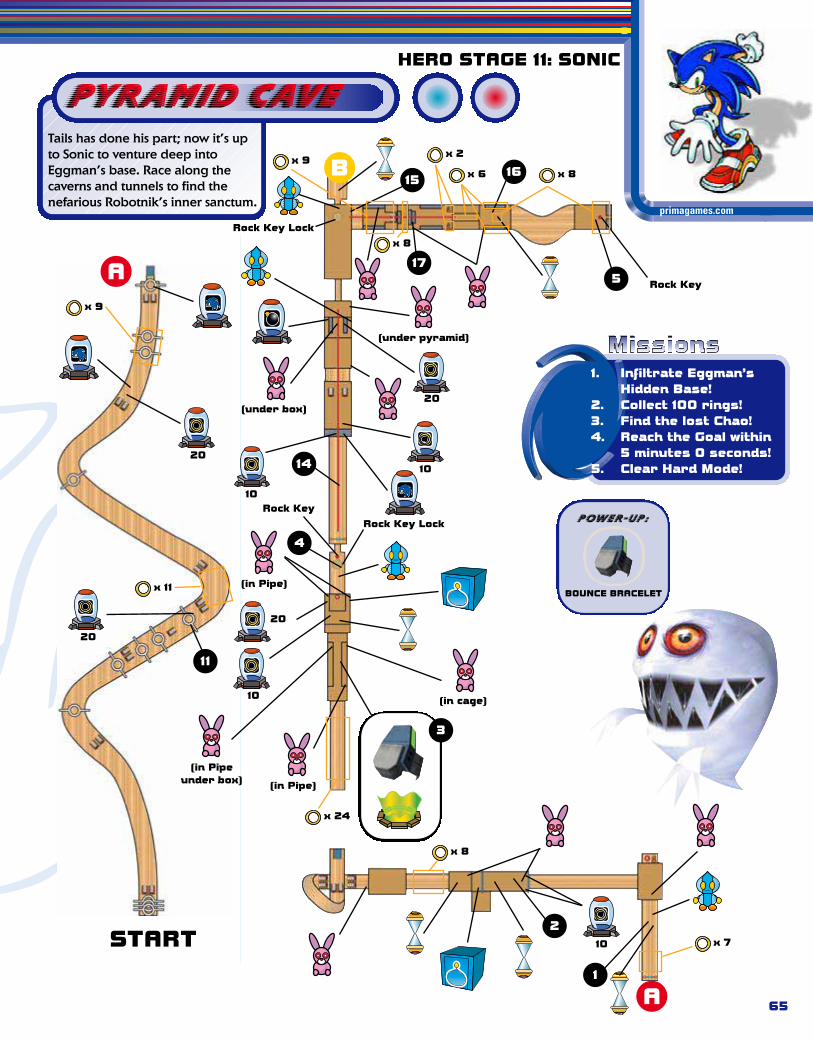
HERO STAGE 11: SONIC
65
A
A
B
START
20
10
(in cage)
Rock Key Lock
20(under box)
(under pyramid)
Rock Key
(in Pipe)
(in Pipe)
20
1. Infiltrate Eggman’s Hidden Base!
2. Collect 100 rings!3. Find the lost Chao!4. Reach the Goal within
5 minutes 0 seconds!5. Clear Hard Mode!
Rock Key Lock
10
20
10
(in Pipeunder box)
POWER-UP:
BOUNCE BRACELET
Tails has done his part; now it’s upto Sonic to venture deep intoEggman’s base. Race along thecaverns and tunnels to find thenefarious Robotnik’s inner sanctum.
pyramid cavepyramid cave
10
primagames.com
1516
17
14
4
11
3
2
1
5
Rock Key
x 7
x 8
x 24
x 11
x 9
x 9
x 8
x 2
x 6 x 8

Prima’s Official Strategy Guide
66
B
C
D
C
D
5
10
(under pyramid)
(top level)
or
9
8
7
12
10
6
13
x 23
x 5
x 8
x 7
x 4
x 14

HERO STAGE 11: SONIC
primagames.com
67
The second ChaoContainer is just ahead.
Use the Gate Key as a weapon,throwing it at robots that get inyour way as you return to the door,or simply put it down and deal withthe robots.
You encounter the first Hourglasshere. Jump on it to flip it over. Thedoor just ahead stays open while thesand runs down in the glass. Getthrough it before time expires.
1
Two Swing Bars are here. If you dropdown, smash the Chao Container andflip the Hourglass. Out of the wallcome steps for you to jump up. Theyretract as the sand spills down, sohop up them quickly.
2
The Bounce Bracelet waits for youhere. Grab it, then deal with the tworobots ahead. To the right is a Cagecontaining a Skeleton Dog. Smash theWooden Container and then the SteelContainer, and you’ll be able to grabthe special animal.
3
Pick up the Gate Key in front of thedoor and place it on the raised dais.It will fit itself in and open the door.
4
Mission 1:Infiltrate Eggman’s Hidden Base
Grab the green Gate Key. Carry it backto the main path and fit it into the daisin front of the locked door.
5
Hit the Hourglass and then run likecrazy down the hall. Try to stay in thecenter, juking the Ghosts that want toslow you down. At the end of the hallis a pit and a door. If you were fastenough, avoid the pit and get underthe closing door. If the door is closed,drop into the pit and try again.
6
When you have Sonic’s MysticMelody—found in Hero Stage 16:Final Rush—play it near this AncientRuin. A line of rings will appear. Giveit a second to fully appear, then LightDash up it to a Pulley. Jump to theplatform you find there.
7
Play the Melody again and Light Dashup the newly formed rings. You cannow fall onto a Rail or drop toanother platform. The platform has aMissile and an Extra Life. The Railleads to the third Chao Container.
8
Here’s the third Chao Container.Bounce up to the Pulley, and at theback of the platform is a Switch thatactivates a Rocket. Ride the Rocketback to the regular path.
9
Hit this Hourglass, then press I toSpin. Release I and you’ll shoot upthe incline and through the closingdoor. Just running won’t get youthere in time.
10

Prima’s Official Strategy Guide
68
The first tunnel contains ring ItemBoxes. Grab them for a good starton your century.
11
Instead of using the Swing Bars, dropdown and grab the two ring Item Boxes.
2
Mission 2: Collect 100 RingsFor being a later Stage, Pyramid Cave is replete with rings and ring Item Boxes. You can collect 100 of them before you'reeven halfway through the Stage. Study the map to find the various groups of rings.
Make the Spring appear with a quickbit of music.
12
Hit the Hourglass and then use theSwing Bars to cross the void. Youneed to cross quickly in order to getthrough the door. The blue guy is juston the other side.
13
Mission 3:Find the Lost ChaoGo to the second set of Ancient Ruin on the regular path.Play the Mystic Melody, and a Spring appears. Use it toreach a higher path, and use the Swing Bars to reach thelost Chao.
Ride this Rail to cut time. You needto move quickly.
14
For this Gate Key, it may behoove younot to ride the Rail. Instead, smashthe robots on the way to the GateKey so you don’t have to deal withthem while you’re carrying it back.
15
Mission 4:Reach the Goal within4 Minutes 0 SecondsYou can do a few things to ensure success in under fourminutes. First, practice grabbing all the Swing Bars; they’re amuch quicker way to travel. Rails can also speed things up.Don’t worry too much about loot; bunches of rings won’tmean anything if you don’t finish in under four minutes.
Once you obtain the Gate Key, yourproblems begin. This Hourglass isimpossible to reach while holding theGate Key. Toss the Gate Key onto theblocks that the Hourglass is on. Jumpup, grab the Gate Key, then hit theHourglass and run out the door.
16
These ledges are too high to jumponto with the Gate Key in hand. Stepa little bit back from the ledge, jump,and toss the Gate Key up. Jump afterit and pick it up. Repeat.
17
Mission 5:Clear Hard ModeHard Mode in Pyramid Cave, like so many Hard Modesbefore, adds bad guys and a few twists to make your life alittle tougher. Your path is now littered with Ghosts. Youcan attack them, but you can avoid them rather easily, too.The E-Series Robots are much faster-shooting than before,and the doors close more quickly after you hit anHourglass. The hardest changes, however, come when youneed to grab the green Gate Key.

HERO STAGE 12: KNUCKLES
primagames.com
69
Time to take a break from searching for all those Emerald pieces. This time, look for thecrucial Gate Keys. Dr. Eggman’s plans are progressing faster than expected. If you cancollect the three Gate Keys, you might just stand a chance against him.
Death ChamberDeath Chamber
10
A
AB
B
(under ledgeand inside box)
(in Pipe)
(in Pipe)
(in Pipe)
(in scarab)
START
(undergolden mask)
1. Find the 3 Gate Keys!2. Collect 100 rings!3. Find the lost Chao!4. Find the 3 Keys within
5 minutes 0 seconds!5. Clear Hard Mode!
POWER-UP:
HAMMER GLOVES
(runs aroundcentral core)(on lower level)
(in scarab)
(underledge andin a box)
10
C
x 16
x 24
x 5
x 6
x 10
x 6
x 6
x 4
x 4
x 6
5
2

70
Gate Keys usually are not in the main rooms of each area. Check theside passages, where you’ll often find Gate Keys hidden in walls orunderground.
A whole world exists under thePyramid Core. Open the trapdoorto it by playing the Mystic Melodynear this ruin.
2Mission 2: Collect 100 RingsRings are everywhere in this Death Chamber. Findingenough to complete this mission should be a breeze.
Although the main areas hold manyrings, don’t forget the many stringsof rings on the paths from one areato another.
The Pyramid Core is a good place tofind rings. They circle the edge of thelower level.
These large murals on the wall areoften doorways to other areas.Position yourself over the blanksquare in the painted capsule. Dig toget through to the other side.
Cor
10
x 19
6
3
7
9
10
8
4
The first order of business is to findthe Hammer Gloves. Luckily for you,it’s nearby. Pop the Hourglass to runthrough and find the WoodenContainers on your right. Bingo.
1
Familiarize yourself with the layout ofthe Stage. The place is divided intofour main areas: blue, red, green, andthe Pyramid Core. Each area connectswith the Pyramid Core or each other.Also, color maps with a “You arehere” blinking light are locatedthroughout the stage.
These Hourglasses control nearbydoors. The Hourglass isn’t alwaysplaced directly in front of the door,so be prepared to look around afteryou’ve bopped one. Hourglasses alsocan control hidden platforms, traps,or any other interactive object.
Mission 1: Find the 3 Gate Keys
Prima’s Official Strategy Guide

HERO STAGE 12: KNUCKLES
primagames.com
71
Mission 3: Find the Lost ChaoOne of the Chao has become lost again. With all the nooks and crannies in this Stage, there’s no way it's going to get out by itself. Can you help it?
In the Pyramid Core area, find theAncient Ruin and the trapdoor itopens. Flip the Switch at the bottomto open a door on the opposite wall.Time is limited, so hurry.
3
After swimming through a fewtunnels, you come up for air in thisroom. An Hourglass in the upperwalls opens a door directly above it.
4
Timing is everything here. The door stays open for only a short time. Afterhitting the Hourglass, Glide out to the opposite wall. Grab the wall at thelevel of the door and Glide again over to the opening. If you simply climbrather than Glide over to the door, it’ll be too late.
Mission 4: Find the 3 Keys within 5 Minutes 0 SecondsIf you don’t find the Gate Keys quickly, Dr. Eggman will progress with his plans. You can’t let that happen.
Study the maps so that you can reachthe desired area quickly. Have you beenusing the colored maps within thestage? If you lose your bearings, checkthese to see where you are. Theblinking white light marks the spot.
Activate the nearest Hint Boxand get going. Until you have allthree hints, do not pass up anopportunity to activate any HintBox you pass.
The first Gate Key is in this room.Destroy the robots here before tryingto find the Gate Key. You don’t needtheir pesky lasers as you’re lookingfor the Gate Key.
5
The Hourglass on the ground pullsout ledges on the walls to allow youto break the Steel Containers. Whenthe Steel Containers are broken, youfind another Hourglass that controlsthe trapdoor in the room’s center.Dig when it’s open to grab the firstGate Key.
Start holding your breath. The secondGate Key is underwater. Activate theAncient Ruin to open the trapdoor anddive down. The Hourglass still opensthe door on the other side, but itcloses much more quickly now.
6
Mission 5: Clear Hard ModeMore enemies have been let loose in these sandy areas. The three Gate Keys are hidden better this time.You’ll need all your sleuthing talents to find them all.
Collect plenty of rings beforeyou dive underwater. The robots’rapid laser fire is dangerous and you’llneed all the help you can get.

Prima’s Official Strategy Guide
72
Don’t worry about the Ghosts. All theydo is slow you down; they won’t hurtyou. The Gate Key is near the spinningspikes on the far end of the last room.
8
You can’t destroy the robot in thenext room, so do what you can toavoid its fire. Change yourswimming direction to dodge thelasers. Pop the Hourglass and swimon through to the next room.
7
Before leaving, how about surfacingfor a little air? The inverted room uphere contains the Hourglass you needto find the last Gate Key. It’s the sameHourglass that you used to free thelost Chao in Mission 3.
9 10
If you can’t reach the inverted room,flip this switch on the ceiling.
After bopping the Hourglass, jumpback into the water and dive
directly down. At the bottom is alittle alcove with a Gate Key in it.
Hurry, it’s closing fast!
Knuckles has dealt with creepy places before, but now he's up against the big daddy of all things haunted. This spookycharacter is King Boom Boo, and he's looking to get Knuckles in his clutches. Try to disappoint the big baddie.
Boss AttacksKing Boom Boo has three attacks he uses to bring you to his side of thinking—the dead side, that is. He comes at youwith a chomp from those vicious teeth, he can throw blue balls of fire, and he breathes a wall of flame at you.
Knuckles vs King Boom BooKnuckles vs King Boom Boo
The strategy is simple; run in a circle. Make sure that yourun around the platform at the very edge—don’t worry,you won’t fall off. If you go around too fast, King BoomBoo will turn and charge you from the other direction.So, stay on the outside edge and run. This keeps you safefrom all attacks.
When the Ghost King leans down and startsbreathing fire, keep running. You’ll end up finding hiscrony, a small Ghost holding an Hourglass. Hit him andthe windows will open to let in sunlight. King Boom Boowill freak and hide in the ground.
The shadow of King Boom Booruns around for a bit before itstops and starts vibrating. That’sthe time to Dig at it.
After the first hit, theGhost King's shadow willclimb the wall. Climb afterhim and use Dig to pryhim out. Give him fourhits and you're done.You've defeated the Kingof the Ghosts. Good job.
When the big guy starts blowingfire at you, it’s time to attack.
Those choppers can make adent in Knuckles. You’d think aGhost wouldn’t have sharpteeth. You’d be wrong.
See his shadow in the floor?Catch up to it and use the DrillClaw move to Dig him out. Thenchase him down and eitherPunch him or Glide into him.

primagames.com
73
BOSS: EGG GOLEM
If you fall into the sand, simplytap the jump button repeatedlyuntil you reach some rings and Pulleys.
Once you've evaded the Golem’s attack, run aroundto his backside. To defeat the Golem, use the HomingAttack on the top of his head. Jump up the largerplatforms on his back until you reach the topmost threeplatforms. Notice the flashing yellow Emblems on thoseplatforms.
Repeat this a few times until you see the Golem’shealth meter go empty.
The quickest way to defeat theGolem is to keep moving. Whileyou’re running around the catwalk,throw in a Homing Attack to gaindistance quickly. Keep this up, andyou may never be directly in front ofthe Golem during his attacks.
Now you’ve done it. Dr. Eggman is upset more now than ever before. Now he wants your lives as well as the ChaosEmerald. Of course, he won’t fight you himself. Instead, he calls up the humongous Egg Golem to do his dirty work forhim. The Golem is big, very big. Not to worry though; the bigger they come….
Boss AttacksWhile the Egg Golem may be big, you’re much quicker. If you can anticipate his next move, you can defeat him withouteven being touched. Watch for signs of his three different attacks.
Sonic vs Egg GolemSonic vs Egg Golem
The Egg Golem’s most commonattack is a single fist slam. Duringthis attack, he slams down onefist, followed by the other. Startrunning when you see thiscoming. Be careful not to run intothe second fist as it comes down.
Possibly the most dangerous of theEgg Golem’s attacks is his double-fisted attack. With thunderous force,the Golem slams down both fists atthe same time, followed by a head-butt. The danger in this attack is thatit leaves you little room to run. Waitfor the fists to drop, then movetoward either one. Stay close to thefists so when the head comes down,you won’t be butted.
Sonic’s Homing Attack homes in onthe yellow Emblems. Use them toquickly reach the top.
The Egg Golem’s final attack is adouble sweep of the hands. Inthis attack, he puts his handsalong the walkway and sweepsthem around twice. It’s possibleto clear the hands with a jump,but that’s risky. Instead, jumpdown to the sand below.

Eternal EngineEternal Engine
Prima’s Official Strategy Guide
B
Laser Patterns(in descending order)
(in box)
10
10
10
5
5(in Pipe)
(in Pipe)x 3
x 6
x 8
x 6
x 8
x 8
1314
1812
11
10
15
74

HERO STAGE 13: TAILS
primagames.com
START
A
A
B
or(in box)
5
20
5
5
(in boxes)
Upper Level
(in Pipe)
(health)
(in Pipe)
75
7
8
6
9
5
4
3
16
1
2
x 4
x 4
x 4
x 4
x 4
x 8
x 3
x 4
x 6
x 6
x 6
The Eclipse Cannon must be destroyed. Theproblem is that it was designed to withstandany external attack. It’s up to you, Tails, tofind a way to destroy it from the inside.
1. Destroy the colony’s power generator!
2. Collect 100 rings!3. Find the lost Chao!4. Reach the Goal within
5 minutes 0 seconds5. Clear Hard Mode!
POWER-UP:
BAZOOKA
(in Pipe)

Prima’s Official Strategy Guide
76
Up to this point, some simpletargeting and shooting does the trick.In this room, however. Bombs dropfrom above. If you make it quick, youcan reach the Spring on the rightbefore any Bombs are dropped. At thetop of the Pulley, before you jump tothe next one, scan the area and shootthe Bomb-dropping robot here.
1
Be careful not to hit the Dynamitepacks on any of the walls. Doing soopens up a hole into space that cansuck you out.
The Switch to open the next door isin this room. Do not shoot the boxeshere until you’ve flicked the Switchon the far side. A stray shot canblow up the door there and make itdifficult for you to reach the Switch.Looking for a Chao Container? That’sin here, too.
2
Drop straight down off this edge.Walk over the button to fire theRocket into the Cages before usingthe Elevators to get across.
3
Mission 1: Destroy the Colony’sPower Generator
In this room, stay near the door andblow up the Tank between the twoboxes. Underneath it is a Switch thatdisables the trap. After the Switch isexposed, hug the right wall and walkaround the rectangular shadow on thefloor. After the Switch is flicked, usethe left Spring to reach the top of thetrap, where a Pulley awaits.
4
There are two Artificial Chaos here.To defeat the robots, target andpummel them with gunfire as youwalk toward them. Constant fireprevents them from shooting outtheir tendrils and knocking your ringsfrom you. Eventually, they’ll exposethemselves and your gunfire will hittheir vulnerable spot.
5
For the second Chao Container,destroy these Steel Containers. You’llneed the Bazooka to do so.
6
Make sure you land between thelasers on these platforms. You can letthe platforms drop below the lasersand still be safe if you keep your cool.
In this area, be careful what youshoot and where you’re standingwhen you do. Plenty of Dynamitepacks are here for you to accidentallyshoot. When the Dynamite goeskaboom, so does your walkway.
7
What’s this? Can you see theSwitch below? Drop down onlyif you want the Chao Containerfrom . After the Switch isflicked, use the Pulley to launchyourself back to the door ahead.
9
You need some extra firepower if youexpect to get any farther. There are twoways to reach the Bazooka. The first istricky because you must flick the Switchat the end of this walkway. Dispatchingthe enemies while preserving thewalkway is the tough part. If yousucceed, flick the Switch and drop belowto enter the room.
8
If the walkway is destroyed, theBazooka can still be yours. Drop allthe way to the bottom platformwhere you’ll find another Switch. ThisSwitch also opens up the door at top.To get back up there, use the Springand floating platforms.
1110

HERO STAGE 13: TAILS
primagames.com
77
Be very careful what you shoot inthis room. The Pulley is right above aDynamite-rigged floor. If you blow outthe floor, the Pulley becomes muchtougher to reach. However, all isn’tlost if you accidentally blast it. Get arunning start and jump when you’re ashort distance from the edge of thehole. Turn on your Boost to resistbeing sucked into space and grab thePulley.
12
Relax and enjoy the ride. You can’t fallhere, so spend your time targeting andeliminating the enemies. To stop theSomersaults, tap the Boost to keepyouself right-side up. You can aimbetter this way.
13
The best way to reach the bottomfloating platform is by using controlledfree falls. Free-fall (do not use Boost)until you see lasers blocking your way.Use Boost just before reaching a laserin your way and move away from itbefore going back into free fall. Thisgets you down quickly while avoidingthe floating enemies.
14
Mission 2: Collect 100 RingsWhile there are plenty of rings for you to collect on this Stage,holding on to them is the real challenge. Tough enemies and thedanger of being sucked out into cold space help prevent you fromreaching the Goal Ring. The key is to not miss any rings whilestrategically engaging enemies.
The two Artificial Chaos robots hereare the first real threats you face.Maintain your distance as you open thedoors to avoid their long-reachingtendrils. Target them and approachwhile rapidly firing your weapon. Yourgunfire will destroy them as they poptheir heads from their protective cover.
5
It’d be a shame if you lost all yourrings after getting this far. TheseDynamite-laden catwalks leave youopen to enemy attack from all sides.Scan the surrounding area with yourLock-on and remove the enemy’selement of surprise. This candetonate many of the walkways, but afew well-placed jumps is a smallprice to pay for keeping your rings.
7
If you’ve been diligent in yourring-collecting adventures, youshould be close to, if not already,done. If you missed some, grabwhat you need here.
15
Mission 3: Find the Lost ChaoWhen was the last time you saw a Chao in space? Exactly. Get the Chao outta here before thelack of atmospheric pressure boils its blood and it splatters all over your pretty fur. To do so, youneed Tails’s Mystic Melody and the Booster.
Hop over to this out-of-the-way ledgeand play the Mystic Melody to bringup the familiar floating platforms.Make your way to the top.
16
The timing on the last jump to thisplatform is tricky. Time it so that youjump just as the platform ahead isabout to reach its farthest point on theleft. Aim for the break in the middle. Ifyou miss and fall, don’t panic. Use theBoost to bring you back to the lowerplatforms and try again.
It looks a little far from here, butyou can make it with a Boost. Jumpwhen the platform is all the way leftand cruise on through; the dooropens as you approach.
How many floating platforms can aship have? To reach the far side, usethis one as a stepping-stone. Fromhere, you see those lasers up aheadbut nowhere to shut them off. Useyour Boost to go over them and landon the other side.
17

Prima’s Official Strategy Guide
78
Mission 4: Reach the Goal within5 Minutes 0 SecondsTime is of the essence. Keep moving and don’t make any mistakes.
There are no Point Markers in thismission. If you fall off an edge or getsmacked by an enemy, you start over.The key here is to keep moving.Do not stop to dispatch anyenemies unnecessarily.
By this point, you’ll realize howimportant free falling is. With only afew seconds left on the clock, freefalling is the fastest way to reach thebottom. Once there, shoot thegenerator as fast as your callousedthumbs can move.
14
MISSION 5: Clear Hard ModeAs if you didn’t have enough to worry about on this Stage, they’ve goneand made it less fox-friendly. Keep an eye out for new dangers.
To reach the Spring in this room, youmust destroy those Steel Containers ontop of the pile. You should have theBazooka by now (found in this Stage’sfirst mission). So hop to it.
1
In some rooms it’s better to runthrough and avoid the enemies ratherthan try to destroy them. Rooms likethese have Dynamite packs on thewalls and floors. It’s safer to just runthrough than to come in with gunsa-blazing.
They moved the Switch in this room.Look under the far left box. Be carefulnot to shoot the door behind it.
2
Before jumping to the trap, destroythe floating robot waiting for you atthe top.
4
There are fewer platforms here, and they’resmaller. You can’t dodge these lasers, so timingis everything. Hop onto the first platform as itrises above the lasers. Then, wait for the nextone to start its rise before hopping over to it.
6
The Dynamite packs are placed indifferent places here. Be carefulin which direction you shoot ifyou’re standing on a section thatcan be destroyed.
7
As you drop to this final platform,scan the area and keep hitting the firebutton. They've added robots near thegenerator that’ll shoot at you.
28

HERO STAGE 14: KNUCKLES
primagames.com
79
A
BA
B
C
20
10
10
5
5
START
(in Pipe)
(in Pipe)
(in Pipe)
(in Pipe)
(in box)
x 8
x 6
x 6
20
x 6x 6
x 6
x 4
x 4
x 4
x 14
4
3
6
5
10
7
8
12
9
x 6
Meteor HerdMeteor Herd

C
The treasure hunting hero has made it to ARK. Now he needs to find more of theMaster Emerald. This area is unlike any other you’ve visited with the red echidna.Step carefully.
Meteor HerdMeteor Herd
1. Find 3 pieces of the Master Emerald!2. Collect 100 rings!3. Find the lost Chao!4. Collect the Emerald Shards in
4 minutes 30 seconds!5. Clear Hard Mode!
POWER-UP:
SUNGLASSES
or5
10
Meteors rain down constantly. Stayon the move to avoid being tagged.It never lets up, so don’t get toocomfortable.
These Meteorech can be sent flyingby a quick Punch. If you run andPunch, they’ll fly farther. Meteorechreappear when you turn your back onthem. Punch them into doors orboxes to bust them open.
1
Find this Meteorech on a platform.Line up behind it, take a runningstart, and Punch the rock into thedoor facing it. It’ll pop to reveal aSteel Container. You need HammerGloves—found in Hero Stage 12:Death Chamber—to break the box.
2
Mission 1: Find 3 Pieces OF THE Master Emerald
Because you’re in space, thegravity is much lower here.Knuckles can jump much higher,and he descends more slowly as heGlides. Take advantage of this whenyou work your way up the platforms.Press and hold U to see how far upyou can send the little red guy.
Kick the Switch that the SteelContainer reveals. Then climb thetower a ways and drop down into theopen area. On the lowest platform,you find the Sunglasses.
3
These are the stars and moonsthat the Hint Box talks about.Unfortunately, there are many, souse the other clues to narrowyour search.
These structures are the rotatingbeacons. Again, there are many, butthe clues mention them often.
Prima’s Official Strategy Guide
80

HERO STAGE 14: KNUCKLES
primagames.com
81
primagames.com
Mission 2:Collect 100 RingsThe biggest obstacle to getting 100 rings is the constantthreat of being hit by a Meteorech. One blow wipes out anyprogress you have made toward the 100 mark. The bestadvice is to keep on the move. Stay still too long and you’llbe targeted. Of course, you could also run smack into afalling rock, so a safe passage depends on luck as well.
Clean out the rings in the base areabefore you launch higher. You canmake a good start on the ground, andfalling won’t be an issue.
4Mission 3:Find the Lost ChaoThe Ancient Ruin is far up in the air, in the highest reaches ofthe level. Use the Rockets to get up there quickly and thenplay your Mystic Melody—found in Hero Stage 2: Wild Canyon.
This Warp Hole will appear. Jump into be transported into a container,where you find another Ancient Ruin.Play the Melody again and use thesecond Warp Hole that appears.
5
And here’s that Chao you’ve beenlooking for. Make it happy by pickingit up to end the mission.
Mission 4: Collect theEmerald Shards in 4Minutes 30 SecondsWhen you’re familiar with the Stage, the Hints will makemore sense. Use the Rockets to get you up high quickly;jumping from platform to platform wastes too much time.
This area is referred to often inseveral missions, but we’ll mentionit here. This can come up in theclues as “many meteorites” orsimilar phrases.
6
Mission 5: Clear Hard ModeOnce again, you need the Sunglasses to finish the HardMode. Luckily, they're found on this level—see Mission 1 inthis section. Once you’ve got the super specs equipped, youcan tackle Mission 5. As always, the three Emerald Shardsare in the same places every time.
Find this Meteorech that you canPunch and then stand behind it. Tapit with a Punch to push it in front ofthe door closest to it.
When it’s more or less in front of thedoor, Punch the Meteorech into thedoor to bust it open. Ta-da, there’sthe first Emerald Shard.
Find your way to this platform witha steel beam sticking out of it and
an Extra Life on the end of thebeam. Walk out onto the beam to
the very edge and use theSunglasses to reveal the Spring.
9
It may take some effort to maneuver the Meteorech in front of the door.Don’t despair; keep giving it taps with your Punch until it’s lined up.
87

Prima’s Official Strategy Guide
82
When you’ve hit the floating Springand reached the peak of the jump itgives you, start your Glide and flyinto the Emerald Shard floatingthere. It’s a tough job and mayrequire a few tries.
The third Emerald Shard is way uphigh. Take the Rockets to get to thisblue moon station, on the second-highest tier of platforms.
10
Jump high and then Glide straightaway from the blue moon. The lastEmerald Shard waits out in the sky.
Step onto the Spring and maneuverKnuckles onto the floating Spring thatyou are launched toward. Do notpress U while trying to hit thefloating Spring. Doing so wouldremove the Sunglasses, and youwouldn’t be able to hit it.
It's you against Rouge. She thinks you should give her the Emerald Shards you've found. Let's see her try to take them.
Boss AttacksRouge's attacks should be familiar to you; they're the same as yours. Remember that although she can attack whilestanding, she can also perform her Sliding attacks while running. In addition, she has a long-range wave attack that canreach you from afar.
Knuckles vs RougeKnuckles vs Rouge
Throw continuous attacks at her. Eventually, she'll stop moving and you'llactually hurt her and prevent her from hurting you.
When the ground is open and Rouge is somewhere on thebeams, it can be hard to find her. Climb high and Glide ina circular motion so you have a view of the arena. Findher and charge.
Keep moving to avoid her attacks. In the meantime, throw in your own Sliding Punch attacks asyou move. Though you can’t hurt her while she’s moving, you can be hurt if you’re not attacking.
Periodically, the floor opens up and the hot air lifts you off theground. When this happens, take the fight to the beams.
The beams are actually aneasier place to engageRouge. The narrow widthlimits your movements, butit also limits hers. Attackher as she stops to catchher breath.
If Rouge decides to climb the supports, resist the urge notto follow her. From the supports, she can come right down on yourvulnerable echidna head.
Rouge's Wave Attack can mean the end of you. You can tell it's coming when shescreams, "Here I come!" Convenient. When she does, get ready for flight. Jumpand start Gliding. It doesn't matter what direction, just get the heck out ofthere. Her wave attack has less chance of hitting you when you're in the air.

HERO STAGE 15: SONIC
primagames.com
83
Looks like Knuckles and Rouge are starting to understand each other. For right nowthough, let's worry about the job at hand: Find Dr. Eggman!
Crazy GadgetCrazy Gadget
Things get really weird around here.Switches throughout this Stagechange the gravitational field. If youdon’t keep your bearings, it’s easy toget lost.
1
The Artificial Chaos robot here won’t waste time reaching out to hurt you.Stand at the beginning of the row of rings and Light Dash toward it. If youdo not run as you Light Dash, you’ll become up close and personal withArtificial Chaos—too close for its already outstretched tendrils to reachyou. Wait for the lasers to shoot out of the way, then jump and use theHoming Attack to get past the Artificial Chaos.
2
After a few changes of the gravitationalfield, you wind up here. Which to choose?The Gravity Control Switch in the middlespells doom. The Switch on the right iswhere you want to go. The left Switch issafe, but it eventually takes you to wherethe Switch on the right does.
3
When you come off the Rail here, beready to face another Artificial Chaos.The best way to deal with it is to jumpup and sideways to avoid both thetendrils and laser beams.
4
There is an Ancient Ruin in the cornerhere. Make sure you have a few ringson you in case you miss the jump. Theplatforms lead you to the ceilingwhere you can change the gravity andtravel an alternate route.
5
The P-100 Chaos here breaks intomany little Cells. Use the BounceAttack to bounce your way toward thefloating “head” and smack it. If youbounce high enough, you can add aHoming Attack to speed things up.
The Beetle robots here are nothingnew. What is tricky is the string ofrings after the last robot. Afterbopping the last ‘bot, ready the LightDash and hit it just as Sonic falls bythe rings. A Chao Container awaitsyou on the other side.
6
When you flick the Switch here, itseems natural to walk forward. Fornow, back up and use a Spring in thecorner. Notice anything special?That’s called the Flame Ring. You canbust through Steel Containers now!
7
If you continue past the Flame Ring,you’ll notice two Rails at the edge.Ride one of them across the pool ofnasty green liquid below. The secondChao Container is here, covering aSwitch. The Switch reveals a string ofrings you must use to get back.
8
Mission 1:Hurry and Find the Eggman
1. Hurry and find Eggman!2. Collect 100 rings!3. Find the lost Chao!4. Reach the Goal within
5 minutes 0 seconds!5. Clear Hard Mode!
POWER-UP:
FLAME RING

Prima’s Official Strategy Guide
A
A
B
START
10
5
10
(in crate)
(in air)
(in crate)
(in box)
(on ceiling)
(on ceiling)
(on ceiling)
(on ceiling)
(in Pipe)
(in Pipeon ceiling)
(in Pipe)
(on ceiling)
(on ceilingabove check
point)
84
Crazy GadgetCrazy Gadget
x 8
x 7
x 3
x 8
x 6
x 6
x 7
x 5
x 8
x 8
x 4
x 7
B
17
2
1
16
3
18
4
5

HERO STAGE 15: SONIC
85
C
D
5
5
(in crate)
(on ceiling)
(in box)
(in wall)
(in box)
(in box)
(under chao box)
(in crate)
(in Pipe)
(in crate)
primagames.com
x 7
x 7
x 4
x 13
x 49
x 8
x 10
x 11
x 11
x 12
x 24
x 6
C
D
8
6
19
18
7
11
10
E
9

Prima’s Official Strategy Guide
86
5
(in cage)
x 7
x 11
x 6
x 10
x 11
1521
20
14
13
19
12
or
E

HERO STAGE 15: SONIC
primagames.com
87
Looks like there’s no way out of heredoesn’t it? Break open the SteelContainer in the center of the room.
9
The beam here is narrow and treacherous. Walk toward the spinning spikes,timing it so that you get close to its center without being swiped off. Then jumpand land on the other side. After destroying that Beetle robot, you can continue.
10
After crossing the beam, you canchoose to reverse the gravity or not.If you don’t reverse the gravity, youcan continue on. If you do reversethe gravity, you can reach the ChaoContainer on the other side. Firstlaunch the Rocket to remove theforce field.
11
Here we go. If you haven’t becomedizzy yet from all the walking on theceiling, now’s the time to pull out thebarf bag. Now we have coloredfloating rectangular boxes to go backand forth to. The general rule here isto flick any Switch you find and letgravity take you to the next box.
12
Don’t be in such a hurry when youreach this edge. Falling off isn’t theonly danger. Use a Homing Attack todestroy the scoundrel and land safelyon the blue box.
To reach the Goal Ring, this Switchmust be flicked.
13
This T-shaped block is the first onethat has two Switches. Flick the onehere to take you to the Goal platform.
14
There’s a button and a Rocket hereonly if you turned on that Switchearlier in . Launch the Rocket andgrab the Goal Ring.
15
Mission 2:Collect 100 RingsThe hardest part about collecting the 100 rings is holding onto them. The Beetle robots and their long-reaching tendrilsare the biggest thorns in your side. Keep your cool.
Collect all the rings and ring Item Boxesyou encounter. Watch out for the robotthat drops down here. You don’t need asetback this early in the stage.
16
Before flicking this Switch, drop downbeyond it to find a ring Item Boxamong the boxes. Then use the Springsand Rails to return to the Switch.
17
This Rail with the strings on it shouldbe the last of the 100 rings if you’vebeen diligent in your collection ofthem. If not, continue on and avoidbeing hit.
18
If you’re confident in your jumpingability and need a good cache ofrings, jump over to the Ancient Ruinand make your way to the top; there’sa big load of rings up there on theceiling at .
5
If you fall off the beam,you can still finish theStage. It just means youwon’t be able to grab theChao Container.
13
19

Prima’s Official Strategy Guide
88
MISSION 3:Find the Lost ChaoNot again! These Chao seem to have a talent for losingthemselves in dangerous, out-of-the-way places.
After flicking the Switch to enablethe Rocket to the Goal Ring, you’replopped on a red, T-shaped box. Flickthe one Switch you didn’t last time toland on this purple box.
20
Use the Mystic Melody and follow thestring of rings to the other side ofthe red T. There it is.
21
Mission 4:Reach the Goal within5 Minutes 0 SecondsFive minutes is tricky to achieve with all the changes in thegravitational field. If you keep your bearings true and yourfocus clear, you’ll have time to spare.
Five minutes is a tough time to beat.To do so, you’ll have to pass upmany enemies.
Light Dashing is key. The Light Dashmoves you along much more quicklythan simply running.
Mission 5: Clear Hard ModeThese Hard Modes are becoming more and more difficult. This Stage poses a particularlyunique challenge with its gravitational fields. The dangerous Beetle robots are morenumerous, and some of the Gravity Control Switches behave differently.
Here’s where the first real changein the stage takes place. You mustnow hop up on these boxes to getany farther.
17
As the Spark Beetle charges, hoponto the Rail. Float slowly toward the‘bot until it drops its shields. Use theHoming Attack to destroy it, then waitfor Sonic to reach his peak heightbefore aiming for the next ‘bot.Repeat with the last one and make itto the ledge above.
18
The final wrench in the gears for you in Hard Modeis the Switch to the final Rocket. It’s been movedto this point. The problem is that it’s covered by acrate. Fiddle with the tow Switches here touncover the Switch. Timing is everything.
19

BOSS: DR. EGGMAN
primagames.com
89
When fleeing the laser, jumpand use your Booster. Boostinggives you more responsive controlover your movement. It’s great foravoiding the laser.
The explosives in the middle of the room can hurt bothyou and Dr. Eggman. Keep to the outer perimeter andshoot the explosives if he nears them.
When Dr. Eggman fires his Power Laser, it's time to run.Head toward him, but away from his line of fire. Bymoving toward him, you have a shorter distance tomove your slow vehicle out of the way. The laser lastsfor quite some time. Use this time to circle around Dr.Eggman and give him a taste of your cannons.
It’s up to you, Tails. Sonic’s been blasted off into space, and only you stand between Dr. Eggman and the Emerald.Sonic doesn’t ask much of you, so you cannot—must not—fail.
Boss AttacksDr. Eggman is faster than you, so keep on your toes. He can attack you in three ways: Cannon fire, Homing missile, andthe Power Laser. Keep your distance if you can, and don’t ease off the fire button.
Tails vs Dr. EggmanTails vs Dr. Eggman
Although it may seem that yourHoming Attack is the best way todispatch of Dr. Eggman, while morepowerful, it’s too slow to hitreliably. You stand a better chanceof hitting him with your regularcannon’s rapid fire. However, itdoesn’t hurt to target him and hopethat a Homing Missile will land.
Once you’ve taken a good bite intoDr. Eggman’s health meter, he pullsout his big Power Laser. This canmean the end if you’re not careful.

Prima’s Official Strategy Guide
90
A
B
A
START
10
5
(in box)
10
20
20
20
20
5
5
5
x 4
x 4
x 8
x 7
x 6 x 3
x 6
x 10
3
16
13
2
12
11
1
(in Pipe)
(in Pipe)
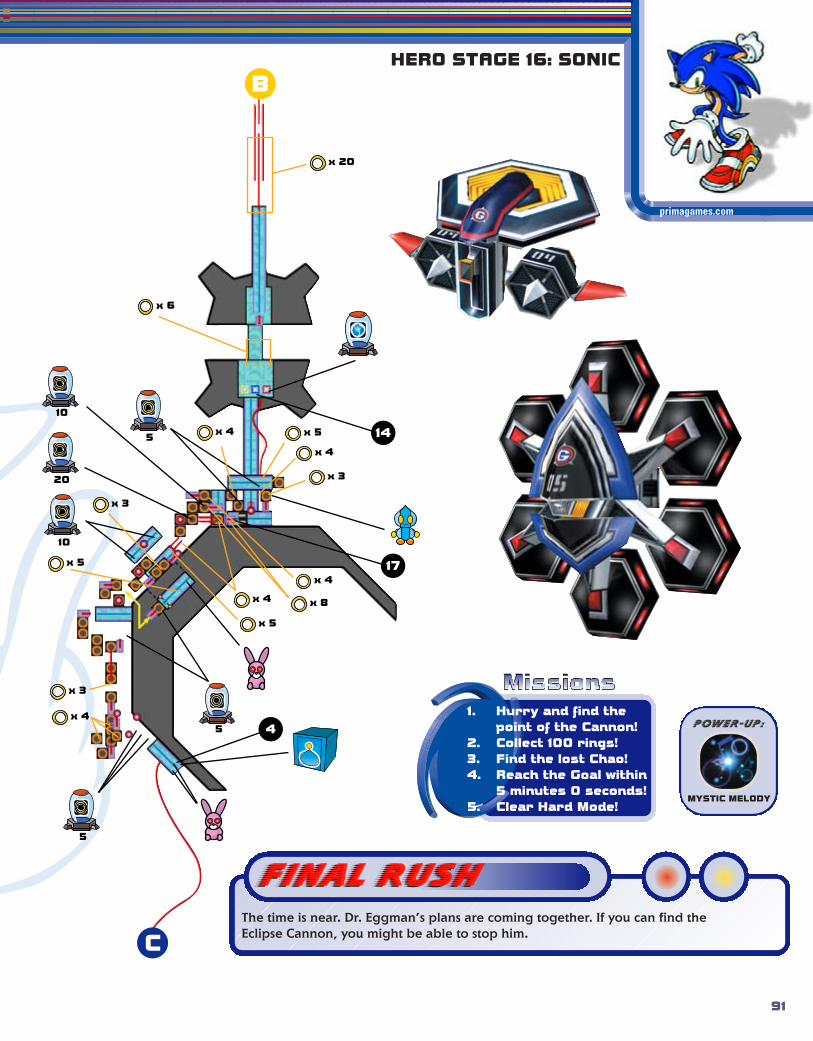
HERO STAGE 16: SONIC
primagames.com
91
C
B
5
5
5
10
10
20
The time is near. Dr. Eggman’s plans are coming together. If you can find theEclipse Cannon, you might be able to stop him.
Final RushFinal Rush
1. Hurry and find the point of the Cannon!
2. Collect 100 rings!3. Find the lost Chao!4. Reach the Goal within
5 minutes 0 seconds!5. Clear Hard Mode!
POWER-UP:
MYSTIC MELODY
x 20
x 6
x 5
x 4
x 4
x 3
x 8
x 4
x 4
x 3
x 5
x 3
x 4
x 5
14
17
4

Prima’s Official Strategy Guide
92
D
C
10
6
9
86
1015
5

HERO STAGE 16: SONIC
primagames.com
93
D
E
E
10
10
(in small box)
(in small box)
(in small box)
x 12
x 8
x 8

Prima’s Official Strategy Guide
94
Heads up, soldier. If you want the firstChao Container, skip over to the leftRail at the end of your ride. When youreach the vertical Rail, jump and usethe Homing Attack to push yourself up.You can clear the next ledge with asingle jump. Follow the Rails until youfind the Chao Container.
1
The second Chao Container is tuckedaway between the two UnbreakableContainers, just below the walkway.
2
For a shortcut, transfer to that Railon the right. If you miss, stay calm.It's a pretty steep Rail, and if youguide yourself as you fall, you standa good chance of landing on itfarther down.
3
If you blink, you’ll miss the thirdChao Container here. The Springsbounce you around very quickly. Assoon as you land on that Rail, jumpaway from the Springs and land onthe platform.
4
Mission 1: Hurry and Findthe Point of the Cannon
There are lots of parallel Railson this Stage. Transfer fromone Rail to the next by pressing theanalog thumb pad in that directionand hitting U.
Hold down I or O on this verticalRail. If you don’t, the Spring at the topwill be out of reach.
5
Hop off the Rail here to catch a rideon the Rocket. It plops you over anExtra Life Item Box. Follow theplatforms, which lead you to theMystic Melody.
6 All the choices on this Stage make itseem complex. Which Rail to take?Which direction to go? They all lead tothe same place in the end. Just keeppressing forward to reach the GoalRing. Check the map for details onwhat’s available on each route.
Mission 2: Collect 100 RingsThis Stage is full of rings. The trick is to know where they’ll appear next. The furious pace ofthe Stage makes them easy to miss. Know how to switch back and forth between Rails.
Study the map to know whenrings are coming up. If they’reon the next Rail over, prepare toposition yourself accordingly. RingItem Boxes are also important. Usethe Homing Attack to pop them.
The Rails often contain strings ofrings. Although it’s easier to stay onone Rail until the end, you can collectmore rings if you hop from one to thenext and back.
Plenty of Ring Item Boxes float about.Hop up and grab them. This can bedangerous, so make sure you knowhow to land after the Item Box ispopped before attempting this move.

HERO STAGE 16: SONIC
primagames.com
95
When you reach this platform,activate the Point Marker beforeawakening the Ruin. If you fall off theedge on the way to the Chao, you canstart again right here. Then activatethe Ancient Ruin to bring forth thetwo platforms floating to the right.
8
That’s right; you must tackle this curved,uphill Rail next. The combination of theRail’s curvature, its uphill attitude, andthe rotating camera angles make this atricky feat. The Homing Attack is thetool to use here.
9
Start by performing a jump, and usethe Homing Attack to propel yourselfonto the Rail. As soon as you stick tothe Rail, hold down I or O tocrouch. Crouching allows you to getmore distance on the Rail. This isimportant because the farther yougrind, the better the camera anglebecomes for your next jump.
Mission 3: Find the Lost ChaoHow the Chao got lost in this out-of-the-way room you’ll never know. For now, getting to it is theproblem. The Mystic Melody, precise control, and nerves of steel are the only requirements.
Because the Rail is uphill, you eventuallyslow to a stop. Just before you do, jumpagain and perform another Homing Attacktoward the Rail to propel yourself farther.Repeat this as often as necessary untilyou reach the next platform.The camera angles make it
difficult to judge in whichdirection to aim the Homing Attack. Tobe safe, jump as you normally wouldto set up the Homing Attack. But,instead of attacking at the height ofthe jump, wait until you fall closer tothe Rail. Doing this reduces thechance that you’ll fall off.
After you activate the next AncientRuin, the string of rings takes you tothis platform. Up ahead are somefloating Rails and platforms that leadto the next tunnel. Beware the Chaosrobot in the tunnel, and find the Chaojust beyond it. Whew!
10
Mission 4: Reach the Goalwithin 5 Minutes 0 SecondsTo finish this mission, you need detailed knowledge of the Stage. Many shortcuts can help youon your way, though they may prove a bit trickier. Do you take the safe route and risk notmaking the time? Or are you daring enough to take the shortcuts…and risk not making it alive?
In general, grind on all Rails.Grinding increases your speedand improves your time. However,remember from the earlier missionsthat on some Rails it is safer not togrind. This is why good map knowledgeis essential for this mission.
On the map, this Rail seems toprovide a shortcut. In reality, it savesyou a few seconds, but only if you nailit perfectly.
11
A better route is to hop over to theRail that leads right. If you don’t grindon the Rail leading up to it, you dropdown on it.
12
From the top of the Ramp, jump tothe Rail on the far right down below.The other two Rails eventually leadyou there, but why waste time?
13
Off to the right is a lonely Rail. Hop offthe Rail you’re on now and catch thatlonely Rail. If you miss, don’t fret;guide yourself as you fall, and you canstill catch it. This is a major shortcut.
3
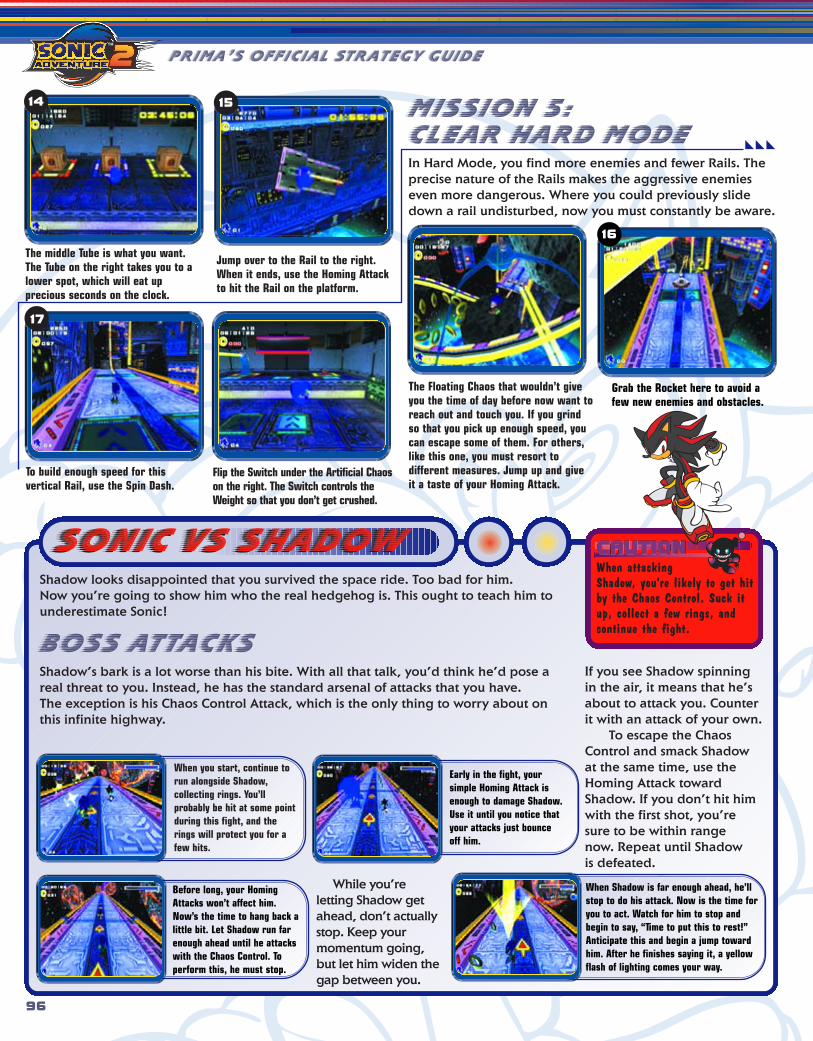
Prima’s Official Strategy Guide
96
Mission 5:Clear Hard ModeIn Hard Mode, you find more enemies and fewer Rails. Theprecise nature of the Rails makes the aggressive enemieseven more dangerous. Where you could previously slidedown a rail undisturbed, now you must constantly be aware.
The Floating Chaos that wouldn’t giveyou the time of day before now want toreach out and touch you. If you grindso that you pick up enough speed, youcan escape some of them. For others,like this one, you must resort todifferent measures. Jump up and giveit a taste of your Homing Attack.
Grab the Rocket here to avoid afew new enemies and obstacles.
16
To build enough speed for thisvertical Rail, use the Spin Dash.
17
The middle Tube is what you want.The Tube on the right takes you to alower spot, which will eat upprecious seconds on the clock.
14
Jump over to the Rail to the right.When it ends, use the Homing Attackto hit the Rail on the platform.
15
Shadow looks disappointed that you survived the space ride. Too bad for him.Now you’re going to show him who the real hedgehog is. This ought to teach him tounderestimate Sonic!
Boss AttacksShadow’s bark is a lot worse than his bite. With all that talk, you’d think he’d pose areal threat to you. Instead, he has the standard arsenal of attacks that you have. The exception is his Chaos Control Attack, which is the only thing to worry about onthis infinite highway.
Sonic vs ShadowSonic vs Shadow
When you start, continue torun alongside Shadow,collecting rings. You’llprobably be hit at some pointduring this fight, and therings will protect you for afew hits.
Early in the fight, yoursimple Homing Attack isenough to damage Shadow.Use it until you notice thatyour attacks just bounceoff him.
Before long, your HomingAttacks won’t affect him.Now’s the time to hang back alittle bit. Let Shadow run farenough ahead until he attackswith the Chaos Control. Toperform this, he must stop.
When Shadow is far enough ahead, he’llstop to do his attack. Now is the time foryou to act. Watch for him to stop andbegin to say, “Time to put this to rest!”Anticipate this and begin a jump towardhim. After he finishes saying it, a yellowflash of lighting comes your way.
If you see Shadow spinningin the air, it means that he’sabout to attack you. Counterit with an attack of your own.
To escape the ChaosControl and smack Shadowat the same time, use theHoming Attack towardShadow. If you don’t hit himwith the first shot, you’resure to be within range now. Repeat until Shadow is defeated.
While you’reletting Shadow getahead, don’t actuallystop. Keep yourmomentum going,but let him widen thegap between you.
When attackingShadow, you're likely to get hitby the Chaos Control. Suck itup, collect a few rings, andcontinue the fight.
Flip the Switch under the Artificial Chaoson the right. The Switch controls theWeight so that you don’t get crushed.

97
DARK STAGE 1: DR. EGGMAN
If you’re quick enough, you can duckunder this door before it shuts. If itlocks down, though, just target thefour locks and blast them to knock itout of your way.
Pound away at the boxes and Tank inthe corner to reveal the secondMini-lift. Ride it so that you canbreak the first Chao Container.
These two Tanks hide a stack of SteelContainers. When you have the LargeCannon—found on Dark Stage 7:Weapons Bed—you can blast theboxes and get to the Laser Blaster.
3
Ride on this Mini-lift and hop over tothe platform to reach the secondChao Container.
4
When the security doors slam shut inyour face, you’ll need to launch aMissile to break through them. Ridethe Mini-lift and target the consolenext to the Missile. Shoot it and theMissile launches, clearing your path.
5
Don’t jump into the Goal Ring rightaway. Drop off to the side and findthe third Chao Container, thenyou’re finished.
6
Mission 1: Get to the Coreof the Military Base
You can target the console frombelow. Stay at the ledge nearthe security door and use yourtargeting laser from there.
Mission 2:Collect 100 RingsBecause this is the first of the Dark Stages, collecting 100rings won’t pose too much of a problem. In fact, if you takeit slowly, you should be able to do it in one try. The maintactic is to avoid being hit by robots. Not very insightful, butit's true. Maintain a steady stream of bullets and Blastershots, and you can tag most of your foes before they can fireoff a shot. So, take care and you can meet the Goal beforemaking it halfway through the level.
This room has a bonanza of rings.Blast away at the capsules and walkaway happy.
3
primagames.com
1. Get to the core of the military base!2. Collect 100 rings!3. Find the lost Chao!4. Reach the Goal within
4 minutes 0 seconds!5. Clear Hard Mode!
It seems that Dr. Eggman is up to his old tricks, and he’s not being very quiet about it.He’s looking for his grandfather’s top-secret work, and you’re going to help him find it.
Iron GateIron Gate
POWER-UP:
LASER BLASTER
1 2
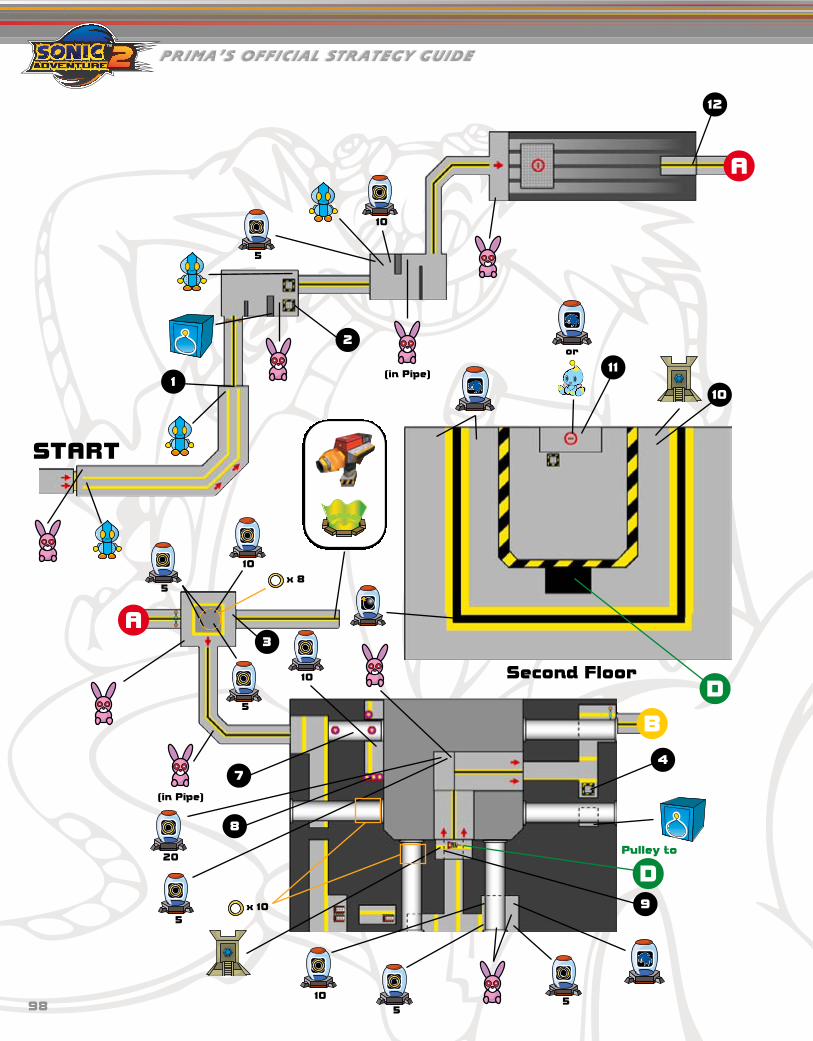
Prima’s Official Strategy Guide
98
A
A
B
START
5
10
5
10
10
20
10
55
5
5
Second Floor
Pulley to
or
(in Pipe)
(in Pipe)
D
Dx 10
x 8
12
10
11
4
9
8
7
3
2
1

DARK STAGE 1: DR. EGGMAN
99
primagames.com
B
C
C
20
5
(in Pipeunder box)
(in Pipe)
(in Pipe)
5
6

Prima’s Official Strategy Guide
100
At the Ruin on the platform, use theMystic Melody to make a new seriesof platforms appear. Hover jump upthem, turn around, and Hover to theplatform with a pull cord above it.
Check to the left to find the Extra Livesand then go to the right and find theRuin. Play the Mystic Melody and leapup the platforms that appear. Careful:More robots wait at the top.
10
Hang on to the handle when itreaches the top and swing yourtargeting laser around. You should beable to target and shoot several of thenasties waiting for you up here.
Ride the short Mini-lift and pick upthe unhappy Chao. You’ve done it.
11
Mission 4:Reach the Goal within4 minutes 0 secondsA few tricks to this mission will help you beat the clock.First, notice that the doors that slam shut at various pointspause before closing all the way. If you can reach themquickly, Dr. Eggman can squeeze his rotund figure throughthe gap. That will save you from having to blast the locks.Also, remember that the point is to beat the clock, not clearthe Stage. You do want to collect points, but don't go outof your way to shoot enemies. If they're not in your way,ignore them.
Mission 5:Clear Hard ModeIron Gate’s Hard Mode isn’t very difficult. The majordifferences are a few more robots—that jump out at you—and more locking doors. By now you should be familiarenough with the Stage that it won’t phase you.
Fire at the door from the descendingplatform. As soon as it’s brokendown, jump off the platform andHover to the door.
12
The Missile is heavily guarded thistime around. Shouldn’t be a problemwith your skills, right?
5
Mission 3: Find the Lost ChaoYou’ll need three specific permanent upgrades for Robotnik before you can find the Lost Chao. Don’t attempt it until you’vefound his Jet Engines in Dark Stage 6: Lost Colony, Dr. Eggman’s Mystic Melody in Dark Stage 3: Sand Ocean, and his LargeCannon in Dark Stage 7: Weapons Bed. When you’re properly equipped, you can make the trek to the Chao successfully.
Traverse to the Spring that isprecariously perched on a pipe andpop up to the platform to the left.Blast the box and bounce. At thepeak of the bounce, start Hoveringand move to the higher platform.
7
9
Use the Long Spring to launch upand Hover to the pipe. Be verycareful to land directly on top of thepipe. Any error will cause you toslip off. Then jump and Hover aroundthe corner.
8
The line of rings is tempting,but if you want to play it safe,make a tight turn around the cornerto the platform past the next pipe.
Make sure you don’t
scrape into the wall as you Hover.
The contact will kill your altitude and
send you spiraling southward swiftly.

BOSS: B-3X HOTSHOT
primagames.com
Robotnik found a strange surprise in the military complex: a Dark hedgehog that goes by the name of Shadow. It seemsthat the military isn’t too keen on leaving Shadow in one piece. See if you can help him out.
Boss AttacksHotshot is similar to Big Foot, the battle Mech that Sonic fights. This guy has one more attack than Big Foot does, butotherwise the strategy should be familiar (assuming you played the Hero Story first, that is). First off, collect a few ringsto keep Shadow safe.
Shadow vs HotshotShadow vs Hotshot
Leap high by pressing U and holding it for a moment before pressingit again to do the Homing Attack.
The area where you battle Hotshot is a square platformwith Wooden Containers in it. Use the Containers tojump higher and defeat Hotshot faster.
Watch the “Enemy” health meter in the upper-rightcorner. It charts how much energy your foe has. Hotshotrequires four hits to defeat.
After you hit him once, Hotshot reveals his newweapon. A round, red targeting reticle appears andlatches onto Shadow. Run to avoid it. You must keep upyour speed or else it will catch up, so loop around theplatform rather than making stops to change direction.If you can’t shake it, tap U twice to jump away from it.
Hotshot repeats these attacks as you run around andavoid them. After you hit him a third time, the bad robotuses his energy blast three times before landing. Keep onyour toes. Every time he lands, he’ll fire a barrage ofMissiles. When that ends, pound on his cockpit. You’llsoon be victorious.
101
Hotshot begins by flying up andstrafing the ground with machine-gun fire. It’s easily seen and he’snot moving very fast. Run in a
wide circle to avoid it.
Try to time it so that you’re closeto Hotshot when the bay doorsclose. As soon as they do, leaphigh in the air and Homing Attack on Big Foot’s cockpit.
After a pass with the machine guns,Hotshot lands, the Missile baysopen, and Missiles shoot out at you.Again, run around until the barragestops. The Missiles aren’t very good at homing in on you.
This red target is a bad thing. Getaway from it. Hotshot charges upan energy blast and fires it at the target—and whatever’s inside it.
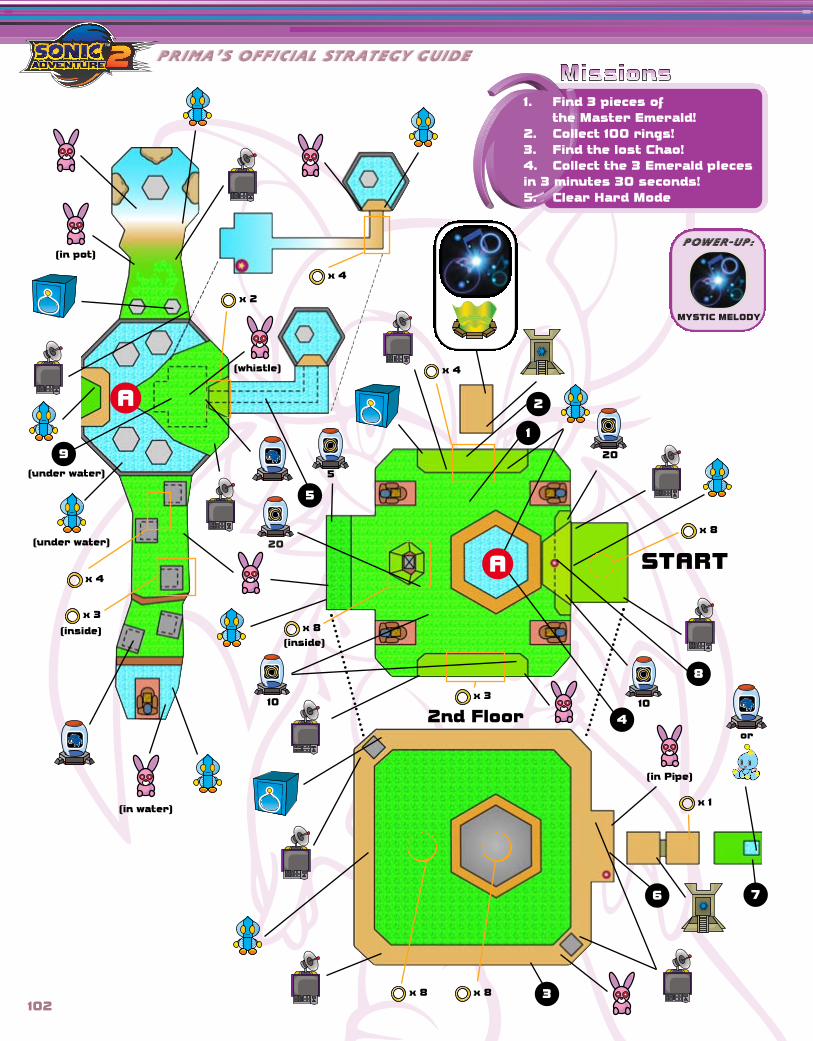
Prima’s Official Strategy Guide
102
1. Find 3 pieces of the Master Emerald!
2. Collect 100 rings!3. Find the lost Chao!4. Collect the 3 Emerald pIeces in 3 minutes 30 seconds!5. Clear Hard Mode
A
2nd Floor
START
1010
5
(in pot)
(under water)
(under water)
(in water)
A
or
(whistle)
(inside)(inside)
20
(in Pipe)
POWER-UP:
MYSTIC MELODY
20
x 4
x 3
x 4
x 2
x 4
x 8
x 3
x 8x 8
x 1
x 8
9
5
2
1
4
8
76
3

DARK STAGE 2: ROUGE
103
The good guys are busy scrounging around for the Master Emerald pieces. You shoulddo the same. If you can find the pieces before they do, you'll be in good shape.
Dry LagoonDry Lagoon
Divided into three areas, this Stage isrelatively small. After you destroy thetwo robots here, the Turtle jumps intothe pool and waits. The Turtle is yourride between the two main areas.
1
If you’ve acquired the Pick Nails fromDark Stage 5: Egg Quarters, you cannow get the Mystic Melody. If not,come back later. The mural here ismade for Digging, so Dig on through.
2
Above the small pool is a ledge thatruns along the side of the walls.Goodies, enemies, and sometimesEmerald pieces are up here.
3
Hitching a ride with the Turtle takesyou to a larger area. In this area, theoasis and the upper level is bigger.
4
primagames.com
Mission 1:Find 3 pieces of the Master Emerald
There is another Turtle in this area.This one is swimming around. Grab itand let it take you through theopposing current of a water tunnel.
5
If you don’t see theswimming Turtle, give itsome time. The Turtle runs aregular route between this areaand the next.
Mission 2:Collect 100 RingsThere are plenty of rings on this stage for you to find. Thefaster you can collect the 100 rings, the higher your rank.
The area where you start has so manyrings that you don’t even need to takea Turtle ride. Don’t overlook the ringItem Boxes or strings of rings floatingin high places.
Mission 3:Find the Lost ChaoThe lost Chao must have been attracted to the oasis. The hotdesert would make any Chao look for water. Look for thelost Chao and help it find refreshment. To do so, you’ll needthe Iron Boots from Dark Stage 12: Mad Space and the PickNails from Dark Stage 5: Egg Quarters.
Make your way to the ledge abovethe start point and find the SteelContainers along the wall. To accessthe mural behind it, break the boxesand jump on through.
6
Climb to the top of this room andyou’ll notice a sparkly Warp Hole.Glide over to it to find the Lost Chao.
7

Prima’s Official Strategy Guide
104
By now you should be familiar withthe Stage. Knowing the Hint Boxlocations and how quickly you canreach them are the keys to beatingthe time.
Don’t forget that there are two otherareas to this stage. The Turtle herewill take you to the big oasis whereyou can hitch a ride with anotherTurtle to a different area.
Mission 4: Collect the Emerald piecesin 3 Minutes 30 SecondsTime is running short, so scramble to find the three pieces of the Master Emerald in this Stage before time runs.
To find the first Shard, climb up onthe ledge with the UnbreakableContainers. Nestled between them isa Wooden Container, breakable byDigging. Surprise! The Spring popsyou high enough to grab that firstShard floating high above.
8
The second Shard is really close. Directly above the oasis isa little air pocket that shoots air upward. Sitting in themiddle of this air pocket is the second Shard. By climbingto higher ground and Gliding toward it, you can almost grabit. However, the air currents are strong. Glide slightlybelow it and let the current take you to it.
4
Mission 5: Clear Hard ModeThey’ve thrown in more enemies and hidden the Shards of Master Emeraldbetter. Don’t let this discourage you, for you are Rouge the bat! Before youbegin, you need the Treasure Scope found in Dark Stage 8: Security Hall.
The third Shard is underwater. Take aride on the Turtle to the large oasis.Dive down to the bottom and take alook in the center where the wateris gushing out.
9
The currents are too strong for you toreach the piece. Jump back to shoreand put on your Treasure Scope. Now,drop down and look just above theEmerald Shard for a Spring. Swim overto it to put this stage to rest.
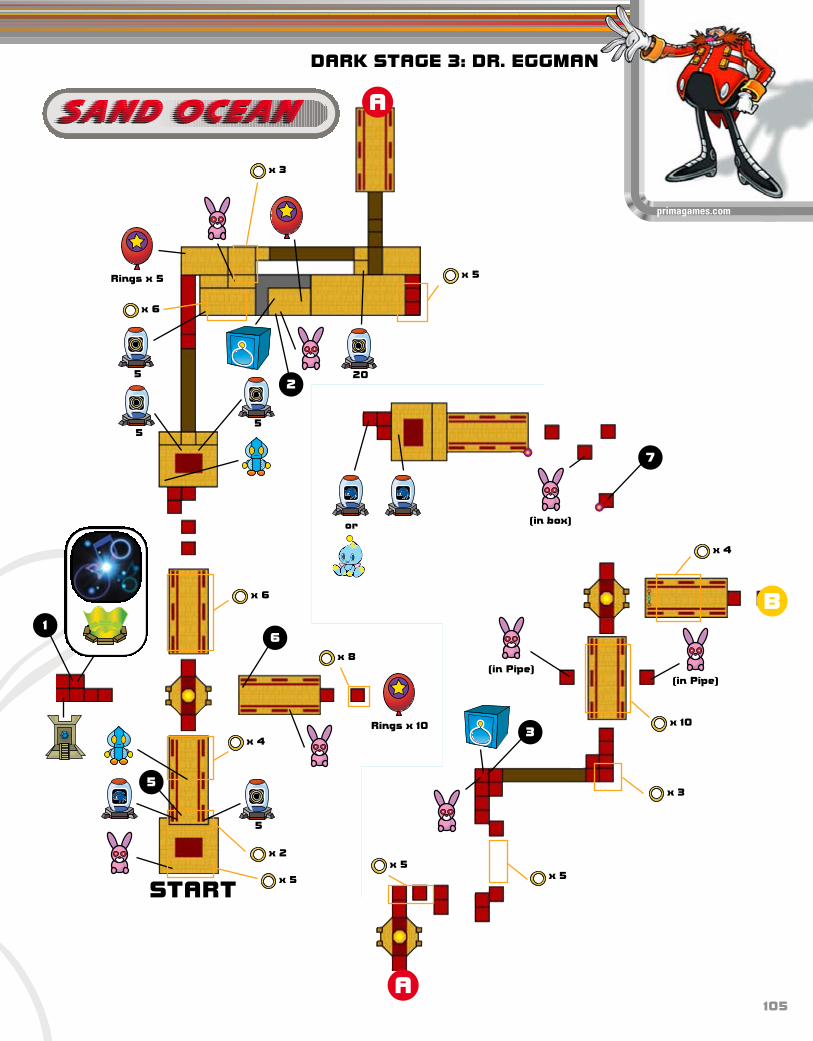
105
DARK STAGE 3: DR. EGGMAN
primagames.com
A
B
A
START
5
5
5
5
20
(in box)or
(in Pipe)(in Pipe)
x 3
x 6
Rings x 5
Rings x 10
x 5
x 6
x 4
x 8
x 2
x 5
x 5x 5
x 3
x 10
x 4
2
6
3
7
1
5
Sand OceanSand Ocean
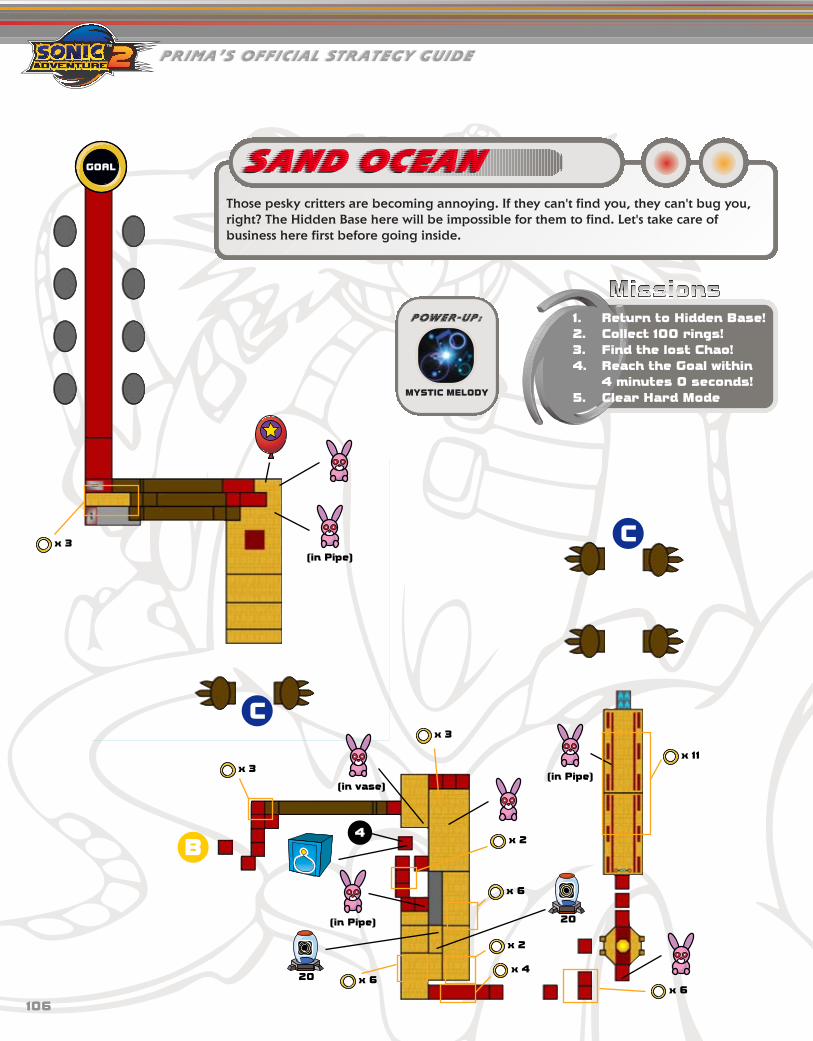
Prima’s Official Strategy Guide
106
C
B
C
(in vase)
20
20
(in Pipe)
(in Pipe)
(in Pipe)
Those pesky critters are becoming annoying. If they can't find you, they can't bug you,right? The Hidden Base here will be impossible for them to find. Let's take care ofbusiness here first before going inside.
Sand OceanSand Ocean
1. Return to Hidden Base!2. Collect 100 rings!3. Find the lost Chao!4. Reach the Goal within
4 minutes 0 seconds!5. Clear Hard Mode
POWER-UP:
MYSTIC MELODY
x 3
x 3
x 2
x 6
x 11
x 6x 6
x 2
x 4
x 3
4

Once you acquire the Jet Engine fromDark Stage 6: Lost Colony, you canuse it to reach the Mystic Melodyway over here. Awaken the AncientRuin also located here and use it as ashortcut. If you’re looking to find allthree Chao Containers, however, thisisn't a good idea; the Warp Hole putsyou all the way near the third one.
1
Shoot the Dynamite packs at thebottom of pillars to create walkways.Don’t be directly underneath one asit falls.
The first Chao Container is righthere. Use the Springs and Hover, ifyou have it, to clear the spinningspikes. If you can’t Hover yet, usecareful timing.
2
DARK STAGE 3: DR. EGGMAN
107
Mission 1:Return to Hidden Base!
Not too far off from the first ChaoContainer is the second one, inplain sight.
3
The third Chao Container is sitting ontop of this pillar. You can reach itwithout the Jet Engine, but be careful.From here on, the Goal isn’t far.
4
Right off the bat, don’t miss the ExtraLife and the ring Item Box here.
5
If you have the Large Cannon fromDark Stage 7: Weapons Bed, you canaccess this area. Beyond it is a bunchof rings.
6
Mission 2:Collect 100 RingsWith plenty of rings to snag, 100 should be no problem.Just watch out for enemies trying to knock them from you.
primagames.com
Be cautious of the Beetle robots.They shoot at you as they approach.Master the use of your HomingMissile, and 100 rings will be yoursin no time.
Mission 3: Find the Lost ChaoIn the desert near Dr. Eggman’s Hidden base is a lonely, lost Chao. Hurry up to find himbefore he becomes sunburned. But before you can rescue the Chao, you must have the JetEngine from Dark Stage 6: Lost Colony.
Beyond this rotating platform is asmall landing square a long distanceaway. It looks far, but with the JetEngine, you can easily make it. Oncethere, time the next landing and jumpjust as it comes close to its pointnearest the next square.
7
From here, another jump and Hoverwill take you to the final landingwhere the lost Chao is. There is anItem Box that you don’t want to missright behind the Chao.
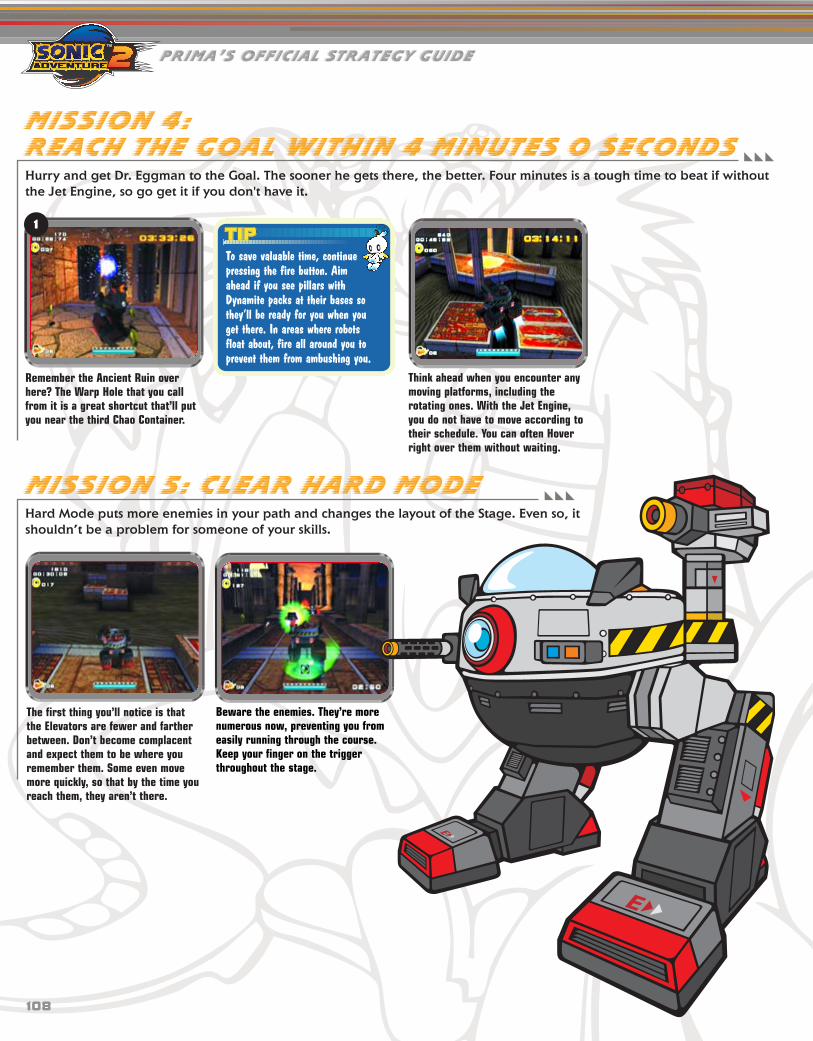
Prima’s Official Strategy Guide
108
To save valuable time, continuepressing the fire button. Aimahead if you see pillars withDynamite packs at their bases sothey’ll be ready for you when youget there. In areas where robotsfloat about, fire all around you toprevent them from ambushing you.
Remember the Ancient Ruin overhere? The Warp Hole that you callfrom it is a great shortcut that’ll putyou near the third Chao Container.
1
Think ahead when you encounter anymoving platforms, including therotating ones. With the Jet Engine,you do not have to move according totheir schedule. You can often Hoverright over them without waiting.
Mission 4:Reach the Goal within 4 minutes 0 SecondsHurry and get Dr. Eggman to the Goal. The sooner he gets there, the better. Four minutes is a tough time to beat if withoutthe Jet Engine, so go get it if you don't have it.
Mission 5: Clear Hard ModeHard Mode puts more enemies in your path and changes the layout of the Stage. Even so, itshouldn’t be a problem for someone of your skills.
The first thing you’ll notice is thatthe Elevators are fewer and fartherbetween. Don’t become complacentand expect them to be where youremember them. Some even movemore quickly, so that by the time youreach them, they aren’t there.
Beware the enemies. They’re morenumerous now, preventing you fromeasily running through the course.Keep your finger on the triggerthroughout the stage.
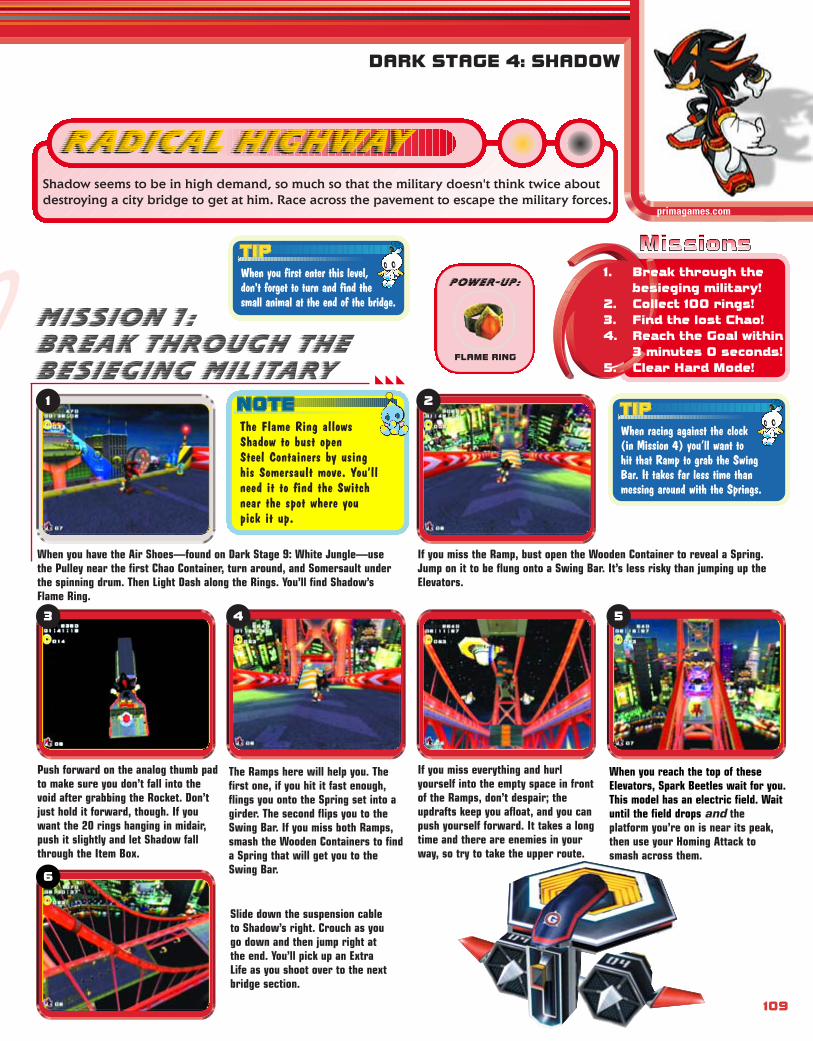
DARK STAGE 4: SHADOW
primagames.com
109
Shadow seems to be in high demand, so much so that the military doesn't think twice aboutdestroying a city bridge to get at him. Race across the pavement to escape the military forces.
Radical HighwayRadical Highway
POWER-UP:
FLAME RING
When you have the Air Shoes—found on Dark Stage 9: White Jungle—usethe Pulley near the first Chao Container, turn around, and Somersault underthe spinning drum. Then Light Dash along the Rings. You’ll find Shadow’sFlame Ring.
1
If you miss the Ramp, bust open the Wooden Container to reveal a Spring.Jump on it to be flung onto a Swing Bar. It’s less risky than jumping up theElevators.
2
1. Break through the besieging military!
2. Collect 100 rings!3. Find the lost Chao!4. Reach the Goal within
3 minutes 0 seconds!5. Clear Hard Mode!
Push forward on the analog thumb padto make sure you don’t fall into thevoid after grabbing the Rocket. Don’tjust hold it forward, though. If youwant the 20 rings hanging in midair,push it slightly and let Shadow fallthrough the Item Box.
3
The Ramps here will help you. Thefirst one, if you hit it fast enough,flings you onto the Spring set into agirder. The second flips you to theSwing Bar. If you miss both Ramps,smash the Wooden Containers to finda Spring that will get you to theSwing Bar.
4
If you miss everything and hurlyourself into the empty space in frontof the Ramps, don’t despair; theupdrafts keep you afloat, and you canpush yourself forward. It takes a longtime and there are enemies in yourway, so try to take the upper route.
When you reach the top of theseElevators, Spark Beetles wait for you.This model has an electric field. Waituntil the field drops and theplatform you’re on is near its peak,then use your Homing Attack tosmash across them.
5
When racing against the clock(in Mission 4) you’ll want tohit that Ramp to grab the SwingBar. It takes far less time thanmessing around with the Springs.
Mission 1: Break Through theBesieging Military
When you first enter this level,don't forget to turn and find thesmall animal at the end of the bridge.
6
Slide down the suspension cableto Shadow’s right. Crouch as yougo down and then jump right atthe end. You’ll pick up an ExtraLife as you shoot over to the nextbridge section.
The Flame Ring allowsShadow to bust openSteel Containers by usinghis Somersault move. You’llneed it to find the Switchnear the spot where youpick it up.

Prima’s Official Strategy Guide
A
B
A
D
(in box)
(in box)
(in box)
20
10
(in the air)
(in barrel)
(in Pipe)
(in Pipe)
110
x 16
x 8
x 5
x 8
x 4
x 5 x 5
x 6
x 9
x 4 x 7
x 6
x 14
x 10
x 5
1
12
7
13
2

DARK STAGE 4: SHADOW
primagames.com
111
C
B
C
D
START
(in red wall)
(in box)
(in box)
20
20
or(in Pipe)
Radical HighwayRadical Highway
x 22 x 6
x 12
x 24
x 5
x 6x 12
x 4
x 16
6
5 43
10
11
9

Prima’s Official Strategy Guide
112
Here’s the first surprise. Be readyfor it, or you’ll lose all the ringsyou’ve collected.
7
You’ll slide down the cable and hit aSpring. It will shoot you back up tothe top of the bridge. Push forwardon the analog thumb pad to land onthe support strut. Then find theAncient Ruin here.
9
Mission 2:Collect 100 RingsIt isn’t too difficult to find 100 rings in this Stage. Theproblem is that robots drop out of the sky, usually whenShadow is running fast and can’t stop or turn quickly. Learnwhere the robots drop on you.
Stop here, next to the Ramp, andjump over the side. Yes, really.Aim at the large suspension cableand land on it.
4
Mission 3:Find the Lost ChaoYou need Shadow’s Mystic Melody—found in Dark Stage 14:Final Chase—to find the Chao in this Stage. You’ll also need asteady hand to catch a grind on a bridge’s suspension cable.
Play your Mystic Melody andplatforms will appear. Hop up them tofind your lost Chao.
You’ve already gotten the Chao, soyou know about the Spring on thesuspension cable. Use it to flingShadow up to the support beam.
10
Mission 4:Reach the Goal within3 Minutes 0 SecondsRunning Radical Highway in three minutes is a toughoperation. However, there is a major shortcut if you canmanage to hit it. Remember that you’re racing against timefor this mission, not against robots. So, don’t bothersmashing the enemies that aren’t directly in your way. Also,use Light Dash along lines of rings to shave a second or two.
11
Here you’ll only see one Spark Beetle.When the shield drops, use yourHoming Attack. Other robots willappear as you keep tapping U to usethe Homing Attack.
13
Instead of a Pulley, you'll find abunch of robots that you can useas a ladder. Use your HomingAttack to smash your way up theline of robots.
12
Mission 5:Clear Hard ModeThere are changes to the number, type, and placement ofenemies, as well as to the design of the bridge itself. After fourmissions where you face the same patterns, it can be a shock tofind so many surprises. Take it slowly and watch out for thesethings, some of the most drastic and dangerous changes:
Here you’ll find another Spark Beetle.However, behind it are only two rows ofrings. To get across, you must use theHoming Attack on the robot and thenuse Light Dash to run along the rings tosafety. Good luck.
5
Then jump onto the next cable anduse I to crouch and speed along tothe next support beam. Doing thiscuts several seconds off yourtime…if you land on the cables.

DARK STAGE 5: ROUGE
113
5
10
5
10
(in ceiling)
Egg Scorpion Chamber
Egg FishChamber
Egg Snake Chamber
(hidden on topof chest)
(in cage)
(under weight)
(in Pipe)
(in Pipe)
or
5
(under weight)
primagames.com
Egg QuarterSEgg QuarterS
x 6
x 6
x 6
x 12
x 5
x 12
x 6
x 6
x 6
x 24
x 8
x 6
1
5
11
4
9
313
10
7
12
2
8
6
20
AB
B
CSnake Altar

Prima’s Official Strategy Guide
114
1. Find the 3 Gate Keys!2. Collect 100 rings!3. Find the lost Chao!4. Find the 3 Keys within
3 minutes 0 seconds!5. Clear Hard Mode!
Rouge the Bat is poking around to see what Dr. Eggman is up to. She'll need to find three Gate Keys in order to accessthe secure areas she seeks. It's up to you to help her get them.
Egg QuarterEgg Quarter
The first Hint Boxes are to the leftand right. The first Omochao isdirectly in front of you. Talk to it tolearn some interesting info.
1
The Beetle robot patrols the EggQuarters constantly in a clockwisedirection. You’ll know it is near whengreen light pulses through the room.Hide in a shadow or out of the robot’sline of sight, or you’ll be shot.
This is the Egg Scorpion Chamber, theroom you start in. Hints that refer toscorpions or the color red arereferring to this room and thespaces around it.
1
This is the Egg Snake Altar room.Note the eight snake heads in themiddle structure. The Ancient Ruincan be found on the Altar.
2
POWER-UP:
PICK NAILS
Mission 1: Find the 3 Gate Keys
Here is the Egg Snake Chamber.Hints that refer to a single snake orthe color green are referring tothis room.
3
This room is the Egg Fish Chamber.Any hint that speaks of fish or thecolor blue is referring to this area.There is also a Missile that youshould launch to open the next room.
4
After firing the missile in the EggFish Chamber, you can go into thenext room and grab the Pick Nails.When Rouge has these, she can Digin the ground for treasure.
5
Pay attention to the flames in therooms. Different colors of fire appearin different areas. Hints often refer tothe flames.
These wall decorations are madewith feathers, not flower petals.Knowing this will help you withcertain clues.

DARK STAGE 5: ROUGE
115
Picking up this container of 20 rings inthe Egg Snake Altar room will be a bighelp. Don’t mess with the rings floatingabove the pillars; there are 100 justlying around that are easier to get.
6
If you have the Magnetic Shield,climb a pillar in the Egg Snake Altarroom and Glide around to pick upthe rings floating above the Altar.
2
Mission 2:Collect 100 RingsNot only can you collect 100 rings easily on this Stage, butyou can do it really fast if you have the Iron Boots—found inStage 12: Mad Space. Check the map for the MagneticShield near the Egg Fish Chamber. You need the Iron Bootsto get it. Then you can just walk around the perimeter of themap and the rings will glide to you. No fuss. Watch out forthe Beetle robots that patrol the area and other nasties thatwould stop you.
Play the tune by the Ruin and jumpinto the Warp Hole you generate.
2
Watch out for the baddies in thischamber. Find this scorpion plate onthe wall to the left of where theWarp Hole dropped you off.
7
Mission 3:Find the Lost ChaoTo get the lost Chao, you must have Rouge’s Pick Nails foundin this stage, Iron Boots found in Stage 12: Mad Space, andMystic Melody found in Stage 2: Dry Lagoon. When you’vegot the gear, head for the Egg Snake Altar and play theMystic Melody next to the Ancient Ruin in the center of theroom. Take the Warp Hole that appears.
primagames.com
Digging into the boxes in the floor can reveal rings and useful items.If you’re not pressed for time, explore them.
In the next room, Dig into the SteelContainer with the Switch under it(check the map for precise location).When you hit it, go to the center ofthe room and Dig into the scorpionplate on the floor.
8
You’ll end up back where you were,but the Weight trap will have lockedin the up position. You can drop intothe hole in the center of the roomand pick up the little lost Chao.
7
This is the first Hint Screen youshould visit. Its clue will be vague,but when you get the third hint, youshould be able to figure out wherethe Gate Key is hidden.
1
Run past enemies like these robots.There’s no time to fight them.
9
Mission 4:Find the 3 Keys within3 Minutes 0 SecondsThe Egg Quarter Stage isn’t very big, so you shouldn’t havetoo much trouble. Have the map ready and make use of allthe Hint Boxes. Travel clockwise, staying ahead of theBeetle robots, and look at the Hint Boxes as you go, startingwith the one to Rouge’s left when the Mission starts.Staying ahead of the Beetle and using the Hint Boxes willsee you through.

Prima’s Official Strategy Guide
116
If a Ghost grabs holdof the bat-lady, Rouge willdrop the bomb and get blasted.Avoid the haunting phantoms.
You must put on the TreasureScope before you get the bombso you can use the Spring. There’sKiki way up high in the hall just offthe Egg Snake Chamber; get a bombfrom it.
You need a bomb to get the first GateKey. Find Kiki and wait for it to toss around grenade at you. When thegrenade bounces to a rest, pick it upbefore it goes off. Then run away.
10
Head back to the cage with the GateKey inside and put the bomb downon it or next to it. Step back, andwhen the bomb blows the Gate Keyis yours.
11
Mission 5: Clear Hard ModeTo defeat this mission, you’ll need Rouge’s Treasure Scope—found in Stage 5: Security Hall. The enemies have becometougher and there are more traps set for your character, but the Gate Keys are always in the same three places.
The second Gate Key is here in the EggSnake Altar room, and you’ll needanother bomb to get it. Collect oneand place it on the top Cage in frontof the scorpion picture on the wall.When it blows, Dig into the picturewhere the Cage used to cover it. Voilà.
12
Yet another bomb is needed for GateKey number three. Put on yourSunglasses and then get one from aconvenient Kiki. Then head into theEgg Snake Chamber and step onto theSpring that reveals itself.
3
When you’re up in the alcove, put thebomb down and it will smash theCages around the third Gate Key.Pick it up and you’re done.
13
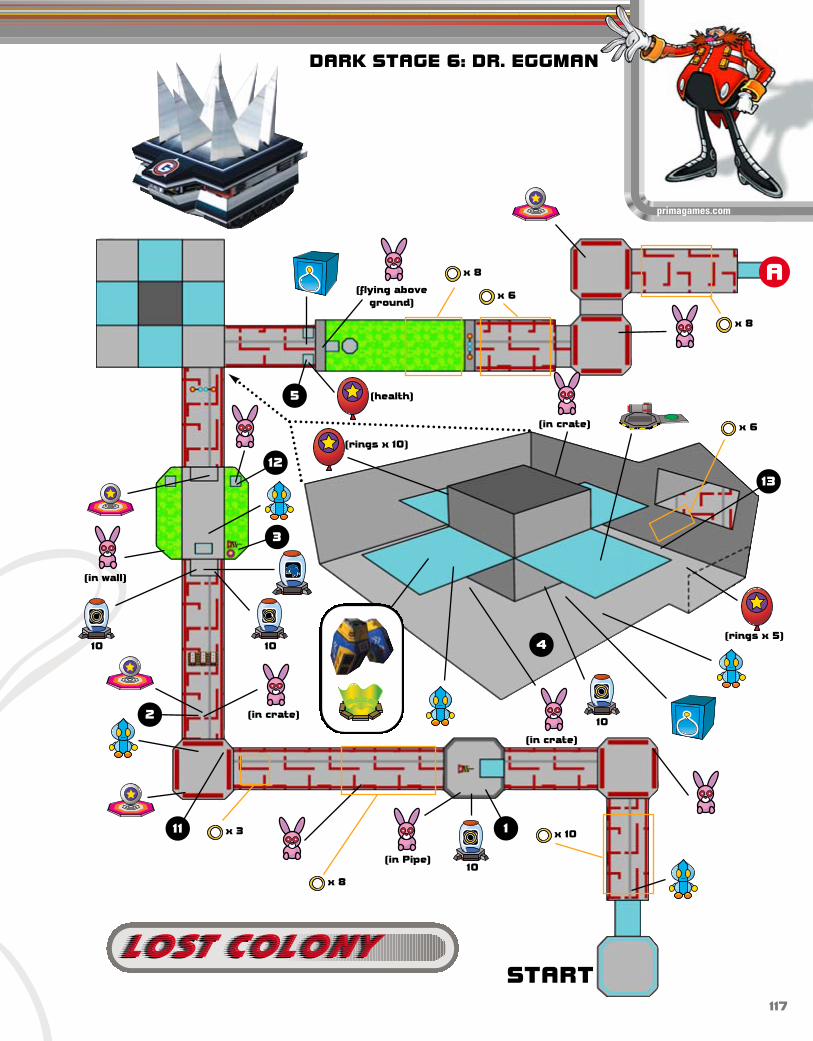
DARK STAGE 6: DR. EGGMAN
A
START
10
10
10
(in crate)
(in wall)
(flying aboveground)
(rings x 5)
(rings x 10)
(health)
(in Pipe)
(in crate)
117
primagames.com
10
x 6
x 8
x 8
x 6
(in crate)
x 3
x 8
x 10
Lost ColonyLost Colony
5
12
2
11 1
4
13
3

Prima’s Official Strategy Guide
118
1. Find the way tothe colony’s core!
2. Collect 100 rings!3. Find the lost Chao!4. Reach the goal within
3 minutes 30 seconds!5. Clear Hard Mode!
This is your first visit to the space colony, ARK. Shadow mentioned something about the central control roomsomewhere in here. If you can find it, it could be very useful to you.
Lost ColonyLost Colony
B
20
(in crate)(in cage)
or
POWER-UP:
JET ENGINE
x 5
x 5
x 4
x 3
x 8
x 8
x 8
A
(flying)
B6
7
10
8 9

The poor lighting in this place makesit hard to see enemies ahead. Butwho’s afraid of the dark when youhave cannons to clear the path?Shooting into the dark lights up thepath with explosions and rids you ofpesky enemies.
Grab the Pulley and let it lower you.Don’t worry about the lasers at thebottom. Unless you want the smallanimal behind you, you can just moveforward and ignore the lasers.
1
If you’ve got the Large Cannon—found in Dark Stage 7: WeaponsBed— you might have destroyed theSteel Containers at to discover aSwitch. The Switch opens a roomthat is accessed by the springpad at
. Find three Item Boxes withgoodies in there.
2
This room seems to be a dead end.The only thing that seems to be hereis a Chao Container; there’s no wayout. Luckily, you’re one resourcefuldoctor. Use these boxes to climb uphere for the Jet Engine. With this,you can now Hover over longerdistances than a simple jump allows.
4
DARK STAGE 6: DR. EGGMAN
primagames.com
119
Right next to the second ChaoContainer are two platforms. Destroythe buggers hanging around here andhop on the platform on the right for alittle prize at the top.
5
Make sure you dispose of all therobots in this room before venturingtoo far off. Though the rings protectyou from immediate harm, you can beknocked off if the robots get theirmitts on you.
6
Mission 1: Find the Way to the Colony’s Core
3
3
4
From this platform, jump backwardand toward the screen. Don’t worry;if you keep on the Hover, you’ll landon a ledge where the last ChaoContainer is.
7
While locked on to this risingplatform, you are free to fire allaround you without fear of falling.It’s a good thing, too, becauseenemies are all around.
8
What to do about the Cages in yourway? Back up along the ledge untilyou see that Rocket. Step on thebutton to bust through them.
9
Mission 2:Collect 100 RingsSnatch up all the rings you can find. Standard procedure,really. Just don’t let the enemies touch you, and this missionwill be over before you know it.
Remember this room? Explore thisarea, both top and bottom. Don’tforget the two strings of ringsbetween the Rocket and the exitdoor. There are also enemies up highhere, so use caution.
4
As a general rule, firing at everythingin your path is a good idea. Theexception to this tactic applies torooms containing these explosives.Once touch from their blasts willsend your rings flying.

Prima’s Official Strategy Guide
120
Even if you hit the robot byaccident, keep Hovering. Youstill may be able to make itacross.
Mission 3:Find the Lost ChaoHow did a little Chao get lost in ARK already? We justdiscovered it! Well, regardless, it’s your job to find it. You’llneed the Mystic Melody from Dark Stage 3: Sand Ocean.
Make your way to this room anddestroy all the enemies to ensure asafe ride. From this point, you cansee a floating platform just below.Jump to it, and it takes you to anAncient Ruin. Play the Mystic Melodyto bring out the floating platformsthat lead you to an upper level.
6
Looks like a long jump to that doorahead. It’s dark, too. You can’t see itfrom here, but there’s a Beetle robotdirectly in your path. Use the Hoverto start your trip to the other sidewhile firing your weapon straightahead.
10
Keep pressing the fire button.Destroy everything in sight so thatthe doors are ready to open whenyou reach them.
Skip the Pulley here and just free-fallto the bottom. Stay close to the wallso the lasers don’t get you.
1
In areas that require Hovering overdistances, shoot while you’re in the air.Try not to pause to shoot enemies. Youshould be able to clear most dangerousenemies while continuing forward.
Mission 4:Reach the Goal within3 Minutes 30 SecondsThe pressure is on, Dr. Eggman. You’ve got to finish this on atight schedule, so you better get cracking.
Push your way through a few morepesky robots to find your lost Chao.
Mission 5:Clear Hard ModeIf they think they can stop you by simply changing thingsaround and adding a few more enemies, they have anotherthing coming. Dr. Eggman will not be stopped!
The Pulley here stops midway down,just above a second set of lasers.Grab the Balloon floating betweenthe first and second set.
1
They've moved the Switch in this room.Destroy the Steel Containers where theold Switch used to be and hop to the topof the pile. The Switch is in the oppositecorner, but you can’t just jump to it.Follow the string of rings to reach it.
11
The left platform won’t take you upthis time. Use the right one. Butfirst, you must uncover the Switchunder these boxes to open the doorat top.
12
You can’t reach the upper level fromthe boxes you used before. Use theCages here to hop on the crates nearthe exit door.
13
8
The catwalks have pieces missing.Be careful where you shoot on thislast catwalk. It's rigged withDynamite packs, so make sureyou're not on it when it blows.

DARK STAGE 7: DR. EGGMAN
121
A
B
ASTART
20
10
(extra life) (20 rings)
(10 rings)
or
primagames.com
Weapons BedWeapons Bed
x 12
x 12
x 12
x 9
x 9
x 8
x 12
3
82
1
4
79

Prima’s Official Strategy Guide
122
B
C
C
5
20
5
1. Rush into the military base!2. Collect 100 rings!3. Find the lost Chao!4. Reach the Goal within
2 minutes 45 seconds!5. Clear Hard Mode!
As part of the diabolical scheme to rule the world, Dr. Eggman is going to cause a distraction so Rouge can grab theChaos Emeralds from Prison Island.
Weapons BedWeapons Bed
POWER-UP:
LARGE CANNON
x 8
x 12
6
5
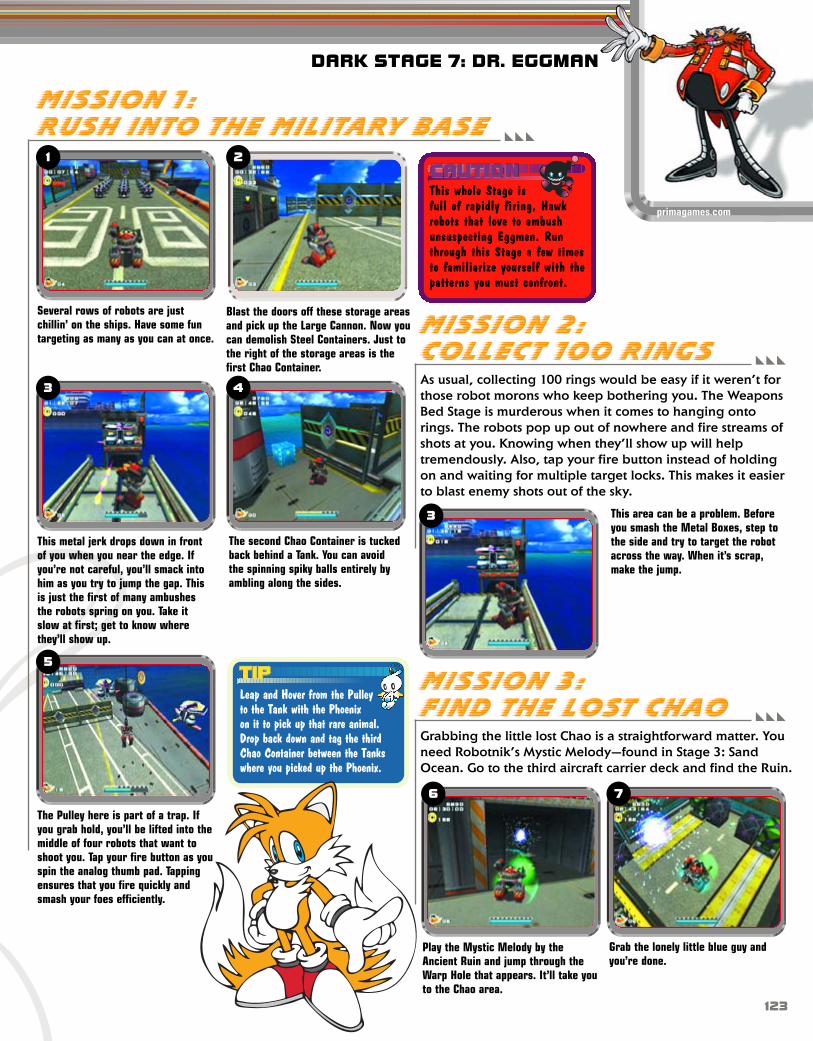
DARK STAGE 7: DR. EGGMAN
primagames.com
123
Several rows of robots are justchillin’ on the ships. Have some funtargeting as many as you can at once.
1
Blast the doors off these storage areasand pick up the Large Cannon. Now youcan demolish Steel Containers. Just tothe right of the storage areas is thefirst Chao Container.
2
Mission 1:Rush into the Military Base
This whole Stage isfull of rapidly firing, Hawkrobots that love to ambushunsuspecting Eggmen. Runthrough this Stage a few timesto familiarize yourself with thepatterns you must confront.
This metal jerk drops down in frontof you when you near the edge. Ifyou’re not careful, you’ll smack intohim as you try to jump the gap. Thisis just the first of many ambushesthe robots spring on you. Take itslow at first; get to know wherethey’ll show up.
3
The second Chao Container is tuckedback behind a Tank. You can avoidthe spinning spiky balls entirely byambling along the sides.
4
The Pulley here is part of a trap. Ifyou grab hold, you’ll be lifted into themiddle of four robots that want toshoot you. Tap your fire button as youspin the analog thumb pad. Tappingensures that you fire quickly andsmash your foes efficiently.
5
Leap and Hover from the Pulleyto the Tank with the Phoenixon it to pick up that rare animal.Drop back down and tag the thirdChao Container between the Tankswhere you picked up the Phoenix.
This area can be a problem. Beforeyou smash the Metal Boxes, step tothe side and try to target the robotacross the way. When it’s scrap,make the jump.
Mission 2:Collect 100 RingsAs usual, collecting 100 rings would be easy if it weren’t forthose robot morons who keep bothering you. The WeaponsBed Stage is murderous when it comes to hanging ontorings. The robots pop up out of nowhere and fire streams ofshots at you. Knowing when they’ll show up will helptremendously. Also, tap your fire button instead of holdingon and waiting for multiple target locks. This makes it easierto blast enemy shots out of the sky.
3
Mission 3:Find the Lost ChaoGrabbing the little lost Chao is a straightforward matter. Youneed Robotnik’s Mystic Melody—found in Stage 3: SandOcean. Go to the third aircraft carrier deck and find the Ruin.
Play the Mystic Melody by theAncient Ruin and jump through theWarp Hole that appears. It’ll take youto the Chao area.
6
Grab the lonely little blue guy andyou’re done.
7
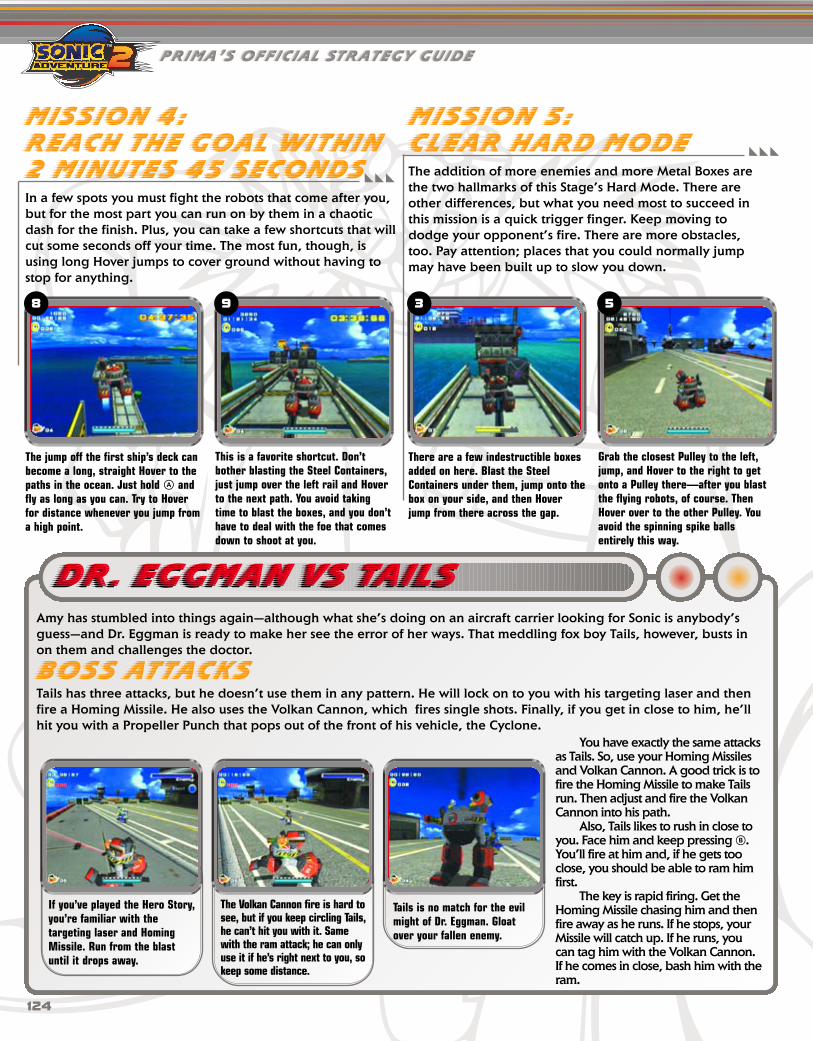
Prima’s Official Strategy Guide
124
Mission 4:Reach the Goal within2 Minutes 45 SecondsIn a few spots you must fight the robots that come after you,but for the most part you can run on by them in a chaoticdash for the finish. Plus, you can take a few shortcuts that willcut some seconds off your time. The most fun, though, isusing long Hover jumps to cover ground without having tostop for anything.
The jump off the first ship’s deck canbecome a long, straight Hover to thepaths in the ocean. Just hold U andfly as long as you can. Try to Hoverfor distance whenever you jump froma high point.
8
This is a favorite shortcut. Don’tbother blasting the Steel Containers,just jump over the left rail and Hoverto the next path. You avoid takingtime to blast the boxes, and you don’thave to deal with the foe that comesdown to shoot at you.
9
Mission 5:Clear Hard ModeThe addition of more enemies and more Metal Boxes arethe two hallmarks of this Stage’s Hard Mode. There areother differences, but what you need most to succeed inthis mission is a quick trigger finger. Keep moving tododge your opponent’s fire. There are more obstacles,too. Pay attention; places that you could normally jumpmay have been built up to slow you down.
There are a few indestructible boxesadded on here. Blast the SteelContainers under them, jump onto thebox on your side, and then Hoverjump from there across the gap.
3
Grab the closest Pulley to the left,jump, and Hover to the right to getonto a Pulley there—after you blastthe flying robots, of course. ThenHover over to the other Pulley. Youavoid the spinning spike ballsentirely this way.
5
Amy has stumbled into things again—although what she’s doing on an aircraft carrier looking for Sonic is anybody’sguess—and Dr. Eggman is ready to make her see the error of her ways. That meddling fox boy Tails, however, busts inon them and challenges the doctor.
Boss AttacksTails has three attacks, but he doesn’t use them in any pattern. He will lock on to you with his targeting laser and thenfire a Homing Missile. He also uses the Volkan Cannon, which fires single shots. Finally, if you get in close to him, he’llhit you with a Propeller Punch that pops out of the front of his vehicle, the Cyclone.
Dr. Eggman vs TailsDr. Eggman vs Tails
You have exactly the same attacksas Tails. So, use your Homing Missilesand Volkan Cannon. A good trick is tofire the Homing Missile to make Tailsrun. Then adjust and fire the VolkanCannon into his path.
Also, Tails likes to rush in close toyou. Face him and keep pressing I.You’ll fire at him and, if he gets tooclose, you should be able to ram himfirst.
The key is rapid firing. Get theHoming Missile chasing him and thenfire away as he runs. If he stops, yourMissile will catch up. If he runs, youcan tag him with the Volkan Cannon.If he comes in close, bash him with theram.
If you’ve played the Hero Story,you’re familiar with thetargeting laser and HomingMissile. Run from the blastuntil it drops away.
The Volkan Cannon fire is hard tosee, but if you keep circling Tails,he can’t hit you with it. Samewith the ram attack; he can onlyuse it if he’s right next to you, sokeep some distance.
Tails is no match for the evilmight of Dr. Eggman. Gloatover your fallen enemy.

DARK STAGE 8: SECURITY HALL
primagames.com
125
Wall B
Wall A Wall C
10
5
5
5
10
5 5 5
5 5
5
5 5
5
5
5
5
(in box) (in smallbox)
Security HallSecurity Hall
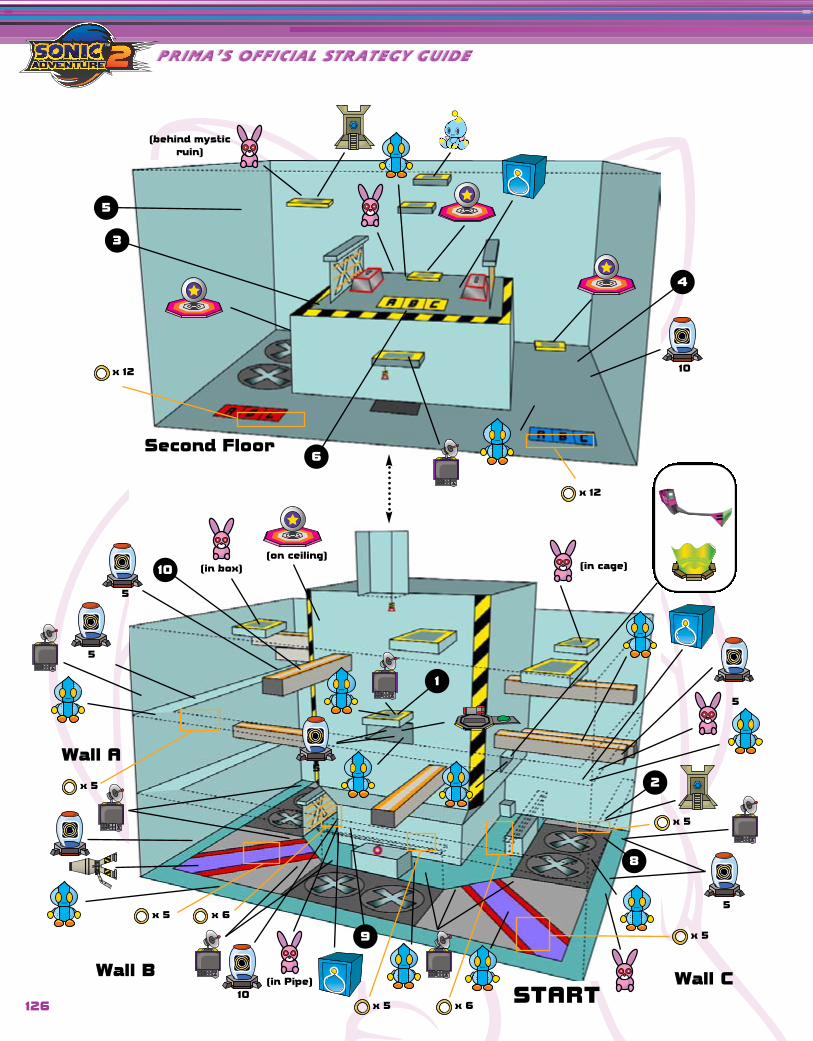
Prima’s Official Strategy Guide
126
10
(behind mysticruin)
5
5
5
10 START
5
5
(in cage)(in box)(on ceiling)
(in Pipe)
Second Floor
Wall A
Wall B Wall C
x 12
x 12
x 5
x 5
x 5
x 5
x 6
x 6
x 5
5
3
4
10
1
9
8
2
6

This Stage is divided into four areas:A, B, C, and the upper level. Everythinglooks the same around here, so usethe letter markings on the floor toidentify what area you’re in.
To go to the upper level, grab on tothe Pulley on the high ledge in B.
1
Have you found the Treasure Scopeyet? Play the Mystic Melody near theAncient Ruin and watch as platformsappear before your very eyes. Youneed the Iron Boots found in DarkStage 12: Mad Space to breakthrough those Steel Containers.
2
Safes like this one are no match for ashifty bat like you. Position yourselfover the blinking “G” and Dig. TheSafes without the “G,” however, needto be unlocked first. Use the Switcheson the upper level.
DARK STAGE 8: SECURITY HALL
primagames.com
127
1. Steal the 3 Chaos Emeralds in 5 minutes!
2. Collect 100 rings!3. Find the lost Chao!4. Collect the Chaos Emeralds
in 3 minutes 30 seconds!5. Clear Hard Mode!
Of all the places to look for Chaos Emeralds! The Security Hall is bound to have someformidable obstacles in your search for Emeralds. Find the Emeralds quickly and avoidthe dangers.
Security HallSecurity Hall
POWER-UP:
TREASURE SCOPE
There are three levels ofSafes, each color-codedby height. The ground floor isred, the middle level is yellow,and the very top level is blue.
Mission 1:Steal the 3 Chaos Emeralds in 5 Minutes
Three Switches on the upper levelactivate the Safes so that you canopen them. Each Switch is codedaccording to the levels of the Safes.The safest way to bypass the lasersfor red and yellow is to go along thisedge. When you reach the wall, climbit and position yourself over thedesired Switch. For the yellowSwitch, just climb down and hit it. Thelasers won’t reach you there.
3
Air currents prevent you fromclimbing down to the red Switch.Climb as close as you can before thecurrent takes you, and wait for thelaser to pass. When it does, jump offthe wall and use the Drill Attack toforce yourself down to the Switch.
There is no need to flip the blueSwitch because the blue safes startout unlocked. If you still want to playwith it, stay on the ground and walkwhen the lasers move above you. Keepperpendicular to the slanted lasersand duck under them to the side.
4
The time limit imposed here forcesyou to be quick with your retrievals.To get to the upper walkways fromthe bottom level, you can climb theinside walls or find the Rockets andPulleys scattered about.

Prima’s Official Strategy Guide
128
Grab all the strings of rings you canfind. These will be the easiest ofyour finds.
Don’t overlook the different ledgesalong the walls. They’re moredangerous, but they also hold yourprecious rings.
Mission 2:Collect 100 RingsThe rings in the Security Hall are hard to come by. Keep an eyeout and don’t pass up any of them. Stay away from enemies.
The Mystic Melody awakens theAncient Ruin on this ledge. What for?Look behind you. There are now 40rings floating above the air current!Jump out there and collect as manyas you need.
5
Strapped for rings? Start looking forthem in the Safes. The rings like to beprotected by lasers.
Now that you have the TreasureScope, finding the lost Chao is amatter of putting it on. Put it on hereand take the newly found Spring toyour friend.
6
Mission 3:Find the Lost ChaoThe Security Hall seems like a pretty safe place, doesn’t it? Itisn’t if you don’t belong there. Get the Chao out of therebefore it cuts itself on the lasers.
Know where all the Hint Boxes are,or you’ll waste a lot of time runningaround looking for them. The threenear the start position should getyou going.
The quickest way to the upper level isto use this Spring. It takes you to thePulley, making it unnecessary to climbany walls.
7
Mission 4: Collect theChaos Emeralds in 3Minutes 30 SecondsYou thought five minutes wasn't enough time? You’ve onlythree and a half to work with now. A little luck and a lot ofexperience is all you need.

BOSS: R-1/A FLYING DOG
primagames.com
129
The first Emerald is in the corner ofthis windy floor. Simply jumping to itwon’t do. Perform a Drill Attack andgrab it.
8
The second Emerald isn’t hard to find;reaching it is the problem. Not only isit protected by a robot, but look at allthose lasers!
Mission 5: Clear Hard ModeThe robots are more aggressive, there are more lasers, and the Emeralds are better hidden.Not to worry; the Treasure Scope you found in this Stage will help you find the Emeralds.
Don’t let the lasers intimidate you. If youGlide through, you can junk the robot andland safely between the lasers. Anotherlittle jump puts you directly underneath it.
Have you been practicing yourScrew Kick? Spin the analogthumb pad a full 360 degreesand press I or O. Use it toreach the Chaos Emerald.
While you’re up there,activate the red Switch. Thelast Emerald is in the red safebehind the trap.
To shut off the trap, put on yourTreasure Scope on the beam highabove. See anything bouncy? Flick theSwitch on the ceiling and go backdown to collect the Emerald.
The military has no end to their variety or supply of attack robots, and they’ve sent out yet another to get Rouge.The little bat-lady isn’t going to be taken down by this bucket of bolts, though.
Boss AttacksThe Flying Dog has three attacks, all of which you've encountered before with Hotshot. So, you're up againstmachine-gun fire, a targeted energy blast, and Missiles. Unlike Sonic and Shadow, however, Rouge is able to climbthe gates on either side of the platform.
Rouge vs Flying DogRouge vs Flying Dog
When the Stage starts,grab a ring or two andleap onto a gate. Let theFlying Dog circlearound shooting itsguns. When it stops andfires Missiles, hop offand run for the othergate. Climb up and thenGlide off it toward theFlying Dog. Whenyou’re over the cockpit,hit I to Drill Drive downon it for a hit.
After being hit fourtimes, the Flying Dogabandons the Missilesand uses only themachine gun and theenergy blast. You canevade the machine gunas usual by climbing thegate. When you see thered targeting reticle,jump from the gate andGlide over the FlyingDog, Drill Driving intothe cockpit.
You can avoid all the machine-gunfire if you just hang out on thegates. This will not protect you fromthe other two attacks, however.
When you’re over the cockpit,use the Drill Drive to smash intothe Flying Dog. You must hit it five times to get it off your back.
Smash the Flying Dog forthe fifth and final time.
109
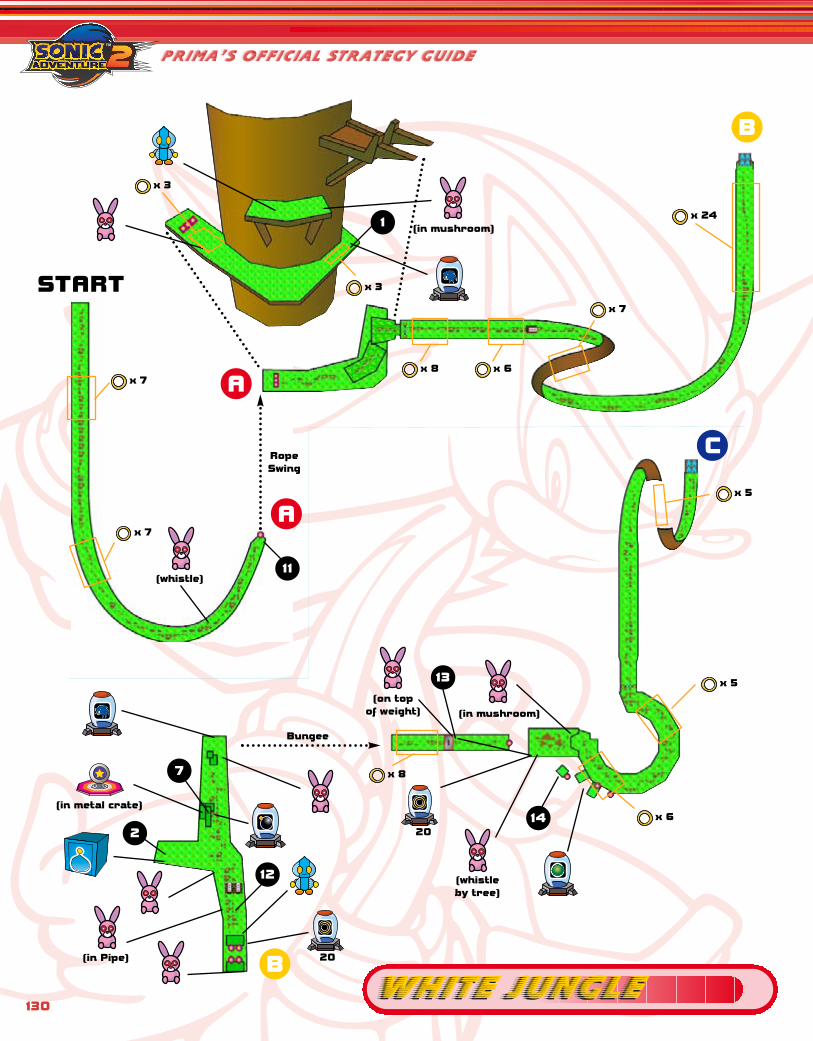
Prima’s Official Strategy Guide
130
A
B
A
B
C
START
Bungee
RopeSwing
20
20
(in mushroom)
(in metal crate)
(in mushroom)
(whistle)
(in Pipe)
(whistleby tree)
(on topof weight)
x 7
x 7
x 8 x 6
x 7
x 24
x 5
x 3
x 3
x 5
x 6
x 8
White JungleWhite Jungle
1
11
7
2
12
13
14

DARK STAGE 9: SHADOW
primagames.com
C
D
E
E
D
RopeSwing
Rope Swing
Bungee
Bungee
Bungee
Bungee
or
(in mushroom)
(light dash)
5
(in mushroom)
(whistle)
(in Pipe)
(in Pipe)
(in Pipe)
x 7
x 16
x 6
x 12
x 17
(light dash)
x 13
x 3
x 8x 8
x 8
x 8
x 17
131
8
5
9
6
3
10
4

Prima’s Official Strategy Guide
132
1. Cut through the WhiteJungle in 10 minutes!
2. Collect 100 rings!3. Find the lost Chao!4. Reach the Goal within
3 minutes 0 seconds!5. Clear Hard Mode!
The distress call from Rouge is a little upsetting. She needs help, Shadow, and you’re heronly chance. As you have visions of Maria, you realize that you can’t let her down.
White JungleWhite Jungle
You can grab the vine here orSomersault under the fence. Beyondthe fence are a few robots and anothervine. Grab the farther one, as it skipsyou ahead a bit to a higher level.
1
If you’re looking for Chao Containers,the first one is beyond these woodenfences to the left. Smash the SteelContainer ahead to reveal a Switchthat leads to an Extra Life; that is, ifyou already have the Air Shoes.
2
Grab the Swing Vine here insteadof the loop. It pops you up to a highledge where there is anInvincibility Shield.
3
Before you can continue, you need theAir Shoes. Hmmm, where could theybe? Bust through the WoodenContainer here and find out.
POWER-UP:
AIR SHOES
Mission 1:Cut Through the White Jungle in 10 Minutes
Grab the second Chao Container hereand don’t forget the ring Item Boxesbehind it.
5
Don’t grab this Swing Vine yet if youwant the last Chao Container. It sitsto the left over here. If you grab theSwing Vine prematurely, it’ll send youstraight to the Goal.
6
Break open the Steel Container here tocall up the rings for some easy money.
7
To animal collectors: Check under the bright blue mushrooms. They’re thesmall animal’s favorite snack.
Mission 2:Collect 100 RingsThere are plenty of rings on this Stage. Keep your eyes openfor danger, and you’ll be there in no time.
A hit from an enemy knocks all your rings from you. You can only recover20, so take your time and avoid them.
1
4
Skip the first Swing Vine and use the secondone. There are only a few more rings thisway, but it cuts down on your time.

DARK STAGE 9: SHADOW
133
The Ancient Ruin is tucked away alongthis ledge. Use the Bounce Pad atto reach it. Play your Mystic Melodyto awaken the platforms that leadto it.
9
Mission 3:Find the Lost ChaoChao become lost easily in overgrown jungles like this.There’s one in here somewhere.
8
Remember the second Swing Vine? Itskips a level and is much quicker.
To avoid the Spark Beetle past thefence here, hop on the rising chunk ofdirt. Waiting for the electric shield toshut off wastes valuable time.
10
Mission 4:Reach the Goal within3 Minutes 0 SecondsWho do these people think they’re dealing with? Threeminutes is plenty of time for a speedy dark hedgehog likeyou. Show ‘em who’s boss.
1Even if you use your Homing Attack onthat Beetle robot, the ledge beyondseems a little too far to reach. It’stime for a leap of faith. Jump andattack the robot, and another willappear. And another. And another.The Chao awaits.
You’re in a hurry. There is notime to unnecessarily destroyenemies. Be the bigger hedgehogand let them live so that you canmake the time.
primagames.com
Mission 5:Clear Hard ModeNow they’ve gone too far; they’ve changed the junglearound with no regard for the environment just to make itharder on you. And all these extra enemies can’t be goodfor the air either.
The Spring at the end of this tube isfloating in the air now. Get ready tojump and use a Homing Attack, oryou’ll go right off the edge.
11
Watch out for these large metaltraps. You can usually just cruiseright over them.
As you drop from above, use theLight Dash on this string of rings toavoid the enemies below.
12
The Bomb has moved from the open spothere. Break open the Steel Container, flipthe Switch, and Light Dash over to thefloating platform to find it.
7
To get through the trap and fencehere, step up to the trap and back off.As the trap drops, hop over it and usethe Homing Attack on the robotbehind it.
13
The ledges over here are the onlyway to go. Hop over the robot if youdon’t want to risk falling off.
14
Where’s the string of rings here?Crack open the box and drop ondown. They’re making you take thelong way now.
4
Looks like a dead end over here. TheAncient Ruin just takes you back tothese traps. It must be a hint. Hop onone of them to get to the upper level,and the Goal Ring is within sight.
15
5

Prima’s Official Strategy Guide
134
If you’re in the middle of a jump when Sonic comes at you,you’ll be fine. However, being hit will bounce you around.Try to stay in the middle of the grassy platform, or you riskbeing knocked off into the water.
You must wait until Sonic has his back to you in order tohit him. Move around until you find the correct angle. Sonicwill run around as well and then stop, back turned, for asecond. That’s when you strike.
While wandering peacefully through the forest, Shadow is accosted by the miserablehedgehog, Sonic. The rude blue guy heaps verbal abuse on Shadow. Not being one toback down from a fight, Shadow decides to take on his nemesis.
Boss AttacksSonic has only one attack—the Homing Attack that you know so well. Plus, the littlecreep picks up rings. Grab four rings at the beginning to keep yourself safe. Sonicdoesn’t attack very aggressively in this encounter. If you leave him alone, he doesn’t domuch. However, if you attack and miss—or he blocks you—he will retaliate immediately.
Shadow vs SonicShadow vs Sonic
When the blue glow surroundsSonic as he jumps, he’s going tocome at you. Hit U and you’llbe protected from his attack.
Stay in the middle. Even whenmoving around, you should stayaway from the Rails. Pounce onSonic when his back is turned.
Once you knock Sonic out cold,you can concentrate on otherthings—like the island blowingup around you.

DARK STAGE 10: ROUGE
primagames.com
135
1. Chase the Tornado!2. Collect 100 rings!3. Don’t hit other cars!4. Don t hit the walls!5. Clear Hard Mode!
Tails has the seventh Chaos Emerald, and the forces of Dark want it. Rogue hops in herroadster and makes tracks after the Tornado, Tails's cool plane.
Route 280Route 280
Right off the bat (heh, heh) you shouldcollect the double row of rings in thecenter of the road. As a rule, go afterrings; you get a Boost for every 20rings you collect.
This is the first gap you see. This maysound obvious, but we should mentionthat you don’t want to fall into it.
Sections of guard rail are missing,usually on sharp corners. Again, trynot to fall off the exposed ledges.
The Balloons in the turnoffs all containrings. Grab ‘em as you need ‘em.
Mission 1:Chase the Tornado
When you get a Boost it will show up in the lower-right corner of thescreen. Press P to send Rouge speeding along. Try to save Boosts forstraightaways, though, or you may end up speeding right into a guard rail.
Save a Boost for the final straightaway. The extra speed can make up fortime you may have lost crashing or scraping along walls.
As soon as you defeat either this Stage or Tails’s Route 101Stage in Story Mode, you’ll unlock the Kart Race option.
The double lines of rings are the meatof this mission. Try to center on themand grab the whole lot.
Mission 2:Collect 100 RingsThe one thing you don’t have to worry about on this Stageis losing your rings. Smacking into the walls or other carsdoesn’t result in an explosion of rings. However, you stillmust be an accurate enough driver to speed through thelines of gold hoops. Familiarize yourself with the layout ofthe map and where the rings are. Don’t panic if you miss afew here and there; keep plugging away.
Remember that youdon’t have to complete thelevel, just grab 100 Rings. Youcan ease up a bit on the speedand concentrate on rings. Don’tforget, though, that you stillmust make it to checkpoints toextend your time.

Prima’s Official Strategy Guide
136
These narrow tunnels can also causeproblems. Once again, let the othercars go ahead until you can passthem in a wider space.
Mission 3:Don’t Hit Other CarsNot as hard as it sounds. Really. The other cars weave acrossthe road but aren’t out to hit you. The worst areas forcrashing are when you reach a sharp curve at the same timeas another car. Rouge slides a bit on turns and can easilyslam into another vehicle. Let off the gas if you’reapproaching the turn next to a car. Allow it to go first.
This is a nasty corner. Slow downbefore you approach it, and then hitthe gas when you clear the first edge.
Mission 4:Don’t Hit the WallsThis mission will most likely take several tries. Don’t despair;by the time you’re able to clear it, you’ll be a Kart master.You must rely on slides and time your turns very well.Release U and then quickly hold it down again as you turnthe analog thumb pad. That should help you corner faster.One other thing: There’s a timer that starts at five minutesand counts down. Every time you hit a wall, you are putback at the beginning, but the clock doesn’t reset—doublejeopardy.
The long stretch at the end isjust an endless expanse. Keephold of a Boost to use on thislast straightaway.
Mission 5:Clear Hard ModeThe Hard Mode for this Stage is made difficult by takingtime away from you. You don’t get as much time from thecheckpoints, and it takes more time to catch the Tornado atthe end. The main cure for these ills is to put the pedaldown and keep it there. And don’t mess up.

137
primagames.com
1. Chase the Tornado!2. Collect 100 rings!3. Find the lost Chao!4. Reach the Goal within
2 minutes 0 seconds!5. Clear Hard Mode!
Rouge kept up with Tails for a time, but now she'spassing the torch to Shadow. He needs to speed acrossthis stage to find where the plane ends up.
Sky RailSky Rail
Don’t feel too rushed; you have timeto explore. You have two choices:Jump over to the Rocket and skipsome stuff, or you can get that ChaoContainer farther along.
1
If you skip the Rocket and ride theshort Rail, you’ll end up next to aPropeller Pad. When it reaches itspeak, you’ll notice a Spark Beetle.Continue riding the Propeller Paduntil you see the field go down,then Homing Attack the robot.
2
Continue using the Homing Attack tosmash along a line of Beetle robots.You’ll end up here, right in front ofthe Ancient Light permanentupgrade. Grab it.
3
The second Chao Container and 30rings are on this ledge, down belowthe area with two Hawk robots and aPropeller Pad. After you’ve picked itall up, leap to the Propeller Pad andbounce out of there.
4
POWER-UP:
ANCIENT LIGHT
The Propeller Pads can be frustrating. Jump and make sure you’redirectly over them before using the Homing Attack to bounce them up. Ifyou’re too far off to a side, you’ll end up ricocheting off it and into the void.
Mission 1: Chase the Tornado
A Beetle robot just hangs out next tothis long Rail. Jump and HomingAttack to it, then press U again toland on a pumpkin rock.
5
Use the Spring on the first pumpkinrock and you’ll launch to another;press on the analog thumb pad to geta little extra distance. You can pick upa bunch of rings and an Extra Life, butthen you must return on the Rail.
6
Grind down the right Rail that windsaround the pumpkin rocks, then jumpat the end. Use a Homing Attack andyou’ll hit the Spring hanging here.There’s a lot of loot on theprecarious ledges beyond.
7
If you don’t want to go the Springroute, use the Propeller Pads to theleft. Notice the Chao Container tothe right.
7
The camera is not your friend when you jump back to the Rail. It willswitch views in midjump, making it very difficult to land on the skinnyRail. You may need to use up that Extra Life you just found.
Don’t worry about this gap in theRails. If you don’t touch the analogthumb pad, Shadow will land righton the next Rail.
8
DARK STAGE 11: SHADOW

Prima’s Official Strategy Guide
138A
B
A
START
D
10
10
5
20
(in Pipe)
(in barrel)
10
5
x 6
x 6
x 8
x 6
x 1
x 8x 8
x 3
Sky RailSky Rail
13
5
10
6
9
2
1
3

DARK STAGE 11: SHADOW
primagames.com
139C
B C
E
20
10
20
(in Pipe)
(in metal box)
(above rail)
10
5
5
20
5
(underneath)
5
x 6
8
11
7

Prima’s Official Strategy Guide
140
D
E
or
10
10
10
20
10
5
10
(in Pipe)(in Pipe)
(in Pipe)
5
x 6
x 7
x 5
x 3
x 8
12
10
4
11

DARK STAGE 11: SHADOW
primagames.com
141
On the first long Rail, take the rightRail first, grab the ring Item Box,switch to the left Rail, and grab theother Item Box and the loose rings onthe Rail.
9
These Hawk robots will fire multipleblasts at you, so be ready. Bust thefirst one, then jump off the ledge anddrop to the Chao Container. Ring ItemBoxes are there as well.
10
After the long Propeller Pad rideback, take the Rail and jump onto theBeetle robot, and then over to thepumpkin rock. Use the Spring thereand you’ll be able to get over the 100mark at the other pumpkin rock.
6
Mission 2:Collect 100 RingsThis level has a lot of rings in it, but they’re in hard-to-reachplaces. Mostly, you’ll find them in Item Boxes throughout thelevel. Here’s a fast way to grab the 100 you need.
Play Shadow’s Mystic Melody at theAncient Ruin to reveal a line of rings.Light Dash along the trail, then ridethe Propeller Pads up.
11
It’s chaotic up on the mesa. You mayget lucky and bounce up to thesecond tier off a robot, but morelikely you’ll have to run around to theother side to the Propeller Pad. Rideit up and grab the Chao.
12
MISSION 3: Find the Lost ChaoCompared to the hoops you must jump through for theChao in other Stages, getting the Sky Rail Chao is ratherstraightforward. The worst part is the high concentrationof Unidus and other killer robots that surround the Chao.Be ready to take a few hits.
It’s not too hard to drop back ontothe Rails. Don’t panic; just makesmall movements on the analog thumb padand line up Shadow over a Rail.
This is the best shortcut; as you’resliding down the first long set ofRails, right before you reach this
turn, jump over to the other set ofRails. It takes a steady hand, but ifyou nail it, you’ll save a lot of time.
13
Mission 4:Reach the Goal within2 Minutes 0 SecondsIt’s entirely possible to bomb through Sky Rail within thetime limit, but you can’t make any mistakes. Whenever you’reon a Rail, press I to crouch and pick up speed. Ignoreenemies that aren’t directly in your path. Other than that, just be perfect.
The worst surprise is finding a spikedball on the Rail. Switch from Rail toRail to avoid them. The first set oflong Rails has a ball on the right Railand then on the left farther along.
9
The Rails that run around the pumpkinhills have a ball on the left Rail andthen the Right rail. Switch after youpass the first one.
10
After the long Propeller Pad ride back,take the Rail and jump onto the Beetlerobot, and then over to the pumpkinrock. Use the Spring there and you’llbe able to get over the 100 mark atthe other pumpkin rock.
11
Mission 5:Clear Hard ModeThis Hard Mode lives up to its name. The additional enemiesin unexpected places are nasty because the ledges are sosmall. Shadow may end up getting pitched off the sides a fewtimes before you succeed.

Prima’s Official Strategy Guide
142
Sonic has managed to defeat your Egg Golem. After his head-pounding, the Egg Golem’s restraints have been brokenand now he’s after you! Man, why does this stuff always happen to the bad guys?
Boss AttacksThe Egg Golem’s three different attacks are meant to throw you off. In your heavy walker, your movements are slowerthan Sonic’s, so you must use different tactics to defeat him.
Dr. Eggman vs Egg GolemDr. Eggman vs Egg Golem
The Egg Golem’s most commonattack is a single fist slam.During this attack, he slamsdown one fist, followed by theother. Time your movement sothat you are moving toward thefirst fist after it comes down.The point is to get out of theway of the second fist.
Go to one of the Pulleys and letit pull you up. At the top, stayon the Pulley and unleash yourcannons at the Golem. It’s muchsafer here than on the catwalk.
During your attack from thePulley, the Golem may try adouble fist slam. Don’t worry;the fists won’t hit you. Whatwill hit you is his stony head.After the fists land, jump offthe Pulley and move on to thenext Pulley.
After breaking through some ofthe Golem’s exterior, someDynamite is revealed in hischest. Target this with yourHoming Missiles and let themfly. This Golem soon learns notto mess with his maker.
When some of thewalkway sections aregone, drop down belowto safety. Don’t forget touse Hover so you don’tfall in the sand. UnlikeSonic, Dr. Eggman can’tescape the sand.
From the Pulley, watch forthe Golem’s next attack. If hepulls a single fist slam, you aresafe from the first fist.Continue firing at him untilthe second fist begins todrop. Time to move, Doc.Jump off the Pulley away fromthe fist and down toward thesand. Move around todifferent Pulleys and repeat.Don't forget to collect somegoodies down below.
If you stay off thecatwalk, the Egg Golemrarely uses his third attack,a double sweep with hishands. In this attack, heputs his hands along thewalkway and sweeps themaround twice. You can’tclear the hands while inyour clunky piece ofmachinery, so just jump offand find a Pulley.

DARK STAGE 12: ROUGE
primagames.com
143
1. Find 3 pieces of the Master Emerald!
2. Collect 100 rings!3. Find the lost Chao!4. Collect the Emerald
pieces in 4 minutes30 seconds!
5. Clear Hard Mode!
Rouge snoops around in ARK’s computers to find info onShadow. She's surprised by what she finds, but is lured away by the possibility of finding more MasterEmerald pieces.
Mad SpaceMad SpaceThe first Hint Box and Omochao (as wellas a robot) are right in front of you. Thehints are either written backward or they are the opposite of the truth. Forexample, a clue that says “The lowest place” means the highest place, sodon't waste time searching low.
1
This planetoid with a dip at the top isthe “Holy Planet.” Take the Rocket ontop of the building to reach theplatforms above.
4
Rockets are on all three arms of thefirst platform. Before you acquire theIron Boots, though, you can reachonly one of them.
2
Become familiar with the threeplanetoids. This is the“CapsulePlanet.” You can escape its gravity bywalking to a side and jumping.
3
POWER-UP:
IRON BOOTS
Mission 1:Find 3 pieces of theMaster Emerald
Don’t overthink the reverseclues. For example, a cluethat says “It’s not under a moon ona yellow platform near an invertedtower” means that “It is under amoon on a yellow platform near aninverted tower.” That’s all thereversing you need to do; don’t tryto reverse every part of the clue.
The round planetoid is called the“Spherical Planet.” You find the IronBoots here. They rest in the building.
5
Just as in Knuckles’s Meteor HerdStage, star and moon signs arescattered throughout the level.Hints often refer to them.
You can reach any planetoidby falling to it. If you get upto the platforms above the planetoids,step off and use the analog thumbpad to guide Rouge’s descent.
If you go to the platform just belowwhere you start and use the TreasureScope—found in Stage 8: Security Hall—you can find this 20-ring Item Box.
6
Mission 2:Collect 100 RingsThere are enough ring Item Boxes to see you through thisMission. Search through the map for them. We like to clearout the area below the starting platform and then move onto the planetoids. The Capsule Planet has many Item Boxes.

Prima’s Official Strategy Guide
144
A
A
B
B
D
C
E
F
(in crate)
(in Pipe)
(under crate)
(under crate)
(under crate)
10
20
(in Pipe)
(under crate)
10
5
x 1
x 8
x 6
Mad SpaceMad Space
3
4
5
1
6
2
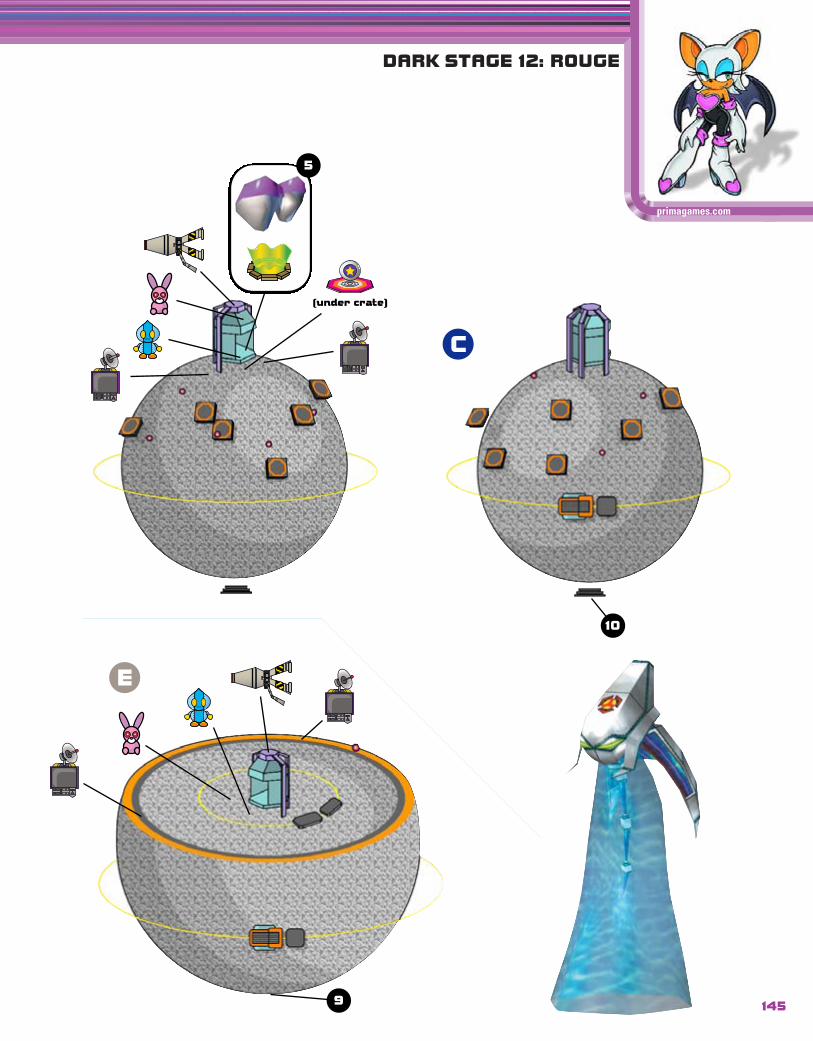
DARK STAGE 12: ROUGE
primagames.com
C
E
(under crate)
10
9
5
145

Prima’s Official Strategy Guide
146
D
F
5
1010
10
5
5
5
5
10
or
(in container)
(in container)
(in Pipe)
(in Pipe)
(flying aroundblack crates)
(in crate)
x 5
7 11
8

After traveling through a container and another warp, youend up in a second container. A robot is in there with you, but youwon’t see it at first. Attack to pop it before it pops you.
DARK STAGE 12: ROUGE
primagames.com
147
Defeat the Artificial Chaos ‘bot andplay the tune to open up a Warp Hole.Climb in.
7
Excellent work. Now it’s time for theharder missions.
8
Mission 3:Find the Lost ChaoYou must climb high to find the missing blue guy. Use theRockets to travel quickly to the Ancient Ruin. After that, it’sjust a matter of using Rouge’s Mystic Melody—found inStage 2: Dry Lagoon.
If you need to reach the platformsquickly, hit this Switch next to theSpring and take the Rocket rightabove it to the Holy Planet. Then ridethe Rocket there to the platforms.
4
Mission 4: Collect theEmerald pieces in 4Minutes 30 SecondsAs usual, knowing your way around the map is especiallyimportant in the time trial. Understanding the Hints is alsokey. Press S to pause the game and study the Hints you’vecollected. Mad Space is a large Stage and it's cumbersometo move through. Learn where each Rocket brings you sothat you won’t be trapped in a planetoid’s gravity well forprecious seconds.
Mission 5:Clear Hard ModeThe Treasure Scope—found in Stage 8: Security Hall—ismandatory for this mission. When you have it, you cantackle Hard Mode. As with the other Rouge and KnucklesStages, the Emerald pieces in the fifth mission are always inthe same places.
The first Shard floats below theHoly Planet. Climb down the side ofthe planetoid until Rouge stops.Then Glide to the Emerald floatingunderneath. That’s one.
9
Make your way to the SphericalPlanet and walk down to the bottom.There’s a platform down there thatyou must jump onto. It’s toughbecause the directions are wonky.Use a Spring to bounce up, then Glideto the prize.
10
Jump to this platform high up andnotice the Emerald Shard floatingabove the star symbol. Stand on thecorner behind the star symbol and dothe Quick Swing Kick—turn theanalog thumb pad in a completecircle and press I to do it. That’s it.
11

It’s you against Knuckles. Your archenemy has found some of the Emeralds Shards you've been looking for. It’s too badhe doesn’t want to give them up. If he wants to do it the hard way, so be it.
Boss AttacksKnuckles’ attacks should be familiar; they're the same as Rouge’s. Remember that although he attacks while standing,he also performs his Sliding Attack while running. In addition, his Hammer Fist Attack reaches you from afar.
Rouge vs KnucklesRouge vs Knuckles
Prima’s Official Strategy Guide
148
If Knuckles climbsthe supports, resist the urge tofollow him. From the supports,he comes right down on yourpretty little head.
Throw continuous attacksat him. Eventually, he’ll stopand you’ll hurt him. Thisway, you also prevent himfrom hurting you. Don’tforget to use your DrillAttack. Glide above Knucklesand push I or O to comecrashing down on him.
The beams are actuallyan easier place to engageKnuckles. The narrow widthlimits your movements, but italso limits his. Attack him ashe stops to catch his breath.
When the ground isopen and Knuckles issomewhere on thebeams, it’s hard to findhim. Climb high andGlide in a circularmotion to view thearena. Find himand charge.
Periodically, the floor opens up andhot air puts you in the air. When thishappens, take the fight to the beams.
Knuckles’s Hammer Fist can meanthe end of you. You know it’scoming when he screams, “Nowwitness my power.” Convenient.When he does this, get ready tofly. Jump and start Gliding in anydirection to get the heck out ofthere. His Hammer Fist Attack hasless chance of hitting you when you’re in the air.
Keep moving to avoid his attacks,throwing in your own SlidingPunch Attacks as you move. Eventhough you can’t hurt him whilehe’s moving, he can hurt you ifyou’re not attacking.

149
DARK STAGE 13: DR. EGGMAN
primagames.com
1. Get and confrontthe trespassers!
2. Collect 100 rings!3. Find the lost Chao!4. Reach the Goal within
8 minutes 0 seconds!5. Clear Hard Mode!
The time is at hand, Dr. Eggman. You've got a lesson to teach those Hero critters aboutthe greatest genius of all time. If they think they can fool you with a fake Emerald, letthem beware.
Cosmic WallCosmic Wall
The gravity here is really weak. Reachreally high places by using your JetEngine. Turn it on at the peak of yourjump for maximum height.
The safest way to drop down thisshaft is to free-fall because you candodge the Chaos ‘bots tendrils. Free-fall just as you see each wave’stendrils extend. They won’t havetime to touch you.
5
This Switch pauses the trap at thetop. Jump on it to gain the heightneeded for the next platform.
6
POWER-UP:
PROTECTION SHIELD
Mission 1:Get and Confrontthe Trespassers
The first Chao Container is easy tomiss if you aren’t careful. A pyramidis on a platform to the right of themain walkway. Destroy the pyramid toreveal the Chao Container and anAncient Ruin. The Ancient Ruin leadsto the lost Chao in Mission 3.
1
Time for a little upgrade. Use arocket to bust out the ProtectionShield. It’s tricky to boost from theRocket platform to the ProtectionShield, so hop onto the platformabove the Shield. From there, dropoff the side and move toward theShield to get it.
2
Walk up to the green lasers to activatethe cart. It locks down your Eggwalkerand takes you for a ride. During yourride, quickly destroy everything you can.
3
After you’re released from the cart,find the second Chao Container justbefore the next Point Marker.
4
The final Chao Container is at thebottom of this Chaos-infested shaftright before the second cart ride tothe Goal Ring.
7
Learn to fire while boosting upto the next level. The heightyou can reach in this low gravityallows you to dispatch enemies asyou rise to their level.

Prima’s Official Strategy Guide
150E C
C
A
A
BD
10
10(in Pipe)
or
(in Pipe)
20
20
(in Pipe)
(in Pipe)
(in Pipe)
(underpyramid)
20
10
x 20
x 18
x 3
x 12
x 8
x 4
x 8
x 6
x 6
x 7
x 8
x 5
x 7
Cosmic WallCosmic Wall
3
1
9
811
2
12
6
4
10
ST
AR
T

DARK STAGE 13: DR. EGGMAN
151
primagames.com
B
D
E
20
20
20
20
20
20
10
20
x 6
x 7
x 8
7
5

Prima’s Official Strategy Guide
152
Mission 2:Collect 100 RingsRings are everywhere in the Cosmic Wall. Collecting 100 ringsearly on this stage is a breeze.
To the left of this trap is a ton ofrings. It’s like picking strawberries.
8
Continue shooting as you move todestroy enemies as well as any ringItem Boxes. Rings are what we’rehere for, right?
If you’ve been diligent in destroyingthe enemies and picking up the rings,you should have 100 rings by thispoint. If not, keep at it to completethe second mission.
9
Mission 3:Find the Lost ChaoChao seem to have a knack for getting themselves lost in theoddest places. Do your deed and find it.
A lonely pyramid-topped platform isto your left. It’s tough to get a goodaim at it from the main walkway, sohop over to it and destroy it as youget closer.
1
Awaken the Ancient Ruin to bring outthe Spring that shoots you up to thenext platform.
The next platforms have meteorsoccupying them. Jump straight upand destroy the meteors before youland on the platforms. You’ve savedthe lost Chao before you know it.
Mission 4:Reach the Goal within8 Minutes 0 SecondsEight minutes is all you have to go through this long,treacherous stage. The trick here is to know where tocut corners.
Don’t underestimate your Jet Engine.You can boost farther and higherthan the walkways suggest. Easilyskip over intermediate platforms likethis. Don’t waste valuable time whenyou can land on the platform above it.
Because the walkway turns back onitself, skip this whole section. Get agood boost going and jump tostraight from .
10
Don’t forget to free-fall down theseshafts. Leave the enemies alone tosave valuable time.
12
11
10
11
Mission 5:Clear Hard ModeThe number of enemies has increased and the course hasbeen changed again. Stay on your toes.
What’s this? These enemies havechanged positions since you last sawthem. No worries; you can adapt.
The course has been changed as well.What’s a doctor to do? Take yourtime going through the mission. Beready for any unexpected changes inthe catwalks.

BOSS: TAILS
primagames.com
153
How cute. This little fox boy thinks he can go up against the all-powerful Dr. Eggman. You’ve already shot Sonic intospace. If that didn’t scare off Tails, it’s time to teach him a little lesson.
Boss AttacksKeep on your toes; Tails can be sneaky. He attacks you three ways: cannon fire, Homing Missile, and the Power Laser.Maintain your distance, and don’t let off the fire button.
Dr. Eggman vs TailsDr. Eggman vs Tails
The Dynamite packs in the middle of the room can hurtboth you and Tails. Stay to the outer perimeter and shootthe explosives if Tails nears them.
When Tails fires his Power Laser, it’s time to book.Head toward him and away from his line of fire. Bymoving toward him, you have a shorter distance tomove your slow vehicle out of the way. If Tails cuts youoff with the laser, change directions, pronto. The PowerLaser lasts for quite some time. Use this time to circlearound Tails and give him a taste of your cannons.
Your Homing Missile is not the bestway to dispatch Tails. While morepowerful, it’s too slow to hit reliably.Your regular cannon’s rapid fire has abetter chance of hitting Tails.However, it doesn’t hurt to targethim and hope that a Homing Missilewill land.
After you’ve taken a good bite out ofTails’s health meter, he pulls out hisPower Laser. This can be the end ofyou if you’re not careful.
When fleeing the Power Laser, jump and use your Jet Engine. Boostingprovides more responsive control over your movement. It's great foravoiding the laser.

Prima’s Official Strategy Guide
154
B
A
A
B
C
START
10
5
5
10
5
520
5
1010
10
5
5
(in box)
(in air)
(in crate)
(in Pipe)
(opens warp)
Warp fromRuin
(in Pipe)
x 10
x 6
x 4
20
(in box)
x 5
x 6
x 11
x 8
x 3
x 3
x 3
x 6
x 8
10
5
Final ChaseFinal Chase
13
1
14
2
3
4
5

155
DARK STAGE 14: SHADOW
primagames.com
C
D
D
E
10
2010
10
5
(in Pipe)
(in Pipe)
(on building ledge)
x 6
x 8x 13
x 8
x 6
x 24
5
6
12

Prima’s Official Strategy Guide
156E
F
F
G
G
(in crate)
(in crate)
or
x 6
x 9
x 7
10
10 5
5
5
20
7
8
9
10

DARK STAGE 14: SHADOW
primagames.com
157
1. Hurry to theEclipse Cannon!
2. Collect 100 rings!3. Find the lost Chao!4. Reach the Goal within
5 minutes 30 seconds!5. Clear Hard Mode!
Dr. Eggman has all he needs for his plans to come through. But what's this? Looks likesomeone is moving toward the Eclipse Cannon. Go check it out.
Final ChaseFinal Chase
When you come to the first spinningdrum, walk up to it and let it take you.To move up as you spin around it,push the analog thumb pad up. Tomove down, push it down. At the top,ease up on the analog thumb pad oryou’ll fall off.
1
Although the general rule is to followthe green arrows on the ground, youmust go against the grain at this pointto find the first Chao Container. Acouple Item Boxes are here too.
2
To move from one spinning drum tothe next, wait until it spins youaround to the top. Jump to the nextdrum and let its gravity take control.
These electric fields aren’t as tough toclear as they seem. Just wait until youcome around to the top of the drum,then hold the jump button formaximum height.
POWER-UP:
MYSTIC MELODY
The first things you notice on this stage are the greenspinning drums. They have their own gravitational field thatspins you around the shaft. Learn to use and navigate these.
Mission 1: Hurry tothe Eclipse Cannon The second Chao Container is in the
right corner of this room, just pastthe Point Marker.
3
The vertical drums are a good distanceapart. For greater jumping distance,wait until you reach the maximumheight of the jump, then use the HomingAttack. This adds extra distance whilekeeping you from losing altitude.
You must clear this electric fence toreach the Mystic Melody at the top.
4
The Spring puts you on the Rail at tophere. You’ll miss the Point Marker justbelow it if you stay on the Rail. Notconfident you’re going to survive?Drop down to activate the PointMarker so you can start back here ifyou fall off the edge.
5
Does it look like there’s nothingbelow? If you make the jump, youfind platforms. The platform justbefore the next Rail also holds thelast Chao Container.
6
Which way to go? They both lead tothe same place. Take the left route;it’s faster if you keep jumping.
7
Until now, you’ve only gone up thevertical spinning drums. These havearrows pointing down, so that’swhere you go.
8

Prima’s Official Strategy Guide
Drop down near the first ChaoContainer to collect the rings.
2
Although jumping from one verticalspinning drum to the next saves time,jumping to the floating platformsrewards you with rings.
Mission 2:Collect 100 RingsIt’s amazing how many rings are on this stage. Collecting100 should be no problem. Enemies are sparse, so holdingon to rings shouldn’t be a problem either.
Mission 3:Find the Lost ChaoAnother lost Chao in space. When will they ever learn? It’s agood thing you get the Mystic Melody on this stage.
There’s no need to spin around thesedrums. As you land on them,immediately jump again to keep ontop of them. You'll never make thetime if you spin around each drum.
From this platform you can jump tothe flat tops of these spinning drums.From the tops, you can skip alongthem much more quickly.
11
Mission 4: Reach theGoal within 5 Minutes30 SecondsTo clear the stage within the time limit, precision is key. Yourtechnique around the spinning drums will decide whetheryou make the time.
This stage involves manyjumps. To shave preciousseconds off the clock, use theHoming Attack to speed things up.
Take a flying leap here instead of goingdown the walkway. The leap takes youto a higher spinning drum. From there,you can jump all the way down to thenext walkway without dealing withtime-consuming obstacles.
12
The Artificial Chaos here can reachyou much earlier. Don’t wait aroundon the walkway until it does. Afterusing the Homing Attack to grab thering Item Box, use another one toquickly shoot yourself past it.
13
Take a flying leap here instead offollowing the walkway. The spinningdrums up here are easier to navigatethan what you’ll find below.
14
Mission 5:Clear Hard ModeThe Artificial Chaos have been let loose. These tricky jokers willgive you nightmares by the time you’re through with this Stage.
The Artificial Chaoswith the long-reaching tendrilsare your worst enemies. Stayaway from them, or your ringswill be yours no more.
If you accidentally hit thespringpad, you can easily makeit back with a long jump.
The spinning drums here are allstaked out by new and faster
enemies. Artificial Chaos reachout with their tendrils at a fasterrate, and spinning spikes wait foryou at the top. Cool nerves and alittle luck will take you through.158
Not so fast, tiger. The Spring seems anatural way to go here, but what’sthat Pulley for? Time it just right andpush up onto the platform withouthitting the Spring.
9
You can’t jump over these fences.Stand just below them and wait untilyou’re spun in front of them; this is thetime to start moving. This way, you’llbe moving past it on the other side.
10

BOSS: SONIC
primagames.com
159
How did that blue hedgehog survive that trip into space? No matter. The final showdown has come.
Boss AttacksSonic is wily, but you’re shiftier. He has the standard arsenal of attacks that you also have. Theexception is his Sonic Wind Attack: the only thing you have to worry about on this infinite highway.
Shadow vs SonicShadow vs Sonic
When you start, run alongsideSonic, collecting rings. You’llprobably be hit at some pointduring this fight, and the ringswill protect you for a few hits.
Early in the fight, your simpleHoming Attack is enough todamage Sonic. Use it until younotice that your attacks justbounce off him.
If you see Sonic spinning in the air, it means thathe's about to attack you. Counter with an attack ofyour own.
Before long, your HomingAttacks won’t affect Sonic.Now’s the time to hang back alittle bit. Let Sonic run aheadof you until he attacks with theSonic Wind. To perform this, hemust stop.
While you’re lettingSonic run ahead of you,charge up your SpinDash by holdingdown I or O. If younotice the highwaybreaking apart, stopyour spin, go to theupper level, and start theSpin Dash again. If youdon’t, you’ll end upspinning off the edge.
When your Spin Dash takes you near him, give Sonic ataste of your Homing Attack. Because of the speed at whichyou approach him, the Homing Attack should be executedwith a double tap of U. Be careful not to overshoot him.Repeat until Sonic is defeated.
When Sonic is far enough ahead,he’ll stop to do his attack. Now isthe time for you to act. Watch forhim to stop and begin to say, “I’mnot done with you yet!” Anticipatethis and let go of I or O to Dashtoward him. After he finishesspeaking, a blue flash of lighting issent your way.
When attacking Sonic, you’re likely to get hit by the SonicWind. Suck it up, collect a few rings, and continue the fight.

Prima’s Official Strategy Guide
160
What’s this? ARK is plummeting to earth and the two sides are banding together to stop it. During this unusual Stageyou will control each of the six playable characters to help save the planet. There are no missions for this level in theStage Select area. Each section is for a different character.
By now you’ve played hours and hours of Sonic Adventure 2 and should be an expert at playing each of the sixcharacters. Especially since Cannon’s Core can only be opened after conquering the Hero and Dark Stages! There aresome new tricks to these levels, but with the skills you possess, you should be able to get through it handily.
Cannon’s CoreCannon’s Core
START
(in Pipe)
(in Pipe)
END
x 6
x 6
x 6
x 8
x 8
x 8
Cannon’s Core: Tails1 2 3
Cannon’s Core has a lot of these TimeStop Switches. Hit them and allmotion—except yours—comes to ahalt. Robots freeze, lasers stop, andplatforms stay still. Hit this one todrop the laser gate.
Jump and hover so that you slowlydescend this bottomless pit. There arethree Hornet robots that you cantarget and blast. Get close to the dooron the other wall and target theDynamite packs. Blasting them opensthe door.
Hit the Time Stop Switch in this roomand jump onto the platform to your leftor right. From there, jump to the nextlevel, where a falling Weight ispounding away (it’s identical on eitherside).
Target the Time Stop Switch and shootwhen the Weight comes down. Jumpon the Weight and hop up to theplatform. Open the door by blasting itwith your cannon. When the Time StopSwitch releases, though, you’ll besurrounded by robots. Stay ready.
To defeat the Hunter robotswith Tails and Dr. Eggman,target them but hold I down. Whenthe enemy moves its shield, releaseI and the blast will take ‘em down.
3
1
2
3

LAST: CANNON’S CORE
primagames.com
161
1
3
This room is a pain to negotiate. Targetthe Time Stop Switch and fire whenthe two blocks that rise out of thefloor are just barely emerging. Hoverfrom one to the next, then hover to thelower area.
When the platform disappears underyou, don’t panic. Hover, then plummetto make it down the shaft. Line up sothat you're not going to hit the lasersthat you can see, then fall until morelasers are visible and Hover again.Keep it up all the way down the shaft.
In this room, hit the Time StopSwitch when the blocks to the leftlook like this, stepped up to thelower platform.
Jump onto the first block you can thathas an X on it. When it reaches thedoor, Hover off and through the door.
20
(under box)
START
END
(in Pipe)(health)
Laser Patterns (in descending order)
x 8
x 4
x 8
x 6
x 8x 3
x 3
x 12
When you see the three enemies nearthe bottom, Hover and blast them.Then, hit the Time Stop Switch andhead for the door.
The blocks all show you which direction they are traveling. Theyhave light up arrows pointing left or right, or Xs if they aretraveling up and down.
Cannon’s Core: Dr. Eggman
5
Freeze time again, when the twoblocks in front of the platform arestepped, like this. Use them to jumpup to the higher platform, then blastthe door open.
1
2
4
5
6
3
2
4 6

Prima’s Official Strategy Guide
162
Cannon’s Core: RougeRouge needs to find a Switch that will raise the water. Rather than search for treasure, hit a series of Switches to getto the big red button.
1 2 3
Climb the pillars. Find the onewithout a block at the top, stand onit, Glide to the next tallest one, climbto the top, then Glide to the nexttallest. At the top of the fourth pillaris a Time Stop Switch.
Kick the Switch, then fall and Glideinto the door behind the waterfall.Tackle the Hunter robot.
Cling to this wall, right next to theTime Stop Switch. As soon as a blockhas passed through the tunnel, hit theSwitch so you can climb into thetunnel and run down.
Bust the Steel Containers to get theInvincibility, and climb up here to hitthe Switch. Now make your way back.
(in ceiling)
START
(in Pipe on sideof tower)
x 20
x 12
x 4
You have to use the TimeStop Switch, then theSpring to get back out to themain room.
4
Jump on the big red button andRouge is finished.
5
5
1
2
3
4

163
LAST: CANNON’S CORE
1 2
Hit Artificial Chaos with a Glide move,then dive to hit the Time Stop Switchunder water. Once it’s flipped, swimback up and go down the corridor thatthe Artificial Chaos was in.
Drill Drive through the Steel Containerfloor and the Spring will pop you up toa Pulley. Flip the Switch you find here,then Drill Drive through that SteelContainer floor just past the Switch.
Dive back into the water and findthe now open tunnel with greenlights pulsing along it. Swimthrough, but dodge the eye beamsthat the Artificial Chaos is firingat you.
Hit the Bomb totake care of thepesky robots andthen Kick theSwitch. To getdown the tunnelyou’ll need to hitthe Time StopSwitch abovethe door.
After you’re throughthe tunnel, enter aroom criss-crossedwith lasers. Getagainst a wall andswim down to theTime Stop Switch.Hit it and go throughthe tunnel nearby.
Cannon’s Core: KnucklesLike Rouge, Knuckles needs to get to a big red button to completehis task. More Switch madness for you.
3
Halfway throughthis tunnel, timestarts up again.Hit the Time StopSwitch here toget through.
START(in box)
10
5
10
x 20
x 8
x 4
x 12
x 6
x 9
x 32 (floating)
x 8
x 8
x 4
x 4
x 4
x 3
4
Hit the big redbutton andyou’re finishedwith Knuckles.
5 6
7
2
1
3
4 5
7
6
primagames.com

Prima’s Official Strategy Guide
164
Cannon’s Core: SonicSonic has a visually confusing level to play. There is so much motion on thewalls it may be difficult to see danger. But you're a Sonic master, no?
A
START
(in box)
(in Pipe)
or
x 16
x 3
x 7
x 6
x 8
x 8
x 16
x 12
x 12
A
1
This is the first tricky bit. First,somersault to take out the two Hunterrobots. Then, use your Homing Attackon the Artificial Chaos. As you bounceoff the Chaos robot's head, pull theanalog thumb pad back toward thefloor you jumped from and press Uagain to land safely.
2
Use the Bounce Attack to make yourway across the rushing water. Keepbouncing to reach the ledge with theTime Stop Switch on it. Hit the Switch,and somersault under the gate.
Jump up to the peak of thiswaterway, then slide down. You’llpass through a tunnel, then shootout into the Goal Ring.
3
3
2
1

BOSS: THE BIOLIZARD
This can be the toughest fight of the game. Shadow must defeat the prototype of theultimate life-form. This huge lizard is not in the mood to play games, possibly because hecan’t move well. Hang tough; we’ll give you the info you need.
Shadow vs BiolizardShadow vs Biolizard
Run away from the gaping mouth andpick up some rings. When you see thewood divider, jump over the water thatcuts through the circular path.
After a time, the Biolizard will tire and start huffingand puffing. Now’s your chance to attack. The pipe alongits neck has lights running up it. Jump onto the pipe andgrind up it. Jump just before the big red light, then use aHoming Attack to bash into the light.
That’s one hit. Now things change a bit. The Biolizardrecovers and starts chasing you again. Stay away. When itstops moving, it spits balls of energy that roll toward you.Some go low, others high. Jump over the low ones andSomersault under the high ones.
This pattern—chasing, energy attack, then Grinding—repeats once more. Then there’s an addition made. TheBiolizard chases and uses its energy attack, but afteryou’re done dodging the energy balls, it rears back andgenerates floating pink eggs. The eggs charge and attackyou, so strike first and fast.
Use the Homing Attack to bounce to the top of theBiolizard. You can direct Shadow a bit with the analogthumb pad. Bounce off an egg near the top, hold thejump button U until you’re directly over the target, thentap U again to attack it.
You must deal with the cloud of eggs twice. Then,after you make a hit the second time, the Biolizard roars,spits out more eggs, and levitates you and them.
It is crucial to gather rings after being hit. You can last through thewhole barrage of energy attacks even if you are hit by every one, aslong as you grab rings after each hit.
This is your target. You must hit itseveral times to win.
These energy balls can be a pain. If youare hit and lose rings, you’ll have amoment to gather them again.
You can use the eggs to reach yourtarget with your Homing Attack.
You can’t use your attacks whilefloating, but you can use the analogthumb pad to direct Shadow. All youhave to do is get to the target. Pushtoward the red light on theBiolizard’s back.
First, the eggs swirl to the right, so direct Shadowthat way. Find a gap free of eggs and push Shadowdown it, closer to the life-support light. All you have todo is push him into it. However, eggs will be bombingyou continuously. Keep moving forward and try not torun into any.
When the energy attacks stop, the Biolizardpresents its neck pipe for you to grind up again.Take another whack at his life-support system.
When you hit the life support forthe final time, the Biolizard slumpsin defeat.
Boss AttacksThe Biolizard has a few attacks up its…sleeve. His vicious bite will do damage and send you flying. He starts chompingaway and shuffling around. You must stay ahead of his mouth on the circular track. Don’t run too fast, though, or he’llswitch direction and whack at you with his tail.
primagames.com
165

Prima’s Official Strategy Guide
166
It’s not over yet! The Biolizard has taken control of space colony ARK and is going to crash it into Earth. Only twoHedgehogs—working together—can stop it. Using the power of the Chaos Emeralds, they transform into their superforms and go out to do battle. Now you can control both Hedgehogs—one at a time—to defeat the final menace.
Boss AttacksBefore describing the attacks you’ll face, you must know how to control the characters. Sonic and Shadow havechanged form and now have new abilities. You can’t use any of the moves and powers they’ve had throughout thegame. But they can fly through space. Use the analog thumb pad to direct them; press U to make them blast forwardand up, press I to make them blast forward and down.
You must aim for the red, swelling blisters on the lizard’s hide.
Sonic and Shadow vsThe Final HazardSonic and Shadow vsThe Final Hazard
Blast forward and dodge the eggsthat swarm after you. It may takesome maneuvering, but you can hitthe first few easily.
The super forms that the hedgehogs use are poweredby rings. The ring counter in the upper-left corner willcount down as the rings are used. You must either hit ared blister on the lizard or switch to the other characterbefore the ring counter hits zero.
You can switch between Sonic and Shadow as youfight the Final Hazard. Simply fly under or over the lizard,and you’ll swap out characters. Do this when you’rerunning out of rings. It can keep you going indefinitely.
Each time you successfully hit a blister, the Biolizardthrows up more defenses. At first it’s just eggs, then abeam that repels you if it touches you. After that comes acombination of the two, and more beams. It can getpretty hairy trying to get at those blisters.
A good tactic is to swap characters whenever you have beenthrown back twice. By being cautious and switching wheneveryou’re low on rings, you ensure that you don’t lose a life.
When you’re in trouble, simply flyunder or over the lizard. Hold U or Iand run under the big jerk.
This lizard won’t go quietly. Use theanalog thumb pad to perform evasivemaneuvers and slip under the defenses.
It takes some fast-and-furious maneuvering to hit thoseblisters at the end. Using the analog thumb pad is a goodstart, but also alternate pressing U and I to sweep upand down as you move in. Continue switching charactersto avoid losing a life as you make runs at the lizard.

KART RACE
primagames.com
167
As soon as you successfully complete one of the two car driving Stages—Tails’s Route 101 orRouge’s Route 280—the Kart Race option opens up for 1P. Beat both the driving Stages, andyou can play it 1P or 2P vs. Mode.
The Kart Race is a fun addition to the game that lets you pit your driving skills against thecomputer and your friends. There are three courses to choose from (and more may becoming from Sega as a download later): Beginner, Standard, and Expert.
The controls are quite simple. Press and hold U to accelerate, and I or O will engagethe brakes.
Rather than brake, however, you should control your turns with a slide. As you come to aturn, move into it and release U for a second. Then jam it back down and continue turning.Your character will do a short power slide around the corner—very handy for sharp turns.
Start Your EnginesStart Your Engines
SonicThe hedgehog is a fast driver. His speed isonly matched by Shadow, his acceleration isgood, and his grip is fine. His braking islow, but hey, who wants to slow down?
TailsThe fox is quick off the line with veryhighacceleration. Sustained speed isnot hisforte, but the decent grip helps maintaincontrol.
KnucklesThe red guardian isn't the fastest, but hisexcellent grip helps you negotiate thetightturns.
ShadowShadow’s stats are almost equal to Sonic’s.He’s a great driver for beginning players.
Dr. EggmanRobotnik’s stats are very well rounded. For an evil scientist, he's a very good Kart driver.
RougeThis bad bat-girl has a nice set of wheels.Her acceleration is top-notch and her gripis good. Her speed is average.
The DriversEach of the six playable characters has his or her own Kart.Here’s a quick rundown on what you can expect from each.
The TracksHere are a few pointers on the tracks. Nothing beatsplaying the tracks to know how to handle their layouts,but we’ll show you the parts to watch for.
Try to pick up rings as you race the tracks. Every 20rings you pick up gives you a boost. Press P to boost.Make sure you wait until you reach a straightaway;nothing’s worse than boosting straight into a wall.
Boosts don’t stack up. You can only hold one at a time. So if youhave a boost at 20 rings, use it before you hit 40 rings.
BeginnerThis track is very straightforward.The one thing to watch for is thisturnoff just before the start line. Ithas a Dash Panel that gives you aboost as you pass over it.
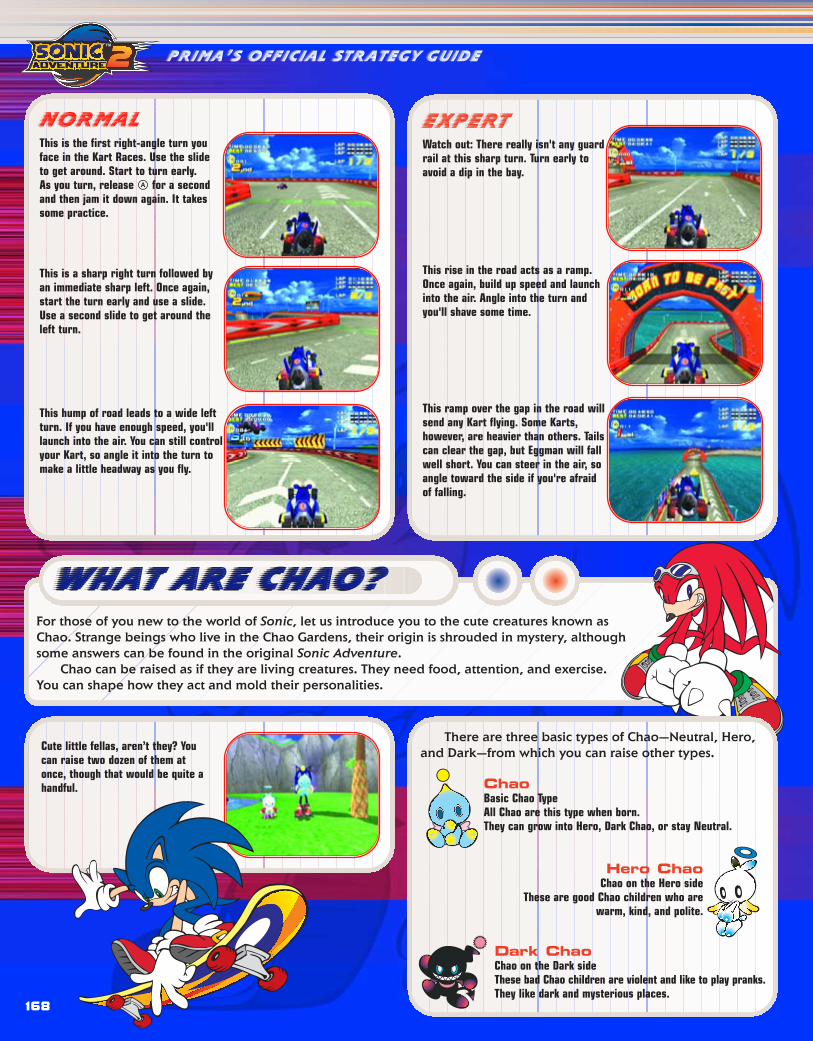
Prima’s Official Strategy Guide
normalThis is the first right-angle turn youface in the Kart Races. Use the slideto get around. Start to turn early.As you turn, release U for a secondand then jam it down again. It takessome practice.
This is a sharp right turn followed byan immediate sharp left. Once again,start the turn early and use a slide.Use a second slide to get around theleft turn.
This hump of road leads to a wide leftturn. If you have enough speed, you'lllaunch into the air. You can still controlyour Kart, so angle it into the turn tomake a little headway as you fly.
ExpertWatch out: There really isn't any guardrail at this sharp turn. Turn early toavoid a dip in the bay.
This rise in the road acts as a ramp.Once again, build up speed and launchinto the air. Angle into the turn andyou'll shave some time.
This ramp over the gap in the road willsend any Kart flying. Some Karts,however, are heavier than others. Tailscan clear the gap, but Eggman will fallwell short. You can steer in the air, soangle toward the side if you're afraidof falling.
168
For those of you new to the world of Sonic, let us introduce you to the cute creatures known asChao. Strange beings who live in the Chao Gardens, their origin is shrouded in mystery, althoughsome answers can be found in the original Sonic Adventure.
Chao can be raised as if they are living creatures. They need food, attention, and exercise.You can shape how they act and mold their personalities.
What Are Chao?What Are Chao?
Cute little fellas, aren’t they? Youcan raise two dozen of them atonce, though that would be quite ahandful.
There are three basic types of Chao—Neutral, Hero,and Dark—from which you can raise other types.
ChaoBasic Chao TypeAll Chao are this type when born.They can grow into Hero, Dark Chao, or stay Neutral.
Hero ChaoChao on the Hero side
These are good Chao children who are warm, kind, and polite.
Dark ChaoChao on the Dark sideThese bad Chao children are violent and like to play pranks.They like dark and mysterious places.

169
THE CHAO PRIMER
primagames.com
Depending on how they are raised, there are up to 108 types of Chao!
Basic InteractionTo start raising your Chao, you must find the ChaoGardens. Do this by smashing open a Chao Containerand picking up the Chao Key during an Action Stage.Then, when you havefinished the Stage, you’ll betransported to the Garden.
Boom—here you are in thetransporter room of the Chao world.
Characters must pick up a Chao Key in one of theirStages before they can access the Chao Garden throughthe Stage Select area.
You can also hatch a Chao by throwing it into a wall,but that’s not a nice way to start your relationship.
In the Garden you’ll find two eggs. To hatch them,pick up and cradle them by holding I and moving theanalog thumb pad.
After doing this, put theegg down and your Chaoshould hatch, happy andhealthy.
A little cuddling is all it takes to make a Chao hatch.
Other GardensThe first Garden you reach is a nice place with greengrass and a waterfall to cool down in. When you havesuccessfully raised a Hero Chao,the Hero Garden opens. If youraise a Dark Chao, the DarkGarden opens.
The regular Chao Garden
The Dark GardenThe Hero Garden
A quick way to raise a Dark or Hero Chao is to bringa character into the Garden—either a Hero character forHero Chao or a Dark character for a Dark Chao. Have thecharacter hatch a Chao and then pet it continually. Feedit every now and then, but mostly just pet it. It takes abit of time (an hour or so), but the Chao will start tochange color and eventually change.
And here’s a basic Dark Chao.Here’s the basic Hero Chao.
It’s easier to raise Dark Chao in the Dark Garden andeasier to raise Hero Chao in the Hero Garden. You canraise Dark Chao in the Hero Garden, and vice versa, butit takes longer. You can raise eight Chao at a time ineach Garden, for a total of twenty-four, which would bequite a handful.

Prima’s Official Strategy Guide
170
Chao AbilitiesEventually, you will be able to enter your Chao in races.To prepare them, you must raise their abilities in severalcategories. There are a few ways to do this.
Swim, Fly, Run, PowerThese four movement abilities can be raised in two ways:with small animals and with Chaos Drives. When you play aStage, you’ll find small animals scattered about. Touch themto pick them up. Also, when you defeat a robot, it will dropa small, colored piece of crystalin a vial. This is a Chaos Drive.Pick them up as well.
Here you can see the small animalsand the Chaos Drives in the Garden.
When you enter the Garden aftercompleting a Stage, the items you
picked up will be dropped off.
Pick up a small animal or Chaos Drive and give it toyour Chao. You decide which Chao get which animalsand Drives, but before you do, study the charts in thissection to learn what each item will do for your Chao.
Plan carefully when giving these items to your Chao.Decide what you want your Chao to be good at, andgive them the items that will either enhance thosespecific skills or shore up weak points.
You can raise them as pets for fun and curiosity, andyou can raise and train them to compete against otherChao in races that test their specific skills.
Intelligence, Stamina, LuckThese three attributes are increased by playing the VMUChao game, Chao Adventure 2.
• Intelligence increases if the Smart Fruit is eaten.• Stamina increases if the seed won at the end of Chao Adventure 2
is planted and the fruit is eaten.• Luck increases if you choose the correct treasure chest and
decreases if you choose an empty chest.
These three attributes are essential to a well-roundedhigh-level Chao, so playing the VMU game is very important.
The seeds you find in Chao Adventure 2 can beplanted in the Chao Gardens. The fruit that grows shouldbe fed to your Chao to increase Stamina. The plantseventually die, so monitor them to get the most benefitfrom their fruits.
1: City Escape Raccoon Rabbit Skunk Sheep Unicorn
4: Metal Harbor Seal Penguin Peacock Raccoon Phoenix
5: Green Forest Rabbit Cheetah Parrot Raccoon Half Fish
11: Pyramid Cave Condor Peacock Bat Sheep Skeleton Dog
15: Crazy Gadget Bear Tiger Seal Skunk Phoenix
16: Final Rush Peacock Condor Penguin Sheep Dragon
Cannon Sonic Cheetah Rabbit Parrot Skunk Dragon
sonic
2: Wild Canyon Peacock Condor Cheetah Sheep Dragon
6: Pumpkin Hill Cheetah Boar Bat Skeleton Dog Half Fish
8: Aquatic Mine Penguin Seal Condor Skunk Dragon
12: Death Chamber Tiger Gorilla Rabbit Skunk Skeleton Dog
14: Meteor Herd Penguin Seal Rabbit Sheep Phoenix
Cannon Knuckles Seal Sea Otter Cheetah Raccoon Unicorn
knuckles
3: Prison Lane Tiger Gorilla Sea Otter Sheep Unicorn
7: Mission Street Boar Rabbit Gorilla Sheep Phoenix
10: Hidden Base Penguin Sea Otter Tiger Skunk Half Fish
13: Eternal Engine Condor Parrot Boar Raccoon Dragon
Cannon Tails Seal Sea Otter Bear Raccoon Phoenix
tails
4: Radical Highway Cheetah Boar Seal Raccoon Unicorn
9: White Jungle Peacock Parrot Bear Skunk Dragon
11: Sky Rail Bear Tiger Condor Sheep Phoenix
14: Final Chase Sea Otter Penguin Tiger Skunk Phoenix
shadow
2: Dry Lagoon Sea Otter Penguin Peacock Sheep Unicorn
5: Egg Quarters Gorilla Bear Parrot Skunk Half Fish
8: Security Hall Parrot Condor Tiger Raccoon Phoenix
12: Mad Space Parrot Peacock Gorilla Raccoon Phoenix
Cannon Rouge Boar Cheetah Condor Skunk Dragon
rouge
1: Iron Gate Gorilla Tiger Rabbit Skunk Dragon
3: Sand Ocean Parrot Peacock Bat Raccoon Skeleton Dog
6: Lost Colony Rabbit Boar Bat Raccoon Skeleton Dog
7: Weapons Bed Seal Sea Otter Cheetah Sheep Phoenix
13: Cosmic Wall Rabbit Cheetah Sea Otter Sheep Unicorn
Cannon Eggman Bear Gorilla Seal Skunk Unicorn
Eggman
Animal Locationsby StageThese tables reveal which animals can be found in thevarious Stages. The tables are organized by Stages.

THE CHAO PRIMER
primagames.com
171
Penguin 18 6 4 -12
Seal 20 -8 0 4
Sea Otter 22 -2 4 -8
Peacock 6 24 -8 -6
Parrot 0 24 -10 2
Condor -10 30 -12 8
Rabbit 0 4 20 -8
Cheetah -4 -4 20 4
Boar -2 -6 16 8
Bear 4 -8 2 18
Tiger -4 -8 10 18
Gorilla -2 -4 2 20
Small animalsAnimal Swim Fly Run Power
Skunk 4 6 6 4
Sheep 4 6 10 10
Raccoon 10 6 2 4
Special animalsAnimal Swim Fly Run Power
CHAOS DRIVESColor Swim Fly Run PowerYellow 8 0 0 0
Purple 0 8 0 0
Green 0 0 8 0
Red 0 0 0 8
Special animals don’t reduce any attributes.
Half Fish 16 0 4 12
Skeleton Dog 4 4 16 8
Bat 4 20 4 4
ghost animalsAnimal Swim Fly Run Power
Dragon 10 2 4 16
Unicorn 8 6 18 0
Phoenix 6 16 2 8
imaginary animalsAnimal Swim Fly Run Power
An animal’s color indicates what attribute it focuses on.
chao behavior learned from SMALL animals
Bear Roar
Boar Dashes
Cheetah Face washing
Condor ????
Dragon Breathe fire
Gorilla Drumming (beats chest)
Parrot Sings
Peacock Struts/haughty
Penguin Slides on belly
Phoenix Tail-wagging
Rabbit Hops around
Raccoon ????
Sea Otter Swims on back
Seal Rolls around
Sheep Somersault
Skunk Gas
Tiger Sharpens nails
Unicorn Bucking
Animal Action Animal Action
Animal Traits and ActionsYou can tell which animals you’ve given your Chao bythe actions the Chao learn and the physical traits theyacquire. Here’s a quick list of what to expect from yourChao when they receive certain animals.
- Swim - Fly - Run - Power
Small Animals and Chaos DrivesHere is a ton of information about the animals and Drivesyou can bring to your Chao, and how the little blue guyswill be affected by them. As you will see, some animalswill boost some attributes while subtracting from others.Have a plan for passing out animals.
Life in the GardenThings are usually peaceful in the Chao Gardens. Timepasses only when one of the characters is actually in aGarden, so you don’t have to worry about your Chaowhile you’re out playing.
When you spend time with the little guys, you canpet them and pick them up to show them you care. Cyclethrough the Action menu byusing P, and use I to executethe action.
A quick hug and nuzzle can put a Chao into a good mood. If it squirms,
though, put it back down.
Chao have moods that are indicated by symbols thatappear above their heads. You can also tell how they’redoing by their facialexpressions and their actions.
This Chao is happy. The heart above it means it’s healthy and having
a good time.

Prima’s Official Strategy Guide
Chao love nuts. Luckily,there are nut trees in theregular Garden. The nuts growas time passes and fallrandomly, or you can grab holdand shake the tree to knockthem off. Pick up a nut andgive it to a Chao to boost theChao’s mood.
Grab a tree by standing next to it andpressing I. Shake it by holding the
analog thumb pad in any direction.
Continue giving attention to your Chao and bring theminto the VMU for the adventure. Provide them with animalsand Chaos Drives to boost their skills, and eventually theywill metamorphose into the different types of Chao.
Different trees sprout different fruit in the Hero andDark Gardens. Treat them the same as the nut trees.
Chao KindergartenIn the Chao world lobby you’ll see adoor to the Chao Kindergarten. Enterthe school either to find out moredetailed information about the Chao youare raising or to teach them new skills.
Principal’sOfficeThe principal of the Chao Kindergarten,Professor Chao, can give you tips onraising and caring for your Chao.He is a wealth of knowledge oneverything from seeds to racing.Drop by for a visit as soon as you can.
BulletinBoardThe Bulletin Board allows you to accessthe online BBS. You can swap storiesand tips with other people who areraising Chao around the world.
ClassroomThe Classroom is where your Chaolearn different skills. Pick up a Chaofrom a Garden and carry them to theKindergarten to learn.
HEALTH CENTERYou can bring your Chao here and havethe nurse examine it. You'll learn whatthe Chao's strengths or weaknessesare. That information can guide yourchoices of which animals or ChaosDrives to give your Chao.
Chao RacesChao aren’t just cute little pets; they’re also fierce competitors in variousraces. Many courses are available for them to compete on, but you mustfirst tackle the Beginner race.
All the races are tests of the various Chao abilities, and each racefocuses on one particular ability. For example, the Crab Pool course is aswimming competition. Plus, each race has different levels. The higherthe level, the better the opponents.
Here is the menu for the Beginnerrace. Each course challenges a
different ability.
This plucky little guy has won all theBeginner races. Note the medal on his
chest.
Try to raise Chao with specialized abilities. Have a running Chao, aswimming Chao, and so on. Doing this will give you competitiveChao to tackle whatever is thrown at you.
Note the scowl and stance of thisChao. It’s in the middle of a tantrum.
You’d better take care of it.
172

THE CHAO PRIMER
primagames.com
173
Chao Race Flow ChartHere’s a quick overview of how the races are structured. It’s a simple system.
STRENGTH(TOTAL OF
4 COURSES/3RACES)
SHORT COURSE FOR NOVICES
JEWEL RACE (6 COURSES/5 LEVELS) APPEARS
MAIN RACE IN CHAO RACE
CHALLENGE RACE (9 LEVELS) APPEARS
ELIMINATION RACES WITH VARIOUS RIVAL CHAO
HERO RACE (4 LEVELS) APPEARSRACE ONLY FOR HERO CHAO
ELIMINATION RACES WITH RIVAL DARK CHAO
DARK RACE (4 LEVELS) APPEARS
RACE ONLY FOR DARK CHAOELIMINATION RACES WITH RIVAL HERO CHAO
WIN ALL COURSESAND ALL LEVELS
(CLEAR)
WIN ALL COURSES(CLEAR) WHILE
BOTH HEROGARDEN AND THE
DARK GARDENHAVE EMERGED
ENCOURAGE CHAOYOU CAN ENCOURAGE CHAO DURING THE CHAO RACE. IF YOU PRESS THE R or L
TRIGGER ON THE CONTROLLER DURING THE RACE, CHAO WILL SPEED UP. CHEER ONYOUR CHAO WITH EFFECTIVE TIMING, AND ENCOURAGE IT WHEN IT GETS THE
GEOGRAPHICAL AREA THAT IS ITS SPECIALTY. WHEN CHAO ARE ENCOURAGED,STAMINA IS USED. IF STAMINA TOTALLY DISAPPEARS, CHAO WILL LOSE.
ALLCHALLENGeR
RACEMULTI-ENTRY RACE FORA MAXIMUM OF 8 CHAO.YOU CAN ONLY CHOOSETHOSE COURSES THAT
HAVE ALREADYAPPEARED
Race Tips and InfoAs mentioned before, you win various items forcompleting races. Most important, though, is that you canwin 10 of the 180 Emblems through the Chao races. So ifyou're looking to complete your Emblem collection, youbetter get into the racing mood.
You can encourage your Chao by using L or R. Becareful, though; each time you encourage the Chao, itstrains and uses up stamina. It’s important to keep an eyeon your Chao’s Stamina bar while racing. It will lowerslowly as the race continues,and when the Stamina bar isempty, your Chao will slowdown. Don’t use it all up byconstantly encouraging.
Note the exclamation point over theChao’s head. That shows up every time
you press L or R.
Stamina is very important for the races. Make sureyou raise it as often as possible. You want enough to lastfor the longer races and still have some left over for aburst of speed at the end.
And So...Your Chao can provide hours of fun and amusement. Raisethem well and they’ll love you for it. Remember that thereare many different types you canraise, so don’t just stick to oneformula. Keep at it and you’ll bea champion trainer, raising cute,winning, and strong Chao.
You’ll soon see your little buddies in thewinner’s circle. Good luck!
You can gain seeds from the Chao Adventure 2 VMU game. Plantthe seeds, and special plants will grow and sprout fruit. Feed thosefruit to your Chao to raise their stamina.
Head to HeadWant to share the thrill of Sonic Adventure 2 with yourfriends? Now you can. Three areas let you competeagainst your friends, pitting character against characterin direct combat and tests of skill.
TWO-PLAYERMODE
TWO-PLAYERMODE

Prima’s Official Strategy Guide
174
Action StagesSonic Adventure 2 lets you play aspects of the gameagainst your friends. The counterparts of the Hero andDark Characters are paired (for example, Sonic withShadow) to compete against each other in three Stages.This creates nine Action Stages, all of which are takenfrom the main game.
You can compete with Sonic vs. Shadow in a footrace, Tails vs. Dr. Eggman in a shooting match, orKnuckles vs. Rouge in treasure hunting. Each pair hasthree stages in which to compete.
SONIC VS. SHADOW KNUCKLES VS. ROUGE TAILS VS. DR. EGGMAN
Green Forest Wild Canyon Mission Street
Radical Highway Pumpkin Hill Sand Ocean
Sky Rail Meteor Herd Weapons Bed
ACTION STAGES
Sonic vs. ShadowKnowing the levels is the best strategy for beating youropponent in the races. Luckily, the levels are almost thesame as in the main game, so you don’t have to learn newcourses. Be aware of whereenemies appear and run pastthem. Smashing robotsrequires time you don’t have.
The split view can take some time tobecome accustomed to. It cuts off someof your side view. Give it a few tries to
get used to it.
SONIC ABILITY SHADOW ABILITY RINGS NEEDED
Speed Up Speed Up 20
Sonic Wind Chaos Spear 40
Time Stop Chaos Control 60
SONIC AND SHADOW SPECIALS
These abilities cycle: you receive a Speed Up at 20rings and again at 80 rings. You get Chaos Spear at 40and 100 rings, and so on. As soon as you get an ability,press I to use it.
Speed Up makes your character run faster. Sonic Windand Chaos Spear blast your opponent, stunning them andmaking them lose their rings. Time Stop and ChaosControl literally stop time foryour opponents, freezingthem for nine seconds. Takeadvantage of these gifts.
The Time Stop and Chaos Control put acrimp in your foe’s stride.
To rule at the races, study them in the Two-PlayerMode. There are important differences and several placeswhere you can outpace youropponent. Know the road tokick butt.
If you can reach this Pulley in RadicalHighway (Sonic is on it in this screen)
before your opponent, force him or her tohop up the Boxes or wait for the Pulley,
either of which will slow them down.
Knuckles vs RougeOnce again, the competition areas are taken from themain game. Know them well to have an edge. The trickybit in the treasure hunting games is that you’re bothgoing after the same Emerald Shards. Whoever gets twoout of the three Shards wins the match. Remember thatwhen you use Hint Boxes,your opponent is also able tosee the hint.
The hint is available to both players.There’s no way to hide it, but maybeyou know more than your opponent
does about the level and can figure itout more quickly. It’s a risk.
Both Knuckles and Rouge have abilities and attacks thatcan hamper your opponent’s progress. You “charge up”these special abilities by collecting rings.
KNUCKLES ABILITY ROUGE ABILITY RINGS NEEDED
Hammer Punch Hip Drop 20
Thunder Arrow Black Wave 40
Power Flash Charm Ray 60
KNUCKLES AND ROUGE SPECIALS
These abilities cycle: you receive a Hammer Punch or HipDrop at 20 rings and again at 80 rings. You get ThunderArrow or Black Wave at 40 and 100 rings, and so on. Assoon as you get an ability, press I to use it.
The Hammer Punch and Hip Drop are like a long-range punch. They’ll knock your opponent down for amoment. Thunder Arrow and Black Wave blast youropponents, making them lose their rings and confusingthem for a bit. Power Flash andCharm Ray stop time for youropponent, freezing him or herfor nine seconds.
Notice the little stars over Rouge’shead? Those are the after-effects of a
Thunder Arrow. As long as those starsare there, Rouge’s directional control
will be wonky.
There’s no substitute for knowing a level inside andout. Keep a sharp eye on the radar to zero in on theEmerald Shards. Don’t Dig for rings; digging consumestime. Stick with the rings you can find lying around.

TWO-PLAYER MODE
primagames.com
Tails vs. Dr. EggmanThe arenas for the slugfests between the two robot ridersare small and intimate. These two characters blast it out inconfined spaces. The areas are taken from the main game,but they are packed with newitems and object. Play themeach a few times to get the feelof where things are.
The camera angles change dependingon how far away the two charactersare. You can see most of the playing
area in this screenshot.
Both Tails and Dr. Eggman have abilities and attacksthat hamper your opponent's progress. You "charge up"these special abilities by collecting rings.
TAILS ABILITY DR. EGGMAN ABILITY RINGS NEEDED
Laser Missile Laser Missile 20
Rocket Launcher Rocket Launcher 40
Power Laser Power Laser 60
tails and dr. eggman SPECIALS
These abilities cycle: You receive a Laser Missile at 20rings and again at 80 rings. You get Rocket Launcher at40 and 100 rings, and so on. As soon as you get anability, press I to use it.
The Laser Missile is like a barrage of the targetedblasts the two walkers use. The Rocket Launcher is a bankof rockets that shoot out the back of the vehicle and fallon your opponent. The Power Laser is a huge laser blastthat knocks the wind out of yourfoe. All these attacks will makethe targets drop whateverrings they have.
When the Power Laser is firing, youcan’t aim it. There’s a second after youhit I that you can align yourself withyour opponent. After the beam starts,
though, you’re stuck.
The rings are limited in the shooting battles. It’s difficultto scramble after them as your opponent takes you topieces. However, the rings also heal damage you take. So,balance between fighting and grabbing the golden hoops.
Every one of Tails’s and Eggman’s special attacks can be avoided.A timely Spring jump or some fancy footwork confounds theattacks. So, line up and get close before you fire.
Kart RaceYou can play a versus gamewith the Karts. Select the KartRace option, choose yourcharacters, and race away.
Here you can decide whose Kart youwill control.
Chao RaceYou have your Chao and yourfriend has Chao he or she hasraised. Perhaps you mightwant to pit them against eachother? This is the place to doit. Set up with Chao from aVMU or the Chao Garden andwatch the little critters go.
SECRETSThe Hidden LandSonic Adventure 2 has a few surprises for you. They aren’teasy to earn, but it’s worth it. There are 180 Emblems youcan earn in the game. Kart Racing, Chao Racing, the Bossmode, and the Stage Select mode all have Emblems you canearn. Hardest of all, though, is earning the Emblem forgetting all A ranks. There are five Missions for each Stage inthe Stage Select mode. If you can earn an A rank on eachand every one, you earn special Emblems. It’s a heck of atask to complete, but it’s worth it.
Once you’ve earned all theEmblems, you’ll unlock theextra Stage.
Notice that green island on the StageSelect map? It hides a secret that takes
a lot of work to uncover.
The Hidden LooksIf you complete every Mission in every Stage for aspecific character, you may find something ratherinteresting when you open the Two-Player Mode.
They are all so darn cute. Howcan you choose which one to
root for?
More details on the raising and racing of Chao appearin “Chao” earlier in this guide. Become familiar with theraising techniques to bring up a champion Chao racer.
More details on handling the Karts appears in “Kart Race”earlier in the guide. To improve your racing, learn each of themaps. If you play them enough, you can anticipate curves andavoid tricky turns. Master the layout to win.
175


![Ação Games #109 [11.96] [Web] - Retro CDN](https://static.fdokumen.com/doc/165x107/631a5a9b1e5d335f8d0b89f3/acao-games-109-1196-web-retro-cdn.jpg)