President's Column - Kerry Deane-Cloutier - Greater ...
15
Volume 13, Issue 2 February 2011 NEXT MEETING Wednesday, Feb. 23, 2011 - 6:30 pm Sapperton Pensioners’ Hall 318 Keary St., New Westminster Main Event: Bruce Hodgeson will be doing Natural Edge Bowls. The Annual General Meeting and Elections will be held this month. Tech Talk Table: Bruce Campbell will host a forum for your technical questions. Critique Table: Larry Stevenson will moderate a critique of your pieces. Focus On Fundamentals: Turning a Spatula with Marco Berera January Food Suppliers: Kees Hof, Graeme Hogarth, Don Hoskins, Keith Hudson, Tom Hultman, Bob James February Food Suppliers: Jim Johnson, Steve Kent, Darryll Kettles, Ron Kredba, Richard Langfield, Art Liestman January’s president’s challenge is “cracks, holes and rot” President’s Column - Kerry Deane-Cloutier Ah February – the shortest month of the year, but somehow it manages to seem like the longest. However, do not despair, spring is around the corner – really! I have been entertaining myself by reading the surveys handed in at the December and January meetings. If nothing else, the responses will teach us how to phrase the questions the next time around. For example, in re- sponse to the question: “how many outside demonstrations would you like to see each year?” one respondent replied “2, if it is under a tent”. Wise guy. Fortunately most questions did receive a serious reply (including the rest of that person’s survey). I have now created a spreadsheet of the responses, but have not had a chance to digest the results. However, one thing is apparent, our members’ desires span the complete spectrum. For example, some feel that the best thing in the library are the magazines, others feel magazines are useless. Some like the older material in the library, others wish we would clear out the old so it is easier to find the new. Some like the social events, others think those events have no place in a woodturning guild. It is clear that the executive will have to perform a balancing act, making choices that we know will please some and not others. Hopefully our choices will strike a balance so that members will continue to be happy. I feel confident this will be so. My confidence is bolstered by the com- ments of many of our members, which were along the lines of this one “the executive is to be congratulated on what is the best guild in Canada”. I would go further than that. The people who are to be congratulated for the success of the guild are ALL the members who volunteer their time to make it so. That leads me to my final preliminary comment on the survey results. There are several good suggestions for new initiatives. Ideas are great, they are the first crucial step. However, manpower (people-power?) is needed to bring these ideas to fruition. Our survey was anonymous, to encourage participation. If you had a great idea and want to see it come to pass, step up and lead it forward. We welcome your participation in making this the best guild in Canada, bar none. Don’t forget, this month’s President’s challenge is “cracks, holes and rot”. I wish I could see your contributions, but I will be elsewhere. See you in March. Table of Contents President’s Column 1 Kerry Deane-Cloutier Doug Fisher: Wood turner - Sculptor - Artist Merv Graham (digested from 2010) 2 John Jordan 2 Turning 101 - Turning a Plain Goblet 3 Allan Cusworth Notes from FOF 4 It’s Time to Lime 6 Ed Prey Turning Site of the Month 8 Vacuum Chucking Setup for the Wood Lathe Submied by Larry Stevenson 8 President’s Challenge - Teapot 11 Instant Gallery 12 Instant Gallery 13 Instant Gallery 14 Announcements 15 Classifieds 15 GVWG Executive & Volunteers 15
-
Upload
khangminh22 -
Category
Documents
-
view
1 -
download
0
Transcript of President's Column - Kerry Deane-Cloutier - Greater ...
Volume 13, Issue 2 February 2011
NEXT MEETING Wednesday, Feb. 23, 2011 - 6:30 pm Sapperton Pensioners’ Hall 318 Keary St., New Westminster
Main Event: Bruce Hodgeson will be doing Natural Edge Bowls.The Annual General Meeting and Elections will be held this month.
Tech Talk Table: Bruce Campbell will host a forum for your technical questions.
Critique Table:Larry Stevenson will moderate a critique of your pieces.
Focus On Fundamentals: Turning a Spatula with Marco Berera
January Food Suppliers: Kees Hof, Graeme Hogarth, Don Hoskins, Keith Hudson, Tom Hultman, Bob James
February Food Suppliers: Jim Johnson, Steve Kent, Darryll Kettles, Ron Kredba, Richard Langfield, Art Liestman
January’s
president’s challenge
is
“cracks, holes and rot”
President’s Column - Kerry Deane-CloutierAh February – the shortest month of the year, but somehow it manages
to seem like the longest. However, do not despair, spring is around the corner – really!
I have been entertaining myself by reading the surveys handed in at the December and January meetings. If nothing else, the responses will teach us how to phrase the questions the next time around. For example, in re-sponse to the question: “how many outside demonstrations would you like to see each year?” one respondent replied “2, if it is under a tent”. Wise guy. Fortunately most questions did receive a serious reply (including the rest of that person’s survey).
I have now created a spreadsheet of the responses, but have not had a chance to digest the results. However, one thing is apparent, our members’ desires span the complete spectrum. For example, some feel that the best thing in the library are the magazines, others feel magazines are useless. Some like the older material in the library, others wish we would clear out the old so it is easier to find the new. Some like the social events, others think those events have no place in a woodturning guild. It is clear that the executive will have to perform a balancing act, making choices that we know will please some and not others. Hopefully our choices will strike a balance so that members will continue to be happy.
I feel confident this will be so. My confidence is bolstered by the com-ments of many of our members, which were along the lines of this one “the executive is to be congratulated on what is the best guild in Canada”. I would go further than that. The people who are to be congratulated for the success of the guild are ALL the members who volunteer their time to make it so.
That leads me to my final preliminary comment on the survey results. There are several good suggestions for new initiatives. Ideas are great, they are the first crucial step. However, manpower (people-power?) is needed to bring these ideas to fruition. Our survey was anonymous, to encourage participation. If you had a great idea and want to see it come to pass, step up and lead it forward. We welcome your participation in making this the best guild in Canada, bar none.
Don’t forget, this month’s President’s challenge is “cracks, holes and rot”. I wish I could see your contributions, but I will be elsewhere. See you in March.
Table of ContentsPresident’s Column 1
Kerry Deane-Cloutier
Doug Fisher: Wood turner - Sculptor - Artist Merv Graham (digested from 2010) 2
John Jordan 2
Turning 101 - Turning a Plain Goblet 3Allan Cusworth
Notes from FOF 4
It’s Time to Lime 6Ed Pretty
Turning Site of the Month 8
Vacuum Chucking Setup for the Wood LatheSubmitted by Larry Stevenson 8
President’s Challenge - Teapot 11
Instant Gallery 12
Instant Gallery 13
Instant Gallery 14
Announcements 15
Classifieds 15
GVWG Executive & Volunteers 15

Volume 13, Issue 2Page 2
Doug Fisher: Wood turner - Sculptor - Artist Merv Graham (digested from 2010)
By popular demand Doug Fisher returns for another class.On Saturday, March 5, Doug
Fisher will give an all day hands-on class for six lucky folks at Island Woodcraft. Doug’s unique style of wood turned sculptures is known internationally and his pieces are in private collections around the
world. Doug’s work is incredibly accomplished and very unique, taking its influence from his appreciation of things past, as well as the Pacific Northwest Coast imagery of his home. He is a member of the Vancouver Island Woodworkers Guild and the American Associa-tion of Woodturners (AAW). His work includes a com-bination of wall sculptures, free standing sculptures, bowls and vessels.
In 1997 Doug considered himself to be a function-al turner making bowls and platters which he sold at small outlets and craft shows. A chance meeting with
the great Frank Sudol at a craft fair turned his interests to art in wood turning. Similarly, he met Harris Smith, a First Nations artist who was looking for a person to col-laborate with. Over the course of years the two collab-orated on thousands of pieces and Douglas developed his style from what he learned from Harris. A facet of his style is the multi axis turning which was developed as an answer to an element of aboriginal imagery, the offset circle within a circle. This has since become a most notable feature of his Pacific Northwest pieces.
During his all day class Doug will lead the students through the process of his unique creations. The stu-dents should bring some sort of carving tools and a simple design to carve and paint onto their project. The Saturday class starts at 9 am at Island Woodcraft. Please contact Fred Baldwin for registration to the class. Cost $160.
John JordanWe are thrilled that John is back.
A reminder that John Jordan is here March 12 &13 for an all day demo and class. John is a leading expert on hollow turning and is internationally known for his elegantly textured and carved hollow vessels. John is willing to do a course on hollow turning, a course in-volving carving, or a course on exploring new ideas.
John is one of the premier teachers of hollowing and carving and matters concerning design. If any of these things are of interest to you, you would be hard pressed to find a better mentor, or for that matter a more interesting person to spend some time with. John’s all day demonstration will be at Sapperton Hall and likely involve a short slide show and then a detail description and demonstration of hollowing a vessel. John has worked out all of the problems that you are likely to face with making and hollowing a form. Even if hollowing is not your cup-of-tea, John’s knowledge stretches far beyond that with insight into design, fine-tuning your work, texturing and finishing and how to get the very best out your gouges and shear scraping.
John’s class will be on Sunday, March 13. No hol-lowing or carving experience is needed. Competence in bowl turning is necessary in order to make a shape
to hollow out or carve.
Here is your chance to seriously bump up your skill level on such top-ics as grinding and using your bowl gouges to their optimum and safest level. Learn how to shear scrape in order to fine tune your design and minimize sand-ing. For texturing, John takes a more deliberate ap-proach than many other people do, an important fac-tor in his exquisite portfolio of work. John’s attention to the fundamentals of all of these skills will help you immensely. You will not be disappointed with his class and as always, it’s a benefit to take in the demo the day before. For better insight into what John makes, please visit his website: http://www.johnjordanwoodturning.com/ - click on “gallery” … and be amazed.
Please contact Fred Baldwin to register for the class. Cost $160 for the full day. The demo is $30 and no registration required. Please ask Steve Hansen if you have any questions.
Volume 13, Issue 2 Page 3
Turning 101 - January 29, 2011 - Turning a Plain Goblet Allan Cusworth
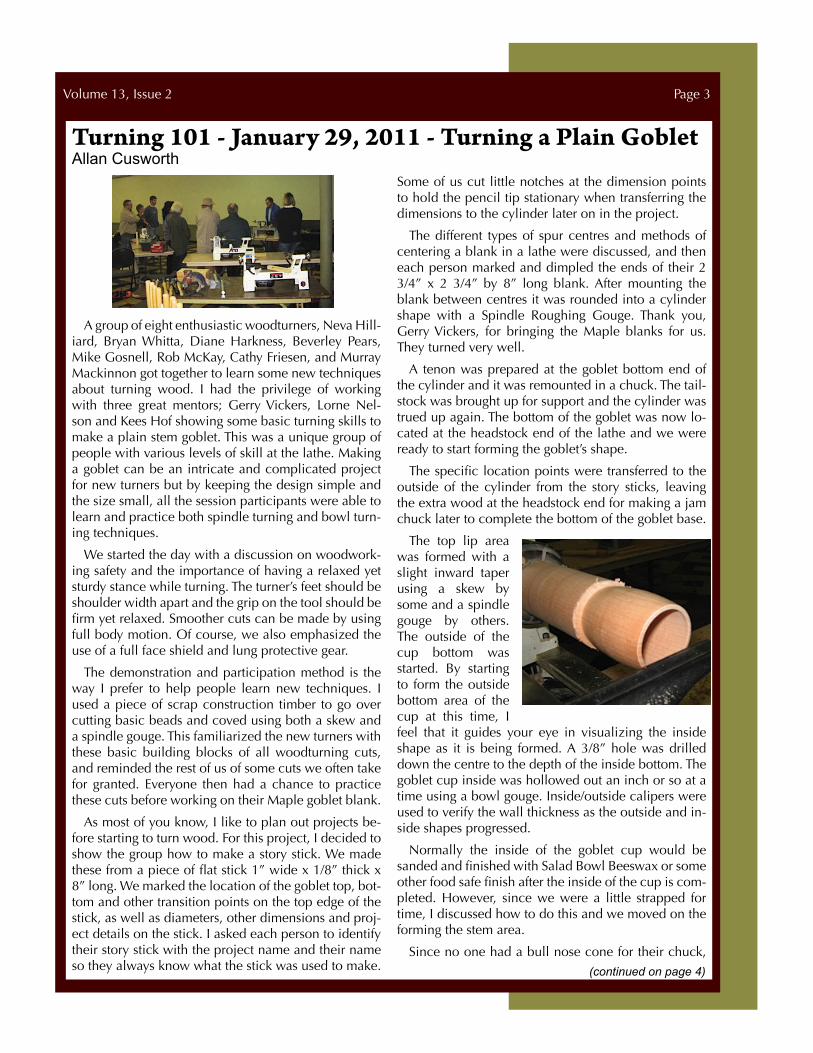
A group of eight enthusiastic woodturners, Neva Hill-iard, Bryan Whitta, Diane Harkness, Beverley Pears, Mike Gosnell, Rob McKay, Cathy Friesen, and Murray Mackinnon got together to learn some new techniques about turning wood. I had the privilege of working with three great mentors; Gerry Vickers, Lorne Nel-son and Kees Hof showing some basic turning skills to make a plain stem goblet. This was a unique group of people with various levels of skill at the lathe. Making a goblet can be an intricate and complicated project for new turners but by keeping the design simple and the size small, all the session participants were able to learn and practice both spindle turning and bowl turn-ing techniques.
We started the day with a discussion on woodwork-ing safety and the importance of having a relaxed yet sturdy stance while turning. The turner’s feet should be shoulder width apart and the grip on the tool should be firm yet relaxed. Smoother cuts can be made by using full body motion. Of course, we also emphasized the use of a full face shield and lung protective gear.
The demonstration and participation method is the way I prefer to help people learn new techniques. I used a piece of scrap construction timber to go over cutting basic beads and coved using both a skew and a spindle gouge. This familiarized the new turners with these basic building blocks of all woodturning cuts, and reminded the rest of us of some cuts we often take for granted. Everyone then had a chance to practice these cuts before working on their Maple goblet blank.
As most of you know, I like to plan out projects be-fore starting to turn wood. For this project, I decided to show the group how to make a story stick. We made these from a piece of flat stick 1” wide x 1/8” thick x 8” long. We marked the location of the goblet top, bot-tom and other transition points on the top edge of the stick, as well as diameters, other dimensions and proj-ect details on the stick. I asked each person to identify their story stick with the project name and their name so they always know what the stick was used to make.
Some of us cut little notches at the dimension points to hold the pencil tip stationary when transferring the dimensions to the cylinder later on in the project.
The different types of spur centres and methods of centering a blank in a lathe were discussed, and then each person marked and dimpled the ends of their 2 3/4” x 2 3/4” by 8” long blank. After mounting the blank between centres it was rounded into a cylinder shape with a Spindle Roughing Gouge. Thank you, Gerry Vickers, for bringing the Maple blanks for us. They turned very well.
A tenon was prepared at the goblet bottom end of the cylinder and it was remounted in a chuck. The tail-stock was brought up for support and the cylinder was trued up again. The bottom of the goblet was now lo-cated at the headstock end of the lathe and we were ready to start forming the goblet’s shape.
The specific location points were transferred to the outside of the cylinder from the story sticks, leaving the extra wood at the headstock end for making a jam chuck later to complete the bottom of the goblet base.
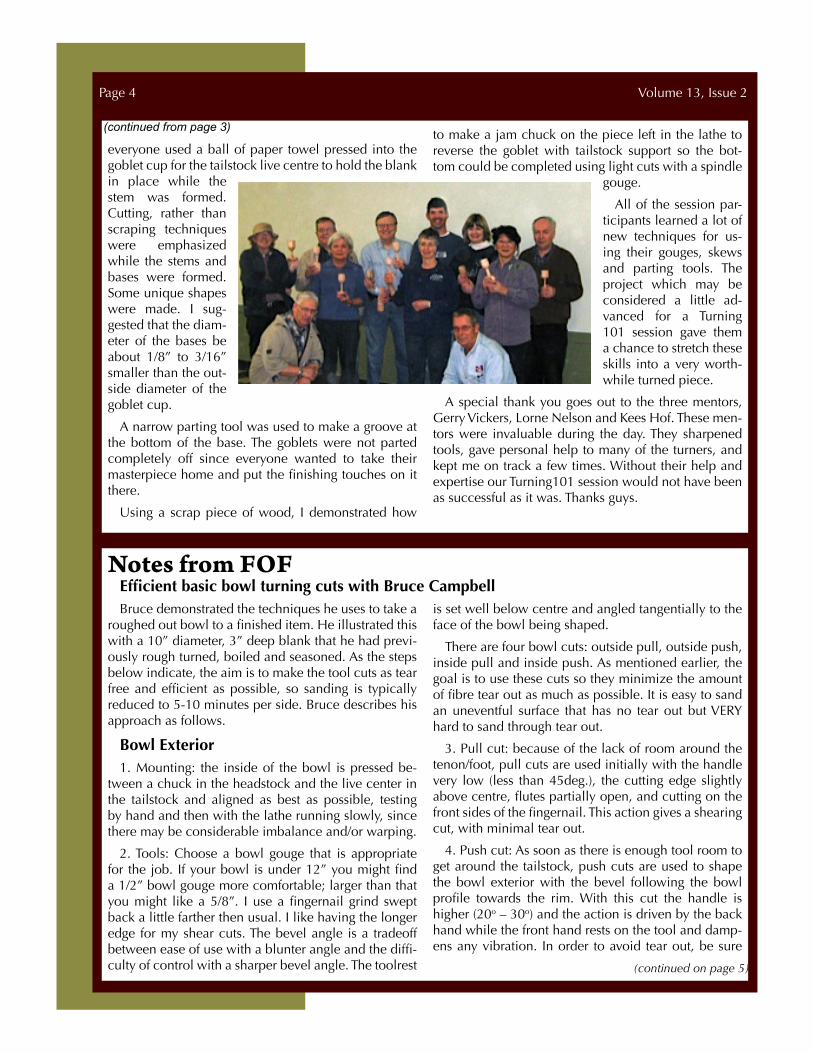
The top lip area was formed with a slight inward taper using a skew by some and a spindle gouge by others. The outside of the cup bottom was started. By starting to form the outside bottom area of the cup at this time, I feel that it guides your eye in visualizing the inside shape as it is being formed. A 3/8” hole was drilled down the centre to the depth of the inside bottom. The goblet cup inside was hollowed out an inch or so at a time using a bowl gouge. Inside/outside calipers were used to verify the wall thickness as the outside and in-side shapes progressed.
Normally the inside of the goblet cup would be sanded and finished with Salad Bowl Beeswax or some other food safe finish after the inside of the cup is com-pleted. However, since we were a little strapped for time, I discussed how to do this and we moved on the forming the stem area.
Since no one had a bull nose cone for their chuck, (continued on page 4)
Volume 13, Issue 2Page 4
everyone used a ball of paper towel pressed into the goblet cup for the tailstock live centre to hold the blank in place while the stem was formed. Cutting, rather than scraping techniques were emphasized while the stems and bases were formed. Some unique shapes were made. I sug-gested that the diam-eter of the bases be about 1/8” to 3/16” smaller than the out-side diameter of the goblet cup.
A narrow parting tool was used to make a groove at the bottom of the base. The goblets were not parted completely off since everyone wanted to take their masterpiece home and put the finishing touches on it there.
Using a scrap piece of wood, I demonstrated how
to make a jam chuck on the piece left in the lathe to reverse the goblet with tailstock support so the bot-tom could be completed using light cuts with a spindle
gouge.
All of the session par-ticipants learned a lot of new techniques for us-ing their gouges, skews and parting tools. The project which may be considered a little ad-vanced for a Turning 101 session gave them a chance to stretch these skills into a very worth-while turned piece.
A special thank you goes out to the three mentors, Gerry Vickers, Lorne Nelson and Kees Hof. These men-tors were invaluable during the day. They sharpened tools, gave personal help to many of the turners, and kept me on track a few times. Without their help and expertise our Turning101 session would not have been as successful as it was. Thanks guys.
(continued from page 3)
Notes from FOFEfficient basic bowl turning cuts with Bruce CampbellBruce demonstrated the techniques he uses to take a
roughed out bowl to a finished item. He illustrated this with a 10” diameter, 3” deep blank that he had previ-ously rough turned, boiled and seasoned. As the steps below indicate, the aim is to make the tool cuts as tear free and efficient as possible, so sanding is typically reduced to 5-10 minutes per side. Bruce describes his approach as follows.
Bowl Exterior1. Mounting: the inside of the bowl is pressed be-
tween a chuck in the headstock and the live center in the tailstock and aligned as best as possible, testing by hand and then with the lathe running slowly, since there may be considerable imbalance and/or warping.
2. Tools: Choose a bowl gouge that is appropriate for the job. If your bowl is under 12” you might find a 1/2” bowl gouge more comfortable; larger than that you might like a 5/8”. I use a fingernail grind swept back a little farther then usual. I like having the longer edge for my shear cuts. The bevel angle is a tradeoff between ease of use with a blunter angle and the diffi-culty of control with a sharper bevel angle. The toolrest
is set well below centre and angled tangentially to the face of the bowl being shaped.
There are four bowl cuts: outside pull, outside push, inside pull and inside push. As mentioned earlier, the goal is to use these cuts so they minimize the amount of fibre tear out as much as possible. It is easy to sand an uneventful surface that has no tear out but VERY hard to sand through tear out.
3. Pull cut: because of the lack of room around the tenon/foot, pull cuts are used initially with the handle very low (less than 45deg.), the cutting edge slightly above centre, flutes partially open, and cutting on the front sides of the fingernail. This action gives a shearing cut, with minimal tear out.
4. Push cut: As soon as there is enough tool room to get around the tailstock, push cuts are used to shape the bowl exterior with the bevel following the bowl profile towards the rim. With this cut the handle is higher (20o – 30o) and the action is driven by the back hand while the front hand rests on the tool and damp-ens any vibration. In order to avoid tear out, be sure
(continued on page 5)

Volume 13, Issue 2 Page 5
to push only with your back hand. Pushing with your front hand turns the cut into a pull cut and will cause much more tear out. In addition, it is very important to slowly swing the handle to control the direction of the cut and to have the bevel “float” along the surface. Failure to do this will create a ragged and torn surface.
Special hint: as the gouge approaches the rim (with-in ¼”) slowly roll the flutes until they are wide open (the flute is pointing upwards) and slowly finish the cut. This technique allows you to cut the edge without breaking it very much.
5. Refining the profile: Once the outside is shaped it can be refined using a cabinet scraper or other flat scraper (such as the blade of a narrow (i.e. 1/16”) part-ing tool). This is used below centre ( or above cen-tre with the lathe in reverse) in the same manner of a cabinet scraper to remove minor imperfections left by the gouge. With a little time and patience you can significantly improve the profile of the bowl before you start sanding. BUT, keep the scraper sharp or you may introduce more problems than you solve.
6. Cutting the tenon: the key is to have the face of the bowl behind the tenon nice and flat with the cor-ner completely cleared out, so that there is a square surface for the chuck to grip. With practice, the faces can be turned with a bowl gouge, or a scraper such as a parting tool or bedan can be used.
7. Finishing: I sand and finish the outside of my bowls before moving on to the interior. (see more info below)
Bowl InteriorOnce again there is a pull and a push cut that can
be used on the inside. I use the pull cut on the rim but rarely on the inside since it always generates lots of tear out. Only consider it when a lot of waste wood needs to be removed and then perhaps ask yourself, “Why is there so much wood to remove? Maybe there is a better way to use it instead of making shavings.”.
1. Mounting: the new tenon is used to grasp the bowl in a scroll chuck, checking that the bowl is well seated in the chuck as the jaws are tightened. Tightening, 60% say, on both sides several times is easier than trying to do it all in one spot. I am also told by engineering types that it distributes the grip better around the tenon.
2. Dress the rim: Using a pull cut, clean up the rim of the bowl until it is completely true. This is usually the last time you will get to work on the rim so do what-ever you want to do now. Later it may be too distorted or too flexible.
3. Tool & toolrest: I use the same bowl gouge on the inside, but the tool rest is now positioned across the mouth of the bowl and high enough that when the gouge is held on the toolrest and level with the bed with the flutes closed, the center of the cutting edge meets the center of the bowl.
4. Push cutting: started at the inside of the rim; hold the gouge level to the floor with the flute closed and the bevel edge pointing at the headstock. In this posi-tion your handle should be well over the lathe. Now, press slowly straight towards the headstock until you cut a small divot into the wood. Then, slowly rotate the gouge open until it is around 45 degrees upwards and drop your back hand downward. From this position, push with your back hand and guide the bevel along the shape you want. Again the tool is controlled by the back hand (with the front hand acting almost as a shock absorber) with the aim of floating the bevel on the surface that has just been cut.
5. Stepping down: It is much better to only do about one inch at a time and work your way down the bowl. This is because the sides will start to distort as soon as you cut the waste wood away. It will only be a little but enough to make re-cutting that section very hard. Better to completely finish one section and then do the next. When the next one is almost done, then float along the pervious step and shear off the last of the next step so the two are perfectly matched.
6. Finishing with a fresh edge: The last cut on each step should be done with a fresh edge but that can be annoying always redoing your gouge. Better to have a second bowl gouge on hand with the same profile and use it only for those finishing cuts. Trust me, it is worth it.
7. About wall thickness: Unless wall thickness is a primary objective, the aesthetics of the interior curve are more important. Once I am happy with the thick-ness on the rim I spend most of my attention on mak-ing the inside profile smooth and “beautiful” rather than “thin” or “thick”.
8. Sanding: I use an electric drill with a 2” or 3” foam backed pad ( #80 grit or whatever is needed) on the first sanding inside. The goal is to get the bumps off and prepare the surface for hand sanding. Power sanding does this quickly and if there are some minor trouble areas I can stop the lathe and quickly “spot” sand through them.
From there I hand sand with good qual-ity flexible, cloth-backed, wet/dry paper on grits of 120/180/240/320/400/600 successively.
(continued from page 4)
(continued on page 6)

Volume 13, Issue 2Page 6
Key steps are: use a nice new piece of paper for each grit, brush off the previous grit particles, if possible run the lathe in reverse and sand to remove projecting fi-bres. If the sandpaper feels too hot, the lathe speed or the finger pressure applied are too high. When the sanding lines are no longer fixed and begin to dance you are done with that grit.
Be sure to clean the surface completely between grits. If you do not do this you will pick up contami-nation from the previous grade of paper and that will leave deeper scratches then the grit you are using.
Bowl base 1. Mounting – Cole jaws can be used, but it is easy to
make a jam chuck that grips the entire rim. Just mount a ¾” oversize disc of plywood on a wormscrew in the chuck and turn a rebate that tightly grips the rim
– you may need to flex the bowl over it due to distor-tion caused by turning/finishing, and give the process a hand by tapping the plywood plate from the back. When it is fitted, use painter’s masking tape around the rim to hold it firmly in place.
I most often use a spindle gouge to do the bottom. I find it allows me to do more detailed work.
It took me about 100 bowls to develop this approach and I have likely turned thousands by now. So don’t get discouraged. Strive for a perfect cut each time and accept what you get. When you get stuck ask a fel-low turner for help or take a class with someone you respect. With patience and practice, you too can turn tear out-free surfaces and sand them smooth in just a few minutes.
(continued from page 5)
It’s Time to LimeEd Pretty
Recently I have received requests from a few other turners for tips on using lime wax. There’s not a lot of literature on the process that I am aware of except a few postings on the net and a book that I have myself; “Colouring Techniques for Woodturners” by Jan Sand-ers. I picked the book up about 12 years ago from Lee Valley and I believe they still sell it. For me it has been an excellent resource and motivator for the treatment of wood post-turning. Because I seem to be getting more calls and emails about liming recently I write an article on it here.
For the purpose of this explanation, I have used the terms “lime wax” or “liming” for simplicity, but tinted (coloured) waxes would be treated the same. Also, the proprietary product known as “Lime Wax” sold by Li-beron isn’t really lime and I don’t think it is really wax, at least as we know it. It is a white pigment in an oil-like base. Perhaps some type of wax, but nevertheless very thin.
To start off with, my approach to colouring wood is something that I do to emphasize grain characteristics such as the figure in wood or perhaps grain lines that naturally have significant contrast (sap wood and heart wood, for example) or just to get away from a bland brown (contrary to popular belief, I don’t think all wood is bland). Although the wood may be coloured, liming is used to emphasize grain direction and pat-tern. ”Gypsy Queen” is an example where both dy-ing and liming are used to enhance both a grain char-acteristic and grain pattern. The process requires a
ring-porous wood for best effect. Ring-porous wood is wood that has the pores isolated into rings rather than dispersed throughout the wood as does diffuse-porous wood. The rings of pores, once treated with a contrasting tint or lime wax, stand out and become the focal point of the piece. Ring-porous woods include ash, oak, elm, hickory, and chestnut. I’m sure there are more but these are all species that I have used success-fully. In such cases as “Black Tie Affair”, I have elimi-nated the colour of the wood entirely, making the grain lines the dominant feature of the piece. In some, I have coloured the wood with dye, keeping the nature of the grain intact but added contrasting or complimenting tint wax for accent. Still others, I have not coloured the wood at all but used black wax to enhance the grain.
None of this is effective at all on diffuse-porous wood. I once tried to use lime wax on black walnut, thinking the contrast might look good. Walnut has zil-lions of little fissures throughout the wood. All it did was make the piece look messy and totally ruined it. So… no diffuse-porous wood, Grasshopper.
The order of business for liming is to turn the piece, finish sand, open the grain, apply a finish and then ap-ply the lime wax. It’s important that all the steps in this procedure are followed and that each is attended to with great detail. First: turning and sanding. Any anom-alies in the turning will stand out like a sore thumb. In the same way that grain lines are emphasized, so is tear out and undesirable marks from poor tool control. Sanding is critical and if any dye is applied that will

Volume 13, Issue 2 Page 7
raise the grain, I always raise the grain with water first then resand prior to using the dye so that doesn’t cause a problem later. Opening the grain is a key step that you probably haven’t done before in other finishes. Us-ing a small brass brush (or very vigorous work with a stiff plastic brush), thoroughly follow every grain line, brushing all bits if sanding dust and wood fibers from the pores. If you miss any it will be like a neon bald patch when it is way too late to do anything about it. You will notice that there is an incredible amount of debris removed from the pores if you put a piece of white paper under your work. If you are going to co-lour the wood, now is when you apply dye or paint. You will notice that not even dye penetrates the pores because of the surface tension of the liquid. If using paint, spray rather than brush it on if possible. If brush-ing, be careful not to work the paint into the pores. I prefer lacquer – mostly because that’s all I’ve used - but other bases like polyurethane are OK. You will have to experiment with these on your own.
There seems to be a misunderstanding that the pro-cedure is to apply the lime wax before putting any fin-ish on the piece. Do not apply lime wax before finish-ing. If you do there will be no opportunity to apply any further finish, but most critically, if you have applied a dye and it has not been sealed with a finish, the lime wax will pull the colour into it and you won’t get the shocking white contrast, just a tint of the colour that you applied. I know because I did that my first time.
So you have the piece turned, sanded, pores opened and colour applied. Some have been hesitant to apply the finish before waxing thinking that the pores would be sealed up and unable to accept wax. Nothing could be further from the truth. When the finish is applied it actually makes the pores deeper and wider but still leaves a “key” at the bottom. The trick is to stop before the pores get “round bottomed” so that the wax won’t key into it. After finishing a couple of pieces you get
to know what to look for. If you don’t believe that the pores remain during finishing, think about any time you tried to finish a piece with deep grain pores and tried to fill them with finish. The same thing happens here only it’s a good thing. Understand that a rough finish like deep orange peel or simple roughness due to too much thinner will retain the wax and the result is very unattractive. If you have orange peel or rough-ness, sand it back before you get too many coats and finish off with a good last coat.
Once the finish is complete it’s time to apply the lime wax. Follow the instructions! Wax on – wax off. Leave it on for only a few minutes like you would your car. If you wait too long it is very hard to remove the excess. Remove excess lime wax with neutral wax and you’re done. Liberon of course recommends their clear furniture wax but I have used all kinds and even neu-tral shoe polish works well.
I have been asked where to get some of the supplies for lime waxing. Lime Wax itself is made by Liberon and available through Craft Supply and Woodchuck-ers. They also make a gilded tint wax as I recall. I use coloured wax that I got at a shoe repair store. I bought gold, silver, red, blue and yellow (metallics and pri-mary colours). Black shoe polish works great for, of all things, black. I spoke to a turner who used white shoe polish as a substitute for lime wax although I am not sure if he used wax or the paint-on type used for the old “saddle shoes” (am I dating myself?). His piece looked very nice but you’re on your own for that one. I have also experimented with paint as a tint but not enough to comment on it here. The brass brushes are available at paint stores. They look like brass tooth brushes. I have used a brush that I got at the grocery store that had plastic and brass bristles; it worked very well but I had to work pretty hard to get what I wanted.
Good luck and have fun. As you can see, liming gets a bit addicting, so be careful.
Volume 13, Issue 2Page 8
Turning Site of the MonthThis month I have a French turner to introduce to
you. Jocelyn (Joss) Naigeon, is a 41 year old, who after having been infected with the Virus, has been a profes-sional turner for the past 5 years. The so called virus was passed onto her after spending an extended pe-riod of time with her ‘master among the masters’ Jean-Francis Escoulen.
Check out her web site at: http://www.tournicoti.net/galerie.php If you don’t want to use Google or Bing to translate the narrative, I am sure you will still enjoy the photos, and may find a few ideas to help you organize your own site for online sales.
The 2nd website at http://www.sawg.org.nz/ is from the South Auckland Woodturners Guild, home of Terry Scott, among several other members. Bruce Hogson
recommended this site. In particular he was impressed by the newsletter article (Dec. 2010) about their an-nual Christmas Sale. This guild has for several years rented and fixed up a storefront location where all members are encouraged to display their wares. The members take turns manning the shop after an open-ing night reception. This year the report is that 60% of the inventory was sold. For those of you who do the Christmas Market circuit, how does that compare with your results?
If you have a secret gem of a site you want to rec-ommend to the membership, please send me a short email at [email protected] explaining what you found of interest, and we will build on this ongoing feature, Peter McLaren.
Vacuum Chucking Setup for the Wood LatheSubmitted by Larry Stevenson
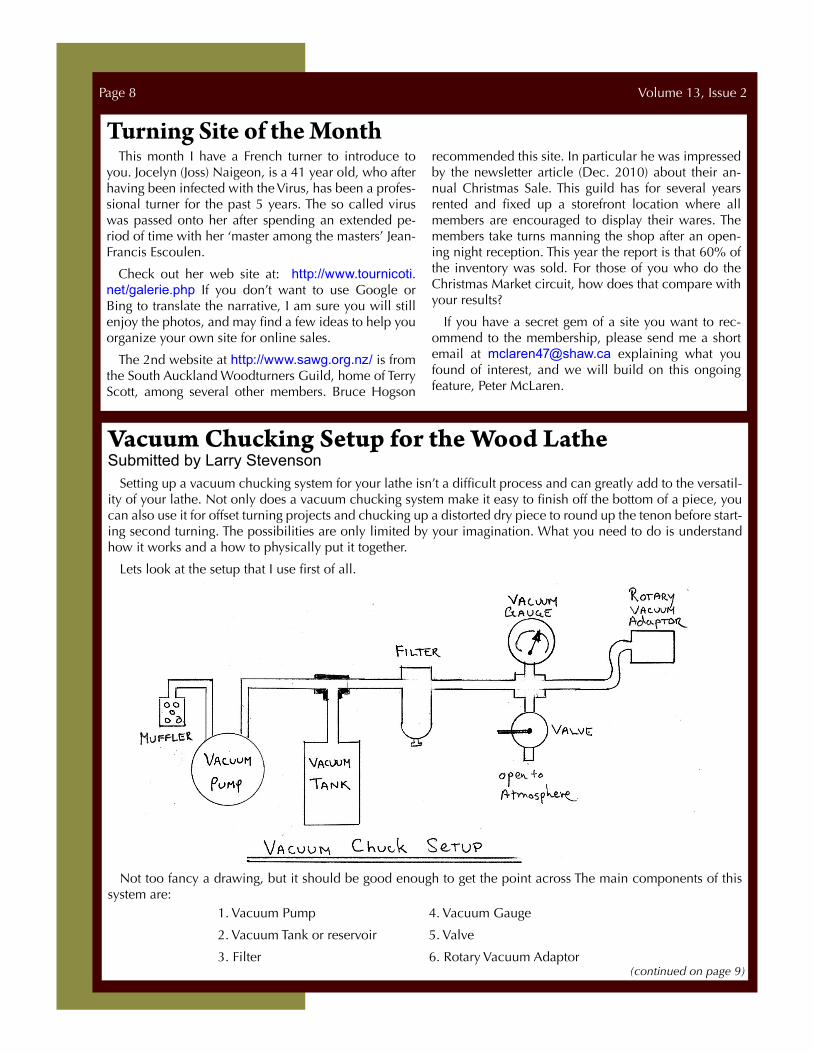
Setting up a vacuum chucking system for your lathe isn’t a difficult process and can greatly add to the versatil-ity of your lathe. Not only does a vacuum chucking system make it easy to finish off the bottom of a piece, you can also use it for offset turning projects and chucking up a distorted dry piece to round up the tenon before start-ing second turning. The possibilities are only limited by your imagination. What you need to do is understand how it works and a how to physically put it together.
Lets look at the setup that I use first of all.
Not too fancy a drawing, but it should be good enough to get the point across The main components of this system are:
(continued on page 9)
1. Vacuum Pump
2. Vacuum Tank or reservoir
3. Filter
4. Vacuum Gauge
5. Valve
6. Rotary Vacuum Adaptor
Volume 13, Issue 2 Page 9
There are various types of vacuum pumps on the market and they are available used. There are carbon vane pumps, diaphragm pumps and oil filled pumps to name a few that I can think of. I have seen them at KMS in the used section at the back of the store and if you do a search on Ebay you’ll find many for sale. You do not have to spend big bucks to get a good unit. If you want a new unit phone around to places like EB Peerless or try the refrigeration suppliers. The next unit I show in the diagram is a reservoir. I am a firm believer in this as it provides a damper quality as some pumps produce a pulsatile vacuum and this smoothes out the vacuum pressure. It also provides a vacuum reserve if for some reason the pump fails or there is a power failure. If the unit fails it will give you enough time to stop the lathe and rescue your piece before it flies off the lathe and is destroyed or worse, hits you on its jour-ney into the wall. I have used a piece of 6” ABS sewer pipe for mine with caps on both ends, however I have set up some for other members and used an old 20 lb propane bottle. You can get these at any gas station that has old expired tanks that are destined for the bone yard. Open the valve of the empty tank and allow it to vent outdoors for a day or so. Use a pipe wrench to re-move the valve and wash the tank out. They will stink for a few days so allow the tank to vent out. Put in a 6” by ¾” NPT nipple and a Tee fitting. This will allow for two hose fitting to go in allowing you to connect hoses to the tank. Remember to use Teflon tape or pipe dope when putting pipe fittings together. The filter provides a method of cleaning the air being removed from the vacuum chuck. There is a small amount of sawdust that is sucked through the system and this removes it before it can cause damage to the pump. I have used an in-expensive air filter that I bought at KMS in the air tool section and have had no problems with it. You could from this point put on a length of hose that goes from this section to your lathe. You want to have the vacuum gauge and valve up at the lathe where you can see it. Vacuum gauges are available at Princess Auto at a very reasonable cost. The valve is used to provide a leak so that you can vary the amount of vacuum you are ap-plying to the vacuum chuck and also to break the vac-uum when you are finished so that you can remove the piece. I am not going to go into making vacuum chuck adaptors as you can do a search on the web and find many different ways of making your own. I purchased a Oneway vacuum adaptor and it is an extremely good unit and I feel it was well worth the cost. Give a call to Island Woodcraft and I’m sure he can help you.
Vacuum chucks may be purchased or made. They
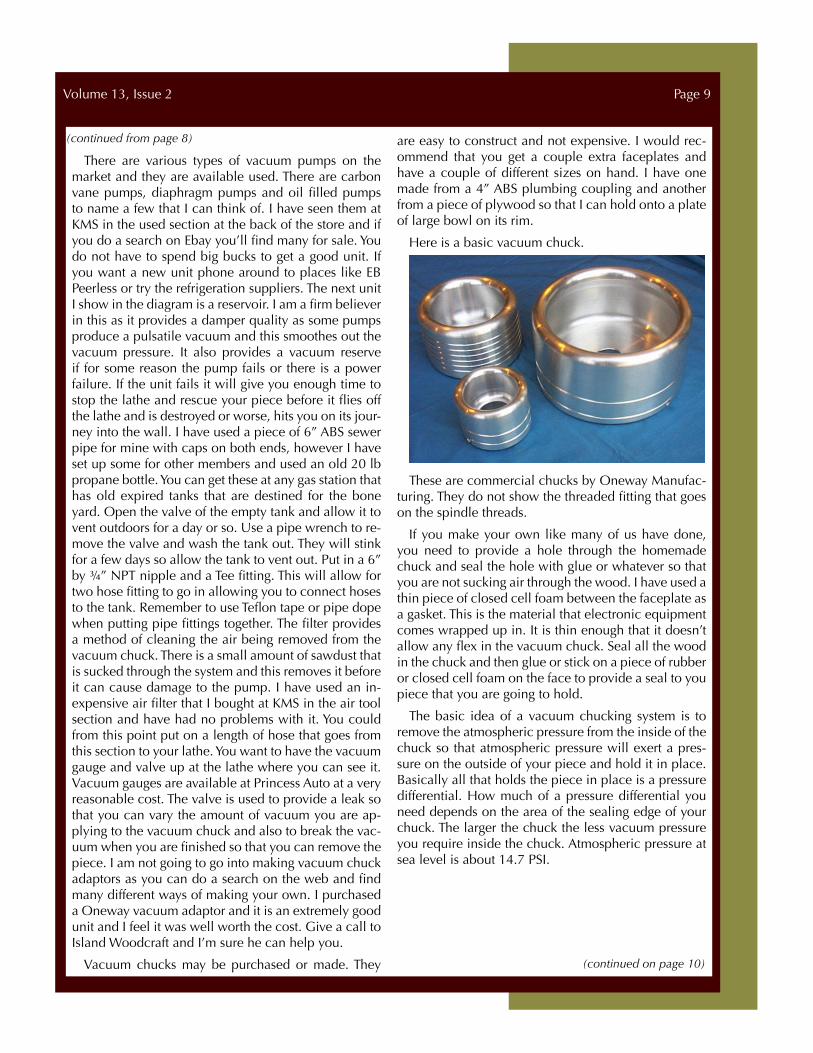
are easy to construct and not expensive. I would rec-ommend that you get a couple extra faceplates and have a couple of different sizes on hand. I have one made from a 4” ABS plumbing coupling and another from a piece of plywood so that I can hold onto a plate of large bowl on its rim.
Here is a basic vacuum chuck.
These are commercial chucks by Oneway Manufac-turing. They do not show the threaded fitting that goes on the spindle threads.
If you make your own like many of us have done, you need to provide a hole through the homemade chuck and seal the hole with glue or whatever so that you are not sucking air through the wood. I have used a thin piece of closed cell foam between the faceplate as a gasket. This is the material that electronic equipment comes wrapped up in. It is thin enough that it doesn’t allow any flex in the vacuum chuck. Seal all the wood in the chuck and then glue or stick on a piece of rubber or closed cell foam on the face to provide a seal to you piece that you are going to hold.
The basic idea of a vacuum chucking system is to remove the atmospheric pressure from the inside of the chuck so that atmospheric pressure will exert a pres-sure on the outside of your piece and hold it in place. Basically all that holds the piece in place is a pressure differential. How much of a pressure differential you need depends on the area of the sealing edge of your chuck. The larger the chuck the less vacuum pressure you require inside the chuck. Atmospheric pressure at sea level is about 14.7 PSI.
(continued from page 8)
(continued on page 10)

Volume 13, Issue 2Page 10
I have made a table here to illustrate the point.
The numbers in the various columns are the pressure in pounds of force exerted on the piece at the various vacuum pressures. You can see that with a large vacu-um chuck that the pressures are extreme and it would be easy to destroy your piece with too much pressure. I once cracked a bowl by having too thin a piece for the vacuum pressure I was using to hold the piece. I keep that piece in my shop as a reminder. You can also see that holding small pieces would require a high vacuum level and a very gentle touch as to not have the piece fly off the lathe.
Wood is a porous material, so each species behaves differently. Oak is much more porous than maple and
you will not be able to achieve as high a vacuum on the piece. As you sand the piece you will notice the dust being sucked into the pores of the wood.
I’m trying to keep this article brief; however I think that I have rambled on long enough. If you have any questions, please ask me to address them as I may have missed something or made some assumption that you are not aware of.
For an in depth article on vacuum chucking refer to www.woodturners.org/tech_tips/vacuum_chuck/vacu-um-chucks.pdf
Happy vacuum chucking.
(continued from page 9)
Diameter in Inches
Pressure @ 30 in Hg
Pressure @ 25 in Hg
Pressure @ 20 in Hg
Pressure @ 15 in Hg
1 11.545353 9.61327352 7.68904802 5.764822519
2 46.18141201 38.45309408 30.75619208 23.05929008
3 103.908177 86.51946168 69.20143218 51.88340267
4 184.725648 153.8123763 123.0247683 92.23716031
5 288.633825 240.331838 192.2262005 144.120563
6 415.6327081 346.0778467 276.8057287 207.5336107
7 565.7222971 471.0504025 376.763353 282.4763034
8 738.9025921 615.2495053 492.0990733 368.9486412
9 935.1735932 778.6751551 622.8128896 466.9506241
10 1154.5353 961.327352 768.904802 576.4822519
11 1396.987713 1163.206096 930.3748104 697.5435248
12 1662.530832 1384.311387 1107.222915 830.1344428
13 1951.164657 1624.643225 1299.449115 974.2550058
14 2262.889188 1884.20161 1507.053412 1129.905214
15 2597.704425 2162.986542 1730.035804 1297.085067
16 2955.610368 2460.998021 1968.396293 1475.794565
20 4618.141201 3845.309408 3075.619208 2305.929008
24 6650.123329 5537.245548 4428.891659 3320.537771

Volume 13, Issue 2 Page 11
President’s Challenge - Teapot
Anne Rostvig - Teapot Cottage - Maple - Acrylic (Unfinished)
Bill Cobb - Teapot - 5 x 6 in - Spalted Birch, Arbutus, Padauk - Tung Oil
Colin Delory - Teapot 5 x 6 in - Black Walnut
Antique Oil
Jim Johnson - Teapot - 5.5 x 6 inMaple Burl - Wipe on Poly
Colin Delory - Teapot - 5 x 5.5 in - Horse Chesnut, Jarra, Maple Burl - Antique Oil
Des Wilson - Teapot - 5 x 6 in Maple, Black Walnut, Stone
Poly
Ed Pretty - Bee Teapot - 11 x 6 in Birch, Ash, Yew - Lacquer, WOP, Acrylic
Peter McLaren - Teapot 5 x 7.5 in - Box Elder Burl
Dye & Wipe on Poly
Marco Berera - .5 x .5 in Cocobolo - CA & Wax
Neil Elmer - Teapot - Maple Burl - Poly
Volume 13, Issue 2Page 12
Instant Gallery
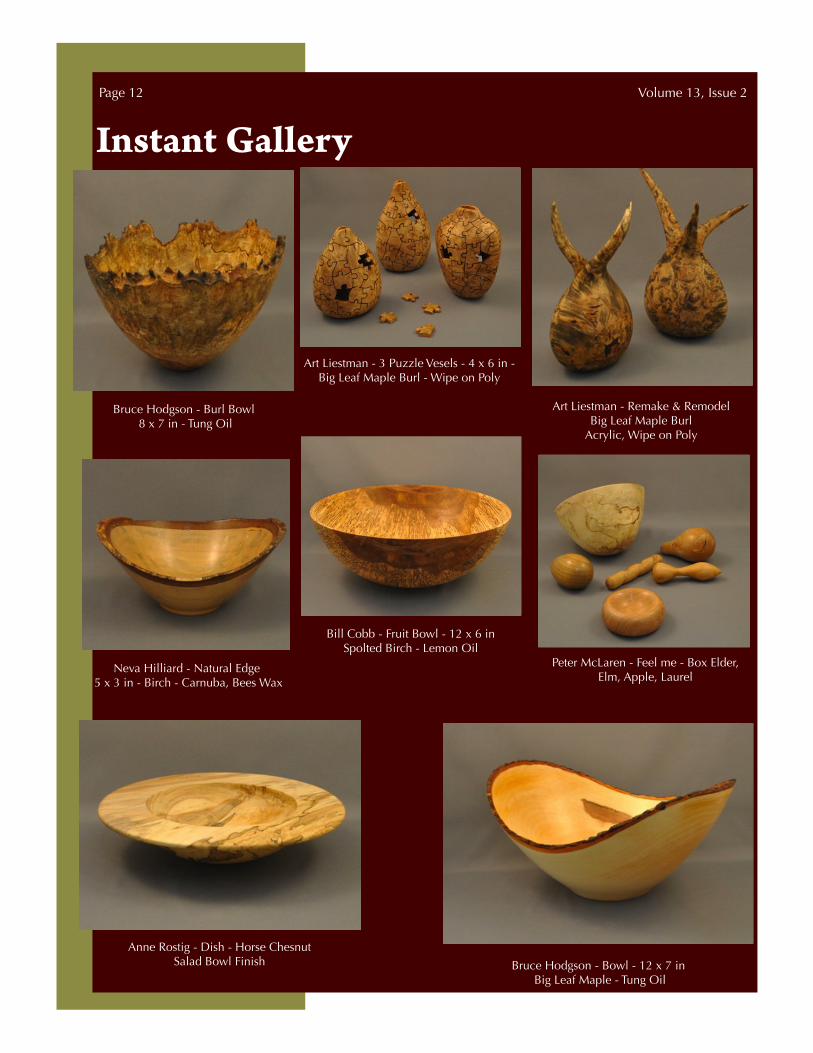
Bruce Hodgson - Burl Bowl 8 x 7 in - Tung Oil
Anne Rostig - Dish - Horse Chesnut Salad Bowl Finish
Art Liestman - Remake & Remodel Big Leaf Maple Burl
Acrylic, Wipe on Poly
Art Liestman - 3 Puzzle Vesels - 4 x 6 in - Big Leaf Maple Burl - Wipe on Poly
Bruce Hodgson - Bowl - 12 x 7 in Big Leaf Maple - Tung Oil
Bill Cobb - Fruit Bowl - 12 x 6 in Spolted Birch - Lemon Oil
Neva Hilliard - Natural Edge 5 x 3 in - Birch - Carnuba, Bees Wax
Peter McLaren - Feel me - Box Elder, Elm, Apple, Laurel

Volume 13, Issue 2 Page 13
Instant Gallery
Keith Hudson - Box Spheres 3 in - Cherry & Maple - Mineral Oil
Gary Cormier - Bowl - 15 x 3.5 in Maple - Lacquer
Gary Cormier - Platter - 18 x 2 in Maple - Lacquer
John Spitters - Bowl - 6.5 x 3 in Maple - Wipe on Poly
Jim Johnson - Hollow Form - 5 x 8 in Maple Burl - Wipe on Poly
Peter McLaren - Ripple - 8 x 6 x 1 in Arbutus - Claphams
Bruce Hodgson - Vase - 6 x 7.5 in Birch & Soapstone - Tung Oil
Bruce Hodgson - Vase - 9 x 8 in Birch & Soapstone - Tung Oil

Volume 13, Issue 2Page 14
Instant Gallery
Graeme Hogarth - Vase - 6 x 10 in Apple - Oil & WaxJohn Spitters - Finial Form
2.75 x 7.75 in - Maple Wipe on Poly
John Spitters - Finial Form 3.25 x 9.5 in - Maple
Wipe on Poly
Bill Cobb - Candle Holders 3.5 x 6 x 11 in - Padauk & Maple
Tung Oil
Jim Johnson - Hollow Form 5 in x 8 in - Maple Burl
Wipe on Poly
Peter McLaren - Stretching Limits 2 x 3.5 in - Holly

Volume 13, Issue 2 Page 15
GVWG Officers, Appointees & Volunteers
President
Kerry Deane-Cloutier 604.468.0605
Vice President
larry StevenSon 604.438.3947
secretary
ClauDia HaywarD 604.462.7597
treasurer
FreD BalDwin 604.812.4972
MeMbers at Large
Jim JoHnSon 604.937.3275Peter mClaren 604.533.1939miCHelle GenDron 604.789.1873eD Pretty 604.888.5967merv GraHam 604.272.3525Steve Kent 604.937.0145
Library acquisitions adVisor
Don HoSKinS 604.939.6808
educationaL coordinators
Steve Kent 604.937.0145Peter mClaren 604.533.1939larry StevenSon 604.438.3947merv GraHam 604.272.3525
Librarian
Gerry viCKerS 604.463.0760
Food chieF
lanCe roSSinGton 604.462.9985
FoF coordinator
murray maCKinnon 604.986.5476
turning 101Gerry viCKerS 604.463.0760
newsLetter
Damien GenDron (eDitor) miCHelle GenDron (PuBliSHer) 604.789.1873
digitaL PhotograPhy
GeorGette mClaren 604.533.1939GreGG ParSonS 604.542.9066
webMaster
Steve HanSen 604.585.0638
AnnouncementsTurning 101 will be on Saturday, Feb. 26 at the Sapperton Pensioner’s Hall. This month Merv Graham will lead the class in making a lidded box with a finial. Contact Jerry Vickers at 604.463.0760 to sign up.
ClassifiedsFor Sale: 30 piece 2.5” Dust Collection Network sold by Lee Valley Tools http://www.leevalley.com/en/wood/page.aspx?p=62594&cat=1,42401,62597,62604,62594. Bought over a year ago and box is unopened. Yours for $45. Peter McLaren 604.533.1939.
For Sale: 1940’s era Walker Turner 6” jointer - all cast iron, c/w 1/2 hp GE motor (from same era) rated at 3450 rpm. Has a 36” bed and blade guard. Comes attached to a 32” X 40” cabinet for sawdust collection. For a good home, you can have it for $55. I might even include a set of spare blades. Peter 604.533.1939.
For Sale: General International Lathe. 16” swing by 42” bed - very similar to the model shown here http://www.general.ca/site_general/g_produits/lathe/25-650.html. Used for recreational turning for less than 3 & 1/2 years. Now I have my Stubby and must let go of my old General. Has all the features of the higher priced units, variable speed, reverse turning, swivel and sliding headstock, and it plugs into a 110 outlet, but turns as though running on 220. Priced to move at $1,500 including vacuum adaptor. Peter 604.533.1939.