Precision 5750 Panduan pengaturan dan spesifikasi - Dell
36
Precision 5750 Panduan pengaturan dan spesifikasi Model Resmi: P92F Tipe Resmi: P92F001 May 2020 Rev. A00
-
Upload
khangminh22 -
Category
Documents
-
view
8 -
download
0
Transcript of Precision 5750 Panduan pengaturan dan spesifikasi - Dell

Precision 5750Panduan pengaturan dan spesifikasi
Model Resmi: P92FTipe Resmi: P92F001May 2020Rev. A00

Catatan, perhatian, dan peringatan
CATATAN: CATATAN menunjukkan informasi penting yang membantu Anda menggunakan produk Anda dengan lebih baik.
PERHATIAN: PERHATIAN menunjukkan kemungkinan terjadinya kerusakan pada perangkat keras atau hilangnya data,
dan memberitahu Anda mengenai cara menghindari masalah tersebut.
PERINGATAN: PERINGATAN menunjukkan potensi terjadinya kerusakan properti, cedera pada seseorang, atau
kematian.
© 2020 Dell Inc. atau anak-anak perusahaannya. Hak cipta dilindungi undang-undang. Dell, EMC, dan merek dagang lainnya adalah merek dagang dari DellInc. atau anak-anak perusahaannya. Merek dagang lain dapat merupakan merek dagang dari pemiliknya masing-masing.

Bab 1: Siapkan komputer Anda......................................................................................................... 5
Bab 2: Membuat drive pemulihan USB untuk Windows....................................................................... 7
Bab 3: Display cahaya biru rendah Dell.............................................................................................. 8
Bab 4: Gambaran umum sasis...........................................................................................................9Tampilan display.....................................................................................................................................................................9Tampilan kiri............................................................................................................................................................................9Right view...............................................................................................................................................................................9Tampilan sandaran tangan....................................................................................................................................................9Tampilan bawah..................................................................................................................................................................... 9Pintasan keyboard................................................................................................................................................................10
Bab 5: Spesifikasi teknis................................................................................................................. 11Dimensi dan berat................................................................................................................................................................. 11Chipset...................................................................................................................................................................................12Processors.............................................................................................................................................................................12Sistem operasi.......................................................................................................................................................................12Memori...................................................................................................................................................................................13Penyimpanan.........................................................................................................................................................................13Pembaca kartu-media..........................................................................................................................................................14Audio...................................................................................................................................................................................... 14Video...................................................................................................................................................................................... 14Port dan konektor................................................................................................................................................................ 15Display....................................................................................................................................................................................15Kamera...................................................................................................................................................................................16Komunikasi.............................................................................................................................................................................17Adaptor daya.........................................................................................................................................................................17Konektor board sistem........................................................................................................................................................ 18Baterai....................................................................................................................................................................................18Panel sentuh......................................................................................................................................................................... 19Keyboard...............................................................................................................................................................................20Pembaca sidik jari di Tombol Daya.................................................................................................................................... 20Spesifikasi sensor dan kontrol............................................................................................................................................20Security (Keamanan).......................................................................................................................................................... 20Perangkat Lunak Keamanan............................................................................................................................................... 21Lingkungan komputer.......................................................................................................................................................... 21
Bab 6: Perangkat Lunak................................................................................................................. 22Mengunduh driver Windows.............................................................................................................................................. 22
Bab 7: System setup (Pengaturan sistem).......................................................................................23Masuk ke program pengaturan BIOS................................................................................................................................23
Daftar Isi
Daftar Isi 3

Tombol navigasi................................................................................................................................................................... 23Urutan Boot..........................................................................................................................................................................24Menu boot satu kali............................................................................................................................................................. 24System setup options......................................................................................................................................................... 24Menghapus kata sandi BIOS (Pengaturan Sistem) dan Sistem....................................................................................35
Bab 8: Mendapatkan bantuan......................................................................................................... 36Menghubungi Dell................................................................................................................................................................36
4 Daftar Isi

Siapkan komputer Andalangkah
1. Sambungkan adaptor daya dan tekan tombol daya.
CATATAN: Untuk menghemat daya baterai, baterai dapat masuk ke mode hemat daya.
2. Tuntaskan penataan sistem Windows.
Ikuti instruksi pada layar untuk menyelesaikan penataan. Saat melakukan pengaturan, Dell merekomendasikan Anda untuk:
● Menyambungkan ke jaringan untuk pembaruan Windows.CATATAN: Jika Anda menyambungkan ke jaringan nirkabel aman, masukkan kata sandi untuk akses jaringan nirkabel saat
diminta.
● Jika terhubung ke internet, masuk atau buat akun Microsoft. Jika tidak terhubung ke internet, buat akun offline.● Pada layar Support and Protection (Dukungan dan Proteksi), masukkan detail kontak Anda.
3. Cari dan gunakan aplikasi Dell dari menu Start Windows—Direkomendasikan
Tabel 1. Mencari lokasi aplikasi Dell
Aplikasi Dell Detail
Registrasi Produk Dell
Daftarkan komputer Anda dengan Dell.
Bantuan & Dukungan Dell
Akses bantuan dan dukungan untuk komputer Anda.
1
Siapkan komputer Anda 5

Tabel 1. Mencari lokasi aplikasi Dell (lanjutan)
Aplikasi Dell Detail
SupportAssist
Secara proaktif, periksa kesehatan perangkat keras danperangkat lunak komputer Anda.
CATATAN: Perbarui atau tingkatkan versi garansi Andadengan mengklik tanggal kedaluwarsa garansi diSupportAssist.
Pembaruan Dell
Perbarui komputer Anda dengan perbaikan dan driver perangkatpenting saat tersedia.
Pengiriman Digital Dell
Unduh aplikasi perangkat lunak termasuk perangkat lunak yangdibeli namun belum terpasang pada komputer Anda.
4. Buat drive pemulihan untuk Windows
CATATAN: Disarankan untuk membuat drive pemulihan guna memecahkan dan memperbaiki masalah yang mungkin terjadi
dengan Windows.
Untuk informasi lebih lanjut, lihat Buat drive pemulihan USB untuk Windows.
6 Siapkan komputer Anda

Membuat drive pemulihan USB untukWindows
Buat drive pemulihan untuk memecahkan masalah dan memperbaiki masalah yang mungkin terjadi pada Windows. Flash drive USB kosongdengan kapasitas minimal 16 GB diperlukan untuk membuat drive pemulihan.
prasyarat
CATATAN: Proses ini membutuhkan waktu hingga satu jam untuk menyelesaikannya.
CATATAN: Langkah-langkah berikut mungkin berbeda-beda tergantung versi Windows yang terinstal. Lihat Situs dukungan
Microsoft untuk instruksi terbaru.
langkah
1. Sambungkan flash drive USB ke komputer Anda.
2. Dalam pencarian Windows, ketik Recovery (Pemulihan).
3. Dalam hasil pencarian, klik Create a recovery drive (Buat drive pemulihan).Jendela User Account Control (Kontrol Akun Pengguna) ditampilkan.
4. Klik Yes (Ya) untuk melanjutkan.Jendela Recovery Drive (Drive Pemulihan) ditampilkan.
5. Pilih Back up system files to the recovery drive (Cadangkan file sistem ke drive pemulihan) dan klik Next (Selanjutnya).
6. Pilih USB flash drive (Flash drive USB) dan klik Next (Selanjutnya).Sebuah pesan ditampilkan, menunjukkan bahwa semua data di flash drive USB akan dihapus.
7. Klik Create (Buat).
8. Klik Finish (Selesai).Untuk informasi lebih lanjut mengenai memasang ulang Windows menggunakan drive pemulihan USB, lihat bagian Pemecahan Masalahdari Manual Servis produk Anda di www.dell.com/support/manuals.
2
Membuat drive pemulihan USB untuk Windows 7

Display cahaya biru rendah DellPERINGATAN: Paparan cahaya biru yang berkepanjangan dari display dapat menyebabkan efek jangka panjang seperti
ketegangan mata, kelelahan mata, atau kerusakan mata.
Fitur ComfortView pada laptop dan display Dell dirancang untuk meminimalkan cahaya biru yang dipancarkan dari display untukkenyamanan mata yang lebih baik.
Untuk mengurangi risiko ketegangan mata setelah menatap display laptop selama jangka waktu yang lama, disarankan Anda untuk:
1. Mengatur display laptop pada jarak pandang yang nyaman antara 20 inci dan 28 inci (50 cm dan 70 cm) dari mata Anda.2. Sering berkedip untuk melembapkan mata Anda atau basahi mata Anda dengan air.3. Beristirahatlah selama 20 menit setiap dua jam.4. Berpalinglah dari display Anda dan pandang objek yang jauh yang berjarak 20 kaki (609,60 cm) untuk setidaknya selama 20 detik setiap
kali beristirahat.
3
8 Display cahaya biru rendah Dell

Gambaran umum sasis
Topik:
• Tampilan display• Tampilan kiri• Right view• Tampilan sandaran tangan• Tampilan bawah• Pintasan keyboard
Tampilan display1. Sensor jarak 2. LED IR
3. Sensor cahaya sekitar 4. Kamera RGB + IR
5. Indikator LED 6. LED IR
7. Panel LCD 8. Lampu diagnostik LED
Tampilan kiri1. Slot kunci berbentuk Wedge2. Port pengisian daya USB Tipe-C 3.2 Gen 2 dengan Thunderbolt3 /DisplayPort 1.43. Port pengisian daya USB Tipe-C 3.2 Gen 2 dengan Thunderbolt3 /DisplayPort 1.4
Right view1. USB Type-C 3.2 Gen 2 Charging port with Thunderbolt3 /
DisplayPort 1.42. USB Type-C 3.2 Gen 2 Charging port with Thunderbolt3 /
DisplayPort 1.4
3. SD-card reader 4.0 4. Universal Audio Jack
Tampilan sandaran tangan1. Mikrofon 2. Tombol daya dengan pembaca sidik jari
3. Speaker 4. Panel sentuh
5. Speaker
Tampilan bawah1. Speaker 2. Speaker
3. Ventilasi kipas 4. Label Tag Servis
4
Gambaran umum sasis 9

Pintasan keyboardCATATAN: Karakter keyboard mungkin berbeda tergantung pada konfigurasi bahasa keyboard. Tombol yang digunakan untuk
pintasan tetap sama di semua konfigurasi bahasa.
Tabel 2. Daftar pintasan keyboard
Tombol Perilaku utama Perilaku sekunder (Fn + Key)
Fn + Esc Keluar Mengalihkan kunci tombol Fn
Fn + F1 Mendiamkan audio Perilaku F1
Fn + F2 Menurunkan volume Perilaku F2
Fn + F3 Meningkatkan volume Perilaku F3
Fn + F4 Mainkan/jeda untukpemutaran audio
Perilaku F4
Fn + F5 Menyalakan/mematikan lampu latarkeyboard
Perilaku F5
Fn + F6 Menurunkan kecerahan Perilaku F6
Fn + F7 Meningkatkankecerahan
Perilaku F7
Fn + F8 Mengalihkan ke displayeksternal
Perilaku F8
Fn + F10 Mencetak layar Perilaku F10
Fn + F11 Home Perilaku F11
Fn + 12 Halaman akhir Perilaku F12
Fn + Ctrl Membuka menuaplikasi
--
10 Gambaran umum sasis

Spesifikasi teknisCATATAN: Penawaran mungkin berbeda-beda di setiap negara. Spesifikasi berikut ini hanya yang dipersyaratkan oleh hukum untuk
dikirimkan bersama komputer Anda. Untuk informasi lebih lanjut mengenai konfigurasi komputer Anda, lihat Help and Support
(Bantuan dan Dukungan) di sistem operasi Windows Anda dan pilih opsi untuk melihat informasi tentang komputer Anda.
Topik:
• Dimensi dan berat• Chipset• Processors• Sistem operasi• Memori• Penyimpanan• Pembaca kartu-media• Audio• Video• Port dan konektor• Display• Kamera• Komunikasi• Adaptor daya• Konektor board sistem• Baterai• Panel sentuh• Keyboard• Pembaca sidik jari di Tombol Daya• Spesifikasi sensor dan kontrol• Security (Keamanan)• Perangkat Lunak Keamanan• Lingkungan komputer
Dimensi dan beratTabel 3. Dimensi dan berat
Deskripsi Nilai
Tinggi:
Depan 8.67 mm (0.34 in.)
Belakang 13.15 mm (0.52 in.)
Panjang 374.48 mm (14.74 in.)
Lebar 248.08 mm (9.77 in.)
Berat 2.13 kg (4.70 lb)
CATATAN: Berat sistem Anda tergantung pada konfigurasi yang dipesandan variabilitas pembuatan.
5
Spesifikasi teknis 11

ChipsetTabel 4. Chipset
Deskripsi Nilai
Chipset Intel WM490
Prosesor 10th Generation Intel Core i5/i7/i9/Xeon
EPROM Flash 32 MB
Bus PCIe Up to Gen 3.0
ProcessorsTable 5. Processors
Description Values
Processors 10thGenerationIntel Corei5-10400HVpro
10thGenerationIntel Corei7-10750H
10thGenerationIntel Corei7-10850HVpro
10thGenerationIntel Corei7-10875HVpro
10th GenerationIntel Corei9-10885H Vpro
10th GenerationIntel Xeon-W10855M Vpro
10th GenerationIntel Xeon-W10885M Vpro
Wattage 45 W 45 W 45 W 45 W 45 W 45 W 45 W
Core count 4 6 6 8 8 6 8
Thread count 8 12 12 16 16 12 16
Speed 2.6 to 4.6GHz
2.6 to 5.0GHz
2.7 to 5.1 GHz 2.3 to 5.1GHz
2.4 to 5.3 GHz 2.8 to 5.1 GHz 2.4 to 5.3 GHz
Cache 8 MB 12 MB 12 MB 16 MB 16 MB 12 MB 16 MB
Integratedgraphics
Intel UHDGraphics
Intel UHDGraphics
Intel UHDGraphics
Intel UHDGraphics
Intel UHDGraphics
Intel UHDGraphics
Intel UHDGraphics
Sistem operasi● Windows 10 Home (64-bit)● Windows 10 Enterprise (64-bit)● Windows 10 Professional (64-bit)● Windows 10 Pro Education (64-bit)● Windows 10 Pro for Workstations (64-bit)● Windows 10 Pro for China (64-bit)● Ubuntu 18.04 LTS (64-bit)
12 Spesifikasi teknis

MemoriTabel 6. Spesifikasi memori
Deskripsi Nilai
Slot Two-SODIMM slots
Tipe Dual-channel DDR4
Kecepatan 2666 MHz for ECC memory/2933 MHz for Non-ECC memory
Memori maksimum 64 GB
Memori minimum 8 GB
Konfigurasi yang didukung ● 8 GB, 1 x 8 GB, DDR4, 2666 MHz, ECC, SODIMM● 16 GB, 1 x 16 GB, DDR4, 2666 MHz, ECC, SODIMM● 16 GB, 2 x 8 GB, DDR4, 2666 MHz, ECC, SODIMM● 32 GB, 1 x 32 GB, DDR4, 2666 MHz, ECC, SODIMM● 32 GB, 2 x 16 GB, DDR4, 2666 MHz, ECC, SODIMM● 64 GB, 2 x 32 GB, DDR4, 2666 MHz, ECC, SODIMM● 8 GB, 1 x 8 GB, DDR4, 2933 MHz, Non-ECC, SODIMM● 16 GB, 1 x 16 GB, DDR4, 2933 MHz, Non-ECC, SODIMM● 16 GB, 2 x 8 GB, DDR4, 2933 MHz, Non-ECC, SODIMM● 32 GB, 1 x 32 GB, DDR4, 2933 MHz, Non-ECC, SODIMM● 32 GB, 2 x 16 GB, DDR4, 2933 MHz, Non-ECC, SODIMM● 64 GB, 2 x 32 GB, DDR4, 2933 MHz, Non-ECC, SODIMM
CATATAN: ECC memory will support 2933 MHz post RTS
PenyimpananYour computer supports one of the following configurations:
● M.2 2230, solid-state drive (class 35)● M.2 2280, solid-state drive (class 40)● M.2 2280, solid-state drive (class 50)● M.2 2280, SED solid-state drive (class 40)
The primary drive of your computer varies with the storage configuration.
Tabel 7. Spesifikasi penyimpanan
Faktor pembentuk Jenis antarmuka Kapasitas
M.2 2230, Gen 3 PCIe x4 NVMe, Class 35 solid-state drive Gen 3 PCIe NVMe x4 256 GB
M.2 2280, Gen 3 PCIe x4 NVMe, Class 40 solid-state drive Gen 3 PCIe NVMe x4 up to 2 TB
M.2 2280, Gen 3 PCIe x4 NVMe, Class 50 solid-state drive Gen 3 PCIe NVMe x4 up to 1 TB
M.2 2280, Gen 3 PCIe x4 NVMe, Class 40 SED solid-statedrive
Gen 3 PCIe NVMe x4 up to 1 TB
Spesifikasi teknis 13

Pembaca kartu-mediaTabel 8. Spesifikasi pembaca kartu-media
Deskripsi Nilai
Tipe SD card slot 4.0
Kartu yang didukung ● Secure Digital (SD)● Secure Digital High Capacity (SDHC)● Secure Digital Extended Capacity (SDXC)
AudioTabel 9. Spesifikasi audio
Deskripsi Nilai
Pengontrol Realtek ALC3204 with Waves MaxxAudio Pro
Konversi stereo 24-bit DAC (Digital-to-Analog) and ADC (Analog-to-Digital)
Interface internal Intel HDA (high-definition audio)
Interface eksternal Universal audio jack
Speaker 4
Rata-rata Output Speaker 2 W
Puncak Output Speaker 2.5 W
VideoTabel 10. Spesifikasi grafis diskret
Grafik diskret
Pengontrol Dukungan display eksternal Ukuran memori Tipe memori
NVIDIA Quadro T2000 mDP/HDMI/Type-C 4 GB GDDR6
NVIDIA Quadro RTX3000 mDP/HDMI/Type-C 6 GB GDDR6
Tabel 11. Spesifikasi Grafis terintegrasi
Grafis terintegrasi
Pengontrol Dukungan display eksternal Ukuran memori Prosesor
Intel UHD Graphics 630 mDP/HDMI/Type-C Shared system memory 10th Generation IntelCore i5/i7/i9
Intel UHD Graphics P630 mDP/HDMI/Type-C Shared system memory Intel Xeon
14 Spesifikasi teknis

Port dan konektorTabel 12. Port dan konektor eksternal
Deskripsi Nilai
Eksternal:
USB ● Four USB Type-C 3.2 Gen 2 Charging port with Thunderbolt3 /DisplayPort 1.4
Audio One Universal Audio Jack
Video via display dongle/dock to connect external display
Port adaptor daya Four Type-C power port
Security (Keamanan) One Wedge-shaped lock slot
Slot kartu Slot kartu SD 4.0
Dongle Dongle HDMI/USB dual port DA20
Tabel 13. Port dan konektor internal
Deskripsi Nilai
Internal:
Satu Kunci-M M.2 (2280 atau 2230) untuk solid-state drive ● One M.2 2230 slot for solid-state drive 256 GB● One M.2 2280 slot for solid-state drive 256 GB/512 GB/1 TB/2
TB● One M.2 2280 slot for Self-Encrypting solid-state drive 512
GB/1 TB
CATATAN: Untuk mempelajari lebih lanjut tentang fitur dariberbagai jenis kartu M.2, lihat artikel basis pengetahuanSLN301626.
DisplayTabel 14. Spesifikasi display
Deskripsi Nilai
Tipe Full High Definition (FHD+) Ultra High Definition (UHD+)
Teknologi panel Wide Viewing Angle (WVA) Wide Viewing Angle (WVA)
Pencahaan (umum) 500 nits 500 nits
Dimensi (Area Aktif):
Tinggi 366.34 mm (14.42 in.) 366.34 mm (14.42 in.)
Panjang 228.96 mm (9.01 in.) 228.96 mm (9.01 in.)
Diagonal 431.80 mm (17 in.) 431.80 mm (17 in.)
Native Resolution (Resolusi Asli) 1920 x 1200 3840 x 2400
Spesifikasi teknis 15
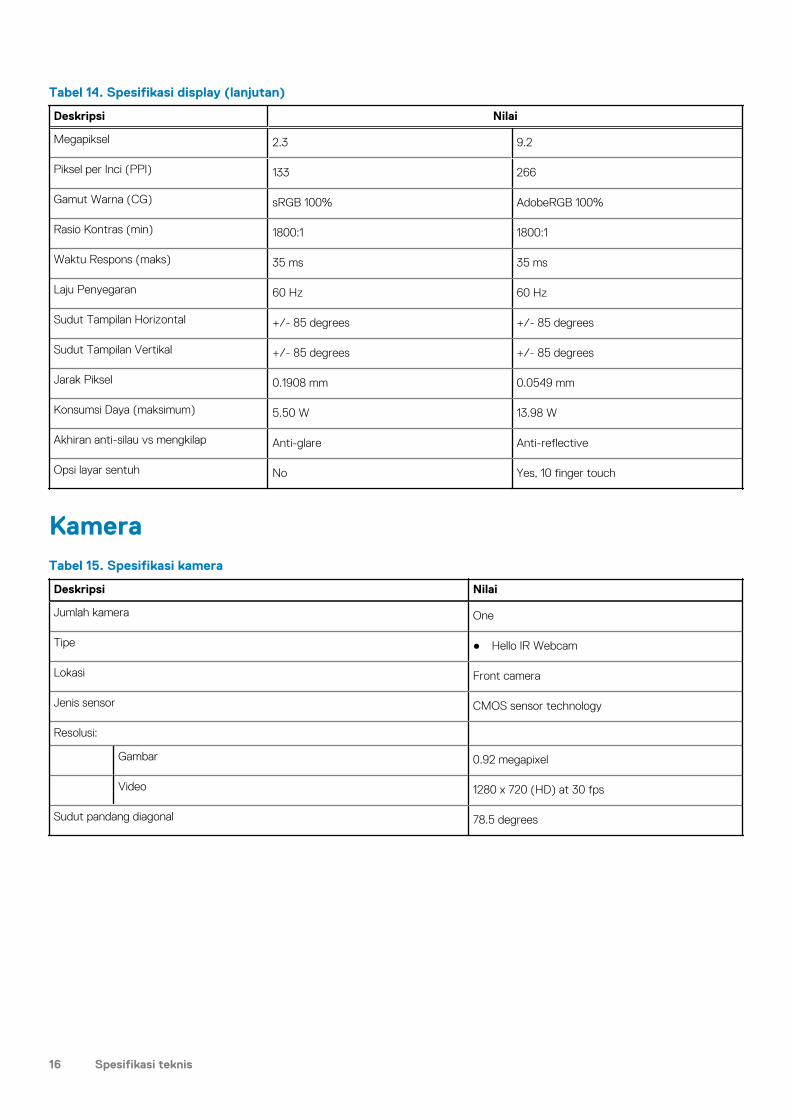
Tabel 14. Spesifikasi display (lanjutan)
Deskripsi Nilai
Megapiksel 2.3 9.2
Piksel per Inci (PPI) 133 266
Gamut Warna (CG) sRGB 100% AdobeRGB 100%
Rasio Kontras (min) 1800:1 1800:1
Waktu Respons (maks) 35 ms 35 ms
Laju Penyegaran 60 Hz 60 Hz
Sudut Tampilan Horizontal +/- 85 degrees +/- 85 degrees
Sudut Tampilan Vertikal +/- 85 degrees +/- 85 degrees
Jarak Piksel 0.1908 mm 0.0549 mm
Konsumsi Daya (maksimum) 5.50 W 13.98 W
Akhiran anti-silau vs mengkilap Anti-glare Anti-reflective
Opsi layar sentuh No Yes, 10 finger touch
KameraTabel 15. Spesifikasi kamera
Deskripsi Nilai
Jumlah kamera One
Tipe ● Hello IR Webcam
Lokasi Front camera
Jenis sensor CMOS sensor technology
Resolusi:
Gambar 0.92 megapixel
Video 1280 x 720 (HD) at 30 fps
Sudut pandang diagonal 78.5 degrees
16 Spesifikasi teknis

Komunikasi
Modul nirkabel
Tabel 16. Spesifikasi modul nirkabel
Deskripsi Nilai
Nomor model Intel Wi-Fi 6 AX201 soldered down
Laju transfer Up to 2400 Mbps
Pita frekuensi didukung 2.4 GHz/5 GHz
Standar nirkabel ● Wi-Fi 802.11a/b/g● Wi-Fi 4 (WiFi 802.11n)● Wi-Fi 5 (WiFi 802.11ac)● Wi-Fi 6 (WiFi 802.11ax)
Enkripsi ● 64-bit/128-bit WEP● AES-CCMP● TKIP
Bluetooth Bluetooth 5.1
Adaptor dayaTabel 17. Spesifikasi adaptor daya
Deskripsi Nilai
Tipe 90 W USB Type-C 130 W Type-C
Diameter (konektor) Type-C connector Type-C connector
Berat 0,23 kg (0,51 lb) 0,32 kg (0,70 lb)
Tegangan input 100 VAC to 240 VAC 100 VAC to 240 VAC
Frekuensi input 50 to 60 Hz 50 to 60 Hz
Arus input (maksimum) 1.50 A 1.80 A
Arus output (kontinu) ● 20 V/4.5 A (Continuous)● 15 V/3 A (Continuous)● 9 V/3 A (Continuous)● 5 V/3 A (Continuous)
● 20 V/6.5 A (Continuous)● 5.0 V/1 A (Continuous)
Nilai tegangan output ● 20 VDC● 15 VDC● 9 VDC● 5 VDC
● 20 VDC● 5 VDC
Pengoperasian 0°C to 40°C (32°F to 104°F) 0°C to 40°C (32°F to 104°F)
Penyimpanan -40°C to 70°C (-40°F to 158°F) -40°C to 70°C (-40°F to 158°F)
Spesifikasi teknis 17

Konektor board sistemTabel 18. Konektor board sistem
Fitur Spesifikasi
Konektor M.2 ● Dua konektor Kunci-M M.2 2280
BateraiTabel 19. Spesifikasi baterai
Deskripsi Nilai
Tipe 56 WHr, 3-cell "smart" lithium-ion 97 WHr, 6-cell "smart" lithium-ion
Tegangan 11.40 VDC 11.40 VDC
Berat (maksimum) 0.27 kg (0.60 lb) 0.385 kg (0.85 lb)
Dimensi:
Tinggi 8.45 mm (0.33 in.) 8.45 mm (0.33 in.)
Panjang 69.70 mm (2.74 in.) 69.70 mm (2.74 in.)
Lebar 330.65 mm (13.02 in.) 330.65 mm (13.02 in.)
Kisaran suhu:
Pengoperasian ● Charge: 0°C to 50°C (32°F to 122°F)● Discharge: 0°C to 60°C (32°F to 140°F)
● Charge: 0°C to 50°C (32°F to 122°F)● Discharge: 0°C to 60°C (32°F to
140°F)
Penyimpanan –40°C to 60°C (-4°F to 140°F) –40°C to 60°C (-4°F to 140°F)
Waktu pengoperasian Berbeda-beda bergantung pada kondisipengoperasian dan dapat berkurang secarasignifikan pada kondisi tertentu yangmembutuhkan daya secara intensif.
Berbeda-beda bergantung pada kondisipengoperasian dan dapat berkurang secarasignifikan pada kondisi tertentu yangmembutuhkan daya secara intensif.
Waktu pengisian (kira-kira) ● Standard charge, 0°C to 50°C (32°F to122°F): 4 hours
● ExpressCharge, 0°C to 15°C (32°F to59°F): 4 hours
● ExpressCharge, 16°C to 45°C (60.80°Fto 113°F): 2 hours
● ExpressCharge, 46°C to 50°C (114.80°Fto 122°F): 3 hours
CATATAN: Control the charging time,duration, start and end time, and so on,using the Dell Power Managerapplication. For more information aboutthe Dell Power Manager, see, Me andMy Dell on www.dell.com/.
CATATAN: Kontrol waktu, durasi, waktumulai dan akhir pengisian daya, dansebagainya menggunakan aplikasi DellPower Manager (Pengelola Daya Dell).
● Standard charge, 0°C to 50°C (32°F to122°F): 4 hours
● ExpressCharge, 0°C to 15°C (32°F to59°F): 4 hours
● ExpressCharge, 16°C to 45°C (60.80°Fto 113°F): 2 hours
● ExpressCharge, 46°C to 50°C(114.80°F to 122°F): 3 hours
CATATAN: Control the charging time,duration, start and end time, and so on,using the Dell Power Managerapplication. For more information aboutthe Dell Power Manager, see, Me andMy Dell on www.dell.com/.
CATATAN: Kontrol waktu, durasi,waktu mulai dan akhir pengisian daya,dan sebagainya menggunakan aplikasiDell Power Manager (Pengelola Daya
18 Spesifikasi teknis

Tabel 19. Spesifikasi baterai (lanjutan)
Deskripsi Nilai
Untuk informasi lebih lanjut mengenaiDell Power Manager (Pengelola DayaDell), lihat Me and My Dell (Saya danDell Saya) di www.dell.com/
Dell). Untuk informasi lebih lanjutmengenai Dell Power Manager(Pengelola Daya Dell), lihat Me and MyDell (Saya dan Dell Saya) diwww.dell.com/
Masa pakai (kira-kira) 300 siklus pengosongan/pengisian 300 siklus pengosongan/pengisian
Baterai sel berbentuk koin Not supported Not supported
Waktu pengoperasian Berbeda-beda bergantung pada kondisipengoperasian dan dapat berkurang secarasignifikan pada kondisi tertentu yangmembutuhkan daya secara intensif.
Berbeda-beda bergantung pada kondisipengoperasian dan dapat berkurang secarasignifikan pada kondisi tertentu yangmembutuhkan daya secara intensif.
Panel sentuhTabel 20. Spesifikasi Panel Sentuh
Fitur Spesifikasi
Resolusi 1221 x 661
Dimensi ● Lebar: 101,7 mm (4,00 in.)● Tinggi: 55,2 mm (2,17 in.)
Multi-sentuh Mendukung multi-sentuh 5-jari
CATATAN: Untuk informasi lebih lanjut tentang gestur panelsentuh untuk Windows 10, lihat artikel basis pengetahuanMicrosoft 4027871 di support.microsoft.com.
Tabel 21. Gestur yang didukung
Gestur yang didukung Windows 10
Menggerakkan kursor Didukung
Mengklik/ mengetuk Didukung
Klik dan seret Didukung
Gulir 2-jari Didukung
Cubit Zoom 2-jari Didukung
Ketuk 2-jari (Mengklik Kanan) Didukung
Ketuk 3-jari (Menjalankan Cortana) Didukung
Geser atas 3-jari (Melihat semua jendela terbuka) Didukung
Geser bawah 3-jari (Menampilkan desktop) Didukung
Geser kanan atau kiri 3-jari (Mengalihkan antara jendela terbuka) Didukung
Ketuk 4-jari (Menjalankan Action Center) Didukung
Geser kanan atau kiri 4-jari (Mengalihkan desktop virtual) Didukung
Spesifikasi teknis 19

KeyboardTabel 22. Spesifikasi keyboard
Fitur Spesifikasi
Jumlah tombol ● 102 (AS dan Kanada)● 103 (Inggris)● 106 (Jepang)
Ukuran Ukuran penuh
● X= 18,6 mm (0,73 in.) pitch tombol● Y= 19,05 mm (0,75 in.) pitch tombol
Keyboard dengan lampu latar Opsional (dengan lampu latar dan tanpa lampu latar)
Tata letak QWERTY
Pembaca sidik jari di Tombol DayaTabel 23. Spesifikasi pembaca sidik jari
Deskripsi Nilai
Teknologi sensor Kapasitif Kapasitif
Resolusi sensor 363 dpi 500 dpi
Ukuran piksel sensor 76 x 100 108 x 88
Spesifikasi sensor dan kontrolTabel 24. Spesifikasi sensor dan kontrol
Spesifikasi
1. Sensor benda jatuh pada motherboard
2. Sensor Efek Aula (Terdeteksi ketika tutup ditutup)
3. Sensor jarak
Security (Keamanan)Tabel 25. Spesifikasi keamanan
Fitur-Fitur Spesifikasi
Trusted Platform Module (TPM) 2.0 Terintegrasi pada board sistem
Pembaca sidik jari Standar
Slot kunci berbentuk Wedge Standar
20 Spesifikasi teknis
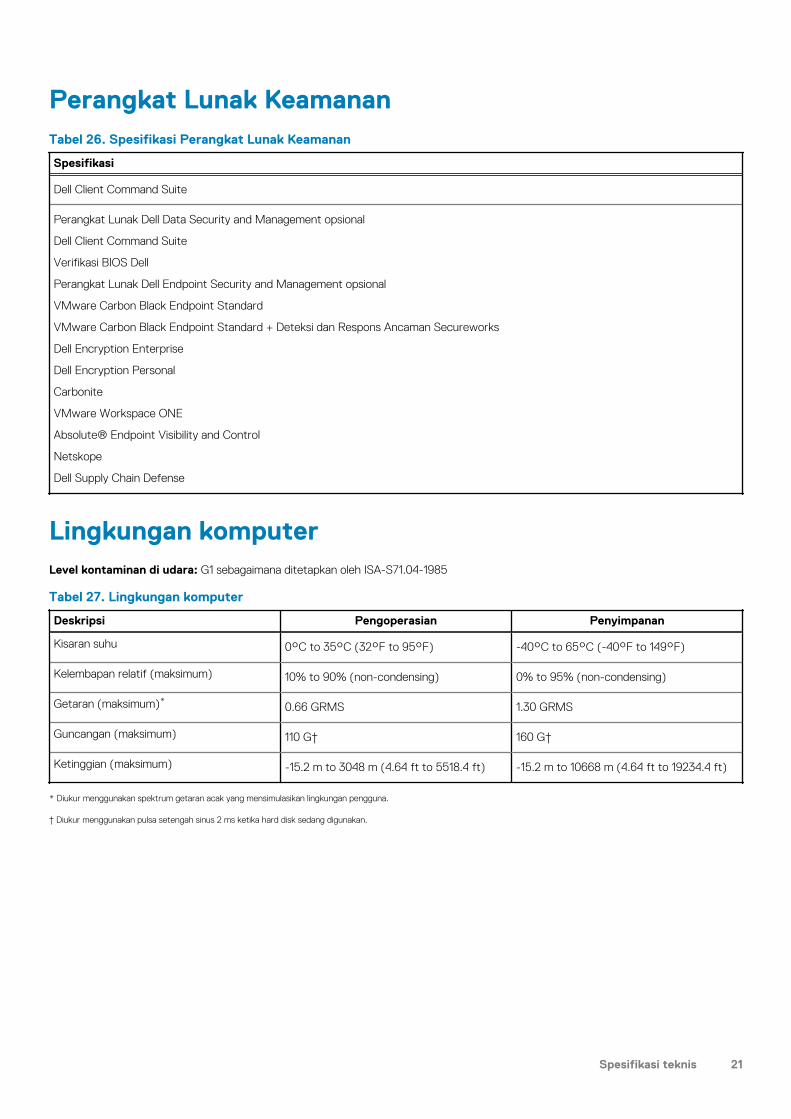
Perangkat Lunak KeamananTabel 26. Spesifikasi Perangkat Lunak Keamanan
Spesifikasi
Dell Client Command Suite
Perangkat Lunak Dell Data Security and Management opsional
Dell Client Command Suite
Verifikasi BIOS Dell
Perangkat Lunak Dell Endpoint Security and Management opsional
VMware Carbon Black Endpoint Standard
VMware Carbon Black Endpoint Standard + Deteksi dan Respons Ancaman Secureworks
Dell Encryption Enterprise
Dell Encryption Personal
Carbonite
VMware Workspace ONE
Absolute® Endpoint Visibility and Control
Netskope
Dell Supply Chain Defense
Lingkungan komputerLevel kontaminan di udara: G1 sebagaimana ditetapkan oleh ISA-S71.04-1985
Tabel 27. Lingkungan komputer
Deskripsi Pengoperasian Penyimpanan
Kisaran suhu 0°C to 35°C (32°F to 95°F) -40°C to 65°C (-40°F to 149°F)
Kelembapan relatif (maksimum) 10% to 90% (non-condensing) 0% to 95% (non-condensing)
Getaran (maksimum)*0.66 GRMS 1.30 GRMS
Guncangan (maksimum) 110 G† 160 G†
Ketinggian (maksimum) -15.2 m to 3048 m (4.64 ft to 5518.4 ft) -15.2 m to 10668 m (4.64 ft to 19234.4 ft)
* Diukur menggunakan spektrum getaran acak yang mensimulasikan lingkungan pengguna.
† Diukur menggunakan pulsa setengah sinus 2 ms ketika hard disk sedang digunakan.
Spesifikasi teknis 21

Perangkat LunakBab ini menjelaskan secara terperinci sistem operasi bersama dengan petunjuk cara menginstal drivers.
Topik:
• Mengunduh driver Windows
Mengunduh driver Windows
langkah
1. Nyalakan notebook.
2. Kunjungi Dell.com/support.
3. Klik Product support (Dukungan Produk), masukkan Tag Servis dari komputer notebook Anda, lalu klik Submit (Ajukan).
CATATAN: Jika Anda tidak memiliki Tag Servis, gunakan fitur deteksi otomatis atau ramban secara manual untuk melihat model
notebook Anda.
4. Klik Drivers and Downloads.
5. Pilih sistem operasi yang terpasang di notebook Anda.
6. Gulir halaman ke bawah dan pilih driver yang akan dipasang.
7. Klik Download File (Unduh File) untuk mengunduh driver untuk notebook Anda.
8. Setelah pengunduhan selesai, navigasikan ke folder tempat Anda menyimpan file driver tersebut.
9. Klik dua kali pada ikon file driver tersebut lalu ikuti petunjuk di layar.
6
22 Perangkat Lunak

System setup (Pengaturan sistem)PERHATIAN: Kecuali Anda pengguna komputer yang ahli, jangan ubah pengaturan pada program BIOS Setup. Perubahan
tertentu dapat membuat komputer Anda beroperasi secara tidak benar.
CATATAN: Bergantung pada komputer dan perangkat yang dipasang padanya, item yang tercantum pada bagian ini dapat
ditampilkan atau juga tidak.
CATATAN: Sebelum Anda mengubah program BIOS Setup, Anda dianjurkan untuk mencatat informasi layar program BIOS Setup
untuk acuan di lain waktu.
Gunakan program BIOS Setup untuk tujuan berikut:
● Mendapat informasi mengenai perangkat keras yang terpasang di komputer Anda, seperti jumlah RAM dan ukuran hard drive.● Mengubah informasi konfigurasi sistem.● Menetapkan atau mengubah opsi yang bisa dipilih oleh pengguna seperti kata sandi pengguna, tipe hard drive yang terpasang, dan
mengaktifkan atau menonaktifkan perangkat dasar.
Topik:
• Masuk ke program pengaturan BIOS• Tombol navigasi• Urutan Boot• Menu boot satu kali• System setup options• Menghapus kata sandi BIOS (Pengaturan Sistem) dan Sistem
Masuk ke program pengaturan BIOS
tentang tugas ini
Nyalakan (atau nyalakan ulang) komputer Anda dan segera tekan F2.
Tombol navigasiCATATAN: Untuk sebagian besar opsi Pengaturan Sistem, perubahan yang Anda buat disimpan tetapi tidak berlaku sampai Anda
memulai ulang sistem.
Tabel 28. Tombol navigasi
Tombol Navigasi
Panah atas Pindah ke kolom sebelumnya.
Panah bawah Pindah ke kolom berikutnya.
Enter Memilih nilai di kolom yang dipilih (jika berlaku) atau mengikutitautan di bidang tersebut.
Spacebar Perluas atau perkecil daftar turun ke bawah, jika ada.
Tab Pindah ke area fokus berikutnya.
CATATAN: Hanya untuk browser grafis standar.
Esc Pindah ke halaman sebelumnya sampai Anda melihat layar utama.Menekan Esc di layar utama menampilkan pesan yang meminta
7
System setup (Pengaturan sistem) 23

Tabel 28. Tombol navigasi (lanjutan)
Tombol Navigasi
Anda untuk menyimpan perubahan yang belum disimpan danmemulai ulang sistem.
Urutan BootUrutan Boot memungkinkan Anda untuk melewati urutan perangkat booting yang ditetapkan oleh Pengaturan Sistem dan melakukanbooting secara langsung ke perangkat tertentu (misalnya: drive optikal atau hard disk). Selama Power-on Self Test (POST), saat logo Dellmuncul, Anda dapat:
● Mengakses System Setup (Pengaturan Sistem) dengan menekan tombol F2● Memunculkan menu boot satu-kali dengan menekan tombol F12
Menu boot satu-kali menampilkan perangkat yang dapat Anda lakukan proses boot termasuk opsi diagnostik. Opsi menu boot adalah:
● Drive Yang Dapat Dilepas (jika ada)● Hard Disk STXXXX (jika ada)
CATATAN: XXX menunjukkan nomor drive SATA.
● Drive Optikal (jika ada)● Hard Disk SATA (jika ada)● Diagnostik
Layar boot sequence (urutan boot) juga menampilkan opsi untuk mengakses layar System Setup (Pengaturan Sistem).
Menu boot satu kaliUntuk masuk ke one time boot menu (menu boot satu kali), nyalakan komputer Anda, lalu segera tekan F2.
CATATAN: Disarankan untuk mematikan komputer jika komputer sedang menyala.
Menu boot satu-kali menampilkan perangkat yang dapat Anda lakukan proses boot termasuk opsi diagnostik. Opsi menu boot adalah:
● Drive Yang Dapat Dilepas (jika ada)● Hard Disk STXXXX (jika ada)
CATATAN: XXX menunjukkan nomor drive SATA.
● Drive Optikal (jika ada)● Hard Disk SATA (jika ada)● Diagnostik
Layar boot sequence (urutan boot) juga menampilkan opsi untuk mengakses layar System Setup (Pengaturan Sistem).
System setup options
NOTE: Depending on this computer and its installed devices, the items that are listed in this section may or may not be displayed.
Table 29. System setup options—System information menu
Overview
precision 5750
BIOS Version Displays the BIOS version number.
Service Tag Displays the Service Tag of the computer.
Asset Tag Displays the Asset Tag of the computer.
Manufacture Date Displays the manufacture date of the computer.
Ownership Date Displays the ownership date of the computer.
24 System setup (Pengaturan sistem)

Table 29. System setup options—System information menu (continued)
Overview
Express Service Code Displays the express service code of the computer.
Ownership Tag Displays the ownership tag of the computer.
Signed Firmware Update Displays whether the signed firmware update is enabled.
Default: Enabled
Battery Displays the battery health information.
Primary Displays the primary battery.
Battery Level Displays the battery level.
Battery State Displays the battery state.
Health Displays the battery health.
AC Adapter Displays whether an AC adapter is connected. If connected, the AC adapter type.
PROCESSOR
Processor Type Displays the processor type.
Maximum Clock Speed Displays the maximum processor clock speed.
Minimum Clock Speed Displays the minimum processor clock speed.
Current Clock Speed Displays the current processor clock speed.
Core Count Displays the number of cores on the processor.
Processor ID Displays the processor identification code.
Processor L2 Cache Displays the processor L2 Cache size.
Processor L3 Cache Displays the processor L3 Cache size.
Microcode Version Displays the microcode version.
Intel Hyper-Threading Capable Displays whether the processor is Hyper-Threading (HT) capable.
64-Bit Technology Displays whether 64-bit technology is used.
MEMORY
Memory Installed Displays the total computer memory installed.
Memory Available Displays the total computer memory available.
Memory Speed Displays the memory speed.
Memory Channel Mode Displays single or dual channel mode.
Memory Technology Displays the technology that is used for the memory.
DIMM SLOT 1 Displays the memory card installed in slot 1
DIMM SLOT 2 Displays the memory card installed in slot 2
DEVICES
Panel Type Displays the Panel Type of the computer.
Video Controller Displays the integrate graphics information of the computer.
Video Memory Displays the video memory information of the computer.
Wi-Fi Device Displays the Wi-Fi device installed in the computer.
Native Resolution Displays the native resolution of the computer.
Video BIOS Version Displays the video BIOS version of the computer.
Audio Controller Displays the audio controller information of the computer.
Bluetooth Device Displays whether a Bluetooth device is installed in the computer.
System setup (Pengaturan sistem) 25

Table 29. System setup options—System information menu (continued)
Overview
Pass Through MAC Address Displays the MAC address of the video pass-through.
Table 30. System setup options—Boot Configuration menu
Boot Configuration
Boot Sequence
Boot Mode: UEFI only Displays the boot mode of this computer.
Boot Sequence Displays the boot sequence.
Secure Digital (SD) Card Boot Enables or disables Secure Digital (SD) Card boot.
Secure Boot
Enable Secure Boot Enables or disables checking of boot software (including firmware drivers and theoperating system).
Secure Boot Mode Modifies the behavior of Secure Boot to allow evaluation or enforcement of UEFIdriver signatures.
By default, Deployed Mode is selected.
Expert Key Management
Enable Custom Mode Enables or disables custom mode to allow keys in the PK, KEK, db, and dbx securitykey databases to be modified.
Default: OFF
Table 31. System setup options—Integrated Devices menu
Integrated Devices
Date/Time
Date Sets the computer date in MM/DD/YYYY format. Changes to the date take effectimmediately.
Time Sets the computer time in HH/MM/SS 24-hour format. You can switch between 12-hour and 24-hour clock. Changes to the time take effect immediately.
Thunderbolt Adapter Configuration
Enable Thunderbolt Technology Support Enables or disables the Thunderbolt Technology feature and associated ports andadapters.
Default: ON
Enable Thunderbolt Boot Support Enables or disables Thunderbolt adapter features during pre-boot.
Default: OFF
Enable Thunderbolt (and PCIe behind TBT)pre-boot modules
Enables or disables the setting that allows PCIe devices that are connected via aThunderbolt adapter.
Default: OFF
Thunderbolt Security level Sets the Thunderbolt adapter security level within the operating system.
By default, User Authorization is selected.
Camera
Enable Camera Enables or disables the camera.
By default, Enable Camera is selected.
Audio
Enable Audio Enables or disables all integrated audio controller.
26 System setup (Pengaturan sistem)

Table 31. System setup options—Integrated Devices menu (continued)
Integrated Devices
Default: ON
Enable Microphone Enables or disables microphone.
By default, Enable Microphone is selected.
Enable Internal Speaker Enables or disables internal speaker.
By default, Enable Internal Speaker is selected.
USB Configuration Enables or disables booting from USB mass storage devices such as external harddrive, optical drive, and USB drive.
By default, Enable USB Boot Support is selected.
By default, Enable External USB Ports is selected.
Miscellaneous Devices
Enable Fingerprint Reader Device Enables or disables the Fingerprint Reader Device.
By default, Enable Fingerprint Reader Device is selected.
Enable Fingerprint Reader Single Sign On Enables or disables the Fingerprint Reader Single Sign On capability.
By default, Enable Fingerprint Reader Single Sign On is selected.
Table 32. System setup options—Storage menu
Storage
SATA Operation Configures operating mode of the integrated SATA hard drive controller.
Default: RAID On. SATA is configured to support RAID (Intel Rapid RestoreTechnology).
Storage Interface
Port Enablement Enables the selected onboard drives.
● SATA-4
Default: ON
● M.2 PCIe SSD-0
Default: ON
● M.2 PCIe SSD-1
Default: ON
Drive Information Displays the information of various onboard drives.
Enable SMART Reporting Enables or disables Self-Monitoring, Analysis, and Reporting Technology (SMART).
Default: OFF
Enable MediaCard Enables to switch all media cards On/Off or set the media card to read-only state.
By default, Enable Secure Digital (SD) Card is selected.
Table 33. System setup options—Display menu
Display
Display Brightness
Brightness on battery power Sets the screen brightness when the computer is running on battery power.
Default: 50
System setup (Pengaturan sistem) 27

Table 33. System setup options—Display menu (continued)
Display
Brightness on AC power Sets the screen brightness when the computer is running on AC power.
Default: 0
Touch Screen Enables or disables the touch screen for the OS.NOTE: The touch screen will always work in the BIOS setup irrespective of thissetting.
Full Screen Logo Enabled or disabled the computer to display full screen logo if the image matchscreen resolution.
Default: OFF
Direct Graphics Controller DirectOutput Mode
When enabled, all graphics output ports directly to the Graphics Processing Unit(GPU), bypassing Intel Integrated graphics outputs for HDMI, Thunderbolt, and mDPports.
Default: OFF
Table 34. System setup options—Connection menu
Connection
Wireless Device Enable Enable or disable internal WLAN/Bluetooth devices.
By default, WLAN is selected.
By default, Bluetooth is selected.
Enable UEFI Network Stack
Enable UEFI Network Stack When enabled, UEFI networking protocols are installed and available, allowing pre-OSand early OS networking features to use any enabled NICs. This may be used withoutPXE turned on.
Default: ON
Wireless Radio Control
Control WLAN radio Enables to sense the connection of the computer to a wired network andsubsequently disable the selected wireless radios (WLAN and/or WWAN). Upondisconnection from the wired network, the selected wireless radios are re-enabled.
Default: OFF
Table 35. System setup options—Power menu
Power
Battery Configuration Enables the computer to run on battery during power usage hours. Use the belowoptions to prevent AC power usage between certain times of each day.
By default Adaptive is selected.
Advanced Configuration
Enable Advanced Battery ChargeConfiguration
Enables Advanced Battery Charge Configuration from the beginning of the day to aspecified work period. Advanced Battery Charged maximizes battery health while stillsupporting heavy use during the work day.
Default: OFF
Peak Shift Enables the computer to run on battery during peak power usage hours.
Default: OFF
Thermal Management Sets cooling fan and processor heat management to adjust system performance,noise, and temperature.
By default, Optimized is selected.
28 System setup (Pengaturan sistem)

Table 35. System setup options—Power menu (continued)
Power
USB Wake Support
Wake on Dell USB-C Dock Enables connecting a Dell USB-C Dock to wake the computer from Standby.
Default: ON
Block Sleep Blocks the computer from entering Sleep (S3) mode in the operating system.
Default: OFF
NOTE: If enabled, the computer will not go to sleep, Intel Rapid Start will bedisabled automatically, and the operating system power option will be blank if itwas set to Sleep.
Lid Switch
Enable Lid Switch Enables or disables the lid switch.
Default: ON
Power On Lid Open Enables the computer to power up from the off state whenever the lid is opened.
Default: ON
Intel Speed Shift Technology Enables or disables the Intel Speed Shift Technology support. Setting this option toenable allows the operating system to select the appropriate processor performanceautomatically.
Default: ON
Table 36. System setup options—Security menu
Security
TPM 2.0 Security On Select whether or not the Trusted Platform Model (TPM) is visible to the OS.
Default: ON
PPI Bypass for Enable Commands Enables or disables the OS to skip BIOS Physical Presence Interface (PPI) userprompts when issuing TPM PPI enabled and activate commands.
Default: OFF
PPI Bypass for Disable Commands Enables or disables The OS to skip BIOS PPI user prompts when issuing TPM PPIDisable and Deactivate commands.
Default: OFF
PPI Bypass for Clear Commands Enables or disables the operating system to skip BIOS Physical Presence Interface(PPI) user prompts when issuing the Clear command.
Default: OFF
Attestation Enable Enables to control whether the TPM Endorsement Hierarchy is available to the OS.Disabling this setting restricts the ability to use the TPM for signature operations.
Default: ON
Key Storage Enable Enables to control whether the TPM Endorsement Hierarchy is available to the OS.Disabling this setting restricts the ability to use the TPM for storing owner data.
Default: ON
SHA-256 Enables or disables the BIOS and the TPM to use the SHA-256 hash algorithm toextend measurements into the TPM PCRs during BIOS boot.
Default: ON
Clear Enables or disables the computer to clear the PTT owner information, and returnsthe PTT to the default state.
System setup (Pengaturan sistem) 29

Table 36. System setup options—Security menu (continued)
Security
Default: OFF
TPM State Enables or disables the TPM. This is the normal operating state for the TPM whenyou want to use its complete array of capabilities.
Default: Enabled
Intel Software Guard Extensions
Intel SGX Enables or disables the Intel Software Guard Extensions (SGX) to provide a securedenvironment for running code/storing sensitive information.
By default, Software Control is selected.
SMM Security Mitigation
SMM Security Mitigation Enables or disables additional UEFI SMM Security Mitigation protections.
Default: OFF
NOTE: This feature may cause compatibility issues or loss of functionality withsome legacy tools and applications.
Data Wipe on Next Boot
Start Data Wipe When enabled, the BIOS will queue up a data wipe cycle for storage device(s)connected to the motherboard on the next reboot.
Default: OFF
Absolute
Absolute Enables, disables or permanently disable the BIOS module interface of the optionalAbsolute Persistence Module service from Absolute Software.
By default, Enable Absolute is selected.
UEFI Boot Path Security
UEFI Boot Path Security Controls whether the system will prompt the user to enter the admin password (ifset) when booting to a UEFI boot path device from the F12 boot menu.
By default, Always Except Internal HDD is selected.
Table 37. System setup options—Passwords menu
Passwords
Admin Password Sets, changes, or deletes the administrator password (sometimes called the "setuppassword"). The administrator password enables several security features.
Password Configuration
Upper Case Letter When enabled, password must contain at least one upper case letter.
Default: OFF
Upper Case Letter When enabled, password must contain at least one lower case letter.
Default: OFF
Digit When enabled, password must contain at least one digit number.
Default: OFF
Special Character When enabled, password must contain at least one special character.
Default: OFF
Minimum Characters Sets the minimum number of characters allowed for passwords.
Default: 04
30 System setup (Pengaturan sistem)

Table 37. System setup options—Passwords menu (continued)
Passwords
Password Bypass
Password Bypass When enabled, the system and the hard drive passwords are prompted when thecomputer is powered on from the Off state.
By default, Disabled is selected.
Password Changes
Enable Non-Admin Password Changes When On, users can change the system and the hard drive password without theneed for administrator password.
Default: ON
Admin Setup Lockout
Enable Admin Setup Lockout Enables or disables the user from entering BIOS Setup when an administratorpassword is set.
Default: OFF
Master Password Lockout
Enable Master Password Lockout Enables or disables the master password support.
Default: OFF
Table 38. System setup options—Update Recovery menu
Update Recovery
UEFI Capsule Firmware Updates
Enable UEFI Capsule Firmware Updates Controls whether this computer allows BIOS updates via EUFI capsule updatepackages.
Default: ON
BIOS Recovery from Hard Drive
BIOS Recovery from Hard Drive Enables the computer to recover from a bad BIOS image, as long as the Boot Blockportion is intact and functioning.
Default: ON
NOTE: BIOS recovery is designed to fix the main BIOS block and cannot work ifthe Boot Block is damaged. In addition, this feature cannot work in the event ofEC corruption, ME corruption, or a hardware issue. The recovery image mustexist on an unencrypted partition on the drive.
BIOS Downgrade
Allow BIOS Downgrade Controls flashing of the system firmware to previous revisions.
Default: ON
SupportAssist OS Recovery
SupportAssist OS Recovery Enables or disables the boot flow for SupportAssist OS Recovery tool in the event ofcertain system errors.
Default: ON
BIOSConnect
BIOSConnect Enables or disables cloud Service OS recover if the main operating system fails toboot with the number of failures equal to or greater than the value specified by theAuto OS Recovery Threshold setup option.
Default: ON
System setup (Pengaturan sistem) 31

Table 38. System setup options—Update Recovery menu (continued)
Update Recovery
Dell Auto OS Recovery Threshold Controls the automatic boot flow for SupportAssist System Resolution Console andfor Dell operating system Recovery tool.
By default, 2 is selected.
Table 39. System setup options—System Management menu
System Management
Service Tag Displays the Service Tag of the computer.
Asset Tag Creates a system Asset Tag that can be used by an IT administrator to uniquelyidentify a particular system. Once set in BIOS, the Asset Tag cannot be changed.
AC Behavior
Wake on AC Enables the computer to turn on and go to boot when AC power is supplied to thecomputer.
Default: OFF
Wake on LAN/WLAN
Wake on LAN/WLAN Enables or disables the computer to turn on by a special LAN/WLAN signal.
By default, Disabled is selected.
Table 40. System setup options—Keyboard menu
Keyboard
Numlock Enable
Enable Numlock Enables or disables Numlock when the computer boots.
Default: ON
Fn Lock Options
Fn Lock Options Enables or disables the Fn lock option.
Default: ON
Lock Mode Default: Lock Mode Secondary. Lock Mode Secondary = If this option is selected, theF1-F12 keys scan the code for their secondary functions.
Keyboard Illumination
Keyboard Illumination Configures the operating mode of the keyboard illumination feature.
By default, Bright is selected.
Keyboard Backlight Timeout on AC
Keyboard Backlight Timeout on AC Configures the timeout value for the keyboard when an AC adapter is connected tothe computer. The keyboard backlight timeout value is only effect when the backlightis enabled.
By default, 1 minute is selected.
Keyboard Backlight Timeout on Battery
Keyboard Backlight Timeout on Battery Configures the timeout value for the keyboard when the computer is running onbattery. The keyboard backlight timeout value is only effect when the backlight isenabled.
By default, 1 minute is selected.
OROM Keyboard Access Enables or disables the option to enter Option ROM configuration screens via hotkeysduring boot.
32 System setup (Pengaturan sistem)
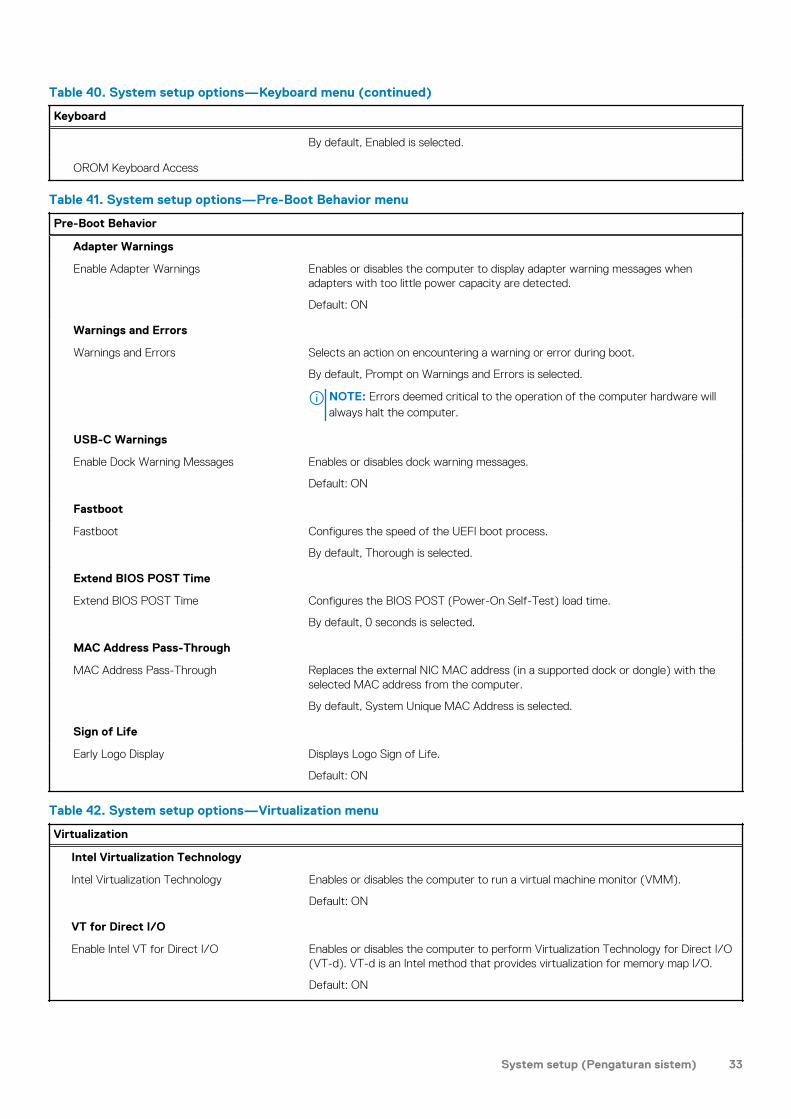
Table 40. System setup options—Keyboard menu (continued)
Keyboard
By default, Enabled is selected.
OROM Keyboard Access
Table 41. System setup options—Pre-Boot Behavior menu
Pre-Boot Behavior
Adapter Warnings
Enable Adapter Warnings Enables or disables the computer to display adapter warning messages whenadapters with too little power capacity are detected.
Default: ON
Warnings and Errors
Warnings and Errors Selects an action on encountering a warning or error during boot.
By default, Prompt on Warnings and Errors is selected.
NOTE: Errors deemed critical to the operation of the computer hardware willalways halt the computer.
USB-C Warnings
Enable Dock Warning Messages Enables or disables dock warning messages.
Default: ON
Fastboot
Fastboot Configures the speed of the UEFI boot process.
By default, Thorough is selected.
Extend BIOS POST Time
Extend BIOS POST Time Configures the BIOS POST (Power-On Self-Test) load time.
By default, 0 seconds is selected.
MAC Address Pass-Through
MAC Address Pass-Through Replaces the external NIC MAC address (in a supported dock or dongle) with theselected MAC address from the computer.
By default, System Unique MAC Address is selected.
Sign of Life
Early Logo Display Displays Logo Sign of Life.
Default: ON
Table 42. System setup options—Virtualization menu
Virtualization
Intel Virtualization Technology
Intel Virtualization Technology Enables or disables the computer to run a virtual machine monitor (VMM).
Default: ON
VT for Direct I/O
Enable Intel VT for Direct I/O Enables or disables the computer to perform Virtualization Technology for Direct I/O(VT-d). VT-d is an Intel method that provides virtualization for memory map I/O.
Default: ON
System setup (Pengaturan sistem) 33

Table 43. System setup options—Performance menu
Performance
Multi-Core Support
Active Cores Changes the number of CPU cores available to the operating system. The defaultvalue is set to the maximum number of cores.
By default, All Cores is selected.
Intel SpeedStep
Enable Intel SpeedStep Technology Enables or disables the Intel SpeedStep Technology to dynamically adjust processorvoltage and core frequency, decreasing average power consumption and heatproduction.
Default: ON
C-States Control
Enable C-State Control Enables or disables the CPU's ability to enter and exit low-power states.
Default: ON
Enable Adaptive C-States for DiscreteGraphics
Allows the computer to dynamically detect high usage of a discrete graphics andadjust the computer parameters for higher performance during that time period.
Default: ON
Intel Turbo Boost Technology
Enable Intel Turbo Boost Technology Enabled or disabled the Intel TurboBoost mode of the processor. If enabled, the IntelTurboBoost driver increases the performance of the CPU or graphics processor.
Default: ON
Intel Hyper-Threading Technology
Enable Intel Hyper-Threading Technology Enabled or disabled the Intel Hyper-Threading mode of the processor. If enabled, theIntel Hyper-Threading increases the efficiency of the processor resources whenmultiple threads run on each core.
Default: ON
Dynamic Tuning:Machine Learning
Enable Dynamic Tuning:Machine Learning Enables or disables OS capability to enhance dynamic power tuning capabilities basedon detected workloads.
Default: OFF
Table 44. System setup options—System Logs menu
System Logs
BIOS Event Log
Clear Bios Event Log Select keep or clear BIOS events.
By default, Keep is selected.
Thermal Event Log
Clear Thermal Event Log Select keep or clear Thermal events.
By default, Keep is selected.
Power Event Log
Clear POWER Event Log Select keep or clear Power events.
By default, Keep is selected.
34 System setup (Pengaturan sistem)

Menghapus kata sandi BIOS (Pengaturan Sistem) danSistem
tentang tugas ini
Untuk menghapus kata sandi sistem atau BIOS, hubungi dukungan teknis Dell seperti yang dijelaskan di www.dell.com/contactdell.CATATAN: Untuk informasi tentang cara mengatur ulang kata sandi Windows atau aplikasi, lihat dokumentasi yang disertakan
bersama Windows atau aplikasi Anda.
System setup (Pengaturan sistem) 35
Mendapatkan bantuan
Topik:
• Menghubungi Dell
Menghubungi Dell
prasyarat
CATATAN: Jika Anda tidak memiliki sambungan Internet aktif, Anda dapat menemukan informasi kontak pada faktur pembelian, slip
kemasan, tagihan, atau katalog produk Dell.
tentang tugas ini
Dell menyediakan beberapa dukungan berbasis online dan telepon serta opsi servis. Ketersediaan bervariasi menurut negara dan produk,dan sebagian layanan mungkin tidak tersedia di daerah Anda. Untuk menghubungi Dell atas masalah penjualan, dukungan teknis, ataulayanan pelanggan:
langkah
1. Buka Dell.com/support.
2. Pilih kategori dukungan Anda.
3. Verifikasikan negara atau kawasan Anda di daftar tarik turun Choose A Country/Region (Pilih Negara/Kawasan) pada bagianbawah halaman.
4. Pilih tautan layanan atau tautan yang terkait berdasarkan kebutuhan Anda.
8
36 Mendapatkan bantuan