Planting Your School Garden
14
Planting Your School Garden A fter planning and preparation, the excitement builds to the day when everyone can really “dig in” and get their hands dirty. Watching the gar- den design magically come to life sparks curiosity and amazement in both youth and adult participants. Although planting involves a lot of hard work, gardeners are usually too captivated by the activity to notice. This chapter offers some planting basics and tips for garden installation. It is important to remember that your focus is on creating an educational tool, and planting is just part of the learning process. Planting Day should be the beginning of a wonderful exploration. Base planting decisions on researched methods, but leave room for students to experiment. Some of your team’s design ideas may thrive and others may fail; just keep trying until you are successful. If you approach the garden with a positive and adventurous attitude, the students, par- ents, and other garden team members will follow. 55 Gardens for Learning: Planting Your School Garden “ ” When I get into the garden, I feel like I am in another world. I feel special because [the garden] has a part of me. I planted something. Student Dr. Martin Luther King, Jr. Academy Salinas, CA Western Growers Charitable Foundation Debbie Delatour
-
Upload
khangminh22 -
Category
Documents
-
view
1 -
download
0
Transcript of Planting Your School Garden
Planting YourSchool Garden
After planning and preparation, the excitement builds to the day wheneveryone can really “dig in” and get their hands dirty. Watching the gar-den design magically come to life sparks curiosity and amazement in bothyouth and adult participants. Although planting involves a lot of hardwork, gardeners are usually too captivated by the activity to notice.
This chapter offers some planting basics and tips for garden installation. It isimportant to remember that your focus is on creating an educational tool, andplanting is just part of the learning process. Planting Day should be the beginningof a wonderful exploration. Base planting decisions on researched methods, butleave room for students to experiment. Some of your team’s design ideas maythrive and others may fail; just keep trying until you are successful. If youapproach the garden with a positive and adventurous attitude, the students, par-ents, and other garden team members will follow.
5 5Ga r d e n s f o r L e a r n i n g : P l a n t i n g Y o u r S c h o o l G a r d e n
“ ”When I get into the garden, I
feel like I am in another world. I feel special because [the garden] has a part of me.
I planted something.
Student
Dr. Martin Luther King, Jr. Academy
Salinas, CA
Wes
tern
Gro
wer
s C
harit
able
Fou
ndat
ion
Deb
bie
Del
atou
r

Preparing the Soil and BedsYour team’s first step will be to prepare the soil and beds. This
procedure will vary greatly in time and intensity depending on the sizeof the project and the location and type of the garden.
Indoor GardenIf your class is creating a windowsill garden, the main preparation
for installation will be to find a way to protect the windowsill or tablefrom water damage. Place pots in individual plant saucers or in a largeplastic tray to catch drainage.
If installing grow lights, follow the directions included with thematerials or research an approved design. Be sure to follow all safetyprecautions and, if possible, ask your school district’s electrician toreview construction.
For indoor gardens, your team will need to obtain a supply of con-tainers and soil. A wide range of pots can be used. Just make sure theyhave drainage holes at the bottom to avoid waterlogged plant roots.Plastic pots are the most common containers because they generally areinexpensive, can be reused, and are lightweight. You could also use claypots, fiber pots, school milk cartons, growers’ flats or market packs, eggcartons, plastic planting bags, and plastic soda bottle bottoms. Studentsmay be able to bring many of these items from home.
The growing medium in which you raise your plants is important. It anchors theroots so the plants don’t fall over and serves as a reservoir for the water, air, andnutrients taken up by the roots. The best medium to use is soilless potting mix, madefrom peat moss (or coco peat), vermiculite, and/or perlite (it does not contain anytrue soil). Soilless potting mix is light enough to allow for good water drainage, rootaeration, and root movement, yet heavy and spongy enough to provide anchorageand to hold on to adequate water and nutrients. Additionally, it is easy to transportand readily available in most garden stores. Another good feature of such pottingmixes is that most are sterilized so that they do not contain weed seeds, insects, ordiseases that could flourish in the favorable conditions of an indoor garden. Andsoilless mix doesn’t produce mud, so if it gets on clothing, it brushes off easily.
Outdoor GardenContainer Gardens. For smaller planting projects, preparing container gar-
dens is much easier than in-ground or raised beds. First, obtain appropriate con-tainers. Your class can use just about any container that will hold soil and hasholes for drainage. Examples of common containers: clay and plastic pots, wood-en barrels, window box planters, and plastic or metal buckets. Your team can alsobe creative and use items like bathtubs, wheelbarrows, shoes, and hollowed-outpumpkins or gourds. Smaller containers will need more frequent watering andfertilization than larger containers. Just make sure, if you are planting fruits andvegetables, that the containers were never used to hold toxic materials.
56 Ga r d e n s f o r L e a r n i n g : P l a n t i n g Y o u r S c h o o l G a r d e n
California Department of Education
Jonn
alee
Hen
ders
on

Fill your chosen containers with a good potting soil mix. Although you canuse garden soil, it tends to compact in containers, making it heavy and poorlydrained, so it is best to use potting soil designed for containers. Potting soil canbe obtained from garden centers.
Most common garden plants will need 8 to 12 inches of soil at the most, so ifthe chosen containers are deeper than that you may want to add a layer of rocks(will add weight) or Styrofoam peanuts (make sure they are made from plastic,not biodegradable materials) at the bottom. This layer can help with drainage inaddition to decreasing the amount of soil needed.
Raised Beds. As mentioned in Chapter 5, Designing Your School Garden,there are two different ways to make raised beds. The simplest way to create araised bed is to measure and stake each planting area (use a string from stake to stake to better delineate the garden bed), then loosen the existing soil with aspading fork and add soil, compost, or both until the bed is 8 to 12 inches high.The soil can be brought in from another location or taken from surroundingareas. Rake the surface smooth to create a flat-topped bed, which increases waterretention and decreases soil erosion.
To create permanent, well-defined raised beds, create frames using rot-resist-ant wood, such as cedar or redwood, or other materials, such as recycled plasticboards, bricks, rocks, or cement blocks. Wheninstalling framed raised beds, consider installing land-scaping fabric to suppress weeds from growing up inyour bed and/or gopher wire as a barrier. Avoidpressure-treated lumber; it has been treated withtoxic chemicals. Fill beds with soil or a mixture ofsoil and compost.
Raised beds have numerous benefits. They lookneat, support healthy plant growth, and help keepyoung students on paths. The loose soil encouragesroots to grow strong and deep, and moisture soaks ineasily. In areas with cool, wet spring weather, soil inraised beds drains and warms more quickly, allowinggardens to be started earlier. Conversely, in arid areas,raised beds soak up available moisture well, but theyalso dry out more quickly. Beds that are constructedslightly below the soil surface conserve moisture moreeffectively than do raised beds.
In-Ground Beds. If your team is installing an in-ground garden, begin by tilling the ground to loosen thesoil and help in removal of weeds. Tilling is a process ofturning the soil to improve its structure. It is also calledcultivation. You can till the soil by hand using shovels or digging forks, or mechanical-ly using a tiller.
Soil is composed of sand, silt, and clay particles and has pore space reservedfor water and air. An ideal garden soil is made up of 50 percent soil particles and50 percent pore space (half filled with water and half filled with air). How the soil
57Ga r d e n s f o r L e a r n i n g : P l a n t i n g Y o u r S c h o o l G a r d e n
“ ”Give back to the garden
more than you take and you will be rewarded
with glorious abundance.
Alan Chadwick
University of California Department of Agriculture and Natural Resources

particles and pore space are configured is called the soil structure.Over time, as we walk on the soil, and through other environ-mental forces, the soil becomes compacted and the structureloses important pore space. By tilling the soil, we decrease compaction and increase the pore space. This improves the soil structure and makes it easier for you to plant and forplants to establish their roots.
Avoid tilling excessively wet or dry soil. If the soil is too dryor too wet, tilling can actually damage the soil structure ratherthan improve it. To test soil moisture, scoop up a handful of soiland try to create a ball. With perfect moisture, the soil will forma stable ball but will crumble easily when touched. If it is toodry, it will not stick together. If it is so tightly stuck together thatit will not come apart when touched, it is probably too wet.Tilling dry soil is backbreaking work that results in a dusty messand drifting soil particles. If the soil is dry, water the gardenthoroughly one to three days before tilling. Wet soil, on theother hand, will stick to shoes and tools. Tilling in this conditionwill destroy air pore space; the weight of the wet particles willcause them to collapse into each other when turned. If the soilis too wet, give it time to dry out before tilling. If your area isexperiencing heavy rainfalls, your class may need to cover thesoil with plastic to decrease water exposure.
If the garden is fairly small, the soil can be tilled by handwith a shovel. This is a great activity for students with excessiveenergy. Try to turn the soil to a depth of 1 to 2 feet if possible.One method used to ensure a thorough tilling of soil by hand iscalled double digging. To do double digging, begin by having stu-dents dig out a row of soil in the garden approximately 1 footwide and 1 to 2 feet deep and place the soil in a wheelbarrow.Next, dig out another row of soil 1 foot wide and 1 to 2 feetdeep, and move this soil into the first empty row. Have studentscontinue to move across the bed until they reach the end andthen dump the wheelbarrow full of soil from the very first rowinto the last empty row. Although double digging is a lot ofwork initially, it ensures a thorough job of turning the soil and a bed that is easy to work in.
Your class can also till the soil mechanically using a tiller. Tillers are like smallplows that work to loosen and turn the soil with blades powered by gas or elec-tric engines. They come in a wide range of sizes and can often be rented fromlocal landscape centers. If your site is larger than an acre, consider using a farm-sized tractor with plowing attachments to break up the soil.
The difference between using a shovel and using a tiller is like the differencebetween using a spoon and using an electric mixer when you’re mixing cake bat-ter. Both will get the job done, but they vary in the time and energy needed forcompletion.
58 Ga r d e n s f o r L e a r n i n g : P l a n t i n g Y o u r S c h o o l G a r d e n
STEPS FOR DOUBLE DIGGING
Cathy Reinhart/UCSC CASFS

If you are concerned about the composition or nutrient content of the soil,add a layer of compost when tilling. Compost is made up of decaying organicmatter. The organic matter increases the moisture retention of the soil, and as itbreaks down, it releases important nutrients. Also, as it decomposes, it providesadditional pore space, improving the soil structure. First, till the garden once tobreak up the compacted soil. Next, add a 2- to 4-inch layer of compost to thesurface and then till the garden again to incorporate it into the soil.
Tilling should be done several weeks before the planting season and againright before Planting Day if possible. Add any soil amendments such as compostor topsoil during your first till. Remove weed and grass plants during tilling.Grass and weeds will compete with garden plants for water, nutrients, and space.After tilling, rake the garden soil smooth, being careful to avoid walking throughthe beds so as not to compact the soil.
Although the landscape plan provides a general idea of the shape of the bedsbefore tilling, after preparing the soil, you should stake out the beds. If planningstraight rows, position stakes in the corners of the future beds and connect themwith a length of string. For beds with a curved outline, lay a garden hose orlength of rope on the ground as a guide. Remember to keep beds narrow enoughso that kids can reach the middle of the bed without stepping in it.
After outlining the beds, install the irrigation system, if any. The next step willbe to add the plants.
Obtaining PlantsPlants may be started from seed, grown from cuttings, or purchased as
mature plants. Most classrooms begin their gardens by planting seeds becausethey are relatively inexpensive and their growth helps students to visualize thefull life cycle of a plant.
Sowing SeedsSeeds may be planted outdoors directly
into the garden or started inside on a win-dowsill and later transplanted to an outdoorgarden (or remain as indoor plants). At theend of this chapter are fall and spring plant-ing guides with information about commonvegetables, fruits, herbs, and flowers plantedfrom seed in school gardens.
Planting Seeds OutdoorsIn moist, but not wet, soil, have students
make holes or shallow trenches, place seedsin these holes, and then cover them with soil.In most cases, they will find proper seed
59Ga r d e n s f o r L e a r n i n g : P l a n t i n g Y o u r S c h o o l G a r d e n
Alic
ia D
icke
rson
/Life
Lab
Deb
bie
Del
atou
r

spacing and depth information on the back of the seed packets. If thisinformation is not available on the packet, check planting guides formore details. It is important to avoid planting seeds too close togeth-er. Crowded seeds compete for resources as they grow. Place a labelwith the date and crop or variety name where it can easily be seen.
After planting, ask responsible students or adult volunteers towater the seeds with a gentle spray. If the water spray is too forceful,the seeds will move from their original planting spot, and seedlingswill emerge in clumps. Make sure the initial watering is thoroughenough to moisten the soil to the depth of the planted seed. Theymay have to provide a succession of gentle sprays to moisten thesoil appropriately, allowing the water to soak into the soil beforeapplying another gentle spray. Flooding newly planted areas cancause the soil to slick or form a “crust” that will inhibit germination.Overwatering causes a shiny soil surface; this is a sign to stop andlet the water soak in before applying more. After planting, it isimportant to keep the soil constantly moist so the seeds will germi-nate. However, too much water will encourage disease and decreasegermination rates.
Planting Seeds Inside to Transplant OutdoorsStarting seeds indoors extends the growing season, allows greater variety in
plant choice, simplifies care of newly germinated seeds, and produces a lot ofplants for less money. In most growing regions in California, it is a good idea tostart vegetable seeds indoors to get a jump on spring planting so your class willhave more mature plants to harvest by the end of the school year. Some vegeta-bles, such as beans, carrots, and squash, prefer to be sown directly in the garden.Others, such as basil and lettuce, can be started indoors or direct seeded. Refer tothe planting guides at the back of this chapter or read the information on seedpackets for more information on growing time.
When to Plant. The best time to start seedlings depends on the crop and theclimate. Generally, seeds should be started three to eight weeks before the typicallast frost date for your area, or so that plants mature before excessive heat arrives.
Containers. Any container at least 3 inches deep will work for seed starting.Students can collect plastic yogurt containers, milk cartons, and plastic milk jugsand poke holes in the bottom for drainage. Commercial peat and plastic contain-ers come in standard sizes, and some are reusable.
Potting Mix. Use a soilless seed-starting mix, available at any garden cen-ter. These contain a blend of finely ground materials that provide adequate mois-ture retention and aeration. Many also include a small amount of fertilizer to helpseedlings get off to a good start.
Temperature and Light. Indoors, most seeds germinate best at soil tem-peratures between 70 and 75 degrees and air temperatures between 65 and 70degrees. Once they’re up, seedlings need lots of light, or they’ll grow tall and weak.Relying on sunlight may limit seed options; grow lights and fluorescent lights pro-vide more control over light availability. If you use grow lights, keep the tops of
60 Ga r d e n s f o r L e a r n i n g : P l a n t i n g Y o u r S c h o o l G a r d e n
“ ”The nation that destroys its soils
destroys itself.
Franklin Delano Roosevelt
Alicia Dickerson/Life Lab

6 1Ga r d e n s f o r L e a r n i n g : P l a n t i n g Y o u r S c h o o l G a r d e n
growing space. They added gypsum
throughout the garden to begin the long-
term process of softening the soil. Debbie
also coordinated a number of parent work-
shops during which parents used pickaxes
and shovels to remove heavy soil from the
perimeter area and inner fence line; it was
replaced with a compost/topsoil mix. These
areas were used to plant borders of annuals
and perennials, climbing peas, sunflowers,
tomatoes, and a strawberry patch.
The soil was not the only challenge. An
adjoining grassy area sloped into the gar-
den, creating serious flooding and
drainage problems. After some trial and
error, the group found the best solution
was to plant on mounded soil and bring in
loads of wood chips for mulch and walk-
ways.
Debbie says that during the first year, “I
think wood chips solved almost all of our
problems! The fourth graders really enjoyed
moving wheelbarrows full of wood chips
and soil. They worked
together very well with a pur-
pose and great enthusiasm,
and they felt like they had
accomplished something.
Wood chip moving brought
out the best in them.”
All of the sweat and time
spent on bed preparation has
paid off. “Now that we are in
the third year of our garden,
we rarely feel challenged by
our soil,” Debbie adds. “The
layers of wood chips have
decomposed over the years
and seem to have lots of
worms. When we need to reclaim more land
for planting, we move aside the wood chips
and add compost to what is now more
workable soil.” Watching and participating
in the soil transformation process provided
valuable lessons on decomposition and
increased students’ understanding of the
importance of good soil in agriculture, fitting
into the program’s focus on science and
nutrition. In addition to academic and horti-
cultural success, Debbie explains, “the most
touching element of this project is the chil-
dren’s love for the garden and their ongoing
enthusiasm for taking care of it. During their
lunch recess they literally arrive in droves (at
times I have counted 60 kids) to water, culti-
vate, weed, and move wood chips and com-
post. The garden is an oasis for them in the
midst of a gang-torn neighborhood, where
they can experience the beauty and bounty
of nature and the joy of working together to
make a difference.”
PROGRAM SPOTLIGHTTransforming Schoolyard SoilDr. Martin Luther King, Jr. Academy, Salinas, CA
In 2003, when Alisal
Union School District’s 5
a Day nutrition educa-
tion program initiated a
school garden laboratory at
the Dr. Martin Luther King,
Jr. Academy (MLK), it faced
numerous planting chal-
lenges. The quarter-acre
location had previously
been the site of a drive-in
theater and flea market,
and it had severely com-
pacted and heavy clay soil.
The group’s original plan
was to bring in a small trac-
tor to till the soil during a ground-breaking
ceremony, but after evaluation, they found
the soil was too dry and hard for cultivat-
ing. So in order to begin gardening, they
constructed 18 hexagonal raised beds,
each 2 feet deep and 6 feet in diameter.
Although a hexagonal bed is somewhat
complicated to build, the design allows
students to work together in a more circu-
lar fashion, facilitating interaction and
cooperative work. Garden Coordinator
Debbie Delatour notes that the beds
“have been extremely successful at our
site.” They are divided into six triangular
sections, and students work in pairs to
design and install their own “plant part”
garden. Students must plant crops with
edible roots, leaves, stems, and flowers.
Peas are planted in the center to represent
fruit/seed crops.
While gardening in the raised beds, stu-
dents worked on improving the rest of the
soil to increase the amount of available
“ ”
Deb
bie
Del
atou
r
The garden is an oasis ... in the midstof a gang-torn neighborhood, where
[these kids] can experience the beautyand bounty of nature and the joy of
working together to make a difference.

the seedlings within a few inches of the bulbs and leave the lights on for 12 to 16hours a day. Check seedlings daily and raise the lights as they grow taller.
Water and Fertilizer. Until seeds germinate, keep the soil moist by spray-ing it with a pump sprayer or mister. Cover the pots with clear plastic to preservemoisture. Once the first seedlings germinate, remove the plastic and place thecontainer under lights. Consistent moisture is very important, but be careful thatsoil doesn’t get too wet, because excess moisture can cause rot.
Begin fertilizing the seedlings when they have their second set of true leaves.(The first leaves that emerge upon germination are seed leaves, also called cotyle-dons; they do not have veins as the true leaves do.) Use a mild fertilizer dilutedfor seedlings as directed on the product label. Some seed-starting mixes containfertilizer, but your seedlings may use it up before the class is ready to transplantthem. Always follow the warnings on fertilizer products and store them in asecure location.
Transplanting. A week before transplanting seedlings intothe garden, begin to acclimate them to the outdoors (a processknown as hardening off). Have students place containers outsideeach day that week, gradually increasing the number of hoursthey spend outside. Start by placing them in a partly shady spotsheltered from the wind; each day, expose them to more sun andwind. By the end of the hardening-off period, they should be ableto withstand full sun and stay outdoors overnight.
When it’s time to transplant, water the seedlings well before-hand. Have students dig a hole for each transplant, spaced asnoted on the seed packet. As they plant, your class may want toincorporate compost or fertilizer beside the plant to add to soilfertility (if using liquid fertilizer, read the label carefully; seedlingsrequire a weaker solution than established plants). Instruct stu-dents to firm the soil around the root ball, water it well, andmark the bed. To reduce transplant shock, avoid transplanting in midday heat.
Planting Seeds Inside for Indoor GardensUse the directions above to start seeds for indoor gardens. However, instead
of transplanting them outside, replant them in larger pots as they grow. Manyplants can be grown from seed in indoor gardens. Low-light plants for win-dowsill gardens include vegetable plants with leaf or root crops, such as beets,carrots, collards, lettuce, mustard greens, parsley, radishes, Swiss chard, andturnips. With grow lights, your class can also raise beans, cucumbers, eggplants,peanuts, peas, peppers, and tomatoes. Some flowering plants you might want totry indoors: ageratums, alyssum, coleus, impatiens, marigolds, morning glories,nasturtiums, petunias, snapdragons, and zinnias. Many herbs can also be startedfrom seed indoors. These include basil, catnip, coriander, chives, dill, marjoram,spearmint, oregano, sage, summer savory, and thyme. Indoor plants are usuallysmaller than outdoor plants and have lower production rates; however, they stillprovide excellent learning opportunities for your students.
62 Ga r d e n s f o r L e a r n i n g : P l a n t i n g Y o u r S c h o o l G a r d e n
Jim Morris/California Farm Bureau Federation

Garden InstallationAlthough you can add plants to your garden at any time, many schools dedi-
cate one day to a majority of the installation. This allows students to come pre-pared and helps in coordinating volunteer recruitment efforts. Careful planning isneeded to ensure a successful Planting Day.Prior to Planting Day:
• Ask your students to research the growing needs of the plants you areplanning to include in the garden. This will increase their involvement andunderstanding of the planting process.
• Recruit members of the garden team and additional adult volunteers to helpon Planting Day. It is important to have extra hands and eyes to keep upwith all the activities. Talk to the volunteers about how important it is foreach child to be an active participant in the project.
• Publicize Planting Day to keep the community informed of your project.Newspapers love to run community-interest stories, and installing the gar-den provides wonderful photo opportunities.
• Make a list of all the tasks to be completed on Planting Day and be preparedto divide them among multiple small groups of volunteers and students.
• Take a “before” picture of the site for class archives.On Planting Day:
• Encourage students to apply sunscreen and wear hats. Require everyone towear closed-toe shoes.
• Begin your day with safety instructions and ground rules. Teach studentshow to use the tools, how to hold tools with sharp edges pointed down,and that they must walk, not run, when carrying them. Remind students tokeep tools below the waist when working in the garden and to leave rakes,hoes, and shovels pointed down and out of pathways when not in use.Provide the right size of tools and gloves for your students.
63Ga r d e n s f o r L e a r n i n g : P l a n t i n g Y o u r S c h o o l G a r d e n
“ ”The soil is the great connector
of our lives, the source and destination of all.
Wendell Berry
The Unsettling of America, 1977
Jim Morris/California Farm Bureau Federation

• Go over the design of the garden with thestudents and volunteers to make sure every-one knows how the garden is supposed tobe installed. Lay out the beds as a group toavoid confusion, and have hard copies ofthe design available. If the area is large, layout the beds prior to Planting Day to savetime (make sure to involve students; this is agreat math activity).
• Demonstrate proper planting and wateringtechniques and describe all the plants to beinstalled in the garden. If you do not feelcomfortable with the demonstrations, recruitan experienced gardener or a member of thegarden team to serve as a guest speaker.
• Divide the students into groups and have anadult volunteer available to work with eachsmall group. Make sure the volunteersunderstand what their group should workon. Installation should be a hands-on expe-rience for all students; working in smallgroups ensures that everyone will have achance to participate.
• Keep a first-aid kit in the garden and provide plenty of drinking water toprevent students from getting dehydrated.
• Take lots of pictures to chronicle your work.• Remember to HAVE FUN!
After Planting Day:• Water plants with a gentle spray and check to see that the plants’ root
zones are moist.• Make sure to clean all tools and store them in a safe location.• Thank all students and volunteers for their hard work.• Take “after” pictures of the newly planted garden.• Share details from Planting Day with school administrators, sponsors, and
the community through letters, the school Web site, and newsletter andnewspaper articles. Thank them for their support. This follow-up will allowsupporters to see the result of their contributions.
• Incorporate the garden into the curriculum and continue with basic mainte-nance activities.
64 Ga r d e n s f o r L e a r n i n g : P l a n t i n g Y o u r S c h o o l G a r d e n
“ ”The earth laughs in flowers.
Ralph Waldo Emerson
John Fisher/Life Lab

Key to Planting Guide HeadingsCrop. This guide provides detailed information about crops
commonly planted by seed in school gardens. We encourage you toexperiment with additional plants that grow well in your area. Checkwith local gardeners, your Cooperative Extension Service office, andgarden center employees for suggestions.
Plant Seeds Indoors. Many seeds can be started indoors andthen transplanted to outdoor gardens. This column provides youwith the weeks to plant your seeds indoors relative to your first orlast frost date. Your Cooperative Extension Service office can tell youthe frost dates in your area.
Plant Seeds or Transplants Outdoors. Some seeds can beplanted indoors or outdoors. Other seeds will not transplant well andshould be sown directly into outdoor gardens. This column providesyou with the weeks to plant your seeds in outdoor gardens and alsothe approximate time to plant seedlings started indoors in outdoor
gardens relative to your first or last frost date. Your Cooperative Extension Service office can tell you the frostdates in your area.
Planting Depth. Generally, seeds should be planted at a depth that is two to three times their width. Thiscolumn lists specific planting depths in inches. Some of the crops listed either require light to germinate or aretoo tiny to be buried under soil. A “0” appearing in this column indicates that the seeds should be planted ontop of the soil and pressed down lightly with a smooth surface, but not buried.
Spacing of Plants. Plants should be grown a certain distance apart to ensure they do not crowd eachother and inhibit healthy growth. This column gives the recommended spacing for mature plants in inches. Sincenot all seeds will germinate, seeds should be planted closer than the distance needed by mature plants. Follow thespacing recommended on the seed packet whenplanting seeds outdoors. If more seeds germinatethan expected, you may need to thin the crop.
Days to Germination. This column tellsyou approximately when seeds will sprout givenreasonable conditions. Temperature and moisturecan greatly affect this rate.
Days to Harvest. This column tells youapproximately when plants will be ready to har-vest. Temperature, water, and a number of otherenvironmental factors can affect this rate.
Good Source Of. This column gives informa-tion on vitamins and minerals provided in substan-tial amounts for fruit and vegetable plants.
65Ga r d e n s f o r L e a r n i n g : P l a n t i n g Y o u r S c h o o l G a r d e n
School Garden Planting Guide
Wes
tern
Gro
wer
s C
harit
able
Fou
ndat
ion
Alicia Dickerson/Life Lab

66
Phot
os:
5 A
Day
SPRING FRUIT AND VEGETABLE PLANTING GUIDEPlant Seeds or
Plant Seeds Indoors Transplants Outdoors Planting Spacing(weeks before or (weeks before or Depth of Plants Days to Days to
Crop after last frost) after last frost) (inches) (inches) Germination Harvest Good Source Of
Beans 3-4 weeks before 1-2 weeks after 1 6-8 4-10 60-80 Vit. C, fiber
Beets * 2-4 weeks before 1/2 2-4 7-10 50-75 Greens high in Vit. A, C,iron, calcium
Broccoli 5-8 weeks before 5-8 weeks before 1/4 15-18 5-10 60-75 Vit. A, C, folate, calcium,magnesium, fiber
Cabbage 4-6 weeks before 5 weeks before 1/4 18 4-10 60+ Vit. C, fiber
Carrots * 2-4 weeks before 1/4 2 10-17 60-80 Vit. A, fiber
Cauliflower 5-8 weeks before 1-2 weeks before 1/4 15-18 5-10 60-72 Vit. C, folate, potassium
Celery 8-10 weeks before 2-3 weeks before 1/4 6 7-12 75-100 Fiber
Corn 3-4 weeks before 1-2 weeks after 1 12-15 3-10 50-95 Thiamine, folate, potassium
Cucumbers 2-3 weeks before 1-2 weeks after 1 12-24 3-8 60-80 -
Garlic * 6 weeks before 1/2 4-6 10-15 90-120 Vit. A, C, folate
Lettuce 3-4 weeks before 2-4 weeks before 1/4 10-12 4-10 45-60 Vit. A, K, calciumthrough 3 weeks after
Onions * 3 weeks before 1/4 4 4-12 60-85 Vit. Cthrough 2 weeks after
Peas 4-6 weeks before 4-6 weeks before 1 4 6-15 55-75 Protein, Vit. B1through 2-3 weeks after
Peppers 6-8 weeks before 1-3 weeks after 1/2 10-12 8-20 70+ Vit. C
Potatoes * 4-6 weeks before 6 10-12 10-15 70+ Vit. C, B6, niacin, copper,potassium, fiber
Pumpkins * After last chance of frost 1 36 7-10 90+ -
Radishes * 4-6 weeks before 1/4 1 3-10 25-40 -
Spinach 3-4 weeks before 3-6 weeks before 1/4 4-8 6-14 40-60 Vit. A, C, K, iron
Squash, * 1-4 weeks after 1 15-24 3-12 60-85 Vit. A, C, fiberSummer
Squash, * 2 weeks after 1/2-1 24-36 4-10 80+ Vit. A, C, potassium, fiberWinter
Tomatoes 6-8 weeks before 2-4 weeks after 1/4-1/2 18-24 6-14 65-85 Vit. A, C, potassium, fiber
Cantaloupe 2 weeks before 2 weeks after 1 24-36 7-14 60-90 Vit. A, C, thiamine, potassium
Strawberries 3-5 weeks before * 1/8 6-8 20 85+ Vit. C, fiber(Alpine)
Watermelon 2 weeks before 2 weeks after 1/2-3/4 24-36 5-10 70-90 Vit. A, B6, C, thiamine
*Not recommended
Ga r d e n s f o r L e a r n i n g : P l a n t i n g Y o u r S c h o o l G a r d e n

67
Phot
os:
Wes
tern
Gro
wer
s C
harit
able
Fou
ndat
ion
SPRING HERB PLANTING GUIDEHerbs may be harvested at any time once they reach a decent size, as long as you leave enough foliage to keep the plant alive.
Plant Seeds or TransplantsPlant Seeds Indoors (weeks Outdoors (weeks before or Planting Depth Spacing of Plants Days to
Crop before or after last frost) after last frost) (inches) (inches) Germination
Basil 4-6 weeks before 1-2 weeks after 1/8 6-12 7-10
Catnip 6 weeks before 2-4 weeks before 1/8 12-18 5-14
Chives 6 weeks before After last chance of frost 1/4 8-12 5-14
Cilantro * After last chance of frost 1/2 12-18 10-15
Dill * 1-2 weeks before 1/4 3-12 20-25
Oregano 6-8 weeks before 2-4 weeks after 1/8 8-12 8-14
Parsley 4-6 weeks before 1-2 weeks after 1/4 6 11-27
Sage 4 weeks before After last chance of frost 1/4 12 14-21
Spearmint 6 weeks before After last chance of frost 1/8 18 10-16
Thyme 8 weeks before 2 weeks after 1/8 6-12 20-30
*Not recommended
SPRING FLOWER PLANTING GUIDEPlant Seeds Indoors Plant Seeds or Transplants Planting Spacing(weeks before or Outdoors (weeks before Depth of Plants Days to Days to
Crop after last frost) or after last frost) (inches) (inches) Germination Harvest Edible?
Bachelor’s 4-5 weeks before 1-2 weeks before 1/4 12-14 7-14 50-60 Yes, petalsButtons
Borage * After last chance of frost 1/4-1/2 12 5-10 45-50 Yes
Calendula 6-8 weeks before After last chance of frost 1/4-1/2 10-12 5-15 40-50 Yes
Cosmos 4 weeks before After last chance of frost 1/4 8-24 5-7 90-100 No
Hollyhocks 6-8 weeks before Early summer 0 (press into soil) 24 10 120-150 Yes
Love-in-a-Mist 4-6 weeks before 2-4 weeks before 1/8 6-12 10-15 60 Yes
Marigolds 4-6 weeks before 1-2 weeks after 1/8 10-12 5-10 70-80 Yes
Nasturtiums * After last chance of frost 1/2 6-12 7-14 40-60 Yes
Sunflowers 3-4 weeks before 2 weeks before 1-2 12-24 7-14 80-120 Yes, seeds
Tithonia 6-8 weeks before After last chance of frost 0 (press into soil) 24 10-15 75-105 No
Zinnias 6 weeks before 1-2 weeks after 1/8 6-12 5-10 70 No
*Not recommended
Ga r d e n s f o r L e a r n i n g : P l a n t i n g Y o u r S c h o o l G a r d e n
68
Planting Guides adapted from:
Jaffe, Roberta, and Gary Appel. 1990. The GrowingClassroom. Menlo Park, CA: Addison-Wesley PublishingCompany.
Pranis, Eve, and Jack Hale. 1988. GrowLab: A CompleteGuide to Gardening in the Classroom. South Burlington, VT:National Gardening Association.
NC State Herb Fact Sheets:www.ces.ncsu.edu/depts/hort/consumer/factsheets/herbs/herbindex.html
NC State Annual Fact Sheets:www.ces.ncsu.edu/depts/hort/consumer/factsheets/annuals/annual_index.html
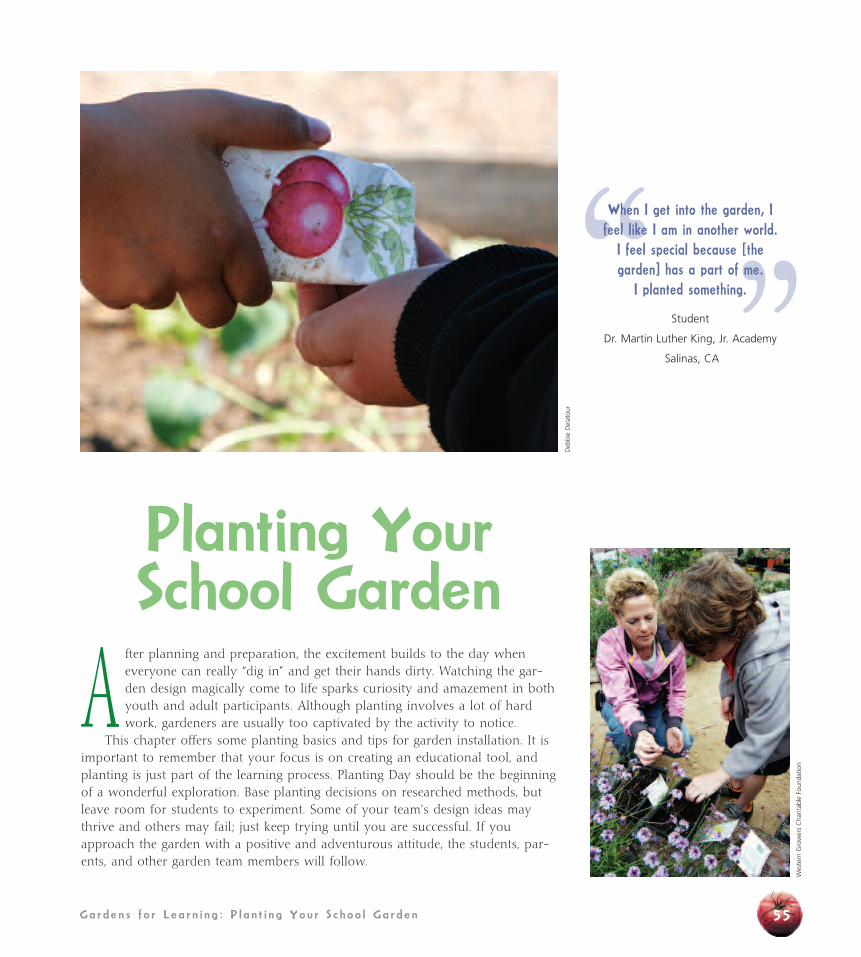
FALL FRUIT AND VEGETABLE PLANTING GUIDEPlant Seeds Outdoors Planting Spacing(weeks before first Depth of Plants Days to Days to
Crop frost) (inches) (inches) Germination Harvest* Good Source Of
Beets 8-10 weeks before 1/2 2-4 7-10 50-75+ Greens high in Vit. A, C, iron,calcium
Broccoli 14-17 weeks before 1/4 15-18 5-10 60+ Vit. A, C, folate, calcium, magnesium, fiber
Cabbage 13-14 weeks before 1/4 18 4-10 60+ Vit. C, fiber
Carrots 13 weeks before 1/4 2 10-17 60+ Vit. A, fiber
Cauliflower 14 weeks before 1/4 15-18 5-10 60+ Vit. C, folate, potassium
Garlic Sept.-Nov. with mulch depth of clove 4-6 160-200 Vit. A, C, folate
Lettuce 6-8 weeks before 1/4 10-12 4-10 45-65 Vit. A, K, calcium
Onions Depends on variety 1/4 4 4-12 60-120 Vit. C
Peas 12 weeks before 1 4 6-15 55+ Protein, Vit. B1
Radishes 7 weeks before 1/4 1 3-10 25+ -
Spinach 6-8 weeks before 1/4 4-8 6-14 40-75 Vit. A, C, K, iron
Strawberries, Alpine 5-8 weeks before 1/8 4 20 Next spring Vit. C, fiber
*Maturity rates of overwintering vegetables vary depending on temperature and available sunlight.
5 A
Day
Wes
tern
Gro
wer
s C
harit
able
Fou
ndat
ion
Ga r d e n s f o r L e a r n i n g : P l a n t i n g Y o u r S c h o o l G a r d e n