PHARLIGHT Manual English - Native Instruments
72
-
Upload
khangminh22 -
Category
Documents
-
view
2 -
download
0
Transcript of PHARLIGHT Manual English - Native Instruments


Table of Contents1. Disclaimer .................................................................................................................. 1
2. Welcome to PHARLIGHT ............................................................................................ 22.1. Document Conventions ..................................................................................... 2
3. General Workflows ..................................................................................................... 43.1. Creating a Sound ............................................................................................. 53.2. Importing Your Own Samples ............................................................................ 6
4. Browsers .................................................................................................................... 74.1. Browser Overview ............................................................................................ 74.2. Opening and Closing Browsers ......................................................................... 84.3. Filtering a Browser Search ................................................................................ 84.4. Using Favorites in the Browser .......................................................................... 9
5. Snapshots ................................................................................................................. 115.1. Saving and Loading Snapshots ........................................................................ 115.2. Sound Types and Tags .................................................................................... 12
6. Perform Page Overview ............................................................................................ 156.1. Perform Page Overview .................................................................................. 156.2. Grain Header ................................................................................................. 166.3. Sample Header .............................................................................................. 176.4. Snapshot Browse Controls .............................................................................. 176.5. XY Pad .......................................................................................................... 18
6.5.1. XY Pad Assignment .............................................................................. 19
7. Sample Page ............................................................................................................ 207.1. Sample Page Overview ................................................................................... 207.2. Pitch .............................................................................................................. 217.3. Start .............................................................................................................. 227.4. Filter .............................................................................................................. 227.5. Filter Modulation ............................................................................................. 237.6. Amp ............................................................................................................... 23
8. Grain Page ............................................................................................................... 258.1. Grain Page Overview ...................................................................................... 258.2. Grains ............................................................................................................ 268.3. Cursor ........................................................................................................... 278.4. Range ............................................................................................................ 288.5. Tune .............................................................................................................. 298.6. Amp ............................................................................................................... 298.7. Envelope ........................................................................................................ 30
9. Effects Page ............................................................................................................. 329.1. Effects Page Overview .................................................................................... 329.2. Effects Section Overview ................................................................................ 33
9.2.1. Effect Selector ...................................................................................... 349.2.2. Loading Effects into Effect Slots ............................................................ 349.2.3. Selecting Effect Modes ......................................................................... 359.2.4. Moving Effect Slots in the Effects Chain ................................................. 369.2.5. Bypass Effect Slots ............................................................................... 36
9.3. Effect Reference ............................................................................................. 379.3.1. Delay ................................................................................................... 379.3.2. Drive .................................................................................................... 389.3.3. Dyn ..................................................................................................... 409.3.4. EQ ...................................................................................................... 429.3.5. Filter .................................................................................................... 439.3.6. Gater ................................................................................................... 479.3.7. Mod ..................................................................................................... 489.3.8. Rev ..................................................................................................... 529.3.9. Util ...................................................................................................... 53
10. Master Page ........................................................................................................... 5410.1. Master Page Overview .................................................................................. 5410.2. Assigning XY Pad to a MIDI Controller ........................................................... 54
11. Send FX Pane ........................................................................................................ 5711.1. Send FX Overview ........................................................................................ 5711.2. Grains .......................................................................................................... 5711.3. Delay ........................................................................................................... 5811.4. XY ............................................................................................................... 5811.5. Reverb ......................................................................................................... 5911.6. Sample ......................................................................................................... 59
12. Macros ................................................................................................................... 6112.1. Macros Pane Overview ................................................................................. 6112.2. Assigning Macros ......................................................................................... 6112.3. Using Macros ............................................................................................... 62
13. Modulation Pane ..................................................................................................... 6413.1. Modulation Pane Overview ............................................................................ 6413.2. LFO 1 .......................................................................................................... 6513.3. Matrix .......................................................................................................... 6513.4. Shaper ......................................................................................................... 6713.5. LFO 2 .......................................................................................................... 67
14. Credits ................................................................................................................... 69
1. DISCLAIMER
The information in this document is subject to change without notice and does not represent acommitment on the part of Native Instruments GmbH. The software described by this document issubject to a License Agreement and may not be copied to other media. No part of this publicationmay be copied, reproduced or otherwise transmitted or recorded, for any purpose, without priorwritten permission by Native Instruments GmbH, hereinafter referred to as Native Instruments.
“Native Instruments”, “NI” and associated logos are (registered) trademarks of Native InstrumentsGmbH.
Mac, macOS, GarageBand, Logic and iTunes are registered trademarks of Apple Inc., registeredin the U.S. and other countries.
Windows and DirectSound are registered trademarks of Microsoft Corporation in the United Statesand/or other countries.
All other trademarks are the property of their respective owners and use of them does not implyany affiliation with or endorsement by them.
Document authored by: Hannah Lockwood, David Gover, Jan Ola Korte.
Software version: 1.0 (05/2020)
Disclaimer
1
2. WELCOME TO PHARLIGHT
PHARLIGHT is a vocal-based granular instrument that produces uniquely-human textures, pads,leads, and effects. It combines a custom sound library, specifically designed around the Grain andSample playback modules, with multiple effects sections and a performance-focused XY modula-tion matrix.
PHARLIGHT's granular engine places the source audio into a powerful and specialized easy-to-use interface. Within the granular engine, sounds can be substantially augmented in size andscope, without sacrificing the sound quality or character. Grains are layered with specially-recor-ded multi-samples or atmospheric one-shots from PHARLIGHT’s Sample module. The Sample en-gine is remarkable in its power and flexibility, producing anything from wavetable-style synthsounds, to clean chopped vocals and textured noise. Combining the granular domain with thesample layer introduces further opportunities for sound design with additional editing and modula-tion features.
When combined, Grain and Samples are able to produce highly expressive and multi-facetedtones with immense versatility. Interesting and unconventional sounds, especially designed and re-corded for use within PHARLIGHT's powerful synth engine, can be morphed from a whisper to anapocalyptic wasteland. The resulting sound palette ranges from luscious, organic timbral spectraand cinematic soundscapes, to dramatic choir installations and ruptured vocal excursions.
The XY pad is the cornerstone of PHARLIGHT’s performance philosophy, designed to produce ex-pressive articulations with attention paid to the precision in timing and intensity required for power-ful, cinematic sound design.
Thank you for choosing PHARLIGHT. We hope you enjoy it!
2.1. Document ConventionsThis document uses particular formatting to point out special facts and to warn you of potential is-sues. The icons introducing the following notes let you see what kind of information can be expec-ted:
The speech bubble icon indicates a useful tip that may help you to solve a task moreefficiently.
The exclamation mark icon highlights important information that is essential for thegiven context.
The warning icon warns you of serious issues and potential risks that require yourfull attention.
Welcome to PHARLIGHT
2

Furthermore, the following formatting is used:
• Paths to locations on your hard disk or other storage devices are printed in italics.• Important names and concepts are printed in bold.• Square brackets are used to reference keys on a computer’s keyboard, e.g., Press [Shift] +
[Enter].
Welcome to PHARLIGHT
3
3. GENERAL WORKFLOWS
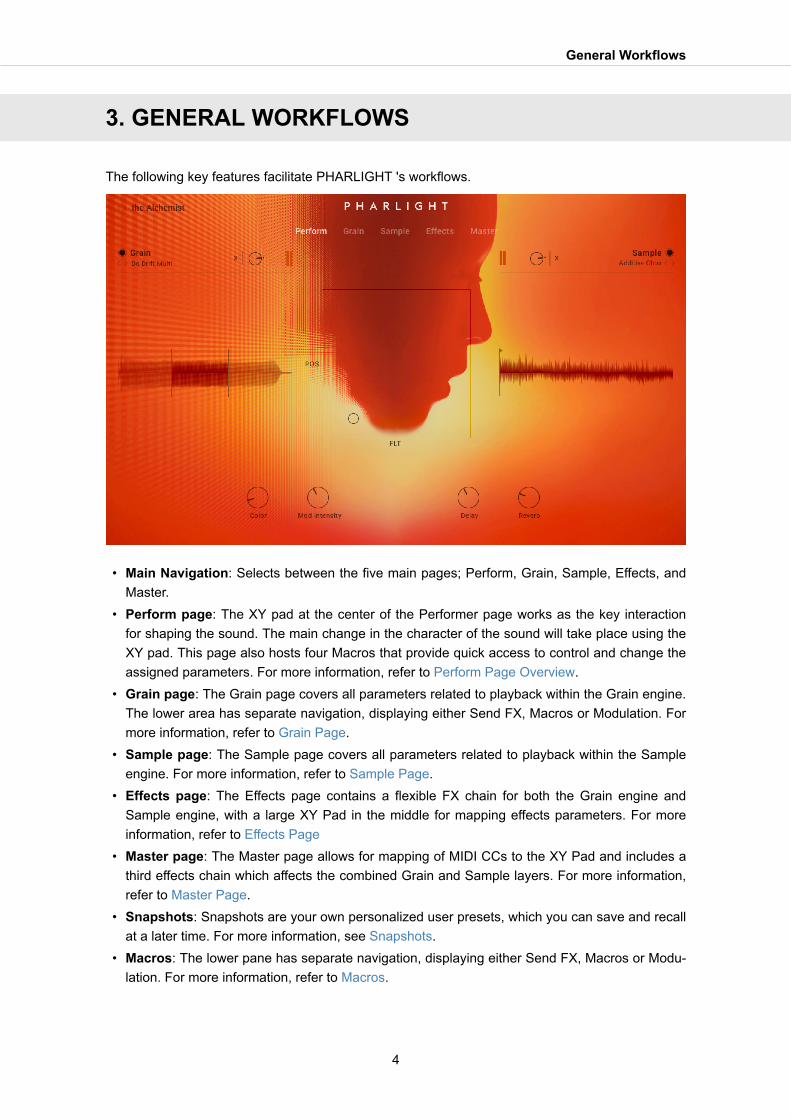
The following key features facilitate PHARLIGHT 's workflows.
• Main Navigation: Selects between the five main pages; Perform, Grain, Sample, Effects, andMaster.
• Perform page: The XY pad at the center of the Performer page works as the key interactionfor shaping the sound. The main change in the character of the sound will take place using theXY pad. This page also hosts four Macros that provide quick access to control and change theassigned parameters. For more information, refer to Perform Page Overview.
• Grain page: The Grain page covers all parameters related to playback within the Grain engine.The lower area has separate navigation, displaying either Send FX, Macros or Modulation. Formore information, refer to Grain Page.
• Sample page: The Sample page covers all parameters related to playback within the Sampleengine. For more information, refer to Sample Page.
• Effects page: The Effects page contains a flexible FX chain for both the Grain engine andSample engine, with a large XY Pad in the middle for mapping effects parameters. For moreinformation, refer to Effects Page
• Master page: The Master page allows for mapping of MIDI CCs to the XY Pad and includes athird effects chain which affects the combined Grain and Sample layers. For more information,refer to Master Page.
• Snapshots: Snapshots are your own personalized user presets, which you can save and recallat a later time. For more information, see Snapshots.
• Macros: The lower pane has separate navigation, displaying either Send FX, Macros or Modu-lation. For more information, refer to Macros.
General Workflows
4
• Randomize: The Randomize button is located in the header sections of both the Grain andSample pages. When the dice button is pressed, random values are applied to all parameterson that page.
3.1. Creating a SoundPHARLIGHT is built from a custom granular engine with hand-tailored audio sources routedthrough matching effects and modulators. In addition to the primary granular engine, there is alsoa sample layer that can be used for complementary sonic tasks like background noise, envelopeattacks, tonal centering, or pads.
To build your own sound and get a feel for the PHARLIGHT workflows, follow these steps:
Grain Engine
1. Select your Grain source and determine the behavior of the Granular engine. Presets for theGranular engine are selected by the arrows or Grain Source label. Click the arrows to browsepresets quickly, or click on the label to open the Grain browser, where you can search for pre-sets that are categorized by Type, Pitch, Category, and Character.
2. Adjust the Start position and set the Range and Length of the Grain sample playback.3. Introduce some movement into your sound by adjusting the Scan and Jitter parameters in the
Cursor section. The Scan control will determine the speed and direction in which the cursormoves, and the Jitter control will determine the random position of each grain.
4. Adjust the envelope section to determine the attack and decay of the Grain source.5. Assign the Detune control to the X-axis and apply a subtle amount of modulation. As you
move the cursor of the XY pad, you will hear the fine deviations in pitch.
Modulation and Effects
1. In the Modulation pane, route an LFO to the Shaper and assign the Shaper to any modulata-ble parameter by choosing S1 from the corresponding menu. Adjust the modulation amountwith the slider underneath the drop-down menu.
2. Open the Send FX pane and turn up the level of the Delay for the Grain layer. Now select apreset from Effect type dropdown until you find a delay character that works with your Grainsound. Assign the Time and Feedback parameters to the X and Y-axis respectively.
3. In the Effect page, select a Filter and assign the Cutoff to the Y-axis. Assign the Resonancecontrol to the X-axis, and move the cursor up and down to hear the filter open as the Delaysend effect becomes more intense.
Sample Engine
1. Sources for the Sampler engine can be chosen via the Sample browser. Use the browser tosearch for sample presets that are categorized by Type, Pitch, Origin, and Mood.
2. Transpose the Sample layer to -1 octave or use the Tune to finely tune the sample to compli-ment the Grain sample source.
3. Extend the Filter Modulation and Amp envelopes to create a more expansive sound, then as-sign LFO 2 to the Volume parameter to create a tremolo effect.
General Workflows
5
4. In the Modulation pane, set LFO 2 to a fast setting to create the rapid deviations in volumethat define tremolo.
Master FX
1. A final Master FX chain applies effects to the combined Grain and Sample layers.2. Explore adding other Effects and assigning their parameters to the XY pad. Using your ears,
following your intuition, and experimenting is the best way to find your own signature sound.3. Note that due to a technical limitation the send effects are not routed through the Master FX
chain.
3.2. Importing Your Own SamplesPHARLIGHT allows you to import your own samples. This feature can be used when designingyour own Snapshots allowing you to utilize the processing power of the specialized grain and sam-ple modules, effects, and the powerful performance-based XY modulation matrix.
How to Import SamplesSamples can be added to PHARLIGHT by dragging and dropping them from your operating sys-tem or the Files folder in KONTAKT, directly onto the waveform displays in the Perform page, theGrain page, or the Sample page.
Compatible audio file formats are: .wav, .aif, and .ncw. Compressed files such as .mp3 do not workbut can be converted to one of the compatible formats using third-party file conversion software.
To add your own sample:
1. Using the mouse, click-and-hold the audio file you want to add.2. Drag the file to a waveform display on the Performance page, Grain page or Sample page.3. Release the mouse button.
Once a file has been imported Kontakt will automatically try to detect the root key. You can also setthe root key of the imported sample manually using the up/down arrows of the Sample Layer RootKey in the top right corner of the Grain or Sample Waveform display. For more information, refer toGrain Page Overview or Sample Page Overview.
For information on importing files from the KONTAKT File menu, refer to the KONTAKT Manualavailable at www.native-instruments.com/en/products/komplete/samplers/kontakt-6/downloads/.
General Workflows
6

4. BROWSERS
PHARLIGHT offers three individual browsers to directly search for Snapshots, Grain Source pre-sets and Sample Source presets. In each of these browsers you can limit the search in the Resultslist by selecting tags from several sound categories. Besides limiting the search, you can alsomark presets as favorites and filter by favorites in the Results list.
The designs and workflows of the individual browsers are identical. The overviewand workflows are written globally.
4.1. Browser OverviewEach of the browsers contain the following elements:
Browser.
(1) Browser Name: Displays the name of the file type you are currently browsing. This can eitherbe SNAPSHOT, GRAIN SOURCE, or SAMPLE SOURCE.
(2) Reset: When pressed, this button resets the browser, clearing any selected tags.
Browsers
7
(3) Preset previous/next: Loads the previous and next Snapshot or preset from the Results list inthe browser. If sound category tags are selected for limiting the search in the Results list, the ar-rows appear filled out.
(4) Snapshot/Source Name: Displays the name of the loaded Snapshot highlighted in white,Grain Source preset or Sample Source preset highlighted in red.
(5) Sound Categories: This area contains different sound categories with several tags each. Youcan use these tags to limit your search in the Results list. For more information, refer to SoundTypes and Tags.
(6) Results List: Provides you with the results defined by the search criteria in the sound catego-ries. You can also mark Snapshots and presets as favorites and filter the results list by favorites.For more information, refer to Using Favorites in the Browser.
(7) Close icon: Click the x icon to close the browser.
(8) XY Pad: A smaller version of the main XY pad that displays the position for the X and Y param-eters of the selected Snapshot. You can also use this XY pad to control the sound of the selectedSnapshot. For more information, refer to XY Pad.
(9) Favorites: Click the star icon next to the preset in the Results List to mark it as a Favorite. Formore information, see Using Favorites in the Browser [9].
For more information on browsing for Snapshots and presets, refer to Filtering a Browser Search.
4.2. Opening and Closing BrowsersTo open a browser:
• Click on the Snapshot name, or on the Grain Source label, or on the Sample Source label onthe pages.The corresponding browser opens.
To close a browser:
• Click on the cross icon at the top left to close the browser.
4.3. Filtering a Browser SearchIn each browser, you can limit the search criteria by selecting tags in several sound categories.You can also exclude an attribute from the search for by pressing [Command] whilst clicking a tagname. The attribute will be displayed stricken through, as shown below.
To filter in a browser search:
1. Click on the tag name to select the tag(s) in the sound category of your choice.2. Press [Command] + click on the tag name to exclude the tag(s) in the sound category.
Selected tags are highlighted, and excluded tags appear stricken through. Items in the Re-sults list are limited accordingly.
Browsers
8
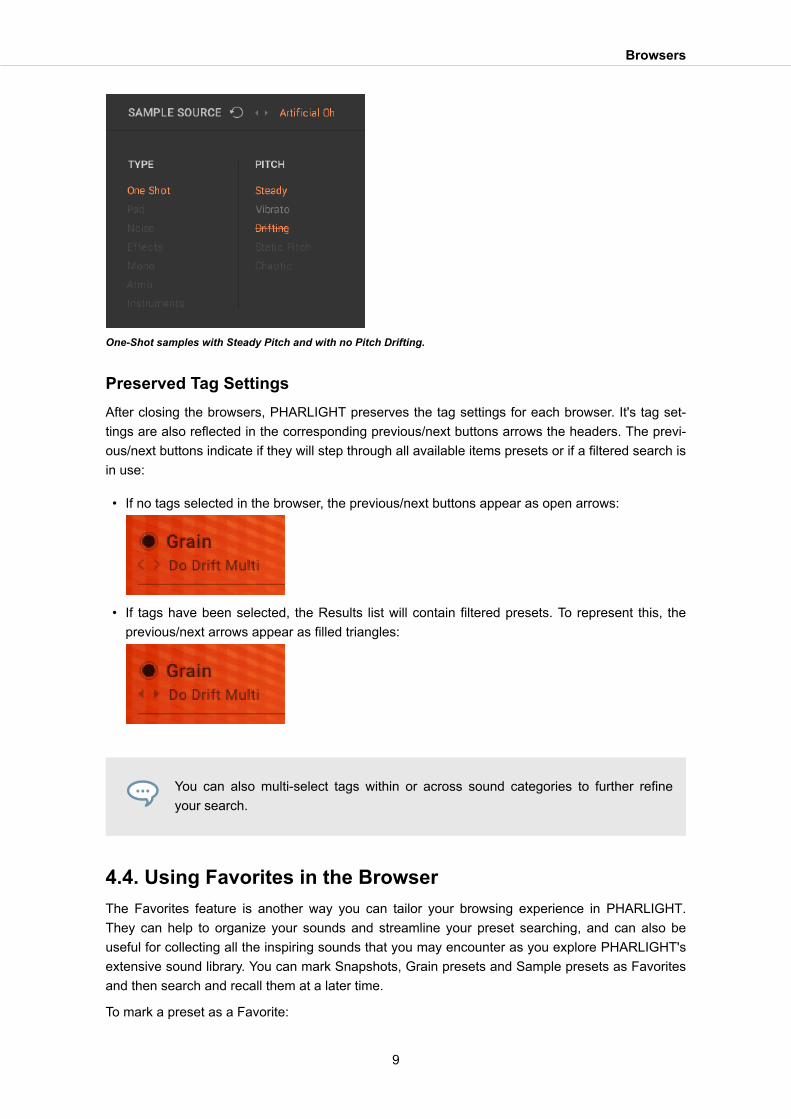
One-Shot samples with Steady Pitch and with no Pitch Drifting.
Preserved Tag SettingsAfter closing the browsers, PHARLIGHT preserves the tag settings for each browser. It's tag set-tings are also reflected in the corresponding previous/next buttons arrows the headers. The previ-ous/next buttons indicate if they will step through all available items presets or if a filtered search isin use:
• If no tags selected in the browser, the previous/next buttons appear as open arrows:
• If tags have been selected, the Results list will contain filtered presets. To represent this, theprevious/next arrows appear as filled triangles:
You can also multi-select tags within or across sound categories to further refineyour search.
4.4. Using Favorites in the BrowserThe Favorites feature is another way you can tailor your browsing experience in PHARLIGHT.They can help to organize your sounds and streamline your preset searching, and can also beuseful for collecting all the inspiring sounds that you may encounter as you explore PHARLIGHT'sextensive sound library. You can mark Snapshots, Grain presets and Sample presets as Favoritesand then search and recall them at a later time.
To mark a preset as a Favorite:
Browsers
9

• Open the respective browser.Click the star icon next to the Snapshot or preset in the Results List.The Snapshots or preset is now marked as a Favorite, indicated by the highlighted star icon.
Marking a preset as a Favorite.
To filter by Favorites:
• Click the star icon next to the PRESETS label of the Results list.The Results list now displays all presets marked as Favorites.
Filtering by Favorites.
Browsers
10
5. SNAPSHOTS
PHARLIGHT's tailor-made library features sample content that was specifically recorded to cover awide range of vocal spectrum. The result is 319 sound sources, with over 370 expert-designedSnapshots that showcase the best of PHARLIGHT’s engine.
Within one singular Snapshot, an entire movie score can exist, which also means that somesounds may need to be thinned out to work more effectively within a fuller musical arrangement.Thinning can easily be achieved by deactivating one of the layers and/or applying the High/LowPass filters, which are setup up on the Macros A and B for many of the provided presets.
Snapshots are also the way for you to save you own personalized User presets, so you can recallyour favorite custom sounds at any time.
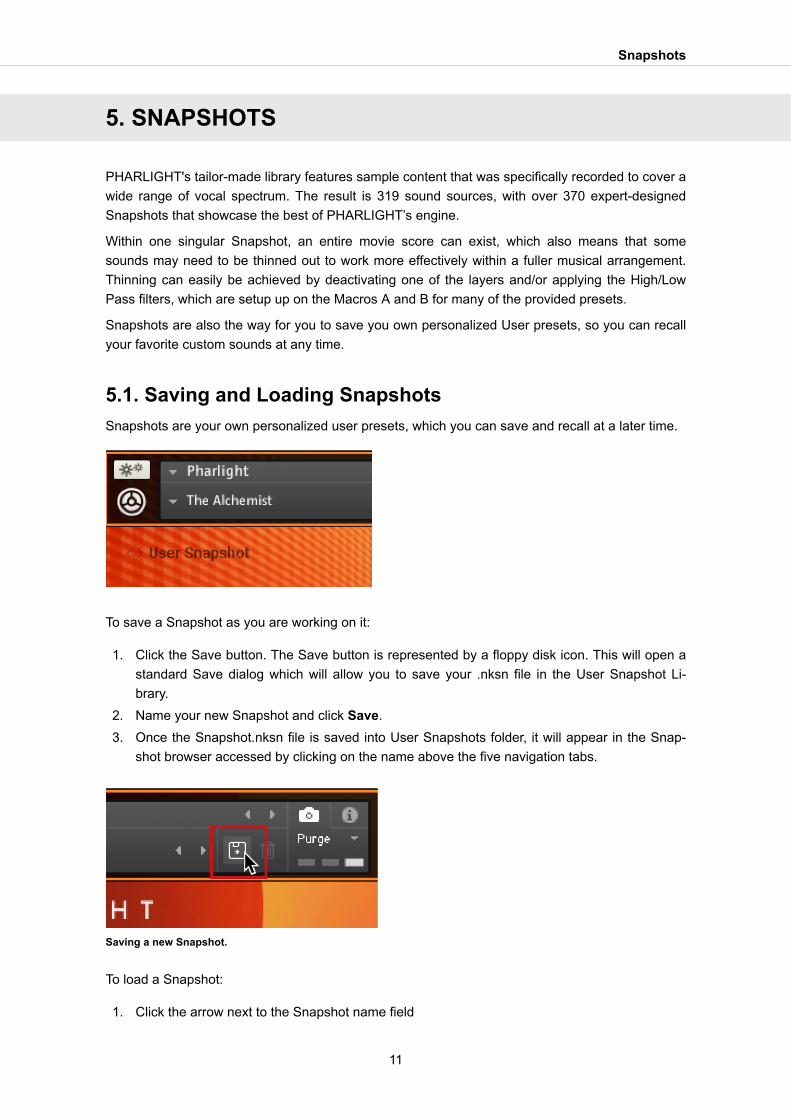
5.1. Saving and Loading SnapshotsSnapshots are your own personalized user presets, which you can save and recall at a later time.
To save a Snapshot as you are working on it:
1. Click the Save button. The Save button is represented by a floppy disk icon. This will open astandard Save dialog which will allow you to save your .nksn file in the User Snapshot Li-brary.
2. Name your new Snapshot and click Save.3. Once the Snapshot.nksn file is saved into User Snapshots folder, it will appear in the Snap-
shot browser accessed by clicking on the name above the five navigation tabs.
Saving a new Snapshot.
To load a Snapshot:
1. Click the arrow next to the Snapshot name field
Snapshots
11
2. Select User and browse the menu for your Snapshot.3. Once clicked, the Snapshot will be loaded.
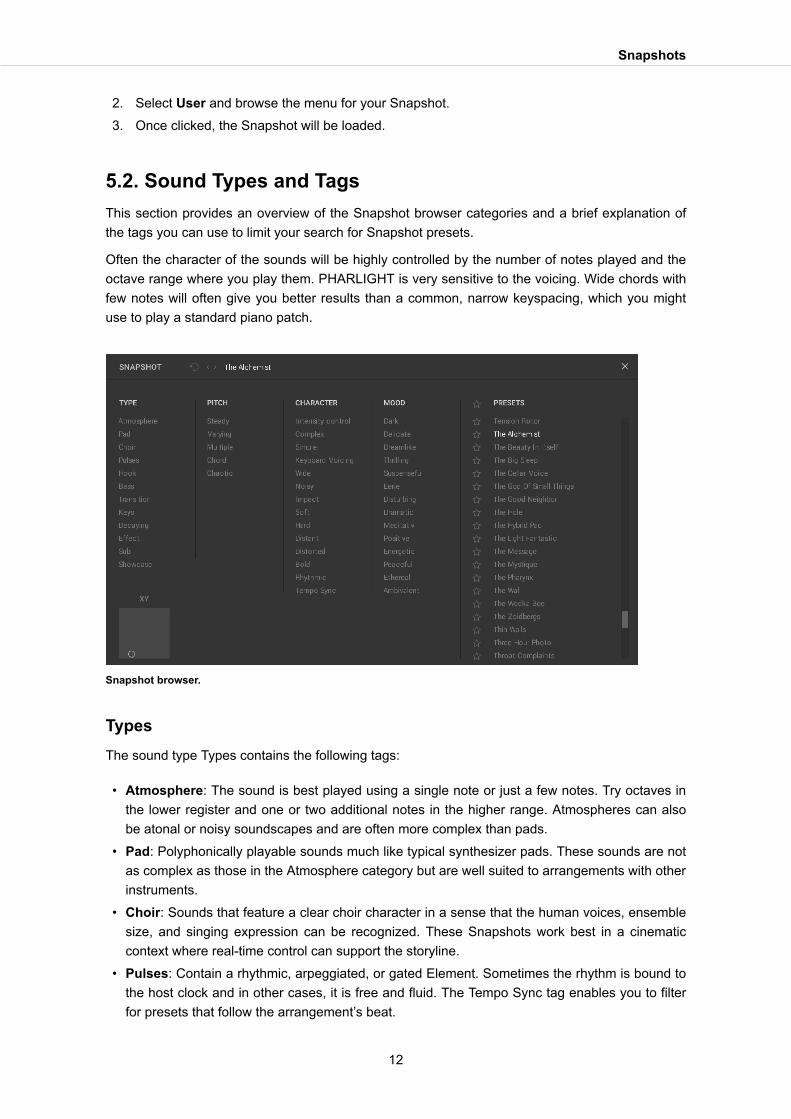
5.2. Sound Types and TagsThis section provides an overview of the Snapshot browser categories and a brief explanation ofthe tags you can use to limit your search for Snapshot presets.
Often the character of the sounds will be highly controlled by the number of notes played and theoctave range where you play them. PHARLIGHT is very sensitive to the voicing. Wide chords withfew notes will often give you better results than a common, narrow keyspacing, which you mightuse to play a standard piano patch.
Snapshot browser.
TypesThe sound type Types contains the following tags:
• Atmosphere: The sound is best played using a single note or just a few notes. Try octaves inthe lower register and one or two additional notes in the higher range. Atmospheres can alsobe atonal or noisy soundscapes and are often more complex than pads.
• Pad: Polyphonically playable sounds much like typical synthesizer pads. These sounds are notas complex as those in the Atmosphere category but are well suited to arrangements with otherinstruments.
• Choir: Sounds that feature a clear choir character in a sense that the human voices, ensemblesize, and singing expression can be recognized. These Snapshots work best in a cinematiccontext where real-time control can support the storyline.
• Pulses: Contain a rhythmic, arpeggiated, or gated Element. Sometimes the rhythm is bound tothe host clock and in other cases, it is free and fluid. The Tempo Sync tag enables you to filterfor presets that follow the arrangement’s beat.
Snapshots
12

• Hook: Sounds that can function as a hook line or lead synths. Often a Hook sound can inspirea whole song. Hook sounds are not necessarily monophonic and often shine when you play asuitable riff or chord progression.
• Bass: Sounds especially suited for bass. These are best played monophonically.• Transition: Sounds that contain a spectral transition or movement that is either scanned
through automatically, synced to the host clock or the transition is the main parameter on theXY pad allowing real-time control of the spectral change.
• Keys: Keyboard type sounds, which also includes organ and mellotron-like presets. Thesounds in this category can be played in a typical keyboard style.
• Decaying: All kinds of sounds that do not contain a loud sustain phase.• Effect: All kinds of real-time controlled cinematic sound effects. There is some overlap with At-
mospheres and Transitions here but it still makes sense to look at it as a separate category.These sounds are mostly atonal.
• Sub: Sounds with remarkable subharmonic content. These are best played monophonically orin octaves.
• Showcase: Indicates a representative selection of PHARLIGHT sounds. Listen to these to geta first impression of the product.
PitchPitch contains the following tags:
• Steady: These sounds feature a steady pitch suitable for chords.• Varying: The sound has a pitch drift, slide, or detuned element.• Multiple: The sound plays a phrase or changes to a different note over time.• Chaotic: The sound has no dedicated root pitch and can change continuously, or has dominant
noise components.
CharacterCharacter contains the following tags:
• Intensity control: The XY pad assignments of the sound are set up to control the ‘intensity’ ofthe sounds. Often, the Snapshot will sound more dramatic when the Y-axis amount is at thetop.
• Complex: Indicates that a higher amount of spectral change over time occurs in the sound.This can be an indicator of how easy it is to combine the preset with other instruments in anarrangement.
• Simple: Indicates that the sound features a small amount of spectral change over time and iseasier to integrate with other sounds in a musical arrangement.
• Keyboard Voicing: Sounds with this tag can be played with a narrow, piano-style voicing. Youcan use this tag to remove Snapshots from the Results list which requires a wider voicing orsound best with few notes.
• Wide: Either stereo spread or depth of dimension are extraordinary in sounds featuring thistag.
• Noisy: The sound contains a remarkable noise amount.• Impact: The sound contains an attacking element. This can be either at the beginning of the
note or within a soundscape or pulsating snapshot.
Snapshots
13

• Soft: The sound has a damped or soft spectrum and soft volume transition.• Hard: The sound has a higher or hard spectrum and might contain dissonant elements.• Distant: The sound has a substantial amount of reverb or delay applied. Attacks might be soft-
ened or washed out.• Distorted: The sound features distortion either in the layer sources or applied via the effects
chains.• Bold: Sounds that cover a wide range of the sonic spectrum and might be the main sound in a
scene.• Rhythmic: The sound contains a rhythmic element, which can be either a repeating spectral
change or an attacking or noise-like component.• Tempo Sync: The rhythmic element either follows the host tempo or the transition speed is
synchronized to the DAW’s clock.
MoodMood contains the following tags:
• Dark: The sound might be suitable for a sinister scene and often features detuned, modulated,distorted aspects.
• Delicate: The sound is relatively thin and clean.• Dreamlike: The sound is beautiful or has a utopian, unreal character to it.• Thrilling: Depending on the voicing, the sound can create a thrilling mood. Thrill is not used in
the context of horror here but rather like excitement.• Suspenseful: Depending on the voicing, the sound can create a mood of suspense and uncer-
tainty.• Eerie: Depending on the voicing, the sound can create a scary atmosphere and might contain
dissonant elements or transitions.• Disturbing: The sound contains an unexpected, annoying or impacting element.• Dramatic: Depending on the voicing the sound can be used to increase the level of drama by
riding the Macros.• Meditative: The sound has a calm, sometimes slightly repetitive mood.• Positive: Depending on the voicing, the sound can be used to convey a confident and positive
vibe.• Energetic: Depending on the voicing, the sound has an active, driving mood. Often, a rhythmic
element is involved.• Peaceful: Depending on the voicing, the sounds create a quiet, balanced and beautiful mood.• Ethereal: Depending on the voicing, the sounds create a light, mystic or arcane mood.• Ambivalent: Some presets can change their mood quite drastically, depending on the played
voicing and the settings of the macro controllers.
Snapshots
14
6. PERFORM PAGE OVERVIEW
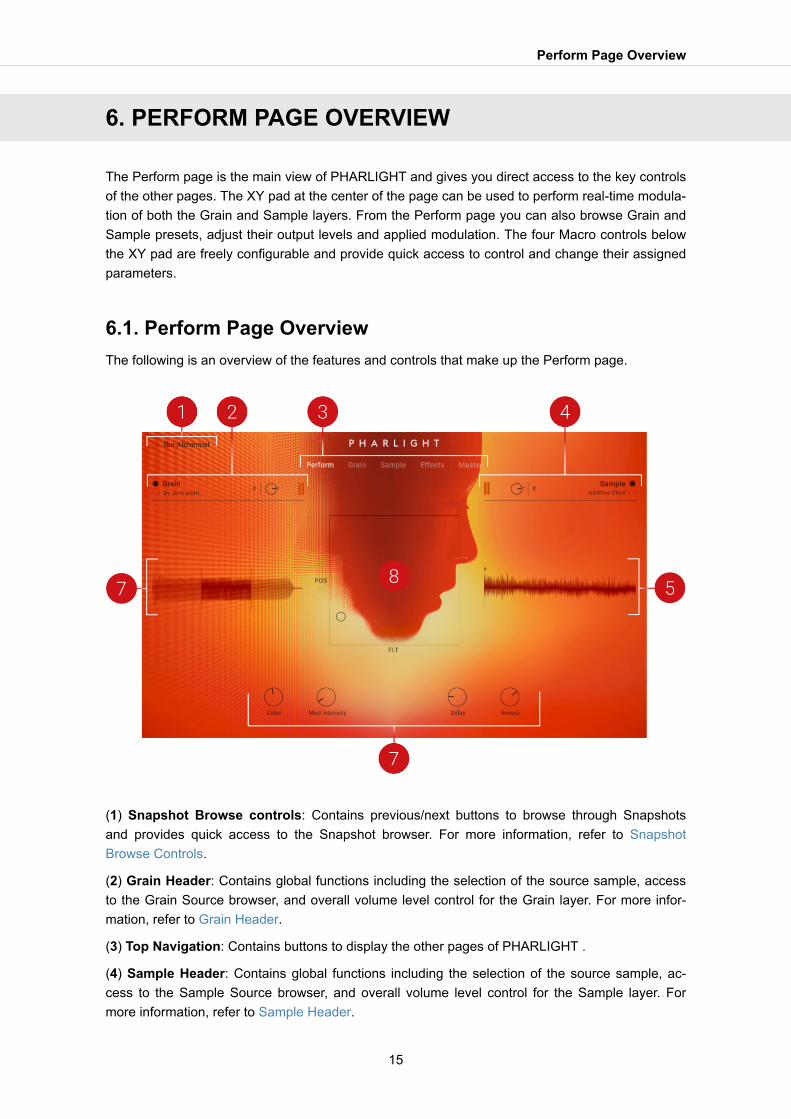
The Perform page is the main view of PHARLIGHT and gives you direct access to the key controlsof the other pages. The XY pad at the center of the page can be used to perform real-time modula-tion of both the Grain and Sample layers. From the Perform page you can also browse Grain andSample presets, adjust their output levels and applied modulation. The four Macro controls belowthe XY pad are freely configurable and provide quick access to control and change their assignedparameters.
6.1. Perform Page OverviewThe following is an overview of the features and controls that make up the Perform page.
(1) Snapshot Browse controls: Contains previous/next buttons to browse through Snapshotsand provides quick access to the Snapshot browser. For more information, refer to SnapshotBrowse Controls.
(2) Grain Header: Contains global functions including the selection of the source sample, accessto the Grain Source browser, and overall volume level control for the Grain layer. For more infor-mation, refer to Grain Header.
(3) Top Navigation: Contains buttons to display the other pages of PHARLIGHT .
(4) Sample Header: Contains global functions including the selection of the source sample, ac-cess to the Sample Source browser, and overall volume level control for the Sample layer. Formore information, refer to Sample Header.
Perform Page Overview
15

(5) Sample Waveform display: Displays the Sample Source waveform and visualizes the play-head position.
(6) Macros: These top-level parameter controls can be assigned to multiple targets at the sametime. You can select the labels corresponding to the parameters. For more information, refer toMacros Pane Overview.
(7) Grain Waveform display: Displays the Grain Source waveform and visualizes the Grain Cur-sor position of up to ten notes. You can also directly jump to the Grain page by clicking within thewaveform.
(8) XY Pad: Controls the sound of the current Snapshot in realtime according to the modulationassignments for the X and Y parameters. For more information, refer to XY Pad.
6.2. Grain HeaderThe Grain Header contains global functions including selection of the source sample, access tothe Grain Source browser, and overall volume level control for the Grain layer. The Grain Headeris available on the Perform page, on the Grain page, and on the Effects page. It contains the fol-lowing controls:
The Grain Header contains the following controls and features:
Grain Header.
(1) Grain Layer Bypass: Determines if the Grain layer is active or bypassed. When the button isfilled out, it indicates the Grain Layer is active.
(2) Grain Source previous/next: Loads the previous/next Grain Source from the Results list inthe Grain Source browser. If tags are selected to limit the results in the Grain Source browser, thearrows appear filled out. For more information, refer to Filtering a Browser Search.
(3) Grain Source Name: Displays the name of the loaded Grain Source. Click the name to openthe Grain Source browser. For more information, see Browsers.
(4) Modulation Source: Selects the Modulation Source to be applied to the Grain Volume control.
(5) Modulation Amount: Controls the amount of modulation applied to the Grain Volume controlby the selected Modulation Source.
(6) Grain Volume: Sets the volume for the Grain Layer which is applied after the Grain Layer ef-fects, and before the MASTER FX chain and the Send FX chain.
(7) Grain Level meter: Displays the current output volume level for the Grain Layer.
Perform Page Overview
16
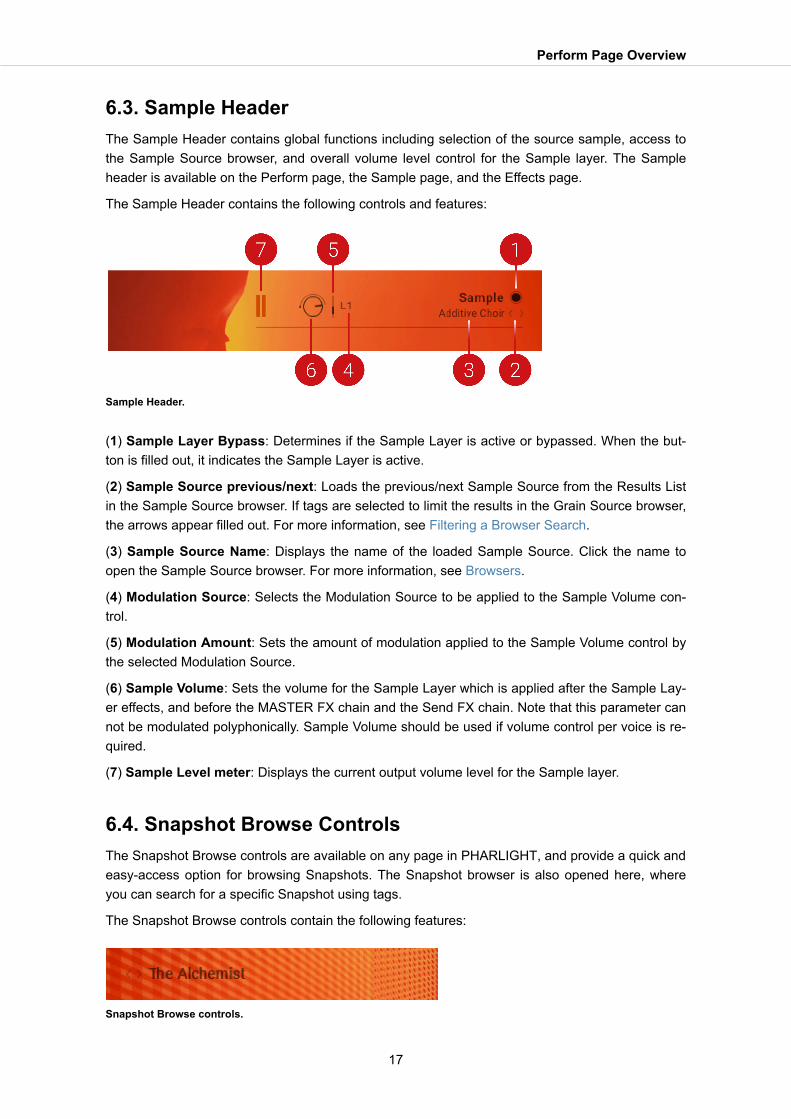
6.3. Sample HeaderThe Sample Header contains global functions including selection of the source sample, access tothe Sample Source browser, and overall volume level control for the Sample layer. The Sampleheader is available on the Perform page, the Sample page, and the Effects page.
The Sample Header contains the following controls and features:
Sample Header.
(1) Sample Layer Bypass: Determines if the Sample Layer is active or bypassed. When the but-ton is filled out, it indicates the Sample Layer is active.
(2) Sample Source previous/next: Loads the previous/next Sample Source from the Results Listin the Sample Source browser. If tags are selected to limit the results in the Grain Source browser,the arrows appear filled out. For more information, see Filtering a Browser Search.
(3) Sample Source Name: Displays the name of the loaded Sample Source. Click the name toopen the Sample Source browser. For more information, see Browsers.
(4) Modulation Source: Selects the Modulation Source to be applied to the Sample Volume con-trol.
(5) Modulation Amount: Sets the amount of modulation applied to the Sample Volume control bythe selected Modulation Source.
(6) Sample Volume: Sets the volume for the Sample Layer which is applied after the Sample Lay-er effects, and before the MASTER FX chain and the Send FX chain. Note that this parameter cannot be modulated polyphonically. Sample Volume should be used if volume control per voice is re-quired.
(7) Sample Level meter: Displays the current output volume level for the Sample layer.
6.4. Snapshot Browse ControlsThe Snapshot Browse controls are available on any page in PHARLIGHT, and provide a quick andeasy-access option for browsing Snapshots. The Snapshot browser is also opened here, whereyou can search for a specific Snapshot using tags.
The Snapshot Browse controls contain the following features:
Snapshot Browse controls.
Perform Page Overview
17
Snapshot previous/next: Loads the previous/next Snapshot from the Results List in the Snapshotbrowser. If tags are selected to limit the results in the browser, the arrows appear filled out. Formore information, see Filtering a Browser Search.
Snapshot Name: Displays the name of the loaded Snapshot. A Snapshot contains a completePHARLIGHT preset. Click the name to open the Snapshot browser. For more information, seeBrowsers.
Snapshots can be saved with KONTAKT's Snapshot functionality in the Instrumentheader. For more information, refer to Saving and Loading Snapshots.
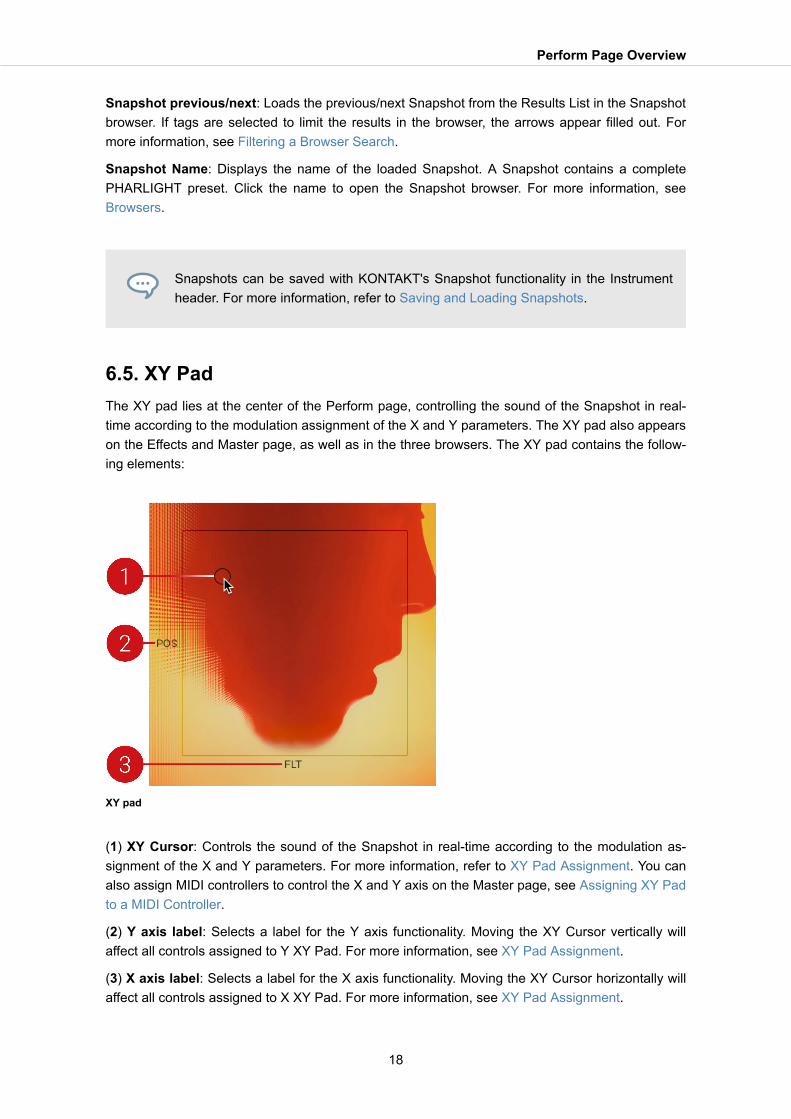
6.5. XY PadThe XY pad lies at the center of the Perform page, controlling the sound of the Snapshot in real-time according to the modulation assignment of the X and Y parameters. The XY pad also appearson the Effects and Master page, as well as in the three browsers. The XY pad contains the follow-ing elements:
XY pad
(1) XY Cursor: Controls the sound of the Snapshot in real-time according to the modulation as-signment of the X and Y parameters. For more information, refer to XY Pad Assignment. You canalso assign MIDI controllers to control the X and Y axis on the Master page, see Assigning XY Padto a MIDI Controller.
(2) Y axis label: Selects a label for the Y axis functionality. Moving the XY Cursor vertically willaffect all controls assigned to Y XY Pad. For more information, see XY Pad Assignment.
(3) X axis label: Selects a label for the X axis functionality. Moving the XY Cursor horizontally willaffect all controls assigned to X XY Pad. For more information, see XY Pad Assignment.
Perform Page Overview
18
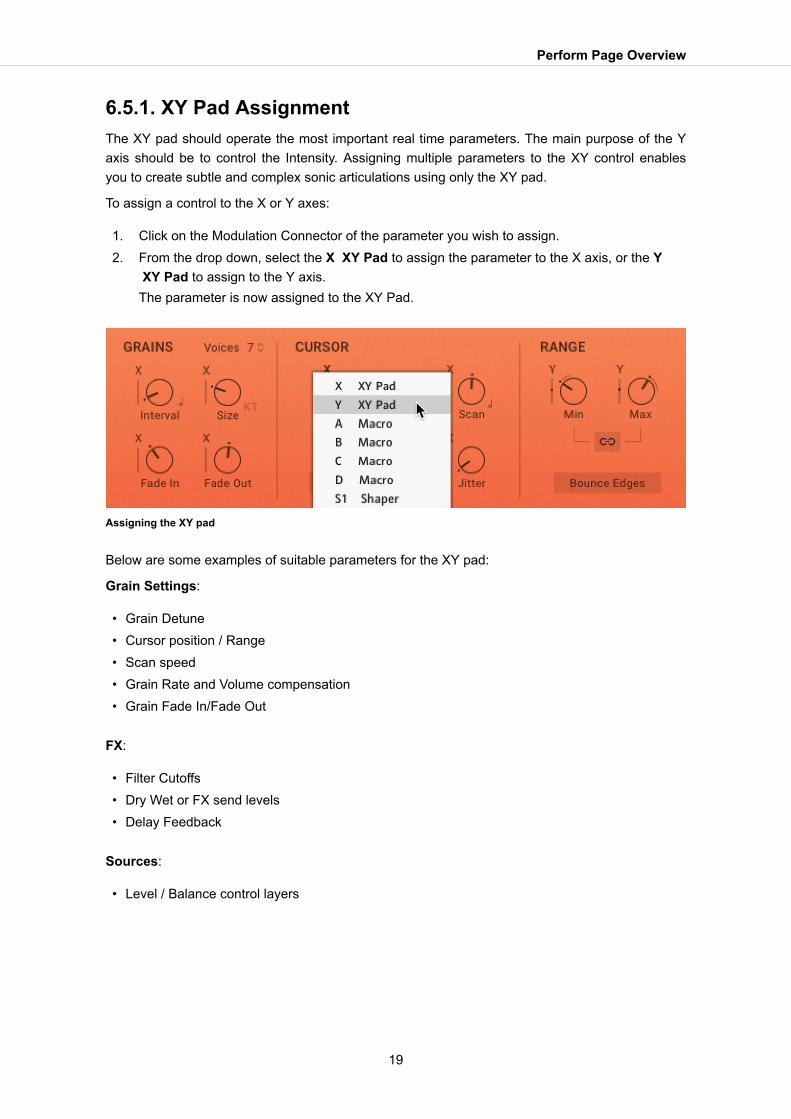
6.5.1. XY Pad AssignmentThe XY pad should operate the most important real time parameters. The main purpose of the Yaxis should be to control the Intensity. Assigning multiple parameters to the XY control enablesyou to create subtle and complex sonic articulations using only the XY pad.
To assign a control to the X or Y axes:
1. Click on the Modulation Connector of the parameter you wish to assign.2. From the drop down, select the X XY Pad to assign the parameter to the X axis, or the Y
XY Pad to assign to the Y axis.The parameter is now assigned to the XY Pad.
Assigning the XY pad
Below are some examples of suitable parameters for the XY pad:
Grain Settings:
• Grain Detune• Cursor position / Range• Scan speed• Grain Rate and Volume compensation• Grain Fade In/Fade Out
FX:
• Filter Cutoffs• Dry Wet or FX send levels• Delay Feedback
Sources:
• Level / Balance control layers
Perform Page Overview
19
7. SAMPLE PAGE
The Sample page controls PHARLIGHT's Sample Layer with a range of parameters that allow youto shape and manipulate the playback of the selected source sample. The Sample Layer accessesa library of specially recorded multi-samples and one-shots, designed to compliment those in theGrain Layer. From crisp vocals and chopped noise, to synthetic wavetable sounds, the Sample en-gine is capable of generating a wide range of multi-use tones and sounds. When combined withthe Grain engine, results are diverse in their sonic character and effect. Sounds can range frommoody, dissonant atmospheres to gritty, textured drones. Modulation inputs enable parameter ad-justments that evolve over time, allowing you to create intricate unfolding soundscapes andnuanced timbral effects.
The Transpose control enables you to pitch the sample an octave higher or lower in relation to theGrain layer, creating a full, robust blend. The Tune control allows for subtle detuning when modula-ted, to replicate the desired detuning effect found in analog synthesizers. Modulating the Startpoint can also create timbrally captivating effects, that add depth and interest to the sample play-back.
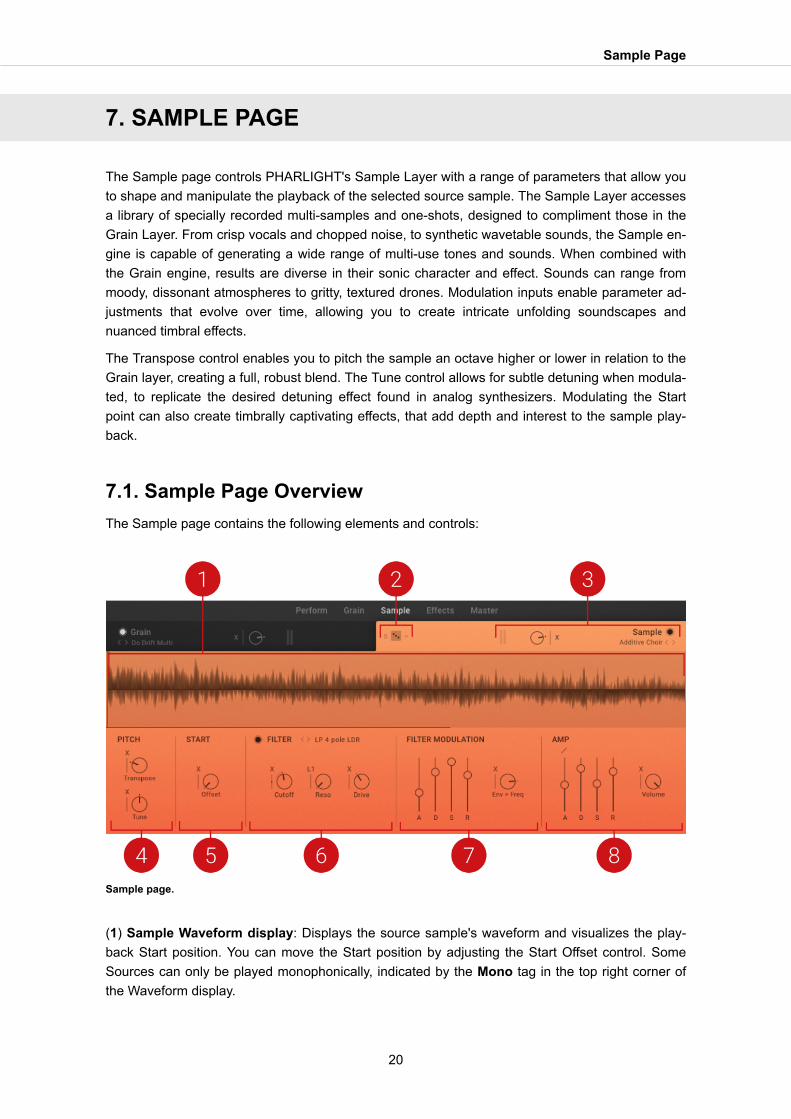
7.1. Sample Page OverviewThe Sample page contains the following elements and controls:
Sample page.
(1) Sample Waveform display: Displays the source sample's waveform and visualizes the play-back Start position. You can move the Start position by adjusting the Start Offset control. SomeSources can only be played monophonically, indicated by the Mono tag in the top right corner ofthe Waveform display.
Sample Page
20
You can import your own sample by dropping your sound onto the waveform. Kontakt will try todetect the root key automatically when the sample is loaded. You can also set the root key of theimported sample manually using the up/down arrows of the Sample Layer Root Key in the top rightcorner of the Waveform display. They allow you to increase or decrease the root key of the impor-ted user sample by one octave. Hold down the option key to change the key in semi-tones. Formore information on adding samples, refer to Importing Your Own Samples [6].
(2) Sample Randomize: Clicking the dice icon applies random values to all parameters in theSample page. The drop-down menu next to the Sample Randomize button offers two options forassigning randomization. P Parameter only applies randomization to parameters only. S IncludeSource randomizes the Sample Source and parameters. The randomization of the Source sampleis limited by the tags selected in the browser.
(3) Sample Header: Contains global functions including the selection of the source sample, ac-cess to the Sample Source browser, and overall Volume control for the Sample layer. For moreinformation, refer to Sample Header.
(4) PITCH: Contains controls related to tuning and transposition. For more information, refer toPitch.
(5) START: Sets the start point from which the sample will playback. For more information, refer toStart.
(6) FILTER: A tool that removes frequencies as determined by the Filter type and Cutoff frequency.For more information, refer to Filter.
(7) FILTER MODULATION: Contains envelopes that modulate and shape the filter and the cutofffrequency of your sample. For more information, refer to Filter Modulation.
(8) AMP: Contains envelopes that modulate the Sample Layer's volume. For more information, re-fer to Amp.
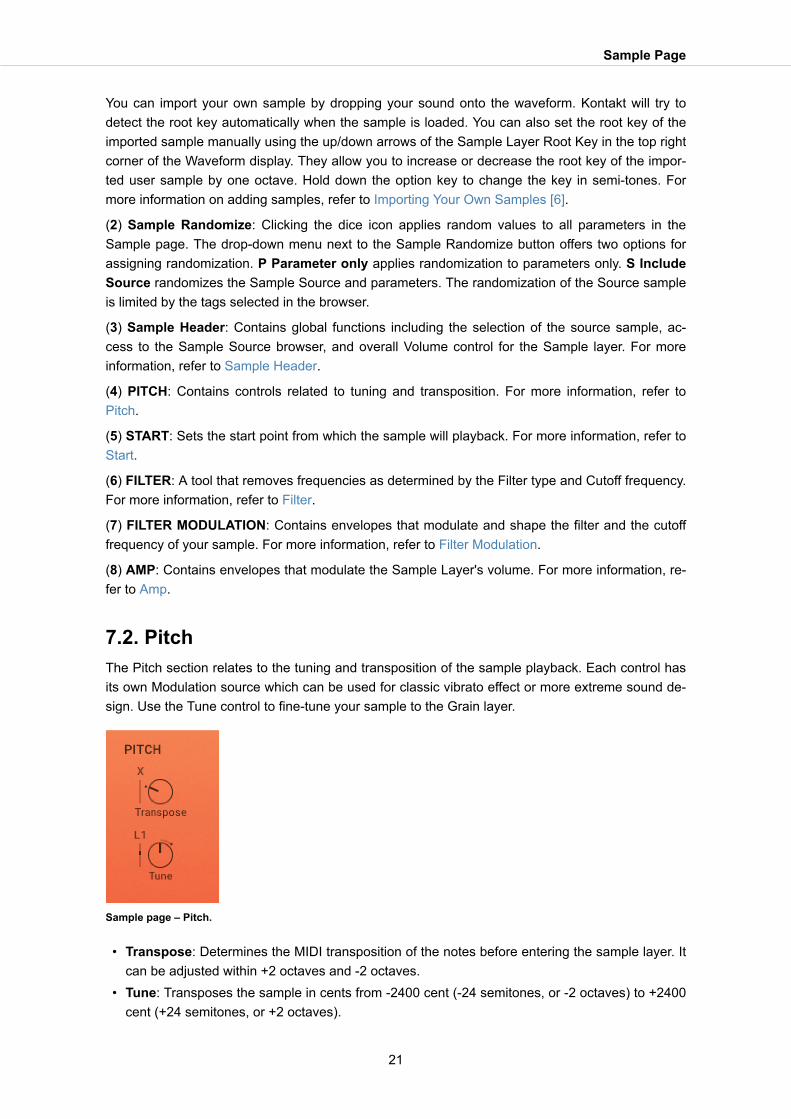
7.2. PitchThe Pitch section relates to the tuning and transposition of the sample playback. Each control hasits own Modulation source which can be used for classic vibrato effect or more extreme sound de-sign. Use the Tune control to fine-tune your sample to the Grain layer.
Sample page – Pitch.
• Transpose: Determines the MIDI transposition of the notes before entering the sample layer. Itcan be adjusted within +2 octaves and -2 octaves.
• Tune: Transposes the sample in cents from -2400 cent (-24 semitones, or -2 octaves) to +2400cent (+24 semitones, or +2 octaves).
Sample Page
21
7.3. StartThe Start section sets the point from which the sample will playback. The start point can be modu-lated to create more dynamic timbres.
Sample page – Start
• Start Offset: Determines where the sample starts to play when a note is triggered.• Start Offset Modulation: Sets the amount of modulation applied to the parameter by the se-
lected modulation source.
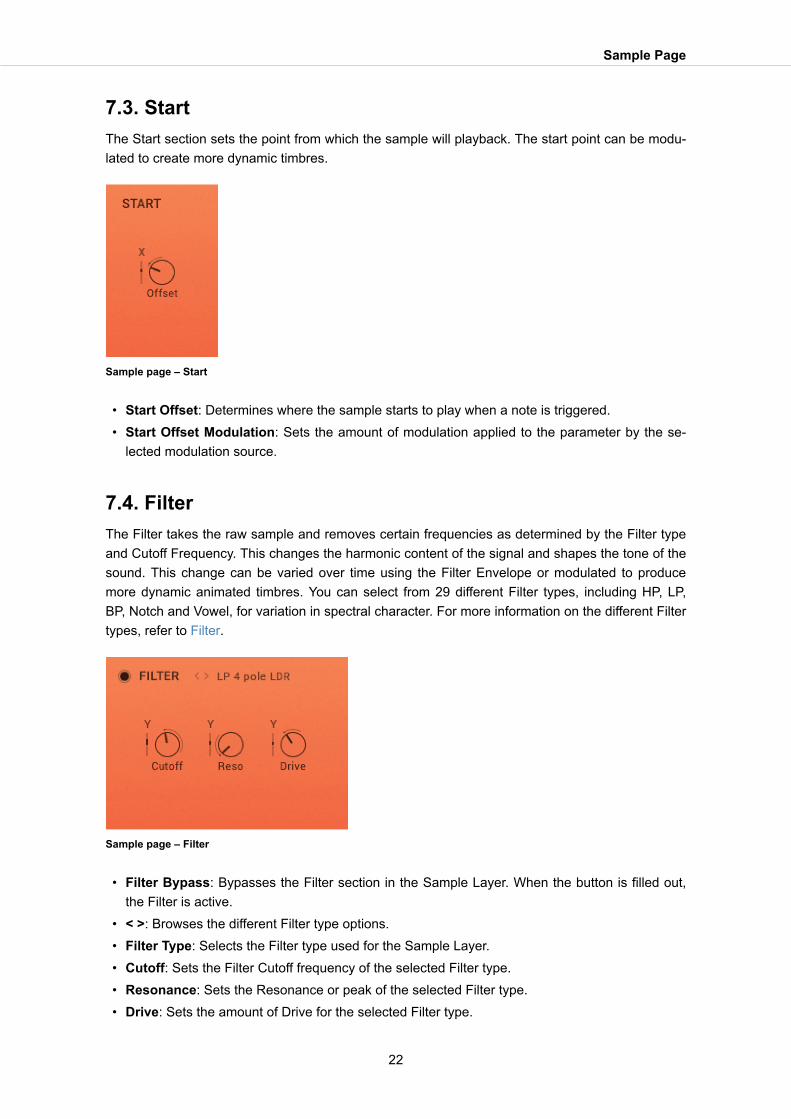
7.4. FilterThe Filter takes the raw sample and removes certain frequencies as determined by the Filter typeand Cutoff Frequency. This changes the harmonic content of the signal and shapes the tone of thesound. This change can be varied over time using the Filter Envelope or modulated to producemore dynamic animated timbres. You can select from 29 different Filter types, including HP, LP,BP, Notch and Vowel, for variation in spectral character. For more information on the different Filtertypes, refer to Filter.
Sample page – Filter
• Filter Bypass: Bypasses the Filter section in the Sample Layer. When the button is filled out,the Filter is active.
• < >: Browses the different Filter type options.• Filter Type: Selects the Filter type used for the Sample Layer.• Cutoff: Sets the Filter Cutoff frequency of the selected Filter type.• Resonance: Sets the Resonance or peak of the selected Filter type.• Drive: Sets the amount of Drive for the selected Filter type.
Sample Page
22

7.5. Filter ModulationThe Filter Modulation section contains envelopes that allow you to modulate and shape the filterand the cutoff frequency of your sample. Use the Envelope Amount to determine the intensity ofthe envelope over the cutoff frequency. Modulating the Envelope Amount can create subtle move-ments or dramatic timbral changes.
Sample page – Filter Modulation
• Attack (A): Adjusts the duration of the envelope’s attack stage, which is the time the envelopetakes to rise from zero to peak level.
• Decay (D): Adjusts the duration of the envelope’s decay stage, which is the time the envelopetakes to fall from peak to sustain level.
• Sustain (S): Adjusts the level of the envelope’s sustain stage, at which the envelope stays aslong as a note is held.
• Release (R): Adjusts the duration of the envelope's release stage, which is the time the enve-lope takes to fall from sustain level to zero.
• Envelope Amount: Determines to which extent the filter envelope modulates the filter. Thisworks on a polyphonic level.
7.6. AmpThe Amp section contains controls related to the Sample layer's volume envelope. It is triggeredby incoming MIDI notes and used to dynamically control the amplitude of the Sample layer's out-put signal. By adjusting the four envelope stages, you can define the overall character of thesound, from snappy, percussive plucks to sustained, elongated drones. Modulate the Volume con-trol with an LFO to create a classic tremolo effect.
Sample Page
23
Sample page – Amp
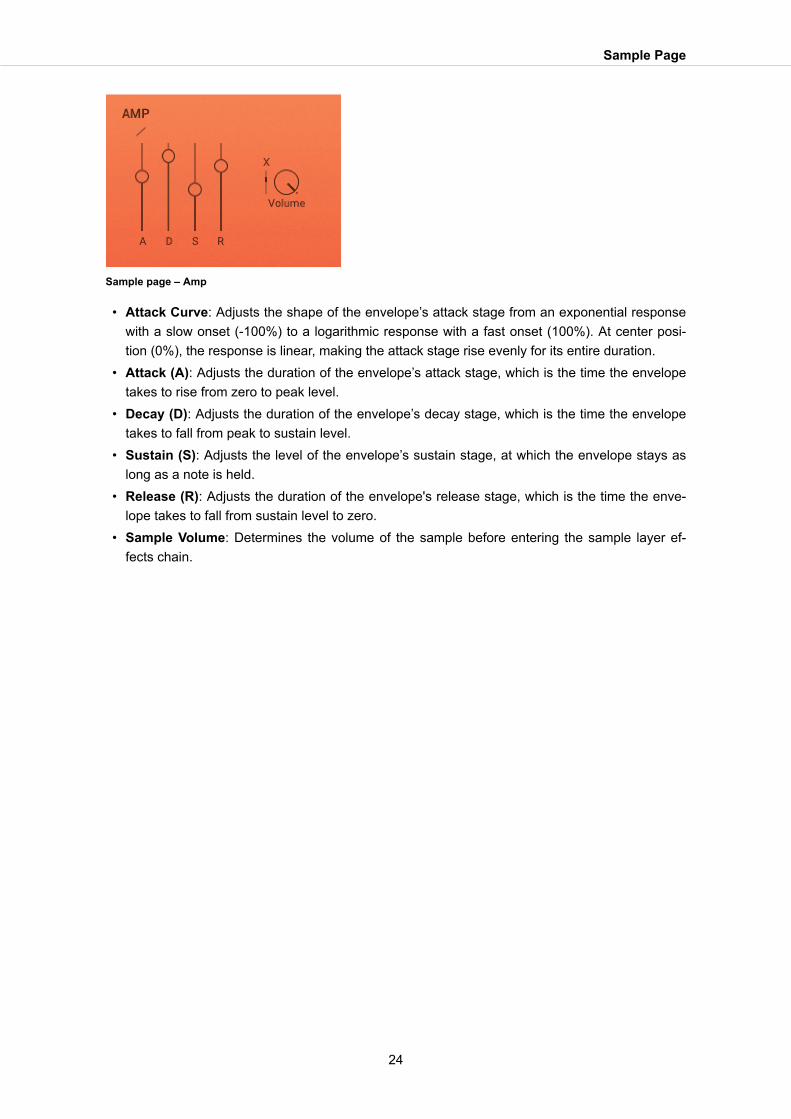
• Attack Curve: Adjusts the shape of the envelope’s attack stage from an exponential responsewith a slow onset (-100%) to a logarithmic response with a fast onset (100%). At center posi-tion (0%), the response is linear, making the attack stage rise evenly for its entire duration.
• Attack (A): Adjusts the duration of the envelope’s attack stage, which is the time the envelopetakes to rise from zero to peak level.
• Decay (D): Adjusts the duration of the envelope’s decay stage, which is the time the envelopetakes to fall from peak to sustain level.
• Sustain (S): Adjusts the level of the envelope’s sustain stage, at which the envelope stays aslong as a note is held.
• Release (R): Adjusts the duration of the envelope's release stage, which is the time the enve-lope takes to fall from sustain level to zero.
• Sample Volume: Determines the volume of the sample before entering the sample layer ef-fects chain.
Sample Page
24
8. GRAIN PAGE
The Grain page controls PHARLIGHT's Grain Layer, with unique ways to play and manipulate thesource sample using granular synthesis. The result is lush, organic timbres that can defy time andpitch, whilst retaining the character and quality of the original source sounds. A slight whisper orspoken vowel can be stretched, shifted and tuned then played back like a pad or keys. The nuan-ces of smaller sounds can be significantly magnified in size and scope.
Granular synthesis uses an audio sample as a basic sound source and divides it into small seg-ments, called grains. The duration, or size of a single grain is typically around a tenth of a secondand below (< 100 ms). In PHARLIGHT, you can set grain sizes ranging from 10 ms to 1000 ms. Ifall grains are played consecutively, the result approximates the original sample. The power ofgranular synthesis lies in the flexibility to change the playback order and speed of the grains, andthe ability to apply processing to each grain (duration, fades, level and pitch) for dramatic effects.Using the tempo-synced Grain Cursor you can also create perfectly timed transitions, sweeps, andrisers.
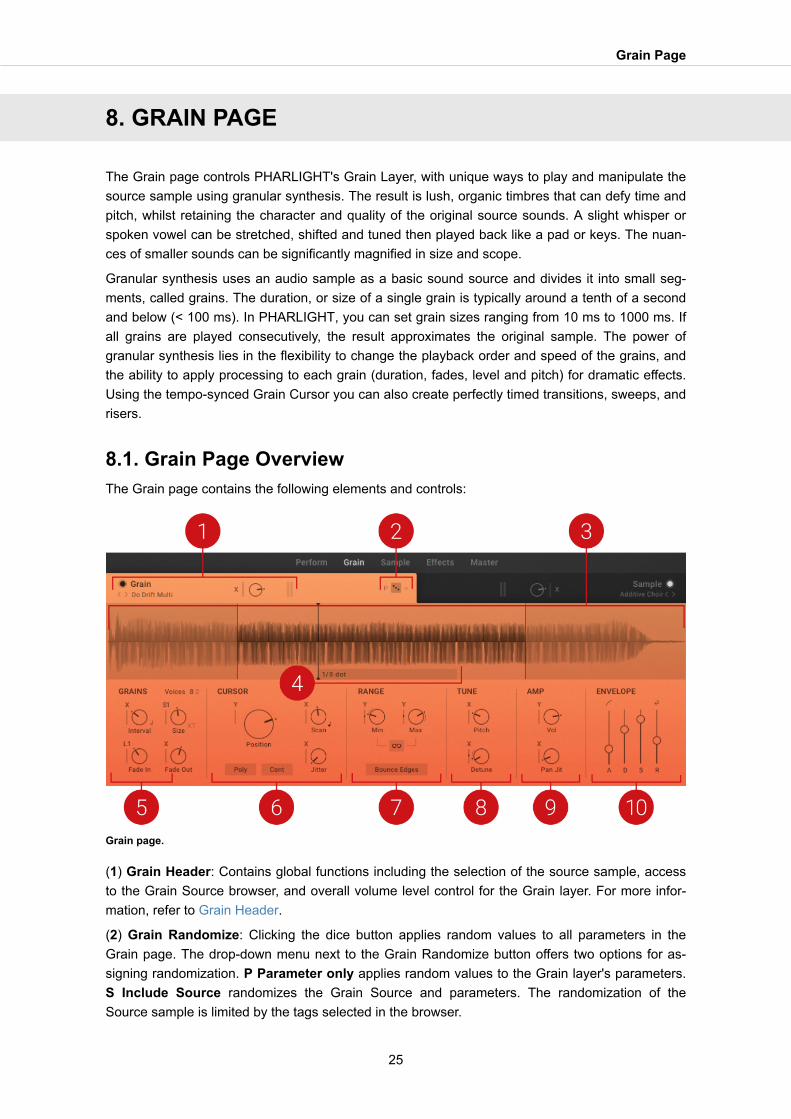
8.1. Grain Page OverviewThe Grain page contains the following elements and controls:
Grain page.
(1) Grain Header: Contains global functions including the selection of the source sample, accessto the Grain Source browser, and overall volume level control for the Grain layer. For more infor-mation, refer to Grain Header.
(2) Grain Randomize: Clicking the dice button applies random values to all parameters in theGrain page. The drop-down menu next to the Grain Randomize button offers two options for as-signing randomization. P Parameter only applies random values to the Grain layer's parameters.S Include Source randomizes the Grain Source and parameters. The randomization of theSource sample is limited by the tags selected in the browser.
Grain Page
25

(3) Grain Waveform display: Displays the source sample's waveform and visualizes the Cursorposition for up to ten notes simultaneously. You can adjust the Cursor Range by clicking and drag-ging the left and right boundaries in the waveform. For more information about the Cursor Range,refer to Range. In Scan Sync mode, the display additionally shows the sync anchor (4).
You can import your own sample by dropping your sound onto the waveform. KONTAKT will try todetect the root key automatically when the sample is loaded. You can also set the root key of theimported sample manually using the up/down arrows of the Grain User Sample Root Key in thetop right corner of the Waveform display. They allow you to increase or decrease the root key ofthe imported user sample by one octave. Hold down the option key to change the key in semi-tones. For more information on adding samples, refer to Importing Your Own Samples.
(4) Sync Anchor: Sets the Cursor's synchronization point in Scan Sync mode. In this mode, theScan control in the CURSOR section adjusts the time it takes the Cursor to move from the Startposition to the sync anchor. Note that the Sync Anchor can be positioned outside of the cursorrange. For more information, refer to Cursor.
(5) GRAINS: Contains controls related to the basic generation of the individual grains and theirshape. For more information, see Grains.
(6) CURSOR: Contains controls related to the Cursor and how it moves through the Source Sam-ple. The Cursor represents the read-out position of the grains. For more information, see Cursor.
(7) RANGE: Contains controls related to the Cursor Range, which sets boundaries for the read-outposition of the grain in the source sample. For more information, see Range.
(8) TUNE: Contains controls related to the Pitch of the individual grains. For more information, seeTune.
(9) AMP: Contains controls related to the Volume level of the individual grains. For more informa-tion, see Amp.
(10) ENVELOPE: Contains controls related to the Grain Layer's Volume Envelope. For more infor-mation, see Envelope.
8.2. GrainsThis section contains controls related to the basic generation of the individual grains and theirshape. This way you can define the basic character of your sound. Interval and Size are funda-mental to the way the sound transforms the source sample. High Interval values can be used formore consistent and slowly evolving sounds, while low values can create lively or erratic resultsthat change at a high rate. Use high values for Size to allow more of the character of the sourcesample to shine through the sound, or dive fully into abstract micro sound with low values. Fade Inand Fade Out can be used to make the sound smoother at high values, or more textured and an-gular at low values.
Grain Page
26

Grain page – Grains.
• Voices: Sets the maximum number of voices the Grain layer can play at the same time.• Interval: Adjusts the time between the generation of individual grains from the source sample.
• Grain Interval Sync: Allows you to set the grain interval in relation to the host tempo.• Size: Adjusts the duration of each individual grain until it is faded out.
• KT: Enables key tracking mode for the Size parameter. When enabled, the grain duration iscompensated according to the pitch of the MIDI note: high pitches result in short-grain dura-tions, while low pitches result in long-grain durations.
• Fade In: Adjusts the fade applied at the beginning of each grain. You can use this to soften theedges of the grains.
• Fade Out: Adjusts the fade applied at the end of each grain. You can use this to smoothen therelease of the grains.
8.3. CursorThis section contains controls related to the Cursor and how it moves through the source sample.The Cursor represents the read-out position of the grains. By changing the Start position, you canexplore the source sample for new sonic material to build your sound. Scan and Jitter determinethe movement of the Cursor during note events. Therefore, they strongly contribute to the charac-ter of the sound and how the original sample is transformed. The additional Poly and Free modesmake it possible to adjust the Cursor's behavior in relation to how the instrument is played viaMIDI.
Grain page – Cursor.
Grain Page
27
• Start: Adjusts the position of the Cursor in the source sample. The Cursor represents the read-out position of the grains. The position is set as percentage of the range between the left andright boundaries of the Cursor Range. For more information about the Cursor Range, refer toRange.
• Poly: Enables Poly mode. When enabled, each incoming MIDI note has its own dedicated Cur-sor. Therefore, each note can play grains from different read-out positions. When disabled, allMIDI notes coming in at the same time are locked to the Cursor position of the first played note.
• Free: Enables Free mode. When enabled, the Cursor position moves freely within the Cursorboundaries and according to the Scan parameter once a note event has started. In this case,modulation applied to the Cursor boundaries or the Start do not change the Cursor position.When disabled, modulation applied to related parameters during a note event change the Cur-sor position accordingly.
• Scan: Adjusts the Cursor's speed and direction as it moves across the source sample during anote event. Negative values let it move backwards, positive values let it move forwards. Notethat related parameters including Bounce Edges, Release direction (option above the enve-lope's R stage), Free mode and the Cursor Range boundaries interact with Scan.
• Scan Sync: Enables Scan Sync mode, which synchronizes the scan speed to the host clock.When enabled, Scan is set in musical note divisions relative to the host clock. The note dura-tion is the time it takes the Cursor to move from the Start position to the sync anchor as set inthe waveform display.
• Jitter: Adjusts the range of random position changes applied to the Cursor position. The maxi-mum value corresponds to 40% of the Cursor Range.
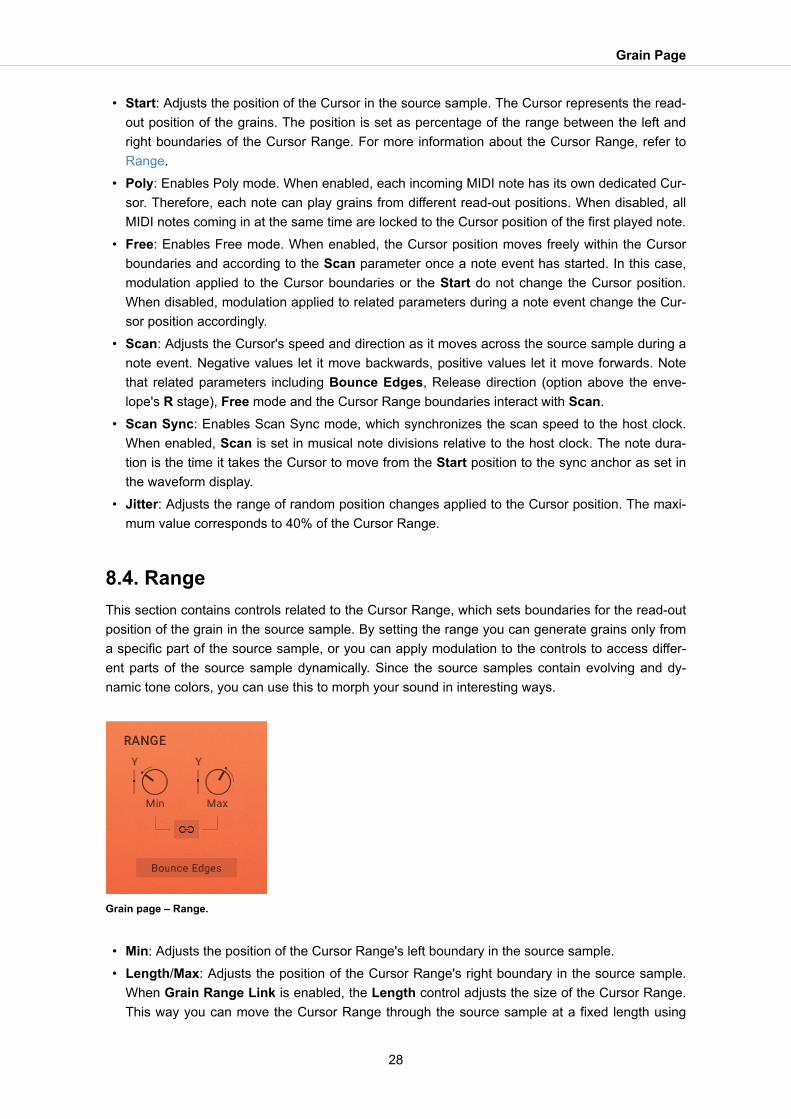
8.4. RangeThis section contains controls related to the Cursor Range, which sets boundaries for the read-outposition of the grain in the source sample. By setting the range you can generate grains only froma specific part of the source sample, or you can apply modulation to the controls to access differ-ent parts of the source sample dynamically. Since the source samples contain evolving and dy-namic tone colors, you can use this to morph your sound in interesting ways.
Grain page – Range.
• Min: Adjusts the position of the Cursor Range's left boundary in the source sample.• Length/Max: Adjusts the position of the Cursor Range's right boundary in the source sample.
When Grain Range Link is enabled, the Length control adjusts the size of the Cursor Range.This way you can move the Cursor Range through the source sample at a fixed length using
Grain Page
28
the Min control. When Grain Range Link is disabled, the Max control adjusts the absolute po-sition of the right boundary.
• Grain Range Link: Sets the behavior of the Length/Max control. When enabled, the control isswitched to Length. When disabled, the control is switched to Max (see Length/Max for moreinformation).
• Bounce Edges: Sets the Cursor's behavior when hitting the Cursor Range's boundaries. Whenenabled, the Cursor rebounds from the position of the boundaries and continues to move in theopposite direction.
When Free is enabled in the CURSOR section, the Cursor can move past the boun-dary's position and bounces back into the Cursor range in a spring-like movement.When Free is disabled, the Cursor cannot move past the boundary's position.
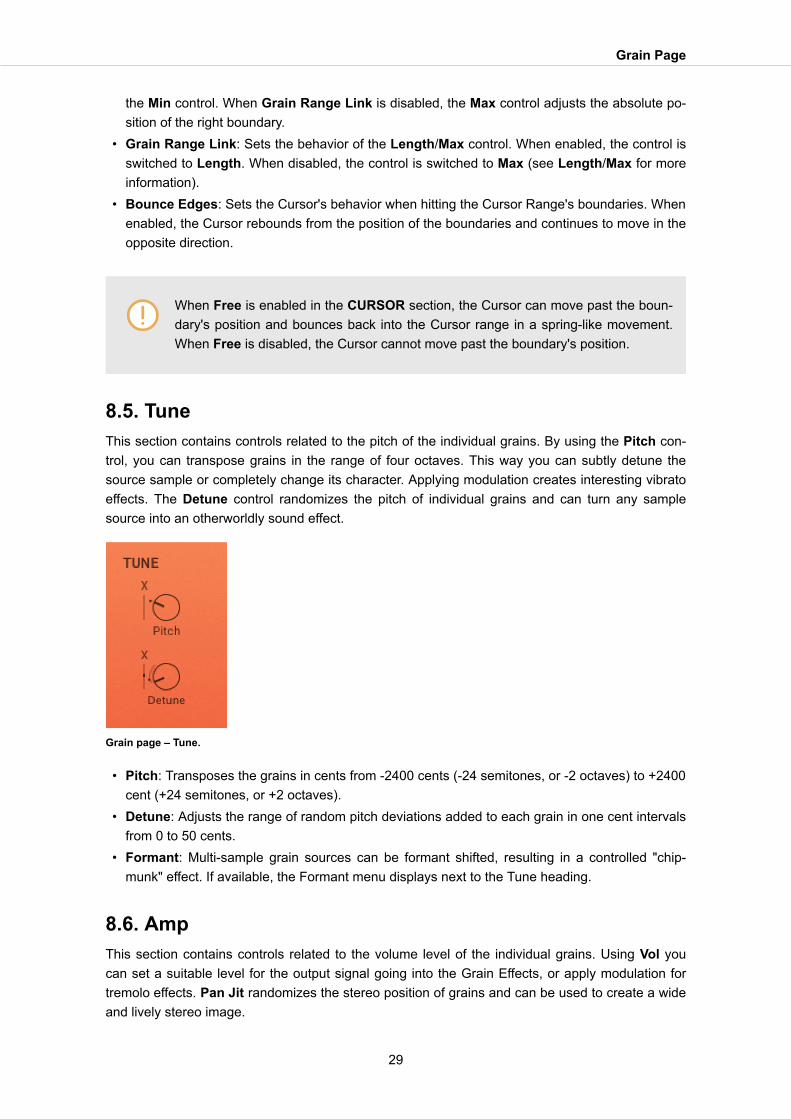
8.5. TuneThis section contains controls related to the pitch of the individual grains. By using the Pitch con-trol, you can transpose grains in the range of four octaves. This way you can subtly detune thesource sample or completely change its character. Applying modulation creates interesting vibratoeffects. The Detune control randomizes the pitch of individual grains and can turn any samplesource into an otherworldly sound effect.
Grain page – Tune.
• Pitch: Transposes the grains in cents from -2400 cents (-24 semitones, or -2 octaves) to +2400cent (+24 semitones, or +2 octaves).
• Detune: Adjusts the range of random pitch deviations added to each grain in one cent intervalsfrom 0 to 50 cents.
• Formant: Multi-sample grain sources can be formant shifted, resulting in a controlled "chip-munk" effect. If available, the Formant menu displays next to the Tune heading.
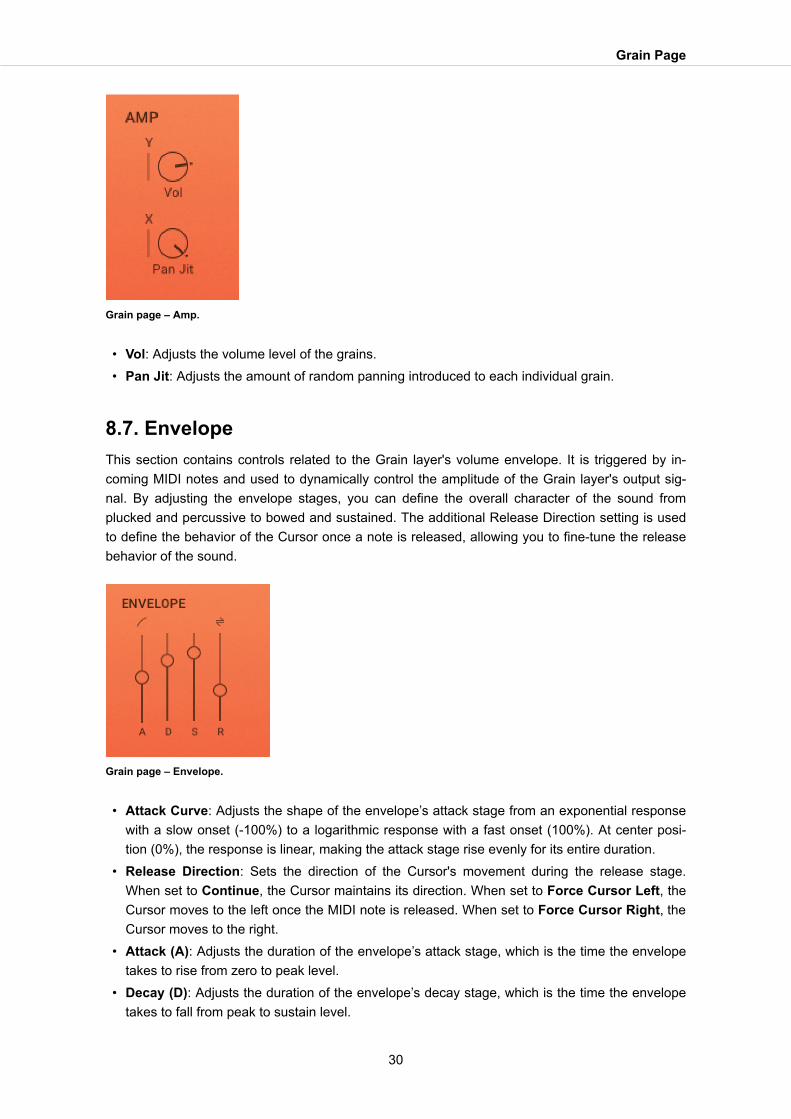
8.6. AmpThis section contains controls related to the volume level of the individual grains. Using Vol youcan set a suitable level for the output signal going into the Grain Effects, or apply modulation fortremolo effects. Pan Jit randomizes the stereo position of grains and can be used to create a wideand lively stereo image.
Grain Page
29
Grain page – Amp.
• Vol: Adjusts the volume level of the grains.• Pan Jit: Adjusts the amount of random panning introduced to each individual grain.
8.7. EnvelopeThis section contains controls related to the Grain layer's volume envelope. It is triggered by in-coming MIDI notes and used to dynamically control the amplitude of the Grain layer's output sig-nal. By adjusting the envelope stages, you can define the overall character of the sound fromplucked and percussive to bowed and sustained. The additional Release Direction setting is usedto define the behavior of the Cursor once a note is released, allowing you to fine-tune the releasebehavior of the sound.
Grain page – Envelope.
• Attack Curve: Adjusts the shape of the envelope’s attack stage from an exponential responsewith a slow onset (-100%) to a logarithmic response with a fast onset (100%). At center posi-tion (0%), the response is linear, making the attack stage rise evenly for its entire duration.
• Release Direction: Sets the direction of the Cursor's movement during the release stage.When set to Continue, the Cursor maintains its direction. When set to Force Cursor Left, theCursor moves to the left once the MIDI note is released. When set to Force Cursor Right, theCursor moves to the right.
• Attack (A): Adjusts the duration of the envelope’s attack stage, which is the time the envelopetakes to rise from zero to peak level.
• Decay (D): Adjusts the duration of the envelope’s decay stage, which is the time the envelopetakes to fall from peak to sustain level.
Grain Page
30
• Sustain (S): Adjusts the level of the envelope’s sustain stage, at which the envelope stays aslong as a note is held.
• Release (R): Adjusts the duration of the envelope's release stage, which is the time the enve-lope takes to fall from the sustain level to zero.
Grain Page
31

9. EFFECTS PAGE
On the Effects page, you can apply effects to the audio signals coming from the Grain layer andthe Sample Layer. For each layer, there is a dedicated Effects section containing an effect chain.Each effect chain consists of four effect slots for loading individual effects. You can choose fromnine effects which can be operated in several modes. Depending on the effect mode, there will bedifferent parameters and controls for the select effect.
This section contains an overview of the Effects page. Here you will learn how to load effects intoeffect slots and how to select an effect mode. You will also learn how to reorder and to disableeffect slots within the effect chain.
The procedures for the Effect sections explained here are the same for the GrainLayer, the Sample Layer, and the MASTER FX section on the Master page.
9.1. Effects Page OverviewThe Effects page contains the following elements and controls:
Effects page.
(1) Grain Header: Contains global functions including selection of the source sample, access tothe Grain Source browser, and overall volume level control for the Grain layer. For more informa-tion, refer to Grain Header.
(2) Sample Header: Contains global functions including selection of the source sample, access tothe Sample Source browser, and overall volume level control for the Sample layer. For more infor-mation, refer to Sample Header.
Effects Page
32
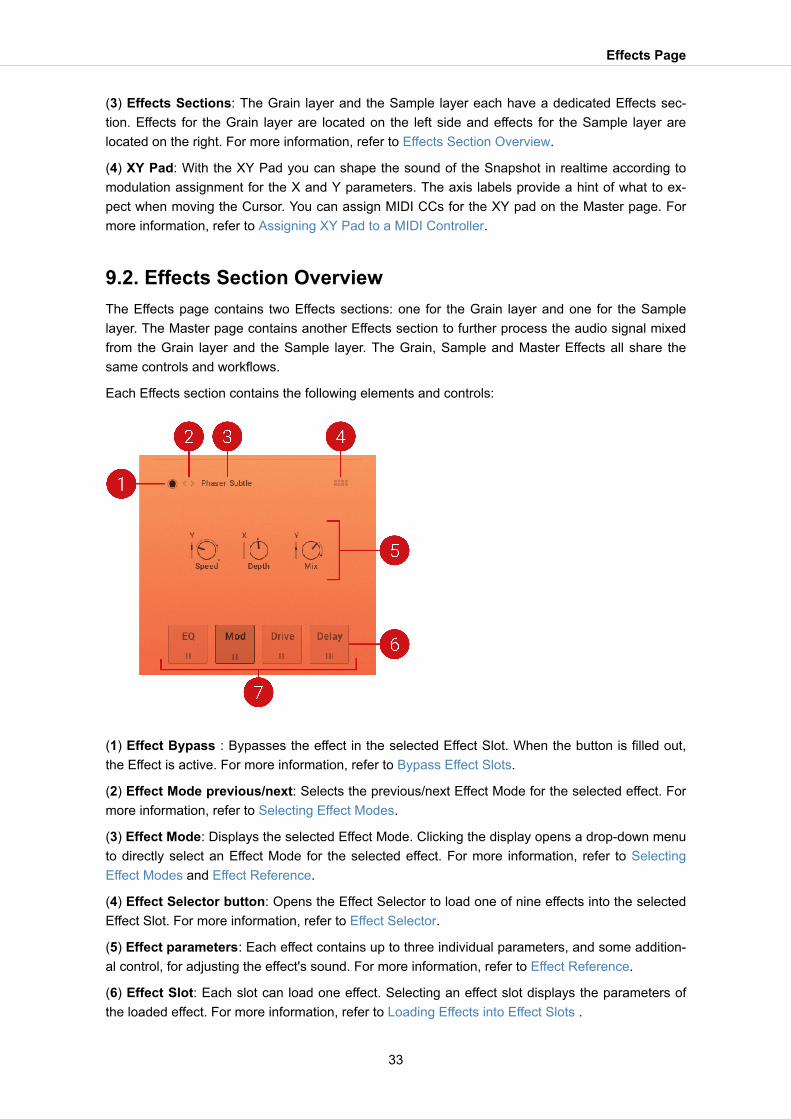
(3) Effects Sections: The Grain layer and the Sample layer each have a dedicated Effects sec-tion. Effects for the Grain layer are located on the left side and effects for the Sample layer arelocated on the right. For more information, refer to Effects Section Overview.
(4) XY Pad: With the XY Pad you can shape the sound of the Snapshot in realtime according tomodulation assignment for the X and Y parameters. The axis labels provide a hint of what to ex-pect when moving the Cursor. You can assign MIDI CCs for the XY pad on the Master page. Formore information, refer to Assigning XY Pad to a MIDI Controller.
9.2. Effects Section OverviewThe Effects page contains two Effects sections: one for the Grain layer and one for the Samplelayer. The Master page contains another Effects section to further process the audio signal mixedfrom the Grain layer and the Sample layer. The Grain, Sample and Master Effects all share thesame controls and workflows.
Each Effects section contains the following elements and controls:
(1) Effect Bypass : Bypasses the effect in the selected Effect Slot. When the button is filled out,the Effect is active. For more information, refer to Bypass Effect Slots.
(2) Effect Mode previous/next: Selects the previous/next Effect Mode for the selected effect. Formore information, refer to Selecting Effect Modes.
(3) Effect Mode: Displays the selected Effect Mode. Clicking the display opens a drop-down menuto directly select an Effect Mode for the selected effect. For more information, refer to SelectingEffect Modes and Effect Reference.
(4) Effect Selector button: Opens the Effect Selector to load one of nine effects into the selectedEffect Slot. For more information, refer to Effect Selector.
(5) Effect parameters: Each effect contains up to three individual parameters, and some addition-al control, for adjusting the effect's sound. For more information, refer to Effect Reference.
(6) Effect Slot: Each slot can load one effect. Selecting an effect slot displays the parameters ofthe loaded effect. For more information, refer to Loading Effects into Effect Slots .
Effects Page
33
(7) Effects Chain: The Effect Chain contains four Effect Slots, each with an individual effect. TheEffect Slots can be moved and rearranged within the Effects Chain. For more information, refer toMoving Effect Slots in the Effects Chain.
The procedure explained here for editing controls is the same for the Grain Layer,the Sample Layer, and the MASTER FX section on the Master page.
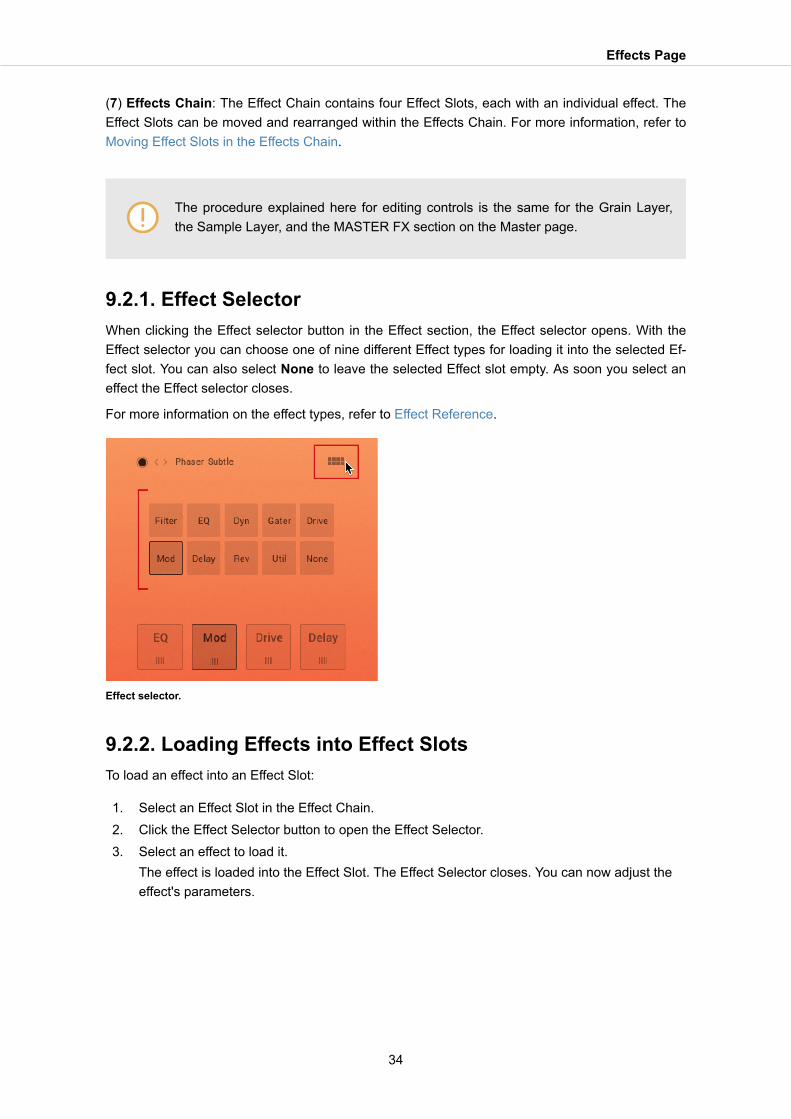
9.2.1. Effect SelectorWhen clicking the Effect selector button in the Effect section, the Effect selector opens. With theEffect selector you can choose one of nine different Effect types for loading it into the selected Ef-fect slot. You can also select None to leave the selected Effect slot empty. As soon you select aneffect the Effect selector closes.
For more information on the effect types, refer to Effect Reference.
Effect selector.
9.2.2. Loading Effects into Effect SlotsTo load an effect into an Effect Slot:
1. Select an Effect Slot in the Effect Chain.2. Click the Effect Selector button to open the Effect Selector.3. Select an effect to load it.
The effect is loaded into the Effect Slot. The Effect Selector closes. You can now adjust theeffect's parameters.
Effects Page
34

Loading an Effect into an Effect Slot
9.2.3. Selecting Effect ModesAny effect can be operated in various modes to change the general behavior of the effect. EachMode has its own set of unique parameters that best shape and articulate the sound of that effect.For more information on Effect Modes, refer to Effect Reference.
To select an Effect Mode:
1. Click the Effect Mode Display to open the Modes menu.2. Select a Mode from the drop-down menu.
The Effect Mode is changed. The new Mode is shown in the Mode Display, and the parame-ter controls are changed accordingly.
Selecting an Effect Mode from the menu.
Alternatively, you can skip to the next or previous Mode using the Effect Mode ar-rows, located next to the Mode Display.
Effects Page
35
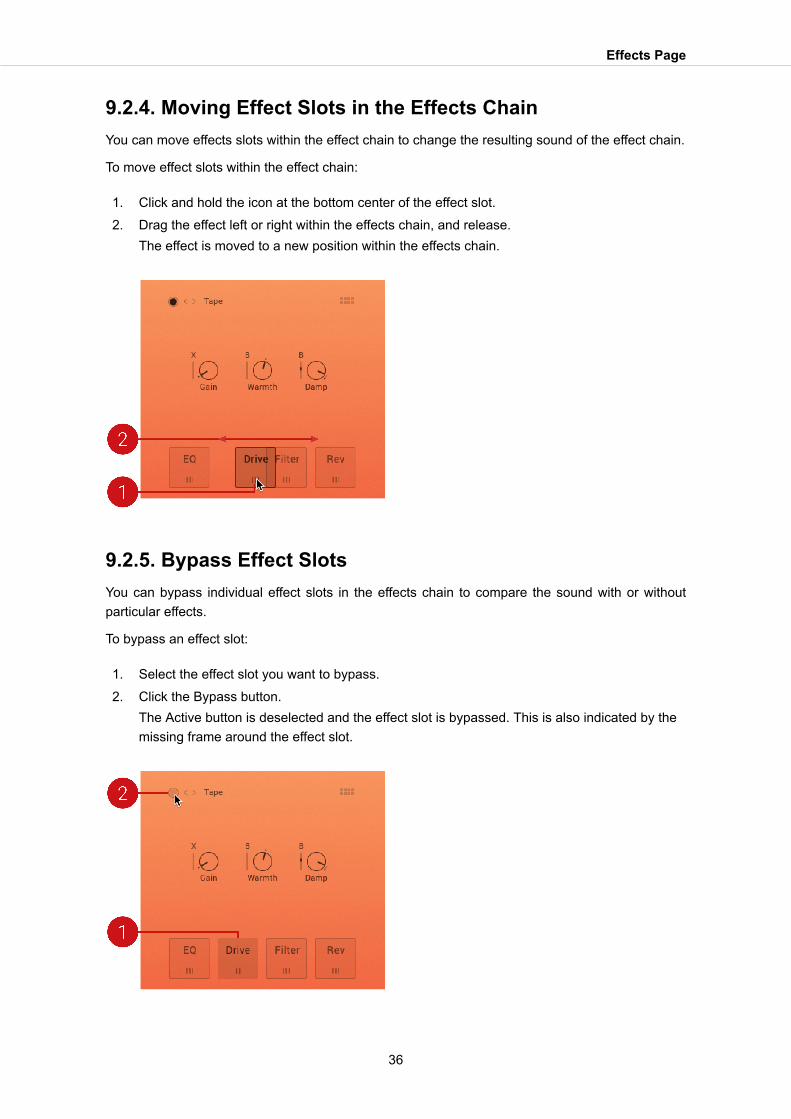
9.2.4. Moving Effect Slots in the Effects ChainYou can move effects slots within the effect chain to change the resulting sound of the effect chain.
To move effect slots within the effect chain:
1. Click and hold the icon at the bottom center of the effect slot.2. Drag the effect left or right within the effects chain, and release.
The effect is moved to a new position within the effects chain.
9.2.5. Bypass Effect SlotsYou can bypass individual effect slots in the effects chain to compare the sound with or withoutparticular effects.
To bypass an effect slot:
1. Select the effect slot you want to bypass.2. Click the Bypass button.
The Active button is deselected and the effect slot is bypassed. This is also indicated by themissing frame around the effect slot.
Effects Page
36
9.3. Effect ReferencePHARLIGHT provides nine different types of Effects, which can be loaded into any of the four slotsin the Effects Chain. When selecting effects, you must consider the function of the effect itself, andits impact in the signal flow of the Effects Chain. Certain combinations of effects are particularlyeffective when used together, while other combinations are less successful. For further flexibilityand functionality for a wide range of sound design, each effect has multiple Effect Modes, whichwill shape the character and behavior of the effect.
In this section you are introduced to all available Effects in PHARLIGHT, and the range of EffectModes in which they can be operated in.
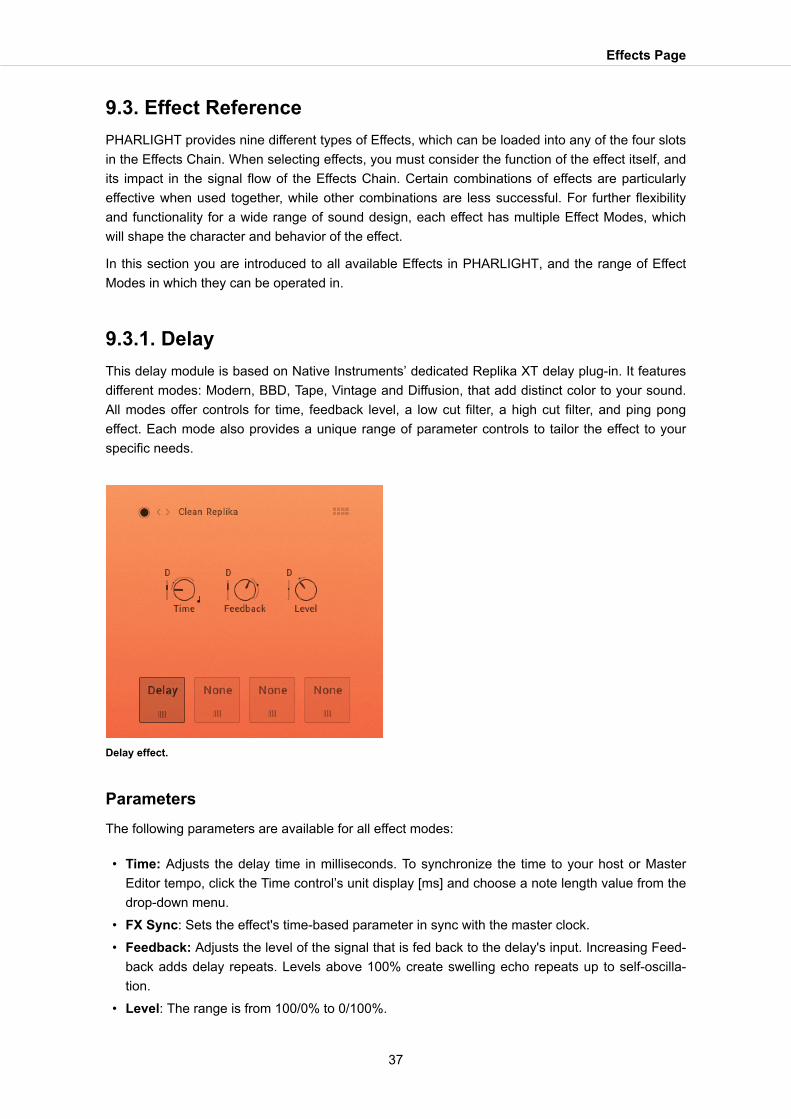
9.3.1. DelayThis delay module is based on Native Instruments’ dedicated Replika XT delay plug-in. It featuresdifferent modes: Modern, BBD, Tape, Vintage and Diffusion, that add distinct color to your sound.All modes offer controls for time, feedback level, a low cut filter, a high cut filter, and ping pongeffect. Each mode also provides a unique range of parameter controls to tailor the effect to yourspecific needs.
Delay effect.
ParametersThe following parameters are available for all effect modes:
• Time: Adjusts the delay time in milliseconds. To synchronize the time to your host or MasterEditor tempo, click the Time control’s unit display [ms] and choose a note length value from thedrop-down menu.
• FX Sync: Sets the effect's time-based parameter in sync with the master clock.• Feedback: Adjusts the level of the signal that is fed back to the delay's input. Increasing Feed-
back adds delay repeats. Levels above 100% create swelling echo repeats up to self-oscilla-tion.
• Level: The range is from 100/0% to 0/100%.
Effects Page
37

Effect ModesThe following effect modes and its variations are available:
• Modern (Saturation, Dark, Ping Pong): Modern mode is a clean delay, with saturation andfilter controls that allow you to add warmth and color to your sound. It is a pristine and transpar-ent delay, well-suited to acoustic instruments like guitar and piano. When changing the delaytime, pitch stays constant.
• BBD (Clean, Warm, Dark, Grunge, Ping Pong, Vibrato LR): Analog mode offers four BucketBrigade delay models that replicate the character sound of BBD chips. From subtle distortionand warmth, to clean, smooth sounds, each model emulates desired characteristics of classicanalog delay units.
• Tape (Fresh, Vintage, Dark, Dark LR): Tape mode reproduces the sound of tape delay, mod-eled on the physical mechanisms that make up early tape machines. Controls for Tape Age,Flutter, and Saturation allow you to manipulate the noise, hiss, and color of the effect.
• Vintage (Ping Pong, Mod, BP): Vintage mode emulates the sound of early digital delay units.Select between four quality levels that model the behavior of vintage delays with a limited sam-ple memory size. Increasing the delay time causes the sampling rate to decrease, introducingaudio artifacts. The sample quality and interpolation vary for each of the four quality levels.
• Diffusion (Dense, Small LR, Gentle, Cloud Pan, 4 Times): Diffusion mode can produce astandard delay effect, but it is best used for its huge, diffusion-based reverb sound. Thicken thedensity of delay repeats with the Dense, Modulation, and Size controls to create a full soundingreverb effect. This mode is ideal for ambient music and sound design.
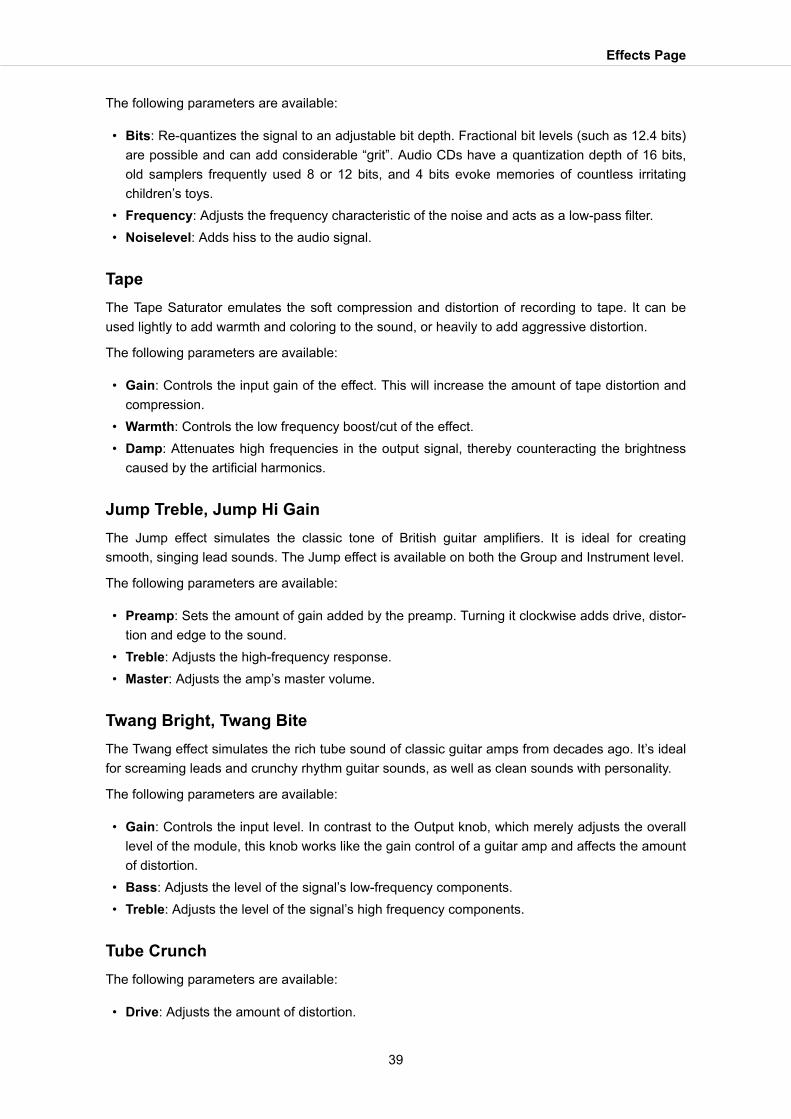
9.3.2. DriveThe Drive effect can be used to apply specific saturation to the sound. Several effect modes fordifferent saturation sounds are available which are explained in more detail below.
Drive effect.
LofiThis module adds various digital artifacts, like quantization noise or aliasing, to a clean signal. It’sgreat for roughing up sounds that would otherwise be too plain and featureless.
Effects Page
38
The following parameters are available:
• Bits: Re-quantizes the signal to an adjustable bit depth. Fractional bit levels (such as 12.4 bits)are possible and can add considerable “grit”. Audio CDs have a quantization depth of 16 bits,old samplers frequently used 8 or 12 bits, and 4 bits evoke memories of countless irritatingchildren’s toys.
• Frequency: Adjusts the frequency characteristic of the noise and acts as a low-pass filter.• Noiselevel: Adds hiss to the audio signal.
TapeThe Tape Saturator emulates the soft compression and distortion of recording to tape. It can beused lightly to add warmth and coloring to the sound, or heavily to add aggressive distortion.
The following parameters are available:
• Gain: Controls the input gain of the effect. This will increase the amount of tape distortion andcompression.
• Warmth: Controls the low frequency boost/cut of the effect.• Damp: Attenuates high frequencies in the output signal, thereby counteracting the brightness
caused by the artificial harmonics.
Jump Treble, Jump Hi GainThe Jump effect simulates the classic tone of British guitar amplifiers. It is ideal for creatingsmooth, singing lead sounds. The Jump effect is available on both the Group and Instrument level.
The following parameters are available:
• Preamp: Sets the amount of gain added by the preamp. Turning it clockwise adds drive, distor-tion and edge to the sound.
• Treble: Adjusts the high-frequency response.• Master: Adjusts the amp’s master volume.
Twang Bright, Twang BiteThe Twang effect simulates the rich tube sound of classic guitar amps from decades ago. It’s idealfor screaming leads and crunchy rhythm guitar sounds, as well as clean sounds with personality.
The following parameters are available:
• Gain: Controls the input level. In contrast to the Output knob, which merely adjusts the overalllevel of the module, this knob works like the gain control of a guitar amp and affects the amountof distortion.
• Bass: Adjusts the level of the signal’s low-frequency components.• Treble: Adjusts the level of the signal’s high frequency components.
Tube CrunchThe following parameters are available:
• Drive: Adjusts the amount of distortion.
Effects Page
39
• Treble: Adjusts the level of the signal’s high frequency components.• Master: Adjusts the amp’s master volume.
Tube CreamerThe following parameters are available:
• Tone: Controls the brightness of the sound. Turning this knob clockwise will result in a morepronounced top-end, which works great on bright, screaming leads and biting rhythms. Turningit counter-clockwise results in a mellower, darker sound.
• Output: Adjusts the module’s output level.
Enh ShapingThe following parameters are available:
• Drive: Adjusts the amount of distortion.• Output: Adjusts the module’s output level.
Tube WarmingThe following parameters are available:
• Drive: Adjusts the amount of distortion.• Damp: Attenuates high frequencies in the output signal, thereby counteracting the brightness
caused by the artificial harmonics.• Output: Adjusts the module’s output level.
AC Box Brilliant, AC Box TremThe ACBox models the guitar amplifier sound that powered the British Invasion of pop music.There were many versions of this highly original amp made, each having a different character. Wechose a model that stands out with a unique flavor and includes the famous Top Boost channel!
The following parameters are available:
• Gain: Sets the level for the Brilliant channel.• Hi-Cut: Controls a low-pass filter. By turning the knob clockwise treble in the output of the Nor-
mal channel is reduced.• Output: Adjusts the module's output level.
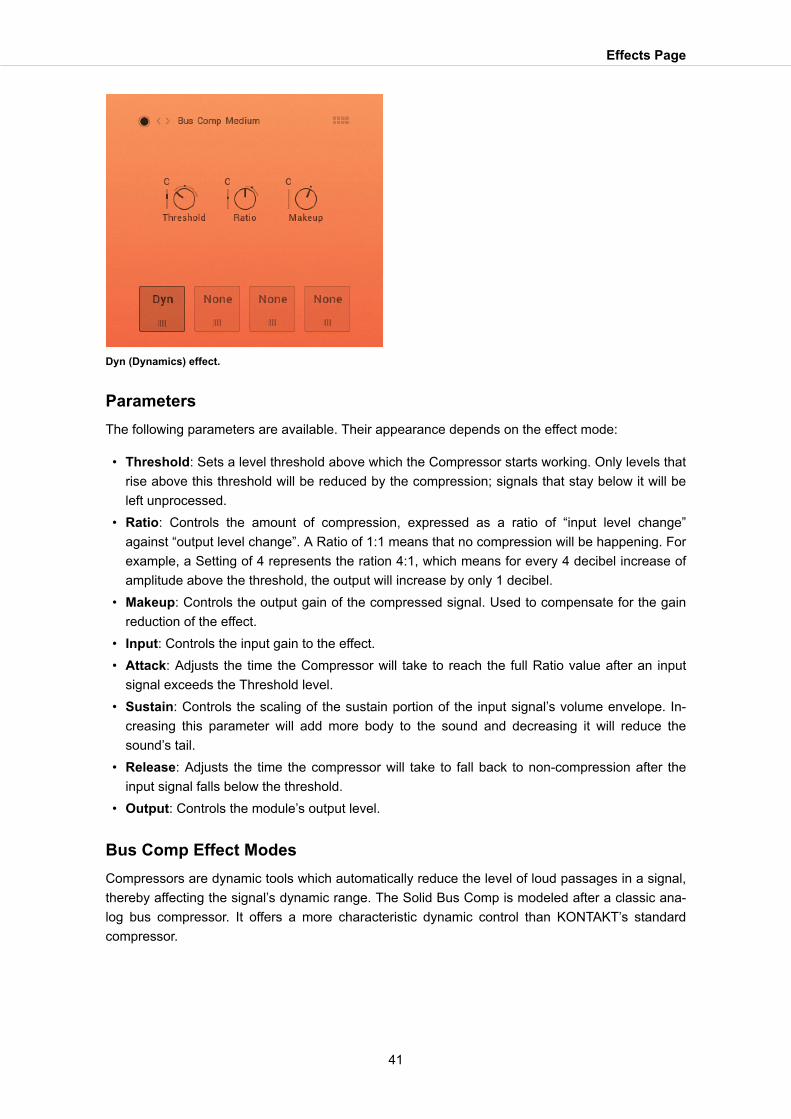
9.3.3. DynThe Dyn (Dynamics) effect can be used, for example, to reduce the level of loud passages in theaudio signal. The available parameters and effect modes are explained in more detail below.
Effects Page
40
Dyn (Dynamics) effect.
ParametersThe following parameters are available. Their appearance depends on the effect mode:
• Threshold: Sets a level threshold above which the Compressor starts working. Only levels thatrise above this threshold will be reduced by the compression; signals that stay below it will beleft unprocessed.
• Ratio: Controls the amount of compression, expressed as a ratio of “input level change”against “output level change”. A Ratio of 1:1 means that no compression will be happening. Forexample, a Setting of 4 represents the ration 4:1, which means for every 4 decibel increase ofamplitude above the threshold, the output will increase by only 1 decibel.
• Makeup: Controls the output gain of the compressed signal. Used to compensate for the gainreduction of the effect.
• Input: Controls the input gain to the effect.• Attack: Adjusts the time the Compressor will take to reach the full Ratio value after an input
signal exceeds the Threshold level.• Sustain: Controls the scaling of the sustain portion of the input signal’s volume envelope. In-
creasing this parameter will add more body to the sound and decreasing it will reduce thesound’s tail.
• Release: Adjusts the time the compressor will take to fall back to non-compression after theinput signal falls below the threshold.
• Output: Controls the module’s output level.
Bus Comp Effect ModesCompressors are dynamic tools which automatically reduce the level of loud passages in a signal,thereby affecting the signal’s dynamic range. The Solid Bus Comp is modeled after a classic ana-log bus compressor. It offers a more characteristic dynamic control than KONTAKT’s standardcompressor.
Effects Page
41
Feedback Comp Fast Effect ModesCompressors are dynamic tools that automatically reduce the level of loud passages in a signal,thereby affecting the signal's dynamic range. A feedback compressor is a type of compressor thatcompares the amplifier's output signal, rather than the input signal, to a threshold level. When thethreshold level is reached, the compressor reduces the signal's gain level. The Feedback Com-pressor is modeled after a classic feedback compressor known for its bright and punchy sound.
Transient MasterThe Transient Master is an easy to use compressor designed to control the attack and sustain of asound. Instead of following the amplitude of the sound like a traditional compressor, it follows thegeneral envelope and is thus not as susceptible to changes of input gain. It is best used on soundswith fast attacks, like percussion, pianos or guitars. The Transient Master can also be quite ex-treme in some cases, so use it with caution.
LimiterLimiters are actually a special form of compressors with a ratio of one to infinity, a threshold justbelow the maximum level, and a very short attack time. They act as a “safety net” to keep shortsignal peaks from overloading the system, which would result in audio clipping. While compressorshave a range of artistic applications, limiters are usually used for technical reasons — they cantame signals with peaks which would otherwise overload the output, without requiring you to turnthe signal’s overall volume down.
9.3.4. EQFully parametric peak equalizers allow for a wide range of tonal alterations and corrections. Usethe EQ to boost or cut selective frequencies of the audio signal. The EQ is mainly a tool to tailoryour audio signal to taste by cutting out selected frequencies or boosting others. The EQ can beoperated in a 1 Band EQ and in a 3 Band EQ which are explained in more detail below.
1 Band EQThe 1 Band EQ is a simple equalizer.
1 Band EQ effect.
Effects Page
42

The following parameters are available:
• Freq. (Frequency): Adjusts the center frequency at which the boost or cut will occur.• Width (Bandwidth): Adjusts the width of the frequency range that will be affected in octaves
(bell shape).• Gain: Adjusts the amount of boost (positive values) or cut (negative values) at the center fre-
quency.
3 Band EQUsing up to three EQ bands, you can boost or cut any frequency range throughout the entire spec-trum by up to 18 dB, with an adjustable Bandwidth parameter allowing you to choose betweengentle corrections or very steep edits.
3 Band EQ effect.
The following parameters are available:
• Equalizer Q: Controls the Quality (or Q) of the frequency band. For most EQs, the higher thequality, the narrower the frequency band. For most EQs, the higher the quality, the narrower thefrequency band, but with this EQ the control is reversed to match the hardware it emulates andbecomes a bandwidth control.
• Gain: Adjusts the amount of boost (positive values) or cut (negative values) at the center fre-quency.
• Freq. (Frequency): Adjusts the center frequency at which the boost or cut will occur.
9.3.5. FilterA filter is a signal processor which changes the frequency content of a signal that passes throughit. This means that in contrast to effects like distortion, reverb, or chorus, it only changes the ampli-tude and phase of frequency components which are already present in your signal, without creat-ing new frequency content.
Effects Page
43
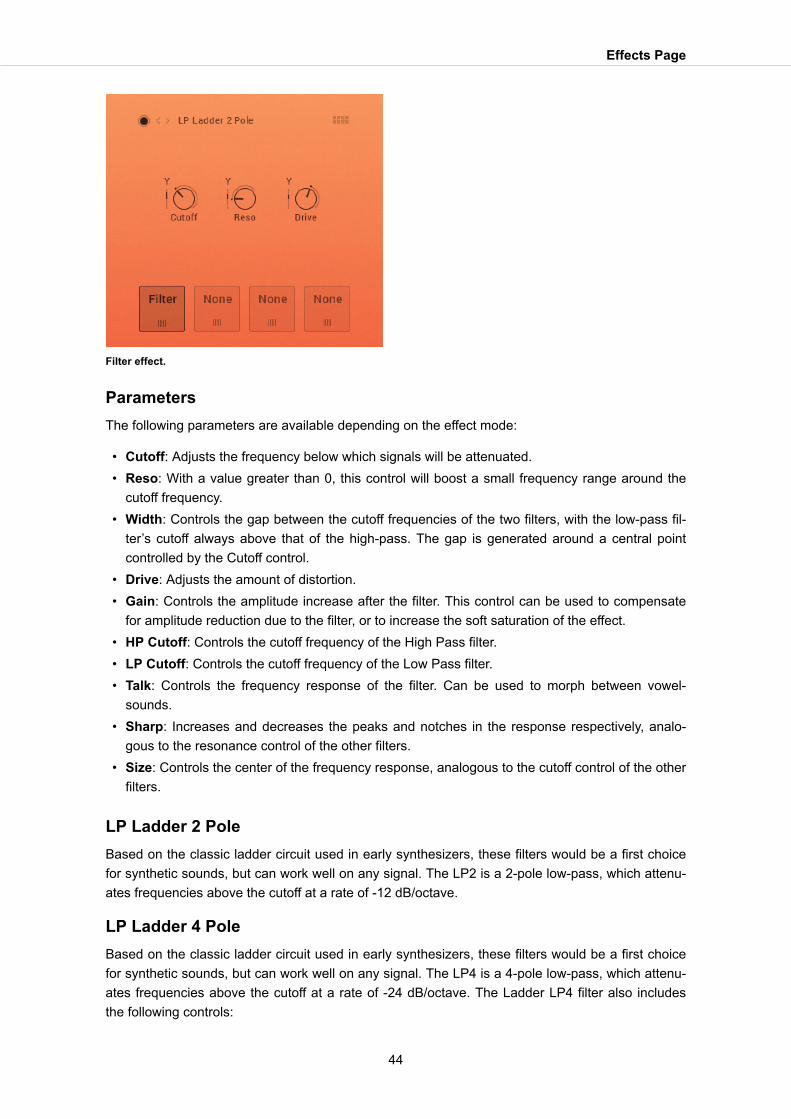
Filter effect.
ParametersThe following parameters are available depending on the effect mode:
• Cutoff: Adjusts the frequency below which signals will be attenuated.• Reso: With a value greater than 0, this control will boost a small frequency range around the
cutoff frequency.• Width: Controls the gap between the cutoff frequencies of the two filters, with the low-pass fil-
ter’s cutoff always above that of the high-pass. The gap is generated around a central pointcontrolled by the Cutoff control.
• Drive: Adjusts the amount of distortion.• Gain: Controls the amplitude increase after the filter. This control can be used to compensate
for amplitude reduction due to the filter, or to increase the soft saturation of the effect.• HP Cutoff: Controls the cutoff frequency of the High Pass filter.• LP Cutoff: Controls the cutoff frequency of the Low Pass filter.• Talk: Controls the frequency response of the filter. Can be used to morph between vowel-
sounds.• Sharp: Increases and decreases the peaks and notches in the response respectively, analo-
gous to the resonance control of the other filters.• Size: Controls the center of the frequency response, analogous to the cutoff control of the other
filters.
LP Ladder 2 PoleBased on the classic ladder circuit used in early synthesizers, these filters would be a first choicefor synthetic sounds, but can work well on any signal. The LP2 is a 2-pole low-pass, which attenu-ates frequencies above the cutoff at a rate of -12 dB/octave.
LP Ladder 4 PoleBased on the classic ladder circuit used in early synthesizers, these filters would be a first choicefor synthetic sounds, but can work well on any signal. The LP4 is a 4-pole low-pass, which attenu-ates frequencies above the cutoff at a rate of -24 dB/octave. The Ladder LP4 filter also includesthe following controls:
Effects Page
44

LP SV 2 PoleThe State Variable (SV) filters have a clean characteristic that can be used for all kinds of audiosignals. The LP2 is a 2-pole low-pass, which attenuates frequencies above the cutoff at a rate of-12 dB/octave.
LP SV 4 PoleThe State Variable (SV) filters have a clean characteristic that can be used for all kinds of audiosignals. The LP4 is a 4-pole low-pass, which attenuates frequencies above the cutoff at a rate of-24 dB/octave.
HP Ladder 2 PoleBased on the classic ladder circuit used in early synthesizers, these filters would be a first choicefor synthetic sounds, but can work well on any signal. The HP2 is a 2-pole high-pass, which at-tenuates frequencies below the cutoff at a rate of -12 dB/octave. The Ladder HP2 filter also in-cludes the following controls:
HP Ladder 4 PoleBased on the classic ladder circuit used in early synthesizers, these filters would be a first choicefor synthetic sounds, but can work well on any signal. The HP4 is a 4-pole high-pass, which at-tenuates frequencies below the cutoff at a rate of -24 dB/octave. The Ladder HP4 filter also in-cludes the following controls:
HP SV 2 PoleThe State Variable (SV) filters have a clean characteristic that can be used for all kinds of audiosignals. The HP2 is a 2-pole high-pass, which attenuates frequencies below the cutoff at a rate of-12 dB/octave.
HP SV 4 PoleThe State Variable (SV) filters have a clean characteristic that can be used for all kinds of audiosignals. The HP4 is a 4-pole high-pass, which attenuates frequencies below the cutoff at a rate of-24 dB/octave.
BP Ladder 2 PoleBased on the classic ladder circuit used in early synthesizers, these filters would be a first choicefor synthetic sounds, but can work well on any signal. The BP2 is a 2-pole band-pass, which at-tenuates frequencies above and below the cutoff at a rate of -12 dB/octave. The Ladder BP2 filteralso includes the following controls:
BP Ladder 4 PoleBased on the classic ladder circuit used in early synthesizers, these filters would be a first choicefor synthetic sounds, but can work well on any signal. The BP4 is a 4-pole band-pass, which at-tenuates frequencies above and below the cutoff at a rate of -24 dB/octave. The Ladder BP4 filteralso includes the following controls:
Effects Page
45

BP SV 2 PoleThe State Variable (SV) filters have a clean characteristic that can be used for all kinds of audiosignals. The BP2 is a 2-pole band-pass, which attenuates frequencies above and below the cutoffat a rate of -12 dB/octave.
BP SV 4 PoleThe State Variable (SV) filters have a clean characteristic that can be used for all kinds of audiosignals. The BP4 is a 4-pole band-pass, which attenuates frequencies above and below the cutoffat a rate of -24 dB/octave.
LP HPThis very clean sounding filter lacks any pronounced resonance and is ideally suited for removal oflow frequency rumble and high frequency issues like harshness and excessive noise without color-ing the filtered signal.
The HP filter is a 2-pole (12 dB/octave), whereas the 1-pole LP has a more gentle slope of 6 dB/octave.
PhaserThis effect continually changes the phase relationships in your signal with an all-pass filter. Thisresults in a comb filtering effect, which attenuates some frequencies while boosting others. Thesound is similar to that of a Flanger but in a more subtle manner.
Vowel AThis filter simulates the resonant frequencies of the human vocal tract; when forming a vowel, thethroat and mouth cavities will change their shape in order to create a complex, natural filter whichemphasizes certain frequencies in the sound created by the vocal chords. These characteristic fre-quencies, called formants, allow the human hearing to discern between different vowels, and arebeing replicated by this filter.
Vowel BThis filter works similarly to the Vowel A module, but has a slightly different sonic character.
FormantFormants are acoustic resonances. The term often applies to the phonetics of human speech, assuch, the formant filters are designed to mimic the frequency response of the human vocal tract.These filters can be used to emulate the “talk box” effect.
LP DraftThe Daft filter has been adapted from MASSIVE and is a more aggressive synthesizer filter de-sign. The response of the filter is a 2-pole low-pass, which attenuates frequencies above the cutoffat a rate of -12 dB/octave. The daft filter also includes a Gain knob that controls the amplitude in-crease after the filter. This control can be used to compensate for amplitude reduction due to thefilter, or to increase the soft saturation of the effect.
Effects Page
46
HP DraftThe Daft filter has been adapted from MASSIVE and is a more aggressive synthesizer filter de-sign. The response of the filter is a 2-pole high-pass, which attenuates frequencies below the cut-off at a rate of -12 dB/octave. The Daft filters also include the following controls:
Notch SV4 PoleThe State Variable (SV) filters have a clean characteristic that can be used for all kinds of audiosignals. The Notch 4 is a 4-pole notch filter, which attenuates frequencies at the cutoff.
AR LP 2The Adaptive Resonance (AR) filters follow the amplitude of the input signal and adjust the reso-nance accordingly. At higher input levels, the resonance will reduce, and for lower levels it will in-crease, this avoids unpleasant peaks. These filters work best on full loops or drums. The LP2 is a2-pole low-pass, which attenuates frequencies above the cutoff at a rate of -12 dB/octave.
AR LP 4The Adaptive Resonance (AR) filters follow the amplitude of the input signal and adjust the reso-nance accordingly. At higher input levels, the resonance will reduce, and for lower levels it will in-crease, this avoids unpleasant peaks. These filters work best on full loops or drums. The LP4 is a4-pole low-pass, which attenuates frequencies above the cutoff at a rate of -24 dB/octave.
AR HP 2The Adaptive Resonance (AR) filters follow the amplitude of the input signal and adjust the reso-nance accordingly. At higher input levels, the resonance will reduce, and for lower levels it will in-crease, this avoids unpleasant peaks. These filters work best on full loops or drums. The HP2 is a2-pole high-pass, which attenuates frequencies below the cutoff at a rate of -12 dB/octave.
AR BP 2The Adaptive Resonance (AR) filters follow the amplitude of the input signal and adjust the reso-nance accordingly. At higher input levels, the resonance will reduce, and for lower levels it will in-crease, this avoids unpleasant peaks. These filters work best on full loops or drums. The BP2 is a2-pole band-pass, which attenuates frequencies below and above the cutoff at a rate of -12 dB/octave.
HP LP SerialThe State Variable (SV) filters have a clean characteristic that can be used for all kinds of audiosignals. The Ser. LP/HP is the combination of a high-pass filter routed serially after a low-pass fil-ter. The result is similar to a band-pass filter.
9.3.6. GaterThe Gater controls the volume of a sound with the help of two step sequencers. This can be usedto rhythmically chop the signal and make it stutter or sound staccato. The Gater has two individualrhythms A and B which you can crossfade using the applied modulation source. The Gater inPHARLIGHT retriggers on the first note to better accommodate vocal-based presets.
Effects Page
47

Gater effect.
(1) Presets: Selects a preset for the Gater effect. The name of the selected preset is displayed.
(2) Rhythm A and B: Switches between the rhythms A and B.
(3) Stepping area: Adjust the steps for the selected rhythm by dragging the bars up or down.
(4) Context menu: With the options in this menu you can, for example, copy or swap the rhythmsfrom A to B.
(5) Division of musical timing: Determines how fast the Gater is stepping forward. You can se-lect from 1/4 to 1/ 64 of a beat.
(6) Size: Determines how many steps the Gater provides. You can select between 2 to 32 steps.
(7) Modulation Source: Selects the modulation source to be applied to the parameter.
The Gater effect can only be used once in PHARLIGHT .
9.3.7. ModThe Mod (Modulation) effect modifies the sound in certain ways. Depending on the selected effectmode, the effect can, for example, "thicken" the sound or be used to split the audio signal and de-lay one version in relation to the original signal. The available effect modes with all parameters areexplained in more detail below.
Effects Page
48
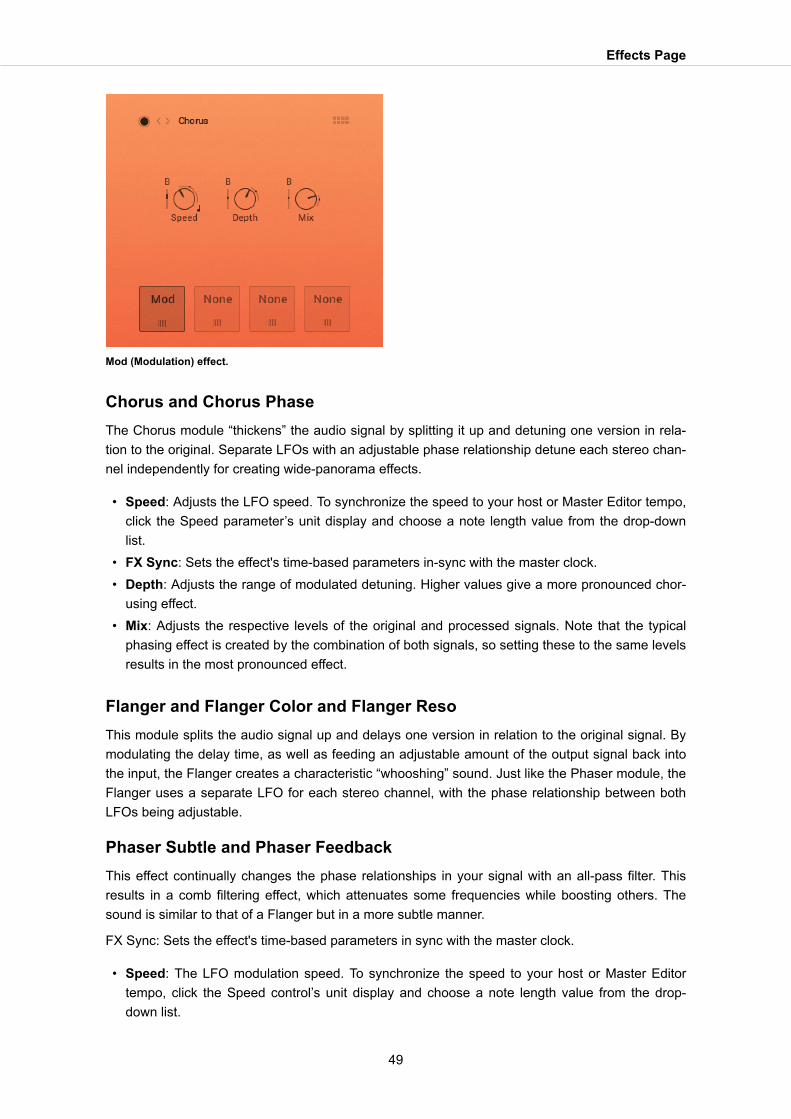
Mod (Modulation) effect.
Chorus and Chorus PhaseThe Chorus module “thickens” the audio signal by splitting it up and detuning one version in rela-tion to the original. Separate LFOs with an adjustable phase relationship detune each stereo chan-nel independently for creating wide-panorama effects.
• Speed: Adjusts the LFO speed. To synchronize the speed to your host or Master Editor tempo,click the Speed parameter’s unit display and choose a note length value from the drop-downlist.
• FX Sync: Sets the effect's time-based parameters in-sync with the master clock.• Depth: Adjusts the range of modulated detuning. Higher values give a more pronounced chor-
using effect.• Mix: Adjusts the respective levels of the original and processed signals. Note that the typical
phasing effect is created by the combination of both signals, so setting these to the same levelsresults in the most pronounced effect.
Flanger and Flanger Color and Flanger ResoThis module splits the audio signal up and delays one version in relation to the original signal. Bymodulating the delay time, as well as feeding an adjustable amount of the output signal back intothe input, the Flanger creates a characteristic “whooshing” sound. Just like the Phaser module, theFlanger uses a separate LFO for each stereo channel, with the phase relationship between bothLFOs being adjustable.
Phaser Subtle and Phaser FeedbackThis effect continually changes the phase relationships in your signal with an all-pass filter. Thisresults in a comb filtering effect, which attenuates some frequencies while boosting others. Thesound is similar to that of a Flanger but in a more subtle manner.
FX Sync: Sets the effect's time-based parameters in sync with the master clock.
• Speed: The LFO modulation speed. To synchronize the speed to your host or Master Editortempo, click the Speed control’s unit display and choose a note length value from the drop-down list.
Effects Page
49
• FX Sync: Sets the effect's time-based parameters in-sync with the master clock.• Depth: The amount of LFO modulation. Higher values cause the Phaser effect to sweep over a
wider frequency range.• Mix: Adjusts the respective levels of the original and processed signals. Note that the typical
phasing effect is created by the combination of both signals, so setting these to the same levelsresults in the most pronounced effect.
Rotator and Rotator Room and Rotator Slow Acc and Rotator Fast AccThe Rotator effect realistically simulates the sound of rotating speaker cabinets, which are com-monly associated with drawbar organs that became popular in rock music of the 60s and 70s. Al-though the effect is almost intrinsically tied to "the" prototypical drawbar organ sound, it worksequally well on guitars, synth pads, and a wide range of other sounds.
• Speed: Although this parameter appears as a knob in order to facilitate automation, it has twopositions Slow and Fast. A change of this setting realistically simulates the acceleration orbraking of the rotor.
• Balance: Controls the relative levels of the cabinet’s treble and bass parts.• Wet: Adjusts the level of the original and processed signal.
Choral Synth, Feedback, Ensemble, Dimension, and SauceChoral features four distinct chorus modes, ranging from the subtle sound of classic studio rackprocessors to the large ensemble sound of early string synthesizers. Choral contains the followingeffects:
• Synth: This mode is inspired by the choruses of polyphonic synthesizers from the late seven-ties and early eighties. Its sound characteristic is dark and vintage. The modulation behavior istuned for rich and dispersed sounds.
• Ensemble: This mode is inspired by the choruses of string synthesizers from the seventies. Itssound characteristic is warm and lush. The modulation behavior is tuned for animated and live-ly sounds.
• Dimension: This mode is inspired by the choruses of studio rack processors from the earlyeighties. Its sound characteristic is bright and transparent. The modulation behavior is tuned forwide and consistent sounds.
• Universal: This mode is a more generic chorus implementation. Its sound characteristic isclean and modern. The modulation behavior is tuned for a range of sounds from consistent tolively, depending on the number of Voices.
Choral Parameters
• Mix: Adjusts the respective levels of the original and processed signals. Note that the typicalphasing effect is created by the combination of both signals, so setting these to the same levelsresults in the most pronounced effect.
• Depth: Adjusts the range of modulated detuning. Higher values give a more pronounced chor-using effect.
• Speed: Adjusts the LFO speed. To synchronize the speed to your host or Master Editor tempo,click the Speed parameter’s unit display and choose a note length value from the drop-downlist.
Effects Page
50
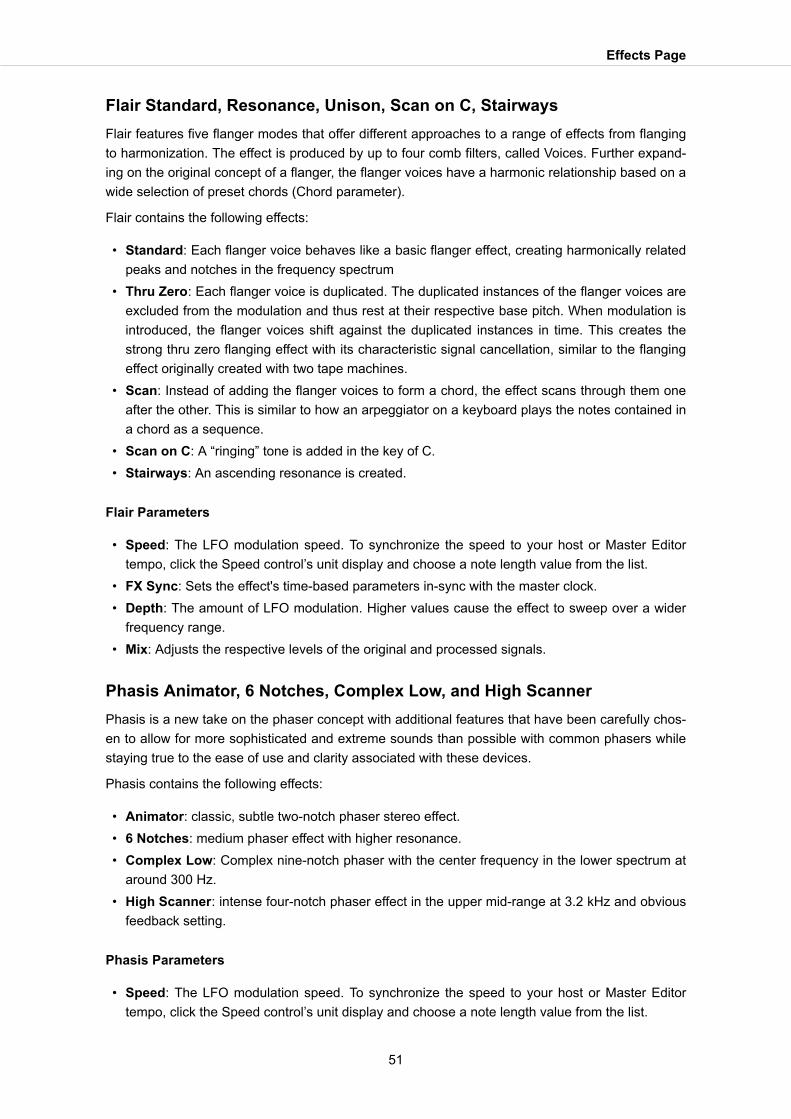
Flair Standard, Resonance, Unison, Scan on C, StairwaysFlair features five flanger modes that offer different approaches to a range of effects from flangingto harmonization. The effect is produced by up to four comb filters, called Voices. Further expand-ing on the original concept of a flanger, the flanger voices have a harmonic relationship based on awide selection of preset chords (Chord parameter).
Flair contains the following effects:
• Standard: Each flanger voice behaves like a basic flanger effect, creating harmonically relatedpeaks and notches in the frequency spectrum
• Thru Zero: Each flanger voice is duplicated. The duplicated instances of the flanger voices areexcluded from the modulation and thus rest at their respective base pitch. When modulation isintroduced, the flanger voices shift against the duplicated instances in time. This creates thestrong thru zero flanging effect with its characteristic signal cancellation, similar to the flangingeffect originally created with two tape machines.
• Scan: Instead of adding the flanger voices to form a chord, the effect scans through them oneafter the other. This is similar to how an arpeggiator on a keyboard plays the notes contained ina chord as a sequence.
• Scan on C: A “ringing” tone is added in the key of C.• Stairways: An ascending resonance is created.
Flair Parameters
• Speed: The LFO modulation speed. To synchronize the speed to your host or Master Editortempo, click the Speed control’s unit display and choose a note length value from the list.
• FX Sync: Sets the effect's time-based parameters in-sync with the master clock.• Depth: The amount of LFO modulation. Higher values cause the effect to sweep over a wider
frequency range.• Mix: Adjusts the respective levels of the original and processed signals.
Phasis Animator, 6 Notches, Complex Low, and High ScannerPhasis is a new take on the phaser concept with additional features that have been carefully chos-en to allow for more sophisticated and extreme sounds than possible with common phasers whilestaying true to the ease of use and clarity associated with these devices.
Phasis contains the following effects:
• Animator: classic, subtle two-notch phaser stereo effect.• 6 Notches: medium phaser effect with higher resonance.• Complex Low: Complex nine-notch phaser with the center frequency in the lower spectrum at
around 300 Hz.• High Scanner: intense four-notch phaser effect in the upper mid-range at 3.2 kHz and obvious
feedback setting.
Phasis Parameters
• Speed: The LFO modulation speed. To synchronize the speed to your host or Master Editortempo, click the Speed control’s unit display and choose a note length value from the list.
Effects Page
51
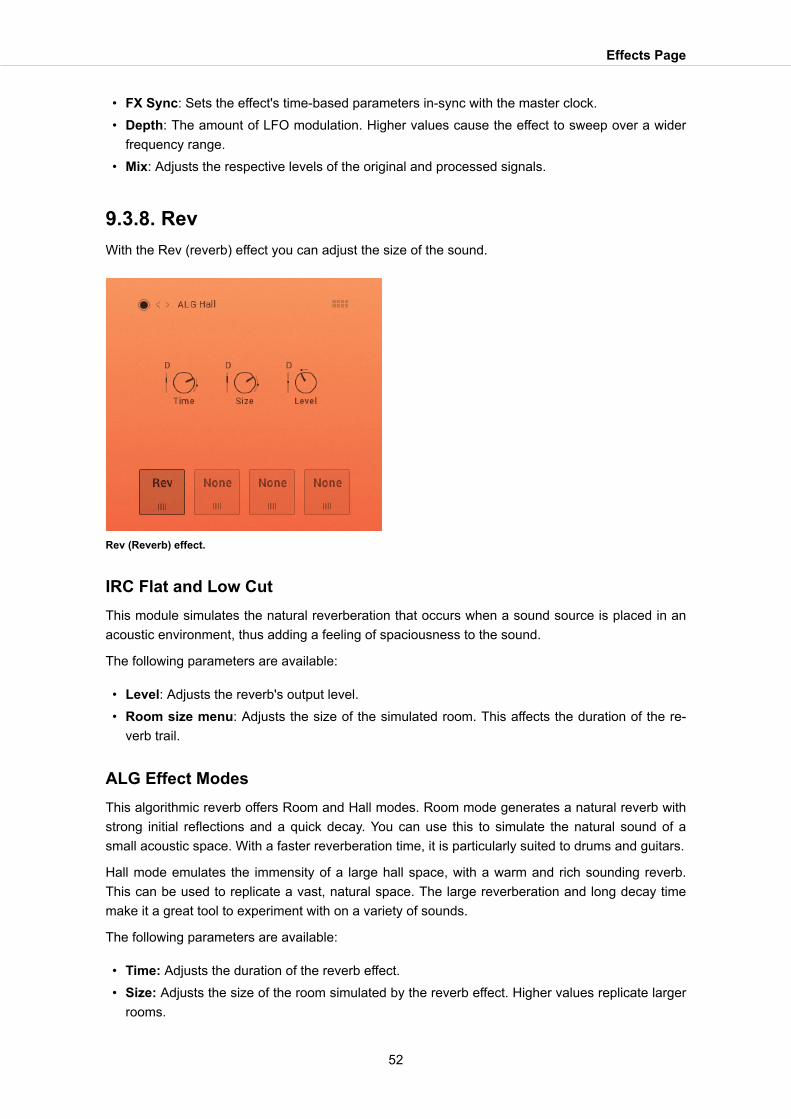
• FX Sync: Sets the effect's time-based parameters in-sync with the master clock.• Depth: The amount of LFO modulation. Higher values cause the effect to sweep over a wider
frequency range.• Mix: Adjusts the respective levels of the original and processed signals.
9.3.8. RevWith the Rev (reverb) effect you can adjust the size of the sound.
Rev (Reverb) effect.
IRC Flat and Low CutThis module simulates the natural reverberation that occurs when a sound source is placed in anacoustic environment, thus adding a feeling of spaciousness to the sound.
The following parameters are available:
• Level: Adjusts the reverb's output level.• Room size menu: Adjusts the size of the simulated room. This affects the duration of the re-
verb trail.
ALG Effect ModesThis algorithmic reverb offers Room and Hall modes. Room mode generates a natural reverb withstrong initial reflections and a quick decay. You can use this to simulate the natural sound of asmall acoustic space. With a faster reverberation time, it is particularly suited to drums and guitars.
Hall mode emulates the immensity of a large hall space, with a warm and rich sounding reverb.This can be used to replicate a vast, natural space. The large reverberation and long decay timemake it a great tool to experiment with on a variety of sounds.
The following parameters are available:
• Time: Adjusts the duration of the reverb effect.• Size: Adjusts the size of the room simulated by the reverb effect. Higher values replicate larger
rooms.
Effects Page
52
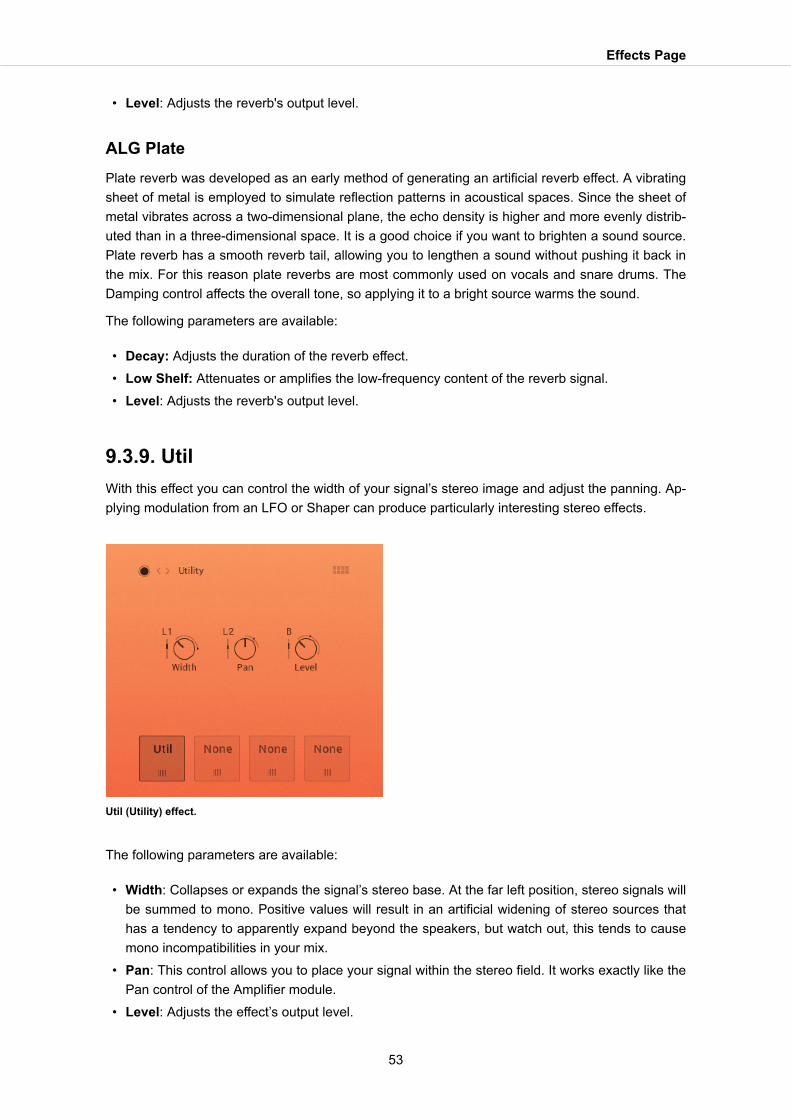
• Level: Adjusts the reverb's output level.
ALG PlatePlate reverb was developed as an early method of generating an artificial reverb effect. A vibratingsheet of metal is employed to simulate reflection patterns in acoustical spaces. Since the sheet ofmetal vibrates across a two-dimensional plane, the echo density is higher and more evenly distrib-uted than in a three-dimensional space. It is a good choice if you want to brighten a sound source.Plate reverb has a smooth reverb tail, allowing you to lengthen a sound without pushing it back inthe mix. For this reason plate reverbs are most commonly used on vocals and snare drums. TheDamping control affects the overall tone, so applying it to a bright source warms the sound.
The following parameters are available:
• Decay: Adjusts the duration of the reverb effect.• Low Shelf: Attenuates or amplifies the low-frequency content of the reverb signal.• Level: Adjusts the reverb's output level.
9.3.9. UtilWith this effect you can control the width of your signal’s stereo image and adjust the panning. Ap-plying modulation from an LFO or Shaper can produce particularly interesting stereo effects.
Util (Utility) effect.
The following parameters are available:
• Width: Collapses or expands the signal’s stereo base. At the far left position, stereo signals willbe summed to mono. Positive values will result in an artificial widening of stereo sources thathas a tendency to apparently expand beyond the speakers, but watch out, this tends to causemono incompatibilities in your mix.
• Pan: This control allows you to place your signal within the stereo field. It works exactly like thePan control of the Amplifier module.
• Level: Adjusts the effect’s output level.
Effects Page
53
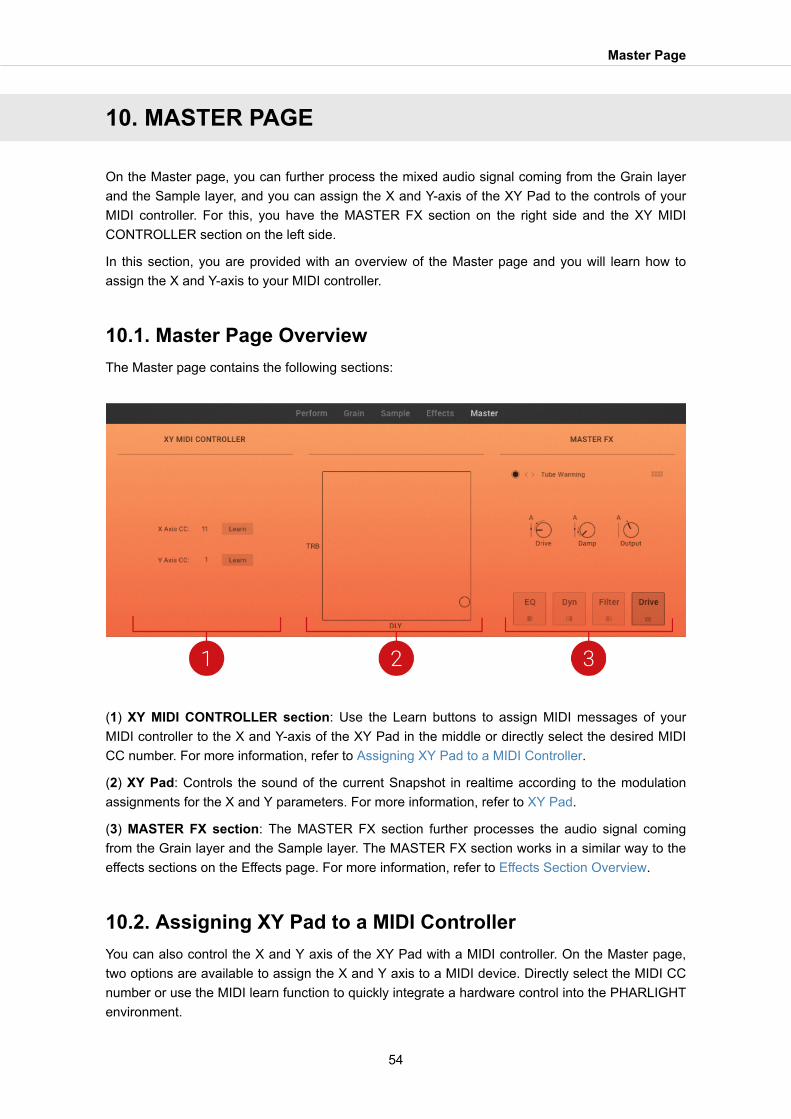
10. MASTER PAGE
On the Master page, you can further process the mixed audio signal coming from the Grain layerand the Sample layer, and you can assign the X and Y-axis of the XY Pad to the controls of yourMIDI controller. For this, you have the MASTER FX section on the right side and the XY MIDICONTROLLER section on the left side.
In this section, you are provided with an overview of the Master page and you will learn how toassign the X and Y-axis to your MIDI controller.
10.1. Master Page OverviewThe Master page contains the following sections:
(1) XY MIDI CONTROLLER section: Use the Learn buttons to assign MIDI messages of yourMIDI controller to the X and Y-axis of the XY Pad in the middle or directly select the desired MIDICC number. For more information, refer to Assigning XY Pad to a MIDI Controller.
(2) XY Pad: Controls the sound of the current Snapshot in realtime according to the modulationassignments for the X and Y parameters. For more information, refer to XY Pad.
(3) MASTER FX section: The MASTER FX section further processes the audio signal comingfrom the Grain layer and the Sample layer. The MASTER FX section works in a similar way to theeffects sections on the Effects page. For more information, refer to Effects Section Overview.
10.2. Assigning XY Pad to a MIDI ControllerYou can also control the X and Y axis of the XY Pad with a MIDI controller. On the Master page,two options are available to assign the X and Y axis to a MIDI device. Directly select the MIDI CCnumber or use the MIDI learn function to quickly integrate a hardware control into the PHARLIGHTenvironment.
Master Page
54
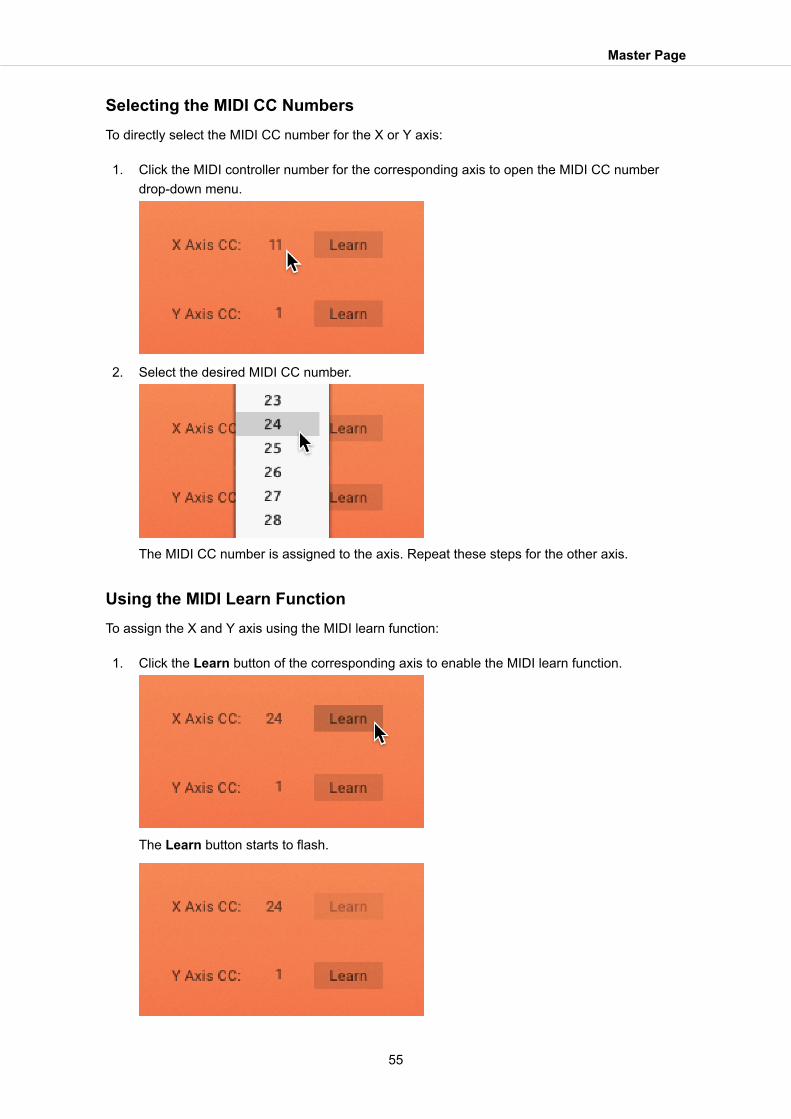
Selecting the MIDI CC NumbersTo directly select the MIDI CC number for the X or Y axis:
1. Click the MIDI controller number for the corresponding axis to open the MIDI CC numberdrop-down menu.
2. Select the desired MIDI CC number.
The MIDI CC number is assigned to the axis. Repeat these steps for the other axis.
Using the MIDI Learn FunctionTo assign the X and Y axis using the MIDI learn function:
1. Click the Learn button of the corresponding axis to enable the MIDI learn function.
The Learn button starts to flash.
Master Page
55

2. Move the control on your MIDI device that you want to assign to the axis.The control is assigned to the axis. The Learn button has stopped flashing. Repeat thesesteps for the other axis.
Master Page
56
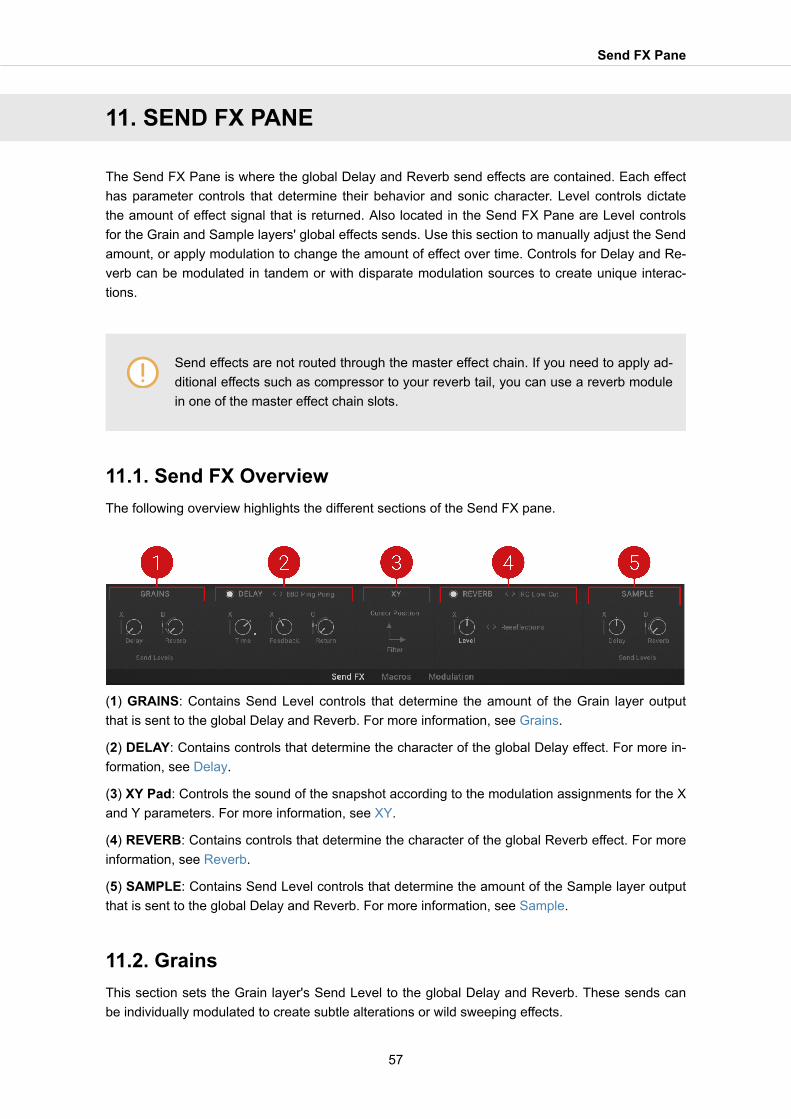
11. SEND FX PANE
The Send FX Pane is where the global Delay and Reverb send effects are contained. Each effecthas parameter controls that determine their behavior and sonic character. Level controls dictatethe amount of effect signal that is returned. Also located in the Send FX Pane are Level controlsfor the Grain and Sample layers' global effects sends. Use this section to manually adjust the Sendamount, or apply modulation to change the amount of effect over time. Controls for Delay and Re-verb can be modulated in tandem or with disparate modulation sources to create unique interac-tions.
Send effects are not routed through the master effect chain. If you need to apply ad-ditional effects such as compressor to your reverb tail, you can use a reverb modulein one of the master effect chain slots.
11.1. Send FX OverviewThe following overview highlights the different sections of the Send FX pane.
(1) GRAINS: Contains Send Level controls that determine the amount of the Grain layer outputthat is sent to the global Delay and Reverb. For more information, see Grains.
(2) DELAY: Contains controls that determine the character of the global Delay effect. For more in-formation, see Delay.
(3) XY Pad: Controls the sound of the snapshot according to the modulation assignments for the Xand Y parameters. For more information, see XY.
(4) REVERB: Contains controls that determine the character of the global Reverb effect. For moreinformation, see Reverb.
(5) SAMPLE: Contains Send Level controls that determine the amount of the Sample layer outputthat is sent to the global Delay and Reverb. For more information, see Sample.
11.2. GrainsThis section sets the Grain layer's Send Level to the global Delay and Reverb. These sends canbe individually modulated to create subtle alterations or wild sweeping effects.
Send FX Pane
57
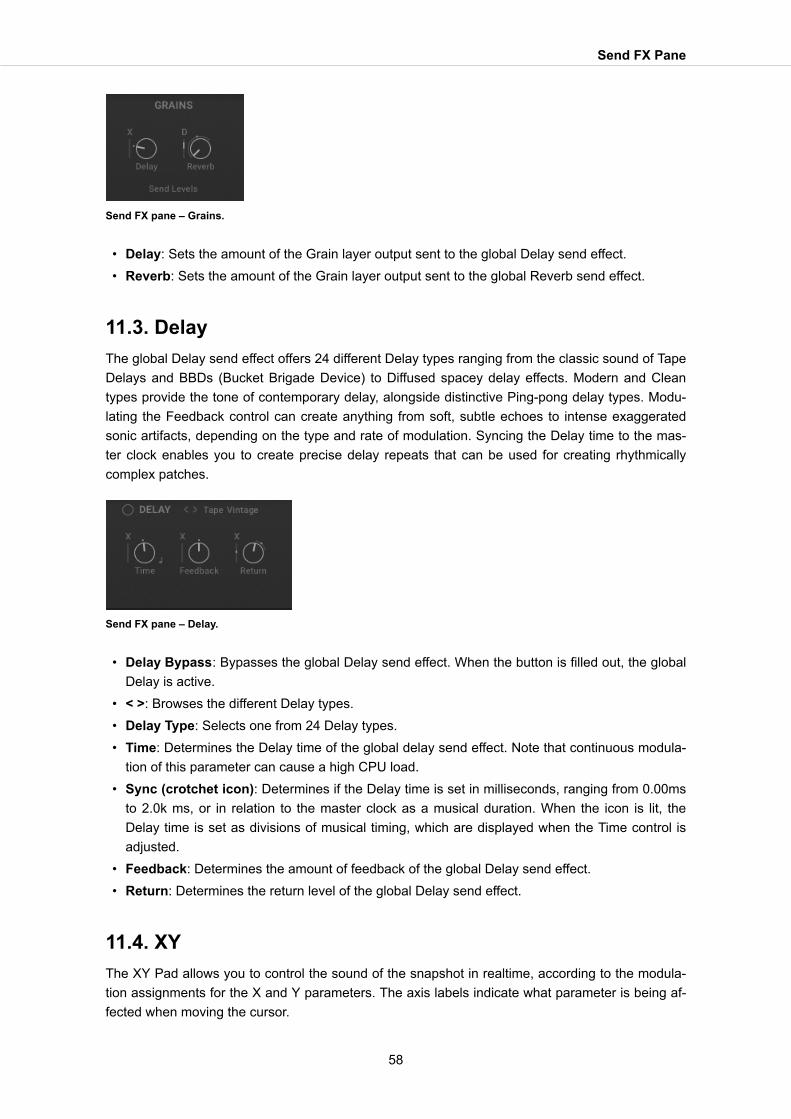
Send FX pane – Grains.
• Delay: Sets the amount of the Grain layer output sent to the global Delay send effect.• Reverb: Sets the amount of the Grain layer output sent to the global Reverb send effect.
11.3. DelayThe global Delay send effect offers 24 different Delay types ranging from the classic sound of TapeDelays and BBDs (Bucket Brigade Device) to Diffused spacey delay effects. Modern and Cleantypes provide the tone of contemporary delay, alongside distinctive Ping-pong delay types. Modu-lating the Feedback control can create anything from soft, subtle echoes to intense exaggeratedsonic artifacts, depending on the type and rate of modulation. Syncing the Delay time to the mas-ter clock enables you to create precise delay repeats that can be used for creating rhythmicallycomplex patches.
Send FX pane – Delay.
• Delay Bypass: Bypasses the global Delay send effect. When the button is filled out, the globalDelay is active.
• < >: Browses the different Delay types.• Delay Type: Selects one from 24 Delay types.• Time: Determines the Delay time of the global delay send effect. Note that continuous modula-
tion of this parameter can cause a high CPU load.• Sync (crotchet icon): Determines if the Delay time is set in milliseconds, ranging from 0.00ms
to 2.0k ms, or in relation to the master clock as a musical duration. When the icon is lit, theDelay time is set as divisions of musical timing, which are displayed when the Time control isadjusted.
• Feedback: Determines the amount of feedback of the global Delay send effect.• Return: Determines the return level of the global Delay send effect.
11.4. XYThe XY Pad allows you to control the sound of the snapshot in realtime, according to the modula-tion assignments for the X and Y parameters. The axis labels indicate what parameter is being af-fected when moving the cursor.
Send FX Pane
58

Send FX pane – XY.
11.5. ReverbThe global Reverb send effect offers nine different reverb types that provide varying spatial andsonic effects. Use the Wide Hall Reverb to add vast spaciousness to your Grain and Sample lay-ers, or the Plate reverb for its character metallic tone and smooth tail. Room Reverbs can be usedto add natural liveliness to the sound source, without losing detail in overly dense reverb tails.Modulating the reverb level can create interesting effects from soft swells to dramatic bursts of re-verberant echo. Note, the reverb is alternating between different reverb engines depending on theselected preset, which leads to different controls in the interface.
Send FX pane – Reverb.
• Reverb Bypass: Bypasses the global Reverb send effect. When the button is filled out, theglobal Reverb is active.
• < >: Browses the different Reverb types.• Delay Type: Selects one from nine Reverb types.• Time: Determines the time or return (Impulse response mode) of the global Reverb send effect.• Size: Determines the room size of the global Reverb send effect.• Level: Determines the return level of the global Reverb send effect.
11.6. SampleThis section sets the Sample layer's Send Level to the global Delay and Reverb. These send lev-els can be individually modulated to create subtle movement or more erratic sonic effects.
Send FX pane – Sample.
• Delay: Sets the amount of the Sample layer output sent to the global Delay send effect.
Send FX Pane
59

• Reverb: Sets the amount of the Sample layer output sent to the global Reverb send effect.
Send FX Pane
60
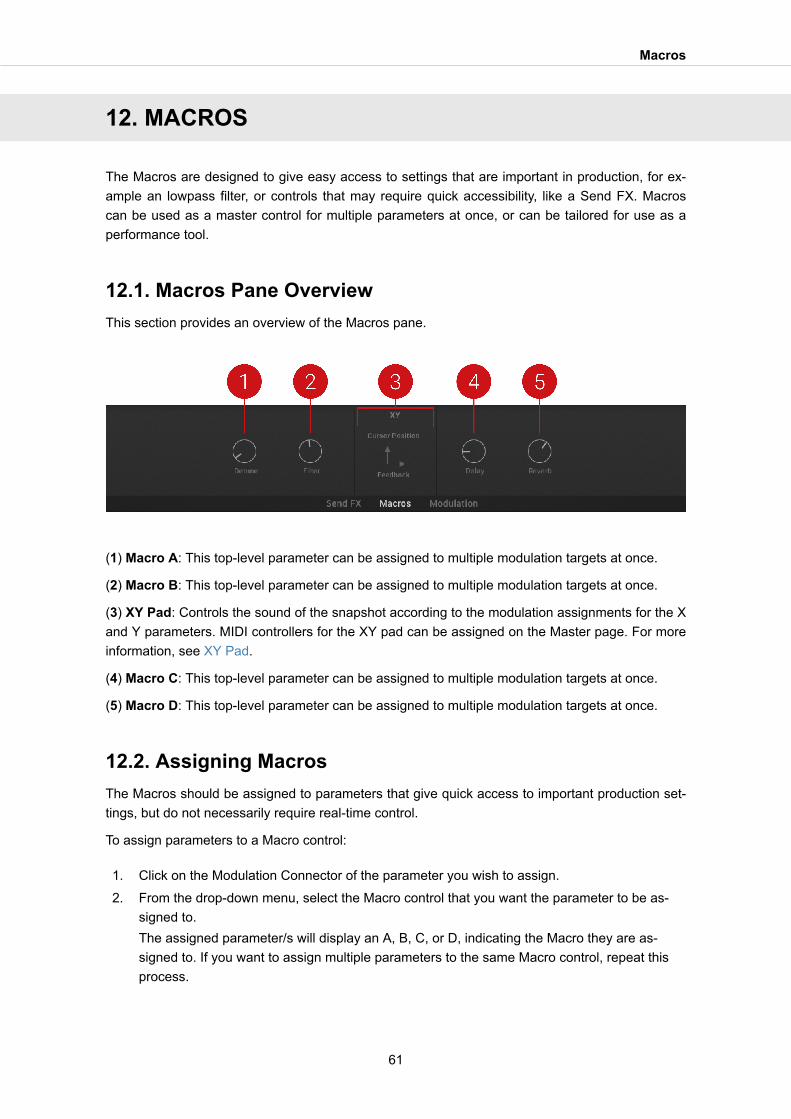
12. MACROS
The Macros are designed to give easy access to settings that are important in production, for ex-ample an lowpass filter, or controls that may require quick accessibility, like a Send FX. Macroscan be used as a master control for multiple parameters at once, or can be tailored for use as aperformance tool.
12.1. Macros Pane OverviewThis section provides an overview of the Macros pane.
(1) Macro A: This top-level parameter can be assigned to multiple modulation targets at once.
(2) Macro B: This top-level parameter can be assigned to multiple modulation targets at once.
(3) XY Pad: Controls the sound of the snapshot according to the modulation assignments for the Xand Y parameters. MIDI controllers for the XY pad can be assigned on the Master page. For moreinformation, see XY Pad.
(4) Macro C: This top-level parameter can be assigned to multiple modulation targets at once.
(5) Macro D: This top-level parameter can be assigned to multiple modulation targets at once.
12.2. Assigning MacrosThe Macros should be assigned to parameters that give quick access to important production set-tings, but do not necessarily require real-time control.
To assign parameters to a Macro control:
1. Click on the Modulation Connector of the parameter you wish to assign.2. From the drop-down menu, select the Macro control that you want the parameter to be as-
signed to.The assigned parameter/s will display an A, B, C, or D, indicating the Macro they are as-signed to. If you want to assign multiple parameters to the same Macro control, repeat thisprocess.
Macros
61
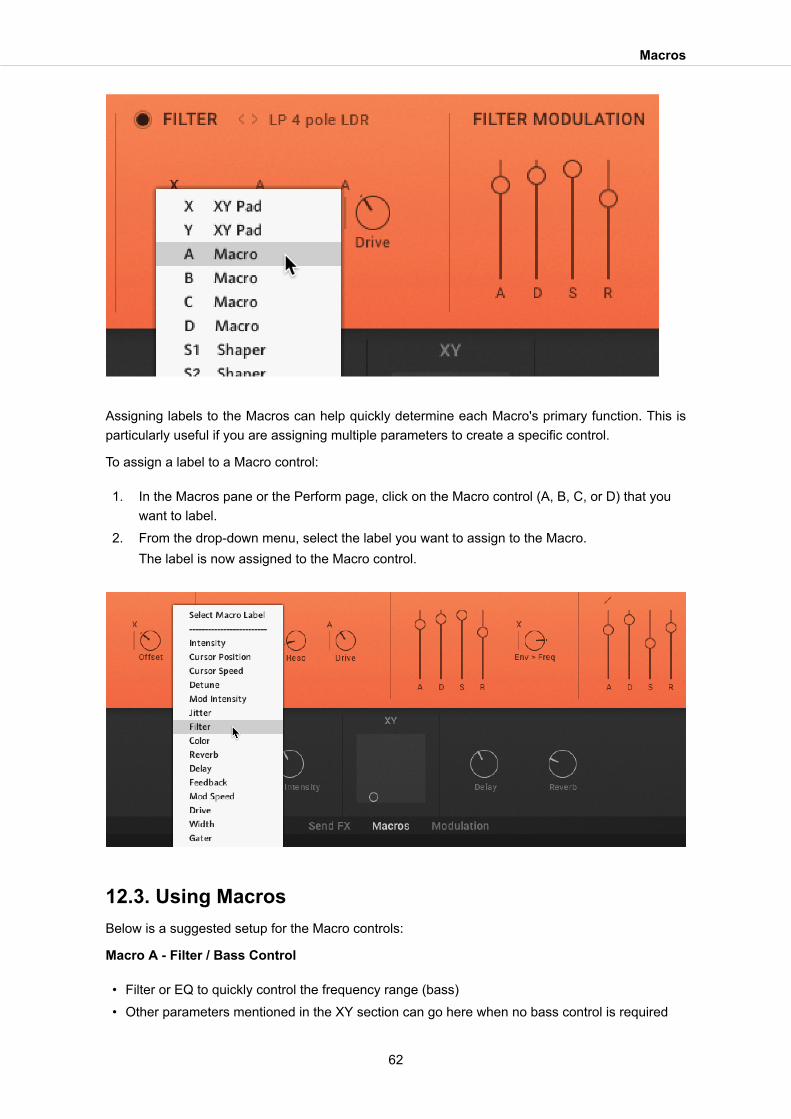
Assigning labels to the Macros can help quickly determine each Macro's primary function. This isparticularly useful if you are assigning multiple parameters to create a specific control.
To assign a label to a Macro control:
1. In the Macros pane or the Perform page, click on the Macro control (A, B, C, or D) that youwant to label.
2. From the drop-down menu, select the label you want to assign to the Macro.The label is now assigned to the Macro control.
12.3. Using MacrosBelow is a suggested setup for the Macro controls:
Macro A - Filter / Bass Control
• Filter or EQ to quickly control the frequency range (bass)• Other parameters mentioned in the XY section can go here when no bass control is required
Macros
62

Macro B - Filter / Treble Control:
• Filter or EQ to quickly control the frequency range (treble)• Other parameters mentioned in the XY section can go here when no treble control is required
Macro C - Motion
• Anything that creates motion in addition to the XY pad.
Macro D - FX Amount (Reverb, Delay)
• FX level control, enabling you to quickly turn down effects levels.
Macros
63
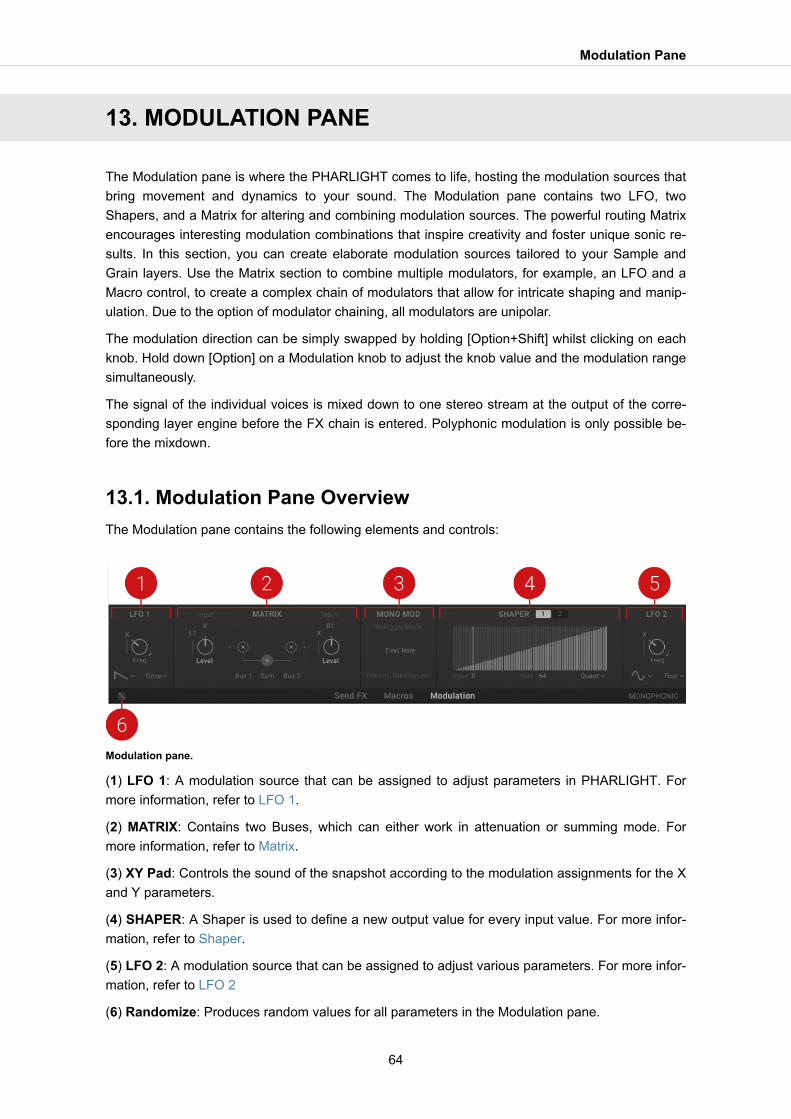
13. MODULATION PANE
The Modulation pane is where the PHARLIGHT comes to life, hosting the modulation sources thatbring movement and dynamics to your sound. The Modulation pane contains two LFO, twoShapers, and a Matrix for altering and combining modulation sources. The powerful routing Matrixencourages interesting modulation combinations that inspire creativity and foster unique sonic re-sults. In this section, you can create elaborate modulation sources tailored to your Sample andGrain layers. Use the Matrix section to combine multiple modulators, for example, an LFO and aMacro control, to create a complex chain of modulators that allow for intricate shaping and manip-ulation. Due to the option of modulator chaining, all modulators are unipolar.
The modulation direction can be simply swapped by holding [Option+Shift] whilst clicking on eachknob. Hold down [Option] on a Modulation knob to adjust the knob value and the modulation rangesimultaneously.
The signal of the individual voices is mixed down to one stereo stream at the output of the corre-sponding layer engine before the FX chain is entered. Polyphonic modulation is only possible be-fore the mixdown.
13.1. Modulation Pane OverviewThe Modulation pane contains the following elements and controls:
Modulation pane.
(1) LFO 1: A modulation source that can be assigned to adjust parameters in PHARLIGHT. Formore information, refer to LFO 1.
(2) MATRIX: Contains two Buses, which can either work in attenuation or summing mode. Formore information, refer to Matrix.
(3) XY Pad: Controls the sound of the snapshot according to the modulation assignments for the Xand Y parameters.
(4) SHAPER: A Shaper is used to define a new output value for every input value. For more infor-mation, refer to Shaper.
(5) LFO 2: A modulation source that can be assigned to adjust various parameters. For more infor-mation, refer to LFO 2
(6) Randomize: Produces random values for all parameters in the Modulation pane.
Modulation Pane
64

13.2. LFO 1The Modulation pane provides two LFOs that can be assigned to modulate parameters of thePHARLIGHT . Combining different LFOs in the Bus Matrix can create complex modulation sourcesthat unfold slowly over time. Eight different waveforms provide options for intricate modulation ef-fects, and five Trigger modes determine the behavior of the LFO.
Modulation pane – LFO 1.
• Freq: Sets the oscillation frequency of the LFO. This parameter can be synchronized to themaster clock.
• Sync (crotchet icon): Determines if the LFO speed is set in Hertz or in relation to the masterclock as a musical duration. When the icon is lit, the LFO speed is set as divisions of musicaltiming, which are displayed when the Freq control is adjusted.
• Waveform Type: Select the Waveform type from Sine, Triangle, Square, Ramp up, Rampdown, Random, Seek 1 and Seek 2. Seek 1 and Seek 2 provide smooth, random LFOs.
• Trigger Mode: Selects one of five modes (Free, First, Retrig, Once, 1st 1x), which determinesthe retrigger behavior of the LFO. Free mode provides polyphonic modulation with a randomstart phase. First mode restarts the LFO with the first note only. In Retrig mode, the LFO re-starts for each key pressed. Once mode triggers only one LFO cycle. 1st 1x triggers one LFOcycle for the first note only.
13.3. MatrixThe Matrix section is where you can combine sources to create more complex modulators. TheMatrix contains two Buses, which can either work in Attenuation or Summing mode. Each Bus fea-tures two inputs which are processed and sent to the modulation targets Bus 1 and Bus 2. Thesetwo Buses can then be individually sent to any assignable parameter. The
In Attenuation mode, as indicated by an x, the attenuator works as a multiplicator. In Summingmode, as indicated by a +, the two modulation sources are added together. Each Bus can be as-signed to a different mode and there is also the Sum of both busses available as a modulationsource. You can monitor the result of each Matrix output with level indicators.
Attenuation ModeThe following controls are available in Attenuation mode. Controls are the same for Bus 2.
Modulation Pane
65
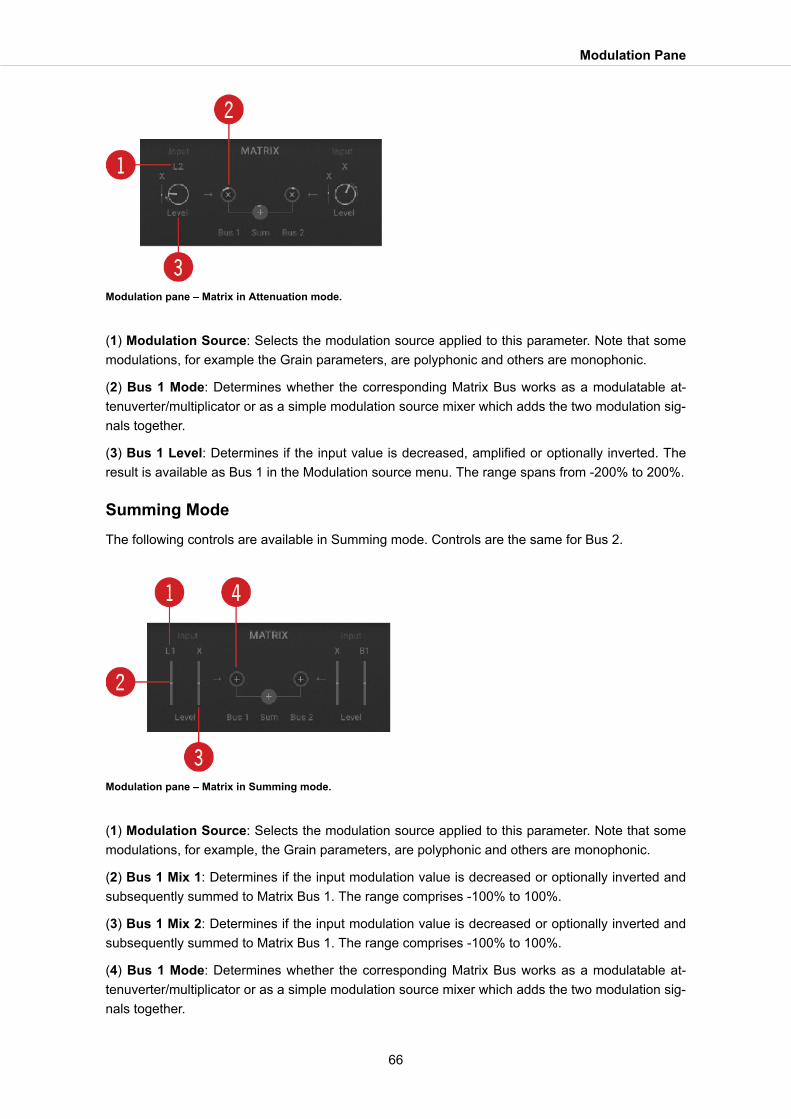
Modulation pane – Matrix in Attenuation mode.
(1) Modulation Source: Selects the modulation source applied to this parameter. Note that somemodulations, for example the Grain parameters, are polyphonic and others are monophonic.
(2) Bus 1 Mode: Determines whether the corresponding Matrix Bus works as a modulatable at-tenuverter/multiplicator or as a simple modulation source mixer which adds the two modulation sig-nals together.
(3) Bus 1 Level: Determines if the input value is decreased, amplified or optionally inverted. Theresult is available as Bus 1 in the Modulation source menu. The range spans from -200% to 200%.
Summing ModeThe following controls are available in Summing mode. Controls are the same for Bus 2.
Modulation pane – Matrix in Summing mode.
(1) Modulation Source: Selects the modulation source applied to this parameter. Note that somemodulations, for example, the Grain parameters, are polyphonic and others are monophonic.
(2) Bus 1 Mix 1: Determines if the input modulation value is decreased or optionally inverted andsubsequently summed to Matrix Bus 1. The range comprises -100% to 100%.
(3) Bus 1 Mix 2: Determines if the input modulation value is decreased or optionally inverted andsubsequently summed to Matrix Bus 1. The range comprises -100% to 100%.
(4) Bus 1 Mode: Determines whether the corresponding Matrix Bus works as a modulatable at-tenuverter/multiplicator or as a simple modulation source mixer which adds the two modulation sig-nals together.
Modulation Pane
66
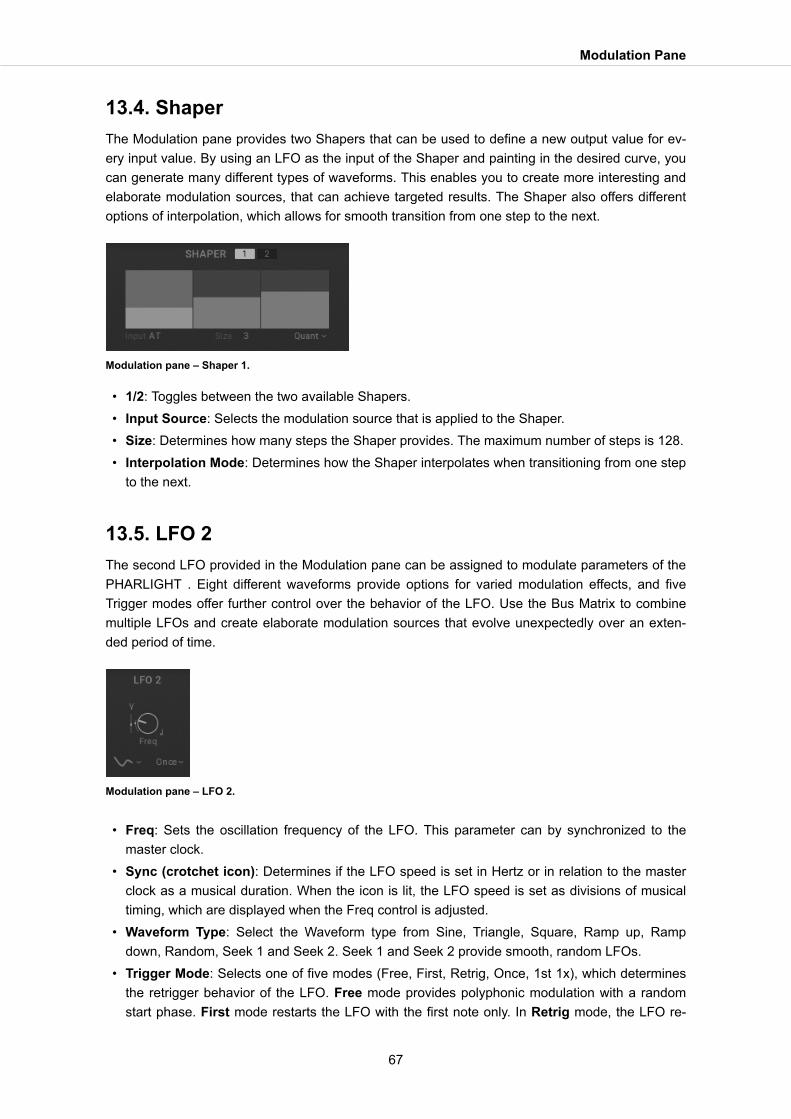
13.4. ShaperThe Modulation pane provides two Shapers that can be used to define a new output value for ev-ery input value. By using an LFO as the input of the Shaper and painting in the desired curve, youcan generate many different types of waveforms. This enables you to create more interesting andelaborate modulation sources, that can achieve targeted results. The Shaper also offers differentoptions of interpolation, which allows for smooth transition from one step to the next.
Modulation pane – Shaper 1.
• 1/2: Toggles between the two available Shapers.• Input Source: Selects the modulation source that is applied to the Shaper.• Size: Determines how many steps the Shaper provides. The maximum number of steps is 128.• Interpolation Mode: Determines how the Shaper interpolates when transitioning from one step
to the next.
13.5. LFO 2The second LFO provided in the Modulation pane can be assigned to modulate parameters of thePHARLIGHT . Eight different waveforms provide options for varied modulation effects, and fiveTrigger modes offer further control over the behavior of the LFO. Use the Bus Matrix to combinemultiple LFOs and create elaborate modulation sources that evolve unexpectedly over an exten-ded period of time.
Modulation pane – LFO 2.
• Freq: Sets the oscillation frequency of the LFO. This parameter can by synchronized to themaster clock.
• Sync (crotchet icon): Determines if the LFO speed is set in Hertz or in relation to the masterclock as a musical duration. When the icon is lit, the LFO speed is set as divisions of musicaltiming, which are displayed when the Freq control is adjusted.
• Waveform Type: Select the Waveform type from Sine, Triangle, Square, Ramp up, Rampdown, Random, Seek 1 and Seek 2. Seek 1 and Seek 2 provide smooth, random LFOs.
• Trigger Mode: Selects one of five modes (Free, First, Retrig, Once, 1st 1x), which determinesthe retrigger behavior of the LFO. Free mode provides polyphonic modulation with a randomstart phase. First mode restarts the LFO with the first note only. In Retrig mode, the LFO re-
Modulation Pane
67

starts for each key pressed. Once mode triggers only one LFO cycle. 1st 1x triggers one LFOcycle for the first note only.
Modulation Pane
68
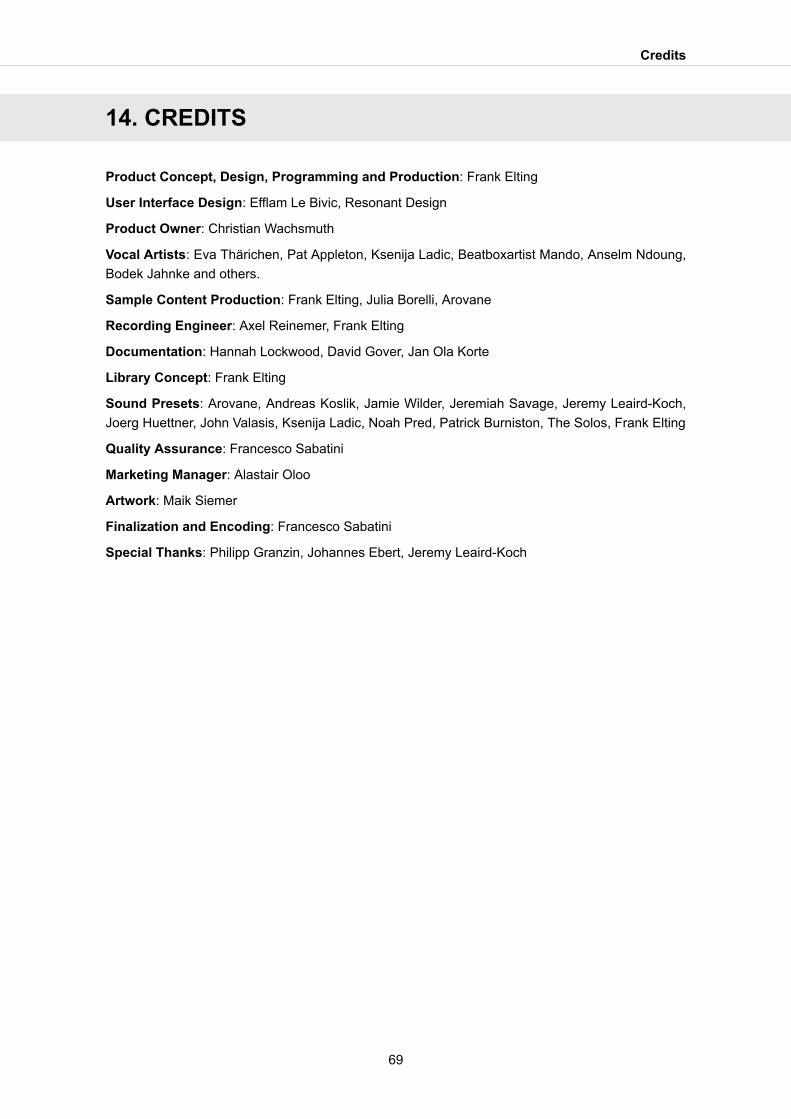
14. CREDITS
Product Concept, Design, Programming and Production: Frank Elting
User Interface Design: Efflam Le Bivic, Resonant Design
Product Owner: Christian Wachsmuth
Vocal Artists: Eva Thärichen, Pat Appleton, Ksenija Ladic, Beatboxartist Mando, Anselm Ndoung,Bodek Jahnke and others.
Sample Content Production: Frank Elting, Julia Borelli, Arovane
Recording Engineer: Axel Reinemer, Frank Elting
Documentation: Hannah Lockwood, David Gover, Jan Ola Korte
Library Concept: Frank Elting
Sound Presets: Arovane, Andreas Koslik, Jamie Wilder, Jeremiah Savage, Jeremy Leaird-Koch,Joerg Huettner, John Valasis, Ksenija Ladic, Noah Pred, Patrick Burniston, The Solos, Frank Elting
Quality Assurance: Francesco Sabatini
Marketing Manager: Alastair Oloo
Artwork: Maik Siemer
Finalization and Encoding: Francesco Sabatini
Special Thanks: Philipp Granzin, Johannes Ebert, Jeremy Leaird-Koch
Credits
69