Parameterize Like a Pro - Verilab
59
Parameterize Like a Pro Welcome to our Short Workshop, presented at DVCon United States in March 2020. This short workshop delivers techniques, tricks, skills and insight for engineers facing the challenges of verifying a highly configurable parameterized design using the Universal Verification Methodology (UVM). Who will benefit? To get the most out of this workshop, you should have sound basic knowledge of SystemVerilog and the UVM, and experience of their use on at least one verification project. It’s tailored for verification engineers and technical leads who are, or soon will be, working on a project where the RTL device under test (DUT) is highly configurable (parameterized). Such configurability is commonly found in generic design IP such as bus fabric, memory controllers and high-speed interfaces. Although the focus is on the UVM, many of the ideas presented will also be of value to those using other verification techniques such as formal property verification. This tutorial workshop brings together a collection of powerful techniques and good practice learnt through experience on many large-scale projects. Drawing on hard-earned wisdom of Verilab’s experienced team, highlights of published papers, and new material created especially for the event, the workshop’s recommendations, guidance and examples aim to be immediately useful as well as having continuing value in your future work. Additional materials Supporting this presentation, a curated and annotated collection of papers written by various Verilab consultants is available at https://www.verilab.com/resources
-
Upload
khangminh22 -
Category
Documents
-
view
4 -
download
0
Transcript of Parameterize Like a Pro - Verilab

Parameterize Like a Pro
Welcome to our Short Workshop, presented at DVCon United States in March 2020.
This short workshop delivers techniques, tricks, skills and insight for engineers facing the challenges of verifying a
highly configurable parameterized design using the Universal Verification Methodology (UVM).
Who will benefit? To get the most out of this workshop, you should have sound basic knowledge of SystemVerilog and the UVM, and
experience of their use on at least one verification project. It’s tailored for verification engineers and technical leads
who are, or soon will be, working on a project where the RTL device under test (DUT) is highly configurable
(parameterized). Such configurability is commonly found in generic design IP such as bus fabric, memory controllers
and high-speed interfaces.
Although the focus is on the UVM, many of the ideas presented will also be of value to those using other verification
techniques such as formal property verification.
This tutorial workshop brings together a collection of powerful techniques and good practice learnt through
experience on many large-scale projects. Drawing on hard-earned wisdom of Verilab’s experienced team, highlights
of published papers, and new material created especially for the event, the workshop’s recommendations, guidance
and examples aim to be immediately useful as well as having continuing value in your future work.
Additional materials Supporting this presentation, a curated and annotated collection of papers written by various Verilab consultants is
available at https://www.verilab.com/resources

Agenda The range of topics we have chosen to discuss are all very practical in nature and are based on experience from the
Verilab consultant community. Parameters are powerful things, and anytime code would otherwise need to be
manually edited, or “ `ifdef MACRO”’d like crazy, thankfully we can say “there is a better way forward”, and we will
be happy to share that better way with you.

Introduction
RTL designers like to use parameters, and with good reason. There is really no downside to using them in an RTL
design context – everything works seamlessly.

Verification’s relationship with RTL parameters has never been easy. Before knowing these techniques, I would
sometimes recreate a “verification version” of the RTL parameters in a file and compile it separately from the design
code – very error prone and involving manual work. Over time better and better ideas have emerged with respect to
the handling RTL parameters by verifiers, and thankfully so.

This slide illustrates why we want to avoid parameterized classes in our UVM environment. It seems natural on the
surface to want to create a parameterized UVM environment to echo a parameterized RTL module, but there are
many reasons to avoid doing this. I have worked on many successful UVM projects over the years and have never
needed to resort to parameterized classes. If you find yourself in a situation where you think you need them,
definitely make an effort to find another way. In my experience there always is one. Each parameterization creates a
new type, and this becomes very tedious to deal with as the number of parameters increases.

In this presentation we aim to provide solutions that will be clean (no parameter ripple), robust (no possible RTL/TB
differences in parameterization value), hands-off (TB automatically adjusts itself to RTL parameters), and efficient.
The techniques demonstrated have been developed and deployed on real projects, so we have high confidence in
their applicability.
Connecting to Parameterized RTL
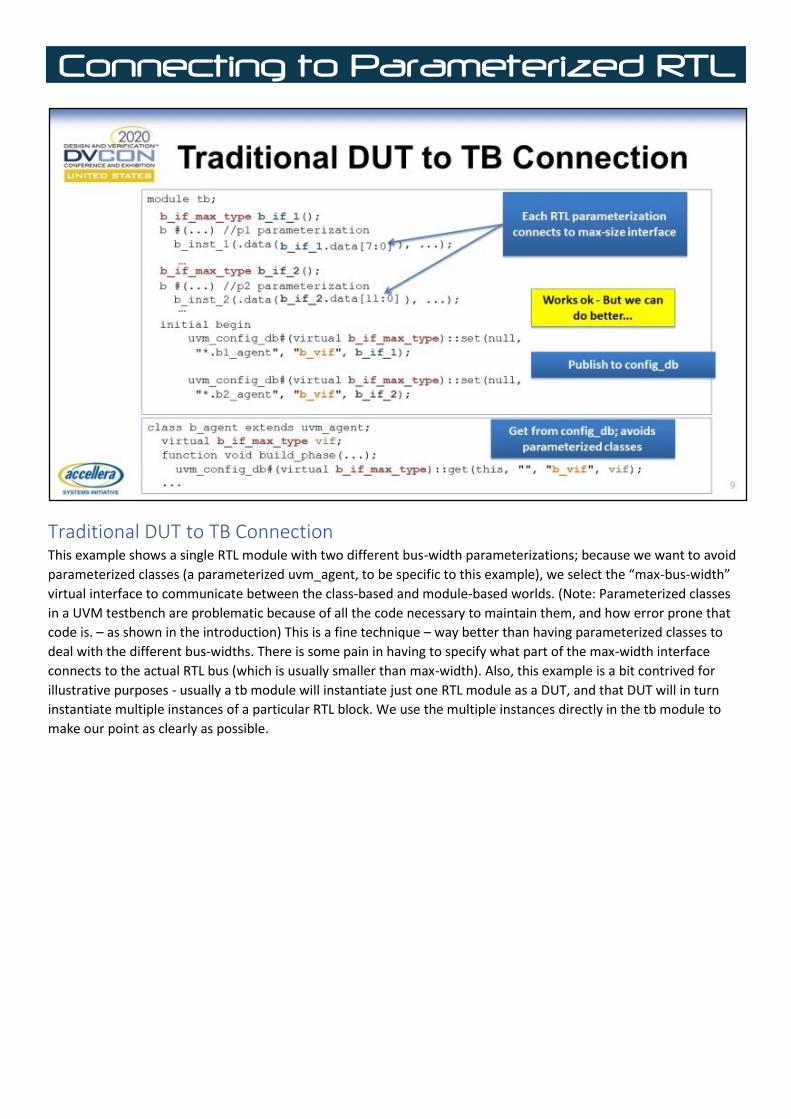
Traditional DUT to TB Connection This example shows a single RTL module with two different bus-width parameterizations; because we want to avoid
parameterized classes (a parameterized uvm_agent, to be specific to this example), we select the “max-bus-width”
virtual interface to communicate between the class-based and module-based worlds. (Note: Parameterized classes
in a UVM testbench are problematic because of all the code necessary to maintain them, and how error prone that
code is. – as shown in the introduction) This is a fine technique – way better than having parameterized classes to
deal with the different bus-widths. There is some pain in having to specify what part of the max-width interface
connects to the actual RTL bus (which is usually smaller than max-width). Also, this example is a bit contrived for
illustrative purposes - usually a tb module will instantiate just one RTL module as a DUT, and that DUT will in turn
instantiate multiple instances of a particular RTL block. We use the multiple instances directly in the tb module to
make our point as clearly as possible.

Traditional DUT to TB Connection This is what it looks like visually when virtual interfaces are published to the config_db and UVM agents get those
virtual interfaces. Recall that the interfaces are defined as max-width interfaces.

UVM Harness The UVM Harness technique was first introduced to the presenters in 2011 in a conference paper written by David
Larson (“UVM Harness Whitepaper: The missing link in interface connectivity”), and it has proven to be very useful
on several projects since then. It’s the kind of technique that you didn’t know you were missing until you see it, as
connecting RTL modules and TB just seems rudimentary and a necessary evil. But this technique is a huge
improvement over the old way of doing things and anyone who grasps it will likely never do it the old way ever
again.

UVM Harness: Interface Placement The UVM harness technique for connecting the RTL module and the UVM world requires a few ‘paradigm shift’
ideas. The first one being that the virtual interface is inside the RTL module rather than outside it.

UVM Harness: Interface Inside DUT The next ‘paradigm shift’ idea is to remember that the SystemVerilog bind statement can do more than copy-paste
code into an instance of a module: it can change the module definition itself, so that all instances are always
affected. Here we show how a particular syntax of the bind statement results in an interface being placed inside a
particular module type by amending that module’s definition to always have the interface. This is a powerful
technique when a design has multiple instances of a particular module, because so much gets accomplished in an
error-resilient manner with very little code.

UVM Harness Step-by-Step We now present the steps involved in the UVM harness technique. Step 1 is to create an RTL module interface
where all of the interface ports are of type wire (in the example we leave out the type, as it defaults to wire –
alternatively we would have written “input wire clk, etc.”), and matching parameters. Of note is that the RTL module
interface has all ports defined as “input”, even if their corresponding RTL module port is output. This is because we
are relying on a little-known SystemVerilog technique called port coercion, whereby the simulator will coerce the
direction of the port to the proper direction. For example, should there be a driver to that port, the compiler will
know to treat it as an output; if there’s no driver, it will remain an input. This is extremely powerful when it comes to
reusing interfaces in highly configurable testbenches (as detailed in [1] and [3] – see references). Also note that port-
coercion is in the SV LRM and therefore is supported by all simulators. Also, the question sometimes gets raised
“instead of doing this port-coercion stuff, why not use inout ports?” The answer is that inout require port widths to
be identical when making connections, and so that doesn’t work in this max-width technique.

UVM Harness Step-by-Step The max-width interface concept is still applied in the UVM harness technique, because we still want to avoid having
parameterized classes. A max-width virtual interface will allow for connection to any instance of the RTL module.

UVM Harness Step-by-Step This is the newest addition to our understanding of how to best do the UVM Harness technique. We instantiate the
max-width interface inside a non-max-width RTL module interface... this is counterintuitive – a larger thing shouldn’t
be able to fit inside a smaller thing! But in software it all works. The reason for not just making the RTL module
interface itself max-width is to immunize ourselves against an RTL module that has ports of a type other than wire
(e.g. logic). It turns out that for port-coercion to work, there needs to be a wire-to-wire connection. By placing the
max-width interface with ports of type wire inside the RTL module interface (also with ports of type wire), the port-
coercion will work regardless of the types on the ports of the actual RTL module. In the past I have asked RTL
designers to change their port types from logic to wire, to accommodate this technique. No longer will I need to do
this.

UVM Harness Step-by-Step Here we tie off the unused bits of the max-width interface. We contemplated what would happen if we just assigned
the entire bus to a weak pulldown rather than being precise about the bits to affect – after all if the pulldown is
really “weak”, it should be overridden when a strong driver is connected to it. After some thought, it turns out that
this is bad verification practice: As a verifier, you don't want to tie-off any bits that the RTL module is really
responsible for: If the RTL module doesn't drive a net it's meant to drive, you don't want the testbench silently
cleaning up the mess through a testbench’s pullup/pulldown.

UVM Harness Step-by-Step This is also a change from our original understanding of the UVM harness: we now believe a module is a better type
for the harness than an interface is. A module is more versatile because it can instantiate other modules. An
interface cannot. Some projects might want to reuse existing assertion modules inside their harness, and making the
harness a module will allow that. Some would argue “an interface can be virtual, a module cannot” – which is true.
However, we were unable to come up with any compelling use cases for a virtual harness in the class world.

UVM Harness Step-by-Step This step is another ‘paradigm shift’ one. The interface ports are being connected to module_type.port_name of the
RTL module, as opposed to module_instance.port_name. The fact that SystemVerilog supports such syntax was a
surprise to me, and it turns out to be powerful. What this is saying is, “anywhere this type of module is visible within
the scope of this harness, connect the ports of that module to the ports of this interface”. This, combined with the
“module-amending” use of bind, become a super-powerful technique for RTL-TB connections, as we’ll see in the next
slides.

UVM Harness Step-by-Step Here’s the power of the technique – with one line of code, we go from having an RTL DUT, to a fully-connected DUT-
TB for all instances of a particular module; no possibility of missing a module, no possibility that one module instance
is connected differently than another module instance; complete certainty that there will be no further TB bugs due
to connections.

UVM Harness Step-by-Step We need to get the virtual interfaces into the UVM config_db. Adding a “set_vif” function in the harness, that takes a
variable string for path, allows the virtual interface to be set wherever it is needed in the verification environment. It
is important to call set_vif before calling run_test, to ensure that the virtual interfaces are in the config_db before
the environment gets built. Having them both in the same initial block assures that this is the case.

UVM Harness: Result What it looks like visually when virtual interfaces are published to the config_db and UVM agents get those virtual
interfaces, using the UVM harness technique. Notice how this is similar to the picture in the traditional approach
except that we have done something a lot more powerful, using a lot less code.

Extracting RTL Parameters
Wouldn’t it be nice for the testbench to be able to make use of RTL parameters in a robust and tidy fashion? I’ve
struggled in the past with non-robust and ugly ways of accomplishing this, but was very pleased to learn about this
approach, which I now use religiously. The idea is to bind an interface (or module – let’s stick with interface for the
sake of readability) to an RTL module, capture the values of the parameters inside that interface (since it has module
scope after the bind) and then publish the parameter values to the config_db so that the class-world can make use
of them. I like to think of this as a kind of trojan-horse technique, with the bound interface being the horse, and
instead of releasing soldiers (parameters) it is capturing them to send off to far away places.

Extracting RTL Parameters We start by defining a harness that has matching parameters as the RTL module we wish to extract from. Next, we
define a data structure (of type struct) that has fields which correspond to each RTL parameter. Finally we define a
method that can be called by a bound harness to capture the values of the RTL parameters in which it is bound, and
publish them to the UVM config_db.

Extracting RTL Parameters The bind statement creates an instance of “dut_harness” inside the DUT module, and therefore the harness’
parameter values are equal to the DUT parameters after that bind statement executes. This is because the bind
statement says “connect DUT_PARAM1 to the PARAM1 parameter of the harness”, which is a way of assigning
DUT_PARAM1 to PARAM1; after the bind, DUT_PARAM1 is the value of the RTL parameter, and so PARAM1 gets the
RTL parameter value. Tricky the first time you see it.

Extracting RTL Parameters Before creating the UVM environment (via run_test), the RTL parameters are captured (via the capture_rtl_info call)
and published to the UVM environment (in this case the set is to *.tb_env). Again it’s important to keep the call to
capture_rtl_info in the same initial block as run_test, to ensure that the config_db has the parameter values when
the build_phase of the verification environment executes.

Extracting RTL Parameters Here’s the final result of what a harness file looks like with interface connection, RTL parameter extraction, and bind
statement.

Extracting RTL Parameters And what the testbench module file looks like with harnesses publishing virtual interfaces and the RTL parameters
being captured and published – all before run_test creates the UVM environment. Notice how clean this is compared
to the “pollution” we normally see in a testbench module file.

Tuning Testbenches with RTL Parameters
Because the extracted RTL parameters are available before the UVM environment is constructed, constraint blocks
can safely make use of the RTL parameters to guide randomization anywhere in the UVM environment. In this
instance the RTL parameter specifies the number of ports present in the DUT, and the randomization limits itself to a
port number inside that valid range. Another situation where I have seen this is to randomize values to be
programmed into DUT registers (via a random configuration object), where the RTL parameters specify the bus
widths of the register fields.

Tuning Testbenches with RTL Parameters Covergroups can be passed arguments at the time of their creation, and these arguments can tune coverage bins.
Fortunately, the RTL parameter extraction technique shown earlier makes the values available before the UVM
environment is built, so any class can make use of them in their constructor. Note that this isn’t usually the case
when it comes to tuning coverage: if you wanted to tune coverage bins to a configuration object that is randomized
within the UVM environment, that configuration object would not be ready in time for the constructor of the
coverage class (1800-2017 section 19.4 states that “An embedded covergroup variable may only be assigned in the
new method.”). Solutions do exist for this situation and are described in [5] and [6].

Tuning Testbenches with RTL Parameters There are different approaches available to use RTL parameters in assertions. One simple way would be to
parameterize the encapsulating module/interface and just pass the RTL parameter values that way. Here we show a
more complex method that was adapted from a technique to use UVM configuration values in SVA. Both techniques
are valid, though the one presented here is slightly less error-prone because it uses the extract RTL parameters as
opposed to relying on manually entering their value upon instantiation of the interface/module containing the SVA
(though defining the parameters as `define macros would alleviate this issue too).
You can find more on this approach in Mark Litterick’s Advanced UVM Tutorial from DVCon-Europe 2015 (see
references at the end of this presentation).

Tuning Testbenches with RTL Parameters The reset value of a register can be specified in an RTL parameter. The slide shows how a UVM RAL implementation
would make use of that parameter when defining the reset value of that field (via reg_field.set_reset()). A user of
that register would later apply the reset to that field (perhaps in response to detecting a hard reset in the system) by
calling reg_field.reset(), and get the correct value according to the current RTL parameterization.

Tuning Testbenches with RTL Parameters The presence/absence of a register in a DUT version can be specified in an RTL parameter. This slide shows how a
UVM RAL implementation would make use of that parameter when defining the access type of that field (via
reg_field.set_access()). A nice feature of the UVM RAL is that the built-in register test sequences will automatically
adapt to the access types of the registers. However, additional testing is required to check if a register which was
present in one DUT version, truly is no longer present in another DUT version. This would be done by attempting to
write to the register and checking that the write value was not stored (or checking for a slave error on the register
block’s port)

Tuning Testbenches with RTL Parameters The width of a register field can be specified RTL parameter. We build this example over the course of a few slides,
so here we just show the most basic approach of hardcoding the size field. Note that this technique was developed
prior to UVM 1800.2, which allows a register model to be unlocked and modified, and so there may be better ways
to do this going forward.

Tuning Testbenches with RTL Parameters An improvement over hardcoding the ”size” field is to use a function to return a value. The ‘base’ version of the
function returns a fixed number, so there’s no value being added just yet. But by making the function virtual (as we
have above), a child of this class could override the function to return a different size.

Tuning Testbenches with RTL Parameters This is where the payoff is: by extracting the RTL parameters, implementing a child class and overriding the virtual
function get_channel_en_size(), we can have the register model specify the ‘size’ field based on the RTL parameters
of the DUT – very powerful! The final step is to use the factory to override the base class with the child class.

RTL Parameter Generation & Coverage
There are several different ways we can use to generate the actual RTL parameters used in a simulation, but all of
them require this to be done in advance. We want to avoid manually created sets of parameters as these are error
prone and difficult to maintain. We could use any scripting language but it’s better to use SystemVerilog as we can
take advantage of the built in constrained random engine

RTL Parameter Generation & Coverage Whether we use SV to generate the parameters, or any other scripting language, the generated parameters need to
be written out to a file. One way to do this is to have the file contain a set of `define values, and then refer to these
in our test environment.

RTL Parameter Generation & Coverage Once we have generated the parameter values, we need to know what was actually generated and SystemVerilog
coverage is ideally suited to this task. This allows us to ensure that all the relevant cases are covered. As the
testbench automatically adapts to the parameters (it retrieves them from the config_db), theoretically we only need
to compile the testbench once, even though the RTL will be compiled for each set of parameters. The testbench can
extract all the parameter values used from the config db and use these for the coverage. For the coverage, we cover
the parameter values themselves but should also consider using the parameters as cross items in functionality which
is dependent on the value of the parameters. Note that code-coverage probably cannot be merged across different
parameter sets.

RTL Parameter Generation & Coverage As we saw earlier, we have an rtl_info_struct type that encapsulates the RTL parameters used. This can be sampled
at construction time of the covergroup as all the RTL parameters are constant (and known) at that point for a given
simulation of a particular set.

Parameter Selection Optimization
Deciding what to test in a complex system is part of the art of verification. But it’s too risky to leave such a choice to
chance, and we verification engineers can do better than that. The two extremes of doing just full random, or just
targeted parameterizations, leave important holes in what’s not covered by verification. Often projects will do a
combination of the two to get the benefits of both worlds - but there’s still opportunity for improvement from doing
that too.

Parameter Selection Optimization The pairwise testing technique comes from the software world and is simple in practice: choose every pair of
variables in the system and run tests with every possible value combination of that pair.

Parameter Selection Optimization The pairwise approach is effective at finding bugs in many systems because bugs are often present when 2 variables
have a certain value pair, and covering all possible value-pairs is doable within a reasonable time frame. Bugs can
and do exist for higher-order combinations (e.g. 3 or more variables having a set of values), but covering all
possibilities at these higher levels is prohibitive in terms of time (we’re talking thousands of years of testing time in
some instances!). Often such bugs are not as prevalent as those that can be found with pairwise, and so it’s a good
approach to cover all pairwise parameterizations. The authors still think constrained-random test should supplement
pairwise testing, to uncover bugs that the pairwise didn’t catch.

Parameter Selection Optimization We present an example of how pairwise testing would work for a DUT with 5 RTL parameters. Notice that although
there are 192 different combinations to achieve exhaustive coverage, there are only 88 different value-pairs to be
checked to achieve pairwise coverage.

Parameter Selection Optimization The 88 value pairs to be checked require less than 88 tests because more than one value pair can be covered in a
single test. This example reached pairwise coverage with just 16 tests. To compare, our attempts with pure
randomization required 3x as many random seeds to achieve pairwise coverage.

Parameter Selection Optimization The Verilab nwise.svh library was designed with general configurations in mind, as opposed to RTL parameters, but it
works equally well for generating RTL parameters. This example shows how a series of variables can make use of the
package, to enable pairwise generation.

Parameter Selection Optimization The nwise.svh library has a simple API for generating pairwise value pairs. The value pairs can then be printed out to
a file for use by a regression management script (or define a macro file, similar to what’s shown in the previous
section “RTL Parameter Generation & Coverage”. For more details on this technique, see
https://www.verilab.com/resources/papers-and-presentations/#dvcon2015nwise.

Additional Topics

Generated/Templated RTL Code

`define Rather Than SV Parameters Instead of using parameterized modules, we can directly use `define macros to refer to the parameter values. In this
case, we can directly use these in our usual testbench configuration object and store that in the config_db, rather
than the extracted parameters struct we saw earlier

Configuration-Aware Testbenches

Mirrored Hierarchies The key takeaway to this slide is that the names and hierarchy of the system under test is exactly mirrored by the
testbench environment.

Self-publishing Interfaces Using Module Path Name We can use the module path format specifier %m to auto-publish the scope of the bound cpu_if.

Automatic Retrieval of the Correct Virtual Interface Now when we “get” the virtual interface from the config_db it automatically has the correct scope

Configuration-Aware Testbenches This illustrates a portion of the verification environment of a block we wish to reuse at system level

Configuration-Aware Testbenches We can use parameters to stub-out the actual CPU RTL in the system-level RTL and then use an agent in out
testbench to drive the actual stimulus in the system, via the embedded virtual interface we saw in the earlier slide

Polymorphic Harnesses This is an advanced technique that’s particularly powerful where an ability to force or examine internal signals in the
RTL is required. SystemVerilog does not allow a virtual interface handle to be created to an interface which has
cross-module references. However, these can be quite handy for forcing stimulus into the RTL to simulate difficult-
to-hit error conditions. This abstract BFM technique was first described by Bromley & Rich in 2008. Our paper
“Verification Prowess with the UVM Harness” builds on this technique

When is Verification Finished? Customer requirements are always top of the list for determining verification completion. Following that, it’s
important to focus on what does need to be verified and guard against verifying sets of parameters that, while
theoretically possible, will never be used in practice. As always, a good specification should be the driver.

Conclusion

Thanks to Our Contributors & Reviewers

References You can find all these materials at verilab.com/resources/papers-and-presentations/